Avid MediaCentral | UX User’s Guide Media Central 2.10.2 UG V2 10 2 EN
User Manual: avid MediaCentral UX - 2.10.2 - User’s Guide Free User Guide for Avid MediaCentral Software, Manual
Open the PDF directly: View PDF ![]() .
.
Page Count: 638 [warning: Documents this large are best viewed by clicking the View PDF Link!]
- Using This Guide
- Getting Started
- Working with Assets
- The Assets Pane
- Working with News Assets
- Working with Interplay | Production Assets
- Identifying Interplay | Production Systems and Media Assets
- Navigating the Interplay | Production Database
- Adding or Removing Property Columns
- Resizing Columns
- Moving Columns
- Media Status Icons
- Moving or Copying Assets
- Moving or Copying Folders
- Duplicating Assets
- Renaming Assets
- Creating a New Folder
- Displaying or Hiding Referenced Assets
- Viewing and Editing Interplay | Production Metadata
- Viewing Interplay | Production Thumbnails
- Restoring an Asset from an Interplay Production Archive
- Working with Interplay | MAM Assets
- Navigating the Interplay | MAM Workspace
- Identifying Interplay | MAM Media Assets
- Creating a New Folder
- Renaming a Folder
- Moving a Folder
- Deleting a Folder
- Creating Assets
- Adding Assets to a Folder
- Triggering the Rights Evaluation for a Basic Sequence
- Duplicating a Basic Sequence
- Selecting Assets
- Moving or Copying Assets
- Renaming Asset References
- Removing Asset References
- Deleting Assets and Basic Sequences
- Viewing and Editing Interplay | MAM Metadata
- Viewing Interplay | MAM Thumbnails
- Viewing PDF Documents
- Working with Projects
- Building a Script
- The Queue/Story Pane
- Creating a Story
- Segmenting Stories
- Writing Stories in Right-to-Left Languages
- Using Annotation to Dictate a Story
- Editing a Story
- Copying Stories
- Locking and Unlocking a Story
- Inserting Script Templates
- Inserting MOS Placeholders
- Adding Media to a Story
- Associating a Sequence with a Story
- Creating a Text-Only Story Segment
- Copying and Sending iNEWS Links
- Recovering Stories In Case of Disconnect
- Deleting or Recovering a Deleted Story
- Dragging a Script Sequence from MediaCentral | UX to Media Composer
- Production Tasks
- Using the Sequence Pane
- Displaying the Sequence Pane
- The Sequence Pane
- Understanding Basic and Advanced Sequences
- Displaying Media Status in the Timeline
- Selecting a Horizontal or Vertical Timeline
- Navigating in the Sequence Timeline
- Using the Sequence Zoom Bar
- Timeline Paging During Playback
- Viewing Sequence Information
- Creating a Sequence
- Creating an Interplay | Production Sequence
- Rules for Creating a Script Sequence (Interplay | Production)
- Associating a Video ID with a Script Sequence
- Sequences Associated with Stories in Instinct and NewsCutter
- Audio-Only and Video-Only Advanced Sequences (Interplay | Production)
- Creating an Interplay | MAM Sequence
- Audio-Only Basic Sequences (Interplay | MAM)
- Saving a Sequence
- Saving a Version of a Sequence
- Exporting a Basic Sequence (Interplay | MAM)
- Recovering Sequences
- Opening and Editing an Existing Sequence in the Sequence Pane
- Opening a Sequence Associated with a Story
- Editing a Sequence Associated with a Story
- Editing a Sequence
- Locking a Basic Sequence (Interplay | MAM)
- Performing an Insert Edit in a Basic Sequence
- Performing an Insert Edit in an Advanced Sequence
- Performing an Overwrite Edit in a Basic Sequence
- Performing an Overwrite Edit in an Advanced Sequence
- Position Indicator Placement After an Insert or Overwrite Edit
- Performing a Replace Edit
- Enabling an Audio Track
- Using a Basic Sequence as a Source for a Sequence (Interplay | Production)
- Using a Basic Sequence as a Source for a Sequence (Interplay | MAM)
- Using Match Frame from Asset Mode to Add Media to a Sequence
- Loading a Clip from the Sequence Timeline
- Undoing and Redoing an Action in the Sequence Pane
- Moving or Deleting Segments in the Timeline
- Adding and Removing Audio Segments
- Creating an Audio-Only NAT or SOT Segment
- Snapping in the Timeline
- Trimming Segments in the Timeline
- Using L-Cuts in the Timeline
- Splitting a Segment
- Adding Markers to a Sequence
- Inserting Video Dissolves (Advanced Sequences Only)
- Enabling Audio Scrubbing
- Modifying the Start Timecode
- Synchronizing Broadcast Graphics with a MediaCentral | UX Sequence
- Working with Video Media
- The Media Pane
- Playing Assets
- Using the J-K-L Keys for Playback
- Stepping Through Assets
- Playing Recently Viewed Assets
- Selecting the Aspect Ratio
- Changing the Maximum Size of the Proxy Video
- Updating the Media Status
- Playback of Simple and Complex Sequences
- Selecting the Playback Quality
- Adjusting for Playback Latency
- Selecting Frame-Based Playback or File-Based Playback
- Working with Remote Assets (Interplay Production)
- Working with Remote Playback (Interplay | MAM)
- Marking In and Out Points
- Working with Markers and Restrictions
- Displaying Captions and Segments
- Using the Timecode Displays
- Entering Timecode to Cue a Frame
- Working in the Media Timeline
- Using the Media Zoom Bar
- Reviewing in the STP Target Resolution
- Playing Back at the Highest Resolution
- Using Match Frame
- Opening an Enclosing Folder
- Transcoding Assets
- Viewing and Editing a Clip During Ingest
- Saving a Frame as an Image
- Viewing an Image
- Exporting an MP4 File
- Using Audio
- Working with Group Clips
- Searching for Assets
- Logging Interplay | Production Assets and Creating Subclips
- Workflows for Logging
- Understanding Markers and Restrictions
- The Log Layout
- The Logging Pane for Interplay | Production Assets
- Adding, Saving, and Deleting Markers
- Working with Restrictions
- Cutting, Copying, and Pasting Text
- Navigating by Markers in the Log Layout
- Viewing In and Out Points for Log Entries
- Filtering Interplay Production Logs
- Exporting Markers
- Entering Marker Text in Right-to-Left Languages
- Unicode Support for Marker Text
- Creating Subclips
- Logging Interplay | MAM Assets
- Understanding Strata
- Logging Overview (Interplay | MAM Assets)
- The Logging Pane (Interplay | MAM)
- Understanding Segmentation Principles
- Locking a Stratum
- Working with Segments
- Navigating by Segments
- Annotating Text Fields
- Entering Segment Text in Right-to-Left Languages
- Annotating Using Tags
- Defining Merge Rules for Annotated Segments
- Filtering a Stratum
- Exporting Strata
- Working with Associations (Interplay | MAM)
- Understanding Associations
- The Associations Pane
- Working in the Associations Pane
- Viewing Associated Assets
- Filtering the Displayed Associated Asset Types
- Opening Associated Assets in Other Panes
- Reusing Associated Assets in Other Panes
- Switching Between Associated Assets
- Creating Associations
- Deleting Associations
- Working with the File Info Pane (Interplay | MAM)
- Working with Closed Captions in MediaCentral | UX
- Using the Assignments Pane
- Sharing MediaCentral | UX Messages
- iNEWS Messaging
- Sending to Playback
- Delivering Assets and Media
- Working with Interplay | MAM Processes and Tasks
- Understanding Processes, Tasks, and Actions
- Creating Processes
- Using File Attachments During Process Creation
- Getting Information on Allowed Attachments
- Using the Quick Send Feature
- Monitoring Processes in the Progress Pane
- Working with Process Dashboards
- Working with Tasks
- The Tasks Pane
- Working in the Tasks Pane
- Filtering Displayed User Tasks
- Delegating User Tasks
- Assigning User Tasks to Users and Groups
- Applying Actions to User Tasks
- Displaying and Editing User Task Data
- Adding and Editing User Task Attachments
- Uploading Files as Attachments
- Downloading File Attachments
- Deleting Attachments
- Working with Avid Maestro in MediaCentral | UX
- MediaCentral | UX Mobile Application for the iPhone
- Connection Basics
- Installing MediaCentral | UX on the iPhone
- Starting MediaCentral | UX on the iPhone
- The Sidebar
- Buttons of the User Interface
- Customizing MediaCentral | UX Settings
- Changing Roles
- Accessing the iNEWS Database
- Editing Stories
- Approving Stories
- Working with Favorites
- Working Offline with Cached Queues and Stories
- MediaCentral | UX and Interplay | Production
- Using Markers
- Setting the Approval Status for Assets
- Working with Deep Links
- MediaCentral | UX Tablet Application for the iPad
- Connection Basics
- Installing MediaCentral | UX on the iPad
- Starting MediaCentral | UX on the Tablet
- The Sidebar
- Buttons of the User Interface
- Customizing MediaCentral | UX Settings
- Changing Roles
- Accessing the iNEWS Database
- Editing Stories
- Approving Stories
- Using Presenter Mode
- Working with Favorites
- Working Offline with Cached Queues and Stories
- MediaCentral | UX and Interplay | Production
- Using Markers
- Setting the Approval Status for Assets
- Working with Deep Links
- MediaCentral | UX for Android Devices
- Connection Basics
- Installing MediaCentral | UX on Your Android Device
- Starting MediaCentral | UX on the Android Device
- The Navigation Drawer and Directory Panel
- Buttons of the User Interface
- Customizing MediaCentral | UX Settings
- Accessing the iNEWS Database
- Viewing Video Associated with a Script
- Working with Stories
- Using Presenter Mode
- MediaCentral | UX and Interplay | Production
- Using Markers
- Setting the Approval Status for Assets
- User Settings
- Keyboard Shortcuts
- Icons
- Pane Type Icons
- Launch Pane Icons
- Assets Pane Icons
- Associations Pane Icons
- File Info Pane Icons
- Media Pane Icons
- Logging Pane Icons (Interplay | Production Assets)
- Logging Pane Icons (Interplay | MAM Assets)
- Process Dashboard Pane Icons
- Progress Pane Icons
- Sequence Pane Icons
- Tasks Pane Icons
- Media | Distribute Icons
- MediaCentral Glossary
- Index

Avid MediaCentral | UX
User’s Guide
Version 2.10.2
2
Legal Notices
Product specifications are subject to change without notice and do not represent a commitment on the part of Avid Technology, Inc.
This product is subject to the terms and conditions of a software license agreement provided with the software. The product may only be
used in accordance with the license agreement.
This product may be protected by one or more U.S. and non-U.S patents. Details are available at www.avid.com/patents.
This document is protected under copyright law. An authorized licensee of MediaCentral may reproduce this publication for the licensee’s
own use in learning how to use the software. This document may not be reproduced or distributed, in whole or in part, for commercial
purposes, such as selling copies of this document or providing support or educational services to others. This document is supplied as a
guide for MediaCentral Reasonable care has been taken in preparing the information it contains. However, this document may contain
omissions, technical inaccuracies, or typographical errors. Avid Technology, Inc. does not accept responsibility of any kind for customers’
losses due to the use of this document. Product specifications are subject to change without notice.
Copyright © 2017 Avid Technology, Inc. and its licensors. All rights reserved.
The following disclaimer is required by Apple Computer, Inc.:
APPLE COMPUTER, INC. MAKES NO WARRANTIES WHATSOEVER, EITHER EXPRESS OR IMPLIED, REGARDING THIS
PRODUCT, INCLUDING WARRANTIES WITH RESPECT TO ITS MERCHANTABILITY OR ITS FITNESS FOR ANY PARTICULAR
PURPOSE. THE EXCLUSION OF IMPLIED WARRANTIES IS NOT PERMITTED BY SOME STATES. THE ABOVE EXCLUSION MAY
NOT APPLY TO YOU. THIS WARRANTY PROVIDES YOU WITH SPECIFIC LEGAL RIGHTS. THERE MAY BE OTHER RIGHTS THAT
YOU MAY HAVE WHICH VARY FROM STATE TO STATE.
The following disclaimer is required by Sam Leffler and Silicon Graphics, Inc. for the use of their TIFF library:
Copyright © 1988–1997 Sam Leffler
Copyright © 1991–1997 Silicon Graphics, Inc.
Permission to use, copy, modify, distribute, and sell this software [i.e., the TIFF library] and its documentation for any purpose is hereby
granted without fee, provided that (i) the above copyright notices and this permission notice appear in all copies of the software and
related documentation, and (ii) the names of Sam Leffler and Silicon Graphics may not be used in any advertising or publicity relating to
the software without the specific, prior written permission of Sam Leffler and Silicon Graphics.
THE SOFTWARE IS PROVIDED “AS-IS” AND WITHOUT WARRANTY OF ANY KIND, EXPRESS, IMPLIED OR OTHERWISE,
INCLUDING WITHOUT LIMITATION, ANY WARRANTY OF MERCHANTABILITY OR FITNESS FOR A PARTICULAR PURPOSE.
IN NO EVENT SHALL SAM LEFFLER OR SILICON GRAPHICS BE LIABLE FOR ANY SPECIAL, INCIDENTAL, INDIRECT OR
CONSEQUENTIAL DAMAGES OF ANY KIND, OR ANY DAMAGES WHATSOEVER RESULTING FROM LOSS OF USE, DATA OR
PROFITS, WHETHER OR NOT ADVISED OF THE POSSIBILITY OF DAMAGE, AND ON ANY THEORY OF LIABILITY, ARISING OUT
OF OR IN CONNECTION WITH THE USE OR PERFORMANCE OF THIS SOFTWARE.
The following disclaimer is required by the Independent JPEG Group:
This software is based in part on the work of the Independent JPEG Group.
This Software may contain components licensed under the following conditions:
Copyright (c) 1989 The Regents of the University of California. All rights reserved.
Redistribution and use in source and binary forms are permitted provided that the above copyright notice and this paragraph are
duplicated in all such forms and that any documentation, advertising materials, and other materials related to such distribution and use
acknowledge that the software was developed by the University of California, Berkeley. The name of the University may not be used to
endorse or promote products derived from this software without specific prior written permission. THIS SOFTWARE IS PROVIDED ``AS
IS'' AND WITHOUT ANY EXPRESS OR IMPLIED WARRANTIES, INCLUDING, WITHOUT LIMITATION, THE IMPLIED WARRANTIES
OF MERCHANTABILITY AND FITNESS FOR A PARTICULAR PURPOSE.
Copyright (C) 1989, 1991 by Jef Poskanzer.
Permission to use, copy, modify, and distribute this software and its documentation for any purpose and without fee is hereby granted,
provided that the above copyright notice appear in all copies and that both that copyright notice and this permission notice appear in
supporting documentation. This software is provided " as is" without express or implied warranty.
Copyright 1995, Trinity College Computing Center. Written by David Chappell.
Permission to use, copy, modify, and distribute this software and its documentation for any purpose and without fee is hereby granted,
provided that the above copyright notice appear in all copies and that both that copyright notice and this permission notice appear in
supporting documentation. This software is provided " as is" without express or implied warranty.
Copyright 1996 Daniel Dardailler.
Permission to use, copy, modify, distribute, and sell this software for any purpose is hereby granted without fee, provided that the above
copyright notice appear in all copies and that both that copyright notice and this permission notice appear in supporting documentation,
and that the name of Daniel Dardailler not be used in advertising or publicity pertaining to distribution of the software without specific,
written prior permission. Daniel Dardailler makes no representations about the suitability of this software for any purpose. It is provided " as
is" without express or implied warranty.
Modifications Copyright 1999 Matt Koss, under the same license as above.
Copyright (c) 1991 by AT&T.
Permission to use, copy, modify, and distribute this software for any purpose without fee is hereby granted, provided that this entire notice
is included in all copies of any software which is or includes a copy or modification of this software and in all copies of the supporting
documentation for such software.
3
THIS SOFTWARE IS BEING PROVIDED " AS IS" , WITHOUT ANY EXPRESS OR IMPLIED WARRANTY. IN PARTICULAR, NEITHER
THE AUTHOR NOR AT&T MAKES ANY REPRESENTATION OR WARRANTY OF ANY KIND CONCERNING THE MERCHANTABILITY
OF THIS SOFTWARE OR ITS FITNESS FOR ANY PARTICULAR PURPOSE.
This product includes software developed by the University of California, Berkeley and its contributors.
The following disclaimer is required by Paradigm Matrix:
Portions of this software licensed from Paradigm Matrix.
The following disclaimer is required by Ray Sauers Associates, Inc.:
“Install-It” is licensed from Ray Sauers Associates, Inc. End-User is prohibited from taking any action to derive a source code equivalent of
“Install-It,” including by reverse assembly or reverse compilation, Ray Sauers Associates, Inc. shall in no event be liable for any damages
resulting from reseller’s failure to perform reseller’s obligation; or any damages arising from use or operation of reseller’s products or the
software; or any other damages, including but not limited to, incidental, direct, indirect, special or consequential Damages including lost
profits, or damages resulting from loss of use or inability to use reseller’s products or the software for any reason including copyright or
patent infringement, or lost data, even if Ray Sauers Associates has been advised, knew or should have known of the possibility of such
damages.
The following disclaimer is required by Videomedia, Inc.:
“Videomedia, Inc. makes no warranties whatsoever, either express or implied, regarding this product, including warranties with respect to
its merchantability or its fitness for any particular purpose.”
“This software contains V-LAN ver. 3.0 Command Protocols which communicate with V-LAN ver. 3.0 products developed by Videomedia,
Inc. and V-LAN ver. 3.0 compatible products developed by third parties under license from Videomedia, Inc. Use of this software will allow
“frame accurate” editing control of applicable videotape recorder decks, videodisc recorders/players and the like.”
The following disclaimer is required by Altura Software, Inc. for the use of its Mac2Win software and Sample Source
Code:
©1993–1998 Altura Software, Inc.
The following disclaimer is required by 3Prong.com Inc.:
Certain waveform and vector monitoring capabilities are provided under a license from 3Prong.com Inc.
The following disclaimer is required by Interplay Entertainment Corp.:
The “Interplay” name is used with the permission of Interplay Entertainment Corp., which bears no responsibility for Avid products.
This product includes portions of the Alloy Look & Feel software from Incors GmbH.
This product includes software developed by the Apache Software Foundation (http://www.apache.org/).
© DevelopMentor
This product may include the JCifs library, for which the following notice applies:
JCifs © Copyright 2004, The JCIFS Project, is licensed under LGPL (http://jcifs.samba.org/). See the LGPL.txt file in the Third Party
Software directory on the installation CD.
Avid Interplay contains components licensed from LavanTech. These components may only be used as part of and in connection with Avid
Interplay.
This product includes FFmpeg, which is covered by the GNU Lesser General Public License.
This product includes software that is based in part of the work of the FreeType Team.
This software is based in part on the work of the Independent JPEG Group.
This product includes libjpeg-turbo, which is covered by the wxWindows Library License, Version 3.1.
Portions copyright 1994, 1995, 1996, 1997, 1998, 1999, 2000, 2001, 2002 by Cold Spring Harbor Laboratory. Funded under Grant
P41-RR02188 by the National Institutes of Health.
Portions copyright 1996, 1997, 1998, 1999, 2000, 2001, 2002 by Boutell.Com, Inc.
Portions relating to GD2 format copyright 1999, 2000, 2001, 2002 Philip Warner.
Portions relating to PNG copyright 1999, 2000, 2001, 2002 Greg Roelofs.
Portions relating to gdttf.c copyright 1999, 2000, 2001, 2002 John Ellson (ellson@lucent.com).
Portions relating to gdft.c copyright 2001, 2002 John Ellson (ellson@lucent.com).
Portions relating to JPEG and to color quantization copyright 2000, 2001, 2002, Doug Becker and copyright (C) 1994, 1995, 1996, 1997,
1998, 1999, 2000, 2001, 2002, Thomas G. Lane. This software is based in part on the work of the Independent JPEG Group. See the file
README-JPEG.TXT for more information. Portions relating to WBMP copyright 2000, 2001, 2002 Maurice Szmurlo and Johan Van den
Brande.
Permission has been granted to copy, distribute and modify gd in any context without fee, including a commercial application, provided that
this notice is present in user-accessible supporting documentation.
4
This does not affect your ownership of the derived work itself, and the intent is to assure proper credit for the authors of gd, not to interfere
with your productive use of gd. If you have questions, ask. " Derived works" includes all programs that utilize the library. Credit must be
given in user-accessible documentation.
This software is provided " AS IS." The copyright holders disclaim all warranties, either express or implied, including but not limited to
implied warranties of merchantability and fitness for a particular purpose, with respect to this code and accompanying documentation.
Although their code does not appear in gd, the authors wish to thank David Koblas, David Rowley, and Hutchison Avenue Software
Corporation for their prior contributions.
This product includes software developed by the OpenSSL Project for use in the OpenSSL Toolkit (http://www.openssl.org/)
MediaCentral may use OpenLDAP. Copyright 1999-2003 The OpenLDAP Foundation, Redwood City, California, USA. All Rights
Reserved. OpenLDAP is a registered trademark of the OpenLDAP Foundation.
Media | Distribute enables its users to access certain YouTube functionality, as a result of Avid's licensed use of YouTube's API. The
charges levied by Avid for use of Media | Distribute are imposed by Avid, not YouTube. YouTube does not charge users for accessing
YouTube site functionality through the YouTube APIs.
Media | Distribute uses the bitly API, but is neither developed nor endorsed by bitly.
Android is a trademark of Google Inc.
Attn. Government User(s). Restricted Rights Legend
U.S. GOVERNMENT RESTRICTED RIGHTS. This Software and its documentation are “commercial computer software” or “commercial
computer software documentation.” In the event that such Software or documentation is acquired by or on behalf of a unit or agency of the
U.S. Government, all rights with respect to this Software and documentation are subject to the terms of the License Agreement, pursuant
to FAR §12.212(a) and/or DFARS §227.7202-1(a), as applicable.
Trademarks
Avid, the Avid Logo, Avid Everywhere, Avid DNXHD, Avid DNXHR, Avid NEXIS, AirSpeed, Eleven, EUCON, Interplay, iNEWS, ISIS, Mbox,
MediaCentral, Media Composer, NewsCutter, Pro Tools, ProSet and RealSet, Maestro, PlayMaker, Sibelius, Symphony, and all related
product names and logos, are registered or unregistered trademarks of Avid Technology, Inc. in the United States and/or other countries.
The Interplay name is used with the permission of the Interplay Entertainment Corp. which bears no responsibility for Avid products. All
other trademarks are the property of their respective owners. For a full list of Avid trademarks, see: http://www.avid.com/US/about-avid/
legal-notices/trademarks.
Adobe and Photoshop are either registered trademarks or trademarks of Adobe Systems Incorporated in the United States and/or other
countries. Apple and Macintosh are trademarks of Apple Computer, Inc., registered in the U.S. and other countries. Windows is either a
registered trademark or trademark of Microsoft Corporation in the United States and/or other countries. All other trademarks contained
herein are the property of their respective owners.
Footage
Hell’s Kitchen - Courtesy of Upper Ground Enterprises/Hell's Kitchen post team.
Avid MediaCentral | UX User’s Guide • Created July 26, 2017 • This document is distributed by Avid in online (electronic)
form only, and is not available for purchase in printed form.
Contents
Using This Guide . . . . . . . . . . . . . . . . . . . . . . . . . . . . . . . . . . . . . . . . . . . . . . . . . . 18
Symbols and Conventions . . . . . . . . . . . . . . . . . . . . . . . . . . . . . . . . . . . . . . . . . . . . . . . . . . . 18
If You Need Help. . . . . . . . . . . . . . . . . . . . . . . . . . . . . . . . . . . . . . . . . . . . . . . . . . . . . . . . . . . 19
Avid Training Services . . . . . . . . . . . . . . . . . . . . . . . . . . . . . . . . . . . . . . . . . . . . . . . . . . . . . . 19
Chapter 1 Getting Started . . . . . . . . . . . . . . . . . . . . . . . . . . . . . . . . . . . . . . . . . . . . . . . . . . . . 20
About MediaCentral | UX . . . . . . . . . . . . . . . . . . . . . . . . . . . . . . . . . . . . . . . . . . . . . . . . . . . . 20
Signing In to MediaCentral | UX . . . . . . . . . . . . . . . . . . . . . . . . . . . . . . . . . . . . . . . . . . . . . . . 21
Understanding Layouts and Panes. . . . . . . . . . . . . . . . . . . . . . . . . . . . . . . . . . . . . . . . . . . . . 22
Working with Layouts. . . . . . . . . . . . . . . . . . . . . . . . . . . . . . . . . . . . . . . . . . . . . . . . . . . . 25
Working with Areas and Panes . . . . . . . . . . . . . . . . . . . . . . . . . . . . . . . . . . . . . . . . . . . . 27
Active Panes . . . . . . . . . . . . . . . . . . . . . . . . . . . . . . . . . . . . . . . . . . . . . . . . . . . . . . . . . . 31
The Menu Bar . . . . . . . . . . . . . . . . . . . . . . . . . . . . . . . . . . . . . . . . . . . . . . . . . . . . . . . . . 32
The Launch Pane. . . . . . . . . . . . . . . . . . . . . . . . . . . . . . . . . . . . . . . . . . . . . . . . . . . . . . . 32
Adjusting Windows ClearType for MediaCentral | UX Fonts . . . . . . . . . . . . . . . . . . . . . . . . . 33
Using Plug-ins and MOS Integration. . . . . . . . . . . . . . . . . . . . . . . . . . . . . . . . . . . . . . . . . . . . 34
Support for iNEWS Communities . . . . . . . . . . . . . . . . . . . . . . . . . . . . . . . . . . . . . . . . . . . . . . 34
Showing Desktop Notifications from Panes . . . . . . . . . . . . . . . . . . . . . . . . . . . . . . . . . . . . . . 36
Viewing MediaCentral | UX Help. . . . . . . . . . . . . . . . . . . . . . . . . . . . . . . . . . . . . . . . . . . . . . . 38
Chapter 2 Working with Assets . . . . . . . . . . . . . . . . . . . . . . . . . . . . . . . . . . . . . . . . . . . . . . . 39
The Assets Pane. . . . . . . . . . . . . . . . . . . . . . . . . . . . . . . . . . . . . . . . . . . . . . . . . . . . . . . . . . . 39
Navigating in the Assets Pane . . . . . . . . . . . . . . . . . . . . . . . . . . . . . . . . . . . . . . . . . . . . . 40
Creating Shortcuts to Assets, Folders, and Queues . . . . . . . . . . . . . . . . . . . . . . . . . . . . 41
Working with News Assets . . . . . . . . . . . . . . . . . . . . . . . . . . . . . . . . . . . . . . . . . . . . . . . . . . . 42
Identifying iNEWS Directories, Queues, Projects, and Facets. . . . . . . . . . . . . . . . . . . . . 42
Navigating the iNEWS Database . . . . . . . . . . . . . . . . . . . . . . . . . . . . . . . . . . . . . . . . . . . 44
Working with Interplay | Production Assets. . . . . . . . . . . . . . . . . . . . . . . . . . . . . . . . . . . . . . . 44
Identifying Interplay | Production Systems and Media Assets . . . . . . . . . . . . . . . . . . . . . 45
Navigating the Interplay | Production Database. . . . . . . . . . . . . . . . . . . . . . . . . . . . . . . . 45
Adding or Removing Property Columns. . . . . . . . . . . . . . . . . . . . . . . . . . . . . . . . . . . . . . 46
Resizing Columns . . . . . . . . . . . . . . . . . . . . . . . . . . . . . . . . . . . . . . . . . . . . . . . . . . . . . . 47
Moving Columns . . . . . . . . . . . . . . . . . . . . . . . . . . . . . . . . . . . . . . . . . . . . . . . . . . . . . . . 47
Media Status Icons. . . . . . . . . . . . . . . . . . . . . . . . . . . . . . . . . . . . . . . . . . . . . . . . . . . . . . 47
Moving or Copying Assets . . . . . . . . . . . . . . . . . . . . . . . . . . . . . . . . . . . . . . . . . . . . . . . . 47
Moving or Copying Folders . . . . . . . . . . . . . . . . . . . . . . . . . . . . . . . . . . . . . . . . . . . . . . . 48
6
Duplicating Assets . . . . . . . . . . . . . . . . . . . . . . . . . . . . . . . . . . . . . . . . . . . . . . . . . . . . . . 48
Renaming Assets. . . . . . . . . . . . . . . . . . . . . . . . . . . . . . . . . . . . . . . . . . . . . . . . . . . . . . . 49
Creating a New Folder . . . . . . . . . . . . . . . . . . . . . . . . . . . . . . . . . . . . . . . . . . . . . . . . . . . 49
Displaying or Hiding Referenced Assets . . . . . . . . . . . . . . . . . . . . . . . . . . . . . . . . . . . . . 49
Viewing and Editing Interplay | Production Metadata. . . . . . . . . . . . . . . . . . . . . . . . . . . . 50
Viewing Interplay | Production Thumbnails . . . . . . . . . . . . . . . . . . . . . . . . . . . . . . . . . . . 51
Restoring an Asset from an Interplay Production Archive . . . . . . . . . . . . . . . . . . . . . . . . 53
Working with Interplay | MAM Assets . . . . . . . . . . . . . . . . . . . . . . . . . . . . . . . . . . . . . . . . . . . 55
Navigating the Interplay | MAM Workspace . . . . . . . . . . . . . . . . . . . . . . . . . . . . . . . . . . . 56
Identifying Interplay | MAM Media Assets . . . . . . . . . . . . . . . . . . . . . . . . . . . . . . . . . . . . 57
Creating a New Folder . . . . . . . . . . . . . . . . . . . . . . . . . . . . . . . . . . . . . . . . . . . . . . . . . . . 59
Renaming a Folder. . . . . . . . . . . . . . . . . . . . . . . . . . . . . . . . . . . . . . . . . . . . . . . . . . . . . . 59
Moving a Folder . . . . . . . . . . . . . . . . . . . . . . . . . . . . . . . . . . . . . . . . . . . . . . . . . . . . . . . . 59
Deleting a Folder . . . . . . . . . . . . . . . . . . . . . . . . . . . . . . . . . . . . . . . . . . . . . . . . . . . . . . . 60
Creating Assets . . . . . . . . . . . . . . . . . . . . . . . . . . . . . . . . . . . . . . . . . . . . . . . . . . . . . . . . 61
Adding Assets to a Folder . . . . . . . . . . . . . . . . . . . . . . . . . . . . . . . . . . . . . . . . . . . . . . . . 66
Triggering the Rights Evaluation for a Basic Sequence. . . . . . . . . . . . . . . . . . . . . . . . . . 66
Duplicating a Basic Sequence . . . . . . . . . . . . . . . . . . . . . . . . . . . . . . . . . . . . . . . . . . . . . 67
Selecting Assets. . . . . . . . . . . . . . . . . . . . . . . . . . . . . . . . . . . . . . . . . . . . . . . . . . . . . . . . 67
Moving or Copying Assets . . . . . . . . . . . . . . . . . . . . . . . . . . . . . . . . . . . . . . . . . . . . . . . . 68
Renaming Asset References . . . . . . . . . . . . . . . . . . . . . . . . . . . . . . . . . . . . . . . . . . . . . . 68
Removing Asset References . . . . . . . . . . . . . . . . . . . . . . . . . . . . . . . . . . . . . . . . . . . . . . 69
Deleting Assets and Basic Sequences . . . . . . . . . . . . . . . . . . . . . . . . . . . . . . . . . . . . . . 69
Viewing and Editing Interplay | MAM Metadata . . . . . . . . . . . . . . . . . . . . . . . . . . . . . . . . 71
Viewing Interplay | MAM Thumbnails. . . . . . . . . . . . . . . . . . . . . . . . . . . . . . . . . . . . . . . . 78
Viewing PDF Documents . . . . . . . . . . . . . . . . . . . . . . . . . . . . . . . . . . . . . . . . . . . . . . . . . 80
Chapter 3 Working with Projects . . . . . . . . . . . . . . . . . . . . . . . . . . . . . . . . . . . . . . . . . . . . . . 83
Opening Projects or Facets . . . . . . . . . . . . . . . . . . . . . . . . . . . . . . . . . . . . . . . . . . . . . . . . . . 83
The Project/Story Pane. . . . . . . . . . . . . . . . . . . . . . . . . . . . . . . . . . . . . . . . . . . . . . . . . . . . . . 84
Associating Stories with Projects or Facets . . . . . . . . . . . . . . . . . . . . . . . . . . . . . . . . . . . . . . 86
Opening a Project or Facet Associated with a Story. . . . . . . . . . . . . . . . . . . . . . . . . . . . . . . . 86
Chapter 4 Building a Script. . . . . . . . . . . . . . . . . . . . . . . . . . . . . . . . . . . . . . . . . . . . . . . . . . . 87
The Queue/Story Pane . . . . . . . . . . . . . . . . . . . . . . . . . . . . . . . . . . . . . . . . . . . . . . . . . . . . . . 87
The Queue/Story Toolbar. . . . . . . . . . . . . . . . . . . . . . . . . . . . . . . . . . . . . . . . . . . . . . . . . 89
The Script Editor . . . . . . . . . . . . . . . . . . . . . . . . . . . . . . . . . . . . . . . . . . . . . . . . . . . . . . . 90
Creating a Story . . . . . . . . . . . . . . . . . . . . . . . . . . . . . . . . . . . . . . . . . . . . . . . . . . . . . . . . . . . 91
Segmenting Stories. . . . . . . . . . . . . . . . . . . . . . . . . . . . . . . . . . . . . . . . . . . . . . . . . . . . . . . . . 93
Writing Stories in Right-to-Left Languages . . . . . . . . . . . . . . . . . . . . . . . . . . . . . . . . . . . . . . . 94
Using Annotation to Dictate a Story . . . . . . . . . . . . . . . . . . . . . . . . . . . . . . . . . . . . . . . . . . . . 95
Editing a Story. . . . . . . . . . . . . . . . . . . . . . . . . . . . . . . . . . . . . . . . . . . . . . . . . . . . . . . . . . . . . 95
7
Formatting a Script. . . . . . . . . . . . . . . . . . . . . . . . . . . . . . . . . . . . . . . . . . . . . . . . . . . . . . 97
Adding Production Cues . . . . . . . . . . . . . . . . . . . . . . . . . . . . . . . . . . . . . . . . . . . . . . . . . 97
Adding Machine Control Instructions . . . . . . . . . . . . . . . . . . . . . . . . . . . . . . . . . . . . . . . . 99
Adding a Primary Machine Control Instruction. . . . . . . . . . . . . . . . . . . . . . . . . . . . . . . . . 99
Copying Stories. . . . . . . . . . . . . . . . . . . . . . . . . . . . . . . . . . . . . . . . . . . . . . . . . . . . . . . . . . . 100
Locking and Unlocking a Story . . . . . . . . . . . . . . . . . . . . . . . . . . . . . . . . . . . . . . . . . . . . . . . 100
Inserting Script Templates . . . . . . . . . . . . . . . . . . . . . . . . . . . . . . . . . . . . . . . . . . . . . . . . . . 101
Inserting MOS Placeholders . . . . . . . . . . . . . . . . . . . . . . . . . . . . . . . . . . . . . . . . . . . . . . . . . 102
Adding Media to a Story . . . . . . . . . . . . . . . . . . . . . . . . . . . . . . . . . . . . . . . . . . . . . . . . . . . . 102
Associating a Sequence with a Story . . . . . . . . . . . . . . . . . . . . . . . . . . . . . . . . . . . . . . . . . . 103
Creating a Text-Only Story Segment . . . . . . . . . . . . . . . . . . . . . . . . . . . . . . . . . . . . . . . . . . 107
Copying and Sending iNEWS Links . . . . . . . . . . . . . . . . . . . . . . . . . . . . . . . . . . . . . . . . . . . 108
Recovering Stories In Case of Disconnect . . . . . . . . . . . . . . . . . . . . . . . . . . . . . . . . . . . . . . 108
Deleting or Recovering a Deleted Story . . . . . . . . . . . . . . . . . . . . . . . . . . . . . . . . . . . . . . . . 110
Dragging a Script Sequence from MediaCentral | UX to Media Composer . . . . . . . . . . . . . 110
Production Tasks . . . . . . . . . . . . . . . . . . . . . . . . . . . . . . . . . . . . . . . . . . . . . . . . . . . . . . . . . 111
Grouping Stories . . . . . . . . . . . . . . . . . . . . . . . . . . . . . . . . . . . . . . . . . . . . . . . . . . . . . . 112
Ordering a Queue . . . . . . . . . . . . . . . . . . . . . . . . . . . . . . . . . . . . . . . . . . . . . . . . . . . . . 113
Floating Stories . . . . . . . . . . . . . . . . . . . . . . . . . . . . . . . . . . . . . . . . . . . . . . . . . . . . . . . 114
Controlling the iNEWS Monitor Server. . . . . . . . . . . . . . . . . . . . . . . . . . . . . . . . . . . . . . 115
Modifying Fields in the Queue Grid View. . . . . . . . . . . . . . . . . . . . . . . . . . . . . . . . . . . . 117
Displaying iNEWS Timing Clocks . . . . . . . . . . . . . . . . . . . . . . . . . . . . . . . . . . . . . . . . . 119
Printing a Rundown View. . . . . . . . . . . . . . . . . . . . . . . . . . . . . . . . . . . . . . . . . . . . . . . . 120
Chapter 5 Using the Sequence Pane . . . . . . . . . . . . . . . . . . . . . . . . . . . . . . . . . . . . . . . . . . 121
Displaying the Sequence Pane. . . . . . . . . . . . . . . . . . . . . . . . . . . . . . . . . . . . . . . . . . . . . . . 121
The Sequence Pane . . . . . . . . . . . . . . . . . . . . . . . . . . . . . . . . . . . . . . . . . . . . . . . . . . . . . . . 122
Understanding Basic and Advanced Sequences . . . . . . . . . . . . . . . . . . . . . . . . . . . . . . . . . 125
Displaying Media Status in the Timeline. . . . . . . . . . . . . . . . . . . . . . . . . . . . . . . . . . . . . . . . 126
Selecting a Horizontal or Vertical Timeline . . . . . . . . . . . . . . . . . . . . . . . . . . . . . . . . . . . . . . 128
Navigating in the Sequence Timeline . . . . . . . . . . . . . . . . . . . . . . . . . . . . . . . . . . . . . . . . . . 129
Using the Sequence Zoom Bar . . . . . . . . . . . . . . . . . . . . . . . . . . . . . . . . . . . . . . . . . . . . . . 129
Timeline Paging During Playback . . . . . . . . . . . . . . . . . . . . . . . . . . . . . . . . . . . . . . . . . . . . . 132
Viewing Sequence Information . . . . . . . . . . . . . . . . . . . . . . . . . . . . . . . . . . . . . . . . . . . . . . . 132
Creating a Sequence . . . . . . . . . . . . . . . . . . . . . . . . . . . . . . . . . . . . . . . . . . . . . . . . . . . . . . 134
Creating an Interplay | Production Sequence . . . . . . . . . . . . . . . . . . . . . . . . . . . . . . . . 135
Rules for Creating a Script Sequence (Interplay | Production) . . . . . . . . . . . . . . . . . . . 137
Associating a Video ID with a Script Sequence . . . . . . . . . . . . . . . . . . . . . . . . . . . . . . . 137
Sequences Associated with Stories in Instinct and NewsCutter . . . . . . . . . . . . . . . . . . 138
Audio-Only and Video-Only Advanced Sequences (Interplay | Production) . . . . . . . . . 138
8
Creating an Interplay | MAM Sequence . . . . . . . . . . . . . . . . . . . . . . . . . . . . . . . . . . . . . 139
Audio-Only Basic Sequences (Interplay | MAM) . . . . . . . . . . . . . . . . . . . . . . . . . . . . . . 140
Saving a Sequence. . . . . . . . . . . . . . . . . . . . . . . . . . . . . . . . . . . . . . . . . . . . . . . . . . . . . . . . 140
Saving a Version of a Sequence. . . . . . . . . . . . . . . . . . . . . . . . . . . . . . . . . . . . . . . . . . . . . . 141
Exporting a Basic Sequence (Interplay | MAM) . . . . . . . . . . . . . . . . . . . . . . . . . . . . . . . . . . 141
Recovering Sequences. . . . . . . . . . . . . . . . . . . . . . . . . . . . . . . . . . . . . . . . . . . . . . . . . . . . . 143
Opening and Editing an Existing Sequence in the Sequence Pane . . . . . . . . . . . . . . . . . . . 144
Opening a Sequence Associated with a Story . . . . . . . . . . . . . . . . . . . . . . . . . . . . . . . . . . . 145
Editing a Sequence Associated with a Story . . . . . . . . . . . . . . . . . . . . . . . . . . . . . . . . . . . . 146
Working with Story Segments and Timing Blocks . . . . . . . . . . . . . . . . . . . . . . . . . . . . . 148
Working with Timing Displays . . . . . . . . . . . . . . . . . . . . . . . . . . . . . . . . . . . . . . . . . . . . 149
Editing Media into Timing Blocks . . . . . . . . . . . . . . . . . . . . . . . . . . . . . . . . . . . . . . . . . . 151
Extending a Segment into Another Timing Block. . . . . . . . . . . . . . . . . . . . . . . . . . . . . . 152
Showing and Hiding Empty Timing Blocks. . . . . . . . . . . . . . . . . . . . . . . . . . . . . . . . . . . 154
Manually Adjusting Timing Blocks . . . . . . . . . . . . . . . . . . . . . . . . . . . . . . . . . . . . . . . . . 155
Editing a Sequence. . . . . . . . . . . . . . . . . . . . . . . . . . . . . . . . . . . . . . . . . . . . . . . . . . . . . . . . 157
Locking a Basic Sequence (Interplay | MAM) . . . . . . . . . . . . . . . . . . . . . . . . . . . . . . . . 157
Performing an Insert Edit in a Basic Sequence . . . . . . . . . . . . . . . . . . . . . . . . . . . . . . . 158
Performing an Insert Edit in an Advanced Sequence . . . . . . . . . . . . . . . . . . . . . . . . . . 159
Performing an Overwrite Edit in a Basic Sequence . . . . . . . . . . . . . . . . . . . . . . . . . . . . 160
Performing an Overwrite Edit in an Advanced Sequence . . . . . . . . . . . . . . . . . . . . . . . 162
Position Indicator Placement After an Insert or Overwrite Edit . . . . . . . . . . . . . . . . . . . 166
Performing a Replace Edit . . . . . . . . . . . . . . . . . . . . . . . . . . . . . . . . . . . . . . . . . . . . . . . 166
Enabling an Audio Track . . . . . . . . . . . . . . . . . . . . . . . . . . . . . . . . . . . . . . . . . . . . . . . . 170
Using a Basic Sequence as a Source for a Sequence (Interplay | Production) . . . . . . . 171
Using a Basic Sequence as a Source for a Sequence (Interplay | MAM) . . . . . . . . . . . 171
Using Match Frame from Asset Mode to Add Media to a Sequence . . . . . . . . . . . . . . . 172
Loading a Clip from the Sequence Timeline . . . . . . . . . . . . . . . . . . . . . . . . . . . . . . . . . 173
Undoing and Redoing an Action in the Sequence Pane . . . . . . . . . . . . . . . . . . . . . . . . 173
Moving or Deleting Segments in the Timeline . . . . . . . . . . . . . . . . . . . . . . . . . . . . . . . . 174
Adding and Removing Audio Segments . . . . . . . . . . . . . . . . . . . . . . . . . . . . . . . . . . . . 174
Creating an Audio-Only NAT or SOT Segment . . . . . . . . . . . . . . . . . . . . . . . . . . . . . . . 175
Snapping in the Timeline . . . . . . . . . . . . . . . . . . . . . . . . . . . . . . . . . . . . . . . . . . . . . . . . 177
Trimming Segments in the Timeline. . . . . . . . . . . . . . . . . . . . . . . . . . . . . . . . . . . . . . . . 177
Using L-Cuts in the Timeline . . . . . . . . . . . . . . . . . . . . . . . . . . . . . . . . . . . . . . . . . . . . . 181
Splitting a Segment . . . . . . . . . . . . . . . . . . . . . . . . . . . . . . . . . . . . . . . . . . . . . . . . . . . . 182
Adding Markers to a Sequence . . . . . . . . . . . . . . . . . . . . . . . . . . . . . . . . . . . . . . . . . . . 183
Inserting Video Dissolves (Advanced Sequences Only) . . . . . . . . . . . . . . . . . . . . . . . . 184
Enabling Audio Scrubbing . . . . . . . . . . . . . . . . . . . . . . . . . . . . . . . . . . . . . . . . . . . . . . . 185
Modifying the Start Timecode . . . . . . . . . . . . . . . . . . . . . . . . . . . . . . . . . . . . . . . . . . . . 185
9
Synchronizing Broadcast Graphics with a MediaCentral | UX Sequence. . . . . . . . . . . . . . . 186
Using the Single Image Preview Setting . . . . . . . . . . . . . . . . . . . . . . . . . . . . . . . . . . . . 188
Editing In and Out Points of a Graphic. . . . . . . . . . . . . . . . . . . . . . . . . . . . . . . . . . . . . . 188
Opening a Graphic for Editing from a Sequence . . . . . . . . . . . . . . . . . . . . . . . . . . . . . . 189
Removing a Graphic from a Sequence . . . . . . . . . . . . . . . . . . . . . . . . . . . . . . . . . . . . . 189
Playing Back a Sequence with Graphics . . . . . . . . . . . . . . . . . . . . . . . . . . . . . . . . . . . . 189
STP for a Sequence with Graphics . . . . . . . . . . . . . . . . . . . . . . . . . . . . . . . . . . . . . . . . 189
Chapter 6 Working with Video Media. . . . . . . . . . . . . . . . . . . . . . . . . . . . . . . . . . . . . . . . . . 190
The Media Pane . . . . . . . . . . . . . . . . . . . . . . . . . . . . . . . . . . . . . . . . . . . . . . . . . . . . . . . . . . 191
Media Pane: Asset Mode. . . . . . . . . . . . . . . . . . . . . . . . . . . . . . . . . . . . . . . . . . . . . . . . 192
Media Pane Menu Options (Asset Mode) . . . . . . . . . . . . . . . . . . . . . . . . . . . . . . . . . . . 194
Media Pane: Group Clip. . . . . . . . . . . . . . . . . . . . . . . . . . . . . . . . . . . . . . . . . . . . . . . . . 196
Media Pane: Output Mode . . . . . . . . . . . . . . . . . . . . . . . . . . . . . . . . . . . . . . . . . . . . . . . 196
Media Pane Menu Options (Output Mode) . . . . . . . . . . . . . . . . . . . . . . . . . . . . . . . . . . 198
Playing Assets . . . . . . . . . . . . . . . . . . . . . . . . . . . . . . . . . . . . . . . . . . . . . . . . . . . . . . . . . . . 199
Using the J-K-L Keys for Playback. . . . . . . . . . . . . . . . . . . . . . . . . . . . . . . . . . . . . . . . . 200
Stepping Through Assets. . . . . . . . . . . . . . . . . . . . . . . . . . . . . . . . . . . . . . . . . . . . . . . . 202
Playing Recently Viewed Assets . . . . . . . . . . . . . . . . . . . . . . . . . . . . . . . . . . . . . . . . . . 202
Selecting the Aspect Ratio. . . . . . . . . . . . . . . . . . . . . . . . . . . . . . . . . . . . . . . . . . . . . . . 202
Changing the Maximum Size of the Proxy Video. . . . . . . . . . . . . . . . . . . . . . . . . . . . . . 203
Updating the Media Status. . . . . . . . . . . . . . . . . . . . . . . . . . . . . . . . . . . . . . . . . . . . . . . 203
Playback of Simple and Complex Sequences . . . . . . . . . . . . . . . . . . . . . . . . . . . . . . . . 203
Selecting the Playback Quality. . . . . . . . . . . . . . . . . . . . . . . . . . . . . . . . . . . . . . . . . . . . 204
Adjusting for Playback Latency . . . . . . . . . . . . . . . . . . . . . . . . . . . . . . . . . . . . . . . . . . . 205
Selecting Frame-Based Playback or File-Based Playback . . . . . . . . . . . . . . . . . . . . . . 205
Working with Remote Assets (Interplay Production). . . . . . . . . . . . . . . . . . . . . . . . . . . . . . . 208
Working with Remote Playback (Interplay | MAM) . . . . . . . . . . . . . . . . . . . . . . . . . . . . . . . . 209
Marking In and Out Points . . . . . . . . . . . . . . . . . . . . . . . . . . . . . . . . . . . . . . . . . . . . . . . . . . 210
Working with Markers and Restrictions. . . . . . . . . . . . . . . . . . . . . . . . . . . . . . . . . . . . . . . . . 211
Displaying Captions and Segments . . . . . . . . . . . . . . . . . . . . . . . . . . . . . . . . . . . . . . . . . . . 212
Using the Timecode Displays . . . . . . . . . . . . . . . . . . . . . . . . . . . . . . . . . . . . . . . . . . . . . . . . 213
Entering Timecode to Cue a Frame . . . . . . . . . . . . . . . . . . . . . . . . . . . . . . . . . . . . . . . . . . . 215
Working in the Media Timeline . . . . . . . . . . . . . . . . . . . . . . . . . . . . . . . . . . . . . . . . . . . . . . . 216
Using the Media Zoom Bar . . . . . . . . . . . . . . . . . . . . . . . . . . . . . . . . . . . . . . . . . . . . . . . . . . 217
Reviewing in the STP Target Resolution . . . . . . . . . . . . . . . . . . . . . . . . . . . . . . . . . . . . . . . 218
Playing Back at the Highest Resolution . . . . . . . . . . . . . . . . . . . . . . . . . . . . . . . . . . . . . . . . 220
Using Match Frame. . . . . . . . . . . . . . . . . . . . . . . . . . . . . . . . . . . . . . . . . . . . . . . . . . . . . . . . 221
Opening an Enclosing Folder . . . . . . . . . . . . . . . . . . . . . . . . . . . . . . . . . . . . . . . . . . . . . . . . 221
Transcoding Assets . . . . . . . . . . . . . . . . . . . . . . . . . . . . . . . . . . . . . . . . . . . . . . . . . . . . . . . 222
Viewing and Editing a Clip During Ingest . . . . . . . . . . . . . . . . . . . . . . . . . . . . . . . . . . . . . . . 224
10
Saving a Frame as an Image . . . . . . . . . . . . . . . . . . . . . . . . . . . . . . . . . . . . . . . . . . . . . . . . 225
Viewing an Image . . . . . . . . . . . . . . . . . . . . . . . . . . . . . . . . . . . . . . . . . . . . . . . . . . . . . . . . . 225
Exporting an MP4 File. . . . . . . . . . . . . . . . . . . . . . . . . . . . . . . . . . . . . . . . . . . . . . . . . . . . . . 226
Chapter 7 Using Audio . . . . . . . . . . . . . . . . . . . . . . . . . . . . . . . . . . . . . . . . . . . . . . . . . . . . . 227
The Audio Pane . . . . . . . . . . . . . . . . . . . . . . . . . . . . . . . . . . . . . . . . . . . . . . . . . . . . . . . . . . 227
The Audio Pane for Asset Mode and Basic Sequences . . . . . . . . . . . . . . . . . . . . . . . . 227
The Audio Pane for Advanced Sequences . . . . . . . . . . . . . . . . . . . . . . . . . . . . . . . . . . 229
Working with Audio Tracks in Basic Sequences. . . . . . . . . . . . . . . . . . . . . . . . . . . . . . . . . . 231
Audio Monitoring for Assets and Basic Sequences . . . . . . . . . . . . . . . . . . . . . . . . . . . . 231
Panning for Assets and Basic Sequences . . . . . . . . . . . . . . . . . . . . . . . . . . . . . . . . . . . 233
Working with Audio Tracks in Advanced Sequences . . . . . . . . . . . . . . . . . . . . . . . . . . . . . . 234
Soloing and Muting Tracks for Advanced Sequences . . . . . . . . . . . . . . . . . . . . . . . . . . 235
Overriding the Default Audio Track Patching. . . . . . . . . . . . . . . . . . . . . . . . . . . . . . . . . 236
Adjusting Audio Levels for Advanced Sequences . . . . . . . . . . . . . . . . . . . . . . . . . . . . . 237
Panning for Advanced Sequences. . . . . . . . . . . . . . . . . . . . . . . . . . . . . . . . . . . . . . . . . 238
Setting the Audio Mix . . . . . . . . . . . . . . . . . . . . . . . . . . . . . . . . . . . . . . . . . . . . . . . . . . . . . . 239
Setting the Reference Level . . . . . . . . . . . . . . . . . . . . . . . . . . . . . . . . . . . . . . . . . . . . . . . . . 239
Recording a Voice-Over . . . . . . . . . . . . . . . . . . . . . . . . . . . . . . . . . . . . . . . . . . . . . . . . . . . . 240
Recording an Audio Clip . . . . . . . . . . . . . . . . . . . . . . . . . . . . . . . . . . . . . . . . . . . . . . . . . . . . 241
Chapter 8 Working with Group Clips . . . . . . . . . . . . . . . . . . . . . . . . . . . . . . . . . . . . . . . . . . 246
Group Clips and Multicamera Workflows . . . . . . . . . . . . . . . . . . . . . . . . . . . . . . . . . . . . . . . 246
Working with Group Clips . . . . . . . . . . . . . . . . . . . . . . . . . . . . . . . . . . . . . . . . . . . . . . . . . . . 247
Loading a Group Clip and Changing the Angle View. . . . . . . . . . . . . . . . . . . . . . . . . . . 250
Working with Banks . . . . . . . . . . . . . . . . . . . . . . . . . . . . . . . . . . . . . . . . . . . . . . . . . . . . 251
Selecting the Active Angle in Asset Mode . . . . . . . . . . . . . . . . . . . . . . . . . . . . . . . . . . . 251
Playing a Group Clip . . . . . . . . . . . . . . . . . . . . . . . . . . . . . . . . . . . . . . . . . . . . . . . . . . . 252
Timecode and Group Clips . . . . . . . . . . . . . . . . . . . . . . . . . . . . . . . . . . . . . . . . . . . . . . 253
Selecting Audio Monitoring Preferences in Asset Mode . . . . . . . . . . . . . . . . . . . . . . . . 253
Markers and Restrictions for Group Clips . . . . . . . . . . . . . . . . . . . . . . . . . . . . . . . . . . . 256
Using Match Frame for Group Clips. . . . . . . . . . . . . . . . . . . . . . . . . . . . . . . . . . . . . . . . 257
Creating a Basic Sequence with Group Clips. . . . . . . . . . . . . . . . . . . . . . . . . . . . . . . . . . . . 258
Adding an Active Angle of a Group Clip to an Advanced Sequence . . . . . . . . . . . . . . . . . . 259
Sending a Sequence with Group Clips to a Playback Device. . . . . . . . . . . . . . . . . . . . . . . . 260
Chapter 9 Searching for Assets . . . . . . . . . . . . . . . . . . . . . . . . . . . . . . . . . . . . . . . . . . . . . 261
Search and the Central Index . . . . . . . . . . . . . . . . . . . . . . . . . . . . . . . . . . . . . . . . . . . . . . . . 261
Federated Search . . . . . . . . . . . . . . . . . . . . . . . . . . . . . . . . . . . . . . . . . . . . . . . . . . . . . 262
Media | Index and Indexed Search . . . . . . . . . . . . . . . . . . . . . . . . . . . . . . . . . . . . . . . . 263
The Search Bar. . . . . . . . . . . . . . . . . . . . . . . . . . . . . . . . . . . . . . . . . . . . . . . . . . . . . . . . . . . 265
The Search Pane . . . . . . . . . . . . . . . . . . . . . . . . . . . . . . . . . . . . . . . . . . . . . . . . . . . . . . . . . 266
11
Search Criteria . . . . . . . . . . . . . . . . . . . . . . . . . . . . . . . . . . . . . . . . . . . . . . . . . . . . . . . . . . . 268
Conducting a Search . . . . . . . . . . . . . . . . . . . . . . . . . . . . . . . . . . . . . . . . . . . . . . . . . . . . . . 270
Using Predefined Metadata . . . . . . . . . . . . . . . . . . . . . . . . . . . . . . . . . . . . . . . . . . . . . . 276
Saving Searches . . . . . . . . . . . . . . . . . . . . . . . . . . . . . . . . . . . . . . . . . . . . . . . . . . . . . . 277
Advanced Search Filters . . . . . . . . . . . . . . . . . . . . . . . . . . . . . . . . . . . . . . . . . . . . . . . . 279
Indexed Search Examples . . . . . . . . . . . . . . . . . . . . . . . . . . . . . . . . . . . . . . . . . . . . . . . 284
Wild Card Characters and Operators Supported for Federated Searches in Interplay | MAM
Databases . . . . . . . . . . . . . . . . . . . . . . . . . . . . . . . . . . . . . . . . . . . . . . . . . . . . . . . . . 285
The Search Results List . . . . . . . . . . . . . . . . . . . . . . . . . . . . . . . . . . . . . . . . . . . . . . . . . . . . 287
Chapter 10 Logging Interplay | Production Assets and Creating Subclips . . . . . . . . . . . . 291
Workflows for Logging . . . . . . . . . . . . . . . . . . . . . . . . . . . . . . . . . . . . . . . . . . . . . . . . . . . . . 291
Understanding Markers and Restrictions . . . . . . . . . . . . . . . . . . . . . . . . . . . . . . . . . . . . . . . 293
The Log Layout. . . . . . . . . . . . . . . . . . . . . . . . . . . . . . . . . . . . . . . . . . . . . . . . . . . . . . . . . . . 295
The Logging Pane for Interplay | Production Assets. . . . . . . . . . . . . . . . . . . . . . . . . . . . . . . 296
Adding, Saving, and Deleting Markers . . . . . . . . . . . . . . . . . . . . . . . . . . . . . . . . . . . . . . . . . 299
Working with Restrictions . . . . . . . . . . . . . . . . . . . . . . . . . . . . . . . . . . . . . . . . . . . . . . . . . . . 300
Understanding Restrictions in MediaCentral | UX . . . . . . . . . . . . . . . . . . . . . . . . . . . . . 300
Adding, Saving, and Deleting Restrictions. . . . . . . . . . . . . . . . . . . . . . . . . . . . . . . . . . . 304
Cutting, Copying, and Pasting Text . . . . . . . . . . . . . . . . . . . . . . . . . . . . . . . . . . . . . . . . . . . 306
Navigating by Markers in the Log Layout . . . . . . . . . . . . . . . . . . . . . . . . . . . . . . . . . . . . . . . 306
Viewing In and Out Points for Log Entries . . . . . . . . . . . . . . . . . . . . . . . . . . . . . . . . . . . . . . 307
Filtering Interplay Production Logs . . . . . . . . . . . . . . . . . . . . . . . . . . . . . . . . . . . . . . . . . . . . 307
Exporting Markers. . . . . . . . . . . . . . . . . . . . . . . . . . . . . . . . . . . . . . . . . . . . . . . . . . . . . . . . . 308
Entering Marker Text in Right-to-Left Languages . . . . . . . . . . . . . . . . . . . . . . . . . . . . . . . . . 310
Unicode Support for Marker Text . . . . . . . . . . . . . . . . . . . . . . . . . . . . . . . . . . . . . . . . . . . . . 310
Creating Subclips . . . . . . . . . . . . . . . . . . . . . . . . . . . . . . . . . . . . . . . . . . . . . . . . . . . . . . . . . 311
Chapter 11 Logging Interplay | MAM Assets. . . . . . . . . . . . . . . . . . . . . . . . . . . . . . . . . . . . . 313
Understanding Strata . . . . . . . . . . . . . . . . . . . . . . . . . . . . . . . . . . . . . . . . . . . . . . . . . . . . . . 313
Logging Overview (Interplay | MAM Assets). . . . . . . . . . . . . . . . . . . . . . . . . . . . . . . . . . . . . 314
The Logging Pane (Interplay | MAM) . . . . . . . . . . . . . . . . . . . . . . . . . . . . . . . . . . . . . . . . . . 316
Understanding Segmentation Principles. . . . . . . . . . . . . . . . . . . . . . . . . . . . . . . . . . . . . . . . 320
Locking a Stratum. . . . . . . . . . . . . . . . . . . . . . . . . . . . . . . . . . . . . . . . . . . . . . . . . . . . . . . . . 323
Working with Segments . . . . . . . . . . . . . . . . . . . . . . . . . . . . . . . . . . . . . . . . . . . . . . . . . . . . 324
Creating Segments (Gaps Not Allowed) . . . . . . . . . . . . . . . . . . . . . . . . . . . . . . . . . . . . 324
Creating Segment (Gaps Allowed). . . . . . . . . . . . . . . . . . . . . . . . . . . . . . . . . . . . . . . . . 325
Resizing Segments (Gaps Not Allowed Mode) . . . . . . . . . . . . . . . . . . . . . . . . . . . . . . . 327
Resizing Segments (Gaps Allowed Mode). . . . . . . . . . . . . . . . . . . . . . . . . . . . . . . . . . . 327
Resizing Overlapping Segments . . . . . . . . . . . . . . . . . . . . . . . . . . . . . . . . . . . . . . . . . . 328
Splitting Segments . . . . . . . . . . . . . . . . . . . . . . . . . . . . . . . . . . . . . . . . . . . . . . . . . . . . . 329
Merging Segments. . . . . . . . . . . . . . . . . . . . . . . . . . . . . . . . . . . . . . . . . . . . . . . . . . . . . 330
12
Deleting Segments. . . . . . . . . . . . . . . . . . . . . . . . . . . . . . . . . . . . . . . . . . . . . . . . . . . . . 330
Segmenting During Ingest . . . . . . . . . . . . . . . . . . . . . . . . . . . . . . . . . . . . . . . . . . . . . . . 331
Navigating by Segments . . . . . . . . . . . . . . . . . . . . . . . . . . . . . . . . . . . . . . . . . . . . . . . . . . . . 331
Annotating Text Fields . . . . . . . . . . . . . . . . . . . . . . . . . . . . . . . . . . . . . . . . . . . . . . . . . . . . . 332
Entering Segment Text in Right-to-Left Languages . . . . . . . . . . . . . . . . . . . . . . . . . . . . . . . 333
Annotating Using Tags . . . . . . . . . . . . . . . . . . . . . . . . . . . . . . . . . . . . . . . . . . . . . . . . . . . . . 333
Adding, Replacing, and Deleting Tags. . . . . . . . . . . . . . . . . . . . . . . . . . . . . . . . . . . . . . 334
Editing Integer or Floating Point Values. . . . . . . . . . . . . . . . . . . . . . . . . . . . . . . . . . . . . 336
Editing Timecode or Duration Values. . . . . . . . . . . . . . . . . . . . . . . . . . . . . . . . . . . . . . . 336
Selecting Boolean Values . . . . . . . . . . . . . . . . . . . . . . . . . . . . . . . . . . . . . . . . . . . . . . . 336
Editing Time Values . . . . . . . . . . . . . . . . . . . . . . . . . . . . . . . . . . . . . . . . . . . . . . . . . . . . 336
Editing Date and Date/Time Values. . . . . . . . . . . . . . . . . . . . . . . . . . . . . . . . . . . . . . . . 337
Assigning Values from Drop-Down Lists . . . . . . . . . . . . . . . . . . . . . . . . . . . . . . . . . . . . 338
Assigning a Master Data Value . . . . . . . . . . . . . . . . . . . . . . . . . . . . . . . . . . . . . . . . . . . 338
Assigning the Term of a Thesaurus . . . . . . . . . . . . . . . . . . . . . . . . . . . . . . . . . . . . . . . . 339
Defining Merge Rules for Annotated Segments . . . . . . . . . . . . . . . . . . . . . . . . . . . . . . . . . . 340
Filtering a Stratum. . . . . . . . . . . . . . . . . . . . . . . . . . . . . . . . . . . . . . . . . . . . . . . . . . . . . . . . . 341
Exporting Strata . . . . . . . . . . . . . . . . . . . . . . . . . . . . . . . . . . . . . . . . . . . . . . . . . . . . . . . . . . 342
Chapter 12 Working with Associations (Interplay | MAM) . . . . . . . . . . . . . . . . . . . . . . . . . . 344
Understanding Associations . . . . . . . . . . . . . . . . . . . . . . . . . . . . . . . . . . . . . . . . . . . . . . . . . 344
The Associations Pane . . . . . . . . . . . . . . . . . . . . . . . . . . . . . . . . . . . . . . . . . . . . . . . . . . . . . 345
Working in the Associations Pane . . . . . . . . . . . . . . . . . . . . . . . . . . . . . . . . . . . . . . . . . . . . 347
Viewing Associated Assets. . . . . . . . . . . . . . . . . . . . . . . . . . . . . . . . . . . . . . . . . . . . . . . . . . 348
Filtering the Displayed Associated Asset Types . . . . . . . . . . . . . . . . . . . . . . . . . . . . . . . . . . 349
Opening Associated Assets in Other Panes . . . . . . . . . . . . . . . . . . . . . . . . . . . . . . . . . . . . . 350
Reusing Associated Assets in Other Panes . . . . . . . . . . . . . . . . . . . . . . . . . . . . . . . . . . . . . 351
Switching Between Associated Assets . . . . . . . . . . . . . . . . . . . . . . . . . . . . . . . . . . . . . . . . . 351
Creating Associations . . . . . . . . . . . . . . . . . . . . . . . . . . . . . . . . . . . . . . . . . . . . . . . . . . . . . . 352
Deleting Associations . . . . . . . . . . . . . . . . . . . . . . . . . . . . . . . . . . . . . . . . . . . . . . . . . . . . . . 355
Chapter 13 Working with the File Info Pane (Interplay | MAM) . . . . . . . . . . . . . . . . . . . . . . 356
Understanding Essences and Essence Packages . . . . . . . . . . . . . . . . . . . . . . . . . . . . . . . . 356
The File Info Pane. . . . . . . . . . . . . . . . . . . . . . . . . . . . . . . . . . . . . . . . . . . . . . . . . . . . . . . . . 357
Working in the File Info Pane . . . . . . . . . . . . . . . . . . . . . . . . . . . . . . . . . . . . . . . . . . . . . . . . 362
Editing the Properties of an Essence Package. . . . . . . . . . . . . . . . . . . . . . . . . . . . . . . . . . . 363
Cleaning Up Essence Packages. . . . . . . . . . . . . . . . . . . . . . . . . . . . . . . . . . . . . . . . . . . . . . 364
Editing the Properties of an Essence . . . . . . . . . . . . . . . . . . . . . . . . . . . . . . . . . . . . . . . . . . 365
Displaying Locations Details for an Essence . . . . . . . . . . . . . . . . . . . . . . . . . . . . . . . . . . . . 367
13
Chapter 14 Working with Closed Captions in MediaCentral | UX . . . . . . . . . . . . . . . . . . . . 369
Basics of Closed Captioning . . . . . . . . . . . . . . . . . . . . . . . . . . . . . . . . . . . . . . . . . . . . . . . . . 369
Closed-Captioning Workflows for MediaCentral | UX . . . . . . . . . . . . . . . . . . . . . . . . . . . . . . 372
How the CCCS Works with Closed-Caption Files. . . . . . . . . . . . . . . . . . . . . . . . . . . . . . . . . 376
Creating and Editing Closed Captions . . . . . . . . . . . . . . . . . . . . . . . . . . . . . . . . . . . . . . . . . 377
The Closed Captioning Pane . . . . . . . . . . . . . . . . . . . . . . . . . . . . . . . . . . . . . . . . . . . . . 377
Importing and Exporting Closed-Caption Files. . . . . . . . . . . . . . . . . . . . . . . . . . . . . . . . 380
Extracting and Repackaging Closed-Caption Data . . . . . . . . . . . . . . . . . . . . . . . . . . . . 381
Creating Closed-Caption Segments. . . . . . . . . . . . . . . . . . . . . . . . . . . . . . . . . . . . . . . . 381
Editing the Text and Position of Closed Captions . . . . . . . . . . . . . . . . . . . . . . . . . . . . . 383
Editing the Timing of Closed Captions. . . . . . . . . . . . . . . . . . . . . . . . . . . . . . . . . . . . . . 385
Working with Multiple Caption Blocks . . . . . . . . . . . . . . . . . . . . . . . . . . . . . . . . . . . . . . 385
Support for Roll-Up Captions . . . . . . . . . . . . . . . . . . . . . . . . . . . . . . . . . . . . . . . . . . . . . 386
Chapter 15 Using the Assignments Pane . . . . . . . . . . . . . . . . . . . . . . . . . . . . . . . . . . . . . . . 387
The Assignments Pane. . . . . . . . . . . . . . . . . . . . . . . . . . . . . . . . . . . . . . . . . . . . . . . . . . . . . 387
Configuring the Assignments Pane. . . . . . . . . . . . . . . . . . . . . . . . . . . . . . . . . . . . . . . . . . . . 388
Using the Assignment Desk Layout . . . . . . . . . . . . . . . . . . . . . . . . . . . . . . . . . . . . . . . . . . . 389
Create and Manage Assignments. . . . . . . . . . . . . . . . . . . . . . . . . . . . . . . . . . . . . . . . . . . . . 391
Creating Assignments . . . . . . . . . . . . . . . . . . . . . . . . . . . . . . . . . . . . . . . . . . . . . . . . . . 391
Adding Details and Resources to Assignments . . . . . . . . . . . . . . . . . . . . . . . . . . . . . . . 393
Deleting Assignments . . . . . . . . . . . . . . . . . . . . . . . . . . . . . . . . . . . . . . . . . . . . . . . . . . 399
Cloning Assignments . . . . . . . . . . . . . . . . . . . . . . . . . . . . . . . . . . . . . . . . . . . . . . . . . . . 399
Filtering Assignments. . . . . . . . . . . . . . . . . . . . . . . . . . . . . . . . . . . . . . . . . . . . . . . . . . . 400
Chapter 16 Sharing MediaCentral | UX Messages . . . . . . . . . . . . . . . . . . . . . . . . . . . . . . . . 402
MediaCentral | UX Messages . . . . . . . . . . . . . . . . . . . . . . . . . . . . . . . . . . . . . . . . . . . . . . . . 402
Using the Messages Pane . . . . . . . . . . . . . . . . . . . . . . . . . . . . . . . . . . . . . . . . . . . . . . . . . . 402
Viewing Messages and Linked Assets. . . . . . . . . . . . . . . . . . . . . . . . . . . . . . . . . . . . . . 403
Sending Messages. . . . . . . . . . . . . . . . . . . . . . . . . . . . . . . . . . . . . . . . . . . . . . . . . . . . . 405
Configuring E-Mail Forwarding . . . . . . . . . . . . . . . . . . . . . . . . . . . . . . . . . . . . . . . . . . . . . . . 407
Using E-Mail Forwarding. . . . . . . . . . . . . . . . . . . . . . . . . . . . . . . . . . . . . . . . . . . . . . . . . . . . 408
Chapter 17 iNEWS Messaging . . . . . . . . . . . . . . . . . . . . . . . . . . . . . . . . . . . . . . . . . . . . . . . . 409
Sending Messages . . . . . . . . . . . . . . . . . . . . . . . . . . . . . . . . . . . . . . . . . . . . . . . . . . . . . . . . 409
Viewing and Replying to Received Messages . . . . . . . . . . . . . . . . . . . . . . . . . . . . . . . . . . . 410
Chapter 18 Sending to Playback . . . . . . . . . . . . . . . . . . . . . . . . . . . . . . . . . . . . . . . . . . . . . . 411
Specifying Send to Playback Settings . . . . . . . . . . . . . . . . . . . . . . . . . . . . . . . . . . . . . . . . . 411
Sending a Sequence to a Playback Device . . . . . . . . . . . . . . . . . . . . . . . . . . . . . . . . . . . . . 414
Sending a Mixed-Resolution Long GOP Sequence to a Playback Device . . . . . . . . . . . . . . 415
Sending Master Clips or Subclips to a Playback Device . . . . . . . . . . . . . . . . . . . . . . . . . . . 416
14
The Progress Pane. . . . . . . . . . . . . . . . . . . . . . . . . . . . . . . . . . . . . . . . . . . . . . . . . . . . . . . . 417
Interplay Services in the Media Services and Transfer Status Tool . . . . . . . . . . . . . . . . . . . 419
Chapter 19 Delivering Assets and Media . . . . . . . . . . . . . . . . . . . . . . . . . . . . . . . . . . . . . . . 420
Understanding MediaCentral Delivery . . . . . . . . . . . . . . . . . . . . . . . . . . . . . . . . . . . . . . . . . 420
Delivering Assets and Media to a Remote Workgroup . . . . . . . . . . . . . . . . . . . . . . . . . . . . . 423
Delivering Assets and Media to a Local Workgroup . . . . . . . . . . . . . . . . . . . . . . . . . . . . . . . 425
Chapter 20 Working with Interplay | MAM Processes and Tasks . . . . . . . . . . . . . . . . . . . . 428
Understanding Processes, Tasks, and Actions . . . . . . . . . . . . . . . . . . . . . . . . . . . . . . . . . . 428
Creating Processes. . . . . . . . . . . . . . . . . . . . . . . . . . . . . . . . . . . . . . . . . . . . . . . . . . . . . . . . 431
Using File Attachments During Process Creation. . . . . . . . . . . . . . . . . . . . . . . . . . . . . . . . . 433
Getting Information on Allowed Attachments . . . . . . . . . . . . . . . . . . . . . . . . . . . . . . . . . . . . 435
Using the Quick Send Feature . . . . . . . . . . . . . . . . . . . . . . . . . . . . . . . . . . . . . . . . . . . . . . . 436
Monitoring Processes in the Progress Pane. . . . . . . . . . . . . . . . . . . . . . . . . . . . . . . . . . . . . 437
Working with Process Dashboards . . . . . . . . . . . . . . . . . . . . . . . . . . . . . . . . . . . . . . . . . . . . 439
The Process Dashboard Pane. . . . . . . . . . . . . . . . . . . . . . . . . . . . . . . . . . . . . . . . . . . . 439
Defining the Dashboard Context . . . . . . . . . . . . . . . . . . . . . . . . . . . . . . . . . . . . . . . . . . 444
Working in the Process Dashboard Pane . . . . . . . . . . . . . . . . . . . . . . . . . . . . . . . . . . . 447
Saving and Opening Saved Dashboards. . . . . . . . . . . . . . . . . . . . . . . . . . . . . . . . . . . . 448
Working with Process Groups . . . . . . . . . . . . . . . . . . . . . . . . . . . . . . . . . . . . . . . . . . . . 450
Applying Filters. . . . . . . . . . . . . . . . . . . . . . . . . . . . . . . . . . . . . . . . . . . . . . . . . . . . . . . . 452
Working with Diagrams . . . . . . . . . . . . . . . . . . . . . . . . . . . . . . . . . . . . . . . . . . . . . . . . . 453
Working with Tasks. . . . . . . . . . . . . . . . . . . . . . . . . . . . . . . . . . . . . . . . . . . . . . . . . . . . . . . . 457
The Tasks Pane. . . . . . . . . . . . . . . . . . . . . . . . . . . . . . . . . . . . . . . . . . . . . . . . . . . . . . . 457
Working in the Tasks Pane . . . . . . . . . . . . . . . . . . . . . . . . . . . . . . . . . . . . . . . . . . . . . . 461
Filtering Displayed User Tasks . . . . . . . . . . . . . . . . . . . . . . . . . . . . . . . . . . . . . . . . . . . 462
Delegating User Tasks. . . . . . . . . . . . . . . . . . . . . . . . . . . . . . . . . . . . . . . . . . . . . . . . . . 463
Assigning User Tasks to Users and Groups . . . . . . . . . . . . . . . . . . . . . . . . . . . . . . . . . 464
Applying Actions to User Tasks . . . . . . . . . . . . . . . . . . . . . . . . . . . . . . . . . . . . . . . . . . . 465
Displaying and Editing User Task Data . . . . . . . . . . . . . . . . . . . . . . . . . . . . . . . . . . . . . 466
Adding and Editing User Task Attachments. . . . . . . . . . . . . . . . . . . . . . . . . . . . . . . . . . 467
Uploading Files as Attachments. . . . . . . . . . . . . . . . . . . . . . . . . . . . . . . . . . . . . . . . . . . 468
Downloading File Attachments. . . . . . . . . . . . . . . . . . . . . . . . . . . . . . . . . . . . . . . . . . . . 469
Deleting Attachments. . . . . . . . . . . . . . . . . . . . . . . . . . . . . . . . . . . . . . . . . . . . . . . . . . . 470
Chapter 21 Working with Avid Maestro in MediaCentral | UX . . . . . . . . . . . . . . . . . . . . . . . 471
Maestro and the Maestro UX Plug-In . . . . . . . . . . . . . . . . . . . . . . . . . . . . . . . . . . . . . . . . . . 471
Installation and Configuration . . . . . . . . . . . . . . . . . . . . . . . . . . . . . . . . . . . . . . . . . . . . . . . . 471
Connecting to and Browsing Maestro Files . . . . . . . . . . . . . . . . . . . . . . . . . . . . . . . . . . . . . 472
Viewing and Working with Maestro Templates. . . . . . . . . . . . . . . . . . . . . . . . . . . . . . . . . . . 473
Editing and Previewing a Graphic Template . . . . . . . . . . . . . . . . . . . . . . . . . . . . . . . . . 475
15
Previewing the Graphic in the Media Pane . . . . . . . . . . . . . . . . . . . . . . . . . . . . . . . . . . 476
Saving a Maestro Graphic . . . . . . . . . . . . . . . . . . . . . . . . . . . . . . . . . . . . . . . . . . . . . . . 477
Adding a Maestro Graphic to an iNEWS Story . . . . . . . . . . . . . . . . . . . . . . . . . . . . . . . . . . . 478
Chapter 22 MediaCentral | UX Mobile Application for the iPhone . . . . . . . . . . . . . . . . . . . 480
Connection Basics . . . . . . . . . . . . . . . . . . . . . . . . . . . . . . . . . . . . . . . . . . . . . . . . . . . . . . . . 480
The iPhone. . . . . . . . . . . . . . . . . . . . . . . . . . . . . . . . . . . . . . . . . . . . . . . . . . . . . . . . . . . 481
Gestures for the Mobile Application . . . . . . . . . . . . . . . . . . . . . . . . . . . . . . . . . . . . . . . . 481
Installing MediaCentral | UX on the iPhone . . . . . . . . . . . . . . . . . . . . . . . . . . . . . . . . . . . . . 482
Starting MediaCentral | UX on the iPhone . . . . . . . . . . . . . . . . . . . . . . . . . . . . . . . . . . . . . . 482
The Sidebar . . . . . . . . . . . . . . . . . . . . . . . . . . . . . . . . . . . . . . . . . . . . . . . . . . . . . . . . . . . . . 484
Buttons of the User Interface . . . . . . . . . . . . . . . . . . . . . . . . . . . . . . . . . . . . . . . . . . . . . . . . 486
Customizing MediaCentral | UX Settings . . . . . . . . . . . . . . . . . . . . . . . . . . . . . . . . . . . . . . . 486
Changing Roles . . . . . . . . . . . . . . . . . . . . . . . . . . . . . . . . . . . . . . . . . . . . . . . . . . . . . . . . . . 487
Accessing the iNEWS Database. . . . . . . . . . . . . . . . . . . . . . . . . . . . . . . . . . . . . . . . . . . . . . 488
Viewing Video Associated with a Script . . . . . . . . . . . . . . . . . . . . . . . . . . . . . . . . . . . . . 494
Editing Stories. . . . . . . . . . . . . . . . . . . . . . . . . . . . . . . . . . . . . . . . . . . . . . . . . . . . . . . . . . . . 495
Using Script Templates . . . . . . . . . . . . . . . . . . . . . . . . . . . . . . . . . . . . . . . . . . . . . . . . . 498
Ways of Saving Stories . . . . . . . . . . . . . . . . . . . . . . . . . . . . . . . . . . . . . . . . . . . . . . . . . 498
Formatting a Script. . . . . . . . . . . . . . . . . . . . . . . . . . . . . . . . . . . . . . . . . . . . . . . . . . . . . 498
Adding Production Cues . . . . . . . . . . . . . . . . . . . . . . . . . . . . . . . . . . . . . . . . . . . . . . . . 499
Adding Machine Control Instructions . . . . . . . . . . . . . . . . . . . . . . . . . . . . . . . . . . . . . . . 500
Working with Links in Stories . . . . . . . . . . . . . . . . . . . . . . . . . . . . . . . . . . . . . . . . . . . . . 500
Approving Stories . . . . . . . . . . . . . . . . . . . . . . . . . . . . . . . . . . . . . . . . . . . . . . . . . . . . . . . . . 501
Working with Favorites . . . . . . . . . . . . . . . . . . . . . . . . . . . . . . . . . . . . . . . . . . . . . . . . . . . . . 501
Working Offline with Cached Queues and Stories . . . . . . . . . . . . . . . . . . . . . . . . . . . . . . . . 504
Caching Queues and Stories . . . . . . . . . . . . . . . . . . . . . . . . . . . . . . . . . . . . . . . . . . . . . 504
Viewing Queues and Stories in Offline Mode. . . . . . . . . . . . . . . . . . . . . . . . . . . . . . . . . 505
MediaCentral | UX and Interplay | Production. . . . . . . . . . . . . . . . . . . . . . . . . . . . . . . . . . . . 506
Viewing Media Assets with MediaCentral | UX . . . . . . . . . . . . . . . . . . . . . . . . . . . . . . . 506
Troubleshooting Video Playback Problems on the iPhone . . . . . . . . . . . . . . . . . . . . . . 509
Using Markers. . . . . . . . . . . . . . . . . . . . . . . . . . . . . . . . . . . . . . . . . . . . . . . . . . . . . . . . . . . . 511
Creating and Editing Markers. . . . . . . . . . . . . . . . . . . . . . . . . . . . . . . . . . . . . . . . . . . . . 512
Setting the Approval Status for Assets . . . . . . . . . . . . . . . . . . . . . . . . . . . . . . . . . . . . . . . . . 516
Working with Deep Links . . . . . . . . . . . . . . . . . . . . . . . . . . . . . . . . . . . . . . . . . . . . . . . . . . . 517
Chapter 23 MediaCentral | UX Tablet Application for the iPad . . . . . . . . . . . . . . . . . . . . . . 519
Connection Basics . . . . . . . . . . . . . . . . . . . . . . . . . . . . . . . . . . . . . . . . . . . . . . . . . . . . . . . . 519
The iPad. . . . . . . . . . . . . . . . . . . . . . . . . . . . . . . . . . . . . . . . . . . . . . . . . . . . . . . . . . . . . 520
Gestures for the Tablet App. . . . . . . . . . . . . . . . . . . . . . . . . . . . . . . . . . . . . . . . . . . . . . 520
Installing MediaCentral | UX on the iPad . . . . . . . . . . . . . . . . . . . . . . . . . . . . . . . . . . . . . . . 521
Starting MediaCentral | UX on the Tablet . . . . . . . . . . . . . . . . . . . . . . . . . . . . . . . . . . . . . . . 521
16
The Sidebar . . . . . . . . . . . . . . . . . . . . . . . . . . . . . . . . . . . . . . . . . . . . . . . . . . . . . . . . . . . . . 523
Buttons of the User Interface . . . . . . . . . . . . . . . . . . . . . . . . . . . . . . . . . . . . . . . . . . . . . . . . 525
Customizing MediaCentral | UX Settings . . . . . . . . . . . . . . . . . . . . . . . . . . . . . . . . . . . . . . . 525
Changing Roles . . . . . . . . . . . . . . . . . . . . . . . . . . . . . . . . . . . . . . . . . . . . . . . . . . . . . . . . . . 526
Accessing the iNEWS Database. . . . . . . . . . . . . . . . . . . . . . . . . . . . . . . . . . . . . . . . . . . . . . 527
Viewing Video Associated with a Script . . . . . . . . . . . . . . . . . . . . . . . . . . . . . . . . . . . . . 532
Editing Stories. . . . . . . . . . . . . . . . . . . . . . . . . . . . . . . . . . . . . . . . . . . . . . . . . . . . . . . . . . . . 533
Ways of Saving Stories . . . . . . . . . . . . . . . . . . . . . . . . . . . . . . . . . . . . . . . . . . . . . . . . . 535
Using Script Templates . . . . . . . . . . . . . . . . . . . . . . . . . . . . . . . . . . . . . . . . . . . . . . . . . 536
Formatting a Script. . . . . . . . . . . . . . . . . . . . . . . . . . . . . . . . . . . . . . . . . . . . . . . . . . . . . 537
Adding Production Cues . . . . . . . . . . . . . . . . . . . . . . . . . . . . . . . . . . . . . . . . . . . . . . . . 538
Adding Machine Control Instructions . . . . . . . . . . . . . . . . . . . . . . . . . . . . . . . . . . . . . . . 539
Working with Links in Stories . . . . . . . . . . . . . . . . . . . . . . . . . . . . . . . . . . . . . . . . . . . . . 540
Approving Stories . . . . . . . . . . . . . . . . . . . . . . . . . . . . . . . . . . . . . . . . . . . . . . . . . . . . . . . . . 540
Using Presenter Mode . . . . . . . . . . . . . . . . . . . . . . . . . . . . . . . . . . . . . . . . . . . . . . . . . . . . . 540
Working with Favorites . . . . . . . . . . . . . . . . . . . . . . . . . . . . . . . . . . . . . . . . . . . . . . . . . . . . . 542
Working Offline with Cached Queues and Stories . . . . . . . . . . . . . . . . . . . . . . . . . . . . . . . . 544
Caching Queues and Stories . . . . . . . . . . . . . . . . . . . . . . . . . . . . . . . . . . . . . . . . . . . . . 544
Viewing Queues and Stories in Offline Mode. . . . . . . . . . . . . . . . . . . . . . . . . . . . . . . . . 546
MediaCentral | UX and Interplay | Production. . . . . . . . . . . . . . . . . . . . . . . . . . . . . . . . . . . . 546
Viewing Media Assets with MediaCentral | UX . . . . . . . . . . . . . . . . . . . . . . . . . . . . . . . 547
Troubleshooting Video Playback Problems on the iPad . . . . . . . . . . . . . . . . . . . . . . . . 549
Using Markers. . . . . . . . . . . . . . . . . . . . . . . . . . . . . . . . . . . . . . . . . . . . . . . . . . . . . . . . . . . . 551
Creating and Editing Markers. . . . . . . . . . . . . . . . . . . . . . . . . . . . . . . . . . . . . . . . . . . . . 553
Setting the Approval Status for Assets . . . . . . . . . . . . . . . . . . . . . . . . . . . . . . . . . . . . . . . . . 555
Working with Deep Links . . . . . . . . . . . . . . . . . . . . . . . . . . . . . . . . . . . . . . . . . . . . . . . . . . . 557
Chapter 24 MediaCentral | UX for Android Devices . . . . . . . . . . . . . . . . . . . . . . . . . . . . . . . 559
Connection Basics . . . . . . . . . . . . . . . . . . . . . . . . . . . . . . . . . . . . . . . . . . . . . . . . . . . . . . . . 559
Android Devices. . . . . . . . . . . . . . . . . . . . . . . . . . . . . . . . . . . . . . . . . . . . . . . . . . . . . . . 560
Gestures for the Mobile Application . . . . . . . . . . . . . . . . . . . . . . . . . . . . . . . . . . . . . . . . 560
Installing MediaCentral | UX on Your Android Device . . . . . . . . . . . . . . . . . . . . . . . . . . . . . 561
Starting MediaCentral | UX on the Android Device. . . . . . . . . . . . . . . . . . . . . . . . . . . . . . . . 561
The Navigation Drawer and Directory Panel. . . . . . . . . . . . . . . . . . . . . . . . . . . . . . . . . . . . . 563
Buttons of the User Interface . . . . . . . . . . . . . . . . . . . . . . . . . . . . . . . . . . . . . . . . . . . . . . . . 563
Customizing MediaCentral | UX Settings . . . . . . . . . . . . . . . . . . . . . . . . . . . . . . . . . . . . . . . 564
Accessing the iNEWS Database. . . . . . . . . . . . . . . . . . . . . . . . . . . . . . . . . . . . . . . . . . . . . . 566
Viewing Video Associated with a Script . . . . . . . . . . . . . . . . . . . . . . . . . . . . . . . . . . . . . . . . 570
Working with Stories . . . . . . . . . . . . . . . . . . . . . . . . . . . . . . . . . . . . . . . . . . . . . . . . . . . . . . . 571
Ways of Saving Stories . . . . . . . . . . . . . . . . . . . . . . . . . . . . . . . . . . . . . . . . . . . . . . . . . 574
Formatting a Script. . . . . . . . . . . . . . . . . . . . . . . . . . . . . . . . . . . . . . . . . . . . . . . . . . . . . 574
17
Adding Production Cues . . . . . . . . . . . . . . . . . . . . . . . . . . . . . . . . . . . . . . . . . . . . . . . . 575
Adding Machine Control Instructions . . . . . . . . . . . . . . . . . . . . . . . . . . . . . . . . . . . . . . . 576
Working with Links in Stories . . . . . . . . . . . . . . . . . . . . . . . . . . . . . . . . . . . . . . . . . . . . . 576
Using Presenter Mode . . . . . . . . . . . . . . . . . . . . . . . . . . . . . . . . . . . . . . . . . . . . . . . . . . . . . 577
MediaCentral | UX and Interplay | Production. . . . . . . . . . . . . . . . . . . . . . . . . . . . . . . . . . . . 578
Viewing Media Assets with MediaCentral | UX . . . . . . . . . . . . . . . . . . . . . . . . . . . . . . . 579
Troubleshooting Video Playback Problems on the Android Device. . . . . . . . . . . . . . . . 581
Using Markers. . . . . . . . . . . . . . . . . . . . . . . . . . . . . . . . . . . . . . . . . . . . . . . . . . . . . . . . . . . . 583
Setting the Approval Status for Assets . . . . . . . . . . . . . . . . . . . . . . . . . . . . . . . . . . . . . . . . . 585
Appendix A User Settings . . . . . . . . . . . . . . . . . . . . . . . . . . . . . . . . . . . . . . . . . . . . . . . . . . . . 587
Appendix B Keyboard Shortcuts. . . . . . . . . . . . . . . . . . . . . . . . . . . . . . . . . . . . . . . . . . . . . . . 590
Queue/Story Pane Shortcuts . . . . . . . . . . . . . . . . . . . . . . . . . . . . . . . . . . . . . . . . . . . . . . . . 591
Assets Pane Shortcuts . . . . . . . . . . . . . . . . . . . . . . . . . . . . . . . . . . . . . . . . . . . . . . . . . . . . . 592
Media Pane Shortcuts. . . . . . . . . . . . . . . . . . . . . . . . . . . . . . . . . . . . . . . . . . . . . . . . . . . . . . 592
Logging Pane (Interplay | Production) Shortcuts . . . . . . . . . . . . . . . . . . . . . . . . . . . . . . . . . 595
Logging Pane (Interplay | MAM) Shortcuts . . . . . . . . . . . . . . . . . . . . . . . . . . . . . . . . . . . . . . 597
Sequence Pane Shortcuts . . . . . . . . . . . . . . . . . . . . . . . . . . . . . . . . . . . . . . . . . . . . . . . . . . 601
Closed Captioning Pane Shortcuts. . . . . . . . . . . . . . . . . . . . . . . . . . . . . . . . . . . . . . . . . . . . 603
Appendix C Icons . . . . . . . . . . . . . . . . . . . . . . . . . . . . . . . . . . . . . . . . . . . . . . . . . . . . . . . . . . . 604
Pane Type Icons. . . . . . . . . . . . . . . . . . . . . . . . . . . . . . . . . . . . . . . . . . . . . . . . . . . . . . . . . . 604
Launch Pane Icons . . . . . . . . . . . . . . . . . . . . . . . . . . . . . . . . . . . . . . . . . . . . . . . . . . . . . . . . 606
Assets Pane Icons . . . . . . . . . . . . . . . . . . . . . . . . . . . . . . . . . . . . . . . . . . . . . . . . . . . . . . . . 606
Associations Pane Icons. . . . . . . . . . . . . . . . . . . . . . . . . . . . . . . . . . . . . . . . . . . . . . . . . . . . 609
File Info Pane Icons . . . . . . . . . . . . . . . . . . . . . . . . . . . . . . . . . . . . . . . . . . . . . . . . . . . . . . . 610
Media Pane Icons . . . . . . . . . . . . . . . . . . . . . . . . . . . . . . . . . . . . . . . . . . . . . . . . . . . . . . . . . 610
Logging Pane Icons (Interplay | Production Assets) . . . . . . . . . . . . . . . . . . . . . . . . . . . . . . . 611
Logging Pane Icons (Interplay | MAM Assets) . . . . . . . . . . . . . . . . . . . . . . . . . . . . . . . . . . . 612
Process Dashboard Pane Icons . . . . . . . . . . . . . . . . . . . . . . . . . . . . . . . . . . . . . . . . . . . . . . 612
Progress Pane Icons. . . . . . . . . . . . . . . . . . . . . . . . . . . . . . . . . . . . . . . . . . . . . . . . . . . . . . . 613
Sequence Pane Icons. . . . . . . . . . . . . . . . . . . . . . . . . . . . . . . . . . . . . . . . . . . . . . . . . . . . . . 613
Tasks Pane Icons . . . . . . . . . . . . . . . . . . . . . . . . . . . . . . . . . . . . . . . . . . . . . . . . . . . . . . . . . 614
Media | Distribute Icons . . . . . . . . . . . . . . . . . . . . . . . . . . . . . . . . . . . . . . . . . . . . . . . . . . . . 614
MediaCentral Glossary . . . . . . . . . . . . . . . . . . . . . . . . . . . . . . . . . . . . . . . . . . . . 615
Index . . . . . . . . . . . . . . . . . . . . . . . . . . . . . . . . . . . . . . . . . . . . . . . . . . . . . . . . . . . 629
Using This Guide
This guide is intended for all users of an Avid MediaCentral | UX system (formerly
Interplay Central). This guide describes product features and basic user procedures, such as user
settings and story or asset creation.
For initial installation and configuration, see the Avid MediaCentral Platform Services Installation
and Configuration Guide. For administrative information, see the Avid MediaCentral | UX
Administration Guide.
Revision History
Symbols and Conventions
Avid documentation uses the following symbols and conventions:
Date Revised Changes Made
April 26, 2017 Added deep links feature for iOS (introduced in v2.10.1) and other 2.10.x updates.
Symbol or Convention Meaning or Action
nA note provides important related information, reminders, recommendations, and
strong suggestions.
cA caution means that a specific action you take could cause harm to your
computer or cause you to lose data.
wA warning describes an action that could cause you physical harm. Follow the
guidelines in this document or on the unit itself when handling electrical
equipment.
> This symbol indicates menu commands (and subcommands) in the order you
select them. For example, File > Import means to open the File menu and then
select the Import command.
This symbol indicates a single-step procedure. Multiple arrows in a list indicate
that you perform one of the actions listed.
(Windows), (Windows
only), (Macintosh), or
(Macintosh only)
This text indicates that the information applies only to the specified operating
system, either Windows or Macintosh OS X.
Bold font Bold font is primarily used in task instructions to identify user interface items and
keyboard sequences.
Italic font Italic font is used to emphasize certain words and to indicate variables.
Courier Bold font
Courier Bold font identifies text that you type.
Ctrl+key or mouse action Press and hold the first key while you press the last key or perform the mouse
action. For example, Command+Option+C or Ctrl+drag.

If You Need Help
19
If You Need Help
If you are having trouble using your Avid product:
1. Retry the action, carefully following the instructions given for that task in this guide. It is
especially important to check each step of your workflow.
2. Check the latest information that might have become available after the documentation was
published. You should always check online for the most up-to-date release notes or ReadMe
because the online version is updated whenever new information becomes available. To view
these online versions, select ReadMe from the Help menu, or visit the Knowledge Base at
www.avid.com/support.
3. Check the documentation that came with your Avid application or your hardware for
maintenance or hardware-related issues.
4. Visit the online Knowledge Base at www.avid.com/support. Online services are available 24
hours per day, 7 days per week. Search this online Knowledge Base to find answers, to view
error messages, to access troubleshooting tips, to download updates, and to read or join online
message-board discussions.
Avid Training Services
Avid makes lifelong learning, career advancement, and personal development easy and convenient.
Avid understands that the knowledge you need to differentiate yourself is always changing, and Avid
continually updates course content and offers new training delivery methods that accommodate your
pressured and competitive work environment.
For information on courses/schedules, training centers, certifications, courseware, and books, please
visit www.avid.com/support and follow the Training links, or call Avid Sales at 800-949-AVID
(800-949-2843).
| (pipe character) The pipe character is used in some Avid product names, such as Interplay |
Production. In this document, the pipe is used in product names when they are in
headings or at their first use in text.
Symbol or Convention Meaning or Action

1Getting Started
The following main topics describe basic user tasks as well as various concepts and features you
might encounter when working with MediaCentral | UX.
•About MediaCentral | UX
•Signing In to MediaCentral | UX
•Understanding Layouts and Panes
•Using Plug-ins and MOS Integration
•Support for iNEWS Communities
•Showing Desktop Notifications from Panes
•Viewing MediaCentral | UX Help
About MediaCentral | UX
MediaCentral UX delivers workflow tools for media professionals through both Web and mobile
applications. With a customizable user interface, MediaCentral UX allows individuals in different
media production functions to access the tools they need to complete tasks with greater visibility to
assets, team collaboration, and workflow agility. Through MediaCentral UX, users can access Avid
iNEWS, Interplay Production, Interplay MAM, or all three.
Avid iNEWS
The Avid iNEWS newsroom computer system provides journalists, producers, directors, and various
technical personnel in the newsroom with an array of tools to make their job easier. It is primarily
made up of iNEWS Workstations, linked together via a local or wide area network, and the iNEWS
Server, which manages all the day-to-day activities of the newsroom.
nAlthough referred to as a singular unit, the iNEWS Server typically consists of two or more
computers running the iNEWS Server software. Each one acts as a backup for the other to protect the
overall stability of the network. For redundancy, the iNEWS system mirrors its database across these
servers for redundancy.
Interplay | Production
The Avid Interplay Production system combines an asset database with workflow management
software, both of which are integrated with Avid shared storage and Avid archive solutions. Interplay
Production provides tools that let journalists and producers add rich media to stories and send the
assembled video sequence to a playout server.
Interplay | MAM
The Avid Interplay MAM system helps to archive and manage media in a shared storage
environment. It integrates production islands, facilitates and streamlines workflows, and grants
access to media assets and associated metadata from any workstation. Interplay MAM provides tools
Signing In to MediaCentral | UX
21
that let archivists, journalist, editors, and producers assign metadata to assets; search, access, and
preview assets; arrange assets in sequences and transfer them to the edit bay; and overview and
manage business processes.
Signing In to MediaCentral | UX
Use a supported browser to connect to and sign in to your MediaCentral server. See the Avid
MediaCentral ReadMe for a list of supported browsers.
MediaCentral UX lets you use a single user name and password to access all Avid systems for which
your account is configured. A journalist might have access to both an Avid iNEWS database and an
Interplay Production database, while a logger might have access only to an Interplay Production
database. MediaCentral UX credentials (user name and password) are created by a MediaCentral UX
administrator in the Users layout.
• Interplay MAM users must sign in with MediaCentral UX credentials that match credentials set
in the Interplay MAM system.
• iNEWS and Interplay Production users have the option of using MediaCentral UX credentials
that are different from their iNEWS and Interplay Production credentials.
The first time you sign in to MediaCentral UX, you must use MediaCentral UX credentials. You
are then given the option of using your MediaCentral UX credentials to sign in to iNEWS and
Interplay Production or to use different credentials. The credentials you use depend on the user
name and password that you can use to sign in directly to iNEWS or Interplay Production.
Supplying these credentials enable you to use only the MediaCentral UX user name and
password at future sign-ins.
Your iNEWS and Interplay Production credentials are set in the iNEWS or Interplay Production
sections of the User Settings dialog box, which you access from the Home menu. You can
change these credentials at any time.
(Chrome v44 and earlier only) After you supply your credentials for the first time, a dialog box asks
you if you want to use MOS plug-ins. See “Using Plug-ins and MOS Integration” on page 34.
(MediaCentral UX 2.4 and later) After you supply your credentials for the first time, a dialog box
asks you if you want to allow or block notifications from the MCS server. Click Allow or Block.You
can change this decision later. For more information, see “Showing Desktop Notifications from
Panes” on page 36.
To sign in to MediaCentral UX:
1. Open a supported browser and type the URL of your MediaCentral server.
The URL is the computer name of the server.
2. At the sign-in screen, type your user name and password.
3. Click Sign In, or press Enter or Return (Macintosh).
After a few moments, the MediaCentral UX application opens and displays the last layout that
you used.
nWhen you sign in to MediaCentral UX, you are automatically signed in to your iNEWS newsroom
computer system, your Interplay MAM system, your Interplay Production system, or all three. If,
however, the credentials for one of these integrated systems is inaccurate, you see a warning message
that states that the application is unable to authorize the sign-in name or password. If you receive
this message, click the link provided and verify your security settings.
Understanding Layouts and Panes
22
4. (Optional) If the layout you want is not displayed, select the one you want from the Layout
selector.
Left: Sign Out button. Right: Layout selector.
nEach MediaCentral UX user is assigned one or more roles by the MediaCentral UX administrator.
Each role is associated with one or more layouts. For more information about available layouts, see
“Working with Layouts” on page 25. For more information about roles, see the Avid
MediaCentral | UX Administration Guide.
To sign out:
tClick Sign Out in the menu bar.
Understanding Layouts and Panes
A layout is a set of panes and other controls that is installed as part of the MediaCentral UX Web
application. The size and location of the panes are set by default in each layout. Not all available
panes are displayed in each layout, but users can customize which panes are displayed, their sizes,
and where they are located in the window. For a list of installed layouts, see “Working with Layouts”
on page 25.
nUsing browser controls to change the size of the contents of the MediaCentral UX window (for
example, Ctrl + to enlarge the window and Ctrl – to reduce the window) is not supported. Using
these controls do not work consistently and slow down the application.
The following table describes the main panes.
Icon Pane Description Refer to...
Assets A pane that displays assets. These assets can
result from a search or from browsing. Assets
are displayed in a folder hierarchy, if
applicable to the assets displayed.
“The Assets Pane” on page 39
Assignments A pane that allows you to create and modify
assignments as part of a story-centric
workflow using Media Distribute or the Social
Media Hub.
“Using the Assignments Pane” on
page 387
Associations A pane that displays associations between
Interplay MAM assets.
“Working with Associations
(Interplay | MAM)” on page 344
Audio A pane that displays the controls for adjusting
the audio settings for media assets.
“The Audio Pane for Asset Mode and
Basic Sequences” on page 227
Closed
Captioning
A pane that displays the controls for dreating
and editing closed captions for a sequence.
“Working with Closed Captions in
MediaCentral | UX” on page 369
Distribution A pane for Media Distribute that allows you to
publish media packages to some platforms
Avid Media | Distribute User’s
Guide.
Understanding Layouts and Panes
23
Documents A pane that displays PDF documents. “Viewing PDF Documents” on
page 80
File Info A pane that displays the essence packages,
essences, and locations of an Interplay MAM
asset.
“The File Info Pane” on page 357
Help A pane that displays the help system. “Viewing MediaCentral | UX Help”
on page 38
Launch A pane from which you navigate to various
locations. This pane displays remote file
systems, local file systems, and other locations
for assets.
“The Launch Pane” on page 32
Logging A pane in which you can add metadata to
media. The functionality of the pane depends
on the type of asset loaded.
• For Interplay Production assets, you can
view and create markers (formerly called
the Markers pane)
• For Interplay MAM assets, you can
annotate and segment strata.
“The Logging Pane for
Interplay | Production Assets” on
page 296
“The Logging Pane (Interplay |
MAM)” on page 316
Maestro
Browser
A pane in which you can view and edit an Avid
Maestro graphics template.
“Working with Avid Maestro in
MediaCentral | UX” on page 471
Media A pane in which you can view and edit media
assets. The controls that are displayed depend
on the selected asset.
“The Media Pane” on page 191
Messages A pane that allows you to send messages and
media links to other MediaCentral UX users.
“Sharing MediaCentral | UX
Messages” on page 402
Metadata A pane that displays properties that are
associated with a selected asset in the Interplay
Production database or Interplay MAM
database.
“Viewing and Editing
Interplay | Production Metadata” on
page 50
“Viewing and Editing
Interplay | MAM Metadata” on
page 71
Packages A pane for Media Distribute users that you can
use to review and approve packages submitted
for publication. The pane also displays a
history of packages ready for publication and
already published, which allows you to search
all submitted and published packages.
Avid Media | Distribute User’s
Guide.
Process
Dashboard
A pane that lets you monitor processes for a
defined context.
“Working with Process Dashboards”
on page 439
Progress A pane in which you can monitor the progress
of background processes, such as send to
playback and sequence mixdowns.
“The Progress Pane” on page 417
Icon Pane Description Refer to...
Understanding Layouts and Panes
24
Project/Story A pane that displays the contents of a project,
its facets, and any associated stories. It can
only be opened from the Assets pane, and is
therefore not listed as part of the Panes menu.
“The Project/Story Pane” on page 84
Queue/Story A pane that displays the contents of a queue
with the contents of a selected story in the
queue, including the story form and any
production cues. It can only be opened from
the Assets pane, and is therefore not listed as
part of the Panes menu.
“The Queue/Story Pane” on page 87
Search A pane from which you can conduct a search.
This pane functions similarly to the Search bar
but includes criteria for advanced searches.
“The Search Pane” on page 266
Sequence A pane that includes the Sequence Timeline
and other controls that let you create and edit a
sequence.
“The Sequence Pane” on page 122
Social
Messages
A pane for Media Distribute users that lets you
create packages for publication to social media
sites.
Avid Media | Distribute User’s
Guide.
thePlatform A pane for Media Distribute users that lets you
create packages for publication to thePlatform
CMS
Avid Media | Distribute User’s
Guide.
Tasks A pane in which you can view and edit user
tasks of MAM processes created by you or
user tasks that have been assigned to you by
other users.
“The Tasks Pane” on page 457
Thumbnails A pane that displays small images of an asset
that is loaded in the Asset mode of the Media
pane.
“Viewing Interplay | Production
Thumbnails” on page 51
“Viewing Interplay | MAM
Thumbnails” on page 78
Web Story A pane for Media Distribute that lets you
create packages for publication to Web
Content Management Systems (CMS).
Avid Media | Distribute User’s
Guide.
Icon Pane Description Refer to...
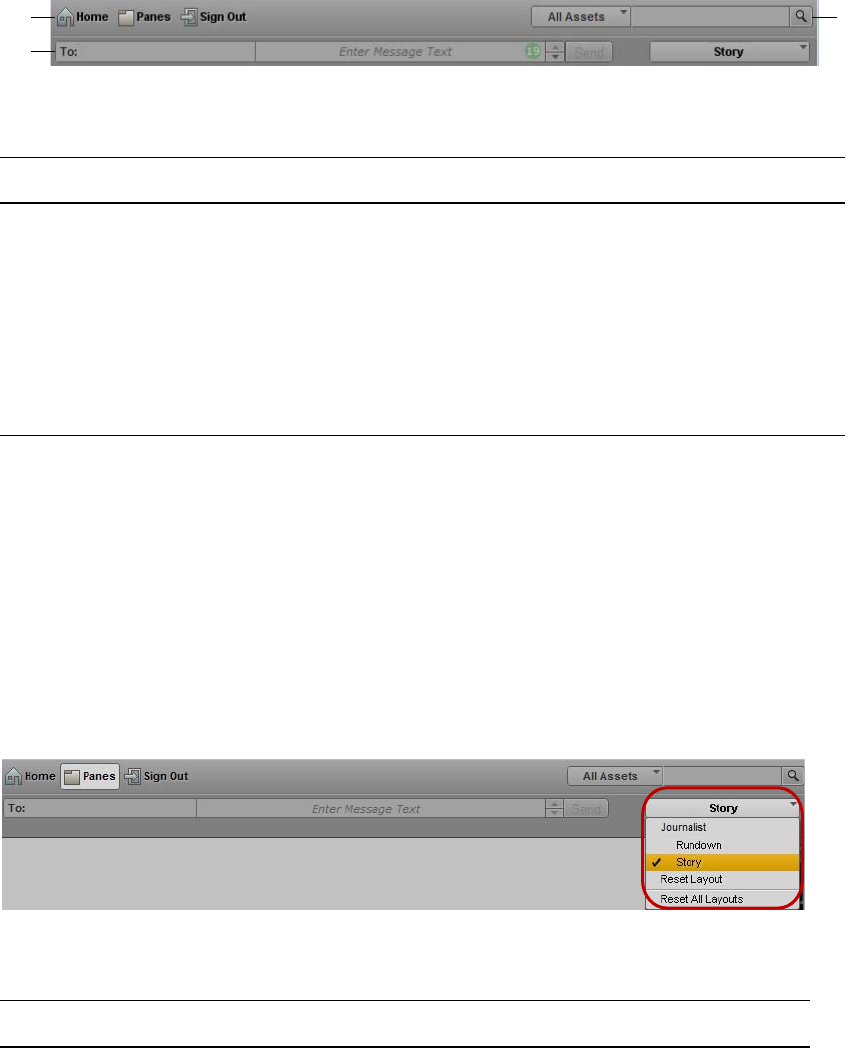
Understanding Layouts and Panes
25
In addition to the panes, the application layouts also feature bars that offer additional information,
options, and functionality.
The following table describes these bars.
Working with Layouts
The MediaCentral UX Web application is installed with predefined layouts. Not all available panes
are included in each layout, but you can open additional panes when you need them.
You select a layout from the Layout selector, located near the upper right corner of the window. The
menu shows the name of the layout that is currently displayed. If you click the menu, it shows the
name of the role or roles for the signed-in user, along with the layouts that are available for that role.
You can select any layout that is displayed.
The following illustration shows the default layouts available to the Journalist role.
The following table lists the layouts and which users have access to them.
qq
ww
ee
Bar Description Refer to...
1 Menu A section of the application that provides
numerous menu options.
“The Menu Bar” on page 32
2 Message A section of the application in which you can
send and receive messages.
“iNEWS Messaging” on page 409
3 Search A section of the application from which you can
conduct a search. The results of a search can be
dragged from the bar and placed in an area as a
pane for better viewing.
“The Search Bar” on page 265
Layout Description Available To
Assignment Desk Journalists use this layout to create, edit, and manage
their assignments, particularly through the Assignments
pane. For more information, see “Using the Assignments
Pane” on page 387.
All users, based on
role, if the
Assignments pane is
installed.
Cut Journalists, media loggers, and editors use this layout to
create sequences. By default the Sequence pane is
displayed horizontally.
All users, based on
role.

Understanding Layouts and Panes
26
To change to a different predefined layout:
tChoose the layout from the Layout selector.
nChanges that you make to a predefined layout are saved when you change to a different layout or
when you sign out.
To close a pane:
tClick the X on the pane’s tab.
To open additional panes:
1. Select the Panes menu.
2. Select the menu option corresponding to the pane you want to open.
The pane you select opens in the active area. For more information, see “Working with Areas and
Panes” on page 27.
To reset a layout to its original configuration:
tSelect Reset Layout from the Layout selector.
Media | Distribute Advance Journalists and Media Distribute Producers use
this layout to publish media packages to multiple delivery
platforms and services. For more information, see the
Avid Media | Distribute User’s Guide.
All users, based on
role, if Media
Distribute is installed.
Log Media loggers use this layout to add markers to clips and
to create subclips. For more information, see “Logging
Interplay | Production Assets and Creating Subclips” on
page 291.
All users, based on
role
Research Journalists use this layout to search and collect Interplay
MAM assets and edit basic sequences.
All users, based on
role
Rundown Journalists use this layout to edit and create stories. All users, based on
role
Story Journalists use this layout to edit and create stories that
include video and audio. By default the Sequence pane is
displayed vertically.
This layout is displayed the first time a user signs in. You
can switch to another layout at any time by selecting it
from the Layout selector.
All users, based on
role
System Settings Administrators use this layout to specify various
configuration settings. For more information, see
“Configuring System Settings” in the Avid
MediaCentral | UX Administration Guide.
Administrators only
Users Administrators use this layout to import, create, and
manage MediaCentral UX users.
For more information, see “Avid MediaCentral | UX User
Management” in the Avid MediaCentral | UX
Administration Guide.
Administrators only
Layout Description Available To
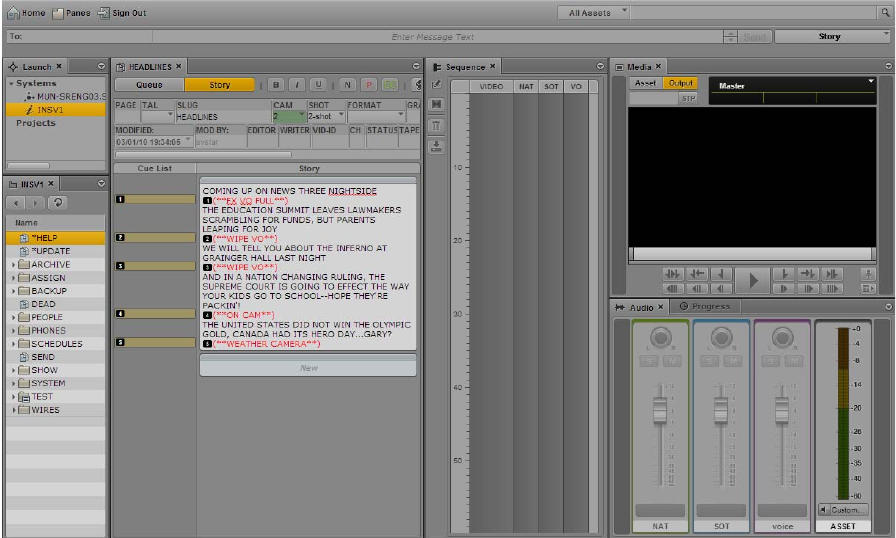
Understanding Layouts and Panes
27
To reset all layouts to their original default configurations:
tSelect Reset All Layouts from the Layout selector.
Working with Areas and Panes
You can customize MediaCentral UX by adjusting a layout’s areas and panes. A single area can
contain one or more panes. When an area contains more than one pane, the panes are displayed in a
tabular format, with one pane on top of the others.
The following illustration shows a typical Story layout. This layout is composed of six different areas
and seven different panes. The area in the lower right contains two panes.
2
34
5
6
1
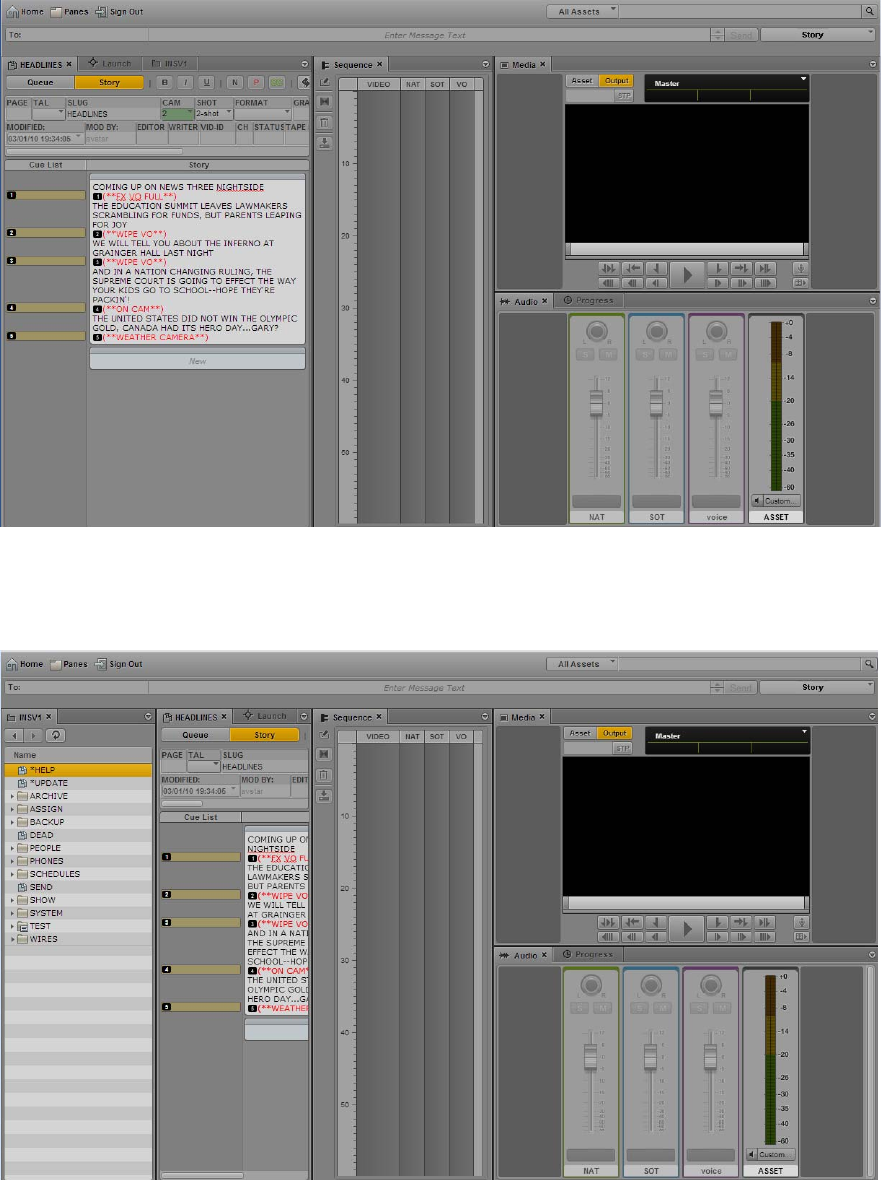
Understanding Layouts and Panes
28
One way to customize this layout is to combine two or more panes into one area, thus reducing the
number of areas and allowing more space for the remaining areas. In the following illustration, the
layout is composed of four areas and seven panes. The area on the left contains the Queue/Story
pane, the Launch pane, and an Assets pane.
You can also move a pane to create a new area. In the following illustration, the Assets pane was
moved to the left to create a new area.
1
12
4
3
1
12
5
4
3
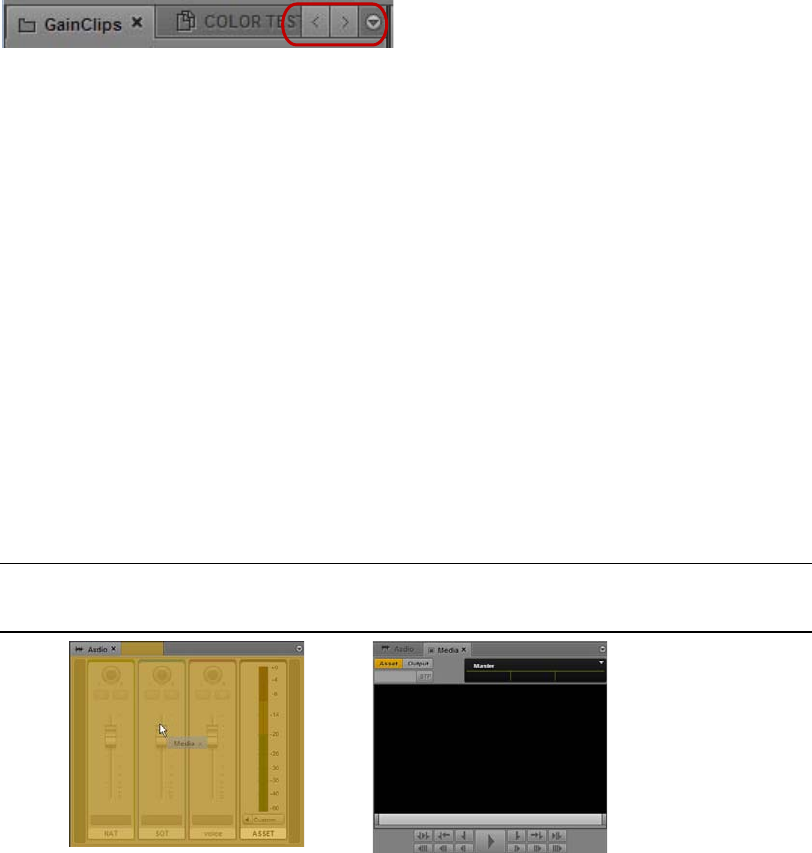
Understanding Layouts and Panes
29
If the number of tabbed panes within an area exceeds the area’s space within the browser window,
Right and Left Arrow buttons appear next to the Pane Menu button, enabling you to navigate through
all of the panes.
You can move panes to save screen space and reconfigure panes in a way that best suits your needs.
The application saves the last arrangement and displays it the next time you sign in to the application.
You move panes into what are called drop zones within an area. Each area has five drop zones: center,
top, bottom, left, and right.
To move a pane:
tClick the pane’s tab and drag it to a drop zone.
nDo not click the X in the pane’s tab unless you want to close the pane.
The drop zone is highlighted in orange to help you identify where the pane will be positioned
within the window when you release the mouse button.
The following illustrations demonstrate the process of dragging the Media pane to each drop
zone. In the illustrations, the Audio pane is already located in the area to which the Media pane is
being moved. If you drag the Media pane into the center drop zone, the two panes are displayed
as tabbed panes, with only one visible at a time. Dragging to the top or bottom drop zones splits
the area vertically. Dragging to the left or right drop zones splits the area horizontally.
Drop
Zone Position Result
Center
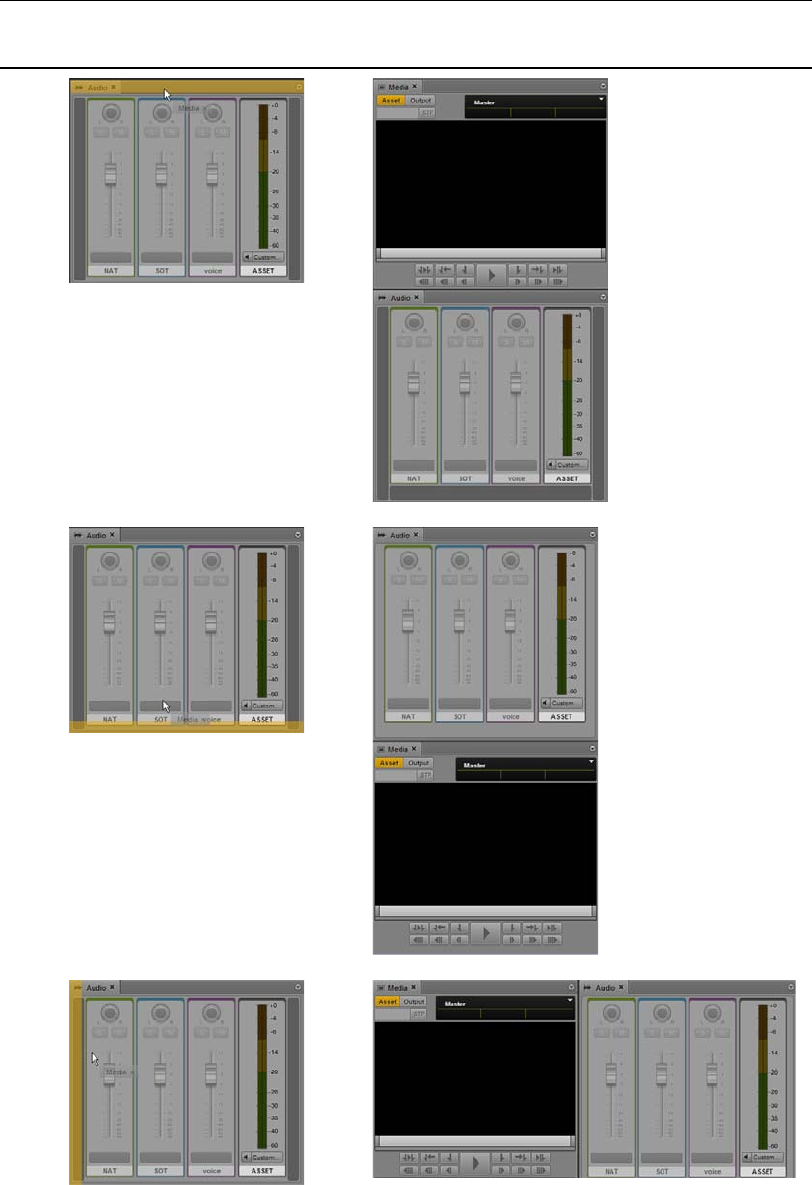
Understanding Layouts and Panes
30
Top
Bottom
Left
Drop
Zone Position Result
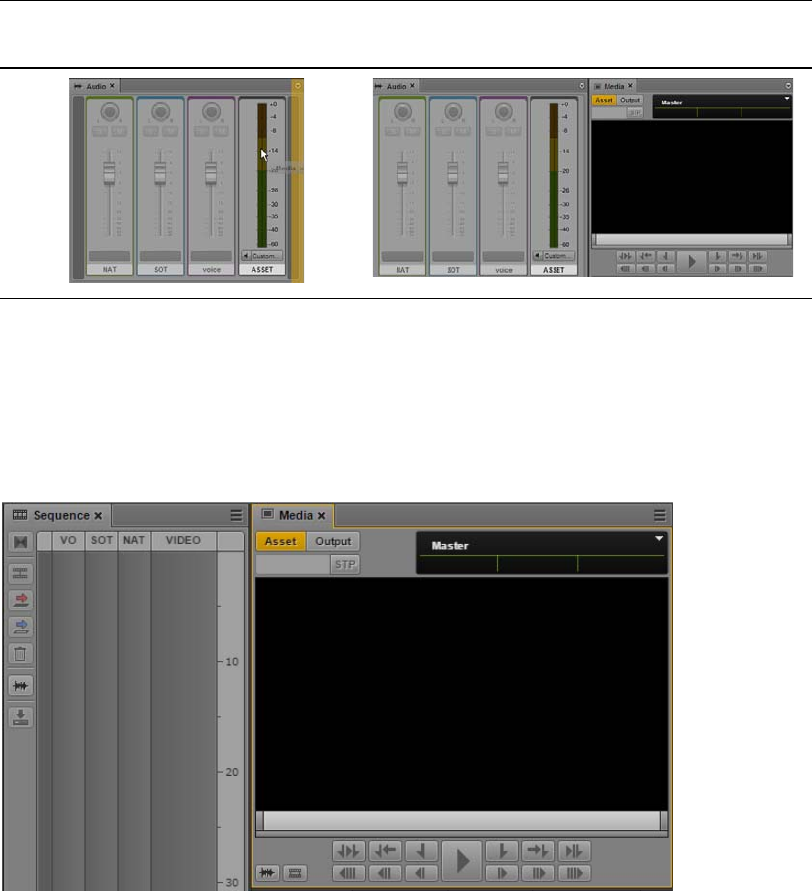
Understanding Layouts and Panes
31
Active Panes
An active pane (the pane with user focus) is outlined in orange.This feature helps you to know which
keyboard shortcuts are available, because some shortcuts are available only if a pane has focus. For
example, pressing the space bar controls playback only when the Media pane has focus. The
following illustration shows the Media pane outlined in orange to indicate focus.
Some panes have global shortcuts that work if another pane has focus. For example, Ctrl+space bar
controls playback when the Logging pane has focus. For more information, see “Keyboard
Shortcuts” on page 590.
Right
Drop
Zone Position Result
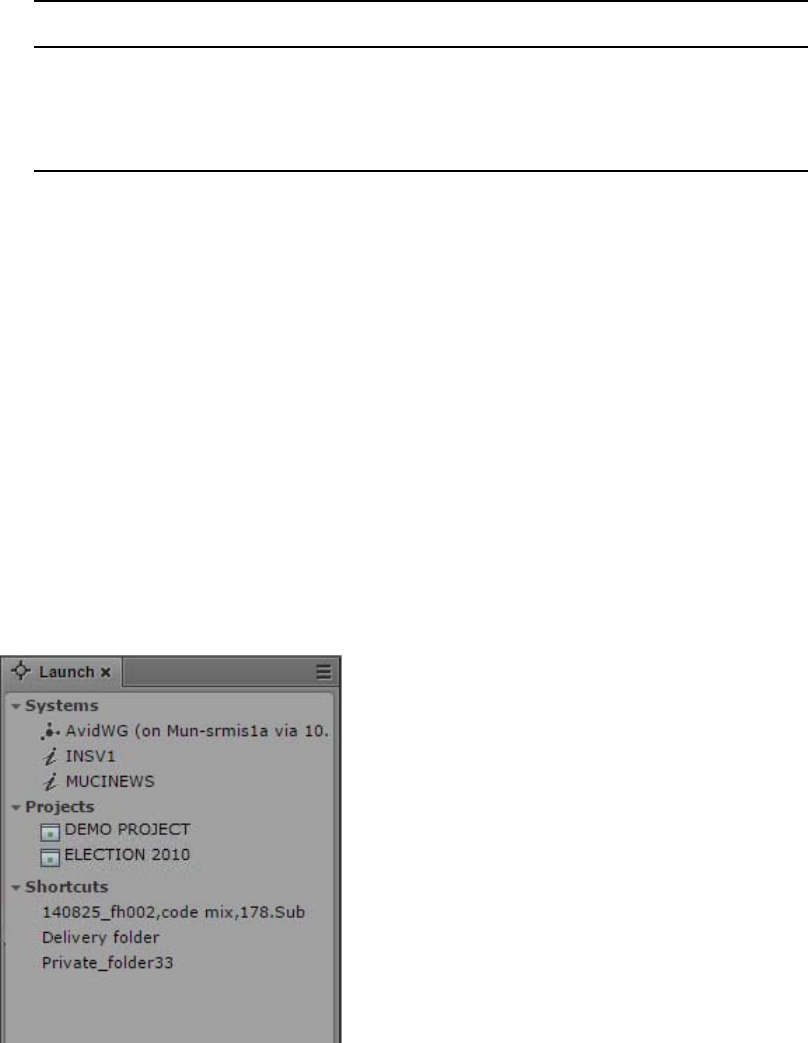
Understanding Layouts and Panes
32
The Menu Bar
The application’s menu bar includes the following menus:
•Home
• Panes
This menu lists the panes that you can open in the selected layout. For a list of these main panes,
see “Understanding Layouts and Panes” on page 22. You are only permitted one instance of
some panes within the user interface; however, you can open multiple instances of an Assets
pane or Search pane. If a single-instance pane is already opened, the option representing that
pane will appear grayed out in the Panes menu.
•Sign Out
Select Sign Out to leave the application and return to the sign-in screen.
The Launch Pane
The Launch pane lists the iNEWS system, Interplay MAM system, and Interplay Production system
that are available on the MediaCentral UX system. The Launch pane also includes any iNEWS
projects and iNEWS servers that are part of an iNEWS community. It also includes any shortcuts you
create. For information about creating shortcuts, see “Creating Shortcuts to Assets, Folders, and
Queues” on page 41.
Option Description
User Settings Opens the Settings dialog box with configuration options available for
modification to non-administrative users. For more information, see
“User Settings” on page 587.
About Opens a screen with information about the product
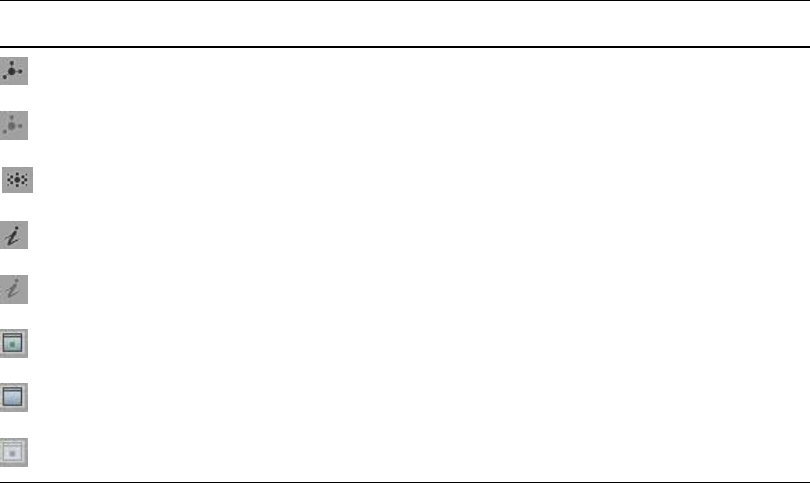
Adjusting Windows ClearType for MediaCentral | UX Fonts
33
Systems and projects are identified by the following icons.
Opening a system, such as an iNEWS newsroom computer system, Interplay MAM system, or
Interplay Production system, lets you view the contents of that system’s database in the Assets pane.
Opening an iNEWS project from the Launch pane lets you view each project’s contents in the Assets
pane.
To open a system or project from the Launch pane, do one of the following:
tDouble-click the item you want to open.
tRight-click the item and select “Open in New Assets Tab.”
For more information about assets and projects, see “Working with Assets” on page 39 and “Working
with Projects” on page 83. For more information about iNEWS communities, see “Support for
iNEWS Communities” on page 34.
Adjusting Windows ClearType for MediaCentral | UX
Fonts
MediaCentral | UX v2.7 introduced new fonts for better scaling across operating systems. On
Windows systems, you can run the ClearType Text Tuner to adjust the font for the best display on
your monitor.
To run the ClearType Text Tuner:
1. Open Windows Control Panel.
2. Click Fonts.
3. In the menu on the left side of the window, click “Adjust ClearType text.”
The ClearType Text Tuner window opens.
4. Select “Turn on ClearType” and click Next.
Icon Description
Connected Interplay Production system
Disconnected Interplay Production system
Connected Interplay MAM system
Connected iNEWS system
Disconnected iNEWS system
Project in the iNEWS database
iNEWS Project (not started)
iNEWS Project (expired)
Using Plug-ins and MOS Integration
34
5. Follow the steps in the wizard to adjust the font to your preference.
Using Plug-ins and MOS Integration
MediaCentral UX v2.4 and later provides support for MOS Active-X plug-ins through the
MediaCentral UX Desktop. Deko Select is an example of a MOS plug-in for a newsroom computer
system’s interface. It allows a user, such as a reporter, to drag and drop graphic templates directly into
the story. Other plug-ins are available through third-party manufacturers.
These plug-ins are specific to iNEWS workflows. Plug-ins can be used in the Cut, Log, Rundown,
and Story layouts.
MediaCentral | UX Desktop is a client application capable of replacing a traditional web browser as
an access portal to MediaCentral UX. Because Chrome v45 has removed support for NPAPI, this
application allows customers that rely on MOS plug-ins for MediaCentral UX to continue to operate
as normal. For more information see the MediaCentral Platform Services Installation and
Configuration Guide.
The following procedures apply only if you are using Chrome v44 or earlier.
Enabling MOS
To use plug-ins, you need to enable MOS in MediaCentral UX.
• If you are using a Chrome browser, the first time you sign in to MediaCentral, a dialog box asks
if you want to use MOS plug-ins. Click Yes.
• If you click No, you can later enable MOS through a user setting. Select Home > User Settings >
MOS and then select “MOS enabled.”
Installing Plug-Ins
For procedures on how to install plug-ins, see the documentation for the plug-in.
After installation and configuration, plug-ins are listed at the bottom of the Panes menu.
Support for iNEWS Communities
MediaCentral UX supports iNEWS communities. The iNEWS Community feature allows customers
with multiple iNEWS systems to share content and collaborate on stories. An iNEWS user can work
with content stored on any of the iNEWS systems in a community from a single iNEWS
Workstation. MediaCentral UX provides similar functionality.
MediaCentral UX requires you to supply credentials to sign in to one iNEWS system. This system is
considered your local system. If your local system is configured in an iNEWS community, you are
able to automatically sign in to other systems in the community. These systems are considered your
remote systems. In the Launch pane, your local iNEWS system is listed first, followed by the remote
systems. To connect to a remote system, double-click the system name.
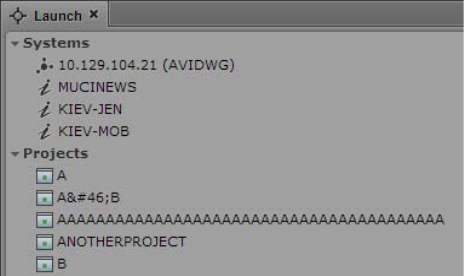
Support for iNEWS Communities
35
In the following illustration, MUCINEWS is the local system and KIEV-JEN and KIEV-MOB are the
remote systems.
Any projects listed are associated with your local system. You cannot show projects that are
associated with remote systems.
In MediaCentral UX, you can perform the following tasks on iNEWS remote systems:
• Browse stories in the Assets pane.
• Load queues in the Queue/Story pane.
• Display stories in the Queue/Story pane.
• Create and edit stories.
• Copy production cues from a story on one iNEWS system to a story on another.
• Search a selected remote system.
nWhen searching an iNEWS database, you can simultaneously search multiple indexed queues.
However, you can only choose one non-indexed queue path at a time. Attempts to choose more than
one result in an invalid selection error message.
• Display and play sequences associated with a story if the sequence is stored in the Interplay
Production database configured with the MediaCentral UX system you are signed in to.
In other words, if you load a story from a remote system that is associated with a sequence, then
click the Open Sequence button, the associated sequence will open if it is stored in the Interplay
Production database listed in the Launch pane. You can then edit and save the sequence.
If you load a story from a remote system, but the associated sequence is stored in a different
Interplay Production database, you cannot view, play, or edit the sequence. If you click the Open
Sequence button, a message tells you that the “mob_id cannot be resolved.” (A mob ID is a
software object that identifies the sequence).
cDo not edit a story after you receive the message that the mob ID cannot be resolved. There is a
risk of data loss if you remove or modify the existing attached mob ID information
• Float stories so that they remain in the queue but do not appear in the rundown.
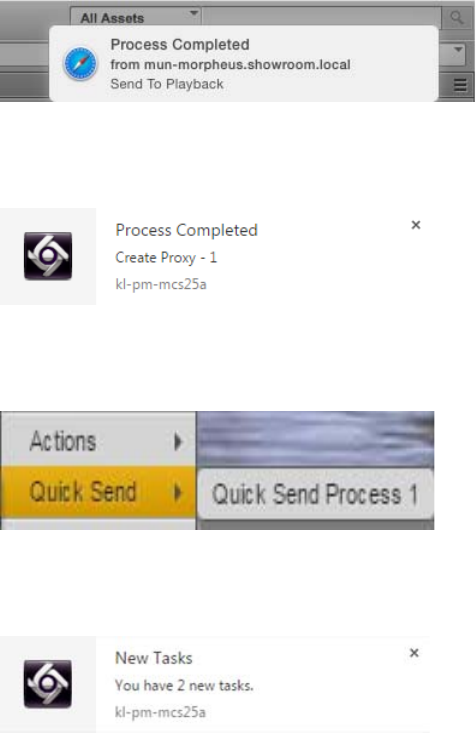
Showing Desktop Notifications from Panes
36
Limitation for MOS Placeholder and Project Bucket Features
MediaCentral UX checks if the iNEWS server supports the MOS placeholder and project bucket
features. These features were added in iNEWS 4.0.0, but the check only succeeds with iNEWS server
versions 4.0.3 and later. For this reason, MediaCentral UX only enables workflows using MOS
placeholders and project bucket features in iNEWS 4.0.3 and later.
Showing Desktop Notifications from Panes
Notifications from panes can be shown as browser alerts. This is useful if the browser running
MediaCentral UX is minimized or hidden by other windows. Notifications are shown for the
following:
• Jobs listed in the Progress pane (Interplay Production)
• Processes listed in the Progress pane (Interplay MAM): When a process is completed or has
failed, a notification is shown.
• Quick Send processes (Interplay MAM): When a Quick Send process is started, a notification is
shown.
• Tasks listed in the Tasks pane (Interplay MAM): If the signed-in user has new tasks in his task
list and the Tasks pane is open but hidden, a notification is shown.
• Messages received in the Messages pane. Click the notification to display the Messages pane.
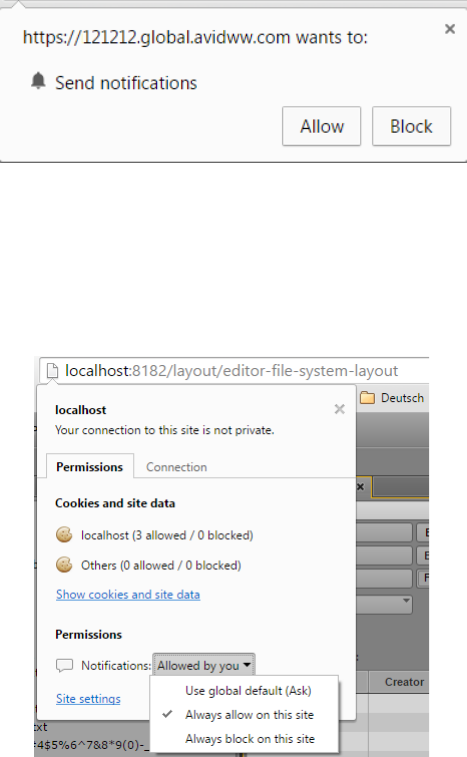
Showing Desktop Notifications from Panes
37
The first time you start MediaCentral UX after the initial installation, you see a message box that
asks you if you want to allow or block notifications from the MCS server. Click Allow or Block.
Depending on your initial selection, you can later allow or block these notifications through your
browser settings.
To allow or block notifications in Chrome:
1. Click the file icon in the URL bar.
2. Click the Permissions tab.
3. In the Permissions section, select one of the following options from the Notifications menu:
- Always allow on this site
- Always block on this site
To allow or block notifications in Safari:
1. Select Preferences from the Safari menu.
2. Click Notifications.
3. For the MCS server, select Allow or Deny.
An administrator can disable this feature for all users of an MCS server by adding the following line
to the application.properties file:
system.client.desktopNotifications.enabled=false
Viewing MediaCentral | UX Help
38
For information about the application.properties file, see the MediaCentral Platform Services
Installation and Configuration Guide.
Viewing MediaCentral | UX Help
The Help system for MediaCentral UX combines the contents of the following documents:
•Avid MediaCentral | UX User’s Guide
•Avid MediaCentral | UX Administration Guide
•Media | Distribute User’s Guide.
You can view help related to a specific pane. For example, if you want to know more about the Media
pane and the controls available within the pane, you can view that information by opening that
portion of the Help system through the Pane Menu button. You can also open the Help system to the
Contents page and use the Contents, Index, or Search to find specific information.
To access a Help topic related to a specific pane:
1. Click the Pane Menu button.
2. Select Help.
You can click the Contents, Index, or Search button to find other information.
To open the Help system to the Contents page:
tSelect Panes > Help.

2Working with Assets
The following main topics describe the Assets pane and how you can work with various assets in
MediaCentral UX.
•The Assets Pane
•Working with News Assets
•Working with Interplay | Production Assets
•Working with Interplay | MAM Assets
See also “Working with Remote Assets (Interplay Production)” on page 208.
The Assets Pane
Assets are items that are stored in a database, such as stories, scripts, video clips, and audio clips.
From the Assets pane, you can view assets for items that are contained in the Launch pane. For
example, if you double-click the name of an iNEWS system in the Launch pane, the Assets pane
displays the contents of the iNEWS database.
After you sign in to MediaCentral UX, an empty pane labeled Assets is displayed in one of the
application areas. After you open a system or project, the label of the Assets pane changes to reflect
your selection, and you can browse the database or work with the assets that are displayed. You can
also open multiple Assets panes, which appear as multiple tabbed panes within an application area.
The options you have for working with assets depends on the type of asset you select.
The following topics describe working with different types of assets:
•“Navigating in the Assets Pane” on page 40
•“Creating Shortcuts to Assets, Folders, and Queues” on page 41
•“Working with News Assets” on page 42
•“Working with Interplay | Production Assets” on page 44
•“Working with Interplay | MAM Assets” on page 55
To display assets in an Assets pane:
tDouble-click an item in the Launch pane.
The following illustration shows the Interplay Production database selected in the Launch pane
and its contents opened in the Assets pane below. The name of the highlighted system appears in
the Asset pane’s tab.

The Assets Pane
40
To open an additional Assets pane, do one of the following:
tSelect Panes > Assets.
tRight-click an item in the Launch pane and select Open in New Assets Tab.
The new pane is displayed next to a previously opened Assets pane.
If you closed the last open Assets pane, the new pane is displayed in an existing area.
To close an Assets pane:
tClick the Close button on the Asset pane’s tab.
nTo ensure the Assets pane has focus, click an item in the pane, not an empty area of the pane.
Navigating in the Assets Pane
As you browse through a database, the history of your navigation is retained in views. You can use
the Back button or Forward button to display these views. You can also navigate to the next folder up
in the database hierarchy by using the Up button. The name that appears in the Assets pane’s tab
changes to reflect your location within the database you are viewing.
The following table lists the navigation buttons in the Assets pane.
Button Description
Up button displays the contents of the next folder up in the database hierarchy.
The button is inactive at the highest level of the hierarchy.
Back button toggles the current view to the previous view in the pane.
Forward button toggles the current view to the next view in the pane.
Refresh button refreshes the current view in the pane.
Close button closes the pane.

The Assets Pane
41
To expand a folder within the current view, do one of the following:
tClick the turn-down arrow to the left of a folder.
tPress the right arrow key.
To collapse a folder within the current view, do one of the following:
tClick the turn-down arrow to the left of a folder.
tPress the left arrow key.
To open a folder in a new view in the existing Assets pane:
tDouble-click a folder.
To display a view you already displayed:
tClick the Forward button or the Back button.
To navigate to a folder up in the database hierarchy:
tClick the Up button.
For a list of all keyboard shortcuts you can use in the Assets pane, see “Assets Pane Shortcuts” on
page 592.
Creating Shortcuts to Assets, Folders, and Queues
If you have specific assets, folders, or queues that you access often, you can create links for them and
display them in the Launch pane. Double-click the shortcut in the Launch pane and the item is
displayed in the Assets pane. You can create shortcuts for Interplay Production systems, Interplay
MAM systems, and iNEWS systems.
You can create shortcuts from the Assets pane or the Search results list. Right-click an asset, folder,
or queue and select Create Shortcut. In the Launch pane, right-click to rename or delete the shortcut.
You can reorder the shortcuts by dragging and dropping.
To create a shortcut to an asset, folder, or queue:
tIn the Assets pane or the Search results list, right-click an item and select Create Shortcut.
A link to the item is displayed in the Shortcuts section of the Launch pane.
Pane Menu button opens a menu providing various options, including opening the
help content related to the pane.
Button Description
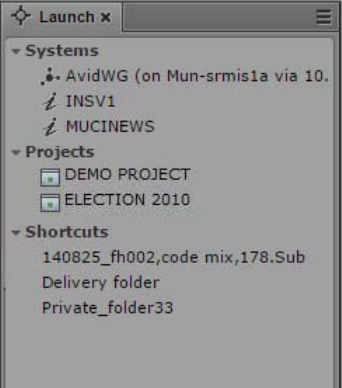
Working with News Assets
42
To rename the shortcut, do one of the following:
tRight-click the shortcut, select Rename Shortcut, type the new name, and press Enter.
tSelect the shortcut, press F2, type the new name, and press Enter.
tSelect the shortcut, click it again, type the new name, and press Enter.
To reorder shortcuts:
tClick a shortcut, drag it to a new location, and release the mouse button.
To delete a shortcut, do one of the following:
tRight-click the shortcut and select Delete Shortcut.
tSelect the shortcut, click the Pane menu, and select Delete Shortcut
tSelect the shortcut and press the Delete key.
A confirmation message asks if you want to delete the shortcut. Click Delete.
Working with News Assets
The following topics describe the iNEWS database as it is displayed in the Assets pane:
•Identifying iNEWS Directories, Queues, Projects, and Facets
•Navigating the iNEWS Database
Identifying iNEWS Directories, Queues, Projects, and Facets
The iNEWS database is a file structure that is organized by directories that contain subfolders or
queues, which in turn contain stories. Directories contained within other directories are known as
subfolders or subdirectories.
Projects are a way of categorizing stories by topic so that news teams working on a particular topic
can find everything related to it in a single place, without moving or copying original source
information within the database. Facets are sub-topics of projects that provide additional granularity.
Any stories associated to a facet are automatically associated to that facet’s parent project.
Working with News Assets
43
You can view the contents of an iNEWS database by choosing the iNEWS system in the Launch
pane. Likewise, Projects can also be opened from the Launch pane. Projects and iNEWS systems are
identified by the following icons.
After you double-click a system in the Launch pane, the database file structure with its directories
and queues is displayed in the Assets pane. If you double-click a project, any facets of the chosen
project are displayed in the Assets pane.
Different icons are used to identify queues, directories and facets in the Assets pane, as listed in the
following table.
Icon Description
Connected iNEWS system
Disconnected iNEWS system
Project in the iNEWS database
iNEWS Project (not started)
iNEWS Project (expired)
Icon Description
Directory or subfolder in the iNEWS database
Indexed directory or subfolder
Queue
Indexed Queue
Locked Queue
Indexed and Locked Queue
Facet
Facet (not started)
Facet (expired)
Working with Interplay | Production Assets
44
In addition to facets, each project also contains the following queues in the Assets pane:
Navigating the iNEWS Database
This topic provides procedures for viewing the database file structure by opening directories and
queues. For information about projects and facets, see “Working with Projects” on page 83.
The contents of directories are displayed in the Assets pane. The contents of queues are viewed in the
Queue/Story pane. For more information, see “The Queue/Story Pane” on page 87.
To open a directory:
tDouble-click the directory in the Assets pane.
This action opens the directory’s contents in the same pane. To return to the previous view of the
database file structure, click the Back button.
tClick the turn-down arrow to the left of the directory in the Assets pane.
This action expands the directory to show its contents while still retaining a view of the rest of
the database file structure. To close the directory, click the turn-down arrow again.
To open a queue:
tDouble-click the queue in the Assets pane.
The queue’s contents open in the Queue/Story pane.
Working with Interplay | Production Assets
An Interplay Production database holds media assets such as clips, subclips, sequences, and graphics.
You can browse the database in the Assets pane and display a media asset in the Media pane. You can
rename assets but you cannot delete them.
The following topics describe working with media assets:
•“Identifying Interplay | Production Systems and Media Assets” on page 45
•“Navigating the Interplay | Production Database” on page 45
•“Adding or Removing Property Columns” on page 46
•“Resizing Columns” on page 47
•“Moving Columns” on page 47
•“Moving or Copying Assets” on page 47
Icon Description
ALL queue - shows all stories associated with the project and its facets. These
stories do not actually reside in the ALL queue. Instead, they retain their original
source queue location and permissions.
QUERY Search Queue - shows results of a search conducted with criteria pre-
defined for the project in iNEWS. Each project can have only one search queue.
BUCKET queue - an indexed queue that acts as a repository for stories that do not
exist elsewhere in the iNEWS database. All stories that reside in a project’s
BUCKET queue will also appear in its ALL queue.
Working with Interplay | Production Assets
45
•“Moving or Copying Folders” on page 48
•“Duplicating Assets” on page 48
•“Renaming Assets” on page 49
•“Displaying or Hiding Referenced Assets” on page 49
•“Viewing and Editing Interplay | Production Metadata” on page 50
•“Viewing Interplay | Production Thumbnails” on page 51
•“Restoring an Asset from an Interplay Production Archive” on page 53
•“Working with Remote Assets (Interplay Production)” on page 208
Identifying Interplay | Production Systems and Media Assets
Different icons are used to identify Interplay Production assets and indicate status in the Assets pane.
For information about remote assets, see “Working with Remote Assets (Interplay Production)” on
page 208.
Navigating the Interplay | Production Database
The contents of folders in an Interplay Production system are displayed in the Assets pane. You can
double-click an asset to open it in the Media pane.
Icon Description Column
Audio asset Name
Video asset: master clip. Name
Video asset: subclip Name
Video asset: sequence Name
Video asset: in-progress clip (Edit While Capture or EWC) Name
Video asset: group clip Name
Video asset: effect Name
Remote asset: downward-pointing arrow for each asset type Name
Supported State
Reservation State
Restriction State
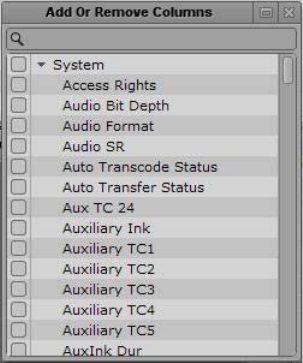
Working with Interplay | Production Assets
46
To open an Interplay Production folder:
tDouble-click the folder in the Assets pane.
This action opens the folder's contents in the same pane. To return to the previous view of the
database file structure, click the Back button.
tClick the turn-down arrow to the left of the folder in the Assets pane.
This action expands the directory to show its contents while still retaining a view of the rest of
the database file structure. To close the folder, click the turn-down arrow again.
To open an asset:
tDouble-click the asset.
The asset opens in the Media pane. If the asset is a sequence and the Sequence pane is open, the
asset is loaded in the Sequence Timeline. For more information, see “Working with Video
Media” on page 190 and “Using the Sequence Pane” on page 121.
Adding or Removing Property Columns
A set of property columns is shown when viewing media assets in the Assets pane. These columns
display metadata that is associated with assets in the Interplay Production database. You can select
other property columns to display. The columns that are available depend on the columns that are
available in a particular Interplay Production database.
To add or remove property columns:
1. Click the Pane Menu button in the top right corner of the Assets pane and select Add or Remove
Columns.
The Add Or Remove Columns window opens. The list is divided in System properties, User
(custom) properties, and Resolutions.
2. Select the columns you want to add or deselect the columns you want to remove.
You can use the search box to find a particular column.
3. Click the Close box or click anywhere outside the window to save your settings.
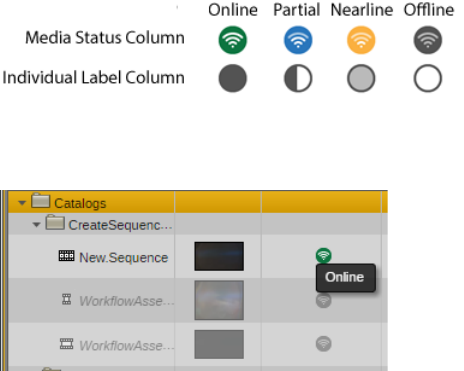
Working with Interplay | Production Assets
47
Resizing Columns
You can adjust the column width of any column displayed in the Assets pane.
To resize a column:
1. Position your mouse pointer over the dividing line between two columns.
The pointer changes to a bi-directional arrow when it hovers over the correct location.
2. Click and drag it right or left to adjust column width.
Moving Columns
You can rearrange the order of columns displayed in the Assets pane.
To move a column:
1. Click the header of the column you want to move.
2. Drag it right or left and release the mouse button when it is repositioned where you want it.
An orange line appears as a guide during the drag-and-drop process.
Media Status Icons
Starting with MediaCentral UX v2.10, for Interplay Production assets, the Media Status column and
individual label (resolution) columns display the status of assets using the following icons:
Hover over an icon to display a tool tip that describes the status.
Moving or Copying Assets
You can move or copy assets in the Interplay Production database by using the Cut, Copy, and Paste
commands.
To move an asset to another folder:
1. Select one or more assets.
2. Right-click and select Cut.
3. Select the folder into which you want to move the asset, right-click, and select Paste.
Working with Interplay | Production Assets
48
To copy an asset to another folder:
1. Select one or more assets.
2. Right-click and select Copy.
3. Select the folder into which you want to move the asset, right-click, and select Paste.
Moving or Copying Folders
You can move or copy folders in the Interplay Production database by using the Cut, Copy, and Paste
commands.
To move a folder to another folder:
1. Select one or more folders.
2. Right-click and select Cut.
3. Select the folder into which you want to move the folder, right-click, and select Paste.
The Move Folder message box opens.
4. Do one of the following:
tClick Yes to move the folder including its contents.
tClick No to keep the folder including its contents in its original location.
If you selected both a folder and individual assets, only the individual assets are moved.
tClick the X button to cancel the move operation.
To copy a folder to another folder:
1. Select one or more folders.
2. Right-click and select Copy.
3. Select the folder into which you want to copy the folder, right-click, and select Paste.
The Copy Folder message box opens.
4. Do one of the following:
tClick Yes to copy the folder including its contents.
tClick No to keep the folder including its contents in its original location.
If you selected both a folder and individual assets, only the individual assets are copied.
tClick the X button to cancel the copy operation.
Duplicating Assets
Duplicating an asset in the Interplay Production database creates a new asset, with new metadata
(MobID). You can duplicate master clips, subclips, audio-only clips, and sequences.
To duplicate an asset, do one of the following:
tRight-click the asset you want to duplicate and select Duplicate.
tSelect the asset you want to duplicate, click the Pane Menu button, and select Duplicate.
A new asset is created in the same folder as the original asset, with the extension .duplicate. The
name is highlighted in edit mode so that you can easily rename it.
Working with Interplay | Production Assets
49
Renaming Assets
You can rename clips and other assets in the Interplay Production database.
To rename an asset, do one of the following:
tSelect the asset, click the name of the asset, and type the new name.
tSelect the asset, press F2 (Windows) or Enter (Macintosh), and type the new name.
Creating a New Folder
You can create a new folder in the Interplay Production database. Your ability to create a new folder
depends on Interplay Production rules. For example, the credentials you use to sign in to the Interplay
Production database must allow creation of folders.
For more information, see the Interplay | Access User’s Guide or your Interplay Production
administrator.
To create a new folder in the Interplay Production database:
1. In the Assets tab, select a folder.
nThe new folder is added as sibling or subfolder depending on the control you use.
2. Do one of the following:
tTo create a sibling of the selected folder, click the Pane Menu button and select Create
Folder.
tTo create a subfolder within the selected folder, right-click the folder and select Create
Folder.
A new folder is created with the name New.Folder. If there is already a folder named New.Folder,
.01 is appended to the folder name, and incremented for each unnamed new folder
(New.Folder.02, and so on).
3. Do one of the following to rename the folder:
tSelect the folder, click the name of the folder, and type the new name.
tSelect the folder, press F2 (Windows) or Enter (Macintosh), and type the new name.
nIn releases prior to MediaCentral UX v2.9, the only way to create a subfolder for Interplay
Production assets was by navigating into a folder and creating a sibling folder.
Displaying or Hiding Referenced Assets
Referenced assets are assets that are referenced by another asset in the same Interplay Production
folder, such as clips that are included in a sequence. You have the option of displaying or hiding
referenced assets through a user setting. The default is to hide referenced assets.
To display or hide referenced assets:
1. Select Home > User Settings.
2. Click Interplay Production.
3. In the Referenced Assets section, select “Show referenced assets” to display referenced assets.
Clear the check box to hide referenced assets.
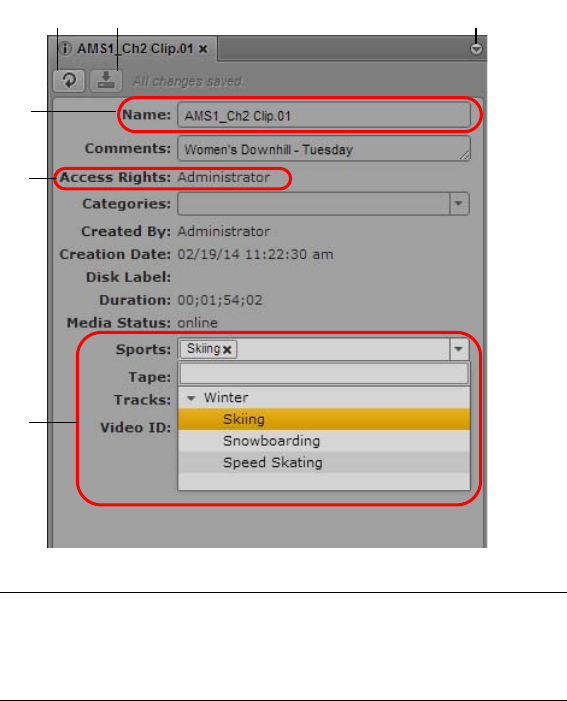
Working with Interplay | Production Assets
50
Viewing and Editing Interplay | Production Metadata
The Metadata pane displays properties that are associated with a selected asset in the Interplay
Production database, such as Comments or Creation date. Some properties are created automatically
and others you can create or edit manually. In the Metadata pane, if a property is editable, a text box
or drop-down menu is displayed.
The properties that are displayed in the Metadata pane are determined by settings in the Property
Layout view in the Interplay Administrator application. An administrator can select both system
properties and custom properties as follows:
• On the System Properties tab, select items in the Inspector Default column.
• On the Custom Metadata tab, select items in the Inspector Default column.
A user must have write permission on an asset to add an identifier to an asset.
For information on system and custom properties, and assigning permissions, see the
Interplay | Engine and Interplay | Archive Engine Administration Guide.
Note the following:
• You can cut, copy, and paste text between the Metadata pane and other applications.
• You can use the Tab key to move to the next editable text box or use Shift+Tab to move to the
previous text box.
qqww
qr
qt
qy
ee
1Refresh button 4Editable text box
2Save button 5Non-editable field
3Pane Menu button 6Custom property drop-down menu
Working with Interplay | Production Assets
51
• Text is limited to 32,000 characters.
• The following characters are not valid for text in the Metadata pane:
- Interplay Production asset names: / \ | Enter
- Interplay Production folder names: * ? : / \ " < > | Enter
If you try to save information that includes an invalid character, an error message is displayed.
nYou can also display database properties in an Assets tab (see “Adding or Removing Property
Columns” on page 46). In an Assets tab, you can display any property from the database, but you
cannot edit a property.
To open the Metadata pane:
tSelect Metadata from the Panes menu.
To view properties of an asset:
tDouble-click an asset in the Assets pane.
To edit properties of an asset:
1. Click in a text box and enter text, or select an entry from a drop-down list.
If you select from a drop-down list and type a letter, MediaCentral UX filters the list to all
properties starting with that letter. As you continue to type, MediaCentral UX continues to filter
the list according to the letters you type.
If you misspell a word in a text field, a wavy red line marks the misspelled word. You can right-
click the word and open the browser’s spell-checker options. This feature is available for both
Chrome and Safari browsers.
You can insert line breaks in a text box, such as the Comments box. However, line breaks are not
supported when viewing metadata in Interplay Access or Media Composer. If the property is
saved in Interplay Access, it is saved as a single line and is shown as a single line in
MediaCentral UX.
2. Click the Save button, or click the Pane menu and select Save.
To discard your changes, click the Refresh button, load a different asset, or close the Metadata
pane.
To update the information displayed:
tClick the Refresh button.
Viewing Interplay | Production Thumbnails
The Thumbnails pane lets you display a series of small images of an asset (thumbnails). Viewing and
double-clicking thumbnails can help you navigate through source clips and markers more quickly.
You can view thumbnails in the following arrangements:
• Time-based: Shows the first frame of the asset, the last frame of the asset, and a frame at the
frequency that you choose. Use the slider to select one of the following frequencies:
- one frame every 10 seconds (default setting)
- one frame every 1 minute
- one frame every 5 minutes
- one frame every 10 minutes
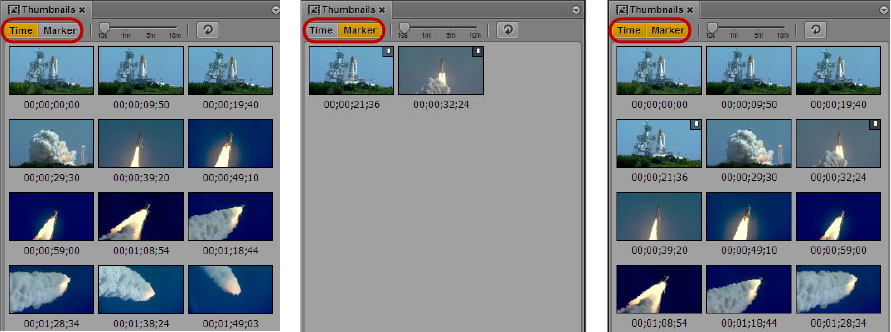
Working with Interplay | Production Assets
52
This setting persists from one session to another. The exact frame displayed depends on the type
of timecode (drop-frame, non-drop frame, 24 fps, and so on). Timecodes are displayed beneath
each thumbnail, reflecting the timecode display that is set in the Media pane: Master, Absolute,
or Remain.
• Marker-based: Shows any frame with one or more markers. A frame with a marker is indicated
by a marker in the upper right corner of the thumbnail.
• Both time-based and marker-based thumbnails.
The following illustrations show each of these arrangements: time-based, marker-based, and both.
Note the following:
• You can show thumbnails for master clips and subclips, and sequences when loaded in Asset
mode.
• You can view thumbnails for video clips, clips with video and audio, and audio-only clips.
• The size of the thumbnails depends on the aspect ratio selected in the Media pane. Changing the
aspect ratio changes the size of the thumbnails.
• You can show thumbnails for group clips. The thumbnails reflect the grid selected in the Media
pane: 1x1, 2x2, or 3x3.
• Currently, you cannot adjust the size of the thumbnails.
• You can view thumbnails for a clip that is ingesting (edit-while-capture) after it is checked into
the Interplay Production database (approximately every two minutes). Click the Refresh button
to update the display.
nSupport for edit-while-capture (EWC) is qualified only for Avid AirSpeed Multi Stream and AS5000
systems.
• Click the Refresh button to update the display for changes to the asset, for example, if you add or
delete a marker.
nThere is an option to turn off generation of thumbnails when the Thumbnails pane is hidden. See
“Disabling Background Thumbnail Generation” on page 53.
Working with Interplay | Production Assets
53
To view thumbnails:
1. Select Panes > Thumbnails.
If an asset is already loaded in Asset mode in the Media pane, thumbnails are displayed in the
Thumbnails pane.
2. In the Assets pane, do one of the following:
tDouble-click a master clip or subclip.
tRight-click a sequence and select Load in Asset Mode.
The asset is loaded in the Media viewer and thumbnails are displayed in the Thumbnail pane,
with timecode for each thumbnail below it. If the asset contains markers, a thumbnail is
displayed for each marker.
3. To show only time-based thumbnails, click the Marker button so that it is inactive. To show only
marker-based thumbnails, click the Time button so that it is inactive. If you want to show time-
based thumbnails, use the slider to select the frequency at which frames are displayed.
4. To navigate to a particular frame in the Media pane, double-click a thumbnail.
The position indicator in the Media Timeline jumps to the frame.
If the double-clicked thumbnail has a marker associated with it, the associated marker
information is highlighted in the Markers pane. If there is no marker associated with the
thumbnail, the nearest marker information is highlighted.
Disabling Background Thumbnail Generation
If the Thumbnails pane is open, MediaCentral UX continues to populate the pane with images if the
pane is in the background (open but hidden behind another pane).
To optimize performance, you can disable generation of thumbnails if the pane is in the background.
To disable background thumbnail generation:
1. Log into MediaCentral UX.
2. Select Home > User Settings.
3. In the list of Settings Groups, click Thumbnails.
4. By default, the option “Generate thumbnails in the background” is selected. To disable
background thumbnail generation, deselect the option.
5. Click Apply.
Restoring an Asset from an Interplay Production Archive
Starting with MediaCentral UX v2.5, you can perform an indexed search that includes an Interplay
Production Archive database. If you find that an asset and its media is archived, you can restore the
asset and its media to your local Interplay Production database. You can then play and edit the asset.
There are several scenarios in which an asset needs to be restored, for example:
• The asset and its media does not exist on the local Interplay Production system.
• The asset exists on the local Interplay Production system, but the media is archived.
• The asset and low-res media exist on the local Interplay Production system, but the high-res
media is archived.
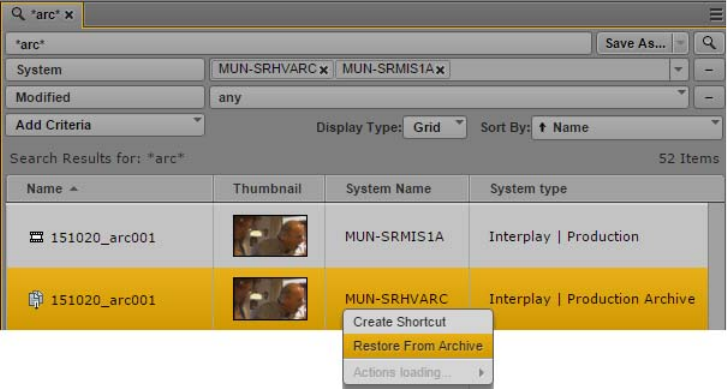
Working with Interplay | Production Assets
54
To restore an asset in MediaCentral UX, the following are required:
• Your Interplay Production workgroup must be properly configured with the Interplay Restore
service. The workgroup must also have the appropriate Interplay Restore templates available.
Templates determine the destination server, the target video quality, and other options. For more
information, see the Interplay Production Services Setup and User’s Guide.
• Your MediaCentral Platform server must be configured to perform an indexed search, and an
Interplay Production Archive system must be available as a remote zone. For information on
configuring Media Index, see the Avid Media | Index Configuration Guide. For information on
how to perform an indexed search, see “Searching for Assets” on page 261.
If you know that an asset is archived, you can improve search time by selecting the Interplay
Production Archive system as a system criterion.
The following illustration shows the result of a search of both a local Interplay Production
system and an Interplay Production Archive system. The highlighted asset is stored on the
archive system. You can right-click the asset, and select Restore From Archive.
If you try to play an archived asset that does not have media on the local Interplay Production server,
the following error message is displayed: “Asset not found in Interplay database.”
Note the following:
• You can restore only one asset at a time. Multiple selection is not supported.
• The metadata that is displayed in the search results list depends on how the MediaCentral
administrator set up the indexed search. If markers are indexed they will be displayed in the
search results under “Time-Based Metadata.”
• No content is shown in the Metadata pane or the Logging pane.
To restore an asset from an Interplay Production archive:
1. Perform an indexed search.
2. In the results list, right-click an asset and select Restore from Archive.
The Restore From Archive dialog box is displayed.
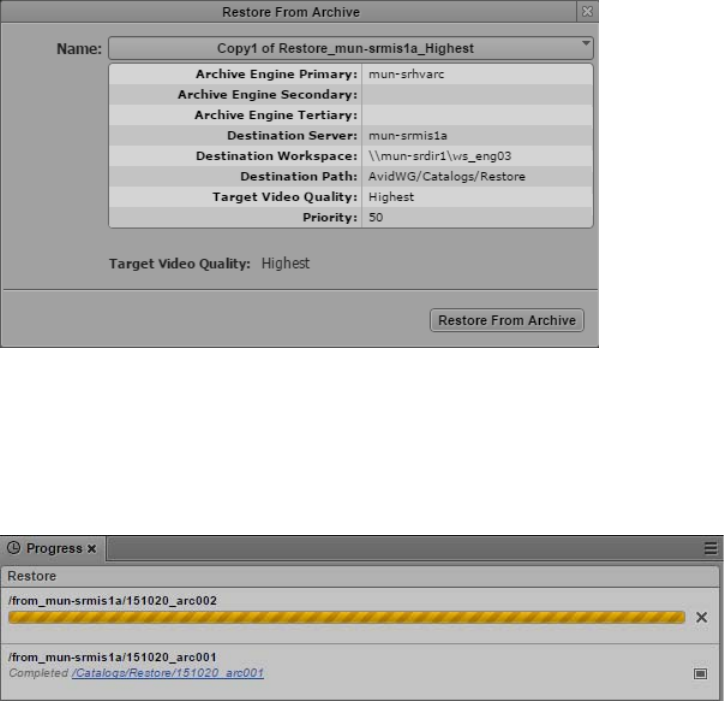
Working with Interplay | MAM Assets
55
3. Select a profile from the Name menu.
Profiles are created by an Interplay Production administrator.
4. Click Restore From Archive.
The job request is sent. You can check the status of the job in the Progress pane.
5. When the job is complete, you can play the asset in the Media viewer.
Working with Interplay | MAM Assets
An Interplay MAM database holds media assets such as video and audio assets, basic sequences, and
graphics. The Interplay MAM Workspace allows you to carry out many aspects of day-to-day work
with these assets by mapping tasks to a tree structure. The Workspace is displayed as a set of folders
that contain references to media assets in the MAM database. For example, you save sequences or
references to video assets to a folder. This allows you to access the media assets directly at a later
date — in other words, you do not need to search for them again.
The Assets pane gives you access to the Workspace of any connected Interplay MAM system. You
can see all folders that are released to you and browse and edit the folder structure in the Assets pane.
You can add, rename, and delete asset references, view and edit asset metadata, and create basic
sequences and initiate processes for assets in the Assets pane.
The following topics describe working with MAM assets:
•“Navigating the Interplay | MAM Workspace” on page 56
•“Identifying Interplay | MAM Media Assets” on page 57
•“Creating a New Folder” on page 59
•“Moving a Folder” on page 59
Working with Interplay | MAM Assets
56
•“Renaming a Folder” on page 59
•“Deleting a Folder” on page 60
•“Creating Assets” on page 61
•“Adding Assets to a Folder” on page 66
•“Triggering the Rights Evaluation for a Basic Sequence” on page 66
•“Duplicating a Basic Sequence” on page 67
•“Moving or Copying Assets” on page 68
•“Renaming Asset References” on page 68
•“Removing Asset References” on page 69
•“Deleting Assets and Basic Sequences” on page 69
•“Viewing and Editing Interplay | MAM Metadata” on page 71
•“Viewing Interplay | MAM Thumbnails” on page 78
•“Viewing PDF Documents” on page 80
•“Creating an Interplay | MAM Sequence” on page 139
•“Working with Associations (Interplay | MAM)” on page 344
•“Creating Processes” on page 431
Navigating the Interplay | MAM Workspace
The contents of released folders in an Interplay MAM Workspace are displayed in the Assets pane.
You can double-click an asset to open it in any pane that supports displaying aspects of that asset.
To open an Interplay MAM folder:
tDouble-click the folder in the Assets pane.
This action opens the folder's contents in the same pane. To return to the previous view of the
Workspace file structure, click the Back button.
tClick the turn-down arrow to the left of the folder in the Assets pane.
This action expands the directory to show its contents while still retaining a view of the rest of
the Workspace file structure. To close the folder, click the turn-down arrow again.
To open an asset:
tDouble-click the asset.
The asset opens in the Media pane. If the panes are open, the asset opens also in the Logging,
Metadata, and Thumbnails pane and its associations are shown in the Associations pane. If the
asset is a basic sequence and the Sequence pane is open, the asset is loaded in the Sequence
Timeline.
For more information, see the following topics:
-“Viewing and Editing Interplay | MAM Metadata” on page 71
-“Viewing Interplay | MAM Thumbnails” on page 78
-“Working with Video Media” on page 190
-“Using the Sequence Pane” on page 121
-“Logging Interplay | MAM Assets” on page 313
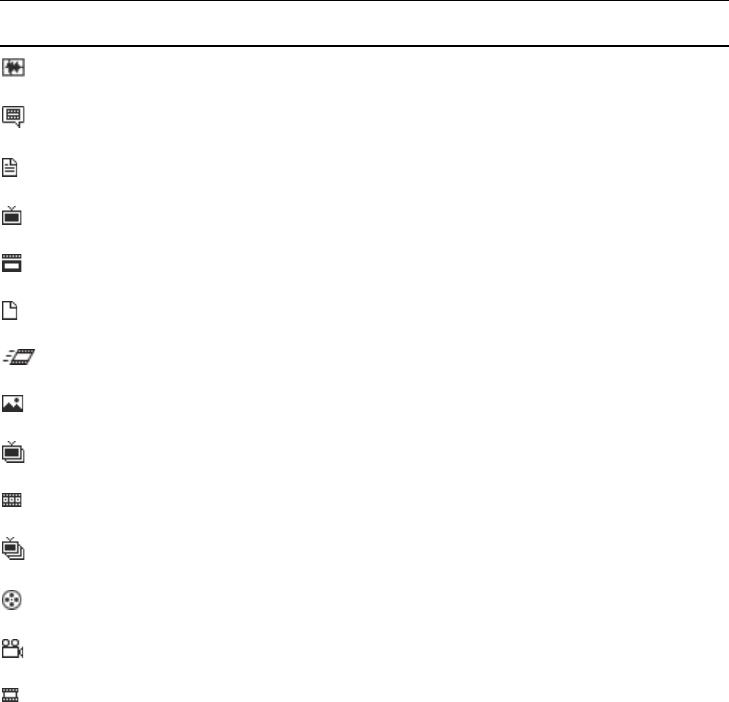
Working with Interplay | MAM Assets
57
-“Working with Associations (Interplay | MAM)” on page 344
To open a basic sequence in Asset mode:
1. Select the sequence.
2. Do one of the following:
tRight-click the sequence and select Open in Asset Mode.
tClick the Pane Menu button, and select Open in Asset Mode.
The sequence opens in Asset mode in the Media pane.
For more information, see “Using a Basic Sequence as a Source for a Sequence (Interplay |
MAM)” on page 171.
Identifying Interplay | MAM Media Assets
A set of property columns are shown when viewing MAM assets in the Assets pane. These columns
display metadata that is associated with assets in the Interplay MAM database. The following
columns are available for MAM assets: Name, Thumbnail, Type, and Rights.
Different icons are used to identify Interplay MAM assets and indicate rights in the Assets pane.
Depending on the installed Interplay MAM package you might see additional icons.
Icon Description Column
Audio asset Name
Commercial or Commercial Version asset Name
Document asset Name
Episode or Episode Version asset Name
Feature or Feature Version asset Name
File asset or Default placeholder icon Name
Graphics asset Name
Image asset Name
Season asset Name
Sequence asset (audio or video) Name
Series asset Name
Stock Footage asset Name
Trailer asset Name
Video or Rushes asset Name
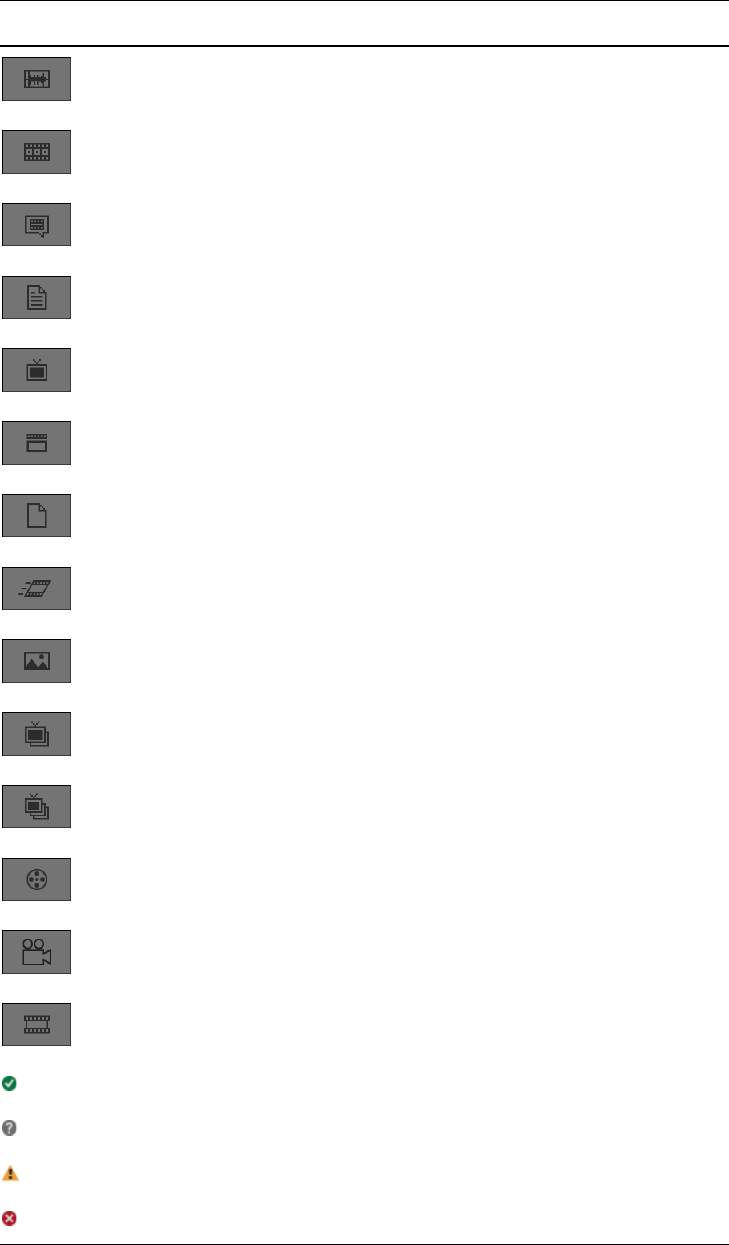
Working with Interplay | MAM Assets
58
Audio asset placeholder icon. Is shown until a specific image
is assigned as a thumbnail.
Thumbnail
Basic Sequence asset placeholder icon. Thumbnail
Commercial or Commercial Version asset placeholder icon. Is
shown until a specific image is assigned as a thumbnail.
Thumbnail
Document asset placeholder icon. Is shown until a specific
image is assigned as a thumbnail.
Thumbnail
Episode or Episode Version asset placeholder icon. Is shown
until a specific image is assigned as a thumbnail.
Thumbnail
Feature or Feature Version asset placeholder icon. Is shown
until a specific image is assigned as a thumbnail.
Thumbnail
File asset or Default placeholder icon. Is shown until a
specific image is assigned as a thumbnail.
Thumbnail
Graphics asset placeholder icon. Is shown until a specific
image is assigned as a thumbnail.
Thumbnail
Image asset placeholder icon. Is shown until a specific image
is assigned as a thumbnail.
Thumbnail
Season asset placeholder icon. Is shown until a specific image
is assigned as a thumbnail.
Thumbnail
Series asset placeholder icon. Is shown until a specific image
is assigned as a thumbnail.
Thumbnail
Stock Footage asset placeholder icon. Is shown until a
specific image is assigned as a thumbnail.
Thumbnail
Trailer asset placeholder icon. Is shown until a specific image
is assigned as a thumbnail
Thumbnail
Video or Rushes asset placeholder icon. Is shown until a
specific image is assigned as a thumbnail.
Thumbnail
Usage right “Free for use” Rights
Usage right “Not evaluated so far” Rights
Usage right “Parts need to be licensed” Rights
Usage right “Contains restricted parts” Rights
Icon Description Column
Working with Interplay | MAM Assets
59
Creating a New Folder
You can create new folders in the Interplay MAM Workspace. Your ability to create a new folder
depends on Interplay MAM rules. For example, the credentials you use to sign in to the Interplay
MAM database must allow creation of folders.
For more information, see the Interplay | MAM Desktop User’s Guide or Interplay | MAM User
Manager User’s Guide.
To create a new folder in the Interplay MAM Workspace:
1. In the Assets tab, select a folder.
nThe new folder is added as sibling or subfolder depending on the control you use.
2. Do one of the following:
tTo create a sibling of the selected folder, click the Pane Menu button and select Create
Folder.
tTo create a subfolder within the selected folder, right-click the folder and select Create
Folder.
A new folder is created with the name New.Folder. If there is already a folder named New.Folder,
.01 is appended to the folder name, and incremented for each unnamed new folder
(New.Folder.02, and so on).
3. Rename the folder. See “Renaming a Folder” on page 59.
Renaming a Folder
You can rename Interplay MAM Workspace folders in the Assets pane.
To rename a folder, do one of the following:
tSelect the folder, click the name of the folder, and type the new name.
tSelect the folder, press F2 (Windows) or Enter (Macintosh), and type the new name.
Moving a Folder
You can move folders with their contents in the Interplay MAM Workspace by using the Cut and
Paste commands or drag and drop. Note that you can move but cannot copy folders.
Your ability to move a folder depends on Interplay MAM rules: The folder permissions in Interplay
MAM Workspace must allow moving the selected folder and adding it to the target folder.
To move a folder to another folder by using commands:
1. Select one or more folders.
2. Do one of the following:
tClick the Pane Menu button and select Cut.
tRight-click and select Cut.
3. Select the folder into which you want to move the folder, right-click, and select Paste.
The Move Folder message box opens.
4. Do one of the following:
Working with Interplay | MAM Assets
60
tClick Yes to move the folder including its contents.
tClick No to keep the folder including its contents in its original location.
If you selected both a folder and individual assets, only the individual assets are moved.
tClick the X button to cancel the move operation.
To move a folder by using drag and drop:
1. Select one or more folders.
2. Drag the selection to the folder into which you want to move the folder.
The folder expands to show its contents and a green icon indicates if dropping is possible.
3. Release the mouse button.
The Move Folder message box opens.
4. Do one of the following:
tClick Yes to move the folder including its contents.
tClick No to keep the folder including its contents in its original location.
If you selected both a folder and individual assets, only the individual assets are moved.
tClick the X button to cancel the move operation.
Deleting a Folder
You can delete folders from Interplay MAM Workspace in the Assets pane. If you delete a folder, all
the references to media assets that it contains will also be deleted. Check whether you need the media
asset references contained in a folder before you delete it.
Your ability to delete a folder depends on Interplay MAM user privileges: the folder permissions in
Interplay MAM Workspace must allow the deletion of the selected folder. If the folder contains
subfolders, you also must have delete permission for each subfolder.
To delete folders:
1. Select one or more folders.
2. Do one of the following:
tRight-click and select Delete.
tClick the Pane Menu button and select Delete.
A security prompt opens.
3. Click Yes.
If your credentials allow deleting folders the folders are deleted.
If you are not authorized to delete some of the selected folders or folders at all a message opens.
After closing the message the folders that are released for deletion are deleted.
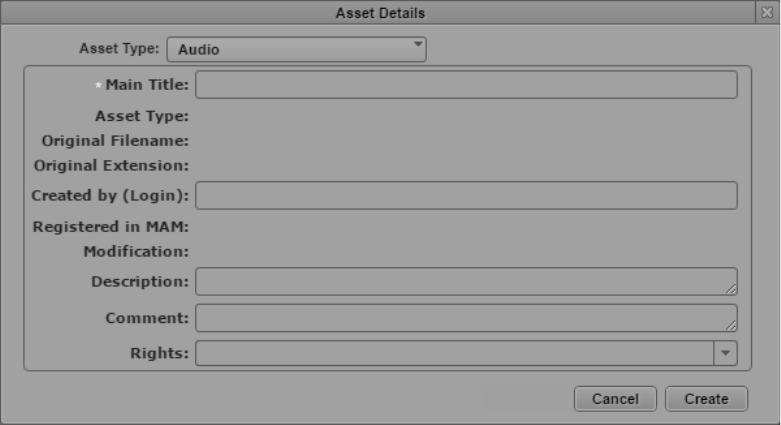
Working with Interplay | MAM Assets
61
Creating Assets
By default assets are created by ingests, watch folder imports, or import processes in Interplay
MAM. You can also create new assets in the Interplay MAM database manually from the Assets
pane. This action additionally creates a reference to the asset in the selected folder. The asset you
create is a “placeholder” asset: It contains metadata but it does not contain any essence, such as a
video or audio file. Upload the essence file to the new asset in a subsequent procedure.
Note the following limitations:
• You can create assets only if you have the proper permissions in Interplay MAM.
• The folder configuration in Interplay MAM must allow creating assets.
• Your ability to upload files depends on Interplay MAM user privileges and rules.
• Individual features offered during file upload, such as Caption Extraction and Quality Check,
require the corresponding packages being installed on your Interplay MAM system.
To create a placeholder asset:
1. Select a folder.
2. Do one of the following:
tRight-click and select Create Asset.
tClick the Pane Menu button and select Create Asset.
The Asset Details dialog box opens.
3. Select the type of the asset to be created from the Asset Type list. The list shows all asset types
that you are allowed to work with.
The fields of the metadata template configured for the selected asset type are shown.
nIf you have already entered data on the template and then select another asset type, the previously
entered data is lost when the new template opens.
4. Type the main title for the new asset in the Main Title field.
Working with Interplay | MAM Assets
62
5. (Optional) Supply optional information in the Asset Details dialog box. For information on the
different types of metadata fields that you might encounter, see “Property Types and Input
Controls” on page 72.
6. Click Create to create the asset and keep the Asset Details dialog box open. This allows you to
continue creating assets.
The asset is created in the MAM database and a reference to the new asset is created in the
selected folder. The folder is updated and shows the new asset reference. An “asset created
successfully” message opens.
7. Close the “asset created successfully” message.
8. (Optional) Create additional assets.
9. Click Cancel to close the Assets Details dialog box.
The asset type you selected in the Asset Details dialog box is saved as user setting and persists
from one session to another. When you open the Asset Details dialog box the next time, the last
used assets type is preselected.
The asset you created is a “placeholder” asset: It contains metadata and you can search for it in
the Search pane, but it does not contain any essence, such as a video or audio file. Upload the
essence file to the new asset, as described in the following procedures for video and non-video
assets.
To upload a video essence to a video asset:
1. Select the new video asset.
2. Do one of the following:
tRight-click a selected asset and select Actions.
tClick the Pane Menu button and select Actions.
3. (Optional) Select the MAM system on which the process is to be created.
4. Select the Upload Video process type.
The Upload Video process creation dialog box opens. It shows the asset to which you upload the
file as an asset card. The dialog box provides preset process options and metadata fields. You can
leave the default values unchanged or adapt the fields before you upload the essence file.
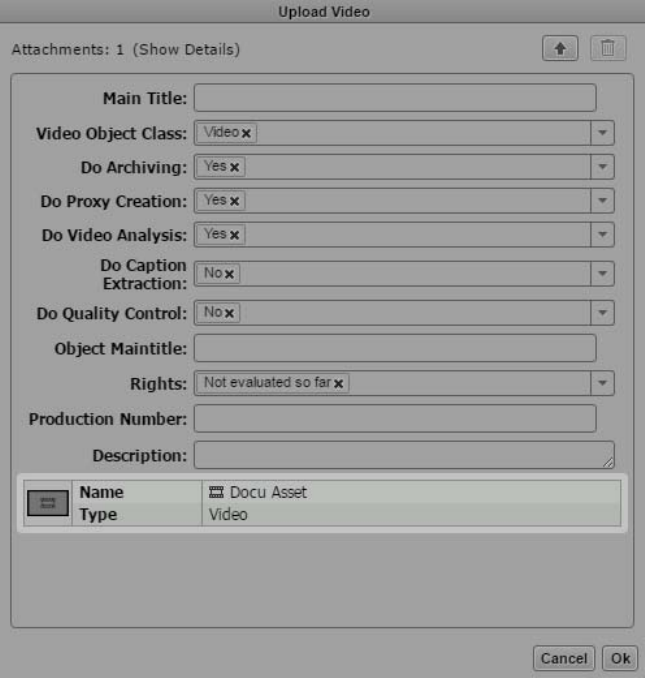
Working with Interplay | MAM Assets
63
5. (Optional) Provide settings for the Upload Video process.
- Provide a name for the process in the Main Title field. This name is shown in the Progress
pane. If you do not type a title, “null” is shown as process name in the Progress pane.
- The Video Object Class list shows the asset type that you set when your created the asset. Do
not change the displayed value.
- Select Yes from the Do Archiving list if you want to archive the uploaded HiRes video. This
triggers an archiving process that runs in the background and can be monitored in the
Progress pane.
- Select Yes from the Do Proxy Creation list if you want to create a browse proxy from the
uploaded HiRes video. This triggers the Create Proxy process that runs in the background
and can be monitored in the Progress pane.
- Select Yes from the Do Video Analysis list if you want to start the video analysis for the
uploaded video. This triggers the Video Analysis process that runs in the background and
can be monitored in the Progress pane. The process creates the Default stratum, the
keyframes set, and a thumbnail.
- Select Yes from the Do Caption Extraction list if you want to start a Caption Extraction
process. The process runs in the background and can be monitored in the Progress pane.
Select Yes only if your Interplay MAM system supports the Caption Extraction feature.
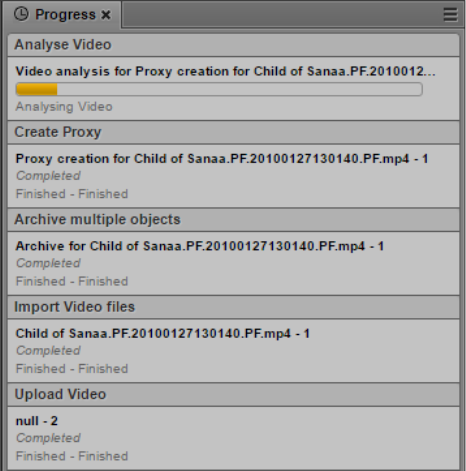
Working with Interplay | MAM Assets
64
- Select Yes from the Do Quality Control list if you want to run a quality check on the
uploaded video. This starts a Baton Quality Control process that runs in the background and
can be monitored in the Progress pane. Select Yes only if your Interplay MAM system
supports the Quality Control feature.
6. (Optional) Provide metadata for the new asset:
- Type a new title in the Object Maintitle field if you want to change the original main title of
the asset. This changes the “Main Title” property of the asset. You do not change the name
of the asset reference in the Assets pane. Leave the field empty if you want to keep the
original main title.
- Select a value of the usage rights property from the Rights list.
- Type a production number in the Production Number field.
- Type a descriptive text for the asset in the Description field.
7. Click the Upload button in the process dialog box and double-click the file to be uploaded in the
Open dialog box.
8. Click OK to close the Upload Video dialog boy and start the upload process.
9. (Optional) Open the Progress pane and monitor the progress of the Upload Video process and its
sub-processes. Depending on your selection in the Upload Video dialog box, different sub-
processes are shown.
To upload an essence to a non-video asset:
1. Select the new non-video asset, such as an audio, image, or document asset.
2. Do one of the following:
tRight-click a selected asset and select Actions.
tClick the Pane Menu button and select Actions.
3. (Optional) Select the MAM system on which the process is to be created.
4. Select the Upload File process type and then the “Upload file to object” menu item.
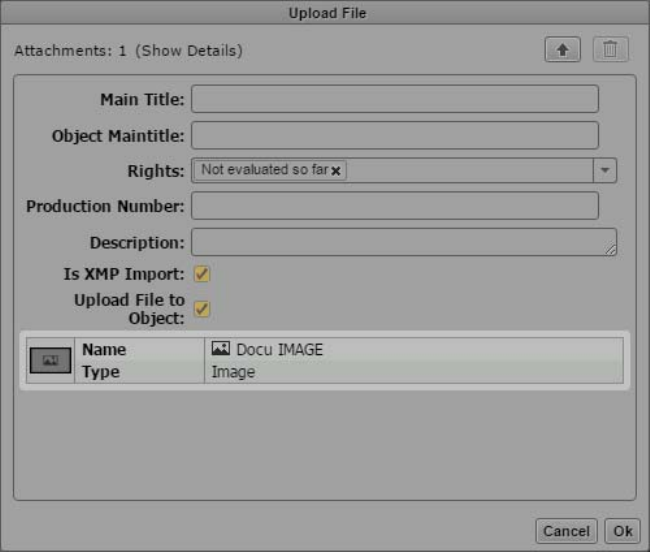
Working with Interplay | MAM Assets
65
The Upload File process creation dialog box opens.
5. (Optional) Provide settings for the Upload File process:
- Provide a name for the process in the Main Title field. This name is shown in the Progress
pane. If you do not type a title, “null” is shown as process name in the Progress pane.
- Type a new title in the Object Maintitle field if you want to change the original main title of
the asset. This changes the “Maintitle” property of the asset. You do not change the name of
the asset reference in the Assets pane. Leave the field empty if you want to keep the original
main title.
- Select a value of the usage rights property from the Rights list.
- Type a production number in the Production Number field.
- Type a descriptive text for the asset in the Description field.
6. Click the Upload button in the process dialog box and double-click the file to be uploaded in the
Open dialog box.
7. Click OK to close the Upload File dialog boy and start the upload process.
8. (Optional) Open the Progress pane and monitor the progress of the Upload File process.
- If the file format is supported, the Upload File and then the Import File process are
completed.
- If you try to upload a file that is not supported for the asset type, a Approval user task is
created.
9. (Optional) Open the Tasks pane, select the “Approve Import to Different Class” task in the Tasks
List, and do one of the following:
tClick Yes to allow uploading the unsupported file format.
tClick No to prevent to unsupported file format from being uploaded and cancel the process.
Working with Interplay | MAM Assets
66
Adding Assets to a Folder
You can add assets to a folder from the Search pane’s search results list after you have conducted a
search, from the Tasks pane’s attachments area or from the Associations pane’s associations list. This
action does not save or copy the asset to the folder. You are creating and saving only a reference to
the asset. Each folder can have only one reference that points to the same asset. If you try to add a
second reference to the same asset, a message is displayed.
To add asset references to a folder:
1. Do one the following:
tOpen the Search pane and conduct a search for MAM assets. For more information, see
“Conducting a Search” on page 270.
tOpen the Tasks pane and select a task. For more information, see “Adding and Editing User
Task Attachments” on page 467.
tOpen the Associations pane and show associations in the associations list. For more
information, see “Viewing Associated Assets” on page 348.
2. Select one or more assets in the search results list or the task attachments area.
3. Drag the selection to the name or icon of the folder into which you want to paste the asset
references.
The folder expands to show its contents and a green icon indicates if dropping is possible.
4. Release the mouse button.
Valid asset references are pasted into the folder. References to assets that are not allowed as
contents of the folder are not pasted.
If there is already a reference to an asset with the same identifier in the folder, a message is
displayed, and the asset is not pasted.
Triggering the Rights Evaluation for a Basic Sequence
A set of property columns is shown when viewing MAM assets in the Assets pane. The Rights
column displays the value of the usage rights property — symbolized by a Rights Indicator icon —
that is associated with assets in the Interplay MAM database.
For basic sequences the usage rights information is not retrieved from the usage rights property but
evaluated dynamically based on the usage rights of the individual segments of assets it contains. The
usage right for the entire basic sequence is determined by the most restrictive usage right for a
segment.
Therefore the Rights column initially does not show a Rights Indicator icon for a basic sequence. You
have to trigger the rights evaluation once, as described in the following procedure. After that, the
Rights Indicator icon of the basic sequence is shown during your current user session. You need to
trigger the rights evaluation for each session.
To trigger the rights evaluation for a basic sequence:
tSelect the basic sequence in the Assets pane.
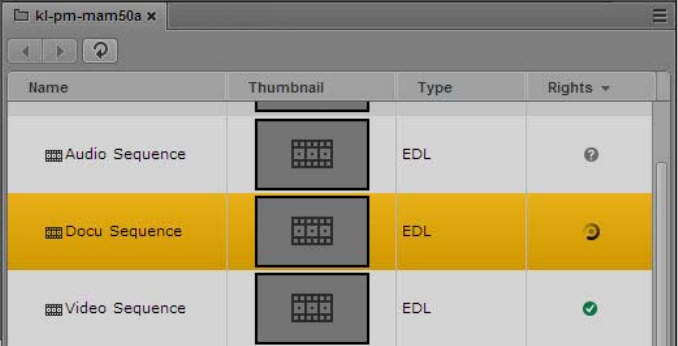
Working with Interplay | MAM Assets
67
The rights evaluation starts. During this time a busy indicator is shown in the Rights column.
When the rights evaluation is finished the calculated usage right of the basic sequence is
indicated by the corresponding Rights Indicator icon. For more information, see “Identifying
Interplay | MAM Media Assets” on page 57.
Duplicating a Basic Sequence
You can duplicate a sequence that is selected in the Assets pane. In doing so, you create a duplicate of
the sequence in the Interplay MAM data base and add a reference to the sequence to the same folder
in which the original sequence is located.
Your ability to duplicate a sequence depends on Interplay MAM user privileges and rules. The
credentials you use to sign in to the Interplay MAM database must allow the creation of sequences.
To duplicate an Interplay MAM basic sequence:
1. In the Assets pane, navigate to the desired folder and select the basic sequence.
2. Do one of the following:
tClick the Pane Menu button and select Duplicate.
tRight-click and select Duplicate.
The Save As dialog box opens. The “Save sequence as” field shows the reference name of the
sequence.
3. (Optional) Change the sequence name. You cannot delete the name.
4. Click Save.
A duplicate of the sequence is created and a reference is added to the folder open in the Assets
pane. The provided name is set in the Main Title property of the sequence and as the name of the
reference in the Assets pane. Your user name is set in the Created by and Modified by properties
of the sequence.
The duplicate sequence is highlighted in the Assets pane but not opened in other panes.
Selecting Assets
Clicking an item (basic sequence, other asset, or folder) in a folder selects and highlights it. Multiple
items can be selected in different ways. Note that you can select items in different folders at the same
time.
Working with Interplay | MAM Assets
68
To select several nonconsecutive items:
tCtrl+click the items you want to select, regardless of order or arrangement.
The items are selected and highlighted.
To select several consecutive items:
tClick an item and then Shift+click the item that ends the series of hits you want to select.
The items in the series are selected and highlighted.
tShift+click an item above or below the highlighted selection.
The selection is expanded or narrowed.
To remove the selection:
tClick the Refresh button of the Assets pane.
The selection is removed.
Moving or Copying Assets
You can move or copy basic sequences and other assets in the Interplay MAM Workspace by using
the Cut, Copy, and Paste commands, or drag and drop. This action does not move or copy the asset.
You are moving and copying only the reference to the asset.
To move or copy an asset to another folder by using commands:
1. Select one or more assets.
2. Do one of the following:
tClick the Pane Menu button and select Cut, or right-click and select Cut.
tClick the Pane Menu button and select Copy, or right-click and select Copy.
3. Select the folder into which you want to move or copy the asset, right-click, and select Paste.
Valid assets are pasted into the folder, and assets that are not allowed as contents of the folder are
not pasted. If there is already an asset with the same identifier in the folder, a message is
displayed, and the asset is not pasted.
To copy an asset to another folder by using drag and drop:
1. Select one or more assets.
2. Drag the selection to the name or icon of the folder into which you want to copy the assets.
The folder expands to show its contents and a green icon indicates if dropping is possible.
3. Release the mouse button.
Valid assets are pasted into the folder, and assets that are not allowed as contents of the folder are
not pasted. If there is already an asset with the same identifier in the folder, a message is
displayed, and the asset is not pasted. If your selection contained folders and individual assets,
the folders and their contents are moved but the individual assets are copied.
Renaming Asset References
You can rename the reference of basic sequences and other assets in the Interplay MAM Workspace.
Note that this action renames only the display name in the folder but not the basic sequence or the
asset itself. To rename the asset or sequence, you must change its Main Title property in the Metadata
pane.
Working with Interplay | MAM Assets
69
Note also that the Media pane always shows the Main Title of an asset. If you only rename the
reference of an asset in the Assets pane but not its Main Title property, you will see different names
displayed for the same asset in the Assets and Media pane.
To rename an asset reference, do one of the following:
tSelect the asset, click the name of the asset, and type the new name.
tSelect the asset, press F2 (Windows) or Enter (Macintosh), and type the new name.
Removing Asset References
You can remove basic sequences and other assets in the Interplay MAM Workspace. Note that this
action removes the reference in the folder but does not delete the basic sequence or the asset itself.
To remove asset references from folders:
1. Select one or more assets.
2. Do one of the following:
tRight-click and select Delete.
tClick the Pane Menu button and select Delete.
A security prompt is displayed.
3. Click Yes.
If your credentials allow deleting assets, the asset references are deleted.
If you are not authorized to delete some of the selected assets or any assets, a message is
displayed. After closing the message the folders that are released for deletion are deleted.
Deleting Assets and Basic Sequences
You can delete assets and basic sequences from the Interplay MAM database. To do so, you can start
a Delete process not only from the Assets pane, but also from the Media, File Info, Associations, and
Search panes. In the Media and File Info panes, you can delete the asset or basic sequence open in the
pane. In the Associations, Assets, and Search panes you can delete up to 50 assets and sequences at
the same time.
Note the following limitations:
• You can delete assets and sequences only if you have the proper permissions in Interplay MAM.
• You can delete assets and basic sequences only from Interplay MAM systems. In addition, you
must select the delete process from the same MAM system that also manages the assets and
sequences.
• You can delete assets and basic sequence of all types.
• Deleting an asset or basic sequence does not remove the reference to the asset or sequence from
the Assets pane.
To delete assets and basic sequences from the Interplay MAM database:
1. Do one of the following:
tIn the Assets pane, navigate to the desired folder and select the assets and basic sequences to
be deleted.
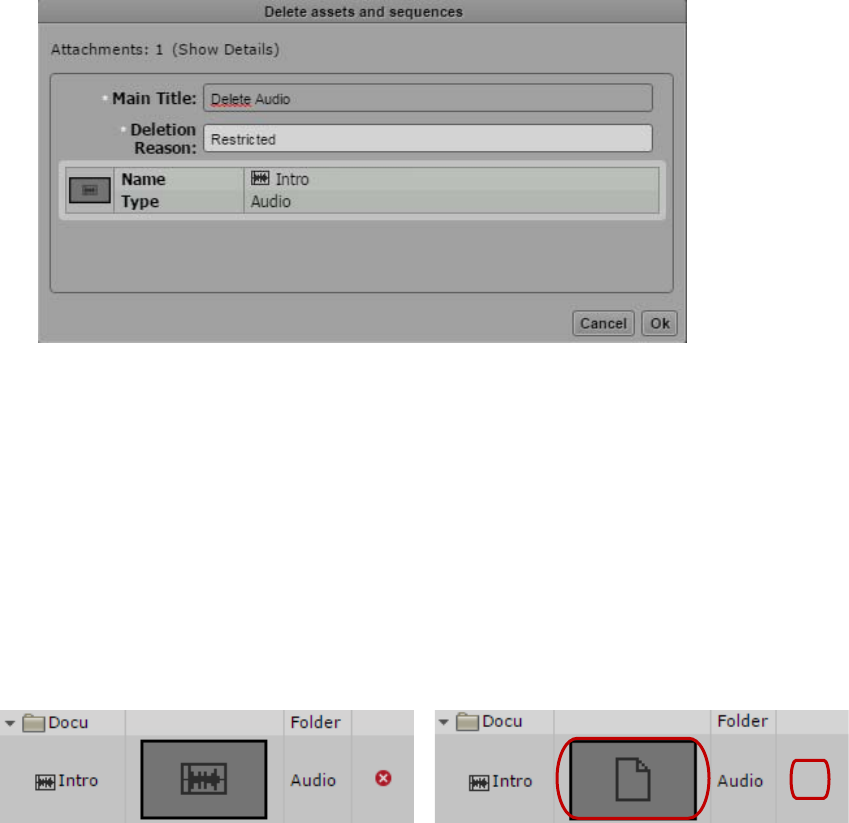
Working with Interplay | MAM Assets
70
tIn the Search pane, conduct a search and select the assets and basic sequences to be deleted
in the results list.
tOpen an asset in the Associations pane and select the assets to be deleted (the source asset
and any of its associated assets).
tOpen an asset or a basic sequence in the Media pane.
tOpen an asset in the File Info pane.
2. Do one of the following:
tClick the Pane Menu button and select Actions.
t(Assets and Search pane only) Right-click and select Actions.
3. (Optional) Select the MAM system on which the Delete process is to be created. This must be
the system from which the asset was opened.
4. Select the Delete Assets and Sequences process type.
The Delete Assets and Sequences process dialog box opens and shows the assets that are to be
deleted as attachments.
5. Provide a main title and a reason for deletion.
6. Click OK.
The Delete Assets and Sequences process dialog box is closed and the delete process is
triggered.
7. (Optional) Open the Progress pane and monitor the progress of the delete process.
When all assets and sequences are deleted, the Progress pane shows a “Finished” message.
The Delete process does not remove the reference to the deleted asset or sequence from the Assets
pane. After a manual refresh, you can notice the following changes in the Assets pane: In the
Thumbnails column, the Default placeholder icon is shown and the Rights column does not shown a
right indicator icon any longer.
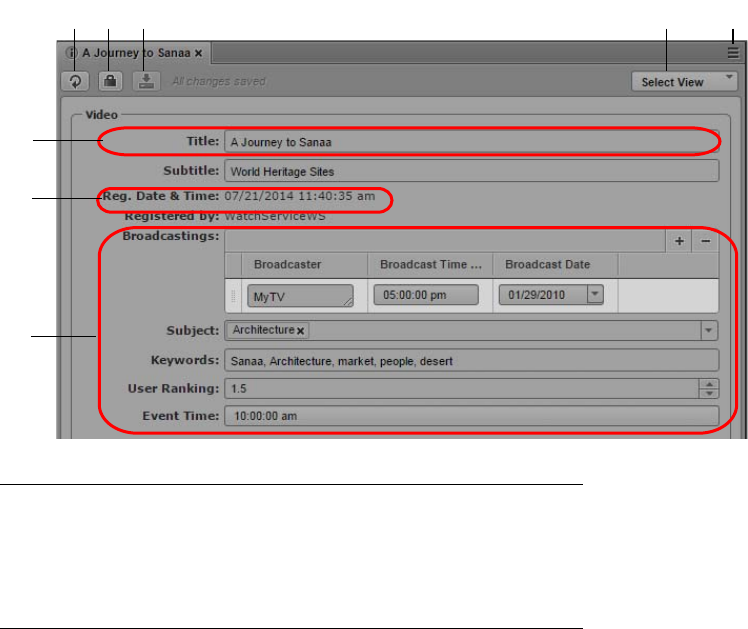
Working with Interplay | MAM Assets
71
When you double-click the reference of a deleted asset or sequence, you see a message such as “The
asset does not exist” or “The sequence does not exist.” Delete the reference from the Assets pane, as
described in “Removing Asset References” on page 69.
Viewing and Editing Interplay | MAM Metadata
The Metadata pane displays properties that are associated with a selected asset in the Interplay MAM
database, such as Comments or Creation date. Some properties are created automatically and others
you can create or edit manually. In the Metadata pane, if a property is editable, a text box, drop-down
menu, or other input control is displayed.
The properties that are displayed in the Metadata pane are determined by the configuration of the
property and the metadata template of the corresponding asset type in the Interplay MAM Datamodel
Administrator application. An administrator can define the following:
• Which properties are displayed
• If a property is editable, read-only, read-only based on the values of another property, or
mandatory
• If a property shows a default value
• Limits for text input
A user must have write permission on assets to edit the metadata of an asset.
For information on properties and assigning permissions, see the Interplay | MAM Datamodel
Administrator User’s Guide and Interplay | MAM User Manager User’s Guide.
rrtt
qqww
i
qy
u
ee
1Refresh button 5Pane Menu button
2Lock button 6Editable text box
3Save button 7Non-editable field
4Metadata section selector 8Examples for editable properties
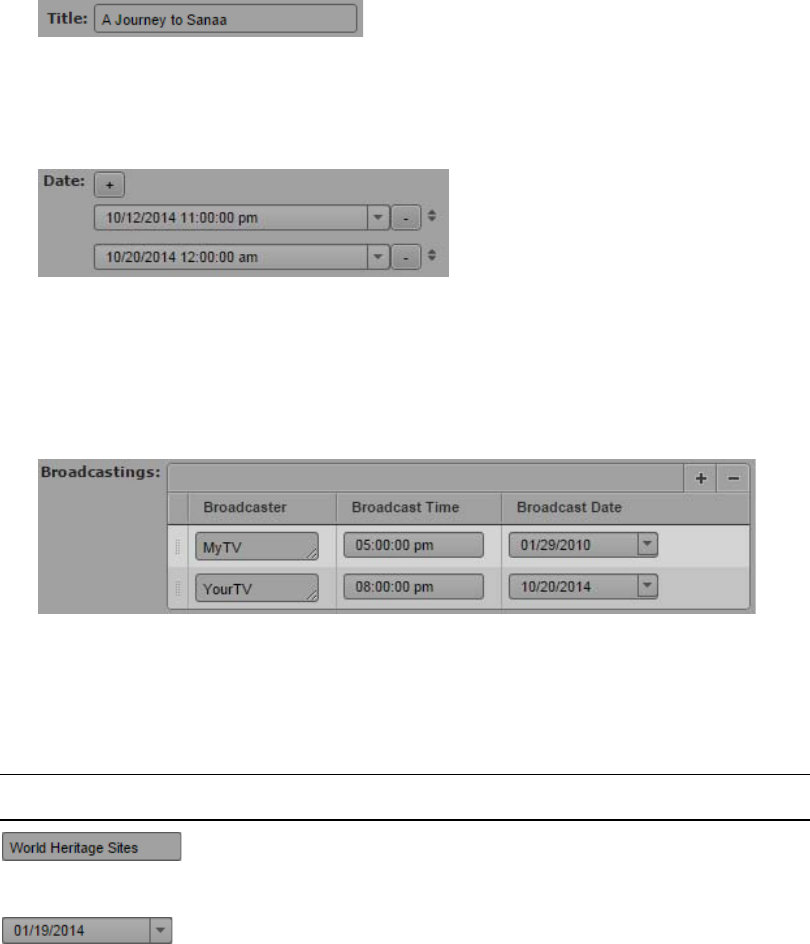
Working with Interplay | MAM Assets
72
Property Types and Input Controls
The fields in the Metadata pane are linked to properties that describe an asset. Interplay MAM and
MediaCentral UX support different property types and input controls.
Property Types
In Interplay MAM, the following three property types are distinguished:
• Single-value property: When you edit metadata that is allocated to a single-value property, there
is only one field available in which to enter data, so only one value can be entered for this asset
property. For more information, see “Editing Metadata” on page 74.
• Multi-value property: When you edit metadata that is allocated a multi-value property, there are
several fields available in which you can enter data for this asset property as shown in the
following illustration. Existing values can be changed or deleted, and new values can be added.
• Compound property: When you edit metadata that is allocated a compound property, you edit
several properties that are combined into a single property. For each of these single properties
you have several fields in which to enter data, just as you do for multi-value properties. The
following illustration shows how three single properties (Broadcaster, Broadcast Time, and
Broadcast Date) are combined into the Broadcastings property.
Input Controls
Depending on the configuration of the metadata template in Interplay MAM, you might encounter
the following input fields when entering data:
Display Field type Description
Text Text fields accept all characters. Input might be limited to a
certain number of characters by the property configuration in
Interplay MAM.
Date Date fields are preformatted. The display format depends on
the locale of your account. You can enter the entire Date
value manually, or select it from a calendar tool.
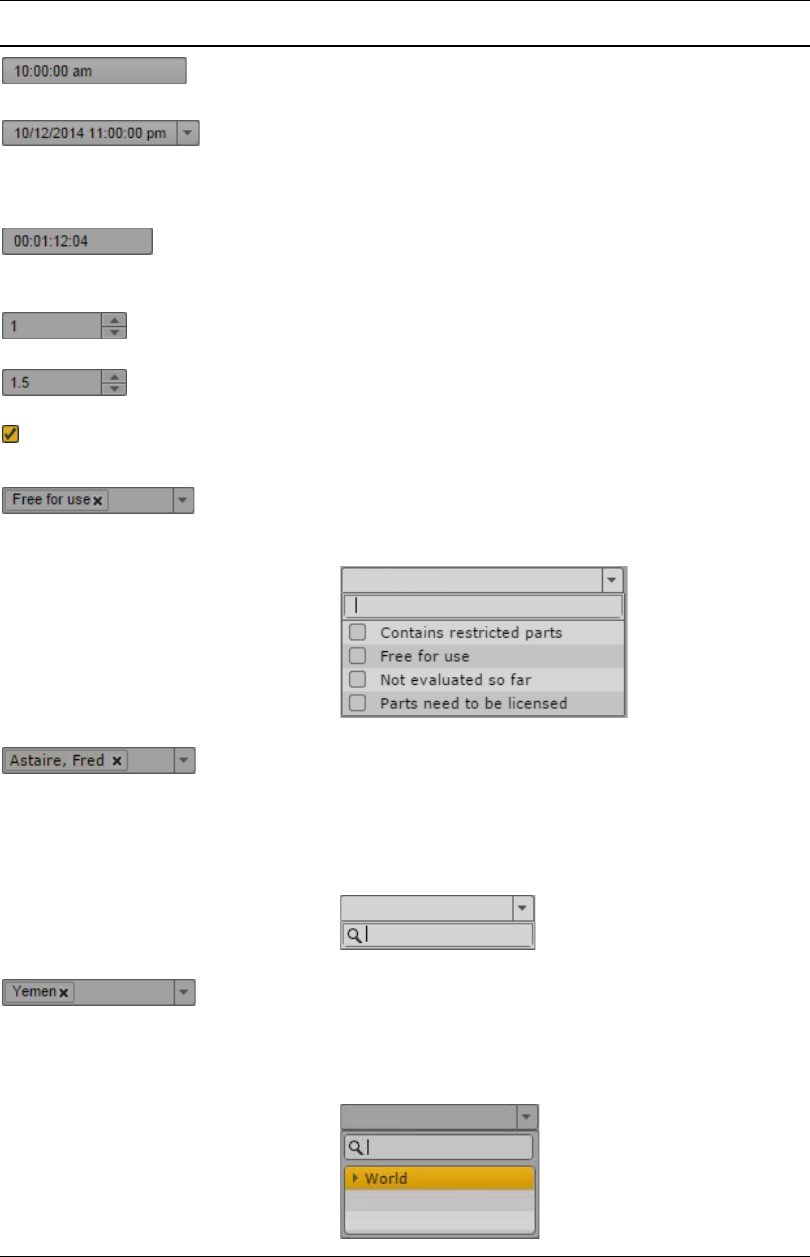
Working with Interplay | MAM Assets
73
Time Time fields are preformatted. The display format depends on
the locale of your account.
Date/Time Date/Time fields are preformatted. The display format
depends on the locale of your account. You can enter the
entire Date/Time values manually, or select the date value
from a calendar tool.
Timecode
Duration
Timecode and Duration fields are preformatted for different
timecode types (PAL, NTSC). They also support pasting
copied timecodes.
Integer Integer fields require figures.
Floating-point Floating-point fields require figures and decimal points.
Boolean Boolean check boxes differentiate between “applies” and
“does not apply.”
Legal list Drop-down lists provide the available values of a property.
When you open a property of type legal list, the input control
initially shows a search box and all values of the property.
Master data Master data, for example, data records about producers,
actors, and so on, consists of multiple distinct values. These
multiple values are represented by one master data value,
when used for annotation. When you open a property of type
master data, the input control initially shows an empty search
box.
Thesaurus Thesauruses are mostly used to provide larger sets of
invariant terms that can be assigned as values to a property.
When you open a property of type thesaurus, the input
control shows a search box and the name of the thesaurus to
search in.
Display Field type Description
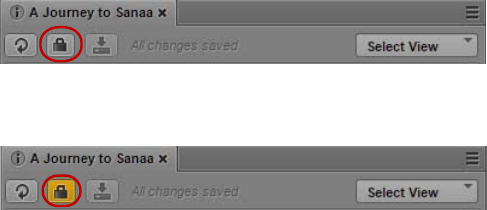
Working with Interplay | MAM Assets
74
Editing Metadata
In the Metadata pane, if a property is editable, a text box, drop-down menu, or other input control is
displayed. Depending on the configuration of the asset template in Interplay MAM, the metadata
might be distributed in several sections on the Metadata pane.
Note the following:
• If you are editing an Interplay MAM asset, metadata is locked to prevent other users from editing
the metadata at the same time. The lock is automatically set when you begin editing a metadata
field. The lock is released when you end editing, load another asset, or close the Metadata pane.
If another user opens the asset while it is locked, and clicks the Lock button or tries to edit the
metadata, the tool tip for the Lock button reads “This metadata is locked by user <user name>.”
• You can cut, copy, and paste text between the Metadata pane and other applications.
• You can use the Tab key to move to the next editable text box or use Shift+Tab to move to the
previous text box.
• If you select from a drop-down list and type a letter, MediaCentral UX filters the list to all values
starting with that letter. As you continue to type, MediaCentral UX continues to filter the list
according to the letters you type.
To open the Metadata pane:
tSelect Metadata from the Panes menu.
To view properties of an asset:
tDouble-click an asset in the Assets or Search pane.
To manually lock metadata:
tClick the Lock button.
When the metadata is locked, the Lock button turns orange.
The metadata remains locked until you end editing, load another asset, or close the Metadata
pane. You can manually unlock the metadata by clicking the Lock button. If you make an edit,
the lock is automatically set again.
To edit single-value properties of an asset:
1. (Optional) If the metadata is grouped in different metadata sections, select the desired section
from the Select View menu.
2. Click in a text box and enter text.
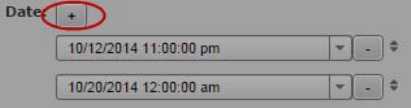
Working with Interplay | MAM Assets
75
3. To edit a legal list property, click in the field and do one of the following:
tDouble-click the value or check its check box.
tNavigate down the list using the Down Arrow key until you reach the desired value and
press Enter.
tStart typing the name of the value in the search box to filter the list, select the value, and
press Enter.
4. To edit a thesaurus property, click in the field and do one of the following:
tNavigate down the thesaurus using the Down Arrow key until you reach the desired term and
press Enter.
tStart typing the name of the term in the search box to filter the list, select the term, and press
Enter.
5. To edit a master data property, click in the field, start typing the name of the value in the search
box to filter the list, select the value, and press Enter.
6. To edit a date, time, or date-time property:
tHighlight the figures you want to change and type in the new figures.
tClick the field’s Down Arrow button and select the date from the calendar that opens.
7. To edit a timecode or duration property, click in the field and do one of the following:
tType in the figures, including “0”, from right to left.
tHighlight the timecode and press Ctrl+V to paste a copied timecode.
8. To edit an integer or float property:
tType the figures, and if necessary, the decimal point.
tPress the Up Arrow or Down Arrow key to increase or decrease the figures.
9. To edit a boolean property:
tCheck the check box to set the property to “true.”
tUncheck the check box to set the property value to “false.”
10. To save your changes, do one of the following:
tClick the Save button, or click the Pane Menu button and select Save.
tPress Ctrl+S (Windows) or Command+S (Macintosh).
To discard your changes, click the Refresh button, load a different asset, or close the Metadata
pane.
To edit multi-value properties of an asset:
1. To add a new value to a multi-value property, click the Plus button.
A new value is added at the bottom of the list.
2. Edit the value for each individual field inside a multi-value property as you would for a single-
value property.
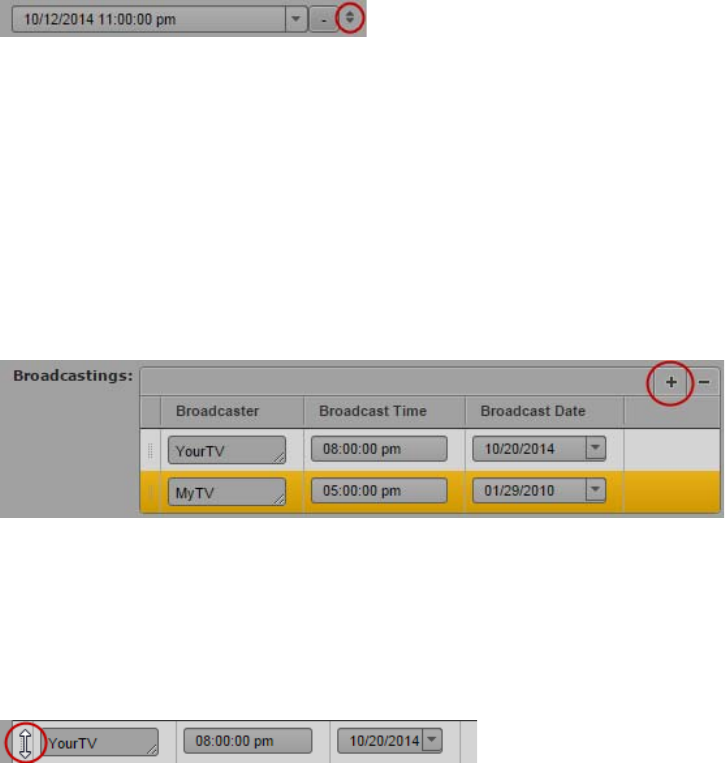
Working with Interplay | MAM Assets
76
3. Press the Tab key to move to the next property within the compound property or use Shift+Tab to
move to the previous property.
4. To change the position of a value, click the drag icon to the right of the value, drag it and drop it
between other values or at the beginning or end of the property’s value list.
5. To remove a property, click the Minus button to the right of the value.
6. Click the Save button, or click the Pane menu and select Save.
To discard your changes, click the Refresh button, load a different asset, or close the Metadata
pane.
To edit compound properties of an asset:
1. To add a new row to a compound property, do one of the following:
tTo add a new row below the last row, click the plus button.
tTo add a new row above a row, select the row and click the Plus button.
2. Edit every field as you would for a single-value property.
3. Press the Tab key to move to the next property within the compound property or use Shift+Tab to
move to the previous property.
4. To change the position of a row, click the drag icon to the left of the row, drag it and drop it
between other rows or at the beginning or end of the property’s table.
5. To remove a row, select the row and click the Minus button.
6. Click the Save button, or click the Pane menu and select Save.
To discard your changes, click the Refresh button, load a different asset, or close the Metadata
pane.
To update the information displayed:
tClick the Refresh button.
Batch Metadata Editing
In the Metadata pane, you can edit only the metadata of the asset open in the pane. To support editing
metadata of several assets at the same time, MediaCentral UX offers a feature called “batch metadata
editing.” You can apply the batch metadata editing feature to assets selected in the Assets or Search
pane.
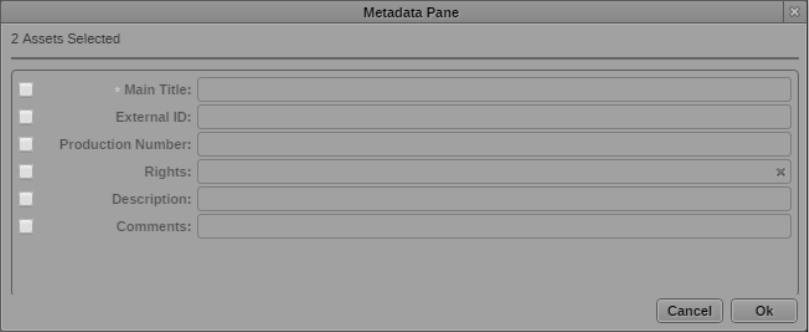
Working with Interplay | MAM Assets
77
Note the following:
• You can select assets of different types at the same time, for example, video and audio assets.
• The batch metadata editing feature changes the value of properties that are editable in all selected
assets. Read-only properties and editable properties that are only available in a few of the
selected assets cannot be changed.
• You cannot change the following property types using the batch metadata editing feature:
duration, time code, multi-value, and multi-value compound.
• Assets that are locked by other users are excluded from the batch metadata editing action.
• If more than one Interplay MAM system is connected to MediaCentral UX, batch metadata
editing is only available when your selection contains assets from the same Interplay MAM
system.
To edit metadata of several assets at the same time:
1. Select the assets in the Assets pane or Search pane.
2. Do one of the following:
tClick the Pane Menu button and select Batch Edit Metadata.
tRight-click and select Batch Edit Metadata.
The Metadata Pane dialog box opens. It shows only editable properties that are available in all
selected assets at the same time. Mandatory properties are marked with an asterisk.
3. Select the check boxes of the properties you want to edit.
4. Do one of the following:
tLeave the text box empty. The old property value will be deleted in all assets.
tType a value in the text box or select a value from the input control. The old property value
will be overwritten by the new value in all assets.
5. Click OK.
If you provided an empty value for an enabled mandatory field, you see a corresponding
message. Provide a value or disable the check box of the mandatory field and click OK.
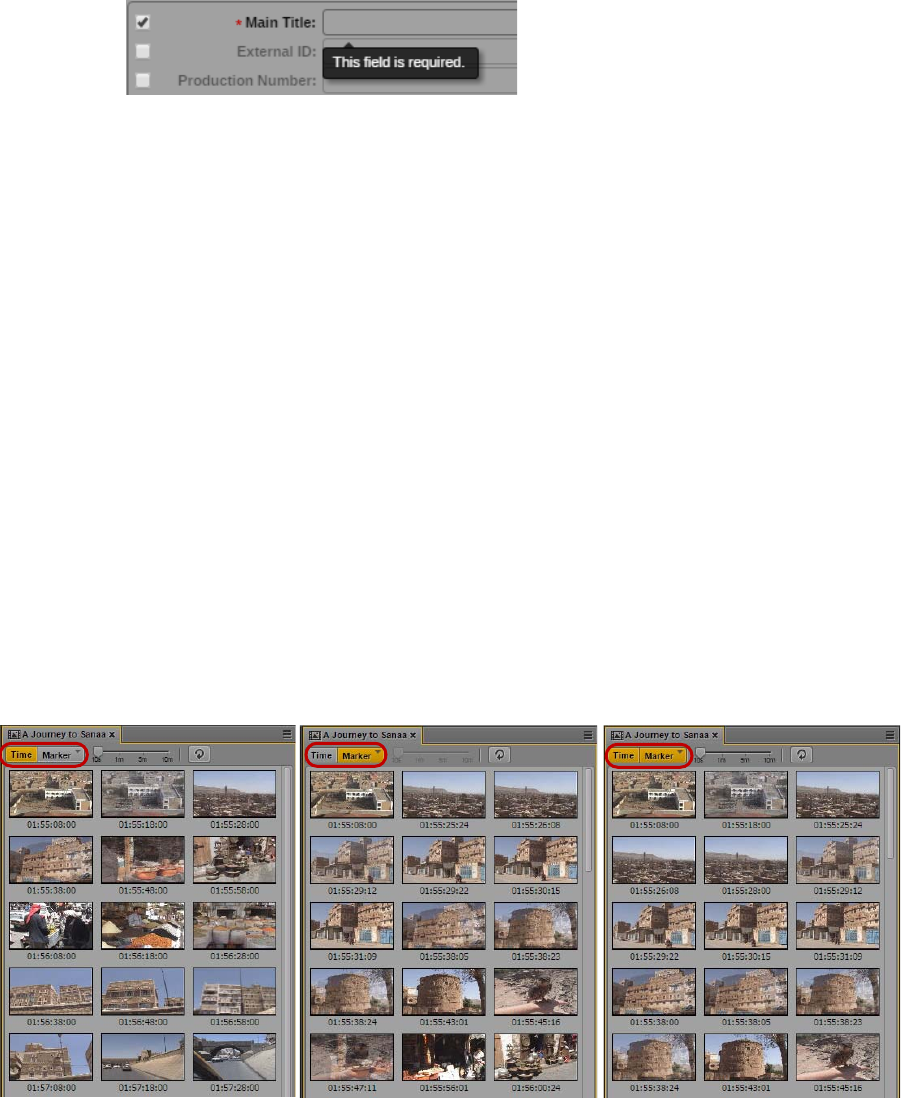
Working with Interplay | MAM Assets
78
A security prompt opens.
6. Click OK.
The security prompt and the Metadata Pane dialog box are closed. The metadata changes are
applied to all selected assets.
Viewing Interplay | MAM Thumbnails
The Thumbnails pane lets you display a series of small images of an asset. In an Interplay MAM
context, these are referred to as “keyframes” that are displayed in Interplay MAM Desktop’s
Lighttable view. In MediaCentral UX they are referred to as “thumbnails.” Viewing and double-
clicking thumbnails can help you navigate through video assets more quickly. You can view
thumbnails in the following arrangements:
• Time-based: Shows the first frame of the asset, the last frame of the asset, and a frame at the
frequency that you choose. The exact frame displayed depends on the type of timecode (drop-
frame, non-drop frame, 24 fps, and so on). Timecodes are displayed beneath each thumbnail,
reflecting the timecode display that is set in the Media pane: Master, Absolute, or Remain.
• Marker-based: Shows any thumbnail that is extracted by the Interplay MAM Video Analysis or a
user in Interplay MAM Cataloger. You can adjust the quantity by applying a marker-based filter.
• Both time-based and marker-based thumbnails.
The following illustrations show each of these arrangements: time-based, marker-based, and both.
Note the following:
• You can show thumbnails for video assets.
• The size of the thumbnails depends on the aspect ratio selected in the Media pane. Changing the
aspect ratio changes the size of the thumbnails.
• Currently, you cannot adjust the size of the thumbnails.

Working with Interplay | MAM Assets
79
• Click the Refresh button to update the display for changes to the asset, for example, if a user has
extracted new thumbnails in Interplay MAM Cataloger.
• If the entire keyframes set is deleted in Interplay MAM Desktop, you can only show time-based
thumbnails in the Thumbnails pane.
nThere is an option to turn off generation of thumbnails when the Thumbnails pane is hidden. See
“Disabling Background Thumbnail Generation” on page 53.
To view thumbnails:
1. Select Panes > Thumbnails.
If an asset is already loaded in Asset mode in the Media pane, thumbnails are displayed in the
Thumbnails pane.
2. In the Assets pane, double-click a video asset.
The asset is loaded in the Media viewer and thumbnails are displayed in the Thumbnail pane,
with timecode for each thumbnail below it.
3. To show only time-based thumbnails, click the Marker button so that it is inactive. To show only
marker-based thumbnails, click the Time button so that it is inactive.
4. To navigate to a particular frame in the Media pane, double-click a thumbnail.
The position indicator in the Media Timeline jumps to the frame.
To apply a time-based filter:
1. To show only time-based thumbnails, click the Marker button so that it is inactive.
2. Use the slider to select one of the following frequencies:
- one frame every 10 seconds (default setting)
- one frame every 1 minute
- one frame every 5 minutes
- one frame every 10 minutes
The Thumbnails pane shows the thumbnails that match the selected frequency. This setting
persists from one session to another.
To apply a marker-based filter:
1. To show only marker-based thumbnails, click the Time button so that it is inactive.
2. Click the arrow in the upper right corner of the Marker button.
The Add or Remove window opens.
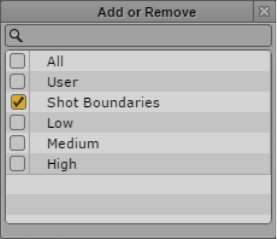
Working with Interplay | MAM Assets
80
3. Select the filter you want to apply or deselect the filter you want to cancel:
- All: Shows all marker-based thumbnails. Includes all other filter criteria.
- User: Shows the thumbnails that are extracted by a user in Interplay MAM Cataloger.
- Shot Boundaries: Shows the thumbnails that are extracted by the Video Analysis for shot
boundaries.
- Low: Shows the thumbnails that are extracted by the Video Analysis already for small
changes in image content.
- Medium Shows the thumbnails that are extracted by the Video Analysis during medium
alteration in image content.
- High: Shows the thumbnails that are extracted by the Video Analysis only when the image
content changed significantly.
4. Click the Close box or click anywhere outside the window to save your settings.
The Thumbnails pane shows the thumbnails matching the selected filter. This setting persists
from one session to another.
Viewing PDF Documents
Interplay MAM assets can contain documents as essence files. By default, assets are created by
ingests, watch folder imports, and import or upload processes in Interplay MAM. If you have
appropriate privileges, you can also upload a document to an asset in MediaCentral UX, as described
in “Creating Assets” on page 61.
When a document is imported or uploaded, a PDF proxy is created, and its text is extracted and
indexed for searching in the Search pane. If an appropriate template is configured, you can view the
extracted text in the Metadata pane as contents of a “Document text” property field. During upload,
the first page of the document is extracted as a thumbnail and displayed in the corresponding row of
the Assets pane and Search pane result lists.
The Documents pane lets you view an entire PDF document. When you open an asset that has a PDF
file with preferred usage “Preview,” the Documents pane loads a PDF viewer with default viewing
features. You can also download the document essence from the Documents pane if the asset contains
a file with the appropriate preferred usage and you have the privileges for downloading.
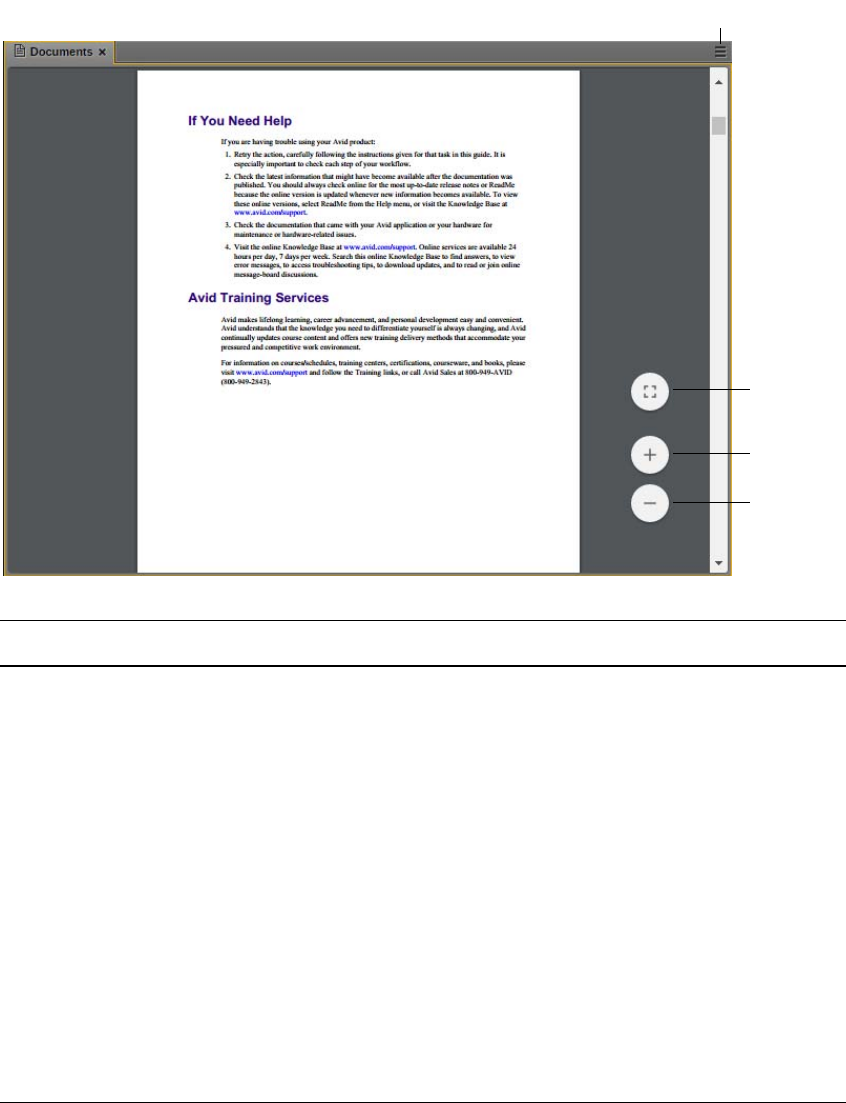
Working with Interplay | MAM Assets
81
The following illustration shows the Document pane and identifies its controls.
rr
ee
qq
ww
Display or Control Description
1 Pane Menu button The Pane menu for the Documents pane contains the following options:
• Actions. Creates a process in the MAM system and attaches the asset to
the process. See “Creating Processes” on page 431.
• Download. Downloads the document. If you do not have the privileges
for downloading or the asset does not contain a “HiRes” file, the
Download link is disabled.
• Help. Displays a Help topic describing controls in the Documents pane.
From this topic you can access the entire MediaCentral UX Help
system.
2 Fit to Page / Fit to Width
toggle button
Toggles the display of the PDF document page in the pane:
• Fit to Page: Displays the entire PDF page in the pane.
• Fit to Width: Adapts the PDF page to the width of the pane.
3 Zoom In button Increases the magnification of the PDF page in the pane.
4 Zoom Out button Reduces the magnification of the PDF page in the pane.
Working with Interplay | MAM Assets
82
Note the following:
• Opening a document requires a “browse” PDF (file with preferred usage “Preview”). You can
check the usage preference of a file in the File Info pane. See “The File Info Pane” on page 357.
If you open an asset without a browse PDF, the Documents pane shows the “Asset has no
document data” message.
• Downloading a document requires a “HiRes” document (file with preferred usage “Editing,”
“Distribution,” or “Archive”).
• If you want to preview as well as download a PDF in the Documents pane, the asset you open
must contain both a browse PDF and a HiRes PDF.
• Your ability to download documents depends on Interplay MAM user privileges and rules.
Downloading documents might be tracked, depending on your company policy. Download
tracking can be enabled and disabled by your Interplay MAM administrator.
To open the Documents pane:
tSelect Documents from the Panes menu.
To open a PDF document:
tDouble-click an asset in the Assets or Search pane.
If the asset has a PDF file with preferred usage “Preview,” the PDF opens in the pane.
The Documents pane displays the first page of the PDF document.
To navigate the PDF document:
tUse default controls to navigate the document:
- Use the scroll bar of the PDF viewer to navigate up and down in the document.
- Press Ctrl+Home or Ctrl+End to go to the first or last page of the document.
- Press the Page Up or Page Down key to navigate page-by-page.
- Press the Up Arrow or Down Arrow key to navigate line-by-line.
To scale the PDF document:
tClick the Fit to Page toggle button to display the entire page in the pane.
tClick the Fit to Width toggle button to adapt the PDF page to the width of the pane.
tClick the Zoom In button to magnify the page in the pane.
tClick the Zoom Out button to reduce the magnification of the page.
To download a document:
tClick the Pane menu and select Download.
The file is downloaded to the default download folder on your computer, as specified by your
browser.

3Working with Projects
The following main topics describe the Project/Story pane and how to use projects and facets in news
production:
•Opening Projects or Facets
•The Project/Story Pane
•Associating Stories with Projects or Facets
•Opening a Project or Facet Associated with a Story
Opening Projects or Facets
Using projects is a feature of the iNEWS newsroom computer system that provides a way of
categorizing stories by topic so that news teams working on a particular topic can find everything
related to it in a single place, without moving or copying the original source information from its
current location in the iNEWS database. Facets are sub-topics, providing additional granularity to
projects.
In MediaCentral UX, iNEWS projects are listed in the Launch pane. Open a project from the Launch
pane to view each project’s contents in the Assets pane. You open facets and the project’s queues
from the Assets pane.
To open a project:
tDouble-click the project in the Launch pane.
The project’s contents open in the Assets pane.
To open a facet:
tDouble-click the facet in the Assets pane.
The facet’s contents open in the Project/Story pane.
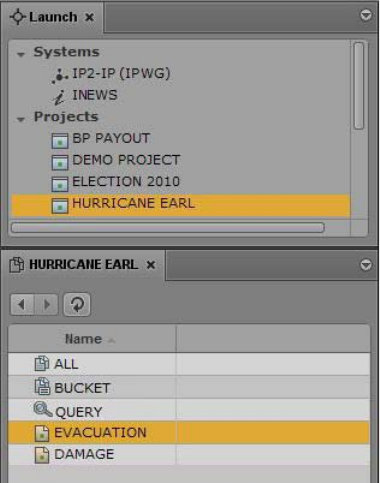
The Project/Story Pane
84
The Project/Story Pane
The contents of a project include an ALL queue, a QUERY queue, a BUCKET queue, and any sub-
topics, known as facets. For example, the following illustration shows the Hurricane Earl project has
facets for topics like Damage and Evacuation.
Every project has an ALL queue that displays in the Queue panel all stories associated with the
project and its facets. Any indexed story can be associated with a project or facet.
Stories associated with a project retain their original source queue location in the iNEWS database;
they do not actually reside in the ALL queue. Stories associated with a project also retain their
original source permissions. For example, a user without read access to a story’s source queue will
not be able to see that story in a project to which its associated, even if the user has read access to the
project.
Every project has a QUERY queue, identified by the magnifying glass icon, which is the search
queue that runs the project’s query. For more information on the icons used to identify projects and
facets, see “Identifying iNEWS Directories, Queues, Projects, and Facets” on page 42.
Every project has a BUCKET queue, which is an indexed queue that acts as the repository for stories
that don’t exist anywhere else in the iNEWS database. A user can copy, create, and delete stories in
the BUCKET queue. All stories in the BUCKET will show up in the ALL queue.
nThe BUCKET queue was first introduced in version 4.0 of iNEWS. When an iNEWS database is
upgraded to v4.0 from an earlier version, current projects get BUCKET queues; however, these
queues are not yet indexed, which is required for all stories associated with projects and/or facets.
For more information, see the “iNEWS Projects” chapter of the Avid iNEWS Setup and
Configuration Guide.
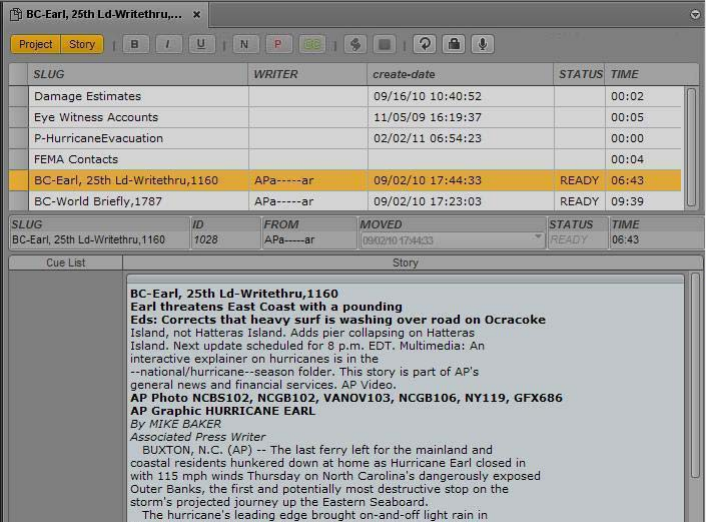
The Project/Story Pane
85
The Project/Story pane functions similarly to the Queue/Story pane. It can display either a project’s
facet or a news story associated with that project’s facet. It can also display both at the same time, as
shown in the following illustration:
nThe title that appears on the pane’s tab changes based on what is selected in the Project/Story pane.
Two buttons, Project and Story, are located at the top of the pane. Use these buttons to toggle on or
off the display of the project or a story. When toggled on the buttons appear orange.
For example, while viewing a project’s contents, clicking the Story button splits the pane’s display
space to show the project’s contents on the top half and the selected story associated with that project
or facet on the bottom half of the pane. Clicking the Story button again hides the story and displays
only the project’s facet or queue once more.
nYou cannot have both the Project and Story buttons toggled off simultaneously. When only one is on
and the you click that button, the system automatically toggles it off and toggles the other button on.
The name on the tab of a Project/Story pane changes based on the story you have selected in the
pane. You can move the mouse pointer over the tab to view the entire path name.
When only the facet or one of the project’s queues (ALL, QUERY, or BUCKET) is shown, the
display is called a grid view. When only the story is shown in the pane, the display is called a story
view. And when both are visible, the display is called a split view.
You can use the horizontal dividing line between the grid and story sections of the pane to adjust the
ratio of the split view display within the pane. When you position your mouse pointer over the
dividing line, the pointer changes to a double arrow, letting you click and drag it up or down to adjust
the space allocated to each section of the pane. However, it is not recommended to use this technique
to hide one section of the pane or the other.
The ratio you set is retained when you sign out.
Associating Stories with Projects or Facets
86
Associating Stories with Projects or Facets
Any indexed story can be associated with a project or facet.
To associate an indexed story with a project or facet.
1. Navigate to and open the indexed queue in which the story resides.
2. Right-click the story in the Queue/Story pane and select Associate Story to Project.
3. In the dialog box, select the projects or facets to which you want the story associated.
4. Click Apply.
Opening a Project or Facet Associated with a Story
In the Project/Story pane, you can open a project that is associated with a story or facet.
To open a project associated with a story:
1. Select a story in the queue section of the Project/Story pane.
2. Click the Pane Menu button and select Projects and the project or facet you want to open.
The project opens in a new Project/Story pane.

4Building a Script
The following main topics describe the Queue/Story pane, basic techniques of script building, and
some typical production tasks.
•The Queue/Story Pane
•Creating a Story
•Segmenting Stories
•Writing Stories in Right-to-Left Languages
•Using Annotation to Dictate a Story
•Editing a Story
•Copying Stories
•Locking and Unlocking a Story
•Inserting Script Templates
•Inserting MOS Placeholders
•Adding Media to a Story
•Associating a Sequence with a Story
•Creating a Text-Only Story Segment
•Copying and Sending iNEWS Links
•Deleting or Recovering a Deleted Story
•Recovering Stories In Case of Disconnect
•Dragging a Script Sequence from MediaCentral | UX to Media Composer
•Production Tasks
The Queue/Story Pane
In MediaCentral UX, you can create iNEWS stories, edit them in the Queue/Story pane, and save
them on an iNEWS server.
The Queue/Story pane can display either an iNEWS queue, such as a show's rundown, or a story in
that queue. The Queue/Story pane can also display both a queue and a story in that queue, as shown
in the following illustration:
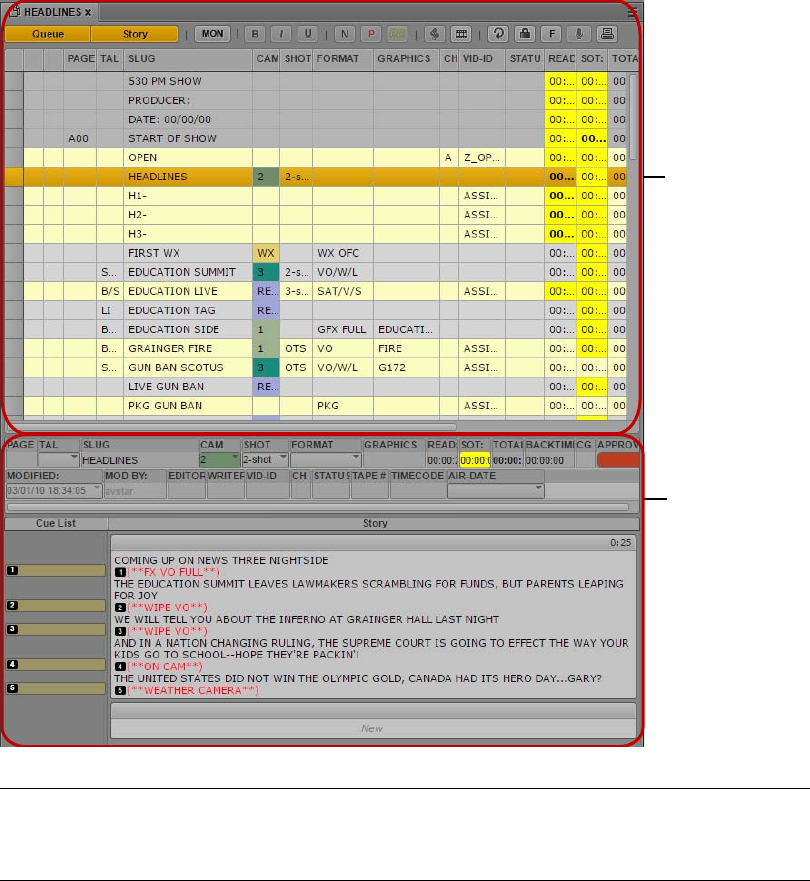
The Queue/Story Pane
88
The name on the tab of a Queue/Story pane changes based on the story you select in the pane. You
can move the mouse pointer over the tab to view the entire path name.
When only the queue is displayed in the pane, the display is called a grid view. When only the story
is shown in the pane, the display is called a story view. When both are visible, the display is called a
split view.
You can use the horizontal dividing line between the queue and story sections of the pane to adjust
the ratio of the split view within the pane. When you position your mouse pointer over the dividing
line, the mouse pointer changes to a double arrow. You can then click and drag the dividing line up or
down to adjust the space allocated to each section of the pane. However, it is not recommended to use
this technique to hide one section of the pane or the other.
The ratio you set is retained when you sign out.
nYou cannot enter data in the Queue section.
qq
ww
1The Queue section
2The Story section, also called the Script Editor. For more information, see “The Script Editor” on
page 90.

The Queue/Story Pane
89
nIf you change queue attributes in iNEWS while you are working in MediaCentral UX, you need to
sign out of MediaCentral UX and sign in again to view your changes.”
The Queue/Story Toolbar
The Queue/Story pane includes a toolbar that has buttons that toggle the display within the pane and
provide functions for editing your story.
Although the toolbar always appears at the top of the pane, even when only the queue is shown in the
grid view, most of the buttons are used for editing stories, not for modifying the queue.
Display or Control Description
1 Queue Toggles display of the queue on or off. When toggled on the button is colored
orange.
2 Story Toggles display of the Story editor on or off. When toggled on the button is
colored orange.
nYou cannot have both the Queue and Story buttons simultaneously toggled
off. When only one is on and you click that button, the system automatically
toggles that display off and the other display on.
3 Monitor Toggles the iNEWS monitor server on or off. See “Controlling the iNEWS
Monitor Server” on page 115.
4 Bold Marks text as bold. See “Editing a Story” on page 95.
5 Italic Marks text as italic.
6 Underline Marks text as underline.
7 Normal Sets text as normal. See “Formatting a Script” on page 97
8 Presenter Sets text as presenter instructions.
9 Closed Caption Sets text as closed-captioning.
10 Template Inserts an iNEWS script template. See “Inserting Script Templates” on page 101
11 Open Sequence Opens the associated sequence. Use this button to create a new script sequence or
to open one previously created. See “Adding Media to a Story” on page 102.
12 Refresh Refreshes the queue.
13 Lock Locks the story. See “Locking and Unlocking a Story” on page 100
14 Float Floats a story in a rundown. See “Floating Stories” on page 114.
15 Annotation Lets you dictate text. See “Using Annotation to Dictate a Story” on page 95.
16 Print Opens the default browser Print dialog box. See “Printing a Rundown View” on
page 120.
qqqwqeqrqtqyquqiqoq1) q1! q1@ q1# gqgq1% q1^
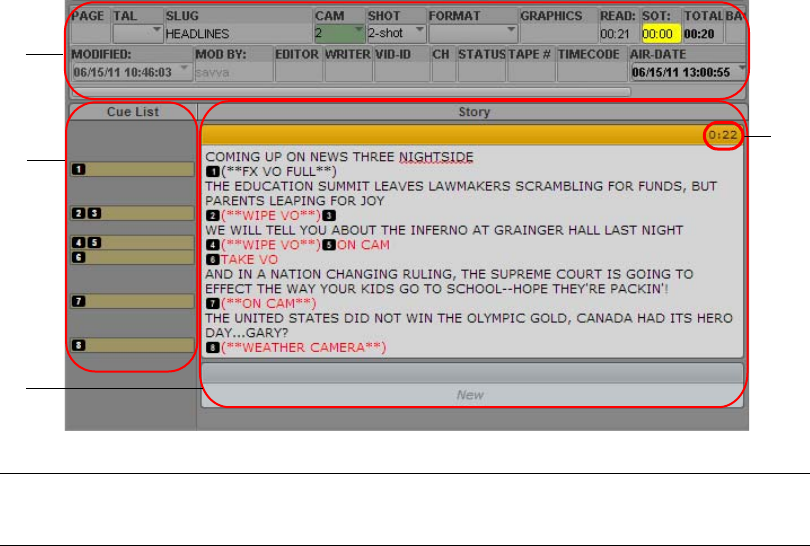
The Queue/Story Pane
90
The Script Editor
The section of the pane in which the story appears is called the Script Editor. There are three sub-
sections of the Script Editor: Story Form, Cue List, and Story. The following illustration identifies
these areas, along with where a story’s timing is displayed.
At the top of every story is the Story Form, which provides story information in fields that are
predetermined by the iNEWS system administrator for each queue in the database. For example, a
form can contain the story’s title (slug), page number, and status. Fields shown in the Story Form
often also appear in the Queue section. Wire queues usually show different fields than rundown
queues. You can edit fields in the Story Form, depending how they are configured by the iNEWS
system administrator.
Avid iNEWS lets a system administrator assign colors to various components. These colors are now
displayed in the following MediaCentral UX areas:
• Queue section: In earlier releases of MediaCentral UX, iNEWS system colors were shown in the
Story Form. These colors are now also shown where applicable in the Queue section (rundown).
If a story is selected in a rundown, any items that use iNEWS system colors display those same
colors.
• Story Form drop-down menus: Any colors shown in Story Form drop-down menus on iNEWS
are also shown in Story Form drop-down menus on MediaCentral UX.
You can use the horizontal dividing line between the Story Form and the rest of the sections to adjust
the ratio of the Script Editor display within the pane. You can also choose to hide the Story Form
while still viewing the other sub-sections of the Script Editor.
qq
ww
ee
er
1Story Form 3Story (text area)
2Cue List 4Timing display
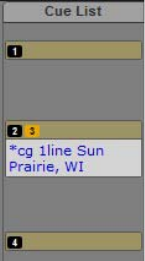
Creating a Story
91
To hide the Story Form, do one of the following:
tClick the Pane Menu button located at the top right corner of the Queue/Story pane and select
Hide Story Form.
tRight-click in the Story Form and select Hide Story Form.
To show the Story Form:
tClick the Pane Menu button located at the top right corner of the Queue/Story pane and select
Show Story Form.
The Story is the sub-section of the Script Editor in which you write your story or view the text of an
existing story. As you type, your text automatically wraps to the next line when you reach the end of
the current line. A scroll bar at the right side of this area appears when text extends beyond the
bounds of the text area.
The timing displays located on the right side of the story’s segment headers show the duration of the
text in each story segment. The duration of the text is based on the read rate that is set in Avid
iNEWS. This number is useful if you create a sequence to accompany your story. See “Editing a
Sequence Associated with a Story” on page 146.
The Cue List is the sub-section of the Script Editor in which you edit production cues and machine
control events, such as those for a character generator (CG). Each cue is numbered within a story,
beginning with one (1). If cues are rearranged in the story, the system renumbers the cues
automatically. The following illustration shows an example of a cue containing a CG event.
For more information, see “Adding Production Cues” on page 97, “Adding Machine Control
Instructions” on page 99, and “Adding a Primary Machine Control Instruction” on page 99.
Creating a Story
You can create a story in MediaCentral UX or edit a story previously created in MediaCentral UX or
iNEWS. For more information on how to edit existing stories, see “Editing a Story” on page 95.
When connected to an iNEWS server version 4.0 or higher, you can create a new story in a queue or
a facet. When you create a story in a facet, the story will be associated with that facet and will live in
a special “project bucket.”
You can add an external link to a story, such as a Web URL.
Creating a Story
92
To create a new story:
1. Navigate to the row in which you want the new story to be inserted in the queue.
2. Click the Pane Menu button located at the top right corner of the Queue/Story pane.
3. Select Create Story.
The existing row is pushed down, and a new row is inserted in the queue at that location.
If you are in split view, you can begin writing your story; if not, open the new story by double-
clicking on the new row.
4. Enter the name of your story in the Title field of the Story Form.
5. Enter the text of your story in the first available segment.
6. Click the Pane Menu button located at the top right corner of the Queue/Story pane.
7. Select Save Story to save your changes.
nNavigating away from a story in the queue automatically saves any changes made to the story, as
does closing the tab or pane.
When you save a story and the preferences were set in your iNEWS client or configuration to
provide a confirmation of the action, MediaCentral UX displays a message asking you to
confirm the save operation. Click OK to save the story or Cancel to delete the new story or to
leave an existing story unmodified. For more information, see “Setting Confirmation
Preferences” in the Avid iNEWS User’s Guide.
nSaving a story does not save a sequence associated with a story. You must save the sequence in the
Sequence pane. See “Saving a Sequence” on page 140 .
To view an existing story:
tSelect the story in the queue you want to view and click the Story button to display the story in
the bottom half of the Queue/Story pane.
To open an existing story to story view:
tDouble-click a story in the queue.
tSelect the story in the queue and click the Queue button.
This toggles off the display of the queue in the Queue/Story pane and displays the story within
the entire pane’s space.

Segmenting Stories
93
Segmenting Stories
You can write a story in a single segment or divide it into multiple segments. The following
illustration shows a story in a single segment.
You can use segments to time the text and integrate it with video, audio, and production cues. See
“Adding Media to a Story” on page 102. Multiple timed segments are combined to form the overall
story. The following illustration shows the same story as the one in the previous example, but written
as a segmented story.
You can add or delete segments, split a segment in two, and rearrange segments within a story.
To add a segment to a story:
tClick in the segment marked NEW located at the bottom of the story and begin typing. See the
previous illustration for an example.
Writing Stories in Right-to-Left Languages
94
To split a segment in two:
1. Position the cursor in the story where you want to split the text into two segments.
2. Do one of the following:
tRight-click and select Split Segment.
tClick the Pane Menu button and select Split Segment.
tPress Ctrl+] (Windows) or Command+] (Macintosh).
To rearrange segments in a story:
tClick the header bar of the segment you want to move and drag it up or down into its new
location.
nWhen you rearrange segments, any production cues or machine control events in those segments are
also moved and renumbered as needed.
To delete a segment and the text in the segment:
1. Select the segment.
2. Click the Pane Menu button located at the top right corner of the Queue/Story pane.
3. Select Delete Segment.
cDeleting the segment also deletes the text in the segment.
Writing Stories in Right-to-Left Languages
The script editor lets you write stories in right-to-left languages (for example, Arabic and Hebrew).
Alignment of the text changes based on the following rules:
• Automatic switching to right-to-left alignment:
- Story segments switch to right-to-left if more than 50 percent of the text consists of right-to-
left characters. To apply the new alignment to a segment, reload the story.
- Production cues switch to right-to-left if more than 50 percent of the text in the production
cue body consists of right-to-left characters.
- Queue grid cells switch to right-to-left and right-aligned if the first character in the cell is a
right-to-left character. If the cell is center-aligned by default, it will remain center-aligned
regardless of cell content.
• Manual switching
- If focus is in any segment, alignment of all segments will be switched. Reloading the story
will return the segment alignment to the default.
- If focus is in the production cue body, only the current cue body alignment will be switched.
Reopening the production cue returns cue body alignment to the default.
- If focus is in a story form field, only the current story form field alignment will be switched.
Reloading the same story form keeps the current field alignment. Reloading a different story
form returns the field to the default.
Using Annotation to Dictate a Story
95
To manually switch alignment of the segment that has focus, do one of the following:
tPress Ctrl+Shift.
tSelect “Switch to RTL” from the Queue/Story Pane menu. If the story is RTL, select “Switch to
LTR.”
tRight-click and select “Switch to RTL.” If the story is RTL, select “Switch to LTR.”
Using Annotation to Dictate a Story
The Annotation feature allows users to dictate their stories, using the Chrome browser's Speech-to-
Text technology.
nThis feature requires a connection to the Internet, and it is only available on Windows-based
computers with Google Chrome, not Apple computers with the Safari browser.
To use the Annotation feature to write stories:
1. Open a blank story and place your cursor in a segment.
2. Click the Annotate button.
A speech bubble appears below the button, instructing you to begin speaking. The speech bubble
also displays an audio level bar and a Cancel button.
3. Speak clearly.
If you want sentence punctuation in your text, you can type it in later, or you can say what
punctuation is needed as you speak. For example, if you want the text to be
Hello, I’m Jane
Doe.
, then you would need to say, “Hello comma I’m Jane Doe period.” The system punctuates
contractions for you.
For best results, conduct your dictation in a location without much background noise. When you
finish talking, the system transfers your speech into text starting at your cursor position.
nA pause in your speech can stop the annotation. To continue, click to position your cursor and click
the Annotate button.
4. After your text is displayed in the Script Editor, you can edit the text as needed.
Editing a Story
When you modify a story, changes you make in MediaCentral UX are automatically updated in the
iNEWS newsroom computer system. The reverse is also true: changes made to a story at an iNEWS
workstation are automatically updated if you open the story in MediaCentral UX.
If you edit a story that is transmitted to a destination queue marked as an update queue, the edited
story replaces the older version in the update queue. For more information on configuring update
queues, see “Setting Automatic Update” in the Avid iNEWS Setup and Configuration Guide.

Editing a Story
96
The standard editing features found in MediaCentral UX are the same as those for most word
processing software applications. You can cut, copy, or paste text as you work on a story. When
cutting or copying text, the system stores the text in a temporary storage spot known as a clipboard;
only one block of text can be stored at a time, so whenever you cut or copy something new, it replaces
whatever was previously stored on the clipboard.
You can use cut, copy, and paste to move text and production cues within a single story or from one
story to another.
You can also edit any editable field for a story in a queue. This includes any editable field that
contains a string value, but it does not include other fields — for example, time or duration fields.
You can also change text to a bold or italicized font, and underline selected text within a story, using
keystroke combinations or the toolbar buttons circled in red in the following illustration.
To cut text:
tSelect the text and press Ctrl+X (Windows) or Command+X (Macintosh).
To copy text:
tSelect the text and press Ctrl+C (Windows) or Command+C (Macintosh).
To paste text:
tSelect the text and press Ctrl+V (Windows) or Command+V (Macintosh).
nTo immediately undo the previous editing change, press Ctrl+Z. On a Macintosh, press
Command+Z.
To undo the previous edit, do one of the following:
tPress Ctrl+Z (Windows) or Command+Z (Macintosh).
tRight-click and select Undo.
tClick the Pane Menu button and select Undo.
To redo the previous edit, do one of the following:
tPress Ctrl+Y (Windows) or Command+Y (Macintosh).
tRight-click and select Redo.
tClick the Pane Menu button and select Undo.
To set text to bold, do one of the following:
tSelect the text and click the B button.
tSelect the text and press Ctrl+B (Windows) or Command+B (Macintosh).
To italicize text, do one of the following:
tSelect the text and click the I button.
tSelect the text and press Ctrl+I (Windows) or Command+I (Macintosh).

Editing a Story
97
To underline text, do one of the following:
tSelect the text and click the U button.
tSelect the text and press Ctrl+U (Windows) or Command+U (Macintosh).
Formatting a Script
When you write a story, the text appears in the normal, the default text style. When you format a
story as a script for a news broadcast, you might need to mark certain text, such as instructions for
presenters or closed captioning.
Presenter instructions are most often used as brief instructions to news presenters (also called news
anchors). The text for presenter instructions appears red in the script, in reverse video on the
teleprompter, and is not included in the text used by the system to calculate the read time.
Closed captioning is most often used for “sound-bite verbatims.” The text for closed captioning
appears green in the script and is sent to a closed caption encoder if your station uses such a device to
broadcast scripts for the hearing-impaired. Closed captioning text does not appear in the
teleprompter, and it is not included in the calculations of a script’s read time.
nThe default normal text style is sent to both the teleprompter and to any closed caption encoder used
at the station.
The following procedures use the toolbar buttons circled in red in the following illustration.
To mark text as a normal text:
tSelect the text and click the N button or press Ctrl+Alt+N (Windows).
To mark text as a presenter instruction:
tSelect the text and click the P button or press Ctrl+Alt+P (Windows).
To mark text as a closed captioning text:
tSelect the text and click the CC button or press Ctrl+Alt+C (Windows).
nYou can click the N, P, or CC buttons before typing your text as well. Any new text you type will
appear in the format you selected. To change the format of the text you type at any time, select
another format.
Adding Production Cues
When you format a story as a script for a news broadcast, you might need to add production cues.
Production cues provide important information to technical staff as well as machine control
commands for devices, such as character generators.
Production cues are added to scripts from the Story area and edited in the Cue List area of the Script
Editor. Each production cue you add is given a numerical value. This number appears in a black box
as a production cue marker in the script, which corresponds to the insertion location of that
production cue’s text box in the Cue List.
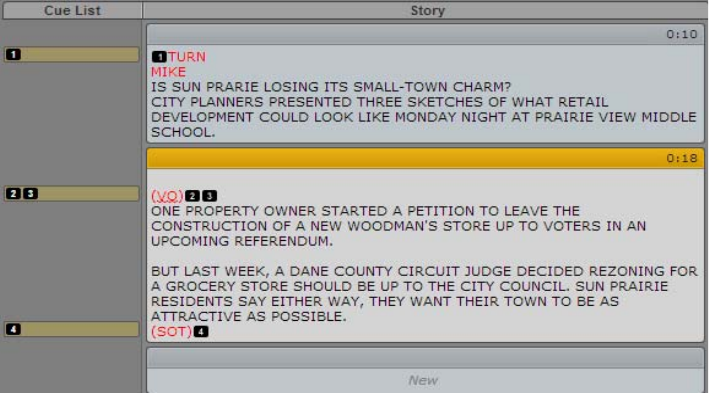
Editing a Story
98
When selected, the production cue marker is colored orange, and the information in the production
cue is visible in the Cue List.
You can copy one or more production cues from one story to another, and you can copy production
cues and paste them within an open story.
To insert a production cue in a script:
1. Position your cursor in the story where you want to insert the production cue marker.
2. Do one of the following:
tRight-click and select Insert Production Cue.
tClick the Pane Menu button and select Insert Production Cue.
tPress Alt+Insert (Windows).
3. Enter the production cue information, such as Take VO, On Camera, Take SOT, or Take Live.
The information is automatically saved when you click someplace else in the story.
To move a production cue in a script:
tClick the production cue’s marker and drag it to another location within the script.
nWhen production cues are rearranged in a script, the system automatically renumbers them,
beginning with one (1). The same renumbering occurs if new production cues are added or existing
ones are deleted.
To delete a production cue from a script:
tSelect the production cue and press the Delete key.
If you delete a production cue and the preferences were set in your iNEWS client or
configuration to provide a confirmation of the action, MediaCentral UX displays a message
asking you to confirm the delete operation. Click OK to delete the production cue or Cancel to
leave the story unmodified. For more information, see “Setting Confirmation Preferences” in the
Avid iNEWS User’s Guide.

Editing a Story
99
To copy one or more production cues to another story:
1. Open two stories.
2. Click and hold the mouse and select the production cue or cues, or text that includes the
production cues.
3. Press Ctrl+C.
4. Position the insert cursor where you want to insert the production cue or cues.
5. Press Ctrl+V.
If necessary, the production cues are renumbered to fit sequentially into the target story.
You can also drag and drop the production cues from one story to another.
Adding Machine Control Instructions
If your station integrates with a broadcast control system, such as iNEWS | Command, the production
cues might include machine control instructions.
These instructions must be preceded by an asterisk (*) and written in a special format, beginning with
a command for the type of device the instruction is for, such as CG for a character generator. After
the command the format specifies a particular item or template, such as 2line for a template that
contains two lines for fulfillment data. If additional comments or information is required it would
follow on succeeding lines in the same production cue text box.
In the following procedure, a machine control instruction for a 2-line character generator graphic is
used as an example.
To add machine control instructions for a CG event:
1. Insert a production cue in the script.
2. In the production cue text box (in the Cue List), type *CG 2line and press Enter.
3. Type the first line of text that should appear on the 2-line CG graphic, such as Mayor Joe Smith.
Press Enter.
4. Type the second line of text that should appear on the 2-line CG graphic, such as Pleasantville.
Your CG machine control instruction will appear in blue font.
Adding a Primary Machine Control Instruction
The machine control event associated with the Story Form, by default, takes precedence over other
machine control commands put into a script, when the event list is generated by the iNEWS monitor
server. If you want the machine control event associated with the Story Form to appear in a position
other than first in the event list, you can insert a placeholder in the Story. The system then inserts the
Story Form machine control event at that location in the event list. You can insert one primary
machine control instruction cue. Only one is allowed in any given story.
Copying Stories
100
Like other machine control instructions, the instructions you type must be preceded by an asterisk (*)
and written in a special format, beginning with a command for the type of device the instruction is
for, such as CG for a character generator.
To insert a primary production cue:
1. Position your cursor in the story where you want to insert the production cue marker.
2. Do one of the following:
tRight-click and select Insert Primary Cue.
tClick the Pane Menu button and select Insert Primary Cue.
A production cue labeled *Primary is created.
Copying Stories
You can copy stories from one location in a queue to another or from one queue to a second queue,
including different queues within an iNEWS Community configuration. If you run a search of
iNEWS stories, you can copy stories from the search results to an open queue.
To copy a story from one location to another, do one of the following:
tSelect the story you want to copy and press the Ctrl key as you drag it to another location in the
queue.
tOpen two queues in separate tabs, then select the story you want to copy from the first queue and
drag it to the second tab and another location in the second queue.
nIf you press Shift while dragging the story, the story is moved from one queue to another without
making a copy.
tSelect a story from the search results in the Search pane, and drag it to another location in an
open queue.
A copied story appears in the new place in the queue or in a new queue.
If you copy a story from one queue to another, and the preferences were set in your iNEWS
client or configuration to provide a confirmation of the action, MediaCentral UX displays a
message asking you to confirm the copy operation. Click OK to complete the copy or Cancel to
leave the queue unmodified. For more information, see “Setting Confirmation Preferences” in
the Avid iNEWS User’s Guide.
Locking and Unlocking a Story
The iNEWS newsroom computer system has multiple types of locks, such as edit locks, segmented
edit locks, easy locks and key locks. Locking a story makes it impossible for another unauthorized
person to change a story while you are working in it. If a story is edit locked by another user, you can
still navigate to that story and view it, but a warning message appears if you attempt to edit the story.
The warning message states:
Unable to obtain edit lock. Story is currently locked by
another user.
Segmented edit locking allows for one user to change Story Form data while another user has a lock
on the story’s text and cue list. This is beneficial for producers who might need to make
modifications in the Story Form section of the Script Editor while a reporter is still working on the
body of the story itself.
Inserting Script Templates
101
Easy locks and key locks can only be applied to a story from an iNEWS workstation, but the security
measures are honored within MediaCentral UX. With easy lock, an iNEWS user locks the story to
his or her user name, so that only that user or an iNEWS system administrator can access it. If any
other user attempts to open an easy-locked story from MediaCentral UX, they will be denied viewing
or editing access to the story. Likewise, an iNEWS user key locks a story by applying a password so
that only those who know the password can view or edit the story. If a MediaCentral UX user
attempts to open a key-locked story, the system will prompt that user for the password.
cSystem administrators cannot supersede the edit lock of another user from MediaCentral UX.
However, neither the easy locking feature nor the key locking feature apply to iNEWS system
administrators. They can access any easy- or key-locked story in the iNEWS database at any
time.
To lock a story, do one of the following:
tBegin typing in the body of the story. An edit lock is automatically applied to the story body.
tClick the Lock/Unlock button in the toolbar. An edit lock is manually applied to the story body.
When you have a story locked, the Lock/Unlock button is colored orange.
To lock the Story Form, do the following:
tBegin typing in any field in the Story Form of a story. The segmented edit lock is automatically
applied.
To unlock a story, do one of the following:
tNavigate to another story in the queue. The story you edited is automatically saved and unlocked.
tClick the Lock/Unlock button.
nIf you click the Unlock button, a confirmation dialog box appears stating the following:
Story has been modified. Do you want to save it before unlocking?
Choose Yes to save it and then unlock the story, No to unlock the story without saving modifications,
or Cancel to return to the story with the edit lock still in place.
Navigating between the Story Form section of the Script Editor to the Story or Cue List sections
releases any segmented edit lock you have on the Story Form. The reverse does the same for any
edit lock you might have on the story body. All changes you made while having either lock are
saved by the system before the locks are released.
Inserting Script Templates
Script templates are templates created by an administrator for you to use to quickly insert predefined
text and segments into stories. For example, if a daily weather story in a show has a standard set of
production cues and presenter instructions that are always the same, an administrator can create a
script template that contains this information. The template can then be made available to
MediaCentral UX users to insert within new stories they write for subsequent shows.
Script templates are inserted at the current cursor position of an opened story.
Inserting MOS Placeholders
102
To insert a script template:
1. Position your cursor in the story body where you want to insert the template information.
2. Do one of the following:
tClick the Template button in the toolbar.
tRight-click and select Insert Script Template.
tPress Ctrl+Shift+I.
3. Select the template you want to use from the list by double-clicking on it.
nIf you already know the name of the template you want, you can also type it in the Search field and
press Enter.
Inserting MOS Placeholders
You can create a placeholder item for a third-party MOS device in an iNEWS story, in either the story
form or as a story’s production cue. To add it to the story form, the story form must be capable of
including MOS information.
nThe iNEWS server must be running iNEWS v4.0.3 or later.
To insert a MOS object placeholder:
1. Position your cursor in one of the following places:
- In a segment in the Story editor.
- In any field in the Story form.
2. Click the Pane Menu button and select Insert Placeholder.
The Create MOS Object Placeholder dialog box opens.
3. Select a device name and enter a title. Optionally, enter a description.
4. Press OK.
The new MOS object placeholder appears as a production cue in the Story editor and the Cue
List, or in the MOS-Title field.
The MOS device user can later update the placeholder with a real ID and object by turning on or
loading the monitor server. The MOS Gateway will then return data back to iNEWS and
MediaCentral UX in the production cue.
Adding Media to a Story
If you want to add media to your story, you need to create a video sequence that is associated with the
story. To create a sequence, click the Open Sequence button in the Queue/Story pane toolbar. You
also use this button to open a sequence that you have already associated with a story. You then can
edit the sequence in the Sequence pane. For more information, see “Using the Sequence Pane” on
page 121 and “Editing a Sequence Associated with a Story” on page 146.
You can set an option to automatically load a sequence associated with a story. Select Home > User
Settings > iNEWS > Autoload Sequence.
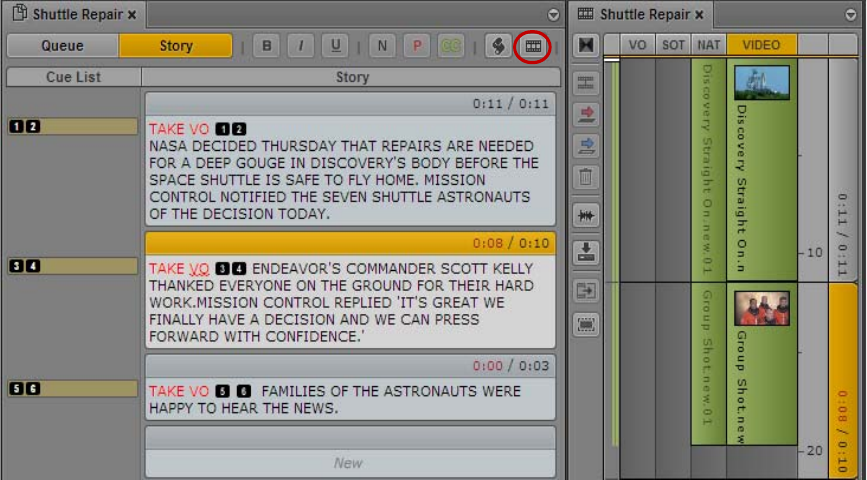
Associating a Sequence with a Story
103
The following illustration shows the Open Sequence button and a sequence that is associated with a
story.
nSaving a story does not save a sequence associated with a story. You must save the sequence in the
Sequence pane. See “Saving a Sequence” on page 140.
Associating a Sequence with a Story
In addition to using MediaCentral UX to create a new sequence for a story (see “Adding Media to a
Story” on page 102), you can associate an existing sequence with an iNEWS story. This lets you
create a video sequence in MediaCentral UX or in Media Composer, and then later associate it with a
story in the iNEWS database. You can associate only one sequence with a story, which then transfers
metadata — such as the information in the fields of the iNEWS story form — from the story to the
existing sequence.
For example, when you associate a sequence with a story, you can transfer the data from the Video ID
field for the story to the Tape ID (Media Composer) or Video ID (MediaCentral UX) for the
sequence. When you then send the sequence to playback, MediaCentral UX automatically sends the
correct ID information to the playback device. See “Associating a Video ID with a Script Sequence”
on page 137.
nIf the story does not have a story (slug) name, the sequence name is used as the story name.
You can associate a sequences with only one story. If you try to associate a sequence with a story that
is already associated with another story, a dialog box asks you if you want to duplicate the sequence.
If you duplicate the sequence, a second sequence is created with a new sequence name:
[sequence_name].duplicate. You can move the new sequence to another folder, and the sequence
maintains its association.
If you associate a sequence with a story that already has a sequence associated with it, you can
overwrite the existing association with the new sequence.

Associating a Sequence with a Story
104
You can update the timing field for a story when you associate a sequence with it so that the duration
of a story matches the duration of the sequence. If you unassociate a sequence from a story, the
duration of the story returns to its original value. The following table illustrates the effect associating
a sequence with a story has on the story timing.
You can also use the Tape ID or Video ID of a sequence to update an iNEWS frame field, or use an
iNEWS frame field to supply the value of a sequence Tape ID or Video ID if none exists. You set
these options in the iNEWS group of the System Settings.
The following table provides an example of how this setting affects the metadata for associated
sequences.
You cannot associate a sequence with a locked story, and you must have write permissions to the
story in order to associate a sequence.
To set options for associating sequences with stories:
1. Sign in to MediaCentral UX as an administrator.
2. Select System Settings from the Layout selector.
The System Settings layout opens.
3. In the Settings pane select iNEWS.
The Details pane displays the iNEWS settings.
Story Duration Value Sequence Duration Value Selected Timing Field Result
1 minute 2 minutes 2 minutes
2 minutes 1 minute 1 minute
Sequence Tape ID or
Video ID Value
Associated iNEWS
Field Value
Sequence Tape ID or
Video ID Result
Associated iNEWS
Field Result
empty empty empty empty
empty ID-456 ID-456 ID-456
ID-123 empty ID-123 ID-123
ID-123 ID-456 ID-123 ID-123
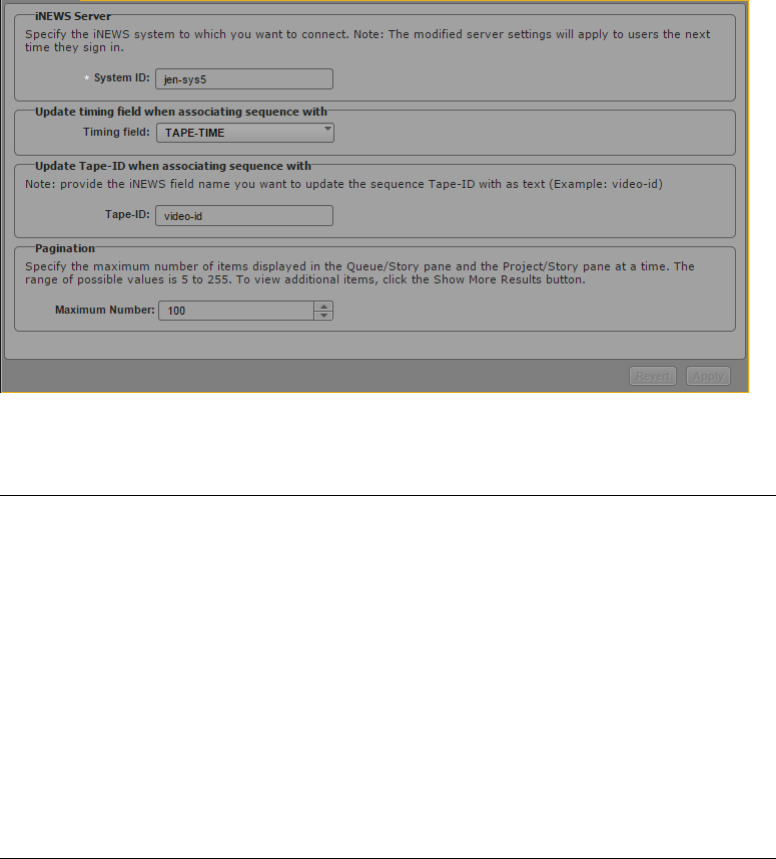
Associating a Sequence with a Story
105
4. To specify how the timing field is updated, click the Timing field menu in the Details pane and
select one of the following:
For more information on these options, see “Form Field Types and Definitions” in the Avid
iNEWS Setup and Configuration Guide.
5. To specify which iNEWS field you want to use to update the sequence Tape-ID metadata field,
type the appropriate field name in the Tape-ID text box.
6. Click Apply to save your new settings or click Revert to replace changed information with the
previously saved settings.
To associate a sequence with a story:
1. Open your story in the Queue/Story pane.
2. Open the sequence in the Interplay database that you want to associate with your story.
3. Drag the sequence from the Media pane, the Asset pane, or the results list in the Search pane, and
then drop it on your iNEWS story.
AUDIO-TIME This field displays the estimated read time for a story. Unless specified
manually, the estimated time is based on the length of the story and
presenter’s read rate. If there is also a TAPE-TIME field in the story form, the
system adds the TAPE-TIME to the AUDIO-TIME to calculate the story’s
total time.
TAPE-TIME If there is an AUDIO-TIME field, the system adds tape time to audio time to
calculate the story’s total time.
MOS-DURATION This field is required to allow duration information from MOS or CAP events
to be included in calculations for CUME-TIME, BACK-TIME or TOTAL-
TIME fields. The contents of MOS-DURATION field are only used if a
RUNS-TIME field is present in the story.
DURATION This field can be used to store manually entered, suggested duration. The
value is not used for time calculation in any other fields.
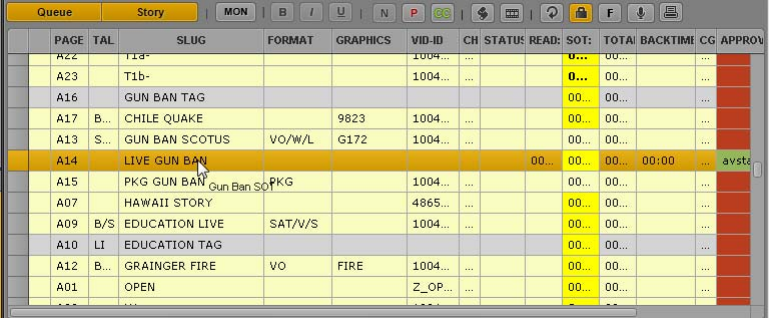
Associating a Sequence with a Story
106
nYou cannot undo this action. If you want to associate a different sequence with your story, select a
new sequence and repeat the procedure.
The new sequence becomes an associated sequence.
To associate a sequence with more than one story:
1. Open your story in the Queue/Story pane.
2. Open the sequence in the Interplay database that you want to associate with your story.
3. Drag the sequence from the Media pane, the Asset pane, or the results list in the Search pane, and
then drop it on your iNEWS story.
A dialog box opens and asks if you want to create a duplicate sequence.
4. Click Yes to create a duplicate sequence.
A duplicated sequence is created in the same folder as the original sequence, and it becomes an
associated sequence.
To associate a different sequence with a story:
1. Open your story in the Queue/Story pane.
2. Open the new sequence in the Interplay database that you want to associate with your story.
3. Drag the sequence from the Media pane, the Asset pane, or the results list in the Search pane, and
then drop it on your iNEWS story.
A dialog box opens and asks if you want to override the existing associated sequence with the
new one.
4. Click Yes.
The new sequence replaces the old associated sequence.
To remove the associated sequence from a story, do one of the following:
tRight-click the story in the queue, and then select Unassociate Sequence.
tSelect the story in the queue, click the Pane Menu button, and select Unassociate Sequence.
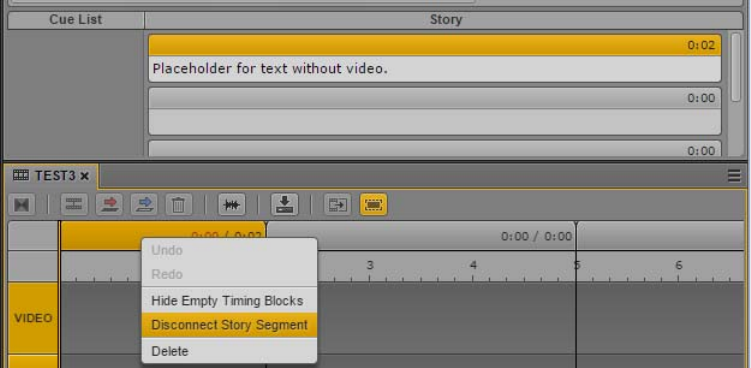
Creating a Text-Only Story Segment
107
Creating a Text-Only Story Segment
For some news stories, you might need to create a story segment that is not associated with video in
the story. For example, a story might include presenter text before the video starts. MediaCentral UX
v2.1.2 and later lets you create a story segment that does not display a corresponding timing block in
the sequence.
You can create more than one text-only story segment in a sequence.
nYou cannot disconnect a story segment if the corresponding timing block contains video. The menu
option is grayed out.
To create a text-only story segment:
1. Create a story segment. You can place it anywhere in the story. You can include the text now or
later.
A corresponding timing block is created in the sequence.
2. In the Sequence pane, right-click the header of the new timing block and select “Disconnect
Story Segment.”
The timing block is removed from the sequence.
If you extend a video or audio segment into a timing block that was removed, the timing block is
displayed.
To reconnect text-only story segments:
tClick the Sequence Pane menu button and select “Reconnect Story Segments.”
This action displays any timing blocks that were previously removed.
Any changes you make to the sequence are saved with the sequence. If you disconnect a story
segment and save the sequence, the next time you open the sequence the story segment will still be
disconnected.
Copying and Sending iNEWS Links
108
Copying and Sending iNEWS Links
You can copy and send links to stories, queues, iNEWS folders, iNEWS facets, and iNEWS projects.
These links are in URL format and can be shared through e-mail, wikis, documents, or chat
messages. The links are valid as long as the item exists in the iNEWS database.
When you click an iNEWS link or paste it into the address bar of a supported browser,
MediaCentral UX opens with the correct layout and asset selection. If you are not signed in, the sign-
in screen is displayed. After signing in, the link target is displayed.
You can select Copy Link or Copy Container Link. Copy Link creates a link to the selected item, and
Copy Container Link creates a link to the item that holds the selected item.
To create a URL for an iNEWS link from the Asset pane, do one of the following:
tIn an iNEWS list, right-click an item and select Copy Link.
tIn an iNEWS list, select an item, click the Pane Menu button, and select Copy Link or Copy
Container Link.
To create a URL for an iNEWS link from the Queue/Story pane or the Project/Story pane, do
one of the following:
tRight-click an item and select Copy Link.
tSelect an item, click the Pane Menu button, and select Copy Link or Copy Container Link.
To create a URL for an iNEWS project link from the Launch pane, do one of the following:
tRight-click an item and select Copy Link.
tSelect an item, click the Pane Menu button, and select Copy Link.
In all cases, a popup dialog box opens with a URL that is already selected for copying. Press Ctrl+C
(Windows) or Command+C (Macintosh) to copy the link, then use Ctrl+V (Windows) or
Command+V (Macintosh) to paste the link.
Recovering Stories In Case of Disconnect
When you work in MediaCentral UX, the state of your story is stored on your local Windows or
Macintosh system every 10 seconds. This feature is helpful in case of a disconnection or service
failure, or if you close a browser session without saving your work. This feature is also helpful if
your administrator sets an automatic session timeout.
Edits made during the last ten seconds cannot be recovered.
nFor information about recovering sequences, see “Recovering Sequences” on page 143.
You can recover your unsaved changes in several different ways:
• If a disconnection or failure occurs and you remain signed in, the editing functions of the Queue/
Story pane are deactivated, and the Auto Recovery dialog box is displayed, as described below.
• If the disconnection or failure results in the need to sign in again, a dialog box is displayed that
lists assets with unsaved changes.
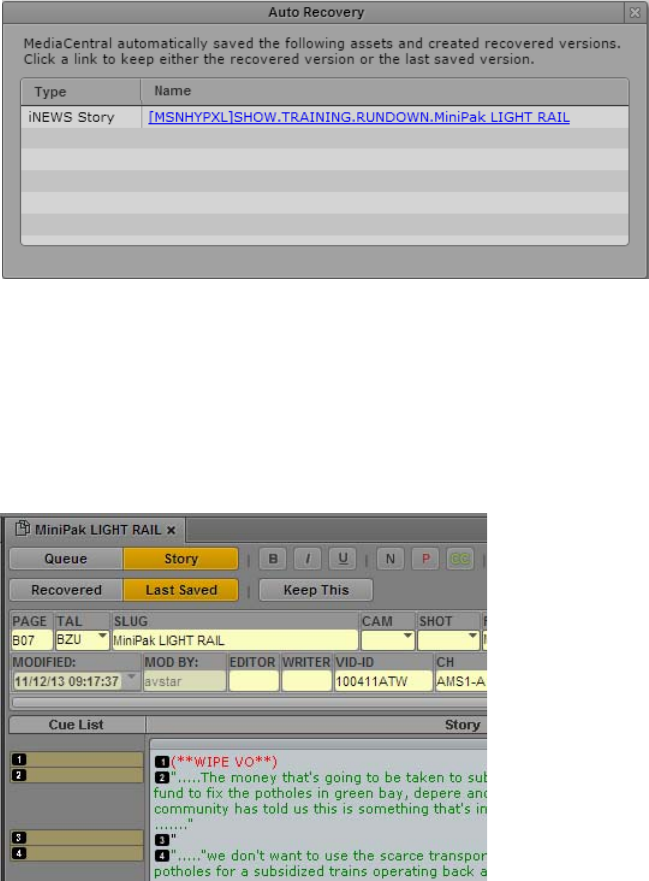
Recovering Stories In Case of Disconnect
109
Click the name of the asset to open the last saved version. If the asset is a story, the Queue/Story
pane displays three additional buttons:
- Recovered: Click this button to open the recovery file (from the local system).
- Last Saved: Click this button to open the last saved file (from the Interplay Production
database).
- Keep This: Click this button to save the version that you display and delete the other version.
If the story includes a script sequence, and the Sequence pane is open, these buttons are
displayed on the Sequence pane.
You can switch back and forth between versions to compare them, and click the Keep This
button when you decide which version to keep.
• If you close the Auto Recovery dialog box without selecting an asset, you can select Auto-
Recovered Assets from the Queue/Story pane menu to display the Auto Recovery dialog. This
option appears only if auto-recovered assets are available.
nThis feature works similarly for stories and sequences. For specific information about auto-save for
sequences, see “Recovering Sequences” on page 143.
nIf your browser crashes, but the MediaCentral UX session and iNEWS session are still active, iNEWS
stories are locked for five minutes. You will not be able to edit or restore the story unless the lock is
released or the MediaCentral UX and iNEWS sessions end. You can ask your MediaCentral UX
administrator to end the MediaCentral UX session, which will release the lock.
Deleting or Recovering a Deleted Story
110
Deleting or Recovering a Deleted Story
When an iNEWS story is deleted, it is sent to a folder labeled Dead (the Dead queue), from which an
administrator can retrieve it for a limited amount of time. This time frame is pre-determined based on
a purge interval set for that queue by each site’s system administrator.
To delete a story:
1. Select the story.
2. Click the Pane Menu button located at the top right corner of the Queue/Story pane.
3. Select Delete Story.
If you delete a story and the preferences were set in your iNEWS client or configuration to
provide a confirmation of the action, MediaCentral UX displays a message asking you to
confirm the delete operation. Click OK to delete the story or Cancel to leave the story in the
queue. For more information, see “Setting Confirmation Preferences” in the Avid iNEWS User’s
Guide.
If you want to recover a deleted story, contact your system administrator to retrieve it from the
Dead queue. After the story is purged from the Dead queue, it cannot be retrieved.
Dragging a Script Sequence from MediaCentral | UX to
Media Composer
(Windows only) If you are running Media Composer and MediaCentral UX on the same system, you
can view or edit a sequence associated with a news story by dragging the story from
MediaCentral UX to a Media Composer bin or source monitor. The associated sequence is then
available for viewing or editing in Media Composer.
Requirements:
• A Windows computer running Media Composer v8.5.2 or later, with access to an Interplay
Production workgroup.
• Access to a server running MediaCentral UX v2.6.1 or later. This MediaCentral server must be
associated with the same Interplay Production server that you are logged in to.
To drag a sequence from MediaCentral UX to Media Composer:
1. Open a Media Composer project.
2. Log in to Interplay Production.
3. Open MediaCentral UX in a Chrome browser window and sign in.
4. In MediaCentral UX, open a queue that contains the story whose sequence you want to open in
Media Composer.
MediaCentral UX shows a sequence icon if a sequence is associated with a story.
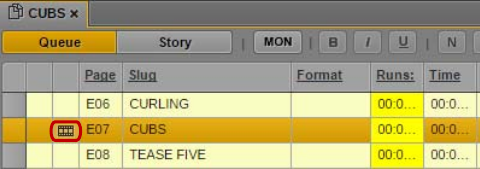
Production Tasks
111
5. Do one of the following:
tSelect one or more stories, drag them to Media Composer, and drop them into a bin.
You can then work with the sequence or sequences as you do with any other Media
Composer sequence. Note that editing the sequence and checking it in to Interplay
Production might make it uneditable or unplayable in MediaCentral UX. For more
information, see “Opening and Editing an Existing Sequence in the Sequence Pane” on
page 144.
tSelect a story, drag it to Media Composer, and drop it into a source monitor.
You can play the sequence without adding it to a bin. Note that if you make changes, like
adding locators or properties, you must save the changes to Interplay Production by right-
clicking the monitor and selecting “Check In to Interplay”.
Note the following limitations for Media Composer v8.5.2, which are removed in v8.5.3:
• If you drag to the Record monitor, the drag cursor indicates that you can drop, but nothing
happens if you do. Dragging to the Record monitor is not supported.
• If you drag to the Source monitor and make changes to the sequence (such as adding locators),
and you do not check in the sequence, you could lose these changes if you clear the monitor or
load another asset into the monitor.
If you lose your changes, your modified asset might still be in the monitor menu, so you might
be able to recover the asset until you close the project or flush the asset out of the monitor menu.
• Drag and drop into the Source monitor fails with an error message (“Dragging from a remote
workgroup is not supported”) if there is a mismatch between the Interplay Engine name used for
login from Media Composer and the Interplay Engine name displayed in MediaCentral UX.
Make sure the captalization matches.
Production Tasks
Some tasks considered to be typically done by producers or production staff—such as grouping
stories, reordering queues, turning on the monitor server, and floating stories—are available via the
Queue/Story pane in MediaCentral UX.
•“Grouping Stories” on page 112
•“Ordering a Queue” on page 113
•“Floating Stories” on page 114
•“Controlling the iNEWS Monitor Server” on page 115
•“Modifying Fields in the Queue Grid View” on page 117
•“Displaying iNEWS Timing Clocks” on page 119
•“Formatting a Script” on page 97
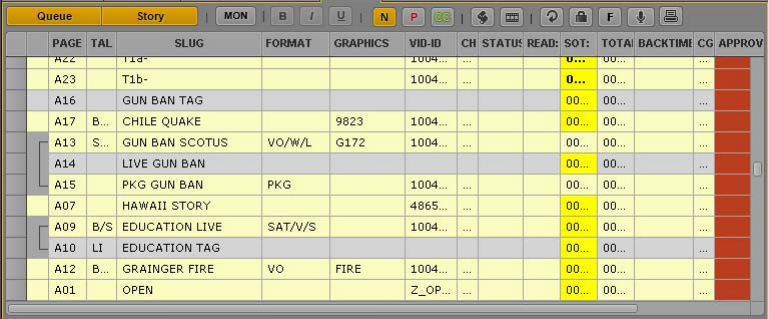
Production Tasks
112
Grouping Stories
You can group stories within a queue to link them together. For example, a producer might want to
link a presenter’s intro and tag before and after a reporter’s package as a story group within a
rundown. When stories in a queue can be grouped, a Story Group column appears as the second
column in the Queue panel located next to first column of selector buttons.
nYou can only create groups from contiguous stories.
The following illustration shows two story groups: the first with three stories about a gun ban, and the
second with two stories about education.
After you create a group, you can move the group together within a queue. You can also create stories
within an existing group or remove them from a story group.
To create a group from existing stories:
1. In the Queue/Story pane, shift+click to select two or more consecutive stories.
2. Do one of the following:
tRight-click and select Create Story Group.
tClick the Pane Menu button, and select Create Story Group.
tPress Ctrl+Alt+G.
To add a story or stories to an existing group, do one of the following:
tPosition your cursor within the group and create a new story. Creating a new story between rows
of a group adds the new story to that group.
tDrag a story or a selection of stories and drop them between the rows of a group.
tIf the story you want to add is located in the row directly above or below the group to which you
want to add it, select it along with the story group, then right-click and select Create Story
Group.
To remove a story from a story group, do the following:
tSelect the story, and then drag it to a new location in the queue.
Production Tasks
113
To move a story group:
1. In the Queue/Story panel, click any square within the Story Group column to select the group.
2. Drag and drop the group into its new location within the queue.
You can drag and drop a story group anywhere within a single queue or from one queue to
another in a different workspace and group associations are retained.
To ungroup a group of stories, do one of the following:
tIn the Queue/Story panel, right-click any story within the group and select Dissolve Story Group.
tClick the Pane Menu button, and select Dissolve Story Group.
tPress Ctrl+Alt+V.
Ordering a Queue
As the stories in a rundown queue develop, the order in which they are presented in the newscast can
change. Only individuals with the proper permissions to order queues (usually a member of the
production staff) can do so.
Users with ordering privileges can select and move stories to change their sequence within a queue.
You can select one or multiple stories, and you can reorder the rundown by dragging the stories to a
new position and dropping them in the new location. An ordered queue can also be locked to prevent
changes to the story sequence.
You can also hold the Ctrl key down as you drag a story to copy it from one location to another or
from one queue to another. For more information, see “Copying Stories” on page 100. When a show
is underway, you can also “float” a story, which will keep the story in the queue but remove it from
show timing, teleprompters, and machine control. For more information, see “Floating Stories” on
page 114.
To order a queue:
1. Open the queue you want to order.
For more information, see “Navigating the iNEWS Database” on page 44.
2. Select the story you want to order. Ctrl+click to select multiple stories, or Shift+click to select a
range of stories.
3. With the stories selected, place the mouse pointer on the first column of one selected story, and
then drag the stories and drop them at the new location.
A line indicator shows the intended new order, and the repositioned stories appear in their new
place within the queue when you release the mouse pointer.

Production Tasks
114
If you reorder a queue, and the preferences were set in your iNEWS client or configuration to
provide a confirmation of the action, MediaCentral UX displays a message asking you to
confirm the story reordering. Click OK to complete the copy or Cancel to leave the queue
unmodified. For more information, see “Setting Confirmation Preferences” in the Avid iNEWS
User’s Guide.
Floating Stories
When you are unsure where in a rundown you want to place a story or whether you want to keep it in
the rundown at all, you can float the story. Floating a story keeps it in the queue but removes the
story’s time from the show timing, causing it to be ignored by machine control and the network
prompters.
To float a story:
1. Open the queue containing the story with which you want to work.
For more information, see “Editing a Story” on page 95.
2. Click a story to select it. Ctrl+click to select multiple stories, or Shift+click to select a range of
stories.
3. Do one of the following:
tClick the Float button in the toolbar.
tRight-click and select Float.
tPress Alt+F.
tClick the Pane menu and select Float.
The story you chose is now floating, or removed from the show’s timing. The Float button is
highlighted, and the floated story displays blue text in the queue.
4. To add the story time back to the rundown, click the Float button again or right-click and select
Unfloat.
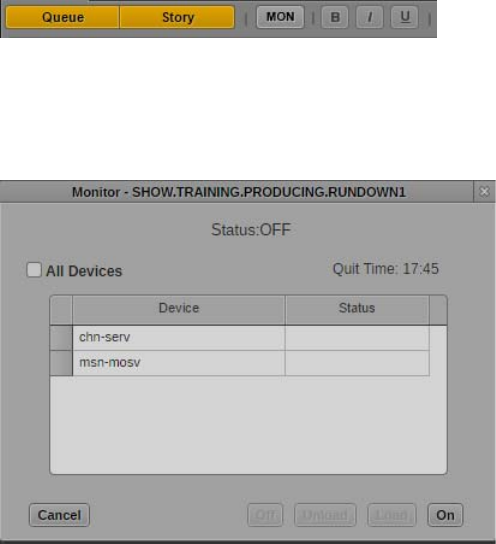
Production Tasks
115
Controlling the iNEWS Monitor Server
The monitor server is a utility program that runs on the iNEWS server. When turned on, it checks its
assigned rundown for machine control events, reports any errors, and creates a playlist. When
“loaded,” the monitor server sends its playlist to a specified device automation system, such as
iNEWS | Command.
nMediaCentral UX v2.6.x and v2.7.x allowed users to turn the monitor server on and off but did not
allow users to load the monitor server.
The Queue/Story pane toolbar includes a button labeled MON, which provides authorized users
access to the Monitor dialog box.
The Monitor dialog box provides options for controlling the iNEWS monitor server. Options in this
dialog box depend on the status of the monitor. The following illustration shows the dialog box when
the status of the monitor is OFF.
The Device list shows production devices that are configured for the selected queue. You can select
one or more devices to load into the monitor. The Status column indicates the status of the device by
color:
•Gray: Not loaded
• Orange: Selected
• Green: Loaded
The Quit Time displayed in the upper right is the time set by the iNEWS system administrator to
automatically shut off broadcast control if either the producer or character generator operator forgets
to turn the monitor server off at the end of the show. You can manually turn off broadcast control at
any time by using the Monitor dialog box. You should manually shut off the monitor server when you
are done with the show rather than relying on the automatic shutoff.
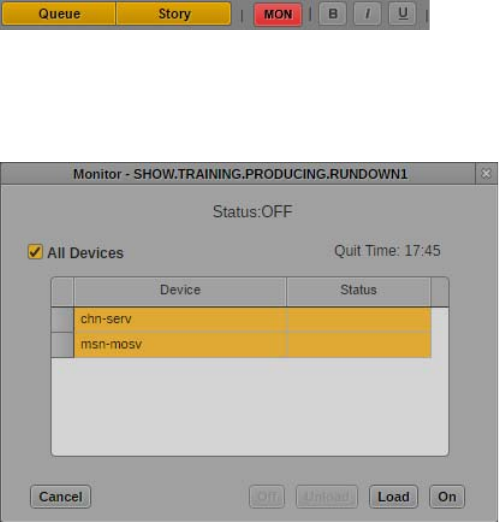
Production Tasks
116
nThe MON button is disabled for MediaCentral UX users who do not have permission to invoke the
monitor server. Positioning the mouse pointer over the MON button displays a tooltip that states
“Current user does not have monitor permissions for this rundown.”
To control the iNEWS monitor server:
1. Click the MON button.
The Monitor dialog box is displayed in the state it was last set.
2. Do one of the following:
tClick On to turn the monitor on.
The dialog box closes, and the MON button turns orange. While on, the iNEWS monitor
server checks its assigned rundown, performing as much error checking as it can by
comparing machine control events with styles located in the SYSTEM.RESOURCE queue,
and without actually communicating with any broadcast equipment. The MON button turns
red if errors are discovered.
tSelect a device by clicking the device name. To select more than one device, hold down
Control while you select up to three devices. To load all devices, click All Devices. After
you have made your selections, click Load.
The dialog box closes, the MON button turns yellow, and then green, to indicate that the
selected devices are loaded. In addition to checking the status as described in the previous
option, the monitor downloads the playlist to the selected devices. If you click the MON
button, the Monitor dialog box shows the status as LOADED.

Production Tasks
117
tClick Unload to clear the playlist from the devices without turning off broadcast control.
tClick Off to turn off the monitor server. This option overrides the automatic shutoff time that
appears in the Quit Time field.
cTo avoid having a user accidentally turn off a loaded monitor server, Avid recommends using
group security (in MAP story for rundowns) to ensure only specific users have permission to
invoke the monitor server from the MediaCentral UX interface. For more information on
group security, see the Avid iNEWS Setup and Configuration Guide.
Modifying Fields in the Queue Grid View
Some fields in the Queue grid can be modified directly in the grid. Text fields, such as the Slug, can
be modified by typing in the grid cell if you have the appropriate permissions. Other fields, such as a
field for story formats, provide a menu of predefined options (also called Combobox fields because
they include both text and menu options). Your iNEWS system manager defines the labels, content,
and layout of the queue fields.
nSome fields in the queue grid might be read-only and cannot be edited. Your iNEWS system manager
can specify certain editable fields that allow you to type text and select from menu options.
To edit text fields for a story in a queue grid:
1. Click within a text field in the queue. Double-clicking the field selects all text in the field.
The story’s row is highlighted, and the cell is active for editing.
2. (Optional) If you edit text in a right-to-left (RTL) language, right-click the active field and select
Switch to RTL.
3. Type to edit the contents of the field. You can also use keyboard shortcuts to copy, cut, and paste
text within the field.
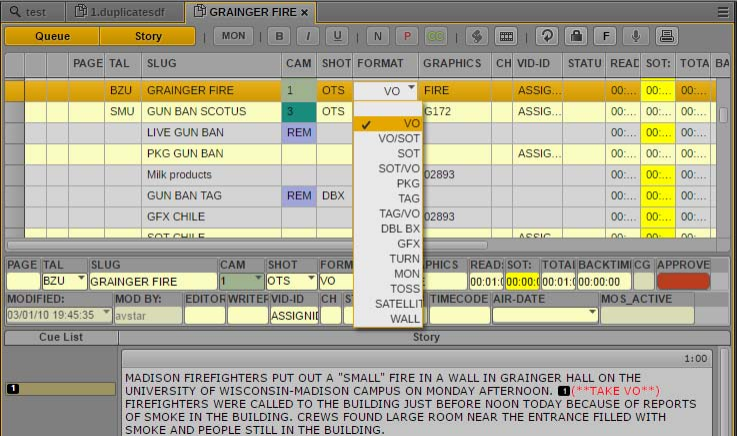
Production Tasks
118
4. When you finish editing the field, click another row to save your changes.
nClicking another field in the same row in the queue does not save your edits.
5. If the option to display a confirmation dialog on story save is enabled on your iNEWS server, a
dialog box displays asking you to confirm your changes. Click Yes to save your changes.
You can click No to discard your changes, or you can click Cancel to return to editing the story’s
row.
To edit Combobox fields for a story in a queue grid:
1. Click within a Combobox field in the queue.
The story’s row is highlighted, and the cell is active for editing.
2. Do one of the following:
tClick the cell menu and select a value.
tStart typing a new value. If the menu options for the cell include an appropriate value, the
value automatically displays in the cell.
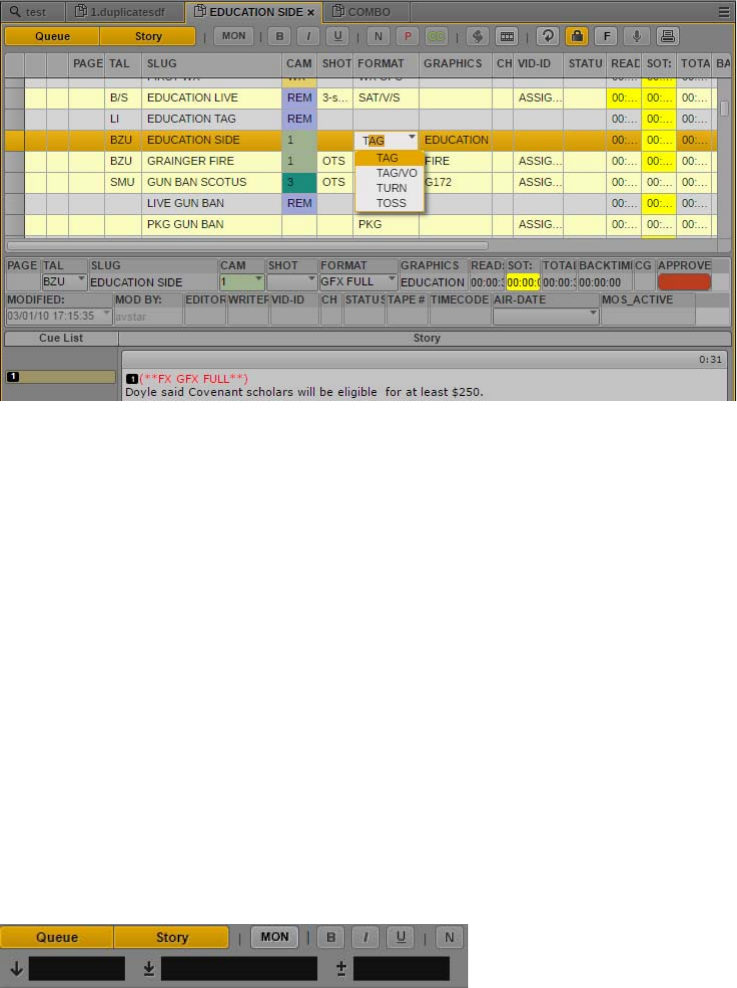
Production Tasks
119
3. When you finish editing the field, click another row to save your changes.
nClicking another field in the same row in the queue does not save your edits.
4. If the option to display a confirmation dialog on story save is enabled on your iNEWS server, a
dialog box displays asking you to confirm your changes. Click Yes to save your changes.
You can click No to discard your changes, or you can click Cancel to return to editing the story’s
row.
Displaying iNEWS Timing Clocks
MediaCentral UX can display the iNEWS show timing clocks, which provide up-to-the-second
information related to an on-air show.
To view the show timing clocks:
1. Click the Pane Menu button located at the top right corner of the Queue/Story pane.
2. Select Show Timing Clocks. When chosen, the pane’s toolbar expands to display three clocks
underneath the Queue and Story buttons.
The show timing clocks are blank (as shown) when show timing is off. From left to right, the
show timing clocks are:
- Item Countdown: This clock displays the time remaining for the current story.
- Segment Countdown: This clock displays the time remaining until the next hard out.
- Over/Under Clock: This clock displays how much over or under the show is, based on the
position of the show timing bar in the rundown—helping to synchronize the rundown to the
actual broadcast. The numerals appear red for overtime and green for under or on time.
nDisplaying the show timing clocks in this manner does not allow a MediaCentral UX user to control
the show’s timing. That is done from an Avid iNEWS workstation.

Production Tasks
120
Printing a Rundown View
In the event that you need a printed copy of a show’s rundown, you can print the current rundown
view from MediaCentral UX.
To print the current rundown view:
tClick the Print button.
The default browser Print dialog box opens, letting you send the current rundown view to a
printer of your choice.

5Using the Sequence Pane
The following main topics describe the Sequence pane and how to use it:
•Displaying the Sequence Pane
•The Sequence Pane
•Understanding Basic and Advanced Sequences
•Displaying Media Status in the Timeline
•Selecting a Horizontal or Vertical Timeline
•Navigating in the Sequence Timeline
•Using the Sequence Zoom Bar
•Viewing Sequence Information
•Creating a Sequence
•Saving a Sequence
•Saving a Version of a Sequence
•Recovering Sequences
•Opening and Editing an Existing Sequence in the Sequence Pane
•Opening a Sequence Associated with a Story
•Editing a Sequence Associated with a Story
•Editing a Sequence
•Synchronizing Broadcast Graphics with a MediaCentral | UX Sequence
Displaying the Sequence Pane
The Sequence pane is displayed in the default Cut, Log, and Story layouts. It is displayed with a
horizontal timeline in the Cut and Log layouts, and with a vertical timeline in the Story layout. You
can change the orientation if you prefer (see “Selecting a Horizontal or Vertical Timeline” on
page 128).
To display the Sequence pane:
tSelect Panes > Sequence.
The Sequence pane opens in the mode and orientation in which it was set when you signed out of
the application.
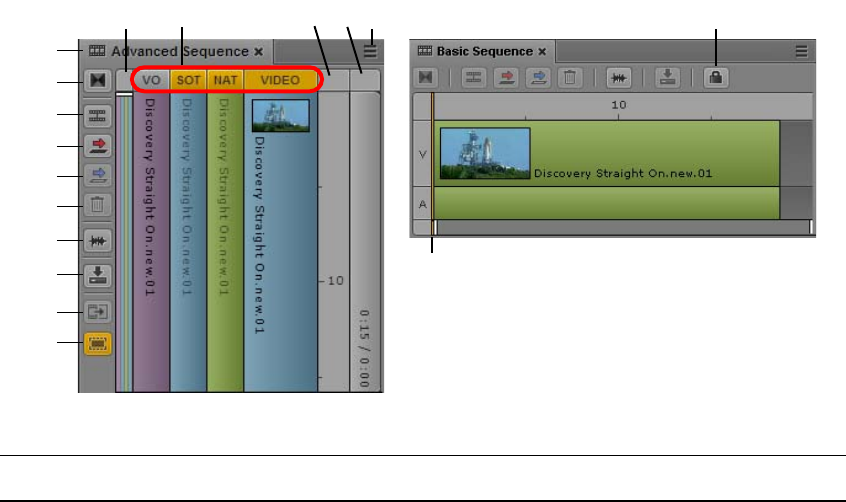
The Sequence Pane
122
The Sequence Pane
The Sequence pane includes the Sequence Timeline and controls that let you edit a sequence. You
can work with one of two Sequence Timelines: basic or advanced. See “Understanding Basic and
Advanced Sequences” on page 125.
You can display the Sequence pane with a vertical timeline or a horizontal timeline.
The following illustration shows the two timelines and two orientations and identifies the controls.
Left: Vertical timeline for an advanced sequence. Right: Horizontal timeline for a basic sequence.
qq
ww
ee
er
1@
et
ey
eu
ei
eo
e1)
1! 1# 1$1%
1^
1&
Control Description
1 Sequence Pane tab Move the mouse pointer over the tab to display
information about the sequence. See “Viewing
Sequence Information” on page 132.
2 Add Video Dissolve button Adds a video dissolve (advanced sequence only). See
“Inserting Video Dissolves (Advanced Sequences
Only)” on page 184.
3 Split button Divides one or more segments into two at the position
indicator. See “Splitting a Segment” on page 182.
4 Overwrite button Performs an overwrite edit. See “Performing an
Overwrite Edit in a Basic Sequence” on page 160 and
“Performing an Overwrite Edit in an Advanced
Sequence” on page 162.
5 Replace button Performs a replace edit. See “Performing a Replace
Edit” on page 166.
6 Delete Segment button Deletes the selected segment from the sequence. See
“Moving or Deleting Segments in the Timeline” on
page 174.
7 Audio pane button Opens the Audio pane or brings it to the front.

The Sequence Pane
123
8 Save button Saves the sequence in the Interplay Production or
Interplay MAM database. See “Saving a Sequence” on
page 140.
9 Extend/Retract button (Script sequence only) Extends a segment beyond the
boundary of a timing block or retracts it. See
“Extending a Segment into Another Timing Block” on
page 152.
10 Show/Hide Empty Timing Blocks (Script sequence only) Shows or hides empty timing
blocks. See “Showing and Hiding Empty Timing
Blocks” on page 154.
11 Sequence zoom bar Lets you enlarge a section of the timeline. Displays
segments, tracks, and other sequence information. See
“Using the Sequence Zoom Bar” on page 129.
12 Track selectors Lets you select the track for an insert edit, an overwrite
edit, or a split segment operation (advanced sequence
only). See
•“Performing an Insert Edit in an Advanced
Sequence” on page 159
•“Performing an Overwrite Edit in an Advanced
Sequence” on page 162
•“Splitting a Segment” on page 182
13 Timecode bar Displays timing for the sequence in hours, minutes,
and seconds, depending on the length of the loaded
asset. Click in the timecode bar to drag the position
indicator, Right-click in the timecode bar to access
certain commands.
14 Timing block header (Script sequence only) Displays the duration of the
media currently contained in the timing block and the
duration of the text in the associated story segment. See
“Working with Timing Displays” on page 149.
15 Pane Menu button Provides options for working with sequences.
16 Position indicator Lets you scrub through a clip or sequence.
17 Lock button Lets you manually lock a sequence to prevent other
users from editing the same sequence. See “Locking a
Basic Sequence (Interplay | MAM)” on page 157.
Control Description

The Sequence Pane
124
The following table describes the items in the Pane menu.
nThe Sequence pane does not include commands to create a new sequence.
You cannot add clips to the timeline until you have created or loaded a sequence. See “Creating a
Sequence” on page 134.
Menu Item Description
Undo Undoes the previous edit. See “Undoing and Redoing
an Action in the Sequence Pane” on page 173.
Redo Redoes the next previously undone edit.
Save As Lets you rename and save a sequence in a different
location. See “Saving a Version of a Sequence” on
page 141.
Save Sequence Saves the sequence in its current location in the
Interplay Production or Interplay MAM database. See
“Saving a Sequence” on page 140.
Insert Dissolve Inserts a video dissolve (advanced sequence only). See
“Inserting Video Dissolves (Advanced Sequences
Only)” on page 184.
Split Divides one or more segments into two at the position
indicator. See “Splitting a Segment” on page 182.
Delete item-name Deletes the selected item (segment, effect, graphic)
Modify Start Timecode See “Modifying the Start Timecode” on page 185.
Hide/Show Empty Timing Blocks (Script segment only) Shows or hides empty timing
blocks. See “Showing and Hiding Empty Timing
Blocks” on page 154.
Transcode Sends a sequence to mixdown. See “Transcoding
Assets” on page 222.
Show Media Status Displays colored segments that represent the media
status. See “Displaying Media Status in the Timeline”
on page 126.
Audio Scrubbing Enables or disables audio scrubbing. A check mark
shows that audio scrubbing is enabled. See “Enabling
Audio Scrubbing” on page 185.
Orientation Lets you select the orientation of the timeline and
toolbar: horizontal or vertical. See “Selecting a
Horizontal or Vertical Timeline” on page 128.
Help Opens a Help topic that describes the Sequence pane
and its functions.
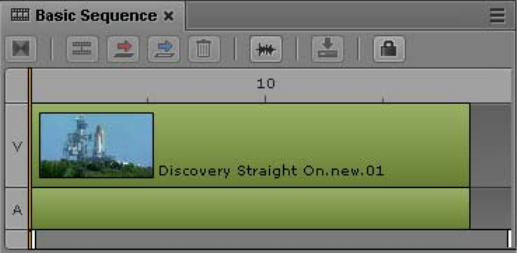
Understanding Basic and Advanced Sequences
125
Understanding Basic and Advanced Sequences
When you create a sequence from the Assets pane, you can choose whether to create a basic
sequence or an advanced sequence. Interplay Production supports basic sequences and advanced
sequences. Interplay MAM supports only basic sequences.
•A basic sequence includes a timeline with one video track and one audio track. The single audio
track represents all source audio tracks. A portion of media that is contained on a track in a
sequence is called a segment. The following illustration shows a basic sequence with one video
segment and one audio segment.
A basic sequence consists of cuts only. It is sometimes referred to as a shotlist or a cut list, or, in
an Interplay MAM context, as an EDL (Edit Decision List). You cannot add video dissolves or
audio dissolves to a basic sequence.
All source audio tracks in the clips that compose a sequence are monitored in a single audio
meter. You can select which channels are monitored. See “Audio Monitoring for Assets and
Basic Sequences” on page 231.
- Interplay MAM supports audio-only basic sequences, which contain one audio track but no
video track (see “Audio-Only Basic Sequences (Interplay | MAM)” on page 140). It does not
support video-only basic sequences.
- Interplay Production does not support audio-only or video-only basic sequences.
•An advanced sequence includes a timeline with one video track. By default it includes three
audio tracks, named NAT (natural sound), SOT (sound on tape), and VO (voice-over) for use
with iNEWS stories. You can create a sequence that is associated with an iNEWS story, or you
can create and edit an independent sequence.
Different colors for segments in the timeline indicate relationships between the segments:
- Video without associated audio: medium blue
- Video with associated NAT, or NAT only: green
- Video with associated SOT, Video with associated NAT and SOT, or SOT only: light blue
-VO: purple
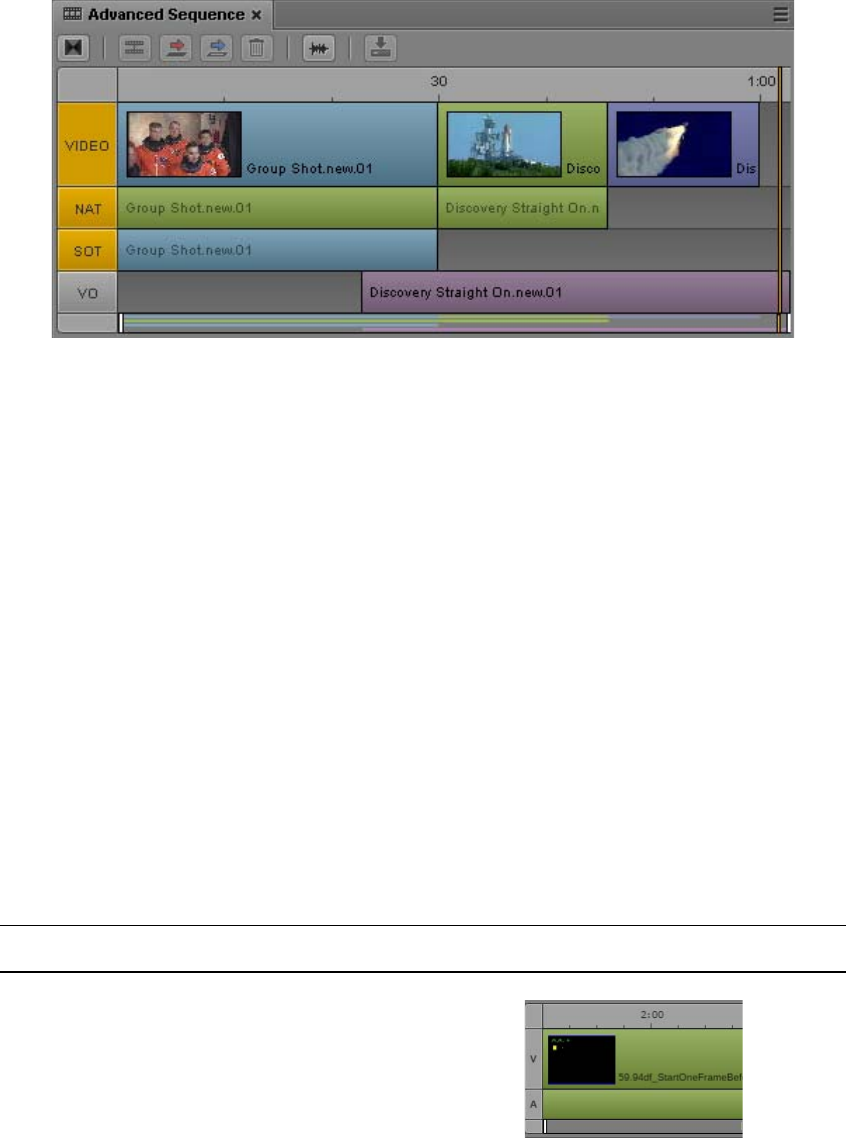
Displaying Media Status in the Timeline
126
The following illustration shows, from left to right, Video with NAT and SOT, VO, Video with
NAT, and Video only.
An administrator can rename the audio track labels. An administrator also determines the audio
track mapping, which you can change. For information on renaming, mapping, and configuring
audio tracks, and adding audio dissolves, see “Working with Audio Tracks in Advanced
Sequences” on page 234.
You can add video dissolves to an advanced sequence. See “Inserting Video Dissolves
(Advanced Sequences Only)” on page 184. Audio dissolves are added automatically. See
“Working with Audio Tracks in Advanced Sequences” on page 234.
Interplay Production supports audio-only and video-only advanced sequences. See “Audio-Only
and Video-Only Advanced Sequences (Interplay | Production)” on page 138.
When you create a sequence from the Queue/Story pane, the sequence is automatically created as an
advanced sequence.
nYou cannot convert a basic sequence to an advanced sequence, or an advanced sequence to a basic
sequence.
Displaying Media Status in the Timeline
Colored segments present a quick way to determine the media status of segments in the Sequence
timeline. The following table lists the types of status and a colored segment that displays the status.
Status Color Example
Online, always shown green
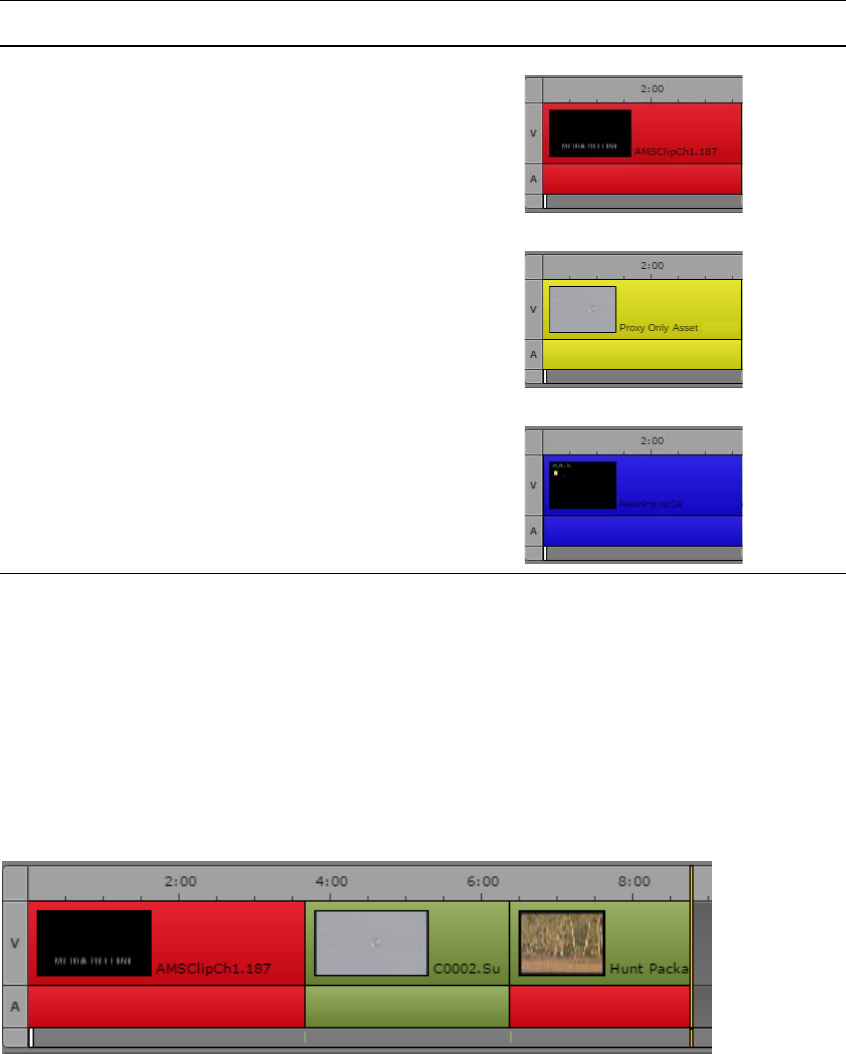
Displaying Media Status in the Timeline
127
nAdvanced sequences display colors for video, NAT, SOT, and VO. See “Understanding Basic and
Advanced Sequences” on page 125.
The following sections provide more information.
Offline Media
Segments whose media is shown as offline in the Media viewer are always colored red in the
Sequence timeline. Segments can have video and audio offline, only video offline, or only audio
offline. Segments can have video and audio offline, only video offline, or only audio offline.
This feature is especially useful when you use the Review for Playback feature to review a sequence
for STP. If you are working with multi-resolution clips, and the STP target resolution is not available,
clips could be online (green) in the sequence but offline (red) after you click the Review for Playback
button. For more information, see “Reviewing in the STP Target Resolution” in the
MediaCentral | UX User’s Guide.
nSegments with partially online media are displayed as online (green).
Offline, always shown red
Proxy-only, shown if Media Status is
selected
yellow
Nearline (Interplay MAM only),
shown if Media Status is selected
dark blue
Status Color Example
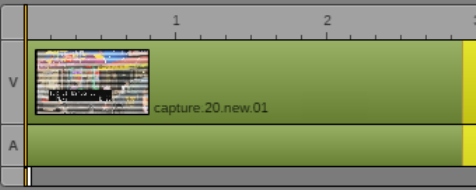
Selecting a Horizontal or Vertical Timeline
128
Proxy-Only Media and Nearline Media
Starting with MediaCentral UX v2.9, you can display the following media status in the Sequence
timeline:
• Proxy-only: Interplay Production and Interplay MAM, colored yellow. Which resolutions are
considered proxy resolutions is determined by Interplay Production or Interplay MAM. A
segment is considered to have proxy-only media if only the proxy resolution is available,
whether or not it was originally recorded with a high-res version.
• Nearline: Interplay MAM, colored blue. Nearline media is not available in all required
resolutions but is possibly fully or partially available on a remote workgroup or archive.
To display media status, click the Sequence Pane menu and select Show Media Status.
A single segment might display more than one status, for example, a segment for which one part has
only the proxy media available. In this case, the part of the segment that has only proxy media is
yellow and the remaining part of the segment is green (full-res media available), as shown in the
following illustration.
Selecting a Horizontal or Vertical Timeline
You can display the Sequence pane with a vertical timeline or a horizontal timeline. You can change
the orientation to your preference and the selection will be saved until you change it or reset your
layout.
You can select Auto to have the orientation determined by the dimensions of the Timeline area of the
Sequence pane:
• If the horizontal size is larger than the vertical size, the Sequence pane is displayed with a
horizontal timeline.
• If the vertical size is larger than the horizontal size, the Sequence pane is displayed with a
vertical timeline.
To select the orientation of the timeline:
tClick the Sequence Pane Menu button, select Orientation, and select Auto, Horizontal, or
Vertical.
Navigating in the Sequence Timeline
129
Navigating in the Sequence Timeline
You can navigate through the Sequence Timeline simply by dragging the position indicator through
the timecode bar, by clicking in the timecode bar, or by using the keyboard (for example, use the
arrow keys to move one frame). For a complete list of keyboard shortcuts, see “Sequence Pane
Shortcuts” on page 601.
Starting with MediaCentral UX v2.7, you can use Ctrl+click (Windows) or Command+click
(Macintosh) to snap the position indicator to the closest cut of the enabled tracks. Do one of the
following:
• Press and hold the Ctrl key, click in the timecode bar, and drag the position indicator to within a
few pixels of the cut. The position indicator snaps to the cut.
• Move the mouse pointer within a few pixels of the cut, then press Ctrl+click.The position
indicator snaps to the cut.
In both cases, the position indicator is located on the first frame after the cut.
Movement in the Sequence Timeline is synchronized with movement in the Media Timeline, so using
controls in the Media pane moves the position indicator to the corresponding location in the
Sequence Timeline. See “Stepping Through Assets” on page 202 and “Media Pane Shortcuts” on
page 592.
Using the Sequence Zoom Bar
The Sequence zoom bar is located below the Sequence Timeline for horizontal orientation or to the
left of the timeline for vertical orientation. You can use the zoom bar to enlarge a section of the
Sequence Timeline so that you can work more easily with long sequences or make precise edit
decisions.
nThe Sequence zoom bar is similar to the Media zoom bar, but the two zoom bars operate
independently. The Media zoom bar is available to loggers who do not have access to the Sequence
pane.
In the following illustration, the top timeline shows a basic sequence with the zoom bar set to show
the entire sequence. The bottom timeline shows the sequence zoomed in to the middle portion of the
sequence.
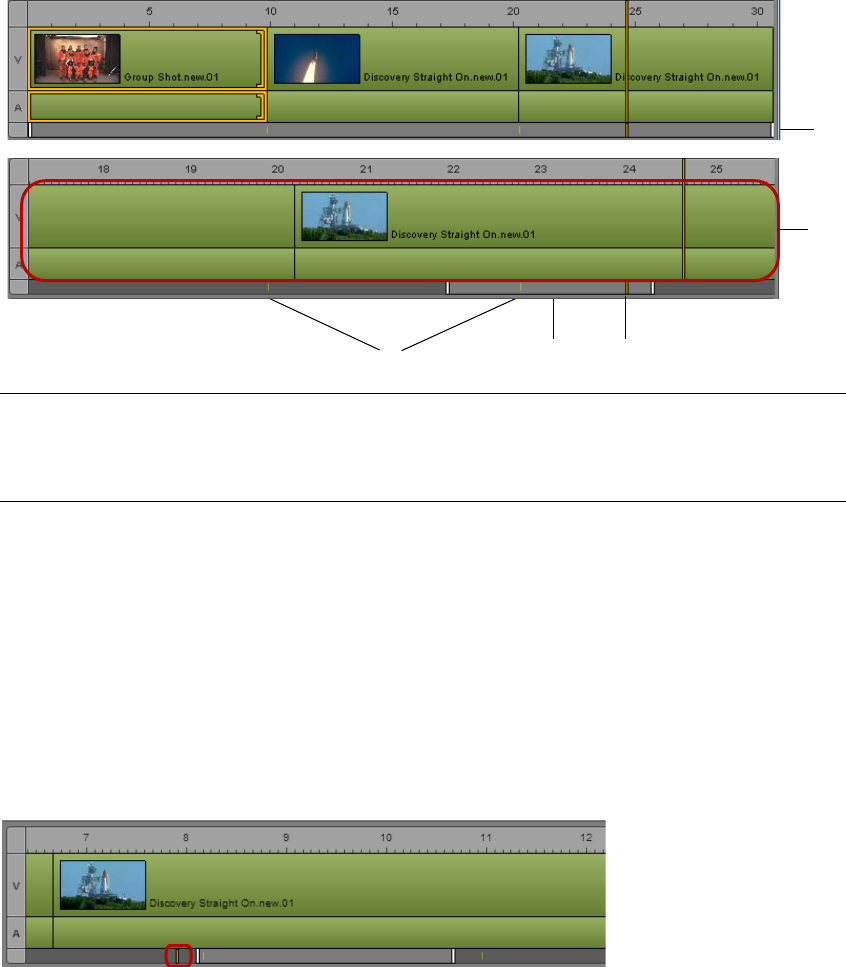
Using the Sequence Zoom Bar
130
The visible area of the timeline is referred to as the zoom region and is represented by the zoom
slider. You can drag the zoom slider along the zoom bar to display a different zoom region anywhere
in the sequence. The zoom region remains the same size as you drag the slider.
If a basic sequence is loaded in the Sequence pane, the zoom bar displays tick marks for edit points
between segments.
The zoom bar includes a position indicator that matches the position indicator in the Sequence
Timeline and the Media Timeline. This position indicator is always visible in the zoom bar, which is
useful when you are zoomed in to a section of the timeline that does not include the timeline position
indicator.
Position indicator in zoom bar but not in zoom region.
You can click the position indicator in the zoom bar and jump to its counterpart in the timeline. The
zoom region moves to and enlarges the section of the timeline that includes the position indicator.
qq
eerr
ww
rt
1Zoom bar 4Zoom slider
2Zoom region 5Position indicator
3Edit points
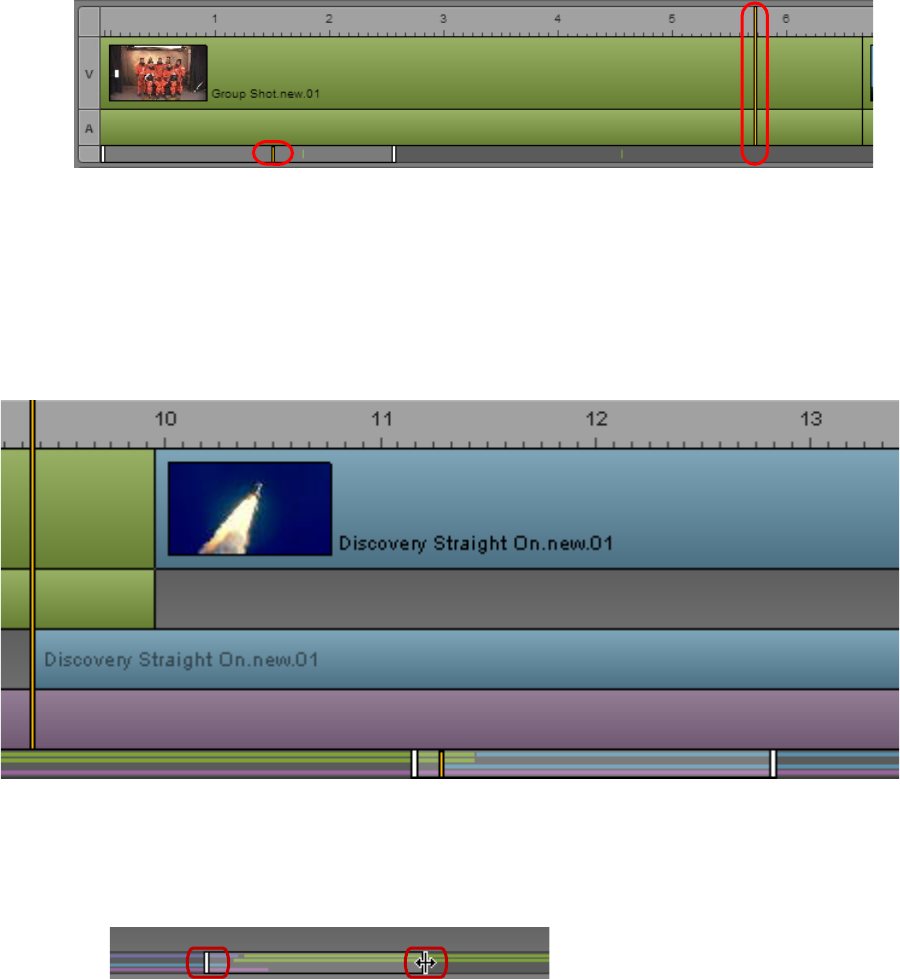
Using the Sequence Zoom Bar
131
Position indicator in the zoom bar and in the zoom region.
You can click anywhere in the zoom bar to move the zoom region left or right.
With an advanced sequence loaded, the zoom bar displays a representation of the sequence as a set of
colored bars. This representation is a “mini-map” that matches the content of the video and audio
tracks of the sequence. These colored bars can help you navigate through the sequence.
The zoom bar displays colored bars that match the content of the tracks in the sequence.
To zoom in to or out from a section of the Sequence Timeline, do one of the following:
tDrag a zoom slider handle in or out. The mouse pointer changes to a double-headed arrow when
you hover over a zoom slider handle and select it.
Zoom slider handles, right handle selected.
The zoom region moves in or out symmetrically unless one end reaches the end of the sequence.
If you want to drag only one end, Alt+click the handle and drag it.
tWith the Sequence pane active, press the Down Arrow key to zoom in by 50 percent or press the
Up Arrow key to zoom out by 50 percent. Press Shift+Up Arrow to reset the zoom level to show
the entire sequence.
If you have zoomed in to a section of the Sequence Timeline, and you perform an edit that includes
material beyond the zoom region, the zoom region moves to display the position indicator. The size
of the zoom region does not change.
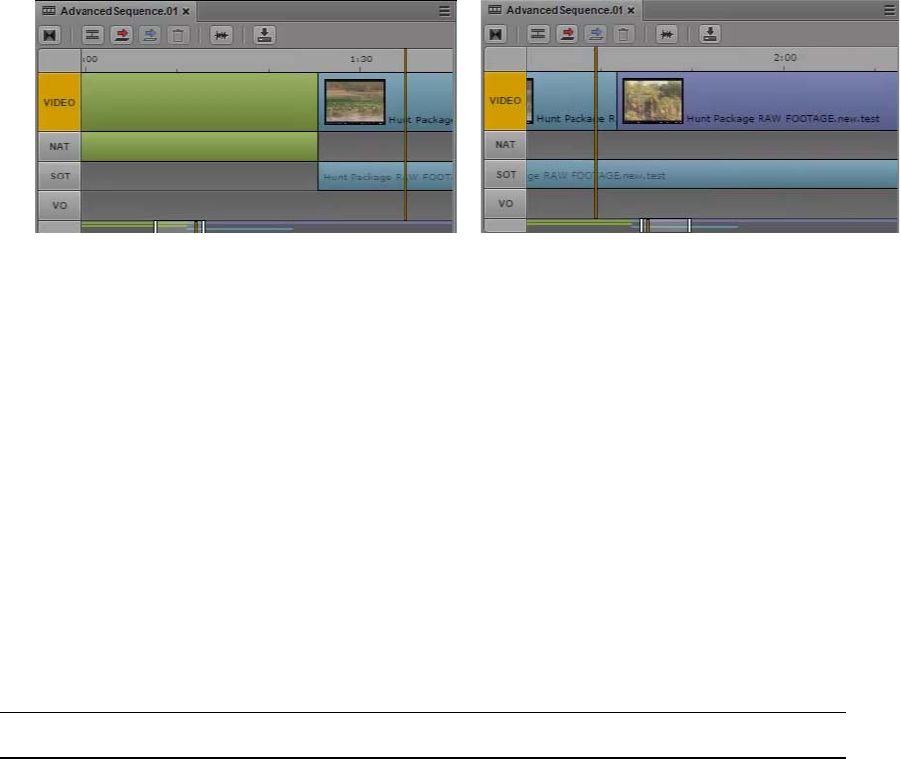
Timeline Paging During Playback
132
Timeline Paging During Playback
Starting with MediaCentral UX v2.5, you can select an option in the User Settings that enables a
paging display during playback in the Sequence Timeline. This feature is useful when you are
zoomed in to a sequence and you want to display the area around the position indicator. When the
position indicator moves close to the end of the visible region of the timeline, the Sequence pane
displays the next region and keeps the position indicator displayed in the region. This timeline paging
also works for reverse playback.
The following illustration shows two consecutive zoomed-in regions.
To enable Sequence Timeline paging:
1. Select Home > User Settings.
2. In the Name column, select Sequence.
3. In the Timeline section, select “Paging enabled.”
4. Click Apply, then close the dialog box.
Viewing Sequence Information
You can view the sequence name, format, and other details about the sequence loaded in the
Sequence pane.
To view sequence information:
tMove the mouse pointer over the Sequence pane’s tab.
The following table describes the information you can view for Interplay Production sequences.
Item Description
Name The asset name as listed in the Interplay Production
database.
Format 30i NTSC
25i PAL, 25p PAL
720p/25, 720p/29.97, 720p/50, 720p/59.94
1080i/59.94, 1080i/50
1080p/25, 1080p/29.97
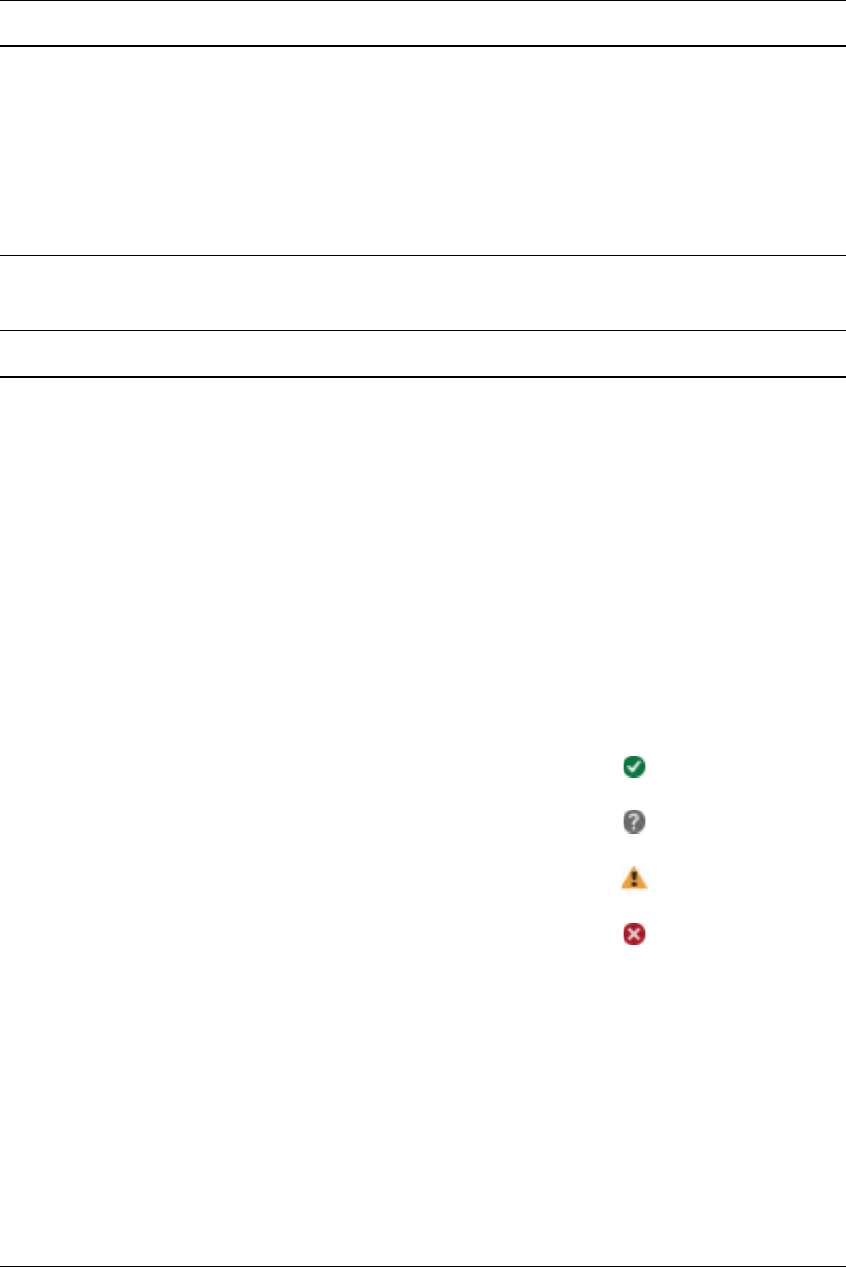
Viewing Sequence Information
133
The following table describes the information you can viewfor Interplay MAM basic sequences.
Aspect ratio 4:3
16:9
Raster Dimensions: 720x486
720x592
1280x720
1920x1080
Item Description
Item Description
Name The basic sequence name as listed in the Interplay
MAM database.
Type Type of sequence: Video or Audio. Defined when you
create the sequence and cannot be changed.
Frame Rate
Sample Rate
Frame rate of a video sequence or sample rate of an
audio sequence. Defined when you create the
sequence.
Mixed Frame Rate Indicates if you can add clips with differing frame
rates to the sequence: allowed or prohibited. Allowed
by default, but can be prohibited by configuration in
Interplay MAM.
Rights Usage right of the sequence:
Free for use
Not evaluated so far
Parts need to be licensed
Contains restricted parts
The usage right for the entire sequence is determined
by the most restrictive usage right for a segment in the
sequence.
Duration Calculated automatically when you add or remove
segments, or change the segment length.
No of Segments Calculated automatically when you add or remove
segments.
Note Is shown when you open a read-only basic sequence;
informs you why the sequence is read-only: due to
Interplay MAM access rules or because it represents
an external sequence.
Creating a Sequence
134
Creating a Sequence
You can create a sequence in MediaCentral UX and save it as an asset in the Interplay Production or
Interplay MAM database. You can also create a sequence and associate it with an iNEWS story. In
this case the sequence is referred to as a script sequence.
Note the following:
• You must create a sequence and load it into the Sequence pane before you can add clips to the
Sequence Timeline.
• You can open and edit some types of sequences created in another Avid application. See
“Opening and Editing an Existing Sequence in the Sequence Pane” on page 144.
• Interplay Production sequences you create in MediaCentral UX can be opened and edited in
Avid Symphony, Media Composer, and NewsCutter. Interplay Production basic sequences
(shotlists) can also be opened and edited in Interplay Assist.
Interplay MAM basic sequences can be opened and edited in Interplay MAM Desktop.
• Interplay MAM supports only basic sequences.
• For Interplay Production sequences, the aspect ratio and the frame rate is determined by the first
clip that you add to the sequence. Any additional clips can have a different resolutions but must
match the initial frame rate. For example, you can mix NTSC 29.97 and 1080i 59.94 in the same
sequence because both use the actual frame rate of 29.97. If the first clip you add is 1080i 59.94
(16x9), an NTSC 29.97 clip will appear stretched. If the first clip you add is NTSC (4x3), a1080i
59.94 clip will be displayed using anamorphic squeeze. See “Recording a Voice-Over” on
page 240.
• For Interplay MAM sequences, the target frame rate is defined when the basic sequence is
created. By default, you can add clips with a differing frame rate but mixed frame rate editing
might be disabled by configuration in Interplay MAM.
See the following topics:
•“Creating an Interplay | Production Sequence” on page 135
•“Rules for Creating a Script Sequence (Interplay | Production)” on page 137
•“Associating a Video ID with a Script Sequence” on page 137
•“Sequences Associated with Stories in Instinct and NewsCutter” on page 138
•“Audio-Only and Video-Only Advanced Sequences (Interplay | Production)” on page 138
•“Creating an Interplay | MAM Sequence” on page 139
•“Audio-Only Basic Sequences (Interplay | MAM)” on page 140
Creating a Sequence
135
Creating an Interplay | Production Sequence
There are several ways to create an Interplay Production sequence:
• Create a sequence in the Interplay Production database without loading it in the Sequence pane,
or with the Sequence pane closed. Use this procedure to create a “placeholder” sequence for later
editing.
• Create a sequence, edit it in the Sequence pane, and save it. Use this procedure to create a
sequence independently from an iNEWS story.
• Create a sequence that is associated with an iNEWS story, edit it in the Sequence pane, and save
it.
nFor more information on associating sequences with iNEWS stories, see “Associating a Sequence
with a Story” on page 103.
nFor information about working with assets stored on a remote Interplay Production system, see
“Working with Remote Assets (Interplay Production)” on page 208.
To create a sequence in the Interplay Production database:
1. In the Assets tab, navigate into the folder in which you want to create the sequence.
nSelecting a folder does not create a sequence in the folder.
2. From the Assets pane tab, select Create Basic Sequence or Create Advanced Sequence.
When the process is finished, a sequence named New.Sequence is displayed in the Assets pane
and highlighted in orange. (You might need to scroll down to see it.) If there is already a
sequence named New.Sequence, .01 is appended to the sequence name, and incremented for
each unnamed new sequence (New.Sequence.02, and so on).
The sequence name is grayed out and in italics until online media is added to the sequence and
you save the sequence.
You can use this procedure to create a “placeholder” sequence for later editing.
3. Rename the sequence in the Assets pane by doing one of the following:
tSelect the sequence, click the name of the sequence, and type the new name,
tSelect the sequence and press F2 (Windows) or Enter (Macintosh).
You can later edit the sequence by opening the Sequence pane and double-clicking the sequence.
To create a sequence in the Interplay Production database, edit it, and save it:
1. Select Panes > Sequence to open the Sequence pane.
2. In the Assets tab, navigate into the folder in which you want to create the sequence.
nSelecting a folder does not create a sequence in the folder.
3. Click the Assets Pane Menu button and select Create Basic Sequence or Create Advanced
Sequence.
When the process is finished, a sequence named New.Sequence is displayed in the Assets pane
and highlighted in orange. (You might need to scroll down to see it.) If there is already a
sequence named New.Sequence, .01 is appended to the sequence name, and incremented for
each unnamed new sequence (New.Sequence.02, and so on).

Creating a Sequence
136
The sequence name is grayed out and in italics until online media is added to the sequence and
you save the sequence.
4. Rename the sequence in the Assets pane by doing one of the following:
tSelect the sequence, click the name of the sequence, and type the new name,
tSelect the sequence, press F2 (Windows) or Enter (Macintosh), and type the new name.
5. Edit the sequence.
See “Editing a Sequence” on page 157.
6. Save the sequence by doing one of the following:
tClick the Save button in the Sequence pane toolbar.
tClick the Pane Menu button and select Save Sequence.
tWith focus in the Sequence pane, press Ctrl+S (Windows) or Command+S (Macintosh)
You need to click the Refresh button in the Assets pane to see the grayed out, italicized sequence
name change to the standard font.
To create an Interplay Production sequence associated with a story, edit it, and save it:
1. Open a story in the Queue/Story pane.
2. Open the Sequence pane.
3. Click the Open Sequence button.
The name of the sequence in the Sequence pane tab and in the Media pane displays the name of
the opened story.
Clicking the Open Sequence button automatically opens the Media pane if it is closed.
If you later change the name of the story and you want to change the name of the sequence, you
must rename the sequence in the Assets pane. To quickly access the sequence in the Assets pane,
make sure the sequence is loaded in the Media pane, click the Pane Menu button, and select
Open Enclosing Folder.
4. Edit the sequence.
See “Editing a Sequence” on page 157.
After you add the first clip to the sequence, a message box informs you that a new sequence is
being created. MediaCentral UX obtains an iNEWS edit lock, creates and saves the sequence in
the script sequence location, and saves the sequence identifier with the story.
nA MediaCentral UX administrator sets the location for storing a script sequence in the Interplay
Production section of the MediaCentral UX System Settings.
5. Save the sequence by doing one of the following:
tClick the Save button in the Sequence pane toolbar.
tClick the Pane Menu button and select Save Sequence.
tWith focus in the Sequence pane, press Ctrl+S (Windows) or Command+S (Macintosh)
The sequence is saved in the script sequence location.

Creating a Sequence
137
You might need to click the Refresh button to see the sequence in the Assets pane.
Rules for Creating a Script Sequence (Interplay | Production)
Keep in mind the following rules when creating a sequence that you want to associate with a story
(referred to as a script sequence):
• When creating a new sequence that you want to associate with a story, first open the Sequence
pane, then click the Open Sequence button to associate the sequence with the story.
• You cannot create a sequence for a story unless the story has a title (labeled Slug).
• If the Autoload Sequence option is enabled, you can create a sequence by opening the Sequence
pane and either clicking the Open Sequence button or navigating to a story that already has a
title.
• If the Autoload Sequence option is disabled, you must create a sequence by opening the
Sequence pane and clicking the Open Sequence button.
• The sequence is not created in the Interplay Production database until you drag the first clip into
the Sequence pane.
• You cannot send a sequence to playback until a video ID is present. See “Associating a Video ID
with a Script Sequence” on page 137
nFor more information on associating sequences with iNEWS stories, see “Associating a Sequence
with a Story” on page 103.
Associating a Video ID with a Script Sequence
If an iNEWS story contains a video ID, and you create a sequence that is associated with the story
(referred to as a script sequence), the video ID is added to the metadata of the sequence. Starting with
MediaCentral UX v2.6.1, the video ID is added to the metadata of a saved sequence even if the
sequence does not contain any media. This is especially useful if the sequence is later edited in Media
Composer.
You can view the video ID with other sequence metadata in the Metadata pane.
nFor more information on associating sequences with iNEWS stories, see “Associating a Sequence
with a Story” on page 103.
To create a script sequence with an associated video ID:
1. In the Queue/Story pane, create a new story or open an existing story that does not yet have a
sequence associated with it.
2. Check if a video ID is listed. You can check the Video-ID column in the queue, or the Video-ID
field in the Story Form.
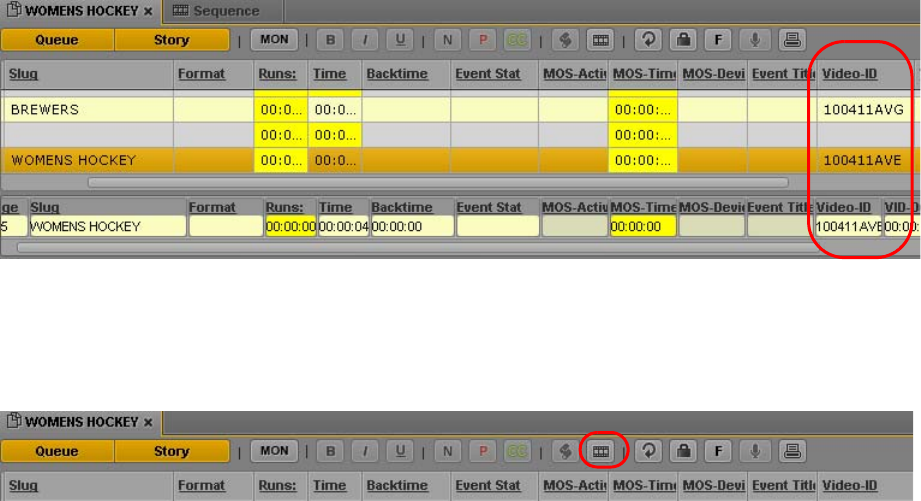
Creating a Sequence
138
If a video ID is not listed, click in either field and enter the appropriate video ID
3. Open the Sequence pane.
4. Click the Open Sequence button.
The name of the story is used for the name of the sequence.
5. (Optional) Edit the sequence.
6. Save the sequence.
The video ID is associated with the sequence and the sequence is checked into the Interplay
Production database. The video ID is listed with other information about the sequence in the
Metadata pane.
Sequences Associated with Stories in Instinct and NewsCutter
MediaCentral UX supports viewing and editing sequences that were associated with a story in Avid
Instinct. Sequences edited in MediaCentral UX cannot be displayed in Avid Instinct after they are
edited.
MediaCentral UX does not support viewing and editing sequences associated with a story in the
News Cutter NRCS tool. The sequence is displayed as a production cue, but does not open in the
Sequence pane. You can open the sequence from the Interplay Production database in the Assets pane
and edit it like other sequences created in Avid editing applications, according to the same rules (see
“Opening and Editing an Existing Sequence in the Sequence Pane” on page 144).
Audio-Only and Video-Only Advanced Sequences (Interplay | Production)
You can create and save a video-only advanced sequence (video track and no audio) or an audio-only
advanced sequence (VO track and no video). However, send-to-playback and other workflows are not
supported for video-only or audio-only sequences. The process fails with the following error
message: “Remote STP process failed: Audio resolution selected but not found (in “wait mixdown”
phase)”
To send the sequence to playback, add a blank audio track or blank video track to the sequence.
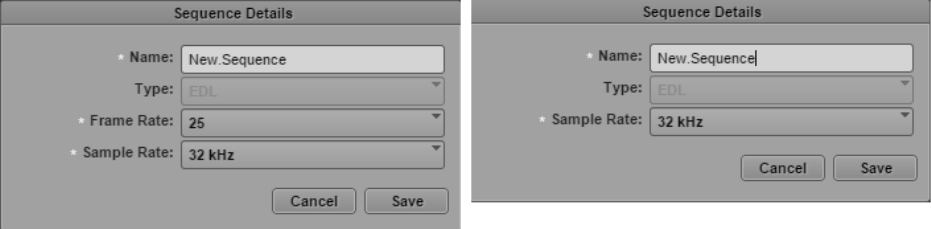
Creating a Sequence
139
Creating an Interplay | MAM Sequence
For Interplay MAM sequences, you define the target frame rate when you create the basic sequence.
By default, you can add clips with a differing frame rate. Note that mixed frame rate editing might be
disabled by configuration in Interplay MAM.
nFor information about working with assets whose media is stored on a remote location, see “Working
with Remote Playback (Interplay | MAM)” on page 209.
To create a basic sequence in the Interplay MAM database, edit it, and save it:
1. Select Panes > Sequence to open the Sequence pane.
2. In the Assets tab, select the folder in which you want to create the sequence.
3. Do one of the following:
tRight-click and select Create Basic Sequence or Create Basic Sequence (audio-only).
tClick the Pane Menu button and select Create Basic Sequence or Create Basic Sequence
(audio only).
The Sequence Details dialog box opens. If you selected “Create Basic Sequence” the dialog box
includes a Frame Rate menu and a Sample Rate menu. If you selected “Create Basic Sequence
(audio-only)” the Frame Rate menu is not displayed. The following illustrations show both
versions of the Sequence Details dialog box.
4. Type a name for the basic sequence in the Name field.
If you do not provide a name, a new basic sequence is created with the name New.Sequence. If
there is already a basic sequence named New.Sequence, .01 is appended to the basic sequence
name, and incremented for each unnamed new basic sequence (New.Sequence.02, and so on).
5. (Option) Select the basic sequence type from the Type list.
6. To define the frame rate of the video, do one of the following:
tSelect a predefined target frame rate from the Frame Rate list.
tType a value greater than 0 in the Frame Rate list field to define a customized frame rate.
7. To define the sample rate of the audio, do one of the following:
tSelect a predefined sample rate from the Sample Rate list.
tType a value greater than 0 in the Sample Rate list field to define a customized sample rate.
8. Click Save.
The new basic sequence is shown in the selected folder.
9. Double-click the basic sequence to open it in the Sequence pane.
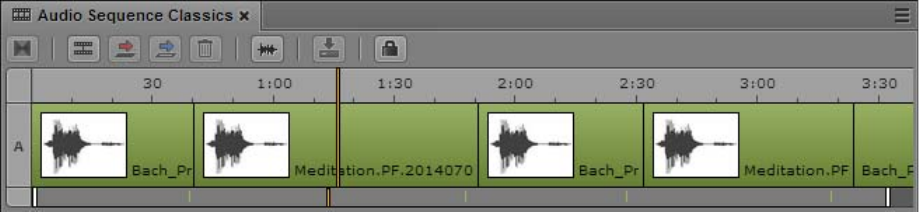
Saving a Sequence
140
10. Edit the sequence.
See “Editing a Sequence” on page 157.
11. Save the sequence by doing one of the following:
tClick the Save button in the Sequence pane toolbar.
tClick the Pane Menu button and select Save Sequence.
tWith focus in the Sequence pane, press Ctrl+S (Windows) or Command+S (Macintosh).
Audio-Only Basic Sequences (Interplay | MAM)
You can create and save an audio-only basic sequence in the Interplay MAM database. An audio-
only basic sequence is a basic sequence without video track, but with one audio track.
When you create the audio-only basic sequence, a preselection offers the standard sample rates of
32kHz, 44.1 kHz, 48 kHz, 96 kHz, and 192kHz. In addition to these, you can define other sample
rates (label “custom”) by entering a number greater than 0. For more information, see “Creating an
Interplay | MAM Sequence” on page 139.
Note the following:
• The sample rate is not evaluated and therefore you can create audio-only basic sequences with
mixed sample rates.
• You can add segments only from an audio asset to an audio-only basic sequence.
• You have the same editing options as for basic sequences with one video and audio track: trim,
split, overwrite, replace, and delete.
• You can also open and edit audio-only basic sequences in Interplay MAM Desktop.
Saving a Sequence
If you save a sequence that is not associated with a story, the sequence is saved in the location you
selected when you created the sequence in the Assets pane. To save another version of the sequence
with a different name or in a different location, use the Save As feature. See “Saving a Version of a
Sequence” on page 141.
If you are working with a sequence associated with a story, and you save the sequence through the
Sequence pane, the story is automatically saved.
nIf you save a story through the Story pane, you must manually save the sequence.
Saving a Version of a Sequence
141
A MediaCentral UX administrator sets the location for storing a script sequence in the Interplay
Production section of the MediaCentral UX System Settings. The default path is Projects/
iNEWSsequences/date.
Saving a sequence automatically saves the markers contained in the sequence.
nYou can move or copy a sequence in the Assets pane by using the Cut, Copy, and Paste commands.
To save a sequence, do one of the following:
tClick the Save button in the Sequence pane toolbar.
tClick the Pane Menu button and select Save Sequence.
tWith focus in the Sequence pane, press Ctrl+S (Windows) or Command+S (Macintosh)
If you try to close a modified sequence without saving it, the Save Changes dialog box opens and
asks if you want to save your changes.
Saving a Version of a Sequence
You can use the Save As feature to create and save a version of a sequence with a different name. You
can also save the sequence in a different location. The new sequence is treated as a duplicate in the
Interplay Production database, and can be edited independently from the original.
nThe Save As feature is not supported for Interplay MAM sequences.
nYou can move or copy a sequence in the Assets pane by using the Cut, Copy, and Paste commands.
To save a version of a sequence:
1. In the Sequence pane, click the Pane Menu button and select Save As.
The Select Interplay Folder dialog box opens.
2. Select the folder in which you want to save the sequence.
3. Rename the sequence.
If the sequence has the same name as a sequence in the selected folder, the Save button is grayed
out. You need to rename the sequence or save it to a different folder.
4. Click Save.
The sequence is saved with the new name. This name is associated with the open sequence, and
the next time you save the sequence, it will be saved with the new name.
To edit and save the sequence with its original name, you need to open the original sequence and
save it with its original name. You cannot use the Save As feature to overwrite an already saved
sequence.
Exporting a Basic Sequence (Interplay | MAM)
When you are finished editing a sequence, you can export it using a MAM Export process. To do so,
the sequence does not necessarily have to be open in the Sequence pane.
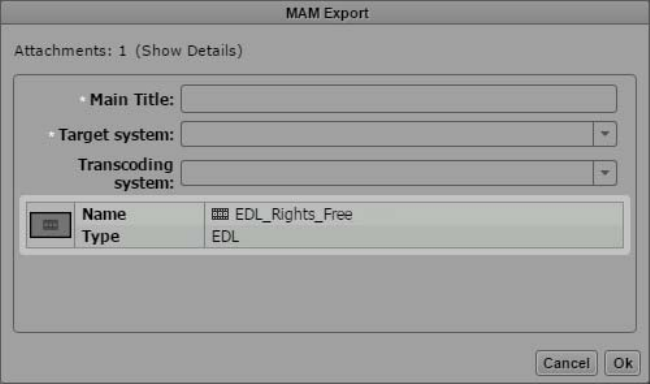
Exporting a Basic Sequence (Interplay | MAM)
142
Your ability to create and initiate MAM Export processes depends on Interplay MAM user privileges
and rules. For example, the credentials you use to sign in to the Interplay MAM database must allow
creation of MAM Export processes. Beyond that, the MAM Export profile must be available and
configured in Interplay MAM.
To export an Interplay MAM basic sequence:
1. Do one of the following:
tOpen a basic sequence in the Media pane.
tIn the Assets pane, navigate to the desired folder and select the basic sequence.
tIn the Search pane, conduct a search and select the basic sequence in the results list.
2. Do one of the following:
tClick the Pane Menu button and select Actions.
t(Assets and Search pane only) Right-click and select Actions.
3. (Option) Select the MAM system on which the Export process is to be created.
4. Select MAM Export > (target-name), such as “All destinations” or “Export to Standard.”
The MAM Export process dialog box opens. The following illustration shows MAM Export
process dialog box for “All destinations.”
5. Provide the required information and click OK.
If the sequence is open in the Sequence pane and has unsaved changes, a dialog box is displayed.
- Click Yes to save the changes and export the changed sequence.
- Click No to keep but not save the changes and to export the unchanged sequence.
- Click Cancel to keep but not save the changes and cancel the export.
For information on monitoring the process, see “Monitoring Processes in the Progress Pane” on
page 437.
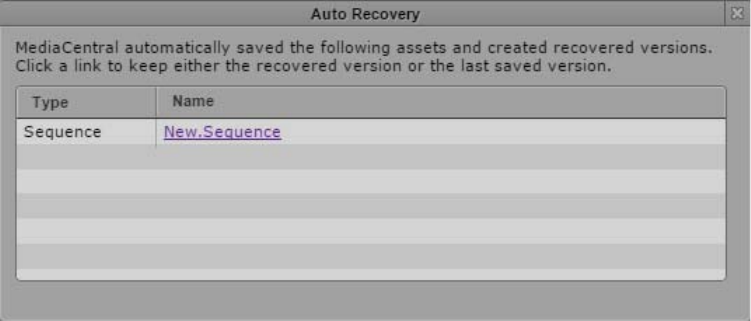
Recovering Sequences
143
Recovering Sequences
When you work in MediaCentral UX, the state of your sequence is periodically stored on your local
Windows or Macintosh system. This feature is helpful in case of a disconnection or service failure, or
if you close a browser session without saving your work. This feature is also helpful if your
administrator sets an automatic session timeout.
Each edit you make is stored, so that the state of the sequence after the last edit can be restored in
case of a crash or timeout, and no edits are lost.
nFor information about recovering stories, see “Recovering Stories In Case of Disconnect” on
page 108.
You can recover your sequence in several different ways:
• If a disconnection or failure occurs and you remain signed in, the editing functions of the
Sequence pane are deactivated, and the Auto Recovery dialog box is displayed, as described
below.
• If the disconnection or failure results in the need to sign in again, the Auto Recovery dialog box
is displayed and lists assets with unsaved changes.
Click the name of the asset to open the last saved version. If the asset is a sequence, the Sequence
pane displays three additional buttons:
- Recovered: Click this button to open the recovery file (from the local system).
- Last Saved: Click this button to open the last saved file (from the Interplay Production or
Interplay MAM database).
- Keep This: Click this button to save the version that you display and delete the other version.
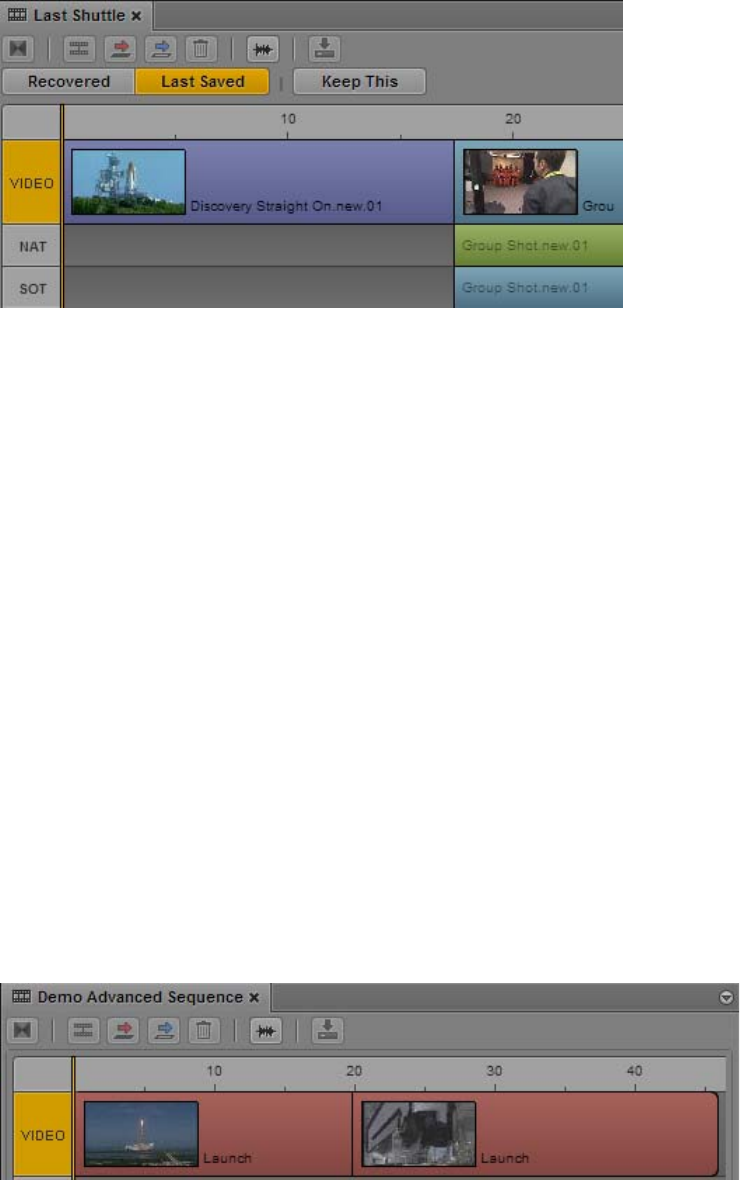
Opening and Editing an Existing Sequence in the Sequence Pane
144
You can switch back and forth between versions to compare them, and click the Keep This
button when you decide which version to keep.
• If you close the Auto Recovery dialog box without selecting an asset, you can select Auto-
Recovered Assets from the Sequence pane menu to display the Auto Recovery dialog. This
option appears only if auto-recovered assets are available.
Opening and Editing an Existing Sequence in the
Sequence Pane
MediaCentral UX lets you open and edit sequences that you created in MediaCentral UX, Avid
Media Composer, Interplay Assist, Avid Instinct, and Interplay MAM Desktop.
You are limited in the types of sequences you can play and edit. Following are some rules for editing
and playback:
• If the sequence contains only cuts (for example, a shotlist), it opens in the Media pane for
playback and you can edit it in the Sequence pane. You can select the camera angle and audio
mapping for group clips in a cuts-only sequence. For more information, see “Working with
Group Clips” on page 246.
• If the sequence contains effects that the playback service supports (such as video and audio
dissolves) but was created in an application other than MediaCentral UX, it opens in the Media
pane for playback. The sequence also opens in the Sequence pane, but you cannot edit it. The
video track is colored dark red to indicate that it is uneditable.
• If the sequence contains unrendered effects the player does not support, the player displays an
error message. The sequence opens in the Sequence pane as uneditable.
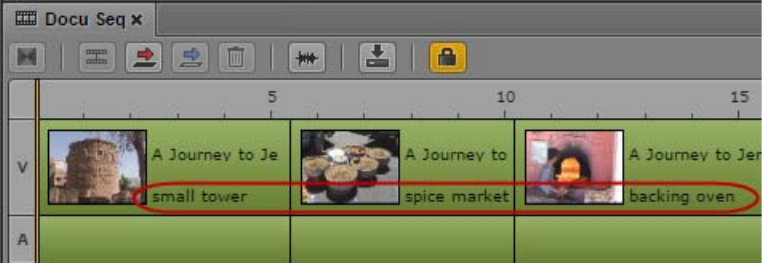
Opening a Sequence Associated with a Story
145
• If all effects are rendered, the sequence opens in the Media pane for playback. The sequence
opens in the Sequence pane as uneditable.
• You cannot create subclips from an uneditable sequence.
• You can add markers to an uneditable sequence, edit marker text, and save the markers with the
sequence, with the proper permissions. See “Understanding Markers and Restrictions” on
page 293.
• If you open a sequence from an Interplay Production database but you do not have a read/write
role for the folder that holds the sequence, the sequence opens as read-only. You can play the
sequence but you cannot edit or save it.
• If you open a sequence from an Interplay MAM database for which you do not have write
permission or that represents an external sequence, the sequence opens as read-only. You can
play the sequence but you cannot edit or save it.
• Interplay MAM sequences that are edited in Interplay MAM Desktop might contain comments
for individual segments. These comments are also displayed in the Sequence pane timeline.
• For more information about playback of sequences, see “Playback of Simple and Complex
Sequences” on page 203.
To open an existing sequence in the Sequence pane:
tDouble-click a sequence in the Assets pane, the Search pane, the Quick Search pane, or the
Tasks pane.
The sequence is loaded into the Media pane and into the timeline in the Sequence pane. The
Sequence pane automatically loads the sequence as basic or advanced.
Opening a Sequence Associated with a Story
If you create a sequence through the Open Sequence button in the Queue/Story pane, the sequence is
associated with the opened story as a script sequence (see “Creating a Sequence” on page 134).
You can select a user setting to automatically open a script sequence when you open the associated
story.
To automatically open a script sequence with a story:
1. Select Home > User Settings.
2. Select iNEWS.
3. Select “Autoload Sequence.”

Editing a Sequence Associated with a Story
146
4. Click Apply.
To manually open a script sequence:
1. Open a story in the Queue/Story pane.
2. Open the Sequence pane.
3. Click the Open Sequence button.
The associated sequence opens in the Sequence pane and Media pane.
nAfter you associate a script sequence with a story, you cannot disassociate it. However, you can
completely revise the sequence and rename it if necessary.
Editing a Sequence Associated with a Story
If you are a journalist working on a sequence associated with a story (a script sequence), you need to
edit the clips in your sequence to match the script in your story. In MediaCentral UX, both the story
segments and the Sequence pane include timing information to help you edit your script and your
sequence.
In the Story pane, a script is divided into story segments. Each story segment has a timed length
based on the read rate that is set in Avid iNEWS. In the Sequence pane, a sequence associated with a
story is divided into timing blocks.
Each story segment is associated with a timing block. Both the story segment and the timing block
show the same timing information: the duration of the media in the timing block and the duration of
the text in the story segment. For example, 0:00/0:16 indicates that there is no media for a story
segment that is 16 seconds long.
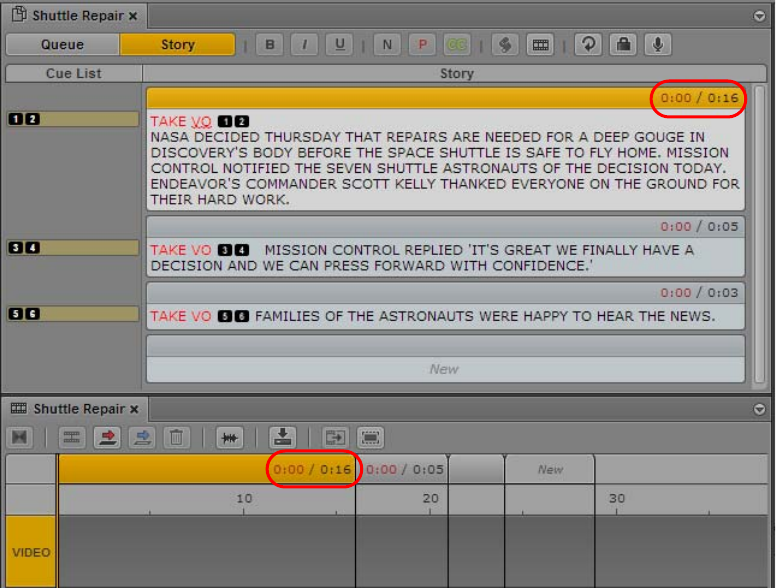
Editing a Sequence Associated with a Story
147
The following illustration shows a story with four story segments (including the default New
segment) and a sequence with four corresponding timing blocks. The sequence does not yet contain
any media, which is shown as 0:00 in the timing displays.
nThe previous illustration shows the Sequence pane in the horizontal orientation. You can change the
orientation by clicking the Pane Menu button and selecting from the Orientation submenu.
As you edit the text in your script and the media in your sequence, the story segments in the Story
pane and the timing blocks in the Sequence pane remain synchronized to help you edit media to
match your script. See the following topics for more information:
•“Working with Story Segments and Timing Blocks” on page 148
•“Working with Timing Displays” on page 149
•“Editing Media into Timing Blocks” on page 151
•“Extending a Segment into Another Timing Block” on page 152
•“Showing and Hiding Empty Timing Blocks” on page 154
•“Manually Adjusting Timing Blocks” on page 155
nTiming blocks are shown only for sequences associated with a story.
Editing a Sequence Associated with a Story
148
Working with Story Segments and Timing Blocks
As you work, MediaCentral UX maintains synchronization between the story segments in your script
and the timing blocks in your script sequence. As you create new story segments, new timing blocks
are created. As you expand your script, or add media, the timing displays are updated. If you change
the order of the story segments, the order of the timing blocks is also changed.
This synchronization gives you the flexibility to focus on the script, the sequence, or both together.
Following are two approaches you can take:
• For a current news story, you might start by drafting a script. As you write, you can break the
script into segments, which creates associated timing blocks in the sequence. Later, you can fill
in the timing blocks with media that comes in from the field, and use the timing displays to fine-
tune the script and the sequence before recording a voice-over.
• For a feature story, you might start by opening a new story, and creating a rough cut using clips
from a media library. By dragging clips to the end of the default “New” timing block, you create
both a new timing block and a new story segment (see “Editing Media into Timing Blocks” on
page 151). You can then work on the script, using the timing displays and timing blocks to help
you match the script to the media.
The following list describes the basic functions when working with story segments and timing
blocks:
• When you highlight a story segment, the corresponding timing block is highlighted. When you
highlight a timing block, the corresponding story segment is highlighted.
• If you add a story segment to a script, a corresponding timing block is added to the sequence.
• If you reorder story segments, the corresponding timing blocks are automatically reordered and
media segments are moved with their timing blocks.
• If you split a story segment, a new timing block is inserted after the selected timing block. Any
media remains in the selected timing block.
• Presenter instructions (red) and closed-captioning text (green) do not affect how iNEWS
calculates the text duration. If a story segment contains only presenter text or only closed-caption
text, the text duration is shown as 0:00. A corresponding timing block is created, but you have
the option of hiding it. See “Showing and Hiding Empty Timing Blocks” on page 154.
• If you are working on a script and a sequence together, the same set of Undo/Redo actions
applies to both the Story pane and the Sequence pane. If you load a new sequence or close the
Sequence pane, the Undo actions are lost in the Story pane.
• For some news stories, you might need to create a story segment that is not associated with video
in the story. For example, a story might include presenter text before the video starts.
MediaCentral UX lets you create a story segment that does not display a corresponding timing
block in the sequence. See “Creating a Text-Only Story Segment” on page 107
nSaving a sequence through the Sequence pane automatically saves the story. However, saving a story
through the Story pane does not automatically save the sequence. You must save the sequence
manually. If you close the story but do not save the sequence, a message asks you if you want to save
the sequence.
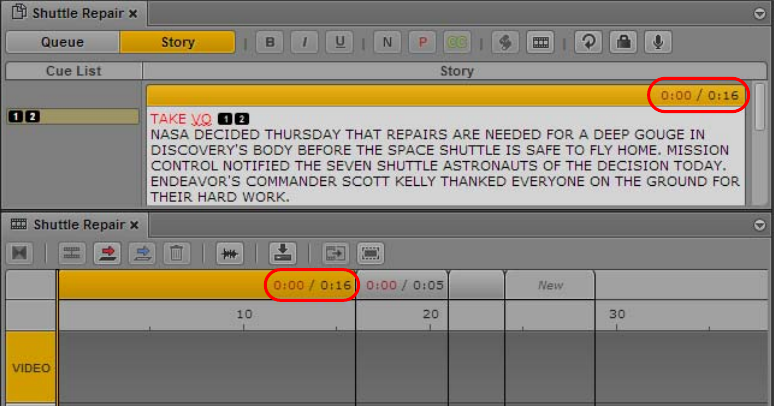
Editing a Sequence Associated with a Story
149
Working with Timing Displays
The header of a story segment and the header of the corresponding timing block show the same set of
two numbers:
• The first number shows the duration of the media currently contained in the timing block.
• The second number shows the duration of the text in the story segment. The duration of the text
is based on the read rate that is set in Avid iNEWS.
nFrames are not shown for the media duration. The duration is rounded up or down to the nearest
second, with the midpoint rounded up. For example, a 24 fps clip with a duration of 00;00;30;12 is
rounded up to 0:31.
The following examples show the results of adding media to a story segment that is 16 seconds long.
In the following illustration, there is no media associated with the story segment, so the timing
display is 0:00/0:16. The media duration is red, indicating that more media is needed to match the
text duration in the story segment and eliminate any video gaps.
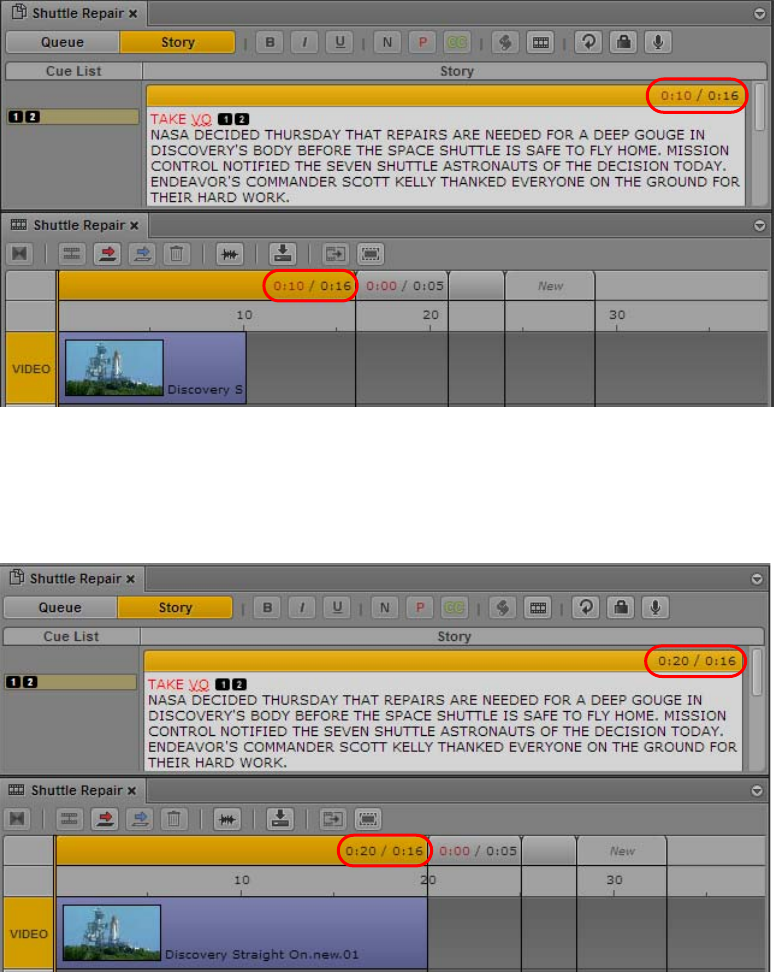
Editing a Sequence Associated with a Story
150
• If you insert a clip that is 10 seconds long, it fills 10 seconds of the timing block and the timing
display changes to 0:10/0:16. Again, the media duration is red, because more media is needed.
To fill this 6 second gap, you can lengthen the clip or add another clip.
• If you insert a clip that is 20 seconds long, it extends the timing block 4 seconds. The timing
display changes to 0:20/0:16. The media duration is black, indicating that there is enough media
to match the length of the text. However, there is now a 4 second gap at the end of the text. You
can either trim the video to 16 seconds, or add some text.
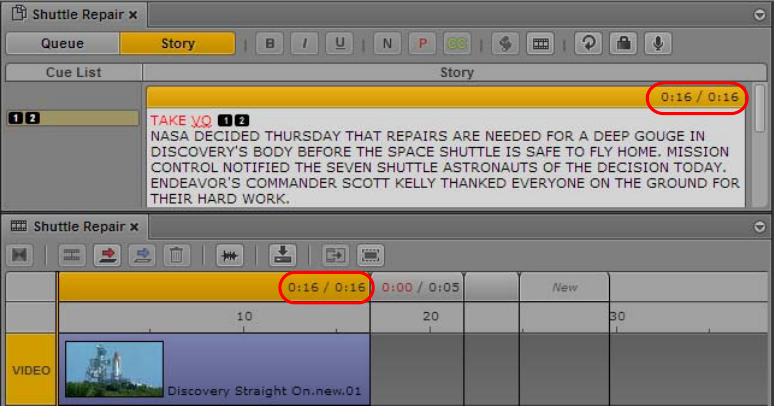
Editing a Sequence Associated with a Story
151
• If you insert a clip that is 16 seconds long, or you trim a clip to 16 seconds, the text duration and
the media duration match. The timing display changes to 0:16/0:16.
Adding text or removing text changes the text duration of a story segment, which automatically
changes the duration of the timing block to match.You can manually adjust the duration of the timing
block. See “Manually Adjusting Timing Blocks” on page 155.
Editing Media into Timing Blocks
Editing media into a timing block is similar to editing media into the sequence (see “Editing a
Sequence” on page 157). You can perform insert edits or overwrite edits, trim segments, split
segments, and so on. For example, you can insert a video clip into a timing block simply by dragging
the clip from the Media viewer to a timing block.
The following actions are specific to editing media into timing blocks:
• Edits respect the boundaries of the timing block. In other words, a media segment shorter than
the duration of the timing block results in a gap in the timing block, and a media segment longer
than the duration of the timing block extends the timing block. To extend a segment beyond a
timing block boundary, use the extend segment feature. See “Extending a Segment into Another
Timing Block” on page 152. You can also manually change the duration of the timing block. See
“Manually Adjusting Timing Blocks” on page 155.
• You can edit media into timing blocks independently. That is, you can edit media into timing
block A, then edit media into timing block C, leaving timing block B empty. This leaves a gap
(or “black hole”) in a sequence. You can use these gaps as placeholders as you work on the
sequence, but in most cases you need to fill them before sending a sequence to playback.
Similarly, a timing block can include gaps in which video media does not completely fill the
timing block.
• An empty timing block displays a length of three seconds by default. You can hide empty timing
blocks. See “Showing and Hiding Empty Timing Blocks” on page 154.
• You can drag segments from one timing block to another.
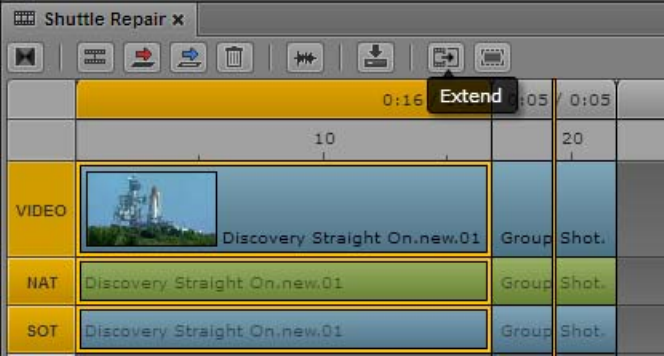
Editing a Sequence Associated with a Story
152
• You can create an L-cut within a timing block using the standard procedure for creating an L cut
(see “Using L-Cuts in the Timeline” on page 181). To create an L-cut beyond a timing block
boundary, you need to use the extend segment feature. See “Extending a Segment into Another
Timing Block” on page 152.
• You can create a new timing block and corresponding story segment by dragging a clip to the
“New” timing block or past it. A timing block is added to the end of the existing blocks, just
before the “New” block. A corresponding story segment is added to the script.
• Recording a voice-over increases the length of a timing block, because audio segments cannot
cross timing block boundaries. After you finish the recording, you can split the audio segment to
edit the audio appropriately.
• You can manually expand or contract the length of a timing block. See “Manually Adjusting
Timing Blocks” on page 155.
Extending a Segment into Another Timing Block
By default, video and audio edits do not cross timing block boundaries. If you try to extend a media
segment beyond the boundary of a timing block, the timing block enlarges to match the duration of
the segment. If you want to extend a segment beyond the timing block, for example, to create an L-
cut, you need to use the extend segment feature.
A common L-cut involves replacing some of the video in a segment while keeping its audio. The
extend segment feature allows you to extend video (and NAT if available) beyond the boundary of a
timing block without affecting the SOT track and the VO track. Use the position indicator to specify
the end point of the extended segment.
The following illustration shows a selected segment (Video plus NAT plus SOT) in the first timing
block. The position indicator is in the middle of the second timing block, which is the location into
which you want to extend the segment. The tool tip for the Extend/Retract button displays “Extend.”
After you click the Extend/Retract button, the video and NAT for the selected segment extend into
the second timing block. The selected video and NAT overwrite the video and NAT in the second
timing block, without affecting the SOT. The Extend/Retract button turns orange and its tool tip
changes to “Retract.” This indicates that the selected segment is extended and you can click the
button to retract it to its original position, as shown in the following illustration.

Editing a Sequence Associated with a Story
153
You can return the extended segments to their original duration by clicking the Extract/Retract button
to retract the segment.
To extend a segment:
1. Move the position indicator to the location to which you want to extend the video segment.
2. Select the segment.
You can select only a video segment and its associated audio segments (if available). Video,
NAT, and SOT are selected, but only video and NAT will be extended. You cannot select or
extend an audio-only track.
3. Do one of the following:
tClick the Extend/Retract button.
tRight-click and select Extend.
tPress Ctrl+Shift+X (Windows) or Command+Shift+X (Macintosh).
The Extend/Retract button turns orange to indicate that the segment is extended into the next
timing block. The tool tip for the button changes to Retract.
nIf you extend a segment over a hidden timing block, the timing block is displayed. See “Showing and
Hiding Empty Timing Blocks” on page 154.
To retract a segment:
1. Select the segment.
2. Do one of the following:
tClick the Extend/Retract button.
tRight-click and select Retract.
The Extend/Retract button turns gray to indicate that the segment is retracted to the original
timing block. The tool tip for the button changes to Extend.
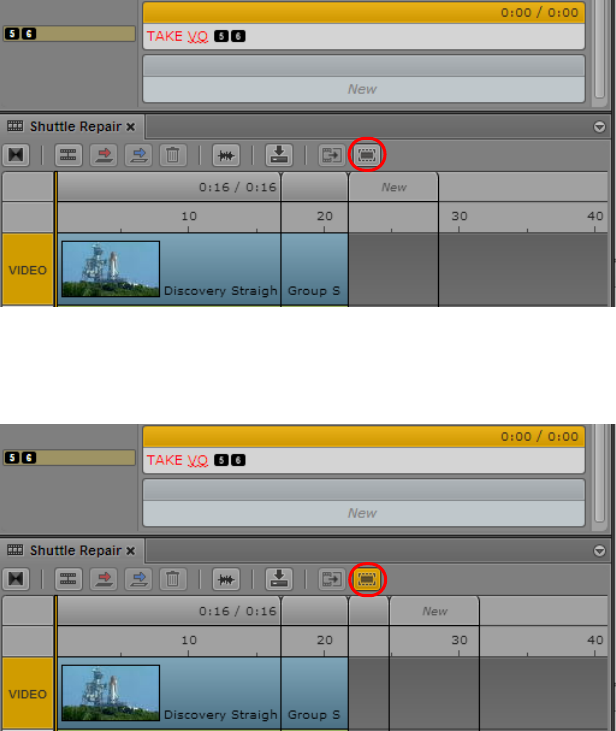
Editing a Sequence Associated with a Story
154
Showing and Hiding Empty Timing Blocks
If a story segment does not contain any text, and its corresponding timing block does not contain
media, the timing is displayed as 0:00/0:00. Because the timing block does not contain media, it is
considered empty, and by default it is not shown in the sequence. Empty timing blocks are also
hidden by default in the following situations:
• All text in a story segment is marked as presenter instructions (red) or closed-captioning text
(green).
• Text in a story segment is timed at one second or less.
The following illustration shows a story segment without timed text (followed by a New segment).
The corresponding timing block is hidden. The Show/Hide Empty Timing Blocks button is circled.
The following illustration shows the formerly hidden timing block. The Show/Hide Empty Timing
Blocks button turns orange.
Editing a Sequence Associated with a Story
155
Note the following:
• If you extend a segment over a hidden timing block and into the next timing block, the hidden
timing block is displayed and the segment is extended into it.
• If you take any actions to change a timing block, such as manually adjusting its duration, the
block will always be shown.
• You can create a text-only story segment that does not have a corresponding timing block. See
“Creating a Text-Only Story Segment” on page 107.
To show timing blocks, do one of the following:
tClick the Show/Hide Empty Timing Blocks button so that it is orange.
The tool tip for the button changes to Hide Empty Timing Blocks.
tSelect Show Empty Timing Blocks from the Pane menu.
To hide timing blocks, do one of the following:
tClick the Show/Hide Empty Timing Blocks button so that it is gray.
The tool tip for the button changes to Show Empty Timing Blocks.
tSelect Hide Empty Timing Blocks from the Pane menu.
Manually Adjusting Timing Blocks
By default the length of a timing block is synchronized with the duration of the text in the
corresponding story segment. As you work on your story, you might want to manually adjust the
duration of a timing block. For example, if you want to use a video segment that is not long enough to
fill a timing block, and you do not need to exactly match the timing of the story segment, you can
shorten the duration of the timing block.
After you manually adjust a timing block, the timing display (media duration and text duration) will
continue to automatically update. However, the size of the timing block will no longer be affected by
the text duration. Also, a manually adjusted timing block cannot be hidden.
To manually adjust a timing block:
1. Move the mouse pointer to the outside border of a timing block header so that a two-headed
arrow appears.
2. Click the border of the header.
The timing block header turns orange.
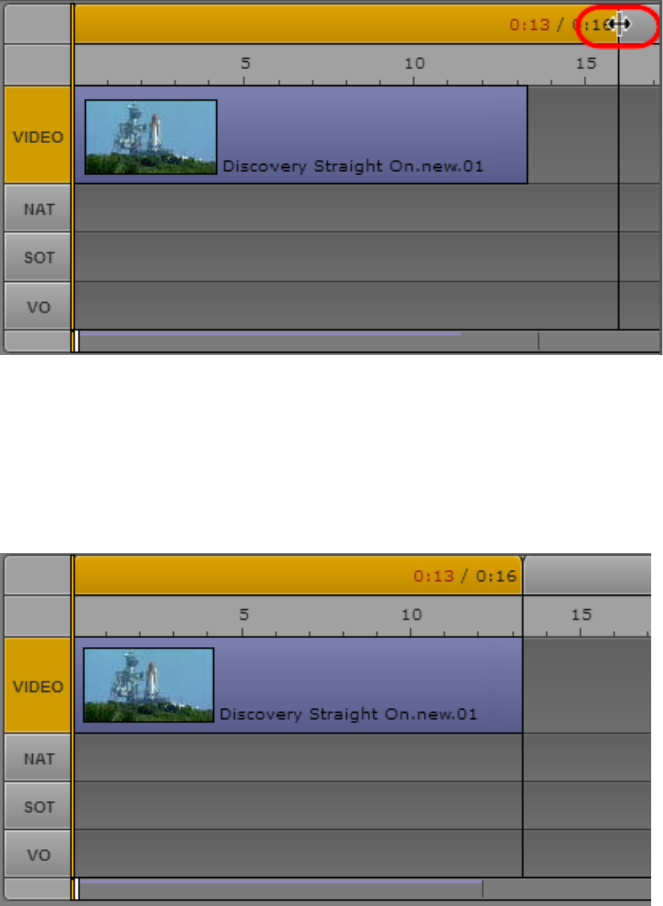
Editing a Sequence Associated with a Story
156
nThe timing block does not need to include media. Media does not need to be selected.
3. Drag the border to shorten or lengthen the duration of the timing block.
The following illustration shows a timing block duration shortened to match the duration of the
video. Note that the media duration (0:13) does not match the text timing (0:16).
If you would like to adjust the timing block to a duration that is shorter than a media segment,
you must first trim the media to the desired duration. Then drag the border of the timing block to
the end of the media segment.
Editing a Sequence
157
Editing a Sequence
You can work with one of two sequences: a basic sequence or an advanced sequence (see
“Understanding Basic and Advanced Sequences” on page 125). The following topics describe how to
work with basic sequences and advanced sequences:
•“Locking a Basic Sequence (Interplay | MAM)” on page 157
•“Performing an Insert Edit in a Basic Sequence” on page 158
•“Performing an Insert Edit in an Advanced Sequence” on page 159
•“Performing an Overwrite Edit in an Advanced Sequence” on page 162
•“Position Indicator Placement After an Insert or Overwrite Edit” on page 166
•“Performing a Replace Edit” on page 166
•“Enabling an Audio Track” on page 170
•“Using a Basic Sequence as a Source for a Sequence (Interplay | Production)” on page 171
•“Using a Basic Sequence as a Source for a Sequence (Interplay | MAM)” on page 171
•“Using Match Frame from Asset Mode to Add Media to a Sequence” on page 172
•“Undoing and Redoing an Action in the Sequence Pane” on page 173
•“Moving or Deleting Segments in the Timeline” on page 174
•“Adding and Removing Audio Segments” on page 174
•“Creating an Audio-Only NAT or SOT Segment” on page 175
•“Snapping in the Timeline” on page 177
•“Trimming Segments in the Timeline” on page 177
•“Using L-Cuts in the Timeline” on page 181
•“Splitting a Segment” on page 182
•“Adding Markers to a Sequence” on page 183
•“Inserting Video Dissolves (Advanced Sequences Only)” on page 184
•“Enabling Audio Scrubbing” on page 185
•“Modifying the Start Timecode” on page 185
nAncillary data that is contained in a clip is preserved when you edit the clip into a sequence.
Locking a Basic Sequence (Interplay | MAM)
If you are editing an Interplay MAM sequence, the sequence is locked to prevent other users from
editing the sequence at the same time. The lock is automatically set when you begin editing the
sequence. You can manually set a lock before beginning editing by clicking the Lock button.
If another user opens the sequence while it is locked, and clicks the Lock button or tries to edit the
sequence, the tool tip for the Lock button reads “Lock could not be acquired.”
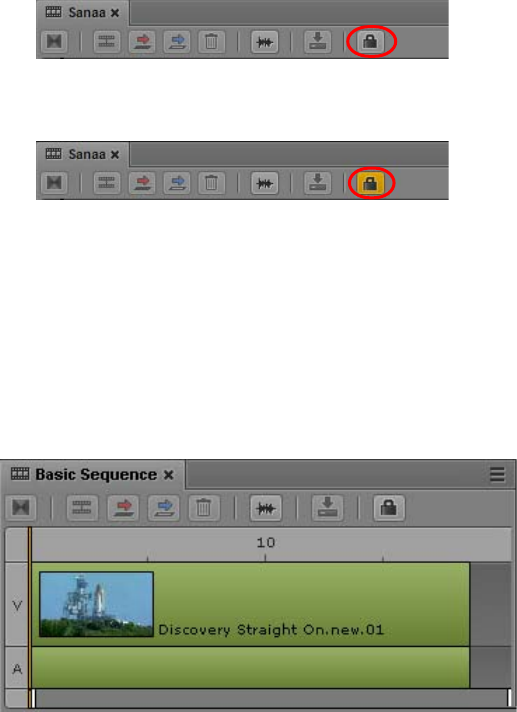
Editing a Sequence
158
To manually lock a sequence:
tClick the Lock button.
When the sequence is locked, the Lock button turns orange.
The sequence remains locked until you close the Sequence pane or load another sequence. You
can manually unlock the sequence by clicking the Lock button. If you make an edit, the lock is
automatically set again.
Performing an Insert Edit in a Basic Sequence
The timeline for a basic sequence has two tracks: video (V) and audio (A). A basic sequence uses
green for video and audio, as shown in the following illustration.
For more information on basic sequences and advanced sequences, see “Understanding Basic and
Advanced Sequences” on page 125 and “Selecting a Horizontal or Vertical Timeline” on page 128.
For Interplay Production sequences, the aspect ratio and the frame rate is determined by the first clip
that you add to the sequence. Any additional clips can have a different resolutions but must match the
initial frame rate. See “Creating a Sequence” on page 134.
For Interplay MAM sequences, the target frame rate is defined when the basic sequence is created.
By default, you can add clips with a differing frame rate but mixed frame rate editing might be
disabled by configuration in Interplay MAM.
To insert an asset into the timeline for a basic sequence:
1. Click a video or audio asset in the Media viewer in the Media pane.
2. Drag the asset from the Media viewer to the timeline until your pointer is over the V or A track,
as shown in the following illustration.
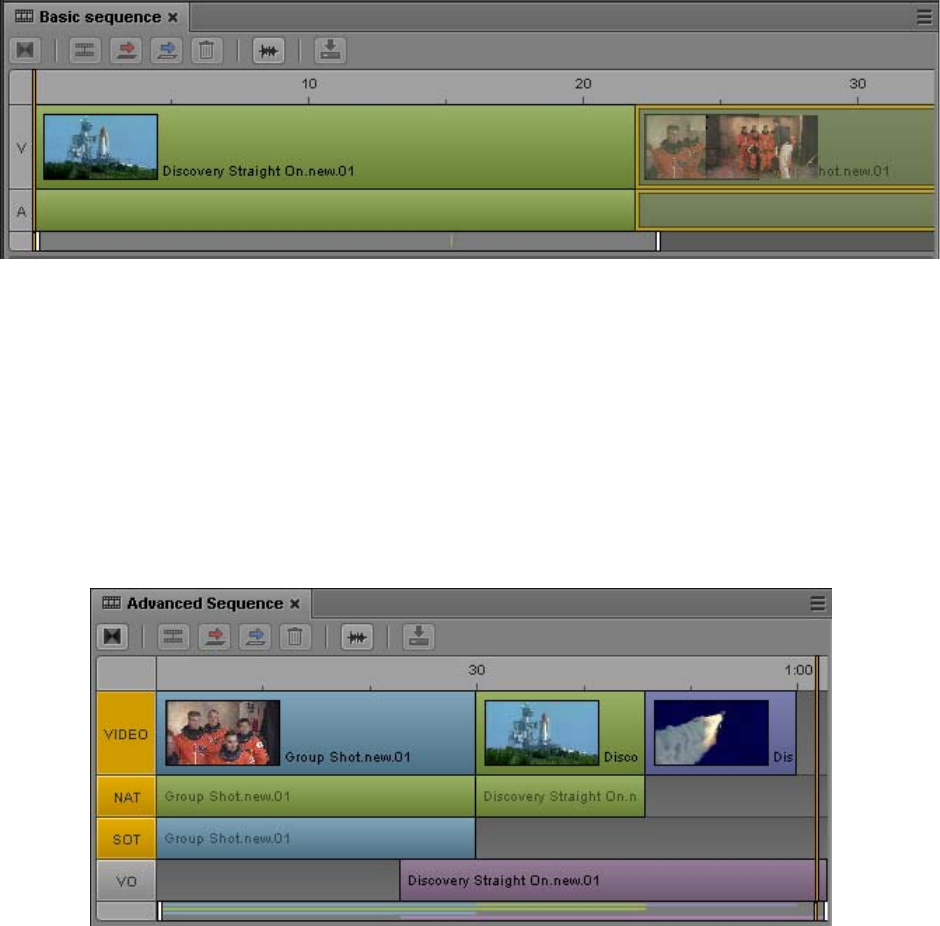
Editing a Sequence
159
As you drag the segment to where you want it, the V and A tracks appear highlighted in orange
to show you where the asset will be inserted when you release the mouse button.
3. Release the mouse button.
The asset is inserted into the timeline and the position indicator moves to the first frame of the
next segment.
Performing an Insert Edit in an Advanced Sequence
The default timeline for an advanced sequence has four tracks: Video, NAT (natural sound), SOT
(sound on tape), and VO (voice-over).
For information about colors in the timeline and other sequence information, see “Understanding
Basic and Advanced Sequences” on page 125 and “Selecting a Horizontal or Vertical Timeline” on
page 128.
If you are editing an advanced sequence, you can drag a clip from the Media viewer to the Sequence
Timeline as either an insert or an overwrite edit (see “Performing an Overwrite Edit in an Advanced
Sequence” on page 162).
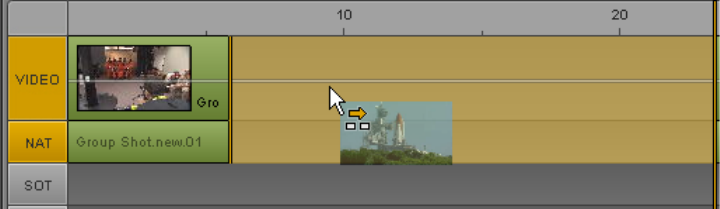
Editing a Sequence
160
When you drag a clip to the timeline, a thin guideline is displayed through the video track. If you
release the mouse button above the guideline, you perform an overwrite edit. If you release the mouse
button below the guideline, you perform an insert edit, as shown in the following illustration.
nThe examples in this topic use a horizontal timeline. If you are editing a sequence in a vertical
timeline, the guideline is also vertical, and the edits are determined by dragging to the left or to the
right of the guideline.
For Interplay Production sequences, the aspect ratio and the frame rate is determined by the first clip
that you add to the sequence. Any additional clips can have a different resolutions but must match the
initial frame rate. See “Creating a Sequence” on page 134.
To perform an insert edit using drag and drop:
1. Load a clip in the Media pane and mark In and Out points.
The amount of material that you insert is determined by the In-to-Out duration of the asset.
2. (Optional) Click the audio track indicator or indicators for the tracks on which you want to insert
the audio. You can enable NAT or SOT or both, or VO. A VO edit does not include video.
If you do not enable an audio track, you can insert NAT or SOT audio by dragging the clip to
either audio track.
nYou can also record a voice-over directly to the timeline. See “Recording a Voice-Over” on page 240.
3. Drag the clip from the Media viewer to a location in the video track or an audio track. Make sure
the mouse pointer is below the guideline.
The timeline shows where the insert will take place and how it will affect the other clips in the
timeline.
4. Release the mouse button.
The selected material is inserted into the timeline and the position indicator moves to the first
frame of the next segment.
Performing an Overwrite Edit in a Basic Sequence
If you are editing a basic sequence (Interplay Production or Interplay MAM), you can use the
Overwrite feature to replace a portion of the sequence with a clip that is loaded in Asset mode. There
are two ways to perform an overwrite edit:
• Click the Overwrite button or press the B key. This method provides you with more options:
- You can use the position indicator as an In point for the overwrite.
- You can perform the overwrite edit from either Asset mode or Output mode.
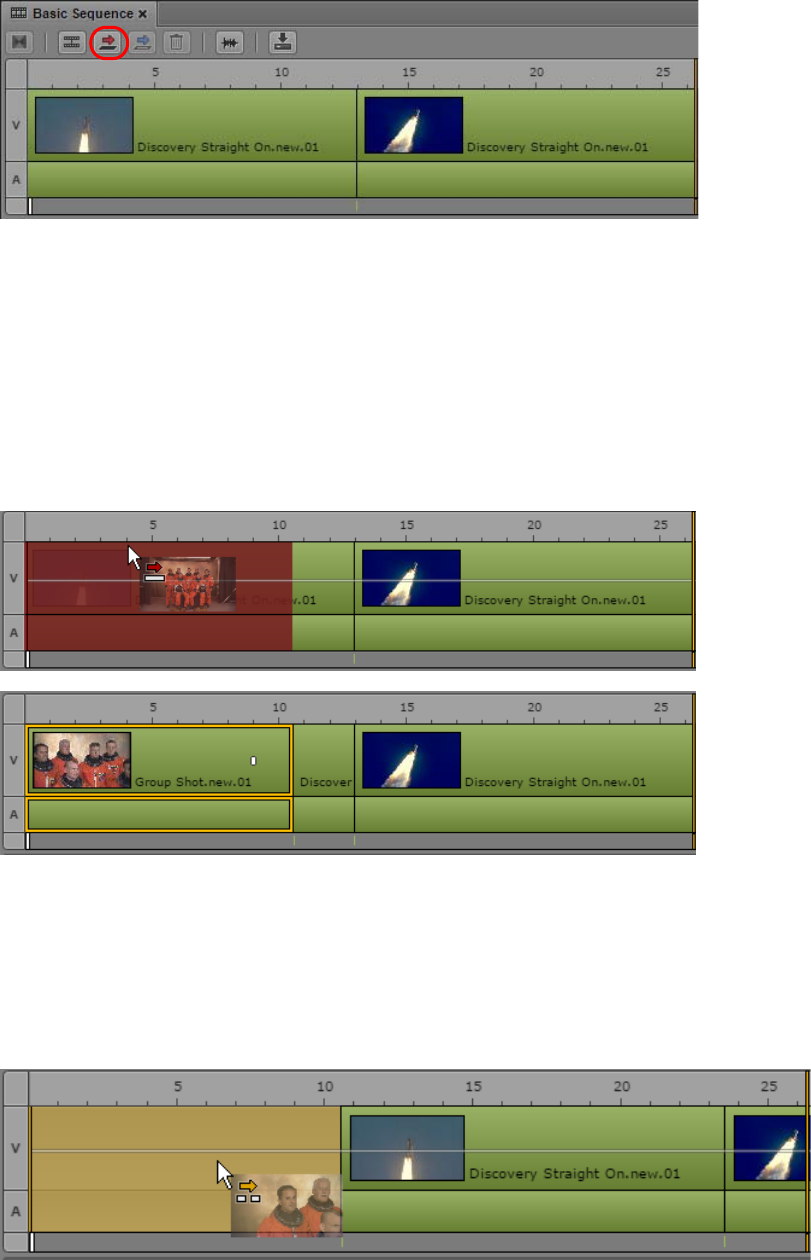
Editing a Sequence
161
The following illustration shows the Overwrite button circled.
• Drag a clip from the Media viewer and drop it on the Sequence Timeline. This method is a quick
way to build a sequence but has fewer options.
- You can overwrite only from the beginning of a video segment.
- You can drag only when the Media pane is in Asset mode.
The following illustration shows how an overwrite edit is displayed when you drag a clip to the
timeline. A thin guideline is displayed through the video track. If you release the mouse button
above the guideline, you perform an overwrite edit, as indicated by the red arrow and red overlay.
The resulting edit is also shown.
nThe examples in this topic use a horizontal timeline. If you are editing a sequence in a vertical
timeline, the guideline is also vertical, and the edits are determined by dragging to the left or to the
right of the guideline.
If you release the mouse button below the guideline, you perform an insert edit, as indicated by
the yellow arrow and yellow overlay.
Editing a Sequence
162
Note the following:
• If you use the drag and drop method, and you drop your clip in the Sequence Timeline before the
guideline appears (approximately 0.5 second), you perform an insert edit instead of an overwrite
edit.
To perform an overwrite edit using the Overwrite button or B key:
1. Load a clip in the Media pane and mark In and Out points.
The amount of material that you overwrite is determined by the In-to-Out duration marked on the
clip.
When you use this method, the Media pane can be in either Asset mode or Output mode
2. In the Sequence Timeline, move the position indicator to the location where you want to start the
overwrite.
3. Click the Overwrite button or press the B key.
The selected material overwrites the material in the timeline and the position indicator moves to
the first frame of the next segment.
To perform an overwrite edit using drag and drop:
1. Load a clip in the Media pane and mark In and Out points.
The amount of material that you overwrite is determined by the In-to-Out duration of the asset.
When you use this method, the Media pane must be in Asset mode.
2. Drag the clip from the Media viewer to a location in the video track of the Sequence Timeline.
Make sure the mouse pointer is above the guideline in the middle of the track.
The timeline shows where the overwrite will take place.
nDo not release the mouse button before the guideline appears (approximately 0.5 second) or you
perform an insert edit instead of an overwrite edit.
3. Release the mouse button.
The selected material overwrites the material in the timeline and the position indicator moves to
the first frame of the next segment.
Performing an Overwrite Edit in an Advanced Sequence
If you are editing an advanced sequence, you can use the Overwrite feature to replace a portion of the
sequence with a clip that is loaded in Asset mode. There are two ways to perform an overwrite edit:
• Click the Overwrite button or press the B key. This method provides you with more options:
- You can use the position indicator as an In point for the overwrite.
- You can perform the overwrite edit from either Asset mode or Output mode.
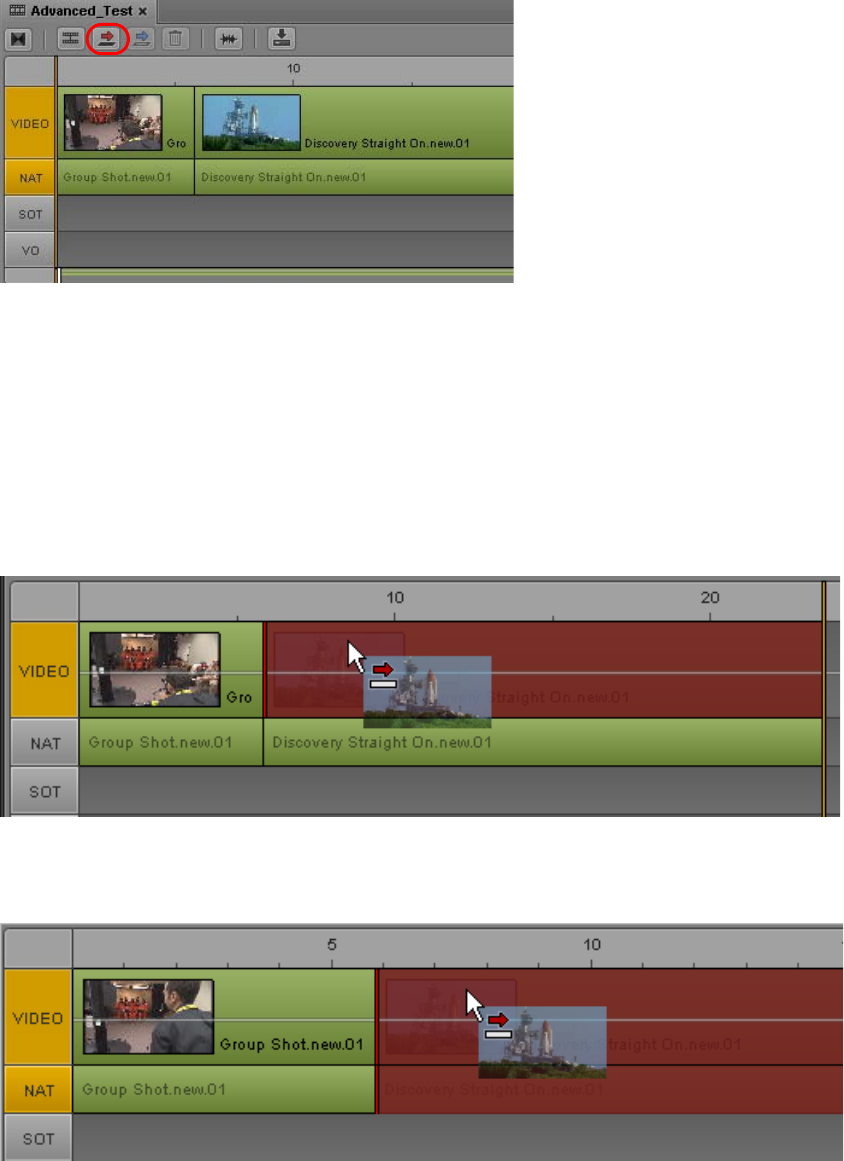
Editing a Sequence
163
The following illustration shows the Overwrite button circled. The NAT track is enabled, so that
audio in the source clip will overwrite audio in the NAT track.
• Drag a clip from the Media viewer and drop it on the Sequence Timeline. This method is a quick
way to build a sequence but has fewer options.
- You can overwrite only from the beginning of a video segment.
- You can drag only when the Media pane is in Asset mode.
The following illustration shows how a video-only overwrite edit is displayed when you drag a
clip to the timeline. A thin guideline is displayed through the video track. If you release the
mouse button above the guideline, you perform an overwrite edit, as indicated by the red arrow
and red overlay.
The following illustration shows how a video and NAT overwrite edit is displayed when you drag
a clip to the timeline. The NAT track indicator is enabled.

Editing a Sequence
164
nThe examples in this topic use a horizontal timeline. If you are editing a sequence in a vertical
timeline, the guideline is also vertical, and the edits are determined by dragging to the left or to the
right of the guideline.
If you have both NAT and SOT segments associated with the video, you can enable both tracks to
overwrite the video segment and both audio segments. You can enable the VO track, but only VO
audio will be overwritten.
nYou cannot overwrite NAT-only or SOT-only segments.
If you release the mouse button below the guideline, you perform an insert edit, as indicated by
the yellow arrow and yellow overlay.
For more information, see “Performing an Insert Edit in an Advanced Sequence” on page 159.
Note the following:
• You can perform an overwrite edit only in an advanced sequence.
• If you use the drag and drop method, and you drop your clip in the Sequence Timeline before the
guideline appears (approximately 0.5 second), you perform an insert edit instead of an overwrite
edit.
To perform an overwrite edit using the Overwrite button or B key:
1. Load a clip in the Media pane and mark In and Out points.
The amount of material that you overwrite is determined by the In-to-Out duration marked on the
clip.
When you use this method, the Media pane can be in either Asset mode or Output mode
2. In the Sequence Timeline, move the position indicator to the location where you want to start the
overwrite.
3. (Optional) Click a track selector to enable the audio track or tracks on which you want to
overwrite the audio. If you do not enable an audio track, only video is overwritten.
nThe Video track is always enabled. You can overwrite video only, but you cannot overwrite audio
only.
4. Click the Overwrite button or press the B key.
The selected material overwrites the material in the timeline and the position indicator moves to
the first frame of the next segment.
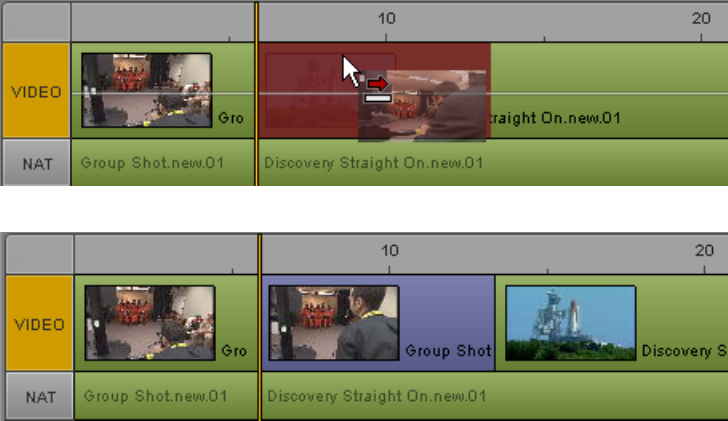
Editing a Sequence
165
To perform an overwrite edit using drag and drop:
1. Load a clip in the Media pane and mark In and Out points.
The amount of material that you overwrite is determined by the In-to-Out duration of the asset.
When you use this method, the Media pane must be in Asset mode.
2. (Optional) Click a track selector to enable the audio track or tracks on which you want to
overwrite the audio. If you do not enable an audio track, only video is overwritten.
nThe Video track is always enabled. You can overwrite video only, but you cannot overwrite audio
only.
3. Drag the clip from the Media viewer to a location in the video track of the Sequence Timeline.
Make sure the mouse pointer is above the guideline in the middle of the track.
The timeline shows where the overwrite will take place.
nDo not release the mouse button before the guideline appears (approximately 0.5 second) or you
perform an insert edit instead of an overwrite edit.
4. Release the mouse button.
The selected material overwrites the material in the timeline and the position indicator moves to
the first frame of the next segment.
- If the selected material is shorter than the segment that you are overwriting, and you are
overwriting only video, the audio of the overwritten segment is preserved and creates an L-
cut. The following illustrations show an example of the edit in progress and the result.
- If the selected material is the same length or longer than the segment that you are
overwriting, and you are overwriting only video, the audio of the overwritten segment
remains in the sequence. The audio is not associated with any video in the timeline. For
more information, see “Creating an Audio-Only NAT or SOT Segment” on page 175.
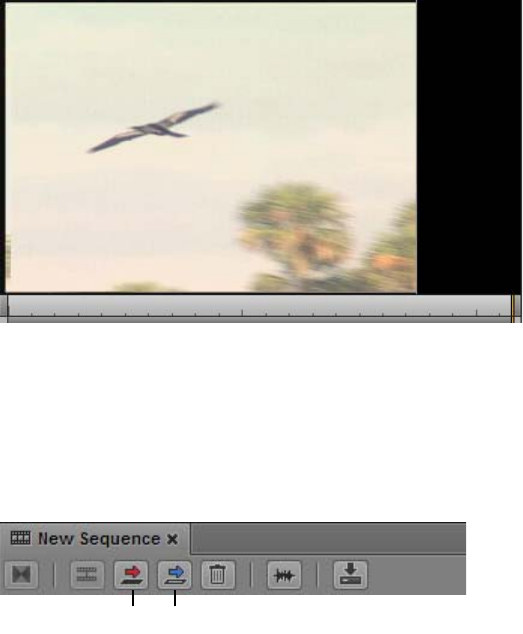
Editing a Sequence
166
Position Indicator Placement After an Insert or Overwrite Edit
If you perform an insert or overwrite edit, the position indicator (playhead) moves to the first frame
of the next segment. This feature lets you make a series of quick edits without losing the final frame
of the edited segment and without the need to switch from Asset mode to Output mode.
If the edited segment is the last segment in the sequence, the position indicator is set on an empty
frame. This final frame is shown by black on the right side of the Media viewer. The only other way
to access this frame is by clicking the Next Frame button or pressing the right arrow key when the
position indicator is at the end of the last segment in a sequence.
Performing a Replace Edit
A replace edit is a quick way to completely overwrite a selected segment in a sequence without
changing the duration of the segment. It is similar to an overwrite edit, but a replace edit is limited to
an entire segment.
1 Overwrite button; 2 Replace button
To perform a replace edit, use the In point to indicate the start of the video you want to use in the
sequence (the source material). MediaCentral UX calculates the amount of material needed to
replace the selected segment. The Out point is not used in the calculation.
If there is not enough material from the In point to the end of the asset to replace the selected
segment, the Replace button is disabled. The following message is displayed as a tooltip:
“Insufficient source material to make this edit.”
qqww
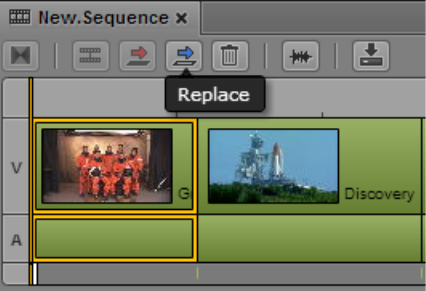
Editing a Sequence
167
Note the following:
• If the sequence contains L-cuts (where an audio segment starts before the video segment or
extends beyond it), there must be enough audio before and after the In point to replace the audio
segment. For example, if video and NAT are selected for a segment, and the NAT starts 10
frames before the video, there must be 10 frames of source audio available before the In point. If
the NAT extends 10 frames beyond the video, there must be sufficient source audio after the In
point.
• If a group clip is loaded (advanced sequences only), the active angle of the group clip is used as
the source material.
• A replace edit preserves any dissolves in the sequence. MediaCentral UX includes the necessary
media handles when determining if the edit is possible. If not enough material is available, a
replace edit shortens a dissolve at the beginning or end of a segment, while keeping the dissolve
symmetrical.
• A replace edit does not preserve any audio volume or panning that were applied to the selected
segment before the replace edit. You need to make these adjustments again.
• In both basic and advanced sequences, markers and restrictions from the source material replace
markers and restrictions in the selected segment.
The replace edit feature works differently for basic sequences and advanced sequences, as described
in the following procedures.
To replace video and audio in a basic sequence:
1. Load a clip in Asset mode and mark an IN point.
2. In the sequence, select the segment that you want to replace.
You cannot select only video or only audio.
3. Click the Replace button.
Video and audio in the selected segment is replaced.
To replace only video in an advanced sequence:
1. Load a clip in Asset mode and mark an IN point.
2. In the sequence, select the segment that you want to replace.
To replace video only, make sure the NAT and SOT track buttons are not selected.
3. Click the Replace button.
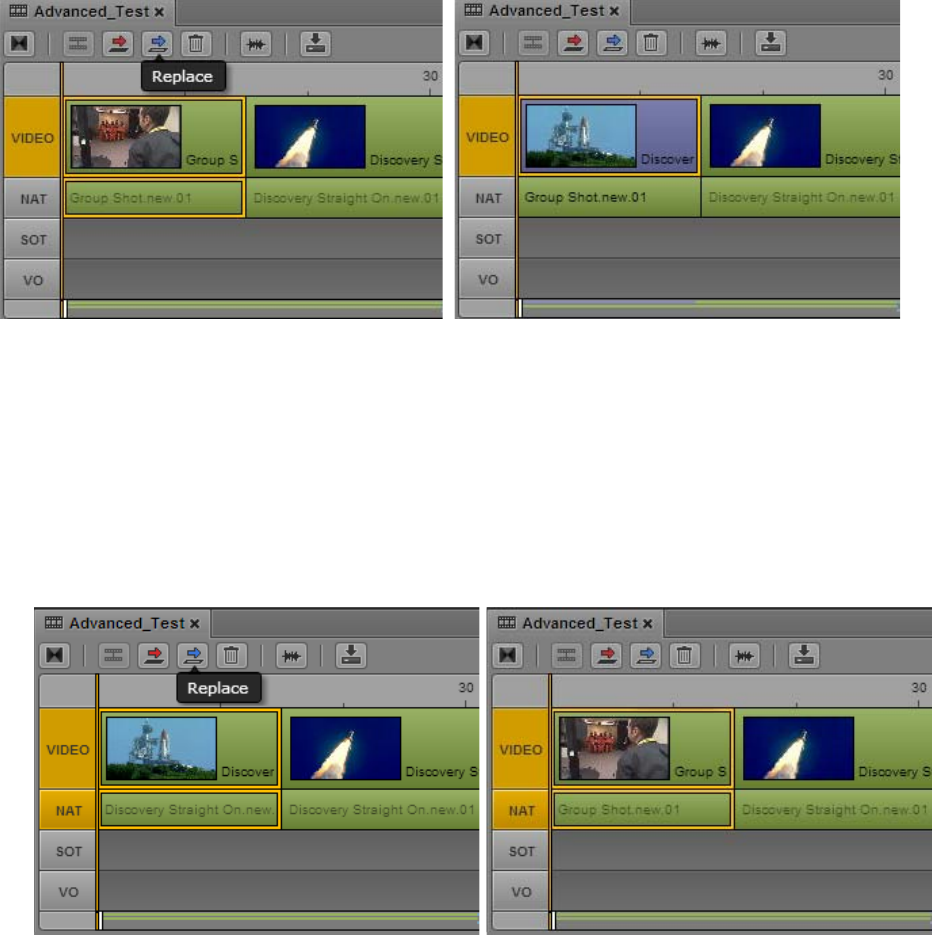
Editing a Sequence
168
The selected video is replaced. In the following illustration, the replaced video segment is
colored dark blue to indicate there is no corresponding audio in the sequence. The NAT video
remains green.
To replace video and audio in an advanced sequence:
1. Load a clip in Asset mode and mark an IN point.
2. In the sequence, select the segment that you want to replace.
3. Select the NAT or SOT track, or both.
4. Click the Replace button.
The selected video and audio is replaced. In the following illustration, the NAT track is selected,
and after the edit the Video and NAT tracks are green, to indicate video plus NAT.
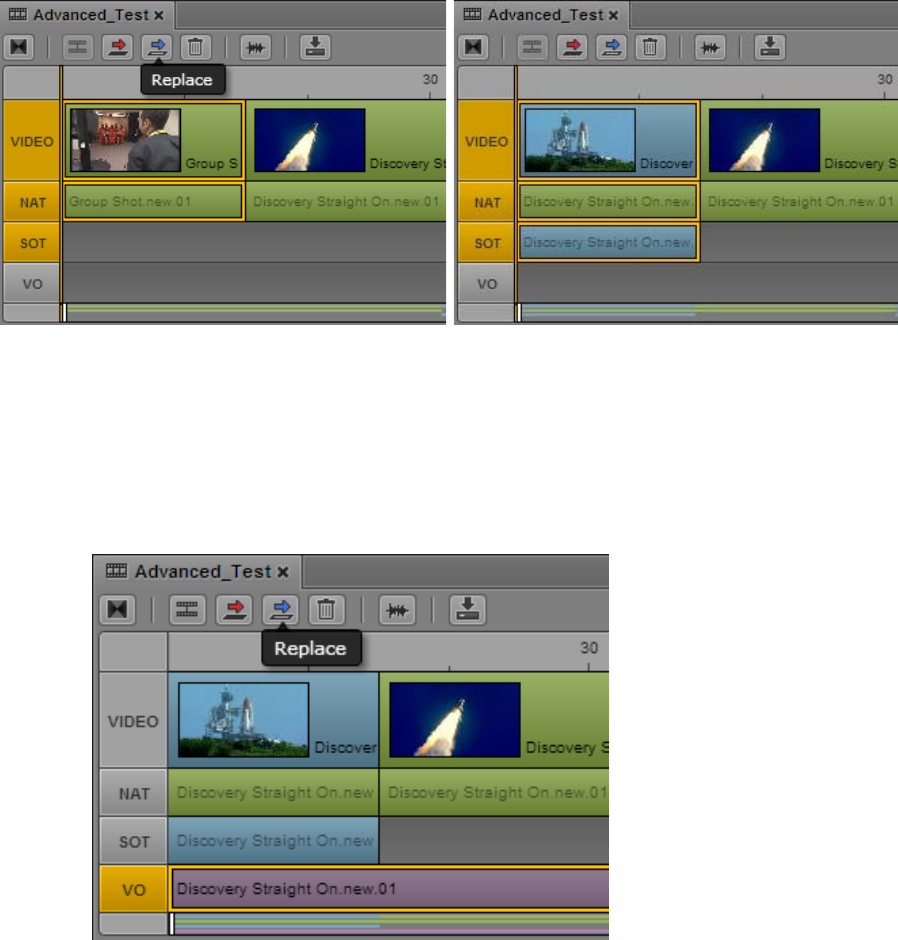
Editing a Sequence
169
In the following illustration, both the NAT track and the SOT track are selected. After the edit the
video segment and SOT audio segment are colored light blue, to indicate video plus SOT. Light
blue is also used for video plus NAT and SOT.
To replace voice-over audio in an advanced sequence:
1. Load a clip in Asset mode and mark an IN point.
2. In the sequence, select the voice-over audio segment you want to replace.
3. Click the VO button.
4. Click the Replace button.
The selected audio is replaced.
Editing a Sequence
170
Enabling an Audio Track
When editing an advanced sequence, you can enable audio tracks in the following combinations:
• Video and NAT track
• Video and SOT track
• Video and NAT and SOT tracks
• VO track
Enabling an audio track provides options for the following operations:
• Splitting a segment. See “Splitting a Segment” on page 182.
• Performing an insert edit. See “Performing an Insert Edit in an Advanced Sequence” on
page 159.
• Performing an overwrite edit. See “Performing an Overwrite Edit in an Advanced Sequence” on
page 162.
• Performing a replace edit. See “Performing a Replace Edit” on page 166.
See the appropriate procedure for more information.
To enable or disable an audio track:
tIn an advanced sequence, click the track indicator button.
The track indicator is colored orange if enabled. The following illustration shows that the NAT
and SOT tracks are enabled.
Note the following:
- Enabling the VO track disables NAT and SOT tracks.
- Enabling either the NAT or the SOT track disables the VO track
- If both the NAT and SOT tracks are enabled, Alt-click a track to disable both tracks.
- If both the NAT or SOT track are disabled, Alt-click a track to enable both tracks.
Editing a Sequence
171
Using a Basic Sequence as a Source for a Sequence (Interplay | Production)
You can open a basic sequence in Asset mode and use it as source footage for a sequence that is
loaded in Output mode.
• Starting with MediaCentral UX v2.5, you can use a basic sequence as a source for a basic
sequence.
• Starting with MediaCentral UX v2.6, you can use a basic sequence as a source for both a basic
sequence and an advanced sequence.
nAdvanced sequences are not currently supported as a source. You can use Match Frame to load a
master clip from an advanced sequence. See “Using Match Frame from Asset Mode to Add Media to
a Sequence” on page 172.
When you load the sequence in Asset mode, editing controls such as Mark In and Mark Out are
available through buttons and keyboard shortcuts.
You can perform an insert edit or an overwrite edit. Replace editing is supported only when using a
basic sequence as a source for a basic sequence.
Note the following:
• If the segment that you edit from the source includes more than one segment, all segments are
added individually to the timeline. The last segment is selected.
• Restrictions in the source sequence are copied to the output sequence.
• Markers that exist on the source sequence are copied to the output sequence only if they apply to
the sequence itself (not to the clips that make up the sequence).
• A group clip in the source sequence is copied as a group clip to the output sequence (basic
sequence only).The active angle and the audio mapping are preserved.
• Advanced sequences do not support group clips. The active angle of a group clip in the source
sequence is copied to the advanced sequence as a master clip.
• A sequence cannot be added to itself. If you load a basic sequence in Output mode, and you open
the same sequence in Asset mode, the sequence will be loaded in Asset mode, but there will be
no timeline in the Sequence pane.
To edit material from a basic sequence to a basic or advanced sequence:
1. In the Assets pane, do one of the following:
tRight-click a sequence and select Open in Asset Mode.
tSelect a sequence, click the Pane Menu button, and select Open in Asset Mode.
The sequence opens in Asset mode in the Media pane.
2. Use the editing tools (Mark In, Mark Out, and so on) to edit the material you want into your
sequence.
Using a Basic Sequence as a Source for a Sequence (Interplay | MAM)
Starting with MediaCentral UX v2.10, you can open an Interplay MAM basic sequence in Asset
mode and use it as source footage for a basic sequence that is loaded in Output mode. When you load
the sequence in Asset mode, editing controls such as Mark In and Mark Out are available through
buttons and keyboard shortcuts.
Editing a Sequence
172
Note the following:
• You can open basic sequences and audio-only basic sequences in Asset mode.
• When you open a basic sequence in Asset mode in the Media pane, the Media pane Actions
menu only provides processes that are supported for sequences.
• If you insert the sequence open in the Media pane to the sequence open in the timeline, all
segments are added individually to the timeline. The last segment is selected.
• A sequence cannot be added to itself. If you load a basic sequence in Output mode, and you open
the same sequence in Asset mode, the sequence will be loaded in Asset mode, but there will be
no timeline in the Sequence pane.
To edit material from a basic sequence to a basic sequence:
1. Locate the basic sequence in one of the following panes: Assets, Associations, or Search pane.
2. Do one of the following:
tRight-click the sequence and select Open in Asset Mode.
tSelect the sequence, click the Pane Menu button, and select Open in Asset Mode.
The sequence opens in Asset mode in the Media pane.
3. Use the editing tools (Mark In, Mark Out, and so on) to edit the material you want into your
sequence.
Using Match Frame from Asset Mode to Add Media to a Sequence
If you want to use an advanced sequence as a source for another sequence, you can load the advanced
sequence into Asset mode in the Media pane, and use the Match Frame feature to open the source
clip for a particular frame. Then select media from the source clip to edit into the currently loaded
sequence.
Because advanced sequences are not currently supported as a source, this approach is most useful
when editing from an advanced sequence.
nYou can also use Match Frame from Output mode. See “Using Match Frame” on page 221.
To use Match Frame to add media to a sequence:
1. In an Assets pane, do one of the following:
tRight-click a sequence and select Open in Asset Mode.
tSelect a sequence, click the Pane Menu button, and select Open in Asset Mode.
The sequence opens in Asset mode in the Media pane.
2. Navigate to a frame in the material that you want to add to a sequence.

Editing a Sequence
173
3. Do one of the following:
tClick the Pane Menu button and select Match Frame.
tClick the Match Frame button.
The master clip that contains the frame is loaded in the Media pane, with the matching frame
displayed. In and Out marks are set to match the segment used in the sequence.
4. Edit the material you want into your sequence.
Loading a Clip from the Sequence Timeline
Starting with MediaCentral v2.10, you can load a media segment (video or audio) from a sequence
into the Media viewer.
nThis feature is similar to the Match Frame feature. However, Match Frame uses the location of the
position indicator to determine which clip to load. The Load Clip feature loads the source clip for the
segment you select, regardless of the location of the position indicator.
To load a clip from the Sequence Timeline, do one of the following:
tDouble-click the segment.
tRight-click the segment and select Load Clip.
The source clip for the segment is loaded into Asset mode in the Media viewer. In and Out marks
are set to match the segment used in the sequence.
Undoing and Redoing an Action in the Sequence Pane
You can undo or redo an action in the Sequence pane, such as restoring a clip that you deleted. You
can undo or redo up to 100 actions. The undo/redo list is not saved after you sign out of a session.
If an action affects a marker (Interplay Production assets only), the change is also shown in the
Logging pane. For example, if you add a marker to a sequence, then trim the sequence to remove the
marker, the marker is removed from the list in the Logging pane. If you undo your action, the marker
is restored to both the sequence and the Logging pane.
nThere is currently no Undo/Redo feature specifically for the Logging pane.
If you are working on a script and a sequence together, the same set of Undo actions applies to both
the Story pane and the Sequence pane. If you load a new sequence or close the Sequence pane, the
Undo actions are lost in the Story pane.
To undo an action, do one of the following:
tPress Ctrl+Z (Windows) or Command+Z (Macintosh).
tSelect Undo from the Sequence pane menu.
tRight-click in the Sequence pane and select Undo from the context menu
To redo an action, do one of the following:
tPress Ctrl+Y (Windows) or Command+Y (Macintosh).
Editing a Sequence
174
tSelect Redo from the Sequence pane menu.
tRight-click in the Sequence pane and select Redo from the context menu
Moving or Deleting Segments in the Timeline
After you add assets to a sequence, you can rearrange them in the timeline. A portion of media that is
contained on a track in a sequence is called a segment.
For an advanced sequence, after you have added a segment to the timeline, you cannot switch it to a
different track. For example, if you drag and drop a clip into the timeline as a SOT, you cannot then
select that segment in the timeline and drag it to another audio track. If the clip has audio on a
channel that is not mapped to the audio track in which you insert it, you will not hear the audio when
the sequence is played.
nIf you want to change the track into which audio was inserted, you can use the procedures described
in “Adding and Removing Audio Segments” on page 174.
To move a segment in a sequence:
1. Click the segment you want to move.
2. Drag the segment and drop it in a new location in the timeline.
In a long sequence, moving a segment to the viewable edge of the sequence (top or bottom for a
vertical timeline, left or right for a horizontal timeline) scrolls the sequence in that direction.
To delete a segment from a sequence, do one of the following:
tRight-click the segment you want to delete and select Delete Segment.
tClick the segment you want to delete and click the Delete button in the Sequence pane toolbar.
tClick the segment you want to delete and select Delete Segment from the Sequence pane menu.
tClick the segment you want to delete and press Delete or Backspace (Windows).
Deleting a segment from the sequence does not remove the original source media from the
server.
Adding and Removing Audio Segments
If a video clip is associated with one or more audio tracks, and you add the video clip in the Sequence
Timeline, you can add or remove its associated audio segments. For example, if a sequence contains
a video segment and its associated NAT segment, you can add a SOT segment. If a sequence contains
a video segment without audio, you can add a NAT segment, a SOT segment, or both.
Similarly, you can remove a NAT segment, a SOT segment, or both.

Editing a Sequence
175
The following illustration shows a video segment with associated NAT and SOT segments. If a video
segment and associated NAT and SOT tracks are included in the timeline, the video segment is
colored blue and matches the SOT segment.
This feature applies only to the segment you select. It does not affect the audio in other segments of
the sequence.
nEnabling the track selector for NAT or SOT does not affect this feature.
To add a NAT or SOT segment:
tRight-click a segment in the Sequence pane and select one of the following:
- Add audio segment > NAT
- Add audio segment > SOT
A check mark indicates if an audio segment is included in the sequence.
To remove a NAT or SOT segment:
tRight-click a segment in the Sequence pane and deselect one of the following:
- Add audio segment > NAT
- Add audio segment > SOT
The check mark is removed.
Creating an Audio-Only NAT or SOT Segment
When editing a sequence, you might need to replace an unneeded video segment, such as an on-
camera stand up, while keeping the audio. If you want to replace the video but keep the audio, you
can perform a video-only overwrite edit. The audio segment remains in the timeline, without
associated video, and you can edit the audio segment independently.
The following illustration shows a selected video segment and its associated SOT audio on the left
(as shown by the orange outlines), and the same sequence after a video-only overwrite edit. The
video segment on the right is colored purple to indicate there is no associated audio. The SOT
segment remains blue, and the clip name is darker than clip names for audio segments associated
with a video segment.
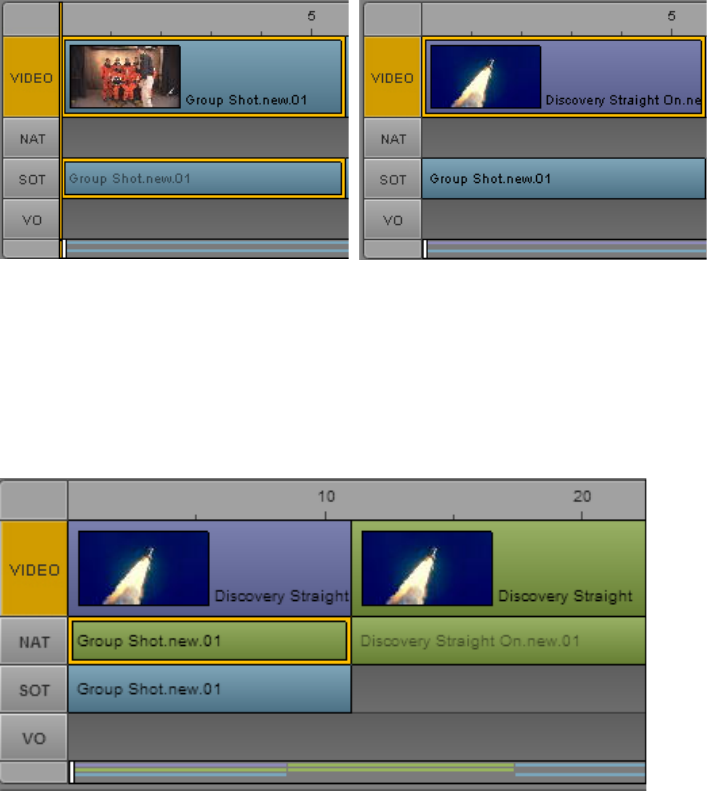
Editing a Sequence
176
If you enable both NAT and SOT for a segment (as described in “Adding and Removing Audio
Segments” on page 174), you can overwrite the original video and keep both NAT and SOT
segments.The following illustration shows NAT and SOT tracks that are not associated with a video
segment. The video segment above the selected NAT track is colored purple to indicate there is no
associated audio. The NAT segment remains green, the SOT segment remains blue, and the clip
names are darker than clip names for audio segments associated with a video segment.
To create an audio-only NAT or SOT segment:
1. Edit a clip with NAT or SOT audio into the sequence.
2. (Optional) Enable a second audio segment (NAT or SOT).
3. Load a clip into the Media pane and set In and Out points for video to replace the video segment
in the timeline. The marked video must be the same length or longer than the video segment you
want to replace.
4. Perform an overwrite edit.
For more information, see “Performing an Overwrite Edit in an Advanced Sequence” on
page 162.
5. If necessary, trim the transitions to align audio and video.
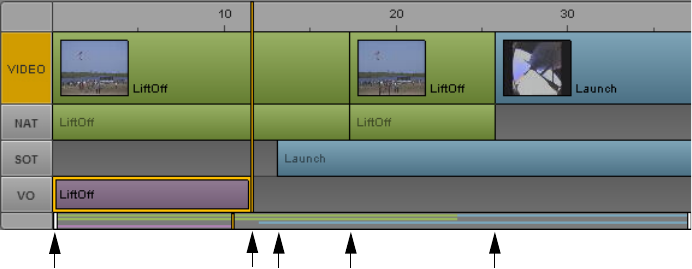
Editing a Sequence
177
Snapping in the Timeline
In some cases, edits that you make in the Sequence Timeline are limited to particular timecode
locations. In other cases, you can make an edit to any timecode location. For example, dragging a
video segment is limited to the start or end of another video segment. However, trimming the end of a
video segment can extend to any available timecode location.
If an edit can be made to any timecode location, snap points can help you accurately align your edit.
This can be particularly useful when aligning audio and video. Snap points include:
• The position indicator
• The start point or end point of another segment in the timeline
• The original start point or end point of the segment you are dragging
• The beginning of a sequence
• The boundaries of a timing block
As you drag a segment or endpoint, the dragging action pauses briefly or snaps to these points. If you
then release the mouse button, the edit is made at the snap point.
The following illustration shows snap points for a VO segment.
Snap points are limited to advanced sequences.
Starting with MediaCentral UX v2.7, you can use Ctrl+click (Windows) or Command+click
(Macintosh) to snap the position indicator to the closest cut of the enabled tracks. See “Navigating in
the Sequence Timeline” on page 129.
To override pausing and snapping:
tHold down the Shift key while you drag a segment or end point.
Trimming Segments in the Timeline
You can trim a segment from either end, lengthening or shortening the segment frame-by-frame or by
larger increments. You can also perform a double-sided trim, in which the combined duration of both
segments remains the same.
After you trim a segment, the position indicator automatically moves to the new position in the
sequence and the frame at that position is displayed in the viewer of the Media pane so you can see
the exact frame to which the segment was trimmed.
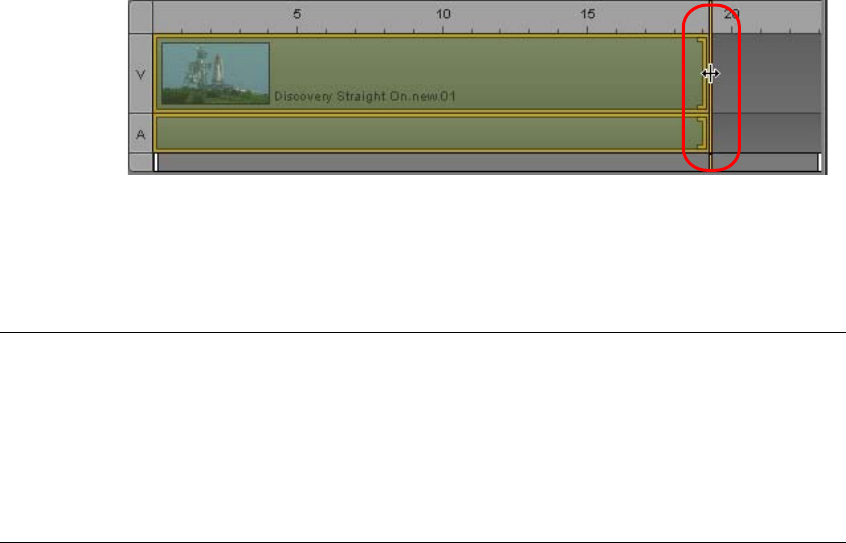
Editing a Sequence
178
nYou can only lengthen a segment to the maximum length of its original source media.
The following topics describe trimming segments:
•“Trimming a Basic Sequence” on page 178
•“Trimming an Advanced Sequence” on page 179
•“Trimming from the Top or the Tail of a Segment” on page 179
•“Using Double-Sided Trim” on page 180
Trimming a Basic Sequence
When trimming a basic sequence, video and audio are trimmed together. You cannot trim only video
or only audio.
To trim a segment using the mouse, do the following:
tClick one end of the segment and drag the audio or video trim indicator.
To trim a segment using keyboard shortcuts:
1. Click the end of the segment you want to trim.
2. Press one of the following keys:
The position indicator automatically moves to the trim location.
M Trim the segment’s selected end by 10 frames earlier.
comma (,) Trim the segment’s selected end one frame earlier.
period (.) Trim the segment’s selected end one frame later.
slash (/) Trim the segment’s selected end 10 frames later.
nThis keyboard shortcut is designed for an American keyboard; it might
not work with another keyboard layout.
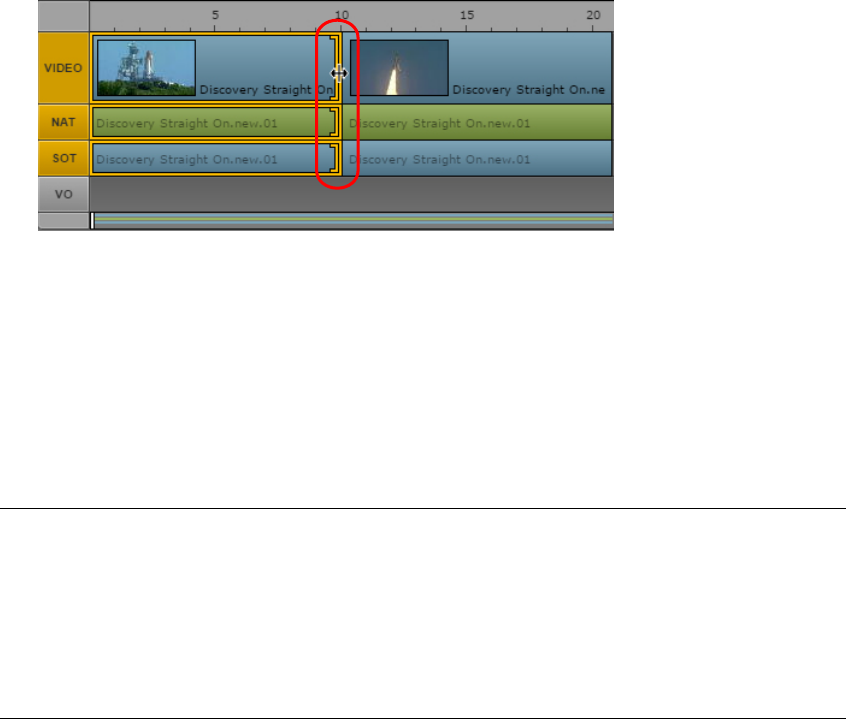
Editing a Sequence
179
Trimming an Advanced Sequence
For an advanced sequence, you can trim the video track, the audio track, or both video and audio.
To trim a segment using the mouse, do one of the following:
tTo trim both video and audio, click one end of the video segment and drag the trim indicator.
The following illustration shows both video and audio segments that can be trimmed from the
end of the segment.
tTo trim only audio, click one end of the audio segment and drag the trim indicator.
tTo trim only video if the sequence includes audio from the same source, hold down the Ctrl key
(Windows) or Command key (Macintosh), click one end of the video segment, and drag the trim
indicator. Use this technique to create an L-cut. See “Using L-Cuts in the Timeline” on page 181.
To trim a segment using keyboard shortcuts:
1. Click the end of the segment you want to trim.
2. Press one of the following keys:
The position indicator automatically moves to the trim location.
Trimming from the Top or the Tail of a Segment
You can use a command or keyboard shortcut to trim a segment from the beginning (top) or end (tail)
to the current position of the position indicator.
To trim from the beginning of a segment:
1. Position the position indicator on the frame to which you want to trim.
You can trim a selected segment or segments that overlap at the position indicator.
To trim overlapping segments, do not select any segments. The trim affects one video segment,
its associated audio segment, and any voice-over segment.
M Trim the segment’s selected end by 10 frames earlier.
comma (,) Trim the segment’s selected end one frame earlier.
period (.) Trim the segment’s selected end one frame later.
slash (/) Trim the segment’s selected end 10 frames later.
nThis keyboard shortcut is designed for an American keyboard; it may not
work with another keyboard layout.
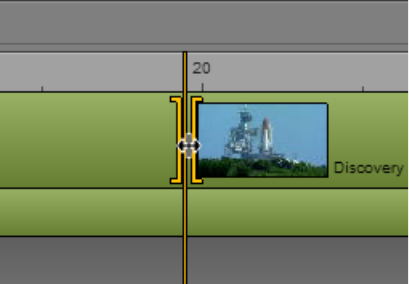
Editing a Sequence
180
nTo deselect a segment, click in an unused part of the timeline.
2. Do one of the following:
tRight-click and select Trim Top.
tPress Shift+[.
nThis keyboard shortcut is designed for an American keyboard; it might not work with another
keyboard layout.
To trim from the end of a segment:
1. Position the position indicator on the frame to which you want to trim.
You can trim a selected segment or all segments that overlap at the position indicator.
To trim overlapping segments, do not select any segments. The trim affects one video segment,
its associated audio segment, and any voice-over segment.
nTo deselect a segment, click in an unused part of the timeline.
2. Do one of the following:
tRight-click and select Trim Tail.
tPress Shift+].
nThis keyboard shortcut is designed for an American keyboard; it might not work with another
keyboard layout.
Using Double-Sided Trim
Double-sided trim refers to a trimming operation in which one video segment is extended into
another video segment and overwrites the material in the trimmed segment. (This feature is referred
to as dual-roller trim in Media Composer and NewsCutter.) The combined duration of both clips
remains the same.
• In a basic sequence, double-sided trim applies to video and to the synced audio track.
• In an advanced sequence, double-sided trim applies to video only.
To use double-sided trim:
tHold down the Control key (Windows) or the Command key (Macintosh) and drag the transition.
Trim indicators appear on both sides of the transition while you hold down the Control key.
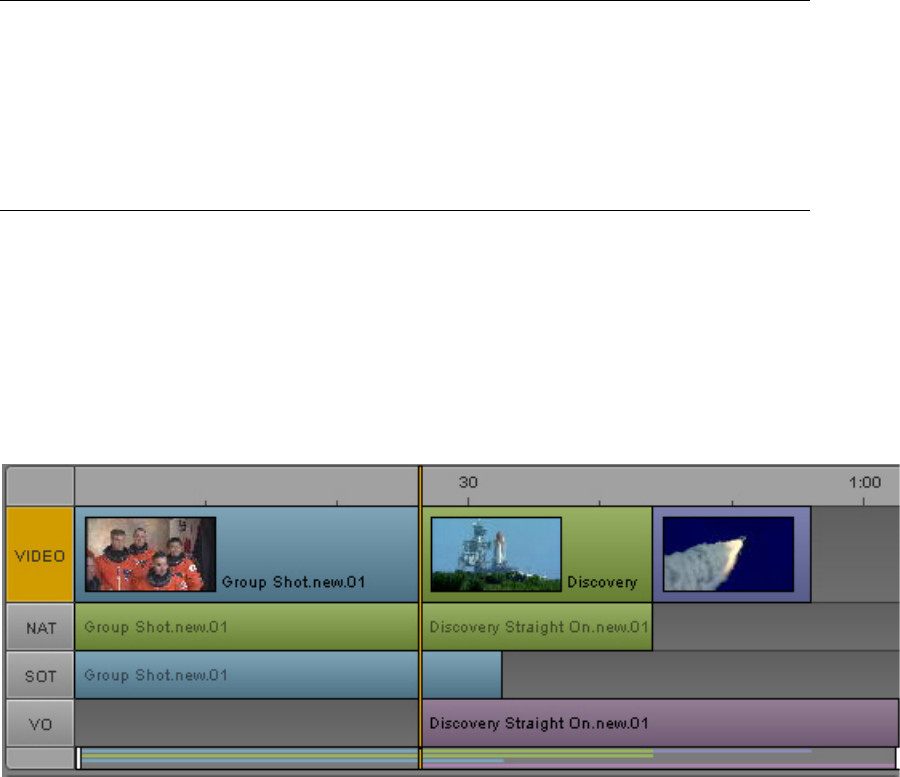
Editing a Sequence
181
You can use the following keystrokes to control the trim:
Using L-Cuts in the Timeline
An L-cut is a split edit between two segments in which the video transition does not occur
simultaneously with the audio transition. In some cases, the audio transition happens before the
video, while in other cases the reverse is true.
The following illustration shows an L-cut near the 20-second mark in the timeline. The SOT segment
in the sequence (light blue) extends beyond its corresponding video.
To create an L-cut:
1. Select the video segment you want to edit, positioning the mouse pointer near the end you want
to adjust.
A trim indicator is displayed in the segment’s video track, audio track, or both.
2. Do one of the following:
tHold down the Ctrl key (Windows) or Command key (Macintosh), click the video trim
indicator, and drag it to a different position.
tClick the audio trim indicator and drag it to a different position.
This separates the video transition from the audio transition and lets you edit one without editing
the other. You can click either indicator to modify each segment independently.
To remove an L-cut:
tClick and drag the trim indicator for audio back into alignment with the video, or vice versa. You
do not have to be exact; the application will automatically realign the video and audio transitions.
Shift+M Trim the segment’s selected end by 10 frames earlier.
Shift+ comma (,) Trim the segment’s selected end one frame earlier.
Shift+period (.) Trim the segment’s selected end one frame later.
Shift+slash (/) Trim the segment’s selected end 10 frames later.
nThis keyboard shortcut is designed for an American keyboard;
it may not work with another keyboard layout.
Editing a Sequence
182
nL-cuts are maintained when you drag a segment to a new location in the sequence.
nWhen audio segments overlap, MediaCentral UX automatically adjusts the audio levels. See
“Working with Audio Tracks in Advanced Sequences” on page 234.
Splitting a Segment
You can use a button, a menu item, or a shortcut key to split segments at a selected timecode location,
and then use the resulting split to edit the sequence. For example, you can split a video segment and
its related audio, then delete one of the new segments. This feature is similar to the Avid editing
system “Add Edit” feature.
Splitting a segment works differently, depending on the type of sequence you are editing:
• For a basic sequence, a split applies to all visible tracks. For a sequence with a video track and
audio track, you cannot split only video or only audio.
• For an advanced sequence, you can select audio tracks to split by enabling the track. To enable a
track, click the track indicator button so that it displays orange. You can split the following
combinations:
- Video only
- Video and NAT
- Video and SOT
- Video, NAT, SOT
-VO only
Combinations that cannot be split:
-VO and Video
- VO and NAT (cannot be enabled at the same time)
- VO and SOT (cannot be enabled at the same time)
- VO, NAT, and SOT (cannot be enabled at the same time)
-L-cuts
When you select Split from the context menu or the pane menu, the menu item text shows which
tracks are enabled for splitting. If you move the mouse pointer over the Split button, the tooltip
shows which tracks are enabled for splitting.
Also note the following:
• Selecting a segment does not affect the split. The split occurs at the position indicator.
• After you split a segment, the first frame of the second segment becomes the current frame.
• For Multicamera group clips, the same camera angle is maintained for both segments. Each
segment’s angle can then be changed independently.
• The location where you want to split the segment can be up to one frame from either end of the
segment.
• Splitting a segment in a sequence does not create new master clips or subclips.
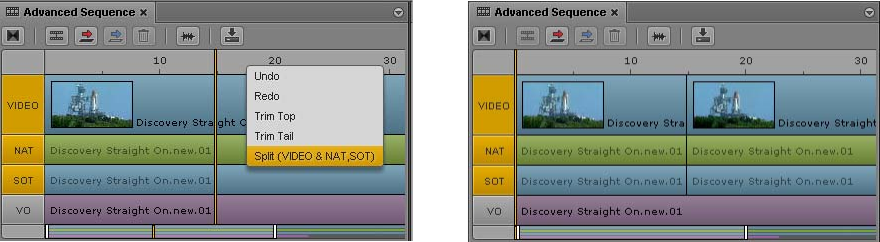
Editing a Sequence
183
To split one or more segments:
1. Move the position indicator to the location where you want to split the segment.
2. For an advanced sequence, enable the audio tracks that include segments that you want to split.
3. Do one of the following:
tClick the Split button.
tPress Ctrl+E (Windows) or Command+E (Macintosh).
tPosition the mouse pointer on the timecode bar, right-click the timecode bar, and select
Split.
tSelect Split from the Sequence pane menu.
The following illustration shows a video segment with associated NAT and SOT tracks
enabled for splitting, and the results of the split operation.
Left: Before splitting the segments; Right: After splitting the segments
You can now edit the split segments, for example, by deleting one of the new segments or
inserting a new clip at the split.
Adding Markers to a Sequence
There are two ways to add markers to a sequence:
• Add a clip or a portion of a clip that contains markers.
• Add markers directly to the sequence.
nMarkers are a feature used in Interplay Production assets. For complete information about working
with markers, see “Logging Interplay | Production Assets and Creating Subclips” on page 291.
Adding a clip that contains markers: Any markers that are contained within the In and Out marks
are copied to the sequence when you edit the clip into the sequence. Copying markers with a clip is a
“one-time copy.” If you lengthen a clip by trimming, markers that are included in the added part of
the clip are not copied. If you shorten a clip by trimming, you remove any markers that are included
in the trimmed portion. They are not restored if you lengthen the clip. To restore the markers, redo
the edit. You can use Match Frame from the sequence to locate the original clip. See “Using Match
Frame” on page 221.
Markers in audio-only clips: Markers are not added for audio-only clips, such as voice-overs. You
can copy markers only from a clip that includes a video track.
Moving segments with markers: When you move a segment of a sequence that contains markers,
the markers are also moved.
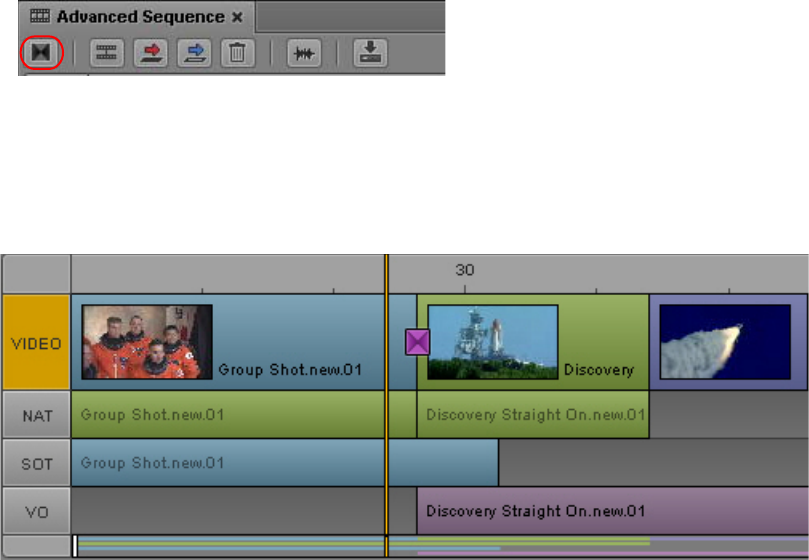
Editing a Sequence
184
Adding markers in Output mode: If you are adding markers to a sequence in Output mode, saving
in the Logging pane or saving in the Sequence pane saves both the sequence and the markers.
Switching modes in the Media pane: If you switch from Output mode to Asset mode, or from Asset
mode to Output mode, the Logging pane switches to match the media that is loaded in the Media
pane.
nIf you set the Logging pane to display only those markers created by you, only your markers are
visible in the Sequence pane. For more information, see “The Logging Pane for
Interplay | Production Assets” on page 296.
Inserting Video Dissolves (Advanced Sequences Only)
You can insert a video dissolve to transition on center between segments in an advanced sequence.
Dissolves can be set to transition from 2 to 300 frames, using even numbers only, with half of the
frames used in the leading segment and the other half in the trailing segment.
nDissolves cannot be placed at the start of the first segment or the end of the last segment in a
sequence. For any dissolve, you must ensure the source material has sufficient media to allow for the
dissolve before Mark In or after Mark Out points. Also, the trailing half of one dissolve cannot
overlap the leading portion of the next dissolve. In all of these cases, the system will issue messages
indicating that a dissolve is not possible.
To insert a video dissolve between two segments:
1. Place the position indicator within two seconds of the cut between two segments in the timeline.
2. Do one of the following:
tClick the Add Video Dissolve button in the Sequence pane toolbar.
tPress the Backslash key (\).
tClick the Pane Menu button and select Insert Dissolve.
The following illustration shows a dissolve between the two segments of a sequence, which is
indicated by the square Dissolve icon located just to the right of the position indicator.

Editing a Sequence
185
nThe icon is a static size and does not change with dissolves of varying durations.
3. By default the duration of dissolves is set to 20 frames, divided evenly at 10 frames in the leading
segment and 10 frames in the trailing segment. This can be changed, however, by double-
clicking on the Dissolve icon or by right-clicking on the icon and selecting Modify Duration.
If altered, any new dissolve added to the sequence afterwards will have the altered setting for its
duration.
nYou can change the default duration by changing the Dissolve Duration in the Sequence User
Settings.
4. You can view the dissolve by positioning the position indicator in the Sequence Timeline at any
point in the leading segment and then playing the output in the viewer of the Media pane.
Dissolves are associated with the leading segment, so if the leading segment is moved to the end
of the sequence, the associated dissolve is automatically deleted.
To delete a dissolve:
tRight-click the Dissolve icon and select Delete Dissolve.
Enabling Audio Scrubbing
By default, scrubbing in the timeline is set to video-only to provide faster operation. You can
optionally turn on audio scrubbing through a context menu command in either the Sequence pane
menu or the Media pane menu.
To enable audio scrubbing:
tClick the Pane Menu button in the Sequence pane or the Media pane and click Audio Scrubbing.
A check mark indicates that Audio Scrubbing is enabled. To disable audio scrubbing and remove
the check mark, click Audio Scrubbing again.
Modifying the Start Timecode
In some cases you might need to change the timecode for the first frame of a sequence. This feature
applies only to Interplay Production sequences.

Synchronizing Broadcast Graphics with a MediaCentral | UX Sequence
186
To modify the start timecode of a sequence:
1. Load a sequence in the Media pane.
2. Click the Sequence Pane Menu button and select Modify Start Timecode.
3. Position the insert bar in front of the digit you want to change and type a new digit.
In the following example, the first digit is changed from 0 to 1.
To restore the original digits of the timecode, press the Backspace key or the Delete key.
4. Click OK.
To switch between drop-frame and non-drop frame for NTSC sequences:
tType a semicolon (;) or colon (:) at any time.
Synchronizing Broadcast Graphics with a
MediaCentral | UX Sequence
Starting with MediaCentral UX v2.10, graphics added to an iNEWS story are shown in an associated
MediaCentral UX script sequence. The Avid Maestro UX plug-in v2.3 and later supports this feature.
For example, if you add a Maestro graphic to a story in MediaCentral UX, the graphic is
automatically added to the associated sequence. If you change the timing of a graphic in the
sequence, or delete a graphic, the change is also made in the story.
This topic describes how to use Maestro graphics in this workflow.
Requirements
To enable synchronized graphics, the MediaCentral server must be configured for the following:
• Avid iNEWS
• Avid Maestro with graphics connector
• Interplay Production
Only advanced Interplay Production sequences are supported for synchronized graphics.
Graphics are not displayed in basic sequences that have been associated with a story.
nCurrently you cannot use Interplay Production assets to fill a Maestro template in MediaCentral UX.
See “Editing and Previewing a Graphic Template” on page 475.
nFor MediaCentral UX v2.10, an administrator needs to edit the application.properties file and the
avid-common params file to enable this feature. For MediaCentral UX v2.10.1 and later, an
administrator only needs to edit the avid-common-params file. For more information, see the Avid
MediaCentral Platform Services Installation and Configuration Guide.
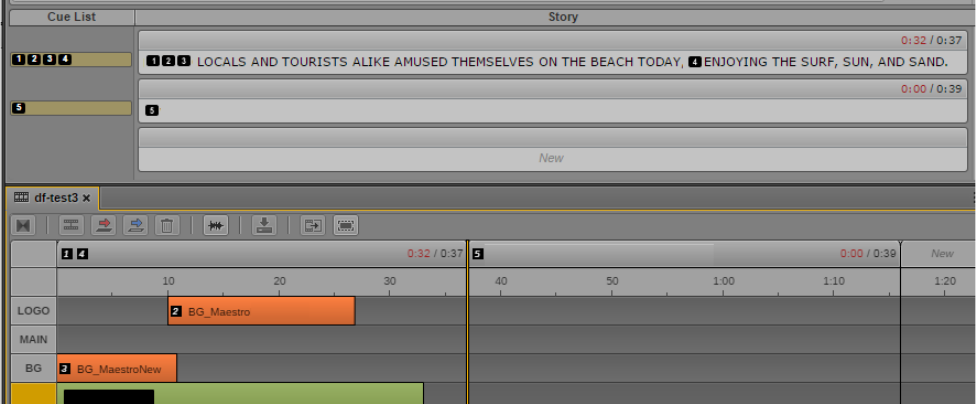
Synchronizing Broadcast Graphics with a MediaCentral | UX Sequence
187
Workflow
There are two types of broadcast graphics you can work with:
• Untimed graphic: No specific In point or Out point is set. During broadcast an operator needs to
play the graphic manually
• Timed graphic: An In point is set; an Out point is optional. During broadcast, playback is
automatic, based on the In point and Out point as they are set within a timing block in the
sequence.
Both types of graphics are shown as production cues in a story. In a sequence, untimed graphics are
shown as production cues, and timed graphics are shown as editable segments, each on a separate
track. The following illustration shows graphics as production cues in a story (top) and the same
graphics as production cues and graphics tracks in a sequence (bottom).
Graphics 1, 4, and 5 are untimed and are displayed in the timing block header. Graphics 2 and 3 are
timed and are displayed as graphics tracks in the sequence. The track labels (LOGO, MAIN, and BG)
are taken from the VSlot labels in the Maestro graphic.
nMaestro graphics are supported only in sequences that are stored in a database in your local zone.
The following is a typical workflow:
1. An MC UX user opens a Maestro template in the Maestro Browser pane (as supported in
MediaCentral UX v2.7.1 and later). This graphic can be timed (with In point and Out point) or
untimed. The user edits the template as required to create a graphic for the story.
2. The user drags the graphic from the Maestro Browser pane to the iNEWS story (as supported in
MediaCentral UX v2.7.1 and later).
3. When the user creates an associated script sequence (or opens a previously created one),
placeholders for the graphics are automatically shown in the Sequence pane timeline.
4. The user can edit the In and Out points of a timed graphic shown in the graphics track, and delete
timed graphics and untimed graphics. When the user saves the story, the changes are saved to the
graphic in the story.
Synchronizing Broadcast Graphics with a MediaCentral | UX Sequence
188
5. The user can preview the sequence and graphics in the Media viewer. A setting determines
whether the preview uses rendered graphics or a representative frame.
6. The user can perform a send-to-playback. Graphics will be delivered separately.
Using the Single Image Preview Setting
Starting with MediaCentral UX v2.10, the Maestro system settings include an option named “Single
image preview.”
If this setting is enabled, and you initiate a preview of a graphic, the representative frame (which is
marked in the Maestro Page editor for every template) will be used as a preview.This option provides
a preview more quickly than a rendered preview and reduces bandwidth needs for the MediaCentral
configuration.
If this setting is disabled, the full animation of a graphic is rendered and provided as a preview.
To enable single image preview:
1. Sign in to MediaCentral UX as an administrator.
2. Select System Settings from the Layout selector.
The System Settings layout opens.
3. In the Settings pane, select Maestro.
The Details pane displays the Maestro settings.
4. In the Render Server section, select “Single image preview” so that an orange check box appears.
5. Click Apply.
To disable the setting, click the orange check box so that it turns gray, then click Apply.
Editing In and Out Points of a Graphic
You can edit the In and Out points of a timed graphic within a MediaCentral UX sequence, and the
changes are synchronized with the graphic in the story. Changing the In or Out points of the graphic
does not change the anchor position of the production cue in the story.
nFor a timed graphic, the position of the production cue (or anchor) in the iNEWS story text has no
relation to the actual position of the graphic segment in the sequence.
You can also edit the In and Out points of the graphic in the Maestro Browser pane.
To edit the In or Out point of a timed graphic when it is displayed in a sequence, do one of the
following:
tSelect the graphic segment in the sequence, and drag it to a new location.
If two graphic segments are on the same track, and you drag one towards the other, the graphic
you are dragging stops when it reaches the other segment. There is no overlap of graphics on the
same track.
tSelect the beginning or end of the graphic segment and drag it to a new location.
Synchronizing Broadcast Graphics with a MediaCentral | UX Sequence
189
Opening a Graphic for Editing from a Sequence
From a MediaCentral UX sequence, you can open a graphic for editing in the Maestro Browser pane.
After you save the graphic, changes are synchronized with the graphic in the sequence.
To open a graphic in the Maestro Browser, do one of the following:
tDouble-click an untimed graphic placeholder or a timed graphic segment.
tRight-click an untimed graphic placeholder or a timed graphic segment and select Edit Graphic.
Removing a Graphic from a Sequence
You can remove a timed graphic (graphic segment) or an untimed graphic (placeholder) from a
sequence. The graphic is also removed from the story.
To remove a graphic from a sequence:
tSelect the graphic segment or graphic placeholder and do one of the following:
- Right-click and select Delete.
- Click the Pane menu button and select Delete.
- Press the Delete key or the Backspace key.
Playing Back a Sequence with Graphics
You can playback the sequence and preview the synchronized graphics at any time. A setting
determines whether the preview uses rendered graphics or a representative frame (see “Using the
Single Image Preview Setting” on page 188).
nOnly timed graphics are rendered and displayed in the Media viewer when you play back a sequence.
Untimed graphics are not shown.
To play back a sequence with graphics:
tIn the Media pane, click the Play button.
If rendering is not complete, the Media viewer displays the message “Graphic not ready.”
STP for a Sequence with Graphics
Synchronized Maestro graphics are not sent to the playback device with the script sequence. The
graphics are sent with the iNEWS rundown.

6Working with Video Media
The following main topics describe how to work with the Media pane to view and edit your video
assets:
•The Media Pane
•Playing Assets
•Working with Remote Assets (Interplay Production)
•Working with Remote Playback (Interplay | MAM)
•Marking In and Out Points
•Working with Markers and Restrictions
•Displaying Captions and Segments
•Using the Timecode Displays
•Entering Timecode to Cue a Frame
•Working in the Media Timeline
•Using the Media Zoom Bar
•Reviewing in the STP Target Resolution
•Playing Back at the Highest Resolution
•Using Match Frame
•Opening an Enclosing Folder
•Transcoding Assets
•Viewing and Editing a Clip During Ingest
•Saving a Frame as an Image
•Viewing an Image
•Exporting an MP4 File
The Media Pane
191
The Media Pane
The Media pane provides you with the controls you need to play, cue, and mark video clips as you
build your story. You can set the Media pane to one of two modes:
• Click the Asset button to work in Asset mode.
Use Asset mode to view master clips, subclips, and sequences, and to edit media into your
sequence. You can also send a sequence to a playback device or add a MAM asset to a process.
For a description of the controls in Asset mode, see “Media Pane: Asset Mode” on page 192,
“Media Pane Menu Options (Asset Mode)” on page 194, and “Media Pane: Group Clip” on
page 196.
• Click the Output button to work in Output mode.
Use Output mode to view a sequence, add a voice-over, and send the sequence to a playback
device or add a MAM basic sequence to a process. For a description of the controls in Output
mode, see “Media Pane: Output Mode” on page 196.
The view in the Media pane automatically switches to Asset mode or Output mode, depending on the
asset you load.
• In the Assets pane, double-click a clip or subclip, or drag it to the Media pane. The clip or
subclip opens in Asset mode.
• In the Assets pane, double-click a sequence, or drag it to the Media pane. The sequence opens in
Output mode.
• In the Assets pane, right-click a sequence and select Open in Asset Mode. The sequence opens in
Asset mode.
• In the Queue/Story pane, click the Open Sequence button. The associated sequence opens in
Output mode.
• In the Search pane, double-click a MAM asset or basic sequence. The asset opens in Asset mode,
and the basic sequence opens in Output mode.
• In the Tasks pane, double-click a MAM asset or basic sequence. The asset opens in Asset mode,
and the basic sequence opens in Output mode.
You can use the Esc key to switch between Asset mode and Output mode.
nIf you have loaded an asset in the Media player, and need to switch layouts (for example, to switch
from Log layout to Cut layout), the asset remains loaded.
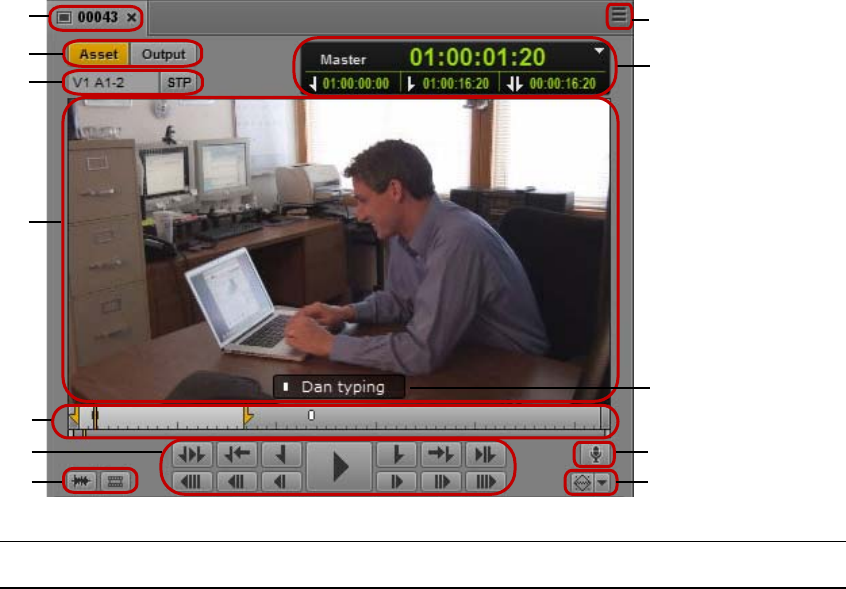
The Media Pane
192
Media Pane: Asset Mode
The following illustration shows the Media pane in Asset mode. Displays and controls are described
in the accompanying table.
q
w
e
r
t
i
o
1)
u
y
1@
1!
Display or Control Description
1 Title Displays the name of an asset loaded from the Interplay Production
database or the title of an asset loaded from the Interplay MAM database.
The title of an Interplay MAM asset might not match the name in the
Assets pane. For more information, see “Renaming Asset References” on
page 68.
2 Asset and Output buttons Lets you switch views between an asset loaded in Asset mode and a
sequence loaded in Output mode.
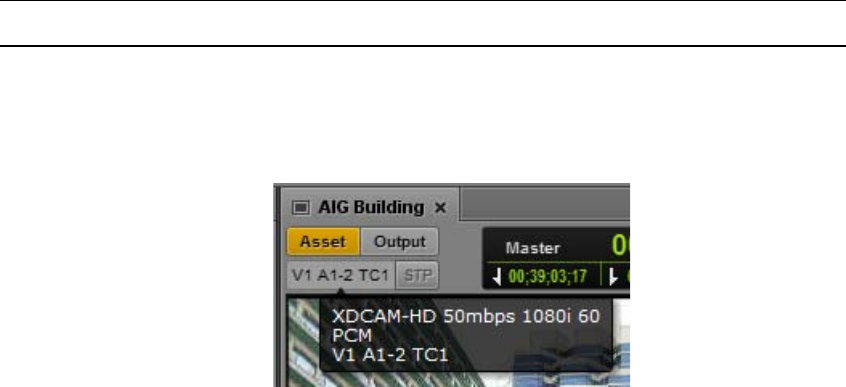
The Media Pane
193
3 Video format display Displays the tracks associated with the asset. If the display is red, the asset
does not have online media that matches the target resolution of the
selected Send to Playback profile. If you move the mouse pointer over the
display, you see what video and audio formats are associated with the
asset, in addition to the tracks.
STP button Click this button to send a playable sequence loaded from an Interplay
Production database to a playback device. In Asset mode, this button is
active only if you load a sequence. For more information, see “Sending a
Sequence to a Playback Device” on page 414.
4 Media viewer Displays video for a loaded asset, including master clips, sequences, and
subclips.
Text for a marker that you select or annotation of a selected stratum is
displayed as an overlay at the bottom of the Media viewer. Error messages
concerning media appear at the top of the Media viewer. The speed display
for J-K-L play is shown in the upper right. For more information, see
“Using the J-K-L Keys for Playback” on page 200.
5 Media Timeline and Media
zoom bar
• The Media Timeline is a graphical representation of the length and
time span of an asset or sequence. The Media Timeline includes timing
marks, a position indicator, and other controls. For more information,
see “Working in the Media Timeline” on page 216.
• The Media zoom bar lets you enlarge a section of the Media Timeline.
For more information, see “Using the Media Zoom Bar” on page 217.
6 Media controls Lets you play, pause, step through, and mark in and out points. For more
information, see “Playing Assets” on page 199, “Stepping Through
Assets” on page 202, and “Marking In and Out Points” on page 210.
7 Audio Pane button Click this button to open or bring forward the Audio pane.
Match Frame button Click this button to load a master clip that contains a selected frame of a
sequence or subclip. See “Using Match Frame” on page 221.
8 Pane Menu button Provides options for controlling the display and sending to playback. For
more information, see “Media Pane Menu Options (Asset Mode)” on
page 194.
9 Timecode displays Provides timecode information for the loaded asset or sequence. For more
information, see “Using the Timecode Displays” on page 213.
Display or Control Description

The Media Pane
194
Media Pane Menu Options (Asset Mode)
The following table lists options in the Media Pane menu when an asset is loaded in Asset mode. For
more information, see the appropriate topic.
10 Marker overlay
Captions overlay
Displays the contents of a selected marker for a loaded Interplay
Production asset. For more information, see “Working with Markers and
Restrictions” on page 211.
Displays the annotation of a selected stratum for the loaded Interplay
MAM video or audio asset. For more information, see “Displaying
Captions and Segments” on page 212.
11 Voice-Over button Displays the controls for recording an audio clip. For more information,
see “Recording an Audio Clip” on page 241.
12 MultiRez button If this option is enabled, lets you choose to play back at the highest
resolution. See “Playing Back at the Highest Resolution” on page 220.
Display or Control Description
Menu Option Description
Match Frame See “Using Match Frame” on page 221.
Recently Viewed Assets See “Playing Recently Viewed Assets” on page 202.
Open Enclosing Folder See “Opening an Enclosing Folder” on page 221.
Interplay Production only
Update Media Status See “Updating the Media Status” on page 203.
Aspect Ratio See “Selecting the Aspect Ratio” on page 202.
MultiAngle View See “Loading a Group Clip and Changing the Angle View” on
page 250.
Interplay Production only
Playback Quality See “Selecting the Playback Quality” on page 204.
Playback Latency See “Adjusting for Playback Latency” on page 205.
Playback Mode (Frame or File) See “Selecting Frame-Based Playback or File-Based Playback” on
page 205.
Captions See “Displaying Captions and Segments” on page 212.
Interplay MAM only
Overlay Text Displays the contents of a selected marker (Interplay Production) or the
annotation of a selected stratum (Interplay MAM).
Closed Captions Displays closed captions as overlays. See “Working with Closed
Captions in MediaCentral | UX” on page 369.
Safe Areas Displays two outlined boxes: the safe title area (inner box) and the safe
action area (outer box). Titles and closed captions should remain within
the inner box. The outer box is the safe action area for video display.
The safe title area is useful when you are positioning closed captions.

The Media Pane
195
Playback Statistics Provides performance information about the media playback.
Audio Scrubbing See “Enabling Audio Scrubbing” on page 185
Send to Playback See “Sending to Playback” on page 411.
Interplay Production only
Send to Playback Settings See “Specifying Send to Playback Settings” on page 411.
Interplay Production only
Deliver to Me See “Delivering Assets and Media to a Local Workgroup” on page 425.
Interplay Production only
Deliver To See “Delivering Assets and Media to a Remote Workgroup” on
page 423.
Interplay Production only
Transcode See “Transcoding Assets” on page 222.
Interplay Production only
Create Subclip See “Creating Subclips” on page 311.
Interplay Production only
Export MP4 See “Exporting an MP4 File” on page 226.
Save as Image See “Saving a Frame as an Image” on page 225.
Input Source See “Recording a Voice-Over” on page 240 and “Recording an Audio
Clip” on page 241.
Actions See “Creating Processes” on page 431.
Interplay MAM only
Quick Send See “Using the Quick Send Feature” on page 436.
Interplay MAM only
Help Displays information about the audio pane. Use the Help control buttons
to access other Help topics.
Menu Option Description
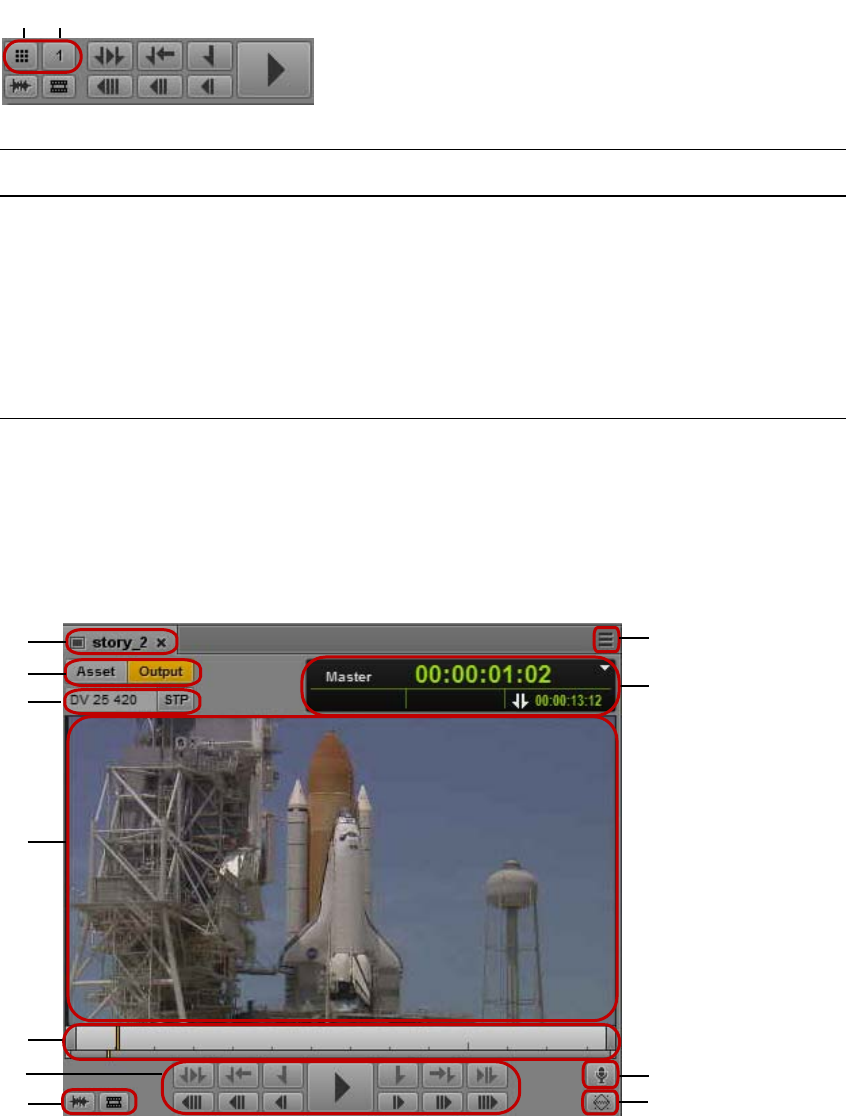
The Media Pane
196
Media Pane: Group Clip
When a group clip is loaded in the Media pane, two additional buttons are displayed.
For more information, see “Working with Group Clips” on page 246.
Media Pane: Output Mode
The following illustration shows the Media pane in Output mode. Displays and controls are described
in the accompanying table.
qqqw
Control Description
1 Multi-Angle View button Determines whether the clip is displayed in multi-angle view:
• Single-angle
•2x2
•3x3
2 Active Angle button Displays the active angle. The number indicates the number of the angle in
the display, from left to right and top to bottom and across banks. Click to
change the video angle from context menu.
q
w
e
r
t
y
i
o
1)
1!
u

The Media Pane
197
Display or Control Description
1 Title Displays the name of a sequence loaded from the Interplay Production
database or the title of a sequence loaded from the Interplay MAM
database. The title of an Interplay MAM sequence might not match the
name in the Assets pane. For more information, see “Renaming Asset
References” on page 68.
2 Asset and Output buttons Lets you switch views between an asset loaded in Asset mode and a
sequence loaded in Output mode.
3 Video format display Displays the target resolution of the selected Send to Playback profile.
Move your mouse pointer over the display to see the complete label for
the target resolution.
STP button Click this button to send the loaded sequence to a playback device. For
more information, see “Sending a Sequence to a Playback Device” on
page 414.
For Interplay Production sequences only.
4 Media viewer Displays and plays media for the sequence loaded in the script editor.
Error messages concerning media appear at the top of the Media viewer.
The speed display for J-K-L play is shown in the upper right. For more
information, see “Using the J-K-L Keys for Playback” on page 200.
5 Media Timeline and Media
zoom bar
• The Media Timeline is a graphical representation of the length and
time span of an asset or sequence. The Media Timeline includes
timing marks, a position indicator, and other controls. For more
information, see “Working in the Media Timeline” on page 216.
• The Media zoom bar lets you enlarge a section of the Media
Timeline. For more information, see “Using the Media Zoom Bar” on
page 217.
6 Media controls Let you play, pause, and step through the sequence. For more
information, see “Playing Assets” on page 199 and “Stepping Through
Assets” on page 202. Controls for working with In points and Out points
are disabled in Output mode.
7 Audio Pane button Click this button to open or bring forward the Audio pane.
Match Frame button Click this button to load a master clip that contains a selected frame of a
sequence or subclip. See “Using Match Frame” on page 221.
8 Pane Menu button Provides options for controlling the display and sending to playback. For
more information, see “Media Pane Menu Options (Output Mode)” on
page 198.
9 Timecode displays Provides timecode information for the loaded sequence. For more
information, see “Using the Timecode Displays” on page 213.
10 Voice-over button Displays the controls for creating a voice-over. For more information, see
“Recording a Voice-Over” on page 240. Advanced sequences only.

The Media Pane
198
Media Pane Menu Options (Output Mode)
The following table lists options in the Media Pane menu when an asset is loaded in Output mode.
For more information, see the appropriate topic.
11 Review for Playback button
MultiRez button
Enables play of media in the send-to-playback target resolution. For more
information, see “Reviewing in the STP Target Resolution” on page 218.
If this option is enabled, the button also lets you choose to play back at
the highest resolution. See “Playing Back at the Highest Resolution” on
page 220.
For Interplay Production sequences only.
Display or Control Description
Menu Option Description
Match Frame See “Using Match Frame” on page 221.
Recently Viewed Assets See “Playing Recently Viewed Assets” on page 202.
Open Enclosing Folder See “Opening an Enclosing Folder” on page 221.
Interplay Production only
Update Media Status See “Updating the Media Status” on page 203.
Aspect Ratio See “Selecting the Aspect Ratio” on page 202.
MultiAngle View See “Loading a Group Clip and Changing the Angle View” on
page 250.
Interplay Production only
Playback Quality See “Selecting the Playback Quality” on page 204.
Playback Latency See “Adjusting for Playback Latency” on page 205.
Playback Mode (Frame or File) See “Selecting Frame-Based Playback or File-Based Playback” on
page 205. Basic sequences only.
File Scrubbing Mode (Server) “Selecting Frame-Based Playback or File-Based Playback” on
page 205.
Captions See “Displaying Captions and Segments” on page 212.
Interplay MAM only
Overlay Text Displays the contents of a selected marker.
Interplay Production only
Playback Statistics Provides performance information about the media playback.
Audio Scrubbing See “Enabling Audio Scrubbing” on page 185
Send to Playback See “Sending to Playback” on page 411.
Interplay Production only
Send to Playback Settings See “Specifying Send to Playback Settings” on page 411.
Interplay Production only
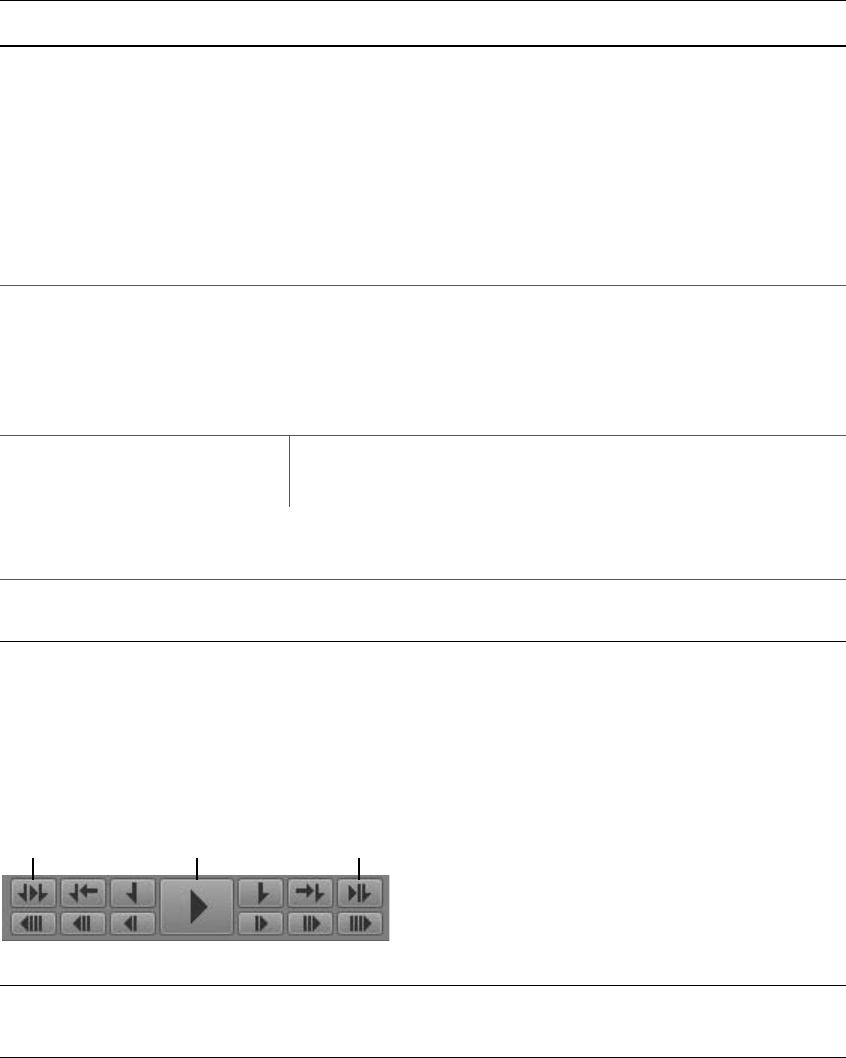
Playing Assets
199
Playing Assets
You can play a video asset or audio asset in the Media pane.
The following illustration shows the play buttons in the Media pane.
You can also use keyboard controls, including the J, K, and L keys. For more information, see “Using
the J-K-L Keys for Playback” on page 200. For information about stepping through media, see
“Stepping Through Assets” on page 202.
For information about playing sequences, see “Playback of Simple and Complex Sequences” on
page 203.
Deliver to Me See “Delivering Assets and Media to a Local Workgroup” on page 425.
Interplay Production only
Deliver To See “Delivering Assets and Media to a Remote Workgroup” on
page 423.
Interplay Production only
Transcode See “Transcoding Assets” on page 222.
Interplay Production only
Create Subclip See “Creating Subclips” on page 311.
Interplay Production only
Export MP4 See “Exporting an MP4 File” on page 226.
Save as Image See “Saving a Frame as an Image” on page 225.
Actions See “Creating Processes” on page 431.
Interplay MAM only
Quick Send See “Using the Quick Send Feature” on page 436.
Interplay MAM only
Help Displays information about the audio pane. Use the Help control buttons
to access other Help topics.
Menu Option Description
qwe
1Play In to Out 3Review Out
2Play/Pause

Playing Assets
200
To view or play a video asset:
1. Do one of the following:
tIn the Assets pane, double-click the asset you want to view or play.
tIn the Assets pane, right-click a sequence and select Open in Asset Mode.
tDrag an asset from the Assets pane and drop it on the Media viewer.
tIn the Queue/Story pane, click the Open Sequence button.
tIn the Search pane, double-click the asset you want to view or play.
tIn the Tasks pane, double-click the asset you want to view or play.
2. To play video or audio, do one of the following:
tIn the Media pane, click the Play/Pause button. While video or audio is playing, the Pause
icon is displayed. To pause play, click the Play/Pause button again.
tOn your keyboard, press the L key or the space bar. To pause play, press the K key or press
the space bar again.
If there is a delay in starting playback, the Play button flashes orange until playback actually
starts. This feature is helpful in high-latency or low-bandwidth situations so that you do not
try to start playback again.
To play from an In point to an Out point, do one of the following:
tIn the Media pane, click the Play In to Out button.
To play to an Out point:
tIn the Media pane, click the Review Out button.
The position indicator moves to three seconds before the Out point and plays to the Out point.
Using the J-K-L Keys for Playback
The J-K-L keys on the keyboard allow you to play and shuttle through media at varying speeds. This
feature, also referred to as three-button play or variable-speed play, allows you to use three fingers to
manipulate the speed of playback for greater control.
The playback speed is displayed in the upper right corner of the Media viewer. For backward play,
the display includes a left-pointing arrow. For forward play, the display includes a right-pointing
arrow.
You can use the J-K-L keys with focus in the Media pane or in the Sequence pane.
nYour ability to use the J-K-L keys when playing Interplay MAM assets depends on Interplay MAM
rules. The credentials you use to sign in to the Interplay MAM database determine if you are allowed
to change the playback speed.
nYou cannot use the J-K-L keys with file-based playback. See “Selecting Frame-Based Playback or
File-Based Playback” on page 205.

Playing Assets
201
To play or shuttle through the media using the J-K-L keys on the keyboard:
tPress the L key to move forward through the footage at normal speed.
tPress the L key multiple times to move forward through the footage at faster speeds, as described
in the following table:
nAn administrator can change the speed associated with the number of key presses. For more
information, see the Media | Central Administration Guide.
tPress the J key to move backward at the same shuttle speed increments.
tPress the K key to stop playback.
tPress the K and L keys together for slow forward at ¼ times normal speed.
tPress the K and J keys together for slow backward at ¼ times normal speed.
tPress and hold the K key and tap the L key or the J key to step through footage one frame at a
time.
To slow or change play direction one speed at a time:
tPress Alt (Windows) or Option (Macintosh) while you tap the J or L key.
Play slows or changes direction one speed at a time from the speed at which you are currently
playing.
For example, you are shuttling backward with the J key at 2x normal speed. Press and hold Alt
and tap the L key once. Play slows to backward at normal speed (1x speed). Hold Alt and tap L
once again. Play stops. Continue to hold Alt and tap L once again. Play goes forward at normal
speed.
Press the L Key To Play Media At
2 times 2x normal speed
3 times 3x normal speed
4 times 4x normal speed
0-1x-2x-3x-4x 1x 2x 3x 4x

Playing Assets
202
Stepping Through Assets
You can use various controls to step through a clip, subclip, or sequence. The following illustration
shows the buttons in the Media pane that you use to step forward or back.
For audio-only clips, stepping 1 frame is the equivalent of stepping .01second.
You can also step through by In and Out points, markers, or timecode. See “Marking In and Out
Points” on page 210, “Working with Markers and Restrictions” on page 211, and “Entering
Timecode to Cue a Frame” on page 215.
To step through an asset or sequence, do one of the following:
tClick the 10 Seconds Back button.
tClick the 1 Second Back button.
tClick the 1 Frame Back button or press the left arrow key.
tClick the 1 Frame Forward button or press the right arrow key.
tClick the 1 Second Forward button.
tClick the 10 Seconds Forward button.
tPress the Home key to move to the beginning of a clip.
tPress the End key to move to the end of a clip.
Playing Recently Viewed Assets
MediaCentral UX keeps a history of the last 10 assets that you loaded in the Asset mode of the Media
pane. You select any of these assets to play, rather than selecting them from the Interplay Production
database tree.
To play one of the last 10 assets loaded in Asset mode:
1. Click the Pane Menu button.
2. Click Recently Viewed Assets > asset_name.
Selecting the Aspect Ratio
MediaCentral UX automatically sizes the Media viewer for the asset you select to play. If necessary,
you can change the aspect ratio.
qwe rt
y
110 Seconds Back 41 Frame Forward
21 Second Back 51 Second Forward
31 Frame Back 610 Seconds Forward
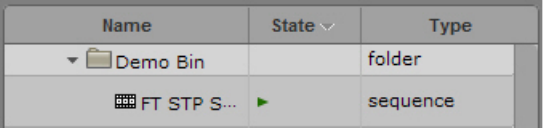
Playing Assets
203
To select the aspect ratio of the Media viewer:
1. Click the Pane Menu button.
2. Click Aspect Ratio > 4x3 or Aspect Ratio > 16x9.
Changing the Maximum Size of the Proxy Video
An administrator can change the default pixel dimensions of the image displayed in the Media
viewer. This is especially useful if you want to work with a large Media viewer. The default pixel
width is 480. As you enlarge the Media viewer, the pixel size of the image enlarges up to the
maximum size specified in the MediaCentral System Settings. For more information, see the
Media | Central Administration Guide.
nThis setting does not apply to remote assets.
Updating the Media Status
At times you might load an asset or sequence and see a message “Media Offline.” This situation
could occur for several reasons, for example, if a shared-storage workspace is not currently available.
If the workspace becomes available, and the media comes back online, the media might not be
automatically loaded. You can use a menu option to force the media player to search for the media
again and load it if it is available.
To update the media status:
1. Click the Pane Menu button.
2. Click Update Media Status.
Playback of Simple and Complex Sequences
You can play sequences that are stored in an Interplay Production or Interplay MAM database, but
some sequences require additional preparation to be completely playable.
Sequences created in Avid editing systems that include effects other than dissolves must be rendered
in the editing system. You then need to check them into Interplay Production before you can play
them correctly in MediaCentral UX.
Sequences that are fully supported for playback in MediaCentral UX are marked by a green triangle
in the State column in the Assets pane. These sequences play as the editor intended, with all effects
rendered.
nThe State column is not displayed by default. For information about how to display it, see “Adding or
Removing Property Columns” on page 46.
Playing Assets
204
Simple Sequences and Complex Sequences
MediaCentral UX can play simple sequences that are checked into the Interplay Production database
or the Interplay MAM database. Simple sequences are defined as:
• Shotlists created in Avid editing applications (NewsCutter, Media Composer, and Symphony)
and Interplay Assist that consist of cuts only, with no effects.
• Sequences created in Avid Instinct and MediaCentral UX that consist of cuts, L-cuts, audio pan/
volume effects, audio dissolve effects, video dissolve effects, and no more than one video track.
• Edit Decision Lists (EDLs) created in Interplay MAM Desktop that have one video and one
audio track, and consist of cuts only, with no effects.
Sequences that you create in MediaCentral UX are considered simple sequences. See “Using the
Sequence Pane” on page 121.
MediaCentral UX can also play complex sequences. Complex sequences are sequences created in
Avid editing applications that have multiple video tracks and various kinds of effects. If you load a
complex sequence in MediaCentral UX, the MediaCentral UX playback server attempts to play the
sequence. If the sequence has unrendered effects it will not play. To assure correct playback, a
sequence must have all effects rendered and must be checked in again when the rendering is done.
nIf you render only high-resolution effects, the MediaCentral Playback Service server plays back
effects as high-resolution and plays back other segments as the proxy resolution.
An editor working in a multi-resolution workgroup can take the following approach to prepare a
complex sequence for review in MediaCentral UX:
1. Make a copy of the sequence.
2. Change the Dynamic Relink settings as desired.
3. Render the copy of the sequence.
4. Check the copy in to an Interplay Production folder.
5. Restore the Dynamic Relink working resolution settings.
6. Continue working on the original sequence.
Mixing Down Complex Sequences
If a sequence is not playable in the Media viewer, and you do not want to render it, you can use the
MediaCentral UX Mixdown feature to create a playable master clip. See “Transcoding Assets” on
page 222.
Selecting the Playback Quality
When you play media in MediaCentral UX, you are viewing media that is compressed for optimum
viewing over a network. Instead of viewing source media in its native format, the media server
compresses it on demand for network-based playback.
You have the option of playing media using one of three quality options: good, better, best. Your
choice is usually based on the network connection between you and the server. If your computer is
connected to the MediaCentral playback server on a local network, you can choose best quality. If
your computer is connected to the MediaCentral playback server over a WAN connection, you might
need to choose good quality. Good quality consumes less bandwidth at the expense of image quality.
Playing Assets
205
To select the playback quality of the compressed media:
tClick the Pane Menu button, select Playback Quality, and select the level you want.
The numbers associated with each level indicate the amount of JPEG compression.
Adjusting for Playback Latency
MediaCentral automatically adjusts to avoid pauses in playback (latency). By default, the
MediaCentral player uses a small buffer and increases the size if the connection is interrupted or
slow. The initial size is 200 milliseconds (ms), which provides very fast response when using J-K-L
keys with a GigE connection.
If you find an unusual amount of latency, such as when using a remote wireless connection, you can
adjust the size of the buffer to improve the playback. Select the level of latency to improve it. For
example, if the latency is high (a lot of pausing or slow response from control keys), select High.
To adjust for playback latency:
tClick the Pane Menu button, select Playback Latency, and select the level you want.
- Auto: The player automatically adjusts the buffer size (the default).
- Low: The player uses a small buffer (200 ms).
- Medium: The player uses a medium-sized buffer (800 ms).
- High: The player uses a large buffer (2 seconds).
Selecting Frame-Based Playback or File-Based Playback
Earlier versions of MediaCentral UX used only frame-based playback. Starting with v2.1,
MediaCentral UX includes an option to use file-based playback. The following sections compare the
two types of playback and provide recommendations for when to use them.
•Frame-based playback: Media is encoded as a series of JPEG files that are streamed directly
from the server for playback. This technique provides frame-accuracy and a smooth transition
between cuts. Frame-based playback provides high quality but requires a higher bandwidth than
file-based playback: from approximately 4Mbps to 25 Mbps, depending on the media and the
playback options.
The following features are possible only with frame-based playback:
- Variable-speed playback
- Viewing and editing of in-process clips (edit-while-capture or growing files)
- Editing of advanced sequences
If sufficient bandwidth if available, frame-based playback is recommended for sequence editing.
•File-based playback: Media is encoded as a series of FLV files that are downloaded to your
workstation for playback. File-based playback provides good quality in low-bandwidth
situations. There are two options for file-based playback, as described later in this topic. The low
option provides playback at 512 Kbps. The high option provides half-size HD screening quality
at approximately 3 Mbps.
You can edit basic sequences using file-based playback. However, playback through the cut
points is not necessarily exact or frame accurate, and you might see a slight pause as the position
indicator passes the cut point.
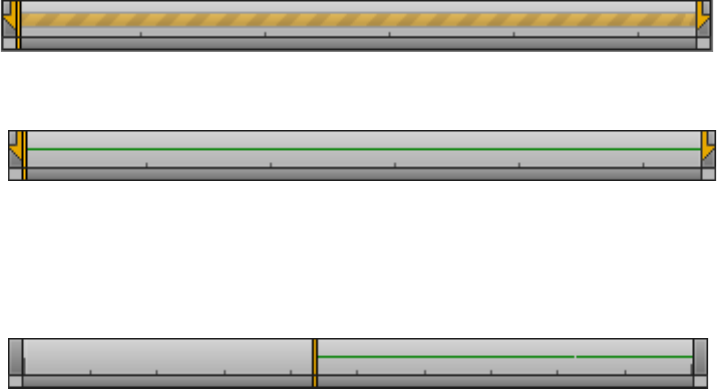
Playing Assets
206
For low-bandwidth situations, file-based playback is a recommended for:
- Searching and previewing
- Logging
- Review and approval
If you select file-based playback, you have an option for how to scrub an asset in the Media viewer:
• Server: This setting is a frame-by-frame scrub that retrieves additional media from the server. It
provides a complete scrub by allowing you to accurately drag the position indicator to every
frame of a video. However, this type of scrub might not work well in low-bandwidth situations.
• Local: This setting is a keyframe scrub that uses media already downloaded and cached on the
local system. It provides a partial scrub by displaying only keyframes (I-frames) that represent a
group of pictures (GOP). If you stop scrubbing, the frame where the position indicator is parked
is displayed. Local scrub provides a less complete scrub than Server scrub, but works better in
low-bandwidth situations.
nFile-based playback and Local scrubbing (referred to as Normal scrub in Interplay MAM) are the
default modes for Interplay MAM assets. Your ability to select frame-based playback and Server
scrubbing (referred to as Fast scrub in Interplay MAM) depends on Interplay MAM rules. The
credentials you use to sign in to the Interplay MAM database determine if you are allowed to use
frame-based playback and Server scrubbing.
Note the following:
• You can select the type of playback for assets loaded in Asset mode or for basic sequences
loaded in Output mode.
• You cannot select file-based playback for advanced sequences.
• Variable-speed play (J-K-L play) is not available for file-based playback.
• When you load an asset for file-based playback, the Media Timeline displays additional
information.
- A progress bar indicates that an asset is loading. Loading takes place from the position
indicator to the end of the asset.
- A green line indicates a portion of the asset that is loaded and ready to play.
- No progress bar or line indicates a portion of the asset that has not yet begun to load. This
might happen if you are editing, and media in a sequence before or after the position
indicator does not need to be loaded. If you click or drag in the unloaded area, loading
begins.
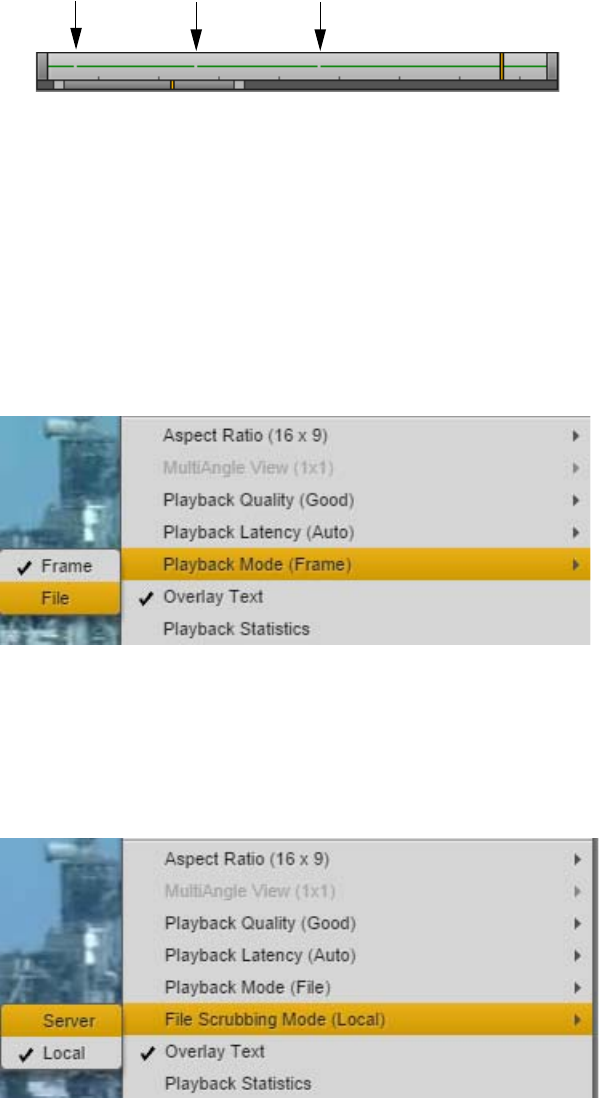
Playing Assets
207
- Breaks in the green line indicate segment boundaries in a sequence (the start and end points
of clips in the timeline). You might need to zoom in to see them.
• A MediaCentral administrator can configure the bit rate for file-based playback. See the System
Settings chapter of the Avid MediaCentral | UX Administration Guide. The low bandwidth
setting is available for both Interplay Production and Interplay MAM assets. The high bandwidth
setting is available for Interplay Production assets only, through the MultiRez button. See
“Playing Back at the Highest Resolution” on page 220.
To select the type of playback:
1. Click the Media Pane Menu button and highlight Playback Mode.
2. The menu option shows either Playback Mode (Frame) or Playback Mode (File). If the type of
playback you want is not shown, select the type of playback you want from the sub-menu.
If you select file-based playback, the File Scrubbing Mode menu option is displayed.
To select the scrubbing mode:
1. Click the Media Pane Menu button and highlight File Scrubbing Mode.
The option shows that either Server or Local is selected.
2. To change the scrubbing mode, select either Server or Local from the sub-menu.
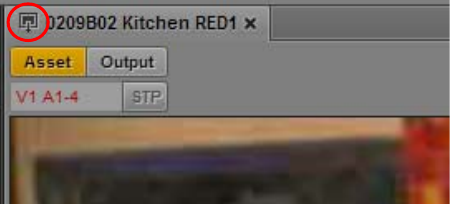
Working with Remote Assets (Interplay Production)
208
Working with Remote Assets (Interplay Production)
If you are working in a multi-zone MediaCentral environment, you can search for Interplay
Production assets in any of the systems that are configured to work with the system you signed into.
You can use either a federated search or an indexed search. For more information on these searches,
see “Searching for Assets” on page 261.
nYou cannot use the Assets panel to browse for assets on a remote system.
When you load a remote asset in the Media viewer, a remote-asset icon is displayed in the title bar, as
shown in the following illustration.
Note the following:
• If you do not have the appropriate access permissions on the asset in the Interplay Production
database, you cannot play the asset.
Access permissions are checked based on the shared user identity in the MediaCentral User
Management system. A users needs to have credentials linked to an Interplay Production user for
any Media Central UX systems the user accesses.
• You can play a remote asset, but you cannot add it to a sequence or create subclips. Controls such
as creating subclips are disabled for remote assets.
• If you want to do more than play an asset, you need to have it delivered to your local Interplay
Production server. For more information, see “Delivering Assets and Media to a Local
Workgroup” on page 425.
• Starting with MediaCentral UX v2.9, you can view and edit marker text, create new markers, and
delete markers if you have the proper permissions.
• You can share remote assets through links in the Messages pane. For more information, see
“Sending Messages” on page 405.
• Starting with MediaCentral UX V2.5, if you are signed in to a MediaCentral server that is not
configured for Interplay Production, you can search for and play assets from one or more remote
Interplay Production systems. Both the local and the remote systems must be configured for
multi-zone and Media Index.
Deliver, Deliver to Me, and Restore from Archive are not available for this configuration because
there is no local Interplay Production system.
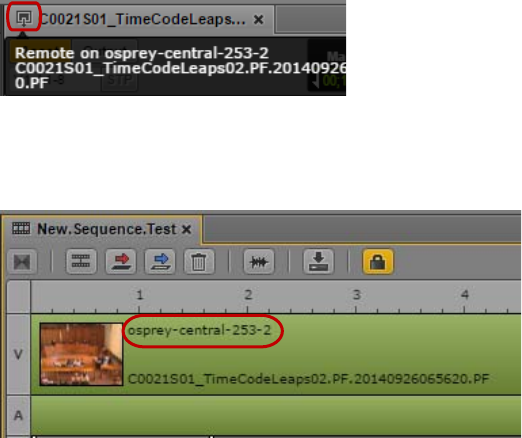
Working with Remote Playback (Interplay | MAM)
209
Working with Remote Playback (Interplay | MAM)
If you are working in a multi-zone MediaCentral environment, a MediaCentral server can be
configured to allow playback of Interplay MAM assets whose essences (media) are stored on a
remote location. For information about enabling remote Interplay MAM playback, see the
MediaCentral Platform Services Installation and Configuration Guide.
You can use this remote media to create an Interplay MAM sequence. Remote media can be mixed
with local media in the same timeline. Starting with MediaCentral UX v2.7, the Sequence pane and
the Media pane include visual indicators that you are working with remote media.
If you load an asset with remote media, a remote asset icon is displayed on the Media pane’s tab. If
you hover the mouse over the tab, the name of the remote MediaCentral UX server (the server that is
playing back the remote media) is displayed. The full name of the asset is also displayed. In the
following illustration, the name of the remote MediaCentral server is “osprey-central-253-2.”
If you add an asset with remote media to a sequence, the name of the remote MediaCentral server is
displayed on the clip, along with the clip name.

Marking In and Out Points
210
Marking In and Out Points
If you want to use only a portion of a clip, you can set an In and Out point in the clip, and then add
the edited clip to the sequence that accompanies your story. By default, In and Out points are set at
the first frame and last frame of a clip. You can mark In and Out points only in Asset mode.
The following illustration shows the buttons in the Media pane that you use with In and Out points
To mark an In point:
1. Load a clip in the Media pane and navigate to the frame where you want to set the In point.
2. Do one of the following:
tClick the Mark In button.
tPress I or E on the keyboard.
The In point is moved to the frame you marked. If the clip is playing, marking an In point does
not stop playback.
You can change an In point’s location by dragging it along the Media Timeline.
To mark an Out point:
1. Load a clip in the Media pane and navigate to the location where you want to set the Out point.
2. Do one of the following:
tClick the Mark Out button.
tPress O or R on the keyboard.
The Out point is moved to the location you marked. If the clip is playing, marking an Out point
does not stop playback.
You can change the Out point’s location by dragging it along the Media Timeline.
To navigate to an In point, do one of the following:
tClick the Go to In button.
tWith focus in the Media pane, press Alt+I, Alt+E, or Q.
tWith focus outside of the Media pane, press Ctrl+Alt+I or Ctrl+Alt+E.
To navigate to an Out point, do one of the following:
tClick the Go to Out button.
tWith focus in the Media pane, press Alt+O, Alt+R or W.
e r
qy
wt
1Play In to Out 4Mark Out
2Go to In 5Go to Out
3Mark In 6Review Out
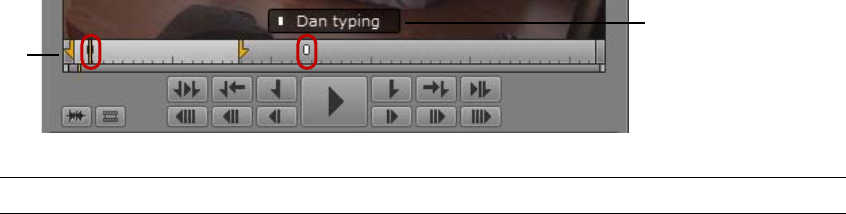
Working with Markers and Restrictions
211
tWith focus outside of the Media pane, press Ctrl+Alt+O or Ctrl+Alt+R.
To play from an In point to an Out point:
tClick the Play In to Out button.
To play to an Out point from any previous frame:
tClick the Review Out button.
The position indicator moves to three seconds before the Out point and plays to the Out point.
Working with Markers and Restrictions
Markers are frame-specific indicators that a user can add when logging media with
MediaCentral UX, Interplay Assist, or Interplay Access. A MediaCentral UX user can add markers
in the Logging pane. For more information about adding markers, see “Logging
Interplay | Production Assets and Creating Subclips” on page 291.
nIn Media Composer v6.0, Avid Symphony v6.0, and NewsCutter v10.0, the term “locators” was
changed to “markers” in both the user interface and the documentation.
Marker icons are displayed in the Media timeline. If you park the position indicator on a marker that
includes text, and you select Overlay Text from the Pane menu, the text is displayed as an overlay in
the Media viewer. You can click a marker to jump to it and display its text.
You can use keyboard shortcuts to step to the next marker or to the previous marker.
nIf you set the Logging pane to display only those markers created by you, only your markers are
visible in the Sequence pane. For more information, see “The Logging Pane for
Interplay | Production Assets” on page 296.
To step to the next marker:
tPress Ctrl+Shift+right-arrow key.
To step to the previous marker:
tPress Ctrl+Shift+left-arrow key.
q
w
1Marker indicators in the Media Timeline 2Marker indicator and marker text
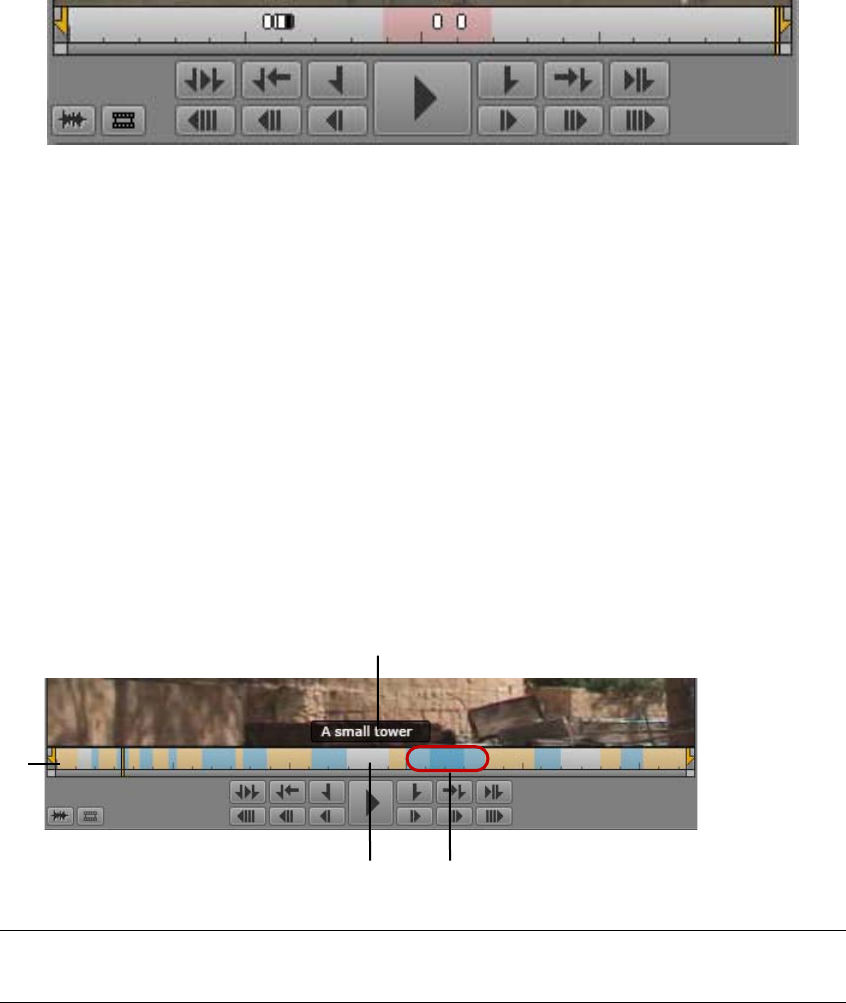
Displaying Captions and Segments
212
A restriction is a set of two markers that indicate clips whose use is limited in some way, such as
through intellectual property rights management. Restrictions are marked in light red in the timeline
in the Media pane, as shown in the following illustration.
For more information, see “Understanding Markers and Restrictions” on page 293.
Displaying Captions and Segments
A stratum allows you to view a media object from a specific perspective to consider its visual or
editorial content. Strata are annotation layers that build the basis for logging Interplay MAM assets:
each stratum can be segmented, each segment is defined by an In and Out mark, and then these
segments can be annotated. For more information about strata and segments, see “Understanding
Strata” on page 313.
When you play an Interplay MAM video asset that was annotated in the Logging pane or Interplay
MAM Cataloger, you can display stratum annotations of type “text” as an overlay in the Media
viewer. You can select the stratum from which the annotations are displayed. The timeline in the
Media pane shows alternating orange and blue sections that represent the individual segments of the
selected stratum. Gaps between segments are represented by light gray sections, and overlapping
segments by a darker shade of the same color.
To show captions and segments of an asset:
1. Load an Interplay MAM video asset in the Media pane in Asset mode.
2. Click the Pane Menu button and select Overlay Text.
3. Click the Pane Menu button, select Captions and select the stratum from which annotation shall
be displayed as captions. If the stratum contains sub-properties of type “text”, select the desired
sub-property.
q
we
r
1Segments of the selected stratum 3Overlapping segments
2Gap between segments 4Annotation of the current segment
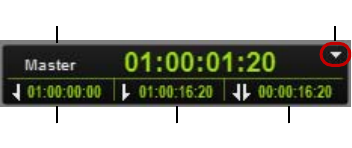
Using the Timecode Displays
213
The Media viewer shows the annotation of the current segment as an overlay. The Media
Timeline shows all segments of the stratum as alternating orange and blue sections.
4. Navigate through the asset.
tTo step to the next segment border (the beginning of the next segment), press Shift+right-
arrow key.
tTo step to the previous segment border (either the beginning of the current segment or the
beginning of the previous segment, if the cursor is positioned directly at the segment border),
press Shift+left-arrow key.
The overlay shows the annotation of the active segment.
Using the Timecode Displays
There are four timecode displays in the top-right corner of the Media pane. The information
displayed depends on whether you are in Asset mode or Output mode, and the options you select.
If you are playing an Interplay MAM audio asset, the timecode displays milliseconds instead of
frames (for example, 00:01:05:243).
q
ert
w
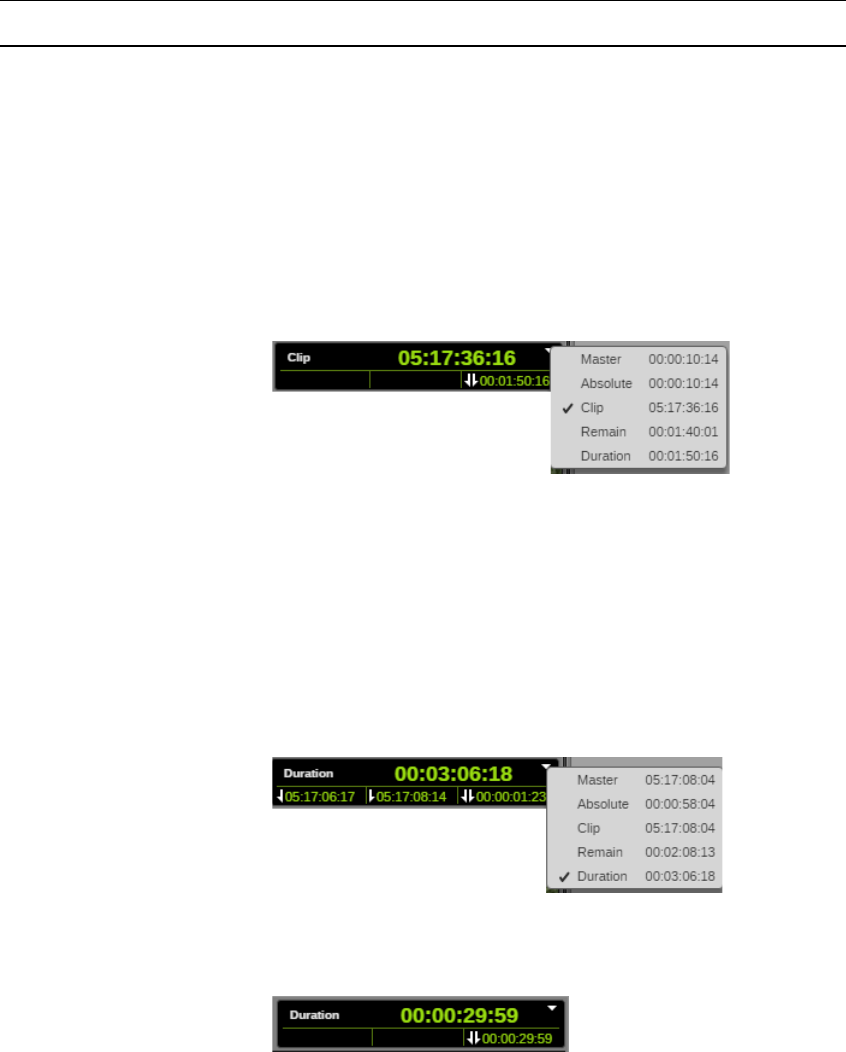
Using the Timecode Displays
214
Display Description
1 Master, Absolute, Clip,
Remain, Duration
Master: In Asset mode, displays timecode for the selected frame that
corresponds to the original (source) timecode for the asset. In Output
mode, displays timecode for the selected frame that corresponds to the
timecode of the sequence.
Absolute: Displays timecode for the selected frame that is offset from the
first frame of the asset or sequence (time elapsed).
Clip: (MediaCentral UX v2.8 and later) In Output mode, displays
timecode for the selected frame that corresponds to the original (source)
timecode of the clip in the loaded sequence. This feature is especially
useful when logging sequences. The following illustration shows the
display for a sequence loaded in Output mode, with Clip selected.
You can also select Clip for a clip loaded in Asset mode, but this is less
useful because in Asset mode the master timecode and the clip timecode
are identical.
Remain: Displays timecode for the selected frame that is offset from the
last frame of the asset or sequence (time remaining).
Duration: (MediaCentral UX v2.8 and later) Displays the total duration of
a loaded asset in either Asset mode or Output mode.The following
illustration shows the display for an asset loaded in Asset mode. Note that
if you select Duration, the Mark In and Mark Out displays show the master
timecode.
The following illustration shows the display for a sequence loaded in
Output mode. Note that the smaller display also shows the duration of the
sequence.
nIf you select Duration, you cannot enter a timecode or a frame-
offset value to cue a specific frame.
2 Timecode display menu button Lists options for the large timecode display.
3 In point (Asset mode only) Displays timecode for the In point. The timecode
displayed depends on your selection: Master, Absolute, or Remain.
4 Out point (Asset mode only) Displays timecode for the Out point. The timecode
displayed depends on your selection: master, absolute, or remain.
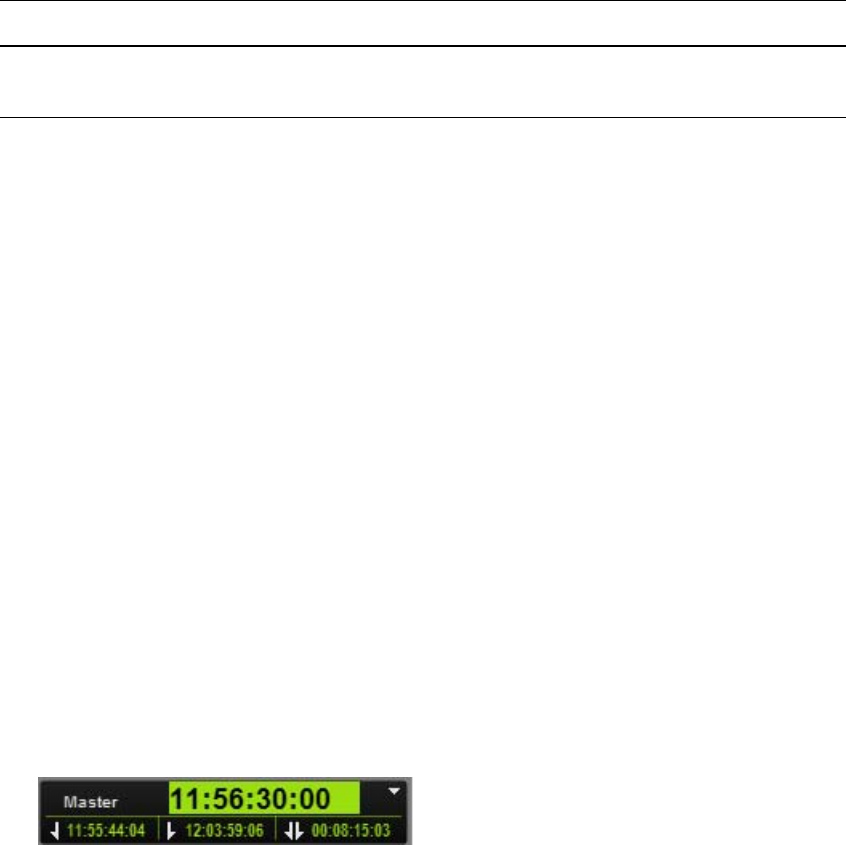
Entering Timecode to Cue a Frame
215
Entering Timecode to Cue a Frame
You can cue a loaded, playable clip or sequence to a specific frame by typing a timecode value,
referred to as direct-entry mode. You can also cue backward or forward from the current location by
a specified number of hours, minutes, seconds, or frames by using positive or negative frame-offset
values. This is referred to as offset mode.
To cue to a frame based on a known timecode:
1. Do one of the following:
tClick the main timecode display.
tWith focus in the Media pane, press Enter (Windows) or Return (Macintosh).
The timecode is displayed with a green background.
2. Using the standard number keys or the numeric keypad, type the timecode for the frame you
want to display, then press Enter (Windows) or Return (Macintosh). If you are using a numeric
keypad, make sure the Num Lock key is on. You can use the period key (.) as a shortcut for
entering 00.
Starting with MediaCentral UX v2.6, existing timecode digits are changed to hyphens. Hyphens
are replaced by the digits you type.
To find a timecode that starts at the same hour, minute, or second as the current timecode, type
only the last digits. For example, if the current timecode is 11:56:24:00 and you type 3000, the
system finds the frame at 11:56:30:00.
To clear the overlay without cueing, press the Esc key.
If you type an invalid timecode (one that is earlier or later than the beginning of a clip), the
position indicator remains in its current position
While you are entering timecode, you can type a plus sign (+) or a minus sign (-) to switch to
offset mode. Any numbers you type are preserved.
To cue to a frame based on a frame-offset value:
1. Using the standard number keys or the numeric keypad, type a plus sign (+) to move forward or
a minus sign (-) to move backward. If you are using a numeric keypad, make sure the Num Lock
key is on.
A plus sign or minus sign is displayed with an empty green field.
5 Duration In Asset mode, shows timecode for the duration from In point to Out point.
In Output mode, shows timecode for the duration of the sequence.
Display Description
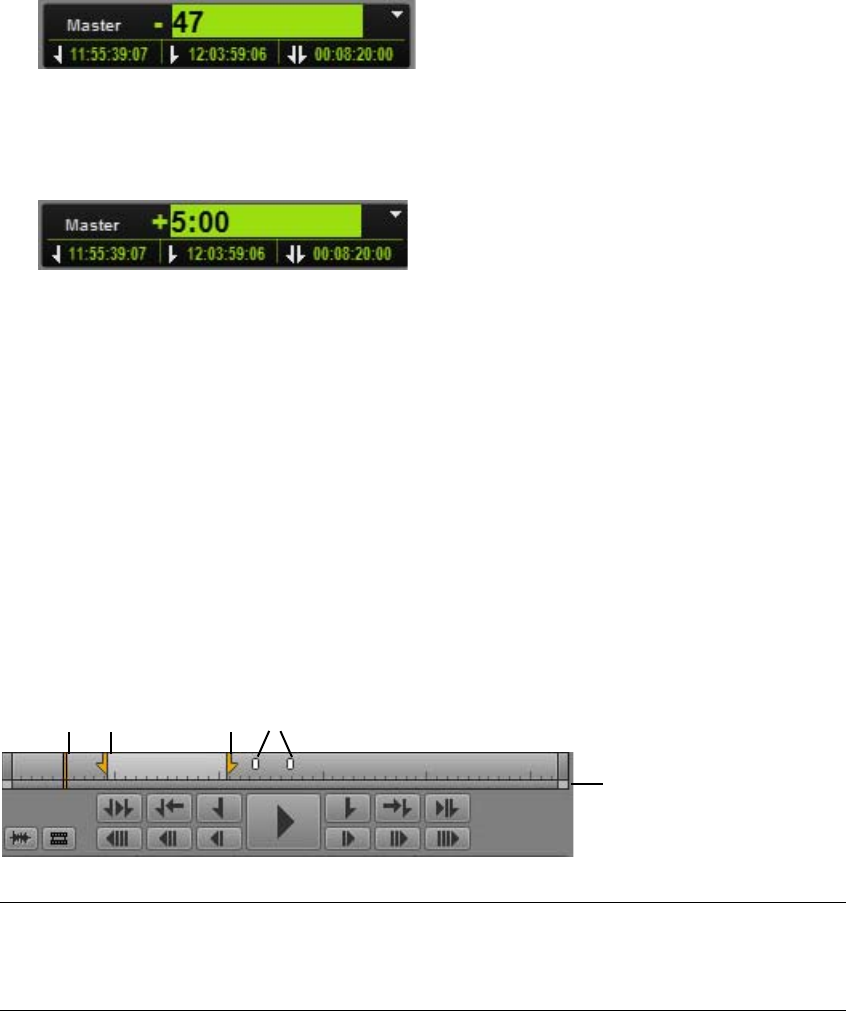
Working in the Media Timeline
216
2. Type the number of hours, minutes, seconds, or frames you want the position indicator to move.
Use the following formats:
- Type 1 through 99 to specify a number of frames forward or backward. Then press Enter
(Windows) or Return (Macintosh). For example, type –47 to move backward 47 frames.
- Type 100 or greater to move forward or backward a specified number of hours, minutes,
seconds, and frames. Then press Enter (Windows) or Return (Macintosh). For example, type
+500 to move forward five seconds.
To clear the overlay without cueing, press the Esc key.
You can use the period key (.) as a shortcut for entering 00.
If you type a number that is beyond the limit of the clip or sequence, the first or last frame of the
clip or sequence is displayed.
While you are entering a forward value, you can type a plus sign (+) again to switch to direct-
entry mode. While you are entering a backward value, you can type a minus sign (-) to switch to
direct-entry mode. Any numbers you type are preserved.
Working in the Media Timeline
The Media Timeline is a graphical representation of the length and time spans of an asset or
sequence. The Media Timeline includes timing marks, a position indicator, and other controls. The
following illustration shows the Media Timeline and controls in Asset mode.
When you play an annotated Interplay MAM asset, you can display its segments on the Media
Timeline in Asset mode. For more information about showing segments, see “Displaying Captions
and Segments” on page 212.
In Output mode, the Media Timeline does not include In and Out markers or markers.
qw er
t
1Position indicator 4Marker indicators
2In mark 5Zoom bar
3Out mark
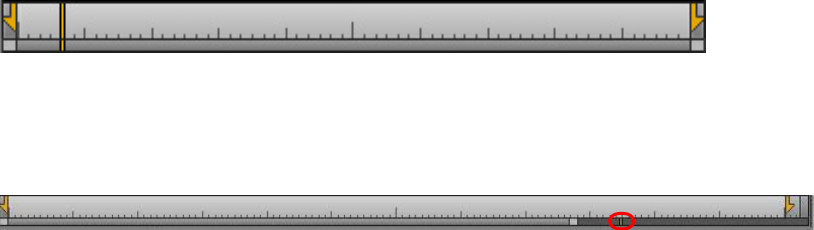
Using the Media Zoom Bar
217
The position indicator functions as a playhead: media for the frame marked by the position indicator
is displayed in the Media viewer. You can drag the position indicator to scrub through a clip or
sequence. You can click a location in the Media Timeline to move the position indicator and display
a specific frame. In Output mode, movement of the position indicator matches movement of the
position indicator in the Sequence Timeline.
Marks in the Media Timeline indicate various time spans. The time spans indicated depend on the
length of the asset or sequence and the settings in the zoom bar. Timing marks indicate the following:
• 1 second
• 10 seconds
• 1 minute (60 seconds)
• 5 minutes (300 seconds)
• 1 hour (3600 seconds)
These timing marks are intended for general navigation, not navigation to a specific timecode. For
information about working with timecode, see “Using the Timecode Displays” on page 213.
Using the Media Zoom Bar
The Media zoom bar is located below the Media Timeline. You can use the zoom bar to enlarge a
section of the Media Timeline so that you can work more easily with long clips. By default, the zoom
bar is set to display the entire clip in the Media Timeline.
nThe Media zoom bar is similar to the Sequence zoom bar (in the Sequence pane), but the two zoom
bars operate independently. The Media zoom bar is available to loggers who do not have access to
the Sequence pane.
The Media zoom bar includes a position indicator that matches the position indicator in the Media
Timeline and is always visible, which is useful when you are zoomed in to a section of the timeline
that does not include the timeline position indicator.
The following illustration shows the zoom bar set for an entire 10-minute clip.
The following illustration shows the zoom bar set so that the timeline shows two minutes. This is
referred to as the zoom region. Notice that the position indicator is displayed in the zoom bar, but is
not visible in the timeline.
You can drag the zoom bar through the clip to select any two-minute region.
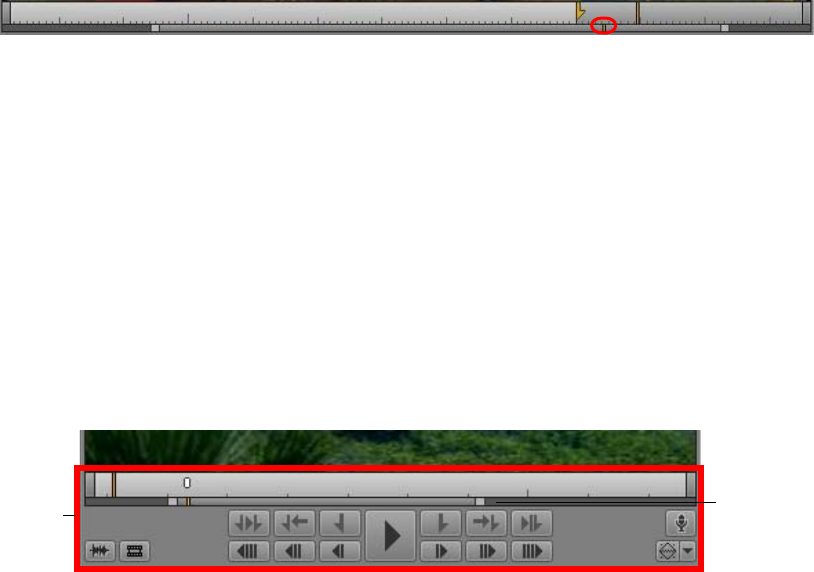
Reviewing in the STP Target Resolution
218
You can click the position indicator in the zoom bar and jump to the position indicator in the
timeline. The zoom region moves to include both position indicators and to enlarge the section of the
timeline that includes the position indicator.
You can click anywhere in the zoom bar to move the zoom region left or right.
If you drag the position indicator in the timeline, or if you play the loaded clip or sequence, the zoom
bar and its position indicator match the movement in the timeline.
To zoom in to or out from a section of the Media Timeline, do one of the following:
tDrag a zoom bar handle in to zoom in or out to zoom out.
tPress the Down Arrow key to zoom in by 50 percent or press the Up Arrow key to zoom out by
50 percent.
tPress Shift+Up Arrow to reset the zoom level to show the entire sequence.
tPosition the mouse pointer below the Media viewer and rotate the mouse wheel forward to zoom
in by 50 percent or rotate the mouse wheel back to zoom out by 50 percent.
1. Area in which the mouse wheel controls the zoom region. 2. The zoom region within the zoom bar.
Reviewing in the STP Target Resolution
When you play media in MediaCentral UX in a multi-resolution environment (Interplay Production
only), the media server plays the most compressed available media. For a send-to-playback
operation, the send-to-playback profile specifies a high-resolution target resolution. You can select an
option to play the media in the target resolution.
Reviewing media in the STP target resolution is a way of testing if all media is available for the
sequence, checking for black frames, and checking if edits are frame-accurate. It is not a way to
check the quality of the resolution. This relink is made only to the specific target resolution and if the
resolution is not available the Media Offline display will be shown.
Starting with MediaCentral UX v2.7, offline media is displayed as red in the Sequence Timeline. See
“Displaying Media Status in the Timeline” on page 126.
qqqw
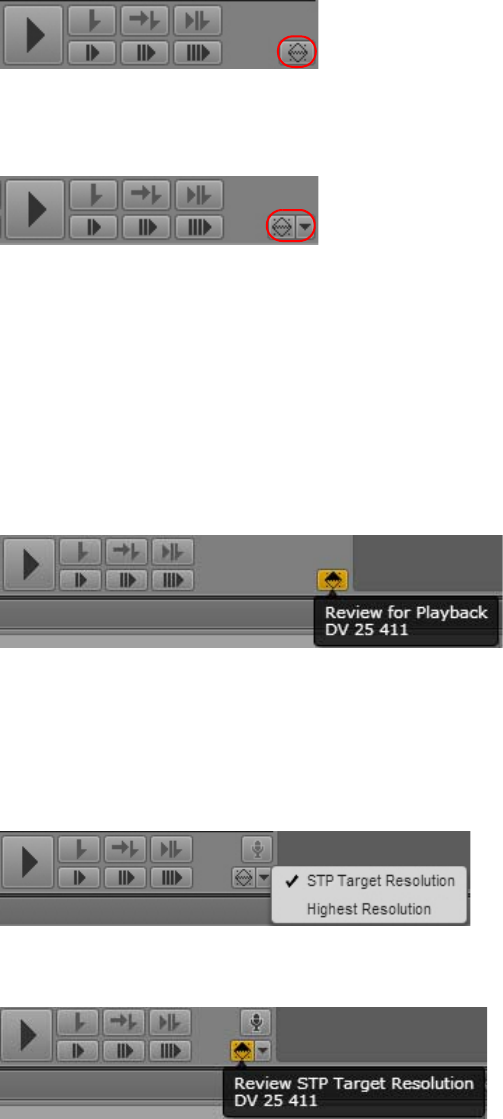
Reviewing in the STP Target Resolution
219
Use the MultiRez button, in the lower right of the Media pane, to review media in the STP target
resolution. There are two different ways the button can be displayed:
• A button with a single function. This is the default button. It is available in Output mode only.
• A multi-function button. This button is enabled by the MediaCentral administrator as a system
setting. It is available in both Asset and Output mode.
For more information about the multi-function button, see “Playing Back at the Highest
Resolution” on page 220.
Reviewing in the STP target resolution is a temporary setting and applies only to the currently loaded
sequence.
To review a sequence in the STP target resolution (single-function button):
1. In Output mode, click the MultiRez button.
The button turns orange. The top half of the icon is black. A tool tip shows the target resolution.
2. Play the sequence.
To review an asset in the STP target resolution (multi-function button):
1. In Asset mode or Output mode, click the arrow next to the MultiRez button, select STP Target
Resolution, then click the MultiRez button.
The button turns orange. The top half of the icon is black. A tool tip shows the target resolution.
2. Play the sequence.
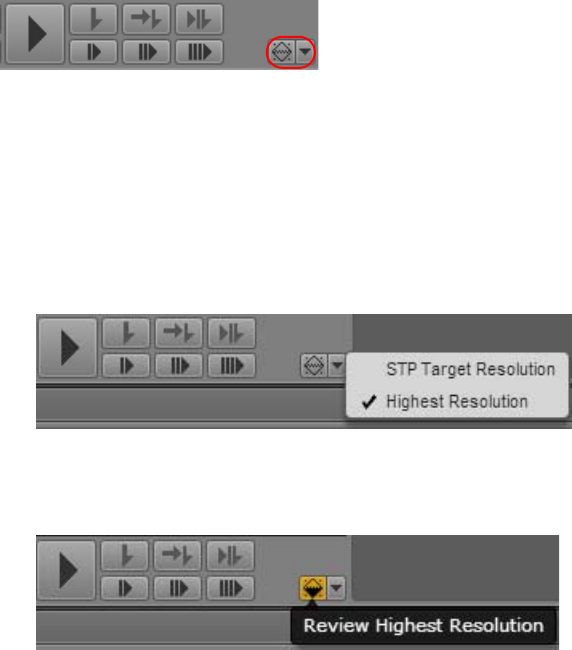
Playing Back at the Highest Resolution
220
To return to normal playback, click the MultiRez button again.
Playing Back at the Highest Resolution
When you play media in MediaCentral UX in a multi-resolution environment, the media server plays
the most compressed available media. You can choose to play back video at the highest available
resolution. If video is available only in one resolution, the video is displayed in that resolution.
This option must be enabled by the MediaCentral administrator in the Player settings of the Systems
Settings layout. For more information, see the Avid MediaCentral | UX Administration Guide.
If this option is enabled, you can choose to play back at the highest resolution in Asset mode or in
Output mode. Use the MultiRez button, in the lower right of the Media Pane.
This option is available for both frame-based playback and file-based playback of Interplay
Production assets. It is not available for Interplay MAM assets unless the Interplay MAM user is
configured. See “Selecting Frame-Based Playback or File-Based Playback” on page 205.
To play back at the highest available resolution:
1. Click the arrow next to the MultiRez button, select Highest Resolution, then click the MultiRez
button.
The button turns orange. The bottom half of the icon is black. A tool tip shows you which option
you selected.
2. Play the asset.
To return to normal playback, click the MultiRez button again.
nYou can select STP Target Resolution from the same button. See “Reviewing in the STP Target
Resolution” on page 218.

Using Match Frame
221
Using Match Frame
The Match Frame feature lets you load a master clip that contains a specific frame of a sequence.
This clip is called the source clip. You can use Match Frame to quickly load a clip from a sequence or
subclip for additional editing.
Match Frame is available in both Asset and Output mode. In Asset mode, it is not enabled for master
clips or advanced sequences. For more information, see “Using Match Frame from Asset Mode to
Add Media to a Sequence” on page 172.
To load a source clip for a specific frame of a subclip or sequence:
1. Navigate to the frame for which you want to load the master clip.
2. Do one of the following:
tClick the Pane Menu button and select Match Frame.
tClick the Match Frame button.
The master clip that contains the frame is loaded in the Media pane, with the matching frame
displayed. In and Out marks are set to match the segment in the sequence.
Opening an Enclosing Folder
You can use the “Open Enclosing Folder” command to open an Assets pane for a folder that contains
a selected asset. For example, you might want to locate a folder that holds master clips captured at the
same time as the clip currently loaded in the Media pane. You can use this command for an asset
loaded in the Media pane, for an asset you select in an Assets pane, or for an asset selected in a
Search pane.
To open the enclosing folder for an asset loaded in the Media pane:
tClick the Pane Menu button and select Open Enclosing Folder.
If the asset is stored in only one folder, the folder opens in a new Assets pane, with the selected
asset highlighted.
If the asset is stored in more than one folder, the Open Enclosing Folder window opens and
displays a list of folders that contain the asset. Double-click one of the listed folders and the
folder opens in a new Assets pane, with the selected asset highlighted. You can use the Up Arrow
and Down Arrow keys to navigate through the list, and the Enter key to open the enclosing folder
for a selected clip. Use the Esc key to cancel and close the window.
To open the enclosing folder for an asset selected in an Assets pane:
tClick the Pane Menu button and select Open Enclosing Folder, or right-click and select Open
Enclosing Folder.
The results are the same as when you select the command for an asset loaded in the Media pane.

Transcoding Assets
222
To open the enclosing folder for an asset selected in a Search pane:
tClick the Pane Menu button and select Open Enclosing Folder, or right-click and select Open
Enclosing Folder.
The folder for the selected asset, as shown in the Path column, directly opens in a new Assets
pane, with the selected asset highlighted.
If the setting “Show only one representation for each asset found” is enabled in the Interplay
Production User Settings, the results are the same as when you select the command for an asset
loaded in the Media pane.
nIf the asset is contained in a folder that contains more objects than can be displayed in an Assets tab,
and the asset is not displayed in the first group, it is not highlighted.
Transcoding Assets
The Transcode feature lets you perform various media operations that are available through the
Interplay Production Transcode service. This feature is available for Interplay Production assets only.
nInterplay Central v1.8 and earlier provided a Sequence Mixdown feature, which also used the
Transcode service. This feature is now available along with other Transcode features.
The Transcode service provides media operations through the following modes. Some modes are
available only for particular media types.
An Interplay Production administrator needs to create profiles for each of these modes. This topic
describes using the Mixdown feature in MediaCentral. For information about other modes, see the
Interplay | Production Services Setup and User’s Guide.
Mode Description Available for...
WHOLE Transcodes an entire clip. Master clips
CONSOLIDATE Transcodes only the portion of a clip used to create a subclip
or portions of clips used to create a sequence
Master clips, Sequences
MIXDOWN Transcodes and mixes down the video and audio of a
sequence to create one master clip
Sequences
DATAEXTRACT Extracts the D1 track as a separate MXF file when you
transcode DNxHD media that contains embedded ancillary
data.
Master Clips, Sequences
DUALMIXDOWN Transcodes and mixes down the video and audio of a
sequence to create a one master clip with two resolutions
associated with it.
Sequences
CROSSRATE Creates a master clip in a project format different from the
project format of the original clip.
Master clips
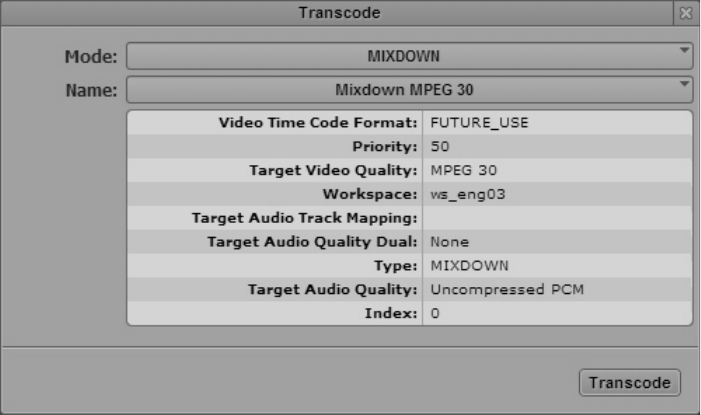
Transcoding Assets
223
A common use of the Transcode option is to mix down a sequence. For example:
• Creating a master clip that is playable in the Media viewer. If a sequence created in an Avid
editing system is too complex to play correctly in the Media pane, you can use the Mixdown
feature to create a new master clip. All master clips are playable. After mixing down the
sequence, you can load the new master clip, mark In and Out points, and add the segment to your
sequence.
nFor information about playing sequences, see “Playback of Simple and Complex Sequences” on
page 203.
• Creating a sequence that matches the send-to-playback resolution. If you want to send a
sequence to a playback device, the resolution of the sequence must match the resolution
specified for the playback device. MediaCentral UX warns you if the sequence does not match
the send-to-playback resolution, and you can use the Mixdown feature to create a master clip that
uses the required resolution. Then create a new sequence containing the mixed-down clip, and
send the new sequence to the playback device.
To transcode an Interplay Production asset:
1. Do one of the following:
tIn the Assets pane or a Search pane, select an Interplay Production asset, right-click, and
select Transcode.
tIn the Assets pane, select an Interplay Production asset and select Transcode from the Assets
Pane menu.
tWith an asset loaded in the Media pane, click the Pane Menu button and select Transcode.
tWith a sequence loaded in the Sequence pane, click the Pane Menu button and select
Transcode.
The Transcode dialog box opens.
2. Select a mode from the Mode menu.
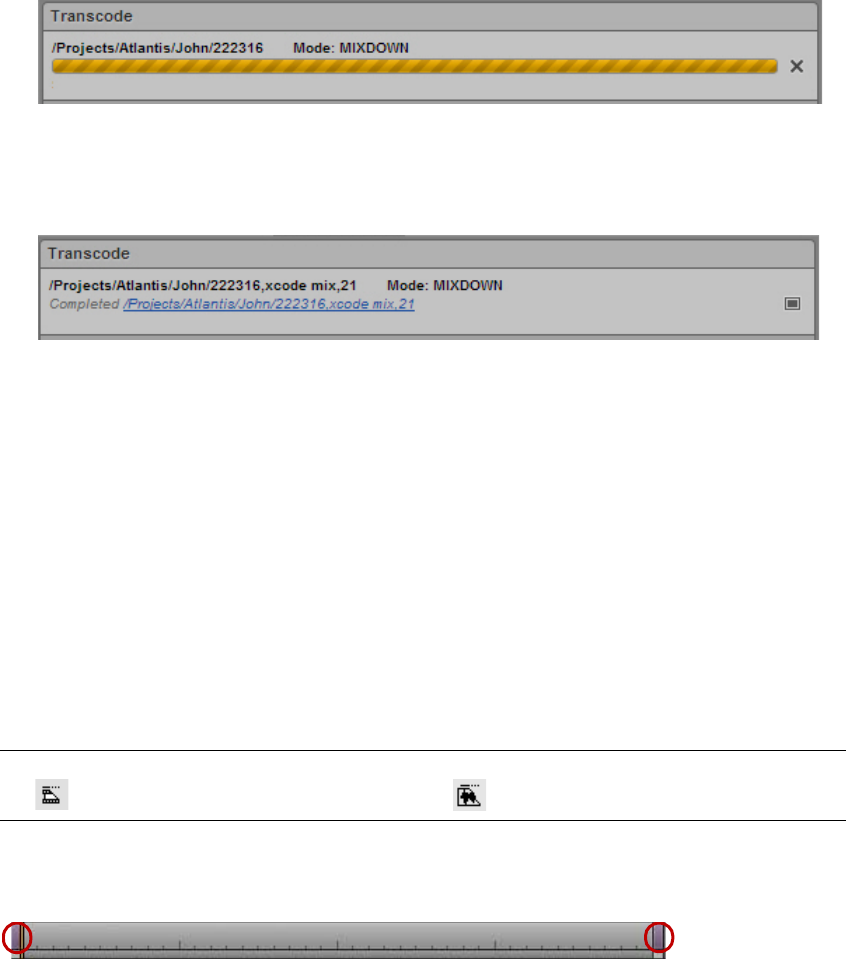
Viewing and Editing a Clip During Ingest
224
3. Select a Transcode profile from the Name menu.
Transcode profiles are created by an Interplay Production administrator in the Production
Services and Transfer Status tool. The Transcode dialog box displays the parameters of the
profiles, but you cannot edit them in MediaCentral.
4. Click Transcode.
The Transcode process uses the selected Transcode profile and begins the operation. You can
view the progress in the Progress pane, along with the target folder and the mode.
To cancel the process, click the x icon. If the process was successful, the Progress pane displays
the name of the new master clip or the transcoded master clip. Click the Monitor icon to play the
clip in the Media pane.
The new master clip is created in the same Interplay Production folder as the original sequence.
Click the blue link to open the folder in the Asset pane.
Media for the new master clip is stored in the workspace specified in the Transcode profile.
Viewing and Editing a Clip During Ingest
MediaCentral UX lets you view and edit a master clip while it is still being captured through an
ingest device. These clips are called in-progress clips, and the process of working with them is called
Frame Chase editing or edit while capture (EWC). You can add an in-progress clip to a sequence and
send the sequence to playback before the capture is complete. For more information about Frame
Chase editing, see the Interplay Transfer documentation.
In-progress clips are indicated by the following icons in the Interplay Production database tree:
If you view an in-progress clip in the Media pane, the ends of the Media Timeline pulse with a purple
glow while the capture is in progress.
During the capture, the visible region of the Media Timeline (the zoom region) remains constant to
make the viewing and editing easier. The zoom bar shrinks as the duration of the clip grows. You can
use the zoom bar to change the zoom region during the capture.
In-progress master clip In-progress audio clip
Saving a Frame as an Image
225
When you are playing close to the end of an in-progress clip, the position indicator can reach the end
of the currently ingested media before a new chunk of media is ingested. Playback then stops without
a message. Wait a few minutes and begin playback again.
You can reduce the zoom region and view new material as it becomes available. For example, if you
zoom in to view the last 5 minutes of a clip and play near the end, the visible region of the timeline
displays the last 5 minutes of the available media during the entire capture operation.
nFor limitations on creating subclips from in-progress clips, see the MediaCentral Platform Services
ReadMe.
Saving a Frame as an Image
From the Media pane, you can select a frame of video and save it as an image in either the PNG or
JPG format.
• If a clip is associated with multiple resolutions, the image is saved in the highest resolution that
is available on line.
• (Version 2.5 and later) If a clip uses an interlaced format (such as NTSC or PAL SD) the image is
saved in a de-interlaced format to remove possible artifacts.
To save a frame as an image:
1. Open a video asset in the Media pane.
2. Navigate to the frame of video you want to save.
3. Click the Pane Menu button and select Save As Image.
4. When the dialog box appears, select the image format: PNG or JPG.
5. (Optional) Click in the Filename text field to change default name of the image.
6. Click Download.
The image is saved to the default download folder on your computer, as specified by your
browser.
Viewing an Image
Interplay MAM supports assets of type “Image.” You can use the Media pane to preview Image
browse proxies from an Interplay MAM database. Supported formats are PNG and JPG.
From the Media pane, you can save the image to the default download folder on your computer and
attach the image to a process. See “Saving a Frame as an Image” on page 225 and “Creating
Processes” on page 431. Note that you cannot add an image to a basic sequence.
To view an image:
1. Do one of the following:
tIn the Assets pane, double-click the image asset or drag the image from the pane and drop it
on the Media viewer.
tIn the Search pane, double-click the image asset or drag the image from the pane and drop it
on the Media viewer.
Exporting an MP4 File
226
tIn the Messages pane, double-click the image asset or drag the image from the pane and
drop it on the Media viewer.
tIn the Tasks pane, double-click the image asset or drag the image from the pane and drop it
on the Media viewer.
The image is shown in the Media viewer. All playback controls are disabled.
2. (Optional) Click the Pane Menu button and select Save As Image to save the image to the default
download folder on your computer.
3. (Optional) Click the Pane Menu button and select Actions to attach the image to a process.
Exporting an MP4 File
You can create an MP4 video and audio file from a clip or sequence loaded in the Media pane. The
MP4 file is created from the resolution that is loaded in the Media pane.
• If a low-resolution version (default) is displayed, the low resolution is used.
• If a high-resolution version is displayed, the high resolution is used.
• If the STP target resolution is displayed, the displayed resolution is used.
Audio gain adjustments and mute controls as set in the Audio tool are used for the exported MP4 file.
The resulting MP4 file is the same video canvas size is the displayed version (for example,
1920x1080) encoded as H.264 with a stereo audio mixdown at 48 kHz per channel.
An Interplay Central administrator sets which user groups are allowed to export MP4 files through
the Image Quality Settings of the System Settings Player tab. For more information, see
“Configuring Image Quality” in the Avid MediaCentral | UX Administration Guide.
To export a clip or sequence as an MP4 file:
1. Load a clip or sequence in the Media pane (in either Asset mode or Output mode).
2. Click the Pane Menu button and select Export MP4.
When processing begins, a message from the Administrator is sent to you in the MediaCentral
Messages pane. Another message is sent when the processing is complete. This message
includes a link from which you can download the file.

7Using Audio
The following main topics describe how to add audio to the Sequence Timeline and adjust audio
levels to produce your final story:
•The Audio Pane
•Working with Audio Tracks in Basic Sequences
•Working with Audio Tracks in Advanced Sequences
•Setting the Audio Mix
•Setting the Reference Level
•Recording a Voice-Over
•Recording an Audio Clip
The Audio Pane
The Audio pane provides you with controls for monitoring and adjusting audio levels.
The Audio pane is displayed in the Cut, Log, and Story layouts. You can drag the Audio pane to a
different area if you prefer. If the Audio pane is not displayed, select Panes > Audio to open it.
Which controls are available depends on the type of asset and which mode is active in the Media
pane. See the following topics:
•“The Audio Pane for Asset Mode and Basic Sequences” on page 227
•“The Audio Pane for Advanced Sequences” on page 229
The Audio Pane for Asset Mode and Basic Sequences
The Audio pane displays the same controls when you load an asset in Asset mode and when you load
a basic sequence in Output mode. In both cases, the Audio pane shows the audio tracks that are
available for monitoring and lets you select which tracks to monitor. You can monitor the audio level
in the audio meters, and use the audio slider to adjust the level.
The following illustration shows the Audio pane for a clip in Asset mode (left) and a basic sequence
in Output mode (right). The clip includes 14 tracks, with tracks A01 through A08 enabled for
monitoring. The sequence includes two tracks, with both tracks enabled for monitoring.
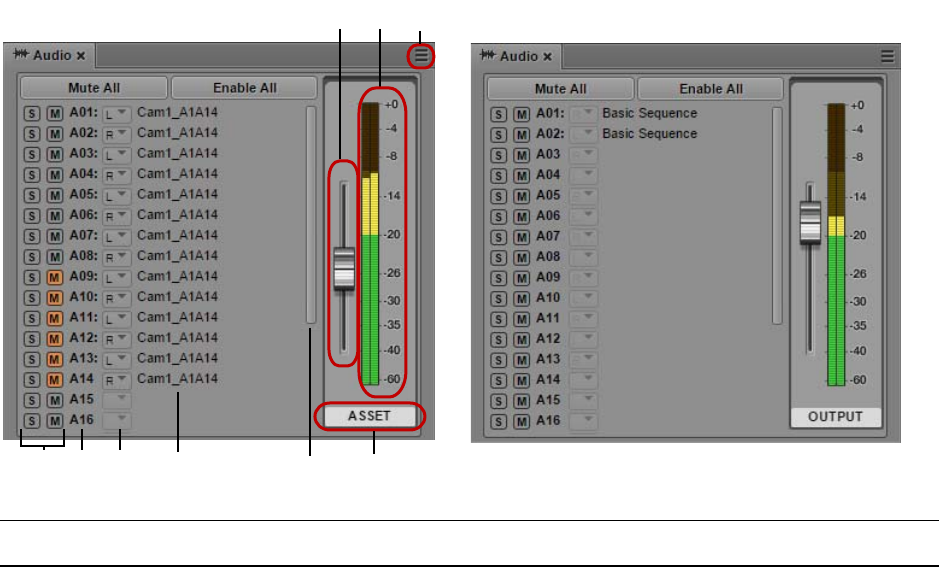
The Audio Pane
228
Control Description
1 Solo and Mute buttons Click the S (Solo) button to monitor only the selected track or tracks. Click the
M (mute) button to mute the selected track or tracks. Gray M buttons indicate
audio is enabled. See “Audio Monitoring for Assets and Basic Sequences” on
page 231.
2 Track identifiers Identifies 24 audio tracks, numbered A01 to A24. Use the scroll bar to display
tracks not currently displayed.
3 Panning menus Display the current panning. In the current release, the panning menus are
inactive. See “Panning for Assets and Basic Sequences” on page 233.
4 Clip name or sequence name Displays the name of the asset for each track in the asset.
5 Scroll bar Drag the scroll bar to display tracks not currently displayed.
6 Mode identifier Identifies which mode is selected in the Media pane.
7 Master volume slider Click and drag the slider to adjust the volume level for overall audio mix in a clip
or sequence. Adjustments are not saved. See “Audio Monitoring for Assets and
Basic Sequences” on page 231.
8 Audio meters Display the audio level for the mix of all tracks in the clip or sequence. There are
two meters. For stereo output, each meter displays a separate level. For mono
output, both meters display the same level. See “Setting the Audio Mix” on
page 239.
qqww
titotu
eerrrtry
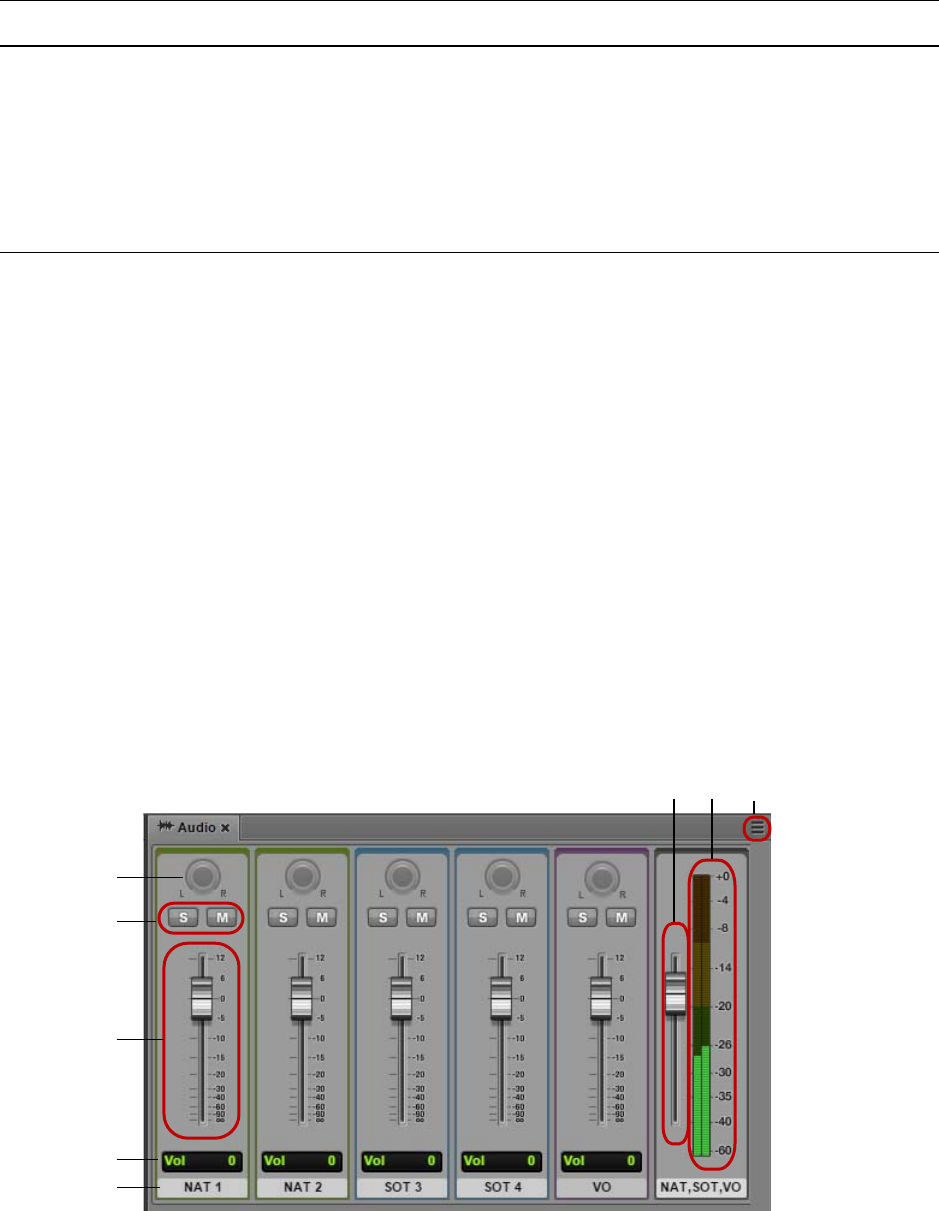
The Audio Pane
229
The display is similar if an uneditable sequence is loaded in Output mode. Audio tracks are displayed
and you can monitor and adjust the audio. Uneditable sequences are colored dark red in the Sequence
pane.
Source clips and basic sequences can include up to 24 tracks of audio.
nSee the MediaCentral ReadMe for possible limitations on the number of tracks you can monitor.
The Audio Pane for Advanced Sequences
When an advanced sequence is open in Output mode, audio controls are available for each active
track along with a slider for adjusting the combined output of the three tracks. The border color of
each set of controls matches the color of the track in the sequence: green for NAT, blue for SOT, and
purple for Voice. The NAT, SOT, and Voice controls are enabled or disabled depending on the
position of the position indicator. For more information, see “Working with Audio Tracks in
Advanced Sequences” on page 234.
The following illustration identifies controls in the Audio pane when an advanced sequence is open
in Output mode, Mix Mode is set for Stereo, and the position indicator spans all three tracks.
9 Pane Menu button Provides the following options:
• Mix Mode: Select Stereo or Mono to specify the audio output. See “Setting
the Audio Mix” on page 239.
• Set Reference Level: Lets you set the reference level for audio monitoring.
See “Setting the Reference Level” on page 239. The default is -20.
• Help: Displays information about the audio pane. Use the Help control
buttons to access other Help topics.
Control Description
q
w
e
r
t
tutity

The Audio Pane
230
Control Description
1 Panning knob Controls the panning for each track. In the current release, the panning
buttons are inactive. See “Panning for Advanced Sequences” on page 238.
2 Solo and Mute buttons Click the S (Solo) button to monitor only the selected track or tracks. All
other tracks are muted. Click the M (mute) button to mute only the selected
track or tracks. Gray M buttons indicate audio is enabled. See “Soloing and
Muting Tracks for Advanced Sequences” on page 235.
3 Volume slider Click and drag the slider to adjust the volume level for an audio clip. The
level applies only to the selected segment of a track, not to the entire track.
These adjustments are saved with the sequence. See “Adjusting Audio
Levels for Advanced Sequences” on page 237.
4 Volume level display Displays the level selected by the volume slider.
5 Track identifier Identifies the track associated with the audio controls. By default, mono
tracks are labeled NAT, SOT, and VO. For stereo tracks, labels by default
are NAT 1, NAT 2, SOT 1, and SOT 2. The identifier for the master slider
shows which tracks are currently monitored.
A MediaCentral UX administrator can change the labels that identify each
track by changing the settings in the Interplay Administrator Application
Database Settings.
6 Master volume slider Click and drag the slider to adjust the volume level for overall audio mix in
the sequence. Changes are not saved. See “Audio Monitoring for Assets and
Basic Sequences” on page 231.
7 Audio meters Displays the audio level for the solo tracks of the sequence, or the overall
mix of the sequence. There are two meters. For stereo output, each meter
displays a separate level. For mono output, both meters display the same
level. See “Setting the Audio Mix” on page 239.
8 Pane Menu button Provides the following options:
• Mix Mode: Select Stereo or Mono to specify the audio output. See
“Setting the Audio Mix” on page 239.
• Set Reference Level: Lets you set the reference level for audio
monitoring. See “Setting the Reference Level” on page 239. The default
is -20.
• Help: Displays information about the audio pane. Use the Help control
buttons to access other Help topics.
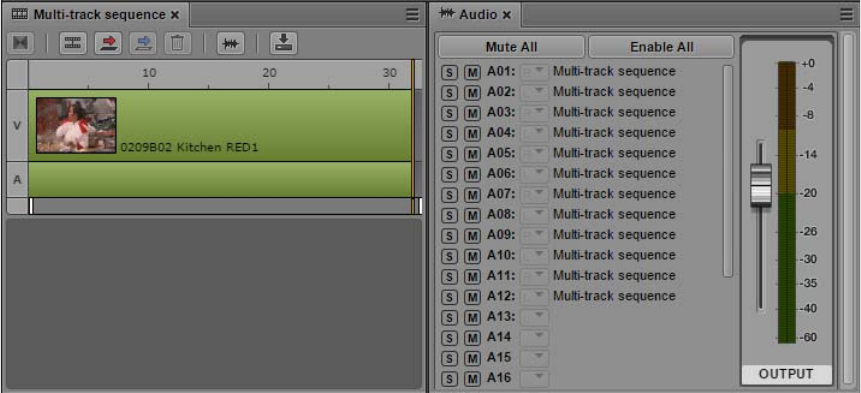
Working with Audio Tracks in Basic Sequences
231
Working with Audio Tracks in Basic Sequences
A basic sequence contains one audio track, which contains all source audio tracks. For a basic
sequence, a single audio track is displayed in the Sequence Timeline. The Audio pane displays all
source audio tracks.
You can add clips with up to 24 audio tracks to a sequence. All tracks are included in the saved
sequence. The following illustration shows a basic sequence composed of a single multi-track clip.
All tracks are displayed in the Audio pane.
You can perform the following tasks to edit audio for clips, subclips, or a basic sequence:
• You can select which tracks to monitor. See “Audio Monitoring for Assets and Basic Sequences”
on page 231.
• You can set the mix as mono or stereo. See “Setting the Audio Mix” on page 239.
Audio Monitoring for Assets and Basic Sequences
You can use controls in the Audio pane to select which tracks to monitor for assets and basic
sequences. Assets and basic sequences can include up to 24 tracks of audio, and you can select any
combination of tracks for monitoring. You can adjust the level of enabled tracks by using the volume
slider next to the audio meters.
nSee the MediaCentral ReadMe for possible limitations on the number of tracks you can monitor.
The display is similar if an uneditable sequence is loaded in Output mode. Audio tracks are displayed
and you can monitor the audio. Uneditable sequences are colored dark red in the Sequence pane. For
more information, see “Opening and Editing an Existing Sequence in the Sequence Pane” on
page 144.
The first time you open the Audio pane all tracks are enabled for monitoring. Any custom monitoring
that you set is retained from session to session.
The following illustration shows the Audio pane for a master clip (left) and a basic sequence (right).

Working with Audio Tracks in Basic Sequences
232
These displays are very similar. For a master clip, audio tracks are labeled with the name of the
master clip (in this example, Cam1_A1A14). For a sequence, audio tracks are labeled with the name
of the sequence (in this example, Basic Sequence). The label beneath the audio meters shows which
mode is selected in the Media pane.
In the master clip, tracks A01 through A08 are enabled for monitoring, which is indicated by the gray
S (Solo) and M (Mute) buttons. Tracks A09 through A14 are muted, which is indicated by orange M
buttons. In the sequence, both tracks are enabled for monitoring.
If a group clip is loaded in the Media pane, additional controls are displayed in the Audio pane. See
“Working with Group Clips” on page 246.
To disable monitoring of a track:
tClick the M button so that it is colored orange. You can mute more than one track.
To enable monitoring of a track:
tClick the M button so that it is colored gray.
To disable monitoring for all tracks:
tClick the Mute All button.
To enable monitoring for all tracks:
tClick the Enable All button.
To mute or enable all but a selected track:
tAlt+click an M button for a specific track.
If one track is muted (the M button is colored orange), Alt-click the button to enable the track
and mute all other tracks. To mute the single track again and enable all other tracks, Alt+click the
M button again.
To solo a track:
tClick the S button. M buttons for other tracks are automatically colored dull orange. You can
solo more than one track.
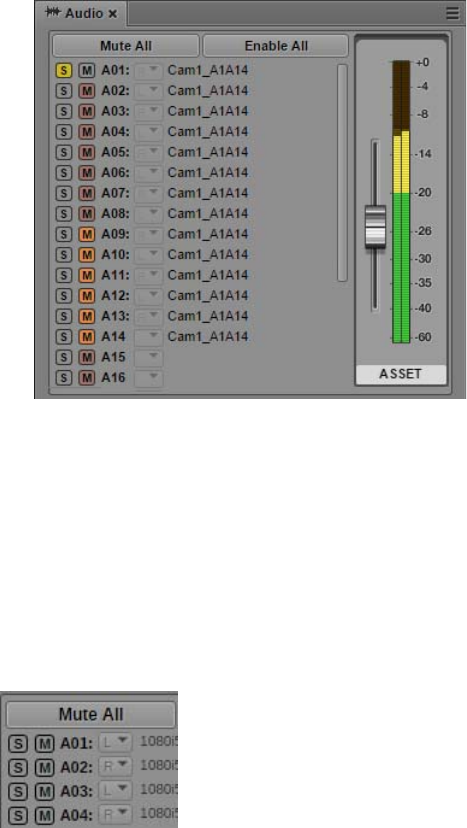
Working with Audio Tracks in Basic Sequences
233
The following illustration shows track A01 selected for soloing. Tracks A09 through A14 were
manually muted (bright orange). Other tracks were automatically muted (dull orange).
Panning for Assets and Basic Sequences
The default panning for clips, subclips, and basic sequences (left, right or center) is set in the
Interplay Administrator (the Application Defaults tab in the Application Database Settings view).
These settings include tracks 1 through 16. MediaCentral assigns odd tracks=left and even
tracks=right for tracks 17 through 24.
If the Mix Mode is set to Stereo, you cannot currently override the default panning. In the current
release, the panning buttons are inactive, as shown in the following illustration.
If Mix Mode is set for Mono, panning is ignored and all tracks are mixed into a single track, which is
played back in both output monitors (left and right). This setting applies only to sequences played in
MediaCentral UX and is not saved with the sequence. Default panning is used for mixdown and send
to playback (STP).
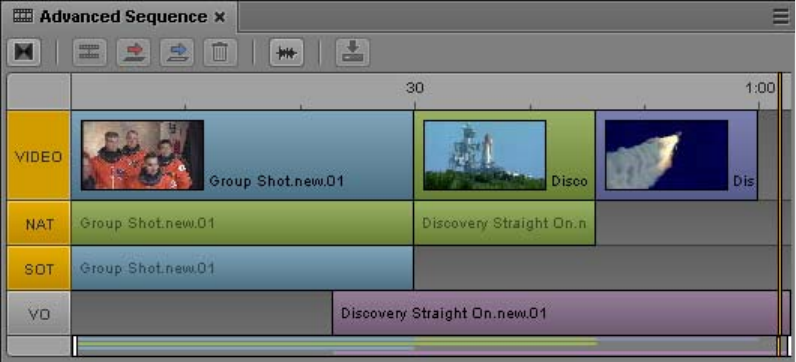
Working with Audio Tracks in Advanced Sequences
234
Working with Audio Tracks in Advanced Sequences
For an advanced sequence, the timeline in the Sequence pane includes three different types of audio
tracks:
• NAT (natural sound): Audio recorded at the same time as the video clip by the microphone built-
in to the video camera. MediaCentral UX supports single-channel or dual-channel NAT tracks.
Media in the NAT track and its associated video segment is colored green. If a video segment
includes both NAT and SOT audio, the video segment is colored light blue.
• SOT (sound-on-tape): Audio recorded at the same time as the video clip, usually with a
microphone separate from the one built in to the video camera, which records the natural sound.
MediaCentral UX supports single-channel or dual-channel SOT tracks. Media in the SOT track
and its associated video track is colored light blue.
• VO (Voice): Audio recorded through an audio device connected to your system or an audio-only
media file opened from the Interplay Production database. MediaCentral UX supports single-
channel Voice tracks. Media in the Voice track is colored purple.
The following illustration shows, from left to right, Video with NAT and SOT, VO, Video with NAT,
and Video only. A video segment without associated audio is colored dark blue.
An Interplay Production administrator can change the labels that identify each track by changing the
settings in the Interplay Administrator Application Database Settings.
The Interplay Administrator Application Database view also includes settings for specifying the
number of channels to use for NAT and SOT and how to patch source and output tracks. You can
select a maximum of five audio tracks for source and output:
• One or two NAT tracks
• One or two SOT tracks
•One Voice track
You can override the default output patching. See “Overriding the Default Audio Track Patching” on
page 236.
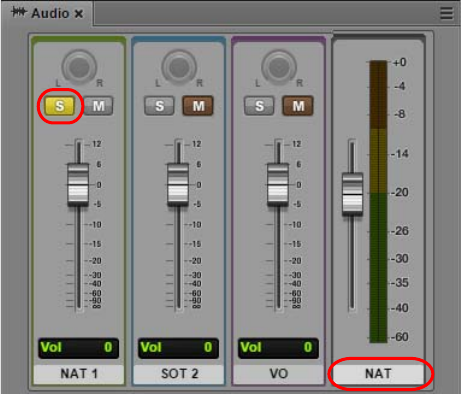
Working with Audio Tracks in Advanced Sequences
235
Automatic Adjustment of Audio Gain Levels
The application automatically sets audio gain levels to ensure the clearest sound for the master audio
track of your story. This provides default volume levels for separate tracks so that you do not need to
manually adjust audio gain levels. Audio gain levels are set according to the following parameters:
• If a Voice track is present, the application lowers (or “ducks”) the audio level on any other tracks
(NAT track, SOT track, or both) running at the same point in the Sequence Timeline.
• If no Voice track is present, and a SOT track is present, the application ducks the audio level on
the NAT track running at the same point in the Sequence Timeline.
• If no Voice or SOT tracks are present, NAT sound remains at full volume.
An Interplay Production administrator can change the amount of ducking by changing the setting in
the Interplay Administrator Application Database Settings. The default level is 12 dB.
Automatic Creation of Audio Dissolves
By default, MediaCentral UX creates an audio dissolve between each clip in your sequence. Because
the dissolve requires at least one frame to fade out or fade in, you should not mark your In point at the
first frame of your clip or your Out point at the last frame of your clip. Instead, use the Video monitor
controls to step in a few frames from the beginning or end of your clip before marking your In and
Out points.
An Interplay Production administrator can change the number of frames used for the dissolve by
changing the setting in the Interplay Administrator Application Database Settings. The default
number of frames is 2.
Soloing and Muting Tracks for Advanced Sequences
To solo a track:
tClick the S button.
The button turns yellow. M buttons for other tracks are automatically colored dull orange. The
track identifier under the audio meters changes to the label of the track or tracks selected for
soloing.
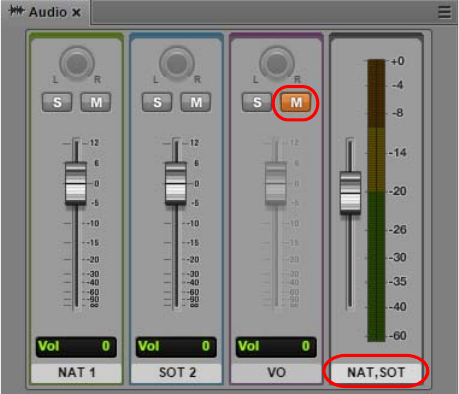
Working with Audio Tracks in Advanced Sequences
236
To mute a track:
tClick the M button.
The button turns orange. Audio controls for the track are grayed out and the track identifier
under the audio meters does not show the muted tracked.
Overriding the Default Audio Track Patching
An Interplay Production administrator sets the default source patching for NAT, SOT, and Voice
audio on the Editing Settings tab of the Application Database Settings view. By default, track A1 is
mapped to NAT audio, A2 is mapped to SOT audio, and A3 is mapped to Voice. If dual-channel
support is enabled, A1 and A4 are mapped to NAT audio, and A2 and A5 are mapped to SOT audio.
nFor information about setting the default audio patching, see “Configuring Settings in the
Interplay | Production Administrator” in the MediaCentral UX Administration Guide.
You might need to change these settings for editing and output. For example, the NAT audio and the
SOT audio might become reversed if a reporter’s microphone is recorded on the wrong track. When
this happens, the NAT sound takes the place of the SOT track, and if you disable the NAT track the
SOT is disabled instead. You can change (or swap) the NAT and SOT tracks to compensate for this
problem. These changes override the source audio patching.
When you override the default NAT or SOT patching, only the active clip in the Sequence Timeline is
modified. Other clips that you added to the Sequence Timeline from the same source clip remain
unchanged.
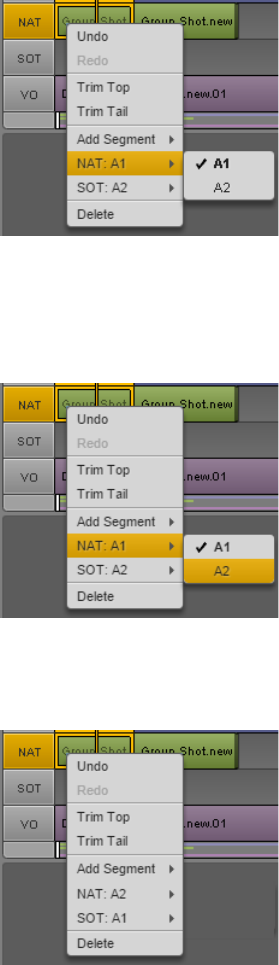
Working with Audio Tracks in Advanced Sequences
237
To override the default source audio patching:
1. Right-click an audio clip in the Sequence pane and select the track you want to change.
The menu shows the currently selected audio patching. The following illustration shows a clip
with two audio tracks that uses the default mapping. A check mark shows the selected source
track. Bold text indicates the default audio patching.
2. From the submenu, select the source track you want to use.
For example, to swap the default NAT and SOT tracks:
- Select NAT A1 > A2.
- Select SOT A2 > A1.
The menu shows the new patching.
Adjusting Audio Levels for Advanced Sequences
You can adjust audio levels for segments in each track in an advanced sequence. These adjustments
are saved with the sequence and preserved when sending to playback. You can also adjust the master
volume for the overall audio mix. Master volume adjustments are not saved.
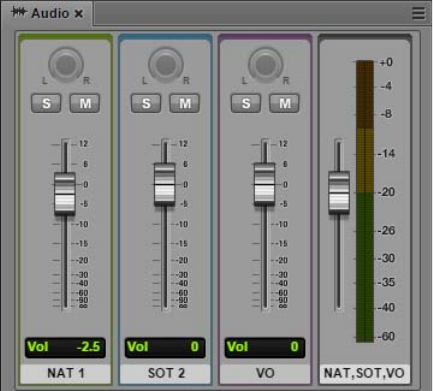
Working with Audio Tracks in Advanced Sequences
238
To adjust audio levels for a track in a sequence:
tDrag the audio slider for the track you want to adjust.
The change in audio level is shown in the volume level display below the slider. The following
illustration shows volume lowered to -2.5 dB for NAT track 1.
For more information about audio controls, see “The Audio Pane” on page 227.
To adjust the master volume for a sequence:
tDrag the master volume slider.
To set the volume at the default level for a track or the entire sequence:
tDouble-click the slider.
nYou can change the default reference level for the master volume. See “Setting the Reference Level”
on page 216.
Panning for Advanced Sequences
MediaCentral UX uses panning for advanced sequences as it is set in the Interplay Administrator.
• NAT and SOT tracks: Mapped as odd tracks=left, even tracks=right. Source tracks for output are
patched in the “Audio - Storyline Audio Patching” setting on the Editing Settings tab of the
Application Database Settings.
• VO track: Mapped as odd tracks=left, even tracks=right. You can center the VO track by
selecting “Center-Panned Sound on Tape and VO” on the Editing Settings tab of the Application
Database Settings.
These settings are saved in the sequence and are used for mixdown and send-to-playback (STP).
If Mix Mode is set for Mono, panning is ignored and all tracks are mixed into a single track for
monitoring, which is played back in both output monitors (left and right). This setting is not saved
with the sequence. Panning as set in the Interplay Administrator is used for mixdown and send-to-
playback.
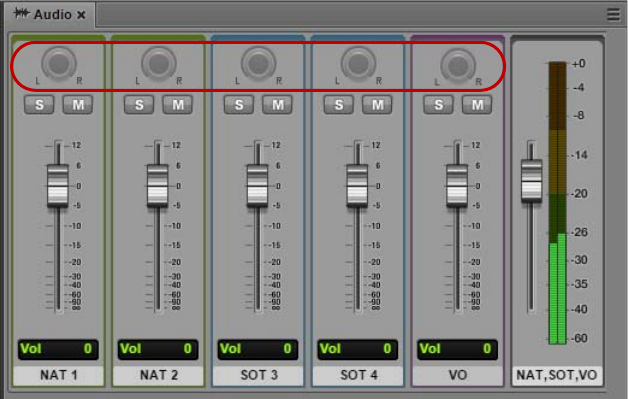
Setting the Audio Mix
239
In the current release, the panning buttons are inactive, as shown in the following illustration.
nFor a procedure to override these defaults by using the application.properties file, see the
MediaCentral Platform Services Installation and Configuration Guide. This override is global and
applies to all Interplay folders.
nComplex (uneditable) sequences created in Media Composer use panning as set in Media Composer.
Setting the Audio Mix
You can set the audio mix for an asset or for a sequence. For an asset, up to 24 tracks are monitored.
You can select which tracks to monitor. For more information, see “Audio Monitoring for Assets and
Basic Sequences” on page 231. The audio mix is used for monitoring only.
nSee the MediaCentral ReadMe for possible limitations on the number of tracks you can monitor.
To set the audio mix, do one of the following:
tSelect Mix Mode > Mono from the Audio Pane menu.
MediaCentral UX maps all audio tracks to a center pan, which creates a mono mixdown of all
tracks. It outputs the resulting track to two identical channels.
tSelect Mix Mode > Stereo from the Audio Pane menu.
MediaCentral UX maps all audio tracks to two channels. The mix depends on your panning
settings. See “Panning for Assets and Basic Sequences” on page 233 and “Panning for Advanced
Sequences” on page 238.
Setting the Reference Level
You can set the reference level for the master volume output. By default the reference level is -20 dB,
which means a tone of -20dB is displayed as -20dB. If you change the reference level to -10, a tone of
-20dB is displayed as -10dB.
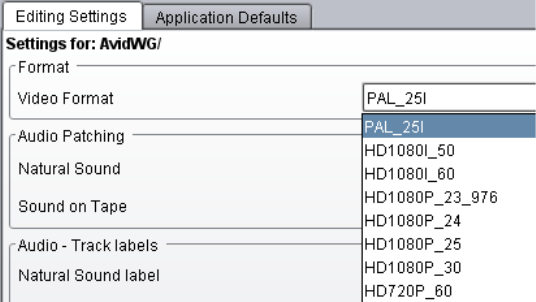
Recording a Voice-Over
240
To set the reference level:
1. Click the pane menu button and select Set Reference Level.
The Reference Level dialog box is displayed.
2. Type a dB (decibel) level from -50 through -1.
3. Click OK.
Recording a Voice-Over
You can use special audio controls in the Media pane to record a voice-over for your story. You can
record the voice-over while the video is playing. You can record a voice-over only for advanced
sequences.
MediaCentral UX uses the recording function of the Adobe Flash Player to determine the input
device used for the voice-over. The Flash Player automatically detects any default microphone or
other audio recorder on your computer and uses that device unless you change it through the Flash
Player settings. To access these settings, right-click anywhere in the Media viewer and select
Settings.
nIf you select a device different from the default system input device, then remove the device, you might
need to manually change the Flash Player settings.
The first time you click the voice-over controls during a session, you see a message from the Flash
Player asking for permission to let the MediaCentral UX server access your camera and microphone.
Click Allow.
nIf you open a sequence created in Avid Instinct, you cannot add a voiceover or markers until you save
the sequence in MediaCentral. The Save button is enabled for this purpose, even if you did not make
any changes to the file.
For Interplay Production sequences, the video format and frame rate is usually determined by the
first clip that you add to the sequence. However, if you record a voice-over before inserting a video
clip, the video format and frame rate are determined by the Video Format setting in the Interplay
Administrator. More specifically, the setting is found on the Editing Settings tab of the Application
Database Settings view. This setting applies at the folder level. The following illustration shows the
Video Format for the root folder set for PAL 25i.
If the setting is Any, MediaCentral UX uses NTSC 29.97 as the default format.
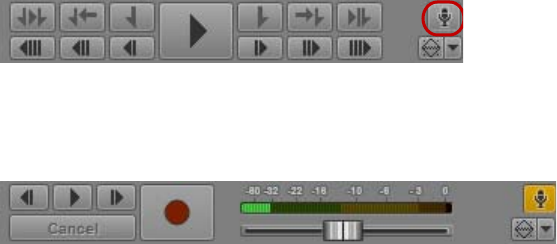
Recording an Audio Clip
241
For more information, see “Configuring Settings in the Interplay | Production Administrator” in the
Avid MediaCentral | UX Administrator’s Guide.
To record a voice-over:
1. Click the Output button to load the sequence into the Media pane.
With the Output button selected, the Voice-Over button is displayed in the lower right of the
Media pane.
2. Click the Voice-Over button.
The voice-over controls are displayed.
3. Click the Media Pane Menu button, select Input Source, and select the device you want to use for
recording.
4. Adjust the recording device parameters to your preference, and use the volume slider to set the
desired volume level.
5. Set the start point for the recording by doing one of the following:
tDrag the position indicator to a location in the Media Timeline or the Sequence Timeline.
tClick the Play/Pause, 1 Frame Back, or 1 Frame Forward buttons in the voice-over controls.
6. When you are ready to record, press the Record button.
A three-second countdown is displayed in the viewer, audio pops mark each second, and the
Record button flashes red. At the end of the countdown, the Record button remains red and you
can begin recording.
You can monitor the recording level in the audio meter and adjust it as needed while recording.
Click Cancel to stop recording without saving the file.
7. When you are finished the recording, press the Record button again.
The voice-over is added to the sequence, in the V column. You can review the recording by
playing the sequence.
When you record a voice-over, the new audio clip is named sequence_name.VO.nn. Voice-overs
are checked into Interplay Production in the same folder as the sequence they are recorded into.
8. To exit the voice-over controls, click the Voice-Over button.
Recording an Audio Clip
You can use audio controls in the Media pane to record an audio master clip. This is an alternative
way of recording a voice-over that gives you more flexibility than recording a voice-over for a
sequence. To record an audio clip, you use the Media Pane in Asset mode.
nThis feature applies to Interplay Production assets only.
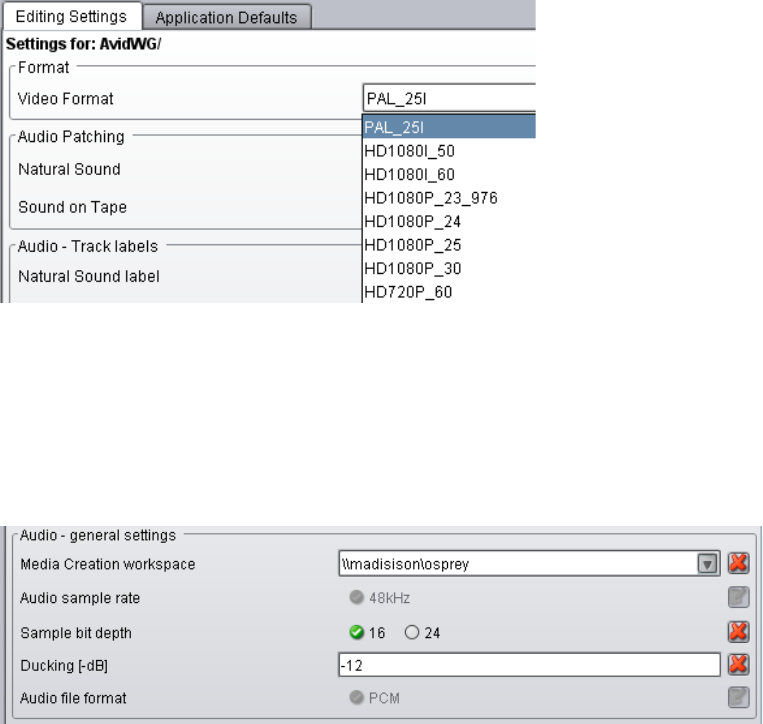
Recording an Audio Clip
242
Adobe Flash Player
MediaCentral UX uses the recording function of the Adobe Flash Player to determine the input
device used for the recording. The Flash Player automatically detects any default microphone or
other audio recorder on your computer and uses that device unless you change it through the Flash
Player settings. To access these settings, right-click anywhere in the Media viewer and select
Settings. You can also change the input source from the Media Pane menu.
nIf you select a device different from the default system input device, then remove the device, you might
need to manually change the Flash Player settings.
The first time you use the recording controls during a session, you see a message from the Flash
Player asking for permission to let the MediaCentral UX server access your camera and microphone.
Click Allow.
Interplay Administrator Settings
When you create a recording, the format is determined by two settings in the Interplay Administrator.
• Video Format setting on the Editing Settings tab of the Application Database Settings view.
This setting determines the frame rate. If the setting is Any, MediaCentral UX uses NTSC 29.97
as the default format. The following illustration shows the Video Format for the root folder set
for PAL 25i.
• Audio - general settings on the Editing Settings tab of the Application Database Settings view
- Audio sample rate: Fixed at 48kHz
- Sample bit depth: Choice of 16 or 24-bit (16-bit is the default)
- Audio file format: Fixed as PCM.
The following illustration shows the bit depth set for 16.
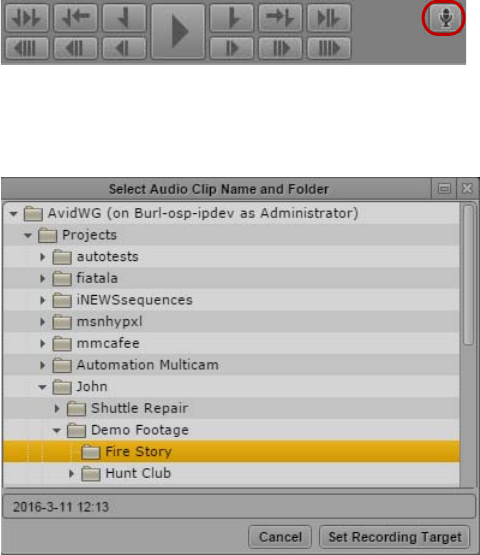
Recording an Audio Clip
243
These settings apply at the folder level.
To record an audio clip:
1. Click the Asset button in the Media pane.
The Voice-Over button is displayed in the lower right of the Media pane.
2. Click the Voice-Over button.
The Select Audio Clip Name and Folder dialog box is displayed.
3. Select the folder and clip name:
a. Select the folder in which you want to save the recorded clip.
Selection is limited to subfolders of the top-level folders.
b. Type a file name or accept the default (the current date and time).
c. Click Set Recording Target.
If a message from the Flash Player asks for permission to let the MediaCentral UX server
access your camera and microphone, click Allow.
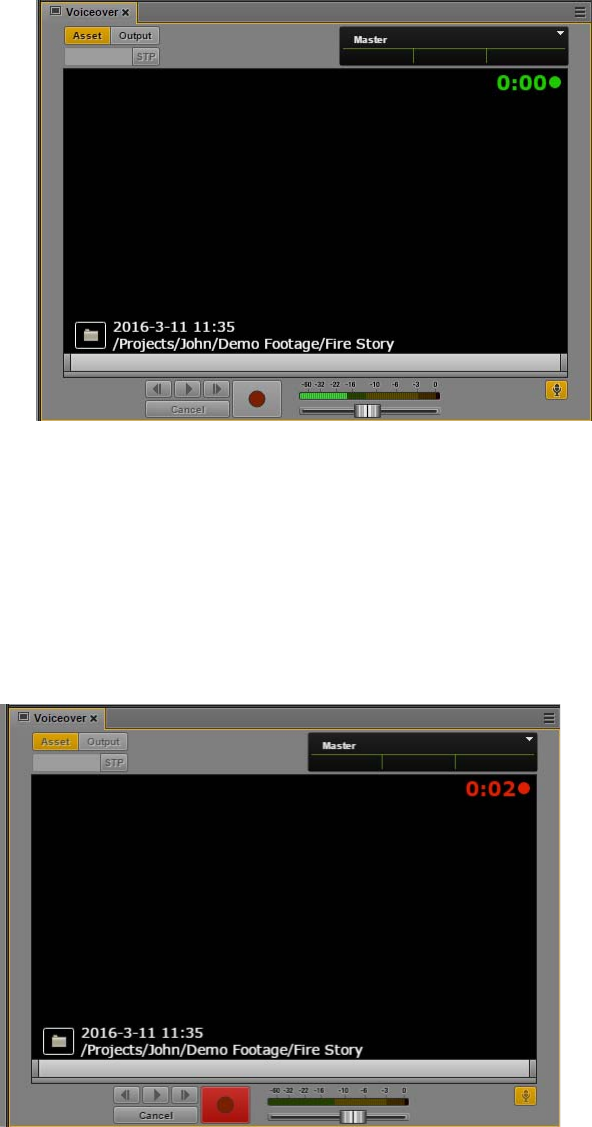
Recording an Audio Clip
244
The Media pane shows the a timer and record indicator (small circle) displayed in green in
the upper right. The file name and path are displayed as an overlay in the lower left. If you
want to change the file name or location, click the file folder icon in the overlay. The Audio
Clip Name and Folder dialog box is displayed and you can change the location or file name.
4. Click the Media Pane Menu button, select Input Source, and select the device you want to use for
recording.
5. Adjust the recording device parameters to your preference, and use the volume slider to set the
desired volume level.
6. When you are ready to record, press the Record button.
A three-second countdown is displayed in the viewer, audio pops mark each second, and the
Record button flashes red. At the end of the countdown, the Record button remains red and the
recording begins. The timer in the upper right turns red, and the recording indicator flashes.
Recording an Audio Clip
245
You can monitor the recording level in the audio meter and adjust it as needed while recording.
Click Cancel to stop recording without saving the file.
7. When you are finished recording, press the Record button again.
An audio clip is created with the name and location you selected and is highlighted in the Asset
pane.
The file name is automatically incremented by a final number in preparation for the next
recording.
8. To exit the audio-recording controls, click the Voice-Over button.

8Working with Group Clips
The following topics describe working with group clips and multicamera workflows in
MediaCentral UX:
•Group Clips and Multicamera Workflows
•Working with Group Clips
•Creating a Basic Sequence with Group Clips
•Sending a Sequence with Group Clips to a Playback Device
nSubclips created from group clips, group clips composed of subclips, and multigroup clips are not
currently supported by MediaCentral UX.
Group Clips and Multicamera Workflows
Multiple cameras are often used for productions such as concerts, award shows, situation comedies,
and reality TV. The resulting footage can then be used to create group clips, an asset type composed
of footage recorded by more than one camera simultaneously. MediaCentral UX includes features for
working with group clips in multiple-camera (multicamera) workflows.
Group Clips
Group clips are created in any of the applications in the Media Composer product family by syncing
a group of clips based on common source timecode, auxiliary timecode, or marks placed in the
footage. A user working in an Avid editing application can check group clips in to and out of
Interplay Production. A user working in MediaCentral UX can view the group clips and use them to
create a sequence. A sequence can contain a mix of master clips and group clips.
nFor more information about group clips and multicamera editing, see the documentation for Media
Composer or another editing application in the Media Composer product family.
Avid Editing Applications
MediaCentral UX is qualified with group clips created by the following Avid editing applications:
• Media Composer v5.0 and later
• Avid Symphony v5.0 and later
• NewsCutter v9.0 and later
MediaCentral UX supports editing of sequences created in these applications that contain group
clips, if the sequence consists of cuts only (for example, a shotlist). The sequence opens in the Media
pane and the Sequence pane, and you can edit the sequence in the same way you edit a sequence you
created in MediaCentral UX.
Supported Project Types and Resolutions
For a listing of supported project types and resolutions, see the MediaCentral ReadMe.
Working with Group Clips
247
Interplay | Production
Interplay Production v3.0 and later is required for complete support of group clips and multicamera
workflows.
A user working in an Avid editing application can check group clips in to and out from an Interplay
Production database. Interplay Access users can view information about group clips, including
master clip relatives.
Group clips and sequences that contain group clips are supported by Interplay Transfer v3.0 and by
the following Interplay Production Services:
• Interplay Archive v3.0
• Interplay Restore v3.0, including Partial Restore
• Interplay Copy v3.0
• Interplay Move v3.0
• Interplay Delivery v3.0, including Partial Delivery
• Interplay STP Encode v3.0
• Interplay Transcode, with the following limitations:
- You cannot use CROSSRATE mode to transcode group clips.
- You can use MIXDOWN mode to transcode a sequence with group clips, but only the
camera angle selected in the Avid editing application timeline is included in the mixed-down
master clip.
nSubclips created from group clips, group clips composed of subclips, and multigroup clips are not
currently supported by Interplay Transfer or Interplay Production Services.
Working with Group Clips
You open a group clip in the same way you open other assets: select the group clip in the Assets pane,
load it in the Media Pane, and the clip opens in Asset mode.
Because a group clip consists of multiple individual clips, each with a different camera angle, you
can view it in different ways:
• Multi-angle view, either 2x2 or 3x3
• Single-angle view
The following illustration shows a group clip displayed in 3x3 multi-angle view and single-angle
view. In multi-angle view, camera angles appear from left to right and top to bottom, based on the
order the group clip was created in the Avid editing application. An orange bounding box marks the
active angle. The active angle determines which camera angle is displayed in single-angle view and
also which angle is displayed when you add the clip to a sequence.
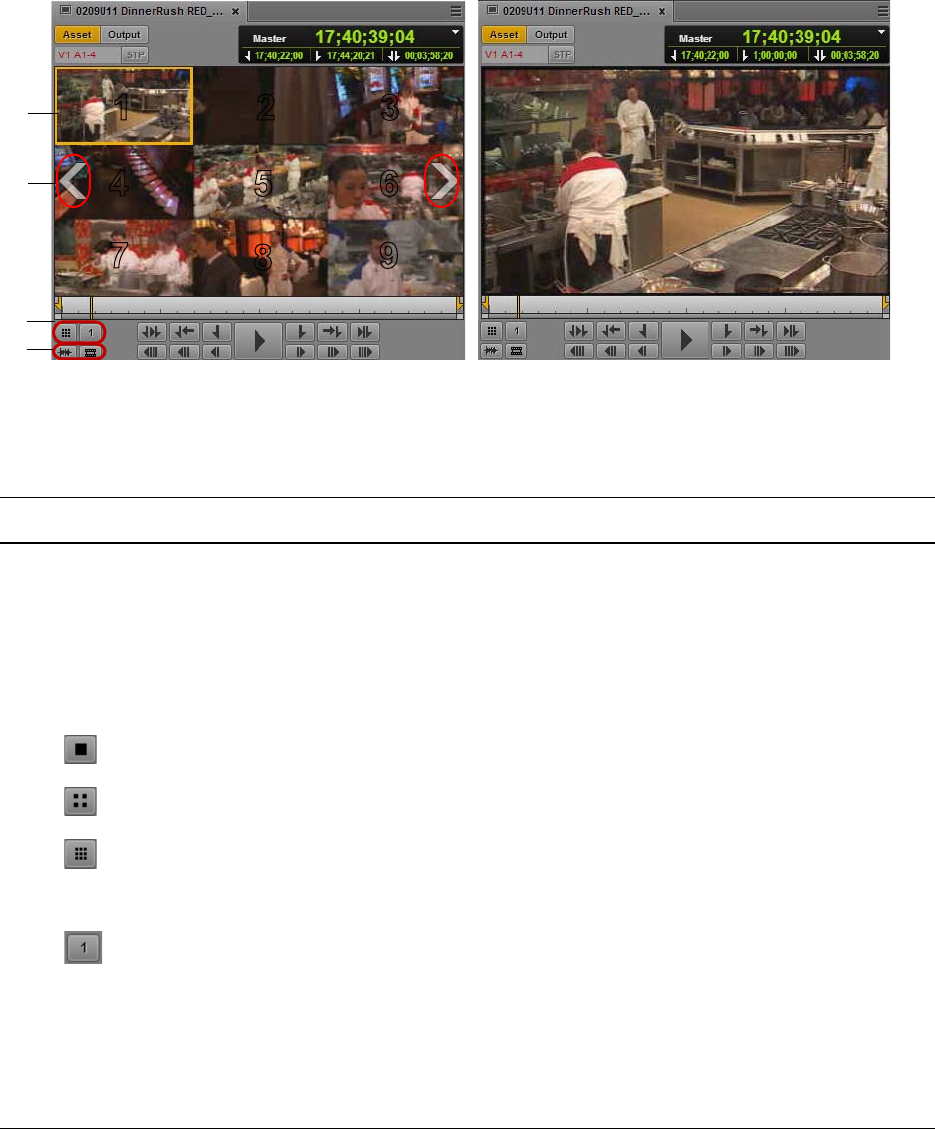
Working with Group Clips
248
nThe numbers shown in the multi-angle view illustration are for reference only and do not appear in
the user interface.
Control Description
1 Active angle indicator An orange bounding box that indicates which master clip in a group
clip is active.
2 Swap banks overlay arrows Switches the display from one group of multiple angles to another. If
a group clip has more angles than fill a single grid (either 2x2 or
3x3), the angles are displayed in banks.
3 Multi-Angle View buttons Determines whether the clip is displayed in multi-angle view:
Single-angle view (1x1)
2x2
3x3
Active Angle button Displays the active angle. The number indicates the number of the
angle in the display, from left to right and top to bottom and across
banks. Click to change the video angle from context menu.
4 Audio Pane button Opens the Audio pane. If the pane is already open, it is brought to the
front.
Match Frame button Click this button to load a master clip that contains a selected frame
of a sequence or subclip. See “Using Match Frame for Group Clips”
on page 257.
qq
we
qw
wr
3
456
789
1 2
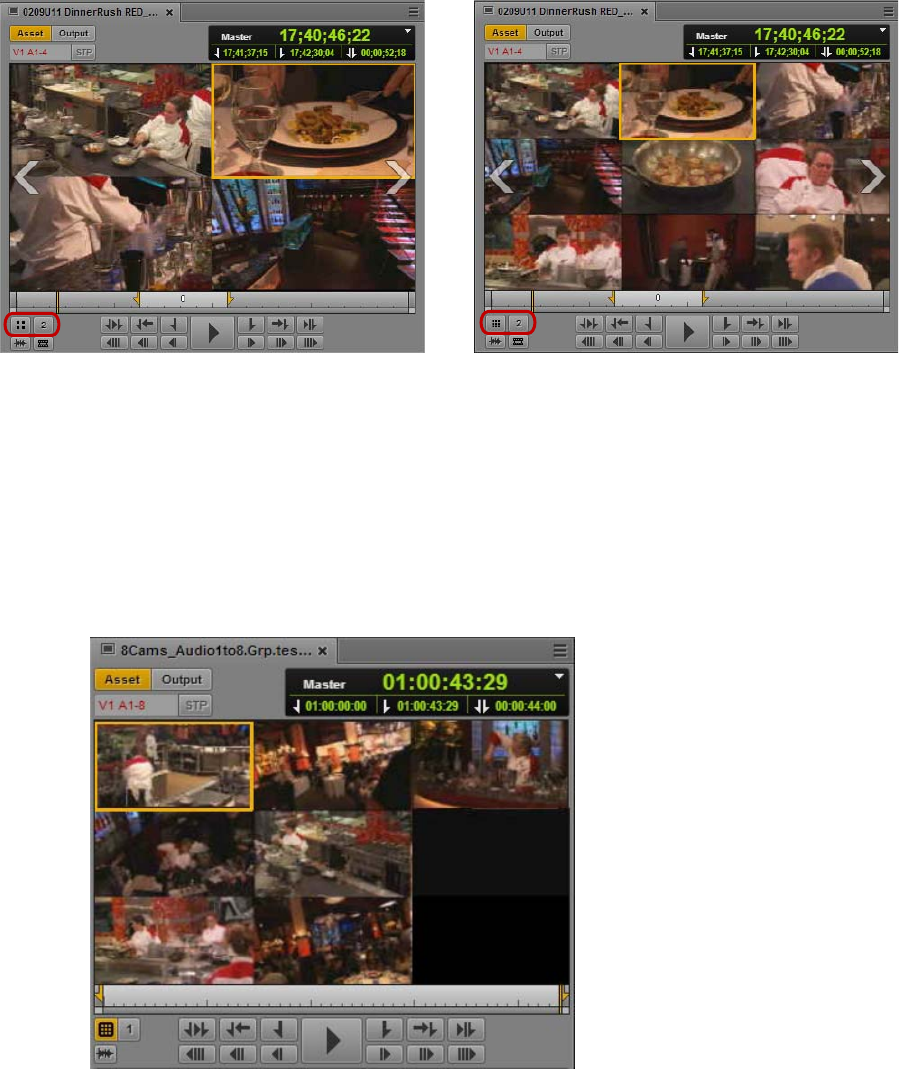
Working with Group Clips
249
The following illustration shows the same group clip in a 2x2 grid and in a 3x3 grid. In both cases,
angle 2 is selected as the active angle.
In multi-angle view, if the last bank of a group clip contains fewer than the number of angles in the
grid, the remaining angles are displayed as empty slots.
Black filler is used as padding in master clips that have different start or end points from other master
clips in the group clip. This filler is slightly lighter in appearance than the empty slot used for non-
existent angles so that you can discern the difference.
The following illustration shows an empty slot in the lower right and above it padding for a clip that
ends before the end of the master clip. The filler is slightly lighter than the empty slot.
You can create an image from a group clip displayed in single-angle view or multi-angle view. In
multi-angle view, all angles are combined as a single image. For more information, see “Saving a
Frame as an Image” on page 225.
nYou cannot currently create a subclip from a group clip.

Working with Group Clips
250
nMediaCentral UX supports group clips that include audio-only source clips (angles). However, at
least one source clip must include video. If you select a video angle in the Media viewer, all clips with
audio tracks are available for track mapping.
For more information, see the following topics:
•“Loading a Group Clip and Changing the Angle View” on page 250
•“Working with Banks” on page 251
•“Selecting the Active Angle in Asset Mode” on page 251
•“Playing a Group Clip” on page 252
•“Timecode and Group Clips” on page 253
•“Selecting Audio Monitoring Preferences in Asset Mode” on page 253
•“Markers and Restrictions for Group Clips” on page 256
•“Using Match Frame for Group Clips” on page 257
Loading a Group Clip and Changing the Angle View
When you load a group clip, the Media viewer displays it in single-angle view. You can also display
angles of the group clip in either a 2x2 grid or a 3x3 grid. You can use the 2x2 grid for a group clip
with more than four angles; the additional angles are displayed in additional banks. You can use the
same controls in either grid layout.
To load a group clip:
1. In the Assets pane, navigate to the group clip you want to open.
Group clips are marked by the group clip icon.
2. Double-click the clip or drag it from the Assets pane to the Media viewer.
To change the grid layout for a group clip, do one of the following:
tClick the Multi-angle View button and select 1x1, 2x2, or 3x3.
The icon on the button changes to show the currently selected grid.The selected grid layout
persists for any new group clips that you open.
tDouble-click in the Media viewer.
- If the display is in single-angle view, the display switches to 3x3 (the default) or the last
known multi-angle grid. For example, if you switch to 2x2, back to 1x1, then double-click
the video, a 2x2 grid is displayed.
- If the display is a multi-angle grid, the display switches to single-angle view.
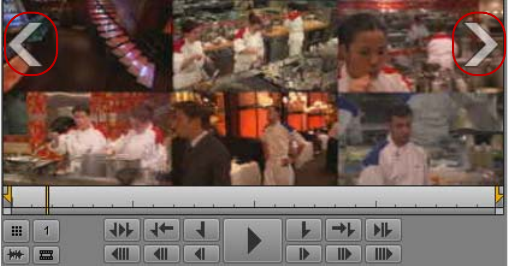
Working with Group Clips
251
Working with Banks
If a group clip contains more than nine camera angles, MediaCentral UX divides the angles into two
banks, each containing either four or nine angles. If the last bank of a group clip has fewer than nine
angles, the remaining angles are displayed as empty slots.
To change the bank displayed, do one of the following:
tFor the next bank, press the right Swap Banks overlay arrow.
tFor the previous bank, press the left Swap Banks overlay arrow.
tFor the next bank, press Alt+. (period).
tFor the previous bank, press Alt+, (comma).
tSelect an active angle that is in a bank not currently displayed, for example, by typing
Alt+number. The Media viewer changes to the bank that contains the new active angle.
Selecting the Active Angle in Asset Mode
The active angle determines which camera angle is displayed in single-angle view and which angle is
used when you add the group clip to a sequence. In multi-angle view, an orange bounding box marks
the active angle.
The default angle displayed is the last active angle saved in the AAF file and the Interplay Production
database, regardless of the user. If an active angle is not yet set (for example, the clip is being loaded
for the first time), angle 1 (V1) in the group clip is displayed.
If you change the active angle during your MediaCentral UX session, the active angle persists until
you sign out or close the session. If you open the group clip in a different session, the active angle
will be the last active angle saved in the Interplay Production database, which might not match the
last active angle you selected in your previous session.
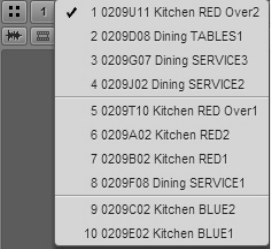
Working with Group Clips
252
To change the active angle displayed in Asset mode, do one of the following:
tClick the Active Angle button and select an angle from the menu.
The following illustration shows angle 1 selected from the 10 angles that make up the group clip.
In this example, the group clip is displayed in a 2x2 grid, so lines divide the list into two banks of
four angles and one bank of two angles. For a 3x3 grid, the list is divided into banks of nine
angles.
nThe order of the clips that compose a group clip is determined by how the clip was created in the Avid
editing application.
tPress a key combination:
- To select a specific camera angle, press Alt+angle number (Alt+1, Alt+2, Alt+3 up to
Alt+9).
If a group clip is divided into banks, and an angle is not displayed in the bank, the display
automatically changes to the correct bank.
- To select the next consecutive camera angle, press Alt+Down Arrow.
- To select the preceding camera angle, press Alt+Up Arrow.
You can change the active angle while the clip is playing and the clip continues to play.
The active angle persists throughout your session, but it is not saved in the Interplay Production
database.
For information about changing the camera angle in the Sequence Timeline, see “Creating a Basic
Sequence with Group Clips” on page 258.
Playing a Group Clip
You can play a single angle of a group clip in single-angle view, or multiple angles in multi-angle
view. In multi-angle view, all angles play simultaneously. You can change the active angle while the
clip is playing and the clip continues to play.
To play a single-angle of a group clip, do one of the following:
tIn single-angle view, click the Play button. You can change the angle you want to play (see
“Selecting the Active Angle in Asset Mode” on page 251).
tIn multi-angle view, double-click the angle you want to play and click the Play button.
Working with Group Clips
253
To play all angles of a group clip:
tIn multi-angle view, click the Play button.
All displayed angles play simultaneously.
Timecode and Group Clips
A group clip has its own timecode, which depends on the sync point and how the group clip was
synced when created. The group clip takes its timecode from the first master clip in the bin when the
group clip was created. If the master clips that compose the group clip share the same timecode and
were synced by timecode, timecode for the group clip will match timecode for any of the active
angles.
• In multi-angle view, the group clip timecode is displayed.
• In single-angle view, the timecode for the active angle is displayed.
Black filler is used as padding in angles that have different start or end points from other angles in the
group clip. In single-angle view, master timecode for this filler is displayed as 01:00:00:00; absolute
and remain timecode are displayed as blank.
For more information, see “Using the Timecode Displays” on page 213.
Selecting Audio Monitoring Preferences in Asset Mode
The Audio pane includes special controls for audio monitoring of group clips.
When you load a group clip in the Media pane and select Asset mode, the Audio pane displays audio
tracks for the group clip and controls to set your monitoring preferences. The following controls are
displayed only for group clips:
•A track selector for each track in the group clip. The track selector uses a drop-down menu that
lets you map the audio track to the corresponding audio track in any angle in the group clip.
• The Audio Follows Video button, which lets you map all audio tracks to tracks from the clip
selected as the active angle. “Audio follows video” is a shortcut that allows the audio mapping
for a track to automatically “follow” any active angle change and use the audio from the new
active angle.
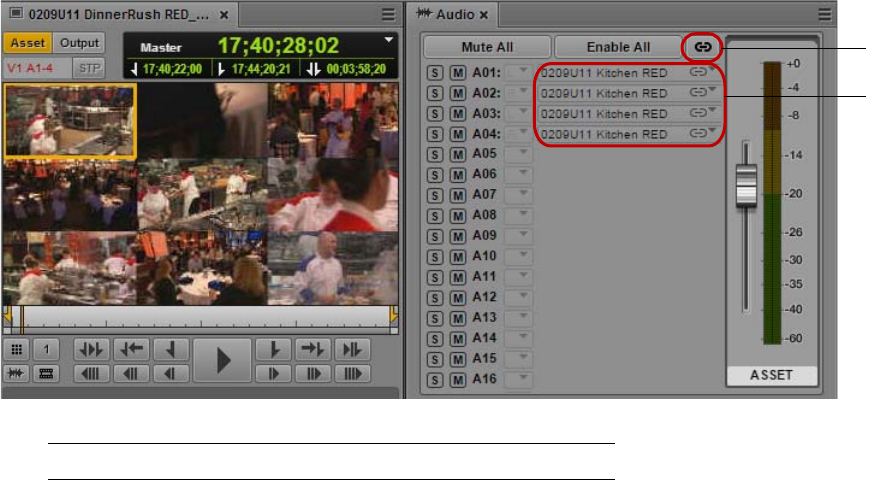
Working with Group Clips
254
The following illustration shows controls in the Audio pane when a group clip is loaded. There are
four track selectors, representing four audio tracks in the group clip.
nThe number of track selectors shown represents the maximum number of tracks in any of the clips
that compose the group clip. For example, if some clips contain two audio tracks, and some clips
contain four tracks, there will be track selectors for four audio tracks.
Audio Follows Video
In the previous illustration, angle 1 is the active angle for the group clip. The master clip for this
angle is named “0209U11 Kitchen RED,” which matches the names of the audio tracks that are
selected. This is an example of “audio follows video,” which is indicated by the link icon on the track
selector drop-down menu.
Enabling and Disabling Tracks
By default, all tracks are enabled for monitoring, as shown by gray S (solo) and M (mute) icons. You
can select which tracks you want to monitor through the various controls. For example, to monitor a
single track (solo a track), click the S button for that track. The other tracks are muted, as indicated
by the dark orange M buttons. The following illustration shows only track A01 monitored.
1Audio Follows Video button 2Audio Track Selectors
qq
qw
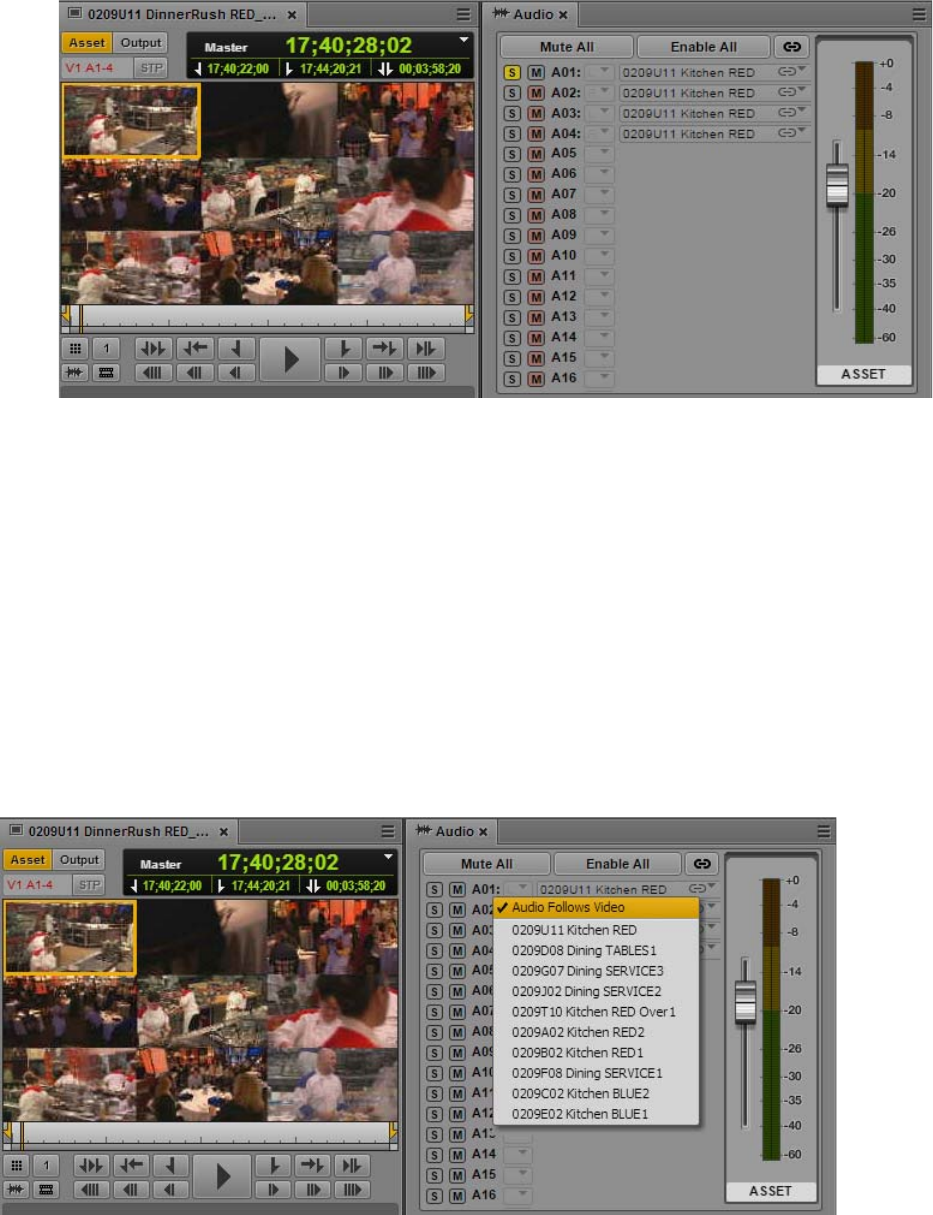
Working with Group Clips
255
Controls for monitoring include the following:
• Click the S button to solo one or more tracks.
• Click the M button to mute one or more tracks.
• Click the Mute All button to disable all tracks for monitoring.
• Click the Enable All button to enable all tracks for monitoring.
For more information on monitoring in the Audio pane, see “Using Audio” on page 227.
Mapping From Other Clips
You can use the drop-down menu for each audio track to select audio from the corresponding audio
track in any other clip in the group clip. The following illustration shows that Audio Follows Video is
set for track A01, with a choice of audio from all angles in the group clip.
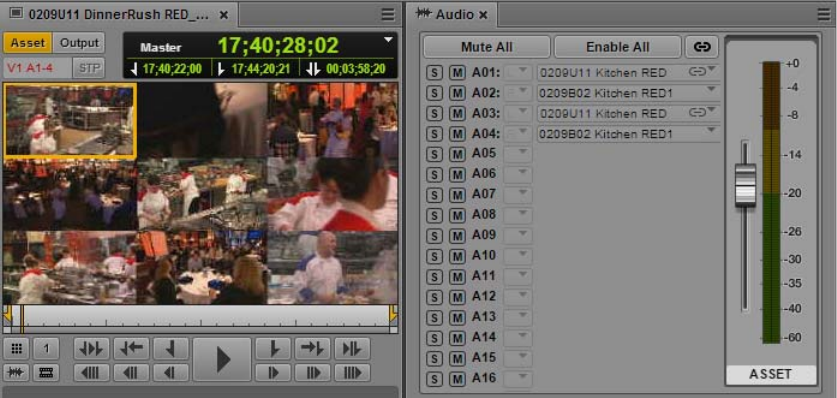
Working with Group Clips
256
nThe order of the angles in the drop-down menu matches the order of the group clip as it was created
in the Avid editing application. This list can include audio-only clips if at least one source clip
includes video. Audio-only clips are not displayed in the Media viewer.
You can map audio for a specific track by selecting an angle from the drop-down menu. To map all
tracks to the same angle, Alt+click the desired angle.
The following illustration shows a customized mix in which angle 1 is associated with audio follows
video and audio from a different angle on alternating tracks.
The monitoring selections that you set are retained when you switch angles in the master clip.
Custom monitoring is a user setting that is retained from session to session.
Markers and Restrictions for Group Clips
Starting with MediaCentral UX version 2.4, there are differences in the way markers and restrictions
for group clips are handled:
• Starting with MediaCentral UX version 2.4, markers created in MediaCentral UX are applied to
the group clip itself, not to a particular angle of a group clip. These markers are checked into the
Interplay Production database and are displayed in Media Composer. Prior to version 2.4,
markers were applied to angles of a group clip, and were not displayed in Media Composer.
Markers created on angles in a group clip can still be viewed in the Media viewer and in the
Logging pane, but are not displayed in Media Composer.
• Restrictions created in MediaCentral UX are applied to angles of a group clip. This support did
not change in version 2.4.
You can add a new restriction to a master clip by selecting it as the active angle, either in single-
angle view or multi-angle view. Master clips and group clips are linked, so that restrictions added
or changed in a master clip are added or changed in the group clip. You cannot add a restriction
to a group clip itself.
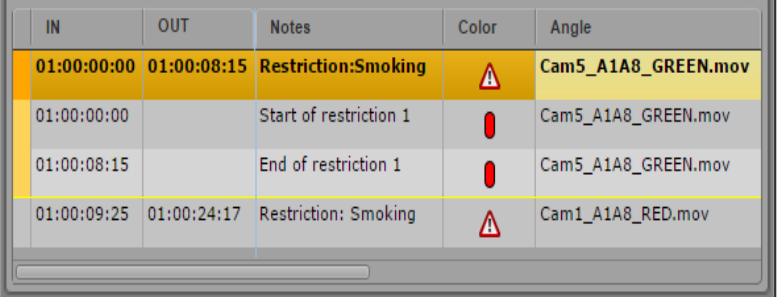
Working with Group Clips
257
When you load a group clip in Asset mode, the Logging pane displays any markers or restrictions for
master clips in the group clip. A resizable column labeled Angle displays the name of the master clip
for each restriction, as shown in the following illustration.
nMarkers applied to angles of a group clip prior to version 2.4 show the name of the master clip in the
Angle column.
You can edit existing markers and restrictions or you can add new ones.
Markers and restrictions are shown in the Media viewer for all angles of a group clip and for the
group clip itself when it is loaded in Asset mode. Starting with MediaCentral UX v2.4.1, if you edit
the active angle of a group clip into a basic or advanced sequence, only markers on the group clip
itself are added to the sequence. Markers on the active angle are not added to the sequence. (Prior to
MediaCentral UX v2.4, editing a group clip into a sequence added markers that were present in the
active angle of the group clip).
nIf you set the Logging pane to display only those markers created by you, only your markers are
visible in the Sequence pane. For more information, see “The Logging Pane for
Interplay | Production Assets” on page 296.
You can export markers and restrictions for a group clip and for a sequence that includes one or more
group clips.
For more information, see “Logging Interplay | Production Assets and Creating Subclips” on
page 291.
Using Match Frame for Group Clips
You can use the Match Frame feature with group clips and sequences that include group clips.
To load the source master clip for the active angle of a group clip:
1. In Asset mode, select the active angle for which you want to load the master clip.
2. Navigate to the frame that you want to match.
3. Click the Pane Menu button and select Match Frame.
The master clip for the active angle of the group clip is loaded in the Media pane, with the
matching frame displayed.
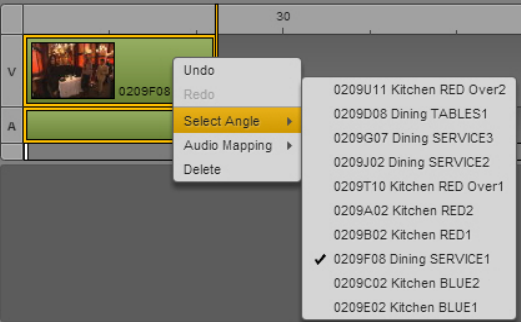
Creating a Basic Sequence with Group Clips
258
To load the source group clip for a segment in a sequence:
1. In Output mode, navigate to the frame for which you want to load the group clip.
2. Click the Pane Menu button and select Match Frame.
The group clip for the selected segment is loaded in the Media pane, in single-angle view. If you
want, you can then use Match Frame to load the source master clip for the matching frame of the
group clip.
Creating a Basic Sequence with Group Clips
Complete editing support for group clips is available only in basic sequences. You can create a basic
sequence exclusively of group clips, or combine group clips with master clips. You can select the
camera angle and audio mapping for group clips in the sequence.
MediaCentral UX also supports editing of sequences created in Media Composer, Avid Symphony,
or NewsCutter that contain group clips, if the sequence consists of cuts only (for example, a shotlist).
nYou can add an active angle to an advanced sequence. See “Adding an Active Angle of a Group Clip
to an Advanced Sequence” on page 259.
To add a group clip to a sequence:
1. Open the Sequence pane.
2. Load an existing basic sequence or create a new one.
3. Do one of the following:
tIn single-angle view, display the active angle you want to use in the sequence and drag it to
the sequence timeline.
tIn multi-angle view, click and hold the angle you want to use and drag the clip to the
sequence timeline.
To change the angle of a group clip in a sequence:
tRight-click the group clip or segment of a group clip, select Select Angle and the angle that you
want to display in the sequence.
You can also use the same keyboard shortcuts you use when selecting an angle in the Media
pane: Alt+Up Arrow, Alt+Down Arrow, and Alt+1 through Alt+9.
The following illustration shows a group clip with 10 available angles.
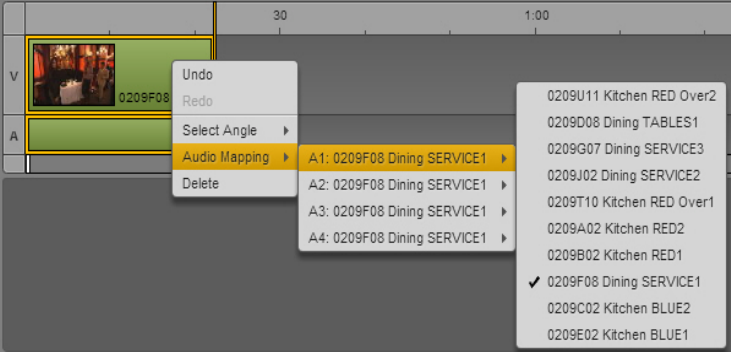
Adding an Active Angle of a Group Clip to an Advanced Sequence
259
You can change the active angle while the sequence is playing.
- If you use the mouse to select the angle, playback stops.
- If you use keyboard shortcuts to select the angle, playback continues.
To change the audio selected for a group clip in a sequence:
tRight-click the group clip or segment of a group clip, select Audio Mapping, select the audio
track you want to map, and select the angle for the audio.
The following illustration shows a group clip with four audio tracks.
You can change the audio track while the sequence is playing, but playback will stop.
Adding an Active Angle of a Group Clip to an
Advanced Sequence
Complete editing support for group clips is available only in basic sequences. However, you can now
add the active angle of a group clip to an advanced sequence. The result is that the original master
clip is used in the sequence, along with its original audio tracks.
The result is similar to using the Match Frame feature with a group clip, and then editing the
resulting master clip into the sequence.
nAll association with the group clip is lost when you add an angle to an advanced sequence. If you
need this metadata, you must use a basic sequence.
To add an active angle of a group clip to an advanced sequence:
1. Load a group clip into the Media pane.
2. Select the active angle.
3. (Optional) Mark In and Out points.
4. Drag the clip to the Sequence Timeline of an advanced sequence.
5. (Optional) Change the audio mapping by right-clicking the clip in the timeline, selecting Audio
mapping 1 or Audio mapping 2, then selecting the desired audio track.
Sending a Sequence with Group Clips to a Playback Device
260
The default track is based on the Interplay Production settings. For more information, see the
Avid MediaCentral | UX Administration Guide.
Sending a Sequence with Group Clips to a Playback
Device
You can send a sequence with group clips to a playback device (STP). However, you need to do a
mixdown before you can send the sequence.
For information about mixdown, see “Transcoding Assets” on page 222. For information about
sending to playback, see “Sending to Playback” on page 411.

9 Searching for Assets
The following main topics describe how to use the Search feature with Interplay Production,
Interplay MAM, and iNEWS databases:
•Search and the Central Index
•The Search Bar
•The Search Pane
•Search Criteria
•Conducting a Search
•The Search Results List
Search and the Central Index
MediaCentral UX provides two methods of searching your asset database. Federated search uses the
search capabilities of MediaCentral databases to provide the full search functionality that individual
databases provide, with the limitations that are imposed by those databases. Media Index search does
not directly search iNEWS, Interplay MAM, and Interplay Production databases but instead queries a
central index synced with multiple databases and finds anything stored in the index.
Using Media Index with the central index provides a unified view of multiple asset management
systems and focuses on simplicity and speed in finding assets. This does not replace existing asset
management solutions, and you can continue to use the federated search for detailed asset
information.
nIndexed search requires Media Index to be installed and configured in your MediaCentral Platform
environment.
Multi-zone search gives you access to media stored in zones other than the one you log in to when
you sign on with MediaCentral UX. Your MediaCentral administrator must configure your user roles
and permissions to view multi-zone databases, and you must have the proper permission settings to
edit or play media assets found in a search. For playback and remote asset delivery, you must log in at
least once to the remote system with MediaCentral UX in order to configure your Interplay
Production credentials.
There currently are some limitations in using an indexed search with iNEWS:
• You cannot use the indexed search with iNEWS in a multi-zone environment. If your
configuration includes multiple zones, the indexed search works only on the iNEWS system
connected to the local zone.
• You cannot search the content of any custom fields of your iNEWS stories. Media Index cannot
search fields that have customized field names.
Search and the Central Index
262
• Searching the central index returns all items that meet the criteria specified in the search,
regardless of read permissions set in iNEWS. You cannot open an iNEWS story listed in the
search results that you do not have the appropriate permissions to view.
• The default search type for the Search bar is the federated search.
The following limitations apply when using an indexed search with Interplay Production assets:
• No per asset/per user permission. You can hide parts of the database by using a PEBCo user
account with limited access for indexing. If the PEBCo user is not an administrator, database
access can be limited to certain directories, and only those directories are indexed. For
information on configuring a PEBCo user for Media Index, see “Configuring and Using the
PEBco Service” in the Avid Media | Index Configuration Guide.
nSince indexed searches respect the permissions of this account and not that of individuals logging
into MediaCentral UX, users with permissions different from the PEBCo user might be exposed to
assets that they could not otherwise view in Interplay Access. Although MediaCentral UX users can
view names and metadata for assets they do not have permission to view, they are blocked from
playing the assets.
• No folder locations. Assets in Interplay Production can be linked to multiple locations. In Media
Index, these locations are not stored and you cannot display or search by folder locations.
The following limitations apply when using an indexed search with Interplay MAM assets:
• All attributes marked as “searchable” in the Interplay MAM data model are always sent to the
central index during the sync process. Attributes marked as “not-searchable” are not sent to the
central index and are not be available for searching or in search result lists. Your Interplay MAM
administrator sets asset permissions for search results using Interplay MAM.
• When using legal list attributes in Interplay MAM CBA rules, MAM allows to build rules using
“>=”, “<“ for legal list values, since these values are integer values in MAM. On Central Index
side, legal list values are treated as “ID-string,” and only comparisons like “=” or “!=” are
supported.
Federated Search
You use federated search to query single or multiple databases in your local zone to find any media
available to your local MediaCentral UX configuration. Federated search respects all user and role
permissions, and search results only appear for media assets the user is qualified to view. This
provides security for projects that include some confidential assets.
If you search across a large number of databases, however, federated search can slow down the speed
with which the search query returns results, and a large search can affect performance within
MediaCentral UX and potentially in your Interplay Production system. In addition, a federated
search returns segregated results because as it tries to search across all systems it cannot treat all
results as a large group — for example, a search by date returns results in blocks and not necessarily
a merged result set.
The default search type for the Search bar is the federated search.

Search and the Central Index
263
Media | Index and Indexed Search
Media Index allows you to search using the central index, which comprises both data storage and a
query engine. The index receives its data from the original data sources — generally, the databases of
multiple asset management systems, including Interplay Production, MAM, and iNEWS — and then
pushes the data to the service that does the indexing. This allows the index to continuously sync to
the database.
The value of searching the central index lies in how it indexes databases in multiple zones and gives
you quick access to all of the media stored in distributed systems for your organization, including
both local and remote assets. You can focus your search by adding filters for any metadata included
in the index. And since a search using Media Index queries the central index and not the database
itself, searches do not affect the performance of the MediaCentral system or the underlying Interplay
Production engines.
You need to use an Advance license to use the indexed search and to access the central index when
you are connecting to multiple systems within your MediaCentral environment. However, if you have
only one system in the index and this system is your local system, and you use a Base license for the
system type of the index, then you can use Media Index with a Base license.
If your MediaCentral Platform configuration includes Media Index, federated search is the default
search method. You can change this by selecting indexed search from the Pane Menu. The search
type selection persists for each user.
Media | Index and Interplay Production
Indexed search maps Interplay Production properties to Media Index criterion fields. The following
table describes how Media Index categorizes some common Interplay Production properties:
Media | Index and Interplay MAM
The indexed search in MediaCentral UX maps Interplay MAM attributes to Media Index criterion
fields. Most MAM attributes correspond to Media Index, but some mappings require additional
information. You can click the “Show mapping info” link on the title bar of the Sync Service
Administrator to see information on mapping of Interplay MAM attributes to Media Index criteria.
Interplay Production Property Media Index Field
Name Name
Created By Creator
Creation Date Created
Modified Date Modified
Changed By Modifier
Start Start
End End
Duration Duration
Comments Description
Mime Type Asset type

Search and the Central Index
264
If you have administrator privileges for MediaCentral, you can sign in to MediaCentral UX and view
the complete mapping information in the Media | Index > Indexes view.
The following table describes how Media Index categorizes Interplay MAM base information:
The following table describes how Media Index categorizes some common Interplay MAM
attributes:
Interplay MAM Information Media Index Field
Prefix.ClassName.
The prefix is “sequence” for EDL classes and “asset” for object
classes — for example, sequence.EDL and asset.VIDEO.
Type
SYSTEMID SystemID
Interplay MAM Attribute Media Index Field
MAINTITLE Name
REGISTRATION_USERLOGIN Creator
MODIFICATION_USERLOGIN Modifier
REGISTRATION_DATETIME.
If REGISTRATION_DATETIME is empty, the values of the
REGISTRATION_DATE and REGISTRATION_TIME attributes are
combined.
Created
MODIFICATION_DATETIME.
If MODIFICATION_DATETIME is empty, the values of the
MODIFICATION_DATE and MODIFICATION_TIME attributes are
combined.
Modified
/api/mam/proxy/forresource?id=interplay-
mam:{SYSTEMID}:1|thumb|{DMGUID}
ThumbnailURL
DESCRIPTION Description
For object classes (asset types): SYSTEM_SOC_TC
For EDL classes (basic sequence types):
• Video: 00:00:00:00 (NDF) or 00;00;00;00 (DF)
• Audio: 00:00:00.000
startTC
For object classes (asset types): SYSTEM_EOC_TC
For EDL classes (basic sequence types): SYSTEM_DURATION_TC
endTC
SYSTEM_DURATION_TC
The value is taken from the SYSTEM_DURATION_UNITS or
SYSTEM_DURATION (as fallback) attributes. Every time when
SYSTEM_DURATION_UNITS or SYSTEM_DURATION are changed,
SYSTEM_DURATION_TC is set.
durationTC
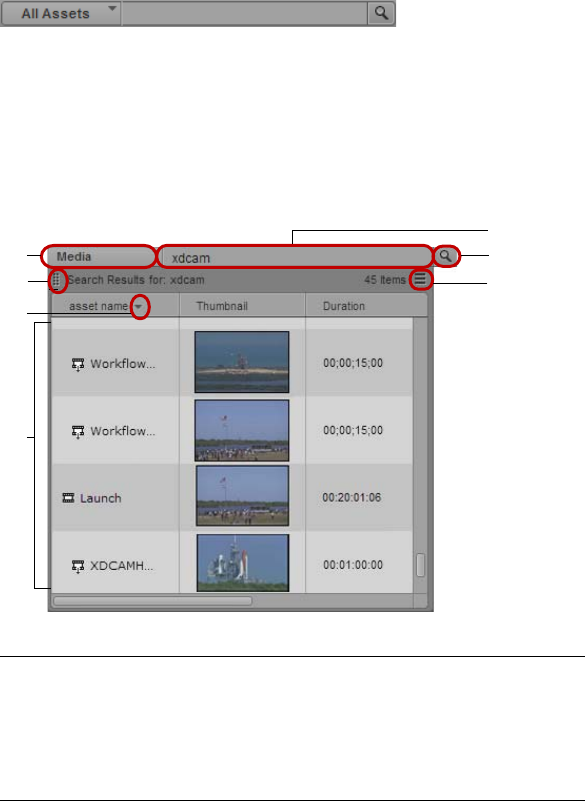
The Search Bar
265
All other MAM attributes are sent as Custom attributes with prefix “com.avid.mam.” followed by the
MAM attribute name in Media Index (for example, com.avid.mam.asset_type).
In MCS v2.6 and later, you can search for Interplay MAM assets that include multi-value metadata.
Multi-value metadata contain several keywords assigned to a single media object that are combined
as a multi-value attribute. For more information, see the Avid Interplay MAM Desktop User’s Guide.
The Search Bar
The Search bar in the top right corner of the application window has a menu that you use to select the
type of asset, a text field in which you can enter search criteria, and a Search button you click to
conduct the search.
When you use the Search bar, the results appear as a list under the Search bar. By default, the search
uses the federated search.
You can adjust the size of the Search bar and the results by clicking and dragging the edges or
corners.
After you perform a search, you can display the results in a Search pane, and then use the advanced
search criteria to refine and speed up your search.
wy
q
u
e
t
r
1Assets menu 5Search Text field
2Detach Search icon 6Search button
3Sort arrow 7Pane Menu button
4Search results

The Search Pane
266
To display search results in a pane, do one of the following:
tClick the Detach Search icon and drag the bar into any area in the MediaCentral UX window.
tClick the Pane Menu button and select Detach Search.
The Search Pane
The Search pane provides advanced search criteria for federated and indexed search that let you
conduct a more precise and faster search. You can open a Search pane directly, or you can open a
Search pane by dragging the Search bar into the MediaCentral UX window. You can open more than
one Search pane.
The following illustration identifies the elements in the Search pane used for an indexed search.
y
w
u
i
o
e
q
ra
s
t
1Search text field 6Search results
2Advanced Criteria (Creator selected) 7Pane Menu button
3Advanced Criteria (Modified selected) 8Search button
4Add Criteria button 9Minus button to remove search criteria
5Sort arrow 10 Sort By menu
11 Display Type menu
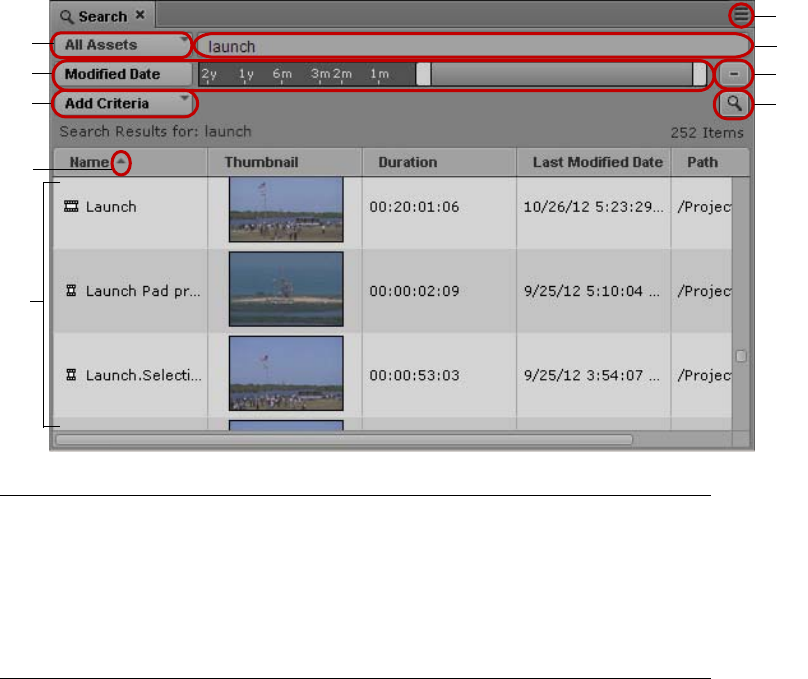
The Search Pane
267
The following illustration identifies the elements in the Search pane used for a federated search.
Starting with MediaCentral UX v2.7.2, an administrator can add a default message to the Search text
field to provide users with suggestions or specific directions when initiating a search. The message
appears in the search field as light gray text. For more information, see “Enabling Custom Text in the
Search Field” in the Avid MediaCentral Platform Services Installation and Configuration Guide.
To open a Search pane:
tSelect Panes > Search.
This opens a blank Search pane in which you can conduct your search. If you have saved
searches in the Launch pane, the last saved search opens in the Search pane. If a public search
has been set as the default search, the Search pane opens with the default criteria displayed. For
more information on setting the default search, see “Saving Searches” on page 277.
tIf you already conducted a search in the Search bar and want to display the results in a pane, do
one of the following:
- Click the Detach Search icon and drag the bar into any area in the MediaCentral UX window
- Click the Pane Menu button and select Detach Search.
For more information, see “The Search Bar” on page 265.
y
wu
i
o
e
q
r
t
1Assets menu 6Pane Menu button
2Advanced Criteria (Modified Date selected) 7Search text field
3Add Criteria button 8Minus button to remove search criteria
4Sort arrow 9Search button
5Search results
Search Criteria
268
Search Criteria
While the Search pane provides natural language searches with additional options, you can use the
search criteria a to limit the search results based on exact value selections. You use search criteria to
reduce the number of results from the main search results list. Criteria filter the results, removing any
that do not match all of the criteria.
When you type your search term, Media Index provides search suggestions to aid in your search. A
drop-down list appears with search suggestions built from the index appears when you type three or
more characters.
Your indexed search can return assets containing timecode-based metadata, such as assets where the
text within markers matches your search query. If you view the search results in Card view, you can
click a timecode link to open the asset in the Media pane at the location of the metadata found by
your search.
Media Index supports searches based on text analysis and normalization. Your search can return
results for terms in different forms of the terms, such as conjugated verbs or plural words. For
example, if you search for “elections,” the natural language search can return results for “elect,”
“electing,” or “election” in addition to the original term.
nIf you want to find an exact match for your search term, either enclose the term in quotation marks or
use the text field of a search criteria. Criteria return exact results.
Media Index also runs a language-dependent analysis of text to provide indexes. Media Index uses
the language and region settings of your system as the default language for searches. You can run a
search in a different language. For example, if you need to search for content that contains German
text, you can specify German as the language for your search. In this example, using English for the
search might not find all assets with German-language text or metadata.
Search and Foreign Languages
Similarly, if you use Chinese as your search language, Media Index recognizes multi-character words
as single search terms. For example, 机器人 (“robot”) is treated as a single word and search results
do not include either 机器 (“machine”) or 人 (“man”), although these characters can be used as
search terms by themselves because Media Index recognizes them as distinct Chinese words.
However, some proper nouns might not be detected as complete words. In these cases, you can
enclose the characters in quotation marks (“) to specify a search for an exact text string.
nMedia Index supports only Simplified Chinese for search.
Media Index supports the following language options:
•English
•Arabic
• Chinese (Simplified and Traditional)
•French
•Estonian
•German
• Italian
• Japanese
Search Criteria
269
•Korean
• Portuguese
• Russian
• Spanish
• Turkish
nYour MediaCentral administrator can limit the number of languages to use for the indexed search
during the Media Index configuration. Your administrator can also set default languages for search
across multiple zones if you work with a multi-zone configuration.
Search Prefixes
Depending on the type of field, criteria offer different prefix options.
•any — All criteria can be set to a neutral mode called “any” where the criteria do not affect the
search results. Use this if you want the criterion to display in the Search pane, but you do not
want it to affect the search results.
•is set — This search does not take any value but only checks if the field has any data set at all.
Using this only returns a result if the criterion has some value set for this field.
•not set — The opposite of “is set,” this only shows results where the criterion field is empty.
nDate criteria do not support the is set/not set search prefixes.
Time Criteria
Time fields do not have a date component and usually reference a recurring time of day.
•before — The time value is earlier than the given value.
•after — The time value is later than the given value.
•between — The time value is between the given values.
•any — All criteria can be set to a neutral mode called “any” where the criteria do not affect the
search results. Use this if you want the criterion to display in the Search pane, but you do not
want it to affect the search results.
Search Operators
When you perform an indexed search, the search query text you type in the search field is used as an
exact string. Results are more precise if you know the name of the asset you want to locate. You can
also use some operators with your search syntax:
• Wildcard characters — You can use the standard asterisk or question mark anywhere in the
words used in the search. Use an asterisk (*) to represent one or more characters in a word, and
use a question mark (?) to represent a single character in a word.
nSome wildcard prefix searches in Media Index can affect performance of the search due to a large
result set. For example, using the search query
*a
to search a large database might result in slow
performance of the indexed search process.
• Fuzziness operator — Use a tilde (~) to include close matches in the search results. For example,
typing
quikc~ brwn~ foks~
returns items containing “quick brown fox.”
Conducting a Search
270
• Proximity operator — Add a tilde (~) and a numeral to your search terms to locate items where
the terms are close to each other. For example, typing
“fox quick”~5
returns items containing
“fox” and “quick” where the words are separated by the specified edit distance. (“Edit distance”
refers to the number of operations necessary to transform one string into another.) Results are
ranked by relevance, with those closest to the query string ranked highest. In this example,
“quick fox” is more relevant than “quick brown fox.”
• Boolean prefixes — You can use a plus (+) or a minus (-) sign as a prefix to force the search to
either include or exclude a term. For example, typing
quick brown +fox -news
causes the
search to return results that must contain “fox” and must exclude “news.” In this example,
“quick” and “brown” are optional, but their presence improves the relevance of the result.
• Boolean operators — You can include the standard Boolean operators AND, OR, and NOT (also
written as &&, ||, and !) in your search terms. For example, typing
quick OR brown AND fox
returns results that must include “brown” and “fox” (because AND takes precedence over OR
and applies to terms on either side of the operator) with “quick” as optional. Some search criteria
allow you to select Boolean operators — true, false, is set, and not set — from a predefined list.
nYou must precede reserved characters with a backslash (\) to escape them. The following characters
are reserved: + - && || ! ( ) { } [ ] ^ " ~ * ? : \ /
Text Criteria
Most fields in the Search pane are text fields. When you use the Search text field to conduct a search,
the search operation assesses the search term in a “natural language” way, performing language
analysis, which might lead to different results from what you would expect from a classical text
search such as the one in Interplay Production. For example, using the Search text field allows the
search to assess root words with their prefixes and suffixes, and some special characters like hyphens
(-) are ignored.
However, terms typed in as text criteria perform result in exact matches, including white space and
special characters used in the text fields. You can use text criteria if you want to match an asset name
or ID exactly. This is similar to enclosing the search expression in the search text box in quotation
marks. For example, if you type
928_myfile
in the search text box, the search matches both
928
and
myfile
. If you type
“928_myfile”
the search matches only this exact string. This is also how the
text criteria behave.
The search criteria menus provide the following search prefixes:
•is — Matches the string exactly, including spaces. For example, “blue” matches “blue” but not
“blueberry.”
•is not — The opposite of “is.” This matches anything that is not the search expression.
•contains — Matches substrings, including spaces. For example, “blue” matches both “blue” and
“blueberry.”
•does not contain — Only matches where the string does not occur.
Conducting a Search
You can search for assets by using the Search bar or the Search pane, using either the indexed search
or the federated search. You can also add filter criteria to your search to narrow your search results.
nIndexed search requires Media Index to be installed and configured in your MediaCentral Platform
environment.
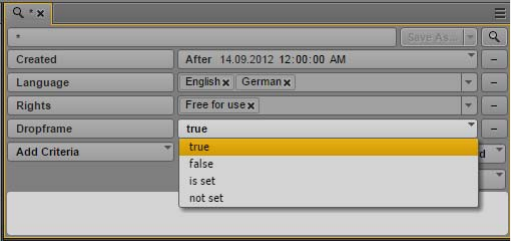
Conducting a Search
271
To conduct an indexed search:
1. Click the Pane Menu button and select Indexed Search.
2. (Option) Click the Pane Menu button and select a language for your search.
nDefault languages used for searching indexes are set during Media Index configuration.
3. Type a key word or words in the Search text field.
You can search for text of one or more characters. Providing more characters results in greater
precision in the search results.
A drop-down list appears with search suggestions built from the index appears when you type
three or more characters.
4. (Search pane only) Click the Add Criteria button to add one or more additional search criteria.
For information about the criteria, see “Advanced Search Filters” on page 279 and “Indexed
Search Examples” on page 284.
To remove the added criteria, click the Minus button at the right of the pane above the Search
button.
nMedia Index maps Interplay Production properties to Media Index criterion fields — for example,
you search for text in the Comments property by using the Description criterion. For more
information, see “Media | Index and Indexed Search” on page 263.
5. If you select criteria that allow Boolean operators, click the search field for a criterion and select
the appropriate operator:
nBoolean fields only allow for selection of one of two states: true or false. For most systems, “false” is
not the same as “not set.”
6. If you select criteria that require a date or span of dates, click the date field.
The date picker window opens.
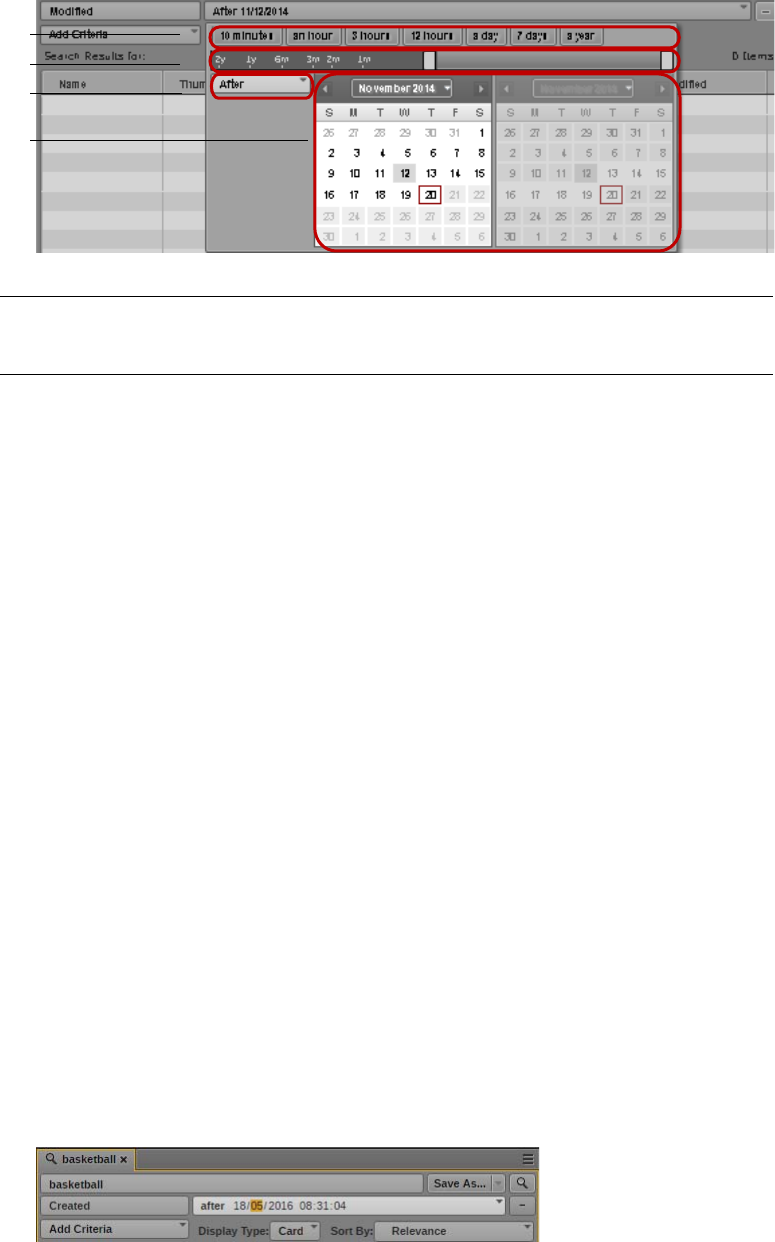
Conducting a Search
272
nDate criteria do not support the is set/not set search prefixes.
7. If you want to define a date range, click the Scope menu and select one of the following to define
your search:
- Between
-After
-Before
- Not restricted
8. To specify a date range, do the following:
tClick one of the shortcut date buttons to set your search for one of the common time spans.
The shortcut date buttons indicate the time from the present.
tUse the date slider to specify a time span for your search. The date slider indicates the time
from the present.
tUse the calendar to select the appropriate dates for your search.
nThe date picker window uses your system time as the present and measures time spans from that
reference.
You can select a date and time in the future. This can be useful when setting up search presets.
The date slider adjusts to match the date options you select, and the date field displays a text
summary of your date search criteria.
9. If you want to modify the date or time values to specify an exact date or time, do the following:
a. Click a date or time value displayed in the criterion text box.
If you click the date value, the date — day, month, or year — is selected.
nDate components and formats are determined by the locale used by your system.
w
e
q
r
1 Shortcut date buttons 3 Scope menu
2 Date slider 4 Date picker
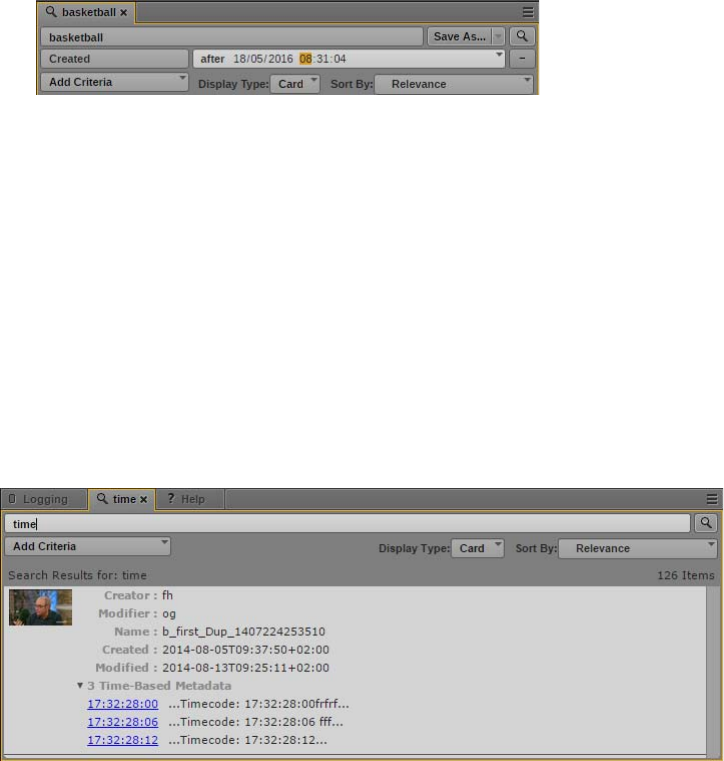
Conducting a Search
273
If you click the time value, the time — hours, minutes, or seconds — is selected.
b. Type a new value.
When you type a legal value, the next value is automatically selected. You can navigate
between the values for days, month, years or for hours, minutes, and seconds by using the
arrow keys, or by pressing the Tab key or Shift+Tab to move to the following or preceding
value. You can also use the up arrow and the down arrow to raise or lower values
incrementally.
10. Click the Search button.
The system clears any existing search results from the results list and returns assets that match
the criteria in the search results list. If the asset exists in multiple locations in the MediaCentral
databases, the search might list all instances.
11. To view the results found in a time-based metadata text field — for example, in marker text —
click the Display Type menu and select Card, and then expand the Time-Based Metadata section.
The results list displays a summary of the text found to match the search query and provides a
timecode link to the location in the asset where the metadata occurs.
To conduct a federated search:
1. Click the Pane Menu button and select Federated Search.
2. Click the Assets menu and select the type of asset:
- All Assets: Select All Assets to search iNEWS, Interplay MAM, and Interplay Production
databases for stories and media that match the search criteria.
- Stories: Select Stories to search iNEWS databases for stories that match the search criteria.
- Media: Select Media to search the Interplay Production databases for media assets that
match the search criteria.
- MAM Assets: Select MAM Assets to search the Interplay MAM database for media assets
that match the search criteria.
Conducting a Search
274
If you select All Assets and then add criteria specific to Interplay Production (like Video
Resolution, Category or Type), the search ignores iNEWS databases and returns results only for
the Interplay Production database. Similarly, if you select All Assets and then add criteria
specific to Interplay MAM (like Asset Types or Rights), the search ignores iNEWS and Interplay
Production databases and returns results only for the Interplay MAM database.
3. Type a key word or words in the Search text field.
You can search for text of one or more characters. The more characters you provide, the faster
the search will provide results.
When you enter two or more words, separated by spaces, the system conducts a search for
anything that matches all words entered.
- For an Interplay Production search, typing
White House
returns items containing that exact
phrase.
- For an Interplay MAM search, typing
White House
returns items containing “White” and
“House” in a single metadata field, or “White” in one metadata field and “House” in a
different metadata field, but the results do not feature items with only “White” or “House.”
- For an iNEWS search, typing
White House
returns any story with both “White” and
“House” in them, but the results do not feature items with only “White” or “House.” Typing
“White House”
returns stories with that exact phrase.
Additionally, the search for a word, for example, “plane”, results in items that contain
“plane” as well as items that contain “airplane.”
nSearch terms are not case-sensitive. However, Avid recommends you use only alpha-numeric
characters.
Use of punctuation or symbols might return inconsistent results. For example, an iNEWS system
treats an asterisk or question mark as a wild card character. When you search stories in the
iNEWS database by typing the letters
Sm*th
, the search locates stories with words such as
“Smith,” “Smyth,” and “smooth.” However, Interplay Production does not support wild card
characters, so the same search for
Sm*th
only returns media assets containing those exact
characters (“Sm*th”). For information about wild card characters and operators supported for
searches in Interplay MAM databases, see “Wild Card Characters and Operators Supported for
Federated Searches in Interplay | MAM Databases” on page 285.
nIn the Search pane, you do not need to include text in your search criteria for Modified Date, Video
Resolution, Category, Type, Asset Types, or Rights.
4. (Search pane only) Click the Add Criteria button to add one or more additional search criteria.
For information about the criteria, see “Advanced Search Filters” on page 279.
To remove the added criteria, click the Minus button at the right of the pane above the Search
button.
5. If you select criteria that require a date or span of dates, click the date field.
The date picker window opens.
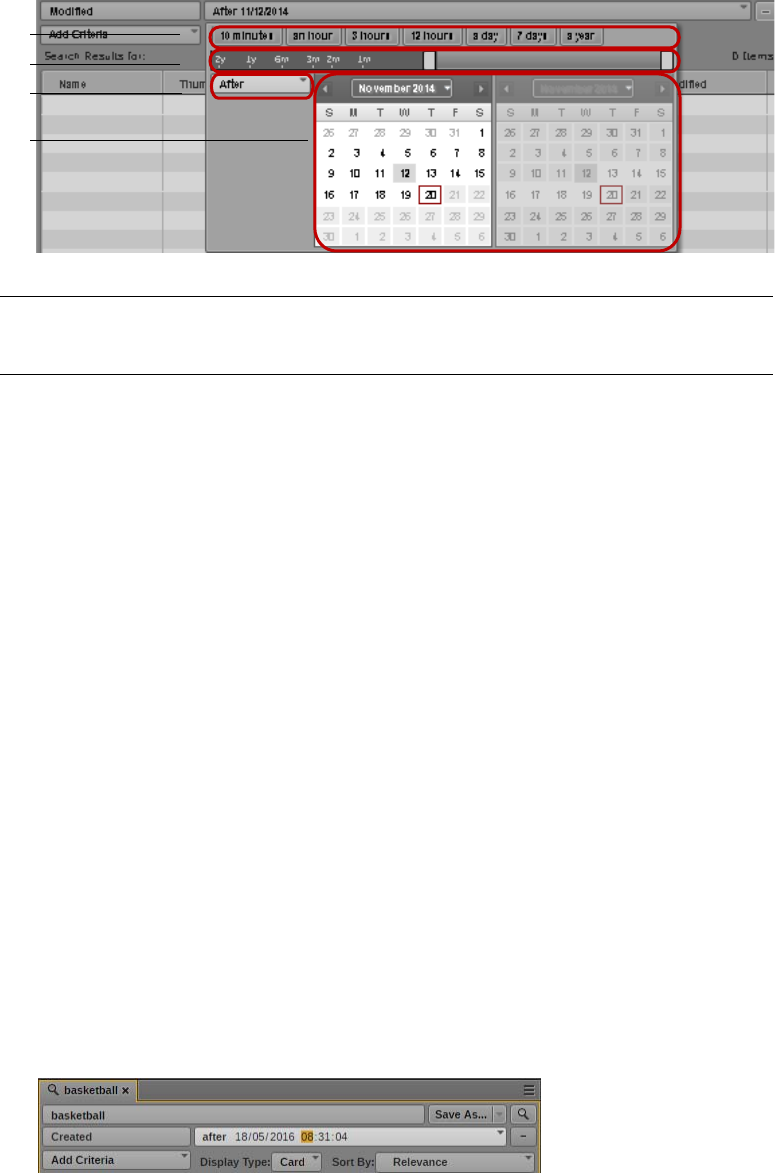
Conducting a Search
275
6. If you want to define a date range, click the Scope menu and select one of the following to define
your search:
- Between
-After
-Before
- Not restricted
7. To specify a date range, do the following:
tClick one of the shortcut date buttons to set your search for one of the common time spans.
The shortcut date buttons indicate the time from the present.
tUse the date slider to specify a time span for your search. The date slider indicates the time
from the present.
tUse the calendar to select the appropriate dates for your search.
nThe date picker window uses your system time as the present and measures time spans from that
reference.
The date slider adjusts to match the date options you select, and the date field displays a text
summary of your date search criteria.
8. If you want to modify the time values to specify an exact time in hours, minutes, and seconds, do
the following:
a. Click a time value displayed in the criterion text box.
The time value — hours, minutes, or seconds — is selected.
b. Type a new value.
When you type a legal value, the next value is automatically selected. You can also navigate
between the values for hours, minutes, and seconds by using the arrow keys, or by pressing
the Tab key or Shift+Tab to move to the following or preceding value.
w
e
q
r
1 Shortcut date buttons 3 Scope menu
2 Date slider 4 Date picker
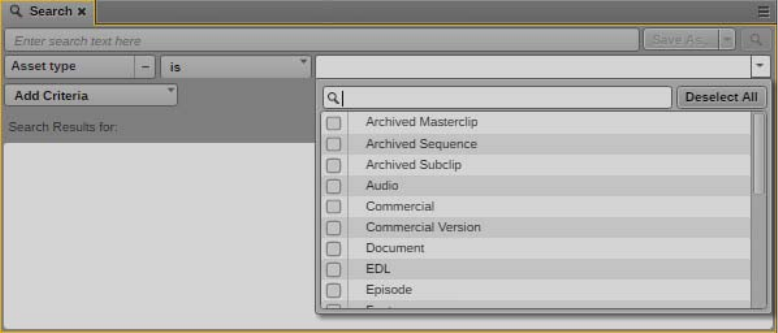
Conducting a Search
276
9. Click the Search button.
The system returns assets that match the criteria in the search results list. If the asset exists in
multiple locations of Interplay Production, the search might list all instances as determined by an
Interplay Production setting.
nThe Interplay Production settings include two settings that can help improve search performance:
“Show only one representation for each asset found” and “Select a time range for your search.” The
Advanced Search criterion Modified Date overrides the Interplay Production time range setting. For
more information, see “User Settings” on page 587.
Using Predefined Metadata
Media Index supports using metadata values that are predefined so that you can use consistent values
in your searches. Typically, predefined terms are contained in a thesaurus or a legal list controlled by
your asset management system. These values then display in the search criteria as a list of terms you
can add to or exclude from your search.
nYou can use legal lists and thesaurus lists defined in your Interplay Media Asset Management (MAM)
systems. For more information on MAM legal lists and thesauruses, see the Interplay | MAM Legal
List Administrator User’s Guide and Interplay | MAM Thesaurus Administrator User’s Guide.
For example. you can use MAM asset types in your search queries. The schema with predefined or
localized labels for assets types are configured in Interplay MAM. Once the Interplay MAM sync
service sends the schema update to Media Index, the “Asset type” criterion allows you to select from
a list of predefined asset types when searching MAM assets. The Asset type list provides localized
labels for MAM asset types to aid in localized searches. For more information, see the
Interplay | MAM Sync Service Administrator User’s Guide.
Thesaurus and legal list search criteria support the use of the following search prefixes:
• any (disables the thesaurus field)
• is (the default prefix)
•is not
• is set (disables the thesaurus field)
• not set (disables the thesaurus field)
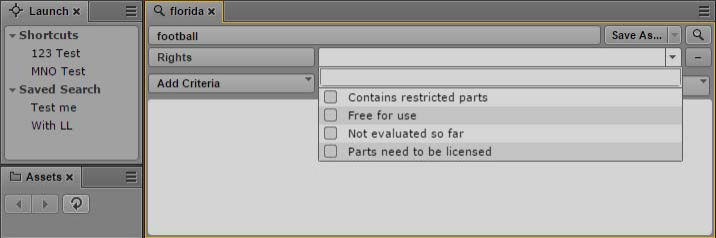
Conducting a Search
277
Empty fields do not affect the search results.
To select pre-defined metadata for your indexed search:
1. Click the Pane Menu button and select Indexed Search.
2. In the Search pane, click the Add Criteria button and select a criterion that contains pre-defined
terms.
3. Click the menu for the list of terms for your criterion, and select one or more appropriate terms.
4. Enter your search terms and select any other criteria you want to use for your search.
5. Click the Search button.
The system returns assets that match the criteria in the search results list. If the asset exists in
multiple locations in the MediaCentral databases, the search might list all instances.
Saving Searches
You can save both indexed searches and federated searches to make it easy to access frequently
searched assets. Users can open a saved search either in the last used Search pane or in a new Search
pane. All saved searches appear in the Launch pane, and you can re-order them by dragging and
dropping the saved searches in the Saved Search list. You can also edit a saved search by opening it
and modifying the parameters of the search.
Saving a search saves the current configuration of the Search pane. This includes the following:
• Search criteria you add to the search
• Values for search criteria
• Text for a search typed into the Search text box
• Type of search that you run (indexed search or federated search)
• Displayed columns and attributes
• Sort order
• Display type (Grid or Card)
Opening a new Search pane loads the last saved search. If you modify a search but do not run the
search, then the next Search pane you open still displays the previous saved search. To save your
current search, you must run the search at least once. The search state does not affect Search panes
that you already have open, so you can keep other search configurations by keeping the tabs open.
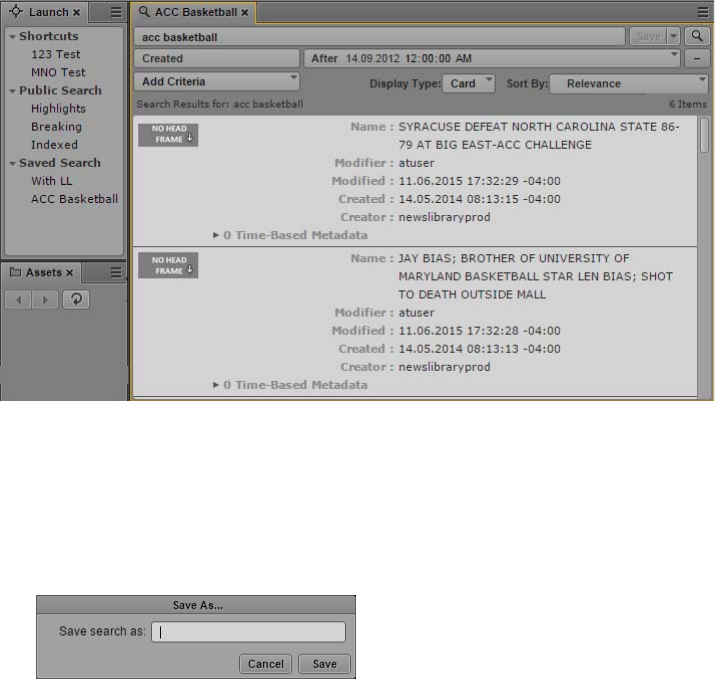
Conducting a Search
278
Saved searches are specific to the user. If you log in as an Administrator, you can share a saved
search with other users by making it public. You can also make a public search the default search that
displays when users open the Search pane when they do not have a previously saved search.
To save a search:
1. Search for assets using one of the procedures described in “Conducting a Search” on page 270.
2. Click Save As.
The Save As dialog box opens.
3. Type a name for the saved search, and then Click Save.
The saved search appears in the Launch pane.
To open a saved search, do one of the following:
tTo open the saved search in the last active Search pane, double-click the saved search in the
Launch pane.
tTo open the saved search in a new Search pane, do one of the following:
- Alt+double-click the saved search in the Launch pane.
- Right-click the saved search in the Launch pane, and select Open in New Search Tab.
The search opens in the appropriate Search pane and immediately runs the selected search. The
search results display in the Search pane.
To edit a saved search:
1. Double-click a saved search in the Launch pane.
The search opens in the appropriate Search pane and immediately runs the selected search. The
search results display in the Search pane.
2. Modify the parameters of the search by adding or deleting search criteria.
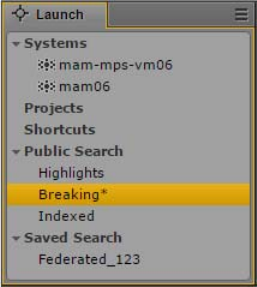
Conducting a Search
279
3. Click the Search button.
The system returns assets that match the modified criteria in the search results list.
4. Click Save.
The modified saved search appears in the Launch pane.
To share a saved search:
1. Log in to MediaCentral UX as a user with Administrator credentials.
2. Right-click a saved search, and then select Create Public Search.
The saved search appears in the Public Search area of the Launch pane and is available to all
users.
nYou must logged in as a user with an Administrator role to edit a public search.
To set a public search as the default search for the Search pane:
1. Log in to MediaCentral UX as a user with Administrator credentials.
2. Right-click a public search, and then select Set As Default.
The public search appears in the Public Search area of the Launch pane and is set as the default
search when the Search pane is opened. An asterisk (*) marks the search as the default search.
3. If you want to remove the default setting for the search, right-click the default search and select
Unset Default.
To rename a saved search, do the following:
tRight-click the saved search in the Launch pane and select Rename.
To delete a saved search, do one of the following:
tRight-click the saved search in the Launch pane and select Delete.
tClick the Save menu in the Search pane, and then select Delete.
Advanced Search Filters
In addition to the basic criteria described in “Conducting a Search” on page 270, you can select from
the criteria filters listed in the following tables. The filters available depend on whether you select the
indexed search or the federated search.

Conducting a Search
280
Advanced Search with Media Index
Indexed search uses metadata categories set up by your MediaCentral administrator when Media
Index is configured. Some search filters apply to all assets in the MediaCentral platform, and some
filters apply only to certain databases. The criteria you select filter the results by removing any assets
that do not match the criteria you specify. Your MediaCentral administrator can configure custom
filters for Media Index, which then display in the list of search filters for indexed searches.
nIndexed search requires Media Index to be installed and configured in your MediaCentral Platform
environment.
Although the filters used by Media Index vary depending on your configuration, the following table
lists some typical filters used for an indexed search.
Search Criterion Description
ID Searches for the unique ID of the media asset.
System Searches a specific Interplay Production, MAM, or iNEWS database, depending on
your configuration.
Asset type Searches for an asset type selected from the Asset type menu — for example,
“video” or “master clip.” Interplay Production and iNEWS assets provide a fixed
list of asset types, but your Interplay MAM administrator can configure custom
asset types to be used in searching MAM assets. Your search can include multiple
asset types.
Creator Searches for the login name of the user who created this item.
Modifier Searches for the login name of the user who last modified this item.
Name Searches for a specified value in the name of the asset.
Created Searches for assets that have been created in the time range you specify. You can
use the shortcut date buttons, the date slider, or the date picker to modify any range
for your search, Move the date slider all the way to the left or select Not Restricted
from the scope menu if you want to specify an unlimited time period.
Modified Searches for assets that have been modified in the time range you specify. You can
use the shortcut date buttons, the date slider, or the date picker to modify any range
for your search, Move the date slider all the way to the left or select Not Restricted
from the scope menu if you want to specify an unlimited time period.
Description Searches the text entered in the description or comments field of media assets.
Tags Searches any tags added as metadata for media assets.
Start Searches for the starting timecode.
Duration Searches for the duration of media assets, measured as a timecode value.
End Searches for the ending timecode.
[system] Searches a specified MediaCentral server. If you select a server, all other server
names are inactive in the search filters list.
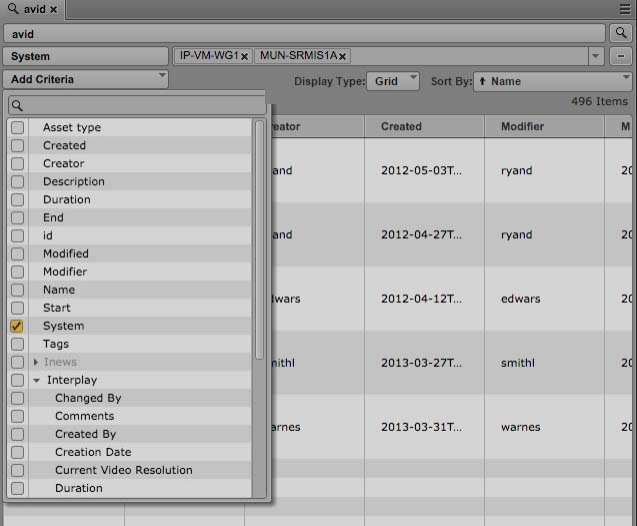
Conducting a Search
281
You can use the following features with the advanced search filters in an indexed search:
• Selecting criteria: You can filter the results by one or more specific criteria. If you select a
criterion that is specific to a system or system type, then all other systems and system types
appear disabled in the dialog box because the system-specific filter you select excludes them. For
example, if you select a criterion that only exists on the Interplay Production A system, you no
longer get results from the Interplay Production B system, which appears disabled in the dialog
box. This provides a visual cue to avoid selecting criteria combinations that would not return any
results.
nIf you want to limit the search to a specific system, use the System criterion and select the system that
you want to search. For example, if you select an Interplay Production system, an iNEWS system
listed in the System criterion filter would be disabled if the Interplay Production system included
criteria specific to that system and not found on the iNEWS system criteria.
• Multiple values: You can select multiple values for some options — for example, you can select
multiple asset types using the menu in the value field for the Asset type criterion.
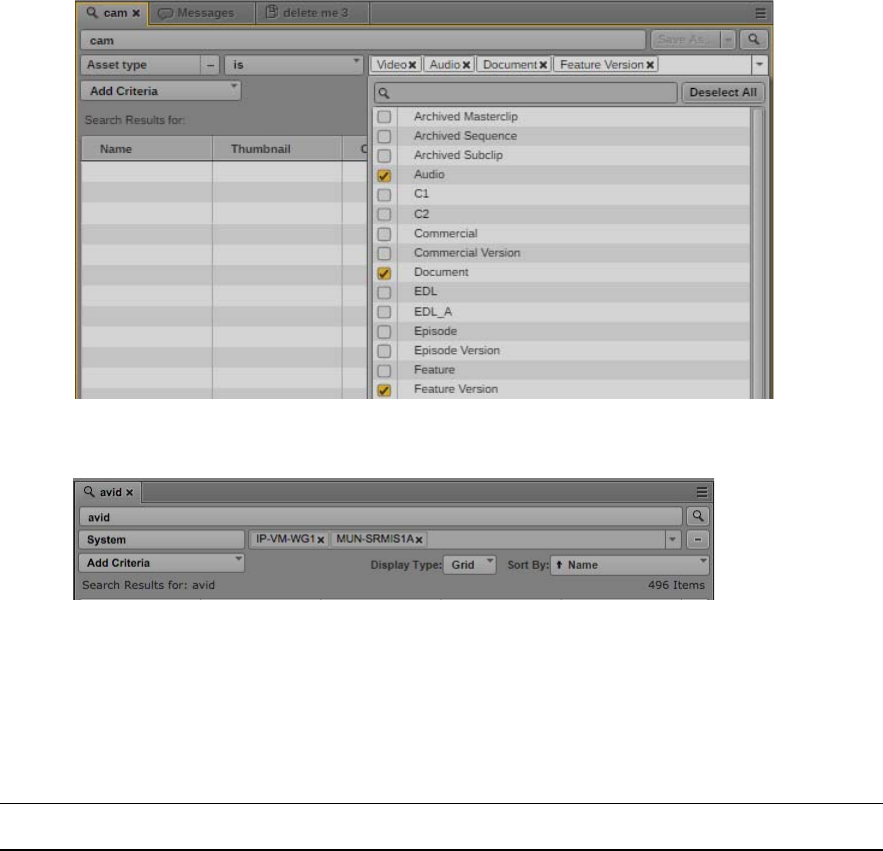
Conducting a Search
282
• Removing a value: Click the x on the value.
Advanced Search with the Federated Search Option
You do not need to include text in your search criteria for Modified Date, Reg. Date & Time, Video
Resolution, Category, Type, Asset Types, or Rights.
Using advanced search filters in the Search pane results in a faster and more precise search.
Search Criterion Description
Folder (Interplay Production, iNEWS only) Searches only the selected folders and their subfolders.
Click Browse to navigate to and select a folder. To select multiple locations for your search,
hold the Control key (Windows) or Command key (Macintosh) down while clicking the
locations in which you want to conduct your search.
If your local iNEWS system is part of an iNEWS community, you can select a folder in any
available iNEWS server.
When searching an iNEWS database, you can simultaneously search multiple indexed
queues. However, you can only choose one non-indexed queue path at a time and you cannot
combine indexed and non-indexed queues. If you make an invalid selection, an error
message is displayed.
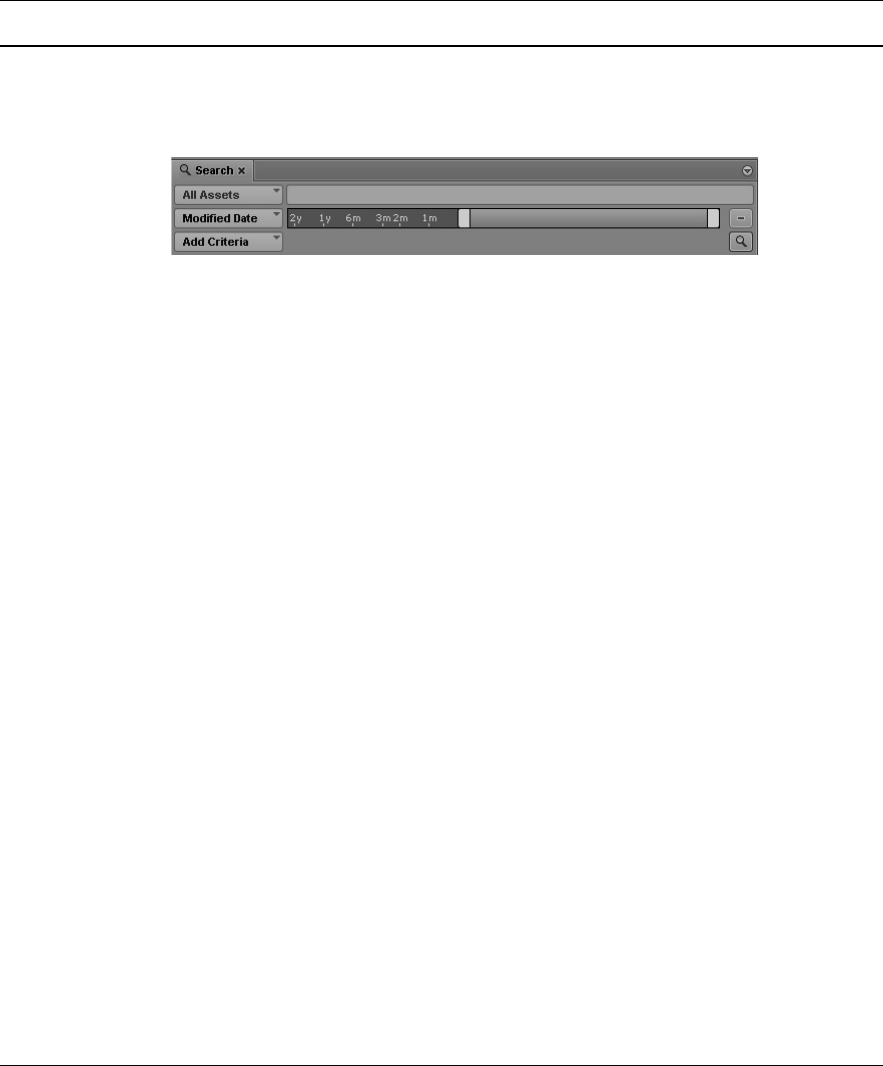
Conducting a Search
283
Modified Date (Interplay Production, Interplay MAM, iNEWS) Searches for assets that have been modified
in the time range you specify. The Modified Date slider uses 14 days as a default date range,
which you can modify to any range for your search. Move the slider all the way to the left if
you want to specify an unlimited time period.
nYou can also specify a date range for search in the Interplay Production user settings.
This setting determines the date range used by searches when you use the Search bar
or when you do not select Modified Date from the Add Criteria menu. When you use
the slider, this date range overrides the user setting. For more information, see “User
Settings” on page 587.
Reg. Date & Time (Interplay MAM only) Searches the Interplay MAM database for assets that have been
created in the time range you specify. The Registration Date & Time slider uses 14 days as a
default date range, which you can modify to any range for your search. Move the slider all
the way to the left if you want to specify an unlimited time period. The Reg. Date & Time
option is only shown if the corresponding property is marked as searchable in the Interplay
MAM configuration.
Video Resolution (Interplay Production only) Searches the Interplay Production database for assets associated
with media in a selected video resolution. Click the field and a list appears. Select one or
more resolutions from the list.
Category (Interplay Production only) Searches the Interplay Production database for assets in a
selected category. A category is an Interplay Production custom grouping to which users can
assign database assets. Click the field and a list appears. Select one or more categories from
the list.
Type (Interplay Production only) Searches the Interplay Production database for assets of a
particular object type. Click the field and a list appears. Select one or more objects from the
list.
Asset Types (Interplay MAM only) Searches the Interplay MAM database for assets of a particular asset
or basic sequence type. In Interplay MAM asset types are referred to as “object classes” and
“EDL classes”. Click the field and a list appears. It shows all object and EDL classes that are
configured in the connected Interplay MAM systems. Select one or more asset types from
the list.
Rights (Interplay MAM only) Searches the Interplay MAM database for assets that have a particular
usage right assigned. Click the field and a list appears. It shows all usage rights that are
configured in the InterplayMAM legal list MA_Rights_Indicator. Select one or more rights
from the list.
Search Criterion Description
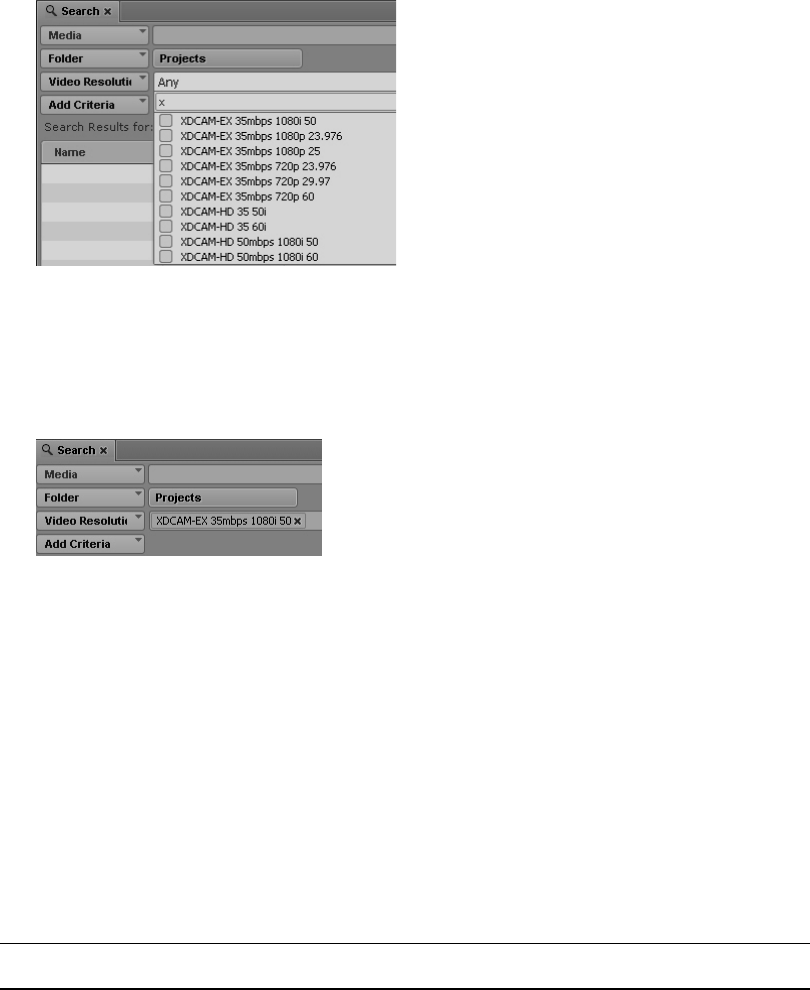
Conducting a Search
284
You can use the following features with the advanced search filters:
• Auto-completion: You can begin to type a value in a field, and as you type, the list of values is
filtered to match the characters that you type. For example, type X to display resolutions that
begin with X, such as XDCAM-EX and XDCAM-HD.
• Keyboard shortcuts: Press Up Arrow or Down Arrow to step through the list of values, press the
space bar to select a value to add to the search field, and press Esc to close the list.
• Multiple values: You can select multiple values from the list of options.
• Removing a value: Click the x on the value.
Indexed Search Examples
The Media Index search engine uses language analysis and, if specified with the appropriate operator,
fuzzy matching to help find content even if the actual text is slightly different. This allows you to find
words with incorrect spelling and word variations.
nIndexed search requires Media Index to be installed and configured in your MediaCentral Platform
environment.
The search syntax does not automatically compensate for spelling mistakes but instead expects exact
matches. You can use different operators to improve your search requests, and you can combine the
operators to create powerful search expressions. For a description of the operators available for the
search syntax, see “Conducting a Search” on page 270.
Operator Search expression Matches Does not match
Fuzzy (~) quick~ quic, quakc,
quick, quite
uid, kik
nBy default the fuzzy operator
allows for two different
characters in a word, but you
can specify more.
quick~3 kwic, black quantum

Conducting a Search
285
Wild Card Characters and Operators Supported for Federated Searches in
Interplay | MAM Databases
In addition to the basic criteria described in “Conducting a Search” on page 270, you can use
different wild cards and operators to specify your query when conducting a federated search in
Interplay MAM databases.
Wildcard (* and ?) qui* quit, quick, quiz quack, kick
qui? quit, quiz quick
?ick tick, sick quick
Proximity (“[term]”~[numeral]) “quick fox”~1 “quick brown fox” “quick and clever
fox”
nFinds all cases where there
words are inside the given
distance from each other. The
number parameter is the
number of words separating
the search terms.
“quick fox”~2 “qucik brown
fox”, “quick and
clever fox”
“quick and slightly
bluish fox”
Boolean prefixes (+ and -) +quick -blue +fox “quick brown
fox”, “fox is
quick”
“quick blue fox”
Operator Search expression Matches Does not match
Option Example Result
Single character
I
Returns assets that contain the single search character
“i” in one of their metadata fields. The field in
question can contain other text.
Example: i finds I robot but also I’m a robot
The single character feature is also used to support
searches for Chinese and Japanese characters.
If the feature Auto-Append Wildcards is activated,
searching for a single character is not possible.
Single search term
house
Returns assets that contain the search term “house” in
one of their metadata fields. The field in question can
contain other text.
Exclamation mark (!)
!house
Returns assets that contain only the search term
“house” in one of their metadata fields. The field in
question cannot contain any further entries.
If the feature Auto-Append Wildcards is activated
using the exclamation mark is not possible.
Quotation marks (“”)
“White House”
Returns assets that contain both the search term
“White” and the search term “House.” “White” must
come before “House” in the text. The two search terms
cannot be separated by any other characters, except
punctuation marks, as these are ignored.

Conducting a Search
286
Operator OR
Operator character |
White OR House
White | House
Returns assets that contain the search term “White” or
the search term “House,” or both.
Operator AND
Operator character &
Terms separated by spaces
White AND House
White & House
White House
Returns assets that contain the search terms “White”
and “House” in a single metadata field, or the search
term “White” in one metadata field and the search
term “House” in a different metadata field.
Operator NOT
Operator character ^ or ~
White NOT House
White ^ House
White ~ House
Returns assets that contain the search term “White” in
at least one metadata field, but that do not contain the
search term “House” in this or any other metadata
field.
Brackets () and Operators
(house AND
(white OR
blair)) NOT
visitors
If you create complex search queries — queries that
use more than one Boolean operator — consider the
priorities with which the operators are processed:
NOT takes priority over AND, and AND takes priority
over OR. In addition, you can use brackets in complex
search queries to give structure to your query. In this
case, the innermost bracket takes priority over the next
bracket, and so on.
The example query excludes all assets that contain the
word “visitors”; returns all assets that contain the other
search terms, as follows: “house” and “white,”
“house” and “blair,” “house” and “white” and “blair”.
Wild card * or %
Whit*
Whit%
The asterisk and the percentage sign are the universal
wildcards that will return any character string (0, 1, or
more characters) in a specific position.
Returns all assets containing words that start with
whit, such as: “whit,” “white,” “white-collar,”
“whitey,” “whiter,” or “whitish.”
Using the * or % wildcard at the beginning of a search
term or within a search term requires specific usage
rights. For performance reasons these search options
are not available by default.
Auto-append *
Whit
If the option Auto-Append Wildcards is set in the
System Settings for Interplay MAM, each search term
is appended automatically by an asterisk before
submission. This allows a search behavior more
similar to Interplay Production and iNEWS.
With the activated Auto-Append Wildcards feature,
searching for a single character and using the
exclamation mark is not possible.
Option Example Result
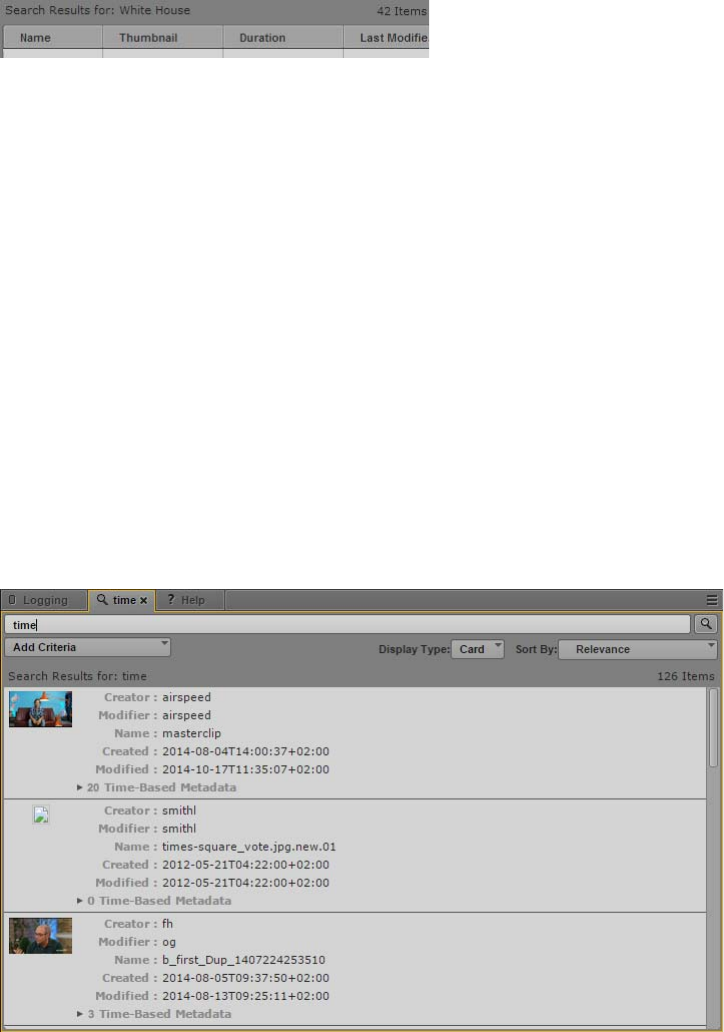
The Search Results List
287
The Search Results List
The system returns assets that match the criteria of your search in the search results list. Above the
result list, the “Search Results for” field repeats the key word or words you typed the Search text
field; additionally the number of items found is shown.
The search result list shows metadata for all found items in an overview table with configurable
columns. Depending on the type of item (iNEWS, Media, or MAM asset) you can select items in the
result list and open them in other panes for subsequent editing. You can also drag items that represent
media stored in the local Interplay Production server from the search results list to a folder in the
Assets pane. If the asset includes both local and remote media, or if the media is offline, you cannot
drag the asset to the Asset pane.
If the number of items found exceeds the configured maximum number of items that can be
displayed at a time in Grid view or for federated searches, the Show More Results button is displayed
at the bottom of the search results list. In Card view, you can view additional results by scrolling
down the results list.
For indexed searches, you can view your results in Card view or in Grid view. Card view provides a
summary of the metadata information in your search results, and Grid view displays your results in a
grid with columns for each selected metadata category. Both views list the number of results your
search has found. If your indexed search results include assets with time-based metadata, you can
click the timecode link in Card view and open the asset at the position specified by the timecode. For
example, if your search query matches text within a marker, clicking the timecode link opens the clip
or sequence in the Media pane at the marker position.
Search results displayed in Card view
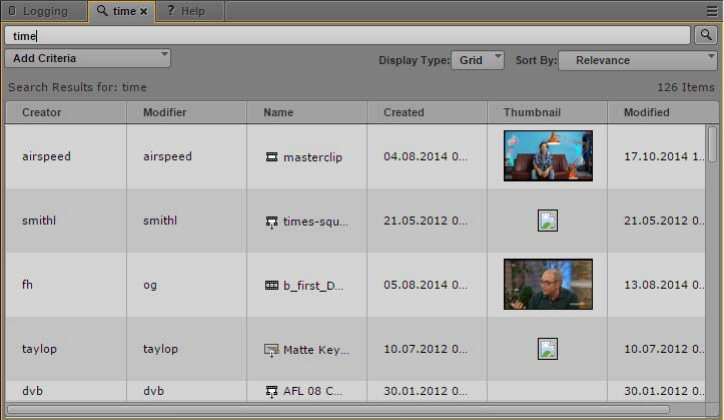
The Search Results List
288
Search results displayed in Grid view
Indexed search results using criteria that include time-based values display a timestamp for the
default time zone selected in the System Settings and appended by a Coordinated Universal Time
(UTC) offset. For example, a timestamp of 04:30:00 AM -4:00 appearing in the search results list on
a New York City system indicates that the time zone difference between New York (EDT) and UTC
is four hours. In Paris (CEST), the same asset in a search results list displays a timestamp of
10:30:00 AM +2:00.
nFor reliable time-based search results, make sure that the iNEWS, Interplay Production, and
MediaCentral servers all have the same time. If systems are not time-synced, assets that otherwise
meet the search criteria might not be returned.
When you sort search results on a column that uses predefined metadata, the results are sorted by the
actual value of the metadata field even though the results in the Search pane might display a localized
label. For example, the stored index values for countries might be integer values, and these are the
values used when sorting results. But the displayed values include the localized name of the
countries, not the integer values, and the results might not follow the expected A-Z sort order.
To change the view of the results list of an indexed search:
tClick the Display Type menu and select one of the following:
- Grid, to view a column-based results list.
- Card, to view a summary of search categories for each result. You can also view time-based
metadata search results in Card view.
To sort search results, do one of the following:
tFor indexed searches, click the Sort By menu and select a category to sort your results. You can
select one category at a time. In Grid view, you can also click the heading of the column you
want to sort by.
nYou can use the Sort By menu to sort the results using a category that is not visible as a column in the
search results list.
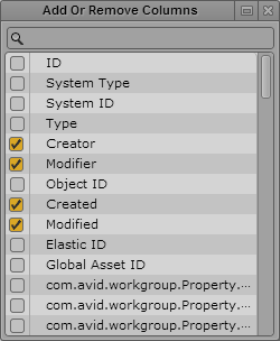
The Search Results List
289
tFor federated searches, click the heading of the column you want to sort by.
An arrow appears in the column. How the column sorts the results depends on the content of the
column. For example, the Name column sorts results alphabetically, starting from the lowest
number and the first letter or the reverse.
To reverse the sorting order in Grid view or for federated searches:
tClick the heading of the column again.
To view additional items in Grid view or for federated searches:
tClick the Show More Results button.
Additional items are shown at the bottom of the search results list.
To add or remove columns from the Search pane:
1. Click the pane menu and select Add or Remove Columns.
The Add or Remove Columns dialog box opens.
2. Select the columns you want to add or deselect the columns you want to remove.
You can use the search box to find a particular column.
3. Click the Close box or click anywhere outside the window to save your settings.
The Search pane displays the selected columns.
To open an item from the search result list, do one of the following:
tFor federated searches or indexed searches, double-click the item.
The asset opens in the Media pane. If the asset is a sequence and the Sequence pane is open, the
asset is loaded in the Sequence Timeline. If the asset is an Interplay MAM asset and the panes
are open, the asset opens also in the Logging, Metadata, and Thumbnails pane and its
associations are shown in the Associations pane. For more information, see “Working with Video
Media” on page 190 and “Using the Sequence Pane” on page 121.
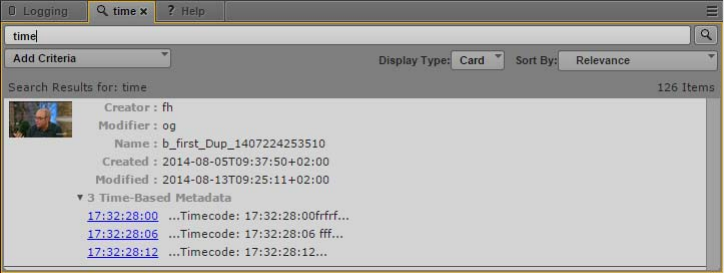
The Search Results List
290
tIf the search results include matches for time-based metadata, expand the Time-Based Metadata
area in Card view, and click the timecode link.
The asset opens in the Media pane at the location of the timecode. If the asset is a sequence and
the Sequence pane is open, the asset is loaded in the Sequence Timeline.
To copy an item from a search result list to another folder:
tClick the item you want to copy, and then drag it to a new folder in the Assets pane.
The asset is copied to the target folder.
nYou can only drag assets in the search result list that are stored on the local Interplay Production
server to a folder in the Assets pane.
To export markers for one or more assets as an .xlsx file:
1. In the search results list (federated search only), select one or more assets that include markers.
2. Right-click and select Export Logs.
A Microsoft Excel file named logs.xlsx is saved to your default download folder.
For more information, see “Exporting Markers” on page 308.
To create a shortcut to an asset:
tRight-click and select Create Shortcut.
A link to the item is displayed in the Shortcuts section of the Launch pane. For more
information, see “Creating Shortcuts to Assets, Folders, and Queues” on page 41.

10 Logging Interplay | Production Assets and
Creating Subclips
The following main topics describe features you use when logging your material.
•Workflows for Logging
•Understanding Markers and Restrictions
•The Log Layout
•The Logging Pane for Interplay | Production Assets
•Adding, Saving, and Deleting Markers
•Adding, Saving, and Deleting Restrictions
•Exporting Markers
•Entering Marker Text in Right-to-Left Languages
•Unicode Support for Marker Text
•Creating Subclips
The following topic lists the keyboard shortcuts used for logging:
•“Logging Pane (Interplay | Production) Shortcuts” on page 595
nIn Media Composer v6.0, Avid Symphony v6.0, and NewsCutter v10.0, the term “locators” was
changed to “markers” in both the user interface and the documentation.
nWhen you open an Interplay MAM asset, the Logging pane displays controls specifically for logging
Interplay MAM assets. For more information, see “Logging Interplay | MAM Assets” on page 313.
Workflows for Logging
In MediaCentral UX, logging refers to the process of adding information to clips, subclips, and
sequences. This information includes markers, restrictions, and text, which you can use for reference
during story creation and media editing.
MediaCentral UX enables fast, flexible logging. A special layout for logging, called the Log layout,
provides a Logging pane for viewing and editing markers. Keyboard shortcuts give you a quick way
to work with markers while controlling media playback.
Workflows for Logging
292
Example Workflows
Following are three typical logging workflows.
• Logging a video feed: A media logger logs content at the same time that the media is being
ingested.The media logger can add markers to specify particular video or audio frames and add
comments to the markers as required. A journalist can then open a specific clip or clips in
MediaCentral UX, view the markers and comments, and copy text if necessary, even while the
recording is in progress.
Working with content while it is being ingested is sometimes referred to as “edit while capture.”
For more information, see “Viewing and Editing a Clip During Ingest” on page 224.
• Logging recorded video: A media logger browses for recorded clips and logs the content by
adding markers and comments. For example, marker comments can include a transcription of an
interview. A journalist can then use the transcription as a starting point for a story.
• Creating a shot list: A media logger can place markers on clips to identify specific shots, mark in
and out points to create a series of subclips, and combine these subclips into a shot list. For
example, a journalist or a logger might create a shot list with markers and subclips for a
sequence, and another media editor can then match the shot list to a story text or use it to create a
voice-over track. For more information, see “Using the Sequence Pane” on page 121.
• Adding markers to a sequence: You can add markers to a sequence you are creating, either by
adding clips with markers to a sequence or by adding markers directly to a sequence. See
“Adding Markers to a Sequence” on page 183.
Multiple Loggers Working on the Same Clip
Two or more media loggers can add markers to the same clip, while it is still being recorded or after
it has already been recorded. Each media logger can refresh the Logging pane to display all saved
markers, including those created by other loggers.
cThere is no locking mechanism if two loggers are editing the same marker text. If two loggers
are editing the same marker text, either one can save the marker, and the clip in the Interplay
Production database updates with the last saved version. To display the latest saved version,
click the Refresh button or press F5.
Multiple Loggers Working on the Same Sequence
Two or more media loggers can add markers to the same sequence. However, the loggers must limit
their edits to the Logging pane and make sure no one else is editing the sequence. Any edits to the
sequence (such as L cuts or trims) that are saved and checked in will overwrite the previously
checked-in sequence, including markers not included in the edited sequence. Closing the Sequence
pane can help avoid this problem.
Each media logger can refresh the Logging pane to display all saved markers, including those created
by other loggers.
cAs with master clips, there is no locking mechanism if two loggers are editing the same marker
text. If two loggers are editing the same marker text, either one can save the marker, and the
clip in the Interplay Production database updates with the last saved version. To display the
latest saved version, click the Refresh button or press F5.
Understanding Markers and Restrictions
293
Keyboard Shortcuts
You can accomplish many functions for logging and controlling playback using keyboard shortcuts,
such as
• Ctrl+M to add a marker.
• Ctrl plus a key on the numeric keypad to add a marker of a specific color. For example, press
Ctrl+3 to create a marker with a red icon.
• Ctrl+Enter to save text.
• Up Arrow to move to previous marker, Down Arrow to move to next marker.
• Ctrl+J (back), Ctrl+K (stop), and Ctrl+L (forward) to control playback while entering markers
and marker text.
For more information, see “Logging Pane (Interplay | Production) Shortcuts” on page 595.
Understanding Markers and Restrictions
In MediaCentral UX, adding markers is the primary way to log material. A marker is an indicator
that you add to a selected frame to mark a particular location in a clip, subclip, or sequence. Markers
can have icons of different colors and can be associated with user-defined comments.
Markers and Avid Applications
Users can add, view, and edit markers in several different Avid applications:
• Avid Media Composer, including NewsCutter and Symphony options
• Interplay Assist
•MediaCentralUX
Markers added in any of these products can be viewed and edited by any of the other products in an
Interplay Production environment.
nIn Media Composer v6.0, Avid Symphony v6.0, and NewsCutter v10.0, the term “locators” was
changed to “markers” in both the user interface and the documentation.
nSpanned markers created on an Avid editing system are not currently supported in MediaCentral.
Markers and Uneditable Sequences
You can add markers to uneditable sequences (sequences that are colored dark red), edit marker text,
and save the markers with the sequence, if you have the proper permissions in Interplay Production.
You need to have a read/write role for the folder that contains the sequence and permissions for
markers as described below.
nFor a description of uneditable sequences, see “Opening and Editing an Existing Sequence in the
Sequence Pane” on page 144.

Understanding Markers and Restrictions
294
Restrictions
A restriction is a span of an asset that indicates a clip, or a portion of a clip, whose use is limited in
some way, such as through intellectual property rights management or content compliance. Users can
add and edit restrictions only in Interplay Assist and MediaCentral UX, but can view them in the
following Avid products:
• Avid Media Composer, including NewsCutter and Symphony options
• Avid Instinct
For information about creating restrictions in MediaCentral UX, see “Adding, Saving, and Deleting
Restrictions” on page 304.
Permissions
To create and modify markers, a MediaCentral UX user’s Interplay Production account must be
configured with the following permissions:
If a user does not have these permissions, the Create Marker button or the Create Restriction button is
grayed out and a tool tip states that the user does not have permission to create a marker or
restriction.
An Interplay Production administrator sets these permissions in the Instinct/Assist User Settings
view of the Interplay Administrator. For more information, see the Interplay | Engine and
Interplay | Archive Engine Administration Guide or the Interplay Production Help.
Markers and Sequences
In MediaCentral UX, you can add markers to clips, subclips, and sequences stored in the Interplay
Production database. Markers that you add to a sequence are associated only with the sequence. They
are not automatically associated with the corresponding master clips used in the sequence. Similarly,
a marker added to a subclip is not added to the associated master clip.
nWhen you add a marker to a sequence, you might notice a delay of a few seconds before you can
create a new marker. In this case, the Insert Marker button is disabled (grayed out). When the button
is enabled again, you can create a new marker.
If you are creating a sequence in the Sequence pane, you can add markers either by adding clips with
markers to the sequence or by adding markers directly to the sequence. See “Adding Markers to a
Sequence” on page 183.
Setting Description
Can create locators Create markers (formerly called “locators” in Avid
editing products)
Can modify locators Modify and delete markers
Can create restrictions Create restrictions
Can modify restrictions Modify and delete restrictions
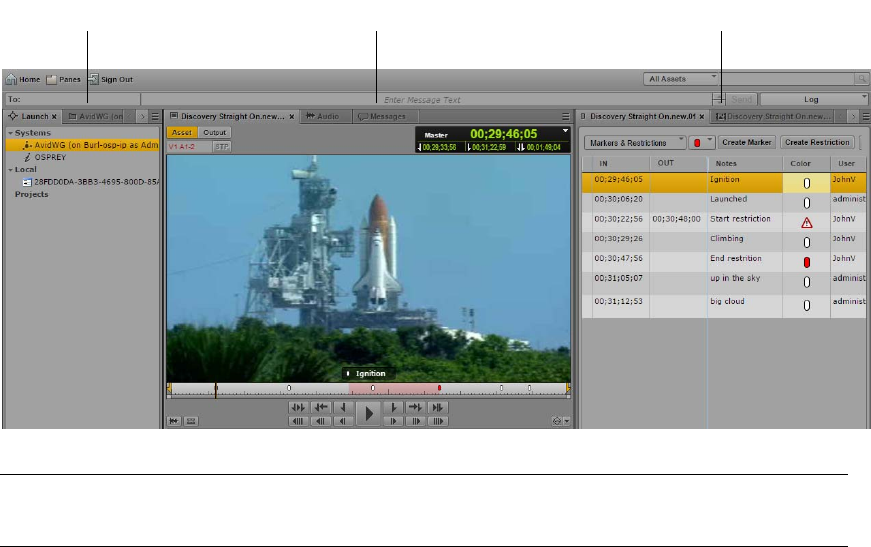
The Log Layout
295
Number of Characters in Marker Text
In MediaCentral UX, marker text has a limit of 32,000 characters for each marker. If marker text
exceeds 32,000 characters, a warning message tells you that the text exceeds the maximum number
of characters and that you cannot save the text until the reduce the number of characters. The Save
status message shows you the character count until it is reduced to 32,000, at which point the
message changes to “Unsaved changes” and you can save the text.
The Log Layout
The Log layout provides you with an arrangement of panes defined for use in logging, which you can
customize. The following illustration shows the Launch pane, the Media pane, and the Logging pane.
The Logging pane tab displays the name of the loaded clip or sequence.
You can adjust the location and size of the panes as you can do in other layouts. For example, you can
drag the Assets pane beneath the Media pane. For more information, see “Working with Areas and
Panes” on page 27.
nThe Output button and the STP button in the Media pane are disabled in the Log layout.
To open the Log layout:
tSelect Log from the Layout selector.
To reset the Log layout:
tSelect Reset Layout from the Layout selector.
qqwwee
1Launch pane, Asset pane 3Logging Pane, Thumbnails Pane, Metadata pane (not shown)
2Media pane, Audio pane, Messages pane
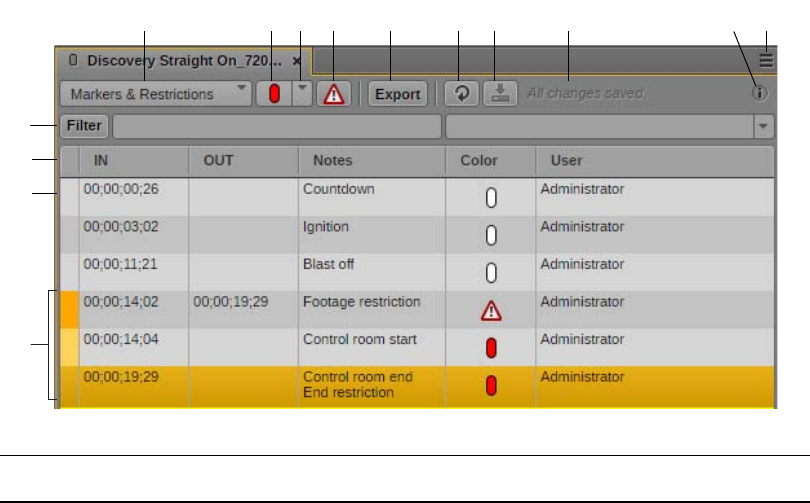
The Logging Pane for Interplay | Production Assets
296
The Logging Pane for Interplay | Production Assets
You create and view markers and marker text in the Logging pane. You can also view restrictions, if
the clip or sequence contains them.
nPrior to MediaCentral v2.1, this pane was called the Markers pane.
The following illustration shows a series of markers in the Logging pane. Displays and controls are
described in the accompanying table.
qqwweerr
6
r
rtro
r
1!
ryru
r
d
ria
r
1#
r
1$
Display or Control Description
1 Strata list Displays the strata configured for editing. For Interplay
Production assets, the only choice in the Strata list is
“Markers & Restrictions.” Strata is an Interplay MAM
feature that does not currently apply to Interplay Production
assets. For more information, see “Logging
Interplay | MAM Assets” on page 313.
3 Create Marker button Click to create a new marker at the timecode selected in the
Media pane. This button displays the color of the next
marker to be added. You can also create a new marker by
pressing Ctrl+M (Windows and Macintosh) or Command +
M (Macintosh). You can create a new marker of a specific
color by pressing Ctrl plus a key on the numeric keypad.
See “Logging Pane (Interplay | Production) Shortcuts” on
page 595
2 Select Color button Click the down arrow and select the color you want for the
next marker.
4 Create Restriction button Creates a restriction for the segment marked by In and Out
points in the Media pane. See “Working with Restrictions”
on page 300.

The Logging Pane for Interplay | Production Assets
297
5 Export button Displays options for exporting marker text to other
applications. See “Exporting Markers” on page 308.
6 Refresh button Updates the display of markers saved for the selected clip or
sequence. This control is especially useful when multiple
loggers are adding markers to the same clip or sequence, or
when a journalist wants to see the latest information added
by the loggers.
If the focus is in the Logging pane, you can also press F5 to
update the display.
7 Save button Saves all markers and exits edit mode.
nEdit mode refers to the state in which the cursor is
displayed in the Notes field and you can enter text.
Ctrl+S saves all markers but does not exit edit mode.
8 Save status message Displays whether or not markers for the clip or sequence
are saved. The messages are “Unsaved changes,” “Saving,”
or “All changes saved.”
9 Info icon Displays the name of the selected stratum when you hover
the mouse pointer over the Info icon. For Interplay
Production, the only info is “Stratum that contains all media
markers and restrictions.”
10 Pane Menu button The Pane menu for the Logging pane contains options for
both Interplay Production and Interplay MAM assets. The
following options are available for Interplay Production:
• Add or Remove Columns. Select the columns you want
to display.
• Delete. Functions the same as the Delete key
(Windows), Backspace (Macintosh), or fn+Backspace
(MacBook).
• Help. Displays a Help topic describing controls in the
Logging pane. From this topic you can access the entire
MediaCentral UX Help system.
11 Filter button, text field, and criteria
list
Lets you set criteria for filtering the list of markers.
Filtering does not apply to restrictions. See “Filtering
Interplay Production Logs” on page 307.
Display or Control Description

The Logging Pane for Interplay | Production Assets
298
To close the Logging pane:
tClick the X in the pane’s tab.
To open the Logging pane:
tSelect Panes > Logging.
12 Columns The Logging pane has six or seven available columns:
• (no label): Displays orange for the selected marker or
markers.
• IN: Displays the timecode in the clip or sequence that
corresponds to the location of the marker or restriction.
• OUT: Displays the timecode in the clip or sequence that
corresponds to the end of a restriction.
• Notes: Displays the text associated with the marker.
You can cut, copy, and paste this text. See “Cutting,
Copying, and Pasting Text” on page 306.
• Color: Displays the icon associated with the marker.
• User: Displays the name of the Interplay Production
user who created the marker.
• Angle: For a group clip, displays the name of the master
clip for each marker or restriction. See “Markers and
Restrictions for Group Clips” on page 256.
After you create a new marker, the focus is in the first
column to the right of the OUT column. This is the Notes
column by default.
You can adjust the width of columns and rearrange the
order of columns by dragging and dropping.
The default sorting in the Logging pane is by timecode,
from lower to higher. Starting with MediaCentral UX v2.9,
you can click a column head to sort in the following ways:
• IN or OUT: lower to higher, or higher to lower.
• Notes: alphabetically, or reverse alphabetically.
13 Unselected marker Gray indicates a marker that is not selected.
14 Restriction A restriction is displayed in several ways:
• The restriction is displayed at the timecode where it
starts. The IN and OUT columns show the span of the
restriction. The far left column is colored dark orange.
• A warning icon is displayed in the Color column.
• If there are markers within the restricted span, the far
left column is colored orange, and the bottom of the last
marker row in the span is marked by a thin yellow line.
See “Working with Restrictions” on page 300.
Display or Control Description

Adding, Saving, and Deleting Markers
299
Adding, Saving, and Deleting Markers
How you add markers depends on your workflow. You can add a marker to a clip, subclip, or
sequence. You can add markers while video plays or you can scrub through the video and add
markers at appropriate locations. You can control the video, add markers, and delete markers by
using the mouse or the keyboard. For example, while in the Log layout, you can use Ctrl+J, Ctrl+K,
or Ctrl+L keys to control video while you type marker text. For a list of keyboard shortcuts, see
“Logging Pane (Interplay | Production) Shortcuts” on page 595.
Adding text in the Notes column is optional. You can add marker text immediately, or you can add a
marker without text and then add text later.
When you add a marker without text, the marker is saved automatically. When you add a marker with
text, the marker is saved automatically and the text is saved if you save the marker manually or if you
step out of a marker (exit edit mode) by using Ctrl+Enter.
nEdit mode refers to the state in which the cursor appears in the Notes field and you can enter text.
You can select which color you want to use for the marker icon. This can be useful if you want to
establish particular meanings for particular colors — for example, red for restrictions or blue for
audio.
The Create Marker button indicates the currently selected color for the marker icon. To change the
color, click the down arrow and select a different color.
Changing the color affects only the next marker you set. Existing markers are not changed.
To add a marker, do one of the following:
tClick the Create Marker button.
tPress Ctrl+M.
tPress Ctrl plus a key on the numeric keypad that is associated with the color you want to use for
the marker icon. You can also press Ctrl plus a number key from the top row of the keyboard. For
example, press Ctrl+3 to create a marker with a red icon. See “Logging Pane
(Interplay | Production) Shortcuts” on page 595.
After you create a new marker, the focus is in the first column to the right of the OUT column.
By default this is the Notes column. The cursor appears in the Notes field and you can begin
typing.
You can add another marker while in edit mode. After you create a new marker, the old marker is
automatically saved and the cursor appears in the Notes field of the new marker.
Working with Restrictions
300
To enter edit mode and edit marker text, do one of the following:
tDouble-click the Notes field.
tSelect a marker and press Enter.
To save marker text, do one of the following:
tClick the Save button. Text is saved and you exit edit mode.
tPress Ctrl+S. Text is saved and you remain in edit mode.
tPress Ctrl+Enter to exit edit mode.
tUse the mouse to select a different marker.
tAdd a new marker.
If you are adding markers to a sequence in Output mode, saving markers in the Logging pane
also saves the sequence, including markers. Similarly, saving a sequence in Output mode also
saves the markers in the sequence.
To delete a marker, select one or more markers and do one of the following:
tPress the Delete key (Windows), Backspace (Macintosh), or fn+Backspace (MacBook).
tRight-click and select Delete.
To change the color of a marker icon, do one of the following:
tDouble-click the Color field for the marker whose color you want to change, then double-click
the color you want to use.
tUse the arrow keys to navigate to the Color field you want to change, press Enter, use the arrow
keys to select the color you want, and press Enter again.
tSelect one or more markers, right-click, select Change Color, and double-click the color you
want to use.
Working with Restrictions
A restriction is a span of an asset that indicates a clip, or a portion of a clip, whose use is limited in
some way, such as through intellectual property rights management or content compliance.
The following topics describe working with restrictions:
•“Understanding Restrictions in MediaCentral | UX” on page 300
•“Adding, Saving, and Deleting Restrictions” on page 304
Understanding Restrictions in MediaCentral | UX
In MediaCentral UX, you can add, modify, save, and delete restrictions in the Logging pane,
similarly to the way you work with markers. The following illustration shows a restriction labeled
“Footage restriction” that includes two markers.
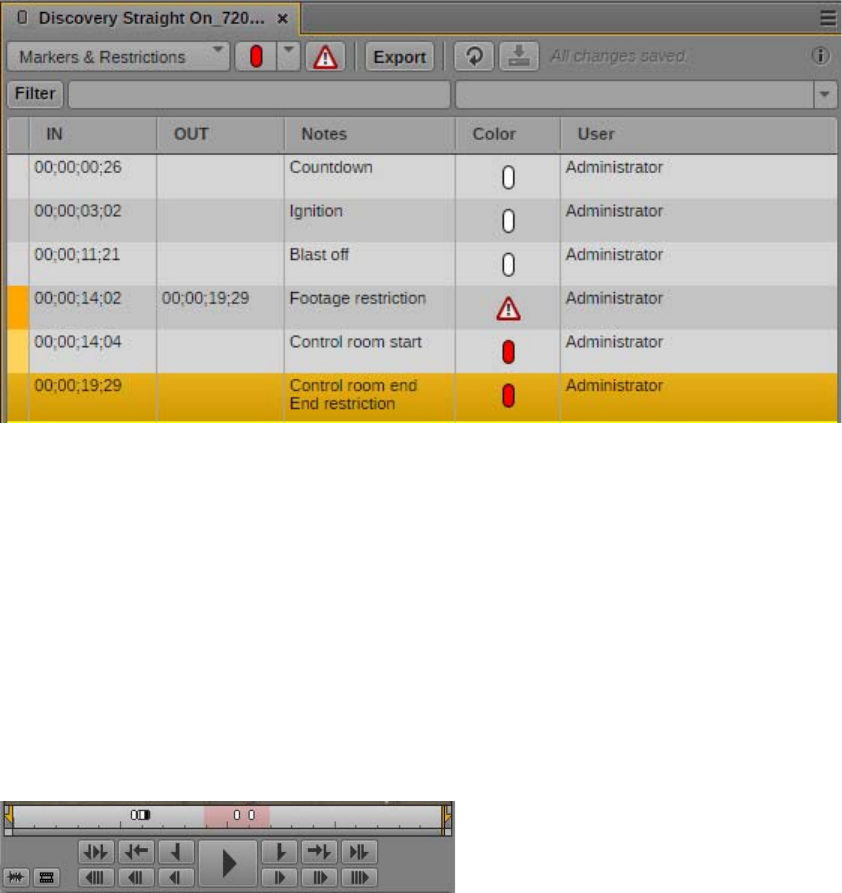
Working with Restrictions
301
Note the following:
• The restriction is displayed at the timecode where it starts. The far left column is colored dark
orange. The IN and OUT columns show the span of the restriction. If the position indicator is
within a restriction, the restriction is displayed in bold.
• A warning icon is displayed in the Color column.
• If there are markers within the restricted span, the far left column is colored orange, and the
bottom of the last marker row in the span is marked by a thin yellow line.
In the previous illustration, there are two markers in the span of the restriction.
Restrictions are also marked in light red in the timeline in the Media pane, as shown in the following
illustration.
You can create a restriction within another restriction, or add a restriction that overlaps another
restriction. In this case, the enclosed restriction or the overlapping area is indicated by a darker shade
of red in the Media Timeline.
Text for the restriction is shown on top of the Media viewer, preceded by a red triangle that indicates
a restriction.
• If there are overlapping restrictions, text for the first restriction is displayed until the start of the
second restriction
• If one restriction encloses another, text for the enclosing restriction is displayed.
The following illustration shows the Logging pane and the Media pane for a clip named “Discovery
Straight On.new.01.” This clip includes markers and two restrictions, labeled “Restriction 1” and
“Restriction 2.” These restrictions overlap briefly; the overlap area is indicated in the Media Timeline
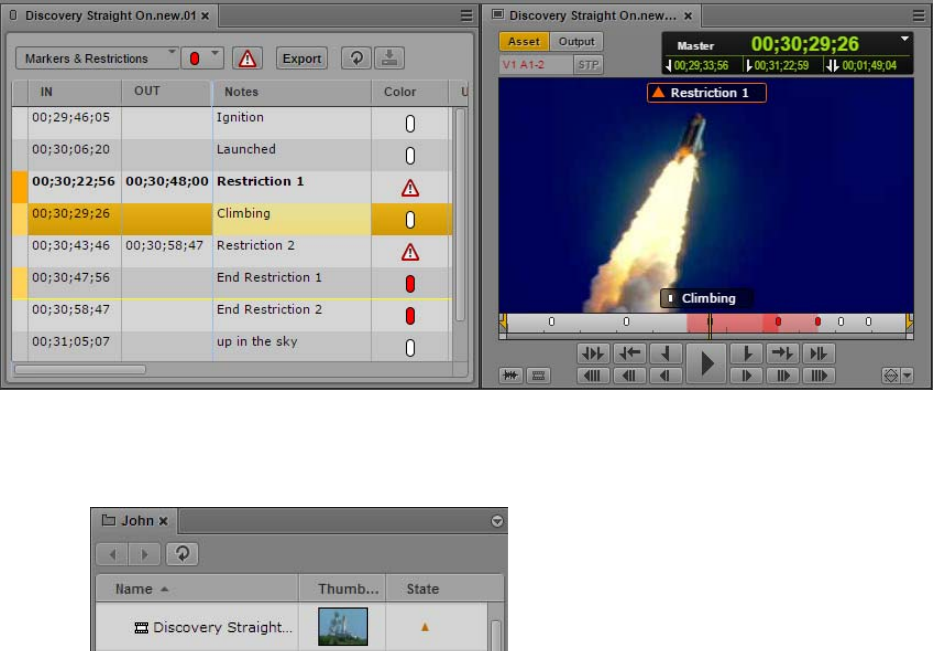
Working with Restrictions
302
by a darker shade of red. The position indicator is parked on a marker that is enclosed by the first
restriction. The restriction text is shown at the top of the viewer, and the marker text is shown at the
bottom.
The following illustration shows the same master clip listed in the Assets pane. An orange triangle in
the State column indicates that the clip contains a restriction.
nThe restriction icon in the State column is displayed only for master clips that include a restriction,
not subclips or sequences.
This icon is also displayed in the DRM column, if the column is selected for display.
Requirements
To create and modify restrictions, a MediaCentral UX user’s Interplay Production account must be
configured with the following permissions:
• Can create restrictions
• Can modify restrictions
If a user does not have these permissions, the Create Restriction button is grayed out and a tool tip
states that the user does not have permission to create a restriction.

Working with Restrictions
303
To delete restrictions, the user’s Interplay Production account must be configured with the following
permission:
• Can modify restrictions
An Interplay Production administrator sets these permissions in the Instinct/Assist User Settings
view of the Interplay Administrator. For more information, see the Interplay | Engine and
Interplay | Archive Engine Administration Guide or the Interplay | Production Help.
Adding and Editing Text
Adding text in the Notes column is optional. You can add restriction text immediately, or you can add
a restriction without text and then add text later.
When you add a restriction without text, the restriction is saved automatically. When you add a
restriction with text, the restriction is saved automatically and the text is saved if you save the
restriction manually or if you step out of a restriction (exit edit mode) by using Ctrl+Enter.
Master Clips and Subclips
You can add restrictions to master clips or subclips. Master clips and subclips are linked, so that
restrictions added or changed in a master clip are added or changed in the corresponding subclip.
Similarly, any restrictions added or changed in a subclip are added or changed in the master clip.
Group Clips
You can view and edit restrictions for a master clip that is included in a group clip. A column labeled
Angle displays the name of the master clip for each marker or restriction, as shown in the following
illustration. There are two restrictions, on two different master clips.
You can add a new restriction to a master clip by selecting it as the active angle, either in single-angle
view or multi-angle view. Master clips and group clips are linked, so that restrictions added or
changed in a master clip are added or changed in the group clip.
You cannot add a restriction to a group clip itself.
Restrictions are shown in the Media viewer for the master clip that is selected as the active angle, in
both Asset mode and Output mode.
You work with markers in the same way you work with restrictions. For more information, see
“Markers and Restrictions for Group Clips” on page 256.
Working with Restrictions
304
Sequences
If you edit a master clip or subclip with a restriction into a sequence, the restriction is carried over to
the sequence. Information in the source clip remains linked to the clip in the sequence, so that if there
is any change to a restriction in the source clip, the information is changed in the sequence.
If the Media pane is in Output mode, any restrictions in the sequence are shown in the Logging pane,
along with any markers included in the sequence. The restriction remains displayed if you trim away
part of the restricted area and remains until there is no part of the restriction remaining in the
sequence.
You cannot edit restrictions on sequence level. You cannot add a restriction directly to a sequence.
The Create Restriction button is inactive.
If you open an unsupported sequence, such as one edited in Media Composer, a message is displayed
at the top of the viewer that states “This sequence contains restricted clips.” Markers are shown in the
Logging pane, but restrictions are not.
Adding, Saving, and Deleting Restrictions
If your Interplay Production account includes the proper permissions (see “Understanding
Restrictions in MediaCentral | UX” on page 300), you can add, modify, save, and delete restrictions
in MediaCentral UX.
To add a restriction to a master clip or subclip:
1. Load a master clip or subclip in the Media pane.
If you add a restriction to a subclip, the restriction is also added to the source master clip.
2. Set In and Out points to mark the region to which you want to add a restriction.
3. Click the Create Restriction button.
A beginning and end point are set for the restriction in the Logging pane and the restriction is
automatically saved. The cursor is positioned in the Notes area so you can immediately add text
for the restriction, if the Notes column is immediately to the right of the OUT column.
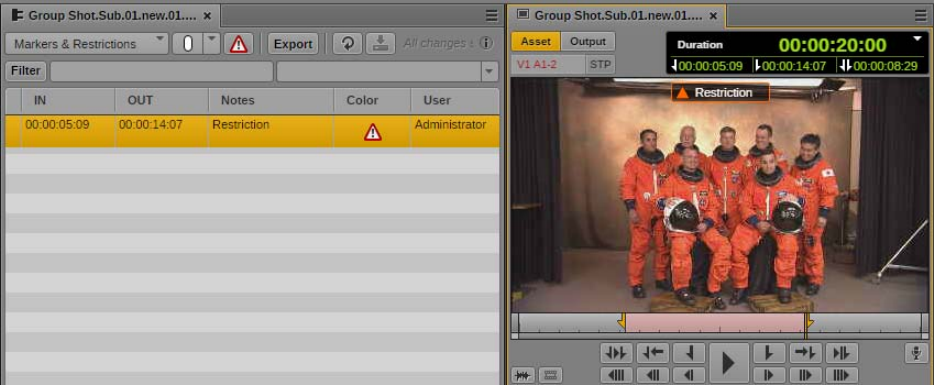
Working with Restrictions
305
4. (Optional) Type text for the restriction in the Notes column, then press Ctrl+Enter.
The following illustration shows a restriction that was created by setting In and Out points, and is
labeled “Restriction.”
To enter edit mode and edit restriction text:
tDouble-click the Notes field.
nEdit mode refers to the state in which the cursor appears in the Notes field and you can enter text.
nYou cannot edit the start and end of a restriction. To change the start or end point, delete the
restriction and create it again.
To save restriction text, do one of the following:
tClick the Save button. Text is saved and you exit edit mode.
tPress Ctrl+S. Text is saved and you remain in edit mode.
tPress Ctrl+Enter to exit edit mode.
tUse the mouse to select a different restriction or a marker.
tAdd a new restriction or marker.
To delete a restriction, select the restriction and do one of the following:
tPress the Delete key (Windows), Backspace (Macintosh), or fn+Backspace (MacBook).
tRight-click and select Delete.
Cutting, Copying, and Pasting Text
306
Cutting, Copying, and Pasting Text
You can use standard keyboard shortcuts to cut text or copy text to the system clipboard, or paste text
from the system clipboard. This includes the ability to copy text from external sources such as
documents or Web pages and to paste the text as marker notes. The text is pasted without formatting.
You can also do the reverse: copy marker text and paste it into an external source, such as Notepad. If
you work on a story in the Story layout, you can copy and paste text into the Script Editor. You can
also copy and paste entire markers (timecode and text). When you paste an entire marker into a
document, the pasted text includes the clip name and frame rate.
To cut text:
tSelect the text and press Ctrl+X.
To copy text:
tSelect the text and press Ctrl+C.
To copy markers:
tSelect one or more markers and press Ctrl+C. Use Shift+click to select contiguous markers, and
Ctrl+click to select non-contiguous markers.
To paste text:
tPress Ctrl+V.
For a complete list of keyboard shortcuts, see “Logging Pane (Interplay | Production) Shortcuts” on
page 595.
Navigating by Markers in the Log Layout
You can use the mouse or keyboard to navigate by marker through a clip or sequence. A marker
selected in the timeline is also selected in the Logging pane. When you select a marker in the
Logging pane, the same marker is selected in the timeline and the Media viewer displays the
corresponding frame.
To navigate to the previous marker, do one of the following:
tWith the focus in the Logging pane, press the Up Arrow key.
tWith the focus in the Media pane, press Shift +Left Arrow.
To navigate to the next marker, do one of the following:
tWith the focus in the Logging pane, press the Down Arrow key.
tWith the focus in the Media pane, press Shift+Right Arrow.
nIn the Story layout, use Shift+Left Arrow and Shift+Right Arrow to navigate by markers.
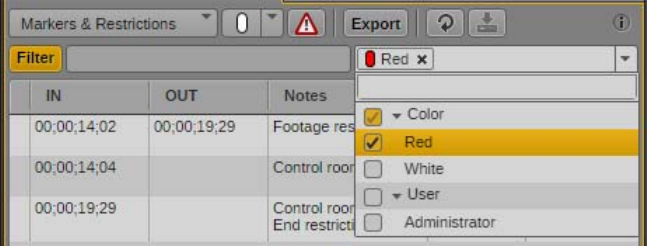
Viewing In and Out Points for Log Entries
307
Viewing In and Out Points for Log Entries
With a log displayed in the Logging pane, you can double-click a log entry so that the source clip is
displayed in the Media viewer, with the logged In and Out points displayed. You can then check the
In and Out points to make sure they are correct. You can use these logged segments to create a
sequence.
nThis feature also applies to logs created for Interplay MAM assets.
Because Interplay Production markers do not use Out points, when you load a clip with a marker, the
marker becomes an In point and MediaCentral UX adds an Out point five seconds after the In point.
For restrictions, the In and Out points displayed match those set in the Logging pane.
In and Out points are not updated when you scrub through or play a clip.
Filtering Interplay Production Logs
If a clip or sequence includes a large number of markers or log entries, you can use the filtering
controls to display a subset of the list. You can filter by text, by marker color, or user.
Filtering does not apply to restrictions, which are always displayed.
To filter by marker or user:
1. Click the down arrow in the Filter Criteria list.
2. Select the criteria you want to use. You can select any of the available users or colors. This list is
determined by the markers in the loaded asset.
The criteria are displayed as buttons in the Filter Criteria list, the Filter button turns orange, and
the list is filtered.
After you set the criteria, you can turn filtering off by clicking the Filter button so that it turns
gray. To turn filtering on again, click the Filter button so that it turns orange.
To remove a criterion, do one of the following:
tClick the x on the criterion button.
tClick the down arrow in the Filter Criteria list and deselect the criterion.
The list is filtered according to the new criteria.
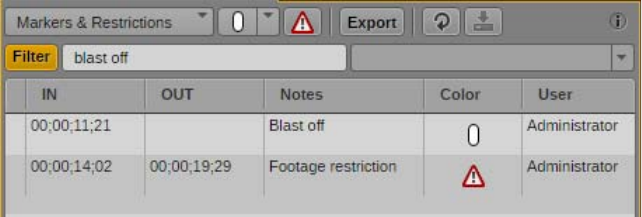
Exporting Markers
308
To filter logs by text:
tBegin typing text in the text box. The Filter button automatically turns orange. As you type, the
logs are filtered according to the text you type. You can type more than one word. Unicode
characters are supported.
After you set the criteria, you can turn filtering off by clicking the Filter button so that it turns
gray. To turn filtering on again, click the Filter button so that it turns orange.
Exporting Markers
You can export a list of markers in one of the following formats:
• Plain text file (.txt) that lists the timecode and text for each marker.
• A tab-delimited text file (.txt) that you can import into Media Composer or another Avid editing
application. For more information, see the documentation for the Avid editing application.
• CSV (comma-separated value) file that you can open as a Microsoft Excel spreadsheet.
• XML file for use in other applications.
You can also export a list of markers as a formatted Microsoft Excel file. Select one or more Interplay
Production assets in the Assets pane or in Search results (federated or indexed search), right-click,
and select Export Logs. A spreadsheet named logs.xlsx is created and downloaded to your browser's
default download location. For multiple assets, each log is written on its own worksheet tab. This
feature applies to master clips, subclips, group clips, and sequences.
You can copy complete markers (timecode and text) to the system clipboard and paste them into
another application. You can also copy and paste marker text.
To export markers for a single asset as a file:
1. Load a clip or sequence that includes markers in the Media viewer.
2. Click the Export button.
The Export dialog box opens.
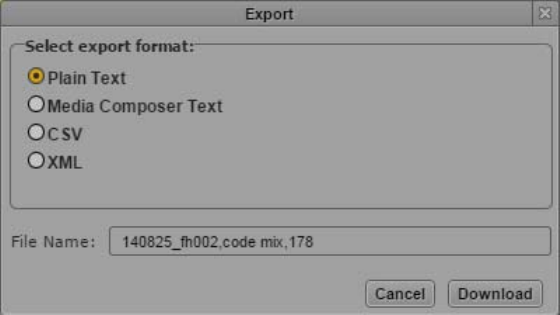
Exporting Markers
309
3. Select the type of file you want to export: Plain Text, Media Composer Text, CSV, or XML.
4. Type a file name. You do not need to add an extension.
5. Click Download.
The file is saved to your default download folder.
The dialog box remembers the format you selected. This format is automatically selected the
next time you open the dialog box.
To export markers for one or more assets as an .xlsx file:
1. In the Assets pane or in the search results list, select one or more assets that include markers.
2. Right-click and select Export Logs.
A file named logs.xlsx is saved to your default download folder.
To copy one or more markers as text to the clipboard:
tSelect one or more markers and press Ctrl+C.
You can use the mouse or keyboard to select multiple markers:
- Select a marker, then press Shift+Up Arrow or Shift+Down Arrow to select a range.
- Select a marker, then press Shift+click to select a range or Ctrl+click to select individual
markers.
You can then use Ctrl+V to paste the timecode and text to another document or application.
To copy marker text to the clipboard:
1. Double-click the Notes field for the marker whose text you want to copy.
2. Select the text you want to copy.
You can then use Ctrl+V to paste the text to another document or application.
Entering Marker Text in Right-to-Left Languages
310
Entering Marker Text in Right-to-Left Languages
You can enter, display, and edit marker text in right-to-left languages (for example, Arabic or
Hebrew). MediaCentral UX recognizes right-to-left characters (RTL). If more than 50 percent of all
marker text for an asset consists of right-to-left characters, the text direction in the Notes column
changes to right-to-left after you do one of the following:
• Click the Refresh button in the Logging pane toolbar
• Reload the asset from the Assets pane
All markers in a single asset change to use the same text direction.
You can also use one of the following the keyboard shortcuts to change the text direction:
• Ctrl+Shift+D (Windows)
• Command+Shift+D (Macintosh)
Text direction persists for all markers in a single asset unless the proportion of marker text changes or
you manually change the direction. If the first marker you enter uses right-to-left, the next marker
will begin with right-to-left, unless more than 50 percent of the text consists of left-to-right
characters or you manually change the direction.
You can copy and paste right-to-left text. If you paste text into the first marker of an asset, you need
to use a keyboard shortcut to change the direction of the text. After that, the next marker will use
right-to-left direction.
You can export the marker text, and the right-to-left direction is retained.
nOverlay text in the Media viewer is displayed only as left-to-right.
To manually change text direction for all marker text:
tPress Ctrl+Shift+D
If the direction is left-to-right, pressing the keyboard shortcut changes direction to right-to-left. If
the direction is right-to-left, pressing the keyboard shortcut changes direction to left-to-right.
Unicode Support for Marker Text
MediaCentral UX v1.2 and later supports input and display of Unicode characters when you create
marker text. As a result, any characters that you use for marker text in MediaCentral UX are
displayed correctly in the following products:
•MediaCentralUX
• Interplay Assist
• Avid Instinct
Media Composer, Symphony, and NewsCutter display Unicode characters only if you set the
operating system to the same locale in which the text was created.
MediaCentral UX correctly displays any characters used for marker text created in other products.
nIn an Interplay Production workgroup, all clients and applications except MediaCentral UX must
use the same locale, either English or one other locale.
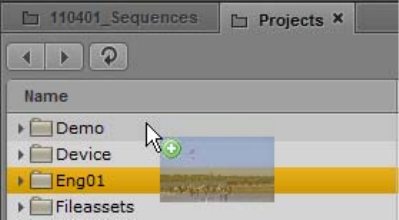
Creating Subclips
311
Creating Subclips
You can create a subclip from a clip that you load in the Media pane and store it in an existing folder
in the Interplay Production database. You can create the subclip by dragging and dropping or by
using a dialog box.
After you create a subclip, the original clip remains in the Media viewer. This is useful if you are
creating a series of subclips from the same master clip. A newly created subclip is automatically
selected in the Assets pane. Double-click the subclip to load it in the Media viewer.
nCreation of subclips from sequences or group clips is not currently supported. You can create a
subclip from a subclip.
To create a subclip by dragging and dropping:
1. Set an In point and an Out point for a clip that is loaded in Asset mode.
2. In the Assets pane, display the folder in which you want to store the subclip.
If you want to store the subclip in a subfolder, open the parent folder. Starting with
MediaCentral UX v2.8.1, hovering over a closed folder while dragging the thumbnail to the
Assets pane does not open the folder.
3. Click anywhere in the Media viewer and drag the thumbnail from the Media pane to the folder,
or to the line in the Assets pane that holds the folder.
Use the mouse pointer to precisely indicate the target location. A green plus sign indicates a
valid location for the subclip.
nYou can also click the Media Pane Menu button while you are in Asset mode and select Create
Subclip. The Select Folder for Subclip dialog box allows you to specify a folder for the subclip.
The subclip is added to the database, with the extension .Sub added to the clip name. Any other
subclips you create from the same clip include an incremented extension, for example, .Sub.01,
.Sub.02, and so on.
4. (Option) Rename the clip by doing one of the following:
tSelect the subclip in the Assets folder, click the name of the clip, and type the new name,
tSelect the subclip in the Assets folder, press F2 (Windows) or Enter (Macintosh), and type
the new name.

Creating Subclips
312
To create a subclip by using a dialog box:
1. Set an In point and an Out point for a clip that is loaded in Asset mode.
2. Do one of the following:
tClick the Media Pane menu button and select Create Subclip.
tWith focus in the Media pane, press the S key.
The Select Folder for Subclip dialog box opens.
The subclip is added to the database, with the extension .Sub.01 added to the clip name. Any
other subclips you create from the same clip include an incremented extension, for example,
.Sub.02.
3. Select the folder or subfolder in which you want to save the subclip. By default, the folder that
holds the master clip is selected.
4. A default name is supplied, with the extension .Sub added to the clip name. Any other subclips
you create from the same master clip include an incremented extension, for example, .Sub.01,
.Sub.02, and so on. Rename the clip if you want.
5. Click Create Subclip.
The subclip is added to the database.

11 Logging Interplay | MAM Assets
The following main topics describe features you use when logging Interplay MAM assets.
•Understanding Strata
•Logging Overview (Interplay | MAM Assets)
•The Logging Pane (Interplay | MAM)
•Understanding Segmentation Principles
•Locking a Stratum
•Working with Segments
•Navigating by Segments
•Annotating Text Fields
•Annotating Using Tags
•Defining Merge Rules for Annotated Segments
•Filtering a Stratum
•Exporting Strata
The following topic lists the keyboard shortcuts used for logging:
•“Logging Pane (Interplay | MAM) Shortcuts” on page 597
Understanding Strata
Logging Interplay MAM assets is based on a few fundamental concepts, the most significant of
which is stratification. Stratification allows annotation of parts of video objects along their timeline,
at any segment defined by an In timecode and an Out timecode. These annotations are similar to
Interplay Production markers; the difference is that an Interplay Production marker is associated to a
single frame, while an Interplay MAM annotation is associated to a sequence of frames.
Annotations might vary in their semantic meaning. For example, you can provide keywords that
specifically describe a part of the material, name the location visible in a scene, or define the rights
situation for a given segment. To keep these kinds of annotations semantically separated, Interplay
MAM and MediaCentral allow you to layer any number of such annotations on top of the timeline,
where each layer is dedicated to annotations of a specific kind. These layers are called strata.
Logging Overview (Interplay | MAM Assets)
314
Strata Types
Interplay MAM provides three types of strata that can be displayed and edited in MediaCentral UX.
These differ from each other as follows:
• Simple strata: Simple strata have only one property assigned to them. The property can be any
data type used throughout Interplay MAM, such as “text,” “timecode,” “date,” “legal list
(selection list),” and so on.
• Structured strata: Structured strata can have multiple properties assigned to them.
• Strata groups: You can combine several strata in a strata group. The segmentation across the
strata within a strata group is always synchronized. Restriction: You cannot combine strata that
allow “overlapping segments” with strata that do not allow overlapping segmentation in a strata
group.
The strata types and specific strata provided by Interplay MAM depend on how they are configured
on site.
Segmentation
Depending on the stratum type, you can create sequential or overlapping segments. Segments can be
annotated at any time.
Interplay MAM has two segmentation modes: Segmentation without gaps, and segmentation with
gaps. If gaps between segments are not allowed in a stratum, segments cannot be deleted from the
stratum.
Segments can be asynchronously distributed across different strata, but segmentation across the strata
of a strata group is always synchronous. The segmentation in an entire strata group can be
asynchronous compared to the segmentation in the strata outside the group. For more information,
see “Understanding Segmentation Principles” on page 320.
Annotation
Annotation refers to the process of adding information to a segment. The kind of annotation that can
be performed depends on the types and number of properties assigned to a stratum. In MediaCentral
UX, segments can be annotated within all strata in the Logging pane. Annotation related to the entire
asset can be entered and edited in the Metadata pane. For more information, see “Editing Metadata”
on page 74.
Logging Overview (Interplay | MAM Assets)
In MediaCentral UX, logging Interplay MAM assets refers to the process of segmenting strata and
adding information to them. This information includes text and other properties, which you can use
for reference during story creation and media editing.
MediaCentral UX enables fast, flexible logging. Keyboard shortcuts give you a quick way to create
segments and controlling media playback while logging.

Logging Overview (Interplay | MAM Assets)
315
Strata and Avid Applications
Users can view and edit strata and segments in the following Avid applications:
• Interplay MAM Cataloger (view strata contents and edit segmentation)
• MediaCentral UX (view strata contents and edit segmentation)
Segments and annotation added to strata in either of these products can be searched and viewed in
Interplay MAM Desktop.
Permissions
To edit a stratum, a MediaCentral UX user’s Interplay MAM account must be configured with the
following permissions:
Properties assigned to a stratum can additionally be restricted by separate read/write permissions.
If a user does not have at least one of the permissions listed in the table above, the controls for
creating segments or editing properties are grayed out in the Logging pane and a tool tip states that
the user does not have permission to edit the stratum.
An Interplay MAM administrator defines expressions and sets permissions on the property level in
Interplay MAM Datamodel Administrator and sets permissions on the strata level in the Interplay
MAM User Manager. For more information, see the Interplay | MAM Datamodel Administrator
User’s Guide and the Interplay | MAM User Manager User’s Guide.
Configuration
Logging can be processed in two modes: Gaps Allowed and Gaps Not Allowed. Which mode is
active in MediaCentral UX is configured in the Interplay MAM System Administrator.
An Interplay MAM administrator can configure if a stratum allows overlapping segments in the
Interplay MAM Datamodel Administrator.
For more information, see the Interplay | MAM Datamodel Administrator User’s Guide,
Interplay | MAM System Administrator User’s Guide, and Interplay | MAM Configuration Settings
Reference.
Setting Description
Strata/READ_<stratum name> Grants the right to see the stratum
Strata/WRITE_<stratum name> Grants the right to edit the stratum. To edit strata
pooled in a strata group you need the WRITE
permission for all strata in the group.
Stratum/WRITE_RULE_<expression> Grants the right to edit the stratum if any of the
conditions defined in the expression are true to
users that do not have the general editing right on
that stratum.
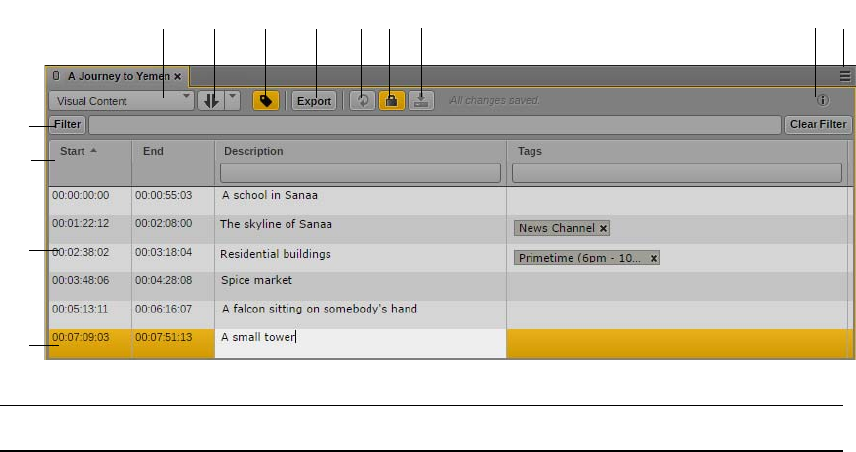
The Logging Pane (Interplay | MAM)
316
Keyboard Shortcuts
When logging Interplay MAM assets you work with the Logging pane and Media pane. Both panes
are synchronized: When you select a segment in the Logging pane, the same segment is selected in
the Media Timeline and the Media Viewer displays the segment’s start frame. And a segment
selected in the Media Timeline is also selected in the Logging pane.
You can accomplish most functions for logging and controlling playback using keyboard shortcuts.
For more information, see “Media Pane Shortcuts” on page 592 and “Logging Pane (Interplay |
MAM) Shortcuts” on page 597.
The Logging Pane (Interplay | MAM)
The Logging pane provides you with an arrangement of controls defined for use in logging Interplay
Production assets or Interplay MAM assets. The layout of the Logging pane adapts automatically
depending on the asset you open:
• If you open an asset from an Interplay Production database, you can create, view, and edit
markers and restrictions. See “Logging Interplay | Production Assets and Creating Subclips” on
page 291.
• If you open an asset from an Interplay MAM database, you can create, view, and edit segments
and segment annotation.
The following illustration shows a series of segments for an Interplay MAM asset in the Logging
pane. Displays and controls are described in the accompanying table.
qqwweerrro
r
a
rtri
r
1!
ryru
qd
qf
Display or Control Description
1 Strata list Contains the strata and strata groups configured for editing. The name of
the selected stratum or strata group is shown on the collapsed list. When
you open an asset in the Logging pane, the stratum that you used the last
time for an asset of that asset type is automatically selected.
2 New Segment control Is shown when logging is configured to allow gaps and for strata that
allow overlapping segments. Creates a new segment with one of the
following options:
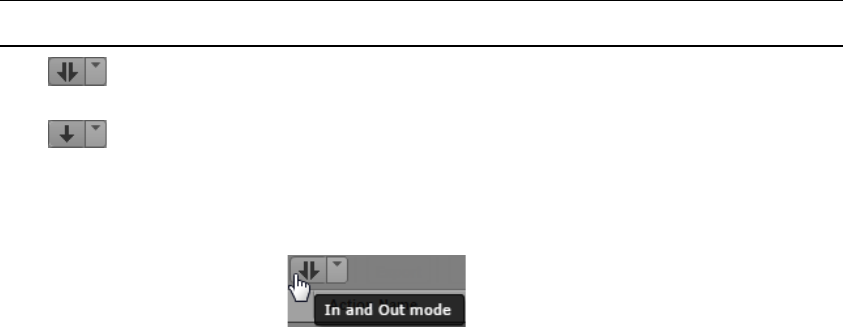
The Logging Pane (Interplay | MAM)
317
• In and Out mode: Sets the In and Out marks at the positions you
defined in the Media Timeline.
• Playhead position mode: Sets the In mark at the current playhead
position but does not define an Out mark.
You see the selected mode when you hover the mouse pointer over the
New Segment control. See “Creating Segment (Gaps Allowed)” on
page 325.
3 Display Type button Toggles the Segment List display between Grid and Tags view.
• When toggled off, the button is colored gray, and Grid view is active.
Shows a separate column for each text and non-text property. Grid
view is active by default.
• When toggled on, the button is colored orange, and Tags view is
active. Shows a separate column for each text property and one
column for all tags (labeled “Tags”).
See “Annotating Using Tags” on page 333.
4 Export button Displays options for exporting strata information. See “Exporting
Strata” on page 342.
5 Refresh button Updates the display of segments saved for the selected stratum. This
control is especially useful when you switch to a stratum that is
currently edited by another user who is adding segments to the same
clip.
If the focus is in the Logging pane, you can also press F5 to update the
display.
6 Lock button Locks or unlocks the selected stratum and indicates if the stratum is
already locked for editing. See “Locking a Stratum” on page 323.
• Gray: You can manually set a lock by clicking the Lock button. If
the stratum is already locked, for example, because another user is
already editing the stratum, a tooltip is shown when you click the
button.
• Orange: The stratum is currently being edited by you and therefore
locked for other users. As soon as you start editing a stratum it is
locked and the Lock button is colored orange. You can manually
unlock the stratum by clicking the Lock button. The lock is
automatically released when you select another stratum or close the
Logging pane.
7 Save button Saves all changes without unlocking the stratum.
Display or Control Description

The Logging Pane (Interplay | MAM)
318
8 Info icon and status message Provides information about the editing status:
• Displays the name of the selected stratum when you hover the
mouse pointer over the Info icon.
• Displays messages when a selected editing option cannot be applied;
for example, if creating an overlapping segment is not allowed.
• Displays whether or not changes for the segment are saved. The
messages are “Unsaved changes,” “Saving,” or “All changes saved.”
9 Pane Menu button The Pane menu for the Logging pane contains the following options.
• Undo. Undoes segment operations.
• Redo. Redoes segment operations.
• Add Or Remove Columns. Shows or hides columns in the Segment
List area.
• Split at current playhead position. Splits the current segment into
two adjacent segments. The timecode selected in the Media pane is
set as the In mark of the new segment. The annotation of the original
segment is copied to the new segment. See “Splitting Segments” on
page 329.
• Merge with next. Merges a selected segment with the segment to its
right on the timeline. A gap between the segments is also merged.
See “Merging Segments” on page 330.
• Delete (Gaps Allowed Mode only). Deletes the selected segment
and creates a gap on the timeline. See “Deleting Segments” on
page 330.
• Set In. Sets the timecode of the current position in the Media
Timeline as the new In mark for the selected segment. In Gaps Not
Allowed mode, it lets you resize adjacent segments by automatically
moving the Out mark of the previous segment. See “Resizing
Segments (Gaps Allowed Mode)” on page 327, “Resizing Segments
(Gaps Not Allowed Mode)” on page 327 and “Resizing Overlapping
Segments” on page 328.
• Set Out. Sets the timecode of the current position in the Media
Timeline as the new Out mark for the selected segment. In Gaps Not
Allowed mode, it lets you resize adjacent segments by automatically
moving the In mark of the following segment.
• Merge rules. Lets you define how the annotation of segments is
handled when the segments are merged. See “Defining Merge Rules
for Annotated Segments” on page 340.
• Help. Displays a Help topic describing controls in the Logging pane.
From this topic you can access the entire MediaCentral UX Help
system.
10 Filter control A general text filter that lets you set criteria for filtering all properties of
the stratum. See “Filtering a Stratum” on page 341.
Display or Control Description

The Logging Pane (Interplay | MAM)
319
To close the Logging pane:
tClick the X in the pane’s tab.
To open the Logging pane:
tSelect Panes > Logging.
To add or remove columns in the Segment List:
1. Click the Pane Menu button in the top right corner of the Logging pane and select Add or
Remove Columns.
The Add Or Remove Columns window opens.
2. Select the columns you want to add or deselect the columns you want to remove.
3. Click the Close box or click anywhere outside the window to save your settings.
11 Segment List columns The Logging pane shows the following columns:
• Start: Displays the start timecode of the segment.
• End: Displays the end timecode of the segment.
• Text (“Comment” in the illustration): Displays the text associated
with the segment. A separate column is shown for each property of
type “text” assigned to the selected stratum or strata group.
You can cut, copy, and paste this text. See “Annotating Text Fields”
on page 332.
• Tags: Displays the values of properties others than type “Text”
added to the segment.
- If Grid view is active, separate columns are shown for tags.
- If Tags view is active, one “Tags” column is shown for all tags.
See “Annotating Using Tags” on page 333.
Start and End are shown for all strata by default, Text and Tags are
shown according to the configuration of the stratum.You can configure
which columns are displayed by using the Logging pane menu’s Add Or
Remove Columns feature.
The default sorting in the Logging pane is by timecode, from lower to
higher. Click a column head to sort in the following ways:
• Timecode: lower to higher, or higher to lower.
• Text field: alphabetically, or reverse alphabetically.
• Numbers: lower to higher, or higher to lower.
Each column shows a column-specific filter that searches segments for
the corresponding property data: a selection list for Boolean properties,
a text box for all other property types. See “Filtering a Stratum” on
page 341.
12 Unselected segment Gray indicates a segment that is not selected.
13 Selected segment in edit
mode
A selected segment is colored orange. When you are actively editing
text for the segment, the text field is white.
Display or Control Description
Understanding Segmentation Principles
320
To change the view of the Segment List:
tClick the gray Display Type button to turn on Tags view and show one “Tags” column for all
tags.
tClick the orange Display Type button to turn on Grid view and show separate columns for tags.
Understanding Segmentation Principles
In Interplay MAM an entire video clip is considered one segment. A segment can be any size, from
one frame to all frames of a video. You can create segments in all available strata.
For all strata types, Interplay MAM can be customized to allow or exclude gaps between segments.
The default setting excludes gaps between segments. Segments can be created or changed in a
stratum, but not deleted. If gaps are not allowed, segmentation is always frame-accurate, meaning the
Out mark and the In mark of adjacent segments are always adjacent frames of the video clip. When
the default setting is changed to allow gaps between segments, it is up to you to decide if you want
gaps between segments or not.
Segmentation - No Gaps Allowed
You can create, resize, or merge segments when gaps are not allowed. Segments cannot be deleted
from a stratum.
• Creating segments: As gaps between segments are not allowed, “Split” is the only method you
can use to create segments. To create segments, start by splitting the entire stratum into two
segments. Then, split one of the two segments into another two, and so on. See “Creating
Segments (Gaps Not Allowed)” on page 324.
• Resizing segments: You can resize adjacent segments by moving the segment border (Out mark/
In mark) between the segments to the left or right. See “Resizing Segments (Gaps Not Allowed
Mode)” on page 327.
• Merging segments: You can merge adjacent segments by applying the “Merge” function, which
deletes the segment border (Out mark/In mark) between the segments. See “Merging Segments”
on page 330.
The No Gaps Allowed mode is reflected in the UI by the following elements: The Logging pane does
not show a New Segment control and the timeline in the Media pane only shows alternating orange
and blue segments.
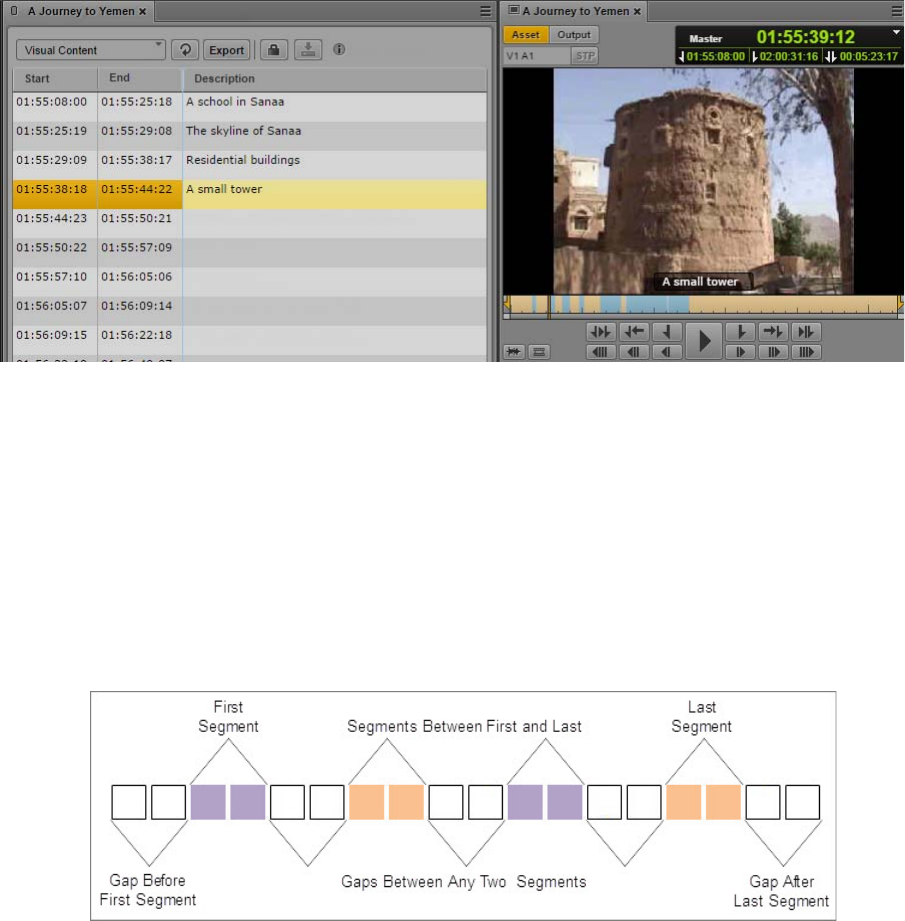
Understanding Segmentation Principles
321
Segmentation - Gaps Allowed
Interplay MAM by default does not allow gaps between segments. The Out mark and In mark of
adjacent segments are always adjacent frames.
When the setting is changed to allow gaps between segments, you can still segment in a stratum as if
gaps were not allowed, but the major purpose is to be able to create segments with gaps between
them.
When you segment in a stratum you can have a gap before the first segment, after the last segment, or
between any two segments after the first or before the last segment, as illustrated:
Instead of starting or ending with a gap, you can also start or end with a segment.
The Logging pane provides the following segmentation functions when gaps are allowed. You can
apply them to simple strata and structured strata:
• Creating segments: You can use the “New Segment” control to create a new segment. See
“Creating Segment (Gaps Allowed)” on page 325.
• Resizing segments: You can use the “Set In” function to move the start of a segment to the left or
right; the Out mark of the previous segment is not affected. You can use the “Set Out” function to
move the end of a segment to the left or right; the In mark of the following segment is not
affected. See “Resizing Segments (Gaps Allowed Mode)” on page 327.
• Splitting segments: You can use the “Split” function to create two adjacent segments. See
“Splitting Segments” on page 329.
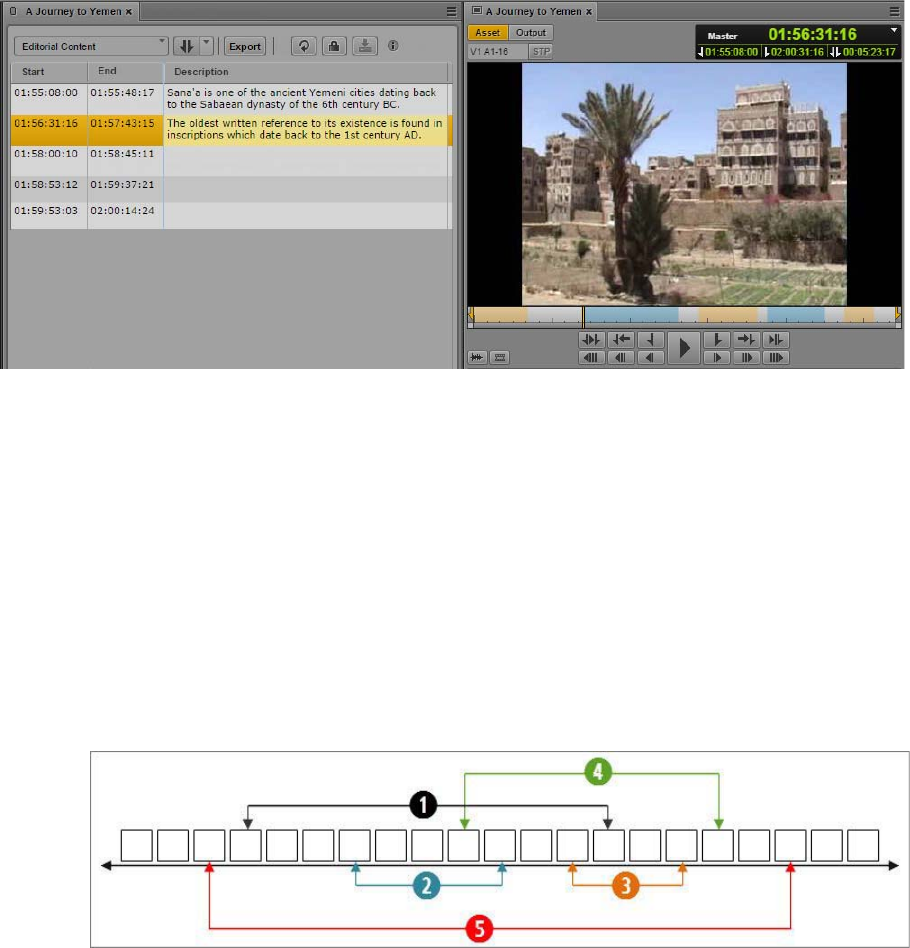
Understanding Segmentation Principles
322
• Merging segments: You can use the “Merge” function to concatenate a selected segment with its
neighboring segment to the right. A gap between the segments is integrated into the merged
segment. See “Merging Segments” on page 330.
• Deleting segments: Use “Delete” to create a gap between adjacent segments or resize the gaps to
the right, or left, or both sides of the selected segment. See “Deleting Segments” on page 330.
The Gaps Allowed mode is reflected in the UI by the following elements: The Logging pane shows a
New Segment control and the timeline in the Media pane shows light gray sections between the
alternating orange and blue segments.
Overlapping Segmentation
Independently from Gaps Allowed and Gaps Not Allowed mode, each stratum can be configured
individually to allow “overlapping segments” — segments that share one or more frames in a
stratum. When such a stratum is selected in the Logging pane, gaps are automatically allowed. This
means that the “overlapping segments” setting overwrites the Gaps Not Allowed configuration mode.
You can create any kind of segment sequences in a stratum that allows overlapping segments:
Segments can be adjacent, have gaps between them, or they can overlap. These different sequences
can be combined across any section of the video, or across the entire video.
The diagram represents a section with five overlapping segments that share at least one frame with
each other. Segments 2 and 3 are the only segments that do not overlap with each other. If considered
separately, they are not adjacent, because there is a gap between them.
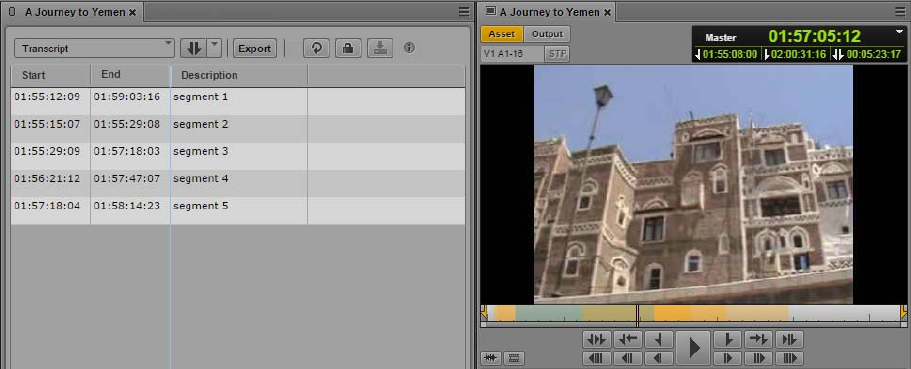
Locking a Stratum
323
The following illustration shows five overlapping segments on the Logging pane and the Media
Timeline. The timeline in the Media pane shows alternating orange and blue sections that represent
the individual segments of the selected stratum. Overlapping segments are represented by a darker
shade of the same color.
Segmenting in Strata Groups
In the Logging pane, you segment in a strata group the same way you segment in a single stratum. If
strata are pooled in a group, the Strata selection list lets you select the strata group but not the
individual strata of the group. Example: You have a strata group Stratagroup_Demo containing two
strata SG_Subtitle and SG_Description. Then the Strata selection list will only offer
Stratagroup_Demo for selection. The segmentation is always passed on to all strata of the group.
In the Media pane, you can only select an individual stratum to be displayed on the Media Timeline.
In the example, only the strata SG_Subtitle and SG_Description can be selected but not
Stratagroup_Demo. It is sufficient to display only one stratum since the segmentation across the
strata within that group is synchronized.
Locking a Stratum
If you are logging an Interplay MAM asset, the stratum is locked to prevent other users from editing
the stratum at the same time. The lock is automatically set when you begin editing the stratum. You
can manually set a lock before beginning editing by clicking the Lock button.
If another user opens the stratum while it is locked, and clicks the Lock button or tries to edit the
stratum, the tool tip for the Lock button reads “Cannot lock. The stratum is locked by user <name>.”
The stratum remains locked until you do one of the following:
• Select another stratum
• Load another asset in the Logging pane
• Close the Logging pane
• Log off from MediaCentral UX.
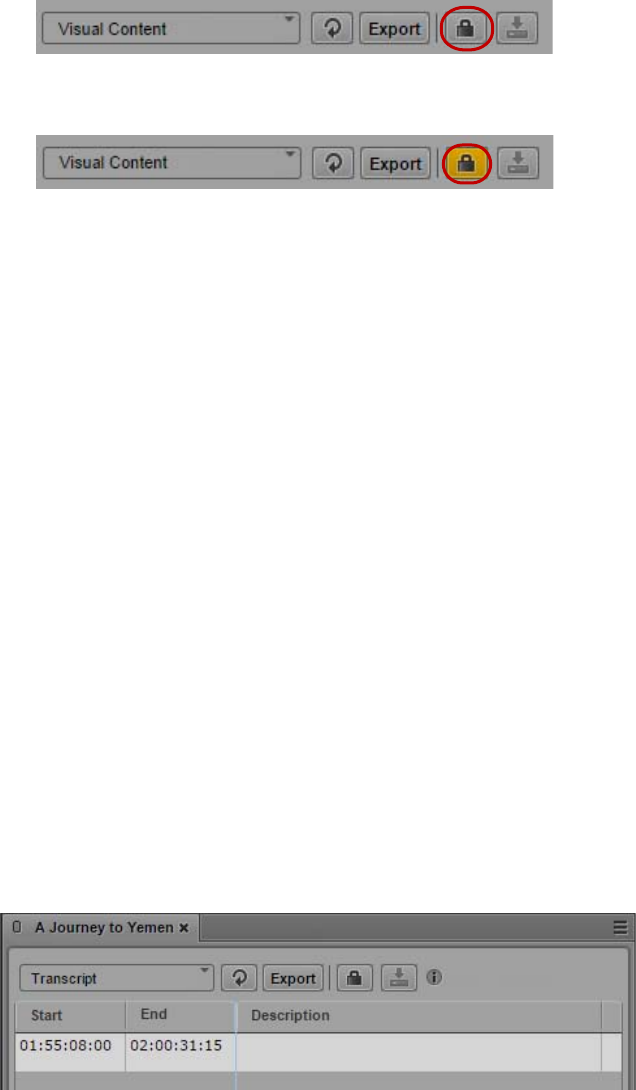
Working with Segments
324
To manually lock a stratum:
tClick the Lock button.
When the stratum is locked, the Lock button turns orange.
You can manually unlock the stratum by clicking the Lock button. If you make an edit, the lock
is automatically set again.
Working with Segments
Segmenting strata and editing segmentation are the primary tasks when logging assets in the Logging
pane. The following topics provide information on how to create and edit segments:
•“Creating Segments (Gaps Not Allowed)” on page 324
•“Creating Segment (Gaps Allowed)” on page 325
•“Resizing Segments (Gaps Not Allowed Mode)” on page 327
•“Resizing Segments (Gaps Allowed Mode)” on page 327
•“Resizing Overlapping Segments” on page 328
•“Splitting Segments” on page 329
•“Merging Segments” on page 330
•“Deleting Segments” on page 330
•“Segmenting During Ingest” on page 331
Creating Segments (Gaps Not Allowed)
Since only splitting segments from the very beginning is possible in No Gaps Allowed mode, a
virtual segment that spans the entire stratum is created when you start editing a stratum for the first
time.
To create segments:
1. Load an asset in the Logging pane and Media pane.
2. In the Logging pane, select the stratum in which you want to segment.
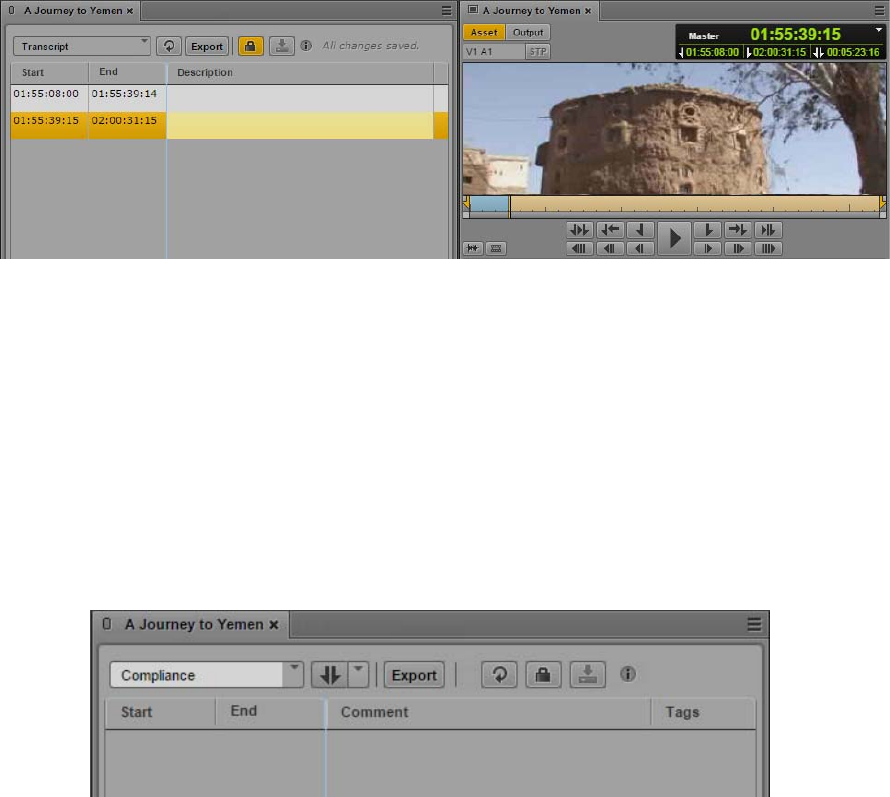
Working with Segments
325
3. In the Media pane, select the same stratum to be displayed on the Media Timeline.
4. Use the transport controls of the Media pane to move through the video and pause at the desired
position.
5. To create segments by splitting the virtual segment, do one of the following in the Logging pane:
tClick the Pane menu and select Split at current playhead position.
tRight-click and select Split at current playhead position from the context menu.
tWith the focus in the Logging pane, press Ctrl+E.
The stratum is locked. The virtual segment is split into two segments.The current frame is used
as In mark of the second segment, the Out mark of the first segment is set to one frame before.
The second segment is selected in the Segment List.
nCurrently you must reload the asset to make a new segment visible on the Media Timeline.
6. (Option) Annotate the segment. For more information, see “Annotating Text Fields” on page 332
and “Annotating Using Tags” on page 333.
7. Repeat steps 4 and 5 to create new segments by applying the split function.
Creating Segment (Gaps Allowed)
In Gaps Allowed mode you can explicitly define In and Out marks of new segments. Therefore you
do not need a virtual segment to split when you segment a stratum in Gaps Allowed mode for the first
time.
When you are creating segments in a stratum that allows overlapping segments, you automatically
have all Gaps Allowed options. Additionally you can create new segments within already existing
segments.
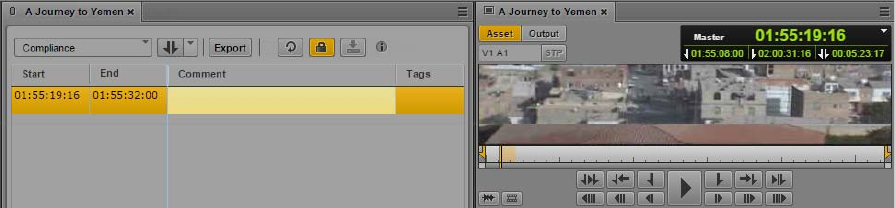
Working with Segments
326
To create segments:
1. Load an asset in the Logging pane and Media pane.
2. In the Logging pane, select the stratum in which you want to segment.
3. In the Media pane, select the same stratum to be displayed on the Media Timeline.
4. Use the transport controls of the Media pane to move through the video and set In and Out points
to mark the start and end of the segment you want to create.
5. To create a segment with the given In and Out marks, do one of the following in the Logging
pane:
tPress the Tab key.
tPress Ctrl+M.
tIn the New Segment control, select In and Out mode and click the control.
The stratum is locked. A segment is created with the given In and Out marks and shown in the
Logging pane’s Segment List.
nCurrently you must reload the asset to make a new segment visible on the Media Timeline.
6. (Option) Annotate the segment. For more information, see “Annotating Text Fields” on page 332
and “Annotating Using Tags” on page 333.
7. In the Media pane, navigate through the asset and stop at a position where you want to start a
new segment.
8. To create a segment at the current playhead position, do one of the following:
tPress Ctrl+Shift+M.
tIn the New Segment control, select Playhead position mode and click the control.
A segment with the given In mark but without Out mark is created and shown in the Logging
pane’s Segment List.
9. (Option) Annotate the segment.
10. To close the open segment, navigate through the asset in the Media pane, stop at a position where
you want to close the segment and do one of the following:
tPress Ctrl+Alt+M.
The Out mark for the segment is set to the current frame.
tPress Ctrl+Shift+M or click the New Segment control (Playhead position mode).
The Out mark for the segment is set to one frame before the current frame. A new segment is
created with the In mark set to the current frame.
Working with Segments
327
Resizing Segments (Gaps Not Allowed Mode)
When editing in Gaps Not Allowed mode, you can move the In and Out mark only within the
selected segment. Restriction: You cannot move the In mark of the first segment, and you cannot
move the Out mark of the last segment.
To resize a segment:
1. Load an asset in the Logging pane and Media pane.
2. In the Logging pane, select the stratum in which you want to resize segments.
3. In the Media pane, select the same stratum to be displayed on the Media Timeline.
4. Select the segment to be resized.
The segment is highlighted in the Logging pane. In the Media pane the position indicator is set to
the first frame of the segment.
5. Set the position indicator within the segment.
6. In the Logging pane, do one of the following:
tRight-click the segment and select Set In or click the Pane Menu and select Set In.
tRight-click the segment and select Set Out or click the Pane Menu and select Set Out.
The segment’s In or Out mark is moved to the current position. If you moved the In mark, the
Out mark of the previous segment is also moved. If you moved the Out mark, the In mark of the
next segment is also moved.
Resizing Segments (Gaps Allowed Mode)
When you want to resize segments in Gaps Allowed mode, select the frames you want to use as the
new In or Out mark from the Media pane. You can extend the segment into a gap but you cannot
extend the segment into another segment. This is only possible for strata that allow overlapping
segments. See “Resizing Overlapping Segments” on page 328.
To resize a segment:
1. Load an asset in the Logging pane and Media pane.
2. In the Logging pane, select the stratum in which you want to resize segments.
3. In the Media pane, select the same stratum to be displayed on the Media Timeline.
4. Select the segment to be resized.
The segment is highlighted in the Logging pane. In the Media pane the position indicator is set to
the first frame of the segment.
5. To move the segment’s In mark, set the position indicator either within the segment or in the gap
before the segment.
6. In the Logging pane, do one of the following:
tRight-click the segment and select Set In.
tClick the Pane Menu and select Set In.
The segment’s In mark is moved to the current position.
7. To move the segment’s Out mark, select the segment to be resized and set the position indicator
either within the segment or in the gap after the segment.
8. In the Logging pane, do one of the following:
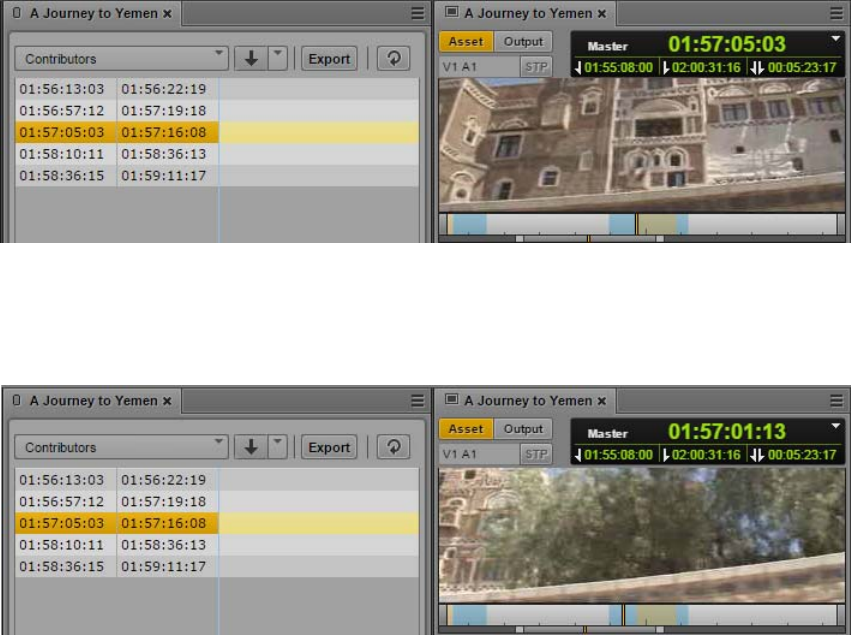
Working with Segments
328
tRight-click the segment and select Set Out.
tClick the Pane Menu and select Set Out.
The segment’s Out mark is moved to the current position.
Resizing Overlapping Segments
Each of the overlapping segments can be resized, by moving its In mark or Out mark to the right or
left. Only when a stratum is configured to allow overlapping segments you can extend a segment into
another segment. To achieve this, the synchronization between the Media Timeline and the Logging
pane is partially disabled as shown in the following procedure.
To resize an overlapping segment:
1. Load an asset in the Logging pane and Media pane.
2. In the Media pane, select the stratum to be displayed on the Media Timeline.
3. In the Logging pane, select the same stratum.
4. Select the segment to be resized.
The segment is highlighted in the Logging pane. In the Media pane the position indicator is set to
the first frame of the segment.
5. To move the segment’s In mark, set the position indicator to the desired position.
Even if another segment is reached in the Media Timeline, the originally selected segment stays
selected in the Logging pane.
6. In the Logging pane, do one of the following:
tRight-click the segment and select Set In.
tClick the Pane Menu and select Set In.

Working with Segments
329
The segment’s In mark is moved to the current position.
7. To move the segment’s Out mark, select the segment in the Logging pane and and set the
position indicator to the desired position in the Media pane.
8. In the Logging pane, do one of the following:
tRight-click the segment and select Set Out.
tClick the Pane Menu and select Set Out.
The segment’s Out mark is moved to the current position.
Splitting Segments
The Split Segment function, which is offered when gaps are allowed, works like it does when gaps
are not allowed: it always defines the Out mark for the left segment and the In mark for the right
segment.
To split within a segment:
1. Load an asset in the Logging pane and Media pane.
2. In the Logging pane, select the stratum in which you want to segment.
3. In the Media pane, select the same stratum to be displayed on the Media Timeline.
4. In the Logging pane, select the segment which you want to split.
5. Move through the segment in the Media pane to select the frame at which you want to split the
segment.
6. To set the split, do one of the following in the Logging pane,:
tClick the Pane menu and select Split at playhead position.
tRight-click and select Split at playhead position.
tPress Ctrl+E.
The segment is split into two segments. The former In mark remains the In mark of the new left
segment, and the former Out mark remains the Out mark of the right segment. The frame that
was selected in the Media pane is set as the In mark of the new right segment, and the frame
adjacent to the left of this In mark is set as the Out mark of the new left segment.
The annotation of the original segment is copied to the newly created segment.
Working with Segments
330
Merging Segments
When you merge segments, the selected segment is always concatenated with the segment to its right
on the timeline. The In mark of the selected segment remains the In mark, and the Out mark of the
right segment remains the Out mark of the new segment. If you merge segments across a gap, the gap
between the two is overridden and integrated into the new segment. How the annotation is merged is
defined by the Merge Rules you can set. See “Defining Merge Rules for Annotated Segments” on
page 340.
To merge segments:
1. Select the stratum in which you want to merge segments.
2. Select the segment you want to merge with the segment to its right.
3. Do one of the following:
tClick the Pane menu and select Merge with next.
tRight-click the segment and select Merge with next.
The segments are merged and the former gap is overridden.
Deleting Segments
Any segment in a stratum can be deleted if logging is configured to Gaps Allowed mode. Depending
on the position of the segment you want to delete, you will have different results:
• If the segment starts at the beginning of the video and has an adjacent segment, you create a gap
the size of the deleted segment.
• If the segment starts at the beginning of the video and is followed by a gap, the gap is resized and
starts at the first frame of the video.
• If the segment ends at the end of the video and has an adjacent segment, you create a gap the size
of the deleted segment.
• If the segment ends at the end of the video and is preceded by a gap, the gap is resized and ends
at the last frame of the video.
• If the segment has adjacent segments to its left and right, you create a gap between the segments.
• If the segment is preceded or followed by a gap, the corresponding gap is resized.
To delete segments:
tSelect one or several segments you want to delete and do one of the following:
- Click the Pane menu and select Delete.
- Right-click a segment and select Delete.
- Press the Delete key.
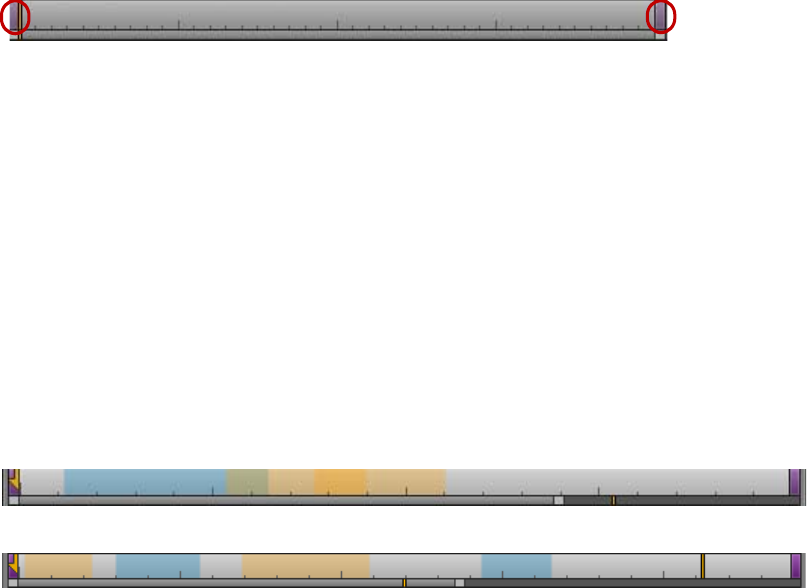
Navigating by Segments
331
Segmenting During Ingest
MediaCentral UX lets you view and edit a clip while it is still being captured through an ingest
device. The process of working with it is called edit while capture (EWC).
If you view a clip that is still being captured in the Media pane, the ends of the Media Timeline pulse
with a purple glow while the capture is in progress.
During the capture, the visible region of the Media Timeline (the zoom region) remains constant to
make the viewing and editing easier. The zoom bar shrinks as the duration of the clip grows. You can
use the zoom bar to change the zoom region during the capture.
You can reduce the zoom region and view new material as it becomes available. For example, if you
zoom in to view the last 5 minutes of a clip and play near the end, the visible region of the timeline
displays the last 5 minutes of the available media during the entire capture operation.
You can edit a clip while being captured in the Logging pane. You can apply all features that are also
available for ingested MAM assets: creating, resizing, merging, splitting, and deleting segments,
depending on the configured segmenting mode (Gaps Allowed, No Gaps Allowed, and Overlapping
segments).
The following illustrations show two examples for segments on the Media Timeline created in edit
while capture mode: overlapping segments and segments with gaps.
Navigating by Segments
You can use the mouse or keyboard to navigate by segment borders through a clip.
• When you select a segment in the Logging pane, the same segment is selected in the Media
Timeline and the Media Viewer displays the segment’s start frame.
• A segment selected in the Media Timeline is also selected in the Logging pane. Note that this
synchronization is not valid for strata that allow “overlapping segments.”
• If segments in a stratum contain several property fields, you can also step through the property
fields.
To navigate to the previous segment, do one of the following:
tWith the focus in the Logging pane, press the Up Arrow key.
tWith the focus in the Media pane, press Shift+Left Arrow.
To navigate to the next segment, do one of the following:
tWith the focus in the Logging pane, press the Down Arrow key.
Annotating Text Fields
332
tWith the focus in the Media pane, press Shift+Right Arrow.
To navigate to the next property, do one of the following:
tWith the focus in the Logging pane, press the Left or Right Arrow key.
Annotating Text Fields
When editing text fields of a segment, most common features of text editing tools are available, such
as inserting text at a selected position, marking text you want to overwrite, copying, pasting, and
deleting, and so on.
You can use standard keyboard shortcuts to cut text or copy text to the system clipboard, or paste text
from the system clipboard. This includes the ability to copy text from external sources such as
documents or Web pages and to paste the text as segment annotation. The text is pasted without
formatting. You can also do the reverse: copy segment text and paste it into an external source, such
as Notepad.
nYou can apply the cut, copy, and paste options only to properties of type “text”.
To edit text fields:
1. Do one of the following:
tDouble-click the text field.
tSelect a segment and press Enter.
The text field is set to edit mode which is indicated by a white background color.
2. If the field is still empty, type the text.
3. If the field already contains text, do one of the following:
tTo add text, select the position at which you want to insert the text and start typing.
tTo change text, mark and overwrite the existing text.
tTo delete text, mark it and press the Delete or Backspace key.
4. Press Ctrl+Enter to leave edit mode and save your changes.
To cut text:
tSelect the text and press Ctrl+X.
To copy text:
tSelect the text and press Ctrl+C.
To paste text:
tPress Ctrl+V.
For a complete list of keyboard shortcuts, see “Logging Pane (Interplay | MAM) Shortcuts” on
page 597.

Entering Segment Text in Right-to-Left Languages
333
Entering Segment Text in Right-to-Left Languages
You can enter, display, and edit segment text in right-to-left languages (for example, Arabic or
Hebrew). MediaCentral UX recognizes right-to-left characters (RTL). If more than 50 percent of all
segment text for a stratum consists of right-to-left characters, the text direction in the Text column
changes to right-to-left after you do one of the following:
• Click the Refresh button in the Logging pane toolbar
• Reload the asset from the Assets pane
All segments in a stratum change to use the same text direction.
You can also use the following keyboard shortcut to change the text direction:
• Ctrl+Shift+D
Text direction persists for all segments in a stratum unless the proportion of segment text changes or
you manually change the direction. If the first segment text you enter uses right-to-left, the next
segment text will begin with right-to-left, unless more than 50 percent of the text consists of left-to-
right characters or you manually change the direction.
You can copy and paste right-to-left text. If you paste text into the first segment of a stratum, you
need to use a keyboard shortcut to change the direction of the text. After that, the next segment will
use right-to-left direction.
nOverlay text in the Media viewer is displayed only as left-to-right.
To manually change text direction for segment text, do one of the following:
tPress Ctrl+Shift+D.
If the direction is left-to-right, pressing the keyboard shortcut changes direction to right-to-left. If
the direction is right-to-left, pressing the keyboard shortcut changes direction to left-to-right.
Annotating Using Tags
The Logging pane provides a Tags column to add tags to the stratum annotation. Tags are values of
properties that are not from type text, for example, date, timecode, or dictionaries. Tags help avoid
typos, secure that terms are used consistently across all assets, and can be added faster than when
typing manually. Which tags you can add to a stratum depends on the configuration of the stratum in
Interplay MAM Datamodel Administrator.
You can display the Segment List in Tags view or in Grid view. Tags view combines all tags in a
single column labeled “Tags,” as shown in the following illustration.
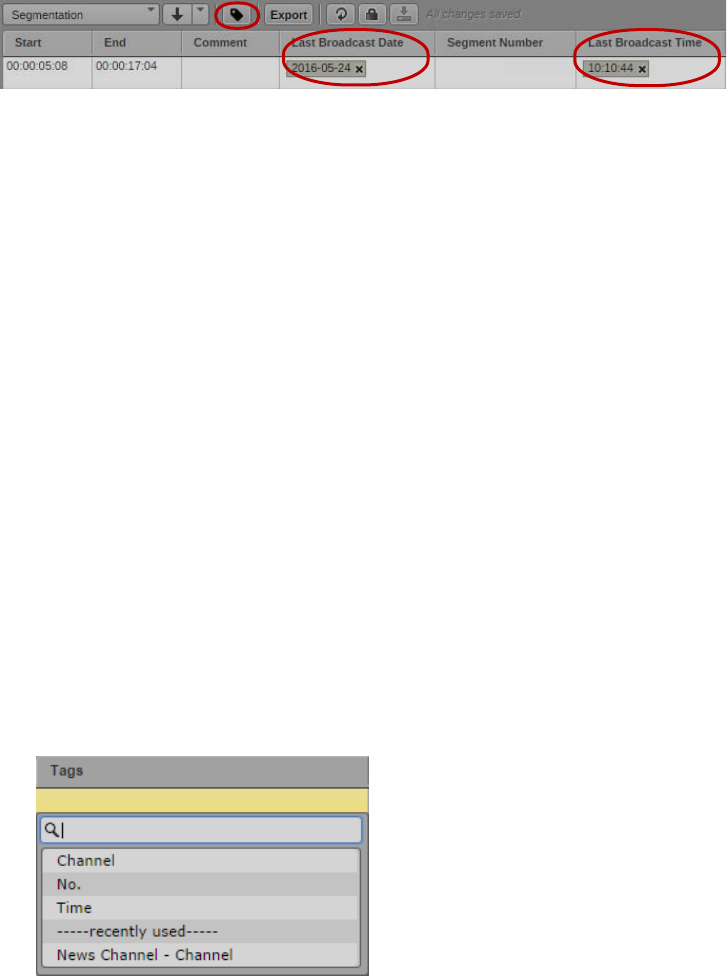
Annotating Using Tags
334
Grid view displays a separate column for each non-text property to display its tags, and the label set
in the data model for the property is used as column header, as shown in the following illustration.
For a list of keyboard shortcuts you can use when working with tags, see “Logging Pane (Interplay |
MAM) Shortcuts” on page 597.
Adding, Replacing, and Deleting Tags
You can add, replace, and delete tags from a segment at any time. Note that you can only add one tag
of the same type to a segment at a given time; adding a second tag of the same type replaces the
original tag. When you work with segments of a strata group, you can add a tag of the same type for
each stratum pooled in the group. For example, if your strata groups contains three strata which all
have a “date” property, you can have three tags of type “date.”
When you work in Tags view, you can add and replace a tag in several segments at the same time. In
Grid view, adding and replacing a tag is limited to the selected tags field.
To add a tag to a segment:
1. Do one of the following:
tRight-click the tags field and select Add Tag from the context menu.
tDouble-click the tags field.
tClick the tags field and press Enter.
tClick the tags field and press the Insert key.
The Tags selector window opens. It shows all properties that are configured for the stratum and
up to five recently used tags.
2. Do one of the following:
tDouble-click the property.
tNavigate down the list using the Down Arrow key until you reach the desired property and
press Enter.
tStart typing the name of the property in the search box to filter the list, select the property,
and press Enter.
t(Option) Double-click a recently used tag to insert it directly into the segment.
Annotating Using Tags
335
3. Type or select the value in the input control that opens.
4. Press Enter.
The tag is added to the segment.
(Tags view only) To add a tag to several segments at the same time:
1. To select several segments, done of the following:
tClick a segment and use the Up Arrow or Down Arrow key to select a series of segments.
tShift+click the two segments that begin and end the series of segments you want to select.
tCtrl+click the segments you want to select, regardless of order or arrangement.
tPress Ctrl+A to select all segments.
2. Open the Tags selector window.
3. Do one of the following:
tDouble-click a recently used tag.
tDouble-click a property, type or select the value, and press Enter.
The tag is added to all selected segments.
(Tags view) To replace tags:
1. Select one or several segments.
2. Open the Tags selector window.
3. Do one of the following:
tDouble-click a recently used tag.
tDouble-click a property, type or select the value, and press Enter.
The original tag is replaced by the new tag in all selected segments.
(Grid view) To replace a tag:
1. Double-click the tags field.
2. Type or select the new value in the input control that opens, and press Enter.
The original tag is replaced by the new tag in the selected segment.
To cancel tag insertion:
tPress the Esc key.
tClick outside the Tags selector window.
To delete a tag:
tClick the tag’s X button.

Annotating Using Tags
336
Editing Integer or Floating Point Values
Figures are the only values that can be entered into integer fields. Figures and decimal points can be
entered into floating point fields. When these fields are preformatted, the periods (such as in 2.3) are
set automatically.
To enter an integer or floating point value:
tType the figures, and if necessary, the decimal point.
tPress the Up Arrow or Down Arrow key to increase or decrease the figures.
The control replaces the old figures from right to left.
Editing Timecode or Duration Values
By default, Timecode and Duration fields are preformatted for different timecode types (PAL,
NTSC). They also support pasting copied timecodes.
To enter a timecode or duration:
tType in the figures, including “0”, from right to left.
The control replaces the old figures starting with the frames value from right to left.
tHighlight the timecode and press Ctrl+V to paste a copied timecode. If you paste an invalid
timecode, the field shows a zero timecode.
Selecting Boolean Values
Boolean values are “True” or “False.” You can select them from a drop-down list.
To set a Boolean value:
tClick the value in the list that opens.
tPress the Up Arrow or Down Arrow key to select a value and press Enter.
Editing Time Values
By default, the time fields are preformatted. The display format depends on the locale of your
account.
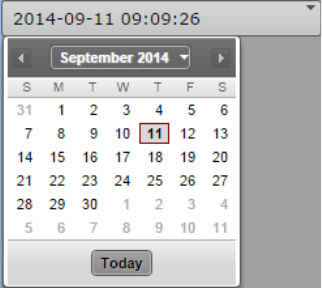
Annotating Using Tags
337
To enter a time:
tHighlight the figures you want to change and type in the new figures.
Editing Date and Date/Time Values
By default, the Date and Date/Time fields are preformatted. The display format depends on the locale
of your account. You can enter the entire Date or Date/Time values manually, or select the date value
from a calender tool.
To assign a date or date/time value manually:
1. Highlight the figures you want to change and type in the new figures.
2. Press Enter to insert the tag.
To assign the current day using the calendar control:
1. To open the Calendar control, do one of the following:
tClick the field’s Down Arrow button.
tWith the focus in the field press the Down Arrow key.
2. Do one of the following:
tClick the outlined number.
tClick the Today button.
tPress the spacebar.
The Calendar control is closed and the current date is entered in the date or date/time field.
To assign another date using the calendar control:
1. Open the Calendar control.
2. To select a year:
tPress Ctrl+Up key (previous year) or Ctrl+Down key (next year).
tClick the calendar’s Month/Year indicator, select the year, and click OK.
3. To select a month:
tPress Ctrl+Left key (previous month) or Ctrl+Right key (next month).
tClick the calendar’s Previous Month or Next Month arrow button.
tClick the calendar’s Month/Year indicator, select the month, and click OK.
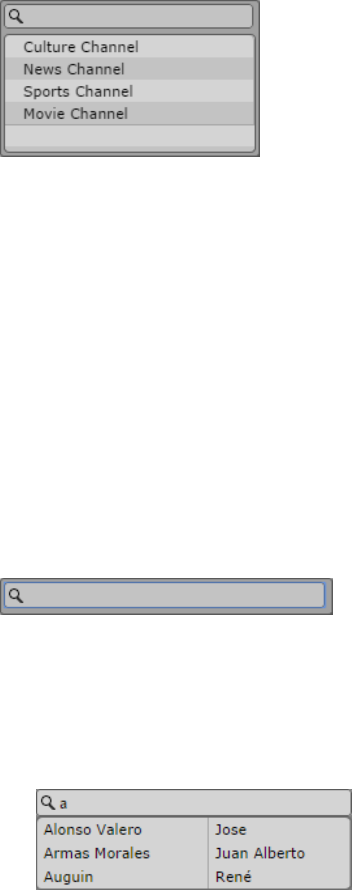
Annotating Using Tags
338
4. To select a day:
tClick the day.
tPress the Left Arrow key (previous day), Right Arrow key (next day), Up Arrow key (this
day a week ago), or Down Arrow key (this day next week) and press Enter.
The Calendar control is closed and the selected date is entered in the date or date/time field.
Assigning Values from Drop-Down Lists
Drop-down lists provide the available values of a property. When you open a property of type legal
list, the Tags selector window initially shows a search box and all values of the property. If you type a
letter, MediaCentral UX filters the values starting with that letter. As you continue to type,
MediaCentral UX continues to filter the list according to the letter you type.
To assign a value from a list, do one of the following:
tDouble-click the value.
tNavigate down the list using the Down Arrow key until you reach the desired value and press
Enter.
tStart typing the name of the value in the search box to filter the list, select the value, and press
Enter.
Assigning a Master Data Value
Master data, for example, data records about producers, actors, and so on, consist of multiple distinct
values. These multiple values are represented by one master data value, when used for annotation.
When you open a property of type master data, the Tags selector window initially shows an empty
search box.
To assign a master data value:
1. Start typing the name of the value in the search box. MediaCentral UX searches the values
starting with that letter. As you continue to type, MediaCentral UX continues to filter the list
according to the letter you type.
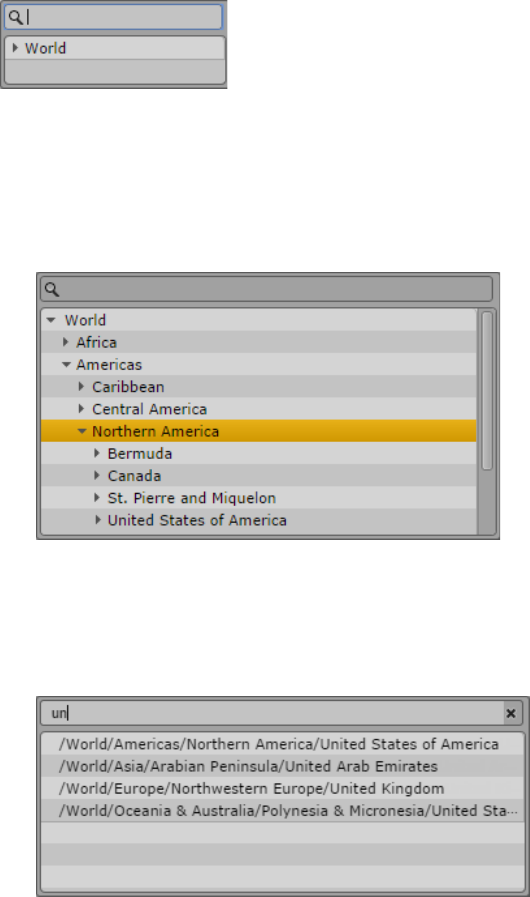
Annotating Using Tags
339
2. Do one of the following:
tDouble-click the value.
tNavigate down the list using the Down Arrow key until you reach the desired value and
press Enter.
Assigning the Term of a Thesaurus
Thesauruses are mostly used to provide larger sets of invariant terms that can be assigned as values to
a property. When you open a property of type thesaurus, the Tags selector window shows a search
box and the name of the thesaurus.
To assign a thesaurus term:
1. Do one of the following:
tNavigate the thesaurus using the Arrow keys: Press the Up Arrow or Down Arrow key to
move up and down, press the Right Arrow or Left Arrow key to expand or collapse a node.
tStart typing the name of the term in the search box. MediaCentral UX searches the terms
starting with that letter. As you continue to type, MediaCentral UX continues to filter the list
according to the letter you type. The Tags selector window additionally shows the path of the
term within the thesaurus.
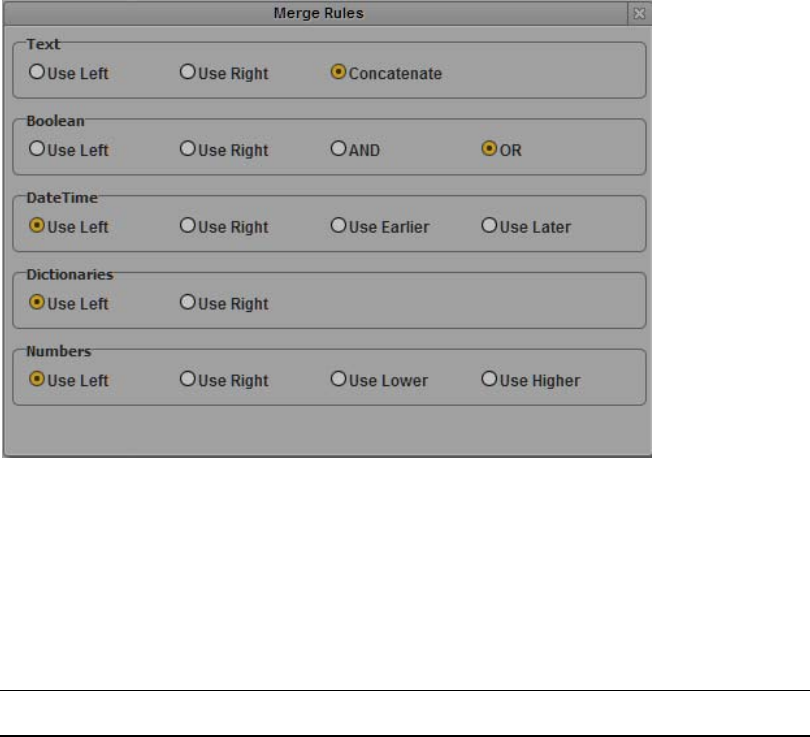
Defining Merge Rules for Annotated Segments
340
2. Do one of the following:
tDouble-click the term.
tNavigate down the list using the Down Arrow key until you reach the desired term and press
Enter.
Defining Merge Rules for Annotated Segments
The Logging pane provides rules to deal with annotation when you merge annotated segments. These
rules apply to the properties provided in a Merge Rules dialog box.
The Use Left and Use Right rules are the same for all property types:
• When you select Use Left, the annotation of the left segment is assigned to the merged segment.
• When you select Use Right, the annotation of the right segment is assigned to the merged
segment.
You can also apply property type specific rules:
Property type Rule Result
Text Concatenate The annotation of both segments is assigned to the
merged segment.
Boolean AND “True” is only assigned to the merged segment if it was
set in both original segments.
OR “True” is assigned to the merged segment if it was set
in one of the original segments.
DateTime Use Earlier
Use Later
The earlier/later date is assigned to the merged
segment.
Is also applied to Timecode properties.
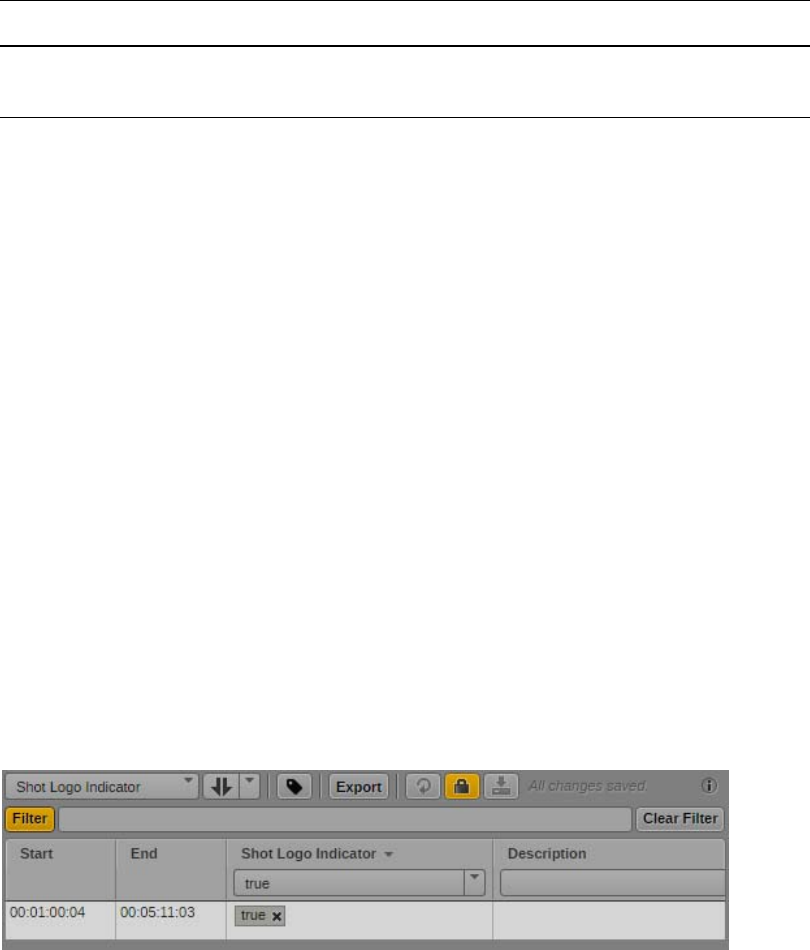
Filtering a Stratum
341
To define merge rules:
1. Click the Pane menu and select Merge Rules.
The Merge Rules dialog box opens.
2. Select the merge rule for each property type you want to change.
3. Click outside the dialog box or click the X button to close the Merge Rules dialog box.
The merge rules are saved in your user settings and are automatically applied when you merge
annotated segments. For more information on how to merge segments, see “Merging Segments” on
page 330.
Filtering a Stratum
If a stratum includes a large number of annotated segments, you can use filtering controls to display a
subset of the list:
• A general text filter that searches in all properties of the stratum.
• Property-specific filters: Each segment property provides a filter control: a selection list for
Boolean properties, a text box for all other property types.
To show only segments in the Logging pane that contain specific keywords, type a search string in
the general Filter box or in the property-specific filter box or select the value from the selection list. If
you use more than one filter box, all filters are combined with an AND condition.
The filter is saved with the asset. You can apply the filter directly when you open the asset again in
the Logging pane.
To filter a stratum:
1. Select the stratum.
2. To apply a general text filter to all segments at the same time, click in the Filter text box and start
to type. As you type, the segments are filtered according to the text you type. You can type more
than one word.
Numbers User Lower
User Higher
The lower/higher number is assigned to the merged
segment.
Property type Rule Result
Exporting Strata
342
3. To apply a filter to a specific segment, click in the filter control of the segment property and do
one of the following:
tFor a Boolean property, select “true” or “false” from the filter control.
tFor any other property type, begin typing text in the filter text box. You can type more than
one word. You can include the standard Boolean operators AND and OR.
The Filter button automatically turns orange. As you type, the segments are filtered according to
the text you type.
4. (Optional) Repeat step 3 for all segment properties you want to filter.
5. (Optional) To turn filtering off, click the Filter button so that it turns gray. The filter is disabled
but saved.
To turn filtering on again, click the Filter button so that it turns orange. The filter is applied.
6. (Optional) To remove filters, do one of the following:
tTo remove the filter from an individual property, delete the filter text or select “any” for a
Boolean property.
tTo remove all filters at the same time, click the Clear Filter button.
Exporting Strata
You can export strata annotation together with the metadata of an asset. You have the following
options:
• CSV: (Comma-separated value) file that you can open as a Microsoft Excel spreadsheet. Only
information of the stratum open in the pane is exported. If you apply a filter to the stratum open
in the pane, only information of the segments that are shown in the pane is exported. See
“Filtering a Stratum” on page 341.
• Normal AXF: All strata and metadata information are written to an Attribute Exchange Format
(AXF) file. For data types that use internal references (for example, thesauruses), the IDs are
exported.
• Localized AXF: Instead of IDs, the localized labels are exported for data types that use internal
references.
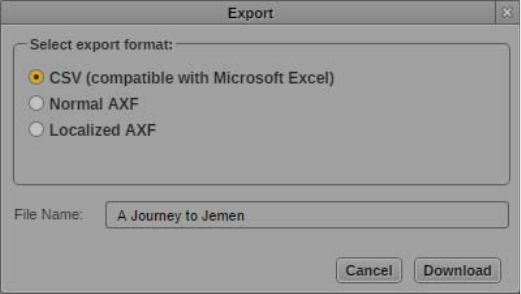
Exporting Strata
343
To export strata as a file:
1. Load an asset that includes annotated strata in the Logging pane.
2. (For CSV export) Select the stratum whose information you want to export and apply a filter to
the segments, if needed.
3. Click the Export button.
The Export dialog box opens.
4. Select the export format: CSV, Normal AXF, or Localized AXF.
5. Type a file name. You do not need to add an extension.
6. Click Download.
The file is saved to your default download folder.
The dialog box remembers the format you selected. This format is automatically selected the
next time you open the dialog box.
Depending on the region, when you open the exported CSV file in Microsoft Excel you might need
to change the used delimiter in Excel’s Text Import Wizard.

12 Working with Associations
(Interplay | MAM)
The following main topics provide information about working with associations between Interplay
MAM assets in MediaCentral UX:
•Understanding Associations
•The Associations Pane
•Working in the Associations Pane
•Viewing Associated Assets
•Filtering the Displayed Associated Asset Types
•Opening Associated Assets in Other Panes
•Reusing Associated Assets in Other Panes
•Switching Between Associated Assets
•Creating Associations
•Deleting Associations
Understanding Associations
Associations are relations between assets that help structure your assets. Associations also allow easy
and quick navigation (without searching) between assets.
The associations available are determined by the underlying data model. Associations can be non-
directional, directional, or hierarchical. The Interplay MAM default data model uses hierarchical and
directional associations.
• Hierarchical: Assets are associated in a superior and subordinate way. Hierarchical associations
automatically establish the corresponding reverse association. Example: When asset C
“contains” asset D, then automatically asset D “belongs to” asset C.
• Directional: Assets are associated in a sequential way. Directional associations automatically
establish the corresponding reverse association. Example: When asset A “refers to” asset B, then
automatically asset B “is referred to by” asset A.
The Interplay MAM default data model generally supports associations between assets of the same
class (for example, between two videos) and between different classes (for example, between video
and audio, or between video and basic sequence). The classes associated are determined by the
underlying data model. The data model also determines the icons and labels that are used for the
associations.
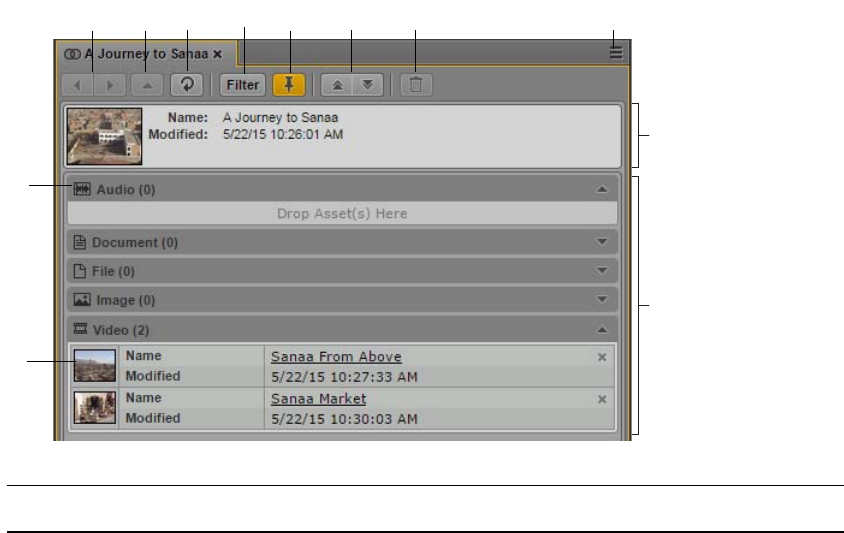
The Associations Pane
345
Associations can be created automatically by the system or manually in Interplay MAM Desktop and
MediaCentral UX. Which associations can be edited and created manually depends on the system
configuration. Once set, the references can be used in MediaCentral UX to navigate between
associated assets.
nIn a default configuration, hierarchical associations are automatically created between assets in the
following hierarchy lines: Series > Season > Episode > Episode Version, Commercial > Commercial
Version, and Feature > Feature Version. You cannot create or delete associations for assets of these
asset classes in the Associations pane.
The Associations Pane
The Associations pane is used to show you all assets that are associated with the selected asset. You
can review, change, and delete the displayed associations and navigate and browse the associated
assets. The following illustration shows several examples of what you might encounter when
displaying associations in the Associations pane.
qqwweerr
ro
ri
rtryru
ra
rs
rd
Display or Control Description
1 Navigation buttons Back button toggles the current view to the previous view in
the pane.
Next button toggles the current view to the next view in the
pane.
2 Parent button Navigates to the parent of the asset in the pane (hierarchical
associations only). The button is only enabled if the asset that
is open in the pane has one parent asset. If it has no parent or
more than one parent asset, the button is disabled.
3 Refresh button Refreshes the current view in the pane.

The Associations Pane
346
4 Filter button Toggles the filter for associated asset types on or off. When
toggled on, the button is colored orange, and the configured
filter is applied. When toggled off, the button is colored gray,
and all associated assets types of the asset that is open in the
pane are shown. See “Filtering the Displayed Associated
Asset Types” on page 349.
5 Pin button Toggles pinning of the current asset on or off. When pinning
is toggled on, the button is colored orange. Pinning prevents
the current asset from being replaced by an asset from another
pane. Pin the current asset to create associations. See
“Creating Associations” on page 352.
6 Expand All and Collapse All buttons Expand All button expands all associations types and shows
all associations in the pane. See “Viewing Associated Assets”
on page 348.
Collapse All button hides all associations from the pane and
shows only the Association types.
7 Delete button Deletes the selected associations. See “Deleting
Associations” on page 355.
8 Pane Menu button The Pane menu for the Associations pane contains the
following options:
• Add or Remove Filters. Allows you to apply an
association type-based or content-based filter to the
Associations pane. See “Filtering the Displayed
Associated Asset Types” on page 349.
• Actions. Creates a process in the MAM system and
attaches the assets that are selected in the Associations
pane to the process. See “Creating Processes” on
page 431.
• Delete. Deletes the selected associations.
• Open in Asset Mode. Opens a sequence in Asset mode in
the Media pane. The menu item is only enabled if you
select a sequence in the Associations pane. See “Using a
Basic Sequence as a Source for a Sequence (Interplay |
MAM)” on page 171.
• Help. Displays a Help topic describing controls in the
Associations pane. From this topic you can access the
entire MediaCentral UX Help system.
9 Current Asset (“Source Asset”) Shows metadata of the asset that is currently open in the
Associations pane (“source asset”).
10 Associations List Shows all assets associated with the current asset grouped by
association types. You can expand and collapse all association
types in the Associations List using the toolbar Expand and
Collapse buttons.
Display or Control Description

Working in the Associations Pane
347
Working in the Associations Pane
The Associations pane is divided into the Asset Details and Associations List areas, which are both
shown at the same time.
To open the Associations pane:
tSelect Panes > Associations.
To close the Associations pane:
tClick the X in the pane’s tab.
To open an asset in the Associations pane:
tDouble-click an asset in the Assets or Search pane.
You see the following:
- If the Associations pane is empty, the asset opens in the pane.
- If an asset is already open in the Associations pane and the asset is not pinned, the new asset
opens in the pane.
- If an asset is already open in the Associations pane and the asset is pinned, the new asset
does not open in the pane.
11 Association Types Each association type that can be set for the current asset is
shown as a separate group. For each association type, the
following are shown:
• An association type icon
• The association type name followed by the number of
associations in brackets
• An Expand/Collapse toggle button. Use the button to
show and hide the associations of the associations type.
As long as no association is created, the Drop Assets Here
area is shown. See “Creating Associations” on page 352.
12 Associations Each associated asset (“association”) is shown as an asset
card. For each association, the following are shown:
• A header frame or placeholder icon. Double-click the
header frame to open the asset in another pane. See
“Opening Associated Assets in Other Panes” on page 350.
• The asset name. Click the asset name link to open the
asset in the Associations pane. See “Switching Between
Associated Assets” on page 351.
• The Modified date
• A Delete button. See “Deleting Associations” on
page 355.
Display or Control Description
Viewing Associated Assets
348
To show and hide associations:
tClick the Expand All button to expand all association types and show all associations in the
Associations List.
tClick the Collapse All button to collapse all association types and hide all associations from the
Associations List.
To select several associations:
tCtrl+click the associations you want to select, regardless of order or arrangement.
tClick an association and then Shift+click the association that ends the series of associations you
want to select.
tShift+click an association above or below the highlighted selection.
To remove the selection, click the Refresh button or collapse the association type that includes
selected associations.
To navigate through the Association pane history:
tClick the Back button to navigate to the previous view in the pane.
tClick the Next button to navigate to the next view in the pane.
To navigate to the parent asset in the pane (hierarchical associations only)
tClick the Parent button.
To refresh the displayed associations:
tClick the Refresh button.
Viewing Associated Assets
The Associations pane lets you see all associations of the asset currently open in the pane. By default,
the pane shows all association types that can be set for the asset in collapsed mode. Which
association types can be set is defined by the underlying Interplay MAM data model.
To display associated assets:
1. Open the asset for which you want to see the associations in the Associations pane.
2. Do one of the following:
tClick the Expand All button.
All association types are expanded and all associations are shown in the Associations List.
tClick the Expand button of an individual association type.
The association type is expanded and its associations are shown in the Associations List.
Each association is displayed as an asset card that provides basic information on the associated
asset and a link to open the asset in the Associations pane.
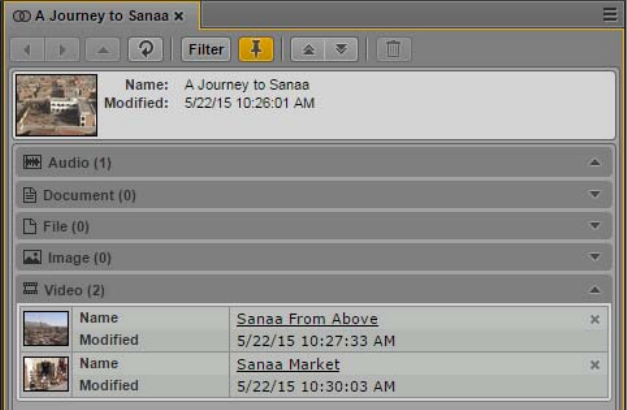
Filtering the Displayed Associated Asset Types
349
Filtering the Displayed Associated Asset Types
The Associations pane lets you see all associations of the asset currently open in the pane. By default,
the pane shows all associated asset types that can be set for the asset. You can apply a filter to do the
following:
• Show and hide associated asset types for which no associations are currently defined
• Show and hide specific associated asset types
Use the Add or Remove Filters window to formulate filters. Note the following:
• The filter window shows all associated asset types that are configured for the Interplay MAM
system of the source asset that is open in the pane. It is not limited to the associated asset types
that can be set for the asset.
• The filter window allows selecting and applying filters based on associated asset types and
content. The groups are cumulative: You select the associated asset type and decide then if it has
to be empty or populated so that it can be shown.
• The filter window does not prevent you from formulating an invalid filter (for example, if you
deselect both content types). If you create an invalid filter, the Associations pane does not show
any associated asset type at all after the filter is applied.
• The filter persists from one session to another.
To filter the displayed associated asset types:
1. Open the asset for which you want to see the associations in the Associations pane.
2. Click the Pane Menu button.
3. Select Add or Remove Filters.
The Add Or Remove Filter window opens. It shows the name of the system from which the
source asset was opened. The filter list is divided in Association Types and Content.
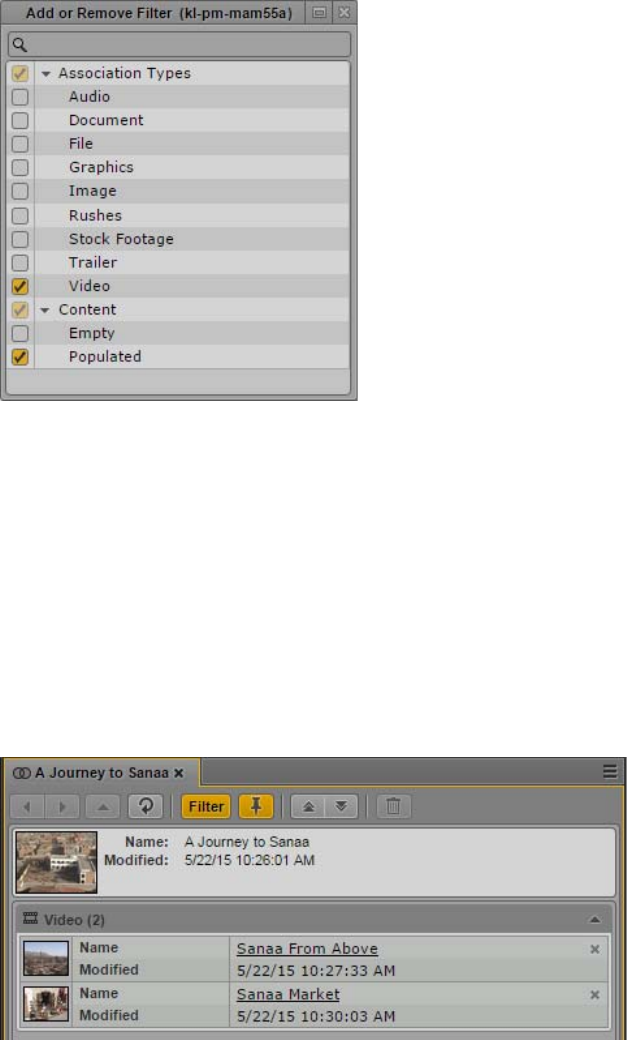
Opening Associated Assets in Other Panes
350
4. Select the filter you want to apply or deselect the filter you want to cancel:
tTo apply an associated-asset-type filter, expand Association Types and select the associated
asset types you want to show. All associated asset types are selected by default.
tTo apply a content filter, expand Content and select Empty or Populated. Both content types
are selected by default.
You can use the search box to find a particular filter.
5. Click the Close box or click anywhere outside the window to save your settings and apply the
filter.
The Associations pane shows the associations that match the selected filter. This setting persists
from one session to another.
6. To display all associated asset types again, click the orange Filter button so that it turns gray.
Opening Associated Assets in Other Panes
You can use the existing associations to directly open connected assets. As a result, you do not have
to search for them again and again. Pinning the source asset has no effect on how associated assets
are opened in other panes. Note that you can also open the source asset in other panes.
Reusing Associated Assets in Other Panes
351
To open associated assets in other panes:
1. (Optional) Open all panes you want to use for the associated asset. For example, for a video
asset, open the Media pane, Metadata pane, and Thumbnails pane.
2. Open the asset for which you want to see the associations in the Associations pane.
3. Expand the association types in the Associations List.
4. Double-click the header frame of the association.
The associated asset is opened in each appropriate pane that is open in MediaCentral UX. The
source asset is still displayed in the Associations pane.
Reusing Associated Assets in Other Panes
You can reuse assets that are shown in the Associations pane (the source asset and its associated
assets) directly in other panes. You can add assets to a folder in the Assets pane, add them as
attachments to a task in the Tasks pane, or add an asset as attachment to a message in the Messages
pane.
You can select assets of the same and different associations types at the same time. Note that clicking
an association type or including an association type in a multi-selection series does not select the
associations in it; you must expand the association type and select the individual assets in it.
To reuse associated assets in other panes:
1. Open all panes in which you want to reuse associated assets (Assets pane, Tasks pane, or
Messages pane).
2. Open the asset from which you want to reuse associated assets in the Associations pane.
3. Expand the association types in the Associations List.
4. Do one of the following:
tSelect one or several assets and drag them to the asset area of a task in the Tasks pane.
A head frame of the video asset or a clip icon of an audio asset is displayed in the asset area,
along with metadata describing the asset. If you dragged an invalid asset type, a message is
displayed and the asset is not attached.
tSelect one or several assets, drag them to the name or icon of the folder into which you want
to paste the asset reference in the Assets pane, and release the mouse button.
Valid asset references are pasted into the folder, and references to assets that are not allowed
as contents of the folder are not pasted. If there is already a reference to an asset with the
same identifier in the folder, a message is displayed and the asset is not pasted.
tSelect an asset and drag it to the asset area of the message in the Messages pane.
A head frame of the video asset or a clip icon of an audio asset is displayed in the message,
along with metadata describing the asset.
Switching Between Associated Assets
You can use the Associations pane to switch between the source asset and an associated asset directly
within the Associations pane. Pinning the source asset has no effect on whether it is replaced by the
associated asset.
Creating Associations
352
If the asset is included in a hierarchical association, you can directly open the parent asset in the
Associations pane. The Parent button is enabled only if the asset open in the pane has one parent
asset. If the asset has no parent or more than one parent asset, the button is disabled.
To navigate using associations:
1. Open the asset for which you want to see the associations in the Associations pane.
2. Expand the association types in the Associations List.
3. Click the linked name of the associated asset you want to open in the Associations pane.
The asset is opened and set as new source asset in the Associations pane.
4. (Optional) Click the Back button to open the previously displayed asset in the Associations pane
again.
5. (Optional) Click the Parent button to navigate to the parent asset of the asset open in the pane.
The parent asset is opened and set as the new source asset in the Associations pane.
Creating Associations
You can create new associations in the Associations pane: either relating already created assets or
adding relations to new assets by uploading files to Interplay MAM. Note the following limitations:
• You must have the proper permissions in Interplay MAM.
• Which asset types can be associated is defined and restricted by the underlying Interplay MAM
data model.
• You can only associate assets from the same Interplay MAM system.
• Your ability to upload files depends on Interplay MAM user privileges and rules.
To allow previewing assets without loading them in the Associations pane (for example, for a review
before setting the association), the current asset can be pinned: if the asset is pinned, loading new
assets is ignored.
To associate already created assets:
1. Open the asset for which you want to create new associations in the Associations pane.
2. To turn pinning on, click the Pin button so that it turns orange.
3. Expand the associations types in the Associations List.
4. Display the assets you want to use for creating new associations in other panes:
tOpen the folder containing the assets in the Assets pane.
tSearch for the assets in the Search pane.
tOpen the asset in the Media pane.
tOpen the Tasks pane and display the attachments of a task.
tOpen the Messages pane.
5. Do one of the following:
tClick one or several assets in the Assets pane and drag them to the associations of the
desired association type in the Associations pane.
tClick one or several assets in the Search pane and drag them to the associations of the
desired association type in the Associations pane.
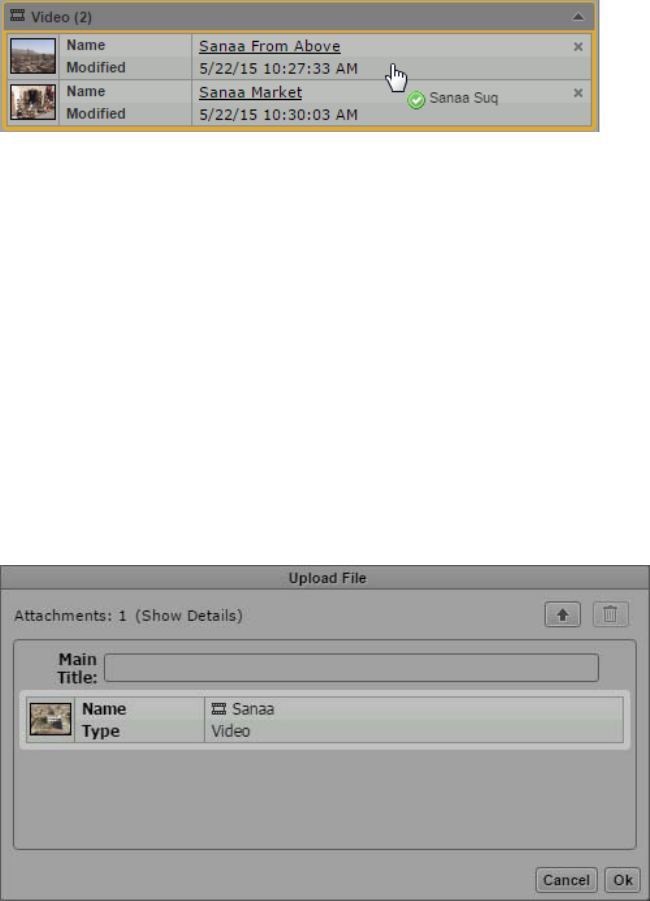
Creating Associations
353
tClick the asset displayed in the Media viewer in Asset mode and drag it to the associations
of the desired association type in the Associations pane.
tClick one or several assets in the Task pane’s assets area and drag them to the associations of
the desired association type in the Associations pane.
tClick the asset attached to a message in the Messages pane and drag them to the associations
of the desired association type in the Associations pane.
The associations (or the Drop Assets Here area, if there is no association until yet) are
highlighted in orange, and a green icon indicates if dropping is possible.
For each association an asset card is shown. A head frame of the video asset or a clip icon of an
audio asset is displayed, along with metadata describing the asset and a link that you can use to
open the associated asset in the Associations pane.
If you dragged an invalid asset type or an asset that is already associated, a message is displayed
and the association is not created.
To associate new assets:
1. Open the asset for which you want to create new associations in the Associations pane.
2. Click the Pane Menu button and select Actions.
3. (Optional) Select the MAM system on which the process is to be created.
4. Select the Upload File process type and then the “Upload file” menu item.
The Upload File process creation dialog box opens. It shows the asset for which you create
associations as an asset card.
5. (Optional) Provide a name of the process in the Main Title field. This name is shown in the
Progress pane. If you do not type a title, “null” is shown as process name in the Progress pane.
6. Click the Upload button in the process dialog box, select the files to be uploaded and click OK in
the Open dialog box.
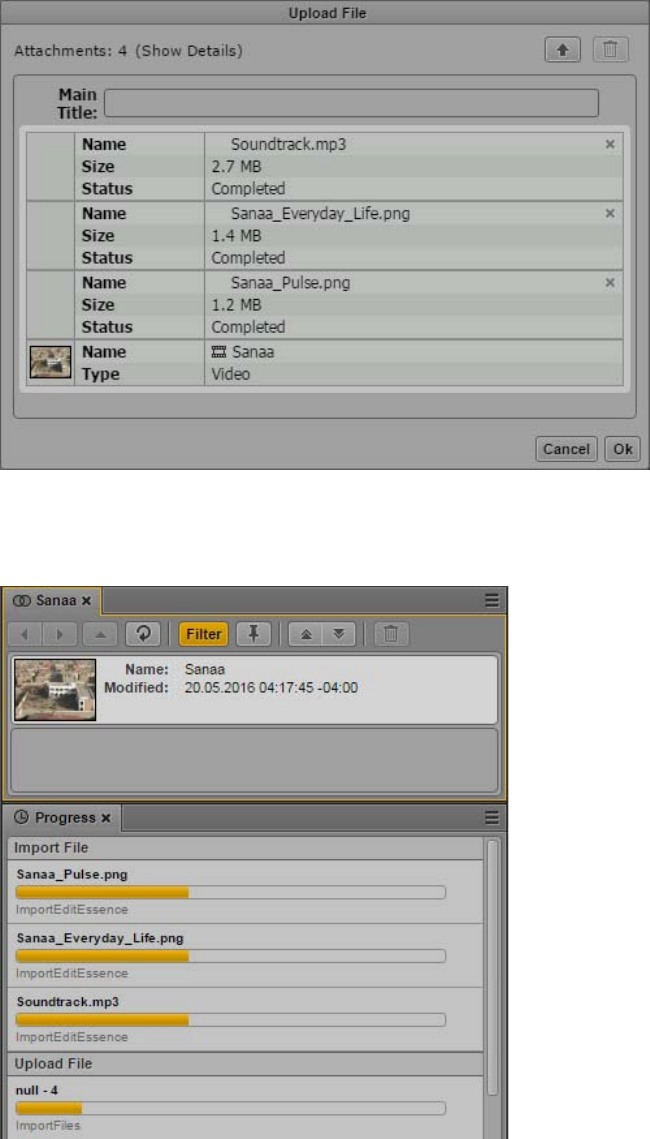
Creating Associations
354
The Upload File dialog box shows the files you selected. Each file will be imported and
registered as a new asset in Interplay MAM using the file name as main title of the new asset.
Each new asset is associated to the selected source asset.
7. Click OK to close the Upload File dialog boy and start the upload process.
8. (Optional) Open the Progress pane and monitor the progress of the Upload File process.
9. When the file import is finished, click the Association pane’s Refresh button.
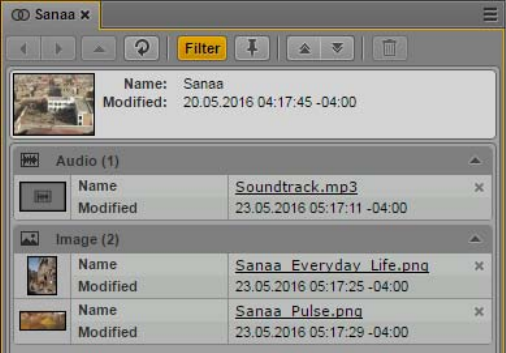
Deleting Associations
355
For each association an asset card is shown. A head frame of the video asset or a clip icon of an
audio asset is displayed, along with metadata describing the asset and a link that you can use to
open the associated asset in the Associations pane.
Deleting Associations
You can delete associations if you have the proper permissions in Interplay MAM. If deleting
associations is not allowed, the assets cards do not show a Delete button.
To delete an association:
1. Open the asset from which you want to delete an association in the Associations pane.
2. Expand the association types in the Associations List.
3. Click the Delete button of the association you want to delete.
The association is deleted. The Associations pane is updated and the association is no longer
displayed.
To delete associations:
1. Open the asset from which you want to delete an association in the Associations pane.
2. Expand the association types in the Associations List.
3. Select the associations you want to delete.
4. Do one of the following:
tClick the Associations Pane Delete button.
tClick the Pane Menu button and select Delete.
The associations are deleted. The Associations pane is updated and the associations are no longer
displayed.

13 Working with the File Info Pane
(Interplay | MAM)
The following main topics provide information about working with essences of Interplay MAM
assets in MediaCentral UX:
•Understanding Essences and Essence Packages
•The File Info Pane
•Working in the File Info Pane
•Editing the Properties of an Essence Package
•Cleaning Up Essence Packages
•Editing the Properties of an Essence
•Displaying Locations Details for an Essence
Understanding Essences and Essence Packages
The File Info pane provides information about video, audio, image, and text files. In Interplay MAM,
such files are described as essences. The File Info pane shows in detail how the essence files that
belong to the asset open in the pane are organized.
Essences
In Interplay MAM, essence refers to the pure media data of an asset without any descriptive
metadata, for example, a video file. Essences are organized in essence packages. Essences are added
to essence packages when they are ingested or imported.
Essence Packages
An essence package is a group of essences classified semantically. Each essence package contains a
set of essences that represent the same content and share the same general purpose.
An asset can contain a number of essence packages and each essence package can contain an
unlimited number of essences, but they should be of the same content; examples are movie, trailer,
stills, script, and so on. The essences within a package can differ in technical features, such as
resolution, quality (HiRes or Browse), format, bit rate, and more, but they still represent the same
content. For example, the script for a movie should not be in the same essence package as the movie
itself, even though they both belong to the same asset. The keyframes of a video are always stored in
the same essence package as the video itself. They are considered a different representation of the
same content.
The File Info Pane
357
Representative Essence Package
One essence package is defined as the representative essence package of the asset. The representative
essence package contains the essences that represent the purpose of the asset. The essences in this
package are opened by default when an essence or essence package is requested by an other
component. The representative essence package can be changed manually or by workflow.
Timecode Handling in Essence Packages
The metadata of an essence package can contain information on the start of content (SOC), end of
content (EOC), and the timecode master. This information is then used to handle requests for
timecodes of the essences in the essence package.
SOC and EOC define the accessible area of the essences in the package. This indicates that SOC and
EOC are the same for all essences of an essence package. If two essences of the same asset have
different SOC and EOC, they must be stored in different essence packages.
A timecode master is the essence within an essence package that is used to determine timecodes,
timecode leaps, and so on. This essence has been video-analyzed, or will be video-analyzed when the
video analysis is triggered. Requests for or calculations of timecodes are answered by the timecodes
of the timecode master essence.
Locations, Carriers, and Pools
The essences are managed in locations on carriers and pools. A carrier is a physical medium that
stores essence files. Carriers can be disks, tapes, or even entire tape archive systems. The scope of a
carrier depends on the granularity that is required to access an essence. A pool is a device or part of a
device that holds one or more carriers.
The File Info Pane
The File Info pane displays all essences that are managed for the selected asset and how they are
organized. You can display detail information, inspect properties, and edit properties. The following
illustration shows several examples of what you might encounter when displaying essences in the
File Info pane.
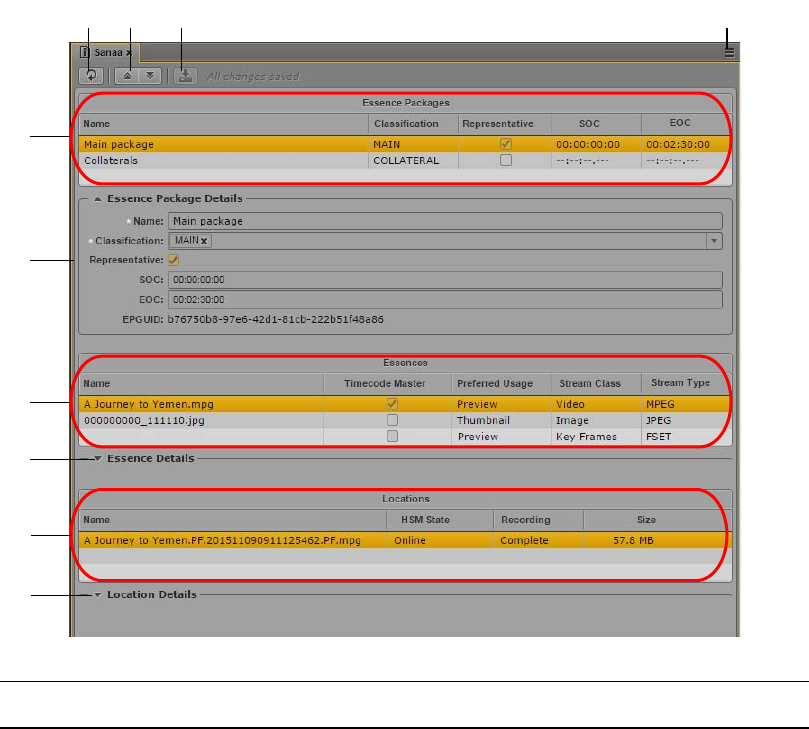
The File Info Pane
358
rr
qo
wa
tt
qqww
i
qy
u
ee
Display or Control Description
1 Refresh button Refreshes the current view in the pane.
2 Expand All and Collapse All
buttons
The Detail areas of the File Info pane are collapsed when you open the
pane.
• Expand All button expands all Detail areas (Essence Package
Details, Essence Details, and Location Details) and shows all
detail information in the pane.
• Collapse All button hides all detail information from the pane and
shows only the information in the Overview areas.
3 Save button Saves the changes you made to the properties of the essence in the
Essence Package Details and Essence Details areas. The status
message beside the Save button displays whether or not changes are
saved. The messages are “Unsaved changes,” “Saving,” or “All
changes saved.”

The File Info Pane
359
4 Pane Menu button The Pane menu for the File Info pane contains the following options:
• Actions. Creates a process in the MAM system and attaches the
asset that is open in the File Info pane to the process. See
“Creating Processes” on page 431. Use the Actions menu item if
you want to clean up essence packages. See “Cleaning Up
Essence Packages” on page 364.
• Help. Displays a Help topic describing controls in the File Info
pane. From this topic you can access the entire MediaCentral UX
Help system.
5 Essence Packages Shows the essence packages of the asset that is currently open in the
File Info pane in read-only mode. The topmost essence package is
selected and highlighted by default. See “Information in the Essence
Packages area” on page 360.
6 Essence Package Details Shows detail information for the essence package selected in the
Essence Packages table.
If you have the appropriate privileges in Interplay MAM, you can edit
the essence package details. See “Editing the Properties of an Essence
Package” on page 363.
7 Essences Shows the essences of the essence package that is selected in the
Essence Packages table in read-only mode. The topmost essence is
selected by default. See “Information in the Essences area” on
page 360.
8 Essence Details Shows detail information for the essence selected in the Essences
table. Which information is shown depends on the stream class of the
selected essence.
If you have the appropriate privileges in Interplay MAM, you can edit
the essence details. See “Editing the Properties of an Essence” on
page 365.
9 Locations Shows the locations of the essence that is selected in the Essences
table in read-only mode. The topmost location is selected by default.
See “Information in the Locations area” on page 362.
10 Location Details Shows detail information for the location selected in the Locations
table in read-only mode. See “Displaying Locations Details for an
Essence” on page 367.
Display or Control Description
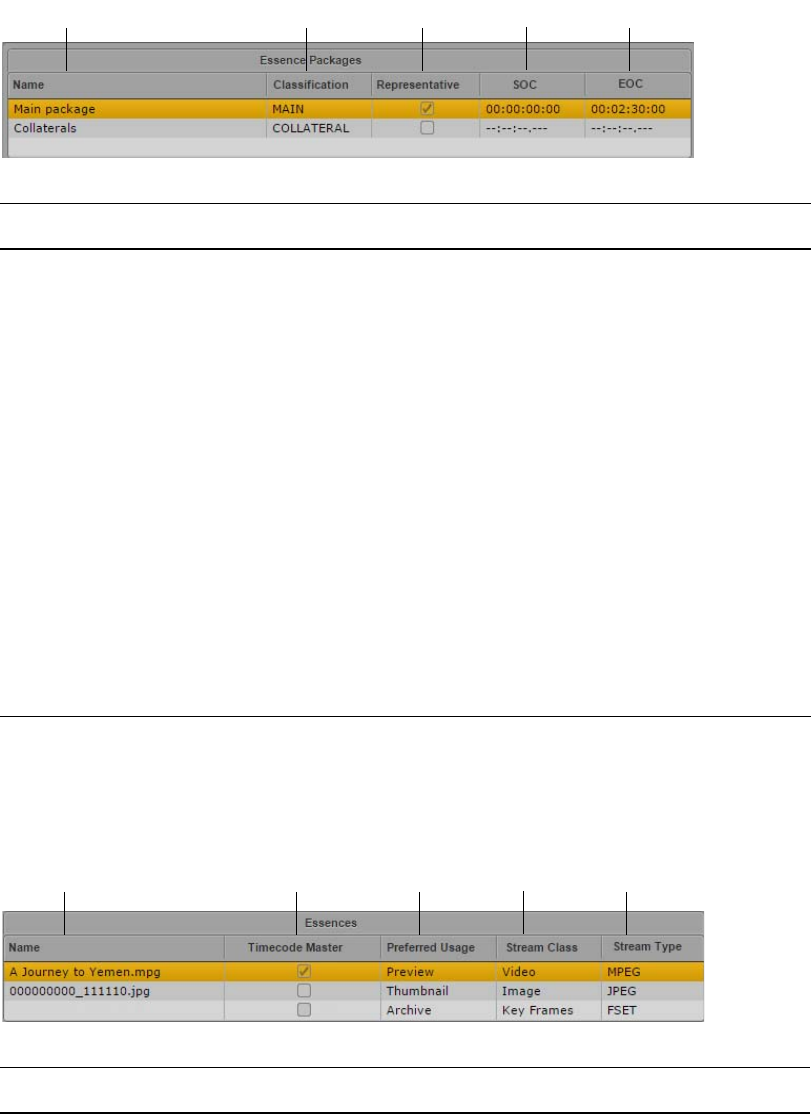
The File Info Pane
360
Information in the Essence Packages area
The Essence Packages area shows the following information for all essence packages of the open
asset in read-only mode:
Information in the Essences area
The Essences area shows the following information for the essence package that is selected in the
Essence Packages area in read-only mode:
rrttqqwwee
Display Description
1 Name The name of the essence package. It is set automatically to “Main package”
when the essence package is created by a workflow. You can change the name.
2 Classification Essence packages are classified according to semantic criteria — for example,
the purpose for which their essences are used. The classification is selected from
a list. In the default configuration, the list contains the following values:
•MAIN
• COLLATERAL
3 Representative For every asset there is exactly one representative essence package. The
representative essence package is designated by a check mark in the
Representative column.
4 SOC The Start of Content (SOC) displays the start timecode of the accessible area of
the essence that is contained in the essence package. It can be set manually or by
a workflow; for example, to exclude color bars at the beginning of a video.
5 EOC The End of Content (EOC) displays the end timecode of the accessible area of
the essence that is contained in the essence package. It can be set manually or by
a workflow; for example, to exclude black frames at the end of a video.
rrttqqwwee
Display Description
1 Name Shows the original name of the essence file. This is the name of the essence
when it was imported or created in Interplay MAM.

The File Info Pane
361
2 Timecode Master If the asset is a video or audio, an essence packages contains the essence for
which the timecode is referred; for example, when a basic sequence is created.
This essence is designated as the timecode master by a check mark in the
Timecode Master column. The Timecode Master essence is determined
automatically but you can change the assignment.
3 Preferred Usage The intended usage of the essence. The usage is assigned to an essence when it is
imported or created in Interplay MAM. It is extracted from the essence’s stream
type and mapped to a fixed list of values:
• Archive (PRESERVE, usage: preservation, archiving)
• Editing (EDIT, usage: editing)
• Distribution (DISTR, usage: transmission)
• Preview (BROWSE, usage: browsing)
• Thumbnail (THUMB, usage: representative image)
• Auxiliary File (AUX, usage: auxiliary file within a stream consisting of
multiple files)
• File (ANY, usage: not defined or unknown usage, application may interpret
from essence parameters)
4 Stream Class The stream class of the essence. It is assigned to an essence when it is imported
or created in Interplay MAM. It gives a top level indication of the primary
content of the essence and is detailed by the stream type. The following stream
classes are supported:
• Video: visual, time- and spatial-coded content which usually contains sub
content streams
• Audio: audible, time-coded content
• Image: visual, spatial-coded content
• Image Sequence: visual, spatial-coded content with several pages (such as
multi-paged TIFF, animated GIF)
• Document: legible, formatted content, may be spatial-coded and paged (for
example PDFs)
• Text: legible unformatted content (without paging information), such as plain
text or HTML (excluding referenced media)
• Key Frames: visual, time- and spatial-coded discontinuous content
• File: any other digital content
5 Stream Type The file format of the essence. The stream type is recognized when an essence is
imported or created in Interplay MAM. The base for determining the essence’s
stream type is its file extension. Interplay MAM’s standard configuration
provides a preconfigured mapping of file extensions and stream types.
Display Description
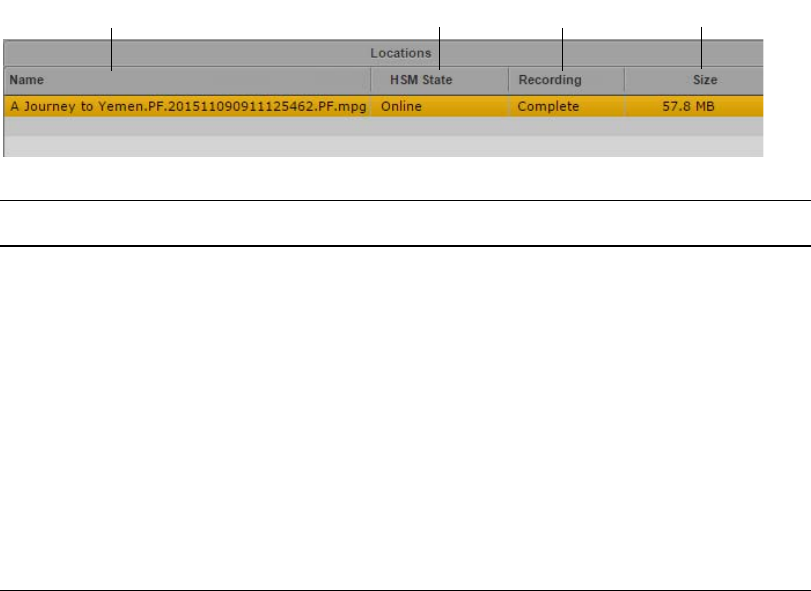
Working in the File Info Pane
362
Information in the Locations area
The Locations area shows the following information for the essence that is selected in the Essences
area in read-only mode:
Working in the File Info Pane
The File Info pane is divided into the Overview and Detail areas. The Overview areas provide
information in read-only mode; if you have the appropriate privileges in Interplay MAM, you can
edit essence properties in the Detail areas. For easier comprehension, the Detail areas of the File Info
pane are collapsed when you open the pane. In the Overview areas the topmost entry is selected and
highlighted by default.
To open the File Info pane:
tSelect Panes > File Info.
To close the File Info pane:
tClick the X in the pane’s tab.
To open an asset in the File Info pane:
tDouble-click an asset in the Assets, Associations, Search, or Tasks pane.
You see the following:
- If the File Info pane is empty, the asset opens in the pane.
- If an asset is already open in the File Info pane, the new asset opens in the pane.
rrqqwwee
Display Description
1 Name Shows the file name of the essence’s copy on that location.
2 HSM State Hierarchical Storage Management state. Indicates the online status of the essence’s
copy on that specific location:
• Online
• Near Online
• Offline
3 Recording Indicates whether the file is still being recorded to the specific location:
• Recording
• Complete
4 Size Size of the essence’s copy on that location.
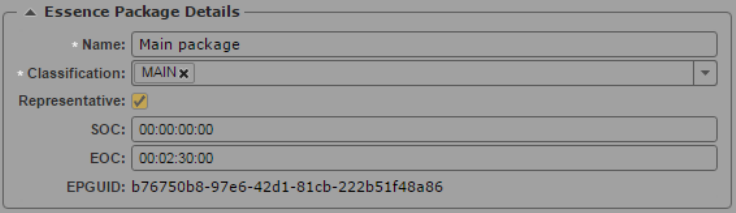
Editing the Properties of an Essence Package
363
To show and hide details:
tClick the Expand All button to expand all details and show all information in the Essence
Package Details, Essence Details, and Location Details areas.
tClick the Collapse All button to collapse all details and hide all detail information from the
Essence Package Details, Essence Details, and Location Details areas.
tClick the Expand/Collapse toggle button of an individual Details area to show or hide its details.
To refresh the displayed files and information:
tClick the Refresh button.
Editing the Properties of an Essence Package
The File Info pane lets you see all essence packages of the asset currently open in the pane. For the
essence package selected in the Essence Packages area, you can show and edit properties in the
Essence Package Details area; by default the Essence Package Details area is collapsed. In the File
Info pane, if a property is editable, a text box, drop-down menu, or other input control is displayed.
Your ability to edit essence package properties depends on Interplay MAM user privileges and rules.
To edit essence package properties:
1. Open the asset for which you want to edit essence package properties in the File Info pane.
2. Select the essence package in the Essence Packages area.
3. Click the Expand button of the Essence Package Details area to display the details of the selected
essence package.
4. Do one of the following:
tClick in the Name field and type the new name.
Name is a mandatory field and cannot be empty.
tClick the Classification list and double-click the desired value or check its check box.
Classification is a mandatory field and cannot be empty.
tSelect the Representative check box.
Since an asset can have only one representative essence package, if you select this check
box, you automatically remove the representative flag from another essence package when
you save your changes.
tClick in the SOC field, enter the desired value for the start timecode by typing the first digit,
and continue typing until you have typed 8 digits.
Cleaning Up Essence Packages
364
tClick in the EOC field, enter the desired value for the end timecode by typing the first digit,
and continue typing until you have typed 8 digits.
To save changed properties:
tClick the Save button.
The save status message changes from “Unsaved changes” to “All changes are saved.”
If you have unsaved changes and select another essence package, load another asset, or close the
File Info pane, you are prompted to save the changes.
Cleaning Up Essence Packages
You can delete files from essence packages in MediaCentral UX. For example, if you want to run a
process that imports a modified video file into an existing asset, the process might require that the
MAIN essence package is empty. To do so, you can start a Cleanup essence packages process from
different panes:
• In the File Info and Media pane, you can clean up the essence packages of the asset open in the
pane.
• In the Associations, Assets, and Search panes, you can clean up the essence packages of up to 50
assets at the same time.
Note the following limitations:
• You can clean up essence packages if you have the proper permissions in Interplay MAM.
• You can clean up essence packages of Interplay MAM assets only. In addition, this requires you
to select the clean up process from the same MAM system that also manages the assets.
• The cleanup essence package process removes all files from the essence package but it does not
delete the essence package itself.
nIf you plan to trigger the Cleanup essence packages process from a pane other than the File Info
pane, check the essence packages to be cleaned up prior to invoking the clean up process.
To clean up essence packages:
1. Do one of the following:
tOpen an asset in the File Info pane.
tOpen an asset in the Media pane.
tOpen an asset in the Associations pane and select the assets whose essence packages you
want to clean up (the source asset and any of its associated assets).
tIn the Assets pane, navigate to the desired folder and select the assets whose essence
packages you want to clean up.
tIn the Search pane, conduct a search and select the assets whose essence packages you want
to clean up.
2. Do one of the following:
tClick the Pane Menu button and select Actions.
t(Assets and Search pane only) Right-click and select Actions.
3. (Option) Select the MAM system on which the process is to be created. This must be the system
from which the asset was opened.
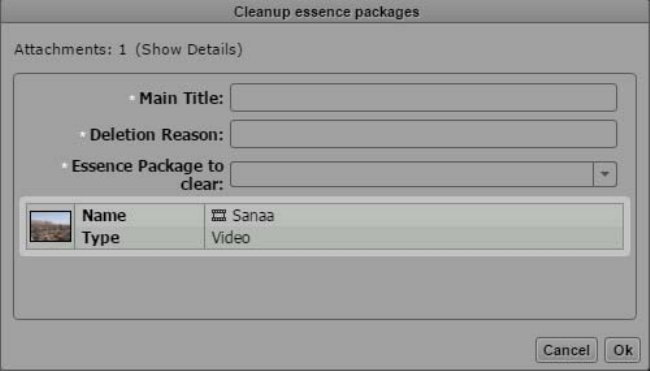
Editing the Properties of an Essence
365
4. Select the Cleanup Essence Packages process type.
The Cleanup Essence Packages process dialog box opens and shows the selected assets as
attachments.
5. Provide a main title and a cleanup reason.
6. Click the Essence Package to Clear list and select one of the following:
tRepresentative: Clean up the representative essence package.
tCollateral: Clean up all essence packages that are not marked as representative.
tAll: Clean up all essence packages.
7. Click OK.
The Cleanup Essence Packages process dialog box is closed and the cleanup process is triggered.
8. (Option) Open the Progress pane and monitor the progress of the cleanup process.
When all essence packages are cleared, the Progress pane shows a “Finished” message.
After cleaning up a representative essence package, you cannot play back the asset in the Media pane
any longer. When you try to open the asset, the Media pane shows “Media Offline.”
Editing the Properties of an Essence
In the File Info pane, for the essence package selected in the Essence Packages area all essences are
shown in the Essences area in read-only mode. For the essence selected in the Essences area, you can
show properties in the Essence Details area; by default the Essence Details area is collapsed.
Use the Essence Details area to get an overview on technical properties of the essence and its values
that are normally set by workflows and processes. In cases where the automatic classification was not
correct, you can use the Essence Details area to correct values, for example, if a preferred usage was
incorrectly assigned or to delete a timecode leap.
Your ability to edit essence properties in the Essence Details area depends on Interplay MAM user
privileges and rules. For security reasons, the edit essence property privilege is not assigned to a user
group by default but must be explicitly assigned to administrators in Interplay MAM. In the File Info
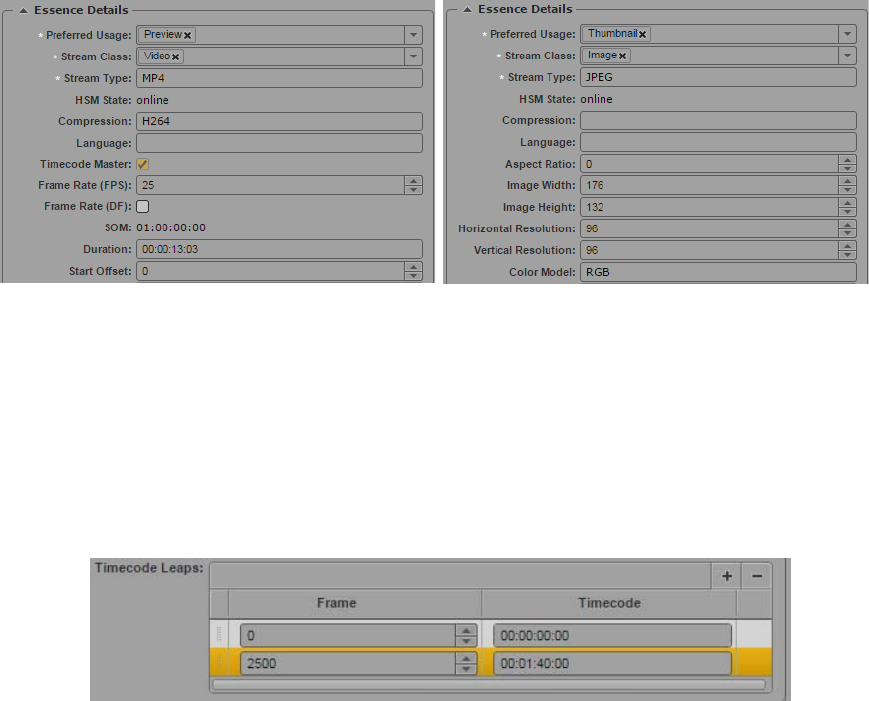
Editing the Properties of an Essence
366
pane, if a property is editable, a text box, drop-down menu, or other input control is displayed. For
information on the different metadata fields and input controls, see “Viewing and Editing
Interplay | MAM Metadata” on page 71.
To edit the properties of an essence:
1. Open the asset for which you want to edit essence properties in the File Info pane.
2. Select the essence package in the Essence Packages area.
3. Select the essence in the Essences area.
4. Click the Expand button of the Essence Details area to display the details of the selected essence.
For each stream class the relevant properties are shown. Therefore the displayed properties differ
depending on the stream class of the selected essence, as shown in the following examples.
5. To change an essence property, click in the respective field and modify the value as needed.
6. The timecode leaps define discontinuities of the timecode labels, where the first one at frame 0
defines the Start of Media (SOM). To edit timecode leaps, do one of the following:
tTo add a timecode leap, go to the Timecode Leaps table, click the Plus button, and enter the
Frame number and the corresponding Timecode.
tTo remove a timecode leap, go to the Timecode Leaps table, select the row and click the
Minus button
To save changed properties:
tClick the Save button.
The save status message changes from “Unsaved changes” to “All changes saved.”
If you have unsaved changes and select another essence package, load another asset, or close the
File Info pane, you are prompted to save the changes.
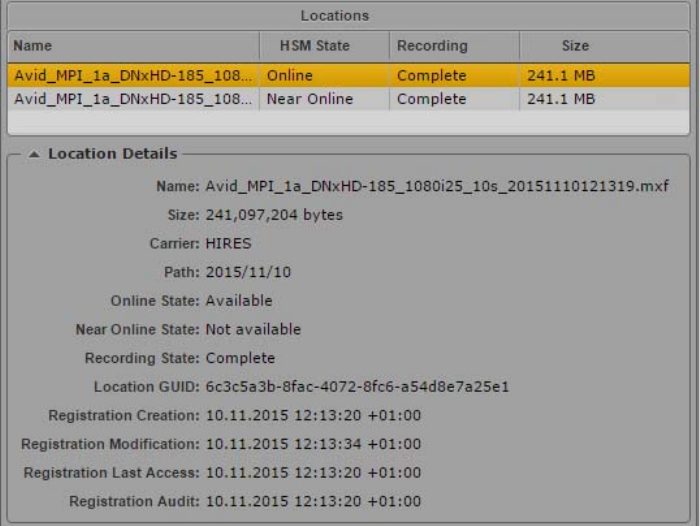
Displaying Locations Details for an Essence
367
Displaying Locations Details for an Essence
In the File Info pane, for the essence package selected in the Essence Packages area, all essences are
shown in the Essences area, and for the essence selected in the Essences area, the locations where it
has been saved are shown in the Locations area. For the location selected in the Locations area, you
can display technical data in the Location Details area; by default the Location Details area is
collapsed. All location and location details data is read-only.
To display location details for an essence:
1. Open the asset for which you want to display location details in the File Info pane.
2. Select the essence package in the Essence Packages area.
3. Select the essence in the Essences area.
4. Select the location in the Locations area.
5. Click the Expand button of the Location Details area to display the location details.
The following location details are shown:
- Name: Shows the file name of the essence’s copy on that location. During its lifecycle the
essence may have been renamed in Interplay MAM. The original name of the essence is
shown as value of the Original Name property in the Essence Details area.
- Size: Size of the essence’s copy on that location in bytes.
- Carrier: A GUID for the carrier to identify references to essences by locations contained on
that carrier; it also specifies which pool a carrier currently resides in.
- Path: The path where the essence’s copy is located. This can be either a UNC path or a
relative file path. For files located directly in the essence pool’s root, the path is empty.
- Online State: Indicates the online status of the essence’s copy on that specific location:
Available or Not Available.
Displaying Locations Details for an Essence
368
- Near Online State: Indicates the near online status of the essence’s copy on that specific
location: Available or Not Available.
- Recording State: Indicates whether the file is still being recorded to the specific location:
Recording or Complete.
- Location GUID: The Globally Unique Identifier of the location. The location GUID is used
internally by Interplay MAM to exactly define and identify the location, for example if path
names are changed.
- Registration Creation: Date and time when the essence file was registered on that location.
- Registration Modification: Date and time when the essence registration for that location was
modified for the last time.
- Registration Last Access: Date and time when the essence registration for that location was
opened or accessed for the last time.
- Registration Audit: Date and time when the essence file on that location was checked during
an audit by the Essence Server managing that location for the last time.
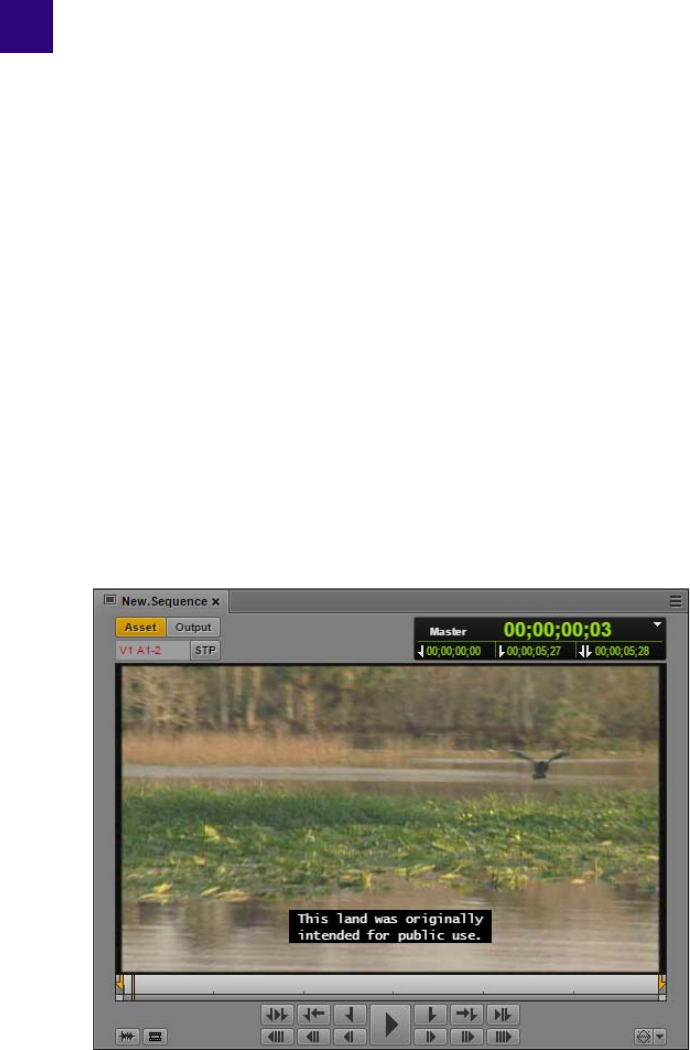
14 Working with Closed Captions in
MediaCentral | UX
The following main topics describe working with closed captions:
•Basics of Closed Captioning
•Closed-Captioning Workflows for MediaCentral | UX
•How the CCCS Works with Closed-Caption Files
•Creating and Editing Closed Captions
Basics of Closed Captioning
MediaCentral UX provides controls for viewing, creating, editing, and outputting closed captions.
The purpose of closed captions is to make video accessible to those who are deaf or hard of hearing,
for viewers whose native language is not English, and for instances when the audio cannot be heard
due to noise (restaurants, public spaces) or a need for quiet (libraries, hospitals). The following
illustration shows a closed caption displayed in the MediaCentral UX media viewer.
The term “closed captions” indicates that the captions are not visible until they are turned on by the
viewer, usually through a remote control or menu option. “Open captions” are “burned in” (visible to
all viewers) and cannot be turned off.
Basics of Closed Captioning
370
nIn the United States and Canada, “subtitles” are distinguished from closed captions by using
subtitles to refer specifically to translation of dialog. In other areas, subtitles can also refer to closed
captions, as in “Subtitles for the hard of hearing.”
The FCC (Federal Communications Commission) requires the majority of English and Spanish
programming seen on broadcast TV in the United States to be closed captioned. The CRTC
(Canadian Radio-television and Telecommunications Commission) requires the same for Canadian
broadcasts. Many other countries have their own requirements as well.
Types of Closed Captions
Closed captions can be displayed as one to four rows at any one time. Typically, up to three rows are
shown. There are three styles of presenting closed captions:
• Pop-on: One or more rows of a caption are displayed (“pop on”) at the same time. A new caption
completely replaces an old caption.
• Roll-up: Rows of a caption move up the screen one line at a time, giving an appearance of rolling
up the screen. Up to three rows are shown.
• Paint-on: Each row of a caption is displayed from left to right, one character at a time.
MediaCentral UX currently supports pop-on captions, and roll-up captions that are imported from
and exported to SCC files.
Position of Closed Captions
Closed captions can be displayed in various places around the screen, depending on factors like
positioning the caption closer to a speaker, centering a caption when a speaker is off screen, or
positioning the caption so it does not block content like bugs or burned-in titles.
MediaCentral UX lets you position a closed caption in one of nine positions: top, middle, bottom,
and left, center, and right. MediaCentral UX preserves other locations if these positions were set in
the original file, but if you change the positioning in MediaCentral UX you cannot restore the
original location.
Appearance of Closed Captions
A fixed-width font is used for closed captioning. The specific font depends on the display device. The
Media viewer in MediaCentral UX uses the Lucida Console font. Text is displayed as white text on a
black box. You can mark text as italics or underscored. You can also add a musical note. Captions
that you edit in MediaCentral UX are saved, repackaged, or exported as default normal text, with
italics and underscores as applied.
The standard closed caption display can use up to four rows, but typically three or fewer rows are
used. Each line can have a maximum of 32 characters, including spaces. To comply with EIA-608
standards, a space before and after italicized or underscored words is required. A space is also
required before the first word in the sentence, but not at the end of a sentence. If you do not include a
required space, MediaCentral UX displays a message informing you that a space is required.
Basics of Closed Captioning
371
MediaCentral | UX Closed Caption Editing
Following is important information for working with closed captions in MediaCentral UX v2.4.
• Closed caption editing requires Interplay Production v3.3 or later. If the Closed Captioning pane
is open, and you try to load a sequence stored in an Interplay Production database earlier than
v3.3, a message tells you that Interplay Production v3.3 is required.
• You can edit or create closed captions only for Interplay Production sequences. You need to open
the sequence in Asset mode. This prevents video or audio editing, so that a user working with
closed captions cannot modify the sequence itself.
cThere is no locking mechanism for sequences, so other users can edit the sequence while it is
open for closed-caption editing. Also, a sequence saved with closed captions can be opened and
edited by another user, possibly changing the timing of the closed captions.
• You cannot edit closed captions when a sequence is in Output mode. Switch the Media Pane to
Asset mode and load the sequence into the Media viewer.
• You can edit or create closed captions for sequences in the following formats:
- NTSC formats with a frame rate of 29.97 fps (drop frame or non-drop frame). This support
includes 1080i/59.94, which uses a frame rate of 29.97 fps.
- PAL formats 720p/50 and 1080i/50. 1080i/50 uses a frame rate of 25 fps. Send to playback
is not currently supported for PAL formats.
• You cannot edit or create closed captions for master clips, group clips, subclips, or Interplay
MAM assets. If you open one of these assets, the message “This asset type is not supported” is
displayed in the Closed Captioning pane.
• MediaCentral UX supports all special characters in English and characters used in the following
languages:
-Danish
-French
-German
- Italian
- Portuguese
- Spanish
nThese characters are listed in technical standard CEA-608-C.
You can mix characters and languages in a single closed caption or a set of closed captions.
All text is displayed in a single set of closed captions. You cannot currently switch between two
sets of closed captions (for example, English and Spanish).
• Unsupported characters are replaced by a blank when imported or extracted.
• Closed-caption editing requires that the ISIS or NEXIS hostname configured for the MCS server
use all lower case letters. This is set in the Virtual Host Name in the MediaCentral UX System
Settings. Select MCPS > Playback Service and select a Storage Location.
• If you are working in a multi-zone environment, you cannot edit closed captions for sequences
stored on a remote Interplay Production system.
• Currently, only Avid AirSpeed is supported as a playback device.
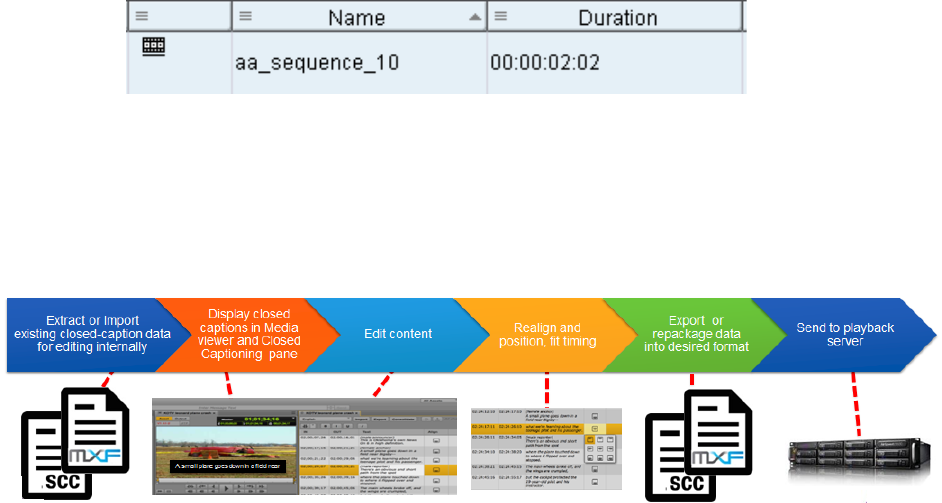
Closed-Captioning Workflows for MediaCentral | UX
372
• Currently, only SCC (Scenarist Closed Caption) files are supported for import. SCC and TTML
files are supported for export.
• A sequence must be dynamically relinked in Media Composer and must be checked into the
Interplay Production database before you can extract or add closed captions. If a sequence is
transferred from one workgroup to another (such as through Interplay Delivery), a Media
Composer system must be available in the target workgroup so that the sequence can be
dynamically relinked before you can extract or add closed captions.
• If an imported SCC file contains segments with timecodes beyond the end of the sequence, these
segments will be lost after a repackaging or export operation.
Closed Captioning Support in Interplay | Access
Interplay Access and Interplay Engine v3.3 and later include features to identify sequences that
include closed captions created or edited in MediaCentral UX. These features do not apply to assets
that have closed captions created or edited in other applications.
• You can use Interplay Access to search for sequences that include closed captions created or
edited in MediaCentral UX. To enable this Advanced search feature, select either or both of the
following new properties as Available in the System Properties tab of the Interplay
Administrator:
- Has Closed Captions: The criterion in search is displayed as “Closed Captions” with options
“Has Closed Captions” and “does not have Closed Captions.”
- Closed Captions Modification Time: The criterion in search is displayed as “CC
Modification Time” with options for setting the date and time.
• Sequences with closed captions that were created or edited in MediaCentral UX are indicated by
a thin line under the normal icons.
Closed-Captioning Workflows for MediaCentral | UX
The following illustration displays the basic closed-captioning workflow for closed captions that
have been created in an SCC file or in the D track of an Interplay Production sequence.
The following sections provide more details. Specific instructions for working with closed captions
are included in “Creating and Editing Closed Captions” on page 377.

Closed-Captioning Workflows for MediaCentral | UX
373
cTo avoid problems with another user editing a sequence, add closed captions only after all
video, audio, and effects editing are completed. Also, the sequence must be dynamically
relinked in Media Composer and must be checked into the Interplay Production database.
Extract Closed Captions from an Interplay Production Sequence
You can work with sequences that are already associated with closed captions. The following steps
describe a possible workflow.
1. A Media Composer editor creates a sequence with existing closed captions, and checks it into an
Interplay Production database.
Technically, the closed captions are embedded in the D tracks of the clips that make up the
sequence.
Sequences that include closed captions are marked by an overlay icon in the Interplay Production
Assets tree.
2. A MediaCentral UX user opens the sequence in Asset mode, opens the Closed Captioning pane,
and clicks the Extract button.
The MediaCentral UX editor can now review and edit the closed captions in the Closed
Captioning pane.
Technically, the Extract operation uses the text in the D tracks to create Timed Text Markup
Language (TTML) data. This “mezzanine file” is what MediaCentral uses for editing. The data is
stored in the TTML format and is associated with the sequence in the Interplay Production
database (similarly to an AAF file).
After editing is complete, several options are possible:
• Close the Closed Captioning pane. This action saves any edits you made. The TTML data
remains associated with the sequence in the Interplay Production database and can be edited as
needed.
• Repackage the edited closed captions with the sequence. See “Repackage Edited Closed
Captions with an Interplay Production Sequence” on page 375.
• Export the edited closed captions as an SCC file. See “Export an SCC File or TTML file from
MediaCentral” on page 376.
After you extract the closed captions once, you do not have to extract them again. If you start another
extract operation, MediaCentral UX warns you that you will overwrite the existing data.
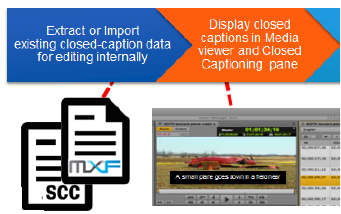
Closed-Captioning Workflows for MediaCentral | UX
374
Import an SCC File into MediaCentral
An SCC (Scenarist Closed Caption) file is a common file format for closed captions. The following
steps describe a workflow for importing closed captions from an SCC file.
1. SCC files are created and saved in a location that is accessible to the MediaCentral UX user.
SCC files use the file extension .scc.
2. The MediaCentral UX user loads an Interplay Production sequence in Asset mode and opens the
Closed Captioning pane.
3. The user clicks the Import button, locates the SCC file, and imports the file.
The MediaCentral UX editor can now review and edit the closed captions in the Closed
Captioning pane.
Technically, the Import operation uses the text in the SCC file to create TTML data, which is
associated with the sequence in the Interplay Production database (similarly to an AAF file).
After editing is complete, several options are possible:
• Close the Closed Captioning pane. This action saves any edits you made. The TTML data
remains associated with the sequence in the Interplay Production database and can be opened
and edited as needed.
• Repackage the edited closed captions with the sequence. See “Repackage Edited Closed
Captions with an Interplay Production Sequence” on page 375.
• Export the edited closed captions as an SCC file. See “Export an SCC File or TTML file from
MediaCentral” on page 376.
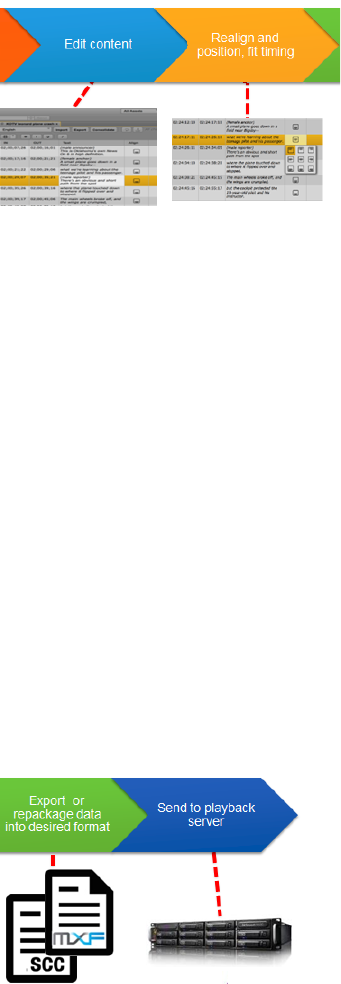
Closed-Captioning Workflows for MediaCentral | UX
375
Create New Closed Captions in MediaCentral
You can create a new set of closed captions by using the Closed Captioning pane. The following
steps describe a possible workflow.
1. The MediaCentral UX user loads an Interplay Production sequence in Asset mode and opens the
Closed Captioning pane.
2. The user creates closed captions in the Closed Captioning pane.
Technically, adding closed captions in the Closed Captioning pane creates data that is stored in
the TTML format.
3. After editing is complete, the user can do one of the following:
- Close the Closed Captioning pane. This action saves any edits you made. The TTML data
remains associated with the sequence in the Interplay Production database and can be
opened and edited as needed.
- Repackage the edited closed captions with the sequence. See “Repackage Edited Closed
Captions with an Interplay Production Sequence” on page 375.
- Export the edited closed captions as an .scc file. See “Export an SCC File or TTML file from
MediaCentral” on page 376.
Repackage Edited Closed Captions with an Interplay Production Sequence
Repackaging integrates edited closed captions into a new D track MXF file. Before repackaging, the
sequence was associated with a D track file for each clip. Repackaging creates a single D track file
for the sequence. The following steps describe a possible workflow:

How the CCCS Works with Closed-Caption Files
376
1. Load closed captions into the Closed Captioning pane in one of the following ways:
- Extract
-Import
- Create new captions
2. After editing is complete, the user clicks the Repackage button.
Technically, text from the TTML data is integrated into a new MXF D track file. The sequence
and its metadata is checked into the Interplay Production database.
The sequence can then be sent to playback or used in other Interplay Production operations. See
“Extracting and Repackaging Closed-Caption Data” on page 381.
Export an SCC File or TTML file from MediaCentral
You can export closed captions from various sources as an SCC file or a TTML file. The following
steps describe a possible workflow:
1. Load closed captions into the Closed Captioning pane in one of the following ways:
- Open a sequence with closed captions already edited in MediaCentral UX.
- Extract closed captions from D tracks in the sequence.
- Import an SCC file.
- Create new closed captions.
2. After editing is complete, the user clicks the Export button.
An SCC file or a TTML file is downloaded to your browser download location. Technically, text
from the TTML data is transcoded to an SCC file (with the extension .scc) or a TTML file (with
the extension .ttml).
How the CCCS Works with Closed-Caption Files
The Closed Caption Conversion Service (CCCS) is a Linux service that is installed with other
MediaCentral Platform Services. The CCCS does the work of importing SCC files or extracting
closed captions from the D tracks of a sequence, and converting them to data in the Timed Text
Markup Language (TTML) format.
The TTML data is associated with the sequence in the Interplay Production database. If you save a
sequence with closed captions, the next time you open it the closed captions from the TTML data
will be displayed in the Closed Captioning pane.
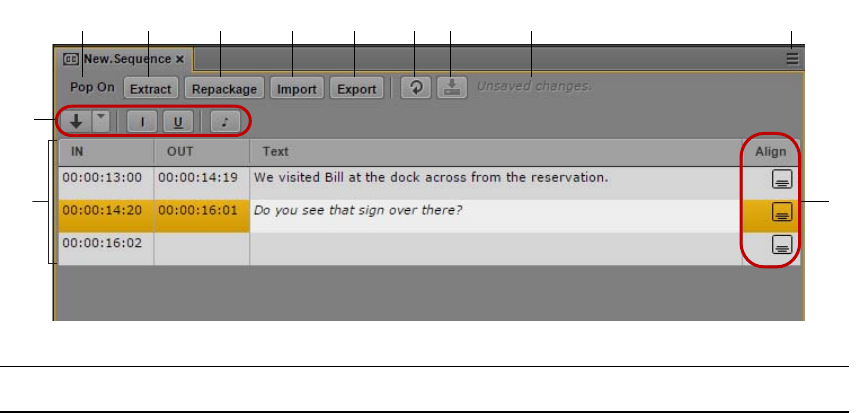
Creating and Editing Closed Captions
377
The CCCS also does the work of exporting the edited file back to the SCC format or repackaging the
edited file with the Interplay Production sequence. This sequence can then be viewed in Media
Composer, or sent to a playback device.
The edited sequence points to new standalone D track. Closed caption information is not written back
to the D tracks of the master clips that compose the sequence.
Creating and Editing Closed Captions
The following topics describe how to edit and create closed captions in MediaCentral UX:
•“The Closed Captioning Pane” on page 377
•“Importing and Exporting Closed-Caption Files” on page 380
•“Extracting and Repackaging Closed-Caption Data” on page 381
•“Creating Closed-Caption Segments” on page 381
•“Editing the Text and Position of Closed Captions” on page 383
•“Editing the Timing of Closed Captions” on page 385
•“Working with Multiple Caption Blocks” on page 385
•“Support for Roll-Up Captions” on page 386
For important information about the current implementation of closed captioning, see
“MediaCentral | UX Closed Caption Editing” on page 371.
The Closed Captioning Pane
You view, edit, and create closed captions in the Closed Captioning pane.
qqqwqeqrqtqyquqiqo
q1)
q1! q1@
Display or Control Description
1 Closed-caption type Displays the type of closed caption currently loaded: Pop On or
Roll Up.
2 Extract button Click this button to extract closed captions from an Interplay
Production sequence and display them in the Closed Captioning
pane.

Creating and Editing Closed Captions
378
3 Repackage button Click this button to combine the edited closed captions with the
Interplay Production sequence.
4 Import button Click this button to import closed captions from a SCC file and
display them in the Closed Captioning pane.
5 Export button Click this button to export closed captions from
MediaCentral UX to an SCC file or a TTML file.
6 Refresh button Updates the display of closed captions. If the focus is in the
Closed Captioning pane, you can also press F5 to update the
display.
7 Save button Saves closed captions as data that is associated with the Interplay
Production sequence and exits edit mode.
nEdit mode refers to the state in which the cursor is
displayed in the Text field, the text field is colored white,
and you can enter text.
nCaptions are automatically saved when you exit edit mode
by pressing Ctrl + Enter or by clicking outside of the text
box.
8 Save status message Displays whether closed captions have been saved as data. The
messages are “Unsaved changes,” “Saving,” or “All changes
saved.”
Display or Control Description

Creating and Editing Closed Captions
379
9 Pane Menu button The following options are available:
• Add or Remove Columns. Select the columns you want to
display.
• Split at Current Playhead position. Divides a closed-caption
segment into two, based on the location of the position
indicator. The complete text for the segment is copied to the
new segment, and you need to edit the text as desired. You
can also use Ctrl+E or right-click a selected segment. The
position indicator must be located within the closed-caption
segment.
• Modify Start Timecode. Changes the In point for the first
closed caption to match the start timecode of the sequence.
The change affects all subsequent closed-caption segments.
See “Editing the Timing of Closed Captions” on page 385.
• Delete. Deletes the selected closed-caption segment.
Functions the same as the Delete key (Windows), Backspace
(Macintosh), or fn+Backspace (MacBook).
• Set In, Set Out
Modifies the start or end of a closed-caption, segment
depending on the location of the position indicator. See
“Editing the Timing of Closed Captions” on page 385.
• Close Gap: Modify In, Close Gap: Modify Out
Closes a gap between two closed captions by changing the In
point or the Out point. See “Editing the Timing of Closed
Captions” on page 385.
• Change Alignment. Opens a grid from which you can select
where to position the closed caption. See “Editing the Text
and Position of Closed Captions” on page 383
• Help. Displays a Help topic describing controls in the Closed
Captioning pane. From this topic you can access the entire
MediaCentral UX Help system.
10 (From left to right)
Create Segment button Creates a closed-caption segment. Use the drop-down menu to
set how you want to create the segment: through In to Out points
or by the location of the position indicator (playhead). See
“Creating Closed-Caption Segments” on page 381.
Italics button Changes the selected text to italics.
Underscore button Adds underscoring to selected text.
Musical note Inserts an eighth note (U+266A) that is a standard symbol to
indicate music in a closed caption.
Display or Control Description

Creating and Editing Closed Captions
380
Importing and Exporting Closed-Caption Files
You can import an SCC (Scenarist Closed Caption) file and edit the closed captions that it contains.
You can associate these captions with a sequence and edit the timing as needed. You can then
repackage them as part of the sequence, export an SCC file, or export a TTML file.
nCurrently only pop-on and roll-up captions are supported. If you try to import a file that includes
paint-on captions, a message is displayed, stating that only pop-on and roll-up captions are
supported.
To import an SCC file:
1. Load an Interplay Production sequence in Asset mode.
2. Click the Media Pane menu and select Closed Captions to display closed captions in the Media
pane.
3. Open the Closed Captioning pane.
4. Click Import.
The browser’s Open dialog box is displayed, with SCC File selected as a filter (labeled Custom
Files).
If closed captions are already listed in the Closed Captioning pane, a message asks if you want to
overwrite the existing text segments. Click Cancel or Overwrite.
5. Navigate to the SCC file and click Open.
The SCC file is converted, and the Closed Captioning pane displays timecode, text, and
alignment for the closed-caption segments.
To export a closed-caption file:
1. Click Export.
The Export dialog box is displayed.
2. Select SCC or TTML, accept the default file name (the name of the Interplay Production
sequence) or provide a new one, and click Download.
The closed-caption data is converted and saved as an SCC file or a TTML file. The file is saved
in your browser download location.
11 Closed-caption list Displays the In point, Out point, text and alignment for each
closed-caption segment. If you scroll down the closed-caption
list or scrub video in the Media viewer, the closed-caption list
and video display stay in sync.
The default sorting in the Closed-Captioning pane is by In
timecode, from lower to higher. Click a column head to sort in
the following ways:
• IN or OUT: lower to higher, or higher to lower.
• Text: alphabetically, or reverse alphabetically.
12 Align column Displays the positioning of the closed caption. To change the
alignment, select one or more closed captions, double-click the
Align column, and select one of the nine positions.
Display or Control Description
Creating and Editing Closed Captions
381
Extracting and Repackaging Closed-Caption Data
If closed captions are included in the D tracks of an Interplay Production sequence, the Closed
Caption Conversion Service (CCCS) lets you extract closed captions and display them in the Closed
Captioning pane. You can then repackage the closed captions as part of the sequence, export an SCC
file, or export a TTML file.
You can also repackage a sequence if you create new closed captions for a sequence.
nCurrently roll-up captions are supported only when imported from SCC files.
Closed captions created in the Closed Captioning pane are saved in the Interplay Production
database. Repackaging is required if you want to use the sequence for Interplay Production
operations /such as the following:
• Send to playback
• Interplay Transcode operations (including Mixdown)
• Interplay Delivery operations
• Viewing closed captions in Media Composer.
If you repackage a basic sequence, the sequence can no longer be edited. This limitation does not
apply to advanced sequences.
To extract closed captions from an Interplay Production sequence:
1. Load an Interplay Production sequence that includes closed captions in Asset mode.
2. Click the Media Pane menu and select Closed Captions to display closed captions in the Media
pane.
3. Click Extract.
The data is extracted and the Closed Captioning pane displays timecode, text, and alignment for
the closed-caption segments.
If the sequence is edited after you have extracted the closed captions, you need to extract the
closed captions again.
To repackage closed captions with an Interplay Production sequence:
tClick the Repackage button.
During the repackaging process, the button is grayed out. It becomes active again when the
process is completed. Repackaging typically takes only a few seconds.
The repackaging operation creates a new D-track clip, named *.cc.nn, in the same folder as the
sequence. This clip includes any other ancillary data included in the master clips in the sequence.
A corresponding MXF media file is created in the workspace specified in the Interplay
Administrator > Application Database view > Editing Settings tab > Audio–general settings >
Media Creation workspace.
Creating Closed-Caption Segments
You can create closed-caption segments for an Interplay Production sequence that does not have
closed captions already associated with it, or create new segments for an existing set of closed
captions. There are two ways to create a closed-caption segment: through In and Out marks or
through the position indicator.
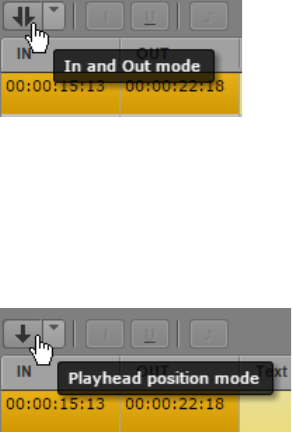
Creating and Editing Closed Captions
382
Make sure that the segment is long enough to display the text for the viewer. As a guideline, use a
minimal duration of 2 seconds for each full line of 32 characters. For example, a caption that consists
of two rows with 32 characters each should be contained in a 4-second segment. If the segment
duration is not long enough to display the text, the text might be merged into the previous segment or
lost during repackaging.
nTo display a closed caption, EIA-608 standards require a buffering area of a minimum one frame
duration for 2 characters, plus 7 frames of control codes for each segment. For example, a 10-
character segment has an approximate minimal duration of 5+7=12 frames.
To create new closed captions:
1. Load an Interplay Production sequence in Asset mode.
2. Click the Media Pane menu and select Closed Captions to display closed captions in the Media
pane.
3. Do one of the following:
tSet an In point and an Out point in the Media pane, set the Create Segment button to In and
Out mode, then click the button. If focus is in the Closed Captioning pane, press Ctrl+.
(period).
A closed-caption segment is created. You can add text and set alignment now or edit the
segment later.
tSet the position indicator where you want the closed caption text to start, set the Create
Segment button to Playhead position mode, then click the button. If focus is in the Closed
Captioning pane, press Ctrl+Shift+. (period).
An In point is set. You can add text and set alignment now or edit the segment later. Click the
Save button to save an open segment.
To set an Out point, move the position indicator to where you want the closed caption text to
end, and click the Create Segment button. If focus is in the Closed Captioning pane, press
Ctrl+Alt+. (period). The segment is now complete, an In point is set for the next segment,
and the segment is automatically saved.
Creating and Editing Closed Captions
383
Editing the Text and Position of Closed Captions
If you have extracted, imported, or created closed-caption segments, you can edit them in the Closed
Captioning pane using the following procedures. Make sure you select Closed Captions from the
Media Pane menu to display closed captions in the Media pane.
To enter edit mode and edit closed-caption text, do one of the following:
tDouble-click the Text field.
tSelect the Text field of a closed-caption segment and press Enter.
The Text field turns white and you can type the text. Use the Italic button and the Underscore
button to format the text. Click the musical note button to add a musical note. Press the Enter key
to start a new line.
MediaCentral UX limits the display to four rows, with of 32 characters per row, including
spaces. A space is also required before the first word in the sentence, but not at the end of a
sentence. If you do not include a required space, MediaCentral UX displays a message informing
you that a space is required.
nIf you add a blank line in a caption segment, two different captions are displayed.
nIf you apply formatting to two words in a closed caption (for example, an underscore), then
repackage and extract the closed captions, the formatting is applied to the space between the words.
This is as designed.
To save closed-caption text, do one of the following:
tPress Ctrl+S. Text is saved and you remain in edit mode.
tClick the Save button. Text is saved and you exit edit mode.
tPress Ctrl+Enter to exit edit mode.
tUse the mouse to select a different closed-caption segment.
tAdd a new closed-caption segment.
To position a closed caption:
1. Do one of the following:
tSelect a closed-caption segment and double-click in the Align box.
tSelect a closed-caption segment, right-click, and select Change Alignment.
tClick the Align field of a closed caption segment and press Enter.
tSelect a closed-caption segment, click the Closed Caption Pane menu button, and select
Change Alignment.
A nine-position alignment grid is displayed. Choices are top, middle, bottom, left, center, and
right.
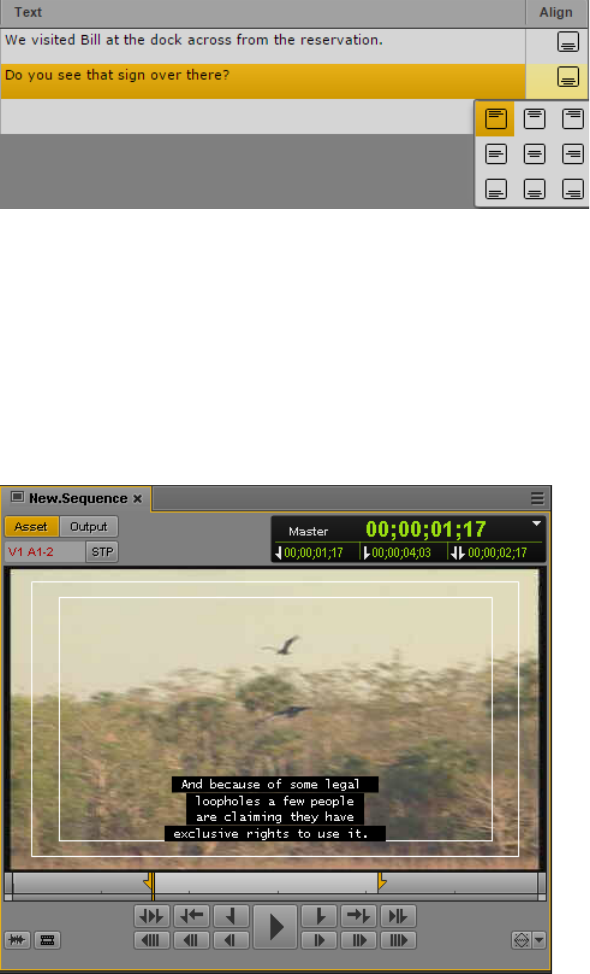
Creating and Editing Closed Captions
384
You can select multiple closed-caption segments and change the alignment for all of them with
the same selection.
2. Select a position from the grid.
MediaCentral UX aligns the caption or captions according to your selection. Captions are
aligned within the standard video safe area. You can view safe area grids in the Media viewer by
clicking the Media Pane menu button and selecting Safe Areas. This display can help if you need
to review previously positioned captions or create new ones. The following illustration shows the
safe area outlines. The inner outline is the safe title area. The outer outline is the safe action area.
nIf closed captions were extracted or imported, and they differ from the nine available positions in
MediaCentral UX, MediaCentral UX preserves the original positions. If you change the positioning
in MediaCentral UX, you cannot restore the original location.
To delete a closed caption, select the closed-caption segment and do one of the following:
tPress the Delete key.
tRight-click and select Delete.
tClick the Closed Captioning Pane menu button and select Delete.
Creating and Editing Closed Captions
385
To save closed-caption segments:
tClick the Save button.
The save status message changes from “Unsaved Changes” to “All Changes Saved.”
Changes are automatically saved whenever you exit edit mode or perform other edits, such as
changing alignment or deleting a closed-caption segment.
Editing the Timing of Closed Captions
When you edit closed captions, you might need to change the timing, as described in the following
procedures. Make sure you select Closed Captions from the Media Pane menu to display closed
captions in the Media pane.
To change an In point or an Out point, do one of the following:
tMove the position indicator to the timecode where you want to set the new In point, select the
closed-caption segment in the Closed Captioning pane, right-click, and select Set In.
tMove the position indicator to the timecode where you want to set the new Out point, select the
closed-caption segment in the Closed Captioning pane, right-click, and select Set Out.
These commands are also available from the Closed Captioning Pane menu.
To close a gap between closed-caption segments, do one of the following:
tTo close a gap by extending the end of a closed-caption segment, right-click on the segment and
select Close Gap: Modify Out.
The Out point is changed to one frame before the following segment’s In point.
tTo close a gap by extending the beginning of a segment, right-click on the segment and select
Close Gap: Modify In.
The In point is changed to one frame after the previous segment’s Out point.
These commands are also available from the Closed Captioning Pane menu. If the commands are
not displayed (context menu) or are disabled (Pane menu), there is no gap between segments.
To change the start timecode of the first closed-caption segment:
1. Click the Closed Captioning Pane menu button and select Modify Start Timecode.
The Modify Start Timecode dialog box is displayed.
2. Enter the desired format for the start timecode by typing the first digit and continue typing until
you have typed 8 digits.
For example, a sequence might start with 01:00:00:00, but the first closed caption starts with
00:00:00:00. In this case, type 01:00:00:00. The change affects all subsequent closed-caption
segments.
3. Click OK.
Working with Multiple Caption Blocks
If two or more closed caption segments share a simultaneous time span, all captions are displayed in
the Media viewer. For example, in a scene with two speakers, you can align one caption left and one
caption right, as shown in the following illustration.
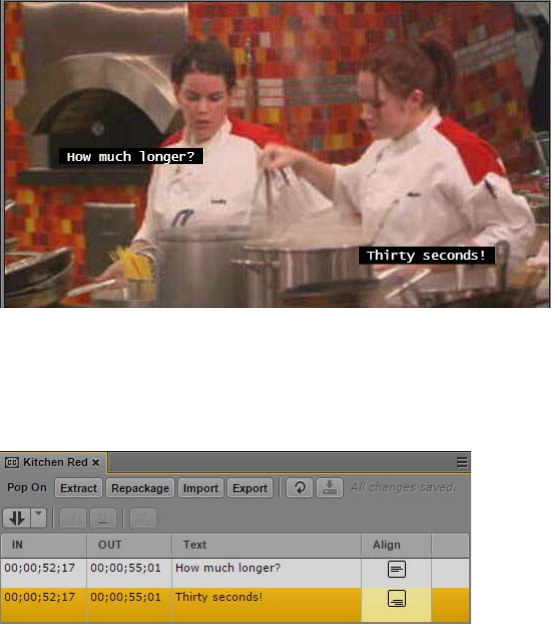
Creating and Editing Closed Captions
386
Text for each caption is entered on a separate segment in the Closed Captioning pane, with the
desired alignment set in the Align column. The following example shows the Closed Captioning pane
for the above illustration:
Note the following:
• If multiple captions share the same line (top, middle, or bottom), they will be merged into a
single line as part of the repackaging or export process. To avoid this, change the alignment so
each caption is on a different line.
• If multiple captions share the same line (top, middle, or bottom), the total number of characters
per line is limited to 32.
• All segments must share the same In point and Out point. You cannot currently edit the In point
and Out point of simultaneous segments after you have set them once.
• Multiple caption blocks are limited to a total of four rows. Additional rows are not displayed.”O
Support for Roll-Up Captions
Captions created as roll-ups in SCC files can be imported, displayed, edited, and exported in SCC
files. Captions are displayed as single row segments in the Closed Captioning pane, and are displayed
in up to three rows in the Media viewer.
If you change the alignment for one segment of a roll-up, the same alignment is applied to all
segments.
nGaps between segments prevent roll-ups from displaying correctly. Use the Close Gap command in
the Closed Captioning pane to correct this.

15 Using the Assignments Pane
The Assignments pane allows you to manage all aspects of your news story or production task and
send your output to the Web, on-air broadcasts, social media, or mobile devices. The following main
topics describe how to configure and use the Assignments pane when you create assignments in
MediaCentral UX:
•The Assignments Pane
•Configuring the Assignments Pane
•Using the Assignment Desk Layout
•Create and Manage Assignments
The Assignments Pane
MediaCentral UX provides the tools needed for a story-centric workflow, where content is the focus
of your production as you deliver stories and media to multiple platforms. Your administrator or
producer can create assignments while gathering information from multiple sources, including news
wires and social media, to assist in sharing content, working with remote production teams, and
delivering to a variety of platforms. Starting with assets created or stored on your iNEWS or
Interplay Production databases, you can use the Assignments pane to organize teams, resources, and
content, and then deliver your work to relevant end points.
The content-oriented, or story-centric, workflow can include the following components:
• A MediaCentral UX administrator customizes the parameters for assignments in the
Assignments section of the System Settings. The settings can provide information for the
assignment — for example, content categories and topics, as well as destinations such as iNEWS
queues and rundowns.
• In the Assignments pane, you can create and modify assignments, add graphics and video from
Interplay Production or Avid MAM, and include story text, social media posts, and comments as
you build your story. The Assignments pane also provides you with the ability to collaborate
with research assistants, editors, graphic artists, journalists, and others on your team.
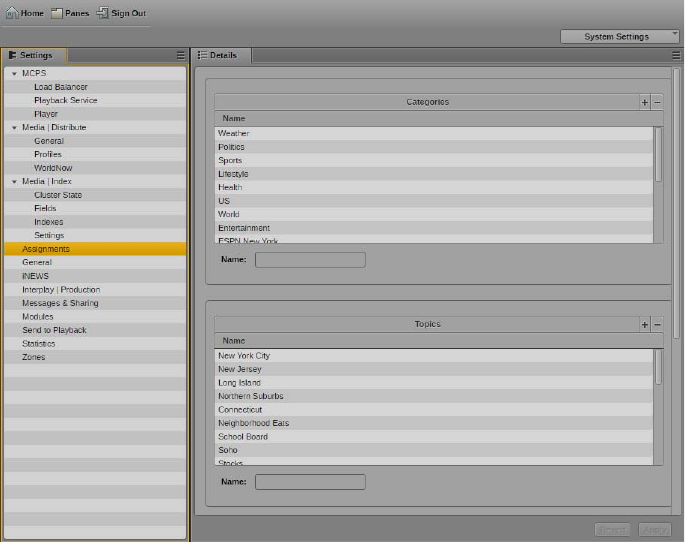
Configuring the Assignments Pane
388
Configuring the Assignments Pane
The Assignments settings in the System Settings allow your MediaCentral UX administrator to
customize lists available for each assignment by specifying the following details:
• Categories — user-defined terms for classifying assignments (for example, World News or
Technology). Items in the Categories list appear as options in the Category menu in the
Assignments pane.
• Topics — user-defined subjects for the content of assignments (for example, for a category
named Local News, the topic might be City Hall). Items in the Topics list appear as options in the
Topics menu in the Assignments pane.
• Destinations — the destination includes the type of system for the assignment (for example,
iNEWS), a user-defined name for the destination, and which system (listed in the Launch pane)
and location the assignment is stored. Items listed in the Endpoint column in the Destinations list
display an asset view of the selected system and appear as options in the Rundown menu in the
Assignments pane. This allows users to select destinations and the saved assignment us
automatically created in the designated destination.
MediaCentral UX administrators can create a list of destinations so when users select them and save
the assignment, floated stories are created automatically in the designated rundown.
To configure the Assignments pane:
1. Sign in to MediaCentral UX as an administrator.
2. Select System Settings from the Layout selector.
The System Settings layout opens.
3. In the Settings pane select Assignments.
The Settings pane displays the Assignments settings.
Using the Assignment Desk Layout
389
4. To add a new category, do the following:
a. In the Categories section, click the plus (+) button, or press the Insert key.
The Name field is active.
b. Type a name for the category.
c. Press Return, or click outside of the Name field.
The new category is added to the Categories list.
nIf you want to add more categories, click the plus (+) button or press the Insert key again.
5. To add a new topic, do the following:
a. In the Topics section, click the plus (+) button, or press the Insert key.
The Name field is active.
b. Type a name for the topic.
c. Press Return, or click outside of the Name field.
The new topic is added to the Topics list.
nIf you want to add more topics, click the plus (+) button or press the Insert key again.
6. To add a new destination, do the following:
a. In the Destinations section, click the plus (+) button, or press the Insert key.
b. Click the Type menu, and select a destination type.
c. Type a name for the destination in the Name text box. The name helps identify the
destination for users working on an assignment.
d. Click the System menu and select an available system.
e. Click the Endpoint menu.
The Endpoint menu displays a list of the folders, queues, or rundowns available on the
selected system.
f. Navigate to a location on the selected system for your destination — for example, a specific
rundown on an iNEWS server.
nIf you want to add more destinations, click the plus (+) button or press the Insert key again.
7. Click Apply to save your changes.
Using the Assignment Desk Layout
When you have configured the Assignment pane, you can create, edit, and manage your assignments
using the Assignment Desk layout in MediaCentral UX. The following illustration shows the
Assignment Desk layout. For more information on using the Assignments pane, see “Create and
Manage Assignments” on page 391.
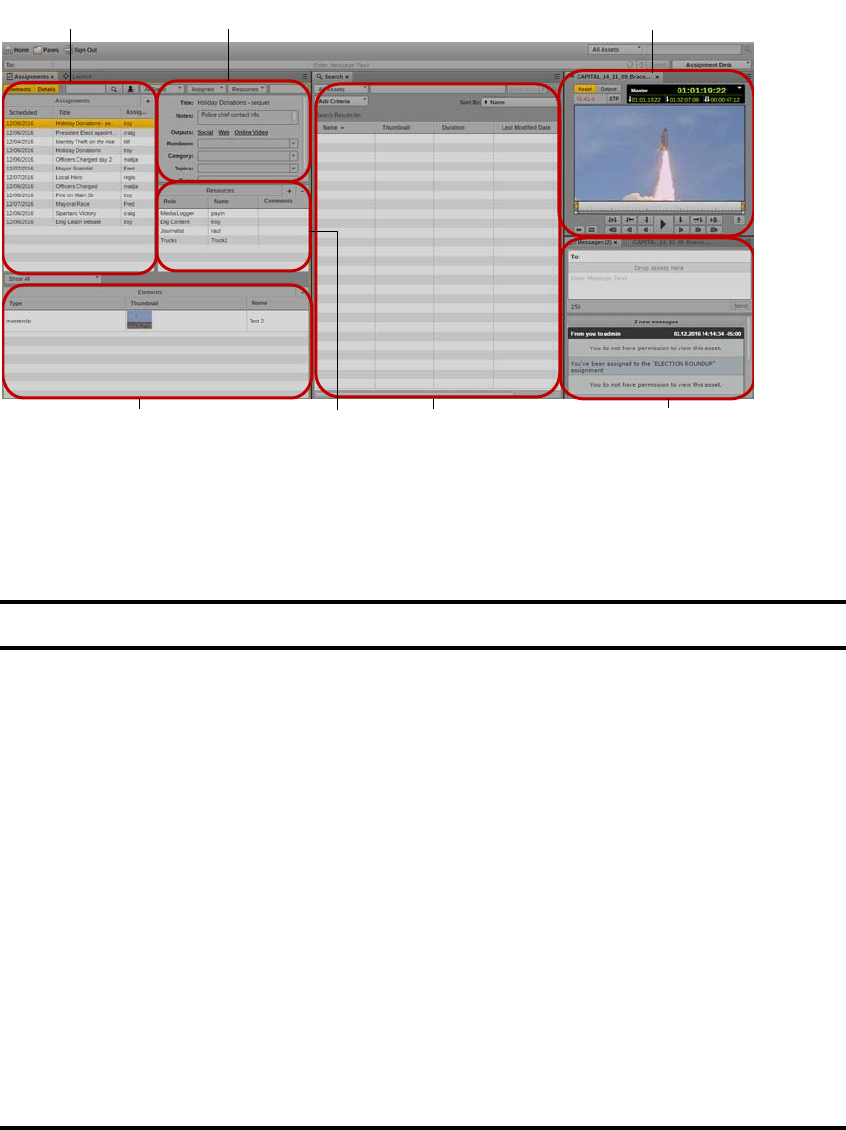
Using the Assignment Desk Layout
390
nYou can customize MediaCentral UX by adjusting a layout’s areas and panes. A single area can
contain one or more panes. When an area contains more than one pane, the panes are displayed in a
tabular format, with one pane on top of the others.
To open the Assignment Desk layout, do the following:
tClick the Layout selector and select Assignment Desk.
w e
ty
q
ru
Pane or Area Description
1 Assignments list A list of all assignments. You use the Assignments list to create, edit, clone, and
delete assignments.
2 Details area An area where you can add notes to assignments, select rundowns, and you select
categories and topics to your assignments.
3 Asset pane A pane in which you can view and edit media assets. The controls that are displayed
depend on the selected asset.
4 Elements area An area that provides a list of supporting elements to your assignment. You can add
elements from any MediaCentral database.
5 Resources area An area where you can add resources to your assignment by selecting roles for the
types of resource you want to add and names from a list of available users. You can
also add comments to help in directing work on the assignments.
6 Work area An area where users can load the iNEWS Rundown pane or the Media Distribute
Social Messages pane for multi-platform publishing.
7 Messages pane A pane that displays a message box for sending both text messages and media asset
links. It also lists all received messages, with the most recent messages at the top of
the list.
Create and Manage Assignments
391
To open a new pane:
1. Select the Panes menu.
2. Select the menu option corresponding to the pane you want to open.
The pane you select opens in the active area.
Create and Manage Assignments
The assignment is the main organizing component for the story-centric workflow. An assignment
might represent a short term task — for example, a story for a 5:00 PM broadcast — or a long term
project.
An assignment can contain the following:
• A title for the assignment
• Notes added by contributors
• Options to create outputs — Web or social media sites (using Media Distribute or the Social
Media Hub), and broadcast locations in an iNEWS rundown.
• A destination, such as an iNEWS queue
• A list of categories, topics, and tags
• Areas to add resources (for example, additional journalists or graphic artists) and elements (for
example, video clips) for the assignment
The Assignments pane provides users a view that lets them see which tasks have been assigned to
them and what resources are needed and available. It also allows MediaCentral UX producers and
administrators to initiate the assignment workflow, and for users to begin work quickly.
You can also filter assignments in two ways: based on assigned dates, users, resources, and topics
• You can filter for text that is included in the Title, Notes, Category, Topics, and Tag fields.
• You can use he filter menus and controls to filter for your assignments, date ranges, assigned
users, resources, and rundowns.
Creating Assignments
The Assignments list includes the following components:
• Scheduled — the time and date that the assignment is due
• Title — the title or story slug for an assignment
• Assigned — the primary MediaCentral UX user responsible for the assignment
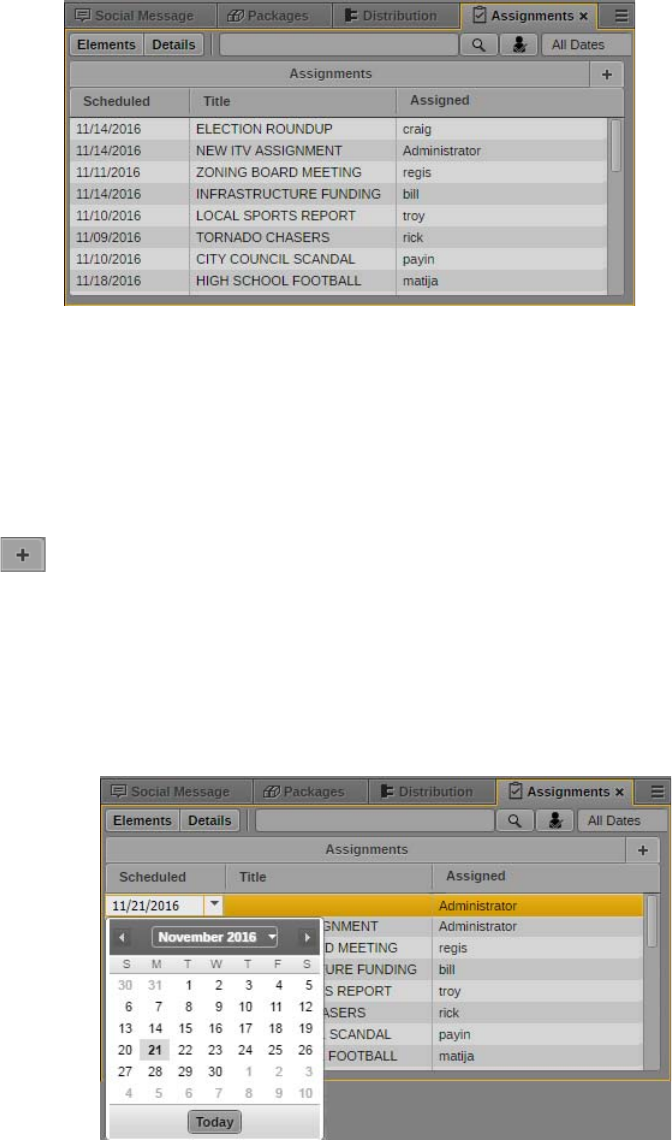
Create and Manage Assignments
392
When a user is attached to an assignment, the assigned user receives a message with a link to the
assignment in the Assignments pane when a new assignment is created. For information on using
MediaCentral UX messages, see “Sharing MediaCentral | UX Messages” in the Avid
MediaCentral | UX User’s Guide.
To create an assignment
1. Do one of the following:
tClick the Add Assignment (+) button.
tPress Alt+n
tPress the Insert key.
A new assignment appears at the top of the Assignment list, with the current date in the
Scheduled column and the user name of the currently logged in user in the Assigned column.
2. If you want to set a date for the assignment to be completed, click the date in the Scheduled
column and select a new date.
3. Click the Title column and type a name for the assignment.
4. Click the Assigned menu, and select the MediaCentral user for whom you want to assign the
story.
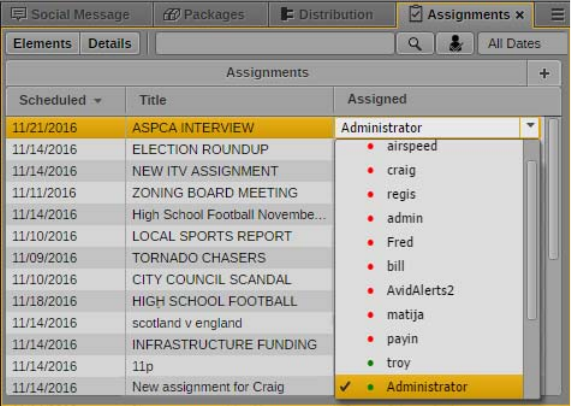
Create and Manage Assignments
393
5. Click Ctrl+S, click another assignment, or click outside the Assignments pane to save the new
assignment.
The assignment appears in the Assignments list. If you have configured e-mail notifications for
the MediaCentral UX user in the Assigned column, the user receives an e-mail notification with
a link to the assignment.
For more information about configuring e-mail notifications, see “Configuring Messaging” in
the Avid MediaCentral | UX Administration Guide.
Adding Details and Resources to Assignments
You can add notes, including contacts and common information, to the assignment that can aid users
involved with the story.
Clicking an option in the Outputs area opens the appropriate pane in MediaCentral UX:
• Social opens the Social Message pane if you have configured Media Distribute for your system.
• Web opens the Web Story pane if you have configured Media Distribute for your system.
• Online Video opens the Social Media Messages pane if you have configured the Social Media
Hub for your system.
You can select one or more rundowns from a list of options specified in the Endpoint list in the
System Settings. When you create a new assignment for an iNEWS story, MediaCentral UX creates a
floated story in the iNEWS locations selected in the Rundown menu. You can work on the assigned
story as soon as the assignment is created.
You can select one or more categories and topics from the corresponding lists in the System Settings
to help define and organize tasks, For example, if the categories World News, Global Weather, and
Politics have been created in System Settings, then when you create an assignment and click the
Category menu, World News, Global Weather, and Politics appear in the Category list so you can
choose the appropriate categories for your assignment.
You can also provide keywords and tags used to categorize and complement the research process for
an assignment.

Create and Manage Assignments
394
When you add resources to your assignment, you select a role for the type of resource you want to
add and a name from a list of available users for that role. The types of resources available are
determined by the MediaCentral UX roles set up by your administrator and can include physical and
human resources, making it easy to ensure that the tasks need to cover an assignment are assigned
and organized. Assignees are based on their roles — for example, photographers, camera operators,
or any other role defined in MediaCentral UX. You can also add a additional comments to provide
more information for the assigned resource or task.
The Elements area provides a list of supporting elements to your assignment. These elements can be
added from any MediaCentral database listed in the Launch pane, such as iNEWS stories or Interplay
Production media clips. Multiple users — including research assistants, editors, graphic artists,
journalists — can add assets to the Elements area so that a wider collaboration can contribute
information and assets to the assignment.
You can drag the following elements to the Elements area:
• Assets from the MediaCentral asset pane, including Interplay Production and Interplay MAM
assets
• Assets from the Media pane
• Assets from the Maestro pane
• Images from the Thumbnails pane
• iNEWS stories from Search pane
• iNEWS stories from the Queue/Story pane
• Social media assets from Social Media Hub panes
Details, resources, and elements can be added, deleted, or modified by any user associated with the
assignment.
To add details to an assignment:
1. Click the assignment in the Assignments list.
2. Click the Details button.
The Details area opens. The title of the assignment displays at the top of the Details area.
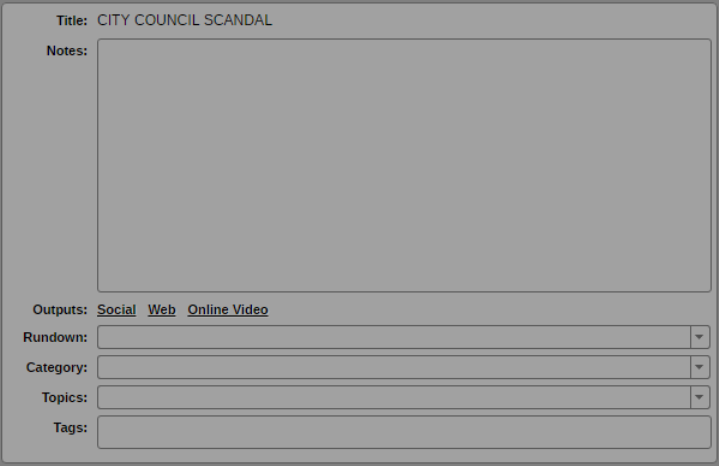
Create and Manage Assignments
395
3. If you want to add notes or comments, type in the Notes text box.
4. If you want to start creating a media package for publication using either Media Distribute or the
Social Media Hub, do one of the following:
tClick Social to open the Social Messages pane to create a package for a social media
platform such as Twitter or Facebook. You must have Media Distribute configured in your
MediaCentral environment in order to use the Social Messages pane.
tClick Web to open the Web Story pane to create a package for a Web story or a standalone
video package. The Web Story pane is used to send media packages to a content
management system, which then can publish the package to a corporate Web page or other
site. You must have Media Distribute configured in your MediaCentral environment in order
to use the Web Story pane.
tClick Online Video to open the SocialMedia Messages pane to create a media package for a
social media platform. You must have the Social Media Hub configured in your
MediaCentral environment in order to use the SocialMedia Messages pane.
For more information about using Media Distribute, see the Avid Media | Distribute User’s
Guide. For more information on using the Social Media Hub, see the Social Media Hub User
Guide.
5. Click the Rundown menu and select one or more rundowns for your assignment. The Rundown
menu lists the available rundown queues specified by your administrator in the System Settings.
nIf you want to delete a rundown queue, click the “x” next to the rundown name.
6. Click the Category menu and select one or more categories for your assignment. The Category
menu lists the available categories specified by your administrator in the System Settings.
nIf you want to delete a category, click the “x” next to the category name.
7. Click the Topics menu and select one or more topics for your assignment. The Topics menu lists
the available topics specified by your administrator in the System Settings.
nIf you want to delete a topic, click the “x” next to the topic name.
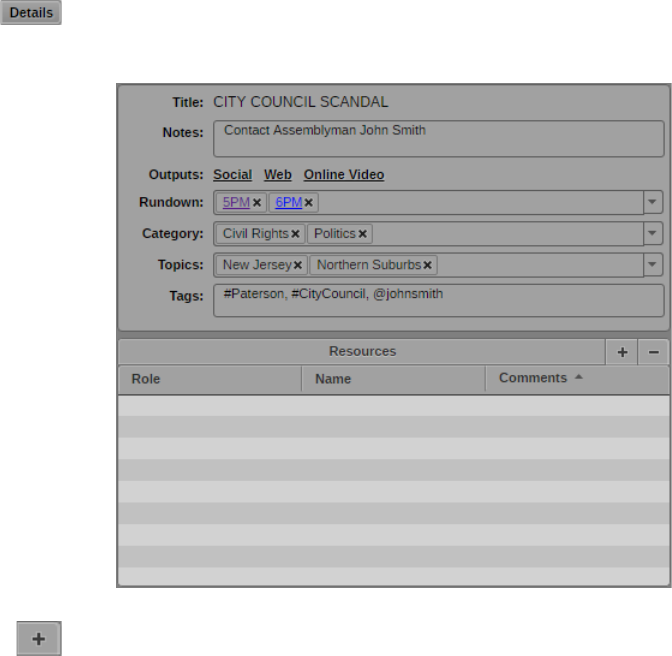
Create and Manage Assignments
396
8. Type keywords or tags for social media use in the Tags text box. Tags must be comma-separated
text values.
9. Click another assignment in the Assignments list or click outside the Details area to save your
changes.
To add resources to an assignment:
1. Click the assignment in the Assignments list.
2. Click the Details button.
The Details area opens, with the Resources area below the Title area.
3. Click the Add Resource (+) button.
A blank resource appears at the top of the Resources list.
4. Click the Role column for the new resource, and then select a role.
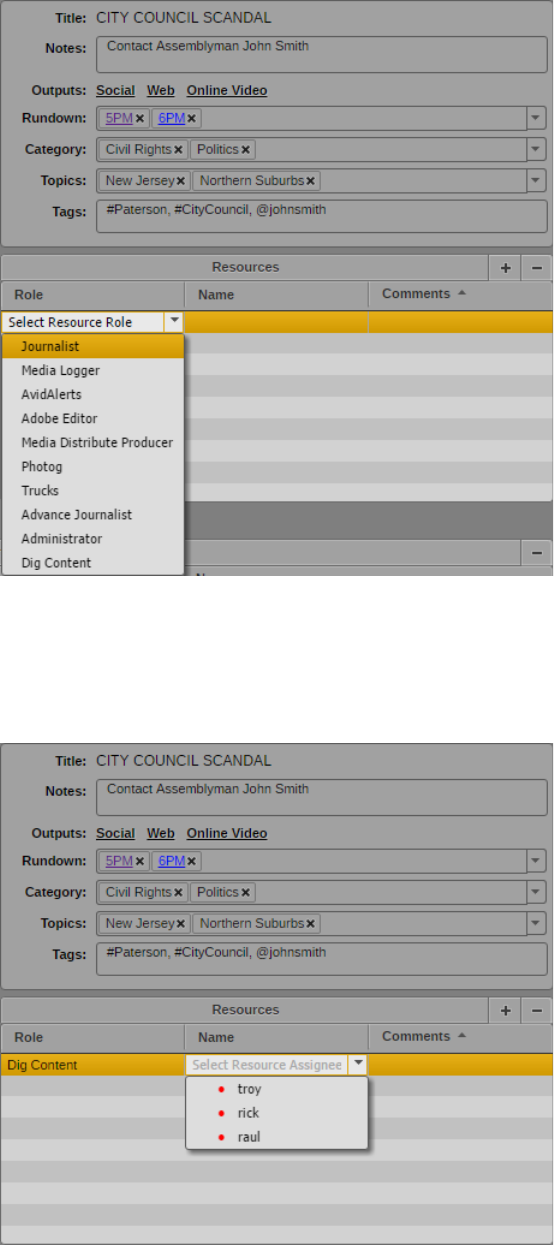
Create and Manage Assignments
397
Roles are created by your MediaCentral UX administrator. For more information about creating
and configuring roles, see “Creating, Deleting, and Assigning Roles” in the Avid MediaCentral |
UX Administration Guide.
5. Click the Name column for the new resource, and then select a user.
The Name menu lists MediaCentral UX users assigned to the selected role.
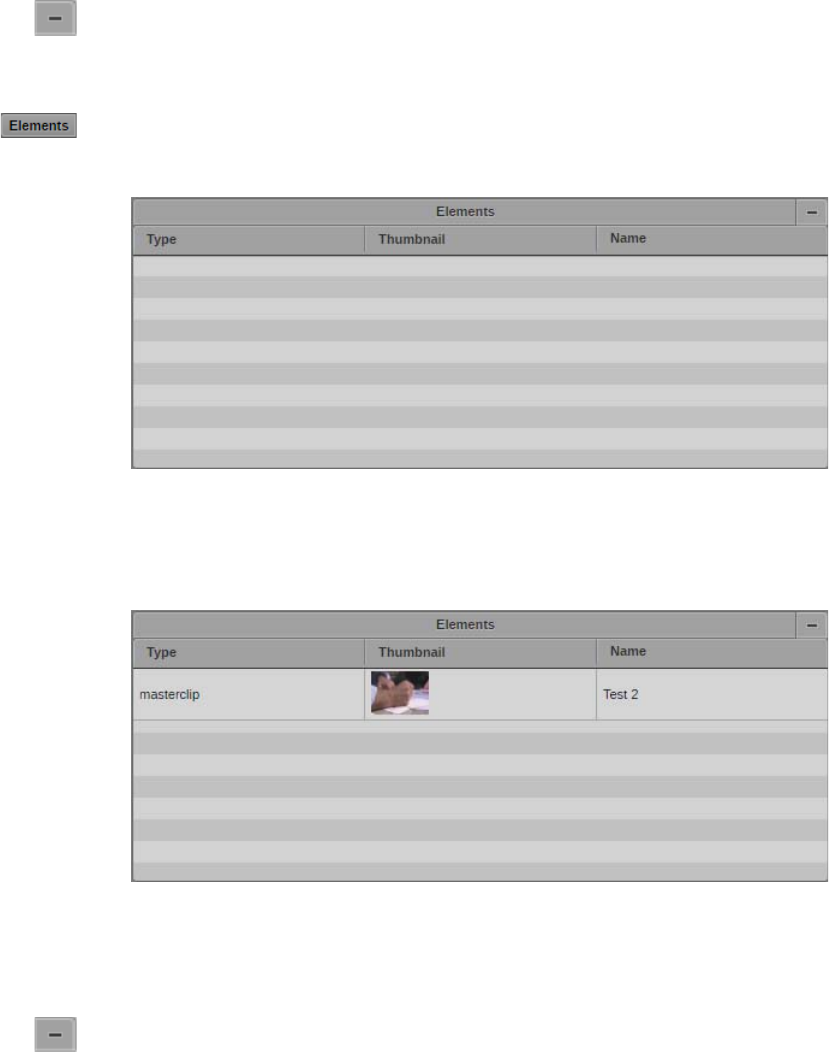
Create and Manage Assignments
398
6. If you want to add a comment, type in the Comments text box for your resource.
7. Click another assignment in the Assignments list or click outside the Details area to save your
changes.
To delete a resource, do the following:
tSelect the resource, in the Resources list, and then click the Remove Resource button.
To add supporting elements to an assignment:
1. Click the assignment in the Assignments list.
2. Click the Elements button.
The Elements area opens.
3. Click an asset from an Assets tab or from the Media pane and drag it to the Elements area.
The asset displays in the Elements list. The Type, Thumbnail, and Name columns display the
appropriate data.
4. Click another assignment in the Assignments list or click outside the Elements area to save your
changes.
To delete an element, do the following:
tSelect the element in the Resources list, and then click the Remove Element button.
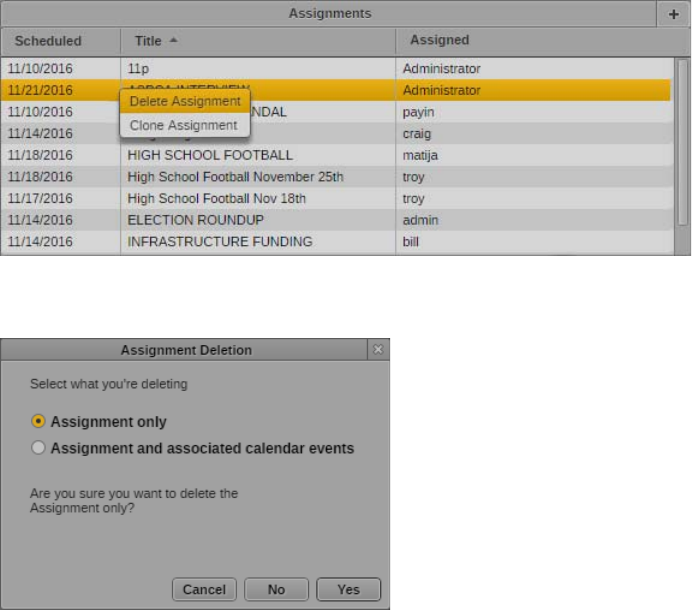
Create and Manage Assignments
399
Deleting Assignments
You can only delete assignments from the Assignments pane. You cannot undo deletions.
nThe Assignment Deletion dialog box might display more than one deletion option. For
MediaCentral UX v2.9, the options available only delete the assignment and do not affect any other
assignment components.
To delete an assignment:
1. Right+click an assignment in the Assignments list, and select Delete assignment.
The Assignment Deletion dialog box opens.
2. Click Yes to delete the assignment.
The assignment is removed from the Assignments pane.
cYou cannot undo an assignment deletion.
Cloning Assignments
Assignments can be duplicated to make it faster to create multiple angles for an assignment.When
you duplicate, or clone, an assignment, a new assignment is created that has the same information as
the original assignment except the rundown. You can then modify the data associated with the
assignment as needed.
The cloned assignment duplicates the following information fields from the original assignment:
• Scheduled
• Title
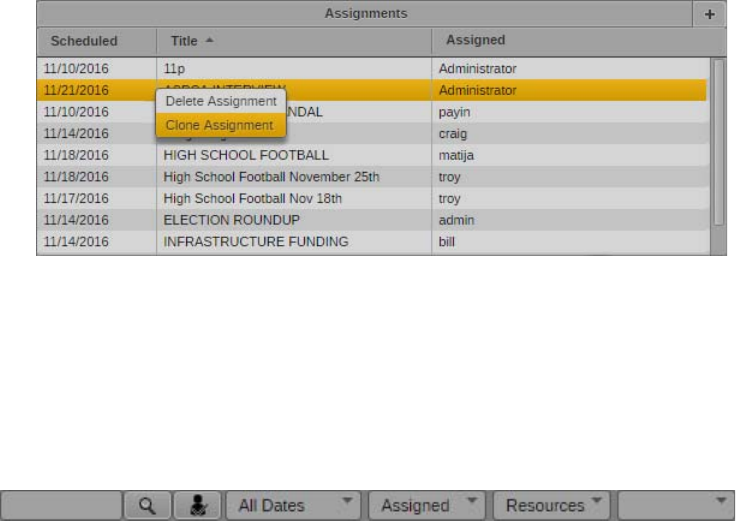
Create and Manage Assignments
400
• Assigned
•Notes
•Category
•Topics
•Tags
•Resources
•Elements
To clone an assignment, do the following:
tRight+click an assignment in the Assignments list, and select Clone assignment.
The assignment is cloned and displays at the top of the Assignments list. The Title field is
selected for editing.
Filtering Assignments
The Assignments list contains all of the assignments currently active for all users. You can use the
filter menus and controls to view only the assignments in which you are interested.
Filter bar, with Search box and Search button; My Assignments button; menus for filtering with the Dates, Assigned,
Resources, and Rundown menus
You can filter the Assignments list using the following controls and menus: button to filter out all
assignments except those assigned to you.
• Search — you can filter the list based on text in the Title, Notes, Category, Topics, and Tags
fields
• My Assignments — clicking the My Assignments button displays only those items assigned to
you so you can see what tasks and stories make up your assignments
• Dates — the dates menu allows you to filter the list based on the Scheduled column (filter for
items scheduled for today, tomorrow, within the current seven-day period, a specified date range,
or all dates).
• Assigned — you can filter the list based on any MediaCentral UX user
• Resources — you can filter for any user role listed as a resource for assignments
• Rundowns — you can filter for any rundowns available in the Rundown menu

Create and Manage Assignments
401
To filter the Assignments list:
1. Do one of the following
tType a search term in the Search text box, and then click the Search button. Text searches
find text in the Title and Notes fields of the Details area.
tClick the My Assignments button. You can view all assignments by clicking the My
Assignments button again.
tClick the All Dates menu and select a date or date range. Clicking Date Range opens the
date picker window where you can specify a date range.
tClick the Assigned menu and select a MediaCentral UX user.
tClick the Resources menu and select a resource role.
The Assignments list displays the relevant results of the filter operation.

16 Sharing MediaCentral | UX Messages
The following topics describe how to use the Messages pane to send messages to MediaCentral UX
users and how to send messages to users logged in to MediaCentral UX and using an Avid editing
application.
•MediaCentral | UX Messages
•Using the Messages Pane
•Configuring E-Mail Forwarding
•Using E-Mail Forwarding
MediaCentral | UX Messages
MediaCentral UX provides users with a messaging service that delivers messages to other users,
including those connected to MediaCentral UX and using iNEWS or an Avid editing application
such as Avid Media Composer. This allows you to share Interplay Production or Interplay MAM
assets with a wide range of MediaCentral UX users. You can send text messages to another Interplay
Production, Interplay MAM, or iNEWS user or to multiple users, and your messages can carry links
to Internet sites using Universal Resource Locators (URLs) as well as links to Interplay Production
assets or Interplay MAM folders and assets. These links, which function as deep links when clicked,
can open specific assets in the MediaCentral UX media viewer, in an Avid editing application
monitor, in a browser, or in the MediaCentral UX Mobile app for iOS devices.
You can also configure e-mail forwarding so that you can receive MediaCentral UX messages when
you are not logged in to the system.
You can drag assets from the Asset pane or the Media viewer to the Messages pane, or you can search
MediaCentral UX and then drag an asset from the Search pane to the Messages pane. The message
displays a head frame of the video asset, the asset name and metadata, as well as a text message
added by the sender. If you added a link to an Interplay MAM folder, the message displays a folder
icon, the folder name, and metadata, as well as a text message added by the sender.
If you have desktop notifications enabled in your browser, a notification is displayed when you
receive a message. You can click on the notification to display the message in the Messages pane. For
more information, see “Showing Desktop Notifications from Panes” on page 36.
Using the Messages Pane
The Messages pane displays a message box for sending both text messages and media asset links. It
also lists all received messages, with the most recent messages at the top of the list.
Messages sent by you display in the message list with a blue background, while messages received
by you display with a green background.
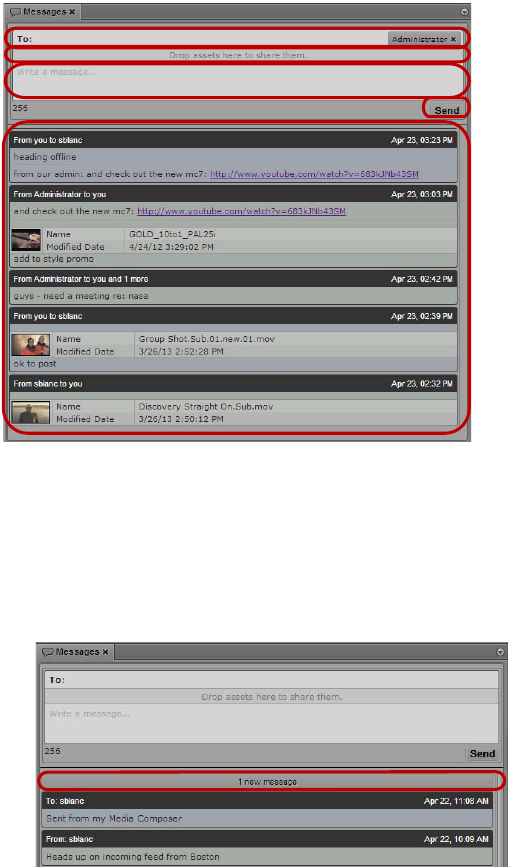
Using the Messages Pane
403
Messages pane (top to bottom): address text box, asset area, message text box, Send button, message list
To display the Messages pane and read messages, do the following:
tSelect Panes > Messages.
The Messages pane opens in the mode and orientation in which it was set when you signed out of
the application. A notification bar above the list appears if you have any new messages.
Messages pane, with the notification bar indicating one new message
Viewing Messages and Linked Assets
When you receive messages sent by other MediaCentral UX users, the Messages pane displays a
notification at the top of the message list indicating unread messages. Clicking the notification or
scrolling up loads the messages, with the most recent ones at the top of the message list.
To view messages:
1. Open the Messages pane.
2. If you received messages since the last time you logged in to MediaCentral UX, click the
notification bar or scroll up.
New messages display in the message list, with the most recent message at the top.
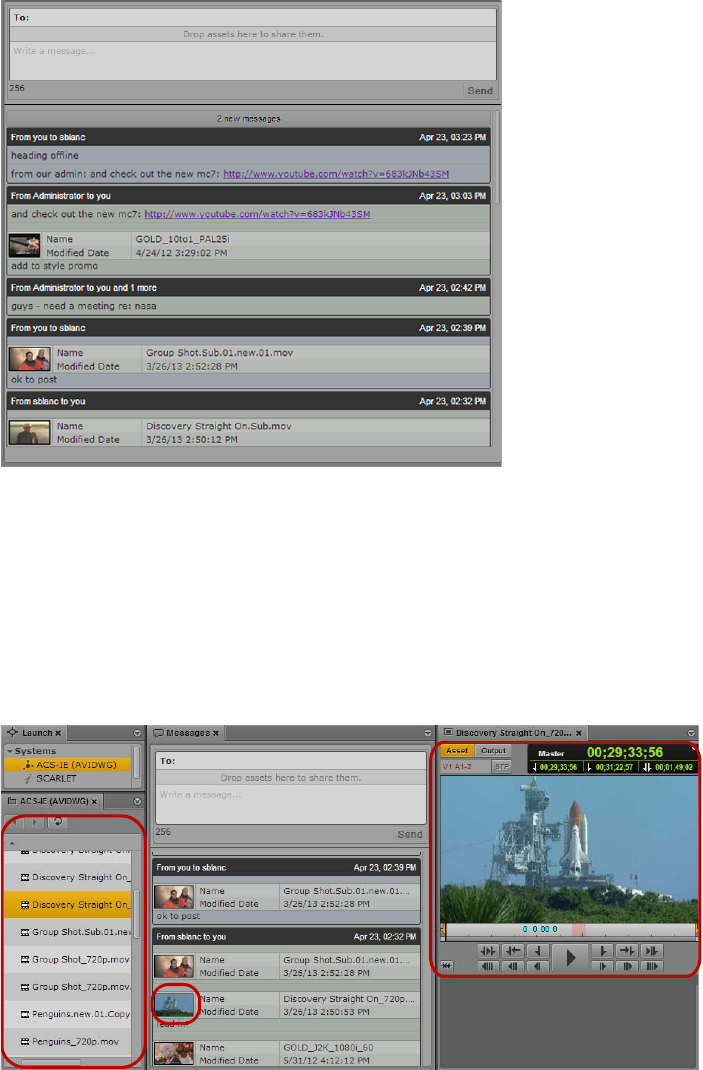
Using the Messages Pane
404
3. If the message includes a media asset, do one of the following:
tDouble-click the head frame in the asset area to view the media or story.
tRight-click and select “Open in Enclosing Folder.”
Double-clicking the asset opens the clip in the Media pane. For an Interplay Production asset, the
Assets pane updates to the location of the clip in the Interplay Production database and selects
the linked clip. For an Interplay MAM asset, the Metadata pane shows the metadata of the asset,
and if the asset is a basic sequence it is shown on the Sequence pane.
Left to right: Asset pane with the linked clip highlighted, head frame of the linked clip in the asset area of the
message, and the linked clip viewed in the Media pane.
If you open the asset in an enclosing folder, a new Asset pane opens and highlights the asset.
nYou must have the appropriate privileges to view media checked in to Interplay Production or
Interplay MAM.
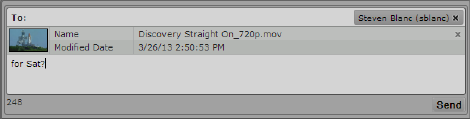
Using the Messages Pane
405
4. (Interplay MAM only) If the message includes a link to a folder, double-click the folder icon in
the asset area.
The Assets pane navigates to the folder in Interplay MAM and shows the asset references saved
in the folder.
5. If the message includes a link to an external Web site (using a URL), you can click the link to
open the Web page in a separate browser tab.
Sending Messages
The Messages pane allows you to share text messages, Interplay Production assets, Interplay MAM
assets, and links to Web pages with other MediaCentral UX users. You can also share messages with
Avid Media Composer users who log on to MediaCentral UX.
You can also send messages without opening the Messages pane if you want to send a media asset to
another user.
When you share an Interplay Production or Interplay MAM asset, the recipient can double-click to
open it in the Media pane. A media asset shared with a Media Composer user opens in the Source/
Record monitor in the Avid editing application.
To write a new message:
1. Do one of the following:
tOpen the Messages pane.
tRight-click an asset in the Assets pane and select Share.
t(Interplay MAM only) Right-click a folder in the Assets pane and select Share.
If you open the Messages pane, an address text box appears at the top of the pane. If you just
want to share an asset, an address text box opens.
2. In the address text box, start typing the name of the recipient or the name of the user group for
your message.
A list of MediaCentral UX users or groups displays as you type.
nIf you type an invalid name, the name changes to red and you receive an error message. You can only
send messages to users and user groups on the MediaCentral UX Users list.
3. Select a name from the list or complete the name by typing it in the address box.
nYou can add multiple names to the address box.
4. If you want to share a media asset, do one of the following:
tClick the asset in the Assets pane and drag it to the asset area of the message.
tClick the asset in the Search pane and drag it to the asset area of the message.
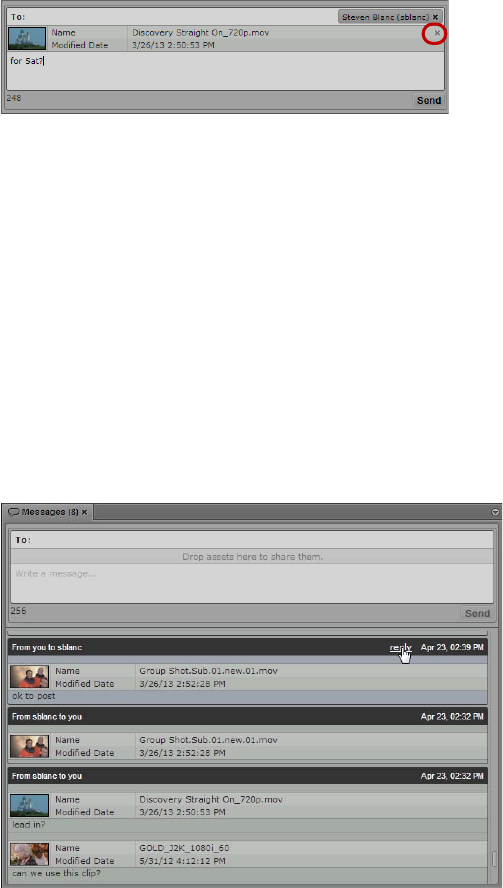
Using the Messages Pane
406
tClick the asset displayed in the Media viewer in Asset mode and drag it to the asset area of
the message.
t(Interplay MAM only) Click the asset in the Tasks pane’s asset area and drag it to the asset
area of the message.
A head frame of the video asset or a clip icon of an audio asset displays in the message, along
with metadata describing the asset.
You can remove the asset by clicking the Remove button in the asset area.
Asset area of the message, with the Remove button
5. In the message text box, type your message.
A character count below the message displays the number of characters allowed in your
message. You can type a total of 256 characters.
6. Click Send.
The message is sent to the MediaCentral UX users listed in the address test box and displays as a
sent message at the top of your message list. Messages sent by you display with a blue
background.
To reply to a message:
1. Position the mouse pointer over the address line of the message to which you want to reply.
The Reply button displays on the right side of the address line.
2. Click Reply.
The address text box in the top of the Messages pane automatically adds the names of the
recipients from the selected message.
3. In the message text box, type your message. You can also share a media asset by dragging it to
the asset area of the message.
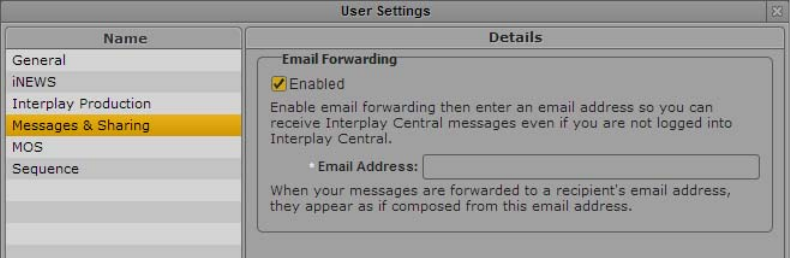
Configuring E-Mail Forwarding
407
A character count below the message displays the number of characters allowed in your
message. You can type a total of 256 characters. If you share an asset, a head frame of video clip
or a clip icon for an audio clip displays in the message
4. Click Send.
The message is sent to the MediaCentral UX users listed in the address text box and displays as a
sent message at the top of your message list.
Configuring E-Mail Forwarding
E-mail forwarding requires an administrator to enable e-mail forwarding and to assign a valid SMTP
server. When your MediaCentral UX administrator enables e-mail forwarding in the System Settings,
you can then use the User settings to enable e-mail forwarding for your account and specify an e-mail
address to which you want your messages sent when you are not logged in to MediaCentral UX.
When you send an e-mail to an offline user, the message is forwarded with your configured e-mail
address listed as the account from which the message is sent.
If you do not configure e-mail forwarding, any messages you send use the e-mail address used for
your MediaCentral UX account. You can override the default MediaCentral UX account by
specifying a new one.
To configure e-mail forwarding for user accounts:
1. Select Home > User Settings.
The User Settings dialog box opens.
2. In the Name column, select Messages & Sharing.
The User Settings dialog box displays the Messages & Sharing settings.
nThe Messages & Sharing settings display a message if your Interplay Production administrator has
not enabled e-mail forwarding,
3. Select Enabled.
4. In the Email Address text box, type the e-mail address from which you want your e-mails
forwarded.
5. Click Apply.
Using E-Mail Forwarding
408
Using E-Mail Forwarding
If e-mail forwarding has been enabled for your workgroup and you have enabled e-mail forwarding
to your personal e-mail account, you can receive messages sent from MediaCentral UX users when
you are not logged in to MediaCentral UX. E-mail forwarding sends messages to your e-mail
account with the subject line, “MediaCentral UX Message: [sender name].”
If the message includes a media asset, the forwarded e-mail provides you with a link to the asset in
MediaCentral UX. You can open this link only if your operating system browser is supported by
MediaCentral UX (Internet Explorer is not currently supported).
Starting with MediaCentral UX v2.6, an administrator has the ability to customize an e-mail message
with the following options:
• Disable the inclusion of an asset link. This option removes the asset link to prevent a problem
opening the link in an unsupported browser. You can open the link when you view the message in
MediaCentral UX.
• Add a custom default header and footer to the message. This option can be especially useful if
the administrator disables inclusion of an asset link. In this case, the administrator can add
default text informing users that the link has been removed from the message.
For more information, see “Configuring E-Mail Options” in the Avid MediaCentral | UX
Administration Guide.
To view an asset included in a forwarded e-mail:
1. Open the forwarded e-mail in the account specified in your MediaCentral UX User settings (see
“Configuring E-Mail Forwarding” on page 407).
2. Click the URL link included in the message.
Your browser opens and displays the MediaCentral UX sign-in screen.
3. Type your user name and password.
4. Click Sign In, or press Enter or Return (Macintosh).
After a few moments, the MediaCentral UX application opens and displays the asset in the
Media pane. The asset is also highlighted in the Asset pane.

17 iNEWS Messaging
The following main topics describe how to use the iNEWS messaging feature.
•Sending Messages
•Viewing and Replying to Received Messages
Sending Messages
MediaCentral UX provides you with two messaging features for communicating with other users
working on iNEWS and MediaCentral UX. You can use the Messages pane to send messages and
media assets to other MediaCentral UX users and to Avid editing applications connected to
MediaCentral UX. For information on using the Messages pane, see “Sharing MediaCentral | UX
Messages” on page 402.
You can also use the Message bar at the top of the application to send messages, reply to messages, or
view messages received during your current session.
A message can be composed of a maximum of 70 characters on a single line, and can be sent to only
one other person.
nAccess to an iNEWS system is required for the messaging feature to work. Messages can be sent only
to a user with an iNEWS account.
To send a message:
1. Click the To: field of the Message bar, and select the user to whom you want to send a message.
All iNEWS user accounts are shown in the list. Colored dots appear next to names in the list to
indicate which users are available to receive messages through MediaCentral UX. A green dot
indicates a signed-in user, and a red dot indicates users who are not signed in.
2. Click the Enter Message Text field and type your message.
3. Click Send.
After the message is sent, the bar turns pale blue.

Viewing and Replying to Received Messages
410
Viewing and Replying to Received Messages
When messages are received, the Message bar turns a pale green, and a numerical value appears near
the right end of the bar to show you how many unread messages you have. The following illustration
shows 10 unread messages.
To view received messages:
tUse the Arrow buttons located near the right end of the Message bar to scroll through any
received messages.
To reply to a received message:
tClick in the bar where the received message is located, type your message, and click Send.

18 Sending to Playback
The following main topics provide information about sending a sequence to a playback device:
•Specifying Send to Playback Settings
•Sending a Sequence to a Playback Device
•Sending a Mixed-Resolution Long GOP Sequence to a Playback Device
•Sending Master Clips or Subclips to a Playback Device
•The Progress Pane
•Interplay Services in the Media Services and Transfer Status Tool
Specifying Send to Playback Settings
When you are finished editing a sequence, you can transfer it to a playback device or playout server
for broadcast. This process is called send to playback, or STP. You can also send sequences created in
other Avid applications to a playback device if they are playable in MediaCentral UX. For more
information, see “Playback of Simple and Complex Sequences” on page 203.
When you send to playback, you use a profile that is created by a MediaCentral UX administrator.
You select a profile and other options in the Send to Playback Settings dialog box.
Starting with MediaCentral UX v2.6, an administrator can specify which users are allowed to send to
playback (STP). If you try to send to playback and do not have permission, the following message is
displayed: “Your user group does not have permission to send to any playback device (STP).”
Starting with v2.7, the User Settings include a Send to Playback page with an option that lets you
preserve the state of the Overwrite setting.For more information, see “User Settings” on page 587.
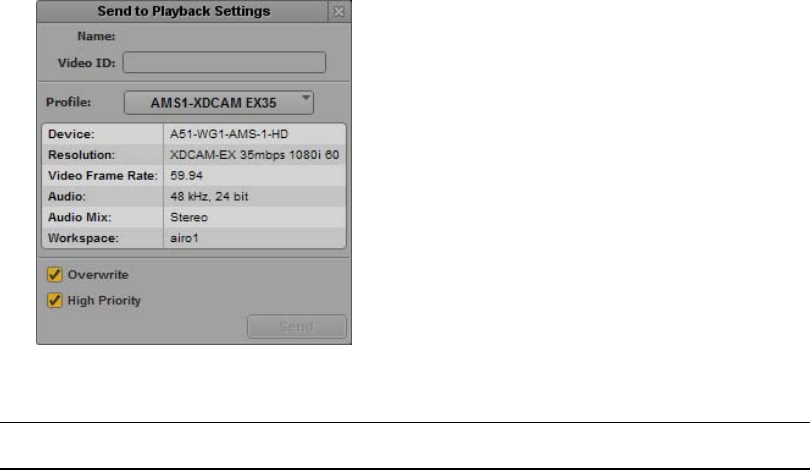
Specifying Send to Playback Settings
412
To specify send-to-playback settings:
1. Click the Pane Menu button and select Send to Playback Settings.
2. Supply the following information:
Setting Description
Name Automatically supplied when you select a sequence for send to playback.
You can copy text from the Name field into the paste buffer. For example, if the
Video ID field is empty, you can paste the clip or sequence name into the Video
ID field.
Video ID Required to send a sequence to playback.
• Script sequences: Automatically supplied when you select a script sequence if
the video ID is already assigned to the story. The video ID is equivalent to the
tape ID in Avid editing systems.
If the Settings dialog box opens after you begin a send-to-playback operation,
and there is no video ID assigned for a script sequence, a blue link is
displayed in the Video ID field. Click this link to display and enable the Video
ID field within the story form of the corresponding story. Then enter the
correct video ID.
• Other sequences: If there is no video ID assigned for a sequence not
associated with a story, type the video ID in the Video ID field.
nValid characters for the Video ID field are alphanumeric characters,
hyphen, and underscore. If invalid characters are used in the clip or
sequence name, they are removed before the text is pasted into the Video ID
field. You cannot type invalid characters in the Video ID field.
Profile Select the profile that you want to use for the send-to-playback operation. Profiles
are created by a MediaCentral UX administrator. Settings for the selected profile
are displayed in the section below the profile name.
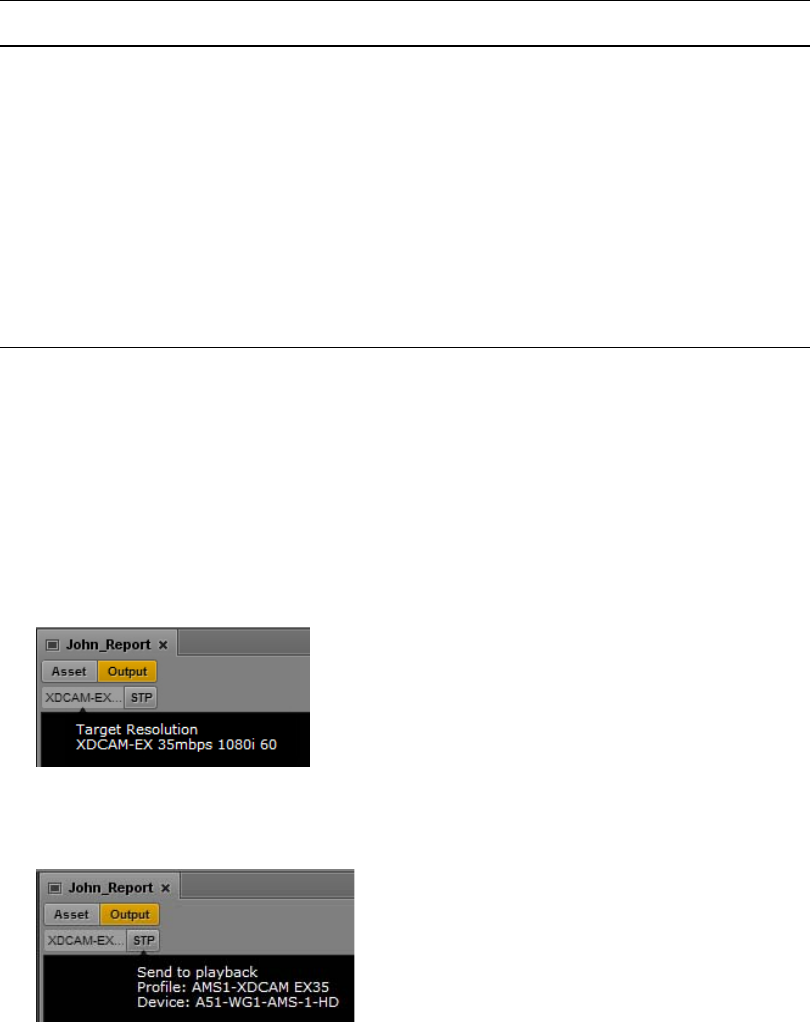
Specifying Send to Playback Settings
413
nIf the Send to Playback Settings dialog opens after you send a sequence to playback, either the
resolution of the sequence does not match the selected profile or the video ID is missing, or both. If
you supply the correct settings, you can click the Send button to start the send to playback process.
3. Click the Close button at the top right of the dialog box or click in another area of the
application.
If a sequence is loaded in Output mode, the resolution for the selected profile is displayed in the
Video Format display. Move the mouse pointer over the display, and the complete resolution is
shown in an overlay.
Move the mouse pointer over the STP button, and a summary of the selected profile is shown in
an overlay.
Overwrite (Optional) Select Overwrite if you want to automatically overwrite any sequence
with the same video ID already sent to the playback device.
nIf you try to send a sequence with the same video ID as one already sent to
the playback device, you receive an error message. Select the Overwrite
option only if you are sure you want to overwrite any sequences with the
same video ID.
nYou can select a User Setting so that the Overwrite selection persists
between operations. See “User Settings” on page 587.
High Priority (Optional) Select High Priority if you want the sequence to be transferred as
quickly as possible by giving the highest priority to Production Services jobs
required for STP.
Setting Description
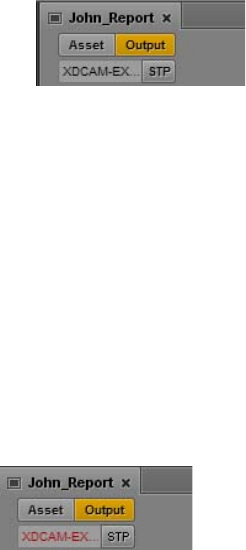
Sending a Sequence to a Playback Device
414
Sending a Sequence to a Playback Device
You can send a sequence to a playback device if the sequence fulfills the following requirements:
• The media format of the sequence must match the media format specified in the selected send-to-
playback profile. The format for the currently selected STP profile is displayed in the Video
Format display. If the format of the sequence matches the format of the STP profile, the display
is black.
For a mixed-resolution Long GOP sequence, this display is red. However, you can send the
sequence to playback so long as all clips in the sequence use the same frame rate. See “Sending a
Mixed-Resolution Long GOP Sequence to a Playback Device” on page 415.
• The sequence must have a video ID. If the sequence does not already have a video ID, you can
add one during the STP process.
The sequence does not need to be associated with an iNEWS story. You can send any sequence to
playback that fulfills these requirements.
If the media format of the sequence does not match the media format specified in the profile, the
Video Format display is red. To send the sequence to playback, select a different profile or replace the
media in the sequence. For more information, see “Specifying Send to Playback Settings” on
page 411.
You can preview a sequence before sending it to playback. For more information, see “Reviewing in
the STP Target Resolution” on page 218.
If a sequence includes closed captions, you must repackage it before you can send it to playback. For
more information, see “Extracting and Repackaging Closed-Caption Data” on page 381.
You can send to playback (STP) a sequence that includes an in-progress (edit-while-capture or EWC)
clip. However, you cannot STP an in-progress clip. If you load an in-progress clip, the STP button is
disabled. See “Sending Master Clips or Subclips to a Playback Device” on page 416.
To send a sequence to a playback device:
1. Load a sequence into the Media pane.
You can load a sequence into Output mode or Asset mode. To load a sequence into Asset mode
from the Assets pane, right-click the sequence and select Open in Asset Mode.
2. Do one of the following:
tClick the STP button.
tClick the Pane Menu button and select Send to Playback (profile-name).
Sending a Mixed-Resolution Long GOP Sequence to a Playback Device
415
If the sequence has unsaved changes, a dialog box is displayed. Click Save to save the sequence
and continue the STP operation.
If the sequence does not have a video ID, the Send to Playback Settings dialog box opens.
Supply the correct settings and click Send.
If there is no video ID assigned for a script sequence, a blue link is displayed in the Video ID
field. Click this link to display and enable the Video ID field within the story form of the
corresponding story. Then enter the correct video ID and start the send-to-playback operation
again.
If the sequence contains gaps of video black, and your MediaCentral UX administrator has
configured the option to detect these, an error message is displayed. For more information, see
the Media Central | UX Administration Guide.
If you try to send to playback and do not have permission, the following message is displayed:
“Your user group does not have permission to send to any playback device (STP).” Contact your
MediaCentral UX administrator. For more information, see the Media Central | UX
Administration Guide.
If the sequence includes a video ID, and the media formats match the requirements of the profile,
the sequence is sent to the Interplay Transfer service, from which it is sent to the selected
playback device. You can continue working while the transfer is taking place.
For information on monitoring the send-to-playback operation, see “The Progress Pane” on
page 417.
Sending a Mixed-Resolution Long GOP Sequence to a
Playback Device
There are limitations on the types of media you can add to a sequence for a successful send-to-
playback operation. In most cases, all media used in the sequence must be available in the target
resolution to start an STP operation.
When you select a Long GOP resolution as a target resolution, you can mix media of different
resolutions if the frame rates match. For example, if the target resolution is XDCAM-HD 1080i, you
can include both XDCAM 1080i clips and DV25 411 NTSC clips in the same sequence. Both use an
actual frame rate of 29.97 fps.
The DV25 clips do not need to be transcoded to XDCAM 1080i before the STP operation begins. For
Long GOP sequences, any necessary transcoding takes place during the STP operation.
nYou can determine the frame rate of a clip in the MediaCentral UX Assets pane. Open the Interplay
Production database and check the FPS column. If the column is not displayed, click the Assets Pane
menu and select Add or Remove Columns.
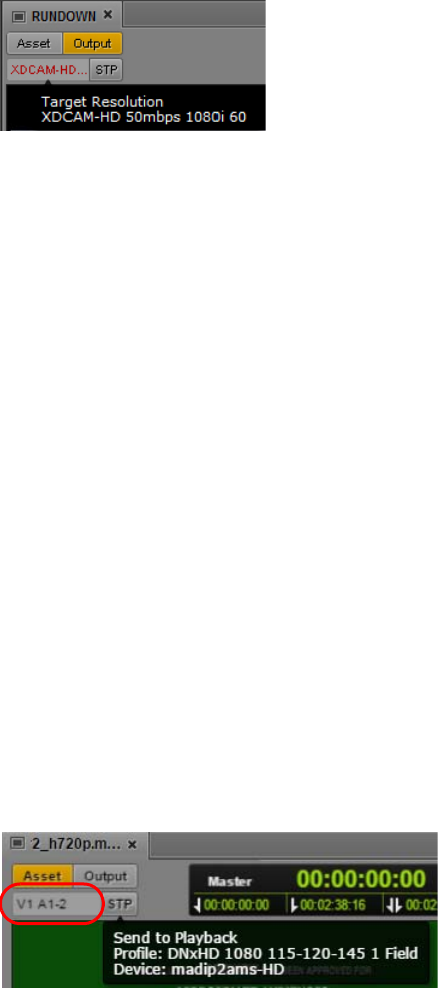
Sending Master Clips or Subclips to a Playback Device
416
Note the following:
• Video Format display: In the Media panel, the Video Format display shows the STP target
resolution. If the media format of any clip in the sequence does not match the media format
specified in the profile, the Video Format display is red.
For a mixed-resolution Long GOP sequence, this display is red. However, you can send the
sequence to playback so long as all clips in the sequence use the same frame rate.
• Aspect ratio: There is no aspect ratio conversion. 4:3 clips are stretched to 16:9.
• Review for Playback: In the Media panel Output mode, when you click the Review for Playback
button, all objects of the sequence that are available in the target resolution are played in the
target resolution. Objects that are not available in the target resolution are replaced by the
message “Media Offline.” To see all parts of the sequence in review mode, clips not in the target
resolution need to be transcoded to the target resolution, for example, by using the Interplay
Transcode feature in an Avid editing system.
cFor target resolutions other than Long GOP, all objects in the sequence must be available in the
target resolution before an STP operation can begin.
Sending Master Clips or Subclips to a Playback Device
If you load a clip or a subclip in Asset mode, you can send it to a playback device (STP). This feature
lets you send to playback without cutting a clip or subclip into a sequence.
You can send a master clip or subclip to a playback device if the clip fulfills the following
requirements:
• The media format of the clip must match the media format specified in the selected send-to-
playback profile. The format for the currently selected STP profile is displayed if you hover the
mouse pointer over the STP button. If the format of the clip matches the format of the STP
profile, the track display is black.
• The clip must have a video ID. If the clip does not already have a video ID, you can add one
during the STP process.
nYou cannot send a group clip, audio-only clip, or in-progress (EWC) to playback. If you load an in-
progress clip, the STP button is disabled.
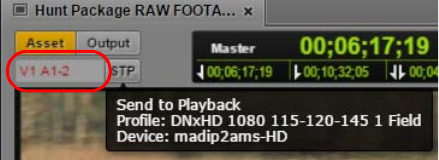
The Progress Pane
417
If the media format of the clip does not match the media format specified in the profile, the track
display is red. To send the clip to playback, select a different profile. For more information, see
“Specifying Send to Playback Settings” on page 411.
You can preview a clip before sending it to playback. For more information, see “Reviewing in the
STP Target Resolution” on page 218.
To send a master clip or subclip to a playback device:
1. Load a clip into the Media pane.
The clip loads in Asset Mode.
2. Do one of the following:
tClick the STP button.
tClick the Pane Menu button and select Send to Playback.
If the clip does not have a video ID, the Send to Playback Settings dialog box opens. Supply the
correct settings and click Send.
If the clip includes a video ID, and the media formats match the requirements of the profile, the
clip is sent to the Interplay Transfer service, from which it is sent to the selected playback device.
You can continue working while the transfer is taking place.
For information on monitoring the send-to-playback operation, see “The Progress Pane” on
page 417.
The Progress Pane
The Progress pane is used to monitor sequence mixdowns and send to playback processes as they
happen. If necessary, you can also cancel a process that is underway or restart a job directly from the
pane. The following illustration shows several examples of what you might encounter when
monitoring processes with the Progress pane.
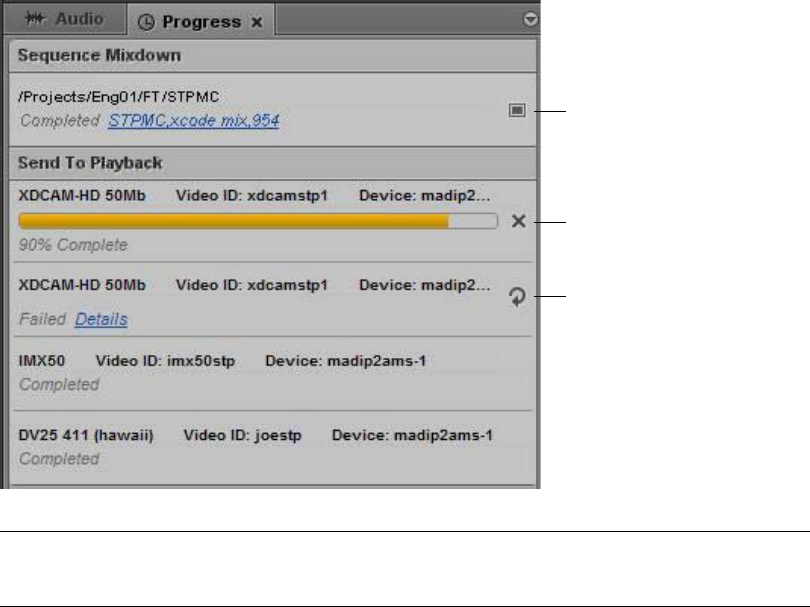
The Progress Pane
418
nClicking the link for successfully finished Sequence Mixdown jobs opens the folder containing the
newly created clip in the Assets pane.
Processes are grouped according to the type of job, such as Sequence Mixdown or Send to Playback.
Single job groups can be collapsed to get a better overview by selectively displaying only one
section. You can display all job groups again manually or from the Pane menu. For example, select
Show Job Groups to open all sections.
In the case a problem occurs, the Details link displays the error message that is reported from the
MediaCentral UX system. In case of Sequence Mixdown, this is the same error message displayed
for the failed transcode job in the Interplay Production Services and Transfer Status tool. For send to
playback (STP) this is the error message that is passed by the MediaCentral Distribution Service.
You can set your browser preferences to show desktop notifications for jobs in the Progress pane as
browser alerts. See “Showing Desktop Notifications from Panes” on page 36.
nIf an STP job uses Interplay Transcode and STP Encode to prepare the job for transfer, the Transcode
and STP Encode jobs are listed in the Media Services and Transfer Status Tool. For more
information, see “Interplay Services in the Media Services and Transfer Status Tool” on page 419.
To open the Progress pane:
tSelect Panes > Progress.
To cancel a process underway:
tClick the Cancel button located to the right of the active process.
qq
ww
we
1Monitor button 3Resend button
2Cancel button
Interplay Services in the Media Services and Transfer Status Tool
419
To retry a failed process:
tClick the Resend button located to the right of the process.
To open the new master clip after a mixdown process:
tClick the Monitor button located to the right of the process. For more information, see
“Transcoding Assets” on page 222.
To remove a job from the list in the Progress pane:
tRight-click the finished process and select Clear Job.
To remove all non-running processes from the list in the Progress pane:
1. Click the Pane Menu button.
2. Select Clear Inactive Jobs.
Interplay Services in the Media Services and Transfer
Status Tool
A Send to Playback (STP) job might use Interplay Transcode and STP Encode to prepare the STP job
for transfer. When this occurs, the Transcode and STP Encode jobs are listed in the Media Services
and Transfer Status Tool while processing, but are removed from the jobs list after processing is
complete. This behavior is different from typical job status reporting, in which jobs persist after
processing is complete.
A similar situation occurs for a Delivery job that uses Mark In to Mark Out. These jobs use Interplay
Consolidate and Interplay Production Services Automation to prepare the files for delivery. An
Interplay Consolidate job is deleted after processing is complete. An Interplay Production Services
Automation job persists.
For both STP and Delivery, progress of the entire job is displayed in the MediaCentral Progress pane.

19 Delivering Assets and Media
The following main topics describe how to deliver assets and media from one Interplay Production
workgroup to another:
•Understanding MediaCentral Delivery
•Delivering Assets and Media to a Remote Workgroup
•Delivering Assets and Media to a Local Workgroup
Understanding MediaCentral Delivery
MediaCentral UX has two options for delivering assets and media:
• Deliver to a remote workgroup. If your organization is configured to include multiple Interplay
Production workgroups, you can use MediaCentral UX to transfer assets and media from your
current workgroup to another workgroup. You use the Deliver To command. For information
about configuring multiple workgroups, see the Interplay Production documentation.
• Deliver from a remote workgroup to a local workgroup. If your MediaCentral server is part of a
multi-zone environment, you can search Interplay Production databases across all zones, view
remote assets, and deliver them to your local Interplay Production workgroup. You use the
Deliver to Me command. For information about multi-zone configuration, see the Avid
MediaCentral Platform Services Installation and Configuration Guide.
Note the following:
• If you attempt to transfer a sequence before you save it, MediaCentral UX asks if you want to
save the file. If you click yes, MediaCentral UX saves the file and then begins the transfer.
• If the Delivery Service is not available, a message “No profiles available” is displayed instead of
the list of profiles. If the Delivery Service cannot be found, the menu options “Deliver To” and
“Deliver to Me” are grayed out.
• You cannot play a clip or sequence in the Receiver workgroup until the delivery process is
complete.
• Delivery of in-process clips (edit-while-capture or EWC) is not supported.
Interplay Delivery Service and Delivery Receiver Service
MediaCentral UX uses the Interplay Delivery service to perform workgroup-to-workgroup transfers
of master clips, subclips, cuts-only sequences, and their media files. The Interplay Delivery Receiver
service must be running on a server in the workgroup to which you are delivering the assets and
media. These services are installed and configured as Interplay Production Services in an Interplay
Production workgroup.
nFor complete information on Interplay Delivery, see “Working with the Delivery Service” in the
Interplay | Production Services Setup and User’s Guide or the Interplay | Production Help.
Understanding MediaCentral Delivery
421
Deliver From Mark In to Mark Out
You can deliver a part of a clip by marking In and Out points and selecting the Deliver from Mark In
to Mark Out option. If you use this feature, MediaCentral UX uses two additional services: Interplay
Production Services Automation and Interplay Consolidate. For more information about these
services, see the Avid Media | Index Configuration Guide.
nSequences and subclips are not supported for delivery from Mark In to Mark Out.
nYou cannot use MediaCentral Delivery to deliver Apple ProRes media if you select “Deliver from
Mark In to Mark Out.” The Consolidate service does not support ProRes as a source or target
resolution.
Delivery Profiles and Consolidate Profiles
When you use MediaCentral UX to transfer media, you select a Delivery profile that includes the
target workgroup, target video quality, and other information. An Interplay Production administrator
creates these Delivery profiles in the Production Services and Transfer Status Tool. These profiles are
created and stored in the local Interplay Production workgroup.
In some situations, a Consolidate profile is used to determine the target resolution. An Interplay
Production administrator must create at least one Consolidate profile in the Production Services and
Transfer Status Tool. This profile must be named “default_for_delivery.” The resolution specified in
this profile is displayed in the Deliver To and Deliver To Me dialog boxes.
nIf this default profile is not created, the parameter “Consolidate Target Video Quality” is blank. If
you attempt a delivery using Deliver from Mark In to Mark Out, the job fails with an error message.
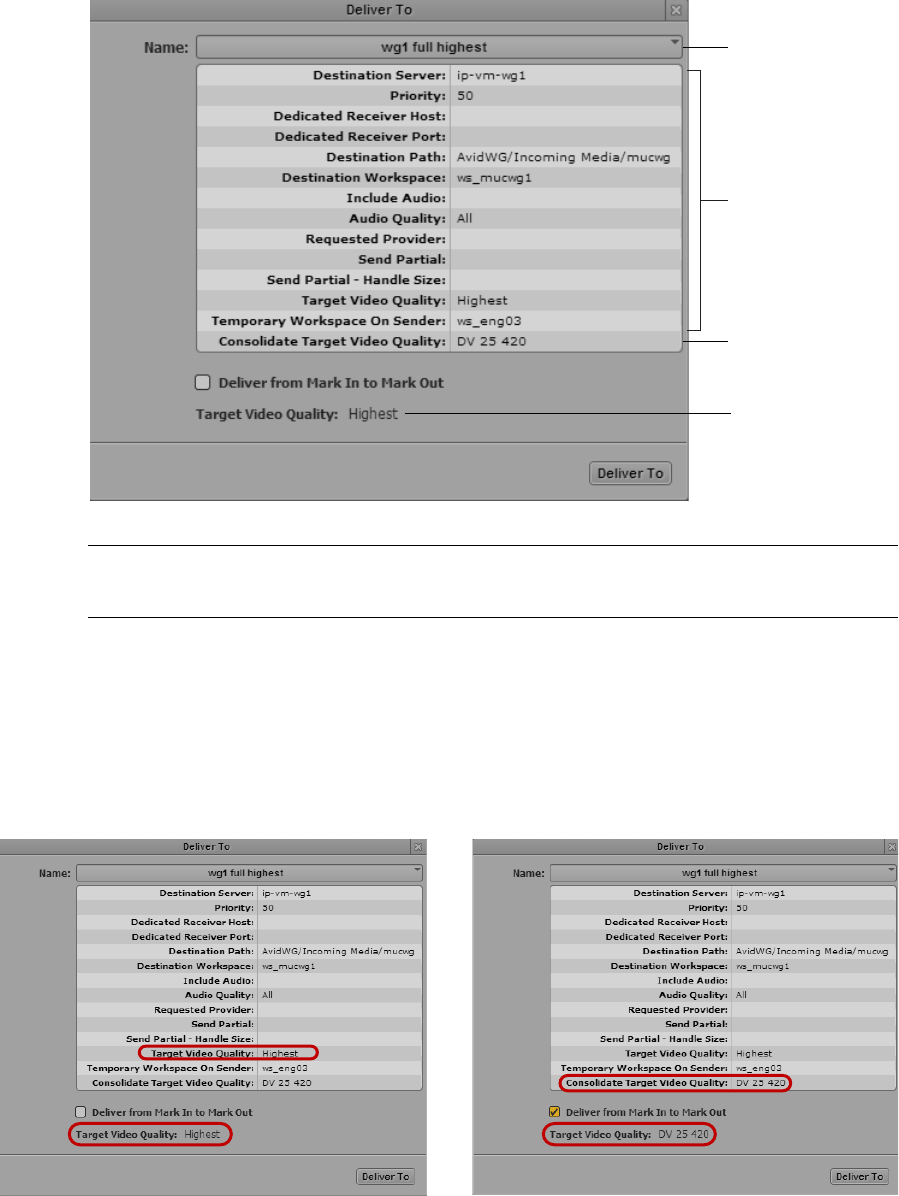
Understanding MediaCentral Delivery
422
The following illustration shows the Deliver To dialog box, with parameters taken from the Delivery
profile and the Consolidate profile.
The following illustration shows two Deliver To dialog boxes:
• The dialog box on the left is using the Delivery profile “wg1 full highest” for its information.
The highest resolution associated with the selected clip will be delivered.
• The dialog box on the right is using the same Delivery profile but has the option “Deliver from
Mark In to Mark Out” selected. The target resolution (DV25 420) is taken from the default
Consolidate profile. Consolidate creates new media. A DV25 420 clip will be delivered.
qq
ww
ee
rr
1Delivery profile list 3Parameter from default Consolidate profile
2Parameters from selected Delivery profile 4Resolution for media that will be delivered

Delivering Assets and Media to a Remote Workgroup
423
nFor more information on creating profiles for Interplay Consolidate, see the Avid Media | Index
Configuration Guide.
Deliver from Mark In to Mark Out Workflows
If you select “Deliver from Mark In to Mark Out,” the Consolidate service creates new clips and new
assets, using information in the Consolidate profile. The following table describes several different
workflows.
Note the following:
• The new asset created by the Consolidate service is appended with “new,n.” For example, for a
clip named “myclip” the resulting target clip will be named “myclip,new,1”. Subsequent assets
created from other parts of the clip will be named “myclip,new,2”, “myclip,new,3”, and so on.
• Clips that are created by Mark In to Mark Out do not display headframes after they are delivered.
Delivering Assets and Media to a Remote Workgroup
If your organization is configured to include multiple Interplay Production workgroups, you can use
MediaCentral UX to transfer assets and media from your current workgroup to another workgroup.
You can transfer assets and media from the Media pane, the Assets pane, or the Search pane.
• In the Media pane, you can transfer from Asset mode or from Output mode. You can transfer
only the currently loaded asset. For clips, you can use the Deliver from Mark In to Mark Out
feature. Sequences and subclips are not supported for delivery from Mark In to Mark Out.
• In the Assets pane or Search pane, you can select one asset or multiple assets.
You can track the status of the transfer in the Progress pane.
Delivery Profile Media Status Consolidate Output
The Delivery profile includes a
specific Target Video Quality.
Media exists in the specified
resolution.
Consolidate creates a new asset
and new media of the specified
length.
Media does not exist in the
specified resolution.
Consolidate creates a new asset
and new media of the specified
length, in the specified resolution.
If a Consolidate profile with the
specified resolution does not
exist, it is automatically created,
using the parameters of the
default profile.
The Delivery profile does not
include a specific Target Video
Quality (for example, it uses “all”
or “highest”).
Media exists in the resolution
specified in the Consolidate
profile.
Consolidate creates a new asset
and new media of the specified
length.
Media does not exist in the
resolution specified in the
Consolidate profile.
Consolidate creates a new asset
and new media of the specified
length, in the specified resolution.
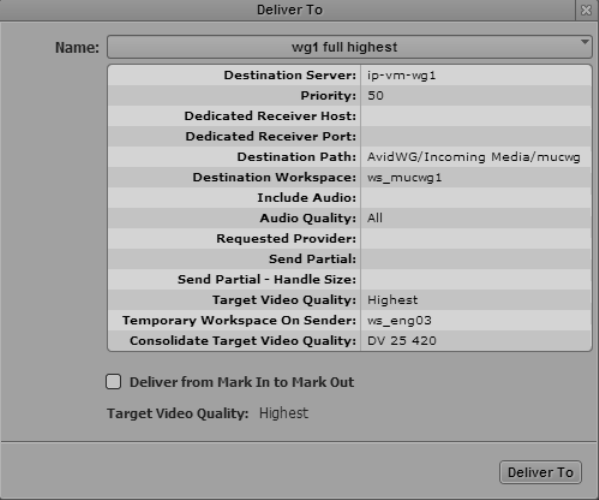
Delivering Assets and Media to a Remote Workgroup
424
nBy default, a Delivery provider is configured to run one job at a time. You can change this value by
editing an .ini file. For more information, see the Interplay Delivery documentation.
To deliver to a remote workgroup from the Media pane:
1. Load an asset in either Asset mode or Output mode.
2. (Optional) If you want to deliver only part of a clip loaded in Asset mode, set In and Out marks.
You cannot set In and Out marks on sequences or subclips.
3. Click the Pane Menu button and select Deliver To.
The Deliver To dialog box opens and displays the parameters of the selected profile.
4. From the Name list, select the Delivery profile that you want to use for the transfer.
Profiles are created by an Interplay Production administrator. The video format that will be
delivered is displayed as Target Video Quality at the bottom of the dialog box.
5. (Optional) To deliver part of a clip, select Deliver from Mark In to Mark Out.
If you use this option, the Target Video Quality is taken from the Consolidate profile. See
“Understanding MediaCentral Delivery” on page 420
6. Click Deliver To.
The job is submitted. You can view the status of the delivery in the Progress pane.
To deliver to a remote workgroup from the Assets pane or the Search pane:
1. Select one or more assets.
2. Do one of the following:
tRight-click a selected asset and select Deliver To.
tClick the Pane Menu button and select Deliver To.
The Deliver To dialog box opens and displays the parameters of the selected profile.
3. From the Name list, select the Delivery profile that you want to use for the transfer.

Delivering Assets and Media to a Local Workgroup
425
Profiles are created by an Interplay Production administrator. The video format that will be
delivered is displayed as Target Video Quality at the bottom of the dialog box.
4. Click Deliver To.
The job is submitted.
To view the status of the delivery:
tIn the Progress pane, click the Pane Menu button and select Show Job Groups > Delivery.
nDelivery jobs that use Mark In to Mark Out use Interplay Consolidate and Interplay Production
Services Automation to prepare the files for delivery. These jobs are displayed in the Interplay Media
Services and Transfer Status tool. An Interplay Consolidate job is deleted after processing is
complete. An Interplay Production Services Automation job persists.
Delivering Assets and Media to a Local Workgroup
If your MediaCentral server is part of a multi-zone environment, you can search Interplay Production
databases across all zones, view remote assets, and deliver them to your local Interplay Production
workgroup.
When you select a profile, the list of profiles is determined by the profiles that exist on the remote
Production Services Engine and that have the local Production Services Engine set as the target.
To deliver to a local workgroup from the Media pane:
1. Perform a search that includes another MediaCentral zone.
For more information, see “Searching for Assets” on page 261.
2. Load an asset in either Asset mode or Output mode.
3. (Optional) If you want to deliver only part of a clip loaded in Asset mode, set In and Out marks.
You cannot set In and Out marks on sequences or subclips.
4. Click the Pane Menu button and select Deliver To Me.
The Deliver To Me dialog box opens and displays the parameters of the selected profile.
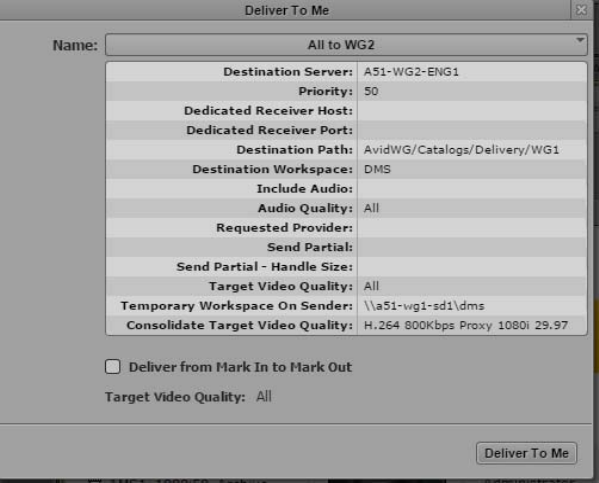
Delivering Assets and Media to a Local Workgroup
426
5. From the Name list, select the Delivery profile that you want to use for the transfer.
Profiles are created by an Interplay Production administrator. The video format that will be
delivered is displayed as Target Video Quality at the bottom of the dialog box.
6. (Optional) To deliver part of a clip, select Deliver from Mark In to Mark Out.
If you use this option, the Target Video Quality is taken from the Consolidate profile. See
“Understanding MediaCentral Delivery” on page 420
7. Click Deliver To Me.
The job is submitted.
To deliver to a local workgroup from the Search pane:
1. Perform a search that includes another MediaCentral zone.
For more information, see “Searching for Assets” on page 261.
2. Select one or more assets.
3. Do one of the following:
tRight-click a selected asset and select Deliver To Me.
tClick the Pane Menu button and select Deliver To Me.
The Deliver To Me dialog box opens and displays the parameters of the selected profile.
4. From the Name list, select the Delivery profile that you want to use for the transfer.
Profiles are created by an Interplay Production administrator. The video format that will be
delivered is displayed as Target Video Quality at the bottom of the dialog box.
5. Click Deliver To Me.
The job is submitted.
To view the status of the delivery
tIn the Progress pane, click the Pane Menu button and select Show Job Groups > Deliver To Me.
Delivering Assets and Media to a Local Workgroup
427
nDelivery jobs that use Mark In to Mark Out use Interplay Consolidate and Interplay Production
Services Automation to prepare the files for delivery. These jobs are displayed in the Interplay Media
Services and Transfer Status tool. An Interplay Consolidate job is deleted after processing is
complete. An Interplay Production Services Automation job persists.

20 Working with Interplay | MAM Processes
and Tasks
The following main topics provide information about working with processes that you created in
Interplay MAM Desktop or MediaCentral UX and the individual user tasks that are part of MAM
processes:
•Understanding Processes, Tasks, and Actions
•Creating Processes
•Using File Attachments During Process Creation
•Getting Information on Allowed Attachments
•Using the Quick Send Feature
•Monitoring Processes in the Progress Pane
•Working with Process Dashboards
•Working with Tasks
Understanding Processes, Tasks, and Actions
Processes allow flexible user activities and automated workflows to be used in Interplay MAM.
Processes, Tasks, and Actions
A process is a defined set of automated workflows and manual activities to achieve a specific goal; it
defines the states, tasks, and the control flow that are used to achieve the goal. For example, you are
finished creating a basic sequence, and want to send it to a reviewer to get approval before the
sequence is transferred to a editing device. You can create a process to achieve this goal. Processes
are modeled to mirror specific business workflows of customers with specific user interactions.
Interplay MAM processes contain tasks, which are elementary steps within a process that are carried
out either automatically (based on workflow scripts) or by user actions. A task that is performed by a
manual user action is called a user task.
Actions are items that you select to create a process.
MAM Systems for Orchestration
As an Interplay MAM user that is assigned an Advance license, you have full access to all connected
Interplay MAM systems. If you are assigned a Base MAM license, you have full access to one
Interplay MAM system but you can also use all other connected Interplay MAM system as
“orchestration-only” systems: You can create and monitor processes on these systems. Process
creation and monitoring and user task editing are considered orchestration features.
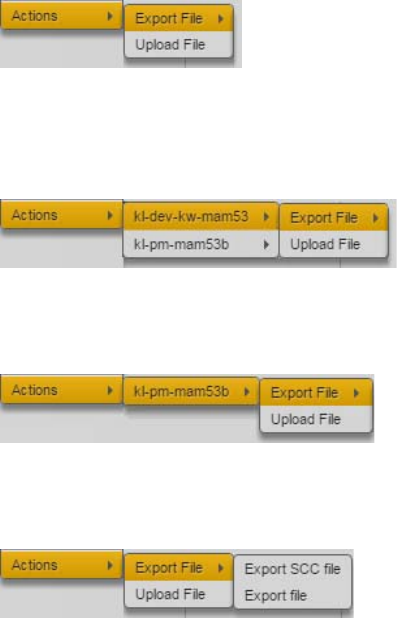
Understanding Processes, Tasks, and Actions
429
Starting with MediaCentral UX v2.8, users that are assigned a Base non-MAM license (Interplay
Production, iNEWS) can also have orchestration-only access to Interplay MAM systems with the
following limitations:
• Interplay MAM systems are not shown in the Launch pane.
• Users cannot access MAM folders in the Assets pane, search for MAM assets, or open MAM
assets in other MediaCentral UX panes.
Creating Processes
Your ability to create and initiate processes depends on Interplay MAM user privileges and rules. For
example, the credentials you use to sign in to the Interplay MAM database must allow creation of
processes. Beyond that, the configuration of the process in Interplay MAM determines which action
can be applied and the number and type of assets that can be attached to a process (for example
MAM basic sequence, MAM video or audio, mixed attachments, or Interplay Production assets).
Panes that support the creation of processes provide an Actions menu item (Media pane, Assets pane,
Search pane, File Info pane) or Create Process menu item (Tasks pane) to let you select the MAM
system running the process and the configured process types.
• If there is one MAM system connected to MediaCentral UX that allows creating processes, the
process types are listed as submenu entries in the Actions or Create Process menu item.
• If there are several MAM systems connected to MediaCentral UX that allow creating processes,
a submenu entry with the system name is shown for each system. Within the individual system
entries the process types are listed as submenu entries.
If only one of the connected systems allows creating processes, one submenu entry with the
system name is shown. Within the system entry the process types are listed as submenu entries.
• If a process type provides options (for example, different targets or file types for an export
process), the process options are listed as submenu entries in the process type menu item.
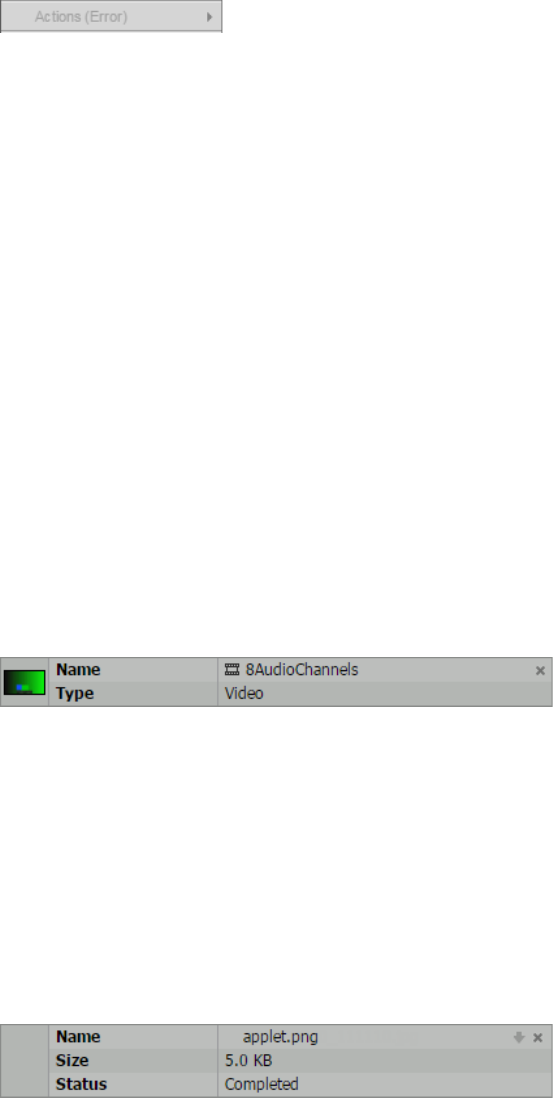
Understanding Processes, Tasks, and Actions
430
• If no MAM system supports process creation or no process type is applicable, the menu item is
disabled; if an issue occurs while the process types are loaded, this is indicated by an (Error) or
(Timeout) suffix in the disabled menu item.
Starting with Interplay MAM v5.9 / MediaCentral UX v2.10, the order in which process types are
listed as submenu entries in the Actions menu can be configured by an Interplay MAM administrator.
If sorting of the process types is not configured in Interplay MAM, the process types appear in an
unsorted order in the Actions menu.
For more information on how to create processes, see “Creating Processes” on page 431.
Assets and Files as Attachments
Depending on the process configuration, you can attach assets or files or both to processes and user
tasks. Note the following differences between asset and file attachments:
• Assets: Assets are registered, saved, and searchable in the Interplay MAM database. You can
attach assets during process creation or in the context of a user task.
- During process creation you can see the attached assets but cannot add assets or delete
attached assets in the process creation dialog box.
- In context of a user task you can apply actions, reuse assets in other MediaCentral UX
panes, and delete them from the task. See “Adding and Editing User Task Attachments” on
page 467 and “Deleting Attachments” on page 470. You cannot download assets.
In the process creation dialog box and the Task pane’s Task Attachment area, for each attached
asset, a header frame or clip icon (MAM assets only), the file name, and status are shown. A
Delete button might also be shown (Task pane only).
• Files: Files only “exist” in the context of a process. You can upload files to a process or a task,
but they do not reside in the system, are not searchable, and cannot be reused in other
MediaCentral UX panes. You can delete file attachments from the process creation dialog box
and the Tasks pane.You can download file attachments only from the Tasks pane. See “Using
File Attachments During Process Creation” on page 433, “Uploading Files as Attachments” on
page 468, “Downloading File Attachments” on page 469, and “Deleting Attachments” on
page 470.
In the process creation dialog box and the Task pane’s Task Attachment area, for each attached
file, the file name, size, and status are shown. A Delete button and (only in the Tasks pane) a
Download button might be shown.
Creating Processes
431
Creating Processes
When you create a process, you select the process type, which was created in Interplay MAM. You
automatically attach the asset that is open (Media pane, File Info pane) or selected (Assets pane,
Search pane) to the process. Use the Tasks pane if you want to create a process without attachments.
See “Understanding Processes, Tasks, and Actions” on page 428.
Starting with MediaCentral UX version 2.4, you can also attach Interplay Production assets or
iNEWS stories to a process if the process is configured accordingly in Interplay MAM. Use the same
procedure for creating processes for MAM assets and assets from other systems.
Starting with MediaCentral UX version 2.6, you can also upload files to a process during process
creation if the process is configured accordingly in Interplay MAM. See “Using File Attachments
During Process Creation” on page 433.
Starting with MediaCentral UX v2.8, as a user that is assigned a Base non-MAM license (Interplay
Production, iNEWS), you also have “orchestration-only access” to all connected Interplay MAM
systems. You have access to orchestration features, such as process creation and monitoring.
You can monitor the status of your processes in the Progress pane, create and edit process dashboards
in the Process Dashboard pane, and track if additional user tasks resulted from processes in the Tasks
pane. See “Monitoring Processes in the Progress Pane” on page 437, “The Process Dashboard Pane”
on page 439, and “The Tasks Pane” on page 457.
To create a process from the Assets pane:
1. Select one or more assets.
2. Do one of the following:
tRight-click a selected asset and select Actions.
tClick the Pane Menu button and select Actions.
3. (Option) Select the MAM system on which the process is to be created.
4. Select the process type.
5. (Option) If the process type provides a submenu, select the desired menu item; for example,
select an export target for an export process.
6. (Option) Upload files to the process.
7. Supply the required information in the process dialog box and click OK.
The process is created and shown in the Progress pane. If the process requires you to take
additional user actions, the corresponding task is shown in the Tasks pane.
To create a process from the Search pane:
1. Conduct a search for the assets you want to use.
2. Select one or more assets in the Search Results list.
3. Do one of the following:
tRight-click a selected asset and select Actions.
tClick the Pane Menu button and select Actions.
4. (Option) Select the MAM system on which the process is to be created.
5. Select the process type.
Creating Processes
432
6. (Option) If the process type provides a submenu, select the desired menu item; for example,
select an export target for an export process.
7. (Option) Upload files to the process.
8. Supply the required information in the process dialog box and click OK.
The process is created and shown in the Progress pane. If the process requires you to take
additional user actions, the corresponding task is shown in the Tasks pane.
To create a process from the Associations pane:
1. (Option) To ensure you see all available associations, expand all association types.
2. Select one or more assets.
You can select the source asset and any of its associated assets.
3. Click the Pane Menu button and select Actions.
4. (Option) Select the MAM system on which the process is to be created.
5. Select the process type.
6. (Option) If the process type provides a submenu, select the desired menu item. For example,
select an export target for an export process.
7. (Option) Upload files to the process.
8. Supply the required information in the process dialog box and click OK.
The process is created and shown in the Progress pane. If the process requires you to take
additional user actions, the corresponding task is shown in the Tasks pane.
To create a process from the Documents or File Info pane:
1. Open an asset in the pane.
2. Click the Pane Menu button and select Actions.
3. (Option) Select the MAM system on which the process is to be created.
4. Select the process type.
5. (Option) If the process type provides a submenu, select the desired menu item. For example,
select an export target for an export process.
6. (Option) Upload files to the process.
7. Supply the required information in the process dialog box and click OK.
The process is created and shown in the Progress pane. If the process requires you to complete
additional user actions, the corresponding task is shown in the Tasks pane.
To create a process from the Media pane:
1. Load an asset in Asset mode or a or basic sequence in Output mode.
If you load and edit a basic sequence, save any changes made to the sequence prior to invoking
the process.
2. (Option) If you select a process that takes into account your selection of Mark-In, Mark-Out, and
the current playback position, set these positions prior to invoking the process. For proper
results, it is recommended to pause playback.
3. Click the Pane Menu button and select Actions.
4. (Option) Select the MAM system on which the process is to be created.
Using File Attachments During Process Creation
433
5. Select the process type.
6. (Option) If the process type provides a submenu, select the desired menu item; for example,
select an export target for an export process.
7. (Option) Upload files to the process.
8. Supply the required information in the process dialog box and click OK.
The process is created and shown in the Progress pane. If the process requires you to complete
additional user actions, the corresponding task is shown in the Tasks pane.
To create a process without attachments from the Tasks pane:
1. Click the Pane Menu button and select Create Process.
2. (Option) Select the MAM system on which the process is to be created.
3. Select the process type.
4. (Option) If the process type provides a submenu, select the desired menu item.
5. (Option) Upload files to the process.
6. Supply the required information in the process dialog box and click OK.
The process is created and shown in the Progress pane. If the process requires you to complete
additional user actions, the corresponding task is shown in the Tasks pane.
Using File Attachments During Process Creation
When you create a process in the Assets pane, Search pane, Media pane, or File Info pane, you attach
at least one asset to it. When you create a process in the Tasks pane, the process has no attachment. In
each pane, if a process is configured accordingly in Interplay MAM, you can upload files to the
process during process creation. In the process dialog box an Upload button is shown and dropping
files to the process dialog box is enabled. See “Assets and Files as Attachments” on page 430.
When you use file attachments for a process, you can finish process creation only if the following
conditions are met:
• All file attachments are completely uploaded.
• The number of attachments complies with the allowed limits. See “Getting Information on
Allowed Attachments” on page 435.
If a requirement is not fulfilled, the process dialog box’s OK button is disabled.
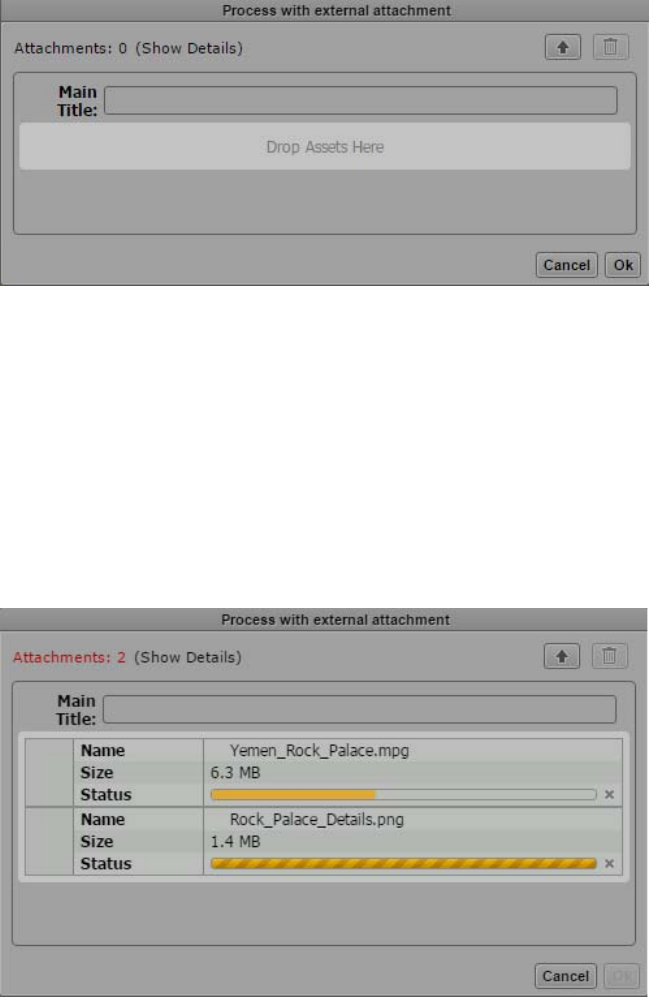
Using File Attachments During Process Creation
434
To upload files to a process:
1. Create a process to open a process dialog box.
The following illustrations show a sample process that allows uploading one file.
2. Do one of the following:
tClick the Upload button in the process dialog box and select the files to be uploaded in the
Open dialog box.
tOpen the Explorer (Windows) or Finder (Mac), select one or several files and drag them to
the process dialog box.
The drop zone is outlined in orange, the Attachment area (or the Drop Assets Here area, if
there is no attachment yet) is highlighted in orange, and a Move icon indicates if dropping is
possible.
For each file an asset card shows the file name, file size, and the upload status.
The status can be one of the following:
- Waiting: A loading indicator for files that have not been uploaded. A Cancel button is shown
beside the loading indicator.
- In Progress: A progress bar during the upload. A Cancel button is shown beside the progress
bar.

Getting Information on Allowed Attachments
435
- “Completed” for successfully uploaded files.
- “Failed” for failed uploads.
If a file with the same name was already uploaded, an “Overwrite file” prompt opens. Click Yes
to overwrite the original file attachment, click No to keep the original attachment.
3. (Option) To cancel the upload, click the Cancel button beside the Loading indicator or progress
bar of the file attachment.
The upload is canceled and the attachment’s assets card removed from the process dialog box.
4. Check the Attachments count to ensure that the number of attachments complies with the
allowed limits. If the Attachment count is shown in red, it exceeds the limits. In this case, delete
files from the process dialog box.
5. (Option) To delete file attachments, do one of the following:
tTo delete a single attachment, click the Delete button on the attachment asset card.
tTo delete several attachments at the same time, select the attachments in the Attachments
area, and click the Delete Attachment button.
All deletable attachments are deleted. The process dialog box is updated and the attachments are
no longer displayed.
Getting Information on Allowed Attachments
When you create a process, the Create Process dialog box shows the number of attachments (assets
and files) in the Attachments count. The same information is provided in the Tasks pane when you
select a task. See “The Tasks Pane” on page 457.
In both environments, if the number of attachments does not comply with the allowed limits, the
“Attachments” count is shown in red. An Allowed Attachment Types window provides details,
including the reason why the limit is exceeded.
To get information on the allowed attachments:
1. Do one of the following:
tOpen the Create Process dialog box.
tOpen the Tasks pane and select a task in the Task List.
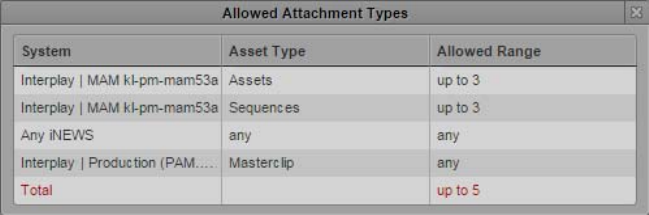
Using the Quick Send Feature
436
The Attachments count shows the number of attached item and the attached items are shown as
“asset cards” in the Attachments area.
2. Click the Show Details link beside the Attachments count.
The Allowed Attachments Type window provides detailed information on the number and type
of allowed attachments. Each row represents a rule. Note that file attachments are not configured
as separate rules, but are evaluated in the total number of allowed attachments.
- System: Type (Interplay MAM, Interplay Production, iNEWS) and name of the system to
which the rule applies. If the rule applies to all systems of a type, the prefix “Any” is shown.
- Asset Types: Name of the allowed asset type or “any” if there is no restriction.
- Allowed Range: Number and range of allowed attachments (none, any, exactly n, up to n,
from n-to m).
- Total: The maximum number of attachments allowed for the process.
Rules that do not comply with the allowed limits are shown in red.
Click the Close box or click anywhere outside the window to close the Allowed Attachments
Types window.
Using the Quick Send Feature
For a quick transfer of material to a certain destination, users of Interplay MAM Desktop can just set
In and Out points and then initiate the transfer. Starting with version 2.4, MediaCentral UX also
provides a “Quick Send” feature for Interplay MAM assets.
Your ability to create and initiate Quick Send processes depends on Interplay MAM user privileges
and rules. For example, the credentials you use to sign in to the Interplay MAM database must allow
creation of Quick Send processes. Beyond that, Quick Send requires a specific configuration since
Interplay MAM provides only a sample Quick Send process.
If Quick Send is configured, the Media pane provides a Quick Send menu item for a fast process
creation for an asset. Other than the Actions Menu, Quick Send offers only a limited set of processes
for MAM assets. If no process type is applicable, the menu item is disabled. When you create a
Quick Send process, you select the process type and attach the asset that is open in the Media pane to
the process, but you do not need to provide additional data in a Create Process dialog box.
Information about In and Out points, the position indicator, and other default settings of the attributes
of the configured Quick Send template are passed to the process.
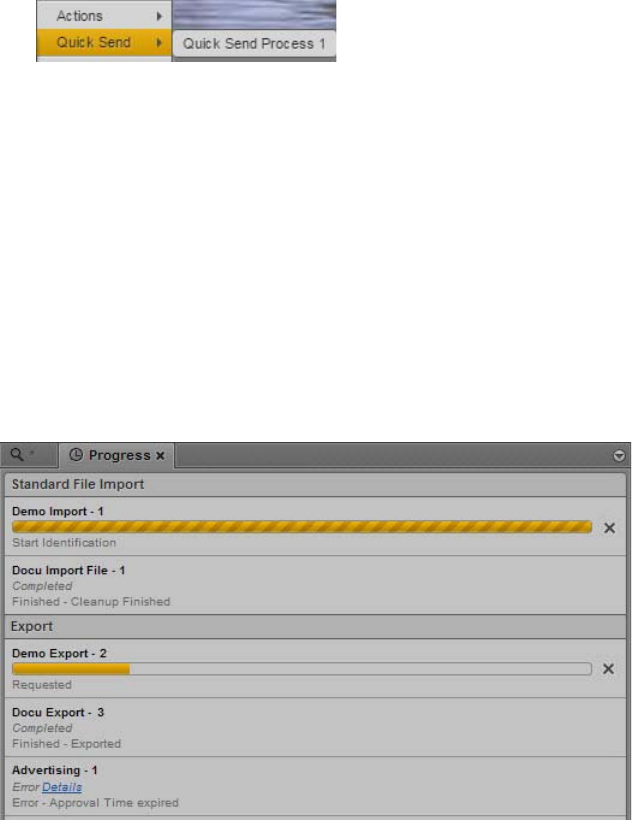
Monitoring Processes in the Progress Pane
437
Note the following:
• Quick Send is available only in the Media pane.
• Quick Send applies only to MAM assets.
• Quick Send fetches processes only from the MAM system from which the asset was loaded.
To create a Quick Send process from the Media pane:
1. Load an MAM asset in Asset mode.
2. Set the In and Out marks and the position indicator in the Media player.
3. Click the Pane Menu button, select Quick Send and the process type.
The process is created and shown in the Progress pane with the title <asset name> <In point>-
<Out point>. If the process requires you to complete additional user actions, the corresponding
task is shown in the Tasks pane. See “Monitoring Processes in the Progress Pane” on page 437
and “The Tasks Pane” on page 457.
Monitoring Processes in the Progress Pane
The Progress pane is used to monitor the processes that you created in Interplay MAM Desktop or
MediaCentral UX and are active or were completed during the last 24 hours. If necessary, you can
also cancel a process that is underway directly from the pane. The following illustration shows
several examples of what you might encounter when monitoring MAM processes with the Progress
pane.
nIf your user account also allows you to work with Interplay Production processes, such as Sequence
Mixdown and Send To Playback, Interplay MAM and Interplay Production processes can be
displayed in the Progress pane at the same time. For more information, see “The Progress Pane” on
page 417.
Monitoring Processes in the Progress Pane
438
Processes are grouped according to the group property. If a group property is not set, processes are
grouped by their process type, such as Export or Import. In MediaCentral UX, the term “job groups”
is used for process types and “job group names” are used for process type labels. Single job groups
can be hidden to get a better overview by selectively displaying only one section. You can display all
job groups again from the Pane menu.
For each process, the Progress pane shows the process title, the number of assets that are attached to
it (if there are any), and information about its life cycle and status. For initialized and running
processes, a progress bar is also shown. For active processes that allow cancellation a Cancel button
is shown to the right of the process.
In case a problem occurs, and the Details property field is supplied in Interplay MAM, the Details
link displays the error message that is reported from the Interplay MAM system.
If activated, notifications about completed or failed processes are shown as browser alerts. For
additional information, see “Showing Desktop Notifications from Panes” on page 36.
To open the Progress pane:
tSelect Panes > Progress.
The pane displays all active or completed processes that you created during the last 24 hours.
To filter the displayed job groups:
tSelect Panes > Show Job Groups and click the job group name.
The pane hides all processes of the selected job group or displays them again if you click an
inactive (non-checked) job group name.
To cancel a process underway:
tClick the Cancel button located to the right of the active process.
The Cancel button is removed. A process cancel request is sent.
To remove all non-running processes from the list in the Progress pane:
1. Click the Pane Menu button.
2. Select Clear Inactive Jobs.
All completed processes are removed from the Progress pane.
Working with Process Dashboards
439
Working with Process Dashboards
The Process Dashboard pane lets you monitor all processes that you are allowed to see. This pane is
different from the Progress pane, which displays only processes you created.
When you work with a process dashboard, you first define the dashboard context, which means you
select the process source and the system that runs the processes, and then select the process type
whose processes are to be displayed in the dashboard. You can save and work with more than one
process dashboard at the same time. For example, you can have one dashboard that monitors
processes of type MAM Export and another dashboard to monitor processes of type Export File.
Saved process dashboards are shown in the Launch pane and can be opened from there.
The following topics provide information about the options you have when working with process
dashboards:
•“The Process Dashboard Pane” on page 439
•“Defining the Dashboard Context” on page 444
•“Working in the Process Dashboard Pane” on page 447
•“Saving and Opening Saved Dashboards” on page 448
•“Working with Process Groups” on page 450
•“Applying Filters” on page 452
•“Working with Diagrams” on page 453
The Process Dashboard Pane
The Process Dashboard pane allows you to monitor processes for a defined context. You can define
and edit the context for the dashboard and save the dashboard to the Launch pane. In the Process
Dashboard pane, you can monitor the processes of the selected type, apply filters to the processes
displayed in the Process List, and modify the Process List layout. You can also show diagrams that
give you a visual summary of processes visible in the Process Dashboard pane. The following
illustration shows an example of what you might encounter when monitoring processes in the
Process Dashboard pane if “displaying processes in groups” is active.
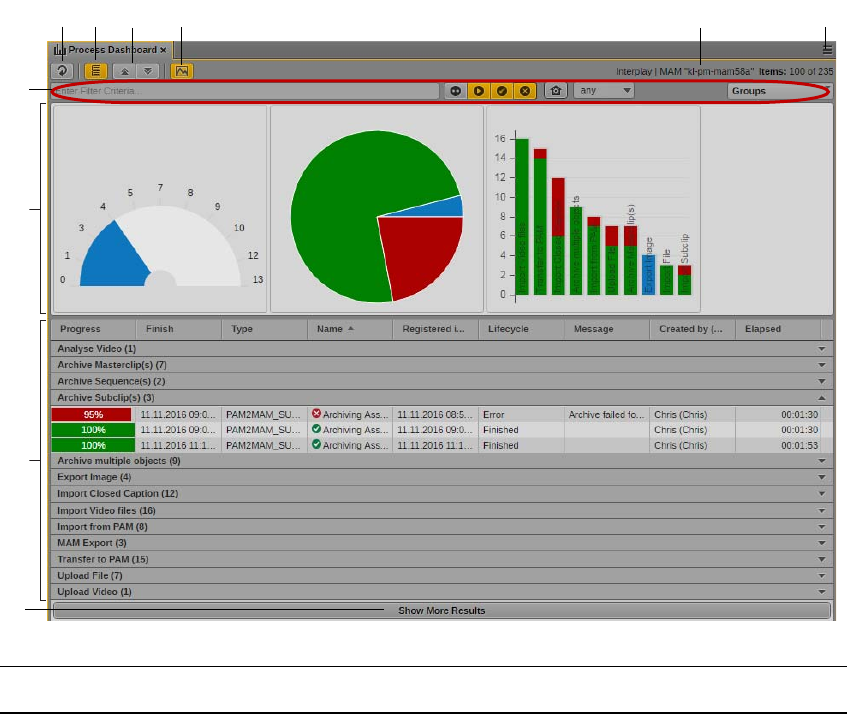
Working with Process Dashboards
440
qqwweerrrt
ri
ry
ru
ro
ra
Display or Control Description
1 Refresh button The Process List updates automatically upon process changes that match
the dashboard context settings and filter criteria. Use the Refresh button to
reload processes in the Process List manually.
2 Display Group button Toggles displaying processes in groups on and off:
• If toggled on, processes are displayed in the Process List grouped by
the process group property (or by the process class property, if process
group is not set).
• If toggled off, processes are displayed in a flat list.
See “Working in the Process Dashboard Pane” on page 447.
3 Expand All and Collapse
All buttons
When displaying processes in groups, you can show and hide the contents
of the process groups:
• The Expand All button expands all process groups and shows all
processes in the pane.
• The Collapse All button hides all processes from the pane and shows
only the process groups.
If displaying processes in groups is toggled off, the Expand All and
Collapse All buttons are disabled. See “Working with Process Groups” on
page 450.

Working with Process Dashboards
441
4 View Diagrams button Toggles displaying diagrams in the Diagrams area on and off:
• If toggled on, the diagrams selected in the Add or Remove Diagrams
dialog box are displayed in the Diagrams area. If no diagrams are
selected, a “Open the pane menu to add diagrams” message is shown.
• If toggled off, the Diagrams area is hidden.
See “Working with Diagrams” on page 453.
5 Dashboard information Displays information about the dashboard context:
• Selected provider and system (for example: Interplay | MAM “kl-
mam57”)
• Number of displayed processes that match the context criteria in the
form “Items: <n> of <m>” (for example: Items: 100 of 239).
<n> is the number of processes displayed in the Process List, <m> is
the number of all processes that match the context criteria and applied
filters.
6 Pane Menu button The Pane Menu for the Process Dashboard pane contains the following
options:
• Define Context. Allows you to define the context of the dashboard.
See “Defining the Dashboard Context” on page 444.
• Add or Remove Columns. Shows or hides columns in the Process
Dashboard pane. See “Working in the Process Dashboard Pane” on
page 447.
• Add or Remove Diagrams. Allows you to select diagrams to be shown
in the Diagrams area. See “Working with Diagrams” on page 453.
• Save As. Allows you to save dashboards to make it easy to access
frequently used process dashboard definitions. All saved dashboards
appear in the Launch pane. See “Saving and Opening Saved
Dashboards” on page 448.
• Help. Displays a Help topic describing controls in the Process
Dashboard pane. From this topic you can access the entire
MediaCentral UX Help system.
7 Filter bar (from left to right) The controls of the Filter bar apply filters to the processes that are already
shown in the Process List. See “Applying Filters” on page 452.
Quick Search box Displays only processes in the Process List that contain the word you
typed.
Life Cycle toggle buttons Toggle filtering of processes that are in one of the following states on and
off (from left to right):
• Pending
• Running
• Finished
•Error
Display or Control Description

Working with Process Dashboards
442
Top Level filter Toggles displaying top-level processes on and off:
• If toggled on, only top-level processes are displayed in the Process
List.
• If toggled off, processes of all hierarchy levels are shown in the
Process List.
If applying the top-level filter is not supported by the system defined in the
Dashboard Context, the button’s tooltip displays a corresponding message.
Creation Time filter Filters the processes shown in the Process List by creation time. The
Creation Time list offers relative time ranges.
Groups selector Filters the processes shown in the Process List by the process group
property (or by the process class property, if process group is not set)
selected in the Groups selector control.
8 Diagrams area Displays the diagrams selected in the Add or Remove Diagrams dialog
box. See “Working with Diagrams” on page 453.
Display or Control Description

Working with Process Dashboards
443
To open the Process Dashboard pane:
tSelect Panes > Process Dashboards.
This opens a blank Process Dashboard pane in which you define the context. If you have saved
dashboards in the Launch pane, you can open a saved dashboard in a new Process Dashboard
pane. See “Defining the Dashboard Context” on page 444 and “Saving and Opening Saved
Dashboards” on page 448.
9 Process List Displays processes, depending on the dashboard criteria and filter applied
to the pane. The Process List shows the following columns by default:
• Name: Displays the name of the process. In front of the process name
an icon indicates the life-cycle status of the process.
Pending
Running
Finished
Error
The icon change as soon as the life-cycle status of the process is
changed.
• Progress: Displays the progress of the process life cycle as a colored
bar and percentage value.
- Uncolored bar and percentage value 0 for Pending processes.
- Blue bar and percentage value 0 through 99 for Running
processes.
- Green bar and percentage value 100 for Finished processes.
- Red bar and value 1 through 100 for Failed processes.
• Elapsed: Displays the time the process is or was active.
• Finish: Displays the date and time when the process finished.
• Type: Displays the label of the process type.
• Registered in MAM: Displays the date and time when the process was
created.
• Life cycle: Displays the life-cycle status of the process: Pending,
Running, Finished, or Error.
• Message: Displays a message if an error occurs during the process life-
cycle. Up to 100 characters are shown in the Message field. If the
message text exceeds this threshold, an ellipsis is shown at the text
end. A tooltip then shows up to 500 characters of the message.
• Created by: Displays the real name of the user who created the process
and the user’s login name or group ID in brackets.
You can configure which columns are displayed by using the Process
Dashboard pane menu’s Add Or Remove Columns feature. See “Working
in the Process Dashboard Pane” on page 447.
10 Show More Results button By default, up to 100 processes are shown in the Process List. If the
number of processes that match the dashboard context criteria exceeds this
threshold, the Show More Results button is displayed at the bottom of the
Process List. This button lets you show up to additional 100 processes.
Display or Control Description
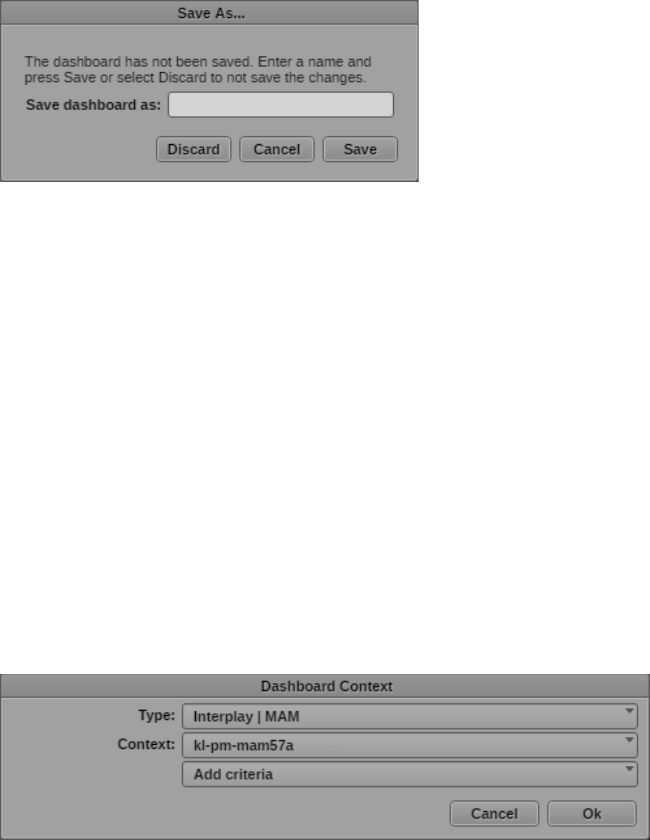
Working with Process Dashboards
444
To close the Process Dashboard pane:
tClick the X in the pane’s tab.
If a dashboard is open in the pane and has unsaved changes, a Save As dialog box is displayed.
- Type a name for the dashboard and click Save to save the changed dashboard and close the
Process Dashboard pane.
- Click Cancel to return to the dashboard without saving the changes.
- Click Discard to close the Process Dashboard pane without saving the changed dashboard.
Defining the Dashboard Context
Opening a Process Dashboard pane from the Panes Menu opens a blank pane in which you need to
define the context for the dashboard. This includes selecting the process source and the system that
provides the processes. When you save the dashboard, its context is also saved. You can edit the
context of a saved dashboard by opening it from the Launch pane and modifying the context
parameters.
To define the dashboard context:
1. Click the Pane Menu button of the Process Dashboard pane and select Define Context.
The Dashboard Context dialog box opens.
2. Select the source type from the Type list. The list shows all available process sources.
3. Select the system from the Context list. The list shows all Interplay MAM systems that you can
use (depending on your license) and that support the process dashboard features (systems based
on Interplay MAM v5.7 or later). Therefore, the list may not be identical with the list of Interplay
MAM systems shown in the Launch pane. If no system is available for the selected type, a
corresponding message is shown instead of the Context list.
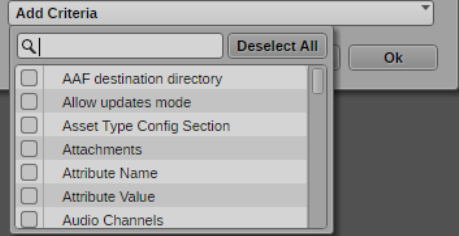
Working with Process Dashboards
445
4. (Optional) Click the Add Criteria selector.
The criteria selector window opens. It shows all filter criteria that you can use for defining the
dashboard context. Currently you can use text, date-time, and legal list properties and
contributors. All entries are deselected by default. You can use the search box to find a particular
criterion.
Select the criteria to be added and click anywhere outside the window to add the criteria to the
Dashboard Context dialog box.To remove a criterion from the context definition, click the Minus
button at the right of the field.
5. (Optional) If you added a criterion other than of type date-time, do the following:
a. Select a value from the condition selector. Which condition selector is available depends on
the criterion type.
-is — Matches the string exactly, including spaces. For example, “blue” matches “blue”
but not “blueberry.”
-is not — The opposite of “is.” This matches anything that is not the search expression.
-is set — This search does not take any value but only checks if the field has any data set
at all. Using this only returns a result if the criterion has some value set for this field.
-is not set — The opposite of “is set,” this only shows results where the criterion field is
empty.
-contains — Matches substrings, including spaces. For example, “blue” matches both
“blue” and “blueberry.”
-starts with — Matches strings starting with the provided characters. For example, “blu”
matches “blue,” “blueberry,” and “blurred.”
-ends with — Matches strings ending with the provided characters. For example, “end”
matches “amend,” “blend,” and “friend.”
Using the “contains,” “starts with,” and “ends with” conditions requires specific usage
rights. For performance reasons these conditions are not available by default.
b. Type a key word or words in the text field or select a value from the selection list.
6. (Optional) If you added a criterion of type date-time, click the date field.
The date picker window opens.
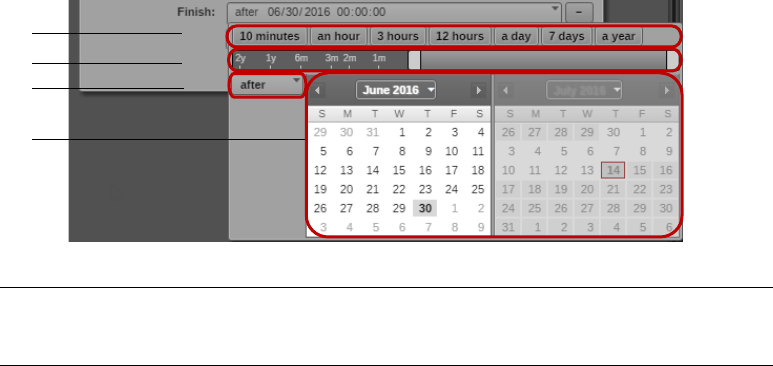
Working with Process Dashboards
446
a. If you want to define a date range, click the Scope menu and select one of the following.
Note the you cannot use “between” and “before.”
-after — The time value is later than the given value.
-any — All criteria can be set to a neutral mode called “any” where the criteria do not
affect the results. Use this if you want the criterion to be used for the context of the
Process Dashboard, but you do not want it to affect the results.
b. To specify a date range, do the following:
tClick one of the shortcut date buttons to set your criterion for one of the common time
spans. The shortcut date buttons indicate the time from the present.
tUse the date slider to specify a time span for your criterion. The date slider indicates the
time from the present.
tUse the calendar to select the appropriate dates for your criterion.
The date slider adjusts to match the date options you select, and the date-time field displays
a text summary of your date criteria.
c. If you want to modify the time values to specify an exact time in hours, minutes, and
seconds, click a time value displayed in the criterion text box, and type a new value.
When you type a legal value, the next value is automatically selected. You can also navigate
between the values for hours, minutes, and seconds by using the arrow keys, or by pressing
the Tab key or Shift+Tab to move to the following or preceding value.
7. Click OK to apply the Dashboard Context settings.
The dashboard shows the processes that match the defined context. The dashboard context is
stored as a user setting.
- If you close the Process Dashboard pane, you are prompted to save your changes.
- If you sign out while the Process Dashboard pane is open, the dashboard context is restored
when you sign in again.
8. Save the dashboard, as described in “Saving and Opening Saved Dashboards” on page 448.
w
e
q
r
1 Shortcut buttons 3 Scope menu
2 Date slider 4 Date picker
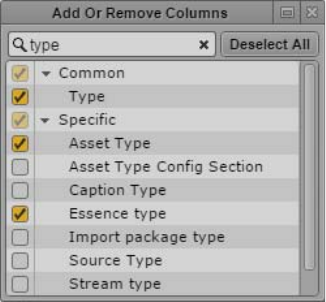
Working with Process Dashboards
447
Working in the Process Dashboard Pane
The Process Dashboard pane shows the processes that you are allowed to see for the defined context.
Processes are displayed in the Process List, which is updated automatically upon process changes,
matching the dashboard context settings and filter criteria. You can modify the Process List layout
and process display, as described in the following procedures.
By default, up to 100 processes are shown in the Process List. If the number of processes that match
the dashboard context criteria exceeds this threshold, the Show More Results button is displayed at
the bottom of the Process List that lets you show an additional 100 processes. For performance
reasons, 1,000 processes can be shown at maximum in the Process List. If 1,000 processes are shown
but there are more that match the context criteria, the Show More Results button is displayed but it is
disabled.
To add or remove columns in the pane:
1. Click the Pane Menu button in the top right corner of the Process Dashboard pane and select Add
or Remove Columns.
The Add Or Remove Columns window opens. The list is divided in two groups:
- Common: Shows process properties that are available for all MAM process types.
- Specific: Shows non-mandatory process properties.
2. Select the columns you want to add or deselect the columns you want to remove. Name is a
mandatory column that you cannot remove.
You can use the search box to find a particular column. You can use the Deselect All button to
deselect all selected columns.
3. Click the Close box or click anywhere outside the window to save your settings.
To sort the dashboard columns:
1. Click the heading of the column you want to sort by.
If the column can be sorted and how the column sorts the results depends on the content of the
column. For sortable columns, an arrow appears in the column. You can sort the following
default columns:
- The Name column sorts results alphabetically, starting from the lowest number and the first
letter.
- The Progress column sorts results starting from the lowest number.
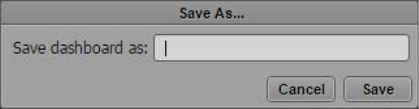
Working with Process Dashboards
448
- The Registered in MAM column sorts results by date, starting from the oldest date.
If grouping is enabled, sorting is applied to the processes within each group.
2. To reverse the sorting order, click the heading of the column again.
To view additional processes:
tClick the Show More Results button.
Up to 100 additional processes are shown at the bottom of the Processes List.
To refresh the Process List:
tClick the Refresh button.
The process data in the Process List is refreshed.
Saving and Opening Saved Dashboards
You can save dashboards to make it easy to access frequently used processes. Users can open a saved
dashboard in a new Process Dashboard pane. All saved dashboards appear in the Launch pane. You
can also edit a saved dashboard by opening it and modifying the parameters of the dashboard.
Saving a dashboard saves the current configuration of the Process Dashboard pane. This includes the
following:
• Context of the dashboard
• Displayed columns and sort order
• Applied filters
• Selected diagrams and diagram display status
Opening a new Process Dashboard pane loads an empty pane and requires defining the context for
the dashboard. The dashboard context does not affect Process Dashboard panes that you already have
open, so you can keep other contexts by keeping the tabs open.
Saved dashboards are specific to the user. If you log in as Administrator, you can share a saved
dashboard with other users by making it public.
To save a dashboard:
1. Define the context of the dashboard, as described in “Defining the Dashboard Context” on
page 444.
2. Click the Pane Menu button and select Save As.
The Save As dialog box opens.
3. Type a name for the dashboard to be saved.
Working with Process Dashboards
449
4. Do one of the following:
tClick Save.
tPress Enter.
The saved dashboard appears in the Launch pane’s Saved Dashboards group.
To open a saved dashboard:
tDouble-click a saved dashboard in the Launch pane.
tRight-click the dashboard in the Launch pane and select Open in New Process Dashboard Tab.
The dashboard opens in a new Process Dashboard pane and shows the processes of the
configured context.
To edit a saved dashboard:
1. Open the dashboard from the Launch pane.
2. Modify the parameters of the dashboard.
3. Save the dashboard.
The modified saved dashboard appears in the Launch pane.
To share a saved dashboard:
1. Log in to MediaCentral UX as a user with Administrator credentials.
2. Right-click a saved dashboard, and then select Create Public Dashboard.
The saved dashboard appears in the Public Dashboards area of the Launch pane and is available
to all users.
nYou must have signed in as a user with Administrator role to edit a public dashboard.
To reorder dashboards:
tClick a dashboard in the Launch pane, drag it to a new location, and release the mouse button.
nYou cannot drag a saved dashboard to the Public Dashboards area, and you cannot drag a public
dashboard to the Saved Dashboards area. You must have signed in as a user with Administrator role
to reorder a public dashboard.
To rename a saved dashboard, do the following:
tRight-click the saved dashboard in the Launch pane, select Rename, and type the new name.
tSelect the saved dashboard in the Launch pane, click the Pane Menu, then select Rename, and
type the new name.
tSelect the dashboard in the Launch pane, press F2 (Windows) or Enter (Macintosh), and type the
new name.
To delete a saved dashboard:
1. Do one of the following:
tRight-click the saved dashboard in the Launch pane and select Delete.
tSelect the saved dashboard in the Launch pane, click the Pane Menu, and then select Delete.
2. Click OK in the Delete Dashboard prompt that opens.
The dashboard is deleted and removed from the Launch pane.
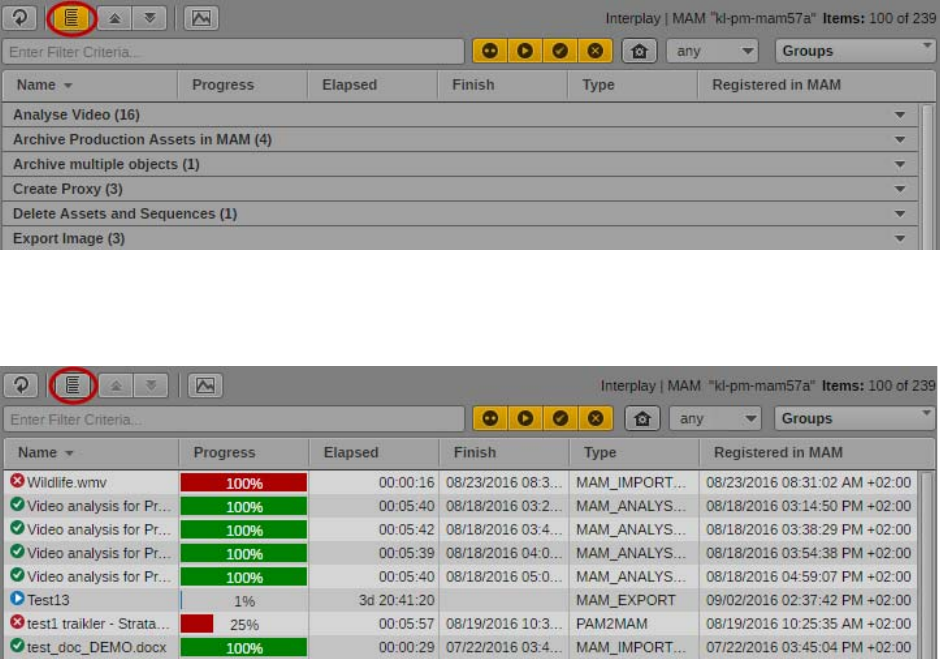
Working with Process Dashboards
450
Working with Process Groups
By default, processes are shown as a list in the Process Dashboard pane that is sorted by the Name
column in alphabetical order. If toggled on, processes are displayed in the Process List grouped by
the process group property (or by the process class property, if the process group property is not set).
Sorting is then applied to the processes within each group.
You have the following options for applying grouping in the Process Dashboard pane:
• You can enable and disable grouping
• You can show and hide the processes within each group
• You can filter the processes by process groups
To enable and disable grouping:
tClick the Display Group Button so it turns orange.
Processes are grouped by the process group property in the Process List.
tClick the orange Display Group Button so it turns gray.
Processes are shown as flat list in the Process List.
To show and hide grouped processes:
tClick the Expand All button to expand all process groups and show all processes in the Process
List.
tClick the Collapse All button to collapse all process groups and hide all processes from the
Process List.
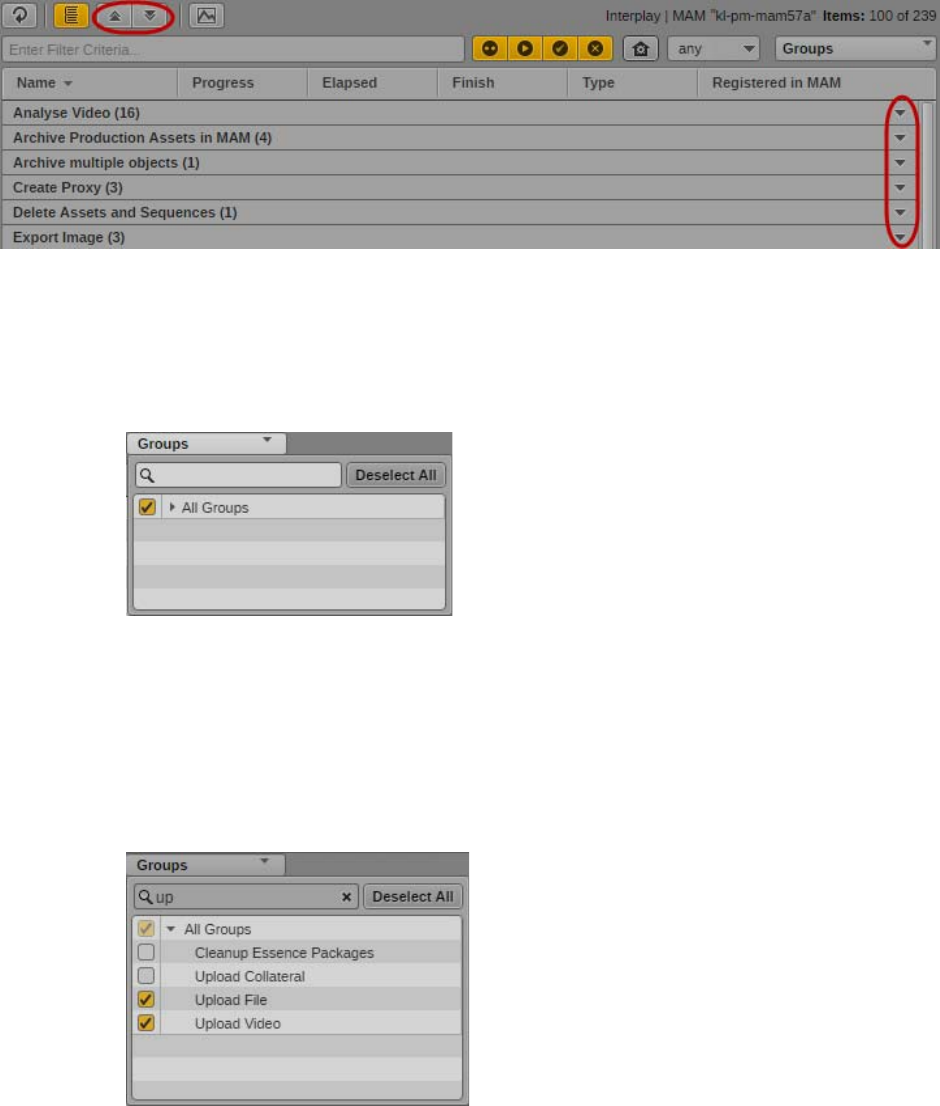
Working with Process Dashboards
451
tClick the Expand/Collapse toggle button or the header of an individual process group to show or
hide its processes.
To apply a process group filter:
1. Click the Groups selector in the Quick Filter bar.
The Process Groups window opens. It shows an All Groups entry that includes all process groups
and process types. All entries are selected by default.
2. Expand the All Groups entry and select the process groups you want to display or deselect the
process groups you want to hide.
- To deselect all entries at the same time, click the Deselect All button or deselect the orange
check box in front of All Groups.
- To select all entries at the same time, select the gray check box in front of All Groups.
You can use the search box to find a particular process group.
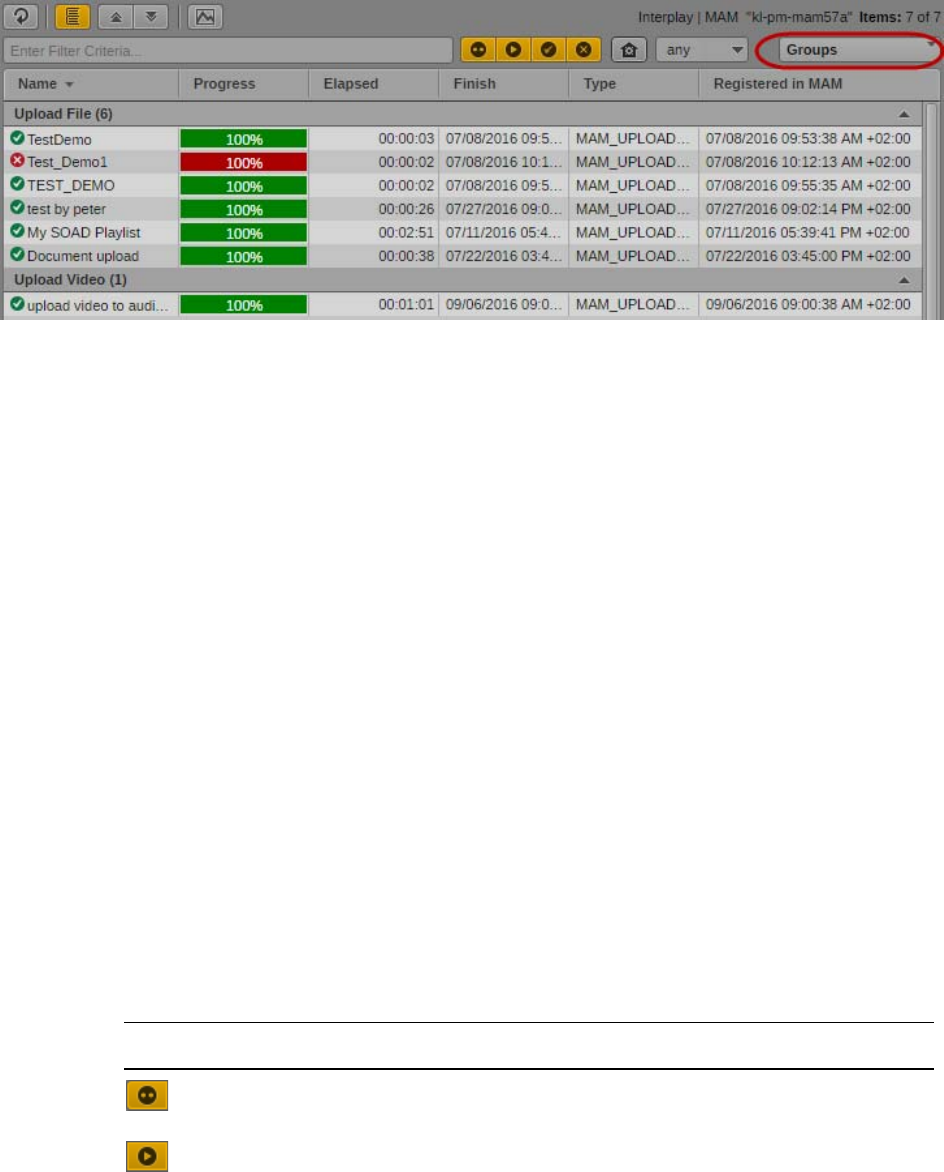
Working with Process Dashboards
452
3. Click anywhere outside the window to apply the filter.
The Process List is updated and shows the processes of the selected groups.
Applying Filters
The controls of the Filter bar allow you to apply filters to the processes shown in the Process List.
• You can apply a text-based filter.
• You can apply a life cycle-based filter.
• You can filter the processes by creation time ranges.
• You can apply a top-level filter.
• You can filter the processes by process groups. See “Working with Process Groups” on page 450.
All filters are cumulative. For example, if you apply a life cycle-based filter and then a group-based
filter, the grouped-based filter is applied to the already filtered Processes List. Each filter is saved
with the dashboard context and persists from one session to another.
To apply a text filter:
tTo show only processes in the Process List that contain a specific keyword, type a search string
in the Quick Search box.
As you type, a “contains” search is conducted in the displayed fields of the Process List.
To apply a life-cycle filter:
tTo hide processes of a specific life cycle, click an orange life-cycle button so it turns gray.
tTo show processes of a specific life cycle, click a gray life-cycle button so it turns orange.
The following table describes the life-cycle buttons.
Button Life-cycle
If the “Pending” button is toggled on, processes that are not yet started are shown.
If the “Running” button is toggled on, started processes are shown.
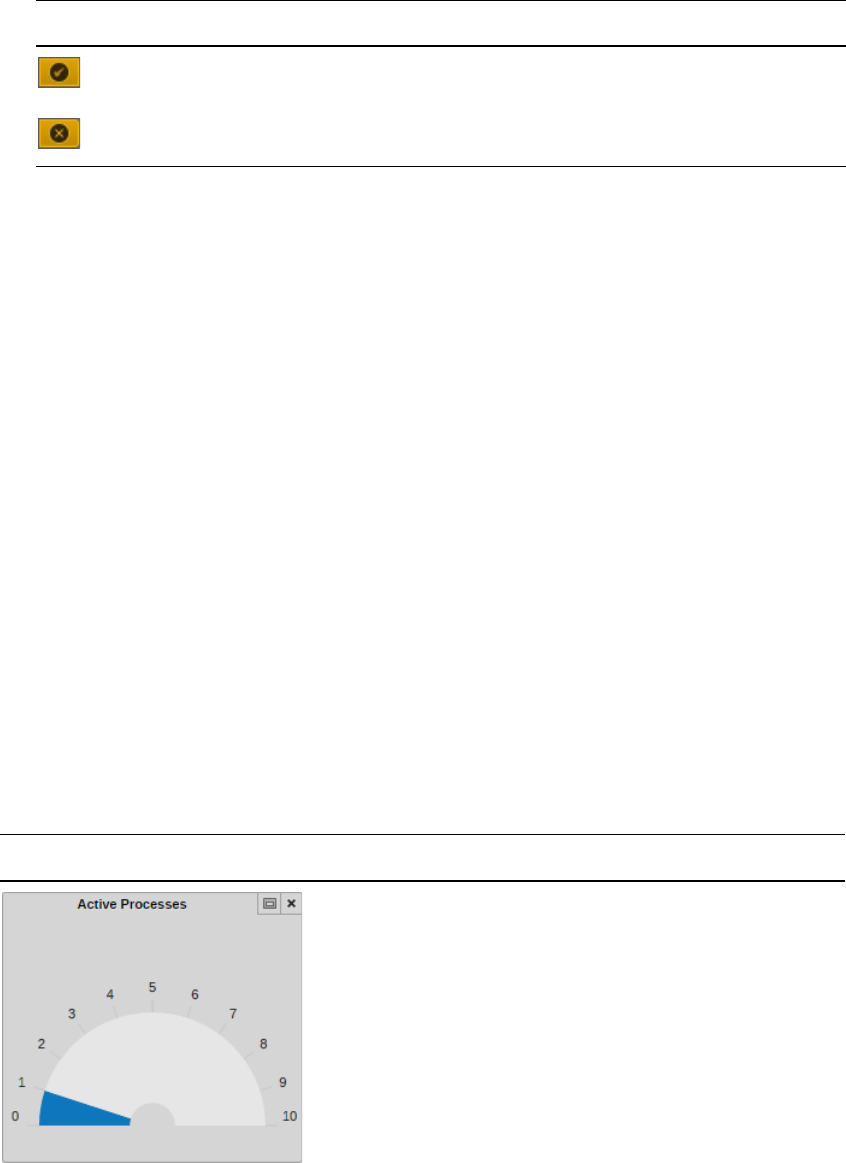
Working with Process Dashboards
453
To apply a top-level filter:
tTo show only top-level processes, click the gray Top Level Filter button so it turns orange.
The Process List shows only processes that have no parent process.
tTo show processes of all hierarchy levels, click the orange Top Level Filter button so it turns
gray.
To apply a creation time filter:
tClick the Creation Time list and select one of the time ranges:
- any (disables creation time filtering, default value)
- last hour
- last 12 hours
-today
- this week (Monday through today)
The Process List is updated and shows the processes that have been created during the selected
time range.
Working with Diagrams
Diagrams give you a visual summary of processes visible in the Process Dashboard pane. If toggled
on, diagrams are displayed in the Diagrams area above the Process List. You can show the following
diagrams:
If the “Finished” button is toggled on, successfully completed processes are shown.
If the “Error” button is toggled on, failed processes are shown.
Button Life-cycle
Diagram Description
The “Active Processes” gauge chart displays the number of
processes that are in life-cycle status “Running.”
The blue chart indicates the minimum value (always 0), the
current number of active processes, and the maximum
number of running processes (at least 10).
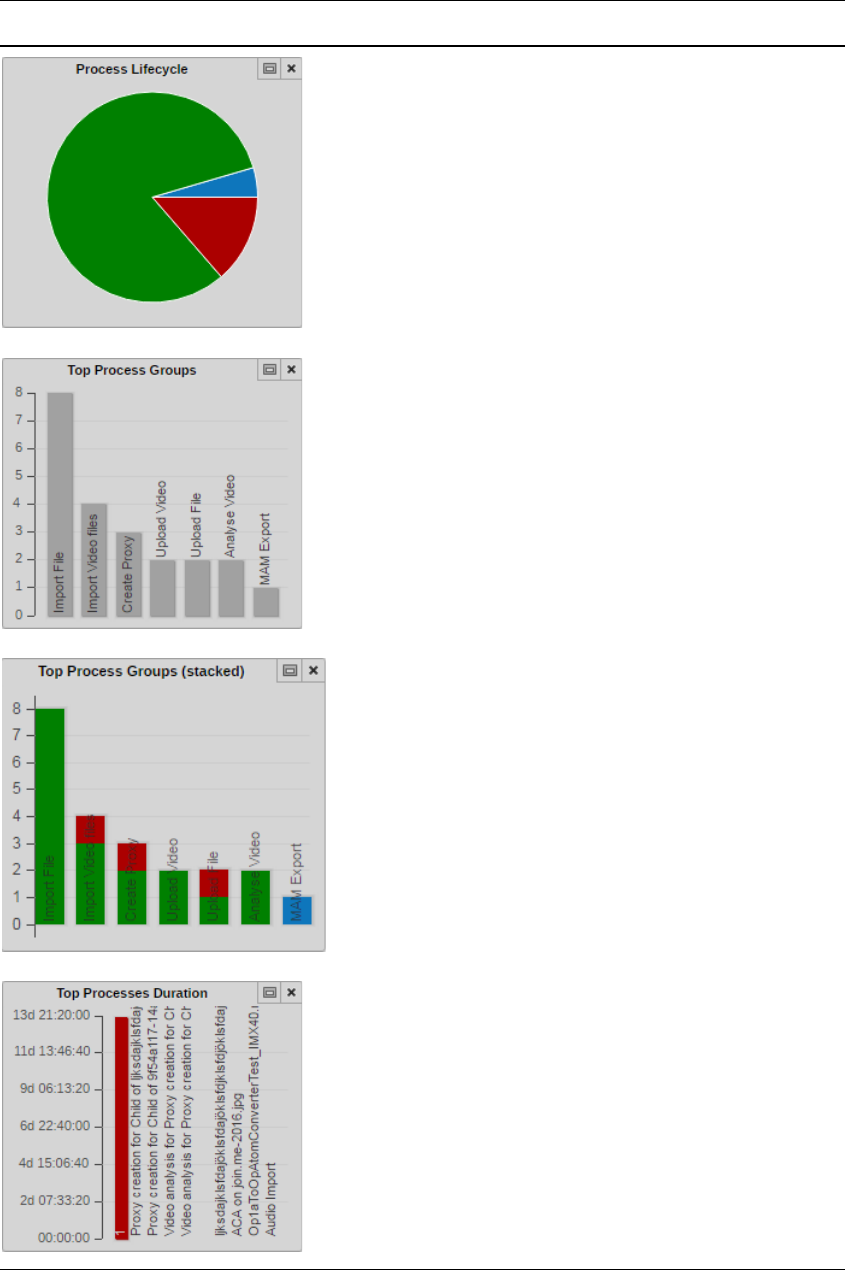
Working with Process Dashboards
454
The “Process Lifecycle” pie chart displays a process count
per process life cycle. The slices indicate:
• Pending: gray slice, number of pending processes
• Running: blue slice, number of running processes
• Finished: green slice, number of successfully finished
processes
• Error: red slice, number of failed processes
When you hover the mouse pointer over a slice, a tooltip
shows the life cycle and number, such as “Running - 135”
The “Top Process Groups” bar chart displays a process
count per process group. The 10 groups having the highest
number of processes are shown in gray bars.
When you hover the mouse pointer over a bar, a tooltip
shows the process group name and the number of its
processes, such as “Import File - 8”
The “Top Process Groups (stacked)” bar chart displays a
process count per process group specified by life cycle. The
10 groups having the highest number of processes are
shown.
In each bar, the colors indicate the share of processes in that
group with the respective life cycle of pending (gray),
running (blue), completed (green), and failed (red).
When you hover the mouse pointer over a bar element, a
tooltip shows the process group name, life cycle, and
number of processes, such as “Import Video - Running - 3”
The “Top Processes Duration” bar chart displays 10
processes with the highest “elapsed time” duration in red
bars.
When you hover the mouse pointer over a bar, a tooltip
shows the process title.
Diagram Description
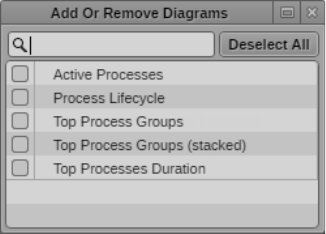
Working with Process Dashboards
455
The Diagrams area is updated automatically upon process changes, matching the dashboard context
settings and filter criteria.
You have the following options for displaying diagrams in the Process Dashboard pane:
• You can show and hide the Diagrams area
• You can show and hide individual diagrams
• You can reorder the displayed diagrams
• You can maximize, restore, and close individual diagrams
To show and hide the Diagrams area:
tClick the View Diagrams button so it turns orange.
The Diagrams area is shown above the Process List. The diagrams selected in the Add or
Remove Diagrams dialog box are displayed. If no diagrams are selected, a “Open the pane menu
to add diagrams” message is shown.
tClick the orange View Diagrams button so it turns gray.
The Diagrams area is hidden.
To add and remove diagrams:
1. Click the Pane Menu and select Add or Remove Diagrams.
The Add or Remove Diagrams window opens. It shows all available diagrams. No entry is
selected by default.
2. Select the diagram you want to display or deselect the diagram you want to hide.
To deselect all entries at the same time, click the Deselect All button. You can use the search box
to find a particular diagram.
3. Click anywhere outside the window to apply the selection.
The Diagrams area updates. Initially it shows the selected diagrams in the order they are listed in
the Add or Remove Diagrams window (left to right). Deselected diagrams are hidden, newly
selected diagrams are shown to the right of the Diagrams area. The selection is saved with the
dashboard context and persists from one session to another.

Working with Process Dashboards
456
To reorder diagrams in the Diagrams area:
tClick a diagram and drag it between two other diagrams. A highlight indicates the drop zone.
After dropping, the Diagrams area is refreshed and shows the reordered diagrams.
To show diagram controls:
tPosition the mouse pointer on the diagram in the Diagrams area.
On the top of the diagram the diagram title, a Maximize/Restore Diagram toggle button, and a
Close Diagram button are shown.
To maximize a diagram, do one of the following:
tDouble-click the diagram in the Diagram area.
tPosition the mouse pointer on the diagram in the Diagrams area and click the Maximize Diagram
button.
The Process List is hidden and the diagram fits to the pane size. The diagram title and a Restore
button are shown. For Process Lifecycle and Top Process Group (stacked) diagrams, a legend is
shown.
nDo not click the legend. Clicking a legend entry shows and hides the corresponding diagram entry. If
you restore the diagram while an entry is hidden, it is also hidden in normal size but you cannot show
the entry again.
To restore a diagram, do one of the following:
tDouble-click the maximized diagram in the Process Dashboard pane.
tClick the Restore button of the maximized diagram.
tWith a maximized diagram open in the pane, click the Display Diagram toggle button twice on
the toolbar.
The Process List and Diagrams area are shown. The diagram is shown on the Diagrams area in
normal size.
To close a diagram:
tPosition the mouse pointer on the diagram in the Diagrams area and click the Close Diagram
button.
The diagram is closed and removed from the Diagrams area. The display of the Diagrams area is
refreshed. You can show the diagram again by using the Add or Remove Diagrams option.
Working with Tasks
457
Working with Tasks
The Tasks pane shows you all tasks that allow you to complete an action. These tasks can be part of
processes that you created or have been created by other users and delegated or assigned to you. All
options for working with tasks depend on rules: the configuration of the corresponding processes
must allow assigning, delegating, and applying actions to user tasks. The process configuration also
determines which actions are available for a task and the results of the task execution.
To prevent different users from editing a task simultaneously, tasks are automatically locked for other
users as soon as the task is edited. The Lock Indicator icon indicates the lock status of each selected
task.
Notifications about new tasks that appear in your tasks list can be shown as browser alerts if the
Tasks pane is open but not visible. For additional information, see “Showing Desktop Notifications
from Panes” on page 36.
The following topics provide information about the options you have when working with user tasks:
•“The Tasks Pane” on page 457
•“Working in the Tasks Pane” on page 461
•“Filtering Displayed User Tasks” on page 462
•“Delegating User Tasks” on page 463
•“Assigning User Tasks to Users and Groups” on page 464
•“Applying Actions to User Tasks” on page 465
•“Displaying and Editing User Task Data” on page 466
•“Adding and Editing User Task Attachments” on page 467
•“Getting Information on Allowed Attachments” on page 435
•“Uploading Files as Attachments” on page 468
•“Downloading File Attachments” on page 469
•“Deleting Attachments” on page 470
The Tasks Pane
The Tasks pane is used to show you all user tasks that allow you to complete an action. You can
review and filter the displayed tasks and review the details of a selected task. If necessary, you can
also edit task data and attachments, or assign and delegate tasks directly to other users and groups, or
apply other actions directly from the pane. The following illustration shows several examples of what
you might encounter when editing tasks with the Tasks pane.
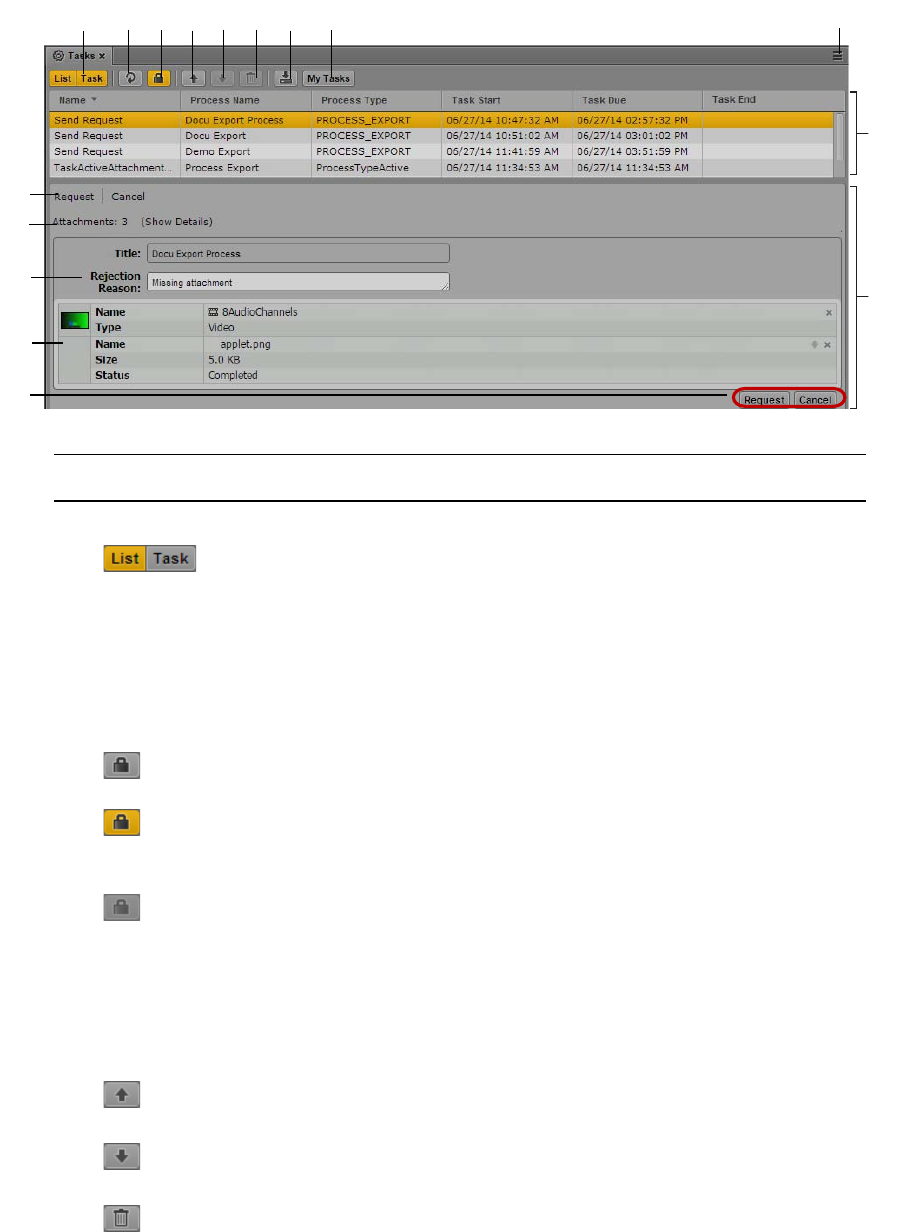
Working with Tasks
458
Display or Control Description
1 List and Task button Toggles display of the Task List and Task Details on or off. When
toggled on the button is colored orange.
nYou can have both the List and Task buttons simultaneously
toggled on but not toggled off. When only one is on and you
click that button, the system automatically toggles that display
off and the other display on.
2 Refresh button Refreshes the display of active tasks in the Task List.
3 Lock Indicator icon Indicates if the selected task is currently locked for editing.
The task is free for editing.
You are currently editing the task and it is therefore locked for other
users. As soon as you start editing a task it is locked and the Lock
Indicator icon is colored orange.
The task cannot be edited because it is already locked — for example,
because another user is already editing the task. In this case you see a
message when you hover the mouse pointer over the Lock Indicator
icon.
The lock is released after you successfully applied an action or
delegated the task, when you select another task, or close the Tasks
pane.
4 Uploads files as attachments to the task. See “Uploading Files as
Attachments” on page 468.
5 Downloads the selected file attachments. See “Downloading File
Attachments” on page 469.
6 Deletes the selected attachments from the task. See “Deleting
Attachments” on page 470.
qqwweerrro
r
a
rtri
r
1!
ryru
r
d
qf
qg
qh
qj

Working with Tasks
459
7 Saves the task data without leaving the edit field. See “Displaying and
Editing User Task Data” on page 466.
8 My Tasks button Toggles the My Tasks filter on or off.
• When toggled on, the button is colored orange, and the Tasks List
shows only the tasks that are assigned to you or the group you are
member of.
• When toggled off, the Tasks List shows all tasks that you are
allowed to edit.
See “Filtering Displayed User Tasks” on page 462.
9 Pane Menu button The Pane menu for the Tasks pane contains the following options:
• Add or Remove Filters. Allows you to apply a time-based or task
type-based filter to the Task List. See “Filtering Displayed User
Tasks” on page 462.
• Add or Remove Columns. Shows or hides columns in the Task
List.
• Delegate To. Allows you to delegate a selected task to another
user or group. See “Delegating User Tasks” on page 463.
• Create Process. Creates a process without attachments in the
MAM system. If several MAM system are connected to
MediaCentral UX, for each MAM system a separate entry is
shown in the Create Process menu item. See “Understanding
Processes, Tasks, and Actions” on page 428 and “Creating
Processes” on page 431.
• Upload File. Uploads files as attachments to the task. See
“Uploading Files as Attachments” on page 468.
• Download File. Downloads the selected file attachments. See
“Downloading File Attachments” on page 469.
• Delete Attachment. Deletes the selected attachments from the
task. See “Deleting Attachments” on page 470.
• Help. Displays a Help topic describing controls in the Tasks pane.
From this topic you can access the entire MediaCentral UX Help
system.
Display or Control Description

Working with Tasks
460
10 Task List Displays active and finished tasks in an overview table, depending on
the filter applied to the pane. The Task List has the following
columns:
• Name: Displays the name of the task.
• Task Status: Displays the status of the task.
• Task Start: Displays the date and time when the task was started.
• Task Due: Displays the planned end date and time of the task
(only for active tasks).
• Task End: Displays the date and time when the task was finished.
• Assignee: Displays the name of the user to which the task is
assigned.
• Assigned Group: Displays the name of the group to which the
task is assigned.
• Next User: Displays the name of the user which is set as assignee
of the next upcoming task.
• Next Group: Displays the name of the group which is set as
assigned group of the next upcoming task.
• System Name: Displays the name of the MAM system on which
the process was created.
• Process Name: Displays the name of the process the task belongs
to.
• Process Type: Displays the type of process the task belongs to.
• Process Status: Displays the status of the process the task belongs
to.
• Process Creation: Displays the date and time when the process
was created.
• Process Modification: Displays the date and time when the
process was modified.
• Process Last Modified By: Displays the name of the service or
user who modified the process for the last time.
• Process Created By: Displays the name of the service or user who
created the process.
You can configure which columns are displayed by using the Tasks
pane menu’s Add Or Remove Columns feature.
11 Task Details Displays details of the task selected in the Task List. Depending on
the task type, the Task Details can be split into the Task Information
and Task Attachments areas. If you select several tasks in the Task
List, the Task Details area does not show information or is cleared.
12 Breadcrumbs Show the names of the current and preceding tasks of the process to
give context information. The current task is the last (right-most) in
the list. Breadcrumbs are shown for active and completed tasks.
Display or Control Description

Working with Tasks
461
Working in the Tasks Pane
The Tasks pane is divided into the Task List and Task Details areas, which can be shown separately or
both at the same time.
To open the Tasks pane:
tSelect Panes > Tasks.
To show and hide the Task List and Task Details areas:
tClick the List button.
The Task List area is shown.
tClick the Task button.
The Task Details area is shown displaying the details of the task selected in the Task List area.
tTo hide an area, click the button again.
You cannot hide both areas at the same time.
13 Attachment count Shows the number of attached assets. If the number of attachments
does not comply with the allowed limits, the Attachments count is
shown in red.
The Show Details links opens a window that provides details,
including the reason why the limit is exceeded. See “Adding and
Editing User Task Attachments” on page 467.
14 Task Information Displays the metadata assigned to the task. See “Displaying and
Editing User Task Data” on page 466.
15 Task Attachments Displays the attachments of the task as asset cards. For each attached
asset, the following are shown:
• A header frame or clip icon (MAM assets only)
• The asset name and type
• A remove button (optional)
For each attached file, the following are shown:
• The file name, size, and status
• A download button (optional)
• A remove button (optional)
Provides controls to delete attachments from and add new
attachments to an active task; allows you to open attachments of
active and completed tasks. See “Adding and Editing User Task
Attachments” on page 467, “Uploading Files as Attachments” on
page 468, “Downloading File Attachments” on page 469, and
“Deleting Attachments” on page 470.
16 Action buttons Trigger an action on the task. Which actions are available is
determined by the task type. See “Applying Actions to User Tasks” on
page 465.
Display or Control Description
Working with Tasks
462
To add or remove property columns in the Task List:
1. Click the Pane Menu button in the top right corner of the Tasks pane and select Add or Remove
Columns.
The Add Or Remove Columns window opens. The list is divided in Common Properties and
MAM Tasks.
2. Select the columns you want to add or deselect the columns you want to remove.
You can use the search box to find a particular column.
3. Click the Close box or click anywhere outside the window to save your settings.
To sort the Task List:
1. Click the heading of the column you want to sort by.
An arrow appears in the column. How the column sorts the results depends on the content of the
column. For example, the Name column sorts results alphabetically, starting from the lowest
number and the first letter or the reverse.
2. To reverse the sorting order, click the heading of the column again.
Filtering Displayed User Tasks
The Tasks pane shows you all user tasks that you are allowed to see and that require you to complete
an action. You can apply filters to the tasks displayed in the Tasks List:
• My Tasks filter: Displays only the tasks where you or the group you are member of are set in the
“Assignee” or “Group” property; hides all tasks that are not explicitly assigned to you or your
group.
• Status- and Type-based filter: Allows selecting and applying filters based on the status and type
of the user task shown in the Tasks List.
Both filters are cumulative. For example, if you apply the My Tasks filter and then a status-based
filter, the status-based filter is applied to the already filtered Tasks List. Each filter is saved as user
setting and persists from one session to another.
To apply the My Tasks filter:
tClick the My Tasks button so it turns orange.
The Tasks List shows only the tasks that are assigned to you or the group you are member of.
tTo display all tasks again, click the orange My Tasks button so that it turns gray.
To apply a status- or type-based filter:
1. Click the Pane Menu button.
2. Select Add or Remove Filters.
The Add Or Remove Filter window opens. The list is divided in Task Status and Task Type.
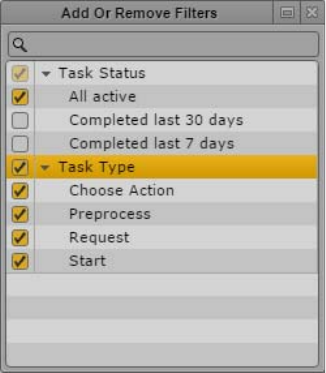
Working with Tasks
463
3. Select the information you want to display or deselect the information you want to hide:
tTo apply a status- and time-based filter, expand Task Status and select “All active,”
“Completed last 30 days,” or “Completed last 7 days.” “All active” is selected by default and
therefore only tasks that still require an action are shown. The two other options show
completed user tasks that can no longer be edited.
tTo apply a task-type-based filter, expand Task Type and select one of the task types (for
example, Request or Start). All task types are selected by default.
You can use the search box to find a particular filter.
4. Click the Close box or click anywhere outside the window to apply the filter and update the Task
List. This setting persists from one session to another.
Delegating User Tasks
You can delegate user tasks to another user or user group. This means that you can delegate an action
that has to be performed during the process execution to another user or group. Delegating changes
the access to the task. Your ability to delegate a task depends on rules: the process configuration must
allow the delegation of the selected task.
To delegate tasks:
1. Select one or several tasks in the Task List.
2. Click the Pane Menu button.
3. Select Delegate To.
The list shows all users and groups to which the selected tasks can be delegated. If delegation is
not restricted to individual users, “Any user” is shown in the list.
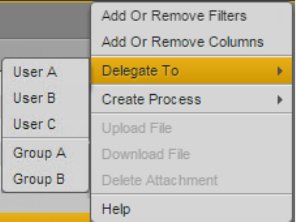
Working with Tasks
464
4. Select the user or group to which you want to delegate the task.
After the delegation is successfully completed for at least one task, the Task List is refreshed. In
most cases, delegated tasks are removed from the Task List. However, if you delegate a task to a
group and you are member of that group, the task will not be removed from the Task List.
Assigning User Tasks to Users and Groups
You can assign user tasks to another user or user group. This means that you can place a user or
group in charge of performing the action that has to be performed during the process execution.
Assignment does not change the access rights to the task; users who are not in charge may also
perform the task, if they are allowed to perform it. Your ability to assign a task depends on rules: the
process configuration must allow assigning the selected task.
Use the Tasks Details area to edit the task assignment. Depending on the configuration of the task
template, you can set the following:
• Assignee: The name of the user to which the task is to be assigned.
• Assigned Group: The name of the group to which the task is to be assigned.
• Next User: The name of the user which is to be set as assignee of the next upcoming task.
• Next Group: The name of the group which is to be set as assigned group of the next upcoming
task.
Additionally information on the Previous User (the performer of the previous user task) and Previous
Group (the group that was set as performer of the previous user task) can be shown. These are read-
only properties and cannot be edited.
To assign tasks:
1. Select a task in the Task List.
The Task Details area shows the metadata fields that are configured for the task.
2. Click in the Assignee, Assigned Group, Next User, or Next Group field and start typing the name
of the name or group in the search box to filter the list.
When you type a letter, MediaCentral UX filters the list to all values containing that letter. As
you continue to type, MediaCentral UX continues to filter the list according to the letters you
type.

Working with Tasks
465
3. Do one of the following:
tDouble-click the value or check its check box.
tNavigate down the list using the Down Arrow key until you reach the desired value and
press Enter.
The field shows the real name with the user’s login name or group ID in brackets.
4. Click outside the metadata field.
The Task List is refreshed and shows the corresponding assignment information. If you filled in
the Assignee or Assigned Group field, a copy of the task with set Task End date is created. It is
shown in the Task List if the filter is set to show completed tasks.
Applying Actions to User Tasks
You can apply actions to active user tasks, for example, a Send Request, Approve, or Reject action.
Which action can be applied depends on the configuration of the process to which the task belongs in
Interplay MAM.
To apply an action to a task:
1. Select a task in the Task List.
The Task Details area shows an Action button for each allowed action that can be applied. If the
task is locked by another user, the buttons are grayed out. If no actions are allowed for the
selected task, no buttons are shown.
2. Do one of the following:
tRight-click the selected task in the Task List and select the action that you want to apply.
tClick the button of the action you want to apply at the bottom of the Task Details area.
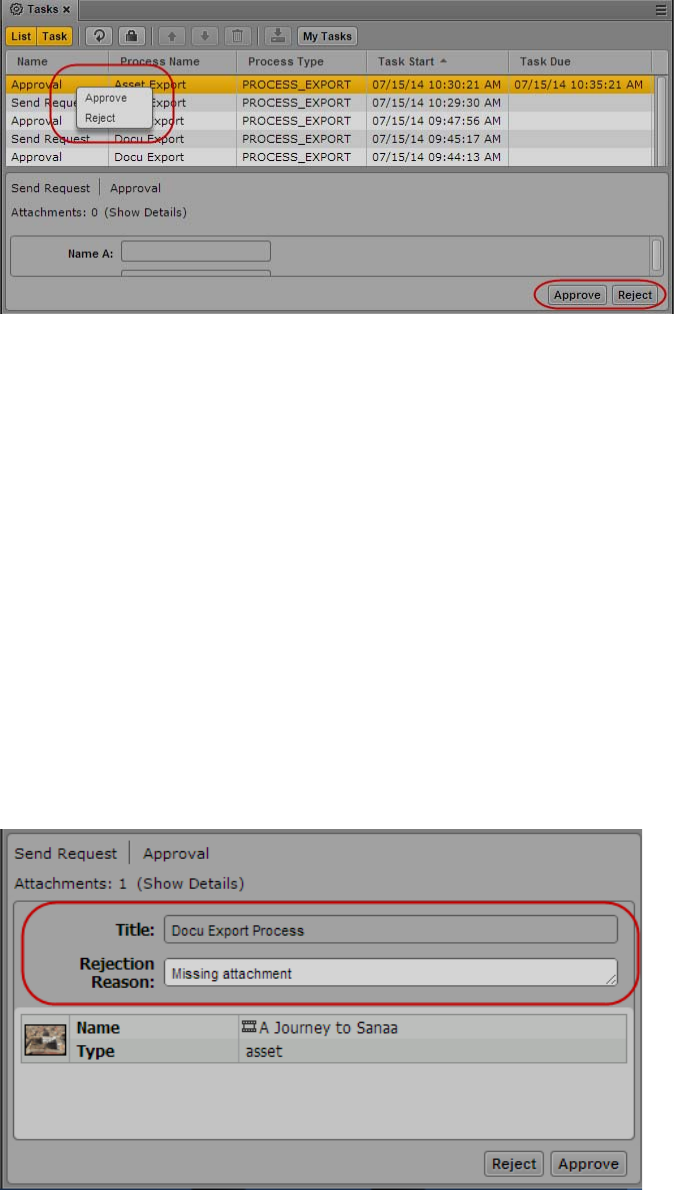
Working with Tasks
466
While the action is applied, the task is locked and all action controls are disabled. After the
action is successfully applied, the lock is released and the Task List and Task Details areas are
refreshed. Depending on the filter applied to the Tasks pane and the process configuration, the
task might be removed from the Task List or a new user task might be created and shown.
Displaying and Editing User Task Data
You can view and edit task metadata in the Task Details area. Which metadata fields are shown and
can be edited depends on the configuration of the task template in Interplay MAM.
To display and edit the task metadata:
1. Select a task in the Task List.
The Task Details area shows the metadata fields that are configured for the task.
2. Click in a metadata field and type or edit the value; for example, type a reject reason as shown in
the following illustration.
For information on the different metadata fields, see “Viewing and Editing Interplay | MAM
Metadata” on page 71.
3. To save your changes, do one of the following:
tClick the Save button.
Working with Tasks
467
tPress Ctrl+S (Windows) or Cmd+S (Macintosh).
tClick outside the metadata field.
If you do not save your changes and apply an action or delegate the task, select another task,
close the Tasks pane, or log off, a message is displayed that asks you to save the changes.
Adding and Editing User Task Attachments
When you create a process, you attach at least one asset to it. If a user task results from the process,
you can edit the attachment within the context of the user task: You can view the attached asset,
remove the asset from the user task, or add new assets in the Tasks pane. Which and how many assets
can be added depends on the configuration of the process to which the task belongs in Interplay
MAM.
To add media to a task and view the attached asset:
1. Select a task in the Task List.
The Task Details area shows the number of attached assets in the header area, and attached assets
as “asset cards” in the Attachments area.
2. If want to view an media asset attached to the task, double-click the head frame in the
Attachments area.
The asset (video or audio clip, or basic sequence) opens in the Media pane.
3. If you want to add a media asset to the task, do one of the following:
tClick one or several assets in the Assets pane and drag them to the Attachments area of the
task.
tClick one or several assets in the Search pane and drag them to the Attachments area of the
task.
tClick one or several assets in the Associations pane and drag them to the Attachments area
of the task.
tClick the asset displayed in the Media viewer in Asset mode and drag it to the Attachments
area of the task.
A head frame of the video asset or a clip icon of an audio asset is displayed in the Attachments
area, along with metadata describing the asset. If you dragged an invalid asset type, a message is
displayed and the asset is not attached.
When you apply an action to the task, for example, you click the Approve or Send Request
button, the range of allowed attachments is checked. If the number of attached assets violates the
configured limit, a corresponding message is displayed.
To add an attached asset to a folder in the Assets pane:
1. Select a task in the Task List.
2. Select the attached asset in the assets area, drag it to the name or icon of the folder into which
you want to paste the asset reference, and release the mouse button.
Valid asset references are pasted into the folder, and references to assets that are not allowed as
contents of the folder are not pasted. If there is already a reference to an asset with the same
identifier in the folder, a message is displayed and the asset is not pasted. For more information,
see “Adding Assets to a Folder” on page 66.
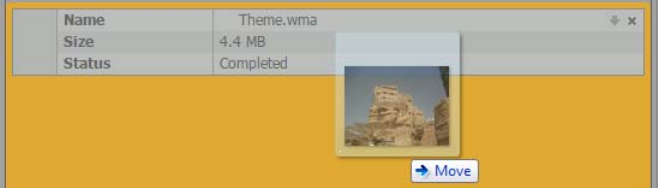
Working with Tasks
468
To use an attached asset to create an association:
1. Select a task in the Task List.
2. Select the attached asset in the assets area, drag it to the associations of the desired association
type in the Associations pane, and release the mouse button. For more information, see “Creating
Associations” on page 352.
Uploading Files as Attachments
You can edit the process attachments within the context of the user task: You can upload files to the
task and download attached files from the task. Note the following:
• Which and how many files can be uploaded depends on the configuration of the process to which
the task belongs in Interplay MAM.
• You can only cancel the upload for files in status “Waiting” and “In Progress.”
• You can overwrite attached files in status “Waiting,” “in Progress,” and “Completed.”
For each selected task, the Tasks pane shows the number of attachments in the header of the Task
Details area. If the number of attachments does not comply with the allowed limits, the
“Attachments” count is shown in red. See “Getting Information on Allowed Attachments” on
page 435.
To upload files:
1. Select a task in the Task List.
The Task Details area shows the number of attached items in the header area, and attached items
as “asset cards” in the assets area.
2. Do one of the following:
tClick the Upload button on the Tasks pane toolbar or click the Pane menu and select Upload
File, then select the files to be uploaded in the Open dialog box.
tOpen the Explorer (Windows) or Finder (Mac), select one or several files and drag them to
the Attachment area in the Tasks pane.
The Attachment area (or the Drop Assets Here area, if there is no attachment until yet) is
highlighted in orange, and a Move icon indicates if dropping is possible.
For each file an asset card shows the file name, file size, and the upload status.
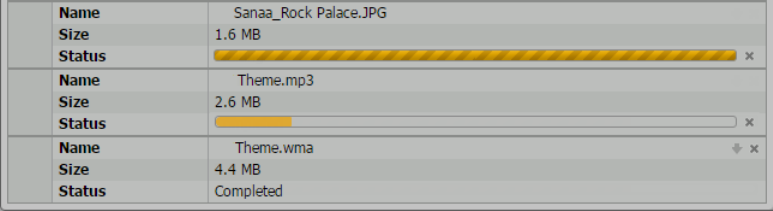
Working with Tasks
469
The status can be one of the following:
- Waiting: A loading indicator for files that have not been uploaded. A Cancel button is shown
beside the loading indicator.
- In Progress: A progress bar during the upload. A Cancel button is shown beside the progress
bar.
- “Completed” for successfully uploaded files
- “Failed” for failed uploads
If the same file was already uploaded or is in status Waiting or In Progress, a “Overwrite file”
prompt opens. Click Yes to overwrite the original file attachment, click No to keep the original
attachment.
To cancel an upload:
tClick the Cancel button beside the Loading indicator or progress bar of the file attachment.
The upload is canceled and the attachment’s assets card removed from the assets area.
Downloading File Attachments
You can edit the process attachments within the context of the user task: You can upload files to the
task and download attached files from the task. Note the following:
• If files can be downloaded depends on the configuration of the process to which the task belongs
in Interplay MAM.
• You can only download files from a task; assets cannot be downloaded.
• You can only download files with status “Completed” or “Downloaded.”
To download files:
1. Select a task in the Task List.
The Task Details area shows the number of attached items in the header area, and attached assets
and files as “asset cards” in the Attachments area.
2. To download a single file, do one of the following:
tClick the Download button on the file attachment asset card.
tRight-click the file attachment asset card and select Download File from the pop-up menu.
Working with Tasks
470
3. To download several files at the same time, select the file attachments in the Attachments area,
and do one of the following:
tClick the Download File button on the Tasks pane toolbar.
tClick the Pane menu and select Download File.
tRight-click the file attachment asset card and select Download File from the pop-up menu.
While the download is initiated, a “Preparing download” message is displayed. A message is
displayed if the download cannot be started. When the download starts, the file status changes to
“Downloaded.”
The files are downloaded to the default download folder on your computer, as specified by your
browser. Several files are downloaded as ZIP archive, a single file is downloaded in unzipped format.
For a ZIP archive, “TaskFileAttachments_<Process ID>.zip” is shown as name; for a single
downloaded file, the original file name is shown.
Deleting Attachments
You can delete attachments (assets as well as files) if the configuration of the process to which the
task belongs allows deletion. Note the following:
• The Deletion controls are not enabled and the assets cards do not show a Delete button if the task
is locked by another user, is already completed, or does not allow deletion of attachments by
configuration.
• Depending on the process configuration, a task might show attachments that you can delete and
non-deletable attachments at the same time.
• If you select several attachments, the Deletion controls are enabled if at least one attachment of
the selection can be deleted.
To delete attachments:
1. Select a task in the Task List.
The Task Details area shows the number of attached items in the header area, and attached assets
and files as “asset cards” in the Attachments area.
2. To delete a single attachment, do one of the following:
tClick the Delete button on the attachment asset card.
tRight-click the attachment and select Delete.
The attachment is deleted. The Tasks pane is updated and the attachment no longer displayed.
3. To delete several attachments at the same time, select the attachments in the Attachments area,
and do one of the following:
tClick the Tasks pane Delete Attachment button.
tClick the Pane Menu button and select Delete Attachment.
tRight-click the selection and select Delete.
All deletable attachments are deleted. The Tasks pane is updated and the attachments are no
longer displayed.

21 Working with Avid Maestro in
MediaCentral | UX
The following main topics describe how to work with Avid Maestro in MediaCentral UX and the
Maestro UX plug-in:
•Maestro and the Maestro UX Plug-In
•Installation and Configuration
•Connecting to and Browsing Maestro Files
•Viewing and Working with Maestro Templates
•Adding a Maestro Graphic to an iNEWS Story
Maestro and the Maestro UX Plug-In
Avid Maestro is a universal controller that lets users create and manage template-based, on-air 3D
graphics. A Maestro user works with a data entry template (page), which is linked to a 3D graphic
scene created in 3Designer or 4Designer. The Maestro user can add graphics, media, and text to the
page, update these data elements in real time, preview the complete graphic for broadcast, and send it
to air. For more information, see the Avid Maestro User Guide.
Starting with MediaCentral UX v2.7.1, a plug-in named Maestro UX is available. This plug-in lets
you connect to a Maestro asset database and work with Maestro graphics directly within
MediaCentral UX. Within MediaCentral UX, you can add the graphics as MOS objects to an iNEWS
story.
Starting with MediaCentral UX v2.10, Maestro graphics added to an iNEWS story are shown in an
associated MediaCentral UX script sequence. For more information, see “Synchronizing Broadcast
Graphics with a MediaCentral | UX Sequence” on page 186.
Installation and Configuration
Maestro UX integration with MediaCentral UX requires separate installation and configuration. For
more information, see the Avid MediaCentral Platform Services Installation and Configuration
Guide.
nAll operations are performed by background services. No components are installed on the client
system.
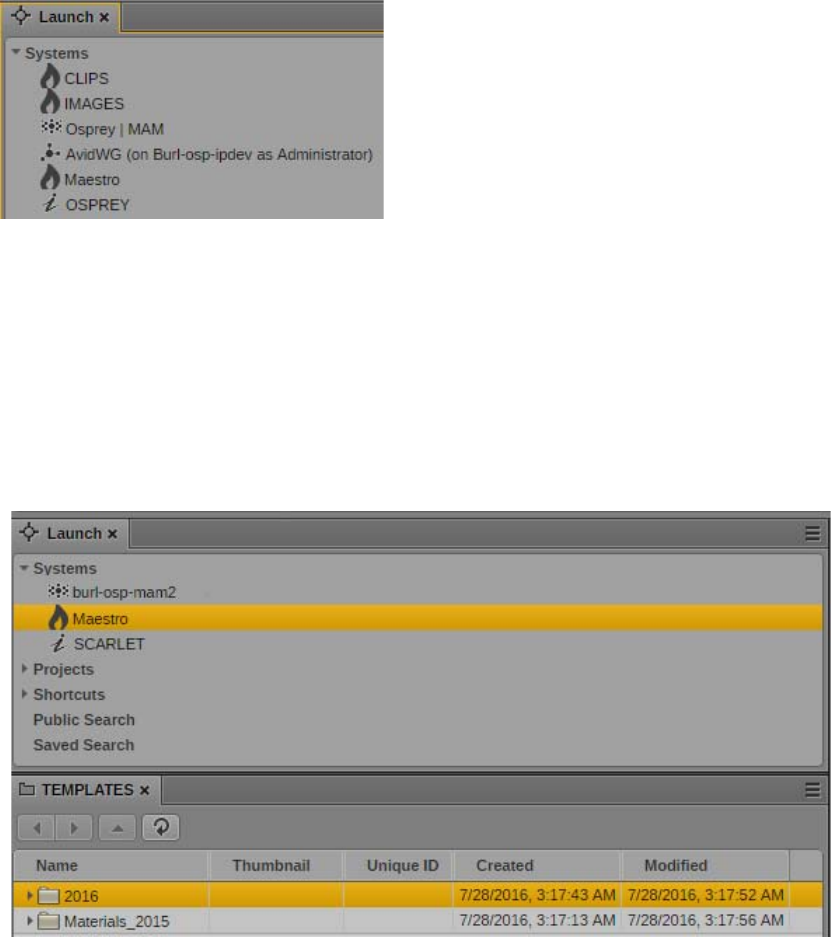
Connecting to and Browsing Maestro Files
472
Connecting to and Browsing Maestro Files
If the Maestro UX plug-in is correctly installed and configured, a Maestro icon and the name Maestro
are displayed in the Launch pane. Interplay MAM and iNEWS systems, which are supported in the
current workflow, are also listed.
Two additional Maestro locations are displayed, if configured through the Maestro Media Browser:
•CLIPS
• IMAGES
Clicking on one of these icons opens the video clips or images stored in the Maestro file system.
They can be used in Maestro templates. For more information, see the Avid Maestro User Guide.
To open the Maestro template database, do one of the following:
tDouble-click the highlighted Maestro icon and name.
tRight-click the highlighted Maestro icon and name and select “Open in New Assets Tab.”
The Maestro template database is displayed in the Assets pane. In the following illustration, the
Maestro database has two top-level folders.
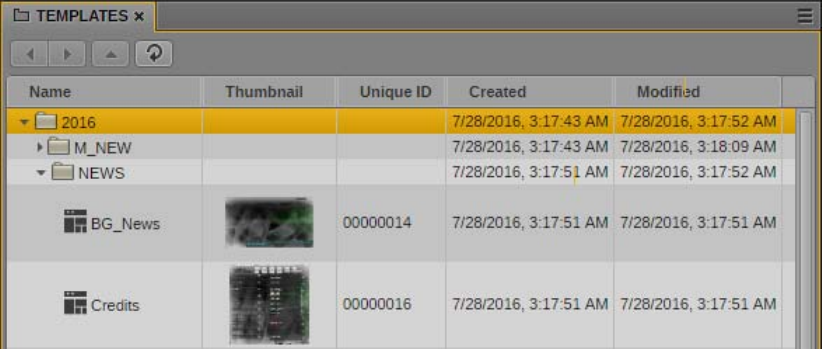
Viewing and Working with Maestro Templates
473
The Maestro database hierarchy uses a standard organization of folders and subfolders, as shown
in the following illustration.
nYou cannot currently search for Maestro graphics through the MediaCentral UX Search pane.
Viewing and Working with Maestro Templates
You can view and work with Maestro graphic templates in the Maestro Browser pane. In the
MediaCentral UX Maestro Browser pane, you are limited to editing the values of the controls.
To open the Maestro Browser pane:
tSelect Panes > Maestro Browser.
To view a graphic template:
tIn the Assets pane, double-click the graphic template you want to view.
The graphic template opens in the Maestro Browser pane. The following illustration shows an
example of a graphic template. This template includes “exports” that allow drag and drop of
graphics (as indicated by “Drag image here”) and editing of text (as indicated by outline boxes).
Buttons and controls are described in the accompanying table.
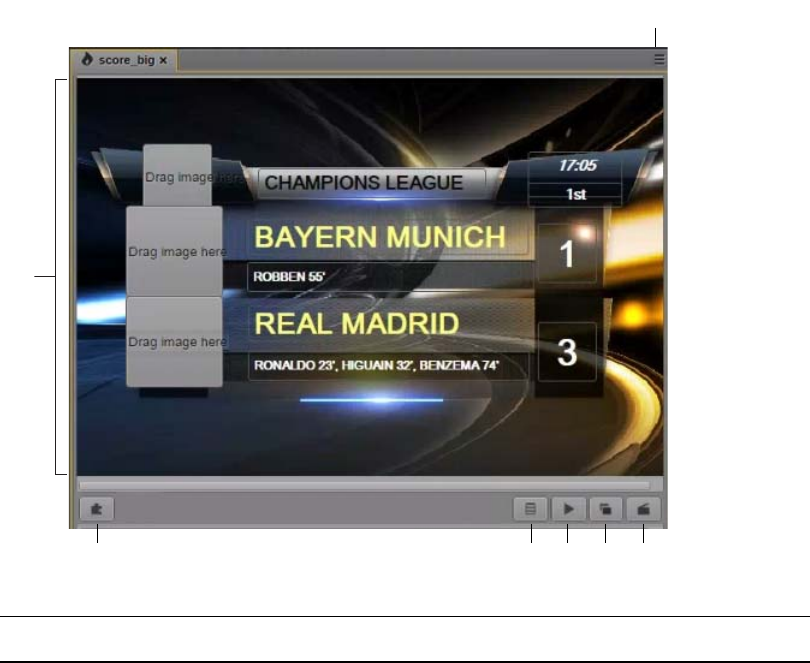
Viewing and Working with Maestro Templates
474
qq
ww
eerrtttytu
Display or Control Description
1 Pane menu Lets you open the MediaCentral UX Help system.
2 Viewer Displays the selected graphic template and lets you update data.
3 Drag and drop button
(puzzle piece button)
Click this button and drag it to the iNEWS story to create a MOS
production cue. See “Adding a Maestro Graphic to an iNEWS Story”
on page 478.
If the system setting “Save item in asset DB” is enabled, the Save
button is displayed instead. See “Saving a Maestro Graphic” on
page 477.
4 Refresh all data sources
button
Refreshes data sources for templates that include data sources.
5 Play button Renders the Maestro graphic and plays it in the MediaCentral UX
Media viewer. As the graphic loads, the button shows the percentage
loaded.
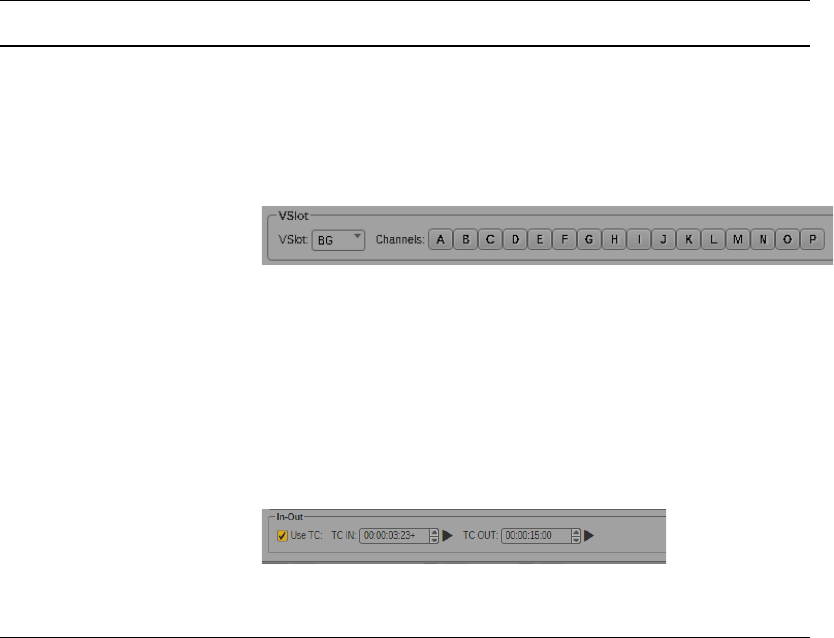
Viewing and Working with Maestro Templates
475
The following topics describe working with Maestro graphic templates:
-“Editing and Previewing a Graphic Template” on page 475
-“Previewing the Graphic in the Media Pane” on page 476
-“Saving a Maestro Graphic” on page 477
Editing and Previewing a Graphic Template
Maestro graphic templates are based on graphics that were created in a graphics program, such as
3Designer or 4Designer. A graphic artist creates “exports,” which are made editable by adding their
controls to a page in the Maestro PageEditor so that a journalist can edit their content during a
broadcast. Any export created in a 3Designer or 4Designer scene is available as a control in Maestro.
For more information, see the Avid Maestro User Guide.
You can edit the value for the controls in the Maestro Browser pane. The following procedures
describe how to add media and edit text.
nCurrently you can use Interplay MAM assets to create a Maestro graphic. You cannot use
Interplay Production assets.
To add media to a graphic template:
1. Load a template into the Maestro Browser window.
2. In MediaCentral UX, use the Launch pane to open a MAM database.
3. Use the Assets pane to browse through the MAM database or use the Search pane to perform a
search until you find a media asset you want to use for the final rendered graphic.
6 VSlot button Opens controls for selecting VSlots (Virtual Slots). VSlots are like
visual layers (in the preview or on-air). Different scenes can be played
to different VSlots. The result would be one scene appearing
superimposed upon another, or one scene loaded in the background
(BG) waiting for a scene in the foreground to play out. It also allows
you to select the output channels where a page will be displayed.
For more information, see the Avid Maestro User’s Guide.
VSlots are displayed as track labels when timed graphics are linked
with a MediaCentral UX sequence.
7 Timecode button Allows automatic cuing of a Maestro graphic at a specified time in a
rundown queue. Graphics that use a timecode cue are referred to as
timed graphics. You can set a timed graphic as a MOS object
production cue. See “Adding a Maestro Graphic to an iNEWS Story”
on page 478.
Timed graphics are displayed as segments in graphics tracks when
linked with a MediaCentral UX sequence.
Display or Control Description
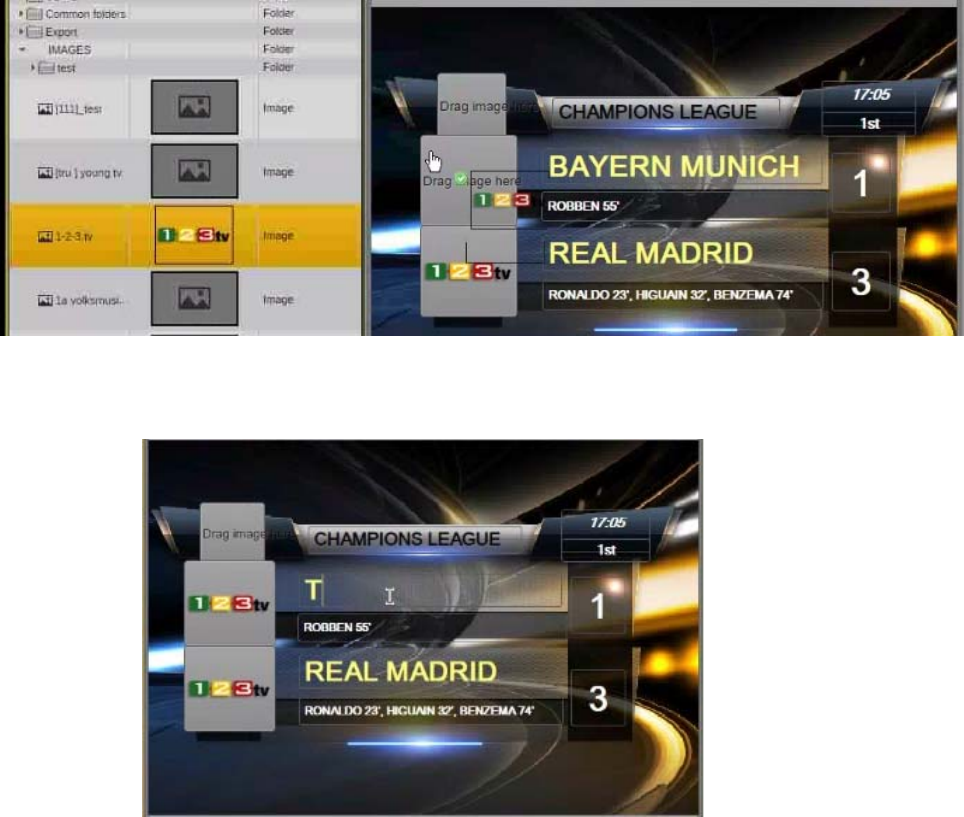
Viewing and Working with Maestro Templates
476
You can also use the Maestro Media Browser folders (CLIPS, IMAGES) to locate the desired
media from the file system.
4. Drag the media asset to the Maestro Browser pane and drop it in the designated area.
To edit text in a graphic template:
tIn the Maestro Browser pane, double-click an outlined box and enter the text you want.
nStarting with Maestro v7.1, you can connect to an Interplay MAM database and add Interplay MAM
graphics to a Maestro template. For more information, see the Avid Maestro User Guide.
Previewing the Graphic in the Media Pane
You can preview the complete graphic in the MediaCentral UX Media viewer.
nA system setting gives you the option of displaying a single representative frame. See “Using the
Single Image Preview Setting” on page 188.
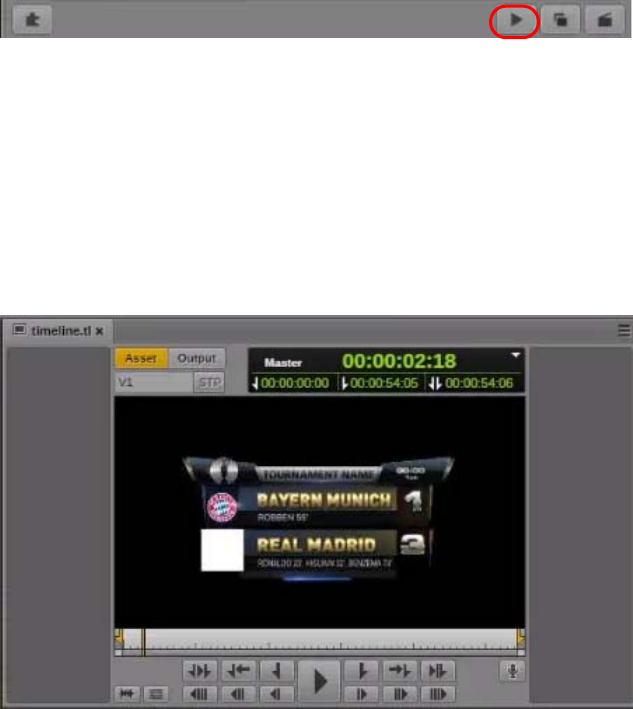
Viewing and Working with Maestro Templates
477
To load a graphic in the Media viewer:
tIn the Maestro Browser windows, click the Play button.
The graphic begins to render. New data from the graphic template is combined with the graphic
itself and the combination is sent to the Maestro Render Server. The Play button shows the
percentage of the graphic that is rendered until it is completely rendered and loaded in the Media
viewer.
After the graphic is loaded, you can click the Play button in the Media viewer to view the graphic
or drag the position indicator to scroll through the timeline.
In the following illustration, the Media pane shows a rendered graphic. Note that the design of
the graphic might look different from the design of the graphic template.
nThe text on the tab of the Media pane refers to the Maestro timeline, where the graphic template
behavior is defined.
Saving a Maestro Graphic
There are two methods for saving your graphic:
• Drag the graphic to a story, edit the graphic, and save it with the story. See “Adding a Maestro
Graphic to an iNEWS Story” on page 478.
• Edit and save the graphic without adding it to a story. This action creates a special Maestro asset
type called an item. An item contains a reference to the Maestro page and control values. When
you open an item, the parent page is loaded with all parameter values and rendering settings. You
can then add the graphic to a story.
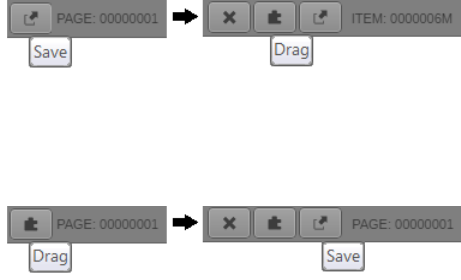
Adding a Maestro Graphic to an iNEWS Story
478
Two MediaCentral UX system settings affect how a graphic is saved:
• “Save item in asset DB”: When this setting is selected, the Save button is displayed at the bottom
of the Maestro Browser window. You must manually save the graphic before the drag-and-drop
button (puzzle-piece button) is displayed. The asset type changes from PAGE to ITEM. You can
then drag the button to a story.
When this setting is deselected, only the puzzle-piece button is displayed. You can drag the
button to the story, but you can save the graphic only after you open it from the story. The asset
type remains PAGE.
• “Create new item on edit”: This setting is displayed only if the “Save item in asset DB” setting is
selected. If selected, a new item is created when you edit and save a graphic already added to a
story..
To open the Maestro system settings:
1. Sign in to MediaCentral UX as an administrator.
2. Select System Settings from the Layout selector.
The System Settings layout opens.
3. In the Settings pane select Maestro.
The Details pane displays the Maestro settings.
4. In the Details pane, specify the settings described above.
5. Click Apply to save your new settings or click Revert to replace changed information with the
previously saved settings.
nFor information on other Maestro system settings, see the Avid MediaCentral Platform Services
Installation and Configuration Guide.
Adding a Maestro Graphic to an iNEWS Story
You can add a Maestro graphic to an iNEWS story within MediaCentral UX. The graphic is added as
a numbered production cue, which represents a MOS object. During a show, a Maestro operator
needs to play the graphic manually, unless a timecode cue is set in the Maestro graphic (see “Viewing
and Working with Maestro Templates” on page 473). After you save the story, you can synchronize
the rundown by using the Maestro Controller to update the playlist and values of the controls of the
pages.
nFor information about synchronizing Maestro graphics to a MediaCentral UX sequence, see
“Synchronizing Broadcast Graphics with a MediaCentral | UX Sequence” on page 186.
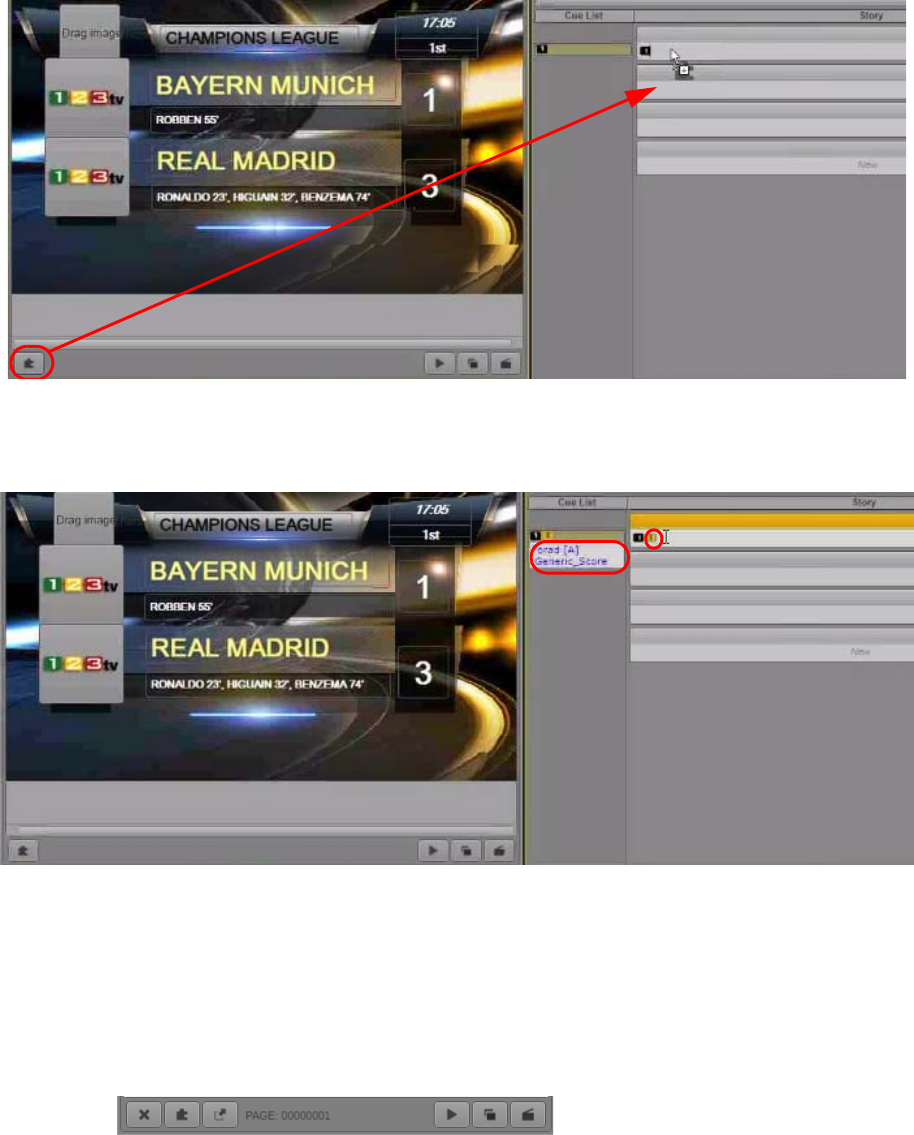
Adding a Maestro Graphic to an iNEWS Story
479
To add a Maestro graphic as a production cue:
1. Click the drag-and-drop button in the bottom left of the Maestro Browser window, drag the icon
to the Queue/Story pane, and drop it on a segment of an iNEWS story.
A production cue is created in the cue list. An asterisk indicates that the cue is a machine control
instruction. In the following illustration, “Orad” refers to the MOS object name and
“Generic_Score” refers to the name of the graphic template.
2. Save the story.
You can set an option in Maestro to automatically update the MOS playlist after saving a story
and open the graphics template in Maestro. For more information about MOS synchronization,
see the Maestro Controller documentation.
3. You can double-click the production cue text to open the graphic in the Maestro Browser pane
and edit it. In this case, a Save button is displayed in the bottom row of the Maestro Browser
pane.
For more information, see “Saving a Maestro Graphic” on page 477.

22 MediaCentral | UX Mobile Application for
the iPhone
The MediaCentral UX mobile app provides a native user interface designed to run on your iPhone
and enable direct, secure access to your station’s iNEWS newsroom computer system and the
Interplay Production database.
The following main topics describe basic user information about the device and mobile app.
•Connection Basics
•Installing MediaCentral | UX on the iPhone
•Starting MediaCentral | UX on the iPhone
•The Sidebar
•Buttons of the User Interface
•Customizing MediaCentral | UX Settings
•Changing Roles
•Accessing the iNEWS Database
•Editing Stories
•Approving Stories
•Working with Favorites
•Working Offline with Cached Queues and Stories
•MediaCentral | UX and Interplay | Production
•Using Markers
•Setting the Approval Status for Assets
•Working with Deep Links
Connection Basics
The MediaCentral UX mobile application can be used to perform many of the same actions
supported by MediaCentral UX in a web-browser, such as:
• Create, edit and approve news stories.
• Navigate the iNEWS and Interplay Production databases.
• Play video sequences associated with scripts.
• View and play media assets from the Interplay Production database.
• Review and approve markers added to media assets.
nIf your MediaCentral UX system is licensed for an iNEWS- only configuration, you cannot preview
or play sequences or other media assets.

Connection Basics
481
The MediaCentral UX iPhone application uses one of several connection options, including Wi-Fi or
carrier-specific cellular service (such as 4G). If you use an unsecured Wi-Fi connection — for
example, a public or mobile network — you must connect to your MediaCentral server through a
virtual private network (VPN) connection.
nThe application automatically selects the first available connection from the list of options according
to the priority shown in the list.
The iPhone
The iPhone has very few exterior buttons. You navigate content with touch gestures — for example,
tapping an icon to start an application. Some gestures perform standard functions, such as displaying
different menu icons, and some perform functions specific to an application.
nRemember, the more applications that you have running, the more memory and battery power your
device uses. To optimize the performance of your device, try to close applications when you finish
with them.
Gestures for the Mobile Application
Applications for touchscreen mobile devices let users accomplish certain tasks utilizing various
gestures like fingertip swipes or taps. What these gestures do can differ from one application to
another. The following table describes what certain gestures do depending on where you use the
gesture within the MediaCentral UX mobile application.
Button Description
The Home button wakes the iPhone when it is sleeping and exits applications, returning you
to the home screen.
Location Gesture Description
Sidebar Tap the Back button Navigates to the location named on the Back
button.
Sidebar Touch and hold the Back
button
Navigates back to the Launch pane, regardless
of your position in the file structure.
Sidebar Tap stars (while in edit mode) Selects or deselects items as Favorites.
Launch pane Tap name of a Favorite item
(while in edit mode)
Lets you modify the item’s name as it appears in
the Favorites list.
Script Editor Swipe Left Displays the Cue List.
Script Editor Tap and hold Opens a menu allowing you to cut, copy, and
paste text, as well as modify text formats.
Script Editor (Cue List
sub-section)
Tap a production cue or
machine control instruction
Auto-scrolls the story text so that the associated
production cue marker comes into view.
Script Editor (Story
sub-section)
Tap a production cue marker Auto-scrolls the cue list so that the production
cue or machine control instruction associated
with that marker comes into view.

Installing MediaCentral | UX on the iPhone
482
Installing MediaCentral | UX on the iPhone
The following procedure assumes licensing, setup, and configuration of the MediaCentral and
iNEWS servers have already been completed.
cIf you are updating your MediaCentral UX iOS app, Avid recommends backing up your apps
before upgrading. For information on backing up your apps on your iOS device, see the Apple
support Web site for your device.
To install MediaCentral UX on the iPhone:
1. Open iTunes (the Apple market).
2. Locate the MediaCentral UX application.
3. Tap Download.
When the MediaCentral UX application is installed on your touch-screen device, an icon
representing the application is also installed on the home screen. You can move it to another
position or a new screen like icons for other applications.
Starting MediaCentral | UX on the iPhone
When you install MediaCentral UX, an icon representing the application displays on your iPhone’s
home screen. If you previously set your Interplay Production account, you can connect to
MediaCentral UX by selecting the MediaCentral icon on your device. To browse iNEWS or Interplay
Production assets, you can sign in with your MediaCentral UX credentials.
MediaCentral UX supports iNEWS communities. The iNEWS Community feature allows customers
with multiple iNEWS systems to share content and collaborate on stories.
MediaCentral UX requires you to supply credentials to sign in to one iNEWS system. This system is
considered your local system. If your local system is configured in an iNEWS community, you are
able to automatically sign in to other systems in the community. These systems are considered your
remote systems. In the MediaCentral UX Launch pane, your local iNEWS system is listed first,
followed by the remote systems. To connect to a remote system, tap the system name.
For more information on iNEWS Community, see “Support for iNEWS Communities” on page 34.
If your iOS device supports Touch ID and you have set up the feature, you can use Touch ID to sign
in to MediaCentral UX. To use Touch ID, you must sign in to MediaCentral UX once using the server
and user credentials for your configuration. Subsequent logins then can use the Touch ID.
Media Viewer Touch and drag in the timeline Moves to new position in viewer’s video
playback timeline.
Media Viewer Tap in the timeline Moves the Playhead to that position on the
timeline.
Media Viewer Pinch in on full screen viewer Minimizes viewer back to original size and
position within the Script Editor.
Location Gesture Description
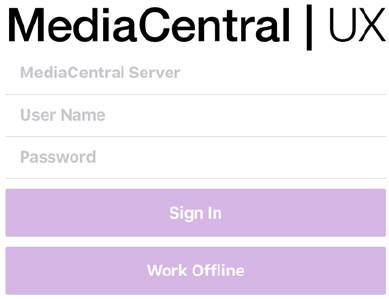
Starting MediaCentral | UX on the iPhone
483
nIf your iOS device fails to read your Touch ID after five attempts, you must manually log in to
MediaCentral UX.
You can also choose to work offline. This allows you to view queues and stories listed in the
Favorites list that you have cached locally on your device. If you select ‘Work Offline” in the sign in
screen, MediaCentral UX uses the credentials last used to sign in to MediaCentral UX. For more
information, see “Working Offline with Cached Queues and Stories” on page 504.
If your connection to MediaCentral UX is restored, you can sign in by tapping the Actions button and
selecting Sign In.
To start MediaCentral UX:
1. Select the MediaCentral icon to start the mobile application.
The sign-in screen appears.
2. Type the MediaCentral UX Server name.
3. Type your MediaCentral UX user name and password.
4. Do one of the following:
tTap the Sign In button.
After you sign in, MediaCentral UX connects to the selected Interplay Production server or
iNEWS system. All servers display in the Sidebar.
nIf your MediaCentral UX credentials are incorrect or missing in your MediaCentral UX account, you
receive a message: “Authentication Failed: The user name or password you entered is incorrect.”
When you click OK, the sign-in screen appears and allows you to enter valid credentials.
tTap the Work Offline button.
MediaCentral UX uses the credentials you used the last time you signed in, and it displays
any cached queues and stories in the Favorites list.
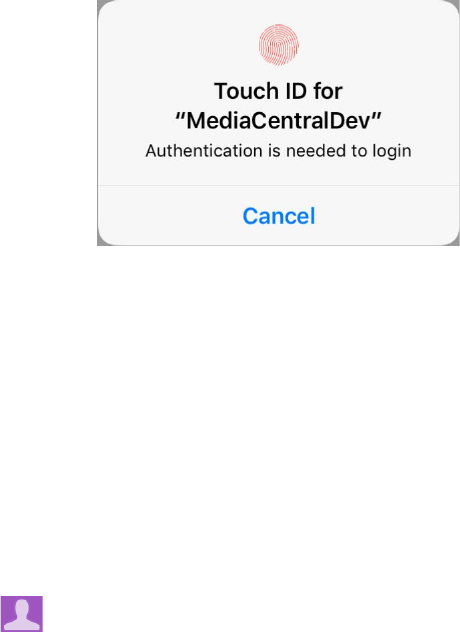
The Sidebar
484
To start MediaCentral UX using Touch ID:
1. Select the MediaCentral icon to start the tablet app.
The sign-in screen appears.
2. Press the Home button using the finger you registered with Touch ID.
nYou must have Touch ID configured on your iOS device, and you must have manually logged in to
your MediaCentral system at least one time using your system and user credentials.
After you sign in, MediaCentral UX connects to the selected Interplay Production server or
iNEWS system. All servers display in the Sidebar.
nIf your MediaCentral UX credentials are incorrect or missing in your MediaCentral UX account, you
receive a message: “Authentication is needed to log in.” If you tap Cancel, the sign-in screen appears
and allows you to attempt to log in using Touch ID or to enter valid credentials.
To view the help system:
1. Tap the Profile button.
2. Select Help.
To sign out:
1. Tap the Profile button.
2. Select Sign Out.
The Sidebar
After you sign in to the MediaCentral UX mobile application on an iPhone, you can view the sidebar,
located along the left side of the screen when displayed. This allows you to navigate various systems
integrated with MediaCentral UX, such as an iNEWS newsroom computer system or an Interplay
Production database The Launch pane also includes any iNEWS projects and iNEWS servers that are
part of an iNEWS community.
The top level of the sidebar contains the Launch pane. The following illustration shows the Launch
pane with an available Interplay Production database and an iNEWS newsroom computer system, as
well as a couple of user-defined Favorites.
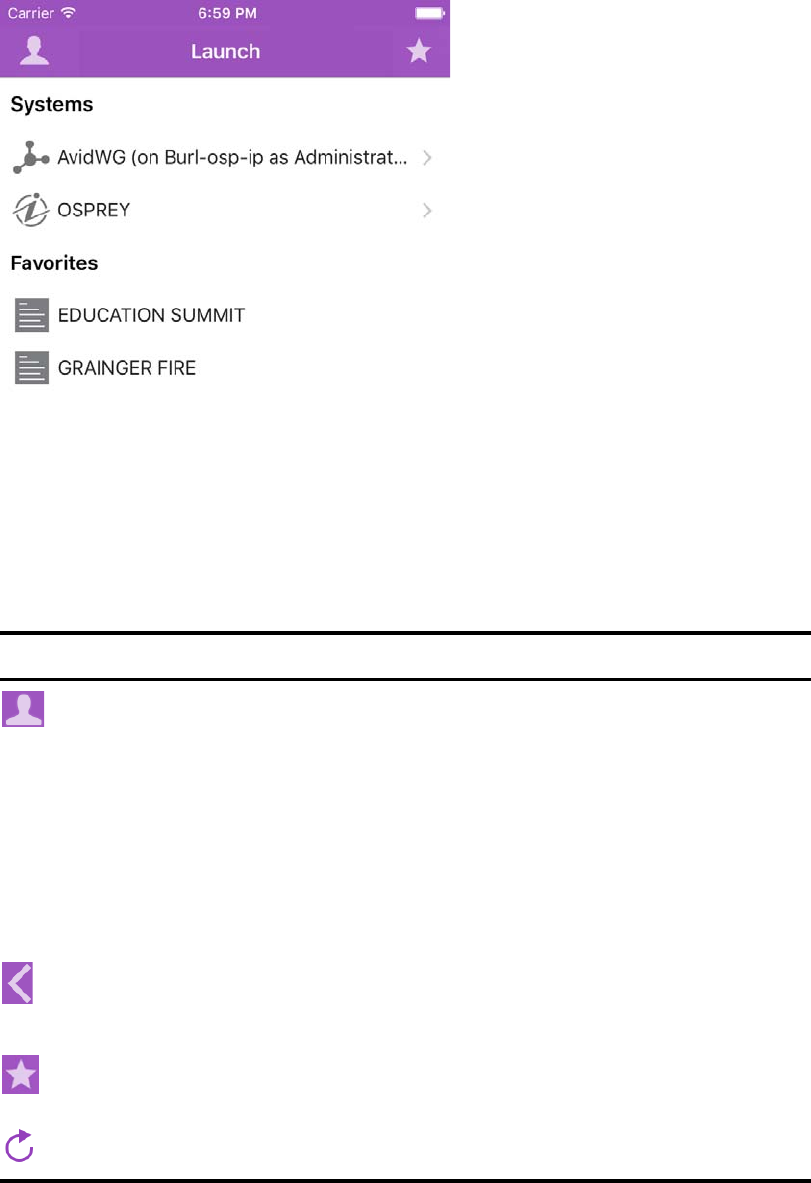
The Sidebar
485
From the Launch pane, you can navigate through the file structure and open assets. After opening
assets, you can view the sidebar at any time by swiping your finger across the screen to the right. You
can also use the Show/Hide button to toggle the display of the sidebar.
nThe look of this button changes depending on the display status of the sidebar.
You can use the Refresh button to update the queues and stories displayed in the iNEWS database or
the media assets displayed in the Interplay Production database by clicking the Refresh button. This
allows you to view any changes made to stories or any new iNEWS or Interplay Production assets.
Button Description
Tap the Profile button to display a list of options:
• Send Log: Allows you to send log files to Avid to help troubleshoot problems. The Send
Log option is active only if you enable logging in the MediaCentral UX settings. For
more information, see “Customizing MediaCentral | UX Settings” on page 486.
• Help: Opens the online help.
• Current Role: Lists your user role and allows you to change the role if you have more
than one role assigned to you. For more information, see “Changing Roles” on page 487.
• Sign Out: Signs you out of your MediaCentral system and ends your session.
nThe Profile button is available only when the Launch pane displays.
Tap the Back button to navigate up one level in the project hierarchy in the sidebar. Tap and
hold the Back button to return to the Launch pane.
nThe Back button is not available on the Launch pane.
Tap the Edit button to create or delete favorites.
Tap the Refresh button to refresh the list of queues, stories, and media assets.
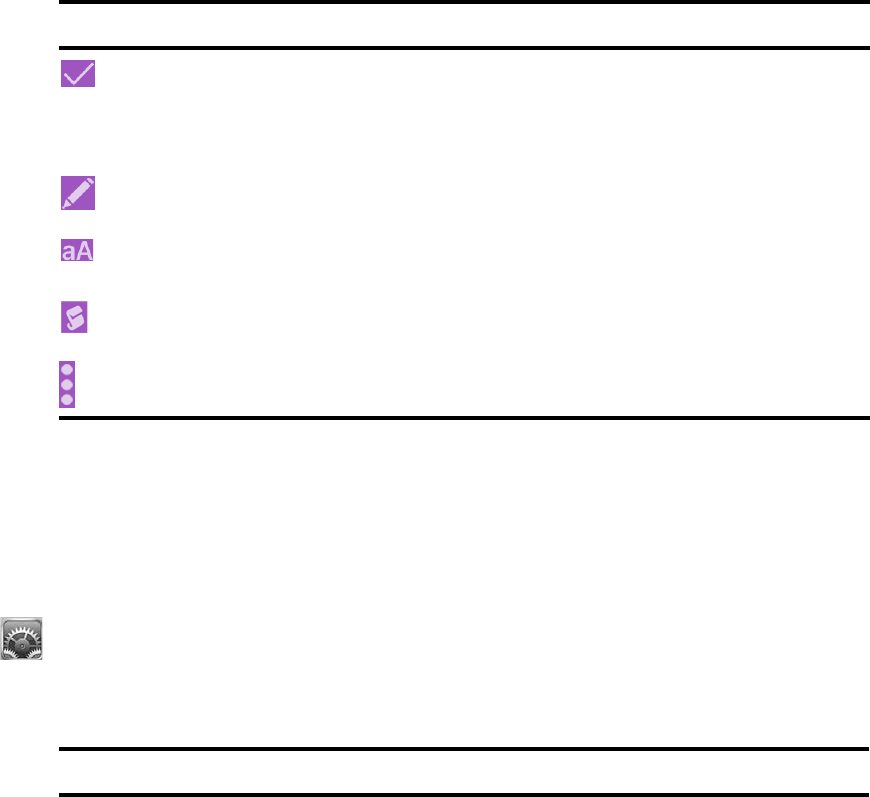
Buttons of the User Interface
486
In edit mode, the plus symbol located at the bottom of the sidebar operates as the Add Story button.
Users can tap it to create a new blank story.
Buttons of the User Interface
The MediaCentral UX mobile application provides a small toolbar of buttons in the top right corner
area of the user interface. The following table describes the buttons and their uses.
Customizing MediaCentral | UX Settings
You can modify some settings in MediaCentral UX.
To modify MediaCentral UX mobile application settings on the iPhone:
1. Start MediaCentral UX.
2. Tap the Settings icon.
3. Select MediaCentral UX in the list of applications.
The following table provides information about general settings.
Button Description
The Approve Story button lets a user approve stories within that queue. The user must have
write access to the queue.
nThe Approve Story button’s icon appears orange for an approved story and white for
an unapproved story.
The Edit Story button enables editing of an opened story by displaying the Edit toolbar and a
virtual keyboard.
The Change Text Size button allows you to increase or decrease the size of the text used for
your stories.
The Script Template button opens a list of script templates. You then can select one of the
templates to insert in a story
The Actions button opens a menu of options that include Reload and Edit Slug.
General Settings Description
Version For display purposes only, this value shows the currently installed version of
the mobile application.
Logging If set to On, MediaCentral UX keeps logs on session activities, which you can
use to troubleshoot issues.
If you tap the Actions button, a Send Log option appears that lets you e-mail the
logs directly to Avid. If the log file is more than 15 MB, you cannot send it
directly. Use the iTunes File Sharing feature as described later in this topic.
If set to Off (default), logging and the Send Log option are disabled.
Logging Level This setting determines how much information is logged if you enable logging.
Options include: Verbose, Info, Warn, and Error.

Changing Roles
487
The following table provides information about the settings for editing.
To send log files to Avid:
1. Connect your device to a Macintosh computer.
2. Open iTunes and navigate to Device > Apps.
3. In the Apps list, select MediaCentral UX.
4. In the MediaCentral UX Documents list, select the Logs folder.
5. Click “Save to” or drag the folder to a location on your computer.
6. Zip the folder and send it to Avid as an e-mail attachment.
Changing Roles
Depending on your MediaCentral UX configuration and license, you might have more than one role
with which you can work on your project. Each role has a set of layouts and permissions associated
with it. If you have multiple roles available, you can change your current role from the Profile button
in the Launch pane.
For more information about roles, see the Avid MediaCentral | UX Administrator’s Guide.
To change your role, do the following:
1. Tap the Profile button, and then tap your new role in the Current Role section.
The Roles pane opens.
Request Timeout Options are intervals of 10, 20, or 30 seconds, 1 minute, or 2 minutes.
Keep me signed in Set to On if you want MediaCentral UX to keep you signed in after you first
sign in.
General Settings Description
Editing Settings Description
Autosave Stories If set to On, MediaCentral UX automatically saves a story if you navigate away
from the modified story to other assets in the system. If set to Off,
MediaCentral UX prompts you to save your modifications. The default setting
is On.
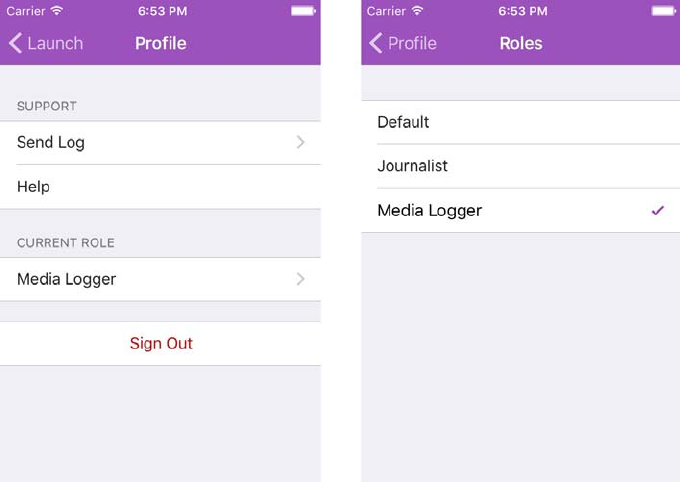
Accessing the iNEWS Database
488
2. Tap a different role to select it.
The current role is marked by a check mark.
Accessing the iNEWS Database
The iNEWS database is the backbone of your iNEWS system. You save the data created in your
newsroom — stories, scripts, and rundowns — in the database on the iNEWS Server. Queues contain
stories, and directories (also known as folders) store the queues.
When viewed with the mobile application, available iNEWS systems appear in the sidebar, along
with any of their directories and queues. For MediaCentral UX v1.7 and later, queues marked to
automatically refresh when changes are made display without pagination in the sidebar. You can
scroll continuously to view all stories in these queues.
nIf the queue contains more than 1000 stories, it might take some time for MediaCentral UX to receive
and display them. You might need to increase the Request Timeout value in the MediaCentral UX
settings. For more information, see “Customizing MediaCentral | UX Settings” on page 486.
Accessing the iNEWS Database
489
The application uses different icons to distinguish between directories, queues, and stories.
Destinations in the iNEWS system directory selected for the Favorites list have a star on the right of
the directory, queue, or story.
nWhile viewing the top level of an iNEWS system directory in the sidebar, the Back button displays the
word Launch, which means you can tap it to return to the previous view of the Launch pane.
However, the button’s name changes the further you navigate down the system directory.
You can open directories, queues, and stories from the MediaCentral UX mobile application.
Directories and queues open within the sidebar. Stories open to the right of the sidebar in the Script
Editor.
Icon Description
Directories hold queues or other subdirectories. Unlike queues, directories do not directly
contain stories. For example, the Wires folder contains queues with incoming wire stories.
Queues let you organize stories in detailed categories. A show’s rundown is one example of
a queue.
Stories — for example, wire stories — contain text, such as contact information or a
description of a news event. Any story can become a script for a show. Scripts contain
additional data beyond text, including production cues, machine control instructions,
presenter instructions, and associated video sequences.
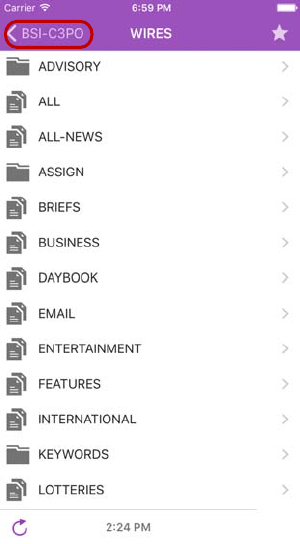
Accessing the iNEWS Database
490
nIf you want to open an iNEWS story or queue that has a key lock applied to it, you must type in the
appropriate password.
To open a directory:
1. Navigate to the directory.
2. Tap a folder on screen to open it.
nAs you navigate the system’s directory structure, the application displays your path or location
within the database at the top of the screen.
The following illustration shows the Wires directory opened to view numerous queues
containing incoming wire stories.
Wires directory on the BSI-C3PO iNEWS server, with the back button at the top of the list
To back out of a directory or queue:
tTap the Back button.
nThe Back button does not display the word “Back” on it, but rather the name on the button changes
as a user navigates further into the directory.
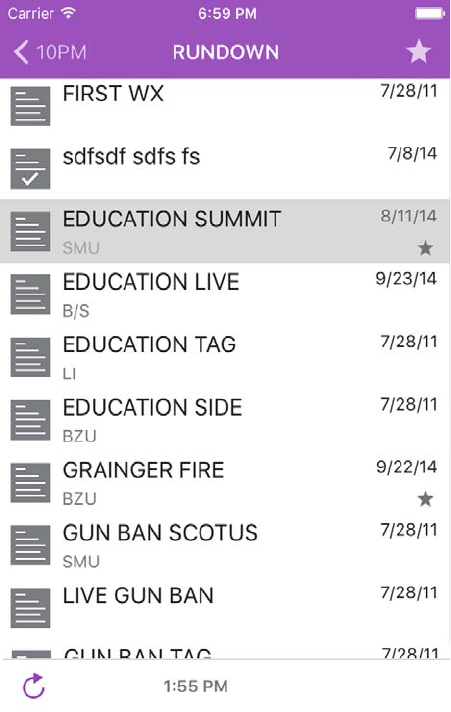
Accessing the iNEWS Database
491
To open a queue:
1. Navigate to the queue inside a directory.
2. Tap the queue to open it.
The following illustration shows an example of a rundown queue.
To open an existing story:
1. Navigate to the story in a queue.
nA story icon with a check mark indicates that the story has been “approved.” You can approve stories
from an iNEWS workstation or from MediaCentral UX.
2. Tap the story to open it.
The story opens in the Script Editor, which has two sections:
- The Story, which contains the text of the story, any presenter instructions, and production
cue markers.
- The Cue List, which contains any production cues or machine control instructions.

Accessing the iNEWS Database
492
The following illustration shows the Script Editor open with the Story section displayed
containing a story with production cue markers identified numerically.
Presenter instructions appear as red text in the body of the story.
3. While viewing the story, swipe left to view the Cue List.
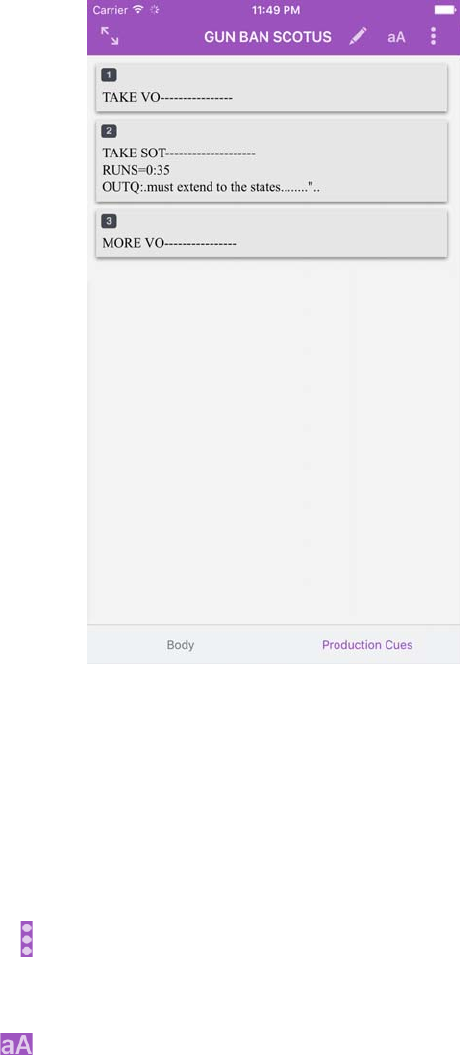
Accessing the iNEWS Database
493
The numerical production cue markers within the story align with production cues and machine
control instructions displayed in the Cue List to the right of the story. Black text indicates
production cues. Blue text indicates machine control instructions (if any).
nBecause of limited screen size on the iPhone, the mobile application does not display the sidebar
with the Script Editor. To view the sidebar at any time, swipe right from the Story section or use the
Show/Hide button (see “The Sidebar” on page 484).
To reload a story:
1. Tap the Actions button.
2. Tap Reload.
To adjust the size of the text of your story:
1. Tap the Change Text Size button.
The Change Text Size controls open.
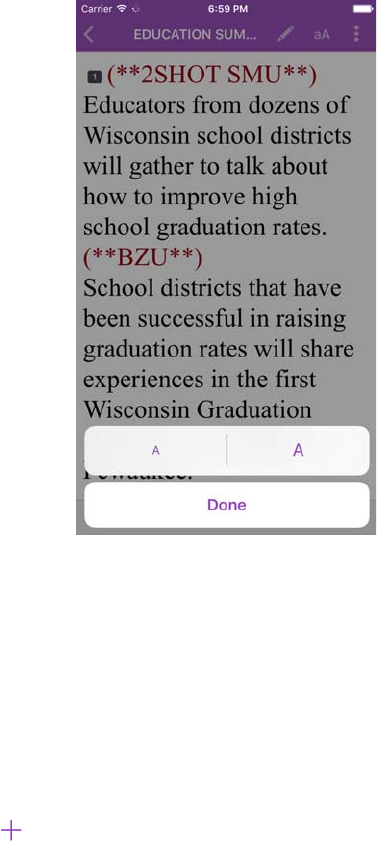
Accessing the iNEWS Database
494
2. Do one of the following:
tTap the smaller letter icon to reduce the text size.
tTap the larger letter icon to increase the text size
You can tap the letter icons multiple times to reduce or increase text to the appropriate size.
3. Tap Done.
To add a new story:
1. Tap the story in the queue below which you want to insert the new story.
2. Tap the Add Story button, located at the bottom of the sidebar.
The Edit Slug dialog box opens.
3. Add a name for the story, and then tap OK.
Viewing Video Associated with a Script
When sequences have been associated with stories in the MediaCentral UX Web application, you can
preview the stories in the media viewer in MediaCentral UX.
nIf your MediaCentral UX system is licensed for an iNEWS- only configuration, you cannot preview
or play sequences or other media assets.
When you associate video with a script, you use the Open Sequence button to open the viewer full
screen and preview sequences. The following table describes buttons available to open and use the
media viewer.
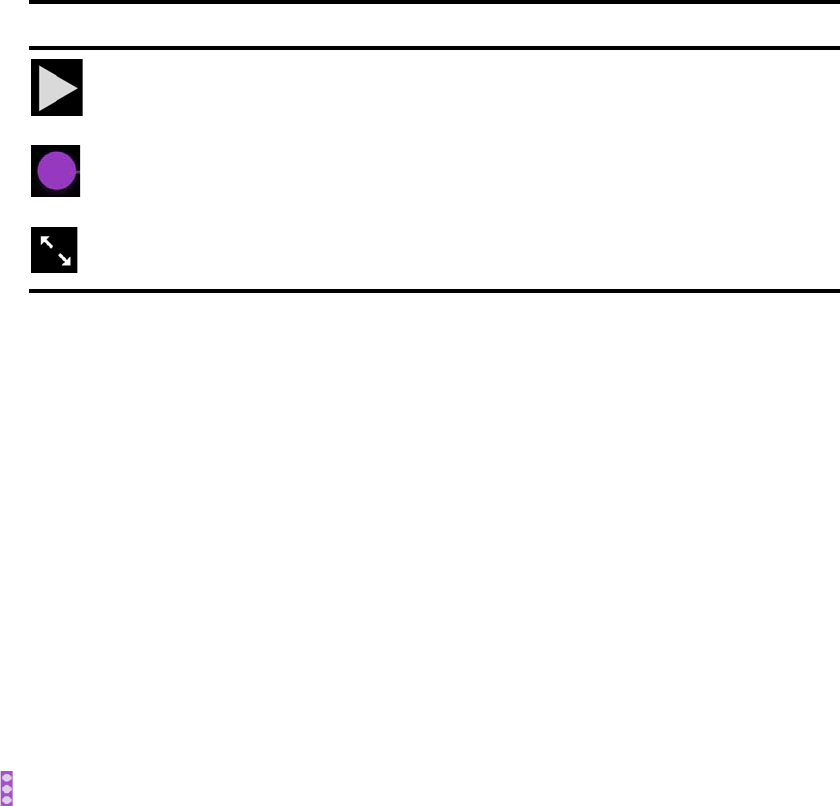
Editing Stories
495
You can view video sequences created in the following way:
• You created and modified the sequence in MediaCentral UX.
• You created the sequence in MediaCentral UX and modified it in NewsCutter or Media
Composer. In this case, you might not see some effects in the media viewer.
• You created the sequence in Instinct and modified it in MediaCentral UX.
nYou cannot view video sequences created directly in NewsCutter or Media Composer, and you cannot
play back shotlists created in Interplay Assist or Interplay Access.
To view video sequences associated with a script:
1. Tap Video at the bottom of the Script Editor, and then tap the Play button.
2. (Optional) Tap the Maximize button in the viewer to open the viewer full screen.
3. (Optional) If you expand the viewer, you can tap the Minimize button to restore the viewer to its
original size and location within the Script Editor.
To regenerate the sequence video proxy for playback:
1. Tap the Actions button.
2. Tap Reload.
Editing Stories
Using the mobile application, you can create a new story or edit an existing one. You can also change
the title of story.
The system obtains an edit lock when you edit a story, which prevents other users from altering a
story while you work on it. The edit lock applies only to the story body when you edit the body, and
it applies only to the story title (the slug) when you edit the title in the sidebar or when you approve a
story. When you start a new story, the edit lock applies both to the story body and the story title.
Saving and closing the story, or discarding your changes, releases the edit lock.
nIf you want to open an iNEWS story or queue that has a key lock applied to it, you must type in the
appropriate password.
MediaCentral UX supports the standard editing features found in most text editing applications,
including cut, copy, and paste.
Button Description
The Play button plays the sequence so you can preview the video associated with the story.
This button changes to a Pause button while the sequence plays.
The Playhead allows you to navigate to a new position in the viewer’s video playback
timeline.
The Maximize button expands the viewer to full screen. This button changes to the
Minimize button when the viewer expands to full screen.

Editing Stories
496
You can use cut, copy, and paste to move text around within a single story or from one story to
another. When cutting or copying text, the system stores the text in the clipboard. The clipboard
stores only one block of text at a time, so whenever you cut or copy something new, the clipboard
overwrites the previously stored text.
To edit an existing story:
1. Navigate to the existing story in the queue and open it.
2. Tap the Edit Story button.
3. Tap in the story to begin editing the text.
The app enters edit mode and displays the Edit toolbar and a virtual keyboard.
4. After you complete your modifications, save the story. For more information, see “Ways of
Saving Stories” on page 498.
To edit text:
1. Tap and hold in the story to select text.
2. Select one of the following:
tTap the Cut button.
tTap the Copy button.
tTap the Paste button.
To add a new story:
1. Tap the Edit Story button.
2. Tap the Add Story button, located at the bottom of the sidebar.
nThe Add Story button only appears in the sidebar after you tap the Edit button in the sidebar.
The Edit Slug dialog box opens.
3. Type the title of your story, and then tap OK.
A blank story is added to the current queue with edit mode already activated for the story. An edit
lock prevents others from changing the story while you edit. The cursor moves to the blank title
field.
When in edit mode (in the Script Editor), the app displays the Edit toolbar and a virtual
keyboard.
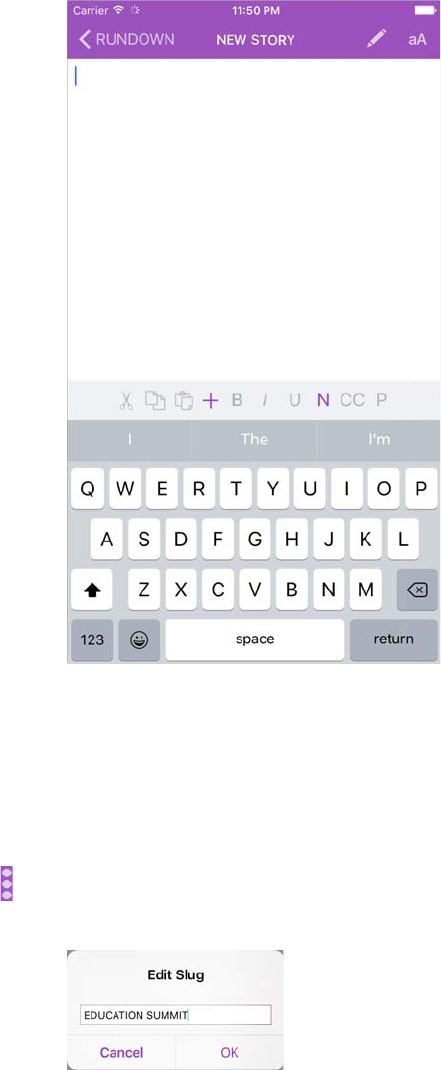
Editing Stories
497
nThe MediaCentral UX mobile app can also be used with a Bluetooth keyboard.
4. (Optional) Enter any production cues or machine control instructions.
5. Save the story. For more information, see “Ways of Saving Stories” on page 498.
To edit the title (slug) of a story:
1. Tap the Actions button.
2. Tap Edit Slug.
An edit lock on the story form in iNEWS prevents others from changing the story title while you
edit.
3. When cursor appears, you can change the name of the story.
4. Tap OK.

Editing Stories
498
Using Script Templates
Script templates are templates created by an administrator that allow you to insert predefined text and
segments quickly into stories. For example, if a daily weather story in a show has a standard set of
production cues and presenter instructions that are always the same, an administrator can create a
script template that contains this information. The template can then be made available to
MediaCentral UX mobile app users who can insert the template in new stories.
To use a script template:
1. Navigate to the existing story in the queue and open it.
2. Tap the Edit Story button.
3. Tap in the story body where you want to insert the template information.
4. Tap the Script Template button.
The Script Template list opens.
5. Tap to select a script template.
The script template displays at the current cursor position.
Ways of Saving Stories
You can save newly created stories or change existing stories by tapping the Edit Story button after
modifying a story while in edit mode. A message appears asking you to confirm whether to save the
changes. You can choose to save the story or exit edit mode without saving your changes.
Your story also is saved when the following occurs:
• You change to another app or send MediaCentral UX to the background by pressing the Home
button.
• Your device goes to sleep due to Auto-Lock timeout.
If you enable Autosave Stories in the MediaCentral UX Settings, you can save newly created stories
or change existing stories in multiple ways:
• The application automatically saves a modified story when you tap on a different story in the
queue.
• The application automatically saves a modified story when you select an asset from the Interplay
Production server to view.
• The application automatically saves a modified story when you change your role from Launch
pane.
• The application automatically saves a modified story when you sign out of the application.
Formatting a Script
When you write a story, text appears in the default text style. However, you can alter the look of the
text, such as changing the default font to bold. When formatting a story as a script for a news
broadcast, you often distinguish certain text by using various specialized styles of text, such as
instructions for presenters or closed captioning.
You use presenter instructions commonly as brief, special instructions to news presenters (also
known as news anchors). The text for presenter instructions appear red, in reverse video on the
teleprompter. This text does not affect how the system calculates the read time.

Editing Stories
499
You use closed captioning commonly for sound-bite transcription. The text for closed captioning
appears green, and the system sends it to a closed caption encoder if your station uses such a device
to broadcast scripts for the hearing-impaired. Closed captioning text does not appear in the
teleprompter, nor does it affect how the system calculates the read time.
nThe system sends the default text style to both the teleprompter and to any closed caption encoder
used at the station.
In the mobile application, an Edit toolbar provides buttons that let you modify the format of the text
into bold text, italicized text, and underlined text, and lets you format text specialized for broadcast
scripts.
To format text, select the appropriate text and do one of the following:
tTo bold text, tap and hold. and then select the B button.
tTo italicize test, tap and hold, and then select the I button.
tTo underline text, tap and hold, and then select the U button.
tTo mark text as a presenter instruction, tap and hold, and then select P for presenter.
tTo mark text as a closed captioning text, tap and hold, and then select CC for closed captioned.
tTo mark text as a normal text, tap and hold, and then select N for normal.
nYou can choose the format before typing your text as well. Any new text you type appears in the
format you selected. To change the format of the text you type at any time, select another format.
Adding Production Cues
When you format a story as a script for a news broadcast, you can add production cues to provide
valuable information to technical staff as well as machine control commands for devices, such as
character generators.
In the mobile application on an iPhone, the menu provides a the Plus (+) button that lets you add this
information to scripts.
You add production cues to scripts from the Story area and edit them in the Cue List area of the Script
Editor. When added to a script, each production cue has an associated number. The number appears
as a production cue marker in the script, which corresponds to the insertion location of the production
cue’s text box in the Cue List. You can select each marker and move it within or remove it from the
story if necessary. If moved or deleted, the text associated with the marker moves or is deleted.
To insert a production cue into a script:
1. Position your cursor in the story where you want to insert the production cue marker.
2. Tap the Plus button.
MediaCentral UX adds a production cue marker with a number into the story at the cursor
position. The marker corresponds to the production cue with the same number located in the Cue
List
3. Tap Production Cue at the bottom of the Script Editor.
Editing Stories
500
4. Enter the production cue information — for example, Take VO, On Camera, Take SOT, or Take
Live.
nThe application automatically saves information in the newly inserted production cue when you
navigate elsewhere within the application. If you attempt to sign out or close the application, a
message appears prompting you to either save or discard your changes.
To move a production cue in a script:
tSelect the production cue marker, and then cut it and paste it in another location within the script.
To delete a production cue from a script, do one of the following:
tPosition cursor to the right of the production cue marker and press the Delete key.
tSelect the production cue marker and tap the Delete key.
Adding Machine Control Instructions
If your station integrates with a broadcast control system, such as iNEWS Command, the production
cues might include machine control instructions.
You should precede these instructions with an asterisk (*) and write them in a format that begins with
a command for a device — for example, CG for a character generator. After the command the format
specifies a particular item or template, such as 2line for a template that contains two lines for
fulfillment data. Additional information or comments follow on succeeding lines in the same
production cue text box.
The following procedure uses the example of a machine control instruction for a 2-line character
generator graphic. The first line calls up the correct template and the subsequent lines of text provide
the fulfillment data that appears in the graphic.
To add machine control instructions for a CG event:
1. Add or open a production cue in the script.
2. Tap Production Cue at the bottom of the Script Editor.
3. Type your machine control command — for example,
*CG 2line
— and then press Return.
nTyping an asterisk (*) automatically switches the text you type from Normal to Machine Control
format, which appears as blue font. The menu also has an MC option that you can select to format
text as a machine control instruction within a production cue.
4. Type the first line of text that should appear on the 2-line CG graphic — for example,
John
Smith
— and then press Return.
5. Type the second line of text for the 2-line CG graphic — for example,
Pleasantville, USA
.
Your CG machine control instruction appears in blue font.
Working with Links in Stories
A story can contain more than simple text. It can contain a URL to a Web page or an e-mail address
to a contact you might need. When Web links or e-mail addresses are included in stories, they
become dynamic links. You can use them to open your device’s browser or to open an e-mail
window.
nYou cannot add a link to a Web page or an e-nail address using the MediaCentral mobile app for iOS.

Approving Stories
501
To open a Web link from a story:
tTap the link in the story.
The device’s Web browser opens and loads the Web page.
To e-mail a contact from a story:
1. Tap the e-mail address in the story.
The application opens an e-mail window, using your device’s default e-mail application.
2. Write your e-mail.
3. Tap Send.
Approving Stories
Endorsing or approving stories allows news producers to identify which scripts in a show have been
reviewed prior to broadcast. You can approve stories from an iNEWS workstation or from the
MediaCentral UX application on an iPad or an iPhone.
nThe ability to approve stories requires write access to the queue for the selected story.
To approve a story from the mobile application:
1. Open the story you want to approve.
2. Tap the Approve Story button, and then swipe right to turn on the Approve option.
To remove approval for a story from the mobile application:
1. Open the story for which you want to remove approval.
2. Tap the Approve Story button, and then swipe left to turn off the Approve option.
Working with Favorites
To make navigation easier, you can designate certain locations in the newsroom system or Interplay
Production as Favorites, which appear in a list on the Launch pane.
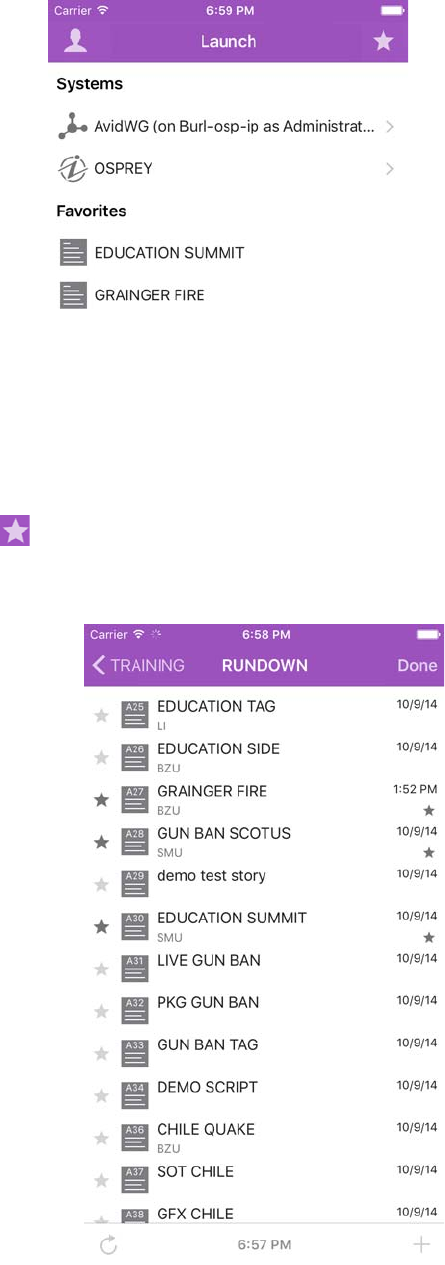
Working with Favorites
502
From the mobile application, you can use your Favorites list to navigate quickly to your most often
used assets, directories, queues, or stories. You can edit your Favorites list by creating new ones,
editing their names, or deleting existing ones from the list.
To create a Favorite:
1. Tap the Edit button.
2. Tap the gray star next to the directory, asset, queue, or story you want to designate as a favorite
destination. You can select more than one at a time.
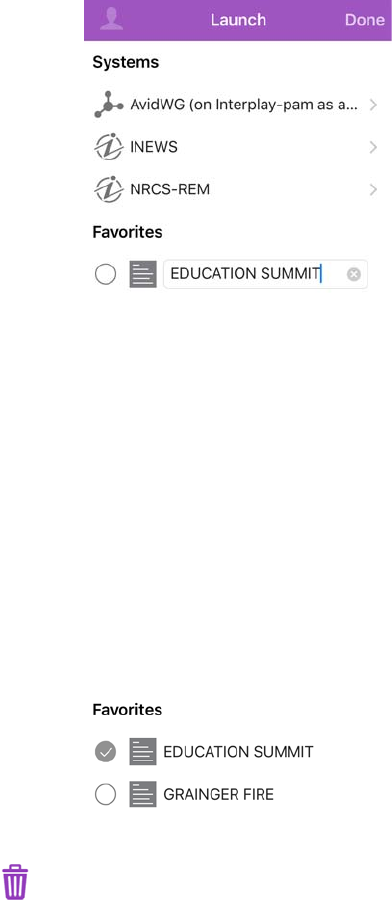
Working with Favorites
503
3. Tap the Done button.
All selections appear in your Favorites list in the Launch pane. A star appears next to each icon
of favorite destinations in the system directory.
To edit the name of a Favorite:
1. Tap the Edit button.
2. Tap the name in the list you want to edit.
3. When the cursor appears, you can change the name.
For example, if you plan to have multiple rundown queues in your Favorites list, some might
share the same queue name. You can edit each one in the list to distinguish which rundown
applies to the morning show, midday show, and evening newscast.
4. Tap the Done button.
The name of the Favorite changes. This does not affect the name of the asset, story, queue, or
rundown in iNEWS or Interplay Production.
To delete a Favorite:
1. Tap the Edit button.
2. Tap to the left of the directory, queue, or story you want to remove as a favorite destination. You
can select more than one at a time.
The selected item displays a check mark next to the title; gray circles indicate those not chosen.
3. Tap the Trash button.
The app deletes the selected items from your Favorites list.
4. Tap Done.
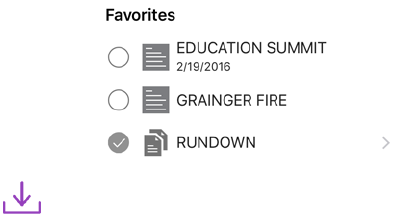
Working Offline with Cached Queues and Stories
504
Working Offline with Cached Queues and Stories
You can use the MediaCentral UX mobile application to view queues and stories cached locally to
your mobile device without being connected to your station’s iNEWS newsroom computer system.
The Launch panel displays cached queues and stories in the Favorites list when you work in offline
mode.
The following notes apply to caching queues and stories:
• You can work in presenter mode from a cached queue in offline mode.
• Caching a queue might take some time, depending on the length of the queue. You can manually
cancel a cache operation. For more information, see “Caching Queues and Stories” on page 504.
• If you manually cancel a cache operation, no part of the queue or story is saved.
• You can cache a queue of up to 1000 stories. If a queue contains more than this limit,
MediaCentral UX caches only the first 1000 stories.
• If an error occurs while caching stories — for example, if you lose your connection to the server
or if you lock your device — the cache operation is interrupted.
• MediaCentral UX updates the cache contents only in the case of an successful operation. If you
have cached the same queue or story before, you can still access the old cache.
• If a story or part of a story has been deleted from a queue marked for caching, it is skipped by the
cache operation.
• If you designate both a queue and a story from the queue as favorites, the cache operation creates
two separate cached versions of the story, one within the cached queue and another for the
individually-cached story.
Caching Queues and Stories
To view queues and stories in offline mode, you must set them as Favorites before they can be cached
locally and viewed when you do not have a connection to server (see “Working with Favorites” on
page 501).
You can delete a cache for a queue or story by deleting the item from the Favorites list.
To cache a queue or story in the Favorites list:
1. In the Launch pane, tap the Edit button, and tap to the left of the queue or story in the Favorites
list you want to cache. You can select more than one queue or story at a time.
The queue or story displays a check mark next to the title.
2. Tap the Cache button.
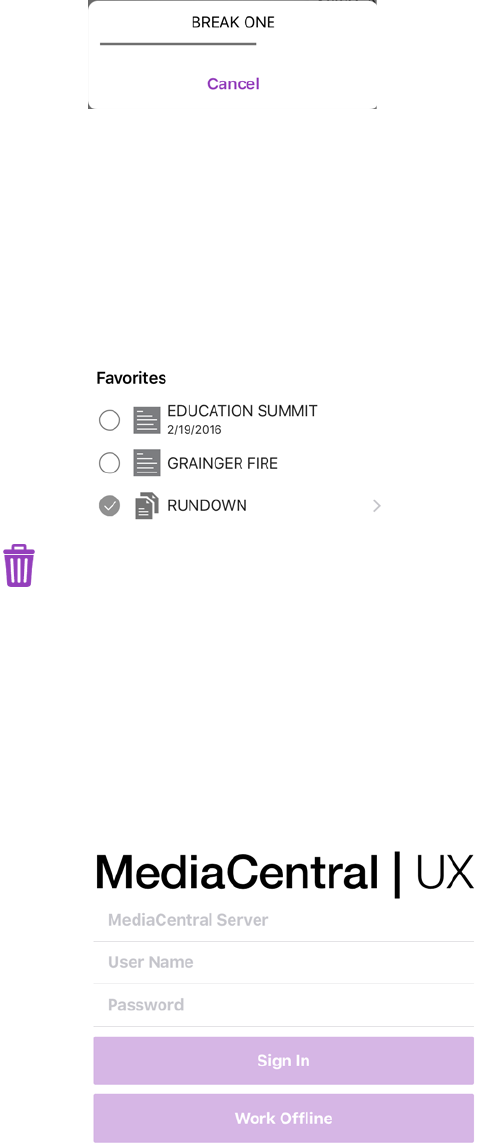
Working Offline with Cached Queues and Stories
505
A progress bar indicates the status of the cache operation. To stop the cache operation, tap the
Cancel button.
When the caching completes, a dialog box appears with the results of the operation.
3. Click OK.
To remove a cache from your device:
1. In the Launch pane, tap the Edit button, and then select the queue or story in the Favorites list
you want to delete.
The queue or story displays a check mark next to the title.
2. Tap the Trash button.
The queue or story is removed from the Favorites list and the cache is deleted.
Viewing Queues and Stories in Offline Mode
When you lose your connection to MediaCentral UX, you can choose to work offline. This allows
you to view queues and stories that have been cached on your mobile device.
To view cached queues and stories after your lose your connection to MediaCentral UX:
1. In the sign-in screen, tap Work Offline.
MediaCentral UX displays the Launch pane, with all cached queues and stories in the Favorites
list.
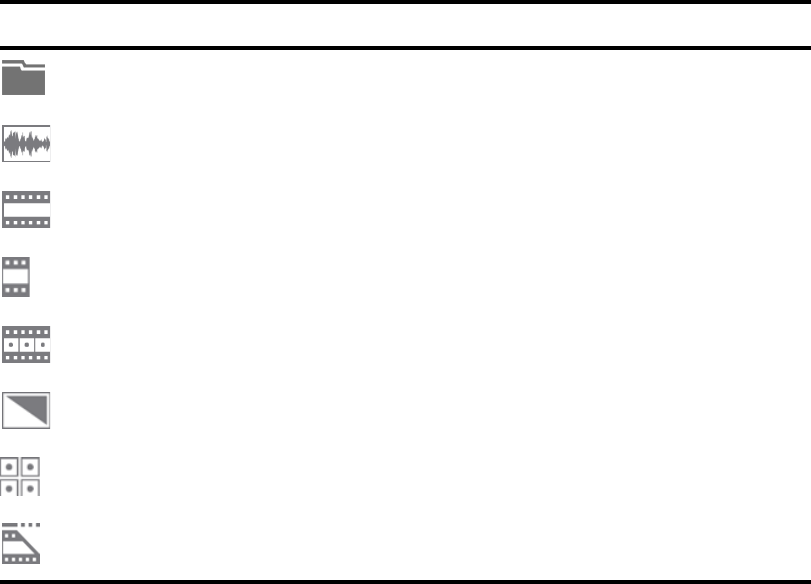
MediaCentral | UX and Interplay | Production
506
2. Tap a queue or story to open it.
MediaCentral | UX and Interplay | Production
You can access media assets stored in an Interplay Production database, such as video clips, audio
clips, and graphics. When viewed with the mobile application, available Interplay Production
systems appear in the sidebar, along with any of their directories and media assets.
Different icons are used to identify Interplay Production assets:
Destinations in the Interplay Production system directory selected for the Favorites list have a star
next to their icons.
nWhile viewing the top level of an asset directory in the sidebar, the Back button displays the word
Launch, which means you can tap it to return to the previous view of the Launch pane. However, the
button’s name changes the further you navigate down the system directory.
Viewing Media Assets with MediaCentral | UX
You can open directories and media assets stored in the Interplay Production database using
MediaCentral UX. Directories and a list of assets open within the sidebar. You can view and play
assets in the Media viewer.
Icon Description
Directories hold media assets or other subdirectories.
An audio clip references audio media files formed from captured audio or imported files.
Audio clips display in the Media viewer as an audio clip icon.
A master clip references audio and video media files formed from captured footage or
imported files.
A subclip references a selected portion of a master clip.
A sequence represents an edited program, partial or complete, that you create from other
clips.
An effect clip references an unrendered effect that you create. You cannot preview an effect
clip in the Media viewer.
A group clip contains two or more grouped clips, strung together sequentially according to
common timecodes.
An in-progress clip, also known as an edit while capture (EWC) clip, is available for viewing
and for use in editing while the capture is still in progress.
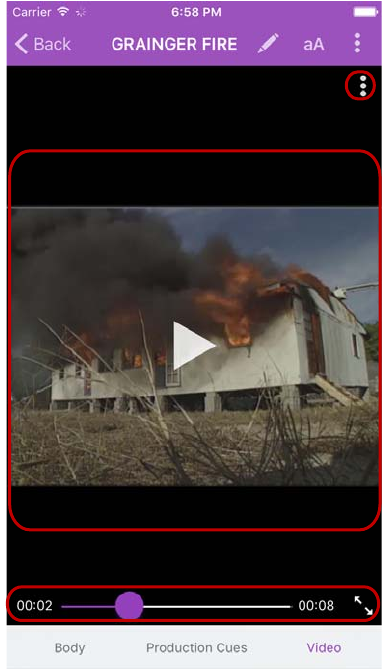
MediaCentral | UX and Interplay | Production
507
Media viewer — Action button, Media player, media controls
To open a directory:
1. Navigate to the directory.
2. Tap a folder on screen to open it.
nAs you navigate the system’s directory structure, the application displays your path or location
within the database at the top of the screen.
The following illustration shows the News Media directory opened to view one subdirectory and
multiple media assets.
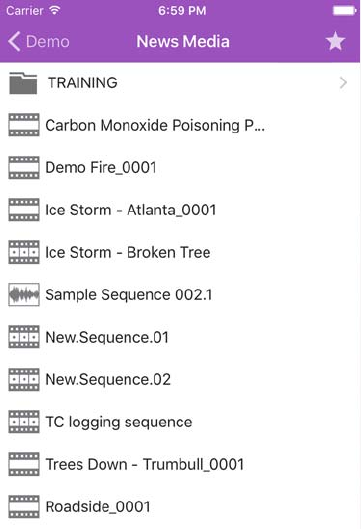
MediaCentral | UX and Interplay | Production
508
To back out of a directory:
tTap the Back button.
nThe Back button does not display the word “Back” on it, but rather the name on the button changes
as a user navigates further into the directory.
To open and play a media asset:
1. Navigate to the asset in a directory.
2. Tap the video or audio asset.
The asset opens in the Media viewer, which replaces the asset list in the sidebar.

MediaCentral | UX and Interplay | Production
509
Media controls: Play button, position indicator, Full Screen button
3. Tap the Play button to play the asset.
4. If you want to scrub through the media asset, or if you want to jump to a specific position in the
clip, tap and hold the position indicator and drag it to a new location.
5. If you want to view a video clip in full screen mode, tap the Full Screen button.
The Media viewer expands to fill the device screen and the video clip starts playing.
To reload an asset:
1. Tap the Actions button.
2. Tap Reload.
Troubleshooting Video Playback Problems on the iPhone
If you experience playback problems with the MediaCentral iOS app, you can try to reload the asset.
This forces the MediaCentral server to reload the full video clip and begin streaming it again. You
can also try playing the asset in a browser to determine if the problem is related to the app or your
connection, or if the problem exists with the MediaCentral server.
To reload an asset:
1. Tap the Actions button.
2. Tap Reload.
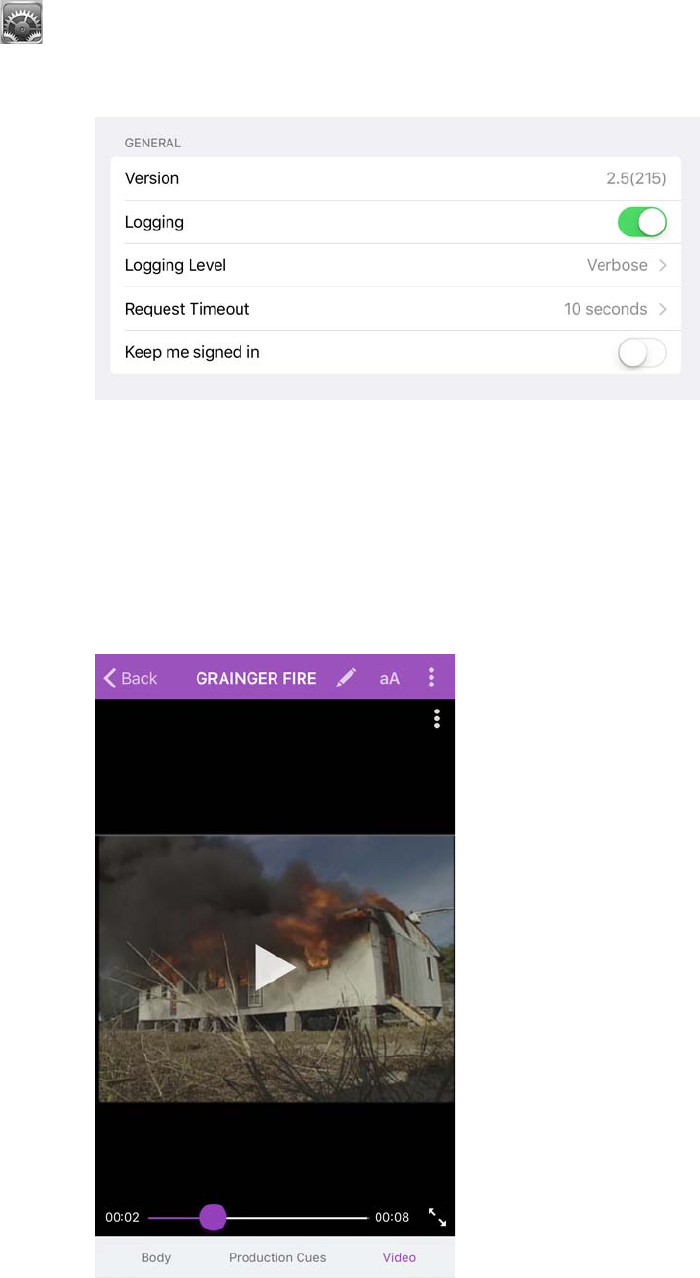
MediaCentral | UX and Interplay | Production
510
To play an asset in a browser:
1. On your iOS device, tap the Settings icon.
2. Select MediaCentral UX in the list of apps.
The MediaCentral Settings screen opens.
3. Set Logging to On.
4. Select the Logging Level to Verbose.
5. Start the MediaCentral UX mobile app.
6. Navigate to an asset in one of the directories.
7. Tap the video asset.
The asset opens in the Media viewer.
Using Markers
511
8. Tap the Play button to play the asset, and make a note of the time playback begins.
9. Tap the Actions button, and then tap Send Log to send an e-mail with the log file directly to an e-
mail account.
10. Open the e-mail on your Macintosh system, and then use a text editor to open the attached log
file.
11. Find a link with .m3u8 suffix that is located on the line marked with the time playback started —
for example:
07-02 16:15:29.830 [ . . . ] http://123.45.678.910/download/
0e41028f99738669c581c50388e80d36/060a2b340101010101010f0013-000000-
92dede5ab6034faa-b737d720c291-4093_1920x1080-
fps25.00_from_0_to_7501_quality_0_video_-1_audio_-1_h264_aac_ts_.m3u8
12. Copy this link, and then paste it into the address field in a browser.
13. Edit link in address field by typing
-WIFI
before the .m3u8 suffix — for example:
http://123.45.678.910/download/0e41028f99738669c581c50388e80d36/
060a2b340101010101010f0013-000000-92dede5ab6034faa-b737d720c291-
4093_1920x1080-fps25.00_from_0_to_7501_quality_0_video_-1_audio_-
1_h264_aac_ts_-WIFI.m3u8
n“WIFI” is case-sensitive.
14. Press Enter to go to the URL in the address field.
nThe Safari browser supports native playback for .m3u8 files. Other browsers — for example,
Chrome, Firefox, Internet Explorer, or Opera — do not. If you are not working on a computer
running Mac OS X, you can use your browser to download the file to your system and play it in a
media player that support .m3u8 video files.
15. Play back the asset.
If playback produces the same problem seen when you played the asset on your mobile device,
the source of the problem is the MediaCentral server and not the app. If the asset plays back
without issues, then the source of the problem is the mobile app, your connection, or your device.
Using Markers
A marker is an indicator that you add to a selected frame to mark a particular location in a clip,
subclip, or sequence. Markers can have icons of different colors and can be associated with user-
defined comments. Markers display in the timeline and in the Markers list below the Media player.
nTo create and modify markers, a MediaCentral UX user’s Interplay Production account must be
configured with the necessary permissions. For information on configuring marker permissions, see
“Understanding Markers and Restrictions” in the Avid MediaCentral | UX User’s Guide.
You can add and edit markers in the MediaCentral UX mobile app for iOS devices in the Markers
view if you have the necessary user permissions configured in Interplay Production. An Interplay
Production administrator sets these permissions in the Instinct/Assist User Settings view of the
Interplay Administrator. For more information, see the Interplay | Engine and Interplay | Archive
Engine Administration Guide or the Interplay Production Help.
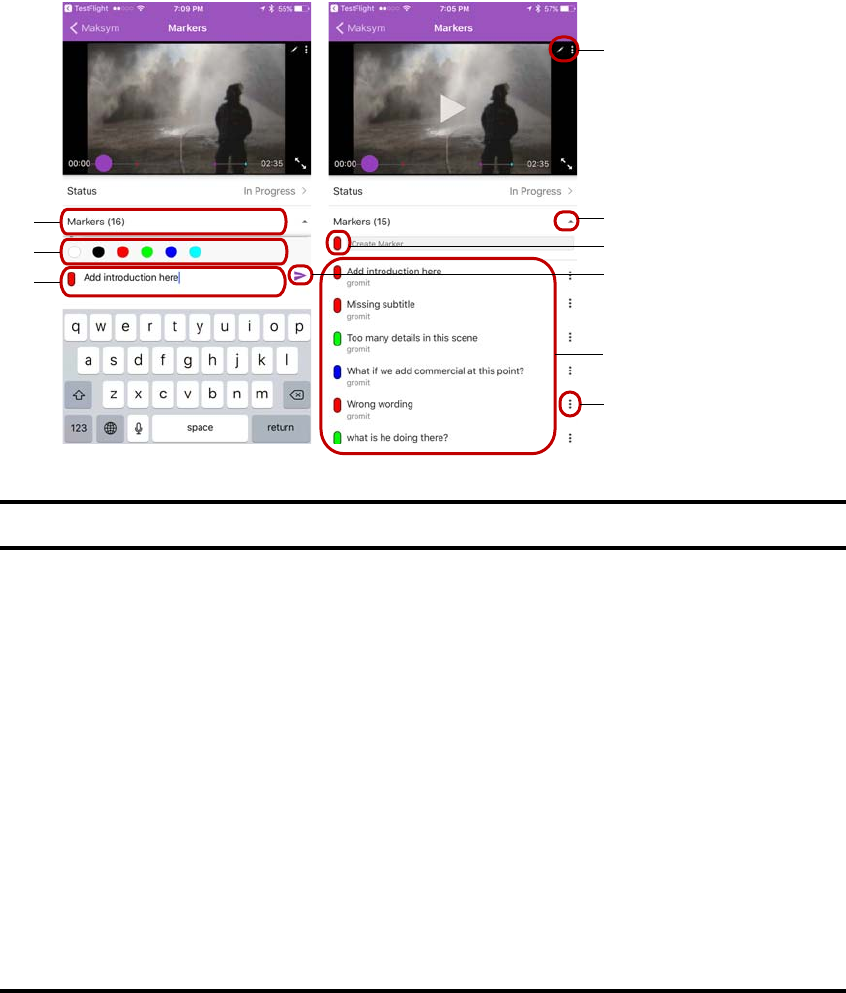
Using Markers
512
Creating and Editing Markers
Users who have the necessary permission assigned to them by their Interplay Production
administrator can create, edit, and delete markers. You can add markers to media assets by playing
the video and clicking the Create Marker button at the appropriate place, or you can scrub to a
specific location in the media and then click the Create Marker button.
In MediaCentral UX, you can add markers to clips, subclips, and sequences stored in the Interplay
Production database. Markers that you add to a sequence are associated only with the sequence. They
are not automatically associated with the corresponding master clips used in the sequence. Similarly,
a marker added to a subclip is not added to the associated master clip.
we
rt
yu
i
q
o
Display Description
1 Create/Edit Marker button Allows you to create a new marker. This button displays if you have
the necessary user permissions to edit the video asset.
2 Status bar Displays the status of the marker. This bar is only visible if your
Interplay Production configuration supports approval of markers —
see “Setting the Approval Status for Assets” on page 516.
3 Show/Hide Marker list button Expands or collapses the Marker list.
4 Change Marker Color bar Allows you to change the color of any marker.
5 Create Marker button Allows you to create a new marker.
6 Notes field In edit mode, allows you to add or to modify text.
7 Done button Commits your changes and exits edit mode.
8 Marker list A list of the markers in the clip or sequence. Markers are sorted by
timecode. You can scroll the list to see all markers.
9 Edit Marker button Allows you to edit or delete an existing marker.
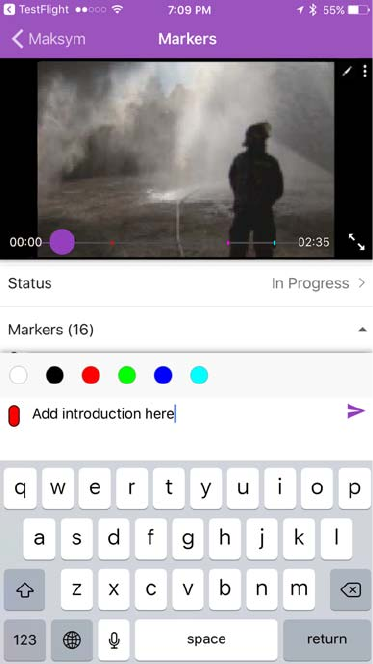
Using Markers
513
To create a marker, do one of the following:
1. Load a video in the Media player.
2. Do one of the following:
tTap the Play button, and then tap the Create Marker button in the player and select Create
Marker when the playhead reaches the appropriate location. You can also click the Create
Marker button below the media player.
tTap in the timeline to scrub to the location where you want to add a marker, and then tap the
Create Marker button in the player and select Create Marker. You can also click the Create
Marker button below the media player.
nIf no cache exists for the video yet, the playhead does not move to the location in the timeline. Once a
sufficient buffer has been created, scrubbing to a specific location works as expected.
A marker is added and the Marker view opens in edit mode.
3. Type the text you want for your marker in the Notes field.
4. Tap the Done button.
Text is saved, the marker is added to the timeline, and you exit edit mode.
nYou can cancel the marker creation by tapping outside the Notes field.
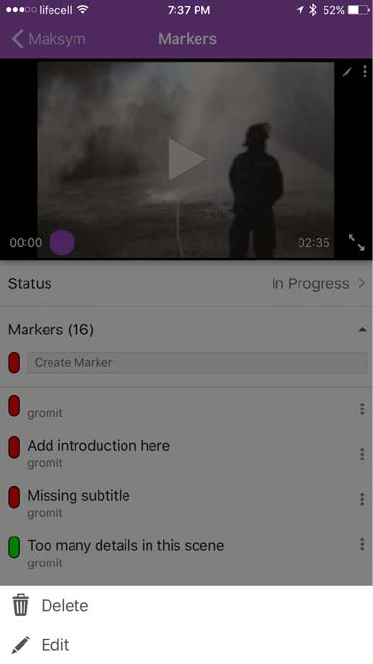
Using Markers
514
To edit an existing marker:
1. Tap the Edit Marker button for the marker you want to edit.
The Marker menu opens.
2. Tap Edit.
The Marker view opens in edit mode.

Using Markers
515
3. Use the keyboard to edit the marker text.
4. Tap the Done button.
Text is saved and you exit edit mode.
nYou can cancel your edit by tapping outside the Notes field.
To delete an existing marker:
1. Tap the Edit Marker button for the marker you want to delete.
The Marker menu opens.
2. Tap Delete.
The marker is deleted from the clip or sequence, and the marker is removed from the timeline.

Setting the Approval Status for Assets
516
Setting the Approval Status for Assets
When enabled through the Interplay Administrator tool, a Status bar appears between the Media
viewer and the Markers list. Tapping the Status bar displays the “Select approval status” window:
Assets are not associated with a default status.
The approval status window displays a list of options that can be customized as desired. When the
user taps an item in the list, a check mark appears to the right of the selection. Tapping Done saves
the selection.
To access the Status bar, your system administrator needs to create a custom property in Interplay
Administrator named “Approval_Process” and import a manually created XML file that includes
the status options. The options described in this example are: Approved, In Progress, Rejected, and
Waiting for Approval.
cWhile the value names can be customized, the custom property in the Interplay Administrator
must be called “Approval_Process”.
Working with Deep Links
517
To create the approval status XML file:
1. On a desktop system, create a new text file with an application such as TextEdit.
2. Add the following information to the text file:
<?xml version="1.0" encoding="UTF-8"?>
<!DOCTYPE values SYSTEM "custom_attributes.dtd">
<values description="Approval Process">
<value name="In Progress"/>
<value name="Waiting For Approval"/>
<value name="Approved"/>
<value name="Rejected"/>
</values>
In the example above, the text for each value name (“In Progress”, “Waiting For Approval”, etc)
is presented to the Mobile app user when selecting a status. If desired, the value names can be
customized to accommodate local workflows.
3. Save the text file with an XML extension as in the following example:
approval.xml
4. Import the XML file to the “Approval_Process” custom property that was created in the Interplay
Administrator.
For more information, see “Adding a Custom Property” in the Avid Interplay Engine and
Interplay Archive Engine Administration Guide.
Working with Deep Links
MediaCentral UX users often exchange text messages between themselves through the Messages
pane in the MediaCentral UX (browser) or through the built-in functionality of the MediaCentral app
for iOS. When creating a message, users have the ability to attach Interplay Production assets or
Interplay MAM folders and assets if desired. If E-mail Forwarding is enabled in the MediaCentral
UX System Settings, offline users receive an e-mail with the text and a link to the asset included in
the original message. These links are referred to as “deep links”.
Version 2.10.1 of the MediaCentral UX mobile app for iOS enables users to more easily access these
deep links. When tapping on a link in an e-mail from a forwarded message, the Safari browser opens
on the mobile device and a tab for MediaCentral UX appears. MediaCentral detects the mobile
device and displays a pop-up window; asking the user if they would like to open the link in the
MediaCentral mobile app.
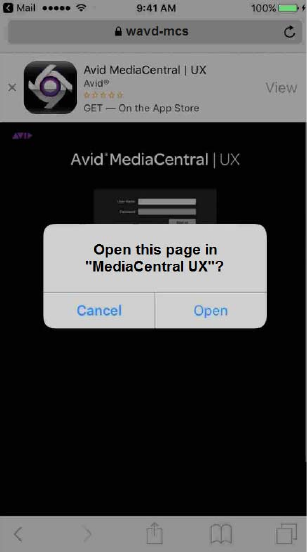
Working with Deep Links
518
If the user selects Open, the MediaCentral UX app appears and requests that the user logs in. Once
logged in, the user is directed to the linked asset. If the user selects Cancel, the pop-up window is
closed and the MediaCentral UX tab in Safari remains.
If the MediaCentral UX mobile app is not installed, a banner at the top of the screen provides a quick
link to download and install the app.
nThe deep link feature for iOS requires a certificate containing the FQDN of the MediaCentral server
to be added to mobile device’s Safari browser. If your site has not obtained a certificate from a
Trusted Authority, you must create and import a self-signed certificate on the mobile device. For more
information, see the following article on the Avid Knowledge Base:
http://avid.force.com/pkb/articles/en_US/how_to/SSL-Certificates-for-server-to-browser-
connections

23 MediaCentral | UX Tablet Application for
the iPad
The MediaCentral UX tablet app provides a native user interface designed to run on your iPad tablet
and enable direct, secure access to your station’s iNEWS newsroom computer system and the
Interplay Production database.
The following main topics describe basic user information about the device and tablet app.
•Connection Basics
•Installing MediaCentral | UX on the iPad
•Starting MediaCentral | UX on the Tablet
•The Sidebar
•Buttons of the User Interface
•Customizing MediaCentral | UX Settings
•Changing Roles
•Accessing the iNEWS Database
•Editing Stories
•Approving Stories
•Using Presenter Mode
•Working with Favorites
•Working Offline with Cached Queues and Stories
•MediaCentral | UX and Interplay | Production
•Using Markers
•Setting the Approval Status for Assets
•Working with Deep Links
Connection Basics
You can use the MediaCentral UX tablet app to perform many actions supported by the
MediaCentral UX Web application:
• Create, edit and approve news stories.
• Navigate the news directory.
• Play video sequences associated with scripts.
• View a show's scripts in presenter mode while signed in to your station’s iNEWS newsroom
computer system.
Connection Basics
520
• Navigate the Interplay Production directory.
• View and play media assets from the Interplay Production database.
nIf your MediaCentral UX system is licensed for an iNEWS- only configuration, you cannot preview
or play sequences or other media assets.
MediaCentral UX uses one of several connection options, including Wi-Fi or carrier-specific cellular
service (such as 4G).
nThe app automatically selects the first available connection from the list of options according to the
priority shown in the list.
The iPad
The iPad has very few exterior buttons. You navigate content with touch gestures — for example,
tapping an icon to start an app. Some gestures perform standard functions, such as displaying
different menu icons, and some perform functions specific to an app.
nRemember, the more apps that you have running, the more memory and battery power your tablet
uses. To optimize the performance of your tablet, try to close apps when you finish with them.
Gestures for the Tablet App
Apps for touchscreen tablets let users accomplish certain tasks utilizing various gestures like
fingertip swipes or taps. What these gestures do can differ from one app to another. The following
table describes what certain gestures do depending on where you use the gesture within the
MediaCentral UX mobile app.
Button Description
The Home button wakes the tablet when it is sleeping and exits apps, returning you to the
home screen.
Location Gesture Description
Sidebar Tap the Back button Navigates to the location named on the Back
button itself.
Sidebar Touch and hold the Back
button
Navigates back to the Launch pane regardless of
how far down the file structure you’ve gone.
Sidebar Tap stars (while in edit mode) Selects or deselects items as Favorites.
Launch pane Tap name of a Favorite item
(while in edit mode)
Lets you modify the item’s name as it appears in
the Favorites list.
Script Editor One Finger Swipe to the Right
or Left
Navigates backward or forward to previous or next
story in a rundown.
Script Editor Tap and hold Opens a menu allowing you to cut, copy, and paste
text, as well as modify text formats.
Script Editor (Cue
List sub-section)
Tap a production cue or
machine control instruction
Auto-scrolls the story text so that the associated
production cue marker comes into view.

Installing MediaCentral | UX on the iPad
521
Installing MediaCentral | UX on the iPad
The following procedure assumes licensing, setup, and configuration of the MediaCentral UX and
iNEWS servers have already been completed.
cIf you are updating your MediaCentral UX iOS app, Avid recommends backing up your apps
before upgrading. For information on backing up your apps on your iOS device, see the Apple
support Web site for your device.
To install MediaCentral UX on the iPad:
1. Open iTunes (the Apple market).
2. Locate the MediaCentral UX mobile app.
3. Tap Download.
When the MediaCentral UX app is installed on your touch-screen tablet, an icon representing the
app is also installed on the home screen. You can move it to another position or a new screen like
icons for other apps.
Starting MediaCentral | UX on the Tablet
When you install MediaCentral UX, an icon representing the app displays on your iPad’s home
screen. If you previously set your Interplay Production account, you can connect to the
MediaCentral UX server by selecting the MediaCentral icon on your device. To browse iNEWS or
Interplay Production assets, you can sign in with your MediaCentral UX credentials.
MediaCentral UX supports iNEWS communities. The iNEWS Community feature allows customers
with multiple iNEWS systems to share content and collaborate on stories.
Script Editor (Story
sub-section)
Tap a production cue marker Auto-scrolls the cue list so that the production cue
or machine control instruction associated with that
marker comes into view.
Media Viewer Touch and drag in the timeline Moves to new position in viewer’s video playback
timeline.
Media Viewer Tap in the timeline Moves the Playhead to that position on the
timeline.
Media Viewer Pinch out on viewer embedded
in the Script Editor above the
Cue List sub-section
Expands the viewer to full screen.
Media Viewer Pinch in on full screen viewer Minimizes viewer back to original size and
position within the Script Editor.
Presenter Mode Swipe left or tap on right edge
of screen
Navigates to next page.
Presenter Mode Swipe right or tap on left edge
of screen
Navigates to previous page.
Presenter Mode Pinch in on full screen Exits full screen presenter mode.
Location Gesture Description

Starting MediaCentral | UX on the Tablet
522
MediaCentral UX requires you to supply credentials to sign in to one iNEWS system. This system is
considered your local system. If your local system is configured in an iNEWS community, you are
able to automatically sign in to other systems in the community. These systems are considered your
remote systems. In the MediaCentral UX Launch pane, your local iNEWS system is listed first,
followed by the remote systems. To connect to a remote system, tap the system name.
For more information on iNEWS Community, see “Support for iNEWS Communities” on page 34.
If your iOS device supports Touch ID and you have set up the feature, you can use Touch ID to sign
in to MediaCentral UX. To use Touch ID, you must sign in to MediaCentral UX once using the server
and user credentials for your configuration. Subsequent logins then can use the Touch ID.
nIf your iOS device fails to read your Touch ID after five attempts, you must manually log in to
MediaCentral UX.
You can also choose to work offline. This allows you to view queues and stories listed in the
Favorites list that you have cached locally on your device. If you select ‘Work Offline” in the sign in
screen, the MediaCentral UX mobile app uses the credentials last used to sign in to the
MediaCentral UX Web application. For more information, see “Working Offline with Cached
Queues and Stories” on page 544.
If your connection to MediaCentral UX is restored, you can sign in by tapping the Actions button and
selecting Sign In.
To start MediaCentral UX:
1. Select the MediaCentral icon to start the tablet app.
The sign-in screen appears.
2. Type the MediaCentral UX Server name.
3. Type your MediaCentral UX user name and password.
4. Do one of the following:
tTap the Sign In button.
After you sign in, MediaCentral UX connects to the selected Interplay Production server or
iNEWS system. All servers display in the Sidebar.
nIf your MediaCentral UX credentials are incorrect or missing in your MediaCentral UX account, you
receive a message: “Authentication Failed: The user name or password you entered is incorrect.”
When you click OK, the sign-in screen appears and allows you to enter valid credentials.

The Sidebar
523
tTap the Work Offline button.
MediaCentral UX uses the credentials you used the last time you signed in, and it displays
any cached queues and stories in the Favorites list.
To start MediaCentral UX using Touch ID:
1. Select the MediaCentral icon to start the tablet app.
The sign-in screen appears.
2. Press the Home button using the finger you registered with Touch ID.
nYou must have Touch ID configured on your iOS device, and you must have manually logged in to
your MediaCentral system at least one time using your system and user credentials.
After you sign in, MediaCentral UX connects to the selected Interplay Production server or
iNEWS system. All servers display in the Sidebar.
nIf your MediaCentral UX credentials are incorrect or missing in your MediaCentral UX account, you
receive a message: “Authentication is needed to log in.” If you tap Cancel, the sign-in screen appears
and allows you to attempt to log in using Touch ID or to enter valid credentials.
To view the help system:
1. Tap the Profile button.
2. Select Help.
To sign out:
1. Tap the Profile button.
2. Select Sign Out.
The Sidebar
After you sign in to MediaCentral UX on an iPad, you can view the sidebar, located along the left
side of the screen when displayed. This allows you to navigate various systems integrated with
MediaCentral UX, such as an iNEWS newsroom computer system or an Interplay Production
database. The Launch pane also includes any iNEWS projects and iNEWS servers that are part of an
iNEWS community.
The top level of the sidebar contains the Launch pane. The following illustration shows the Launch
pane with an available Interplay Production database and iNEWS newsroom computer systems, as
well as two user-defined Favorites.
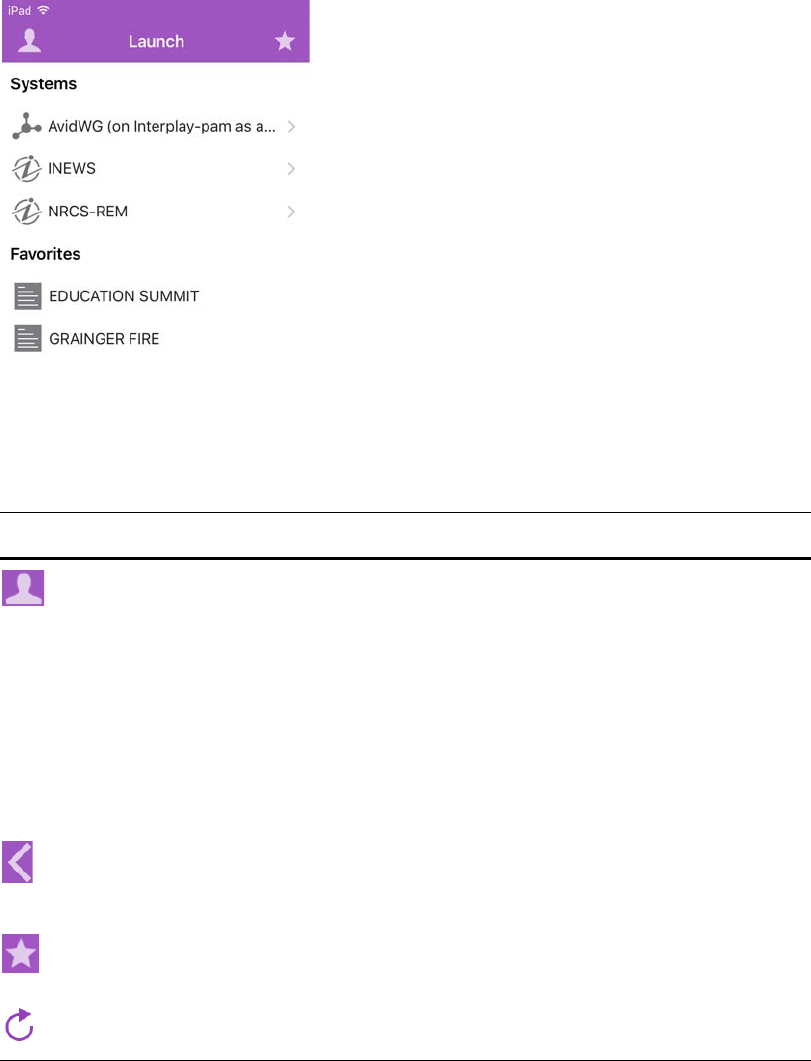
The Sidebar
524
From the Launch pane, you can navigate through the file structure and open assets. In Portrait mode,
you can swipe left to hide the sidebar at any time to increase the screen real estate for viewing assets
on the tablet.
You can use the Refresh button to update the queues and stories displayed in the iNEWS database or
the media assets displayed in the Interplay Production database by clicking the Refresh button. This
allows you to view any changes made to stories or any new iNEWS or Interplay Production assets.
In edit mode, the plus symbol located at the bottom of the sidebar operates as the Add Story button.
Users can tap it to create a new blank story.
Button Description
Tap the Profile button to display a list of options:
• Send Log: Allows you to send log files to Avid to help troubleshoot problems. The Send
Log option is active only if you enable logging in the MediaCentral UX settings. For
more information, see “Customizing MediaCentral | UX Settings” on page 525.
• Help: Opens the online help.
• Current Role: Lists your user role and allows you to change the role if you have more
than one role assigned to you. For more information, see “Changing Roles” on page 526.
• Sign Out: Signs you out of your MediaCentral system and ends your session.
nThe Profile button is available only when the Launch pane displays.
Tap the Back button to navigate up one level in the project hierarchy in the sidebar. Tap and
hold the Back button to return to the Launch pane.
nThe Back button is not available on the Launch pane.
Tap the Edit button to create or delete favorites.
Tap the Refresh button to refresh the list of queues, stories, and media assets.

Buttons of the User Interface
525
Buttons of the User Interface
When you browse or edit stories in MediaCentral UX, a small toolbar of buttons displays in the top
right corner area of the user interface. The following table describes these buttons and describes their
uses.
Customizing MediaCentral | UX Settings
You can modify some settings in MediaCentral UX.
To modify MediaCentral UX settings on the iPad:
1. On the Home screen, tap the Settings icon.
2. Select MediaCentral UX in the list of apps.
The following table provides information about general settings.
Button Description
The Approve Story button lets a user approve stories within that queue. The user must have
write access to the queue.
nThe Approve Story button’s icon appears orange for an approved story and white for
an unapproved story.
The Edit Story button enables editing of an opened story by displaying the Edit toolbar and a
virtual keyboard.
The Change Text Size button allows you to increase or decrease the size of the text used for
your stories.
The Script Template button opens a list of script templates. You then can select one of the
templates to insert in a story
The Presenter Mode button opens a show's rundown of stories in presenter mode to the
current selected story in the sidebar. This button is enabled only for queues set to
automatically refresh.
The Actions button opens a menu of options that include Reload and Edit Slug.
General Settings Description
Version For display purposes only, this value shows the currently installed version of the
tablet app.
Logging If set to On, MediaCentral UX keeps logs on session activities, which you can use
to troubleshoot issues.
If you tap the Actions button, a Send Log option appears that lets you e-mail the
logs directly to Avid. If the log file is more than 15 MB, you cannot send it directly.
Use the iTunes File Sharing feature as described later in this topic.
If set to Off (default), logging and the Send Log option are disabled.
Logging Level This setting determines how much information is logged if you enable logging.
Options include: Verbose, Info, Warn, and Error.

Changing Roles
526
The following table provides information about the settings for editing.
The following table provides information about the settings for presenter mode.
To send log files to Avid:
1. Connect your device to a Macintosh computer.
2. Open iTunes and navigate to Device > Apps.
3. In the Apps list, select MediaCentral UX.
4. In the MediaCentral UX Documents list, select the Logs folder.
5. Click “Save to” or drag the folder to a location on your computer.
6. Zip the folder and send it to Avid as an e-mail attachment.
Changing Roles
Depending on your MediaCentral UX configuration and license, you might have more than one role
with which you can work on your project. Each role has a set of layouts and permissions associated
with it. If you have multiple roles available, you can change your current role from the Profile button
in the Launch pane.
For more information about roles, see the Avid MediaCentral | UX Administrator’s Guide.
Request Timeout Options are intervals of 10, 20, or 30 seconds, 1 minute, or 2 minutes.
Keep me signed in Set to On if you want MediaCentral UX to keep you signed in after you first sign in.
General Settings Description
Editing Settings Description
Autosave Stories If set to On, MediaCentral UX automatically saves a story if you navigate away
from the modified story to other assets in the system. If set to Off, MediaCentral UX
prompts you to save your modifications. The default setting is On.
Presenter Mode Settings Description
Font Size Options for presenter mode are 18, 22, 26, 32, and 38.
Normal Text Normal text is the default text format of the story. Options are Black on
White or White on Black.
Presenter Text Presenter text is most often used for special instructions to presenters in
scripts. Options are White on Black, Black on White, or Red on White.
Closed Captioning Text Closed captioning is text sent to a closed caption encoder if your station
uses such a device to broadcast text for the hearing-impaired. Options
are White on Black, Black on White, or Green on White.
Skip Blank Stories If set to On, presenter mode skips any stories that have no text or
production cues.
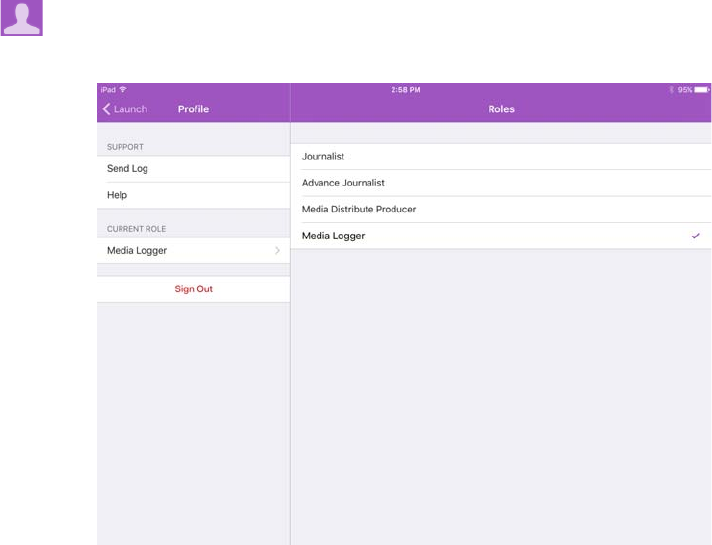
Accessing the iNEWS Database
527
To change your role, do the following:
1. Tap the Profile button, and then tap your new role in the Current Role section.
The Roles pane opens.
2. Tap a different role to select it.
The current role is marked by a check mark.
Accessing the iNEWS Database
The iNEWS database is the backbone of your iNEWS system. You save the data created in your
newsroom — stories, scripts, and rundowns — in the database on the iNEWS server. Queues contain
stories, and directories (also known as folders) store the queues.
When viewed with the tablet app, available iNEWS systems appear in the sidebar, along with any of
their directories and queues. For MediaCentral UX v1.7 and later, queues marked to automatically
refresh when changes are made display without pagination in the sidebar. You can scroll
continuously to view all stories in these queues.
nIf the queue contains more than 1000 stories, it might take some time for MediaCentral UX to receive
and display them. You might need to increase the Request Timeout value in the MediaCentral UX
settings. For more information, see “Customizing MediaCentral | UX Settings” on page 525.
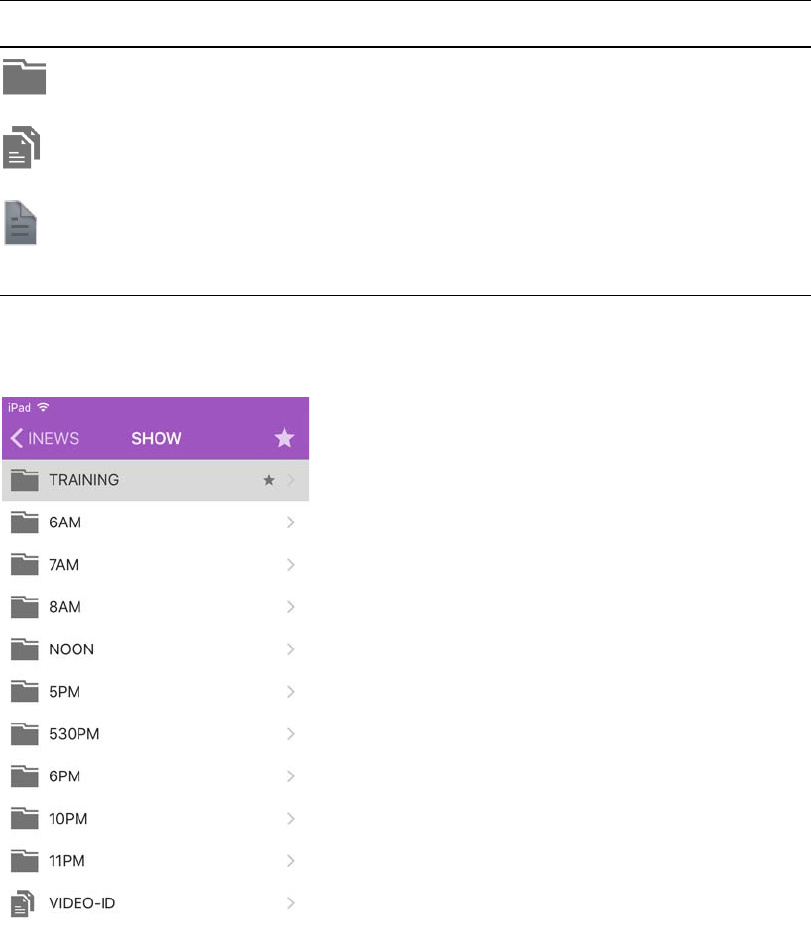
Accessing the iNEWS Database
528
The app uses different icons to distinguish between directories, queues, and stories.
Destinations in the iNEWS system directory selected for the Favorites list have a star on the right of
the directory, queue, or story.
nWhile viewing the top level of an iNEWS system directory in the sidebar, the Back button displays the
word Launch, which means you can tap it to return to the previous view of the Launch pane.
However, the button’s name changes the further you navigate down the system directory. You can
return to the Launch pane at any time by tapping and holding the Back button.
You can open directories, queues, and stories from MediaCentral UX. Directories and queues open
within the sidebar. Stories open to the right of the sidebar in the Script Editor.
nIf you want to open an iNEWS story or queue that has a key lock applied to it, you must type in the
appropriate password.
Icon Description
Directories hold queues or other subdirectories. Unlike queues, directories do not directly
contain stories. For example, the Wires folder contains queues with incoming wire stories.
Queues let you organize stories in detailed categories. A show's rundown is one example of a
queue.
Stories — for example, wire stories — contain text, such as contact information or a
description of a news event. Any story can become a script for a show. Scripts contain
additional data beyond text, including production cues, machine control instructions,
presenter instructions, and associated video sequences.

Accessing the iNEWS Database
529
To open a directory:
1. Navigate to the directory.
2. Tap a folder on screen to open it.
nAs you navigate the system’s directory structure, the app displays your path or location within the
database at the top of the screen.
The following illustration shows the Wires directory opened to view numerous queues
containing incoming wire stories.
Wires directory on the BSI-C3PO iNEWS server, with the back button at the top of the list
To back out of a directory or queue:
tTap the Back button.
nThe Back button does not display the word “Back” on it, but rather the name on the button changes
as a user navigates further into the directory.
To open a queue:
1. Navigate to the queue inside a directory.
2. Tap the queue to open it.
The following illustration shows an example of a rundown queue.
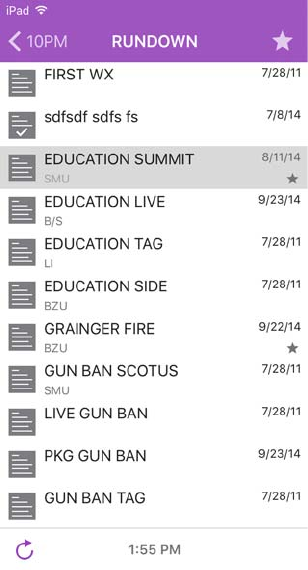
Accessing the iNEWS Database
530
To open an existing story:
1. Navigate to the story in a queue.
nA story icon with a check mark indicates that the story has been “approved.” You can approve stories
from an iNEWS workstation or from MediaCentral UX.
2. Tap the story to open it.
The story opens in the Script Editor, which has two sections:
- The Cue List, located on the left side, which contains any production cues or machine
control instructions.
- The Story, located on the right side, which contains the text of the story, any presenter
instructions, and production cue markers.
In portrait view, the sidebar is hidden by default. You can swipe right to display or swipe left to
hide the sidebar in portrait view.
The following illustration shows the Script Editor with a story containing production cue
markers identified numerically. These markers align with production cues and machine control
instructions displayed in the Cue List to the left of the story. Blue text indicates machine control
instructions. Black text indicates production cues. Red text in the body of the story indicates
presenter instructions.
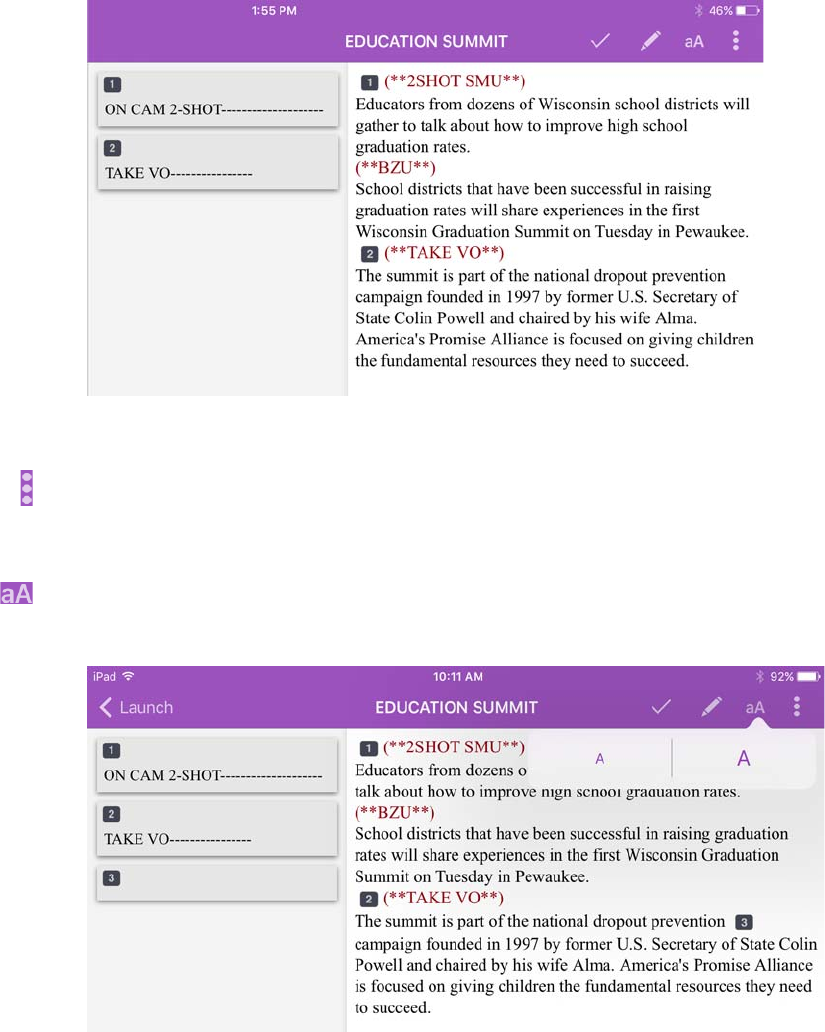
Accessing the iNEWS Database
531
To reload a story:
1. Tap the Actions button.
2. Tap Reload.
To adjust the size of the text of your story:
1. Tap the Change Text Size button.
The Change Text Size controls open.
2. Do one of the following:
tTap the smaller letter icon to reduce the text size.
tTap the larger letter icon to increase the text size
You can tap the letter icons multiple times to reduce or increase text to the appropriate size.
3. Tap anywhere on the screen to dismiss the Change Text Size controls.
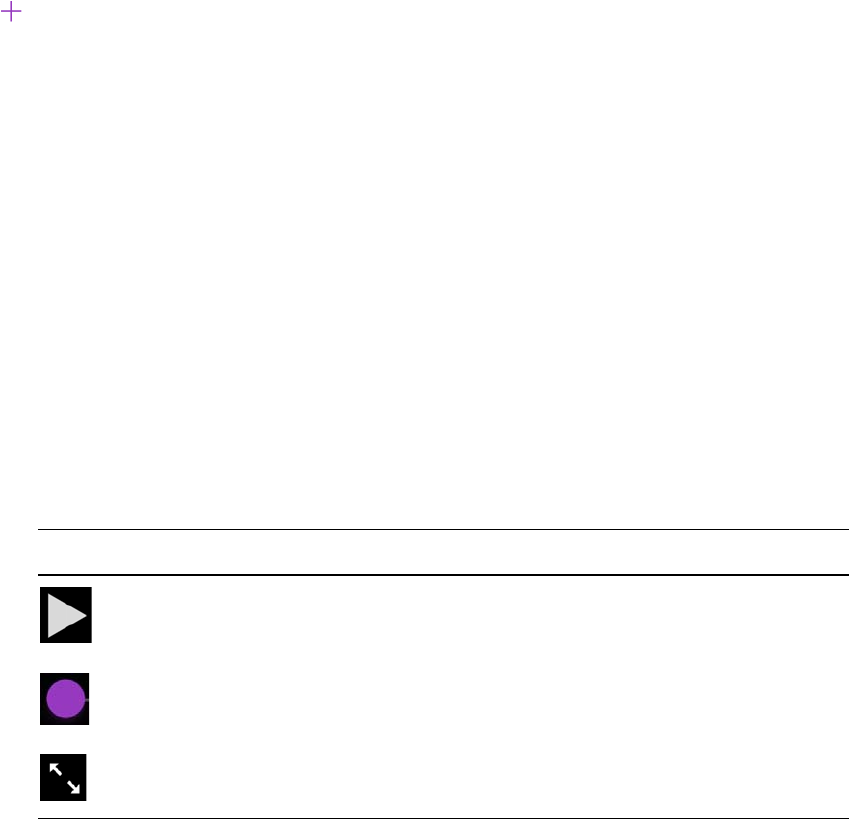
Accessing the iNEWS Database
532
To add a new story:
1. Tap the story in the queue below which you want to insert the new story.
2. Tap the Add Story button, located at the bottom of the sidebar.
The Edit Slug dialog box opens.
3. Add a name for the story, and then tap OK.
Viewing Video Associated with a Script
When sequences have been associated with stories in the MediaCentral UX Web application, you can
preview the stories in the media viewer in the MediaCentral UX mobile app.
nIf your MediaCentral UX system is licensed for an iNEWS- only configuration, you cannot preview
or play sequences or other media assets.
In landscape mode, a small media viewer appears above the Cue List sub-section of the Script Editor,
but you can expand the viewer to full screen. In portrait mode, you must the Open Sequence button to
open the viewer full screen and preview sequences.
nThe viewer appears in landscape mode. and the Open Sequence button is enabled in either mode,
only when a video script sequence is associated with the open story.
The following table describes buttons available to open and use the media viewer.
You can view video sequences created in the following way:
• You created and modified the sequence in MediaCentral UX.
• You created the sequence in MediaCentral UX and modified it in Avid NewsCutter or Avid
Media Composer. In this case, you might not see some effects in the media viewer.
• You created the sequence in Instinct and modified it in MediaCentral UX.
nYou cannot view video sequences created directly in NewsCutter or Media Composer, and you cannot
play back shotlists created in Interplay Assist or Interplay Access.
Button Description
The Play button plays the sequence so you can preview the video associated with the story.
This button changes to a Pause button while the sequence plays.
The Playhead allows you to navigate to a new position in the viewer’s video playback
timeline.
The Maximize button expands the viewer to full screen. This button changes to the
Minimize button when the viewer expands to full screen.
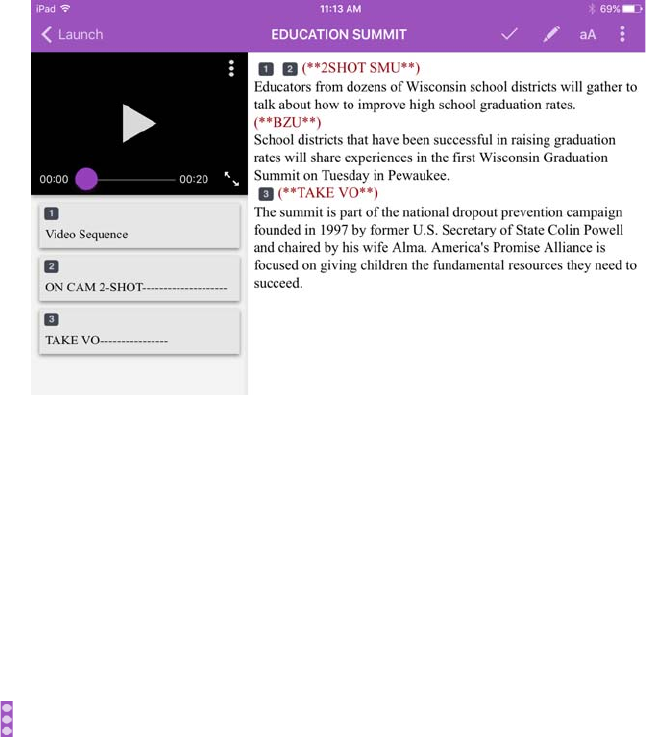
Editing Stories
533
To view video sequences associated with a script:
1. Do one of the following:
tTap the Play button in the viewer located above the Cue List sub-section of the Script Editor.
tTap the Maximize button in the viewer to open the viewer full screen. Then tap the Play
button.
2. (Optional) If you expand the viewer, you can tap the Minimize button to restore the viewer to its
original size and location within the Script Editor.
To regenerate the sequence video proxy for playback:
1. Tap the Actions button.
2. Tap Reload.
Editing Stories
Using the tablet app, you can create a new story or edit an existing one. You can also change the title
of story.
The system obtains an edit lock when you edit a story, which prevents other users from altering a
story while you work on it. The edit lock applies only to the story body when you edit the body, and
it applies only to the story title (the slug) when you edit the title in the sidebar or when you approve a
story. When you start a new story, the edit lock applies both to the story body and the story title.
Saving and closing the story, or discarding your changes, releases the edit lock.
nIf you want to open an iNEWS story or queue that has a key lock applied to it, you must type in the
appropriate password for the story.
MediaCentral UX supports the standard editing features found in most text editing applications,
including cut, copy, and paste.

Editing Stories
534
You can use cut, copy, and paste to move text around within a single story or from one story to
another. When cutting or copying text, the system stores the text in the clipboard. The clipboard
stores only one block of text at a time, so whenever you cut or copy something new, the clipboard
overwrites the previously stored text.
To edit an existing story:
1. Navigate to the existing story in the queue and open it.
2. Tap the Edit Story button.
3. Tap in the story to begin editing the text.
The app enters edit mode and displays the Edit toolbar and a virtual keyboard.
4. After you complete your modifications, save the story. For more information, see “Ways of
Saving Stories” on page 535.
To edit text:
1. Tap and hold in the story to select text.
2. Select one of the following:
tTap the Cut button.
tTap the Copy button.
tTap the Paste button.
To add a new story:
1. Tap the Add Story button, located at the bottom of the sidebar.
nThe Add Story button only appears in the sidebar after you tap the Edit button in the sidebar.
The Edit Slug dialog box opens.
2. Type the title of your story, and then tap OK.
A blank story is added to the current queue with edit mode already activated for the story. An edit
lock prevents others from changing the story while you edit. The cursor moves to the blank title
field.
When in edit mode (in the Script Editor), the app displays the Edit toolbar and a virtual
keyboard.
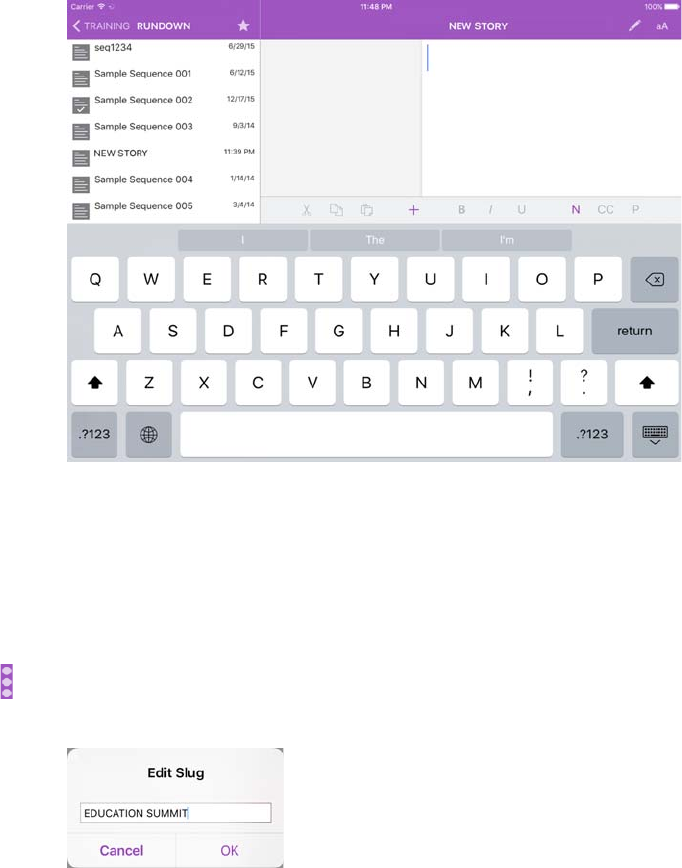
Editing Stories
535
nThe MediaCentral UX mobile app can also be used with a Bluetooth keyboard.
3. (Optional) Enter any production cues or machine control instructions.
4. Save the story. For more information, see “Ways of Saving Stories” on page 535.
To edit the title (slug) of a story:
1. Tap the Actions button.
2. Tap Edit Slug.
An edit lock on the story form in iNEWS prevents others from changing the story title while you
edit.
3. When cursor appears, you can change the name of the story.
4. Tap OK.
Ways of Saving Stories
You can save newly created stories or change existing stories by tapping the Edit Story button after
modifying a story while in edit mode. A message appears asking you to confirm whether to save the
changes. You can choose to save the story or exit edit mode without saving your changes.

Editing Stories
536
Your story also is saved when the following occurs:
• You change to another app or send MediaCentral UX to the background by pressing the Home
button.
• Your device goes to sleep due to Auto-Lock timeout.
• If you use a Smart Cover and close the cover, sending the device to sleep.
If you enable Autosave Stories in the MediaCentral UX Settings, you can save newly created stories
or change existing stories in multiple ways:
• The app automatically saves a modified story when you tap on a different story in the queue.
• The app automatically saves a modified story when you tap the Presenter Mode button.
• The app automatically saves a modified story when you select an asset from the Interplay
Production server to view.
• The app automatically saves a modified story when you change your role from Launch pane.
• The app automatically saves a modified story when you sign out of the app.
Using Script Templates
Script templates are templates created by an administrator that allow you to insert predefined text and
segments quickly into stories. For example, if a daily weather story in a show has a standard set of
production cues and presenter instructions that are always the same, an administrator can create a
script template that contains this information. The template can then be made available to
MediaCentral UX mobile app users who can insert the template in new stories.
To use a script template:
1. Navigate to the existing story in the queue and open it.
2. Tap the Edit Story button.
3. Tap in the story body where you want to insert the template information.
4. Tap the Script Template button.
The Select Script Template list opens.
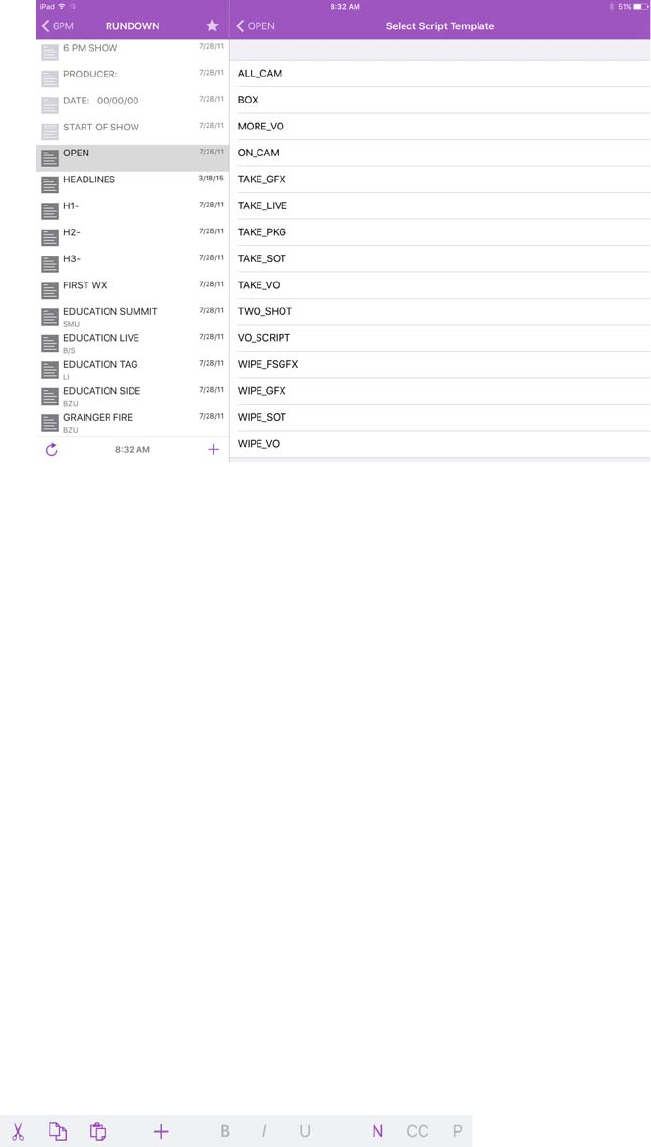
Editing Stories
537
5. Tap to select a script template.
The script template displays at the current cursor position.
Formatting a Script
When you write a story, text appears in the default text style. However, you can alter the look of the
text, such as changing the default font to bold. When formatting a story as a script for a news
broadcast, you often distinguish certain text by using various specialized styles of text, such as
instructions for presenters or closed captioning.
You use presenter instructions commonly as brief, special instructions to news presenters (also
known as news anchors). The text for presenter instructions appear red, in reverse video on the
teleprompter. This text does not affect how the system calculates the read time.
You use closed captioning commonly for sound-bite transcription. The text for closed captioning
appears green, and the system sends it to a closed caption encoder if your station uses such a device
to broadcast scripts for the hearing-impaired. Closed captioning text does not appear in the
teleprompter, nor does it affect how the system calculates the read time.
nThe system sends the default text style to both the teleprompter and to any closed caption encoder
used at the station.
In the tablet app, the Edit toolbar provides buttons that let you modify the format of the text into bold
text, italicized text, and underlined text, and lets you format specialized for broadcast scripts.
To format text, select the appropriate text and do one of the following:
tTo bold text, tap and hold. and then select the B button.
tTo italicize test, tap and hold, and then select the I button.
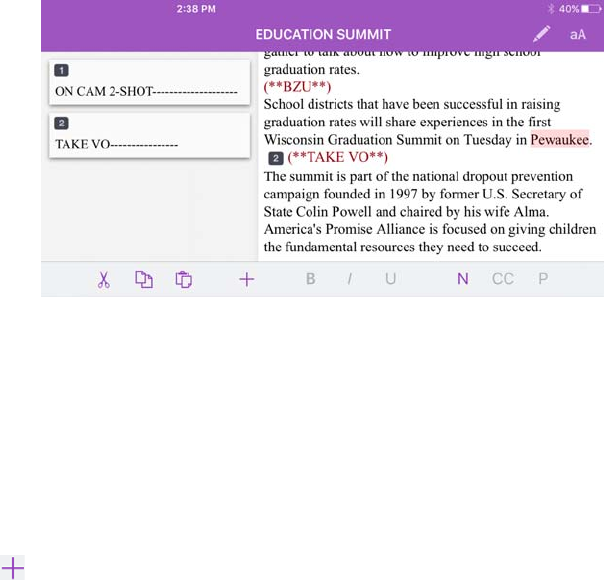
Editing Stories
538
tTo underline text, tap and hold, and then select the U button.
tTo mark text as a presenter instruction, tap and hold, and then select P for presenter.
tTo mark text as a closed captioning text, tap and hold, and then select CC for closed captioned.
tTo mark text as a normal text, tap and hold, and then select N for normal.
nYou can choose the format before typing your text as well. Any new text you type appears in the
format you selected. To change the format of the text you type at any time, select another format.
Adding Production Cues
When you format a story as a script for a news broadcast, you can add production cues to provide
valuable information to technical staff as well as machine control commands for devices, such as
character generators.
In the tablet app, the Edit toolbar provides a the Plus (+) button that lets you add this information to
scripts.
You add production cues to scripts from the Story area and edit them in the Cue List area of the Script
Editor. When added to a script, each production cue has an associated number. The number appears
as a production cue marker in the script, which corresponds to the insertion location of the production
cue’s text box in the Cue List. You can select each marker and move it within or remove it from the
story if necessary. If moved or deleted, the text associated with the marker moves or is deleted.
To insert a production cue into a script:
1. Position your cursor in the story where you want to insert the production cue marker.
2. Tap the Plus button.
3. Enter the production cue information — for example, Take VO, On Camera, Take SOT, or Take
Live.
nThe app automatically saves information in the newly inserted production cue when you navigate
elsewhere within the app. If you attempt to sign out or close the app, a message appears prompting
you to either save or discard your changes.
To move a production cue in a script:
tSelect the production cue marker, and then cut it and paste it in another location within the script.
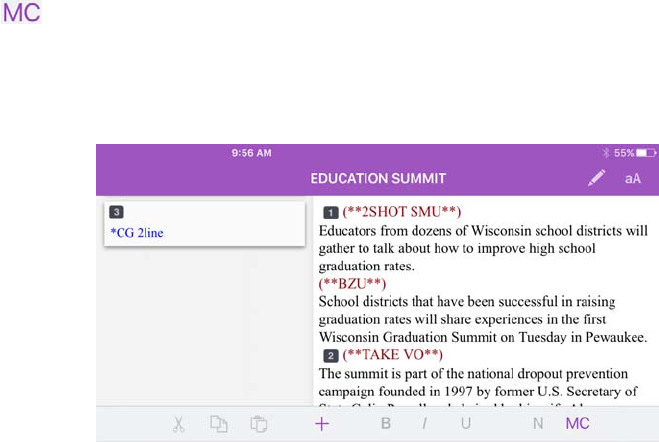
Editing Stories
539
To delete a production cue from a script, do one of the following:
tPosition cursor to the right of the production cue marker and press the Delete key.
tSelect the production cue marker and tap the Delete key.
Adding Machine Control Instructions
If your station integrates with a broadcast control system, such as iNEWS Command, the production
cues might include machine control instructions.
You should precede these instructions with an asterisk (*) and write them in a format that begins with
a command for a device — for example, CG for a character generator. After the command the format
specifies a particular item or template, such as 2line for a template that contains two lines for
fulfillment data. Additional information or comments follow on succeeding lines in the same
production cue text box.
The following procedure uses the example of a machine control instruction for a 2-line character
generator graphic. The first line calls up the correct template and the subsequent lines of text provide
the fulfillment data that appears in the graphic.
To add machine control instructions for a CG event:
1. Add or open a production cue in the script.
2. Do one of the following:
tWith your cursor in the production cue area, tap the MC (machine control).
tType an asterisk (*), which automatically switches the text you type from Normal to
Machine Control format.
Machine Control format appears as blue font
3. Type your machine control command — for example,
*CG 2line
— and then press Return.
4. Type the first line of text that should appear on the 2-line CG graphic — for example,
John
Smith
— and then press Return.
5. Type the second line of text for the 2-line CG graphic — for example,
Pleasantville, USA
.
Your CG machine control instruction appears in blue font.

Approving Stories
540
Working with Links in Stories
A story can contain more than simple text. It can contain a URL to a Web page or an e-mail address
to a contact you might need. When Web links or e-mail addresses are included in stories, they
become dynamic links. You can use them to open your tablet’s browser or to open an e-mail window.
nYou cannot add a link to a Web page or an e-nail address using the MediaCentral mobile app for iOS.
To open a Web link from a story:
tTap the link in the story.
The tablet’s Web browser opens and loads the Web page.
To e-mail a contact from a story:
1. Tap the e-mail address in the story.
The tablet opens an e-mail window, using your tablet’s default e-mail application.
2. Write your e-mail.
3. Tap Send.
Approving Stories
Endorsing or approving stories allows news producers to identify which scripts in a show have been
reviewed prior to broadcast. You can approve stories from an iNEWS workstation or from the
MediaCentral UX app on an iPad or an iPhone.
nThe ability to approve stories requires write access to the queue for the selected story.
To approve a story from the tablet app:
1. Open the story you want to approve.
2. Tap the Approve Story button, and then swipe right to turn on the Approve option.
To remove approval for a story from the tablet app:
1. Open the story for which you want to remove approval.
2. Tap the Approve Story button, and swipe left to turn off the Approve option.
Using Presenter Mode
The MediaCentral UX mobile app lets users view a show's scripts in a page-by-page layout, similar
to printed scripts used by news presenters. This method of viewing stories from a rundown is known
as presenter mode. When in presenter mode, MediaCentral UX automatically updates stories and

Using Presenter Mode
541
story positions in a rundown, although it ignores updates for the currently viewed story. If a different
user makes changes to the stories in the rundown, MediaCentral UX automatically updates them in
the background.
Also, MediaCentral UX caches stories locally on the tablet for offline use while you work in
presenter mode. This allows you to continue working if you lose your connection to the server as
long as you remain in presenter mode. However, if you lose the connection to your server, updates do
not occur.
To enter presenter mode:
1. Open a show's rundown.
2. Tap the Presenter Mode button.
Presenter mode opens on the story selected by the user in the sidebar. The app displays a
progress dialog as it loads the rest of the stories in the rundown in order to cache them locally on
your device. When the cache operation completes, the progress dialog closes.
Stories load in the following order:
- Load the previous story — the one before the selected story in the rundown.
- Load the next story — the one after the selected story in the rundown.
- Load the second story after the selected story in the rundown.
- Continue incrementally after throughout the rest of the rundown.
- Load the second story before the selected story in the rundown.
- Continue incrementally before throughout the rest of the rundown.
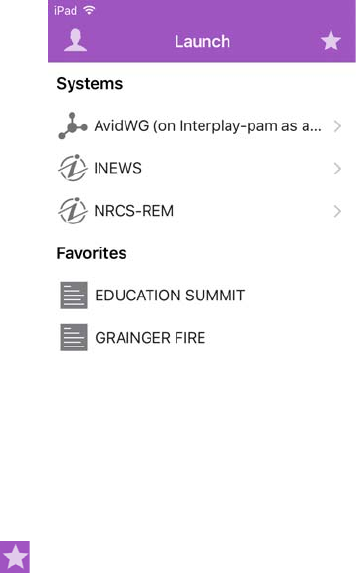
Working with Favorites
542
To navigate through scripts in presenter mode:
tSwipe left or tap right edge of the touch screen to go to the next page.
tSwipe right or tap the left edge of the touch screen to go to the previous page.
nWhen you swipe right or left from the first or last page of a story, the display moves to the next story
in the rundown.
To exit presenter mode:
tPinch in on the screen.
You can customize the appearance of text in presenter mode by modifying some MediaCentral UX
settings. Additionally, you can opt to skip blank stories while in presenter mode. For more
information, see “Customizing MediaCentral | UX Settings” on page 525.
Working with Favorites
To make navigation easier, you can designate certain locations in the newsroom system or Interplay
Production as Favorites, which appear in a list on the Launch pane.
From the tablet app, you can use your Favorites list to navigate quickly to your most often used
assets, directories, queues, or stories. You can edit your Favorites list by creating new ones, editing
their names, or deleting existing ones from the list.
To create a Favorite:
1. Tap the Edit button.
2. Tap the gray star next to the directory, asset, queue, or story you want to designate as a favorite
destination. You can select more than one at a time.
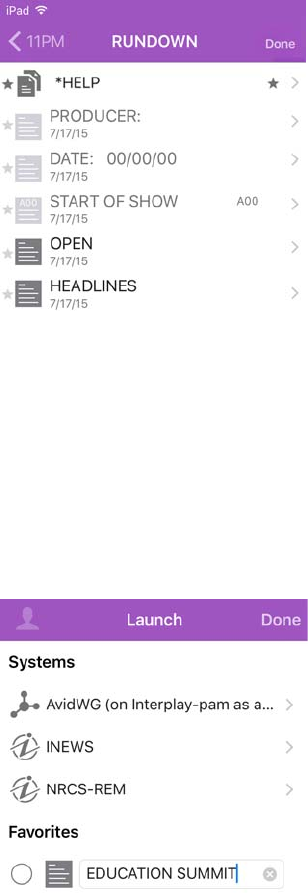
Working with Favorites
543
3. Tap the Done button.
All selections appear in your Favorites list in the Launch pane. A star appears next to each icon
of favorite destinations in the system directory.
To edit the name of a Favorite:
1. Tap the Edit button.
2. Tap the name in the list you want to edit.
3. When the cursor appears, you can change the name.
For example, if you plan to have multiple rundown queues in your Favorites list, some might
share the same queue name. You can edit each one in the list to distinguish which rundown
applies to the morning show, midday show, and evening newscast.
4. Tap the Done button.
The name of the Favorite changes. This does not affect the name of the asset, story, queue, or
rundown in iNEWS or Interplay Production.
To delete a Favorite:
1. Tap the Edit button.
2. Tap to the left of the directory, queue, or story you want to remove as a favorite destination. You
can select more than one at a time.
The selected item displays a check mark next to the title; gray circles indicate those not chosen.

Working Offline with Cached Queues and Stories
544
3. Tap the Trash button.
The app deletes the selected items from your Favorites list.
4. Tap Done.
Working Offline with Cached Queues and Stories
You can use the MediaCentral UX mobile app to view queues and stories cached locally to your
mobile device without being connected to your station’s iNEWS newsroom computer system.
The Launch panel displays cached queues and stories in the Favorites list when you work in offline
mode.
The following notes apply to caching queues and stories:
• You can work in presenter mode from a cached queue in offline mode.
• Caching a queue might take some time, depending on the length of the queue. You can manually
cancel a cache operation. For more information, see “Caching Queues and Stories” on page 544.
• If you manually cancel a cache operation, no part of the queue or story is saved.
• You can cache a queue of up to 1000 stories. If a queue contains more than this limit,
MediaCentral UX caches only the first 1000 stories.
• If an error occurs while caching stories — for example, if you lose your connection to the server
or if you lock your device — the cache operation is interrupted.
• MediaCentral UX updates the cache contents only in the case of an successful operation. If you
have cached the same queue or story before, you can still access the old cache.
• If a story or part of a story has been deleted from a queue marked for caching, it is skipped by the
cache operation.
• If you designate both a queue and a story from the queue as favorites, the cache operation creates
two separate cached versions of the story, one within the cached queue and another for the
individually-cached story.
Caching Queues and Stories
To view queues and stories in offline mode, you must set them as Favorites before they can be cached
locally and viewed when you do not have a connection to server (see “Working with Favorites” on
page 542).
You can delete a cache for a queue or story by deleting the item from the Favorites list.

Working Offline with Cached Queues and Stories
545
To cache a queue or story in the Favorites list:
1. In the Launch pane, tap the Edit button, and tap to the left of the queue or story in the Favorites
list you want to cache. You can select more than one queue or story at a time.
The queue or story displays a check mark next to the title.
2. Tap the Cache button.
A progress bar indicates the status of the cache operation. To stop the cache operation, tap the
Cancel button.
When the caching completes, a dialog box appears with the results of the operation.
3. Click OK.
To remove a cache from your device:
1. In the Launch pane, tap the Edit button, and then select the queue or story in the Favorites list
you want to delete.
The queue or story displays a check mark next to the title.
2. Tap the Trash button.
The queue or story is removed from the Favorites list and the cache is deleted.
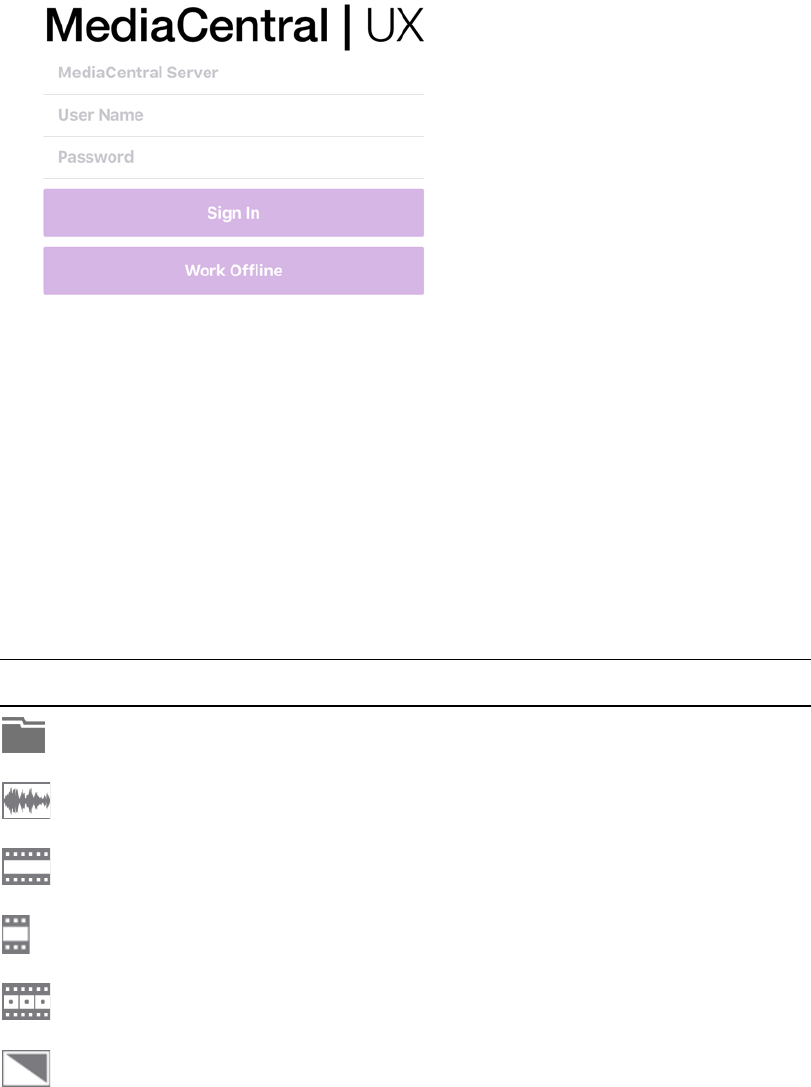
MediaCentral | UX and Interplay | Production
546
Viewing Queues and Stories in Offline Mode
When you lose your connection to MediaCentral UX, you can choose to work offline. This allows
you to view queues and stories that have been cached on your mobile device.
To view cached queues and stories after your lose your connection to MediaCentral UX:
1. In the sign-in screen, tap Work Offline.
MediaCentral UX displays the Launch pane, with all cached queues and stories in the Favorites
list.
2. Tap a queue or story to open it.
MediaCentral | UX and Interplay | Production
You can access media assets stored in an Interplay Production database, such as video clips, audio
clips, and graphics. When viewed with the tablet app, available Interplay Production systems appear
in the sidebar, along with any of their directories and media assets.
Different icons are used to identify Interplay Production assets:
Icon Description
Directories hold media assets or other subdirectories.
An audio clip references audio media files formed from captured audio or imported files.
Audio clips display in the Media viewer as an audio clip icon.
A master clip references audio and video media files formed from captured footage or
imported files.
A subclip references a selected portion of a master clip.
A sequence represents an edited program, partial or complete, that you create from other
clips.
An effect clip references an unrendered effect that you create. You cannot preview an effect
clip in the Media viewer.
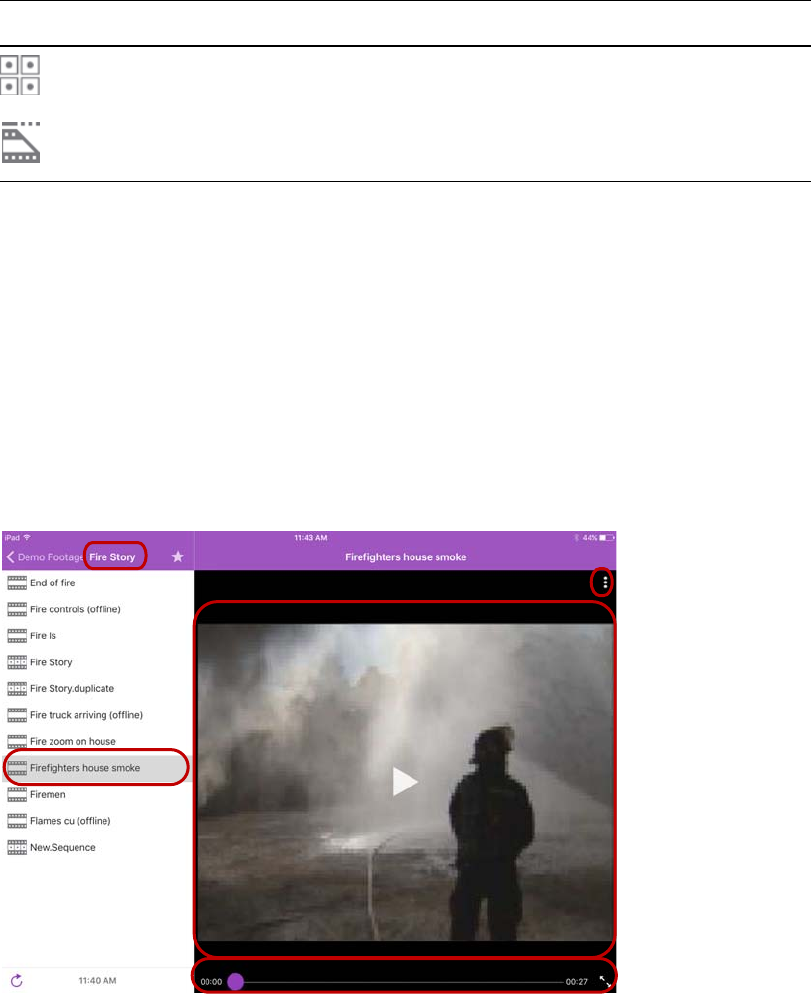
MediaCentral | UX and Interplay | Production
547
Destinations in the Interplay Production system directory selected for the Favorites list have a star
next to their icons.
nWhile viewing the top level of an asset directory in the sidebar, the Back button displays the word
Launch, which means you can tap it to return to the previous view of the Launch pane. However, the
button’s name changes the further you navigate down the system directory.
Viewing Media Assets with MediaCentral | UX
You can open directories and media assets stored in the Interplay Production database using
MediaCentral UX. Directories and a list of assets open within the sidebar. You can view and play
assets in the Media viewer.
Media viewer — top: selected directory, Action button; middle: selected asset, Media player; bottom: Media controls
To open a directory:
1. Navigate to the directory.
2. Tap a folder on screen to open it.
nAs you navigate the system’s directory structure, the app displays your path or location within the
database at the top of the screen.
A group clip contains two or more grouped clips, strung together sequentially according to
common timecodes.
An in-progress clip, also known as an edit while capture (EWC) clip, is available for viewing
and for use in editing while the capture is still in progress.
Icon Description
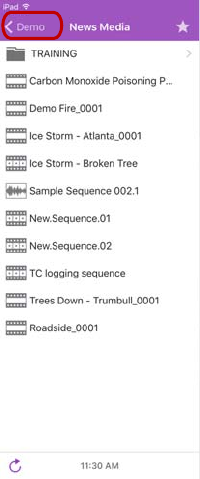
MediaCentral | UX and Interplay | Production
548
The following illustration shows the News Media directory opened to view one subdirectory and
multiple media assets.
News Media directory on the Interplay Production server, with the back button at the top of the list indicating the
parent directory
To back out of a directory:
tTap the Back button.
nThe Back button does not display the word “Back” on it, but rather the name on the button changes
as a user navigates further into the directory.
To open and play a media asset:
1. Navigate to the asset in a directory.
2. Tap the video or audio asset.
The asset opens in the Media viewer.
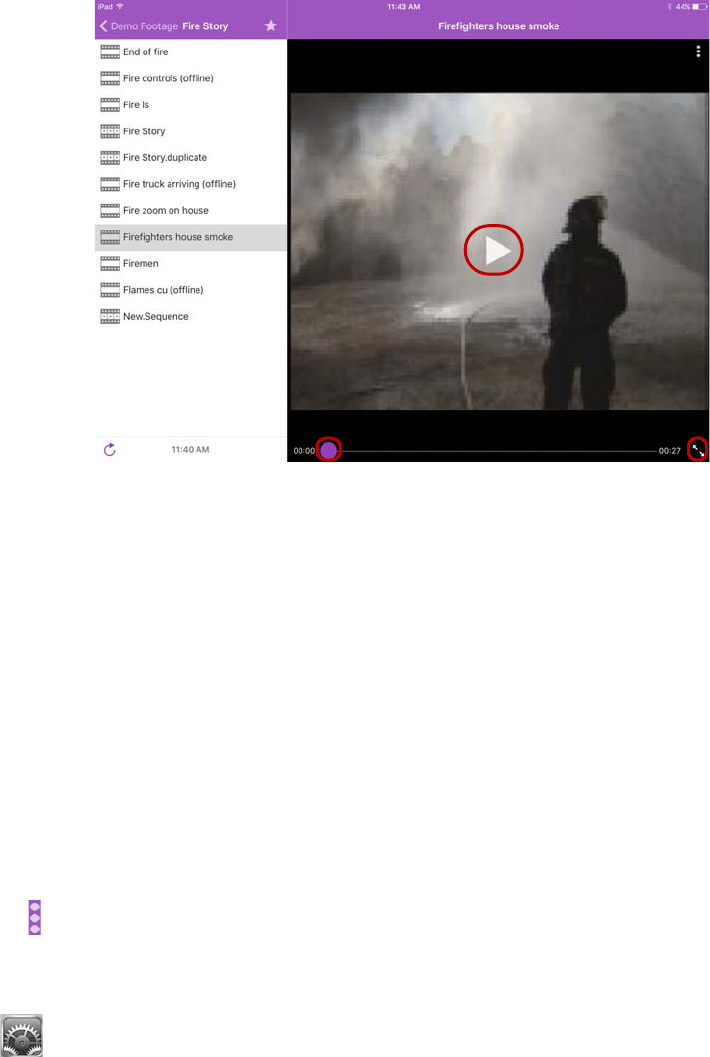
MediaCentral | UX and Interplay | Production
549
Media controls: Play button, position indicator, Full Screen button
3. Tap the Play button to play the asset.
4. If you want to scrub through the media asset, or if you want to jump to a specific position in the
clip, tap and hold the position indicator and drag it to a new location.
5. If you want to view a video clip in full screen mode, tap the Full Screen button.
The Media viewer expands to fill the tablet screen and the video clip starts playing.
Troubleshooting Video Playback Problems on the iPad
If you experience playback problems with the MediaCentral iOS app, you can try to reload the asset.
This forces the MediaCentral server to reload the full video clip and begin streaming it again. You
can also try playing the asset in a browser to determine if the problem is related to the app or your
connection, or if the problem exists with the MediaCentral server.
To reload an asset:
1. Tap the Actions button.
2. Tap Reload.
To play an asset in a browser:
1. On your iOS device, tap the Settings icon.
2. Select MediaCentral UX in the list of apps.
The MediaCentral Settings screen opens.
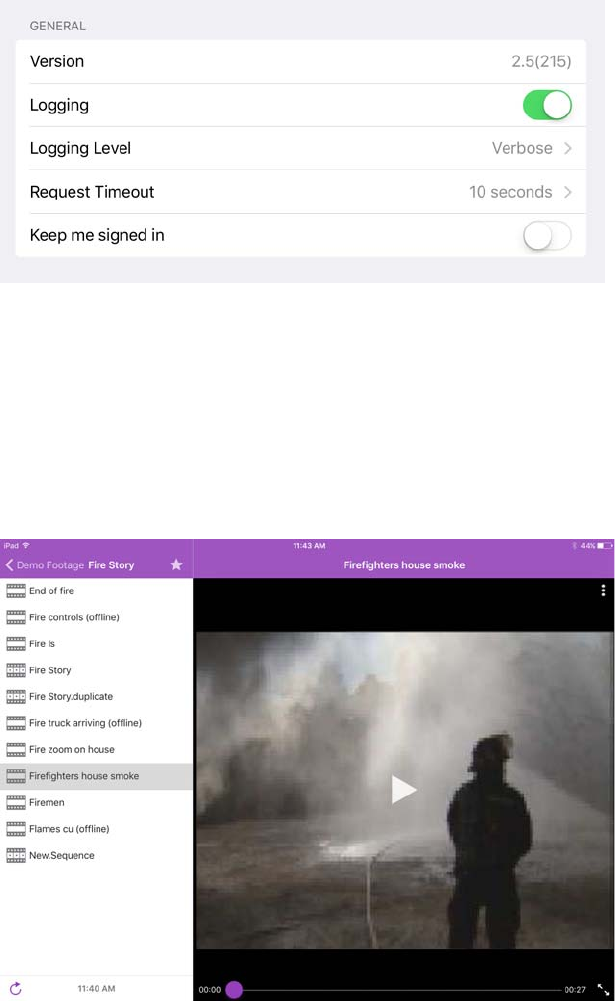
MediaCentral | UX and Interplay | Production
550
3. Set Logging to On.
4. Select the Logging Level to Verbose.
5. Start the MediaCentral UX mobile app.
6. Navigate to an asset in one of the directories.
7. Tap the video asset.
The asset opens in the Media viewer.
8. Tap the Play button to play the asset, and make a note of the time playback begins.
9. Tap the Actions button, and then tap Send Log to send an e-mail with the log file directly to an e-
mail account.
10. Open the e-mail on your Macintosh system, and then use a text editor to open the attached log
file.
Using Markers
551
11. Find a link with .m3u8 suffix that is located on the line marked with the time playback started —
for example:
07-02 16:15:29.830 [ . . . ] http://123.45.678.910/download/
0e41028f99738669c581c50388e80d36/060a2b340101010101010f0013-000000-
92dede5ab6034faa-b737d720c291-4093_1920x1080-
fps25.00_from_0_to_7501_quality_0_video_-1_audio_-1_h264_aac_ts_.m3u8
12. Copy this link, and then paste it into the address field in a browser.
13. Edit link in address field by typing
-WIFI
before the .m3u8 suffix — for example:
http://123.45.678.910/download/0e41028f99738669c581c50388e80d36/
060a2b340101010101010f0013-000000-92dede5ab6034faa-b737d720c291-
4093_1920x1080-fps25.00_from_0_to_7501_quality_0_video_-1_audio_-
1_h264_aac_ts_-WIFI.m3u8
n“WIFI” is case-sensitive.
14. Press Enter to go to the URL in the address field.
nThe Safari browser supports native playback for .m3u8 files. Other browsers — for example,
Chrome, Firefox, Internet Explorer, or Opera — do not. If you are not working on a computer
running Mac OS X, you can use your browser to download the file to your system and play it in a
media player that support .m3u8 video files.
15. Play back the asset.
If playback produces the same problem seen when you played the asset on your mobile device,
the source of the problem is the MediaCentral server and not the app. If the asset plays back
without issues, then the source of the problem is the mobile app, your connection, or your device.
Using Markers
A marker is an indicator that you add to a selected frame to mark a particular location in a clip,
subclip, or sequence. Markers can have icons of different colors and can be associated with user-
defined comments. Markers display in the timeline and in the Markers list below the Media player.
nTo create and modify markers, a MediaCentral UX user’s Interplay Production account must be
configured with the necessary permissions. For information on configuring marker permissions, see
“Understanding Markers and Restrictions” in the Avid MediaCentral | UX User’s Guide.
You can add and edit markers in the MediaCentral UX mobile app for iOS devices in the Markers
view if you have the necessary user permissions configured in Interplay Production. An Interplay
Production administrator sets these permissions in the Instinct/Assist User Settings view of the
Interplay Administrator. For more information, see the Interplay | Engine and Interplay | Archive
Engine Administration Guide or the Interplay Production Help.
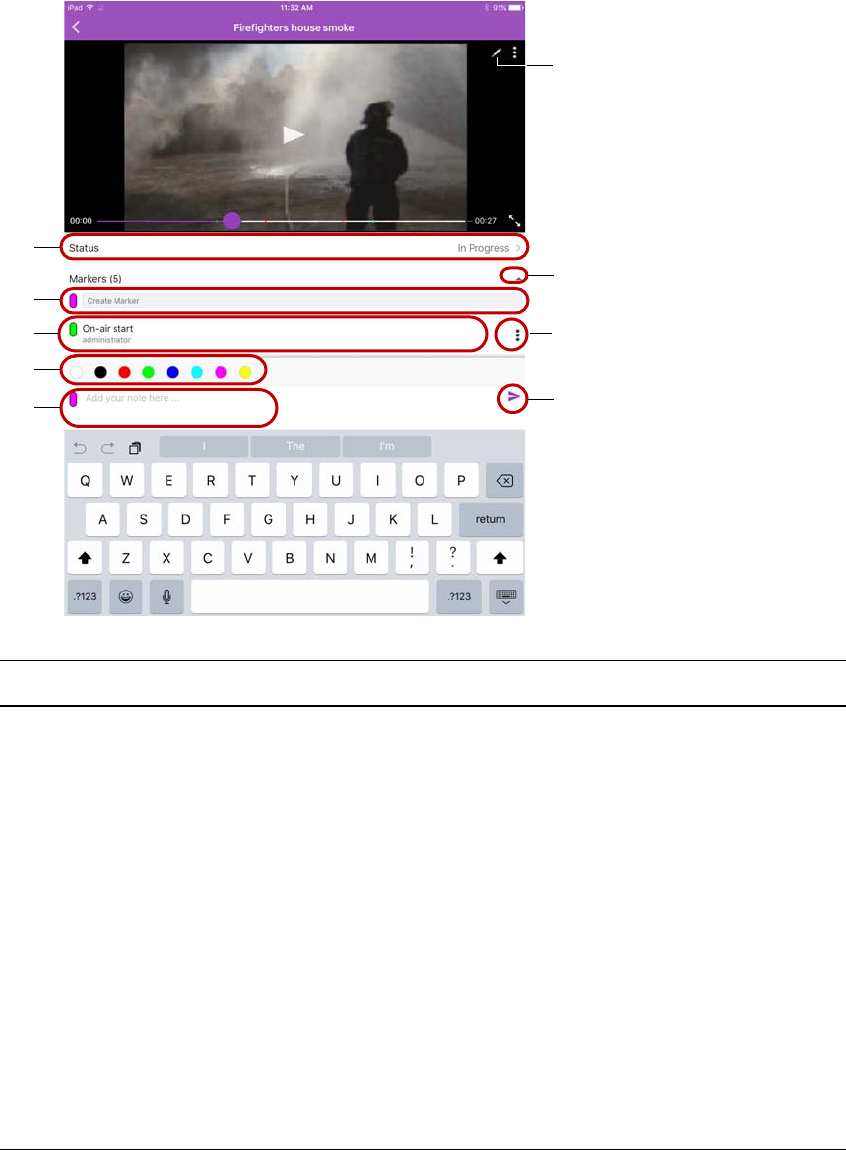
Using Markers
552
w
q
y
u
i
e
o
t
r
Display Description
1 Create/Edit Marker button Allows you to create a new marker. This button displays if you have
the necessary user permissions to edit the video asset.
2 Status bar Displays the status of the marker. This bar is only visible if your
Interplay Production configuration supports approval of markers —
see “Setting the Approval Status for Assets” on page 555.
3 Show/Hide Marker list button Expands or collapses the Marker list.
4 Create Marker button Allows you to create a new marker.
5 Marker list A list of the markers in the clip or sequence. Markers are sorted by
timecode. You can scroll the list to see all markers.
6 Edit Marker button Allows you to edit or delete an existing marker.
7 Change Marker Color bar Allows you to change the color of any marker.
8 Notes field In edit mode, allows you to add or to modify text.
9 Done button Commits your changes and exits edit mode.
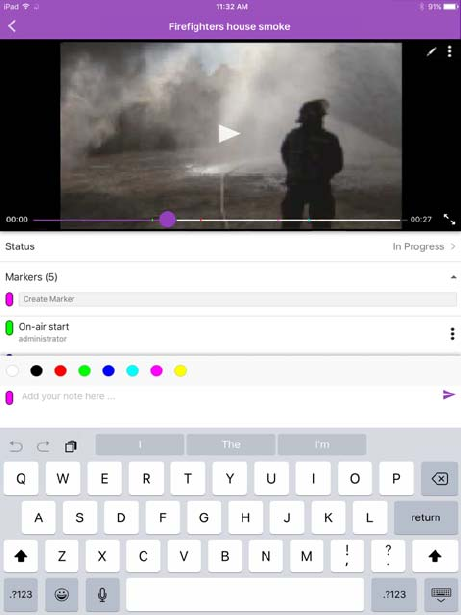
Using Markers
553
Creating and Editing Markers
Users who have the necessary permission assigned to them by their Interplay Production
administrator can create, edit, and delete markers. You can add markers to media assets by playing
the video and clicking the Create Marker button at the appropriate place, or you can scrub to a
specific location in the media and then click the Create Marker button.
In MediaCentral UX, you can add markers to clips, subclips, and sequences stored in the Interplay
Production database. Markers that you add to a sequence are associated only with the sequence. They
are not automatically associated with the corresponding master clips used in the sequence. Similarly,
a marker added to a subclip is not added to the associated master clip.
To create a marker, do one of the following:
1. Load a video in the Media player.
2. Do one of the following:
tTap the Play button, and then tap the Create Marker button in the player and select Create
Marker when the playhead reaches the appropriate location. You can also click the Create
Marker button below the media player.
tTap in the timeline to scrub to the location where you want to add a marker, and then tap the
Create Marker button in the player and select Create Marker. You can also click the Create
Marker button below the media player.
nIf no cache exists for the video yet, the playhead does not move to the location in the timeline. Once a
sufficient buffer has been created, scrubbing to a specific location works as expected.
A marker is added and the Marker view opens in edit mode.
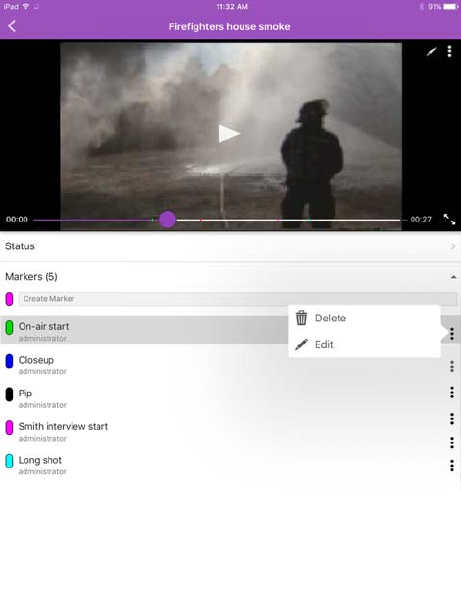
Using Markers
554
3. Type the text you want for your marker in the Notes field.
4. Tap the Done button.
Text is saved, the marker is added to the timeline, and you exit edit mode.
nYou can cancel the marker creation by tapping outside the Notes field.
To edit an existing marker:
1. Tap the Edit Marker button for the marker you want to edit.
The playhead moves to the marker location in the timeline and the Marker menu opens.
2. Tap Edit.
The Marker view opens in edit mode.
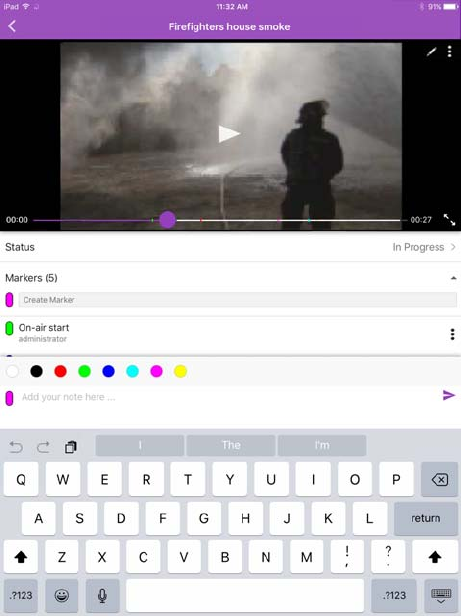
Setting the Approval Status for Assets
555
3. Use the keyboard to edit the marker text.
4. Tap the Done button.
Text is saved and you exit edit mode.
nYou can cancel your edit by tapping outside the Notes field.
To delete an existing marker:
1. Tap the Edit Marker button for the marker you want to delete.
The Marker menu opens.
2. Tap Delete.
The marker is deleted from the clip or sequence, and the marker is removed from the timeline.
Setting the Approval Status for Assets
When enabled through the Interplay Administrator tool, a Status bar appears between the Media
viewer and the Markers list. Tapping the Status bar displays the “Select approval status” window:
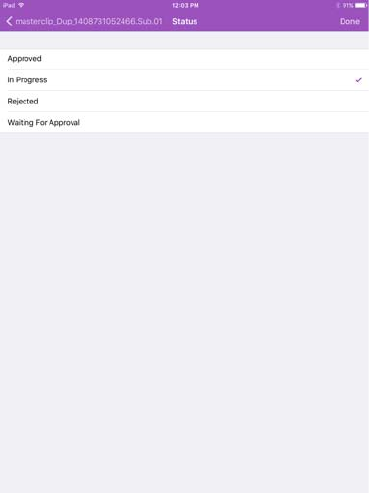
Setting the Approval Status for Assets
556
Assets are not associated with a default status.
The approval status window displays a list of options that can be customized as desired. When the
user taps an item in the list, a check mark appears to the right of the selection. Tapping Done saves
the selection.
To access the Status bar, your system administrator needs to create a custom property in Interplay
Administrator named “Approval_Process” and import a manually created XML file that includes
the status options. The options described in this example are: Approved, In Progress, Rejected, and
Waiting for Approval.
cWhile the value names can be customized, the custom property in the Interplay Administrator
must be called “Approval_Process”.
To create the approval status XML file:
1. On a desktop system, create a new text file with an application such as TextEdit.
2. Add the following information to the text file:
<?xml version="1.0" encoding="UTF-8"?>
<!DOCTYPE values SYSTEM "custom_attributes.dtd">
<values description="Approval Process">
<value name="In Progress"/>
<value name="Waiting For Approval"/>
<value name="Approved"/>
<value name="Rejected"/>
</values>
In the example above, the text for each value name (“In Progress”, “Waiting For Approval”, etc)
is presented to the Mobile app user when selecting a status. If desired, the value names can be
customized to accommodate local workflows.
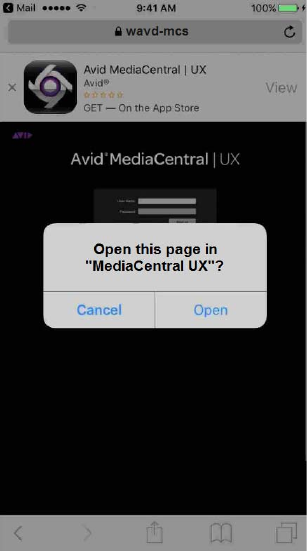
Working with Deep Links
557
3. Save the text file with an XML extension as in the following example:
approval.xml
4. Import the XML file to the “Approval_Process” custom property that was created in the Interplay
Administrator.
For more information, see “Adding a Custom Property” in the Avid Interplay Engine and
Interplay Archive Engine Administration Guide.
Working with Deep Links
MediaCentral UX users often exchange text messages between themselves through the Messages
pane in the MediaCentral UX (browser) or through the built-in functionality of the MediaCentral app
for iOS. When creating a message, users have the ability to attach Interplay Production assets or
Interplay MAM folders and assets if desired. If E-mail Forwarding is enabled in the MediaCentral
UX System Settings, offline users receive an e-mail with the text and a link to the asset included in
the original message. These links are referred to as “deep links”.
Version 2.10.1 of the MediaCentral UX mobile app for iOS enables users to more easily access these
deep links. When tapping on a link in an e-mail from a forwarded message, the Safari browser opens
on the mobile device and a tab for MediaCentral UX appears. MediaCentral detects the mobile
device and displays a pop-up window; asking the user if they would like to open the link in the
MediaCentral mobile app.
If the user selects Open, the MediaCentral UX app appears and requests that the user logs in. Once
logged in, the user is directed to the linked asset. If the user selects Cancel, the pop-up window is
closed and the MediaCentral UX tab in Safari remains.
Working with Deep Links
558
If the MediaCentral UX mobile app is not installed, a banner at the top of the screen provides a quick
link to download and install the app.
nThe deep link feature for iOS requires a certificate containing the FQDN of the MediaCentral server
to be added to mobile device’s Safari browser. If your site has not obtained a certificate from a
Trusted Authority, you must create and import a self-signed certificate on the mobile device. For more
information, see the following article on the Avid Knowledge Base:
http://avid.force.com/pkb/articles/en_US/how_to/SSL-Certificates-for-server-to-browser-
connections

24 MediaCentral | UX for Android Devices
MediaCentral UX provides a native user interface designed to run on your Android device and enable
direct, secure access to your station’s iNEWS newsroom computer system.
The following main topics describe basic user information about the device and mobile application.
•Connection Basics
•Installing MediaCentral | UX on Your Android Device
•Starting MediaCentral | UX on the Android Device
•The Navigation Drawer and Directory Panel
•Buttons of the User Interface
•Customizing MediaCentral | UX Settings
•Accessing the iNEWS Database
•Viewing Video Associated with a Script
•Working with Stories
•Using Presenter Mode
•MediaCentral | UX and Interplay | Production
•Using Markers
•Setting the Approval Status for Assets
Connection Basics
The MediaCentral UX mobile application can be used to perform many of the same actions
supported by MediaCentral UX in a web-browser, such as:
• Navigate the iNEWS and Interplay Production databases.
• Edit news stories.
• View and play media assets from the Interplay Production database.
• View a show's scripts in presenter mode while signed in to your station’s iNEWS newsroom
computer system.
• Review and approve markers added to media assets.
nIf your MediaCentral UX system is licensed for an iNEWS- only configuration, you cannot preview
or play sequences or other media assets.
The MediaCentral UX Android application uses one of several connection options, including Wi-Fi
or carrier-specific cellular service (such as 4G). If you use an unsecured Wi-Fi connection — for
example, a public or mobile network — you must connect to your MediaCentral server through a
virtual private network (VPN) connection.

Connection Basics
560
nThe application automatically selects the first available connection from the list of options according
to the priority shown in the list.
Android Devices
Android devices usually include very few exterior buttons. You navigate content with touch
gestures — for example, tapping an icon to start an application. Some gestures perform standard
functions, such as displaying different menu icons, and some perform functions specific to an
application.
nRemember, the more applications that you have running, the more memory and battery power your
device uses. To optimize the performance of your device, try to close applications when you finish
with them.
Gestures for the Mobile Application
Applications for touchscreen mobile devices let users accomplish certain tasks utilizing various
gestures like fingertip swipes or taps. What these gestures do can differ from one application to
another. The following table describes what certain gestures do depending on where you use the
gesture within the MediaCentral UX mobile application.
Location Gesture Description
Navigation drawer Tap the name of an iNEWS
server.
Opens the Directory panel, which allows you
to navigation queues and open rundowns and
stories.
Directory panel Tap the Back button on your
Android device.
Navigates to the last location selected in the
Directory panel. If your location is the root
position in the Directory panel, tapping the
Back button closes the app.
Body tab Swipe left. Displays the Production Cues tab.
Production Cues tab Swipe left. Displays the Sequence tab for assets
associated with a story.
Body tab Swipe right. Displays the navigation drawer. You can
swipe left to hide the navigation drawer.
Production Cues tab Swipe right. Displays the Body tab.
Sequence tab Swipe right. Displays the Production Cues tab.
Directory panel Tap the Up button or swipe
right.
Displays the navigation drawer with any
Interplay Production or iNEWS servers,
regardless of your position in the directory
structure.
Body or Production Cues
tab
Tap the Up button. Displays the navigation drawer. You can
swipe left to hide the navigation drawer.
Navigation drawer Tap the Back button on your
Android device.
Closes the Navigation drawer.
Script Editor Swipe Left Displays the Cue List.

Installing MediaCentral | UX on Your Android Device
561
Installing MediaCentral | UX on Your Android Device
The following procedure assumes licensing, setup, and configuration of MediaCentral have already
been completed.
To install MediaCentral UX on the Android device:
1. Open the Android Play Store.
2. Locate the MediaCentral UX application in the Apps section.
3. Tap Install.
When MediaCentral UX is installed on your Android device, an icon representing the
application is also installed on the home screen. You can move it to another position or a new
screen like icons for other applications.
Starting MediaCentral | UX on the Android Device
When you install MediaCentral UX, an icon representing the application displays on your Android
device’s home screen. If you previously set your MediaCentral account, you can connect to your
MediaCentral server by selecting the MediaCentral UX icon on your device. To browse iNEWS or
Interplay Production, you can sign in with your MediaCentral credentials.
MediaCentral UX supports iNEWS communities. The iNEWS Community feature allows customers
with multiple iNEWS systems to share content and collaborate on stories.
The MediaCentral mobile application requires you to supply credentials to sign in to one iNEWS
system. This system is considered your local system. If your local system is configured in an iNEWS
community, you are able to automatically sign in to other systems in the community. These systems
are considered your remote systems. In the MediaCentral UX navigation drawer, your local iNEWS
system is listed first, followed by the remote systems. To connect to a remote system, tap the system
name.
For more information on iNEWS Community, see “Support for iNEWS Communities” on page 34.
Script Editor Tap and hold Selects the word you tap and allows you to
select text and modify text formats.
Media Viewer Touch and drag in the timeline Moves to new position in viewer’s video
playback timeline.
Media Viewer Tap in the timeline Moves the Playhead to that position on the
timeline.
Presenter Mode Swipe left or tap on right edge
of screen
Navigates to next page.
Presenter Mode Swipe right or tap on left edge
of screen
Navigates to previous page.
Presenter Mode Tap the Back button Exits full screen presenter mode.
Location Gesture Description

Starting MediaCentral | UX on the Android Device
562
When you log in to MediaCentral UX, you might be required to accept Avid’s End-User License
Agreement (EULA). The EULA appears when you first log in to a MediaCentral server or when you
first log in after updating the MediaCentral UX mobile app on your Android device.
If you lose your connection to MediaCentral after you have signed in and try to navigate to a new
location, a dialog box displays the message:
The app cannot load the content. Try Again.
To start MediaCentral UX:
1. Select the MediaCentral UX icon to start the mobile application.
The sign-in screen appears.
2. Type the MediaCentral server name.
3. Type your MediaCentral user name and password.
4. Tap the Sign In button.
nIf your MediaCentral credentials are incorrect or missing in your MediaCentral account, you receive
a message: “Authentication Failed: The user name or password you entered is incorrect.” When you
click OK, the sign-in screen appears and allows you to enter valid credentials.
If you are signing in with the MediaCentral mobile application for the first time and use incorrect
credentials, you might not see an error message and the navigation drawer does not display any
iNEWS servers. The iNEWS sign in screen displays and you must log in with the correct credentials.
The iNEWS sign in screen displays until you enter your correct user name and password.
After you sign in, the MediaCentral mobile application connects to the selected Interplay
Production or iNEWS system. All servers display in the navigation drawer.
To view the help system:
1. Tap the Action overflow button.
2. Select Help.
To sign out:
1. Tap the Action overflow button.
2. Select Sign Out.
To exit the application, do the following:
tTap the Home button on your Android device.
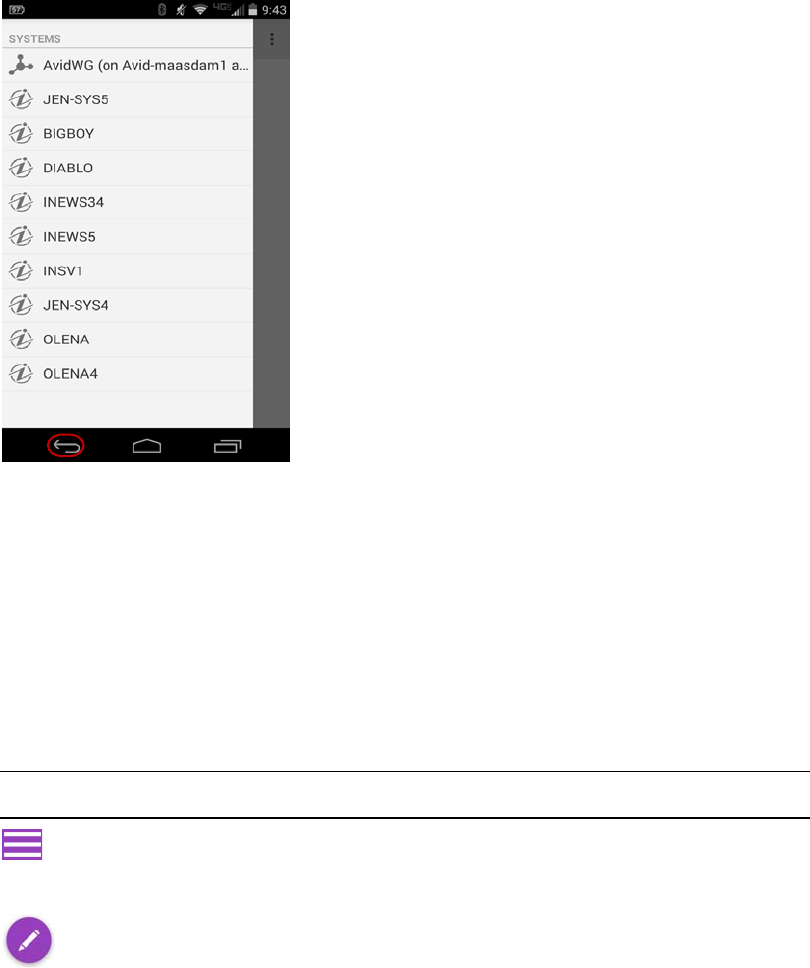
The Navigation Drawer and Directory Panel
563
The Navigation Drawer and Directory Panel
After you sign in to MediaCentral on your Android device, you can view the navigation drawer,
located along the left side of the screen when displayed. From the navigation drawer, you can connect
to various systems integrated with MediaCentral, such as iNEWS newsroom computer systems or an
Interplay Production database. The navigation drawer also includes any iNEWS servers that are part
of an iNEWS community.
The following illustration shows the navigation drawer.
The navigation drawer with the Android Back button
From the navigation drawer, you can open the Directory panel to navigate through the directory
structure and open assets. After opening assets, you can view the navigation drawer at any time by
swiping your finger across the screen to the right or by tapping the Up button.
Buttons of the User Interface
The MediaCentral mobile application provides buttons in the user interface that allow you to access
the features of the app. The following table describes the buttons and their uses.
Button Description
The Up button lets users return to the navigation drawer when browsing the iNEWS or
Interplay Production database. It also lets users show the navigation drawer when a queue,
story, or asset is open.
The Edit Story button enables editing of an opened story by displaying the Edit toolbar and a
virtual keyboard.

Customizing MediaCentral | UX Settings
564
Customizing MediaCentral | UX Settings
You can modify some settings in the MediaCentral mobile application.
To modify MediaCentral UX settings on an Android device:
1. Start MediaCentral UX.
2. Tap the Action overflow button, and then select Settings.
3. Select the appropriate settings option.
The following table provides information about general settings.
The Add Story button opens a new story at the top of the queue (for tablets, the story is added
either at the top of the queue or above the selected story), and allows you to name the slug. If
you use an Android tablet, the new story opens in Story view.
The Save Story button displays in Edit mode and allows you to save your changes to a story.
The Presenter Mode button opens a show's rundown of stories in presenter mode to the current
selected story in the sidebar. This button is enabled only for queues set to automatically refresh.
The Action overflow button opens a menu of options:
• Reload — refreshes the display to reflect any changes in the stories or queues (see
“Starting MediaCentral | UX on the Android Device” on page 561).
• Edit Slug — allows the user to edit the story title (the slug). This option only appears in edit
mode.
• Send Log — allows the user to send a log file to Avid Customer Support to help
troubleshoot any issues (see “Customizing MediaCentral | UX Settings” on page 564).
• Legal Notices — displays the copyright notices for Avid’s Android application.
• Sign Out — allows the user to end the current session (see “Starting MediaCentral | UX on
the Android Device” on page 561).
• Settings — opens the Preferences dialog box (see “Customizing MediaCentral | UX
Settings” on page 564).
• Help — opens the online help system (see “Starting MediaCentral | UX on the Android
Device” on page 561).
Button Description
General Settings Description
Version For display purposes only, this value shows the currently installed version of
the mobile application.
Keep me signed in Set to On if you want MediaCentral UX to keep you signed in once you first
sign in to MediaCentral.

Customizing MediaCentral | UX Settings
565
The following table provides information about the settings for editing.
The following table provides information about the settings for presenter mode.
To send log files to Avid:
1. Click the Action overflow button and select Send Log.
The MediaCentral Log dialog box opens, displaying your e-mail and text options.
2. Tap the icon for the app you want to use to send the log.
The app opens on your Android device.
3. Depending on the app, you can add a note or comment, and then send the log to Avid.
Logging If selected, MediaCentral UX keeps logs on session activities, which you can
use to troubleshoot issues.
If you tap the Action overflow button, a Send Log option appears that lets you
e-mail the logs directly to Avid.
If the option is deselected (default), logging is disabled.
Logging Level This setting determines how much information is logged if you enable
logging. Options include: Verbose, Info, Warn, and Error.
Request Timeout Options are intervals of 10, 20, or 30 seconds, 1 minute, or 2 minutes.
General Settings Description
Editing Settings Description
Autosave Stories If set to On, MediaCentral UX automatically saves a story if you tap the Back
button while in edit mode. If set to Off, MediaCentral UX prompts with the Release
Edit Lock dialog box if you tap the Back button while in edit mode. Tap Discard to
discard your modifications, or tap Cancel to dismiss the dialog box. The default
setting is Off.
Presenter Mode Settings Description
Font Size Options for presenter mode are 18, 22, 26, 32, and 38.
Normal Text Normal text is the default text format of the story. Options are Black on
White or White on Black.
Presenter Text Presenter text is most often used for special instructions to presenters in
scripts. Options are White on Black, Black on White, or Red on White.
Closed Captioning Text Closed captioning is text sent to a closed caption encoder if your station
uses such a device to broadcast text for the hearing-impaired. Options
are White on Black, Black on White, or Green on White.
Skip Blank Stories If set to On, presenter mode skips any stories that have no text or
production cues.
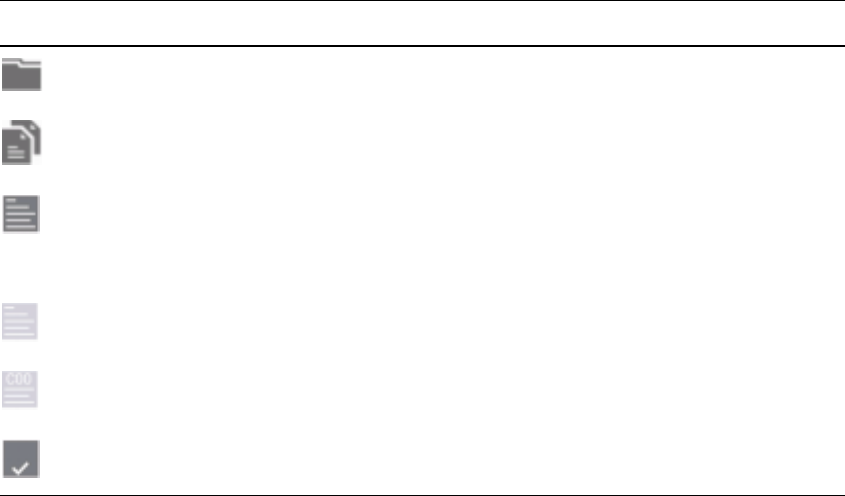
Accessing the iNEWS Database
566
Accessing the iNEWS Database
The iNEWS database is the backbone of your iNEWS system. You save the data created in your
newsroom — stories, scripts, and rundowns — in the database on the iNEWS server. Queues contain
stories, and directories (also known as folders) store the queues.
When viewed with the mobile application, available iNEWS systems appear in the navigation
drawer. Tapping the name of a server opens the Directory panel, which displays directories and
queues. Queues marked to automatically refresh when changes are made display without pagination
in the Directory panel. You can scroll continuously to view all stories in these queues.
nIf the queue contains more than 1000 stories, it might take some time for the MediaCentral mobile
application to receive and display them. You might need to increase the Request Timeout value in the
MediaCentral mobile application settings. For more information, see “Customizing
MediaCentral | UX Settings” on page 564.
The application uses different icons to distinguish between directories, queues, and stories.
Icon Description
Directories hold queues or other subdirectories. Unlike queues, directories do not directly
contain stories. For example, the Wires folder contains queues with incoming wire stories.
Queues let you organize stories in detailed categories. A show’s rundown is one example of a
queue.
Stories — for example, wire stories — contain text, such as contact information or a description
of a news event. Any story can become a script for a show. Scripts contain additional data beyond
text, including production cues, machine control instructions, presenter instructions, and
associated video sequences.
Floated stories are stories kept in the queue but which have removed the stories’ time from the
show timing, causing them to be ignored by machine control and the network prompters.
Break stories have designated rows in their queues that form a “break” in the show — for
example, a commercial break.
Approved stories have been endorsed for broadcast. Only individuals authorized by the iNEWS
system administrator can approve a story.
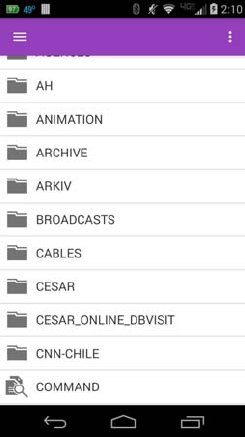
Accessing the iNEWS Database
567
The following illustration shows an example of the iNEWS Directory panel with queues and folders
displayed.
nWhile viewing an iNEWS system directory in the Directory panel, you can tap the Up button to
display to the navigation drawer. You can also tap the Back button to navigate back through the
directory.
You can open directories, queues, and stories from the MediaCentral mobile application. Directories
and queues open within the Directory panel. When you tap a story, it displays in Story view in the
Body tab.
If you try to open an iNEWS story that has an edit key lock applied to it, a dialog box opens and
allows you to type the key used to open the story for editing. Once you open the locked story, you do
not need to enter the key again during your current work session. If you attempt to open an easy
locked story, a message box informs you that the story is locked and cannot be opened.
Queues marked with the autorefresh attribute in iNEWS automatically redisplay their content
whenever changes are made to the queue. For more information on setting the autorefresh attribute,
see your iNEWS documentation.
To open a directory:
1. Tap the iNEWS server in the Navigation drawer you want to use, and then tap items in the
Directory panel to navigate to the directory.
2. Tap a folder on screen to open it.
The following illustration shows the Wires directory opened to view numerous queues
containing incoming wire stories.
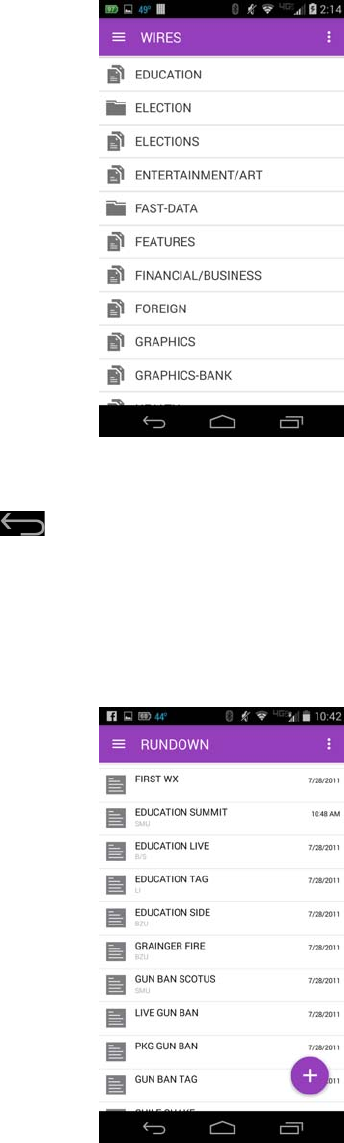
Accessing the iNEWS Database
568
To back out of a directory or queue:
tTap the Back button on your Android device.
To open a queue:
1. Tap in the Directory panel to navigate to the queue inside a directory.
2. Tap the queue to open it.
The following illustration shows an example of a rundown queue.
To open an existing story:
1. Tap in the Directory panel to navigate to the story in a queue.
nA story icon with a check mark indicates that the story has been “approved.” You can approve stories
from an iNEWS workstation.

Accessing the iNEWS Database
569
2. Tap the story to open it.
The story opens in Story view in the Body tab.
The following illustration shows the Body tab containing a story with production cue markers
identified numerically.
3. While viewing the story, do one of the following to view the Production Cues tab.
tTap the Production Cues tab.
tSwipe Left.
The numerical production cue markers within the story align with production cues and machine
control instructions displayed in the Production Cues tab. Black text indicates production cues.
Blue text indicates machine control instructions (if any).
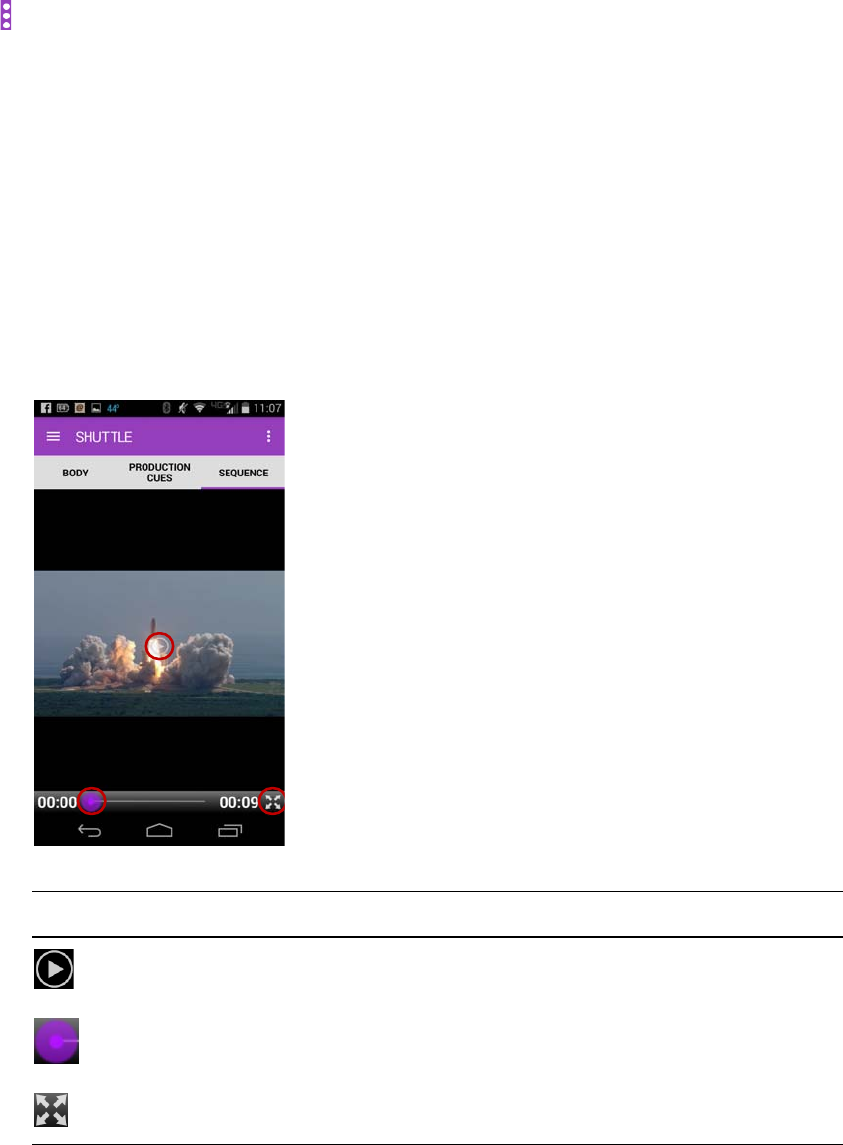
Viewing Video Associated with a Script
570
nBecause of limited screen size on Android devices, the mobile application does not display the
Directory panel with the story. You can view the Navigation drawer at any time by swiping right from
the Body or the Production Cues tab or use the Up button (see “The Navigation Drawer and
Directory Panel” on page 563).
To reload a story:
1. Tap the Action overflow button.
2. Tap Reload.
Viewing Video Associated with a Script
When sequences have been associated with stories in the MediaCentral UX Web application, you can
preview the stories in the media viewer in the MediaCentral Android application.
nIf your MediaCentral system is licensed for an iNEWS- only configuration, you cannot preview or
play sequences or other media assets.
When you open a story with an associated video with a script, you use the Sequence tab to open the
viewer and preview the sequence. The Sequence tab displays only for stories that have an associated
sequence.
Button Description
The Play button plays the sequence so you can preview the video associated with the story.
This button changes to a Pause button while the sequence plays.
The Playhead allows you to navigate to a new position in the viewer’s video playback
timeline.
The Maximize button expands the viewer to full screen.

Working with Stories
571
You can view video sequences created in the following way:
• A sequence created and modified the sequence in MediaCentral UX.
• A sequence created in MediaCentral UX and modified it in NewsCutter or Media Composer. In
this case, you might not see some effects in the media viewer.
• A sequence created in Instinct and modified it in MediaCentral UX.
nYou cannot view video sequences created directly in NewsCutter or Media Composer, and you cannot
play back shotlists created in Interplay Assist or Interplay Access.
To view video sequences associated with a script:
1. Tap the Sequence tab to open the viewer.
2. Tap the Play button.
The sequence plays in the viewer. You can rotate your Android device to view the video in
landscape or portrait mode. The viewer controls do not display after 3 seconds of play. The
controls display when you tap the device screen or pause playback.
3. (Optional) If you expand the viewer, the orientation adjusts to display the video in landscape
mode. You can tap the Minimize button on the viewer or the Back button on your device to
restore the original size and orientation within the Sequence tab.
Working with Stories
Using the mobile application, you can create a new story or edit an existing one. You can also change
the title of story.
The system obtains an edit lock when you edit a story, which prevents other users from altering a
story while you work on it. The edit lock applies only to the story body when you edit the body, and
it applies only to the story title (the slug) when you edit the title. When you start a new story, the edit
lock applies both to the story body and the story title. Saving and closing the story, or discarding your
changes, releases the edit lock.
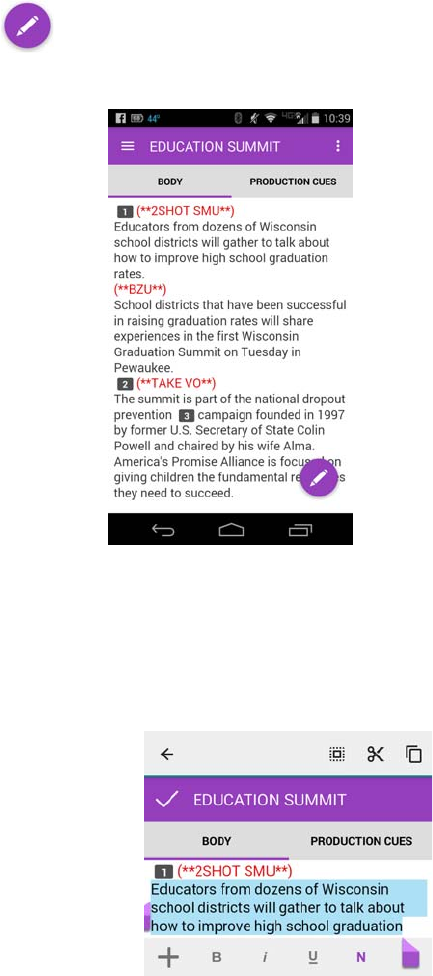
Working with Stories
572
nThe MediaCentral UX mobile app can also be used with a Bluetooth keyboard.
Using the edit toolbar, you can cut, copy, and paste text, production cues, and segment breaks within
the story while in edit mode.
To edit an existing story:
1. Tap in the Directory panel to navigate to an existing story in the queue and open it.
2. Tap the Edit Story button.
The story opens in edit mode. An edit lock prevents others from changing the story while you
edit.
3. Tap in the story to begin editing the text.
4. If you want to cut, copy, or paste text, do the following:
a. Tap and hold in the story where you want to edit the text.
The selection arrows and the edit toolbar display.
Edit mode, with the edit toolbar with Select All, Cut, Copy, and Paste buttons.
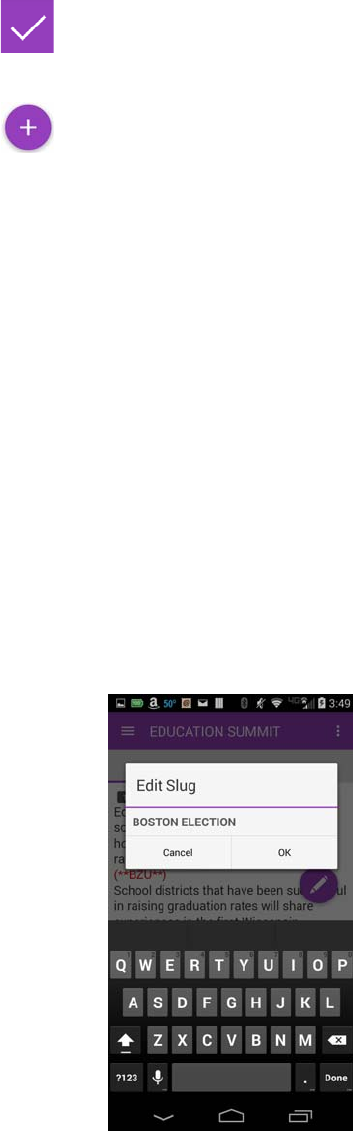
Working with Stories
573
b. Tap and hold the selection arrows, and then drag them to highlight the text you want to edit
or to place them at the location in the text where you want to perform an edit. You can cut,
copy, and paste any text in the story, including production cues and segment breaks.
c. Tap the appropriate button in the edit toolbar.
5. After you complete your modifications, tap the Save Story button to save the story. For more
information, see “Ways of Saving Stories” on page 574.
To add a new story:
1. Tap the Add Story button.
The Edit Slug dialog box opens.
2. Type the title of your story, and tap OK.
A blank story is added to the current queue.
3. Tap the new story to open it, and then tap the Edit Story button.
When in edit mode (in the Script Editor), the application displays a virtual keyboard.
An edit lock prevents others from changing the story while you edit.The cursor moves to the
blank title field.
4. (Optional) Enter any production cues or machine control instructions.
5. Save the story. For more information, see “Ways of Saving Stories” on page 574.
To edit the title (slug) of a story:
1. Navigate to an existing story in the queue and open it.
2. Tap Action overflow button.
nThe Action overflow button is not accessible in Edit mode.
3. Tap Edit Slug.
The Edit Slug dialog box opens, and the application displays a virtual keyboard.
4. Edit the story title, and then tap OK.
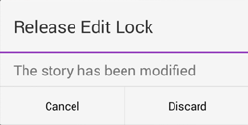
Working with Stories
574
Ways of Saving Stories
You can save newly created stories or change existing stories by tapping the Save Story button after
modifying a story while in edit mode. You can also save your story when you change to another app
or send the MediaCentral mobile application to the background by pressing the Home button. If you
tap the Back button when you have turned off the Autosave Stories option in the settings, a message
appears asking you to confirm whether to save the changes. You can choose to save the story or exit
edit mode without saving your changes.
If you enable Autosave Stories in the MediaCentral UX Settings, you can save newly created stories
or change existing stories in multiple ways:
• The application automatically saves a modified story when you tap the Save Story button.
• The application automatically saves a modified story when you change to another app or send
the MediaCentral mobile application to the background by pressing the Home button.
Formatting a Script
When you write a story, text appears in the default text style. However, you can alter the look of the
text, such as changing the default font to bold. When formatting a story as a script for a news
broadcast, you often distinguish certain text by using various specialized styles of text, such as
instructions for presenters or closed captioning.
You use presenter instructions commonly as brief, special instructions to news presenters (also
known as news anchors). The text for presenter instructions appear red, in reverse video on the
teleprompter. This text does not affect how the system calculates the read time.
You use closed captioning commonly for sound-bite transcription. The text for closed captioning
appears green, and the system sends it to a closed caption encoder if your station uses such a device
to broadcast scripts for the hearing-impaired. Closed captioning text does not appear in the
teleprompter, nor does it affect how the system calculates the read time.
nThe system sends the default text style to both the teleprompter and to any closed caption encoder
used at the station.
In the mobile application, a toolbar provides buttons that let you modify the format of the text into
bold text, italicized text, and underlined text, and lets you format text specialized for broadcast
scripts.
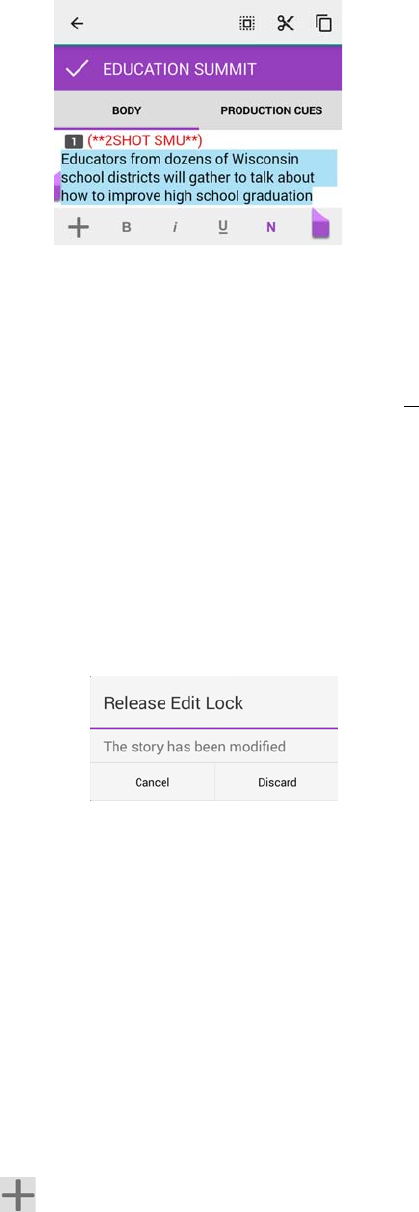
Working with Stories
575
To format text, tap and hold to select the appropriate text and do one of the following:
tTo bold text, and then select the B button.
tTo italicize test, and then select the I button.
tTo underline text, and then select the U button.
tTo mark text as a normal text, and then select N for normal.
tTo mark text as a presenter instruction, and then select P for presenter.
nYou can choose the format before typing your text as well. Any new text you type appears in the
format you selected. To change the format of the text you type at any time, select another format.
If you tap the Back button when you have turned off the Autosave Stories option in the settings,
a message appears asking you to confirm whether to save the changes. You can choose to save
the story or exit edit mode without saving your changes.
Adding Production Cues
When you format a story as a script for a news broadcast, you can add production cues to provide
valuable information to technical staff as well as machine control commands for devices, such as
character generators.
You add production cues to scripts from the Story area and edit them in the Cue List area of the Script
Editor. When added to a script, each production cue has an associated number. The number appears
as a production cue marker in the script, which corresponds to the insertion location of the production
cue’s text box in the Cue List.
To insert a production cue into a script:
1. Position your cursor in the story where you want to insert the production cue marker.
2. Tap the Plus button.
The MediaCentral mobile application adds a production cue marker with a number into the story
at the cursor position. The marker corresponds to the production cue with the same number
located in the Cue List.
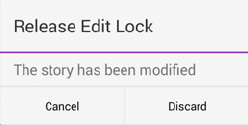
Working with Stories
576
3. Swipe left to view the Cue List and edit the production cue.
4. Enter the production cue information — for example, Take VO, On Camera, Take SOT, or Take
Live.
The application automatically saves information in the newly inserted production cue when you
navigate elsewhere within the application. If you tap the Back button when you have turned off
the Autosave Stories option in the settings, a message appears asking you to confirm whether to
save the changes. You can choose to save the story or exit edit mode without saving your
changes.
Adding Machine Control Instructions
If your station integrates with a broadcast control system, such as iNEWS Command, the production
cues might include machine control instructions.
You should write your instructions in a format that begins with a command for a device — for
example, CG for a character generator. After the command the format specifies a particular item or
template, such as 2line for a template that contains two lines for fulfillment data. Additional
information or comments follow on succeeding lines in the same production cue text box.
The following procedure uses the example of a machine control instruction for a 2-line character
generator graphic. The first line calls up the correct template and the subsequent lines of text provide
the fulfillment data that appears in the graphic.
To add machine control instructions for a CG event:
1. Add or open a production cue in the script.
2. Swipe left to view the Cue List with your production cue.
3. Select MC, and then type your machine control command — for example,
CG 2line
— and
then press Return.
An asterisk (*) is automatically added and your text appears as blue font.
4. Type the first line of text that should appear on the 2-line CG graphic — for example,
John
Smith
— and then press Return.
5. Type the second line of text for the 2-line CG graphic — for example,
Pleasantville, USA
.
Your CG machine control instruction appears in blue font.
Working with Links in Stories
A story can contain simple text as well as Web page URL. When Web links are included in stories,
they become dynamic links. You can use them to open your device’s browser.
nYou cannot add a link to a Web page using the MediaCentral mobile app.

Using Presenter Mode
577
To open a Web link from a story:
tTap the link in the story.
The device’s Web browser opens and loads the Web page.
Using Presenter Mode
The MediaCentral UX mobile app lets users view a show's scripts in a page-by-page layout, similar
to printed scripts used by news presenters. This method of viewing stories from a rundown is known
as presenter mode. When in presenter mode, MediaCentral UX automatically updates stories and
story positions in a rundown, although it ignores updates for the currently viewed story. If a different
user makes changes to the stories in the rundown, MediaCentral UX automatically updates them in
the background.
Also, MediaCentral UX caches stories locally on the tablet for offline use while you work in
presenter mode. This allows you to continue working if you lose your connection to the server as
long as you remain in presenter mode. However, if you lose the connection to your server, updates do
not occur.
nThe MediaCentral UX mobile app for Android devices supports presenter mode only on tablets.
To enter presenter mode:
1. Open a show's rundown.
2. Tap the Presenter Mode button.
Presenter mode opens on the story selected by the user in the sidebar.
Stories load in the following order:
- Load the previous story — the one before the selected story in the rundown.
- Load the next story — the one after the selected story in the rundown.
- Load the second story before the selected story in the rundown.
- Load the second story after the selected story in the rundown.
- Continue loading stories before and after the selected story incrementally throughout the rest
of the rundown.

MediaCentral | UX and Interplay | Production
578
To navigate through scripts in presenter mode:
tSwipe left to go to the next page.
tSwipe right to go to the previous page.
nWhen you swipe right or left from the first or last page of a story, the display moves to the next story
in the rundown.
To exit presenter mode:
tTap the Back button.
You can customize the appearance of text in presenter mode by modifying some MediaCentral UX
settings. Additionally, you can opt to skip blank stories while in presenter mode. For more
information, see “Customizing MediaCentral | UX Settings” on page 564.
MediaCentral | UX and Interplay | Production
You can access media assets stored in an Interplay Production database, such as video clips, audio
clips, and subclips. When viewed with the mobile app, available Interplay Production systems appear
in the sidebar, along with any of their directories and media assets.
Different icons are used to identify Interplay Production assets:
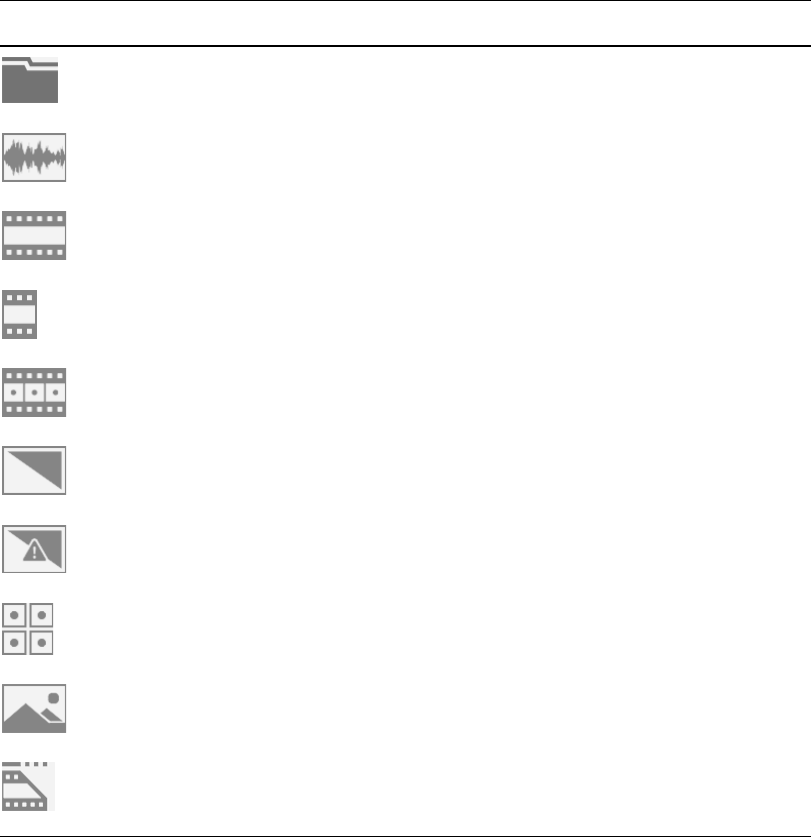
MediaCentral | UX and Interplay | Production
579
nWhile viewing an Interplay Production directory in the Directory panel, you can tap the Up button to
display to the navigation drawer. You can also tap the Back button to navigate back through the
directory.
You can open directories and media assets from the MediaCentral mobile application. Directories
open within the Directory panel. When you tap a media asset, it displays in the Media viewer.
Viewing Media Assets with MediaCentral | UX
You can open directories and media assets stored in the Interplay Production database using
MediaCentral UX. Directories and a list of assets open within the Directory panel. You can view and
play assets in the Media viewer.
Icon Description
Directories hold media assets or other subdirectories.
An audio clip references audio media files formed from captured audio or imported files.
Audio clips display in the Media viewer as an audio clip icon.
A master clip references audio and video media files formed from captured footage or
imported files.
A subclip references a selected portion of a master clip.
A sequence represents an edited program, partial or complete, that you create from other
clips.
A clip that references an effect media file generated when you render an effect. You cannot
preview an effect clip in the Media viewer.
An effect clip that references an unrendered effect that you create, including motion effects.
You cannot preview an effect clip in the Media viewer.
A group clip contains two or more grouped clips, strung together sequentially according to
common timecodes. You cannot preview a group clip in the Media viewer.
A graphics clip references an image imported from a graphics file. You cannot preview a
graphics clip in the Media viewer.
An in-progress (edit while capture or EWC) clip references a clip you create using Frame
Chase capture capabilities, either on an Avid editing application or with a line feed or ingest
device such as an Avid AirSpeed.
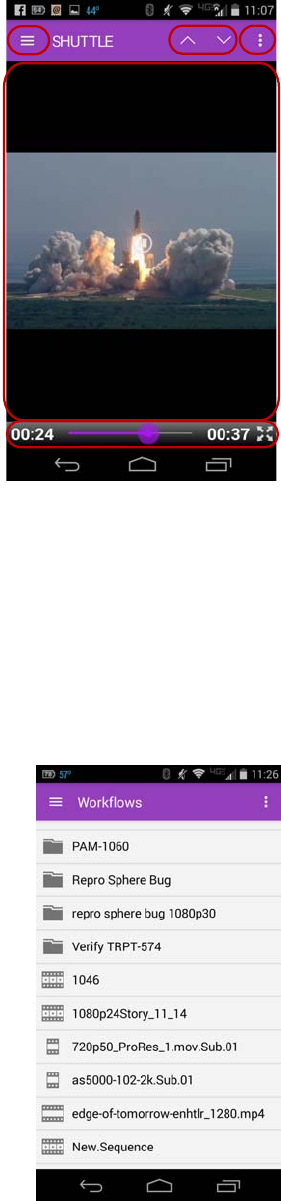
MediaCentral | UX and Interplay | Production
580
Media viewer — top: Up button, Previous/Next buttons; Action overflow button; middle: Media player; bottom: Media
controls
To open a directory:
1. Tap the Interplay server in the Navigation drawer you want to use, and then tap items in the
Directory panel to navigate to the directory.
2. Tap a folder on screen to open it.
The following illustration shows the Workflows directory opened to view multiple subdirectories
and media assets.

MediaCentral | UX and Interplay | Production
581
To back out of a directory:
tTap the Back button on your Android device.
To open and play a media asset:
1. Tap in the Directory panel to navigate to the asset in a directory.
2. Tap the video or audio asset.
The asset opens in the Media viewer.
Media controls: Play button, position indicator, Full Screen button
3. Tap the Play button to play the asset.
4. If you want to scrub through the media asset, or if you want to jump to a specific position in the
clip, tap and hold the position indicator and drag it to a new location.
5. If you want to view a video clip in full screen mode, tap the Full Screen button.
The Media viewer expands to fill the tablet screen and the video clip starts playing.
6. If you want to view the previous or next video or audio asset in the Asset pane, tap the Previous
or Next button.
Troubleshooting Video Playback Problems on the Android Device
If you experience playback problems with the MediaCentral Android app, you can try to reload the
asset. This forces the MediaCentral server to reload the full video clip and begin streaming it again.
You can also try playing the asset in a browser to determine if the problem is related to the app or
your connection, or if the problem exists with the MediaCentral server.
To play an asset in a browser:
1. Start the MediaCentral UX mobile app.
2. Tap the Action overflow button, and then select Settings.
The Preferences window opens.
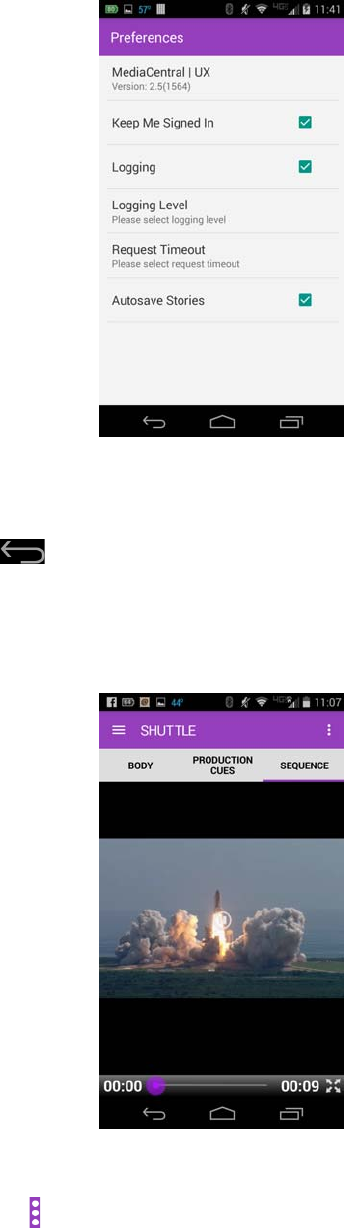
MediaCentral | UX and Interplay | Production
582
3. Select Logging to enable logging.
4. Tap Logging Level and then select Verbose.
5. Click the Back button to return to MediaCentral UX.
6. Navigate to an asset in one of the directories.
7. Tap the video asset.
The asset opens in the Media viewer.
8. Tap the Play button to play the asset, and make a note of the time playback begins.
9. Click the Action overflow button and select Send Log to send an e-mail with the log file directly
to an e-mail account.
The MediaCentral Log dialog box opens, displaying your e-mail and text options.
Using Markers
583
10. Tap the icon for the app you want to use to send the log.
The app opens on your Android device.
11. Send the log to your e-mail account.
12. Open the e-mail on your system, and then use a text editor to open the attached log file.
13. Find a link with .m3u8 suffix that is located on the line marked with the time playback started —
for example:
07-02 16:15:29.830 [ . . . ] http://123.45.678.910/download/
0e41028f99738669c581c50388e80d36/060a2b340101010101010f0013-000000-
92dede5ab6034faa-b737d720c291-4093_1920x1080-
fps25.00_from_0_to_7501_quality_0_video_-1_audio_-1_h264_aac_ts_.m3u8
14. Copy this link, and then paste it into the address field in a browser.
15. Edit link in address field by typing
-WIFI
before the .m3u8 suffix — for example:
http://123.45.678.910/download/0e41028f99738669c581c50388e80d36/
060a2b340101010101010f0013-000000-92dede5ab6034faa-b737d720c291-
4093_1920x1080-fps25.00_from_0_to_7501_quality_0_video_-1_audio_-
1_h264_aac_ts_-WIFI.m3u8
n“WIFI” is case-sensitive.
16. Press Enter to go to the URL in the address field.
nThe Safari browser supports native playback for .m3u8 files. Other browsers — for example,
Chrome, Firefox, Internet Explorer, or Opera — do not. If you are not working on a computer
running Mac OS X, you can use your browser to download the file to your system and play it in a
media player that support .m3u8 video files.
17. Play back the asset.
If playback produces the same problem seen when you played the asset on your mobile device,
the source of the problem is the MediaCentral server and not the app. If the asset plays back
without issues, then the source of the problem is the mobile app, your connection, or your device.
Using Markers
A marker is an indicator that is added to a selected frame to mark a particular location in a clip,
subclip, or sequence. Markers can have icons of different colors and can be associated with user-
defined comments. Markers display in the timeline and in the Markers list below the Media viewer.
The MediaCentral UX mobile application for Android devices allows you to review markers added
through MediaCentral UX (browser, desktop, or iOS mobile), Media Composer, or other supported
applications.
The following image and table describe the Marker feature added with MediaCentral UX mobile for
Android v2.10:
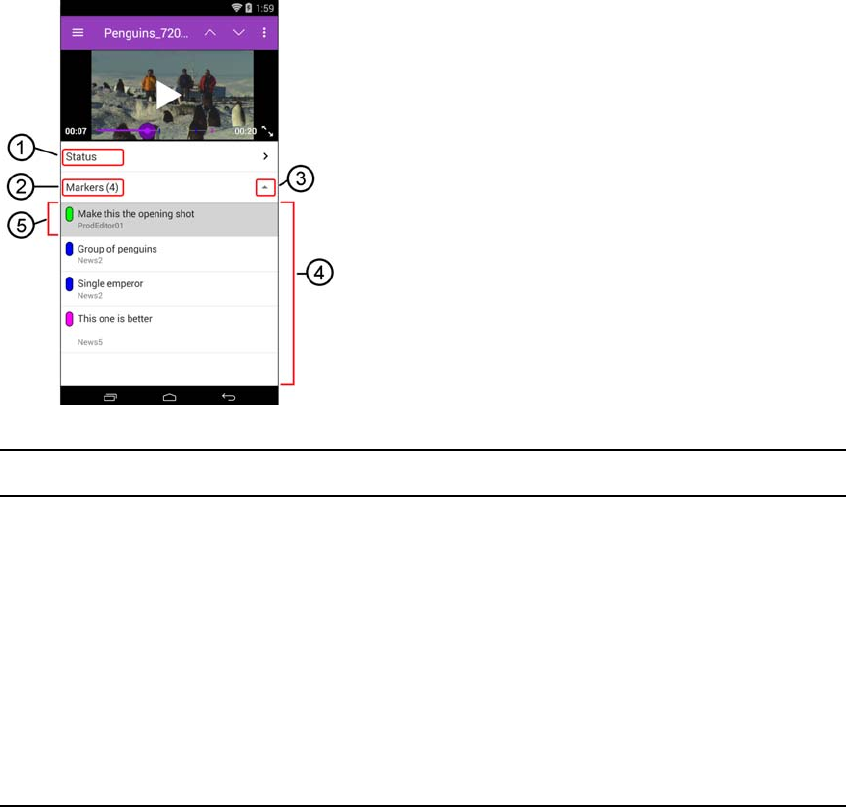
Using Markers
584
nMarkers are supported through the MediaCentral UX mobile application when connecting to
MediaCentral servers running v2.6 and later.
When opening an asset that contains one or more markers, a list appears under the Media viewer.
Each marker is indexed in chronological order according to the asset’s time code. Each marker is
displayed with its icon color, comments (if applicable), and name of the user that created it. If an
asset does not contain any markers, the list is replaced with a message indicating that no markers
exist for the selected asset.
nThe Marker list only appears on Android phones when in portrait mode. Tablets support markers in
both portrait and landscape.
In a collaborative workflow where another user is adding new markers to the asset, the mobile user
can swipe down on the list to refresh the connection and access the newly created markers.
Display Description
1 Status bar Displays the status of the asset. This bar is only visible if your
Interplay Production configuration supports approval — see “Setting
the Approval Status for Assets” on page 585.
2 Marker count Displays the number of markers associated with this asset.
3 Show/Hide Marker list button Expands or collapses the Marker list.
4 Marker list A list of the markers in the clip or sequence. Markers are sorted by
timecode. You can scroll the list to see all markers.
5 Active marker When selected, the marker is highlighted in the list. Additionally, the
Media viewer’s playhead advances to the position of the marker and
pauses playback.
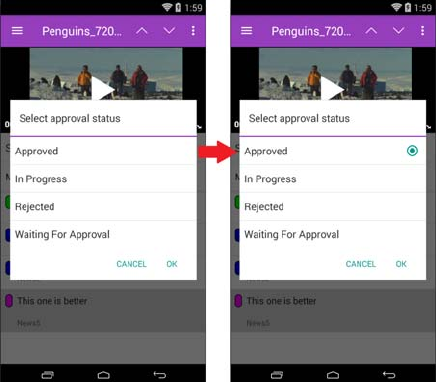
Setting the Approval Status for Assets
585
Setting the Approval Status for Assets
When enabled through the Interplay Administrator tool, a Status bar introduced in MediaCentra UX
Mobile for Android v2.10 appears between the Media viewer and the Markers list. Tapping the Status
bar displays the “Select approval status” window:
As shown in the image on the left, assets are not associated with a default status.
The approval status window displays a list of options that can be customized as desired. When the
user taps an item in the list, a green circle appears to the right of the selection. Tapping OK saves the
selection.
To access the Status bar, your system administrator needs to create a custom property in Interplay
Administrator named “Approval_Process” and import a manually created XML file that includes
the status options. The options described in this example are: Approved, In Progress, Rejected, and
Waiting for Approval.
cWhile the value names can be customized, the custom property in the Interplay Administrator
must be called “Approval_Process”.
To create the approval status XML file:
1. On a desktop system, create a new text file with an application such as Windows Notepad.
2. Add the following information to the text file:
<?xml version="1.0" encoding="UTF-8"?>
<!DOCTYPE values SYSTEM "custom_attributes.dtd">
<values description="Approval Process">
<value name="In Progress"/>
<value name="Waiting For Approval"/>
<value name="Approved"/>
<value name="Rejected"/>
</values>
Setting the Approval Status for Assets
586
In the example above, the text for each value name (“In Progress”, “Waiting For Approval”, etc)
is presented to the Mobile app user when selecting a status. If desired, the value names can be
customized to accommodate local workflows.
3. Save the text file with an XML extension as in the following example:
approval.xml
4. Import the XML file to the “Approval_Process” custom property that was created in the Interplay
Administrator.
For more information, see “Adding a Custom Property” in the Avid Interplay Engine and
Interplay Archive Engine Administration Guide.

AUser Settings
You can access and modify user settings in the User Settings dialog box. To open the User Settings
dialog box, select Home > User Settings.After you change a user setting, click Apply to save your
changes.
The following table describes these user settings.
Settings Group Setting Description
General Language Controls the language used for the Web application
user interface. Select the language you want from the
drop-down menu.
Time Zone Controls the display of dates and times. This setting
is used by the indexed search in MediaCentral UX to
display dates and other formatted data according to
your selection. Select the time zone you want from
the drop-down menu.
nThe default time zone is set by the
MediaCentral UX administrator in the System
Settings.The default setting is “Use System
Timezone,” which uses the time zone that is set
by the computer’s operating system.
Date Format Works with the time zone setting to display dates and
times according to your selection. Select the format
you want from the drop-down menu.
nThe default date format is set by the
MediaCentral UX administrator in the System
Settings..For more information, see the
MediaCentral | UX Administration Guide.
Password Changes the password for your MediaCentral UX
account. The new credentials are not in effect until
you sign out and sign in again.
iNEWS iNEWS Credentials Sets the user name and password for access to the
Avid iNEWS server. The user name and password
must match the user name and password of an
iNEWS account.
An option lets you set your MediaCentral UX user
name and password to access the iNEWS server.
Sequence: Autoload Sequence Determines if a script sequence is automatically
opened in the Sequence pane and Media pane if its
associated iNEWS story is opened.

588
Interplay | Production Interplay Production credentials Sets the user name and password for access to the
Interplay Production server. The user name and
password must match the user name and password of
an Interplay Production account.
An option lets you set your MediaCentral UX user
name and password to access the Interplay
Production server.
Search Result Filter: Show only one
representation for each asset found
Sets that only one representation (link) for an asset
should be shown in the Interplay Production search
results. Selecting this option can improve the search
response time.
Search Criteria: Time Range Sets the time range for an asset’s created or modified
date when you perform a search of the Interplay
Production database. The default setting is “Last 14
days.” A small time range can improve the search
response time.
This setting is used for a search unless you specify a
range using the search criteria Modified Date. For
more information, see “Conducting a Search” on
page 270.
Referenced Assets Determines if referenced assets are displayed in the
Assets tab. Referenced assets are assets that are
referenced by another asset in the same Interplay
Production folder, such as clips that are included in a
sequence. The default is to hide referenced assets.
Media | Distribute User Profile Name Lists the Media Distribute profiles for publication
types — for example, Twitter or Facebook. You can
use this settings group to create personal accounts for
Media Distribute publication.
Messages and Sharing Email Forwarding Enables or disables e-mail forwarding. When you use
the Messages pane to send messages, e-mail
forwarding allows you to receive messages at the
specified e-mail address when you are not logged in
to MediaCentral UX.
MOS MOS: MOS enabled (Chrome 44 and earlier only) Enables use of MOS
plug-ins, such as the Avid Deko Select plug-in.
For more information, see “Using Plug-ins and MOS
Integration” on page 34 and the documentation for
your plug-in.
Settings Group Setting Description

589
Send to Playback Preserve Overwrite State (MediaCentral UX v2.7 and later) Determines
whether the state of the Overwrite option in the Send
to Playback Settings (opened from the Media Pane
menu) persists between STP operations.
• If the check box is selected, the state of the
Overwrite setting persists between STP
operations.
• If the check box is unselected, the state of the
Overwrite setting is reset to off after each STP
operation.
nIf the Overwrite setting is selected, an STP
operation overwrites any sequence with the
same video ID already sent to the playback
device.
Sequence Effects: Dissolve Duration Sets the default duration for video dissolves that can
be used to transition between segments in a sequence.
By default, the duration is set to 20 frames. You can
override the default when you apply a dissolve to a
sequence.
Timeline: Enable paging Enables a paging display during playback in the
Sequence Timeline. This feature is useful when you
are zoomed in to a sequence and you want to display
the area around the position indicator. For more
information, see “Timeline Paging During Playback”
on page 132.
Thumbnails Generate thumbnails in the
background
If the Thumbnails pane is open, MediaCentral UX
continues to populate the pane with images if the
pane is in the background (open but hidden behind
another pane).
To optimize performance, you can disable generation
of thumbnails if the pane is in the background by
clearing the check box.
Settings Group Setting Description

BKeyboard Shortcuts
The following main topics provide information about keyboard shortcuts:
•Queue/Story Pane Shortcuts
•Assets Pane Shortcuts
•Media Pane Shortcuts
•Logging Pane (Interplay | Production) Shortcuts
•Logging Pane (Interplay | MAM) Shortcuts
•Sequence Pane Shortcuts
•Closed Captioning Pane Shortcuts
nThese keyboard shortcuts can be used on Windows systems or Macintosh systems, unless otherwise
noted. The Macintosh generally uses the Command key in place of the CTRL key, however, you can
still use the CTRL key shortcut. For example, on a Macintosh, you can save a story by pressing either
CTRL+S or Command+S.
nSafari on the Macintosh currently has a known issue with Command (CMD) keyboard shortcuts. In
some cases complex key combinations with more that one additional key (CMD+J+K) fail to register
correctly when one of the additional keys is held for a longer time. This should not occur if all keys
are pressed approximately at the same time and released immediately.
Using the Tab Key in a Browser Window
By default, the Tab key works differently in Chrome and Safari:
• In both browsers, you can use the Tab key to move from one text field to the next text field.
• In Chrome, you can also use the Tab key to move from one screen object to the next, such as
tabbing from a text field to a button. To match this behavior in Safari, do one of the following:
-Use Option+Tab
- In the Preferences > Advanced settings panel, select the following setting: “Press Tab to
highlight each item on a Webpage.”
The behavior described for Chrome also applies to Chrome Frame in Internet Explorer.

Queue/Story Pane Shortcuts
591
Queue/Story Pane Shortcuts
Keyboard shortcuts available when working in the Queue/Story pane are listed in the following table.
Some keystroke combinations only work when the cursor is located in a certain section of the pane;
the Focus column in the table specifies the section of the pane when that is the case. For more
information on the pane and its sections, see “The Queue/Story Pane” on page 87.
Shortcut Description Focus
Ctrl+S Save story Queue/Story pane
Ctrl+E Toggle the story’s edit lock on and off Queue/Story pane
Shift+Left Arrow Select text one character at a time moving backward Story
Shift+Right Arrow Select text one character at a time moving forward Story
Shift+Up Arrow Select text one line at a time moving upward Story
Shift+Down Arrow Select text one line at a time moving downward Story
Ctrl+] Split the segment Story
Ctrl+X Cut selection Story
Ctrl+C Copy selection Queue/Story pane
Ctrl+V Paste selection Story
Ctrl+Z Undo previous change Queue/Story pane
Ctrl+Y Redo previous change Queue/Story pane
Ctrl+B Set selected text to bold Story
Ctrl+I Italicize selected text Story
Ctrl+U Underline selected text Story
Ctrl+Alt+P Turn on Presenter Instruction mode or mark selected
text as presenter instructions
Story
Alt+Insert Insert production cue Story
Ctrl+Alt+M Mark selected text as machine control instructions Cue List
Ctrl+Alt+C Turn on Closed Captioning mode or mark selected text
as closed captioning text
Story
Ctrl+Alt+N Turn on Normal text mode or change selected text to
normal font
Story
Ctrl+Alt+G Create a Story Group Queue/Story pane
Ctrl+Alt+V Dissolve a Story Group Queue/Story pane
Tab Move to next form field Story Form
Shift+Tab Move to previous form field Story Form

Assets Pane Shortcuts
592
Assets Pane Shortcuts
Keyboard shortcuts available when working with the Assets pane are listed in the following table. For
more information on the pane and its sections, see “Working with Assets” on page 39.
nIn MediaCentral UX V1.2 and earlier, pressing the Return key on a Macintosh loaded a selected
asset into the Media Pane. In MediaCentral UX V1.3 and later, pressing the Return key lets you
rename an item.
nIn MediaCentral UX V1.3 and later, there is currently no keyboard shortcut for loading a selected
asset into the Media pane (Windows or Macintosh). Double-click the asset to load it into the Media
pane.
Media Pane Shortcuts
Keyboard shortcuts available when working with the Media pane are listed in the following tables.
For more information on the pane and its sections, see “The Media Pane” on page 191.
Shortcuts with Focus in the Media Pane
The following table lists shortcuts you can use when the focus is in the Media pane.
Shortcut Description Focus
Up Arrow Move the selection highlight up and select an item. Assets pane
Down Arrow Move the selection highlight down and select an item. Assets pane
Right Arrow Expand a folder Assets pane
Left Arrow Collapse a folder Assets pane
F2 (Windows)
Return (Macintosh)
Rename an asset or folder. Assets pane
Shortcut Description Focus
Space bar Play or pause play. Media pane
Home
fn+Left Arrow (MacBook)
Move to the beginning of a clip or sequence. Media pane
End
fn+ Right Arrow (MacBook)
Move to the end of a clip or sequence. Media pane
I
E
Insert an In point. Media pane
O
R
Insert an Out point. Media pane
Left Arrow Move 1 frame back Media pane
Right Arrow Move 1 frame forward Media pane

Media Pane Shortcuts
593
Shortcuts with Focus Outside the Media Pane
The following table shows keyboard shortcuts you can use to control playback when focus is not in
the Media pane, for example, when you are logging in the Logging pane.
nSome keyboard shortcuts work differently when you are working in the Logging pane in edit mode.
See “Logging Pane (Interplay | Production) Shortcuts” on page 595.
nSome keyboard shortcuts work differently when you are working in the Sequences pane. See
“Sequence Pane Shortcuts” on page 601.
Down Arrow Zoom in to a section of the timeline by 50 percent. Media pane
Up Arrow Zoom out from a section of the timeline by 50 percent. Media pane
Shift+Up Arrow Zoom to show the entire sequence Media pane
J, K, L See “Using the J-K-L Keys for Playback” on
page 200.
Media pane
Ctrl+Shift+Left Arrow Go to the previous marker. Media pane
Ctrl+Shift+Right Arrow Go to the next marker. Media pane
Alt+Left Arrow Move 10 seconds back Media pane
Alt+Right Arrow Move 10 seconds forward Media pane
Alt+E
Alt+I
Q
Go to In point Media pane
Alt+R
Alt+O
W
Go to Out point Media pane
Esc Switch between Asset mode and Output mode Media pane
Enter (Windows)
Return (Macintosh)
Select the timecode display to enable keyboard entries. Media pane
S Open the Select Folder for Subclip dialog box. Media pane
Group clip shortcuts
Alt+1 through Alt+9 Select the active angle of a group clip. These
keystrokes apply only to camera angles 1 through 9.
nIn a multi-angle view, camera angles are
numbered from upper left and left to right.
Media pane
Alt+Up Arrow Select the previous angle of a group clip in the current
bank.
Media pane
Alt+Down Arrow Select the next angle of a group clip in the current
bank.
Media pane
Alt+, (comma) Display the previous bank of camera angles Media pane
Alt+. (period) Display the next bank of camera angles Media pane
Shortcut Description Focus

Media Pane Shortcuts
594
Shortcut Description Focus
Ctrl +space bar Play or pause play. Global
Ctrl+Home
fn+Left Arrow (MacBook)
Move to the beginning of a clip or sequence. Global
Ctrl+End
fn+Right Arrow (MacBook)
Move to the end of a clip or sequence. Global
Ctrl+I Insert an In point. Global
Ctrl+O Insert an Out point. Global
Ctrl+Left Arrow Move 1 frame back
nOn Macintosh systems, to use Ctrl+Left Arrow
or Ctrl+Right Arrow to move 1 frame, you need
to deselect the Mission Control option in
System Settings > Keyboard. By default, Ctrl+
arrow key will switch you one space in the
direction of the arrow key selected.
nThis shortcut does not work when you are
typing text into a marker (edit mode).
Global
Ctrl+Right Arrow Move 1 frame forward
nThis shortcut does not work when you are
typing text into a marker (edit mode).
Global
Ctrl+Down Arrow Zoom in to a section of the timeline by 50 percent. Global
Ctrl+Up Arrow Zoom out from a section of the timeline by 50
percent.
Global
Ctrl+J, Ctrl+K, Ctrl+L See “Using the J-K-L Keys for Playback” on
page 200.
Global
Ctrl+Shift+Left Arrow Go to the previous marker. Global
Ctrl+Shift+Right Arrow Go to the next marker. Global
Ctrl+Alt+Left Arrow Move 10 seconds back Global
Ctrl+Alt+Right Arrow Move 10 seconds forward Global
Ctrl+Alt+E, Ctrl+Alt+I Go to In point Global
Ctrl+Alt+R, Ctrl+Alt+O Go to Out point Global
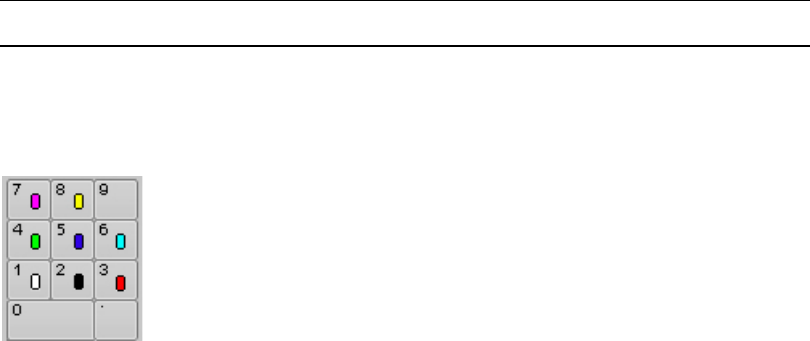
Logging Pane (Interplay | Production) Shortcuts
595
Logging Pane (Interplay | Production) Shortcuts
For shortcuts that you can use to control playback while logging, see “Shortcuts with Focus Outside
the Media Pane” on page 593.
Shortcuts for Working with Markers
Some of the following keystroke combinations work when the cursor is anywhere in the application
and others work only when the cursor is located in the Logging pane. The Focus column in the table
describes the focus required for each keystroke combination.
Shortcut Description Focus
Ctrl+M (Windows and Macintosh)
Command+M (Macintosh)
Create a new marker Global
Ctrl +number (top-row or numeric
keypad)
Create a marker and set the icon color as
follows:
• Ctrl+0: Last color picked. If no previous
color was selected in a session, the color is
white.
• Ctrl+1: White
• Ctrl+2: Black
• Ctrl+3: Red
• Ctrl+4: Green
• Ctrl+5: Blue
•Ctrl+6: Cyan
• Ctrl+7: Magenta
• Ctrl+8: Yellow
The NumLock state must be enabled to use these
commands on the numeric keypad.
Global
Delete key (Windows)
Backspace key (Macintosh)
fn+Backspace key (MacBook)
Delete the selected marker or markers Logging pane
Up Arrow Move to and select previous marker Logging pane
Down Arrow Move to and select next marker Logging pane
Left Arrow Move left one column and then up to next
marker
Logging pane
Right Arrow Move right one column and then down to next
marker
Logging pane
Enter Enter edit mode Logging pane
Ctrl+Enter (Windows and Macintosh)
Command+Enter (Macintosh)
Exit edit mode and save Logging pane
Esc Exit edit mode without saving Logging pane

Logging Pane (Interplay | Production) Shortcuts
596
Shortcuts for Working with Marker Text
The following table lists keyboard shortcuts that you use while working with marker text in edit
mode.
n“Edit mode” refers to the mode in which the Notes column is selected and the insert bar is displayed.
Ctrl+S (Windows and Macintosh)
Command+S (Macintosh)
Save markers and text without exiting edit mode Logging pane
F5 Reload the content of the Logging pane Logging pane
Shortcut Description Focus
Shortcut Description Focus
Enter, Alt+Enter Create a line break Logging pane
Ctrl+Left Arrow (Windows)
Alt+Left Arrow (Macintosh)
Go to previous word Logging pane
Ctrl+Right Arrow (Windows)
Alt+Right Arrow (Macintosh)
Go to next word Logging pane
Up Arrow Go to previous line Logging pane
Down Arrow Go to next line Logging pane
Ctrl+Shift+Up Arrow (Windows)
Alt+Shift+Up Arrow (Macintosh)
Select previous paragraph Logging pane
Ctrl+Shift+Down Arrow (Windows)
Alt+Shift+Down Arrow (Macintosh)
Select next paragraph Logging pane
Ctrl+Shift+Home (Windows)
Ctrl+Shift+Pos1 (Windows)
Command+Shift+Up Arrow
(Macintosh)
Select text from the beginning to the current
position
Logging pane
Ctrl+Shift+End (Windows)
Command+Shift+Down Arrow
(Macintosh)
Select text from the current position to the end Logging pane
Shift+Left Arrow Select text one character at a time moving
backward
Logging pane
Shift+Right Arrow Select text one character at a time moving
forward
Logging pane
Ctrl+Shift+Left Arrow (Windows)
Alt+Shift+Left Arrow (Macintosh)
Select text one word at a time moving backward Logging pane
Ctrl+Shift+Right Arrow (Windows)
Alt+Shift+Right Arrow (Macintosh)
Select text one word at a time moving forward Logging pane
Shift+Up Arrow Select text one line at a time moving upward Logging pane
Shift+Down Arrow Select text one line at a time moving downward Logging pane

Logging Pane (Interplay | MAM) Shortcuts
597
For more information on the Logging pane and its sections, see “The Logging Pane for
Interplay | Production Assets” on page 296.
Logging Pane (Interplay | MAM) Shortcuts
For shortcuts that you can use to control playback while logging, see “Media Pane Shortcuts” on
page 592.
Shortcuts for Working with Segments
Some of the following keystroke combinations work when the cursor is anywhere in the application
and others work only when the cursor is located in the Logging pane. The Focus column in the table
describes the focus required for each keystroke combination.
Ctrl+A (Windows)
Command+A (Macintosh)
Select all text Logging pane
Delete key Delete one letter or space forward Logging pane
Backspace key Delete one letter or space backward Logging pane
Ctrl+X Cut selection Logging pane
Ctrl+C Copy selection Logging pane
Ctrl+V Paste selection Logging pane
Ctrl+Shift+D (Windows)
Command+Shift+D (Macintosh)
Change the direction of the text (right-to-left or
left-to-right)
Logging pane
Shortcut Description Focus
Shortcut Description Focus
Ctrl+M (Windows and Macintosh)
Command+M (Macintosh)
Create a new segment with the given In and Out
marks
Global
Ctrl+Shift+M Create a new segment: Sets the In mark at the
current playhead position but does not define an
Out mark
Global
Ctrl+Alt+M Close the segment by setting an Out mark at
current the playhead position
Global
Tab key Create a new segment with the given In and Out
marks
Logging pane
Ctrl+E Split segment Logging pane
Ctrl+Z Undo segment operation Logging pane
Ctrl+Y Redo segment operation (see above) Logging pane
Insert key Opens the Tag selector window to add a tag to a
single segment or multiple segments at once
(requires selecting multiple segments first using
Ctrl+click or Shift+Click)
Logging pane

Logging Pane (Interplay | MAM) Shortcuts
598
Shortcuts for Working with Segment Text
The following table lists keyboard shortcuts that you use while working with segment text in edit
mode.
n“Edit mode” refers to the mode in which the text field of a segment is activated for text input
(indicated by white field color).
Delete key (Windows)
Backspace key (Macintosh)
fn+Backspace key (MacBook)
Delete the selected segment or segments Logging pane
Up Arrow Move to and select previous segment Logging pane
Down Arrow Move to and select next segment Logging pane
Left Arrow If the segment contains several properties, move
to the previous property field
If the segment contains only one property field,
move to and select previous segment
Logging pane
Right Arrow If the segment contains several properties, move
to the next property field
If the segment contains only one property field,
move to and select next segment
Logging pane
Enter Enter edit mode (text field) or open Tags selector
window (tags field)
Logging pane
Ctrl+Enter (Windows and Macintosh)
Command+Enter (Macintosh)
Exit edit mode and save (when the focus is in a
text field)
Logging pane
Esc Exit edit mode or close Tag selector window
without saving
Logging pane
Ctrl+S (Windows and Macintosh)
Command+S (Macintosh)
Save segment and text without exiting edit mode Logging pane
F5 Reload the content of the Logging pane Logging pane
Shortcut Description Focus
Shortcut Description Focus
Enter Create a line break Logging pane
Up Arrow Go to previous line Logging pane
Down Arrow Go to next line Logging pane
Home or Pos1 (Windows) Go to the beginning of the current line Logging pane
End (Windows) Go to the end of the current line Logging pane
Ctrl+Shift+Up Arrow (Windows)
Alt+Shift+Up Arrow (Macintosh)
Select previous paragraph Logging pane

Logging Pane (Interplay | MAM) Shortcuts
599
Ctrl+Shift+Down Arrow (Windows)
Alt+Shift+Down Arrow (Macintosh)
Select next paragraph Logging pane
Ctrl+Shift+Home (Windows)
Ctrl+Shift+Pos1 (Windows)
Command+Shift+Up Arrow
(Macintosh)
Select text from the beginning to the current
position
Logging pane
Ctrl+Shift+End (Windows)
Command+Shift+Down Arrow
(Macintosh)
Select text from the current position to the end Logging pane
Shift+Left Arrow Select text one character at a time moving
backward
Logging pane
Shift+Right Arrow Select text one character at a time moving
forward
Logging pane
Ctrl+Shift+Left Arrow (Windows)
Alt+Shift+Left Arrow (Macintosh)
Select text one word at a time moving backward Logging pane
Ctrl+Shift+Right Arrow (Windows)
Alt+Shift+Right Arrow (Macintosh)
Select text one word at a time moving forward Logging pane
Shift+Up Arrow Select text one line at a time moving upward Logging pane
Shift+Down Arrow Select text one line at a time moving downward Logging pane
Ctrl+A (Windows)
Command+A (Macintosh)
Select all text Logging pane
Delete key Delete one letter or space forward Logging pane
Ctrl+Delete key Delete one word forward Logging pane
Backspace key Delete one letter or space backward Logging pane
Ctrl+Backspace key Delete one word backward Logging pane
Ctrl+X Cut selection Logging pane
Ctrl+C Copy selection Logging pane
Ctrl+V Paste selection Logging pane
Ctrl+Shift+D Change the direction of the text (right-to-left or
left-to-right)
Logging pane
Shortcut Description Focus

Logging Pane (Interplay | MAM) Shortcuts
600
Shortcuts for Working with Segment Tags
The following table lists keyboard shortcuts that you use while working with segment tags.
Shortcut Description Focus
Down Arrow Set focus from search field into list of properties/
tags selecting the first item in the (filtered) list
Tags selector
window
Enter Open input control for the selected property Tags selector
window
Esc Close Tags selector window without inserting a
tag
Tags selector
window
Enter Insert selected value as tag All input
controls
Alphabetic key Navigate to the first element beginning with the
typed letter
Thesaurus
Tab Autocomplete the typed word Thesaurus
Up Arrow Select previous thesaurus entry Thesaurus
Down Arrow Select next thesaurus entry Thesaurus
Right Arrow Expand thesaurus node Thesaurus
Left Arrow Collapse thesaurus node Thesaurus
Alphabetic key Navigate to the first element beginning with the
typed letter
Legal list
Tab Autocomplete the typed word Legal list
Up Arrow Select previous list entry Legal list
Down Arrow Select next list entry Legal list
Alphabetic key Navigate to the first element beginning with the
typed letter
Master data
Up Arrow Select previous list entry Master data
Down Arrow Select next list entry Master data
Down Arrow Opens the calendar control Date or Date/
Time field
Spacebar Insert current day Calendar
Ctrl+Up Arrow Go to previous year Calendar
Ctrl+Down Arrow Go to next year Calendar
Ctrl+Left Arrow Go to previous month Calendar
Ctrl+Right Arrow Go to next month Calendar
Up Arrow Select the highlighted day a week ago Calendar
Down Arrow Select the highlighted day next week Calendar

Sequence Pane Shortcuts
601
For more information on the Logging pane and its sections, see “Logging Interplay | MAM Assets”
on page 313.
Sequence Pane Shortcuts
Keyboard shortcuts available when working with the Sequence pane are listed in the following table.
For more information on the pane and its sections, see “Using the Sequence Pane” on page 121.
Left Arrow Select previous day Calendar
Right Arrow Select next day Calendar
Up Arrow Increase the figures by one unit Integer or
Floating point
field
Down Arrow Decrease the figures by one unit Integer or
Floating point
field
Shortcut Description Focus
Shortcut Description Focus
Ctrl+S (Windows)
Command+S (Macintosh)
Save the sequence. Sequence pane
Delete
Backspace (Windows)
Delete the selected segment. Sequence pane
backslash (\) Insert a video dissolve. Sequence pane
Ctrl+E (Windows)
Command+E (Macintosh)
Split a segment into two segments Sequence pane
Ctrl+Shift+X (Windows)
Command+Shift+X
(Macintosh)
Extends a segment into another timing block. Sequence pane
B Perform an overwrite edit Sequence pane
N Perform a replace edit. Sequence pane
Shift+drag In an insert edit, override snap (sticky) points. Sequence pane
Ctrl+click (Windows)
Command+click (Macintosh)
Snaps the position indicator to the closest cut of the
enabled tracks.
• Press and hold the Ctrl key, click in the timecode
bar, and drag the position indicator to within a few
pixels of the cut.
• Move the mouse pointer within a few pixels of the
cut, then press Ctrl+click..
Sequence pane

Sequence Pane Shortcuts
602
A Move the position indicator to the previous segment in
the Timeline. The position indicator moves to the first
frame after the cut. In an Advanced sequence, the
position indicator moves to the closest segment on an
active track.
Sequence pane
S Move the position indicator to the next segment in the
Timeline. The position indicator moves to the first
frame after the cut. In an Advanced sequence, the
position indicator moves to the closest segment on an
active track.
If you move the position indicator to the end of a
sequence, the position indicator moves to the final
(empty) frame.
Sequence pane
Up arrow Zoom out of a sequence Sequence pane
Down arrow Zoom in to a sequence Sequence pane
Alt+drag zoom handle Enlarge or reduce one end of the zoom region
(asymmetrical zoom)
Sequence pane
Right arrow Move 1 frame forward Sequence pane
Left arrow Move 1 frame back Sequence pane
Space bar Play or pause play Sequence pane
Ctrl+Z (Windows)
Command+Z (Macintosh)
Undo an action Sequence pane
Ctrl+Y (Windows)
Command+Y (Macintosh)
Redo an action Sequence pane
With trim indicators active
M Trim the segment’s selected end by 10 frames earlier. Sequence pane
comma (,) Trim the segment’s selected end one frame earlier. Sequence pane
period (.) Trim the segment’s selected end one frame later. Sequence pane
slash (/) Trim the segment’s selected end 10 frames later. Sequence pane
Shift+[ Trim from start of segment to the position indicator
(trim top).
Sequence pane
Shift+] Trim from the position indicator to the end of a
segment (trim tail).
Sequence pane
With double-sided trim
indicators active
Shift+M Trim the segment’s selected end by 10 frames earlier. Sequence pane
Shift+ comma (,) Trim the segment’s selected end one frame earlier. Sequence pane
Shift+period (.) Trim the segment’s selected end one frame later. Sequence pane
Shift+slash (/) Trim the segment’s selected end 10 frames later. Sequence pane
Shortcut Description Focus

Closed Captioning Pane Shortcuts
603
Closed Captioning Pane Shortcuts
Keyboard shortcuts available when working in the Closed Captioning pane are listed in the following
table.
Shortcut Description Focus
Ctrl+. (period) (Windows)
Command+. (Macintosh)
(In and Out mode) Creates a closed-caption segment
using In and Out marks
Closed
Captioning
pane
Ctrl+Shift+. (period)
Command+Shift+. (Macintosh)
(Playhead position mode) Creates a closed caption
with an In point only.
Closed
Captioning
pane
Ctrl+Alt+.(period) (Playhead position mode) Creates an Out point for a
closed caption.
Closed
Captioning
pane
Ctrl+E (Windows)
Command+E (Macintosh)
Divides a closed-caption segment into two, based on
the location of the position indicator. The complete
text for the segment is copied to the new segment, and
you need to edit the text as desired.
Closed
Captioning
pane

CIcons
This topic provides a quick reference guide to icons or buttons you might encounter when using
MediaCentral UX. They are grouped in the following topics:
•Pane Type Icons
•Launch Pane Icons
•Assets Pane Icons
•Associations Pane Icons
•File Info Pane Icons
•Media Pane Icons
•Logging Pane Icons (Interplay | Production Assets)
•Logging Pane Icons (Interplay | MAM Assets)
•Process Dashboard Pane Icons
•Progress Pane Icons
•Sequence Pane Icons
•Tasks Pane Icons
•Media | Distribute Icons
Pane Type Icons
The follow icons are used to identify the various types of panes you might have open in the
MediaCentral UX user interface. For more information about these panes, see “Understanding
Layouts and Panes” on page 22.
Icon Description
Assets pane
Assignments pane
Associations pane
Audio pane
Closed Captioning pane
Combined Messages pane (Media Distribute)
Pane Type Icons
605
Distribution pane (Media Distribute)
Documents pane
File Info pane
Help pane
Launch pane
Logging pane
Maestro Browser pane
Media pane
Messages pane
Metadata pane
Packages pane
Process Dashboard pane
Progress pane
Project/Story pane
Queue/Story pane
Search pane
Sequence pane
Social Message pane (Media Distribute)
Tasks pane
thePlatform pane (Media Distribute)
Thumbnails pane
Web Story pane (Media Distribute)
Icon Description
Launch Pane Icons
606
Launch Pane Icons
The following icons are used in the Launch pane.
Assets Pane Icons
Various icons are used distinguish between the different types of assets accessible via
MediaCentral UX. Other icons are used to show the state of an asset. These type and status icons are
displayed in the Assets pane in either the Name or State columns.
Interplay | Production Assets
Icons for Interplay Production assets appear in the Name and State columns.
Icon Description
Connected Interplay Production system
Disconnected Interplay Production system
Connected Interplay MAM system
Connected iNEWS system
Disconnected iNEWS system
Project in the iNEWS database
iNEWS Project (not started)
iNEWS Project (expired)
Icon Description Column
Audio asset Name
Video asset: master clip. Name
Video asset: subclip Name
Video asset: sequence Name
Video asset: in-progress clip (Edit While Capture) Name
Video asset: group clip Name
Video asset: effect Name
Assets Pane Icons
607
iNEWS Assets
All icons for iNEWS assets appear in the Name column.
Interplay | MAM Assets
Icons for Interplay MAM assets appear in the Name, Thumbnail, and Rights columns.
Remote asset: downward-pointing arrow for each asset type Name
Supported State
Reservation State
Restriction State
Icon Description Column
Icon Description
Directory or subfolder in the iNEWS database
Indexed Directory
Queue in the iNEWS database
Indexed Queue (also BUCKET queue)
Locked Queue
Indexed and Locked Queue
Facet in the iNEWS database
Facet (not started)
Facet (expired)
QUERY Search Queue
Icon Description Column
Audio asset Name
Commercial or Commercial Version asset Name
Document asset Name
Assets Pane Icons
608
Episode or Episode Version asset Name
Feature or Feature Version asset Name
File asset or Default placeholder icon Name
Graphics asset Name
Image asset Name
Season asset Name
Sequence asset (audio or video) Name
Series asset Name
Stock Footage asset Name
Trailer asset Name
Video or Rushes asset Name
Audio asset placeholder icon. Is shown until a specific image
is assigned as a thumbnail.
Thumbnail
Basic Sequence asset placeholder icon. Thumbnail
Commercial or Commercial Version asset placeholder icon. Is
shown until a specific image is assigned as a thumbnail.
Thumbnail
Document asset placeholder icon. Is shown until a specific
image is assigned as a thumbnail.
Thumbnail
Episode or Episode Version asset placeholder icon. Is shown
until a specific image is assigned as a thumbnail.
Thumbnail
Feature or Feature Version asset placeholder icon. Is shown
until a specific image is assigned as a thumbnail.
Thumbnail
File asset or Default placeholder icon. Is shown until a
specific image is assigned as a thumbnail.
Thumbnail
Graphics asset placeholder icon. Is shown until a specific
image is assigned as a thumbnail.
Thumbnail
Image asset placeholder icon. Is shown until a specific image
is assigned as a thumbnail.
Thumbnail
Season asset placeholder icon. Is shown until a specific image
is assigned as a thumbnail.
Thumbnail
Icon Description Column
Associations Pane Icons
609
Associations Pane Icons
The following icons are used in the Associations pane.
Series asset placeholder icon. Is shown until a specific image
is assigned as a thumbnail.
Thumbnail
Stock Footage asset placeholder icon. Is shown until a
specific image is assigned as a thumbnail.
Thumbnail
Trailer asset placeholder icon. Is shown until a specific image
is assigned as a thumbnail
Thumbnail
Video or Rushes asset placeholder icon. Is shown until a
specific image is assigned as a thumbnail.
Thumbnail
Usage right “Free for use” Rights
Usage right “Not evaluated so far” Rights
Usage right “Parts need to be licensed” Rights
Usage right “Contains restricted parts” Rights
Icon Description Column
Icon Description
The Parent button navigates to the parent asset in the pane (hierarchical
associations only).
The Back and Next buttons toggle the current view to the previous view and next
view in the pane.
Refreshes the current view in the pane.
Toggles display of empty association types on or off. When toggled on, the button
is colored orange, and empty association types are not shown.
Toggles pinning of the current asset on or off. When pinning is toggled on, the
button is colored orange.
Expand All button expands all associations types and shows all associations in the
pane. Collapse All button hides all associations from the pane and shows only the
Association types.
Deletes the selected associations.
File Info Pane Icons
610
File Info Pane Icons
The following icons are used in the File Info pane.
Media Pane Icons
The following icons are used in the Media pane.
Icon Description
Refreshes the current view in the pane.
Expand All button expands all Detail areas (Essence Package Details, Essence
Details, and Location Details) and shows all detail information in the pane.
Collapse All button hides all detail information from the pane and shows only the
information of the Overview areas.
Saves changes.
Buttons Description
The Asset and Output buttons let you switch between a loaded asset and a loaded
sequence.
Plays the asset or the story sequence. The Play button changes to a Pause button while
the asset or story sequence is being played.
Plays from an In point to an Out point.
Moves the position indicator to the In point.
Marks an In point.
Marks an Out point
Moves the position indicator to the Out point.
Plays the last three seconds before the Out point.
Steps back 10 seconds.
Steps back 1 second
Steps back 1 frame
Steps forward 1 frame
Steps forward 1 second
Logging Pane Icons (Interplay | Production Assets)
611
Logging Pane Icons (Interplay | Production Assets)
The following icons are used in the Logging pane.
Steps forward 10 seconds
Displays the Audio pane
Displays the voice-over controls
Displays the selected sequence to review for playback in the target resolution
Loads a master clip that contains a selected frame of a sequence or subclip (Match
Frame).
Displays a group clip in single-angle view (1x1)
Displays a group clip in a 2x2 grid.
Displays a group clip in a 3x3 grid.
Buttons Description
Icon Description
Insert Marker and Select Marker Color
Add Restriction
Refresh
Cancel
(Customized Logger only) Creates a new segment (In and Out mode): Sets the In
and Out marks at the positions you defined in the Media Timeline.
(Customized Logger only) Creates a new segment (Playhead position mode): Sets
the In mark at the current playhead position and sets the Out mark for the previous
segment.
Logging Pane Icons (Interplay | MAM Assets)
612
Logging Pane Icons (Interplay | MAM Assets)
The following icons are used in the Logging pane.
Process Dashboard Pane Icons
The following icons are used in the Process Dashboard pane.
Button Description
Lets you select the stratum for editing
Creates a new segment (In and Out mode): Sets the In and Out marks at the
positions you defined in the Media Timeline (Gaps Allowed mode only).
Creates a new segment (Playhead position mode): Sets the In mark at the current
playhead position but does not define an Out mark (Gaps Allowed mode only).
Toggles the Segment List display between Tags view and Grid view.
Refresh
Indicates the lock status of the stratum and lets you manually lock and unlock the
stratum
Exports stratified annotation and all other metadata
Icon Description
Reloads processes in the Process List.
Toggles displaying processes in groups on and off.
When displaying processes in groups, you can show and hide the contents of the
process groups. The Expand All button expands all process groups and shows all
processes in the pane. The Collapse All button hides all process from the pane and
shows only the process groups.
Toggles displaying diagrams in the Diagrams area on and off.
Toggles filtering of processes that are in one of the following states on and off
(from left to right):
• Pending
• Running
• Finished
•Error
Toggles displaying top-level processes on and off.

Progress Pane Icons
613
Progress Pane Icons
The following icons are used in the Progress pane.
Sequence Pane Icons
The following icons are used in the Sequence pane.
Icon Description
Open in Media pane
Cancel
Resend/Retry
Icon Description
Adds a dissolve
Divides a segment into two segments at the position indicator.
Performs an Overwrite edit.
Performs a Replace edit.
Deletes the segment
Shows Audio pane
Saves the sequence
Extends or retracts a segment.
Shows or hides empty timing blocks
Tasks Pane Icons
614
Tasks Pane Icons
The following icons are used in the Tasks pane.
Media | Distribute Icons
The following icons are used in Media Distribute:
Icon Description
Toggles display of the Task List and Task Details on or off.
Refresh
The Lock Indicator icon indicates if the selected task is currently locked for
editing. If a task is free for editing, the icon shown in the table is displayed. If a
task is locked by you, the Lock Indicator icon is colored orange. If a task is locked
by another user, the Lock Indicator icon is grayed out.
Uploads new files as attachments to the task.
Downloads the selected file attachments.
Deletes the selected file attachments from the task.
Saves changes made to items in the pane.
Toggles the My Tasks filter on or off. When toggled on, the Tasks List shows only
the tasks that are assigned to you or your group. When toggled off, the Tasks List
shows all tasks that you are allowed to edit.
Icon Description
Shows the Social Messages pane.
Shows the Web Story pane.
Shows the Combined Messages pane.
Indicates a system profile, which contains credentials for a target — for example,
a corporate Twitter account — associated with a corporate or group house account
and accessible by multiple users.
Indicates a user profile, which contains credentials for a specific target — for
example, a personal Facebook account — and associated with a specific user.
MediaCentral Glossary
ABCDEFGIJLMNOPQRSTUVWZ
A
Administrators group
A default group used for MediaCentral UX user management that contains users with
administrative privileges.
active angle
In a group clip, the camera angle selected for single-angle view and the angle displayed when
you add the clip to a sequence.
advanced sequence
A sequence you create in MediaCentral UX that includes a timeline with one video track and
user-specified audio tracks. By default, these tracks are named NAT, SOT, and VO for use with
iNEWS stories. However, you can rename these and use the sequence independently from an
iNEWS story
angle
In a group clip, one of the individual clips, each of which has a different camera angle.
area
A section of the MediaCentral UX Web application. You can customize the application to reduce
or expand the number of areas. Also referred to as a pane area.
asset
An object that you can use to create stories and sequences. There are different types of assets,
such as video media, audio media, graphics, images, and text. Asset usually refers to objects or
also lists of objects, such as rundowns, that are stored in an asset management database.
616
Asset mode
If you click the Asset button in the Media pane, you can view media for the currently loaded asset
and use controls that apply specifically to assets, such as controls for setting In and Out points.
Compare with the definition of Output mode.
Assets pane
A pane in the client application that displays assets. These assets can result from a search or from
browsing. Assets are displayed in a folder hierarchy, if applicable to the assets displayed.
Assignments pane
A pane in the client application that allows you to manage all aspects of your news story or
production task and send your output to the Web, on-air broadcasts, social media, or mobile devices.
associations
Relations between assets that help structure your Interplay MAM assets. Associations also allow
easy and quick navigation (without searching) between assets. The associations available are
determined by the underlying Interplay MAM data model.
Associations pane
A pane in the client application that shows all assets that are associated with the selected Interplay
MAM asset. You can review, change, and delete the displayed associations and navigate and browse
the associated assets.
audio follows video
An audio setting that allows the audio mapping for a track in a group clip to automatically “follow”
any active angle change and use the audio from the new active angle.
authentication provider
A server that checks the credentials (user name and password) of a user and allows access. A
MediaCentral UX administrator designates an authentication provider for imported users, such as a
Windows Domain server.
B
basic sequence
A sequence you create in MediaCentral UX that includes a timeline with one video track and one
audio track. This single audio track represents all source audio tracks. Typically you use it to create a
simple sequence (sometimes referred to as a cut list, a shotlist, or an EDL).
617
C
carrier
In Interplay MAM, a physical medium that stores essence files. Carriers can be disks, tapes, or even
entire tape archive systems. The scope of a carrier depends on the granularity that is required to
access an essence.
Closed Captioning pane
A pane that displays closed captions for the Interplay Production asset loaded in the Media pane. The
Closed Captioning pane lists timecode and text for the closed captions and includes controls for
importing, exporting, editing, and positioning.
Contacts list
In the Message bar, a list of iNEWS users from which you can select a recipient of a message.
Cue List
The area in the Script Editor in which the journalist adds or edits production cues and machine
control events, such as those for a character generator (CG).
D
Details pane
A pane in the Users layout and the System Settings layout that displays information and settings for a
selected item.
Documents pane
A pane that lets you view proxies of PDF documents stored as Interplay MAM assets. If you have the
appropriate user privileges, you can also download the document to your computer.
drop zone
The part of an area into which you can move a pane. Each area has five drop zones: center, top,
bottom, left, and right.
E
Edit Decision List (EDL)
Basic sequence created in Interplay MAM Desktop. See basic sequence.
edit while capture (EWC)
See Frame Chase editing.
618
essence
In Interplay MAM, “essence” describes the pure media data of an asset without any descriptive
metadata, for example, a video file. Essences are organized in essence packages. You can display
essences and edit their properties in the File Info pane.
essence package
In Interplay MAM, an essence package is a group of essences classified semantically. Each essence
package contains a class of essences that represent the same content and share the same general
purpose. One essence package is defined as the representative essence package of the asset. The
representative essence package contains the essences that represent the purpose of the asset.You can
display essence packages and edit their properties in the File Info pane.
F
facet
A subtopic of an iNEWS project that provides additional granularity. Any stories associated to a facet
are automatically associated to that facet’s parent project. See also project.
federated search
A search that uses the search capabilities of the MediaCentral Platform to provide the full search
functionality that individual databases provide.
file-based playback
Playback mode where media is downloaded to your workstation for playback. File-based playback
provides good quality in low-bandwidth situations.
File Info pane
A pane in the client application that provides information about video, audio, image, and text files. In
Interplay MAM, such files are described as essences. The File Info pane shows in detail how the
essence files that belong to the asset open in the pane are organized.
frame-based playback
Playback mode where media is streamed directly from the server for playback. Frame-based
playback provides high quality but requires a higher bandwidth than file-based playback.
Frame Chase editing
A feature that lets you view and edit media while it is being captured from a line feed or ingest
device. Also known as edit while capture (EWC).
G
group clip
A master clip created in Media Composer or another Avid editing application by syncing a group of
clips based on common source timecode, auxiliary timecode, or marks placed in the footage.
619
I
indexed search
A search that queries a central index synced with multiple databases and finds anything stored in the
index. It does not directly search Interplay Production databases. See also Media | Index
J
J-K-L play
The J-K-L keys on the keyboard allow you to play and shuttle through media at varying speeds. This
feature is also referred to as three-button play or variable-speed play.
L
Launch pane
A pane in the client application from which you navigate to various locations. This pane displays
remote file systems, local files systems, and other locations for assets.
Layout
A collection of panes designed for a specific purpose, such as a layout for journalists or a layout for
administrators.
Layout selector
A list from which you select the layout that you want to work in.
L-cut
A split edit between two clips in which the video transition and the audio transition do not occur
simultaneously. The audio transition can occur before the video transition or the video transition can
occur before the audio transition.
locator
See marker.
Log layout
A layout that a media logger or journalist uses to view and create markers.
logging
1. Interplay Production: Adding information to clips, subclips, and sequences. This information
includes markers, restrictions, and text, which can be used for reference during story creation
and media editing.
2. Interplay MAM: Segmenting strata and adding information to them. This information includes
text and other properties.
620
Logging pane
A pane that provides a media logger or journalist with an arrangement of controls defined for use in
logging Interplay Production assets or Interplay MAM assets. The layout of the Logging pane adapts
automatically depending on the asset open.
M
marker
An indicator added to a selected frame to mark a particular location in a clip, subclip, or sequence.
Markers can be different colors and can be associated with user-defined text. Markers are displayed
in the Media Timeline and marker text is displayed as an overlay in the Media viewer. Formerly
called locator.
master clip
A media object that contains pointers to media files in which the actual digital video and audio data is
stored.
Match Frame
A feature that lets you load a source clip, a portion of which is contained in a sequence.
MediaCentral Distribution Service (MCDS)
An Interplay Production service that coordinates jobs with Interplay Production Services for send to
playback.
MediaCentral Platform
The software infrastructure that supports MediaCentral products and services
MediaCentral User Management Service (UMS)
One of the MediaCentral Platform services. It provides the ability to create and manage users and
groups and authenticate users across multiple systems.
MediaCentral Zone
A MediaCentral zone consists of the following configuration:
• One MediaCentral server or MediaCentral cluster server
• One Interplay | Production engine, one iNEWS database, or both
• One or more Avid shared-storage systems
By default, a MediaCentral system is configured as a single zone. Large organizations can combine
two or more single-zone systems into a multi-zone environment.
Media Distribute layout
A layout that displays different options for publishing to multiple platforms. The layout includes the
Social Message, Web Story, and Packages panes used for publishing media packages.
621
Media controls
In the Media pane, controls that let you play and move through an asset and edit an asset for use in
creating a sequence. Which controls are displayed depends on the selected asset.
Media | Index
A search engine that allows users to search a central index for multiple Interplay Production
databases over multiple zones. See also indexed search.
Media pane
A pane in the client application in which you can view and edit media assets, using the Media
controls.
Media viewer
The section of the Media pane used to view an asset.
Media Timeline
In the Media pane, a graphical representation of the length and time spans of an asset or sequence.
Media zoom bar
In the Media pane, a control located below the Media Timeline that lets you enlarge a section of the
Media Timeline so you can work more easily with long clips. See also Sequence zoom bar.
Message bar
A section of the client application in which you can send and receive messages. The Message bar
consists of the To field, the Message field, and the Send button.
Menu bar
A section of the client application from which you can select various menu options.
Message History
In the Message bar, arrow buttons are provided to let you read recent messages. A numerical
indicator appears when multiple unread messages exist.
Messages pane
A pane in the client application that displays a message box for sending both text messages and
media asset links to other MediaCentral UX users. It also lists all received messages.
metadata
Data that describes an asset. Metadata includes properties, reservations, restrictions, and other
information.
Metadata pane
A pane that displays properties that are associated with a selected asset in an Interplay MAM or
Interplay Production database, such as Start Timecode or Comments.
622
mixdown
A process in which multiple video tracks, multiple audio tracks, and effects are combined into a new
master clip with one video track and a reduced number of audio tracks.
N
NAT (natural sound)
Audio recorded at the same time as the video, often by a microphone built in to a camera. Compare
with the definition of SOT (sound on tape).
O
Output mode
If you click the Output button in the Media pane, you can view media for the currently loaded
sequence and use controls that apply specifically to sequences, such as voice-over controls. Compare
with the definition of Asset mode.
orchestration-only access
Access for users that are assigned a non-MAM Base license (Interplay Production, iNEWS) to
Interplay MAM orchestration features (process creation and monitoring, user task editing).
P
package
In Media Distribute, a collection of text (messages or stories), images, video, and audio, all
associated with a common iNEWS story and Interplay Production master clip or sequence.
Packages pane
A pane in the client application that displays a history of packages ready for publication and already
published. The pane also allows you to review and approve packages submitted for publication.
pagination
A system setting the specifies the maximum number of items listed in the Queue/Story pane or the
Project/Story pane.
pane
A section of the MediaCentral UX Web application. An area contains one or more panes. Multiple
panes can be layered within an area, with the names of each pane appearing on tabs that the user can
select to view.
Pane menu
A menu of commands that are available for each pane. To access the menu, click the Pane Menu
button.
623
pool
In Interplay MAM, a device or part of a device that holds one or more carriers. See carrier.
position indicator
A vertical bar in the Media Timeline that indicates the location of the frame displayed in the Media
viewer. The Sequence Timeline also includes a position indicator, which can be vertical or horizontal,
depending on the orientation of the Sequence pane. You can drag the position indicator to scrub
through a clip or sequence.
presenter mode
A feature of the MediaCentral UX tablet application lets users view a show’s scripts in a page-by-
page layout, similar to printed scripts used by news presenters.
production cue
An object in an iNEWS story that provides important information to technical staff as well as
machine control commands for devices, such as character generators.
process
In Interplay MAM, a defined set of automated workflows and manual activities to achieve a specific
goal; it defines the states, tasks, and the control flow that are used to achieve the goal.
Process Dashboard pane
A pane used to monitor Interplay MAM processes for a defined context. You can define and edit the
context for the dashboard and save the dashboard to the Launch pane.
Progress pane
A pane in the client application that displays the progress and status of MediaCentral UX processes
such as sequence mixdown and send to playback.
Project/Story pane
A pane in the client application that displays the contents of a project, its facets, and any associated
stories.
project
An iNEWS term for a group of stories categorized by topic so that news teams working on a
particular topic can find everything related to it in a single place. See also facet.
Q
Queue/Story pane
A pane in the client application that displays the contents of a queue with the contents of the story,
including the story form.
624
queue
A subfolder in an iNEWS database that contains stories.
R
read-only sequence
1. A sequence that you open from an Interplay Production folder but cannot edit or save because
you do not have a read/write role for the folder.
2. A sequence that you open from an Interplay MAM database for which you do not have write
permission or that represents an external sequence.
You can play the sequence but you cannot edit or save it. See also uneditable sequence.
restriction
A set of two markers that indicate clips whose use is limited in some way, such as through
intellectual property rights management or content compliance.
role
A set of features, privileges, and layouts that are assigned to a user by a MediaCentral UX
administrator. An administrator can create MediaCentral UX roles based on roles within an
organization.
rundown
A lineup or timed list of scripts indicating the order in which they will be aired during a news
program.
Rundown layout
A layout that a journalist uses to edit and create stories.
S
script
The text that is read on air. Also the content for organizing a feature.
Script Editor
A section of the Queue/Story pane in which a journalist creates and organizes the elements of a story.
There are four sub-sections of the Script Editor: Story Form, Cue List, Story, and Sequence Timeline.
script sequence
A sequence (see sequence) that is associated with an iNEWS story in MediaCentral UX. Script
sequences are saved in the Interplay Production database and can be sent to a playback device.
625
Search bar
A section of the client application in which you can conduct a search for assets that match specific
criteria.
Search pane
1. A pane that lets a user search for information and assets.
2. A pane in the Users layout that lets an administrator search for MediaCentral UX groups and
users.
Send button
In the Message bar, the button you click to send a message.
segment
1. In a rundown, a portion of the show aired between commercial breaks.
2. A portion of the story body/text. A journalist uses segments to time the text and integrate it with
video, audio, and production cues. Multiple timed segments are combined to form the overall
story.
3. In a sequence, a portion of media contained on a track.
4. In a stratum, a portion of media defined by an In and Out mark. Segments contain annotation that
is associated to a sequence of frames.
send to playback (STP)
The process of transferring a sequence to a playback device or playout server for broadcast.
sequence
Video, images and audio clips, or any combination, arranged in a series. See also basic sequence and
advanced sequence.
Sequence pane
A pane in which you can work with video and audio clips to create or edit a sequence. You can
associate the sequence with a new story as a script sequence or store it as an independent asset in an
Interplay Production database.
Sequence Timeline
The area of the Sequence pane that hold the video and audio clips. The Sequence Timeline includes a
video track, one or three audio tracks, and a timing track.
Sequence zoom bar
The Sequence zoom bar is located below the Sequence Timeline for horizontal orientation or to the
right of the timeline for vertical orientation. You can use the zoom bar to enlarge a section of the
Sequence Timeline so that you can work more easily with long sequences or make precise edit
decisions. See also Media zoom bar.
Settings pane
A pane in the System Settings layout from which you can select a group of settings to view or edit.
626
shuttle
To view media at speeds slower or faster than real time. In MediaCentral UX you can use the J, K,
and L keys to shuttle through a clip or sequence.
sidebar
A feature of the MediaCentral UX mobile application from which you can navigate various systems
integrated with MediaCentral UX, such as an iNEWS newsroom computer system
simple sequence
See basic sequence.
Social Message pane
A pane in the client application that allows you to create packages for publication to social media
sites, such as Facebook or Twitter.
SOT (sound on tape)
Audio recorded at the same time as the video, often by a microphone separate from the one built in to
a camera. Compare with the definition of NAT (natural sound).
source clip
A video clip or audio clip that is used as part of a sequence.
story
A compilation of elements that includes the script that is sent to the teleprompter and read on air, any
video and audio that is broadcast with the script, as well as production cues and machine control
instructions associated with the queue. A story can also be created as a feature that uses the script to
organize the feature.
Story Form
A section of the Script Editor that provides story information in fields that are predetermined by the
iNEWS system administrator for each queue in the database.
Story layout
A layout that a journalist uses to edit and create stories that include video and audio.
STP (send to playback)
The process of transferring a sequence to a playback device or playout server for broadcast.
strata
Annotation layers that build the basis for logging Interplay MAM assets. Each stratum allows you to
view information about an asset from a specific perspective.
627
subclip
A clip created by marking IN and OUT points in a master clip and saving the frames between the
points. The subclip does not contain pointers to media files. The subclip references the master clip,
which contains pointers to the media files.
System Settings layout
A layout that a MediaCentral UX administrator uses to specify various configuration settings.
T
task
An elementary step within a process that is carried out either automatically (based on workflow
scripts) or by a user action.
Tasks pane
A pane in which a user can view and edit user tasks of Interplay MAM processes created by him or
user tasks that have been assigned to him by other users.
Thumbnails pane
A pane that displays small images of an asset that is loaded in the Asset mode of the Media pane.
Images are displayed by timecode, marker, or both.
Timecode displays
In the Media pane, displays that provide timecode information for the loaded asset or sequence.
Timecode Master
In Interplay MAM, the timecode master is the essence within an essence package that is used to
determine timecodes, This essence has been video-analyzed, or will be video-analyzed when the
video analysis is triggered. Requests for or calculations of timecodes are answered by the timecodes
of the timecode master essence. You can display and set the timecode master in the File Info pane.
timing block
A section of a script sequence that corresponds in duration to the read rate of a story segment. A
timing block serves as a container for editing actions.
track selector
In the Audio pane, a drop-down menu that lets you map an audio track of a group clip to the
corresponding audio track of any other angle in the group clip.
trim indicator
In the Sequence Timeline, a mark that appears at the beginning or end of a clip in the video column
or audio column when hovering over that area with the mouse pointer. You can trim video and audio
together, or you can trim them separately to create an L-cut.
628
U
Unassigned group
A default group used for MediaCentral UX user management that includes users that were removed
from a group but are not members of any other groups.
uneditable sequence
A sequence created on Media Composer or another Avid editing application that cannot be edited in
MediaCentral UX, such as a sequence that includes rendered effects. Uneditable sequences are
colored dark red in the Sequence Timeline. See also read-only sequence.
User Management Service (UMS)
See MediaCentral User Management Service (UMS).
user task
A task that requires a user action and is completed by a user action. See task.
User Tree pane
A pane in the Users layout that displays groups and users in a hierarchical layout.
Users layout
A layout for MediaCentral UX user management that a MediaCentral UX administrator uses to
import, create, and manage users and group.
V
Voice-over controls
Controls that let you record a voice-over and adjust its volume.
W
Web Story pane
A pane in the client application that allows you to create packages for publication to Web Content
Management Systems.
window
The primary user interface element of the application.
Z
zoom bar
See Media zoom bar and Sequence zoom bar.

629
A B C D E F G H I J K L M N O P Q R S T U V W X Y Z
A
About menu option 32
Actions
applying to tasks 465
Active-X plug-ins 34
Adding
attachments to tasks 467
file attachments to processes 433
Advanced sequence
described 125
group clips 259
Android application for MediaCentral UX 559
Annotating
segments 332
segments using tags 334
Annotation
speech-to-text 95
Applying actions to tasks 465
Approve stories
MediaCentral mobile app 540
MediaCentral UX mobile app 501
Areas 27
Aspect ratio 202
Asset mode
described 191
displays and controls 192
Assets
adding to folder 66
aspect ratio 202
creating 61
deleting 69
described 39
duplicating 48
moving and copying 47, 48, 68
navigating using associations 351
opening associated 350
playing 199
recently viewed 202
removing 69
renaming 49, 68
resusing associated 351
stepping through 202
working with Interplay Production 44
working with MAM 55
working with news 42
Assets pane
described 39
keyboard shortcuts 592
list of icons 606
navigating 40
Assigning user tasks 464
Assignment Desk layout 389
Assignments
adding details and resources 393
cloning 399
creating 391
deleting 399
described 391
filtering 400
Assignments pane
adding details and resources to assignments 393
cloning assignments 399
configuring 388
creating assignments 391
deleting assignments 399
filtering assignments 400
workflow 387
Associations
creating 352
deleting 355
filtering empty types 349
opening connected assets 350
reusing assets 351
understanding 344
using for navigation 351
viewing connected assets 348
Associations pane
described 345
list of icons 609
working in 347
Audio
advanced sequence 234
basic sequence 231
disabling NAT tracks 174
ducking audio 234
enabling a track 170
enabling NAT tracks 174
enabling scrubbing 185
overriding default NAT and SOT tracks 236
panning for advanced sequences 238
panning for assets and basic sequences 233
reference level 239
Index

Index A B C D E F G H I J K L M N O P Q R S T U V W X Y Z
630
swapping NAT and SOT tracks 236
types of audio tracks 234
Audio clip
recording 241
Audio dissolves
automatic creation 234
Audio gain
adjusting 234
adjusting for advanced sequence 237
automatic adjustment 234
Audio levels
setting 234
Audio mix 239
Audio monitoring
setting preferences 231
Audio pane
described 227
Audio track
enabling 170
Audio-only segment 175
Audio-only sequences 138, 140
Auto-Save
sequences 143
stories 108
Avid
online support 19
training services 19
Avid Central
adding machine control instructions 576
adding production cues 575
formatting a script 574
saving stories 574
working with links 576
Avid iNEWS
described 20
Avid Instinct
associated sequences 138
Avid Maestro 471
B
Banks
for group clips 251
Basic sequence
described 125
group clips 258
C
Captions
displaying in Media pane 212
CCCS (Closed Caption Conversion Service) 376
Clips
loading from Sequence Timeline 173
moving and deleting 174
transcoding and mixing down 222
Closed Captioning pane 377
Closed captions
CCCS 376
Closed Captioning pane 377
creating segments 381
editing position 383
editing text 383
editing timing 385
extracting and repackaging 381
importing and exporting 380
keyboard shortcuts 603
multiple caption blocks 385
overview 369
roll-up captions 386
workflows 372
Colors
for segments 125
Communities
iNEWS 34
Complex sequence
defined 203
Creating
asset (Interplay MAM) 61
associations 352
processes 431, 436
segments with gaps 324, 325
Cue List
described 90
D
Dead queue 110
Defining
merge rules 340
Delegating user tasks 463
Deleting
associations 355
segments 330
task attachments 470
Delivery service
described 420
to local workgroup 425
to remote workgroup 423
Desktop notifications
Progress pane. 36
Dictation
speech-to-text 95
Displaying
location details 367
Dissolves
audio 234
video 184
Document Viewer pane 80
Double-sided trim 180
Downloading
attachments of tasks 469
Drop zones
described 27

A B C D E F G H I J K L M N O P Q R S T U V W X Y Z Index
631
Dual-roller trim 180
Ducking
for audio tracks 234
E
Easy locks 100
Edit locks 100
Edit while capture (EWC)
in-progress clips 224
logging clips 331
Editing
attachments of tasks 467
data of tasks 466
essence package properties 363
essence properties 365
Interplay MAM metadata 71, 74, 76
E-mail forwarding
configuring for messages 407
using with messages 408
Essence packages
cleaning up 364
editing properties 363
Essences
editing properties 365
understanding 356
Exporting
markers 308
MP4 video 226
strata 342
F
Facet
associating story with 86
described 42
opening 83
opening a facet associated with a story 86
Favorites 501, 542
Federated search 262
File Info pane
described 357
list of icons 610
working in 362
File-based playback 205
Filtering
association types 349
Interplay Production logs 307
Filtering user tasks 462
Floating a Story 114
Folder
adding asset 66
creating Interplay | MAM 59
creating Interplay | Production 49
deleting 60
moving and copying 59
opening for an asset 221
renaming 59
Font
adjusting Windows ClearType 33
Frame-based playback 205
G
General
user settings 587
Group clips
audio monitoring 253
banks 251
changing angle 250
creating basic sequence 258
described 246
for advanced sequence 259
markers and restrictions 256
match frame 257
playing 252
selecting active angle 251
sending to playback 260
timecode 253
working with 247
Grouping stories 112
H
Help
viewing 38
Highest resolution
playback 220
Hits
selecting 67
Horizontal sequence
selecting 128
I
Icons
Assets pane 606
Associations pane 609
File Info pane 610
Launch pane 606
Logging pane (Interplay MAM) 612
Logging pane (Interplay Production) 611
Media | Distribute 614
Media pane 610
pane types 604
Process Dashboard pane 612
Progress pane 613
Sequence pane 613
Tasks pane 614
Image
creating from a video frame 225
viewing 225

Index A B C D E F G H I J K L M N O P Q R S T U V W X Y Z
632
In point
marking 210
Indexed search 263
iNEWS
adding Maestro graphics 478
database 42
described 20
MediaCentral mobile app on a tablet 527
MediaCentral UX mobile application for Android
devices 566
MediaCentral UX on an iPhone 488
navigating database 44
project 83
script templates 101
support for communities 34
user settings 587
iNEWS links
creating and sending 108
In-progress clips 224
Instinct
associated sequences 138
Interplay | MAM
asset types 57
deleting assets 69
moving and copying assets 68
moving and copying folders 59
navigating Workspace 56
remote playback 209
removing assets 69
renaming assets 68
renaming folders 59
vieweing image asset 225
viewing PDF documents 80
viewing thumbnails 78
working with associations 344
working with essences 356
Interplay | Production
asset types 45
described 20
duplicating assets 48
moving and copying assets 47, 48
navigating database 45
property columns 46
renaming assets 49
user settings 587
Interplay MAM
editing metadata 71, 74, 76
property types and input controls 72
Interplay Production
MediaCentral mobile app 547, 579
MediaCentral UX mobile app 506
iPad
custom settings 525
gestures 520
Home button 520
MediaCentral mobile app 519
J
J-K-L playback 200
JPG file
creating from a video frame 225
K
Key locks 100
Keyboard shortcuts
Assets pane 592
Closed Captioning pane 603
Logging 595
Logging Interplay MAM assets 597
Media pane Pane 592
Queue/Story pane 591
Sequence pane 601
L
Latency
adjusting for 205
Launch pane 32
list of icons 606
Layouts
Assignment Desk 389
Logging 295
working with 25
L-cut 181
Links
in Avid Central 576
in the MediaCentral mobile app 540
in the MediaCentral UX mobile app 500
Locations
displaying details 367
Locators 211
Locking
basic sequence 157
story 100
stratum 323
Locks, types of 100
Log layout
described 295
Logging
Edit whle capture (EWC) 331
keyboard shortcuts 595
right-to-left languages 310, 333
workflows 291
Logging Interplay MAM assets
keyboard shortcuts 597
Logging pane (Interplay MAM)
described 316
keyboard shortcuts 597
list of icons 612
Logging pane (Interplay Production)
296
described 296

A B C D E F G H I J K L M N O P Q R S T U V W X Y Z Index
633
keyboard shortcuts 595
list of icons 611
LTR (left to right) 94
M
Machine control instructions
adding 99
adding in Avid Central 576
adding in the MediaCentral mobile app 539
adding in the MediaCentral UX mobile app 500
Maestro database
connecting to 472
Maestro graphics
adding graphics to iNEWS story 478
editing from a sequence 189
editing In and Out points 188
playing back a sequence 189
previewing 476
removing from a sequence 189
single image preview 188
STP sequence 189
synchronizing with sequence 186
working with templates 473
Maestro UX plug-in
connecting to Maestro database 472
described 471
installation and configuration 471
Markers
adding 299
adding to sequence 183
approval 516, 555, 585
approval status 516, 555, 585
creating 512, 553
cutting, copying, pasting text 306
deleting 299, 512, 553
described 293
editing 512, 553
exporting 308
group clips 256
navigating by 306
saving 299
text in right-to-left languages 310
Unicode support 310
using 551
Match Frame 221
Match frame
group clips 257
Media
adding to a basic sequence 158
adding to an advanced sequence 159
playback quality 204
updating status 203
viewing in mobile app 494
viewing in mobile application 570
viewing in tablet app 532
Media | Distribute
list of icons 614
Media Composer
dragging a script sequence to. 110
Media Index
indexed search 263
Media pane
Asset mode 192
group clip 196
keyboard shortcuts 592
list of icons 610
menu options Asset mode 194
menu options Output mode 198
Output mode 196
Media status
icons 47
Media timeline
described 216
Media viewer
size of video 203
MediaCentral | UX
described 20
MediaCentral mobile app
accessing iNEWS 527
accessing Interplay Production 547, 579
accessing media assets 546, 578
adding machine control instructions 539
adding production cues 538
approving stories from iPad 540
buttons 525
caching queues and stories 544
connection basics 519
custom settings 525
favorites 542
formatting a script 537
installing on a iPad 521
presenter mode 540, 577
saving stories 535
sidebar 523
starting 521
view video sequences 532
viewing queues and stories offline 544, 546
working offline 544
working with links 540
MediaCentral UX
deep links 402
MediaCentral UX Android application 559
MediaCentral UX mobile application 559
mobile app. See MediaCentral mobile app
sending links 402
MediaCentral UX mobile app
accessing iNEWS 488
accessing Interplay Production 506
accessing media assets 506
adding machine control instructions 500
adding production cues 499
approving stories from iPhone 501
buttons 486

Index A B C D E F G H I J K L M N O P Q R S T U V W X Y Z
634
caching queues and stories 504
connection basics 480
custom settings 486
favorites 501
formatting a script 498
gestures 481
installing on a iPad 482
saving stories 498
starting 482
the sidebar 484
view video sequences 494
viewing queues and stories offline 505
working offline 504
working with links 500
MediaCentral UX mobile application
accessing iNEWS 566
buttons for Android devices 563
connection basics for Android devices 559
custom settings for Android devices 564
gestures for Android devices 560
installing on an Android device 561
starting on an Android device 561
the navigation drawer 563
view video sequences 570
MediaCentral UX mobile appn
viewing queues and stories offline 504
Menu bar
described 32
Merge rules for segments 340
Merging
segments 330
Messages
e-mail forwarding 407
forwarding messages 408
Media Central | UX messages 402
Messages pane 402, 405
sending 409
sending messages with the Message pane 405
sending messages with the Messages pane 405
using the Message pane 402
viewing and replying to 410
viewing messages in the Messages pane 403
Metadata pane
property types and input controls 72
Metadatas pane 50
Metadats pane 71
Mix Mode 239
Mixdown 222
Monitor server 115
Monitoring
processes 437
MOS
inserting placeholders 102
user settings 587
MOS integration 34
MP4 file
creating from a clip or sequence 226
Multi-angle views
group clips 247
Multicamera workflows
described 246
MultiRez button
highest resolution 220
STP target resolution 218
Mute
track in advanced sequence 235
track in asset or basic sequence 231
N
NAT column 159
NAT tracks
changing the default 236
described 234
disabling 174
enabling 174
swapping with SOT tracks 236
Navigating
using associations 351
Navigation drawer, described 563
NewsCutter
associated sequences 138
NRCS tool
associated sequences 138
O
Online support 19
Opening
associated assets 350
Ordering a Queue 113
Out point
marking 210
Output mode
described 191
displays and controls 196
Overwrite edit
Advanced sequences 162
P
Panes
Asset 39
Assignments 388
Associations 345
Audio 227
Document Viewer 80
File Info 357
Launch 32
list of 22
list of icons 604
Logging (Interplay MAM) 316
Media 191

A B C D E F G H I J K L M N O P Q R S T U V W X Y Z Index
635
Metadata 50, 71
Process Dashboard 439
Progress 437
Project/Story 84
Queue/Story 87
Search 266
Tasks 457
Thumbnail 51, 78
working with 27
Panning
for advanced sequences 238
for assets and basic sequences 233
Playback
frame-based and file-based 205
simple and complex sequences 203
Playback latency
adjusting for 205
Playback quality 204
Plug-ins
working with 34
PNG file
creating from a video frame 225
Position indicator
described 90
Presenter mode 540, 577
custom settings 486, 525
Procedures
using story groups 112
Process Dashboard pane
described 439
list of icons 612
Processes
adding file attachments 433
creating 431, 436
monitoring 437
understanding 428
Producer tasks 111
Production cue
adding 97
adding in Avid Central 575
adding in the MediaCentral mobile app 538
adding in the MediaCentral UX mobile app 499
Progress pane
described 417, 437
desktop notifications 36
list of icons 613
Project
associating story with 86
described 42, 83
opening 83
opening a project associated with a story 86
Property columns
adding and removing 46
moving 47
resizing 47
Proxy video
maximum size 203
Q
Queue/Story pane
described 87
keyboard shortcuts 591
toolbar 89
Queues
caching 504, 544
creating story groups in 112
in Assets pane 42
viewing offline 505, 546
R
Recording
audio clip 241
Recovered files
sequences 143
stories 108
Redoing
in the Sequence pane 173
Reference level
setting audio 239
Referenced assets
displaying or hiding 49
Remote assets
working with 208
Remote playback
Interplay | MAM 209
Replace edit 166
Resizing
overlapping segments 328
segments 327, 327
Resolution
highest for playback 220
Restrictions
adding 304
defined 300
deleting 304
described 293
group clips 256
overview 300
saving 304
Reusing associated assets 351
Reviewing
for playback 218
Right-to-Left languages
entering marker text 310
entering segment text 333
Roll-up captions 386
RTL (right-to-left) 94
Rundowns
creating story groups in 112

Index A B C D E F G H I J K L M N O P Q R S T U V W X Y Z
636
S
SCC file
importing and exporting closed captions 380
Script
formatting 97
Script Editor
described 90
Script sequence
associating a video ID 137
dragging to Media Composer 110
editing 146
rules for creating 137
Script sequences
creating 134, 135
Script templates 101
Scrubbing
enabling audio 185
Search bar 265
Search pane 266
Searching
advanced criteria 279
advanced syntax 284
federated search 262
for assets 270
indexed search 263
indexed search examples 284
overview 261
simple syntax 284
Segment
described 125
Segmentation
understanding 320
Segmented edit locks 100
Segments
annotating tags 334
annotating text 332
creating (gaps allowed) 324, 325
deleting 330
described 93, 314
displaying in Media pane 212
merge rules 340
merging 330
moving and deleting in timeline 174
navigating by 331
resizing 327, 327
resizing overlapping 328
splitting 182, 329
text in right-to-left languages 333
text-only 107
Selecting
hits 67
Send to playback (STP)
group clips 260
selecting a profile 411
sending a master clip or subclip 416
sending a mixed-resolution Long GOP sequence 415
sending a sequence 414
Sequence pane
described 122
displaying 121
list of icons 613
Sequence Timeline
described 90
offline media red 126
paging 132
Sequences
adding markers 183
adding media to advanced 159
adding media to basic 158
adding media using Match Frame 172
associated in Instinct and NewsCutter NRCS 138
audio-only 138, 140
basic and advanced 125
basic sequence as source 171, 171
creating 134
creating Interplay MAM 139
creating Interplay Production 135
duplicating Interplay MAM 67
editing 157
enabling audio tracks 170
exporting Interplay MAM 141
horizontal and vertical 128
inserting dissolves 184
navigating in timeline 129
offline media red 126
opening existing sequence 144
opening sequence associated with story 145
playing 199
recovering 143
saving 140
saving a copy 141
script sequences 137
simple and complex 203
splitting segments 182
stepping through 202
timeline paging 132
transcoding and mixing down 222
trimming clips 177
trimming segments 177
user settings 587
video-only 138
viewing in mobile app 494
viewing in mobile application 570
viewing in tablet app 532
viewing information 132
Settings menu option 32
Shortcuts
adding to Launch pane 41
keyboard 590
Sidebar, described 484, 523
Signing in 21
Signing out 21

A B C D E F G H I J K L M N O P Q R S T U V W X Y Z Index
637
Simple sequence
defined 203
Snapping
in the timeline 177
Solo
track in advanced sequence 235
track in asset or basic sequence 231
SOT column 159
SOT tracks
changing the default 236
described 234
swapping with NAT tracks 236
Speech-to-Text 95
Split edit 181
Splitting
segments 329
Start timecode
modifying 185
Stories
Floating 114
grouping 112
Story
adding Maestro graphic 478
approving from iPad 540
approving from iPhone 501
caching 504, 544
creating 91
deleting 110
described 90
dragging sequence to Media Composer 110
editing 95
inserting script templates 101
locking and unlocking 100
opening sequence 145
recovering 108, 110
right-to-left languages 94
saving from tablet app 498, 535
saving from tablet application 574
segments 93
text-only segments 107
timing 102
viewing offline 505, 546
Story Form
described 90
Strata
annotating 332, 334
creating segments with gaps 324, 325
deleting segments 330
described 314
exporting 342
locking 323
merge rules for segments 340
merging segments 330
resizing overlapping segments 328
resizing segments 327, 327
splitting segments 329
understanding 313
Subclips
creating 311
T
Tab key
in browser window 590
Tags
using for annotation 334
Tasks
adding and editing attachments 467
applying actions 465
assigning 464
delegating 463
deleting attachments 470
downloading file attachments 469
editing data 466
filtering 462
getting information on allowed attachments 435
understanding 428
uploading files 468
Tasks pane
described 457
list of icons 614
working in 447, 461
Templates, for scripts 101
Thumbnails pane 51, 78
Timecode
groups clips 253
modifying start 185
using to cue a frame 215
Timecode displays 213
Timing blocks
editing media into 151
extending segment into 152
manually adjusting 155
overview 148
showing and hiding 154
timing displays 149
Timing taglines 102
Training services 19
Transcode
clips and sequences 222
Transitions, dissolves 184
Trimming
advanced sequence 179
basic sequence 178
double-sided trim 180
segments in timeline 177
top or tail of a segment 179
Troubleshooting 19
TTML file
exporting closed captions 380

Index A B C D E F G H I J K L M N O P Q R S T U V W X Y Z
638
U
Understanding
associations 344
essence packages 356
essencesEssence packages
understanding 356
processes and tasks 428
strata 313
Undoing
in the Sequence pane 173
Unicode
support for marker text 310
Unlocking
story 100
Unrstanding
segmentation principles 320
Update Media Status command 203
Uploading
files to task 468
User Settings 587
V
V column 159
Vertical sequence
selecting 128
Video dissolves 184
Video ID
associating with a script sequence 137
Video sequences
view from Android mobile application 570
view from mobile app 494
view from tablet app 532
Video-only sequences 138
Viewing
associations 348
image asset 225
Voice tracks
described 234
Voice-over
recording 240
Volume
setting 234
Z
Zoom bar, Media
described 217
with in-process clips 224
Zoom bar, Sequence
described 129
