Avid Thunder Select Installation And User’s Guide Install
User Manual: avid Avid Thunder Select - Installation and User’s Guide Free User Guide for Avid Thunder Software, Manual
Open the PDF directly: View PDF ![]() .
.
Page Count: 40

make manage move | media™
Avid
®
Avid® Thunder® Select
Installation and User’s Guide
2
Copyright and Disclaimer
Product specifications are subject to change without notice and do not represent a commitment on the part of
Avid Technology, Inc.
The software described in this document is furnished under a license agreement. You can obtain a copy of that license by
visiting Avid's Web site at www.avid.com. The terms of that license are also available in the product in the same directory as
the software. The software might not be reverse assembled and might be used or copied only in accordance with the terms of
the license agreement. It is against the law to copy the software on any medium except as specifically allowed in the license
agreement.
Avid products or portions thereof are protected by one or more of the following United States Patents: 4,746,994; 4,970,663;
5,045,940; 5,267,351; 5,309,528; 5,355,450; 5,396,594; 5,440,348; 5,452,378; 5,467,288; 5,513,375; 5,528,310; 5,557,423;
5,577,190; 5,583,496; 5,584,006; 5,627,765; 5,640,601; 5,644,364; 5,654,737; 5,715,018; 5,719,570; 5,724,605; 5,726,717;
5,729,673; 5,745,637; 5,752,029; 5,754,851; 5,799,150; 5,812,216; 5,828,678; 5,842,014; 5,852,435; 5,999,406; 6,038,573;
6,061,758; 6,141,007; 6,211,869; 6,532,043; 6,546,190; 6,596,031; 6,636,869; 6,747,705; 6,763,523; 6,766,357; 6,813,622;
6,847,373; 7,081,900; D352,278; D372,478; D373,778; D392,267; D392,268; D392,269; D395,291; D396,853; D398,912.
Other patents are pending.
This document is protected under copyright law. An authorized licensee of Deko Select might reproduce this publication for
the licensee’s own use in learning how to use the software. This document might not be reproduced or distributed, in whole or
in part, for commercial purposes, such as selling copies of this document or providing support or educational services to
others. This document is supplied as a guide for Deko Select. Reasonable care has been taken in preparing the information it
contains. However, this document might contain omissions, technical inaccuracies, or typographical errors. Avid Technology,
Inc. does not accept responsibility of any kind for customers’ losses due to the use of this document. Product specifications
are subject to change without notice.
Copyright © 2007 Avid Technology, Inc. and its licensors. All rights reserved.
Attn. Government User(s). Restricted Rights Legend
U.S. GOVERNMENT RESTRICTED RIGHTS. This Software and its documentation are “commercial computer software” or
“commercial computer software documentation.” In the event that such Software or documentation is acquired by or on behalf
of a unit or agency of the U.S. Government, all rights with respect to this Software and documentation are subject to the terms
of the License Agreement, pursuant to FAR §12.212(a) and/or DFARS §227.7202-1(a), as applicable.
Trademarks
888 I/O, Adrenaline, AirPlay, AirSPACE, AirSPACE HD, AirSpeed, AniMatte, AudioSuite, AudioVision, AutoSync, Avid,
Avid DNA, Avid DNxcel, Avid DNxHD, AVIDdrive, AVIDdrive Towers, Avid DS Assist Station, Avid ISIS,
Avid Learning Excellerator, Avid Liquid, Avid Mojo, AvidNet, AvidNetwork, Avid Remote Response, AVIDstripe, Avid Unity,
Avid Unity ISIS, Avid Xpress, AVoption, AVX, CamCutter, ChromaCurve, ChromaWheel, DAE, Dazzle, Deko, DekoCast, D-Fi,
D-fx, DigiDelivery, Digidesign, Digidesign Audio Engine, Digidesign Intelligent Noise Reduction, DigiDrive,
Digital Nonlinear Accelerator, DigiTranslator, DINR, DNxchange, do more, D-Verb, Equinox, ExpertRender, Face Robot,
FieldPak, Film Composer, FilmScribe, FluidMotion, FXDeko, HIIP, HyperSPACE, HyperSPACE HDCAM, IllusionFX,
Image Independence, iNEWS, iNEWS ControlAir, Instinct, Interplay, Intraframe, iS9, iS18, iS23, iS36, LaunchPad, Lightning,
Lo-Fi, Magic Mask, make manage move | media, Marquee, Matador, Maxim, MCXpress, Media Browse, Media Composer,
MediaDock, MediaDock Shuttle, Media Fusion, Media Illusion, MediaLog, Media Reader, Media Recorder, MEDIArray,
MediaShare, MediaStream, Meridien, MetaSync, MissionControl, NaturalMatch, Nearchive, NetReview, NewsCutter, Nitris,
OMF, OMF Interchange, OMM, Open Media Framework, Open Media Management, PCTV, Pinnacle MediaSuite,
Pinnacle Studio, Pinnacle Systems, ProEncode, Pro Tools, QuietDrive, Recti-Fi, RetroLoop, rS9, rS18, Sci-Fi, ScriptSync,
SecureProductionEnvironment, Show Center, Softimage, Sound Designer II, SPACE, SPACEShift, SpectraGraph,
SpectraMatte, SteadyGlide, Symphony, TARGA, Thunder, Trilligent, UnityRAID, Vari-Fi, Video RAID, Video Slave Driver,
VideoSPACE, and Xdeck are either registered trademarks or trademarks of Avid Technology, Inc. in the United States and/or
other countries.
Adobe and Photoshop are either registered trademarks or trademarks of Adobe Systems Incorporated in the United States
and/or other countries. Apple and Macintosh are trademarks of Apple Computer, Inc., registered in the U.S. and other
countries. Windows is either a registered trademark or trademark of Microsoft Corporation in the United States and/or other
countries. All other trademarks contained herein are the property of their respective owners.
Avid Thunder Select Installation and User's Guide • 0130-07834-01 Rev B • December 2007
1
Contents
Using This Guide . . . . . . . . . . . . . . . . . . . . . . . . . . . . . . . . . . . . . . . . . . . . . 3
Symbols and Conventions . . . . . . . . . . . . . . . . . . . . . . . . . . . . . . . . . . . . . . . . . . . . . 4
If You Need Help. . . . . . . . . . . . . . . . . . . . . . . . . . . . . . . . . . . . . . . . . . . . . . . . . . . . . 4
How to Order Documentation . . . . . . . . . . . . . . . . . . . . . . . . . . . . . . . . . . . . . . . . . . . 5
Avid Training Services . . . . . . . . . . . . . . . . . . . . . . . . . . . . . . . . . . . . . . . . . . . . . . . . 5
Welcome to Thunder Select . . . . . . . . . . . . . . . . . . . . . . . . . . . . . . . . . . . . 7
Installing Thunder Select . . . . . . . . . . . . . . . . . . . . . . . . . . . . . . . . . . . . . . 9
Compatibility with Prior Versions. . . . . . . . . . . . . . . . . . . . . . . . . . . . . . . . . . . . . . . . . 9
Installing the Software. . . . . . . . . . . . . . . . . . . . . . . . . . . . . . . . . . . . . . . . . . . . . . . . . 9
Installing Thunder Select on iNEWS Clients . . . . . . . . . . . . . . . . . . . . . . . . . . . 10
Configuring the ThunderMOS.cfg File . . . . . . . . . . . . . . . . . . . . . . . . . . . . . 10
Configuring the ThunderMOS.ini . . . . . . . . . . . . . . . . . . . . . . . . . . . . . . . . . 12
Installing Thunder Select Software on ENPS Clients. . . . . . . . . . . . . . . . . . . . . 12
Configuring the Thunder Server and Thunder Select Client . . . . . . . . . 15
Configuring the Thunder Server . . . . . . . . . . . . . . . . . . . . . . . . . . . . . . . . . . . . . . . . 15
Configuring the Thunder Select Client . . . . . . . . . . . . . . . . . . . . . . . . . . . . . . . . . . . 17
Changing the Database in ENPS . . . . . . . . . . . . . . . . . . . . . . . . . . . . . . . . . . . . 19
Setting Up the ENPS Client to Use Thunder Select. . . . . . . . . . . . . . . . . . . . . . 19
Launching Thunder Select from ENPS . . . . . . . . . . . . . . . . . . . . . . . . . . . . . . . . . . . 21
Using Thunder Select with ENPS in a Live-to-Air Environment . . . . . . 25
Creating a Story in ENPS . . . . . . . . . . . . . . . . . . . . . . . . . . . . . . . . . . . . . . . . . . . . . 26
Adding a Story to a Rundown in ENPS. . . . . . . . . . . . . . . . . . . . . . . . . . . . . . . . . . . 27
Playing Stories to Air in ENPS . . . . . . . . . . . . . . . . . . . . . . . . . . . . . . . . . . . . . . . . . 29
Troubleshooting. . . . . . . . . . . . . . . . . . . . . . . . . . . . . . . . . . . . . . . . . . . . . 33
Common Setup Problems and Checklist . . . . . . . . . . . . . . . . . . . . . . . . . . . . . . . . . 34
Checklist. . . . . . . . . . . . . . . . . . . . . . . . . . . . . . . . . . . . . . . . . . . . . . . . . . . . . . . 34
Limitations . . . . . . . . . . . . . . . . . . . . . . . . . . . . . . . . . . . . . . . . . . . . . . . . . . . . . . . . . 35
Accessing Online Support. . . . . . . . . . . . . . . . . . . . . . . . . . . . . . . . . . . . . . . . . . . . . 35
Technical Support Information . . . . . . . . . . . . . . . . . . . . . . . . . . . . . . . . . . . . . . . . . 35
Using This Guide
The Avid® Thunder Select Installation and Configuration Guide is an instructional manual
for installing and configuring Avid Thunder Select.
If you are responsible for installing and configuring Thunder Select for use with iNEWS or
ENPS, carefully follow the instructions in this guide.
References to the Newsroom Computer System, or NCS, apply to ENPS® from Associated
Press and to iNEWS® from Avid Technology. Specific references to ENPS or iNEWS are
made only where there is a difference.
nThe documentation describes the features and hardware of all models. Therefore, your
system might not contain certain features and hardware that are covered in the
documentation.

Using This Guide
4
Symbols and Conventions
Avid documentation uses the following symbols and conventions:
If You Need Help
If you are having trouble using Thunder Select:
1. Retry the action, carefully following the instructions given for that task in this guide. It
is especially important to check each step of your workflow.
2. Check for the latest information that might have become available after the
documentation was published:
- If the latest information for your Avid product is provided as printed release notes,
they ship with your application and are also available online.
- If the latest information for your Avid product is provided as a ReadMe file, it is
supplied on your Avid installation CD or DVD as a PDF document and is also
available online.
Symbol or Convention Meaning or Action
nA note provides important related information, reminders,
recommendations, and strong suggestions.
cA caution means that a specific action you take could cause harm to
your computer or cause you to lose data.
wA warning describes an action that could cause you physical harm.
Follow the guidelines in this document or on the unit itself when
handling electrical equipment.
> This symbol indicates menu commands (and subcommands) in the
order you select them. For example, File > Import means to open the
File menu and then select the Import command.
tThis symbol indicates a single-step procedure. Multiple arrows in a
list indicate that you perform one of the actions listed.
Italic font Italic font is used to emphasize certain words and to indicate variables.
Courier Bold font
Courier Bold font identifies text that you type.
Ctrl+key or mouse action Press and hold the first key while you perform the mouse action. For
example, Ctrl+drag.
How to Order Documentation
5
You should always check online for the most up-to-date release notes or ReadMe
because the online version is updated whenever new information becomes
available. To view these online versions, select ReadMe from the Help menu. or visit
the Knowledge Base at www.avid.com/readme.
3. Check the documentation that came with your Avid application or your hardware for
maintenance or hardware-related issues.
4. Visit the online Knowledge Base at www.avid.com/onlinesupport. Online services are
available 24 hours per day, 7 days per week. Search this online Knowledge Base to find
answers, to view error messages, to access troubleshooting tips, to download updates,
and to read or join online message-board discussions.
How to Order Documentation
To order additional copies of this documentation from within the United States, call Avid
Sales at 800-949-AVID (800-949-2843). If you are placing an order from outside the United
States, contact your local Avid representative.
Avid Training Services
Avid makes lifelong learning, career advancement, and personal development easy and
convenient. Avid understands that the knowledge you need to differentiate yourself is always
changing, and Avid continually updates course content and offers new training delivery
methods that accommodate your pressured and competitive work environment.
To learn about Avid's new online learning environment, Avid Learning Excellerator
(ALEX), visit http://learn.avid.com.
For information on courses/schedules, training centers, certifications, courseware, and
books, please visit www.avid.com/training or call Avid Sales at 800-949-AVID
(800-949-2843).
Using This Guide
6
Chapter 1
Welcome to Thunder Select
Thunder Select is an ActiveX plugin that allows a journalist to select, view, and preview
media assets (stills and clips) on a Thunder, and add them to their story in iNEWS or ENPS.
Thunder Select allows the journalist to preview stills and clips in a read-only format.
• For stills, right-click on the still and select Show Picture from the menu. You will get a
full screen hi-res view of the graphic.
• For clips, right-click on the clip and select Preview from the menu. The Proxy viewer
opens which enables you to play video and hear audio for the clip. You can also scrub
through the read-only clip. No editing can be done.
Chapter 1 Welcome to Thunder Select
8
Chapter 2
Installing Thunder Select
This chapter contains information on installing Thunder Select for both ENPS and iNEWS.
nSetting up a Thunder system in an ENPS environment requires three steps: setting up the
Thunder broadcast device to communicate with the ENPS server via MOS, installing the
ENPS client software on a workstation, and configuring that workstation to use Thunder
Browse and the ThunderX ActiveX control.
Compatibility with Prior Versions
In order for Thunder Select to work correctly, your Thunder Server must be running version
7.1.0 or later.
nIf you are upgrading to version 7.1 from a version prior to 7.0, you must ensure that your
Thunder server is running 7.1 or higher. You must also upgrade your SQL database. Please
run the "updateDatabase.sql" script that is included on the software CD.
Installing the Software
Due to the nature of a MOS newsroom computer system, the easiest method to install the
Thunder Select client software is not via the CD. We suggest you copy the Thunder Select
software installer onto a shared network drive and run the installer remotely from each
machine. This reduces your total installation time because you have a large number of client
machines that need to be updated all at the same time. Our suggestion is to do the following:
1. Create a shared folder on your SQL server.
2. Copy the installer to that folder.
Chapter 2 Installing Thunder Select
10
3. Browse to the installer from each client.
4. Run the installer from there.
Because iNEWS and ENPS use different methods to access different Thunders, installing
Thunder Select for iNEWS or for ENPS is done through different procedures.
For more information, see the following topics:
•“Installing Thunder Select on iNEWS Clients” on page 10
•“Installing Thunder Select Software on ENPS Clients” on page 12
Please select the appropriate installation and read the entire section before beginning your
installations.
Installing Thunder Select on iNEWS Clients
When installing Thunder Select for iNEWS, there are three files that are required during the
Thunder Select client software installation.
• ThunderSelectSetup.exe - Installs the Thunder Select ActiveX client and necessary files.
• ThunderMOS.cfg - Contains master data for the Thunder Select client to change
databases. Must reside on a shared network folder (one file per iNEWS system).
• ThunderMOS.ini - Provides a path to the ThunderMOS.cfg file. A copy must reside on
every client (one file per client).
Configuring the ThunderMOS.cfg File
The ThunderMOS.cfg file contains information that allows the Thunder Select client to find
your various Thunder servers and browse their respective MOS databases. This information
is set up in a line per Thunder server.
nThe .cfg file can reside on any shared network folder, as long as every client can access that
folder. However, we recommend that it resides on the SQL server for easy maintenance
reasons.
For each Thunder server that you want your iNEWS clients to access using Thunder Select,
configure the ThunderMOS.cfg file.
To configure the ThunderMOS.cfg file:
1. Add a line in the ThunderMOS.cfg with the following information:
- An arbitrary name for the Thunder that the journalists at the clients will easily
recognize. This can be any name. Examples are “Control Room A,” “Morning
News,” “Sports,”, and so on.
Installing the Software
11
- The MOS ID. This must match the name in the MOSconfig.xml file on the iNEWS
server.
- The full UNC path to the Thunder database specified when you set up the MOS
protocol.
nEach of these values must be separated by a semi-colon and all be on one line.
nDue to the nature of the MOS configuration, you can only have one database per Thunder
server. While you can add multiple databases in the cfg file and the clients will browse the
databases correctly, the MOS metadata will not be properly transmitted between the iNEWS
server and the Thunder server.
2. If you:
tHave a security database, type the correct path on a separate line below the
Thunder lines.
tDo not have a security database, delete the whole line starting with “SecurityDB=”
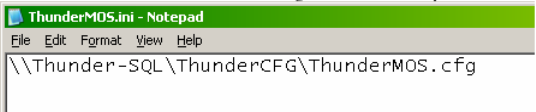
Your finished ThunderMOS.cfg file might look like this:
3. Save the ThunderMOS.cfg file.
4. On the SQL server create a folder called “ThunderCFG” and make sure it is shared to
everyone for read access.
5. Move the ThunderMOS.cfg file into the ThunderCFG folder.
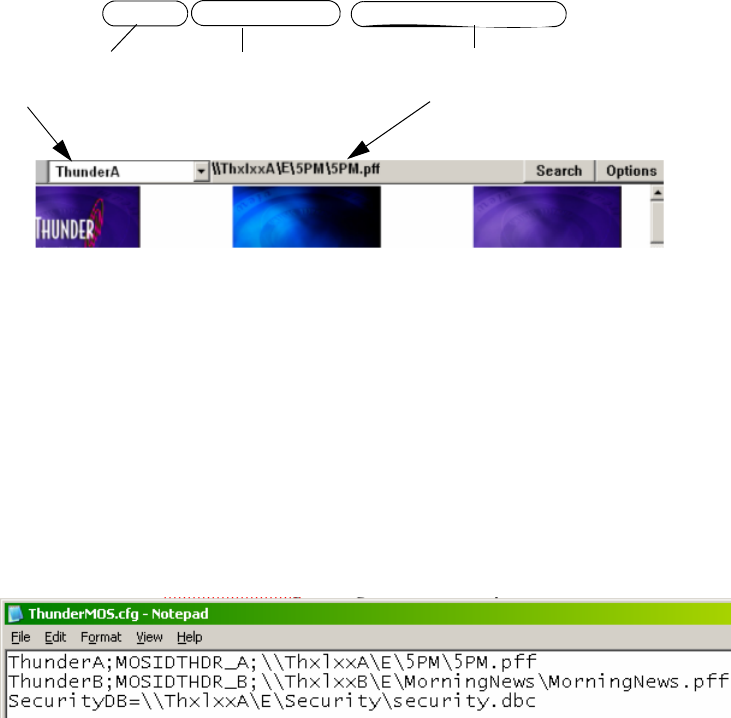
ThunderA;MOSIDTHDR_A;\\ThxlxxA\E\5PM\5PM.pff
This part is seen in the
drop-down list of the
iNEWS client.
This is the MOS ID. It should
match the MOS ID in the
iNEWS MOSconfig.xml.
This is the full path to the Thunder
database. Make sure it corresponds to
the Thunder specified in the MOS ID.
Chapter 2 Installing Thunder Select
12
Configuring the ThunderMOS.ini
To configure the ThunderMOS.ini file:
1. Type the full path to the cfg file you just created.
2. Copy this .ini file to the same place as the ThunderSelectSetup.exe installer for now.
3. Run the ThunderSelectSetup.exe installer.
4. Copy and paste this ThunderMOS.ini file into the c:\Thunder folder on every client.
Your finished ThunderMOS.ini file might look like this:
5. Repeat the installation of the ThunderSelectSetup.exe installer on each client.
6. After the setup has finished, copy the ThunderMOS.ini file into the c:\Thunder folder of
each client.
Installing Thunder Select Software on ENPS Clients
Before you install Thunder Select on ENPS clients, you must have installed the ENPS
clients. For more information, see your System Administrator for installation of the ENPS
client. The system administrator must add you as a new user to the ENPS user database
before you can log in to ENPS, and can also verify that the ENPS client is licensed properly.
To install the Thunder Select software on ENPS clients:
1. Double-click on ThunderSelectSetup.exe from each client and follow the dialog boxes.
Database settings for multiple Thunders are saved in order to move back and forth
between multiple Thunders with different settings. The database information for each
Thunder is saved and used to bring up the correct settings and database when a specific
Thunder is accessed.
nThis setting is only necessary if you have more than one Thunder and wish to switch between
them. If you are only running one Thunder, or do not wish to switch between multiple
Thunders using MOS, then setting the User ID is not necessary.
2. Start the ENPS client and go to MOS Configuration.
Installing the Software
13
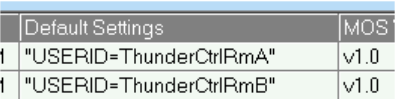
3. In the Default Settings box, do the following:
tAssign the machine name of each Thunder. You must add “USERID=name”
including the quotation marks (where ‘name’ is your Thunder name) into the
Default Settings field.
tType the IP Address of the Thunder workstation.
tType the name of the Active X control.
4. Click Save and then close Thunder Select and the MOS client.
5. Restart your system.
Chapter 2 Installing Thunder Select
14
Chapter 3
Configuring the Thunder Server and
Thunder Select Client
This chapter contains information on configuring Thunder Select for both iNEWS
and ENPS.
See the following topics:
•Configuring the Thunder Server
•Configuring the Thunder Select Client
•Launching Thunder Select from ENPS
Configuring the Thunder Server
The procedure for configuring the Thunder server is the same for both iNEWS and ENPS
configurations.
To configure the Thunder Server:
1. Launch Thunder.
Chapter 3 Configuring the Thunder Server and Thunder Select Client
16
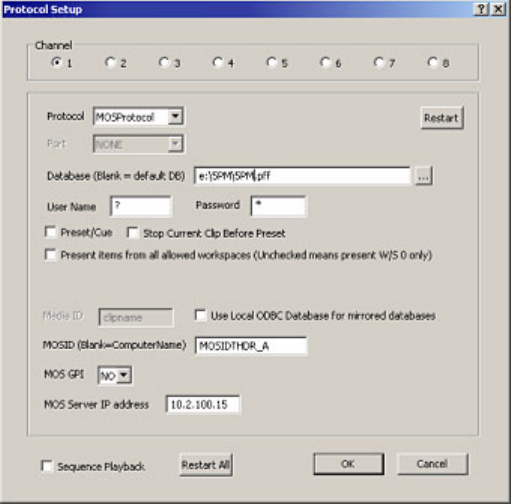
2. Configure a MOS connection by selecting File > Preferences > Protocol Setup.
The Protocol Setup dialog box opens.
3. In the Protocol Setup dialog box, do the following:
- Select a channel (1-8) in the Channel area.
- Select MOSProtocol from the Protocol menu.
- Select a database from the Database (Blank = default DB) field.
- Type in the IP address of the MOS (or ENPS) server in the MOS Server IP address
field. For details on determining the IP address of the ENPS server, see
“Determining the IP Address” on page 37.
- (Option) Thunder Select can use the computer name as the MOS ID to identify the
Thunder. However, you may assign a different name in the MOSID field.
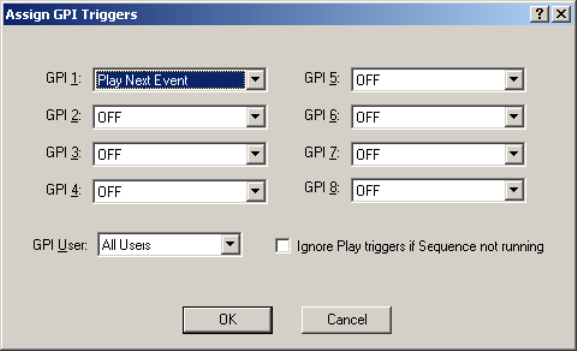
- (Option) If you want MOS to be playable by GPIs, select a GPI trigger from the
MOS GPI list.
4. Click the Restart button, then click OK. If you want to restart all, click the Restart All
button.
Configuring the Thunder Select Client
17
5. If you selected a MOS GPI, the GPIs must also be configured by selecting File >
Preferences > Assign GPIs.
The Assign GPI Triggers dialog box opens.
6. Set this trigger to issue a Play Next Event command, and click OK.
7. Enable the GPI(s) by selecting File > Preferences > Enable GPI triggers.
Configuring the Thunder Select Client
Thunder Select requires a SQL server and ODBC connection. If you get an error that the
“Datasource name not found,” check your ODBC setup.
For information on SQL server and ODBC configuration, see the Avid Thunder Products
User’s Guide, and the Avid On-Air Graphics Setup and Configuration Guide.
Chapter 3 Configuring the Thunder Server and Thunder Select Client
18
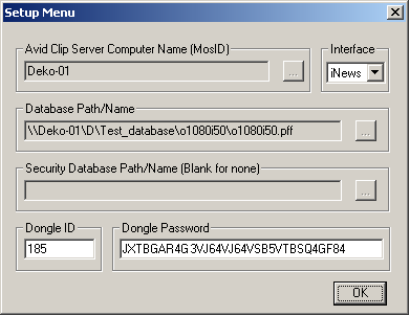
To configure the Thunder Select Client:
1. Open the MOS connection:
The first time that a new MOS connection is opened, the Setup Menu dialog box opens.
2. Select the interface, either iNEWS or ENPS, depending upon the newsroom computer
system that you are installing into.
nIf you are installing into an iNEWS system, the fields will be grayed out and populated
according to the information you supplied in the ThunderMOS.cfg file.
3. If you are installing into an ENPS system, you must do the following:
- Type the Thunder name in the Avid Clip Server Computer Name (MosID) field, or
browse to the Thunder by clicking on the ellipsis (“…”) button.
- Select File > Preferences > Protocol Setup, and browse to or enter the database that
was set up on the Thunder.
4. Type the Application key (dongle) information in the Dongle ID and Dongle Password
fields. If your Thunder system is a:
- ThunderXL or LT system, use the dongle ID and password of the dongle on the
Thunder server.
- ThunderMX, HD, or HY system, use the dongle ID and password that was printed
on the options letter which shipped with your ThunderMX/HD/HY software CD.
nThe number of Thunder Select client licenses is controlled by the dongle on the server, and is
determined by the number of client licenses that you purchased.
Configuring the Thunder Select Client
19
5. Click OK. The database connects, and you will see thumbnails of clips and stills
appearing in the Thunder database. You can now drag and drop this media into an
iNEWS or ENPS story.
nOnce this setup information has been entered, it should not need to be reconfigured.
However, if the dongle is removed, or for any other reason the data has changed, a warning
dialog appears and the setup information will need to be reconfigured.
Changing the Database in ENPS
If you are working in ENPS, you can change the database at any time while in the Thunder
Select application.
tThis can be done by pressing F9 or clicking the Advanced button in the Options
dialog box.
After you have entered the dongle password or ID, or changed the database, you must close
Thunder Select and then restart it.
Setting Up the ENPS Client to Use Thunder Select
Install ThunderX on the client machine by running either the Thunder Browse or ThunderX
installer.
To Set up the ENPS client to Use Thunder Select:
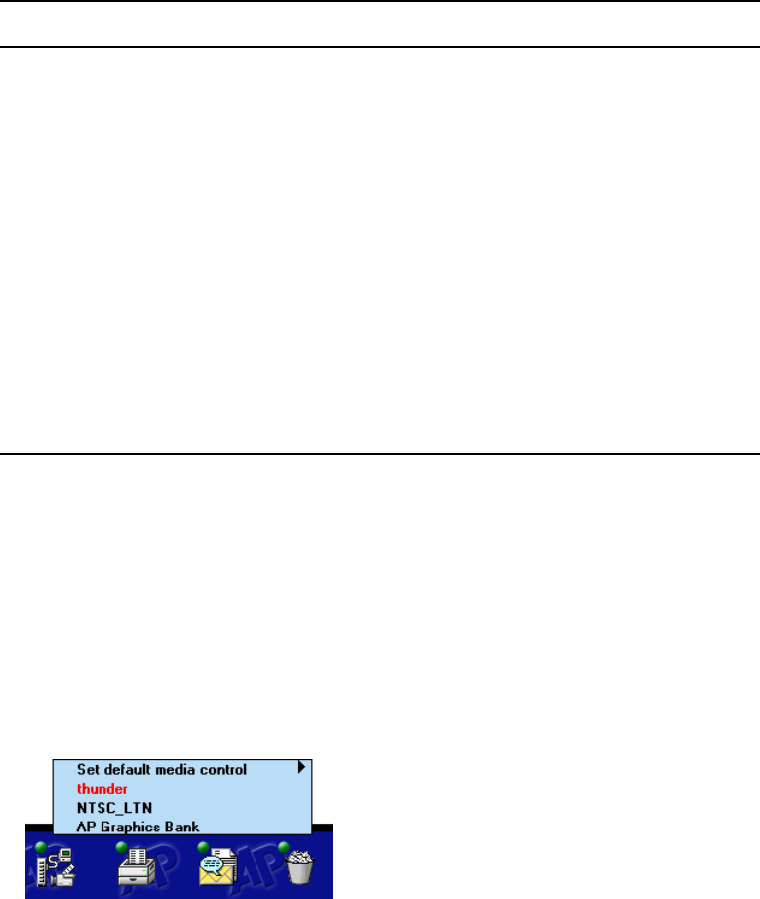
1. To configure the ENPS client to see the ThunderX ActiveX control, click on the fourth
folder’s rover (the green dot in the upper left of the folder) and select System
Maintenance > MOS configuration.
2. Click New in the dialog. The ENPS (New ID) dialog box opens.
Chapter 3 Configuring the Thunder Server and Thunder Select Client
20
3. Type a name for the new ID and click OK.
nThe ID can either be the computer network name of your Thunder or Lightning or a different
name that you set up in the MOSID field in the Protocol Setup dialog box.
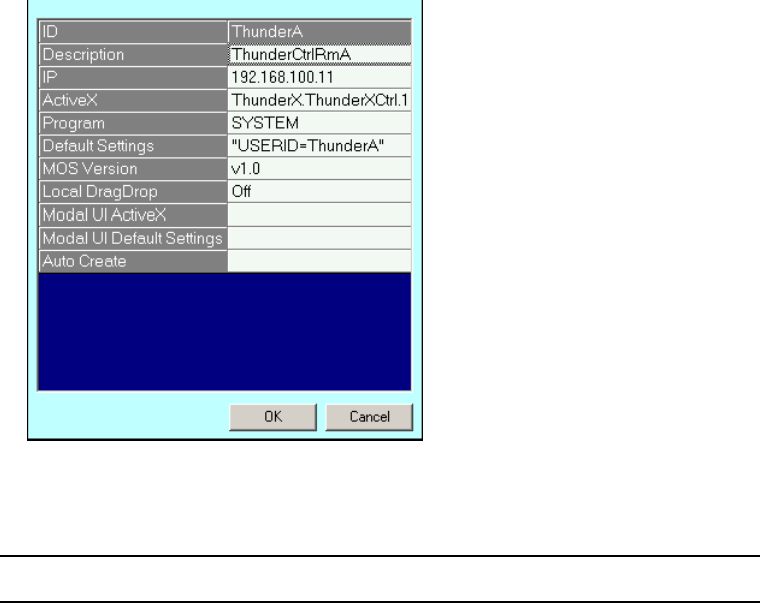
4. Complete the fields in the dialog box as shown in the following table:
Thunder Configuration
Field Value
Description Type a description to help you identify your Thunder.
IP Type the IP address of the Thunder/Lightning broadcast device.
For information on how to obtain the IP address, see
“Determining the IP Address” on page 37.
ActiveX Type ThunderX.ThunderXctrl.1 for Thunder running version
5.2 or later. Or, type LightningX.LightningXctrl.1 for
Lightnings or if you are running Thunder version 5.1 or earlier.
Program Enter the folder ID for the ENPS folder where the Thunder
MOS items will be stored.
Launching Thunder Select from ENPS
21
5. Click OK to save your changes and close the dialog box.
Launching Thunder Select from ENPS
Once all software components have been installed, and the ENPS MOS configuration has
been completed, you can launch the Thunder Select plug-in from ENPS.
To launch Thunder Select from ENPS:
1. Click on the Media rover and select the desired Thunder system.
nThe first time you launch Thunder Select from ENPS, you might get a series of three error
messages.
Default Settings This setting is only necessary if you have more than one
Thunder and want to switch between them. If you are only
running one Thunder, or do not want to switch between
multiple Thunders using MOS, then configuring this setting is
not necessary.
nIf you are setting up more than one Thunder, ENPS can
be set up so that ThunderX can switch between the
different Thunders easier.
Type the machine name of each Thunder. You must add
“USERID=name” including the quotation marks (where
‘name’ is your Thunder name) into the Default Settings field.
The database information for each Thunder is now saved and
used to bring up the correct settings and database when a
specific Thunder is accessed.
Local DragDrop OFF.
Thunder Configuration
Field Value
Chapter 3 Configuring the Thunder Server and Thunder Select Client
22
2. Option: If you get any error messages, click OK on each error message dialog box.
The Thunder Select plug-in window opens. The first time it opens, the window will be
blank (you will not see any thumbnails of clips and stills from the specified Thunder
database).
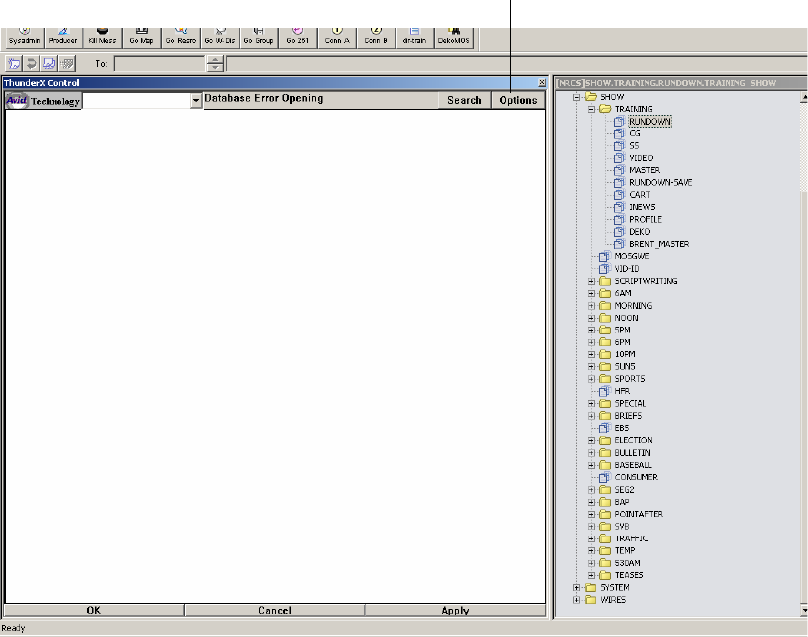
Options button

Launching Thunder Select from ENPS
23
3. Click on the Options button.
nIf another error message dialog box appears, click OK to close the error message dialog
box.
The Setup Menu dialog box opens.
4. Select ENPS from the Interface list. This activates the fields in the window.
5. Type the Thunder name in the Avid Clip Server Computer Name (MosID) field, or
browse to the Thunder by clicking the ellipsis (“…”) button.
6. In the Database Path/Name field, type the name of the database that was set up in the
Thunder Protocol Setup Window, or browse to that .pff file by clicking on the ellipsis
(“…”) button.
7. In the Dongle ID and Password fields, type the Application key (dongle) information of
the dongle that is currently connected to the Thunder server (not the dongle on the client
Browse workstation). If your Thunder system is a
tThunderXL or LT system, use the dongle ID and password of the dongle on the
Thunder server.
tThunderMX, HD, or HY system, use the dongle ID and password that was printed
on the options letter which shipped with your ThunderMX/HD/HY software CD.
nThe number of Thunder Select client licenses is controlled by the dongle on the server, and is
determined by the number of client licenses that you purchased.
Chapter 3 Configuring the Thunder Server and Thunder Select Client
24
8. Click OK. The database connects, and you will see thumbnails of clips and stills from
the specified Thunder database. You can now drag and drop this media into an ENPS
story.
wOnce this setup information has been entered, it should not need to be reconfigured.
However, if the dongle is removed, or for any other reason the data has changed, the
warning dialog will appear and the setup information will need to be reconfigured.
9. Option: If you want to change the database at any time while in the ThunderX
application, press F9 or click on the Advanced button in the Options dialog box.
10. After you have entered the dongle password or ID, or changed the database, close
ThunderX and restart it.
The database will open in a window in the bottom edit window of the ENPS client
software.
Chapter 4
Using Thunder Select with ENPS in a
Live-to-Air Environment
This chapter contains information on using Thunder Select with ENPS in a Live-to-air
environment.
ENPS is a considerably flexible program that enables the user to perform different steps to
create the same result. For more information, refer to the sections “Writing Stories” and
“Using MOS” in the ENPS Help.
This topic contains one possible method to create a new story and rundown and play to air
from ENPS.
See the following topics:
•“Creating a Story in ENPS” on page 26
•“Adding a Story to a Rundown in ENPS” on page 27
•“Playing Stories to Air in ENPS” on page 29
Chapter 4 Using Thunder Select with ENPS in a Live-to-Air Environment
26
Creating a Story in ENPS
To create a story in ENPS:
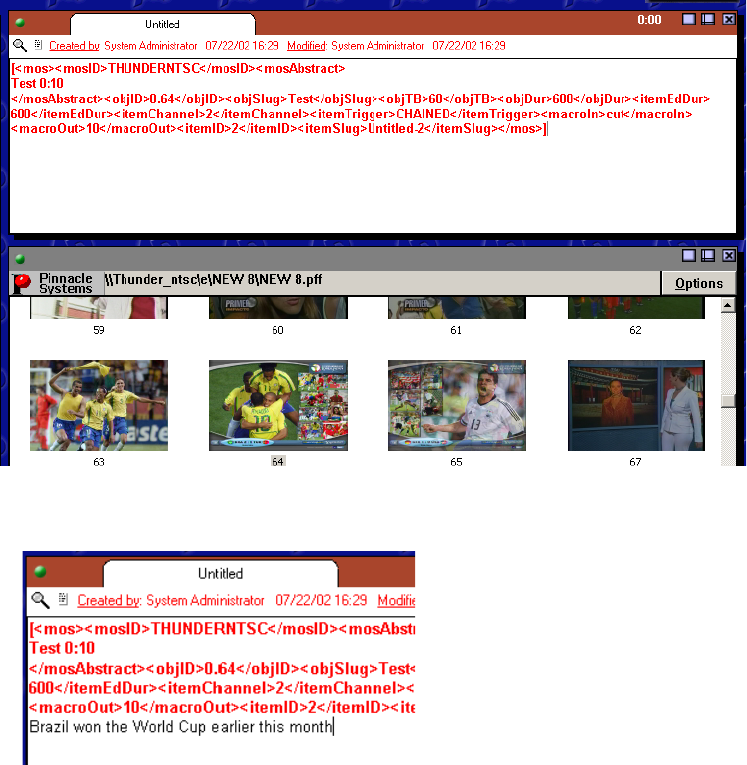
1. Drag a MOS object into the upper-right edit window to start a new story.
2. Write the script for the story.
Adding a Story to a Rundown in ENPS
27
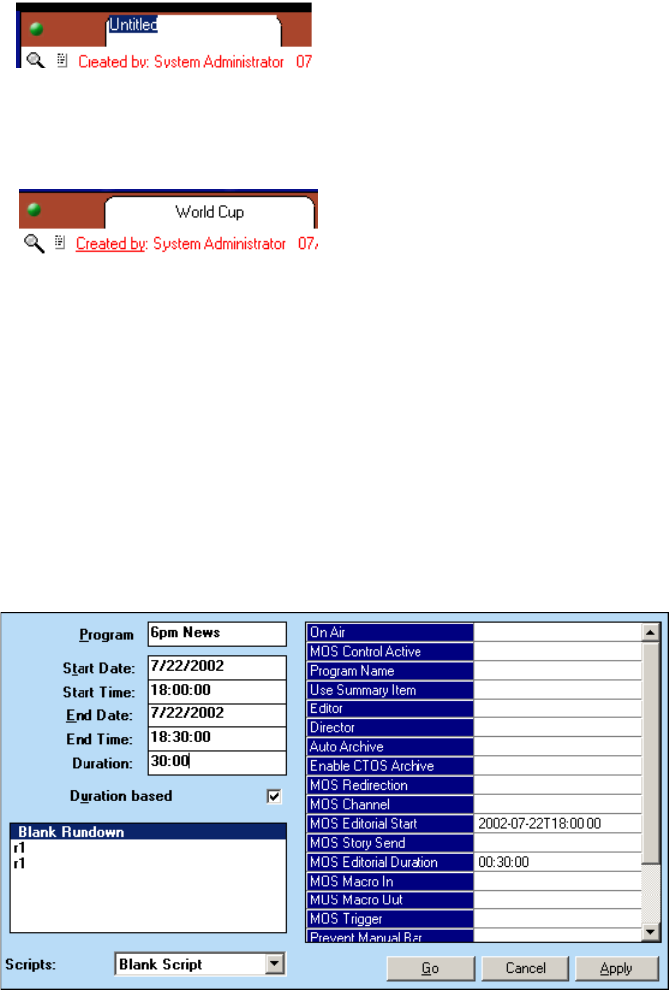
3. Retitle the script by doing the following:
tDouble-click on “Untitled” in the tab above the story.
tType in the new title.
tPress Enter.
The new title is displayed in the tab. Now, you must add the story to a rundown. For
more information, see “Adding a Story to a Rundown in ENPS” on page 27.
Adding a Story to a Rundown in ENPS
To add a story to a rundown in ENPS:
1. Create a new rundown by clicking on the third folder’s rover and selecting New >
Rundown.
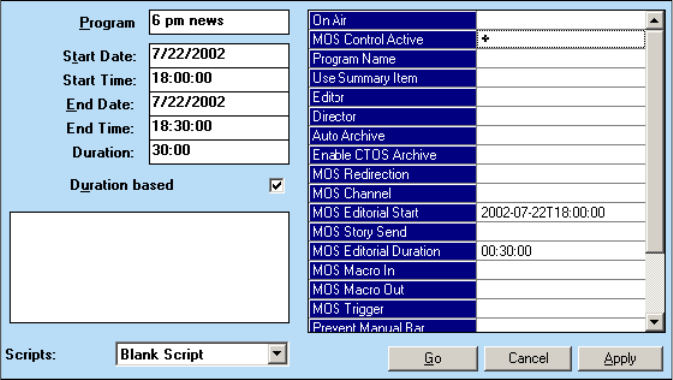
2. Add a title for the rundown in the Program field, and make any other changes, such as
start or end times.

Chapter 4 Using Thunder Select with ENPS in a Live-to-Air Environment
28
3. Click the Go button.
The new rundown displays along the top of the window.
4. Add story to the rundown by dragging the tab of the story into the rundown list.
The story name appears in the Story Slug column.
5. Option: Add other stories to the rundown, and reposition them as desired.
Playing Stories to Air in ENPS
29
Now you can play your stories to air in ENPS. For more information, see “Playing
Stories to Air in ENPS” on page 29.
Playing Stories to Air in ENPS
To play stories to air in ENPS:
1. When the rundown is ready to be played to air, click the rundown rover and select
Properties.
2. Click in the MOS Control Active box.
nMake sure that a ‘+’ appears in the box.
Chapter 4 Using Thunder Select with ENPS in a Live-to-Air Environment
30
The MOS Status column changes from blank to “NOT READY” with a red background.
This indicates that there is MOS communication with the Thunder broadcast device, but
that rundown is not ready to air.
On the Thunder, a new sequence has been created with the clips, but has not yet been
cued.
3. Click on the rundown rover and select MOS Ready to air.
nSetting the rundown ready to air cues the sequence on the Thunder.
The MOS Status column should display “READY.”

Playing Stories to Air in ENPS
31
Any stories that are above the black line are considered active. Stories can be dragged
from below the black line to above the black line and automatically added to the
rundown.
Chapter 4 Using Thunder Select with ENPS in a Live-to-Air Environment
32
Chapter 5
Troubleshooting
This chapter contains information on troubleshooting any problems you might find after
your Thunder Select installation and configuration. Also included is information on how to
access Avid online support, and Avid Technical Support.
See the following topics:
•Common Setup Problems and Checklist
•Limitations
•Accessing Online Support
•Technical Support Information

Chapter 5 Troubleshooting
34
Common Setup Problems and Checklist
After you have setup Thunder Select, you might get one or more error messages. The
following table provides some possible error messages and troubleshooting.
Checklist
Use the following checklist to make sure you have performed the basic setup steps for each
software component:
•SQL Server:
- Set up tables. If there already is a SQL server configured, no changes are necessary.
- Copy the ThunderSelectSetup.exe installer to a shared folder for easier
client installation.
•iNEWS:
- Make appropriate changes to ThunderMOS.cfg, and place it in a shared folder.
- Make changes to ThunderMOS.ini pointing it to the folder where you just copied
ThunderMOS.cfg.
- Copy ThunderMOS.ini to the same folder as ThunderSelectSetup.exe.
Setup Error Troubleshooting table
Error Message Description
• Error readingThunderMOS.ini file
• Error reading ThunderMOS.cfg file
• Can’t open database
If all of the files are in the correct folders as described in the
setup procedure, these errors can be caused by user
permission restrictions.
One way to test this is to browse to the shared folder using
Windows Explorer. If a logon dialog box appears, then the
user you are logged in as does not have the
proper permissions.
Data source not found This is caused by the client not having the ODBC
connection set up to connect to the Thunder SQL Server.
Make sure the system DSN points to the Thunder SQL
Server. For more information on using SQL with Thunder,
see the Avid Thunder Products User’s Guide.
In addition, verify that the latest Microsoft Data Access
Components (MDAC) drivers are installed on each client.
MDAC version 2.8 installer can be found on your
ThunderMOS installation CD.
Limitations
35
• Thunder Server:
- Install Version 7.1 of Thunder software
- Configure MOS protocol with correct NRCS server IP address and database.
• Thunder Select client workstations (perform on each client):
- Install Thunder Select ActiveX software by running ThunderSelectSetup.exe,
preferably by running the installer remotely from the SQL server.
- Set up an ODBC connection to the SQL server.
- iNEWS: copy the ThunderMOS.ini into the c:\Thunder folder.
- Run NRCS client software and then Thunder Select ActiveX plug-in.
- Configure dongle ID and password and test connection.
Limitations
The following is a limitation found in Avid Thunder Select:
• If you switch the Thunder Select client from ENPS to iNEWS and have just a single
database in the ThunderMOS.cfg file, you may sometimes not see the proper database in
the client. To work around this, add a second line in the ThunderMOS.cfg file similar to
the first. This should allow you to select the proper database.
Accessing Online Support
Avid Online Support is available 24 hours per day, 7 days per week. Search the Knowledge
Base to find answers, to view error messages, to access troubleshooting tips, to download
updates, and to read/join online message-board discussions.
To access Avid Online Support:
tGo to www.avid.com/onlineSupport/.
Technical Support Information
Most products feature a number of coverage options. Avid Assurance service offerings are
designed to facilitate your use of Avid solutions. Service options include extended telephone
coverage, automatic software maintenance, extended hardware warranty, and preferred
pricing on replacement parts. Offerings and options may vary by product and are not
available for all products.
Chapter 5 Troubleshooting
36
For more information regarding Avid’s service offerings, visit www.avid.com/support or call
Avid Sales at 800-949-AVID (800-949-2843).
Program availability and details might vary depending on geographic location and are
subject to change without notice. Contact your local Avid office or your local Avid Reseller
for complete program information and pricing. However, if you need help locating an Avid
office or Avid Reseller near you, please visit www.avid.com or call in North America 800-
949-AVID (800-949-2843). International users call 978-275-2480.
Appendix A
Obtaining IP Addresses
This chapter contains information on getting IP addresses when configuring your Thunder
Select installation.
Many NT networks use a DHCP server to assign IP addresses, rather than giving fixed
addresses to each machine. Under DHCP, the IP address for each machine is dynamically
allocated, meaning that it can change. However, our experience has been that these addresses
are stable, especially if the machine is left on. For more information on this subject, see your
System Administrator.
Determining the IP Address
There are two easy ways to determine the IP address of a machine. Both ways are accessed
from the Command prompt.
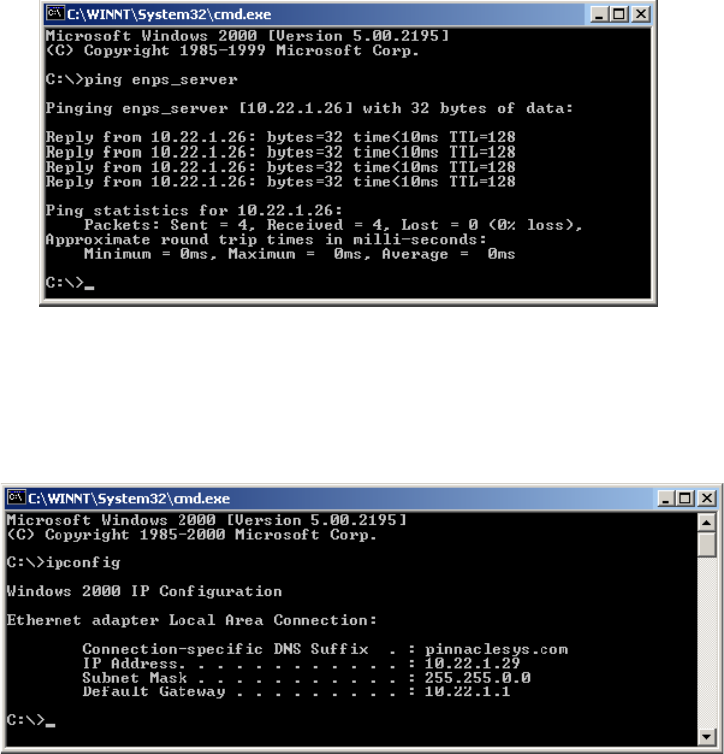
1. Go to Start > Run and type cmd in the Run dialog box, and click OK.
2. If you want to determine the IP address of
tThis machine, type ipconfig and press Enter.
This will provide the IP Address of this machine, (In this example, 10.22.1.29.
Appendix A Obtaining IP Addresses
38
tA remote machine on the network, type ping and the network name of the desired
machine, e.g. “ping enps_server”, and press Enter,
This results in the output Pinging enps_server [10.22.1.26]… which reveals that the IP
address for enps_server is 10.22.1.26.
