Avid Using Xpress Studio Workflow Guide 4.5 WG
User Manual: avid Xpress Studio - 4.5 - Workflow Guide Free User Guide for Avid Xpress Software, Manual
Open the PDF directly: View PDF ![]() .
.
Page Count: 148 [warning: Documents this large are best viewed by clicking the View PDF Link!]
- Title
- Contents
- Using This Guide
- Avid Xpress Studio Workflow Overview
- Using Avid Xpress Pro
- Using Avid FX
- Using Avid 3D
- Using Digi 002, Mbox, and Avid Pro Tools LE
- Using Pro Tools LE for Finishing Audio
- Exporting Audio and Video from Avid Xpress Pro
- Importing Audio and Video into Pro Tools LE
- Editing Audio Files in Pro Tools LE
- Bringing Your Audio from Pro Tools LE to Avid Xpress Pro
- Using Avid DVD by Sonic
- Using Pro Tools LE with Progressive Projects
- Index
make manage move | media™
Avid
®
Using Avid Xpress® Studio
Workflow Guide
2
Copyright and Disclaimer
Product specifications are subject to change without notice and do not represent a commitment on the part
of Avid Technology, Inc.
The software described in this document is furnished under a license agreement. You can obtain a copy of
that license by visiting Avid's Web site at www.avid.com. The terms of that license are also available in the
product in the same directory as the software. The software may not be reverse assembled and may be
used or copied only in accordance with the terms of the license agreement. It is against the law to copy the
software on any medium except as specifically allowed in the license agreement.
Avid products or portions thereof are protected by one or more of the following United States Patents:
4,746,994; 4,970,663; 5,045,940; 5,267,351; 5,309,528; 5,355,450; 5,396,594; 5,440,348; 5,452,378;
5,467,288; 5,513,375; 5,528,310; 5,557,423; 5,568,275; 5,577,190; 5,584,006; 5,640,601; 5,644,364;
5,654,737; 5,715,018; 5,724,605; 5,726,717; 5,729,673; 5,745,637; 5,752,029; 5,754,851; 5,799,150;
5,812,216; 5,852,435; 5,905,841; 5,929,836; 5,930,445; 5,946,445; 5,987,501; 6,016,152; 6,018,337;
6,023,531; 6,058,236; 6,061,758; 6,091,778; 6,105,083; 6,118,444; 6,128,001; 6,134,607; 6,137,919;
6,141,691; 6,198,477; 6,201,531; 6,223,211; 6,249,280; 6,269,195; 6,317,158; 6,317,515; 6,330,369;
6,351,557; 6,353,862; 6,357,047; 6,392,710; 6,404,435; 6,407,775; 6,417,891; 6,426,778; 6,477,271;
6,489,969; 6,512,522; 6,532,043; 6,546,190; 6,552,731; 6,553,142; 6,570,624; 6,571,255; 6,583,824;
6,618,547; 6,636,869; 6,665,450; 6,678,461; 6,687,407; 6,704,445; D392,269; D396,853; D398,912. Other
patents are pending.
No part of this document may be reproduced or transmitted in any form or by any means, electronic or
mechanical, including photocopying and recording, for any purpose without the express written permission
of Avid Technology, Inc.
Copyright © 2004 Avid Technology, Inc. and its licensors. All rights reserved. Printed in USA.
The following disclaimer is required by Apple Computer, Inc.
APPLE COMPUTER, INC. MAKES NO WARRANTIES WHATSOEVER, EITHER EXPRESS OR IMPLIED,
REGARDING THIS PRODUCT, INCLUDING WARRANTIES WITH RESPECT TO ITS
MERCHANTABILITY OR ITS FITNESS FOR ANY PARTICULAR PURPOSE. THE EXCLUSION OF
IMPLIED WARRANTIES IS NOT PERMITTED BY SOME STATES. THE ABOVE EXCLUSION MAY NOT
APPLY TO YOU. THIS WARRANTY PROVIDES YOU WITH SPECIFIC LEGAL RIGHTS. THERE MAY BE
OTHER RIGHTS THAT YOU MAY HAVE WHICH VARY FROM STATE TO STATE.
The following disclaimer is required by Sam Leffler and Silicon Graphics, Inc. for the use of
their TIFF library:
Copyright © 1988–1997 Sam Leffler
Copyright © 1991–1997 Silicon Graphics, Inc.
Permission to use, copy, modify, distribute, and sell this software [i.e., the TIFF library] and its
documentation for any purpose is hereby granted without fee, provided that (i) the above copyright notices
and this permission notice appear in all copies of the software and related documentation, and (ii) the
names of Sam Leffler and Silicon Graphics may not be used in any advertising or publicity relating to the
software without the specific, prior written permission of Sam Leffler and Silicon Graphics.
THE SOFTWARE IS PROVIDED “AS-IS” AND WITHOUT WARRANTY OF ANY KIND, EXPRESS,
IMPLIED OR OTHERWISE, INCLUDING WITHOUT LIMITATION, ANY WARRANTY OF
MERCHANTABILITY OR FITNESS FOR A PARTICULAR PURPOSE.
IN NO EVENT SHALL SAM LEFFLER OR SILICON GRAPHICS BE LIABLE FOR ANY SPECIAL,
INCIDENTAL, INDIRECT OR CONSEQUENTIAL DAMAGES OF ANY KIND, OR ANY DAMAGES
WHATSOEVER RESULTING FROM LOSS OF USE, DATA OR PROFITS, WHETHER OR NOT ADVISED
OF THE POSSIBILITY OF DAMAGE, AND ON ANY THEORY OF LIABILITY, ARISING OUT OF OR IN
CONNECTION WITH THE USE OR PERFORMANCE OF THIS SOFTWARE.
The following disclaimer is required by the Independent JPEG Group:
Portions of this software are based on work of the Independent JPEG Group.
The following disclaimer is required by Paradigm Matrix:
Portions of this software licensed from Paradigm Matrix.
3
The following disclaimer is required by Ray Sauers Associates, Inc.:
“Install-It” is licensed from Ray Sauers Associates, Inc. End-User is prohibited from taking any action to
derive a source code equivalent of “Install-It,” including by reverse assembly or reverse compilation, Ray
Sauers Associates, Inc. shall in no event be liable for any damages resulting from reseller’s failure to
perform reseller’s obligation; or any damages arising from use or operation of reseller’s products or the
software; or any other damages, including but not limited to, incidental, direct, indirect, special or
consequential Damages including lost profits, or damages resulting from loss of use or inability to use
reseller’s products or the software for any reason including copyright or patent infringement, or lost data,
even if Ray Sauers Associates has been advised, knew or should have known of the possibility of such
damages.
The following disclaimer is required by Videomedia, Inc.:
“Videomedia, Inc. makes no warranties whatsoever, either express or implied, regarding this product,
including warranties with respect to its merchantability or its fitness for any particular purpose.”
“This software contains V-LAN ver. 3.0 Command Protocols which communicate with V-LAN ver. 3.0
products developed by Videomedia, Inc. and V-LAN ver. 3.0 compatible products developed by third
parties under license from Videomedia, Inc. Use of this software will allow “frame accurate” editing control
of applicable videotape recorder decks, videodisc recorders/players and the like.”
The following disclaimer is required by Altura Software, Inc. for the use of its Mac2Win
software and Sample Source Code:
©1993–1998 Altura Software, Inc.
The following disclaimer is required by Ultimatte Corporation:
Certain real-time compositing capabilities are provided under a license of such technology from Ultimatte
Corporation and are subject to copyright protection.
The following disclaimer is required by 3Prong.com Inc.:
Certain waveform and vector monitoring capabilities are provided under a license from 3Prong.com Inc.
Attn. Government User(s). Restricted Rights Legend
U.S. GOVERNMENT RESTRICTED RIGHTS. This Software and its documentation are “commercial
computer software” or “commercial computer software documentation.” In the event that such Software or
documentation is acquired by or on behalf of a unit or agency of the U.S. Government, all rights with
respect to this Software and documentation are subject to the terms of the License Agreement, pursuant to
FAR §12.212(a) and/or DFARS §227.7202-1(a), as applicable.
Trademarks
888 I/O, Adrenaline, AirPlay, AirSPACE, AirSPACE HD, AniMatte, AudioSuite, AudioVision, AutoSync,
Avid, Avid DNA, AVIDdrive, AVIDdrive Towers, Avid Mojo, AvidNet, AvidNetwork, AVIDstripe, Avid Unity,
Avid Xpress, AVoption, AVX, CamCutter, ChromaCurve, ChromaWheel, DAE, D-Fi, D-fx, Digidesign,
Digidesign Audio Engine, Digidesign Intelligent Noise Reduction, DigiDrive, Digital Nonlinear Accelerator,
DigiTranslator, DINR, D-Verb, Equinox, ExpertRender, FieldPak, Film Composer, FilmScribe, FluidMotion,
HIIP, HyperSPACE, HyperSPACE HDCAM, IllusionFX, Image Independence, Intraframe, iS9, iS18, iS23,
iS36, Lo-Fi, Magic Mask, make manage move | media, Marquee, Matador, Maxim, MCXpress,
Media Composer, MediaDock, MediaDock Shuttle, Media Fusion, Media Illusion, MediaLog,
Media Reader, Media Recorder, MEDIArray, MediaShare, Meridien, MetaSync, NaturalMatch, Nearchive,
NetReview, NewsCutter, Nitris, OMF, OMF Interchange, OMM, Open Media Framework,
Open Media Management, ProEncode, Pro Tools, QuietDrive, Recti-Fi, RetroLoop, rS9, rS18, Sci-Fi,
Softimage, Sound Designer II, SPACE, SPACEShift, Symphony, the Avid|DS logo, Trilligent, UnityRAID,
Vari-Fi, Video Slave Driver, VideoSPACE, and Xdeck are either registered trademarks or trademarks of
Avid Technology, Inc. in the United States and/or other countries.
iNEWS, iNEWS ControlAir, and Media Browse are trademarks of iNews, LLC.
All other trademarks contained herein are the property of their respective owners.
Footage
Arri — Courtesy of Arri/Fauer — John Fauer, Inc.
Bell South “Anticipation” — Courtesy of Two Headed Monster — Tucker/Wayne Atlanta/GMS.
Canyonlands — Courtesy of the National Park Service/Department of the Interior.
Eco Challenge British Columbia — Courtesy of Eco Challenge Lifestyles, Inc., All Rights Reserved.
4
Eco Challenge Morocco — Courtesy of Discovery Communications, Inc.
It’s Shuttletime — Courtesy of BCP & Canadian Airlines.
Nestlé Coffee Crisp — Courtesy of MacLaren McCann Canada.
Saturn “Calvin Egg” — Courtesy of Cossette Communications.
“Tigers: Tracking a Legend” — Courtesy of www.wildlifeworlds.com, Carol Amore, Executive Producer.
Windhorse — Courtesy of Paul Wagner Productions.
Arizona Images — KNTV Production — Courtesy of Granite Broadcasting, Inc.,
Editor/Producer Bryan Foote.
Canyonlands — Courtesy of the National Park Service/Department of the Interior.
Tornados + Belle Isle footage — Courtesy of KWTV News 9.
WCAU Fire Story — Courtesy of NBC-10, Philadelphia, PA.
Women in Sports – Paragliding — Courtesy of Legendary Entertainment, Inc.
GOT FOOTAGE?
Editors — Filmmakers — Special Effects Artists — Game Developers — Animators — Educators —
Broadcasters — Content creators of every genre — Just finished an incredible project and want to
share it with the world?
Send us your reels and we may use your footage in our show reel or demo!*
For a copy of our release and Avid’s mailing address, go to www.avid.com/footage.
*Note: Avid cannot guarantee the use of materials submitted.
Using Avid Xpress Studio Workflow Guide• Part 0130-06216-01 • June 2004
Contents
Using This Guide . . . . . . . . . . . . . . . . . . . . . . . . . . . . . . . . . . . . . 9
Symbols and Conventions . . . . . . . . . . . . . . . . . . . . . . . . . . . . . . . . . . . 10
If You Need Help . . . . . . . . . . . . . . . . . . . . . . . . . . . . . . . . . . . . . . . . . . 11
Accessing the Online Library . . . . . . . . . . . . . . . . . . . . . . . . . . . . . . . . . 11
How to Order Documentation . . . . . . . . . . . . . . . . . . . . . . . . . . . . . . . . . 12
Avid Educational Services . . . . . . . . . . . . . . . . . . . . . . . . . . . . . . . . . . . 12
Chapter 1 Avid Xpress Studio Workflow Overview . . . . . . . . . . . . . . . . . 13
Avid Xpress Studio Applications. . . . . . . . . . . . . . . . . . . . . . . . . . . . . . . 14
Basic Workflow. . . . . . . . . . . . . . . . . . . . . . . . . . . . . . . . . . . . . . . . . . . . 16
Avid FX . . . . . . . . . . . . . . . . . . . . . . . . . . . . . . . . . . . . . . . . . . . . . . 17
Avid 3D . . . . . . . . . . . . . . . . . . . . . . . . . . . . . . . . . . . . . . . . . . . . . . 17
Avid Pro Tools LE . . . . . . . . . . . . . . . . . . . . . . . . . . . . . . . . . . . . . . 18
Avid DVD by Sonic. . . . . . . . . . . . . . . . . . . . . . . . . . . . . . . . . . . . . . 19
File Formats and Media Handling. . . . . . . . . . . . . . . . . . . . . . . . . . . . . . 19
Chapter 2 Using Avid Xpress Pro . . . . . . . . . . . . . . . . . . . . . . . . . . . . . . . 21
Working in Avid Xpress Pro . . . . . . . . . . . . . . . . . . . . . . . . . . . . . . . . . . 21
Creating a Program in Avid Xpress Pro . . . . . . . . . . . . . . . . . . . . . . 22
Opening other Avid Xpress Studio Applications . . . . . . . . . . . . . . . 26
Chapter 3 Using Avid FX. . . . . . . . . . . . . . . . . . . . . . . . . . . . . . . . . . . . . . . 27
Basic Steps. . . . . . . . . . . . . . . . . . . . . . . . . . . . . . . . . . . . . . . . . . . . . . . 27
Opening the Effect Palette . . . . . . . . . . . . . . . . . . . . . . . . . . . . . . . . 28
Dragging the Avid FX Effect on to the Timeline . . . . . . . . . . . . . . . . 29
Entering Effect Mode . . . . . . . . . . . . . . . . . . . . . . . . . . . . . . . . . . . . 29
Displaying the Avid FX Interface . . . . . . . . . . . . . . . . . . . . . . . . . . . 30
6
Creating an Effect. . . . . . . . . . . . . . . . . . . . . . . . . . . . . . . . . . . . . . . 31
Creating a Transition Effect . . . . . . . . . . . . . . . . . . . . . . . . . . . . 32
Adding Media to an Effect . . . . . . . . . . . . . . . . . . . . . . . . . . . . . 35
Applying the Effect . . . . . . . . . . . . . . . . . . . . . . . . . . . . . . . . . . . . . . 38
Rendering the Effect . . . . . . . . . . . . . . . . . . . . . . . . . . . . . . . . . . . . . 38
Creating Text Effects. . . . . . . . . . . . . . . . . . . . . . . . . . . . . . . . . . . . . . . . 39
Creating a Title . . . . . . . . . . . . . . . . . . . . . . . . . . . . . . . . . . . . . . . . . 39
Adding an Effect to Filler . . . . . . . . . . . . . . . . . . . . . . . . . . . . . . 39
Creating Text in a Title . . . . . . . . . . . . . . . . . . . . . . . . . . . . . . . . 40
Animating Text on a Path . . . . . . . . . . . . . . . . . . . . . . . . . . . . . . . . . 44
Saving and Sharing Your Work. . . . . . . . . . . . . . . . . . . . . . . . . . . . . . . . 47
Using the Avid FX Engine . . . . . . . . . . . . . . . . . . . . . . . . . . . . . . . . . . . . 48
Next Steps. . . . . . . . . . . . . . . . . . . . . . . . . . . . . . . . . . . . . . . . . . . . . . . . 49
Chapter 4 Using Avid 3D . . . . . . . . . . . . . . . . . . . . . . . . . . . . . . . . . . . . . . 51
Exporting Media . . . . . . . . . . . . . . . . . . . . . . . . . . . . . . . . . . . . . . . . . . . 52
Send To Avid 3D . . . . . . . . . . . . . . . . . . . . . . . . . . . . . . . . . . . . . . . 53
Converting OMF Media . . . . . . . . . . . . . . . . . . . . . . . . . . . . . . . 53
Exporting Media to Avid 3D . . . . . . . . . . . . . . . . . . . . . . . . . . . . 54
Viewing AAF Media in Avid 3D . . . . . . . . . . . . . . . . . . . . . . . . . 57
Creating 3D Content . . . . . . . . . . . . . . . . . . . . . . . . . . . . . . . . . . . . . . . . 59
Applying Video Clips as Background or Textures. . . . . . . . . . . . . . . 60
Creating a Scene for Export to the Avid Editing Application. . . . . . . 68
Exporting Media from Avid 3D . . . . . . . . . . . . . . . . . . . . . . . . . . . . . . . . 72
Chapter 5 Using Digi 002, Mbox, and Avid Pro Tools LE . . . . . . . . . . . . 79
Using Pro Tools LE for Finishing Audio . . . . . . . . . . . . . . . . . . . . . . . . . 80
Basic Steps in the Avid Xpress Pro to Pro Tools LE Workflow. . . . . 80
Before You Begin . . . . . . . . . . . . . . . . . . . . . . . . . . . . . . . . . . . . . . . 81
Editing Audio with Avid Studio Xpress Complete. . . . . . . . . . . . 81
Editing Audio with Avid Xpress Studio Essentials . . . . . . . . . . . 84
Frame-Rate Accurate Video Editing and Sample-Rate Accurate
Audio Editing. . . . . . . . . . . . . . . . . . . . . . . . . . . . . . . . . . . . . . 85
Hardware Requirements . . . . . . . . . . . . . . . . . . . . . . . . . . . . . . 86
Disk Drive Requirements . . . . . . . . . . . . . . . . . . . . . . . . . . . . . . 86
7
QuickTime Movies versus QuickTime Reference Movies . . . . . 87
Exporting Audio and Video from Avid Xpress Pro . . . . . . . . . . . . . . . . . 88
Using the Send To Avid Pro Tools LE Templates . . . . . . . . . . . . . . 88
Determining the Audio Settings to use for Your Pro Tools LE
Session. . . . . . . . . . . . . . . . . . . . . . . . . . . . . . . . . . . . . . . . . . 90
Importing Audio and Video into Pro Tools LE. . . . . . . . . . . . . . . . . . . . . 90
Editing Audio Files in Pro Tools LE . . . . . . . . . . . . . . . . . . . . . . . . . . . . 97
Bringing Your Audio from Pro Tools LE to Avid Xpress Pro. . . . . . . . . . 98
Exporting Tracks from Pro Tools LE . . . . . . . . . . . . . . . . . . . . . . . . 98
Before You Begin . . . . . . . . . . . . . . . . . . . . . . . . . . . . . . . . . . . 98
Exporting Selected Tracks. . . . . . . . . . . . . . . . . . . . . . . . . . . . . 99
Importing an OMF File into Avid Xpress Pro . . . . . . . . . . . . . . 101
Using the Bounce to Disk Command . . . . . . . . . . . . . . . . . . . . . . . 103
Using Publish as OMFI With the Bounce to Disk
Command. . . . . . . . . . . . . . . . . . . . . . . . . . . . . . . . . . . . . . . 103
Using the Media Tool to Import the Files. . . . . . . . . . . . . . . . . 105
Exporting a Stereo-Interleaved File . . . . . . . . . . . . . . . . . . . . . 107
Importing the File into a Bin. . . . . . . . . . . . . . . . . . . . . . . . . . . 109
Chapter 6 Using Avid DVD by Sonic . . . . . . . . . . . . . . . . . . . . . . . . . . . . 113
Preparing the Sequence. . . . . . . . . . . . . . . . . . . . . . . . . . . . . . . . . . . . 113
Encoding the Sequence with Sorenson Squeeze . . . . . . . . . . . . . . . . 114
Producing the DVD with Avid DVD by Sonic . . . . . . . . . . . . . . . . . . . . 116
Setting Up the Avid DVD by Sonic Project. . . . . . . . . . . . . . . . . . . 116
Working in the Avid DVD by Sonic Application . . . . . . . . . . . . . . . 118
Outputting the Project to DVD . . . . . . . . . . . . . . . . . . . . . . . . . . . . . . . 121
Photoshop File Restrictions . . . . . . . . . . . . . . . . . . . . . . . . . . . . . . . . . 121
Using Pro Tools LE with Progressive Projects. . . . . . . . . . . 123
Exporting Files to Pro Tools from a Progressive Project . . . . . . . . . . . 123
Use the Media Creation Tool to Create OMF Media . . . . . . . . . . . 124
MXF File Format Issues. . . . . . . . . . . . . . . . . . . . . . . . . . . . . . . . . 124
Creating a New OMF Template for the Send To Command . . . . . 125
Using Audio Pulldown with Progressive Projects . . . . . . . . . . . . . . . . . 130
23.976p NTSC Projects . . . . . . . . . . . . . . . . . . . . . . . . . . . . . . . . . 130
8
Video Sources . . . . . . . . . . . . . . . . . . . . . . . . . . . . . . . . . . . . . 130
Audio Sources . . . . . . . . . . . . . . . . . . . . . . . . . . . . . . . . . . . . . 131
Export to Pro Tools . . . . . . . . . . . . . . . . . . . . . . . . . . . . . . . . . 131
Export from Pro Tools to Avid Xpress Pro . . . . . . . . . . . . . . . . 132
24p NTSC Projects. . . . . . . . . . . . . . . . . . . . . . . . . . . . . . . . . . . . . 132
Video Sources . . . . . . . . . . . . . . . . . . . . . . . . . . . . . . . . . . . . . 132
Audio Sources . . . . . . . . . . . . . . . . . . . . . . . . . . . . . . . . . . . . . 133
Export to Pro Tools . . . . . . . . . . . . . . . . . . . . . . . . . . . . . . . . . 134
Export from Pro Tools to Avid Xpress Pro . . . . . . . . . . . . . . . . 134
24p PAL Projects . . . . . . . . . . . . . . . . . . . . . . . . . . . . . . . . . . . . . . 135
Video Sources . . . . . . . . . . . . . . . . . . . . . . . . . . . . . . . . . . . . . 135
Audio Sources . . . . . . . . . . . . . . . . . . . . . . . . . . . . . . . . . . . . . 137
Export to Pro Tools . . . . . . . . . . . . . . . . . . . . . . . . . . . . . . . . . 140
Export from Pro Tools to Avid Xpress Pro . . . . . . . . . . . . . . . . 141
Index . . . . . . . . . . . . . . . . . . . . . . . . . . . . . . . . . . . . . . . . . . . . . 143
Using This Guide
Congratulations on your purchase of the Avid Xpress Studio package of
editing applications. You can use your applications to create broadcast-quality
output incorporating every possible production element from full-speed,
high-resolution footage, to multimedia artwork and animation, to
computer-generated effects and titling.
This guide outlines the workflow between the component applications of
Avid Xpress Studio.
This guide is intended for all users, from beginning to advanced.
Unless noted otherwise, the material in this document applies to the
Windows XP and Mac OS X operating systems.The majority of screen shots
in this document were captured on a Windows XP system, but the information
applies to both Windows XP and Mac OS X systems. Where differences exist,
both Windows XP and Mac OS X screen shots are shown.
nThe documentation describes the features and hardware of all models.
Therefore, your system might not contain certain features and hardware that
are covered in the documentation.

Using This Guide
10
Symbols and Conventions
Avid documentation uses the following symbols and conventions:
Symbol or Convention Meaning or Action
nA note provides important related information,
reminders, recommendations, and strong suggestions.
cA caution means that a specific action you take could
cause harm to your computer or cause you to lose data.
wA warning describes an action that could cause you
physical harm. Follow the guidelines in this document
or on the unit itself when handling electrical
equipment.
> This symbol indicates menu commands (and
subcommands) in the order you select them. For
example, File > Import means to open the File menu
and then select the Import command.
tThis symbol indicates a single-step procedure.
Multiple arrows in a list indicate that you perform one
of the actions listed.
kThis symbol represents the Apple or Command key.
Press and hold the Command key and another key to
perform a keyboard shortcut.
Margin tips In the margin, you will find tips that help you perform
tasks more easily and efficiently.
(Windows), (Windows
only), (Macintosh), or
(Macintosh only)
This text indicates that the information applies only to
the specified operating system, either Windows XP or
Macintosh OS X.
Italic font Italic font is used to emphasize certain words and to
indicate variables.
Courier Bold font
Courier Bold font identifies text that you type.
Ctrl+key or mouse action
k+key or mouse action
Press and hold the first key while you press the last
key or perform the mouse action. For example,
k+Option+C or Ctrl+drag.
If You Need Help
11
If You Need Help
If you are having trouble using Avid Xpress Studio:
1. Retry the action, carefully following the instructions given for that task in
this guide. It is especially important to check each step of your workflow.
2. Check for the latest information that might have become available after
the documentation was published in one of two locations:
- If release notes are available, they ship with your application.
- If ReadMe files are available, they are supplied in your Avid
application folder. ReadMe files are also available from Help.
nRelease notes and ReadMe files are also available on the Avid Knowledge
Center.
3. Check the documentation that came with your Avid application or your
hardware for maintenance or hardware-related issues.
4. Visit the online Knowledge Center at www.avid.com/support. Online
services are available 24 hours per day, 7 days per week. Search this
online Knowledge Center to find answers, to view error messages, to
access troubleshooting tips, to download updates, and to read/join online
message-board discussions.
5. For Technical Support, please call 800-800-AVID (800-800-2843).
For Broadcast On-Air Sites and Call Letter Stations, call
800-NEWSDNG (800-639-7364).
Accessing the Online Library
The Avid Xpress Studio Online Library DVD or CD-ROM contains all the
product documentation in PDF format and tutorials. Avid recommends the
tutorials as your first resource for learning how to use your application. You
can access the documentation and tutorial from the Online Library DVD or
CD-ROM or from the Help menu.
Using This Guide
12
nYou need Adobe® Acrobat® Reader® installed to view the documentation
online. You can download the latest version of Acrobat from the Adobe Web
site. The tutorial and the effects reference guide requires Apple’s QuickTime®
application to view the QuickTime movies. You can download the latest
version of QuickTime from the Apple® Web site.
To access the online library and tutorial from the Online Library DVD or
CD-ROM :
1. Insert the Online Library DVD or CD-ROM into the drive.
2. Double-click the Mainmenu file.
To access the online library and tutorial from the Help:
1. Insert the Online Library DVD or CD-ROM into the drive.
2. In your Avid application, select Help > Online Library.
How to Order Documentation
To order additional copies of this documentation from within the
United States, call Avid Sales at 800-949-AVID (800-949-2843). If you are
placing an order from outside the United States, contact your local
Avid representative.
Avid Educational Services
For information on courses/schedules, training centers, certifications,
courseware, and books, please visit www.avid.com/training or call Avid Sales
at 800-949-AVID (800-949-2843).
Chapter 1
Avid Xpress Studio Workflow
Overview
Avid Xpress® Studio comprises the following applications:
•Avid
® Xpress Pro
• Avid FX
• Avid 3D
• Avid Pro Tools® LE
• Avid DVD by Sonic™
Once you create a sequence in Avid Xpress Pro, you can enhance it with high-
quality titling and effects in Avid FX, with 3D elements in Avid 3D, and with
audio processing in Avid Pro Tools LE. You can then encode it for DVD
production in Avid DVD by Sonic.
This document outlines the flow of your work going to and from the
applications of Avid Xpress Studio in “Basic Workflow” on page 16. It also
describes file formats and media handling in “File Formats and Media
Handling” on page 19.
FILE INFORMATION:
Chapter 1 Avid Xpress Studio Workflow Overview
14
Avid Xpress Studio Applications
The following applications are part of Avid Xpress Studio:
•Avid Xpress Pro: the base application for Avid Xpress Studio. In
Avid Xpress Pro you capture or import your material, work with clips and
sequences, and perform all your basic editing tasks. You can put material
out to the other applications of the studio and work with that material, but
it always comes back to Avid Xpress Pro until you are ready to output it to
DVD. See “Using Avid Xpress Pro” on page 21.
•Avi d FX: operates as an AVX plug-in that you access from within
Avid Xpress Pro. Avid FX offers effects such as:
- 2D and 3D text treatments
- Multi-layer composites
- Motion tracking
- Transitions
For a workflow outline, see “Avid FX” on page 17.
•Avi d 3D : allows you to create 3D elements such as the following:
- Flying logos
-ID bugs
- Particle effects
- Special effects
- Animated backgrounds
- 3d transition effects, 2D compositing
- 3D scenes that interact with live action.
For a workflow outline, see “Avid 3D” on page 17.
•Avid Pro Tools (PT) LE: a flexible tool for audio production. Its
capabilities include the following:
- Sound effects editing and design
- Music composition and editing
- Dialog conforming and editing
- Voice-over recording and editing
- Foley recording and editing
Avid Xpress Studio Applications
15
- Mixing and signal processing.
For a workflow outline, see “Avid Pro Tools LE” on page 18.
•Avid DVD by Sonic: integrates authoring and disc creation into a single
application.
For a workflow outline, see “Avid DVD by Sonic” on page 19.
You can find details about workflow using each component application in the
following chapters:
•Using Avid Xpress Pro
•Using Avid FX
•Using Avid 3D
•Using Digi 002, Mbox, and Avid Pro Tools LE
•Using Avid DVD by Sonic
Supplemental information about using Pro Tools LE is in “Using Pro Tools LE
with Progressive Projects” on page 123.
In addition, see the Avid Xpress Pro Online Library CD-ROM for complete
information about Avid Xpress Pro, Avid FX, Avid 3D, Avid Pro Tools LE,
and Avid DVD by Sonic. Each application (except for Avid Pro Tools LE)
also has online Help that you can select from the Help menu within the
application.
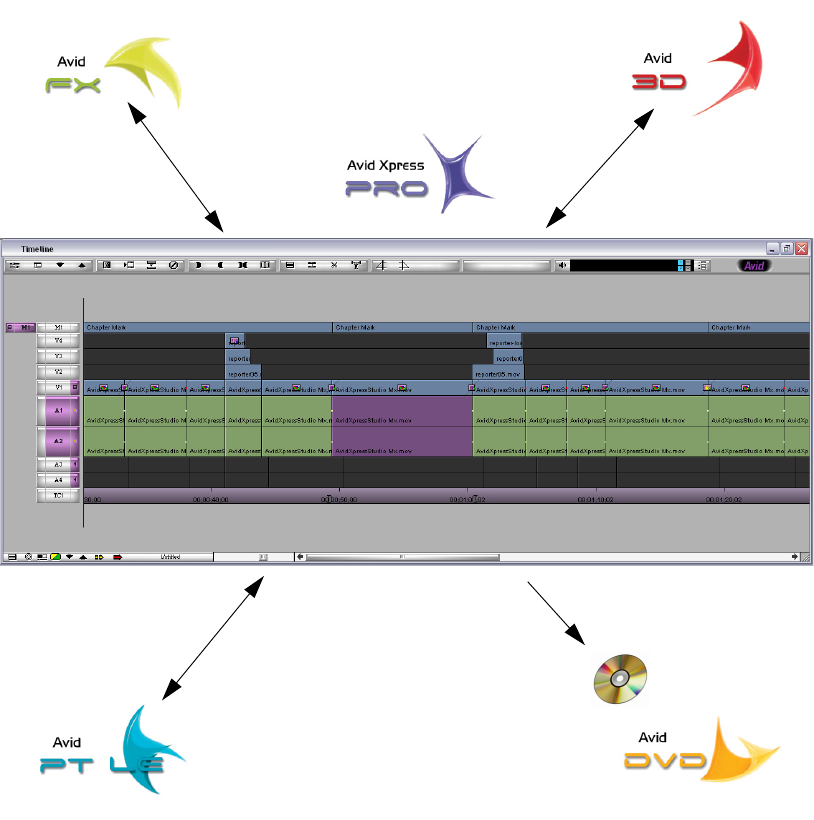
Chapter 1 Avid Xpress Studio Workflow Overview
16
Basic Workflow
The following figure illustrates the basic workflow to produce a program with
Avid Xpress Studio.
The following sections outline the workflow for each component application.
Basic Workflow
17
Avid FX
Do the following to work with Avid FX:
1. In Avid Xpress Pro, open the Effect Palette.
2. Select the Avid FX effect, and drag it onto the Timeline.
3. Enter Effect mode.
4. In the Effect editor, click the Other Options button to display the Avid FX
windows.
5. Create your effect.
6. Apply the effect, and then return to the Avid Xpress Pro timeline.
7. Render the effect.
For more detailed information about this workflow, see “Using Avid FX” on
page 27.
Avid 3D
Do the following to work with Avid 3D starting in Avid Xpress Pro:
1. Edit your sequence in Avid Xpress Pro. Make sure it is in MXF format.
2. Create a bin named Avid3D Incoming.
3. Select File > Send To > Avid Xpress Studio > Avid 3D.
a. Select AutoLaunch.
b. Select the default Export Setting 1 to export the sequence to AAF.
c. Click OK.
The file is exported as AAF and is sent to Avid 3D, which then opens.
4. Create a new scene or open an exisiting scene in Avid 3D.
5. Add the sequence to your scene.
6. Add logos, 3D models, warping effects, models, textures, shapes.
7. Export the scene as AAF.
8. Find the file in the Avid3D InComing bin in Avid Xpress Pro.
Chapter 1 Avid Xpress Studio Workflow Overview
18
Do the following to work with Avid 3D starting in Avid 3D:
1. Create a 3D scene within Avid 3D.
2. Export it directly to Avid Xpress Pro as a clip.
3. Edit it into a sequence.
For more detailed information about these workflows, see “Using Avid 3D” on
page 51.
Avid Pro Tools LE
Do the following to work with Avid Pro Tools LE:
1. Export your sequence from Avid Xpress Pro. Settings depend on your
hardware:
- Digidesign 002
- Mbox
2. Close Avid Xpress Pro.
3. Create a new Avid Pro Tools LE session with appropriate settings in the
following areas:
- Audio file format
- Sample rate
- Bit depth
4. Import the AAF file into the session.
5. Work with the audio in Avid Pro Tools LE.
6. Export the finished audio to Avid Xpress Pro:
- Export selected tracks as OMF/AAF.
- Export selected regions as OMF.
7. Integrate the new audio elements as clips or mixed tracks in Avid Xpress
Pro:
- For exported tracks, import the OMF file into a bin.
- For individual clips, drag the clips from the Media tool into a bin.
For more detailed information about this workflow, see “Using Digi 002,
Mbox, and Avid Pro Tools LE” on page 79.

File Formats and Media Handling
19
Avid DVD by Sonic
Do the following to work with Avid DVD by Sonic:
1. Create a finished program in Avid Xpress Pro.
2. Create MetaSync information.
3. Select File > Send To > Avid Xpress Studio > Encoding for Avid DVD
by Sonic, and encode the sequence with Sorenson Squeeze.
4. Set up the Avid DVD by Sonic project, and create movies and menus in it.
5. Output the project to DVD.
For more detailed information about this workflow, see “Using Avid DVD by
Sonic” on page 113.
File Formats and Media Handling
The following table presents information about how each component
application handles file format and media.
Component Application File Formats and
Media Handling
File Format
Avid Xpress
Pro Avid 3D
Avid Pro
Tools LE Avid FX
Avid DVD
by Sonic
Standard NTSC/PAL NTSC/PAL NTSC/PAL NTSC/PAL NTSC/PAL
Aspect Ratio 4:3, 16:9 4:3, 16:9 4:3, 16:9 4:3, 16:9 4:3, 16:9
Resolutions 720x486, 720x480,
720x576
720x486, 720x480,
720x576
720x486,
720x480,
720x576
720x486,
720x480,
720x576
720x486,
720x480,
720x576
Alpha Channel
Support
Import Import/Export N/A Import/Export N/A
Media File
Formats for Input
QuickTime, AVI,
Sequential Image
files, MXF, OMF,
AAF, Still image
files
QuickTime, AVI,
Sequential Image
files, MXF, AAF,
Still image files
OMF Audio
and MXF
Video
QuickTime,
AVI, Sequential
Image files,
MXF, OMF,
Still image files
MPEG2 files,
QuickTime,
AVI, .tif, tga,
Still Image
files

Chapter 1 Avid Xpress Studio Workflow Overview
20
Media File
Formats for
Output
QuickTime, AVI,
Sequential Image
files, MXF, OMF,
AAF, Still image
files
Sequential Image
files, MXF, AAF,
Still image files
OMF Audio QuickTime,
AVI, Sequential
Image files,
MXF, AAF, Still
image files
DVD Image,
DVD disc
Metadata File
Format for Import
AAF AAF AAF N/A XML
Metadata File
Format for Export
AAF AAF AAF (audio
only)
N/A N/A
Color Levels 601, RGB,
RGB Dithered
RGB N/A N/A N/A
Codecs DV25, DV25p,
Uncompressed,
JFIF, 15:1s, 28:1p
Playback Only:
35.1p, 14:1p
Same as
Avid Xpress Pro
Input and Output
Same as
Avid Xpress
Pro
Input only
Same as
Avid Xpress Pro
Input and Output
Same as
Avid Xpress
Pro
Input only
Interlaced/
Deinterlaced and
Progressive
Uses Interlaced or
Progressive
Need to interpret
Fields on import.
Need Field Render
options for output.
Uses format
from
Avid Xpress
Pro OMF file
Uses whatever
the Project is set
to in
Avid Xpress Pro
N/A
Component Application File Formats and
Media Handling (Continued)
File Format
Avid Xpress
Pro Avid 3D
Avid Pro
Tools LE Avid FX
Avid DVD
by Sonic
Chapter 2
Using Avid Xpress Pro
Avid Xpress Pro is your editing application in the Avid Xpress Studio suite of
applications. In Avid Xpress Pro you capture or import footage, create
sequences by assembling video and audio clips, and then edit the sequences by
rearranging elements, trimming, and adding effects and titles. You can output
your results with digital cut, and you can export the file in various formats.
Avid Xpress Studio adds other tools for enhancing your sequence. You can
add effects from Avid FX; you access Avid FX from within Avid Xpress Pro.
You can export your sequence to Avid 3D, add 3D elements, and then export it
back to Avid Xpress Pro. You can also export your sequence to Avid Pro Tools
LE to work on the audio portions of the program, and then export it back to
Avid Xpress Pro. When your program is finished, you create a MetaSync track
and send it to Avid DVD by Sonic.
See “Avid Xpress Studio Workflow Overview” on page 13 for a workflow
overview, and see the Avid Xpress Pro Help for complete details on using
Avid Xpress Pro.
Working in Avid Xpress Pro
The following topics outline how you can use Avid Xpress Pro with the other
Avid Xpress Studio applications. You can use the other applications in any
order you want, saving Avid DVD by Sonic for the last. For more information
on each application, see the chapter about that application’s workflow in this
document and the relevant user’s guide and other documentation on the
Online Library DVD or CD-ROM.
FILE INFORMATION:

Chapter 2 Using Avid Xpress Pro
22
Creating a Program in Avid Xpress Pro
To create a program in Avid Xpress Pro:
1. Create a project.
2. Capture DV footage over FireWire.
3. Organize the clips into bins.
4. Assemble clips into a sequence.
5. Rearrange and trim the elements in the Timeline.
6. Add effects from the Effect Palette.
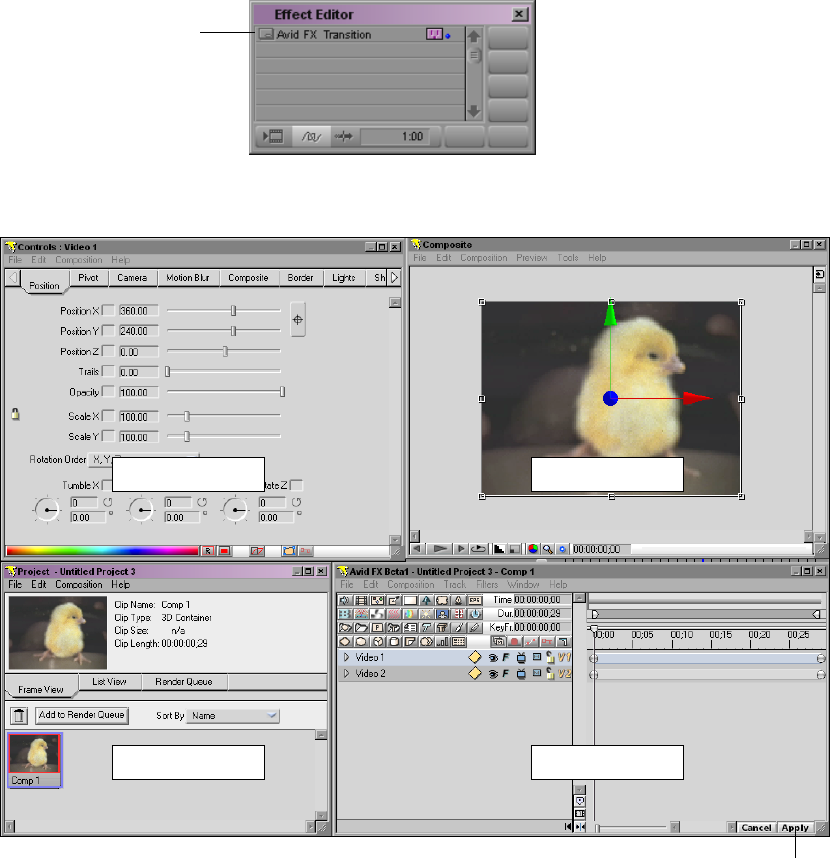
7. To add an Avid FX element, drag the Avid FX effect from the Effect
Palette onto the Timeline, and do the following:
a. Enter Effect Mode.
Working in Avid Xpress Pro
23
b. In the Effect Editor, click the Other Options button.
The Avid FX windows open.
c. Create your effect.
d. Apply your effect and return to the Avid Xpress Pro Timeline.
Other Options button
Composite window
Controls window
Project window Timeline window
Click to apply effect back to Avid
Chapter 2 Using Avid Xpress Pro
24
e. Render your effect.
8. To work in Avid 3D, do the following:
a. In Avid Xpress Pro, create a bin called Avid3D Incoming and leave it
open.
b. Select File > Send To > Avid Xpress Studio > Avid 3D, and export an
MXF sequence to AAF.
c. If Avid 3D doesn’t open, select Studio > Launch Avid 3D.
d. Create a new scene or open an existing scene.
e. Add the imported video to the scene as a texture, floating image plate,
or fixed background.
f. Add logos, 3D models, warping effects, models, textures, shapes.
g. Export the scene as AAF.
h. Find the file in the Avid3D InComing bin in Avid Xpress Pro.
Working in Avid Xpress Pro
25
9. To work in Avid Pro Tools LE, do the following:
a. Export your sequence from Avid Xpress Pro, and then close
Avid Xpress Pro.
nYou cannot run Avid Pro Tools LE at the same time as Avid Xpress Pro. If you
have not closed Avid Xpress Pro, when you select Launch Pro Tools LE, a
message box opens asking if you want to save your work and then quit
Avid Xpress Pro.
b. Create a new Avid Pro Tools session with appropriate settings in the
areas of audio file format, sample rate, and bit depth.
c. Import the AAF file into the session.
d. Work with the audio in Avid Pro Tools LE.
e. Export the finished audio to Avid Xpress Pro.
f. Integrate the new audio elements as clips or mixed tracks in
Avid Xpress Pro.
10. When you are satisfied with your finished program, do the following to
create a DVD:
a. Create MetaSync information.
b. Select File > Send To > Avid Xpress Studio > Encoding for Avid
DVD by Sonic, and then encode the file with Sorenson Squeeze.
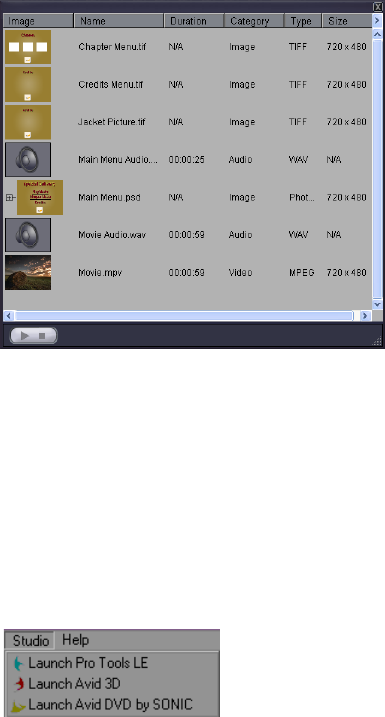
c. In Avid DVD by Sonic, open the file you exported, import any other
assets you want to use for creating the DVD, and create movies and
menus.
Chapter 2 Using Avid Xpress Pro
26
11. Output the project to a disc image, or DVD.
12. Save your DVD project and exit the application.
Opening other Avid Xpress Studio Applications
To open other Avid Xpress Studio applications from within
Avid Xpress Pro:
tSelect the application from the Studio menu.
a
nYou can start the Avid FX standalone application by selecting Start >
Programs > Avid Xpress Studio > Avid FX Engine.
nYou cannot run Avid Pro Tools LE at the same time as Avid Xpress Pro. When
you select Launch Pro Tools LE, a message box opens asking if you want to
save your work and then quit Avid Xpress Pro.
Chapter 3
Using Avid FX
You can use Avid FX to add a wide range of high-quality titling, compositing,
and effects to your Avid Xpress Pro sequences. You can use Avid FX’s
powerful tools to create your own effects, or choose from Avid FX’s library of
over 1,500 customizable titles, effects, and transition templates. Avid FX
works as an AVX 1.5 plug-in, so you can apply it just like you apply other
Avid effects. You can also work with the standalone version of Avid FX,
called the Avid FX Engine.
This chapter includes the following sections:
•Basic Steps
•Creating Text Effects
•Saving and Sharing Your Work
•Using the Avid FX Engine
•Next Steps
Basic Steps
The basic steps in applying and editing an Avid FX effect are:
1. Open the Effect Palette.
2. Select the the Avid FX effect, and then drag it onto the Timeline.
3. Enter Effect Mode.
4. In the Effect Editor, click the Other Options button to display the Avid FX
interface.
Chapter 3 Using Avid FX
28
5. Create your effect.
6. Apply the effect, and then return to the Avid Xpress Pro Timeline.
7. Render your effect.
The following sections explain these steps in more detail. These sections show
you how to create a transition effect that spins as it scales and exchanges two
video clips.
Opening the Effect Palette
To open the Effect palette:
1. Determine where in your sequence you want to apply the transition.
2. Click the Effects tab in the Project window or press Ctrl+8.
The Effect palette is displayed and Avid FX appears at the top of the list.
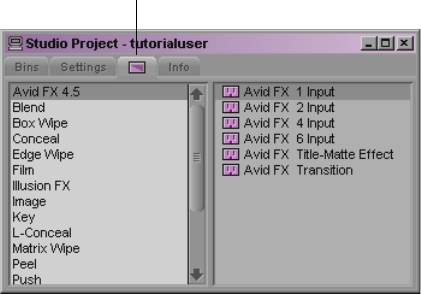
You can choose from one of the following six effects:
• Avid FX 1 Input: Apply this effect if you want to use one Avid track in
creating your effect. Avid FX uses the track on which you apply the effect
as source media.
• Avid FX 2 Input: Apply this effect if you want to use two Avid tracks as
source media. Avid FX uses the track on which you appliy the effect and
the one below it.
• Avid FX 4 Input: Apply this effect if you want to use three or four Avid
tracks as source media.
Effects tab
Basic Steps
29
• Avid FX 6 Input: Apply this effect if you want to use five or six Avid
tracks as source media. It’s a good idea to use only the number of inputs
you really need. If you have empty tracks, Avid Xpress Pro takes time and
computer power to render the empty tracks.
• Avid FX Title-Matte Effect: Apply this effect only to edit titles that you
have first created with the Title Tool.
• Avid FX Transition: Apply this effect to create any kind of transition.
Dragging the Avid FX Effect on to the Timeline
To add an Avid FX effect to a sequence:
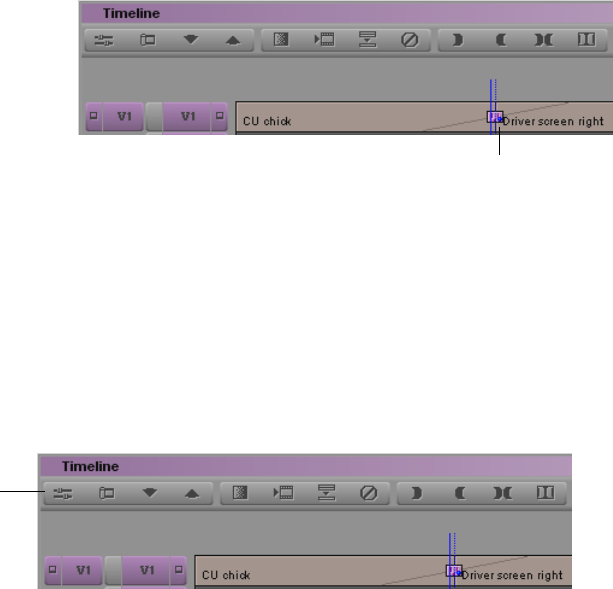
tDrag the Transition effect to a transition between two clips in the
Timeline.
The plug-in effect icon is displayed at the transition point.
Next you need to open Avid FX to create the transition.
Entering Effect Mode
To enter Effect mode:
tPlace the position indicator over the effect icon, and then click the Effects
Mode button.
Plug-in effect icon
Effects Mode button
Chapter 3 Using Avid FX
30
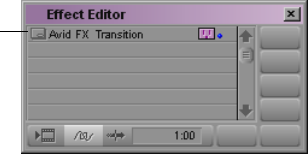
You are now in Effects mode and the Effect Editor is displayed.
Now you need to display the windows and controls of the Avid FX interface.
Displaying the Avid FX Interface
To display the Avid FX interface:
tIn the Effect Editor window, click the Other Options button.
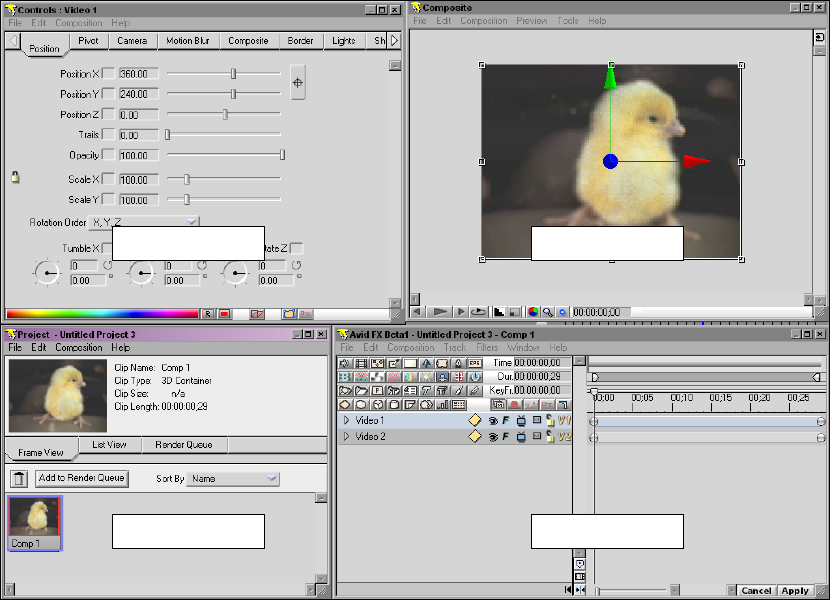
Four Avid FX windows open by default:
- Controls window
- Composite window
- Timeline window
-Project window
Other Options button
Basic Steps
31
Creating an Effect
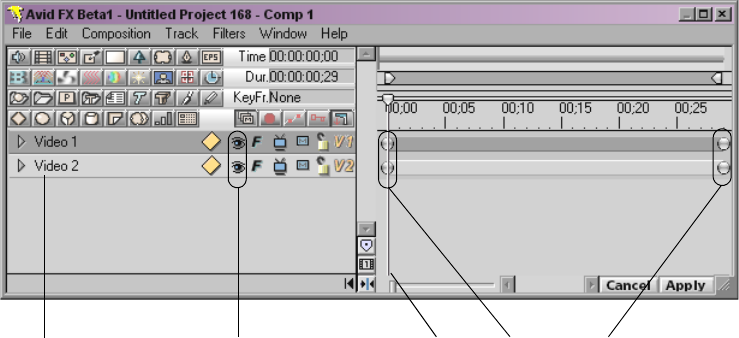
The Timeline window displays two video tracks: Video 1 represents the
outgoing clip and Video 2 represents the incoming clip. The position indicator
in the Timeline window is placed on the first frame of both clips; the first
frame of the outgoing clip is displayed in the Composite window.
Composite window
Controls window
Project window Timeline window
Chapter 3 Using Avid FX
32
To change the video track that is displayed:
tClick the Toggle Track Visibility button.
If you want to view the first frame of the incoming clip (Video 2), hide
Video 1 by clicking the Toggle Track Visibility button. Click the Toggle
Track Visibility button again to show Video 1.
Creating a Transition Effect
To create a transition effect:
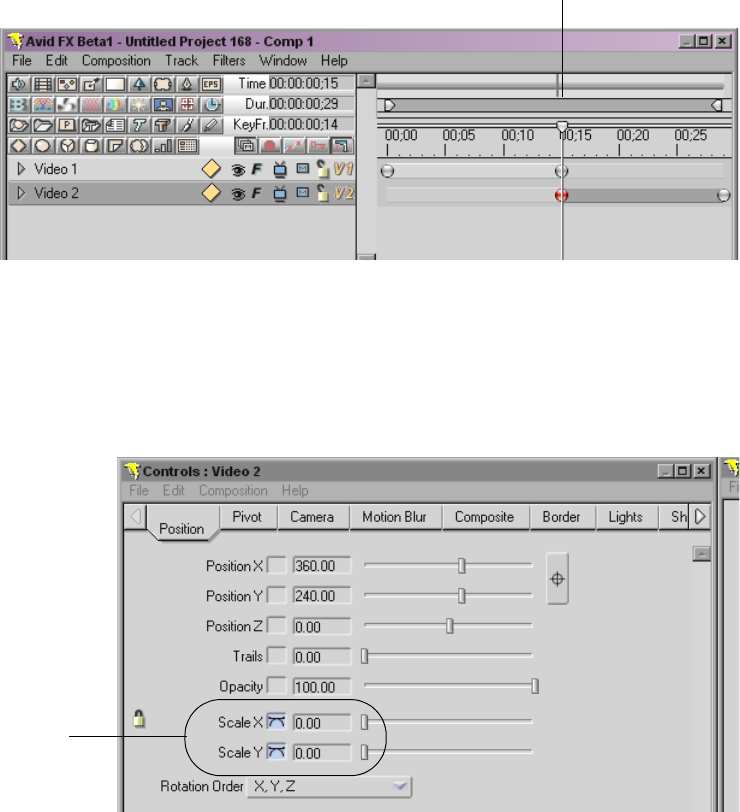
1. In the Timeline window, adjust the length of each of the clips by dragging
the keyframes:
a. Drag the last keyframe of Video Track 1 to the midway point of the
duration (frame 00;15).
b. Drag the first keyframe of Video Track 2 to the same point.
Toggle Track
Visibility buttons
KeyframesTrack names Position
indicator
Basic Steps
33
2. Ctrl + click the keyframes you just dragged to select both of them.
The selected keyframes turn red.
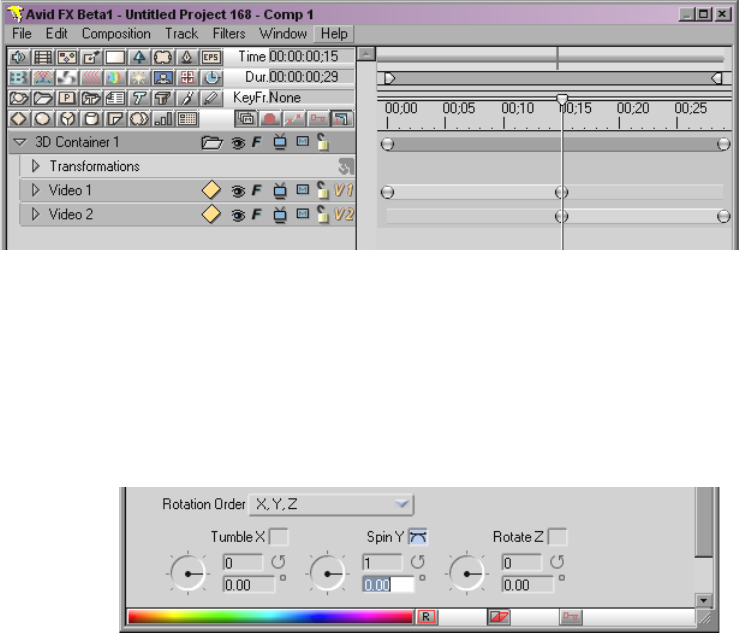
3. In the Controls window, adjust the scale for the keyframes to 0.00. You
can type the value or drag a slider. Notice that the Scale X and Scale Y
controls are locked.
The video for the middle keyframes is now invisible. The video at the
beginning and end of the clips is still visible, because the keyframes are
set to 100.
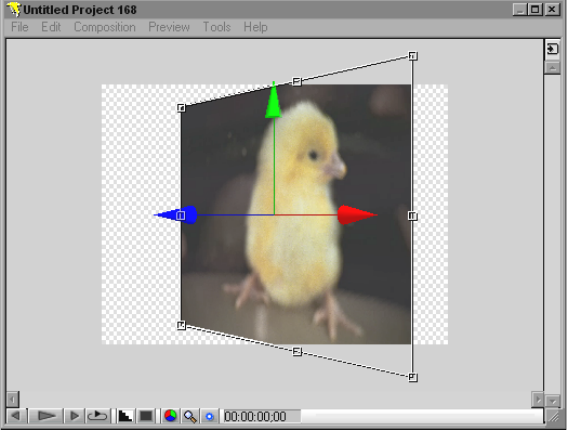
4. In the Timeline window, add a container track by selecting both tracks
(Ctrl + click each track), and then selecting Track > New 3D Container.
Keyframes at the midpoint
of the transition
Scale controls
Chapter 3 Using Avid FX
34
You’ve just created a container track to hold the two video tracks. The
video tracks (and a new track, Transformations) are indented slightly.
Container tracks make it easier to work with multilayer effects. Notice
that a container track has its own keyframes.
5. Click the first keyframe in the container track, and then, in the Controls
Window, adjust the Spin Y to 1 rotation. You can type 1 or use the mouse
pointer to spin the dial one complete rotation.
Spinning the dial lets you watch the video move.
Basic Steps
35
6. Press the space bar to preview the effect.
By default, the effect loops until you press the space bar again. You can
also drag the Timeline position indicator to scrub through the effect. If
you want, try changing the number of rotations or the degree of rotation.
The background of the transition is black, because it was created as a
transparency. You can add a more interesting background by adding media on
a new track.
Adding Media to an Effect
To add media to an effect:
1. In the Timeline window, collapse the 3D Container track by clicking the
triangular opener, and then deselect the track by clicking in an empty
space.
2. Select Track > New Media > Color.
A track labeled Solid Color is added above the 3D Container track.
3. Drag the new track below the 3D Container track.
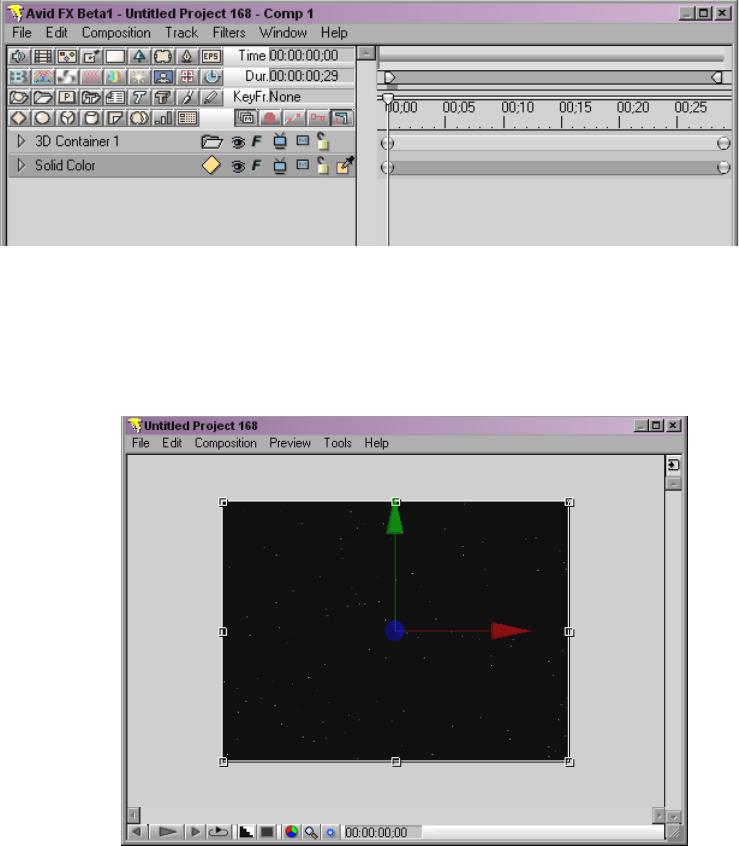
Chapter 3 Using Avid FX
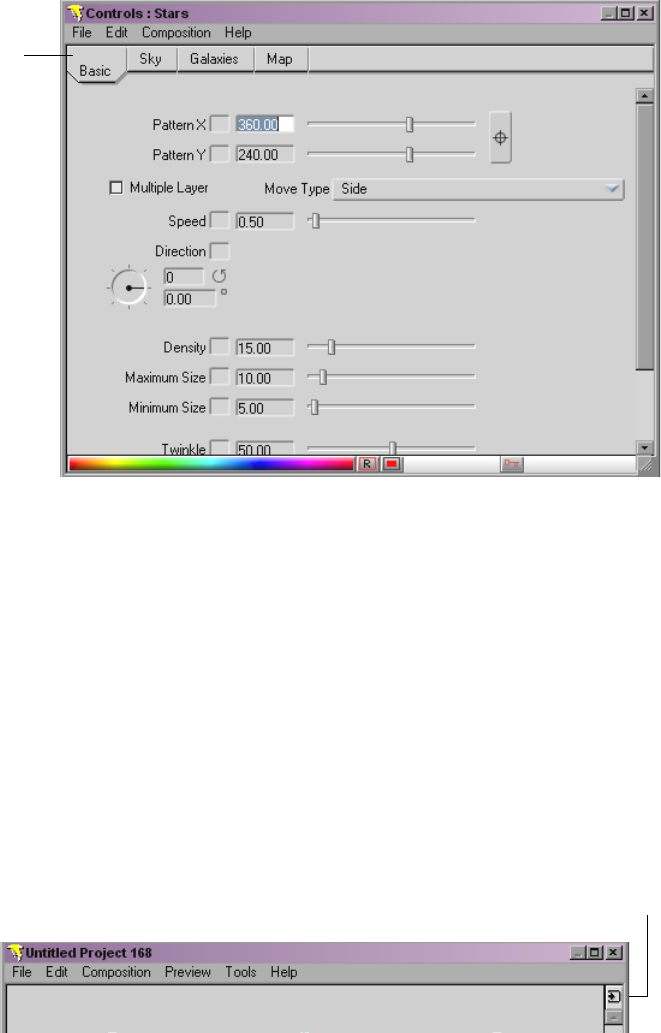
36
4. Click to highlight the new track, and then select Filters > Generators >
Stars.
5. To view the new background media, click the Track Visibility button for
the 3D Container track.
Avid FX includes hundreds of filters and textures and ways to adjust
them.
Notice the tabs in the Controls window. You can use the controls in the
tabs to vary the number of stars, add galaxies, and make other
customizations.
Basic Steps
37
6. In the Timeline, click the Track Visibility button on the 3D Container
track again.
Because the Stars track is new media, it takes longer to preview.
7. To display your transition, do one of the following:
tSelect Preview > Preview to RAM. Avid FX uses the computer’s
random-access memory (RAM) to preview the effect. The first time
preview cycle is slow, as the transition is loaded in memory, but
subsequent preview are real time. Press the space bar to stop the
preview.
tIf you have a client monitor connected to the Avid Mojo DNA, in the
Composite window, select Preview > Display Frame to Monitor or
click the Preview Frame to Monitor button.
Ta b s
Preview Frame to
Monitor button
Chapter 3 Using Avid FX
38
Applying the Effect
When you’re satisfied with your effect, you can apply it to the sequence.
To apply the effect:
tClick the Apply button in the Timeline window.
The Avid FX interface closes.
To close the Avid FX interface without applying the effect:
tClick the Cancel button in the Timeline window.
Rendering the Effect
Now you can render the effect in the same way that you render other effects.
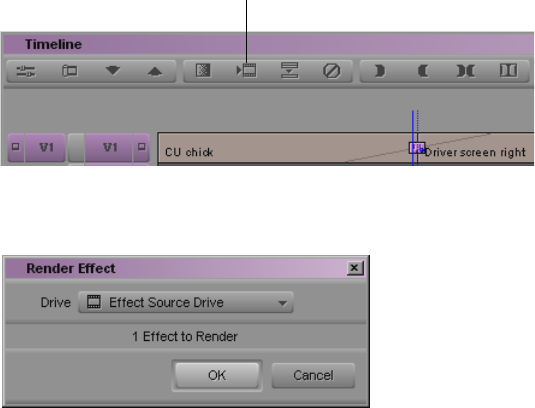
To render the effect:
1. Place the position indicator on the effect icon.
2. Click the Render Effect button.
The Render Effect dialog box is displayed.
Render Effect button
Creating Text Effects
39
3. Click OK.
In a few seconds, depending on the complexity of the effect, your effect is
ready to play.
Creating Text Effects
Avid FX includes features that let you easily create and animate titles and
other text effects. This section describes how to create a simple title, and then
animate it around a circle.
Creating a Title
You can add a title over video in the same way you add a transition effect. If
you want to create a title (or any effect) without video, insert filler into a
sequence and apply the effect to the filler.
nYou can also use Avid FX as a standalone application. For more information,
see “Using the Avid FX Engine” on page 48.
Adding an Effect to Filler
To add an effect to filler:
1. Open a sequence, or create a new sequence.
2. Select Clip > Load Filler.
The system loads a 2-minute clip of filler into the Source monitor.
3. Mark IN and OUT points to create the length of filler you want.
The length of the filler determines the speed of the animation.
4. Click the Splice-in button to edit the filler into the sequence.
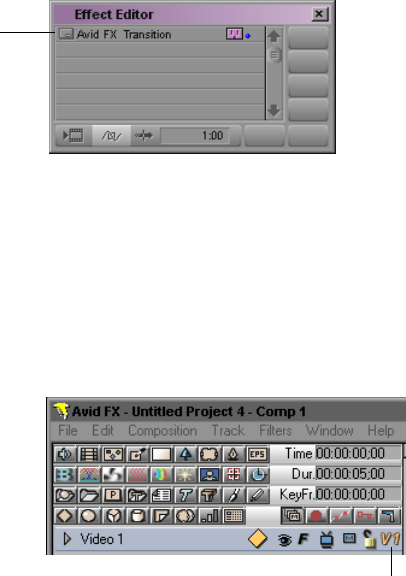
5. Click the Effects tab in the Avid Xpress Pro Project window.
6. Drag the Avid FX 1 Input effect onto the filler clip in the sequence.
7. Enter Effect mode by parking the position indicator over the effect icon
and clicking the Effects Mode button.
8. In the Effect Editor, click the Other Options button.
Chapter 3 Using Avid FX
40
The Avid FX interface is displayed.
Creating Text in a Title
To create text:
1. In the Avid FX Timeline, click the Media icon, and then select Text from
the menu.
The Text window is displayed.
Other Options button
Media icon
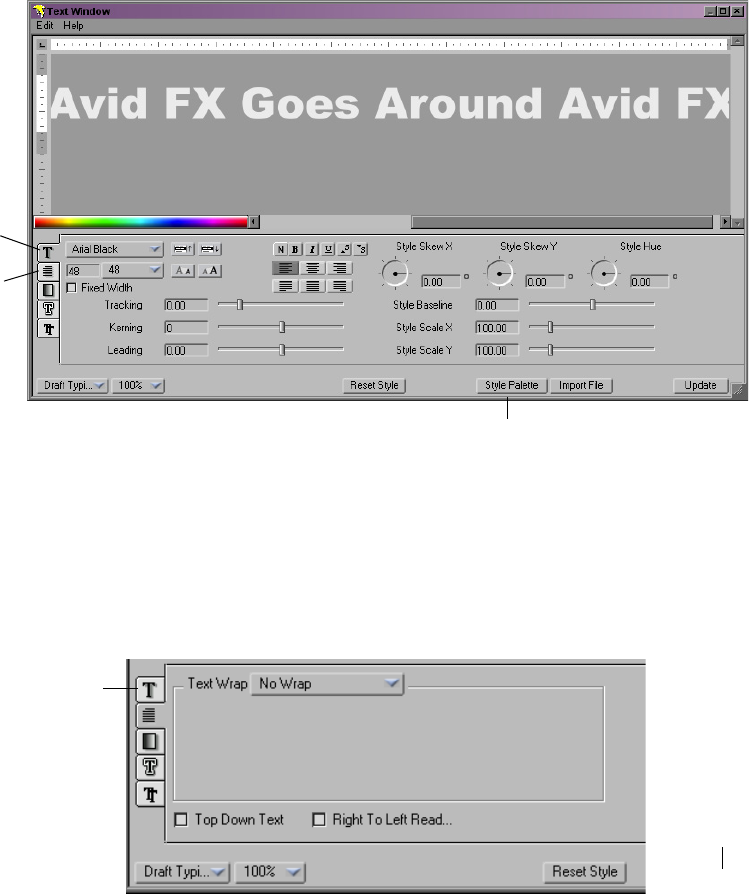
Creating Text Effects
41
The Text window contains five panels of controls, which let you adjust
the font, size, color, and spacing and other text attributes. By default, the
Style tab is displayed.
2. Click in the top part of the Text window, and then type the text that you
want to animate in a circle. For this example, on the Page tab of the Text
window, make sure that Text Wrap is set to No Wrap.
3. Click the Style tab again.
Style tab
Page tab
Style Palette button
Style tab
Style Palette
Chapter 3 Using Avid FX
42
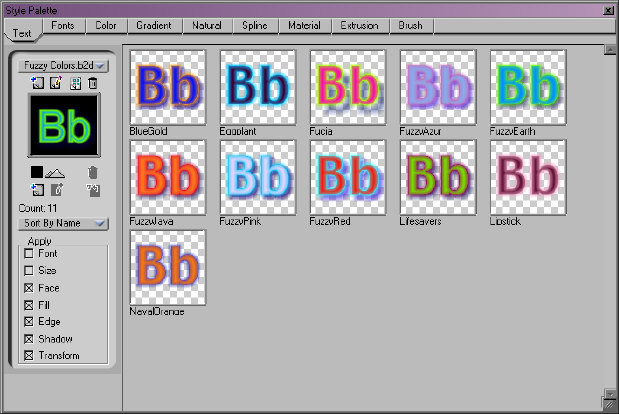
4. To view and select one of the hundreds of text styles, click the Style
Palette button at the bottom of the Text window.
The Style Palette opens.
5. Open different sets from the drop-down menu.
A wide range of font choices is displayed, from Basic Black and White to
Glows and Fuzzy Colors.
6. Double-click your choice.
The newly styled text is displayed in the Text window.
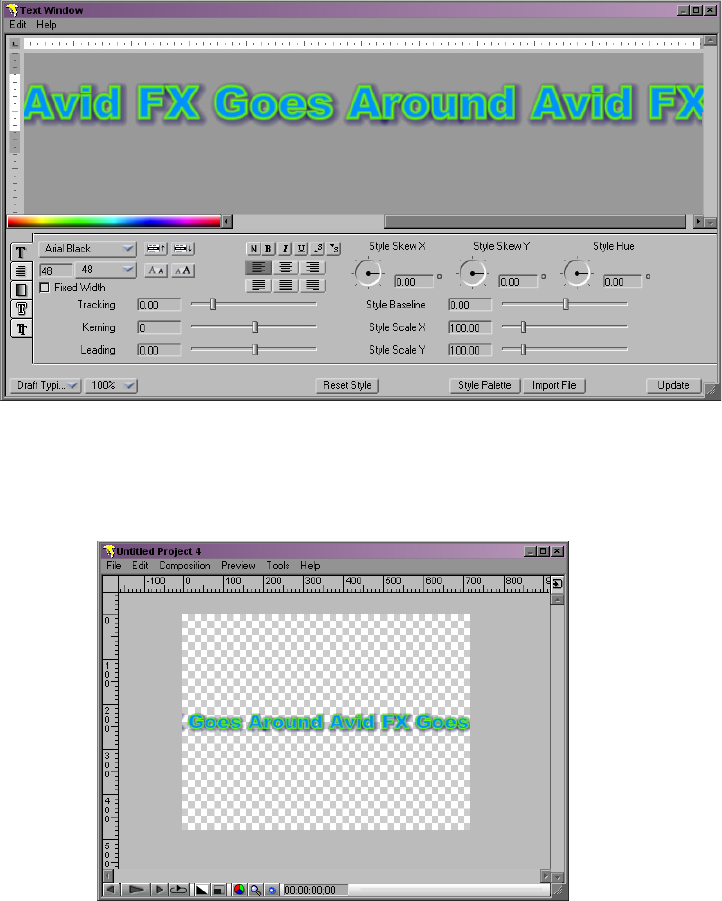
Creating Text Effects
43
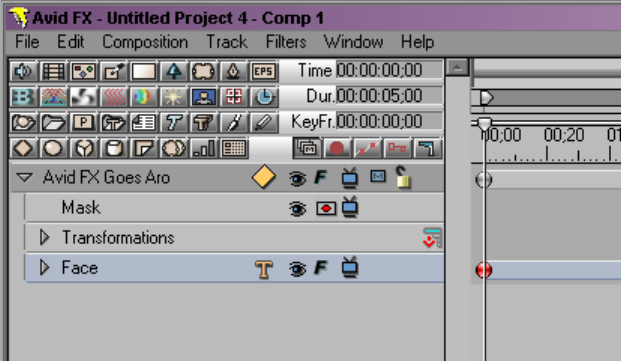
7. To see what the text look likes in a monitor, click the Update button on the
Text window.
The text appears in the Composite window.
The checkerboard pattern indicates that the text is created on a transparent
background.
8. Close the Style Palette by clicking the close button.
Chapter 3 Using Avid FX
44
9. Save your work:
a. Select File > Save Project As
b. Name your project.
c. Click Save.
At this point, you could apply the title to the sequence. In this example, let’s
animate the text first.
Animating Text on a Path
It’s easy to place text on a path and animate it. The following example uses a
simple circle, but you can use any path that you can create in Avid FX.
To animate text on a path:
1. In the Timeline window, click the triangular opener to display all tracks in
the effect.
2. Select the first keyframe in the Face track.
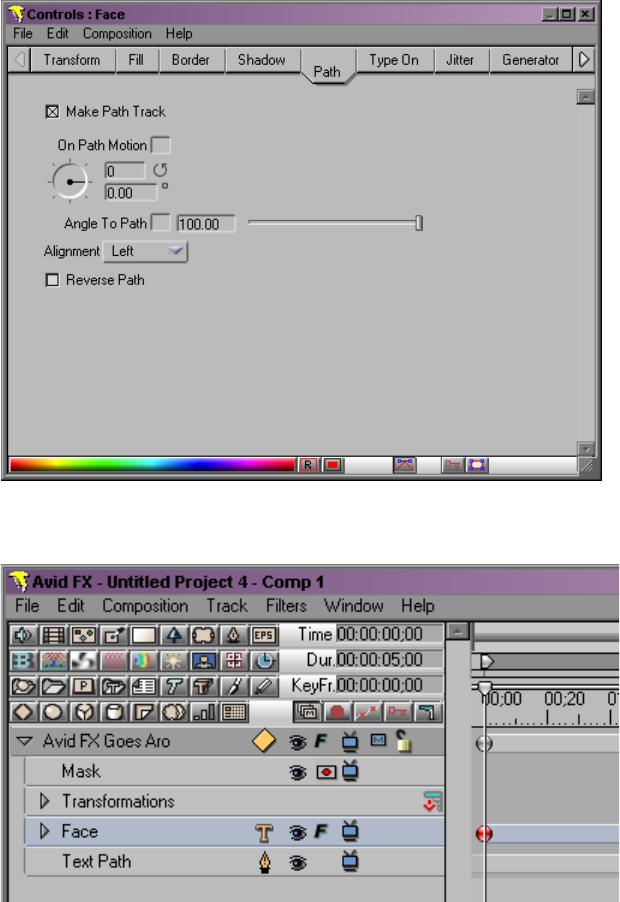
3. Click the Path tab in the Controls window, and then select Make Path
Track.
Creating Text Effects
45
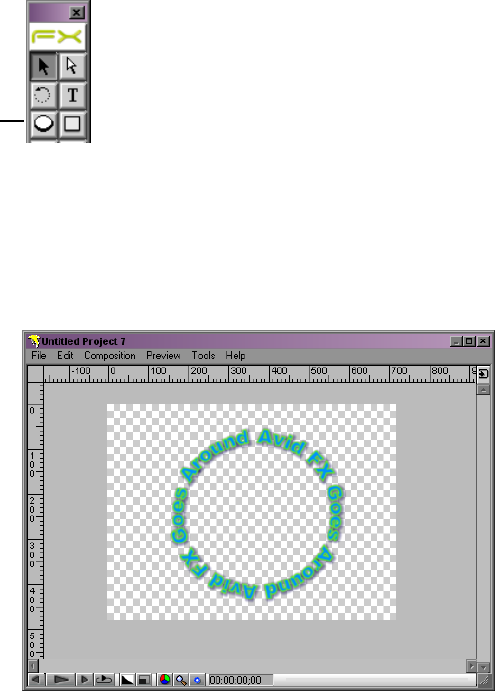
The Text Path track is displayed below the Face track in the timeline.
4. Select the Text Path track in the timeline.
The Tool window opens.
Chapter 3 Using Avid FX
46
5. With the Text Path track selected, click the Oval tool in the Tool window
and draw a circle in the Composite window. If you want, press the Shift
key while you drag to constrain the tool to draw a circle instead of an oval.
The Composite window updates, showing the text wrapped around the
object in the Text Path track.
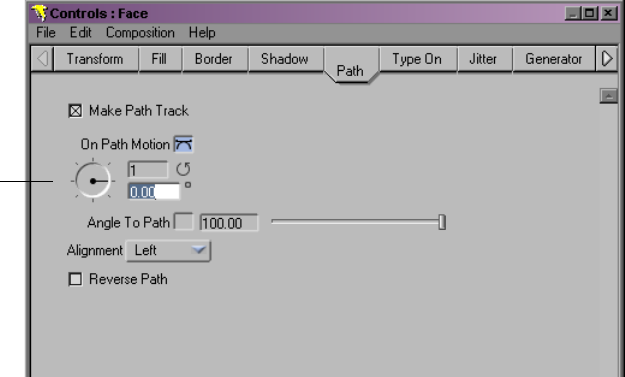
6. Click the Face track, and on the Path tab of the Controls window, set the
rotation dial to 1.
Oval
tool
Saving and Sharing Your Work
47
7. Select Preview > Preview to RAM to preview the animation.
8. Click Apply, and then render the effect in the Avid Xpress Pro Timeline.
Saving and Sharing Your Work
There are several ways to save your work in Avid FX.
To save one or more compositions in a single project:
tSelect Composition > Save Composition.
To save a project, select one of the following:
tFile > Save.
tFile > Save Project As.
tFile > Save Project Copy As.
tFile > Save Project Copy to Library.
Saving to the Library lets you save your effects in the Keyframe Library, a
storehouse of hundreds of preset effects. Using the Keyframe Library makes it
easy to reuse your titles and graphics. You can create a folder for your projects
in the following location:
C:\Program Files\Avid\Avid FX\Keyframe Libraries
Rotation dial
Chapter 3 Using Avid FX
48
To open the Keyframe Library:
tSelect Window > Library Browser.
The folder you created appears at the bottom of the scroll list.
You can also export your titles and effects in several different formats.
To export an effect:
1. Select File > Export in the Timeline window or any other window.
2. Select one of the following:
- Movie File (for QuickTime, Targa Sequence, or AVI)
-Targa File
-Flash File
3. For Movie files, select the file type, and then click OK.
4. Navigate to the folder where you want to store the file, and then click
Save.
Using the Avid FX Engine
In addition to applying Avid FX effects directly to an Avid Xpress Pro
sequence, you can run Avid FX independently. This standalone version of
Avid FX is called the Avid FX Engine.
With the Avid FX Engine, you can create titles, effects, or composites using
whatever combination of imported files and generated effects you choose, and
then export them for use in other applications. For example, you might use the
Avid FX engine to create an animated menu in a DVD project assembled with
Avid DVD by Sonic.
To open the Avid FX Engine:
tSelect Start > Programs > Avid Xpress Studio > Avid FX Engine.
To close the Avid FX Engine:
tSelect File > Exit, or click the close box in the Timeline window.
Next Steps
49
Next Steps
This chapter has described only a few aspects of the many special effects that
are available in Avid FX. For step-by-step practice in more sophisticated
effects, see the Avid FX Tutorial on the Online Library.
For complete information, see the Avid FX User’s Guide and the Avid FX
Reference Guide on the Online Library, and the Avid FX online Help.
Chapter 3 Using Avid FX
50
Chapter 4
Using Avid 3D
Avid 3D provides editors with a wide range of 3D animation tools. With
Avid 3D, you can import clips and sequences from your Avid editing
application, and then add 3D elements or 3D effects. Shared media and
metadata formats between your Avid editing application and Avid 3D allow
you to move media easily between the applications.
You can also use Avid 3D for building and deforming 3D models, creating
and extruding text and logos, and designing and applying particle systems.
Avid 3D includes an extensive library, which you can use to add models,
materials, textures, and shaders to 3D scenes.
There are two basic workflows when using Avid 3D with Avid Xpress Studio:
• Export a clip or sequence from Avid Xpress Pro to Avid 3D, add 3D
elements or effects, and then export the media from Avid 3D back to
Avid Xpress Pro.
• Create a 3D scene within Avid 3D, export it directly to Avid Xpress Pro
as a clip, and then edit it into a sequence.z
The following sections describe the procedures used in these workflows:
•Exporting Media
•Creating 3D Content
•Exporting Media from Avid 3D
Chapter 4 Using Avid 3D
52
Exporting Media
You can use clips and sequences from your projects in your Avid editing
application as backgrounds and textures in Avid 3D. This allows you to add
logos or identification graphics (ID “bugs”) to video, or to use footage to
create a variety of 3D effects.
You use the Send To feature to export clips and sequences from your Avid
editing application as Advanced Authoring Format (AAF) files. AAF is a
cross-platform, multimedia file format that allows interchange of media and
composition information between AAF-compliant applications.
There are two general types of data in an AAF file:
• Media such as audio and video
• Composition information, or metadata, that provides the instructions
needed to combine and modify the media portions of the AAF file to
produce a complete multimedia program
nAvid 3D does not import audio information from the AAF file. For information
on importing audio, see the Avid 3D User’s Guide in the Avid Xpress Studio
online library.
AAF files facilitate the transfer of data from the Avid editing application to
Avid 3D by creating pointers to the original media so that the media files
themselves are not duplicated. This reduces the space needed for storing
media files, and it speeds up the transfer of information between applications.
Before you export your media, you need to prepare your clip or sequence and
select which tracks and segments you want to export. For more information on
how to export media, see “Exporting and Exchanging Material” in the Help
for your Avid editing application.
If the clip or sequence you want to export is in the OMF file format, you need
to transcode it to the MXF file format. You can use the Send To feature to
automate this transcoding operation, as described in “Send To Avid 3D” on
page 53. However, you must first select your transcoding options by using
either the Media Creation dialog box or the Transcode command in the
Consolidate/Transcode dialog box. For more information on transcode
options, see “Media Creation Settings” and “Using the Transcode Command”
in the Help for your Avid editing application.
Exporting Media
53
Send To Avid 3D
The Send To feature enables you to send sequences or master clips from your
Avid editing system to other applications, automating your workflow. The
Send To feature provides you with a choice of several pre-defined templates to
streamline your workflow. These templates are set to default parameters and
are customized for specific workflows.
nAvid recommends you use the pre-defined template default settings, which
have been qualified by Avid.
Converting OMF Media
You can export only MXF media from the Avid editing application to
Avid 3D. If your source media is in the OMF media file format, you need to
convert (transcode) the media from OMF format to MXF format before
exporting to Avid 3D. You use the Send To feature to automate the
conversion, but first you must set the transcode options in the Media Creation
dialog box.
To set transcode options in the Media Creation dialog box:
1. Do one of the following:
tDouble-click Media Creation in the Settings scroll list.
tSelect Tools > Media Creation.
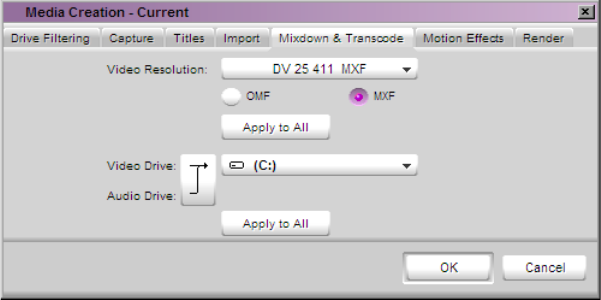
2. Click the Mixdown & Transcode tab.
The Mixdown & Transcode tab of the Media Creation dialog box opens.
Chapter 4 Using Avid 3D
54
3. Select MXF as a file format.
4. Click the Video Resolution pop-up menu, and select a video resolution.
The Video Resolution pop-up menu contains a list of the available
resolutions.
5. Select a video drive and an audio drive. To select the same drive for both
audio and video, click the Single/Dual Drives Mode button until only a
single drive pop-up menu opens.
nThe drive that appears in boldface type has the most available space.
6. Click OK to save your settings.
Exporting Media to Avid 3D
Once your media is in the correct format, you can export it to Avid 3D.
To export a clip or sequence from your Avid editing application:
1. Select an MXF clip or sequence in a bin. You can select multiple clips or
sequences.
2. Do one of the following:
tSelect File > Send To > AVID Xpress Studio > Avid 3D.
tRight-click the clip or sequence, and select Send To > AVID Xpress
Studio > Avid 3D.
Exporting Media
55
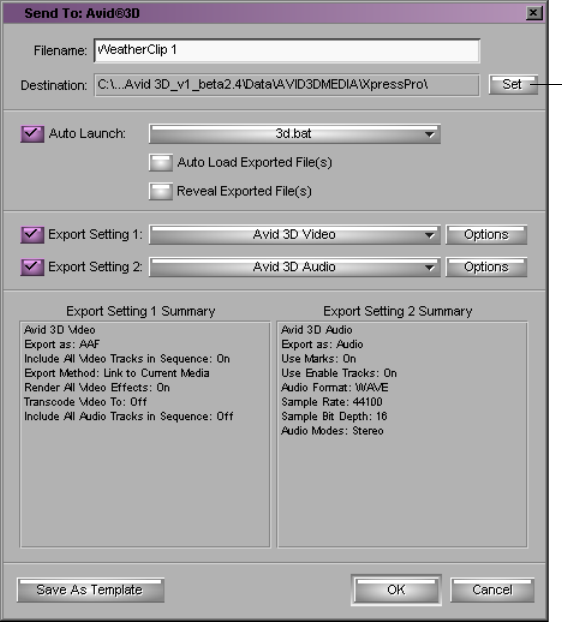
The Send To Avid®3D dialog box opens.
3. (Option) Click the Set button to navigate to a destination for the exported
files.
nIn order for exported media to appear in the appropriate section of Avid 3D’s
Materials Library, your Avid editing application must store the media files at
the default location at C:\Softimage\Avid
3D\Data\AVID3DMEDIA\XpressPro. If you want to store your media in
another location, or if you installed Avid 3D on a different drive, see the
Avid 3D User’s Guide or the Avid 3D Help for information on customizing the
location of stored media.
Set
button

Chapter 4 Using Avid 3D
56
4. Select options as described in the following table:
Avid 3D Options
Option Suboption Description
Filename Type the name you want for the exported file.
The default is the title of the clip or sequence you
selected to export.
Destination Use the Set button to navigate to a location other
than the default location.
Auto Launch Select Avid 3D to have the application open
automatically once the Send To function is
complete.
Auto Load Exported
File(s)
Select if you want the exported AAF file to load
automatically in Avid 3D.
Reveal Exported File(s) Select if you want the system to display the
destination of exported media files.
Export Setting 1 Select the export setting you want to use from the
menu (the default is Avid 3D). Export settings are
listed in the Export Setting 1 Summary section.
If you want to customize your settings, click
Options. For more information about export
settings, see “Export Settings” in the Help for
your Avid editing application.
Export Setting 2 This option is used to export a separate audio
wave file to Avid 3D. If you do not want audio,
deselect this option.
Exporting Media
57
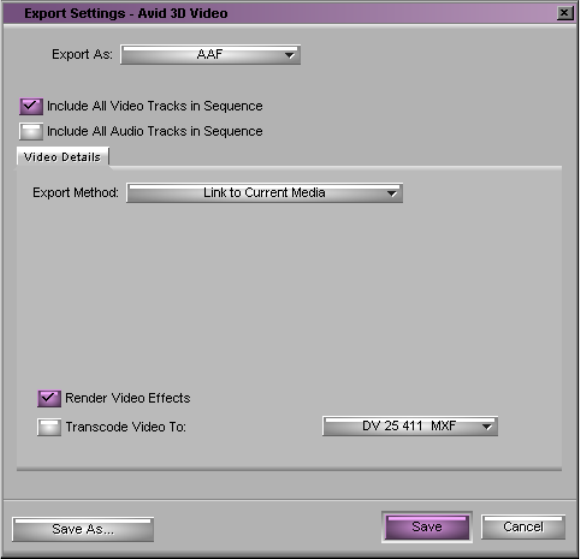
5. Click Options.
The Export Settings dialog box opens.
6. In the Video Details tab, make sure Render Video Effects is selected.
nAll effects must be rendered before exporting media to Avid 3D.
7. Click Save to close the Export Settings dialog box.
8. Click OK.
The Avid editing application exports the clip or sequence, and sends the
AAF file to Avid 3D.
Viewing AAF Media in Avid 3D
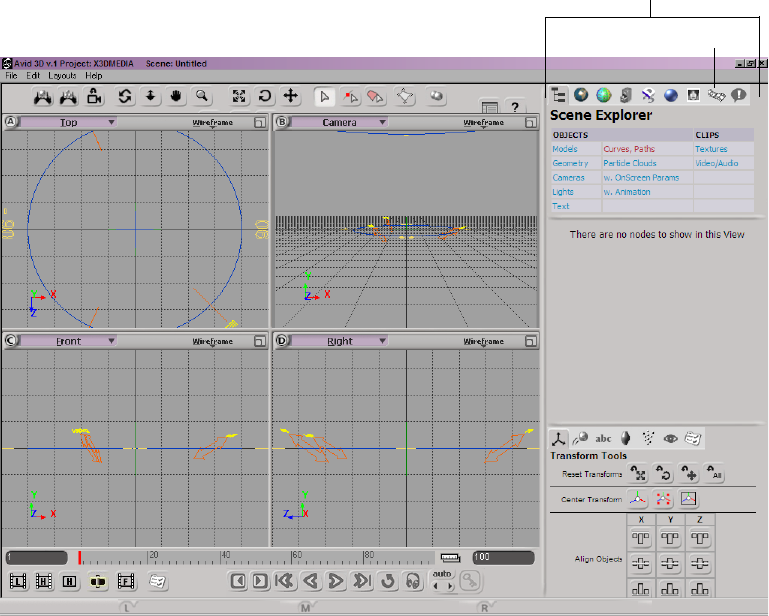
The Send To feature sends your AAF media to Avid 3D and stores it in a
folder where Avid 3D can then access the video and use it as an object in a
3D scene.
Chapter 4 Using Avid 3D
58
To view the AAF media in Avid 3D:
1. Open Avid 3D if the application did not automatically launch when you
exported the clip using the Send To feature.
50
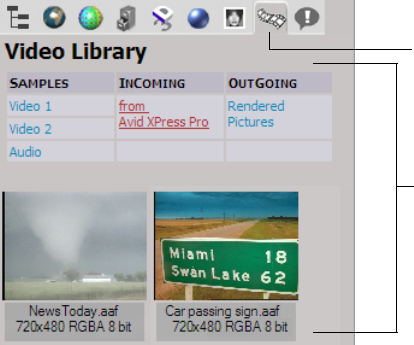
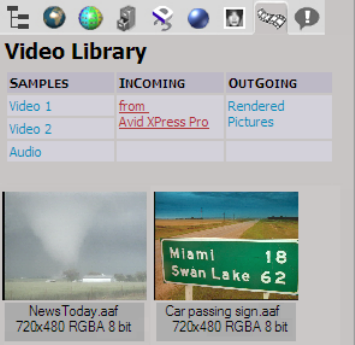
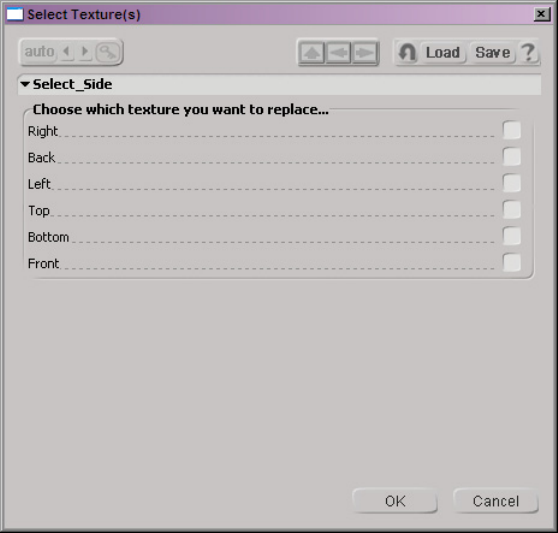
2. Click the Video Clip Library tab in the Library Panel.
The Video Library displays.
Library Panel
Video Clip Library tab
Creating 3D Content
59
3. Click From Avid Xpress Pro in the InComing column to view the media
sent from the Avid editing application.
Creating 3D Content
Avid 3D provides you with the tools you need in order to add 3D effects and
scenes to your sequences. You can create 3D models, logos, extruded text,
particle systems, and warping effects. You can add textures, materials, and
shaders, and you can customize 3D elements provided in the supplied
libraries. For more information on all of these features, see the Avid 3D User’s
Guide.
Because Avid 3D and the Avid editing application use shared media and
metadata formats, you can move media between the applications in a number
of ways. This section focuses on two separate workflows:
• Use video clips exported from your Avid editing application in your 3D
scenes by applying them as background or textures.
• Create a scene in Avid 3D that can be exported to your Avid editing
application as a clip, title, or matte key effect.
Video Clip Library tab
Video Library
Chapter 4 Using Avid 3D
60
Applying Video Clips as Background or Textures
Clips and sequences that you send to Avid 3D appear in the Video Library.
You can use these elements just as you would any 3D object or material when
you build your 3D scene.
To add a video background to a scene:
1. Create a new scene or open an existing scene in Avid 3D.
2. Click the Video Clip Library tab, and then click “from Avid Xpress Pro”
in the InComing column.
The Video Library displays all movies in the library.
3. Make sure no objects are selected in your scene.
4. Click the video clip you want to use, and drag it to the viewport.
Creating 3D Content
61
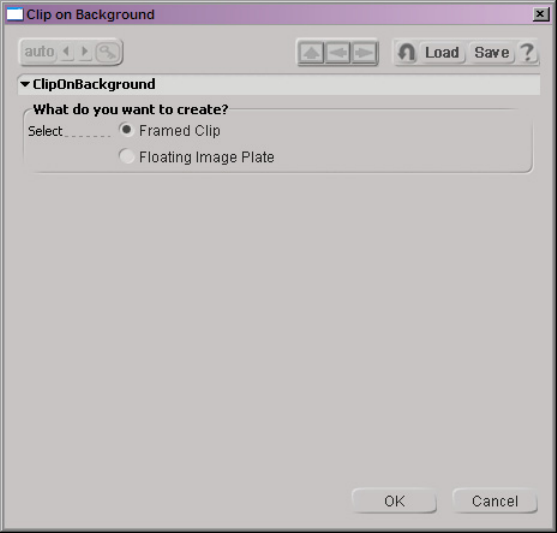
The Clip on Background dialog box opens.
5. In the Clip on Background dialog box, select one of the following options:
-Framed Clip if you want to use the clip as a fixed background.
-Floating Image Plate if you want to modify or reposition the clip as
an element in the scene.
6. Click OK.
Chapter 4 Using Avid 3D
62
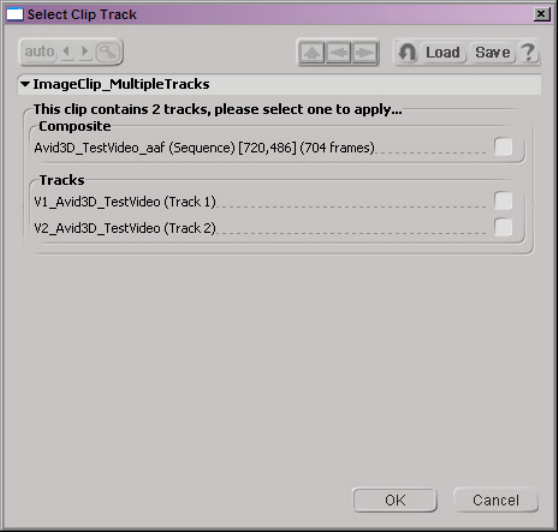
If the clip contains more than one video track, the Select Clip Track dialog
box opens.
7. Do one of the following:
- In the Composite area, select your sequence if you want to apply all
tracks to your scene.
- In the Tracks area, select one of the tracks to apply to your scene.
Creating 3D Content
63
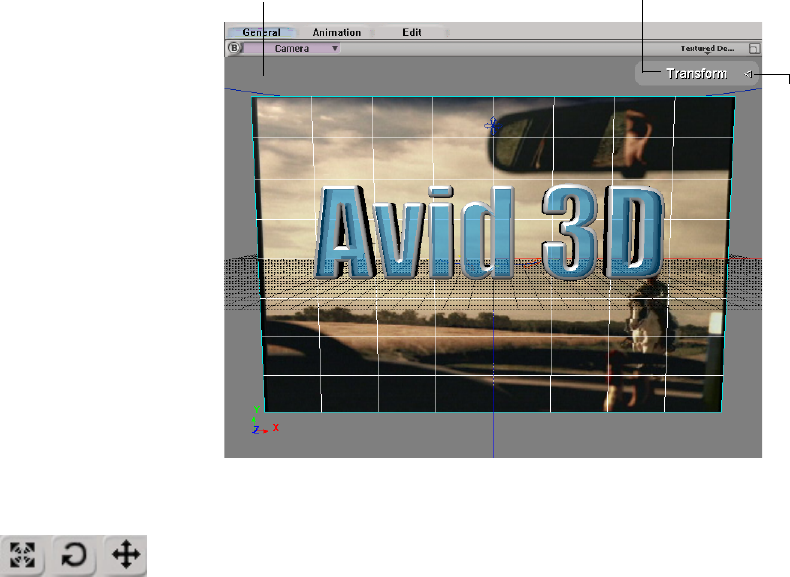
The video appears in the viewport either as a fixed background or as a
texture applied to a floating image plate.
8. If your video is not a fixed background, do one of the following to
position the image plate in the viewport:
tUse the Scale, Rotate, and Translate tools on the Main toolbar.
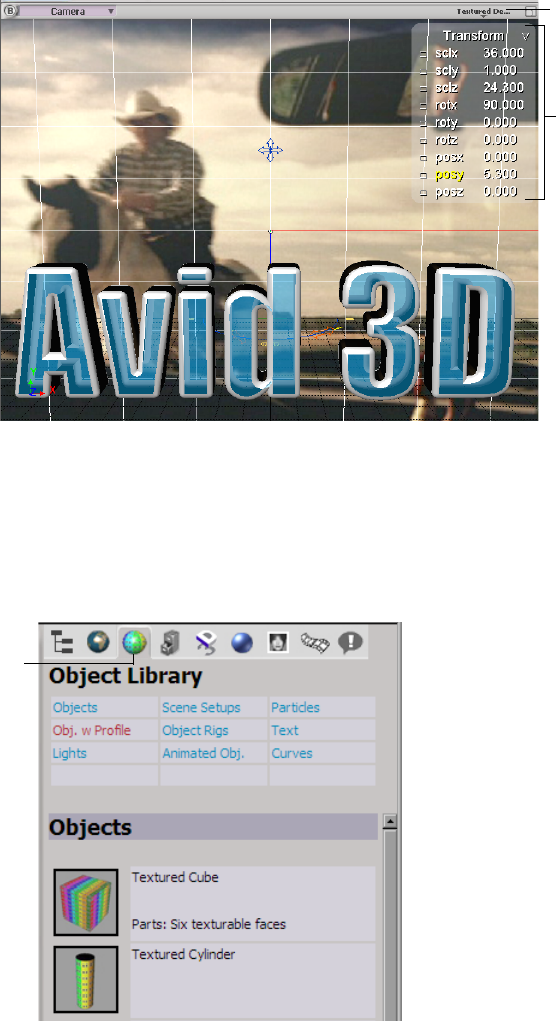
tClick the Expand icon on the On-Screen Transform parameters and
adjust the parameters.
On-Screen Transform parameters
Expand
icon
Viewport
Chapter 4 Using Avid 3D
64
To add video to a textured object:
1. Create a new scene or open an existing scene in Avid 3D.
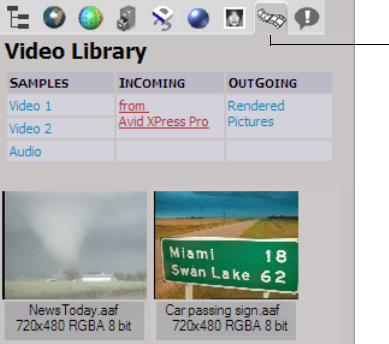
2. Click the Object Library tab, and then click Objects.
The Object Library displays objects in the library.
On-Screen
Transform
parameters
Tex tur ed
Decal
pop-up
menus
Object
Library
tab
Creating 3D Content
65
3. Click one of the textured objects, and drag it to the viewport.
4. Click the Video Clip Library tab, and then click “from Avid Xpress Pro”
in the InComing column.
The Video Library displays all movies in the library.
5. Click a video clip and drag it to the textured object.
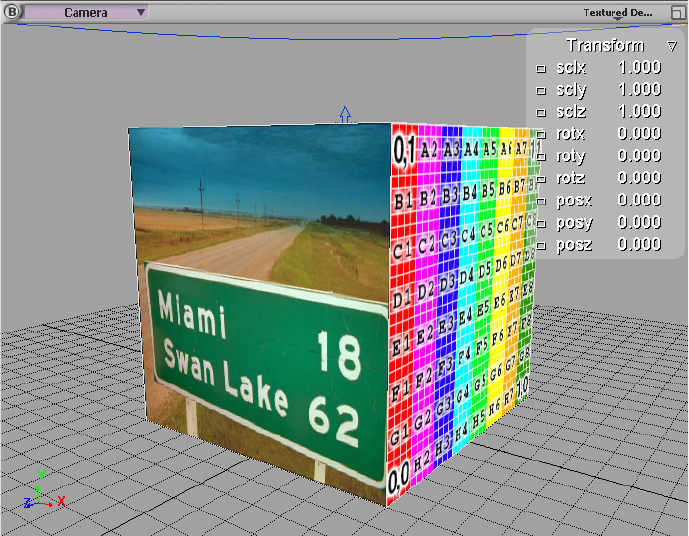
6. To see the clip, select Open GL from the Textured Decal pop-up menu in
the upper right corner of the Scene window.
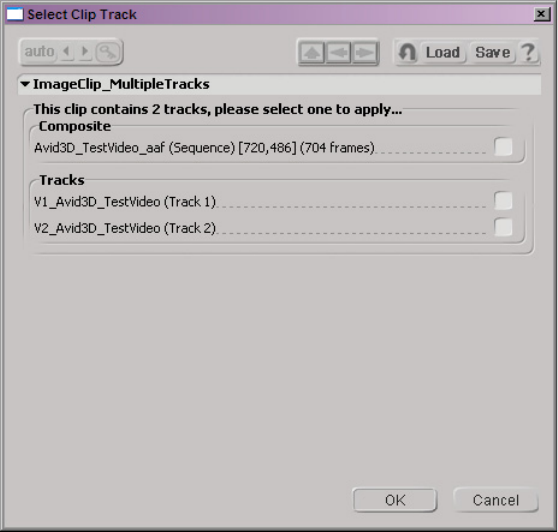
If the object has more than one side to which the texture can be applied,
the Select Texture(s) dialog box opens.
Video Library tab
Chapter 4 Using Avid 3D
66
7. Select the side(s) on which you want your video to appear, and then click
OK.
Creating 3D Content
67
If the clip contains more than one video track, the Select Clip Track dialog
box opens.
8. Do one of the following:
- In the Composite area, select your sequence if you want to apply all
tracks to your scene.
- In the Tracks area, select one of the tracks to apply to your scene.
9. Click OK.
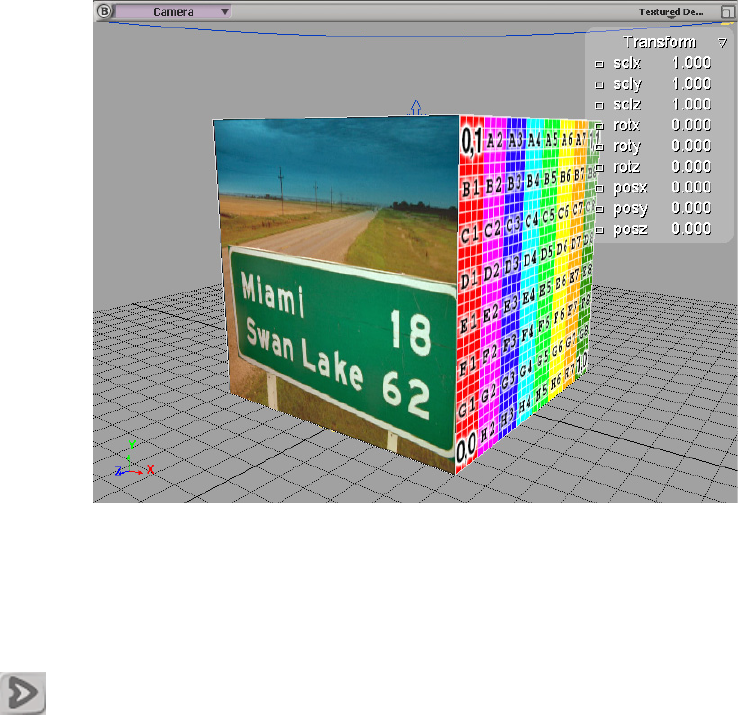
Chapter 4 Using Avid 3D
68
The video clip is added to the object as a texture.
nThe video scales to the size of the selected surface.
10. (Option) Use the On-Screen Transform parameters to resize the textured
object so the video displays with the correct width and height.
To test your video:
tClick the Play button in the Playback controls.
Creating a Scene for Export to the Avid Editing Application
The scenes you can export to your Avid editing application include 3D
environments, virtual sets, 3D characters, titles, logos, and ID bugs. Creating
these scenes is covered in detail in the Avid 3D User’s Guide. The purpose of
this section is to provide a brief overview of the steps necessary for creating
content that you can then export to your editing application.
Creating 3D Content
69
The example used in this section describes how to create 3D text that the Avid
editing application can use as an animated title.
nThis example uses the Text Creation Wizard to create animated text. You can
also use the Text tools in the Tools and Options panel. For more information
on the Text tools, see the Avid 3D User’s Guide.
To create 3D text:
1. Select File > New to create a scene in Avid 3D.
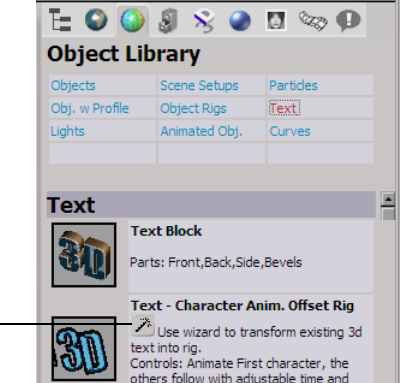
2. Click the Object Library tab, and then click Text.
The Object Library displays all the text objects in the library.
3. In the Text library, click the Text Creation Wizard button.
A message box asks if you want to create a new text string.
4. Click OK.
Text Creation
Wizard button
Chapter 4 Using Avid 3D
70
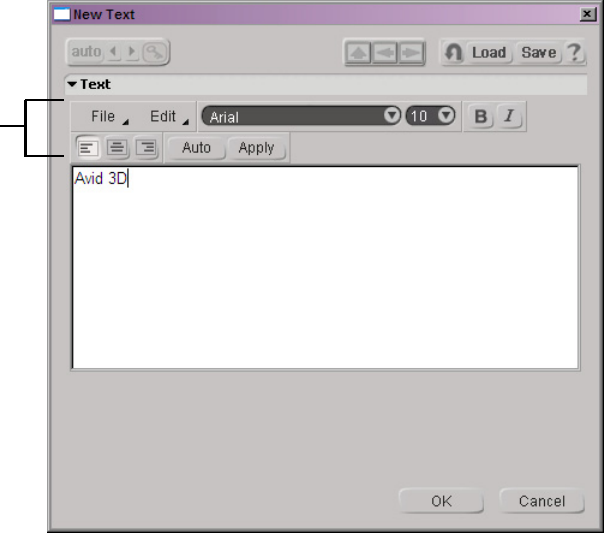
The New Text dialog box opens.
5. Type your text in the text box. You can use the Format buttons to format
your text.
6. Click OK.
Format
buttons
Creating 3D Content
71
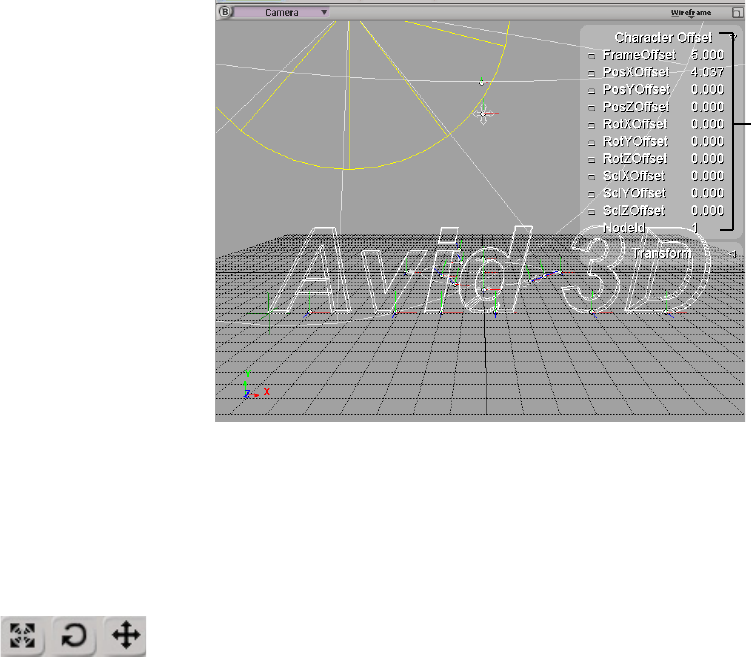
The text object appears in the viewport.
7. You can use the On-Screen Character Offset parameters to position,
rotate, and scale elements of the text object. For more information on
using the Character Offset controls, see the Avid 3D User’s Guide.
8. Select the first letter of the text object.
9. Do one of the following to position the text where you want your
animation to begin:
tUse the Scale, Rotate, and Translate tools on the Control bar.
tClick the Expand icon on the On-Screen Transform parameters and
adjust the parameters.
The Text Creation Wizard repositions all other letters behind the first
letter.
10. Use the Keyframe tool to set the first keyframe.
On-Screen
Character
Offset
parameters

Chapter 4 Using Avid 3D
72
11. Do one of the following to reposition the first letter:
tUse the Scale, Rotate, and Translate tools on the Control bar.
tClick the Expand icon on the On-Screen Transform parameters, and
then adjust the parameters.
The Text Creation Wizard repositions all other letters behind the first
letter, using the Frame Offset parameter so the letters follow the lead letter
along the motion path.
12. Add another keyframe.
13. Repeat steps 11 and 12 to complete your animation.
14. Save the scene.
You can now render and export the scene to your Avid editing application as a
clip with an alpha channel that allows you to edit it into your sequence as a
title. For more information on exporting clips from Avid 3D, see “Exporting
Media from Avid 3D” on page 72.
Exporting Media from Avid 3D
Once you have created content or effects in Avid 3D, you can export your
material directly to your Avid editing application. You use the Render Options
dialog box to convert the 3D material to AAF files that Avid 3D exports to the
Avid application.
nAvid 3D places the exported clip in a bin in your Avid editing project called
Avid3D InComing. You must create a bin and name it Avid3D InComing
before you export your movie from Avid 3D. The target bin’s name is case-
sensitive and must be exactly as cited here, including capitalization and
spacing.
Avid 3D provides a number of render options that allow you to customize the
scenes you can export to your Avid editing application. You set these options
using the Render and Preview controls and the Options tab in the Tools and
Options Panel.
The following procedure provides an overview of the export function. For
more details and a full description of render options, see the Avid 3D User’s
Guide.
Exporting Media from Avid 3D
73
To export a scene to the Avid editing application as an AAF file:
1. Create a bin called Avid3D InComing in your Avid editing project and
leave the bin open.
2. Open a scene in Avid 3D.
3. Click one of the Render buttons in the Rendering and Preview controls:
- Render Low-Quality (Textured) — Use this button if speed is more
important than quality.
- Render High-Quality (mental ray) — Use this button for the best
render quality.
The Render Options dialog box opens.
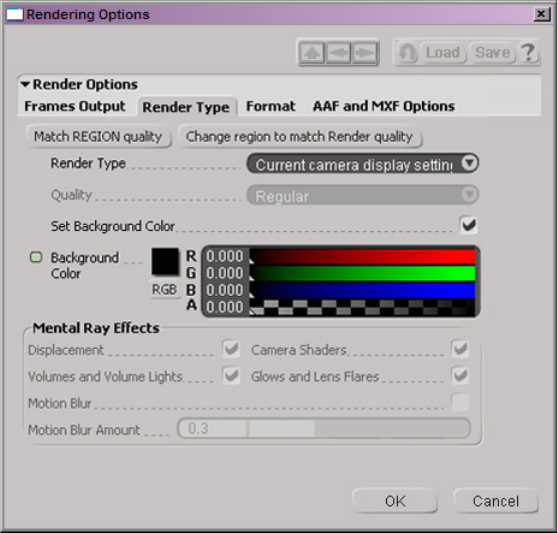
4. (Option) Click the Frames Output tab, and then type a start frame and an
end frame for your movie.
nAvid 3D uses the information in the Frames Sequence area to create
temporary files while rendering. For information on customizing the render
operation, see the Avid 3D User’s Guide.
Tabs
Frame
Sequence
area
Chapter 4 Using Avid 3D
74
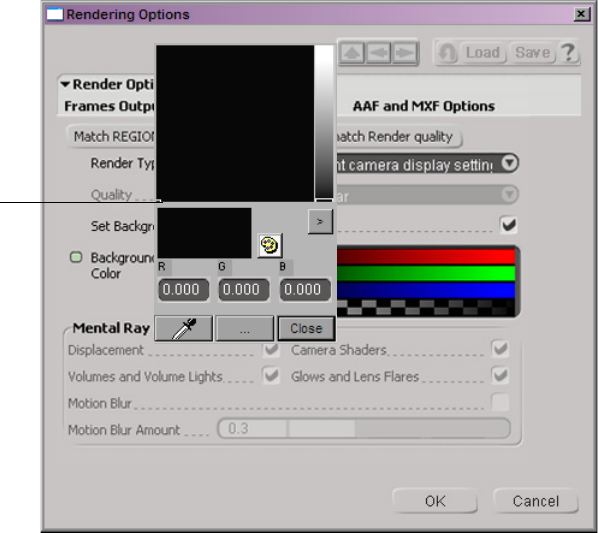
5. Click the Render Type tab, and then select a render option from the
Render Type menu:
- Mental Ray — This provides the highest quality render in Avid 3D.
- Current camera display settings — This uses the settings in the
Camera view.
-display type — You can select any of the display types available in
the Display Type menu at the top of the viewport.
6. (Option) If you selected Mental Ray as a render type, click the Quality
menu, and then select an image quality.
Exporting Media from Avid 3D
75
7. (Option) If you did not select Mental Ray as your render engine, select Set
Background Color, and then use the RGB Color Picker to select a color.
8. (Option) If you selected Mental Ray as your render engine, you can select
the following effects in the Mental Ray Effects area:
- Displacement
- Camera shaders
- Volumes and Volume Lights
- Glows and Lens Flares
- Motion Blur
9. Click the Format tab, and then select one of the following resolutions
from the Format menu:
-Custom
- NTSC D1 4/3 720x486
- NTSC D1 16/9 720x486
RGB Color Picker
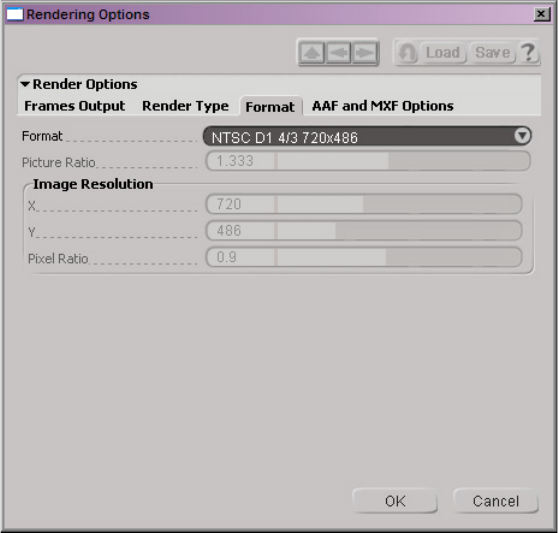
Chapter 4 Using Avid 3D
76
- NTSC DV 720x480
- PAL D1 4/3 720x576
- PAL D1 16/9 720x576
nSelect Custom to set custom parameters for Picture Ratio and Image
Resolution. For more information, see the Avid 3D User’s Guide.
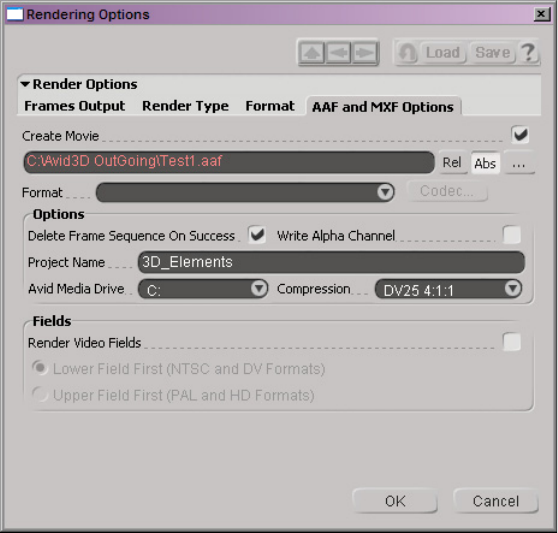
Exporting Media from Avid 3D
77
10. Click the AAF and MXF Options tab.
11. Select Create Movie.
12. Navigate to the Avid3D Outgoing folder by doing the following:
a. Click the Browse (“...”) button, and navigate to a preferred Avid
media drive.
b. Open the drive, and select the Avid3D Outgoing folder.
c. Click OK in the Select a file window.
13. Set the following additional options in the Rendering Options dialog box:
a. Type a file name for your AAF file in the Avid3D Outgoing folder.
b. Select Format > AAF.
c. Select Delete Frame Sequence On Success.
d. If you plan to edit your movie into your sequence as a matte key clip,
select Write Alpha Channel.
e. Type the project name of your Avid editing project.
Chapter 4 Using Avid 3D
78
f. Select the media drive where you want the MXF media files stored.
The default is D.
g. Select a compression for the rendered movie from the Compression
menu:
- Uncompressed
- DV25 4:1:1
- DV50 4:2:2
nYou must have an Avid Mojo attached to your system to export uncompressed
media.
h. Select Render Video Fields if you want interleaved video for your
project, and select one of the following:
- Lower Field First (NTSC and DV Formats)
- Upper Field First (PAL and HD Formats)
nFor more information on field ordering, see the Avid 3D User’s Guide or
“Field Ordering in Graphic Imports and Exports” in the Help for your Avid
editing application.
14. Click OK.
Avid 3D renders the scene, creates an AAF file in the default directory
(media drive:\Avid3D OutGoing), and places the clip in the Avid3D
InComing bin in your Avid editing project.
nYou must create the Avid3D InComing bin before you export your movie from
Avid 3D.
To view the AAF file in your Avid editing application:
1. Click back into your Avid editing project.
2. The clip exported from Avid 3D appears in the Avid3D InComing bin.
You can now edit the clip as you would any other clip or sequence in your
project.
nIf the AAF file does not appear in the Avid3D InComing bin, click out of
Avid Xpress Pro and back into Avid Xpress Pro. This should force a rescan of
the media drive and the AAF file should appear in the bin.
Chapter 5
Using Digi 002, Mbox, and
Avid Pro Tools LE
This chapter explains how Avid Xpress Pro users can use Pro Tools LE to
finish the audio for their video projects.
•Using Pro Tools LE for Finishing Audio
•Exporting Audio and Video from Avid Xpress Pro
•Importing Audio and Video into Pro Tools LE
•Editing Audio Files in Pro Tools LE
•Bringing Your Audio from Pro Tools LE to Avid Xpress Pro
Chapter 5 Using Digi 002, Mbox, and Avid Pro Tools LE
80
Using Pro Tools LE for Finishing Audio
Pro Tools LE is a flexible tool for all types of audio production. You can use
Pro Tools LE to perform a broad range of functions including:
• Sound effects editing and design
• Music composition and editing
• Dialog conforming and editing
• Voice-over and ADR recording and editing
• Foley recording and editing
• Mixing and signal processing
Basic Steps in the Avid Xpress Pro to Pro Tools LE Workflow
The workflow between Avid Xpress Pro and Pro Tools LE has three basic
transactions:
1. Export a sequence from Avid Xpress Pro to Pro Tools LE. This step
delivers working audio and video but it is optional; some workflows start
directly in Pro Tools LE before picture editing has begun.
2. Import the audio and video files into Pro Tools LE, perform your
audio finishing, and export new audio files. Once audio and music
production is completed in Pro Tools LE, this step delivers individual
audio clips, tracks with unmixed audio clips, or mixed tracks.
3. Import the audio files into Avid Xpress Pro for integration with the
finished video tracks.
This chapter describes each step of this workflow. See “Using Pro Tools LE
with Progressive Projects” on page 123 for information specific to film
projects and progressive projects.
Using Pro Tools LE for Finishing Audio
81
Before You Begin
This section describes some things you should know before you get started,
including:
• Two Avid Xpress Studio configurations
• Aspects of frame-rate and sample-rate editing
• Hardware and disk drive requirements
• Two kinds of QuickTime movies
Editing Audio with Avid Studio Xpress Complete
Avid Xpress Studio Complete includes Pro Tools LE, Avid Mojo DNA
hardware, and a Digi 002. In this configuration, you can use the Digi 002 as
your primary audio I/O device for Avid Xpress Pro as well as for editing audio
with Pro Tools LE. You can also use the Digi 002 as a control surface to
control many aspects of the Avid Xpress Pro user interface.
If the Digi 002 is turned on and properly connected to your computer before
you start Avid Xpress Pro, Avid Xpress Pro automatically recognizes the
device and uses it as the primary audio device. If the Digi 002 is not connected
or is in Standalone mode, Avid Xpress Pro uses the Avid Mojo DNA
hardware as the primary audio device.
For information on connecting the Digi 002 and Mbox hardware to your
Avid Xpress Pro system, see the Avid Xpress Studio Hardware Setup
Instructions.
You can also use the Digi 002 as a standalone mixer. However, you cannot use
the Digi 002 as a mixer while you are using it as the audio I/O device for
Avid Xpress Pro.
Chapter 5 Using Digi 002, Mbox, and Avid Pro Tools LE
82
You can perform your audio work “to picture” with real-time video playback.
When using Avid Xpress Pro with Avid Mojo DNA hardware and a Digi 002,
Pro Tools LE can stream video out from the Avid Mojo DNA hardware’s
analog video outputs to a client monitor.
To use the Digi 002 as your primary audio device while you work in
Avid Xpress Pro:
1. (Optional) Connect a black burst generator to the Ref connector on the
Avid Mojo DNA.
nAvid recommends using a black burst generator when performing an
audio-only capture.
2. Connect one end of an RCA cable to the analog audio output connectors
labeled CLK on the Avid Mojo DNA (white audio output) and connect
the other end to the S/PDIF In on the Digi 002. This allows the Digi 002 to
receive audio sync from the Avid Mojo DNA and the optional black burst
generator.
3. Connect the video output (composite or S-video) on the Avid Mojo DNA
to a client monitor.
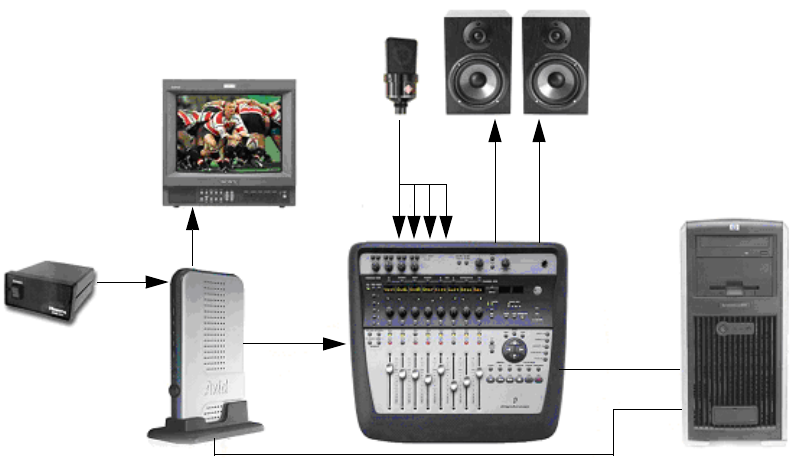
Using Pro Tools LE for Finishing Audio
83
The following illustration shows the Digi 002 with the optional hardware.
To use the Digi 002 as a control surface for Avid Xpress Pro:
1. Turn on the Digi 002 before starting Avid Xpress Pro.
2. Start Avid Xpress Pro, and then click the Settings tab in the Project
window.
3. Double-click Controller Settings.
4. Select the Digi 002 options from the Controller, Port, and Gain Controller
Port pop-up menus.
5. (Option) Click Edit Settings, view or change the button settings, and then
click OK.
6. Click OK in the Controller Settings dialog box to save your changes.
For information on using the Digi 002 as a control surface on your
Avid Xpress Pro system, see “Using an External Fader or Mixer” in the
Avid Xpress Pro Help.
Video I/O
1394
Host
Black Burst
(optional) S/PDIF
(sync)
64-bit
1394
Card
Stereo Monitor Out
External
Audio
Sources
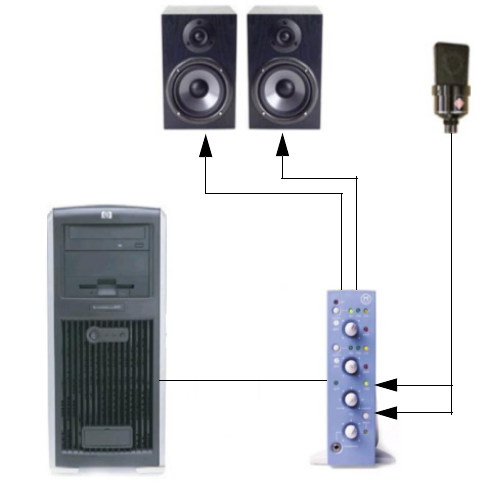
Chapter 5 Using Digi 002, Mbox, and Avid Pro Tools LE
84
Editing Audio with Avid Xpress Studio Essentials
Avid Xpress Studio Essentials includes Pro Tools LE and a Digidesign Mbox.
Avid Xpress Studio Essentials can use the Mbox as the primary audio device
for Avid Xpress Pro as well as for editing audio with Pro Tools LE.
You can perform your audio work “to picture” with real-time video playback
for synchronization when you are working with an Mbox.
When using Pro Tools LE and an Mbox, Pro Tools LE can play video in a
floating QuickTime window within the Pro Tools LE user interface.
You can also use the Mbox as your primary audio device. You can use it for
audio playback, audio input, and audio output, as shown in the following
illustration.
External
Audio
Sources
Stereo
Monitor
Out
USB
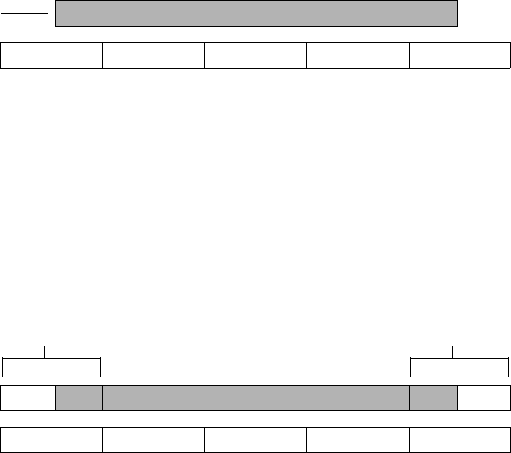
Using Pro Tools LE for Finishing Audio
85
Frame-Rate Accurate Video Editing and Sample-Rate Accurate Audio Editing
Avid Xpress Pro edits with frame accuracy. This means that in a 30-fps
project, you can edit at 30 different locations for every one second of video.
Pro Tools LE edits with sample rate accuracy. In a 48-kHz session, there are
potentially 48000 locations to edit for every second of audio.
When Pro Tools LE exports an AAF or OMF composition, it must ensure that
the audio media files line up on frame boundaries. To do this, it might have to
split an existing audio clip into three clips. For example, the following
illustration shows a 5-frame video clip and a corresponding audio clip. In Pro
Tools LE, the audio clips might not line up on video frame boundaries.
In order to export frame accurate audio clips, Pro Tools LE splits the audio
media on frame boundaries and fills any gaps with silence. The following
illustration shows the resulting audio clips that are exported to
Avid Xpress Pro.
When you use Export Selected Tracks as OMF/AFF to export tracks from Pro
Tools LE, a number of additional media files appear in the bin. Some are
named Sample accurate edit. These are the additional media files that Pro
Tools LE creates to make sure that Avid Xpress Pro receives frame-accurate
audio. You also see the sample-accurate edit media files if you zoom in on
portions of the imported audio in the Timeline.
One Pro Tools LE
Audio clip
5 frame
video clip
The original audio clip does not line up on video frame boundaries
Three exported
Audio clips
5 frame
video clip
Exported audio clips line up on video frame boundaries
New audio clip with
padded silence
New audio clip with
padded silence
Chapter 5 Using Digi 002, Mbox, and Avid Pro Tools LE
86
Hardware Requirements
The following requirements apply to using Avid Xpress Pro and Pro Tools LE
on the same system:
• Pro Tools LE requires Basic disk drives for audio. You cannot use Pro
Tools LE to edit audio on Dynamic disk drives (striped drives are
Dynamic disk drives). For more information, see “Disk Drive
Requirements” on page 86.
• To import AAF files from Avid Xpress Pro into Pro Tools LE, you must
have the Digidesign DV Toolkit™ installed on your system and an
authorized iLok USB Smart Key (iLok) must be attached to your system.
• Pro Tools LE does not support 9-pin serial deck control. In order to
perform a frame-accurate digital cut, export the audio to Avid Xpress Pro
and perform the digital cut from Avid Xpress Pro. For more information
on frame accuracy, see “Frame-Rate Accurate Video Editing and Sample-
Rate Accurate Audio Editing” on page 85.
nFor information on connecting the Digi 002 and Mbox hardware to your
Avid Xpress Pro system, see the Avid Xpress Studio Hardware Setup
Instructions.
Disk Drive Requirements
You cannot use Pro Tools LE to edit audio on a striped drive or other Dynamic
disk drive. Pro Tools LE requires Basic disk drives. For more information on
disk drives, see the Avid Pro Tools LE User Guide on the online library
CD-ROM or DVD.
When you import an AAF file into Pro Tools LE, if the source audio files are
on a Dynamic disk drive, Pro Tools LE displays a dialog box asking if you
want to copy the files to a Basic disk drive.
When capturing material, you can instruct Avid Xpress Pro to capture video to
striped drives and capture audio to a separate Basic disk drive. You can
specify the drives in the Capture tool. You can also use the Media Creation
tool to specify the drive that is used to capture, import, and create audio files.
To use the Media Creation tool:
1. Make sure that a Basic disk drive is attached to your system.
2. In Avid Xpress Pro, select Tools > Media Creation.
Using Pro Tools LE for Finishing Audio
87
3. Click the following tabs, and specify your Basic drive for audio files:
-Capture tab
-Import tab
- Mixdown and Transcode tab
nThe Media Creation tool does not identify a drive as a Basic drive. You must
determine whether a drive is a Basic drive before you open the Media
Creation tool.
QuickTime Movies versus QuickTime Reference Movies
The following Send To templates create QuickTime movies:
• Avid Pro Tools LE (MBox_Ref) creates a QuickTime Reference movie.
• Avid Pro Tools LE (MBox_Mov) creates a QuickTime movie.
nFor more information about using Send To templates, see “Exporting Audio
and Video from Avid Xpress Pro” on page 88.
A QuickTime reference movie is a QuickTime movie that contains
composition information but no movie data. The movie instead contains
pointers to the original media in the OMFI MediaFiles directory. Because the
QuickTime reference movie does not contain media, the file is much smaller
than a QuickTime movie, usually only a few kilobytes per file. Exporting a
sequence as a QuickTime reference movie is faster and takes up less disk
space than exporting a sequence as a QuickTime movie.
The drawback to using a QuickTime Reference movie is that the height and
width of the movie are directly related to the resolution of the original media
files. For example, if you are using 2:1 or uncompressed media, the movie can
be large when you display it in Pro Tools LE. You cannot modify the size of
the movie in Pro Tools LE.
QuickTime movies are self-contained files. They take longer to encode and
take up more disk space. However, the height and width are adjustable when
you export them from Avid Xpress Pro. The “Avid Pro Tools LE
(MBox_Mov)” template uses a size that is useful on most screen resolutions.
You can also create a new template with a custom size.
You can experiment to determine whether QuickTime movies or QuickTime
Reference movies work better for your purposes.

Chapter 5 Using Digi 002, Mbox, and Avid Pro Tools LE
88
Exporting Audio and Video from Avid Xpress Pro
Before you export, create a sequence with audio tracks as described in the
Avid Xpress Pro Help. The following illustration shows a sequence with two
audio tracks and two unrendered video effects.
Using the Send To Avid Pro Tools LE Templates
To use the Send To Avid Pro Tools LE templates:
1. Select a sequence with audio tracks in a bin.
nAAF exports ignore IN and OUT marks, but QuickTime exports do not. The
default templates that create QuickTime movies automatically deselect Use IN
and OUT marks to ensure that the QuickTime movie matches the audio.
2. Select File > Send To > Avid Xpress Studio, and then select one of the
following templates:
- Avid Pro Tools LE (002) — Creates one AAF file that references the
audio and video media files used in the sequence. When you edit the
audio in Pro Tools LE, you can play the video in the client monitor.
If you don’t have a client monitor attached to your system, use one of
the following Mbox options.
- Avid Pro Tools LE (MBox_Ref) — Creates an AAF file that
references the audio files in the sequence and creates a QuickTime
Reference movie for video display in Pro Tools LE.
- Avid Pro Tools LE (MBox_Mov) — Creates an AAF file that
references the audio files in the sequence and creates a QuickTime
movie for video display in Pro Tools LE.
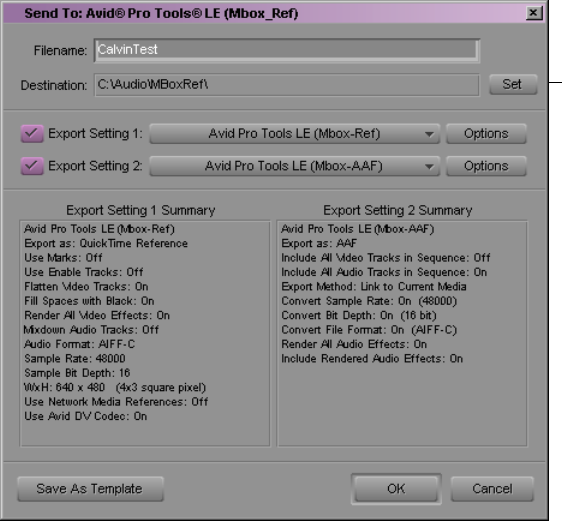
Exporting Audio and Video from Avid Xpress Pro
89
nFor a comparison of QuickTime movies and QuickTime Reference movies, see
“QuickTime Movies versus QuickTime Reference Movies” on page 87.
The corresponding Send To: Avid Pro Tools LE dialog box opens. The
following illustration shows the Avid Pro Tools LE (MBox_Ref)
dialog box.
The Export Settings dialog box displays a summary of the default settings.
3. Click Set, and then navigate to a location to store the exported files.
4. (Option) Click either Options button to view the export settings, and then
make any changes. If you make any changes, you can use the Save As
Template button to create a new template.
nThis workflow assumes that you use the default values. This means that you
are exporting using the Project sample rate, audio file format, and sample bit
depth.
Click the Set button to
select a destination.
Chapter 5 Using Digi 002, Mbox, and Avid Pro Tools LE
90
5. Click OK.
Avid Xpress Pro performs the requested operations and exports the files
to the destination folder. If Avid Xpress Pro has to render effects or
perform audio file conversions, a new sequence appears in the bin with
the name filename.Export.01, and a new audio master clip appears in the
bin with the name filename.new.01.
Determining the Audio Settings to use for Your Pro Tools LE Session
To determine the audio settings to use for your Pro Tools LE session:
1. Select the Project window and click the Settings tab.
2. Double-click Audio Project.
The Audio Project Settings dialog box opens.
3. Take note of the following settings. You need them when you set up your
Pro Tools LE session.
- Sample Rate
- Audio File Format
- Sample Bit Depth
The default Send To Pro Tools LE templates use the current Audio
Project settings for the above values. If you changed the values when you
performed the export, take note of those values.
Importing Audio and Video into Pro Tools LE
Depending on the Send To Pro Tools LE template that you used to perform
your export, you now have the following files:
• Avid Pro Tools LE (002) — An AAF file that references the audio and
video media files used in the sequence
• Avid Pro Tools LE (MBox_Ref) — An AAF file that references the audio
files in the sequence and a QuickTime Reference movie
• Avid Pro Tools LE (MBox_Mov) — An AAF file that references the
audio files in the sequence and a QuickTime movie
Importing Audio and Video into Pro Tools LE
91
This workflow uses a fast method of creating a new Pro Tools LE session. If
you choose File > Open Session and open the AAF file you exported from
Avid Xpress Pro, Pro Tools LE creates a new session using the following
values from the AAF file:
• Audio file type (audio file format in Avid Xpress Pro)
• Sample Rate
• Bit Depth
If you use other methods of creating a new session you must ensure that your
new session uses the same values that are in the AAF file you exported from
Avid Xpress Pro. See “Determining the Audio Settings to use for Your Pro
Tools LE Session” on page 90.
nIn order to view the video in the AAF file created by the Avid Pro Tools LE
(002) template, you must have a Digi 002 and an external monitor attached to
your system.
To create a new session and import the files into Pro Tools LE:
1. In Pro Tools LE, select File > Open Session.
The Choose a session dialog box opens.
2. Navigate to the AAF file that you want to import.
- For the Avid Pro Tools LE (002) template, this AAF file references
both the audio and video from the Avid Xpress Pro sequence that you
exported.
- For the Mbox_Ref and Mbox_Mov templates, this file references the
audio files used in the sequence. You import the QuickTime
Reference movie or QuickTime movie separately.
The following illustration shows files created by the Mbox_Ref or
Mbox_Mov template. The QuickTime movie is a separate file.
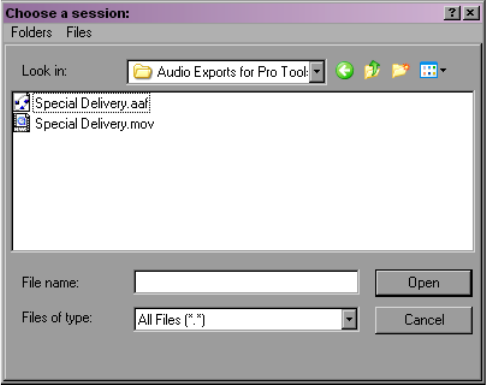
Chapter 5 Using Digi 002, Mbox, and Avid Pro Tools LE
92
3. Select the AAF file and click Open.
The Name the session dialog box opens.
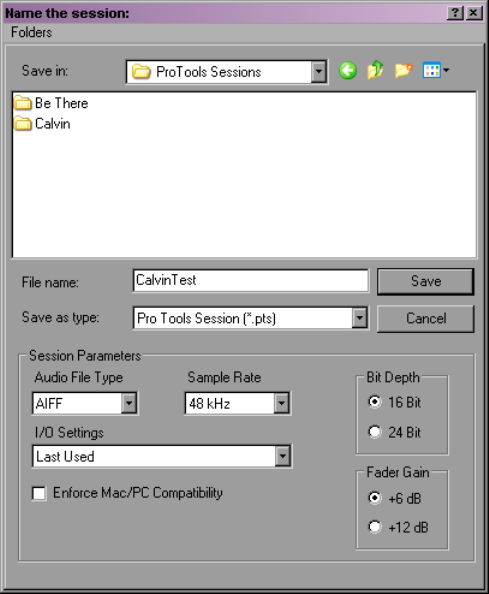
Importing Audio and Video into Pro Tools LE
93
4. In the Save in area, navigate to the location where you want to create a
new folder for the Session. This location must be on a Basic disk drive.
See “Disk Drive Requirements” on page 86.
5. In the File name text box, type a name for the session. Pro Tools LE uses
this name to create a new folder and a new session.
Because you used File > Open Session and opened the exported AAF file,
the Session Parameters automatically have the following values from your
AAF file:
- Audio File Type (Audio File Format in Avid Xpress Pro)
- Sample Rate
- Bit Depth
6. Click Save.
The Import Session Data window opens.
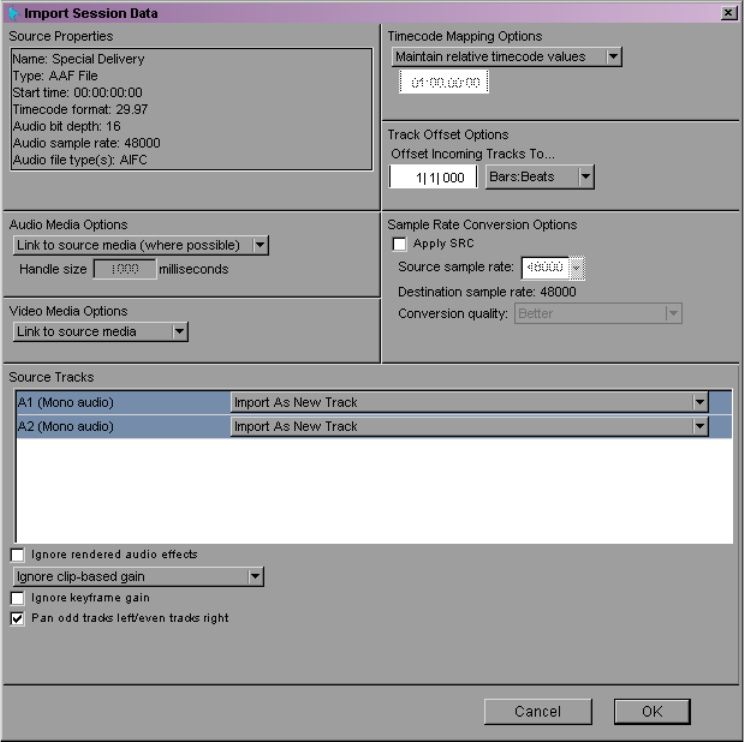
Chapter 5 Using Digi 002, Mbox, and Avid Pro Tools LE
94
7. Select the following:
- Audio Media Options - Link to source media (where possible)
- Video Media Options - Link to source media
8. Click OK.
If the source media has a different frame rate than the session, Pro Tools
LE asks if you want to change the session frame rate.
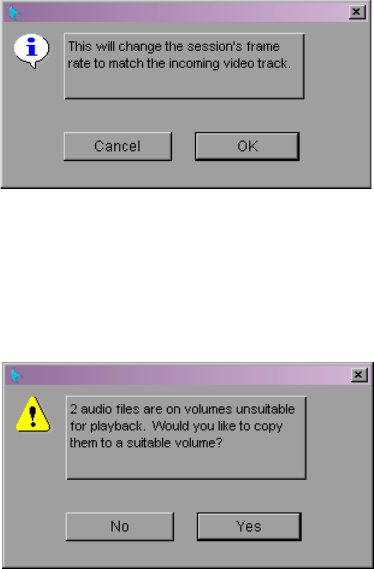
Importing Audio and Video into Pro Tools LE
95
9. Click OK.
If your audio source media is on a Dynamic disk drive, Pro Tools LE
displays a dialog box that allows you to copy the media to a Basic disk
drive.
10. Click Yes, and then follow the prompts to navigate to a Basic drive.
Pro Tools LE imports the session data and creates tracks for the audio. If
you used the 002 template, Pro Tools LE also creates a track for the video.
11. If you are importing files created by the MBox_Ref or MBox_Mov
templates, do the following:
a. Select Movie > Import Movie.
The Select Video File to Import dialog box opens.
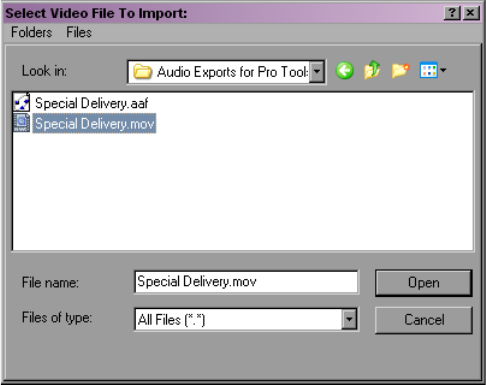
Chapter 5 Using Digi 002, Mbox, and Avid Pro Tools LE
96
b. Navigate to the QuickTime Reference movie or QuickTime movie
that you created when you performed the Send To operation in
Avid Xpress Pro.
c. Select the movie.
d. Click Open.
Pro Tools LE creates a track for the movie in the Timeline and displays
the movie in a QuickTime movie window. The following illustration
shows the Pro Tools LE session and the QuickTime movie.
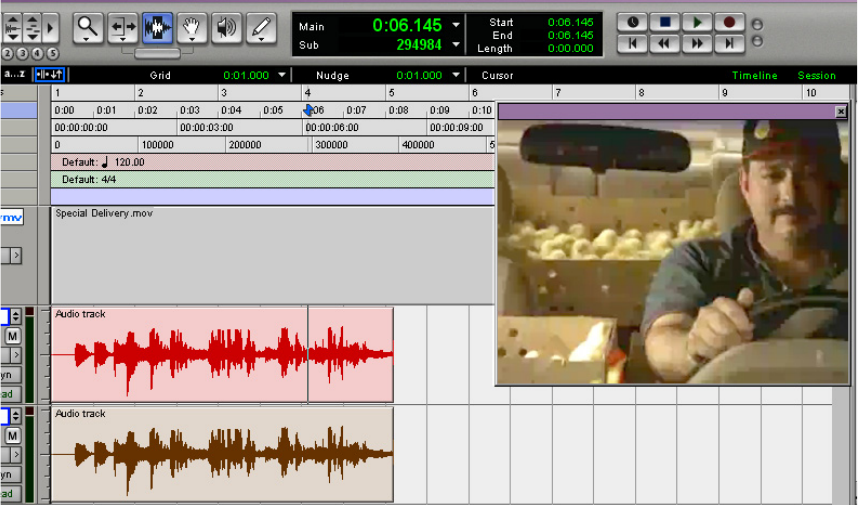
Editing Audio Files in Pro Tools LE
97
Now you are ready to edit the audio files in Pro Tools LE while viewing the
video in a floating QuickTime window or on a client monitor.
Editing Audio Files in Pro Tools LE
Even though the audio files that you import point to the original audio files in
the Avid Xpress Pro sequence, your editing session does not change the files.
By default, Pro Tools LE does not perform destructive edits on the audio files
that you import. When you export the finished audio files, Pro Tools LE
creates new audio files. You import these new audio files into
Avid Xpress Pro.
As you edit the audio files, you can view the corresponding video file either on
your client monitor or in a QuickTime window. For information on editing the
audio files, see the tutorial in the Avid Pro Tools LE User Guide or the Pro
Tools LE Reference Guide.
Chapter 5 Using Digi 002, Mbox, and Avid Pro Tools LE
98
Bringing Your Audio from Pro Tools LE to
Avid Xpress Pro
There are two basic methods of exporting audio tracks from Pro Tools LE for
use with Avid Xpress Pro:
• Export selected Tracks as OMF/AAF.
• Use the Bounce to Disk or the Export Selected as Files commands to
export the files.
For other export methods, see the Avid Pro Tools LE User Guide.
Exporting Tracks from Pro Tools LE
To export tracks from Pro Tools LE, you need to create a folder, export the
tracks as OMF/AAF, and then import the OMF file into Avid Xpress Pro, as
described in the following sections.
Before You Begin
Before you perform the export from Pro Tools, create a folder on your system
where you can store the exported Pro Tools composition. For this example, we
create a folder named Audio From Pro Tools on the Desktop.
In this example we store the composition in the Audio From Pro Tools folder
and store the associated media files in the OMFI MediaFiles folder.
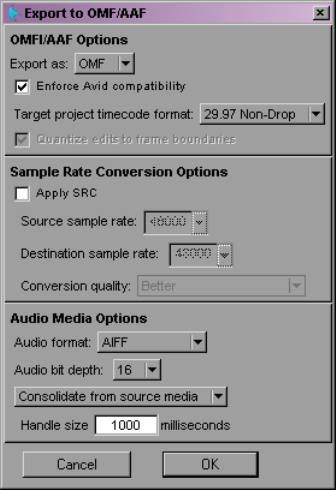
Bringing Your Audio from Pro Tools LE to Avid Xpress Pro
99
Exporting Selected Tracks
To export selected tracks from Pro Tools LE:
1. Select the tracks in the Pro Tools LE session (choose either mixed or
unmixed tracks).
2. Select File > Export Selected Tracks as OMF/AAF.
The Export to OMF/AAF dialog box opens.
3. In the OMF/AAF Options area, select Export As > OMF, and select
Enforce Avid compatibility.
nThe Enforce Avid compatibility option limits the sample rate options to 44.1 or
48 kHz. Dithering without noise shaping is applied to files being exported
from 24-bit to 16-bit.
4. Make sure that the Target project timecode format selection is correct for
the Avid Xpress Pro project.
This is probably correct because Pro Tools LE automatically detected the
value when you imported the AAF file into Pro Tools LE.
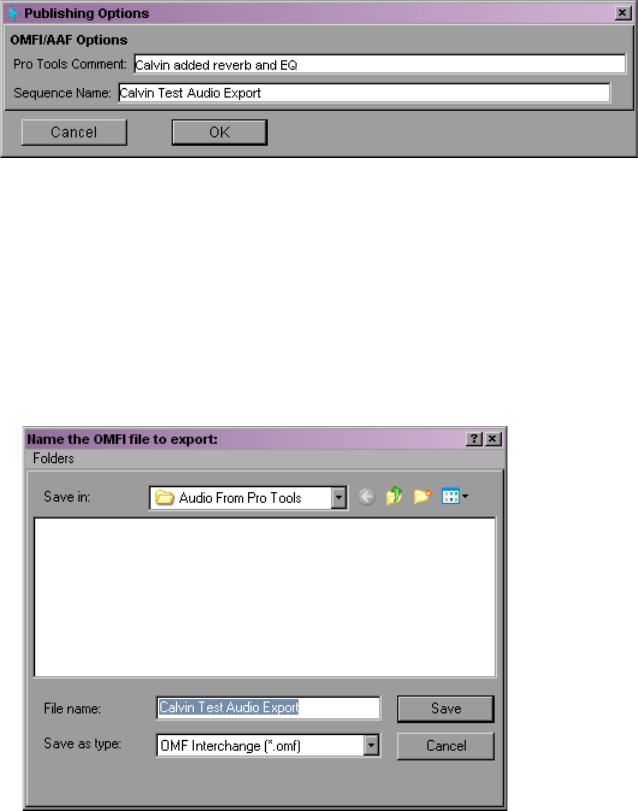
Chapter 5 Using Digi 002, Mbox, and Avid Pro Tools LE
100
5. In the Audio Media Options area, make sure that the Audio format and
Audio bit depth match your Avid Xpress Pro audio settings.
6. Select Consolidate from source media from the pop-up menu.
7. Click OK.
The Publishing Options dialog box opens.
8. Type a comment in the Pro Tools Comment text box, and then type a
name in the Sequence Name text box.
9. Click OK.
Pro Tools LE creates a sequence with the name you supply. The Pro Tools
comment appears in the Avid Xpress Pro bin in a Pro Tools Comment
column.
The Name the OMFI file to export dialog box opens.
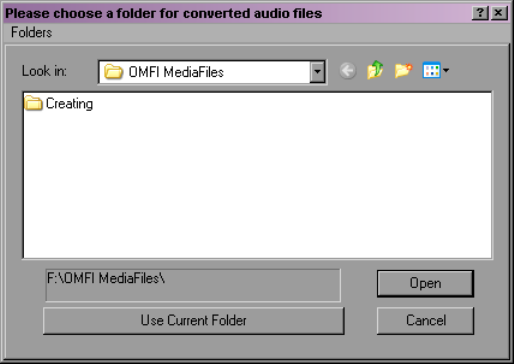
Bringing Your Audio from Pro Tools LE to Avid Xpress Pro
101
10. Navigate to a folder where you can easily locate the Pro Tools
composition when it is time to import it into Avid Xpress Pro. In this
example, we select the Audio From Pro Tools folder that we created
earlier.
11. Click Save.
The Please choose a folder for converted audio files dialog box opens.
12. Navigate to the OMFI MediaFiles folder.
13. Click Use Current Folder.
Pro Tools LE exports the composition to the Audio From Pro Tools folder
and exports the related media files to the OMFI MediaFiles folder.
14. Quit Pro Tools LE.
Importing an OMF File into Avid Xpress Pro
To import a sequence into Avid Xpress Pro:
1. Start Avid Xpress Pro.
2. Select a bin where you would like to import the sequence.
3. Select File > Import.
The Select Files to Import dialog box opens.
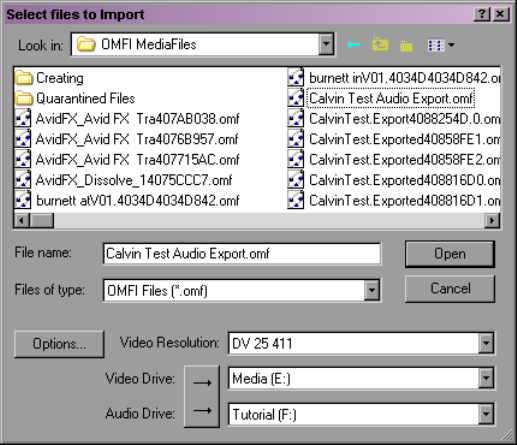
Chapter 5 Using Digi 002, Mbox, and Avid Pro Tools LE
102
4. Navigate to the folder that contains the exported Pro Tools composition,
and then select Files of Type > OMFI Files.
5. Select the OMF file.
6. Select the target drive for the audio media files.
7. Click Open.
The new sequence appears in the selected bin, along with a number of
related audio clips.
You might find it useful to designate a bin for imports and then copy the
sequence to the bin you are working in. This can help reduce the number
of files in your working bin. You can close the bin containing the
additional media files, but don’t delete the files because they are needed
for the sequence.
8. Drag the sequence to the Source monitor, and then play the sequence to
listen to the audio.
9. Drag the original video sequence into the Record Monitor.
10. Select Clip > New Audio Track to add enough tracks for the imported
sequence.
Bringing Your Audio from Pro Tools LE to Avid Xpress Pro
103
nYou might find it useful to leave the original audio tracks in place to compare
synchronization with the imported sequence.
11. Edit the imported tracks into the Timeline.
Using the Bounce to Disk Command
The Avid Pro Tools LE User Guide describes how to use the Bounce to Disk
and Export Selected as Files commands to export OMF files from Pro Tools
LE. This section describes how to use the Bounce to Disk command to export
files to Avid Xpress Pro.
The method you use to import files into Avid Xpress Pro depends on whether
you use the Publish as OMFI option when you perform the Bounce to Disk
operation in Pro Tools LE.
Using Publish as OMFI With the Bounce to Disk
Command
To use the Bounce to Disk command with the Publish as OMFI option:
1. Start Pro Tools LE, and then open the session that contains the tracks you
want to export.
2. Select the tracks.
3. Select File > Bounce to Disk.
The Bounce dialog box opens.
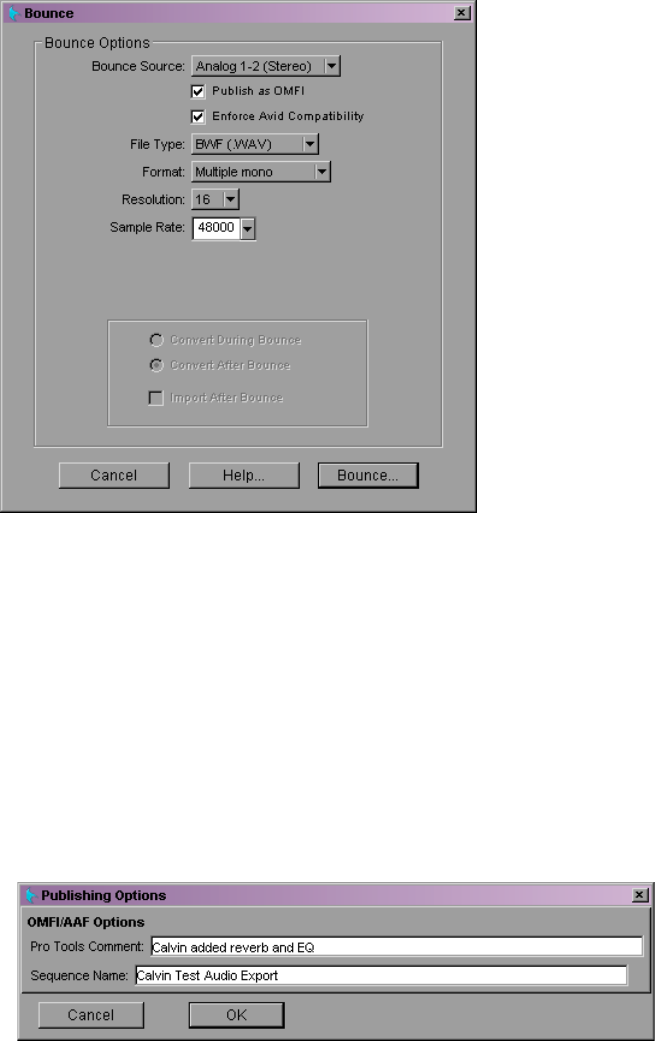
Chapter 5 Using Digi 002, Mbox, and Avid Pro Tools LE
104
4. Select the following options:
-Publish as OMFI
- Enforce Avid compatibility
- File Type > BWF (WAV) or File Type > AIFF
- Format > Multiple mono
- Resolution (bit depth) (from your Avid Xpress Pro project)
- Sample Rate (from your Avid Xpress Pro project)
5. Click Bounce.
The Publishing Options dialog box opens.
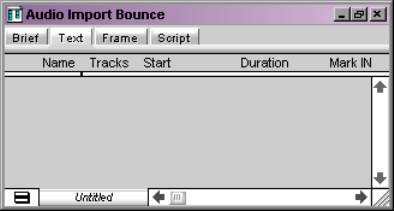
Bringing Your Audio from Pro Tools LE to Avid Xpress Pro
105
6. Type a comment in the Pro Tools Comment text box, and then type a
name in the Sequence Name text box.
7. Click OK.
Pro Tools LE creates a master clip with the name you supply. The Pro
Tools comment appears in the Avid Xpress Pro bin in a Pro Tools
Comment column.
The Save Bounce As dialog box opens.
8. Name the file, and then navigate to the OMFI MediaFiles folder.
9. Click Save.
Pro Tools LE mixes down the selected tracks to multiple mono audio files
and stores the files in the OMFI MediaFiles folder.
10. Quit Pro Tools LE.
Using the Media Tool to Import the Files
Use this procedure if you selected the Publish as OMFI option with the
Bounce to Disk command and then exported the files to the OMFI MediaFiles
folder.
To use the Media Tool to import the files:
1. Start Avid Xpress Pro.
2. Select the bin that you want to hold the imported master clip.
3. Select File > Refresh Media Directories.
nThis command updates the media database. If you don’t use this command, the
clip does not appear in the Media Tool.
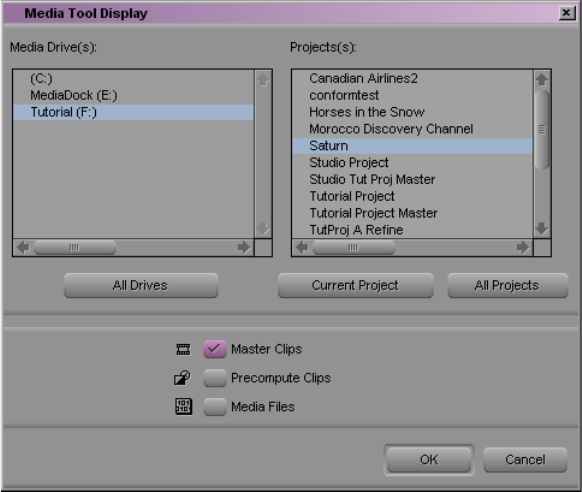
Chapter 5 Using Digi 002, Mbox, and Avid Pro Tools LE
106
4. Select Tools > Media Tool.
The Media Tool opens.
5. Select the drive that you used to export the files from Pro Tools LE.
6. Select All Projects, and make sure that Master Clips is selected.
7. Click OK.
The Media Tool displays all the master clips on the selected drive.
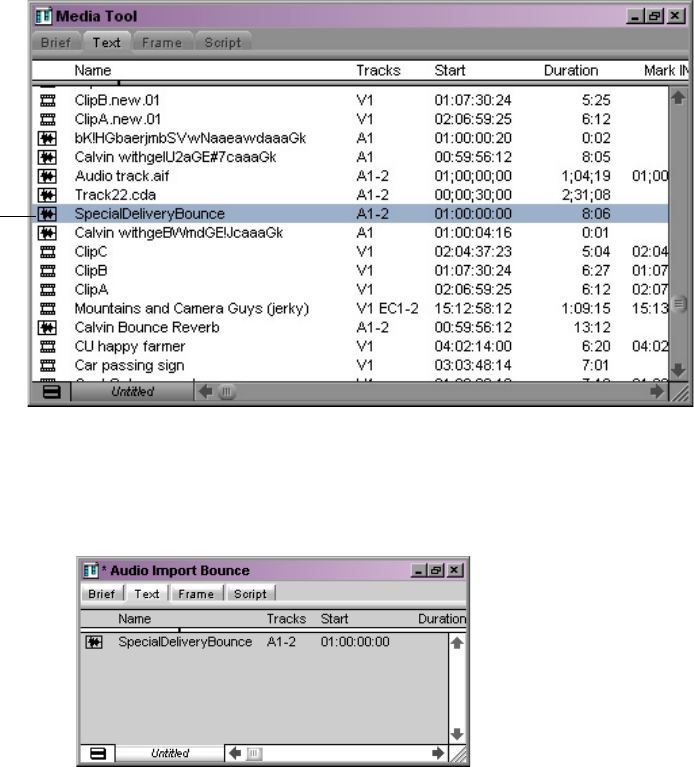
Bringing Your Audio from Pro Tools LE to Avid Xpress Pro
107
8. Locate the master clip with the same name as the files you exported from
Pro Tools LE.
9. Drag the master clip to your bin.
10. Edit the master clip into your sequence.
Exporting a Stereo-Interleaved File
When you create a stereo-interleaved file, you can export the resulting file to
any folder on your system. Then you can import it into your Avid Xpress Pro
project.
Master Clip from
Pro Tools LE
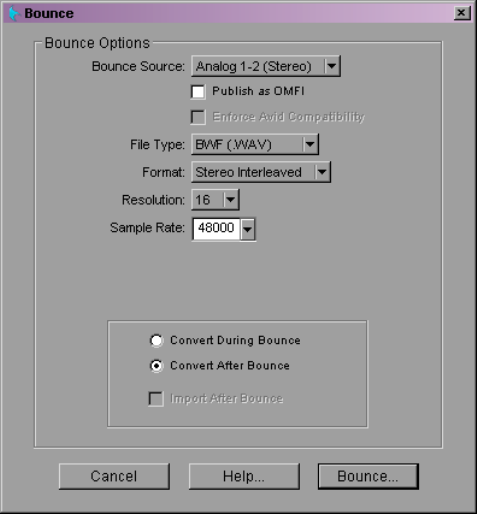
Chapter 5 Using Digi 002, Mbox, and Avid Pro Tools LE
108
To use the Bounce to Disk command to create a stereo-interleaved file:
1. Start Pro Tools LE, and then open the session that contains the tracks you
want to export.
2. Select the tracks.
3. Choose File > Bounce to Disk.
The Bounce dialog box opens.
4. Select the following options:
- File Type > BWF (WAV) or File Type > AIFF
- Format > Stereo Interleaved
- Resolution (bit depth) (from your Avid Xpress Pro project)
- Sample Rate (from your Avid Xpress Pro project)
- Convert after Bounce
5. Deselect Publish as OMFI.
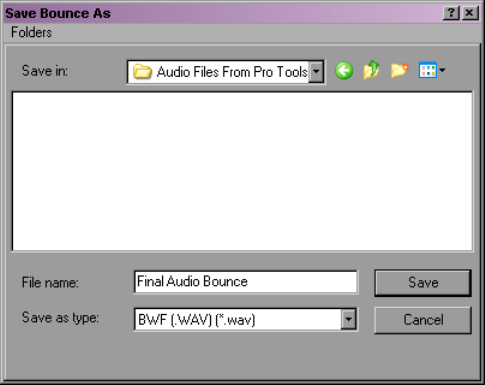
Bringing Your Audio from Pro Tools LE to Avid Xpress Pro
109
6. Click Bounce.
The Save Bounce As dialog box opens.
7. Name the file and navigate to a folder on your system.
8. Click Save.
Pro Tools LE mixes down the tracks you selected to a stereo-interleaved
file and stores the files in the folder you selected.
Importing the File into a Bin
When you export a stereo-interleaved file to a folder on your system, you can
import the files into Avid Xpress Pro as a master clip.
To import the files into a bin:
1. Start Avid Xpress Pro.
2. Select the bin that you want to hold the imported master clip.
3. Select File > Import.
The Select Files to Import dialog box opens.
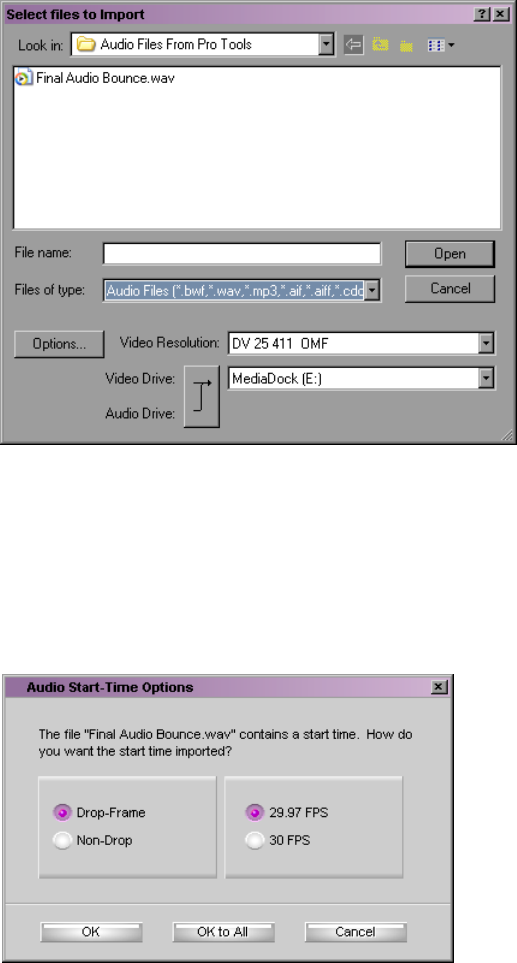
Chapter 5 Using Digi 002, Mbox, and Avid Pro Tools LE
110
4. Select Files of Type > Audio Files, and then navigate to the folder that
contains the audio file.
5. Select the file that was created by the Bounce to Disk command and click
Open.
If the Audio Start-Time Options dialog box opens, select the timecode
options used by your project.
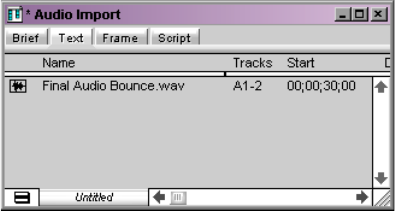
Bringing Your Audio from Pro Tools LE to Avid Xpress Pro
111
6. Click OK.
Avid Xpress Pro creates a new master clip from the files and places it in
the bin.
7. Drag the master clip into the Source monitor and click the Play button to
listen to the audio.
8. Edit the master clip into your sequence.
Chapter 5 Using Digi 002, Mbox, and Avid Pro Tools LE
112
Chapter 6
Using Avid DVD by Sonic
Many projects are delivered on DVD because they can be played on any
computer with a DVD drive or on any DVD player. The following workflow
allows you to send your finished sequence from Avid Xpress Pro to Avid
DVD by Sonic for output to a DVD disc. This workflow makes it easy to
export a completed sequence from Avid Xpress Pro including chapter marks
and reference frames, send it to Sorenson Squeeze where it can be encoded,
and then send it to Avid DVD by Sonic for DVD authoring and creation.
This workflow consists of the following:
•Preparing the Sequence
•Encoding the Sequence with Sorenson Squeeze
•Producing the DVD with Avid DVD by Sonic
•Outputting the Project to DVD
Preparing the Sequence
To prepare a finished sequence:
1. Select your finished sequence in Avid Xpress Pro.
2. Select Clip > New Meta Track.
A new MetaSync track is added to the sequence.
3. Select File > Import.
4. Make sure Files of Type is set to MetaSync files, and then navigate to the
folder where the DVD Producer .aeo file is located:
\Program Files\Avid\AvidXpress Pro\Avid AEOs\Avid DVD
Producer.aeo
Chapter 6 Using Avid DVD by Sonic
114
5. Select the DVD Producer aeo file.
The Chapter Button Reference Frame file and the Chapter Mark
enhancement file appear in the bin.
6. Double-click the Chapter Mark enhancement file.
7. Edit the enhancement into the Timeline by doing the following:
tMark IN and OUT points in the timeline, mark an IN point in the
enhancement in the Source monitor, and then either drag the
enhancement to the Meta track or click an edit button (Splice or
Overwrite).
The default (maximum) duration of a clip is 4 hours. Dragging a clip
without IN or OUT points creates a 4-hour clip in the Timeline. This
length allows an enhancement to be active for a long-form
production.
8. Add Reference frames by scrubbing the timeline indicator to the desired
frame.
9. Alt + double-click the Chapter Button Reference Frame enhancement clip
in the bin.
A marker is added to the chapter span indicating it will use this frame as
the Chapter button in Avid DVD by Sonic.
Encoding the Sequence with Sorenson Squeeze
1. Select the sequence you prepared in Avid Xpress Pro.
2. Select File > Send To > Avid Xpress Studio > Encoding for Avid DVD by
Sonic.
The Send To dialog box opens.
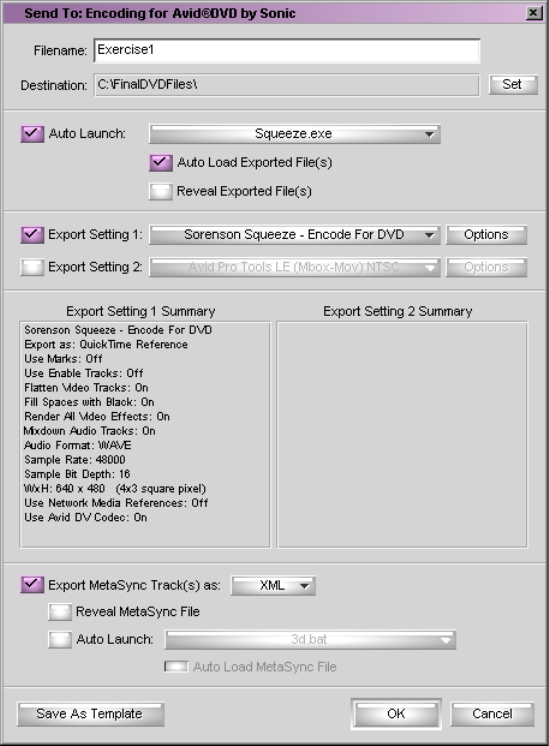
Encoding the Sequence with Sorenson Squeeze
115
3. Click Set, and then choose a destination folder where you want the
exported files located.
4. Make sure Auto Launch is selected in the second pane, and make sure
Squeeze.exe is selected from the pop-up menu.
5. Make sure “Auto Load Exported File(s)” is selected.
6. Make sure “Export MetaSync Track(s) as” is set to XML.
7. Click OK.
Sorenson Squeeze automatically opens with the selected sequence loaded.
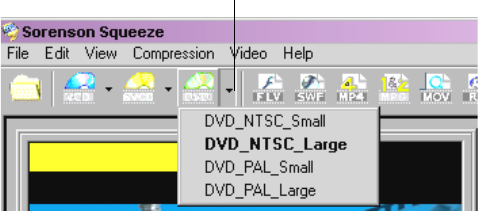
Chapter 6 Using Avid DVD by Sonic
116
8. Select the DVD icon submenu, and then select DVD_project type_Large.
9. Default settings files appear in the Squeeze output pane.
10. Click Squeeze It to encode the files.
Squeeze creates an MPV and WAV file and places them in the same
folder you designated in step 3.
11. Close the Sorenson Squeeze application.
Producing the DVD with Avid DVD by Sonic
Once you start the Avid DVD by Sonic application, you can use the following
workflow to create a final DVD. See the Avid DVD by Sonic Help or the Avid
DVD by Sonic User Guide for detailed information on the following
procedures.
Setting Up the Avid DVD by Sonic Project
To set up the project:
1. Start Avid DVD by Sonic, select your project type, either NTSC or PAL,
and then click OK.
An empty Palette Window and empty List window open.
DVD icon submenu
Producing the DVD with Avid DVD by Sonic
117
2. Using Windows Explorer, access the folder you designated in Step 3 of
“Encoding the Sequence with Sorenson Squeeze” on page 114.
3. Drag the _Large files from the folder to the empty Palette window in the
Avid DVD by Sonic application.
4. Add any other assets you want to use for creating the DVD, for example,
Photoshop files, by doing one of the following:
tRight-click in the Palette window, select Add Files to Project,and
then select the files you want to add.
tDrag and drop the items into the Palette window.
The media files are added to the project and appear in the Palette window.
Information about each file is displayed in the Palette window’s columns
for Name, Duration, Category, Type, and Size. See “Photoshop File
Restrictions” on page 121 for information on adding Photoshop files to
your project.
Palette Window
List Window
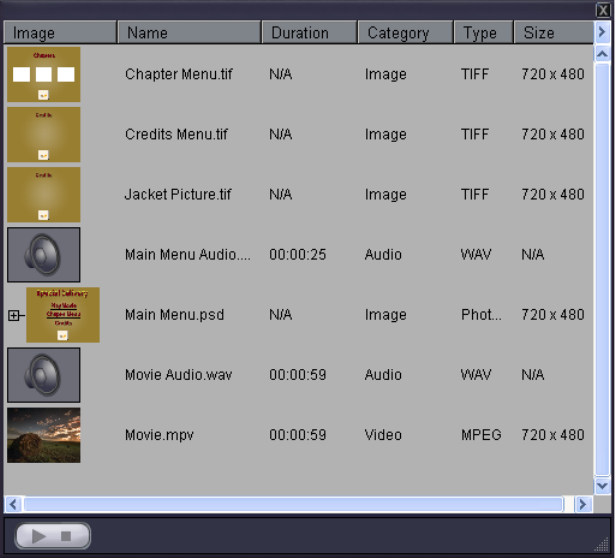
Chapter 6 Using Avid DVD by Sonic
118
5. Save the Project by selecting File > Save.
The Image column in the Palette window displays a thumbnail for each
file. Thumbnails for Photoshop files are displayed with a Plus symbol that
can be clicked to show or hide the layers contained in the file.
Working in the Avid DVD by Sonic Application
To create movies and add additional tracks and objects:
1. Create movies by dragging video clips from the Palette window to the
Movies column in the List window.
2. Double-click the movie in the List window to open the movie in the
Timeline window.
3. Add audio tracks by dragging the audio file from the List window to the
timeline.

Producing the DVD with Avid DVD by Sonic
119
4. Select the movie in the Movie list, right-click, and then select Import
metadata. Select the XML file located in the same folder designated in
step 3 of “Encoding the Sequence with Sorenson Squeeze” on page 114.
5. Create menus by dragging still images, Photoshop layers, or video clips to
the Menus column in the List window, and then double-click the item.
The menu editor opens.
6. Ctrl + drag a chapter point label from the Movie Timeline window into
the Menu Editor Window, and then place it where you want to create a
chapter button in the menu.
The thumbnail displayed is the one you designated in step 9 of “Preparing
the Sequence” on page 113.
7. Continue to Ctrl + drag chapter point labels from the Movie Timeline
window into the Menu Editor Window.
8. Continue adding graphics and text objects to menus.
9. Link additional movies to menus by dragging them to the Menu Editor
window.
10. For each menu, set button highlight colors. A menu’s Highlight Colors
determine how its buttons appear when displayed normally, selected, and
activated. Do the following:
a. In the List window, select the menu for which you want to set the
Highlight Colors.
b. If the Menu Editor window is not open, select Windows > Show
Menu Editor Window or press F4.
c. If the menu’s overlay layer is not visible, click the Show Overlay
button so it becomes selected. The overlay graphics appear.
d. If the Properties window is not open, select Windows > Show
Properties Window, or press F3.
Chapter 6 Using Avid DVD by Sonic
120
e. In the Highlight Colors section of the Properties window, configure
the Normal colors by doing the following:
Click the Normal button. The Menu Editor window displays the
buttons as they appear when not selected.
For each of the three Normal colors (Color 1, Color 2, and Color 3),
select a Color and an Opacity. The new colors are displayed in the
Menu Editor window.
f. Configure the Selection colors by doing the following:
Click the Selection button. The Menu Editor window displays the
buttons as they appear when selected.
For each of the three Selection colors (Color 1, Color 2, and Color 3),
select a Color and an Opacity. The new colors are displayed in the
Menu Editor window.
g. Configure the Activation colors by doing the following:
Click the Activation button. The Menu Editor window displays the
buttons as they appear when activated.
For each of the three Selection colors (Color 1, Color 2, and Color 3),
select a Color and an Opacity. The new colors are displayed in the
Menu Editor window.
11. Proof the project in Simulation mode by selecting File > Simulation.
12. Use the Remote Control window to test playback order, remote control
interaction, button navigation, and link destinations.
13. Select File > Save.
Outputting the Project to DVD
121
Outputting the Project to DVD
To output the project to a DVD:
1. Insert a disc in your recorder. The disc must be DVD+R format.
2. Select Build > Make DVD Disc.
3. The Make DVD Disc window opens.
4. Leave the Source menu set to Current Project.
5. Select your DVD or CD Recorder from the Recorder menu. If your device
does not appear in the menu, check that it is a supported device and make
sure it is turned on. If necessary, click Search to scan for available
devices.
6. Set the Write Speed for the recorder.
7. Enter a value for the number of copies you want to make.
8. Click Next.
9. Check the Summary window.
10. Click Build to write the DVD to disc.
If you selected multiple copies, you are prompted to insert a new disc as
each is completed.
Photoshop File Restrictions
If you are adding Photoshop files to your project, the Photoshop dimensions
for NTSC should be 720 x 480 pixels. The Photoshop file dimensions for PAL
should be 720 x 576 pixels. See the Avid DVD by Sonic User Guide for more
information.
The Photoshop files should contain only two layers, named Background and
Overlay. If the file contains any extra layers, Avid DVD by Sonic cannot use
the file to create a menu. See the Avid DVD by Sonic User Guide for more
information on creating Photoshop files for menus.
Chapter 6 Using Avid DVD by Sonic
122
Appendix A
Using Pro Tools LE with
Progressive Projects
This appendix summarizes the following information relating to progressive
project interchange between Avid Xpress Pro and Pro Tools LE:
•Exporting Files to Pro Tools from a Progressive Project
•Using Audio Pulldown with Progressive Projects
Exporting Files to Pro Tools from a Progressive
Project
If you work in a progressive project in Avid Xpress Pro and plan to perform
perf-slip editing before you export your audio files to Pro Tools LE, you
should modify your workflow so that you export OMF files to Pro Tools LE.
The default Send To templates perform an AAF export and you need to
modify the template.
nIf you are not going to perform per-slip editing in Avid Xpress Pro, you can
use the default Send To templates and ignore this section.
This section describes how to create a new template and describes other issues
related to modifying your workflow.
Appendix A Using Pro Tools LE with Progressive Projects
124
Use the Media Creation Tool to Create OMF Media
If you plan to perform perf-slip edits in Avid Xpress Pro, you need to set up
the Media Creation tool so that you create OMF media before you begin
capturing media into your project.
To use the Media Creation tool to create OMF media:
1. Select Tools > Media Creation.
2. Click the Mixdown & Transcode tab.
3. Click the OMF button and select a resolution from the Video Resolution
pop-up menu.
4. Click the Apply to All button under the OMF button. This applies the
same settings to the following tabs:
- Titles
-Import
-Capture
-Render
5. Click OK.
MXF File Format Issues
If you already have MXF media in a sequence that you are exporting to Pro
Tools via OMF, you must transcode the MXF media to OMF before you
perform the Send To export. Before you perform the transcode, operation you
must open the Media Creation tool and change the Mixdown and Transcode
tab to OMF as described in the previous section. For more information on
using the Transcode command, see the Avid Xpress Pro Help.
nYou only need to transcode media to OMF if you perform perf-slip editing
Avid Xpress Pro and then export to Pro Tools LE.
nIf you are plan to export to Avid 3D, you must transcode the master clip to
MXF before exporting to Avid 3D.
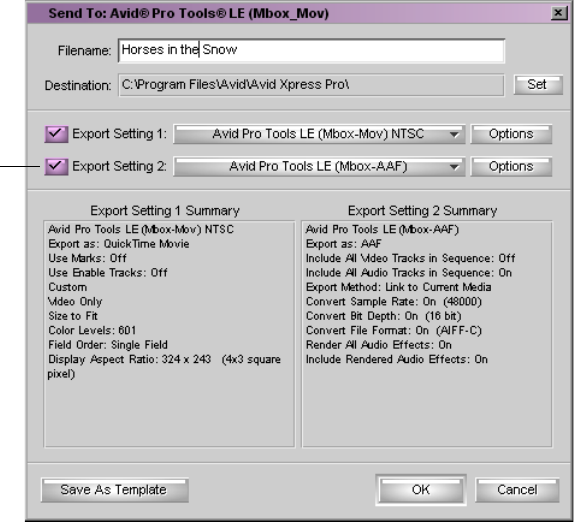
Exporting Files to Pro Tools from a Progressive Project
125
Creating a New OMF Template for the Send To Command
This section describes how to modify an existing Send To template to export
OMF 2.0 media.
To create a new default OMF template from an existing template:
1. In Avid Xpress Pro, select a sequence with audio tracks in a bin.
2. Select File > Send To > Avid Xpress Studio, and then select the template
you want to use as a base. In this example we select Avid Pro Tools LE
(MBox_Mov).
The corresponding Send To Avid Pro Tools LE dialog box opens. The
following illustration shows the Avid Pro Tools LE (MBox_Mov) dialog
box.
3. Click the Options button for the Export Setting that specifies AAF.
The Export Settings dialog box opens.
Default AAF Setting
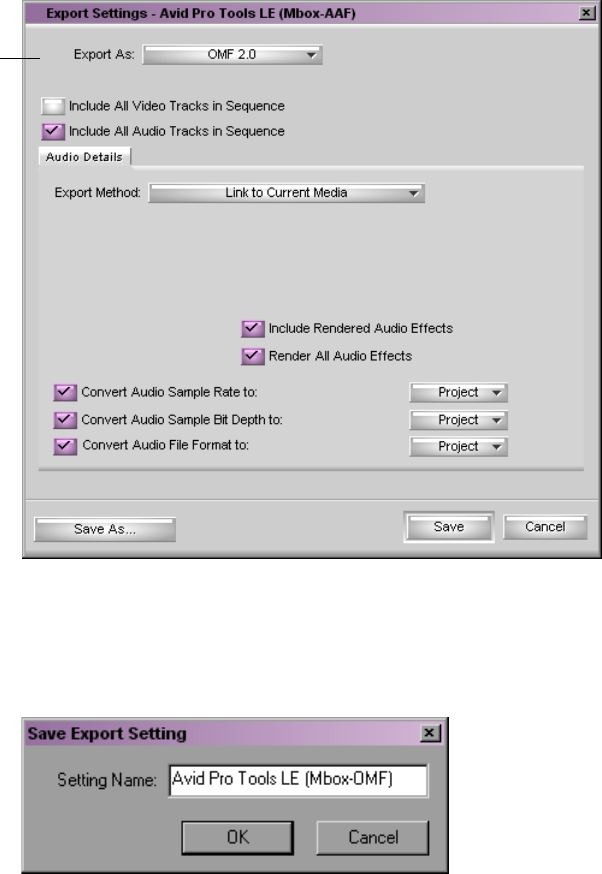
Appendix A Using Pro Tools LE with Progressive Projects
126
4. Select Export As > OMF 2.0.
5. Click Save As to create a new Export Setting.
The Save Export Setting dialog box opens.
6. Name the new setting. For example, the preceding illustration shows the
text changed from AAF to OMF.
7. Click OK.
Select OMF 2.0
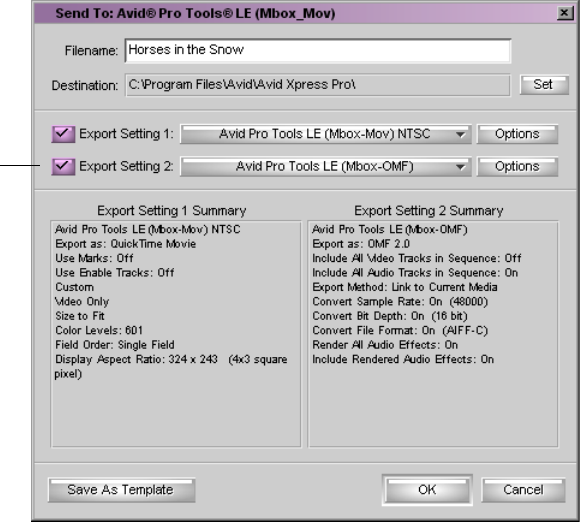
Exporting Files to Pro Tools from a Progressive Project
127
8. Click Save.
The new setting appears in the Export Settings list of the Send To dialog
box.
9. Click Save As Template to create a new template.
The Save As dialog box opens.
New Export Setting
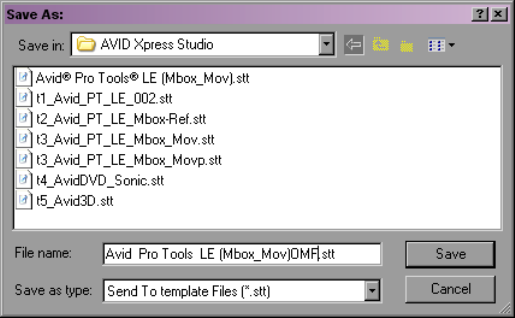
Appendix A Using Pro Tools LE with Progressive Projects
128
10. Type a name for the template in the File Name text box, and then click
Save. For example, the preceding illustration adds OMF to the name.
nKeep the .stt extension on the template name.
11. Click Save.
The new template opens.
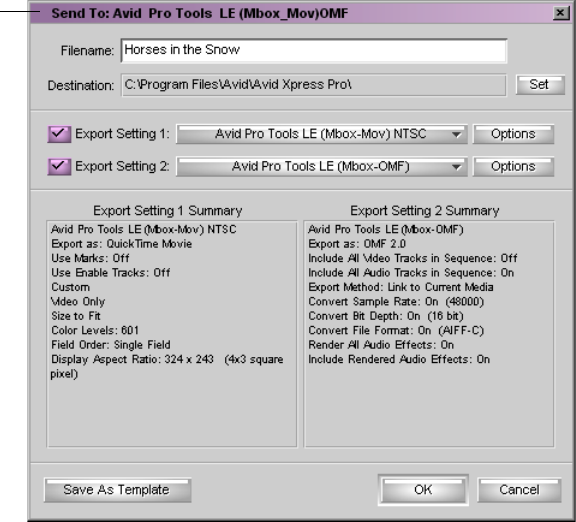
Exporting Files to Pro Tools from a Progressive Project
129
12. Click Cancel to close the dialog box, or click OK to export the file.
The next time you choose Select File > Send To > Avid Xpress Studio,
the new template appears in the list.
New Template Name
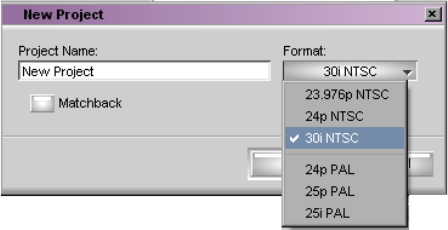
Appendix A Using Pro Tools LE with Progressive Projects
130
Using Audio Pulldown with Progressive Projects
The term pulldown describes the process of slowing down an audio file to
match the video. This is sometimes necessary when you capture audio at 30
fps or 24 fps (film speed) and need to match it to 29.97 fps (video speed). The
term pullup is the opposite, where audio captured at video speed is sped up to
match film speed.
Avid Xpress Pro supports six project types as shown in the following
illustration:
Three of the project types (30i NTSC, 25i PAL, and 25p PAL) deal with audio
and video program material that does not typically change speed during the
post production process.
The remainder of this appendix focuses on the other three project types
(23.976p NTSC, 24p NTSC, and 24p PAL), summarizing the recommended
workflows and requirements surrounding audio pullup and audio pulldown.
23.976p NTSC Projects
Video Sources
Video sources for 23.976p NTSC projects contain images that are shot at
24 fps or 23.976 fps, but are mapped onto 29.97 fps video tape in a process
similar to the way a telecine system operates. That is, two fields are created
from each progressive image and then three fields for every other image. The
fields are stored on video tape using industry standard 2:3:2:3 or 2:3:3:2
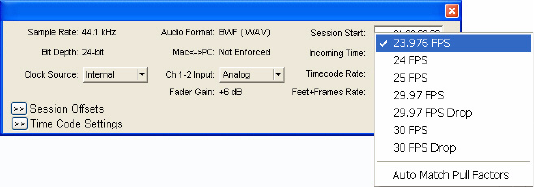
Using Audio Pulldown with Progressive Projects
131
cadencing. During capture, Avid Xpress Pro reconstitutes the original 24 fps
progressive images. Avid Xpress Pro then plays back the images at 23.976
fps, adding in the standard 2:3:2:3 or 2:3:3:2 cadencing automatically.
nAvid Xpress Pro supports playback of 23.976p projects at 24 fps if Avid Mojo
DNA hardware is connected.
Audio Sources
Audio sources for 23.976p NTSC projects typically contain project material
that is at “video speed” when played back at standard sample rates (44.1 kHz
or 48 kHz).
Export to Pro Tools
Pro Tools can play back 24p video media at 23.976 fps while playing back 48
kHz audio. This means that exporting an Avid Xpress Pro sequence from a
23.976p project is straight forward; that is, no conversion is necessary during
export or import. For example, an AAF sequence exported from a 23.976p
NTSC project contains a composition whose edit rate is 23.976, linking to 24p
video media and “video speed” 48 kHz audio files.
Once you import this AAF file into Pro Tools, make sure the Session Setup
window is set for 23.976 timecode rate (with Auto Match Pull Factors
deselected), as shown in the following illustration.
Appendix A Using Pro Tools LE with Progressive Projects
132
Export from Pro Tools to Avid Xpress Pro
After completing the audio session, you might want to integrate the finished
audio with the finished picture, and then output it to tape or to encoded files.
Because Pro Tools LE does not support 9-pin serial deck control, Avid
recommends that you export the finished audio as AAF or OMF, and then
import it into Avid Xpress Pro for integration with the finished picture and
delivery.
24p NTSC Projects
Video Sources
Video sources for 24p NTSC projects contain images that are shot at 24 fps or
23.976 fps, but are encoded onto 29.97 fps video tape in a process similar to
the way a telecine system operates. That is, two fields are created from each
progressive image and then three fields for every other image. The fields are
then stored on video tape using industry standard 2:3:2:3 or 2:3:3:2 cadencing.
During capture, Avid Xpress Pro reconstitutes the original 24 fps progressive
images. Avid Xpress Pro then plays back the images at 24 fps.
nAvid Xpress Pro supports capture of 24 fps material if Avid Mojo DNA
hardware is connected.
Avid Xpress Pro can play back 24p NTSC projects at either 23.976 or true 24
fps display rates. This setting does not affect the sync relationship between
audio and video; rather, it affects absolute playback of audio and video.
To change the playback speed:
1. Click the Settings tab in the Project window.
2. Double-click Film and 24p Settings.
The Film and 24P Setting dialog box opens.
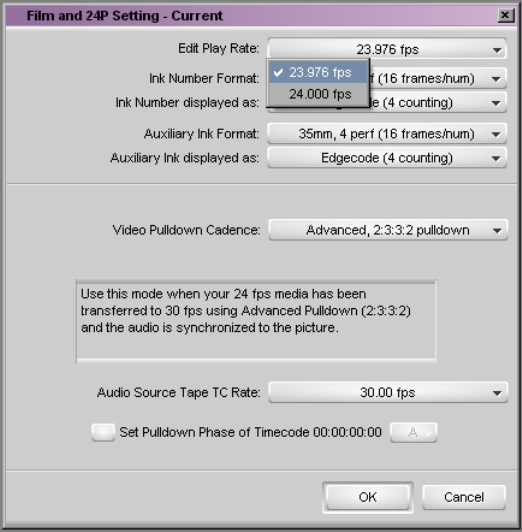
Using Audio Pulldown with Progressive Projects
133
3. Change the Edit Play Rate, and then click OK.
nThe Edit Play Rate setting does not affect AAF/OMF export. Regardless of the
value of this setting, Avid Xpress Pro exports a 24-fps sequence.
Audio Sources
Audio sources for 24p NTSC projects contain project material that is at “film
speed” when played back at standard sample rates (44.1 kHz or 48 kHz).
When you perform a video-plus-audio capture into a 24p NTSC project,
Avid Xpress Pro automatically enables pulldown so that the captured audio
material is sped up to film speed on playback. For audio-only captures, you
must manually set the pulldown switch. In other words, you must manually
enable pulldown during the capture of “video speed” audio sources and
manually disable pulldown during the capture of “film speed” audio sources.
nAvid Xpress Pro supports capture of audio in 24p NTSC projects if Avid Mojo
DNA hardware is connected.

Appendix A Using Pro Tools LE with Progressive Projects
134
Export to Pro Tools
Pro Tools can play back 24P video media at 24 fps while playing back 48 kHz
audio. This means that exporting an Avid Xpress Pro sequence from a 24p
NTSC project is straightforward. That is, no conversion is necessary during
export or import. For example, an AAF sequence exported from a 24p NTSC
project contains a composition whose edit rate is 24, linking to 24p video
media and “film speed” 48 kHz audio files.
Once this AAF file is imported into Pro Tools, make sure that the Session
Setup window is set to 24-fps timecode rate (with Auto Match Pull Factors
deselected) as shown in the following illustration.
Export from Pro Tools to Avid Xpress Pro
After completing the audio session, you might want to integrate the finished
audio with the finished picture and output it to tape or to encoded files.
Because Pro Tools LE does not support 9-pin serial deck control, Avid
recommends that you export the finished audio as AAF or OMF and import it
into Avid Xpress Pro for integration with the finished picture and delivery (by
way of Digital Cut, encoding, and so on).
Avid Xpress Pro provides the option of playing back 24p NTSC projects at
23.976 fps for digital cut to video tape as described above. In this case, the
video and audio are both pulled down by Avid Xpress Pro in real time.
However, in this case the audio sample rate is now 47.952kHz. Some video
VTRs do not allow sync or can cause artifacts in the high frequencies.
Using Audio Pulldown with Progressive Projects
135
24p PAL Projects
Video Sources
Video sources for 24p PAL projects contain images that are shot at 24 fps, but
are encoded onto 25 fps video tape in a “frame-for-frame” transfer. That is, the
24 fps source material is played back at 25 fps (4.1percent speedup) so that
each video frame represents a single source frame. During capture,
Avid Xpress Pro reconstitutes the original progressive images by de-
interlacing the frames. Avid Xpress Pro then plays back the images at 24 fps.
nAvid Xpress Pro can capture audio or video in a 24p PAL project if Avid Mojo
DNA hardware is connected.
Avid Xpress Pro can play back 24p PAL projects at either 24 fps or 25 fps
display rates. This setting does not affect the sync relationship between audio
and video, rather it affects absolute playback of audio and video.
To change the playback speed:
1. Click the Settings tab in the Project window.
2. Double-click Film and 24p Settings.
The Film and 24P Setting dialog box opens.
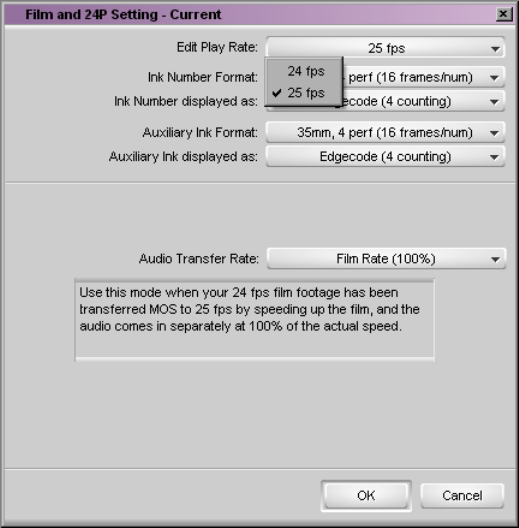
Appendix A Using Pro Tools LE with Progressive Projects
136
3. Change the Edit Play Rate, and then click OK.
nThe Edit Play Rate setting does not affect AAF/OMF export. Regardless of the
value of this setting, Avid Xpress Pro exports a 24 fps sequence.
Using Audio Pulldown with Progressive Projects
137
Audio Sources
nAvid Xpress Pro can capture audio in a 24p PAL project if Avid Mojo DNA
hardware is connected.
There are two methods for capturing audio into a 24p PAL project using
Avid Xpress Pro:
1. Method 1 – audio is captured from 25 fps sources. The audio on these
sources is sped up by 4.1percent, so Avid Xpress Pro stamps these sound
files at PAL pulldown (non-standard) sample rates: 46080 instead of
48000, 42336 instead of 44100.
2. Method 2 – audio is captured from 24 fps sources. The audio on these
sources is film speed, so Avid Xpress Pro stamps these sound files at
standard sample rates of 44.1 kHz or 48 kHz.
nFor highest audio quality, Method 2 is best because it does not require speed
changes or sample rate conversion. Avid recommends that you use Method 2
whenever possible. This is a double system workflow and always requires a
two-pass capture operation – one for picture and one for sound. If you use the
BWF file import feature, you can save time during the audio capture stage.
Whether you are in Method 1 or Method 2 modality depends on a project
setting called Audio Transfer Rate, available in the Film and 24P Setting
dialog box. Audio Transfer Rate is a setting that can be changed at any time
while working in a 24p PAL project. However, Avid recommends that you do
not switch rates once a project has started. You establish the Method 1 or
Method 2 setting when you first create a 24p PAL project, as shown in the
following illustration.
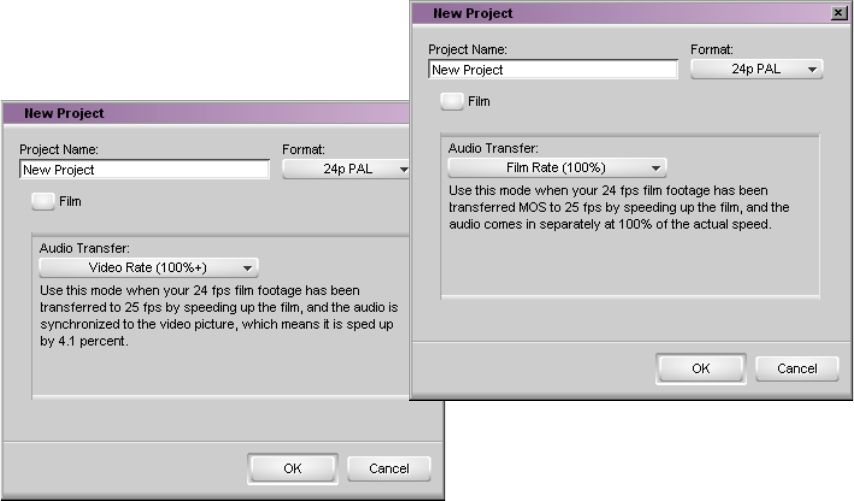
Appendix A Using Pro Tools LE with Progressive Projects
138
To change the transfer rate within a project:
1. Click the Settings tab in the Project window.
2. Double-click Film and 24p Settings.
The Film and 24P Setting dialog box opens.
Method 1
Method 2
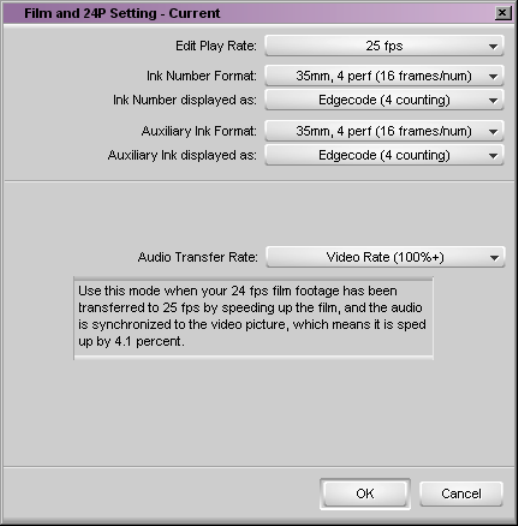
Using Audio Pulldown with Progressive Projects
139
3. Change the Audio Transfer Rate and click OK.
Changing to Method 1 within a project
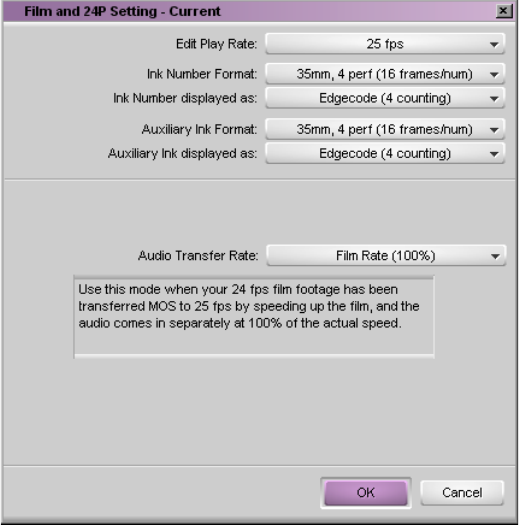
Appendix A Using Pro Tools LE with Progressive Projects
140
The preceding illustration shows the audio transfer rate for Method 1. The
following illustration shows the audio transfer rate for Method 2.
Method 1 produces sound files that are at non-standard nominal sample rates
(42336 or 46080). Avid Xpress Pro uses real-time sample rate conversion to
play back 42336 or 46080 files so the audio is appropriately slowed down and
pitched down during playback. Avid Xpress Pro can work with sequences that
intermix 46080 and 48000 files.
Export to Pro Tools
An AAF sequence exported from a 24p PAL project contains a composition
whose edit rate is 24, linking to 24p video media. The AAF file might also link
to film speed 48 kHz audio files or Method 1 46080 sample rate files.
Changing to Method 2within a project
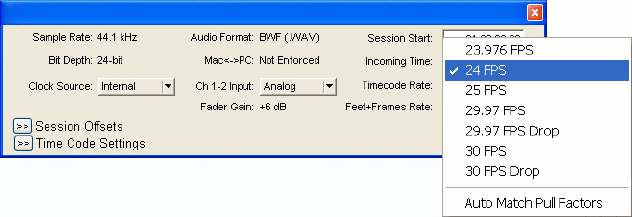
Using Audio Pulldown with Progressive Projects
141
Pro Tools does not support import of an AAF file that links to audio files with
intermixed sample rates. To solve this problem, the Send To templates
automatically convert the audio to a uniform, standard sample rate.
nIn order for the Send To template to properly convert to standard sample rates
during export from a 24p PAL project, the Audio Transfer Rate must be set to
Film Rate (Method 2). This is necessary for the 24p PAL sequence
interchange to work properly.
Once the AAF file is imported into Pro Tools, make sure the session setup
window is set for 24 FPS timecode rate (with Auto Match Pull Factors
deselected), as shown in the following illustration.
These settings should be automatically set after importing a 24p PAL
sequence.
Export from Pro Tools to Avid Xpress Pro
After completing the audio session, you might want to integrate the finished
audio with the finished picture and output it to tape or to encoded files.
Because Pro Tools LE does not support 9-pin serial deck control, Avid
recommends that you export the finished audio as AAF or OMF and import it
into Avid Xpress Pro for integration with the finished picture and delivery (by
way of Digital Cut, encoding, and so on).
Avid Xpress Pro provides the option of playing back 24p PAL projects at
either 24 fps or 25 fps as described above.
nThe Audio Transfer Rate setting can affect the sample rate of audio files
imported into Avid Xpress Pro. If you want to import a 48 kHz interleaved
WAV file into Avid Xpress Pro, make sure the Audio Transfer Rate setting has
Appendix A Using Pro Tools LE with Progressive Projects
142
the desired value. If it is set for Method 1, the imported file is converted to a
46080 sound file. If it is set for Method 2, the imported file is converted to a
48000 sound file. This dependency on the Audio Transfer Rate setting applies
to importing raw sound files, but does not affect AAF imports.
A B C D E F G H I J K L M N O P Q R S T U V W X Y Z
Numerics
23.976 NTSC projects and Pro Tools LE 123, 130
24p NTSC projects and Pro Tools LE 132
24p PAL projects and Pro Tools LE 135
3D animation
content 59
objects 64
scenes 68
text 69
textures 65
A
AAF
described 52
exporting (Avid 3D) 52
exporting from Avid 3D 73
importing (Pro Tools LE) 91
Accuracy
frame rate 85
sample rate 85
Alpha channel support, described 19
Applications, described 14
Aspect Ratio, described 19
Audio
editing (Pro Tools LE) 97
editing with Digi 002 81
editing with Mbox 84
exporting from Avid Xpress Pro 88
exporting from Pro Tools LE 98
importing into Pro Tools LE from Avid Xpress
Pro 90
settings (Pro Tools LE) 90
Audio IO device
Digi 002 81
Mbox 84
Audio playback speed
changing in Avid Xpress Pro 132, 135
Audio transfer rate
Method 1 and Method 2 137
Avid 3D
adding video background 60
adding video textures 64
Character Offset controls 71
creating 3D content 59
creating scenes 68
export settings options 56
exporting scenes 72
media files 55
Object Library 64
On-Screen parameters 63, 68
overview 51
rendering formats 75
rendering options 73
Rotate tool 63, 71, 72
Scale tool 63, 71, 72
Send To options 56
sending media to 52
text 69
Text Creation Wizard 69
textured objects 65
titles 69
Translate tool 63, 71, 72
Video Library 58
workflow overview 17, 18, 59
Index
Index A B C D E F G H I J K L M N O P Q R S T U V W X Y Z
144
Avid DVD by Sonic
adding tracks and objects in 118
creating movies in 118
outputting the project to a DVD 121
setting up a project 116
workflow overview 19
Avid FX
background media 35
exporting from 48
interface 30
Keyframe Library 47
saving work 47
text effects 39
text on a path 44
Timeline window 31
transition effect, creating 32
using 27
workflow overview 17
Avid FX Engine 48
Avid Pro Tools LE. See Pro Tools LE
Avid Xpress Pro
described 21
working with Pro Tools LE 80
Avid Xpress Studio
basic workflow 16
component applications 13, 14
Avid Xpress Studio Complete
described 81
Avid Xpress Studio Essentials
described 84
B
Background
adding video in Avid 3D 60
Basic disk drive
and Pro Tools LE 86
Basic workflow 16
Blackburst generator
and Digi 002 82
Bounce to Disk command (Pro Tools LE) 103
Buttons
Highlight Colors (Avid DVD by Sonic) 119
Render High-Quality (Avid 3D) 73
Render Low-Quality (Avid 3D) 73
Show Overlay (Avid DVD by Sonic) 119
C
Chapter Mark file (Avid DVD by Sonic) 114
Chapter Reference file (Avid DVD by Sonic) 114
Character Offset controls (Avid 3D) 71
Clips
exporting from Avid 3D 72
exporting from Avid editing application to Avid
3D 52
Codecs, described 20
Color levels, described 20
Creating
new text string (Avid 3D) 69
D
Digi 002
as control surface 81, 83
configuration for playing video 82
Drive requirements (Pro Tools LE) 86
DVD
creation workflow overview 19
outputting project to (Avid DVD by Sonic) 121
producing with Avid DVD by Sonic 116
DVD Producer aeo file
locating 113
Dynamic disk drive
and Pro Tools LE 86
E
Edit play rate
changing in Avid Xpress Pro 132, 135
Editing
audio fles (Pro Tools LE) 97
Effects
creating with Avid FX 27
Encoding files, with Sorenson Squeeze (Avid DVD
by Sonic) 116
Enhancement files
for Avid DVD by Sonic 114
Export Selected as Files command
Pro Tools LE 98
A B C D E F G H I J K L M N O P Q R S T U V W X Y Z Index
145
Export Selected Tracks as OMF/AAF
Pro Tools LE 98
Export settings
options for Avid 3D 56
Exporting
3D scenes 72
AAF files from Avid 3D 73
AAF files from Avid Xpress Pro 52
audio 88
clips to Avid 3D 52
formats in Avid 3D 75
from Avid FX 48
from Pro Tools LE 98
sequences to Avid 3D 52
stereo-interleaved file (Pro Tools LE) 107
F
File formats, described 19
Film projects and Pro Tools LE 123
Frame-rate accuracy (Avid Xpress Pro) 85
I
Importing
audio and video (Pro Tools LE) 90
OMF into Avid Xpress Pro (Pro Tools LE) 101
stereo-interleaved file as master clip 109
using Media Tool 105
Interlaced/ Deinterlaced format, described 20
K
Keyframe Library (Avid FX) 47
M
Mbox
as primary audio device 84
Media file formats
for input, described 19
for output, described 19
Media files
default location for Avid 3D 55
Media handling, described 19
Media Tool
using to import files 105
Metadata file format
for export, described 20
for import, described 20
Method 1 and Method 2 audio transfer 137
Movies
creating in Avid DVD by Sonic 118
QuickTime 87
O
Object Library
viewing objects in Avid 3D 64
Object Library tab (Avid 3D) 64
OMF
importing into Avid Xpress Pro 101
OMF/AAF
exporting as (Pro Tools LE) 99
On-Screen parameters
Character Offset controls (Avid 3D) 71
Transform controls (Avid 3D) 63, 68
Opening applications from within Avid Xpress Pro
21
P
Palette Window
displaying media files in (Avid DVD by Sonic)
117
Photoshop
file restrictions (Avid DVD by Sonic) 121
Pro Tools LE
and digital cut 86
Bounce to Disk command 103
displaying video 82, 84
drive requirements 86
editing audio files 97
editing with 80
Export Selected as Files command 98
Export Selected Tracks as OMF/AAF command
98
exporting audio files 98
film projects 123
hardware requirements 86
Index A B C D E F G H I J K L M N O P Q R S T U V W X Y Z
146
importing audio from Avid Xpress Pro 90
progressive projects 123
running at the same time as Avid Xpress Pro 21,
21
using the Send To templates 88, 125
workflow 80
workflow overview 14, 18, 18
Progressive format, described 20
Projects
setting up in Avid DVD by Sonic 116
Q
QuickTime
movies, described 87
QuickTime reference movies
described 87
R
Render High-Quality button (Avid 3D) 73
Render Low-Quality button (Avid 3D) 73
Rendering
Avid 3D scenes 72
formats in Avid 3D 75
options in Avid 3D 73
Resolutions, described 19
Rotate tool (Avid 3D) 63, 71, 72
S
Sample-rate accuracy (Pro Tools LE) 85
Scale tool (Avid 3D) 63, 71, 72
Send To
Avid 3D 52, 53
Avid DVD by SONIC 113
Avid Pro Tools LE 88
options for Avid 3D 56
using predefined templates 53
Sequences
exporting to Avid 3D 52
Sorenson Squeeze (Avid DVD by Sonic) 116
Squeeze It
using to encode files 116
Standalone mode 81
Standard file format, described 19
Stereo-interleaved file
importing as master clip (Avid Xpress Pro) 109
Stereo-interleaved file (Pro Tools LE) 107
Studio menu, selecting applications from 21
T
Text
Character Offset controls (Avid 3D) 71
creating in Avid 3D 69
formatting in Avid 3D 70
Text Creation Wizard (Avid 3D) 69
Textured objects (Avid 3D) 65
Textures
adding video in Avid 3D 64
Timeline window (Avid FX) 31
Titles
animated 69
Character Offset controls (Avid 3D) 71
creating with Avid 3D 69
creating with Avid FX 39
formatting in Avid 3D 70
Text Creation Wizard (Avid 3D) 69
Transition effect
creating with Avid FX 32
Translate tool (Avid 3D) 63, 71, 72
V
Video
exporting 72
exporting to Avid 3D 52
Video background
adding to 3D scenes 60
Video Clip Library tab 58
Video Library
viewing media in Avid 3D 58
Video textures
adding to 3D scenes 64
W
Workflow overview
Avid 3D 17, 18