Avid Xpress Getting Started Guide 2.0 Windows NT
User Manual: avid Xpress - 2.0 - Windows NT - Getting Started Guide Free User Guide for Avid Xpress Software, Manual
Open the PDF directly: View PDF ![]() .
.
Page Count: 171 [warning: Documents this large are best viewed by clicking the View PDF Link!]
- Avid Xpress™ Getting Started Guide
- Contents
- List of Tables
- Introduction
- About Avid Xpress
- Starting a Project
- Digitizing
- Getting Ready to Edit
- Editing a Rough Cut
- Refining the Edit
- Adding Effects
- Creating Titles
- Creating New Titles
- Understanding the Title Tool Window
- Working with Text
- Text Formatting Tools
- Choosing Colors and Setting Transparency
- Adjusting the Color
- Saving Titles
- Editing a Title into a Sequence
- Tutorial: Creating Titles
- Adding a Title
- Saving a Title
- Editing the Title into the Sequence
- Adding Rolling Credits
- Output
- Backing Up
- Index
a
tools for storytellers™
Avid Xpress™
Getting Started Guide
Release 2.0
for the Windows NT® Operating System
ii
© 1998 Avid Technology, Inc. All rights reserved. Printed in USA.
Avid Xpress Getting Started Guide • Part 0130-01365-01 Rev. A • October 1998

iii
Contents
Chapter 1 Introduction
Using the Tutorial. . . . . . . . . . . . . . . . . . . . . . . . . . . . . . . . . . . . . . . . . . . 12
What You Need . . . . . . . . . . . . . . . . . . . . . . . . . . . . . . . . . . . . . . . . . . . . . 13
Turning On Your Equipment . . . . . . . . . . . . . . . . . . . . . . . . . . . . . . . . . 14
Installing the Avid Xpress Tutorial Files. . . . . . . . . . . . . . . . . . . . . . . 15
Starting Avid Xpress . . . . . . . . . . . . . . . . . . . . . . . . . . . . . . . . . . . . . . . . 16
Electronic Licensing. . . . . . . . . . . . . . . . . . . . . . . . . . . . . . . . . . . . . . . . . 16
How to Proceed. . . . . . . . . . . . . . . . . . . . . . . . . . . . . . . . . . . . . . . . . . . . . 17
Using Help. . . . . . . . . . . . . . . . . . . . . . . . . . . . . . . . . . . . . . . . . . . . . . . . . 17
Finding Topics with the Index . . . . . . . . . . . . . . . . . . . . . . . . . . . . 18
Searching with the Find Feature . . . . . . . . . . . . . . . . . . . . . . . . . . 19
Adding a Note to a Help Topic. . . . . . . . . . . . . . . . . . . . . . . . . . . . 19
Using Online Documentation . . . . . . . . . . . . . . . . . . . . . . . . . . . . . . . . 20
Chapter 2 About Avid Xpress
Video Editing with Avid Xpress . . . . . . . . . . . . . . . . . . . . . . . . . . . . . . 22
Avid Xpress Essentials. . . . . . . . . . . . . . . . . . . . . . . . . . . . . . . . . . . . . . . 23
Media Files. . . . . . . . . . . . . . . . . . . . . . . . . . . . . . . . . . . . . . . . . . . . . 23
Clips. . . . . . . . . . . . . . . . . . . . . . . . . . . . . . . . . . . . . . . . . . . . . . . . . . . 24
Subclips. . . . . . . . . . . . . . . . . . . . . . . . . . . . . . . . . . . . . . . . . . . . . . . . 24
Sequences . . . . . . . . . . . . . . . . . . . . . . . . . . . . . . . . . . . . . . . . . . . . . . 25
Your Program . . . . . . . . . . . . . . . . . . . . . . . . . . . . . . . . . . . . . . . . . . . 26
Bins . . . . . . . . . . . . . . . . . . . . . . . . . . . . . . . . . . . . . . . . . . . . . . . . . . . 26
Your Project . . . . . . . . . . . . . . . . . . . . . . . . . . . . . . . . . . . . . . . . . . . . 26
The Attic Folder. . . . . . . . . . . . . . . . . . . . . . . . . . . . . . . . . . . . . . . . . 27

iv
The Avid Xpress File System . . . . . . . . . . . . . . . . . . . . . . . . . . . . . . . . . 27
Chapter 3 Starting a Project
About Avid Projects and Avid Users Folders . . . . . . . . . . . . . . . . . . . 30
Using the Bins Display . . . . . . . . . . . . . . . . . . . . . . . . . . . . . . . . . . . . . . 31
Using the Settings Display. . . . . . . . . . . . . . . . . . . . . . . . . . . . . . . . . . . 32
Tutorial: Starting a Project . . . . . . . . . . . . . . . . . . . . . . . . . . . . . . . . . . . 34
Starting Avid Xpress . . . . . . . . . . . . . . . . . . . . . . . . . . . . . . . . . . . . . . . . 34
Opening a Project. . . . . . . . . . . . . . . . . . . . . . . . . . . . . . . . . . . . . . . . . . . 35
Creating a User . . . . . . . . . . . . . . . . . . . . . . . . . . . . . . . . . . . . . . . . . 35
Selecting a Project. . . . . . . . . . . . . . . . . . . . . . . . . . . . . . . . . . . . . . . 35
Chapter 4 Digitizing
Selecting Settings. . . . . . . . . . . . . . . . . . . . . . . . . . . . . . . . . . . . . . . . . . . 38
About the Digitize Tool. . . . . . . . . . . . . . . . . . . . . . . . . . . . . . . . . . . . . . 39
About the Audio Tool . . . . . . . . . . . . . . . . . . . . . . . . . . . . . . . . . . . . . . . 41
About the Video Input Tool . . . . . . . . . . . . . . . . . . . . . . . . . . . . . . . . . . 43
Digitize Preparations Check List . . . . . . . . . . . . . . . . . . . . . . . . . . . . . 44
Digitizing. . . . . . . . . . . . . . . . . . . . . . . . . . . . . . . . . . . . . . . . . . . . . . . . . . 45
Digitizing and Logging at the Same Time . . . . . . . . . . . . . . . . . . 45
Batch Digitizing. . . . . . . . . . . . . . . . . . . . . . . . . . . . . . . . . . . . . . . . . 46
Redigitizing . . . . . . . . . . . . . . . . . . . . . . . . . . . . . . . . . . . . . . . . . . . . 46
Chapter 5 Getting Ready to Edit
About Bin Display Modes . . . . . . . . . . . . . . . . . . . . . . . . . . . . . . . . . . . 48
Controlling Playback. . . . . . . . . . . . . . . . . . . . . . . . . . . . . . . . . . . . . . . . 49
Using Position Bars and Position Indicators. . . . . . . . . . . . . . . . 49
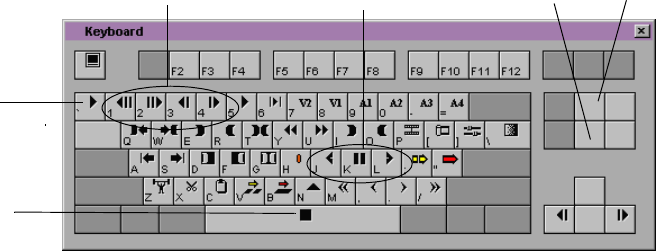
Using Buttons. . . . . . . . . . . . . . . . . . . . . . . . . . . . . . . . . . . . . . . . . . . 50
Play Button . . . . . . . . . . . . . . . . . . . . . . . . . . . . . . . . . . . . . . . . . 51
Step Buttons . . . . . . . . . . . . . . . . . . . . . . . . . . . . . . . . . . . . . . . . 51
Using the Tool Palette. . . . . . . . . . . . . . . . . . . . . . . . . . . . . . . . . . . . 51
Using the Keyboard . . . . . . . . . . . . . . . . . . . . . . . . . . . . . . . . . . . . . 52
J-K-L Keys (Three-Button Play) . . . . . . . . . . . . . . . . . . . . . . . 52

v
Home, End, and Arrow Keys . . . . . . . . . . . . . . . . . . . . . . . . . . 53
Marking IN and OUT Points . . . . . . . . . . . . . . . . . . . . . . . . . . . . . . . . . 53
Creating Subclips. . . . . . . . . . . . . . . . . . . . . . . . . . . . . . . . . . . . . . . . . . . 54
Tutorial: Getting Ready to Edit . . . . . . . . . . . . . . . . . . . . . . . . . . . . . . . 55
Viewing Clips . . . . . . . . . . . . . . . . . . . . . . . . . . . . . . . . . . . . . . . . . . . . . . 55
Viewing in Text Mode . . . . . . . . . . . . . . . . . . . . . . . . . . . . . . . . . . . 56
Viewing in Frame Mode . . . . . . . . . . . . . . . . . . . . . . . . . . . . . . . . . 57
Playing Clips. . . . . . . . . . . . . . . . . . . . . . . . . . . . . . . . . . . . . . . . . . . . . . . 57
Playing Clips in a Source Pop-up Monitor . . . . . . . . . . . . . . . . . 57
Controlling Playback . . . . . . . . . . . . . . . . . . . . . . . . . . . . . . . . . . . . 59
Marking Edit Points. . . . . . . . . . . . . . . . . . . . . . . . . . . . . . . . . . . . . . . . . 60
Marking the planing ms Clip . . . . . . . . . . . . . . . . . . . . . . . . . . . . . 60
Marking the ducks Clip . . . . . . . . . . . . . . . . . . . . . . . . . . . . . . . . . . 62
Marking the draw knife cu Clip . . . . . . . . . . . . . . . . . . . . . . . . . . . 62
Using Timecode to Find a Frame . . . . . . . . . . . . . . . . . . . . . . . . . . 63
Using Frame Offset. . . . . . . . . . . . . . . . . . . . . . . . . . . . . . . . . . . . . . 65
Subclipping. . . . . . . . . . . . . . . . . . . . . . . . . . . . . . . . . . . . . . . . . . . . . . . . 66
Clearing IN Points and OUT Points . . . . . . . . . . . . . . . . . . . . . . . 67
Closing the Project . . . . . . . . . . . . . . . . . . . . . . . . . . . . . . . . . . . . . . 67
Ending the Session . . . . . . . . . . . . . . . . . . . . . . . . . . . . . . . . . . . . . . 68
Chapter 6 Editing a Rough Cut
Viewing Methods. . . . . . . . . . . . . . . . . . . . . . . . . . . . . . . . . . . . . . . . . . . 70
Navigating in the Timeline . . . . . . . . . . . . . . . . . . . . . . . . . . . . . . . . . . 70
Using the Position Indicator. . . . . . . . . . . . . . . . . . . . . . . . . . . . . . 70
Using the Scroll Bar . . . . . . . . . . . . . . . . . . . . . . . . . . . . . . . . . . . . . 71
Displaying More or Less Detail. . . . . . . . . . . . . . . . . . . . . . . . . . . . . . . 71
Using the Track Selector Panel . . . . . . . . . . . . . . . . . . . . . . . . . . . . . . . 72
Selecting Tracks. . . . . . . . . . . . . . . . . . . . . . . . . . . . . . . . . . . . . . . . . 74
Monitoring Tracks. . . . . . . . . . . . . . . . . . . . . . . . . . . . . . . . . . . . . . . 75
Monitoring Video . . . . . . . . . . . . . . . . . . . . . . . . . . . . . . . . . . . . . . . 75
Tutorial: Rough Cut . . . . . . . . . . . . . . . . . . . . . . . . . . . . . . . . . . . . . . . . . 76
Making the First Edit. . . . . . . . . . . . . . . . . . . . . . . . . . . . . . . . . . . . . . . . 76

vi
Using Digital Audio Scrub . . . . . . . . . . . . . . . . . . . . . . . . . . . . . . . 77
Splicing an Audio Clip . . . . . . . . . . . . . . . . . . . . . . . . . . . . . . . . . . 77
Playing a Sequence. . . . . . . . . . . . . . . . . . . . . . . . . . . . . . . . . . . . . . 78
Confirming the Duration. . . . . . . . . . . . . . . . . . . . . . . . . . . . . . . . . 78
Splicing Video into the Sequence. . . . . . . . . . . . . . . . . . . . . . . . . . . . . 79
Splicing the ducks clip . . . . . . . . . . . . . . . . . . . . . . . . . . . . . . . . . . . 80
Playing IN to OUT . . . . . . . . . . . . . . . . . . . . . . . . . . . . . . . . . . . . . . 80
Using the Go to OUT Key . . . . . . . . . . . . . . . . . . . . . . . . . . . . . . . . 81
Moving to the Head and Tail of a Shot. . . . . . . . . . . . . . . . . . . . . 81
Using the Splice-in Button . . . . . . . . . . . . . . . . . . . . . . . . . . . . . . . 82
Splicing a Shot into the Middle of a Sequence. . . . . . . . . . . . . . 82
Undoing an Edit . . . . . . . . . . . . . . . . . . . . . . . . . . . . . . . . . . . . . . . . 83
Using the I/O (IN Point / OUT Point) Tracking Display. . . . . . 83
Chapter 7 Refining the Edit
Using Segment Mode . . . . . . . . . . . . . . . . . . . . . . . . . . . . . . . . . . . . . . . 86
Editing in Segment Mode . . . . . . . . . . . . . . . . . . . . . . . . . . . . . . . . 86
Distinguishing Two Types of Buttons . . . . . . . . . . . . . . . . . . . . . 86
Basic Trim Procedures . . . . . . . . . . . . . . . . . . . . . . . . . . . . . . . . . . . . . . . 87
Entering Trim Mode . . . . . . . . . . . . . . . . . . . . . . . . . . . . . . . . . . . . . 87
Leaving Trim Mode. . . . . . . . . . . . . . . . . . . . . . . . . . . . . . . . . . . . . . 88
Selecting Between Trim Sides . . . . . . . . . . . . . . . . . . . . . . . . . . . . 89
Performing a Basic Trim. . . . . . . . . . . . . . . . . . . . . . . . . . . . . . . . . . 90
Audio Editing . . . . . . . . . . . . . . . . . . . . . . . . . . . . . . . . . . . . . . . . . . . . . . 91
Tutorial: Refining Edits. . . . . . . . . . . . . . . . . . . . . . . . . . . . . . . . . . . . . . 92
Overwriting Shots into a Sequence . . . . . . . . . . . . . . . . . . . . . . . . . . . 93
Storyboarding . . . . . . . . . . . . . . . . . . . . . . . . . . . . . . . . . . . . . . . . . . . . . . 94
Marking Clips for Storyboarding . . . . . . . . . . . . . . . . . . . . . . . . . 94
Storyboard Editing the Clips . . . . . . . . . . . . . . . . . . . . . . . . . . . . . 96
Rearranging Shots . . . . . . . . . . . . . . . . . . . . . . . . . . . . . . . . . . . . . . . . . . 98
Overwriting with the Three-Point Edit . . . . . . . . . . . . . . . . . . . . 98
Rearranging Footage with Extract/Splice-In . . . . . . . . . . . . . . . . 99
Removing Footage from a Sequence . . . . . . . . . . . . . . . . . . . . . . . . . 100

vii
Removing Footage with Extract/Splice-In . . . . . . . . . . . . . . . . . 100
Removing Footage with Lift . . . . . . . . . . . . . . . . . . . . . . . . . . . . . 101
Trimming . . . . . . . . . . . . . . . . . . . . . . . . . . . . . . . . . . . . . . . . . . . . . . . . . 102
Dual-Roller Trimming . . . . . . . . . . . . . . . . . . . . . . . . . . . . . . . . . . 102
Using Dual Rollers to Trim the Outgoing Shot. . . . . . . . . . . . . 104
Trimming the pan lumber Shot. . . . . . . . . . . . . . . . . . . . . . . . . . . 105
Single-Roller Trimming. . . . . . . . . . . . . . . . . . . . . . . . . . . . . . . . . 106
Adding Synced Audio . . . . . . . . . . . . . . . . . . . . . . . . . . . . . . . . . . 106
Working with Audio . . . . . . . . . . . . . . . . . . . . . . . . . . . . . . . . . . . . . . . 108
Adjusting Audio Level. . . . . . . . . . . . . . . . . . . . . . . . . . . . . . . . . . 108
Adjusting Audio Pan . . . . . . . . . . . . . . . . . . . . . . . . . . . . . . . . . . . 109
Chapter 8 Adding Effects
Effects Editing. . . . . . . . . . . . . . . . . . . . . . . . . . . . . . . . . . . . . . . . . . . . . 112
Displaying the Effect Palette . . . . . . . . . . . . . . . . . . . . . . . . . . . . . . . . 113
Effect Categories. . . . . . . . . . . . . . . . . . . . . . . . . . . . . . . . . . . . . . . . . . . 113
Effect Types . . . . . . . . . . . . . . . . . . . . . . . . . . . . . . . . . . . . . . . . . . . . . . . 114
Transition Effects. . . . . . . . . . . . . . . . . . . . . . . . . . . . . . . . . . . . . . . 114
Segment Effects. . . . . . . . . . . . . . . . . . . . . . . . . . . . . . . . . . . . . . . . 115
Applying Effects to a Sequence. . . . . . . . . . . . . . . . . . . . . . . . . . . . . . 115
Working in Effect Mode . . . . . . . . . . . . . . . . . . . . . . . . . . . . . . . . . . . . 116
Rendering an Effect . . . . . . . . . . . . . . . . . . . . . . . . . . . . . . . . . . . . . . . . 116
Tutorial: Adding Effects . . . . . . . . . . . . . . . . . . . . . . . . . . . . . . . . . . . . 117
Adding Transition Effects. . . . . . . . . . . . . . . . . . . . . . . . . . . . . . . . . . . 118
Adding Fade In . . . . . . . . . . . . . . . . . . . . . . . . . . . . . . . . . . . . . . . . 118
Dissolving Between Shots. . . . . . . . . . . . . . . . . . . . . . . . . . . . . . . 119
Creating a Series of Dissolves. . . . . . . . . . . . . . . . . . . . . . . . 120
Creating Audio Dissolves . . . . . . . . . . . . . . . . . . . . . . . . . . . 120
Adding a Fade Within the Sequence. . . . . . . . . . . . . . . . . . . . . . 121
Adding a Picture-In-Picture Effect . . . . . . . . . . . . . . . . . . . . . . . . . . . 122
Using the Second Video Track . . . . . . . . . . . . . . . . . . . . . . . . . . . 122
Creating the Picture-In-Picture Effect. . . . . . . . . . . . . . . . . . . . . 123
Repositioning the Image. . . . . . . . . . . . . . . . . . . . . . . . . . . . . . . . . . . . 124

viii
Adjusting a Parameter . . . . . . . . . . . . . . . . . . . . . . . . . . . . . . . . . . 125
Adding Keyframes . . . . . . . . . . . . . . . . . . . . . . . . . . . . . . . . . . . . . 125
Adding Background Images. . . . . . . . . . . . . . . . . . . . . . . . . . . . . 126
Rendering the Effect. . . . . . . . . . . . . . . . . . . . . . . . . . . . . . . . . . . . 127
Screening the Sequence . . . . . . . . . . . . . . . . . . . . . . . . . . . . . . . . . . . . 128
Chapter 9 Creating Titles
Creating New Titles. . . . . . . . . . . . . . . . . . . . . . . . . . . . . . . . . . . . . . . . 130
Understanding the Title Tool Window . . . . . . . . . . . . . . . . . . . . . . . 131
Working with Text . . . . . . . . . . . . . . . . . . . . . . . . . . . . . . . . . . . . . . . . . 132
Text Formatting Tools . . . . . . . . . . . . . . . . . . . . . . . . . . . . . . . . . . . . . . 132
Choosing Colors and Setting Transparency . . . . . . . . . . . . . . . . . . . 134
Adjusting the Color . . . . . . . . . . . . . . . . . . . . . . . . . . . . . . . . . . . . . . . . 134
Saving Titles . . . . . . . . . . . . . . . . . . . . . . . . . . . . . . . . . . . . . . . . . . . . . . 135
Editing a Title into a Sequence . . . . . . . . . . . . . . . . . . . . . . . . . . . . . . 136
Tutorial: Creating Titles. . . . . . . . . . . . . . . . . . . . . . . . . . . . . . . . . . . . . 137
Adding a Title . . . . . . . . . . . . . . . . . . . . . . . . . . . . . . . . . . . . . . . . . . . . . 138
Creating a New Title. . . . . . . . . . . . . . . . . . . . . . . . . . . . . . . . . . . . 138
Repositioning Text . . . . . . . . . . . . . . . . . . . . . . . . . . . . . . . . . . . . . 139
Changing Color . . . . . . . . . . . . . . . . . . . . . . . . . . . . . . . . . . . . . . . . 140
Adding a Shadow . . . . . . . . . . . . . . . . . . . . . . . . . . . . . . . . . . . . . . 140
Saving a Title. . . . . . . . . . . . . . . . . . . . . . . . . . . . . . . . . . . . . . . . . . . . . . 140
Editing the Title into the Sequence . . . . . . . . . . . . . . . . . . . . . . . . . . 141
Adding Rolling Credits. . . . . . . . . . . . . . . . . . . . . . . . . . . . . . . . . . . . . 141
Editing the Title. . . . . . . . . . . . . . . . . . . . . . . . . . . . . . . . . . . . . . . . 141
Adding Video Background . . . . . . . . . . . . . . . . . . . . . . . . . . . . . . 142
Viewing the Creation Date . . . . . . . . . . . . . . . . . . . . . . . . . . . . . . 142
Splicing the Title into a Sequence . . . . . . . . . . . . . . . . . . . . . . . . 143
Deleting Excess Footage. . . . . . . . . . . . . . . . . . . . . . . . . . . . . . . . . 144
Closing the Title Tool . . . . . . . . . . . . . . . . . . . . . . . . . . . . . . . . . . . 144
Chapter 10 Output
Output Options. . . . . . . . . . . . . . . . . . . . . . . . . . . . . . . . . . . . . . . . . . . . 146

ix
Preparing for Output. . . . . . . . . . . . . . . . . . . . . . . . . . . . . . . . . . . . . . . 146
Digital Cut. . . . . . . . . . . . . . . . . . . . . . . . . . . . . . . . . . . . . . . . . . . . . . . . 146
Supported File Types for Export . . . . . . . . . . . . . . . . . . . . . . . . . . . . . 147
Preparing to Export . . . . . . . . . . . . . . . . . . . . . . . . . . . . . . . . . . . . . . . . 148
Tutorial: Output . . . . . . . . . . . . . . . . . . . . . . . . . . . . . . . . . . . . . . . . . . . 149
Recording a Digital Cut to Tape . . . . . . . . . . . . . . . . . . . . . . . . . . . . . 150
Chapter 11 Backing Up
About Media Files . . . . . . . . . . . . . . . . . . . . . . . . . . . . . . . . . . . . . . . . . 154
Media Objects and Files . . . . . . . . . . . . . . . . . . . . . . . . . . . . . . . . 155
Media Relationships. . . . . . . . . . . . . . . . . . . . . . . . . . . . . . . . . . . . 156
Basic Media Tool Features . . . . . . . . . . . . . . . . . . . . . . . . . . . . . . . . . . 157
Freeing Storage Space . . . . . . . . . . . . . . . . . . . . . . . . . . . . . . . . . . . . . . 158
Consolidating Media. . . . . . . . . . . . . . . . . . . . . . . . . . . . . . . . . . . . . . . 158
Backing up Media Files. . . . . . . . . . . . . . . . . . . . . . . . . . . . . . . . . . . . . 160
Backing up Project Folders. . . . . . . . . . . . . . . . . . . . . . . . . . . . . . . . . . 160
Tutorial: Backing Up . . . . . . . . . . . . . . . . . . . . . . . . . . . . . . . . . . . . . . . 161
Consolidating the Boat Shop Sequence. . . . . . . . . . . . . . . . . . . . . . . 162
Saving Your Work on a Drive or Diskette. . . . . . . . . . . . . . . . . . . . . 164
Restoring from a Backup . . . . . . . . . . . . . . . . . . . . . . . . . . . . . . . . . . . 164
Quitting and Shutting Down. . . . . . . . . . . . . . . . . . . . . . . . . . . . . . . . 165
Summary . . . . . . . . . . . . . . . . . . . . . . . . . . . . . . . . . . . . . . . . . . . . . . . . . 165

x
Tables
Table 6-1 Starting the Tutorial: Rough Cut . . . . . . . . . . . . . . . . . . 76
Table 7-1 Starting the Tutorial: Refining Edits . . . . . . . . . . . . . . . 92
Table 7-2 Mark Points for Boat Shop Clips . . . . . . . . . . . . . . . . . . 95
Table 8-1 Starting the Tutorial: Adding Effects . . . . . . . . . . . . . 117
Table 9-1 Starting the Tutorial: Creating Titles. . . . . . . . . . . . . . 137
Table 10-1 Starting the Tutorial: Output . . . . . . . . . . . . . . . . . . . . 149
Table 11-1 Media Objects and Files . . . . . . . . . . . . . . . . . . . . . . . . 156
Table 11-2 Starting the Tutorial: Backing Up . . . . . . . . . . . . . . . . 161

11
CHAPTER 1
Introduction
This chapter explains how to use this guide and work through the
tutorial sections that teach you the basics of your Avid Xpress system.
This chapter contains the following sections:
•Using the Tutorial
•Turning On Your Equipment
•Installing the Avid Xpress Tutorial Files
•Starting Avid Xpress
•Electronic Licensing
•How to Proceed
•Using Help
•Using Online Documentation

12
Using the Tutorial
The self-paced tutorial sections included in this guide are designed as
guided Avid edit sessions using the basic features of the Avid Xpress
system. In the tutorial, you’re going to edit a 1-minute sequence about
a company in Amesbury, Massachusetts that makes small fishing
boats called dories.
The footage for the sequence is on the Avid Xpress Tutorial CD-ROMs
that came with your system. They contain digitized media that is
ready for you to use.
The instructions in the tutorial sections take you through each step of
the editing process. The tutorial is divided into the following sections:
• Starting a project (in Chapter 3)
• Getting ready to edit (in Chapter 5)
• Editing a rough cut (in Chapter 6)
• Refining the edit (in Chapter 7)
• Adding effects, titles, and other finishing touches to the sequence
(in Chapter 8 and Chapter 9)
• Preparing output (in Chapter 10)
• Backing up (in Chapter 11)
The tutorial assumes a basic familiarity with the Windows NT® oper-
ating system. If you have never used a Windows NT system, refer to
your Windows NT documentation.
You don’t need any previous experience with the Avid Xpress system
to use this guide. The terms and techniques needed for each tutorial
section are in each chapter. However, it will help to read Chapter 2 of
this guide before starting any of the tutorial sections. You can also use
the Avid Xpress Help (see “Using Help” on page 17) and online books
(see ““Using Online Documentation” on page 20) for more informa-
tion.
13
Completing all the tutorial sections takes approximately 4 hours.
Before you begin, you need:
• An installed Avid Xpress system
See the Avid Xpress Setup Guide if you have not yet set up your
Avid Xpress system. See the Avid Xpress Release Notes if you need
to install the Avid Xpress software.
• The Boat Shop media and project files on the Avid Xpress Tutorial
CD-ROM
Depending on your level of expertise in editing on Avid systems, you
may choose to go through the tutorial in either of two ways.
• If you have no experience with Avid Xpress or other Avid systems,
you should go through the entire tutorial.
• If you have used other Avid systems, you may want to read cer-
tain chapters to understand the specific features of Avid Xpress,
and complete the tutorial in that chapter. Each tutorial is self-
contained.
What You Need
The CD-ROMs packaged with your Avid Xpress system include all
files necessary to complete this tutorial. They are:
•OMFI MediaFiles folder — contains the digitized files you need
for the tutorial. You need to copy these files onto your external
media drive.
•Avid Projects folder — contains the project and bins you need for
the tutorial. You need to copy these files onto your internal hard
drive.
14
Turning On Your Equipment
Begin your edit session by turning on the various components of your
Avid Xpress system. If any part of your system fails to turn on, make
sure its electrical cord is plugged snugly into an appropriate electrical
outlet or power strip. See the Avid Xpress Setup Guide for information
on setting up your system.
cIf you fail to follow the proper sequence for starting up your system,
you could damage your computer or storage drives.
Always turn on the devices as follows:
1. Fixed-storage drives: Turn on fixed-storage drives before starting
the computer. Allow 10 to 15 seconds for the drives to spin up to
speed before starting your personal computer (PC).
2. Other peripheral hardware: Turn on all other peripheral units
except the PC. These include:
• Monitors and speakers.
• Meridien I/O box.
• Tape decks and additional autoassembly configurations
(switcher, time-base corrector, and so on) if you plan to digi-
tize or conduct an autoassembly.
• Black burst generator (to maintain proper sync between audio
and video while digitizing and editing).
3. The PC:
a. Turn on the PC.
The computer goes through a self-check routine, and the
Windows NT startup screen appears.
b. Press Ctrl+Alt+Delete and log on.

15
For information on
Windows NT features,
such as the desktop and
icons, see your
Windows NT documen-
tation.
The Windows NT desktop appears.
To avoid damage, do not disconnect or turn off hard disks or
individual disk drives while the PC is on.
Installing the Avid Xpress Tutorial Files
The Avid Xpress Tutorial CD-ROMs contain all of the files you need
for the tutorial sections of this guide. It takes about 30 minutes to copy
the media files from the CD-ROM to the external hard drive.
The CD-ROMs contain an NTSC version and a PAL version of the
tutorial media files digitized at a 4:1s compression ratio. You need
approximately 1 GB of free space on your external hard drive to
accommodate the media.
The tutorial files require two CD-ROMs for NTSC and two for PAL.
The procedure is the same for installing either type.
nFor instructions on installing the tutorial media files and the Boat Shop
project, see "Installing the Tutorial Files" in the Avid Xpress Release
Notes.

16
Starting Avid Xpress
To start Avid Xpress:
1. Click the Start button.
2. Point to Programs.
3. Point to the Avid folder.
4. Select Avid Xpress.
The Avid splash screen appears, then the License Agreement dialog
box appears.
nTo start Avid Xpress from the desktop, Avid recommends that you create a
shortcut and place it there. For more information on creating a shortcut, see
your Windows NT documentation.
Electronic Licensing
To accept your Avid Xpress product license electronically:
1. Read the License Agreement, then click the Accept button or the
Decline button at the bottom of the screen.
The agreement appears the first several times you start Avid
Xpress. After several starts, a new button appears at the bottom of
the screen.
2. If you do not want to see the license agreement again, click the
Accept and Don’t Show Again button.
A dialog box appears.
3. Enter the name of your organization in the dialog box, and click
OK.
After Avid Xpress starts, the Open Project dialog box appears, as
described in “Opening a Project” on page 35.
17
How to Proceed
The following are a few tips for taking full advantage of the Avid
Xpress documentation and other resources:
• Complete the tutorial sections in this book before starting a
project.
• Begin learning about basic procedures by using the default set-
tings. As your confidence builds, begin to explore additional pro-
cedures and settings.
• Instead of using the standard menus to find the command you
need in a window, try using shortcut menus. Using the right
mouse button, click on a window to bring up a shortcut menu that
shows the most frequently used commands for that window.
• Keep the Avid Xpress Quick Reference on hand during editing ses-
sions.
• Make a habit of reading Avid’s newsletters, mailings, and other
trade publications.
• Make use of additional training resources provided by Avid when-
ever possible, such as classes and instructional videotapes. For
more information, contact Avid at 800-867-2843.
• Check the Avid Web site at www.avid.com/services/training/
training.html for listings of courses, schedules, and locations.
Using Help
Help for your Avid Xpress system is automatically installed with Avid
Xpress. Help includes all reference and procedural information for
Avid Xpress.
You can access Help in two ways:
• From the Help menu, choose Avid Xpress Help.
18
• As context-sensitive Help:
a. Position the cursor on the window for which you want Help.
b. Press the F1 key on the keyboard or right-click and choose
What’s This? from the shortcut menu.
A window opens with information about the tool or feature
for which you want Help.
c. Click on different areas of the tool or feature to see pop-up
Help.
nIf no specific Help for the window exists, the Help Topics window opens.
Procedures are displayed in yellow How To windows; background
information and illustrations are displayed in white Reference
windows.
To find a topic in Help:
1. Open the Help Topics window.
2. Do one of the following:
• Click the Contents tab to view lists of topics in the main Help
window.
• Click the Index tab to open the Index window and view a list
of index entries.
• Click the Find tab to search for words or phrases that might be
contained in a Help topic.
Finding Topics with the Index
To find topics using keywords in the Index:
1. Click the Index tab to display the Index panel.
2. In the text box, type the keyword you are interested in or choose a
topic from the list.
19
3. Click the Display button to view the topic or double-click the topic
name in the Index scroll list.
Searching with the Find Feature
To search for words in a Help file:
1. Click the Find tab to display the Find panel.
2. In the text box, type the word or phrase you want to find.
A list shows topics that contain the words you searched for. As
you type additional words, the list updates.
3. To change the way in which you search for a word or words, click
Options and select your preferences.
4. Select a topic in the list and then click the Display button or dou-
ble-click the topic.
5. The topic is displayed, and the words you searched for are high-
lighted.
Adding a Note to a Help Topic
To add a note to a Help topic:
1. In the Help topic window, click Options.
2. Choose Annotate.
A dialog box appears.
3. Type your note in the dialog box.
4. Click Save.
For more information
about using Help, see
“Help:overview” in the
Help index.
A paper clip icon appears at the top of the topic. Click this icon to
see, edit, or delete your note.
20
Using Online Documentation
The Avid Xpress Online Publications CD includes:
• Avid Xpress Effects Guide
•Avid Xpress Getting Started Guide (this book)
• Avid Xpress Help system
The books are PDF files. You can view them with the
Adobe® Acrobat Reader®, which you can install from the CD-ROM.
The online version of the books enables you to:
• Navigate through books by using bookmarks and hyperlinks.
• Speed up information retrieval by performing keyword searches.
• Annotate the books with your own notes.
• Zoom in on a page, enabling closer review of text and images.
• Print any or all pages.
• View the books with full-color graphics.
• View movies that illustrate Avid Xpress effects.
nAvid gives you permission to print up to three complete copies of each book.

21
CHAPTER 2
About Avid Xpress
Welcome to the world of nonlinear digital video editing, in which you
can create professional-quality video programs from your desktop.
The Avid Xpress system allows you to change any part of your video
program at any time, until you create your final program on tape. With
Avid Xpress, you can be as flexible and as creative as possible when
editing your video programs.
This chapter explains the basic concepts and terminology that you
need to be familiar with to edit video with Avid Xpress. This chapter
contains the following sections:
•Video Editing with Avid Xpress
•Avid Xpress Essentials
•The Avid Xpress File System
22
Video Editing with Avid Xpress
In traditional video editing, you electronically copy video from a
source tape to an edit master tape. The process is tedious, and it is dif-
ficult to make changes to your work.
By contrast, when you edit with Avid Xpress, you don’t have to dub
footage onto a master videotape. Instead, you manipulate Avid Xpress
“clips” that reference your digitized audio and video material. This
allows you to experiment with every edit you make through multiple
generations. You can trim, move, delete, duplicate, or modify individ-
ual frames or entire segments, and immediately see the results.
When you play back your work, the system accesses and plays the
appropriate portions of the digitized video and audio.
The following is a summary of the Avid Xpress editing process:
1. Collect source material for your project
Collect your source video and audio. You can start with any video
format — Beta SP, 3/4 inch, 8mm, Hi 8, VHS, S-VHS, or any other.
You can also incorporate still images or other computer-generated
files, including computer graphics, still-image files, animations,
sound effects, or AVI movies.
2. Digitize your source material
Play your source videotapes on a video deck, and digitize them
right onto your hard disk. Import computer-generated files into
your project — graphics, still images, animations, sound effects,
synthesized music, AVI movies, and special effects.
3. Create a rough cut of your video
Play your digitized source material in Avid Xpress. Organize your
sources, and lay out a storyboard using representative clip frames.
Mark sections of your digitized sources, and edit them together.
Reorder your material, cut and paste sections, and trim the transi-
tions between clips. Immediately view each change you make.
23
Save the changes that you like; easily undo the changes that you
don’t like.
4. Refine your edits
Use Avid Xpress to enhance your program with special effects,
such as dissolves, wipes, filters, and video overlays. Add graphics
and animations, CD-quality sound, and a voice-over. Incorporate
titles and credits.
5. Record your finished program
Record your final program from Avid Xpress onto videotape. Save
a copy of your program in AVI format for CD-ROM or network
distribution. Modify and record a new version of your program at
any time.
Avid Xpress Essentials
This section explains the terms and concepts that you will need to
know in order to understand the Avid Xpress editing process.
Media Files
Material is stored in
media files. When you digitize source material from a video or audio deck, or
when you import computer graphic files into your Avid Xpress
project, the material is saved in media files on your system’s external
hard disk. One media file is created for each track of video or audio.
Three media files — for one track of video and two tracks of audio —
are created for a video with a stereo sound track.
24
Clips
Clips point to media
files. You do not manipulate media files directly. Avid Xpress creates
another file, called a master clip, on your system’s internal disk when
you digitize media. The master clip is simply a pointer to its corre-
sponding media file.
While editing your video, you create other clips, such as graphic clips
and effects clips. You make your edits by modifying clips — the
corresponding media files remain unchanged. This allows you to eas-
ily create and undo edits without destroying your original material.
Because you work with clips instead of media files, you can create vir-
tually unlimited versions of a program without creating multiple cop-
ies of the extremely large source material.
Subclips
Subclips are sections
that you mark within
clips.
Subclips are specific sections of clips that you want to use in your pro-
gram. You create a subclip by marking IN and OUT points in a clip
and then dragging this material to the bin. The subclip is composed of
the material between the IN and OUT points.
Video Deck
Master Clip
Media Drive
OMFI
MediaFiles

25
A subclip points to a media file’s master clip. You must not delete the
master clip from which a subclip was created. If you delete the master
clip, you will lose the information in the subclip.
Sequences
A sequence is a pro-
gram created from one
or more clips and sub-
clips.
You can join different clips and subclips to create a sequence. A
sequence can include edited material from source clips and subclips,
new clips created when you add effects during the editing process,
and material from other sequences. Your final program will be
composed of one or more sequences, depending on how it’s most con-
venient for you to work.
A sequence is composed of marked material from clips, subclips, and
other sequences. The material outside the IN and OUT points remains
in the media file’s master clip. This material is very important, because
you need it to trim cuts and create transition effects between segments.
See “Trimming” on page 102 for more information about trimming
cuts. See the Avid Xpress Effects Guide for information about creating
transition effects.
Like a clip, a sequence contains pointers to media files. If you delete
one of the clips used to create a sequence, the sequence still works,
because the sequence contains its own pointers to the media files.
Clip
Subclip
26
Your Program
The program is your
final video creation. A program consists of one or more sequences. You use clips, subclips,
and sequences to build a program. Your program is represented by the
Timeline. A program is your final creation; you can output your pro-
gram to tape when you are finished.
Even though your media files contain the actual source material for
the program, you never manipulate the media files directly. Instead,
you move, copy, and edit clips, subclips, and sequences.
Bins
You organize your foot-
age in bins. Clips, subclips, and sequences are organized and stored in bins. Tradi-
tionally, a bin is a place where film editors store reels of film. In Avid
Xpress, bins are tools for organizing the material for a project.
Your Project
You edit within a
project. A project con-
sists of one or more
bins, normally contain-
ing footage for a spe-
cific program.
You gather the material you need to create a program in a project. Each
project contains information about bins, clips, subclips, sequences, and
the program in the Timeline. You may have several projects on your
system, but you can only work on one project at a time.
Sequence
Clip
Subclip OMFI MediaFiles
27
The Attic Folder
For a complete descrip-
tion of retrieving bins
from the Attic folder,
see “Attic folder:
retrieving bins from” in
the Help index.
Avid Xpress saves copies of your current project and its bins at regular
intervals and whenever you save or close a project or bin. These auto-
save files are stored in the Attic folder at the base level of the internal
hard drive. If at any time you lose work due to a power outage or sys-
tem error, open the Attic folder and look for a project or bin of the
same name.
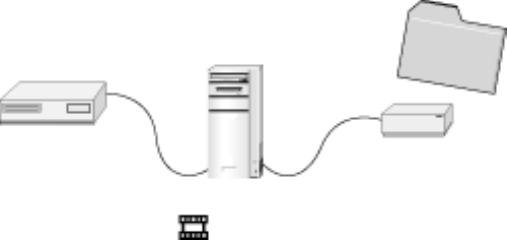
The Avid Xpress File System
The following illustration shows the different kinds of Avid Xpress
files and where they are stored. The Avid Xpress application folder is
stored on your computer’s internal hard drive. The Avid Projects
folder is stored on the same disk as the Avid Xpress application folder.
Media files must be stored on a separate, Avid-approved media drive,
which is guaranteed to be fast enough to support real-time video play-
back.
28
Media Drive
(application folder)
Avid Xpress Avid Projects
OMFI MediaFiles
Project subfolder
Project
Bin A Bin B
Supporting
Files
Avid Xpress
Settings
Attic

29
CHAPTER 3
Starting a Project
The Project window provides controls in three different display modes
for structuring and viewing important information about your current
project. These include a display of bins and folders associated with the
project, a list of all settings, and basic information about the format of
the project and use of system memory and hardware.
Starting a project is described in the following sections:
•About Avid Projects and Avid Users Folders
•Using the Bins Display
•Using the Settings Display
Tutorial: Starting a Project contains the following sections:
•Starting Avid Xpress
•Opening a Project
30
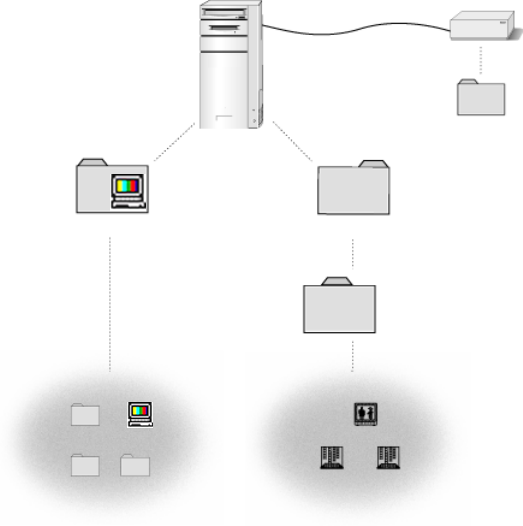
About Avid Projects and Avid Users Folders
Avid Projects and Avid Users folders allow you to move whole
projects or selected project and user settings between systems by copy-
ing and moving files on your desktop.
When you create a new project or user, the system creates the follow-
ing files and folders:
• When you create a new user, the system creates three items: a user
profile file, a User settings file, and a user folder containing the
two. Each item is given the user name you provide. This new
folder is stored in the Avid Users folder on the internal hard drive.
• When you create a new project, the system creates three items: a
project file, a Project settings file, and a folder containing the two,
each of which is given the project name you provide. This new
folder is stored in the Avid Projects folder on the internal hard
drive.
Your settings are initially set to the default values. As you work, the
files maintain current settings, while the project folder fills with bin
files.
31
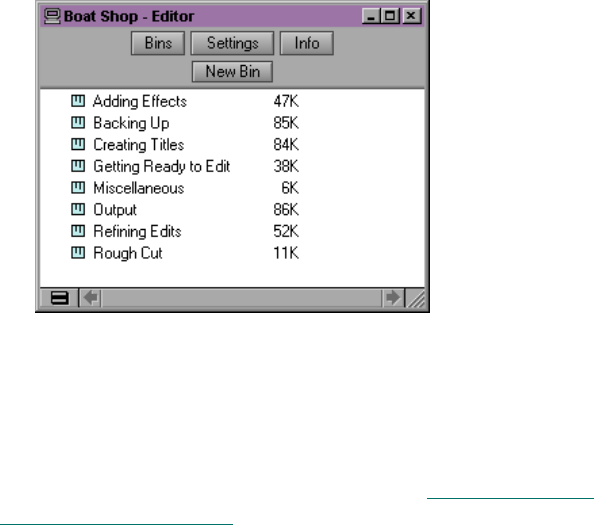
Using the Bins Display
Bins are windows that store titles, “thumbnails,” and information
about the materials you digitize. These editable files are called master
clips. They refer to the actual media files created when you digitize
source material. While the physical media are stored on external hard
drives, the master clips that refer to that media reside in the bin. Bins
also store the sequences, subclips, group clips, and effect clips that you
create during a project. The Project window allows you to make a new
bin, close it, reopen it, and move clips among these bins. You can also
open bins created for different projects.
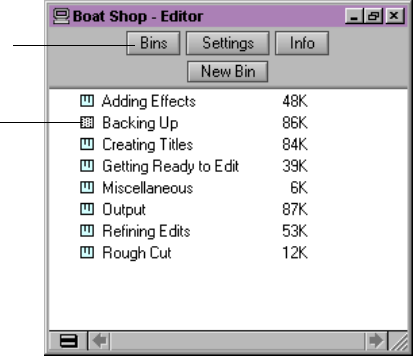
After you select a user and project in the Open Project dialog box, the
Project window opens. To view a complete list of bins associated with
the project, click the Bins button in the Project window. A list of bins
appears.
From the Bins list you can examine the number, names, size, and loca-
tion of bins, and you can also open bins. Dotted bin icons next to bin
names indicate bins that are currently open; solid icons indicate closed
bins.
Bins button
Open bin
32
nThe Trash icon appears in the Bins setting window when you delete a bin. You
can use the Trash to retrieve bins you deleted by mistake, or empty the Trash
to create more disk space. To empty the contents of the Trash, right-click the
Trash icon and choose Empty Trash from the shortcut menu.
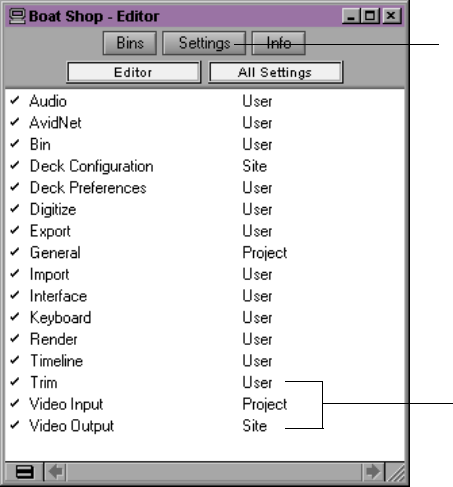
Using the Settings Display
From the Settings display you can view, select, open, and alter various
User, Project, and Site settings, as described in this section.
To view the Settings display, click the Settings button in the Project
window.
Settings types
Settings button
33
Three types of settings are displayed in the Settings scroll list: User,
Project, and Site settings.
•User settings are specific to a particular editor. In general, User
settings reflect individual preferences for adjusting the way you
view the Avid Xpress system. Individual User settings are stored
in each user folder within the Avid Users folder on the internal
hard drive.
•Project settings are directly related to individual projects. When a
Project setting is changed, it affects all editors working on the
project. Specific Project settings are stored in each project folder
within the Avid Projects folder on the internal hard drive.
For a complete descrip-
tion of all settings and
their options, see
“Settings:described” in
the Help index.
•Site settings establish default parameters for all new users and
projects on a particular system. These can apply to particular con-
figurations of equipment installed at the site, for example, spec
and node settings for an external switcher. They can also include
other User or Project settings that you copy into the Site Settings
window. Site settings are stored in a separate Settings folder in the
Avid Xpress folder on the internal hard drive.
34
Tutorial: Starting a Project
In this tutorial, you start Avid Xpress, create a user, and select a
project. Before starting this procedure, make sure you have installed
the Tutorial files (see “Installing the Avid Xpress Tutorial Files” on
page 15).
Starting Avid Xpress
To start Avid Xpress:
1. Click the Start button, and then point to Programs.
2. Point to the Avid Xpress folder.
3. Select Avid Xpress.
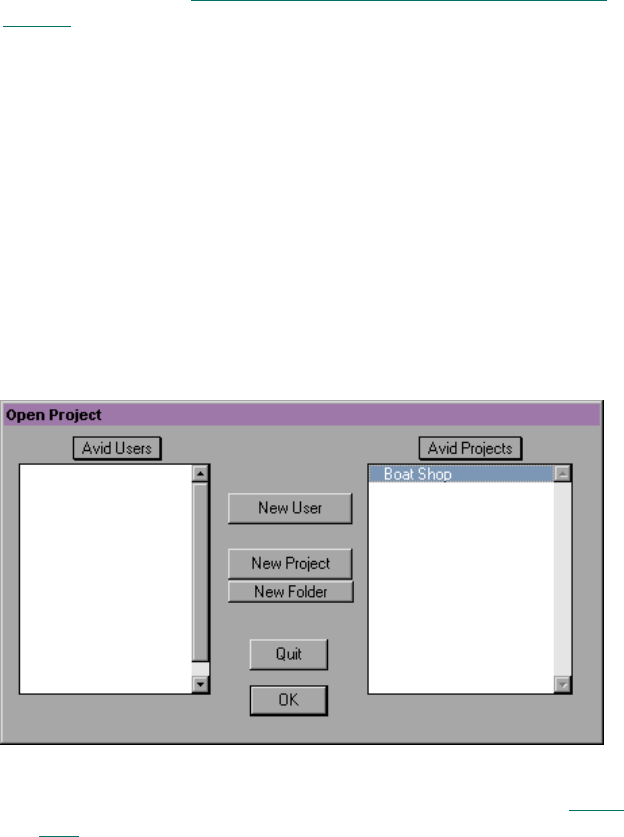
The Avid splash screen appears, and then the Open Project dialog
box appears.
For this tutorial, you will use the Boat Shop project (along with its
settings file) that you copied into the Avid Projects folder in Chap-
ter 1.
35
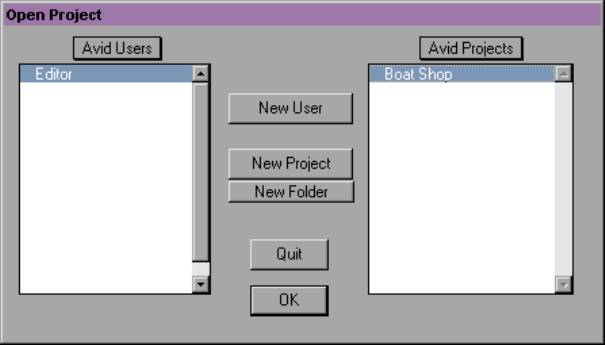
Opening a Project
To open a project, you create a new user and select an existing project.
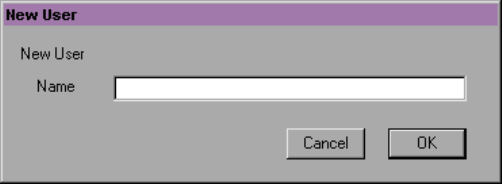
Creating a User
To create a new user:
1. Click the New User button on the Open Project dialog box.
The New User dialog box appears.
2. Type Editor and click OK.
The Open Project dialog box reappears with Editor highlighted in
the list of users.
Selecting a Project
To select a project:
1. Select Boat Shop from the Avid Projects list and click OK.
Click on the Project
window and press F1 to
bring up the context-
sensitive Help for the
Project window.
The Project window opens. It lists the bins, or storage areas, cre-
ated to hold the clips and sequences you will need for this tutorial.
36
2. Double-click the icon to the left of Getting Ready to Edit to open
the bin.
This bin contains the clips of the source footage you will use to
begin to build the Boat Shop sequence.
You’ve finished this tutorial. The next tutorial is “Tutorial: Getting
Ready to Edit” on page 55. Be sure to read Chapter 4 and the introduc-
tory material in Chapter 5 before continuing the tutorial.

38
Selecting Settings
For more information
on the selecting set-
tings, see “Digitizing:
settings for” in the Help
index.
A number of settings have a direct bearing on the digitizing process.
Before digitizing, review the following options for General settings,
Deck settings, and Digitize settings:
•Drive Filtering Based on Resolution causes the system to dim all
drives for which speed capabilities are unknown or untested in a
particular resolution. This setting is selected by default in the Gen-
eral Settings dialog box.
cThe Avid Xpress system does not prevent you from using non-Avid
drives, but their reliability cannot be assured.
• Deck Configuration Settings allow you to establish deck control
parameters.
•Deck Preferences include various options for source deck, sync
mode, preroll, drop/non-drop-frame preference, and deck control.
• Digitize Settings include essential options for digitizing and
batch-digitizing, including general parameters for capture of the
source material, and special conditions such as digitizing across
timecode breaks or capturing a single video frame.
39
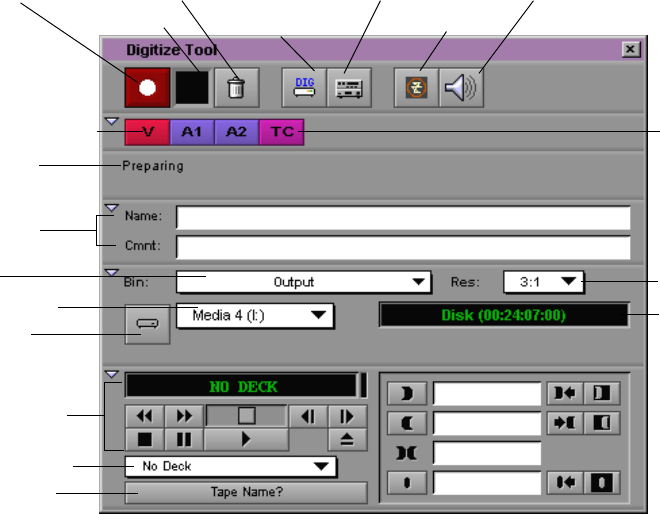
About the Digitize Tool
For more information
on the Digitize Tool, see
“Digitize Tool” in the
Help index.
The Digitize Tool provides controls for digitizing your footage.
To open the Digitize Tool, choose Digitize from the Tools menu. The
Digitize Tool window opens.
The Digitize Tool has the following controls:
•Channel Selection panel lets you choose which video and audio
tracks you want to digitize from the source tape and whether you
want to record timecode.
•Bin pop-up menu lets you choose a target bin as the destination
for the master clips created when you digitize on-the-fly. You can
Channel Selection
Deck controls
Status bar
Deck Selection
Source Tape
Record Button Trash Button
Digitize/Log Mode
Audio Input Tool
Video Input Tool
Toggle Source
Enable
Target Drive
Clip name
Resolutio
n
Disk time
Bin
Digitize
indicator
and comment
available
One/Two
Disk Mode
Timecode
Display
40
also choose a target bin containing the logged clips you will use to
batch-digitize your media.
•Resolution pop-up menu next to the Bin pop-up menu lets you
choose a resolution.
•Digitize indicator flashes on and off while you are digitizing.
•Record button begins the digitizing process.
•Digitize/Log Mode button lets you switch between Digitize mode
and Log mode.
•One/Two Disk Mode button lets you target a single or separate
media drive volumes for digitizing the audio and video for each
clip.
•Target Drive pop-up menu lets you choose the target drive
volumes.
•Disk time available is displayed after you select a video resolu-
tion and target a drive or drives for the digitized media.
•Trash button stops the digitizing process and deletes the digitized
media.
•Status bar displays information on the current status of the tool.
•Toggle Source button switches between the deck being online or
offline. When the deck is offline, the software ceases to recognize
the deck.
•Deck controls operate the deck.
•Deck Selection pop-up menu lets you choose the deck you want
to play from. It also lets you check and reset serial port connec-
tions to decks.
•Source Tape display shows the name of the source tape.
41
About the Audio Tool
For more information
on the Audio Tool, see
“Audio Tool” in the
Help index.
The Audio Tool controls parameters for audio input and output.
To open the Audio Tool, choose Audio Tool from the Tools menu or
click the Audio Tool icon in the Digitize Tool window. Click the Input,
Output, and Setup buttons to fully open the Audio Tool.
The Audio Tool has the following controls:
•Input display lets you adjust the input level.
•Output display contains a single slider control for raising or low-
ering global audio output.
•Setup display contains information and controls for adjusting
audio output.
•Reset Peak button resets the current maximum peak measure-
ments. It also stops the playback of the internal calibration tone.
Output Setup
Reset Peak
Peak/Hold
In/Out
Channel
Digital Scale
Output
Selectors
Meters
Input
display display display
SetupInput
Track
Menu
Volume Unit Scale
42
•In/Out buttons switch the meter displays for each channel
between input levels from a source device and output levels to the
speakers and record devices. I indicates input, and O indicates
output.
•Peak Hold menu allows you to choose options for customizing
the meter displays, and setting and playing back the internal cali-
bration tone.
•Digital scale to the left of the meters displays a fixed range of val-
ues from 0 to -90 decibels (dB), according to common digital peak
meter standards.
•Volume Unit scale to the right of the meters displays a fixed range
of values that you can conform to the headroom parameters of
your source audio.
•Meters dynamically track audio levels for each channel as
follows:
- Meters show green below the target reference level (the
default reference level is -14 on the digital scale).
- Meters show yellow for the normal headroom range, above
the reference level to approximately -3 dB.
- Meters show red for peaks approaching overload, between
-3 dB and 0 (zero) dB.
- Thin green lines at the bottom indicate signals below the dis-
play range.
•Channel Selector pop-up menus let you map tracks in the
sequence to output channels.
43
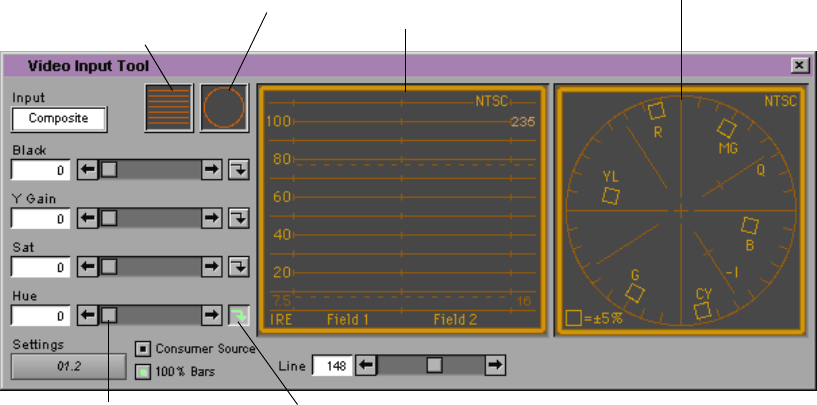
About the Video Input Tool
For more information
on the Video Input Tool,
see “Calibrating: video
input” in the Help
index.
The Video Input Tool controls parameters for incoming video.
To open the Video Input Tool, choose Video Input Tool from the Tools
menu or click the Video Input Tool icon in the Digitize Tool window.
Click the Internal Waveform Monitor button and Vectorscope button
to fully open the tool.
The Video Input Tool has the following options:
•Input pop-up menu lets you choose either a Composite,
Component, or S-Video input source.
•Sliders let you change the value for Black, Y Gain, Saturation, and
Hue.
•Preset buttons are highlighted when the factory preset levels are
displayed. When you click a lit Preset button, it turns gray and the
slider returns to the most recent manual level setting.
Vectorscope VectorscopeInternal
Waveform
Monitor
Internal
Waveform
monitor
Slider
button
Preset buttons
button

44
•Settings pop-up menu lets you save the settings for an individual
tape each time you calibrate bars.
•Consumer Source is selected if you are using a consumer-grade
video deck (VCR), or a deck that has no built-in time-based
corrector.
•100% Bars is used if the source displays 100% bars for calibration.
•Internal Waveform monitor lets you adjust luminance values.
•Vectorscope monitor lets you adjust hue and saturation.
Digitize Preparations Check List
1. Check your hardware configurations: power switches, cable con-
nections, and remote switch on the source deck for deck control
(see the Avid Xpress Setup Guide for hardware configurations).
2. In the Project Settings scroll list, make sure you have the desired
options selected in the General Settings, Deck Settings, Deck Pref-
erences, Deck Configuration, and Digitize Settings dialog boxes.
3. Make sure your drives are striped according to the Avid Xpress
Setup Guide if you are working on a complex project with multiple
streams of video and high-resolution images.
4. Consider labeling each of your external disk drives with a mean-
ingful name to help identify the information on the drive.
5. Insert a tape into the deck and set up the Digitize Tool for track
selection, target bin, target drives, source tape, and source deck.
6. Use the Audio Tool to set the audio input levels.
7. Use the Video Input Tool to set the video input levels; save your
video settings for future use.
45
Digitizing
You can digitize your source material in one of the following ways:
• Digitize and log at the same time
• Batch digitize
• Redigitize
Digitizing and Logging at the Same Time
When you digitize without entering log information in a bin ahead of
time, the system creates clips and associated media files while you dig-
itize. Digitizing in this manner involves manually cueing source foot-
age with an Avid-controlled deck using the deck controls in the
Digitize Tool.
For more information
on digitizing, see “Digi-
tizing” in the Help
index.
There are several ways to digitize and log at the same time. They are:
•Digitizing from a mark IN to a mark OUT. This method lets you
specify the exact timecode location to begin and end digitizing.
You can also specify only a mark IN or mark OUT, and enter the
other mark on-the-fly.
•Digitizing on-the-fly. This method is easier than setting marks,
but it is less precise. It involves using the deck controls in the
lower left corner of the Digitize Tool to cue, play, and stop the
source footage manually while digitizing.
•Autodigitizing. This method requires the least amount of supervi-
sion and effort, but usually calls for more digitizing time and disk
storage space. It involves playing each source tape from a cue
point near the beginning and letting the system digitize the entire
tape, automatically naming and entering each clip into the bin.
46
Batch Digitizing
For more information
and procedures, see
“Batch Digitizing” in
the Help index.
Once you have imported a log or manually logged a group of clips
into a bin, you can automate the digitize process by using the Avid
Xpress batch digitizing capabilities. To batch digitize, source tapes
must have timecode.
Redigitizing
For more information
and procedures, see
“Redigitizing” in the
Help index.
Redigitizing is the process of capturing previously digitized source
footage based on existing clips and sequences. Redigitizing uses the
batch digitize process and does not require extra logging time because
the clip information for such things as source tracks, timecodes, and
resolutions already exists in the bin.

47
CHAPTER 5
Getting Ready to Edit
Before starting an editing session, you need to understand how to
organize and manipulate your clips.
Preparing to edit is described in the following sections:
•About Bin Display Modes
•Controlling Playback
•Marking IN and OUT Points
•Creating Subclips
Tutorial: Getting Ready to Edit contains the following sections:
•Viewing Clips
•Playing Clips
•Marking Edit Points
•Subclipping
48
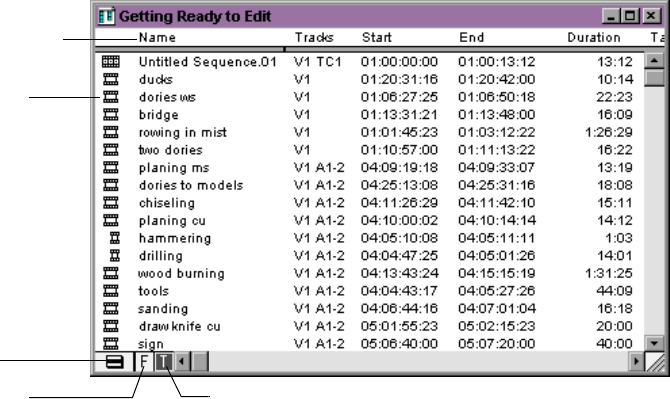
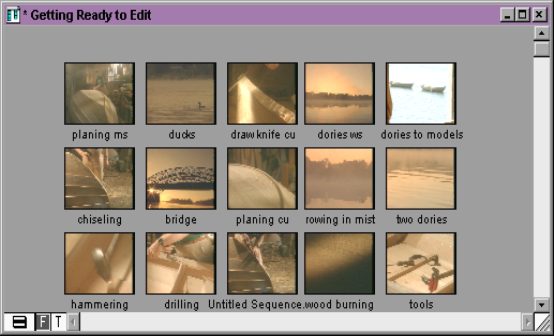
About Bin Display Modes
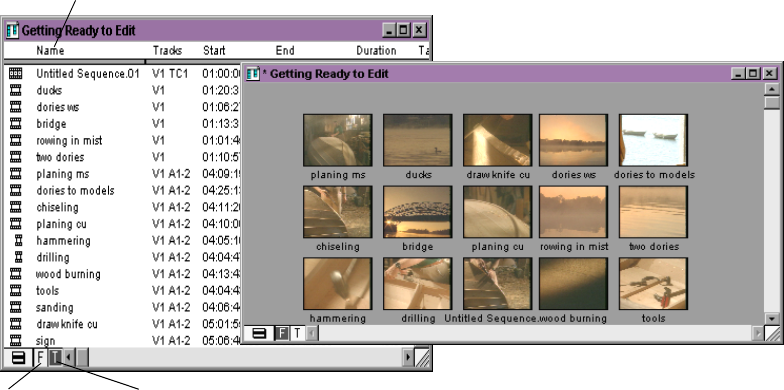
You can use two display modes for viewing and working with clips in
a bin: Text mode and Frame mode.
The Bin Fast menu dis-
plays the same menu as
the Bin menu on the
toolbar along the top of
your screen.
•In Text mode, clips are displayed in a database text format using
columns and rows, with icons representing the various objects.
You can save various arrangements of columns, text, and objects
as customized views by using the Bins settings in the Project win-
dow and the Bin Fast menu.
To enter Text mode, click the Text Mode button (T) in the lower left
corner of the bin.
•In Frame mode, each clip is represented by a single picture frame,
with the name of the clip. You can play back the footage in each
frame, change the size of frames, and rearrange frames in any
order within the bin.
To enter Frame mode, click the Frame Mode button (F) in the
lower left corner of the bin.
Column headings
Object icons
Text mode
Bin Fast
Frame mode
Menu button
49
Controlling Playback
There are several ways to play, view, and cue clips. You can:
• Instantly access frames or move through footage by using the
position indicator within the position bar under the Composer and
Source pop-up monitors
• Play, step (jog), or shuttle through footage by using the buttons
that appear below the Composer and Source pop-up monitors
• Play, step, or shuttle by using keyboard equivalents
Using Position Bars and Position Indicators
You can quickly access frames within a clip that’s been loaded into a
monitor or move through the footage by using the position indicators
that appear in the position bars under the Composer or Source pop-up
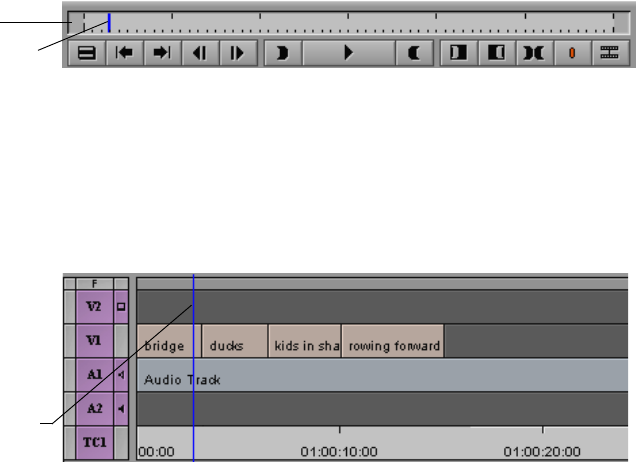
monitors, and in the Timeline when you are viewing a sequence.
• You can move the position indicator within the position bar under
the Composer or Source pop-up monitors by clicking anywhere in
50
the position bar, or by dragging the position indicator to the left or
right. The speed with which you drag the position indicator deter-
mines the speed at which you move through the footage.
• In the Timeline, the position indicator shows your position within
the sequence. It is always in the same position as the position indi-
cator in the Composer monitor’s position bar, and works in the
same way. You can click anywhere in the Timeline to relocate the
position indicator, or you can drag the position indicator through
footage at varying speeds.
• You can go directly to the beginning or end of a clip or sequence
by clicking at the far left or far right of the clip or sequence.
Using Buttons
You can use the buttons that appear below the Composer and Source
pop-up monitors to play and step through your footage. You can also
use the keyboard to manipulate footage.
Position bar
Position indicator
Position indicator in Timeline
51
Play Button
The Play button works like the Play button on a VCR. With a clip
loaded in a monitor, the Play button plays your footage at a normal
rate. During playback, the Play button acts as a Pause button.
The Play button appears by default in the buttons below the Com-
poser and Source pop-up monitors.
For more information
on using the Play but-
ton, see “Play But-
ton:using” in the Help
index.
When viewing sequences in the Composer monitor, you can play only
video and audio tracks that are currently monitored in the Track
Selector panel.
Step Buttons
You can also use the Step buttons under either monitor to jog or play
the clip backward or forward in 1-frame increments.
If you press the Alt key as you click either button, you can advance ten
frames forward and ten frames backward.
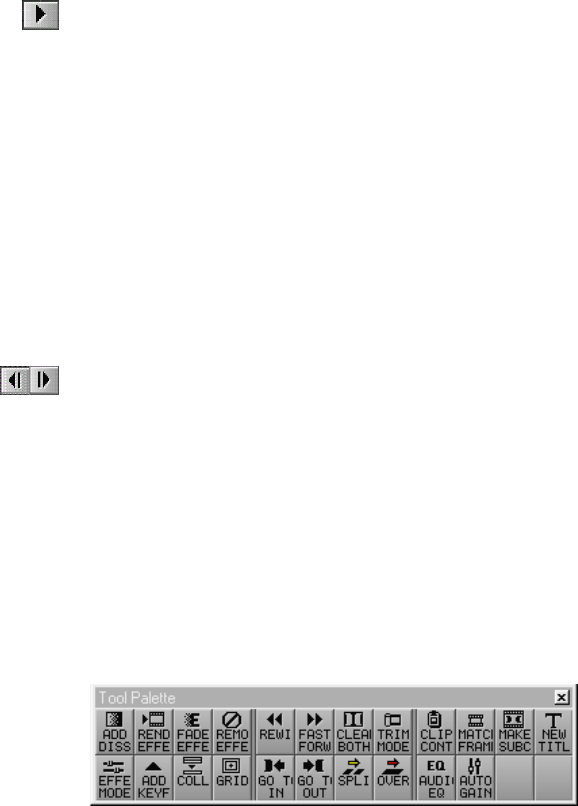
Using the Tool Palette
The Tool Palette provides additional buttons for editing and
navigating.
You can view the Tool Palette by clicking the Fast Menu button under
the Composer or Source pop-up monitors. Drag the Tool Palette to any
other location on the screen for easy access. If necessary, resize the Tool
Palette so that it displays both rows of buttons.
52
Using the Keyboard
The default keyboard contains all of the buttons discussed so far as
well as several additional ones. To access the keyboard, choose Key-
board from the Project Window Settings scroll list.
J-K-L Keys (Three-Button Play)
The J-K-L keys on the keyboard allow you to play, step, and shuttle
through footage at varying speeds. This feature, also referred to as
three-button or variable-speed play, allows you to use three fingers to
manipulate the speed of playback for greater control.
To shuttle through the footage using the J-K-L keys on the keyboard:
1. Load a clip or sequence into the Composer or Source pop-up
monitors.
2. Use the following keys to shuttle at varying speeds:
• Press the L key to move forward through the footage at nor-
mal speed. Press once to increase the forward speed 2 times,
twice to increase it 4 times, and three times to increase it 8
times normal speed.
• Press the J key to move backward at the same shuttle speed
increments.
Play button
Pause button
Play/Step/Shuttle buttonsStep buttons Home key
End key

53
• Press and hold the K and L keys together for slow forward.
• Press and hold the K and J keys together for slow backward.
3. To pause the shuttling, press the K key or the space bar.
Home, End, and Arrow Keys
You can also use the Home, End, and arrow keys on the keyboard to
move through footage when a clip is loaded in a monitor.
• The Home key takes you to the beginning of a clip or sequence.
• The End key takes you to the end of a sequence.
• The Left Arrow key moves the footage one frame forward.
• The Right Arrow key moves the footage one frame backward.
Marking IN and OUT Points
You can mark IN and OUT points for your clips in advance, which
provides several advantages:
• You can quickly build a sequence by splicing the marked clips into
place one after another.
• You can use the process of rough-cut or storyboard editing, which
allows you to instantly splice several prepared clips into a
sequence (see “Storyboarding” on page 94).
• You can play back and mark clips in the bin before loading a single
clip, saving several steps.
• Even if your marks are not accurate now, the Avid Xpress system
allows you to trim the edit points and fine-tune the sequence later
without reediting the material.

54
Creating Subclips
When you mark footage with IN and OUT points, you can either save
the entire clip along with the new marks, or you can create subclips
based on the marks you set to break up longer master clips into
smaller segments of selected footage.
This is similar to creating selects of all your best footage before editing.
Unlike selects, however, subclips do not directly reference the original
media. Subclips remain linked to the master clips from which they are
created, and the master clips in turn reference the digitized media files
located on your storage drives. As a result, none of the original footage
is lost.
You can create subclips directly from the marked section of material in
the monitors by using one of the following methods:
•Alt key: Press and hold the Alt key, then drag the picture from the
monitor to the bin in which you want to store the subclip.
•Subclip button: Click the Subclip button located on the Tool
Palette to create the subclip and place it into the active bin by
default. If you press the Alt key as you click the Subclip button,
the Bin Selection dialog box appears, enabling you to choose the
destination bin for the subclip.
The new subclip is listed in the bin, preceded by a subclip icon and
identified with a numbered.Sub suffix.
Subclips do not limit your access to the original, digitized master clip
material when trimming. Therefore, if you must trim beyond the
marked IN to OUT boundaries of the subclip to make it longer or
shorter, your system does accommodate the boundary adjustments
during the trim.

55
Tutorial: Getting Ready to Edit
The following tutorial steps correspond to the clips and sequence in
the bin titled Getting Ready to Edit:
nBe sure to read Chapter 2 and the preceding overview sections of this chapter
before you start the tutorial.
1. If Avid Xpress is not already running, start it by double-clicking
the Avid Xpress icon.
2. From the Boat Shop Project window, double-click the Getting
Ready to Edit bin.
The clips associated with the tutorial are displayed in the bin.
Viewing Clips
The information in a bin can be viewed in several ways:
• Text mode displays columns of information about your clips.
• Frame mode displays each clip as a single representative image.
56
Viewing in Text Mode
Let’s look at Text mode.
1. Click the Text Mode button (T) in the lower left corner of the bin to
view information about clips in the Getting Ready to Edit bin.
If the button is dark, you are already in Text mode.
You can rearrange the clips in the bin by sorting on a particular
column. Let’s sort by clip name so we can easily locate any clip.
2. Click the Name heading in the bin.
3. Choose Sort from the Bin menu along the top of the screen.
The clip names are rearranged in alphabetical and numerical
order.
Frame mode
Text Mode Frame Mode
Name heading
Text mode
button button
57
Viewing in Frame Mode
Now let’s look at Frame mode.
1. Click the Frame Mode button (F) to see a pictorial representation
of each clip in the bin.
nThe sorted order of clips does not carry over to Frame mode.
You can also press
Ctrl+K (Reduce Frame)
and Ctrl+L (Enlarge
Frame) to change frame
size.
2. Choose Reduce Frame or Enlarge Frame from the Edit menu.
3. Click the Maximize button at the right of the title bar.
The bin enlarges to enclose all the clips. However, they might be
scattered randomly in the bin window. Let’s fix that.
4. Choose Fill Window from the Bin menu.
The clips are arranged in neat rows and columns in the bin.
Now you can adjust frame size so the clips are “readable” but not
so large that they won’t fit in the bin window.
Playing Clips
Your Avid Xpress system offers a variety of ways to play clips. The
more you practice the various methods, the more control you will
have over the editing process.
Playing Clips in a Source Pop-up Monitor
A Source pop-up monitor is a window in which you can play clips.
1. In the Getting Ready to Edit bin, select the clip named bridge by
double-clicking anywhere in the frame.
The bridge clip appears in a Source pop-up monitor.

58
2. Press the Play (5) key on the keyboard to play the clip at normal
speed.
3. Press the Play (5) key again (or press the space bar on the key-
board) to pause playback at any point.
4. Press the Home key (between the main keyboard and the numeric
keypad) to go to the start of the clip.
The End key, just below the Home key, moves the position indica-
tor to the end of the clip.
5. Press the Play (L) key on the keyboard to play the clip forward at
normal speed. Press the key repeatedly to play the clip forward at
60, 90, 150, and 240 frames per second (fps).
6. Press the Reverse Play (J) key to play the clip backward at normal
speed. Press the key repeatedly to play the clip backward at 30, 60,
90, 150, and 240 frames per second (fps).
7. Press the Pause (K) key to stop playback.
8. To move forward or backward at slow speed, press the Pause (K)
key as you press the Play (L) or Reverse Play (J) key.
59
9. Use the 4, 3, 2, and 1 keys to step through the footage forward or
backward in 1-frame or 10-frame increments.
Controlling Playback
In a Source pop-up monitor, you can use:
• Playback control keys
• Equivalent buttons below a Source pop-up monitor
• Blue position indicator to go to a specific position or scroll (move)
through a clip
1. Double-click the tools clip in the Getting Ready to Edit bin.
The clip appears in a Source pop-up monitor.
You can also press the 5
key on the keyboard to
play.
2. Click the Play button.
3. Click the Play button again (or press the space bar on the key-
board) to pause playback at any point.
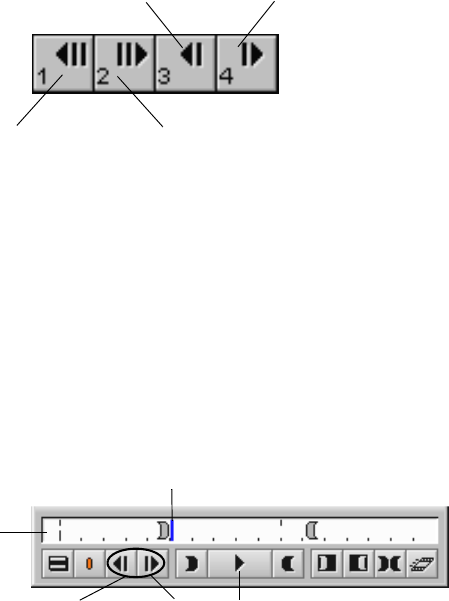
Step Ten
Frames Backward Step Ten
Frames Forward
Step One
Frame Backward Step One
Frame Forward
Play
Position
bar
Step Step
Position indicator
Backward Forward
60
4. Step through the footage forward or backward in 1-frame incre-
ments using the Step Forward and Step Backward buttons under
the Source pop-up monitor. You can also use the 4, 3, 2, and 1 keys
on your keyboard.
5. Locate the vertical blue position indicator in the position bar in the
Source pop-up monitor.
To step several frames
forward, click just to the
right of the position
indicator.
6. Click to the left of the position indicator to step several frames
back in the clip.
Press the End key to go
to the end of the clip. 7. Press the Home key to go to the beginning of the clip.
8. Step through the clip by clicking different spots in the position bar.
9. Drag the position indicator to the left, then to the right, to scroll
through the clip.
Marking Edit Points
Before making your first edit, you can mark the segments of the clips
you want to use in your sequence. You can mark clips in a Source pop-
up monitor.
In this section, you:
• Mark IN and OUT points in a Source pop-up monitor.
• Locate IN and OUT points by timecode in a Source pop-up
monitor.
Marking the
planing ms
Clip
Let’s first display clips in a Source pop-up monitor, and then mark a
couple of clips you will use when you edit the sequence.
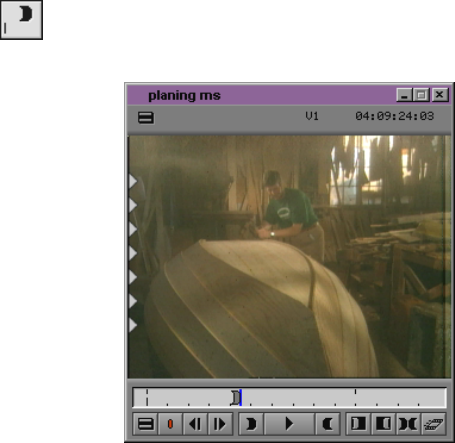
61
1. Activate the Getting Ready to Edit bin by clicking anywhere in it
or by choosing Getting Ready to Edit from the Windows menu.
The bar above the active window turns purple.
2. Double-click the planing ms clip to open it.
The clip name is highlighted and the clip appears in the Source
pop-up monitor.
3. Play the clip from the head by pressing the Home key and then the
Play (5) key, and find the approximate place where the boatbuilder
begins to plane. Then use the Step Forward and Step Backward
(3 and 4) keys to locate the frame where he starts the first planing
stroke.
4. Mark an IN point by pressing the Mark IN (I) key.
A white sawtooth pattern appears on the left edge of the Mark IN
frame.
5. Step forward two full strokes of the plane.

62
6. Mark an OUT point by pressing the Mark OUT (O) key.
Avid Xpress remembers your IN and OUT points until you change
them.
Marking the
ducks
Clip
Now mark the IN and OUT points for the ducks clip. This time,
instead of using the 5 key, use the J-K-L keys to play the clip.
1. Double-click the ducks clip to open it.
2. Locate the frame where the second duck enters the right edge of
the frame behind the duck swimming in the foreground.
Use the 3 and 4 keys to locate the precise frame.
3. Mark an IN point by pressing the I key.
A white sawtooth pattern appears on the left edge of the Mark IN
frame.
4. Step forward to locate the first frame where the same duck flies
beyond the left edge of the screen.
5. Mark an OUT point by pressing the O key.
A white sawtooth pattern appears on the right edge of the Mark
OUT frame.
Marking the
draw knife cu
Clip
Let’s mark another clip we’ll use in the sequence.
1. Open the draw knife cu in a Source pop-up monitor by double-
clicking it in the Getting Ready to Edit bin.
When you edit the sequence, you want to show just three strokes
of the knife.
63
2. Place the position indicator around the midpoint of the clip, and
play forward until just after the first fairly large wood chip falls
off.
Use the Play button (or J-K-L keys) to get close to the frame, and
then use the Step buttons to locate the frame you want to use as
your IN point.
3. Mark an IN point by clicking the Mark IN button under the
monitor.
A white sawtooth pattern appears on the left edge of the Mark IN
frame.
4. Step forward and locate a frame just after three strokes of the
knife.
5. Mark an OUT point by clicking the Mark OUT button under the
monitor.
A white sawtooth pattern appears on the right edge of the Mark
OUT frame.
Using Timecode to Find a Frame
You can mark IN and OUT points by using timecode as your reference
point. If you know the timecode for the frame you want to mark, you
can go to that frame instantly by typing it on the numeric keypad.
In this section, you will use visual cues to mark an IN point, and then
locate a specific timecode. First, you need to display the appropriate
timecode information.
1. Double-click the chiseling clip to open it.
2. Place the cursor in the gray title bar area over the timecode infor-
mation displayed above the Source pop-up monitor.
3. When the cursor changes to a downward arrow, click to display
the pop-up menu, then choose TC, V1 (timecode for track V1)
from the menu. A check mark means it is already selected.
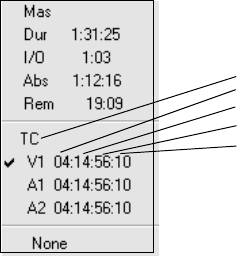
64
The timecode references the frame displayed in the Source pop-up
monitor.
4. Use the Play and Step buttons to locate the frame where the boat-
builder begins one of the first strokes of the chisel.
5. Click the Mark IN button.
6. Read the timecode in the Timecode display at the IN point. Add 15
frames (13 frames PAL) to the timecode number. (Remember, there
are 30 frames in a second.)
For example, if the timecode is 04:11:34:15, adding 15 frames gives
you a result of 04:11:35:00.
7. Type the resulting number on the numeric keypad and press the
Enter key on the numeric keypad. The system inserts the colons
for you.
As you start typing, a window opens in the middle of the Source
pop-up monitor, showing the numbers you type. When you press
the Enter key, the position indicator locates the specified frame.
The Timecode window displays the current number.
nTo locate frames using the numeric keypad, you must show the appropriate
timecode in the Timecode display. For example, the timecode display must
show track V1 to go to a specific frame on the V1 track.
One second holds 30 frames
Timecode shows the following:
Hours
Minutes
Seconds
Frames
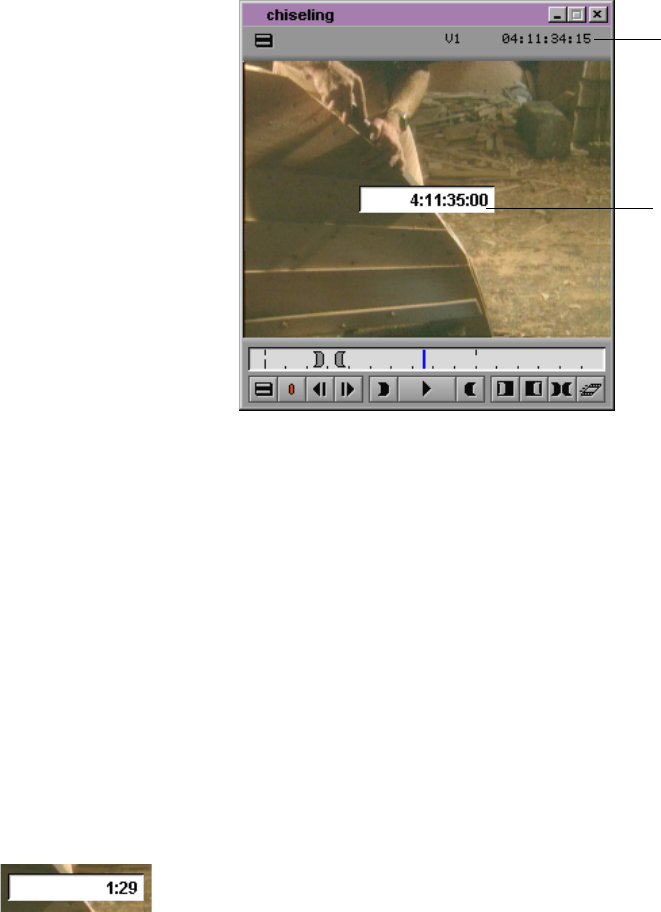
65
8. Click the Mark OUT button.
Using Frame Offset
Whenever you use the
numeric keypad, you
must press the Enter
key on the numeric key-
pad after typing the
number.
You can also use the numeric keypad to move the position indicator
forward or backward a specified number of frames, with the frame off-
set feature. Let’s mark an IN point for the planing cu clip and then use
frame offset to locate the OUT point.
1. Double-click the planing cu clip to open it in a Source pop-up
monitor.
2. Use the Play and Step buttons to locate the frame where the boat-
builder begins making the first stroke of the plane.
3. Click the Mark IN button.
4. To advance two seconds, type +129 (+124 PAL) on the numeric
keypad and press the Enter key on the numeric keypad. The sys-
tem inserts the colons for you.
Timecode
entered
Timecode
display
66
Since Avid Xpress counts the frame it is parked on, you type one
frame less than two seconds.
When using frame off-
set, type one frame less
than the number of
frames you want to
advance.
If you want to move back a certain number of frames, type a
minus sign (–) instead of a plus sign (+) in front of the number.
5. Mark that frame as the OUT point.
Subclipping
Now you will copy portions of one clip into shorter clips, called sub-
clips. Subclipping is a great way to organize your footage into man-
ageable units.
1. Double-click the tools clip in the Getting Ready to Edit bin.
2. Press the Home key to go to the start of the clip.
3. Scroll through the clip by clicking the Play button or dragging the
blue position indicator. Notice there are two separate actions that
can be copied into separate subclips.
4. Mark an IN point when the boatbuilder begins turning the auger
drill.
5. Mark an OUT point 14 seconds later by typing +1400 on the
numeric keypad and pressing the Enter key on the numeric key-
pad.
Actually, you have marked an OUT after 14 seconds and 1 frame,
but that’s okay because you need not be so precise here.
6. Press and hold the Alt key, and drag the picture from the monitor
to the Getting Ready to Edit bin.
As you begin dragging, the pointer changes to a hand attached to
a small box.

67
The subclip has the
name of the original
clip, followed by Sub.n,
where n is the number
of times the master clip
has been cataloged to
that bin.
A new item called tools.Sub.01 appears in the Getting Ready to
Edit bin. The name is highlighted.
7. Type drilling and press the Enter key to name the subclip.
Clearing IN Points and OUT Points
Now you will clear previous IN and OUT points, mark new IN and
OUT points, and create a new clip.
1. With the tools clip in a Source pop-up monitor, click the Clear
Both Marks button in the Tool Palette to clear IN and OUT points.
2. Mark an IN point in the clip when the boatbuilder begins ham-
mering, after he takes a few practice swings.
3. Mark an OUT point at the end of the clip.
4. Press and hold the Alt key, and drag the clip from the Source pop-
up monitor to the Getting Ready to Edit bin.
The clip name is highlighted in the Getting Ready to Edit bin.
5. Type hammering and press the Enter key.
You’ve finished this tutorial. You can go on to “Tutorial: Rough Cut”
on page 76, or end the session.
Closing the Project
To close the project:
1. Choose Close Bin from the File menu.
2. Choose Close from the File menu.
The system saves and closes the project. A dialog box appears.
68
3. Do one of the following:
• Select an existing project.
• Create a new one.
•Click Quit.
Ending the Session
To end the session:
1. Choose Save Bin or Save All Bins from the File menu.
2. Click the Project window labeled Boat Shop and choose Save All
from the File menu.
3. Do one of the following:
• Go to the next tutorial.
• If you are ready to take a break, choose Exit from the File
menu to quit Avid Xpress.
• The system returns to the desktop.

69
CHAPTER 6
Editing a Rough Cut
Beginning to edit involves working with various elements of the Avid
Xpress interface.
Editing a rough cut is described in the following sections:
•Viewing Methods
•Navigating in the Timeline
•Displaying More or Less Detail
•Using the Track Selector Panel
Tutorial: Rough Cut contains the following sections:
•Making the First Edit
•Splicing Video into the Sequence
70
Viewing Methods
You can work with clips and sequences in several different ways,
depending upon your needs and preferences. Each method has its
own uses and advantages, as follows:
•Viewing in bins: Frame mode shows you pictorial images of the
clips in your bins; Text mode shows you the clips listed by name.
•Viewing in a Source pop-up monitor: You can load clips and
sequences into a Source pop-up monitor to view and mark or sub-
catalog shots for use in a sequence that you build in the Composer
monitor.
•Viewing in the Composer monitor: You can load a sequence into
the Composer monitor to view, mark, or modify an existing
sequence.
•Viewing in the Timeline: Use the Timeline to view individual
tracks for either a sequence or a source clip.
Navigating in the Timeline
The Timeline window provides various controls for quickly moving
through a sequence and adjusting your view of details displayed in
the tracks while editing. You can change Timeline views by using the
Timeline Fast menu.
Using the Position Indicator
The position indicator (the vertical blue line) in the Timeline marks
your place in the sequence. It also determines how some of your com-
mands are interpreted. For example, when you perform an edit, the
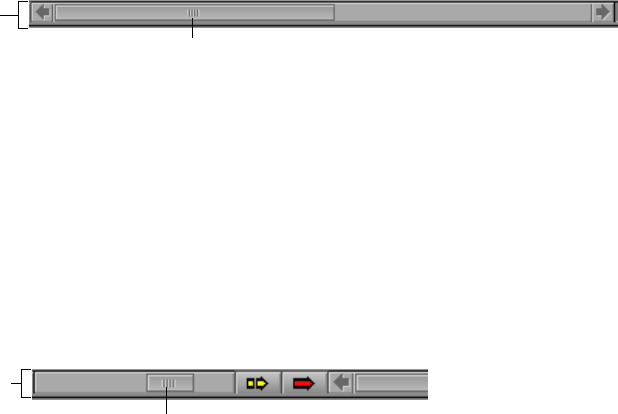
71
system takes the location of the position indicator as the Mark IN in
the absence of established marks.
When you move the position indicator in the Timeline, the smaller
position indicator within the Composer monitor’s position bar also
moves.
Using the Scroll Bar
The scroll bar functions like any standard Windows scroll bar. Click
the arrows or drag the scroll box to scroll left or right.
Displaying More or Less Detail
The scale box on the scale bar stretches and contracts the Timeline area
centered around the blue position bar, allowing you either to zoom in,
focusing on a specific area of your sequence, or to zoom out to see
your whole sequence. This is especially useful when you have a
lengthy sequence with many edits.
The Timeline always expands or contracts proportionally on both
sides of the position indicator.
• To see more detail, click the scale box and drag it to the right.
As the Timeline expands, a second “shadow” position indicator
appears next to the blue position indicator showing the end of a
Scroll bar
Scroll box
Scale box
Scale bar
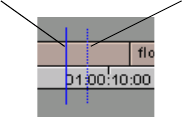
72
single frame, and the two continue to move apart as you expand
the Timeline.
The position indicator and its shadow mark the beginning and
end of each frame.
• To contract an expanded Timeline to see less detail but more of the
sequence, click the scale box and drag it to the left.
Using the Track Selector Panel
The Track Selector panel provides numerous controls for working
effectively with multiple tracks. With this one resource you can select,
delete, monitor, enlarge, reduce, lock, patch, and move any video or
audio track.
The Track Selector panel also provides a quick display of track infor-
mation. You can see which tracks (on the source or record side) are
available, active, patched, monitored, or locked. The following config-
uration shows just one example. The Track Selector panel may look
very different depending on the nature of the source material or the
work underway in the sequence.
Position indicator Shadow position indicator
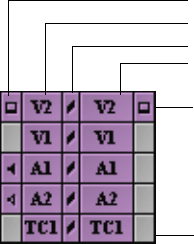
73
The source side (left side) of the panel displays only those tracks avail-
able for the clip currently loaded and displayed in the Source pop-up
monitor. For instance, a clip that has audio digitized for track A1 only
does not display an A2 track in the Track Selector panel.
The record side of the panel displays only those tracks currently in use
for the sequence and displayed in the Composer monitor. However, if
you edit source material with a track selected that does not yet exist on
the record side (A3 or V2, in the previous example), by default the
track appears on the record side after the edit takes place.
Source track monitor
Source tracks
Track lock indicators
Record tracks
Record track monitor
Timecode track
74
Selecting Tracks
You can select tracks on either the record side or the source side as
follows:
• You can edit selected tracks on the source side directly into the
sequence, assuming you have selected parallel tracks on the
record side.
• You cannot edit deselected tracks on the source side into the
sequence, regardless of record track selections.
• You cannot edit deselected tracks on the record side, regardless of
source track selections.
There are three methods for selecting tracks:
• Click any deactivated Track Selector button to select it. Click any
activated Track Selector button to deselect it.
• Drag a lasso around multiple Track Selector buttons to select them
at once.
• With the Timeline window active, choose Select All Tracks from
the Edit menu to select all tracks on the record and source side.
For example, you might select the source and record tracks for V1, A1,
and A2 to edit video and audio from the source clip into the sequence.
Select only V1 source and record tracks to edit the video without the
sound. Or select only A1 and A2 to edit the sound without the video.
nThere are also keyboard equivalents for selecting tracks. Check your keyboard
or the Keyboard settings in the Project window Settings scroll list.
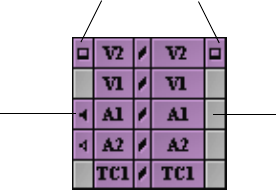
75
Monitoring Tracks
You determine the monitoring of tracks by clicking the monitor col-
umn of either the source- or record-side tracks to activate or deactivate
the monitor icons.
Monitoring Video
The video track monitor determines whether you see video during
playback. You can turn it off at any time to monitor only audio during
editing. When there are multiple video tracks, all tracks below the
monitored track are active during playback.
When you edit with multiple tracks, you can activate the monitor on a
lower track to monitor only the video on that track. This is especially
useful when you have multiple layers of video effects and need to see
one track without the additional layers.
nIf you reposition the video monitor, be sure to return it to the topmost track to
view, render, or record all the tracks together. Unmonitored tracks are not
included in playback.
Video track monitors
Audio track
monitor Audio track
monitor

76
Tutorial: Rough Cut
In this tutorial you begin editing the Boat Shop sequence. This section
corresponds to the clips and sequence in the bin titled Rough Cut. See
Table 6-1.
nBe sure to read the preceding overview sections of this chapter before you start
this tutorial.
Making the First Edit
In this section, you lay down the audio clip, which contains the
sequence’s music and narration. You learn how to mark exactly
1 minute of the clip, which will be the duration of your finished
sequence. First, you play the clip.
1. Double-click the Audio Track clip and play the clip in a Source
pop-up monitor.
The clip displays as black because it’s audio only.
Table 6-1 Starting the Tutorial: Rough Cut
If you have worked on the
previous tutorial and Avid
Xpress is still running:
If you have worked on the
previous tutorial but have
quit the Avid Xpress system:
If you are just starting out
with this tutorial and
haven’t completed the
previous tutorials:
1. Double-click the Rough
Cut bin to open it. 1. Start Avid Xpress by double-
clicking the Avid Xpress icon. 1. Start Avid Xpress by double-
clicking the Avid Xpress
icon.
2. Click the Rough Cut
Sequence clip and drag it into
the Composer monitor to
begin the tutorial.
2. Click the Rough Cut
Sequence clip and drag it into
the Composer monitor to begin
the tutorial.
2. Click the Rough Cut
Sequence clip and drag it into
the Composer monitor to begin
the tutorial.

77
2. Go to the head of the clip by pressing the Home key on your key-
board.
Using Digital Audio Scrub
Use digital audio scrub to locate a specific frame of audio. Use it now
to locate the first frame of music in the audio clip.
1. Press the Caps Lock key to activate digital audio scrub.
2. Play the clip again and click the Play button to stop at the approxi-
mate place where the music begins.
3. Press the Step (jog) keys (1, 2, 3, 4 on the keyboard) to locate the
first frame of the music and click the Mark IN button.
When you use the Step keys, a frame of music or speech sounds
scratchy or buzzlike. You might want to increase the volume of
your speakers to hear the first frame of music.
4. Press the End key on the keyboard.
5. Press the Step Backward key to find the last frame of music.
6. Mark that frame as the OUT point.
7. Press the Caps Lock key again to close digital audio scrub.
Splicing an Audio Clip
Click the yellow Splice-in button on the Tool Palette to copy the clip
into the Composer monitor.
If no points are selected,
the entire clip is edited
into the Timeline.
The clip is edited onto track A1 of the Timeline. The first frame is the
IN point you marked in the clip; the last frame is the OUT point you
marked in the clip.
The audio track appears in the Timeline. The sequence also appears in
the Composer monitor.
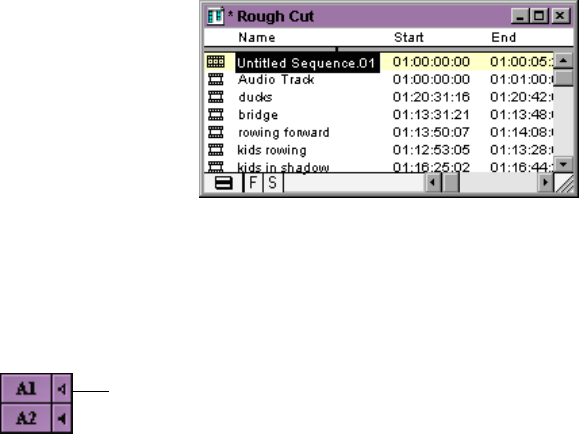
78
Playing a Sequence
The Rough Cut bin contains your newly created sequence. By default,
Avid Xpress names it Untitled Sequence.01. Let’s change this name.
1. Click the name Untitled Sequence.01 to select it; do not click the
sequence icon.
The name is highlighted in black.
2. Type Boat Shop Cut and press the Enter key.
3. Click the position bar beneath the Composer monitor or anywhere
near the left side of the Timeline, then click the Play button to play
the audio.
This audio track should run the length of the sequence, and its
duration should be approximately 1 minute.
Confirming the Duration
The next steps explain how to confirm the duration by displaying the
master timecode, which is the timecode of your sequence.
1. If Master timecode is not displayed, click and pull down the Time-
code display from the gray area above the Composer monitor and
select Mas (Master) timecode.
The master timecode displays the location of the position indicator
in your sequence.
Audio
Monitor
button
button appears when a
speaker is activated.
The Audio Monitor

79
2. Move the position indicator in the Timeline or the Composer mon-
itor to the last frame of the sequence.
The master timecode should read approximately 01:01:00:00.
Splicing Video into the Sequence
Now we’ll start laying some video over the audio. For the opening
shot in the sequence, use the bridge clip.
1. From the Rough Cut bin, double-click the bridge clip to display it
in a Source pop-up monitor.
Play the whole clip
through once first to get
a sense of the material.
2. Mark an IN point midway through the clip, about 2 seconds after
the camera begins to pan left. Watch the timecode at the top of the
Source pop-up monitor to determine 2 seconds after the camera
pans left.
3. Mark an OUT point 3 seconds and 6 frames (5 frames PAL) later, at
approximately 01:13:43:23.
nIf you do not mark an IN point and OUT point, the entire clip will be edited
into the sequence.
4. Move the position indicator in the Timeline or Composer monitor
to the head of the sequence.
5. Deselect record track A1.
A track changes color when it is selected; it is gray when it is
deselected.
6. Press the Splice-in (V) key on the keyboard or click the yellow
Splice-in button on the Tool Palette.
The bridge clip is edited into the V1 track in the Timeline and is
displayed in the Composer monitor. The position indicator rests
on the first frame of black following the splice.
80
When you want to
bring an open bin or
monitor to the fore-
ground, you can click
anywhere in it or
choose its name from
the Windows menu.
7. Click anywhere in the Composer monitor to activate it.
8. Do one of the following to move to the head of the sequence:
• Press the Home key.
• Click the beginning of the Timeline.
9. Click the Play button to play the shot in the sequence.
10. Choose Clear Monitor from the clip name pop-up menu above the
Source pop-up monitor to close the clip.
Splicing the
ducks
clip
Previously, you entered IN and OUT points, but we need to create dif-
ferent ones. It’s not necessary to clear the IN and OUT points. When
you create a new IN point and OUT point, the system automatically
clears previously set points.
1. From the bin, double-click the ducks clip to open it in a Source
pop-up monitor.
2. Locate a frame in the Source pop-up monitor just after the clip’s
midway point where the duck that has been sitting in the water is
about to take off. Mark an IN point five frames before the duck
begins to move its wings to fly.
3. Mark an OUT point in the first frame after the duck leaves the
monitor to the left.
Playing IN to OUT
Now you can take a look at the marked portion of the clip to make
sure it is what you want.
1. Press the Play IN to OUT (6) key on the keyboard.
The clip plays from the IN point to the OUT point.

81
If possible, it would be nice to provide a little “breathing space”
before the next shot.
2. Play the rest of the clip to see if there are several frames of water
after the duck leaves the shot.
Using the Go to OUT Key
You can snap the position indicator to an OUT (or IN) point.
1. Click the Go to OUT button on the Tool Palette or press the Go to
OUT (W) key on the keyboard.
Whenever you use the
numeric keypad, you
must press the Enter
key on the numeric key-
pad after typing the
number.
2. Type +6 on the numeric keypad and press the Enter key on the
numeric keypad to add 7 frames to the shot.
3. Mark that frame as the OUT point.
The OUT point automatically moves to the new position.
nYou can also press and hold the Alt key, and click the Mark IN button to go to
the IN mark. Press and hold the Alt key, and click the Mark OUT button to go
to the OUT mark.
Moving to the Head and Tail of a Shot
Before splicing in the next shot, make sure the position indicator is on
the first frame of black after the bridge edit.
1. Move the position indicator anywhere to the right of the bridge
clip in the Timeline.
2. Press and hold the Ctrl key, and click the mouse between the tran-
sition and the position indicator. The position indicator snaps to
the first frame of the shot.
3. Select source and record tracks V1 in the Timeline.
The selected tracks appear bright, not gray.

82
Using the Splice-in Button
To splice a shot:
1. Click the yellow Splice-in button on the Tool Palette.
The second shot is now edited into the sequence.
2. Go to the head of the sequence and play through the first two
shots.
Splicing a Shot into the Middle of a Sequence
With nonlinear editing, you can splice a shot anywhere in your
sequence.
1. From the Rough Cut bin, open the kids rowing clip.
2. Mark IN and OUT points to mark 4 seconds of the camera pan-
ning from the girl to the boy.
Let’s see what this shot looks like between the first and second
shots.
3. Click in the middle of the ducks clip, between the position indica-
tor and the bridge clip.
4. Press and hold the Alt key, and click the mouse within the ducks
clip in the Timeline to place the position indicator on the first
frame of the ducks clip.
5. Press the Splice-in (V) key on the keyboard.
Wherever you splice a shot into the middle of a sequence, the rest
of the sequence moves down. Splicing lengthens the material on
the track.
6. Play the sequence so far to see what you have done.

83
Undoing an Edit
The kids rowing shot doesn’t seem to fit here. Let’s undo the last step.
Choose Undo Splice-in from the Edit menu or press Ctrl+Z.
Use the Undo feature whenever you feel you have made a mistake or
want to go back a step. You can undo or redo up to 32 previous
actions.
Using the I/O (IN Point / OUT Point) Tracking Display
Now, you will add two more shots to the sequence.
1. Open the kids in shadow clip.
2. Click the Clear Both Marks button on the Tool Palette.
3. Mark an IN point in the first half of the clip, one frame before the
second boat enters screen left.
4. Mark an OUT point 3 seconds and 17 frames later (PAL: 3 seconds
and 14 frames) by doing the following:
a. Choose I/O from the Tracking Information pop-up menu in
the gray area above the Source pop-up monitor.
The I/O option displays the duration from the IN to OUT
points. If you only mark the IN point, the I/O displays the
duration from the IN point to the position indicator.
b. Step forward until the I/O display reaches 3:17, and mark the
OUT point.
5. Move the position indicator to the first black frame.
6. Press the Splice-in (V) key on the keyboard to splice the clip into
the Timeline as the third shot.

84
7. Open the rowing forward clip and mark an IN point a little less
than halfway through the clip, when the dory is evenly centered
between the right and left edges of the frame.
8. Mark an OUT point 5 seconds later.
9. Splice the clip into the Timeline as the fourth shot.
10. Choose Save All Bins from the File menu.
You’ve finished this tutorial. You can go on to “Tutorial: Refining
Edits” on page 92, or quit Avid Xpress.

85
CHAPTER 7
Refining the Edit
Refining edits tightens and improves the relationship between pic-
tures and sound.
Refining edits is described in the following sections:
•Using Segment Mode
•Basic Trim Procedures
•Audio Editing
Tutorial: Refining Edits contains the following sections:
•Overwriting Shots into a Sequence
•Storyboarding
•Rearranging Shots
•Removing Footage from a Sequence
•Trimming
•Working with Audio

86
Using Segment Mode
Segment mode provides editing controls for moving, deleting, mark-
ing, and editing entire segments in the Timeline. A segment is a portion
of the sequence that includes two or more transitions. There are two
modes for editing segments or adding shots: Extract/Splice-in, indi-
cated by a yellow arrow, and Lift/Overwrite, indicated by a red arrow.
Unlike traditional editing, Segment mode allows you to instantly
reposition entire segments using visual controls as though you were
physically “dragging” portions of your sequence around on a tape.
You can move clips separately or together, on one track or across
tracks.
Editing in Segment Mode
Observe the following guidelines when editing in Segment mode:
• Transition effects on either side of a moved selection are deleted.
Transition effects inside the selection are preserved.
• You can track the audio while moving segments by pressing the
Caps Lock key to enable audio scrub.
• When you are finished, Segment mode continues to affect your
editing unless you click the active Segment Mode button to
deactivate it.
Distinguishing Two Types of Buttons
In Chapter 6, you used the Splice-in button. The Splice-in button and
the Overwrite button (see “Overwriting Shots into a Sequence” on
page 93) take clips from a Source pop-up monitor and places them into
the Timeline. The Segment Mode buttons, Extract/Splice-in and Lift/
Overwrite, move segments around within the Timeline. The names are
similar but you use them for different purposes.
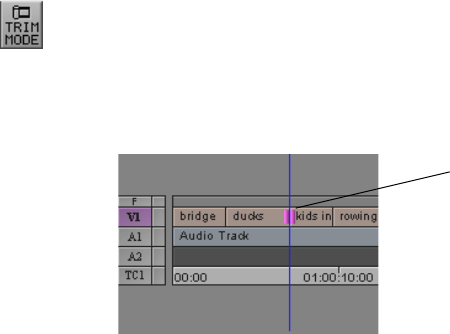
87
Basic Trim Procedures
You can enter Trim mode in several different ways, depending on the
type of trim you expect to perform. Once in Trim mode you can:
• Select additional tracks
• Switch between trim sides
• Perform and play back the trim
Entering Trim Mode
There are two methods for entering Trim mode. They are:
•Clicking the Trim Mode button in the Tool Palette. By default the
system enters Trim mode and selects the tracks nearest the posi-
tion indicator for dual-roller trimming. This method is useful for
selecting straight-cut transitions on one track or across video and
audio tracks.
When you deselect one or more tracks in the Track Selector panel,
by default only the transitions in the highlighted tracks are
selected for trimming. If the transitions are not straight cuts (over-
lap cuts or L-edits), the system highlights the topmost track near-
est the position indicator.
Transition selected
for trimming
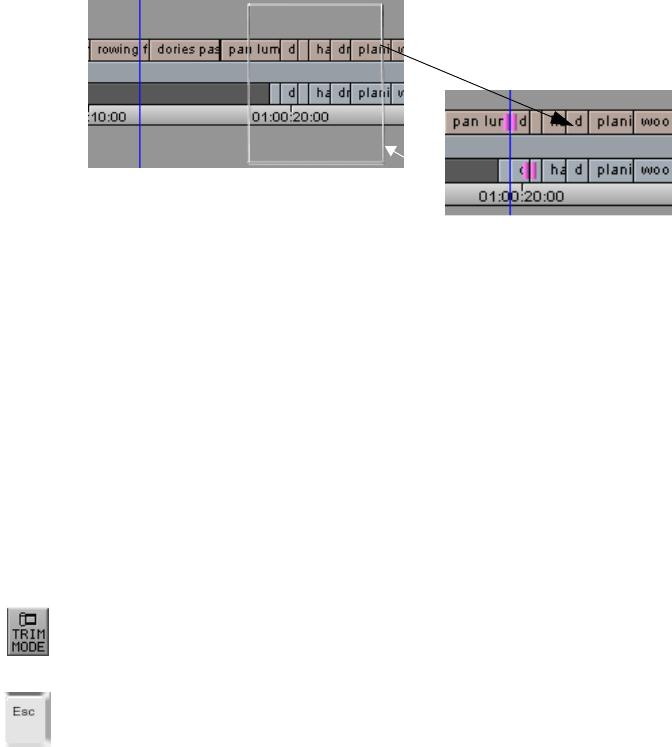
88
•Lassoing the transitions in the Timeline. Draw the lasso by click-
ing at a point above the top track in the Timeline and dragging to
surround the transitions. This method is useful when you need to
select multiple transitions staggered across parallel tracks (overlap
cuts) for simultaneous trimming.
You can drag from right to left, or left to right, and you can lasso
single transitions across several contiguous tracks. However,
avoid lassoing more than one transition from left to right on a sin-
gle track, because this activates Segment mode.
nTo select transitions located below several track layers, draw a lasso within
the Timeline by pressing the Ctrl key as you drag.
Leaving Trim Mode
You can leave Trim mode at any time in one of several ways:
• Click the Trim Mode button on the Tool Palette.
• Press the Esc (Escape) key on the keyboard.
• Click a specific location in the Timecode (TC1) track at the bottom
of the Timeline to leave Trim mode. The position indicator moves
to that location.
Transitions are selected for dual-roller trim
Lasso drawn across three tracks
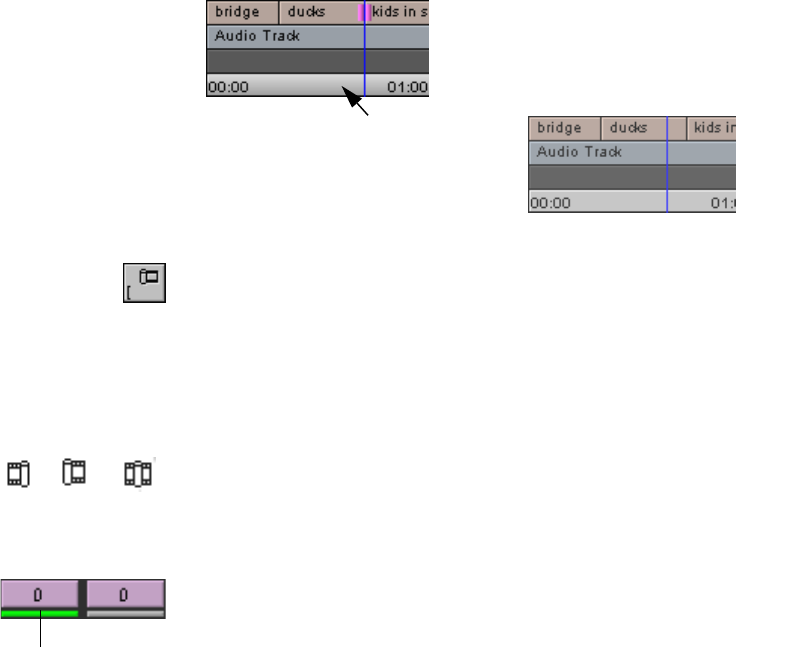
89
• Press the Left Bracket key on the keyboard.
Selecting Between Trim Sides
To select sides of a transition to trim, click the outgoing (A-side) or
incoming (B-side) monitor to define which side of the transition to
trim. Notice that the pointer changes to a single-roller A-side, single-
roller B-side, or double-roller icon depending on position.
The selected parts of the transition are highlighted, and the corre-
sponding rollers appear in the Timeline. Also, one or both of the frame
counter indicators below the monitors are highlighted to reflect the
active trim sides: A-side, B-side, or both. The number indicates how
many frames have been added or subtracted (-) from the transition.
Click in the TC track at a
selected location
The system leaves Trim mode and
relocates the position indicator
A-side B-side A and B
Highlight indicates
A-side B-side
active sides

90
Performing a Basic Trim
With your transitions and trim sides selected, you can perform a basic
trim using one of the following procedures:
• Use the Trim buttons to trim forward or backward by 1- or 10-
frame increments.
• Use the numeric keypad at the right side of the keyboard, as fol-
lows:
- To move the transition a specific number of frames, type a
plus sign (+) or minus sign (–) and the number of frames
(from 1 to 99) you want to move forward or backward. Then
press the Enter key on the numeric keypad. If the number of
frames is larger than 99, type an F after the number to indicate
frame count. For example, to enter 200 frames, type 200F and
press the Enter key.
- To move the transition to an exact timecode, type a timecode
number larger than 99, including frames. For example, type
102 to enter 1 second and 2 frames.
• Use controls in the Timeline by clicking a roller at the selected
transition and dragging forward or backward in the sequence.
• For greater control:
- Press the Alt key as you drag to move one frame at a time.
- Press the Ctrl key to snap to other transition points.
As you trim, all selected transitions in the Timeline move in unison.
The Frame counter displays the frame count backward or forward for
1 frame 10 frames
Click and drag a transition in the Timeline
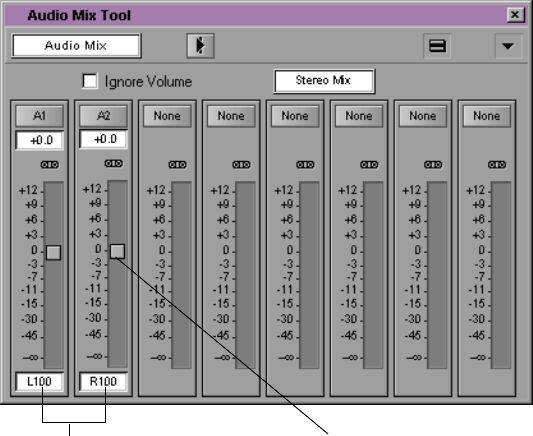
91
one or both trim sides, and the monitors display the new incoming or
outgoing frames.
nTo trim successfully, the clips must have available frames on either side of the
IN and OUT points. These frames must be more or the same in number as
frames you are going to trim.
Audio Editing
The Avid Xpress system provides audio scrub features and waveform
plots specifically designed for frame-accurate cueing, marking, and
editing of audio. You can use these features at any time during editing
or while making adjustments with the audio tools.
You can use the Audio Mix Tool to adjust volume (level) and balance
(pan).
Pan adjustment Level adjustment

92
Tutorial: Refining Edits
In this tutorial you refine and trim edits and adjust audio levels. This
section corresponds to the clips and sequence in the bin titled Refin-
ing Edits. See Table 7-1.
nBe sure to read the preceding overview sections of this chapter before you start
this tutorial.
Table 7-1 Starting the Tutorial: Refining Edits
If you have worked on the
previous tutorial and Avid
Xpress is still running:
If you have worked on the
previous tutorial but have
quit the Avid Xpress system:
If you are just starting out
with this tutorial and
haven’t completed the
previous tutorials:
1. Double-click the Refining
Edits bin to open it. 1. Start Avid Xpress by double-
clicking the Avid Xpress icon. 1. Start Avid Xpress by double-
clicking the Avid Xpress icon.
2. Press and hold the Alt key,
and drag the sequence you
were working on from the
previous tutorial into the
Refining Edits bin. Close the
Rough Cut bin.
2. From the Boat Shop Project
window double-click the Rough
Cut bin and the Refining Edits
bin to open them.
2. Click the Refining Edits
Sequence clip and drag it into
the Composer monitor to begin
the tutorial.
3. Drag the sequence you
were working on from the
Refining Edits bin into the
Composer monitor.
3. Press and hold the Alt key,
and drag the sequence you were
working on from the previous
tutorial into the Refining Edits
bin. Close the Rough Cut bin.
4. Drag the sequence you were
working on from the Refining
Edits bin into the Composer
monitor.

93
Overwriting Shots into a Sequence
In addition to splicing, you can overwrite shots into a sequence. An
overwrite edit replaces a section of a sequence with other source foot-
age. An overwrite edit does not affect the length of the sequence.
The rowing forward shot is too long. In this section you will edit the
next shot into the sequence before the end of the rowing forward clip.
1. Make sure the Composer monitor is active.
2. Place the position indicator in the Timeline on the first frame of
rowing forward.
3. Advance 3 seconds by typing +229 (+224 PAL) on the numeric
keypad, and pressing the Enter key on the numeric keypad.
4. Mark an IN point.
5. Open the dories passing clip.
6. Mark an IN point in the first half of the clip, 18 frames (4 frames
PAL) after the tips of the two boats seem to touch in the middle of
the screen.
7. Mark an OUT point a few frames less than 7 seconds later, when
the girl’s oars are both out of the water, and her left oar just catches
the light.
8. Click the red Overwrite button on the Tool Palette or press the B
key on the keyboard.
The shot overwrites the end of the rowing forward clip and
extends beyond it, thus lengthening the video portion of the
sequence.
You should now be at about 19:20 into the sequence, with five video
clips in it.

94
Storyboarding
Storyboarding allows you to set up a group of clips in a sequence of
events and then load them into the Composer monitor all at once.
In this section, you mark a group of clips using the instructions in
Table 7-2. The table provides a timecode to set the IN point, and based
on the duration, you can use the numeric keypad to determine the
OUT point.
Marking Clips for Storyboarding
Use the following procedure to set your IN and OUT points for each
clip in the table:
1. Open each clip listed in Table 7-2 into a Source pop-up monitor.
2. Choose V1 in the Tracking Information display above the Source
pop-up monitor.
You use the V1 numbers to go to the IN point.
3. Mark your IN point.
In Table 7-2, the clips you have already marked are followed by an
asterisk. You may simply want to check the IN and OUT points
and reset them only if necessary.
4. To set the OUT point, type the duration (from Table 7-2) on the
numeric keypad and press the Enter key on the numeric keypad.
5. Mark the OUT point.
6. Continue marking IN and OUT points for the remaining clips —
but do not edit the clips into the sequence yet.

95
*You might have set the IN and OUT points for these clips in the
previous tutorial. Check them to see whether or not they need to be
reset.
Table 7-2 Mark Points for Boat Shop Clips
Clip Name Mark IN Point Duration
draw knife cu* 05:02:08:09 1:16 (NTSC)
1:13 (PAL)
chiseling* 04:11:34:22 (NTSC)
04:11:36:21 (PAL) 00:16 (NTSC)
00:13 (PAL)
hammering* 04:05:10:08 1:00
drilling* 04:04:47:25 (NTSC)
04:04:48:21 (PAL) 1:00
planing cu* 04:10:05:17 (NTSC)
04:10:07:04 (PAL) 2:00
planing ms* 04:09:24:00 (NTSC)
04:09:25:14 (PAL) 3:19 (NTSC)
3:16 (PAL)
sanding 04:06:52:03 3:12 (NTSC)
3:10 (PAL)
wood burning 04:14:24:02 6:15 (NTSC)
6:12 (PAL)
two dories 01:11:03:03 (NTSC)
01:11:04:10 (PAL) 1:22 (NTSC)
1:18 (PAL)
rowing in mist 01:02:38:29 1:22 (NTSC)
1:18 (PAL)
dories ws 01:06:38:26 4:00
dories to models 04:25:22:28 3:23 (NTSC)
3:19 (PAL)
sign 05:06:52:01 (NTSC)
05:06:44:07 (PAL) 10:00 (NTSC)
10:00 (PAL)
96
Storyboard Editing the Clips
To arrange the clips as a storyboard:
1. Display the Refining Edits bin in Frame mode and click the zoom
box so the bin fills the screen, or click the lower right corner of the
bin and drag it to enlarge the window.
2. Choose Fill Window from the Bin menu to arrange the clips in the
bin.
3. Drag the draw knife cu clip to a clear space in the lower left area
of the bin.
4. Arrange the following clips (after draw knife cu) in two or three
rows, from left to right, and top to bottom, to form the storyboard.
Make sure you maintain the order of clips:
•chiseling
• hammering
• drilling
• planing cu
• planing ms
•sanding
• wood burning
• two dories
• rowing in mist
• dories ws
• dories to models
•sign
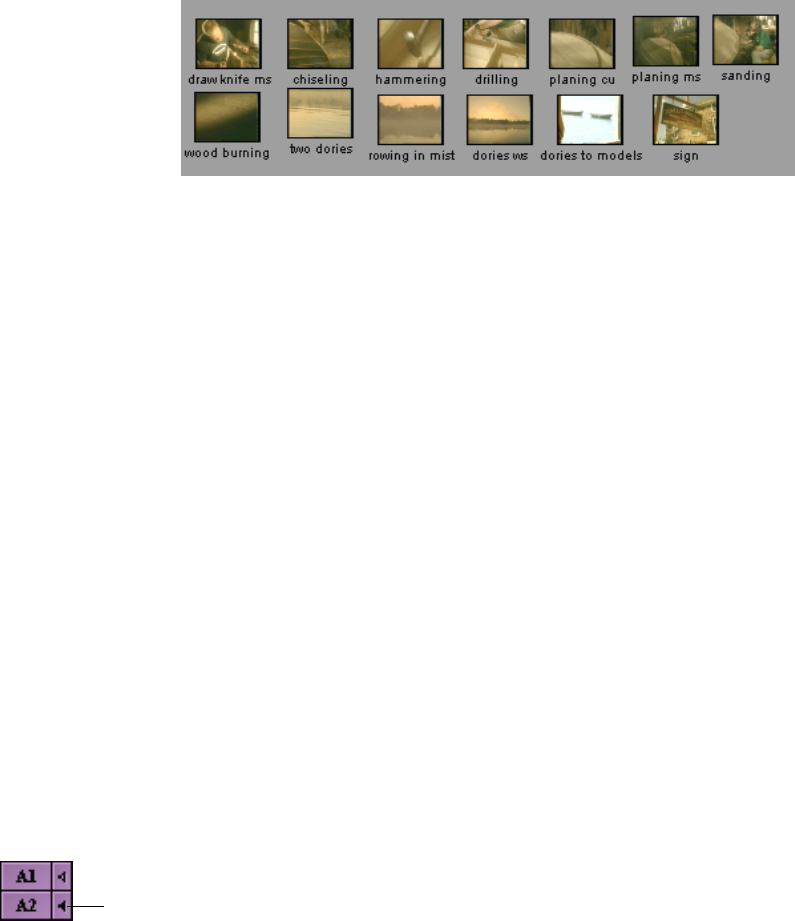
97
Now you’re ready to load the marked clips into the sequence.
5. Place the position indicator in the Timeline on the first frame of
black following the dories passing clip and press the Ctrl key as
you click the mouse.
6. Select only record track V1 and deselect A1 in the Timeline.
7. Select the storyboarded clips all at once:
a. Position the mouse pointer in the bin in the blank area just to
the left of the draw knife cu clip.
b. Lasso the clips by dragging the pointer to the right and down,
making sure to select all of the storyboarded clips.
A box forms as you move the mouse, starting next to the draw
knife cu clip and ending at the last pointer position. All the
names are highlighted in blue.
8. Click the mouse on one of the clips (on the image, not the name),
and drag the group into the Timeline. Release the mouse when a
yellow arrow appears in the Timeline.
The shots are spliced into the sequence in the order you specified.
9. To play the sequence:
a. Move the position indicator to the head of the sequence.
b. Activate the speaker icons for tracks A1 and A2 by clicking the
record track monitors (only one record track monitor can be
activated at a time).
Record
Track
Monitor

98
Track A2 contains sound for several clips.
c. Click the Play button under the Composer monitor.
Rearranging Shots
You can rearrange shots by overwriting material, lifting material, or
removing material. Overwriting material doesn’t change the length of
the sequence. Lifting material leaves filler and doesn’t affect the length
of the sequence. Removing material shortens the length of the
sequence.
Overwriting with the Three-Point Edit
The three-point edit is an excellent way to replace a shot in a sequence.
Use the Mark Clip button to select the shot in the sequence (or mark an
IN and OUT point for a segment that’s not a single shot), and mark
either the IN or OUT point in the source clip. The system calculates the
exact duration of the source clip to insert.
Let’s replace the chiseling shot with draw knife ms to create a
smoother movement across the cut.
1. To enlarge this area, in the Timeline:
a. Press the Home key.
b. Click the scale box and drag it to enlarge the Timeline.
c. Click the scale box and drag it to the right until you see the
entire chiseling clip.
2. Move the position indicator to the chiseling clip.
3. Select only record tracks V1 and A2.
99
4. Click the Mark Clip button in the row of buttons below the
Composer monitor, or press the T key on the keyboard.
The IN and OUT points appear at the head and tail of the clip in
the TC1 track of the Timeline; the marked segment turns purple.
The IN and OUT points also appear in the Composer monitor’s
position bar.
5. Open the draw knife ms clip in a Source pop-up monitor and
mark an IN point around 2.5 seconds (7.5 seconds for PAL) into
the clip, when the boatbuilder’s motions become smooth.
6. Click the red Overwrite button on the Tool Palette (the B key on
the keyboard) to make the three-point edit.
The shot draw knife ms replaces the chiseling shot.
7. Click the scale box and drag it to the left to return to the previous
Timeline view.
Rearranging Footage with Extract/Splice-In
Extract/Splice-in is a great tool for changing the order of shots in a
sequence. Let’s see what it looks like if we reverse the position of two
shots in the sequence, rowing in mist and two dories.
1. Expand the Timeline again with the scale bar. Click the scroll box
and drag it toward the end of the sequence until you reach the
rowing in mist clip.
2. Click the yellow Segment Mode (Extract/Splice-in) button below
the Timeline.
When the button is activated, its background turns light gray.
cDon’t confuse the Extract/Splice-in and Splice-in buttons. The
Extract/Splice-in button is located below the Timeline; the Splice-in
button is located on the keyboard and on the Tool Palette (see “Dis-
tinguishing Two Types of Buttons” on page 86).

100
3. Select only track V1. Deselect all audio tracks.
4. Press and hold the Alt key, and click the rowing in mist shot. Drag
it to the left, so it is completely over the two dories shot, and
release the mouse.
Two dories should now follow rowing in mist.
5. Click the Extract/Splice-in button again to deselect it.
6. Click the Timeline in front of the two shots and play the shots.
The edit works.
Removing Footage from a Sequence
You can remove footage from your sequence, and either close or retain
the gap that results. Extract/Splice-in closes the gap, and Lift/Over-
write retains the gap.
Removing Footage with Extract/Splice-In
The planing ms shot breaks up the feeling of being close to the action.
Let’s remove it from the sequence and close the gap that results.
1. Use the scroll bar to locate the planing ms clip.
2. Click the yellow Segment Mode (Extract/Splice-in) button below
the Timeline.
To eliminate footage
that does not start and
end at a transition, use
IN and OUT points to
delimit the segment
that you want to
extract.
3. Click anywhere in the planing ms clip on V1, then Shift+click the
audio portion of the clip in track A2.
The clip is highlighted in both tracks.

101
4. Press the Delete key on the keyboard.
The selected shot is eliminated and the surrounding shots close
the gap.
5. Click the Extract/Splice-in button again to deselect it.
Removing Footage with Lift
Lift retains the gap after lifting footage from the sequence. Use Lift if
you want to maintain the rhythm of a sequence or the synchronization
of the video and audio tracks.
The dories passing shot plays for too long, but we want the next shot,
draw knife cu, to remain in sync with the audio. We will use Lift to
shorten dories passing, but maintain the same entrance point for the
next shot. Later, we’ll determine what to put in its place.
1. Display the master timecode in the Composer monitor’s timecode
display by choosing Mas from the Timecode menu.
2. Turn off track A2.
3. Mark an IN point in the sequence at master timecode 01:00:17:29
(01:00:17:24 PAL) by using the Mark IN button below the Com-
poser monitor.
4. Go to the last frame of the dories passing segment by placing the
position indicator in the next clip beyond dories passing. Press
and hold the Alt key, and click the mouse.
5. Mark an OUT point.
You must mark an IN and OUT point in the sequence.
6. Press the Lift key (Z) on the keyboard to remove the segment.
The selected segment lifts out and leaves black filler in its place.
7. Play the entire sequence in the Composer monitor.
102
Trimming
Trimming allows you to adjust incoming and outgoing frames of your
clip. There are two types of trims: dual-roller and single-roller.
Dual-Roller Trimming
Use a dual-roller trim to adjust both sides of a transition simulta-
neously, adding frames to one shot while subtracting frames from the
adjacent shot. The total duration of the sequence does not change.
Let’s cut the kids in shadow shot right on the beat of the music.
1. Select record track V1 and deselect the audio tracks. Make sure the
A1 speaker is turned on in the Timeline.
2. Place the position indicator near the ducks/kids in shadow tran-
sition, and click the Trim Mode button on the Tool Palette.
The position indicator snaps to the transition.
The Composer monitor shows the last (tail) frame of the ducks
shot on the left and the first (head) frame of the kids in shadow
shot on the right.
New buttons appear below the trim windows. Note that during
dual-roller trim mode, both frame counters are purple.
Trim
transition
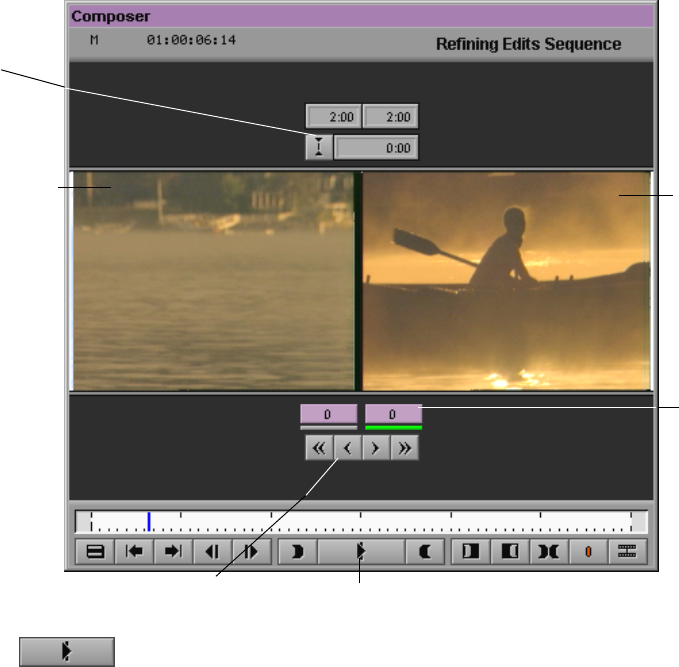
103
3. Play the transition by clicking the Play Loop button.
The transition plays repeatedly.
4. To stop the playback loop, click the Play Loop button again.
5. Press the Caps Lock key on the keyboard so you can hear the
audio as you trim.
To use digital audio scrub, make sure the speaker icon for record
track A1 is hollow and increase the speaker volume, if necessary.
6. Press and hold the Alt key, and click the speaker icon for track A1
if it is not hollow.
Transition effect
palette
Outgoing video Incoming
Frame
counters
Trim frame buttons buttonPlay Loop
video
104
7. Click the Trim Right One Frame button under the Frame counters
until you hear a change in loudness around the seventh frame
(sixth frame PAL).
This adds frames to the tail of the outgoing shot and removes
them from the head of the incoming one. The duration of the video
track remains unchanged.
8. Play the transition again by using the Play Loop button.
9. Do one of the following to leave Trim mode:
• Click the Trim Mode button in the Tool Palette.
• Press the Left Arrow key on the keyboard.
Using Dual Rollers to Trim the Outgoing Shot
Let’s insert a shot to take the place of the filler we left in the sequence.
You replace the filler with pan lumber, because this shot provides con-
tinuity of movement from the previous shot. Once you overwrite the
shot into the sequence, you trim it.
1. Place the position indicator within the filler between the dories
passing and the draw knife cu clips.
2. Select record tracks V1 and A2 in the Timeline, and deselect A1.
3. Click the Mark Clip button under the Composer monitor or press
the T key on the keyboard.
Hollow speaker icon
Trim Right
Ten Frames
Trim Right
One Frame
Trim Left
One Frame
Trim Left
Ten Frames
105
4. Open the pan lumber clip and mark an OUT point where the lum-
ber is in sunlight and the camera stops panning. Do not mark an
IN point.
5. Select record tracks V1 and A2.
6. Click the red Overwrite button on the Tool Palette.
cDon’t confuse the Lift/Overwrite and Overwrite buttons. The Lift/
Overwrite button is located below the Timeline; the Overwrite but-
ton is located on the keyboard (the B key) and on the Tool Palette.
Trimming the
pan lumber
Shot
In the next steps, you will trim the pan lumber shot so it enters a little
earlier.
1. Enter Trim mode by lassoing the Timeline tracks:
a. Click the cursor above all the Timeline tracks just to the left of
the dories passing/pan lumber transition.
b. Drag the mouse down and to the right to surround the
transition.
The trim rollers appear.
2. Move the transition 74 frames earlier by clicking the Trim
Left Ten Frames button 7 times and the Trim Left One Frame
button 4 times.
You see the numbers change in the purple frame counters.
Trim Rollers
106
Single-Roller Trimming
In the trims you made so far, you trimmed both the head and the tail
shots an equal number of frames, adding to one side and subtracting
from the other. Now let’s trim the tail of the pan lumber shot without
affecting the head of the draw knife cu shot.
1. While still in Trim mode, advance to the pan lumber/draw knife
cu transition by pressing the S key on the keyboard.
2. Select track A2 in addition to V1 in the Timeline so you can trim
both the audio and video of the shot.
3. Click the left frame counter (A-Side Trim counter).
Your trim will only affect the outgoing shot, which is in the left
Trim monitor. The left frame counter remains purple, while the
right one is deselected.
4. Type -10 and press the Enter key on the numeric keypad to sub-
tract 10 frames from the outgoing shot.
This moves the transition 10 frames to the left.
5. Leave Trim mode by pressing the Left Arrow key on the keyboard
or by clicking the Trim Mode button on the Tool Palette.
Adding Synced Audio
Now we’ll add some synced audio to the sequence.
1. Open the intervu: Lowell’s Boat Shop clip.
Be sure the volume on the speakers is turned up.
2. Mark the IN point at the start of the first phrase, “Lowell’s Boat
Shop isn’t quite the same as it always has been...” and mark the
OUT point at the end of the last phrase, “...a great symbol of New
England.”
Left frame
counter
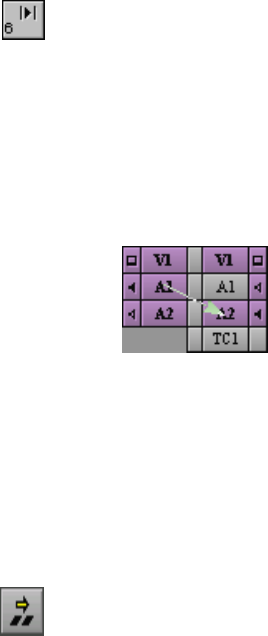
107
3. Click the Play IN to OUT (6) button on the keyboard to play the
clip from the IN to OUT marks.
The audio is on track A1 in the source clip, but we want to add it
to the end of track A2 in the Timeline.
First we patch from source track A1 to record track A2.
4. To patch the track, drag the cursor from the A1 source track icon to
the A2 record track icon.
5. Display the master timecode (Mas) in the timecode display above
the Composer monitor.
6. In the sequence, place the Mark IN point at master timecode
01:00:41:00 (01:00:40:25 PAL), in the middle of the dories ws clip.
7. Make sure source track A1 and record tracks V1 and A2 are
selected.
8. Click the yellow Splice-in button on the Tool Palette.
The audio is patched into the sequence.
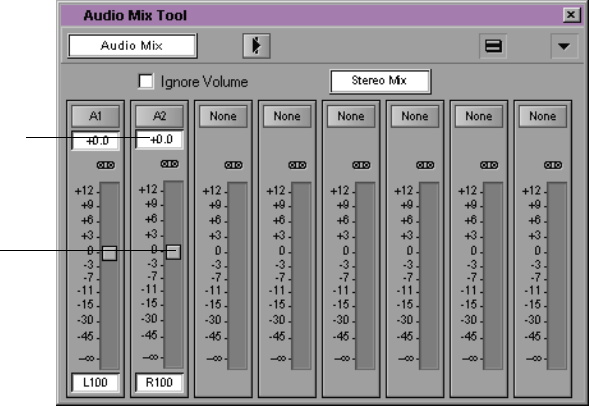
108
Working with Audio
In this section, you adjust audio levels to the already placed intervu:
Lowell’s Boat Shop clip.
Adjusting Audio Level
The volume in the intervu: Lowell’s Boat Shop shot is noticeably
lower than in the rest of the sequence. Let’s make this shot louder.
1. Select record track A2 and deselect track A1.
2. Place the position indicator anywhere within the intervu: Lowell’s
Boat Shop shot.
3. Choose Audio Mix from the Tools menu.
Type a number
Level slider
109
4. In the A2 area, move the A2 Audio Level slider to level +6 by
doing one of the following:
• Drag the slider to level +6.
•Type 6.
• Press the Up or Down Arrow key on the keyboard to reach
level +6.
5. Play a portion of the shot.
The volume is still too low.
6. Activate the Audio Mix Tool by clicking in it, and move the slider
to level +10.
Adjusting Audio Pan
Most of the audio for the sequence plays only out of the left speaker;
the intervu: Lowell’s Boat Shop shot plays only out of the right
speaker. You can adjust the audio pan (balance) so the sound plays
equally from both speakers.
1. Clear any IN or OUT points from the sequence by pressing the G
key on the keyboard.
2. Select record tracks A1 and A2.
3. Activate the Audio Mix Tool by clicking anywhere in it.
4. Click the Timeline’s position indicator at a point that has audio on
track A1.
5. Pull down the Pan Adjustment window for track A1.
The Pan slider appears.
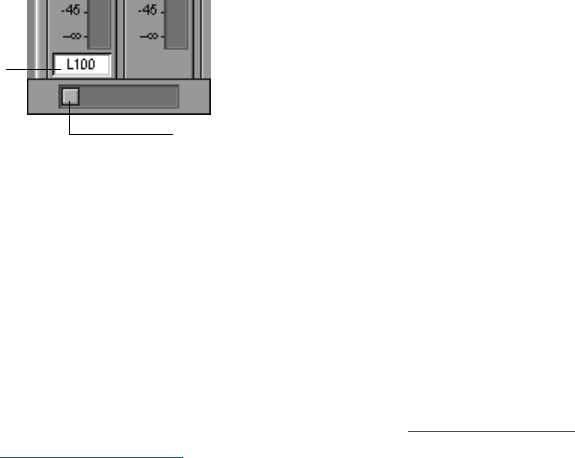
110
To snap the slider to
MID, press and hold the
Alt key, and click the
slider.
6. Drag the Pan slider to the middle of the scale until it reads MID.
7. Pull down the Pan Adjustment window for track A2 and drag the
Pan slider until it reads MID.
8. Play a portion of the sequence to check speaker balance.
9. Click the Close button to close the Audio Mix Tool.
10. Play your sequence through and save it.
You’ve finished this tutorial. You can go on to “Tutorial: Adding
Effects” on page 117, or quit Avid Xpress.
Pan slider
Pull down window here

111
CHAPTER 8
Adding Effects
Adding an effect to a clip enhances your sequence by fading in or out
of a scene or adding video or a graphic on top of a clip.
Adding effects is described in the following sections:
•Effects Editing
•Displaying the Effect Palette
•Effect Categories
•Effect Types
•Applying Effects to a Sequence
•Working in Effect Mode
•Rendering an Effect
Tutorial: Adding Effects contains the following sections:
•Adding Transition Effects
•Adding a Picture-In-Picture Effect
•Screening the Sequence
112
Effects Editing
The Avid Xpress system offers many effects that you can apply to your
sequences. The effects that are available on your Avid Xpress system
depend on the model and options that you purchased. For the list of
effects available for your model, see the Avid Xpress Release Notes.
This chapter explains how to apply effects to transitions or segments
(clips) in your sequence. After you have selected the effect and applied
it to a transition or segment, you can adjust the effect parameters to
meet your requirements.
Many effects are real time, which means you do not have to render
them before you play them. You can preview effects that are not real
time before rendering. Rendering an effect creates a media file that
plays with the sequence.
After you create an effect, you can save it as an effect template and
reapply the template to other transitions or segments in your
sequence. Some effects can be applied only to transitions, other effects
can be applied only to segments, and some effects can be applied to
both transitions and segments. In addition, some effects can be applied
to a single video layer, and others to multiple video layers.
For an explanation of particular effects and the effect parameters, see
”2D Effects Reference” and “3D Effects Editing” in the Avid Xpress
Effects Guide.
113
Displaying the Effect Palette
You select most effects from the Effect Palette in the Tools menu. The
exceptions are Motion effects that you access from the Fast menu on a
Source pop-up monitor, the Freeze Frame effect that you access from
the Clip menu, and titles that you create with the Title Tool.
Effect Categories
The effects available through the Effect Palette are grouped by effect
category:
•Blend
• Box Wipe
• Conceal
• Edge Wipe
•Image
• Key
• L-Conceal
114
•Matrix Wipe
•Peel
•Push
• Sawtooth Wipe
•Shape Wipe
•Spin
• Squeeze
Each of these effect categories contains multiple effects.
Effect Types
There are two primary effect types that are defined by where you use
them in a sequence:
• Transition effects
• Segment effects (single-layer and multilayer)
Transition Effects
A transition is the point where two clips meet. You apply a transition
effect to the cut point between two clips on the same video track. After
you apply a transition effect, you can adjust its relative position and
duration. Depending on the specific effect, other effect parameters
may apply.
Transition effects are included in all effect categories on the Effect
Palette except the Image effect category.
For an explanation of the transition effects in each effect category, see
the Avid Xpress Effects Guide.
115
Segment Effects
You apply a segment effect to an entire clip or a group of clips. There
are two types of segment effects:
• A single-layer segment effect, such as a Mask, is applied to a seg-
ment on one video track.
• A multilayer segment effect, such as a Picture-In-Picture effect, is
applied to the top layer of segments that contain two or more
video tracks that will be played simultaneously.
All of the Avid effects and their effect types are listed in the Avid Xpress
Effects Guide.
Applying Effects to a Sequence
This section explains how to apply an effect to a sequence in the Com-
poser monitor. You can apply an effect:
• To one transition or segment on a single video layer
• To multiple transitions or segments on a single video layer
• To multiple transitions or segments on multiple video layers
The effect type (transition or segment) determines where you can
place the effect in the sequence.
After you apply an effect, the next step is to adjust the effect’s parame-
ters.
116
Working in Effect Mode
After you have created an effect and applied it to a transition or seg-
ment in your sequence, you can adjust its appearance and operation
by changing its effect parameters in Effect mode.
Not all effect parameters apply to all effects. Parameters that do not
apply to an effect do not appear in the Effect Mode window. To deter-
mine which parameters pertain to an effect, refer to the effect’s
description in the Avid Xpress Effects Guide.
Rendering an Effect
You must render a non-real-time effect before it can be played. When
an effect is rendered, the system stores the effect and its media file as a
precomputed master clip (often referred to as a precompute). The sys-
tem uses the precompute to play the effect at its normal speed.

117
Tutorial: Adding Effects
In this tutorial you add dissolves and a Picture-In-Picture effect. This
section corresponds to the clips and sequence in the bin titled Adding
Effects. See Table 8-1.
nBe sure to read the preceding overview sections of this chapter before you start
this tutorial.
Table 8-1 Starting the Tutorial: Adding Effects
If you have worked on the
previous tutorial and Avid
Xpress is still running:
If you have worked on the
previous tutorial but have
quit the Avid Xpress system:
If you are just starting out
with this tutorial and
haven’t completed the
previous tutorials:
1. Double-click the Adding
Effects bin to open it. 1. Start Avid Xpress by double-
clicking the Avid Xpress icon. 1. Start Avid Xpress by double-
clicking the Avid Xpress icon.
2. Press and hold the Alt key,
and drag the sequence you
were working on from the
previous tutorial into the
Adding Effects bin. Close the
Refining Edits bin.
2. From the Boat Shop Project
window double-click the Refin-
ing Edits bin and the Adding
Effects bin to open them.
2. Click the Adding Effects
Sequence clip and drag it into
the Composer monitor to begin
the tutorial.
3. Drag the sequence you
were working on from the
Adding Effects bin into the
Composer monitor.
3. Press and hold the Alt key,
and drag the sequence you were
working on from the previous
tutorial into the Adding Effects
bin. Close the Refining Edits
bin.
4. Drag the sequence you were
working on from the Adding
Effects bin into the Composer
monitor.

118
Adding Transition Effects
Transition effects are added in between two clips. Effects you can use
include: Blend, Box Wipe, Conceal, Edge Wipe, L-Conceal, Matrix
Wipe, Peel, Push, Sawtooth Wipe, Shape Wipe, Spin, and Squeeze.
Adding Fade In
Now you’ll add a fade in to a transition.
1. If you don’t see any video in the Composer monitor, click the
check box to the right of V1 so a square (tiny monitor) appears.
The video appears in the Composer monitor.
2. Select the V1 record track and click the head of the sequence.
3. Click the Add Dissolve button on the Tool Palette.
The Quick Dissolve dialog box appears.
119
4. Create a 20-frame dissolve (fade in), starting at the cut, by doing
the following:
a. Choose Dissolve from the Add pop-up menu.
b. Type 20 in the Duration text box.
c. Choose Starting at Cut from the Position pop-up menu.
5. Choose the disk on which the effect media file should be stored
from the Target Disk pop-up menu.
The default disk is Effect Source Disk.
6. Click the Add and Render button to render the effect.
The system creates the media file of the video effect during the
rendering process. It also places a box in the Timeline where you
added the effect.
7. Play the effect. Press the space bar to stop playback.
Dissolving Between Shots
You can create a nice effect by adding a dissolve between the first two
shots of the sequence.
1. Select the V1 record track and click the first frame of the ducks
clip.
2. Click the Add Dissolve button in the Fast menu.
3. Create a 20-frame dissolve, centered on the cut by doing the fol-
lowing:
a. Choose Dissolve from the Add pop-up menu.
b. Type 20 in the Duration text box.
c. Choose Centered on Cut from the Position pop-up menu.
4. Choose the disk on which the effect media file should be stored
from the Target Disk pop-up menu.
120
5. Click the Add and Render button to render the effect.
6. Play the effect. Press the space bar to stop playback.
Creating a Series of Dissolves
After you create one dissolve, you can quickly add it to other transi-
tions in a sequence. In this section, you add a series of dissolves in the
middle of the sequence to smooth the transition between several short
shots.
1. Place the position indicator at the transition between dories pass-
ing and pan lumber.
2. Create a 10-frame dissolve, centered on the cut.
3. Repeat steps 1 and 2 for all transitions through sanding/wood
burning.
If you can’t see the clips in the Timeline, use the scale bar to
expand the Timeline.
nYou do not have to change any dissolve parameters when you make these
dissolves.
4. Play the sequence through to see your work.
Creating Audio Dissolves
It’s just as easy to add audio dissolves, and the procedure is the same
as adding video dissolves.
As an exercise, create audio dissolves for every audio transition on
track A2 up through sanding/woodburning, except the beginning
and the end of the sequence.
Use 10-frame dissolves, centered on the cut. Be sure to select track A2
and deselect other tracks.

121
Adding a Fade Within the Sequence
Now we’ll create a fade to black within the sequence after the dories
passing shot, to cut more forcefully on the words, “wooden boat
building.” Notice that the transition already has a 10-frame dissolve.
1. Place the position indicator on the last frame of the dories passing
shot.
2. Select only track V1.
3. Click the Remove Effect button on the Tool Palette.
The dissolve is removed from the transition.
4. Without moving the position indicator, mark both an IN and an
OUT point on that frame. Use the Mark In and Mark Out buttons,
not the Mark Clip button.
5. Click the red Segment Mode (Lift/Overwrite) button below the
Timeline.
6. Press Ctrl+X.
A single frame is lifted from the sequence, leaving one frame of
black.
7. Deselect the Lift/Overwrite button.
8. Add a 20-frame dissolve, ending at the cut.
9. Select the disk drive and click the Add and Render button to add
and render the dissolve.

122
Adding a Picture-In-Picture Effect
Let’s make one final change to increase the impact of the last part of
the sequence. Using a Picture-In-Picture effect, you’ll squeeze the
image of the boat shop owner into the lower left corner of the screen,
and lay some other images behind him.
Using the Second Video Track
This effect takes up two video tracks: V1 for the shots of boats and
boating and V2 for the interview. First, you have to move the inter-
view shot from track V1 to V2.
1. Select the V1 track only.
2. On the V1 track, place the position indicator within the intervu:
Lowell’s Boat Shop shot in the Timeline and click the Mark Clip
button under the Composer monitor.
The intervu: Lowell’s Boat Shop shot is highlighted.
3. To add a new video track, choose New Video Track from the Clip
menu on the toolbar.
4. Click the red Segment Mode (Lift/Overwrite) button below the
Timeline.
5. Press and hold the Ctrl key, and click the intervu: Lowell’s Boat
Shop clip. Drag it to the track above, V2.
The clip appears on track V2.
6. Click the Segment Mode (Lift/Overwrite) button again to deselect
it.
7. Select track V2 and its monitor.
123
Creating the Picture-In-Picture Effect
To create the Picture-In-Picture effect:
1. Choose Effect Palette from the Tools menu.
The Blend effects, including the Picture-In-Picture effect, are dis-
played in the right window.
2. Place the position indicator anywhere in the intervu: Lowell’s
Boat Shop clip on V2.
3. Click the Picture-In-Picture Effect icon from the Effect Palette and
drag it to the intervu: Lowell’s Boat Shop shot on track V2.
The Effect icon appears in the Timeline.
The boat shop owner appears in a box midscreen.
Effect icon
124
Repositioning the Image
Let’s move the image to the lower left corner of the screen.
1. In the Timeline, move the position indicator directly over the
Effect icon.
2. Click the Effect Mode button on the Tool Palette to enter Effect
mode.
Parameters for the Picture-In-Picture effect appear in the Effect
Editor.
3. Click the image of the boat shop owner. Drag handles (the dots at
the edges and in the middle of the box) appear, and a white hand
appears when the mouse is over a handle.
4. Click the drag handle in the middle of the picture and drag the
image to the lower left corner of the screen.
Foreground Background
filler (V1)
image (V2)

125
Adjusting a Parameter
Now let’s use one of the Picture-In-Picture effect parameters to soften
the edge of the image.
1. Click the Soft slider in the Effect Editor.
2. Drag the Soft slider to the right to a value of 30.
You can also type 30 on the numeric keypad.
3. Click the Play Preview button in the Effect Editor to view an out-
line of the effect.
You can click the mouse button or press the space bar at any time
to stop the preview.
Adding Keyframes
To add dissolves within the Picture-In-Picture effect, you need to add
keyframes. These let the system know this is the location in the Pic-
ture-In-Picture effect where you want to start the dissolve.
1. Choose V1 from the timecode track menu.
Soft slider
Add Keyframe
button
Play Preview button
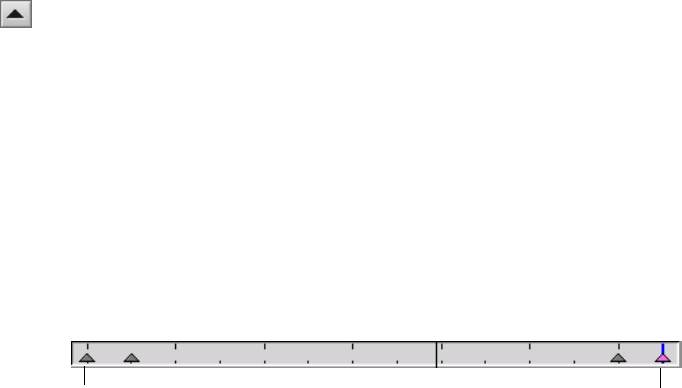
126
2. Click the first keyframe in the Composer monitor.
3. Drag the Level slider all the way to the left to display 0.
4. Type +1.00 on the numeric keypad and press the Enter key on the
numeric keypad to move the position indicator 1 second after the
first keyframe.
5. Click the Add Keyframe button in the Effect Editor.
6. Drag the Level slider all the way to the right to display 100.
7. Click the mouse button on the last keyframe.
8. Drag the Level slider all the way to the left to display 0.
9. Type -15 on the numeric keypad and press the Enter key on the
numeric keypad to move the position indicator 15 frames before
the last keyframe.
10. Click the Add Keyframe button.
11. Drag the Level slider all the way to the left to display 0.
12. Click Close to close the Effect Editor.
Adding Background Images
In this section you add a background image on track V1, below the
intervu: Lowell’s Boat Shop image.
1. Select track V1 and its monitor and deselect V2.
2. Place the position indicator in the filler just above and below the
intervu: Lowell’s Boat Shop image.
3. Click the Segment Mode (Extract/Splice-in) button.
4. Press Ctrl+X.
Last KeyframeFirst Keyframe
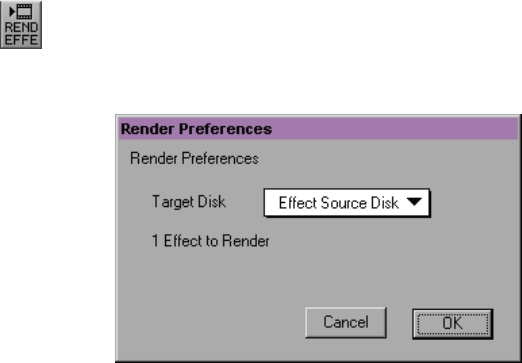
127
This removes the filler and adds the three clips at the end of the
sequence as your background for the Picture-In-Picture effect.
5. Select the V2 track.
6. Click the dories to model and Shift+click the sign clips on the A2
track.
7. Press Ctrl+X to delete the excess audio.
8. Click the Segment Mode (Extract/Splice-in) button again to dese-
lect it.
9. Play your sequence through.
Rendering the Effect
You must render the Picture-In-Picture effect to play it at full speed.
1. Place the position indicator on the Effect icon in the intervu: Low-
ell’s Boat Shop clip.
2. Select track V2.
3. Click the Render Effect button in the Tool Palette or choose Render
at Position from the Clip menu.
The Render Preferences dialog box appears.
4. Select a disk from the Target Disk pop-up menu and click OK.

128
The Effect Source Disk is the default disk for storing the rendered
effect.
5. After the effect is rendered, close the Effect Palette.
6. To save your work, choose Save All Bins from the File menu.
Screening the Sequence
You’ve done a lot of work. Now take a look at the sequence.
1. Move the position indicator to the beginning of the sequence.
2. Select the V2 monitor.
3. Click the Play button.
You’ve finished this tutorial. You can go on to “Tutorial: Creating
Titles” on page 137, or quit Avid Xpress.

129
CHAPTER 9
Creating Titles
You can create a new title with the Title Tool and save the title in a bin,
or add a new video track to the Timeline if you want the title to appear
over video.
Creating titles is described in the following sections:
•Creating New Titles
•Understanding the Title Tool Window
•Working with Text
•Text Formatting Tools
•Choosing Colors and Setting Transparency
•Adjusting the Color
•Saving Titles
•Editing a Title into a Sequence
Tutorial: Creating Titles contains the following sections:
•Adding a Title
•Saving a Title
•Editing the Title into the Sequence
•Adding Rolling Credits
130
Creating New Titles
You can create a new title with or without a sequence in the Timeline.
However, if you want to create a title with a video background, you
can load a video clip into the Composer monitor to use as a reference
frame while you create the title. The video reference frame you select
appears in the background of the Title Tool while you create the title.
The reference frame makes it easier to position text and objects exactly
where you want them and to select colors from the frame to use in the
text and objects.
You can easily load the new title into a Source pop-up monitor and use
the standard editing procedures to edit the title into your sequence.
nAfter you create a title with a particular video format (PAL or NTSC), if you
want to create a title for a project using the other video format, you must quit
and restart the Avid Xpress system.
Avid Xpress saves into a bin each title you create. You can load a title
into a Source pop-up monitor at any time or drag the Title Effect icon
from the bin to a segment in the Timeline. You can also drag a title
from the bin onto an existing title in the Timeline; this causes the exist-
ing title to be replaced.
nThe procedures described in this section use a video reference frame to create a
title.
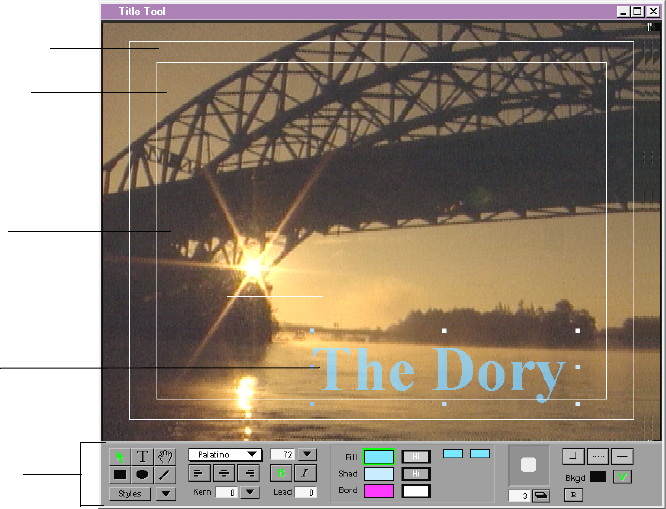
131
Understanding the Title Tool Window
The Title Tool window has several major components:
• The toolbar at the bottom of the screen
• A video or color background
• The title that you create
For more information,
see “Safe Title/Action
area” in the Help index.
• The safe title and safe action area guidelines
The following illustration shows a title over a video background:
Toolbar
Safe action
area
Video
background
Safe title
area
Title

132
Working with Text
By default, the Text Tool is active when you open the Title Tool. Click
in the window at the position where you want to enter text.
To use the Text Tool at any other time, click the Text Tool icon, click
anywhere within the title frame, and begin typing. A blinking vertical
bar indicates your cursor position in the frame.
The Text Tool remains selected until you select another tool.
Text Formatting Tools
The text formatting tools control the appearance of text. If a text object
is selected when you change an attribute, Avid Xpress automatically
applies the attribute to the object.
The text formatting tools allow you to change the following text
characteristics:
•Current font
• Bold and italic
• Point size
• Justification
Text Tool
Text formatting tools
133
• Kerning
• Leading
For more information,
see “Titles:text for: over-
view” in the Help
index.
This section describes how to change these characteristics on a text
string basis. You can also change these attributes on a character-by-
character basis by editing the text string.
You can also modify the following text attributes on a text string basis:
• Color
• Transparency
• Drop and depth shadows
• Outlines surrounding text
While you type text, only the text color is apparent. Shadows, outlines,
and other color attributes appear when you finish typing the text and
click the Selection Tool.
nIf you have multiple text elements in a title, and you want to give each ele-
ment a different appearance, create separate text strings.

134
Choosing Colors and Setting Transparency
You can select the color and transparency for objects, shadows, and
borders.
• The Color selection boxes control the fill (Fill), shadow (Shad), and
border (Bord) color selection.
• The Transparency selection boxes control the fill, shadow, and bor-
der transparency selection.
• The Blend and Transparency preview windows appear when you
select the fill or border color or transparency selection box.
If you select a color selection box, the top windows show the two
colors that are used to create the blend. The bottom window
shows the blended color and allows you to control the direction of
the blend or transparency.
If you select a transparency selection box, the top windows show
the two transparency values that are used to create the blend. The
bottom window allows you to control the direction of the trans-
parency blend.
Adjusting the Color
To select a color from the Title Tool Color Picker, use an eyedropper to
select a color from any open application on your computer or use the
Blend and Transparency preview
Transparency selection
Color selection

135
Color dialog box to select a color. All of these features are available
through the Title Tool Color Picker.
The Title Tool Color Picker allows you to select object, shadow, or out-
line color. The box you use controls whether the color applies to an
object, creates a colored shadow, or places a colored outline around the
selected object.
Saving Titles
There are three basic ways to work with titles:
• Create a new title by choosing New Title from the Clip menu.
• Edit an existing title by pressing the Ctrl key and double-clicking a
Title Effect icon in a bin.
• Edit an existing title that is in a sequence.
The main difference between the three methods is that you can use
Save As for the first two but you cannot use Save As for the third
method.
Color selection bar
Shade selection palette
Original Color window
New Color window
Grayscale
selection bar
Eyedropper
Select to open
Color dialog box
136
Editing a Title into a Sequence
After you have created a title with the Title Tool, you can use one of
the following two methods to edit the title into your sequence:
•Method 1: Add a new video track, load the title into a Source pop-
up monitor, mark an IN point and an OUT point, and splice/over-
write the title into the sequence.
•Method 2: In Segment mode, drag the Title Effect clip from the bin
to an existing segment in the Timeline between the edit points.
You edit titles into a sequence by using the same editing procedures
you use for video. The only difference is that if you want to key the
title over video, you must add a new video track.

137
Tutorial: Creating Titles
In this tutorial you create a title, and edit and add a rolling credit to the
end of the sequence. This section corresponds to the clips and
sequence in the bin titled Creating Titles. See Table 9-1.
nBe sure to read the preceding overview sections of this chapter before you start
this tutorial.
Table 9-1 Starting the Tutorial: Creating Titles
If you have worked on the
previous tutorial and Avid
Xpress is still running:
If you have worked on the
previous tutorial but have
quit the Avid Xpress system:
If you are just starting out
with this tutorial and
haven’t completed the
previous tutorials:
1. Double-click the Creating
Titles bin to open it. 1. Start Avid Xpress by double-
clicking the Avid Xpress icon. 1. Start Avid Xpress by double-
clicking the Avid Xpress icon.
2. Press and hold the Alt key,
and drag the sequence you
were working on from the
previous tutorial into the
Creating Titles bin. Close the
Adding Effects bin.
2. From the Boat Shop Project
window double-click the Add-
ing Effects bin and the Creating
Titles bin to open them.
2. Click the Creating Titles
Sequence clip and drag it into
the Composer monitor to begin
the tutorial.
3. Drag the sequence you
were working on from the
Creating Titles bin into the
Composer monitor.
3. Press and hold the Alt key,
and drag the sequence you were
working on from the previous
tutorial into the Creating Titles
bin. Close the Adding Effects
bin.
4. Drag the sequence you were
working on from the Creating
Titles bin into the Composer
monitor.

138
Adding a Title
Once you create and add a title to your sequence, you can reposition it,
change the text color, adjust the font and point size, add a shadow or
border, adjust levels and kerning, and bold or italicize it.
Creating a New Title
To create a new title:
1. In the Timeline, place the blue position indicator on the bridge clip
in the sequence.
2. Choose New Title from the Clip menu.
The Title Tool window opens.
3. The Text Tool button is already selected. Click in the Title Tool
window.
The cursor becomes an I-beam.
4. Click in the water below the bridge.
A blinking insertion point appears.
5. Type The Dory.
6. Click the Selection Tool on the toolbar.
Object selection handles surround the title.
7. Choose 72 from the point size pop-up menu.
8. Choose Palatino from the font pop-up menu.
9. Click the B button for bold if it’s not already selected.
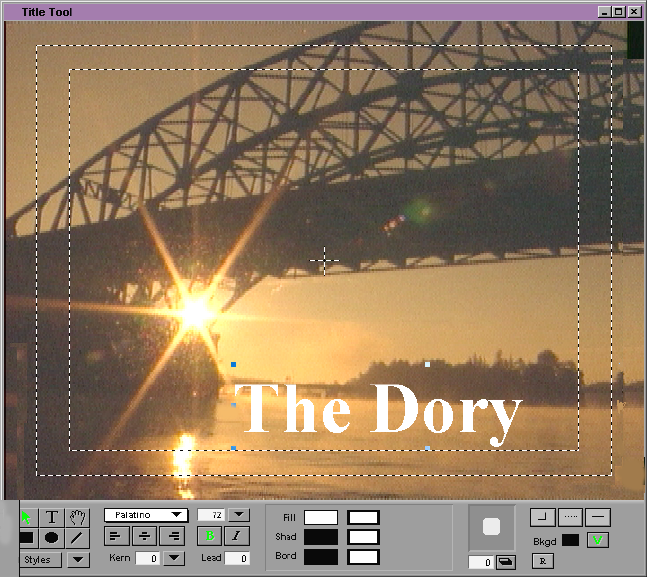
139
nYou might want to drag the right side of the text selection box to eliminate
any unused space, especially if you want to use the Alignment menu com-
mands. To drag the right side, click the middle handle on the right side of the
text selection box and drag it to the left until it is closer to the text.
Repositioning Text
To reposition the title text:
1. With the Selection Tool selected, click the title and drag it so that it
appears across the water.
2. Use the arrow keys to move the title more precisely.
140
Changing Color
To change the color of the title text:
1. Click and hold the Fill box.
The Color dialog box appears.
2. Click a blue color.
The color is applied to the title.
Adding a Shadow
To add a shadow to the title text, do one of the following:
• Enter a value in the Shadow Depth text box.
• Drag the shadow icon in the direction you want the shadow to fall.
Saving a Title
To save your title:
1. Choose Save Title from the File menu.
A dialog box appears.
2. Type The Dory in the top text box.
3. Choose the Creating Titles bin and a target disk to store your title.
4. Click OK.
The Title appears in the Creating Titles bin.
5. Click Close to close the Title Tool.
141
Editing the Title into the Sequence
To add your title to your sequence:
1. Double-click the title in the bin.
The title opens in a Source pop-up monitor.
2. Turn the V2 track on and turn V1, A1, and A2 off.
3. Click the V1 source track and drag it to the V2 record track.
4. In the Source pop-up monitor, set an IN mark at the beginning of
the clip and an OUT mark at 1:00:02:15.
5. In the Timeline, move the position indicator to 1:00:00:06.
6. Click the red Overwrite button on the Tool Palette.
This adds the title to the V2 video track.
7. Play the sequence to see your title.
Adding Rolling Credits
You can create a title in the Title Tool and then make it scroll vertically;
this is known as a rolling title.
Editing the Title
To edit the existing title:
1. In the bin, press and hold the Ctrl key, and double-click the Roll-
ingTitle: Credits clip to open it in the Title Tool.
The text cursor appears.
2. Drag the cursor over the entire Your Name text to select it.
3. Type in your name.
142
4. Click Close.
A confirmation dialog box appears.
5. Click Save.
Two titles appear in the bin (the old title and the new title you just
edited).
Adding Video Background
To add video background to your title:
1. Double-click the rowing in mist clip.
2. Clear any IN and OUT marks.
3. Turn on the V1 record track and turn off all others.
4. Drag the V1 source track to the V1 record track.
5. In the Timeline, move the position indicator to the end of the sign
clip.
6. Click the yellow Splice-in button on the Tool Palette.
The rowing in mist clip is added to the sequence.
Viewing the Creation Date
Your edited title has the same name as the version originally in the bin.
To distinguish the two, you can look at the creation date.
1. Click the Creating Titles bin to select it.
2. Choose Headings from the Bin menu.

143
3. Select creation date and click OK.
The clips now appear with their creation dates. The new credits
clip you created has the later creation date.
Splicing the Title into a Sequence
To splice the title into your sequence:
1. Double-click the new Rolling Title: Credits title clip to load it into
a Source pop-up monitor.
2. From the Source pop-up monitor, click the Play button to play
through the rolling credit.
Black appears at first, then eventually the credits appear.
3. Set an IN mark at 00:00:02:12 (NTSC) or at the beginning of the
clip (PAL).
4. From the numeric keypad type +33:09 and press the Enter key on
the numeric keypad, then click the Mark OUT button.
5. Drag the position indicator to the end of the intervu:Lowell’s Boat
Shop clip on the V2 record track.
6. Select the V2 record track and turn off all other tracks.
7. Drag the V1 source track to the V2 record track.
8. Click the yellow Splice-in button on the Tool Palette.
The Rolling Title: Credits clip appears over the rowing in mist
clip.
9. Click the Play button to view the rolling title over video.

144
Deleting Excess Footage
There is excess footage continuing beyond the rolling title. To delete
the excess:
1. Turn on the V1 record track.
2. In the Timeline, move the position indicator to the end of the
Credits clip.
3. Press the Add Edit key (P) on the keyboard.
This creates a transition.
4. Click the red Segment Mode (Lift/Overwrite) button below the
Timeline.
5. On the V1 track, click the last clip (the second rowing in mist clip)
in the Timeline to select it.
6. Press the Delete key.
The clip is deleted.
7. Save your project and bins and play the sequence.
Closing the Title Tool
To close the Title Tool after creating a new title, click Close.
You’ve finished this tutorial. You can go on to “Tutorial: Output” on
page 149, or quit Avid Xpress.

145
CHAPTER 10
Output
The Avid Xpress system provides tools for generating output for indi-
vidual tracks or entire sequences to various videotape or audiotape
formats.
Preparing for output and exporting is described in the following sec-
tions:
•Output Options
•Preparing for Output
•Digital Cut
•Supported File Types for Export
•Preparing to Export
Tutorial: Output contains the following section:
•Recording a Digital Cut to Tape
146
Output Options
Avid Xpress provides tools for generating output for individual tracks
or entire sequences to various videotape or audiotape formats. You
can also use VTR emulation for direct playback of sequences using an
edit controller in an analog editing suite.
Preparing for Output
Preparing for video output involves the following procedures:
• Render all non-real-time effects, as described in the Avid Xpress
Effects Guide.
For more information
on calibrating and
adjusting video and
audio output levels, see
“Video output:calibrat-
ing” and “Audio out-
put:calibration
tone:setting” in the
Help index.
• Calibrate and adjust video output levels.
• Calibrate and adjust audio output levels.
• Decide whether you want to generate stereo or mono audio.
• Mix down multiple audio tracks if necessary. Systems equipped
with a two-channel audio board can generate a maximum of two
channels.
• Prepare the record tapes.
• (Optional) Record reference bars and tone to tape.
Digital Cut
The Digital Cut Tool provides frame-accurate control when recording
a sequence to tape. You can also use the Digital Cut Tool to preview
the sequence with a computer-generated countdown.
147
The Digital Cut Tool provides several options for managing the
recording of your sequence. For example, you can:
• Record using either assemble or insert edits.
• Record a selected portion of the sequence or selected tracks.
• Record according to different timecode parameters.
Supported File Types for Export
There are several reasons why you might want to export video, audio,
or both from Avid Xpress:
• You can export audio files for audio sweetening in compatible
applications.
• You can export video files for touching up or creating special
effects in third-party applications.
• You can export files compatible with CD-ROM for use in multime-
dia projects.
• You can export files to be viewed as an AVI Codec movie.
You can export files in the following formats:
• Shot log
• PICT
•AVI
• OMF Interchange®
148
Preparing to Export
If you are exporting part or all of a sequence, you can speed the export
process by preparing the sequence in advance as follows:
See the Avid Xpress
Effects Guide for more
information on
rendering.
• Render all effects in advance. Although any unrendered effects are
rendered on export (except for an OMF® export), rendering effects
in advance saves you time.
• Consider mixing down additional tracks in advance; see “Video
mixdown:performing” and “Mixing down audio tracks” in the
Help index.
• Check and adjust all pan and audio levels in advance; see “Audio
Mix Tool” in the Help index. All current pan and level settings in
the sequence are carried through to the exported media.
• If you are exporting an OMF file, remember that OMF does not
mix down the tracks in a sequence during export. OMF maintains
all editing information in your sequence, allowing changes later.
Avid Xpress mixes down video for PICT and AVI formats and
audio for PICT formats.
• If you are exporting an OMF file, consider consolidating the media
to save time and disk space. See “Consolidating:media:described”
and “Transferring OMF files to Pro Tools” in the Help index.

149
Tutorial: Output
In this tutorial you create a digital cut. This section corresponds to the
clips and sequence in the bin titled Output. See Table 10-1.
nBe sure to read the preceding overview sections of this chapter before you start
this tutorial.
Table 10-1 Starting the Tutorial: Output
If you have worked on the
previous tutorial and Avid
Xpress is still running:
If you have worked on the
previous tutorial but have
quit the Avid Xpress system:
If you are just starting out
with this tutorial and
haven’t completed the
previous tutorials:
1. Double-click the Output
bin to open it. 1. Start Avid Xpress by double-
clicking the Avid Xpress icon. 1. Start Avid Xpress by double-
clicking the Avid Xpress icon.
2. Press and hold the Alt key,
and drag the sequence you
were working on from the
previous tutorial into the Out-
put bin. Close the Creating
Titles bin.
2. From the Boat Shop Project
window double-click the Creat-
ing Titles bin and the Output
bin to open them.
2. Click the Output Sequence
clip and drag it into the Com-
poser monitor to begin the
tutorial.
3. Drag the sequence you
were working on from the
Output bin into the Com-
poser monitor.
3. Press and hold the Alt key,
and drag the sequence you were
working on from the previous
tutorial into the Output bin.
Close the Creating Titles bin.
4. Drag the sequence you were
working on from the Output bin
into the Composer monitor.
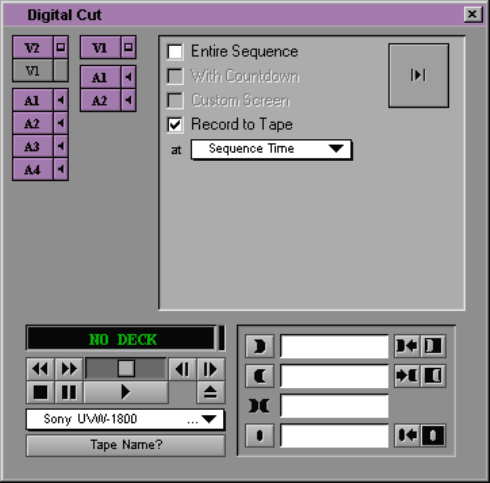
150
Recording a Digital Cut to Tape
To record a digital cut to tape:
1. Load the Boat Shop sequence (or Output Sequence) into the
Composer monitor.
2. Choose Digital Cut from the Clip menu.
The Digital Cut dialog box appears.
3. Use the deck controller to cue and record tape during Digital Cut
recording.
4. If you want the system to ignore any IN or OUT marks and play
the entire sequence from start to finish, select Entire Sequence
If you have established IN or OUT marks for recording a portion
of the sequence, deselect Entire Sequence.
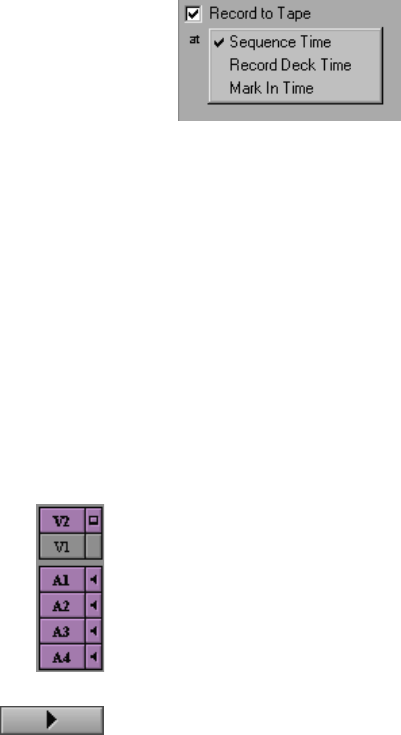
151
5. Choose an option from the Record to Tape pop-up menu as fol-
lows:
• Choose Sequence Time to start the recording at a timecode
existing on tape that matches the start timecode of the
sequence. If you intend to record several sequences to tape
one after another, this option requires resetting the start time-
code on each sequence to match appropriate IN points on the
tape.
• Choose Record Deck Time to ignore the timecode of the
sequence, and start the recording wherever the record deck is
currently cued.
• Choose Mark In Time to ignore the sequence timecode and
establish a specific IN point on the record tape. Enter the new
value in the Mark In text box.
6. Select the audio and video tracks you want represented in the dig-
ital cut. Only those tracks beside and beneath the speaker icon and
the monitor icon are included in the digital cut.
The display of tracks in the Digital Cut window varies according
to the tracks existing in the sequence.
7. Click the Play button.
The system cues the record deck, then plays and records the digi-
tal cut. The playback appears in the Record monitor and the full-
screen monitor.
8. To stop the recording at any time, press the space bar.

152
nAfter assemble-edit recording, a freeze frame is usually added after the OUT
point for one or more seconds, depending upon the record deck model. This
provides several frames of overlap for the next IN point, before control track
and timecode break up.
You’ve finished this tutorial. You can go on to “Tutorial: Backing Up”
on page 161, or quit Avid Xpress.

153
CHAPTER 11
Backing Up
When you digitize footage, the system creates digital media files for
the video and audio tracks on the media drives attached to your sys-
tem. The Avid Xpress system provides useful tools and features for
directly managing media files for storage, playback, backup, and
transfer between systems.
Backing up is described in the following sections:
•About Media Files
•Basic Media Tool Features
•Freeing Storage Space
•Consolidating Media
•Backing up Media Files
•Backing up Project Folders
Tutorial: Backing Up contains the following sections:
•Consolidating the Boat Shop Sequence
•Saving Your Work on a Drive or Diskette
•Restoring from a Backup
•Quitting and Shutting Down
•Summary
154
About Media Files
The system stores the media files created during digitizing in folders
on your media drives labeled OMFI MediaFiles.
Media files are created in the following circumstances:
• During digitizing, a media file is created for each selected track
(for example, V1, A1, A2), and they all are linked to the master
clip.
• When you render effects, the system creates effect media files, oth-
erwise known as precomputes, that are linked to the effect clip.
• When you create subclips and sequences, you do not create new
media files. These refer to the media files for the source master
clips.
To manage media files, the system also creates a Database file that is
stored in each MediaFiles folder. The system updates the Database file
each time you make a change to a media file.
The following illustration shows the links among media files (stored
on the media drives), the various clips (stored in the bin files in the
Avid Projects folders on the internal hard drive), and an edited
sequence (shown in the Timeline and stored in the bin).
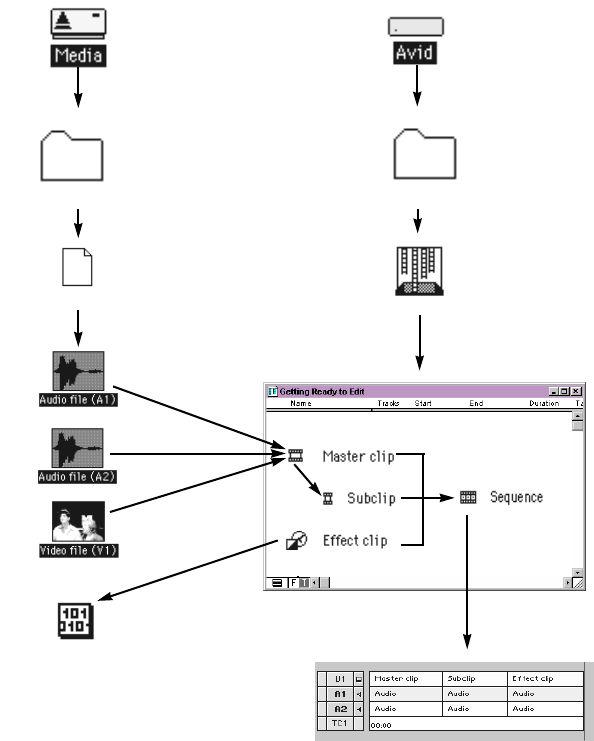
155
Media Objects and Files
Drives
Desktop files
Avid Xpress
Media drive files Internal hard drive files
OMFI MediaFiles Avid Projects
Bin
Media database
Precompute media file
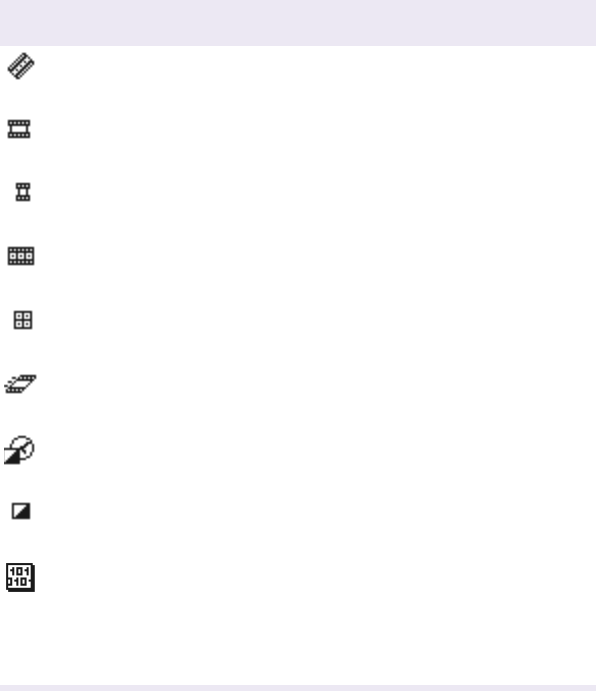
156
Media Relationships
Table 11-1 displays the Media File icons and a description of each icon.
Table 11-1 Media Objects and Files
Object Icon Object Description
Source clip A clip that references the original videotape source
footage for master clips.
Master clip A clip that references audio and video media files
formed from digitized footage or imported files.
Subclip A clip that references a selected portion of a master
clip.
Sequence A clip that represents an edited program, partial or
complete, that you create from other clips.
Group clip A file in the bin that combines two or more clips
based on marks or tracking info sync points.
Motion effect A file in the bin that references effect media files
generated when you create motion effects.
Rendered effect A clip that references an effect media file generated
when you render an effect.
Effect and Title A clip that references an unrendered effect that you
create.
Media file A file on the media drive containing digital audio
or video material. Media files are formed when you
digitize footage or import files, mix down audio or
video tracks, create an effect (precompute media
file), or render an effect.

157
Basic Media Tool Features
The Media Tool provides many of the same controls for viewing and
managing information that you use with bins, including the following:
• The two display modes in the Media Tool function like those in
bins: Text mode and Frame mode.
• The Media Tool Fast menu gives you quick access to all the same
commands available in the Bin Fast menu.
• You can highlight, move, copy, duplicate, delete, and sift clips. You
can also select media relatives, sources, and unreferenced clips.
• You can use Text mode headings and display options for columns
of clip and media file data. You can also use procedures such as
customizing the display of columns, moving within columns, and
sorting information described in “Media Tool” in the Help index.
• You can use the same Frame mode display options described in
“About Bin Display Modes” on page 48.
• You can print Media Tool data using the same procedures for
printing bins, described in “Bins:printing” in the Help index.
In addition to the procedures just described, the Media Tool has a
number of unique functions, described in this section. These include
the following:
• Unlike bins, the Media Tool displays all the tracks digitized for
each clip as separate media files. Therefore, when you view,
delete, and manipulate files, you have the added option of specify-
ing individual video and audio tracks.
• The Media Tool does not display sequences and subclips. Only
master clips, precompute (rendered effect) master clips, and asso-
ciated media files are displayed.
• The following Bin menu commands do not apply to the Media
Tool: Modify, Select Offline Items, and Relink. You must perform
these functions from the bin.
158
• The Media Tool database and display options are not saved as
they are with bins. Instead they are re-created each time you open
the tool. Likewise, closing the Media Tool deletes any
customization of columns or other view elements.
Freeing Storage Space
Unlike the bin files stored in project folders on the internal hard drive,
media files require considerable storage space. To maximize your use
of storage during larger projects, you can abridge or convert media
files. You can perform these procedures on clips selected in either the
Media Tool or in bins.
In addition, you can delete unreferenced media files for a finished
sequence. This procedure is performed on clips selected in bins only.
Consolidating Media
When you consolidate media files, the system finds the media files or
portions of media files associated with selected clips, subclips, or
sequences. It then makes copies of them, and saves the copies on a tar-
get disk that you specify. Because the Media Tool displays only master
clips, you cannot consolidate subclips or sequences with the Media
Tool. You can consolidate master clips, subclips, and sequences in the
bin.
The Consolidate feature operates differently depending upon whether
you are consolidating master clips, subclips, or sequences. There are
also different advantages in each case, as follows:
•Master clips: When you consolidate a master clip, the system cre-
ates exact copies of the media files. If you link the original master
clip to the new files, the system creates a master clip with the
extension .old that remains linked to the old files. If you choose to
159
maintain the link between the original master clip and the old
media files, the system creates a new master clip with the exten-
sion .new that is linked to the new files. The new clips are also
numbered incrementally beginning with .01. Consolidating master
clips does not save storage space because the system copies the
same amount of media for each clip.
•Subclips: When you consolidate a subclip or group of subclips,
the system copies only the portion of the media files repre-
sented in the subclip, and creates a copy of both the master
clips and the subclips. The suffix .new is attached, along with
incremental numbering beginning with .01.
•Sequences: When you consolidate a sequence, the system copies
only the portions of media files edited into the sequence, and cre-
ates new master clips for each shot in the sequence. The suffix
.new is attached to the master clips, along with incremental
numbering beginning with .01. The sequence is not renamed,
but is automatically relinked to the new media files.
nBecause a consolidated sequence is linked to the new files by default, consider
duplicating the sequence each time you consolidate if you need to maintain
links to the original files.

160
Backing up Media Files
The MediaFiles folders on your external media drives contain the indi-
vidual media files created when you digitize source material. Unlike
the smaller Avid Projects and Avid Users folders, these folders are too
large to back up onto diskettes.
For backing up media files:
• You can use the Consolidate feature, described in “Consolidating
Media” on page 158, to make copies of selected media files on a
target hard drive connected to the system.
• You can archive larger media files and folders to a dedicated mass-
storage system.
• You can consolidate or make copies of media files for transfer to
another system. For more information, see “Consolidat-
ing:media:described” in the Help index.
Backing up Project Folders
To back up the larger
media files that are cre-
ated when you digitize
footage, you must use a
mass-storage device.
Although Avid Xpress automatically saves your bins, projects, and set-
tings, you should back up these items frequently to avoid losing any of
your work in case of a hard drive crash or corruption of the files.
Because the storage requirements are minimal, you can back up these
files easily to a variety of storage devices, such as:
• Diskette
• Network storage device, such as a file server
• Mass storage device

161
Tutorial: Backing Up
In this tutorial you learn to back up and free up space on your media
drive. This section corresponds to the clips and sequence in the bin
titled Backing Up. See Table 11-2.
nBe sure to read the preceding overview sections of this chapter before you start
this tutorial.
Table 11-2 Starting the Tutorial: Backing Up
If you have worked on the
previous tutorial and Avid
Xpress is still running:
If you have worked on the
previous tutorial but have
quit the Avid Xpress system:
If you are just starting out
with this tutorial and
haven’t completed the
previous tutorials:
1. Double-click the Backing
Up bin to open it. 1. Start Avid Xpress by double-
clicking the Avid Xpress icon. 1. Start Avid Xpress by double-
clicking the Avid Xpress icon.
2. Press and hold the Alt key,
and drag the sequence you
were working on from the
previous tutorial into the
Backing Up bin. Close the
Output bin.
2. From the Boat Shop Project
window double-click the Output
bin and the Backing Up bin to
open them.
2. Click the Backing Up
Sequence clip and drag it into
the Composer monitor to begin
the tutorial.
3. Drag the sequence you
were working on from the
Backing Up bin into the Com-
poser monitor.
3. Press and hold the Alt key,
and drag the sequence you were
working on from the previous
tutorial into the Backing Up bin.
Close the Output bin.
4. Drag the sequence you were
working on from the Backing
Up bin into the Composer moni-
tor.
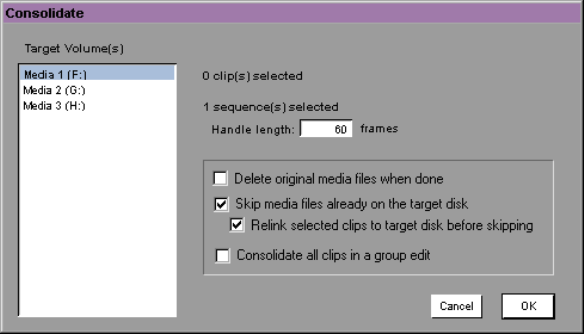
162
Consolidating the
Boat Shop
Sequence
To consolidate the Boat Shop sequence:
For more information
on rendering effects, see
the Avid Xpress Effects
Guide.
1. Select the Boat Shop sequence (or Backing Up Sequence).
2. Choose Duplicate from the Edit menu.
This allows you to maintain links to the original files, if necessary,
and render any unrendered effects.
3. Choose Consolidate from the Bin menu.
The Consolidate dialog box appears.
4. Click one of the following:
• “Delete original media files when done” to delete original
media files automatically.
• “Skip media files already on the target disk” if some related
media files are already located on the target disk.
• “Relink selected clips to target disk before skipping” to ensure
that all selected clips are linked to media on the target drive.
This option appears when you click “Skip media files already
on the target disk.”
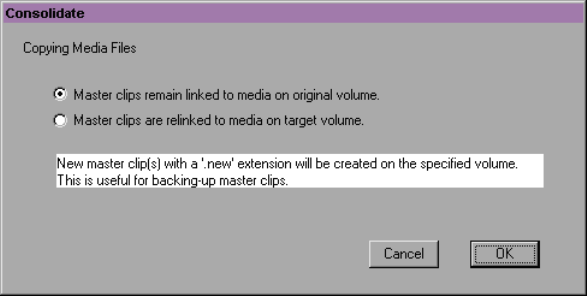
163
5. Choose a target disk from the pop-up menu.
Make sure that you choose a target disk with enough storage
space for all the consolidated media files.
6. Enter a handle length for the new clips in the text box, or leave it at
60 frames to accept the default.
7. Click OK.
If you did not choose to delete the original media files, a second
dialog box appears and offers you a choice.
8. Link the original master clips to the new or old media files, accord-
ing to preference.
9. Click OK.
Another way to back up media files is to copy them directly onto
another hard drive on the desktop. You cannot, however, take advan-
tage of the storage-saving features of the Consolidate command, and it
is more difficult to identify particular media files when searching
directly through folders.
cDo not make copies of media files on the desktop while Avid Xpress
is running. Also, do not keep duplicate copies of media files online;
either delete the originals, take the backups offline, or store the
backups in a folder with a different name.
164
Saving Your Work on a Drive or Diskette
To save your work on a drive or diskette:
1. Mount the drive or insert the diskette.
2. Double-click the icon for the targeted storage drive or diskette to
open it. Double-click any additional folders to target the appropri-
ate storage location.
3. Double-click the internal hard drive to open it.
4. Drag a project folder, user folder, or Settings file to the targeted
storage location.
5. When the system finishes copying the files, eject the diskette or
unmount the drive.
Restoring from a Backup
To restore a project, user profile, or settings from a backup storage
device:
1. Mount or insert the drive or diskette as appropriate.
2. Open the drive or diskette, and the internal hard drive.
3. If you are restoring an individual bin or bins, you must relink
them to the project from within the Project window. For more
information, see “Media files:relinking” in the Help index.
4. Drag the copies from the storage device to the appropriate folder
on the internal hard drive:
• Project folders and Settings files go in the Avid Projects folder.
• User folders and Settings files go in the Avid Users folder.
• Site settings files go in the Avid Xpress folder.
5. Start Avid Xpress. The restored project/user profile appears in the
Open Project dialog box.
165
Quitting and Shutting Down
To quit and shut down:
1. Click Quit in the Open Project dialog box.
2. Choose Leave when the system prompts you.
3. Choose Shut Down from the Start menu.
4. After a few seconds, turn off the rest of your hardware.
Summary
Congratulations on completing the Avid Xpress Tutorial! We hope
you’ve enjoyed this introduction to the Avid editing process. After
mastering these skills, you can proceed to learn more advanced tech-
niques for inputting media, adding other effects and titles, and output-
ting work for digital cuts.
For further information about any Avid Xpress techniques or features,
see the Help index.
Avid also recommends that you consult the latest Avid Training
Catalog for complete descriptions and schedules of Avid’s course
offerings. All classes are led by trained, experienced professionals. A
variety of hands-on student activities encourage participant learning.
Call 800-867-2843 for more information.

166
A
Actions, undoing 83
Add Dissolve button 118, 119
Adding shadows to titles 140
Adding shots to a sequence 83
Adjusting
audio hardware 41
luminance 44
Adjusting input volume in Audio Tool 41
Agreeing to electronic license 16
Applying effects 115
Arrow keys, jogging with 53
A-side (outgoing frames), in trims 89
Attic folder 27
Audio
locating specific frame 77
tracks, monitoring 75
Audio Tool
adjusting audio hardware 41
adjusting input volume 41
controlling audio output 41
displaying digital values 42
displaying volume values 42
opening 41
resetting peak measurements 41
tracking audio levels on meters 42
Autodigitizing 45
Avid Projects folder, described 30
Avid Users folder, described 30
Avid Xpress
overview 23
Avid Xpress files 27
B
Backing up
media files 160
project folders 160
Batch digitizing 46
Beginning to digitize 40
Bins
autosaving 130
choosing in Digitize Tool 39
defined 26
displaying in Project window 31
Frame view 57
organizing footage in 26
saving using system backup 160
Text view 56
viewing clips in 55
Bins Display (Project window) 31
Black burst generator, turning on 14
Blue bar See Position indicator
B-side (incoming frames), in trims 89
Index
A B C D E F G H I J K L M N O P R S T U V W

167
Buttons
Add Dissolve 118, 119
Extract/Splice-in 101
for controlling playback 50
Play 51
Remove Effect 121
C
Changing the order of shots 99
Changing title color 140
Choosing a deck for digitizing 40
Choosing a resolution for digitizing 40
Choosing bins for digitizing 39
Choosing Composite, Component, or S-Video
source 43
Choosing target drives for digitizing 40
Clips
defined 24
exporting 147
playing
in the Source pop-up monitor 57
using buttons 51
viewing 55
Color 135, 135
Color dialog box 135, 135
Color selection boxes in Title Tool 134
Composer monitor, viewing in 70
Consolidate dialog box 162
Consolidating media files
defined 158
master clips 158
procedure 162
sequences 159
subclips 159
Controlling audio output 41
Controlling transparency 134
Correcting mistakes 83
Countdown in a digital cut 146
Creating subclips 54
Creation dates, viewing 142
D
Deck controls in Digitize Tool 40
Deck offline, taking 40
Deck, choosing in Digitize Tool 40
Default keyboard 52
Deleting digitized media 40
Desktop, Avid Xpress elements on 15
Digital audio scrub 77
Digital Cut command (Output menu) 147
Digital cuts
previewing 146
Record to Tape options 151
recording 147
Digital scale in Audio Tool 42
Digitize button in Digitize Tool 40
Digitize Indicator in Digitize Tool 40
Digitize settings 38
Digitize Tool 38 to ??, 39 to 40, 41 to ??
Digitizing
and logging at the same time 45
batch 46
on-the-fly 45
preparations for 44
redigitizing 46
Digitizing from a Mark IN to a Mark OUT 45
Diskette, saving work on 160
Displaying digital audio values 42
Displaying digitizing status 40
Displaying volume values 42
Dissolves, creating a series of 120
Drive, saving work on 164
E
Editing
process of 22

168
titles 136
using keys 52
Effect categories 113
Effect mode, working in 116
Effect parameters 114
Effect template 112
Electronic license 16
End key 53
Ending the session 68
Entering Trim mode 87
Exiting
Title Tool 144
Trim mode 88
Exporting files
preparing for 148
supported formats for 147
Extract/Splice-in button 99, 101
Eyedropper 135
F
File formats for exporting 147
Files, Avid Xpress 27
Fixed-storage drive, turning on 14
Frame offset 65
Frame view 57, 60
Frames, title background in 130
Freeing storage space 158
Freeze Frame effect, accessing 113
G
Going back to previous actions 83
H
Hardware, starting 14
Home key 53
I
Input source in Video Input Tool 43
Input Volume button in Audio Tool 41
Installing tutorial files 15
Internal Waveform Monitor button in Video
Input Tool 44
J
J-K-L keys (three-button play) 52
Jogging
with arrow keys 53
with buttons 51
with J-K-L keys 52
K
Keyboard, described 52
L
Left Arrow key 53
License agreement, accepting 16
Lifting 101
Luminance, adjusting 44
M
Making subclips 54
Mark In Time option (Digital Cut Tool) 151
Marking
clips 94
IN and OUT points 60
Masks, effect types 115
Master clips, consolidating 158
Media files

169
backing up 160
consolidating
defined 158
procedure 162
defined 23
storing 23
Media Tool features 157
Meters in Audio Tool 42
Monitor icons 75
Monitoring audio/video tracks 75
Monitors, viewing in 70
Motion effects, accessing 113
Moving through clips 50
Multiple layer effects, defined 114
N
Navigating using keys 52
New Title command 138
Nonlinear editing 22
Non-real-time effects 116
Numeric keypad 63, 65
O
One/Two Drives Mode button in Digitize Tool
40
Operating the deck for digitizing 40
Options for output 146
Output
See also Digital cuts
generating 146
preparing for 146
Output button in Audio Tool 41
Overwriting shots 93, 98
P
Picture tracks, monitoring 75
Picture-In-Picture effect
applying 122
defined 115
Play button 51
Playback, controlling
with buttons 50
with position bars and indicator 49
Playing clips 80
Position bar 49
Position indicator
in the Timeline 70
positioning for title creation 138
using 49
Precompute 116
Preparing to digitize 44
Previewing digital cuts 146
Process of video editing 22
Programs 26
Project settings, defined 33
Project window
bins display 31
Settings display, using 33
Projects
closing 67
defined 26
programs and 26
saving 160
Projects folder See Avid Projects folder
R
Real-time effects 116
Record Deck Time option (Digital Cut Tool) 151
Record/Log mode button in Digitize Tool 40
Recording digital cuts 147
Redigitizing 46
Remove Effect button 121

170
Removing footage from a sequence 100
Rendering of effects 116
Repositioning title text 139
Reset Peak button in Audio Tool 41
Resetting peak measurements 41
Resolution, choosing in Digitize Tool 40
Restoring files from backup 164
Right Arrow key 53
Rollers See Trim mode
S
Saving
bins 160
on a drive 164
projects 160
Segment effect
multiple layer effects, defined 114
single layer effects 115
types of 114
Selecting
all Tracks 74
tracks in the Timeline 74
transitions for trimming 87
trim sides 89
Selecting settings 38
Selecting title colors 134
Sequence Time option (Digital Cut Tool) 151
Sequences
adding shots to 82
changing name of 78
consolidating 159
defined 25
exporting 147
output options for 146
programs and 26
removing footage from 100
title editing 136
Settings
displaying 33 to ??
overview of 33
site, defined 33
Setup button in Audio Tool 41
Shadows, adding to titles 140
Shuttling with J-K-L keys 52
Single layer segment effects 115
Site settings, defined 33
Source pop-up monitor
marking edit points in 62
playing clips in 57
viewing in 70
Source Tape display in Digitize Tool 40
Splicing a shot 82
Splicing video 79 to 84
Status bar in Digitize Tool 40
Stepping See Jogging
Stopping digitizing process 40
Storyboard editing 96
Subclip button 54
Subclipping 66
Subclips
consolidating 159
creating 54
defined 24
handle (dot) 54
Switching between Digitize mode and Log
mode 40
T
Target drive, choosing in Digitize Tool 40
Targeting drives for digitizing 40
Text for titles, repositioning of 139
Text formatting tools 132
Text Tool, working with 132
Text view 56
Three-button play (J-K-L keys) 52
Three-point edit 98
Timecode, using as reference for marking 63
Timeline

171
monitoring tracks in 75
position indicator 70
segment editing of titles 136
title development 130
Track Selector panel 72
viewing in 70
Title text, adjusting color 134
Title Tool
accessing 113
Color Picker 134
creating a new title with 130 to 138
creating multiple titles 130
exiting 144
window 131
Title, editing 136
Toggle Source button (Digitize Tool) 40
Tool Palette, using 51
Tools for text formatting 132
Track Selector panel, using 72
Tracking audio levels 42
Tracks
monitoring 75
selecting 74
video, titles over 129
Transition effects, applying 114
Transitions, selecting for trimming 87
Transparency selection boxes in Title Tool 134
Trash button in Digitize Tool 40
Trim mode
basic procedures in 87
entering 87
exiting 88
selecting
single transitions in 87
trim sides in 89
Trim sides, selecting 89
Turning on the system 14
U
Undoing actions 83
User profile, creating new 30
User settings, defined 33
V
Variable-speed play See Playback
Video editing, process of 22
Video Input Tool
adjusting luminance 44
choosing input source 43
opening 43
Video output, preparing for 146
Video tracks, monitoring 75
Videotape, recording digital cut to 147
Viewing clips 55
Viewing creation dates 142
Viewing in monitors 70
Viewing source tape name while digitizing 40
VU scale in Audio Tool 42
W
Windows NT desktop 15
