b mobile 10-014 Mobile Phone User Manual K370 OM MX
b mobile HK Limited Mobile Phone K370 OM MX
b mobile >
Users Manual

Teléfono
Modelo Bmobile K370
Dimensiones(LxAnxAl) 113.8 x 48.5 x 13.85 mm
Peso 71.2g
Li-ion
Modelo Bmobile CM186
Voltaje estándar 3.7V
Capacidad nominal 600mAh
Cargador de batería
Modelo Bmobile
Entrada 100-240V 0.15A
Salida 5V 500mA
Cable USB
Tipo de conector Micro 5 pines
Auricular
Tipo de conector 3.5mm
Referencia Técnica
1. Funciones del Menú
Partes del Teléfono
Apariencia
Introducción
Introducción a tu teléfono
Teclas y Funciones
Nombre
Tecla izquierda
Tecla derecha
Tecla de marcación
Tecla Finalizar llamada
Arriba
Abajo
Izquierda
Derecha
Tecla Central
1
0, 2 ~ 9
*
0
Teclas de
dirección
Teclas
numéricas
Función en la pantalla de espera
Mensaje SMS
Lista de accesos directos
-Conteste las llamadas entrantes
-Marque el número almacenado en la tarjeta
SIM.
-Ir al registro de llamadas
Pulsación breve:
- Para finalizaro rechazar la llamada
entrante.
- Regresar a la pantalla de espera en
cualquier modo.
Pulsación larga:
- Colgar / Encender / Apagar el teléfono
Cámara
Calendario
Mensaje SMS
Lista de accesos directos
Menú
Pulsación corta: Llamar al buzón de voz.
Pulsación corta: marcación rápida de los
números 0 y 2 ~ 9.
Activa/ Desactiva la luz ultavioleta*
Activa/ Desactiva la linterna
1.1 Agenda
Puede almacenar el nombre y número de teléfono en la memoria del teléfono o
en la tarjeta SIM. Hasta 500 registros de números y nombres pueden ser
almacenados en la memoria del teléfono. La capacidad de almacenamiento de
la tarjeta SIM se determina por el tipo de la tarjeta SIM.
1.2 Llamadas
1.2.1 Historial de llamadas
Usted puede ver las llamadas perdidas, llamadas hechas, las llamadas recibidas
a través de esta función, así como eliminar todo registro.
1.2.2 Llamadas perdidas
Ver las llamadas que no pudieron ser contestadas o fueron ignoradas.
1.2.3 Números marcados
Ver todos los números que fueron marcados por el dispositivo.
1.2.4 Llamadas recibidas
Ver las llamadas que se recibieron
1.2.5 Llamadas rechazadas
Ver los números telefónicos que llamaron y fueron rechazados.
1.2.6 Contador de tiempo de las llamadas
Muestra el tiempo de todas las llamadas, dividiéndolas por llamadas recibidas y
números marcados, también muestra el conteo total de los minutos en llamada.
1.3 Alarma
Alerta en una hora exacta, se puede programar para que solo alarme en un día
de la semana, todos los días o solo para una hora.
- Para programar 3 alarmas distintas: Ver opción de programación de alarmas
Como retirar la cubierta posterior:
• Asegúrese de que el dispositivo esté apagado.
• Sujete firmemente el aparato con la parte frontal hacia abajo.
• La tapa se encuentra cerrada a presión, utilice la ranura que se encuentra en
la parte inferior para levantarla, y para cerrarla presione con cuidado hasta que
quede completamente cerrada.
Como insertar la tarjeta SIM:
Ubique la ranura para tarjeta SIM e inserte la SIM tal como se muestra en la
figura. Adicional usted tendrá una ayuda visual, como referencia, de donde se
inserta la tarjeta SIM.
• Deslice la tarjeta SIM en la ranura hasta que esta llegue al tope de la misma.
Encendido / Apagado
Para apagar el teléfono, presione y mantenga presionada la tecla de Apagar.
Para encender el teléfono, pulse y mantenga presionado el botón de Encender
hasta que la pantalla se encienda o vibre el teléfono.
Como instalar una tarjeta de memoria
Para tener un almacenamiento adicional para sus imágenes, vídeos, música y
archivos, puede comprar una tarjeta de memoria e instalarla en su dispositivo.
Localice la ranura de la tarjeta de memoria donde se indica en la imagen e
inserte la tarjeta de memoria en la ranura con los contactos dorados hacia abajo
hasta que encaje correctamente.
Carga de la batería
Las baterías nuevas se envían parcialmente cargadas. Antes de comenzar a
utilizar el dispositivo, se recomienda hacer una carga completa de la batería.
Algunas baterías tienen mejor rendimiento después de varios ciclos de carga /
descarga.
Cargador:
- No cargue el teléfono en las siguientes condiciones:
- Lugares con luz solar directa.
- Lugares con temperatura ambiente inferior a 0° o superior a 40°, lugares
húmedos o polvorientos con fuertes vibraciones (Esto pueden provocar un mal
funcionamiento)
- Lugares cerca de electrodomésticos (Esto puede afectar las imágenes y el
sonido) como aparato de TV, radio, etc.
- El adaptador debe estar conectado cerca del equipo y debe ser de fácil acceso.
MANUAL DE USUARIO
BMOBILE K370
1. Auricular
2. Pantalla
3. Botón aceptar
4. Botón borrar/ regresar
5. Botón aceptar
6. Botón de navegación
7. Botón contestar
8. Botón colgar/ cancelar
9. Teclado
10. Botón luz ultavioleta
11. Botón activar/ desactivar
modo silencio
12. Botón linterna
13. Linterna
14. Luz ultavioleta
15. Cámara
16. Altavoz
17. Conector USB
18. Conector auricular
19. Micrófono
Seguridad
Con el fin de garantizar que el teléfono es usado de manera segura y correcta,
lea las siguientes precauciones antes de utilizarlo.
1.1 Precauciones generales
• El teléfono es adecuado solo para la batería y el cargador aprobados por el
fabricante, usar otros accesorios puede provocar que la batería presente mal
funcionamiento como fugas, sobrecalentamiento, explosiones o incendiarse.
• No golpee, haga vibrar o tire el teléfono para evitar daños en la unidad.
• Si hay fenómenos anormales, como aumento de la temperatura, cambio de
color o deformación durante el uso, la carga o el almacenamiento de la batería,
por favor, deje de usarlo y sustituir la batería por una nueva lo antes posible.
• El líquido de la batería puede ocasionar quemaduras en la ropa y piel en caso
de que se presenten fugas. Si esto sucede, por favor, lavar con abundante agua
limpia inmediatamente y vaya al hospital más cercano.
• Por favor, mantenga la batería lejos del fuego para evitar incendios o explosión
ya que puede provocar fugas o emitir un olor extraño.
• No coloque o exponga el teléfono a la humedad o puede provocar
sobrecalentamiento, humo y corrosión.
• No utilice ni coloque la batería bajo la luz solar directa o en lugares calientes,
puede causar fugas o sobrecalentamiento, lo que reduce el rendimiento y acorta
la vida útil de la misma.
• No cargue la batería durante más de 24 horas seguidas.
• Use con cuidado el auricular, el uso del mismo con excesivo volumen puede
causar pérdida auditiva.
1.2 Precauciones en el uso del cargador
• No provoque ningún tipo de cortocircuito en el cargador, o puede causar una
descarga eléctrica, humos y daños al cargador.
• No utilice el cargador si el cable de alimentación está roto o dañado, o puede
provocar incendios y descargas eléctricas.
• Elimine el polvo acumulado en la clavija de alimentación.
• No ponga contenedores de agua al lado de la fuente de alimentación para
evitar el sobrecalentamiento, incendios, descargas eléctricas y mal
funcionamiento.
• No desmonte ni fuerce el cargador o puede provocar lesiones personales,
descarga eléctrica, fuego y daños en el cargador.
• No utilice el cargador en lugares de alta humedad, como cuartos de baño, o
puede causar una descarga eléctrica, fuego y daños en el cargador.
• No toque el cargador, el cable o el tomacorriente de alimentación con las
manos mojadas ya que esto puede causar una descarga eléctrica.
• No coloque objetos pesados sobre el cable de alimentación o puede dañar el
cable y provocar un mal funcionamiento
• Por favor desconecte el cargador del tomacorriente antes de su limpieza y
mantenimiento.
• Por favor, mantenga el cargador desconectado del tomacorriente y no tire del
cable de alimentación ya que puede dañar el cable de alimentación y provocar
una descarga eléctrica.
1.3 Limpieza y mantenimiento
• Dado que el teléfono, la batería y el cargador no son resistentes al agua, no los
utilice en lugares de alta humedad y evite que se mojen debido a la lluvia.
• Por favor, limpiar la batería y el cargador con un paño suave y seco.
• Nunca utilice alcohol, solventes y/o soluciones corrosivas, como el benceno,
para limpiar el teléfono.
• Los tomacorrientes sucios pueden causar un mal contacto y una baja en la
fuente de alimentación, o incluso puede hacer que la carga de la batería no se
realice correctamente. Así que, por favor, límpielos periódicamente.
1.4 Precauciones Comunes
Teléfono móvil:
• Utilice el teléfono en un ambiente con temperatura entre 20 a 40 y la
humedad menor a 75 %.
• Utilice el teléfono lejos de los teléfonos fijos, televisores, radios y equipos de
automatización de oficina, para no afectar el normal funcionamiento de estos
equipos y del teléfono móvil.
Batería:
• Almacene la batería en un lugar fresco, ventilado y sin luz solar directa.
• La batería tiene una vida útil limitada. El uso de la batería se reducirá
progresivamente debido a la carga frecuente. Una vez que la batería ya no se
recargue, significa que su vida útil ha terminado, y usted tendrá que
reemplazarla con una nueva batería aprobada por el fabricante.
• No tire las baterías gastadas a la basura doméstica. Depositarlas en los
lugares de reciclaje específicos y siga las instrucciones estipuladas para su
eliminación.
PRECAUCIÓN: SE CORRE EL RIESGO DE EXPLOSIÓN SI SE SUSTITUYE
LA BATERÍA POR UNA DE TIPO INCORRECTA. ELIMINE LAS BATERIAS
USADAS DE ACUERDO CON LAS REGULACIONES DE SU PAIS.
1
13 14
15 16
17 18 19
2
34
5
6
7
9
10
12
11
8
SIM #1
SIM #2
1.4 Ajustes
1.4.1 Ajustes de llamada
Permite personalizar el funcionamiento al recibir y realizar llamadas.
- Selección de SIM principal
Convierte a la SIM 1 como SIM principal del teléfono y la utilizará
automáticamente para realizar llamadas o enviar mensajes.
o SIM 1 para llamadas
o SIM 1 para mensajes
- Modo avión: Este modo bloquea todas las conexiones del teléfono, no podrá
enviar y recibir llamadas ni mensajes, no podrá utilizar la radio FM ni conectarse
por medio de bluetooth a otro dispositivo. Es necesario activar el modo avión
cuando está por despegar o aterrizar par evitar que el dispositivo haga
interferencia con los sistemas de comunicación del avión.
- Renombrar las tarjetas SIM: Permite renombrar a las tarjetas SIM a gusto del
usuario
- Desvío de llamadas: esta función de red le permite desviar las llamadas
entrantes a otro número que haya especificado previamente.
- Llamada en espera: Después de elegir Activar, el teléfono móvil se
comunicará con la red. Un momento después, la red hará una respuesta y
enviara un mensaje para confirmar la activación de la operación.
Si se activa la función de llamada en espera, la red le avisará y la pantalla del
teléfono móvil se mostrará el número de la llamada entrante mientras está en
una conversación.
- Llamadas restringidas: La llamada a la función de restricción le permite
bloquear las llamadas, según sea necesario. Al configurar esta función, es
necesario utilizar un código de red de restricción, que se puede obtener del
operador de red. Si el código es incorrecto, aparecerá un mensaje de error y se
le solicitará en la pantalla ingresarlo nuevamente. Después de seleccionar una
opción de restricción de llamadas, continúe para seleccionar Activar o
Desactivar. El teléfono móvil le pedirá que introduzca el código de bloqueo de
llamadas y luego se pondrá en contacto con la red. Un momento después, la red
dará una respuesta y enviara los resultados de la operación al teléfono móvil.
- Ocultar ID: Esconde tu número al realizar llamadas.
- Grabación de llamadas: Guarda las conversaciones de las llamadas, depente
de cuanto espacio de almacenamiento esté disponible.
1.4.2 Ajustes de teléfono
- Selección de idioma: Elección del idioma principal del teléfono, se puede
elegir entre: español o inglés.
- Hora-fecha: Editar la hora y fecha que muestra el teléfono, también permite
definir el formato en que se quiere ver la hora y fecha.
- Modificación de los Accesos directos: Modifica los accesos directos
predeterminados del dispositivo.
- Encendido y apagado automático: Permite definir cuando se enciende y
cuando se apaga el teléfono automáticamente.
- Ajustes de ahorro de energía: Edita las opciones de ahorro de energía como
quitar animaciones, desactivar datos, desactivar bluetooth.
Y también permite definir cuando se quiere activar el ahorro de energía.
1.4.3 Pantalla
- Elegir fondo de pantalla: Permite elegir entre fondos predeterminados o
imágenes y fotos agregadas por el usuario.
- Tiempo de iluminación de pantalla: Definir cuanto tiempo la luz de la pantalla
permanecerá encendida después de que se deje de usar el dispositivo
- Información a mostrar: Seleccionar la información que se mostrará en la
pantalla principal como, hora, fecha, estado de las tarjetas SIM, tareas, música
o radio FM.
- Luz del teclado: Cambia el tiempo en que el teclado permanece iluminado
después de su uso.
1.4.4 Seguridad
- PIN y PIN 2 de SIM
Usted puede activar, desactivar o modificar el código PIN. Ingrese el Código PIN
correcto para poder desbloquear o desactivar el código PIN. Si se activa la
verificación del código PIN, cada vez que encienda el teléfono, tendrá que
ingresar el código PIN correcto. Si ingresa 3 veces códigos PIN no válidos se
bloqueará la tarjeta SIM. Usted tendrá que introducir el código de PUK1 para
desbloquearlo. Por favor, póngase en contacto con el operador de red para
obtener el código PUK1.
- Activar código para desbloqueo de teléfono al encender: Puede activar o
desactivar la contraseña del teléfono. Cuando se activa la contraseña del
teléfono, debe introducir la contraseña cada vez que se enciende el teléfono. La
contraseña del teléfono por defecto es 0000.
- Auto bloqueo de tecla: Una vez que se deja usar el dispositivo, se bloquea
para evitar que active en su bolsillo por error.
- Números de marcación fija: Activa o desactiva la marcación fija. Cuando la
marcación fija está activada, el teléfono sólo puede llamar a determinados
números y realizar llamadas de emergencia. Las llamadas entrantes se siguen
recibiendo, aunque la marcación fija esté activada.
1.4.5 Conexiones
- Cuentas de red: Permite observar, editar y agregar cuenta de red. Esto
dependerá de su tarjeta SIM.
- Selección de red: Permite elegir a que red se desea conectar. Esto dependerá
de su tarjeta SIM.
2. Aviso importante sobre FCC
15.19 Requerimientos de etiquetado
Cualquier cambio o modificación no aprobados expresamente por la parte
responsable del cumplimiento podrían anular la autoridad del usuario para
operar el equipo. Este dispositivo cumple con la parte 15 de las normas FCC. La
operación está sujeta a las siguientes dos condiciones: (1) Este dispositivo no
debe causar interferencias perjudiciales. (2) Este dispositivo debe aceptar
cualquier interferencia recibida, incluyendo interferencias que puedan causar un
funcionamiento no deseado.
15.21 Información para el usuario
Cualquier cambio o modificación no aprobada expresamente por la entidad
certificadora puede anular la autoridad del usuario a usar el equipo.
15.105 Información para el usuario
Nota: Este equipo ha sido probado y cumple con los límites para un dispositivo
digital de Clase B, según la Parte 15 de la normativa FCC. Estos límites están
diseñados para proporcionar una protección razonable contra las interferencias
perjudiciales en una instalación residencial. Este equipo genera, utiliza y puede
irradiar energía de radiofrecuencia si no se instala y utiliza de acuerdo con las
instrucciones, puede causar interferencias perjudiciales en las comunicaciones
de radio. Sin embargo, no hay garantía de que no se produzcan interferencias
en una instalación en particular. Si este equipo causa interferencias perjudiciales
en la recepción de radio o televisión, lo cual puede determinarse apagándolo y
encendiéndolo, se recomienda al usuario que intente corregir la interferencia
mediante una o más de las siguientes medidas:
- Reorientar o reubicar la antena receptora.
- Aumente la separación entre el equipo y el receptor.
- Conecte el equipo a un tomacorriente en un circuito diferente de aquel al que
está conectado el receptor.
-Consulte a su distribuidor o a un técnico de radio / televisión para obtener
ayuda.
Información de Tasa de Absorción específica (SAR)
Este dispositivo cumple con los requisitos del gobierno para exposición a las
ondas de radio. Las directrices están basadas en estándares que fueron
desarrollados por organizaciones científicas independientes a través de la
evaluación y el estudio periódico de las pruebas.
Los estándares incluyen un margen sustancial de seguridad diseñado para
asegurar la seguridad de cualquier persona independientemente de su edad.
La declaración de FCC para exposición al RF indica que el límite para EEUU
(FCC) es 1.6 W/Kg promedio por cada gramo de tejido. Este dispositivo fue
probado bajo condiciones normales de uso con la parte trasera del mismo a 1.0
cm del cuerpo. Para mantener la validez con FCC y la exposición a RF, use
accesorios que mantengan una separación de 1.0 cm entre el cuerpo y la parte
trasera del equipo. El uso de clips para cinchos, detenedores y accesorios
similares no deben contener partes metálicas en su ensamblaje. El uso de
accesorios que no cumplan con lo mencionado anteriormente pueden no cumplir
con la normas FCC y deben ser evitados. Uso en el cuerpo: Este dispositivo fue
probado para usos típicos en el cuerpo. Para cumplir con los requerimientos de
exposición a RF, una separación mínima de 1.0 cm debe ser mantenida entre el
cuerpo del usuario y el dispositivo, incluyendo la antena. El uso de clips para
cinchos, detenedores y accesorios similares no deben contener partes metálicas
en su ensamblaje. El uso de accesorios que no cumplan con lo mencionado
anteriormente pueden no cumplir con la normas FCC y deben ser evitados. Use
únicamente la antena de fábrica o en su defecto cualquier antena aprobada..
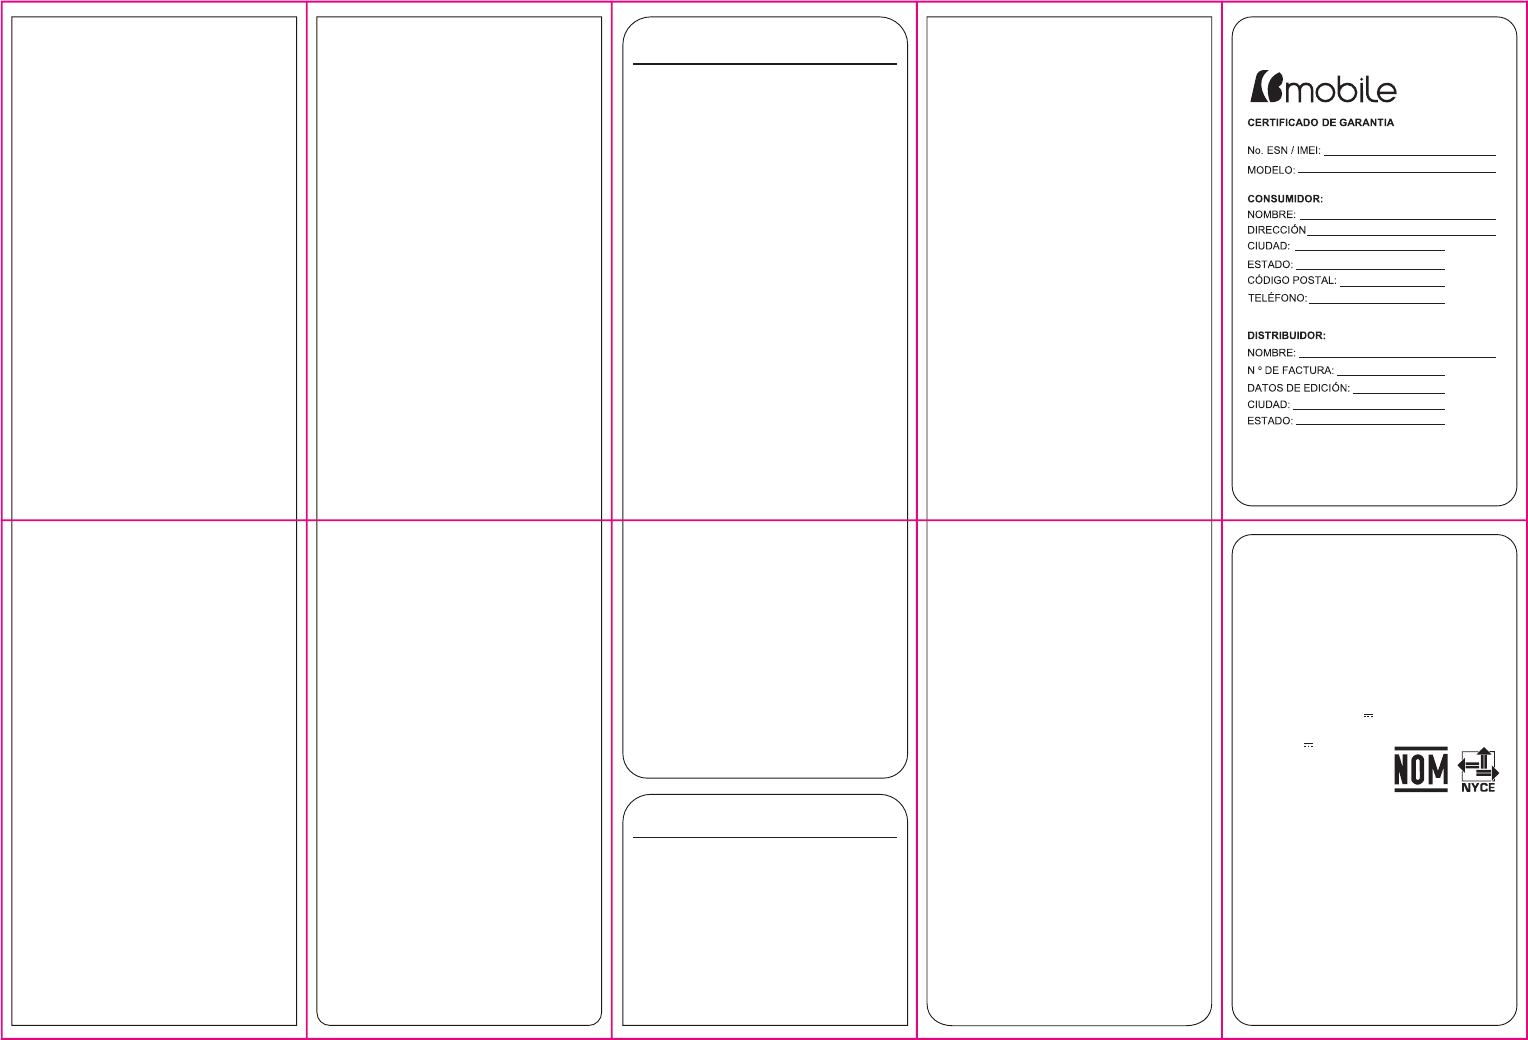
QUE HAREMOS Si, durante el período de garantía, este producto falla en
operar bajo uso y servicio normal, debido a defectos de diseño, materiales o
mano de obra, los distribuidores y Centros de Servicio autorizados por Bmobile,
en el país / región donde el Producto fue adquirido, repararán o reemplazarán el
mismo, a su criterio, sin que ello de derecho a reclamación alguna, de acuerdo
con los términos y condiciones estipulados en adelante.
Bmobile y sus Centros de Servicio, se reservan el derecho de recargar un costo
a la reparación si el Producto recibido se encontrara fuera de las condiciones de
garantía que se presentan a continuación. Por favor, tenga en cuenta que sus
configuraciones personales o descargas, podrían perderse cuando el producto
es reparado o reemplazado.
CONDICIONES
Garantía proporcionada por Bmobile, no cubre:
1. Daños debido al uso normal del producto, incluyendo carcasas, teclado,
lentes, pantallas y otros componentes;
2. Cuando el producto se hubiese utilizado en condiciones distintas a las
normales.
3. Cuando el producto no hubiese sido operado de acuerdo con el instructivo de
uso que se le acompaña.
4. Cuando el producto hubiese sido alterado o reparado por personas no
autorizadas por el fabricante nacional, importador o comercializador
responsable respectivo.
5. Los daños causados por el mal uso se entiende como, pero no limitada a,
dirección confundida, arañazos, caídas, accidentes, derrames y / o alimentos, la
exposición a la humedad o condiciones climáticas extremas, la corrosión y la
oxidación en el producto o sus componentes.
6. Productos cuyo número de serie ilegible, raspadas, dañados, borrados y / o
eliminados.
7. Alteraciones, modificaciones y / o reparaciones realizadas por terceros que no
estén acreditadas oficialmente por Bmobile como distribuidor.
8. Los productos que no tienen partes y / o componentes originales de la marca
Bmobile.
9. Los productos y componentes que hayan sido dañados por abuso, o han sido
dañados por el mal uso de piezas y componentes no originales Bmobile.
10. Desfiguración o daño al producto causado por el envío de productos no
autorizados, causada por virus de acceso a sitios de Internet, entre otros.
VALIDEZ DE GARANTIA
1. Para hacer efectiva la garantía no deben exigirse mayores requisitos que la
presentación del producto, acompañado de la póliza correspondiente,
debidamente sellada por el establecimiento que lo vendió, o la factura, o recibo
o comprobante, en el que consten los datos específicos del producto objeto de
la compraventa. Bmobile se reserva el derecho de rechazar los servicios de
garantía si no cumplen estos requisitos básicos
2. Si Bmobile repara o reemplaza el Producto, el Producto reparado o
reemplazado será garantizado por el tiempo restante al de la garantía original o
por noventa (90) días desde la fecha de reparación o reemplazo, el que fuera
más largo. La reparación o el reemplazo pueden involucrar la utilización de
unidades reacondicionadas equivalentes al Producto original. Las partes o
componentes reemplazados, pasarán a ser propiedad de Bmobile.
3. Esta garantía no cubre ninguna falla del Producto ocasionada por el desuso o
cualquier otro tipo de uso diferente a aquel indicado por las instrucciones de uso
y mantenimiento del Producto de Bmobile (Manual de Usuario). Esta garantía
tampoco cubre cualquier falla.
ATENCION
Bmobile recomienda encarecidamente que, antes de la actualización del
software o el mantenimiento del producto, se haga una copia de seguridad de los
datos, enlaces y otros contenidos que se ha enviado a través de descarga y se
almacena en la memoria, ya que se pueden perder durante el procedimiento o
reparación de la actualización. En caso de sustitución, se recomienda el mismo
procedimiento. Bmobile no será responsable en ningún caso por pérdida, daño
y / o corrupción de datos sobre producto entregado para su reparación,
actualización de software o un reemplazo.
3. Garantía limitada Bmobile
Bmobile, provee esta Garantía Limitada para su teléfono celular junto con sus
accesorios. (En adelante denominado “Producto”). Si su Producto requiere
servicio de garantía, por favor entréguelo al Distribuidor a quien se lo haya
comprado; o visite www.bmobile.eu.com para mayor información.
NUESTRA GARANTÍA Sujeto a las condiciones de esta Garantía Limitada,
Bmobile otorga una garantía comercial por un período de doce meses desde la
fecha de entrega del producto al operador o por un periodo de un (1) año
contado a partir de la fecha de adquisición del Producto por parte del usuario,
por los defectos del mismo. Los accesorios, cuentan con una Garantía comercial
de seis (6) meses, contados a partir de la fecha de compra por parte del usuario.
La garantía incluye mano de obra y los gastos de transportación son cubiertos
únicamente desde el establecimiento de compra. Para adquirir partes,
componentes, consumibles y accesorios avocarse al taller de servicio
autorizado, para más información visita nuestra página web
www.bmobile.com
Nombre del producto: Teléfono Celular
Producto: Teléfono Celular, Marca Bmobile, Modelo: K370
Características Nominales: 3.7V 600 mAh
Adaptador De Corriente: Bmobile Adaptador
Entrada: AC 100-240V~50/60HZ 0.2A
Salida: DC 5.0V 500mA
Batería: Bmobile Li-ion Battery
Modelo: CM186
Voltaje: 3.7Vcc Capacidad 600mAh
2.22 Wh.
HECHO EN CHINA
INFORMACIÓN PARA MÉXICO
INCLUYE: Teléfono celular, marca Bmobile K370, Adaptador ca/cc
marca Bmobile, sin modelo, Batería Recargable marca Bmobile
CM186, Manos Libres sin marca y sin modelo, Manual de Usuario,
Protector de pantalla.
Nombre del Importador: B TELECOMUNICACIONES MÉXICO S.A DE C.V.
Avenida Vasco de Quiroga No. 3900 Torre A Piso 10-B Colonia Santa Fe
Cuajimalpa, Delegación Cuajimalpa de Morelos, Ciudad de México,
México. CP 05348 R.F.C.: BTM 150819 AS8
1.5 Mensajes
Permite crear y enviar mensajes SMS también permite visualizar los mensajes
recibidos.
- Escribir mensajes.
- Bandeja de entrada.
- Borrador.
- Bandeja de salida
- Mensajes de difusión
Permite observar y editar las configuraciones de los mensajes de difusión.
1.6 Multimedia
1.6.1 Cámara
Esta función le permite tomar imágenes. Puede pulsar la tecla de dirección arriba
o abajo para acercar o alejar la imagen; Tecla OK para tomar la foto o capturar
vídeos; Tecla de función izquierda para acceder a los ajustes de la cámara de
video; tecla de función derecha para salir de la interfaz de captura.
1.6.2 Grabadora de video
Permite capturar videos, utilice la tecla OK para empezar a grabar, opción
izquierda para detener y opción derecha para descartar; antes de empezar a
grabar use tecla de función izquierda para acceder a los ajustes de la cámara de
video; tecla de función derecha para salir de la interfaz de captura.
1.6.3 Radio FM
El teléfono está equipado con una radio FM. Puede utilizar la aplicación como una
radio FM tradicional con sintonización automática y emisoras guardadas. Puede
escuchar la radio mientras ejecuta otras aplicaciones.
1.6.4 Galeria
Usted puede ver la imagen o las imágenes a través de esta función.
1.6.5 Reproductor de audio
Reproduce archivos de audio. Puede ordenar en listas de reproducción
personalizadas o escuchar su lista completa. Puede seguir escuchando sus
archivos de audio mientras ejecuta otras aplicaciones.
1.6.6 Reproductor de video
Esta función reproduce archivos de vídeo. Pulsando las teclas de dirección se
puede controlar el proceso de reproducción del reproductor de vídeo:
reproducción / pausa (tecla de dirección arriba), avance rápido (presione y
sostenga la tecla de dirección derecha) y rebobinar (presione y sostenga la tecla
de dirección izquierda). En la interfaz de reproductor de vídeo, pulse la tecla * para
cambiar al modo pantalla completa; puede presionar 2 u 8 para el subir y bajar el
volumen respectivamente.
1.7 Perfiles de sonido
El usuario puede cambiar de un modo a otro de acuerdo a diferentes ocasiones.
Modos disponibles: Modo general, el modo silencioso, Modo de reuniones, Modo
al aire libre y Modo Mi estilo. El usuario también puede restablecer los modos
individualizados pulsando la tecla de función izquierda para entrar en la interfaz
opción. Puede personalizar las siguientes opciones para nuevos perfiles.
- Normal: Volumen de llamadas, mensajes y demás alertas en un 50%
- Silencioso: Volumen de llamadas, mensajes y demás alertas en 0%
- Interior: Volumen de llamadas, alertas y mensajes a un 40%
- Exterior: Volumen a 100% para mensajes, alertas y llamadas.
- Creados por el usuario: El usuario puede personalizar los perfiles de sonido
según su preferencia.
1.8 Organizador
- Explorador de archivos: Permite administrar los archivos en la memoria del
teléfono o tarjeta de memoria.
- Calculadora: Realiza operaciones aritméticas (suma, resta, multiplicación y
división)
- Reloj mundial: Permite agregar tiempos de otros países.
- Conversión de unidades: Convierte unidades comunes de peso o longitud
- Menú de SIM: Muestra las opciones del menú de la tarjeta SIM, varía
dependiendo del proveedor.
- Bluetooth: Permite vincular con otros dispositivos para la transferencia de
archivos por medio de bluetooth o conectar a audífonos bluetooth para escuchar
música.
- Linterna: Activa / desactiva la linterna del dispositivo
- Luz ultravioleta: Activa / desactiva la luz ultravioleta del dispositivo
1.9 Cámara/ Grabadora de video
Esta función le permite tomar imágenes. Puede pulsar la tecla de dirección arriba
o abajo para acercar o alejar la imagen; Tecla OK para tomar la foto o capturar
vídeos; Tecla de función izquierda para acceder a los ajustes de la cámara de
video; tecla de función derecha para salir de la interfaz de captura.
-1-
Content
1 General Information ......................................................................................................................................... 4
1.1 Profile .................................................................................................................................. 4
1.2 Safety Information ............................................................................................................... 4
1.3 Safety warning and Attentions ............................................................................................. 4
2 Your phone ......................................................................................................................................................... 7
2.1 Phone overview ................................................................................................................... 7
2.2 Functions of Keys ................................................................................................................ 8
2.3 Technical specifications ....................................................................................................... 9
3 Getting started ................................................................................................................................................... 9
3.1 Installing the SIM Cards and the Battery............................................................................. 9
3.2 Installing T-Flash Card ...................................................................................................... 12
-2-
3.3 Charging the Battery .......................................................................................................... 12
3.4 Powering On/Off the Mobile Phone .................................................................................. 15
3.5 Linking to the Network ...................................................................................................... 15
3.6 Dialing Calls ...................................................................................................................... 15
3.7 Using the Headset .............................................................................................................. 15
4 Input method ................................................................................................................................................... 16
4.1 Key for Input Methods ....................................................................................................... 16
4.2 To Shift Entry Methods ...................................................................................................... 16
4.3 Numeric Input .................................................................................................................... 16
4.4 English input and numeric input: ....................................................................................... 16
4.5 Inserting a Symbol ............................................................................................................. 18
5 Using the Menus .............................................................................................................................................. 19
5.1 Tplus .................................................................................................................................. 19
5.2 Call logs ............................................................................................................................. 19
5.3 Multimedia ......................................................................................................................... 20
5.4 Contacts ............................................................................................................................. 22
5.5 Audio ................................................................................................................................. 22
-3-
5.6 Message ............................................................................................................................. 22
5.7 File manager ...................................................................................................................... 24
5.8 Application ........................................................................................................................ 24
5.9 Settings .............................................................................................................................. 25
5.10 Profiles ........................................................................................................................... 28
5.11 Games ............................................................................................................................. 28
5.12 Services .......................................................................................................................... 29
6 Appendix .......................................................................................................................................................... 29
-4-
1 General Information
1.1 Profile
Please read this pamphlet carefully in order to make your phone in perfect condition.
Our company may change this mobile phone without prior written notice and reserves the final right
to interpret the performance of this mobile phone.
Due to different software and network operators, display on your phone may be different, refer to
your phone for details.
1.2 Safety Information
If your phone has lost or been stolen, notify the telecommunication office the SIM card is disabled
(network support is required). This can avoid economic loss caused by unauthorized use.
Please take measures as following to avoid your phone being unauthorized used:
· Set PIN code of SIM card
· Set phone password
1.3 Safety warning and Attentions
Safety warning
ROAD SAFETY COMES FIRST
-5-
Do not use a hand-held phone while driving. Use hands-free fittings when calls are unavoidable while
driving. In some countries, dialing or receiving calls while driving is illegal!
SWITCH OFF IN AIRCRAFT
Wireless devices can cause interference in aircraft. Using a mobile phone in flight is illegal and risky.
Please make sure that your mobile phone is powered off in flight.
SWITCH OFF BEFORE ENTERING RISKY AREAS
Strictly observe the relevant laws, codes, and regulations on the use of mobile phones in risky areas.
Turn off your mobile phone before entering a place susceptible to explosion, such as an oil station, oil tank,
chemical plant or a place where a blasting process is under way.
OBSERVE ALL SPECIAL REGULATIONS
Follow any special regulations in force in any area such as hospitals and always switch off your phone
whenever it is forbidden to use it or, when it may cause interference or danger. Properly use your mobile
phone near medical apparatuses, such as pacemakers, hearing aids and some other electronic medical devices,
as it may cause interference to such apparatus.
Follow any special regulation in force in any area such as hospital and always switch off your phone
whenever it is forbidden to use it or, when it may cause interference or danger. Properly use your mobile
phone near medial apparatuses, such as pacemakers, hearing-aids and some other electronic medical devices,
as or may cause interference to such apparatuses.
INTERFERENCE
The conversation quality of any mobile phone may be affected by radio interference. An antenna is built
inside the mobile phone and located below the microphone. Do not touch the antenna area during a
-6-
conversation, lest that the conversation quality deteriorate.
QUALIFIED SERVICE
Only qualified personnel may install or repair phone equipment. Installing or repairing the mobile phone
on your own may bring great danger and violate the warranty rules.
ACCESSORIES AND BATTERIES
Use only approved accessories and batteries.
USE SENSIBLY
Use only in a normal and proper manner.
EMERGENCY CALLS
Ensure the phone is switched on and in service, enter the emergency number, e.g. 112, then press the
Dial key. Give your location and state your situation briefly. Do not end the call until told to do so.
Note: Just like all other mobile phones, this mobile phone does not necessarily support all the features
described in this manual due to network or radio transmission problems. Some networks even do not support
the emergency call service. Therefore, do not rely solely on the mobile phone for critical communications
such as first aid. Please consult the local network operator. Just like all other mobile phones, this mobile
phone does not necessarily support all the features described in this manual due to network or radio
transmission problems. Some network even do not support the emergency call service
Precaution
This mobile phone is well designed with fine art. Please exercise special care when using it. The
following suggestions will help your mobile phone survive the warranty period and extend its service life:

-7-
Keep the mobile phone and all its fittings beyond children's reach.
Keep the mobile phone dry. Keep away from rain, moisture, liquid or other substances that may
corrode electronic circuits.
Do not use or store the mobile phone in dusty place, lest that active parts of the mobile phone be
damaged.
Do not store the mobile phone in a high-temperature place. High temperature will shorten the
life of electronic circuits and damage the battery and some plastic parts.
Do not store the mobile phone in a chilly place. Otherwise, moisture will be formed inside the
mobile phone to damage electronic circuits when the mobile phone is moved to a constant temperature
place.
Do not throw, knock or shock the mobile phone, as that will destroy the internal circuit and high
precision components of the mobile phone.
2 Your phone
2.1 Phone overview
The phone has many powerful function and good appearance.
-8-
2.2 Functions of Keys
Dial1 key
Press dial 1 to originate a call by entering the called number or selecting a contact from the phonebook;
or press dial 1 to receive an incoming call; or press it in standby state to show the latest call records.
End key
Press it to end a call being dialed or end an ongoing call; or press it to exit the menu and return to
the standby state. You can hold it for two or three seconds can power on/off the mobile phone
Direction key
Press them to scroll the options when browsing a function list. In edit state, press direction keys to
navigate.
Dial 1 key and Right soft key
The bottom line on the screen displays the functions of the dial 1 key and Right soft key.
OK key
Press it to confirm a selection.
Number keys, * key and # key
Press number keys 0 through 9 to input or edit state to input numbers and characters;
In idle screen, you can press left soft key then press * to lock/unlock keypad.
Press two times the key * to input "+" in standby interface. When the symbol "+" appears,Press
the * key quickly to input "P" or "W" starting the second word,"P" and "W" are used for calling the
extension; "+" are used for dialing an international call.
-9-
2.3 Technical specifications
Phone
Dimensions (W×D×H):
Weight:
Lithium battery
Rated capacity:
Continuous standby duration: (Relates to network status)
Continuous conversation duration: (Relates to network status)
Please refer to their labels for other data related to the battery and the charger.
3 Getting started
3.1 Installing the SIM Cards and the Battery
A SIM card carries useful information, including your mobile phone number, PIN (Personal Identification
Number), PIN2, PUK (PIN Unlocking Key), PUK2 (PIN2 Unlocking Key), IMSI (International Mobile
Subscriber Identity), network information, contacts data, and short messages data.
Note:
-10-
After powering off your mobile phone, wait for a few seconds before removing or inserting a SIM card.
Exercise caution when operating a SIM card, as friction or bending will damage the SIM card.
Properly keep the mobile phone and its fittings such as the SIM cards beyond children's reach.
Installation
Hold the End key for a while to power off the mobile phone.
Take the back cover above the battery away.
Take the battery away.
Insert the SIM card into the SIM card slot lightly with the corner cutting of the card
aligning to the notch of the slot and the gold plate of the card facing download, till the SIM card cannot
be further pushed in.
With the metallic contacts of the battery facing the metallic contacts in the battery slot,
press the battery down until it locks into place.
Using code
The mobile phone and the SIM cards support sorts of passwords, in order to prevent the phone and the
SIM cards from being misused. When you are prompted to input any of the codes mentioned below, just
input the correct code and then press the OK key. If you input a wrong code, clear it and then input the
correct code.
Phone lock code
The phone lock code may be set to prevent your mobile phone from being misused. In general, this code
is provided along with the mobile phone by the manufacturer. The initial phone lock code is set to 1234 by
the manufacturer. If the phone lock code is set, you need to input the phone lock code when powering on the
-11-
mobile phone.
PIN
The PIN (Personal identification number, 4 to 8 digits) code prevents your SIM card from being used by
unauthorized people. In general, the PIN is supplied with SIM card by the network operator. If PIN check is
enabled, you need to input the PIN each time when you power on your mobile phone. The SIM card will be
locked if you input wrong PIN code for three times.
Unlocking methods as follows:
-Input the correct PUK according to the screen tips to unlock the SIM card.
-Then input the new PIN and press the OK key.
-Input the new PIN again and then press the OK key.
-If the input PUK is correct, the SIM card will be unlocked and the PIN will be reset.
Note: The SIM card will be locked if you input wrong PIN code for three times. To unlock the SIM card,
you need to input the PUK. In general, the PUK can be obtained from the network operator.
PUK
The PUK code (Personal Unlocking Key) is required to change a blocked PIN. It is supplied with SIM
card. If not, contact your network operator. If you input wrong PUK code for 10 times, SIM card will be
invalid. Please contact the network operator to replace the SIM card.
Barring code
A barring code is required for setting the call barring function. You can obtain this code from the
network operator to set the call barring function.

-12-
3.2 Installing T-Flash Card
The T-Flash card is a pluggable mobile storage card inside the mobile phone.
Insert the T-Flash card into the T-Flash card slot lightly with the corner cutting of the card aligning to
the notch of the slot and the gold plate of the card facing download, till the T-Flash card cannot be further
pushed in.
Note:
1. The mobile phone cannot automatically identify the T-flash card being inserted when the mobile
phone is powered on. You must power off the mobile phone and then power it on, so that the phone can
identify the T-Flash card.
2. The T-Flash card is a miniature object. Keep it out of the reach of children for fear that children swallow
it!
3.3 Charging the Battery
The lithium battery delivered with the mobile phone can be put into use immediately after being
unpacked.
Battery level indication:
Your mobile phone can monitor and display the battery state.
Normally the remaining energy of the battery is indicated by the battery level icon at the
upper right corner of the display screen.
When the battery energy is insufficient, the mobile phone prompts "Battery low". If you
have set an alert tone, an alert tone will be given off when the battery level is too low.
-13-
A charging animation appears when the battery is being charged. When the charging is
complete, the animation disappears.
Using a travel adapter:
Install the battery into the mobile phone before charging the battery.
Connect the adapter of the travel charger with the charging slot in the mobile phone. Ensure
that the adapter is fully inserted.
Insert the plug of the travel charger to an appropriate power outlet.
During the charging, the battery level grid in the battery icon keep flickering till the battery
is fully charged.
It is normal when the battery becomes hot during the charging period.
The battery icon does no longer flicker when the charging process ends.
Note:
Ensure that the plug of the charger, the plug of the earphone, and the plug of the USB cable are inserted
in the right direction. Inserting them in a wrong direction may cause charging failure or other problems.
Before the charging, ensure that the standard voltage and frequency of the local mains supply match the
rated voltage and power of the travel charger.
Using the Battery
The performance of a battery is subject to multiple factors: radio network configuration, signal strength,
ambient temperature, chosen functions or settings, phone fittings, and the voice, data or other application
mode you choose to use.
To guarantee the optimal performance of your battery, please stick to the following rules:
-14-
Use only the battery provided by the vendor. Otherwise, damages or even injuries could be
caused during the charging.
Power off the mobile phone before removing the battery.
The charging process lasts a longer time for a new battery or a battery not in use for long. If
the battery voltage is too low to enable the mobile phone to be powered on, charge the battery for a
longer time. In this case, the battery icon does not flicker until a long time after the battery enters the
charge status.
During the charging, ensure the battery is placed in a room temperature environment or in
an environment close to room temperature.
Immediately stop using the battery if the battery produces odor, overheat, cracks, distort or
has other damage, or if the electrolyte leaks.
The battery wears out with use. A longer charging time is required as the battery is put into
use for a long time. If the total conversation duration decreases but the charging time increases even
though the battery is properly charged, purchase a standard battery from the OEM or use a battery
approved by our company. Using any poor-quality fittings will cause harm to your mobile phone or
even incur danger!
Note: To guarantee your personal safety and protect the environment, do not litter the battery! Return
the old battery to the mobile phone manufacturer or place it in specified battery reclamation areas. Do not
litter any battery with other rubbish.
Warning: Short-circuits of the battery may cause explosion, fire, personal injury or other severe
consequences!
-15-
3.4 Powering On/Off the Mobile Phone
Hold the End key for a while to power on the mobile phone. A power-on animation appears on the
display screen.
Input the phone lock code and press the OK key if the mobile phone prompts you to input the phone
lock code. The original code is 1234.
Input the PIN and press the OK key if the mobile phone prompts you to input the PIN. The PIN is
provided by the network operator for new opening SIM card.
Enter the standby interface.
To power off the mobile phone, hold the End key for a while.
3.5 Linking to the Network
After the SIM card and the mobile phone are successfully unlocked, the mobile phone automatically
searches for an available network. After finding a network, the mobile phone enters the standby state. When
the mobile phone is registered in the network, the name of the network operator is displayed on the screen.
Then you can dial or receive a call.
3.6 Dialing Calls
In the standby interface, press Dial-pad enter virtual dial pad, press number keys to input the area code
and the telephone number, and then press the dial key to dial a call.
3.7 Using the Headset
It would enter headset mode automatically when you insert headset to the slot. Make sure of inserting it
-16-
at the bottom of the slot, or you can’t use it normally.
4 Input method
This mobile phone provides English input, smart English input and numeric input method. You can use
these input methods when editing the contacts, short messages, files and greeting text.
4.1 Key for Input Methods
After you enter an edit window such as a window for editing the contacts, short messages or the
memorandum, an icon is displayed to indicate the current input method:
Numeric input:“123”
English input:“ABC, abc, Abc”
4.2 To Shift Entry Methods
Press the # key to switch between input methods.
4.3 Numeric Input
You can input numbers with the numeric input method. Press a number key to input the corresponding
number.
4.4 English input and numeric input:
The keyboards for English input and numeric input are defined in the following table:

-17-
Key
Character or Function
Remarks
Number key 1
. , - ? ! ’@ : # $ /_ 1
Number key 2
ABCabc2
Number key 3
DEFdef3
Number key 4
GHIghi4
Number key 5
JKLjkl5
Number key 6
MNOmno6
Number key 7
PQRSpqrs7
Number key 8
TUVtuv8
Number key 9
WXYZwxyz9
Number key 0
0
# key
Press it to switch between input
methods
Left direction
key
Press it to move to the left
Right direction
key
Press it to move to the right
Left soft key
Equivalent to OK or Options
Right soft key
Equivalent to Back or Clear

-18-
End key
Press it to return to the standby
interface
English input:
Each key is used to represent multiple characters. Quickly and continuously press a key
till the character you want appears. Input the next character after the cursor moves.
Press the # key to switch between input methods
To input a blank, switch to the English input mode (in upper or lower case) and then
press number key 0.
To clear wrong inputs, press the Right soft key.
4.5 Inserting a Symbol
Press * key to enter the Select symbol interface, use direction keys or number keys to select a symbol
you want.
-19-
5 Using the Menus
5.1 Tplus
5.2 Call logs
All calls
All calls will be in the list.
Missed Calls
You can view a list of the latest missed calls.
Note: When the mobile phone indicates that some calls are missed, you can select Read to enter the
missed calls list. Navigate to a missed call and then press the Dial key to dial the number that originated that
call.
Dialed Calls
You can view the latest dialed calls. Choose dialed calls and then select a dialed call to delete, save, dial,
or edit (or send a short message to it).
Received Calls
You can view the latest received calls. Choose received calls and then select a received call to delete,
save, dial, or edit (or send a short message to it).
-20-
Rejected Calls
You can view the latest rejected calls. Choose rejected calls and then select a rejected call to delete,
save, dial, or edit (or send a short message to it).
Delete All
You can delete all the latest call records.
Call Timers
Choose Call timers to view the last call time, the total time of all dialed calls, the total time of all
received calls and the total time of call history or to reset all the time.
5.3 Multimedia
Camera
The phone is provided with a camera, which supports the photographing functions. In the capture
interface, roll the phone to align the camera to the picture and then press OK key to capture photos. Pictures
will be saved in the file system of the memory card or the phone.
Image Viewer
You can view the pictures in the T-card by this function. Press the direction key to choose them and left
soft key edit the pictures. Press right soft key to return last interface.
-21-
Video recorder
This function enables you to record dynamic pictures. In the capture interface, press OK key to capture
videos clip.
Video Player
Use this function to play video files. By pressing the direction key can you control the playing process
of video player: play/pause(OK key), fast forward (press and hold right direction key) and rewind (press and
hold left direction key). In video player interface, you can press * and # key to control volume.
Audio Player
You can use this function to play audio files. By pressing the direction key you can control the playing
process of audio player: play/pause(OK key), switch to last song/next song (press left or right direction
key), fast forward (press and hold right direction key) and rewind (press and hold left direction key). In audio
player interface, you can press * and # key to control volume.
Recorder
The phone support WAV and AMR. The AMR takes the compression algorithm. So in the same memory
condition, it has longer recording time than WAV.
FM radio
You can use the application as a traditional FM radio with automatic tuning and saved channels. Before
using it, you should insert the earphone as antenna. In FM radio interface, left or right direction key to search
-22-
channels manually, OK key to play/pause the playing process of the current channel.
5.4 Contacts
The mobile phone can store up to 500 telephone numbers. The telephone numbers that a SIM card can
store depends on the storage capacity of the SIM card. The telephone numbers stored in the mobile phone
and in the SIM cards form a phonebook. The phonebook search function enables you to view contacts. You
can search a contact as required from the phonebook. Select this option, in the edit interface, input the name
of the contact you want to search or the first letter(s) of the name. All the contacts meeting the search
condition are listed. Press the Up and Down direction keys to browse the contacts and select contact. Press
right direction key to view other groups: SIM1/2, family, friends, business, classmates and so on.
This function enables you to view the internet. Your phone will ask you with existed way. You can start
to view only by starting corresponding way.
Note: Consulting the local network operator for related fee and specific setup.
5.5 Audio
You can use this function to play audio files. By pressing the direction key you can control the playing
process of audio player: play/pause(OK key), switch to last song/next song (press left or right direction
key), fast forward (press and hold right direction key) and rewind (press and hold left direction key). In audio
player interface, you can press * and # key to control volume.
5.6 Message
If the short message memory is full, a blinking message icon appears on the top of the screen. To
-23-
normally receive short messages, you need to delete some of the existing short messages.
If the destination user has received the short message you sent and the short message delivery report
function is activated, the phone will give off a message report alert tone.
Write message
Access this menu to create a text message.
Inbox
Received Messages are listed in this menu.
Outbox
The messages which are sent failed are stored in the Outbox.
Drafts
Draft messages are listed in this menu.
Sent
Sent messages are listed in this menu.
Templates
You can create pre-defined messages in this interface.
-24-
5.7 File manager
The phone supports the memory card. The capacity of the memory card is selectable. You can use the
file manager to conveniently manage various directories and files on the memory card or the phone.
Choose this option to enter the root directory of the memory. The root directory will list the default
folders, new folders and user files. When the mobile phone is powered on for the first time or when you have
not changed the directory, the root directory contains the default folders only.
5.8 Application
Bluetooth
You can transfer data, such as music to other device using Bluetooth. Search the device and
receive/transfer data. The received data is automatically stored in the directory.
Alarm
You can set three alarms through this function.
Calendar
Once you enter this menu, there is a monthly-view calendar for you to keep track of important
appointments, etc. Days with events entered will be marked.
Calculator
The calculator can add, subtract, multiply and divide.
-25-
World time
You can view and set your phone time by choose different time zones.
Stopwatch
You can use this function to record the time.
Unit conversion
You can switch the different units through this function in weight and length.
Torch
You can turn on/off the flashlight by this function.
5.9 Settings
Phone settings
Date & time: Set the time, set the date, time format, date format and detail time of the location.
Note: If you remove the battery from the mobile phone or if the battery energy was exhausted a long
time ago, you may need to reset the date and time when re-inserting the battery or powering on the mobile
phone after recharging.
Language settings: Select the display language and writing language for the mobile phone.
Shortcut settings:Select preferred function as shortcut on screen direction key as needed.
Auto power on/off: Set the time when the mobile phone will be automatically powered on or
-26-
off.
Power management:you can view you battery statue through this function.
Restore factory settings: You can cancel the setting you set. The original code is 1234.
Display
Users can access this item to set Wallpaper, Idle display settings, Contrast, Backlight and Keypad
backlight time etc.
Call Settings
Dual-SIM: You can set standby mode, reply by original SIM, set SIM name and Set Dual Sys
Call Foward through this function
Call Divert: this network function enables you to forward incoming calls to another number
you have previously specified.
Call Waiting: After you choose Activate, the mobile phone will contact the network. A moment
later, the network will make a response and send a message to acknowledge your operation. If the call
waiting function is activated, the network will alert you and the mobile phone screen will display the
incoming call number if others are calling you while you are already in a conversation.
Call Barring: The call barring function enables you to bar calls as needed. When setting this
function, you need to use a network barring code, which can be obtained from the network operator. If
the code is wrong, an error message will be prompted on the screen. After selecting a call barring option,
continue to select Activate or Deactivate. The mobile phone will prompt you to input the call barring
-27-
code and then contact the network. A moment later, the network will make a response and send the
operation results to the mobile phone.
Hide ID: You can select hide ID, display own ID and or display ID by network.
Others: You can set blacklist,auto record, auto redial, call reminder, vibration when connected
and reply SMS after reject through this function.
Security Settings
This function provides you with related settings about safety use
PIN: To activate PIN lock, you need to input the correct PIN code. If you set PIN lock to On,
you need to input the PIN each time you power on the mobile phone. In the case you input a wrong PIN
for three consecutive times; you need to input the PIN Unblocking Key (PUK). The PUK is used to
unlock and change the locked PIN. To obtain the PUK, contact the network operator.
Modify PIN2: To change PIN2 code of PIN code.
Phone locked: The function enables you to lock/unlock the phone. Entering password to switch
on or off the phone. Password is required when the phone is locked. The initial password is 1234.
Modify the cell phone password: to change phone password.
Privacy : You can set password to protect your date security, the initial password is 1234.
Auto keypad lock: The function enables you to lock/unlock the keypad. Set the auto locking
time, 5s, 15s, 30s, 1min and 5mins are available.
Lock screen by end-key: You can select to turn on/off this function.
Theftproof: You can set password to protect your cell phone.
-28-
Fixed dialing:you can only dial the number in the list.
Connections
Contact the network operator to obtain the following network services:
Network account: You can manage network account through this function.
GPRS Service: You can select to turn on/off this function.
Data connection settings: The default setting is connecting when needed.
Network selection: Set Network selection mode to Automatic or Manual. Automatic is
recommended. When Network selection mode is set to Automatic, the mobile phone will prefer the
network where the SIM card is registered. When Network selection mode is set to Manual, you need to
select the network operator's network where the SIM card is registered.
5.10 Profiles
The mobile phone provides multiple user profiles, so that you can customize some settings to adapt to
the specific events and environments.
Customize the user profiles according to your preference and then activate the user profiles. The user
profiles fall into five scenarios:Normal, Silent, meeting, Indoor, outdoor. you can also save the Profiles if
you like. In the standby mode long press # can switch scenarios.
5.11 Games
There is a game named snake,you can press direction keys to control the snake in the game.

-29-
5.12 Services
Internet
You can use the function to view web pages and search for information on the web before you connecting
to the internet. When you open Internet, your home page opens. The web address (URL) of the current page
is displayed at the top of the window.
STK
STK service is the tool kit of SIM card. This phone supports the service function .The specific items are
depended by SIM card and network. Service menu will be auto added to the phone menu when supported by
network and SIM card.
6 Appendix
Appendix 1:Troubleshooting
If you find exceptions when operating the mobile phone, restore the factory settings and then refer to the
following table to solve the problem. If the problem persists, contact the distributor or service provider.
Fa
ult
C
ause
Solution
SIM card
error
The SIM
card is
damaged.
Contact your network service provider

-30-
The SIM
card is not in
position.
Check the SIM card
The
metal face of
the SIM card
is polluted.
Clean the SIM card with a clean cloth
Poor
received signal
quality
Signals
are
obstructed.
For instance,
radio waves
cannot be
effectively
transmitted
nearby a high
building or in
a basement.
Move to a place where signals can be effectively
transmitted

-31-
Line
congestions
occur when
you use the
mobile phone
in high-traffic
hours
Avoid using the mobile phone in high-traffic hours
The
mobile phone
cannot be
powered on
The
battery energy
is exhausted.
Charge the battery
Calls
cannot be
dialed
Call
barring is
activated
Cancel call barring

-32-
The
mobile phone
cannot connect
the network
The SIM
card is invalid
Contact your network service provider
The
mobile phone
is not in a
service area
of the GSM
network
Move to the network operator's service area
The
signal is weak
Move to a place where the signal quality is high
The
battery cannot
be charged
The
charging
voltage does
not match the
voltage range
indicated on
the charger
Ensure the charging voltage matches the voltage range
indicated on the charger

-33-
An
improper
charger is
used
Use the charger specially designed for the mobile phone
Poor
contact
Ensure the charger plug is in good contact with the mobile
phone

-34-
FCC Caution.
This equipment has been tested and found to comply with the limits for a Class B digital device, pursuan
t to Part 15 of the FCC Rules. These limits are designed to provide reasonable protection against harmful inte
rference in a residential installation. This equipment generates, uses and can radiate radio frequency energy a
nd, if not installed and used in accordance with the instructions, may cause harmful interference to radio com
munications. However, there is no guarantee that interference will not occur in a particular installation. If this
equipment does cause harmful interference to radio or television reception, which can be determined by turni
ng the equipment off and on, the user is encouraged to try to correct the interference by one or more of the fol
lowing measures:
• Reorient or relocate the receiving antenna.
• Increase the separation between the equipment and receiver.
• Connect the equipment into an outlet on a circuit different from that to which the receiver is connected.
• Consult the dealer or an experienced radio/TV technician for help.
§ 15.19 Labelling requirements.
This device complies with part 15 of the FCC Rules. Operation is subject to the following two
conditions: (1) This device may not cause harmful interference, and (2) this device must accept any
interference received, including interference that may cause undesired operation.
§ 15.21 Information to user.
Any Changes or modifications not expressly approved by the party responsible for compliance could
void the user's authority to operate the equipment.
-35-
Specific Absorption Rate (SAR) information:
This Mobile Phone meets the government's requirements for exposure to radio waves. The guidelines
are based on standards that were developed by independent scientific organizations through periodic and
thorough evaluation of scientific studies. The standards include a substantial safety margin designed to
assure the safety of all persons regardless of age or health.
FCC RF Exposure Information and Statement The SAR limit of USA (FCC) is 1.6 W/kg averaged over one
gram of tissue. This device was tested for typical body-worn operations with the back of the handset kept
10mm for body worn. To maintain compliance with FCC RF exposure requirements, use accessories that
maintain a 10mm for body worn. The use of belt clips, holsters and similar accessories should not contain
metallic components in its assembly. The use of accessories that do not satisfy these requirements may not
comply with FCC RF exposure requirements, and should be avoided.
Body-worn Operation
This device was tested for typical body-worn operations. To comply with RF exposure requirements, a
minimum separation distance of 10mm for body worn must be maintained between the user’s body and the
handset, including the antenna. Third-party belt-clips, holsters, and similar accessories used by this device
should not contain any metallic components. Body-worn accessories that do not meet these requirements
may not comply with RF exposure requirements and should be avoided. Use only the supplied or an
approved antenna.