Bento User’s Guide 3 Bento3 Ug En
User Manual: bento Bento 3 - User’s Guide Free User Guide for Bento Software, Manual
Open the PDF directly: View PDF ![]() .
.
Page Count: 139 [warning: Documents this large are best viewed by clicking the View PDF Link!]
- Bento® 3
- Welcome to Bento
- Overview of Bento
- Using Libraries
- Using the Address Book, iCal, and iPhoto Libraries
- Using Collections
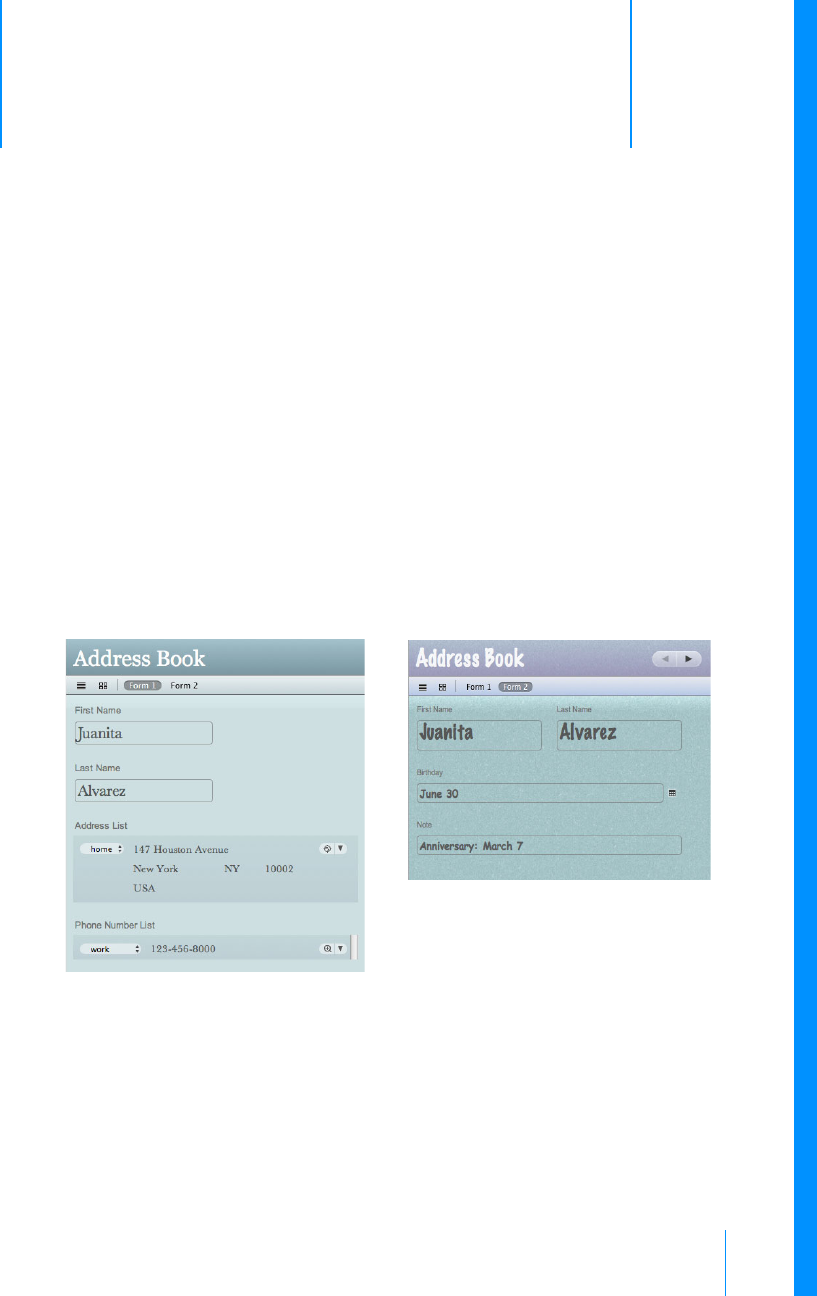
- Using Form View
- About Forms
- Viewing a Form and a Table at the Same Time
- Creating Records in Form View
- Editing Records in Form View
- Duplicating Records in Form View
- Deleting Records in Form View
- Creating Forms
- Deleting Forms
- Duplicating Forms
- Renaming Forms
- Adding Fields to a Form
- Tabbing Between Fields
- Moving Fields and Objects on Forms
- Resizing Fields and Objects
- Removing Fields from a Form
- Customizing Form Layouts
- Using Table View
- Using Grid View
- Using Fields
- Importing, Exporting, and Printing
- Backing Up and Restoring Information
- Using Bento with Bento for iPhone and iPod touch
- Keyboard Shortcuts
- Reverting to a Previous Version of Bento
- Index
Bento® 3
User’s Guide
© 2007-2009 FileMaker, Inc. All rights reserved.
FileMaker, Inc.
5201 Patrick Henry Drive
Santa Clara, California 95054
FileMaker, the file folder logo, Bento and the Bento logo are
trademarks of FileMaker, Inc. in the U.S. and other countries. Mac and
the Mac logo are the property of Apple Inc. registered in the U.S. and
other countries. All other trademarks are the property of their
respective owners.
FileMaker documentation is copyrighted. You are not authorized to
make additional copies or distribute this documentation without
written permission from FileMaker. You may use this documentation
solely with a valid licensed copy of FileMaker software.
All persons, companies, email addresses, and URLs listed in the
examples are purely fictitious and any resemblance to existing
persons, companies, email addresses or URLs is purely coincidental.
Credits are listed in the Acknowledgements documents provided
with this software. Mention of third-party products and URLs are for
informational purposes only and constitutes neither an endorsement
nor a recommendation. FileMaker, Inc. assumes no responsibility with
regard to the performance of these products.
For more information, visit our website at www.filemaker.com.
Edition: 01

3
Contents
Preface 7Welcome to Bento
7Bringing It All Together
16 Summary
17 About This Document
17 Resources for Learning More
Chapter 1 19 Overview of Bento
19 Home Dialog
20 Bento Window
Chapter 2 31 Using Libraries
31 About Libraries
32 Creating a Library Using the Bento Templates
34 Creating a New Blank Library
34 Creating a Library by Importing
34 Changing the Icon for a Library
34 Sharing Your Bento Database
37 Grouping Libraries
37 Deleting Records from a Library
37 Deleting a Library
Chapter 3 39 Using the Address Book, iCal, and iPhoto Libraries
39 Displaying the Address Book, iCal, and iPhoto Libraries
41 Address Book Library
44 iCal Events and iCal Tasks Libraries
47 iPhoto Library
Chapter 4 51 Using Collections
51 About Collections
52 Creating Collections
53 Removing Records from a Collection
53 Deleting a Collection
53 About Smart Collections

4Contents
54 Creating Smart Collections
54 Working with Smart Collections
54 Changing a Smart Collection
Chapter 5 55 Using Form View
55 About Forms
56 Viewing a Form and a Table at the Same Time
56 Creating Records in Form View
56 Editing Records in Form View
57 Duplicating Records in Form View
57 Deleting Records in Form View
58 Creating Forms
58 Deleting Forms
58 Duplicating Forms
59 Renaming Forms
59 Adding Fields to a Form
59 Tabbing Between Fields
59 Moving Fields and Objects on Forms
60 Resizing Fields and Objects
60 Removing Fields from a Form
61 Customizing Form Layouts
Chapter 6 65 Using Table View
65 About Table View
66 Selecting Records in Table View
66 Creating Records in Table View
67 Editing Records in Table View
68 Duplicating Records in Table View
68 Deleting Records in Table View
69 Sorting Records
69 Working with Fields and Columns in Table View
72 Summarizing Column Data
Chapter 7 75 Using Grid View
75 About Grid View
76 Viewing the Grid and a Form at the Same Time
76 Displaying Grid View Items
76 Setting Grid View Options
76 Changing the Display Size of Grid View Items
77 Working with Library Folders in Grid View

Contents 5
Chapter 8 79 Using Fields
79 About Fields
82 Creating Fields
88 Navigating to Related Records
89 Using the Fields Pane
90 Working with List Fields
93 Working with Related Data Fields
94 Working with Media Fields
97 Working with Encrypted Fields
Chapter 9 101 Importing, Exporting, and Printing
101 About Comma-Separated and Tab-Separated Files
104 Importing Information into Bento
110 Exporting Information from Bento
113 Printing Information
Chapter 10 117 Backing Up and Restoring Information
118 About Bento Backup Files
119 Using the Back Up Reminder
119 Changing the Back Up Reminder
120 Creating a Backup File
120 Restoring from a Backup File
121 Using Time Machine with Bento
Chapter 11 123 Using Bento with Bento for iPhone and iPod touch
123 Syncing Information Between Bento and Bento for iPhone
Appendix A 127 Keyboard Shortcuts
Appendix B 131 Reverting to a Previous Version of Bento
131 Reverting to Bento 1 or Bento 2 from Bento 3
Index 135

6Contents

7
Welcome to Bento
Bento® helps you organize your information, providing the
power of a database without complexity.
Bento is an easy-to-use database that manages contacts, tasks, and other information
that is important to you. Because Bento is a database, you can create data
relationships and view your data in more ways than you can in a spreadsheet.
Bento was designed for Mac OS X. The Bento window has features that will seem
familiar to you if you use Address Book, iCal, Keynote, iTunes, or iPhoto.
Bringing It All Together
Bento brings your important information together in one place to help you get
organized. You’ll be able to manage your contacts, coordinate events, track projects,
prioritize tasks, and more.
For example, say you are running a travel club, and you are planning events for the
club. You have the contact information for the travel club members in Address Book,
and you have a few events on the calendar in iCal. But you are also using a spreadsheet
to track some expenses for each of the members of the travel club. You can use Bento
to manage all information in one place.
8Preface
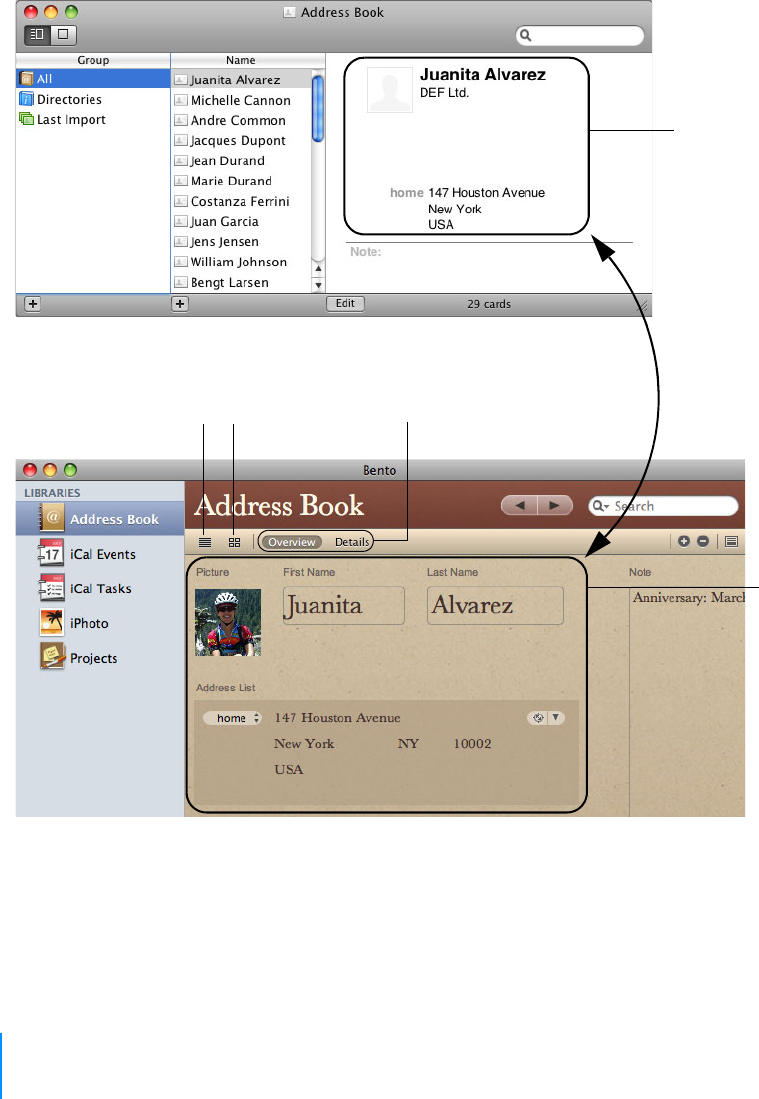
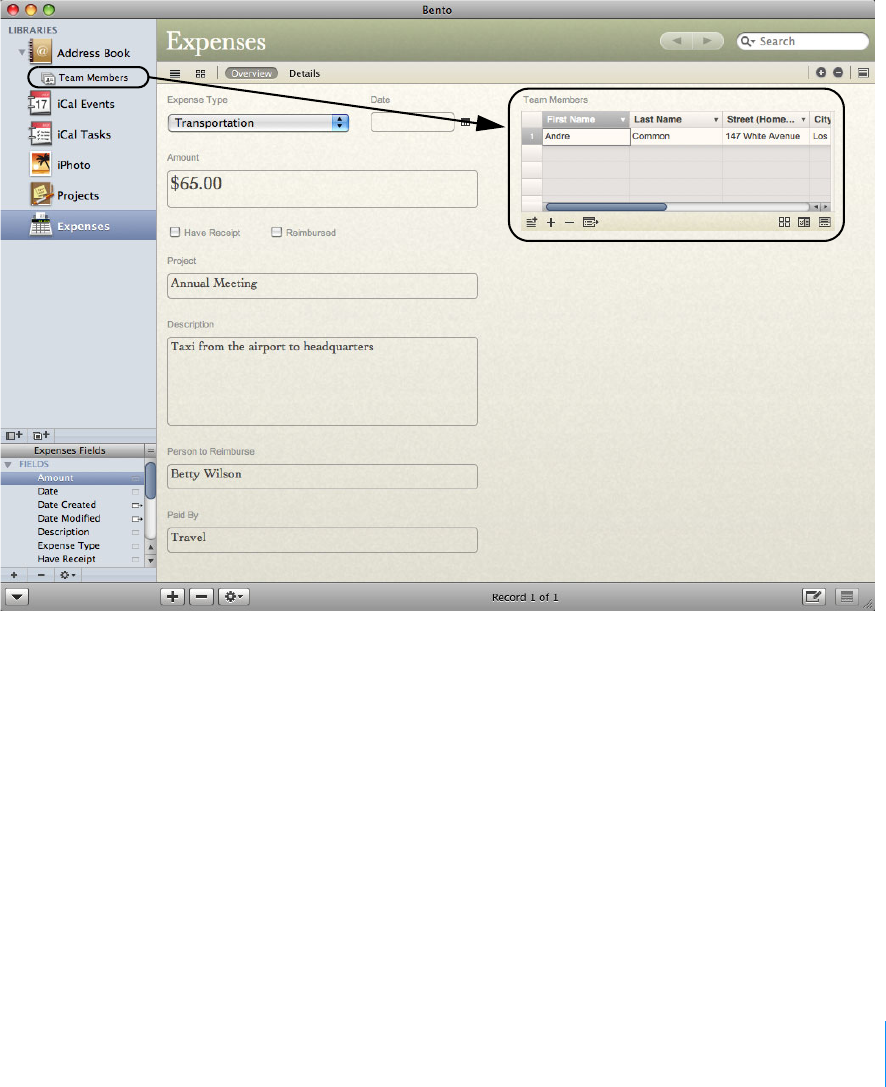
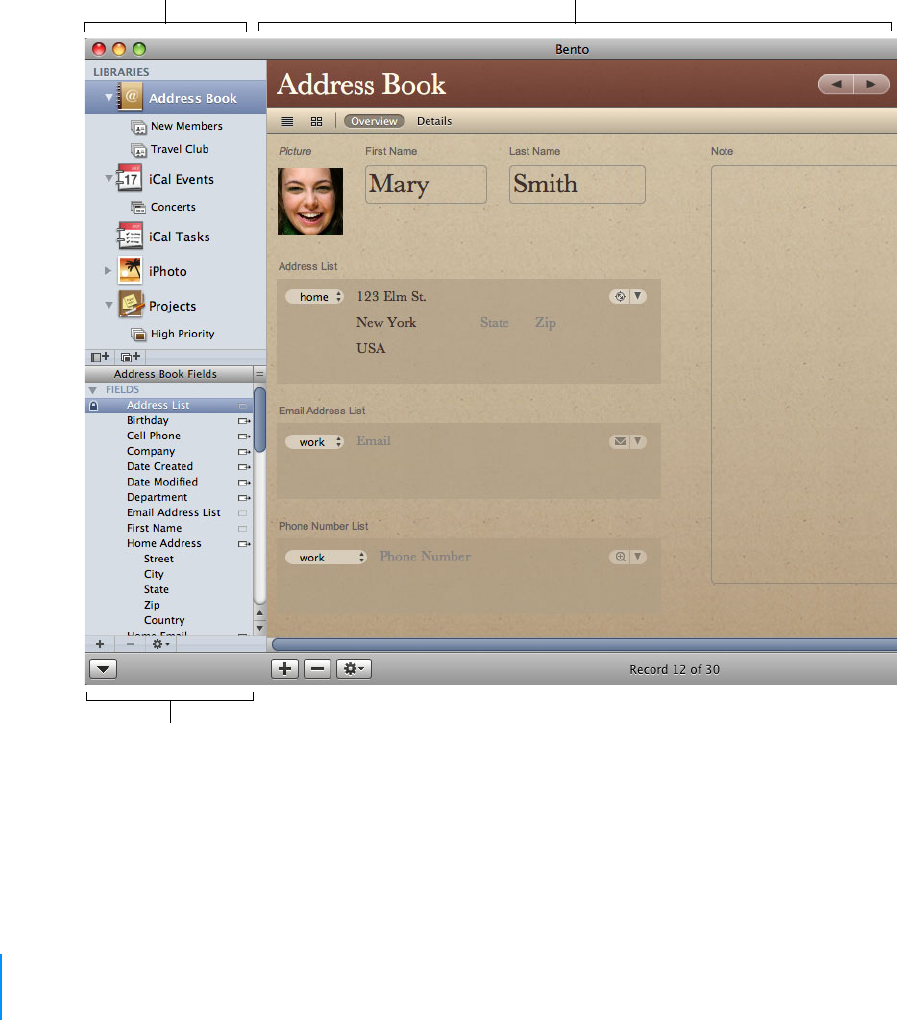
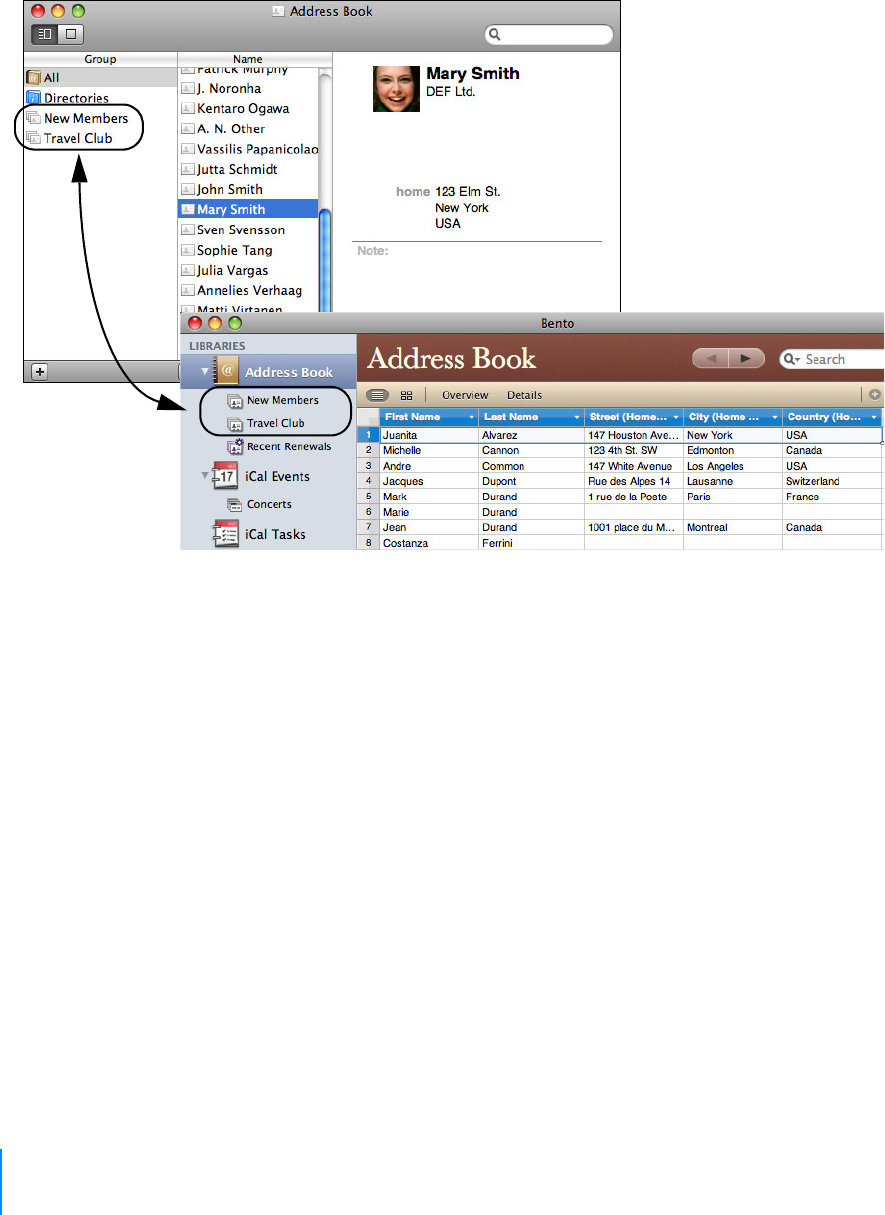
Using Address Book Data
When you open Bento, you see the Home dialog that helps you get started. After you
start using Bento, you see that the Bento Address Book library displays contact records
from the Address Book application.
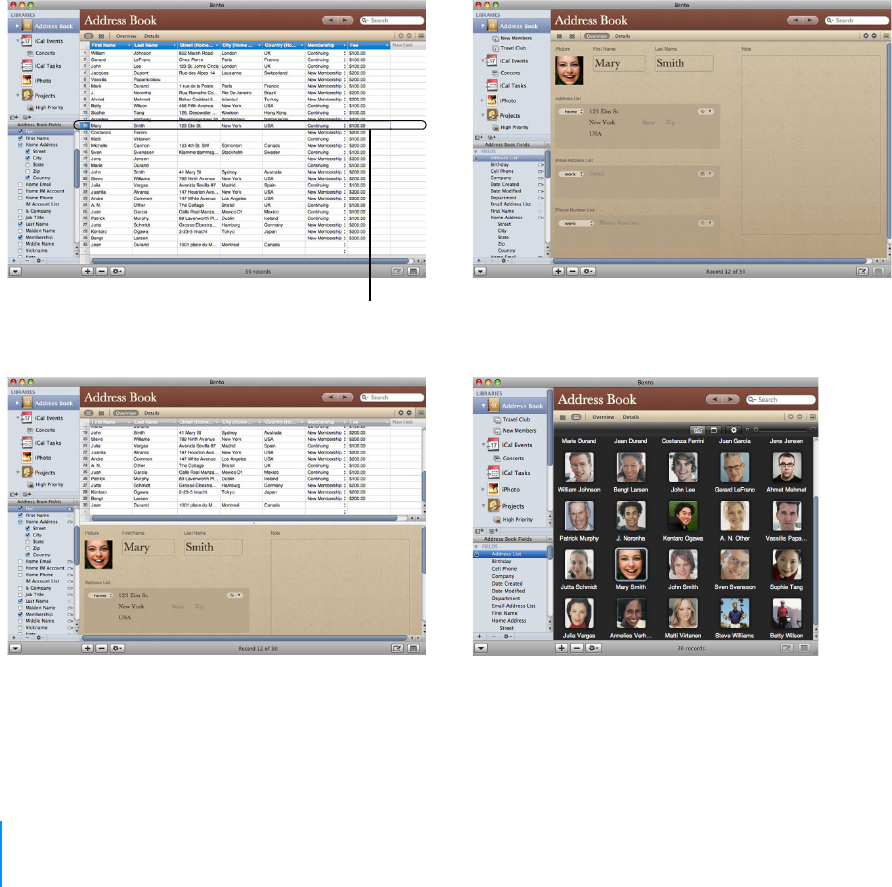
View data in several form views.
Bento provides the “Overview.”
A contact in the
Address Book
application.
The same
contact in the
Bento Address
Book library.
View all the records
in table view.
View all the records
in grid view.
Preface 9
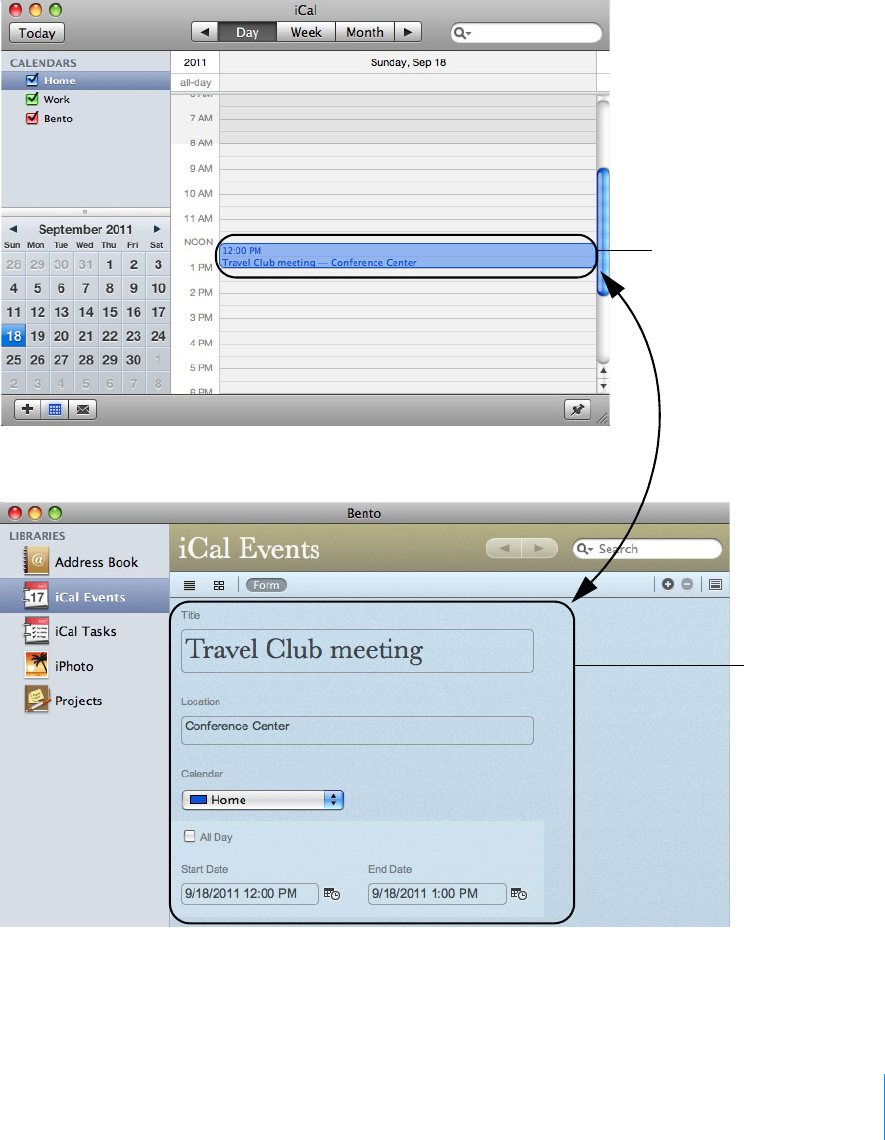
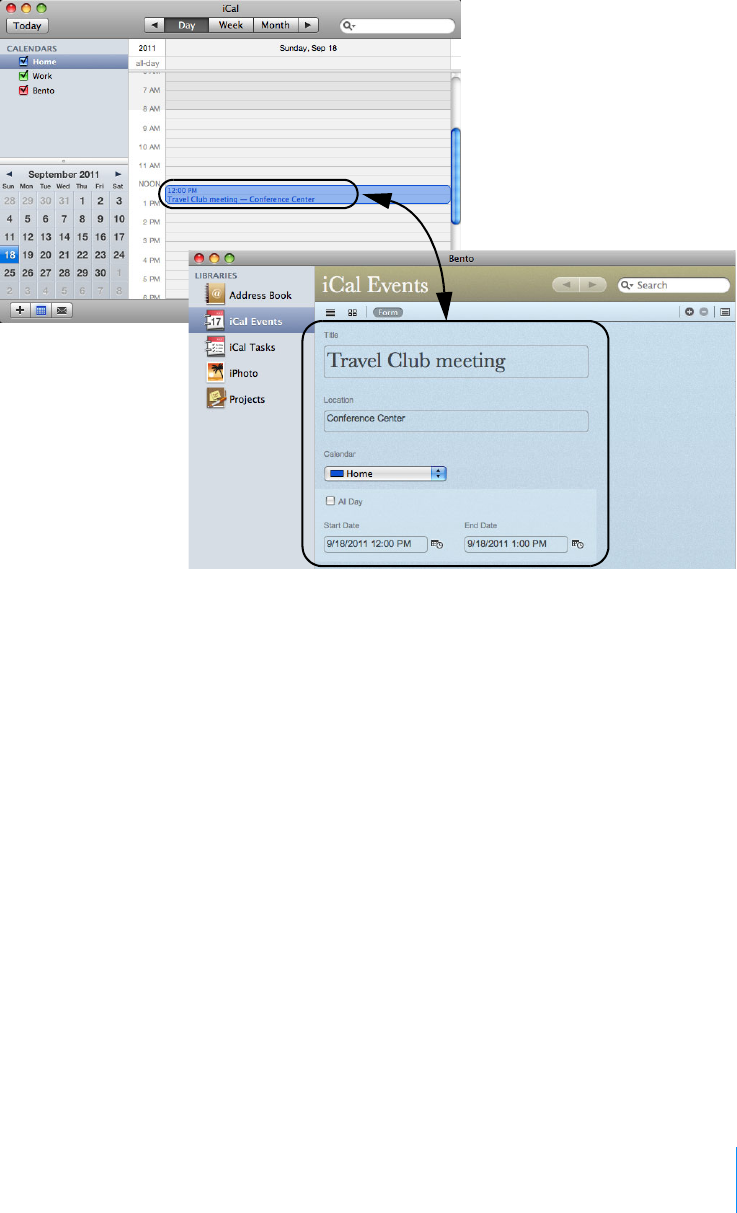
Using iCal Data
The Bento iCal Events library displays the events that are in the iCal application.
An event in the
iCal application.
The same event
in the Bento iCal
Events library.
10 Preface
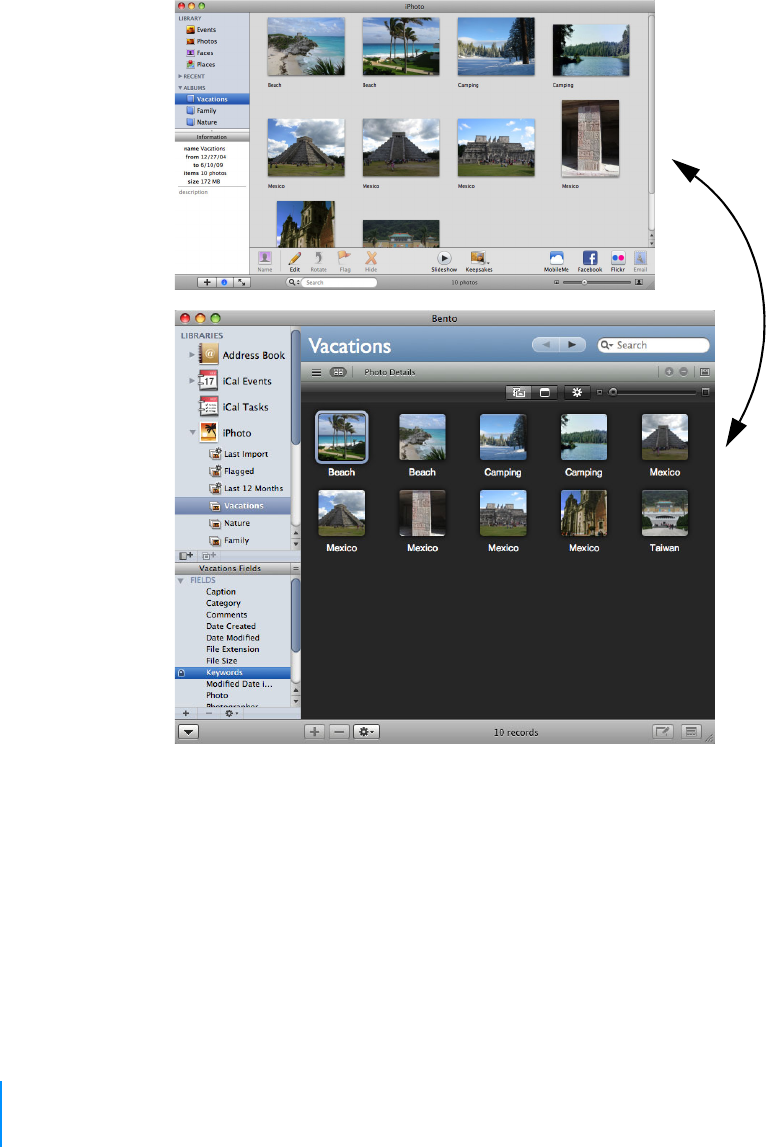
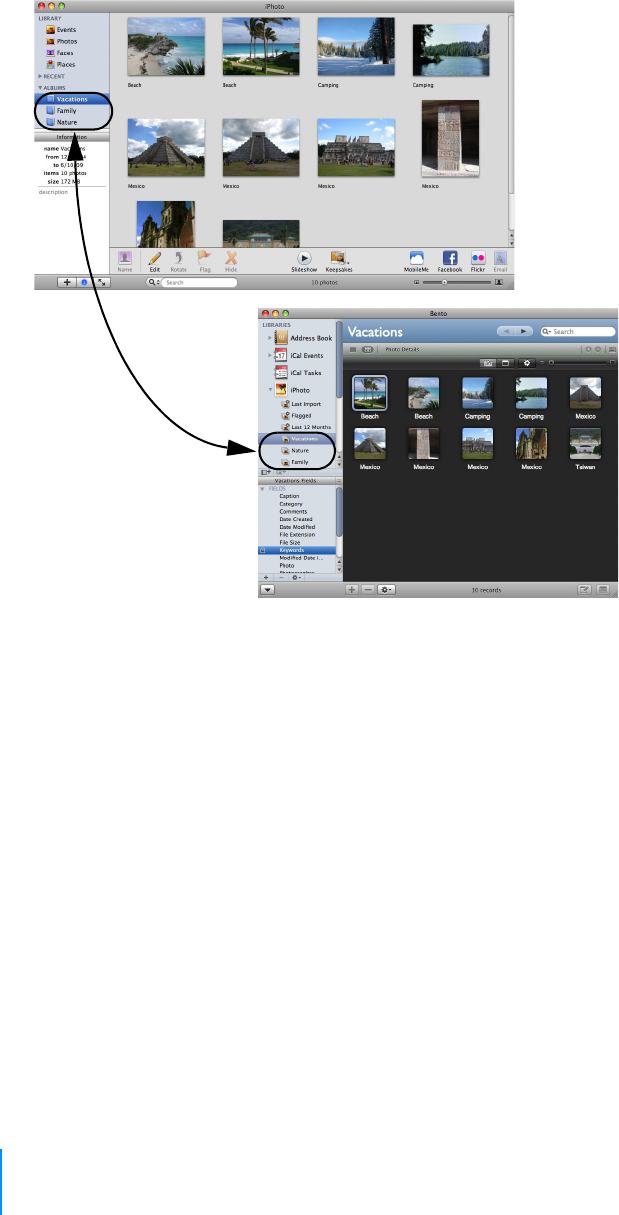
Using iPhoto Data
The iPhoto library displays photos and video clips that are in the iPhoto application.
An abum in the
iPhoto application.
The same album in the
Bento iPhoto library.
Preface 11
Managing Data in Libraries
Bento comes with more than 30 library templates to help you create libraries easily.
You can create an Expenses library to track information about expenses, and an Event
Planning library to track information about your travel club events.
12 Preface
Bento provides a Projects library, so you’re ready to start managing projects for your
travel club.
You can add fields to any library, even the Bento Address Book, iCal, and iPhoto
libraries.
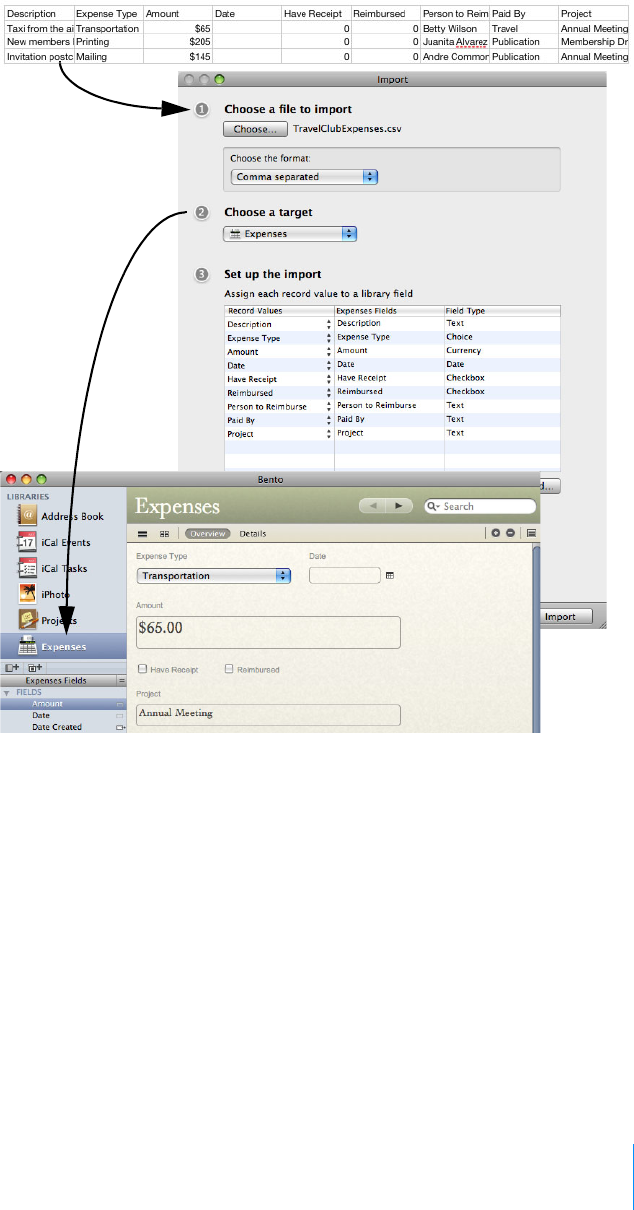
Importing Data from Other Applications
How do you add your spreadsheet of expenses to Bento? Create a library by importing
data from another application, or import data into a library you’ve already created.
Save your spreadsheet as a comma-separated values (CSV), tab-separated values
(TAB), Numbers, or Excel file, and then import the file into Bento. Bento creates the
fields needed to hold your data and creates records for each row of data in the file.
Libraries Fields
Preface 13
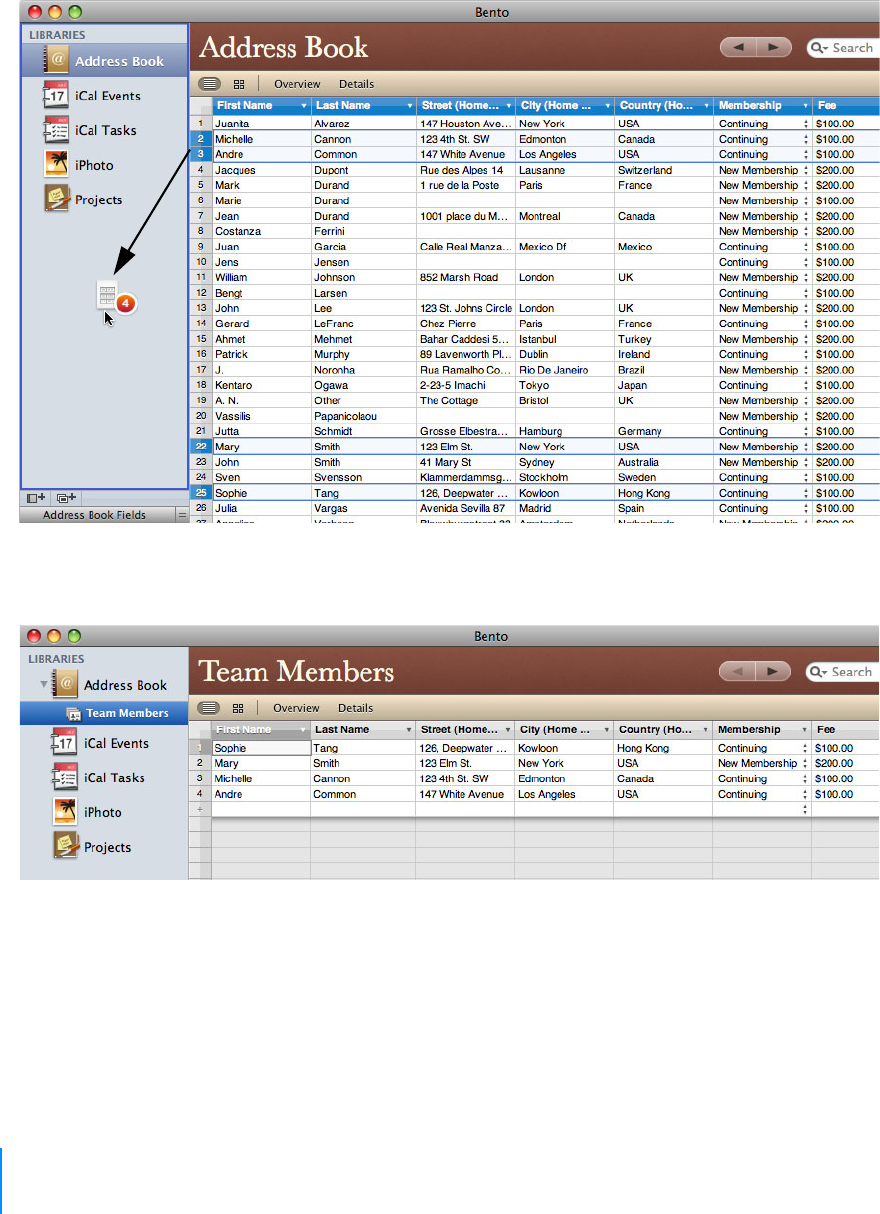
Creating Collections
You have a team of people who are working with you on your next travel club event.
All of your team members are in the Bento Address Book library, but you’d like to
create a smaller group that includes only your team members, not everyone in the
Address Book library. You want to create a collection.
Creating a collection is as easy as creating a group in Address Book or a playlist in
iTunes. Open the Bento Address Book library in table view. Select the records for the
team members and choose the New Collection from Selection menu item, or drag the
selected records to the Libraries pane.
Importing
spreadsheet
data into a
Bento library.
14 Preface
Give the collection the name “Team Members” and Bento creates the Team Members
collection.
Drag the selected
records to the
Libraries pane.
Preface 15
Creating Relationships
Bento makes it easy to connect your libraries of information using related data fields.
For example, say you want to track expenses by team member. To create a related data
field, drag “Team Members” to the “Expenses” form.
16 Preface
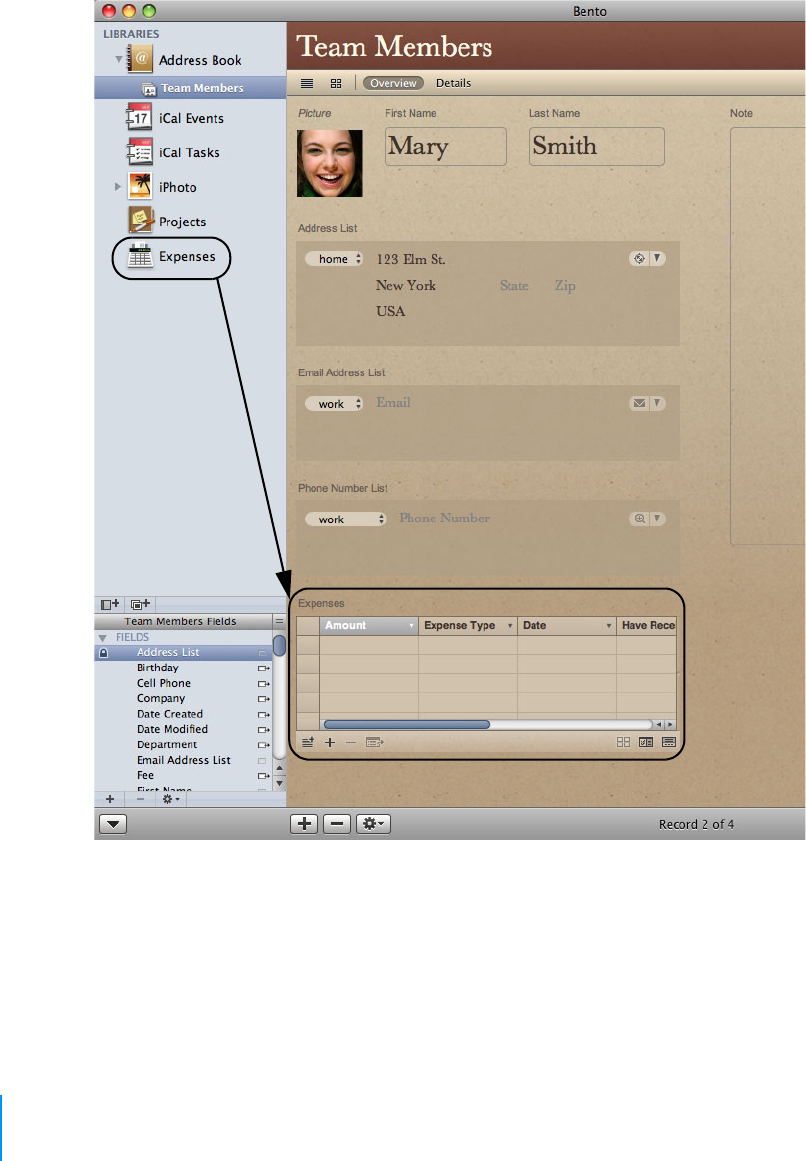
You can also create a related data field that shows expenses for each team member.
Drag “Expenses” to the “Team Members” form.
Summary
With Bento, you’re able to display data from Address Book, iCal, and iPhoto, create new
libraries to keep all your data together, import data from other applications, and
create unique data relationships between libraries and collections.
Preface 17
About This Document
The following table tells you where to find information in this documentation.
Resources for Learning More
To get the most from Bento, consult the resources listed below.
User’s Guide
Bento User’s Guide is a PDF document that provides detailed information on using
Bento.
To open the User’s Guide:
Choose Help > Bento User’s Guide.
Onscreen Help
To access help from within Bento, choose Help > Bento Help. You can browse through
the table of contents to find a specific topic, or enter a question in the search field.
For information about See
The features of Bento Chapter 1, “Overview of Bento” on page 19
Using libraries to manage your information Chapter 2, “Using Libraries” on page 31
Using the Address Book, iCal, and iPhoto libraries to
display data from the Address Book, iCal, and iPhoto
applications
Chapter 3, “Using the Address Book, iCal, and
iPhoto Libraries” on page 39
Creating a subset of records from a library Chapter 4, “Using Collections” on page 51
Viewing your data one record at a time, creating
forms, changing the appearance of forms, and
adding new fields to forms
Chapter 5, “Using Form View” on page 55
Viewing all the records in a library or collection in a
table
Chapter 6, “Using Table View” on page 65
Using media fields and library folders in grid view Chapter 7, “Using Grid View” on page 75
All the field types that Bento provides, and using
the Fields pane
Chapter 8, “Using Fields” on page 79
Sharing data by importing, exporting, and printing Chapter 9, “Importing, Exporting, and Printing”
on page 101
Creating a backup of your Bento data Chapter 10, “Backing Up and Restoring
Information” on page 117
Syncing information between Bento and Bento for
iPhone
Chapter 11, “Using Bento with Bento for iPhone
and iPod touch” on page 123
Using keyboard shortcuts Appendix A, “Keyboard Shortcuts” on page 127
Reverting to a previous version of Bento Appendix B, “Reverting to a Previous Version of
Bento” on page 131

18 Preface
Tutorial
For a demonstration of what you can do with Bento, view the tutorials.
To access the tutorials:
Choose Help > Video Tutorial, and then follow the instructions.
Bento Forum
Visit the Bento forum to get technical support, tips, report problems, and share with
others how you use Bento.
To access the Bento forum:
Choose Help > Bento Forum.
Bento Template Exchange
Visit the Bento template exchange to submit your own templates and download
templates created by other Bento users.
To access the Bento template exchange:
Choose Help > Bento Template Exchange.
Bento for iPhone and iPod touch
Visit the Bento for iPhone web page to get information about its features and
requirements.
To view the Bento for iPhone web page:
Choose Help > Bento for iPhone and iPod touch.
Technical Support
To learn more about the support options that are available to Bento users, view the
service and support information.
To view the service and support information:
Choose Help > Service and Support.

1
19
Overview of Bento
This chapter provides an overview of Bento features.
This chapter is a description of what you see when you start using Bento. It introduces
the Home dialog and describes the sections of the Bento window, including the
Libraries pane, the Fields pane, and the records area where you can display your
information in table view, form views, grid view, or split view.
Home Dialog
When you first open Bento, you use the Home dialog to learn about Bento and to
create your first library.
To see how easy it is to use,
take a video tour of Bento.
Bento uses libraries to store
information. One way to start using
Bento is by creating a library.
When you’re done with the Home
dialog, click this button to start
using Bento.
If you decide that you don’t need the Home dialog,
deselect the “Show this dialog on startup” checkbox.
20 Chapter 1 Overview of Bento
Bento Window
The Bento window contains two main sections:
•The left side of the window contains the Libraries pane and the Fields pane.
•The right side of the window displays the records in Bento. You can display
record data in table view, form view, grid view, or split view.
By default, both sections of the Bento window are displayed. To hide the Libraries
pane and Fields pane, choose View > Hide Libraries & Fields Pane.
Libraries pane Records area
Fields pane
Chapter 1 Overview of Bento 21
Libraries Pane
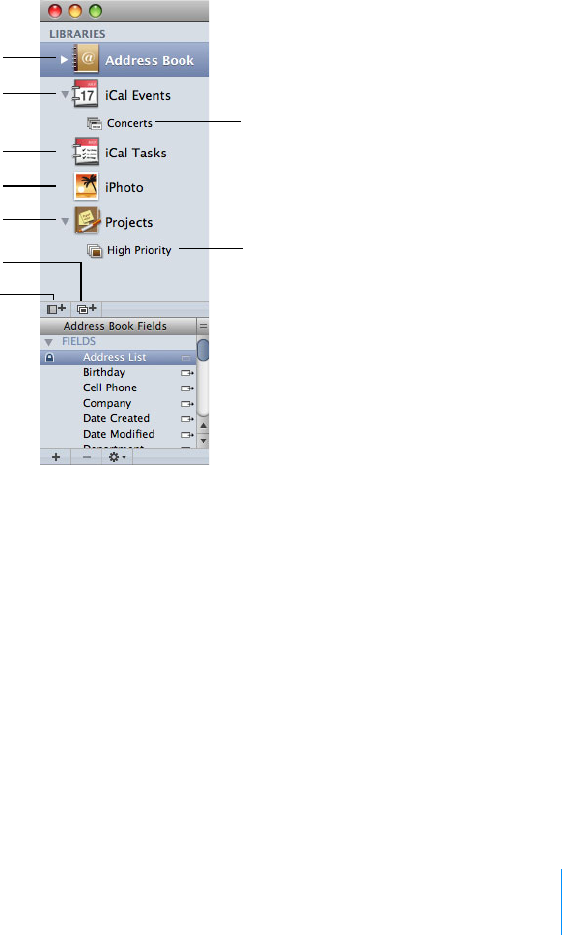
The Libraries pane displays the libraries and collections that are in Bento.
•A library categorizes data by content. Bento provides several libraries by
default. The Address Book, iCal Tasks, iCal Events, and iPhoto libraries display
data from the Address Book, iCal, and iPhoto applications. The Projects
library, which stores data about projects, is an example library with sample
data. You can create libraries to store other categories of data. You can
organize a group of libraries within a folder.
To add a library to the Libraries pane, click the New Library button. See Chapter 2,
“Using Libraries” on page 31.
•A collection is set of records from a library. A collection is similar to an Address
Book group or to a playlist in iTunes. A collection contains records from its
parent library. A record from the library can be in more than one collection.
For example, one person might be both a friend and a co-worker. If you had
one collection named “Friends” and another named “Co-workers” you could
add this person’s contact record to both collections in the Address Book
library.
To add a collection to the Libraries pane, click the New Collection button. See
Chapter 4, “Using Collections” on page 51.
Tip If you want to change the size of the icons and text in the Libraries pane, choose
Bento > Preferences. For “Libraries Pane Text,” select Small or Large.
Address Book
Library
iCal Events
Library
Collection of
iCal Events
Collection of
records from
Projects
New Library
New Collection
Projects Library
iCal Tasks
Library
iPhoto Library

22 Chapter 1 Overview of Bento
Address Book, iCal, and iPhoto Libraries
Bento displays the data you’ve already entered into the Mac OS X applications Address
Book, iCal, and iPhoto using these libraries: Address Book, iCal Events, iCal Tasks, and
iPhoto.
Address Book Library
The Address Book library displays contact information from the Mac OS X Address
Book application, so there is no need to re-enter your contact information. Enter new
contacts in Address Book or in Bento, and the information appears in both
applications.
See ”Address Book Library” on page 41.
iCal Events Library
The iCal Events library displays information from the events in the Mac OS X iCal
application. You can view those events in Bento, and use them with other data you
store in Bento. For example, you can display which iCal events are related to a specific
project by creating a relationship to iCal Events in a Projects library.
Enter new events in iCal or in Bento, and the information appears in both applications.
See ”iCal Events and iCal Tasks Libraries” on page 44.
iCal Tasks Library
The iCal Tasks library displays information from the To Do items in iCal. You can use
those tasks in your Bento libraries and collections. For example, you can display which
iCal tasks are related to a specific project by creating a relationship to iCal Tasks in a
Projects library.
Enter To Do items in iCal or task records in Bento, and the information appears in both
applications.
See ”iCal Events and iCal Tasks Libraries” on page 44.
iPhoto Library
The iPhoto library displays photos and video clips from the albums and Smart Albums
in the Mac OS X iPhoto application. You can view those albums and Smart Albums in
Bento, and use them with other data you store in Bento. For example, you can display
photos that are related to a specific project by creating a relationship to iPhoto in a
Projects library.
Chapter 1 Overview of Bento 23
Collections
Create a collection when you want a subset of the records from a library. There are two
kinds of collections:
•Collections are created by adding records from the library to a new collection.
Creating a collection is as easy as creating a playlist in iTunes. Select the
records in the library and use the New Collection from Selection menu item,
or drag the selected records to the Libraries pane.
•Smart Collections are created based on criteria you set up. Records that meet
the defined criteria appear in the Smart Collection. You use Advanced Find to
create a Smart Collection.
See Chapter 4, “Using Collections” on page 51.
Creating Libraries
Bento comes with more than 30 library templates that make it easy for you to create
new libraries of information. A template defines the fields of information used in each
record of a library, which you can change based on your needs. Select the library
template that most closely matches the category of data you want to store.
See ”Creating a Library Using the Bento Templates” on page 32.
24 Chapter 1 Overview of Bento
Records Area
On the right side of the Bento window, you can display information stored in Bento in
either table view, a form view, grid view, or split view.
•Table view shows information in an entire library or collection in a
spreadsheet-like table, where each row in the table is a record in the library.
•Form view shows fields from one record at a time, in arrangements that you
can customize, using beautiful themes.
•Grid view shows the media fields and form thumbnails of a selected library or
collection in a grid layout.
•Split view shows the selected record in either form view and table view, or
form view and grid view at the same time.
Table view shows each record as a row in a table. Form view shows fields from a single record.
Split table and form view lets you view a record as a row in
a table and in a page-like format at the same time.
Grid view shows media fields or form thumbnails
in the selected library.

Chapter 1 Overview of Bento 25
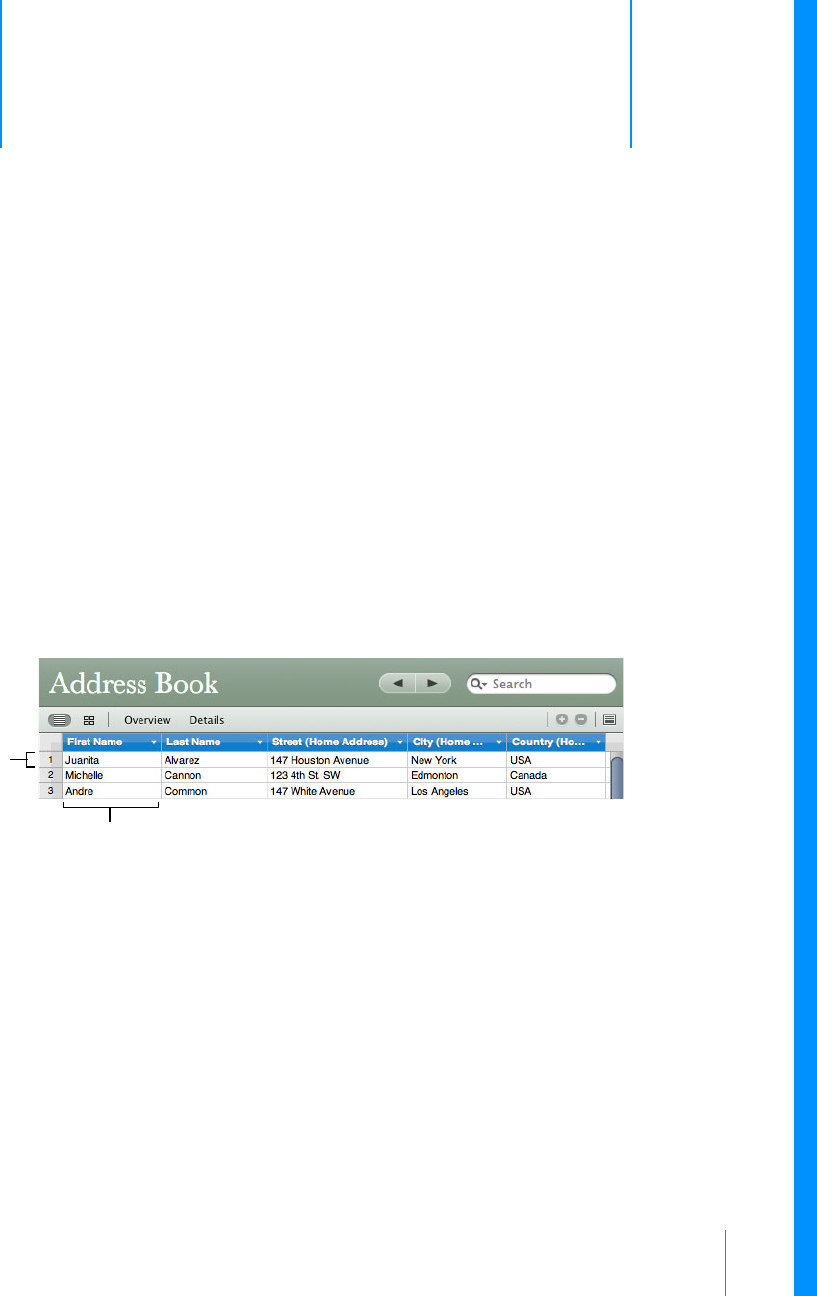
Table View
To view the information in an entire library or collection in a spreadsheet-like table,
use table view.
In table view, you can work with your records in many ways, including:
•Selecting the columns (fields) that you want to show.
•Arranging the columns in any order.
•Sorting records by selecting a specific column.
•Analyzing data using a summary row.
See Chapter 6, “Using Table View” on page 65.
Form View
To view your information one record at a time, use form view. In form view, you can
create multiple forms for each collection or library, giving each form a different name.
For example, you could create a form in the Address Book library to show birthdays,
and track whether you’ve sent a card or gift.
You can customize forms in many ways, including:
•Selecting the fields that you want to show.
•Arranging the fields on the form.
•Changing the size of fields.
•Changing the appearance of the form using themes.
•Adding a header and a logo.
See Chapter 5, “Using Form View” on page 55.
Grid View
To view the media fields and form thumbnails in a selected library or collection, use
grid view.
In grid view, you can work with thumbnails of media fields and forms, called grid view
items, in many ways, including:
•Filtering grid view items.
•Setting and changing labels of grid view items.
•Changing the display size of grid view items.
See Chapter 7, “Using Grid View” on page 75.
Split View
To view the selected record in form view and table view at the same time, or in form
view and grid view at the same time, use split view.
Chapter 1 Overview of Bento 27
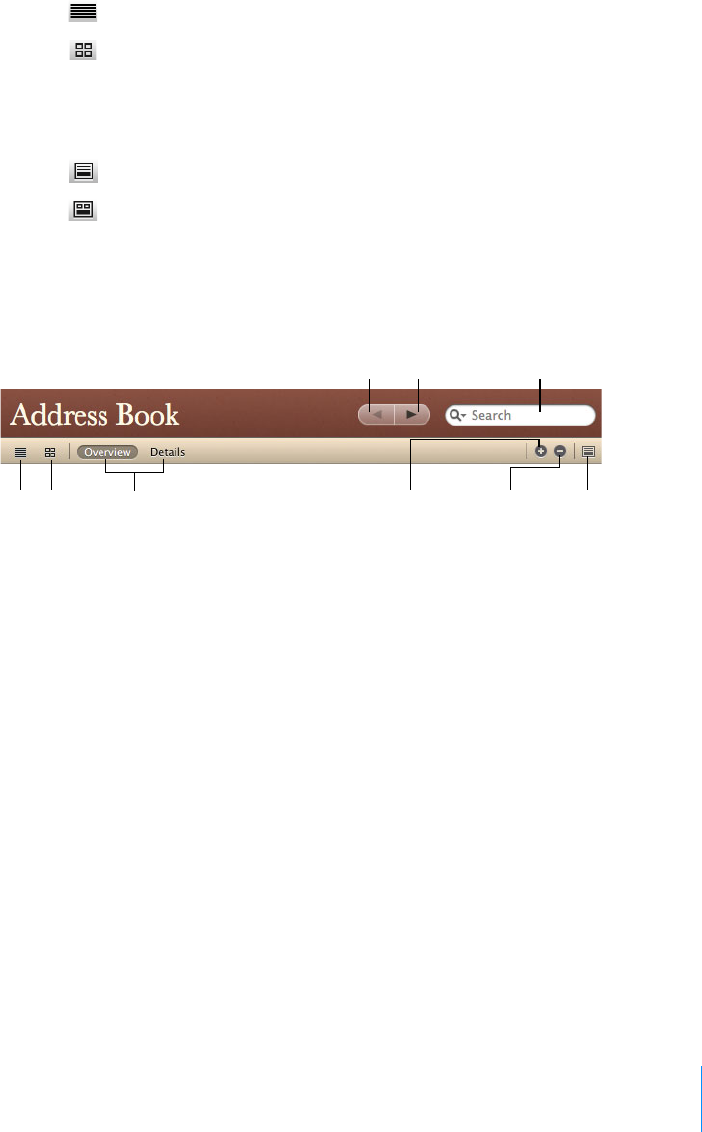
Navigation Bar
The navigation bar contains several controls that help you display information in
Bento.
•Click to see records in table view.
•Click to see records in grid view.
•Click one of the form view buttons to see records one at a time in a page-like
view. In the example below, there are two form view buttons: “Overview” and
“Details.” You can have as many form views as you want.
•Click to switch to split view from table view or form view.
•Click to switch to split view from grid view.
•To move through the records in a library or collection, click the Previous
record and Next record buttons (the arrow buttons).
To go to the first record, Option-click the Previous record button. To go to the last
record, Option-click the Next record button.
Search Field and Advanced Find
•Use the Search field to do a simple search for text in all field types except
media, related data, file list, message list, and encrypted.
Note You can search encrypted fields if they are unlocked.
•Use Advanced Find to find a set of matching records by defining search
values and criteria for specific fields.
Form view buttons New form Delete form
Previous record
Show or hide
split view
Next record Search field
Grid
view
Table
view
28 Chapter 1 Overview of Bento
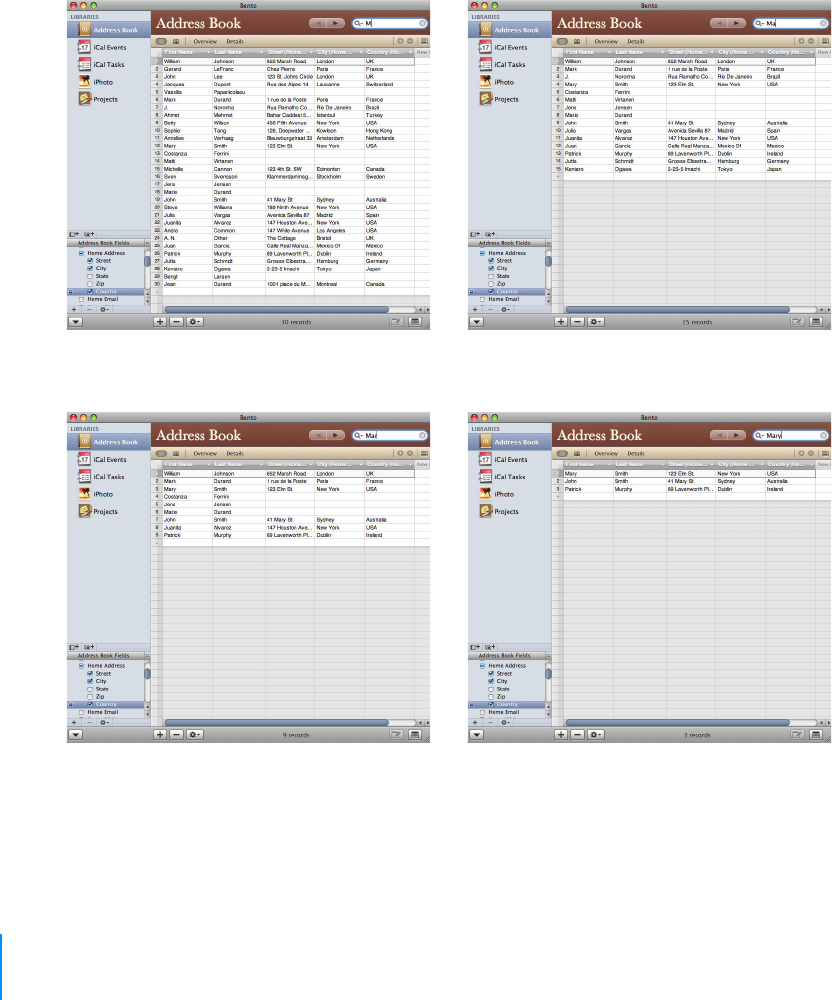
To use the Search field:
1Select the library or collection.
2Enter a text string into the Search field.
Bento searches across all the applicable fields of the selected library or collection.
Bento lets you know how many records match the search string, and updates the
current view to display the matching records for those fields that are selected in table
view or have been added to a form in form view.
1. Type “M”and the result is 30 records. 2. Type “Ma” and the result is 15 records.
3. Type “Mar” and the result is 9 records. 4. Type “Mary” and the result is 3 records.
Chapter 1 Overview of Bento 29
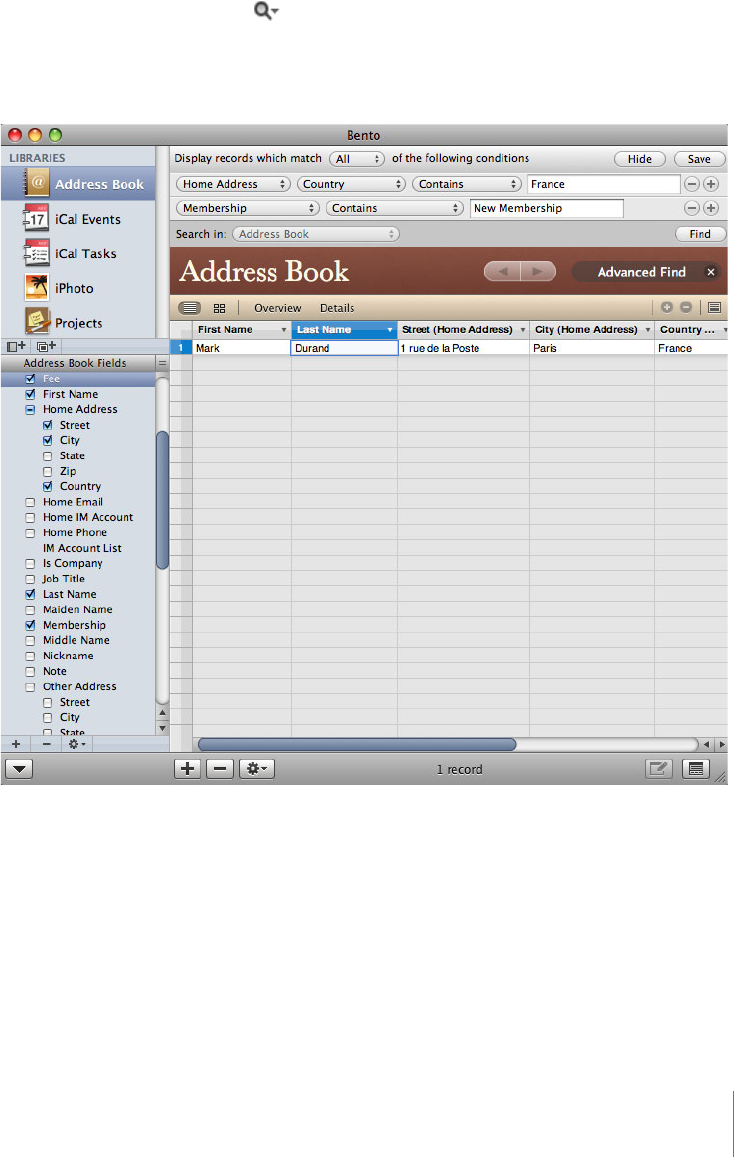
To use Advanced Find:
1Select the library or collection.
2In the search field, click and select Advanced Find, or press Command-F.
3Specify what you want to find. Add or remove criteria as needed.
4Click Find.
Bento performs the search, and displays the matching records.
•To save the matching records as a Smart Collection, click Save. See ”Ab ou t
Smart Collections” on page 53.
•To close Advanced Find, click the X next to “Advanced Find” or press
Command-F. When you close Advanced Find, Bento shows all records.
30 Chapter 1 Overview of Bento
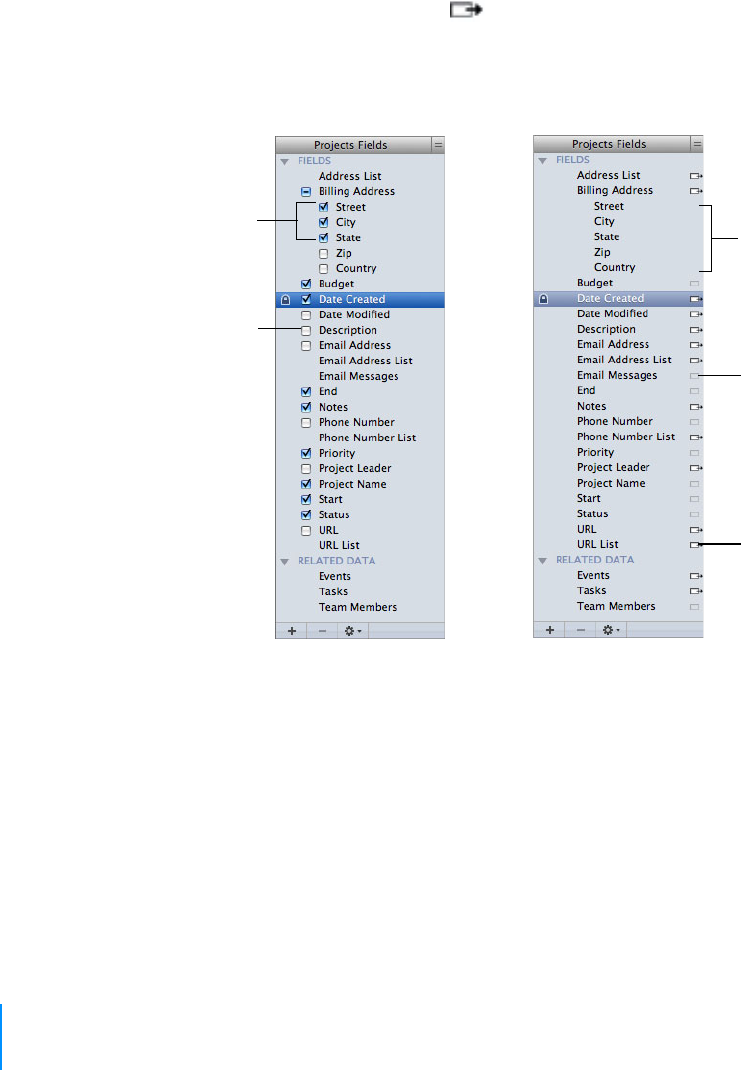
Fields Pane
The Fields pane on the left side of the Bento window displays the fields that are
defined for the selected library or collection.
•In table view, use the Fields pane to select which columns are shown.
•In a form view, use the Fields pane to add fields to the current form by
dragging a field name with to the form.
•In split view, the Fields pane indicates the fields that can be added to the
current form or can be displayed in table view.
See ”Using the Fields Pane” on page 89.
Drag to add field to
the current form.
Field is already on
the current form.
Fields with
selected
checkboxes are
already shown as
columns in table
view.
In form view
In table view
Select an
unchecked field to
show it as a
column in table
view.
Address subfields
can’t be added to the
form individually.

2
31
Using Libraries
In Bento, you use libraries to organize your information. You
can use the libraries that Bento provides, and create your
own libraries using templates. You can share your entire
database or selected libraries with up to five users on a local
network.
Bento contains four libraries that display data from other Mac OS X applications:
•Address Book library, which displays contact records from the Address Book
application
•iCal Events library, which displays events from the iCal application
•iCal Tasks library, which displays To Do items from the iCal application
•iPhoto library, which displays photos from the iPhoto application
For information on these libraries, see Chapter 3, “Using the Address Book, iCal, and
iPhoto Libraries” on page 39.
You can also create libraries to hold your information:
•By using the New Library dialog
•By importing existing information from a comma-separated (CSV), tab-
separated (TAB), Numbers, Excel, or library template file
This chapter describes how to use libraries to organize, manage, and share your
information.
About Libraries
Bento stores information in libraries. Libraries are composed of records, and libraries
are defined by the fields in the records.
For example, the Address Book library contains contact records. Contact records are
composed of the fields that are used to store information about contacts and to
update the Address Book application, such as names, addresses, and phone numbers .

32 Chapter 2 Using Libraries
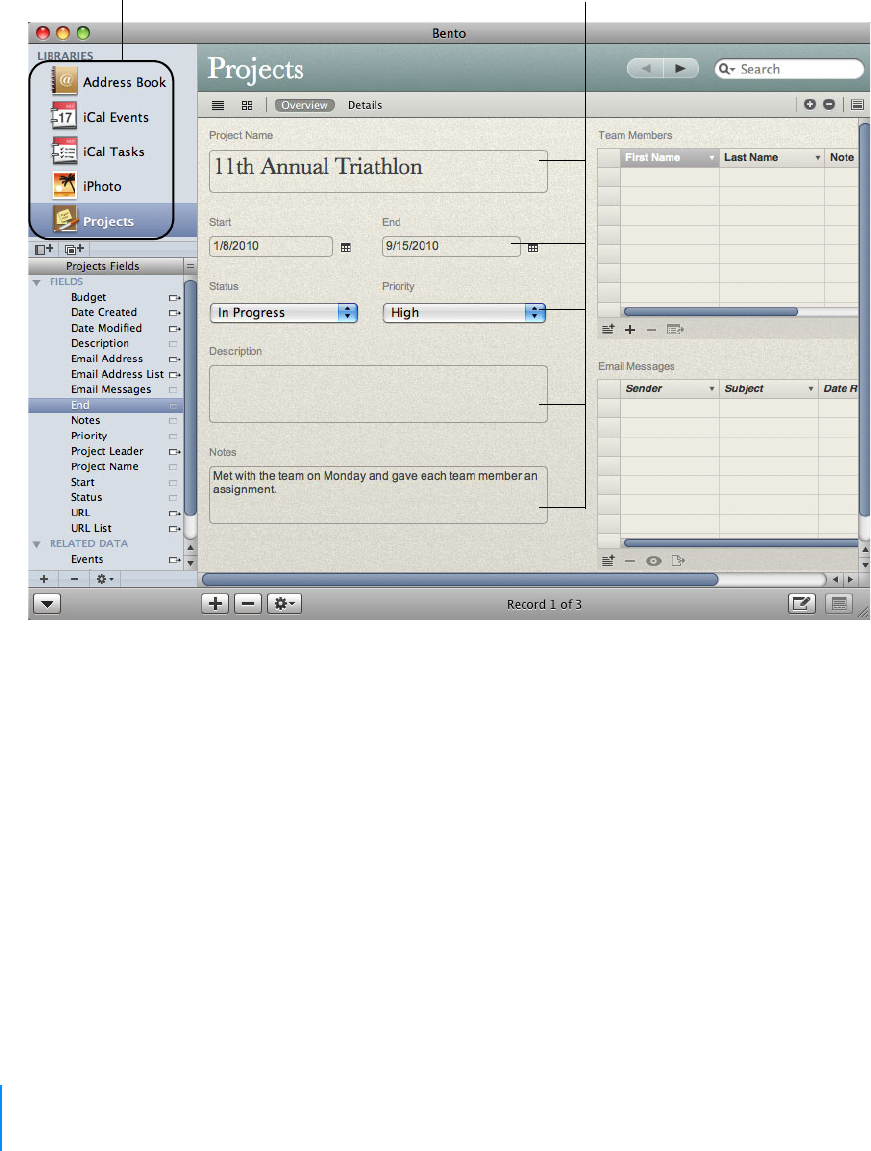
As another example, the default Projects library records are composed of fields that
are useful for managing projects, such as fields for the project status, start and end
dates, and team member information.
Bento provides several ways for you to view the records of a library:
•Form view shows fields from a single record. Each page shows one record at a
time, for example, a single contact record in the Address Book library. You can
have more than one form view for the library. See Chapter 5, “Using Form
View” on page 55.
•Table view shows the records in a table, for example, a list of the contacts in
the Address Book library. Each row in the table represents a single record in
the library. See Chapter 6, “Using Table View” on page 65.
•Grid view displays at a glance the media fields and form thumbnails of a
selected library or collection. See Chapter 7, “Using Grid View” on page 75.
•Split view shows a record in form view and table view or grid view at the same
time.
The remainder of this chapter describes how to create, use, and share libraries:
•You can create your own libraries by using library templates. See the
following section, ”Creating a Library Using the Bento Templates” on page 32.
•You can create a library by importing your own data. See ”Importing
Information into Bento” on page 104.
•You can share your libraries with up to five other Bento users on your local
network. See ”Sharing Your Bento Database” on page 34.
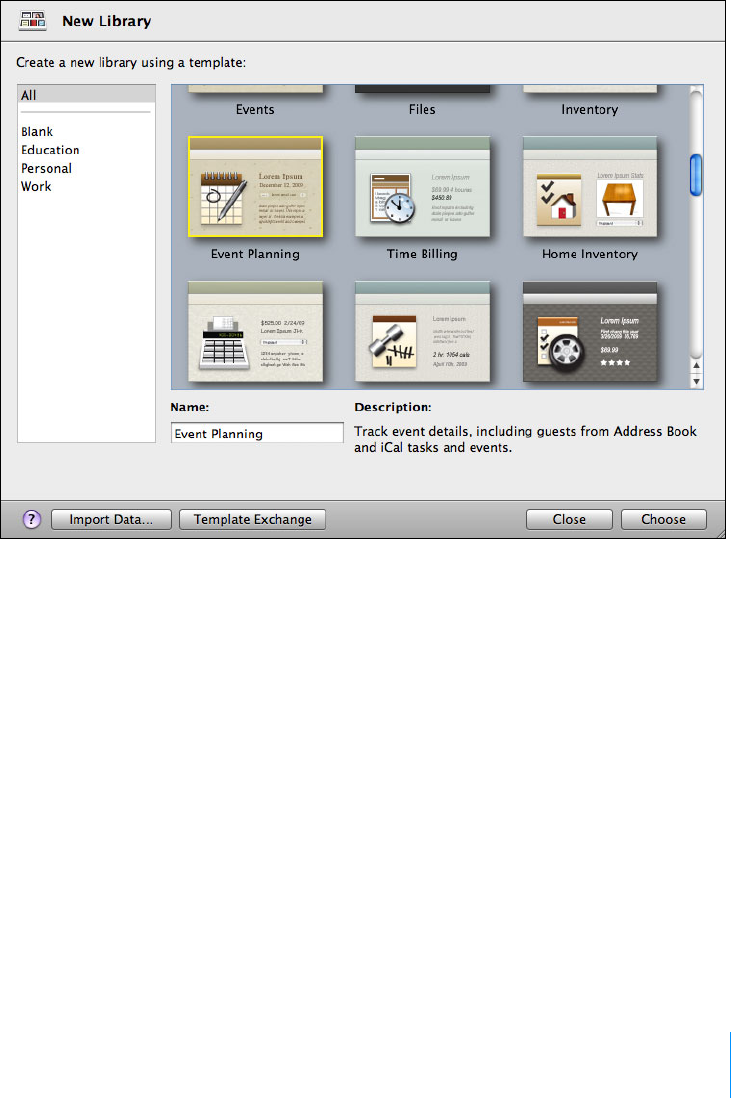
Creating a Library Using the Bento Templates
Before you create a library, think about the type of information you want to manage
with the library. Do you want to manage schedules and dates? Do you want to
manage contact information? Are you looking for a way to bring tasks and
assignments together in an event planner? Or do you want to manage a list of things,
such as inventory or equipment lists?
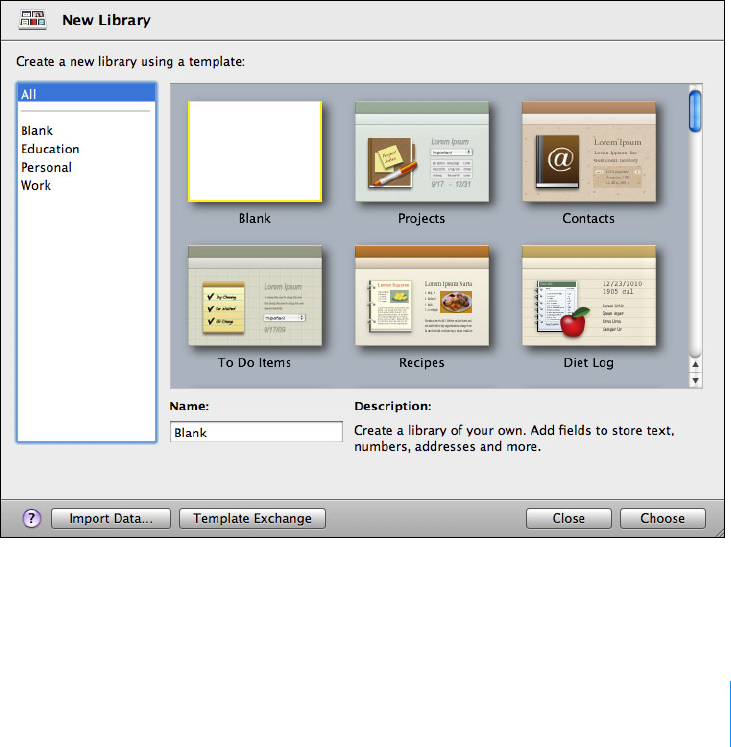
Bento provides library templates that create the fields to manage specific kinds of
information. These templates also apply pre-designed themes to the form views.
By selecting the library template that most closely fits the type of information you
want to manage, you create the library you need more quickly. If you can't find a
template for the kind of information you want to store, you can use the “Blank”
template and create a library of your own. After you create a library from a template,
you can customize the form view by adding or removing fields and changing the
theme.
Tip If you already have information from another application that you want to use in
Bento, see ”Importing Information into Bento” on page 104.

Chapter 2 Using Libraries 33
To create a library using the Bento templates:
1Choose File > New Library from Template.
2In the New Library dialog, select a template category in the left column, then
select the template.
Select “Blank” if none of the templates meet your needs. You can create all of the
fields yourself with the Blank library.
3Enter a name for your library, and click Choose.
Bento creates the library and opens it in form view.
If you selected a template other than the Blank template, review the fields that are
defined for your new library.
•If you are happy with the fields and form views in your new library, then
you’re ready to add records and enter information. See ”Editing Records in
Form View” on page 56.
•If you need additional fields, you can customize the library by adding fields.
See ”Adding Fields to a Form” on page 59.
•If there are fields defined for information that you do not need, delete those
fields. See ”Removing Fields from a Form” on page 60.

34 Chapter 2 Using Libraries
•If you want to change the layout of the fields on the form view, see
”Customizing Form Layouts” on page 61.
•If you want to change the appearance of the form view, you can select a
different theme. See ”Customizing Form Layouts” on page 61.
Creating a New Blank Library
You can get started quickly by creating a blank library, then add data to it as you would
in a spreadsheet.
To create a new blank library:
1Choose File > New Blank Library.
Bento creates a library with a default name and opens it in table view.
2Double-click the library name to rename it.
3Click in the highlighted cell to start entering or pasting data.
See ”Editing Records in Table View” on page 67 and ”Copying and Pasting Data in
Table View” on page 67.
Creating a Library by Importing
If you already have information from another application that you want to include in
Bento, then create a library and records in that library by importing your information.
See ”Importing Information into Bento” on page 104.
Changing the Icon for a Library
Each library comes with its own icon. You can change the icon for any library you
create.
To change a library icon:
1In the Libraries pane, Control-click the library you want to change.
2Choose “Choose a library icon.”
3Click an icon, then click OK.
Sharing Your Bento Database
You can share your Bento database with up to five other Bento users at the same time
over a local network (in the same subnet). Sharing requires Bento 3 on each computer
that is either sharing a database or looking for shared databases.
Chapter 2 Using Libraries 35
You can export data from a shared library, but you can’t export a shared library into a
template file. For more information, see ”Exporting Information from Bento” on
page 110.
When you first start Bento, your libraries are set up ready to be shared. You then
decide whether to share your entire database or only selected libraries.
Note When you share your iCal Events library it becomes read-only, and other users
can’t modify events.
To share your database with other Bento users:
1Choose Bento > Preferences.
2Click Sharing at the top of the window.
3Select “Share my Bento database.”
4Select “Share entire database” or “Share selected libraries,” then select the
libraries you want to share.
5(Optional) Enter a different name for your shared database.
This is the name that is displayed on other users’ computers (if they are set up to
look for shared databases on your network).
6If you want other users to be able to make changes to the shared database,
select “Allow others to make changes to your data.”
If a shared database is not allowed to be changed, users see italicized field labels
and when they move the cursor over the fields.
Users viewing your shared database can’t create or delete fields or make changes
to form layouts.
If you make certain types of changes to the database while it being shared (create
fields, collections, or folders; delete folders; change field options or the database
name), users are prompted to disconnect from the database and then reconnect
to ensure they have the latest version.
7Leave Bento open on your computer for users to see your shared database on
other computers.
Important Users editing a shared database can’t undo their changes once they have
tabbed or clicked outside the field currently being edited.
To disconnect a shared database, click next to the shared database.
Turning Off Database Sharing
You can turn off database sharing to prevent other users on your local network from
seeing your database.

36 Chapter 2 Using Libraries
To turn off database sharing:
1Choose Bento > Preferences.
2Click Sharing at the top of the window.
3Deselect “Share my Bento database.”
Looking for Shared Databases
If your computer is connected to other computers over a local network, you can look
for databases that are being shared.
To look for shared databases on your local network:
1Choose Bento > Preferences.
2Click Sharing at the top of the window.
3Select “Look for shared Bento databases.”
Any shared databases appear in the Shared section of the Libraries pane.
Setting a Password for a Shared Database
You can require users to enter a password, called the Sharing Password, before they
can view your shared items. This password is different from the Database Password.
For more information about the Database Password, see ”Setting a Password for Your
Bento Database” on page 97.
To set the Sharing Password:
1Choose Bento > Preferences.
2Click Sharing at the top of the window.
3Select Require Sharing Password, then type a password.
Opening a Password-Protected Shared Database
Password-protected shared databases are indicated by in the Libraries pane.
To open a password-protected shared database:
1Select a password-protected shared database.
2In the dialog, enter the Sharing Password that was set by the owner of the
shared database.
Working with Shared Encrypted Fields
Users can access encrypted fields in shared databases by first entering the Sharing
Password (if one has been set) and then the Database Password for the shared

Chapter 2 Using Libraries 37
database. For more information about the Database Password, see ”Setting a
Password for Your Bento Database” on page 97.
Users can lock and unlock data in shared encrypted fields. For more information, see
”Locking and Unlocking Data in Encrypted Fields” on page 98.
Grouping Libraries
You can organize a group of libraries within a folder.
To create a library folder:
1Choose File > New Library Folder.
An untitled folder is created in the Libraries pane above the currently selected
library or folder.
2Enter a new name for the folder and press Return.
To add a library to a library folder:
Select the library and drag it to the desired library folder.
Deleting Records from a Library
To delete records from a library:
1Select the library.
2Select the records and press Command-Delete.
Note When you press Command-Delete, the records are permanently deleted from
both the library and any collection or related data fields that displayed them.
Deleting a Library
To delete a library:
Select the library and press the Delete key. When you press Delete, the library and all
of its records are deleted.
Any related data fields in other libraries based on this library are also deleted.
Note You cannot delete the Address Book, iCal Events, iCal Tasks, or iPhoto libraries. If
you do not want to display these libraries, see ”Displaying the Address Book, iCal, and
iPhoto Libraries” on page 39.

38 Chapter 2 Using Libraries

3
39
Using the Address Book, iCal, and
iPhoto Libraries
Bento provides libraries that display data from the Mac OS X
Address Book, iCal, and iPhoto applications. With these
libraries, you can manage contacts, events, tasks, and photos
together, and display them as related records in other
libraries in Bento.
Bento contains four libraries that display data from other Mac OS X applications:
•Address Book library, which displays information from the Address Book
application
•iCal Events library, which displays events from the iCal application
•iCal Tasks library, which displays to-do items from the iCal application
•iPhoto library, which displays photos and video clips from the iPhoto
application
This chapter describes how to use these libraries to organize information about
contacts, events, tasks, and photos, and how to add information from these libraries to
your own libraries.
Displaying the Address Book, iCal, and iPhoto Libraries
Bento starts with an Address Book library, an iCal Events library, an iCal Tasks library,
and an iPhoto library. Even if the Address Book, iCal, and iPhoto applications are not
running, you see the data from these applications in Bento.
Displaying the Address Book, iCal, and iPhoto libraries is optional. When you first start
using Bento, these libraries are displayed by default.
If you turn off the display of these libraries in Bento, their records no longer appear in
Bento, but they still appear in the Address Book, iCal, and iPhoto applications.

40 Chapter 3 Using the Address Book, iCal, and iPhoto Libraries
Displaying Data from the Address Book Application
To display the Address Book data in Bento:
1In Bento, choose File > Address Book, iCal and iPhoto Setup.
2Select “Display Address Book data in Bento.”
To turn off the display of Address Book data in Bento:
1In Bento, choose File > Address Book, iCal and iPhoto Setup.
2Clear “Display Address Book data in Bento.”
When you click OK, the Address Book library no longer appears in Bento.
If you have related data fields based on the Address Book library, those related
data fields are no longer displayed when you turn off the display of the Address
Book library.
Displaying Data from the iCal Application
To display the iCal data in Bento:
1In Bento, choose File > Address Book, iCal and iPhoto Setup.
2Select “Display iCal data in Bento.”
To turn off the display of iCal data in Bento:
1In Bento, choose File > Address Book, iCal and iPhoto Setup.
2Clear “Display iCal data in Bento.”
When you click OK, the iCal libraries no longer appear in Bento.
If you have related data fields based on the iCal libraries, those related data fields
are no longer displayed when you turn off the display of the iCal libraries.
Displaying Data from the iPhoto Application
To display the iPhoto data in Bento:
1In Bento, choose File > Address Book, iCal and iPhoto Setup.
2Select “Display iPhoto data in Bento.”

Chapter 3 Using the Address Book, iCal, and iPhoto Libraries 41
To turn off the display of iPhoto data in Bento:
1In Bento, choose File > Address Book, iCal and iPhoto Setup.
2Clear “Display iPhoto data in Bento.”
When you click OK, the iPhoto library no longer appears in Bento.
If you have related data fields based on the iPhoto library, those related data fields
are no longer displayed when you turn off the display of the iPhoto library.
Address Book Library
By default, Bento displays contact information and groups from the Mac OS X Address
Book application. When you make changes to records in the Bento Address Book
library, you are actually updating the records in the Address Book application.
You can use the Bento Address Book library to edit data from any application or device
that synchronizes with the Address Book application.
By displaying the Bento Address Book library, you add your contacts to Bento and
keep your contacts up-to-date, whether you edit the information in the Address Book
application or in Bento.
•If you add a record in the Address Book library, then it is added to the Address
Book application.
•If you delete a record in the Address Book library, then it is deleted from the
Address Book application.
•For every group that you create in the Address Book application, Bento
creates an Address Book library collection.
•For every collection you create in the Address Book library, the Address Book
application creates an Address Book group.
If you delete a collection under the Address Book library, the associated Address Book
group is deleted also. Similarly, if you delete a group in the Address Book application,
the associated collection under the Address Book library is deleted also.
42 Chapter 3 Using the Address Book, iCal, and iPhoto Libraries
You can use the records in the Bento Address Book library just like the records in any
other library and collection in Bento. The only difference is that changes in the
Address Book library update information in the Address Book application.
Note Bento does not display Smart Groups from the Address Book application.
Conversely, Smart Collections from the Bento Address Book library are not added to
the Address Book application.
The Address Book library
displays contact
information from the
Address Book application.
Address Book
groups display
as collections
in Bento.

Chapter 3 Using the Address Book, iCal, and iPhoto Libraries 43
Bento Address Book Fields That Update the Address Book Application
The following fields in the Address Book library update information in the Address
Book application.
You can add other fields to your Address Book library records in Bento, but your
additional fields are not added to the Address Book application. See Chapter 8, “Using
Fields” on page 79 for information on adding fields.
Conversely, any custom field labels you have defined in the Address Book application
are not displayed in the Address Book library in Bento.
Troubleshooting Address Book Updates
This section describes some common issues with displaying data from the Address
Book application.
•Why don’t I see my Smart Groups from the Address Book application in
Bento?
Bento does not display Address Book Smart Groups because the criteria used to
create the groups are not available to Bento.
•Why don’t I see my Address Book library’s Smart Collections in the Address
Book application?
The criteria used to create Bento Smart Collections cannot be passed to the
Address Book application because the criteria may use fields that appear only in
Bento and may involve fields that are not available to the Address Book
application.
Address: Home, Work, Other
Address list
Birthday
Company name
Department
Email address: Home, Work, Other
Email address list
First name
Home page
IM account: Home, Work, Other
IM account list
Is Company
Job title
Last name
Maiden name
Middle name
Nickname
Note
Phone number: Work, Home, Mobile,
Main, Home fax, Work fax, Pager,
Other
Phone number list
Phonetic first name
Phonetic last name
Phonetic middle name
Prefix
Suffix
URL
URL list

44 Chapter 3 Using the Address Book, iCal, and iPhoto Libraries
Other Address Book Considerations
•When you create a Bento backup file, the data from the Address Book
application is not included in the Bento backup file. To back up the data from
Address Book, use the Address Book application.
If you add fields to the Address Book library, information from those additional
fields is included in the Bento backup file. See Chapter 10, “Backing Up and
Restoring Information” on page 117 for information on creating a Bento backup
file.
•You can use import and export with the Address Book library. Records
imported into the Address Book library update the Address Book application.
See Chapter 9, “Importing, Exporting, and Printing” on page 101 for
information on importing and exporting.
iCal Events and iCal Tasks Libraries
iCal is a convenient application for keeping track of your events and tasks.
By default, Bento gets the calendar information from the iCal application and keeps
the information in your iCal Events and iCal Tasks libraries updated with iCal changes.
In addition, any changes you make in Bento update the iCal application information.
Bento creates a record for each event or task in the iCal application, for the iCal
calendars stored on your computer. By default, any events or tasks you create in Bento
are added to the Bento calendar in iCal, and you can reassign them to other iCal
calendars.
Chapter 3 Using the Address Book, iCal, and iPhoto Libraries 45
You can use the records in the iCal Events and iCal Tasks libraries just like the records in
any other libraries and collections in Bento. The only difference is that changes in the
iCal Events and iCal Tasks libraries update the information in the iCal application.
Note Bento does not display information from the subscribed calendars in the iCal
application.
The iCal Events library
displays event records
from the iCal application.

46 Chapter 3 Using the Address Book, iCal, and iPhoto Libraries
Bento Event Fields That Update the iCal Application
The following fields in the Bento iCal Events library update the iCal application.
•All Day
•Calendar
•End date
•Location
•Note
•Start date
•Title
•URL
Note In the iCal application, the “URL” field is a text field. In order to correctly display
this value in Bento, the iCal Events library uses a text field as well, rather than using a
Bento URL field.
You can add other fields to your event records in Bento, but your additional fields do
not update the iCal application. See Chapter 8, “Using Fields” on page 79 for
information on adding fields.
Bento Task Fields That Update the iCal Application
The following fields in the Bento iCal Task library update the iCal application.
•Calendar
•Completion date
•Due date
•Note
•Priority
•Title
•URL
Note In the iCal application, the “URL” field is a text field. In order to correctly display
this value in Bento, the iCal Tasks library uses a text field as well, rather than using a
Bento URL field.
You can add other fields to your task records in Bento, but your additional fields do not
update the iCal application. See Chapter 8, “Using Fields” on page 79 for information
on adding fields.

Chapter 3 Using the Address Book, iCal, and iPhoto Libraries 47
Troubleshooting iCal Updates
This section describes some common issues with displaying data from the iCal
application.
•Why don’t I see the collections from iCal Events or iCal Task libraries in the iCal
application?
The iCal application does not have a way to display a subset of the events or tasks
from a specific calendar.
•Why don’t I see events or tasks from my subscribed calendars?
Subscribed calendars are stored on an external server; Bento displays information
for local calendars only.
•How do I create a calendar in Bento?
When you create a calendar in the iCal application, it can be used as a calendar
selection in Bento. You cannot create a calendar in Bento.
Other iCal Considerations
•When you create a Bento backup file, the data from the iCal application is not
included in the Bento backup file. To back up the data from iCal, use the iCal
application.
If you add fields to the iCal libraries, information from those added fields is
included in the Bento backup file. See Chapter 10, “Backing Up and Restoring
Information” on page 117 for information on creating a Bento backup file.
•You can use import and export with the iCal libraries. Records imported into
the iCal libraries update the iCal application. See Chapter 9, “Importing,
Exporting, and Printing” on page 101 for information on importing and
exporting.
iPhoto Library
iPhoto is a convenient application for keeping track of your photos and video clips.
By default, Bento gets the photo and video clip information from the iPhoto
application and keeps the information in your iPhoto library updated with iPhoto
changes. However, you can’t add, delete, or duplicate records, collections, Smart
Collections, or records within collections and Smart Collections in the iPhoto library.
You can’t edit the contents of fields that originate in the iPhoto application.
You can add fields to your records in the iPhoto library, and then edit or delete them,
but those fields do not display in the iPhoto application. See Chapter 8, “Using Fields”
on page 79 for information on adding fields.
In Bento, your iPhoto Albums appear as collections and Smart Albums appear as
Smart Collections. The Bento iPhoto library contains default collections that
correspond to these iPhoto items: Last 12 Months, Last Import, and Flagged.
48 Chapter 3 Using the Address Book, iCal, and iPhoto Libraries
Bento iPhoto Fields
You can’t modify the names or the contents of the default Bento iPhoto library fields.
You can add other fields to your photo or video clip records in Bento but your
additional fields do not update the iPhoto application. See Chapter 8, “Using Fields”
on page 79 for information on adding fields.
Troubleshooting iPhoto Updates
This section describes some common issues with displaying data from the iPhoto
application.
•Why don’t I see any photos, video clips, or collections in my Bento iPhoto
library?
If you have iPhoto installed on your computer but have never launched it, there
won’t be any photos, video clips, or collections displayed in the Bento iPhoto
library until you launch iPhoto.
The iPhoto library displays
photos and video clips from
the iPhoto application.
Albums display as
collections in Bento.
Albums in the iPhoto application.
Chapter 3 Using the Address Book, iCal, and iPhoto Libraries 49
Other iPhoto Considerations
•When you create a Bento backup file, the data from the iPhoto application is
not included in the Bento backup file. To back up the data from iPhoto, use
the Time Machine application.
•If you add fields to the iPhoto library, information from those additional fields
is included in the Bento backup file. Those fields are not added to the iPhoto
application. See Chapter 10, “Backing Up and Restoring Information” on
page 117 for information on creating a Bento backup file.
Using Related Data Fields in the iPhoto Library
You can quickly create a related data field based on the iPhoto library by dragging
onto a form in another library.
In a related data field based on the iPhoto library, you can’t create or delete records.
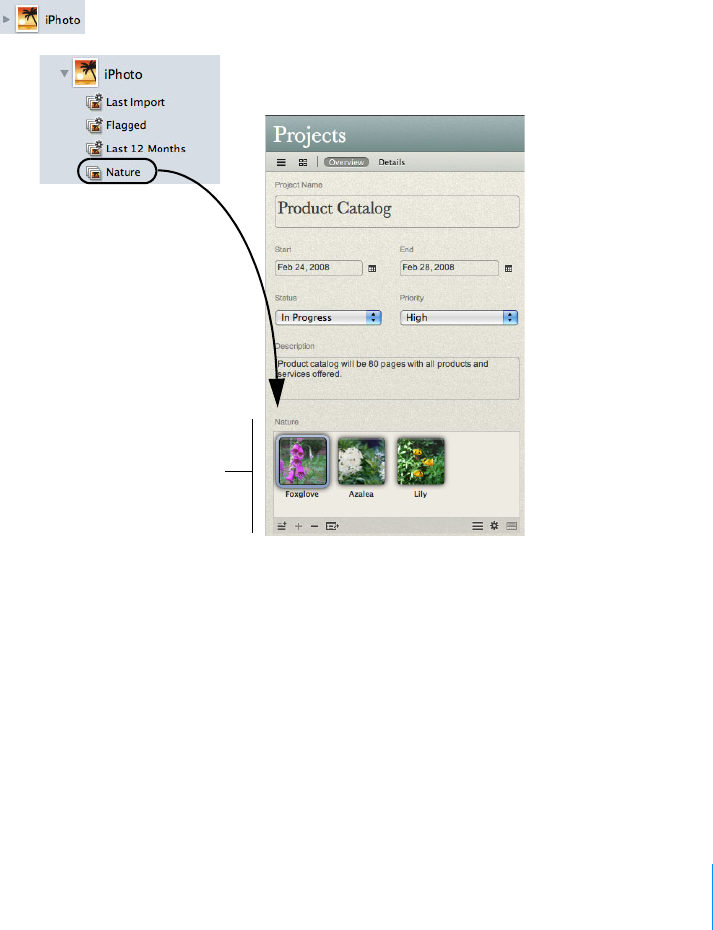
Drag the Nature
collection to a form in
the Projects library...
...to create a related data
field.
50 Chapter 3 Using the Address Book, iCal, and iPhoto Libraries
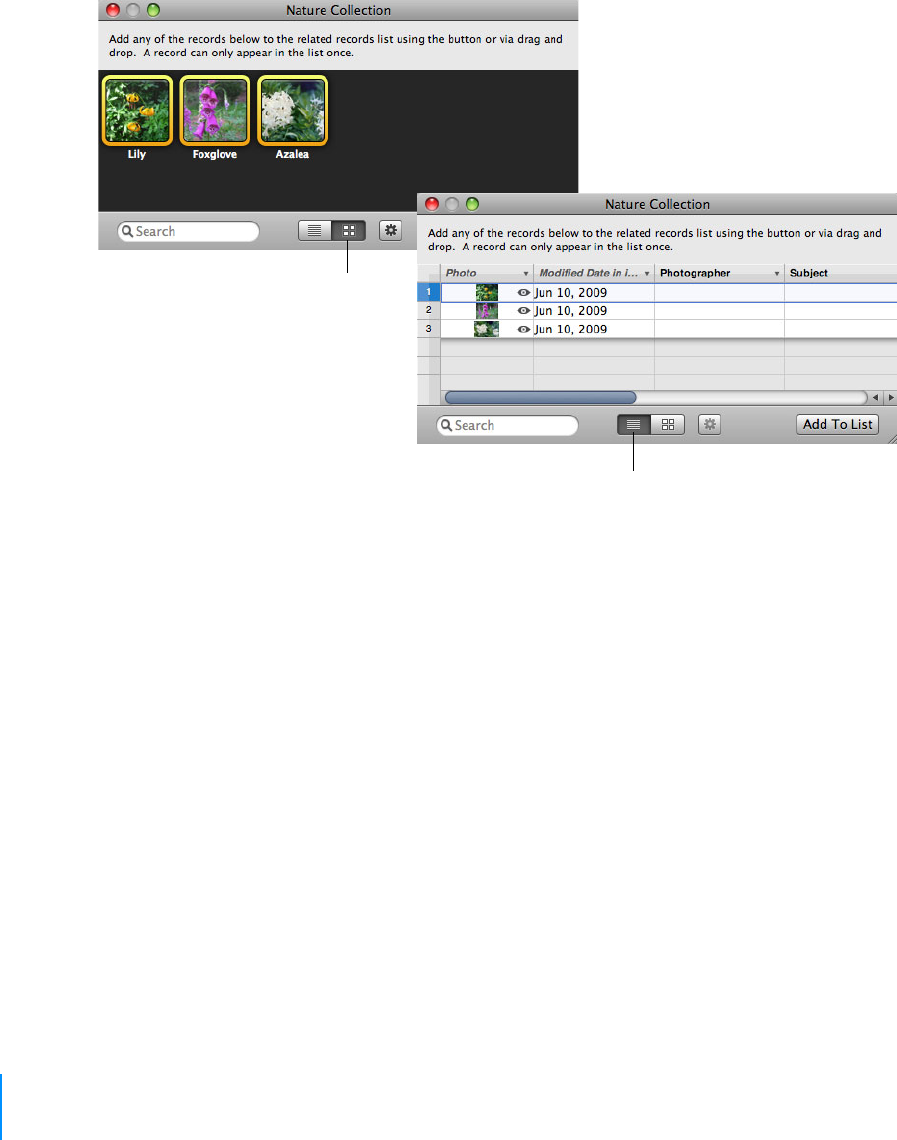
When you add records to a related data field, you can view them within the related
data field in a grid layout (which displays media fields only) or a table (which displays
media fields as thumbnails).
Click to display records in
table format.
Click to display records
in grid format.
4
51
Using Collections
This chapter describes how to use collections to further
organize your records in Bento.
In Bento, your records are kept in libraries, as described in Chapter 2, “Using Libraries”
on page 31. If you want to organize records in different ways or if you want to work
with a subset of the records in a library, you can create a collection.
About Collections
A collection is a set of records from a library. You can create a collection to:
•Create a set of records for a special purpose. For example, you could create a
collection of the people invited to a specific event.
•Sort records in a different order. For example, you could create a collection of
contacts to sort the contact records by last name.
•Export the data from the records in the collection rather than from all the
records in the library.
A collection in Bento is similar to a playlist in iTunes. If you have used iTunes, you know
how convenient it is to use a playlist to create a compilation of songs and videos.
Collections in Bento give you the same convenience for grouping records from a
library.
A collection contains records from a single library. For example, you can put records
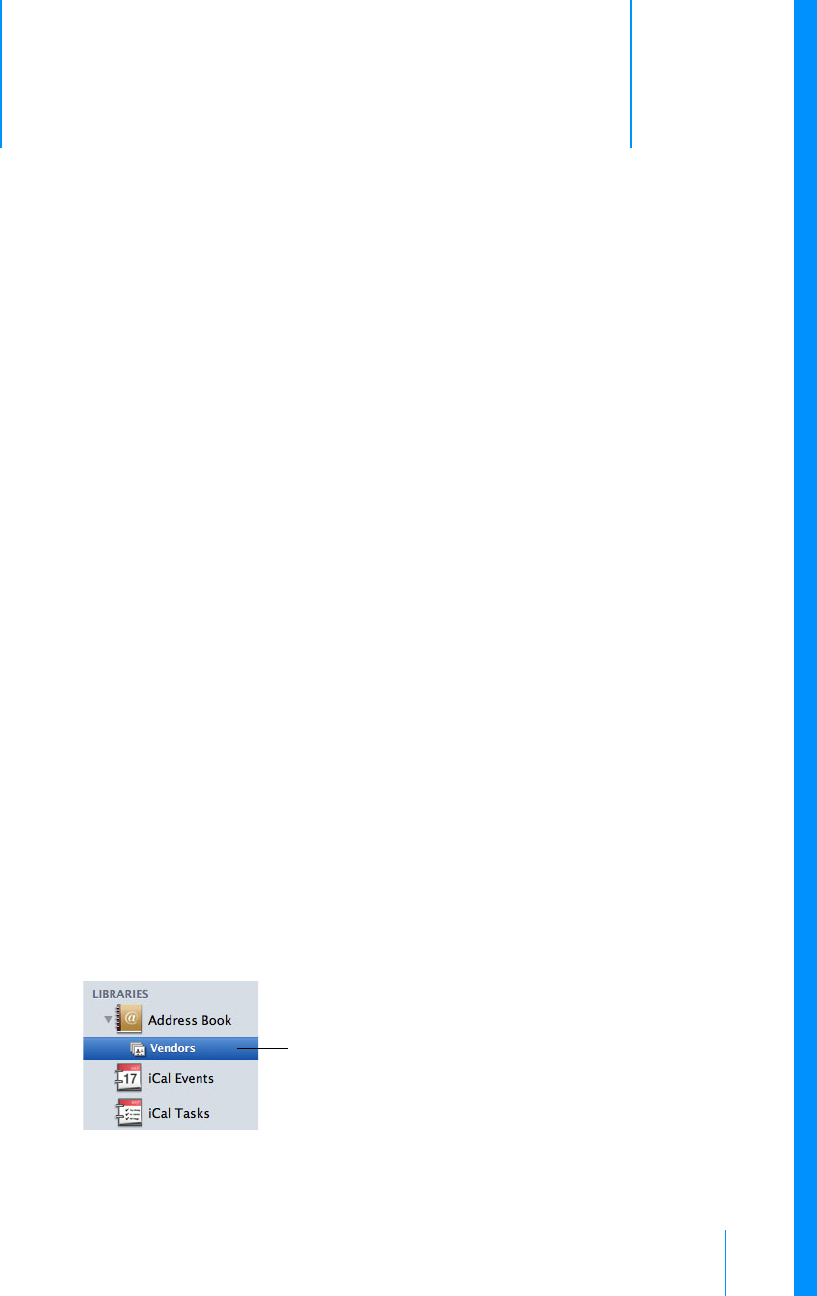
from the Address Book library in an Address Book collection such as Vendors. You
cannot put any other library’s records in the Vendors collection.
Vendors collection in the
Address Book library

52 Chapter 4 Using Collections
However, a record from a library can be added to any of the collections within the
same library. For example, if you have a “DVD” library with a “Favorites” collection and
a “Classic Movies” collection, you can have the same record in both collections.
There are two kinds of collections:
•collections
•Smart Collections
You create collections by using the New Collection menu item, by selecting records
and using the New Collection from Selection menu item, or by dragging selected
records to an existing collection or to the Libraries pane.
Smart Collections are created based on criteria you set up. Smart Collections update as
your library changes; records that meet the defined criteria appear in the Smart
Collection.
Creating Collections
Create a collection when you want to make a specific list of records.
To create a collection:
1Select a library in which you want to make a collection.
2Click or choose File > New Collection.
3Type a name for the collection, then press Return.
4Select the library you selected in step 1 again.
5Click Table in the navigation bar or choose View > Table View to show the
library in table view.
6Select the record you want to add to the collection. Drag the selected record
to the collection, or click and choose Add to Collection to add the
selected record to the collection.
To select multiple records, hold down the Command or Shift key while you click.
Tip To quickly create a collection containing selected records, select the records,
then choose File > New Collection From Selection or drag the records to a blank
space in the Libraries pane.

Chapter 4 Using Collections 53
Removing Records from a Collection
To remove records from a collection:
1Select the collection.
2Select the records and press Command-Delete.
If you click Remove from Collection, the records are removed only from the
collection, not from the associated library. If you click Delete, the records are
permanently removed from both the library and the collection.
Deleting a Collection
To delete a collection:
Select the collection and press the Delete key. The records are removed from the
collection but not from the library.
Note If you delete a library or collection that one or more related data fields are based
on, those related data fields are also deleted.
About Smart Collections
Create a Smart Collection when you want a collection that contains records that meet
criteria you define. Smart Collections show all the records that meet the criteria.
For example, you could create a Smart Collection of contacts who live in the same city.
When you add a new contact record for a person who lives in that city, Bento
automatically adds that contact record to your Smart Collection.
Or you could create a Smart Collection of event records that are due in the same week.
If you add or modify a record so that it meets the criteria, that record appears in the
Smart Collection the next time you click the Smart Collection in the Libraries pane.
Because a Smart Collection is a set of records that match defined criteria, it is different
from a collection in the following ways:
•You cannot manually add records to or remove records from Smart
Collections. To remove certain records from the Smart Collection, edit the
criteria or modify the records’ values so that they no longer meet the criteria.
•You can create Smart Collections in the Address Book library, but Smart
Collections do not appear in the Address Book application.
•You can create Smart Collections in the iCal Events and iCal Tasks libraries,
but Smart Collections do not appear in the iCal application.
•You cannot import records into a Smart Collection.
54 Chapter 4 Using Collections
Creating Smart Collections
You can create a Smart Collection that adds records to or removes records from a
collection according to criteria that you define.
To create a Smart Collection:
1Choose File > New Smart Collection.
2Type a name for the Smart Collection, then press Return.
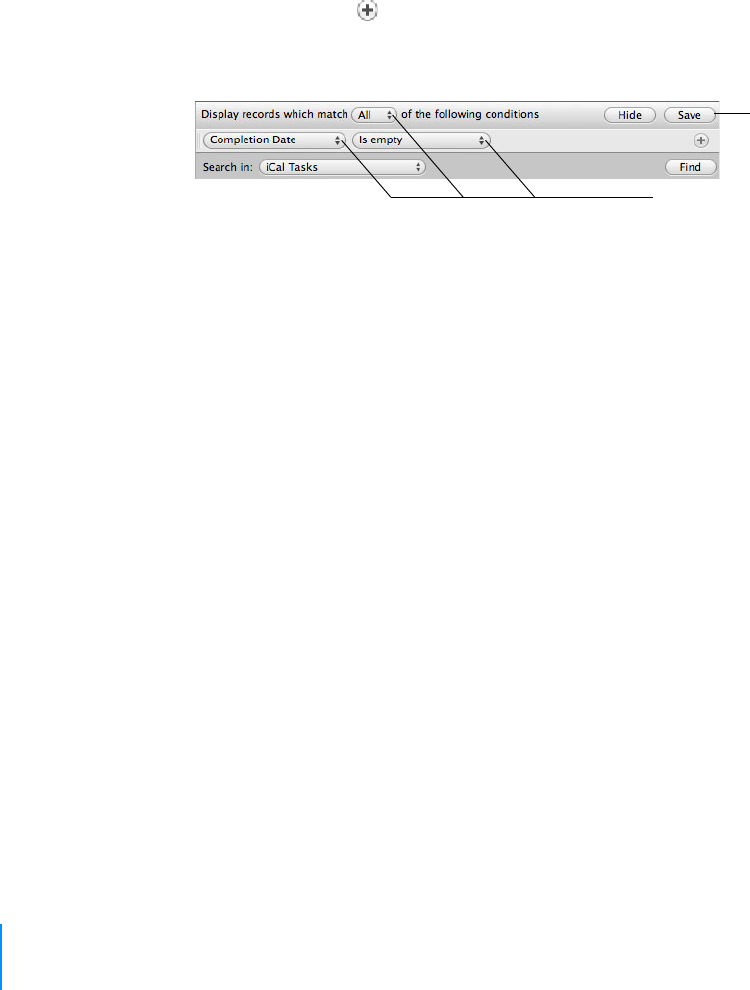
Use the pop-up menus and entry fields to specify the criteria for the Smart
Collection. Click to add additional criteria.
For example, to create a Smart Collection that only shows iCal tasks that are not
completed, specify the criteria to be All, Completion Date, and Is empty.
3Click Save.
Tip You can also create a Smart Collection by clicking Save after you specify the
criteria for an Advanced Find. See ”Search Field and Advanced Find” on page 27.
Working with Smart Collections
After you create a Smart Collection, you can edit and duplicate records within it. See
”Editing Records in Table View” on page 67 and ”Duplicating Records in Table View”
on page 68.
Changing a Smart Collection
When you change a Smart Collection, Bento updates the collection based on the
criteria that you define.
To change a Smart Collection:
1Select the Smart Collection and choose File > Edit Smart Collection.
2Use the pop-up menus and entry fields to modify, add, or remove the criteria.
3Click Find to see if the new criteria produce the records you want.
4Click Save.
Note To discard the changes you made to the criteria, click any other item in the
Libraries pane.
1. Select the criteria.
2. Save the criteria.
5
55
Using Form View
In Bento, you use form view to display one record at a time
from a library or collection.
This chapter describes how to create and edit records in form view, create and modify
forms, and customize form layouts.
About Forms
In form view, you can create and use forms to display one record at a time from a
library or collection in a page-like format. For example, you can display a contact in the
Address Book library or a task in the iCal Tasks library.
With forms, you can see the fields for an individual record. You can create and use
multiple forms, or pages, to display different information about that record.
For a given library or collection, you can use any of its fields on any of its forms.
If you want to see more than one record at a time, or scan and sort your information
quickly, use table view instead. See Chapter 6, “Using Table View” on page 65.
The same record displayed in another form
view, using a different organization of fields
A record displayed in one form view

56 Chapter 5 Using Form View
Forms can also display records from other libraries or collections in related data fields.
For example, you can display a list of people who are attending an event on a form in
the iCal Event library. See ”Creating Related Data Fields” on page 85.
Viewing a Form and a Table at the Same Time
You can view a selected record in form view and table view at the same time. Select
the record, then choose View > Split View.
Creating Records in Form View
You can create records in either form view or table view. For table view instructions,
see ”Creating Records in Table View” on page 66.
To create a record for a library or collection:
1Select the library or collection you want to add a record to.
2Click a form name in the navigation bar or choose View > Form View > Form
Name.
3Choose Records > New Record or press Command-N.
4Type data in the fields.
5Press Tab to move to the next field in the same record. Press Shift-Tab to move
to the previous field in the same record.
Tip To quickly create a record, Control-click in a blank area on the form and choose
New Record from the pop-up menu.
Editing Records in Form View
To edit a record:
1Select the library or collection that contains the record you want to edit.
2Navigate to the desired record.
Press Tab or Shift-Tab to move from field to field.
3Click a form name in the navigation bar or choose View > Form View > Form
Name.
4Click the field you want to change, modify the data, then click outside the
field or press Tab to save the change.

Chapter 5 Using Form View 57
Adding the Current Date and Time to a Field
When editing a record, you can add the current date and time to a date, time, or text
field.
To add the current date and time to a field:
1Click in the date, time, or text field.
2Choose Insert > Current Date and Time.
Duplicating Records in Form View
To quickly add a record with the same or similar data as an existing record:
1Navigate to the record you want to duplicate.
2Choose Records > Duplicate Record.
Deleting Records in Form View
To permanently delete a selected record from a library:
1Select the library.
2Click a form name in the navigation bar or choose View > Form View > Form
Name.
3Select the record.
4Choose Records > Delete Record or press Command-Delete.
In the dialog, click Delete.
If the field type is You see the current
Date Date. Set the “Display Time” option to also display the time.
Time Time
Text Date and time

58 Chapter 5 Using Form View
To remove a selected record from a collection:
1Select the collection.
2Navigate to the record you want to remove.
3Choose Records > Remove Record.
If you click Remove from Collection, the record is removed only from the
collection, not the library. If you click Delete, the record is permanently removed
from both the library and the collection.
Note if you delete a record from the Address Book library, the record is also
deleted in the Address Book application. If you delete a record from the iCal
Events or iCal Tasks library, the record is also deleted in the iCal application.
Creating Forms
To create a form:
1Select the library or collection you want to add a form to.
2Click in the navigation bar or choose Forms > New Form.
In the Form name dialog, type a name, then click OK.
3Add fields to the blank form.
See ”Adding Fields to a Form” on page 59.
4Create records.
See ”Creating Records in Form View” on page 56.
Deleting Forms
To delete a form:
1Select the library or collection you want to delete a form from.
2Click in the navigation bar or choose Forms > Delete Form.
If there is only one form, you can’t delete it.
Duplicating Forms
To duplicate a form:
1Select a form in the navigation bar or choose View > Form View > Form Name.
2Choose Forms > Duplicate Form.

Chapter 5 Using Form View 59
Renaming Forms
To rename a form:
1Double-click the form name at the top of the window.
2In the Form name dialog, type a new name, then click OK.
Adding Fields to a Form
To add a field to a form:
1Select a library or collection.
2Select a form in the navigation bar or choose View > Form View > Form Name.
3Drag a field from the Fields pane to the desired location on the form.
To move a field, see ”Moving Fields and Objects on Forms” on page 59. To resize a
field, see ”Resizing Fields and Objects” on page 60. To create a field, choose Insert
> New Field. See ”Creating Fields” on page 82.
Tabbing Between Fields
To tab between fields on a form:
1Select a library or collection.
2Select a form.
3Click in a field, then press Tab to move from field to field, and within each
column if you have added a column divider. Press Shift-Tab to move in the
reverse direction.
Note To enable the Tab key to move to all controls, make sure “All controls” is
selected in the Mac OS X Keyboard and Mouse preferences (Keyboard Shortcuts
tab).
Moving Fields and Objects on Forms
To move one field or object:
1Select a form in the navigation bar or choose View > Form View > Form Name.
2Move your mouse near the field label or the edges of the field or object.
When the cursor changes into a hand, click to select the field or object, then
drag it to a new location.
Bento allows you to drag fields above, below, next to, or between other objects on
the form.

60 Chapter 5 Using Form View
To move multiple fields or objects:
1Select a form in the navigation bar or choose View > Form View > Form Name.
2Command-click or Shift-click to select multiple fields or objects.
Tip To quickly select many fields and objects, click in an empty part of the form, and
while holding down the mouse button, drag to select multiple items.
Resizing Fields and Objects
Any field and any object can be resized.
To resize a field or object:
1Select a form in the navigation bar or choose View > Form View > Form Name.
2Select the field or object.
3Move the cursor to one of the handles. When the cursor changes to a double
arrow, drag to change the size.
Removing Fields from a Form
To remove a field from a form:
1Select a form in the navigation bar or choose View > Form View > Form Name.
2Select the field, then press the Delete key or drag the field off the form.
The data in the field is still in Bento even though the field is no longer displayed
on the form.

Chapter 5 Using Form View 61
Customizing Form Layouts
You can quickly change the appearance of a form.
Changing the Theme
You can change a form’s theme (the coordinated colors, layout, and text attributes) at
any time. For example, you can use a light-colored theme for printing records.
To change a form’s theme:
1Select a form in the navigation bar or choose View > Form View > Form Name.
2Choose Forms > Theme Chooser.
3In the Theme Chooser, select a theme, then click OK.
You see a ripple effect as the theme changes. If you don’t want the ripple effect,
choose Bento > Preferences, click General at the top of the window, then clear
“Display animation.”
If you want to preview a theme before applying it to your form, click Try It.
Resizing Column Widths
You can change the width of columns. Increase the width to accommodate wider
fields or to increase the amount of blank space between columns.
To resize the width of a column:
1Select a form in the navigation bar or choose View > Form View > Form Name.
2Position the cursor over a column divider, then drag left or right.
Changing the Position and Size of Labels
You can change how the labels for fields are positioned on a form.
To change the position of labels adjacent to fields:
1Select a form in the navigation bar or choose View > Form View > Form Name.
2Choose Forms > Labels.
3Select Above or Beside.
To change the size of text in labels:
1Choose Forms > Labels.
2Select Small, Medium, or Large.

62 Chapter 5 Using Form View
Changing the Size of Text
You can change the size of text that is displayed in fields.
To change the size of text in fields:
1Select a form in the navigation bar or choose View > Form View > Form Name.
2Select the fields.
3Choose Forms > Text Size.
4Select a size from the list: Smallest, Small, Medium, Large, Largest.
Changing the Shading of Fields
You can change the level of shading that is displayed behind fields.
To change the shading of fields:
1Select a form in the navigation bar or choose View > Form View > Form Name.
2Select the fields.
3Choose Forms > Shading.
4Select a level of shading: None, Light, or Dark.
Aligning the Right Edges of Fields
You can align the rightmost edges of selected fields within a column.
To align the right edges of fields:
1Select a form in the navigation bar or choose View > Form View > Form Name.
2Select the fields whose right edges you want to align within a column.
Command-click or Shift-click to select multiple fields.
Tip To quickly align the right edges of many fields, click in an empty part of the
form, and while holding down the mouse button, drag to select multiple items.
3Choose Forms > Align Right Edges.

Chapter 5 Using Form View 63
Adding Text Boxes
Add a text box if you want text such as a heading on your form.
To add a text box:
1Select a form in the navigation bar or choose View > Form View > Form Name.
2Choose Insert > Text Box.
An untitled box appears at the bottom of the form.
3Drag the text box to the desired location, double-click in the text box, and
start typing.
Adding Image Boxes
Add an image box if you want an image such as a logo or letterhead to appear on
every record in your form.
To add an image box:
1Select a form in the navigation bar or choose View > Form View > Form Name.
2Choose Insert > Image Box.
An image box appears on the form.
3Drag an image file from the Finder into the image box.
4Click in the image box to reposition or change the display size of the image.
For more information, see ”Positioning Images” on page 96 and ”Changing the
Display Size of Images” on page 96.
Adding Horizontal Separators
A horizontal separator is an object you can add to a form. Separators help organize
forms by visually separating the items above and below the separator. The appearance
of the horizontal separator is defined by the theme applied to the form. You can
change the horizontal separator's width but not its height.
To add a horizontal separator:
1Select a form in the navigation bar or choose View > Form View > Form Name.
2Choose Insert > Horizontal Separator.
3Drag the horizontal separator to the desired location on the form.

64 Chapter 5 Using Form View
Adding Column Dividers
You can divide up space on a form with column dividers.
To add a column divider:
1Select a form in the navigation bar or choose View > Form View > Form Name.
2Choose Insert > Column Divider.
3Drag the column divider to the desired location on the form.
Adding Spacers
Use a spacer to create a blank space between items on a form. For example, add a
spacer to separate groups of fields. When editing the form, you can change the
spacer's width, height, and shading.
To add a spacer:
1Select a form in the navigation bar or choose View > Form View > Form Name.
2Choose Insert > Spacer.
3Drag the spacer to the desired location on the form.
Drag the right or bottom edge of the spacer to change its width or height.
4(Optional) Choose Forms > Shading.
5(Optional) Select a level of shading.
6
65
Using Table View
In Bento, you use table view to display text and media in a
spreadsheet-like format where rows represent records and
columns represent fields.
This chapter describes how to create and modify records in table view, sort records,
and rearrange, summarize, and display data in columns.
About Table View
In table view, you can see your records in rows with the fields in columns (in a format
similar to a spreadsheet).
To go to table view, choose View > Table View.
Table view gives you flexibility while working with your data. For example, you can:
•see more than one record at a time
•choose which fields are displayed as columns
•sort records in ascending or descending order by using sort commands in the
column header pop-up menu
•duplicate one or more records
•delete multiple records
•enter, select, copy, and paste values in one or more cells, in a spreadsheet-like
manner
One record
One field

66 Chapter 6 Using Table View
•summarize data
•select and drag multiple records to create new collections within one library
•create, view, and edit media fields
In table view, you cannot see related data fields or any of the list field types, such as
address, email address, file list, message list, and simple list. See ”Working with Related
Data Fields” on page 93 and ”Working with List Fields” on page 90.
Viewing a Table and Form at the Same Time
You can view a selected record in table view and form view at the same time. Select
the record, then choose View > Split View.
Setting Table View Text Size
You can change the size of text for displaying records in table view.
To change the size of text used in table view:
1Choose Bento > Preferences.
2For “Table View Text,” select Small or Large.
Selecting Records in Table View
To select one record in table view:
Click a row number.
To select multiple records in table view:
Click a row number, then Shift-click the last row you want to include in the selection.
Or Command-click individual rows to include in the selection.
Creating Records in Table View
You can create records in table view or form view.
To create a record for a library or collection:
1Select the library or collection you want to add a record to.
2In table view, choose Records > New Record. Or click in the last empty row
and start typing.
At the bottom of the window, the record count indicator increases.

Chapter 6 Using Table View 67
3Type data in the columns.
If you type data in the last column, Bento creates a new field with the default
name Field.
4Press Tab to move to the next field in the same record. Press Shift-Tab to move
to the previous field in the same record.
To add existing records to another collection within the same library:
Select the records, choose Edit > Add To, then choose a collection from the list. The
selected records are added to the collection that you chose in the list.
Editing Records in Table View
To edit a record:
1Select the library or collection that contains the record you want to edit.
2Double-click a field (table cell). Press Tab to move to the next field in the same
record. Press Shift-Tab to move to the previous field in the same record.
Press Command-Return to insert a line break in a text field.
Copying and Pasting Data in Table View
You can copy and paste data between Bento records in the same or other libraries as
well as between Bento and spreadsheet applications such as Numbers and Excel.
To copy data:
1Do one of the following:
•In Bento, select one or more rows of data by clicking the row number. To
select adjacent rows, select one row, then hold down the Shift key as you
select adjacent rows. To select nonadjacent rows, hold down the
Command key as you select rows.
•Drag a selected block of data from a spreadsheet application to Bento.
Note In your spreadsheet application, you may need to switch rows of cells to
columns or columns to rows before copying the data.
2Choose Edit > Copy.
Bento copies the selected data to the Clipboard.

68 Chapter 6 Using Table View
To paste data:
1Click a cell.
2Choose Edit > Paste.
Bento creates additional records and columns as necessary.
Note When pasting into existing fields, Bento pastes as many values as possible. If
the data being pasted doesn’t match the field type, Bento gives you the choice of
rejecting the data or changing the field type to Text.
To paste data into new columns:
1Click a cell in the empty column after the last column of data.
2Choose Edit > Paste.
Bento creates new text fields, and additional records as necessary.
Duplicating Records in Table View
To quickly add a record with the same or similar data as an existing record:
1Select the library or collection.
2Select one or more records, then choose Records > Duplicate Record.
If you duplicated a record in a collection, the record is created in the parent library
and displayed in the collection.
Deleting Records in Table View
To permanently delete selected records from a library:
1Select the library.
2Select the records, then choose Records > Delete Selected Records or press
Command-Delete.
In the dialog, click Delete.
To permanently delete selected records from a collection:
1Select the collection.
2Select the records, then choose Records > Remove Selected Records or press
Command-Delete.
In the dialog, if you click Delete, the records are permanently removed from both
the library and the collection. If you click “Remove from Collection,” the records
are removed only from the collection, not the library.

Chapter 6 Using Table View 69
Sorting Records
To sort records:
Click the pop-up menu in a column header, then choose Sort Ascending or Sort
Descending.
If you want to sort two or more fields, sort by the least significant field first, followed
by the more important field or fields. For example, to sort records by last name and
first name, first sort by the First Name field, then by the Last Name field.
Working with Fields and Columns in Table View
Creating Fields in Table View
To create a field in table view:
1For blank libraries, the first field is automatically created with the default
name New Field.
2Double-click the column header and type a new name for the field, then
press Return.
3Enter data in the field.
Bento creates a Text field by default. You can change the field to another type.
See ”Changing the Field Type” on page 70.
4Press Tab to create another field, where you can continue typing in the same
record.
5Repeat steps 2-4 to create as many fields as you want.
Adding Fields in Table View
To add a field before or after a column:
1Click near the right edge of a column header.
2Choose Add Field Before or Add Field After.
A new column is inserted before or after the current column with the default
name Field.
3Type a new name for the field.

70 Chapter 6 Using Table View
Working with Media Fields in Table View
You can create, view, and edit media fields in table view in the same way as you do
other field types.
Changing Options for a Field
To change field options:
1Click near the right edge of a column header.
2Choose Edit Field.
3Change the field name or set options.
Duplicating Fields
To duplicate a field:
1Click near the right edge of a column header.
2Choose Duplicate Field.
Changing the Field Type
You can change the type of some fields to another. For more information see
”Changing an Existing Field from One Type to Another” on page 90.
To change the field type:
1Click near the right edge of a column header.
2Choose Change To, then select a field type from the list.
Showing and Hiding Columns
To hide columns:
1Click near the right edge of a column header.
2Choose Hide Field.
Press the Space bar
to view the selected
media field.

Chapter 6 Using Table View 71
To show or hide columns using the Fields pane:
In the Fields pane, select a field’s checkbox to display the field in table view. Clear the
checkbox to hide the field in table view. To select multiple fields at once, select one
field, then Shift-click another field to select all fields in between. To quickly clear them,
press the Space bar.
When you hide a field in table view, the field and its data are not deleted from the
library or collection.
Tip To display more data, hide the Libraries and Fields pane. Choose View > Hide
Libraries & Fields Pane.
Deleting Fields in Table View
To delete a field in table view:
1Click near the right edge of a column header.
2Choose Delete Field.
3In the dialog, click Delete.
The fields and their data are permanently removed from the library.
Select
checkboxes
to display
fields.
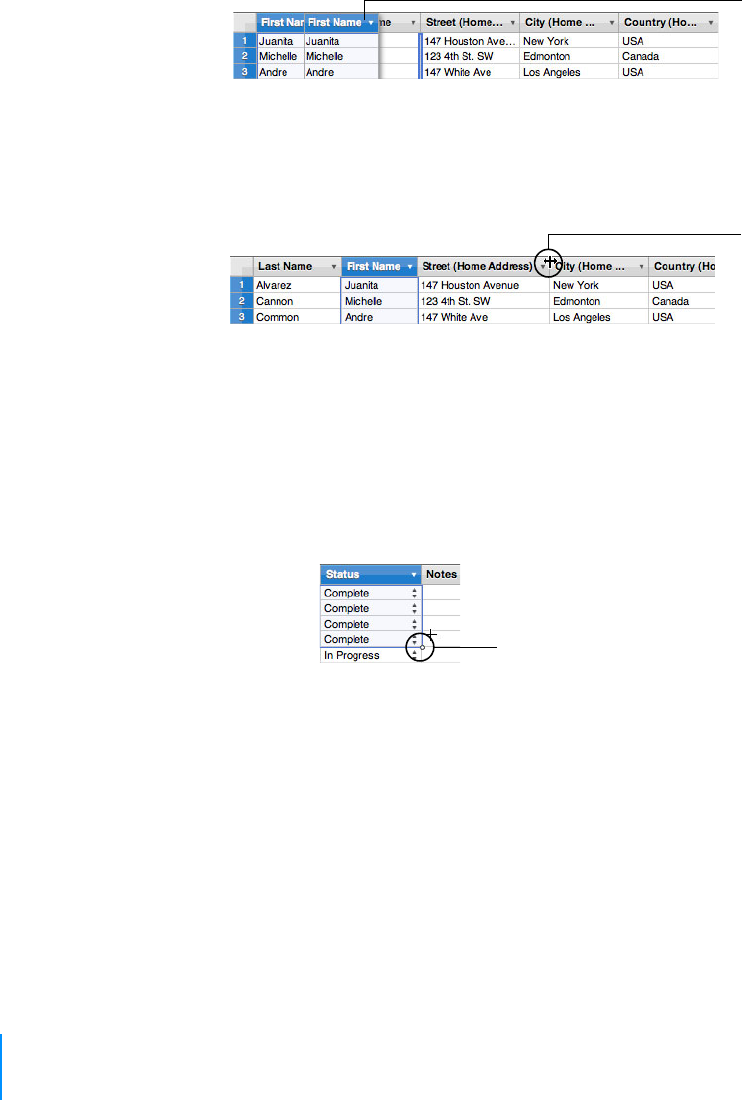
72 Chapter 6 Using Table View
Reordering Columns
To reorder a column:
Drag the column header left or right to a new location.
Resizing Columns
To resize a column:
1Drag the edge of a column header to the width you want.
Filling Fields Automatically
Bento lets you use the content in one or more rows to automatically add or replace
records below the selected fields.
To fill fields automatically:
1Select one or more fields in one or more records.
2Drag the fill handle to copy the fields’ values downward as far as you drag.
Summarizing Column Data
The summary row provides an easy way to perform basic operations on the data in a
column and display the results. The summary row is located at the bottom of table
view and at the bottom of related data fields.
To show or hide the summary row, choose View > Show Summary Row or Hide
Summary Row.
Drag header to
reorder column.
Drag header edge to
resize column.
Fill handle
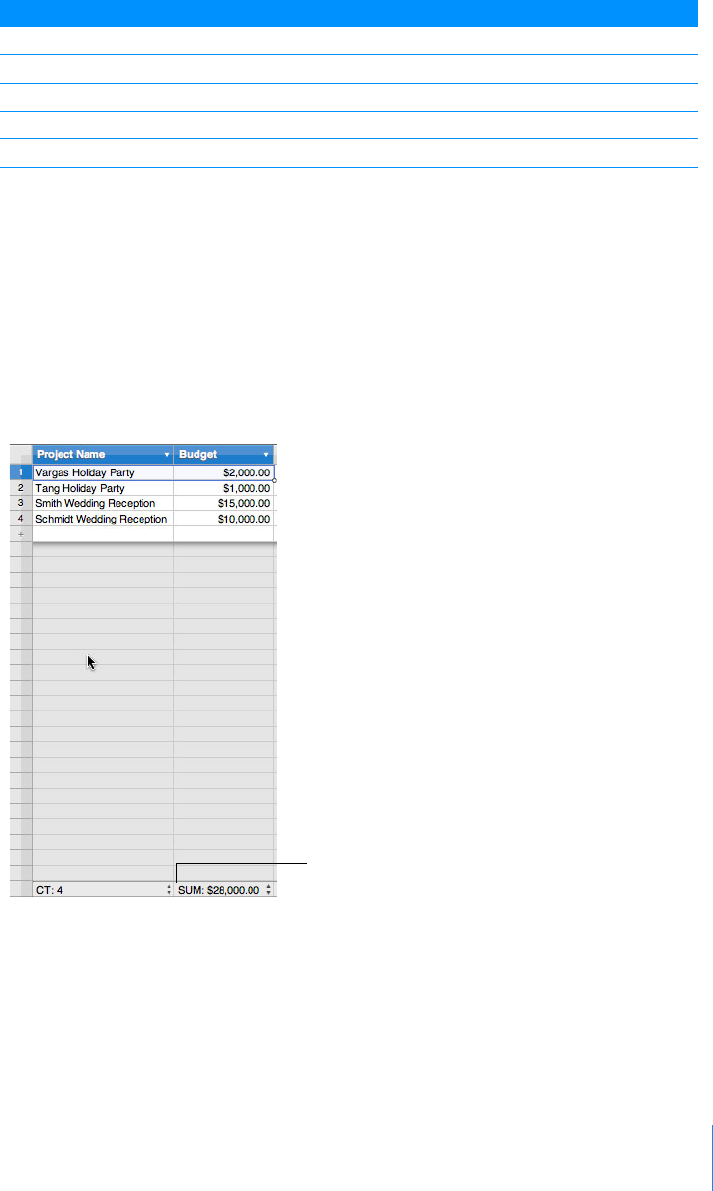
Chapter 6 Using Table View 73
Depending on the field type, the following summary functions are available.
You can use the Count function on any type of field. You can use the Sum, Average,
Minimum, and Maximum functions on fields of the following types: Number, Currency,
Duration, Rating, Automatic Counter, and Calculation (when the result is number,
currency, or duration). You can also use the Minimum and Maximum functions on
Date and Time fields.
To calculate a summary for a column:
Click in the summary row of the selected column, then choose a function from the
pop-up menu. The name of the function and the results are displayed in the summary
row.
When you do a search or an Advanced Find, the summary is recalculated based on the
records that are found.
Name Purpose
Sum Calculates the total of the values in the selected field
Count Reports the number of items that have an entry in the selected field
Average Reports the average of the values in the selected field
Minimum Reports the lowest value of the values in the selected field
Maximum Reports the highest value of the values in the selected field
Choose Sum in the summary
row to calculate the total of
the amounts listed in the
Budget column.

74 Chapter 6 Using Table View
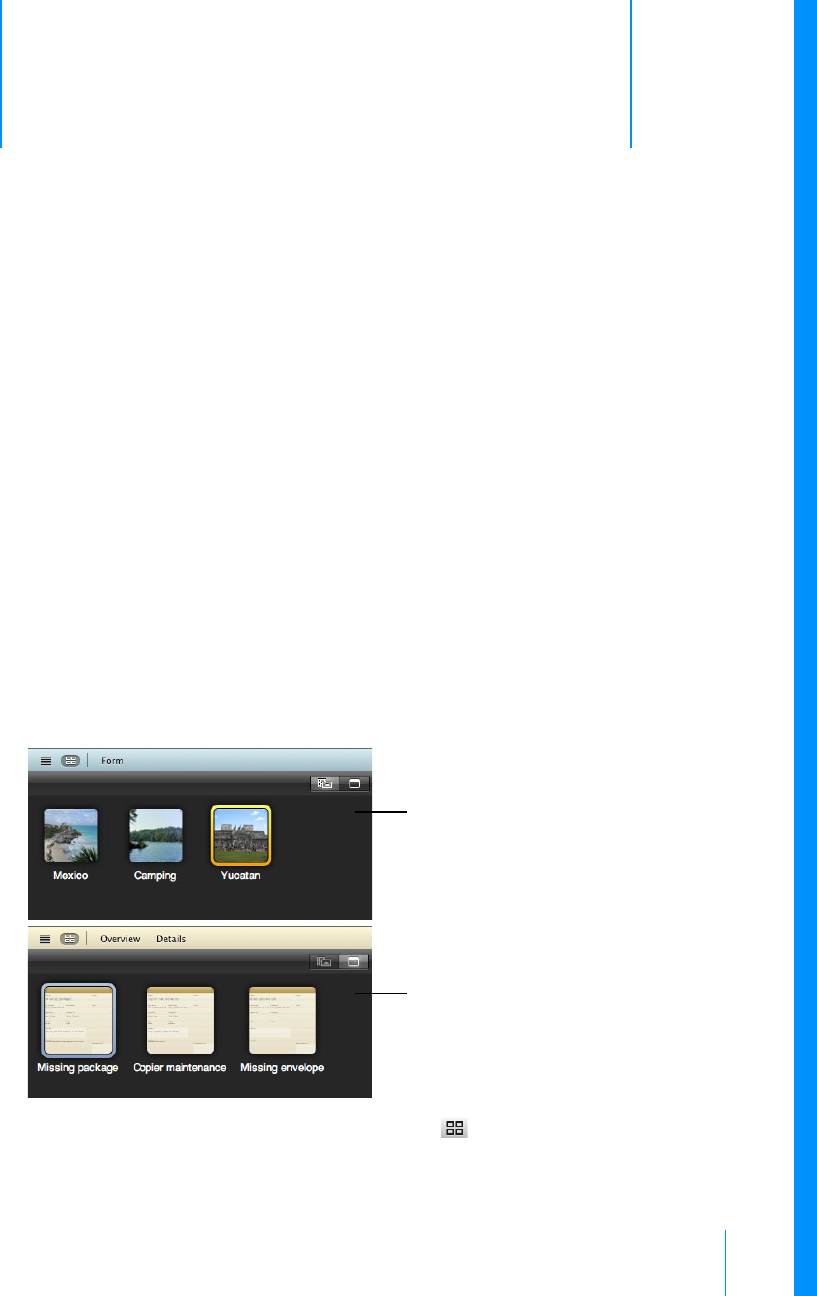
7
75
Using Grid View
In Bento, you can work with your media fields (pictures,
music, and movies) and forms in an easy-to-use grid layout.
This chapter describes how to work with a library’s media fields and form thumbnails
in grid view, look at a record in grid view and a form view at the same time, filter grid
view items, set and change labels of grid view items, change the display size of grid
view items, and work with library folders in grid view.
About Grid View
In grid view, the media fields in each record of a library or collection are displayed as
thumbnails in rows. Each thumbnail is a grid view item. If a library or collection does
not contain any media fields, Bento displays thumbnails of the forms.
Move the cursor back and forth over a grid view item to flash in succession all the
media fields within the grid view item.
To go to grid view, choose View > Grid View or click .
Media fields displayed in grid view
Form thumbnails displayed in grid view
76 Chapter 7 Using Grid View
Viewing the Grid and a Form at the Same Time
You can view a selected record in a form view and grid view at the same time.
If you are in grid view, select the record, then choose View > Split View or click .
If you are in form view, select the record, then choose View > Split View or click .
Displaying Grid View Items
To display grid view items:
Click to display photos, music, movies, and documents.
Click to display form thumbnails.
Setting Grid View Options
To set labels for grid view items:
1Click .
2Choose the fields to be used for the labels that appear below the grid view
items.
You can specify up to two fields per line.
Note If you don’t want any labels to be displayed, click the Title pop-up menu,
then choose the dash symbol for both fields. Click the Subtitle pop-up menu, then
choose the dash symbol for both fields.
To set the default media field for grid view items:
1Click .
2Click the image in the Grid Settings window, then choose a media field.
Changing the Display Size of Grid View Items
To change the display size of grid view items:
Drag the zoom slider.
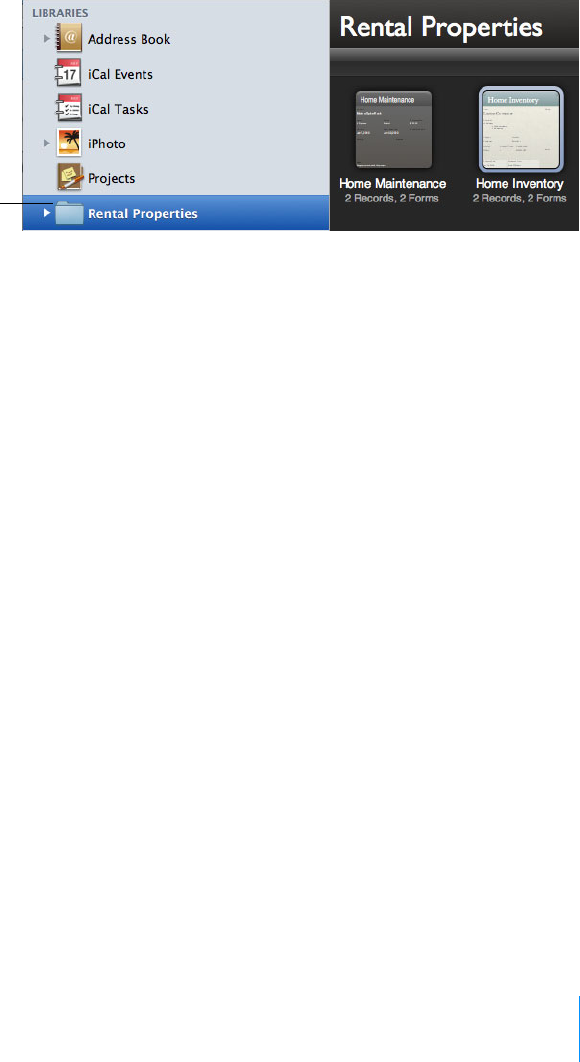
Chapter 7 Using Grid View 77
Working with Library Folders in Grid View
When you select a library folder, you see a grid view of all the libraries contained in the
folder along with information about the number of records and forms in each library.
Move the cursor back and forth over a library to flash in succession all the forms it
contains.
To go to a specific form:
1Move the cursor over a grid view item until you see the form you want.
2Control-click and choose Go to Form from the pop-up menu.
To set the default form displayed for grid view items:
1Move the cursor over a grid view item until you see the form you want.
2Control-click and choose Set Default Grid Form from the pop-up menu.
Library folder

78 Chapter 7 Using Grid View

8
79
Using Fields
Bento provides a wide variety of field types to store the kinds
of information you use in your daily life.
In Bento, you can choose from many different field types to track things such as
names, addresses, dates, times, prices, images, movies, songs, and lists of files.
This chapter describes the purpose of the field types, how to create and modify fields,
how to use the Fields pane, and work with the various types of fields that Bento
provides.
About Fields
Each library (except the Blank library) contains a set of fields. Each field allows you to
store a particular kind of data. In the record pictured on the next page, there are
several fields. For example, the Project Name field contains text.
Once you have created a field, you can use it on multiple forms and tables within the
same library or collection. When you want to link data between libraries or collections,
you can use related data fields.
From address, email, IM account, phone number, and URL fields you can perform tasks
such as sending an email message, getting directions to an address, or displaying a
phone number in large type.
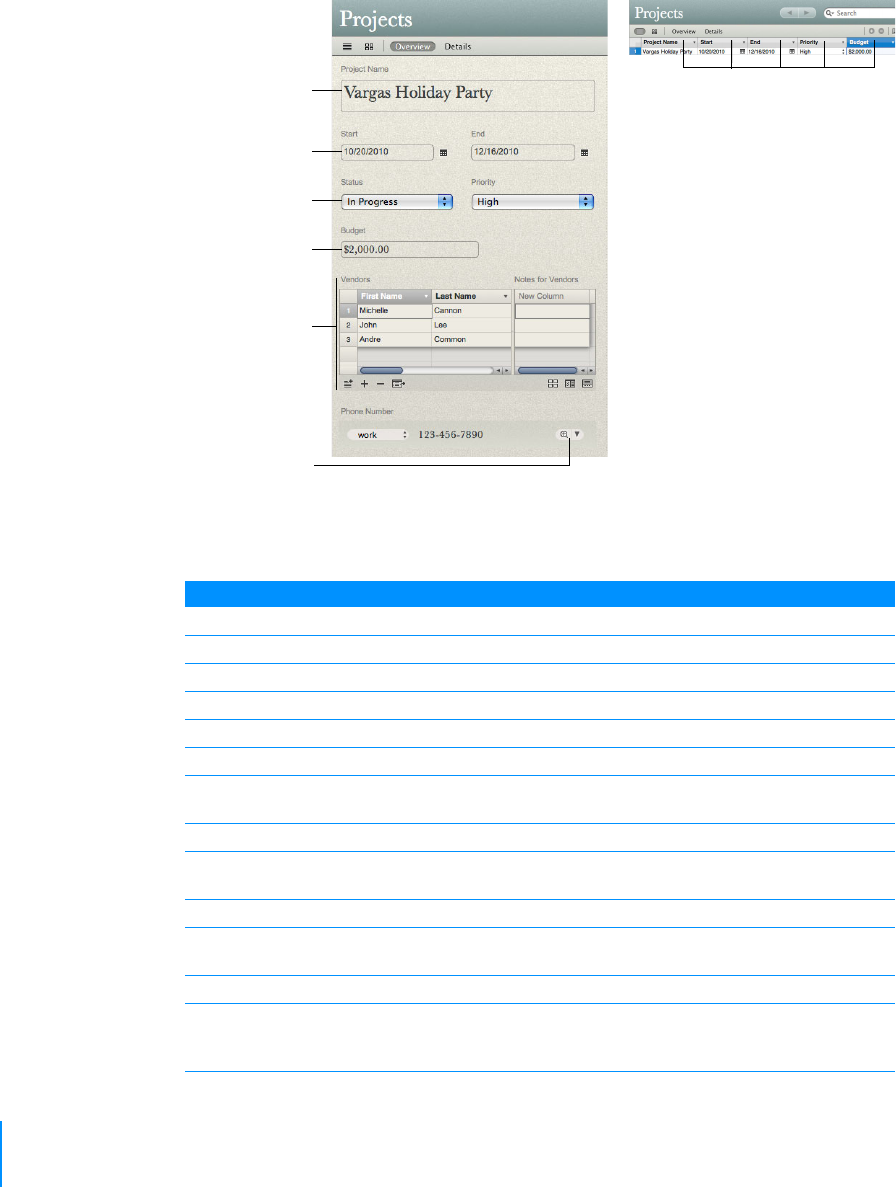
80 Chapter 8 Using Fields
Field Types
These are the types of fields you can create in Bento:
Table viewForm view
Text field Fields
Date field
Currency field
Related data field
Choice field
Display phone
number in large type
Field Type Purpose
Text Store anything you type*
Number Store numeric data, with formatting options**
Choice Create a pop-up menu in order to select an item from a list
Checkbox Provide an on-off type of choice
Media Store and use image, movie, and sound files
Simple list Store text data in a list format
File list Store and view thumbnails of aliases to other files or folders that are on
your computer
Message list Display emails, notes, and RSS articles from the Mac OS X Mail application
Related data Store one or more records from another library or collection that are
related to the current record
Time Choose and store a time of day, in hours, minutes, and seconds, AM or PM
Date Choose and store a date and time value. Displays the date by default and
can also display the time.
Duration Store an amount of time in weeks, days, hours, minutes, and seconds
Calculation Display the result of a specified calculation. Supported operators are
addition, subtraction, multiplication, division, and concatenation (joining
two or more words or sentences).

Chapter 8 Using Fields 81
For a list of field types that you can import data into, see ”Field Types Supported for
Import” on page 109.
List Fields
When you create address, phone number, email address, URL, and IM account fields,
Bento creates an associated list field that lets you display multiple addresses, phone
numbers, and so on for one record. When you enter data in one of these single field
types, Bento displays the same data in the associated list field.
For example, suppose you have a form that displays a home phone number in a phone
number field named “Home Phone Number.” You add work and mobile phone
numbers to two other phone number fields. Bento creates a list field and displays all
three phone numbers in that list field, but the work and mobile phone numbers are
not added to the “Home Phone Number” field you created.
Currency Store an amount of money and display it in the selected currency format
Automatic counter Assign a higher number to each new record
Rating Set the rating value of an item by clicking stars in the field
Encrypted Protect sensitive or confidential data and hide it from view (data is
displayed as bullets). Encrypted data is stored in your Bento database.
Address Store all components of a single street address
Phone number Store a phone number, including the area code
Email address Store an email address
URL Store a website, FTP site, or AFP site address***
IM account Store an IM account and service name
Notes:
*Maximum text field size is approximately 2 GB.
**The largest number supported is 263.
***The URL field does not support URL values that contain Japanese
characters.
Field Type Purpose
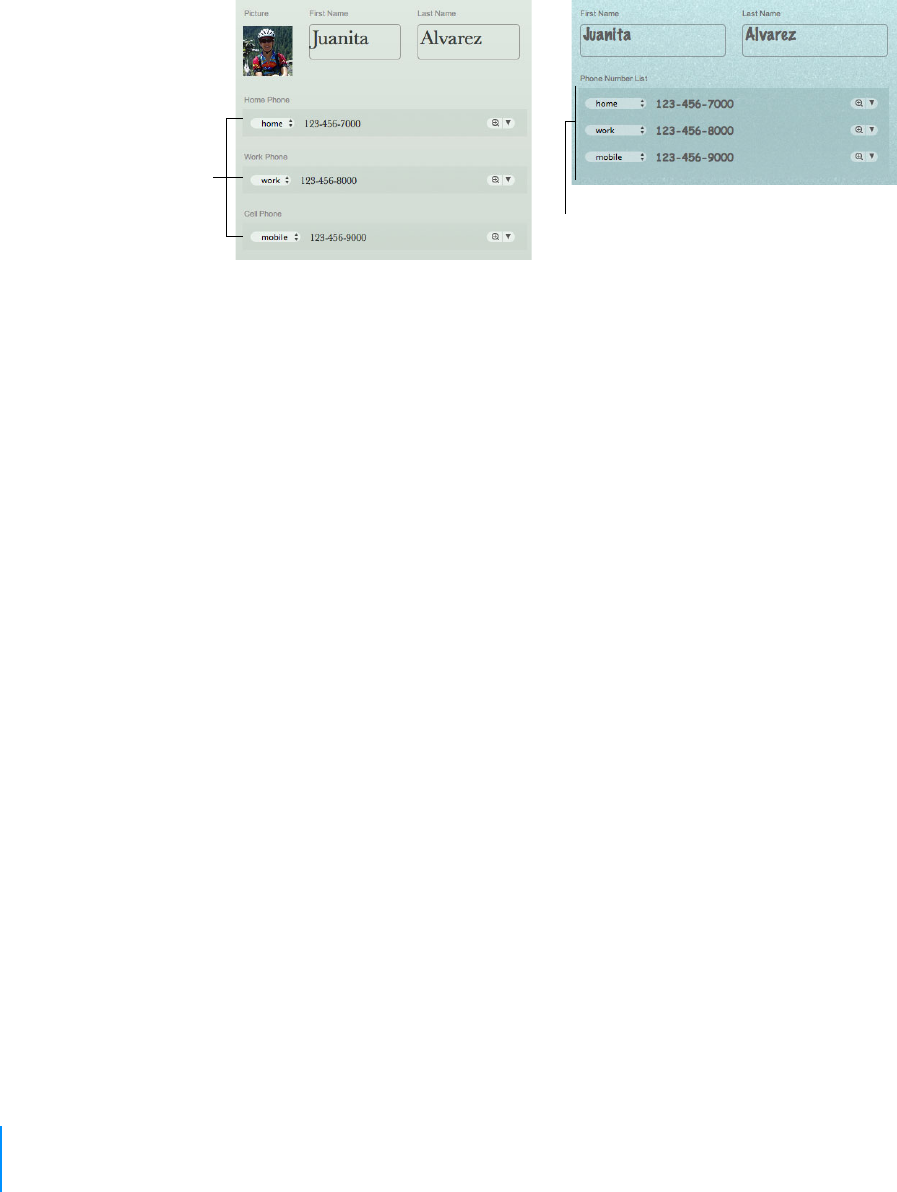
82 Chapter 8 Using Fields
You can import and export values stored in regular fields (for example, “Home Phone
Number” in the form shown above) but you can’t import or export values stored in list
fields. You can see values stored in list fields in form view but not in table view.
Creating Fields
Follow the steps below to create all types of fields, except calculation, file list, message
list, and related data fields. For more information about those field types, see
”Creating Calculation Fields” on page 83, ”Creating File List Fields” on page 84,
”Creating Message List Fields” on page 85, and ”Creating Related Data Fields” on
page 85.
To create fields:
1Choose Insert > New Field or press Control-N.
2Choose a field type.
3Name the field.
The name must be unique within the library.
4Set the options on the field, if any.
5Click “Create and Continue” or press Command-Return.
6Repeat steps 2-5 to create additional fields.
7Click Close.
The fields are added to the Fields pane.
On Form 1, you enter data in single
phone number fields.
On Form 2, Bento displays the data in the
phone number list field that you entered
in the single phone number fields.
Phone number list field created by Bento
Single
phone
number
fields
Form 1 Form 2
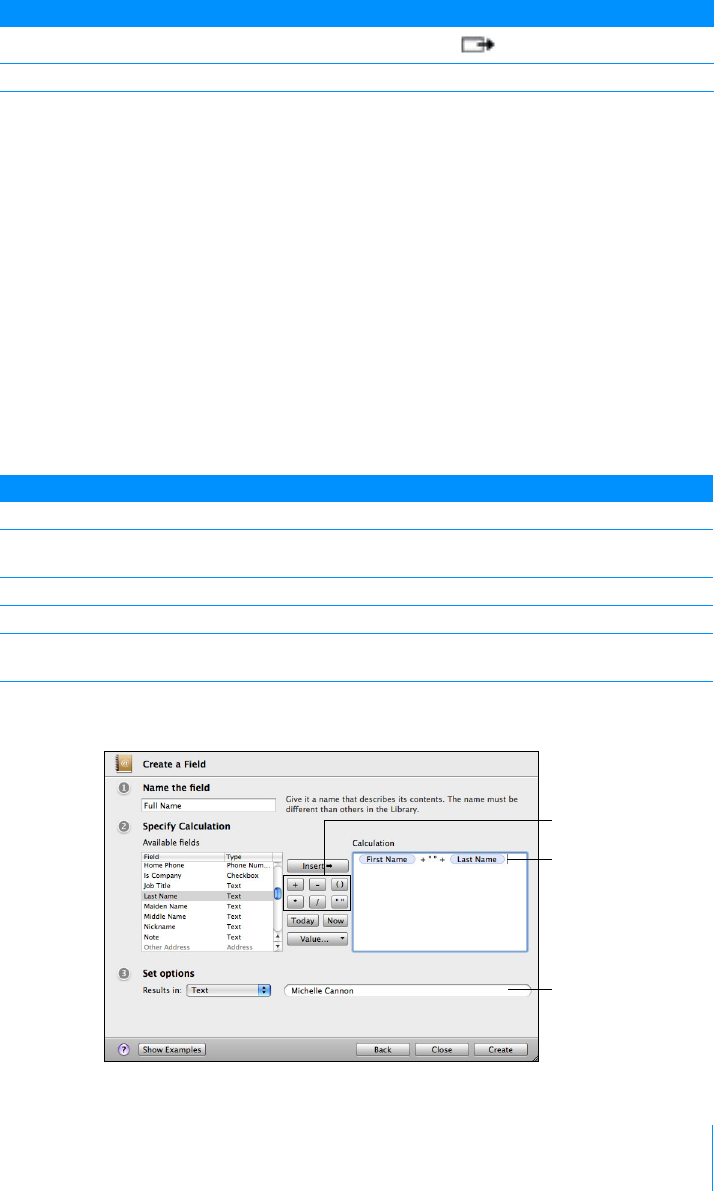
Chapter 8 Using Fields 83
8Use the Fields pane to add or display fields.
Note In table view, you cannot see related data fields or any of the list field types, such
as address, email address, file list, message list, and simple list.
After you have created a field, you can enter data into it.
Creating Calculation Fields
To create a calculation field:
1Choose Insert > New Field.
2Choose Calculation.
3Click Continue.
4Name the field.
5Build a formula for your calculation.
6Choose the correct data type for the result you want and set any other options.
To Do this in the Fields pane
Add a field to a form in form view or split view Drag to the form.
Display a field as a column in table view or split view Select a field’s checkbox.
To add Do this
A reference to a field In the Available Fields list, double-click a field name.
A mathematical or
text operator
Click an operator button or type an operator in the formula.
The current date Click Today to insert the current date.
The current time Click Now to insert the current time.
A pre-formatted
value
Click Value, then select a value from the list. Replace the pre-formatted value with
the value you want.
This is what you see
in the calculation
field for the current
record.
The formula for
the calculation
Operator buttons

84 Chapter 8 Using Fields
7Click Create.
The new field is added to the Fields pane.
Tip If you are unfamiliar with creating calculations, click Show Examples to see and
experiment with examples of calculations.
Creating File List Fields
Use a file list field to store a list of aliases to files or folders on your computer. Each alias
contains a path to a specific file or folder in a specific location on your hard drive.
You can quickly open files or applications that are stored in file list fields. For example,
you could store a PDF file of a resume in the record for a prospective employee. If you
double-click the PDF icon, the document opens in either Preview or Adobe Reader,
depending on your system default values.
If you move or rename a file or folder that an alias refers to, the alias is broken. If you try
to open the file or folder, you can navigate to it or remove the alias from the list.
To create a file list field and add files to it:
1Choose Insert > New Field.
2Choose File List.
3Name the field.
4Click Create.
The new field is added to the Fields pane.
5In form view, drag the field to a form.
See ”Adding Fields to a Form” on page 59.
Tip You can see file list fields in form view but not in table view. Choose View >
Split View so that when you are working in table view you can also see file list
fields in form view.
6In the bottom-left corner of the table for the file list field, click or choose
Insert > File.
7In the Open dialog, navigate to the file you want to include in the file list field,
then click Select.
You can also drag files from the Finder to the file list field.
8Click and choose Open, or double-click an alias in the file list field to
open the file.
You can preview files that are stored in file list fields with Quick Look. See
”Previewing Files with Quick Look” on page 92.

Chapter 8 Using Fields 85
Creating Message List Fields
Use a message list field to store aliases to Mac OS X Mail messages, notes, and RSS
articles that are relevant to a specific record. For example, you can keep a log of
correspondence linked to a project or event.
Note Because the message list field stores aliases to messages, when you delete a
message from Mac OS X Mail, it is also deleted from the message list field.
To create a message list field:
1Choose Insert > New Field.
2Choose Message List.
3Name the field.
4Click Create, then Close.
The new field is added to the Fields pane.
5In form view, drag the field to a form.
See ”Adding Fields to a Form” on page 59.
Note You can see message list fields in form view but not in table view.
6Add Mac OS X Mail items (messages, notes, and RSS articles) to the field.
See ”Adding Mac OS X Mail Items to a Message List Field” on page 91.
Creating Related Data Fields
Use a related data field to display one or more records from a library or collection that
are related to the record you are viewing.
For example, if you used the Projects library to manage planning a holiday party and
wanted to display a list of vendors on a form, you could create a related data field to
display the vendors that you hired to supply different types of party equipment. These
records come from the Vendors collection under the Address Book library. If you add a
new record in the related data field, the record is displayed there but is stored in the
Vendors collection and the Address Book application.
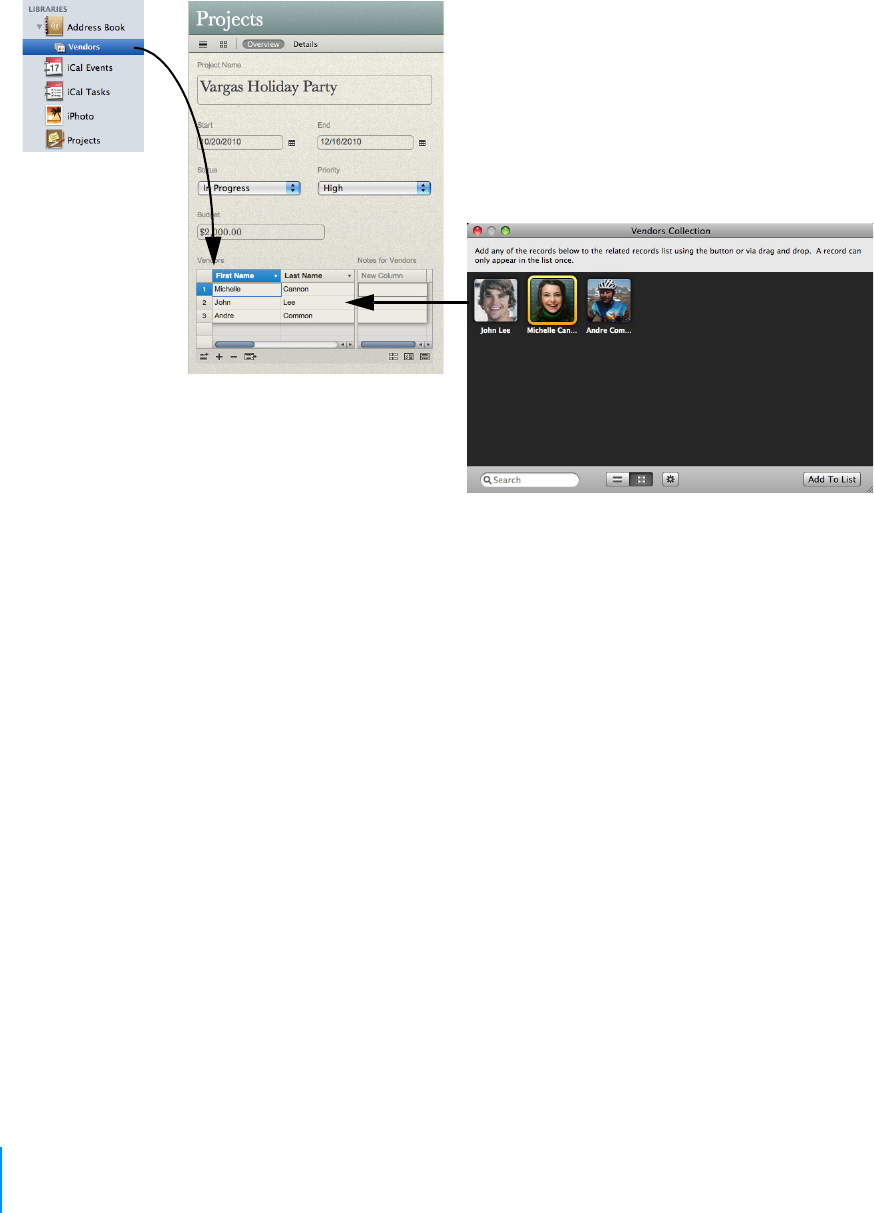
86 Chapter 8 Using Fields
You can create a related data field by dragging a library or collection to a form, as
illustrated above, or you can use menu commands, as outlined below.
You can see related data fields in form view but not in table view.
You see the contents of media fields as thumbnails in related data fields when you
display the fields in a grid.
To create a related data field:
1Select the library or collection you want to add a list of related records to.
2Choose Insert > New Field.
3Choose Related Data.
4Name the field.
5Choose the data source from the list.
The data source can be a library, collection, or Smart Collection. If you select a
library, you can add any record from the library to the related data field. If you
select a collection, you can only add records from that collection to the related
data field.
6Click Create.
The new field is added to the Related Data section of the Fields pane.
1. Drag the
Vendors collection
onto the Projects
form.
2. Bento creates a related data
field on the form.
3. Add the selected vendors to the related data field.
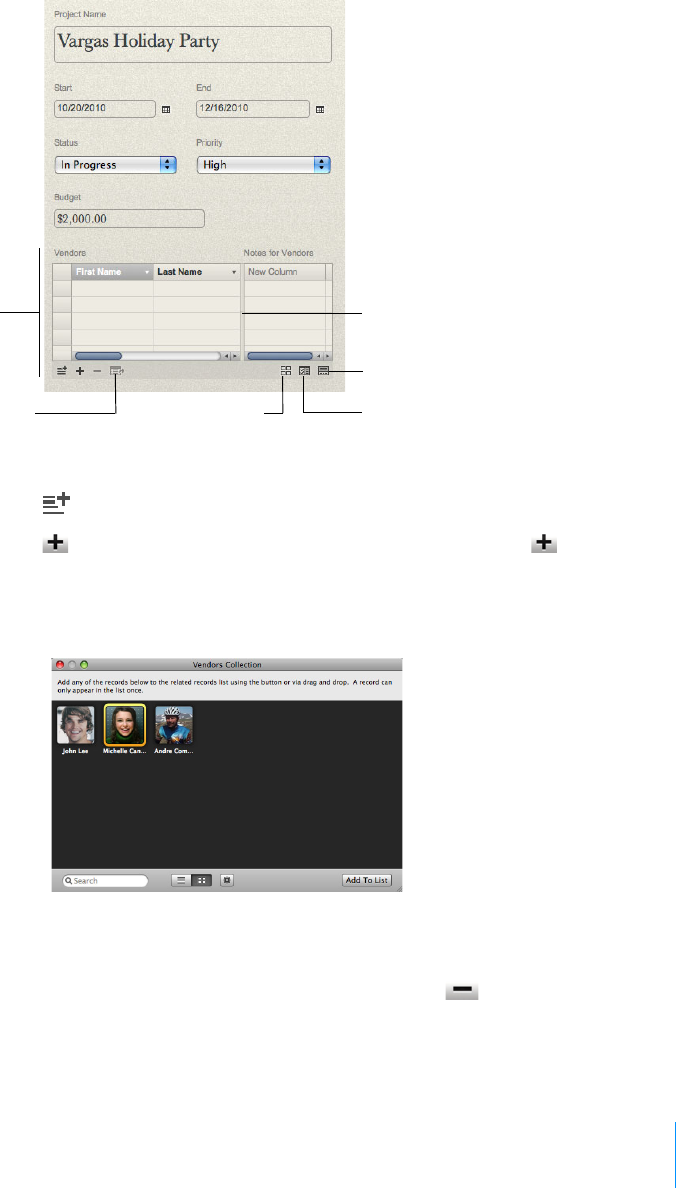
Chapter 8 Using Fields 87
7Drag the field to the form you want.
8Click to display records from the data source you specified in step 5.
Click to add a record. If the data source is a Smart Collection, is disabled,
since you can’t add records to a Smart Collection.
9Select the records you want to add, then drag them to the related data field
or click Add to List.
10 Press Esc to close the library or collection window.
•To remove a record from a related data field, click . This removes the
record from the related data field only. The record still remains in the data
source (the library or collection) that the related data field is based on.
Related data field
Drag here to show or hide the
Notes section.
Go to the selected
record in its source
library or collection.
View related
records in a
grid.
Show or hide the
summary row.
Switch between fields listed in the
Fields pane (data source or library).
88 Chapter 8 Using Fields
•If you delete a library or collection that a related data field is based on,
the related data field is also deleted.
•If a record that appears in a related data field is deleted in its data source,
the record is also deleted from any other related data field it appears in.
Using the Address Book, iCal, or iPhoto Library as a Data Source
You can create related data fields that display records from the Address Book library or
an Address Book collection. If you add Address Book records to the related data field
and make changes to the records, you are updating the data in the Address Book
application.
If you delete a contact record from the Address Book application, it is removed from
any related data field where it appeared in Bento.
You can create related data fields that display records from the Bento iCal Events and
iCal Tasks libraries. If you change an iCal Event or iCal Task record in a related data field,
you are updating the data in the iCal application.
If you delete an event or task record from the iCal application, it is removed from any
related data field where it appeared in Bento.
You can create related data fields that display records from the Bento iPhoto library or
an iPhoto collection.
If you delete a record from the iPhoto application, it is removed from any related data
field where it appeared in Bento.
Navigating to Related Records
You can view the details of a specific record stored in a related data field, and you can
quickly navigate among records stored in different related data fields.
To navigate among related records:
1Click a record.
2Click to go to the record in its library or collection and view the record’s
details.
You can edit the record you have navigated to.
3As you navigate among records in different related data fields, you can
quickly return to the previously viewed related record by clicking in the
navigation bar.
However, once you select an item in the Libraries pane, Bento stops keeping track
of the related records you viewed and disappears.

Chapter 8 Using Fields 89
Using the Fields Pane
The Fields pane displays an alphabetical list of the fields that are available for the
selected library or collection. Use the Fields pane to select the fields that you want to
add to the current form (in form view) or to display as columns (in table view). In split
view, the Fields pane indicates the fields that can be added to the current form or can
be displayed in table view.
In the Fields pane you can:
•create a field by clicking
•drag a field with to a form
•select a field’s checkbox to display the field in table view
•double-click field names to modify names and settings. Some fields are
locked . You can’t modify their names or settings because they are shared
with Address Book, iCal, or iPhoto, or are reserved by Bento.
•duplicate a field by clicking and choosing Duplicate
Field has not been
added to the
current form.
Field has been
added to the
current form.
Field is
displayed in
table view.
Field is not
displayed in
table view.
List field has no
checkbox
because it can’t
be displayed in
table view.
In table view In form view
Address subfields
can’t be added to
the form
individually.
90 Chapter 8 Using Fields
•delete a field and its data by clicking . When you delete a field, it is
deleted from the library and from collections and related data fields that use
it. You can’t delete fields that are used for displaying data from Address Book,
iCal, or iPhoto, locked fields, address subfields (for example, street, city, and
country fields), and the Date Created and Date Modified fields.
Note In the Fields pane in table view, there is no checkbox next to related data
fields or the list field types (address, email address, phone number, IM account,
URL, file list, message list, and simple list) because these fields can’t be displayed
in table view.
Changing an Existing Field from One Type to Another
You can change the type of some fields to another.
To change an existing field from one type to another:
1Select a column name in table view.
2Click .
3Choose Change To, then select a field type from the list.
Working with List Fields
Each type of list field (address, phone number, email address, URL, and IM account) has
a pop-up menu from which you can quickly perform actions such as displaying the
selected phone number in large type, getting directions to or from the selected
address, and displaying a map for the selected address.
Sending Emails
In form view and table view, you can quickly send emails to your family, friends, or
colleagues.
Convert
from:
Convert to:
Text Number Choice Checkbox Time Date Duration Currency Rating Phone
Other
list
fields
Text • • • • • • • • • •
Number • • • • • •
Choice • • • • • • • • • •
Checkbox • • •
Time • •
Date • •
Duration • •
Currency • •
Rating • •
Chapter 8 Using Fields 91
To send an email in form view:
1Select a form in the navigation bar or choose View > Form View > Form Name.
2Click next to the email address field.
If you see , the email address is not valid.
3The default email application opens and displays a blank email message
addressed to the name in the email address field.
4Compose the message and send it.
To send an email in table view:
1Select one or more email address fields.
You can select any block of fields to quickly select multiple email address fields.
2Choose Edit > Email Selected Address or Email Selected Addresses, or press
Shift-Command-M.
3The default email application opens and displays a blank email message
addressed to the name or names in the selected email address field or fields.
4Compose the message and send it.
Adding Mac OS X Mail Items to a Message List Field
In message list fields, you can store aliases to Mac OS X Mail messages, notes, and RSS
articles that are relevant to a specific record. For instructions on creating message list
fields, see ”Creating Message List Fields” on page 85.
To add a Mac OS X Mail message, note or RSS article to a message list field:
1Select a form in the navigation bar or choose View > Form View > Form Name.
2In the bottom-left corner of the message list field, click to open the Mac
OS X Mail application.
3In Mac OS X Mail, select a folder that contains messages, notes, or RSS articles.
4Drag one or more items to the message list field.
Tip Click to show the fields for the message list field in the Fields pane.
To open the items in Mac OS X Mail, see “Working with Files Stored in File List
Fields and Message List Fields” below.
Working with Files Stored in File List Fields and Message List Fields
When browsing records, you can quickly open files or applications stored in file list
fields, and Mac OS X Mail messages, notes, and RSS articles stored in message list
fields.
92 Chapter 8 Using Fields
To open files stored in a file list field or message list field:
1Select a form in the navigation bar or choose View > Form View > Form Name.
2Select one or more items in the file list field or message list field. Command-
click to select nonadjacent items.
3Click and choose Open (file list) or (message list), or double-click the
items you want to open.
4The application associated with each item starts and displays the contents of
the items.
For example, if you double-click a PDF file and a QuickTime movie file, the Mac
OS X Preview and QuickTime Player applications start and display the PDF file and
the QuickTime movie file. If you double-click an email message, note, or RSS
article, the Mac OS X Mail application starts and displays the Mac OS X Mail item.
To view files stored in a file list field:
1Click to display the items in a table.
Click to switch back to the grid format.
2Click to change the display size of the items.
Previewing Files with Quick Look
With Quick Look, you can quickly view the contents of an item in a file list field or
message list field without opening it.
To preview a file:
1Select a form in the navigation bar or choose View > Form View > Form Name.
2Select one or more items in a file list field or message list field.
3Click and choose Quick Look filename or press the Space bar.
The content you see depends on the type of file. If it’s an image, you’ll see a
smaller version of it. If it’s a text document, you can read the text and scroll to see
more. If you selected multiple items, you can use the arrow keys or the buttons at
the bottom of the Quick Look window to move from one item to another.
Working with Simple List Fields
With a simple list field, you can drag it onto a form and just start typing to add data
that is relevant to the record. A simple list field can only contain alphanumeric text.
You work with columns and rows in simple list fields in much the same way as you do
in table view. See ”Working with Fields and Columns in Table View” on page 69. You
can copy and paste data from table view or a spreadsheet file into simple list fields.
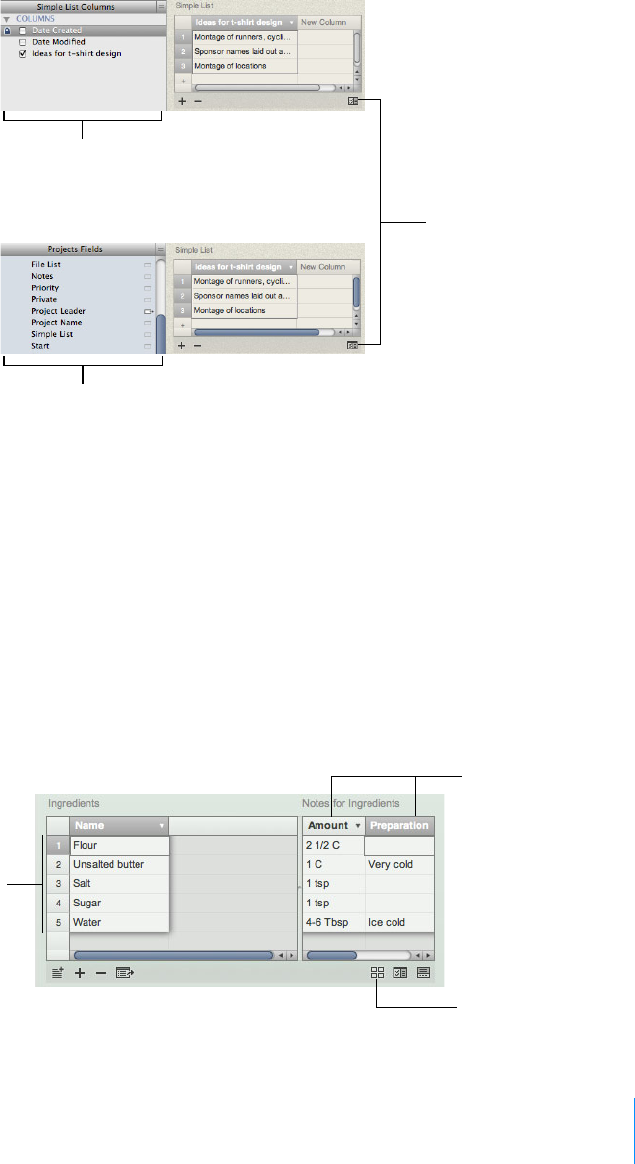
Chapter 8 Using Fields 93
You show or hide columns in simple list fields using the Fields pane. See ”Showing and
Hiding Columns” on page 70.
Working with Related Data Fields
In a related data field, you can store information about records that is relevant to the
data source but isn’t linked to the data source. This information is stored in a separate
section of the related data field called notes.
For example, in a Recipes library that has a related data field linked to the Ingredients
library, you could store information such as the required amount of each ingredient in
a recipe in the notes section of the Ingredients related data field. In other fields in the
notes section, you could add details about how to prepare the ingredient or the name
of the store where you purchased it. The information in the note fields is not stored in
the Ingredients library.
Click to switch between the
displays in the Fields pane.
Fields pane displaying columns
in the simple list field
Fields pane displaying fields
in the library
Notes fields
Related records from
the Ingredients library
Click to display records
in a grid format.

94 Chapter 8 Using Fields
To display the notes section:
Position your cursor on the right edge of a related data field. When the cursor changes
to , drag it to the left. You see the notes section with the first notes field created for
you.
To create additional fields in the notes section:
Double-click the New Column column header and type a new name for the field, then
press Return.
To delete a field in the notes section:
Click the pop-up menu in a column header, then choose Delete Column.
To sort records in related data fields:
Click the pop-up menu in a column header, then choose Sort Ascending or Sort
Descending.
To display related data records in a grid format:
Click to display the records in a grid.
To set labels for grid view items:
1Click .
You can specify up to two fields.
2Click the Title pop-up menu, then choose the fields.
If you don’t want any labels to be displayed, choose the dash symbol in both
fields.
Working with Media Fields
You can add many types of sound, image, and movie files to a media field, including
JPEG, QuickTime, and MP3 files.
If you add a sound file that you purchased from the iTunes Store, you may have to
enter the account name and password for the account that was used to purchase the
sound file.
Note You can’t add movie files that you purchased from the iTunes Store.

Chapter 8 Using Fields 95
Taking Photos
If your computer has an iSight camera, you can take pictures with it to use in your
forms.
To take a photo:
1Click an empty media field.
For information about how to create a media field, see ”Creating Fields” on
page 82.
2Click .
3In the window, click , then wait for the image to appear.
4Optional: Click , then select a special effect to apply to the photo.
5Click Set to save and load the image into the media field.
Tip To back up a photo, export it. For more information, see ”Exporting Images” on
page 96.
Adding Media Files
You can add sound, image, and movie files to media fields. Image files include images
from the web or other applications such as iPhoto.
To add a media file:
1Click in the media field.
2Drag a media file from the Finder, iPhoto, or iTunes to the media field or click
to choose a file.
Except for iTunes files, when you add a media file, Bento copies it into the
bento.bentodb file. When you add an iTunes file to a media field, Bento creates an
alias to the file.
If you don’t want to copy the media file into Bento, hold down the Option key
after you start dragging the media file to the media field. An arrow appears on
the thumbnail. Bento creates an alias that contains a path to a specific file in a
specific location on your hard drive. If you use an alias for the media file, and then
move or rename the original media file, the alias to it is broken.
3In the Open dialog, select the image you want to add, then click Open.
Playing a Movie or Sound File
Playing a movie or sound file in Bento is similar to how you play a movie or sound file
in QuickTime Player.
96 Chapter 8 Using Fields
To play a movie or sound file:
1Click in the media field.
2Click in the playbar to start the movie or sound file.
Drag the slider up or down to adjust the volume.
3To pause the movie or sound file, click . To restart playing the movie or
sound file, click .
Positioning Images
You can move an image in any direction within a media field.
To position an image:
1Click in the media field.
2Drag the image within the field.
If you drag the image out of view, select Fit to Frame to bring it back into view.
Changing the Display Size of Images
You can change the display size of an image within the media field.
To change the display size of an image:
1Click in the media field.
2Drag the zoom slider to zoom in or out on the image.
3Select Fit to Frame to make the image the same size as the field.
Exporting Images
You can export (save) any image file with a different name or in a different location. It
is saved in its original file format.
To export an image:
1Click in the media field.
2Click .
3In the Save As dialog, navigate to the folder where you want to save the
image file.
4Type a name, then click Save.

Chapter 8 Using Fields 97
Deleting Media Files
When you delete a media file from a record, it is permanently deleted from its library
and from any collections within the same library.
To delete content in a media field:
1Click in the media field.
2Press the Delete key or choose Edit > Clear.
Working with Encrypted Fields
You can store sensitive data in encrypted fields. When you enter data in encrypted
fields, it is securely stored in your Bento database and can only be read within Bento.
Encrypted data in a locked field is displayed as bullets.
If you attempt to enter data in an encrypted field and you have not already set the
Database Password, you won’t be able to proceed until you do so. For information
about setting the Database Password, see ”Setting a Password for Your Bento
Database” on page 97.
You can search encrypted fields if they are unlocked. For more information about
searching, see ”Search Field and Advanced Find” on page 27.
Setting a Password for Your Bento Database
You can set a password to protect your database. The Database Password also protects
all encrypted fields. To set a password for accessing a shared database, see ”Setting a
Password for a Shared Database” on page 36.
To set the Database Password:
1Choose Bento > Preferences.
2Click Security at the top of the window.
3Select Use Database Password.
4For Enter Database Password, type the password.
5For Confirm, type the password again.
6(Optional) For Password Hint, type a word or phrase to help you remember
the password.
7Keep your password in a safe place. If you forget your password, it is not
possible to recover it.
8Click Set Password.
9Click the lock to prevent further changes.
98 Chapter 8 Using Fields
To clear the Database Password:
1Choose Bento > Preferences.
2Click Security at the top of the window.
3Click the lock to make changes.
4Deselect Use Database Password.
Locking Bento
You can lock Bento to hide the Bento window and protect your data.
To lock Bento:
1Choose Bento > Preferences.
2Click Security at the top of the window.
3Click the lock to make changes.
4Select “Require Database Password when Bento starts.”
5Choose Bento > Lock Bento.
The Bento window is hidden.
To make the Bento window visible again:
1Enter your Database Password.
2Click Submit.
Locking and Unlocking Data in Encrypted Fields
Locking encrypted fields helps keep your data safer, since you have to first unlock the
fields before viewing the data. After you lock encrypted fields, you can’t modify their
contents until you unlock them.
To lock data in all encrypted fields:
In form view, select an encrypted field and click next to the field. Then select Lock
Encrypted Fields. In table view, select an encrypted field and click the pop-up menu in
the column header, then choose Lock Encrypted Fields.
A appears next to all encrypted fields and bullets replace the contents of all
encrypted fields.
Note You can’t copy and paste when encrypted fields are locked.

Chapter 8 Using Fields 99
To unlock data in all encrypted fields:
1In form view, select an encrypted field and click . Then select Unlock
Encrypted Fields. In table view, select an encrypted field and and click the
pop-up menu in the column header, then choose Unlock Encrypted Fields.
2Enter your Database Password, then click Submit.
A appears next to all encrypted fields.
Showing or Hiding Data in Encrypted Fields
To show data in an encrypted field:
In form view, select the encrypted field and click . In table view, click the pop-up
menu in the column header, then choose Show Encrypted Field Contents.
The data you encrypted replaces the bullets.
To hide data in an encrypted field:
In form view, select the encrypted field and click . In table view, click the pop-up
menu in the column header, then choose Hide Encrypted Field Contents.
Bullets replace the encrypted data.
Note You can’t copy and paste when the data in encrypted fields is hidden.

100 Chapter 8 Using Fields

9
101
Importing, Exporting, and Printing
This chapter describes the various ways you can import and
export information so others can view or use it. You can also
print information to share it with others.
A good way to start using Bento is by importing information. Bento supports
importing information in a variety of file formats: comma-separated values (CSV) file,
tab-separated values (TAB) file, Numbers, Excel, Excel 2008, and library template. For
example, you can import CSV files created from spreadsheets, exported from other
databases, or downloaded from banking or stock websites.
If you need to share your information, you can export your Bento information as a CSV,
TAB, Numbers, Excel 2008, or library template file. You can export records from a
library (including shared libraries) or from a collection. You can also export a group of
records from search or Advanced Find. If you create a library with forms that you want
to give to another Bento user, you can export the library as a library template file.
Bento lets you print information from form view, table view, split view, and from
search and Advanced Find.
About Comma-Separated and Tab-Separated Files
A comma-separated values file (CSV) or a tab-separated values file (TAB) is a file that
represents a table of data. Each column/field value is separated by a comma or a
semicolon (for CSV) or a tab character (for TAB). One record appears in each row of the
data file. Often, the first row of data in the CSV file represents the column names for
the table.
Note Some locales may use a different separator in CSV files rather than commas. The
default separator is defined by your locale setting.

102 Chapter 9 Importing, Exporting, and Printing
Exporting CSV and TAB Files from Other Applications
For the best results when importing information into Bento, follow these guidelines:
•Export your data from the other application as a CSV or TAB file.
•If your Excel worksheet contains multiple tables, put each table in its own
worksheet, and make sure the column names are in the first row.
•Note whether your CSV or TAB file contains a row with the column names.
Bento can use the values in that row as field names when you import the
information into a new library. In Bento, these field names appear as labels in
form view and as column names in table view.
•Make a note of the order of the fields in the CSV or TAB file. If the file doesn’t
contain a row with the column names, you can refer to your notes to
manually name the fields when you import the file.
•ClarisWorks and AppleWorks create tab-separated files when you select the
ASCII Text option in the Save As dialog. Make sure you add the TAB extension
to the filename when you save an AppleWorks 6 file that you plan to import
into Bento. For example, if you have an AppleWorks file named “MyData” save
it as “MyData.tab” so that Bento recognizes it as a tab-separated file.
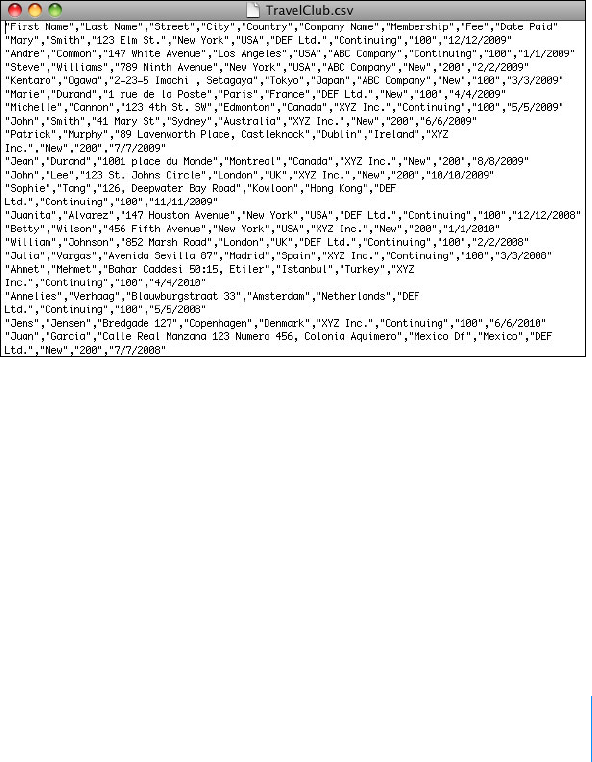
Chapter 9 Importing, Exporting, and Printing 103
Correcting CSV Files
If you are having difficulty importing a CSV file, open it in a text editor and do the
following:
•Put double quotation marks around field values that have embedded
commas.
For example: “10,000 Donors“
•Put double quotation marks around field values with leading or trailing
spaces.
•Put double quotation marks around field values that contain embedded line-
breaks.
•Put double quotation marks around field values that contain double
quotation marks. Change the embedded double quotation marks into a pair
of consecutive double quotation marks.
For example: “She said ““I will be there”” in her email.“
Example of a comma separated (CSV) file
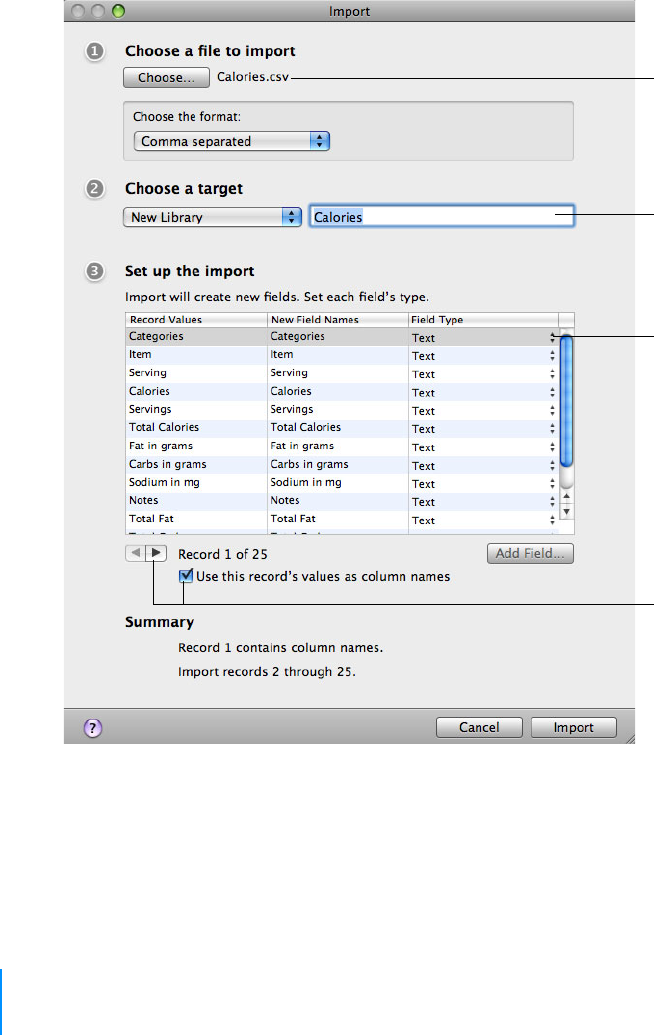
104 Chapter 9 Importing, Exporting, and Printing
Importing Information into Bento
When you import information into Bento, you can either create a library or import the
information into an existing library or collection.
Creating a Library by Importing
You can create a library when you import a file.
Click the pop-up to set
the field type. If you don’t
want to create the field,
choose “Do not create.”
Enter the name for the
new library.
Use the arrows to go to
the row that contains
column names, then
select “Use this record’s
values as column
names.”
Choose a file. The
options you see here
vary according to the file
format of the selected
file.

Chapter 9 Importing, Exporting, and Printing 105
To create a library by importing:
1Choose File > Import > File.
2Click Choose, then select the file you want to import in one of the following
file formats: .csv, .tab, .tsv, .numbers, .xls, .xlsx.
•For .csv, .tab, or .tsv files, in the section “Choose the format,” choose
Comma separated, Semicolon separated, or Tab separated.
•For Numbers files, use the pop-up menus to select a sheet, then a table.
•For Excel files, use the pop-up menu to select a worksheet.
3For “Choose a target,” choose New Library, and enter a unique name for the
library.
4Indicate whether the file contains a row with values that you want to use as
field names.
•If the file contains a row with column names, click the arrow buttons to
go to that row and select “Use this record’s values as column names.”
Bento uses the values in this row as the new field names.
•If the file does not contain a row with column names, clear “Use this
record’s values as column names.”
Bento assigns default names to each new field. To change a default field
name, double-click the field name and type a unique name.
5Bento sets the field types to “Text” by default. To change a field’s type, click
the pop-up menu and select a new field type.
•If there is a column that you do not want to import, click the pop-up
menu and select “Do not create.“
•For information on the field types supported for import, see ”Field Types
Supported for Import” on page 109.
6Click Import.
When the import is done, Bento displays the records, which you can view in table
view, form view, split view, or grid view.
Importing into an Existing Library
If you want the information that you are importing to go into an existing library,
import the file into that library. Bento creates new records in the library.
You can also import a file into a collection. When you choose a collection as the target
for the import, Bento creates new records in the library that contains that collection,
and adds the new records to the collection.
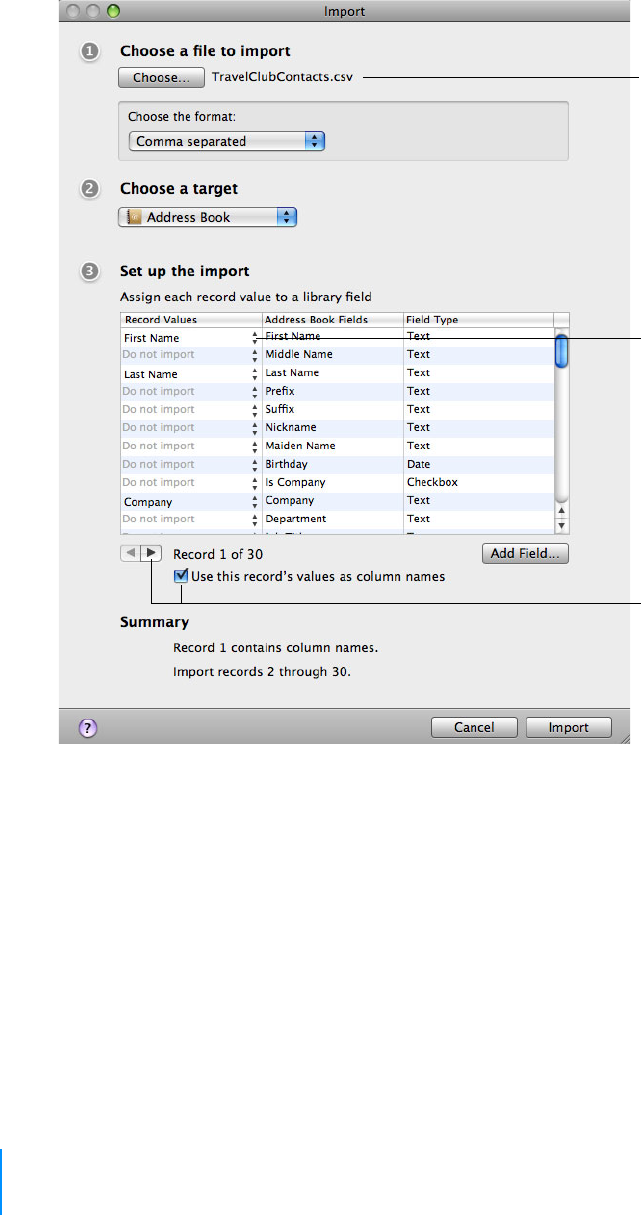
106 Chapter 9 Importing, Exporting, and Printing
To import information into an existing library or collection:
1Choose File > Import > File.
2Click Choose and choose the file you want to import in one of the following
file formats: .csv, .tab, .tsv, .numbers, .xls, .xlsx.
•For .csv, .tab, or .tsv files, in the section “Choose the format,” choose
Comma separated, Semicolon separated, or Tab separated.
•For Numbers files, use the pop-up menus to select a sheet, then a table.
•For Excel files, use the pop-up menu to select a worksheet.
3For “Choose a target,” choose the library or collection that you want your
information to be added to.
The example above shows the “Address Book” library as a target library.
Click the pop-up and
select a field name to
manually map the fields
set to “Do not import.”
Use the arrows to go to
the row that contains
column names, then
select “Use this record’s
values as column
names.”
Choose a file. The
options you see here vary
according to the file
format of the selected file.

Chapter 9 Importing, Exporting, and Printing 107
4Indicate whether the file contains a row with values that you want to use as
column names.
•If the file contains a row with column names, click the arrow buttons to
go to that row and select “Use this record’s values as column names.”
Bento reads the column names in the file, and attempts to match them to the
field names already defined in the library or collection you have selected.
Bento maps the column names to field names when their names match
exactly. For any names that do not match, Bento sets the field name to “Do
not import” and you need to map the fields to the columns manually. You can
also manually map the record values that Bento has matched.
•If the file does not contain a row with column names, clear “Use this
record’s values as column names.”
Without column names, Bento has no way to map the record values to the
column names. Bento sets the column names to “Do not import” and you
need to map the fields to the columns manually.
5If the new field’s name matches a column name in the file, Bento maps that
column’s records values to the new field. Otherwise, you can map your
column values to the new field manually.
For record values that are set to “Do not import,” click the pop-up menu and select
the column name or record value to manually map it to the adjacent field name.
6If there is no field that you can map a given field to, you can create a field. To
do this, click Add Field. Bento opens the Create a Field dialog to allow you to
add a field to the library.
7(Optional) See how the record values are mapped to the field names by
clicking the arrow buttons to move through the record contents.
8Click Import.
When the import is done, Bento displays the records, which you can view in table
view, form view, split view, or grid view.
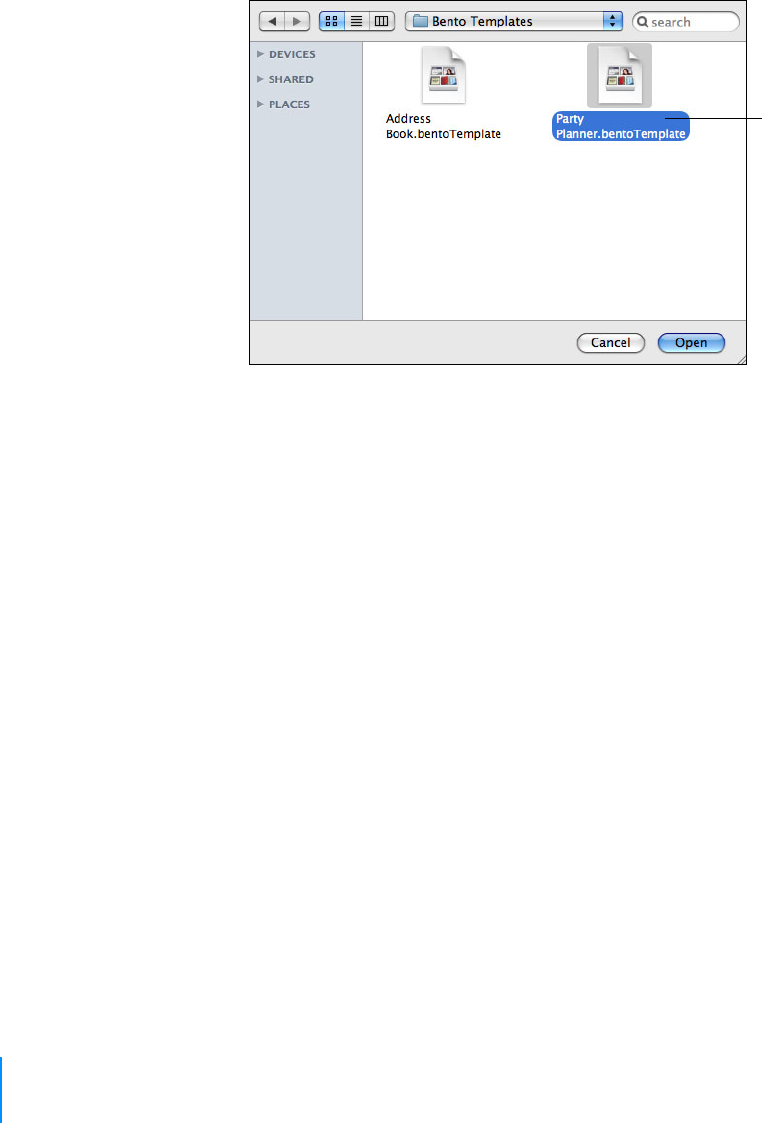
108 Chapter 9 Importing, Exporting, and Printing
Importing a Library Template
A library template file contains all of the forms, collections, Smart Collections, table
view settings, and related libraries (if any) of an exported library, but no records.
To import a library template:
1Choose File > Import > Template.
2Choose a library template file.
3Click Open.
4Bento adds the library, collections, and Smart Collections contained in the
library template file to the Libraries pane. If the library template file contains
multiple libraries, all of them are added to the Libraries pane except for the
default libraries (Address Book, iCal Events, iCal Tasks, and iPhoto).
Additional Ways to Import Information
In addition to the File > Import menu items, Bento provides the following ways to
import information:
•Choose File > New Library from Template to open the New Library dialog.
Then click “Import Data.”
•Drag a data file (Text, Numbers, Excel format) to the Libraries pane in Bento.
•Drag a data file (Text, Numbers, Excel format) to a specific library or collection
in the Libraries pane in Bento.
•Drag a library template file or data file (Text, Numbers, Excel format) to the
Bento application icon.
Choose a library
template file.
Chapter 9 Importing, Exporting, and Printing 109
Field Types Supported for Import
You can import into these field types: text, choice, checkbox, number, rating,
encrypted (when unlocked), currency, time, date, duration, address, phone number,
email address, URL, and IM account.
For this field type This data can be imported
text
choice
address
phone number
IM account
encrypted (when
unlocked)
Any text
email address Any text, but a valid email address must include the @ character.
URL Any text, but the URL field does not support URL values that contain
Japanese characters.
checkbox “1” for checked; “0” for not checked
“True” for checked; “False” for not checked
“Yes” for checked; “No” for not checked
number
currency
Numeric data
rating A number between 0 and 10
time Numeric data in the form HH, HH:MM, or HH:MM:SS, optionally with
“AM” or “PM” where:
•HH represents the hour (between 0 and 24, if you don’t use “AM” or
“PM”, or between 0 and 12 if you use “AM” or “PM”)
•MM is minutes (between 0 and 59)
•SS is seconds (between 0 and 59).
For example: 12:59:59 PM
date Numeric data in the form DD, MM/DD, or MM/DD/YYYY, where:
•DD is the day (between 1 and 31, as valid for the month)
•MM is the month (between 1 and 12)
•YYYY is the year (between 1 and 9999).
A date field can also contain a “time” value, as described for the time
field.
Note: These formats vary depending on the current system date settings.

110 Chapter 9 Importing, Exporting, and Printing
You cannot import into these field types: file list, media, automatic counter,
calculation, related data, message list, simple list, or encrypted (when locked).
When you import into an address, phone number, email, URL, or IM account field, the
data is automatically added to the associated address list, phone number list, email
address list, URL list or IM account list field.
See Chapter 8, “Using Fields” on page 79 for additional information on field types.
Note The message “Some values in some records can’t be imported” in the Import
dialog means that one or more record values are not valid for the type of field to which
you are importing the values. For example, you cannot import alphabetic text into a
number field or into a date field. You can either change the field type to match the
data, or proceed with import. If you proceed with import, the invalid values will not be
imported. Other options are to change the contents of the file or to import the data
into a Text field. Text fields accept all values.
Exporting Information from Bento
Bento can export information into a CSV, TAB, Numbers, or Excel 2008 file from a
library, from a collection, from a Smart Collection, or from the results of a search or
Advanced Find.
Bento can export a library into a library template file. This is a good way to preserve
the structure of an individual library or give a library to another Bento user. A library
template file contains all of the forms, collections, Smart Collections, table view
settings, and related libraries (if any) of an exported library, but no records. You can
give the library template file to other Bento users or import it later.
Exporting from a Library, Collection, or Smart Collection
When you export records from a library or collection, you can choose to export all the
values from all of the fields in table view or only those fields that are currently
displayed in table view.
duration Text representing a duration in weeks, days, hours, minutes, and seconds.
The text may use the following abbreviations:
•w for weeks
•d for days
•h for hours
•m for minutes
•s for seconds
For example, the following are all valid duration text:
•8 days, 5 hours
•8d,5h
•8d5h
For this field type This data can be imported
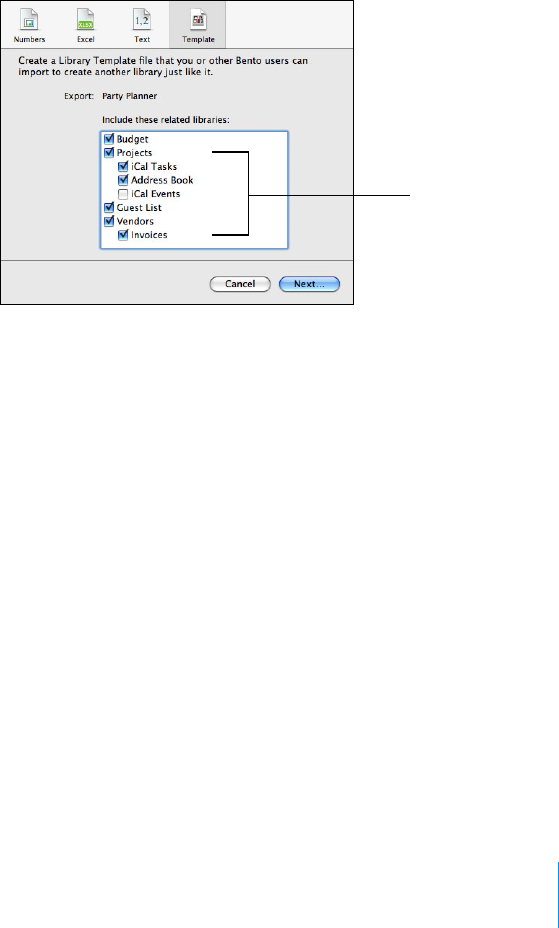
Chapter 9 Importing, Exporting, and Printing 111
To export from a library, collection, or Smart Collection:
1Select the library, collection, or Smart Collection that contains the
information you want to export.
2Choose File > Export.
3Click Numbers, Excel, Text, or Template.
To export a file compatible with versions of Excel earlier than Excel 2008, export a
Text file.
•For Numbers, Excel, or Text, choose “All records” or “Only current records.”
•For Template, choose the related libraries you want to include (if any).
4Choose how to export the data.
•For Numbers, Excel, or Text, choose “All table view fields” or “Only fields
displayed in table view.”
•For Text, choose Comma separated (.csv), Semicolon separated (.csv), or
Tab separated (.tab).
5Click Next, then specify the filename and location for the file.
Bento exports the table view field data from the library, collection, or Smart
Collection into a file with the name you specify.
Exporting from Search or Advanced Find
If you want to export a subset of records, you can use search or Advanced Find to
narrow the set of records in a library or collection, and then export the records.
You can include
related libraries that
are contained within
another library.
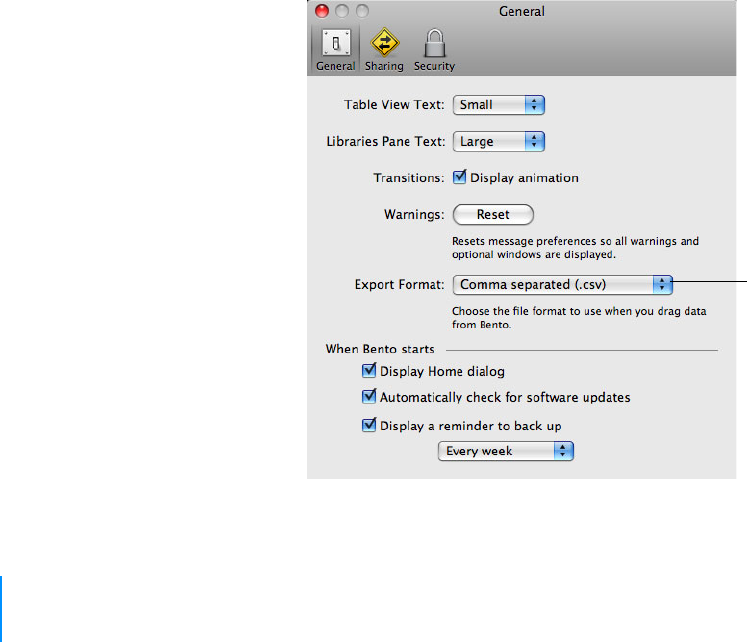
112 Chapter 9 Importing, Exporting, and Printing
To export from a subset of records:
1Use the search field or Advanced Find to create a subset of records.
See ”Search Field and Advanced Find” on page 27.
•For search, the set of records that matches the criteria is displayed as you
type the search string.
•For Advanced Find, click Find to display the set of records that matches
the criteria.
2Follow steps 2-5 in ”Exporting from a Library, Collection, or Smart Collection”
on page 110.
Bento exports the table view field data from the subset of records into a file with
the name you specify.
Additional Ways to Export Information
In addition to the File > Export menu item, Bento provides another way to export
information as a file:
•Drag a library or a collection icon from the Libraries pane in Bento to the
desktop or to any folder in a Finder window. Bento exports the field data from
all the records in the library or the collection into a file with a name matching
the library or collection name and the file format matching the current Export
Format setting in the Preferences dialog.
For files that you
export by dragging
them to the Finder,
select a file format.

Chapter 9 Importing, Exporting, and Printing 113
Export Considerations for Specific Field Types
You cannot export:
•Contents of address list fields, phone number list fields, email list fields, URL
list fields, IM account list fields, or message list fields. However, you can export
data from individual address, phone number, email, URL and IM account
fields that are displayed in table view.
•Contents of locked encrypted fields.
•Information displayed in a related data field.
•File aliases in file list fields.
•Movie and sound files you have added to media fields. To export images, see
”Exporting Images” on page 96.
Printing Information
You can print information from a library, from a collection, or from the results of a
search or Advanced Find.
Printing from Libraries and Collections
When you print records from a library or a collection, the selected view determines the
appearance of the printed output. In split view, the location of the cursor at the time of
printing determines the appearance of the printed records.
To print records from a library or collection:
1Select the library or collection that contains the information you want to
print.
2Select the form or table view that contains the fields you want to print.
3Choose File > Print.
4Specify options for the printed output.
•Select “Selected records only” to print the currently viewed record only
(in form view) or to print all selected records (in table view).
•Select “All displayed records” to print all of the records in the currently
viewed library or collection.
•Select “Don’t print background” to print without the background in form
view or without the alternating row colors in table view. This option
prints in black and white without any background color and saves ink.
•When printing table view data, select “Fit to width” to scale the columns
to fit on one page.
•When printing table view data, select “Include field titles on every page”
to print field titles at the top of each page.

114 Chapter 9 Importing, Exporting, and Printing
•When printing form view data, select “Print one record per page” to print
one record per page.
•When printing form view data, select “Form only (no data)” to print a
blank form.
•Select additional options to include the title banner, page numbers, date,
and time.
Printing from Search or Advanced Find
If you want to print a subset of records, you can use search or Advanced Find to narrow
the set of records in a library or collection, and then print the records.
To print a subset of records:
1Use the search field or Advanced Find to create a subset of records.
See ”Search Field and Advanced Find” on page 27.
•For search, the set of records that matches the criteria is displayed as you
type the search string.
•For Advanced Find, click Find to display the set of records that matches
the criteria.
2Choose File > Print.
3Specify which records in the subset to print.
•Select “Selected records only” to print the currently viewed record only
(in form view) or to print all selected records (in table view).
•Select “All displayed records” to print all of the records in the current
subset.

Chapter 9 Importing, Exporting, and Printing 115
Printing Mailing Labels
When you use the Bento Address Book library, your contact records update the data in
the Address Book application.
To print address labels:
1Open the Address Book application.
2In the Address Book application, select All or a group in the Group column, or
select specific contacts that you want to print.
Command-click or Shift-click to select multiple contacts.
3Choose File > Print.
4Choose Mailing Labels from the Style pop-up menu, then set the print
options.
•Layout tab: Choose a type of label from the Page pop-up menus. Select
“Define Custom” to set the page margins and gutter space between
labels, and to specify how many labels to print on a page.
•Label tab: Choose which addresses to use from the Addresses pop-up
menu. Choose the order in which to print the labels using the “Print in”
pop-up menu. Add a small graphic to the labels by clicking the Image Set
button. Change the font by clicking the Font Set button.
For more information, see the Address Book Help.

116 Chapter 9 Importing, Exporting, and Printing

10
117
Backing Up and Restoring
Information
This chapter describes how to create a backup copy of your
Bento data. Use the backup copy to recover your original
information if you make an inadvertent change, or to restore
your data in case of a problem such as a hard drive failure.
A Bento backup file contains the data in Bento at the time you run the back up
command. The back up command is easy to use; you simply specify a name and
location for the backup file. Restore is just as easy to use; you select the backup file
from which you want to restore data.
Because it’s a good idea to regularly back up your data, Bento provides an optional
reminder to periodically back up your data.
Note Backup and restore features apply to all of your data in Bento. If you want to save
the data from an individual library or collection, use the export feature described in
”Exporting Information from Bento” on page 110.
You can also use the Mac OS X application technology called Time Machine to back up
and restore your Bento data.
Tip To save a copy of your backup file, copy it to another location, such as an external
hard disk or a CD.
118 Chapter 10 Backing Up and Restoring Information
About Bento Backup Files
When you create a Bento backup file, you create a copy of the data that is in Bento. The
backup file contains the data in your libraries and collections at the time you run the
back up command.
Important The Bento backup file does not contain the data from the Address Book
iCal, and iPhoto applications. You should back up your Address Book, iCal, and iPhoto
data whenever you back up your Bento data.
•To create a backup of the data in the Address Book application, use the
Address Book application’s archive feature.
•To create a backup of the data in the iCal application, use the iCal
application’s backup feature.
•To create a backup of the data in the iPhoto application, use the Time
Machine feature.
However, if you add fields to the records in the Address Book library, the iCal Events
library, the iCal Tasks library, or the iPhoto library, then the data in those additional
fields is included in the Bento backup file.
How Field Types Are Backed Up
Consider the following when you back up file list fields, media fields, or related data
fields.
For Bento backs up
File list fields The listed filenames and locations, but not the contents of the files.
Media fields The contents of the fields (for most media fields) because Bento stores copies of the
media files.
However, if you use aliases to media files rather than copying the media files into
bento.bentodb, Bento backs up the filenames and locations of the files that are added
to media fields, but not the contents of the files. You should back up these media files
to a location in the Finder.
Related data
fields
The data shown in related data fields, because these fields show data from libraries
and collections.
However, Bento does not back up the data from the Address Book, iCal Events, iCal
Tasks, and iPhoto libraries. If you use related data fields that reference those libraries,
then the data is dependent on what is available in the Address Book , iCal, and iPhoto
applications.
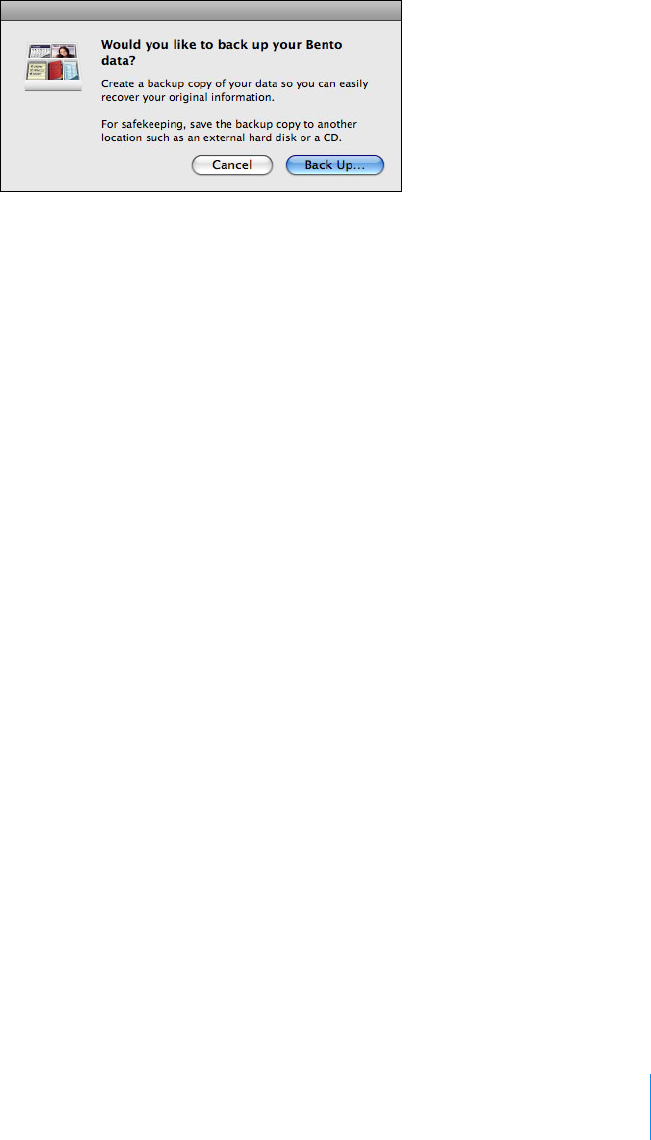
Chapter 10 Backing Up and Restoring Information 119
Using the Back Up Reminder
By default, Bento reminds you to create a backup file once a week.
To create a Bento backup file from the back up reminder dialog:
1Click Back Up.
2In the dialog that appears, use the default name and location or type a name
and location for the backup file.
Changing the Back Up Reminder
You can change the default back up reminder frequency or turn off the back up
reminder.
To turn on the back up reminder or to change the reminder frequency:
1Choose Bento > Preferences.
2Select “Display a reminder to back up” and set the frequency for how often
you want to see a reminder to back up your data. You can get a reminder to
back up your data either every week or every month.
To turn off the back up reminder:
1Choose Bento > Preferences.
2Clear “Display a reminder to back up.”
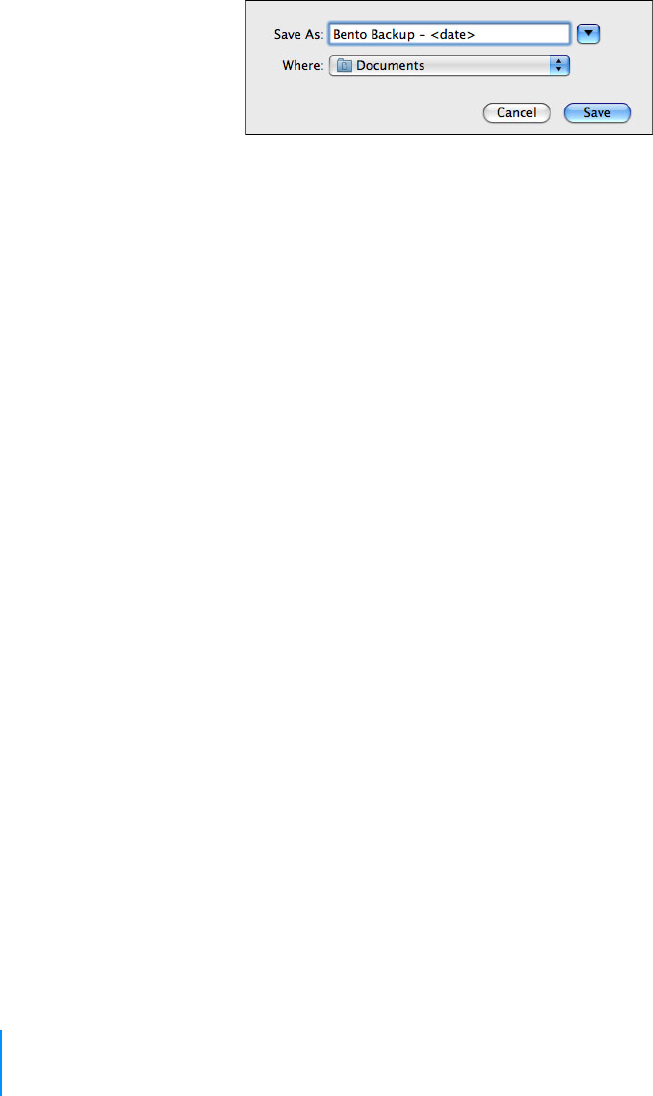
120 Chapter 10 Backing Up and Restoring Information
Creating a Backup File
When you create a Bento backup file, you create a copy of the data that is in Bento. It’s
a good idea to back up your Bento data before you make extensive changes, such as
importing data, deleting libraries, or significantly changing forms.
To create a backup file:
1Choose File > Back Up Bento Data.
2Use the default name and location or type a name and location for the
backup file.
3Click Save.
4(Optional) If you display Address Book, iCal, and iPhoto application data in
Bento, you should back up the data in those applications next. The Bento
backup file does not include data from those applications.
Restoring from a Backup File
When you restore data from a Bento backup file, you replace the data that is in Bento
with the contents of the Bento backup file. Any additions you have made in Bento
since you created the backup file are lost. Any deleted records are recovered.
To restore data from a backup file:
1(Optional) If you display Address Book, iCal, and iPhoto application data in
Bento, you should restore the data from those applications’ archive (Address
Book) or backup (iCal) or Time Machine (iPhoto) files first. The Bento backup
file does not include data from those applications.
2Choose File > Restore from Bento Backup and locate the backup file.
3Click Open.
4When Bento displays a confirmation dialog, click Continue. Bento loads the
contents of the Bento backup file.

Chapter 10 Backing Up and Restoring Information 121
Using Time Machine with Bento
Time Machine is the Mac OS X application that backs up your computer (including
Bento data) on a regular basis. You can use Time Machine to restore the Bento data
from a specific backup date and time.
When you restore data from a Time Machine backup, you replace all of the data that is
in Bento with the contents of the backup file.
To set up the Time Machine options:
1Choose Apple menu > System Preferences, and then click Time Machine.
2In the Time Machine preferences, slide the switch to ON and choose a backup
disk.
3Verify that the user's Library folder is backed up by Time Machine. (By default,
Time Machine backs up your entire hard drive.)
To restore Bento data using Time Machine:
1Quit Bento.
2(Optional) If you display Address Book and iCal application data in Bento,
restore the data from those applications’ backup files first. The Bento backup
file does not include data from those applications.
3Open a Finder window to the user’s Library folder for Bento:
Library/Application Support/Bento/
4Open Time Machine from the Dock or the Applications folder.
5Use the arrows or the timeline along the right side of your screen to browse
through all the backups that Time Machine has created.
6When you find the date for the data you want to restore, select the file
bento.bentodb and then click Restore.
7Click Replace in the confirmation dialog.
The restored bento.bentodb file is copied to Library/Application Support/Bento/,
replacing all of the data that is in Bento.
8Open Bento. Bento loads the contents of the restored bento.bentodb file.

122 Chapter 10 Backing Up and Restoring Information

11
123
Using Bento with Bento for iPhone
and iPod touch
This chapter describes how to sync Bento with Bento for
iPhone.
Bento for iPhone is a personal database application that allows you to create libraries,
collections, records, fields, and on iPhone or iPod touch.
What you need:
•Bento 3
•Bento for iPhone
Syncing Information Between Bento and Bento for iPhone
Syncing allows you to share information between your computer and your device. For
example, if you add information to a library in Bento for iPhone, you can sync to add
that information to Bento on your computer.
Connecting Bento for iPhone to Bento
Bento for iPhone can sync with Bento when both applications are open and
connected to the same Wi-Fi network, including a computer-to-computer network.
See Mac OS X Help for information about networks.
Note If you are using a computer-to-computer network with an iPhone, you must turn
on Airplane Mode before syncing. In iPhone Settings, turn on Airplane Mode, then
turn on Wi-Fi and select your computer-to-computer network.
To connect both applications to the same Wi-Fi network:
1From the Home screen in your device, tap Settings, then select a Wi-Fi
network.
2On your Mac, choose Apple menu > System Preferences > Network.
3In the left side of the Network pane, click AirPort.
4For Network Name, select the same Wi-Fi network that you connected Bento
for iPhone to.

124 Chapter 11 Using Bento with Bento for iPhone and iPod touch
5Click Turn Airport On.
6Click Apply, then close the Network pane.
Syncing for the First Time
After you have connected Bento for iPhone and Bento to the same Wi-Fi network, you
can sync the applications.
Before syncing, back up your Bento data. For more information, see Chapter 10,
“Backing Up and Restoring Information” on page 117.
To sync for the first time:
1Start Bento for iPhone, then tap .
2In the Sync screen, tap “Set up sync with computer.”
3A four-digit passcode appears.
Note If your device is not connected to a Wi-Fi network, an alert appears. To
connect to a Wi-Fi network, see ”Connecting Bento for iPhone to Bento” on
page 123.
4Start Bento, then choose File > Set Up Sync with Device.
5Select your device, then click Continue.
6In the Connect pane, enter the passcode.
7In the Success pane, click Done.
Note If you synced using a computer-to-computer network with an iPhone, make
sure to turn off Airplane Mode and restore your normal network settings.
Syncing
After syncing for the first time, you can add, edit, or delete data in either application,
then sync the applications. When you sync, changes appear in both applications.
Bento for iPhone can sync with Bento when both applications are open and
connected to the same Wi-Fi network. For more information, see ”Connecting Bento
for iPhone to Bento” on page 123.
Note If you are using a computer-to-computer network with an iPhone, you must turn
on Airplane Mode before syncing. In iPhone Settings, turn on Airplane Mode, then
turn on Wi-Fi and select your computer-to-computer network.

Chapter 11 Using Bento with Bento for iPhone and iPod touch 125
To sync the applications:
1In Bento for iPhone, tap .
2(Optional) In Bento, in the Devices section of the Libraries pane, select your
device, then select the libraries you want to sync with.
Note By default, all libraries are synced. The iCal Events, iCal Tasks, and iPhoto
libraries are not supported in Bento for iPhone.
3In Bento for iPhone, tap Sync Now.
Note If you synced using a computer-to-computer network with an iPhone, make
sure to turn off Airplane Mode and restore your normal network settings.
Troubleshooting Syncing
This section describes some common issues with syncing information between Bento
and Bento for iPhone. For more information on syncing iPhone or iPod touch, see the
iPhone user’s guide, the iPod touch user’s guide, or the Apple support website.
•Can I sync more than one device with Bento?
No. Bento can only sync with one device. If you sync a second device to Bento, the
first device disconnects. To prevent data loss, avoid connecting to additional
devices.
•Can I sync more than one Bento desktop with a device?
No. A device can only sync with one Bento desktop. If you sync a second Bento
desktop to your device, the first desktop disconnects. To prevent data loss, avoid
connecting to additional desktops.
•Why weren’t all of my files synced?
Files that are larger than 10 megabytes or that cannot be opened or played on
your device cannot be synced.
•What if Bento for iPhone is interrupted while syncing?
If Bento for iPhone is interrupted while syncing (for instance, by a phone call or
power failure), you must restart the sync.
•When I sync, what happens if data in one application conflicts with data in the
other?
If there is a data conflict, data in Bento for iPhone overwrites data in Bento. For
example, you have John Smith’s phone number stored in both applications. You
change his phone number to 555-1010 in Bento and 555-9090 in Bento for
iPhone. When you sync, the phone number on your device overwrites the phone
number on your computer.
•Why don’t I see my iCal Events and iCal Tasks libraries in Bento for iPhone?
The iCal Events and iCal Tasks libraries are not supported in Bento for iPhone.

126 Chapter 11 Using Bento with Bento for iPhone and iPod touch

A
127
Keyboard Shortcuts
This section provides a reference of the keyboard shortcuts.
You can use your keyboard and mouse to quickly accomplish many tasks in Bento. To
find the shortcuts for common menu commands, look in the menus (or see the menu
shortcuts listed here). To complete an action, press the shortcut keys in the order
shown.
Note To tab and shift-tab to all fields in form and table view, you must set full
keyboard access to “All controls.”
To set full keyboard access to all controls:
1Open System Preferences (choose Apple menu > System Preferences).
2Open “Keyboard & Mouse” preferences.
3Click the Keyboard Shortcuts tab.
4Under Full keyboard access, select “All controls.”
Action Shortcut
Working with Form View
Show or hide form tools Option-Command-C
Move to next field Tab
Move to previous field Shift-Tab
Rename form Double-click form name.
Select multiple fields Click outside the first field, then drag the selection rectangle
through the other fields you want to select.
Extend field selection With fields selected, Shift-click or Command-click to add or remove
items from the selected set of fields.
Select all fields Command-A
Deselect all fields Shift-Command-A

128 Appendix A
Working with Table View
When One Cell is Selected
Edit a value Option-Return
Save and move to next cell Return
Add a carriage return in a text field Command-Return
Move to cell above Up arrow
Move to cell below Down arrow
Move to next field Tab
Move to previous field Shift-Tab
Working with Table View
When One or More Cells are
Selected
Extend selection upward Shift-up arrow
Extend selection downward Shift-down arrow
Working with Table View
When Records are Selected
Select a record Click the row number. The entire record is selected.
Select multiple records Select one record, then Shift-click another record to select all
records in between.
Extend record selection With records selected, Command-click record to add a record to
selection, if it is not selected, or to remove a record from selection,
if it is selected.
Move to record above Up arrow
Move to record below Down arrow
Working with Records
Add record Command-N
Duplicate record Shift-Command-D
Delete record (Library)
Remove record (Collection)
Command-Delete
Go to next record Command-right bracket (])
Go to previous record Command-left bracket ([)
Go to first record Option-Command-left bracket ([)
Go to last record Option-Command-right bracket (])
Working with Text and Objects
Select all text within a field being
edited
Command-A
Action Shortcut

Appendix A 129
Deselect all text within a field
being edited
Shift-Command-A
Cut Command-X
Copy Command-C
Paste Command-V
Duplicate Command-D
Delete Delete
Check spelling Command-semicolon (;)
Show spelling window Command-colon (:)
Show special characters window Option-Command-T
General
Create library from template
(opens New Library dialog)
Command-L
Create collection Shift-Command-N
Create Smart Collection Option-Command-N
Add field Control-N
Show or hide Advanced Find Command-F
Quick Look selected item Command-Y
In table view, send email to one or
more selected email addresses
Shift-Command-M
Use search field Option-Command-F
Show table view Command-1
Show grid view Command-2
Show split view (table/form or
grid/form)
Command-3
Show form view (repeat shortcut
to move to next form)
Command-4
Show or hide libraries and fields
pane
Command-5
Move to next area of main window Control-Option-right arrow
Move to previous area of main
window
Control-Option-left arrow
Show or hide summary row Command-6
Import file Shift-Command-I
Export current library or collection Shift-Command-E
Print current library or collection in
the current view
Command-P
Undo last action Command-Z
Redo last undone action Shift-Command-Z
Open window Command-0 (zero)
Action Shortcut

130 Appendix A
Close window Command-W
Minimize window Command-M
Show preferences Command-comma (,)
Lock Bento Shift-Command-L
Show Bento Help Command-question mark (?)
Hide Bento Command-H
Hide other windows Option-Command-H
Quit Bento Command-Q
Action Shortcut

B
131
Reverting to a Previous Version of
Bento
This section provides instructions for Bento 1 and Bento 2
users who installed Bento 3 and then decide to go back to
their previous version.
Reverting to Bento 1 or Bento 2 from Bento 3
If you have Bento 1 installed, Bento 3 will create a new database file using your Bento 1
database file. Your old Bento 1 database is renamed to
bentoUpgradeBackup.bentodb, and the Bento 3 database is named bento.bentodb.
If you have Bento 2 installed, Bento 3 will create a new database file using your Bento 2
database file. Your old Bento 2 database is renamed to
bentoUpgradeBackup.bentodb, and the Bento 3 database is named bento.bentodb.
If you want to use data that you created in Bento 3 with your previous version of
Bento, export the Bento 3 records in CSV format before you revert the database. For
more information, see ”Exporting Information from Bento” on page 110.
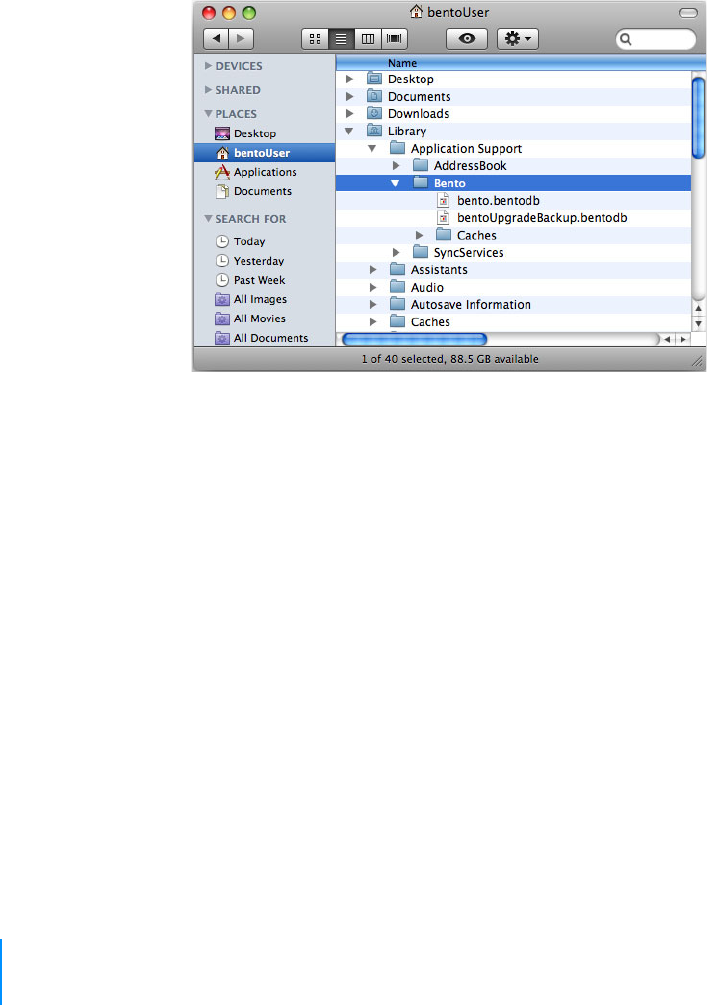
132 Appendix B
To revert to Bento 1 or Bento 2 from Bento 3:
1Choose Bento > Quit Bento.
2In the Finder, choose Go > Home.
3Open the Library folder, then the Application Support folder, then the Bento
folder.
You see the current Bento 3 database file (bento.bentodb) and the Bento
database backup file (bentoUpgradeBackup.bentodb).
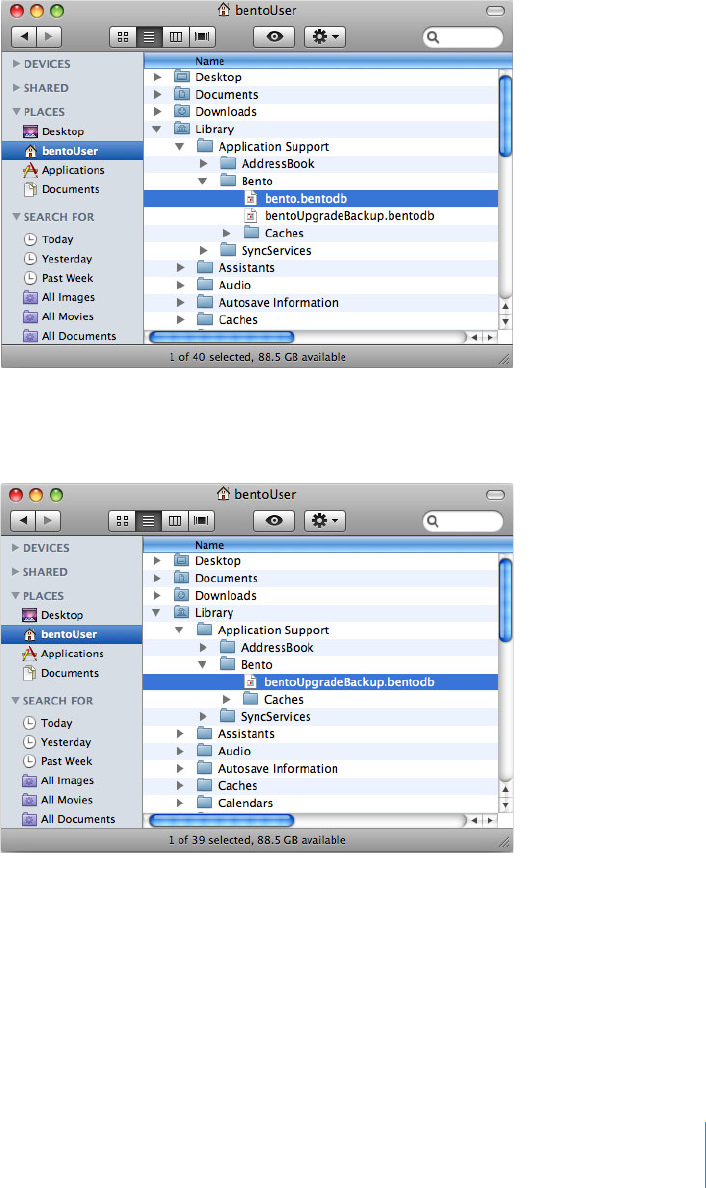
Appendix B 133
4Drag the bento.bentodb (Bento 3) file to the Trash.
5Rename the bentoUpgradeBackup.bentodb file to bento.bentodb.
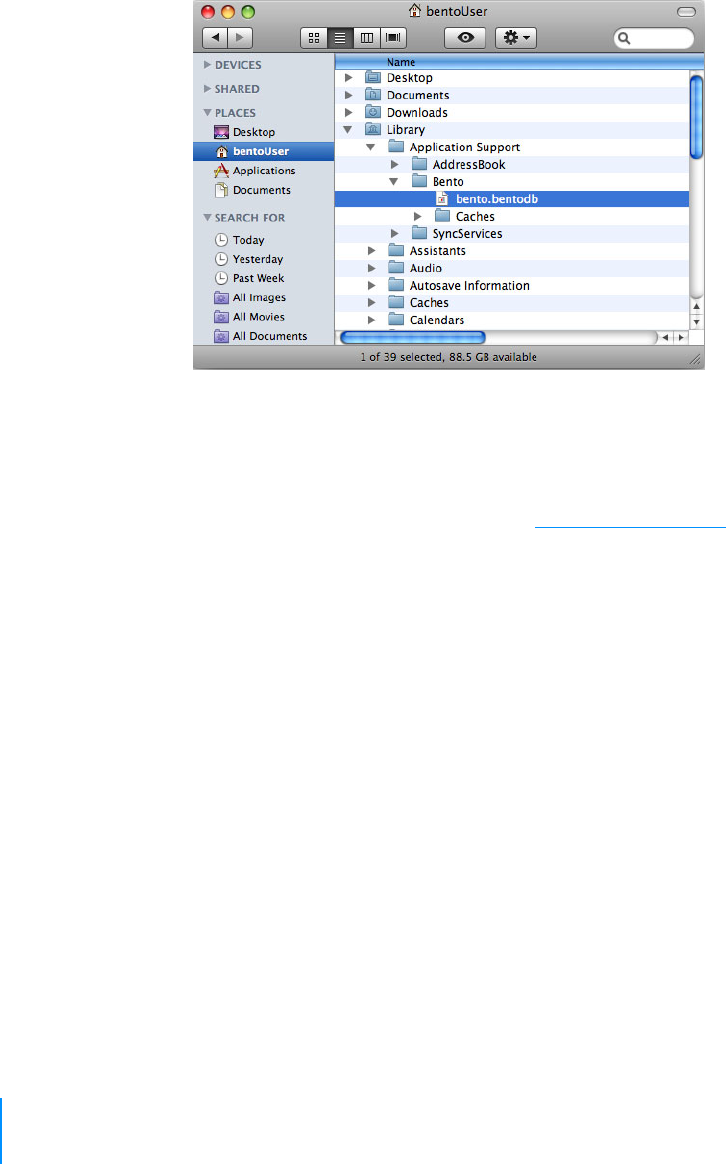
134 Appendix B
6Your folder should now look like this (bentoUpgradeBackup.bentodb has
been replaced with bento.bentodb).
7Locate and start the Bento 1 or Bento 2 application.
If you overwrote your Bento 1 or Bento 2 application with the Bento 3 trial, you
can download another copy from the Bento Support website.
8Your data will appear in Bento 1 or Bento 2 as it did before you started Bento 3.
9Drag the Bento 3 application to the Trash.
Or, rename the application (and store it in another folder) in case you need to use
it again.

135
Index
A
Address Book application 8, 22
Address Book groups 41
displaying data from 39
Address Book library 8
described 22, 31, 41
fields updated in Address Book application 43
hiding 40
address fields 81
Advanced Find 29
aliases to files or folders 84, 85, 95
aligning fields on forms 62
AppleWorks, exporting from 102
autofilling fields 72
automatic counter fields 81
Average function 73
B
backing up
described 117
turning off reminder 119
backups, restoring from 120
bento.bentodb 95, 121
Bento for iPhone, syncing Bento with 123
Bento forum 18
Bento template exchange 18
bentoUpgradeBackup.bentodb 131
Blank template 32
C
calculation fields 80
creating 83
calculations, setting up 83
calendars
displaying 44, 47
subscribed 45
changing field types 90
checkbox fields 80
choice fields 80
ClarisWorks, exporting from 102
collections 13
adding to Libraries pane 21
and Address Book groups 41
creating 52
deleting 53
described 23, 51
displaying different data from 55
importing to 105
relating records in different 85
viewing fields in 30
color of form, changing 61
column dividers 64
column names 105
columns in table view. See also fields
described 65
reordering 72
resizing 72
showing or hiding 71
summarizing data in 72
column width (forms) 61
comma-separated value files 12
described 101
computer-to-computer networks 123, 124
contacts
Address Book application 39
displaying 41
emailing 90, 91
related 85
copying records 57, 68
Count function 73
creating
collections 52
fields 82, 89
forms 58
libraries 32
records in form view 56
records in table view 66
Smart Collections 54
CSV files 12
described 101
currency fields 81
current date and time 57
customizing forms 59

136 Index
D
Database Password 97
See also Sharing Password
databases
disconnecting shared 35
importing from 102
looking for shared 36
sharing 34
turning off sharing 35
data sources, specifying for related records 86
date fields 80
dates
current 57
displaying 44, 47
deleting
collections 53
fields and data 90
fields from form 60
forms 58
libraries 37
media files 97
records 37, 57, 68
devices, syncing 123
duration fields 80
E
email address fields 81
emails
sending in form view 90
sending in table view 91
encrypted fields
and Database Password 97
described 81
searching 27
shared 36
events
displaying 44, 47
iCal application 39
exporting
by dragging files 112
in CSV format 110
in Excel 2008 format 110
in library template format 110
in Numbers format 110
in TAB format 110
F
field labels 55
changing text size 61
moving 61
field names 82
changing in Fields pane 89
changing in table view 69
setting up during import 105
fields
adding shading to 62
adding to a form 59
address 81
aligning on forms 62
autofilling 72
automatic counter 81
calculating data in 83
calculation 80
checkbox 80
choice 80
creating 82, 89
currency 81
date 80
deleting data from 90
deleting from form 60
described 79
displayed from Address Book 43
displayed from iCal 46
duplicating 89
duration 80
email address 81
encrypted 36, 81, 97
file list 80
IM account 81
in current library 30
in different form views 55
in form view 79
in table view 65, 79
list fields 81
locked in Fields pane 89
locking 98
media 80, 94
message list 80, 85
moving between 59
number 80
phone number 81
protecting 97
rating 81
related data 80
resizing 60
selecting 59
sharing 36
simple list 80, 92
text 80
time 80
URL 81
Fields pane 20
described 30, 89
hiding 20, 71
using to hide fields in table view 71

Index 137
field types
and exporting 113
and importing 109
changing 90
choosing 82
described 80
file list fields 80
creating 84
opening files from 91
finding records 27
flexible spaces 64
folders, library 37, 77
font size
changing in form view 62
changing in table view 66
forms
adding column dividers to 64
adding fields to 59
adding media files to 95
adding objects to 63
changing column width 61
changing themes 61
creating 58
customizing 59
deleting 58
duplicating 58
renaming 59
thumbnails in grid view 75
formulas 83
form view
described 25, 32, 55
Overview and Details buttons 27
forum 18
G
grid view, described 25, 75
grid view items
adding labels 76
changing display size 76
described 75
displaying 76
setting default form 77
setting default media field 76
grouping libraries 37, 77
groups, Address Book
and Bento collections 41
H
Home dialog 19
I
iCal application 9, 22
displaying data from 39
iCal Events library 9
described 22, 31, 44, 47
fields updated in iCal application 46
iCal libraries, hiding 40
iCal Tasks library
described 22, 31, 44, 47
fields displayed in iCal application 46
icons for libraries 34
IM account fields 81
image boxes 63
images 94
moving and resizing 96
saving 96
importing 12
described 101
into existing library 105
into new library 104
library templates 108
preparing for 102
iPhone 123
iPhoto application 10, 22
displaying data from 39
iPhoto library 10
described 31
hiding 40
iPod touch 123
iSight cameras 95
iTunes
adding files to media fields 95
playlists 51
J
JPEGs 94
K
keyboard shortcuts 127
L
labels
field 55, 61
mailing 115
libraries 12
adding to Libraries pane 21
changing icon 34
creating by importing 34, 104
creating by using templates 32, 108
deleting 37
described 21, 31, 39
displaying different data from 55
exporting 110
grouping 37, 77
importing to existing 105
relating records in different 85
viewing fields in 30

138 Index
Libraries pane
changing size of icons and text 21
described 21
hiding 20
library folders 37, 77
list fields 81
locked fields, in Fields pane 89
locking
Bento 98
fields 98
M
Mac OS X Mail items 85
mailing labels 115
mapping fields 107
Maximum function 73
media fields 80, 94
media files
adding 95
deleting 97
message list fields 80, 85
Minimum function 73
movies 96
MP3 files 94
music 96
N
navigation bar 27
number fields 80
O
objects
image boxes 63
moving on form 59
resizing 60
selecting on form 59
text boxes 63
operators 83
P
pairing devices 123
passcode 124
passwords
for database and encrypted fields 97
for shared databases 36
PDF files 84
phone number fields 81
photos 95
previewing files with Quick Look 92
printing 113
mailing labels 115
selected records 114
Q
Quick Look 92
QuickTime 94
R
rating fields 81
records
adding 56, 66, 105
adding media files to 95
adding to collections 52
calculating data in 80
deleting 37, 57, 68
duplicating 57, 68
editing in form view 56
editing in table view 67
finding 27
in form view 55
in table view 65
related 85
removing 53
selecting in table view 66
sorting 69
records area 20
related data fields 15, 80
and Address Book application 88
and iCal application 88
and iPhoto application 88
creating 85
navigating to 88
related records lists. See related data fields
relationships 15, 85
removing records from collection 53
restoring data 120
reverting to previous version of Bento 132
rows in table view. See records
S
searching 27
sending emails
in form view 90
in table view 91
separators, horizontal 63
sharing databases 34
looking for 36
turning off 35
Sharing Password 36
See also Database Password
simple list fields 80, 92
Smart Collections 42
creating 54
described 23, 53
Smart Groups 42
sorting records 69
sound files 96
spacers 64

Index 139
split view, described 25, 56
spreadsheets, importing from 102
subscribed calendars 45
Sum function 73
summary row 72
syncing Bento with Bento for iPhone 123, 125
T
TAB files, described 101
table view
copying and pasting data in 67
described 25, 32, 65
selecting records in 66
text size 66
tab-separated value files, described 101
tasks
displaying 44, 47
iCal application 39
technical support 18
template exchange 18
templates 11
Blank template 32
creating libraries with 32
described 23
text, changing size of 62
text boxes 63
text fields 80
Theme Chooser 61
themes
changing for a form 61
described 26
time, current 57
time fields 80
Time Machine 117, 121
troubleshooting
Address Book updates 43
iCal updates 47, 48
iPhoto updates 48
syncing Bento with Bento for iPhone 125
TSV files, described 101
tutorial 18
U
URL fields 81
V
views, described 24
W
Wi-Fi networks 123, 124
