Bias Peak 4.14 New Feature Addendum Software User’s Guide UG EN
User Manual: bias Peak - 4.14 - Software User’s Guide Addendum Free User Guide for BIAS Peak Software, Manual
Open the PDF directly: View PDF ![]() .
.
Page Count: 7
Peak
Version 4.14
Software User’s Guide Addendum
TM

Addendum: Peak 4.14 New Features 2
Addendum:
Peak 4.14 New Features
Introduction
Peak 4.14 is a free update for registered users. It
provides new features and functionality, including:
• Supports Mac OS X v. 10.4 (“Tiger”)
• Provides a higher quality real-time sample rate
converter when playing audio documents with a
sample rate that is different from the supported
sample rates of the audio device being played on.
• A new feature allows the loop flags in AIFF files to
be turned on or off when saving.
• A new feature, “Auto Define Tracks” has been
added to the list of available DSP processes.
The 4.14 update also includes a number of other
enhancements – for more details, please see the
included Peak 4.14 Read Me document.
Directions for using New Features
Of the new features/functionality in Peak 4.14, some are
enhancements that operate behind the scenes and do
not require user interaction, and some are new features
that require explanation. This section goes over using
the new features in version 4.14.
Auto Define Tracks
The Auto Define Tracks tool allows you to automatically
split audio recordings into separate Regions, each of
which will become an individual CD track when an audio
CD is burned. This tool is useful for quickly editing LP
and cassette recordings, and then burning them to CD.
This DSP tool works by automatically placing Region
markers into an audio document based on audio level,
minimum period of silence between songs, and
minimum song duration. Peak analyzes the audio levels
throughout a document, and places Region markers
around each song. The louder parts are considered to be
songs, and the quieter parts are the gaps between them.
Addendum: Peak 4.14 New Features 3
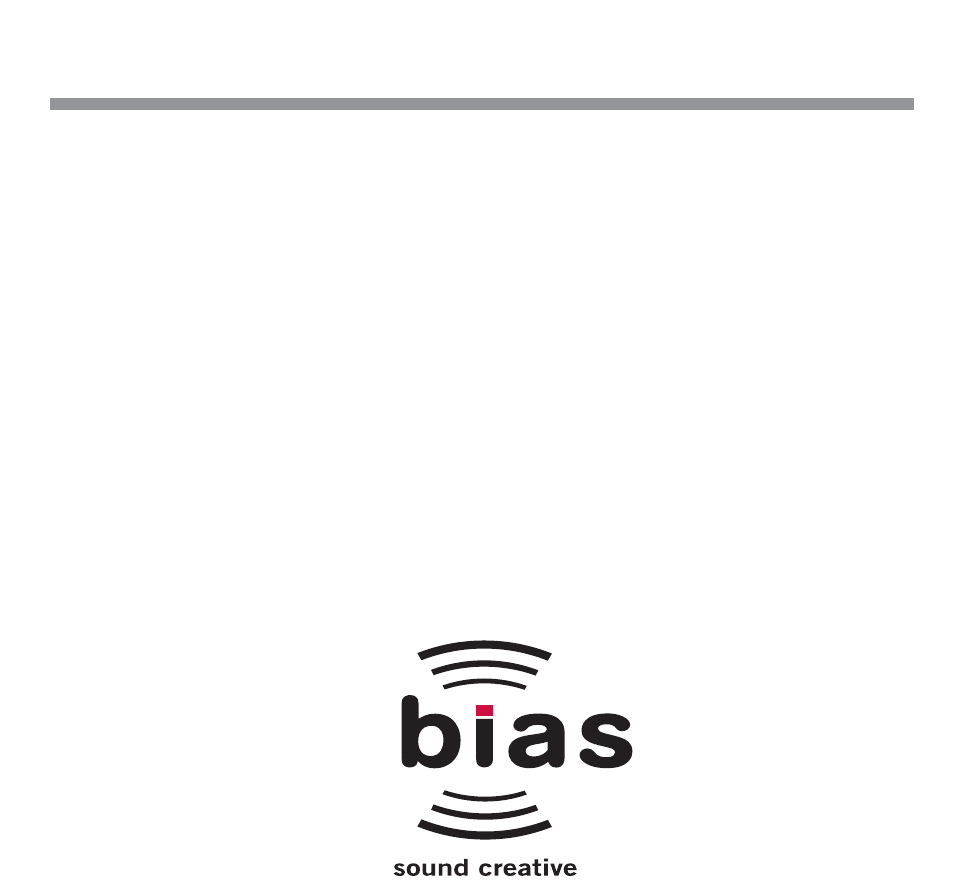
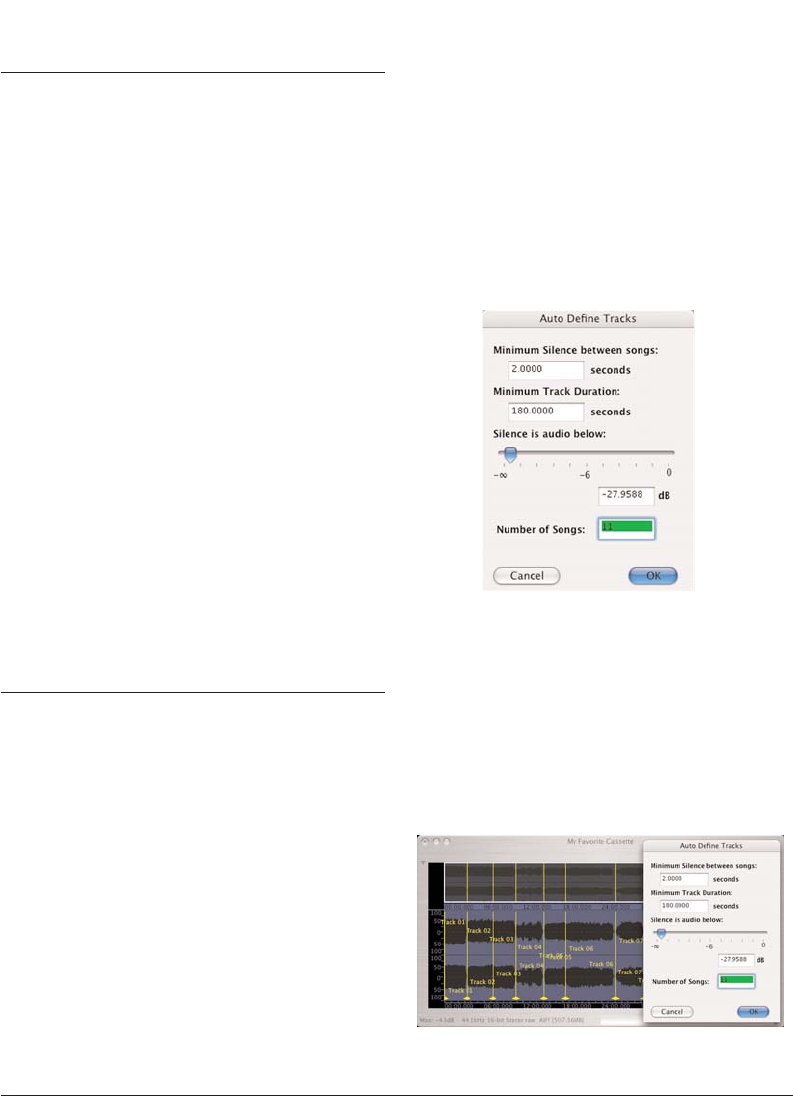
When Auto Defining Tracks, Region markers are placed into the
audio document as settings are made – this makes it easy to see if
your settings are accurate.

Since some songs may contain very quiet parts that could
mistakenly be interpreted as gaps between tracks, a few
parameters are available to help Peak correctly
distinguish between songs and the gaps between them.
Minimum Silence Between Tracks
This field is used to enter the minimum gap time between
songs in the audio document you are working with. If a
recording you are working with contains two second gaps
between each song, start with the default value of “2.00” in
this field. If the gaps between songs vary in length, enter the
value of the shortest gap in the entire recording.
If you need to measure the gap time between
songs, activate the Cursor Info overlay by selecting
Show Cursor Info (
-Shift-T) from the Options
menu, and then select the gap between songs in the
audio waveform – the Cursor Info overlay will tell
you the length of the selected area. You may also
need to set your preferred Time Units to
Min:Sec:ms – this can be done in the Options
Menu>Time Units.
Minimum Track Duration
Peak needs to have some information about the length of
each song, in order to accurately divide a long recording
into individual songs.
The Minimum Track Duration parameter tells Peak how
long the shortest song in a recording is, and helps ensure
that Region markers are placed in the correct location in the
audio waveform – that is, a begin Region marker just before
a song starts, and an end Region marker just after a song
ends – even if the audio level falls below the threshold value
set with the Silence is Audio Below slider (see next section).
If a recording you are working with contains songs that are
all approximately 4-5 minutes long, a good value to enter in
this field would be 240 seconds (4 minutes).
Silence is Audio Below slider
This slider controls the threshold level between audio
material you wish to define as a Region and the gaps
between it. As this slider is moved, you will notice
Region markers appearing in the audio waveform in the
background, and you will also notice the value in the
Number of Songs field changing. (More information on
the Number of Songs field is in the next section).
For example, if you are working with a recording from a
cassette, the gaps will typically contain hiss or other
noise that is not completely silent, but has a significantly
lower amplitude level than the program material that you
are trying to isolate into tracks. By adjusting the Silence
is Audio Below slider, you can make the judgment as to
what should be silence, even if it does contain some low
level audio such as tape hiss, or other background noise.
Number of Songs field
This numerical field is tied to the Silence is Audio Below
slider, and displays the number of songs that Peak
automatically detects in a recording, based on the settings
used for Minimum Silence Between Songs, Minimum Track
Duration, and Silence is Audio Below. Depending on the
settings you choose, Peak will detect a different number of
songs, and this field will display different numbers.
When the Silence is Audio Below slider is moved, the
number of songs detected will update, and typing in a new
value in the Number of Songs field will update the Silence is
Audio Below slider.
Typically, the automatic number of songs detected is very
accurate, provided you have entered accurate settings for
the other parameters that define tracks. There may be times
however, where Peak detects more or fewer songs than the
recording actually contains.
You may choose to define the number of tracks using the
Silence is Audio Below slider, or by typing in a known
number of songs in the recording, and then fine tuning with
the Silence is Audio Below slider.
Be aware that the values you enter in the Number of Songs
field, and the values you set with the Silence is Audio Below
slider may override each other.
Addendum: Peak 4.14 New Features 4
To Auto Define Tracks:
1. Open a recording from a cassette or LP.
2. Select All (-A).
3. From the DSP menu, choose Auto Define Tracks.
4. In the Minimum Silence Between Songs field, enter
the shortest amount of time (gap time) between
any two songs in the entire recording.
5. In the Minimum Track Duration field, enter the
length of the shortest song in the recording.
6. Adjust the Silence is Audio Below slider until the
Number of Songs field reflects the actual number
of songs in the recording – Peak inserts Region
markers for each song detected (you can visually
scan the waveform of the entire recording and
count the number of individual songs).
7. Click OK.
Tips for using Auto Define Tracks
Before Auto Defining Tracks
When recording cassettes and LPs, you will be working with fairly
long audio documents, and there are a few things you can do to
get the most accurate results with the Auto Define Tracks tool.
• Zoom out all the way, so you can see the entire
recording from beginning to end. This way, when
you are setting parameters in the Auto Define
Tracks dialog, you will be able to see where Region
markers are being placed in the audio waveform.
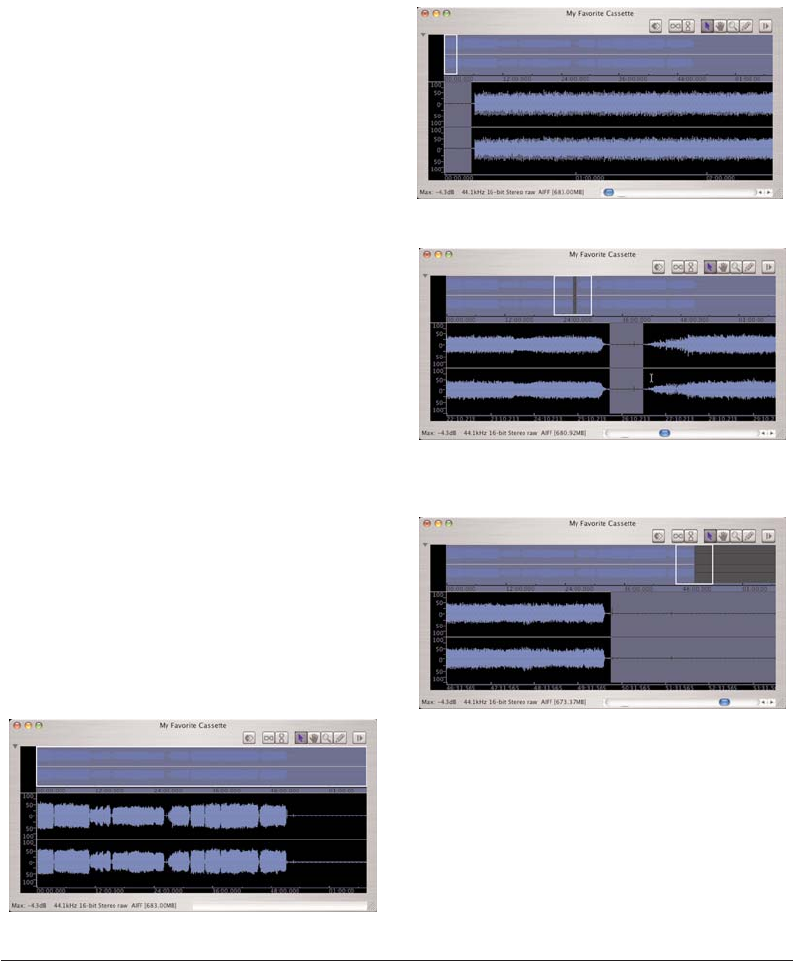
• Delete excess silence – if you have recorded excess
silence at the beginning or end of the audio
document, or recorded a long pause when “flipping”
a cassette or LP, it’s a good idea to edit this out before
attempting to use the Auto Define Tracks tool.
• You may want to apply noise reduction for clicks,
crackles, pops, broadband noise, and hum before
auto-defining tracks. These types of noise are
reflected in the audio waveform and may interfere
with accurate placement of markers. Some of
Peak’s built-in tools can help reduce/remove
certain kinds of unwanted noise, but for the best
Addendum: Peak 4.14 New Features 5
Excess silence at the beginning of a recording should be deleted
Excess silence in the middle of a recording should be deleted – this
space was created when recording a cassette, when flipping the
cassette to record side 2
Excess silence at the end of a recording should be deleted
Zooming out all the way gives the best view of the entire recording,
and lets you see individual songs/tracks in the waveform
results, BIAS recommends using SoundSoap or
SoundSoap Pro. More information is available at:
http://www.bias-inc.com/products/soundsoap/
http://www.bias-inc.com/products/soundsoappro/
• Get an idea of the length of songs and gap times
between songs – this will give the most accurate
results in placing Region markers/creating tracks.
From the Options menu, choose Show Cursor Info
(-Shift-T), this will show you the duration of the
selected portion of the waveform.
• Visually scan the audio waveform, while looking for:
-The number of songs in the recording – you
should be able to see how many individual
songs there are by counting the number of
high amplitude areas.
-The shortest song – select the shortest song
from beginning to end, and then turn on
Cursor Info, which will show the length of the
selected part of the waveform. You may need
to zoom in to make a more accurate selection.
-The shortest gap time between songs – select
the gap between songs and measure using the
Cursor Info overlay.
After Auto Defining Tracks
There may be times when an anomaly in the audio
waveform, or a less than ideal setting causes a
track/Region marker to be placed in the wrong location.
In some cases, when most of the tracks have been
identified correctly, but one or two have not, it may be
easiest to simply adjust the markers that are in the wrong
position.
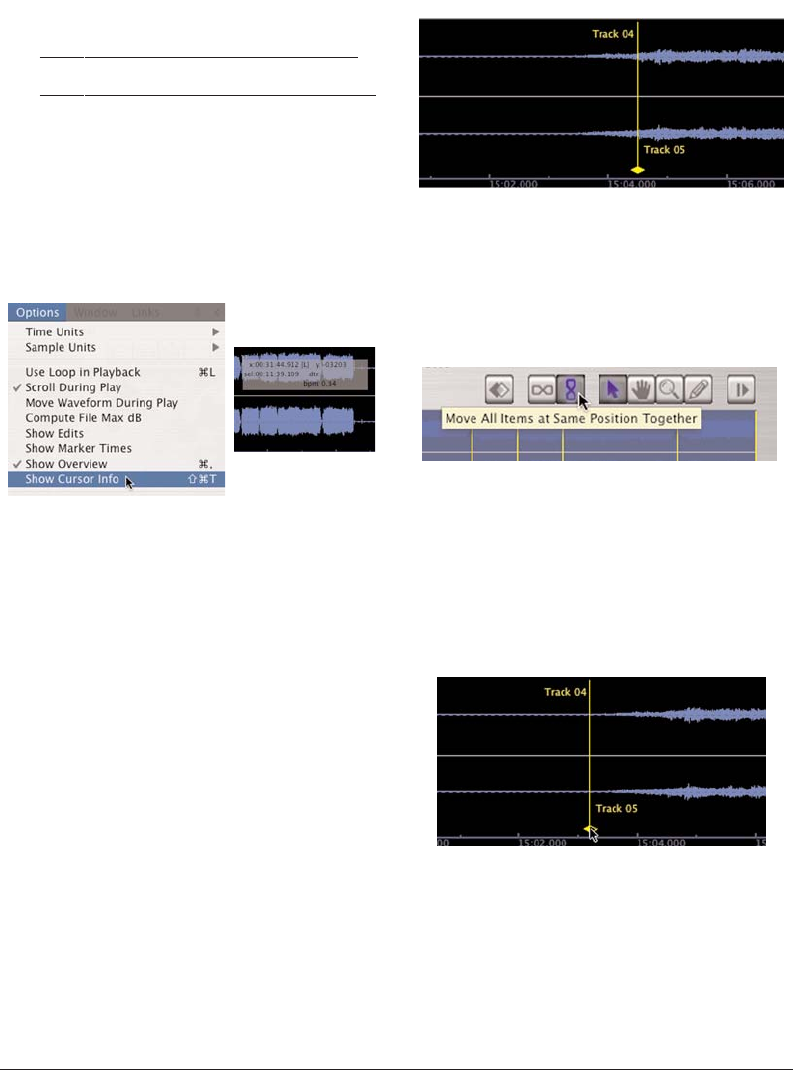
Region markers may be moved by clicking and dragging
the triangular base to the left or right. Also, by engaging
Peak’s Vertical Lock mode, you may move the end of one
song/Region and the beginning of the next at the same
time.
This technique is especially useful when working with
live recordings or DJ mixes, where it’s important to
preserve the overall duration and timing – but a track
index needs to be adjusted into the correct position.
Addendum: Peak 4.14 New Features 6
The end of Track 4 and the beginning of Track 5 is not in quite the
right place...
Turning on Peak’s Vertical Lock mode allows the end of Track 4 and
beginning of Track 5 to be moved at the same time...
Now they are in the right place, so Track 5 starts just before the
audio starts to fade in
Turning on the translucent Cursor Info overlay allows you to see
information about selection length, x/y cursor position, etc.
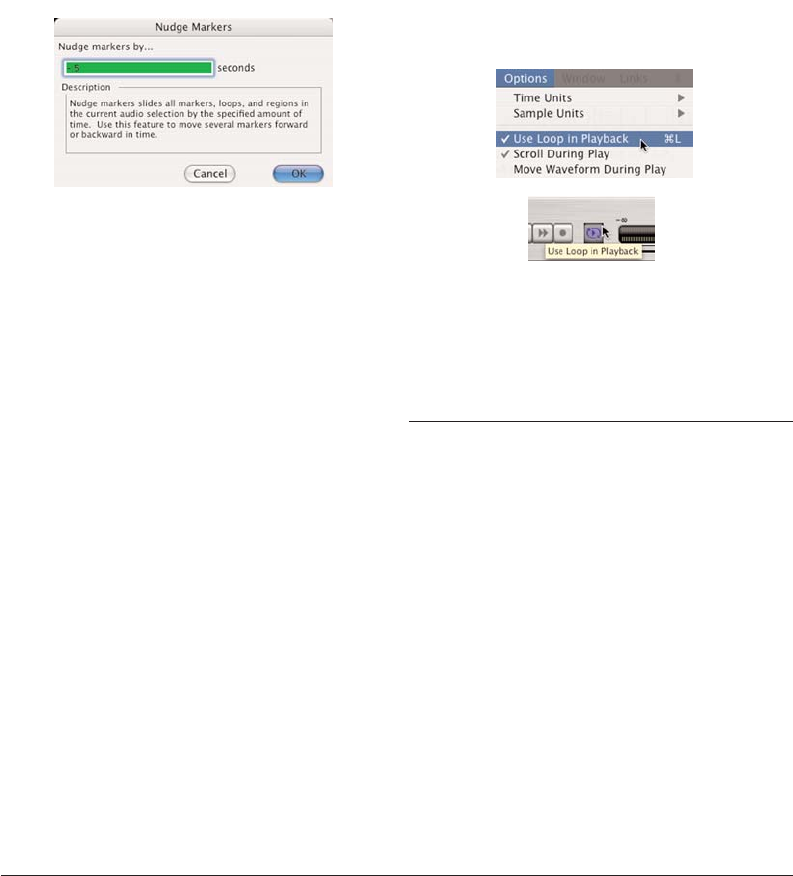
Nudging Markers
If all the Region markers placed into an audio document
are incorrectly placed, but are off by a small amount, you
may wish to use the Nudge feature to adjust them all
simultaneously. To nudge a group of markers, select the
portion of the audio waveform that contains the markers
you wish to nudge, and then choose Nudge from the
Action menu.
Now that you know a bit about Peak’s Auto Define Tracks
tool, give it a try! This feature can save lots of time, and
the more you use it, and get a feel for how the various
parameters need to be set, the faster it will work.
Turn Loop Flag On/Off on Save
This feature allows the loop flag in AIFF files to be turned
on or off when saving a file. The state of this loop flag
when a file is saved determines the file’s playback
behavior when loaded into Peak again, or into another
application capable of reading embedded loop flags.
The loop flag is now toggled on or off when saving,
depending on the state of the Loop Playback setting in
Peak.
To Save an AIFF File with the Loop Flag On:
1. From the Options menu, choose Use Loop in
Playback (-L), or click the Use Loop in Playback
button in the Transport. A check next to the menu
item, or an illuminated button in the Transport
indicates the loop flag is turned on.
2. Save the AIFF file – the loop flag is saved in the on
position.
To Save an AIFF File with the Loop Flag Off:
1. From the Options menu, choose Use Loop in
Playback (-L), or click the Use Loop in Playback
button in the Transport. The absence of a check
next to the menu item, or a non-illuminated button
in the Transport indicates the loop flag is turned
on.
2. Save the AIFF file – the loop flag is saved in the off
position.
Conclusion
We hope you enjoy the new updated features and
functionality in Peak 4.14.
Addendum: Peak 4.14 New Features 6
If multiple markers are off by the same amount, using Peak’s Nudge
Markers tool is an easy way to move them all at the same time
There are two ways to turn Use Loop in Playback on or off
