Corel CorelDRAW(R) Graphics Suite X6 Macro Programming Guide Draw CDraw Program
User Manual: corel Corel Draw Graphics Suite - X6 - Macro Programming Guide Free User Guide for Corel Draw Software, Manual
Open the PDF directly: View PDF ![]() .
.
Page Count: 160 [warning: Documents this large are best viewed by clicking the View PDF Link!]
- Introduction
- Understanding automation
- What is automation?
- Which automation environments are supported?
- What are the main elements of automation?
- How is automation coding structured?
- Declaring variables
- Using functions and subroutines
- Ending lines
- Including comments
- Allocating memory
- Defining scope
- Using Boolean comparison and assignment
- Using logical and bitwise operators
- Providing message boxes and input boxes
- Referencing objects
- Referencing collections
- Using object shortcuts
- Providing event handlers
- Getting started with macros
- Creating macros
- Making macros user-friendly
- Organizing and deploying macros
- Understanding the CorelDRAW object model
- Glossary
- Index
Macro Programming Guide

Macro Programming Guide
Contents i
Contents
Introduction . . . . . . . . . . . . . . . . . . . . . . . . . . . . . . . . . . . . . . . . . . . . . . . . . . . . . . 1
About this resource . . . . . . . . . . . . . . . . . . . . . . . . . . . . . . . . . . . . . . . . . . . . . . . . . . . . . . . . . . . . . . . . 1
About additional resources . . . . . . . . . . . . . . . . . . . . . . . . . . . . . . . . . . . . . . . . . . . . . . . . . . . . . . . . . . 2
Understanding automation . . . . . . . . . . . . . . . . . . . . . . . . . . . . . . . . . . . . . . . . . . 4
What is automation? . . . . . . . . . . . . . . . . . . . . . . . . . . . . . . . . . . . . . . . . . . . . . . . . . . . . . . . . . . . . . . . 4
Which automation environments are supported? . . . . . . . . . . . . . . . . . . . . . . . . . . . . . . . . . . . . . . . . . 5
What is VBA?. . . . . . . . . . . . . . . . . . . . . . . . . . . . . . . . . . . . . . . . . . . . . . . . . . . . . . . . . . . . . . . . . . . . . . . . . . . .6
What is VSTA?. . . . . . . . . . . . . . . . . . . . . . . . . . . . . . . . . . . . . . . . . . . . . . . . . . . . . . . . . . . . . . . . . . . . . . . . . . . 8
What are the main elements of automation? . . . . . . . . . . . . . . . . . . . . . . . . . . . . . . . . . . . . . . . . . . . . 10
What is an object model? . . . . . . . . . . . . . . . . . . . . . . . . . . . . . . . . . . . . . . . . . . . . . . . . . . . . . . . . . . . . . . . . .10
What is a class?. . . . . . . . . . . . . . . . . . . . . . . . . . . . . . . . . . . . . . . . . . . . . . . . . . . . . . . . . . . . . . . . . . . . . . . . .11
What is a collection? . . . . . . . . . . . . . . . . . . . . . . . . . . . . . . . . . . . . . . . . . . . . . . . . . . . . . . . . . . . . . . . . . . . . .11
What is a property?. . . . . . . . . . . . . . . . . . . . . . . . . . . . . . . . . . . . . . . . . . . . . . . . . . . . . . . . . . . . . . . . . . . . . .11
What is a method? . . . . . . . . . . . . . . . . . . . . . . . . . . . . . . . . . . . . . . . . . . . . . . . . . . . . . . . . . . . . . . . . . . . . . .12
What is an event? . . . . . . . . . . . . . . . . . . . . . . . . . . . . . . . . . . . . . . . . . . . . . . . . . . . . . . . . . . . . . . . . . . . . . . .12
What is an enumeration? . . . . . . . . . . . . . . . . . . . . . . . . . . . . . . . . . . . . . . . . . . . . . . . . . . . . . . . . . . . . . . . . .12
What is a constant?. . . . . . . . . . . . . . . . . . . . . . . . . . . . . . . . . . . . . . . . . . . . . . . . . . . . . . . . . . . . . . . . . . . . . .12
How is automation coding structured? . . . . . . . . . . . . . . . . . . . . . . . . . . . . . . . . . . . . . . . . . . . . . . . . 13
Declaring variables . . . . . . . . . . . . . . . . . . . . . . . . . . . . . . . . . . . . . . . . . . . . . . . . . . . . . . . . . . . . . . . . . . . . . .13
Using functions and subroutines. . . . . . . . . . . . . . . . . . . . . . . . . . . . . . . . . . . . . . . . . . . . . . . . . . . . . . . . . . . .15
Ending lines. . . . . . . . . . . . . . . . . . . . . . . . . . . . . . . . . . . . . . . . . . . . . . . . . . . . . . . . . . . . . . . . . . . . . . . . . . . . 16
Including comments . . . . . . . . . . . . . . . . . . . . . . . . . . . . . . . . . . . . . . . . . . . . . . . . . . . . . . . . . . . . . . . . . . . . .16
Allocating memory . . . . . . . . . . . . . . . . . . . . . . . . . . . . . . . . . . . . . . . . . . . . . . . . . . . . . . . . . . . . . . . . . . . . . .16
Defining scope . . . . . . . . . . . . . . . . . . . . . . . . . . . . . . . . . . . . . . . . . . . . . . . . . . . . . . . . . . . . . . . . . . . . . . . . .17
Using Boolean comparison and assignment . . . . . . . . . . . . . . . . . . . . . . . . . . . . . . . . . . . . . . . . . . . . . . . . . . .17
Using logical and bitwise operators . . . . . . . . . . . . . . . . . . . . . . . . . . . . . . . . . . . . . . . . . . . . . . . . . . . . . . . . .18
Providing message boxes and input boxes . . . . . . . . . . . . . . . . . . . . . . . . . . . . . . . . . . . . . . . . . . . . . . . . . . . .19
Referencing objects . . . . . . . . . . . . . . . . . . . . . . . . . . . . . . . . . . . . . . . . . . . . . . . . . . . . . . . . . . . . . . . . . . . . . .19
Referencing collections . . . . . . . . . . . . . . . . . . . . . . . . . . . . . . . . . . . . . . . . . . . . . . . . . . . . . . . . . . . . . . . . . . .20
Using object shortcuts. . . . . . . . . . . . . . . . . . . . . . . . . . . . . . . . . . . . . . . . . . . . . . . . . . . . . . . . . . . . . . . . . . . . 22
Providing event handlers. . . . . . . . . . . . . . . . . . . . . . . . . . . . . . . . . . . . . . . . . . . . . . . . . . . . . . . . . . . . . . . . . .23
Getting started with macros . . . . . . . . . . . . . . . . . . . . . . . . . . . . . . . . . . . . . . . . 25
Setting up the automation feature . . . . . . . . . . . . . . . . . . . . . . . . . . . . . . . . . . . . . . . . . . . . . . . . . . . 25
To install the VBA and VSTA features . . . . . . . . . . . . . . . . . . . . . . . . . . . . . . . . . . . . . . . . . . . . . . . . . . . . . . . .25
To specify VBA options . . . . . . . . . . . . . . . . . . . . . . . . . . . . . . . . . . . . . . . . . . . . . . . . . . . . . . . . . . . . . . . . . . .25
Using the Macros toolbar . . . . . . . . . . . . . . . . . . . . . . . . . . . . . . . . . . . . . . . . . . . . . . . . . . . . . . . . . . . 26
Using the Macro Manager docker . . . . . . . . . . . . . . . . . . . . . . . . . . . . . . . . . . . . . . . . . . . . . . . . . . . . 27
Using the Add-in Manager . . . . . . . . . . . . . . . . . . . . . . . . . . . . . . . . . . . . . . . . . . . . . . . . . . . . . . . . . . 28
Using the Macro Editor . . . . . . . . . . . . . . . . . . . . . . . . . . . . . . . . . . . . . . . . . . . . . . . . . . . . . . . . . . . . 28
Using the Project Explorer . . . . . . . . . . . . . . . . . . . . . . . . . . . . . . . . . . . . . . . . . . . . . . . . . . . . . . . . . . . . . . . . .30
Using the Code window . . . . . . . . . . . . . . . . . . . . . . . . . . . . . . . . . . . . . . . . . . . . . . . . . . . . . . . . . . . . . . . . . .31
Using the Properties window . . . . . . . . . . . . . . . . . . . . . . . . . . . . . . . . . . . . . . . . . . . . . . . . . . . . . . . . . . . . . .34
Using the Macro Editor toolbars . . . . . . . . . . . . . . . . . . . . . . . . . . . . . . . . . . . . . . . . . . . . . . . . . . . . . . . . . . . .35
Using the Object Browser . . . . . . . . . . . . . . . . . . . . . . . . . . . . . . . . . . . . . . . . . . . . . . . . . . . . . . . . . . . . . . . . .35
Using the VSTA Editor . . . . . . . . . . . . . . . . . . . . . . . . . . . . . . . . . . . . . . . . . . . . . . . . . . . . . . . . . . . . . 40

Macro Programming Guide
Contents ii
Creating macros . . . . . . . . . . . . . . . . . . . . . . . . . . . . . . . . . . . . . . . . . . . . . . . . . . 42
Creating macro projects . . . . . . . . . . . . . . . . . . . . . . . . . . . . . . . . . . . . . . . . . . . . . . . . . . . . . . . . . . . . 42
To create a macro project . . . . . . . . . . . . . . . . . . . . . . . . . . . . . . . . . . . . . . . . . . . . . . . . . . . . . . . . . . . . . . . . . 43
To add a dialog box to a macro project. . . . . . . . . . . . . . . . . . . . . . . . . . . . . . . . . . . . . . . . . . . . . . . . . . . . . . .44
To add a code module to a macro project. . . . . . . . . . . . . . . . . . . . . . . . . . . . . . . . . . . . . . . . . . . . . . . . . . . . .44
To add a class module to a macro project. . . . . . . . . . . . . . . . . . . . . . . . . . . . . . . . . . . . . . . . . . . . . . . . . . . . .45
Writing macros . . . . . . . . . . . . . . . . . . . . . . . . . . . . . . . . . . . . . . . . . . . . . . . . . . . . . . . . . . . . . . . . . . 45
To add a macro to a macro project . . . . . . . . . . . . . . . . . . . . . . . . . . . . . . . . . . . . . . . . . . . . . . . . . . . . . . . . . . 46
To edit a VBA macro . . . . . . . . . . . . . . . . . . . . . . . . . . . . . . . . . . . . . . . . . . . . . . . . . . . . . . . . . . . . . . . . . . . . . 46
To delete a VBA macro . . . . . . . . . . . . . . . . . . . . . . . . . . . . . . . . . . . . . . . . . . . . . . . . . . . . . . . . . . . . . . . . . . .46
Recording macros . . . . . . . . . . . . . . . . . . . . . . . . . . . . . . . . . . . . . . . . . . . . . . . . . . . . . . . . . . . . . . . . 46
To record and save a macro . . . . . . . . . . . . . . . . . . . . . . . . . . . . . . . . . . . . . . . . . . . . . . . . . . . . . . . . . . . . . . .47
To record a temporary macro . . . . . . . . . . . . . . . . . . . . . . . . . . . . . . . . . . . . . . . . . . . . . . . . . . . . . . . . . . . . . .48
Running macros . . . . . . . . . . . . . . . . . . . . . . . . . . . . . . . . . . . . . . . . . . . . . . . . . . . . . . . . . . . . . . . . . . 49
To run a saved macro . . . . . . . . . . . . . . . . . . . . . . . . . . . . . . . . . . . . . . . . . . . . . . . . . . . . . . . . . . . . . . . . . . . . 49
To run a temporary macro . . . . . . . . . . . . . . . . . . . . . . . . . . . . . . . . . . . . . . . . . . . . . . . . . . . . . . . . . . . . . . . .50
Debugging macros . . . . . . . . . . . . . . . . . . . . . . . . . . . . . . . . . . . . . . . . . . . . . . . . . . . . . . . . . . . . . . . . 50
Making macros user-friendly . . . . . . . . . . . . . . . . . . . . . . . . . . . . . . . . . . . . . . . . 54
Providing toolbars for macros . . . . . . . . . . . . . . . . . . . . . . . . . . . . . . . . . . . . . . . . . . . . . . . . . . . . . . . 54
To create a macro toolbar . . . . . . . . . . . . . . . . . . . . . . . . . . . . . . . . . . . . . . . . . . . . . . . . . . . . . . . . . . . . . . . . .55
To add buttons to a macro toolbar . . . . . . . . . . . . . . . . . . . . . . . . . . . . . . . . . . . . . . . . . . . . . . . . . . . . . . . . . .55
To associate an image or icon with a macro . . . . . . . . . . . . . . . . . . . . . . . . . . . . . . . . . . . . . . . . . . . . . . . . . . .55
To set a caption for a macro . . . . . . . . . . . . . . . . . . . . . . . . . . . . . . . . . . . . . . . . . . . . . . . . . . . . . . . . . . . . . . .55
To set a tooltip for a macro. . . . . . . . . . . . . . . . . . . . . . . . . . . . . . . . . . . . . . . . . . . . . . . . . . . . . . . . . . . . . . . .56
Providing dialog boxes for macros . . . . . . . . . . . . . . . . . . . . . . . . . . . . . . . . . . . . . . . . . . . . . . . . . . . . 56
Setting up dialog boxes. . . . . . . . . . . . . . . . . . . . . . . . . . . . . . . . . . . . . . . . . . . . . . . . . . . . . . . . . . . . . . . . . . .57
Coding dialog boxes . . . . . . . . . . . . . . . . . . . . . . . . . . . . . . . . . . . . . . . . . . . . . . . . . . . . . . . . . . . . . . . . . . . . .59
Providing user interaction for macros . . . . . . . . . . . . . . . . . . . . . . . . . . . . . . . . . . . . . . . . . . . . . . . . . 64
Capturing mouse clicks . . . . . . . . . . . . . . . . . . . . . . . . . . . . . . . . . . . . . . . . . . . . . . . . . . . . . . . . . . . . . . . . . . . 64
Capturing mouse drags. . . . . . . . . . . . . . . . . . . . . . . . . . . . . . . . . . . . . . . . . . . . . . . . . . . . . . . . . . . . . . . . . . .65
Capturing coordinates. . . . . . . . . . . . . . . . . . . . . . . . . . . . . . . . . . . . . . . . . . . . . . . . . . . . . . . . . . . . . . . . . . . .66
Providing documentation for macros . . . . . . . . . . . . . . . . . . . . . . . . . . . . . . . . . . . . . . . . . . . . . . . . . . 66
Organizing and deploying macros . . . . . . . . . . . . . . . . . . . . . . . . . . . . . . . . . . . . 68
Organizing macros . . . . . . . . . . . . . . . . . . . . . . . . . . . . . . . . . . . . . . . . . . . . . . . . . . . . . . . . . . . . . . . . 68
Deploying macros . . . . . . . . . . . . . . . . . . . . . . . . . . . . . . . . . . . . . . . . . . . . . . . . . . . . . . . . . . . . . . . . 68
To export a GMS file . . . . . . . . . . . . . . . . . . . . . . . . . . . . . . . . . . . . . . . . . . . . . . . . . . . . . . . . . . . . . . . . . . . . .69
To import a GMS file . . . . . . . . . . . . . . . . . . . . . . . . . . . . . . . . . . . . . . . . . . . . . . . . . . . . . . . . . . . . . . . . . . . . .69
To export workspace features . . . . . . . . . . . . . . . . . . . . . . . . . . . . . . . . . . . . . . . . . . . . . . . . . . . . . . . . . . . . . .69
To import workspace features. . . . . . . . . . . . . . . . . . . . . . . . . . . . . . . . . . . . . . . . . . . . . . . . . . . . . . . . . . . . . .69
Understanding the CorelDRAW object model . . . . . . . . . . . . . . . . . . . . . . . . . . . 71
Understanding the object-model hierarchy . . . . . . . . . . . . . . . . . . . . . . . . . . . . . . . . . . . . . . . . . . . . . 71
Working with the Application object . . . . . . . . . . . . . . . . . . . . . . . . . . . . . . . . . . . . . . . . . . . . . . . . . . 72
Working with documents . . . . . . . . . . . . . . . . . . . . . . . . . . . . . . . . . . . . . . . . . . . . . . . . . . . . . . . . . . . 72
Creating documents . . . . . . . . . . . . . . . . . . . . . . . . . . . . . . . . . . . . . . . . . . . . . . . . . . . . . . . . . . . . . . . . . . . . .80
Opening documents . . . . . . . . . . . . . . . . . . . . . . . . . . . . . . . . . . . . . . . . . . . . . . . . . . . . . . . . . . . . . . . . . . . . .80
Activating documents . . . . . . . . . . . . . . . . . . . . . . . . . . . . . . . . . . . . . . . . . . . . . . . . . . . . . . . . . . . . . . . . . . . .81
Setting document properties. . . . . . . . . . . . . . . . . . . . . . . . . . . . . . . . . . . . . . . . . . . . . . . . . . . . . . . . . . . . . . .82
Displaying documents . . . . . . . . . . . . . . . . . . . . . . . . . . . . . . . . . . . . . . . . . . . . . . . . . . . . . . . . . . . . . . . . . . . .82
Modifying documents . . . . . . . . . . . . . . . . . . . . . . . . . . . . . . . . . . . . . . . . . . . . . . . . . . . . . . . . . . . . . . . . . . . .84
Creating command groups for documents . . . . . . . . . . . . . . . . . . . . . . . . . . . . . . . . . . . . . . . . . . . . . . . . . . . .85

Macro Programming Guide
Contents iii
Saving documents. . . . . . . . . . . . . . . . . . . . . . . . . . . . . . . . . . . . . . . . . . . . . . . . . . . . . . . . . . . . . . . . . . . . . . .85
Exporting files from documents . . . . . . . . . . . . . . . . . . . . . . . . . . . . . . . . . . . . . . . . . . . . . . . . . . . . . . . . . . . . 86
Publishing documents to PDF . . . . . . . . . . . . . . . . . . . . . . . . . . . . . . . . . . . . . . . . . . . . . . . . . . . . . . . . . . . . . .88
Printing documents. . . . . . . . . . . . . . . . . . . . . . . . . . . . . . . . . . . . . . . . . . . . . . . . . . . . . . . . . . . . . . . . . . . . . .89
Closing documents . . . . . . . . . . . . . . . . . . . . . . . . . . . . . . . . . . . . . . . . . . . . . . . . . . . . . . . . . . . . . . . . . . . . . .91
Working with pages . . . . . . . . . . . . . . . . . . . . . . . . . . . . . . . . . . . . . . . . . . . . . . . . . . . . . . . . . . . . . . . 91
Creating pages . . . . . . . . . . . . . . . . . . . . . . . . . . . . . . . . . . . . . . . . . . . . . . . . . . . . . . . . . . . . . . . . . . . . . . . . .93
Activating pages . . . . . . . . . . . . . . . . . . . . . . . . . . . . . . . . . . . . . . . . . . . . . . . . . . . . . . . . . . . . . . . . . . . . . . . .94
Reordering pages . . . . . . . . . . . . . . . . . . . . . . . . . . . . . . . . . . . . . . . . . . . . . . . . . . . . . . . . . . . . . . . . . . . . . . .95
Sizing pages . . . . . . . . . . . . . . . . . . . . . . . . . . . . . . . . . . . . . . . . . . . . . . . . . . . . . . . . . . . . . . . . . . . . . . . . . . .95
Modifying pages . . . . . . . . . . . . . . . . . . . . . . . . . . . . . . . . . . . . . . . . . . . . . . . . . . . . . . . . . . . . . . . . . . . . . . . .96
Deleting pages . . . . . . . . . . . . . . . . . . . . . . . . . . . . . . . . . . . . . . . . . . . . . . . . . . . . . . . . . . . . . . . . . . . . . . . . .97
Working with layers . . . . . . . . . . . . . . . . . . . . . . . . . . . . . . . . . . . . . . . . . . . . . . . . . . . . . . . . . . . . . . . 97
Creating layers . . . . . . . . . . . . . . . . . . . . . . . . . . . . . . . . . . . . . . . . . . . . . . . . . . . . . . . . . . . . . . . . . . . . . . . . .99
Activating layers . . . . . . . . . . . . . . . . . . . . . . . . . . . . . . . . . . . . . . . . . . . . . . . . . . . . . . . . . . . . . . . . . . . . . . . .99
Locking and hiding layers . . . . . . . . . . . . . . . . . . . . . . . . . . . . . . . . . . . . . . . . . . . . . . . . . . . . . . . . . . . . . . . . .99
Reordering layers. . . . . . . . . . . . . . . . . . . . . . . . . . . . . . . . . . . . . . . . . . . . . . . . . . . . . . . . . . . . . . . . . . . . . . .100
Renaming layers . . . . . . . . . . . . . . . . . . . . . . . . . . . . . . . . . . . . . . . . . . . . . . . . . . . . . . . . . . . . . . . . . . . . . . .100
Importing files into layers . . . . . . . . . . . . . . . . . . . . . . . . . . . . . . . . . . . . . . . . . . . . . . . . . . . . . . . . . . . . . . . . 100
Deleting layers. . . . . . . . . . . . . . . . . . . . . . . . . . . . . . . . . . . . . . . . . . . . . . . . . . . . . . . . . . . . . . . . . . . . . . . . .101
Working with shapes . . . . . . . . . . . . . . . . . . . . . . . . . . . . . . . . . . . . . . . . . . . . . . . . . . . . . . . . . . . . . 102
Creating shapes. . . . . . . . . . . . . . . . . . . . . . . . . . . . . . . . . . . . . . . . . . . . . . . . . . . . . . . . . . . . . . . . . . . . . . . .111
Determining shape type . . . . . . . . . . . . . . . . . . . . . . . . . . . . . . . . . . . . . . . . . . . . . . . . . . . . . . . . . . . . . . . . .121
Selecting shapes . . . . . . . . . . . . . . . . . . . . . . . . . . . . . . . . . . . . . . . . . . . . . . . . . . . . . . . . . . . . . . . . . . . . . . .121
Duplicating shapes . . . . . . . . . . . . . . . . . . . . . . . . . . . . . . . . . . . . . . . . . . . . . . . . . . . . . . . . . . . . . . . . . . . . .125
Transforming shapes . . . . . . . . . . . . . . . . . . . . . . . . . . . . . . . . . . . . . . . . . . . . . . . . . . . . . . . . . . . . . . . . . . . .125
Coloring shapes. . . . . . . . . . . . . . . . . . . . . . . . . . . . . . . . . . . . . . . . . . . . . . . . . . . . . . . . . . . . . . . . . . . . . . . .130
Applying effects to shapes . . . . . . . . . . . . . . . . . . . . . . . . . . . . . . . . . . . . . . . . . . . . . . . . . . . . . . . . . . . . . . .135
Searching for shapes . . . . . . . . . . . . . . . . . . . . . . . . . . . . . . . . . . . . . . . . . . . . . . . . . . . . . . . . . . . . . . . . . . . .138
Deleting shapes. . . . . . . . . . . . . . . . . . . . . . . . . . . . . . . . . . . . . . . . . . . . . . . . . . . . . . . . . . . . . . . . . . . . . . . .138
Working with import filters and export filters . . . . . . . . . . . . . . . . . . . . . . . . . . . . . . . . . . . . . . . . . . 138
Working with import filters. . . . . . . . . . . . . . . . . . . . . . . . . . . . . . . . . . . . . . . . . . . . . . . . . . . . . . . . . . . . . . . 139
Working with export filters . . . . . . . . . . . . . . . . . . . . . . . . . . . . . . . . . . . . . . . . . . . . . . . . . . . . . . . . . . . . . . .141
Glossary. . . . . . . . . . . . . . . . . . . . . . . . . . . . . . . . . . . . . . . . . . . . . . . . . . . . . . . . 144
Index . . . . . . . . . . . . . . . . . . . . . . . . . . . . . . . . . . . . . . . . . . . . . . . . . . . . . . . . . . 149
Macro Programming Guide
Introduction 1
Introduction
Welcome to the Macro Programming Guide!
This resource can help you explore the macro-related features and functions of CorelDRAW® and
Corel® PHOTO-PAINT™. An understanding of these features and functions can help you automate tasks or
develop commercial solutions that integrate with the software.
In this resource
This resource contains the following sections.
Also included is a glossary (see page 144), which defines many of the key terms used in this documentation.
Most of the code examples provided in this documentation are written in VBA.
In this section
This section contains the following topics:
• “About this resource” on page 1
• “About additional resources” on page 2
About this resource
This resource assumes that the reader has experience with at least one procedural programming language, such
as BASIC, Microsoft® Visual Basic® (VB), C, C++, Java™, Pascal, Cobol, or Fortran.
Section Description
“Understanding automation” on page 4 Introduction to the concepts of automation and macros,
and to the macro-programming formats supported by the
software
“Getting started with macros” on page 25 Overview of the macro-related tools and features of the
software
“Creating macros” on page 42 How to write, record, run, and debug macros
“Making macros user-friendly” on page 54 How to enhance the usability of macros through dialog
boxes, toolbar buttons, user interaction, and
documentation
“Organizing and deploying macros” on page 68 How to organize and deploy the macros you create
“Understanding the CorelDRAW object model” on
page 71
Overview of the most important features and functions of
the CorelDRAW object model

Macro Programming Guide
Introduction 2
This resource does not describe the basics of procedural programming (such as functions, conditional branching,
and looping). Therefore, before using this documentation, non-programmers are strongly advised to learn basic
programming in a language such as Microsoft® Visual Basic® for Applications (VBA).
Most of the code examples provided in this documentation are written in VBA.
For more detailed instruction on the VB programming environment and on VBA, see Microsoft Visual
Basic Help, which is available from the Help menu in the Macro Editor.
For a more basic introduction to macros, please see the topic “Working with macros” in the main Help
file for the application. You can access the main Help from within an application by clicking Help ` Help
topics.
Documentation conventions
The following table explains the documentation conventions used in this resource.
About additional resources
This topic describes how to get even more information about macros or the software.
For more information about macros
This software provides additional resources that contain helpful information about macros. These additional
resources, located in the Data folder for the installed software, are described in the following table.
Wherever you see this You’ll find
A note — describes required conditions for performing a procedure or
presents other essential information
A tip — describes helpful information such as shortcuts, alternate
methods, or benefits that are related to a procedure
bold text The name of a control or other element on the user interface
<text in italics and between angle brackets> A placeholder for user-specified information, such as a path or filename
monospace text A reference to coding
Resource Description and filename
Macro Help for CorelDRAW Provides comprehensive information about the CorelDRAW
object model and the macro-related features and functions of
the application
draw_om.chm

Macro Programming Guide
Introduction 3
For a more basic introduction to macros, please see the topic “Working with macros” in the main Help
file for the application. You can access the main Help from within an application by clicking Help ` Help
topics.
For more information about the software
A variety of additional resources for the software are also available to you.
For comprehensive information about the features in the software, you can consult its installed documentation:
• The program group for the software (on the Windows® Start menu) includes a Documentation folder,
which provides easy access to various installed resources.
• Each program offers in-product Help, displayed by clicking Help ` Help topics.
For even more information about the software, see the following Web-based resources.
You can submit any comments or suggestions about the software by using the contact information provided at
www.corel.com/contact.
Macro Help for Corel PHOTO-PAINT Provides comprehensive information about the Corel PHOTO-
PAINT object model and the macro-related features and
functions of the application
pp_om.chm
Object-model diagram for CorelDRAW Provides a hierarchical representation of the CorelDRAW object
model
CorelDRAW Object Model Diagram.pdf
Object-model diagram for Corel PHOTO-PAINT Provides a hierarchical representation of the Corel PHOTO-
PAINT object model
Corel PHOTO-PAINT Object Model Diagram.pdf
Resource Description and URL
CorelDRAW website Provides the latest news, tips and tricks, and information about upgrades
www.corel.com/coreldraw
Corel® Support Services website Provides prompt and accurate information about product features,
specifications, pricing, availability, services, and technical support
www.corel.com/support
Corel® Knowledge Base™ Provides a repository of articles written by the Corel Technical Support
Services team in response to questions by users
www.corel.com/knowledgebase
CorelDRAW online community Provides interaction with other users through sharing experiences, asking
questions, and receiving help and suggestions
www.coreldraw.com
Resource Description and filename

Macro Programming Guide
Understanding automation 4
Understanding automation
Before you begin to work with macros, you need to understand the concept of automation. This section provides
basic information about automation and about the macro-programming formats that are supported by the
software.
In this section
This section contains the following topics:
• “What is automation?” on page 4
• “Which automation environments are supported?” on page 5
• “What are the main elements of automation?” on page 10
• “How is automation coding structured?” on page 13
What is automation?
Many actions that you perform in the software can be combined with other, related actions into a single
automated solution. Automating repetitive tasks saves time, reduces effort, and lets you perform operations that
are too complex to perform manually.
Automation can be used by programmers and nonprogrammers alike.
This documentation does not teach programming skills to nonprogrammers; rather, it helps experienced
programmers develop useful solutions within the software. If you are not a programmer, you may want
to refer to other programming-related resources before continuing to read this documentation.
What is a macro?
Most macros are created to automate a series of tasks within an application. The simplest meaning of the term
“macro” is the recording of a group of related actions that can be played back automatically, in sequence,
whenever you need to perform them. Macros consist of instructions that are written in a programming language,
and some programming languages provide access to additional, more advanced, actions that cannot be recorded.
For the purposes of this documentation, a macro refers to a coded solution that performs tasks in the
application by automating functions and subroutines (see “Using functions and subroutines” on page 15).
Although you can record a sequence of actions in the software, the real power of automation is that you can add
conditions and looping mechanisms to a recording. As an example, let’s consider a simple macro that applies a
red fill and a 1-point outline to a selected shape. By adding a condition and a looping mechanism to the code,
you can produce a macro that seeks out each selected shape and applies only the fill to text shapes and only the
outline to all other shape types.
After you create a macro, you can ensure that it has the desired outcome by setpping through its code one line a
a time, or “debugging” it. When you are happy with the macro, you can keep it for future use and even share it
with others.
Macro Programming Guide
Understanding automation 5
Which sample macros are available?
The software includes sample VBA macros, which supply additional functionality, demonstrate automation in
the suite, and provide sample code.
The following sample VBA macros are included for CorelDRAW:
• File converter (FileConverter.gms) — converts a vector or bitmap to a specified vector or bitmap format. You
can choose export parameters by using dialog boxes associated with particular filters. You can also save each
page as a separate file and set various page properties, such as size, orientation, and background color. The
following file formats are supported: AI, BMP, CDR, CGM, CMX, CPT, DSF, DXF, EPS, GIF, JPEG, PCT,
PNG, PPF, SVG, SWF, TIF, WMF, and WPG.
• Calendar wizard (CalendarWizard.gms) — generates customized calendars. You can choose the date range,
layout, font, color, language, and many other options. You can also add holidays and moon phases.
The following sample VBA macro is included for Corel PHOTO-PAINT:
• HTML slide show creator (Slideshow.gms) — generates an HTML slide show from the images you specify.
Open files can be added, ordered, and published as a series of HTML files, each of which displays one image
and provides navigation buttons. You can create a title, alternate text, and a name for each slide. You can also
choose a location and a name for the delineation folder; select the image folder; and specify notes, a caption, a
URL, and more.
Which automation environments are supported?
For CorelDRAW versions 6 through 9, the only method of automating tasks was using the Corel SCRIPT™
language. Solution developers used Corel SCRIPT to create intelligent mini-applications for drawing shapes,
repositioning and resizing shapes, opening and closing documents, and setting styles within CorelDRAW.
Although the Corel SCRIPT language was useful for automating basic tasks, a more flexible and powerful
solution became necessary. For version 10, CorelDRAW was enhanced with support for the
Microsoft Visual Basic for Applications (VBA) engine, which handled behind-the-scenes automation. The
addition of VBA made CorelDRAW immediately accessible to millions of VBA and Microsoft Visual Basic (VB)
developers around the world. Since then, VBA has been supported by every version of the CorelDRAW software
suite.
More recently, the software suite added support for Microsoft® Visual Studio® Tools for Applications (VSTA),
the successor to VBA.
Although CorelDRAW no longer includes the Corel SCRIPT editor, it does include the Corel SCRIPT
run-time engine. Therefore, you can easily migrate scripts that were written for earlier versions of
CorelDRAW to later versions of the software. For information on using Corel SCRIPT with CorelDRAW,
see “Working with scripts” in the main Help file for CorelDRAW (draw.chm).
In Corel PHOTO-PAINT, you can automate tasks by using VBA or VSTA to create a macro, or by using
Corel SCRIPT to create a script. A macro is the better choice if you want to write the code that is required
to carry out the task (by using VBA or VSTA), while a script is the better choice if you want to record
the steps that are required to carry out the task (by using Corel SCRIPT). For information on using

Macro Programming Guide
Understanding automation 6
Corel SCRIPT with Corel PHOTO-PAINT, see “Working with scripts” in the main Help file for
Corel PHOTO-PAINT (corelpp.chm).
By supporting VBA and VSTA, the software suite offers a platform for the following:
• developing powerful corporate graphical solutions — such as automated ticket generators, customized
calendars, and batch file-processors
• streamlining workflows — such as with on-the-fly page-layout mechanisms
• customizing default software features — such as the creation, alignment, or transformation of objects
• ...and much more!
VBA and VSTA each provide their own fully integrated development environment (IDE), with contextual pop-
up lists, syntax highlighting, line-by-line debugging, and visual designer windows. These features are
particularly helpful to inexperienced developers.
For more information on VBA and VSTA, see the following topics:
• “What is VBA?” on page 6
• “What is VSTA?” on page 8
What is VBA?
Microsoft Visual Basic for Applications (VBA) is a built-in programming environment that can be used to
automate repetitive functions and create intelligent solutions in the software that supports it. VBA is a subset of
the Microsoft Visual Basic (VB) object-driven programming environment. Usually, VBA is integrated into
another application to customize functionality within that application.
VBA is both a language and an editor. The VBA language cannot be used without its editor, and the VBA editor
is the only utility in which VBA code can be edited or VBA programs can be run.
The VBA language is an event-driven programming language. In other words, it is used to write code that
produces a response to an action, such as clicking a button or choosing an option from a list box. When the
action occurs, the appropriate event is called, and the code for that event is executed. Events can be simple or
complex. For instance, you can code a single line that displays a message box or write an entire procedure that
interacts with a database.
With traditional procedural programming (or “object-driven programming”), the program starts at the
first line and executes one line at a time. VB provides an example of an object-driven programming
environment.
Most of the code examples provided in this documentation are written in VBA.
The VBA editor — called the “Macro Editor” (formerly the “Visual Basic Editor”) in CorelDRAW and
Corel PHOTO-PAINT — is an integrated development environment (IDE) that lets you manipulate the objects
that are exposed by the object model of the application. To help you code macros, the Macro Editor provides
context-sensitive Help for all the object-model elements that are available to you.
VBA is an in-process automation controller. In other words, VBA can be used to control software features that
can be automated, and VBA runs efficiently by bypassing the interprocess synchronization mechanisms.
However, the automation that the in-process VBA can access can also be accessed by the following:
• external out-of-process automation controllers (OLE clients)
• applications that are developed in programming languages (such as VB, Visual C++,
Windows® Script Host, and C++) that can be used to develop OLE clients

Macro Programming Guide
Understanding automation 7
• the VBA engines of other applications
VBA provides a set of tools for customizing the graphical user interface of the software. These tools let you
process and present data efficiently and effectively. Advantages of using VBA include the following:
• familiarity of the VB language
• rapid application development (RAD) IDE
• fast run-time performance of the resulting integrated solutions
• extensible forms package that supports ActiveX® controls for creating user interfaces
• access to the full Windows application programming interface (API) and the underlying file system
• connectivity to corporate data
• integration with other software that is based on component object models (COMs)
VBA lets you customize an application to suit your needs, or even integrate it with another VBA-enabled
application by referencing the object-model components of the second application. Although VBA was
developed by Microsoft and is built into almost all its desktop applications (including Microsoft Office),
Microsoft licenses the technology to other companies (including Corel Corporation; Autodesk, Inc., in
AutoCAD®; and IntelliCAD Technology Consortium, in IntelliCAD®). Software products that support VBA
can typically be used to control each other, and they can even be used to control some software products that do
not support VBA. Consequently, you can use VBA to build solutions in CorelDRAW and Corel PHOTO-PAINT
that access a wide variety of other software products: databases, word processors, XML editors, and more.
For a complete list of applications that support VBA, see the Microsoft website.
How does VBA differ from VB and VBScript?
The VB programming system is an advanced set of programming tools that provides advanced functionality and
components for the Windows operating system and other Windows-based programs. For example, unlike VBA
or VBScript, VB lets you create application extensions (DLL files) and stand-alone executable programs (EXE
files). (The programs that you create with VBA must run inside the host application.)
VB is a “visual”version of the BASIC programming language — that is, it provides visual cues within the editor.
As a result, VB is an easy language to learn. In addition, Microsoft has greatly enhanced the original BASIC
language, so that VB is both powerful and fast (although not as powerful as Java or C++, nor as fast as C).
VBA is a subset of the VB programming language, and it uses the programming structure of VB to manipulate
the object-model elements that are exposed by an application. The manipulation of these objects results in small
packets of code procedures within the application. These code procedures and resulting projects are called “add-
ins.”
VBScript (sometimes referred to as Microsoft Visual Basic, Scripting Edition) is also a subset of the VB
programming language. VBScript is a Web-based HTML document scripting language.
How does VBA differ from Java and JavaScript?
VBA is similar to Java and JavaScript® in that it is a high-level, procedural programming language with full
garbage collection and very little memory-pointer support. (For more information, see “Allocating memory” on

Macro Programming Guide
Understanding automation 8
page 16.) In addition, code that is developed in VBA, much like code developed in Java and JavaScript, supports
on-demand compilation and can be executed without being compiled.
VBA is also similar to JavaScript in that it cannot be executed as a stand-alone application. JavaScript is
embedded within Web pages as a mechanism for manipulating the document object model (DOM) of the Web
browser. Likewise, VBA programs are executed inside a host environment (such as CorelDRAW or
Corel PHOTO-PAINT) to manipulate the object model of the host.
Most VBA applications can be compiled to p-code to make them run more quickly, although the difference is
hardly noticeable because of the sophistication of today’s computer hardware. Similar compilation is possible
with Java, but not with JavaScript.
Finally, whereas VBA uses a single equals sign ( =) for both comparison and assignment, Java and JavaScript use
a single equals sign ( =) for assignment and two equals signs ( == ) for Boolean comparison. (For more
information, see “Using Boolean comparison and assignment” on page 17.)
How does VBA differ from C and C++?
Like C and C++, VB uses functions. In VB, functions can be used to return a value, but subroutines cannot be
used in that way. However, functions are used in C and C++, regardless of whether you want to return a value.
(For more information, see “Using functions and subroutines” on page 15.)
VBA allocates and frees memory transparently. In C and C++, however, the developer is responsible for most
memory management. As a result, using strings in VBA is even simpler than using the CString class in C++.
Finally, whereas VBA uses a single equals sign ( =) for both comparison and assignment, C and C++ use a
single equals sign ( =) for assignment and two equals signs ( == ) for Boolean comparison. (For more
information,see “Using Boolean comparison and assignment” on page 17.)
How does VBA differ from WSH?
Windows Script Host (WSH) is an out-of-process automation controller that lets you do occasional scripting and
automation of Windows tasks and can be used to control software. Although WSH is a useful addition to the
Windows operating system, WSH scripts tend to be slow because they must run out of process, and they cannot
be compiled (and must be interpreted as they are executed).
WSH is a host for a number of scripting languages, each of which has its own syntax. However, the standard
language that WSH uses is a macro language that resembles VB, so for standard scripts, the syntax is the same
as in VBA.
What is VSTA?
The successor to VBA, Microsoft Visual Studio Tools for Applications (VSTA) is based on
Microsoft Visual Studio 2008. In CorelDRAW and Corel PHOTO-PAINT, the VSTA feature supports the .NET
framework and enables development in two programming languages: Visual Basic .NET and Visual C#.
Most of the code examples provided in this documentation are written in VBA.
The VSTA Editor in CorelDRAW and Corel PHOTO-PAINT is an integrated development environment (IDE)
that lets you create VSTA solutions for the software.

Macro Programming Guide
Understanding automation 9
How does VSTA compare with VBA?
Both VSTA and VBA allow you to create powerful macro solutions. With VSTA, you use the VSTA Editor as an
IDE, and you use Visual Basic .NET or Visual C# as a programming language. With VBA, you use the
Macro Editor as an IDE, and you use VBA as a programming language.
If you want to perform any of the following tasks, you can use either VSTA or VBA:
• customize or extend the features of the software
• interact with other applications that use Visual Basic 6 — or with other compatible components that are
external to the software
• interact with Web-based services
• customize the IDE with add-ins
• create macro projects — with multi-threading support, if desired
• access macro projects programmatically
• generate macro code dynamically
• store macro code in a pre-compiled format
• hide macro code from other macro authors
• debug macro projects
• create customized user interfaces for macro projects
However, if you want to perform any of the following tasks, you must use VSTA:
• access the .NET framework natively — to support using Managed Add-in Framework (MAF), referencing
.NET assemblies directly, running customized code on the Common Language Runtime (CLR), enforcing
.NET security policies, or creating user interfaces by using .NET WinForms
• fully customize the IDE
• create macro projects that are certified to run on Windows Vista
• create macro projects that support 64-bit processors
• create macro projects that support server-side customizations
• create macro projects that support all data types, including BigDecimal and Int64
• create macro projects and macro assemblies that persist without the use of structured storage
• open and modify macro projects in Visual Studio
• compile macro projects to DLL assemblies
• run macro projects out of process
• run macro projects without causing the host application to stop execution at errors or breakpoints
• isolate macro projects from one another; run macro projects independently, and stop them during runtime
without affecting other running projects
• author macros within managed code
• prevent servers from running customized user interfaces for macro projects

Macro Programming Guide
Understanding automation 10
What are the main elements of automation?
If you’ve ever developed object-oriented code in C++, Borland Delphi, or Java, you’re already familiar with
programming-related concepts such as “objects,” “classes,” “properties,” and “methods.” However, let’s
reexamine these terms as they apply to automating CorelDRAW and Corel PHOTO-PAINT.
In this topic
This topic contains the following subtopics:
• “What is an object model?” on page 10
• “What is a class?” on page 11
• “What is a collection?” on page 11
• “What is a property?” on page 11
• “What is a method?” on page 12
• “What is an event?” on page 12
• “What is an enumeration?” on page 12
• “What is a constant?” on page 12
What is an object model?
An object model represents the hierarchy of items (or “objects”) that make up an application and defines the
interrelationships of the objects within that hierarchy. In an object model, each object is a child of another object,
which is a child of yet another object, and so on. Furthermore, each object in an object model is defined by a
property, a method, or an event, or a combination of these items.
Besides providing a high level of structure, an object model also lets you use object types (or “classes”) in various
ways. For example, a Shape object of type “group” is used to contain other Shape objects, each of which is from
type “group” or some other type, such as “rectangle,” “curve,” or “text.”
This high level of organization makes the object model easy to use, yet powerful.
How is an object model used in automation?
Automating CorelDRAW or Corel PHOTO-PAINT is accomplished by using the object model of the
application to access the various objects in a document and make changes to those objects.
In CorelDRAW and Corel PHOTO-PAINT, the Application object represents the top of the object hierarchy:
the program itself. All objects are children or grandchildren (or great-grandchildren, and so on) of the
application.
Starting with the Application object, you can “drill down” through the layers of hierarchy in the object model
until you find the desired, and usually the more specific, object. To reference the desired object, you must use a
standard notation to separate each level of the object hierarchy. As in many object-oriented languages, the
automation environment requires the use of a period or “dot operator” ( . ) to indicate that the object on the
right is a member (or child) of the object on the left.
Application.Documents(1).Pages(1).Layers(1).Shapes(1).Name = "ABC"

Macro Programming Guide
Understanding automation 11
An object requires its full hierarchical (or “fully qualified”) reference unless a shortcut is available to it (or unless
it has an implicit or implied meaning). An object shortcut is merely a syntactic replacement for the long-hand
version of an object. For example, the shortcut object ActiveLayer replaces the long-hand version
Application.ActiveDocument.ActivePage.ActiveLayer, while the object shortcut ActiveSelection
replaces the long-hand version Application.ActiveDocument.Selection.
For more information on object shortcuts, see “Using object shortcuts” on page 22.
What is a class?
A class is the definition or description of an object. A class outlines the properties, methods, and events that
apply to a type of object in an application; it acts as a template for all objects of that type class. To use a
metaphor, the class “car” is a small vehicle with an engine and four wheels.
An object is an instance of a class. To extend the car metaphor, the actual, physical car purchased for the purposes
of driving is an object (that is, an instance of the class “car”).
In the context of CorelDRAW and Corel PHOTO-PAINT, each open document is an instance of the Document
class, each page in the document is an instance of the Page class, and each layer (and each shape on each layer)
are more instances of more classes. For example, Document represents the Document class in the software
program. However, ActiveDocument represents an object within that class because it makes specific reference
to one object.
As previously discussed, objects are often made up of other smaller objects. For example, a car contains four
objects of the class “wheel,” two objects of the class “headlight,” and so on. Each of these child objects has the
same properties and methods of its class-type. This parent/child relationship of objects is an important one to
recognize, particularly when referencing an individual object.
Some classes “inherit” features from their parents. For example, in the context of CorelDRAW and
Corel PHOTO-PAINT, the Shape type has many subtypes (or “inherited types”), including Rectangle, Ellipse,
Curve, and Te x t . All these subtypes can make use of the basic members of the Shape type, including methods
for moving and transforming the shape and for setting its color. However, the subtypes also have their own
specialist members; for example, a Rectangle can have corner radii, whereas Te x t has an associated Font
property.
What is a collection?
A collection is similar to an array of objects; it is an object that contains a group of objects that are similar in
type. These objects share the same properties, methods, and events, and they are uniquely identified within the
collection by their index number or their name. Collection objects act in the same manner and are always plural.
For example, Documents represent the Documents collection class in the software program. However,
Documents.Item (1) references the first Document object in that collection.
What is a property?
A property is like an adjective in that it represents an attribute or characteristic quality of an object. Properties
can be returned or set, or they can be read-only.
Most classes have properties. As an illustration, the properties of the class “car” are that it is small, it has an
engine, and it has four wheels. Every instance of the class “car” (that is, every object in that class) also has
properties such as color, speed, and number of seats. Read-only properties are fixed by the design of the class; for

Macro Programming Guide
Understanding automation 12
example, the number of wheels or seats does not (usually) vary from car to car. However, other properties can be
changed after the object has been created; for example, the speed of the car can go up and down, and, with a bit
of help, its color can be changed.
In the context of CorelDRAW and Corel PHOTO-PAINT, Document objects have a name, a resolution, and
horizontal and vertical ruler units; individual shapes have outline properties and fill properties, as well as a
position and a rotation factor; and text objects have text properties, which may include the text itself. For
example, ActiveDocument.Name represents the Name property of a Document object; it specifies the name of
the active document.
What is a method?
A method is like a verb in that it represents an action that can be performed by or on an object. In the example
of a class “car,” the car can be made to go faster and slower, so two methods for the class are “accelerate” and
“decelerate.”
In the context of CorelDRAW and Corel PHOTO-PAINT, documents have methods for creating new pages,
layers have methods for creating new shapes, and shapes have methods for applying transformations and effects.
For example, ActiveDocument.Close represents the Close method of a Document object; it closes the active
document.
What is an event?
An event is like a noun in that it represents an action that takes place within an object. An event is triggered by
an action, such as a mouse click, a key press, or a system timer. An event can be coded to trigger appropriate
response in its object.
For example, the ActiveDocument.AfterSave event triggers an action in the Document object after it has
been saved.
What is an enumeration?
An enumeration (also called an “enumerated type”) represents a fixed value in the procedures and functions of
the coding for a macro. Whereas a variable temporarily stores a changing data value, the value of an
enumeration does not change.
What is a constant?
A constant is an instance of an enumeration, and an enumeration groups similar constants together.
For example, AddinFilter is an enumeration, yet it contains several constants, including AddinFilterNone
and AddinFilterNew.

Macro Programming Guide
Understanding automation 13
How is automation coding structured?
Your programming knowledge should help you learn to automate the software, regardless of your level of
experience with Microsoft Visual Basic for Applications (VBA) or Microsoft Visual Studio Tools for Applications
(VSTA).
In this topic
This topic contains the following subtopics:
• “Declaring variables” on page 13
• “Using functions and subroutines” on page 15
• “Ending lines” on page 16
• “Including comments” on page 16
• “Allocating memory” on page 16
• “Defining scope” on page 17
• “Using Boolean comparison and assignment” on page 17
• “Using logical and bitwise operators” on page 18
• “Providing message boxes and input boxes” on page 19
• “Referencing objects” on page 19
• “Referencing collections” on page 20
• “Using object shortcuts” on page 22
• “Providing event handlers” on page 23
The Macro Editor formats all VBA coding for you (see “Formatting code automatically” on page 31). The
only way to customize the formatting is to change the size of the indentations.
VBA can be used to create object-oriented classes. However, this function is a feature of the programming
language and is therefore not discussed in detail in this documentation.
Declaring variables
In VBA, the construction for declaring variables is as follows:
Dim foobar As Integer
The built-in data types are Byte, Boolean, Integer, Long, Single, Double, String, Variant, and several
other less-used types including Date, Decimal, and Object.
Variables can be declared anywhere within the body of a function, or at the top of the current module. However,
it is generally a good idea to declare a variable before it is used; otherwise, the compiler interprets it as a
Variant, and inefficiencies can be incurred at run time.
Booleans take False to be 0 and True to be any other value, although converting from a Boolean to a
Long results in True being converted to a value of –1.
To get more information about one of the built-in data types, type it in the Code window of the
Macro Editor, select it, and then press F1.

Macro Programming Guide
Understanding automation 14
Data structures can be built by using the following VBA syntax:
Public Type fooType
item1 As Integer
item2 As String
End Type
Dim myTypedItem As fooType
The items within a variable declared as type fooType are accessed by using dot notation:
myTypedItem.item1 = 5
Declaring strings
Using strings is much simpler in VBA than in C. In VBA, strings can be added together, truncated, searched
forwards and backwards, and passed as simple arguments to functions.
To add two strings together in VBA, simply use the concatenation operator ( &) or the addition operator ( +):
Dim string1 As String, string2 As String
string2 = string1 & " more text" + " even more text"
In VBA, there are many functions for manipulating strings, including InStr(), Left(), Mid(), Right(),
Len(), and Trim().
Declaring enumerations
To declare an enumeration in VBA, use the following construction:
Public Enum fooEnum
ItemOne
ItemTwo
ItemThree
End Enum
By default, the first item in an enumerated type is assigned a value of 0.
Declaring arrays
To declare an array in VBA, use parentheses — that is, the ( and ) symbols:
Dim barArray (4) As Integer

Macro Programming Guide
Understanding automation 15
The value defines the index of the last item in the array. Because array indexes are zero-based by default, there
are five elements in the preceding sample array (that is, elements 0 thru 4, inclusive).
Arrays can be resized by using ReDim. For example, the following VBA code adds an extra element to barArray
but preserves the existing contents of the original five elements:
ReDim Preserve barArray (6)
Upper and lower bounds for an array can be determined at run time by using the functions UBound() and
LBound().
Multidimensional arrays can be declared by separating the dimension indexes with commas, as in the following
VBA example:
Dim barArray (4, 3)
Using functions and subroutines
VBA uses both functions and subroutines (or “subs”). Functions can be used to return a value, but subs cannot.
In VBA, functions and subs do not need to be declared before they are used, nor before they are defined. In fact,
functions and subs need to be declared only if they actually exist in external system DLLs.
Typical functions in a language such as Java or C++ can be structured as follows:
void foo( string stringItem ) {
// The body of the function goes here
}
double bar( int numItem ) { return 23.2; }
In VBA, however, functions are structured as in the following example:
Public Sub foo (stringItem As String)
' The body of the subroutine goes here
End Sub
Public Function bar (numItem As Integer) As Double bar = 23.2
End Function
To force a function or sub to exit immediately, you can use Exit Function or Exit Sub (respectively).

Macro Programming Guide
Understanding automation 16
Ending lines
In VBA, each statement must exist on its own line, but no special character is required to denote the end of each
line. (In contrast, many other programming languages use a semicolon to separate individual statements.)
To break a long VBA statement over two or more lines, each of the lines (other than the last line) must end with
an underscore ( _ ) preceded by at least one space:
newString = fooFunction ("This is a string", _
5, 10, 2)
You can combine several statements in a single VBA line by separating them with colons:
a = 1 : b = 2 : c = a + b
A VBA line cannot end with a colon. VBA lines that end with a colon are labels that are used by the Goto
statement.
Including comments
Comments in VBA — similarly to in ANSI, C++, and Java — can be created only at the end of a line.
Comments begin with an apostrophe ( ') and terminate at the end of the line.
Each line of a multi-line comment must begin with its own apostrophe in VBA:
a = b ' This is a really interesting piece of code that
' requires so much explanation that I needed to break
' the comment over multiple lines.
To comment out large sections of VBA code, use the following syntax (similarly to in C or C++):
#If 0 Then ' That's a zero, not the letter 'oh'.
' All this code will be ignored by
' the compiler at run time!
#End If
Allocating memory
VBA does not support C-style memory pointers. Memory allocation and garbage collection are automatic and
transparent, just as in Java and JavaScript (and some C++ code).
Passing arguments
Most languages, including C++ and Java, pass an argument to a procedure as a copy of the original. If the
original must be passed, then one of two things can happen:
• a memory pointer is passed that directs the procedure to the original argument in memory
• a reference to the original argument is passed

Macro Programming Guide
Understanding automation 17
Microsoft Visual Basic (VB) has the same requirements for passing arguments. In VB, passing a copy of the
original argument is called “passing by value” and passing a reference to the original is called “passing by
reference.”
By default, function and subroutine parameters are passed by reference. A reference to the original variable is
passed in the argument of the procedure; changing the value of that argument, in effect, changes the value of the
original variable value as well. In this way, more than one value can be returned from a function or subroutine. To
explicitly annotate the code to indicate that an argument is being passed by reference, you can prefix the
argument with ByRef.
If you want to prevent a procedure from changing the value of the original variable, you can force the copying of
an argument. To do this in VBA, prefix the argument with ByVal, as shown in the example that follows. The
functionality of ByRef and ByVal is similar to the ability of C and C++ to pass a copy of a variable, or to pass a
pointer to the original variable.
Private Sub fooFunc (ByVal int1 As Integer, _
ByRef long1 As Long, _
long2 As Long) ' Passed ByRef by default
In the preceding VBA example, arguments long1 and long2 are both, by default, passed by reference.
Modifying either argument within the body of the function modifies the original variable; however, modifying
int1 does not modify the original because it is a copy of the original.
Defining scope
You can define the scope of a data type or procedure (or even an object). Data types, functions, and subroutines
(and members of classes) that are declared as private are visible only within that module (or file). By contrast,
functions that are declared as public are visible throughout all the modules; however, you may need to use fully
qualified referencing if the modules are almost out of scope — for example, if you are referencing a function in a
different project.
Unlike C, VBA does not use braces — that is, the { and } symbols — to define local scope. Local scope in VBA
is defined by an opening function or subroutine definition statement (that is, Function or Sub) and a matching
End statement (that is, End Function or End Sub). Any variables declared within the function are available
only within the scope of the function itself.
Using Boolean comparison and assignment
In Microsoft Visual Basic (VB), Boolean comparison and Boolean assignment are both performed by using a
single equals sign ( =):
If a = b Then c = d
By contrast, many other languages use a double equals sign for Boolean comparison and a single equals sign for
Boolean assignment:
if( a == b ) c = d;

Macro Programming Guide
Understanding automation 18
The following code, which is valid in C, C++, Java, and JavaScript, is invalid in VBA:
if( ( result = fooBar( ) ) == true )
The preceding example would be written in VBA as the following:
result = fooBar( )
If result = True Then
For other Boolean comparisons, VBA uses the same operators as other languages (except for the operators for “is
equal to” and “is not equal to”). All the Boolean-comparison operators are provided in the following table.
The result of using a Boolean operator is always either True or False.
Using logical and bitwise operators
In VBA, logical operations are performed by using the keywords And, Not, Or, Xor, Imp, and Eqv, which perform
the logical operations AND, NOT, OR, Exclusive-OR, logical implication, and logical equivalence (respectively).
These operators also perform Boolean comparisons.
The following code shows a comparison written in C or a similar language:
if( ( a && b ) || ( c && d ) )
This example would be written as follows in VBA:
If ( a And b ) Or ( c And d ) Then
Alternatively, the preceding VBA code could be written in the following full long-hand form:
If ( a And b = True ) Or ( c And d = True ) = True Then
The following table provides a comparison of the four common VBA logical and bitwise operators, and the C-
style logical and bitwise operators that are used by C, C++, Java, and JavaScript.
Comparison VBA operator C-style operator
Is equal to ===
Is not equal to <> !=
Is greater than >>
Is less than <<
Is greater than or equal to >= >=
Is less than or equal to <= <=
VBA operator C-style bitwise operator C-style Boolean operator
And & &&

Macro Programming Guide
Understanding automation 19
Providing message boxes and input boxes
In VBA, you can present simple messages to the user by using the MsgBox function:
Dim retval As Long
retval = MsgBox("Click OK if you agree.", _
vbOKCancel, "Easy Message")
If retval = vbOK Then
MsgBox "You clicked OK.", vbOK, "Affirmative"
End If
You can also get strings from the user by using InputBox function:
Dim inText As String
inText = InputBox("Input some text:", "type here")
If Len(inText) > 0 Then
MsgBox "You typed the following: " & inText & "."
End If
If the user clicks Cancel, the length of the string returned in inText is zero.
For information on creating more complex user interfaces, see “Making macros user-friendly” on page 54.
Referencing objects
If you want to create a reference to an object so that you can treat that reference like a variable (sh, in the
following VBA example for CorelDRAW), you can use the Set keyword.
Dim sh As Shape
Set sh = ActiveSelection.Shapes.Item(1)
After you create this reference, you can treat it as though it were the object itself.
sh.Outline.Color.GrayAssign 35
If the selection is changed while sh is still in scope, sh references the original shape from the old selection and is
Not ~ !
Or | ||
Xor ^
VBA operator C-style bitwise operator C-style Boolean operator

Macro Programming Guide
Understanding automation 20
unaffected by the new selection. You cannot simply assign the object to the variable as in the following example:
Dim sh As Shape
sh = ActiveSelection.Shapes.Item(1)
To release an object, you must set its reference value to Nothing.
Set sh = Nothing
You can also test whether a variable references a valid object by using the Nothing keyword.
If sh Is Nothing Then MsgBox "sh is de-referenced."
Objects do not need to be explicitly released. In most cases, VB releases the object upon disposal of the variable
when you exit the function or subroutine.
Referencing collections
Many objects are members of collections. A collection is similar to an array, except that it contains objects rather
than values. However, members of collections can be accessed in the same way as arrays. For example, a
collection that is used frequently in CorelDRAW is the collection of shapes on a layer: The object ActiveLayer
references either the current layer or the layer that is selected in the Object Manager docker.
CorelDRAW contains many collections: A document contains pages, a page contains layers, a layer contains
shapes, a curve contains subpaths, a subpath contains segments and nodes, a text range contains lines and words,
a group contains shapes, and the application contains windows. All these collections are handled by VBA in the
same way.
Referencing collection items
To reference the shapes on a layer, the collection of shapes for that layer is used: ActiveLayer.Shapes. To
reference the individual shapes in the collection, the Item() property is used. Here is a VBA example for
CorelDRAW:
Dim sh As Shape
Set sh = ActiveLayer.Shapes.Item(1)
Most elements of a collection start at 1 and increase. For the collection ActiveLayer.Shapes, Item(1) is the
item at the “top” or “front” of the layer — in other words, it is the item that is in front of all other shapes.
Furthermore, because each item in the ActiveLayer collection is an object of type Shape, you can reference any
item in VBA merely by appending the appropriate dot-notated member:
ActiveLayer.Shapes.Item(1).Outline.ConvertToObject
Sometimes, individual items have names. If the item you are looking for has an associated name (and you know
what the name is and which collection the item is in), you can use that name to reference the item directly, as in
the following VBA example for CorelDRAW:
Dim sh1 As Shape, sh2 As Shape

Macro Programming Guide
Understanding automation 21
Set sh1 = ActiveLayer.CreateRectangle(0, 5, 7, 0)
sh1.Name = "myShape"
Set sh2 = ActiveLayer.Shapes.Item("myShape")
Also, because an item is usually the implied or default member of a collection, it is not strictly required. For this
reason, the last line of the preceding VBA code can be rewritten as follows:
Set sh2 = ActiveLayer.Shapes("myShape")
Counting collection items
All collections have a property called Count. This read-only property gives the number of members in the
collection, as in the following VBA example for CorelDRAW:
Dim count As Long
count = ActiveLayer.Shapes.Count
The returned value is not only the number of items in the collection: Because the collection starts from 1, it is
also the index of the last item.
Parsing collection items
It is often necessary to parse through the members of a collection to check or change the properties of each item.
By using the Item() and Count members, it is straightforward to step through a collection of items. With each
iteration, it is possible to test the properties of the current item, or to call its methods. The following VBA code
for CorelDRAW restricts all shapes on the layer to no wider than ten units:
Dim I As Long, count As Long
count = ActiveLayer.Shapes.Count
For I = 1 to count
If ActiveLayer.Shapes.Item(i).SizeWidth > 10 Then
ActiveLayer.Shapes.Item(i).SizeWidth = 10
End If
Next I
There is, however, a more convenient way of parsing a collection in VBA. Instead of using the Count property
and a For-Next loop, this technique uses a For-Each-In loop:
Dim sh As Shape
For Each sh In ActiveLayer.Shapes
If sh.SizeWidth > 10 Then

Macro Programming Guide
Understanding automation 22
sh.SizeWidth = 10
End If
Next sh
If you want to copy the selection and then parse it later when it is no longer selected, copy the selection into a
ShapeRange object:
Dim sr As ShapeRange
Dim sh As Shape
Set sr = ActiveSelectionRange
For Each sh In sr
' Do something with each shape
Next sh
Using object shortcuts
Shortcuts are provided for some frequently accessed objects. Using shortcuts requires less typing, so shortcuts are
easier to use than their longhand versions. (Also, using shortcuts can improve run-time performance because the
compiler does not need to determine every object in a long dot-separated reference.)
For CorelDRAW, a shortcut can be used on its own as a property of the Application object. The following
table provides these shortcuts and their long forms. (For a description of any item, see the “Object Model
Reference” section of the Macros Help file for CorelDRAW [draw_om.chm].)
For Corel PHOTO-PAINT, a shortcut can be used on its own as a property of the Corel PHOTO-PAINT
Application object. The following table provides these shortcuts and their long forms. (For a description of any
item, see the “Object Model Reference” section of the Corel PHOTO-PAINT Macros Help file [pp_om.chm].)
Shortcut Long form
ActiveLayer ActivePage.ActiveLayer
ActivePage ActiveDocument.ActivePage
ActiveSelection ActiveDocument.Selection
ActiveSelectionRange ActiveDocument.SelectionRange
ActiveShape ActiveDocument.Selection.Shapes(1)
ActiveView ActiveWindow.ActiveView
ActiveWindow ActiveDocument.ActiveWindow
Shortcut Long form
ActiveLayer ActivePage.ActiveLayer

Macro Programming Guide
Understanding automation 23
For CorelDRAW, the following shortcuts can also be used as members of a given Document object:
• ActiveLayer
• ActivePage
• ActiveShape
• ActiveWindow
For Corel PHOTO-PAINT, the following shortcuts can also be used as members of a given Document object:
• ActiveLayer
• ActiveWindow
For CorelDRAW, the Document object also has the properties Selection and SelectionRange, which let you
get the selection or selection range (respectively) from a specified document regardless of whether that document
is active.
Providing event handlers
While running, CorelDRAW and Corel PHOTO-PAINT raise various events to which macros can respond
through the use of event handlers — subroutines with specific, defined names. Each macro project defines its
event handlers in one of the following code modules:
•ThisMacroStorage — for macro projects that are stored in Global Macro Storage (GMS) files
•ThisDocument — for macro projects that are stored in documents
The GlobalMacroStorage object is a virtual object that represents each and all open documents. The
GlobalMacroStorage object has several events that are raised at the time of any event, such as opening,
printing, saving, or closing a document (although the range of events is actually greater than this because each
one has a “before” and “after” event).
To respond to an event, you must provide an event handler — a subroutine in any ThisMacroStorage module
with a specific name for which the application is pre-programmed to search. However, the application does check
all ThisMacroStorage modules in all installed projects; for this reason, you can create an event-driven solution
and distribute it as a single project file just as you would provide any other solution. Each project can have only
one ThisMacroStorage module, and it is automatically created when the project is first created.
In VBA, you can add event handlers to a ThisMacroStorage module by using the Macro Editor. For example, a
CorelDRAW macro solution may need to respond to the closing of a document by logging the closure in a file as
part of a workflow-management system. To respond to the opening of a document, the solution must respond to
the OpenDocument event for the GlobalMacroStorage class. To create this event handler in VBA, do the
following:
•Open a ThisMacroStorage module for editing in the Macro Editor.
• Next, choose GlobalMacroStorage from the Object list box at the top of the Code window, and then choose
DocumentOpen from the Procedure list box.
The Macro Editor creates a new, empty subroutine called GlobalMacroStorage_DocumentOpen()— or, if that
subroutine already exists, the Macro Editor places the cursor into it. To then add the name of the opened file to
the log, you need only write some code. To reduce the size of the ThisMacroStorage module, you can assign this
ActiveWindow ActiveDocument.ActiveWindow
Shortcut Long form

Macro Programming Guide
Understanding automation 24
event-logging task to a public subroutine in another module. This technique lets the run-time interpreter more
easily parse all the ThisMacroStorage modules each time an event is raised. The following VBA code illustrates
this example for CorelDRAW:
Private Sub GlobalMacroStorage_OpenDocument(ByVal Doc As Document, _
ByVal FileName As String)
Call LogFileOpen(FileName)
End Sub
Here is a small sample of the events available in CorelDRAW:
Event handlers for frequent events — such as events related to the Shape class — should be as efficient
as possible, to keep the application running as quickly as possible.
Event Description
Start Raised when the user starts the application
DocumentNew Raised when a document is created; passes a reference to
the document
DocumentOpen Raised when a document is opened; passes a reference to
the document
DocumentBeforeSave Raised before a document is saved; passes the file name of
the document as a parameter
DocumentAfterSave Raised after a document is saved; passes the file name of the
document as a parameter
DocumentBeforePrint Raised before the Print dialog box is displayed
DocumentAfterPrint Raised after a document is printed
SelectionChange Raised when a selection changes
DocumentClose Raised before a document is closed
Quit Raised when the user quits the application

Macro Programming Guide
Getting started with macros 25
Getting started with macros
Now that you understand a bit about automation, you’re ready to get started with macros. This section provides
an overview of the macro-related tools and features of CorelDRAW and Corel PHOTO-PAINT.
In this section
This section contains the following topics:
• “Setting up the automation feature” on page 25
• “Using the Macros toolbar” on page 26
• “Using the Macro Manager docker” on page 27
• “Using the Add-in Manager” on page 28
• “Using the Macro Editor” on page 28
• “Using the VSTA Editor” on page 40
Setting up the automation feature
Before you can develop and run macros in the software, you may need to set up the automation features for VBA
and VSTA.
When you perform a “typical installation” of the software, the VBA and VSTA features are installed by default.
However, you can manually install them if necessary. You can also specify various options for VBA.
For details on setting up the automation feature, see the following procedures:
• “To install the VBA and VSTA features” on page 25
• “To specify VBA options” on page 25
To install the VBA and VSTA features
1Access the setup, and follow the on-screen instructions for modifying the software.
2On the Features page of the setup, enable the following check boxes in the Utilities list box:
• Visual Basic for Applications
• Visual Studio Tools for Applications
To specify VBA options
1Click Tools ` Options.
2In the Workspace list of categories, click VBA.
3In the Security area, specify how to control the risk of running malicious macros by clicking Security
options.
If you want to bypass this security feature, enable the Trust all installed GMS modules check box, and then
proceed to step 6.
4On the Security level page of the Security dialog box, enable one of the following options:
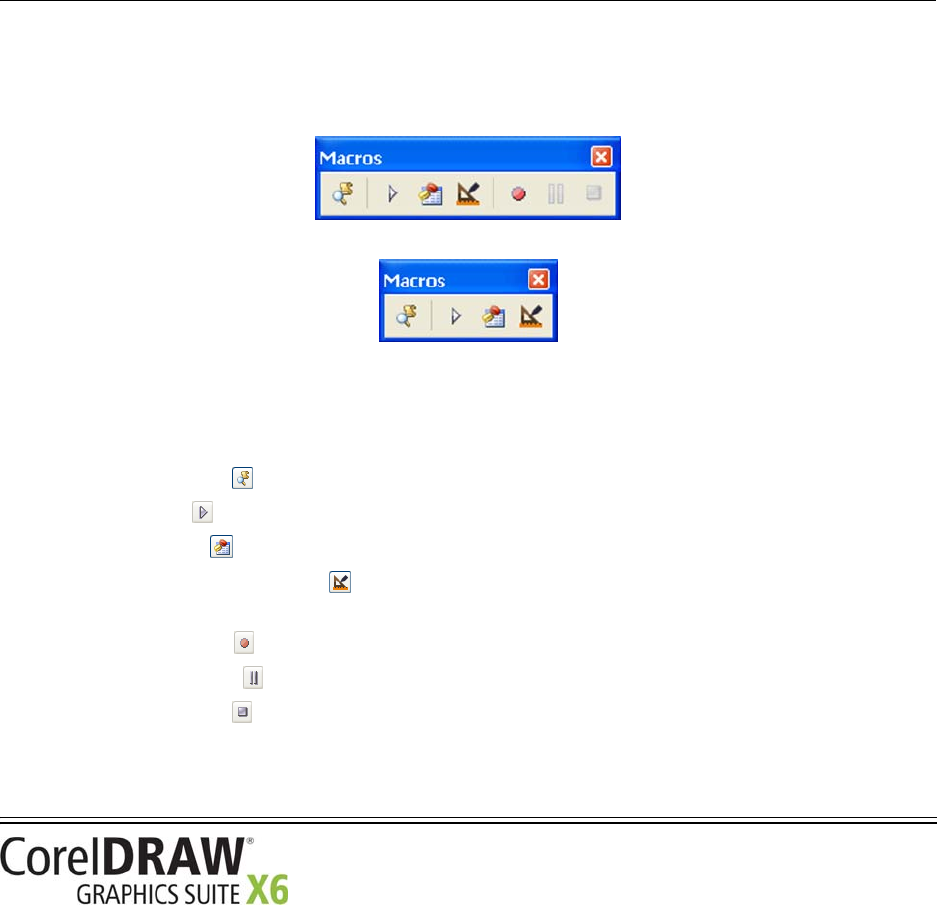
Macro Programming Guide
Getting started with macros 26
•Very high — allows only macros installed in trusted locations to run. All other signed and unsigned macros
are disabled.
•High — allows only signed macros from trusted sources to run. Unsigned macros are automatically
disabled.
•Medium — lets you choose which macros run, even if they are potentially harmful.
•Low (not recommended) — allows all potentially unsafe macros to run. Enable this setting if you have
virus-scanning software installed, or if you check the safety of all documents that you open.
5On the Trusted publishers page of the Security dialog box, review which macro publishers are trusted. Click
View to display details on the selected macro publisher, or click Remove to delete the selected macro
publisher from the list.
If desired, you can enable or disable the Trust access to Visual Basic project check box for the selected
macro publisher.
6Disable the Delay load VBA check box if you want to load the VBA feature at start-up.
Using the Macros toolbar
CorelDRAW and Corel PHOTO-PAINT feature a Macros toolbar that provides easy access to several macro-
related featues, such as the Macro Editor.
The Macros toolbar in CorelDRAW
The Macros toolbar in Corel PHOTO-PAINT
Using the Macros toolbar in CorelDRAW
In CorelDRAW, the Macros toolbar features the following buttons:
•Macro Manager button — opens the Macro Manager docker
•Run Macro button — runs a macro
•Macro Editor button — opens the Macro Editor
•Disable application events button — switches the Macro Editor between its modes for designing and
running macros
•Start Recording button — records a macro
•Pause Recording button — pauses the recording of a macro
•Stop Recording button — stops the recording of a macro
To d i s p l a y t h e Macros toolbar in CorelDRAW, click Window ` To o l b a r s ` Macros. A check mark next to the
command indicates that the toolbar is displayed.

Macro Programming Guide
Getting started with macros 27
Using the Macros toolbar in Corel PHOTO-PAINT
In Corel PHOTO-PAINT, the Macros toolbar features the following buttons:
•Macro Manager button — opens the Macro Manager docker
•Run Macro button — runs a macro
•Macro Editor button — opens the Macro Editor
•Disable application events button — switches the Macro Editor between its modes for designing and
running macros
To d i s p l a y t h e Macros toolbar in Corel PHOTO-PAINT, click Window ` To o l b a r s ` Macros. A check mark
next to the command indicates that the toolbar is displayed.
Using the Macro Manager docker
In CorelDRAW and Corel PHOTO-PAINT, macros are stored in code modules, which are stored in macro
projects. The Macro Manager docker provides a list of all existing VBA macro projects, plus the code modules
and macros that are stored in them. You can use the Macro Manager docker to perform various tasks related to
macro projects, code modules, and macros (see “Creating macros” on page 42).
The Macro Manager docker in CorelDRAW, with a macro selected
The Macro Manager docker in Corel PHOTO-PAINT, with a macro selected

Macro Programming Guide
Getting started with macros 28
To d i s p l a y t h e Macro Manager docker, do one of the following:
•Click Tools ` Macros ` Macro Manager.
•Click the Macro Manager button on the Macros toolbar.
Using the Add-in Manager
An add-in is a separate module that extends the functionality of an application. The Add-in Manager for
CorelDRAW and Corel PHOTO-PAINT displays a list of all registered add-ins for the application.
The Add-in Manager
To open the Add-in Manager, click To o l s ` Macros ` Add-in Manager. You can then use the Add-in Manager
to perform various tasks related to add-ins.
You can use a registered add-in by clicking To o l s ` Macros ` Add-ins and then choosing the add-in.
Using the Macro Editor
CorelDRAW and Corel PHOTO-PAINT provide an integrated development environment (IDE) for creating
VBA macro projects. Called the Macro Editor, this IDE is similar to the one included with the full version of
Visual Basic. You can use the Macro Editor to perform various tasks related to VBA macros, such as the
following:
• browsing the contents of a VBA macro project
• developing and debugging VBA macro code
• setting object properties for VBA macros
• creating dialog boxes or “forms” for VBA macros
You cannot use the Macro Editor to compile executable (EXE) program files.
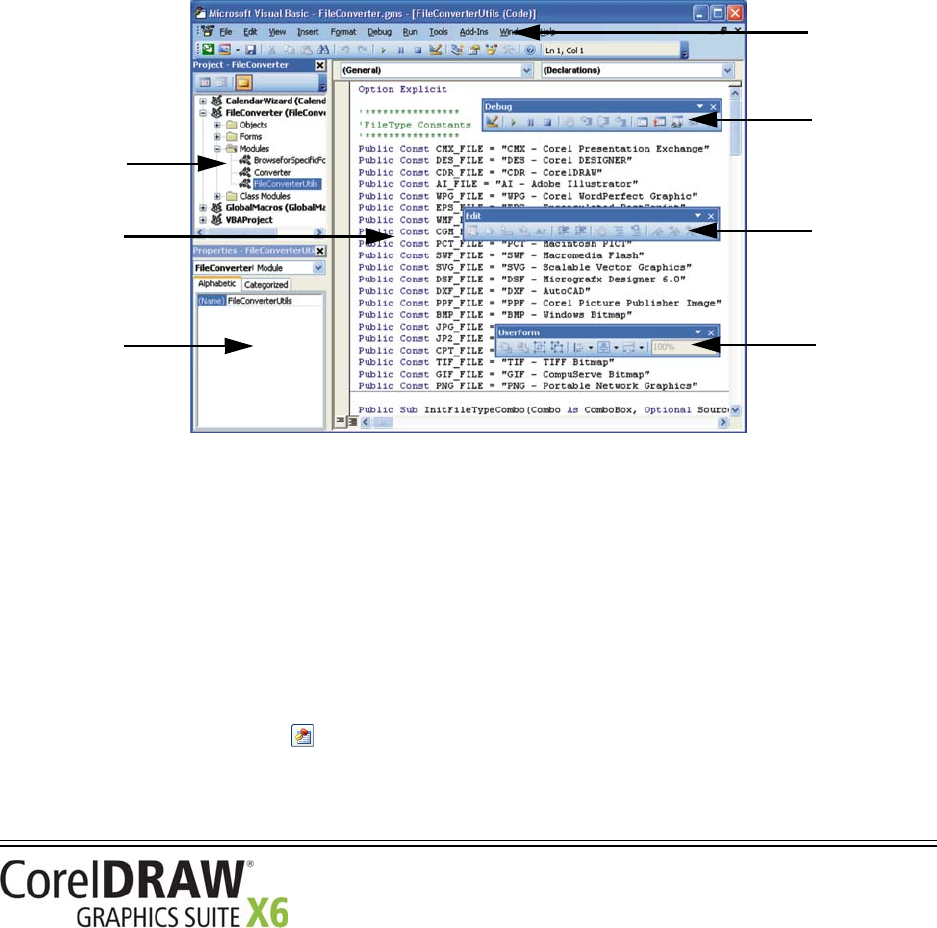
Macro Programming Guide
Getting started with macros 29
The Macro Editor features three main areas:
• Project Explorer — lets you browse macro projects and their contents. For more information, see “Using the
Project Explorer” on page 30.
•Code window — lets you work with macro code. For more information, see “Using the Code window” on
page 31.
•Properties window — lists all editable properties for the selected object. For more information, see “Using
the Properties window” on page 34.
The Macro Editor also features four main toolbars:
•Standard toolbar — is the default toolbar
•Debug toolbar — contains buttons for common debugging tasks
•Edit toolbar — contains buttons for common code-editing tasks
•UserForm toolbar — contains buttons specific to designing dialog boxes
For more information on these toolbars, see “Using the Macro Editor toolbars” on page 35.
The Macro Editor (CorelDRAW version shown) features the following:
1) Project Explorer; 2) Code window; 3) Properties window;
4) Standard toolbar; 5) Debug toolbar; 6) Edit toolbar;
7) UserForm toolbar
The Macro Editor also lets you access the Object Browser, which displays the entire object model of each
referenced component and of the host application. For more information, see “Using the Object Browser” on
page 35.
Although the Macro Editor opens in a separate window from its host application, it runs within the process of
that application. To display the Macro Editor, do any of the following:
•Click Tools ` Macros ` Macro Editor on the main menu in the application.
•Click the Macro Editor button on the Macros toolbar.
•Right-click Visual Basic for Applications in the Macro Manager docker, and then click Show IDE.
• Press Alt + F11.
1
3
6
7
2
4
5
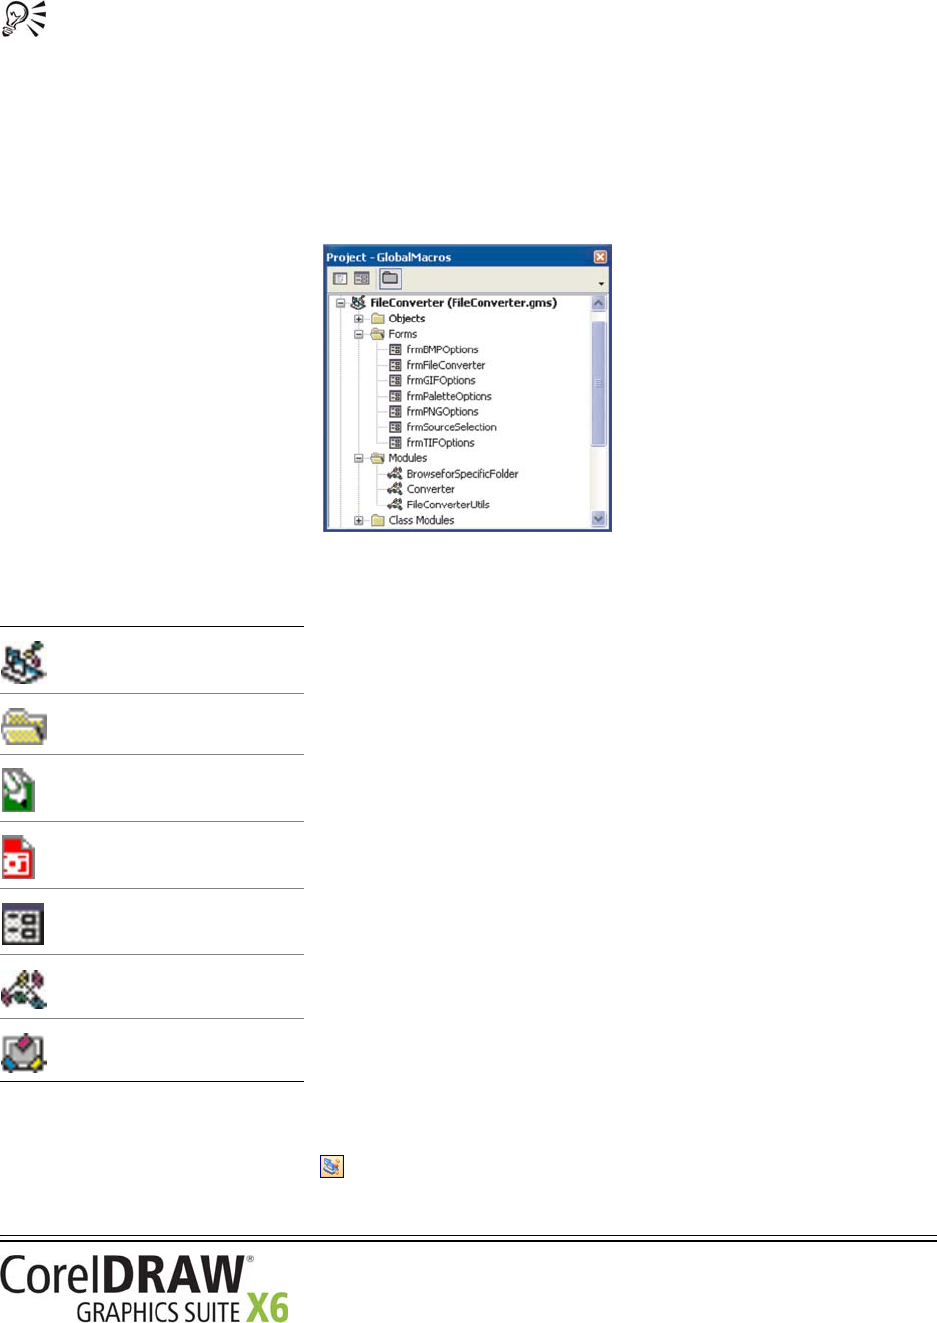
Macro Programming Guide
Getting started with macros 30
To switch between the Macro Editor and the application, use the Windows taskbar, or press Alt + F11
or Alt + Tab.
For more detailed information on constructing code procedures and setting properties, please see the
Microsoft Visual Basic for Applications Help file, which is available from the Help menu in the Macro Editor.
Using the Project Explorer
The Project Explorer is essential for navigating macro projects and their contents: documents and objects, forms,
modules, and class modules (or “classes”).
Each type of component in the Project Explorer has an icon assigned to it:
To display or hide the Project Explorer, do any of the following:
•Click View ` Project Explorer.
•Click the Project Explorer button on the Standard toolbar.
• Press Ctrl + R.
Icon Item
macro project
folder
document or object
(CorelDRAW)
document or object
(Corel PHOTO-PAINT)
form
module
class module (or “class”)
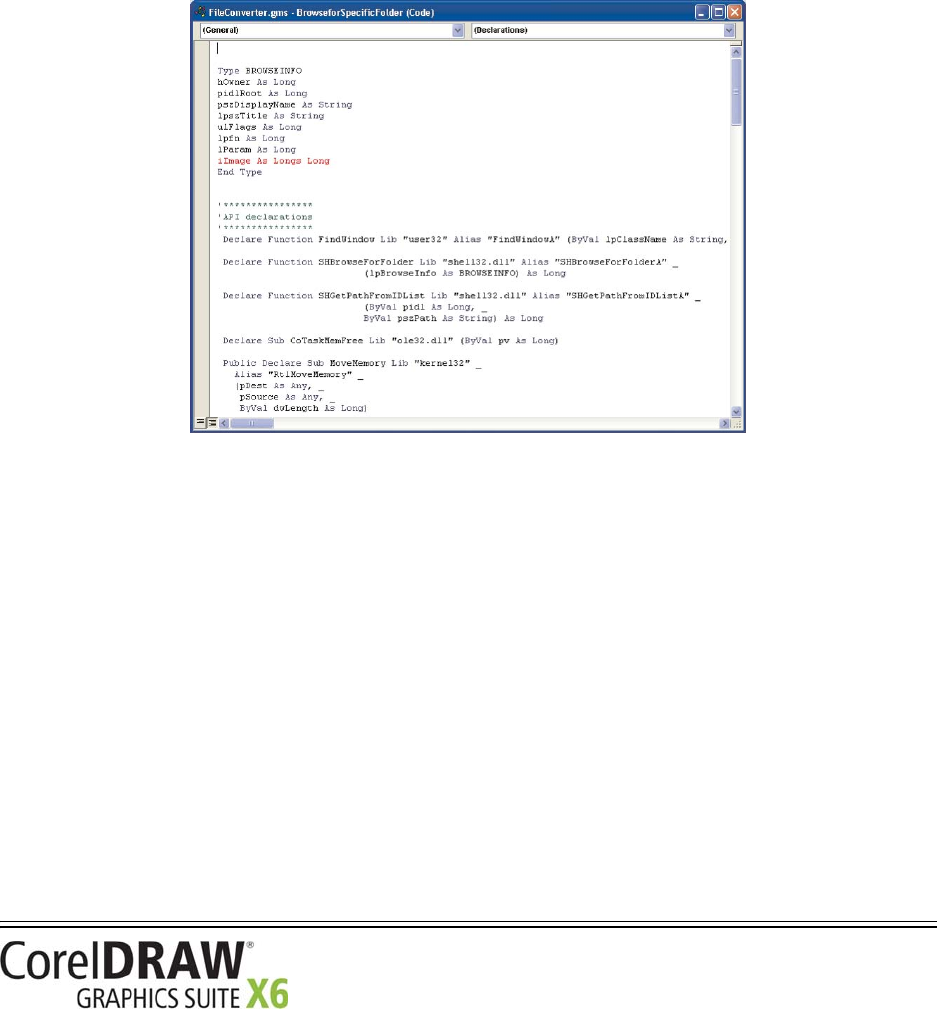
Macro Programming Guide
Getting started with macros 31
Using the Code window
The Code window is where you spend most of your time when working on macros. A standard code editor in the
style of Microsoft Visual Studio, the Code window lets you do the following:
• format code automatically
• color syntax automatically
• check syntax automatically
• jump to definitions
• use contextual pop-up lists and automatic completion
If you are already familiar with any of the Microsoft Visual Studio editors, the Code window will be entirely
familiar to you.
The Code window
To d i s p l a y t h e Code window, do one of the following:
•Click View ` Code.
• Press F7.
Formatting code automatically
The Macro Editor formats code automatically for you. Even the capitalization of keywords, functions,
subroutines, and variables is taken care of by the Macro Editor, irrespective of what you type. You cannot
custom-format code, although you can set the indentation for each line, as well as the placing of custom line
breaks.
If you use the returned value when calling a function, the parentheses around the parameters are mandatory (just
as in most modern programming languages):
a = fooFunc (b, c)
However, if the returned value from a function call is being discarded, or if you are calling a subroutine, the

Macro Programming Guide
Getting started with macros 32
parentheses must be left out (unlike in most other languages):
barFunc d, e
fooBarSub f
If you prefer always to see the parentheses, use the Call keyword before the function call or subroutine call:
Call barFunc (d, e)
Call fooBarSub (f)
Coloring syntax automatically
As you develop code in the Code window, the Macro Editor colors each word according to its classification.
The Code window also uses the following colorization techniques:
These syntax-colorization techniques make the code much easier to read.
Word color Classification
Blue Automation keyword or programming statement
Green Comment
Black All other text
Colorization technique Classification
Red text Line of code containing errors
White text on blue background Selected text
Text highlighted in yellow Line where execution is paused for debugging
White text on red background and red dot in the left
margin
Breakpoint set for debugging purposes
For more information, see “Setting breakpoints” on
page 52.
Blue dot in the left margin Bookmark set in the code
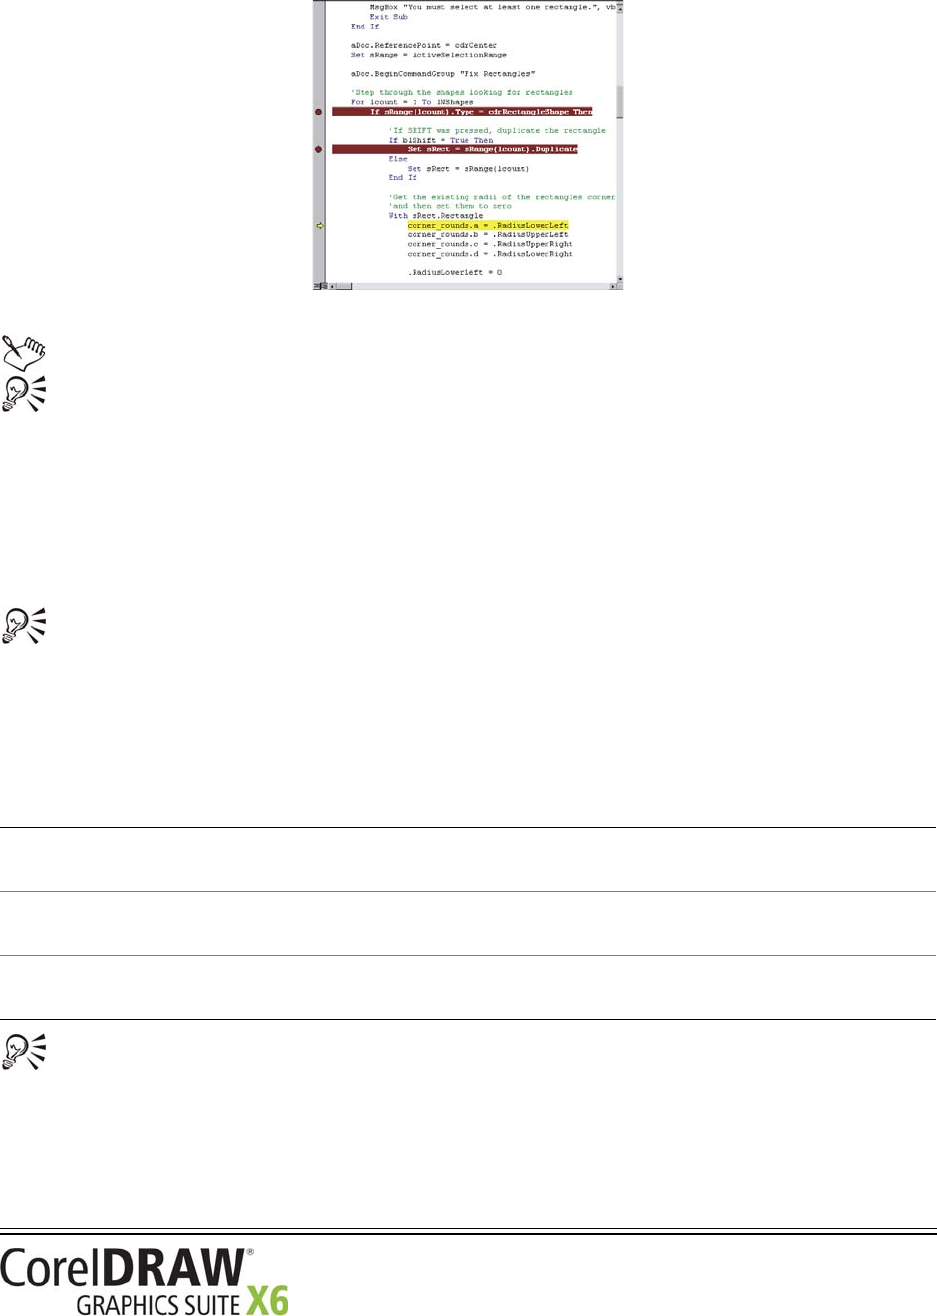
Macro Programming Guide
Getting started with macros 33
Syntax coloring and highlighting
Breakpoints and bookmarks are lost when you quit the application.
The Macro Editor lets you modify the default colors for syntax highlighting. Click To o l s ` Options, and
choose your settings on the Editor Format page.
Checking syntax automatically
Every time you move the cursor out of a line of code, the Macro Editor checks the syntax of the code in that line;
if an error is found, the line is colored red and a pop-up warning is displayed. This real-time checking is useful
(particularly when you are learning to program macros) because it indicates many possible errors in the code
without having you run the code.
The Macro Editor lets you disable pop-up warnings. Click To o l s ` Options, click the Editor tab, and
then disable the Auto Syntax Check check box. Although the Macro Editor still checks the syntax and
colors erroneous lines red, it stops displaying a warning when you paste text from another line of code.
Jumping to definitions
The Macro Editor lets you jump directly to the definition of a variable, function, or object.
To return to where you requested the definition, right-click anywhere in the Code window, and then
click Last Position.
Using contextual pop-up lists for automatic completion
The Macro Editor adds the functions you write and the variables you define to an internal list that contains all
built-in keywords and enumerated values. As you type, the Macro Editor displays a contextual list of words that
Desired definition Procedure Destination
Variable Right-click the variable in the Code
window, and then click Definition.
The definition of the variable in the
code
Function Right-click the function in the Code
window, and then click Definition.
The definition of the function in the
code
Object Right-click the object in the Code
window, and then click Definition.
The definition of the object in the
Object Browser
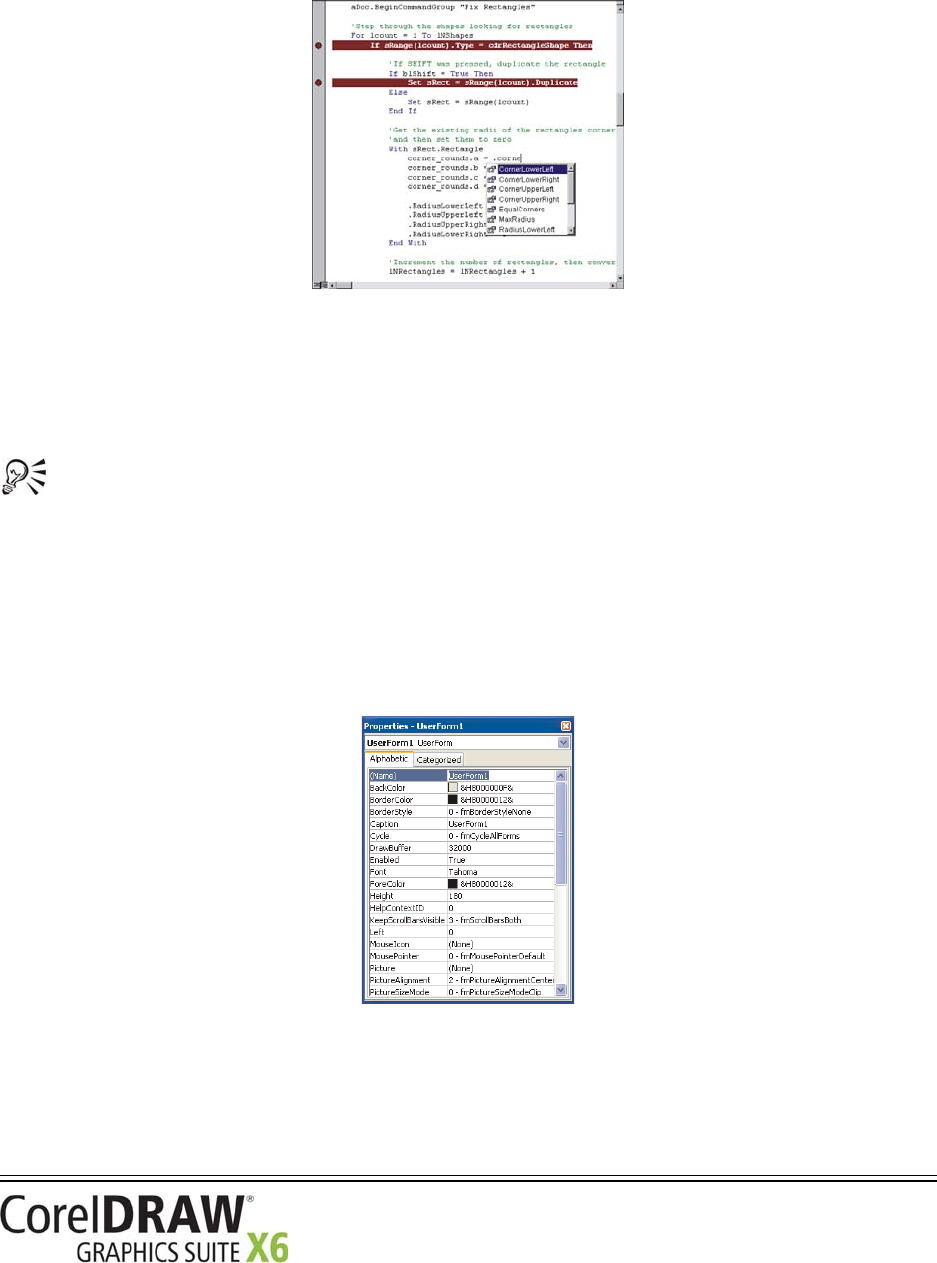
Macro Programming Guide
Getting started with macros 34
are valid candidates for insertion at the current position. This auto-completion feature makes code development
quicker and more convenient.
An auto-completion pop-up list
If you type the first few characters of the word you want to use, the pop-up list advances to the nearest candidate
that matches those characters. Select the desired word, and then do one of the following:
• type the character to follow the word (typically a space, line feed, parenthesis, period, or comma)
• enter only the word by pressing Ta b or Ctrl + Enter
To force the pop-up menu display, press Ctrl + Spacebar; the menu scrolls to the word that most closely
matches the characters that you have typed so far. This technique is particularly useful for filling
parameter lists when calling a function or subroutine. If there is only one exact match, the Macro Editor
inserts the word without popping up the list; to display the pop-up list for the selected keyword at any
time without auto-filling it, press Ctrl + J.
Using the Properties window
The Properties window lists all editable properties for the selected object. Many macro objects — including
projects, modules, and forms and their controls — have property sheets that can be modified.
The Properties window, with the properties of a form displayed
The Properties window is automatically updated when you select an object, or when you change the properties
of the selected object by using other methods (for example, by using the mouse to move and resize form
controls).

Macro Programming Guide
Getting started with macros 35
To display or hide the Properties window, do any of the following:
•Click View ` Properties Window.
•Click the Properties Window button on the Standard toolbar.
• Press F4.
Using the Macro Editor toolbars
The Macro Editor features four toolbars — Standard, Debug, Edit, and UserForm — that you can use to
perform macro-related tasks.
The Standard toolbar is the default toolbar.
The Standard toolbar (CorelDRAW version shown)
The Debug toolbar contains buttons for common debugging tasks (see “Debugging macros” on page 50).
The Debug toolbar
The Edit toolbar contains buttons for common code-editing tasks.
The Edit toolbar
The UserForm toolbar contains buttons specific to designing dialog boxes (see “Designing dialog boxes” on
page 58).
The UserForm toolbar
To display or hide a toolbar, click View ` To o l b a r s , and then click the corresponding command. A check mark
next to a command indicates that its toolbar is currently displayed.
You can “float” a toolbar by dragging it from the menu bar.
You can dock a toolbar by dragging it to the menu bar.
Using the Object Browser
The Object Browser is one of the most useful tools that is provided by the Macro Editor. In an easy-to-use,
structured format, the Object Browser displays the entire object model of each referenced component and, most
importantly, of CorelDRAW and Corel PHOTO-PAINT.
Referenced components include all ActiveX or Object Linking and Embedding (OLE) objects that are
used by the project.
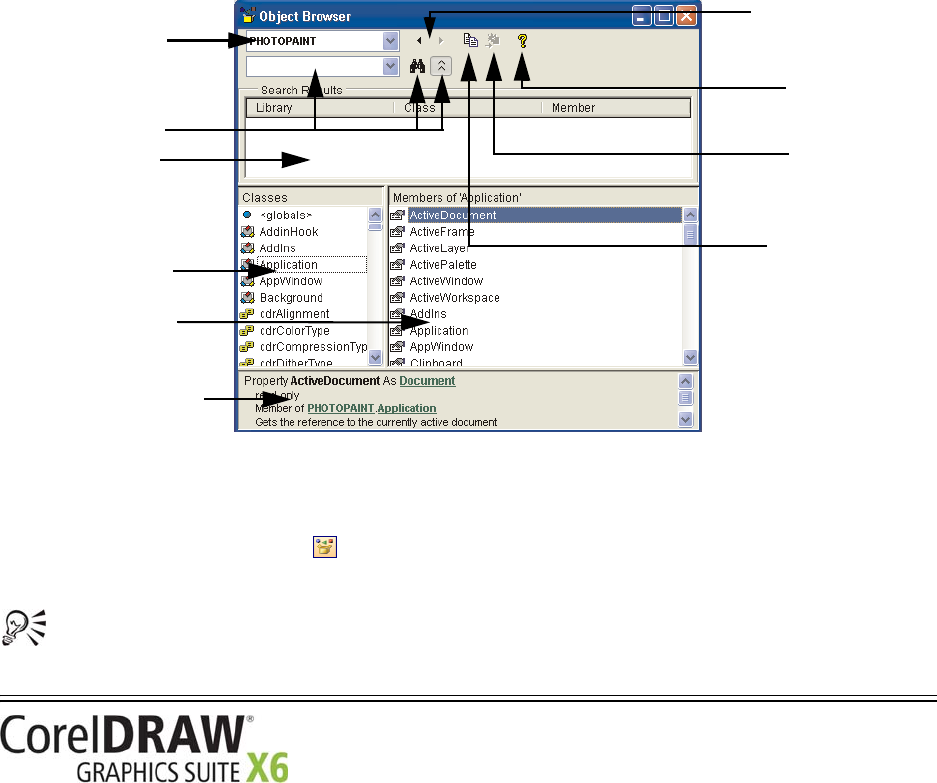
Macro Programming Guide
Getting started with macros 36
The Object Browser window features the following items:
•Project/Library list box — lists all referenced components (projects and libraries). Choosing a project or
library from this list updates the Object Browser to display only the items for that project or library.
Generally, displaying only one project or library at a time makes it easier to use the Object Browser.
• navigation buttons — let you cycle through your selections from the Object Browser
•Copy to Clipboard button — copies the current selection to the Clipboard
•View Definition button — displays where the current selection is defined in the Code window
•Help button — displays a Help topic for the current selection. You can also access this Help topic by pressing
F1.
• search controls — let you search the selected project or library for a given string. For more information, see
“Using the search controls” on page 40.
•Search Results window — displays the results of a search. For more information, see “Using the search
controls” on page 40.
•Class list — displays all class-related items for the selected project or library. For more information, see “Using
the Class list” on page 37.
•Member list — displays the members of the selected class. For more information, see “Using the Member list”
on page 38.
•Information window — displays information about the selected class or class member. For more information,
see “Using the Information window” on page 39.
The Object Browser window (Corel PHOTO-PAINT version shown)
To open the Object Browser from within the Macro Editor, do any of the following:
•Click View ` Object Browser.
•Click the Object Browser button on the Standard toolbar.
• Press F2.
To reference the object model of another application, click To o l s ` References. Referenced components
can be accessed by the macro code.
Project/
Library
list box
search
controls
Class list
Member
list
Information
window
navigation
buttons
Copy to
Clipboard
button
View
Definition
button
Help
button
Search
Results
window
Macro Programming Guide
Getting started with macros 37
Using the Class list
Every project and library has an object model that contains the following class-related items, which are displayed
in the Class list: global values, classes, modules, types, and enumerations.
Global values apply to an entire project or library, and they include individual members from enumerations (such
as text-paragraph alignments, shape types, and import/export filters).
Classes contain properties, methods, and events. For more information, see “What is a class?” on page 11.
For documentation on all classes available to CorelDRAW or Corel PHOTO-PAINT, see the “Object
Model Reference | Classes” section of the Macros Help file for the application.
Modules contain macro code.
For documentation on all modules available to CorelDRAW, see the “Object Model Reference |
Modules” section of the Macros Help file for the application.
Types are customized data types that supplement the built-in data types that are provided by the automation
environment (see “Declaring variables” on page 13).
For documentation on all types available to CorelDRAW, see the “Object Model Reference | Types”
section of the Macros Help file for the application.
Enumerations represent fixed values in the procedures and functions of the coding for a macro. For more
information, see “What is an enumeration?” on page 12.
For documentation on all enumerations available to CorelDRAW or Corel PHOTO-PAINT, see the
“Object Model Reference | Enumerations” section of the Macros Help file for the application.
Each type of item in the Class list has an icon assigned to it:
To access the Help topic for a selected item, click the Help button, or press F1.
Icon Item
global value
class
module
type
enumeration
Macro Programming Guide
Getting started with macros 38
Using the Member list
When you choose an item from the Class list, the members of that item appear in the Member list. Class
members include the following:
•properties
•methods
•events
•constants
A property can be a simple type (such as a Boolean, integer, or string), or it can be a class or enumeration from
the Class list. A property that is based on a class from the Class list inherits all members of that class.
Many classes have a default property. The default property is implied if no property name is given when getting
or setting the value of the parent object. For example, collection types have the default property Item, which can
be indexed; in such instances, it is not necessary to specify the Item property. Here,
ActiveSelection.Shapes.Item(1).Selected = False
is the same as the shorter
ActiveSelection.Shapes(1).Selected = False
because Item is the default or implied property of a collection of shapes.
For documentation on all properties available to CorelDRAW or Corel PHOTO-PAINT, see the “Object
Model Reference | Properties” section of the Macros Help file for the application.
Methods are commonly known as “member functions” — functions that a class can perform on itself. A good
example is the Move method of the Shape class in CorelDRAW, which moves a shape by using an [x, y] vector.
The following code moves the selected shapes 2 measurement units to the right and 3 measurement units
upwards:
ActiveSelection.Move 2, 3
If the return value of a function is not used, the function call does not take parentheses around the argument list
unless the Call keyword is used.
For documentation on all methods available to CorelDRAW or Corel PHOTO-PAINT, see the “Object
Model Reference | Methods” section of the Macros Help file for the application.
Events are associated with some classes. You can set up an event handler that is called when that event occurs in
the application; this functionality lets you develop sophisticated applications that respond automatically to what
is happening within the application. Commonly handled events include the BeforePrint, BeforeSave,
PageActivate, SelectionChange, and ShapeMove events of the Document class in CorelDRAW.
For documentation on all events available to CorelDRAW or Corel PHOTO-PAINT, see the “Object
Model Reference | Events” section of the Macros Help file for the application.
The constants displayed in the Member list are members of enumerations or are defined as public in a module.
Enumerations group related items from a closed list — such as CorelDRAW shape types, import/export filters,
and alignments — for use anywhere an integer value is required.

Macro Programming Guide
Getting started with macros 39
In CorelDRAW and Corel PHOTO-PAINT, many constants begin with cdr (for example, cdrEPS and
cdrLeftAlignment), while others begin with clr, cui, pdf, pnt, or prn. Visual Basic also has its own constants,
including ones (such as vbKeyEnter) for keystrokes and ones (such as vbOK) for dialog-box buttons.
For documentation on all constants available to CorelDRAW or Corel PHOTO-PAINT, see the “Object
Model Reference | Constants” section of the Macros Help file for the application.
Each type of item in the Member list has an icon assigned to it:
To access the Help topic for a selected item, click the Help button, or press F1.
Using the Information window
The Information window provides information about the selected class or class member. This information
includes the following:
• a prototype of the item
• an indication of whether the item is a read-only property
• the parent of the item
• a short description of the item
The Information window for the Document.Application property
in Corel PHOTO-PAINT
The Information window provides hyperlinks to all referenced types and classes that are defined within the
current object model. For example, the information for the Document.Application property in
Corel PHOTO-PAINT (see the preceding figure) includes the following hyperlinks:
•Application — accesses the Application class, because Application is both the type of the
Document.Application property and a class in the PHOTOPAINT library
•PHOTOPAINT — accesses the class for the PHOTOPAINT library, which contains all classes in the
Corel PHOTO-PAINT object model
Icon Item
property
default property
method
event
constant
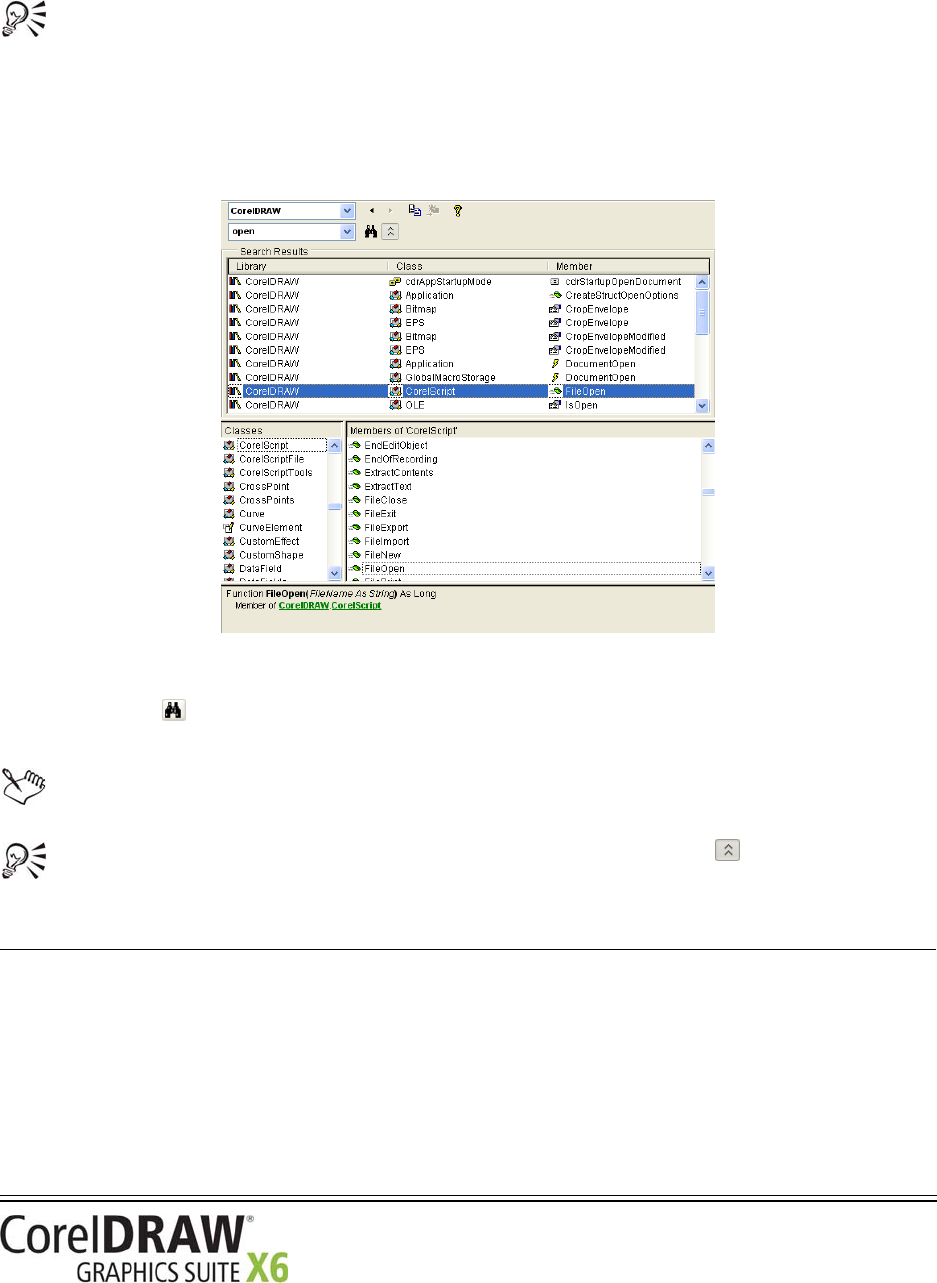
Macro Programming Guide
Getting started with macros 40
•Document — accesses the Document class, which is the parent of the Application property
When the Information window is not tall enough to reveal its complete contents, a scroll bar is provided.
To increase the height of the Information window, drag the top border of the window upwards.
Using the search controls
The search controls let you search the selected project or library for a given string. Searching is useful when you
can only partly remember the name of a class or class member, or when you want to find classes and members
that have similar names (such as those containing the word “open”).
Searching the CorelDRAW object model
To search the classes and members of the selected object model, type a string into the Search box, and then click
the Search button . The Search Results window displays, in alphabetical order, all matches. Clicking a
match advances the Class list and Member list to that item and displays the Information window for that item.
Matching class names have a blank Member column in the Search Results window.
To hide the Search Results window, click the Hide Search Results button .
Using the VSTA Editor
CorelDRAW and Corel PHOTO-PAINT provide an integrated development environment (IDE) for creating
VSTA macro projects. Called the VSTA Editor, this IDE is similar to the Macro Editor (which is the IDE for
VBA macro projects in CorelDRAW and Corel PHOTO-PAINT). You can use the VSTA Editor to perform
various tasks related to VSTA macros.

Macro Programming Guide
Getting started with macros 41
By default, the software creates VSTA folders at the following location:
•for CorelDRAW: My Documents\Corel\VSTA\CorelDRAW
• for Corel PHOTO-PAINT: My Documents\Corel\VSTA\Corel PHOTO-PAINT
Be sure to load VSTA add-ins from the following location:
•for CorelDRAW: My Documents\Corel\VSTA\CorelDRAW\Addins
• for Corel PHOTO-PAINT: My Documents\Corel\VSTA\Corel PHOTO-PAINT\Addins
You can open the VSTA Editor from within CorelDRAW or Corel PHOTO-PAINT. Although the VSTA Editor
opens in a separate window, it runs within the process of its host application. To open the VSTA Editor, do any of
the following:
•Click Tools ` Macros ` VSTA Editor on the main menu in the application.
• Press Alt + Shift + F12.
To switch between the VSTA Editor and the application, use the Windows taskbar, or press
Alt + Shift F12 or Alt + Tab.
For more detailed information on VSTA and its programming environment, please consult the Help menu in the
VSTA Editor.

Macro Programming Guide
Creating macros 42
Creating macros
Now that you are familiar with the concept of automation and with the macro-related tools and features of
CorelDRAW and Corel PHOTO-PAINT, you are ready to create macros.
In this section
This section contains the following topics:
• “Creating macro projects” on page 42
• “Writing macros” on page 45
• “Recording macros” on page 46
• “Running macros” on page 49
• “Debugging macros” on page 50
Creating macro projects
The process of creating a macro begins with creating a macro project. A macro project can be created in one of
two ways:
• as a Global Macro Storage (GMS), or “project,” file
• in a document
Using GMS files
For best results in storing and distributing a macro project, it is highly recommended that you use a GMS file.
GMS files are stored in the GMS folder for the application, the location of which depends on the type of macro
project.
Macro-project type GMS folder
Default projects installed with
the software
X:\Program Files\Corel\<suite>\<program>\GMS
Legend:
•X: is the drive and Program Files\Corel\<suite> is the path where the software
suite is installed
•<program> is the program subfolder
User-created projects on
Windows 7 and Windows
Vista®
X:\Users\<username>\AppData\Roaming\Corel\<suite>\<program>\GMS
Legend:
•X: is the drive where the software is installed
•<username> is the name of the user
• <suite> is the folder where the software suite is installed
•<program> is the application subfolder
Macro Programming Guide
Creating macros 43
Understanding macro projects
The Macro Manager docker provides basic tools for working with macro projects. For access to more advanced
tools, you can use the Macro Editor (for VBA macro projects) or the VSTA Editor (for VSTA macro projects).
In the Macro Editor, a VBA macro project is broken into four types of components, which are displayed as the
following folders in the Project Explorer (see “Using the Project Explorer” on page 30):
•<application> Objects — contains a single item that is used mostly for event handling: ThisMacroStorage
for GMS-based macro projects, or ThisDocument for document-based macro projects. For normal code, this
module is not used.
•Forms — contains customized dialog boxes and user interfaces, plus the code to control them
•Modules — contains code modules, for storing general code and macros
•Class Modules — contains object-oriented Visual Basic class modules (which are not discussed in this
documentation)
In the Macro Editor, you cannot move a component from one folder to another within the same project.
However, you can drag a component to another project to make a copy of it there.
Related procedures
For details on creating macro projects, see the following procedures:
• “To create a macro project” on page 43
• “To add a dialog box to a macro project” on page 44
• “To add a code module to a macro project” on page 44
• “To add a class module to a macro project” on page 45
To create a macro project
•In the Macro Manager docker, do one of the following:
•Click Visual Basic for Applications in the list, click New, and then click New macro project.
•Right-click Visual Basic for Applications in the list, and then click New macro project.
Project names must follow normal variable-naming conventions: They must begin with an alphabetic
character, and they must not contain spaces nor special characters other than underscores ( _ ).
User-created projects on
Windows XP
X:\Documents and Settings\<username>\Application Data\Corel\<folder>\
<application>\GMS
Legend:
•X: is the drive where the software is installed
•<username> is the name of the user
•<suite> is the folder where the software suite is installed
•<program> is the program subfolder
Macro-project type GMS folder

Macro Programming Guide
Creating macros 44
Some macro projects are locked and cannot be modified.
To add a dialog box to a macro project
1In the Project Explorer of the Macro Editor, right-click the project.
2Click Insert ` UserForm.
A form is added to the Forms folder for the project.
Some macro projects are locked and cannot be modified.
For more information, see “Providing dialog boxes for macros” on page 56.
To add a code module to a macro project
•Do one of the following:
•In the Macro Manager docker, click the project in the list, click New, and then click New module.
•In the Macro Manager docker, right-click the project in the list, and then click New module.
• In the Project Explorer of the Macro Editor, right-click the project, and then click Insert ` Module.
You can also
Load a macro project Do one of the following:
•Click Visual Basic for Applications in the list, click Load, and then
choose the project.
•Right-click Visual Basic for Applications in the list, click Load
macro project, and then choose the project.
Rename a macro project Right-click the project in the list, and then click Rename.
You can also rename a macro project from within the Macro Editor.
Click the project in the Project Explorer, and then edit the (Name)
value in the Properties window. Press Enter to commit your
changes.
Copy a GMS-based macro project Right-click the project in the list, click Copy to, and then choose the
target location for the copy.
NOTE: You cannot copy a document-based macro project. Such
projects are stored within a document and cannot be managed
separately from that document.
Unload a GMS-based macro project Right-click the macro project in the list, and then click Unload
macro project.
NOTE: You can close a document-based macro project only by
closing the document in which it is stored.
Macro Programming Guide
Creating macros 45
Some macro projects are locked and cannot be modified.
To add a class module to a macro project
1In the Project Explorer of the Macro Editor, right-click the project.
2Click Insert ` Class Module.
A new class module is added to the Class Modules folder for the project.
Some macro projects are locked and cannot be modified.
Detailed documentation on creating class modules is beyond the scope of this documentation.
Writing macros
You can manually code a macro by writing it in the Macro Editor or the VSTA Editor. (Alternatively, in
CorelDRAW, you can create a VBA macro by recording it. For information, see “Recording macros” on page 46.)
Macros that are developed in the Macro Editor or the VSTA Editor can take advantage of full programming
control, including conditional execution, looping, and branching. In effect, you can write macros that are
programs in their own right.
In this documentation, all macro code is referred to as a macro. In some contexts, however, a macro is
just those parts of the code that can be run by CorelDRAW or Corel PHOTO-PAINT.
To write a macro, you must first add it to a code module for the desired macro project. You can edit, rename, or
even delete macros.
For details on writing macros, see the following procedures:
• “To add a macro to a macro project” on page 46
You can also
Display or hide all code modules in the Macro Manager
docker
In the Macro Manager docker, click the Simple mode
button .
Edit a code module In the Macro Manager docker, do one of the following:
• Click the module in the list, and then click the Edit button
.
• Right-click the module in the list, and then click Edit.
The code module opens in the Macro Editor.
Rename a code module In the Macro Manager docker, right-click the module in
the list, and then click Rename.
Delete a code module In the Macro Manager docker, do one of the following:
• Click the module in the list, and then click the Delete
button .
• Right-click the module in the list, and then click Delete.
Macro Programming Guide
Creating macros 46
• “To edit a VBA macro” on page 46
• “To delete a VBA macro” on page 46
To add a macro to a macro project
•In the Macro Manager docker, do one of the following:
• Click the desired container module in the macro project, click New, and then click New macro.
• Right-click the desired container module in the macro project, and then click New macro.
Some macro projects are locked and cannot be modified.
To ed i t a V B A m a c ro
•In the Macro Manager docker, do one of the following:
• Click the macro in the list, and then click the Edit button .
• Right-click the macro in the list, and then click Edit.
The macro opens in the Macro Editor.
Some macro projects are locked and cannot be modified.
For detailed information on manually coding macros, see “How is automation coding structured?” on
page 13.
To d el e t e a V B A m ac r o
•In the Macro Manager docker, do one of the following:
• Click the macro in the list, and then click the Delete button .
• Right-click the macro in the list, and then click Delete.
Some macro projects are locked and cannot be modified.
Recording macros
CorelDRAW offers a recording feature that lets you create a macro without needing to manually code it. For
many simple and repetitive tasks, recorded macros are a quick, efficient solution: They store the sequence of keys
that you press and the mouse actions that you perform within the application. You may prefer to create macros
by recording them if you are not familiar with the object model for the application, or if you are not sure which
objects and methods to use.
In Corel PHOTO-PAINT, actions can be recorded as Corel SCRIPT scripts but not as VBA or VSTA
macros. For information on recording scripts, see “Working with scripts” in the main Help file for
Corel PHOTO-PAINT (corelpp.chm).
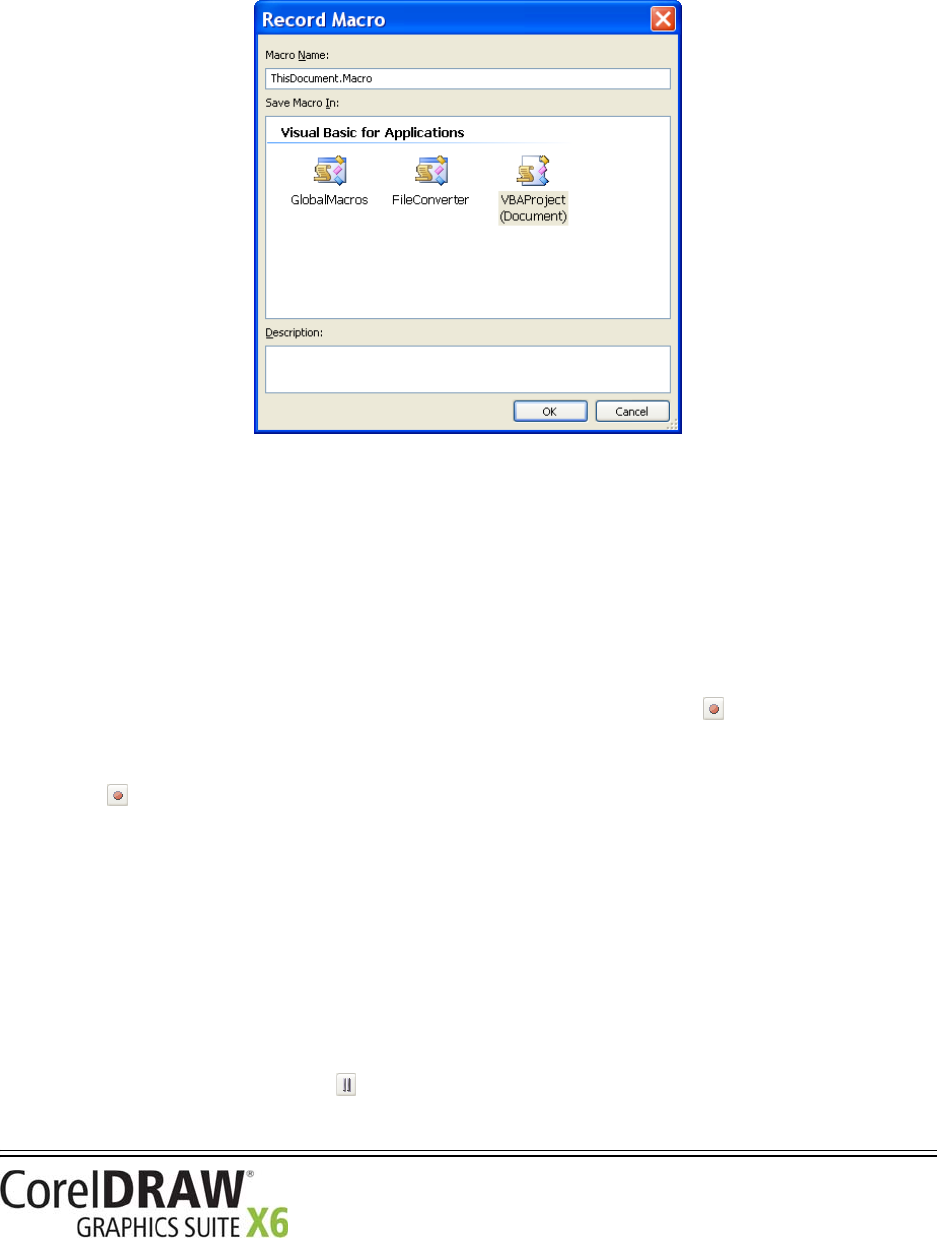
Macro Programming Guide
Creating macros 47
If you want to store a recorded macro for future use, you can save it by using the Record Macro dialog box.
Saving a recorded macro is particularly useful if you want to extend or customize its functionality by editing it in
the Macro Editor.
The Record Macro dialog box
However, if you want to use a recorded macro during the current session only, you can record a temporary macro.
For details on recording macros, see the following procedures:
• “To record and save a macro” on page 47
• “To record a temporary macro” on page 48
To record and save a macro
1Do one of the following:
•Click To o l s ` Macros ` Start recording, or click the Start recording button on the Macros toolbar,
to store the macro in the default macro project for recordings.
• In the Macro Manager docker, click the project in which to store the macro, and then click the Record
button .
The Record Macro dialog box appears.
2In the Macro name box, type a name for the macro.
Macro names can contain numerals, but they must begin with a letter. Macro names cannot contain spaces or
non-alphanumeric characters other than underscores ( _).
3Type a description of the macro in the Description box, and then click OK.
4Perform the actions that you want to record.
The application begins recording your actions. If you want to pause recording, do one of the following:
•Click To o l s ` Macros ` Pause recording. Repeat this step to resume recording.
•Click the Pause recording button on the Macros toolbar or in the Macro Manager docker. Repeat this
step to resume recording.
Macro Programming Guide
Creating macros 48
5To stop recording, do one of the following:
•Click To o l s ` Macros ` Stop recording.
•Click the Stop recording button on the Macros toolbar or in the Macro Manager docker.
• Press Ctrl+Shift+O.
You cannot record a macro if all available macro projects are locked..
Not all actions can be recorded — some because of their complexity (although many such actions can be
manually coded in the Macro Editor). When an action cannot be recorded, a comment is placed in the
macro code (“The recording of this command is not supported.”), but the recording process
continues until you stop it. You can view any comments in the code by opening the macro in the
Macro Editor.
You can specify the default macro project for recordings by right-clicking the project in the Macro
Manager docker, and then clicking Set as recording project. However, you cannot specify a locked
macro project.
You can cancel recording a macro, and discard any commands recorded thus far, by clicking To o l s `
Macros ` Cancel recording.
To record a temporary macro
1Do one of the following:
•Click To o l s ` Macros ` Record temporary macro.
• Press Ctrl+Shift+R.
2Perform the actions that you want to record.
The application begins recording your actions. If you want to pause recording, do one of the following:
•Click To o l s ` Macros ` Pause recording. Repeat this step to resume recording.
•Click the Pause recording button on the Macros toolbar or in the Macro Manager docker. Repeat this
step to resume recording.
3To stop recording, do one of the following:
•Click To o l s ` Macros ` Stop recording.
•Click the Stop recording button on the Macros toolbar or in the Macro Manager docker.
• Press Ctrl+Shift+O.
The macro is temporarily saved to the default recording project. When the current session is ended, the macro
is deleted from that project.
You cannot record a temporary macro if all available macro projects are locked.
Not all actions can be recorded.
You can also
Save the actions in the Undo list as a VBA macro Click Tools ` Undo, perform the actions that you want to
record, and then click the Save list to a VBA macro
button in the Undo docker.
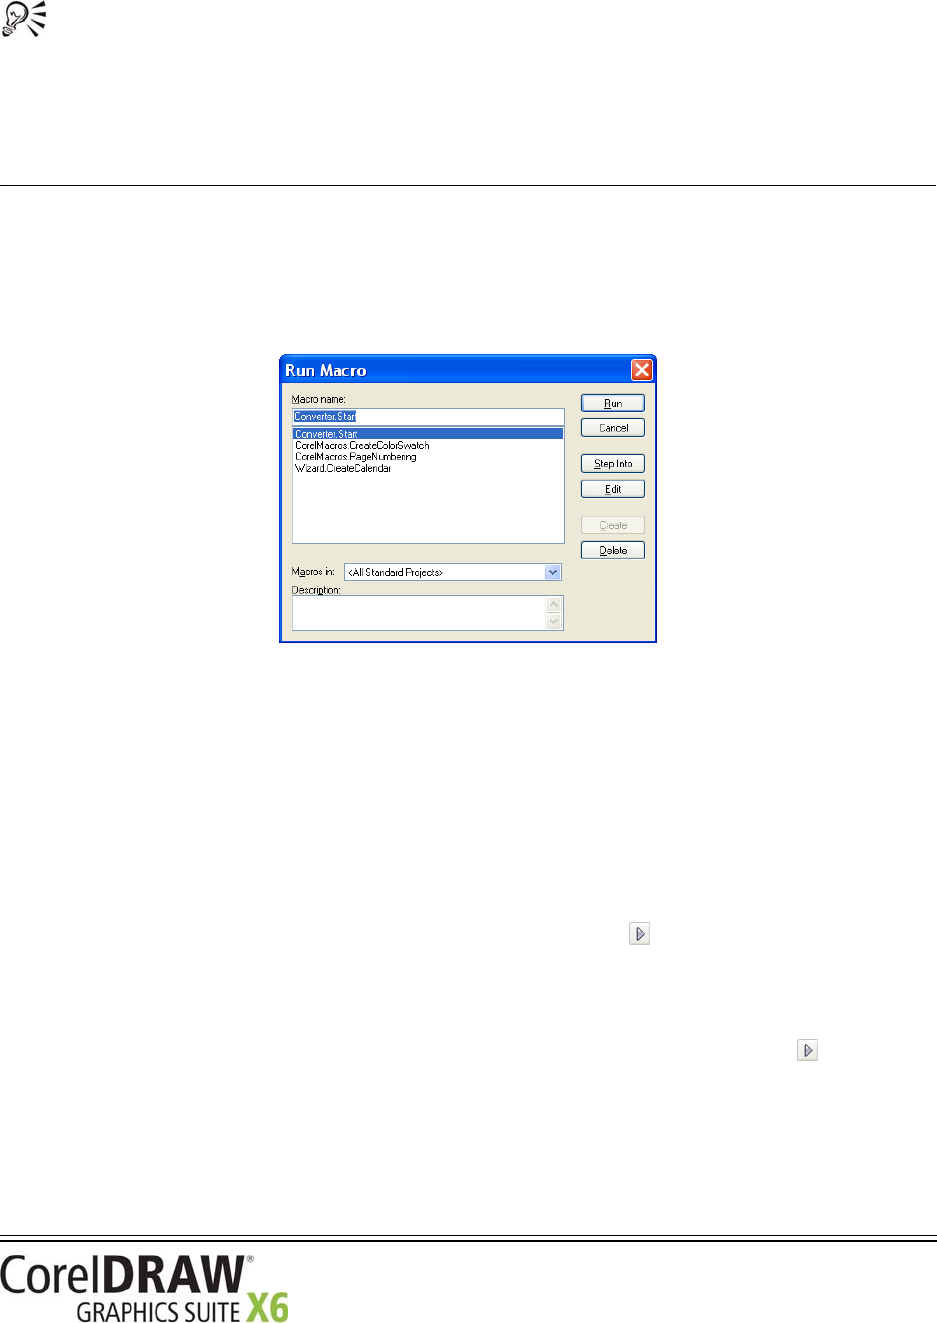
Macro Programming Guide
Creating macros 49
You can specify the default recording project by right-clicking the project in the Macro Manager docker,
and then clicking Set as recording project. (You cannot specify a locked macro project.) If you want,
you can create multiple temporary recordings by assigning each one to its own macro project.
You can cancel recording a macro, and discard any commands recorded thus far, by clicking To o l s `
Macros ` Cancel recording.
Running macros
You can run saved macros in one of two ways:
• from directly within CorelDRAW or Corel PHOTO-PAINT
• from within the Macro Editor
The Run Macro dialog box
You can also run any temporary macro recorded in CorelDRAW.
For details on running macros, see the following procedures:
• “To run a saved macro” on page 49
• “To run a temporary macro” on page 50
To run a saved macro
•Do one of the following:
•Click To o l s ` Macros ` Run macro, or click the Run macro button on the Macros toolbar. From the
Macros in list box, choose the project or file in which the macro is stored. From the Macro name list,
choose the macro. Click Run.
•In the Macro Manager docker, double-click the macro in the list.
•In the Macro Manager docker, click the macro in the list, and then click the Run button .
•In the Macro Manager docker, right-click the macro in the list, and then click Run.
• In the Macro Editor, click anywhere in the subroutine that forms the macro, and then click Run ` Run
macro.
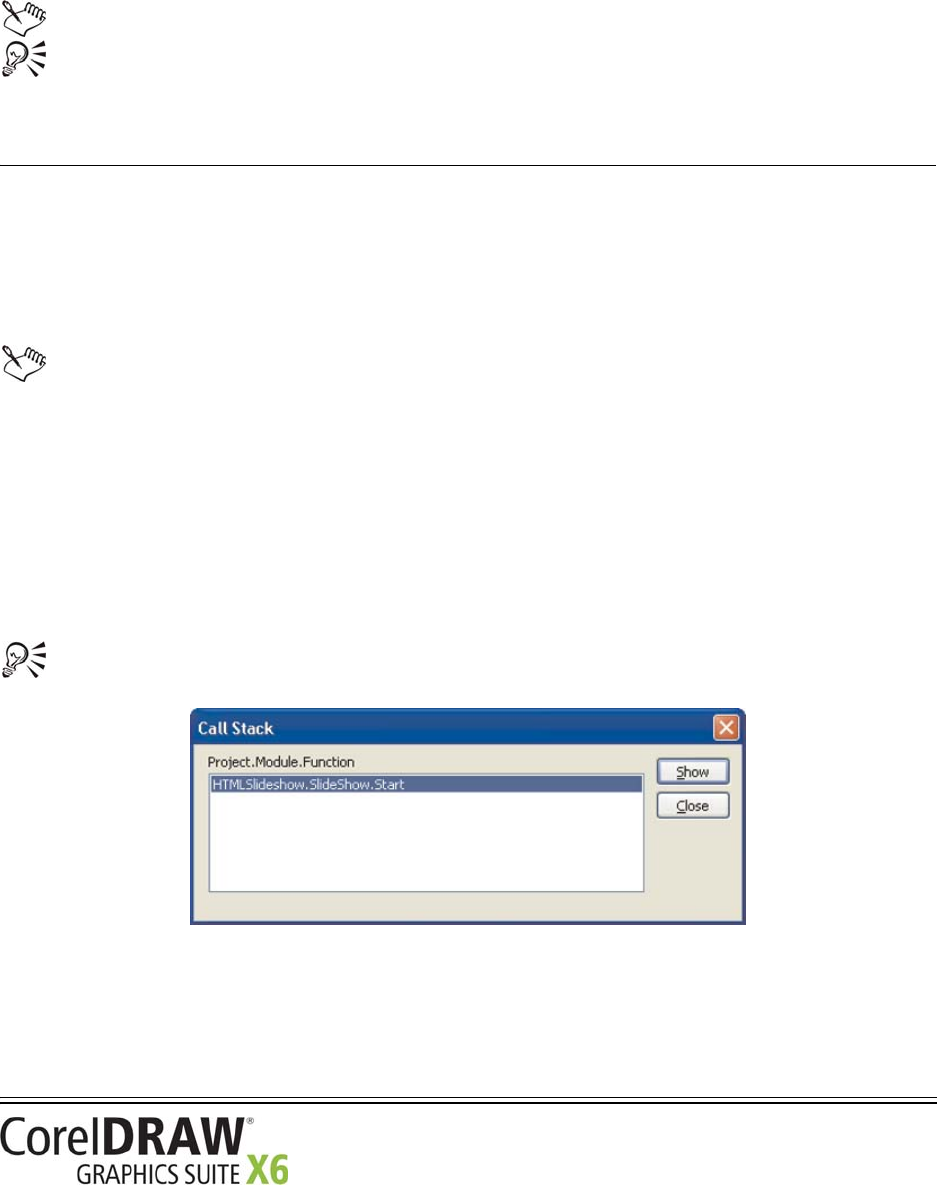
Macro Programming Guide
Creating macros 50
To run a temporary macro
•Do one of the following:
•Click To o l s ` Macros ` Run temporary macro.
• Press Ctrl+Shift+P.
This option is enabled only after you record a temporary macro.
If you have created multiple temporary macros, you must specify which macro project contains the one
that you want to run. Right-click the project in the Macro Manager docker, and then click Set as
recording project.
Debugging macros
To ensure that your macros run as expected, it’s important to debug them.
The Macro Editor provides four windows for debugging VBA code. The Macro Editor also provides two strong
debugging facilities that are common to language editors: setting breakpoints, and stepping through code.
The Macro Editor also supports two advanced debugging techniques that are not discussed in this
documentation: Making changes to the code while it is running, and watching and changing variables.
Using the debugging windows
The Macro Editor provides four windows for debugging VBA code: the Call Stack window, the Immediate
window, the Locals window, and the Wat c he s window. All of these windows provide important information
about the state of functions and variables while an application is running.
The Call Stack window is a modal dialog box that lists which function calls which function. In long, complicated
applications, this information is useful for tracing the steps to a particular function being called. To visit a
function listed in the window, select the function name and then click Show, or else close the window.
To display the Call Stack window, click View ` Call Stack.
The Call Stack window
The Immediate window lets you type in and run arbitrary lines of code while a macro is paused. This
functionality is useful for getting or setting the property of an object in the document, or for setting the value of
a variable in the code. To run a piece of code, type it in the Immediate window, and then press Enter; the code
is executed immediately.
Macro Programming Guide
Creating macros 51
To display the Immediate window, click View ` Immediate window.
The Immediate window
The Locals window displays all variables and objects that exist within the current scope. The type and value for
each variable are listed in the columns next to the name of the variable. Some variables and objects have several
children, which can be displayed by clicking the button next to the parent. Many variables let you edit their
value by clicking it.
To display the Locals window, click View ` Locals window.
The Locals window
The Watc h e s window is used to watch specific variables or object properties. This functionality is useful for
watching just one or two values rather than searching for them among all the values in the Locals window.
To display the Watches window, click View ` Watch window.

Macro Programming Guide
Creating macros 52
The Watches window
To add a value to the Wa t c he s window, do one of the following:
• Select the variable or object and its property, and then drag the selection onto the Watches window.
• Click the item, and then click Debug ` Quick watch.
The Add Watch dialog appears.
The Add Watch dialog box
Select the item that you want to watch, select any conditions for this watch, and then click OK. If the condition
becomes true, the application pauses to let you examine the code.
Setting breakpoints
A breakpoint is a marker in a line of code that causes execution to pause. To continue, you must either restart the
execution or step through the subsequent lines of code.
To set or clear a breakpoint, click the line, and then click Debug ` Tog g l e b r e a k p o i n t . By default, the line is
highlighted in dark red, and a red dot is placed in the margin.
To restart the code after it pauses at a breakpoint, click Run ` Continue. To pause the execution of the code
(immediately exiting from all functions and discarding all return values), click Run ` Reset.
You can also “run to cursor” — that is, execute the code until it reaches the line that the cursor is on, and then
pause at that line. To do this, click the line where you want execution to pause, and then click Debug ` Run to
cursor.
To clear all breakpoints, click Debug ` Clear all breakpoints.

Macro Programming Guide
Creating macros 53
If the line with the breakpoint (or the cursor, when “running to cursor”) is not executed because it is in a
conditional (if-then-else) block, the code does not stop at that line.
Breakpoints are not saved. They are lost when you close the Macro Editor.
Stepping through the code
When execution pauses at a breakpoint, you can continue through the code one line at a time. This functionality,
called “stepping through the code,” lets you do the following:
• examine the values of individual variables after each line
• determine how the code affects the values
• determine how the values affect the code
To step through the code, click Debug ` Step into. The execution advances to every line in all called functions
and subroutines.
To step through each line of the current function or subroutine but not through the lines of each called function
or subroutine, click Debug ` Step over. The called functions and subroutines are executed, but not line-by-line.
To execute the rest of the current function or subroutine but pause when the function or subroutine returns to
the point where it was called, click Debug ` Step out. This technique is a quick way of returning to the point of
entry of a function, to continue stepping through the code of the calling function.

Macro Programming Guide
Making macros user-friendly 54
Making macros user-friendly
An important part of many macro solutions is the user interface. A well-designed interface improves the ease-of-
use, power, and acceptance of a macro solution. Simple user interfaces can be created with toolbars, while more
complex interfaces can be created with dialog boxes or dockers — and can even allow the user to interact with
the mouse.
However, for some macro solutions, a user interface alone is not enough. To make a macro solution as user-
friendly as possible, you can provide documentation for it.
In this section
This section contains the following topics:
• “Providing toolbars for macros” on page 54
• “Providing dialog boxes for macros” on page 56
• “Providing user interaction for macros” on page 64
• “Providing documentation for macros” on page 66
Providing toolbars for macros
A toolbar provides a basic interface that enhances the user’s experience with your macro solution. Toolbars are
useful because their buttons are memorable even if small, and because those buttons can be set to display
meaningful captions and helpful tooltips.
Designing toolbars for macros
When creating toolbars, you should plan carefully. Having multiple small toolbars containing a few related
buttons is better than having one big toolbar containing all of the buttons for all of your macros. By breaking
your buttons into small groups, it is much easier to deploy them with the projects to which they belong.
For more information, see the following procedures:
• “To create a macro toolbar” on page 55
• “To add buttons to a macro toolbar” on page 55
Associating images or icons with macros
Macro commands can have an image or icon associated with them. This image or icon can be displayed or hidden
on toolbars and menus, and it can be sized as small (16 × 16 pixels), medium (32 × 32 pixels), or large
(48 × 48 pixels).
For more information, see the following procedure:
• “To associate an image or icon with a macro” on page 55
Setting captions and tooltips for macros
Each macro can have both a caption and a tooltip. The caption is displayed whenever the menu command is used

Macro Programming Guide
Making macros user-friendly 55
and can be displayed as part of a button, while the tooltip appears when the pointer hovers over the button or
menu item.
For more information, see the following procedures:
• “To set a caption for a macro” on page 55
• “To set a tooltip for a macro” on page 56
To create a macro toolbar
1Click Tools ` Options.
2Click Wo r k s p a c e ` Customization ` Command bars.
3Click New.
4Type a name for the toolbar.
5Enable the check box next to the name of the toolbar.
To add buttons to a macro toolbar
1Click Wo r k s p a c e ` Customization ` Commands.
2Choose Macros from the Commands list box.
The list displays the fully qualified names of all of the public, parameter-free subroutines from all of the
installed project (GMS) files.
3Drag a macro from the list to the toolbar.
The macro appears on the toolbar with the default macro icon.
To associate an image or icon with a macro
1Click Wo r k s p a c e ` Customization ` Commands.
2Choose Macros from the Commands list box.
The list displays the fully qualified names of all of the public, parameter-free subroutines from all of the
installed project (GMS) files.
3Select a macro in the Command list.
4Click the Appearance tab, and then do one of the following:
• To apply a Windows bitmap (BMP) image to the macro, click Import, navigate to where the image is
stored, and select it. The colors in the image are mapped to their closest available matches.
• To create a customized icon for the macro, edit the pixels displayed in the Image area.
To set a caption for a macro
1Click Wo r k s p a c e ` Customization ` Commands.
2Choose Macros from the Commands list box.
The list displays the fully qualified names of all of the public, parameter-free subroutines from all of the
installed project (GMS) files.
3Select a macro in the Command list.
4Click the Appearance tab, and then type the caption in the Caption box.

Macro Programming Guide
Making macros user-friendly 56
To specify a character in the caption as an accelerator that can be activated in combination with the Alt key,
type an ampersand ( &) in front of that character. This accelerator key applies only to menu commands,
which display accelerator characters with an underscore ( _).
To set a tooltip for a macro
1Click Wo r k s p a c e ` Customization ` Commands.
2Choose Macros from the Commands list box.
The list displays the fully qualified names of all of the public, parameter-free subroutines from all of the
installed project (GMS) files.
3Select a macro in the Command list.
4Click the General tab, and then type the tooltip in the To o l t i p h e l p box.
Providing dialog boxes for macros
A dialog box provides a user-friendly interface for more complex macro solutions.
For best results, all dialog boxes must provide the following:
• a meaningful title
• an obvious function for cancelling or closing the dialog box
• an easy-to-use layout
• a Help button from which users can access how-to documentation
• a tooltip (that is, a ControlTipText string) for every control
There are two types dialog boxes: modal and modeless.
Understanding modal dialog boxes
A modal dialog box locks the application until the user acts on and then closes the dialog box. Most built-in
dialog boxes for macro solutions are modal, and most modal dialog boxes provide the following buttons:
•OK — performs an action and then closes the dialog box. This button is the default.
•Cancel — closes the dialog box without performing an action. This button provides the same functionality as
the Close button in the upper-right corner of a dialog box.
In addition, some modal dialog boxes provide the following button:
•Apply — performs an action that can be commited by clicking the OK button or cancelled by clicking the
Cancel button
Finally, most wizard-style dialog boxes provide the following buttons:
•Previous — returns to the previous page. This button can be disabled on the first page of the dialog box.
•Next — advances to the next page. This button can be replaced by a Finish button on the last page of the
dialog box.
•Finish — performs the action for the dialog box and then closes the dialog box
Macro Programming Guide
Making macros user-friendly 57
Understanding modeless dialog boxes
A modeless dialog box does not lock the application, so the user can leave the dialog box open and continue
working in the application. In this way, modeless dialog boxes behave like dockers. Most modeless dialog boxes
provide the following buttons:
•Apply or Create — performs an action (and can, in fact, be specially labeled to describe that action). This
button is typically the default.
•Close –– closes the dialog box. This button is used after the action is applied.
Choosing between modal and modeless dialog boxes
Before you can create a dialog box for your macro solution, you must decide whether to make it modal or
modeless by considering what you want the dialog box to achieve.
For example, let’s say that you are creating a “one-shot” end-to-end solution such as a customized Print dialog
box or Save dialog box. In this case, you would provide a modal dialog box because it is unlikely that the user
would want to apply the specified settings repeatedly.
On the other hand, let’s say that you are creating a solution for setting up an effect to apply to a selection of
shapes. To let the user specify the desired settings and then apply them repeatedly, you would provide a modeless
dialog box.
After choosing which type of dialog box to provide, you are ready to set it up. For information, see “Setting up
dialog boxes” on page 57. After setting up a dialog box, you are ready to code it. For information, see “Coding
dialog boxes” on page 59.
Setting up dialog boxes
The Form Designer in the Macro Editor provides easy access to the tools for setting up a dialog box. You can
access the Form Designer by creating a new, blank dialog box. In the Project Explorer, right-click the project to
which you want to add a dialog box, and then click Insert ` UserForm.
A blank form in the Form Designer

Macro Programming Guide
Making macros user-friendly 58
The Form Designer provides two main features for designing dialog boxes:
•the Form Designer toolbox
•The UserForm toolbar
The Form Designer also provides functions for naming and testing dialog boxes.
Designing dialog boxes
The Form Designer toolbox is the main utility for designing dialog boxes. It lets you add controls to a dialog
box by dragging them from the toolbox.
The Form Designer toolbox
The Form Designer toolbox lets you add the following controls to a dialog box:
Icon Control name Function
Label Provides static text, such as instructions or captions
Te x t B o x Provides an area for typing text. For information on coding this control, see
“Providing text boxes in dialog boxes” on page 60.
ComboBox Provides a list from which a single item can be selected; optionally, also provides
an area for typing text. For information on coding this control, see “Providing
combination boxes and list boxes in dialog boxes” on page 61.
ListBox Provides a list from which multiple items can be selected. For information on
coding this control, see “Providing combination boxes and list boxes in dialog
boxes” on page 61.
CheckBox Provides a check box that can be enabled (by clicking to display a check mark),
disabled (by clicking to remove the check mark), or grayed (that is, made
unavailable)
OptionButton Provides a “radio button” that is linked to other radio buttons with the same
GroupName property, such that only one of the buttons can be enabled at a time
ToggleButton Provides a button that can be toggled (to appear pressed or not pressed)
Macro Programming Guide
Making macros user-friendly 59
The Form Designer toolbox also features a Pick tool , which lets you select and move the controls
on a dialog box.
To display a Help topic containing information about a selected dialog-box control in the Form Designer,
press F1.
The Form Designer also provides access to the UserForm toolbar, which you can use when designing a dialog
box. For information on this toolbar, see “Using the Macro Editor toolbars” on page 35.
Naming dialog boxes
After you have finished designing your dialog box, you may want to change its title. Click the dialog box to
select it, and then in the Properties window, change the Caption property.
For clarity, you can give each dialog box a unique, descriptive name by using the Properties window.
However, remember to follow the standard programming conventions for naming variables.
Testing dialog boxes
At any time, you can test your dialog box by pressing F5 to run it.
After you finish setting up your dialog box, you can start coding it. For information, see “Coding dialog boxes”
on page 59.
Coding dialog boxes
After setting up a dialog box, you can develop the VBA code for displaying it. You can also develop the code for
providing its text boxes, combination boxes and list boxes, buttons, and images.
Frame Groups items together so that they move with the frame
CommandButton Provides a button that can be clicked to commit an assigned action. For
information on coding this control, see “Providing buttons in dialog boxes” on
page 61.
Ta b S t r i p Provides separate views of related controls
MultiPage Provides multiple pages of controls
ScrollBar Provides immediate access to a range of values by scrolling
SpinButton Enhances another control (such as a Te x t B o x control) so that the value for that
control can be set more quickly
Image Provides an image. For information on coding this control, see “Providing images
in dialog boxes” on page 63.
Icon Control name Function

Macro Programming Guide
Making macros user-friendly 60
Displaying dialog boxes
The Show method for a dialog box lets you determine how the dialog box is displayed.
For example, the following code uses the Show method to display the dialog box frmFooForm:
frmFooForm.Show
In addition, the Show method provides a Modal parameter, which lets you specify whether the dialog box is
modal or modeless. A value of vbModal (or 1) for this parameter creates a modal dialog box, while a value of
vbModeless (or 0) creates a modeless dialog box. The following VBA example creates a modeless dialog box:
frmFooForm.Show vbModeless
To open a dialog box from a macro that is available from within the application itself, you must create a public
subroutine within a code module. However, a subroutine cannot be made available from within the application if
the subroutine exists either within the code for a dialog box or within a class module. In addition, the subroutine
cannot take any parameters.
The following VBA example subroutine opens frmFooForm as a modeless dialog box:
Public Sub showFooForm()
frmFooForm.Show vbModeless
End Sub
When a dialog box loads, it triggers its own UserForm_Initialize event. From this event handler, you
must initialize all the relevant controls on the dialog box. For more information, see “Providing event
handlers” on page 23.
Finally, you can also use the Show method to open additional dialog boxes from within the current one, as in the
following VBA example:
UserForm2.Show vbModal
However, control is not returned to you until all open dialog boxes are unloaded.
Providing text boxes in dialog boxes
Text boxes (that is, Te x t B o x controls) are the mainstay of user input. They are simple to use and quick to
program, and they are suitable for a number of purposes.
To set the text in a text box when initializing it, set the Te x t (default or implicit) property for the Te x t B ox
control, as in the following VBA example:
txtWidth.Text = "3"
txtHeight = "1"

Macro Programming Guide
Making macros user-friendly 61
To get the value of a Te x t B o x control, get its Te x t property in the Properties window, as in the following VBA
example:
Call SetSize(txtWidth.Text, txtHeight.Text)
Providing combination boxes and list boxes in dialog boxes
In a combination box (that is, a ComboBox control), the user can either choose an item from the list or type a
value into the text box. You can prevent users from being able to type into a ComboBox control by setting its
Style property (in the Properties window) to fmStyleDropDownList.
In a list box (that is, a ListBox control), the user can choose one or more items (typically, from between three and
ten items) from the list.
To populate a list of any type, you must call the member function AddItem for the list. This function takes two
parameters: the string or numerical value, and the position in the list. The position parameter is optional, so
omitting it inserts the item at the last position in the list. For example, the following VBA code populates the list
ComboBox1 with four items:
ComboBox1.AddItem 1
ComboBox1.AddItem 2
ComboBox1.AddItem 3
ComboBox1.AddItem 0, 0
To test which item is selected when the OK button is clicked, test the ListIndex property for the list.
To get the value of the caption for a selected combination box or list box, test the Te x t property for the item, as
in the following VBA example:
Dim retList As String
retList = ComboBox1.Text
Providing buttons in dialog boxes
You can add a button to a dialog box by using the CommandButton control. Click the dialog box to add a
default-sized button, or drag to create a custom-sized one. Click the caption to edit it, or select the button and
edit its Caption property in the Properties window. You might also want to change the name of the button to
something more descriptive, such as buttonOK or buttonCancel.

Macro Programming Guide
Making macros user-friendly 62
Designing buttons in the Form Designer
Most dialog boxes have an OK button and a Cancel button. However, no button functions until its dialog box
has code for handling the click event for the button. (This is because dialog boxes in VBA and VSTA are event-
driven.)
For an OK button, you can set its Default property to Tr u e so that the event handler for the button is called
when the user presses Enter to activate the dialog box. That way, the click-event handler for the button performs
the functionality of the dialog box and then unloads that dialog box.
If the dialog box is used to set the size of the selected CorelDRAW shapes by setting their width and height, then
the click-event handler for the OK button could resemble the following VBA code sample (which assumes you
have already created two text boxes called txtWidth and txtHeight):
Private Sub buttonOK_Click()
Me.Hide
Call SetSize(txtWidth.Text, txtHeight.Text)
Unload Me
End Sub
Similarly, the size-setting CorelDRAW subroutine could resemble the following:
Private Sub SetSize(width As String, height As String)
ActiveDocument.Unit = cdrInch
ActiveSelection.SetSize CDbl(width), CDbl(height)
End Sub
Macro Programming Guide
Making macros user-friendly 63
From inside the code module for the dialog box, the dialog-box object is implicit, so all the controls can be
simply accessed by name. From other modules, the controls must be accessed through their full name (as in
UserForm1.buttonOK).
The Cancel button is the simplest control: it must dismiss the form without doing anything else. To add a cancel
action to a Cancel button, double-click the button from within the Form Designer to display its code in the
Code window. This creates a new subroutine called cmdCancel_Click:
The Code window with code for a Cancel button
The following VBA code, if applied to a Cancel button, dismisses the dialog box when the button is clicked:
Private Sub cmdCancel_Click()
Unload Me
End Sub
If you continue by setting the Cancel property for the dialog box to Tr u e , then when the user presses Escape,
the cmdCancel_Click event is triggered and the provided code unloads the form.
Providing images in dialog boxes
The Image control is used to place graphics on a dialog box. The image (a bitmap) is contained in the Picture
property, so you can either load an RGB image from a file (such as a GIF, JPEG, or Windows Bitmap BMP file)
or paste one into the property.
At run time, you can change the Picture property if you want to load a new image into the Image control. To
change the Picture property, use the function LoadPicture and provide a path to the new image file, as in the
following VBA example:
Image1.Picture = LoadPicture("C:\Images\NewImage.gif")

Macro Programming Guide
Making macros user-friendly 64
Providing user interaction for macros
One way to make your macro solutions more user-friendly is to optimize them for user interaction, such as mouse
input. A macro that captures mouse actions gives users real-time influence on the result of that macro.
The CorelDRAW object model provides three main ways to receive mouse input from users, as explained in the
following topics:
• “Capturing mouse clicks” on page 64
• “Capturing mouse drags” on page 65
• “Capturing coordinates” on page 66
Capturing mouse clicks
To get the position of a single mouse click, you can use the GetUserClick method of the Document class. This
method pauses the macro until the specified period of time elapses, or until the user clicks in the document or
presses Escape. Here is a VBA example that uses the Document.GetUserClick method:
Dim doc As Document, retval As Long
Dim x As Double, y As Double, shift As Long
Set doc = ActiveDocument
doc.Unit = cdrCentimeter
retval = doc.GetUserClick(x, y, shift, 10, True, cdrCursorPick)
The following parameters for the Document.GetUserClick method are coded into the preceding example:
•The variable x returns the horizontal position of the mouse click.
•The variable y returns the vertical position of the mouse click.
• The parameter shift returns the combination of the Shift, Ctrl, and Alt keys that is held down by the user
when clicking the mouse. The Shift, Ctrl, and Alt keys are assigned values of 1, 2, and 4 (respectively), the
sum of which is the returned value.
•The value 10 specifies the number of seconds for the user to click in the document.
•The value True specifies that the SnapToObjects parameter is enabled.
•The value cdrCursorPick specifies that the icon for the Pick tool is used for the cursor icon. (You cannot use
a custom icon.)
One of the following values is returned:
•0 — The user successfully completes the click.
•1 — The user cancels by pressing Escape.
•2 — The operation times out.
The returned coordinates are relative to the origin of the page and, unless explicity specified, are in
document units.

Macro Programming Guide
Making macros user-friendly 65
To get the shapes under the returned click point, you can use the method SelectShapesAtPoint (which is a
member of Page), as in the following VBA example:
doc.ActivePage.SelectShapesAtPoint x, y, True
A value of True selects unfilled objects, while False does not select unfilled objects.
Capturing mouse drags
To get the position of a mouse drag (or an area or rectangle), you can use the GetUserArea method of the
Document class. This method pauses the macro until the specified period of time elapses, or until the user
clicks, drags, and releases in the document or presses Escape. Here is a VBA example that uses the
Document.GetUserArea method:
Dim doc As Document, retval As Long, shift As Long
Dim x1 As Double, y1 As Double, x2 As Double, y2 As Double
Set doc = ActiveDocument
doc.Unit = cdrCentimeter
retval = doc.GetUserArea(x1, y1, x2, y2, shift, 10, True, cdrCursorExtPick)
ActivePage.SelectShapesFromRectangle x1, y1, x2, y2, False
The following parameters for the Document.GetUserArea method are coded into the preceding example:
•The variables x1 and y1 return the horizontal and vertical positions (respectively) of the upper-left corner of
the area.
•The variables x2 and y2 return the horizontal and vertical positions (respectively) of the lower-right corner of
the area.
• The parameter shift returns the combination of the Shift, Ctrl, and Alt keys that is held down by the user
when dragging the mouse. The Shift, Ctrl, and Alt keys are assigned values of 1, 2, and 4 (respectively), the
sum of which is the returned value.
•The value 10 specifies the number of seconds for the user to click in the document.
•The value True specifies that the SnapToObjects parameter is enabled.
•The value cdrCursorExtPick specifies the icon to use for the cursor.
In the preceding example, the code ends by selecting the shapes that lie completely within the area by using the
Page.SelectShapesFromRectangle method.
One of the following values is returned:
•0 — The user successfully completes the selection.
•1 — The user cancels by pressing Escape.
•2 — The operation times out.
This method returns two points that are interpreted as the corners of a rectangle. However, the two
points can also be used as the start point and end point of a mouse drag.
The returned coordinates are relative to the origin of the page and, unless explicity specified, are in
document units.

Macro Programming Guide
Making macros user-friendly 66
Capturing coordinates
When capturing mouse actions, or when developing a complex macro solution, you may want to convert
between screen coordinates and document coordinates. This conversion is done with the methods
ScreenToDocument and DocumentToScreen of the Window class.
The following VBA example converts a set of screen coordinates into a point in the document that is visible in
the active window:
Dim docX As Double, docY As Double
ActiveDocument.Unit = cdrMillimeter
ActiveWindow.ScreenToDocument 440, 500, docX, docY
The following VBA example returns the screen coordinates of a point in the document as it appears on the
screen:
Dim screenX As Long, screenY As Long
ActiveDocument.Unit = cdrMillimeter
ActiveWindow.DocumentToScreen 40, 60, screenX, screenY
In both examples, the converted coordinates are returned in the last two parameters.
Screen coordinates start from the upper-left corner of the screen, so positive y-values are down the screen,
whereas negative y-values are up the screen.
You can test whether a set of coordinates (that is, a point) is inside, outside, or on the outline of a curve by using
the Shape.IsOnShape method. For a set of document coordinates, this method returns one of the following:
•cdrInsideShape — if the coordinate is inside the shape
•cdrOutsideShape — if the coordinate is outside the shape
•cdrOnMarginOfShape — if the coordinate is on or near the outline of the shape
For example, the following VBA code tests where the point (4, 6) is in relation to the active shape:
Dim onShape As Long
ActiveDocument.Unit = cdrInch
onShape = ActiveShape.IsOnShape(4, 6)
Providing documentation for macros
To make a macro as user-friendly as possible, you can provide documentation for it.
One solution is to create a Readme file or a printed manual. Another solution is to incorporate the
documentation directly into the user interface for the macro, but this method uses up valuable on-screen “real
estate.” Yet another solution is to create an online Help system, but this method requires special tools and a fair
amount of additional work.

Macro Programming Guide
Making macros user-friendly 67
Perhaps the simplest way to provide macro documentation is in the form of a plain-text file. In fact, upon
installation, a macro project can create a registry value that points to the location of this file. In VBA, the
following function can be used to open a plain-text file (where the parameter file provides the full path to the
file, such as C:\ReadMe.txt):
Public Sub launchNotepad(file As String)
Shell "Notepad.exe" & " " & file, vbNormalFocus
End Sub
A much more powerful solution is to provide documentation in HTML format. HTML provides numerous
benefits over plain-text, including support for graphics and for hypertext links (such as to specific locations in the
document — for example, index.html#middle). In VBA, the following function can be used to open an HTML
file (where the parameter url provides the full path to the file — such as C:\ReadMe.txt — or a URL for the
file):
' Put this Declare statement before all Subs and Functions!
Declare Function ShellExecute Lib "shell32.dll" _
Alias "ShellExecuteA" (ByVal hwnd As Long, _
ByVal lpOperation As String, ByVal lpFile As String, _
ByVal lpParameters As String, ByVal lpDirectory As String, _
ByVal nShowCmd As Long) As Long
Public Sub launchBrowser(url As String)
ShellExecute 0, vbNullString, url, vbNullString, vbNullString, 5
End Sub

Macro Programming Guide
Organizing and deploying macros 68
Organizing and deploying macros
When you’ve finished developing your macro solution, you can make it available to other users.
In this section
This section contains the following topics:
• “Organizing macros” on page 68
• “Deploying macros” on page 68
Organizing macros
To make your macro solutions easy to deploy, you can organize them. Here are some tips:
• To sort your macros, use a separate code module for each macro, and then group related macros into a single
GMS file.
• To help users find the entry point to a macro, place all public subroutines into a single code module so that the
macro can be called from within the application.
Deploying macros
You can deploy macro solutions to users for installation. You can deploy GMS files or workspaces, or both.
Deploying GMS files
Every document has an intrinsic GMS file. For this reason, you can explicitly distribute a macro as part of a
document because when that document is opened, the user has immediate access to its macros. This deployment
technique lets you, for example, set up a macro to track how much time the user has spent editing a document.
Alternatively, you can distribute the code module that contains the macro. However, this deployment method
requires users to manually integrate the code module into an existing project file.
The simplest and most reliable way to deploy a macro project is to use its GMS file. To begin, you must export
the GMS file from your computer. Then, each user must import the GMS file by using the Macro Manager
docker. For more information, see the following procedures:
• “To export a GMS file” on page 69
• “To import a GMS file” on page 69
Deploying workspaces
Some macro solutions include a customized workspace that contains relevant toolbars, menus, and shortcut keys.
You can deploy the features of a customized workspace to users by creating a Corel workspace (XSLT) file. You
can export a subset of workspace features — such as individual menus, individual toolbars, or complete sets of
shortcut keys — if you want users to install only those features, or you can export the entire workspace if you
Macro Programming Guide
Organizing and deploying macros 69
prefer. For more information, see “To export workspace features” on page 69.
Users can install customized workspace features by importing the XSLT files that you provide. For more
information, see “To import workspace features” on page 69.
In CorelDRAW, users can also import workspace features by using the Application.ImportWorkspace
method.
To ex p o r t a G M S fi l e
•Locate the GMS file on your computer, and make it available to your users.
For help locating this folder, see “Using GMS files” on page 42.
To im p o r t a G M S f i l e
1Save the GMS file to a GMS folder on your computer.
For help locating this folder, see “Using GMS files” on page 42.
2In the Macro Manager docker, do one of the following:
•Click Visual Basic for Applications in the list, click Load, and then choose the project.
•Right-click Visual Basic for Applications in the list, and then click Load macro project.
To export workspace features
1Right-click the menu bar, and click Customize ` Wor k s p a c e ` Export Workspaces.
2In the list, enable the check boxes next to the workspace features that you want to export:
•Dockers — includes the sizes and positions of dockers
•Menus — lets you choose which menus to include
•Shortcut Keys — includes all available shortcut keys
•Status Bar — includes the status bar
•To o l b a r s — lets you choose which toolbars to include
Enable all check boxes if you want to export the entire workspace.
3Click Save.
4In the File name box, type a filename.
The specified workspace features are saved to a single Corel workspace (XSLT) file with the specified filename.
If you want, you can export each workspace feature to a separate file. Simply export one item at a time
to create a series of XSLT files.
When you export shortcut keys, you export all shortcut keys. If you want to distribute only a few keys,
create a new workspace, remove all shortcut keys from it, and then add only the desired keys.
To import workspace features
1Right-click the toolbar, and click Customize ` Workspa ce ` Import Workspaces.
2Click Browse.
3Select the desired Corel workspace (XSLT) file, and then click Next.

Macro Programming Guide
Organizing and deploying macros 70
4In the list, enable the check boxes next to the workspace features that you want to import:
•Dockers — includes the sizes and positions of dockers
•Menus — lets you choose which menus to include
•Shortcut Keys — includes all available shortcut keys
•Status Bar — includes the status bar
•To o l b a r s — lets you choose which toolbars to include
Enable all check boxes if you want to import the entire workspace.
5Click Next.
6Choose a destination for the workspace features by doing one of the following:
• Enable the Current workspace option to import the specified workspace features into the current
workspace, and then click Next.
• Enable the New workspace option to import the specified workspace features into a new workspace. Click
Next, and provide details about the workspace. Click Next.
7Confirm the details of the import, and then click Finish.
The specified workspace features are imported into the specified workspace.
If the name of an incoming toolbar is the same as an existing toolbar, the incoming toolbar is renamed.
If an imported command calls an uninstalled macro, it does not function.
Macro Programming Guide
Understanding the CorelDRAW object model 71
Understanding the CorelDRAW object model
In CorelDRAW, the Application object is the root of all other objects and is used if no other root object is
specified.
Documents, pages, layers, shapes, and filters are among the most important objects in the CorelDRAW object
model. Understanding these objects — and their relationships to one another — is the key to understanding the
CorelDRAW object model.
In this section
This section contains the following topics:
• “Understanding the object-model hierarchy” on page 71
• “Working with the Application object” on page 72
• “Working with documents” on page 72
• “Working with pages” on page 91
• “Working with layers” on page 97
• “Working with shapes” on page 102
• “Working with import filters and export filters” on page 138
All code examples in this section are written in VBA.
For a visual representation of the object model, please see the object-model diagram at
X:\Program Files\Corel\<folder>\Data (where X: is the drive and <folder> is the folder where the
software is installed):
•CorelDRAW Object Model Diagram.pdf
Understanding the object-model hierarchy
The main structure of the CorelDRAW object model can be summarized as follows:
•The Application object contains a Documents collection of all open Document objects. When a
CorelDRAW document is created or opened, a corresponding Document object is added to the Documents
collection for the Application object.
•Each Document object contains a Pages collection of all the Page objects (or “pages”) in that document.
•Each Page object contains a Layers collection of all the Layer objects (or “layers”) on that page.
•Each Layer object contains a Shapes collection of all the Shape objects (or “shapes”) on that layer.
In addition, the object model contains a set of filter objects, which provide support for files from other technical-
graphics applications. Import filters are governed by the Layer class, while export filters are governed by the
Document class.

Macro Programming Guide
Understanding the CorelDRAW object model 72
For a visual representation of the object model, please see the object-model diagram at
X:\Program Files\Corel\<folder>\Data (where X: is the drive and <folder> is the folder where the
software is installed):
•CorelDRAW Object Model Diagram.pdf
Working with the Application object
In CorelDRAW, the Application object is the root of all other objects and is used if no other root object is
specified. You can use the application’s Application object to reference the application’s object model from an
out-of-process controller.
Dim cdr As CorelDRAW.Application
Set cdr = CreateObject("CorelDRAW.Application")
If desired, you can avoid using the CreateObject keyword in the preceding example by importing the
target type library and using the data types directly.
Working with documents
Each open document, or Document object, is a member of the Application.Documents collection. The
documents in that collection appear in the order in which they were created or opened.
CorelDRAW provide a number of properties, methods, and events for working with documents, the most useful
of which are listed in the following table.
Class Member Description
ActiveView OriginX property
and
OriginY property
Combine to specify the origin of the active view
For more information, see “Panning” on page 84.
ActiveView SetViewPoint method Specifies the origin of the active view
For more information, see “Panning” on page 84.
ActiveView Zoom property Specifies the zoom factor of the active view
For more information, see “Zooming” on page 84.
AddInHook New event Is triggered when a document is created
For more information, see “Creating documents” on
page 80.
Application ActiveDocument property Provides direct access to the active document
For more information, see “Activating documents” on
page 81.

Macro Programming Guide
Understanding the CorelDRAW object model 73
Application CreateDocument method
or
CreateDocumentFromTemplate method
Create a document
For more information, see “Creating documents” on
page 80.
Application DocumentAfterExport event Is triggered when a document is exported (that is, when
the Export dialog box closes)
For more information, see “Exporting files from
documents” on page 86.
Application DocumentAfterPrint event Is triggered when a document is printed (that is, when the
Print dialog box closes)
For more information, see “Printing documents” on
page 89.
Application DocumentAfterSave event Is triggered when a document is saved (that is, when the
Save dialog box closes)
For more information, see “Saving documents” on
page 85.
Application DocumentBeforeExport event Is triggered when the Export dialog box opens
For more information, see “Exporting files from
documents” on page 86.
Application DocumentBeforePrint event Is triggered when the Print dialog box opens
For more information, see “Printing documents” on
page 89.
Application DocumentBeforeSave event Is triggered when the Save dialog box opens
For more information, see “Saving documents” on
page 85.
Application DocumentClose event Is triggered when a document is closed
For more information, see “Closing documents” on
page 91.
Application DocumentNew event Is triggered when a document is created
For more information, see “Creating documents” on
page 80.
Application DocumentOpen event Is triggered when a document is opened
For more information, see “Opening documents” on
page 80.
Application Documents property Contains the collection of open documents
For more information, see “Activating documents” on
page 81.
Class Member Description

Macro Programming Guide
Understanding the CorelDRAW object model 74
Application OpenDocument method Opens a document
For more information, see “Opening documents” on
page 80.
Application QueryDocumentClose event Is triggered when the user responds to a request to close a
document
For more information, see “Closing documents” on
page 91.
Application QueryDocumentExport event Is triggered when the user responds to a request to export
a document
For more information, see “Exporting files from
documents” on page 86.
Application QueryDocumentPrint event Is triggered when the user responds to a request to print a
document
For more information, see “Printing documents” on
page 89.
Application QueryDocumentSave event Is triggered when the user responds to a request to save a
document
For more information, see “Saving documents” on
page 85.
Application WindowActivate event Is triggered when a window is activated
For more information, see “Activating documents” on
page 81.
Application WindowDeactivate event Is triggered when a window is deactivated
For more information, see “Activating documents” on
page 81.
Document Activate method Activates a document
For more information, see “Activating documents” on
page 81.
Document ActiveWindow property Provides direct access to the active window for a document
For more information, see “Working with windows” on
page 82.
Document AfterExport event Is triggered when a document is exported (that is, when
the Export dialog box closes)
For more information, see “Exporting files from
documents” on page 86.
Class Member Description

Macro Programming Guide
Understanding the CorelDRAW object model 75
Document AfterPrint event Is triggered when a document is printed (that is, when the
Print dialog box closes)
For more information, see “Printing documents” on
page 89.
Document AfterSave event Is triggered when a document is saved (that is, when the
Save dialog box closes)
For more information, see “Saving documents” on
page 85.
Document BeforeExport event Is triggered when the Export dialog box opens
For more information, see “Exporting files from
documents” on page 86.
Document BeforePrint event Is triggered when the Print dialog box opens
For more information, see “Printing documents” on
page 89.
Document BeforeSave event Is triggered when the Save dialog box opens
For more information, see “Saving documents” on
page 85.
Document BeginCommandGroup method
and
EndCommandGroup method
Combine to create a “command group” that reduces a
series of programmed, document-related actions to a
single, undoable step
For more information, see “Creating command groups for
documents” on page 85.
Document Close event Is triggered when a document is closed
For more information, see “Closing documents” on
page 91.
Document Close method Closes a document
For more information, see “Closing documents” on
page 91.
Document CreateView method Creates a document view
For more information, see “Working with views” on
page 83.
Document Export method,
ExportEx method,
or
ExportBitmap method
Exports a file from a document
For more information, see “Exporting files from
documents” on page 86.
Class Member Description

Macro Programming Guide
Understanding the CorelDRAW object model 76
Document FilePath property,
FileName property,
or
FullFileName property
Specifies the file path or filename (or both) of a saved
document
For more information, see “Activating documents” on
page 81.
Document GetUserArea method Returns information about a document area that the user
drags with the mouse
For more information, see “Capturing mouse drags” on
page 65.
Document GetUserClick method Returns information about a document position that the
user clicks with the mouse
For more information, see “Capturing mouse clicks” on
page 64.
Document Open event Is triggered when a document is opened
For more information, see “Opening documents” on
page 80.
Document PrintOut method
and
PrintSettings property
Combine to print a document by using the specified
settings
For more information, see “Printing documents” on
page 89.
Document PublishToPDF method
and
PDFSettings property
Combine to publish a document to PDF by using the
specified settings
For more information, see “Publishing documents to PDF”
on page 88.
Document QueryClose event Is triggered when the user responds to a request to close a
document
For more information, see “Closing documents” on
page 91.
Document QueryExport event Is triggered when the user responds to a request to export
a document
For more information, see “Exporting files from
documents” on page 86.
Document QueryPrint event Is triggered when the user responds to a request to print a
document
For more information, see “Printing documents” on
page 89.
Class Member Description

Macro Programming Guide
Understanding the CorelDRAW object model 77
Document QuerySave event Is triggered when the user responds to a request to save a
document
For more information, see “Saving documents” on
page 85.
Document ReferencePoint property Specifies the reference point for the document
For more information, see “Setting document properties”
on page 82.
Document SaveAs method
or
Save method
Saves a document
For more information, see “Saving documents” on
page 85.
Document Unit property Specifies the unit of measurement for the document
For more information, see “Setting document properties”
on page 82.
Document WorldScale property Specifies the drawing scale for the document
For more information, see “Setting document properties”
on page 82.
Document Views property Contains the collection of views for a document
For more information, see “Working with views” on
page 83.
GlobalMacro
Storage
DocumentAfterExport event Is triggered when a document is exported (that is, when
the Export dialog box closes)
For more information, see “Exporting files from
documents” on page 86.
GlobalMacro
Storage
DocumentAfterPrint event Is triggered when a document is printed (that is, when the
Print dialog box closes)
For more information, see “Printing documents” on
page 89.
GlobalMacro
Storage
DocumentAfterSave event Is triggered when a document is saved (that is, when the
Save dialog box closes)
For more information, see “Saving documents” on
page 85.
GlobalMacro
Storage
DocumentBeforeExport event Is triggered when the Export dialog box opens
For more information, see “Exporting files from
documents” on page 86.
Class Member Description

Macro Programming Guide
Understanding the CorelDRAW object model 78
GlobalMacro
Storage
DocumentBeforePrint event Is triggered when the Print dialog box opens
For more information, see “Printing documents” on
page 89.
GlobalMacro
Storage
DocumentBeforeSave event Is triggered when the Save dialog box opens
For more information, see “Saving documents” on
page 85.
GlobalMacro
Storage
DocumentClose event Is triggered when a document is closed
For more information, see “Closing documents” on
page 91.
GlobalMacro
Storage
DocumentNew event Is triggered when a document is created
For more information, see “Creating documents” on
page 80.
GlobalMacro
Storage
DocumentOpen event Is triggered when a document is opened
For more information, see “Opening documents” on
page 80.
GlobalMacro
Storage
QueryDocumentClose event Is triggered when the user responds to a request to close a
document
For more information, see “Closing documents” on
page 91.
GlobalMacro
Storage
QueryDocumentExport event Is triggered when the user responds to a request to export
a document
For more information, see “Exporting files from
documents” on page 86.
GlobalMacro
Storage
QueryDocumentPrint event Is triggered when the user responds to a request to print a
document
For more information, see “Printing documents” on
page 89.
GlobalMacro
Storage
QueryDocumentSave event Is triggered when the user responds to a request to save a
document
For more information, see “Saving documents” on
page 85.
GlobalMacro
Storage
WindowActivate event Is triggered when a window is activated
For more information, see “Activating documents” on
page 81.
Class Member Description

Macro Programming Guide
Understanding the CorelDRAW object model 79
For detailed information on any property, method, or event, see “Object Model Reference” section in the
Macros Help file for the application.
In this topic
For more information on document-related activities, see the following subtopics:
• “Creating documents” on page 80
• “Opening documents” on page 80
• “Activating documents” on page 81
• “Setting document properties” on page 82
• “Displaying documents” on page 82
• “Modifying documents” on page 84
GlobalMacro
Storage
WindowDeactivate event Is triggered when a window is deactivated
For more information, see “Activating documents” on
page 81.
View Activate method Applies a saved view to the document window
For more information, see “Working with views” on
page 83.
Window Activate method Activates a document window
For more information, see “Working with windows” on
page 82.
Window ActiveView property Provides direct access to the active view for a document
window
For more information, see “Working with views” on
page 83.
Window Close method Closes a document window
For more information, see “Working with windows” on
page 82.
Window NewWindow method Creates a document window
For more information, see “Working with windows” on
page 82.
Window Next property Accesses the next window for a document
For more information, see “Working with windows” on
page 82.
Window Previous property Accesses the previous window for a document
For more information, see “Working with windows” on
page 82.
Class Member Description

Macro Programming Guide
Understanding the CorelDRAW object model 80
• “Creating command groups for documents” on page 85
• “Saving documents” on page 85
• “Exporting files from documents” on page 86
• “Publishing documents to PDF” on page 88
• “Printing documents” on page 89
• “Closing documents” on page 91
Files of all supported formats can be imported. Imported files are placed on document layers, so
information on importing files is provided in the section on working with layers (see “Importing files into
layers” on page 100) rather than in this section on working with documents.
Creating documents
The Application object has two methods for creating documents: CreateDocument and
CreateDocumentFromTemplate.
The Application.CreateDocument method creates an empty document based on the default page size,
orientation, and styles:
Application.CreateDocument() As Document
The Application.CreateDocumentFromTemplate method creates an untitled document from a specified
template (CDT) file:
Application.CreateDocumentFromTemplate(Template As String, _
[IncludeGraphics As Boolean = True])As Document
Both of these functions return a reference to the new document, so they are typically used as follows:
Dim newDoc as Document
Set newDoc = CreateDocument
The new document becomes active immediately and can be referenced by using the
Application.ActiveDocument property. For more information on this property, see “Activating documents” on
page 81.
If you want, you can use event handlers to respond to events that are triggered by creating a document:
• AddinHook.New
• Application.DocumentNew
• GlobalMacroStorage.DocumentNew
Opening documents
To open a document, you can use the Application.OpenDocument method.
Dim doc As Document
Set doc = OpenDocument("C:\graphic1.cdr")

Macro Programming Guide
Understanding the CorelDRAW object model 81
If you want, you can use event handlers to respond to events that are triggered by opening a document:
• Application.DocumentOpen
• Document.Open
• GlobalMacroStorage.DocumentOpen
Activating documents
Each open document is a member of the Application.Documents collection. The documents in that collection
appear in the order in which they were created or opened.
To reflect the actual stacking order of the documents, you must use the Application.Windows
collection.
The Application.ActiveDocument property provides direct access to the active document — that is, the
document that is in front of all the other documents in the application window. ActiveDocument is an object of
type Document and, therefore, has the same members — properties, methods, and objects — as the
Document class.
If no documents are open, ActiveDocument returns nothing. You can check for open documents by using the
following VBA code:
If Documents.Count = 0 Then
MsgBox "There aren't any open documents.", vbOK, "No Docs"
Exit Sub
End If
The Document.Activate method activates a document so that it can be referenced by ActiveDocument. The
following VBA code activates the third open document (if three or more documents are open):
Documents(3).Activate
Using the Document.Activate method on the Application.ActiveDocument property has no effect.
If you want, you can specify which open document to activate by referencing the one of the following properties:
•Document.FilePath — checks only the file path (for example, C:\My Documents)
•Document.FileName — checks only the filename (for example, Graphic1.cdr)
•Document.FullFileName — checks both the file path and the filename (for example, C:\My
Documents\Graphic1.cdr)
You can check the filename of each open document by using the following VBA code:
Public Function findDocument(filename As String) As Document
Dim doc As Document
For Each doc In Documents
If doc.FileName = filename Then Exit For

Macro Programming Guide
Understanding the CorelDRAW object model 82
Set doc = Nothing
Next doc
Set findDocument = doc
End Function
You can then activate the returned document by using the Document.Activate method.
Setting document properties
You can specify the reference point, unit of measurement, and drawing scale for a document by using the
corresponding properties of the Document class.
The Document.ReferencePoint property specifies the reference point for a document. This point is referenced
when positioning the objects in that document.
The Document.Unit property specifies the unit of measurement for a document. This unit is used to position
and size the objects in that document.
The Document.WorldScale property specifies the drawing scale for a document. The drawing scale lets you
make the distances in a drawing proportionate to real-world distances; for example, you can specify that 1 inch
in the drawing corresponds to 1 meter in the physical world.
These properties affect all elements in your document, such as the objects that you draw. For optimal
results, choose the settings that best fit your macro solution.
Displaying documents
You can simultaneously display multiple windows for a single document. For example, a large document can be
displayed with one window zoomed in to the upper-right corner of the document and another zoomed in to the
lower-right corner. Although the individual windows can be zoomed and panned independently, turning the
page in one window affects all windows.
By using the View Manager, you can create views that have individual display settings. Choosing a saved view
displays the page according to the settings for that view.
In VBA, the Window object provides access to the windows that contain each View object for (or view
of) a given document. The Window object represents a frame, while the View object displays the
document inside that frame.
Besides letting you work with windows and views, the application lets you display documents by zooming and
panning.
Working with windows
Each Document object has a Windows collection for displaying that document. To switch between windows,
use the Window.Activate method:
ActiveDocument.Windows(2).Activate
The Document.ActiveWindow property provides direct access to the active window — that is, the document
window that is in front of all other document windows.

Macro Programming Guide
Understanding the CorelDRAW object model 83
The next window and previous window for the active document are referenced in the Window.Next and
Window.Previous properties:
ActiveWindow.Next.Activate
To create a new window, use the Window.NewWindow method:
ActiveWindow.NewWindow
To close a window (and the document, if it has only one open window), use the Window.Close method:
ActiveWindow.Close
If you want, you can use event handlers to respond to events that are triggered by activating a window:
• Application.WindowActivate
• GlobalMacroStorage.WindowActivate
You can also use event handlers to respond to events that are triggered by deactivating a window:
•Application.WindowDeactivate
• GlobalMacroStorage.WindowDeactivate
Working with views
The Window.ActiveView property and the Document.Views property both represent document views. Each
Window object has one ActiveView object, which represents the current view of the document; saving the
display settings for an ActiveView object creates a view. In contrast, each Document object has a collection of
View objects in its Views property; choosing a View object activates the corresponding saved view, which
contains the display settings for the corresponding ActiveView object.
The only way to access an ActiveView object is from the Window.ActiveView property.
You can create a View object and add it to a Document.Views collection. The following VBA code adds the
current ActiveView settings to the Views collection:
ActiveDocument.Views.AddActiveView "New View"
You can also create a view with specific settings by using the Document.CreateView method. The following
VBA code creates a new View object that accesses the position (3, 4) in inches, uses a zoom factor of 95%, and
displays page 6:
ActiveDocument.Unit = cdrInch
ActiveDocument.CreateView "New View 2", 3, 4, 95, 6
To apply a saved view to the active window, call the View.Activate method:
ActiveDocument.Views("New View").Activate

Macro Programming Guide
Understanding the CorelDRAW object model 84
Zooming
To zoom an ActiveView object by a set amount, set the ActiveView.Zoom property by specifying a double
value in percent. For example, the following VBA code sets the zoom factor to 200%:
ActiveWindow.ActiveView.Zoom = 200.0
You can also zoom by using the following methods of the ActiveView class:
•SetActualSize
• ToFitAllObjects
•ToFitArea
•ToFitPage
• ToFitPageHeight
•ToFitPageWidth
•ToFitSelection
•ToFitShape
• ToFitShapeRange
Panning
To p a n a n ActiveView object, you can move its origin by modifying the ActiveView.OriginX and
ActiveView.OriginY properties. The following VBA code pans the document 5 inches to the left and 3 inches
up:
Dim av As ActiveView
ActiveDocument.Unit = cdrInch
Set av = ActiveWindow.ActiveView
av.OriginX = av.OriginX - 5
av.OriginY = av.OriginY + 3
Alternatively, you can use the ActiveView.SetViewPoint method:
Dim av As ActiveView
ActiveDocument.Unit = cdrInch
Set av = ActiveWindow.ActiveView
av.SetViewPoint av.OriginX - 5, av.OriginY + 3
Modifying documents
You can modify a document regardless of whether it is active.
Modifying an inactive document does not activate that document. To activate a document, you must use
its Activate method (see “Activating documents” on page 81).

Macro Programming Guide
Understanding the CorelDRAW object model 85
The following VBA code adds a layer named “fooLayer” to the third open document:
Dim doc As Document
Set doc = Documents(3)
doc.ActivePage.CreateLayer "fooLayer"
The following VBA code uses the findDocument() function to add a layer named “fooLayer” to the inactive
document named barDoc.cdr:
Dim doc As Document
Set doc = findDocument("barDoc.cdr")
If Not doc Is Nothing Then doc.ActivePage.CreateLayer "fooLayer"
Creating command groups for documents
Two very useful methods of the Document class combine to create a “command group,” which can reduce a
series of programmed, document-related actions to a single, undoable step. These methods —
BeginCommandGroup and EndCommandGroup — are demonstrated in the following VBA example:
Dim sh As Shape
ActiveDocument.BeginCommandGroup "CreateCurveEllipse"
Set sh = ActiveLayer.CreateEllipse(0, 1, 1, 0)
sh.ConvertToCurves
ActiveDocument.EndCommandGroup
The preceding code sets the Undo string in the Edit menu as Undo CreateCurveEllipse. Clicking this
command undoes not only the ConvertToCurves operation but also the CreateEllipse operation.
A command group can contain many hundreds of commands, if required. Creating command groups can make
your macros appear to be fully integrated into the application.
Saving documents
Two methods can be used for saving documents: Document.SaveAs and Document.Save.
The Document.SaveAs method saves a document by using the specified file path and filename. You can use this
method to save a previously unsaved document or to save an existing document to a different file.
The Document.SaveAs method provides an optional parameter that lets you access the
StructSaveAsOptions class to specify additional settings.
The Document.Save method saves over an existing document file — that is, by using the existing file path and
filename for the document.
Macro Programming Guide
Understanding the CorelDRAW object model 86
If you want, you can use event handlers to respond to events that are triggered by opening the Save dialog box:
• Application.DocumentBeforeSave
• Document.BeforeSave
• GlobalMacroStorage.DocumentBeforeSave
You can also use event handlers to respond to events that are triggered by saving a document and closing the
Save dialog box:
• Application.DocumentAfterSave
• Document.AfterSave
• GlobalMacroStorage.DocumentAfterSave
Finally, you can also use event handlers to respond to events that are triggered when the user responds to a
request to save a document:
• Application.QueryDocumentSave
•Document.QuerySave
• GlobalMacroStorage.QueryDocumentSave
Exporting files from documents
Files of all supported formats can be exported.
Files are exported at the Document level because the range of exported objects can extend over multiple
layers and multiple pages. However, files are imported at the Layer level because each imported object
is assigned to a specified layer on a specified page (see “Importing files into layers” on page 100).
The Document class has three file-export methods — Export, ExportEx, and ExportBitmap — all of which
can export to the bitmap and vector formats.
The wide selection of supported file formats is due to the vast number of filters that are available to the
application. Each filter lets you work with the files from another graphics application. To learn more
about working with these filters, see “Working with import filters and export filters” on page 138.
If you want, you can use event handlers to respond to events that are triggered by opening the Export dialog
box:
• Application.DocumentBeforeExport
• Document.BeforeExport
• GlobalMacroStorage.DocumentBeforeExport
You can also use event handlers to respond to events that are triggered by exporting a document and closing the
Export dialog box:
• Application.DocumentAfterExport
• Document.AfterExport
• GlobalMacroStorage.DocumentAfterExport
Finally, you can also use event handlers to respond to events that are triggered when the user responds to a
request to export a document:
• Application.QueryDocumentExport
•Document.QueryExport
• GlobalMacroStorage.QueryDocumentExport

Macro Programming Guide
Understanding the CorelDRAW object model 87
Understanding the Document.Export method
To export a page, you require only the Document.Export method, a filename, and a filter type. The following
VBA code exports the current page to a TIFF bitmap file:
ActiveDocument.Export "C:\ThisPage.eps", cdrTIFF
However, the preceding code gives little control over the output of the image. More control is obtained by
including a StructExportOptions object, as in the following VBA code:
Dim expOpts As New StructExportOptions
expOpts.ImageType = cdrCMYKColorImage
expOpts.AntiAliasingType = cdrNormalAntiAliasing
expOpts.ResolutionX = 72
expOpts.ResolutionY = 72
expOpts.SizeX = 210
expOpts.SizeY = 297
ActiveDocument.Export "C:\ThisPage.eps", cdrTIFF, cdrCurrentPage, expOpts
A StructPaletteOptions object can also be included in the function call for palette-based image formats,
if you want to provide the settings for automatically generating the palette.
Understanding the Document.ExportEx method
The Document.ExportEx method is the same as the Document.Export method, except that ExportEx can
retreive the dialog-box settings for a filter and apply those settings to the export:
Dim eFilt As ExportFilter
Set eFilt = ActiveDocument.ExportEx("C:\ThisPage.eps", cdrEPS)
If eFilt.HasDialog = True Then
If eFilt.ShowDialog = True Then
eFilt.Finish
End If
Else
eFilt.Finish
End If
Understanding the Document.ExportBitmap method
The Document.ExportBitmap method is similar to the Document.ExportEx method in that it returns an

Macro Programming Guide
Understanding the CorelDRAW object model 88
ExportFilter object that can be used to display the Export dialog box. However, the ExportBitmap method
simplifies the coding by taking the individual members of the StructExportOptions object as parameters:
Dim eFilt As ExportFilter
Set eFilt = ActiveDocument.ExportBitmap("C:\Selection.eps", _
cdrTIFF, cdrSelection, cdrCMYKColorImage, _
210, 297, 72, 72, cdrNormalAntiAliasing, _
False, True, False, cdrCompressionLZW)
eFilt.Finish
Publishing documents to PDF
Publishing documents to PDF is a two-step process. The first step is to specify the PDF settings (although this
step can be skipped by specifying those settings from the application or by using the default settings). The
second step is to export the file.
To specify the PDF settings, you can use the Document.PDFSettings property. This property is an object of
type PDFVBASettings and contains properties for all PDF settings that can be set in the Publish To PDF
dialog box.
The following VBA code exports pages 2, 3, and 5 to a PDF file named MyPDF.pdf:
Dim doc As Document
Set doc = ActiveDocument
With doc.PDFSettings
.Author = "Corel Corporation"
.Bookmarks = True
.ColorMode = pdfRGB
.ComplexFillsAsBitmaps = False
.CompressText = True
.DownsampleGray = True
.EmbedBaseFonts = True
.EmbedFonts = True
.Hyperlinks = True
.Keywords = "Test, Example, Corel, CorelDRAW, PublishToPDF"
.Linearize = True
Macro Programming Guide
Understanding the CorelDRAW object model 89
.PageRange = "2-3, 5"
.pdfVersion = pdfVersion13
.PublishRange = pdfPageRange
.TrueTypeToType1 = True
End With
doc.PublishToPDF "C:\MyPDF.pdf"
The following VBA example gives more control to the user by displaying the Publish to PDF Settings dialog
box:
Dim doc As Document
Set doc = ActiveDocument
If doc.PDFSettings.ShowDialog = True Then
doc.PublishToPDF "C:\MyPDF.pdf"
End If
Profiles for PDF settings can be saved and loaded by using the PDFVBASettings.Save method and
PDFVBASettings.Load method (respectively).
Printing documents
Using VBA to print documents is straightforward: almost all settings that are available in the Print dialog box
are available to the Document.PrintSettings property. When these properties are set, printing the document is
simply a matter of calling the Document.PrintOut method.
For example, the following VBA code prints three copies of pages 1, 3, and 4 to a level-3 PostScript® printer:
With ActiveDocument.PrintSettings
.Copies = 3
.PrintRange = prnPageRange
.PageRange = "1, 3-4"
.Options.PrintJobInfo = True
With .PostScript
.DownloadType1 = True
.Level = prnPSLevel3
End With

Macro Programming Guide
Understanding the CorelDRAW object model 90
End With
ActiveDocument.PrintOut
Each page in the Print dialog box has a corresponding object-model class that contains all settings for that page.
The following table lists these classes.
You cannot set layout options in VBA. However, if necessary, you can open the Print dialog box by using
the PrintSettings.ShowDialog method.
You can print only the selected objects in a document by setting the PrintSettings.PrintRange property
to prnSelection.
You can use a specific printer in the Application.Printers collection by specifying it in the
PrintSettings.Printer property.
You can save a printing profile by using the PrintSettings.Save method.
You can access a saved printing profile by using the PrintSettings.Load method, but be sure to specify
the full path to the profile.
You can reset the print settings by using the PrintSettings.Reset method.
If you want, you can use event handlers to respond to events that are triggered by opening the Print dialog box:
• Application.DocumentBeforePrint
• Document.BeforePrint
• GlobalMacroStorage.DocumentBeforePrint
You can also use event handlers to respond to events that are triggered by printing a document and closing the
Print dialog box:
• Application.DocumentAfterPrint
• Document.AfterPrint
• GlobalMacroStorage.DocumentAfterPrint
Finally, you can also use event handlers to respond to events that are triggered when the user responds to a
request to print a document:
• Application.QueryDocumentPrint
•Document.QueryPrint
• GlobalMacroStorage.QueryDocumentPrint
Page in Print dialog box Class in object model
General PrintSettings
Layout PrintSettings and PrintLayout
Separations PrintSeparations and PrintTrapping
Prepress PrintPrepress
PostScript PrintPostScript
Misc PrintOptions
Macro Programming Guide
Understanding the CorelDRAW object model 91
Closing documents
You can close a document by calling the Document.Close method.
The following VBA code closes the active document and activates the document behind it:
ActiveDocument.Close
If the code closes a document that is not active, the document referenced by the
Application.ActiveDocument property does not change.
You must explicitly test the Dirty property for a document and take appropriate action if that document
has been modified.
You can also close a document by using the Close method of the Document object itself (as in
doc.Close).
If you want, you can use event handlers to respond to events that are triggered by closing a document:
• Application.DocumentClose
•Document.Close
• GlobalMacroStorage.DocumentClose
You can also use event handlers to respond to events that are triggered when the user responds to a request to
close a document:
• Application.QueryDocumentClose
•Document.QueryClose
• GlobalMacroStorage.QueryDocumentClose
Working with pages
Each page, or Page object, is a member of the Document.Pages collection for the document in which it appears.
The pages in a Document.Pages collection appear in the order in which they appear in that document — for
example, the fifth page in the active document is ActiveDocument.Pages.Item(5). If pages are added,
reordered, or deleted, the affected Pages collection is immediately updated to reflect the new page order of that
document.
CorelDRAW provide a number of properties, methods, and events for working with pages, the most useful of
which are listed in the following table.
Class Member Description
Application ActivePage property Provides direct access to the active page of the active document
For more information, see “Activating pages” on page 94.
Application PageSizes property Contains the collection of defined page sizes for the application
For more information, see “Using defined page sizes” on page 96.
Document ActivePage property Provides direct access to the active page of a document
For more information, see “Activating pages” on page 94.

Macro Programming Guide
Understanding the CorelDRAW object model 92
Document AddPages method
or
AddPagesEx method
Adds blank pages to the end of a document
For more information, see “Creating pages” on page 93.
Document InsertPages method
or
InsertPagesEx method
Inserts pages at the specified location in a document
For more information, see “Creating pages” on page 93.
Document MasterPage property Specifies the default page size
For more information, see “Specifying the default page size” on
page 95.
Document PageActivate event Is triggered when a page is activated
For more information, see “Activating pages” on page 94.
Document PageChange event Is triggered when a page is deactivated
For more information, see “Activating pages” on page 94.
Document PageCreate event Is triggered when a page is created
For more information, see “Creating pages” on page 93.
Document PageDelete event Is triggered when a page is deleted
For more information, see “Deleting pages” on page 97.
Document Pages property Contains the collection of pages for a document
For more information, see “Activating pages” on page 94.
Page Activate method Activates a page
For more information, see “Activating pages” on page 94.
Page Delete method Deletes a page
For more information, see “Deleting pages” on page 97.
Page MoveTo method Moves a page to the specified location in a document
For more information, see “Reordering pages” on page 95.
Page SetSize method Sets the size of a page
For more information, see “Specifying the size and orientation of
pages” on page 95.
PageSize BuiltIn property Returns Tr u e if a page size is built-in (rather than user-defined)
For more information, see “Using defined page sizes” on page 96.
PageSize Delete method Deletes a user-defined page size
For more information, see “Using defined page sizes” on page 96.
Class Member Description
Macro Programming Guide
Understanding the CorelDRAW object model 93
For detailed information on any property, method, or event, see “Object Model Reference” section in the
Macros Help file for the application.
In this topic
For more information on page-related activities, see the following subtopics:
• “Creating pages” on page 93
• “Activating pages” on page 94
• “Reordering pages” on page 95
• “Sizing pages” on page 95
• “Modifying pages” on page 96
• “Deleting pages” on page 97
Creating pages
The methods for creating pages belong to the Document class.
Both the Document.AddPages method and the Document.AddPagesEx method add the specified number of
pages to the end of a document. The difference between these methods is that AddPages uses the default page
size, while AddPagesEx uses a specified size.
Similarly, both the Document.InsertPages method and the Document.InsertPagesEx method insert the
specified number of pages at the specified location in a document. The difference between these methods is that
InsertPages uses the default page size, while InsertPagesEx uses a specified size.
As an example, the following VBA code uses the AddPages method to add three default-sized pages to the end
of the document:
Public Function AddSomeSimplePages() as Page
Set AddSomeSimplePages = ActiveDocument.AddPages(3)
End Function
The following VBA example uses the AddPagesEx method to add to the end of the document three pages that
are 8.5 inches wide by 11 inches high:
Public Function AddSomeSpecifiedPages() as Page
PageSize Height property Specifies the height of a defined page size
For more information, see “Using defined page sizes” on page 96.
PageSize Name property Specifies the name of a defined page size
For more information, see “Using defined page sizes” on page 96.
PageSize Width property Specifies the width of a defined page size
For more information, see “Using defined page sizes” on page 96.
Class Member Description

Macro Programming Guide
Understanding the CorelDRAW object model 94
Dim doc as Document
Set doc = ActiveDocument
doc.Unit = cdrInch
Set AddSomeSpecifiedPages = doc.AddPagesEx(3, 8.5, 11)
End Function
The preceding examples return the first page that was added; all other added pages follow this page. You can
therefore reference any of the added pages by incrementing the Index property of the returned page:
Dim firstNewPage As Page, secondNewPage As Page
Set firstNewPage = AddSomeSimplePages
Set secondNewPage = ActiveDocument.Pages(firstNewPage.Index + 1)
If you want, you can use event handlers to respond to events that are triggered by creating a page:
• Document.PageCreate
Activating pages
Each page is a member of the Document.Pages collection for the document in which it appears. The pages in a
Document.Pages collection appear in the order in which they appear in that document — for example, the fifth
page in the active document is ActiveDocument.Pages.Item(5). If pages are added, reordered, or deleted,
the affected Pages collection is immediately updated to reflect the new page order of that document.
You can access the active page of the active document by using the Application.ActivePage property (or
ActiveDocument.ActivePage, or simply ActivePage). A reference to the active page in the active document,
of type Page, is returned.
Dim pg As Page
Set pg = ActivePage
You can access the active page of a document, regardless of whether that document is active, by using
ActivePage property for that document:
Public Function getDocsActivePage(doc As Document) As Page
Set getDocsActivePage = doc.ActivePage
End Function
You can switch pages by finding the desired page and then invoking its Activate method. The following VBA
code activates page 3 in a document:
ActiveDocument.Pages(3).Activate
If you want, you can use event handlers to respond to events that are triggered by activating a page:
• Document.PageActivate

Macro Programming Guide
Understanding the CorelDRAW object model 95
You can also use event handlers to respond to events that are triggered by deactivating a page:
• Document.PageChange
Reordering pages
A page can be moved to another location in a document by using its MoveTo method. The following VBA code
moves page 2 to the position of page 4:
ActiveDocument.Pages(2).MoveTo 4
Activating a page in an inactive document does not activate that document. To activate a document, you
must use its Activate method (see “Activating documents” on page 81).
Sizing pages
You can specify the size and orientation of pages, specifying the default page size, and use defined page sizes.
Specifying the size and orientation of pages
You can size a page by using its SetSize method, which applies two size values (width and height) to the page.
The following VBA code changes the size of the active page in the active document to A4:
ActiveDocument.Unit = cdrMillimeter
ActivePage.SetSize 210, 297
ActivePage.Orientation = cdrLandscape
For the SetSize method, the first number is always the page width and the second number is always the page
height. Reversing the two numbers switches the orientation of the page.
Specifying the default page size
The default page size for a document is determined by the value of the item that has an index of 0 in the
Document.Pages collection. You can specify the default page size by changing the value of this item:
Dim doc As Document
Set doc = ActiveDocument
doc.Unit = cdrMillimeter
doc.Pages(0).SetSize 297, 210
Alternatively, you can use the Document.MasterPage property to specify the default page size:
Dim doc As Document
Set doc = ActiveDocument
doc.Unit = cdrMillimeter

Macro Programming Guide
Understanding the CorelDRAW object model 96
doc.MasterPage.SetSize 297, 210
Using defined page sizes
Page sizes can be defined by either the application or the user. All defined page sizes are stored in the
Application.PageSizes collection, and the name of each PageSize object in that collection is defined by its
Name property:
Dim pageSizeName As String
pageSizeName = Application.PageSizes(3).Name
Page sizes can be specified by name. For example, the following VBA code gets the PageSize object named
“Business Card”:
Dim thisSize As PageSize
Set thisSize = Application.PageSizes("Business Card")
You can get the actual dimensions of a PageSize object by using its Width and Height properties. The following
VBA code retrieves the width and height (in millimeters) of the third PageSize object:
Dim pageWidth As Double, pageHeight As Double
Application.Unit = cdrMillimeter
pageWidth = Application.PageSizes(3).Width
pageHeight = Application.PageSizes(3).Height
Although each PageSize object provides a Delete method, this method can be used only on user-defined page
sizes. You can determine whether a PageSize object is user-defined by testing its BuiltIn Boolean property:
Public Sub deletePageSize(thisSize As PageSize)
If Not thisSize.BuiltIn Then thisSize.Delete
End Sub
You can specify a particular unit of measurement for a page size by setting the units for the document
before getting its width and height.
Modifying pages
You can modify a page regardless of whether it is active.
Activating a page in an inactive document does not activate that document. To activate a document, you
must use its Activate method (see “Activating documents” on page 81).
By explicitly referencing the page that you want to modify, you can make those changes without activating the
page. The following VBA code deletes all shapes on page 3 of the active document without activating that page:
Public Sub DeleteShapesFromPage3()

Macro Programming Guide
Understanding the CorelDRAW object model 97
Dim doc As Document
Set doc = ActiveDocument
doc.Pages(3).Shapes.All.Delete
End Sub
Deleting pages
You can delete a page by using its Delete method, as in the following VBA example:
ActivePage.Delete
The Page.Delete method deletes all shapes on that page, deletes the page from the Pages collection for that
document, and then updates that collection to reflect the change.
If you want to delete more than one page, you must use the Delete method for each unwanted page. However,
you cannot delete all pages in a document. You can avoid trying to delete the last remaining page in a document
by using the following VBA code:
If ActiveDocument.Pages.Count > 1 Then ActivePage.Delete
If you want, you can use event handlers to respond to events that are triggered by deleting a page:
• Document.PageDelete
Working with layers
Layers are invisible planes that let you organize the objects on a page. You can group related objects into layers,
and you can change the vertical order (or “stacking order”) of those layers to change the appearance of the page.
Master layers apply to all pages in a document, while local layers apply to a single page.
Each layer, or Layer object, is a member of the Page.Layers collection for the page on which it appears. The
layers in a Page.Layers collection appear in the order in which they appear on that page — the first layer is the
one at the top of the “stack,” and the last layer is the one at the bottom. If layers are added, reordered, or deleted,
the affected Page.Layers collection is immediately updated to reflect the new layer order of that page.
CorelDRAW provide a number of properties, methods, and events for working with layers, the most useful of
which are listed in the following table.
Class Member Description
Document ActiveLayer property Provides direct access to the active layer for a document
For more information, see “Activating layers” on page 99.
Document LayerActivate event Is triggered when a layer is activated
For more information, see “Activating layers” on page 99.

Macro Programming Guide
Understanding the CorelDRAW object model 98
For detailed information on any property, method, or event, see “Object Model Reference” section in the
Macros Help file for the application.
In this topic
For more information on layer-related activities, see the following subtopics:
Document LayerChange event Is triggered when a layer is deactivated
For more information, see “Activating layers” on page 99.
Document LayerCreate event Is triggered when a layer is created
For more information, see “Creating layers” on page 99.
Document LayerDelete event Is triggered when a layer is deleted
For more information, see “Deleting layers” on page 101.
Layer Activate method Activates a layer
For more information, see “Activating layers” on page 99.
Layer Delete method Deletes a layer
For more information, see “Deleting layers” on page 101.
Layer Editable property Controls whether a layer is editable
For information, see “Locking and hiding layers” on page 99.
Layer Import method
or
ImportEx method
Imports a file into a layer
For information, see “Importing files into layers” on page 100.
Layer MoveAbove method
or
MoveBelow method
Moves a layer
For information, see “Reordering layers” on page 100.
Layer Name property Specifies the name of a layer
For information, see “Renaming layers” on page 100.
Layer Visible property Controls whether the contents of a layer are visible
For information, see “Locking and hiding layers” on page 99.
Page ActiveLayer property Provides direct access to the active layer for a page
For more information, see “Activating layers” on page 99.
Page CreateLayer method Inserts a new layer at the top of the list of non-master layers
For more information, see “Creating layers” on page 99.
Page Layers property Contains the collection of layers for a page
For more information, see “Activating layers” on page 99.
Class Member Description
Macro Programming Guide
Understanding the CorelDRAW object model 99
• “Creating layers” on page 99
• “Activating layers” on page 99
• “Locking and hiding layers” on page 99
• “Reordering layers” on page 100
• “Renaming layers” on page 100
• “Importing files into layers” on page 100
• “Deleting layers” on page 101
Creating layers
You can create a layer by using the Page.CreateLayer method. Creating a layer inserts a new layer at the top of
the list of non-master layers.
The following VBA code creates a new layer called “My New Layer”:
ActivePage.CreateLayer "My New Layer"
If you want, you can use event handlers to respond to events that are triggered by activating a layer:
• Document.LayerCreate
Activating layers
Each layer is a member of the Page.Layers collection for the page on which it appears. The layers in a
Page.Layers collection appear in the order in which they appear on that page — the first layer is the one at the
top of the “stack,” and the last layer is the one at the bottom. If layers are added, reordered, or deleted, the
affected Page.Layers collection is immediately updated to reflect the new layer order of that page.
The Document.ActiveLayer property provides direct access to the active layer for a document, while the
Page.ActiveLayer property provides direct access to the active layer for a page.
You can activate a layer by using the Layer.Activate method:
ActivePage.Layers("Layer 1").Activate
Activating a locked layer does not unlock it. Similarly, activating a hidden layer does not make it visible.
For information on unlocking and displaying layers, see “Locking and hiding layers” on page 99.
If you want, you can use event handlers to respond to events that are triggered by activating a layer:
• Document.LayerActivate
You can also use event handlers to respond to events that are triggered by deactivating a layer:
• Document.LayerChange
Locking and hiding layers
Layer objects feature the properties Editable and Visible, which control (respectively) whether the layer is
editable and whether its contents are visible. Both properties are Boolean. By setting both the properties to
Tr u e , you unlock and display the layer for editing. By setting either property to False, however, you lock the
layer such that it cannot be edited.

Macro Programming Guide
Understanding the CorelDRAW object model 100
The following sample VBA code locks, but displays, the layer on the active page:
ActivePage.Layers("Layer 1").Visible = True
ActivePage.Layers("Layer 1").Editable = False
The result of any changes to these properties is immediately displayed in the Object Manager.
The preceding example affects only the active page. You can access the layer settings for a given page by
specifying a page from the Document.Pages collection, or by referencing the Document.ActivePage property.
To make the changes to all pages in a document, use the Document.MasterPage property:
ActiveDocument.MasterPage.Layers("Layer 1").Visible = True
For more information on working with pages, see “Working with pages” on page 91.
Reordering layers
You can reorder layers by using the following two methods of the Layer class: MoveAbove and MoveBelow.
Both methods move the specified layer above or below the layer that is referenced as a parameter.
The following VBA code moves the layer called “Layer 1” to immediately below the layer “Guides”:
Dim pageLayers As Layers
Set pageLayers = ActivePage.Layers
pageLayers("Layer 1").MoveBelow pageLayers("Guides")
The change is immediately reflected in the Object Manager (although it may be apparent only in the Layer
Manager).
Renaming layers
You can rename a layer by editing its Name property.
The following VBA code renames “Layer 1” as “Layer with a New Name”:
ActivePage.Layers("Layer 1").Name = "Layer with a New Name"
Importing files into layers
Files of all supported formats can be imported.
Files are imported at the Layer level because each imported object is assigned to a specified layer on a
specified page. However, files are exported at the Document level because the range of exported objects
can extend over multiple layers and multiple pages (see “Exporting files from documents” on page 86).
The Layer class has two file-import methods: Import and ImportEx.
The wide selection of supported file formats is due to the vast number of filters that are available to the
application. Each filter lets you work with the files from another graphics application. To learn more
about working with these filters, see “Working with import filters and export filters” on page 138.

Macro Programming Guide
Understanding the CorelDRAW object model 101
Understanding the Layer.Import method
The Layer.Import method provides basic functionality for importing files.
The following VBA code imports the file C:\logotype.gif into the active layer at the center of the page:
ActiveLayer.Import "C:\logotype.gif"
Importing a file selects the contents of that file and deselects any other selected objects in the document. You can
therefore reposition or resize the imported objects by getting the document selection:
ActiveDocument.Unit = cdrInch
ActiveSelection.SetSize 3, 2
Some file formats can be imported by using one of several filters, so it is important to understand the benefits of
each available filter. For example, when importing an Encapsulated PostScript (EPS) file, you can choose between
the EPS filter and the PDF filter. The EPS filter lets you do the following:
• import an EPS file as a placeable object that can be printed but not modified
• interpret the PostScript portion of the file, so that you can import the original artwork from within the file
rather than its low-resolution header
To specify which filter to use, you can include the optional parameter Filter, as in the following VBA example:
ActiveLayer.Import "C:\map.eps", cdrPSInterpreted
Understanding the Layer.ImportEx method
The Layer.ImportEx method provides much better control over the import filter through its optional use of a
StructImportOptions object. The following VBA code imports the specified file as a linked file:
Dim iFilt As ImportFilter
Dim importProps As New StructImportOptions
importProps.LinkBitmapExternally = True
Set iFilt = ActiveLayer.ImportEx("C:\world-map.epsf", cdrAutoSense, importProps)
iFilt.Finish
Deleting layers
As previously discussed, each layer is a member of the Page.Layers collection for the page on which it appears.
You can delete a layer by calling its Delete method. Deleting a layer removes that layer from the document,
taking with it all shapes on that layer on all pages in the document.
The following VBA code deletes the layer called “Layer 1”:
ActivePage.Layers("Layer 1").Delete

Macro Programming Guide
Understanding the CorelDRAW object model 102
If you want, you can use event handlers to respond to events that are triggered by deleting a layer:
• Document.LayerDelete
Working with shapes
Every document is made up of shapes, or Shape objects, which are created by using the drawing tools. Any
changes that are made to the properties of a shape — such as by moving the shape, changing its size, or giving it
a new fill — are immediately visible to the object model.
The shapes on a document page are stored on layers. Each shape is a member of the Layer.Shapes collection for
the layer on which it appears. The shapes in a Layer.Shapes collection appear in the order in which they appear
on that layer — the first shape is the one at the top of the “stack,” and the last shape is the one at the bottom. If
shapes are added, reordered, or deleted, the affected Layer.Shapes collection is immediately updated to reflect
the new shape order of that layer.
In addition, each document page has a Shapes collection, which contains all Layer.Shapes collections for
that page. The first shape in a Page.Shapes collection is the one at the very top of that page, and the last
shape is the one at the very bottom.
CorelDRAW provide a number of properties, methods, and events for working with shapes, the most useful of
which are listed in the following table.
Class Member Description
AddinHook ShapeCreated event Is triggered when a shape is created
For more information, see “Creating shapes” on
page 111.
Application CreateCurve method Creates a line or a curve “in memory”
For more information, see “Creating lines and curves” on
page 114.
Application SelectionChange event Is triggered when a selection is deactivated
For more information, see “Deselecting shapes” on
page 125.
Application SymbolLibraries property Contains the collection of all external symbol libraries for
the application
For more information, see “Creating symbols” on
page 118.
Color CopyAssign method Copies a color from one shape fill or shape outline to
another
For more information, see “Working with color” on
page 134.

Macro Programming Guide
Understanding the CorelDRAW object model 103
Color Type method Specifies the color model for a shape color
For more information, see “Working with color” on
page 134.
Curve CreateSubPath method Adds a subpath to a line or a curve
For more information, see “Creating lines and curves” on
page 114.
Document ClearSelection method Deselects all objects in a document
For more information, see “Deselecting shapes” on
page 125.
Document Selection method Returns, as a single Shape object, all selected objects in a
document
For more information, see “Accessing selections directly”
on page 122.
Document SelectionChange event Is triggered when a selection is deactivated
For more information, see “Deselecting shapes” on
page 125.
Document SelectionRange property Returns, as a ShapeRange object, all selected objects in
a document
For more information, see “Accessing copies of
selections” on page 123.
Document ShapeChange event Is triggered when a shape is deselected
For more information, see “Deselecting shapes” on
page 125.
Document ShapeCreate event Is triggered when a shape is created
For more information, see “Creating shapes” on
page 111.
Document ShapeDelete event Is triggered when a shape is deleted
For more information, see “Deleting shapes” on
page 138.
Document ShapeDistort event Is triggered when a shape is distorted
For more information, see “Applying distortions” on
page 137.
Document ShapeMove event Is triggered when a shape is positioned
For more information, see “Positioning shapes” on
page 129.
Class Member Description

Macro Programming Guide
Understanding the CorelDRAW object model 104
Document ShapeTransform event Is triggered when a shape is transformed
For more information, see “Transforming shapes” on
page 125.
Document SymbolLibrary property Returns the internal symbol library for a document
For more information, see “Creating symbols” on
page 118.
Fill ApplyFountainFill method Applies a fountain fill to a shape
For more information, see “Applying fountain fills” on
page 131.
Fill ApplyHatchFill method Applies a hatch fill to a shape
For more information, see “Applying hatch fills” on
page 133.
Fill ApplyPatternFill method Applies a pattern fill to a shape
For more information, see “Applying pattern fills” on
page 132.
Fill ApplyPostScriptFill method Applies a PostScript fill to a shape
For more information, see “Applying PostScript fills” on
page 133.
Fill ApplyTextureFill method Applies a texture fill to a shape
For more information, see “Applying texture fills” on
page 132.
Fill ApplyUniformFill method Applies a uniform fill to a shape
For more information, see “Applying uniform fills” on
page 131.
Fill Fountain property Specifies the fountain-fill properties for a shape
For more information, see “Applying fountain fills” on
page 131.
Fill Hatch property Specifies the hatch-fill properties for a shape
For more information, see “Applying hatch fills” on
page 133.
Fill Pattern property Specifies the pattern-fill properties for a shape
For more information, see “Applying pattern fills” on
page 132.
Class Member Description

Macro Programming Guide
Understanding the CorelDRAW object model 105
Fill PostScriptFill property Specifies the PostScript-fill properties for a shape
For more information, see “Applying PostScript fills” on
page 133.
Fill Texture property Specifies the texture-fill properties for a shape
For more information, see “Applying texture fills” on
page 132.
Fill Type property Specifies the type of fill that is applied to a shape
For more information, see “Coloring shapes” on
page 130.
Fill UniformColor property Specifies the uniform-fill properties for a shape
For more information, see “Applying uniform fills” on
page 131.
FountainColor Move method Moves a color in the fountain fill for a shape
For more information, see “Applying fountain fills” on
page 131.
FountainColors Add method Adds a color to the fountain fill for a shape
For more information, see “Applying fountain fills” on
page 131.
FountainColors Count property Counts the number of colors between the start color and
end color in the fountain fill for a shape
For more information, see “Applying fountain fills” on
page 131.
GlobalMacroStora
ge
SelectionChange event Is triggered when a selection is deactivated
For more information, see “Deselecting shapes” on
page 125.
Layer CreateArtisticText method
or
CreateArtisticTextWide method
Creates an artistic-text object on the specified layer
For more information, see “Creating text objects” on
page 115.
Layer CreateCurve method Creates, on the specified layer, a line or a curve that is
created “in memory” by using the
Application.CreateCurve method
For more information, see “Creating lines and curves” on
page 114.
Layer CreateCurveSegment method
or
CreateCurveSegment2 method
Creates a basic curve on the specified layer
For more information, see “Creating lines and curves” on
page 114.
Class Member Description

Macro Programming Guide
Understanding the CorelDRAW object model 106
Layer CreateEllipse method,
CreateEllipse2 method,
or
CreateEllipseRect method
Creates an ellipse on the specified layer
For more information, see “Creating ellipses” on
page 113.
Layer CreateLineSegment method Creates a basic line on the specified layer
For more information, see “Creating lines and curves” on
page 114.
Layer CreateParagraphText method
or
CreateParagraphTextWide method
Creates an paragraph-text object on the specified layer
For more information, see “Creating text objects” on
page 115.
Layer CreateRectangle method,
CreateRectangle2 method,
or
CreateRectangleRect method
Creates a rectangle on the specified layer
For more information, see “Creating rectangles” on
page 111.
Layer Shapes property Contains the collection of shapes for a layer
For more information, see “Selecting shapes” on
page 121.
Outline Color property Specifies the color of the outline for a shape
For more information, see “Applying outlines” on
page 133.
Outline Style property Specifies the dash settings (that is, style properties) for
the outline of a shape
For more information, see “Applying outlines” on
page 133.
Outline Type property Specifies whether an outline is applied to a shape
For more information, see “Applying outlines” on
page 133.
Outline Width property Specifies, in document units, the width of the outline for
a shape
For more information, see “Applying outlines” on
page 133.
Segment AddNodeAt method Adds a node to a line segment or a curve segment
For more information, see “Creating lines and curves” on
page 114.
Shape CreateBlend method Applies a blend effect to a shape
For more information, see “Applying blends” on
page 136.
Class Member Description

Macro Programming Guide
Understanding the CorelDRAW object model 107
Shape CreateContour method Applies a contour effect to a shape
For more information, see “Applying contours” on
page 136.
Shape CreateCustomDistortion method Applies a customized distortion effect to a shape
For more information, see “Applying distortions” on
page 137.
Shape CreateCustomEffect method Applies a customized effect to a shape
For more information, see “Applying customized effects”
on page 136.
Shape CreateDropShadow method Applies a drop-shadow effect to a shape
For more information, see “Applying drop shadows” on
page 137.
Shape CreateEnvelope method,
CreateEnvelopeFromCurve method,
or
CreateEnvelopeFromShape method
Applies an envelope effect to a shape
For more information, see “Applying envelopes” on
page 137.
Shape CreateExtrude method Applies an extrusion effect to a shape
For more information, see “Applying extrusions” on
page 137.
Shape CreateLens method Applies a lens effect to a shape
For more information, see “Applying lenses” on
page 137.
Shape CreatePerspective method Applies a perspective effect to a shape
For more information, see “Applying perspective” on
page 138.
Shape CreatePushPullDistortion method Applies a Push-and-pull distortion effect to a shape
For more information, see “Applying distortions” on
page 137.
Shape CreateSelection method Creates a selection from a single shape
For more information, see “Selecting shapes” on
page 121.
Shape CreateTwisterDistortion method Applies a Twister distortion effect to a shape
For more information, see “Applying distortions” on
page 137.
Class Member Description
Macro Programming Guide
Understanding the CorelDRAW object model 108
Shape CreateZipperDistortion method Applies a Zipper distortion effect to a shape
For more information, see “Applying distortions” on
page 137.
Shape Duplicate method Duplicates a shape
For more information, see “Duplicating shapes” on
page 125.
Shape Evaluate method Returns the result of a given expression that evaluates
the properties of the current shape
For more information, see “Searching for shapes” on
page 138.
Shape GetBoundingBox method Returns the size of a shape based on the size of its
bounding box
For more information, see “Sizing shapes” on page 126.
Shape GetPosition method Returns the horizontal and vertical position of a shape
For more information, see “Positioning shapes” on
page 129.
Shape GetSize method Returns the size of a shape
For more information, see “Sizing shapes” on page 126.
Shape PlaceTextInside method Places the selected text inside the specified shape
For more information, see “Creating text objects” on
page 115.
Shape PositionX property Returns, or sets, the horizontal position of a shape
For more information, see “Positioning shapes” on
page 129.
Shape PositionY property Returns, or sets, the vertical position of a shape
For more information, see “Positioning shapes” on
page 129.
Shape Rotate method
or
RotateEx method
Rotates a shape
For more information, see “Rotating shapes” on
page 129.
Shape Selected method Specifies whether a shape is selected
For more information, see “Selecting shapes” on
page 121.
Class Member Description

Macro Programming Guide
Understanding the CorelDRAW object model 109
Shape SetBoundingBox method Sets the size of a shape based on the size of its bounding
box
For more information, see “Sizing shapes” on page 126.
Shape SetPosition method
or
SetPositionEx method
Sets the position of a shape
For more information, see “Positioning shapes” on
page 129.
Shape SetSize method
or
SetSizeEx method
Sets the size of a shape
For more information, see “Sizing shapes” on page 126.
Shape SizeHeight property Returns, or sets, the height of a shape
For more information, see “Sizing shapes” on page 126.
Shape SizeWidth property Returns, or sets, the width of a shape
For more information, see “Sizing shapes” on page 126.
Shape Skew method
or
SkewEx method
Skews a shape
For more information, see “Skewing shapes” on
page 128.
Shape Stretch method
or
StretchEx method
Stretches (or scales) a shape
For more information, see “Stretching shapes” on
page 128.
Shape Type property Returns the type for a shape
For more information, see “Determining shape type” on
page 121.
ShapeRange CreateSelection method Creates a selection from a range of shapes
For more information, see “Selecting shapes” on
page 121.
ShapeRange Duplicate method Duplicates a range of shapes
For more information, see “Duplicating shapes” on
page 125.
Shapes All method Returns all shapes from the specified collection of shapes
For more information, see “Selecting shapes” on
page 121.
Shapes FindShape method Returns a single shape that has the specified properties
For more information, see “Searching for shapes” on
page 138.
Class Member Description

Macro Programming Guide
Understanding the CorelDRAW object model 110
For detailed information on any property, method, or event, see “Object Model Reference” section in the
Macros Help file for the application.
Shapes FindShapes method Returns, as a shape range, all shapes that have the
specified properties
For more information, see “Searching for shapes” on
page 138.
SubPath AppendCurveSegment method
or
AppendCurveSegment2 method
Adds a curve-type segment to a subpath
For more information, see “Creating lines and curves” on
page 114.
SubPath AppendLineSegment method Adds a line-type segment to a subpath
For more information, see “Creating lines and curves” on
page 114.
Symbol Definition property Returns the definition of a symbol
For more information, see “Creating symbols” on
page 118.
SymbolDefinition NestedSymbols property Contains the collection of all nested symbols for a
symbol definition
For more information, see “Creating symbols” on
page 118.
SymbolLibrary Symbols property Contains the collection of all symbol definitions for a
symbol library
For more information, see “Creating symbols” on
page 118.
Text FitTextToPath method Attaches the specified artistic text to the outline of a
shape
For more information, see “Creating text objects” on
page 115.
Te x t Fr a m e s property Represents a series of text frames (or Te x t Fr a m e
objects), each of which has its own text range (or
Te x t R a n g e object)
For more information, see “Creating text objects” on
page 115.
Te x t S t o r y property Represents a text range (or Te x t R a n g e object) that
includes all text in a series of text frames (or Te x t Fr a m e
objects)
For more information, see “Creating text objects” on
page 115.
Class Member Description

Macro Programming Guide
Understanding the CorelDRAW object model 111
In this topic
For more information on shape-related activities, see the following subtopics:
• “Creating shapes” on page 111
• “Determining shape type” on page 121
• “Selecting shapes” on page 121
• “Duplicating shapes” on page 125
• “Transforming shapes” on page 125
• “Coloring shapes” on page 130
• “Applying effects to shapes” on page 135
• “Searching for shapes” on page 138
• “Deleting shapes” on page 138
Creating shapes
Every document is made up of shapes, or Shape objects, which are created by using the drawing tools. The
shapes on a document page are stored on layers, so the various shape-creation methods belong to the Layer class.
For information on creating specific types of shapes, see the following subtopics:
• “Creating rectangles” on page 111
• “Creating ellipses” on page 113
• “Creating lines and curves” on page 114
• “Creating text objects” on page 115
• “Creating symbols” on page 118
Supported shapes not discussed in this section include polygons (or Polygon objects) and customized
shapes (or CustomShape objects).
Customized shapes that are supported include tables (or TableShape objects).
Shapes are measured in document units. You can specify the unit of measurement for a document by
using the Document.Unit property (see “Setting document properties” on page 82).
If you want, you can use event handlers to respond to events that are triggered by creating a shape:
• AddinHook.ShapeCreated
• Document.ShapeCreate
Creating rectangles
You can add rectangles (or Rectangle objects) to your documents by using one of the following methods:
• Layer.CreateRectangle
• Layer.CreateRectangle2
• Layer.CreateRectangleRect
These methods return a reference to the new Shape object. They differ only in the parameters that they take, so
you can choose the method that best suits your macro solution.
You can also use these rectangle-creation methods to create squares.

Macro Programming Guide
Understanding the CorelDRAW object model 112
The CreateRectangle method creates a rectangle by using four parameters that specify the following:
• the distance between the left, top, right, and bottom sides of the rectangle (in that order)
• the corresponding edges of the page frame
The following VBA example uses the CreateRectangle method to create a 2" × 1" rectangle that is positioned
6" up from the bottom of the page frame and 3" in from the left side of the page frame:
Dim sh As Shape
ActiveDocument.Unit = cdrInch
Set sh = ActiveLayer.CreateRectangle(3, 7, 6, 5)
The CreateRectangle2 method creates a rectangle based on the coordinates of its lower-left corner, its width,
and its height.
The following VBA example uses the CreateRectangle2 method to create the same rectangle as the previous
example:
Dim sh As Shape
ActiveDocument.Unit = cdrInch
Set sh = ActiveLayer.CreateRectangle2(3, 6, 2, 1)
Finally, the CreateRectangleRect method creates a rectangle based on its bounding box (or Rect object).
These three rectangle-creation methods provide optional parameters for specifying corner roundness.
The CreateRectangle method specifies corner roundness by using parameters for the upper-left, upper-right,
lower-left, and lower-right corners (in that order). These parameters take integer values (which range from the
default 0 to 100) that define the radius of the four corners as a whole-number percentage of half of the length of
the shortest side.
The following VBA example re-creates the 2" × 1" rectangle from the previous examples. However, this time,
the four corner radii are set to 100%, 75%, 50%, and 0% of half of the length of the shortest side (that is, to
0.5", 0.375", 0.25", and a cusp):
Dim sh As Shape
ActiveDocument.Unit = cdrInch
Set sh = ActiveLayer.CreateRectangle(3, 7, 6, 5, 100, 75, 50, 0)
The CreateRectangle2 method and the CreateRectangleRect method define the corner radii in the same order
as the CreateRectangle method (that is, upper-left, upper-right, lower-left, and lower-right). However,
CreateRectangle2 and CreateRectangleRect take double (floating-point) values that measure the corner radii
in document units.
When using CreateRectangle2 or CreateRectangleRect, you must limit the size of the corner radii to
less than half of the length of the shortest side of the rectangle.

Macro Programming Guide
Understanding the CorelDRAW object model 113
The following VBA example uses the CreateRectangle2 method to create the same round-cornered rectangle as
the previous example:
Dim sh As Shape
ActiveDocument.Unit = cdrInch
ActiveDocument.ReferencePoint = cdrBottomLeft
Set sh = ActiveLayer.CreateRectangle2(3, 6, 2, 1, 0.5, 0.375, 0.25, _
0)
Creating ellipses
You can add ellipses (or Ellipse objects) to your documents by using one of the following methods:
• Layer.CreateEllipse
• Layer.CreateEllipse2
• Layer.CreateEllipseRect
These methods return a reference to the new Shape object. They differ only in the parameters that they take, so
you can choose the method that best suits your macro solution.
You can also use the ellipse-creation methods to create circles, arcs, and pie shapes.
The CreateEllipse method creates an ellipse by using four parameters that specify the following:
• the distance between the left, top, right, and bottom sides of the ellipse (in that order)
• the corresponding edges of the page frame
The following VBA example creates a 50-millimeter circle:
Dim sh As Shape
ActiveDocument.Unit = cdrMillimeter
Set sh = ActiveLayer.CreateEllipse(75, 150, 125, 100)
The CreateEllipse2 method creates an ellipse based on its center point, its horizontal radius, and its vertical
radius. (If only one radius is given, a circle is created.)
The following VBA example uses the CreateEllipse2 method to create an ellipse:
Dim sh As Shape
ActiveDocument.Unit = cdrMillimeter
Set sh = ActiveLayer.CreateEllipse2(100, 125, 50, 25)

Macro Programming Guide
Understanding the CorelDRAW object model 114
The following VBA example uses the CreateEllipse2 method to create the same 50-millimeter circle as the
CreateEllipse example:
Dim sh As Shape
ActiveDocument.Unit = cdrMillimeter
Set sh = ActiveLayer.CreateEllipse2(100, 125, 25)
Finally, the CreateEllipseRect method creates an ellipse based on its bounding box (or Rect object).
These three ellipse-creation methods provide three optional parameters for creating an arc or a pie shape. The
StartAngle and EndAngle parameters — which are double values that are measured with zero being
horizontally right on the page and with positive values being degrees from zero and moving counterclockwise —
are used to define the start angle and end angle of the shape (respectively). In addition, the Pie parameter —
which is a Boolean value — defines whether the shape is an arc (False) or a pie shape (Tr u e ).
The following VBA code uses the CreateEllipse method to create a “C” shape:
Dim sh As Shape
ActiveDocument.Unit = cdrMillimeter
Set sh = ActiveLayer.CreateEllipse(75, 150, 125, 100, 60, 290, False)
Creating lines and curves
You can add lines and curves (or Curve objects) to your documents. To create a line or a curve, you must first
create a Curve object “in memory” by using the Application.CreateCurve method.
Each Curve object has at least one subpath (or SubPath object). You can add a subpath to a line or a curve by
using the Curve.CreateSubPath method.
Each SubPath object has at least one segment (or Segment object), which can be line-type or curve-type. You
can add a line-type segment to the end of a subpath by using the SubPath.AppendLineSegment method; you
can add a curve-type segment by using the SubPath.AppendCurveSegment method or the
SubPath.AppendCurveSegment2 method.
The SubPath.AppendLineSegment method requires one set of Cartesian coordinates, which defines the
end of the new segment.
The SubPath.AppendCurveSegment method requires one set of Cartesian coordinates, which defines
the end of the new segment. Optionally, you can specify two sets of polar coordinates if you want to define
the lengths and angles of the starting and ending control handles for the segment.
The SubPath.AppendCurveSegment2 method requires three sets of Cartesian coordinates: one to
define the end of the new segment, and two to define the positions of the starting and ending control
handles for the segment.
You can add a segment to the beginning of a subpath by setting the AppendAtBeginning parameter
for the segment-creation method to Tr u e .
Finally, each Segment object has at least one node (or Node object). You can add a node to a segment by using
the Segment.AddNodeAt method.

Macro Programming Guide
Understanding the CorelDRAW object model 115
You can close a Curve object by setting its Closed property to Tr u e .
After creating a curve “in memory,” you can apply it to a layer by using the Layer.CreateCurve method. A
reference to the new Shape object is returned.
The following VBA code creates a D-shaped curve that is closed:
Dim sh As Shape, spath As SubPath, crv As Curve
ActiveDocument.Unit = cdrCentimeter
Set crv = Application.CreateCurve(ActiveDocument)
'Create Curve object
Set spath = crv.CreateSubPath(6, 6) ' Create a SubPath
spath.AppendLineSegment 6, 3 ' Add the short vertical segment
spath.AppendCurveSegment 3, 0, 2, 270, 2, 0 ' Lower curve
spath.AppendLineSegment 0, 0 ' Bottom straight edge
spath.AppendLineSegment 0, 9 ' Left straight edge
spath.AppendLineSegment 3, 9 ' Top straight edge
spath.AppendCurveSegment 6, 6, 2, 0, 2, 90 ' Upper curve
spath.Closed = True ' Close the curve
Set sh = ActiveLayer.CreateCurve(crv) ' Create curve shape
The Layer class provides three additional methods that act as shortcuts for creating a basic line or basic curve
that has a single segment on a single subpath:
•Layer.CreateLineSegment — creates a basic line based on the given starting point and ending point
•Layer.CreateCurveSegment — creates a basic curve based on the given starting point and ending point and,
optionally, on the lengths and angles of the starting and ending control handles for the curve
•Layer.CreateCurveSegment2 — creates a basic curve based on the given starting point and ending point and
on the given positions of the starting and ending control handles for the curve
These three methods return a reference to the new Shape object.
Creating text objects
You can add text (or Te x t objects) to your documents. Two types of text are supported: artistic text and
paragraph text. An artistic-text object is a short line of text to which you can apply graphical effects. In contrast,
a paragraph-text object is a large block of text — stored in a rectangular container called a “frame” — to which
you can apply more complex formatting.

Macro Programming Guide
Understanding the CorelDRAW object model 116
To create an artistic-text object, you can use one of the following methods:
•Layer.CreateArtisticText — creates basic artistic text
•Layer.CreateArtisticTextWide — creates artistic text that is in Unicode format
Both of these methods require you to specify the position and content of the artistic-text object.
Optionally, both of these methods let you set such text attributes as font style, font size, formatting, and
alignment. In addition, both of these methods return a reference to the new Shape object.
The following VBA code uses the CreateArtisticText method to create a basic artistic-text object that places the
words “Hello World” at the specified position:
Dim sh As Shape
ActiveDocument.Unit = cdrInch
Set sh = ActiveLayer.CreateArtisticText(1, 4, "Hello World")
You can fit artistic text to a path by using the Te x t . F i t Te x t To Pa t h method, which simply attaches the text to
the outline of a shape such that the text flows along the path of that shape.
The following VBA code creates a new artistic-text object and attaches it to the selected shape:
Dim sh As Shape, sPath As Shape
ActiveDocument.Unit = cdrInch
Set sPath = ActiveShape
Set sh = ActiveLayer.CreateArtisticText(1, 4, "Hello World")
sh.Text.FitToPath sPath
To create a paragraph-text object, you can use one of the following methods:
•Layer.CreateParagraphText — creates basic paragraph text
•Layer.CreateParagraphTextWide — creates paragraph text that is in Unicode format
Both of these methods require you to specify the size of the paragraph-text frame by setting its position
from the left, top, right, and bottom sides of the page frame (in that order). Optionally, both of these
methods let you specify the desired text and set such text attributes as font style, font size, formatting,
and alignment. In addition, both of these methods return a reference to the new Shape object.
The following VBA code uses the CreateParagraphText method to create a basic paragraph-text object that
centers the words “Hi There” in a frame of the specified size:
Dim sh As Shape
ActiveDocument.Unit = cdrInch
Set sh = ActiveLayer.CreateParagraphText(1, 4, 5, 2, "Hi There", _
Alignment := cdrCenterAlignment)

Macro Programming Guide
Understanding the CorelDRAW object model 117
You can format existing paragraph text by using text ranges (or Te x t R a n g e objects). Text ranges are handled in
two ways, both of which involve frames (or Te x t Fr a m e objects):
• “frames” method — The Te x t . Fr a m e s property represents a series of text frames, each of which has its own
text range.
•“story” method — The Te x t . S t o r y property represents a text range that includes all text in a series of text
frames.
A text range can be treated as a single block of text, such that any changes to text properties (such as font style
and font size) are applied to all text in that text range. Alternatively, a text range can be broken down into the
following smaller text ranges:
•columns (or Te x t C o l u m n s objects)
• paragraphs (or Te x t Pa r a g r a p h s objects)
•lines (or TextLines objects)
• words (or Te x t Wo r d s objects)
• characters (or TextCharacters objects)
The object model supports all paragraph-formatting options and character-formatting options that are
offered by the application.
The following VBA code formats the specified text range by using the Te x t . S t o r y property. The first paragraph
of the story is changed to a heading style and the second and third paragraphs into a body-text style:
Dim txt As TextRange
' Format the first paragraph
Set txt = ActiveShape.Text.Story.Paragraphs(1)
txt.ChangeCase cdrTextUpperCase
txt.Font = "Verdana"
txt.Size = 18
txt.Bold = True
' Format the second and third paragraphs
Set txt = ActiveShape.Text.Story.Paragraphs(2, 2)
txt.Font = "Times New Roman"
txt.Size = 12
txt.Style = cdrNormalFontStyle
You can place selected text inside closed shapes by using the Shape.PlaceTextInside method.

Macro Programming Guide
Understanding the CorelDRAW object model 118
The following VBA code creates a 5" × 2" ellipse and places the selected text inside it:
Dim txt As Shape, sh As Shape
ActiveDocument.Unit = cdrInch
Set txt = ActiveShape
Set sh = ActiveLayer.CreateEllipse(0, 2, 5, 0)
sh.PlaceTextInside txt
Creating symbols
A symbol (or Symbol object) is a reusable graphic element that is defined in a symbol library. Using symbols in
your documents provides the following benefits:
• lower file-size — Each symbol is defined only once, regardless of how many actual instances of that symbol
appear in the document.
• increased productivity — Any changes made to a symbol definition are automatically propagated to all
instances of that symbol in the document.
• improved workflow — Symbol libraries are a convenient way to store and reuse common graphic elements.
Symbol libraries come in two varieties: external and internal.
External symbol libraries use the filename extension CSL and contain symbol definitions that must be manually
added to the workspace at the application level. You cannot modify a symbol that is defined in an external library
unless you open the associated external library (CSL) file; simply importing the file as a library does not let you
modify its contents.
External symbol libraries must be published to a location that all users can access. A common mapped
drive is a good solution, but a corporate intranet is a better one. However, if the security of the symbols
is not important, the best solution is a corporate Internet site.
Internal symbol libraries exist at the document level. Defining a new symbol in a document — or adding an
instance of an external-library symbol to a document — automatically adds that symbol to the internal library
for that document. For this reason, each document has its own unique internal symbol library.
Inserting an instance of a symbol from an external symbol library creates a link to the definition for that
symbol in that external symbol library. If, at any point, the document cannot access the external symbol
library, the symbol definition in the internal symbol library for that document is used instead.
The Application.SymbolLibraries property contains the collection of all external symbol libraries (or
SymbolLibrary objects) that are available to the application; the Document.SymbolLibrary property returns
just the internal symbol library for that document. The SymbolLibrary.Symbols property contains the
collection of all symbol definitions (or SymbolDefinition objects) in that symbol library. A SymbolDefinition
object is also returned by the Symbol.Defintion property; therefore, you can modify the defintion of a symbol
by using the various properties and methods of the SymbolDefinition class.
To remove a symbol definition from the internal symbol library for a document, you must delete all
instances of the symbol from the document and then run the SymbolLibrary.PurgeUnusedSymbols
method. Simply removing all instances of a symbol from a document does not automatically remove its
symbol definition from the internal symbol library for that document.

Macro Programming Guide
Understanding the CorelDRAW object model 119
The following VBA code demonstrates the basics of using symbols:
Sub AddRemoveSymbols()
Dim objSymLibSwitchA As SymbolLibrary
Dim shpSymBreaker2 As Shape, shpSymBreaker2A As Shape
ActiveDocument.Unit = cdrMillimeter
'Add the switchesA external symbol library to the global
'workspace.
Set objSymLibSwitchA = SymbolLibraries.Add _
("C:\libs\switches\switchesA.csl")
'Add the breaker2 symbol to the active layer.
'NOTE: This automatically adds the symbol definition to the
'internal symbol library for the document.
Set shpSymBreaker2 = ActiveLayer.CreateSymbol(15, 20, _
"breaker2", SymbolLibraries("switchesA"))
'Add another instance of the breaker2 symbol, this time from the
'internal symbol library. NOTE: We did not specify a library, so
'the library for the local document is used by default.
Set shpSymBreaker2A = ActiveLayer.CreateSymbol(30, 20, _
"breaker2")
'Remove the switchesA library from the global workspace.
SymbolLibraries("switchesA").Delete
'Delete the two breaker2 symbols.
shpSymBreaker2.Delete
shpSymBreaker2A.Delete
'At this point, the internal symbol library for the document
'still has the definition of breaker2 stored. To remove this
'definition, we must purge the unused symbols from the library.
'The definition is unused because there are no instances that

Macro Programming Guide
Understanding the CorelDRAW object model 120
'reference it.
ActiveDocument.SymbolLibrary.PurgeUnusedSymbols
End Sub
A symbol can contain (or “nest”) other symbols. A top-level symbol can contain symbols, and each of those
symbols can contain a symbol, and so forth. In the object model, the SymbolDefinition.NestedSymbols
property returns (as a SymbolDefinitions object) the collection of nested symbols for a symbol definition. While
there is no restriction on how many nesting levels can be created, the symbol cannot be rendered without access
to its symbol definition (whether external or internal). In addition, even if the first and second nesting layers of a
symbol are rendered correctly, a symbol on the third nesting layer may not be rendered correctly without access
to its required symbol definition.
Symbols and nested symbols
The following VBA code demonstrates the basics of using nested symbols:
Sub MakeNestedSymbol()
Dim shp1 As Shape, shp2 As Shape, shp3 As Shape, shpSym As Shape
Dim shpRng As New ShapeRange
'Create a pair of rectangles and a circle.
Set shp1 = ActiveLayer.CreateRectangle2(0, 0, 10, 20)
Set shp2 = ActiveLayer.CreateRectangle2(50, 50, 20 ,10)
Set shp3 = ActiveLayer.CreateEllipse(10, 10, 20)
'Make a symbol out of the circle. NOTE: This circle is
'automatically added to the internal symbol library for the

Macro Programming Guide
Understanding the CorelDRAW object model 121
'document.
Set shpSym = shp3.ConvertToSymbol("circle")
'Add the rectangles and the circle symbol to a shape range.
shpRng.Add shp1
shpRng.Add shp2
shpRng.Add shpSym
'Convert the shape range into a symbol. NOTE: This symbol is
'added to the internal symbol library for the document. It is
'also is a nested symbol because it contains the symbol circle.
shpRng.ConvertToSymbol "shapes"
End Sub
Determining shape type
Each Shape object has a read-only Ty p e property, which returns the shape type (for example, rectangle, ellipse,
curve, text, or group). The properties and methods that are available to a shape vary with shape type; therefore,
it’s a good idea to determine the shape type before applying any properties or methods to that shape.
The following sample VBA code determines whether a shape is text. If the shape is text, the code determines
whether it is artistic text or paragraph text. If the shape is artistic text, it is rotated by 10 degrees.
Dim sh As Shape
Set sh = ActiveShape
If sh.Type = cdrTextShape Then
If sh.Text.IsArtisticText = True Then
sh.Rotate 10
End If
End If
Selecting shapes
Each shape is a member of the Layer.Shapes collection for the layer on which it appears. The shapes in a
Layer.Shapes collection appear in the order in which they appear on that layer — the first shape is the one at the
top of the “stack,” and the last shape is the one at the bottom. If shapes are added, reordered, or deleted, the
affected Layer.Shapes collection is immediately updated to reflect the new shape order of that layer.

Macro Programming Guide
Understanding the CorelDRAW object model 122
In addition, each document page has a Shapes collection, which contains all Layer.Shapes collections for
that page. The first shape in a Page.Shapes collection is the one at the very top of that page, and the last
shape is the one at the very bottom.
If you want to access individual shapes, you can select them. When you select shapes, you create a “selection”
that contains only those shapes.
The Shape.Selected property takes a Boolean value that indicates whether a shape is selected: Tr u e if the shape
is selected, False otherwise. You can select a shape by changing the value of its Selected property to Tr u e ; this
technique adds the shape to the current selection — that is, rather than creating a new selection that contains
only that shape.
If you want to create a new selection from a shape — that is, by selecting a specified shape and deselecting any
other selected shapes — you can use the Shape.CreateSelection method, as in the following VBA example:
Dim sh As Shape
Set sh = ActivePage.Shapes(1)
If sh.Selected = False Then sh.CreateSelection
You can select multiple shapes by using the ShapeRange.CreateSelection method. The following VBA code
uses this method — in combination with the Shapes.All method — to select all shapes on the active page
(except those on locked or hidden layers):
ActivePage.Shapes.All.CreateSelection
You can access a selection in one of two ways:
•Use the Document.Selection method to return a special Shape object that contains the actual selection. This
Shape object is automatically refreshed when the selection is updated.
•Use the Document.SelectionRange property to return a ShapeRange object that contains a copy of the
selection. This ShapeRange object represents a “snapshot” of the selection (at the time when the
ShapeRange object was created), so it is not automatically refreshed when the selection is updated.
To summarize, you can access a selection directly, or you can access a copy of that selection; alternatively, you can
access a subset of the shapes in a selection. You can also reorder the shapes in a selection. When you no longer
require a selection, you can deselect one or all of its shapes.
For more information on selecting shapes, see the following subtopics:
• “Accessing selections directly” on page 122
• “Accessing copies of selections” on page 123
• “Accessing the shapes in a selection” on page 124
• “Reordering the shapes in a selection” on page 125
• “Deselecting shapes” on page 125
Accessing selections directly
As previously discussed, you can use the Document.Selection method to access the contents of a selection
directly. A Shape object is returned, and this Shape object is updated to reflect any changes made to the
selection.

Macro Programming Guide
Understanding the CorelDRAW object model 123
The following VBA code returns the selection for the active document:
Dim sel As Shape
Set sel = ActiveDocument.Selection
The shortcut for ActiveDocument.Selection is ActiveSelection, which returns a Shape object of subtype
cdrSelectionShape. The Shape subtype has a member collection called Shapes, which represents a collection of
all the selected shapes in the document. The shapes in the ActiveSelection.Shapes collection can be accessed
as in the following VBA example:
Dim sh As Shape, shs As Shapes
Set shs = ActiveSelection.Shapes
For Each sh In shs
sh.Rotate 15 'Rotate each shape by 15 degrees counterclockwise
Next sh
After you use the ActiveSelection command to select shapes, you cannot subsequently use the
command to access those shapes. Instead, you must create a copy of the selection by using one of the
following methods:
• Recreate the selection as an array of Shape objects.
• Recreate the selection as a Shapes collection.
• Create a “snapshot” of the selection as a ShapeRange object (see “Accessing copies of selections” on
page 123).
Accessing copies of selections
As previously discussed, you can use the Document.SelectionRange property to make a copy of the shapes in a
selection. However, the returned ShapeRange object is not refreshed when the selection is updated because it
represents a “snapshot” of the selection at the moment when that ShapeRange object was created.
The following VBA code returns a copy of the selection for the active document:
Dim selRange As ShapeRange
Set selRange = ActiveDocument.SelectionRange
The shortcut for the ActiveDocument.SelectionRange command is ActiveSelectionRange, which returns
a ShapeRange object. This object contains a collection of references to the shapes that were selected at the
moment when the property was invoked. The shapes in the ActiveSelectionRange collection can be accessed
as in the following VBA example:
Dim sh As Shape, shRange As ShapeRange
Set shRange = ActiveSelectionRange
For Each sh In shRange

Macro Programming Guide
Understanding the CorelDRAW object model 124
sh.Skew 15 ' Skew each shape thru 15° counterclockwise
Next sh
After you use the ActiveSelectionRange command to create a copy of the current document selection, you
can subsequently access the returned ShapeRange object to access any of its shapes. You can even add shapes to
or remove shapes from the returned ShapeRange object. You can then use the ShapeRange.CreateSelection
method if you want to replace the current selection with the modified ShapeRange object.
The following VBA code creates a ShapeRange object from the current document selection, removes the first
and second shapes from that shape range, and then replaces the original selection with this modified
ShapeRange object:
Dim shRange As ShapeRange
Set shRange = ActiveSelectionRange
shRange.Remove 1
shRange.Remove 2
shRange.CreateSelection
If you want to add a specified ShapeRange object to the current selection (rather than use it to replace
the current selection), you can use the ShapeRange.AddToSelection method.
Accessing the shapes in a selection
You can use a similar process for accessing the shapes in a selection as you can for accessing the shapes in a
selection range.
Here is a a VBA code sample for accessing the shapes in a selection:
Dim shs As Shapes, sh As Shape
Set shs = ActiveSelection.Shapes
For Each sh In shs
' Do something with the shape, sh
Next sh
Here is a VBA code sample for accessing the shapes in a selection range:
Dim sRange As ShapeRange, sh As Shape
Set sRange = ActiveSelectionRange
For Each sh In sRange
' Do something with the shape, sh
Next sh

Macro Programming Guide
Understanding the CorelDRAW object model 125
Remember that the ActiveSelection.Shapes command provides direct access to the current
selection, while the ActiveSelectionRange command provides a copy of the current selection. Use
ActiveSelection.Shapes if you want to access the current selection; use ActiveSelectionRange if
you want to create a “snapshot” of the current selection that you can access later.
Reordering the shapes in a selection
The ActiveSelection.Shapes command and the ActiveSelectionRange command return shapes in the
reverse order from which they were selected: the first shape is the last one selected, and the last shape is the first
one selected. Please keep this fact in mind when reordering the shapes in a selection.
Deselecting shapes
You can deselect any shape by changing the value of its Shape.Selected property to False.
You can deselect all shapes by using the Document.ClearSelection method. The following VBA code uses the
ClearSelection method to deselect all shapes in the active document:
ActiveDocument.ClearSelection
If you want, you can use event handlers to respond to events that are triggered by deseleting a shape:
• Document.ShapeChange
You can also use event handlers to respond to events that are triggered by deactivating a selection:
• Application.SelectionChange
• Document.SelectionChange
• GlobalMacroStorage.SelectionChange
Duplicating shapes
You can use the Shape.Duplicate method to duplicate a shape, and you can use the ShapeRange.Duplicate
method to duplicate a range of shapes.
ActiveSelection.Duplicate
The Duplicate method provides two optional parameters, OffsetX and OffsetY, which offset the duplicate from
the original (horizontally and vertically, respectively). The following VBA code positions the duplicate two inches
to the right and one inch above the original:
ActiveDocument.Unit = cdrInch
ActiveSelection.Duplicate 2, 1
Transforming shapes
You can transform shapes in various ways, as explained in the following topics:
• “Sizing shapes” on page 126
• “Stretching shapes” on page 128
• “Skewing shapes” on page 128
• “Rotating shapes” on page 129

Macro Programming Guide
Understanding the CorelDRAW object model 126
• “Positioning shapes” on page 129
If you want, you can use event handlers to respond to events that are triggered by transforming a shape:
• Document.ShapeTransform
Sizing shapes
You can return the width and height of a shape (in document units) by using the Shape.SizeWidth and
Shape.SizeHeight properties, as in the following VBA example:
Dim width As Double, height As Double
ActiveDocument.Unit = cdrMillimeter
width = ActiveShape.SizeWidth
height = ActiveShape.SizeHeight
You can also use the Shape.SizeWidth and Shape.SizeHeight properties to resize an existing shape by
specifying new values for those properties. The following VBA example uses these properties to set the size of the
active shape to a width of 50 millimeters and a height of 70 millimeters:
ActiveDocument.Unit = cdrMillimeter
ActiveShape.SizeWidth = 50
ActiveShape.SizeHeight = 70
You can return both the width and the height of a shape (in document units) by using the Shape.GetSize
method, as in the following VBA example:
Dim width As Double, height As Double
ActiveDocument.Unit = cdrMillimeter
ActiveShape.GetSize width, height
You can resize a shape by using the Shape.SetSize method to specify a new width and new height for it, as in the
following VBA example:
ActiveDocument.Unit = cdrMillimeter
ActiveShape.SetSize 50, 70
You can also resize a shape by using the Shape.SetSizeEx method. Besides the new width and new height for the
shape, this method takes a reference point for the resize (instead of using the center point of the shape). The
following VBA code uses the SetSizeEx method to resize the current selection to 10 inches wide by 8 inches high
about the reference point (6, 5) in the document:
ActiveDocument.Unit = cdrInch
ActiveSelection.SetSizeEx 6, 5, 10, 8

Macro Programming Guide
Understanding the CorelDRAW object model 127
If you want to take the outline of a shape into account when returning the size of that shape, you must use the
Shape.GetBoundingBox method. The bounding box for a shape surrounds both the shape and its outline;
however, the actual dimensions of a shape specify its width and height irrespective of the size of its outline. The
following VBA example uses the GetBoundingBox method to return the size of the active shape:
Dim width As Double, height As Double
Dim posX As Double, posY As Double
ActiveDocument.Unit = cdrInch
ActiveDocument.ReferencePoint = cdrBottomLeft
ActiveShape.GetBoundingBox posX, posY, width, height, True
The Shape.GetBoundingBox method takes parameters that specify the position of the lower-left corner of the
shape, the width of the shape, and the height of the shape. The final parameter is a Boolean value that indicates
whether to include (Tr u e ) or exclude (False) the outline of the shape. The Shape.SetBoundingBox method lets
you set the size of a shape by specifying the size of its bounding box; however, this method lacks the parameter
for specifying whether to include the outline in the new size. If you want to calculate the size and position of the
bounding box of a shape without including its outline, you can use the GetBoundingBox method twice (once
including the outline and once excluding it), as in the following VBA example:
Public Sub SetBoundingBoxEx(X As Double, Y As Double, _
Width As Double, Height As Double)
Dim sh As Shape
Dim nowX As Double, nowY As Double
Dim nowWidth As Double, nowHeight As Double
Dim nowXol As Double, nowYol As Double
Dim nowWidthol As Double, nowHeightol As Double
Dim newX As Double, newY As Double
Dim newWidth As Double, newHeight As Double
Dim ratioWidth As Double, ratioHeight As Double
Set sh = ActiveSelection
sh.GetBoundingBox nowX, nowY, nowWidth, nowHeight, False
sh.GetBoundingBox nowXol, nowYol, nowWidthol, nowHeightol, True
ratioWidth = Width / nowWidthol
ratioHeight = Height / nowHeightol
Macro Programming Guide
Understanding the CorelDRAW object model 128
newWidth = nowWidth * ratioWidth
newHeight = nowHeight * ratioHeight
newX = X + (nowX - nowXol)
newY = Y + (nowY - nowYol)
sh.SetBoundingBox newX, newY, newWidth, newHeight, False, _
cdrBottomLeft
End Sub
Stretching shapes
You can stretch a shape (or scale it by stretching is proportionately) by using the Shape.Stretch method or the
Shape.StretchEx method. Both methods take a decimal value for the stretch, where 1 is 100% (or no change);
you cannot use zero, so you must use a very small value instead.
The following VBA code uses the Shape.Stretch method to stretch the selection to half its current height and
twice its width, about the midpoint of the bottom edge of its bounding box:
ActiveDocument.ReferencePoint = cdrBottomMiddle
ActiveSelection.Stretch 2, 0.5
If you want to specify the reference point about which to perform a stretch, you can use the Shape.StretchEx
method. The following VBA code performs the same stretch as the previous code, but it performs that stretch
about the point (4, 5) on the page (in inches):
ActiveDocument.Unit = cdrInch
ActiveSelection.StretchEx 4, 5, 2, 0.5
The Shape.Stretch and Shape.StretchEx methods provide an optional Boolean parameter that
determines how to stretch paragraph text. A value of Tr u e stretches the characters, while False stretches
the bounding box and re-flows the text within it.
Skewing shapes
You can skew a shape by using the Shape.Skew method or the Shape.SkewEx method. These methods let you
specify the horizontal-skew angle (in degrees, where positive values move the top edge to the left and the bottom
edge to the right) and the vertical-skew angle (in degrees, where positive values move the right edge upwards
and the left edge downwards).
Skews of angles close to or greater than 90° are not allowed.
The horizontal skew is applied before the vertical skew.
The difference between the Shape.Skew and Shape.SkewEx methods is the point about which the skew is
performed: Skew uses the center of rotation for the shape, while SkewEx uses the specified reference point.
Macro Programming Guide
Understanding the CorelDRAW object model 129
You can determine the center of rotation for a shape by returning the values of its
Shape.RotationCenterX and Shape.RotationCenterY properties. Changing these values moves the
center of rotation for that shape.
The following VBA code uses the Shape.Skew method to skew the selection (about its center of rotation) by 30°
horizontally and by 15° vertically:
ActiveSelection.Skew 30, 15
Rotating shapes
You can rotate a shape by using the Shape.Rotate method or the Shape.RotateEx method. These methods
rotate the shape by the given angle (in degrees). However, the difference between these methods is the point
about which they perform the rotation: Rotate uses the center of rotation for the shape, while RotateEx uses the
specified reference point.
You can determine the center of rotation for a shape by returning the values of its
Shape.RotationCenterX and Shape.RotationCenterY properties. Changing these values moves the
center of rotation for that shape.
The following VBA code uses the Shape.Rotate method to rotate the selection (about its center of rotation) by
30°:
ActiveSelection.Rotate 30
The following VBA code uses the Shape.RotateEx method to rotate each selected shape by 15° clockwise about
its lower-right corner:
Dim sh As Shape
ActiveDocument.ReferencePoint = cdrBottomRight
For Each sh In ActiveSelection.Shapes
sh.RotateEx -15, sh.PositionX, sh.PositionY
Next sh
Positioning shapes
You can return the horizontal and vertical position of a shape by using the Shape.PositionX and
Shape.PositionY properties (respectively). Alternatively, you can use the Shape.GetPosition method to return
both the horizontal position and the vertical position of a shape.
You can use the Shape.GetBoundingBox method if you want to return the position of a shape,
including its outline. For more information on this method, see “Sizing shapes” on page 126.
The following VBA code uses the Shape.GetPosition method to return the position of the selection relative to
the current reference point of the active document, which the code explicitly sets to the lower-left corner:
Dim posX As Double, posY As Double
ActiveDocument.ReferencePoint = cdrBottomLeft

Macro Programming Guide
Understanding the CorelDRAW object model 130
ActiveSelection.GetPosition posX, posY
You can also use the Shape.PositionX and Shape.PositionY properties to set the horizontal and vertical
position of a shape (respectively), thereby moving that shape to the specified position. Alternatively, you can use
the Shape.SetPosition method to move a shape to specified horizontal and vertical position, or you can use the
Shape.SetPositionEx method to move the shape to a specified point.
You can also use the Shape.SetSizeEx and Shape.SetBoundingBox methods to set the position of a
shape. For more information on these methods, see “Sizing shapes” on page 126.
The following VBA code uses the Shape.SetPosition method to set the position of the lower-right corner of each
selected shape in the active document to (3, 2) in inches:
Dim sh As Shape
ActiveDocument.Unit = cdrInch
ActiveDocument.ReferencePoint = cdrBottomRight
For Each sh In ActiveSelection.Shapes
sh.SetPosition 3, 2
Next sh
If you want, you can use event handlers to respond to events that are triggered by positioning a shape:
•Document.ShapeMove
Coloring shapes
You can add color to a shape by applying a fill (or Fill object) to it. The fill type for a shape is recorded by the
Fill.Type property as one of the following constants for the cdrFillType enumeration:
•cdrUniformFill — uniform fill
•cdrFountainFill — fountain fill
•cdrPatternFill — pattern fill
•cdrTextureFill — texture fill
•cdrPostScriptFill — PostScript fill
•cdrHatchFill — hatch fill
•cdrNoFill — no fill
The following VBA code returns the type of fill that is applied to the active shape:
Dim fillType As cdrFillType
fillType = ActiveShape.Fill.Type
You cannot change the fill type for a shape by modifying its Fill.Type property. Instead, you must use
the appropriate Fill.Apply...Fill method, as described in the subsections that follow.
You can also add color to a shape by applying an outline (or Outline object) to it.
In addition, the object model provides a variety of properties and methods for working with the colors (or Color
objects) that you apply to shapes.

Macro Programming Guide
Understanding the CorelDRAW object model 131
For information on applying fills and outlines and on working with colors, see the following subtopics:
• “Applying uniform fills” on page 131
• “Applying fountain fills” on page 131
• “Applying pattern fills” on page 132
• “Applying texture fills” on page 132
• “Applying PostScript fills” on page 133
• “Applying hatch fills” on page 133
• “Applying outlines” on page 133
• “Working with color” on page 134
In your macros, you can include queries that search for shapes that have specific fill properties, outline
properties, or color properties. For information, see “Including queries in macros” in the Macros Help file
for the application.
Applying uniform fills
Uniform fills consist of a single, solid color. A uniform fill is represented by the Fill.UniformColor property as a
Color object.
You can apply a uniform fill to a shape by using the Fill.ApplyUniformFill method. The following VBA
example applies a red uniform fill to the active shape:
ActiveShape.Fill.ApplyUniformFill CreateRGBColor(255, 0, 0)
You can change the color of a uniform fill by modifying its Fill.UniformColor property. The following VBA
example changes the uniform fill of the active shape to deep navy blue:
ActiveShape.Fill.UniformColor.RGBAssign 0, 0, 102
You can remove the uniform fill from a shape by using the Fill.ApplyNoFill method.
Applying fountain fills
Fountain fills display a progression between two colors. A fountain fill is represented by the Fill.Fountain
property as a FountainFill object, which specifies the various properties for the fountain fill: start color, end
color, angle, blend type, and so on. The colors in a fountain fill are represented by a FountainColors collection.
You can apply a fountain fill to a shape by using the Fill.ApplyFountainFill method. This method provides
optional parameters for various fountain-fill settings, such as the midpoint and offset of the blend. The following
VBA example creates a simple linear fountain fill, from red to yellow, at 30 degrees to the horizontal:
Dim startCol As New Color, endCol As New Color
startCol.RGBAssign 255, 0, 0
endCol.RGBAssign 255, 255, 0
ActiveShape.Fill.ApplyFountainFill startCol, endCol, cdrLinearFountainFill, 30
Macro Programming Guide
Understanding the CorelDRAW object model 132
You can add a color to a fountain fill by using the FountainColors.Add method. Color positions are integer
values in percent, where 0% is the start-color position and 100% is the end-color position. The following VBA
example adds a green color to the fountain fill at a position about one-third (33%) of the way from the existing
red color:
Dim fFill As FountainFill
Set fFill = ActiveShape.Fill.Fountain
fFill.Colors.Add CreateRGBColor(0, 102, 0), 33
You can move a color in a fountain fill by using the FountainColor.Move method. The following VBA code
moves the green color from the previous example to a position that is 60% of the way from the red (that is, more
towards the yellow):
ActiveShape.Fill.Fountain.Colors(1).Move 60
You can use the FountainColors.Count property to determine the number of colors between the start color and
end color of a fountain fill. (For the preceding example, this value is 1.) The first color in the collection is that
start color, and its index number is 0; this color cannot be moved, but its color can be changed. The last color in
the collection is the end color, and its index number is (Count + 1); this color cannot be moved, but its color
can be changed. The following VBA code changes the end color from yellow to blue:
Dim cols As FountainColors
Set cols = ActiveShape.Fill.Fountain.Colors
cols(cols.Count + 1).Color.RGBAssign 0, 0, 102
You can remove the fountain fill from a shape by using the Fill.ApplyNoFill method.
Applying pattern fills
Pattern fills display a series of repeating vector objects or bitmap images. A pattern fill is represented by the
Fill.Pattern property as a PatternFill object, which specifies the various properties for the pattern fill:
foreground color, background color, tile offset, and so on.
The collection of available pattern fills is stored in the PatternCanvases collection.
You can apply a pattern fill to a shape by using the Fill.ApplyPatternFill method.
You can remove the pattern fill from a shape by using the Fill.ApplyNoFill method.
Applying texture fills
Texture fills are fractally generated and fill a shape with one image rather than a series of repeating images. A
texture fill is represented by the Fill.Texture property as a TextureFill object, which specifies the various
properties for the texture fill: origin, resolution, tile offset, and so on.
Macro Programming Guide
Understanding the CorelDRAW object model 133
The properties for a texture fill are stored in a TextureFillProperties collection.
You can apply a texture fill to a shape by using the Fill.ApplyTextureFill method.
You can remove the texture fill from a shape by using the Fill.ApplyNoFill method.
Applying PostScript fills
PostScript fills are texture fills that are designed by using the PostScript language. A PostScript fill is represented
by the Fill.PostScript property as a PostScriptFill object, which specifies the various properties for the
PostScript fill.
You can apply a PostScript fill to a shape by using the Fill.ApplyPostScriptFill method.
You can remove the PostScript fill from a shape by using the Fill.ApplyNoFill method.
Applying hatch fills
Hatch fills are composed of vector-based lines and can be used to clearly distinguish the materials or object
relationships in a drawing. A hatch fill is represented by the Fill.Hatch property as a HatchFill object, which
specifies the various properties for the hatch fill.
The collection of available hatch-fill patterns is stored in the HatchPatterns collection, and each
document stores its own library of hatch-fill patterns in a HatchLibraries collection.
You can apply a hatch fill to a shape by using the Fill.ApplyHatchFill method.
You can remove the hatch fill from a shape by using the Fill.ApplyNoFill method.
Applying outlines
You can use the various properties and methods of the Outline class to define the outline of a shape.
The Outline.Type property uses the following constants of the cdrOutlineType enumeration to record whether
the specified shape has an outline:
•cdrOutline — indicates that the shape has an outline
•cdrNoOutline — indicates that the shape does not have an outline
If a shape has no outline, setting its Outline.Type property to cdrOutline applies the document-default
outline style.
If a shape has an outline, setting its Outline.Type property to cdrNoOutline removes that outline.
The Outline.Width property for an outline sets its width in document units. In the following VBA example, the
outline of the selected shapes is set to 1 millimeter:
ActiveDocument.Unit = cdrMillimeter
ActiveSelection.Outline.Width = 1

Macro Programming Guide
Understanding the CorelDRAW object model 134
If a shape does not have an outline, its Outline.Width value is 0. Changing this value applies an outline
and automatically changes the value for the Outline.Type property from cdrNoOutline to cdrOutline.
Similarly, if a shape has an outline, its Outline.Width value is greater than 0. Changing this value to 0
removes the outline and automatically changes the value for the Outline.Type property from cdrOutline
to cdrNoOutline.
The Outline.Color property for an outline defines its color, as in the following VBA example:
ActiveSelection.Outline.Color.GrayAssign 0 ' Set to black
Setting the color of an outline automatically sets the Outline.Type property of that outline to
cdrOutline and applies the default outline width.
The Outline.Style property for an outline specifies the dash settings of that outline. These dash settings are
defined by the following properties of the OutlineStyle class:
•DashCount — represents the number of pairs of dashes and gaps in an outline. This value ranges from 1 to 5.
•DashLength — represents the length of each dash in an outline. This value is calculated as a multiple of the
outline width, which is measured in document units. For example, if DashLength(1) is 5 and the outline is
0.2" wide, the length of the dash is 1"; however, if the width of the line is changed to 0.1", the length of the
dash becomes 0.5".
•GapLength — represents the length ofeach gap in an outline. This value is calculated as a multiple of the
outline width, which is measured in document units.
•Index — represents the index number of a predefined outline style in the OutlineStyles collection for the
application. The OutlineStyles collection is customizable, so the index number that is associated with each
outline style in the collection may vary from user to user; however, the expression OutlineStyles.Item(0)
always specifies a solid line.
Outline objects have many other properties, including the following:
•StartArrow and EndArrow — specify the arrowhead on each end of an open curve
•LineCaps and LineJoin — respectively, specify the type of line caps (butt, round, or square) and line
joins (bevel, miter, or round)
•NibAngle and NibStretch — specify the shape of the nib used to draw the outline
•BehindFill and ScaleWithShape — respectively, draw the outline behind the fill and scale the
outline with the shape
Outline objects also have methods, including the following:
•ConvertToObject — converts the outline to an object
•SetProperties — sets most of the available outline properties in a single call
Working with color
The Color class defines the fill colors and outline colors that you apply to shapes. This class provides a number of
properties and methods for working with color.
You can determine the color model of a color by accessing its Color.Type property, as in the following VBA
example:
Dim colType As cdrColorType
colType = ActiveShape.Outline.Color.Type
Macro Programming Guide
Understanding the CorelDRAW object model 135
The Color.Type property is defined by the cdrColorType enumeration, which provides the following constants
(among many others) for supported color models:
•cdrColorCMYK — specifies the CMYK color model
•cdrColorRGB — specifies the RGB color model
•cdrColorGray — specifies the grayscale color model
The color components for each supported color model are defined by additional properties of the Color
class, as demostrated by the following VBA examples:
• CMYK color model — is defined by the Color.CMYKCyan, Color.CMYKMagenta,
Color.CMYKYellow, and Color.CMYKBlack properties
• RGB color model — is defined by the Color.RGBRed, Color.RGBGreen, and Color.RGBBlue
properties
• grayscale color model — is defined by the Color.Gray property
The range of values that is supported by a color component depends on the color model for that
component.
To create a color, you can use the automation keyword New, as in Dim col As New Color.
To assign a color model to a new color, you can use the desired ...Assign method (such as
Color.CMYKAssign, Color.RGBAssign, or Color.GrayAssign). Each of these methods provides one
parameter for each color component in its respective color model. For example,
col.RGBAssign 0, 0, 102 assigns a deep-blue RGB color to the new color that was created in the
previous tip.
To use the application’s color-management settings to change the color model that is assigned to a color,
you can use the desired ConvertTo... method (such as Color.ConvertToCMYK, Color.ConvertToRGB,
or Color.ConvertToGray). For example, ActiveShape.Fill.UniformColor.ConvertToRGB
converts the fill of the active shape to the RGB color model.
You can copy the properties of one color to another color by using the Color.CopyAssign method, as in the
following VBA example:
Dim sh As Shape
Set sh = ActiveShape
sh.Outline.Color.CopyAssign sh.Fill.UniformColor
The color “none” does not exist. To set a fill color or outline color to “none,” you must instead set the fill
type or outline type to “none.”
Applying effects to shapes
The object model provides a number of methods for applying effects to shapes. For information on these
methods, see the following subtopics:
• “Applying blends” on page 136
• “Applying contours” on page 136
• “Applying customized effects” on page 136
• “Applying distortions” on page 137

Macro Programming Guide
Understanding the CorelDRAW object model 136
• “Applying drop shadows” on page 137
• “Applying envelopes” on page 137
• “Applying extrusions” on page 137
• “Applying lenses” on page 137
• “Applying perspective” on page 138
Applying an effect returns an Effect object, which lets you access various properties and methods for the
created effect. For example, you can use the Effect.Separate method to separate the shapes that are
generated by an effect from the shape to which that effect is applied. In addition, you can use the
Effect.Clear method to remove an effect from a shape.
Applying blends
The Shape.CreateBlend method creates a blend between the current shape and the shape that is specified as a
parameter. This method provides optional parameters for various blend settings, such as the acceleration of the
blend and the path along which the blend is created.
The following VBA code creates a basic ten-step blend:
Dim sh As Shapes, eff As Effect
Set sh = ActiveSelection.Shapes
Set eff = sh(1).CreateBlend(sh(2), 10)
In the preceding example, the number of shapes in the blend is twelve: the start and end shapes, plus the
ten blend steps that are created.
The Shape.CreateBlend method returns an Effect object, the Effect.Blend property for which you can
use to modify the created blend.
Applying contours
The Shape.CreateContour method applies a contour to a shape. This method provides optional parameters for
various contour settings, such as the colors and acceleration of the contour.
The following VBA code creates a three-step contour at a five-millimeter spacing:
Dim eff As Effect
ActiveDocument.Unit = cdrMillimeter
Set eff = ActiveShape.CreateContour(cdrContourOutside, 5, 3)
The Shape.CreateContour method returns an Effect object, the Effect.Contour property for which you
can use to modify the created contour.
Applying customized effects
The Shape.CreateCustomEffect method applies a customized effect to a shape. This method provides
parameters for various effect settings.
Macro Programming Guide
Understanding the CorelDRAW object model 137
The Shape.CreateCustomEffect method returns an Effect object, the Effect.Custom property for
which you can use to modify the created effect.
Applying distortions
The following methods apply a distortion to a shape:
•Shape.CreatePushPullDistortion — applies a Push-and-pull distortion
•Shape.CreateTwisterDistortion — applies a Twister distortion
•Shape.CreateZipperDistortion — applies a Zipper distortion
•Shape.CreateCustomDistortion — applies a customized distortion
These methods provide parameters for various distortion settings.
The distortion-creation methods return an Effect object, the Effect.Distortion property for which you
can use to modify the created distortion.
If you want, you can use event handlers to respond to events that are triggered by distorting a shape:
• Document.ShapeDistort
Applying drop shadows
The Shape.CreateDropShadow method applies a drop shadow to a shape. This method provides optional
parameters for various drop-shadow settings, such as the feathering and offset of the drop shadow.
The Shape.CreateDropShadow method returns an Effect object, the Effect.DropShadow property for
which you can use to modify the created drop shadow.
Applying envelopes
The following methods apply an envelope to a shape:
•Shape.CreateEnvelope — applies a basic envelope
•Shape.CreateEnvelopeFromCurve — applies an envelope by using the specified curve as a template
•Shape.CreateEnvelopeFromShape — applies an envelope by using the specified shape as a template
These methods provide parameters for various envelope settings.
The envelope-creation methods return an Effect object, the Effect.Envelope property for which you can
use to modify the created envelope.
Applying extrusions
The Shape.CreateExtrude method applies an extrusion to a shape. This method provides optional parameters
for various extrusion settings, such as the angle and color of the extrusion.
The Shape.CreateExtrude method returns an Effect object, the Effect.Extrude property for which you
can use to modify the created extrusion.
Applying lenses
The Shape.CreateLens method applies a lens to a shape. This method provides optional parameters for various
lens settings, such as the color and magnitude of the lens.

Macro Programming Guide
Understanding the CorelDRAW object model 138
The Shape.CreateLens method returns an Effect object, the Effect.Lens property for which you can use
to modify the created lens.
Applying perspective
The Shape.CreatePerspective method applies perspective to a shape. This method provides optional
parameters for specifying horizontal and vertical vanishing points.
The Shape.CreatePerspective method returns an Effect object, the Effect.Perspective property for
which you can use to modify the created perspective effect.
Searching for shapes
In your macros, you can include queries that search for shapes that have specific shape properties, fill properties,
outline properties, or color properties. To do this, you use Corel Query Language (CQL) in conjunction with one
of the following methods:
•Shape.Evaluate — returns the result of a given expression that evaluates the properties of the current shape
•Shapes.FindShape — returns a single shape that has the specified properties
•Shapes.FindShapes — returns, as a shape range, all shapes that have the specified properties
You can specify the shape properties for which to search. For example, the expression
ActiveShape.Evaluate("@name") searches searches the Name property of all selected shapes.
Consider the following VBA code sample, in which the Ty p e property and the Width property are used to select
all rectangles that are wider than two inches:
ActivePage.Shapes.FindShapes(Query := "@type = 'rectangle' and _
@width > {2 in}").CreateSelection
For comprehensive information on using CQL, see “Including queries in macros” in the Macros Help file for the
application.
Deleting shapes
If you want, you can use event handlers to respond to events that are triggered by deleting a shape:
• Document.ShapeDelete
Working with import filters and export filters
As previously discussed, methods are available for importing files (see “Importing files into layers” on page 100)
and exporting files (see “Exporting files from documents” on page 86).
These file-import and file-export methods can also be used for performing batch conversions or modifying
file repositories.
The wide selection of supported file formats is due to the vast number of filters that are available to the
application. Each filter lets you work with the files from another graphics application.

Macro Programming Guide
Understanding the CorelDRAW object model 139
In this topic
To learn more about working with filters, see the following subtopics:
• “Working with import filters” on page 139
• “Working with export filters” on page 141
Working with import filters
To ensure the portability of a file-import script, you must use the default ImportFilter object (rather than the
filter-specific object DSFImport), as in the following VBA example:
Sub OpenRectangle()
Dim FilterObject As ImportFilter
'Initialize FilterObject
Set FilterObject = ActiveLayer.ImportEx("C:\devo\rect.dsf", _
cdrDSF)
'Set the advanced features of the filter
FilterObject.DefaultLinestyle = 1 'Dashed
FilterObject.DeleteInvisibleObjects = True
'Invoke the filter
FilterObject.Finish
End Sub
For best results, use the filter-specific object DSFImport only to learn the specific interfaces that are supported
by a filter. For example, the following screenshot demonstrates that the ImportFilter object exposes only generic
interfaces in Microsoft® IntelliSense® because the ImportFilter interface is generic (and not filter-specific). The
ImportFilter object does not contain the DefaultLinestyle and DeleteInvisibleObjects properties; however,
you can still set these properties in the ImportFilter interface if they are supported by the specified import filter.

Macro Programming Guide
Understanding the CorelDRAW object model 140
As previously discussed, using the ImportFilter object (rather than the filter-specific object DSFImport)
ensures that a file-import script can be used on any other workstation running the same version of the
application. To reference the properties, methods, and enumerations for a specific filter, locate that filter in the
Object Browser. For example, the following screenshot demonstrates that the line-style dsfDashed2 can be
specified by assigning a value of 7 to the DefaultLinestyle property.
To access the object model for a filter, click To o l s ` References from within the Macro Editor. In the
References dialog box that appears, click Browse, and navigate to the Filters folder of the installed software.
Select the dynamic-link library (DLL) file for the desired filter, and then click OK. When the References dialog
box reappears, enable the checkbox that corresponds to the desired filter, and then click OK. You can now access
the object model for the filter, as in the following VBA example:
Sub OpenRectangleDSF()
Dim FilterObject As DSFImport
Dim Style As DsfLinestyle
'Initialize FilterObject
Set FilterObject = ActiveLayer.ImportEx("C:\devo\rect.dsf", _
cdrDSF)
'Set the advanced features of the filter
Style = dsfDashed
FilterObject.DefaultLinestyle = Style
FilterObject.DeleteInvisibleObjects = True
'Invoke the filter
FilterObject.Finish
End Sub
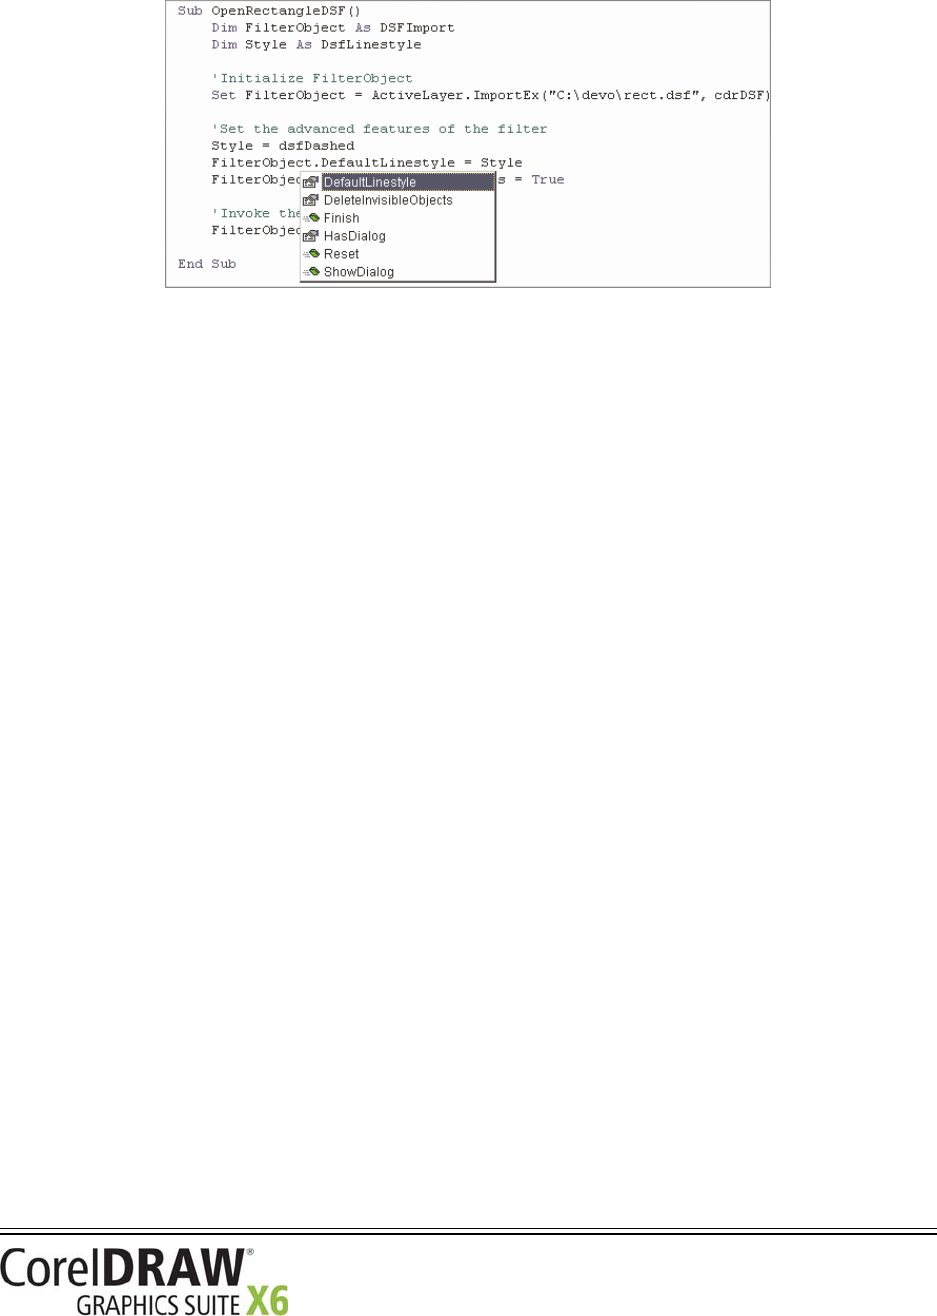
Macro Programming Guide
Understanding the CorelDRAW object model 141
Working with an import filter is made much easier by having the script access the object model for that filter;
however, as discussed, this technique reduces the portability of the script. When used at another workstation, the
script must first be updated with the correct location of the DLL file for the filter.
Working with export filters
The following VBA example demonstrates how to save a document as an AutoCAD DXF file by using an export
filter:
Sub SaveRectangleDXF()
Dim FilterObject As DXFExport
Dim BitmapType As DxfBitmapType
Dim TextAsCurves As Boolean
Dim Units As DxfUnits
Dim Version As DxfVersion
'Initialize FilterObject
Set FilterObject = ActiveDocument.ExportEx("C:\devo\rect.dxf", _
cdrDXF)
'Set the advanced features of the filter
BitmapType = dxfBitmapGIF
FilterObject.BitmapType = BitmapType
Units = dxfInches
FilterObject.Units = Units
TextAsCurves = False
FilterObject.TextAsCurves = TextAsCurves

Macro Programming Guide
Understanding the CorelDRAW object model 142
Version = dxfVersion2000
FilterObject.Version = Version
'Invoke the filter
FilterObject.Finish
End Sub
In the preceding example, a call is made to ActiveDocument.ExportEx method, and the interface for the
export filter (DXFExport) is invoked. However, you can use the generic export interface (ExportFilter) rather
than the filter-specific interface (DXFExport), as in the following VBA example:
Sub SaveRectangle()
Dim FilterObject As ExportFilter
'Initialize FilterObject
Set FilterObject = ActiveDocument.ExportEx("C:\devo\rect.dxf", cdrDXF)
'Set the advanced features of the filter
FilterObject.BitmapType = 1 'GIF
FilterObject.Units = 0 'Inches
FilterObject.TextAsCurves = False
FilterObject.Version = 1 'AutoCAD 2000
'Invoke the filter
FilterObject.Finish
End Sub
The following VBA example demonstrates how to invoke the Export dialog box:
Sub ShowExportDialog()
Dim FilterObject As ExportFilter
Dim vntReturn As Variant
'Initialize FilterObject
Set FilterObject = ActiveDocument.ExportEx("C:\devo\rect.dxf", cdrDXF)
'If FilterObject supports a dialog, invoke it
If (FilterObject.HasDialog = True) Then

Macro Programming Guide
Understanding the CorelDRAW object model 143
vntReturn = FilterObject.ShowDialog
'Verify that the user clicked "OK" and not "Cancel"
If (vntReturn = True) Then
'Invoke the filter
FilterObject.Finish
End If
End If
End Sub
The preceding example requires you to check the return value of the dialog box, and to invoke the Finish
method for when the user clicks OK.

Macro Programming Guide
Glossary 144
Glossary
argument
See “parameter.”
array
A set of sequentially indexed objects of the same data type (or “array elements”)
Each array element has the same data type (although elements can have different values), and the entire array is
stored contiguously in memory (with no gaps between elements). For example, you could have an array of integers
or an array of characters or an array of anything that has a defined data type.
By default, array indexes are zero-based.
Arrays can have more than one dimension. A one-dimensional array is called a “vector,” while a two-dimensional
array is called a “matrix.”
automation
The process of recording or scripting a macro
class
The definition of each property, method, and event that applies to a type of object in the application
class module
A type of module that contains the definition of an object-oriented Visual Basic class, including the definitions
of the properties and methods for that class
collection
A group of objects that have similar characteristics and similar actions but that are uniquely identified by index
names or index numbers
Collections are always plural. For example, Documents is a collection of Document objects.
constant
A value in an automation-programming structure that remains fixed while the macro is being executed
Unlike a variable, which temporarily stores a changing data value in a code procedure or code function, constant
values do not change.
A constant is an instance of an enumeration.
dithering
The process of simulating color by putting dots of another color very close together
The Windows operating system uses dithering to display colors that the graphics adapter cannot display.

Macro Programming Guide
Glossary 145
enumeration
Also called an “enumerated type,” a data type that lists all possible values for the variables that use it
Unlike a variable, which temporarily stores a changing data value, an enumeration stores fixed values.
A constant is an instance of an enumeration.
enumerated type
See “enumeration.”
event
An action that takes place in an object and that is recognized by a form or control
Each object within an object model is defined by a property, method, event, or a combination of each. An event
is triggered by an action — such as a click, key press, or system timer — and you can write code that causes an
object to respond to that event.
event-driven programming
A style of programming, unlike traditional procedural programming (in which the program starts at line 1 and
executes line by line), that executes code in response to events
Visual Basic for Applications is an event-driven programming language. Most of the code you create is written to
respond to an event.
Compare with “object-oriented programming.”
event handler
A subroutine that is programmed to cause the application to respond to a specific event
form
A type of module that is used for customized dialog boxes and user interfaces, and that includes the code to
control them
function
A procedure that performs a given task in a macro and that can be used to return a value
A function procedure begins with a Function statement and ends with an End Function statement. In VBA
and VSTA, functions do not need to be declared before being used, nor before being defined.
gap
A space between dashes in an outline style
global value
A value that applies to a given project in its entirety

Macro Programming Guide
Glossary 146
GMS file
Also called a “project file” (and short for “Global Macro Storage file”), the location to which the Macro Editor
stores all modules for a project
index number
A reference to an object in a collection that contains more than one object
An index number is used to identify each object in a collection. The index number can range from 1 to the number
of available objects within the collection.
macro
A recorded or scripted set of tasks that can be repeatedly invoked within an application
A macro is a symbol, name, or key that represents a list of commands.
method
An operation that an object can have performed on itself
modal dialog box
A dialog box thatlocks the application and must be acted upon (that is, either submitted or cancelled) before the
macro can be resumed
Most built-in dialog boxes that can be controlled by automation coding are modal.
modeless dialog box
A dialog box that does not lock the application and can be left open while the user continues working in the
application
Modeless dialog boxes behave like dockers.
module
A container that is used by a GMS file for storing project components
Generic modules are used for general code and for macros. Other types of modules include forms and class
modules.
object
When referring to an object model, an instance of a class
object model
A high-level structure of the relationship between the parent objects and child objects in an application
For example, the Application object represents the beginning of the object hierarchy. From the Application
object, you can “drill down” and navigate through the object model until you find the desired object. To reference
an object with Visual Basic code, you separate each level of the object hierarchy with the dot operator ( .).

Macro Programming Guide
Glossary 147
object-oriented programming
A style of programming that places emphasis on creating and using objects
Compare with “event-driven programming.”
parameter
Synonymous with “argument,” a value that is passed to a routine and that defines a characteristic of an object in
the Visual Basic programming environment
Parameters are attributes that appear after a recorded command in the Recorder docker. For example, dialog-
box options are not recorded as separate commands in the Recorder docker; they are recorded as attributes of the
command that initially invoked the dialog box.
passing by reference
The act of passing an argument to a function or subroutine by using a reference to the original
By default, function parameters and subroutine parameters are passed by reference. To explicity indicate that
you want to pass an argument by reference, prefix the argument with ByRef.
passing by value
The act of passing an argument to a function or subroutine by using a copy of the original
To explicity indicate that you want to pass an argument by value, prefix the argument with ByVal.
property
A characteristic of a class
Properties can be returned or set. In addition, properties can be designated as read-only (to indicate that they are
fixed by the design of the class).
range
A series of similar objects
scope
The visibility of a data type, procedure, or object
shortcut object
A syntactic replacement for the longhand version of an object
String
A data type consisting of a sequence of contiguous characters that represent the characters themselves rather than
their numeric values
A string can include letters, numbers, spaces, and punctuation. The String data type can store fixed-length
strings ranging in length from 0 to approximately 63K characters and dynamic strings ranging in length from 0
to approximately 2 billion characters. The dollar sign ( $) type-declaration character represents a string in
Visual Basic.

Macro Programming Guide
Glossary 148
sub
See “subroutine.”
subroutine
Sometimes called a “sub,” a procedure that performs a given task in a macro but cannot be used to return a value
A subroutine procedure begins with a Sub statement and ends with an End Sub statement. In VBA and VSTA,
subroutines do not need to be declared before being used, nor before being defined.
variable
An item that can be created (or “declared”) for the purposes of storing data
The built-in data types are Boolean, Double, Integer, Long, Single, String, Variant, and several other less-
used types including Date, Decimal, and Object. If a variable is not declared before being used, the compiler
interprets it as a Variant.
Variant
The data type for all variables that are not declared as another type, such as Dim, Private, Public, or Static
The Variant data type has no type-declaration character.
VBA
A built-in programming language that can automate repetitive functions and create intelligent solutions in a
software application
VBA is a subset of the Microsoft Visual Basic (VB) object-driven programming environment, but it is considered
“for applications” because it is most often integrated into another application to customize the functionality of
that application.
Visual Basic for Applications
See “VBA.”
Visual Studio Tools for Applications
See “VSTA.”
VSTA
The successor to VBA
VSTA is based on Microsoft Visual Studio 2008. The integrated development environment (IDE) for VSTA can
be used to support two additional programming languages (Visual Basic .NET and C#) and to take advantage of
the .NET framework natively.

Macro Programming Guide
Index 149
Index
A
activating
documents . . . . . . . . . . . . . . . . . . . . . . . . . . . . .81
layers . . . . . . . . . . . . . . . . . . . . . . . . . . . . . . . . .99
pages . . . . . . . . . . . . . . . . . . . . . . . . . . . . . . . . .94
shapes . . . . . . . . . . . . . . . . . . . . . . . . . . . . . . .121
Add-in Manager . . . . . . . . . . . . . . . . . . . . . . . . . . .28
add-ins . . . . . . . . . . . . . . . . . . . . . . . . . . . . . . . . . . .28
allocating memory . . . . . . . . . . . . . . . . . . . . . . . . .16
Application class
understanding . . . . . . . . . . . . . . . . . . . . . . . . . .72
arcs . . . . . . . . . . . . . . . . . . . . . . . . . . . . . . . . . . . . .113
arguments, passing . . . . . . . . . . . . . . . . . . . . . . . .16
arrays
declaring . . . . . . . . . . . . . . . . . . . . . . . . . . . . . .14
assignments, Boolean . . . . . . . . . . . . . . . . . . . . . .17
automation
coding structure . . . . . . . . . . . . . . . . . . . . . . . . .13
setting up . . . . . . . . . . . . . . . . . . . . . . . . . . . . . .25
supported environments . . . . . . . . . . . . . . . . . . .5
understanding . . . . . . . . . . . . . . . . . . . . . . . . . . .4
use of object models in . . . . . . . . . . . . . . . . . . .10
automation elements . . . . . . . . . . . . . . . . . . . . . . .10
B
bitwise operators . . . . . . . . . . . . . . . . . . . . . . . . . .18
blends . . . . . . . . . . . . . . . . . . . . . . . . . . . . . . . . . .136
Boolean comparisons and assignments . . . . . . .17
breakpoints . . . . . . . . . . . . . . . . . . . . . . . . . . . . . . .52
building functions and subroutines . . . . . . . . . . .15
buttons
adding to macro toolbars . . . . . . . . . . . . . . . . . .55
providing in dialog boxes . . . . . . . . . . . . . . . . . .61
C
C and C++
vs. VBA . . . . . . . . . . . . . . . . . . . . . . . . . . . . . . . . .8
Call Stack window . . . . . . . . . . . . . . . . . . . . . . . . .50
captions, macro . . . . . . . . . . . . . . . . . . . . . . . . . . .55
checking syntax . . . . . . . . . . . . . . . . . . . . . . . . . . .33
circles . . . . . . . . . . . . . . . . . . . . . . . . . . . . . . . . . . .113
class modules
adding to macro projects . . . . . . . . . . . . . . . . . .45
classes
understanding . . . . . . . . . . . . . . . . . . . . . . . . . .11
closing
documents . . . . . . . . . . . . . . . . . . . . . . . . . . . . .91
macro projects . . . . . . . . . . . . . . . . . . . . . . . . . .44
code
stepping through . . . . . . . . . . . . . . . . . . . . . . . .53
understanding structure of . . . . . . . . . . . . . . . .13
code modules
adding macros . . . . . . . . . . . . . . . . . . . . . . . . . .46
adding to macro projects . . . . . . . . . . . . . . . . . .44
deleting . . . . . . . . . . . . . . . . . . . . . . . . . . . . . . .45
displaying or hiding . . . . . . . . . . . . . . . . . . . . . .45
editing . . . . . . . . . . . . . . . . . . . . . . . . . . . . . . . .45
renaming . . . . . . . . . . . . . . . . . . . . . . . . . . . . . .45
Code window in Macro Editor . . . . . . . . . . . . . . .31
coding dialog boxes . . . . . . . . . . . . . . . . . . . . . . . .59
collections
counting items in . . . . . . . . . . . . . . . . . . . . . . . .21
parsing items in . . . . . . . . . . . . . . . . . . . . . . . . .21
referencing in macros . . . . . . . . . . . . . . . . . . . . .20
referencing items in . . . . . . . . . . . . . . . . . . . . . .20
understanding . . . . . . . . . . . . . . . . . . . . . . . . . .11
color components . . . . . . . . . . . . . . . . . . . . . . . .134
color models
specifying color components . . . . . . . . . . . . . .134
specifying for colors . . . . . . . . . . . . . . . . . . . . .134
working with . . . . . . . . . . . . . . . . . . . . . . . . . .134
coloring
shapes . . . . . . . . . . . . . . . . . . . . . . . . . . . . . . .130
syntax . . . . . . . . . . . . . . . . . . . . . . . . . . . . . . . . .32
colors
converting color models for . . . . . . . . . . . . . . .134
copying properties . . . . . . . . . . . . . . . . . . . . . .134
creating . . . . . . . . . . . . . . . . . . . . . . . . . . . . . .134
specifying color models . . . . . . . . . . . . . . . . . .134
working with . . . . . . . . . . . . . . . . . . . . . . . . . .134
combination boxes
providing in dialog boxes . . . . . . . . . . . . . . . . . .61
command groups . . . . . . . . . . . . . . . . . . . . . . . . . .85

Macro Programming Guide
Index 150
comments, in macro code . . . . . . . . . . . . . . . . . . .16
comparisons, Boolean . . . . . . . . . . . . . . . . . . . . . .17
completion of code, automatic . . . . . . . . . . . . . .33
constants
understanding . . . . . . . . . . . . . . . . . . . . . . . . . .12
contextual pop-up lists for coding . . . . . . . . . . . .33
contours . . . . . . . . . . . . . . . . . . . . . . . . . . . . . . . .136
controls, dialog box
list of available . . . . . . . . . . . . . . . . . . . . . . . . . .58
converting color models . . . . . . . . . . . . . . . . . . .134
coordinates, capturing . . . . . . . . . . . . . . . . . . . . .66
copying
color properties . . . . . . . . . . . . . . . . . . . . . . . .134
macro projects . . . . . . . . . . . . . . . . . . . . . . . . . .44
counting items in a collection . . . . . . . . . . . . . . .21
curves . . . . . . . . . . . . . . . . . . . . . . . . . . . . . . . . . . .114
customized effects . . . . . . . . . . . . . . . . . . . . . . . .136
D
Debug toolbar . . . . . . . . . . . . . . . . . . . . . . . . . . . .35
debugging macros
methods for . . . . . . . . . . . . . . . . . . . . . . . . . . . .50
windows for . . . . . . . . . . . . . . . . . . . . . . . . . . . .50
declaring
arrays . . . . . . . . . . . . . . . . . . . . . . . . . . . . . . . . .14
enumerations . . . . . . . . . . . . . . . . . . . . . . . . . . .14
strings . . . . . . . . . . . . . . . . . . . . . . . . . . . . . . . .14
variables . . . . . . . . . . . . . . . . . . . . . . . . . . . . . . .13
defining scope . . . . . . . . . . . . . . . . . . . . . . . . . . . .17
definitions, jumping to . . . . . . . . . . . . . . . . . . . . .33
deploying
macros . . . . . . . . . . . . . . . . . . . . . . . . . . . . . . . .68
workspaces . . . . . . . . . . . . . . . . . . . . . . . . . . . . .68
deselecting shapes . . . . . . . . . . . . . . . . . . . . . . . .125
designing dialog boxes . . . . . . . . . . . . . . . . . . . . .58
dialog boxes
adding to macro projects . . . . . . . . . . . . . . . . . .44
coding . . . . . . . . . . . . . . . . . . . . . . . . . . . . . . . .59
designing . . . . . . . . . . . . . . . . . . . . . . . . . . . . . .58
displaying . . . . . . . . . . . . . . . . . . . . . . . . . . . . . .60
macro . . . . . . . . . . . . . . . . . . . . . . . . . . . . . . . . .56
naming . . . . . . . . . . . . . . . . . . . . . . . . . . . . . . . .59
providing buttons . . . . . . . . . . . . . . . . . . . . . . . .61
providing combination boxes . . . . . . . . . . . . . . .61
providing images in . . . . . . . . . . . . . . . . . . . . . .63
providing list boxes . . . . . . . . . . . . . . . . . . . . . . 61
providing text boxes . . . . . . . . . . . . . . . . . . . . . 60
setting up . . . . . . . . . . . . . . . . . . . . . . . . . . . . . 57
testing . . . . . . . . . . . . . . . . . . . . . . . . . . . . . . . . 59
displaying
documents . . . . . . . . . . . . . . . . . . . . . . . . . . . . 82
layers . . . . . . . . . . . . . . . . . . . . . . . . . . . . . . . . 99
distortions . . . . . . . . . . . . . . . . . . . . . . . . . . . . . . 137
documentation, macro
creating . . . . . . . . . . . . . . . . . . . . . . . . . . . . . . . 66
using . . . . . . . . . . . . . . . . . . . . . . . . . . . . . . . . . . 1
documents
activating . . . . . . . . . . . . . . . . . . . . . . . . . . . . . 81
closing . . . . . . . . . . . . . . . . . . . . . . . . . . . . . . . 91
creating . . . . . . . . . . . . . . . . . . . . . . . . . . . . . . . 80
creating command groups . . . . . . . . . . . . . . . . 85
displaying . . . . . . . . . . . . . . . . . . . . . . . . . . . . . 82
exporting files . . . . . . . . . . . . . . . . . . . . . . . . . . 86
modifying . . . . . . . . . . . . . . . . . . . . . . . . . . . . . 84
opening . . . . . . . . . . . . . . . . . . . . . . . . . . . . . . 80
printing . . . . . . . . . . . . . . . . . . . . . . . . . . . . . . . 89
publishing to PDF . . . . . . . . . . . . . . . . . . . . . . . 88
saving . . . . . . . . . . . . . . . . . . . . . . . . . . . . . . . . 85
setting properties . . . . . . . . . . . . . . . . . . . . . . . 82
working with . . . . . . . . . . . . . . . . . . . . . . . . . . 72
drawing scales . . . . . . . . . . . . . . . . . . . . . . . . . . . . 82
drop shadows . . . . . . . . . . . . . . . . . . . . . . . . . . . 137
duplicating shapes . . . . . . . . . . . . . . . . . . . . . . . 125
E
Edit toolbar . . . . . . . . . . . . . . . . . . . . . . . . . . . . . . 35
editing
code modules . . . . . . . . . . . . . . . . . . . . . . . . . . 45
macros . . . . . . . . . . . . . . . . . . . . . . . . . . . . . . . 46
effects, shape . . . . . . . . . . . . . . . . . . . . . . . . . . . 135
elements, automation . . . . . . . . . . . . . . . . . . . . . 10
ellipses . . . . . . . . . . . . . . . . . . . . . . . . . . . . . . . . . 113
ending lines . . . . . . . . . . . . . . . . . . . . . . . . . . . . . . 16
enumerated types (enumerations) . . . . . . . . . . . 12
enumerations
declaring . . . . . . . . . . . . . . . . . . . . . . . . . . . . . . 14
understanding . . . . . . . . . . . . . . . . . . . . . . . . . 12
envelopes . . . . . . . . . . . . . . . . . . . . . . . . . . . . . . . 137
event handlers . . . . . . . . . . . . . . . . . . . . . . . . . . . . 23
events
understanding . . . . . . . . . . . . . . . . . . . . . . . . . 12

Macro Programming Guide
Index 151
export filters
understanding . . . . . . . . . . . . . . . . . . . . . . . . .138
working with . . . . . . . . . . . . . . . . . . . . . . . . . .141
exporting
documents to PDF . . . . . . . . . . . . . . . . . . . . . . .88
files . . . . . . . . . . . . . . . . . . . . . . . . . . . . . . . . . . .86
GMS files . . . . . . . . . . . . . . . . . . . . . . . . . . . . . .69
workspace features . . . . . . . . . . . . . . . . . . . . . .69
extrusions . . . . . . . . . . . . . . . . . . . . . . . . . . . . . . .137
F
files
exporting . . . . . . . . . . . . . . . . . . . . . . . . . . . . . .86
importing . . . . . . . . . . . . . . . . . . . . . . . . . . . . .100
fills
fountain . . . . . . . . . . . . . . . . . . . . . . . . . . . . . .131
hatch . . . . . . . . . . . . . . . . . . . . . . . . . . . . . . . .133
pattern . . . . . . . . . . . . . . . . . . . . . . . . . . . . . . .132
PostScript . . . . . . . . . . . . . . . . . . . . . . . . . . . . .133
texture . . . . . . . . . . . . . . . . . . . . . . . . . . . . . . .132
uniform . . . . . . . . . . . . . . . . . . . . . . . . . . . . . .131
filters . . . . . . . . . . . . . . . . . . . . . . . . . . . . . . . . . . .138
Form Designer . . . . . . . . . . . . . . . . . . . . . . . . . . . . .57
formatting code . . . . . . . . . . . . . . . . . . . . . . . . . . .31
forms (dialog boxes)
adding to projects . . . . . . . . . . . . . . . . . . . . . . .44
creating . . . . . . . . . . . . . . . . . . . . . . . . . . . . . . .56
fountain fills . . . . . . . . . . . . . . . . . . . . . . . . . . . . .131
functions
building . . . . . . . . . . . . . . . . . . . . . . . . . . . . . . .15
jumping to definitions . . . . . . . . . . . . . . . . . . . .33
G
getting started with macros . . . . . . . . . . . . . . . . .25
GMS files
exporting . . . . . . . . . . . . . . . . . . . . . . . . . . . . . .69
importing . . . . . . . . . . . . . . . . . . . . . . . . . . . . . .69
working with . . . . . . . . . . . . . . . . . . . . . . . . . . .42
H
hatch fills . . . . . . . . . . . . . . . . . . . . . . . . . . . . . . . .133
hiding layers . . . . . . . . . . . . . . . . . . . . . . . . . . . . . .99
I
icons, macro . . . . . . . . . . . . . . . . . . . . . . . . . . . . . .55
images
associating with macros . . . . . . . . . . . . . . . . . . 55
providing in dialog boxes . . . . . . . . . . . . . . . . . 63
Immediate window . . . . . . . . . . . . . . . . . . . . . . . 50
import filters
understanding . . . . . . . . . . . . . . . . . . . . . . . . 138
working with . . . . . . . . . . . . . . . . . . . . . . . . . 139
importing
files . . . . . . . . . . . . . . . . . . . . . . . . . . . . . . . . . 100
GMS files . . . . . . . . . . . . . . . . . . . . . . . . . . . . . . 69
workspace features . . . . . . . . . . . . . . . . . . . . . . 69
input boxes . . . . . . . . . . . . . . . . . . . . . . . . . . . . . . 19
inserting pages . . . . . . . . . . . . . . . . . . . . . . . . . . . 93
installing VBA and VSTA . . . . . . . . . . . . . . . . . . . 25
J
Java and JavaScript
vs. VBA . . . . . . . . . . . . . . . . . . . . . . . . . . . . . . . . 7
jumping to definitions . . . . . . . . . . . . . . . . . . . . . 33
L
layers
activating . . . . . . . . . . . . . . . . . . . . . . . . . . . . . 99
creating . . . . . . . . . . . . . . . . . . . . . . . . . . . . . . . 99
deleting . . . . . . . . . . . . . . . . . . . . . . . . . . . . . . 101
hiding and displaying . . . . . . . . . . . . . . . . . . . . 99
importing files . . . . . . . . . . . . . . . . . . . . . . . . . 100
locking and unlocking . . . . . . . . . . . . . . . . . . . . 99
renaming . . . . . . . . . . . . . . . . . . . . . . . . . . . . 100
reordering . . . . . . . . . . . . . . . . . . . . . . . . . . . . 100
working with . . . . . . . . . . . . . . . . . . . . . . . . . . 97
lenses . . . . . . . . . . . . . . . . . . . . . . . . . . . . . . . . . . 137
lines of code, ending . . . . . . . . . . . . . . . . . . . . . . 16
lines, creating . . . . . . . . . . . . . . . . . . . . . . . . . . . 114
list boxes
providing in dialog boxes . . . . . . . . . . . . . . . . . 61
loading macro projects . . . . . . . . . . . . . . . . . . . . 44
Locals window . . . . . . . . . . . . . . . . . . . . . . . . . . . . 50
locking layers . . . . . . . . . . . . . . . . . . . . . . . . . . . . . 99
logical operators . . . . . . . . . . . . . . . . . . . . . . . . . . 18
M
Macro Editor
Code window . . . . . . . . . . . . . . . . . . . . . . . . . . 31
debugging windows . . . . . . . . . . . . . . . . . . . . . 50

Macro Programming Guide
Index 152
Object Browser . . . . . . . . . . . . . . . . . . . . . . . . . .35
Project Explorer . . . . . . . . . . . . . . . . . . . . . . . . .30
Properties window . . . . . . . . . . . . . . . . . . . . . . .34
toolbars . . . . . . . . . . . . . . . . . . . . . . . . . . . . . . .35
using . . . . . . . . . . . . . . . . . . . . . . . . . . . . . . . . .28
Macro Manager docker . . . . . . . . . . . . . . . . . . . . .27
macro projects
adding class modules . . . . . . . . . . . . . . . . . . . . .45
adding code modules . . . . . . . . . . . . . . . . . . . . .44
adding dialog boxes . . . . . . . . . . . . . . . . . . . . . .44
adding macros . . . . . . . . . . . . . . . . . . . . . . . . . .46
copying . . . . . . . . . . . . . . . . . . . . . . . . . . . . . . .44
creating . . . . . . . . . . . . . . . . . . . . . . . . . . . . . . .43
loading . . . . . . . . . . . . . . . . . . . . . . . . . . . . . . . .44
renaming . . . . . . . . . . . . . . . . . . . . . . . . . . . . . .44
understanding . . . . . . . . . . . . . . . . . . . . . . . . . .42
unloading . . . . . . . . . . . . . . . . . . . . . . . . . . . . . .44
macro resources . . . . . . . . . . . . . . . . . . . . . . . . . . . .1
macro toolbars
adding buttons . . . . . . . . . . . . . . . . . . . . . . . . . .55
creating . . . . . . . . . . . . . . . . . . . . . . . . . . . . . . .55
macros
adding to macro projects . . . . . . . . . . . . . . . . . .46
captions for . . . . . . . . . . . . . . . . . . . . . . . . . . . .55
comments in . . . . . . . . . . . . . . . . . . . . . . . . . . . .16
creating . . . . . . . . . . . . . . . . . . . . . . . . . . . . . . .42
debugging . . . . . . . . . . . . . . . . . . . . . . . . . . . . .50
deleting . . . . . . . . . . . . . . . . . . . . . . . . . . . . . . .46
deploying . . . . . . . . . . . . . . . . . . . . . . . . . . . . . .68
editing . . . . . . . . . . . . . . . . . . . . . . . . . . . . . . . .46
getting started with . . . . . . . . . . . . . . . . . . . . . .25
images or icons for . . . . . . . . . . . . . . . . . . . . . . .55
options for . . . . . . . . . . . . . . . . . . . . . . . . . . . . .25
organizing . . . . . . . . . . . . . . . . . . . . . . . . . . . . .68
providing dialog boxes . . . . . . . . . . . . . . . . . . . .56
providing documentation . . . . . . . . . . . . . . . . . .66
providing event handlers in . . . . . . . . . . . . . . . .23
providing user interaction . . . . . . . . . . . . . . . . .64
recording . . . . . . . . . . . . . . . . . . . . . . . . . . . . . .46
referencing collections . . . . . . . . . . . . . . . . . . . .20
referencing objects . . . . . . . . . . . . . . . . . . . . . . .19
running . . . . . . . . . . . . . . . . . . . . . . . . . . . . . . .49
sample . . . . . . . . . . . . . . . . . . . . . . . . . . . . . . . . .5
toolbars for . . . . . . . . . . . . . . . . . . . . . . . . . . . .54
tooltips for . . . . . . . . . . . . . . . . . . . . . . . . . . . . .56
understanding . . . . . . . . . . . . . . . . . . . . . . . . . . .4
using object shortcuts in . . . . . . . . . . . . . . . . . .22
writing . . . . . . . . . . . . . . . . . . . . . . . . . . . . . . . .45
Macros toolbar
Corel PHOTO-PAINT . . . . . . . . . . . . . . . . . . . . . .27
CorelDRAW . . . . . . . . . . . . . . . . . . . . . . . . . . . . .26
using . . . . . . . . . . . . . . . . . . . . . . . . . . . . . . . . .26
memory pointers . . . . . . . . . . . . . . . . . . . . . . . . . . 16
memory, allocating . . . . . . . . . . . . . . . . . . . . . . . . 16
message boxes . . . . . . . . . . . . . . . . . . . . . . . . . . . 19
methods
understanding . . . . . . . . . . . . . . . . . . . . . . . . . 12
modal dialog boxes
understanding . . . . . . . . . . . . . . . . . . . . . . . . . 56
vs. modeless . . . . . . . . . . . . . . . . . . . . . . . . . . . 57
modeless dialog boxes
understanding . . . . . . . . . . . . . . . . . . . . . . . . . 57
vs. modal . . . . . . . . . . . . . . . . . . . . . . . . . . . . . 57
mouse
capturing clicks . . . . . . . . . . . . . . . . . . . . . . . . . 64
capturing coordinates . . . . . . . . . . . . . . . . . . . . 66
capturing drags . . . . . . . . . . . . . . . . . . . . . . . . . 65
N
naming dialog boxes . . . . . . . . . . . . . . . . . . . . . . 59
O
Object Browser in Macro Editor
Class list . . . . . . . . . . . . . . . . . . . . . . . . . . . . . . 37
Information window . . . . . . . . . . . . . . . . . . . . . 39
Member list . . . . . . . . . . . . . . . . . . . . . . . . . . . . 38
search controls . . . . . . . . . . . . . . . . . . . . . . . . . 40
using . . . . . . . . . . . . . . . . . . . . . . . . . . . . . . . . . 35
object model
definition of . . . . . . . . . . . . . . . . . . . . . . . . . . . 10
overview of . . . . . . . . . . . . . . . . . . . . . . . . . . . . 71
objects
jumping to definitions . . . . . . . . . . . . . . . . . . . 33
referencing in macros . . . . . . . . . . . . . . . . . . . . 19
understanding . . . . . . . . . . . . . . . . . . . . . . . . . 10
using shortcuts in macros . . . . . . . . . . . . . . . . . 22
opening
documents . . . . . . . . . . . . . . . . . . . . . . . . . . . . 80
macro projects . . . . . . . . . . . . . . . . . . . . . . . . . 44
operators
logical and bitwise . . . . . . . . . . . . . . . . . . . . . . 18
organizing macros . . . . . . . . . . . . . . . . . . . . . . . . 68
orientation, page . . . . . . . . . . . . . . . . . . . . . . . . . 95
outlines . . . . . . . . . . . . . . . . . . . . . . . . . . . . . . . . . 133
P
pages
activating . . . . . . . . . . . . . . . . . . . . . . . . . . . . . 94

Macro Programming Guide
Index 153
deleting . . . . . . . . . . . . . . . . . . . . . . . . . . . . . . .97
inserting . . . . . . . . . . . . . . . . . . . . . . . . . . . . . . .93
modifying . . . . . . . . . . . . . . . . . . . . . . . . . . . . . .96
reordering . . . . . . . . . . . . . . . . . . . . . . . . . . . . .95
sizing . . . . . . . . . . . . . . . . . . . . . . . . . . . . . . . . .95
specifying size and orientation . . . . . . . . . . . . . .95
working with . . . . . . . . . . . . . . . . . . . . . . . . . . .91
panning documents . . . . . . . . . . . . . . . . . . . . . . . .84
parsing items in a collection . . . . . . . . . . . . . . . . .21
passing arguments
passing by reference . . . . . . . . . . . . . . . . . . . . . .16
passing by value . . . . . . . . . . . . . . . . . . . . . . . . .16
understanding . . . . . . . . . . . . . . . . . . . . . . . . . .16
pattern fills . . . . . . . . . . . . . . . . . . . . . . . . . . . . . .132
PDF, publishing to . . . . . . . . . . . . . . . . . . . . . . . . .88
perspective effects . . . . . . . . . . . . . . . . . . . . . . . .138
pie shapes . . . . . . . . . . . . . . . . . . . . . . . . . . . . . . .113
playing macros . . . . . . . . . . . . . . . . . . . . . . . . . . . .49
pointers, memory . . . . . . . . . . . . . . . . . . . . . . . . . .16
pop-up lists for coding . . . . . . . . . . . . . . . . . . . . .33
positioning shapes . . . . . . . . . . . . . . . . . . . . . . . .129
PostScript fills . . . . . . . . . . . . . . . . . . . . . . . . . . . .133
printing documents . . . . . . . . . . . . . . . . . . . . . . . .89
Project Explorer in Macro Editor . . . . . . . . . . . . . .30
project files
creating . . . . . . . . . . . . . . . . . . . . . . . . . . . . . . .42
exporting . . . . . . . . . . . . . . . . . . . . . . . . . . . . . .69
importing . . . . . . . . . . . . . . . . . . . . . . . . . . . . . .69
projects, macro
creating . . . . . . . . . . . . . . . . . . . . . . . . . . . . . . .42
properties
understanding . . . . . . . . . . . . . . . . . . . . . . . . . .11
Properties window . . . . . . . . . . . . . . . . . . . . . . . . .34
properties, color
copying . . . . . . . . . . . . . . . . . . . . . . . . . . . . . .134
publishing to PDF . . . . . . . . . . . . . . . . . . . . . . . . . .88
R
recording macros
for future use . . . . . . . . . . . . . . . . . . . . . . . . . . .47
for temporary use . . . . . . . . . . . . . . . . . . . . . . . .48
methods for . . . . . . . . . . . . . . . . . . . . . . . . . . . .46
rectangles . . . . . . . . . . . . . . . . . . . . . . . . . . . . . . .111
reference points . . . . . . . . . . . . . . . . . . . . . . . . . . .82
reference, passing by . . . . . . . . . . . . . . . . . . . . . . 16
referencing
collections in macros . . . . . . . . . . . . . . . . . . . . . 20
items in collections . . . . . . . . . . . . . . . . . . . . . . 20
objects in macros . . . . . . . . . . . . . . . . . . . . . . . 19
renaming
code modules . . . . . . . . . . . . . . . . . . . . . . . . . . 45
layers . . . . . . . . . . . . . . . . . . . . . . . . . . . . . . . 100
macro projects . . . . . . . . . . . . . . . . . . . . . . . . . 44
projects . . . . . . . . . . . . . . . . . . . . . . . . . . . . . . . 45
reordering
layers . . . . . . . . . . . . . . . . . . . . . . . . . . . . . . . 100
pages . . . . . . . . . . . . . . . . . . . . . . . . . . . . . . . . 95
shapes in selections . . . . . . . . . . . . . . . . . . . . 125
resources
for macros . . . . . . . . . . . . . . . . . . . . . . . . . . . . . 1
for software . . . . . . . . . . . . . . . . . . . . . . . . . . . . 2
rotating shapes . . . . . . . . . . . . . . . . . . . . . . . . . . 129
running macros
methods for . . . . . . . . . . . . . . . . . . . . . . . . . . . 49
saved . . . . . . . . . . . . . . . . . . . . . . . . . . . . . . . . 49
temporary . . . . . . . . . . . . . . . . . . . . . . . . . . . . . 50
S
sample macros . . . . . . . . . . . . . . . . . . . . . . . . . . . . 5
saving
documents . . . . . . . . . . . . . . . . . . . . . . . . . . . . 85
recorded macros . . . . . . . . . . . . . . . . . . . . . . . . 47
scales, drawing . . . . . . . . . . . . . . . . . . . . . . . . . . . 82
scaling shapes . . . . . . . . . . . . . . . . . . . . . . . . . . . 128
scope, defining . . . . . . . . . . . . . . . . . . . . . . . . . . . 17
searching for
shapes . . . . . . . . . . . . . . . . . . . . . . . . . . . . . . . 138
selecting
shapes . . . . . . . . . . . . . . . . . . . . . . . . . . . . . . . 121
selections
accessing copies of . . . . . . . . . . . . . . . . . . . . . 123
accessing directly . . . . . . . . . . . . . . . . . . . . . . 122
accessing shapes in . . . . . . . . . . . . . . . . . . . . . 124
reordering shapes in . . . . . . . . . . . . . . . . . . . . 125
setting breakpoints . . . . . . . . . . . . . . . . . . . . . . . . 52
shapes
accessing in selections . . . . . . . . . . . . . . . . . . 124
applying effects . . . . . . . . . . . . . . . . . . . . . . . 135
coloring . . . . . . . . . . . . . . . . . . . . . . . . . . . . . . 130
creating . . . . . . . . . . . . . . . . . . . . . . . . . . . . . . 111
deleting . . . . . . . . . . . . . . . . . . . . . . . . . . . . . . 138

Macro Programming Guide
Index 154
deselecting . . . . . . . . . . . . . . . . . . . . . . . . . . . .125
determining type . . . . . . . . . . . . . . . . . . . . . . .121
duplicating . . . . . . . . . . . . . . . . . . . . . . . . . . . .125
positioning . . . . . . . . . . . . . . . . . . . . . . . . . . . .129
reordering in selections . . . . . . . . . . . . . . . . . .125
rotating . . . . . . . . . . . . . . . . . . . . . . . . . . . . . .129
scaling . . . . . . . . . . . . . . . . . . . . . . . . . . . . . . .128
searching for . . . . . . . . . . . . . . . . . . . . . . . . . .138
selecting . . . . . . . . . . . . . . . . . . . . . . . . . . . . . .121
sizing . . . . . . . . . . . . . . . . . . . . . . . . . . . . . . . .126
skewing . . . . . . . . . . . . . . . . . . . . . . . . . . . . . .128
stretching . . . . . . . . . . . . . . . . . . . . . . . . . . . . .128
transforming . . . . . . . . . . . . . . . . . . . . . . . . . .125
working with . . . . . . . . . . . . . . . . . . . . . . . . . .102
shortcuts
using in macros . . . . . . . . . . . . . . . . . . . . . . . . .22
size, page
default, specifying . . . . . . . . . . . . . . . . . . . . . . .95
specifying . . . . . . . . . . . . . . . . . . . . . . . . . . . . . .95
using defined . . . . . . . . . . . . . . . . . . . . . . . . . . .96
sizing
pages . . . . . . . . . . . . . . . . . . . . . . . . . . . . . . . . .95
shapes . . . . . . . . . . . . . . . . . . . . . . . . . . . . . . .126
skewing shapes . . . . . . . . . . . . . . . . . . . . . . . . . . .128
software resources . . . . . . . . . . . . . . . . . . . . . . . . . .2
squares . . . . . . . . . . . . . . . . . . . . . . . . . . . . . . . . . .111
Standard toolbar . . . . . . . . . . . . . . . . . . . . . . . . . .35
stepping through code . . . . . . . . . . . . . . . . . . . . .53
stretching shapes . . . . . . . . . . . . . . . . . . . . . . . . .128
strings
declaring . . . . . . . . . . . . . . . . . . . . . . . . . . . . . .14
structuring code . . . . . . . . . . . . . . . . . . . . . . . . . . .13
subroutines . . . . . . . . . . . . . . . . . . . . . . . . . . . . . . .15
subs (subroutines) . . . . . . . . . . . . . . . . . . . . . . . . .15
supported automation environments . . . . . . . . . .5
symbols . . . . . . . . . . . . . . . . . . . . . . . . . . . . . . . . .118
syntax
checking automatically . . . . . . . . . . . . . . . . . . . .33
coloring automatically . . . . . . . . . . . . . . . . . . . .32
T
temporary macros
recording . . . . . . . . . . . . . . . . . . . . . . . . . . . . . .48
running . . . . . . . . . . . . . . . . . . . . . . . . . . . . . . .50
testing dialog boxes . . . . . . . . . . . . . . . . . . . . . . . .59
text boxes
providing in dialog boxes . . . . . . . . . . . . . . . . . 60
text objects . . . . . . . . . . . . . . . . . . . . . . . . . . . . . 115
texture fills . . . . . . . . . . . . . . . . . . . . . . . . . . . . . . 132
toolbars
Debug . . . . . . . . . . . . . . . . . . . . . . . . . . . . . . . . 35
Edit . . . . . . . . . . . . . . . . . . . . . . . . . . . . . . . . . . 35
Macros . . . . . . . . . . . . . . . . . . . . . . . . . . . . . . . 26
Standard . . . . . . . . . . . . . . . . . . . . . . . . . . . . . . 35
UserForm . . . . . . . . . . . . . . . . . . . . . . . . . . . . . 35
toolbars, macro
adding buttons . . . . . . . . . . . . . . . . . . . . . . . . . 55
creating . . . . . . . . . . . . . . . . . . . . . . . . . . . . . . . 55
providing . . . . . . . . . . . . . . . . . . . . . . . . . . . . . 54
tooltips, macro . . . . . . . . . . . . . . . . . . . . . . . . . . . 56
transforming shapes . . . . . . . . . . . . . . . . . . . . . . 125
U
Undo string
setting for documents . . . . . . . . . . . . . . . . . . . . 85
uniform fills . . . . . . . . . . . . . . . . . . . . . . . . . . . . . 131
units of measurement
setting for documents . . . . . . . . . . . . . . . . . . . . 82
unloading macro projects . . . . . . . . . . . . . . . . . . 44
unlocking layers . . . . . . . . . . . . . . . . . . . . . . . . . . 99
user interaction, providing for macros . . . . . . . 64
user interfaces, providing for macros . . . . . . . . 54
UserForm toolbar . . . . . . . . . . . . . . . . . . . . . . . . . 35
V
value, passing by . . . . . . . . . . . . . . . . . . . . . . . . . . 16
variables
declaring . . . . . . . . . . . . . . . . . . . . . . . . . . . . . . 13
jumping to definitions . . . . . . . . . . . . . . . . . . . 33
VB . . . . . . . . . . . . . . . . . . . . . . . . . . . . . . . . . . . . . . . 7
VBA
installing . . . . . . . . . . . . . . . . . . . . . . . . . . . . . . 25
options for . . . . . . . . . . . . . . . . . . . . . . . . . . . . 25
understanding . . . . . . . . . . . . . . . . . . . . . . . . . . 6
vs. C and C++ . . . . . . . . . . . . . . . . . . . . . . . . . . 8
vs. Java and JavaScript . . . . . . . . . . . . . . . . . . . . 7
vs. VB . . . . . . . . . . . . . . . . . . . . . . . . . . . . . . . . . 7
vs. VBScript . . . . . . . . . . . . . . . . . . . . . . . . . . . . . 7
vs. Windows Script Host . . . . . . . . . . . . . . . . . . . 8
VBScript . . . . . . . . . . . . . . . . . . . . . . . . . . . . . . . . . . 7
views . . . . . . . . . . . . . . . . . . . . . . . . . . . . . . . . . . . . 83

Macro Programming Guide
Index 155
Visual Basic (VB) . . . . . . . . . . . . . . . . . . . . . . . . . . . .7
Visual Basic for Applications (VBA) . . . . . . . . . . . .6
Visual Basic Script (VBScript) . . . . . . . . . . . . . . . . .7
Visual Studio Tools for Applications (VSTA) . . . . .8
VSTA
installing . . . . . . . . . . . . . . . . . . . . . . . . . . . . . . .25
understanding . . . . . . . . . . . . . . . . . . . . . . . . . . .8
VSTA Editor . . . . . . . . . . . . . . . . . . . . . . . . . . . . . . .40
W
Watches window . . . . . . . . . . . . . . . . . . . . . . . . . .50
windows . . . . . . . . . . . . . . . . . . . . . . . . . . . . . . . . .82
Windows Script Host
vs. VBA . . . . . . . . . . . . . . . . . . . . . . . . . . . . . . . . .8
workspaces
deploying . . . . . . . . . . . . . . . . . . . . . . . . . . . . . .68
exporting features . . . . . . . . . . . . . . . . . . . . . . .69
importing features . . . . . . . . . . . . . . . . . . . . . . .69
writing macros . . . . . . . . . . . . . . . . . . . . . . . . . . . .45
Z
zooming in documents . . . . . . . . . . . . . . . . . . . . .84
Copyright 2012 Corel Corporation. All rights reserved.
CorelDRAW® Graphics Suite X6 Macro Programming Guide
Product specifications, pricing, packaging, technical support and information (“specifications”) refer to the retail
English version only. The specifications for all other versions (including other language versions) may vary.
Information is provided by Corel on an “as is” basis, without any other warranties or conditions, express or
implied, including, but not limited to, warranties of merchantable quality, satisfactory quality, merchantability
or fitness for a particular purpose, or those arising by law, statute, usage of trade, course of dealing or otherwise.
The entire risk as to the results of the information provided or its use is assumed by you. Corel shall have no
liability to you or any other person or entity for any indirect, incidental, special, or consequential damages
whatsoever, including, but not limited to, loss of revenue or profit, lost or damaged data or other commercial or
economic loss, even if Corel has been advised of the possibility of such damages, or they are foreseeable. Corel is
also not liable for any claims made by any third party. Corel’s maximum aggregate liability to you shall not
exceed the costs paid by you to purchase the materials. Some states/countries do not allow exclusions or
limitations of liability for consequential or incidental damages, so the above limitations may not apply to you.
Corel, the Corel logo, Corel DESIGNER, CorelDRAW, Corel PHOTO-PAINT, Corel SCRIPT, and
Knowledge Base are trademarks or registered trademarks of Corel Corporation and/or its subsidiaries in Canada,
the U.S., and/or other countries. Other product, font, and company names and logos may be trademarks or
registered trademarks of their respective companies.
117101
