Corel VideoStudio Pro X5 User Guide Video Studio Instruction Manual UG En
User Manual: corel VideoStudio Pro - X5 - Instruction Manual Free User Guide for Corel VideoStudio Pro Software, Manual
Open the PDF directly: View PDF ![]() .
.
Page Count: 206 [warning: Documents this large are best viewed by clicking the View PDF Link!]
- Welcome
- Introducing Corel VideoStudio Pro
- What’s new in Corel VideoStudio Pro X5?
- System requirements
- Installing and uninstalling the application
- Starting and quitting the application
- Accessing the Corel Guide
- Learning how to use the application
- Preparing for video capture and editing
- Registering Corel products
- Updating the application
- Corel Support Services
- About Corel
- Corel VideoStudio Pro Editor
- Starting a new movie project
- Capture
- Edit
- Working with clips
- The Edit Step Options Panel
- Assets and Effects
- Media
- Transitions
- Adding transitions to My Favorites
- Titles
- Saving your titles to My Favorites in the Library
- The Title Safe Area
- Editing titles
- Modifying text attributes
- Applying animation
- Applying title effects
- Graphic
- Adding Color Clips
- Adding Objects or Frames
- Adding Flash animations
- Customizing objects, frames and animations
- Filters
- Key frame settings
- Audio
- Copying and pasting media clip attributes
- Taking snapshots in the Edit Step
- Ripple Editing
- Enabling and disabling tracks
- Editing with Smart Proxy
- Converting multiple files
- Enhancing clips
- Adding cues and chapters
- Working with Overlays
- Painting images and animations using Painting Creator
- Working with Audio
- Adding audio files
- Adding voice-over narration
- Adding background music
- Importing music from an audio CD
- Auto Music
- Using the Clip Volume Control
- Trimming and cutting audio clips
- Stretching audio duration
- Fade-in/out
- Audio view
- Using the Surround Sound Mixer
- Adjusting stereo channels
- Mixing Surround Sound
- Duplicating an audio channel
- Applying audio filters
- Share
- Appendix A: Shortcuts
- Appendix B: DV-to-DVD Wizard
- Glossary
- blank page portrait.pdf
- Welcome
- Introducing Corel VideoStudio Pro
- What’s new in Corel VideoStudio Pro X5?
- System requirements
- Installing and uninstalling the application
- Starting and quitting the application
- Accessing the Corel Guide
- Learning how to use the application
- Preparing for video capture and editing
- Registering Corel products
- Updating the application
- Corel Support Services
- About Corel
- Corel VideoStudio Pro Editor
- Starting a new movie project
- Capture
- Edit
- Working with clips
- The Edit Step Options Panel
- Assets and Effects
- Media
- Transitions
- Adding transitions to My Favorites
- Titles
- Saving your titles to My Favorites in the Library
- The Title Safe Area
- Editing titles
- Modifying text attributes
- Applying animation
- Applying title effects
- Graphic
- Adding Color Clips
- Adding Objects or Frames
- Adding Flash animations
- Customizing objects, frames and animations
- Filters
- Key frame settings
- Audio
- Copying and pasting media clip attributes
- Taking snapshots in the Edit Step
- Ripple Editing
- Enabling and disabling tracks
- Editing with Smart Proxy
- Converting multiple files
- Enhancing clips
- Adding cues and chapters
- Working with Overlays
- Painting images and animations using Painting Creator
- Working with Audio
- Adding audio files
- Adding voice-over narration
- Adding background music
- Importing music from an audio CD
- Auto Music
- Using the Clip Volume Control
- Trimming and cutting audio clips
- Stretching audio duration
- Fade-in/out
- Audio view
- Using the Surround Sound Mixer
- Adjusting stereo channels
- Mixing Surround Sound
- Duplicating an audio channel
- Applying audio filters
- Share
- Appendix A: Shortcuts
- Appendix B: DV-to-DVD Wizard
- Glossary
- Welcome
- VSX5-User-Guide-for-PDF.pdf

Contents i
Contents
Welcome . . . . . . . . . . . . . . . . . . . . . . . . . . . . . . . . . . . . . . . 1
Introducing Corel VideoStudio Pro. . . . . . . . . . . . . . . . . . . . . . . . . 2
What’s new in Corel VideoStudio Pro X5? . . . . . . . . . . . . . . . . . . . 3
System requirements. . . . . . . . . . . . . . . . . . . . . . . . . . . . . . . . . . . 5
Minimum system requirements . . . . . . . . . . . . . . . . . . . . . . . . 5
Recommended system specifications . . . . . . . . . . . . . . . . . . . . 5
Supported input/output devices. . . . . . . . . . . . . . . . . . . . . . . . 6
Hardware acceleration. . . . . . . . . . . . . . . . . . . . . . . . . . . . . . . 6
Installing and uninstalling the application . . . . . . . . . . . . . . . . . . . 7
Starting and quitting the application . . . . . . . . . . . . . . . . . . . . . . . 8
Accessing the Corel Guide . . . . . . . . . . . . . . . . . . . . . . . . . . . . . . . 9
Learning how to use the application . . . . . . . . . . . . . . . . . . . . . . . 9
Preparing for video capture and editing. . . . . . . . . . . . . . . . . . . . 10
Registering Corel products. . . . . . . . . . . . . . . . . . . . . . . . . . . . . . 10
Updating the application. . . . . . . . . . . . . . . . . . . . . . . . . . . . . . . 11
Corel Support Services. . . . . . . . . . . . . . . . . . . . . . . . . . . . . . . . . 12
About Corel . . . . . . . . . . . . . . . . . . . . . . . . . . . . . . . . . . . . . . . . 12
Corel VideoStudio Pro Editor . . . . . . . . . . . . . . . . . . . . . . . 13
Workspace . . . . . . . . . . . . . . . . . . . . . . . . . . . . . . . . . . . . . . . . . 14
Step Panel. . . . . . . . . . . . . . . . . . . . . . . . . . . . . . . . . . . . . . . . . . 17
Menu Bar . . . . . . . . . . . . . . . . . . . . . . . . . . . . . . . . . . . . . . . . . . 17
Preview Window and Navigation Panel . . . . . . . . . . . . . . . . . . . . 18
Toolbar . . . . . . . . . . . . . . . . . . . . . . . . . . . . . . . . . . . . . . . . . . . . 20

ii Corel VideoStudio Pro User Guide
Project Timeline. . . . . . . . . . . . . . . . . . . . . . . . . . . . . . . . . . . . . . 21
Storyboard View . . . . . . . . . . . . . . . . . . . . . . . . . . . . . . . . . . 22
Timeline View . . . . . . . . . . . . . . . . . . . . . . . . . . . . . . . . . . . . 22
Options Panel . . . . . . . . . . . . . . . . . . . . . . . . . . . . . . . . . . . . . . . 25
Library . . . . . . . . . . . . . . . . . . . . . . . . . . . . . . . . . . . . . . . . . . . . 26
Adding and deleting media clips in the Library. . . . . . . . . . . . 27
Tagging Files as 3D . . . . . . . . . . . . . . . . . . . . . . . . . . . . . . . . 28
Saving Titles to the Library . . . . . . . . . . . . . . . . . . . . . . . . . . . 30
Thumbnail Views. . . . . . . . . . . . . . . . . . . . . . . . . . . . . . . . . . 32
Starting a new movie project . . . . . . . . . . . . . . . . . . . . . . . 33
Creating new projects . . . . . . . . . . . . . . . . . . . . . . . . . . . . . . . . . 34
Using Instant Project templates . . . . . . . . . . . . . . . . . . . . . . . . . . 34
Setting your preferences . . . . . . . . . . . . . . . . . . . . . . . . . . . . . . . 36
Setting project properties . . . . . . . . . . . . . . . . . . . . . . . . . . . . . . 36
Adding clips . . . . . . . . . . . . . . . . . . . . . . . . . . . . . . . . . . . . . . . . 37
Previewing . . . . . . . . . . . . . . . . . . . . . . . . . . . . . . . . . . . . . . . . . 37
Setting a preview range. . . . . . . . . . . . . . . . . . . . . . . . . . . . . 38
Undoing and redoing actions . . . . . . . . . . . . . . . . . . . . . . . . . . . 38
Showing and hiding grid lines. . . . . . . . . . . . . . . . . . . . . . . . . . . 39
Saving projects . . . . . . . . . . . . . . . . . . . . . . . . . . . . . . . . . . . . . . 40
Saving projects by using Smart Package. . . . . . . . . . . . . . . . . . . . 40
Capture . . . . . . . . . . . . . . . . . . . . . . . . . . . . . . . . . . . . . . . 41
The Capture Step Options Panel . . . . . . . . . . . . . . . . . . . . . . . . . 42
Capturing Video . . . . . . . . . . . . . . . . . . . . . . . . . . . . . . . . . . . . . 42
Split by scene . . . . . . . . . . . . . . . . . . . . . . . . . . . . . . . . . . . . 44
Digital Video (DV) . . . . . . . . . . . . . . . . . . . . . . . . . . . . . . . . . 45
Controlling the DV camcorder with the Navigation Panel . . . . 45
High Definition Video (HDV) . . . . . . . . . . . . . . . . . . . . . . . . . 46

Contents iii
Digital TV or DVB-T video. . . . . . . . . . . . . . . . . . . . . . . . . . . . 46
Analog video . . . . . . . . . . . . . . . . . . . . . . . . . . . . . . . . . . . . . 47
TV footage . . . . . . . . . . . . . . . . . . . . . . . . . . . . . . . . . . . . . . 48
DV Quick Scan . . . . . . . . . . . . . . . . . . . . . . . . . . . . . . . . . . . . . . 48
Importing from digital media . . . . . . . . . . . . . . . . . . . . . . . . . . . 49
Creating stop motion animations . . . . . . . . . . . . . . . . . . . . . . . . 50
Creating screen capture videos . . . . . . . . . . . . . . . . . . . . . . . . . . 53
Toolbar Basics . . . . . . . . . . . . . . . . . . . . . . . . . . . . . . . . . . . . 53
Recording your screen . . . . . . . . . . . . . . . . . . . . . . . . . . . . . . 54
Edit . . . . . . . . . . . . . . . . . . . . . . . . . . . . . . . . . . . . . . . . . . 57
Working with clips . . . . . . . . . . . . . . . . . . . . . . . . . . . . . . . . . . . 58
Adding video clips . . . . . . . . . . . . . . . . . . . . . . . . . . . . . . . . . 58
Adding photos . . . . . . . . . . . . . . . . . . . . . . . . . . . . . . . . . . . 59
Color. . . . . . . . . . . . . . . . . . . . . . . . . . . . . . . . . . . . . . . . . . . 60
Speed and Time-lapse . . . . . . . . . . . . . . . . . . . . . . . . . . . . . . 60
Reversing video playback . . . . . . . . . . . . . . . . . . . . . . . . . . . . 64
Replacing media clips . . . . . . . . . . . . . . . . . . . . . . . . . . . . . . 64
Trimming a clip . . . . . . . . . . . . . . . . . . . . . . . . . . . . . . . . . . . 65
Split by Scene . . . . . . . . . . . . . . . . . . . . . . . . . . . . . . . . . . . . 67
Multi-trimming your video. . . . . . . . . . . . . . . . . . . . . . . . . . . 69
Saving trimmed clips . . . . . . . . . . . . . . . . . . . . . . . . . . . . . . . 71
The Edit Step Options Panel . . . . . . . . . . . . . . . . . . . . . . . . . . . . 72
Assets and Effects . . . . . . . . . . . . . . . . . . . . . . . . . . . . . . . . . . . . 76
Media . . . . . . . . . . . . . . . . . . . . . . . . . . . . . . . . . . . . . . . . . . 76
Transitions. . . . . . . . . . . . . . . . . . . . . . . . . . . . . . . . . . . . . . . 78
Adding transitions to My Favorites. . . . . . . . . . . . . . . . . . . . . 80
Titles . . . . . . . . . . . . . . . . . . . . . . . . . . . . . . . . . . . . . . . . . . . 81
Saving your titles to My Favorites in the Library . . . . . . . . . . . 83

iv Corel VideoStudio Pro User Guide
The Title Safe Area. . . . . . . . . . . . . . . . . . . . . . . . . . . . . . . . . 83
Editing titles . . . . . . . . . . . . . . . . . . . . . . . . . . . . . . . . . . . . . 84
Modifying text attributes . . . . . . . . . . . . . . . . . . . . . . . . . . . . 84
Applying animation . . . . . . . . . . . . . . . . . . . . . . . . . . . . . . . . 86
Applying title effects . . . . . . . . . . . . . . . . . . . . . . . . . . . . . . . 87
Graphic . . . . . . . . . . . . . . . . . . . . . . . . . . . . . . . . . . . . . . . . . 88
Adding Color Clips. . . . . . . . . . . . . . . . . . . . . . . . . . . . . . . . . 88
Adding Objects or Frames . . . . . . . . . . . . . . . . . . . . . . . . . . . 89
Adding Flash animations . . . . . . . . . . . . . . . . . . . . . . . . . . . . 90
Customizing objects, frames and animations . . . . . . . . . . . . . 90
Filters . . . . . . . . . . . . . . . . . . . . . . . . . . . . . . . . . . . . . . . . . . 90
Key frame settings . . . . . . . . . . . . . . . . . . . . . . . . . . . . . . . . . 92
Audio . . . . . . . . . . . . . . . . . . . . . . . . . . . . . . . . . . . . . . . . . . 94
Copying and pasting media clip attributes . . . . . . . . . . . . . . . . . . 94
Taking snapshots in the Edit Step . . . . . . . . . . . . . . . . . . . . . . . . 95
Ripple Editing . . . . . . . . . . . . . . . . . . . . . . . . . . . . . . . . . . . . . . . 96
Enabling and disabling tracks . . . . . . . . . . . . . . . . . . . . . . . . . . . 98
Editing with Smart Proxy . . . . . . . . . . . . . . . . . . . . . . . . . . . . . . . 99
Converting multiple files . . . . . . . . . . . . . . . . . . . . . . . . . . . . . . 100
Enhancing clips. . . . . . . . . . . . . . . . . . . . . . . . . . . . . . . . . . . . . 100
Adjusting color and brightness . . . . . . . . . . . . . . . . . . . . . . 101
Adjusting white balance . . . . . . . . . . . . . . . . . . . . . . . . . . . 101
Adjusting tones . . . . . . . . . . . . . . . . . . . . . . . . . . . . . . . . . . 103
Applying pan and zoom effect. . . . . . . . . . . . . . . . . . . . . . . 103
Resizing and distorting clips. . . . . . . . . . . . . . . . . . . . . . . . . 106
Adding cues and chapters. . . . . . . . . . . . . . . . . . . . . . . . . . . . . 107
Working with Overlays . . . . . . . . . . . . . . . . . . . . . . . . . . . . . . . 109
Adding clips to the Overlay Track. . . . . . . . . . . . . . . . . . . . . 110
Adding Multiple Tracks . . . . . . . . . . . . . . . . . . . . . . . . . . . . 111

Contents v
Working with Overlay clips . . . . . . . . . . . . . . . . . . . . . . . . . 112
Trimming Overlay clips. . . . . . . . . . . . . . . . . . . . . . . . . . . . . 112
Repositioning the current Overlay clip . . . . . . . . . . . . . . . . . 112
Resizing an Overlay clip . . . . . . . . . . . . . . . . . . . . . . . . . . . . 113
Distorting an Overlay clip. . . . . . . . . . . . . . . . . . . . . . . . . . . 114
Applying motion to an Overlay clip . . . . . . . . . . . . . . . . . . . 114
Enhancing Overlay clips . . . . . . . . . . . . . . . . . . . . . . . . . . . . 115
Chroma keying an Overlay clip . . . . . . . . . . . . . . . . . . . . . . . 116
Adding a mask frame . . . . . . . . . . . . . . . . . . . . . . . . . . . . . 117
Painting images and animations using Painting Creator . . . . . . . 118
Painting Creator interface basics . . . . . . . . . . . . . . . . . . . . . 119
Painting Creator control buttons and sliders. . . . . . . . . . . . . 120
Painting Creator modes . . . . . . . . . . . . . . . . . . . . . . . . . . . . 122
Working with Audio . . . . . . . . . . . . . . . . . . . . . . . . . . . . . . . . . 124
Adding audio files . . . . . . . . . . . . . . . . . . . . . . . . . . . . . . . . 124
Adding voice-over narration. . . . . . . . . . . . . . . . . . . . . . . . . 125
Adding background music. . . . . . . . . . . . . . . . . . . . . . . . . . 125
Importing music from an audio CD . . . . . . . . . . . . . . . . . . . 126
Auto Music . . . . . . . . . . . . . . . . . . . . . . . . . . . . . . . . . . . . . 126
Using the Clip Volume Control. . . . . . . . . . . . . . . . . . . . . . . 127
Trimming and cutting audio clips. . . . . . . . . . . . . . . . . . . . . 128
Stretching audio duration . . . . . . . . . . . . . . . . . . . . . . . . . . 129
Fade-in/out . . . . . . . . . . . . . . . . . . . . . . . . . . . . . . . . . . . . . 130
Audio view . . . . . . . . . . . . . . . . . . . . . . . . . . . . . . . . . . . . . 130
Using the Surround Sound Mixer . . . . . . . . . . . . . . . . . . . . . 130
Adjusting stereo channels . . . . . . . . . . . . . . . . . . . . . . . . . . 131
Mixing Surround Sound. . . . . . . . . . . . . . . . . . . . . . . . . . . . 132
Duplicating an audio channel . . . . . . . . . . . . . . . . . . . . . . . 133
Applying audio filters. . . . . . . . . . . . . . . . . . . . . . . . . . . . . . 134

vi Corel VideoStudio Pro User Guide
Share . . . . . . . . . . . . . . . . . . . . . . . . . . . . . . . . . . . . . . . . 135
The Share Step Options Panel . . . . . . . . . . . . . . . . . . . . . . . . . . 135
Creating video files . . . . . . . . . . . . . . . . . . . . . . . . . . . . . . . . . . 136
Creating 3D video files. . . . . . . . . . . . . . . . . . . . . . . . . . . . . 141
Creating HTML5 video files . . . . . . . . . . . . . . . . . . . . . . . . . 142
Creating sound files . . . . . . . . . . . . . . . . . . . . . . . . . . . . . . . . . 143
Creating discs . . . . . . . . . . . . . . . . . . . . . . . . . . . . . . . . . . . . . . 143
Assembling files . . . . . . . . . . . . . . . . . . . . . . . . . . . . . . . . . 145
Adding and Editing chapters . . . . . . . . . . . . . . . . . . . . . . . . 146
Creating disc menus . . . . . . . . . . . . . . . . . . . . . . . . . . . . . . 148
Previewing . . . . . . . . . . . . . . . . . . . . . . . . . . . . . . . . . . . . . 154
Burning your project onto a disc . . . . . . . . . . . . . . . . . . . . . 155
Copying a disc image file. . . . . . . . . . . . . . . . . . . . . . . . . . . 158
Creating disc labels . . . . . . . . . . . . . . . . . . . . . . . . . . . . . . . 159
Exporting to mobile device . . . . . . . . . . . . . . . . . . . . . . . . . 160
Project Playback. . . . . . . . . . . . . . . . . . . . . . . . . . . . . . . . . . 161
Recording to a DV camcorder . . . . . . . . . . . . . . . . . . . . . . . 161
Recording to an HDV camcorder . . . . . . . . . . . . . . . . . . . . . 162
Uploading to the Web. . . . . . . . . . . . . . . . . . . . . . . . . . . . . 163
Creating movie templates . . . . . . . . . . . . . . . . . . . . . . . . . . . . . 166
Appendix A: Shortcuts . . . . . . . . . . . . . . . . . . . . . . . . . . . 169
Menu command shortcuts . . . . . . . . . . . . . . . . . . . . . . . . . . . . 169
Step Panel shortcuts . . . . . . . . . . . . . . . . . . . . . . . . . . . . . . . . . 170
Navigation Panel shortcuts . . . . . . . . . . . . . . . . . . . . . . . . . . . . 170
Timeline shortcuts. . . . . . . . . . . . . . . . . . . . . . . . . . . . . . . . . . . 171
Multi-trim Video shortcuts . . . . . . . . . . . . . . . . . . . . . . . . . . . . 172
Layout settings shortcuts. . . . . . . . . . . . . . . . . . . . . . . . . . . . . . 173
Screen capture shortcuts . . . . . . . . . . . . . . . . . . . . . . . . . . . . . . 173

Contents vii
Others . . . . . . . . . . . . . . . . . . . . . . . . . . . . . . . . . . . . . . . . . . . 173
Appendix B: DV-to-DVD Wizard. . . . . . . . . . . . . . . . . . . . 175
Scanning for scenes . . . . . . . . . . . . . . . . . . . . . . . . . . . . . . . . . 175
Applying templates and burning to DVDs . . . . . . . . . . . . . . . . . 177
Glossary. . . . . . . . . . . . . . . . . . . . . . . . . . . . . . . . . . . . . . 179

Welcome 1
Welcome
Thank you for purchasing Corel® VideoStudio® Pro, the video-editing
software that lets you produce professional-looking videos, regardless of
your skill level. Corel VideoStudio Pro provides a complete set of tools for
capturing, importing, and editing video and other media, and for
sharing your final production on a DVD or Blu-ray Disc™, mobile devices,
or the Web.
The availability of features depends on the version of the software
you have.
This section contains the following topics:
• Introducing Corel VideoStudio Pro
• What’s new in Corel VideoStudio Pro X5?
•System requirements
• Installing and uninstalling the application
• Starting and quitting the application
• Accessing the Corel® Guide
•Learning how to use the application
• Preparing for video capture and editing
• Registering Corel products
• Updating the application
• Corel® Support Services™
•About Corel
2 Corel VideoStudio Pro User Guide
Introducing Corel VideoStudio Pro
Corel VideoStudio Pro guides you step-by-step through the process of
capturing, editing, and sharing videos. The application also offers more
than a hundred transitions, professional titling capabilities, and simple
tools for creating soundtracks.
To produce a video, you must capture or import footage from a
camcorder or another video source. You can then trim the captured
videos, arrange their order, apply transitions, and add overlays, animated
titles, voice-over narration, and background music. These elements are
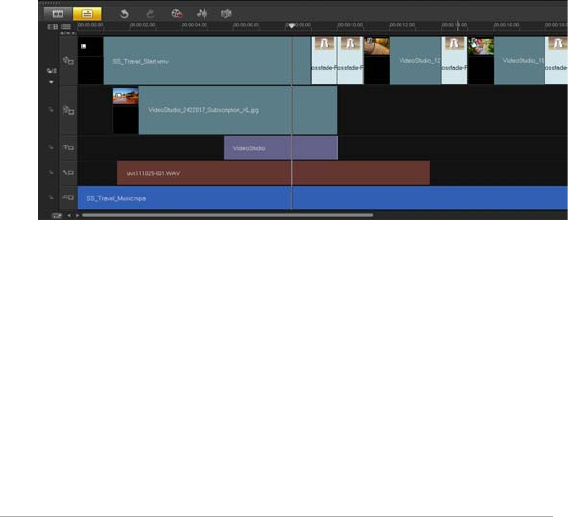
organized on separate tracks in Timeline View and appear as
chronologically arranged thumbnails in Storyboard View.
Components of a project as displayed in Timeline View
Video projects are saved as Corel VideoStudio Pro project files (*.vsp),
which contain information on the location of the clips, on the Library, and
on how the movie has been put together. After you finish your movie
production, you can burn it to a DVD or Blu-ray Disc, or export the movie
back to your camcorder. You can also output your movie as a video file
for playback on a computer, or export your movie to mobile devices or the
Web.

Welcome 3
What’s new in Corel VideoStudio Pro X5?
Corel VideoStudio Pro X5 provides you with advanced features that
support the latest video editing technologies, making it possible to create
home movies with ease.
•Screen capture — You can now capture mouse movements and
other actions on your computer screen by using the Active Screen
Capture option. This is a great way to make presentations that
require the visual environment of your computer. It is perfect for
producing training and demo videos. If visuals are not enough, you
can also define the capture area and simultaneously record voice-
overs for a better understanding of your videos!
For more information, see “Creating screen capture videos” on
page 53.
•Track Vi sibility — Just like showing and hiding layers in photo editing
software such as Corel PaintShop Pro, you can now enable or disable
any track in the Timeline with a single button! Disable tracks to
exclude media when you render your video.
For more information, see “Enabling and disabling tracks” on
page 98.
•3D video support — Fascinated with 3D media? You can now make
3D movies from your own home videos and photos from 3D
camcorders and cameras! Tag videos and photos as 3D media clips
to easily identify them in the Library and Timeline.
For more information, see “Creating 3D video files” on page 141 and
“Tagging Files as 3D” on page 28.
•Corel PaintShop Pro Layer Support — Maximize interoperability with
your Corel video and photo software! Import Corel® PaintShop™ Pro
PSPIMAGE files (*.pspimage) directly into Corel VideoStudio Pro X5!
As an added feature, the program automatically detects the layers in

4 Corel VideoStudio Pro User Guide
each file, which can be used as individual media clips in the Video,
Background and Overlay tracks.
For more information, see “Adding photos” on page 59.
•Optional Paste Attributes — To improve media clip customization in
your video, you can now select media clip attributes that you want
to apply to other clips in the Timeline.
For more information, see “Copying and pasting media clip
attributes” on page 94.
•HTML5 output for the Web — Corel VideoStudio Pro X5 now
supports HTML 5! You can create more interactive videos that
support the latest technologies in sharing videos to the Web. Embed
hyperlinks in your video and choose from the available project
dimension presets.
For more information, see “Creating HTML5 video files” on page 142
and “Adding cues and chapters” on page 107.
•More Overlay Tracks — Explore the possibilities of video editing with
a total of 21 editing tracks combined for your media clips!
For more information, “Adding Multiple Tracks” on page 111.
•More Burning Options — With an improved integrated burning and
authoring capability, you can now create multiple copies of discs
from ISO disc image files!
For more information, “Creating discs” on page 143.

Welcome 5
System requirements
For optimal performance of Corel VideoStudio Pro, make sure that your
system meets the recommended specifications.
Minimum system requirements
•Intel
® Core™ Duo 1.83-GHz Processor or AMD® Dual Core 2.0-GHz
Processor
• Microsoft Windows® 7 SP1 (32-bit or 64-bit edition), Windows
Vista® SP1 or SP2 (32-bit or 64-bit editions), or Windows® XP SP3
operating system software
•2 GB of RAM
• Minimum display resolution: 1024 × 768
•Windows
®-compatible sound card
• Windows-compatible DVD-ROM (for program installation)
• Windows-compatible DVD Burner (for DVD output)
Recommended system specifications
•Intel
® Core™ i5 or i7 Processor, or AMD Phenom™ II X4 or X6
Processor
• Microsoft Windows 7 (32-bit or 64-bit edition), Windows Vista SP2
(32-bit or 64-bit editions), or Windows XP SP3 operating system
software
• 4GB of RAM or higher
• 1GB of VRAM or higher
• Minimum display resolution: 1024 × 768
• Windows-compatible sound card
• Windows-compatible Blu-ray Disc™ Burner (for Blu-ray Disc and DVD
output)

6 Corel VideoStudio Pro User Guide
Supported input/output devices
• 1394 FireWire® cards for use with DV, D8, or HDV™ camcorders
• USB Video Class (UVC) DV
• Support for OHCI Compliant IEEE-1394
• Analog capture cards for analog camcorders (VFW and WDM
support for Windows XP and Broadcast Driver Architecture support
for Windows Vista and Windows 7)
• Analog and digital TV capture device (Broadcast Driver Architecture
support)
• Camcorders that record to internal memory, memory card, DVD disc
or hard drive
• USB capture devices, PC cameras, webcams
• Windows-compatible Blu-ray Disc, DVD-R/RW, DVD+R/RW, DVD-
RAM and CD-R/RW drive
•iPhone
®, iPad®, iPod Classic® with video, iPod touch®, Sony® PSP®,
Pocket PC, Smartphone, and Nokia® mobile phones
Hardware acceleration
Depending on your hardware specifications, Corel VideoStudio Pro lets
you optimize the performance of your system by optimizing hardware
acceleration.
Hardware decoder and encoder acceleration is supported only by
Windows Vista and later versions of the Windows operating
system software and requires at least 512 MB of VRAM.
To change hardware acceleration settings
1Select Settings > Preferences [F6].

Welcome 7
2Click the Performance tab and select the following options under
Editing Process and File Creation:
• Enable Hardware Decoder acceleration — enhances editing
performance and improves clip and project playback by using
video graphics acceleration technologies of the computer’s
available hardware
• Enable Hardware Encoder acceleration — improves the rendering
time required for producing your movies
Note: For optimum performance, VGA cards must support DXVA2
VLD mode with Vertex and Pixel Shader 2.0 or later.
If you want the program to automatically detect the hardware
acceleration capabilities of your system and determine the
optimum settings, select all hardware acceleration options in
Performance Optimization, including Enable hardware
acceleration optimization.
If the feature is not supported by your system, some hardware
acceleration options will be grayed out.
Installing and uninstalling the application
The Corel VideoStudio Pro installation disc has an autorun feature that is
designed to start installing the application automatically.
To install Corel VideoStudio Pro
1Insert the Corel VideoStudio Pro installation disc into your DVD-ROM
drive.
2When the Setup screen appears, follow the instructions to install
Corel VideoStudio Pro on your computer.
Note: If the Setup screen does not appear after you load the DVD,
you can manually launch it by double-clicking the My Computer icon
on your desktop and then double-clicking the icon for the DVD-ROM

8 Corel VideoStudio Pro User Guide
drive where the installation disc is inserted. When the DVD-ROM
window appears, double-click the Setup icon.
3In addition to Corel VideoStudio Pro, the following programs and
drivers are automatically installed:
• DirectX® 2007
• Microsoft® Visual C++® 2005 Redistributable Package
• Microsoft Visual C++ 2008 Redistributable Package
• SmartSound®
• Adobe® Flash® Player
To uninstall Corel VideoStudio Pro
1On the Windows taskbar, click Start > Control Panel.
2Click the Add or Remove Programs icon.
The Add or Remove Programs dialog box appears.
3From the Currently installed programs list, choose Corel VideoStudio
Pro X5, and click Remove.
4Follow the instructions to remove Corel VideoStudio Pro from your
computer.
Starting and quitting the application
You can start Corel VideoStudio Pro from the Windows desktop or Start
menu, and quit the program from the application window.
To start the application
• Double-click the Corel VideoStudio Pro X5 icon on the Windows
desktop.
Note: You can also start Corel VideoStudio Pro from the list of
programs on the Windows Start menu.

Welcome 9
To quit the application
• Click the Close button in the upper-right corner of the application
window.
Accessing the Corel Guide
The Corel Guide provides the most up-to-date information and content
for your application. You can find tips and tricks, download new styles
and content for your projects, explore new ways to share your photos and
videos, and access the latest updates for your application.
To access the Corel Guide
• On the upper right corner of the application window, click the Help
and product information button . The Corel Guide window
appears.
Learning how to use the application
You can learn how to use Corel VideoStudio Pro in various ways: by
searching the Help, by accessing the tips and tricks in the Corel Guide, or
by exploring the Corel Web site (www.corel.com).
To use the Help
1On the application window, click the Help and product information
button .
2On the Learn tab of the Corel Guide, click Launch Help.
3In the Help window, click one of the following tabs:
• Contents — lets you browse through topics in the Help
• Index — lets you use the keywords from the index to find a topic.
• Search — lets you search the full text of the Help for a particular
word or phrase. If you are looking for information about a specific

10 Corel VideoStudio Pro User Guide
tool or command, you can type keywords to display a list of
relevant topics.
You can also press F1 to launch the Help.
Preparing for video capture and editing
Video capture and editing are tasks that require a lot of computer
resources. Your computer must be properly set up to ensure successful
capturing and smooth video editing. Below are some tips on how to
prepare and optimize your computer for capturing and editing.
• It is recommended that you close all other applications when
working with Corel VideoStudio Pro. To avoid interruptions while
capturing, it is best to turn off any automatically launched software,
such as a screen saver.
• If you have two hard drives in your system, it is recommended that
you install Corel VideoStudio Pro to your system drive (usually C:) and
store captured videos on your other drive (usually D:).
• It is recommended that you store video files on a dedicated hard
drive.
• Increase the Paging File (Swap File) size to twice your amount of
RAM.
Registering Corel products
Registering Corel products is important to ensure that you receive timely
access to the latest product updates, as well as valuable information
about product releases. Registration also gives you access to free
downloads, articles, tips and tricks, and special offers.
Welcome 11
The Corel Guide provides you with information about registering your
Corel products. You can also check the Knowledgebase articles on how to
register your Corel products.
To access registration information in the Corel Guide
1Click the Help and product information button .
2In the Corel Guide, click the Product information and preferences
button , and choose Register now from the menu.
Updating the application
You can check for and install product updates. Updates provide
important new information about your application.
To update the application
1Click the Help and product information button .
2In the Corel Guide, click the Product information and preferences
button , and choose Check for Updates.
You can turn automatic program updates on or off by choosing
Message preferences from the Product information and
preferences menu and marking options in the dialog box.
You can find the application version information and serial
number by choosing About Corel VideoStudio Pro X5 from the
Product information and preferences menu.

12 Corel VideoStudio Pro User Guide
Corel Support Services
Corel Support Services can provide you with prompt and accurate
information about product features, specifications, pricing, availability,
services, and technical support options. For the most current information
on available support and professional services for your Corel product,
please visit the Corel Software Support page of your region.
About Corel
Corel is one of the world’s top software companies, with more than 100
million active users in over 75 countries. We develop software that helps
people express their ideas and share their stories in more exciting,
creative, and persuasive ways. Through the years, we’ve built a reputation
for delivering innovative, trusted products that are easy to learn and use,
helping people achieve new levels of productivity. The industry has
responded with hundreds of awards for software innovation, design, and
value.
Our award-winning product portfolio includes some of the world's most
widely recognized and popular software brands, including Corel® Digital
Studio™, CorelDRAW® Graphics Suite, Corel® Painter™, Corel DESIGNER®
Technical Suite, Corel PaintShop Pro, Corel® VideoStudio® Pro, Corel®
WinDVD®, Corel® WordPerfect® Office, and WinZip®. Our global
headquarters are in Ottawa, Canada, and our major offices are in the
United States, the United Kingdom, Germany, China, Taiwan, and Japan.

Corel VideoStudio Pro Editor 13
Corel VideoStudio Pro Editor
Corel VideoStudio Pro provides a hands-on workflow to produce
professional-looking videos, giving you the freedom to customize all the
elements in your video project.
This section introduces you to the Corel VideoStudio Pro application
window and workspace tools and briefly explains the steps involved in
creating a movie.
This section contains the following topics:
•Workspace
•Step Panel
•Menu Bar
• Preview Window and Navigation Panel
•Toolbar
• Project Timeline
•Options Panel
•Library
14 Corel VideoStudio Pro User Guide
Workspace
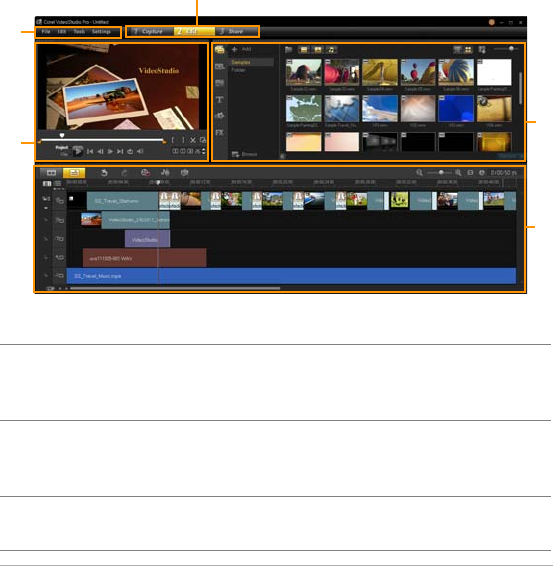
The new workspace is designed to provide you with a better editing
experience. You can now customize the size of the program window and
change the size and position of the elements on your screen for full
control of your editing environment.
Each panel bahaves like an independent window that can be modified
according to your editing preferences. This is very useful when you are
using large displays or dual monitors.
Part Description
1 — Step Panel Contains the Capture, Edit, and Share buttons,
which correspond to the different steps in the
video editing process.
2 — Menu Bar Contains the File, Edit, Tools, and Settings
menus, which provide different sets of
commands.
3 — Player Panel Contains the Preview Window and Navigation
Panel.
2
3
4
1
5

Corel VideoStudio Pro Editor 15
To move a panel
• Double-click the top-left corner of the Player Panel, Timeline Panel or
Library Panel.
When the panel is active, you can minimize, maximize, resize each
panel.
You can also drag the panel outside the main application window
into the second display area for dual-monitor setups.
To customize the size of the program window
• You can do one of the following:
• Click the Restore button and drag the ends of the program
window to the desired size.
• Click the Maximize button for full screen editing.
4 — Library Panel Contains the Media Library, Media Filters and
Options Panel.
5 — Timeline Panel Contains the Toolbar and Project Timeline.
Part Description
16 Corel VideoStudio Pro User Guide
To dock a panel
1Click and hold an active panel.
The docking guide appears.
2Drag your mouse over the docking guide and choose a docking
position to snap the panel in place.
To save a custom workspace layout
• Click Settings > Layout Settings > Save to and click a Custom
option.
To load a custom workspace layout
• Click Settings > Layout Settings > Switch to and choose Default or
one of the custom settings you have saved.
To know more about hotkey combinations assigned for each preset,
see “Layout settings shortcuts” on page 173.
You can also change the layout settings from the UI Layout tab in
Settings > Preferences.

Corel VideoStudio Pro Editor 17
Step Panel
Corel VideoStudio Pro simplifies the process of creating movies into three
simple steps. Click the buttons in the Step Panel to switch between steps.
Menu Bar
The Menu Bar provides various commands for customizing Corel
VideoStudio Pro, opening and saving movie projects, working with
individual clips, and more.
Media clips can be recorded or imported directly
to your computer's hard drive in the Capture Step.
This step allows you to capture and import video,
photo, and audio clips.
The Edit Step and the Timeline are the heart of
Corel VideoStudio Pro, where you can arrange,
edit, trim and add effects to your video clips.
The Share Step lets you export your finished movie
to tape, a DVD, or the Web.
18 Corel VideoStudio Pro User Guide
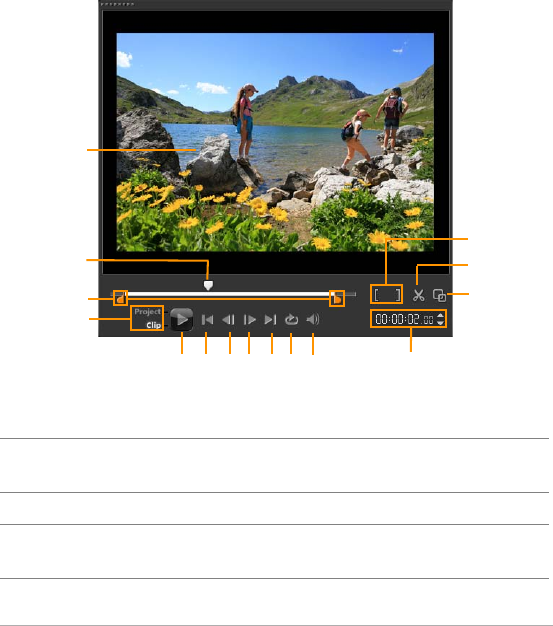
Preview Window and Navigation Panel
The Navigation Panel provides buttons for playback and for precision
trimming of clips. Use the Navigation Controls to move around a selected
clip or your project. Use the Trim Marke rs and Scrubber to edit your clips.
In the Capture Step, this panel also acts as the device control for the DV
or HDV camcorder.
Part Description
1 — Preview Window Shows the current project or clip being
played.
2 — Scrubber Lets you scrub through the project or clip.
3 — Trim Markers Lets you drag to set a preview range in the
project or to trim a clip.
8
7
6
59
13
11 12
4
3
14
15
1
2
10

Corel VideoStudio Pro Editor 19
4 — Project/Clip
Mode
Specifies a preview of the entire project or of
a selected clip only.
5 — Play Plays, pauses, or resumes the current project
or a selected clip.
6 — Home Returns to the starting segment or cue.
7 — Previous Moves to the previous frame.
8 — Next Moves to the next frame.
9 — End Moves to the end segment or cue.
10 — Repeat Loops playback.
11 — System Volume Lets you adjust the volume of your
computer's speakers by dragging a slider.
12 — Timecode Lets you jump directly to a part of your
project or selected clip by specifying the
exact timecode.
13 — Enlarge Preview
Window
Increases the size of the Preview Window.
14 — Split Clip Splits the selected clip. Position the Scrubber
to where you want the clip to be split, and
then click this button.
15 — Mark-in/Mark-
out
Sets a preview range in the project, or sets
the start and end points for trimming a clip.
Part Description

20 Corel VideoStudio Pro User Guide
Toolbar
The toolbar provides easy access to many editing commands. You can
change your project view, zoom in and out on the Project Timeline, and
launch different tools that can help you edit efficiently.
Part Description
1 — Storyboard View Displays your media thumbnails in
chronological order.
2 — Timeline View Lets you perform frame-accurate editing of
your clips on separate tracks, add and
position other elements such as titles,
overlays, voice-over and music.
3 — Undo Undoes the last action.
4 — Redo Repeats the last action that was undone.
5 — Record/Capture
Option
Shows the Record/Capture Option panel,
where you can capture video, import files,
record voice-overs and take snapshots.
6 — Sound Mixer Launches the Surround Sound Mixer and the
multitrack Audio Timeline, which lets you
customize your audio settings.
7 — Auto Music Launches the Auto Music Options Panel for
adding Smartsound background music to
your project in a variety of styles and moods.
You can set the music to match the duration
of your project.
1234910
7
568

Corel VideoStudio Pro Editor 21
Project Timeline
The Project Timeline is where you assemble the media clips for your video
project.
Two types of views are displayed in the Project Timeline: Storyboard View
and Timeline View. To switch between the different views, click the
buttons at the left side of the Toolbar.
8 — Zoom Controls Lets you adjust your view of the Project
Timeline by using the zoom slider and
buttons.
9 — Fit Project in
Timeline Window
Adjusts your project view to fit the entire
span of your Timeline.
10 — Project
Duration
Shows the duration of the project.
Part Description
22 Corel VideoStudio Pro User Guide
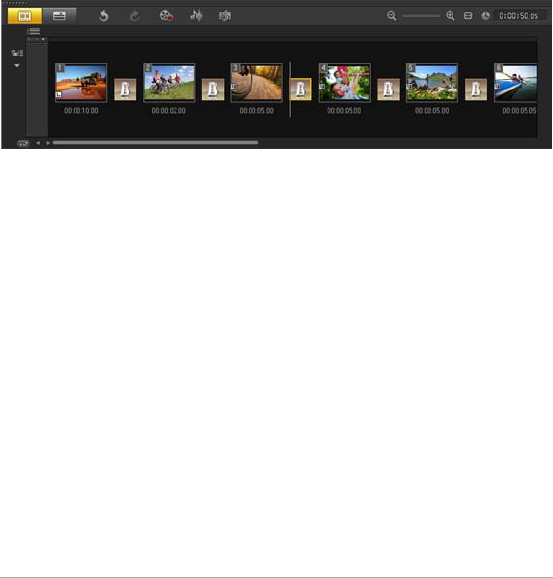
Storyboard View
The fastest and simplest way to organize photos and video clips in a
project is to use the Storyboard View. Each thumbnail in the storyboard
represents a photo, video clip, or a transition. Thumbnails are shown in
the order in which they appear in your project, and you can drag
thumbnails to rearrange them. The duration of each clip is shown at the
bottom of each thumbnail. In addition, you can insert transitions
between video clips, and you can trim a selected video clip in the Preview
Window.
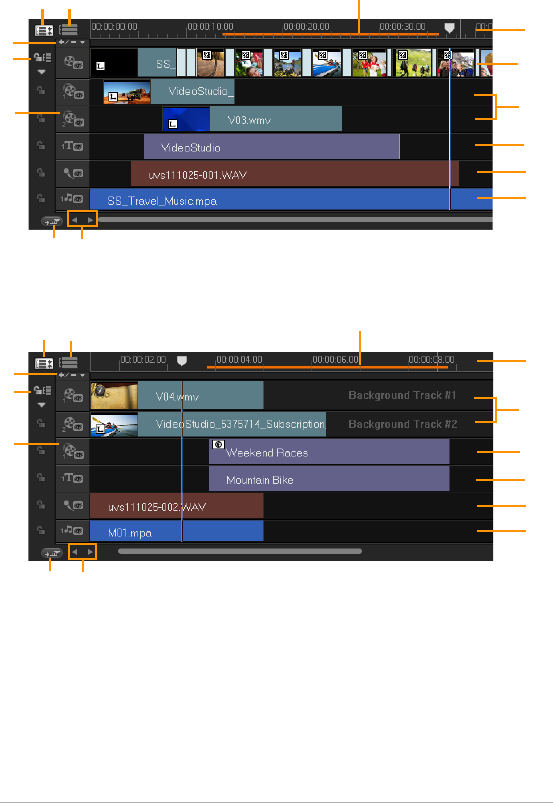
Timeline View
Timeline View gives you the most comprehensive display of the elements
in your movie project. It divides a project into separate tracks for video,
overlay, title, voice, and music.
Corel VideoStudio Pro Editor 23
Corel VideoStudio Pro Timeline
Corel VideoStudio Pro Timeline in HTML5 Mode
5
6
78
3
9
10a
12
13
14
1
4
2
11a
5
6
78
3
9
12
13
14
1
4
2
10b
11b

24 Corel VideoStudio Pro User Guide
Part Description
1 — Show All Visible
Track s
Displays all tracks in your project.
2 — Track Manager Lets you manage the tracks visible in the
Project Timeline.
3 — Selected range Displays a color bar that represents the
trimmed or selected part of a project.
4 — Add / Remove
Chapter or Cue
Lets you set chapter or cue points in your
movie.
5 — Enable / Disable
Ripple Editing
Locks or unlocks tracks of any movement
while you insert clips.
6 — Track buttons Lets you select individual tracks.
7 — Automatically
scroll timeline
Enables or disables scrolling along the
Project Timeline when you preview a clip
that extends beyond the current view.
8 — Scroll controls Lets you move around your project by using
the left and right buttons or dragging the
Scroll Bar.
9 — Timeline ruler Helps you determine clip and project length
by displaying the project's timecode
increments in
hours:minutes:seconds:frames.
10a — Video Track Contains videos, photos, color clips, and
transitions.
10b — Background
Track (HTML5 Mode)
Contains videos, photos, color clips, and
transitions in creating HTML5 projects.
11a — Overlay Tracks Contains overlay clips, which can be video,
photo, graphic, or color clips.

Corel VideoStudio Pro Editor 25
To move between tracks, click the track buttons. You can use the
mouse wheel to scroll through the Project Timeline.
Right-click on any track button and choose Select all media to
select all media clips that are in the track.
When the pointer is at the Zoom controls or Timeline ruler, you
can use the wheel to zoom in and out of the Project Timeline.
You can show or hide tracks from playback or when you render
your video. For more information, see “Enabling and disabling
tracks” on page 98.
Options Panel
The Options Panel changes according to the program’s mode and the
step or track that you are working on. The Options Panel may contain one
or two tabs. The controls and options in each tab vary, depending on the
selected clip.
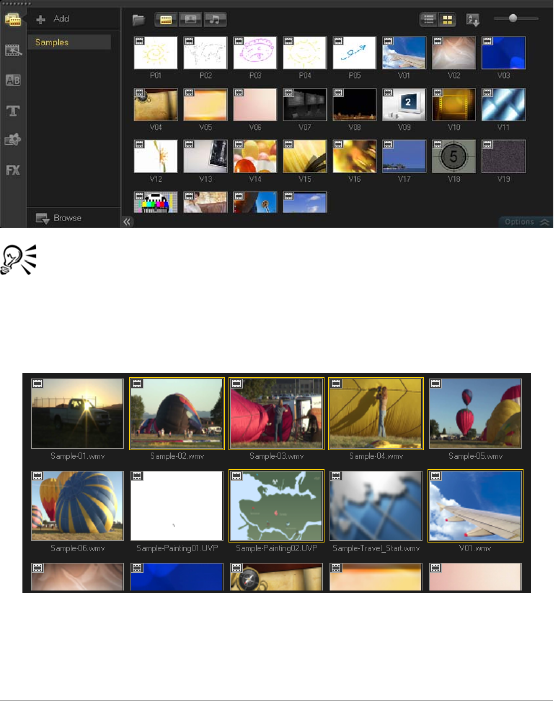
When you start Corel VideoStudio Pro, the Edit Step appears, and the
video clip thumbnails are displayed in the Library. You can open the
Options Panel by double-clicking a clip or clicking the Options button.
11b — Overlay Tracks
(HTML5 Mode)
Contains overlay clips, which can be photo,
graphic, or color clips.
12 — Title Track Contains title clips.
13 — Voice Track Contains voice-over clips.
14 — Music Track Contains music clips from audio files.
Part Description
26 Corel VideoStudio Pro User Guide
Library
The Library is a storage depot for everything you need to create a movie:
video clips, photos, instant project templates, transitions, titles, filters,
color clips, and audio files.
Right-click a clip in the Library to view the clip's properties as well
as copy, delete, or split clips by scene.
You can also trim a clip in the Library by using the Trim markers.
Hold [Ctrl] or [Shift] to select multiple clips.

Corel VideoStudio Pro Editor 27
Adding and deleting media clips in the Library
Organize the media clips in the Library so you can access assets for your
projects with ease and speed. You can also import a Library to restore
media files and other library information.
To add media clips to the Library
1Click Add to create a new library folder where you want to store your
media clips.
Note: You can create custom folders to separate your personal clips
from sample clips and manage your assets more efficiently or to
keep all clips that belong to a project in a single folder.
2Click Import Media Files to locate your files.
3Select the files you want to import.
4Click Open.
Click Browse to open the File Explorer where you can drag and
drop files to the Library or Timeline.
To delete media clips from the Library
1In the Library, select a clip and press [Delete].
Or, right-click the clip in the Library and click Delete.
Note: While the clips are referenced in the Library, they actually
remain in their original location, so when you delete a clip from the
Library, only the Library instance is deleted. You can still access the
actual file in the location where it is stored.
2When prompted, confirm that you want to delete the thumbnail
from the Library.

28 Corel VideoStudio Pro User Guide
To automatically locate and restore the link of the files in your library
• Click File > Relink.
A message appears that notifies you about the number of clips that
are successfully relinked.
Note: If the links to some clips are not restored, you can restore
them manually by browsing for the corresponding file on your
computer.
To export a library
1Click Settings > Library Manager > Export library and specify a
folder location where you want to save your Library.
2Click OK.
It is recommended that you back up your Library to avoid losing
important library information and media clips. This action creates
a backup of the virtual media files information of your current
library in a directory you specify.
To import a Library
1Click on Settings > Library Manager > Import Library and find the
folder path of the directory you want to import.
2Click OK.
To reset your Library to the default settings, select Settings >
Library Manager > Reset Library.
Tagging Files as 3D
3D media clips are supported in Corel VideoStudio Pro. Tagged 3D media
clips are marked with 3D for easy identification and to enable the 3D
media clip for 3D editing.
Corel VideoStudio Pro Editor 29
To tag video and photo clips as 3D
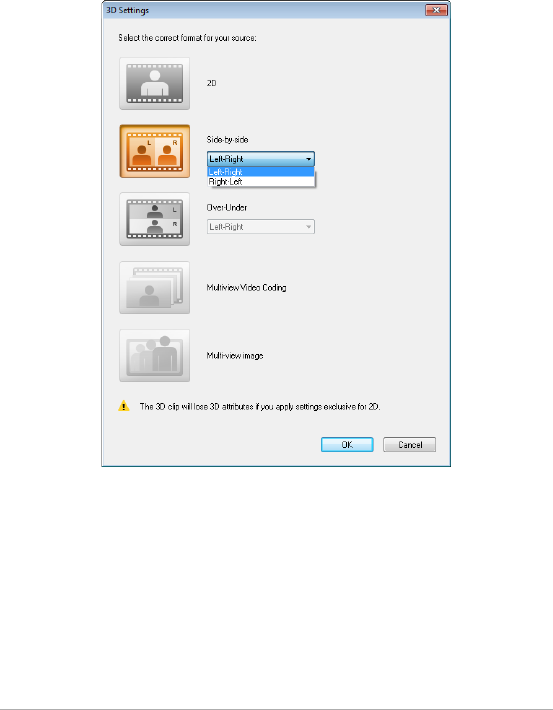
1Right-click 3D files imported into the Library or the Timeline and
choose Ta g a s 3 D from the right-click menu. The 3D Settings dialog
box is displayed.
2Choose one of the following options to set the correct format for 3D
content:
• 2D — the default setting if the selected clip is not recognized as
3D.
• Side-by-side — delivers 3D content by splitting the horizontal
resolution of each frame for the left and right eye. Side-by-side 3D
is widely used by cable channels for delivering content for 3D ready

30 Corel VideoStudio Pro User Guide
TV sets because of lower bandwidth usage. Choose between the
Left-Right and Right-Left formats.
• Over-Under — delivers 3D content by splitting the vertical
resolution of each frame for the left and right eye. The higher
count of horizontal pixels makes this option more suitable for
displaying panning motion. Choose between the Left-Right and
Right-Left formats.
• Multiview Video Coding (MVC) — generates a high-definition two-
view (stereoscopic) video or a multi-view 3D video.
• Multi-view image — delivers high-quality stereoscopic images such
as Multi-Picture Object (MPO) files that are shot using 3D cameras.
3Click OK.
The thumbnail of the media clip in the Library and Timeline now has
the 3D tag.
In Corel VideoStudio Pro, MVC and MPO clips are automatically
detected and tagged as 3D during import.
The Left-Right format for side-by-side 3D is a popular choice for
delivering content and is used mostly in media clips imported or
captured from 3D video cameras. The Right-Left option is used
mostly in media clips acquired from the Web.
Tagging video and photo clips as 3D is required for editing in 3D
mode.
To preserve 3D attributes, make sure you only split or trim 3D
media clips. Applying 2D effects or filters to a 3D clip converts the
3D clip to 2D.
Saving Titles to the Library
When you are creating multiple title clips that share the same attributes,
such as font type and style, it is useful to store a copy of your title clip in
the Library.

Corel VideoStudio Pro Editor 31
To save your title as a preset
• Right-click the title clip in the Timeline and click Add to My Favorites.
This way, you can easily change the text by dragging it from My
Favorites in the Library back onto the Title Track while still
maintaining the attributes of the title clip.
Sorting clips in the Library by using Media Filters
There are different ways to sort your media clips according to
classifications and views.
To sort media clips by name, date or rating
• Click the Sort clips in the Library button , then select Sort by
Name, Sort by Type or Sort by Date.
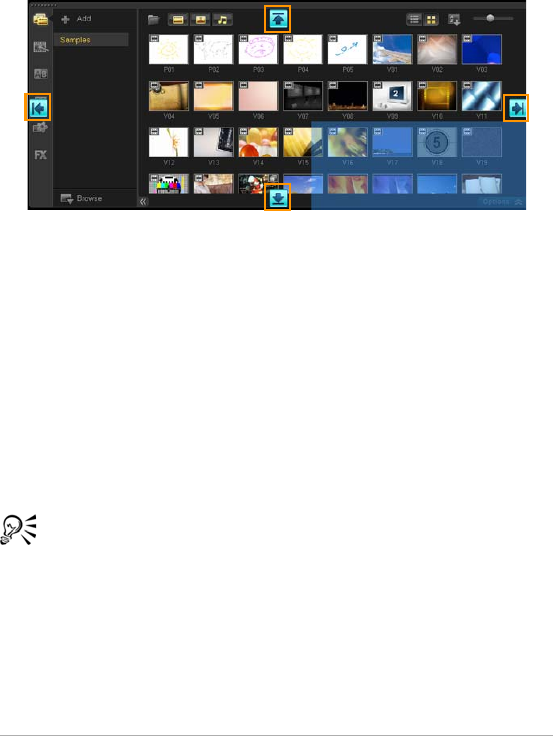
To change the media clips views
• Click the List view button to display your media clips in a list that
includes file properties, or click the Thumbnail view button to
display thumbnails.
32 Corel VideoStudio Pro User Guide
To show or hide media clips
• Click one or more of the following buttons:
• Show / Hide Videos
• Show / Hide Photos
• Show / Hide Audio Files
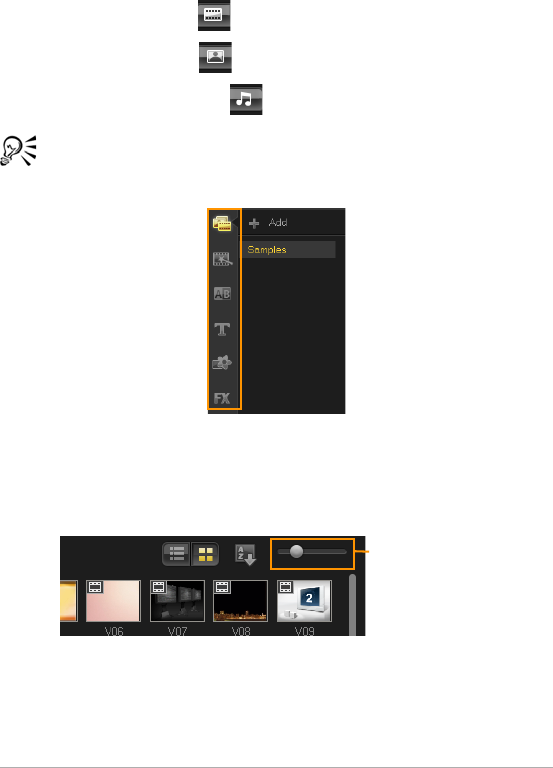
You can also use the icons in the Media Library to display media
clips, transitions, titles, graphics and filters.
Thumbnail Views
Corel VideoStudio Pro allows you to adjust the size of thumbnails for
easier access to the different media clips in the Library.
To adjust thumbnail size
• Move the slider to the left or right to decrease and increase
thumbnail size.
Thumbnail size
slider

Starting a new movie project 33
Starting a new movie project
Corel VideoStudio Pro combines the video, titles, sounds, and effects in
a process called rendering. Project settings determine how your movie
project is rendered when you preview it. The output video can then be
played back on your computer, burned to disc, or uploaded to the
Internet.
This section contains the following topics:
•Creating new projects
• Using Instant Project templates
• Setting your preferences
• Setting project properties
• Adding clips
•Previewing
• Undoing and redoing actions
• Showing and hiding grid lines
•Saving projects
• Saving projects by using Smart Package

34 Corel VideoStudio Pro User Guide
Creating new projects
When you start Corel VideoStudio Pro, it automatically opens a new
project and lets you start creating your movie. New projects are always
based on the default settings of the application. You can also create
HTML5 projects that you can post on the Web.
To create a new project
• Click File > New Project [Ctrl + N].
To create a new HTML5 project
• Click File > New HTML5 Project [Ctrl + M].
To open an existing project
• Click File > Open Project [Ctrl + O].
Using Instant Project templates
Corel VideoStudio Pro has sample project templates that can help you get
familiar with the tasks and features of the application. You can also use
the Instant Project templates to create your video project or custom
templates.
To open an Instant Project template
1Click the Instant Project button in the Media Library.
Note: The Custom category is the default path that contains
templates you have created.
2Choose a template category from the folders that appear and click a
project thumbnail to preview the selected template.
3Right-click on the template thumbnail and choose the point of
insertion in the Timeline between Add at the beginning and Add at
the end.
The template will be automatically imported into the Timeline.

Starting a new movie project 35
Note: You can also drag the template thumbnail to the Timeline.
To create an Instant Project template
1Open the video project that you want to save as a template.
2Click File > Export as template.
3Click Yes when prompted to save your project.
4Enter a File name, Subject and Description.
5Browse for the folder where you want to save your template and
click Save.
6In the Export project as template dialog box, move the slider to
display the thumbnail that you want to use for the template.
7Specify the path and folder name. Choose the category from the
drop-down menu where you want to keep your template.
Template details will also be displayed.
8Click OK.
To import project templates
1Click Import a project template and browse for the *.vpt file that you
want to import.
2Click Open.

36 Corel VideoStudio Pro User Guide
Setting your preferences
Customize your working environment by using the Preferences dialog
box. You can specify a working folder for saving files, set undo levels,
choose preferred settings for program behavior, enable Smart Proxy,
choose the default transition effect for your project and more.
To set program preferences
• Click Settings > Preferences or press F6 to launch the Preferences
dialog box.
The Corel VideoStudio Pro Timeline allows 30P (30 frames per
second) editing by default. To prevent video clips with high frame
rates from being truncated, it is recommended that you choose
Enable 60P/50P editing from the Settings menu.
Setting project properties
Project Properties serve as your template for previewing your movie
projects. The project settings in the Project Properties dialog box
determine the appearance and quality of a project when it is previewed
on-screen.
To modify project properties
1Click Settings > Project Properties.
2Choose the appropriate setting options in the Project Properties
dialog box.
3Click OK.
When customizing project settings, it is recommended that you
make the settings the same as the attributes of the video footage
that will be captured to avoid distorting the video images and
have smooth playback without jumping frames.
Starting a new movie project 37
Adding clips
There are a number of ways to add clips to your project.
To add clips
• Do one of the following:
• Capture video clips from a video source. The video clips are
inserted into the Video track.
• Drag clips from the Library to the appropriate tracks.
• Drag clips from File Explorer to the appropriate tracks.
• In the Library, right-click on the thumbnail, select Insert To and
choose the track where you want to insert the media file.
• Right-click on the Timeline and choose the type of media you want
to add.
Previewing
The Play button in the Navigation Panel serves two purposes: for playback
of your entire project or a selected clip.
To preview projects or clips
• Click Project or Clip, then click Play.
While working on your project, you will want to preview your work
frequently to see how your project is progressing. Instant Playback allows
you to quickly preview changes in your project. Playback quality will be
dependent on your computer’s resources.
38 Corel VideoStudio Pro User Guide
Setting a preview range
You may choose to play only a part of your project. The selected range of
frames to preview is referred to as the preview range, and it is marked as
a colored bar in the Ruler Panel.
To play the preview area only
1Use the Tri m Markers or the Mark-in/out buttons to select the
preview range.
2To preview the selected range, select what you want to preview
(Project or Clip), then click Play. To preview the entire clip, hold
[Shift], then click Play.
Undoing and redoing actions
You can undo or redo the last set of actions that you performed while
working on your movie.
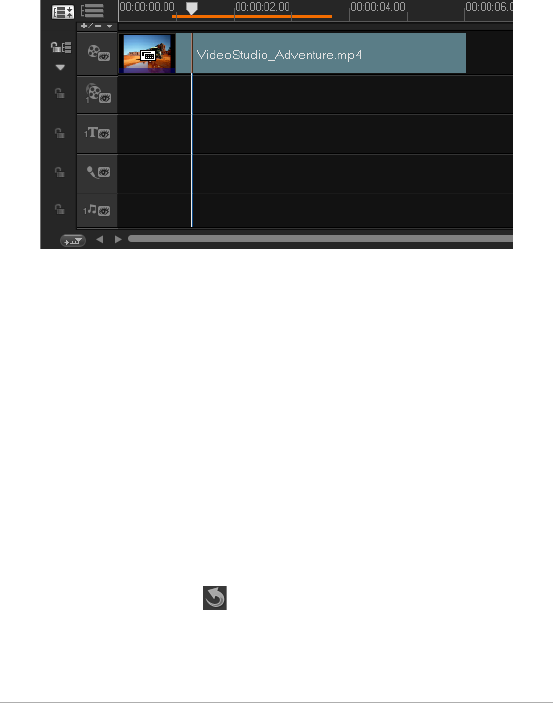
To undo the last action
• Click the Undo button in the Toolbar.
Starting a new movie project 39
To redo the last undone action
• Click the Redo button in the Toolbar.
You can adjust the number of undo levels in the Preferences dialog
box.
You can also use the keyboard shortcuts [Ctrl] + Z and [Ctrl] + Y
to undo and redo actions respectively.
Showing and hiding grid lines
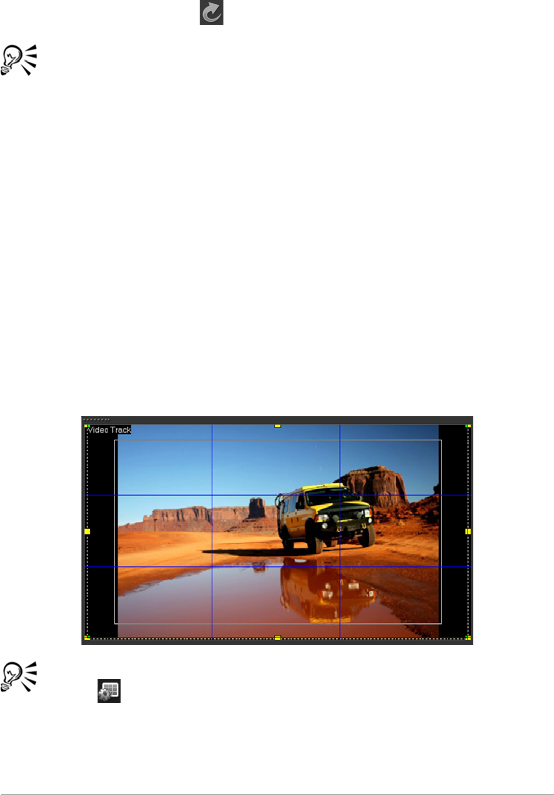
You can use grid lines to guide you when repositioning or resizing photos
and videos. You can also use grid lines to line up titles in your movie.
To show grid lines
1 In the Edit step, double-click a clip to display the Options Panel.
2Click the Attribute tab and choose Distort clip.
3Check Show grid lines.
Click to adjust grid line settings.

40 Corel VideoStudio Pro User Guide
Saving projects
To save your project
• Click File > Save [Ctrl + S].
Note: Corel VideoStudio Pro project files are saved in *.vsp file
format. HTML5 video projects are saved in *.vsh file format.
To automatically save your work
1Click Settings > Preferences and click the General tab.
2Choose Automatic save interval: and specify the time interval
between saves.
Note: This setting is set at 10 minutes by default.
Save your project frequently to avoid accidental loss of work.
Saving projects by using Smart Package
Packaging a video project is useful if you want to back up your work or
transfer your files for sharing or for editing in a laptop or another
computer. You can also package your project as a zipped folder or
prepare them for online storage using WinZip’s file compression
technology that is integrated into the Smart Package feature.
To save projects by using Smart Package
1Click File > Smart Package and choose to pack your project as a
folder or Zip file.
2Specify the Folder path, Project folder name and Project file name.
3Click OK.
You need to save your project before you use Smart Package.

Capture 41
Capture
Corel VideoStudio Pro lets you capture or import video from DVD-video,
DVD-VR, AVCHD™ and BDMV discs including camcorders that record on
memory cards, internal memory of discs, DV or HDV camcorders, mobile
devices, as well as analog and digital TV capture devices.
This section contains the following topics:
• The Capture Step Options Panel
•Capturing Video
•DV Quick Scan
• Importing from digital media
• Creating stop motion animations
• Creating screen capture videos
42 Corel VideoStudio Pro User Guide
The Capture Step Options Panel
In the Capture Step, Corel VideoStudio Pro displays the Library and the
Capture Options Panel where different media capture and import
methods are available.
The table below discusses the options in the Capture Step.
Capturing Video
The steps on how to capture are similar for all types of camcorders except
for the available capture settings in the Capture Video Options Panel that
can be selected for each type of source.
To capture video and photos from your camcorder
1Connect your camcorder to your computer and turn on the device.
Set it to Play (or VTR / VCR) mode.
2In Capture Options Panel, click Capture Video.
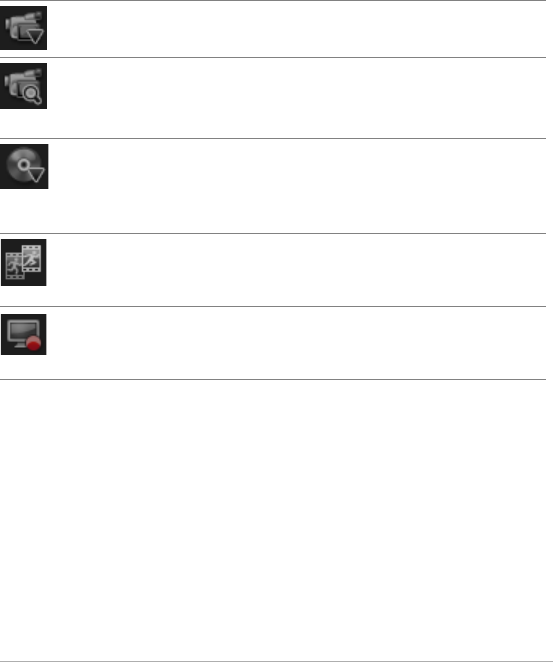
Click Capture Video to capture video footage and photos
from your camcorder into your computer.
Click DV Quick Scan to scan your DV tape and select the
scenes you want to add to your movie.
Click Import from Digital Media to add media clips from a
DVD-Video/DVD-VR, AVCHD, BDMV formatted disc or from
your hard drive. This feature also allows you to import video
directly from AVCHD, Blu-ray Disc or DVD camcorders.
Click Stop Motion to create instant stop motion animations
using captured images from your photos and video capture
devices.
Click Screen Capture to create screen capture videos that
capture all computer actions and elements shown on your
screen.

Capture 43
3Select your capture device from the Source drop-down list.
4Select a file format to use for saving your captured video from the
Format drop-down list. Browse the folder location where the files
will be saved under Capture folder.
Note: Click Options to customize capture settings specific to your
video device.
5Scan your video to search the part for capture.
Note: If you are capturing video from a DV or HDV camcorder, use
the Navigation Panel to play your video tape.
6Click Capture Video, when your video for capture is already on cue.
Click Stop Capture or press [Esc] to stop capturing.
7To capture a photo from the video footage, pause the video on the
desired photo then click Take a Snapshot.
Note: When your camcorder is in Record mode (usually named
CAMERA or MOVIE), you can capture live video.
Note: The available settings in the Video properties dialog box vary,
depending on the capture file format that you have chosen.
Capture Video Options Panel
•Duration — Sets the length of time for the capture.
•Source — Displays the detected capture device and lists other
capture devices installed in your computer.
•Format — Gives you a list of options where you select a file format
for saving your captured video.
•Capture folder — This feature allows you to specify a folder where
you want your captured files to be saved.
•Split by scene — Automatically separates captured video into several
files based on changes in shooting date and time when capturing
video from a DV camcorder.
•Capture to library — Choose or create a Library folder where you
want your video to be saved.

44 Corel VideoStudio Pro User Guide
•Options — Displays a menu allowing you to modify your capture
settings.
•Capture Video — Transfers video from your source to your hard
drive.
•Take a Snapshot — Captures the displayed video frame as a photo.
Direct video capture to MPEG format
Corel VideoStudio Pro supports real-time capture from DV, analog, or any
video source to MPEG-2 format.
To capture video in MPEG-2 format
1In Source, choose your video source.
2Specify or browse for the destination folder where you want your
clips to be stored in Capture folder.
3Click Options and select Video Properties. In the dialog box that
opens, select a profile in the Current Profile drop-down menu.
4Click OK.
5Click Capture Video to start capturing and Stop Capture to end your
capturing session. Your media clip will automatically be stored as
MPEG-2 format in the folder you specified.
Split by scene
A single DV tape may contain several videos that were shot at different
times. Corel VideoStudio Pro automatically detects these segments and
saves them as separate files.
To use Split by scene option in Capture Step
1Select the Split by scene option in the Options Panel.
2Click Capture Video. Corel VideoStudio Pro will automatically look
for the scenes according to their shooting date and time and capture
them as separate files.
Capture 45
Digital Video (DV)
To capture Digital Video (DV) in its native format, select DV from the
Format list in the Options Panel. This saves the captured video as a DV AVI
file (.avi).
You can also use the DV Quick Scan option to capture DV video
DV AVI Type-1 and Type-2
When capturing DV, click Options in the Options Panel and select Video
properties to open a menu. In the Current Profile, choose whether to
capture DV as DV Type-1 or DV Type-2.
Controlling the DV camcorder with the Navigation Panel
When capturing from a DV camcorder, use the Navigation Panel to scan
your footage and locate the scenes you want to capture.
To find scenes in your video
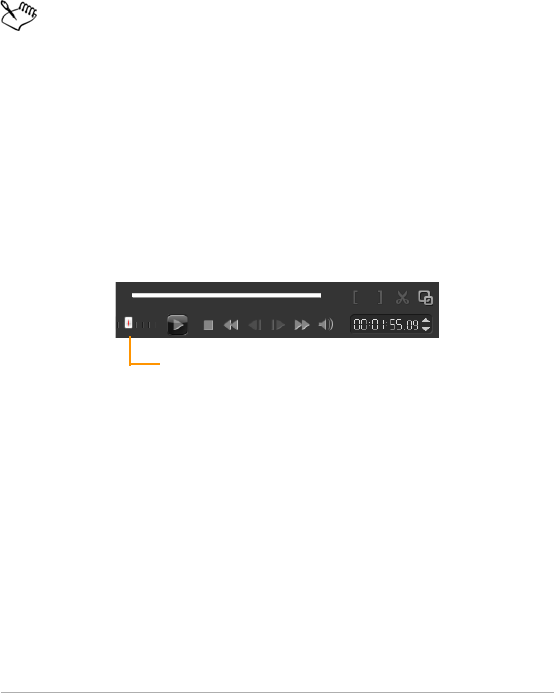
•Drag the Shuttle Slider to move forward and back through the
footage at variable speeds.
Shuttle Slider

46 Corel VideoStudio Pro User Guide
High Definition Video (HDV)
You can capture high definition video using the following methods:
• For HDV camcorders, use the Capture video feature.
• For AVCHD and Blu-ray Disc devices, use Import from Digital Media.
To capture video from an HDV camcorder
1Connect your HDV camcorder to your computer’s IEEE-1394 port
using the IEEE-1394 cable.
2Turn on your camcorder and switch it to Play/Edit mode and make
sure that your HDV camcorder is switched to HDV mode.
Note: For Sony HDV camcorders, flip open the LCD screen and see if
HDVout I-Link is on the LCD screen to check if the camera is set to
HDV mode. If you see DVout I-Link, press P-MENU at the lower right
of the screen. In the menu, press MENU > STANDARD SET > VCR
HDV/DV and press HDV.
3Click Capture Step and click to capture video.
Digital TV or DVB-T video
Before capturing, ensure that the DVB-T source is connected via a
compatible capture card installed on your computer.
To capture DVB-T video
1Click Capture Step and select Capture Video.
2Select Digital TV Source from the Source drop-down list.
3Click Options and select Video Properties. The Video properties
dialog box will appear.
4In the Input Source tab, select TV from the Input source drop-down
list. Click OK.
5In Channel List, click Start Scan to start scanning for channels.

Capture 47
Note: DVB-T channels are not automatically scanned. Make sure to
manually scan the channels first before capturing.
6Click Capture Video.
7Click Yes when prompted if you want to start capturing and
automatically recovering DVB-T video.
8Follow the remaining steps as described in the procedure for
capturing videos.
Analog video
When footage is captured from analog sources such as VHS, S-VHS,
Video-8, or Hi8 camcorders/VCRs, it is converted to a digital format that
can be read and stored by the computer. Before capturing, choose the
desired file format to use for saving the captured video in the Options
Panel’s Format list.
To specify the type of video source you are capturing from
1Click Options and select Video properties.
2In the dialog box that opens, you can customize the following
capture settings:
• In the Input Source tab, choose whether you are capturing NTSC,
PAL, or SECAM video and select the Input source (TV, Composite,
or S-Video).
• In the Color Manager tab, you can fine tune the video source to
ensure good quality captures.
• In the Template tab, choose the frame size and compression
method to use for saving the captured video.

48 Corel VideoStudio Pro User Guide
TV footage
Corel VideoStudio Pro allows you to capture TV footage through a TV
tuner. Capture a segment of your favorite television show on regular TV
or cable then save it in your hard drive in AVI or MPEG.
To capt u r e TV footag e
1Select your TV tuner device from the Source drop-down list.
2Click Options > Video Properties to open the Video properties dialog
box. If needed, adjust the settings accordingly.
Click the Tuner Information tab to choose Antenna or Cable, scan
available channels in your region, and more.
3In the Channel box, specify the channel number from which to
capture.
DV Quick Scan
Use this option to scan a DV device for scenes to import. You can add the
date and time of your video.
For more information on this feature, see “Appendix B: DV-to-DVD
Wizard” on page 175.
To add the date and time of your video
1 After scanning your DV tape, click Next.
This will then display the Import Settings dialog box.
2Select Insert to Timeline and choose Add video date information as
title.
Note: If you want the shooting date to appear in the entire duration
of the video, select Entire video or only during a specified time.
Capture 49
Importing from digital media
You can import DVD/DVD-VR, AVCHD, BDMV video and photos from a
disc, hard drive, memory card, digital camcorders and DSLRs into Corel
VideoStudio Pro.
To import digital media
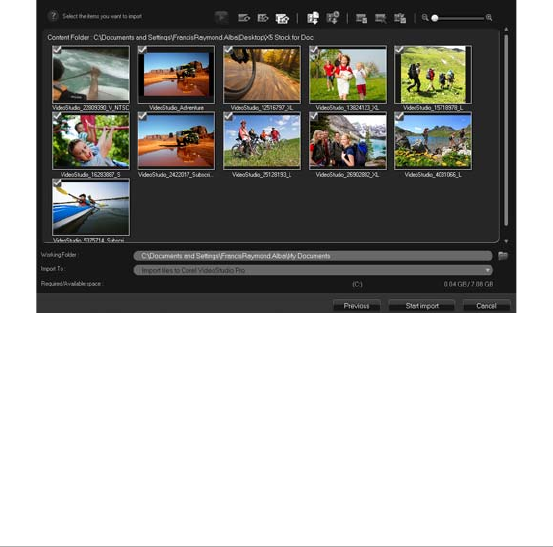
1Click Capture Step then click Import from Digital Media.
2Click Select Import Source Folders and browse for folders that
contain your digital media and click OK.
3Click Start and the Import from Digital Media dialog box appears.
4Choose the media clips you want to import and click Start import. All
imported videos will be added to the thumbnail list in the Library.
To enable timecode retrieval for AVCHD
1In the Capture Step Options Panel, click Import from Digital Media.
2Select the thumbnail of the video file. Click Start import to launch
Import Settings.
50 Corel VideoStudio Pro User Guide
3In Import Destination, select Insert to Timeline or select Add video
date information as title.
4Choose Entire video to import the timecode of video file to appear as
a title spanning the entire duration of the video. Choose Duration to
import the timecode as a title within a specified duration. Click OK to
apply the settings.
Note: You can apply the same settings for all video files for
importing. Click the Apply this setting and never ask me again box or
press [F6] to turn on the settings.
Creating stop motion animations
Using captured images from DV/HDV camcorders or webcam, or photos
imported from DSLRs, you can create stop motion animations directly in
Corel VideoStudio Pro and add them to your video projects.
For best results, use a tripod when you shoot photos and videos
that you want to use in your stop motion animation project.
To open the Stop Motion window
• Click Stop Motion in the Capture Step Options Panel to launch the
Stop Motion window.
Note: You can also launch the Stop Motion window when you click
Stop Motion from Record/Capture Option .
To create a new stop motion animation project
1Click Create to create a new stop motion project.
Note: If you have an existing project open, you will be prompted to
save your work before proceeding.
2In Project Name, enter a name for your stop motion project.
3In Capture Folder, specify or browse for the destination folder where
you want your clips to be stored.

Capture 51
4Select where you want you stop motion project to be stored by
choosing an existing Library folder from the drop-down menu in
Save to Library.
Note: You can also create a new Library folder when you click Add a
new folder.
To capture images
1Connect your capture device (webcam / DV/HDV camcorder) to your
computer.
If you are using a DV/HDV camcorder, switch it to Play/Edit mode
and make sure that your DV/HDV camcorder is switched to DV/HDV
mode.
2In Image Duration, choose the exposure time for each image.
Note: A higher frame rate results in a shorter exposure time for each
image.
3In Capture Resolution, adjust the screen capture quality.
Note: Options vary according to the capabilities of your capture
device.
4In Onion Skin, move the slider from left to right to control the
opacity of the new captured image and the previous captured frame.
5Click Capture image to capture a specific frame that you want to
include in your project.
Captured frames automatically appear in the Stop Motion timeline.
Note: If you are using a webcam or a camcorder in Record mode,
move your subject between each capture to show movement in the
images. If you are using footage from a DV/HDV camcorder, you can
make screen captures during video playback.
You can also configure the program to capture automatically
using preset intervals. In Auto Capture, click Enable auto capture
and set the Capture Frequency and Total Capture Duration in Set
Time.

52 Corel VideoStudio Pro User Guide
To open an existing stop motion animation project
1Click Open and browse for the stop motion animation project that
you want to work on.
Note: Stop motion animation projects created in Corel VideoStudio
Pro are in Ulead Image Sequence (*uisx) format.
2Click Open to activate the project.
To import images into a stop motion animation project
1Connect your DSLR to your computer.
2Click Import and browse for the photos that you want to include in
your stop motion animation projects.
3Click Open.
Your photos are automatically included in the stop motion animation
project.
A series of photos shot with your DSLR on auto/continuous mode
is a good example for stop motion animation projects.
To play your stop motion animation project
• Click Play.
To save your stop motion animation project
• Click Save. Your project is automatically saved in the Capture and
Library folders that you specified.
To exit Stop Motion
• Click Exit to go back to your video project.
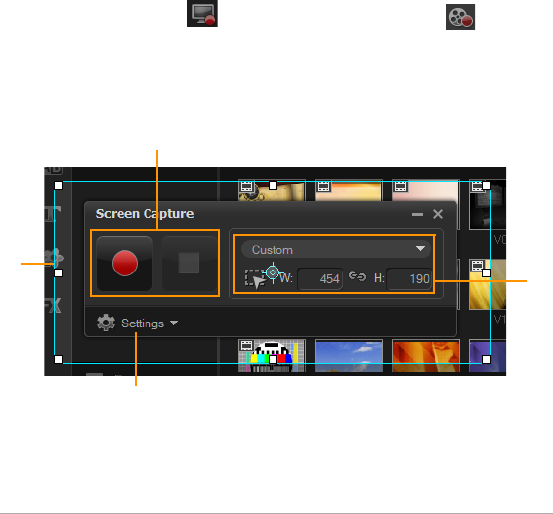
Capture 53
Creating screen capture videos
Record computer actions and mouse movement by using the screen
capture feature in Corel VideoStudio Pro. This feature lets you create
videos that require visualization in a few easy steps. You can also define
the capture area for more emphasis and focus or integrate voice-overs.
To open the Active Screen capture window
• Click Screen Capture in the Capture Step Options Panel to launch the
Screen Capture toolbar.
The Corel VideoStudio Pro main program window minimizes in the
background and the Screen Capture toolbar appears.
Note: You can also launch the Screen Capture toolbar when you
click Screen Capture from Record/Capture Option .
Note: The capture area frame automatically appears along with the
Screen Capture toolbar.
Toolbar Basics
1
2
3
4

54 Corel VideoStudio Pro User Guide
Recording your screen
Before taking the actual screen capture, make sure to configure the
settings of the video first.
To configure your video
1Click Settings.
2In File Settings, specify the following details:
• Filename — Enter a filename for your project.
• Save to — Lets you specify the location where you want to save
the video file.
• Capture to library — Enable to automatically import your screen
capture to the Library.
Note: Screen captures are saved to the Samples folder in the Library
by default. Click to add a new folder and change the location
where the file is saved.
3In the Format drop-down menu, choose an option from the available
formats.
Part Description
1 — Capture area
frame
Specifies the display area to capture.
2 — Recording
Controls
Contains the buttons that control your screen
capture.
3 — Capture area
frame dimensions
Specifies the active program to capture and the
exact dimensions of the area to capture in the
Width and Height boxes.
4 — Settings
(default view)
Lets you specify file, audio, display and
keyboard shortcut settings.

Capture 55
4In Audio Settings > Voice, do one of the following:
• Click Enable voice recording to record a voice-over. Click the
Sound Check button to test your voice input.
• Click Disable voice recording to disable voice-over recording.
5Enable or disable System audio and adjust the slider to your
preference.
6In Monitor Settings, choose a display device.
Note: The program automatically detects the number of display
devices available on your system. Primary monitor is selected by
default.
7Click Enable F10/F11 shortcut key to turn the keyboard shortcuts for
screen capture on and off.
Note: If the screen capture shortcut keys are in conflict with the
program you want to capture, it is recommended that you disable
this feature to avoid accidental stops or pauses while recording.
To record your screen capture
1Choose one of the following options:
• Full screen — lets you capture the entire screen. When you launch
the Screen Capture toolbar, this option is enabled by default.
• Custom — lets you specify the area to capture. The capture area
dimensions are displayed accordingly. You can also specify an
application window to capture by choosing an option from the list
of active programs.
2Click Settings to access more options.
Note: To include voice-overs and system audio, you must enable and
configure the respective settings before you start recording.

56 Corel VideoStudio Pro User Guide
3Click Start / Resume Recording to start the screen capture.
All activities inside the specified capture area are recorded. Screen
capture starts after the countdown.
Note: You can press F10 to stop and F11 to pause or resume the
screen capture.
4Click Stop Recording to finish your screen capture.
The screen capture is added to the Library and the custom folder that
you have specified and can be imported into the Corel VideoStudio
Pro Timeline.

Edit 57
Edit
The Edit Step is where you put together all the elements of your project.
You can select videos, instant project templates, transitions, titles,
graphics, effects, and audio clips from the Library and add them to the
Timeline. Using the Options Panel, you can further customize the
attributes of each element that you use.
This section contains the following topics:
• Working with clips
• The Edit Step Options Panel
• Assets and Effects
• Copying and pasting media clip attributes
• Taking snapshots in the Edit Step
• Ripple Editing
• Enabling and disabling tracks
• Editing with Smart Proxy
• Converting multiple files
• Enhancing clips
• Adding cues and chapters
• Working with Overlays
• Painting images and animations using Painting Creator
•Working with Audio
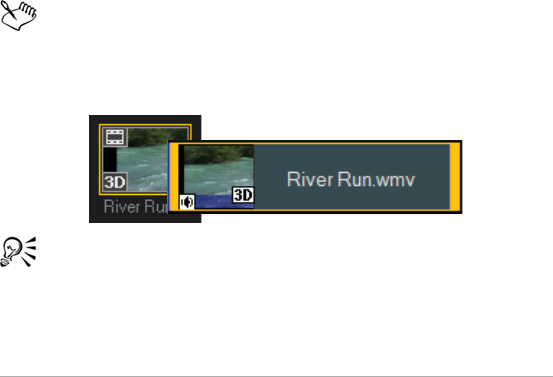
58 Corel VideoStudio Pro User Guide
Working with clips
Videos, photos and audio clips are the foundation of your project and
manipulating them is the most important skill you can master.
Adding video clips
There are several ways of inserting video clips to the Timeline:
• Select a clip in the Library and drag it to the Video Track or Overlay
Track. Multiple clips can be selected by pressing [Shift].
• Right-click a clip in the Library and select Insert To: Video Track or
Insert To: Overlay Track.
• Select one or more video files in Windows Explorer and drag them to
the Video Track or Overlay Track.
• To insert a clip from a file folder directly to the Video Track or Overlay
Track, right-click the Timeline, select Insert Video and locate the
video to use.
3D media clips are supported in Corel VideoStudio Pro. You can
tag 3D media clips so that they can be easily identified and edited
with 3D editing features. For more information, see “Tagging Files
as 3D” on page 28.
Aside from video files, you can also add video from DVD or DVD-
VR formatted discs.
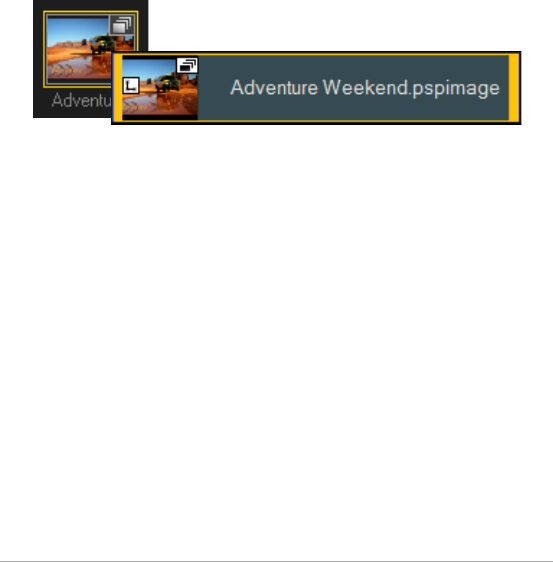
Edit 59
Adding photos
Photo clips are added to the Video Track the same way as video clips.
Before you start adding photos to your project, determine the photo size
that you want for all your photos. By default, Corel VideoStudio Pro
adjusts the size to keep the photo’s aspect ratio.
Corel PaintShop Pro PSPIMAGE files (*.pspimage) are now supported in
Corel VideoStudio Pro. PSPIMAGE files that are imported into the Library
have a multiple layer indicator so you can distinguish them from other
types of media clips.
To make all inserted photos the same size as the frame size of your
project
1Click Settings > Preferences > Edit.
2Change the Image resampling option default to Fit to project size.
To import PSPIMAGE files into the Timeline
1Right-click a clip in the Library.
2Click Insert To and select the track where you want to add your
media clip.
3Choose one of the following options:
• Layers - lets you include the layers of a file into separate tracks
• Flatten - lets you insert a flattened image into a single track
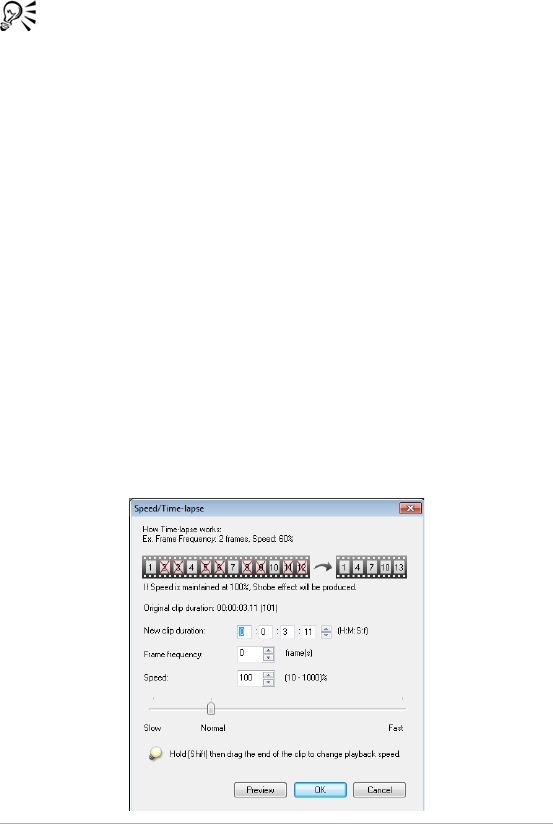
60 Corel VideoStudio Pro User Guide
You can also drag the file directly into the Timeline and the
program will automatically add the layers to separate tracks. To
insert a flattened image, hold down [Shift] and dragging the file.
Color
Color clips are usually added as backgrounds and are useful for titles.
Adding of color clips on the Video Track follows the same procedure as
that of video and image clips. For more information about adding color
clips, see “Adding Color Clips” on page 88.
Speed and Time-lapse
You can modify the playback speed of your videos. Set your video in slow
motion to emphasize a movement, or set it to play at lightning speed and
give your movie a comical air. You can also use this feature to achieve
time-lapse and strobe effects on your videos and photos.
To adjust the speed and time-lapse attributes of your video clip
1Click Speed/Time-lapse in the Options Panel of the Edit Step.

Edit 61
2In New clip duration, specify a set duration for your video clip.
Note: If you want to maintain the original duration of your clip, do
not change the original value.
3In Frame Frequency, specify the number of frames to be removed at
regular intervals during video playback.
Note: A higher value entered in Frame Frequency will produce a
more noticeable time-lapse effect on your video. Otherwise,
maintain the value at 0 to retain all frames in your video clip.
4Drag the Speed slider according to your preferences (i.e., slow,
normal or fast), or enter a value.
Note: The higher the value you set, the faster the playback of your
clip. (Values range from 10-1000%).
5Click Preview to view the results of your settings.
6Click OK.
To apply Time-lapse/Strobe effects on your photos
1Click File > Insert Media File to Timeline > Insert Photo for Time-
lapse/Strobe.
2Browse for the photos you want to include in your project and click
Open.
Note: It is recommended to choose a series of photos taken in
succession from your DSLR.
3Specify the number of frames to be retained and removed in Keep
and Drop.
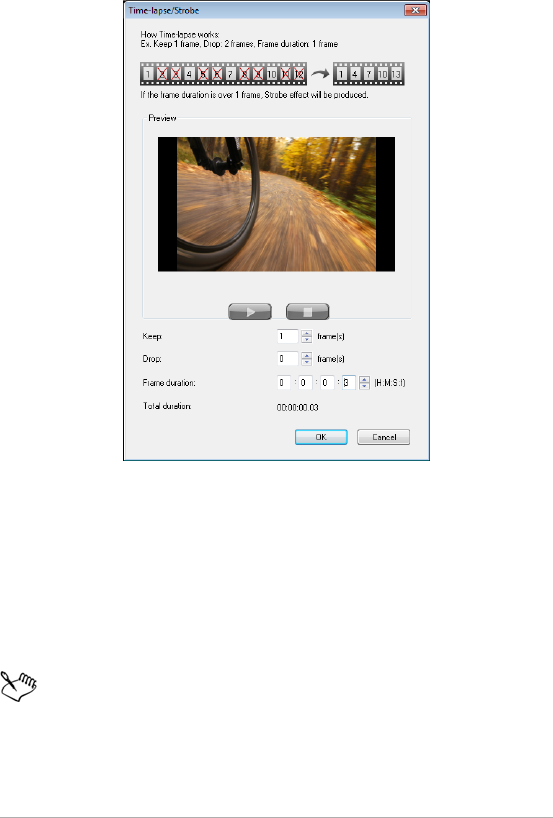
62 Corel VideoStudio Pro User Guide
Note: For example, you enter a value of 1 in Keep and 3 in Drop.
This means that it will follow the interval to retain one frame and
remove three frames for the entire video clip.
4In Frame duration, specify the exposure time for each frame.
5Use the playback controls to preview the effect of the frame settings
on your photos.
6Click OK.
If the value of Frame Frequency is more than 1 and clip duration
is the same, Strobe effect will be produced. If the value of Frame
Frequency is more than 1 and clip duration is shortened, Time-
lapse effect will be produced.

Edit 63
Hold [Shift] then drag the end of the clip on the Timeline to
change the playback speed.
The black arrow means you are trimming or extending the clip,
while the white arrow means that you are changing the playback
speed.

64 Corel VideoStudio Pro User Guide
Reversing video playback
You can reverse the playback of video clips.
To reverse video playback
• Click Reverse video in the Options Panel.
Replacing media clips
Media clips in the Timeline can be replaced in its current position. When
you replace a clip, the attributes of the original clip are applied to the new
clip.
To replace a clip
1In the Timeline, right-click the media clips you want to replace.
2Choose Replace clip from the right-click menu.
The Replace/relink clip dialog box appears.
3Browse for the replacement media clips and click Open.
The clip in the Timeline is automatically replaced.
The duration of the replacement clip must be equal to or longer
than the duration of the original clip.
Hold [Shift] and click multiple clips to select two or more clips in
the Timeline and repeat the process for replacing multiple clips.
The number of replacement clips must match the number of clips
that you selected in the Timeline.
You can also drag a video clip from the Library to the Timeline and
hold the [Ctrl] key to automatically snap on a clip to be replaced.
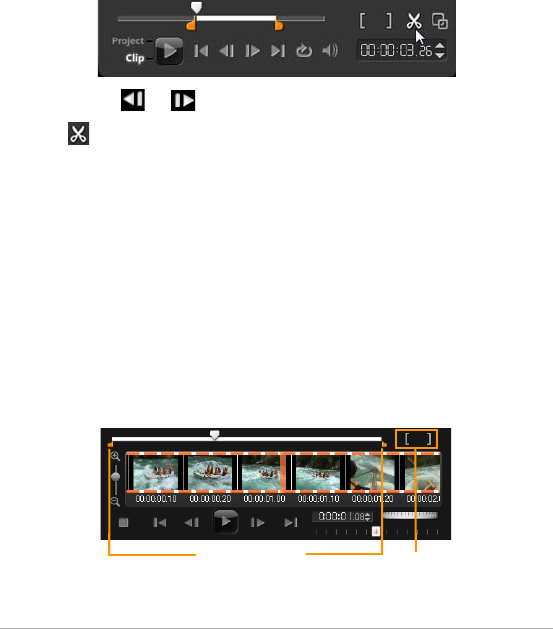
Edit 65
Trimming a clip
The best part of editing your movie on your computer is the ease with
which you can split and trim your clips with frame accuracy.
To split a clip into two
1In Storyboard View or Timeline View, select the clip you want to split.
2Drag the Scrubber to the point where you want to split the clip.
Note: Click or to set the cutting point more precisely.
3Click to split the clip into two clips. To remove one of these clips,
select the unwanted clip and press [Delete].
To trim a clip with the Trim markers using Single Clip Trimmer
1Double-click a video clip in the Library or right-click on a video clip
and choose Single Clip Trim to launch the Single Clip Trim dialog box.
2Click and drag the Trim markers to set the Mark-in/Mark-out points
on the clip.
3For more precise trimming, click on a Trim marker, hold it, and use
the left or right arrow keys on your keyboard to trim one frame at a
time. The Mark-in/Mark-out points can also be set by pressing [F3]
and [F4], respectively.
Trim markers
Mark-in/
Mark-out
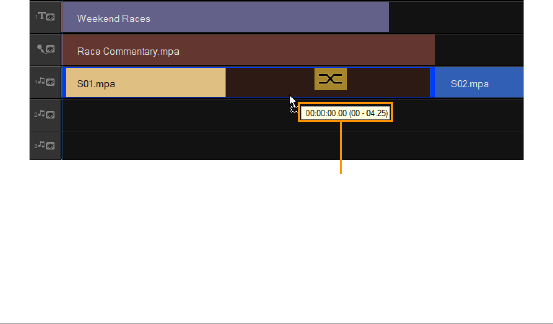
66 Corel VideoStudio Pro User Guide
4To preview the trimmed clip only, press [Shift + Space] or hold [Shift]
and click the Play button.
Note: You can also use zoom controls to display each frame of your
video on the Timeline and trim one frame at a time. The Scroll Bar
makes navigating through your project quicker and easier. A wheel
mouse can also be used to scroll, and to zoom by pressing [Ctrl].
To trim a clip directly on the Timeline
1Click a clip on the Timeline to select it.
2Drag the Trim mar k ers on either side of the clip to change its length.
The Preview Window reflects the position of the Trim marker in the
clip.
Note: Instant timecode tip is a feature of Corel VideoStudio Pro that
allows you to add clips with a specific timecode. It appears while
trimming and inserting overlapping clips on the Timeline, enabling
you to make adjustments based on the timecode shown. For
example, the instant timecode tip appears with the format
00:00:00.00 (00 - 04.25). 00:00:00.00 indicates the current
timecode where the selected clip is located. The (00 - 04.25) start-
end range represents the duration of one overlapping clip with the
previous clip and another overlapping with the next clip.
Instant timecode tip

Edit 67
To trim a clip using the Duration box
1Click a clip on the Timeline to select it.
2Click the timecode in the Duration box in the Options Panel and
enter the desired clip length.
Note: Changes made in the video Duration box only affect the
Mark-out point. The Mark-in point remains unchanged.
Split by Scene
Use the Split by Scene feature in the Edit Step to detect different scenes
in a video file and automatically break it down into several clip files.
The way Corel VideoStudio Pro detects scenes depends on the type of
video file. In a captured DV AVI file, scenes can be detected in two ways:
•DV Recording Time Scan detects scenes according to their shooting
date and time.
•Frame Content detects content changes, such as motion change,
camera shifting, brightness change, etc., and splits them into
separate files.
In an MPEG-1 or MPEG-2 file, scenes can only be detected based on
content changes (i.e., by Frame Content).
Duration
Trim
markers

68 Corel VideoStudio Pro User Guide
To use Split by Scene on a DV AVI or MPEG file
1Go to the Edit Step and select a captured DV AVI file or an MPEG file
on the Timeline.
2Click Split by Scene button in the Options Panel. This will open
the Scenes dialog box.
3Choose your preferred scan method (DV Recording Time Scan or
Frame Content).
4Click Options. In the Scene Scanning Sensitivity dialog box, drag the
slider to set the Sensitivity level. A higher value means more precision
in the scene detection.
5Click OK.
6Click Scan. Corel VideoStudio Pro then scans through the video file
and lists all the detected scenes.
You may merge some of the detected scenes into a single clip.
Simply select all the scenes that you want to join together then click
Join. The plus sign (+) and a number indicates how many scenes are
merged into that particular clip. Click Split to undo any Join actions
that you have done.
7Click OK to split the video.
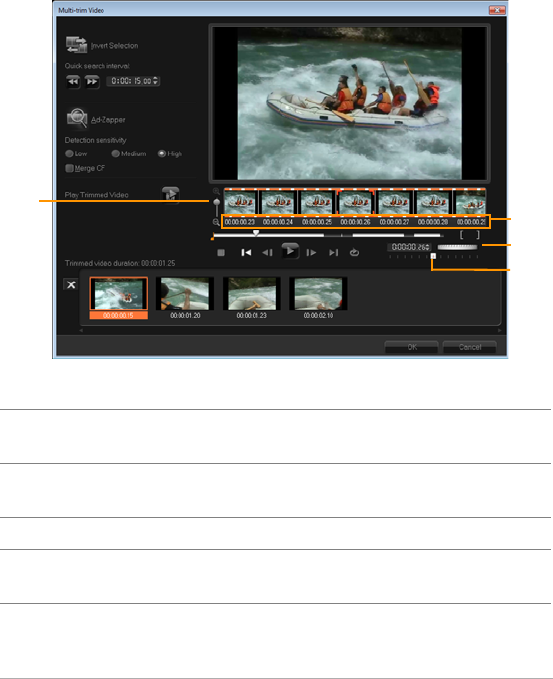
Edit 69
Multi-trimming your video
The Multi-trim Video feature is another method for breaking down a clip
into multiple segments. While Split by Scene is automatically done by the
program, Multi-trim Video gives you complete control over the clips you
wish to extract, making it even easier to include only the scenes you want.
Part Description
1 - Timeline zoom Drag up and down to sub-divide a video clip
into frames per second.
2 - AccuCut
Timeline
Scan a video clip frame by frame for accurate
mark-in and mark-out positions.
3 - Jog Wheel Use to scroll to different parts of the clip.
4 - Playback Speed
Control
Preview the clip at different playback speeds.
1
2
3
4

70 Corel VideoStudio Pro User Guide
To trim a video file into multiple clips
1Go to the Edit Step and select the clip that you want to trim.
2Double click the clip to open the Options Panel.
3Click Multi-trim Video in the Options Panel.
4View the whole clip first by clicking Play to determine how you want
to mark segments in the Multi-trim Video dialog box.
5Choose the number of frames to display by dragging the Timeline
zoom. You can choose to display the smallest subdivision of one
frame per second.
6Drag the Scrubber until you get to the part of the video that you
want to use as the beginning frame of the first segment. Click Set
Mark-in button .
7Drag the Scrubber again, this time, to the point where you want the
segment to end. Click Set Mark-out button .
8Do steps 4 and 5 repeatedly until you have marked all the segments
you want keep or remove.
Note: To mark segments in and out, you can press [F3] and [F4]
while playing the video. You can also click the Invert Selection button
or press [Alt+I] to toggle between marking segments that you
want to retain or marking segments that you want taken out from
the clip.
Quick search interval allows you to set a fixed interval between
frames and browse through the movie using the set value.
9Click OK when finished. The video segments that you kept are then
inserted onto the Timeline.
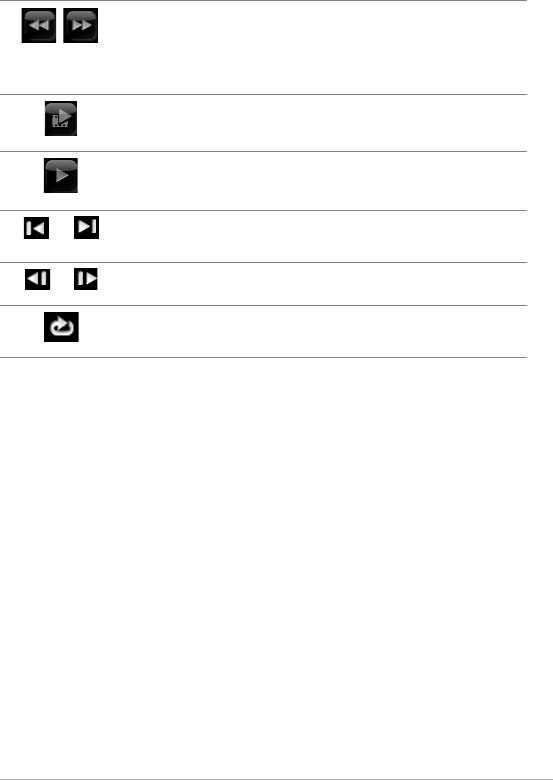
Edit 71
Saving trimmed clips
Frequently, when you make changes (i.e., after auto-splitting clips using
Split by Scene, extracting clips using Multi-trim Video, or manually
trimming clips), you may wish to make a permanent change to the clip
and save the edited file. Corel VideoStudio Pro gives you a margin of
safety since it saves the trimmed video to a new file and does not alter the
original file.
To save a trimmed clip
1In the Storyboard View, Timeline View, or the Library, select a
trimmed clip.
• Click File > Save Trimmed Video.
Navigation controls in the Multi-trim Video dialog box
Reverses or advances through the video in fixed
increments. By default, these buttons move up or
down through the video in increments of 15
seconds.
Plays a preview of the final trimmed video.
Plays the video file. Hold [Shift] then click to play only
the selected segments.
Moves to the start or end frame of a trimmed
segment.
Moves to the previous/next frame in the video.
Repeats playback of video
[F5] [F6]
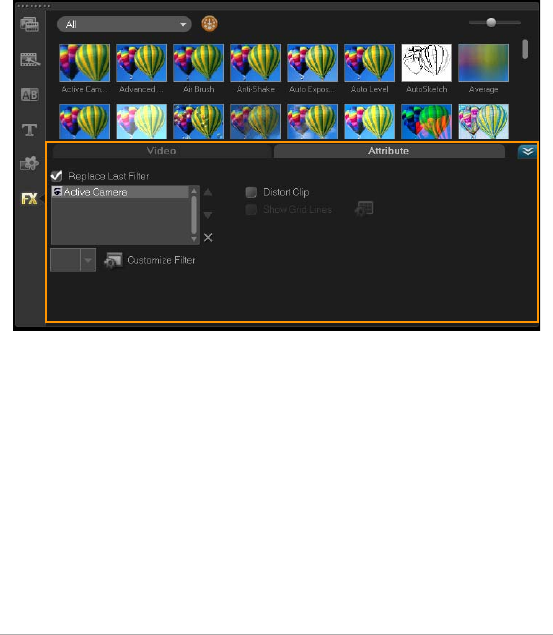
72 Corel VideoStudio Pro User Guide
The Edit Step Options Panel
The Options Panel in the Edit Step allows you to modify the media,
transitions, titles, graphics, animation, and filters that you add to the
Timeline.
The elements that you use in your project or effects that you apply to your
clips can be modified or fine tuned in the Attribute tab.
Video: Video tab
•Video Duration — Displays the duration of the selected clip in
hours:minutes:seconds:frames. You can trim the selected clip by
changing the clip duration.
•Clip volume — Allows you to adjust the volume of the audio
segment of your video.
•Mute — Silences the audio segment of your video without deleting
it.

Edit 73
•Fade-in/out — Gradually increases/decreases the volume of the clip
for a smooth transition. Select Settings > Preferences > Edit to set
the fade-in/out duration.
•Rotate — Rotates the video clip.
•Color Correction — Allows you to adjust the hue, saturation,
brightness, contrast, and gamma of the video clip. You can also
adjust the White balance of the video or photo clip or make auto
tone adjustments.
•Speed/Time-lapse — Allows you to adjust the playback speed of your
clip and apply Time-lapse and Strobe effects.
•Reverse video — Plays the video backward.
•Take a Snapshot — Saves the current frame as a new image file and
places it in the Photo Library. All enhancements made to the file are
discarded before saving.
•Split Audio — Allows you to separate the audio from a video file and
place it on the Voice Track.
•Split by Scene — Splits a captured DV AVI file based on the shooting
date and time, or the changes in video content (i.e., motion change,
camera shifting, brightness change, etc.).
•Multi-trim Video — Allows you to choose desired segments from a
video file and extract them.
Photo: Photo tab
•Duration — Sets the duration of the selected image clip.
•Rotate — Rotates the image clip.
•Color Correction — Allows you to adjust the hue, saturation,
brightness, contrast, and gamma of the image. You can also adjust
the White balance of the video or image clip or make auto tone
adjustments.

74 Corel VideoStudio Pro User Guide
•Resampling Option — Lets you modify a photo’s aspect ratio when a
transition or effect is applied.
•Pan & Zoom — Applies the Pan & Zoom effect to the current image.
•Presets — Provides various Pan & Zoom presets. Choose a preset
from the drop-down list.
•Customize — Allows you to define how to pan and zoom the
current image.
Color: Color tab
•Duration — Sets the duration of the selected color clip.
•Color Picker — Click the color box to adjust the color.
Attribute tab
•Mask & Chroma Key — Allows you to apply overlay options such as
mask, chroma key, and transparency.
•Alignment Options — Allows you to adjust object position in
preview window. Set the option through the Alignment Options
pop-up menu.
•Replace last filter — Allows the last filter applied to a clip to be
replaced when you drag a new filter onto the clip. Clear this option if
you want to add multiple filters to your clips.
•Applied filters — Lists the video filters that were applied to a clip.
Click or to arrange the order of the filters; click to remove
a filter.
•Presets — Provides various filter presets. Choose a preset from the
drop-down list.
•Customize Filter — Allows you to define the behavior of the filter
throughout the clip.

Edit 75
•Direction/Style — Allows you to set the direction and style of entry/
exit of the clip. This can be set to static, top/bottom, left/right, top-
left/top-right, bottom-left/bottom-right.
As for the style, you can set direction of entry/exit of clips through:
Rotate before/after pause duration and Fade in/out motion effect.
•Distort clip — Allows you to modify the size and proportions of the
clip.
•Show grid lines — Select to display the grid lines. Click to open a
dialog box where you can specify settings for the grid lines.
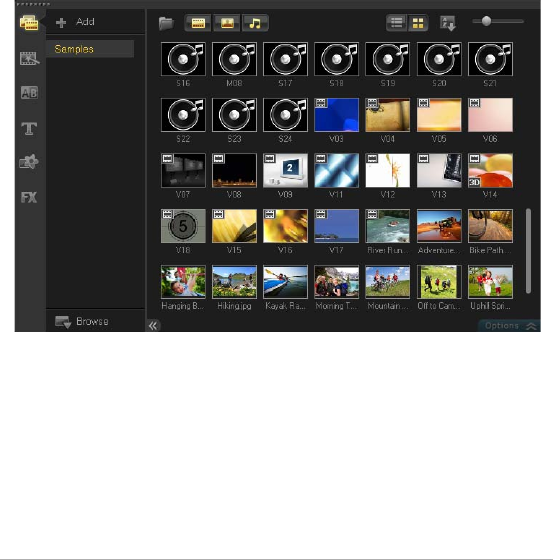
76 Corel VideoStudio Pro User Guide
Assets and Effects
Video and photo files, transitions, titles, graphics, filters, and audio files
are common elements in a movie production. The Library Panel provides
quick access to these elements. Clicking a button in the Library Panel
displays a specific media type or effect in the Library.
Media
The Media Library displays a selection of photos, videos and audio in the
Library. These elements can be added to the corresponding tracks.

Edit 77
Video format support:
Input: AVI, MPEG-1, MPEG-2, HDV, AVCHD, M2T, MPEG-4, M4V, H.264,
QuickTime®, Windows Media® Format, MOD (JVC MOD File Format),
M2TS, TOD, BDMV, 3GPP, 3GPP2, DVR-MS, FLI, FLC, FLX, SWF, DivX®*,
RM*, UIS, UISX, WebM
Output: DVAVI, MPEG-2, MPEG-4, H.264, QuickTime, Windows Media
Format, 3GP, 3GP2, AVCHD, BDMV, FLI, FLC, FLX, RM*, DivX*, UIS, UISX,
WebM
*Drivers need to be installed to enable this option.
Image format support:
Input: BMP, CLP, CUR, EPS, FAX, FPX, GIF87a, IFF, IMG, JP2, JPC, JPG,
MAC, MPO, PCD, PCT, PIC, PNG, PSD, PXR, RAS, SCT, SHG, TGA, TIF/TIFF,
UFO, UFP, WMF, PSPImage, Camera RAW (RAW/CRW/CR2/BAY/RAF/DCR/
MRW/NEF/ORF/PEF/X3F/SRF/ERF/DNG/KDC/D25/HDR/SR2/ARW/NRW/
OUT/TIF/MOS/FFF), 001, DCS, DCX, ICO, MSP, PBM, PCX, PGM, PPM, SCI,
WBM, WBMP
Output: BMP, JPG
Audio format support:
Input: Dolby Digital® Stereo, Dolby Digital®5.1, MP3, MPA, QuickTime,
WAV, Windows Media® Audio, MP4, M4A, Aiff, AU, CDA, RM, AMR,
AAC, OGG
Output: Dolby Digital Stereo, Dolby Digital 5.1, M4A, OGG, WAV, WMA
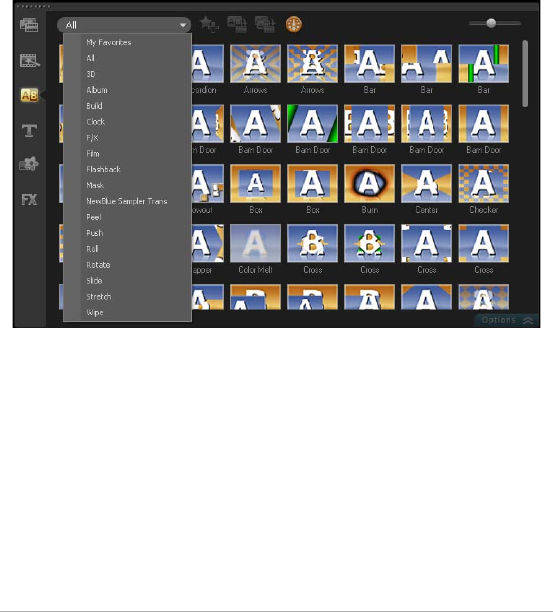
78 Corel VideoStudio Pro User Guide
Transitions
Transitions can help your movie switch smoothly from one scene to the
next. They can be applied to single clips or in between clips on all tracks
in the Timeline. Effective use of this feature can add a professional touch
to your movie.
There are 16 types of transitions in the Library. For every type, you choose
a specific preset effect by using the thumbnails.
To add a transition
•In the Corel VideoStudio Pro Editor, do one of the following:
• Click Transitions in the Library and select from various categories of
transitions from the drop-down list. Scroll through the transitions
in the Library. Select and drag an effect between two video clips in
the Timeline. Drop your effect and it will snap into place. You can
only drag and drop one transition at a time.
• Double-click a transition in the Library to automatically insert it
into the first empty transition slot between two clips. Repeat this
process to insert a transition at the next cut. To replace a transition

Edit 79
in your project, drag the new transition onto the transition
thumbnail for replacement in the Storyboard View or Timeline
View.
• Overlap two clips in the Timeline.
To add a transition automatically
1Select Settings > Preferences > Edit, then select Automatically add
transition effect.
2Choose a transition effect from the Default transition effect drop-
down menu.
3The default transition is added automatically between clips.
Note: A default transition, however, is always added automatically
between overlapping clips, whether the Automatically add transition
effect in Preferences is enabled or not.
To add a selected transition to all video track clips
1Select the thumbnail of the transition.
2Click the Apply current effect to video track button or right-click
on the transition and select Apply current effect to video track.
To add random transitions to all video track clips
• Click the Apply random effect(s) to video track button .
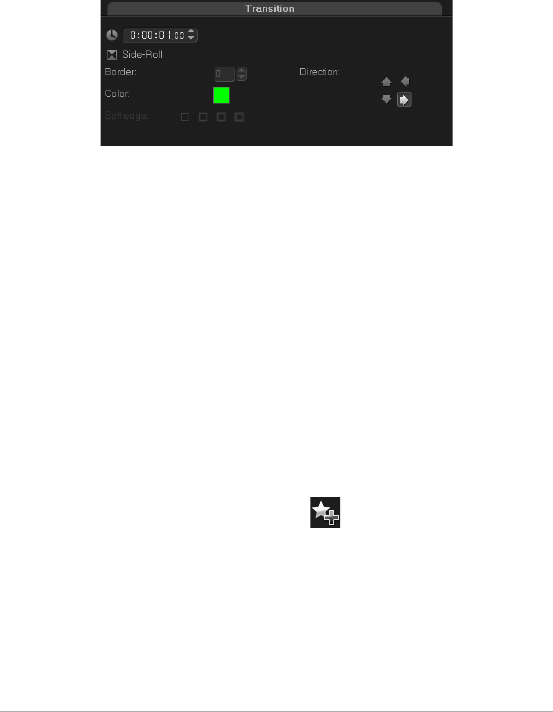
80 Corel VideoStudio Pro User Guide
To customize a preset transition
1Double-click a transition effect in the Timeline.
2Modify the attributes or behavior of the transition in the Options
Panel.
To delete a transition
• Click on the transition to be removed and press [Delete].
• Right-click on the transition and select Delete.
• Drag to separate two clips with transition effect.
Adding transitions to My Favorites
You can collect your favorite transitions from different categories and
save them in the My Favorites folder. This way, you can easily find the
transitions you use most often.
To save a transition in My Favorites
1Select the thumbnail of the transition.
2Click the Add to My Favorites button to add the transition in the
Favorites Library list.

Edit 81
Titles
Corel VideoStudio Pro lets you create professional-looking titles,
complete with special effects, in minutes. While a picture may be worth
a thousand words, the text in your video production (i.e., subtitles,
opening and closing credits, etc.) adds to the clarity of your movie.
Corel VideoStudio Pro allows you to add text either in multiple text boxes
or in a single text box. Using multiple text boxes gives you the flexibility
to position the different words of your text anywhere on the video frame
and allows you to arrange the stacking order of the text. A single text box
works well when you are creating opening titles and end credits for your
projects.
To add multiple titles directly on the Preview Window
1Click Title in the Library Panel.
2Double-click the Preview Window.
3In the Edit tab, select Multiple titles.
4Use the buttons in the Navigation Panel to scan your movie and
select the frame where you want to add the title.
5Double-click the Preview Window and type in your text.
Click outside the text box when you are done typing. To add another
set of text, double-click again on the Preview Window.
You can also add a preset title from the Library and modify the text
on the Preview Window by dragging a preset title thumbnail from
the Library to the Title Track. and modifying the text on the Preview
Window.

82 Corel VideoStudio Pro User Guide
You can add multiple titles and modify the attributes of each title.
Title clips can be placed on both Title and Video tracks.
To add a preset title to your project
1Click Title in the Library Panel.
2Drag and drop the preset text onto the Title Track.
Note: You can modify a preset title by double-clicking it on the
Preview Window and entering new text. Open the Options Panel to
edit the title attributes.
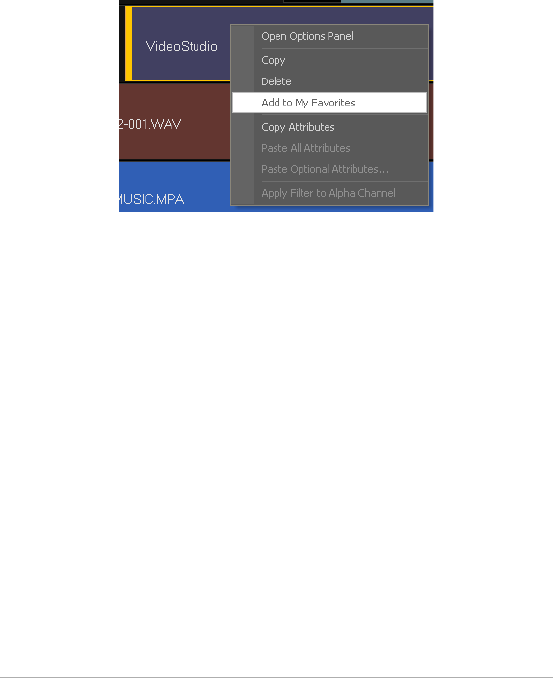
Edit 83
Saving your titles to My Favorites in the Library
If you still intend to use the title you have created for other projects, it is
recommended that you save to My Favorites in the Library. You can drag
a title to the Library to save it or right-click the title clip in the Timeline
and click Add to My Favorites.
The Title Safe Area
It is recommended to keep your text within the title safe area. The title
safe area is the rectangular white outline on the Preview Window.
Keeping the text within the bounds of the title safe area will make sure
the title does not get cut off at the edges.
To show or hide the title safe area
1Click Settings > Preferences.
2Under the General tab, click Display title safe area on Preview
Window.
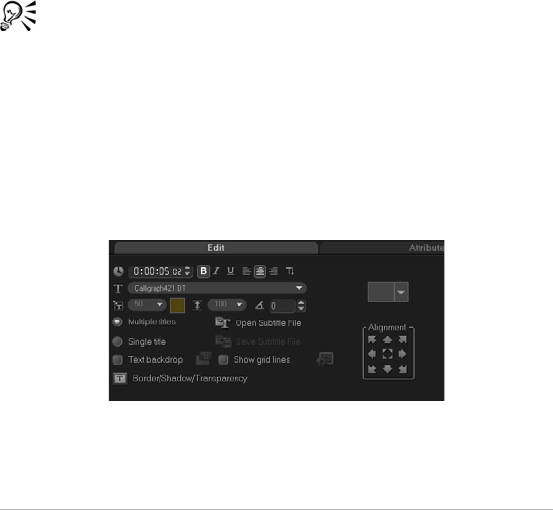
84 Corel VideoStudio Pro User Guide
Editing titles
To edit titles
1Select the title clip on the Title Track and click the Preview Window to
enable title editing.
2Modify the properties of the title clip by using the different options
in the Edit and Attribute tabs of the Options Panel.
To adjust the duration of title clips
• Do one of the following:
• Drag the handles of the clip
• Enter a Duration value in the Edit tab.
To see how the title appears on the underlying video clip, select
the title clip and then click Play Trimmed Clip or drag the Scrubber.
Modifying text attributes
Modify the attributes of your text, such as font face, style, size, and more,
by using the available settings in the Edit tab of the Title Library. Click Title
in the Library then go to the Edit tab to apply options available for
modifying text attributes.
More options allow you to set the style and alignment, apply Border,
Shadow and Transparency and add a Text backdrop to your text.

Edit 85
You can apply preset styles to your title by clicking the
Title Style Preset button.
A text backdrop superimposes your text on an ellipse, rounded rectangle,
curve-edged rectangle and a rectangle color bar.
To add a text backdrop
1Click the Customize text backdrop attributes button to open the
Text Bac kdrop dialog box.
2Choose a solid background bar or shapes that fit with text.
3Choose the color of your backdrop. Use a solid or gradient color and
set the transparency.
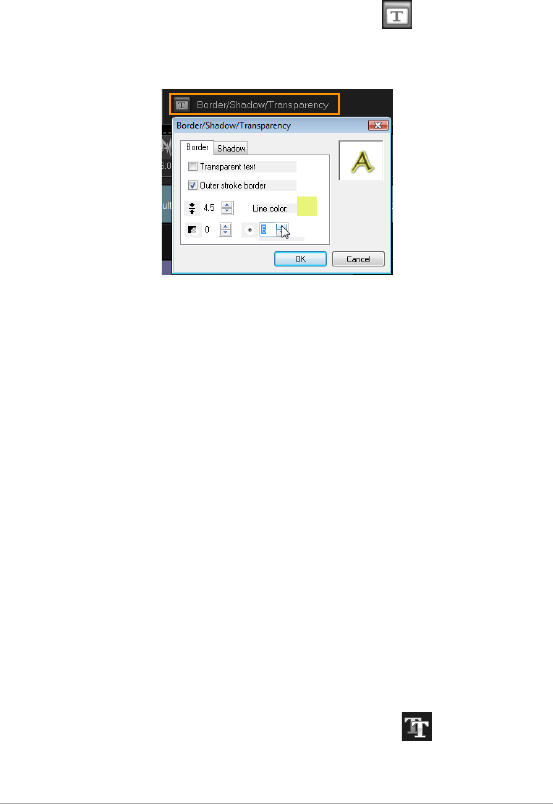
86 Corel VideoStudio Pro User Guide
To modify text border, transparency, and add shadows
• Click the Border/Shadow/Transparency button in the Options
Panel and set attributes using the Border/Shadow/Transparency
dialog box.
To rotate text in the Preview Window
1Select a text to display the yellow and purple handles in the Preview
Window.
2Click and drag a purple handle to the position you want.
Note: You can also rotate text using the Options Panel. In the Edit
tab, specify a value in Rotate by degree to apply a more precise angle
of rotation.
Applying animation
Apply motion to your text using title animation tools, such as Fade,
Moving Path, and Drop.
To apply animation to the current text
1In the Attribute tab, select Animation and Apply.
2Select the animation category from the Type drop-down list and
select the specific preset animation from the box under Type.
3Click the Customize animation attributes button to open a
dialog box where you can specify animation attributes.

Edit 87
4In some animation effects, you can drag the Pause duration handles
to specify how long the text will pause after it enters and before it
exits the screen.
Pause duration handles
Applying title effects
Apply filters to your text using preset Title Effects such as Bubble, Mosaic,
and Ripple. The title filters are in a separate Title Effects category.
To apply title filters to the current text
1Click Filter and choose Title Effects in the Gallery drop-down menu.
The Library displays the thumbnails of various filters under the Title
Effects category.
2Select the clip in the Timeline then choose the title filter from
thumbnails shown in the Library.
3Drag and drop the title filter onto your clip in the Title Track.
Note: By default, the filter applied to a clip is always replaced with
the new filter dragged onto the clip. In the Attribute tab of the
Options Panel, clear Replace last filter to apply multiple filters to a
single title.
4Click Customize Filter in the Attribute tab of the Options Panel to
customize the attributes of the title filter. Available options depend
on the selected filter.
5Preview how your clip looks with the video filter applied to it using
the Navigator.
Note: When there is more than one title filter applied to a clip, you
can change the order of filters by clicking or . Changing the
order of the title filters will have different effects on your clip.
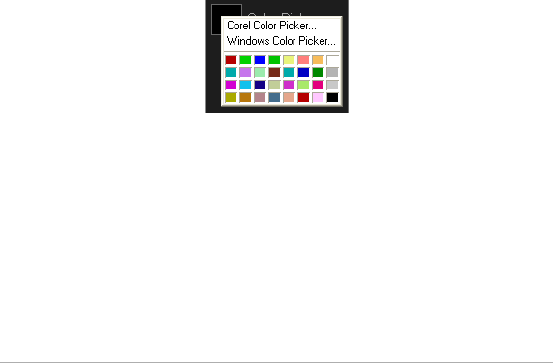
88 Corel VideoStudio Pro User Guide
Graphic
The Graphic Library contains color clips, objects, frames and flash
animation.
Adding Color Clips
Color clips are solid colored backgrounds. You can use the preset color
clips or create new color clips in the Library. For example, you can insert
a black color clip as background for end credits.
To select a color clip in the Color Library
1Select Graphic from the Library Panel and choose Color from the
Library drop-down list.
2Choose the desired color as displayed in the Library and drag to the
Video or Overlay Track.
3To add a color that is not in the Library, click the color box beside the
color picker. Here, you can select a color either from Corel Color
Picker or the Windows Color Picker.
4Set the Duration of the color clip in the Options Panel.
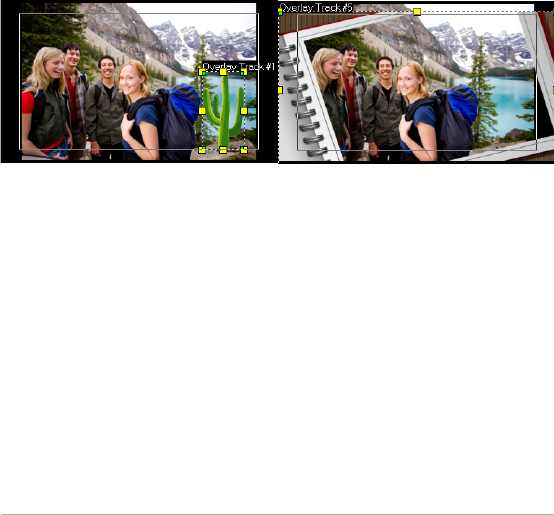
Edit 89
Adding Objects or Frames
Add decorative objects or frames to your videos as Overlay clips.
To add an object or frame
1Select Graphic in the Library.
2From the drop-down list, you can choose to add Object or Frame.
3Select an object or frame and drag it onto the Overlay Track in the
Timeline.
4Click the Attribute tab to resize and reposition the object or frame.
Note: You can also resize an object by double-clicking it on the
Preview Window and dragging the yellow handles.
Object Frame

90 Corel VideoStudio Pro User Guide
Adding Flash animations
Give more life to your videos by adding Flash animations as Overlay clips.
To add a Flash animation
1From the drop-down list in the Graphic Library, select Flash
Animation.
2Select a Flash animation then drag it onto the Overlay Track.
3Click the Options button.
4In the Attribute tab, customize your Flash Animation.
Customizing objects, frames and animations
Use the various options available in the Edit and Attribute tabs to
customize your object and frame. You can add animation, apply
transparency, resize the object or frame, and more.
Filters
Video filters are effects that you can apply to clips in order to change their
style or appearance. Using filters is a creative way to enhance your clips,
or correct flaws in your video. For example, you can make a clip look like
a painting or improve its color balance.
Filters can be applied alone or in combination to the Video, Overlay, Title
and Audio Tracks.

Edit 91
To apply a video filter to a photo or video clip in the Video Track
1Click Filter in the Library to display the thumbnails of various filter
samples.
2Select the clip in the Timeline then choose the video filter from
thumbnails shown in the Library.
3Drag and drop the video filter onto your clip in the Video Track.
4Click Customize Filter in the Attribute tab of the Options Panel to
customize the attributes of the video filter. Available options depend
on the selected filter.
5Preview how your clip looks with the video filter applied to it using
the Navigator.
Applying multiple filters
By default, the filter applied to a clip is always replaced with the new filter
dragged onto the clip. Uncheck Replace last filter to apply multiple filters
to a single clip. Corel VideoStudio Pro allows you to apply a maximum of
five filters to a single clip.
You can also choose the filter to be previewed through the selection in
the view toggle. In the event that you choose to render your project, only
enabled filters will be included in your movie.
When there is more than one video filter applied to a clip, you can change
the order of filters by clicking or . Changing the order of the video
filters will have different effects on your clip.
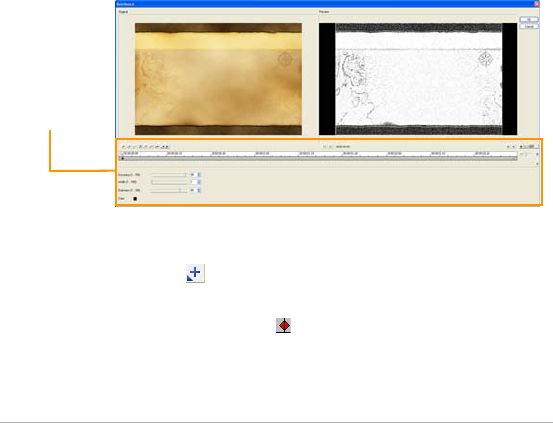
92 Corel VideoStudio Pro User Guide
Key frame settings
Corel VideoStudio Pro allows you to customize video filters in a variety of
ways, such as by adding key frames to your clips. Key frames let you
specify a different attribute or behavior for your video filter. This gives you
the flexibility to determine how your video filter will look at any point in
a clip and to vary the intensity of an effect over time.
To set key frames for your clips
1Drag and drop a video filter from the Library onto a clip on the
Timeline.
2Click Customize Filter. The dialog box for the video filter appears.
Note: The available settings are different for each video filter.
3In the Key frame controls, drag the Scrubber or use the arrows to go
to the frame where you'd like to change the attributes of your video
filter.
Note: You can use the mouse wheel to zoom in or out of the
Timeline Control bar for precise placement of key frames.
4Click Add key frame to set that frame as a key frame in the clip.
You can adjust the video filter settings for that particular frame.
Note: A diamond-shaped mark on the Timeline Control bar
appears and indicates that the frame is a key frame in the clip.
Key frame
Controls

Edit 93
5Repeat steps 3 and 4 to add more key frames to your clip.
6Use the Timeline controls to edit or to go to a key frame in the clip.
• To delete a key frame, click Remove key frame .
• Click Reverse key frames to reverse the sequence of key frames
on the Timeline such that the sequence starts with the last key
frame and ends with the first key frame.
• To move to the succeeding key frame, click Go to next key frame
.
• To move to the key frame prior to the one selected, click Go to
previous key frame .
7Click Fade In and Fade Out to establish fade points in your
filter.
8Adjust the video filter settings according to your preferences.
9Preview the changes you've made by clicking Play in the Preview
Window of the dialog box.
10 Click OK when finished.
Note: To preview the clip with the video filter applied, use the
Preview Window or an external device such as a TV monitor or DV
camcorder.
To choose the display medium, click , then click to open the
Preview Playback Options dialog box.

94 Corel VideoStudio Pro User Guide
Audio
Sounds are one of the elements that determine the success of your video
production. Corel VideoStudio Pro allows you to add both narration and
music to your project.
The Audio feature in Corel VideoStudio Pro consists of two tracks: Voice
and Music. You can insert narration on the Voice Track and background
music or sound effects on the Music Track.
For more information on working with audio files, see Adding audio files,
Adding voice-over narration, and Adding background music.
Copying and pasting media clip attributes
You can use the attributes of one clip and apply it to a different clip in
your movie project. When working with audio, you can also add filters to
audio clips in the Music & Voice Options Panel in the Edit Step.
To copy and paste media clip attributes
1Right-click the source clip and choose Copy Attributes,
2Right-click the target clip and choose Paste All Attributes.
You can also choose the attributes to paste into another media
clip. Right-click the target clip and select Paste Optional
Attributes. Choose the attributes you want to paste into the target
clip and click OK.

Edit 95
Taking snapshots in the Edit Step
You can take a photo snapshot in the Edit Step by selecting a specific
frame on the Timeline and saving it as an image file.
To capture photos
1Click Settings > Preferences > Capture.
Choose Bitmap or JPEG as the Snapshot format.
Note: If you select JPEG, set the Snapshot quality.
2Click OK.
3Select a video clip in your project.
4Drag the Scrubber to the frame you want to capture.
5Click Edit > Take a Snapshot. The photo snapshot is automatically
added to the Library and saved to your working folder.
You can also take snapshots of the current position of the
Scrubber by choosing Snapshot from Record/Capture Option.
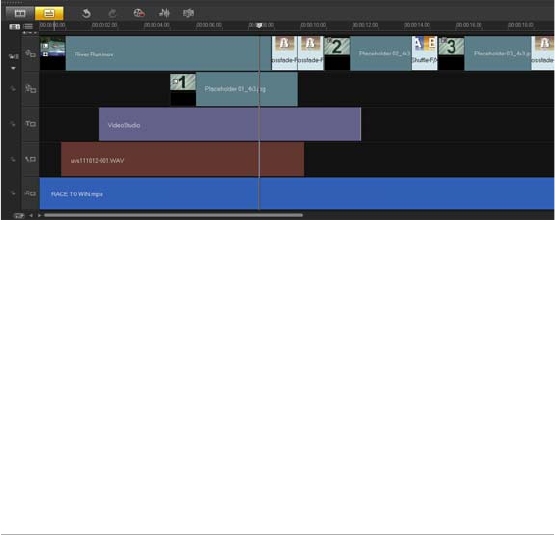
96 Corel VideoStudio Pro User Guide
Ripple Editing
Ripple Editing allows you to insert or remove clips while automatically
moving other clips (including empty spaces) accordingly, to make room
for it on the Timeline. Ripple editing begins after the insertion point. Use
this mode to maintain the original synchronization of tracks when
inserting or deleting clips.
This feature is useful when you want other titles or tracks to play along
with a particular moment in the video. This also makes editing more
efficient by keeping all tracks synchronized, using the video track as
reference.
Original Timeline
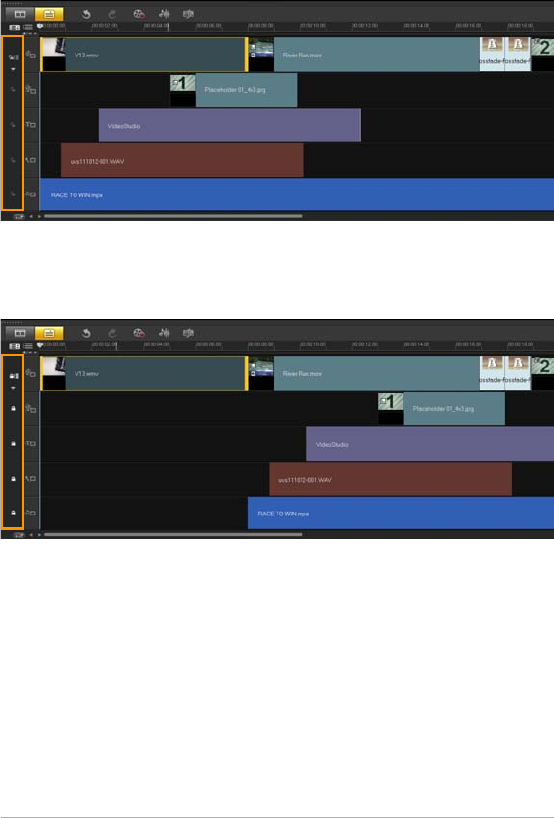
Edit 97
Timeline after a clip is inserted in the Video Track with
Ripple Editing disabled. Only the clips on the Video Track
are moved when a new clip is inserted.
Timeline after a clip is inserted in the Video Track with
Ripple Editing enabled on some tracks. Clips on the
tracks with Ripple Editing enabled move when a new
clip is inserted to maintain original synchronization.

98 Corel VideoStudio Pro User Guide
To insert clips in Ripple Editing mode
1Click Enable/Disable Ripple Editing to activate the panel, then select
the corresponding box for each track where you want to apply
Ripple Editing.
2Drag the clip to insert from the Library to the desired position on the
Timeline. As soon as the new clip is in place, all clips where Ripple
Editing is applied will shift accordingly while maintaining their track
positions relative to one another.
Note: Ripple Editing also works in removing clips.
Enabling and disabling tracks
You can show or hide tracks from playback or when you render your
video. You can also see the effect of each track in a project without having
to delete and reimport media clips repeatedly.
The eye on the Track buttons indicate the status of each track.
When enabled, an open eye appears. When disabled, the closed
eye appears and the selected track is grayed out.
To enab l e tracks
• Click the Track button of the track that you want to show.
The track is enabled and included when you render or play your
project.
To disable tracks
• Click the Track button of the track that you want to hide.
The track is disabled when you render or play your project.

Edit 99
Editing with Smart Proxy
The main purpose of the Smart Proxy feature is to have a more fluid
editing experience when working with large, high resolution video files.
When you edit and preview your project, proxy files will be used as
substitutes for their large video source counterparts. This feature works
especially for handling video footage shot in HD, which can take up a lot
of your computer’s resources to process. Whereas when you render a
video file, the original video source files will be used.
Proxy files are lower resolution working copies of video files. They are
reduced in resolution or compression bit rate -- to speed up editing of
high definition files such as HDV and AVCHD. Proxy files are source-
dependent rather than project-dependent. In other words, proxy files can
be shared among different projects. Smart Proxy can also be used with
other video file formats and is not limited to HD files.
To enable the creation of proxy files
• Click Settings > Smart Proxy Manager > Enable Smart Proxy.
Note: The Smart Proxy feature is enabled by default if the
computer’s hardware can support the feature. However, you can
force the creation of proxies at any time by right-clicking on a file, or
multiple files in the Timeline, and choose Create Smart Proxy File.
To set the environment when smart proxy files will be generated
1Select Settings > Smart Proxy Manager > Settings.
2In the Performance tab of the Preferences dialog box, you can
customize Smart Proxy settings.
The Smart Proxy File Manager lists the source and proxy files. You
can use this manager to delete proxy files you no longer need.
The Smart Proxy Queue Manager shows the files for which proxies
will be generated.

100 Corel VideoStudio Pro User Guide
In the case of HDV and AVCHD files, Smart Proxy is automatically
activated during capture and use of these files in your project.
Once Smart Proxy is enabled, proxy files will automatically be created and
used in your project whenever you insert video files into the Timeline.
To view the list of video files to be generated as proxy files
1Go to Settings > Smart Proxy Manager > Smart Proxy Queue
Manager.
2Select the files you want to include in your queue.
3Click OK.
Converting multiple files
Batch Convert allows you to convert a large number of files to another
format in sequence.
To do Batch Convert
1Click File > Batch Convert.
2Click Add and then choose the files you want to convert.
3Select an output folder in Save in folder.
4In Save as type, choose your desired output type.
5Click Convert.
The result is shown in the Tas k R e por t dialog box. Click OK to finish.
Enhancing clips
Corel VideoStudio Pro lets you improve the appearance of a video or
image clip by adjusting its current properties such as its color settings in
Color Correction.

Edit 101
Adjusting color and brightness
Adjust color and brightness settings of photos and video on the Timeline
by clicking Color Correction in the Options Panel.
To adjust color and brightness
1Select the video or image clip to enhance on the Timeline.
2Drag the sliders to adjust the Hue, Saturation, Brightness, Contrast
or Gamma of the clip.
3Watch the Preview Window to see how the new settings affect the
image.
Note: Double-click the appropriate slider to reset the original color
setting of the clip.
Adjusting white balance
White balance restores the natural color temperature of an image by
removing unwanted color casts due to conflicting light sources and
incorrect camera settings.
For example, an object illuminated with incandescent lights may turn out
too reddish or yellowish in an image or video clip. To successfully achieve
a natural look, you need to identify a reference point in your image which
represents the color white. Corel VideoStudio Pro gives you different
options in selecting the white point:
•Auto — Automatically chooses a white point that is well-matched
with the overall color of your image.
•Pick Color — Allows you to manually select the white point in the
image. Use the Eyedropper Tool to pick a reference area that should
be white or neutral gray.
•White balance presets — Automatically selects white point by
matching specific light conditions or scenarios.
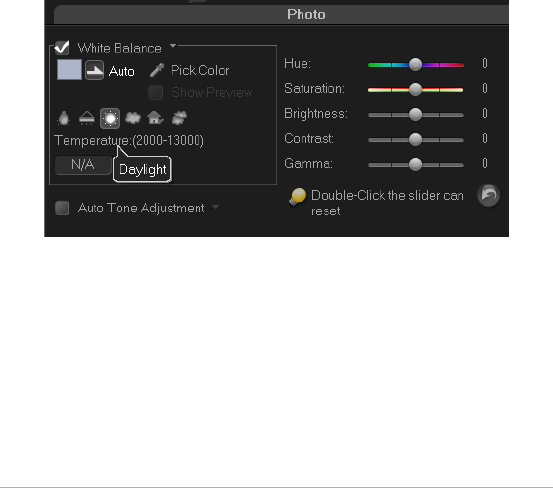
102 Corel VideoStudio Pro User Guide
•Temperature — Allows you to specify color temperature of light
sources in Kelvin (K). Lower values indicate Tungsten, Fluorescent and
Daylight scenarios while Cloudy, Shade and Overcast fall under high
color temperature.
To adjust White balance
1Select an video or photo on the Timeline or the Library.
2In the Video or Photo tab of the Edit Step Options Panel, click Color
Correction.
3Check the White balance option box.
4Determine how you want to identify the white point. Choose among
the different options (Auto, Pick color, White balance presets or
Temperature).
5If you have selected Pick color, choose Show preview to display a
preview area in the Options Panel.
6When you drag your cursor to the Preview area, it will change to an
eyedropper icon.
7Click to identify a reference point in your image which represents the
color white.
8Watch the Preview Window to see how the new settings affect the
image.

Edit 103
Note: Click the White balance drop-down arrow to display more
color adjustments you can use. Select either Vivid Color or Normal
Color for the color intensity. As for the level of sensitivity of White
balance, you can choose any of the following options: Weaker,
Normal and Stronger.
Adjusting tones
To adjust the tone quality of your video or image clips
• Click Color Correction in the Edit Step Options Panel and select Auto
Tone Adjustment.
Note: You can indicate if you want the clip as Brightest, Brighter,
Normal, Darker or Darkest by clicking the Auto Tone Adjustment
drop-down menu.
Applying pan and zoom effect
Pan & Zoom is applied to photos, and it emulates the pan and zoom
movements of a video camera. This is known as the “Ken Burns effect”.
To apply pan and zoom effect to photos
• Right-click the photo in the Timeline and select Auto Pan & Zoom.
Note: You can also apply pan and zoom to a photo by clicking Pan &
Zoom in the Photo tab of the Options Panel.
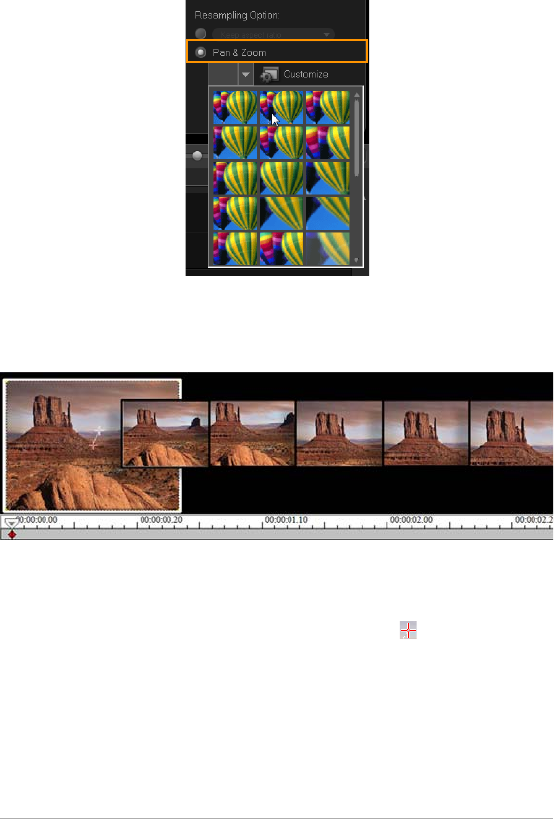
104 Corel VideoStudio Pro User Guide
You can customize a pan and zoom effect. The procedure below shows
an example of how to start zoomed in on a subject, then pan and zoom
out to show the whole image.
To customize pan and zoom effect
1In the Photo tab, select Customize under Pan & Zoom.
2In the Pan and Zoom dialog box, the crosshairs in the Original
Window represent the key frames in the image clip where settings
can be customized to produce the pan and zoom effect.
3Drag the Start key frame, represented by crosshairs in the Image
Window, to the area where you want to focus.
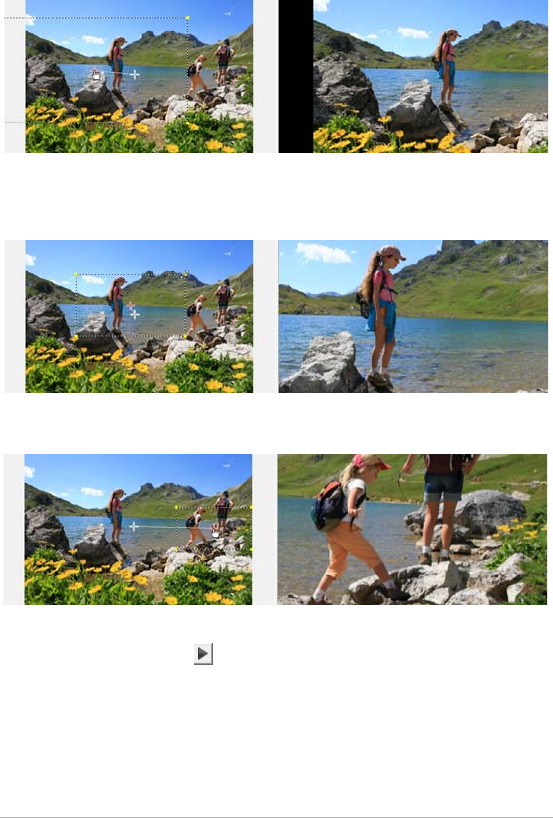
Edit 105
4Zoom in on the area by minimizing the marquee box or by increasing
the Zoom ratio.
5Drag crosshairs of the End key frame to your desired final point.
6Click the Play button to preview the effect.
7Click OK to apply the effect to the image.
Additional options in the Pan and Zoom dialog box allow you to further
customize this effect. Click the Anchor boxes to move the marquee box
to fixed positions in the Original Window.
Image Preview
Original Preview
Preview
Original
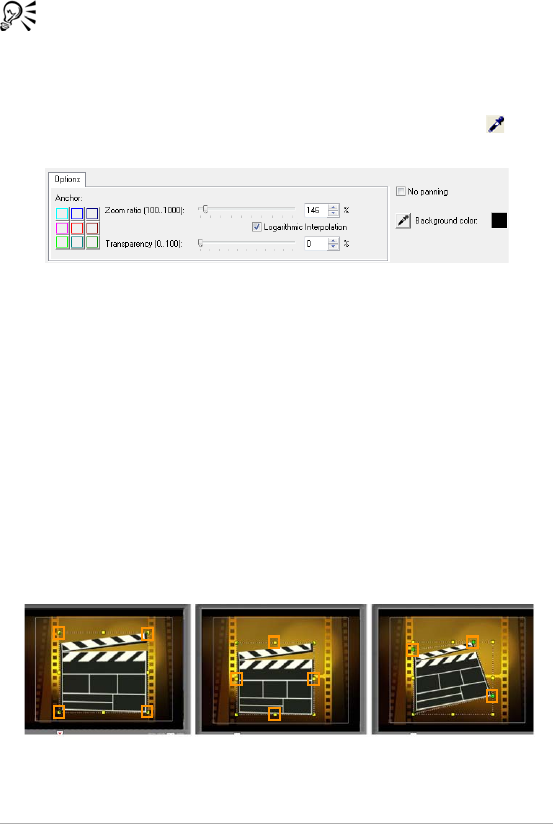
106 Corel VideoStudio Pro User Guide
To zoom in or out of a fixed area without panning the image,
select No panning.
To include a fade-in/out effect, increase the Transparency. The
image will fade to the Background color. Click the color box to
choose a background color, or use the eye dropper tool to
select a color on the Image Window.
Resizing and distorting clips
To resize or distort a clip
1Select a clip in the Video Track then click the Attribute tab in the
Options Panel.
2Check the Distort clip option box. The yellow handles will appear. Do
the following steps:
• Drag yellow handles at the corners to resize the clip proportionally
(A).
• Drag yellow handles at the sides to resize without maintaining
proportions (B).
• Drag the green handles at the corners to skew the clip (C).
ABC
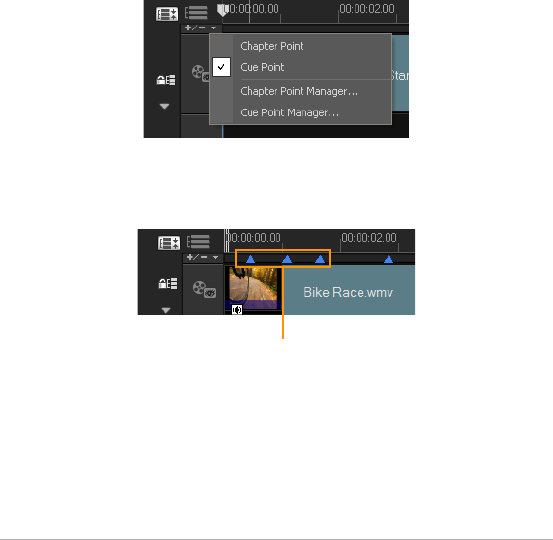
Edit 107
Adding cues and chapters
Adding cues and chapters helps you to navigate through a project and
allows you to place comments on your Timeline. These cue and chapter
marks are used mainly as project guides or disc menu chapters and
interactive links in HTML5 projects.
Cue points serve as markers that help in lining up media clips in a project.
Chapter points specify disc menu chapters or hyperlinks.
To add project cues
1Click the Chapter/Cue Menu.
2Click Cue Point.
3Drag the cursor to where you want to add a cue point and click the
bar below the Timeline ruler. Notice that a blue arrow icon is added.
Cue points
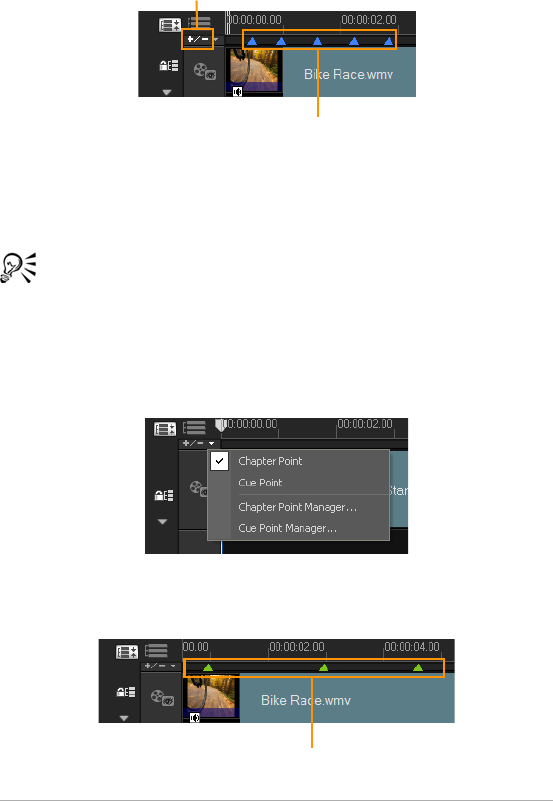
108 Corel VideoStudio Pro User Guide
4Repeat Step 3 to add more cue points.
Note: You can also use the Cue Point Manager when adding cue
points. Select Add and specify the timecode and name of cue for
easy identification. Click OK and then Close.
You can also add a cue point by dragging the Timeline slider to
the desired cue point position in your project and clicking Add/
Remove Cue Point.
To add chapters
1Select Chapter Point in the Chapter/Cue Menu.
2Drag the cursor where you want to add a chapter and click the bar
below the Timeline ruler. Notice that a green arrow icon appears that
serves as a marker in your movie.
Cue points
Add/Remove Cue Point
Chapter points

Edit 109
3To edit a chapter, click on a chapter point and drag to a new
position.
4To rename a chapter, double click a chapter point and enter a new
chapter name. Click OK.
To remove chapters and cues, drag the markers outside the
Timeline ruler and release the mouse button. You can also drag
the Timeline ruler to a chapter or cue point and click Add/Remove
Chapter Point or Add/Remove Cue Point.
You can also drag the Timeline slider to the desired chapter point
position in your project. Click the Add/Remove Chapter Point.
Working with Overlays
Another feature under the Edit Step is the application of overlay effects.
This allows you to add overlay clips to combine with your videos in the
Video Track. You can also use an overlay clip to create a picture-within-a-
picture effect. You can also use an overlay clip to create a picture-within-
a-picture effect, or to add a lower third, which can make your movie
production look more professional. Overlay tracks are also used to insert
video while keeping the audio from the main track.
To make overlay clips with transparent backgrounds, you can create a 32-
bit alpha channel AVI video file or an image file with an alpha channel.
You can use programs such as Corel PaintShop Pro and CorelDRAW to
create these video and image files.
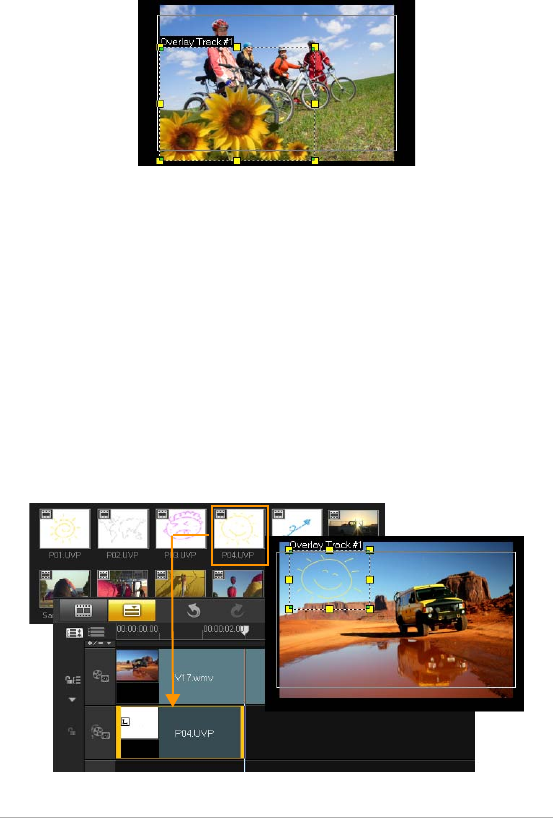
110 Corel VideoStudio Pro User Guide
Another alternative is to use the Mask & Chroma Key function in Corel
VideoStudio Pro to make a specific color on an image transparent.
Adding clips to the Overlay Track
Drag media files to the Overlay Track on the Timeline to add them as
overlay clips for your project.
To add a clip to the Overlay Track
1In the Library, select the media folder that contains the Overlay clip
that you want to add to your project.
2Drag the media file from the Library to the Overlay Track on the
Timeline.
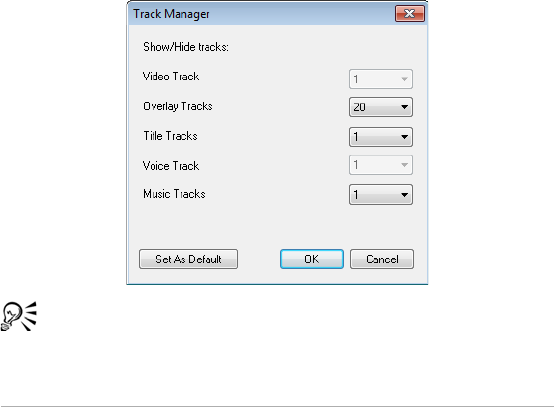
Edit 111
Note: You can also use color clips as Overlay clips. To add more
tracks, see “Adding Multiple Tracks” on page 111.
3To customize the Overlay clip, click the Attribute tab. The Overlay clip
is then resized to a preset size and positioned at the center. Use the
options in the Attribute tab to apply direction/style to the Overlay
clip, add filters, resize and reposition the clip, and more.
Adding Multiple Tracks
You can insert media files on more than one Overlay Track for added
impact in your movie. You can either show or hide Overlay Tracks in your
project.
To add multiple tracks
1Click Track Manager on the Toolbar.
2Specify the number of tracks you want to display from the drop-
down list for each track.
Click Set as Default to save current settings as defaults for all new
projects.

112 Corel VideoStudio Pro User Guide
You can add up to one Video track, 20 Overlay tracks, two Title
tracks, one Voice track and three Music tracks.
In an HTML5 project, you can add up to three Background tracks,
18 Overlay tracks, two Title tracks, one Voice track and three
Music tracks.
Working with Overlay clips
Adding multiple Overlay Tracks gives you more creative possibilities for
your movie. You can superimpose clips over a background video with
portions of the overlay being transparent or add objects and frames to
your video. Achieving different effects for your projects is easy when you
know how to use Overlay clips and tracks.
Trimming Overlay clips
You trim a clip in the Overlay Track the same way you trim a clip in the
Video Track.
To split a clip in the Video and Overlay Tracks
1Click Project as the Play mode and drag the slider to the part you
want to cut.
2Click the Split Clip button .
Repositioning the current Overlay clip
To reposition an Overlay clip
• Do one of the following:
• Drag the Overlay clip to the desired area on the Preview Window. It
is recommended that you keep the Overlay clip within the title safe
area.
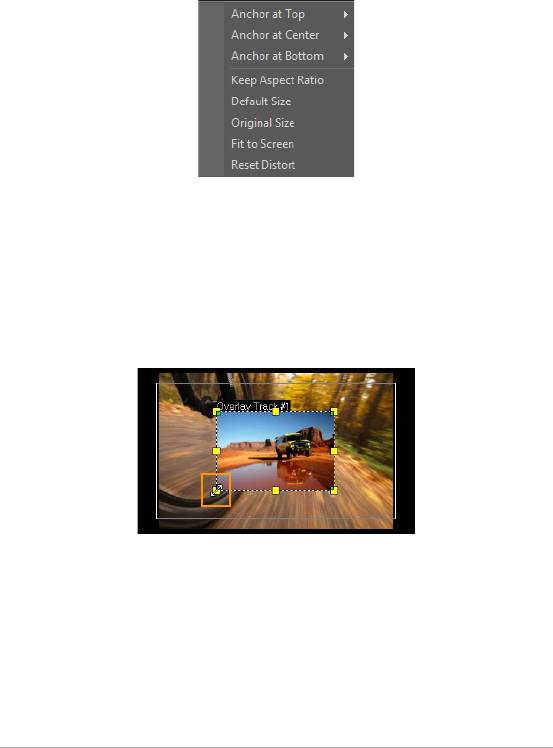
Edit 113
• In Timeline View, click on the Overlay clip and click Options. In the
Attribute tab, click Alignment Options and choose from a menu of
position options.
Resizing an Overlay clip
To resize an Overlay clip
• In the Preview Window, drag the handles on the Overlay clip to
resize it.
Note: If you drag the yellow corner handle, it will keep the aspect
ratio when you resize the clip.
To specify the alignment and size of the Overlay clip
• Click Alignment Options in the Attribute tab and click your desired
option to achieve your desired effect.
This resizes and adjusts the position of the Overlay clip.
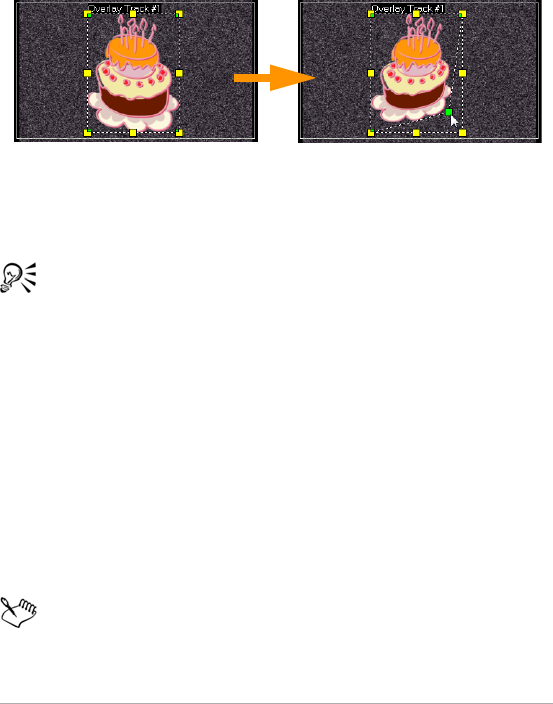
114 Corel VideoStudio Pro User Guide
Distorting an Overlay clip
To distort the Overlay clip
• Drag the green nodes at the corners of the outline box that surround
the Overlay clip.
Dragging the green node distorts an overlay clip.
When you select the green node, the cursor becomes a smaller arrow
with a small black box at its tail.
Hold [Shift] while dragging the green nodes to keep the distortion
within the outline box of the current clip.
Applying motion to an Overlay clip
To apply motion to an Overlay clip
1In the Attribute tab, select the direction and style by which the
Overlay clip will move to or from the screen under Direction/Style
option.
2Click a specific arrow to set where you want your clip to enter and
exit in your movie.
You can rotate the clip or fade it in and out.
Pause duration determines how long your pause will be in the
designated area before the clip exits the screen. If you applied
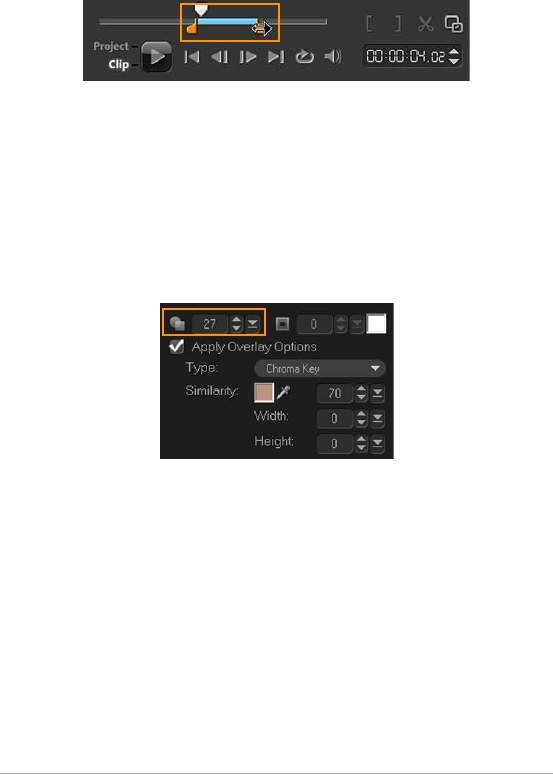
Edit 115
motion to the Overlay clip, drag the Trim mark ers to set the Pause
duration.
Enhancing Overlay clips
Applying transparency, border, chroma key, and filters can enhance your
Overlay clips.
To apply transparency to an Overlay clip
1In the Attribute tab, click Mask & Chroma Key.
2Drag the Transparency slider to set the opacity of the Overlay clip.
To add a border to an Overlay clip
1In the Attribute tab, click Mask & Chroma Key.
2Click the Border arrow keys to set the thickness of the border for the
Overlay clip.
3Click the Border color box located beside the arrow keys to set the
color of the border.
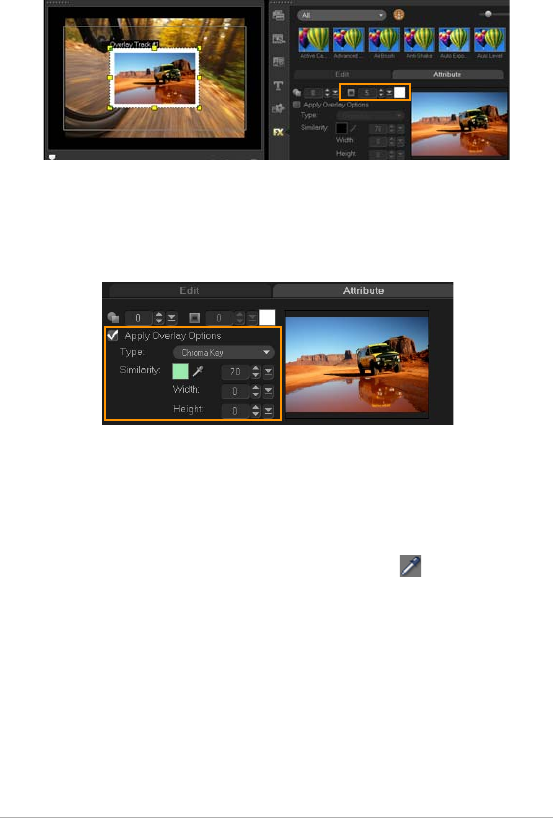
116 Corel VideoStudio Pro User Guide
Chroma keying an Overlay clip
Chroma keying makes a particular color in a clip transparent and shows
the clip in the Video Track as background.
To specify Chroma Key settings to the current Overlay clip
1Click Mask & Chroma Key in the Attribute tab.
2Click Apply Overlay Options, then choose Chroma Key from the Type
drop-down list.
3In the Similarity option, use the eye dropper tool to pick the color
to be rendered as transparent in the Preview Window. As you click
the eye dropper to pick the color mask, you can instantly see how
chroma keying affects the image.
4Move the color similarity slider to adjust the range color to be
rendered transparent.
Note: You can also crop the overlay clip by setting Width and
Height.
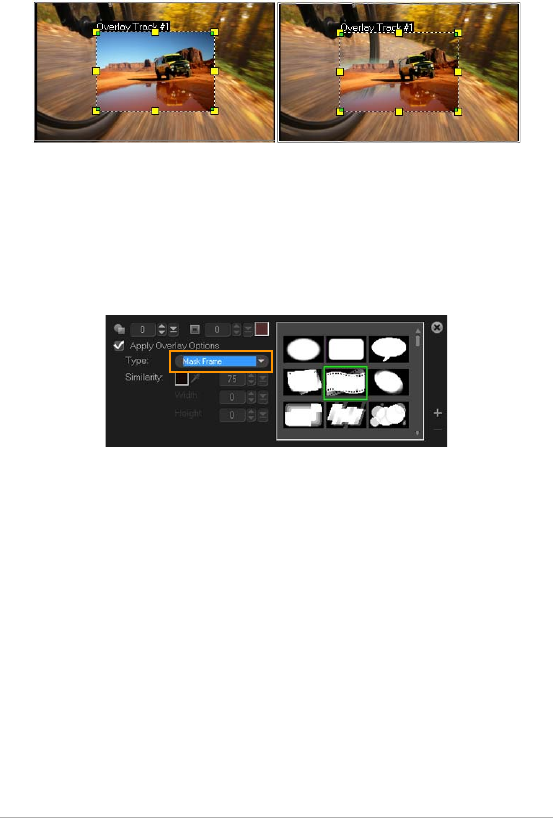
Edit 117
Adding a mask frame
Adding a mask or a matte to an overlay clip applies a shape around it that
you can render opaque or transparent.
To add a mask frame
1Click Mask & Chroma Key in the Attribute tab.
2Click Apply Overlay Options then choose Mask Frame from the Type
drop-down list.
3Select a mask frame.
4Watch the Preview Window to see how the new settings affect the
image.
Without Chroma Key With Chroma Key

118 Corel VideoStudio Pro User Guide
5To import a mask frame, first create a mask for your project. Click
and browse for the image file.
Note: You can use any image file for a mask. If your mask is not in
the required 8-bit bitmap format, Corel VideoStudio Pro
automatically converts the mask. You can use programs such as
Corel PaintShop Pro and CorelDRAW to create an image mask.
Painting images and animations using Painting Creator
Painting Creator is a feature of Corel VideoStudio Pro that allows you to
record painting, drawing, or writing strokes as an animation to use as an
overlay effect.
To launch the Painting Creator dialog box
• Click Tools > Painting Creator.
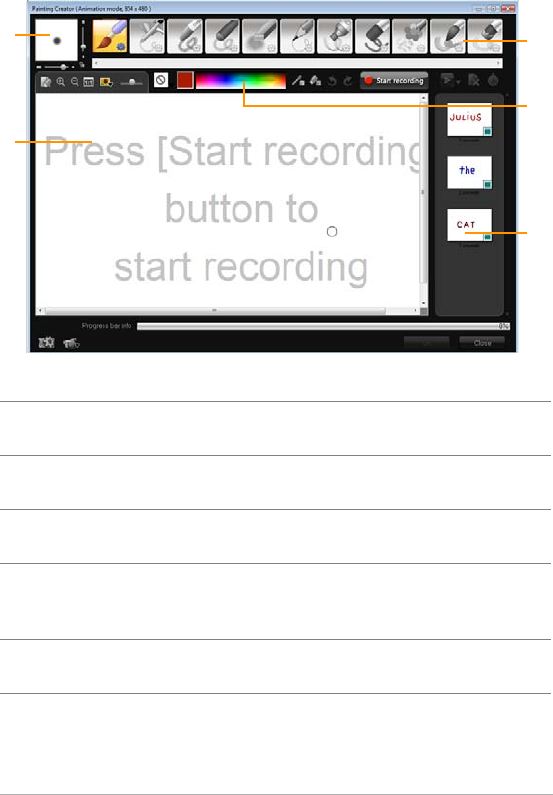
Edit 119
Painting Creator interface basics
Part Description
1 — Brush
Thickness
defines the thickness of your brush tip through
a pair of sliders and a preview box
2 — Canvas /
Preview Window
the painting area
3 — Brush Panel choose from a wide array of paint media,
brush/tool tips, and transparency
4 — Color Palette allows you to choose or specify color using the
Windows Color Picker or Corel Color Picker. You
can also pick color by clicking the eye dropper
5 — Macro / Static
Painting Library
contains previously recorded clips
1
4
2
3
5
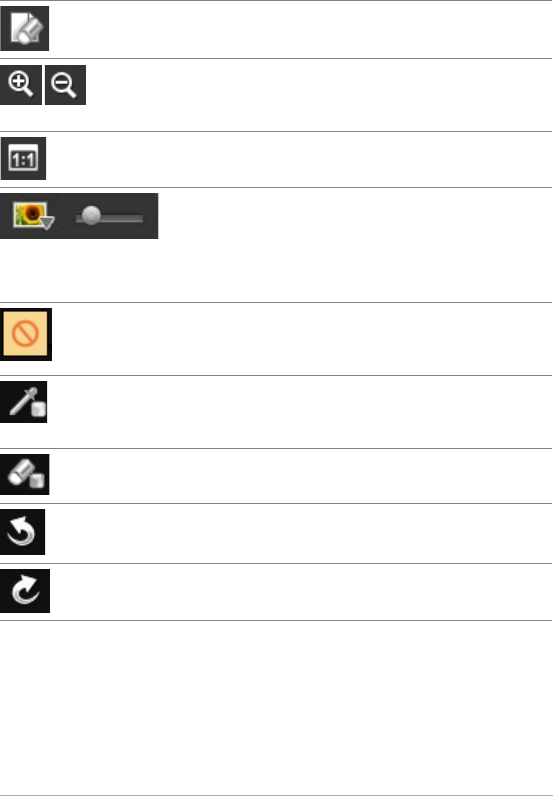
120 Corel VideoStudio Pro User Guide
Painting Creator control buttons and sliders
New / Clear Button — Launches a new
canvas or Preview Window.
Zoom In and Zoom Out buttons — Allows
you to zoom in and zoom out your view of
the painting.
Actual Size — Reverts your canvas or
Preview Window to its actual size.
Background image button and slider —
Clicking on the Background Image button
allows you to use images as reference for
your painting and control its transparency
through the slider.
Texture Option Button — Allows you to
choose and apply textures to your brush
tips.
Eyedropper Tool — Allows you to select a
color from the color palette or surrounding
objects.
Eraser mode button — Enables you to write
or erase your painting / animation.
Undo Button — Allows you to undo and
redo actions in Still and Animation modes.
Redo button — Allows you to undo and
redo actions in Still and Animation modes.
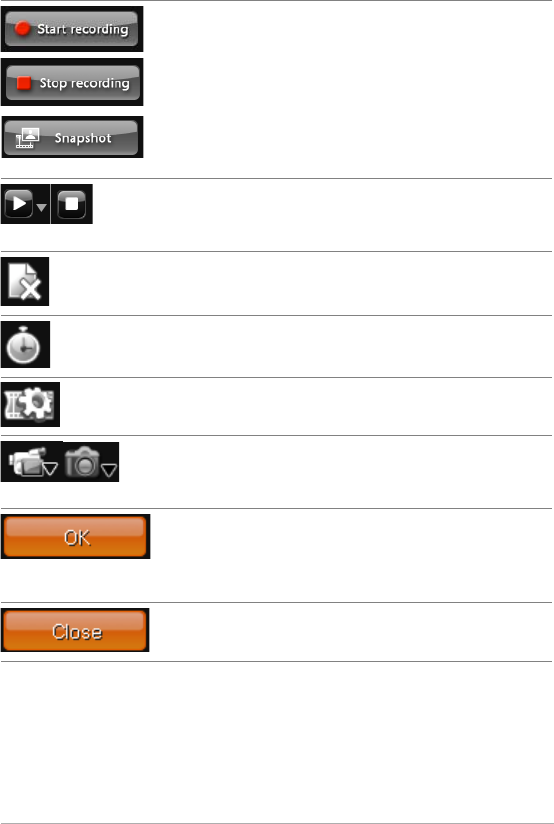
Edit 121
Start recording / Snapshot button —
Records your painting session or adds your
painting to the Painting Library. The
Snapshot button only appears if in Still
mode.
Play / Stop button — Plays or stops the
current painting animation. Enabled only in
Animation mode.
Delete button — Deletes an animation or
image from the library.
Change duration button — changes the
duration of the selected clip.
Preference setting button — Launches the
Preferences dialog box.
Change to Animation or Still mode button
— Allows you to switch between Animation
mode and Still mode.
OK button — Closes Painting Creator and
inserts the animations and images in the
Video Library and saves the files in *.uvp
format in the Corel VideoStudio Pro Library.
Close button — Closes the Painting Creator
module dialog box.
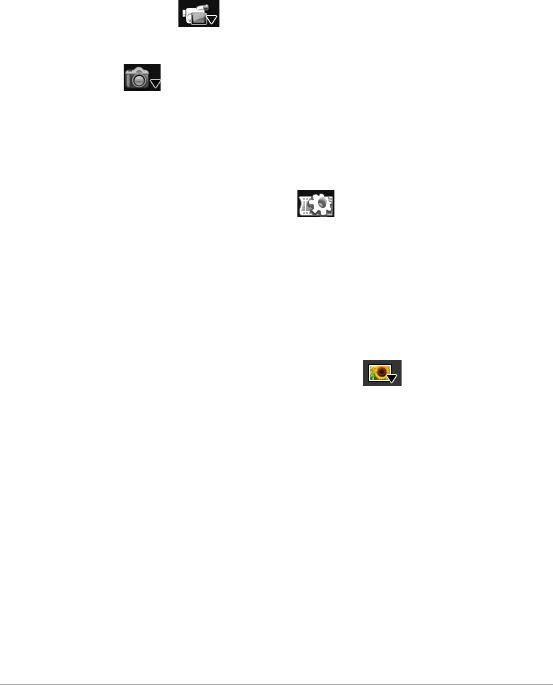
122 Corel VideoStudio Pro User Guide
Painting Creator modes
There are two modes of Painting Creator for you to choose from.
To choose between Painting Creator modes
• Click one of the following buttons:
• Animation mode — lets you record entire painting sessions
and embed your output in the Timeline.
• Still mode — lets you create image files using different sets of
tools just like any digital imaging program.
Note: By default, Painting Creator will launch in Animation mode.
To change a default clip duration
1Click the Preference setting button .
The Preferences dialog box appears.
2In the General tab, increase or decrease the Default macro duration.
3Click OK.
To use a reference image
• Click the Background Image Option button and the
Background Image Option dialog box appears. Set the following
options:
• Refer to the default background color — Allows you to select a
solid background color for your painting or animation.
• Current timeline image — Uses the video frame currently being
displayed on the Timeline.
• Customize image — Allows you to open an image and use it as the
background for your painting or animation.

Edit 123
To paint a still image
• Using the different sets of brushes and colors, paint your still image
on the canvas or Preview Window and click Snapshot when finished.
Note: Your painting will automatically be saved in the Painting
Creator Library.
To record a painting animation
1Click Start recording.
2Using the different sets of brushes and colors, paint your still image
on the canvas or Preview Window and click Stop recording when
finished.
Note: Your painting animation will automatically be saved in the
Painting Creator Library.
To play your painting animations
• Choose your desired animations from the Macro/Static Library and
click the Play button to play the selected gallery item.
To convert your animation to a still image
• Right-click your animation thumbnail and select Transfer animation
item to still.
Note: You can use the still image as an intro or end clip of your
animation.
To import animations and images in the Corel VideoStudio Pro
Library
• Choose your desired animations and images in the Gallery and
choose OK. Corel VideoStudio Pro will automatically insert your
animations in the Library’s Video folder and images in the Images
folder both in *.uvp format.

124 Corel VideoStudio Pro User Guide
To specify your brush settings
1Click on the Settings button .
2Modify the brush properties to achieve your desired brush stroke
effect.
Note: Options vary for each painting tool.
3Click OK.
Working with Audio
Sounds are one of the elements that determine the success of your video
production. Corel VideoStudio Pro allows you to add music, narration,
and sound effects to your project.
The Audio feature in Corel VideoStudio Pro consists of four tracks. You
can insert narrations on the Voice Track and the background music or
sound effects on the Music Track.
Adding audio files
You can add audio files to your project in any of the following ways:
• Add audio files to the Library from a local or network drive.
•Rip audio from CD
• Record a voice-over clip
• Use Auto Music
Note: You can also extract audio from a video file.
To add an audio file to the Library
• Click the Import Media Files button to browse for audio files in
your computer.

Edit 125
Adding voice-over narration
Documentaries, news and travel features often use narrations to help the
audience understand what is going on in the video. Corel VideoStudio
Pro allows you to record your own narration.
To add voice-over narration
1Move the scrubber to the section of the video where you want to
insert your voice-over.
2In Timeline view, click the Record/Capture Option button and
select Voice-over. The Adjust Volume dialog box appears.
Note: You cannot record over an existing clip. When a clip is
selected, recording is disabled. Make sure that a clip is not selected
by clicking on an empty area on the Timeline.
3Speak into the microphone and check if the meter responds
accordingly. You can use the Windows audio mixer to adjust the level
of the microphone.
4Click Start and begin speaking into the microphone.
5Press [Esc] or [Space] to end recording.
Note: The best way to record narrations is to do the recording in 10
to 15-second sessions. This makes it easier to remove a badly
recorded narration and redo it. To remove, just select the clip on the
Timeline and press [Delete].
Adding background music
Corel VideoStudio Pro can record and convert sound tracks from your CD
into WAV files and then insert them onto the Timeline.
Corel VideoStudio Pro also supports WMA, AVI, and other popular audio
file formats which you can directly insert onto the Music Track.

126 Corel VideoStudio Pro User Guide
Importing music from an audio CD
You can import music tracks from an audio CD. Corel VideoStudio Pro
copies the CDA audio file then saves it in your hard drive as a WAV file.
To import music from an audio CD
1In Timeline view, click the Record/Capture Option button and
click Import from audio CD.
The Rip CD Audio dialog box appears.
2Select the tracks to be imported in the Trac k List.
3Click Browse and select the destination folder where the imported
files will be saved.
4Click Rip to start importing the audio tracks.
Auto Music
The Auto Music feature of Corel VideoStudio Pro lets you easily create
high-quality sound tracks from royalty-free music and use them as
background music in your project. You can have different tempos or
musical instrument variations per music.
Auto Music Maker utilizes the patented SmartSound® Quicktracks
technology in sound track creation and features a variety of
SmartSound background music.
With SmartSound, you can set the feel of your movie with the
background music of your choice. Set Mood allows you to adjust
parameters to change the mood or feel of a song. You can create several
moods for a single song.
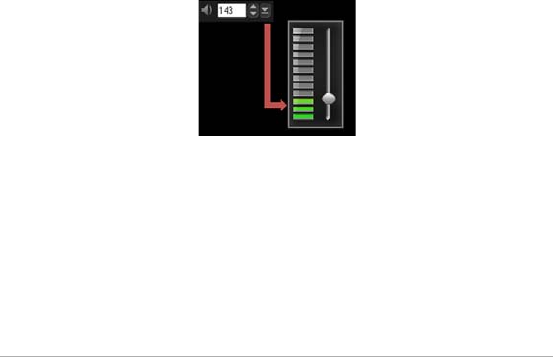
Edit 127
To add third-party music
1Click Auto Music in the Toolbar.
2Select how the program will search for music files in Scope.
3Select the Filter and Filter to determine the classification and genre
of the music to be used in your project.
4Select the music to use under Music.
5Select a Variation of the selected music. Click Play Selected Music to
play back the music with the variation applied.
6Click Add to Timeline and set the volume level of the audio clip.
Note: Select Auto trim to automatically trim the audio clip or cut
down to the desired duration.
Using the Clip Volume Control
You will find the volume control in the Music & Voice tab. Clip volume
represents the percentage of the original recorded volume. Values range
from 0 to 500%, where 0% completely silences the clip and 100% retains
the original recorded volume.
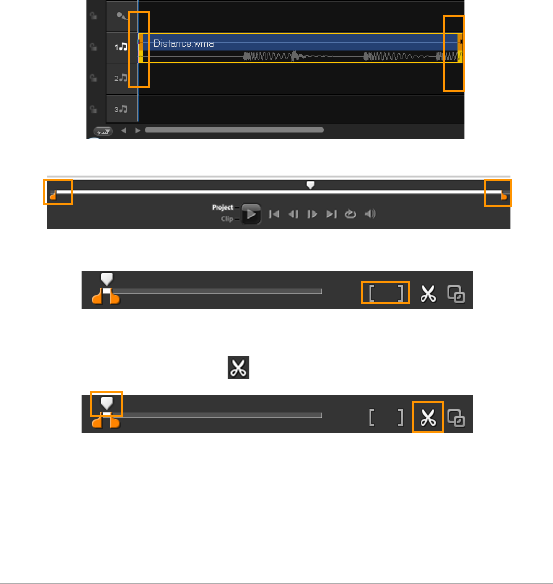
128 Corel VideoStudio Pro User Guide
Trimming and cutting audio clips
After recording voice and music, you can easily trim your audio clips in
the Timeline.
To trim a udio clips
• Do one of the following:
• Drag a handle, either from the beginning or end, to shorten a clip.
Note: In the Timeline, a selected audio clip has two handles that can
be used for trimming.
• Drag the Trim mar kers.
• Move the Scrubber and use click the Mark-in / Mark-out buttons.
To split the audio clip
• Click the Split Clip button to split the clip.
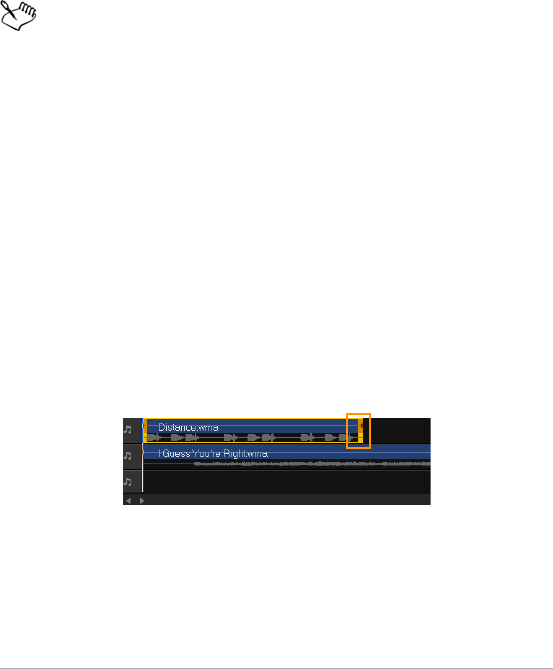
Edit 129
Stretching audio duration
The time stretch feature allows you to stretch an audio clip to match
video duration without distorting its pitch. Normally, stretching audio
clips to fit the project results in a distorted sound. The time stretch feature
will make the audio clip sound like it is just played in a slower tempo.
When you stretch an audio clip by 50-150%, the sound will not
be distorted however, if stretched below or above that range the
sound may be distorted.
To stretch the duration of an audio clip
1Click on an audio clip in the Timeline or Library and open the Options
Panel.
2In the Music & Voice tab panel, click Speed/Time-lapse to open the
Speed/Time-lapse dialog box.
3Enter a value in Speed or drag the slider to change the speed of the
audio clip. A slower speed makes the clip’s duration longer while a
faster speed makes it shorter.
Note: You can specify how long the clip will play in Time stretch
duration. The speed of the clip will automatically adjust to the
specified duration. This feature will not trim the clip when you
specify a shorter time.
You can stretch the time of an audio clip on the Timeline
by holding [Shift] then dragging the handles on the
selected clip.

130 Corel VideoStudio Pro User Guide
Fade-in/out
Background music that starts and ends gradually is commonly used to
create smooth transitions.
To apply fade effects to your audio clips
• Click the Fade-in and Fade-out buttons.
Audio view
The key to making narrations, background music, and existing audio of
your video clips blend well together is to control the relative volume of
your clips.
To blend the different audio tracks in your project
• Click the Sound Mixer button in the Toolbar.
Note: If you are in 5.1 mode, the Surround Sound Mixer is
displayed. If in Stereo mode, the 2-Channel Mixer is displayed.
Using the Surround Sound Mixer
Unlike a stereo stream that carries only two audio channels, Surround
Sound has five separate audio channels encoded into one file which is
delivered to five speakers and one sub-woofer.
The Surround Sound Mixer has all the controls to position sounds around
the listener, outputting audio through the 5.1 configuration of multiple
speakers. You can also use this mixer to adjust the volume for stereo files,
making it sound as if the audio moves from one speaker to another.

Edit 131
Adjusting stereo channels
In stereo files (two channels), a single waveform represents the left and
right channels.
To use stereo mode
1Go to Settings and disable or uncheck Enable 5.1 Surround in the
menu.
2Click the Sound Mixer button in the toolbar.
3Click on the Music Track.
4Click Play in the Options Panel.
5Click the music note symbol in the center of the Surround Sound
Mixer and adjust depending on your preferred sound position.
Note: Moving the note symbol will affect the sound coming from
your preferred direction.
6Drag Volume to adjust the volume level of the audio.

132 Corel VideoStudio Pro User Guide
Mixing Surround Sound
All audio channels in Surround Sound have a set of similar controls that
you will find in the stereo configuration of this panel, plus a few more
specific controls.
•Six-channel VU Meter — Front Left, Front Right, Center, Sub-woofer,
Surround Left, Surround Right.
•Center — Controls the amount of output sound from the center
speaker.
•Sub-woofer — Controls the amount of low-frequency sound output.
To use Surround Sound mode
1Go to Settings and enable or check Enable 5.1 Surround in the
menu.
2Click the Sound Mixer button in the toolbar.
3Click the music note symbol in the center of the Surround Sound
Mixer. Drag it to any of the six channels depending on your sound
position preference. Repeat steps 1 and 2 in using stereo mode.
4Drag the Volume, Center and Sub-woofer sliders to adjust sound
controls of your audio
Note: You can also adjust the sound position preference of your
tracks in Video, Overlay and Voice. To do this, click your preferred
track button and repeat steps 2 to 3.
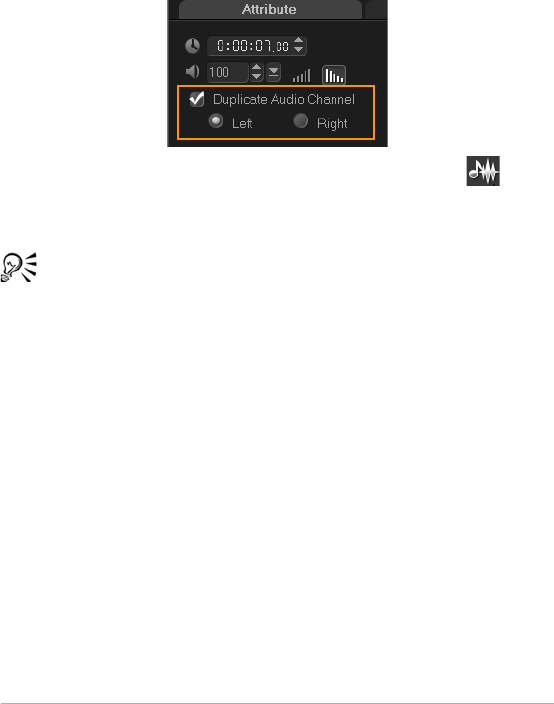
Edit 133
Duplicating an audio channel
Audio files sometimes separate the vocal sound from the background
audio and put them in different channels. Duplicating an audio channel
allows you to mute the other channel.
To duplicate an audio channel, click the Sound Mixer button in the
toolbar. Click the Attribute tab and select Duplicate audio channel.
Choose which audio channel to duplicate this may be Left or Right.
In recording voice-overs using the microphone, it will be recorded
on one channel only. You can improve the audio volume by using
this feature to duplicate across channels.
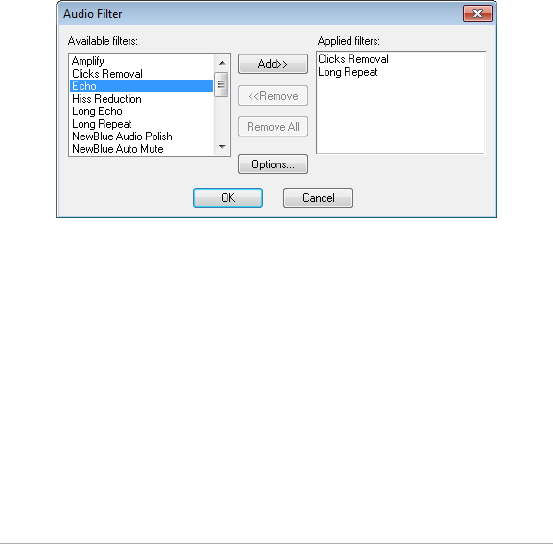
134 Corel VideoStudio Pro User Guide
Applying audio filters
Corel VideoStudio Pro allows you to apply filters to your audio clips in the
Music and Voice Tracks.
To apply audio filters
1Click on an audio clip and open the Options Panel.
2In the Music & Voice tab, click Audio Filter.
The Audio Filter dialog box appears.
3In the Available filters list, select the desired audio filters and click
Add.
Note: An audio filter can be customized if the Options button is
enabled. Click Options to open a dialog box where you can define
the settings for the particular audio filter.
4Click OK.

Share 135
Share
Share your project in a format that is suitable for your audience or
purpose. You can export your rendered movie as a video file, burn your
project as an AVCHD, DVD and BDMV disc complete with menus, export
to mobile devices or upload directly to your Vimeo®, YouTube™,
Facebook® or Flickr® accounts.
This section contains the following topics:
• The Share Step Options Panel
• Creating movie templates
The Share Step Options Panel
In the Share tab, Corel VideoStudio Pro displays the Media Clips Library
and the Share Options Panel. In the Share Options Panel are the following
tasks:
• Create Video File — Creates a video file of your project with
your specified project settings.
• Create HTML5 File — Creates an HTML5 video folder of your
project with your specified project settings.
• Create Sound File — Lets you save the audio segment of your
project as a sound file.
• Create Disc — Invokes the Disc Authoring Wizard that lets you
output your project in AVCHD, DVD, or BDMV format.
• Export to Mobile Device — Creates an exportable version of
your video file that can be used on an external device such as an
iPhone, iPad, iPod Classic, iPod touch, Sony PSP, Pocket PC,

136 Corel VideoStudio Pro User Guide
smartphone, Nokia mobile phone, Windows Mobile-based device
and an SD (Secure Digital) card.
• Project Playback — Clears the screen and displays the whole
project or a selected segment against a black background. It can also
output to tape if you have a VGA to a TV converter, camcorder, or a
video recorder connected to your system. It also lets you manually
control the output device when recording.
• DV Recording — Lets you record a selected video file onto a DV
tape by using a DV camcorder.
• HDV Recording — Lets you record a selected video file onto a
DV tape by using an HDV camcorder.
• Upload to Web — Lets you share videos online using your
Vimeo, YouTube, Facebook and Flickr accounts.
Creating video files
Corel VideoStudio Pro lets you create video files of your project. You can
choose from a wide variety of file formats and video settings. You can also
output your projects to a 3D format.
Before rendering your entire project into a movie file, make sure
you first save it as a Corel VideoStudio Pro project file (*.VSP) by
clicking File > Save or Save As. This lets you return to your project
at any time and make edits.
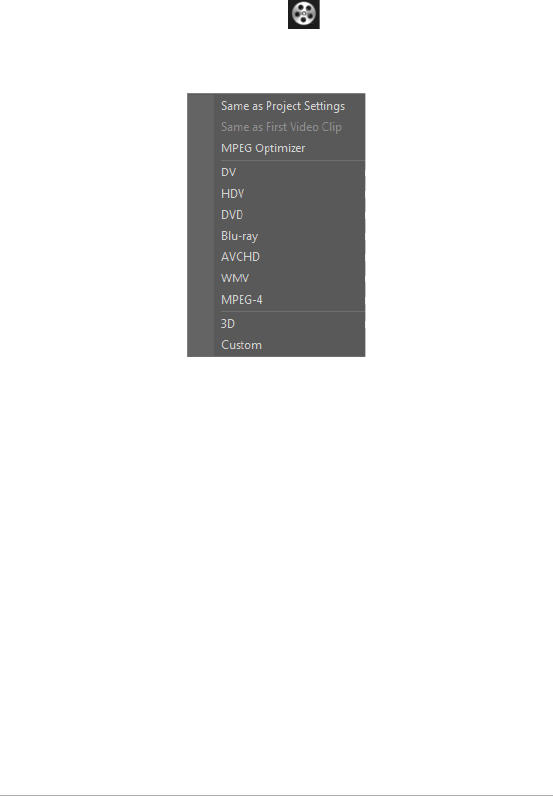
Share 137
To create a video file of the entire project
1Click the Create Video File button in the Share Options Panel.
A pop-up menu appears that shows several options for creating a
video file.
2Select a preset movie template.
You can choose an output format or one of the following options:
• Same as First Video Clip — Applies the settings of the first video
clip in the Video Track.
• Same as Project Settings — Applies the settings of the current
project. You can access the current project settings by clicking
Settings > Project Properties.
• MPEG Optimizer — Lets you optimize the rendering of MPEG
movies.
• Custom — Lets you choose your own settings for creating the
movie.
Note: To create a movie template, click Settings > Make Movie
Templates Manager.
3Enter a file name and click Save. The movie file is saved in the current
library.
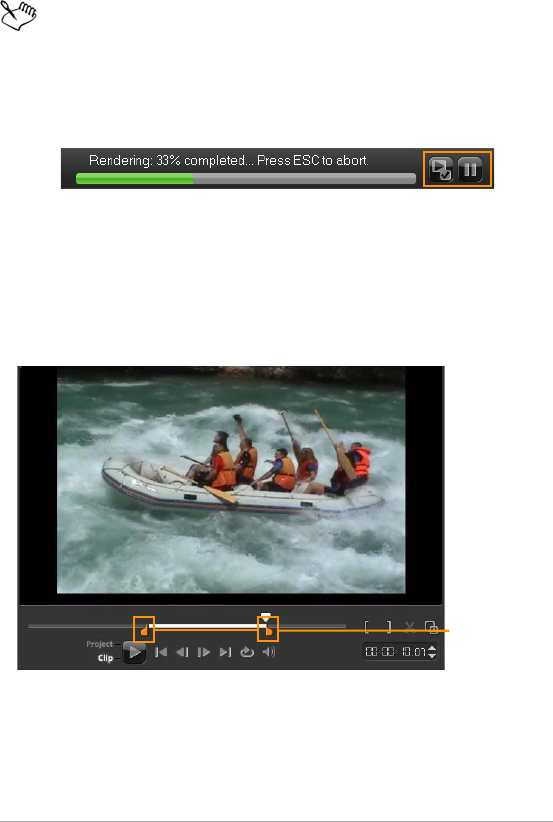
138 Corel VideoStudio Pro User Guide
Press the Esc key to abort the rendering process.
Click the Pause/Play button on the progress bar to pause and
resume the rendering process.
You can also enable playback while rendering or stop the preview
to reduce rendering time.
To create a video file of the preview range
1Make sure that no clip is selected by clicking on the Timeline or by
clicking Project in the Preview Window.
2Select a preview range using the Trim Markers. You may also drag
the triangle along the ruler then press [F3] and [F4] to mark the start
and end points respectively.
Note: An orange line representing the selected range should appear
on the Timeline ruler.
Trim
markers

Share 139
3Click the Create Video File button in the Options Panel.
4Select a movie template.
5In the Create Video File dialog box, click Options.
6In the Options dialog box, select Preview range and click OK.
7Enter a file name and click Save.
Optimizing MPEG video settings
MPEG Optimizer makes creating and rendering movies in MPEG format a
lot faster. It analyzes and finds the best MPEG settings or the Optimal
project settings profile to use and maintains the quality of your project.
As an additional feature, you can now specify the target file size of your
output to comply with file size limitations for your desired output.
The MPEG Optimizer automatically detects changes in your project and
renders out only the edited portions for faster rendering times.
To launch the MPEG Optimizer dialog box
• Click Create Video File and select MPEG Optimizer from the pop-up
menu.
Corel VideoStudio Pro displays the MPEG Optimizer dialog box
where it shows the resulting file size of your project should you
choose to apply the optimization.
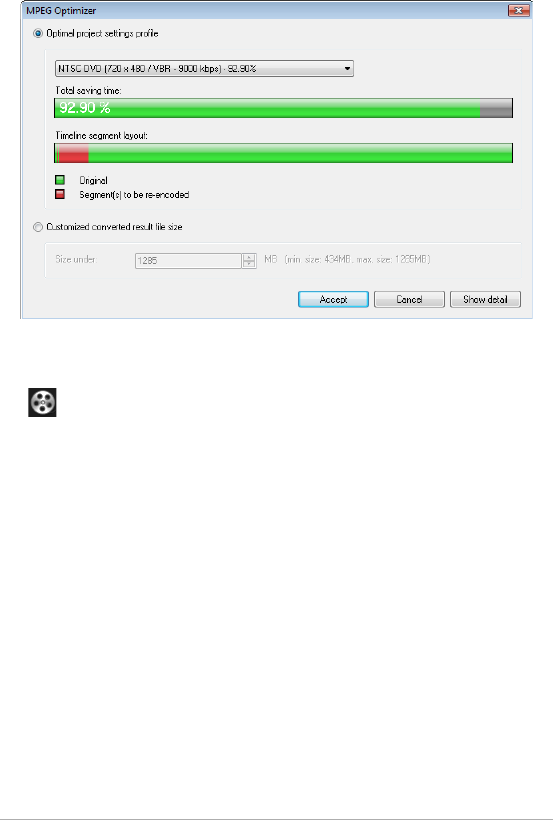
140 Corel VideoStudio Pro User Guide
To use MP EG Optimiz e r
1In the Share Step Options Panel, click the Create Video File button
and select MPEG Optimizer.
Note: MPEG Optimizer is automatically enabled when an MPEG
movie template is selected. To stop showing the MPEG Optimizer
dialog box when selecting MPEG movie templates, deselect Show
MPEG Optimizer dialog box in the General tab of Preferences.
2The MPEG Optimizer dialog box appears.
3Choose from the following options:
• Optimal project settings profile — Lets the program to determine
the optimal project settings for your output.
• Customized converted result file size — Lets you enter your desired
file size output. Video and Audio Settings automatically adjust to
your specified file size.
4Click Accept.

Share 141
Creating 3D video files
Corel VideoStudio Pro lets you create 3D movies or convert regular 2D
video into 3D video files. With the help of this feature and compatible 3D
gadgets, you can enjoy 3D video popping out of your screen in just a few
easy steps.
To create 3D video files
1In the Share Step Options Panel, click the Create Video File button
and select 3D.
2Choose the video format from the submenu.
The Create Video File dialog box appears.
3Click Options to specify additional video file settings.
4Depending on the properties of the media clips used in the 3D
project, enable one of the following options:
• Create 3D File — This option is available when you use tagged 3D
media clips and no 2D filters or effects have been applied.
• 3D Simulator — This option is available when you have 2D media
clips in the Timeline that you can simulate as 3D. Enter a value in
Depth to adjust the depth of the 3D video file.
5Choose a mode of 3D conversion from the following options:
• Anaglyph — Requires only the red and blue generic anaglyph 3D
glasses to view 3D video without the need for special display
monitors.
• Side-by-side — Requires polarized 3D glasses and a compatible
polarized display monitor to view 3D video.
Note: You need a playback software that supports Side-by-side 3D
video playback to view your 3D video files. For 3D TVs, 3D
equipment and glasses are required.
6Enter a file name and click Save.
The movie file is saved in the current library.

142 Corel VideoStudio Pro User Guide
Creating HTML5 video files
Output your projects to the HTML5 format complete with hyperlinks and
chapters. This video format is compatible with browsers that support the
HTML5 technology like Google Chrome 12, Internet Explorer 9 and
Mozilla Firefox 7 and later versions. It is also supported on the Safari
browser for iPhone, iPad and iPod touch devices.
You can only make HTML5 videos if you are working on an HTML5
project. For more information, see “Creating new projects” on
page 34.
To create an HTML5 video folder
1Click the Create HTML5 File button in the Share Step Options
Panel. The Create HTML5 files dialog box appears.
2In Folder path, browse for the folder where you want to save your
HTML5 video folder.
3Enter a name in Project folder name.
4In Project dimensions, choose the screen resolution and aspect ratio
from the drop-down list.
Note: Enable Flatten audio and background video if your browser
can only support a single track for audio and video.
5Click OK. The program renders your project and automatically opens
the folder you specified.
Open Index.html in your browser to view your project.

Share 143
Creating sound files
Corel VideoStudio Pro allows you to save the audio track of your video
project as a separate audio file. This is especially useful when you want to
use the same sound with another set of images, or when you want to
convert the audio of a captured live performance into sound files. Corel
VideoStudio Pro makes it easy for you to create an audio file of your
project in M4A, OGG, WAV or WMA format.
To create an audio file
1Click the Create Sound File button in the Share Step Options
Panel.
Note: You can also create a sound file from an existing video file by
selecting it in the Library.
2From the Save as type list, select the audio format you want to use
and select Options to display the Audio Save Options dialog box.
3Fine tune your audio attributes and click OK.
4Enter a file name and click Save.
Creating discs
Corel VideoStudio Pro lets you burn your projects to a DVD, AVCHD, Blu-
ray or BD-J.
To output your project to a disc
1Click Create Disc in the Options Panel.
2In the menu that appears, choose an output format.
A new window appears where you can customize the disc output.
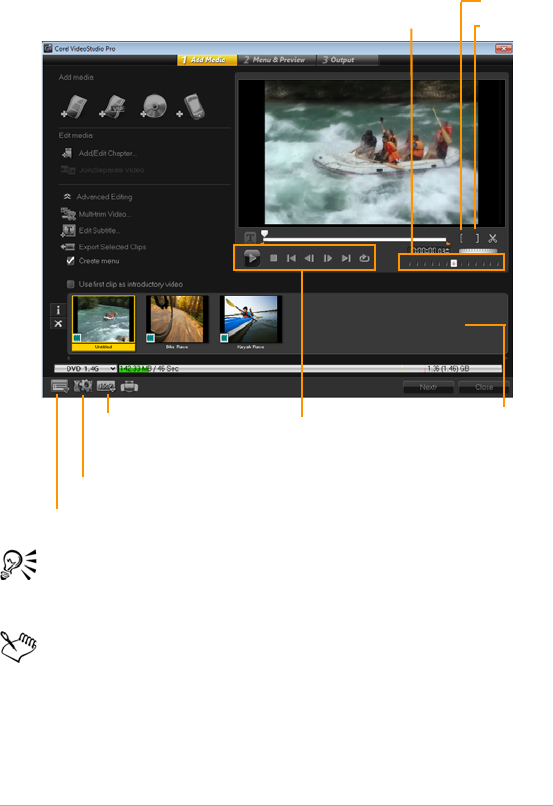
144 Corel VideoStudio Pro User Guide
Even if you have not saved your VideoStudio Pro project as a *.vsp
file, it can be brought into the Create Disc dialog box for burning.
Imported videos are automatically adjusted to the correct aspect
ratio (as specified in the Disc Templates Manager dialog box), and
are letterboxed or pillarboxed to fit the correct aspect ratio.
Jog Slider Mark-out
Navigation
Panel
Project Settings
Settings and options
Media
Clip List
Change display
aspect ratio
Mark-in
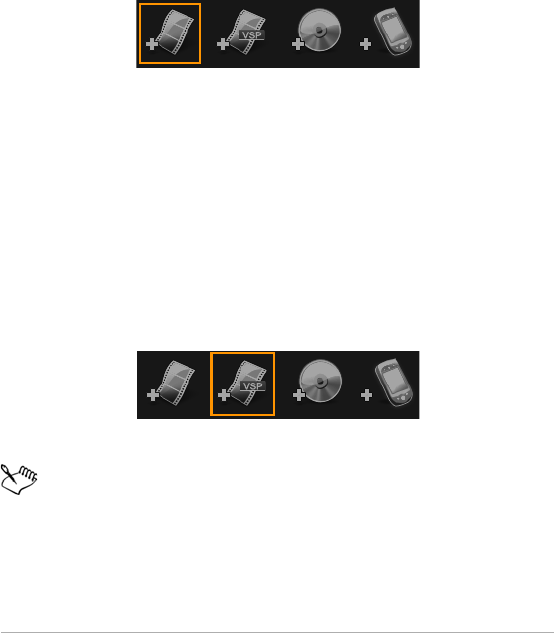
Share 145
Assembling files
You can import videos or VideoStudio Pro project files (*.vsp) that you
want to include in your final movie.
To add videos
1Click Add video files. Locate the folder where the videos are stored.
Select one or more video clips.
2Click Open.
Note: After a video clip is added to the Media Clip List, you may see
a black thumbnail that may be caused by a black first frame of the
video clip. To change it, click on the video clip and move the Jog
Slider to the scene that you want. Right-click the thumbnail and
choose Change Thumbnail.
To add VideoStudio Pro projects
1Click Add VideoStudio Pro project files. Locate the folder where the
projects are stored.
Select one or more video projects you want to add.
2Click Open.
You can also add videos from DVD/DVD-VR, AVCHD and BDMV
discs.
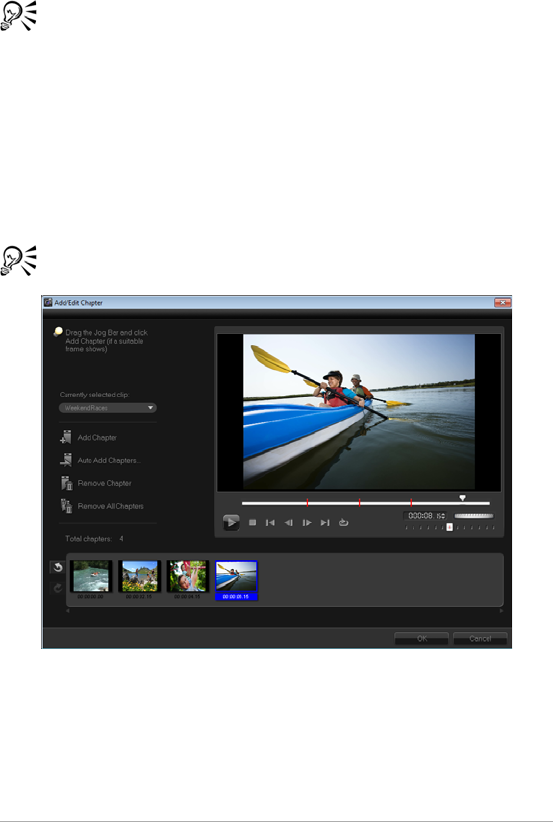
146 Corel VideoStudio Pro User Guide
You can trim video clips and VideoStudio Pro project by using the
Jog Slider, mark-in/out, and navigation controls. Trimming a video
gives you the freedom to precisely edit the video length.
Adding and Editing chapters
This feature is available only when the Create menu option is selected. By
adding chapters, you can create submenus linked to their associated
video clip.
You can create up to 99 chapters for a video clip.
Represented as a video thumbnail in a submenu, each chapter is like a
bookmark for a video clip. When viewers click a chapter, the playback of
the video will start from the selected chapter.
If the Create menu option is not selected, you will be guided to the
preview step immediately without creating any menus after clicking Next.

Share 147
When you are creating a disc with only one VideoStudio Pro
project or one video clip, do not select Use first clip as introductory
video if you want to create menus.
To create or edit chapters linked to a video clip
1Select a video in the Media Clip List.
2Click Add/Edit Chapter.
3Drag the Jog Slider to move to a scene that you want to set as a
chapter point, and click Add Chapter. You can also click Auto Add
Chapters to let VideoStudio Pro automatically select chapters.
Note: If you want to use Auto Add Chapters, your video must be at
least one minute long or the video has scene change information.
4Repeat Step 3 to add more chapter points.
5Click OK.
You can also use Remove Chapter or Remove All Chapters to
delete unwanted chapters.
If you click Auto Add Chapters and your video is a DV-formatted
AVI file, the program automatically detects scene changes and
add chapters accordingly. For MPEG-2 files, the program uses the
scene change information to automatically generate chapters.
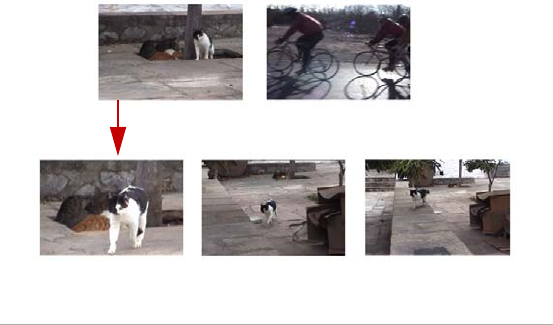
148 Corel VideoStudio Pro User Guide
Creating disc menus
Disc menus allow viewers to easily navigate through the contents of a disc
and easily choose the specific parts of the video to watch.
In Corel VideoStudio Pro, you can create disc menus by applying menu
templates and editing them to suit the requirements of your projects.
To edit a menu template, choose options in the Edit tab or click menu
objects in the Preview Window. You can also add new texts, decorations
and note menus. Customized templates can then be saved as new menu
templates.
If you are authoring Blu-ray discs, you can create advanced menus that
can be used without interrupting playback. This means that viewers can
navigate the contents of your disc while watching the movie.
Advanced menu templates are made up of three separate layers for
background settings, title menus, and chapter menus. You can edit menu
objects in the currently selected layer.
The illustration below shows the structure of a disc menu.
Clip 1
Main menu
Submenu #1
Clip 2
Share 149
In this example, Clip 1 has three chapters, so when you click the Clip 1
video thumbnail, it jumps to submenu #1. If you look at Clip 2, it has no
chapters assigned to it, so when you click Clip 2, the video starts playing
from the beginning.
To apply a menu template
1Select Create menu in the 1 Add Media page and click Next. This
takes you to the 2 Menu & Preview page.
2In the Gallery tab, click the menu template thumbnail to apply it.
To add background music to menus
1Click the Set the background music button in the Edit tab and
choose from a menu of options for selecting an audio file to be used
as background music.
2In the Open Audio File dialog box, choose the audio file to use.
Note: Click the Set audio properties button to adjust the
duration of your audio and apply fade in and out effects.
To add motion menus
1Select Motion menu in the Edit tab.
2Adjust the duration of the video thumbnail by setting the number of
seconds in Duration.
Note: Using motion menus increases the file size. Check the disc
space usage indicator and the Required menu space value to make
sure that the file size remains within the limits of your selected
output.
To add background image or video to menus
1Click the Set the background button in the Edit tab and choose
from a menu of options for selecting an image or a video file to be
used as background image or video.

150 Corel VideoStudio Pro User Guide
2In the Open Image File or the Open Video File dialog box, choose the
image file or the video to use.
To edit text style in menus
1Right-click a text object in the Preview Window and select Font
Attributes.
2Modify text attributes in the Font dialog box.
Clicking Font Settings in the Edit tab also opens the Font dialog
box.
To add menu filters and transition effects
1Click a menu object in the Preview Window.
2Choose the filter or effects to apply in the Edit tab.
• Moving Path — Applies a predefined motion path to menu objects
such as titles, thumbnail buttons, and navigation buttons.
• Menu In/Menu Out — Opens a selection filters and transition
effects. If a menu template has a Menu In effect, its default
duration is 20 seconds.
Some template menus have sound effects for Menu In and Menu
Out transitions. These sound effects, however, cannot be
modified nor deleted.
The Menu Out transition effects are not supported in DVD+VR
projects.

Share 151
To resize, rotate, and distort menu objects
• Click the menu object in the Preview Window and drag the handles
or nodes.
To revert objects to its previous state, right-click on the Preview
Window and select Set to 0 Degree Angle or Remove Object
Distortion
To align a single menu object
• Click the menu object in the Preview Window and drag it to the
desired position.
To use the grid lines as reference when dragging the menu
objects, right-click the Preview Window and select Show Grid Line.
To automatically align your object to the nearest grid line as you
drag it, select Snap to Grid Line.
Make sure that the objects are within the TV safe area (defined by
a border with dotted lines).
To align multiple menu objects
1Select the objects in the Preview Window by pressing the Ctrl key.
2Right-click, select Align, and choose from the following options:
• Left/Top/Right/Bottom — Moves all selected objects (except model
object) horizontally to align left/top/right/bottom side with the left/
top/right/bottom side of model object.
• Center Vertically — Moves all selected objects vertically to the
center of top/bottom most objects.
• Center Horizontally — Moves all selected objects horizontally to
the center of left/right most objects.
• Center Both — Moves all selected objects to the center of top/
bottom/left/right most objects.

152 Corel VideoStudio Pro User Guide
• Space Evenly Vertically — Moves all selected objects (except top/
bottom most objects) vertically to even vertical space. This menu
item is only available when more than three objects are selected.
• Space Evenly Horizontally — Moves all selected objects (except left/
right most objects) horizontally to even horizontal space. This
menu item is only available when more than three objects are
selected.
• Equal Width/Height — Resizes all selected objects (except model
object) to the same width/height as model object.
• Equal Width and Height — Resizes all selected objects (except
model object) to the same width and height as model object.
To arrange the Z-order of menu objects
• Right-click the menu object in the Preview Window, select Align, and
choose from the following alignment options:
• Bring Forward — Brings selected object one layer forward.
• Send Backward — Sends selected object one layer backward.
• Bring to Front — Brings selected object to front.
• Send to Back — Sends selected object to the layer just above the
background object.
To copy and paste shape menu object attributes
• Right-click the menu object in the Preview Window and select Copy
Shape Attributes or Paste Shape Attributes.
Note: You can copy and paste attributes such as width, height,
rotation degree, distortion, transparency, shadows and highlights.
Text boundary, however, cannot be copied.
To apply layout settings to other menu pages
• Click Layout Settings in the Edit tab and select Apply to All Pages of
this Menu.

Share 153
To add a title menu
• Click Advanced Settings in the Edit tab and select Add Title Menu.
To add chapter menus
• Click Advanced Settings in the Edit tab and select Create Chapter
Menu.
To show the menu thumbnail numbers
• Click Advanced Settings in the Edit tab and select Show Thumbnail
Number.
To create a menu template:
1Click Customize in the Edit tab of the 2 Menu & Preview page. The
Customize Menu dialog box appears.
2Choose from the following options:
• Set the background music — Lets you choose an audio file to be
used as background music.
• Set the background — Lets you choose an image or a video file to
be used as background image or video.
• Font Settings — Lets you apply text attributes.
• Pan & Zoom — Lets you apply pan and zoom effects.
• Motion Filter — Lets you apply motion effects.
• Menu In/Menu Out — Lets you apply menu motion effects.
3In the drop down menu, select Frame, Navigation Button, or Layout
to display the associated preset thumbnails. Double-click a
thumbnail to apply it.
Note: You can also resize, distort, rotate, and move menu objects in
the Preview Window.
4Click Add to Menu Template to add the template to the Favorites
folder.
Note: When working in the Customize Menu dialog box, use the
Font dialog box to accurately resize text. The Font dialog box can
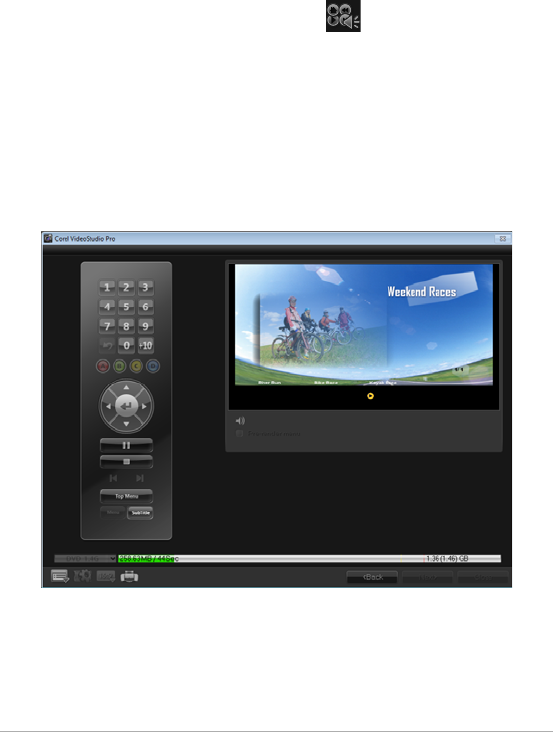
154 Corel VideoStudio Pro User Guide
also be launched by right-clicking the text and selecting Font
Attributes.
To add button sounds for advanced menus
• Click the Set the button sound button in the Edit tab and
choose from a menu of options for selecting or deleting audio files.
Previewing
Now, it's time to see how your movie looks before you burn it onto a disc.
Simply move the mouse and click Play to watch your movie and test the
menu on your computer. Use the navigation controls here as you would
on a standard remote control of a standalone disc player.
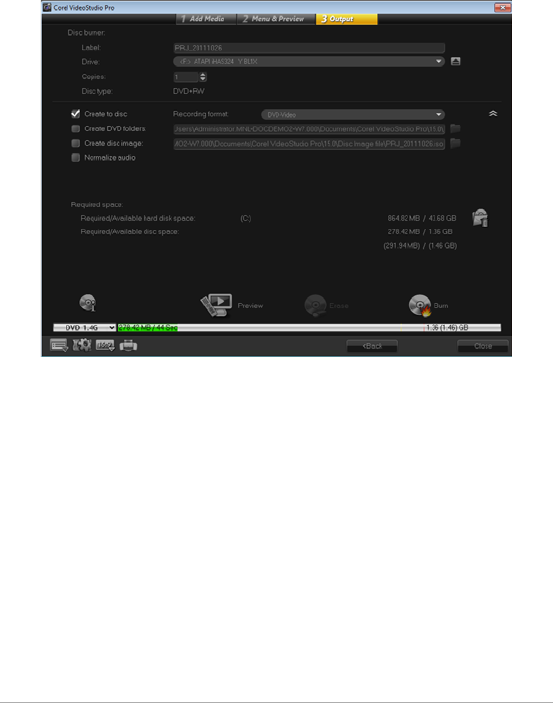
Share 155
Burning your project onto a disc
This is the final step in the disc creation process. You can burn your movie
to a disc, save it to a folder on your hard drive, or create a disc image file
so that you can burn the movie at a later time.
Burning options
•Disc burner — Specifies the settings for your burning device.
•Label — Enables you to enter a volume name for the Blu-ray Disc/
DVD. The label can contain a maximum of 32 characters.
•Drive — Selects the disc burner that you want to use to burn the
video file.
•Copies — Sets the number of disc copies to burn.
•Disc type — Displays the output disc format for the current project.
•Create to disc — Allows you to directly burn your video project onto
a disc.

156 Corel VideoStudio Pro User Guide
•Recording format — Select DVD-Video format to use the DVD
industry standard. To quickly re-edit your disc without copying the
file to the hard drive, select DVD-Video (fast re-editable) which still
complies with the industry standard and has very high compatibility
when working with set-top home DVD players and computer DVD-
ROM. Select DVD+VR for DVD players supporting this format.
•Create DVD folders — This option is only enabled when the video file
being created is a DVD-Video. The files created are in preparation for
burning the video file to a DVD+VR, AVCHD, BD-J or Blu-ray Disc.
This also allows the user to view the finished disc folders on the
computer using a disc playback software like Corel WinDVD.
•Create disc image — Select this option if you plan to burn the video
disc several times. By selecting this option, you don't have to
generate the file again when you want to burn the same video disc.
This option is only available for DVD-Video and disabled for AVCHD,
BD-J and Blu-ray Disc projects.
•Normalize audio — Different video clips may have different audio
recording levels when created. When these video clips are put
together, the volume may vary greatly. To make volume levels
consistent between clips, the Normalize audio function evaluates
and adjusts the audio waveform of the whole project to ensure a
balanced audio level throughout the video.
•Erase — Deletes all the data on a rewritable disc.
•Burning Options — Adjusts the advanced output settings for
burning your project.
•Delete temp files — Removes all unnecessary files in your working
folder.
•Burn — Begins the recording process.

Share 157
•Required space — Serves as a reference when you burn your
projects. These indicators help determine if you have sufficient space
to successfully burn your project onto the disc.
•Required/Available hard disk space — Displays the space needed by
the project and the available hard drive space.
•Required/Available disc space — Displays the space needed to fit the
video file on the disc and the space that is available for use.
To burn your movie onto a disc
1Click Next after you preview your project.
2Click Show more output options and enable one or more of the
following options:
• Create DVD folders — Creates DVD folders in a specified location.
• Create disc image — Creates an ISO image file of the DVD.
• Normalize audio — Evens out irregular audio levels during
playback.
Note: Create disc image is disabled for AVCHD, BD-J and Blu-ray
Disc projects.
3Click More settings for burning.
The Burning Options dialog box appears. Define additional burner
and output settings and click OK.
4Click Burn to start the burning process.
Click OK when prompted that the task is done.
5Click Close to save your work automatically and return to the Corel
VideoStudio Pro Editor.
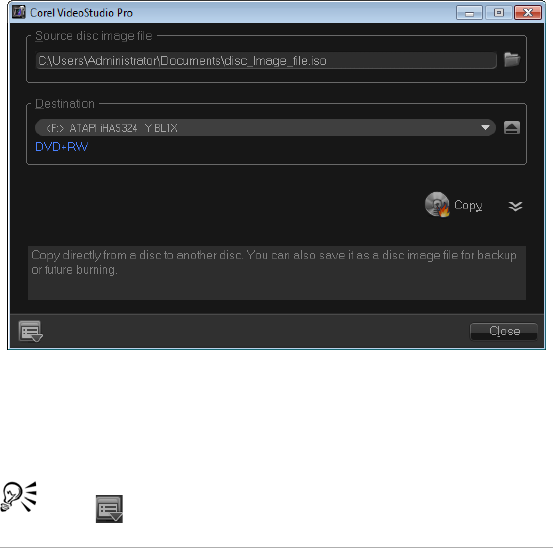
158 Corel VideoStudio Pro User Guide
Copying a disc image file
A disc image file is a single file that has captured the entire contents and
file structure of a disc. Creating a disc image file on your computer allows
you to archive the source disc contents for backup or future burning. You
will need sufficient space on your computer to store the disc image file.
To copy a disc image file:
1Insert a blank disc into your disc burner.
2Click Tools > Burn from Disc Image (ISO).
The disc copying dialog box is displayed.
3In Source disc image file, browse and select your source disc image
(*.iso) file.
4Choose your burner drive in Destination.
5Click Copy to start copying.
Click to set burning preferences.

Share 159
Creating disc labels
Create and print disc labels, case covers, and inserts in Corel VideoStudio
Pro. You can add and edit images, texts, and icons to complete your
layout.
To launch the disc label creation dialog box
• Click the Print disc label icon at the lower left part of the Create disc
dialog box.
General tab
The General tab allows you to select a disc label or disc cover template to
start with. You can then customize the overall design of the disc label,
disc cover, insert, or booklet. The actual dimensions of your media or label
in relation to the selected paper size is displayed to serve as your guide.
Image tab
The Image tab allows you to adjust the properties of your images.
Text tab
The Text tab allows you to format and adjust the properties of your texts.
Disc label creation options
You can do any of the following tasks when designing a disc label.
• Files
•Load Disc Label — Opens a previously saved disc label project.
•Save Disc Label — Saves a disc label project.
•Add Image — Selects an image to add on the label.
•Add Text — Adds a text object to the label.

160 Corel VideoStudio Pro User Guide
•Add Icon — Adds an icon to the label.
•Playlist — Opens the Add/Edit Playlist Information dialog box to
allow you to add information on the label such as the album title,
artist name, as well as date.
•Clear content — Removes all objects and background from the disc
layout. This is useful when starting over with your design.
Other options
•Show/Hide Disc — Shows/hides the outline of the disc for better
alignment of images or text.
•Show/Hide Grid — Shows/hides gridlines for laying out images and
text symmetrically.
Exporting to mobile device
A video file can be exported to file formats compatible to other external
devices such as the iPad, iPhone, iPod touch, Sony PSP, mobile phones,
and Windows-based mobile devices such as smartphones and Pocket PCs.
You can only export your project after you have created a video
file.
To export to a mobile device
1Select a video clip from the Library.
2Click the Export to Mobile Device button and select the video
property.
3In the Save dialog box, type the file name and click the device where
to export your movie.
4Click OK.

Share 161
Project Playback
Project Playback is used to output your entire project or part of it to a DV
camcorder. This also gives you an actual size preview of your movie using
the entire screen of either a PC or TV monitor. You can only output your
project on a DV camcorder if your project is using a DV AVI template.
How your video is played back will depend on the Playback method
option that you selected in Preferences.
To play your project in actual size
1In the Share Step Options Panel, click the Project Playback button
.
2In the Project Playback - Options dialog box, select Entire project or
Preview range, then click Finish to start viewing the project in full
screen.
3To stop the play back, press [Esc].
Note: If you only want to output the preview range of your project,
select Preview range.
Recording to a DV camcorder
After editing your project and creating a video file, Corel VideoStudio Pro
allows you to record the video to your DV camcorder. You can only record
a video that is using DV AVI format to your DV camcorder.
To record a movie to your DV camcorder
1Turn your camcorder ON and set it to Play mode (or VTR / VCR
mode). See your camcorder's manual for specific instructions.
2Select a compatible DV AVI file from the Library.
3In the Share Step Options Panel, click the DV Recording button .
4The DV Recording - Preview Window dialog box opens. You can
preview the video file here. After you are done previewing, click Next.

162 Corel VideoStudio Pro User Guide
5In the Project Playback - Record Window dialog box, use the
Navigation Panel to go to the section of the DV tape where to start
recording.
Note: Click Transmit to device unit for preview to preview your
project on the DV camcorder’s LCD monitor.
6Click Record. After you are done recording your project to the DV
camcorder, click Finish.
Note: Before recording a video file back to your DV camcorder,
make sure the video is saved with the correct codec. For example,
the codec DV Video Encoder usually works well for most NTSC DV
camcorders. You can select it from the Compression tab in the Video
Save Options dialog box.
Recording to an HDV camcorder
To record your finished project to an HDV/HD camcorder, you must first
render it as HDV/HD-encoded MPEG-2 transport stream file.
To record a movie to your HDV camcorder
1Turn your camcorder ON and set it to Play/Edit mode. See your
camcorder's manual for specific instructions.
2In Share Step Options Panel, click the HDV Recording button
and select a transport stream template.
The Create Video File dialog box appears.
3Enter a file name for your video file.
4Corel VideoStudio Pro renders the project. When done, HDV
Recording - Preview Window dialog box opens. You can preview the
video file here.
5Click Next to start recording.
6In the Project Playback - Record Window dialog box, use the
Navigation Panel to go to the section of the DV tape where to start
recording.

Share 163
Note: Click Transmit to device unit for preview to preview your
project on the HDV camcorder’s LCD monitor.
7Click Record. After recording your project to the HDV camcorder,
click Finish.
Uploading to the Web
Share your video projects online by uploading your videos to Vimeo,
YouTube (in 2D and 3D formats), Facebook and Flickr. You can access your
accounts from within Corel VideoStudio Pro.
Please make sure to abide by the terms of use regarding copyright
ownership of video and music as set by Vimeo, YouTube,
Facebook and Flickr.
To upload your video to Vimeo
1Select a video file or clip from the Library.
2In the Share Step, click the Upload to Web button and click
Vimeo. A pop-up menu will appear.
3If you have already saved your video file, click Browse for a file to
upload to locate the video from the file directory. If you have not
saved your video, choose from the list of video qualities. Your video
will be saved following the quality settings you selected.
4Enter your e-mail address and password.
Note: If you do not have an existing Vimeo account, click Join Vimeo
to establish an account and follow the on-screen instructions.
5Click Log in. The authorization appears.
6Fill in the necessary information such as your video title, description,
privacy settings and additional tags.
7Click Upload to upload your video. The Upload Video Progress bar
shows the progress of your upload.

164 Corel VideoStudio Pro User Guide
8Click Done when uploading is completed. This launches the Vimeo
web page where you can check out the recently uploaded video file.
To upload 2D and 3D videos to YouTube
1Select a video file or clip from the Library.
2In the Share Step, click the Upload to Web button and click
YouTube or YouTube 3D. A pop-up menu will appear.
3If you have already saved your video file, select Browse for a file to
upload to locate the video from the file directory. If you have not
saved your video, select from the list of video qualities. Your video
will be saved following the quality settings you selected.
Note: To maximize 3D potentials in YouTube, make sure that the 3D
video files is in Side-by-side format.
4Choose a video file or clip from the directory folder and click Open.
This will launch the Log-in YouTube window.
5If you already have an account, enter username and password.
Note: If you do not have an existing YouTube account, click Join
YouTube to establish an account and follow the on-screen
instructions.
6Click Next. The Copyright Disclaimer page will appear. Check the
agreement statement and click Next.
7Fill in the necessary information about the video in the metadata
dialog box that appears.
8Click Upload. The Upload Video Progress bar shows the progress of
your upload.
9Click Done when the video has been successfully uploaded. This
launches the YouTube web page where you can check out the
recently uploaded video file.

Share 165
To upload your video to Facebook
1In the Share Step, click the Upload to Web button and click
Facebook. A pop-up menu will appear.
2If you have already saved your video file, select Browse for a file to
upload to locate the video from the file directory. If you have not
saved your video, select from the list of video qualities. Your video
will be saved following the quality settings you selected.
3Choose a video file or clip from the directory folder and click Open.
This will launch the Log in to Facebook window.
4Enter your e-mail address and password for your Facebook account
and click Login.
If you do not have a Facebook account, you can create one by
clicking the Sign up for Facebook link.
Note: You can also enable Keep me logged in to Corel VideoStudio
Pro to allow the program to remember your account details to skip
this step the next time you log in.
5Click Allow to permit the program to post the video in your profile.
6Enter your Title and Description in the text boxes provided and
choose the Privacy settings for your video.
You can also click Log in as another user to use another Facebook
account.
7Click Upload and monitor the upload progress.
8Click Done and your default web browser will open to view the video
you uploaded in your Facebook profile.
To upload your video to Flickr
1In the Share Step, click the Upload to Web button and click
Flickr. A pop-up menu will appear.
2If you have already saved your video file, select Browse for a file to
upload to locate the video from the file directory. If you have not

166 Corel VideoStudio Pro User Guide
saved your video, select from the list of video qualities. Your video
will be saved following the quality settings you selected.
3Choose a video file or clip from the directory folder and click Open.
This will launch the Log in to Flickr window.
4Enter your e-mail address and password for your Yahoo! Mail
account and click Sign in.
5Enter your username for your Flickr account and click OK, I’LL
AUTHORIZE IT.
If you click NO THANKS, you will be taken to your Flickr home page
and will not continue with the upload process.
If you do not have an associated Flickr account, you will be
automatically directed to sign up for Flickr.
6Enter your desired Title, Description and Tags in the text boxes
provided and choose the set where you want to add your video.
Choose your desired privacy settings in Set Privacy.
7Choose the safety level and content type for your video in Set safety
level and Set content types.
8Click Upload and monitor the upload progress.
9Click Done and your default web browser will open to view the video
you uploaded in your Flickr profile.
Creating movie templates
Movie templates contain settings which define how to create the final
movie file. By using the preset movie templates provided by Corel
VideoStudio Pro or by creating your own templates in the Make Movie
Templa t es Manager, you can have multiple variations of your final movie.
For instance, you can create movie templates that provide high quality
output for DVD and video recording, and also set up movie templates
that give lower quality but acceptable outputs for different purposes,
such as Web streaming and e-mail distribution.

Share 167
To create movie templates
1Click Settings > Make Movie Templates Manager. The Make Movie
Templa tes Manager dialog box opens.
2Click New. In the New Template dialog box, select the File format and
type in a Template name. Click OK.
3In the Template Options dialog box, set the options you want in the
General and Compression tabs.
Note: The available options in the tabs will depend on the type of
file format of the template.
4Click OK.
Note: Movie templates will appear in a selection menu when you
click Create Video File in the Share Step. If you do not want to
use a movie template, you can select Custom from the pop-up
menu. This allows you to choose your own settings for creating the
final movie or simply use the current project settings.
Note: To modify the settings of a movie template, click Edit in the
Make Movie Templates Manager dialog box.

Appendix A: Shortcuts 169
Appendix A: Shortcuts
This section contains the following topics:
• Menu command shortcuts
• Step Panel shortcuts
• Navigation Panel shortcuts
• Timeline shortcuts
• Multi-trim Video shortcuts
• Layout settings shortcuts
• Screen capture shortcuts
•Others
Menu command shortcuts
Ctrl + N Create a new project
Ctrl + M Create a new HTML5 project
Ctrl + O Open a project
Ctrl + S Save a project
Alt + Enter Project Properties
F6 Preferences
Ctrl + Z Undo
Ctrl + Y Redo
Ctrl + C Copy
Ctrl + V Paste

170 Corel VideoStudio Pro User Guide
Step Panel shortcuts
Navigation Panel shortcuts
Del Delete
F1 Help
Alt + C Go to Capture Step
Alt + E Go to Edit Step
Alt + F Go to Effect in the Gallery list
Alt + O Go to Media in the Gallery list
Alt + T Go to Title in the Gallery list
Alt + S Go to Share Step
F3 Set mark-in
F4 Set mark-out
Ctrl + P Play/Pause
Space Play/Pause
Shift + Play button Play the currently selected clip
Home Return to the starting segment or
cue
Ctrl + H Home
End Move to the end segment or cue
Ctrl + E End
BPrevious frame
FNext frame
Ctrl + R Repeat
Ctrl + L System Volume

Appendix A: Shortcuts 171
Timeline shortcuts
Ctrl + I Split Video
Tab Toggle between the Trim Handles
and Scrubber.
Enter When the left Trim Handle is active,
pressing [Tab] or [Enter] switches
to the right handle.
Left If you pressed [Tab] or [Enter] to
make the Trim Handles or Scrubber
active, use the Left-arrow key to
move to the previous frame.
Right If you pressed [Tab] or [Enter] to
make the Trim Handles or Scrubber
active, use the Right-arrow key to
move to the next frame.
ESC If you pressed [Tab] or [Enter] to
activate and toggle between the
Trim Handles and Scrubber, you
can press [Esc] to deactivate the
Trim Handles / Scrubber.
Ctrl + A Select all clips on the Timeline.
Single title: Select all characters in
the on-screen edit mode.
Ctrl + X Single title: Cut selected characters
in the on-screen edit mode.
Shift + Click Select multiple clips in the same
track. (To select multiple clips in the
Library, [Shift] + [Click] or [Ctrl] +
[Click] the clips.)
Left Select the previous clip on the
Timeline.

172 Corel VideoStudio Pro User Guide
Multi-trim Video shortcuts
Right Select the next clip on the Timeline.
+ / - Zoom in/out.
Ctrl + Right Scroll forward.
Ctrl + Left Scroll backward.
Ctrl + Up /
Page Up
Scroll up.
Ctrl + Down /
Page Down
Scroll down.
Home Move to the start of the Timeline.
End Move to the end of the Timeline.
Ctrl + H The previous segment.
Ctrl + E The next segment.
Del Delete
F3 Set mark-in
F4 Set mark-out
F5 Go backward in the clip
F6 Go forward in the clip
Esc Cancel

Appendix A: Shortcuts 173
Layout settings shortcuts
Screen capture shortcuts
Others
F7 Switch to Default
Ctrl + 1 Switch to Custom #1
Ctrl + 2 Switch to Custom #2
Ctrl + 3 Switch to Custom #3
Alt + 1 Save to Custom #1
Alt + 2 Save to Custom #2
Alt + 3 Save to Custom #3
F10 Stop screen capture
F11 Pause / Resume screen capture
ESC Stop capturing, recording,
rendering, or close a dialog box
without making any changes.
If you switched to Full Screen
Preview, press [Esc] to return to the
Corel VideoStudio Pro workspace.
Double-click a transition in the
Effects Library
Double-clicking a transition in the
Library automatically inserts it into
the first empty transition slot
between two clips. Repeating this
process will insert a transition into
the next empty transition slot.

Appendix B: DV-to-DVD Wizard 175
Appendix B: DV-to-DVD Wizard
Using the DV-to-DVD Wizard, you can capture video from FireWire-
enabled DV and HDV tape camcorders, add a theme template, and then
burn to DVD. This video-editing mode provides a fast and direct way to
transfer your videos to a DVD.
You can launch the DV-to-DVD Wizard by clicking Tools > DV-to-DVD
Wizard.
This section contains the following topics:
• Scanning for scenes
• Applying templates and burning to DVDs
Scanning for scenes
Scan the DV tape and select the scenes that you want to add to your
movie.
To scan for scenes
1Connect your camcorder to your computer, and turn on the device.
Set your camcorder to Play (or VTR/VCR) mode.
2Select a recording device under Device.
3Click the Capture format arrow to select a file format for captured
videos.
4Specify whether to burn all videos of the tape (Burn whole tape) or
scan your DV tape (Scene detection).
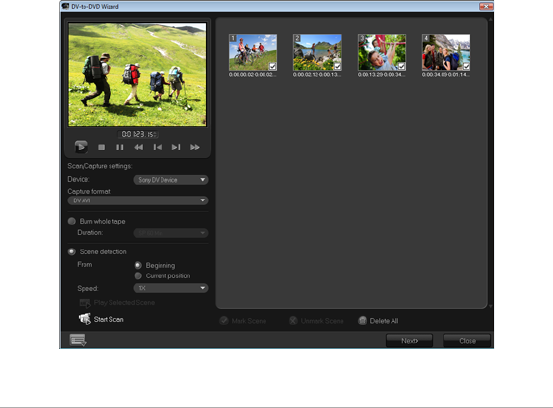
176 Corel VideoStudio User Guide
To burn the whole tape
1Select Burn whole tape and then specify the tape duration under
Duration.
2Click Next to apply the template and burn to DVD.
To use scene detection
1After selecting Scene detection, choose whether to scan the tape
from the Beginning or Current position.
• Beginning — Scans the tape for scenes from the beginning. The
tape will automatically be rewound if the tape position is not in the
beginning.
• Current position — Scans the tape for scenes from the current
tape position.
2Specify the scan speed and click Start Scan to begin scanning the DV
device for scenes. Scenes are video segments that are distinguished
by date and time stamps on the DV tape.
DV-to-DVD Wizard

Appendix B: DV-to-DVD Wizard 177
3In the Storyboard View, select each scene that you want to include in
your movie, and click Mark Scene.
4Click Next.
Note: To save and import the scanned file without having to re-scan
it, click the Options button and select Save DV Quick Scan
Digest. To manage a large number of tapes, click Save DV Quick Scan
Digest as HTML. This feature lets you print the HTML file and attach
it with your tapes.
Applying templates and burning to DVDs
Choose a style template, specify settings, and burn your movies to DVD.
To apply a style template and burn to DVD
1Specify a volume name and recording format for your movie.
Note: If you have more than one burner installed on your computer,
or if the default drive is not a burner, specify the burner that you
want to use in the Advanced Settings dialog box.
2Choose a style template from one of the available presets to apply to
your movie, and then select the output video quality.
3To customize the theme template text, click Edit Title.

178 Corel VideoStudio User Guide
4In the Begin tab of the Edit Template Title dialog box, double-click
the text that you want to modify. You can also modify attributes such
as font, color or shadow settings.
5Click the End tab to modify the text. Click OK.
6To mark your video clips with date information, click Add as title in
Video date information. Select Entire video if you want the video to
appear from beginning to end, or specify the duration.
7Click the Burn button to burn your movie file to a disc.
Note: If the movie is too big to fit onto a DVD, click Fit & Burn.

Glossary 179
Glossary
Aspect Ratio
The relationship of width to height for a given image or graphic. Keeping
or maintaining the aspect ratio refers to the process of maintaining size
relationships when either the width or height of an image or graphic is
changed. In video, the two most common aspect ratios are 4:3 and 16:9
for Standard definition (SD) and High definition (HD) Widescreen video
formats.
AVI
Audio-Video Interleave is a digital video file format designed specifically
for the Microsoft Windows environment, now commonly used as a
storage for several audio and video codecs.
AVCHD
Advanced Video Codec High Definition is a video format that is designed
for camcorder use. It uses a disc structure designed for Blu-ray Disc / high
definition compatibility and can be burned on standard DVDs.
Blu-ray Disc
Blu-ray Disc is an optical disc format that uses a blue laser for high
definition video recording and playback. Each disc also allows more
information to be burned in 25-GB (single-layer) and 50-GB (dual-layer)
discs, offering more than five times the capacity of standard DVDs.
Capture
The recording of video or images to a computer hard disk.
Capture Plug-ins
These are utilities integrated with Corel VideoStudio Pro that allow the
program to recognize capture devices and automatically detect them
when they are connected to the computer.

180 Corel VideoStudio Pro User Guide
Clip
A short section or part of a movie. A clip can be audio, video, still images
or a title.
Codec
A special algorithm or program that is used to process video. The origin
of the word is compression/decompression or coder/decoder.
Color Clip
A simple background color used in a movie. It is often used for titles and
credits since they stand out clearly against the solid color.
Compression
Compression is achieved through a codec and works by removing
redundant data or describing it in terms that can be decompressed.
Nearly all digital video is compressed in some way or another but differs
on the degree of compression. The more compressed, the more resources
needed for playback.
Data Rate
The amount of data per second that is transferred from one part of your
computer to another. These data rates vary in different types of media.
Device Control
A software driver that allows programs to control video sources like the
camcorder or VCR.
DNLE
Digital Non-Linear Editing is a method of combining and editing multiple
video clips to produce a finished product. DNLE offers random access to
all source materials at all times during the editing process.
Driver
A software program that controls the connection between a specific
device and a computer.

Glossary 181
DV
Digital Video with a capital "D" and a capital "V" stands for a very specific
format of video, just like VHS or High-8. This format can be understood
(played back, recorded) by DV camcorders and your computer, if you
have the proper hardware and software. DV can be copied from your
camcorder to your computer, and then back to your camcorder (after
editing, of course) without any loss of quality.
DVD
DVD (Digital Versatile Disc) is popular in video production because of its
high quality and broad compatibility. Not only does it guarantee audio
and video quality, DVDs make use of the MPEG-2 format, used to
produce discs that are single- or double-sided, and single- or dual-layer.
They can be played on standalone DVD players or on the DVD-ROM drive
of your PC.
Effect
In Corel VideoStudio Pro, an effect is a special computer generated
attribute applied to video clips that alters the appearance and quality of
video to achieve a certain look.
Export
The process of sharing files. When you export a file, the data is usually
converted into a format that is recognizable by the receiving application.
The original file remains unchanged.
Fade
A transition effect where the clip gradually disappears or appears. In
video, the picture would gradually change to or from a solid color; or
from one image to another. For audio, the transition would be from full
volume to complete silence or vice-versa.
FireWire
A standard interface used for connecting digital audio/video devices such
as DV camcorders to computers. It is the Apple’s trademarked name for
the IEEE-1394 standard.

182 Corel VideoStudio Pro User Guide
Footage
A length of recorded film intended for use in a larger project.
Frame
A single image in a movie.
Frame Rate
The number of frames per second in a video. NTSC video is commonly
29.97 frames per second (fps) while PAL has 25 fps, but smaller video files
can be created on the computer by using lower frame rates.
Frame Size
The size of displayed images in video or animation sequences. If an image
intended for the sequence is larger or smaller than the current frame size,
it must be resized or cropped.
HDV
HDV is a format for recording and playback of high-definition video on a
DV cassette tape. Announced in 2003 as an affordable high definition
format, HDV video supports resolutions up to 1440 × 1080 and is
compressed with MPEG-2. HDV audio is compressed using MPEG-1 Layer
2.
IEEE-1394
Also known as Firewire, 1394 is standard that allows high-speed serial
connections between the computer and an HDV/DV camcorder, or other
high speed peripheral device. Devices conforming to recent updates to
this standard are capable of transmitting digital data at 400 megabits per
second.
Instant Playback
Allows you to view the entire project without rendering. It instantly plays
all the clips in the Preview Window without creating a temporary preview
file in your system. Playback quality is dependent on your hardware
configuration.
If Instant Playback results in drop frames, then use High Quality Playback
to preview a project.

Glossary 183
Key frame
A specific frame in a clip that is flagged for special editing or other
activities in order to control the flow, playback or other characteristics of
the completed animation. For example, when applying a video filter,
assigning different effect levels on the beginning and end frames shows
a change in the appearance of the video from start to end of the video
clip. When creating a video, assigning key frames on parts where there
are high data transfer requirements helps control how smoothly the video
plays back.
Library (Corel VideoStudio Pro)
The Library is the repository for all of your media clips. You can store
video, audio, titles, or color clips in the Library and instantly retrieve them
for use in a project.
Link
A method of storing previously saved information in another program
without significantly affecting the size of the resulting file. Linking offers
another advantage in that the original file can be modified in its original
program and the changes will automatically be reflected in the program
where it is linked.
Mark In/Out
Points in a clip that have been marked for editing and trimming purposes.
A section can be selected from a longer clip by setting its beginning (Mark
in) and ending (Mark out).
MP3
Abbreviation of MPEG Audio Layer-3. MP3 is an audio compression
technology that produces near CD audio quality at a very small file size,
making it transfer quickly over the Internet.
MPEG-2
A standard for video and audio compression used in products like DVD.

184 Corel VideoStudio Pro User Guide
MPEG-4
A video and audio compression format that is commonly used in mobile
devices and video streaming in the Internet that provides high-quality
videos at lower data rates.
NLE
Non-Linear Editing. In the past, conventional editing on a VCR was
necessarily linear because of the need to access clips on a video tape in
order. Computer editing can be done in any order that is convenient.
Noise
Noise may be found in audio and video. In audio, it manifests as
unwanted residual hiss while they are random image specks and dots
onscreen in video. These are electronic interferences that are most
common in analog audio and video.
NTSC/PAL
NTSC is the video standard in North America, Japan, Taiwan, and some
other regions. Its frame rate is 29.97 fps. PAL is common in Europe,
Australia, New Zealand, China, Thailand, and some other Asian places,
which has a frame rate of 25 fps. There are other differences. In the world
of DV and DVD, NTSC has the video resolution of 720 × 480 pixels, while
PAL has 720 × 576 pixels.
Overlay
These are superimposed video or image clips over existing clips in your
project.
Plug-ins
Plug-ins are utilities that add more functions and effects to a program. In
Corel VideoStudio Pro, plug-ins have made it possible for the program to
automatically recognize capture devices as well as output videos for
different purposes such as for e-mail, Web page, video greeting cards,
and DV recording.

Glossary 185
Profile
A profile covers various attributes for a Windows Media Format file such
as bit rate, number and type of streams, compression quality, frame size
and so on.
Project File
In Corel VideoStudio Pro, a project file (*.VSP) contains the required
information to link all associated image, audio, and video files. With Corel
VideoStudio Pro, you must open a project file before you can edit a video.
Render
Rendering is the process of making a finished movie from the source files
in a project.
Scenes
A scene is a series of continuous frames. In Corel VideoStudio Pro, each
scene that is captured by using the Split by Scene feature is based on the
recording date and time of the footage. In a captured DV AVI file, scenes
can be separated into several files based on the recording date and time
of the footage or based on changes in the content of the video. In an
MPEG-2 file, the content changes are used to separate scenes into files.
SmartRender
SmartRender technology saves time when generating previews by
rendering only the parts that have been modified from your last render
operation.
Split by scene
This feature automatically splits up different scenes into individual files. In
Corel VideoStudio Pro, the way scenes are detected depends on which
step you are in. In the Capture Step, Split by Scene detects individual
scenes based on the original footage's recording date and time. In the
Edit Step, if Split by Scene is applied to a DV AVI file, scenes can be
detected in two ways: by the recording date and time, or by the changes
in the content of the video. Whereas in an MPEG file, scenes are detected
only based on the content changes.

186 Corel VideoStudio Pro User Guide
Storyboard
A Storyboard is a visual representation of your movie. Individual clips are
represented as image thumbnails on the Timeline.
Streaming
Allows large files to be played as they are being downloaded. Streaming
is commonly used for large video and audio files that are made available
on the Internet through video-sharing Web sites.
Template
A work pattern in a software program. They are predefined formats and
settings to serve as guides in making projects.
Timecode
The timecode of a video file is a numerical way of representing the
position in a video. Timecodes can be used to make very accurate edits.
Timeline
The Timeline is a graphic representation of your movie in chronological
order. The relative size of clips on the Timeline gives you an accurate idea
of the length of your media clips and the relative positions of titles,
overlays and audio.
Title
A title can be a movie title, a caption or credit. Any text that overlays your
video can be referred to as titles.
Transition Effect
A transition is a method of sequencing between two video clips, like
fading from one into another.
Trim
The process of editing or cropping a video clip. Video can be trimmed
frame by frame.

Glossary 187
Video Filters
A video filter is a method of changing the appearance of a video clip, like
mosaic and ripple. It can be used as a corrective measure by
compensating for shooting errors and can also be creative by achieving a
certain effect to video.
Voice-over
The narration of a video or movie is commonly called the voice-over. This
is most notable in documentary films.

Index 189
Index
Numerics
2D to 3D 141
3D
3D media 58
creating 141
60P/50P editing 36
A
Add / Remove Chapter or Cue
24
Adding
audio files 124
clips to your project 37
third-party music 126
Adding transitions to My
Favorites 80
Adding/Editing chapters 146
Adjusting color and brightness
101
Analog video 47
Applying motion to the Overlay
clip 114
Applying selected transition
effect to all clips 79
Attribute tab 74
Audio filters 134
Auto Add Chapters 147
B
Background Track 24
Batch Convert 100
Blu-ray Disc 179
Border 115
Burn whole tape 176
Burning
Burning your project onto a
disc 155
C
Capture Video 42
Capture Video Options Panel
43
Chapter Point 108
Chapter/Cue Menu 107

190 Corel VideoStudio Pro User Guide
Chroma Key 116
Color
Color tab 74
Color clips 88
Controlling the DV camcorder
with the Navigation Panel 45
copying discs 158
Corel Corporation 12
Corel Guide 9
Create Disc 135
Create HTML5 File 135
Create Sound File 135
Create Video File 135
Creating 34
HTML project 34
movie project 34
selection menus 148
Cue Point 107
Cue Point Manager 108
customer support 12
Customize Filter 87, 91
D
Digital TV 46
disc
burning 143
creating 143
disc image files 158
Distorting an Overlay clip 114
Duplicating an audio channel
133
DV 45
DV Quick Scan 48
DV Recording 136
DVB-T video 46
E
Edit Title 177
Editing text 84
Enhancing Overlay clips 115
F
Fade-in/out 130
Filter 90
Fit & Burn 178
Flash animations 90

Index 191
G
Glossary 179
Graphic 88
H
Hardware acceleration 6
decoder 7
encoder 7
optimization 7
HDV Recording 136
Help system 9
High Definition Videos 46
HTML5
Background Track 25
I
Importing digital media 49
Instant Playback 37
Instant Project 34
Instant project
templates 34
Instant timecode tip 66
ISO 158
K
Key frame 92
L
learning the application 9
Help system 9
Library 26
M
Make Movie Templates
Manager 166
Mark-in/out 19
Mask & Chroma Key 115
Mask Frame 117
Menu Bar 17
Mixing audio tracks 130
Modifying text attributes 84
MPEG Optimizer 139
MPEG-2 44
Multiple tracks 111
Multi-trim Video 69
Music Track 25

192 Corel VideoStudio Pro User Guide
N
Navigation Panel 18
New HTML5 project 34
New project 34
Normalize audio 156
O
Opening an existing project 34
Options Panel 25
Overlay Tracks 24, 25
P
Painting Creator
Modes 122
Panning & Zooming 103
Pause Duration 114
Photo
Photo tab 73
Photos 59
Play Mode 19
Playback speed 60
Preset text 82
Preview range 38
Preview Window 18
Previewing 154
Project Playback 136
Project Properties 36
Project Timeline 21
Q
quitting the application 8
R
registering Corel products 10
Rendering 33
Repositioning the current
Overlay clip 112
Resizing an Overlay clip 113
Resizing and distorting clips
106
Rip CD Audio 126
Rotate by degree 86
Rotating text 86
S
Save DV Quick Scan Digest 177
Save DV Quick Scan Digest as
HTML 177

Index 193
Saving
Smart Package 40
Trimmed clips 71
Scene detection 176
screen capture 53
Shortcuts 169
Shuttle Slider 45
Split Audio 73
Split by scene 43, 44
starting the application 8
Step Panel 17
stop motion 50
configuring
capture settings 51
project settings 50
creating 50
importing images 52
opening 52
Storyboard View 22
Stretching audio duration 129
System Volume 19
T
technical support 12
templates
creating 35
importing 35
opening 34
Text Backdrop 85
The Mask transition 80
Time-lapse 60
Timeline View 22
Title safe area 83
Title Track 25
Toolbar 20
Transparency 115
Trim Markers 18
Trimming a clip 65
Trimming Overlay clips 112
TV footage 48
U
updating the application 11
V
Video
Edit tab 72
Video date information 178
Video Track 24, 37
Corel® VideoStudio® Pro X5 User Guide
© 2012 Corel Corporation. All rights reserved. Corel, CorelDRAW, DESIGNER,
Digital Studio, Painter, PaintShop Pro, Ulead, VideoStudio Pro, WinDVD, WinZip,
WordPerfect Office, the Corel logo, and the Corel balloon logo are trademarks or
registered trademarks of Corel Corporation and/or its subsidiaries. All other
product names and any registered and unregistered trademarks mentioned are
used for identification purposes only and remain the exclusive property of their
respective owners.
Product specifications, pricing, packaging, technical support and information
("specifications") refer to the retail English version only. The specifications for all
other versions (including other language versions) may vary.
INFORMATION PROVIDED HEREIN BY COREL IS PROVIDED "AS IS" BASIS, WITHOUT
WARRANTIES OR CONDITIONS, EXPRESS OR IMPLIED, INCLUDING, BUT NOT
LIMITED TO, WARRANTIES OF MERCHANTABLE, FITNESS FOR A PARTICULAR
PURPOSE, TITLE AND NON-INFRINGEMENT, OR THOSE ARISING BY LAW, STATUTE,
USAGE OF TRADE, COURSE OF DEALING OR OTHERWISE. THE ENTIRE RISK AS TO
THE RESULTS OF THE INFORMATION PROVIDED OR ITS USE IS ASSUMED BY YOU.
COREL SHALL HAVE NO LIABILITY TO YOU OR ANY OTHER PERSON OR ENTITY FOR
ANY INDIRECT, INCIDENTAL, SPECIAL, OR CONSEQUENTIAL DAMAGES
WHATSOEVER, INCLUDING, BUT NOT LIMITED TO, LOSS OF REVENUE OR PROFIT,
LOST OR DAMAGED DATA OR OTHER COMMERCIAL OR ECONOMIC LOSS, EVEN
IF COREL HAS BEEN ADVISED OF THE POSSIBILITY OF SUCH DAMAGES OR THEY
ARE FORESEEABLE. COREL IS ALSO NOT LIABLE FOR ANY CLAIMS MADE BY ANY
THIRD PARTY. COREL'S MAXIMUM AGGREGATE LIABILITY TO YOU SHALL NOT
EXCEED THE COSTS PAID BY YOU TO PURCHASE THE MATERIALS. SOME STATES/
COUNTRIES DO NOT ALLOW EXCLUSIONS OR LIMITATIONS OF LIABILITY FOR
CONSEQUENTIAL OR INCIDENTAL DAMAGES, SO THE ABOVE LIMITATIONS MAY
NOT APPLY TO YOU.
This manual may not, in whole or part, be copied, photocopied, reproduced,
translated, or reduced to any electronic medium or machine readable form
without the prior agreement and written permission of Corel Corporation.
