Corel WordPerfect X3 User Guide Word Perfect Instruction Manual Ug
User Manual: corel WordPerfect - X3 - Instruction Manual Free User Guide for Corel WordPerfect Software, Manual
Open the PDF directly: View PDF ![]() .
.
Page Count: 278 [warning: Documents this large are best viewed by clicking the View PDF Link!]
- Table of contents
- Getting started in WordPerfect
- Working with files
- Viewing and navigating
- Formatting pages
- Formatting text
- Formatting paragraphs
- Editing documents
- Working with footnotes and endnotes
- Numbering
- Printing
- Setting up a printer
- Setting up a print job
- Previewing a print job
- Printing documents
- Controlling a print job
- Printing double-sided pages
- Printing document sections and comments
- Printing file details
- Printing envelopes and labels
- Printing graphics
- Laying out a print job
- Saving print settings
- Using printer commands
- Printing to a file
- Sending faxes
- Reference: Printing
- Merging documents
- Creating data for a merge
- Working with form documents for a merge
- Associating merge files
- Performing a merge
- Converting merge files
- Sorting, viewing, and finding data in data files
- Editing merge data files
- To add a column to a data table
- To delete a column from a data table
- To add a row to a data table
- To delete a row from a data table
- To add or delete a field from a data text file record
- To add or delete a field name from a data text file
- To add a record to a data text file
- To add a field to a data file using Quick data entry
- To add a record to a data file using Quick data entry
- To edit fields using Quick data entry
- Selecting specific data for merges
- Merging with address books
- Changing merge options
- Using merge commands
- Merge programming commands
- ASSIGN(var;expr)
- BEEP
- BREAK
- CALL(label)
- CANCELOFF
- CANCELON
- CAPS(expr)
- CASEOF(expr[;...;expr])
- CHAINDATA(filename)
- CHAINFORM(filename)
- CHAINMACRO(macroname)
- CHAR(var[;prompt][;title])
- CODES(merge codes)
- COMMENT(comment)
- CONTINUE
- CTON(character)
- DATE
- DEFAULT
- DISPLAYSTOP
- DOCUMENT(filename)
- ELSE
- EMBEDMACRO(macro statements)
- ENDFIELD
- ENDFOR
- ENDIF
- ENDRECORD
- ENDSWITCH
- ENDWHILE
- FIELD(field)
- FIELDNAMES(name1;...;nameN)
- FIRSTCAP(expr)
- FOREACH(var;expr1;...;exprN)
- FORNEXT(var;start;stop[;step])
- GETSTRING(var[;prompt][;title])
- GO(label)
- IF(expr)
- IFBLANK(field)
- IFEXISTS(var)
- IFNOTBLANK(field)
- INSERT(text)
- KEYBOARD([prompt])
- LABEL(label)
- LOOK(var)
- MRGCMND(merge codes)
- NESTDATA(filename)
- NESTFORM(filename)
- NESTMACRO(macroname)
- NEXT
- NEXTRECORD
- NTOC(number)
- ONCANCEL(action)
- ONERROR(action)
- PAGEOFF
- PAGEON
- POSTNET(string)
- PROCESSOFF
- PROCESSON
- PROMPT(message)
- QUIT
- REPEATROW
- RETURN
- RETURNCANCEL
- RETURNERROR
- REWRITE
- STATUSPROMPT(message)
- STEPOFF
- STEPON
- STOP
- STRLEN(expr)
- STRPOS(expr;subexpr)
- SUBSTDATA(filename)
- SUBSTFORM(filename)
- SUBSTR(expr;start;length)
- SWITCH(expr)
- SYSTEM(sysvar)
- TOLOWER(expr)
- TOUPPER(expr)
- VARIABLE(var)
- WAIT(10ths second)
- WHILE(expr)
- ASSIGNLOCAL(var;expr)
- Working with levels, loops, and merge variables
- Working with merge expressions
- Expression terms
- Reference: The Merge toolbar and programming commands
- Recordings, macros, and automation features
- Using QuickMacros
- Recording, saving, and storing macros
- Playing macros
- Using macros included with WordPerfect
- Using toolbars for macros
- Using template macros
- Editing and deleting template macros
- Triggering macros from templates
- Customizing WordPerfect macros
- Assigning template macros to keystrokes, menus, and toolbars
- To assign a template macro to a keystroke
- To create a keyboard with the same initial settings as an existing keyboard
- To assign a template macro to a menu
- To edit the current template menu
- To create a template menu with the same initial settings as an existing menu
- To assign a template macro to a toolbar button
- To edit a toolbar button
- To edit the image of a toolbar button
- Associating toolbars with template features
- Writing and editing macros by using PerfectScript
- Understanding macro commands and syntax
- Using macro conventions and formatting macros
- Recording macro commands in macros
- Inserting codes in macros
- Using macros from earlier versions of WordPerfect
- Using programming commands in macros
- Using parameters in macros
- Using variables in PerfectScript
- Using the macro command browser
- Using macro commands to retrieve information
- Using OLE object commands in macros
- Compiling macros
- Working from the PerfectScript utility
- Testing for errors from PerfectScript
- Editing and deleting macros
- Searching in macros
- Integrating with Microsoft Visual Basic for Applications
- Using the PerfectScript class to change WordPerfect documents
- Working with VBA methods
- Accessing and manipulating applications from other applications
- Using OLE Automation
- Understanding OLE Automation
- Using files with DDE Execute from previous versions of WordPerfect
- Getting online Help for macros
- Index

WordPerfect

Table of contents iii
Table of contents
WordPerfect
Getting started in WordPerfect. . . . . . . . . . . . . . . . . . . . . . . . . . . . . . . . . .1
Discovering WordPerfect . . . . . . . . . . . . . . . . . . . . . . . . . . . . . . . . . . . . . . . . . . 1
Exploring the work area . . . . . . . . . . . . . . . . . . . . . . . . . . . . . . . . . . . . . . . . . . . 2
Creating and opening documents . . . . . . . . . . . . . . . . . . . . . . . . . . . . . . . . . . . . 3
Entering and inserting text . . . . . . . . . . . . . . . . . . . . . . . . . . . . . . . . . . . . . . . . . 4
Selecting and deleting text . . . . . . . . . . . . . . . . . . . . . . . . . . . . . . . . . . . . . . . . . 6
Performing Web searches powered by Yahoo! . . . . . . . . . . . . . . . . . . . . . . . . . . . 7
Working with files . . . . . . . . . . . . . . . . . . . . . . . . . . . . . . . . . . . . . . . . . . . .9
Inserting files into active documents . . . . . . . . . . . . . . . . . . . . . . . . . . . . . . . . . . 9
Counting words. . . . . . . . . . . . . . . . . . . . . . . . . . . . . . . . . . . . . . . . . . . . . . . . . 10
Converting multiple files . . . . . . . . . . . . . . . . . . . . . . . . . . . . . . . . . . . . . . . . . . 11
Saving documents . . . . . . . . . . . . . . . . . . . . . . . . . . . . . . . . . . . . . . . . . . . . . . . 12
Viewing and navigating . . . . . . . . . . . . . . . . . . . . . . . . . . . . . . . . . . . . . .15
Switching document views . . . . . . . . . . . . . . . . . . . . . . . . . . . . . . . . . . . . . . . . 15
Using Reveal Codes. . . . . . . . . . . . . . . . . . . . . . . . . . . . . . . . . . . . . . . . . . . . . . 16
Formatting pages . . . . . . . . . . . . . . . . . . . . . . . . . . . . . . . . . . . . . . . . . . .19
Setting page margins. . . . . . . . . . . . . . . . . . . . . . . . . . . . . . . . . . . . . . . . . . . . . 19
Choosing page size and orientation . . . . . . . . . . . . . . . . . . . . . . . . . . . . . . . . . . 20
Customizing page sizes . . . . . . . . . . . . . . . . . . . . . . . . . . . . . . . . . . . . . . . . . . . 21
Making text fit a specific number of pages. . . . . . . . . . . . . . . . . . . . . . . . . . . . . 24
Creating and deleting columns . . . . . . . . . . . . . . . . . . . . . . . . . . . . . . . . . . . . . 25
Formatting text . . . . . . . . . . . . . . . . . . . . . . . . . . . . . . . . . . . . . . . . . . . . .29
Modifying font settings . . . . . . . . . . . . . . . . . . . . . . . . . . . . . . . . . . . . . . . . . . . 29
Copying the format of text . . . . . . . . . . . . . . . . . . . . . . . . . . . . . . . . . . . . . . . . 32
Formatting paragraphs . . . . . . . . . . . . . . . . . . . . . . . . . . . . . . . . . . . . . . .35
Indenting text . . . . . . . . . . . . . . . . . . . . . . . . . . . . . . . . . . . . . . . . . . . . . . . . . . 35
Justifying text . . . . . . . . . . . . . . . . . . . . . . . . . . . . . . . . . . . . . . . . . . . . . . . . . . 36
Changing the spacing between lines and paragraphs . . . . . . . . . . . . . . . . . . . . . 38

iv Table of contents
Adding tab stops . . . . . . . . . . . . . . . . . . . . . . . . . . . . . . . . . . . . . . . . . . . . . . . . 39
Changing the alignment of tab stops . . . . . . . . . . . . . . . . . . . . . . . . . . . . . . . . . 41
Moving tab stops . . . . . . . . . . . . . . . . . . . . . . . . . . . . . . . . . . . . . . . . . . . . . . . . 42
Removing and restoring tab stops . . . . . . . . . . . . . . . . . . . . . . . . . . . . . . . . . . . 42
Editing documents . . . . . . . . . . . . . . . . . . . . . . . . . . . . . . . . . . . . . . . . . .45
Finding and replacing text . . . . . . . . . . . . . . . . . . . . . . . . . . . . . . . . . . . . . . . . . 45
Cutting, copying, and pasting text and graphics . . . . . . . . . . . . . . . . . . . . . . . . 48
Copying and pasting text from a Web browser . . . . . . . . . . . . . . . . . . . . . . . . . 49
Moving text and graphics. . . . . . . . . . . . . . . . . . . . . . . . . . . . . . . . . . . . . . . . . . 49
Reviewing documents . . . . . . . . . . . . . . . . . . . . . . . . . . . . . . . . . . . . . . . . . . . . 50
Routing documents . . . . . . . . . . . . . . . . . . . . . . . . . . . . . . . . . . . . . . . . . . . . . . 52
Comparing documents . . . . . . . . . . . . . . . . . . . . . . . . . . . . . . . . . . . . . . . . . . . . 54
Controlling document comparisons . . . . . . . . . . . . . . . . . . . . . . . . . . . . . . . . . . 56
Working with footnotes and endnotes. . . . . . . . . . . . . . . . . . . . . . . . . . .59
Inserting footnotes and endnotes . . . . . . . . . . . . . . . . . . . . . . . . . . . . . . . . . . . . 59
Finding footnotes and endnotes . . . . . . . . . . . . . . . . . . . . . . . . . . . . . . . . . . . . . 61
Modifying the display of footnotes and endnotes on a page . . . . . . . . . . . . . . . . 63
Numbering . . . . . . . . . . . . . . . . . . . . . . . . . . . . . . . . . . . . . . . . . . . . . . . .65
Numbering pages . . . . . . . . . . . . . . . . . . . . . . . . . . . . . . . . . . . . . . . . . . . . . . . 65
Changing the appearance of page numbers . . . . . . . . . . . . . . . . . . . . . . . . . . . . 67
Printing . . . . . . . . . . . . . . . . . . . . . . . . . . . . . . . . . . . . . . . . . . . . . . . . . . .69
Setting up a printer . . . . . . . . . . . . . . . . . . . . . . . . . . . . . . . . . . . . . . . . . . . . . . 69
Setting up a print job. . . . . . . . . . . . . . . . . . . . . . . . . . . . . . . . . . . . . . . . . . . . . 72
Previewing a print job . . . . . . . . . . . . . . . . . . . . . . . . . . . . . . . . . . . . . . . . . . . . 73
Printing documents . . . . . . . . . . . . . . . . . . . . . . . . . . . . . . . . . . . . . . . . . . . . . . 75
Controlling a print job . . . . . . . . . . . . . . . . . . . . . . . . . . . . . . . . . . . . . . . . . . . . 76
Printing double-sided pages . . . . . . . . . . . . . . . . . . . . . . . . . . . . . . . . . . . . . . . . 78
Printing document sections and comments . . . . . . . . . . . . . . . . . . . . . . . . . . . . 79
Printing file details. . . . . . . . . . . . . . . . . . . . . . . . . . . . . . . . . . . . . . . . . . . . . . . 81
Printing envelopes and labels . . . . . . . . . . . . . . . . . . . . . . . . . . . . . . . . . . . . . . . 82
Printing graphics . . . . . . . . . . . . . . . . . . . . . . . . . . . . . . . . . . . . . . . . . . . . . . . . 83
Laying out a print job . . . . . . . . . . . . . . . . . . . . . . . . . . . . . . . . . . . . . . . . . . . . 85

Table of contents v
Saving print settings . . . . . . . . . . . . . . . . . . . . . . . . . . . . . . . . . . . . . . . . . . . . . 88
Using printer commands . . . . . . . . . . . . . . . . . . . . . . . . . . . . . . . . . . . . . . . . . . 90
Printing to a file . . . . . . . . . . . . . . . . . . . . . . . . . . . . . . . . . . . . . . . . . . . . . . . . 91
Sending faxes. . . . . . . . . . . . . . . . . . . . . . . . . . . . . . . . . . . . . . . . . . . . . . . . . . . 92
Reference: Printing . . . . . . . . . . . . . . . . . . . . . . . . . . . . . . . . . . . . . . . . . . . . . . 93
Merging documents . . . . . . . . . . . . . . . . . . . . . . . . . . . . . . . . . . . . . . . . .97
Creating data for a merge . . . . . . . . . . . . . . . . . . . . . . . . . . . . . . . . . . . . . . . . . 97
Working with form documents for a merge. . . . . . . . . . . . . . . . . . . . . . . . . . . 100
Associating merge files . . . . . . . . . . . . . . . . . . . . . . . . . . . . . . . . . . . . . . . . . . 105
Performing a merge. . . . . . . . . . . . . . . . . . . . . . . . . . . . . . . . . . . . . . . . . . . . . 107
Converting merge files . . . . . . . . . . . . . . . . . . . . . . . . . . . . . . . . . . . . . . . . . . 110
Sorting, viewing, and finding data in data files . . . . . . . . . . . . . . . . . . . . . . . . 111
Editing merge data files. . . . . . . . . . . . . . . . . . . . . . . . . . . . . . . . . . . . . . . . . . 112
Selecting specific data for merges. . . . . . . . . . . . . . . . . . . . . . . . . . . . . . . . . . . 116
Merging with address books . . . . . . . . . . . . . . . . . . . . . . . . . . . . . . . . . . . . . . 117
Changing merge options . . . . . . . . . . . . . . . . . . . . . . . . . . . . . . . . . . . . . . . . . 121
Using merge commands . . . . . . . . . . . . . . . . . . . . . . . . . . . . . . . . . . . . . . . . . 122
Merge programming commands . . . . . . . . . . . . . . . . . . . . . . . . . . . . . . . . . . . 125
Working with levels, loops, and merge variables . . . . . . . . . . . . . . . . . . . . . . . 169
Working with merge expressions. . . . . . . . . . . . . . . . . . . . . . . . . . . . . . . . . . . 174
Expression terms . . . . . . . . . . . . . . . . . . . . . . . . . . . . . . . . . . . . . . . . . . . . . . . 180
Reference: The Merge toolbar and programming commands . . . . . . . . . . . . . . 184
Recordings, macros, and automation features. . . . . . . . . . . . . . . . . . . .191
Using QuickMacros. . . . . . . . . . . . . . . . . . . . . . . . . . . . . . . . . . . . . . . . . . . . . 192
Recording, saving, and storing macros. . . . . . . . . . . . . . . . . . . . . . . . . . . . . . . 193
Playing macros . . . . . . . . . . . . . . . . . . . . . . . . . . . . . . . . . . . . . . . . . . . . . . . . 195
Using macros included with WordPerfect . . . . . . . . . . . . . . . . . . . . . . . . . . . . 196
Using toolbars for macros . . . . . . . . . . . . . . . . . . . . . . . . . . . . . . . . . . . . . . . . 198
Using template macros . . . . . . . . . . . . . . . . . . . . . . . . . . . . . . . . . . . . . . . . . . 200
Editing and deleting template macros . . . . . . . . . . . . . . . . . . . . . . . . . . . . . . . 202
Triggering macros from templates. . . . . . . . . . . . . . . . . . . . . . . . . . . . . . . . . . 203
Customizing WordPerfect macros . . . . . . . . . . . . . . . . . . . . . . . . . . . . . . . . . . 206
Assigning template macros to keystrokes, menus, and toolbars . . . . . . . . . . . . 209

vi Table of contents
Associating toolbars with template features . . . . . . . . . . . . . . . . . . . . . . . . . . . 212
Writing and editing macros by using PerfectScript . . . . . . . . . . . . . . . . . . . . . 212
Understanding macro commands and syntax . . . . . . . . . . . . . . . . . . . . . . . . . . 214
Using macro conventions and formatting macros . . . . . . . . . . . . . . . . . . . . . . . 216
Recording macro commands in macros. . . . . . . . . . . . . . . . . . . . . . . . . . . . . . . 218
Inserting codes in macros . . . . . . . . . . . . . . . . . . . . . . . . . . . . . . . . . . . . . . . . . 218
Using macros from earlier versions of WordPerfect . . . . . . . . . . . . . . . . . . . . . 219
Using programming commands in macros . . . . . . . . . . . . . . . . . . . . . . . . . . . . 219
Using parameters in macros . . . . . . . . . . . . . . . . . . . . . . . . . . . . . . . . . . . . . . . 220
Using variables in PerfectScript . . . . . . . . . . . . . . . . . . . . . . . . . . . . . . . . . . . . 222
Using the macro command browser . . . . . . . . . . . . . . . . . . . . . . . . . . . . . . . . . 223
Using macro commands to retrieve information . . . . . . . . . . . . . . . . . . . . . . . . 224
Using OLE object commands in macros . . . . . . . . . . . . . . . . . . . . . . . . . . . . . . 225
Compiling macros . . . . . . . . . . . . . . . . . . . . . . . . . . . . . . . . . . . . . . . . . . . . . . 225
Working from the PerfectScript utility. . . . . . . . . . . . . . . . . . . . . . . . . . . . . . . 228
Testing for errors from PerfectScript . . . . . . . . . . . . . . . . . . . . . . . . . . . . . . . . 229
Editing and deleting macros. . . . . . . . . . . . . . . . . . . . . . . . . . . . . . . . . . . . . . . 230
Searching in macros . . . . . . . . . . . . . . . . . . . . . . . . . . . . . . . . . . . . . . . . . . . . . 231
Integrating with Microsoft Visual Basic for Applications . . . . . . . . . . . . . . . . . 232
Using the PerfectScript class to change WordPerfect documents . . . . . . . . . . . 239
Working with VBA methods . . . . . . . . . . . . . . . . . . . . . . . . . . . . . . . . . . . . . . 242
Accessing and manipulating applications from other applications. . . . . . . . . . . 244
Using OLE Automation. . . . . . . . . . . . . . . . . . . . . . . . . . . . . . . . . . . . . . . . . . 246
Understanding OLE Automation . . . . . . . . . . . . . . . . . . . . . . . . . . . . . . . . . . . 247
Using files with DDE Execute from previous versions of WordPerfect . . . . . . . 250
Getting online Help for macros . . . . . . . . . . . . . . . . . . . . . . . . . . . . . . . . . . . . 251

Getting started in WordPerfect 1
Getting started in WordPerfect
This chapter tells you how to perform basic operations in WordPerfect. You can explore
the work area and gain a better understanding of the basic tools and features available
for creating powerful word processing documents.
In this section, you’ll learn about
• discovering WordPerfect
• exploring the work area
• creating and opening documents
• entering and inserting text
• selecting and deleting text
• performing Web searches powered by Yahoo!®
Discovering WordPerfect
WordPerfect X3 provides exceptional ease of use and complete formatting control for
producing newsletters, articles, reports, proposals, books, and other documents. The
popular Reveal Codes, Corel® RealTime Preview™, and Legal features help reduce the
amount of time you spend on document formatting, freeing you to focus on creating
content. WordPerfect X3 also provides enhanced compatibility with Microsoft Word,
the new ability to import PDFs, and robust PDF publishing capabilities that ensure you
can freely exchange information with colleagues and clients, regardless of the software
they use.
Here’s a list of some of the new and enhanced features:
•New! Import PDF files with WordPerfect
For more information, see “Working with PDF files” in the online Help.
•Enhanced! Publish to PDF
For more information, see “Working with PDF files” in the online Help.
•New & Enhanced! Wo r d C o u n t
For more information, see “Counting words” in the online Help.
2 WordPerfect X3 User Guide
•Enhanced! Document Routing
For more information, see “Routing documents” in the online Help.
•Enhanced! Pasting and exporting HTML
For more information, see “Copying and pasting text from a Web browser” on
page 49 and “Working with HTML files” on page 27.
•New! Online Resources
For more information, see “Performing Web searches powered by Yahoo!” on
page 7.
•New! Removing metadata
For more information, see “Excluding metadata when saving documents” in the
online Help.
•New! Label formats
For more information, see “Creating labels” in the online Help.
Exploring the work area
The work area in WordPerfect includes everything you see on your screen when you
start the application. The large open area is the document window.
The menu bar, located at the top of the work area just below the title bar, provides
access to most of the WordPerfect commands.
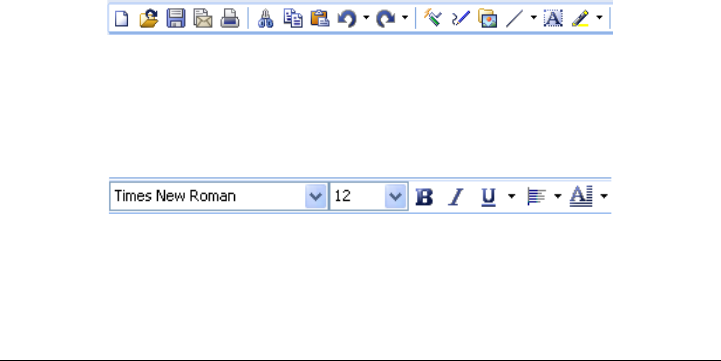
Toolbars
Many menu commands can be accessed through toolbars, located below the menu bar.
This is the WordPerfect toolbar.
The property bar is a context-sensitive toolbar that displays buttons and options related
to the task you are performing. For example, when text is selected, the property bar
contains only text-related commands.
This is the property bar.
By default, the property bar is located above the document window.

Getting started in WordPerfect 3
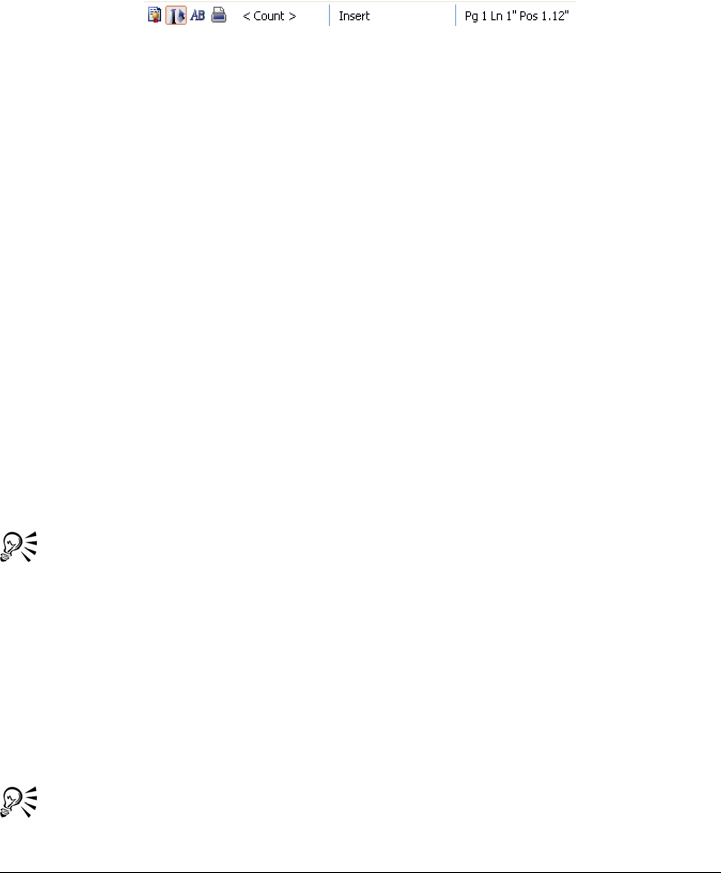
The application bar
The application bar displays information about the status of the active WordPerfect
document. By default, the application bar is located below the document window.
When you open a file, a document button with the name of the file appears on the
application bar. You can use document buttons to quickly move between the
documents. For more information about moving between documents, see “Navigating
documents” in the online Help.
These items appear on the right side of the application bar.
Creating and opening documents
You can create a document in WordPerfect by using the default template, a blank
document that includes formatting elements such as margin settings, tab settings, and
toolbars. WordPerfect also includes ready-made project templates that you can open
and use to create a wide range of documents, including letters, fax cover sheets,
calendars, and business cards.
For more information about templates, see “Creating documents using project
templates” in the online Help.
You can open word-processing documents that were created in WordPerfect or in
another application. The advantage of opening, rather than importing a document
created in another application, is that many of the formatting attributes in the original
document, such as page size, margins, font properties, bullets, and underlining are
preserved. Some of the features not supported include embedded pictures, hidden text,
interline spacing, kerning, macros, multiple page layouts (the first one in the document
is used throughout), and OLE objects. For more information about importing files, see
“Import and export file formats for WordPerfect” in the reference information section
of the online Help.
To create a document by using the default template
•Click File ` New.
You can also
Create a document from a project template Click File ` New from project.

4 WordPerfect X3 User Guide
You can also apply the default template to a new document by clicking the
New blank document button on the toolbar.
To open a document
1Click File ` Open.
2Choose the drive and folder where the document is stored.
3Choose a file.
4Click Open.
You can also open a document by clicking the Open button on the toolbar.
If you know where a file is located, you can type the full path and filename in
the File name list box.
Entering and inserting text
You can enter text in the document window. You can use the shadow cursor to show
where the text will be positioned.
You can also enter text in a text box so that it appears in a separate frame.
You can insert text from another file.
If you have more than one document opened, you can use the application bar to insert
text from one document to another document.
For information about selecting and deleting text, see “Selecting and deleting text” on
page 6.
To enter text in a document window
1Click in the document window.
2Ty p e t e x t .
To enter text by using the shadow cursor
1Click View ` Shadow cursor.

Getting started in WordPerfect 5
A check mark next to the menu command indicates that the shadow cursor is
enabled.
2Click anywhere on the page.
3Ty p e t e x t .
The shadow cursor changes appearance to show how text will be aligned when
you start typing. Small arrows beside the shadow cursor point in different
directions when text is left-justified, centered, or right-justified.
To enter text in a text box
1Click Insert ` Te x t b o x .
2Ty p e t e x t .
To insert text from another document
1Click where you want to insert the text.
2Click Insert ` File.
3Choose the drive and folder where the document is stored.
4Choose a file.
5Click Insert.
To insert text from another document by using the application bar
1Select the text you want to insert.
2Drag the selected text to the button on the application bar that displays the name
of the document into which you want to insert the text, but don’t release the mouse
button.
This document opens in the document window.
3Point to where you want to insert the text, and release the mouse button.
For more information about using the application bar, see “Customizing the
application bar” in the online Help.

6 WordPerfect X3 User Guide
The text you select is removed from the document. You can copy the text by
holding down Ctrl while dragging.
Selecting and deleting text
You can select text, a tabular column, a rectangular block of text, or a range of text. You
can also deselect text and delete text. You can also set selection options.
To select text
To select a tabular column
1Select the text from the first character in the tabular column to the last character in
the tabular column.
2Click Edit ` Select ` Tabular column.
To select a rectangular block of text
1Select the text from the upper left corner to the lower left corner of the block.
2Click Edit ` Select ` Rectangle.
To select a range of text in a document
1Click Edit ` Select ` Section.
2From the Select list, choose one of the following options:
To select Do the following
A character or word Drag across a character or word.
A sentence Click in a sentence. Click Edit ` Select `
Sentence.
A paragraph Click in a paragraph. Click Edit ` Select `
Paragraph.
A page Click on a page. Click Edit ` Select ` Page.
A document Click Edit ` Select ` All.

Getting started in WordPerfect 7
• Page — lets you select certain pages
• Secondary page — lets you select certain secondary pages
• Chapter — lets you select certain chapters
• Volume — lets you select certain volumes
3Type a value in the Range box.
To deselect text
• Click anywhere outside the selected text.
To delete text
1Select the text you want to delete.
2Press Delete.
You can also delete text by clicking after the text you want to delete and
pressing Backspace.
To set the selection options for a document
1Click To o l s ` Settings.
2Click Environment.
3In the Environment settings dialog box, click the General tab.
4Enable the Automatically select whole words when dragging to select text
check box.
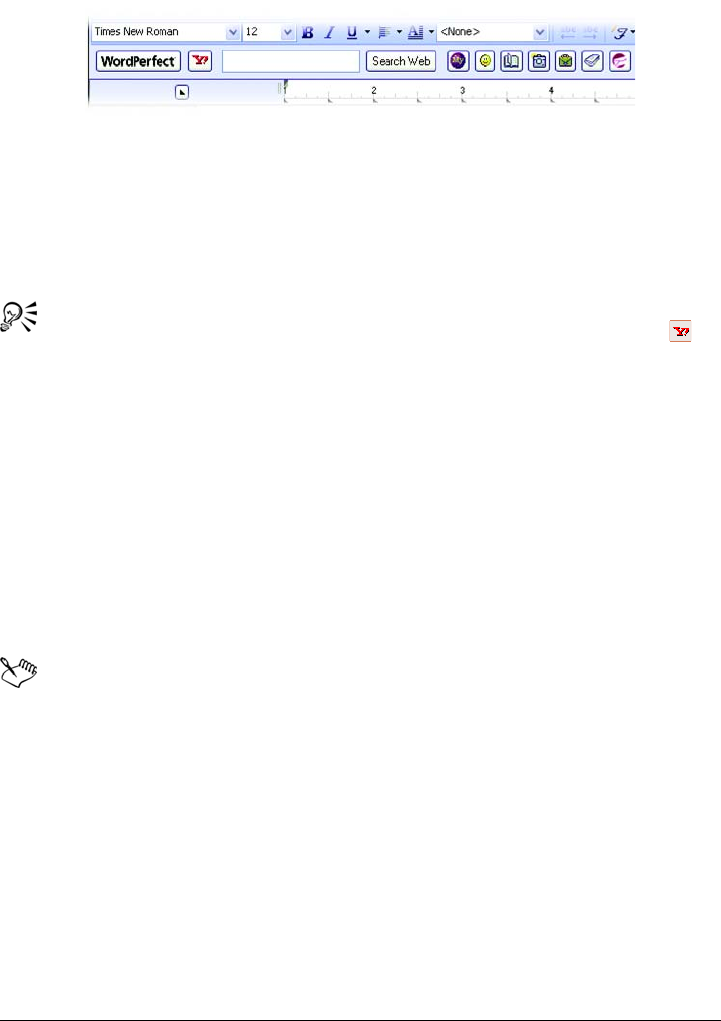
Performing Web searches powered by Yahoo!
WordPerfect features searching technology powered by Yahoo!, which allows you to
perform a Web search directly from a document. You can choose to display or hide the
Yahoo! Search bar. You can search either by selecting text or by using the Yahoo! Search
bar. Using the Yahoo! Search bar gives you access to various online sites and services.
8 WordPerfect X3 User Guide
The new Yahoo! Search bar lets you quickly search the Web and access important online
resources.
To display or hide the Yahoo! Search bar
•Click View ` Ya h o o ! S e a r c h .
You can also hide or display the Yahoo! Search bar clicking the Ya h o o !
button on the toolbar.
To perform a Web search by using the Yahoo! Search bar
1In the search box on the Yahoo! Search bar, type the term you want to search.
2Click the Search Web button.
To perform a Web search by selecting text
1Select the term you want to search.
2Right-click, and click Search with Yahoo!.
You can perform a Web search by selecting text when the Yahoo! Search bar
is hidden.

Working with files 9
Working with files
File management is an important part of any project. You can insert files into
documents, count words in a document, and convert multiple files to the WordPerfect
file format. You can save files to earlier versions of WordPerfect or to other file formats.
In this section, you’ll learn about
• inserting files into active documents
• counting words
• converting multiple files
• saving documents
Inserting files into active documents
You can insert a copy of a file into an active document.
To insert a file into an active document
1Click where you want to insert the file.
2Click Insert ` File.
3Choose All files from the File type list box.
4Choose the drive and folder in which the file is stored.
5Click a file.
6Click Insert.
For information about opening files, see “Opening and previewing files” in the
online Help.
10 WordPerfect X3 User Guide
Counting words
With WordPerfect, you can find out how many words are in a document or in selected
text. You can also verify the number of pages, paragraphs, sentences, and lines that are
in the document. In addition, you have the ability to exclude various elements, such as
headers, footers, footnotes, endnotes, or comments, from the word count.
The new <Count> button appears on the Application bar, making it easier than ever
to count words in a document.
To count words in a document
1Click To o l s ` Wo r d cou n t .
2Disable any of the following check boxes to exclude document elements from the
count:
• Headers
• Footers
• Comments
• Footnotes
• Endnotes
• Watermarks
• Text boxes
• Box captions
3Click Update.
The word count summary appears in the Statistics area.
While working in a document, you can perform or refresh a word count by
clicking the <Count> button on the Application bar.
To count words in selected text
1Select the text.
2Click To o l s ` Wo r d cou n t .
The word count summary appears in the Statistics area.
While working in a document, you can perform or refresh a word count by
clicking the <Count> button on the Application bar.

Working with files 11
Converting multiple files
The WordPerfect Office Conversion Utility lets you convert various types of files, such
as files created in older versions of WordPerfect, or Microsoft Word files, to one of five
WordPerfect file formats.
If you chose the standard installation of WordPerfect Office, the WordPerfect Office
Conversion Utility is available by default. If the utility is not available, you can add it
by modifying the installation.
For more information about using the WordPerfect Conversion Utility, see the
WordPerfect Conversion Utility Help.
To install the WordPerfect Office Conversion Utility
1Close any open applications.
2On the Windows taskbar, click Start ` Settings ` Control panel.
If your operating system is Windows XP, click Settings ` Control panel.
3Double-click the Add/Remove programs icon.
4Choose WordPerfect Office X3 from the Currently installed programs list, and
then click Change.
5In the InstallShield wizard, enable the Modify option, and click Next.
6In the list of features, open the WordPerfect Office X3 ` Utilities category.
7Click the icon next to the WordPerfect Conversion Utility item, and click This
feature will be installed on local hard drive.
8Click Next.
9Click Install.
To convert multiple files
1On the Windows taskbar, click Start ` Programs ` WordPerfect Office X3 `
Utilities ` Conversion utility.
2Click Add.
3Choose the drive and folder in which the files you want to convert are stored.
If you can’t see the files, choose All files from the File type box.
4Click Add all.

12 WordPerfect X3 User Guide
If you want to convert the files in the folders within the folder, enable the Include
subfolders check box.
5From the Convert to list box, choose a version of WordPerfect.
Saving documents
By default, you can save documents in WordPerfect 6/7/8/9/10/11/12/X3 format. This
ensures cross-platform compatibility for documents saved in WordPerfect 6.x and later,
and lets you save a document in an earlier version of WordPerfect. You can also save
documents in formats other than WordPerfect, such as Microsoft Word.
WordPerfect lets you save documents in compound file format. When you save a
document in compound file format, OLE compound document information is wrapped
around the WordPerfect document, which lets you open the document more quickly.
However, saving a document containing embedded objects in compound file format
increases both the file size and the time required to open and save the file.
You can save selected text or graphics in a new WordPerfect document.
WordPerfect lets you create backup copies of documents. Creating backup copies helps
prevent the loss of your work if you close a document before saving it, or if a power
failure occurs.
To save a document
1Click File ` Save.
2Choose the drive and folder in which you want to save the file.
To save a file in a format other than WordPerfect, choose a file format from the File
type list box.
3Ty p e a n a m e i n t h e Filename box.
To embed the fonts in the document, enable the Embed fonts using TrueDoc®
check box.
4Click Save.
You can also
Save changes to a document Click File ` Save.
Working with files 13
If you have already saved the document, you will not be prompted to specify
the drive, folder, and filename.
Embedding ensures that the information for all fonts used in a document is
saved with the document. You may want to embed fonts if you are using an
unusual font, or if you want to ensure that the font you are using is displayed
properly.
A filename cannot exceed 255 characters.
You can also save a document by pressing F3 or by clicking the Save button
on the toolbar.
To save a document to a new location
1Click File ` Save as.
2From the Save in list box, choose the drive and folder in which you want to store
the document.
If you want to embed the fonts in the document, enable the Embed fonts using
Tr u e D o c check box.
3Click Save.
Embedding ensures that the information for all fonts used in a document is
saved with the document. You may want to embed fonts if you are using an
unusual font, or if you want to ensure that the font you are using is displayed
properly.
To save selected text or a graphic in a new document
1Select the text or graphic you want to save in a new document.
2Click File ` Save.
3In the Save area, enable one of the following options:
• Selected text
Rename a file Right-click the file, and click Rename. Type
a new name in the Filename box.
You can also

14 WordPerfect X3 User Guide
• Selected graphic
4Click OK.
5In the Save file dialog box, choose the drive and folder in which you want to save
the file.
6Ty p e a n a m e i n t h e Filename box.
7Click Save.
To save a document in compound file format
1Click File ` Save as.
2Ty p e a n a m e i n t h e Filename box.
3Choose WordPerfect compound file from the File type list box.
4Click Save.
If a file is password protected, WordPerfect saves OLE object information in
WordPerfect format, rather than in compound file format. Saving files in
WordPerfect format prevents others from using an OLE-enabled application to
viewing embedded objects in a password-protected file.
To set timed document backups
1Click To o l s ` Settings.
2Click Files.
3On the Document page, enable the Timed document backup every check box.
4Type a value in the minutes box.

Viewing and navigating 15
Viewing and navigating
WordPerfect lets you switch document views. You can also use Reveal Codes, which
lets you quickly format long or complex documents by viewing and editing formatting
codes.
In this section, you’ll learn about
• switching document views
•using Reveal Codes
Switching document views
In WordPerfect, you can view documents in four ways: draft, page, two pages, and
browser preview.
In draft view, WordPerfect displays the body text of a document the way it will look
when it is printed. Draft view does not display formatting such as headers, footers, and
watermarks.
Page view displays a document with all of its formatting, the way it will look when it is
printed.
Two pages view displays the same formatting as page view, except that two consecutive
pages display side by side in the document window.
The browser preview displays a document in HTML format, suitable for an intranet or
for the Web; however, WordPerfect codes with no equivalent HTML tags are either
modified or deleted from the document. For more information about creating HTML
documents, see “Publishing to HTML” in the online Help.
To switch the document view
•Click View, and click one of the following:
• Draft — to hide some document elements such as footers, page breaks, margins,
and watermarks
16 WordPerfect X3 User Guide
• Page — to display the document the way it will look when printed
• Tw o p a g e s — to display two consecutive pages in a document side by side
• Preview in browser — to display a document in HTML format
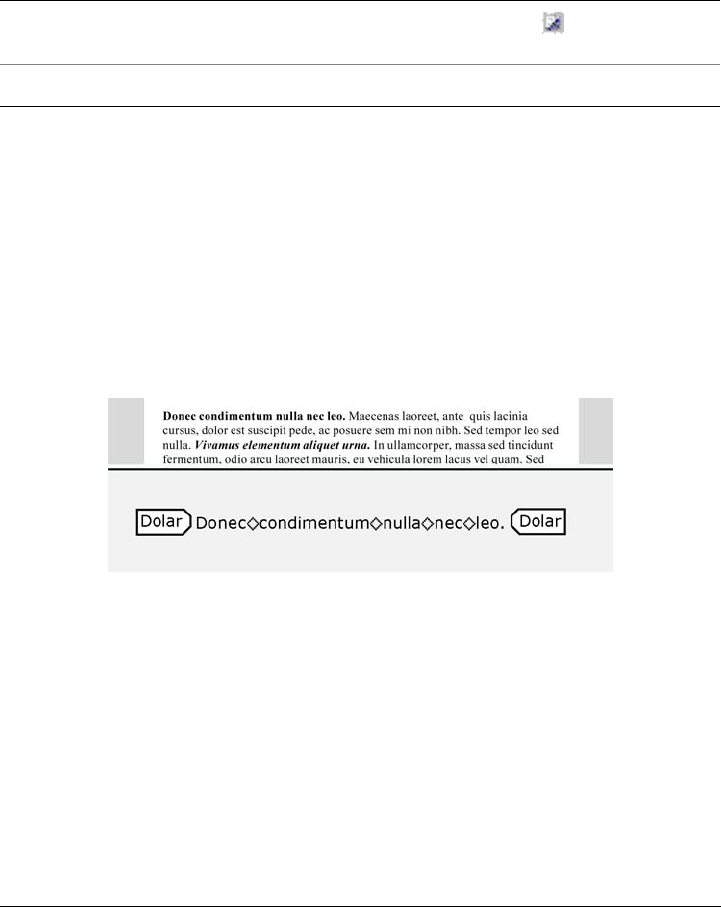
Using Reveal Codes
Formatting codes are inserted when you add text and formatting to a document. Reveal
Codes gives you full control over document formatting, especially when copying and
pasting text from various sources. For example, to remove bold formatting, you can turn
on Reveal Codes, locate the <Bold> code, and then just drag it out of the Reveal Codes
window. You can also double-click any code in the Reveal Codes window to make
advanced alterations to the settings or styles. Codes are hidden by default; however,
they can be displayed in a separate window below the active document.
This is how the text is displayed in the Reveal Codes window.
You can hide or display formatting codes. You can also customize the display of the
codes; for example, you can specify the font style and color, and several other formatting
options. In addition, you can print the contents of the Reveal Codes window.
For more information about printing Reveal Codes, see
To hide or display formatting codes
•Click View ` Reveal Codes.
A check mark beside Reveal Codes indicates that formatting codes are displayed.
You can also
Switch between Preview in browser and
Page view
Click the Change view button.
Display the ruler in Tw o p a g e s view In Tw o p a g e s view, click View ` Ruler.

Viewing and navigating 17
To customize the display of formatting codes
1Click To o l s ` Settings.
2Click Display.
3Click the Reveal Codes tab.
4In the Format area, enable or disable any of the following check boxes:
• Wrap lines at window — to continue codes on the next line
• Show spaces as bullets — to display a bullet for each space character
• Show codes in detail — to display formatting information with codes
• Auto-display codes in Go to dialog — to display the Reveal Codes window
when a code match is found in a specific section of the document
You can also
Change the font Click Font, and choose a font from the Face
list box.
Change the font size Choose a font size from the Size list box.
Change the font color In the Color area, disable the Use system
colors check box. Open the Te x t color
flyout, and click a color.
Change the background color In the Color area, disable the Use system
colors check box. Open the Background
color flyout, and click a color.
Use Windows system colors In the Color area, enable the Use system
colors check box.

Formatting pages 19
Formatting pages
WordPerfect lets you format a document by modifying the physical arrangement of
information on pages. For example, you can adjust page size and margins. You can also
add columns to documents. When formatting pages, you can modify the format of an
entire page or a portion of a page.
In this section, you’ll learn about
• setting page margins
• choosing page size and orientation
• customizing page sizes
• making text fit a specific number of pages
• creating and deleting columns
Setting page margins
WordPerfect lets you set margins using various methods. You can set margins by using
guidelines. Guidelines are vertical or horizontal dotted lines that are displayed on pages.
You can also set margins using exact measurements or the ruler.
All margin settings affect the current page and subsequent pages until you change
them.
To set the margins using the margin guidelines
1Click View ` Guidelines.
2Enable the Margins check box.
3Point to one of the following guidelines:
• left vertical dotted guideline
• right vertical dotted guideline
• upper horizontal dotted guideline
• lower horizontal dotted guideline
20 WordPerfect X3 User Guide
The pointer changes to a double-sided arrow.
4Drag the guideline to a new position.
To set the margins using exact measurements
1Click in the document where you want the margin changes to start.
2Click Format ` Margins.
3Click the Page setup tab.
4In the Document margins area, type values in any of the following boxes:
• Left — lets you specify where the left margin starts
• Right — lets you specify where the right margin starts
• To p — lets you specify where the top margin starts
• Bottom — lets you specify where the bottom margin starts
You can also set margins by clicking File ` Page setup.
To set the margins using the ruler
1Point to the Margin marker to the left or right of the ruler.
The pointer changes to a double-sided arrow.
2Drag the Margin marker to a new location on the ruler.
Choosing page size and orientation
When creating documents, you can choose the size and orientation of pages. The page
size and orientation determine how a printer formats and prints pages. You can choose
from preset page sizes, or you can create your own. For more information about creating
custom page sizes, see “Customizing page sizes” on page 21.
You can also
Set all margins to the last margin value
edited
In the Document margins area, click
Equal.
Set all margins to the minimum size allowed
by the current printer
In the Document margins area, click
Minimum.

Formatting pages 21
Page sizes are matched to the printer you have selected. A size may not be available
when you change to another printer or a different computer. If the same size is not
available, WordPerfect finds the best match for a page size, selecting from those
available with the other printer. If the match does not work, you may need to customize
a page size.
To select a preset page size
1Click File ` Page setup.
2Click the Page setup tab.
3From the Page definition list box, choose one of the following:
• Printer page types — lists all page size options for installed printers
• Standard page types — lists all page size options for most printers
4Choose a page definition from the Page definition list.
5In the Page definition applies to area, enable one of the following options:
• Current and following pages — applies the page definitions to the current and
following pages
• Current page only — applies the page definitions to the current page only
If you apply the page size definition to the current page only, WordPerfect
inserts a delay code in the next page. For more information about delay codes,
see “Inserting and editing delay codes” in the online Help.
To specify page orientation
1Click File ` Page setup.
2Click the Page setup tab.
3In the Orientation area, enable one of the following options:
• Portrait — prints the document on pages that have greater length than width
• Landscape — prints the document on pages that have greater width than
height
Customizing page sizes
If you require a page size that is not available in WordPerfect, you can create a custom
page size. You can do this by creating a page size or modifying a preset page size. When
you create a custom page size, it is added to the printer’s page size selection as a preset.
22 WordPerfect X3 User Guide
Therefore, you can apply the custom size to more than one document. If you no longer
require the custom or modified page sizes, you can delete the page size or restore the
default page sizes.
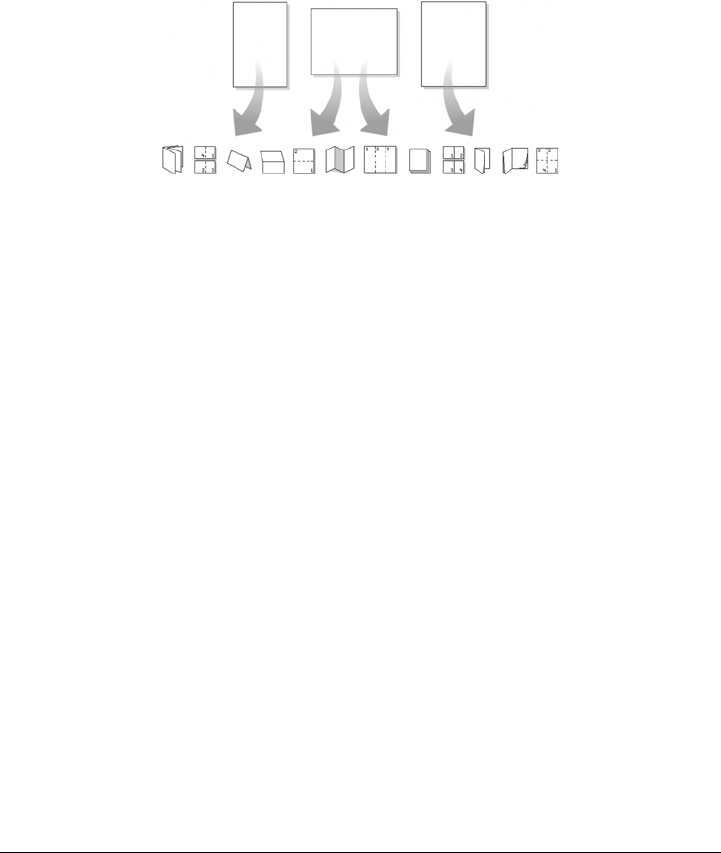
In addition, you can divide a physical page into several logical pages. Dividing pages is
useful when you want to create small documents, such as pamphlets, raffle tickets, or
business cards.
These are examples of how you can divide pages.
As you edit a document, each logical page is treated as a separate page. The document
window also changes to show the dimensions of the logical page. After you fill a logical
page, the text continues on the next logical page.
To create a custom page size
1Click File ` Page setup.
2Click the Page setup tab.
3Click Add.
4In the Add new form dialog box, type a name for the new page size in the Name
box.
5Choose a predefined paper type from the Ty p e list box.
6Choose a predefined paper size from the Size list box.
If you want to create a page size definition from a nonstandard paper size, choose
User defined size from the Size list box.
7Type values in the following boxes:
• Width
• Height
8Choose a paper source from the Source list box.
Formatting pages 23
The paper source is not saved as part of the document. It must be redefined for
each document.
All printers have a nonprintable zone. If information is formatted to print in
this area, it will not print. To shift information out of the nonprintable zone,
you must specify printing adjustments.
To modify a preset page size
1Click File ` Page setup.
2Click the Page setup tab.
3Choose a page definition from the Page definition list.
4Click Edit.
5Modify any of the settings.
To delete a page size
1Click File ` Page setup.
2Click the Page setup tab.
3From the Page definition list box, choose one of the following:
• Printer page types — lists all page size options for installed printers
• Standard page types — lists all page size options for most printers
4Choose a page definition from the Page definition list box.
You can also
Display the available page size definitions for
all the installed printers
In the Show page size for area, enable the
All printers option.
Display the available page size definitions for
the printer you have selected
In the Show page size for area, enable the
Current printer only option.
Specify a vertical printing adjustment In the Printing adjustment area, choose an
adjustment from the Vertical list box. Type a
value in the box.
Specify a horizontal printing adjustment In the Printing adjustment area, choose an
adjustment from the Horizontal list box.
Type a value in the box.

24 WordPerfect X3 User Guide
5Click Delete.
When you delete a page size definition, you can no longer use that definition;
a document can print with a similar page definition, but it may not be an exact
match.
To restore default page sizes
1Click File ` Page setup.
2Click the Page setup tab.
3From the Page definition list box, choose one of the following:
• Printer page types — lists all page size options for installed printers
• Standard page types — lists all page size options for most printers
4Click Restore.
To divide a page
1Click File ` Page setup.
2Click the Layout tab.
3In the Divide pages area, type a value in one of the following boxes:
• Columns — lets you divide a page into a specified number of columns
• Rows — lets you divide a page into a specified number of rows
Making text fit a specific number of pages
You can make selected text or all text in a document fit a specific number of pages.
To make text fit a specific number of pages
1Click in a document.
2Click Format ` Make It Fit.
3Type a value in the Desired number of pages box.
The number of pages you set must be within 50 percent of the document’s current
page count.
4In the Items to adjust area, enable any of the following check boxes:
• Left margin

Formatting pages 25
• Right margin
• Top margin
• Bottom margin
• Font size
• Line spacing
5Click Make it fit.
To make only a certain block of text fit, select the text.
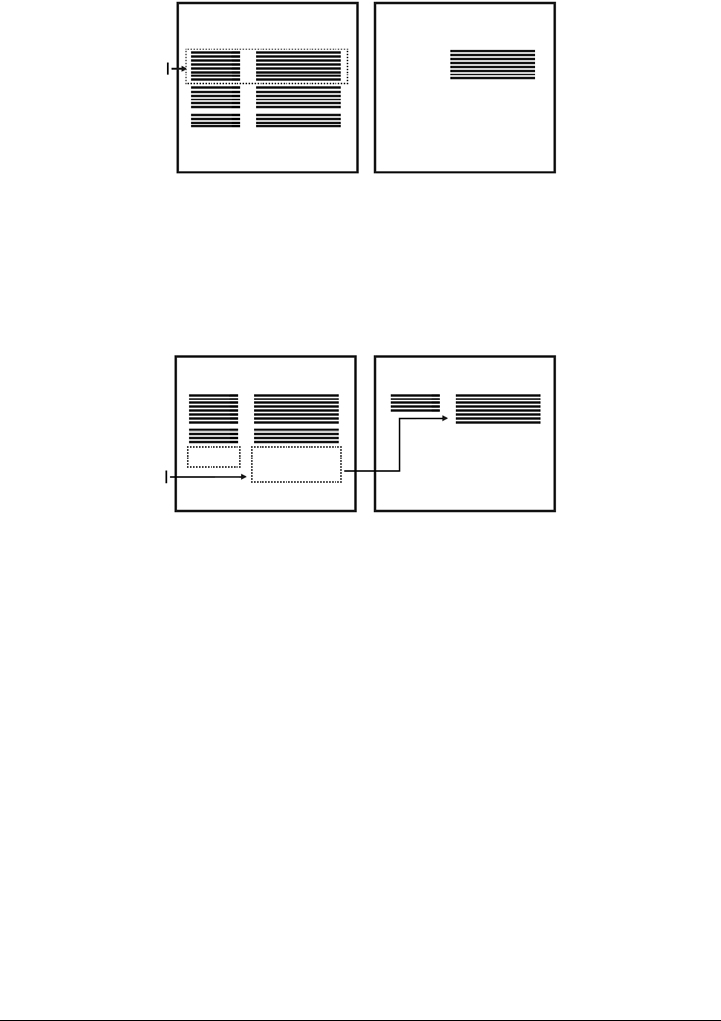
Creating and deleting columns
You can use columns to divide text vertically on a page. You can use four types of
columns in documents: newspaper, balanced newspaper, parallel, and parallel with
block protect. You can add columns to documents to create newsletters, glossaries,
scripts, or inventory lists. You can discontinue columns when they are complete. You
can also delete columns and quickly move through columns.
Text in newspaper columns flows down the column to the bottom of a page or column
break and starts again at the top of the next column.
Balanced newspaper columns are similar to regular newspaper columns, but each
column is adjusted on the page so that all columns are equal in length.
These are examples of pages with columns. The left page displays newspaper columns.
The right page displays balanced newspaper columns.
The parallel column text is grouped across the page in a row. The next row starts below
the longest column of the previous row. Parallel columns are useful for resumes, scripts,
charts, inventory lists, or lists where columns span multiple pages.
26 WordPerfect X3 User Guide
This is an example of parallel columns.
Parallel columns with block protect keep each row of columns together. If a column in
one row becomes so long that it moves across a page break, the entire row moves to the
next page. You can also use tables to create this type of column. For information about
working with tables, see “Using tables and charts” in the online Help.
This is an example of parallel columns with block protect.
To create columns
1Click a page.
2Click Format ` Columns.
3Type a value in the Number of columns box.
4In the Ty p e o f c o l u m n s area, enable one of the following options:
• Newspaper — makes text flow down a column to the bottom of a page or
column break and continues it at the top of the next column
• Balanced newspaper — adjusts newspaper columns so that columns are of
equal length
• Parallel — groups columns across the page in rows, and starts subsequent rows
below the longest column of the previous row
• Parallel w/block protect — keeps all rows of the columns together across page
breaks
Formatting pages 27
You can also apply columns to a page by clicking the Columns button on
the toolbar.
To discontinue columns
1Click where you want columns to discontinue.
2Click Format ` Columns.
3Click Discontinue.
Press Ctrl + Enter to end one column and start the next column.
To delete all columns
1Click in the top-left corner of the first column.
2Click Format ` Columns.
3Click Discontinue.
You can also delete columns by dragging the [Col Def] code out of the Reveal
Codes window.
To navigate columns
To m o v e t o P r e s s
The top of a column Alt + Home
The last line of a column Alt + End
The previous column Alt + Left Arrow
The next column Alt + Right Arrow

Formatting text 29
Formatting text
In WordPerfect, you can use a variety of formatting tools to control the look of text.
In this section, you’ll learn about
• modifying font settings
•copying the format of text
Modifying font settings
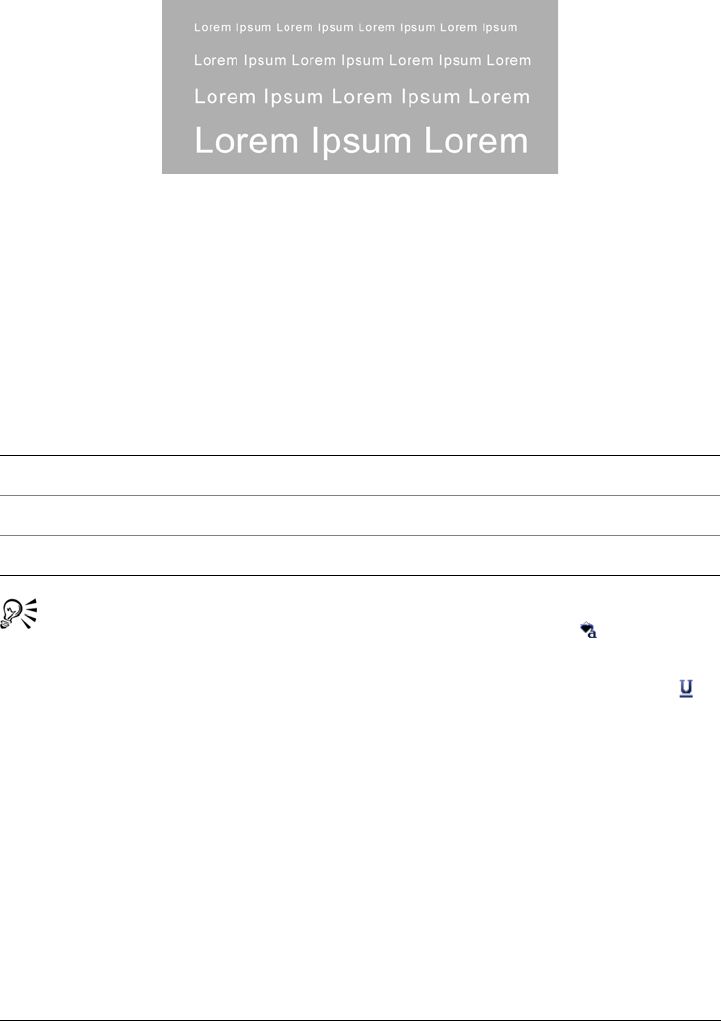
You can apply formatting to text to change the font and its attributes, such as style, size,
and color.
You can also apply relative font sizes, which allows you to format text relative to the
specified font size. Suppose you want to add a heading to a document that has a 12-
point paragraph font. If you select the heading text and specify a large relative font size,
the text displays proportionately larger than the 12-point font.
This is an example of different fonts.
Using Corel RealTime Preview lets you view text fonts and sizes before you apply them.
For example, you can view text as it will display in various fonts before choosing which
is the most suitable. If you do not want to preview fonts and their sizes, you can disable
Corel RealTime Preview.
WordPerfect lets you format text using recent font settings, including the font and its
size. You can also change the default font and font size for the active document or for
all documents.
30 WordPerfect X3 User Guide
This is an example of different font sizes.
To change the font
1Click in the document.
2Click Format ` Font.
3Click the Font tab.
4Choose a font from the Face list.
You can also change the font color by clicking the Font color button on the
property bar, and clicking a color.
You can also change the underline font style by opening the Underline
picker on the property bar and clicking an underline style.
To change the font appearance
1Select the text you want to modify.
2Click Format ` Font.
3Click the Font tab.
4In the Appearance area, enable one or more of the following check boxes:
• Bold — Applies bold formatting to the selected text
• Italic — Applies italic formatting to the selected text
• Underline — Applies a single underline to the selected text
You can also
Change the font size Choose a font size from the Size list box.
Change the relative font size Click Relative size, and click a font size.
Change the font color Open the Color picker, and click a color.

Formatting text 31
• Outline — Outlines the selected text
• Shadow — Applies a shadow to the selected text
• Small caps — Applies small capitals to the selected text
• Redline — Applies the color red to the selected text
• Strikeout — Applies a line through the selected text
• Hidden — Applies the hidden format to the selected text
To change the font using Corel RealTime Preview
1Click in a document.
2Open the Font face list box on the property bar, and point to a font.
Changes to the font display in the font face preview window.
3Choose a font from the Font face list box.
You can change the font size using Corel RealTime Preview by opening the
Font size list box on the property bar, viewing the font sizes in the font size
preview window, and choosing a font size.
To disable Corel RealTime Preview
1Click To o l s ` Settings.
2Click the Display icon.
3Click the Document tab.
4In the Show area, disable the RealTime Preview check box.
Corel RealTime Preview is enabled by default.
To reuse a recent font
1Select the text you want to format.
If the Fonts toolbar is not displayed, click View ` To o l b a r s . In the To o l b a r s
dialog box, enable the Fonts check box.
2Click the QuickFonts button on the font toolbar, and choose a font from the
list.
The QuickFonts list displays the 10 most recently used fonts.

32 WordPerfect X3 User Guide
To change the default font and font size
1Click File ` Document ` Default font.
2Choose a font from the Face list.
3Choose a font size from the Size list box.
If you want to change the default font and font size for all new documents, click
Settings, and click Set as default for all documents.
You must install a printer before you can change the default font.
If you specify a default printer font and distribute the file to others, the file may
not display or print correctly if their printer doesn’t have the specified default
font.
You can view the available attributes for each font by clicking the plus sign (+)
to the left of a font in the Face list.
Copying the format of text
You can copy the format of text and apply it to other text in a document. If you want
to copy selected text, then formatting attributes, such as font, font size, and font style,
are all copied. If you want to copy the heading in a paragraph, the paragraph style as
well as the font and its attributes are copied.
When you copy the format of text, you automatically create a text style. Changing text
that has been formatted using a text style also changes other text in the document that
uses that style. For information about text styles, see “Applying and editing text styles”
in the online Help.
To copy the format of text
1Click in the text whose format you want to copy.
2Click Format ` QuickFormat.
3Enable one of the following options:
• Selected characters — copies the format of the font and its attributes
• Headings — copies the format of the paragraph and its styles, and the font and
its attributes
4Click OK.

Formatting text 33
5Drag the QuickFormat paintbrush pointer over the text to which you want to
copy the format.
6Click Format ` QuickFormat.
QuickFormat is disabled when no check mark displays beside the QuickFormat
menu command.
You can also enable or disable QuickFormat by clicking the QuickFormat
button.

Formatting paragraphs 35
Formatting paragraphs
WordPerfect allows you to control the look of documents by formatting paragraphs.
By changing the paragraph formatting, including justification, tab stops, and line
spacing, you can control the placement of paragraphs on a page.
In this section, you’ll learn about
• indenting text
• justifying text
• changing the spacing between lines and paragraphs
•adding tab stops
• changing the alignment of tab stops
• moving tab stops
• removing and restoring tab stops
Indenting text
Indenting arranges text on a page by moving one or more lines to the left or the right
of the paragraph margin. You can indent a line or paragraph manually or you can indent
lines or paragraphs using the ruler or automatically.
To move the first line of a paragraph farther to the left than subsequent lines, you can
apply a hanging indent. To indent an entire paragraph one tab stop from both the left
and right margins, you can apply a double indent. A double indent is often used to
format lengthy quotations.

36 WordPerfect X3 User Guide
These are examples of indenting text.
To apply a single indent to text
To apply a hanging or double indent
1Click at the beginning of a paragraph.
2Click Format ` Paragraph, and click one of the following:
• Hanging indent — indents all but the first line in the paragraph
• Double indent — indents the paragraph equally from both margins
You can also apply a hanging indent by clicking at the beginning of any line
in a paragraph, except the first line, and pressing Ta b .
To remove an indent
1Click at the beginning of a line of text.
2Press Shift + Ta b .
Justifying text
You can justify text in a document. Doing so aligns the text horizontally between the
left and right margins of the page.
Formatting paragraphs 37
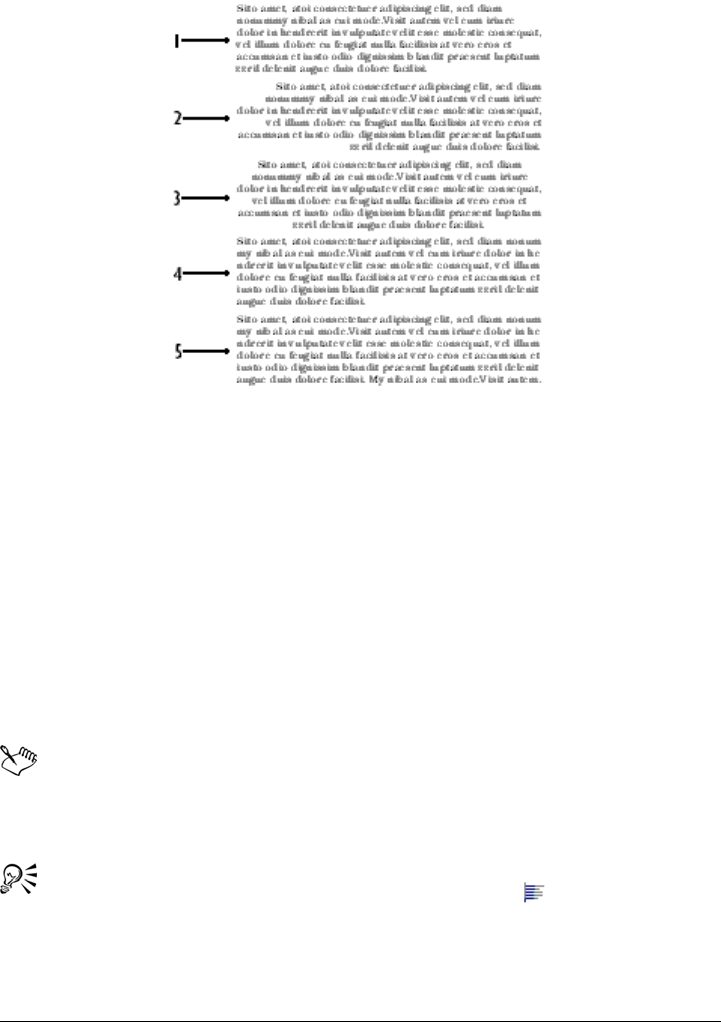
This is an example of a left-justified paragraph (1), a right-justified paragraph (2),
a center-aligned paragraph (3), a fully justified paragraph (4), and a fully justified
paragraph that includes the last line (5).
To justify text
1Click in a paragraph.
2Click Format ` Justification, and click one of the following:
• Left — aligns text evenly with the left margin
• Right — aligns text evenly with the right margin
• Center — centers text between the right and left margins
• Full — aligns text, excluding the last line, along both the right and left margins
• All — aligns text, including the last line, along both the right and left margins
Justification is applied to all text from the cursor location forward. If you want
to apply justification to a word, line, or paragraph, you must first select the
text.
You can also justify text by clicking the Justification picker on the
property bar and clicking a justification.

38 WordPerfect X3 User Guide
Changing the spacing between lines and paragraphs
The space between lines, or the amount of white space that appears between the bottom
of one line and the top of the next line, is referred to as leading.
This is an example of changing spacing between lines.
You can change the leading by changing the line spacing and changing the line height.
This is an example of changing the line height.
You can also control the amount of space between paragraphs.
To adjust the leading
1Click in a paragraph.
2Click Format ` Typesetting ` Word/Letter spacing.
3Enable the Adjust leading check box.
4Type a value in the Between lines box.
A positive value increases the leading; a negative value decreases it.
To change the line spacing
1Click in a paragraph.
2Click Format ` Line ` Spacing.
3Type a value in the Spacing box.

Formatting paragraphs 39
You can also change the line spacing of selected text.
To change the line height
1Click in the line of text where you want the line height change to begin.
If you want to limit the line height change to a specific section of text, select the
text.
2Click Format ` Line ` Height.
3Enable one of the following options:
• Automatic — defines the line height according to the font being used
• Fixed — lets you specify the height of the line regardless of the font being used
• At least — lets you specify the minimum height of the line
Line height is determined by multiplying the current line height by the
number you specify.
You can also change the line height of selected text.
To change the space between paragraphs
1Click in a paragraph.
2Click Format ` Paragraph ` Format.
3In the Spacing between paragraphs area, enable one of the following options:
• Number of lines — inserts the number of lines you specify
• Distance in points — inserts the spacing you specify measured in points
There are 72 points in 1 inch.
Adding tab stops
Tab stops let you determine where the cursor moves to when you tab forward or tab
back in a document. You can add tab stops to a document using exact measurements or
using the ruler. You can also copy a tab stop using the ruler or add tab stops at evenly
spaced intervals.
40 WordPerfect X3 User Guide
To add a tab stop using exact measurements
1Click a paragraph.
2Click Format ` Line ` Ta b s e t .
3Choose a tab type from the Tab type list box.
4Type a value in the Tab position box.
5Enable one of the following options:
• From left margin (relative) — measures the distance of the tab stop relative to
the left margin. When the left margin changes, the tab stop adjusts accordingly.
• From left edge of paper (absolute) — measures the distance of the tab stop
from the left edge of the page. When the left margin changes, the tab stop
remains fixed.
6Click Set.
To add a tab stop using the ruler
1Click a paragraph.
2Click the Ta b button , and choose a tab style.
3On the tab bar, which displays under the ruler, click where you want to add a tab
stop.
For the tab bar to appear, the ruler must be displayed.
To copy a tab stop using the ruler
1Click a paragraph.
2Hold down Ctrl, and drag the tab stop to another position on the ruler.
To add tab stops at evenly spaced intervals
1Click a paragraph.
2Click Format ` Line ` Ta b s e t .
3Click Clear all.
4Enable the Repeat every check box, and type a value in the box.
5Click Set.

Formatting paragraphs 41
When you add a tab stop, the Margin icon is displayed in the left margin.
Clicking the Margin icon displays a ruler with the settings for the
paragraph.
For information about displaying the margin icon, see “To hide or display
nonprinting items” in the online Help.
You can also set tab stop intervals by double-clicking a tab stop on the ruler.
Changing the alignment of tab stops
When using a tab stop, you can specify the tab alignment, which is useful when you
want to arrange a column of text in a specific way, such as right-justified or left-justified.
You can also specify a decimal alignment. For example, you can align a column of
numbers at the decimal point. Tab alignment is also used to create dot leaders. For more
information about dot leaders, see “Inserting leaders and specifying leader characters”
in the online Help.
To change the alignment of a tab stop
1Click a paragraph.
2Click Format ` Line ` Ta b se t .
3Choose a tab type from the Ta b t y p e list box.
4Click Set.
You can also change the alignment of a tab stop by double-clicking the tab
stop on the ruler, choosing a tab type from the Tab type list box, and clicking
Set.
To specify a decimal alignment
1Click a paragraph.
2Click Format ` Line ` Ta b se t .
3Choose Decimal from the Tab type list box.
4In the Decimal alignment area, type a character in the Character to align on
box.

42 WordPerfect X3 User Guide
5Click Set.
Moving tab stops
WordPerfect lets you move a tab stop. You can position a tab stop relative to the left
margin or from the left edge of a page. You can also move a tab stop or multiple tab
stops. As you move a tab stop, you can make it automatically align to the ruler gridlines;
this is referred to as snapping.
To move a tab stop
1Click in a paragraph.
2Drag the tab stop to a new position on the ruler.
You can also change the position of a tab stop by double-clicking the tab stop
on the ruler.
To move multiple tab stops
1Click in a paragraph.
2Hold down Shift and drag across the tab stops on the tab bar to select them.
3Drag the tab stops to a new position.
To make a tab stop snap to ruler gridlines
1Click To o l s ` Settings.
2Click Display.
3In the Display settings dialog box, click the Ruler tab.
4Enable the Tabs snap to ruler grid check box.
Removing and restoring tab stops
You can remove one tab stop or multiple tab stops. If you’ve modified the tab stops, you
can restore the default tab settings.

Formatting paragraphs 43
To remove a tab stop
1Click a paragraph.
2Click Format ` Line ` Ta b se t .
3Click one of the following:
• Clear — clears the first tab stop to the left edge of the ruler
• Clear all — clears all tab stops
4Click Set.
You can remove a tab stop by dragging it off the ruler.
You can also remove all tab stops by right-clicking a tab stop, and clicking
Clear all tabs.
To restore the default tab settings
• Right-click a paragraph, and click Default tab settings.

Editing documents 45
Editing documents
After you create a document, you can edit it by using a variety of methods.
In this section, you’ll learn about
• finding and replacing text
• cutting, copying, and pasting text and graphics
• copying and pasting text from a Web browser
• moving text and graphics
• reviewing documents
•routing documents
• comparing documents
• controlling document comparisons
Finding and replacing text
WordPerfect lets you find and replace text. You can search for words, phrases, or
individual characters in a document. Once the text is found, you can replace some or all
occurrences of the text with other text, or you can delete the text.
You can search for text that is displayed in a specific font or case. You can also find and
replace forms of a word. For example, you can replace forms of the word “entry” with
the word “insertion.” Therefore, if the plural form, “entries,” is found, it is replaced with
the word “insertions.” Furthermore, you can search for occurrences of words that are
whole words, and not part of a larger word. For example, if you do a default search for
the word “sum,” you will find “sum,” “summer,” and “summit.” If you do a whole-word
search for the word “sum,” you will find only occurrences of the word “sum.
To find and replace text
1Click Edit ` Find and replace.
2In the Find box, type the text you want to search for.
46 WordPerfect X3 User Guide
3Type the replacement text in the Replace with box.
4Click one of the following:
• Find next — finds the next occurrence of the search text
• Find prev — finds the previous occurrence of the search text
• Replace — finds and replaces the next occurrence of the search text
• Replace all — finds and replaces all occurrences of the search text
You can delete all occurrences of a text string by typing the text you want to
delete in the Find box and leaving the Replace with box empty.
You can search for a word or phrase you searched for previously by choosing
the word or phrase from the Find list box.
To find text in a specific font
1Click Edit ` Find and replace.
2In the Find box, type the text you want to find.
3Click Match ` Font.
4Enable the Font check box.
5Choose a font from the Font list box.
6Click one of the following:
• Find next — finds the next occurrence of the search text
• Find prev — finds the previous occurrence of the search text
You can also
Find the next occurrence of the search text Press Ctrl + Alt + N.
Find the previous occurrence of the search
text
Press Ctrl + Alt + P.
You can also
Search for a font style Choose a font style from the Font style list
box.
Search for a specific point size Enable the Point size check box. Type a
point size in the Point size box.

Editing documents 47
To find and replace case-specific text
1Click Edit ` Find and replace.
2Click Match ` Case.
3In the Find box, type the text you want to find.
4Type the replacement text in the Replace with box.
5Click one of the following:
• Find next — finds the next occurrence of the search text
• Find prev — finds the previous occurrence of the search text
• Replace — finds and replaces the next occurrence of the search text
• Replace all — finds and replaces all occurrences of the search text
To find and replace a form of a word
1Click Edit ` Find and replace.
2Click Ty p e ` Word forms.
3In the Find box, type the word you want to find.
4Type the replacement word in the Replace with box.
5Click one of the following:
• Find next — finds the next occurrence of the word
• Find prev — finds the previous occurrence of the word
• Replace — finds and replaces the next occurrence of the word
• Replace all — finds and replaces all occurrences of the word
To find and replace a whole word
1Click Edit ` Find and replace.
2Click Match ` Whole word.
3In the Find box, type the word you want to find.
4Type the replacement word in the Replace with box.
5Click one of the following:
Search for specific font attributes In the Attributes area, enable one or more
of the attribute check boxes.
You can also
48 WordPerfect X3 User Guide
• Find next — finds the next occurrence of the word
• Find prev — finds the previous occurrence of the word
• Replace — finds and replaces the next occurrence of the word
• Replace all — finds and replaces all occurrences of the word
Cutting, copying, and pasting text and graphics
You can cut or copy text or graphics and paste them to a new location in a document.
When you cut or copy information, it is stored on the Clipboard. You can paste it in the
active document, in another document, or in another application.
Clipboard contents are available only until you cut or copy something else, or until you
quit Windows. However, instead of replacing the information already stored, you can
append the Clipboard contents so that new information is added to the existing
contents.
You can also choose a specific format when you paste information from the Clipboard
into WordPerfect. For example, you can copy text from another application as Rich Text
Format (.rtf) or as simple text (.txt).
To cut, copy, and paste text and graphics
You can also copy, cut, or paste text or graphics by clicking Copy , Cut ,
or Paste on the toolbar.
You can link copied information to a document by enabling the Paste link
option. The changes you make to the linked information in the active file are
To Do the following
Copy text or graphics to the Clipboard Select the text or graphic, and click Edit `
Copy.
Cut text or graphics and move to the
Clipboard
Select the text or graphic, and click Edit `
Cut.
Paste text or graphics in a document Click where you want to insert the text or
graphic, and click Edit ` Paste.
Add a selection to the current Clipboard
contents
Select the text to add to the Clipboard, and
click Edit ` Append.

Editing documents 49
reflected in the original file. The changes made to the original file also appear
in the active file.
To paste Clipboard contents in a specified format
1Select the text or graphic.
2Click Edit, and click one of the following:
• Copy
• Cut
3Click Edit ` Paste special.
4Enable the Paste option.
5Choose a format from the As list.
You can paste text as unformatted by pressing Ctrl + Alt + V.
Copying and pasting text from a Web browser
You can copy text from a Web browser and paste it into a WordPerfect document.
To copy and paste text from a Web browser
1In the Web browser, select the text to copy.
2Click Edit ` Copy.
3In the WordPerfect document, click where you want to insert the text.
4Right-click, and click Paste unformatted text.
You can paste text as unformatted by pressing Ctrl + Alt + V.
Moving text and graphics
You can move text and graphics by dragging them within a document or between
documents.

50 WordPerfect X3 User Guide
To move text or graphics by dragging within a document
• Select a text or graphic, and drag it to a new position.
To move text or graphics by dragging to another document
1Click Window, and click one of the following:
• Tile top to bottom — arranges the windows so that the documents are
displayed above or below one another
• Tile side by side — arranges the windows so that the documents are displayed
side by side
2Select the text or graphic, and drag it to the other document.
Reviewing documents
Using WordPerfect, you can send a document to a reviewer, or multiple reviewers, to
add changes or make revisions to the document. These changes and revisions are also
referred to as annotations. If you authored the document, you can open it to accept or
reject the annotations.
If you send the document to multiple reviewers, the annotations of each reviewer are
displayed in a unique color. All revisions are displayed as strikeout text , and
comments are displayed as redline text. However, you can modify the way annotations
are displayed. For more information about modifying the display of annotation text, see
“Changing the settings for document review and comparison” in the online Help.
To review a document
1Click File ` Document ` Review.
2Click Reviewer.
3Ty p e y o u r n a m e i n t h e User name box.
4Type your initials in the User initials box.
5Open the color picker on the feature bar, and click a color. All changes you make to
the document are displayed in the color you choose.
To avoid choosing the same color as another reviewer, view the color selections of
other reviewers by choosing their names from the Reviewer list box.
6Edit the document.
7Click File ` Save.

Editing documents 51
8Click Close.
You can use all WordPerfect features except Sort to edit a document. Only
text editing changes, however, are marked with a color.
You can edit the additions made by previous reviewers; however, you cannot
edit or undo the deletions made by previous reviewers.
To incorporate reviewers’ changes
1Click File ` Document ` Review.
2Click Author.
3Choose a reviewer from the View annotations from list box.
4Only changes made by the selected reviewer are displayed. To display the changes
made by all reviewers, choose All reviewers from the View annotations from list
box.
5Click one of the following:
• Go to previous — moves to the previous change
• Go to next — moves to the next change
6Click one of the following:
• Show/hide — displays or hides margin markers
• Display annotations — shows the edited text with or without color
markings
• Insert current annotation — incorporates the current annotation
• Insert all annotations — inserts all annotations
• Delete the current annotation — deletes the current annotation
• Delete all annotations — deletes all the annotations in the document
7Save the document.
When moving through the document from change to change, you cannot
move through subsections, such as headers, footers, and footnotes.
If you save a reviewed document in another file format — for example, Rich
Text Format (.rtf files) — the document will not be in review mode when you
open it. The reviewer’s remarks will be lost because the added text (red) and
the deleted text (strikeout) revert to regular text. Therefore, make sure that all

52 WordPerfect X3 User Guide
changes are incorporated before you save the document to a different file
format.
You can also incorporate a reviewer’s changes in a subdocument by clicking in
the subdocument and then clicking the Next button to move from change
to change.
Routing documents
Routing a document allows you to send a document for an online review to several
reviewers in a specified order. In this routing process, the document is sent to one
reviewer at a time, so that each reviewer sees the changes made by each of the previous
reviewers. When you route a document, it is inserted in an e-mail as an attachment. You
must have an e-mail client, such as WordPerfect MAIL, installed on your computer for
this option to work.
To route a document, you must create a routing slip. The routing slip allows you to
specify the recipients of the document and the order in which they will receive the
document.
A reviewer who receives a routed document can make changes and revisions to the
document. The reviewer can then save the changes, close the document, and send it to
the next reviewer listed on the routing slip. Alternatively, a reviewer can wait before
sending the document to the next reviewer or can reassign a routed document to
another reviewer listed on the routing slip.
To create a routing slip
1Click File ` Document ` Routing slip.
2Type a subject name in the Subject box.
The subject name that you type in the box appears in the subject box of the e-mail
to be sent.
3Type a message in the Message box.
The text that you type in the Message box appears in the message area of the e-
mail to be sent.
4Click Addresses to add reviewers to the Reviewers list box.
The WordPerfect or Outlook address book opens to allow you to choose the
reviewers’ e-mail addresses.
Editing documents 53
When you create the first routing slip for a document, the e-mail address
specified in the environment settings automatically appears in the Author’s e-
mail address text box. If you insert a different e-mail address in the box, the
new e-mail address becomes the default address the next time you create a
routing slip for the same document. If you enable the Store as default address
check box, this e-mail address appears every time you create a routing slip.
If you are using WordPerfect MAIL as the e-mail client and you want to add
addresses from the WordPerfect MAIL address book, you need to access these
addresses through the WordPerfect address book. When you click the
Addresses button, the WordPerfect address book opens, and the
WordPerfect MAIL address book item appears in the Tree view pane.
To review a routed document
1In an e-mail message, double-click the attached document.
If you want, you can save the document and then open the saved document to
review it.
2In the Reviewer mode options dialog box, click Review.
3Ty p e y o u r n a m e i n t h e Reviewer list box.
4Open the color picker on the feature bar, and click a color. All changes you make to
the document are displayed in the color you choose.
To see another reviewer’s color selection, choose the reviewer’s name from the
Reviewer list box.
You can also
Change the e-mail address from which the
routing slip is initially sent
In the Author’s e-mail address text box,
type the e-mail address from which to send
the routing slip.
Specify a new default e-mail address Enable the Store as default address check
box.
Move a reviewer up in the routing order Choose a reviewer from the Reviewers list,
and click the Up arrow.
Move a reviewer down in the routing order Choose a reviewer from the Reviewers list,
and click the Down arrow.

54 WordPerfect X3 User Guide
5Edit the document.
6Click Close.
You can edit the additions made by previous reviewers; however, you cannot
edit or undo the deletions made by previous reviewers.
To reassign a routed document
1In the e-mail, double-click the attached document.
2In the Reviewer mode options dialog box, click Reassign.
3In the Reassign document review dialog box, choose a reviewer from the list.
4Click Send.
Comparing documents
You can compare a current version of a document with an earlier version to see what
changes have been made. When comparing documents, you can generate a comparison
summary and a list of changes. A comparison summary describes the color and the
attributes used to display deletions and insertions. It also lists the number of deletions,
insertions, and moves that were made. The list of changes details all of the changes
made in the document.
When you compare and review a document, the document that contains the
comparison markings is opened in review mode. In addition, you can restore a
document to the way it was before the comparison. For more information about
reviewing documents, see “Reviewing documents” on page 50.
To compare a document
1Click File ` Document ` Compare.
2In the With box, type the folder and filename of the file you want to compare.
To browse for the file, click the Browse button.
3In the Show markings in area, enable one of the following options:
• New document — displays comparison results in a new document
• Current document — displays comparison results in the active document
4Click Compare only.

Editing documents 55
To generate a comparison summary
1Click File ` Document ` Compare.
2Click Settings ` Compare only.
3In the Document compare settings dialog box, click the Options tab.
4In the Summary of comparison area, enable one of the following options:
• None — inserts no comparison summary
• Insert at beginning — inserts the comparison summary at the beginning of the
document
• Insert at end — inserts the comparison summary at the end of the document
To generate a list of changes
1Click File ` Document ` Compare.
2Click Settings ` Compare only.
3In the Document compare settings dialog box, click the Options tab.
4In the List of changes area, enable one of the following options:
• None — displays no revision list
• Show surrounding context — displays a revision list that details the changes in
the context of the document
• Show change only — displays a revision list that includes only the changes
made to the document
To compare and review the differences between documents
1Click File ` Document ` Compare.
2In the With box, type the folder and filename of the file with which you want to
compare the active document.
To browse for the file, click the Browse button.
3In the Show markings in area, enable one of the following options:
• New document — displays comparison results in a new document
• Current document — displays comparison results in the active document
4Click Compare/Review.
To restore a document
1Click File ` Document ` Remove markings.

56 WordPerfect X3 User Guide
2Enable one of the following options:
• Remove redline markings and strikeout text — restores the current
document to its condition before the comparison
• Remove strikeout text only — keeps the markings for added and moved text,
but removes markings for deleted text
• Remove document compare deletions only — removes only markings for
deleted text
• Remove all document compare markings — removes all markings,
insertions, deletions, and moves
Controlling document comparisons
When comparing documents, you can control how the comparison is done. You can
choose to compare document text word by word or character by character. You can also
include substructure text in a document comparison. For example, you can include
headers, footers, and comments in a comparison. Conversely, you can exclude text from
a document comparison.
To compare document text by word or by character
1Click File ` Document ` Compare.
2Click Settings ` Compare only.
3In the Document compare settings dialog box, click the Options tab.
4In the Marking precision area, enable one of the following options:
• Word — compares document text word by word
• Character — compares document text character by character
If you plan to review the document after the comparison, you can specify the
marking precision — word by word or character by character — by clicking
Settings ` Compare then review.
To include substructure text in a document comparison
1Click File ` Document ` Compare.
2Click Settings ` Compare only.
3In the Document compare settings dialog box, click the Options tab.
4In the Include in comparison area, enable any the following check boxes:

Editing documents 57
• Headers/Footers — includes headers and footers in a document comparison
• Comments — compares information in comments
• Expand master documents — expands all subdocuments associated with the
file
If you plan to review the document after the comparison, you can specify which
text to include in the comparison by clicking Settings ` Compare then
review.
To exclude text from a document comparison
1Click File ` Document ` Compare.
2Click Settings ` Compare only.
3In the Document compare settings dialog box, click the Options tab.
4In the Characters to enclose text to skip in comparison box, type a character.
If you plan to review the document after the comparison, you can specify which
text to exclude from a document by clicking Settings ` Compare then
review.

Working with footnotes and endnotes 59
Working with footnotes and
endnotes
Footnotes and endnotes allow you to add reference information to a document, such as
additional notes that accompany a topic or that provide references. Footnotes are
displayed at the bottom of a page, while endnotes are found at the end of a document.
In this section, you’ll learn about
• inserting footnotes and endnotes
• finding footnotes and endnotes
• modifying the display of footnotes and endnotes on a page
Inserting footnotes and endnotes
When creating a document, WordPerfect allows you to insert footnotes or endnotes. A
footnote is found below the text on a page or at the bottom of a page, whereas an
endnote displays at the end of a document. When you insert endnotes or footnotes, a
reference number or mark is inserted in the document text. That number or mark is
linked to the corresponding information in the endnote or footnote. For more
information about modifying footnote and endnote numbering, see “Numbering
footnotes and endnotes” in the online Help.
This is an example of footnotes.
To insert a footnote
1Click where you want the footnote reference mark to display.

60 WordPerfect X3 User Guide
2Click Insert ` Footnote/Endnote.
3Enable the Footnote number option.
If you want to restart the footnote numbering at a specific number, type the
number in the Footnote number box.
4Click Create.
5Type the footnote text.
If you want to align the footnotes with the document margins, enable the Align
with document margins check box.
6Click File ` Close.
While working with a footnote, you do not have access to all available
WordPerfect functions until you return to the body of the text.
You can restore a deleted footnote number by clicking the Note number
button on the property bar.
To insert an endnote
1Click where you want the endnote reference mark to display.
2Click Insert ` Footnote/Endnote.
3Enable the Endnote number option.
4Click Endnote placement.
5Enable the Insert endnotes at insertion point option.
6Click Create.
7Type the endnote text.
If you want to align the endnotes with the document margins, enable the Align
with document margins check box.
8Click File ` Close.
While working with a endnote, you do not have access to all the available
WordPerfect functions until you return to the body of the text.

Working with footnotes and endnotes 61
You can restart the endnote numbering at a specific number by typing the
number in the Endnote number box. When you enable the Insert endnotes
at insertion point and restart numbering option, all endnotes up to the
number you’ve specified display on one page, and then a note numbering starts
over with 1 on a new page.
You can restore a deleted footnote number by clicking the Note number
button on the property bar.
Finding footnotes and endnotes
WordPerfect lets you find specific footnotes or endnotes in a document. You can also
search for footnote and endnote codes while in Reveal Codes. This provides you with a
faster way of modifying specific footnote settings. For example, if you want to change
the length of a footnote separator line, you can search for the “Footnote Sep Ln” code.
To find a footnote
1Click Insert ` Footnote/Endnote.
2Enable the Footnote number option.
3In the Footnote number box, type the number of the footnote you want to find.
4Click Edit.
To find an endnote
1Click Insert ` Footnote/Endnote.
2Enable the Endnote number option.
3In the Endnote number box, type the number of the endnote you want to find.
4Click Edit.
To find footnote codes
1Press Alt + F3 to display the Reveal Codes window.
2Click Edit ` Find and replace.
3Click Match ` Codes.
4Choose one of the following codes from the Find codes list:

62 WordPerfect X3 User Guide
• Footnote — represents a footnote
• Footnote Cont Msg — represents a footnote “continued” message
• Footnote Min — represents the minimum vertical space that is available for
footnotes at the bottom of a page
• Footnote Num Dec — represents the decrease footnote numbering setting for
footnotes
• Footnote Num Disp — represents footnote number style
• Footnote Num Each Pg — represents the restart of footnote numbering on
each page
• Footnote Num Inc — represents the increase footnote numbering setting for
footnotes
• Footnote Num Meth — represents the footnote numbering method
• Footnote Num Set — specifies new footnote number
• Footnote Sep Ln — represents the footnote separator line
• Footnote Space — represents the space between footnotes
• Footnote Txt Pos — represents footnote text position
To find endnote codes
1Press Alt + F3 to display the Reveal Codes window.
2Click Edit ` Find and replace.
3Click Match ` Codes.
4Choose one of the following codes from the Find codes list:
• Endnote — represents an endnote
• Endnote Min — represents the minimum amount of space that is available for
an endnote at the bottom of a page
• Endnote Num Dec — represents decrease endnote numbering setting for
endnotes
• Endnote Num Disp — represents endnote number style
• Endnote Num Inc — represents increase endnote numbering setting for
endnotes
• Endnote Num Meth — represents the endnote numbering method
• Endnote Num Set — specifies new endnote number
• Endnote Placement — represents endnote placement
• Endnote Space — represents space between endnotes

Working with footnotes and endnotes 63
Modifying the display of footnotes and endnotes on a page
WordPerfect lets you modify the way footnotes and endnotes display on a page. You can
change the amount of space between footnotes or endnotes. You can also change the
position of footnotes on a page. For example, you can display footnotes immediately
following the corresponding text on a page or at the bottom of a page. You can also
choose to continue footnotes on the following page if there isn’t enough room on a page.
As well, you can adjust the separator line between document text and footnotes.
To change the amount of space between footnotes or endnotes
1Click Insert ` Footnote/Endnote.
2Enable one of the following options:
• Footnote number
• Endnote number
3Click Options, and click Advanced.
4Type a value in the Space between notes box.
To change the position of footnotes on a page
1Click Insert ` Footnote/Endnote.
2Enable the Footnote number option.
3Click Options, and click Advanced.
4In the Position area, enable one of the following options:
• Place notes below text
• Place notes at bottom of page
To continue footnotes on the following page
1Click Insert ` Footnote/Endnote.
2Enable the Footnote number option.
3Click Options, and click Advanced.
4In the Continued notes area, type a value in the Amount of note to keep
together box.
This value specifies the minimum distance allowed for a footnote at the bottom of a
page before the note is moved to the next page.

64 WordPerfect X3 User Guide
If you want to include a “continued...” message on the last footnote line of a page
and the first footnote line of a new page, enable the Insert (continued...) message
check box.
To adjust the separator line between document text and footnotes
1Click Insert ` Footnote/Endnote.
2Enable the Footnote number option.
3Click Options, and click Separator.
4In the Add space area, type a value in the Above line box.
This value specifies the amount of white space between the separator line and the
document text above it.
5Type a value in the Below line box.
This value specifies the amount of white space between the separator line and the
footnote text below it.
6In the Line format area, choose one of the following positions for the line from the
Line position list box:
• Left
• Center
• Right
7Choose a line length from the Length of line list box.
8Open the Line style picker, and click a line style on the line style palette.
You can also
Position the separator line between margins Choose Full from the Line position list box.
Specify a specific line position Choose Set from the Line position list box.
Ty p e a v a l u e i n t h e From left edge box.

Numbering 65
Numbering
WordPerfect allows you to count elements of a document. You can also change the
appearance of numbering and use counters to count elements of a document.
WordPerfect allows you to number pages and change the appearance of numbering.
In this section, you’ll learn about
• numbering pages
• changing the appearance of page numbers
Numbering pages
WordPerfect allows you to insert page numbers in a document and to choose where to
position page numbers on a page. When you begin page numbering, you can also
specify which number to begin with. For example, you may want the first page of a
document to be labeled page 3 instead of page 1.
You can also insert secondary page numbers, which allow you to start a new page
numbering scheme in a document. For example, suppose you are creating a document
in WordPerfect, but in the middle of the document, you need to add maps that were
not created in WordPerfect. The WordPerfect document is 10 pages, but the maps need
to be added as pages 7 and 8. To accomplish this, you can start page numbering at 1 at
the beginning of the document and insert a secondary page number, number 9, on the
document’s page 7. This would allow for the addition of the maps without disrupting
the page numbering.
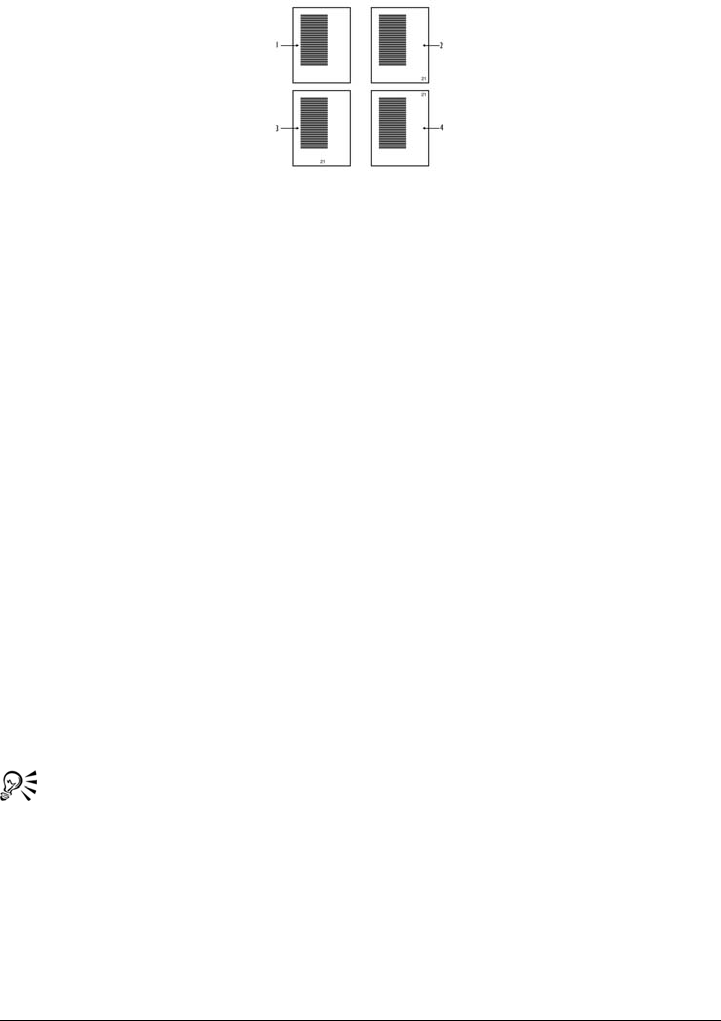
66 WordPerfect X3 User Guide
These are examples of various page numbering options: 1) no page number, 2) page
number in the bottom-right corner, 3) page number at the bottom center, and 4) page
number in the top-right corner.
To insert page numbers
1Click Format ` Page ` Numbering.
2From the Position list box, choose a position for the page numbers.
3From the Page numbering format list, choose a format for the page numbers.
To specify an alternate starting page
1Click Format ` Page ` Numbering.
2Click Set value.
3In the Values dialog box, click the Page tab.
4Type a new page number in the Set page number box.
5Enable one of the following options:
• Always keep number the same — ensures that the number remains the same
when the document is edited
• Let number change as pages are added or deleted — lets the number change
as the document is edited
When you merge a multiple-page form document, you can restart the page
numbering for each merged record by enabling the Always keep number the
same option.
To insert a secondary page number
1Click Format ` Page ` Insert page number.
2Choose Secondary page from the list.

Numbering 67
3Click Value/Adjust .
4In the Values dialog box, click the Secondary tab.
5Choose a numbering format from the Secondary page number method list box.
6Type a value in the Set secondary page number box.
7Click Insert.
Changing the appearance of page numbers
You can change the font size and style, which includes attributes, such as bold or italic,
of page numbers. In addition, you can also create custom page numbering formats. For
example, you can add the name of a document or a chapter number to a page number.
If you no longer need the custom format, you can delete it. However, you cannot delete
the default page numbering formats provided with WordPerfect.
To change the font attributes of page numbers
1On a page, click where you want the font change to begin.
2Click Format ` Page ` Numbering.
3Click Font.
4In the Page numbering font dialog box, choose a font from the Face list.
5Choose a font size from the Size list box.
To customize a page number format
1Click Format ` Page ` Numbering.
2Click Custom format.
3In the Custom page numbering dialog box, delete the text that displays in the
Custom page numbering format (numbering codes with text) box.
You can also
Change page number style In the Appearance area, enable one or more
check boxes.
Change page number color Open the color picker, and click a color.
Change page number shading Type a value in the Shading box.

68 WordPerfect X3 User Guide
4Choose a number format from one of the following lists:
• Page
• Total pgs
• Chapter
• Volume
• Secondary pg
5Click Insert in format.
6Repeat steps 4 and 5 until the Custom page numbering format (numbering
codes with text) box contains the numbers you want.
7In the Custom page numbering format (numbering codes with text) box, type
the text that you want to display with the number codes.
Examples
• If you wanted to display the name of a document, Snowboarding 101, with the
chapter number and page number, you would type Snowboarding 101 beside the
number codes in the Custom page numbering format (numbering codes
with text) box. The text in the box would appear as: Snowboarding 101 [Chpt
#] [Page #].
• If you wanted to include the words Chapter and Page in the customized format,
you would type Snowboarding 101, Chapter, and Page beside the number codes
in the Custom page numbering format (numbering codes with text) box.
The text in the box would appear as: Snowboarding 101 Chapter [Chpt #] Page
[Page #].
The five most recently used formats display at the top of the Page numbering
format list box so that you can quickly apply them to a document.
For each custom format you create, you can choose only one type of number
from each list box.
To delete a page numbering format
1Click Format ` Page ` Numbering.
2Choose a format from the Page numbering format list box.
3Press Delete.

Printing 69
Printing
WordPerfect allows you to print a variety of documents, including envelopes and
labels.
In this section, you’ll learn about
• setting up a printer
• setting up a print job
• previewing a print job
•printing documents
• controlling a print job
• printing double-sided pages
• printing document sections and comments
• printing file details
• printing envelopes and labels
• printing graphics
• laying out a print job
• saving print settings
• using printer commands
•printing to a file
•sending faxes
For more information about printing, see “Reference: Printing” on page 93.
Setting up a printer
If you have access to different printers, you can set them up in the application so you
can print to any of them, and, before printing a file, you can choose the printer you want
use. Once you install one or more printers, you can configure them in a number of ways.
You can also select a printer as the default printer for WordPerfect. In addition, you can
change printer properties and reformat documents for the default printer.

70 WordPerfect X3 User Guide
For more information about installing a printer, refer to the Windows documentation.
In addition, many printer settings are printer-specific; therefore, not all printer settings
may be available for your printer. Consult your printer manual for more information.
You can also disable printer metrics. Printer metrics are used to determine line endings.
If you disable printer metrics, printer fonts will not be visible in the list of fonts.
To add a printer
1Click File ` Print.
2On the Main page, click Printers.
3In the Printers and faxes or Printers dialog box, double-click the Add printer
icon.
4Follow the steps in the Add printer wizard.
To select a printer
1Click File ` Print.
2On the Main page, choose a printer from the Name list box.
To change the application default printer
1Click File ` Print.
2On the Main page, choose the printer you want as the default from the Name list
box.
3Click Edit settings.
4From the Named settings dialog box, choose Application default from the
Name for current settings list box.
5Click Save.
If you disabled the Reformat documents for the WordPerfect default
printer on open check box in the Environment settings dialog box,
WordPerfect ignores the default printer settings and retrieves the settings for
the application default printer with which the document was formatted.
By enabling both the Use printer properties from currently selected
printer check box and the Retrieve properties from printer each time
setting is retrieved option, the settings from the application default printer

Printing 71
are automatically updated every time you choose Application default setting.
This works only for the printer saved as the application default printer.
To reformat documents for the default printer
1Click To o l s ` Settings.
2Click Environment.
3In the Environment settings dialog box, click the General tab.
4Enable the Reformat documents for the WordPerfect default printer on open
check box.
When you disable the Reformat documents for the WordPerfect default
printer on open check box, WordPerfect looks for the printer with which the
document was formatted. If that printer is not available, WordPerfect
reformats the document for the current printer if necessary.
To change printer properties
1Click File ` Print.
2On the Main page, choose the printer for which you want to change the properties
from the Name list box.
3Click Properties.
4Change the printer properties.
WordPerfect no longer uses WordPerfect printer drivers (.prs files). When you
retrieve documents created with old printer drivers, documents are reformatted
for the Windows printer that is selected.
If you choose a paper source, enable collating, or specify the number of copies
to print directly in the printer’s properties dialog box, the settings are detected
by WordPerfect.
You can also specify the paper source by clicking the Paper/Quality tab and
choosing a paper source from the Paper source list box.

72 WordPerfect X3 User Guide
To disable printer metrics
1Click To o l s ` Settings.
2Click Convert.
3In the Convert settings dialog box, click the Compatibility tab.
4In the Options area, enable the Do not format document using print metrics
check box.
Setting up a print job
You can set the printing orientation to landscape or portrait. In addition, you can print
documents in reverse order. You can also specify where paper is fed into the printer.
Before printing, you must choose and properly configure the appropriate printing
device driver. To find out how best to set up the printing device driver, consult the
manufacturer’s documentation for the printing device, the Windows documentation, or
the service bureau that will print the work.
To set landscape or portrait orientation
1Click File ` Page setup.
2In the Orientation area, enable one of the following options:
• Portrait — prints text and graphics on a page whose height is greater than its
width
• Landscape — prints text and graphics on a page whose width is greater than its
height
To print document pages in reverse order
1Click File ` Print.
2On the Main page, enable the Print in reverse order check box from the Copies
area.
To specify where paper is fed into the printer
1Click File ` Print.
2Click the Advanced tab.

Printing 73
3In the Advanced options area, choose one of the following options from the Paper
feed list box:
• Left — specifies that the paper is being inserted at the left of the printer
• Center — specifies that the paper is being inserted at the center of the printer
• Right — specifies that the paper is being inserted at the right of the printer
Previewing a print job
Documents sometimes print differently than they appear on the screen. You can,
however, view a document the way it would print, without having to print it. You can
also increase or decrease the zoom level while previewing a print job. In addition, you
can edit text, adjust margins, and print a document.
To preview a print job
•Click File ` Print preview.
A check mark beside the Print preview command indicates that the print job is in
Print Preview mode.
You can close the preview window by clicking File ` Print preview.
You can also preview a print job by clicking the Mini preview button in
the Print dialog box.
To edit text in Print Preview mode
1In Print Preview mode, click the beginning of the text you want to edit.
2Click View ` Zoom.
3Enable the 150% option.
4Click OK.
5Edit the text.
You can revert to the default Print Preview zoom level by clicking View `
Zoom, and typing 52 in the Other box.
74 WordPerfect X3 User Guide
To increase or decrease the zoom level while previewing a print job
1Click File ` Print preview.
2Click the Zoom picker on the toolbar, and click a zoom option.
To adjust margins in Print Preview mode
1Click the paragraph or page where you want the margin changes to start.
Adjustments to margins apply to the line in which the cursor is located and all
subsequent lines.
2Click Format ` Margins.
3Click the Page setup tab.
4In the Document margins area, type values in the following boxes:
• Left
• Right
• Top
• Bottom
Most printers have an area around the edge of the page where they cannot
print. WordPerfect does not allow smaller margins than your printer can
accommodate.
If you want to change the margins for specified text, select the text.
To print from Print Preview
1In Print Preview mode, click the Print button on the property bar.
2Click Print.
You can also
Set all margins equal to the last margin
value edited
In the Document margins area, click
Equal.
Set all margins to the minimum size allowed
by the current printer
In the Document margins area, click
Minimum.

Printing 75
Printing documents
In addition to printing a file, you can print multiple copies of a file and print a document
saved on disk or on a network drive.
To print a document
1Click File ` Print.
2On the Main page, choose a printer from the Name box.
3In the Print range area, enable one of the following options:
• Full document — prints the entire file
• Current page — prints the page where the cursor is located
• Pages — prints the pages specified in the page box
• Selected text — prints the selected text in the document (available only if text is
selected)
• Document summary — prints only the document summary (available only if
there is a document summary)
If you enables the Pages option, type the pages you want to print in the Pages box.
A hyphen (-) between numbers defines a range of sequential pages (for example, 1-
5 prints pages 1 to 5). A comma (,) between numbers defines a series of non-
sequential pages (for example, 1, 5 prints pages 1 and 5 only). Any combination of
hyphens and commas is supported (for example, 1-3, 5, 7, 10-12 prints the
following pages: 1, 2, 3, 5, 7, 10, 11, and 12).
4Click Print.
For information about printing specific pages, see “Printing multiple pages” on
page 93.
If there is no document summary created for the document you are using, the
Document summary option is grayed. For information about creating
document summaries, see “Using document summaries” in the online Help.
To print multiple copies
1Click File ` Print.
2On the Main page, type the number of copies you want to print in the Number of
copies box.
If you want the copies collated, enable the Collate option.

76 WordPerfect X3 User Guide
3Click Print.
To print a document saved on disk or on a network drive
1Click File ` Print.
2Click the Advanced tab.
3Enable the Document on disk check box.
4Click Browse.
5In the Open file dialog box, choose the drive and folder where the document is
stored.
6Double-click the document name.
7Click Print.
Controlling a print job
Once you have created a print history and submitted a print job, you can control the
print job.
You can view the status of print jobs, so that you know where they are in the print queue
and whether they are progressing normally.
In addition, you can view the history of print jobs sent to the printer during your current
session. Print jobs display in the history list in the order they were sent to the printer,
with the most recent job at the top.
You can also pause print jobs, although on network printers you can only pause your
own print jobs. You can resume printing a paused print job.
You can cancel a print job.
To view the status or history of a print job
1Click File ` Print.
2On the Main page, click Status.
If you cannot view the history, make sure the Hide completed jobs command
is disabled. In the Print history and status dialog box, click Display. The

Printing 77
absence of a check mark next to the Hide completed jobs command indicates
that the command is disabled.
To pause a print job
1Click File ` Print.
2On the Main page, click Status.
3In the Print history and status dialog box, choose a file from the list.
4Click Document ` Pause printing.
To resume a print job
1Click File ` Print.
2On the Main page, click Status.
3In the Print history and status dialog box, choose a document from the list.
4Click Printer ` System printers.
5In the Printers and faxes or Printers dialog box, double-click the active printer.
6Click Document ` Resume.
To cancel a print job
1Click File ` Print.
2On the Main page, click Status.
3On the Print page, click Status.
4In the Print history and status dialog box, choose a document from the list.
5Click Document ` Cancel printing.
On a network printer, you can cancel only your own print jobs.
You can cancel the job in the Windows print queue, in your network print
queue, or at your printer. But if your printer has a large memory buffer,
printing may continue for a few moments after you cancel the print job. For
more information about each of these options, see the respective product
documentation.

78 WordPerfect X3 User Guide
Printing double-sided pages
If your printer supports printing on both sides of a page, you can print double-sided
directly from the application. If your printer doesn’t support double-sided printing, you
can still print double-sided manually.
If a file contains printing codes specifying that it is to be printed double-sided, but you
want to print single-sided, you can override the codes.
You can also print a document in a booklet style. When you divide pages to print in a
booklet style (with pages folded in half), you can print with the pages numbered and
ordered automatically.
To print double-sided pages automatically
1Click File ` Print.
Make sure that the printer you want to use is displayed in the Name list box. If it is
not, choose the correct printer.
2Click the Layout tab.
3In the Two-sided printing area, enable one of the following Automatic (printer
supports two-sided printing) options:
• Flip on long edge — prints the document for binding the long edge of the page
(for example, a book)
• Flip on short edge — prints the document for binding the short edge of the
page (for example, a flip chart or tablet)
4Click Print.
To print double-sided pages manually
1Click File ` Print.
Make sure that the printer you want to use is displayed in the Name list box. If it is
not, choose the correct printer.
2Click the Layout tab.
3In the Two-sided printing area, enable one of the following Manual (two steps)
options:
• Step 1: print odd pages
• Step 2: print even pages
If you are printing the second side of the document, enable the option not used for
the first side of the document.

Printing 79
4Click Print.
5When printing is complete, turn the pages over and reload them in the paper tray.
6Repeat steps 1 to 4.
Before printing, you may want to print a double-sided test page.
Some printer manufacturers discourage reinserting a page into the printer if it
has been used for printing. Please refer to your printer documentation for more
information.
To override two-sided printing codes
1Click File ` Print.
2Click the Layout tab.
3In the Two-sided printing area, enable the Off option.
To print a booklet
1Click File ` Print.
2Click the Layout tab.
3In the Two-sided printing area, enable the Use document settings option.
4Enable the Print as booklet check box.
5Click Print.
The booklet option is available only when the document has divided pages.
In order to print a booklet properly, the physical page must be subdivided into
two logical pages. For information about dividing pages, see “Specifying single-
sided or double-sided pages for a document” in the online Help.
Printing document sections and comments
WordPerfect allows you to print sections of a document, such as specific volumes or
chapters. Additionally, you can print comments that were inserted in the document. For
more information about comments, see “Adding, editing, and deleting comments” in
the online Help.

80 WordPerfect X3 User Guide
To print sections of a document
1Click File ` Print.
2Click the Advanced tab.
3Type a number or a combination of numbers in any of the following list boxes:
• Page(s)/Label(s) — prints the specified pages
• Secondary pages — prints the specified secondary pages
• Chapters — prints the specified pages in the specified chapters
• Volumes — prints the specified pages in the specified volumes
4Click Print.
The Volumes setting takes precedence over all other settings, followed by
chapters, secondary pages, and then page(s)/label(s). For example, if you type
2 in the Volumes box, only pages and chapters within volume 2 will print,
even if you have specified pages and chapters that are located in other parts of
the document.
For more information about printing pages in sections, see “Printing sections”
on page 94.
You can click the down arrow in the Secondary pages, Chapters, or Volumes
list boxes to see a list of range patterns. Click the pattern you want, delete the
supplied page numbers, and type the pages you want. You can also type a page
range yourself if you are familiar with the patterns.
To print a comment
1Click immediately after the comment.
2Click Insert ` Comment ` Edit.
3Click File ` Print.
Any comments that have been converted to document text will print when the
document is printed.

Printing 81
Printing file details
You can print file information for a file, such as the file path, at the bottom of the page.
In addition, you can show crop/fold marks when you print a file, so that you can clearly
identify the edges of the printed area for such purposes as using a paper cutter.
In addition, you can print documents with codes displayed. Documents will print as
they display in Reveal Codes view. This is useful for analyzing the document formatting.
For more information on displaying Reveal Codes, see “Using Reveal Codes” on
page 16.
To print file information
1Click File ` Print.
2Click the Layout tab.
3In the Details area, enable the Print file information check box.
4Click Print.
By default, the file path is printed. You can add information by typing in the
Print file information list box. The information you add overwrites the file
path and cannot exceed 168 characters.
To print crop/fold marks
1Click File ` Print.
2Click the Layout tab.
3In the Details area, enable the Show crop/fold marks check box.
4Click Print.
To print codes in a document
1Click File ` Print.
2Click the Advanced tab.
3In the Advanced options area, enable the Print Reveal Codes check box.

82 WordPerfect X3 User Guide
When you print codes in a document, the printed document does not contain
any information other than the codes and the text. For example, graphics and
file information are not printed.
For information on displaying Reveal Codes, see “Using Reveal Codes” on
page 16.
Printing envelopes and labels
To print on different sizes of paper, you must select a page size definition so the printer
can format and print a document as you want. For information about creating page size
definitions, see “Choosing page size and orientation” on page 20.
You can print envelopes in WordPerfect. WordPerfect allows you to print different sizes
of envelopes. For information about creating envelopes, see “Creating and editing
labels” in the online Help.
You can select a label size. You can also print labels.
For more information about printing labels, see “Printing labels” on page 95.
To print an envelope
1Click the page of a document that is set up as an envelope.
2Click File ` Print.
3Click the Main tab.
4Click Print.
You can also print an envelope by clicking the Print current envelope
button on the property bar.
To select a label size
1Click the page where you want labels to begin.
2Click Format ` Labels.
3In the List labels for area, enable one of the following options:
• Laser printed — if you are using a laser printer
• Tractor-fed — if you are using a tractor-fed printer

Printing 83
• Both — if you are using a tractor-fed laser printer
4Choose a label definition from the Labels list.
5Click Select.
To print a label
1Click File ` Print.
2Click the Advanced tab.
3In the Page(s)/Label(s) list box, type the number of each label or a range of labels.
For example, to print label 3, type 3; to print labels 3 and 8, type 3, 8; to print
label 3 through the end of the document, type 3-.
4Click Print.
The screen changes so that the first label is displayed and the rest of the
document window is shaded. As you fill the labels with text, more label “pages”
display in the window.
Labels that reach the edge of the sheet may not print correctly on printers with
a wide nonprinting zone. You must adjust the label size to account for the
printer’s nonprinting zone. Also, printing the same label on different printers
may give different results.
Printing graphics
The appearance of the graphics you print is determined partly by a process called
dithering, which combines several differently colored pixels to create a new color or
shade. With WordPerfect, you can change the dither method, the dither source, and
halftone options for printing graphics. For more information about dithering, see
“Dithering methods” on page 95.
To change the dither method used for printing graphics
1Right-click a graphic, and click Image tools.
2Click Edit attributes.
3In the Image settings dialog box, click Print parameters.
4In the Dither method area, enable one of the following options:

84 WordPerfect X3 User Guide
• Error diffusion — prints using a random pattern of dots, which provides
superior blending and image detail in bitmap images
• Ordered dither — prints using an ordered pattern of dots, which works well
with both bitmap and vector images
• Halftoning — prints using evenly spaced dots of variable diameter, which
provides sharper image detail with bitmap images
Some dither method options are available only from certain printers.
To change the dither source used for printing graphics
1Right-click a graphic, click Image tools.
2Click Edit attributes.
3In the Image settings dialog box, click Print parameters.
4In the Dither source area, enable one of the following options:
• WordPerfect
• Printer
You should use the printer’s settings as the dither source, which are enabled by
default, unless these settings provide poor printing results.
To change a graphic’s halftone options
1Right-click a graphic, and click Image tools.
2Click Edit attributes.
3In the Image settings dialog box, click Print parameters.
4In the Dither method area, enable the Halftoning option.
5In the Halftone options area, type a value in any of the following boxes:
• Angle — changes the angle of the line screening
• Lines per inch — changes the number of lines per inch in the halftone option
Either option may be unavailable, depending on the printer driver selected.
Halftone options are available only for PostScript printers.

Printing 85
Laying out a print job
You have different options for laying out a print job. For example, you can scale a print
job, so that the printed area on the page is smaller or larger than normal. When scaling,
you can choose to maintain the aspect ratio, so that the page height and width increase
or decrease proportionally and the output is not distorted.
You can scale a print job, so that the printed area on the page is smaller or larger than
normal. When scaling, you can choose to maintain the aspect ratio, so that the page
height and width increase or decrease proportionally and the output is not distorted.
You can also adjust a print job to fit the output page by specifying the output
orientation and margins.
You can tile a print job, so that portions of each page are printed on separate sheets of
paper. You can then assemble the pages into one large sheet. This is useful for printing
documents, such as banners, that are larger than the printer paper.
You can also print a document in thumbnail format. Thumbnails are miniature pictures
of individual pages. Several thumbnails are printed on each piece of printer paper.
If you need greater control when printing, you can specify advanced printing options
such as printing in color or printing text as graphics.
To scale a print job
1Click File ` Print.
2Click the Layout tab.
3Enable the Scale/Tiling option.
4In the Size area, type a value in the Width box.
If you do not want to maintain the aspect ratio, disable the Maintain aspect ratio
check box, and type a value in the Length box.
5Click Print.
If you enlarge a document by more than 100%, the document will be printed
on multiple pages. The # of tiles box shows the number of pages that will be
used when you print the document.
To adjust a print job to fit the selected page
1Click File ` Print.

86 WordPerfect X3 User Guide
2Click the Layout tab.
3Enable the Fit to output page option.
4Click Output page.
5In the Page setup dialog box, choose a page definition from the list.
6In the Orientation area, enable one of the following options:
• Portrait — prints text and graphics on a page whose height is greater than its
width
• Landscape — prints text and graphics on a page whose width is greater than its
height
7In the Document margins area, type values in the following boxes:
• Left
• Right
• Top
• Bottom
8Click OK.
9Click Print.
To tile a print job
1Click File ` Print.
2Click the Layout tab.
3Enable the Scale/Tiling option.
4Enable the Print tiled pages check box.
5In the # of tiles area, type values in the following boxes:
• Row
• Column
6Click Print.
If the # of tiles column box is grayed, disable the Maintain aspect ratio check
box.
You can specify the size of the page you are tiling by clicking the Output page
button.

Printing 87
To print a document in thumbnail format
1Click File ` Print.
2Click the Layout tab.
3Enable the Thumbnails option.
4Type a value in the Thumbnail boxes, to specify the number of thumbnails.
5In the Page ordering area, enable one of the following options:
• Down — prints thumbnails consecutively in columns
• Across — prints thumbnails consecutively in rows
6Enable any of the following check boxes:
• Show borders — prints page borders around each thumbnail
• Show index — prints the page number for each thumbnail
7Click Print.
To adjust the advanced print options
1Click File ` Print.
2Click the Advanced tab.
3Enable any of the following check boxes:
• Print in color — prints file in color
• Print text only — prints only the text of a document
• Print text as graphics — prints text as graphics rather than as fonts
downloaded to the printer. This option can also be useful if you are having
trouble printing reversed text (white text on a black background).
• Use graphic transparency — allows you to apply a transparency for a graphic if
the printer used does not provide support for a transparency
• Keep print history — keeps a record of print jobs
• Reset number of copies each time — resets the number of copies after each
print job is complete
The Use graphic transparency option is enabled by default.
The Print in color check box may be enabled by default when you choose a
color printer.
If you have a color printer selected, but the Print in color check box is grayed,
click Properties on the Main page, and make sure that the color settings are
correct for your printer.

88 WordPerfect X3 User Guide
Saving print settings
You can save print settings so you can retrieve them and apply them to other
documents. Print settings are made up of printing properties such as the number of
copies to print or printing text as graphics. You may require different print settings for
different types of documents or printers. For example, you may use one for printing
letters and another for printing envelopes.
By default, the properties are retrieved from the printer you have selected and then the
printer settings are applied. The default settings are in effect until you change them or
you close the file. You can, however, save a selected printer’s settings and specify not to
retrieve the settings from the printer each time you apply the settings. Therefore, if the
printer’s settings are changed, the settings you saved do not change.
If you no longer need the settings, you can delete them. You can also restore the factory
application default settings.
To save print settings
1Click File ` Print.
2On the Main page, choose a printer from the Name list box.
3Choose the printing options you want to save from the Main, Layout, and
Advanced pages.
4On the Main page, click Edit settings.
5In the Settings to save list, enable the check boxes next to the settings you want to
save.
If you disable a setting’s check box, the setting is not saved.
6Type a name for the settings in the Name for current settings list box.
7Disable the Use printer properties from currently selected printer check box.
8Click Save.
To automatically detect and save a printer's settings
1Click File ` Print.
2On the Main page, choose a printer from the Name list box.
3Click Edit settings.
4In the Edit settings dialog box, type a name for the settings in the Name for
current settings list box.

Printing 89
5Enable the Use printer properties from currently selected printer check box.
6Enable the Save current printer properties with setting option.
When you enable the Save current printer properties with setting option, the
current printer properties are retrieved before saving, but they are not retrieved
from the printer every time the setting is retrieved. Therefore, if the printer’s
settings change, the settings you save do not change.
7Click Save.
If you disable any or all of the following check boxes: Number of copies,
Collate, Two-sided printing, or Print in color, the settings are not retrieved
from the printer and the settings specified in the Print dialog box are not
saved. In order for the settings to be retrieved from the printer, the printer
must have the specified settings available.
If you disable a setting’s check box in the Settings to save list, the setting is
not saved.
To retrieve print settings
1Click File ` Print.
2Click the Main tab.
3From the Settings list box, choose the saved settings you want to retrieve.
If you are in the Edit settings dialog box, you can retrieve saved settings by
choosing the settings from the Name for current settings list box and
clicking Retrieve.
To delete print settings
1Click File ` Print.
2Click the Main tab.
3From the Settings list box, choose the settings you want to delete.
4Click Edit settings.
5Click Delete.

90 WordPerfect X3 User Guide
You can’t delete the Application default settings. You can, however, restore
the Application default factory settings. For more information about
restoring the Application default settings, see “To restore the application
default print settings” on page 90.
To restore the application default print settings
1Click File ` Print.
2Click the Main tab.
3From the Settings list box, choose Application default.
4Click Edit settings.
5Click Restore.
Using printer commands
You can control your printer using printer commands. Printer commands vary
according to the printer installed. Check your printer documentation for information
about printer commands to let you use the special functions of your printer.
You can insert printer commands into a document from a printer command file. For
more information about printer commands, see “Printer commands” on page 96.
WordPerfect allows you to insert a code that pauses the printer at the cursor.
After you send a printer command to the printer, you can reset the printer (using
another printer command) to the printer’s default values to restore normal printer
functions. For more information about your printer’s default values, see the printer
manual.
To insert printer commands into a document from a printer command file
1Click where you want to insert the printer command.
2Click Format ` Ty p e s e t t i n g ` Printer command.
3In the Printer command dialog box, enable the Printer command filename
option.
4Click Browse.
5Choose the drive and folder where the printer command file is stored.

Printing 91
6Double-click the printer command filename.
To pause the printer at the cursor
1Click where you want to pause the printer.
2Click Format ` Ty p e s e t t i n g ` Printer command.
3Enable the Pause printer check box.
To reset the printer
1Click where you want to insert the printer command.
2Click Format ` Ty p e s e t t i n g ` Printer command.
3In the Printer command dialog box, enable the Command option.
4In the Command box, type the printer’s default values to insert in the document.
Printing to a file
You can print to a file instead of to a printer. This is useful if you don’t have a printer
attached to your computer, or if you want to print the document on a printer other than
the one attached to your computer.
For more information about printing files to disk, see “Printing to files” on page 96.
To print to a file
1Click File ` Print.
2On the Main page, choose a printer from the Name list box.
3Enable the Print to file check box.
4Click Print.
5In the Print to file dialog box, choose the drive and folder where you want to save
the file.
6Type the name for the file in the File name box.
7Click Save.
When you print to a file, you can print directly from DOS to the printer it was
formatted for. For example, if the file you printed to is named LETTER, saved

92 WordPerfect X3 User Guide
to C:\, and the computer you are using is printing to LPT1, type copy/b
c:\letter at a DOS prompt, then press Enter. You can also print the file using
the DOS Print command. See the DOS reference manual for more information.
Sending faxes
If the fax driver for your modem is installed, you can fax a file to others. For information
about installing fax drivers, consult the documentation included with your fax program.
Before you can send a fax, you must select a fax driver.
When you send a fax, you can choose to fax the entire file or fax only specific pages or
sections.
You can monitor the progress of a fax and view a list of the faxes sent during the current
session. You can pause a fax. When you pause a fax, any other faxes in the list continue
to transmit.
To send a fax
1Click Send to ` Fax.
2On the Main page, choose a fax driver from the Name list box.
3In the Print range area, enable one of the following options:
• Full document — sends the entire document
• Current page — sends the page where the cursor is located
• Pages — sends the range of pages specified in the page box
• Selected text — sends the selected text in the document (only available if text is
selected)
• Document summary — sends only the document summary (only available if a
summary is created)
4Click Fax.
Your fax program should open to guide you through the faxing process.
To view the status of a fax
1Click File ` Print.
2On the Main page, click Status.
Printing 93
To pause a fax
1Click File ` Print.
2On the Main page, click Status.
3In the Print history and status dialog box, choose a fax from the document list.
4Click Document ` Pause printing.
A check mark beside the Pause printing command indicates the fax is paused.
Fax jobs display in the order they were sent, with the current job at the top of
the list.
Reference: Printing
This topic provides additional information about printing multiple pages, printing
sections, printing labels, dithering methods, printer commands, and printing
WordPerfect files to a disk.
Printing multiple pages
Some examples for printing multiple pages are listed in the table below.
You can also
Resume sending a fax Choose a fax from the document list. Click
Document ` Pause printing.
Cancel a fax Choose a fax from the document list. Click
Document ` Cancel printing.
To p r i n t Ty p e
Pages 3, 5, and 8 3,5,8
Pages 3 and 8 3,8
Page 3 through the end of the document 3-
The beginning of the document through
page 3
-3
Pages 1 through 3 and 8 1-3,8
94 WordPerfect X3 User Guide
You must type the page numbers in numerical order. For example, if you type 10, 1, 2,
only page 10 will print. You can also print pages in reverse order. For more information
about printing pages in reverse order, see “To print document pages in reverse order”
on page 72.
Printing sections
You can specify the current page, chapter, or volume number in a document and then
print specific pages from each section.
For example, suppose a document has sections and page numbers as listed in the table
below.
Some examples for printing sections of this document are listed in the table below.
If no number is specified in the Volumes, Chapters, and Secondary pages list
boxes, the first page of the document matching the page number (in Roman or
Arabic) is printed.
A hyphen (-) between numbers defines a range of sequential pages (for
example, 1-5 prints pages 1 to 5). A comma (,) between numbers defines a
series of non-sequential pages (for example, 1, 5 prints pages 1 and 5 only).
Any combination of hyphens and commas is supported (for example, 1-3, 5, 7,
10-12 prints the following pages: 1, 2, 3, 5, 7, 10, 11, and 12). A colon
between numbers defines a specific page number, where the first number
indicates the chapter, and the second indicates the page (for example, 2:3
prints chapter 2, page 3).
Pages 3, 5, and 9 through 15 3,5,9-15
Section Pages
Preface i-vii
Chapter 1 1-12
Chapter 2 1-20
Chapter 3 1-10
Index i-iii

Printing 95
For more information about numbering pages, see “Inserting chapter, volume,
and page total numbers” in the online Help.
Printing labels
Labels are set up in WordPerfect so that you can print to portions of a page. Essentially,
label printing is set up in the same way as divided pages. The sheet or roll of labels is
called the physical page, and each individual label is called a logical page.
WordPerfect includes many label definitions that are commonly used or that match
commercially available labels. When you want to print labels or similar kinds of
projects, browse the list to see if there is one that meets your needs.
The default labels file for the United States, Canada, and other countries that use
Imperial measurements is Avery labels EN.LAB, where EN is the two-letter language
code (such as “EN” for English). The default labels file for countries that use the metric
system is Avery labels A4.LAB. You can print the document with the label definition
on another computer, but you cannot edit the definition itself.
Because the printer information is in the printer driver, the same document on a
different computer will not necessarily have the same printer information. This could
affect where information prints at the margin.
Dithering methods
Dithering places pixels with specific colors or values relative to other pixels of a specific
color. The relationship of one colored pixel to another creates the appearance of
additional colors that do not exist in the color palette.
With WordPerfect, you can control both the dithering method and the dithering source.
Provided your printer supports these options, you can:
• choose one of three color or grayscale blending methods (error diffusion, ordered
dither, or halftone)
• have dithering applied by WordPerfect or by your printer
Error diffusion scatters pixels irregularly, making edges and colors softer. Ordered
dithering approximates color blends using fixed dot patterns; as a result, solid colors are
emphasized and edges appear harder.
The halftone option is especially useful if you are making photocopies, since it can give
your original image sharper detail. If you choose halftone dithering, you can further
refine your selection, increasing the lines per inch (lpi) setting to increase image

96 WordPerfect X3 User Guide
sharpness and reduce gray shading. You can use the dither source to specify where the
bitmap or vector image is converted into the final format for printing. The image can
be converted by WordPerfect or the printer. If you are using a PostScript printer, you
can also specify the angle of line screening.
Printer commands
Printer commands vary according to the printer installed. Type printer commands using
the syntax documented in your printer manual. To include a decimal value for a control
code or character, enclose that value in angle brackets (such as <27> for ESC).
WordPerfect does not check that printer commands are valid. You will know that a
command in the document or printer command file is invalid or incorrect only if the
document fails to print correctly. If the text within a printer command is printed, this
means that the printer does not recognize it as a printer command. Check your printer
manual to be sure you have entered the command correctly.
Printing to files
If you are planning to send the file to a service bureau for printing, you can print it to
a file and then deliver the file to the service bureau on a disk or as an e-mail attachment.
The file can then be printed from another computer, whether or not that computer has
a copy of WordPerfect Office installed.
Printing files to disk creates a PostScript file when you have a PostScript printer
installed. PostScript is a page description language used to send instructions to a
PostScript device about how to print each page. All the elements in a print job (for
example, curves and text) are represented by lines of PostScript code that the printing
device uses to produce the document.
PostScript is not the only method for sending instructions to a printing device, and some
printing devices are not compatible with PostScript. However, there are several
functions that are unavailable if you are not using the PostScript printing device
language. For example, without PostScript, you cannot adjust color separations and
halftone screens.

Merging documents 97
Merging documents
When you merge documents, you combine a form document and a data source. The
merge produces varying copies of the form document, each containing information
from a specific record in the data source.
In this section, you’ll learn about
• creating data for a merge
• working with form documents for a merge
•associating merge files
• performing a merge
• converting merge files
• sorting, viewing, and finding data in data files
• editing merge data files
• selecting specific data for merges
• merging with address books
•changing merge options
• using merge commands
• merge programming commands
• working with levels, loops, and merge variables
• working with merge expressions
•expression terms
You can program a merge by adding merge commands. For more information, see
“Reference: The Merge toolbar and programming commands” on page 184.
Creating data for a merge
When you merge documents, you produce varying copies of a form document. Each
copy contains specific information from a record in a data source, such as a data file, an
address book, or keyboard input.
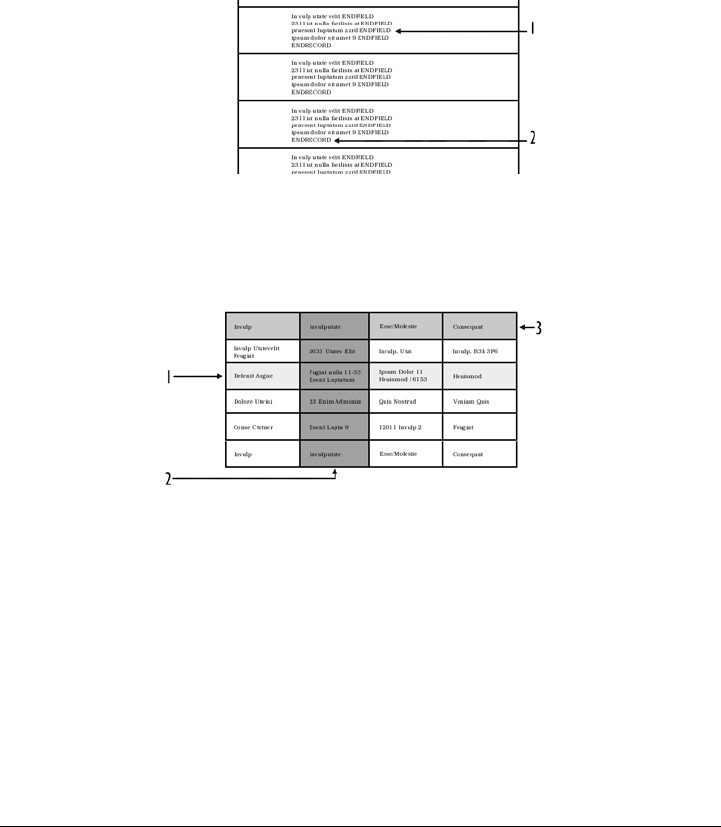
98 WordPerfect X3 User Guide
To use a WordPerfect data file as the data source, you can create either a data text file
or a data table file. In both types of data files, information is organized into records and
fields. For example, a record may include a name, address, telephone number, and other
contact information. Each item within the record, such as name or address, is recognized
as a field. It is recommended that you use no more than 512 fields per record.
When you create a data text file, each field is marked by the ENDFIELD code and each
record by the ENDRECORD code.
This is an example of a data text file containing 1) ENDFIELD codes and
2) ENDRECORD codes.
When you create a data table file, fields and records are arranged in columns and rows.
Each column contains a field. Each row contains a record.
This is an example of a data table file containing 1) records, 2) fields, and 3) field
names.
You can retrieve data from other file formats to use as data files in WordPerfect. For
example, you can retrieve and convert a database file, a spreadsheet file, an ODBC data
source, or a text file. For information about converting files, see “Opening and
previewing files” in the online Help.
You can also use an address book as a merge data source. For information, see “Merging
with address books” on page 117.
When you create a data file, WordPerfect automatically inserts a Merge toolbar into the
merge data file.

Merging documents 99
For more information about the Merge toolbar, see “Using the Merge toolbar” on
page 184.
To create a data file for a merge
1Click To o l s ` Merge.
2In the Merge dialog box, click Data source ` Create data file.
If there is text in the active document, enable one of the following options in the
Data file source dialog box:
• Use file in the active window — uses the active document
• New document window — creates a new document
3Click OK.
4In the Create data file dialog box, type the name of a field in the Name a field
box.
For example, if you are creating data for a form letter, you might include fields such
as name, address, city, province, postal code, phone number, and e-mail address.
To create a data table file, enable the Format records in a table check box.
5Click Add.
6To organize a selected field, click any of the following:
• Replace — replaces the name of the selected field
• Delete — deletes the selected field
• Move up — moves the selected field up in the Fields used in merge list
• Move down — moves the selected field down in the Fields used in merge list
7When you are satisfied with the field names and arrangement for your data file,
click OK.
8In the Quick data entry dialog box, type information for each field that you have
created.
9Click New record to add the completed record to your data file. Repeat steps 8
and 9 to continue adding records to your data file. Click Close, and click Ye s .
You can also
Number the fields in an empty data file Click OK in the Create data file dialog box.
Specify the number of fields in the Number
of fields in each record box.
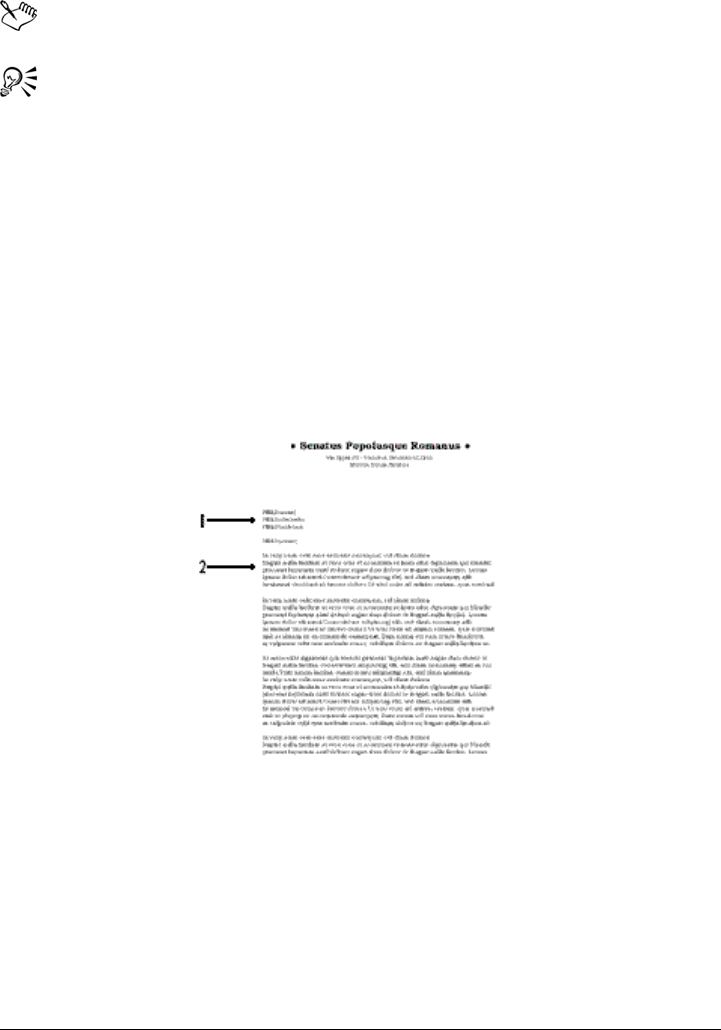
100 WordPerfect X3 User Guide
It is recommended that you use no more than 512 fields per record.
To add a line to a field, press Ctrl + Enter.
Press Ta b to move to the next field.
Working with form documents for a merge
A form document provides the pattern and layout for a merged document. It can
contain text, formatting, graphics, and merge commands. You create form documents
the same way you create regular documents; however, you insert merge commands
which are replaced by information from a data source during the merge. For more
information about inserting merge commands, see “Using merge commands” on
page 122.
This is an example of a form document containing 1) FIELD codes where the name
and address of the recipient are inserted and 2) text for a letter.
At the top of the document window, WordPerfect inserts the Merge toolbar to give you
greater control over a merge. For more information about the Merge toolbar, see
“Using the Merge toolbar” on page 184.
WordPerfect lets you create a form document that you can personalize during a
keyboard merge. A keyboard merge lets you enter information into the form document

Merging documents 101
each time you need to send it. For more information about the KEYBOARD command,
see “Merge programming commands” on page 125. You also can create a form
document for labels and merged text that is oriented sideways.
If you do not want to create a new series of merged documents, you can send all of the
merged data to a table. After you perform the merge, all of the merged output will be
formatted into a single table with each column representing a field.
To create a form document for a merge
1Click To o l s ` Merge.
2In the Merge dialog box, click Form document ` Create form document.
If there is text in the active document, enable one of the following options in the
Data file source dialog box:
• Use file in active window — uses the active document
• New document window — creates a new document
3Click OK.
4In the Associate form and data dialog box, enable one of the following:
• Associate a data file — specifies the path and filename for the file
• Associate an address book — specifies an address book
• Associate an ODBC data source — lets you select the ODBC source to use
• No association — does not associate any data file
5Click OK.
6Type text, apply formatting, and insert merge commands in the form document.
You can now begin inserting fields in the form document.
For information about inserting merge commands, see “To insert a merge
command” on page 123.
For information about inserting fields, see “To insert a field in a form document
for a merge” on page 101.
To insert a field in a form document for a merge
1Click Insert Field on the Merge toolbar.
2Click in the form document where you want data to be filled in from a data source.
3In the Insert field name and number dialog box, choose a field from the Field
names list.

102 WordPerfect X3 User Guide
Yo u c a n k e e p t h e Insert field name and number dialog box open and continue to
add information and formatting to the form document.
4Click Insert.
To create a form document for labels
1Click To o l s ` Merge.
2In the Merge dialog box, click Form document ` Create form document.
If you have typed in the current document, enable one of the following options in
the Data file source dialog box:
• Use file in active window — uses the active document
• New document window — creates a new document
3In the Associate form and data dialog box, enable the Associate an address
book option, and choose an address book from the list box.
4Click OK.
5On the WordPerfect menu bar, click Format ` Labels.
6In the List labels for area, enable one of the following label options:
• Laser printed — displays laser label options
• Tractor-fed — displays tractor-fed label options
• Both — displays laser and tractor-fed label options
7Choose a label style from the Labels list, and click Select.
8Insert fields in the form document.
For information about inserting fields, see “To insert a field in a form document
for a merge” on page 101.
You can merge selected records from an address book. For information, see “To
merge selected records from an address book” on page 118.
To create a sideways text form document
1Click To o l s ` Merge.
2In the Merge dialog box, click Form document ` Create form document.
If there is text in the active document, enable one of the following options in the
Data file source dialog box:
• Use file in active window — uses the active document

Merging documents 103
• New document window — creates a new document
3Click OK.
4In the Associate form and data dialog box, enable one of the following options:
• Associate a data file — specifies the path and filename for the associated data
file
• Associate an address book — specifies an address book
• Associate an ODBC data source — lets you select the ODBC source
• No association — does not associate any data file
5Click OK.
6On the WordPerfect menu bar, click Insert ` Te x t b ox .
7Insert fields in the new text box, and click Close.
8Right-click the text box, and click Content.
9Enable a rotation option in the Rotate text counterclockwise area, and click OK.
For information about inserting fields, see “To insert a field in a form document
for a merge” on page 101.
To create a form document for a keyboard merge
1Click To o l s ` Merge.
2In the Merge dialog box, click Form document ` Create form document.
If there is text in the active document, enable one of the following options in the
Data file source dialog box:
• Use file in active window — uses the active document
• New document window — creates a new document
3Click OK.
4In the Associate form and data dialog box, enable one of the following options:
• Associate a data file — specifies a path and filename for the associated data file
• Associate an address book — specifies an address book
• Associate an ODBC data source — lets you select the ODBC source
• No association — does not associate any data file
5Click OK.
6Add text and formatting, and insert fields in the form document.
7Click where you want to insert a keyboard prompt in the form document.

104 WordPerfect X3 User Guide
8On the Merge toolbar, click Insert merge code, and choose Keyboard.
9In the Insert merge code dialog box, type a user prompt for the information to be
entered and click OK.
To create a table for a merge
1Click To o l s ` Merge.
2In the Merge dialog box, click Form document ` Create form document.
If there is text in the active document, enable one of the following options in the
Data file source dialog box:
• Use file in active window — uses the active document
• New document window — creates a new document
3In the Associate form and data dialog box, enable one of the following options
and click OK:
• Associate a data file — specifies the path and filename for the associated data
file
• Associate an address book — specifies an address book
• Associate an ODBC data source — lets you select an ODBC source
• No association — does not associate any data file
4On the WordPerfect menu bar, click Ta b l e ` Create and in the Create table dialog
box, type the specified values in the following boxes:
• Columns — number of columns
• Rows — 2
5Click Create, and type a heading in each cell of the first row.
6Right-click the table, click Format, and on the Ta b l e tab, enable the Insert new
rows automatically check box, and click OK.
7Insert fields in the second row of the table, and click Close.
8Click at the end of the last cell in the second row, and on the Merge toolbar, click
Insert merge code and choose More.
9In the Insert merge codes dialog box, choose REPEATROW from the Merge
codes list, click Insert, and click Close.
After merging, the table expands one row for each record in the associated data
file.

Merging documents 105
Press Ta b to move to the next cell.
Associating merge files
Before you can merge documents, you must link a data source filename to a form
document. This is called associating a data source. You can associate a data source with
a form document, or you can associate a form document with a data file, such as an
ODBC data source. The association is always stored in the form document.
If the data source changes, you can associate a different data file. You can also go to an
associated form document from its data file or to an associated data file from its form
document.
To associate a data file with a form document
1Open a data file.
2Click Go to form on the Merge toolbar.
3In the Associate dialog box, click one of the following:
• Select — associates an existing form document
• Create — creates a new form document
The association is stored in the form document.
To associate a form document with a data source
1Open a form document that has no association with a data source.
2Click Go to data on the Merge toolbar.
3Click one of the following:
• Select — associates a data file
• Create — creates and names a new data file or form file
• Address book — associates an address book
• ODBC — associates an ODBC data source
For information about associating an ODBC data source, see “To associate a
form document with an ODBC data source” on page 106.

106 WordPerfect X3 User Guide
To associate a form document with an ODBC data source
1Open a form document that has no association with a data source.
2Click Go to data on the Merge toolbar.
3Click ODBC.
If prompted, log in to the database.
4Choose a location from the Data source list box.
5From the Ta b l e l i s t box, choose a table in the database that contains the merge
data.
For more information about logging in to an ODBC database, see the online
Help for the Microsoft® SQL Server™ ODBC driver.
To go to the associated data file
1Open a form document.
2On the Merge toolbar, click Go to data.
If there is no associated data file, you can select an existing data file or create a
new one. For information about associating a data source, see “To associate a
form document with a data source” on page 105. For information about
creating a data file, see “To create a data file for a merge” on page 99.
To go to the associated form document
1Open a data file.
2On the Merge toolbar, click Go to form.
The associated form document must be open.
The association is stored in the form document.
To change the associated data source
1Open a form document.
2Click Insert field on the Merge toolbar.
3Click Data source, and browse to locate a data file.
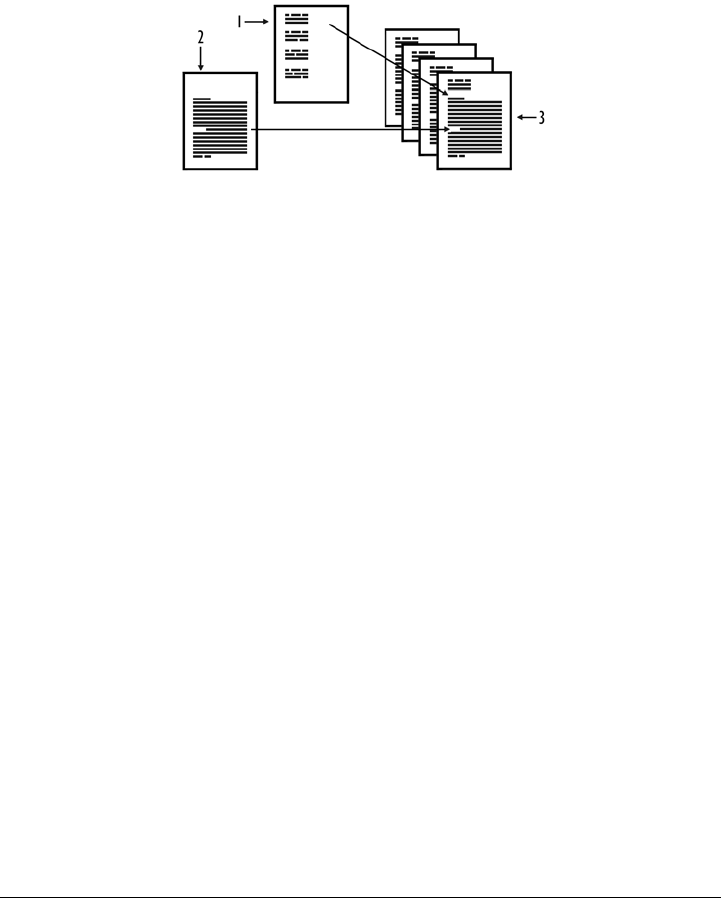
Merging documents 107
Performing a merge
When you merge documents, you combine a form document and a data source.
WordPerfect provides a variety of output options for the merged documents. For
example, you can save it to disk, print it, or add it to the active document.
This is an example of 1) a data source document, 2) a form document, and 3) merged
documents.
You can perform a keyboard merge and add information at the time of the merge.
When you perform the keyboard merge, WordPerfect pauses the merge as specified in
the form document and waits for you to enter information from the keyboard.
You can create envelopes as you merge a form document (such as a letter), or you can
create merged envelopes on their own. An envelope is created for each record selected
in the data source. For more information about working with envelopes, see “Creating
and editing envelopes” in the online Help.
You can also send each merged document as e-mail.
Please note that it is recommended that you use no more than 512 fields per record.
To perform a merge
1Click To o l s ` Merge.
2In the Merge dialog box, click Form document, and choose the location of the
form file to merge.
3Click Data source, and choose the location of the data file to merge.
4Click Output, and choose one of the following:
• Current document
• New document
• Printer
5Click Merge.

108 WordPerfect X3 User Guide
You can also perform a keyboard merge by clicking Merge on the Merge
toolbar. For more information about using the Merge toolbar, see “Using the
Merge toolbar” on page 184.
To merge to envelopes
1Click To o l s ` Merge.
2Click Form document, and choose the location of the form document.
If you are merging envelopes only, click Current document as the location of the
form file.
3Click Data source, and choose the location of the data file.
4Click Envelopes.
5On the Merge toolbar, click Insert Field and insert fields in the form document.
6Click Close.
7Click Continue merge on the Merge toolbar.
8Click Output, and choose a location for the merged file.
9Click Merge.
The merged envelopes are placed at the end of the merged file.
If there is an existing envelope for this document, you can edit, cancel, or define
the envelope. For more information about creating envelopes, see “Creating
and editing envelopes” in the online Help.
To perform a keyboard merge
1Open a form or data file containing the KEYBOARD merge command.
You can also
Stop a merge in progress Press Esc.
Save the merged file to disk Click Output ` File on disk. Choose the
folder, drive, and where you want to save the
file. Type a filename in the Filename list
box. Click Select.
Merging documents 109
2Click To o l s ` Merge.
3Click Form document, and choose Current document.
4Click Data source, and choose the location of the data file.
5Click Output, and choose a location for the merged file.
6Click Merge.
7When the merge pauses at the KEYBOARD command, type the information as
prompted.
8On the Merge toolbar, click Continue.
To continue the merge to the end of the active record and ignore all other
merge commands, click Quit on the Merge toolbar.
To merge to e-mail
1Click To o l s ` Merge.
2Click Form document, and choose the location of the form file to merge.
3Click Data source, and choose the location of the data file to merge.
4Click Output, and choose E-mail.
5Choose the field containing the e-mail address from the Select field name of e-
mail address list box.
6In the Subject line box, type the subject line for the merged e-mail message.
7Click OK.
8Click Merge.
9Choose a profile from the Profile name list box.
You can also
Skip a record Review the data in the Next record list box
on the Merge toolbar. Click Skip next
record.
Stop a keyboard merge Click Stop on the Merge toolbar.

110 WordPerfect X3 User Guide
Converting merge files
You can convert form documents and data files to regular WordPerfect documents.
When a file is converted, it is no longer recognized as a form document or a data file for
a merge, and the Merge toolbar is removed. For information about the Merge toolbar,
see “Using the Merge toolbar” on page 184. You can also convert a table to a data text
file.
When you use a data file that is not formatted for a merge, WordPerfect imports and
converts it for the merge. You can use the file one time and not save it as a merge file,
or you can save the file in WordPerfect format so that you can use it again.
You can also import data in other forms, such as a spreadsheet, database, or text file,
into a data text file for a merge. For more information, see “To link or embed
spreadsheet data as regular text”, “To link or embed a database as regular text”, and “To
link or embed a delimited text file” in the online Help.
It is recommended that you use no more than 512 fields per record.
To convert a form document or data file to a regular document
1Open a data file or a form document.
2On the Merge toolbar, click Options, and choose Remove merge bar.
One of the following dialog boxes displays:
• The file will not be recognized as a merge file — indicates that the active file
will not be recognized as a merge form document or merge data file
• Data file association will be lost — indicates that the active file will not be
recognized as a merge form document and will not be associated with any data
file
After the Merge toolbar has been removed, you cannot click Undo to display
it again. You need to re-create the merge file.
To convert a table to a data text file for a merge
1Select a table.
2Press Backspace.
3Enable the Convert table contents option.
4Click OK.

Merging documents 111
5Enable the Convert text to merge data file (.dat) option.
If you want to convert the cells in the first row to field names, enable the Use text
as first row as field names check box.
Sorting, viewing, and finding data in data files
You can sort a data file. Using the Quick data entry feature in WordPerfect, you can
scroll through the records and fields in a data file to view them. You can also find records
that contain specific text.
To sort a data file
1On the Merge toolbar, click Options, and choose Sort.
2Choose a criterion from the Sort by box.
3Click Sort.
The table is sorted alphabetically or numerically in ascending order based on the
first cell in each row.
For more information about sorting records, see “Working with records” in the
online Help.
To view records in a data file using Quick data entry
1Click Quick entry on the Merge toolbar.
2Click one of the following:
• First
• Previous
• Next
• Last
3Click Close.
To view a field in a data file using Quick data entry
1Click Quick entry on the Merge toolbar.
2Click any of the following:
• Next field — moves the cursor to the next field
• Previous field — moves the cursor to the previous field

112 WordPerfect X3 User Guide
To find text in a data file using Quick data entry
1Click Quick entry on the Merge toolbar.
2Click Find, and type the text to match in the Find box.
3Click one of the following:
• Find next — moves to the next record containing the text specified
• Find previous — moves to the previous record containing the text specified
Depending on which record is displayed, Find next or Find previous may be
grayed.
If no record is found, the first record in the data file displays.
Editing merge data files
A data file organizes data for a merge into fields and records and can be formatted as
either a data text file or a data table file. In a data table file, information is organized in
a table. Each column of the table contains a field, and each row contains a record. You
can add and delete columns and rows from a data table.
In a data text file, fields are separated by an ENDFIELD code. Records are separated
by an ENDRECORD code and a hard page break. WordPerfect lets you add fields to
and delete fields from records. You can also add field names and records to data text
files.
Using Quick data entry, you can add and delete fields or records in both data text files
and data table files. You can also edit the contents of fields in records.
It is recommended that you use no more than 512 fields per record.
To add a column to a data table
1Click in a column next to where you want to add a new column.
2On the Merge toolbar, click Column, and choose Insert.
3Type the name of the new field in the Field name box.
4Click one of the following:
• Before current field — inserts the new field before the selected column
• After current field — inserts the new field after the selected column
• After last field — inserts the new field as the last column in the table

Merging documents 113
It is recommended that you use no more than 512 fields per record.
To delete a column from a data table
1Click in a column.
2Click Column on the Merge toolbar.
3Choose Delete.
To add a row to a data table
1Click in a row next to where you want to add a new row.
2On the Merge toolbar, click Row, and choose Insert.
3Click one of the following:
• Add row above current row
• Add row below current row
• Add row to end of table
To delete a row from a data table
1Click in a row.
2On the Merge toolbar, click Row and choose Delete.
To add or delete a field from a data text file record
It is recommended that you use no more than 512 fields per record.
To Do the following
Add a field Click where you want to add the field. Type
data, and click End field on the Merge
toolbar.
Delete a field Select the text and the ENDFIELD merge
code. Press Delete.
114 WordPerfect X3 User Guide
To add or delete a field name from a data text file
A semicolon, but no spaces, separates each field name.
You need to manually add or delete fields from records. For information, see
“To add or delete a field from a data text file record” on page 113.
It is recommended that you use no more than 512 fields per record.
To add a record to a data text file
1Type the text for the first field.
2Click End field on the Merge toolbar.
3Click after the last ENDFIELD code of the record.
4Click End record on the Merge toolbar.
To add a field to a data file using Quick data entry
1Click Quick Entry on the Merge toolbar.
2Click Field names.
To Do the following
Add a field name Click where you want to add a field. The
cursor must be within the parentheses of the
Fieldnames code.
Type the new field name followed by a
semicolon.
Delete a field name Click within the parentheses of the
Fieldnames code. Select the field name and
following semicolon. Press Delete.
You can also
Delete a record from a data text file Select the record, including the ENDFIELD
and ENDRECORD codes and the hard page
break at the end of the record. Press Delete.
Print a data text file Click To o l s ` Merge. On the Merge
toolbar, click Options, and choose Print.

Merging documents 115
3Type the field name in the Field name box.
4Click one of the following:
• Add — adds the new field after the selected field
• Add before — adds the new field before the selected field
If you replace a field name, information in that field will be deleted from each
record in the data file. For example, if you replace “Address” with “Street
Address,” all data in the “Address” field in all records will be deleted.
If you delete a field name, information in that field will be deleted from each
record in the data file.
It is recommended that you use no more than 512 fields per record.
To add a record to a data file using Quick data entry
1Click Quick entry on the Merge toolbar.
2Click New record.
3Type the data for a field.
4Click Close.
Press Enter to move to the next field.
To edit fields using Quick data entry
1Click Quick entry on the Merge toolbar.
2Click in the field you want to edit.
You can also
Replace a field name in a data file Choose a field from the Fields used in
merge list box. Click Replace.
Delete a field from a data file Choose a field from the Fields used in
merge list box. Click Delete.
You can also
Delete the displayed record Click Delete record.

116 WordPerfect X3 User Guide
If you want to edit dimmed fields, enable the Allow editing of dimmed fields
check box.
3Ty p e t e x t .
If you edit fields with functions, the functions are deleted.
For information about finding data in a data file, see “Sorting, viewing, and
finding data in data files” on page 111.
Selecting specific data for merges
When you merge documents, you produce varying copies of the form document. Each
copy contains specific information from a record in the data source. If you do not want
to merge all the records in a data source, you can limit a merge to certain records in the
data file by marking a range of records that you want to merge or by specifying
conditions for records.
It is recommended that you use no more than 512 fields per record.
To mark records for a merge
1Click To o l s ` Merge.
2In the Merge dialog box, click Form document, and choose the location of the
form file.
3Click Data source, and choose the location of the data file.
4Click Records.
5Enable the Mark records option in the Selection method area.
6Type the range of records to display in the Display records from boxes.
7Choose the first field to display in the First field to display box.
8Click Update record list.
9Click OK.
You can also
Mark individual records Enable the records in the Record list box.
Select all records Click Mark all records in list.

Merging documents 117
To specify conditions for a merge
1Click To o l s ` Merge.
2Click Merge.
3Click Form document, and choose the location of the form file.
4Click Data source, and choose the location of the data file.
5Click Records.
6Enable the Specify conditions option in the Selection method area.
7Select a field from the Field list box.
8Type the selection criteria in the Condition text boxes.
If you want to see examples of selection criteria, click Example.
9Click OK.
Merging with address books
When you use an address book as the data source for a merge, you do not have to create
a data file. You can merge all records or select specific records from an address book and
merge them directly to letters, envelopes, labels, or form documents. By default,
WordPerfect lets you access Directory Server, MAPI, and Windows address books
through the Microsoft Outlook address book. For more information about using
Microsoft Outlook, see “Using Microsoft Outlook address books in WordPerfect” in the
online Help.
Clear all marked records Click Unmark all records in list.
You can also
Choose a range of records Enable the Record number range check
box. In the From box, type the first record
in the range. In the To box, type the last
number in the range.
Reset conditions Click Clear all.
You can also

118 WordPerfect X3 User Guide
You can also create a merge data file by using the records in an address book.
WordPerfect lets you create a data file by using all records or selected ones. When you
merge information from an address book, the records are interpreted as a merge data
file at the time of the merge. If you want to save address book information as a merge
data file, you can use the adrs2mrg.wcm macro included with WordPerfect. For more
information about macros, see “Recordings, macros, and automation features” on
page 191.
You can merge envelopes with a form document by using an address book. You can also
insert address book records as labels.
It is recommended that you use no more than 512 fields per record.
To merge using an address book
1In a form document, click To o l s ` Merge.
2Click Data source. Choose Address book, and choose an address book from the
enabled list box.
3Click Output, and choose a format for the merged file.
4Click Merge.
If you have selected records from an address book before starting the merge,
those are the records that merge unless you specify others.
To merge selected records from an address book
1Click To o l s ` Merge.
2Click Form document, and choose the location of the form document.
3Click Data source, choose Address book, and choose an address book from the
list box.
4Click Records.
5Hold down Ctrl, click each entry to use, and click OK.
6In the Format address dialog box, click OK.
7Click Output, and choose a format for the merged file.
8Click Merge.

Merging documents 119
To create a merge data file from an address book
1Click To o l s ` Macro ` Play.
2Choose adrs2mrg.wcm.
3Click Play.
4Enable the All records from address book option.
5Choose an address book from the Select address book list box.
6Click OK.
To create a merge data file from selected address book records
1Click To o l s ` Macro ` Play.
2Choose adrs2mrg.wcm, and click Play.
3Enable the Selected records option.
4Click Select records, and click OK.
5In the list of categories, double-click the type of address book, and click an address
book.
6Hold down Ctrl, click each entry you want to use, and click Insert.
7In the Format address dialog box, click OK.
8In the Address book to merge dialog box, click OK.
If the adrs2mrg.wcm macro is not listed, you need to install it.
To merge envelopes and a form document with an address book
1Click To o l s ` Merge.
2Click Data source, choose Address book, and choose an address book from the
list box.
3Click Envelopes.
If there is an existing envelope for this document, you can edit, cancel, or define the
envelope.
4Click where you want to insert a field.
5Click Insert field on the Merge toolbar, choose a field, and click Insert.
6Click Close.

120 WordPerfect X3 User Guide
7Click Continue on the Merge toolbar.
8Click Form document, and choose the location of the form file.
9Click Output, choose the location for the merged file, and click Merge.
When you merge envelopes with an address book, you cannot add graphics to
the envelope. Only the return address, the recipient’s address, and a bar code
can be used. You can add extra text, such as “Air Mail,” below the return
address or above the recipient’s address. The extra text prints in the same font
as the addresses. For more information about creating envelopes, see “Creating
and editing envelopes” in the online Help.
The merged envelopes are placed at the end of the merged file.
To insert an address book record as a label
1In a new document window, click To o l s ` Merge.
If you have typed in the document, enable the New document window option in
the Create merge file dialog box.
2In the Associate form and data dialog box, enable the Associate an address
book option, and choose an address book from the list box.
3Click Format ` Labels on the WordPerfect menu bar.
4In the List labels for area, enable one of the following label options:
• Laser printed — displays laser label options
• Tractor-fed — displays tractor-fed label options
• Both — displays both laser and tractor-fed label options
5Choose a label format from the Labels list, and click Select.
6Click where you want to insert the address label.
7Click To o l s ` Address book.
8Choose an address, and click Insert.
You can also
Merge only envelopes using an address book Open a blank form document.
Print envelopes using an address book Click Output, and choose Printer. Click
Merge.
Reset envelope, form, and data options Click Reset in the Merge dialog box.

Merging documents 121
9In the Format address dialog box, choose a format from the Format list box.
Changing merge options
When you perform a merge, you combine a form document with a data source to form
a new set of documents. You can change the default file extensions for merge forms and
data files.
Merge options can be changed. For example, you can specify the number of copies to
produce for each merged document. WordPerfect lets you separate each merged record
with a page break and insert a blank line for each empty field. You can also reset all of
the options to the default.
To specify an extension for merge filenames
1Click To o l s ` Settings.
2Double-click Files.
3In the Files settings dialog box, click the Merge/Macro tab.
4Disable the following check boxes:
• Use default form file extension on open and save
• Use default data file extension on open and save
5Type an extension in the following boxes:
• Use default form file extension on open and save — specifies the file
extension for form files. The default is .frm.
• Use default data file extension on open and save — specifies the file
extension for data files. The default is .dat.
To change merge options
To Do the following
Specify the number of copies for each
merged record
Click Tools ` Merge. Click Options. Type a
value in the Number of copies for each
record box.
Separate merged documents with a page
break
Click To o l s ` Merge. Click Options.
Enable the Separate each merged
document with a page break check box.
122 WordPerfect X3 User Guide
If Reset is disabled in the Perform merge dialog box, all options (envelope,
form, and data) are set to the default.
Using merge commands
Merge commands (or merge codes) help you customize and automate a merge. Merge
commands instruct WordPerfect how to combine data sources and form documents.
Like macro commands, they resemble programming languages in the use of a language
(syntax), variables, and logical operations.
Merge codes are displayed in red and the text you type is displayed in black.
You can customize a merge by inserting merge commands. For example, if you add the
DATE command to a letter, WordPerfect will replace the [DATE] code with the current
date. You can also delete, display, or hide merge commands.
Insert a blank line for an empty field Click To o l s ` Merge. Click Options.
Choose Leave blank line from the If field is
empty in data source list box.
Remove a blank line representing an empty
field
Click To o l s ` Merge. Click Options.
Choose Remove blank line in the If field is
empty in data source list box.
Reset merge options to the default Click To o l s ` Merge. Click Reset.
To Do the following

Merging documents 123
WordPerfect performs a specific function for each merge command. Some codes are
accessible as buttons on the Merge toolbar. Other merge commands require careful
placement and the correct use of parameters and other commands.
The POSTNET command can be inserted into a form document. A POSTNET bar
code is a postal symbol used for addresses in the United States. WordPerfect inserts the
POSTNET bar code for the specified ZIP code. You can insert the same POSTNET bar
code for all of the records in a merge, or you can insert a different code for each record
in a data file.
To insert a merge command
1On the Merge toolbar, click Insert merge code, and click More.
2Click where you want to insert a merge code.
3Choose a merge code from the Merge codes list box.
4Click Insert.
If prompted, type parameters, and click OK.
For more information, see “Reference: The Merge toolbar and programming
commands” on page 184.
To delete a merge command
1Click at the beginning or end of a merge command.
2Press Delete.
When you delete merge commands, WordPerfect will remove the code and
parentheses, leaving prompts and parameters.
To display or hide a merge command
1Click To o l s ` Settings.
2Click Display.
3In the Display settings dialog box, click the Merge tab.
4Enable one of the following options:
• Display merge codes — displays the merge commands
• Display merge codes as markers — displays command markers only

124 WordPerfect X3 User Guide
• Hide merge codes — does not display commands
You can also click Options on the Merge toolbar to display or hide merge
codes.
To display or hide a merge command for a keyboard merge
1Click To o l s ` Merge.
2Click Options.
3Choose one of the following options from the Display merge codes list box:
• Show codes — displays the merge commands
• Hide codes — does not display commands
• Show as markers — displays command markers only
To merge a single POSTNET bar command in a form document
1On the Merge toolbar, click Insert merge code, and click More.
2Click where you want to insert the POSTNET bar command.
3Choose POSTNET(string) from the Merge codes list box.
4Click Insert.
5Type the ZIP code between the parentheses of the POSTNET command.
6Click Close.
To insert a merge field for a POSTNET bar command
1Click Insert merge code, and click More on the Merge toolbar.
2Click where you want to insert the POSTNET bar code.
3Choose POSTNET(string) from the Insert merge codes list box.
4Click Insert.
5Click between the parentheses of the POSTNET command.
6Click Insert field on the Merge toolbar.
7In the Field names box, choose the field containing the ZIP code.
8Click Insert and close.

Merging documents 125
To choose a field, you must have associated a data source with the form
document. If not, you can type the name of the field, making sure that it
matches the field name in the data source. For information about data sources,
see “Associating merge files” on page 105. For information about form
documents, see “Working with form documents for a merge” on page 100.
Merge programming commands
WordPerfect merge programming commands let you program a merge. Many
commands are similar to those in other programming languages. The following
commands can be used in merge. For more information about each command, click on
the command name to link to the command’s Help topic. For information on merging,
see “Merging documents” on page 97.
ASSIGN(var;expr)
ASSIGNLOCAL(var;expr)
BEEP
BREAK
CALL(label)
CANCELOFF
CANCELON
CAPS(expr)
CASEOF(expr[;...;expr])
CHAINDATA(filename)
CHAINFORM(filename)
CHAINMACRO(macroname)
CHAR(var[;prompt][;title])
CODES(merge codes)
COMMENT(comment)
CONTINUE
CTON(character)

126 WordPerfect X3 User Guide
DATE
DEFAULT
DISPLAYSTOP
DOCUMENT(filename)
ELSE
EMBEDMACRO(macro statements)
ENDFIELD
ENDFOR
ENDIF
ENDRECORD
ENDSWITCH
ENDWHILE
FIELD(field)
FIELDNAMES(name1;...;nameN)
FIRSTCAP(expr)
FOREACH(var;expr1;...;exprN)
FORNEXT(var;start;stop[;step])
GETSTRING(var[;prompt][;title])
GO(label)
IF(expr)
IFBLANK(field)
IFEXISTS(var)
IFNOTBLANK(field)
INSERT(text)
KEYBOARD([prompt])
LABEL(label)
LOOK(var)

Merging documents 127
MRGCMND(merge codes)
NESTDATA(filename)
NESTFORM(filename)
NESTMACRO(macroname)
NEXT
NEXTRECORD
NTOC(number)
ONCANCEL(action)
ONERROR(action)
PAGEOFF
PAGEON
POSTNET(string)
PRINT
PROCESSOFF
PROCESSON
PROMPT(message)
QUIT
REPEATROW
RETURN
RETURNCANCEL
RETURNERROR
REWRITE
STATUSPROMPT(message)
STEPOFF
STEPON
STOP
STRLEN(expr)

128 WordPerfect X3 User Guide
STRPOS(expr;subexpr)
SUBSTDATA(filename)
SUBSTFORM(filename)
SUBSTR(expr;start;length)
SWITCH(expr)
SYSTEM(sysvar)
TOLOWER(expr)
TOUPPER(expr)
VARIABLE(var)
WAIT(10ths second)
WHILE(expr)
ASSIGN(var;expr)
Use ASSIGN to assign the value returned by expr to the global variable var. You do not
need to enclose the expression in quotes.
Expressions are evaluated, and the result is assigned to the variable.
Non-numeric characters and expressions that cannot be evaluated numerically are
treated as strings.
After a value has been assigned to a variable, the variable command VARIABLE(var)
can be placed anywhere you would normally place the variable contents. To erase a
variable (remove it from memory), leave the expr argument empty. For example, you
could use the command ASSIGN(Fred;) to erase a variable named Fred. When you
erase a variable, it no longer “exists.” For information, see “IFEXISTS(var)” on
page 148.
To assign a local variable, see “ASSIGNLOCAL(var;expr)” on page 169.
In the following example, the variable Fred is first assigned a value, then an expression,
then a string.
CODES(
ASSIGN(Fred;3)
Assign 3 to variable Fred.

Merging documents 129
ASSIGN(Fred;VARIABLE(Fred)*2)
Multiply old value of variable Fred by 2; assign the result (6) as the new value of
variable Fred.
ASSIGN(Fred;WordPerfect)
Assign the string “WordPerfect” to variable Fred.
VARIABLE(Fred)
Return the value of the variable to the document.
)
BEEP
Use BEEP to cause your computer to beep. This command is often useful in
combination with CHAR, KEYBOARD, PROMPT, STATUSPROMPT, and
GETSTRING, which prompt the user. You can also use it to signal various points of
the merge, such as the end of a lengthy process.
The following example sounds a beep at each keyboard pause. The user enters the
requested information, then clicks Continue on the Merge toolbar or presses Alt +
Enter (ENDFIELD) to continue to the next prompt.
MEMO
To : B E E P K E Y B OA R D ( E n t e r To in f o r m a t i o n )
From: BEEP KEYBOARD(Enter From information)
Date: DATE
Subject: BEEP KEYBOARD(Enter Subject information)
BREAK
Use BREAK to exit from a loop before it would normally end. The location of the
command and the type of file it is in determine how it functions.
The rules that govern how BREAK functions are listed below.
Each of the following rules assumes that the previous rules do not hold.
•If BREAK is encountered within a FORNEXT or WHILE structure, execution
moves to the end of the structure (just after the ENDFOR or ENDWHILE). If

130 WordPerfect X3 User Guide
these structures are nested, execution moves after the ENDFOR or ENDWHILE
command of the current level.
•If BREAK is encountered in a nested file, execution returns to the parent file.
•If BREAK is encountered in a form file, the merge moves to the top of the form file
and continues with the next data record.
•If BREAK is encountered in a data file, the merge is terminated.
The following example uses BREAK to exit an infinite loop when the correct number
is guessed.
CODES(
ASSIGN(Actual Number;SUBSTR(SYSTEM(random);3;1))
WHILE(1)
CHAR(Guess;Guess a number between 0 - 9?;Guessing Game)
IF(VARIABLE(Guess)=VARIABLE(Actual Number))
BEEP
PROMPT(Correct, the number was VARIABLE(Actual Number))
WAIT(30)
BREAK
ELSE
PROMPT(Sorry, the number wasn’t VARIABLE(Guess))
WAIT(10)
ENDIF
ENDWHILE
)
CALL(label)
Use CALL to transfer execution to the label subroutine. When execution of the
subroutine is completed (when a RETURN is encountered in the subroutine), execution
returns to the command following CALL. For more information about subroutines and
labels, see “Levels” on page 170.

Merging documents 131
The example below is a form file that creates a data file. The Info subroutine is called to
get the information for each record.
GETSTRING prompts the user to enter information and assigns the information to a
variable. MRGCMND places the necessary merge codes into the data file being created.
When no name is entered for variable name, that variable is erased.
IFEXISTS then returns a false (0), and QUIT is executed, ending the merge.
CODES(
MRGCMND(FIELDNAMES(Name;Address;City;State;ZIP)ENDRECORD
====================================
)
WHILE(1)
CALL(Info)
VARIABLE(name)MRGCMND(ENDFIELD)
VARIABLE(address)MRGCMND(ENDFIELD)
VARIABLE(city)MRGCMND(ENDFIELD)
VARIABLE(state)MRGCMND(ENDFIELD)
VARIABLE(zip)MRGCMND(ENDFIELD)
MRGCMND(ENDRECORD)
====================================
ENDWHILE
LABEL(Info)
GETSTRING(name;Enter Name or choose Cancel to Quit;Name)
IFEXISTS(name)
ELSE
QUIT
ENDIF
GETSTRING(address;Enter Address;Address)
GETSTRING(city;Enter City;City)

132 WordPerfect X3 User Guide
GETSTRING(state;Enter State;State)
GETSTRING(zip;Enter ZIP Code;ZIP Code)
RETURN
)
CANCELOFF
Use CANCELOFF to stop the Esc key from performing its normal function.
CANCELOFF is useful to prevent a user from stopping a merge by pressing Esc.
CANCELOFF
• (During this part of the merge, pressing Cancel does not end the merge.)
CANCELON
• (During this part of the merge, pressing Cancel does not end the merge.)
CANCELON
Use CANCELON to enable the Esc key after it has been disabled with the
CANCELOFF command.
For an example of CANCELON, see “CANCELOFF” on page 132.
CAPS(expr)
Use CAPS to capitalize the first character of each word in the returned expression expr.
To change all letters in a returned expression to uppercase or lowercase, see
“TOUPPER(expr)” on page 168 or “TOLOWER(expr)” on page 168. To capitalize only
the first letter of the first word, see “FIRSTCAP(expr)” on page 144.
In the example below, CAPS capitalizes the first letter of each word in the name,
address, and city variables. TOUPPER capitalizes both letters of the state abbreviation.
FIRSTCAP capitalizes the first letter of the first word in the comments string.
TOLOWER ensures that the merge will continue if either an uppercase or a lowercase
“y” is assigned to VARIABLE(char).
CODES(
LABEL(info)
GETSTRING(name;Enter Name;Name)

Merging documents 133
ASSIGN(name;CAPS(VARIABLE(name)))
GETSTRING(address;Enter Address;Address)
ASSIGN(address;CAPS(VARIABLE(address)))
GETSTRING(city;Enter City;City)
ASSIGN(city;CAPS(VARIABLE(city)))
GETSTRING(state;Enter state abbreviation;State)
ASSIGN(state;TOUPPER(VARIABLE(state)))
GETSTRING(zip;Enter ZIP code;ZIP)
GETSTRING(comments;Enter comments;Additional Comments)
ASSIGN(comments;FIRSTCAP(VARIABLE(comments)))
VARIABLE(name)
VARIABLE(address)
VARIABLE(city) VARIABLE(state) VARIABLE(zip)
VARIABLE(comments)
====================================
CODES(
CHAR(char;Do Another Record?;Continue (Y/N)?)
IF(TOLOWER(VARIABLE(char)) = y)
GO(info)
ENDIF
)
CASEOF(expr[;...;expr])
Use CASEOF when using the SWITCH command. When you use CASEOF, you can
enter multiple merge expressions within the parentheses.
For examples of CASEOF, see “SWITCH(expr)” on page 166 and
“FORNEXT(var;start;stop[;step])” on page 144.

134 WordPerfect X3 User Guide
CHAINDATA(filename)
Use CHAINDATA to begin using records from the named data file, when the end of
the current data file is reached. This command is especially useful if you have broken a
large data file into several smaller files. If you insert CHAINDATA in the smaller data
files, they will act like one data file.
The following example shows how a large data file has been broken into two smaller
files. When you specify the first small file as the data file in a merge, the records of the
second small file will be used as soon as those in the first small file are completed.
First Small File:
FIELDNAMES(name;status) ENDRECORD
====================================
PROCESSON CHAINDATA(file2)PROCESSOFF COMMENT(
The PROCESS commands ensure that the CHAINDATA command executes.
The merge stores the CHAINDATA command and filename, then executes it
when the current data file has ended.)
JoseENDFIELD
StaffENDFIELD
ENDRECORD
====================================
• (additional records)
====================================
BarbaraENDFIELD
ProfessionalENDFIELD
ENDRECORD
Second Small File (named FILE2 in the default directory):
FIELDNAMES(name;status)
ENDRECORD
====================================

Merging documents 135
JulieENDFIELD
Part-timeENDFIELD
ENDRECORD
====================================
• (additional records)
====================================
ShojiENDFIELD
Leave of AbsenceENDFIELD
ENDRECORD
====================================
CHAINFORM(filename)
Use CHAINFORM to continue the merge with an additional form file after all records
have been merged with the current form file.
The following example uses CHAINFORM to merge an envelope form file with the
current data file.
CHAINFORM(envelope.frm)
• (body of form file)
CHAINMACRO(macroname)
Use CHAINMACRO to start the named macro at the end of the merge, if the merge
terminates normally. You can place CHAINMACRO anywhere in the form file.
Only the last macro chained during the merge is executed.
In the following example, the chained macro print.wcm executes when the merge is
complete.
CHAINMACRO(print)
COMMENT(Chain the macro PRINT.WCM when the merge is complete.)
DATE
Dear FIELD(Name),

136 WordPerfect X3 User Guide
• (rest of the letter)
Sincerely,
Chris Smith
CHAR(var[;prompt][;title])
Use CHAR to prompt the user to input a single character. CHAR prompts you with a
message and waits until you press a single key.
The pressed key is assigned to the specified variable var. “Prompt” is the information
displayed in the dialog box telling the user what to do.
“Title” is the title of the dialog box created during the merge.
For an example of CHAR, see “CTON(character)” on page 137.
CODES(merge codes)
Use CODES to enter merge codes and have the merge ignore any formatting or text
you might add. The merge carries out all the merge commands inside the CODES
parentheses but ignores any text or formatting (such as hard returns). To enter text or
formatting inside the CODES parentheses, use the INSERT command.
The following example shows a code that pauses the merge at each record and lets you
choose which records you want to merge.
CODES(
LABEL(top)
ASSIGN(field;FIELD(1))
EMBEDMACRO(
PERSIST(fld)
PROMPT(“Which name would you like to merge? ”;“ OK to merge “+field+”?”;2)
PAUSE
ENDPROMPT
)
IF(VARIABLE(fld)=2)

Merging documents 137
INSERT(FIELD(1))
INSERT(FIELD(2))
INSERT(FIELD(3))
====================================
ENDIF
NEXTRECORD
GO(top)
)
For another example of CODES, see “CTON(character)” on page 137.
COMMENT(comment)
Use COMMENT to include comments that will make the merge easier to understand.
Merge ignores everything between the COMMENT parentheses.
For an example of COMMENT, see “CTON(character)” on page 137.
CONTINUE
Use CONTINUE at the end of a CASEOF statement to execute the commands in the
next CASEOF statement.
For examples of CONTINUE, see “SWITCH(expr)” on page 166 and
“FORNEXT(var;start;stop[;step])” on page 144.
CTON(character)
Use CTON (Character to number) to convert a character (any character in the
WordPerfect character sets) to a unique number (its WordPerfect “key value”). CTON
performs the inverse (opposite) function of NTOC. You can use the key value to
calculate the WordPerfect character set value.
To calculate the character set value for a given character
1Use CTON to obtain the key value.
2Divide the key value by 256.
The quotient is the number of the WordPerfect character set (0–12).

138 WordPerfect X3 User Guide
The remainder is the character number in the character set (0–255).
The following example calculates the character set value for a character. Because all
the variables are local, this file could be nested within another file and would not
change any of the original file’s variables, even if they have the same name. The
comments in the first part of this merge do not need to be in a COMMENT
command, because they are within the CODES command. The final comment
must be in a COMMENT command, or it will be inserted in the merged
document.
CODES(
ASSIGNLOCAL(char;0)
Initialize a local variable named char.
CHAR(char;Type a character;Display Character Set Value)
Assign input to the variable char.
ASSIGNLOCAL(set;CTON(VARIABLE(char))/256)
Assign quotient to a variable named set.
ASSIGNLOCAL(num;CTON(VARIABLE(char))%256)
Assign remainder to a variable named num.
)
VARIABLE(set),VARIABLE(num)
COMMENT(Write out the character set value.)
DATE
Use DATE to insert the current date in merged documents, as formatted in the Date
format feature. The merged file will contain the current date as indicated by your
computer’s internal clock.
For an example of DATE, see “BEEP” on page 129.
DEFAULT
Use DEFAULT with the SWITCH command to cover all cases not covered by
CASEOF. When the expression being tested is different from all the CASEOF
expressions, the merge executes DEFAULT.
For examples of DEFAULT, see “SWITCH(expr)” on page 166 and
“FORNEXT(var;start;stop[;step])” on page 144.

Merging documents 139
DISPLAYSTOP
Use DISPLAYSTOP to stop the display of text after a KEYBOARD command. For
example, after a KEYBOARD command, the merge displays as many as 1000
characters ahead. DISPLAYSTOP placed in text after KEYBOARD stops the text
from displaying from that point on.
DATE
FIELD(name)
FIELD(address)
FIELD(city)
Dear FIELD(name):
It has come to our attention that your bill has not been paid. Please send us
$KEYBOARD(Enter how much they owe us — Press Alt + Enter or choose Continue
when done), which is the balance of your unpaid account.DISPLAYSTOP
If the balance of your account is not paid in KEYBOARD(Enter how many days —
Press Alt + Enter or choose Continue when done) days, we will be forced to take legal
action.DISPLAYSTOP
If you have already made arrangements to settle your account, please disregard this
notice.
The rest of the letter after DISPLAYSTOP does not display on the screen while the user
is prompted to type information at the keyboard.
This removes distracting information from the screen, so users can focus their attention
on the area where they are to enter information.
DOCUMENT(filename)
Use DOCUMENT to insert the named document into the merged document at the
DOCUMENT command. The document is not processed as a merge file, so any merge
commands in the inserted document are included in the file but not executed. This
command is commonly used for inserting variable paragraphs in contracts and similar
documents (often called document assembly) or for building a form or data file.
In the following example, DOCUMENT inserts the document called oneroom.mrg in
the merged document if the variable rooms is equal to 1, or it inserts the document
tworooms.mrg if the variable rooms is not equal to 1.

140 WordPerfect X3 User Guide
CODES(
CHAR(rooms;Enter the number of rooms (1 or 2); Number of Rooms)
IF(VARIABLE(rooms)=1)
DOCUMENT(c:\mrgfiles\oneroom.mrg)
ELSE
DOCUMENT(c:\mrgfiles\tworooms.mrg)
ENDIF
)
ELSE
Use ELSE with IF, IFBLANK, IFEXISTS, IFNOTBLANK, and ENDIF. ELSE
marks the beginning of the commands that execute should the IF value be zero (false).
ELSE is not a required part of an IF statement. It should be used when there are certain
steps that need to be performed only when the IF value is zero (false).
Commands that appear after ENDIF execute whether or not the IF value is true.
For an example of ELSE, see “DOCUMENT(filename)” on page 139.
EMBEDMACRO(macro statements)
Use EMBEDMACRO to embed macro commands within a merge. You can enter any
macro command inside the EMBEDMACRO parentheses. The macro commands are
compiled the first time they are encountered during the merge.
For an example of EMBEDMACRO, see “CODES(merge codes)” on page 136.
ENDFIELD
Use ENDFIELD to signal the end of a field in a data file. A hard return [HRt] is
automatically inserted with this command to make the file easier to read.
When you insert this command, the number of the field where the cursor is currently
located displays at the bottom of the window. If you use FIELDNAMES, the name of
the field appears instead of the number.
Records in the following data file have three fields:

Merging documents 141
International ExportingENDFIELD
(801) 555-4421ENDFIELD
George WileyENDFIELD
ENDRECORD
====================================
Tradewinds, Inc.ENDFIELD
(409) 555-3567ENDFIELD
Susan EscherENDFIELD
ENDRECORD
====================================
ENDFOR
Use ENDFOR to signal the end of FORNEXT and FOREACH loops.
For an example of ENDFOR, see “FORNEXT(var;start;stop[;step])” on page 144.
ENDIF
Use ENDIF to mark the end of an IF structure. ENDIF is used with IF, IFBLANK,
IFEXISTS, IFNOTBLANK, and ELSE.
For an example of ENDIF, see “DOCUMENT(filename)” on page 139.
ENDRECORD
Use ENDRECORD to signal the end of a record in a data file. A hard page break is
inserted automatically with this command to make the file easier to read.
When you insert this command, the number of the field where the cursor is currently
located displays at the bottom of the window. If you use FIELDNAMES, the name of
the field appears instead of the number.
For examples of ENDRECORD, see “ENDFIELD” on page 140 and
“FIELDNAMES(name1;...;nameN)” on page 142.

142 WordPerfect X3 User Guide
ENDSWITCH
Use ENDSWITCH to end a SWITCH statement.
For an example of ENDSWITCH, see “SWITCH(expr)” on page 166.
ENDWHILE
Use ENDWHILE to signal the end of a WHILE loop.
For an example of ENDWHILE, see “NEXTRECORD” on page 153.
FIELD(field)
Use FIELD to insert the contents of the named (or numbered) field in the merged
document or in another merge command.
In the following example, the contents of the name and address fields are inserted in the
letter.
FIELD(name)
FIELD(address)
Dear FIELD(name):
For additional examples of FIELD, see “DISPLAYSTOP” on page 139.
FIELDNAMES(name1;...;nameN)
Use FIELDNAMES to declare the names and order of the fields in a data file. Using
this command in the data file allows you to reference the fields by name in a form file,
which is usually easier than remembering the order of the fields and referencing them
by number.
WordPerfect places FIELDNAMES at the top of the data file. It must be located at the
top of the file to work correctly. If records have more fields than those declared in
FIELDNAMES, additional fields are numbered. When initially inserted, the command
and field names are all on one line. You may find it easier to read if you put each field
name on a separate line, as in the example below. A hard page code [HPg] is
automatically inserted when you insert ENDRECORD.
After you insert this command, the name or number of the field where the cursor is
currently located displays on the status bar at the bottom of the window.

Merging documents 143
In the following example, the first three fields of each record are named using
FIELDNAMES. The additional fields are not named and are therefore numbered Field
4, Field 5, and so on.
FIELDNAMES(
company;
phone;
contact;
)ENDRECORD
====================================
International ExportingENDFIELD
(801) 555-4421ENDFIELD
George WileyENDFIELD
FurnitureENDFIELD
45ENDFIELD
$1.5 millionENDFIELD
ENDRECORD
====================================
Tradewinds, Inc.ENDFIELD
(409) 555-3567ENDFIELD
Susan EscherENDFIELD
MemorabiliaENDFIELD
200ENDFIELD
$2.0 millionENDFIELD
ENDRECORD
====================================
For another example of FIELDNAMES, see “CHAINDATA(filename)” on page 134.

144 WordPerfect X3 User Guide
FIRSTCAP(expr)
Use FIRSTCAP to capitalize the first letter of the first word in the returned expression
expr.
For an example of FIRSTCAP, see “CAPS(expr)” on page 132.
FOREACH(var;expr1;...;exprN)
Use FOREACH to assign a list of items to one variable var. The merge then executes
the subsequent commands for each expr listed in FOREACH, changing var to the next
value at the end of each loop.
For example, the following codes assign different days of the week to the variable
weekday until it matches the field day.
FOREACH(weekday;Monday;Tuesday;Wednesday;Thursday;Friday)
IF(VARIABLE(weekday)=FIELD(day))
BREAK
ENDIF
ENDFOR
FORNEXT(var;start;stop[;step])
Use FORNEXT to execute a series of commands a certain number of times. The
commands between FORNEXT and ENDFOR are executed once for each value of var
between start and stop inclusive, as incremented by step.
The start, stop, and step values can be entered in the command as expressions, variables,
or other commands. Each expression, variable, or command is evaluated, and the
resulting value is assigned to the variable. The step value is optional; its default value is
1 (or -1, if stop is less than start).
In any FORNEXT loop, ENDFOR must be used to determine the end of the series of
commands included in the loop. ENDFOR sends execution to the top of the loop for
the next iteration. You can also use NEXT to send execution to the next iteration, but
you must still include ENDFOR to mark the end of the loop.
FORNEXT initializes the variable with the start value. If the variable has not been
assigned, it is defined as a local variable. You do not need to pre-assign the variable.

Merging documents 145
Each subsequent time FORNEXT is executed (at the top of the loop), the variable is
incremented by the step value.
The example below uses a FORNEXT loop to apply a SWITCH statement once for
each character in the sentence that is entered.
CODES(
GETSTRING(sentence;Type a sentence;Sentence To Be Evaluated)
ASSIGN(vowels;0)
ASSIGN(consonants;0)
ASSIGN(misc;0)
FORNEXT(i;1;STRLEN(VARIABLE(sentence));)
SWITCH(TOLOWER(SUBSTR(VARIABLE(sentence);VARIABLE(i);1)))
CASEOF(a;e;i;o;u)
ASSIGN(vowels;VARIABLE(vowels)+1)
CASEOF(b;c;d)
CONTINUE
CASEOF(f;g;h;)
CONTINUE
CASEOF(j;k;l;m;n)
CONTINUE
CASEOF(p;q;r;s;t)
CONTINUE
CASEOF(v;w;x;y;z)
ASSIGN(consonants;VARIABLE(consonants)+1)
DEFAULT
ASSIGN(misc;VARIABLE(misc)+1)
ENDSWITCH
ENDFOR

146 WordPerfect X3 User Guide
)
There were:
VARIABLE(vowels) vowels,
VARIABLE(consonants) consonants, and
VARIABLE(misc) other characters.
GETSTRING(var[;prompt][;title])
Use GETSTRING to prompt the user by displaying a dialog box.
Information returned by the dialog box is assigned to the variable var.
“Prompt” is the information displayed in the dialog box telling the user what to do.
“Title” is the title of the dialog box created during the merge.
For an example of GETSTRING, see “CAPS(expr)” on page 132.
GO(label)
Use GO to transfer execution to the location in the merge file indicated by label. It is
used in conjunction with LABEL, which marks the place to which execution is
transferred.
GO is useful when you want to skip a part of your merge or transfer control to another
part based on a condition. Unlike CALL, GO does not require the merge to return to
that point of execution.
For an example of GO, see “CAPS(expr)” on page 132.
IF(expr)
Use IF to execute a set of commands only if a certain condition exists.
If the condition exists (expr is evaluated to be true), the commands between the IF and
ENDIF are executed. If an ELSE is included, the commands between the IF and ELSE
are executed if the expression is true; otherwise, the commands between the ELSE and
ENDIF are executed.
The expr argument is usually a logical expression. An expression is true if it is evaluated
as a non-zero number. For example, when the expression 4=4 is evaluated, the result is

Merging documents 147
–1 (which corresponds to true). The value is false if it results in a 0 or contains nothing
at all.
An IF statement always begins with IF and ends with ENDIF. If you want certain
commands to execute only when the value is not true, use ELSE.
For an example of IF, see “DOCUMENT(filename)” on page 139.
IFBLANK(field)
Use IFBLANK to execute a set of commands if the indicated field is blank. Be sure to
end the set of commands to be executed with an ENDIF command. See also
“IFNOTBLANK(field)” on page 148.
In the following example, the data file records have a Title field and a Name field. The
merge determines if the Title field of the current record is blank. If it is blank, only the
name is inserted in the merged document. Otherwise, the merge inserts the title before
the name.
CODES(
IFBLANK(title)
If the Title field is blank in this record,
INSERT(FIELD(name))
Write out just the Name.
ELSE
Otherwise,
INSERT(FIELD(title) FIELD(name))
Write the Title before the Name.
ENDIF
End of IFBLANK statement.
)

148 WordPerfect X3 User Guide
IFEXISTS(var)
Use IFEXISTS to check if the indicated variable has been defined. If it has, the
commands following IFEXISTS are executed. Like other IF statements, IFEXISTS
requires an ENDIF and can use an ELSE command.
The following commands could be placed at the end of any form file.
They cancel the merge if any key is pressed.
LOOK(Key)
IFEXISTS(Key)
STOP
ENDIF
IFNOTBLANK(field)
Use IFNOTBLANK to execute a set of commands if the indicated field is not blank.
Be sure to end the set of commands to be executed with an ENDIF command. See also
“IFBLANK(field)” on page 147.
In the following example, the data merge file records have a Title field and a Name field.
The merge determines if the Title field of the current record is blank. If it is not, the
title is inserted before the name. Otherwise, the merge inserts only the name.
CODES(
IFNOTBLANK(title)
If the Title field is not blank in this record,
INSERT(FIELD(title) FIELD(name))
Write the Title before the Name.
ELSE
Otherwise,
INSERT(FIELD(name))
Write out only the Name.
ENDIF
End of IFNOTBLANK statement.

Merging documents 149
)
INSERT(text)
Use INSERT to enter text or formatting inside a CODES command.
For example, the merge will not recognize a hard return inside the CODES parentheses.
To make the merge return a hard return, use INSERT, then press hard return.
For examples of INSERT, see “IFNOTBLANK(field)” on page 148 and
“NESTMACRO(macroname)” on page 151.
KEYBOARD([prompt])
Use KEYBOARD to pause an executing merge so the user can enter information from
the keyboard. As many as 1,000 characters of the form file are displayed. Merge codes
are displayed using the current display setting. The merge continues when you click
Continue on the Merge toolbar or press Alt + Enter (ENDFIELD).
While an executing merge is paused at KEYBOARD, you can execute QUIT,
NEXTRECORD, or STOP from the keyboard.
In the following example, the KEYBOARD commands pause to let you enter the
“From:,” “To:,” and “Subject:” text as the merge is executed.
MEMO
To : B E E P K E Y B OA R D ( E n t e r To in f o r m a t i o n )
From: BEEP KEYBOARD(Enter From information)
Date: DATE
Subject: BEEP KEYBOARD(Enter Subject information)
If KEYBOARD is executed within another merge command, a dialog box displays with
the indicated prompt. You cannot execute commands from the keyboard, but any text
entered at the prompt is inserted into the merged document.
LABEL(label)
Use LABEL to mark a place in the merge file. Execution can be sent directly to the label
from any place in the merge file. CALL and GO are used to send execution to the label.

150 WordPerfect X3 User Guide
The label name distinguishes one label from another. Label names can be as many as 30
characters long, including spaces. Different labels in the same merge file must have
different names. If a name is duplicated, the first one is used, and the other is ignored.
Do not assign a label and a local variable the same name, or the merge may not function
properly.
For examples of LABEL, see “CALL(label)” on page 130 and “CAPS(expr)” on
page 132.
LOOK(var)
Use LOOK to determine if a key has been pressed. If it has, that key is assigned to the
variable; it is not executed. If no key has been pressed, the variable is deleted; execution
continues without stopping.
For an example of LOOK, see “IFEXISTS(var)” on page 148.
MRGCMND(merge codes)
Use MRGCMND to insert text, codes, and commands in the document being created
by the merge. Any text, codes, or merge commands that appear between the
MRGCMND parentheses are sent directly to the merged document without the
commands being interpreted or executed.
For an example of MRGCMND, see “CALL(label)” on page 130.
NESTDATA(filename)
Use NESTDATA to interrupt the use of the current data file and switch to another data
file during the merge. The parent data file then continues only when the merge on the
nested data file has been completed. You can nest data files as many as 10 levels deep.
For information, see “Levels” on page 170.
If you nest from within one data file to another, be careful to avoid infinite loops. Use
CANCEL or BREAK to terminate the loop.
When you nest a data file, the switch to that file occurs immediately.
When you chain data files, the switch to the new data file is made when the end of the
current data file is reached. For more information, see “CHAINDATA(filename)” on
page 134.
For an example of NESTDATA, see “NESTFORM(filename)” on page 151.

Merging documents 151
NESTFORM(filename)
Use NESTFORM to turn control of the merge over to another form file. When the
commands in the nested file have been executed, control returns to the original form
file, where execution resumes after NESTFORM. For information on how to change the
data file, see “NESTDATA(filename)” on page 150.
You can nest form files as many as 10 levels deep. Using NESTFORM without
specifying a filename is the same as using SUBSTFORM with the current form
filename as the argument. In this case, NESTFORM does not use one of the 10 nest
levels. For more information, see “Levels” on page 170.
FIELD(name),
It has been a pleasure serving you this year.
CODES(
IF(FIELD(balance)!=0)
NESTDATA(transact.dat)
NESTFORM(invoice.frm)
ENDIF
)
Sincerely,
NESTMACRO(macroname)
Use NESTMACRO to execute the named macro during a merge.
When the macro is finished, the merge continues with the code following
NESTMACRO.
Macros created in earlier versions of WordPerfect (before version 6.x) will need to be
converted.
The following example nests a macro that computes the interest on an account balance.
CODES(
ASSIGN(balance;FIELD(balance))
NESTMACRO(calcint)
INSERT(Interest on this balance is VARIABLE(interest))

152 WordPerfect X3 User Guide
)
NEXT
Use NEXT to execute the next iteration of a FORNEXT, FOREACH, or WHILE
loop. Usually, the ENDFOR or ENDWHILE that ends the loop sends execution to the
next iteration. However, you can use NEXT to send execution to the next iteration
from anywhere within the loop. For example, you may use nested IF statements as part
of the loop. Then, when a certain condition is true, execution will skip the rest of the
commands in the loop and go to the next iteration. In this case, you would use NEXT
at the point where you want the next iteration to begin.
Even if you use NEXT in a loop, you must still use an ENDFOR or ENDWHILE to
mark the end of the loop.
The following merge writes **********@@@@@.
CODES(
FORNEXT(i;1;15;1)
Repeat the loop 15 times, starting at 1, ending at 15, in
increments of 1.
IF(VARIABLE(i)10)
If variable i is greater than 10,
INSERT(@)
write an @,
NEXT
and skip to the next iteration of this FORNEXT loop.
ENDIF
INSERT(*)
Write an * each time the loop is completed.
ENDFOR
)

Merging documents 153
NEXTRECORD
Use NEXTRECORD to move the record pointer in the data file to the next record. If
it does not find the next record, it ends the merge or returns the merge to the previous
data file if the data file was nested.
While an executing merge is paused at KEYBOARD, you can execute
NEXTRECORD from the keyboard.
In this example, the data file is searched until the variable company name matches the
company field in the data file. When a match is found, the contents of the amount field
for that record in the data file are written to the merged document.
CODES(
WHILE(VARIABLE(Company Name)!=FIELD(Company))
NEXTRECORD
ENDWHILE
)
FIELD(Amount)
NTOC(number)
Use NTOC (Number to character) to convert a WordPerfect key value or character set
number to its character equivalent. It performs the inverse function of CTON. For
example, the NTOC of 294 is Ç.
To calculate the key value for a given character set value
• Multiply the character set number by 256, then add the number of the character.
For example, “Ç” is character number 38 in Character Set 1.
Multiply 256 times 1 (256), then add 38 (294). The NTOC of 294 is Ç.
NTOC will return nothing if you enter a number that is not equivalent to a character.
The following example prompts for a number, then returns the character equivalent.
GETSTRING(num;Enter a key value number;)
NTOC(VARIABLE(num))

154 WordPerfect X3 User Guide
ONCANCEL(action)
Use ONCANCEL to specify what the merge does if you press Esc (Cancel) or if a
RETURNCANCEL has been returned by a subroutine, a nested macro, or a nested
merge. When a Cancel occurs, the merge performs the default action (STOP) if it has
not already encountered the ONCANCEL command. For this reason, it is a good idea
to place the command before a Cancel can occur, otherwise execution will terminate
when Esc is pressed. If no action is specified in ONCANCEL, the Cancel is ignored, and
execution continues as if there has been no Cancel.
Valid actions available with this command are
•BREAK
•CALL
•GO
•QUIT
•RETURN
•RETURNCANCEL
•RETURNERROR
•STOP
When Esc is pressed, the last ONCANCEL command encountered in the file is
executed.
ONCANCEL is local to the file in which it is encountered. It cannot be used from other
files. For example, a data file cannot use ONCANCEL from a form file.
In the following example, if you press Esc during the merge, the end subroutine is
executed.
CODES(
ONCANCEL(GO(end))
If Esc is pressed during the merge, execute the End
subroutine.
•(commands in form file)
STOP
LABEL(end)
Beginning of End subroutine.

Merging documents 155
PROMPT(Merge canceled prematurely.)
Send notification message.
WAIT(40)
Display message for 4 seconds.
STOP
Terminate execution.
)
For another example of ONCANCEL, see “RETURNCANCEL” on page 160.
ONERROR(action)
Use ONERROR to tell WordPerfect what to do if an error is detected in merge
execution or if a RETURNERROR has been returned by a subroutine or nested macro
or merge.
Inserting ONERROR without an action causes the merge to ignore the error and
continue execution when possible.
The errors that can be trapped with this command are
•File not found
• Print queue errors
• End of file condition returned by a NEXTRECORD
If you chain a file that does not exist or is not found, the error condition is not generated
until the merge tries to execute the chained file (that is, at the end of the current merge
file). For more information, see also “CHAINDATA(filename)” on page 134,
“CHAINFORM(filename)” on page 135, and “CHAINMACRO(macroname)” on
page 135.
The default action is STOP. For a list of other possible actions, see
“ONCANCEL(action)” on page 154.
ONERROR is local to the file in which it is encountered. It cannot be seen from other
files. For example, a data file cannot use ONERROR from a form file.
In the following example, a new form file is nested. ONERROR specifies that
subroutine error be executed if the file is not found when the merge tries to nest it.
CODES( ONERROR(GO(error))

156 WordPerfect X3 User Guide
If an error is generated, execute the Error subroutine.
• (more merge commands)
NESTFORM(invoice.frm)
• (more merge commands)
STOP
LABEL(error)
If the file was not found when the merge tried to nest it,
execution moves here.
PROMPT(File not found. Move INVOICE.FRM to default directory and start merge
again.)
Send a message to the user.
WAIT(15)
Display the message for 1.5 seconds.
STOP
Terminate execution.
)
For another example of ONERROR, see “RETURNERROR” on page 161.
PAGEOFF
Use PAGEOFF to eliminate the hard page code [HPg] between copies of the form file
in the merged document. Use PAGEON to begin inserting hard page codes again after
you have used PAGEOFF.
PAGEON and PAGEOFF are global to the merge; they may be included in any form
or data file and are in effect for all the files in the merge until the opposite command is
encountered. PAGEOFF and PAGEON override the options set in the Merge Run
dialog box.
These commands are useful for merging labels or for including multiple records in a
document. You can also use PAGEOFF with PRINT to eliminate blank pages between
copies of the merged document when merging to the printer.
For an example of PAGEOFF, see “PAGEON” on page 157.

Merging documents 157
PAGEON
Use PAGEON to reinstate the use of hard page codes between copies of the form file in
the merged document. See also “PAGEOFF” on page 156.
In the example below, the nested form file, list.pf, creates a list of players on a given
team. The final result of the merge is a list of the players on each team, one team per
page.
CODES(
ASSIGN(team;FIELD(team))
Assign the current field to a global variable so that the nested
form file can use it.
INSERT(These people are on Team FIELD(team):)
PAGEOFF
This command prevents the insertion of a hard page between
iterations of the nested form file.
NESTFORM(list.frm)
This form file produces a list using the Name field of
all records whose Team field matches the current Team variable.
PAGEON
This command restores the use of page breaks to allow one team
list per page.
)
POSTNET(string)
Use POSTNET to insert a POSTNET bar code into a form file for letters, envelopes,
or labels. For the string parameter, you can type the bar code digits or enter a field for
the digits.
The following is a sample form file for an envelope including the return address and a
POSTNET bar code:
JASPER DEAN

158 WordPerfect X3 User Guide
2745 CHARLES DU DRE PKWY
MADISON WI 53725-9876
POSTNET(FIELD(zipcode))
FIELD(name)
FIELD(address)
FIELD(city/state) FIELD(zipcode)
When this form file is merged, the mailing address will return a different name, address,
city/state, and bar code for each record.
PRINT
Use PRINT to send the current merged text to the printer. Once the text is sent to the
printer, it is no longer in the merged document.
When you merge to the printer using this command, the usual page break is still
inserted between each iteration of the form file. To eliminate the extra page between
each copy, insert PAGEOFF before PRINT as shown in the example.
The data file to be used with the form file in the following example contains 1,000
records. If you were to merge it to the document window, the resulting document would
have 1,000 pages. This merge uses PRINT to send each letter to the printer as soon as
it is merged.
ABC COMPANY
245 WEST CENTER STREET LONG BEACH CA 90807
DATE
FIELD(name)
FIELD(company)
Dear FIELD(firstname):
Thank you for your inquiry regarding our new product.
• (rest of letter)
Sincerely,
Amy Wilcox
Product Manager

Merging documents 159
PAGEOFF PRINT
PROCESSOFF
Use PROCESSOFF to end a PROCESSON command.
For an example of PROCESSON and PROCESSOFF, see “CHAINDATA(filename)”
on page 134.
PROCESSON
Use PROCESSON with PROCESSOFF in a data merge file to ensure that codes are
processed even if they are not in the field or record being processed by the form file.
For an example of PROCESSON and PROCESSOFF, see “CHAINDATA(filename)”
on page 134.
PROMPT(message)
Use PROMPT to display a message that gives instructions to the user.
For examples of PROMPT, see “ONCANCEL(action)” on page 154 and
“ONERROR(action)” on page 155.
QUIT
Use QUIT to stop the execution of the merge. For example, while a merge is paused at
KEYBOARD, you can execute QUIT from the keyboard.
In a merge, the rest of the form file after QUIT is written out to the resulting merged
document before the merge terminates, but any commands after QUIT are not
executed. If you don’t want the rest of the form file written out, use STOP instead of
QUIT.
If QUIT is used in a data file, the data file is abandoned at that point.
However, the rest of the form file is written out (but not processed) just as if the
command had been encountered in the form file. The merge then terminates.
The following example is a standard memo sent by a personnel department to all
employees before their six-month salary review. The merge ends just after the DATE
command, but the rest of the memo is written out to the resulting merged document.
MEMO

160 WordPerfect X3 User Guide
To: KEYBOARD(Enter To information)
From: Kim Charleston, Personnel
Date: DATE QUIT
Subject: Six-month Review Preparation
====================================
• (rest of memo)
REPEATROW
Use REPEATROW when merging information into a table from a data file. The
REPEATROW command in a row inserts that row for each record in the data file.
RETURN
Use RETURN to mark the end of a subroutine and signal the merge to return from a
CALL command. RETURN must be paired with CALL, or an error message displays.
For an example of RETURN, see “CALL(label)” on page 130.
RETURNCANCEL
Use RETURNCANCEL to cause execution to leave the current level and return a
Cancel to the next higher level. For more information, see “Levels” on page 170.
In this example, RETURNCANCEL is used to return a Cancel from a status checking
subroutine.
CODES(
ONCANCEL(GO(send message))
• (During this part of the merge, if the user presses Cancel,
• execution is transferred to the Send Message label.)
CALL(check status)
• (more merge commands)
STOP
LABEL(check status)
IF(VARIABLE(chk)=0)

Merging documents 161
RETURNCANCEL
ELSE
RETURN
ENDIF
)
If the chk variable equals FALSE (0), then the ONCANCEL condition is executed; if it
is TRUE, then it returns without executing the ONCANCEL condition.
RETURNERROR
Use RETURNERROR to cause execution to leave the current level and return an error
to the next higher level. For more information, see “Levels” on page 170.
In this example, RETURNERROR returns an error from a subroutine that nests a form
file.
CODES(
ONERROR(GO(error))
If an error is generated, execute the Error subroutine.
• (more merge commands)
CALL(getfile)
• (more merge commands)
STOP
LABEL(getfile)
ONERROR(RETURNERROR)
NESTFORM(invoice.frm)
RETURN
LABEL(error)
If the file was not found when the merge tried to nest it,
execution moves here.
PROMPT(File not found. Move INVOICE.FRM to default directory and start merge
again.)

162 WordPerfect X3 User Guide
Send a message to the user.
WAIT(15)
Display the message for 1.5 seconds.
STOP
Terminate execution
)
REWRITE
Use REWRITE to rewrite the document window. Since none of the merged document
is written to the document window during a merge, you may want to use this command
to display what has been merged at a certain point.
In the following example, REWRITE is used to view each letter on the screen as it is
merged.
ABC COMPANY
245 WEST CENTER STREET LONG BEACH CA 90807
DATE
FIELD(name)
FIELD(company)
Dear FIELD(firstname):
Thank you for your inquiry regarding our new product.
• (rest of the letter)
Sincerely,
Amy Wilcox
Product Manager
REWRITE
STATUSPROMPT(message)
Use STATUSPROMPT to display a message. The message is displayed during the
merge. The message stays in the message window until it is cleared by another

Merging documents 163
command that uses the message window, such as another STATUSPROMPT or a
KEYBOARD command.
For example, if you always run two merges one after the other, you could use
STATUSPROMPT to display the prompt “Merge 1 has been completed” at the end of
the first merge.
• (Main body of first form file)
STATUSPROMPT(Merge 1 has been completed.)
You could then clear the message window at the end of the second merge by using
STATUSPROMPT with no parameters.
• (Main body of second form file)
STATUSPROMPT()
STEPOFF
Use STEPOFF to turn off a single step execution after it has been turned on. See also
“STEPON” on page 163.
STEPON
Use STEPON for debugging merges. It causes the merge to execute one step at a time.
Between each step, a message indicates what the next command is. The command
executes when the user presses any key. Each character is displayed after it is written out
to the resulting document.
You may find it useful to step through merges with Reveal Codes on.
• (This section will execute normally.)
STEPON
• (This section will execute one keystroke at a time.)
STEPOFF
• (This section will execute normally.)
STOP
Use STOP to stop all execution. It is similar to QUIT, except that the rest of the form
file is not read in. If this command is found in a nested file, execution is not returned to
the parent file. Chained files are also not executed.

164 WordPerfect X3 User Guide
While an executing merge is paused at KEYBOARD, you can execute STOP from the
keyboard.
For an example of STOP, see “IFEXISTS(var)” on page 148.
STRLEN(expr)
Use STRLEN to determine the length of a variable or of the value returned by an
expression. This command is useful for validating or restricting the length of user input.
You can use FIELD, VARIABLE, text, or complex expressions in the argument expr.
For an example of STRLEN, see “SUBSTR(expr;start;length)” on page 166.
STRPOS(expr;subexpr)
Use STRPOS to determine the position of a subexpr within an expr.
For an example of STRPOS, see “SUBSTR(expr;start;length)” on page 166.
SUBSTDATA(filename)
Use SUBSTDATA to change to the named data file and start with the first record in
that file. The merge does not return to the original data file. If you substitute a file that
is not found, or no file, an error is returned. You can use ONERROR to determine what
should happen if this error occurs.
In the following example, two data files are used, each sorted by ZIP code in descending
order, so that any records where the ZIP field is blank will be at the end of the file.
SUBSTDATA causes the records with no ZIP code to be skipped, and the next data file
to be used.
CODES(
IFBLANK(ZIP)
SUBSTDATA(file2.dat)
ENDIF
)

Merging documents 165
SUBSTFORM(filename)
Use SUBSTFORM to change to the named form file. SUBSTFORM is similar to
NESTFORM and CHAINFORM. The difference is that the named form file is used
instead of the current form file from the point of this command on. The merge does not
return to the original form file; no commands following this one in the original form file
are executed. Local variables in a previous form file are erased.
If you substitute either a file that is not found or no file, an error is returned. You can
use ONERROR to determine what should happen if this error occurs.
In the following example, the data file has a Days Overdue field. The merge begins
using the form file invoice.frm, which substitutes a different form file depending on
the number in the Days Overdue field.
At the end of each substituted file, the record pointer is moved to the next record, and
invoice.frm is substituted, so that it will execute again.
CODES(
ASSIGN(days;FIELD(Days Overdue) DIV 30)
SWITCH(VARIABLE(days))
CASEOF(0)
SUBSTFORM(under30.frm)
CASEOF(1)
SUBSTFORM(under60.frm)
CASEOF(2)
SUBSTFORM(under90.frm)
DEFAULT
SUBSTFORM(90&over.frm)
ENDSWITCH
)
In this example, the following code would be placed at the end of each substituted form
file.
•(body of file)
NEXTRECORD

166 WordPerfect X3 User Guide
SUBSTFORM(invoice.frm)
SUBSTR(expr;start;length)
Use SUBSTR to extract a portion (substring) of the expression specified in the expr
parameter. You can specify which part of the expression to use with the start and length
parameters. The start parameter counts from the left side of the expr. The length
parameter specifies how many characters are included in the substring.
For example, if a form file contains the statement SUBSTR(think;2;2), the substring
“hi” is inserted into the merged document. The start parameter has the value 2, so the
substring begins with the second character in the expr parameter (“h.”). The count
parameter has the value 2, so the substring contains two characters (“h” and “i”).
You can use FIELD, VARIABLE, text, or complex expressions in the argument expr.
In this example, the data file has a name field where the names are stored in the format
“Last, First.” SUBSTR extracts the first name from the name field. STRPOS is used to
find the beginning of the first name (2 characters after the start of the comma and
space). STRLEN is used to find the length of the first name (by subtracting the starting
position of the first name from the length of the full name).
CODES(
ASSIGN(start;STRPOS(FIELD(name);, )+2)
ASSIGN(length;STRLEN(FIELD(name)-VARIABLE(start)))
ASSIGN(firstname;SUBSTR(FIELD(name);VARIABLE(start);VARIABLE(length)))
VARIABLE(firstname)
)
SWITCH(expr)
Use SWITCH with CASEOF, CONTINUE, DEFAULT, and ENDSWITCH to
evaluate input and execute different functions depending on the input.
The expression in SWITCH must match the expression in CASEOF exactly. For
example, “y” does not match “Y.” If no match is found in the SWITCH statement,
execution continues after the SWITCH statement. You can use DEFAULT as the last
case in the command to handle all cases that do not match. You can use CONTINUE
to perform the commands for more than one case.

Merging documents 167
In the following example, SWITCH is used to include certain documents in the merge
file based on the value of the class field in a data file. If the class field does not match
any of the first three cases, DEFAULT is executed, and the file general.fil is included
in the merged document.
Because each of the other cases ends with CONTINUE, the DEFAULT case and any
cases following the one selected are executed along with the case selected. For example,
if the class field contains 2nd, then the files 2ndclass.fil, 3rdclass.fil, and general.fil
would all be included in the merged document for that record.
Dear FIELD(name):
You have chosen to travel FIELD(class) class. This allows you to enjoy the following
benefits during your trip:
CODES(
SWITCH(FIELD(class))
CASEOF(1st)
DOCUMENT(1stclass.fil)
CONTINUE
CASEOF(2nd)
DOCUMENT(2ndclass.fil)
CONTINUE
CASEOF(3rd)
DOCUMENT(3rdclass.fil)
CONTINUE
DEFAULT
DOCUMENT(general.fil)
ENDSWITCH
)
For another example of SWITCH, see “FORNEXT(var;start;stop[;step])” on
page 144.

168 WordPerfect X3 User Guide
SYSTEM(sysvar)
Use SYSTEM to return the value of the given system variable. System variables allow
the merge to be aware of the current state of WordPerfect.
In the following example, the merge includes only the first three records of the form file.
When the merge reaches the fourth page of the resulting merge document, it stops.
CODES(
IF(SYSTEM(Page)=4)
STOP
ENDIF
)
• (Body of the form file)
System variables are listed on the Parameter Entry dialog box when you choose the
SYSTEM command.
TOLOWER(expr)
Use TOLOWER to lowercase each character in the returned expression expr.
For an example of TOLOWER, see “CAPS(expr)” on page 132.
TOUPPER(expr)
Use TOUPPER to uppercase each character in the returned expression expr.
For an example of TOUPPER, see “CAPS(expr)” on page 132.
VARIABLE(var)
Use VARIABLE to access the contents of global and local variables. If you have a global
and a local variable with the same name, this command accesses the local variable.
There is no way to access global variables while local variables of the same name exist.
For an explanation of global and local variables, see “Merge variables” on page 170.
After you assign a value to a variable (using ASSIGN(var;expr) or
ASSIGNLOCAL(var;expr)), you can place the VARIABLE command anywhere you
would normally place the variable contents. You can place it as an argument for another
command, as part of an argument for another command, or by itself.

Merging documents 169
For an example of VARIABLE, see “SUBSTR(expr;start;length)” on page 166.
WAIT(10ths second)
Use WAIT to delay further execution of the merge for the indicated time. This
command is useful when you want a message to be displayed for a certain amount of
time. The wait time is specified in tenths of a second (20 = 2 seconds).
For an example of WAIT, see “ONCANCEL(action)” on page 154.
WHILE(expr)
Use WHILE to execute commands repeatedly. While the expression expr is true, the
commands between WHILE and ENDWHILE are repeatedly executed. This
command is like FORNEXT, except that it does not increment a value each time
through the loop. In order to end the loop, you must use BREAK or another command
that will force the expression to be evaluated as false. For more information, see “Loops”
on page 173.
Remember that if you use a variable in expr, the variable must already exist before the
WHILE command is executed.
For an example of WHILE, see “NEXTRECORD” on page 153.
ASSIGNLOCAL(var;expr)
Use ASSIGNLOCAL to assign the value returned by expr to the local variable var.
Local variables are accessible only to the current file; they are deleted when the merge
is finished or the file is exited. See also “ASSIGN(var;expr)” on page 128.
For an example of ASSIGNLOCAL, see “CTON(character)” on page 137.
Working with levels, loops, and merge variables
The following topics provide information about using levels, loops, and merge variables
when you program a merge.
Levels
Loops
Merge variables

170 WordPerfect X3 User Guide
System variables compared to user defined variables
Global variables compared to local variables
Naming variables
Variable contents
Assigning variables
Executing variables
Variable duration
Operations on variables
Levels
In a merge document you can have as many as 40 levels of execution per file. IF
commands do not require a level; they can be nested indefinitely. Each SWITCH,
FORNEXT, or WHILE uses one level.
NESTMACRO, NESTFORM, and NESTDATA do not require an execution level,
because each nested file has 40 new execution levels.
However, they do require a nesting level. You can nest files 10 levels deep.
Merge uses separate stacks to maintain execution levels and nesting levels.
Merge variables
A variable represents a place in memory where data is stored. As its name indicates, the
data in a variable is changeable. You can use variables to calculate and keep track of text
and numeric values that change during a merge.
System variables vs. user-defined variables
There are two major types of variables in WordPerfect: system variables and user-
defined variables. System variables are variables that WordPerfect creates and
maintains; they contain information about the current state of the application. You
cannot change the names or contents of these variables, but you can use their contents
at any given time. System variables are listed in the Parameter Entry dialog box when
you choose the system command.

Merging documents 171
User-defined variables are variables that you create. You determine the name and
contents of these variables when you assign them. You can also perform operations on
them to change their contents. There are two subcategories of user-defined variables:
global and local.
Global variables compared to local variables
Global variables are accessible from anywhere inside a merge or a macro. All global
merge variables can be read by macros; macro variables can be read by merge
commands if the PERSIST command is used in the macro.
Local variables are available only in a merge and are stored in a place in memory
separate from global variables. They are accessible only from the file in which they are
defined. For example, if you create a local variable named Number in a form file, the
data file or other form files cannot access the information stored in it. When you nest
merge files, the local variables in the parent file cannot be used in the nested file.
When you return to the parent file, the local variables in the nested file no longer exist,
but the local variables in the parent file are once again accessible.
Local variables take precedence over global variables. For example, suppose you have
both a global and a local variable named Number. If you try to access the global variable
Number from inside a file where the local variable Number is accessible, you will get
the contents of the local variable. The global variable Number still exists, but is
inaccessible until you are no longer accessing the current merge file.
Naming variables
Variable names can be as many as 30 characters long for both global and local variables.
Although you can use the same name for a local and a global variable, you cannot use
the same name for any two local variables or any two global variables. You should not
use the same name for a local variable and a label.
Variable names are not case sensitive. Abc, AbC, ABC, and abc are read as the same
variable.
Variables receive their names when they are assigned. For more information, see
“Assigning variables” on page 172.

172 WordPerfect X3 User Guide
Variable contents
All user-defined variables can contain text or numbers. A user-defined variable can hold
127 characters.
Assigning variables
You assign a global variable with ASSIGN and a local variable with ASSIGNLOCAL.
For example, the following two statements assign two different variables, one global
and one local:
• ASSIGN(Number;45)
• ASSIGNLOCAL(Number;36)
ASSIGN creates a global variable named Number with “45” as its contents.
ASSIGNLOCAL creates a separate, local variable named Number with “36” as its
contents. For more information, see “ASSIGN(var;expr)” on page 128 and
“ASSIGNLOCAL(var;expr)” on page 169.
In addition to using ASSIGN and ASSIGNLOCAL, the following commands also
assign variables:
•CHAR
•FOREACH
•GETSTRING
•LOOK
The following rules determine whether the variables assigned by CHAR,
GETSTRING, and LOOK are local or global in a merge:
• If a local variable with the name used in the command exists, the command assigns
the value to the local variable.
• If no local variable with the name used in the command exists, but a global variable
by that name does exist, the command assigns the value to the global variable.
• If no variable with the name used in the command exists, a global variable of that
name is created and assigned by the command.
FOR and FOREACH assign variables by the same rules as above, except that if no
variable with the name used in the command exists (the third rule), a local variable is
created and assigned by the command. This feature allows recursion using FOR and
FOREACH in a merge.
If a variable already exists and you assign new contents to it, the previous contents will
be replaced without warning.

Merging documents 173
Executing variables
You can execute (write out) a variable anywhere you want its contents to appear. For
example, by executing a variable you can do the following:
• Use the contents of the variable as a subroutine
• Insert the contents as text in a document or in the message strings of programming
commands
• Provide variable arguments in other programming commands
To execute a variable, use VARIABLE. For example, the statement
VARIABLE(Number) would execute the variable named Number.
Variable duration
Local variables exist only in the file in which they are defined. Once you quit the file
that defined the variables or once the merge ends, the local variables are erased (and the
memory assigned to them is released). However, the contents of global variables remain
in memory until you exit WordPerfect. To conserve memory, you should use local
variables instead of global variables whenever possible.
If you want to erase a variable without exiting a file or exiting WordPerfect, assign
nothing to the variable by using the following commands: ASSIGN(var;) or
ASSIGNLOCAL(var;). These commands empty the variable of its contents and release
the memory used by the variable. After you use this command, the variable no longer
exists. It is a good idea to empty variables at the beginning of the merge in which they
are used (unless the merge assigns new contents to them).
Operations on variables
All variables can be compared to each other, and user-defined variables can have other
operations performed on them. Operations are performed using various programming
commands. See “Working with merge expressions” on page 174 and “Merge
programming commands” on page 125.
Loops
Whenever the same commands repeat several times, that section of the merge is called
a loop. When you create a loop, it is very important to have a way for the loop to end.
If the loop does not have an end, there is no way to stop execution without pressing Esc
or Ctrl + Enter.

174 WordPerfect X3 User Guide
There are many types of loops you can create with merge programming commands.
Yo u c a n u s e a n IF structure or you can use FORNEXT or WHILE. You can also create
loops by going to or calling subroutines (with GO or CALL). The structure you should
use for any given loop depends on the task you are trying to accomplish.
Working with merge expressions
Merge expressions are used to determine values in the ASSIGN, ASSIGNLOCAL,
CAPS, CASEOF, CTON, FIRSTCAP, FOREACH, FORNEXT, IF, NTOC,
STRLEN, STRPOS, SUBSTR, SWITCH, TOLOWER, TOUPPER, and WHILE
commands. Expressions can perform operations on either numbers or strings.
The following topics explain how to use expressions when you program a merge in
WordPerfect:
Numeric expressions
String expressions
Expression evaluation
Operator precedence
String delimiters
Other merge delimiters
Numeric expressions
Numeric expression values must contain only integers (or variables that contain
integers).
You can use signed numbers in expressions. The highest positive number you can use is
2,147,483,647. Numbers higher than that are considered negative in WordPerfect. For
information, see “Negative numbers” on page 183. The lowest negative number you
can use is –2,147,483,648.
If you try to use an invalid numeric expression, the expression is treated as a text string.
Examples of invalid numeric expressions are characters other than numbers and valid
operators or expressions that evaluate to numbers outside the numeric limits.
The following is a list of numeric expressions. In this list, the terms n1 and n2 represent
number 1 and number 2. Although only a single operator is illustrated in each example

Merging documents 175
below, you can use several operators as well as parentheses in expressions. For definitions
of the operations used in the following table, see “Expression terms” on page 180.
Expression Operation
NOT n1 Returns the logical (0 or –1) NOT of n1.
Examples: NOT 0 is –1. NOT 2 is 0.
!n1 Returns the arithmetic (bitwise) NOT of n1.
Examples: !0 is –1. !2 is –3.
-n1 Returns the negative of n1.
Example: If variable Num holds 5, –
VARIABLE(Num) is –5.
n1+n2 Returns the sum of n1 and n2.
Example: 5+4 is 9.
n1–n2 Returns the difference of n1 and n2.
Example: 10–1 is 9.
n1*n2 Returns the product of n1 and n2.
Example: 6*5 is 30.
n1/n2 or n1 DIV n2 Returns the integer quotient of n1 and n2.
Examples: 20/5 is 4. 5 DIV 2 is 2.
n1%n2 or n1 MOD n2 Returns the remainder of the quotient of n1
and n2.
Examples: 20%5 is 0. 5 MOD 2 is 1.
n1 AND n2 Returns the logical (0 or –1) AND of n1 and
n2.
Examples: 0 AND –1 is 0. 3 AND 4 is –1.
n1 & n2 Returns the arithmetic (bitwise) AND of n1
and n2.
Examples: 7&4 is 4. 3&4 is 0.
n1 OR n2 Returns the logical (0 or –1) OR of n1 and
n2.
Examples: 0 OR –1 is –1. 3 OR 4 is –1.

176 WordPerfect X3 User Guide
n1|n2 Returns the arithmetic (bitwise) OR of n1
and n2.
Examples: 7|4 is 7. 3|4 is 7.
n1 XOR n2 Returns the logical (0 or –1) XOR (exclusive
OR) of n1 and n2.
Examples: 0 XOR –1 is –1. 3 XOR 4 is 0.
n1=n2 Returns a true value (–1) if n1 and n2 are
equal; otherwise, returns a false value (0).
Examples: If variable 1 holds 5, then
VARIABLE(1)=5 is true, and
VARIABLE(1)=3 is false.
n1!=n2 or n1<>n2 Returns a true value (–1) if n1 and n2 are
not equal; otherwise, returns a false value
(0).
Examples: If variable 1 holds 5, then
VARIABLE(1)!=3 is true, and
VARIABLE(1)<>5 is false.
n1>n2 Returns a true value (–1) if n1 is greater
than n2; otherwise, returns a false value (0).
Examples: 6>4 is true. 4>6 is false.
n1<n2 Returns a true value (–1) if n1 is less than
n2; otherwise, returns a false value (0).
Examples:2<10 is true. 10<2 is false.
n1>=n2 Returns a true value (-1) if n1 is greater than
or equal to n2; otherwise, returns a false
value (0).
Examples: 6>=6 is true. 4>=6 is false.
n1<=n2 Returns a true value (–1) if n1 is less than or
equal to n2; otherwise, returns a false value
(0).
Examples: 2<=2 is true. 10<=2 is false.
Expression Operation

Merging documents 177
Expression evaluation
An expression must be written according to the rules and syntax in this appendix for
WordPerfect to evaluate it correctly. The following information will help you create and
use expressions.
When an expression is encountered in a command, the expression is evaluated first, and
the result of the expression is used to complete the command. For example, in the
statement ASSIGN(1;VARIABLE(1)+1), the expression is VARIABLE(1)+1.
When the expression is evaluated, the contents of variable 1 are incremented by one.
The assignment is then performed, replacing the old contents of variable 1 with the
result of the expression.
In several of the expressions, the result of the operation is either true or false.
WordPerfect assigns a numeric value to true (–1) and false (0). These values were chosen
because they are opposites (numeric complements) of each other. For information, see
“Bitwise NOT (!)” on page 182 in “Expression terms” on page 180. WordPerfect
interprets any non-zero numeric value as true, but when it assigns a value for true, it
assigns –1.
In the following example, the first assignment statement assigns false (0) to variable 1,
the second assignment statement assigns true (–1), the logical opposite of false, to
variable 1, and the third assignment statement assigns true (–1) to variable 1.
ASSIGN(1;5=4)
ASSIGN(1;NOT VARIABLE(1))
ASSIGN(1;5!=4)
The order in which the various operators are applied in an expression is not simply the
order in which they occur. WordPerfect uses an order of precedence that determines
which operators are used first, second, and so forth. For example, in the expression
4+7*8, there is a different result depending on whether the addition is performed
before or after the multiplication. For more information about the order of evaluation,
see “Operator precedence” on page 177.
Operator precedence
WordPerfect supports expressions with several operators. Therefore, an order of
evaluation must be followed. The operator precedence is similar to the precedence for
mathematical operators. The following table shows the order in which operators are
applied:

178 WordPerfect X3 User Guide
1. – (unary minus), + (unary plus), ! (bitwise NOT), NOT (logical NOT)
2. * (multiply), / (divide), DIV (divide), % (mod), MOD (mod)
3. – (subtract), + (add)
4. < (less than), > (greater than), = (equal to), != (not equal to), <= (less than or
equal to), >= (greater than or equal to) Relational operators also work on strings.
5. & (bitwise AND), AND (logical AND), | (bitwise OR), OR (logical OR), XOR
(exclusive OR)
You can override the operator precedence by placing parentheses around the elements
you want evaluated first. Elements inside of parentheses are always evaluated before the
elements outside. If parentheses are nested, the innermost parentheses are evaluated
first.
In the expression 4+7*8, the multiplication (7*8) is performed first, followed by the
addition, because multiplication has a higher precedence than addition. The result is 60.
To perform the addition first, type (4+7)*8. In this case, the result is 88.
String delimiters
A string delimiter is a character that marks the beginning or end of a string. In string
operations, quotation marks (") serve as string delimiters. In most cases, string
delimiters are not needed. Any expression that cannot be evaluated as a valid numeric
expression is considered a string.
However, if you want an expression to remain a string even though it could be evaluated
as a numeric expression, surround the expression with quotation marks. For example, if
you assign a phone number to a variable, but do not surround the number in quotes,
the phone number is evaluated as a numeric expression. For example, the command
ASSIGN(1;555-1555) assigns the result of subtracting 1555 from 555 (-1000) to
variable 1. The command ASSIGN(1;“555-1555”) assigns the string 555-1555 to
variable 1.
Other merge delimiters
A merge delimiter is a word or character that marks the beginning or end of a parameter
or argument. Word delimiters can include such reserved words as AND, OR, NOT.
Semi-colons (;) serve as merge delimiters in merge commands with multiple parameters
(SUBSTR(expr;start;length). When a semi-colon is encountered during the merge, it
is treated as ending the parameter unless the parameter is within quotation marks.

Merging documents 179
String expressions
A string is any sequence of one or more characters, including spaces. For example, 245,
Strawberry, QB12, Z, and Personal Computer are strings. Quotation marks are not
necessary to define strings.
The expressions outlined in the following table are used to compare strings. The terms
s1 and s2 represent string 1 and string 2.
Expression Operation
s1=s2 Returns a true value (–1) if string 1 is
identical (including case) to string 2;
otherwise, returns a false value (0).
Examples: blue=blue is true. blue=BLUE is
false.
s1!=s2 or s1<>s2 Returns a true value (–1) if string 1 is not
identical (including case) to string 2;
otherwise, returns a false value (0).
Examples: If variable 1 holds the string
“thread,” then VARIABLE(1)!=rope is true,
and VARIABLE(1)<>thread is false.
s1>s2 Returns a true value (–1) if string 1 is greater
than* string 2; otherwise, returns a false
value (0).
Examples: abcd>aabcd is true. a>A is true.
s1<s2 Returns a true value (–1) if string 1 is less
than* string 2; otherwise, returns a false
value (0).
Examples: aabcd<abcd is true. A<a is true.
s1>=s2 Returns a true value (–1) if string 1 is greater
than* or equal to string 2; otherwise, returns
a false value (0).
Examples: abcd>=abcd is true. a>=A is
true.

180 WordPerfect X3 User Guide
* In a string comparison, the WordPerfect character set values are compared. For
information, see “WordPerfect character set values” on page 184.
Expression terms
The following are technical terms used in the discussion of expressions. Understanding
these terms is not essential to performing merges. These definitions are provided for
those who are familiar with basic programming concepts.
Bitwise Operation
Bitwise AND (&)
Bitwise NOT (!)
Bitwise OR (|)
Evaluate the Expression
Exclusive OR (XOR)
Logical AND (AND)
Logical NOT (NOT)
Logical OR (OR)
Negative Numbers
WordPerfect character set values
Bitwise operation
In computer language, numbers are represented as a series of 16 bits. A bit can only
have a value of 1 or 0. Each 16-bit series (or column) represents a numeric value (such
as 1, 2, 4, 8 and so on). The following table outlines some values and their
corresponding bits.
s1<=s2 Returns a true value (–1) if string 1 is less
than* or equal to string 2; otherwise, returns
a false value (0).
Examples: abcd<=abcd is true. A<=a is
true.

Merging documents 181
A bitwise operation works on one column at a time (starting with the right column)
using a single bit from each number. The operation is done 16 times so each bit of each
number is operated on.
Bitwise AND (&)
A bitwise AND operation compares the bits of two numbers. When both numbers have
a 1 bit in the same position (for example, there is a 1 bit in column 1 [the right column]
of the first number and the second number), a 1 is placed in that position in the result.
The following table demonstrates the way the expression 21&47 is evaluated.
The resulting bits represent the number 5, so 21&47=5.
Value Bits
0 0000000000000000
–1 1111111111111111
–3 1111111111111101
–21 1111111111101011
3 0000000000000011
4 0000000000000100
7 0000000000000111
21 0000000000010101
47 0000000000101111
Value Bits
21 0000000000010101
47 0000000000101111
21&47 0000000000000101
182 WordPerfect X3 User Guide
Bitwise NOT (!)
A bitwise NOT operation takes the bits of the number and complements them. For
example, if the expression is !0 (0 is 0000000000000000), the resulting value is –1 (–1
is 1111111111111111).
Bitwise OR (|)
A bitwise OR operation compares the bits of both numbers. When either number has
a 1 bit in the same position (for example, there is a 1 bit in column 1 [the right column]
of the first number or the second number), a 1 is placed in that position in the result.
For example, the expression 21|47 is evaluated as shown in the following table:
The resulting bits represent the number 63, so 21|47=63.
Evaluate the expression
Perform the operation(s) on the expression.
Exclusive OR (XOR)
A logical XOR operation evaluates two expressions and returns a true (–1) if one, but
not both, of the expressions is true. If both expressions are false or both are true, XOR
returns a false (0). For example, 1=1 XOR 2=3 is true (–1), because only one of the
expressions being evaluated is true. 6>3 XOR 3>1 is false (0), because both
expressions are true.
Logical AND (AND)
A logical AND operation evaluates two expressions and returns a true (–1) if both
expressions are true. In all other cases, it returns a false (0). For example, 1=1 AND
2=3 is false (0), because one of the expressions being evaluated is false. 6>3 AND 3>1
is true (–1), because both expressions are true.
Value Bits
21 0000000000010101
47 0000000000101111
21|47 0000000000111111

Merging documents 183
Logical NOT (NOT)
A logical NOT operation returns the logical opposite (0 or –1) of the expression.
WordPerfect interprets any nonzero numeric value as true, but when it assigns a value
for true, it assigns –1. For example, NOT 2 is false (0), because 2 is evaluated as true.
NOT 0 is true (–1).
Logical OR (OR)
A logical OR operation evaluates two expressions and returns a true (–1) if either or
both expressions are true. If both expressions are false, it returns a false (0). For example,
1=1 OR 2=3 is true (–1), because one of the expressions being evaluated is true.
6<3 OR 3<1 is false (0), because both expressions are false.
Negative numbers
In WordPerfect, negative numbers are represented as large positive numbers, from
2,147,483,648 to 4,294,967,295. The number
4,294,967,295 is –1, 4,294,967,294 is –2, and so on. To determine the number
WordPerfect uses to represent any given negative number from –1 to –2,147,483,648,
use the following formula:
4,294,967,296 – |x|
where x is the negative number whose equivalent you are trying to find. For example,
to find the equivalent of –3,
4,294,967,296 – 3 = 4,294,967,293
To find the negative number (n) represented by a given equivalent, use this formula:
x – 4,294,967,296=n
where x is the equivalent. For example, to find the negative number represented by
4,294,967,293,
4,294,967,293 – 4,294,967,296 = –3
You can assign variables to be negative numbers by using the minus (–) operator or by
using the WordPerfect equivalent. Do not use commas or other punctuation in the
equivalent. For example,
ASSIGN(number;–1)

184 WordPerfect X3 User Guide
is the same as
ASSIGN(number;4294967295)
For more information about creating numeric expressions, see “Numeric expressions”
on page 174.
WordPerfect character set values
WordPerfect assigns a unique value to each character in each WordPerfect character set.
For more information, see the descriptions for the CTON and NTOC commands under
“Merge programming commands” on page 125. This is called the WordPerfect
character set value. In a string comparison, the character set values are compared.
For characters in the same character set, one character is considered “less than” another
character if the first character comes before the second character. For example, in
character set 0, “3” is less than “4” and “A” is less than “a.” For characters in different
character sets, the character from the character set with the lower numerical value is
considered “less than” the character from the higher numerical character set. For
example, any character from character set 2 is less than any character from character set
3.
Reference: The Merge toolbar and programming commands
The Merge toolbar displays at the top of the document window when you create a form
document or a data file for a merge. You can control a merge and edit merge files by
using the Merge toolbar.
You can also control a merge by using merge programming commands. The merge
commands are similar to codes used in computer programming languages. For example,
you need to specify parameters for some commands, and you can create subroutines, a
set of commands that can be repeated in a merge.
Using the Merge toolbar
When you create a form document or a data file for a merge, the Merge toolbar displays
at the top of the document window.
This is the Merge toolbar.

Merging documents 185
You can control a merge and perform specific merge functions by using the Merge
toolbar. The Merge toolbar is context-sensitive, which means that the buttons available
on the Merge toolbar change according to the task you are performing. For example,
you would see different buttons for performing a keyboard merge and for editing a data
table file.
You cannot hide the Merge toolbar for a merge form document or merge data file. If it
is not visible, then the active file is not a form document or a merge data file.
Prompting for user input and message display
Several commands are used to display a message for, or request information from, the
person running the merge. You can use a message to inform the user of the progress of
the merge or you can use a prompt to remind the user of the kind of information needed
in a fill-in form.
The following table lists commands displaying a message or prompt and shows how
they differ from each other:
Command Action and user input
PROMPT (followed by WAIT) Displays message for the duration of the
WAIT command; no user input is required.
STATUSPROMPT Displays message until another message is
displayed; no user input is required.
KEYBOARD Displays message and asks for keyboard
input; text is inserted in the document. The
user types information and clicks Continue
on the Merge toolbar (or presses Alt +
Enter).
GETSTRING Displays message and asks for keyboard
input; text is assigned to a variable. The user
types information and presses Enter.
CHAR Displays message and asks for one-character
input; the character is assigned to a variable.
The user types one character.

186 WordPerfect X3 User Guide
Reusing commands with subroutines
You can create a subroutine to call a set of commands which are repeated several times
in a merge. You do not need to add them each time. You can add them once, label them
as a subroutine, then return to them (or call them) each time you want them to run.
The three commands used to define and call a subroutine are described in the following
table.
Using multiple files and macros in a merge
A merge can consist of more than one data file or form file, and it can include multiple
macros. This may be useful if you want to merge different documents with the same
data or if you have multiple data sources to merge. There are three ways to connect
merge files: nesting, chaining, and substituting.
LOOK No message; checks whether a key has been
pressed. If a key has been pressed, the key is
assigned to a variable; otherwise, the
variable is deleted. The user types one
character or nothing (merge does not pause
for input).
Command Action and user input
CALL(label) Stops the merge and directs it to execute the
subroutine. The label parameter must match
the name of the label.
LABEL(labelname) Marks the beginning of the subroutine. The
labelname parameter is a unique name that
identifies the subroutine.
RETURN Marks the end of the subroutine and returns
the merge to the line after the CALL
command. If you do not add the RETURN
command, the merge will continue in an
infinite loop or will not continue correctly.
Command Action and user input

Merging documents 187
Nesting
Nesting a file or macro is like calling a subroutine. The merge pauses while the nested
file or macro runs, then continues after the nested file has finished. This is useful if you
use certain procedures frequently in your merges because you can save them in smaller
files.
You can have multiple levels of nesting. A merge file can nest a second file or macro,
which in turn nests another file, and so on. The three nest commands are described in
the following table.
Chaining
Chaining another file or macro starts that file or macro when the original merge is
finished. This is one way to run multiple merges one after the other instead of starting
each one manually. Only one chain command is used in a merge file; if there are more
than one, the last one is used. The three chain commands are described in the following
table.
Command Action and user input
NESTDATA(filename) Changes to another data source. After that
data has been merged with the form file, the
merge returns to the first data source.
Include a full path with the filename.
NESTFORM(filename) Pauses the merge and changes to another
form file. After that file has merged
completely, the original merge continues.
Include a full path with the filename.
NESTMACRO(macroname) Pauses the merge, plays the macro, then
continues the merge after the macro ends.
You do not need to add a full path or the
.wcm filename extension to the name of the
macro.
Command Action and user input
CHAINDATA(filename) Merges records from the second file when all
records from the first data source have been
merged. Include a full path with the
filename.

188 WordPerfect X3 User Guide
Substituting
Substituting another form or data file is another way to change from one merge file to
another. However, a substitute command moves the merge immediately to the second
file without finishing the original merge file. When this happens, the new merge does
not return to the original merge. The two substitute commands are described in the
following table.
Understanding merge code parameters
Most merge programming codes use parameters (also called arguments). In the
following table, parameters are enclosed in parentheses and any optional parameters are
enclosed in square brackets. When there are two or more parameters, they are separated
with a semicolon.
Merge code parameters
You need to enter the correct parameters and arguments as required for the merge code.
The following table lists parameters and their arguments.
CHAINFORM(filename) Merges the new form file when the original
form file has finished. Include a full path
with the filename.
CHAINMACRO(macroname) Plays the macro after the merge has finished.
You do not need to add a full path or the
.wcm filename extension to the name of the
macro.
Command Action and user input
SUBSTDATA(filename) Changes to the new data file and begins
merging its records. Include a full path with
the filename.
SUBSTFORM(filename) Changes to the new form file and begins
executing the merge commands in the file.
Include a full path with the filename.
Command Action and user input

Merging documents 189
Parameter What you do
(expr);(subexpr) Enter a number, string, variable, command,
expression, or a combination of these
(label) Enter a unique label name
(var) Enter a unique variable name
(field) Enter a unique name or field number
(filename) Enter a filename, including the full path
(macroname) Enter a unique macro name; the full path is
optional and no .wcm extension is needed.
(title) Enter the title of the dialog box
(prompt);(message) Enter information to display on the screen
(comment) Enter a description of what the merge does;
this does not display on screen.

Recordings, macros, and automation features 191
Recordings, macros, and
automation features
WordPerfect lets you create three types of macros:
• WordPerfect — is stored in the document it applies to or in a macro library file.
Create this macro when your task is contained within WordPerfect.
• PerfectScript — is stored with a .wcm filename extension. This macro is useful if
you want to interact with other WordPerfect Office applications, such as Quattro
Pro and Presentations.
• Visual Basic for Applications (VBA) — lets you develop scripts that are saved in
specific projects that use a robust version of the Visual Basic programming
language. You can access the VBA editor from WordPerfect.
You can use macros to perform repetitive or complex tasks automatically. A macro
performs a series of instructions. For example, you can create a macro that retrieves a
file, gives it a new name, and saves it to another format. You can then play the macro
to repeat the action.
A macro can consist of keystrokes, programming commands, product commands, and
comments. The simplest way to create a macro is to “record” the keystrokes in
WordPerfect. You can also write a macro if you want to include non-recordable tasks.
(For example, you can define a macro to play until a certain event happens.)
In this section, you’ll learn about:
• using QuickMacros
• recording, saving, and storing macros
• playing macros
• using macros included with WordPerfect
• using toolbars for macros
• using template macros
• editing and deleting template macros
• triggering macros from templates
• customizing WordPerfect macros
• assigning template macros to keystrokes, menus, and toolbars

192 WordPerfect X3 User Guide
• associating toolbars with template features
• writing and editing macros by using PerfectScript
• understanding macro commands and syntax
• using macro conventions and formatting macros
• recording macro commands into macros
• inserting codes in macros
• using macros from earlier versions of WordPerfect
• using programming commands in macros
• using parameters in macros
• using variables in PerfectScript
• using the macro command browser
• using macro commands to retrieve information
• using OLE object commands in macros
• compiling macros
• working from the PerfectScript utility
• testing for errors from PerfectScript
• editing and deleting macros
• searching in macros
• integrating with Microsoft Visual Basic for Applications
• using the PerfectScript class to change WordPerfect documents
• working with VBA methods
• accessing and manipulating applications from other applications
• using OLE Automation
• understanding OLE Automation
• using files with DDE Execute from previous versions of WordPerfect
• getting online Help for macros
WordPerfect Office contains a minimal set of macros. To access more macros, visit our
OfficeCommunity site on the World Wide Web.
Using QuickMacros
WordPerfect lets you create QuickMacros. A QuickMacro is a temporary macro that
you can record without saving. WordPerfect stores a QuickMacro in your computer's
memory for the current WordPerfect session only.

Recordings, macros, and automation features 193
When you record a new QuickMacro, the existing QuickMacro is replaced. You cannot
edit a QuickMacro or save it to a template.
To record a QuickMacro
1Click To o l s ` Template macro ` Record.
2Click Record without entering a macro name in the Name box.
3Perform the task you are recording.
4Click To o l s ` Template macro ` Record to stop recording the macro.
WordPerfect records both the keyboard and mouse actions you make;
however, you must use the keyboard instead of the mouse to position the cursor
in the document window.
To play a QuickMacro
1Click To o l s ` Template macro ` Play.
2Click Play without entering a macro name in the Name box.
Recording, saving, and storing macros
Macros automate application tasks. For example, WordPerfect macros automate tasks,
such as setting margins, selecting a font, or creating a merge file. Macro tasks consist of
instructions, called statements. There are several kinds of statements: assignments,
conditions, loops, comments, and commands. For example,
MarginLeft (1.0")
MarginRight (1.0")
are WordPerfect commands that set one-inch left and right margins. Each command
represents one instruction or statement. The simplest macro consists of only one
statement. Complex macros have hundreds of statements. The sequence of statements
determines how a macro performs its tasks.
One way to create a macro is to record a task in WordPerfect. When you record a macro,
you convert actions into macro commands. These are stored until you need them. Use
the fewest number of steps necessary to perform your task.
194 WordPerfect X3 User Guide
To include programming commands, or non-recordable actions, you must edit the
macro after you record it. For more information about editing macros, see “Editing and
deleting macros” on page 230.
You can instruct WordPerfect to pause while playing a macro if you want the macro to
stop playing. This can be useful if you want to allow users time to type in text when
they run the macro. When you play the macro, it runs until it reaches the PauseKey
command.
WordPerfect allows you to store macros in any folder, including the default and
supplemental macros folders. The default macros folder contains the macros with which
WordPerfect was shipped. By default, WordPerfect’s shipping macros are stored in
X:\program files\WordPerfect Office X3\macros\wpwin, where X represents the
drive letter. You can use the supplemental macros folder as an additional folder to store
macros.
To record a macro
1Click To o l s ` Macro ` Record.
A check mark beside the Record command indicates that the command is enabled.
2Type a name for the macro in the Filename box.
3Click Record.
4Perform the actions you want to record.
A check mark beside the Pause command indicates that the command is enabled.
A macro is saved with a .wcm filename extension.
If you are recording a new macro, clicking Edit ` Undo will still retain the step
that you tried to undo.
You can also
Pause recording a macro Click To o l s ` Macro ` Pause.
Resume recording a macro Click To o l s ` Macro ` Pause.
Stop recording a macro Click To o l s ` Macro ` Record.

Recordings, macros, and automation features 195
To change the default macros folder
1Click To o l s ` Settings.
2Click Files.
3Click the Merge/Macro tab.
4Click the Browse button in the Default macro folder box.
If you want to change the supplemental macros folder, click the Browse button
in the Supplemental macro folder box.
5Choose the drive and folder where you want to store the macros.
Playing macros
WordPerfect allows you to play and pause the play of macros. You can play a macro to
repeat the sequence of steps for a task you want to perform. Before you can play a
macro, however, it must be compiled with a compiler. For more information, see
“Compiling macros” on page 225.
To play a macro
1Click To o l s ` Macro ` Play.
2Choose the folder where the file is stored.
3Double-click the macro filename.
The Macro submenu displays the last nine macros you have played.
A macro you record may not play properly in every situation. Some macros
depend on certain options or settings. When a macro cannot play, a message
may display, indicating the reason and the line number(s) in the macro you can
check.
You can pause or resume playing a macro by clicking To o l s ` Macro ` Pause.
You can play a macro you’ve used recently by clicking To o l s ` Macro, and
clicking a macro displayed under the Macro command toolbar.
To play a macro multiple times
1Click Edit ` Repeat next action.

196 WordPerfect X3 User Guide
2Type a value in the Number of times to repeat next action box.
If you want WordPerfect to use this value as a default, click Use as default.
Using macros included with WordPerfect
WordPerfect comes with many predefined macros. The macros included with
WordPerfect Office can be used as a basis for writing your own macro. For more
information, see “Writing and editing macros by using PerfectScript” on page 212.
Many of the macros can be played by clicking buttons on the Shipping macros toolbar.
For more information, see “Using toolbars for macros” on page 198. For more
information about playing macros, see “Playing macros” on page 195.
Macros included with WordPerfect
Macro Description
abbrev.wcm Lets you insert the expanded forms of
QuickWords.
adrs2mrg.wcm Copies the address book (for automated
templates) into a merge data file.
allfonts.wcm Creates a document that lists every font
available to the current printer and shows
sample text in each font.
checkbox.wcm Inserts a check box in the document that you
can click to add or remove a check mark.
closeall.wcm Closes all open documents and prompts you
to save the modified ones.
ctrlm.wcm Activates the macro command browser.
cvtdocs13.wcm Lets you convert multiple documents from
another document type to WordPerfect X3
format.
dcconvert.wcm Converts “whole word” drop caps to
“number of characters” drop caps for
conversion to Microsoft Word.

Recordings, macros, and automation features 197
endfoot.wcm Converts endnotes to footnotes in the
document or selected text. To run this
macro, your cursor must be outside of the
footnote or endnote box (that is, your cursor
must be in the main body of the page).
expndall.wcm Expands all QuickWords in the document.
filestmp.wcm Places the filename and path of the current
document in a header or footer.
flipenv.wcm Creates an envelope rotated 180 degrees
(text is upside down). On printers with a
large trailing margin, this lets you print the
return address 0.25” from the edge.
fontdn.wcm Decreases the font size of the selected text by
2 points.
fontup.wcm Increases the font size of the selected text by
2 points.
footend.wcm Converts footnotes to endnotes in the
document or in selected text.
longname.wcm Changes the name of selected documents
from the DOS (8.3) filename to a long
filename based on the document summary
description.
parabrk.wcm Inserts symbols or small graphics as
paragraph breaks. The graphics are centered
on the blank line between paragraphs.
pleading.wcm Creates lines and numbers for pleading
documents.
prompts.wcm Helps you create prompts for automated
templates.
reverse.wcm Creates white text on black background (or
uses other color combinations) in selected
text or table cells.
Macro Description
198 WordPerfect X3 User Guide
In order to run the footend.wcm or endfoot.wcm macros, your cursor must
be outside of the footnote or endnote box (that is, your cursor must be in the
main body of the page).
Using toolbars for macros
WordPerfect has toolbars associated with macros, which you can use to: stop, record,
play, and pause macros; insert system variables, product commands, and programming
commands; save and compile a macro; insert merge and find and replace codes; change
how a macro is saved; or close a macro.
To view a macro toolbar
1Click To o l s ` Settings.
2Click Customize.
3In the Customize settings dialog box, click the To o l b a r s tab.
4In the Available toolbars list, enable any of the following check boxes:
• Macro tools
• Shipping macros
saveall.wcm Prompts you to save open documents.
savetoa.wcm Saves the current document and makes a
copy of it on the diskette in drive A.
tconvert.wcm Converts WordPerfect 6.0 templates that
used the _autofil.wcm macro.
uawp13en.wcm Used by PerfectExpert. Do not delete this
macro from the macros folder.
wp_org.wcm Creates an organization chart in
WordPerfect.
wp_pr.wcm Sends a WordPerfect outline to
Presentations.
Macro Description
Recordings, macros, and automation features 199
To view the Macro toolbar
•Click To o l s ` Macro ` Macro toolbar.
A check mark beside the Macro toolbar command indicates that the command is
enabled.
To access commands on the Macro toolbar or the Te m p l a t e m ac r o toolbar,
you can press Alt + Shift and the letter on the desired button. For example,
to access the Codes button command, you can press Alt + Shift + O.
To view the Template macro toolbar
•Click To o l s ` Template macro ` Template macro toolbar.
A check mark beside the Template macro toolbar command indicates that the
command is enabled.
To use the Macro toolbar
Click To
Stop Stop recording or playing a macro
Record Begin recording in the current document
Play Play the current macro
Pause Pause while recording or playing a macro
Dialog editor Display the editor for customizing dialog
boxes
Commands Insert system variables, product commands,
and programming commands at the cursor
Save & compile Save and compile the macro
Codes Insert merge and Find & Replace codes
Options Change how the macro is saved, close the
macro, or hide the Macro toolbar

200 WordPerfect X3 User Guide
Using template macros
WordPerfect lets you add macros to a template. Template macros are macros attached
to a template and are saved as part of that template file. They can be played only from
that template and are not listed with standard macros.
There are three ways to add a macro to a template: you can add a template macro from
another template; add a macro from a macro file stored on disk; or record a template
macro from scratch.
You can record macros for specific templates and select specific templates as the default
location to which you can record macros. You can only view the macros saved with the
current template.
You can play a template macro. WordPerfect includes several templates with macros
that are ready to use. You can pause a template macro if you need to interrupt the macro
you are playing. You cannot play a template macro until you save and exit the template
to which it is attached.
You can pause while playing a template macro. This can be useful if you want to allow
users time to type in text when they run the template macro.
To add a template macro from another template
1Click File ` New from project.
2Choose a category from the Category list box.
3Choose a template from the Project list.
4Click Options ` Edit WP template.
5Click the Copy/Remove object button on the Te m p l a t e toolbar.
6In the Copy/Remove template objects dialog box, choose the template that
contains the macro from the Templates to copy from list box.
7Choose Macros from the Object type list box.
If you want to add a macro from a macro file stored on disk, choose Macros on
disk from the Object type list box, click the Browse button in the Macros on
disk area, and choose the drive and folder in which the macro is stored.
8From the Source list box, choose the macro you want to copy.
9Click one of the following:
• Copy — copies only selected items in the Macros list
• Copy all — copies all items in the Macros list

Recordings, macros, and automation features 201
If the Te m p l a t e toolbar is not displayed, click View ` To o l b a r s , and enable
the Te m p l a t e check box.
To record a template macro from scratch
1Click To o l s ` Template macro ` Record.
2Type the name of the macro in the Name box.
3Click Location.
4Enable one of the following options in the Macro location dialog box:
• Current template — specifies the current template to record a template macro
to
• Default template — specifies the default template to record a template macro
to
If you want to record a template macro to the enabled location by default, enable
the Use as default check box.
5Click OK.
6Click Record.
7Perform the task you want to record.
The macros saved with the current template are listed in the Macros in template list box.
If you are recording a new macro, clicking Edit ` Undo does not undo the
most recent step performed; you will still retain the step that you tried to undo.
To play a template macro
1Click File ` New from project.
You can also
Pause a template macro you are recording Click To o l s ` Template macro ` Pause.
Resume recording a template macro Click To o l s ` Template macro ` Pause.
Stop recording a template macro Click To o l s ` Template macro ` Record.
View the macros that are saved with the
current template
Click To o l s ` Template macro ` Play.
202 WordPerfect X3 User Guide
2Choose a category from the Category list box.
3Choose a template from the Project list box.
4Click Create.
5Click To o l s ` Template macro ` Play.
6Choose a macro from the Macros in template list.
The macro name displays in the Name box.
7Click Play.
If you want to use the Number of times to repeat next action value as a
default, click Use as default.
Editing and deleting template macros
By editing template macros, you can add, edit, or delete macro commands. The same
rules of syntax and conventions that apply to macros apply to template macros. For
more information, see “Writing and editing macros by using PerfectScript” on
page 212, “Compiling macros” on page 225, and “Editing and deleting macros” on
page 230.
To edit a template macro
1Click File ` New from project.
2Choose a template from the Project list.
3Click Options ` Edit WP template.
4Click To o l s ` Template macro ` Edit.
5Choose a template macro from the Macros in template box.
You can also
Pause a template macro Click To o l s ` Template macro ` Pause.
Resume playing a template macro Click To o l s ` Template macro ` Pause.
Play a template macro multiple times Click Edit ` Repeat next action, and type a
value in the Number of times to repeat
next action box.

Recordings, macros, and automation features 203
6Click Edit.
7Edit any macro commands.
8Click Save & compile on the Template macro toolbar.
9Click Options ` Close macro on the Template macro toolbar.
To display the Te m p l a t e m a c r o toolbar, click Tools ` Te m p l a t e m a c r o `
Template macro toolbar.
To delete a template macro
1Click To o l s ` Template macro ` Edit.
2Choose a template macro from the Macros in template box.
3Click Delete.
You cannot delete template macros that are assigned to a toolbar, keyboard, or
menu. WordPerfect deletes template macros from a template when you
remove them from a toolbar, keyboard, or menu.
Triggering macros from templates
You can play a macro as you use a template. For example, if you use a template to create
letters, you can set a PRE PRINT trigger in the template that runs a spell-check macro.
The macro then lets you check the spelling of your letters just before they print.
You can use the following macro triggers.
Trigger Description
POST CLOSE Runs in the active window after you close a
window.
POST NEW Runs after you open a window by clicking
File ` New.
POST OPEN Runs after you open a window by clicking
File ` Open.

204 WordPerfect X3 User Guide
Adding the TemplateFill macro command
The TemplateFill() macro command displays a dialog box that lets you enter template
data. This dialog box varies depending on the fields required for the current template.
If personal information is not specified, this command first prompts you to specify
personal information regardless of what data the current template requires. If the
current template does not require data other than personal information, and the
personal information has been set, this command updates the personal information in
the document without displaying the dialog box. If the current document is not based
POST PRINT Runs after you send a print job to the
printer.
POST STARTUP Runs when you start WordPerfect. The
macro must be associated with the default
template.
POST SWITCH DOC Runs in the active window after you switch
from another window.
POST TABLES Runs after you create a table structure in a
document, but before you enter data in the
table.
PRE CLOSE Runs before you close the active window by
clicking File ` Close.
PRE NEW Runs in the active window before you open
another window by clicking File ` New.
PRE OPEN Runs in the active window before you open
another window by clicking File ` Open.
PRE PRINT Runs after you click File ` Print, but before
the print job is generated.
PRE SWITCH DOC Runs in the active window before you switch
to another window.
PRE TABLES Runs after you insert a table by clicking
Insert ` Ta b l e , but before the table
structure is created in the current window.
Trigger Description

Recordings, macros, and automation features 205
on an automated template, and the personal information has been set, this command
does nothing.
Only macros that have been added to the template can be used with triggers. A trigger
specifies when a macro plays in a template (for example, before you close a document).
Macros on disk cannot be associated with a trigger. Running the Prompt Builder
associates the POST NEW trigger with <dofiller>, the feature that runs the Prompts
dialog box. If the POST NEW trigger is associated with a template macro, use the
TemplateFill() macro command in that template macro to activate the DoFiller feature.
If you want DoFiller to run when you are using a template macro, you need to add the
TemplateFill macro command. The position of this command is important because
macro execution is generally sequential. For example, if you want to insert a macro in a
template that adds a date code to your document, you need to let the macro place the
date code prior to your filling out the template prompts.
To insert a macro trigger in a template
1Click File ` New from project.
2Choose a template from the Project list.
3Click Options ` Edit WP template.
4Click Associate on the Te m p l a t e toolbar.
5Enable the Tr i g g e r s option.
6Choose a trigger from the Items to associate list.
7From the Macros list box, choose the macro you want to associate with the trigger.
Only template macros that you have created in that template or copied to that
template display in the Macros list box.
To add the TemplateFill macro command
1Click To o l s ` Macro ` Edit.
2Double-click a filename.
3Press Ctrl + End to place the cursor at the end of the macro document.
4Press Enter.
5Type TemplateFill().

206 WordPerfect X3 User Guide
6Click Save & compile on the Template macro toolbar.
7Choose the drive and folder where you want to save the macro.
8Type the filename in the Filename box.
9Click Options ` Close macro on the Template macro toolbar.
Customizing WordPerfect macros
You can assign macros to keystrokes, menus, toolbars, and the property bar.
WordPerfect allows you to edit the name and QuickTips of a button, edit button
images, and change the macro triggered by a button.
To assign a macro to a keystroke
1Click To o l s ` Settings.
2Click Customize.
3In the Customize settings dialog box, click the Keyboards tab.
4Choose a keyboard from the Available keyboards list, and click Edit.
If you want to create a keyboard with the same initial settings as an existing
keyboard, choose a keyboard, click Create, and type a name in the New keyboard
name box.
5In the Choose a shortcut key list, choose a key to which you want to assign the
template macro.
6Click the Macros tab.
7Click one of the following:
• Assign macro to key
• Assign template macro to key
8In the Select macro dialog box, type the filename and path in the Filename box.
9Click Select.
If you save a macro file without its full path, WordPerfect searches for the
macro in the default folder, as specified on the Document page of the File
settings dialog box. To open the File settings dialog box, click To o l s `
Settings, and click Files.

Recordings, macros, and automation features 207
To assign a macro to a menu
1Click To o l s ` Settings.
2Click Customize.
3In the Customize settings dialog box, click the Menus tab.
4Choose a menu from the Available menus list.
5Click Edit.
6Click the Macros tab.
7Click Add macro.
8In the Select macro dialog box, click a macro.
9Click Select.
To assign a macro to a toolbar button
1Click To o l s ` Settings.
2Click Customize.
3Choose a toolbar from the Available toolbars list box.
4Click Edit.
5Click the Macros tab.
6Click Add macro.
7Type the macro path and filename in the Filename box.
8Click Select.
To edit the name and QuickTips of a button
1Right-click a button, and click Edit.
You can also
Place the macro in a menu Drag the new macro item over the menu.
The blue line represents the macro.
Create a menu with the same initial settings
as an existing menu
Click the Menus tab, and choose a menu
from the Available menus list. Click
Create, and type a name for the new menu
in the New menu bar name box.

208 WordPerfect X3 User Guide
2Right-click the button you want to edit, and click Customize.
3Type text in any of the following boxes:
• Button text — edits the text of the button
• QuickTip — edits the QuickTips text of the button
If you save a macro file without its full path, WordPerfect searches for the
macro in the default folder, as specified on the Document page of the Files
settings dialog box.
To edit the image of a macro button
1Right-click a button, and click Edit.
2In the To o l b a r e d i t o r dialog box, click the Macros tab.
3With the To o l b a r e d i t o r dialog box open, right-click the button on the toolbar,
and click Customize.
4In the Customize button dialog box, click Edit.
5Make changes in any of the following areas:
• Colors — lets you change the color of the button
• Drawing mode — lets you choose between changing the image a single pixel at
a time or filling the whole area
• Zoomed image — lets you re-create the image
To assign a macro to the property bar
1Click To o l s ` Settings, and click Customize.
2Click the Property bars tab.
3Choose a property bar from the Available property bars box.
4Click Edit.
5Click the Macros tab.
6Click Add macro.
7Type the macro filename and path in the Filename box.
8Click Select.
9Drag the button that represents the macro to the property bar.

Recordings, macros, and automation features 209
Assigning template macros to keystrokes, menus, and toolbars
You can assign template macros to a keystroke, a menu, and a toolbar button. When
you press the assigned keystroke, click a menu item, or click a toolbar button, the macro
is launched. You can assign template macros by using macros that you have created or
macros that are included with WordPerfect.
You can also edit the current menu and create a menu with the same initial settings as
an existing menu.
To assign a template macro to a keystroke
1Click File ` New from project.
2Choose a template from the Project list.
3Click Options ` Edit WP template.
4Click To o l s ` Settings, and click Customize.
5Click the Keyboards tab.
6Choose a keyboard from the Available keyboards list, and click Edit.
7Choose a key in the Choose a shortcut key list.
If you want to remove a template macro from a keystroke, choose a key to remove
from the template macro from the Choose a shortcut key list box, and click
Remove assignment.
8Click the Macros tab, and click Assign template macro to key.
9Click a macro in the Macros in template list, and click Select.
To create a keyboard with the same initial settings as an existing keyboard
1Click File ` New from project.
2Choose a template from the Project list.
3Click Options ` Edit WP template.
4Click To o l s ` Settings, and click Customize.
5Click the Keyboards tab.
6Choose a keyboard from the Available keyboards list, and click Create.
7Type a name for the new keyboard in the New keyboard name box.
8Click Location.

210 WordPerfect X3 User Guide
9Enable one of the following options:
• Current template — saves the keyboard in the current template
• Default template — saves the keyboard in the default template
To assign a template macro to a menu
1Click File ` New from project.
2Choose a WordPerfect template, and click Options ` Edit WP template.
3Click To o l s ` Settings, and click Customize.
4In the Customize settings dialog box, click the Menus tab.
5Choose a menu from the Available menus list, and click Edit.
6Click the Macros tab, and click Add template macro.
7Choose the template macro from the Macros in template list, and click Select.
8Click OK.
9Drag the button that represents the template macro to the menu.
To edit the current template menu
1Right-click the current template menu.
2Click Settings.
3Click Edit.
To create a template menu with the same initial settings as an existing menu
1Click File ` New from project.
2Choose a category from the Category list box.
3Choose a template from the Project list.
4Click Options ` Edit WP template.
5Click To o l s ` Settings, and click Customize.
6In the Customize settings dialog box, click the Menus tab.
7Choose a menu from the Available menus list, and click Create.
8In the Create menu bar dialog box, type a name for the new menu in the New
menu bar name box.
9Click Location, and enable one of the following options:

Recordings, macros, and automation features 211
• Current template — saves the menu in the current template
• Default template — saves the menu in the default template
To assign a template macro to a toolbar button
1Click File ` New from project.
2Choose a category from the Category list.
3Choose a template from the Project list.
4Click Options ` Edit WP template.
5Click To o l s ` Settings, and click Customize.
6Click the To o l b a r s tab, enable a toolbar in the Available toolbars list box, and
click Edit.
7In the To o l b a r e d i t o r dialog box, click the Macros tab, and click Add template
macro.
8In the Select template macro dialog box, click a macro in the Macros in
template list box.
9Click Select.
If you want the macro to display in a menu, drag the new macro menu item over
the menu of your choice to the position you want. The blue line represents the
macro.
To edit a toolbar button
1Right-click any button, and click Edit.
If you want to customize a button, make any changes in the Toolbar editor dialog
box.
2Right-click the button you want to edit, and click Customize.
3In the Customize button dialog box, type text in any of the following boxes:
• Button text — edits the text of the button
• QuickTip — edits the QuickTips text of the button
To edit the image of a toolbar button
1Right-click any button, and click Edit.
2Right-click the button you want to edit, and click Customize.

212 WordPerfect X3 User Guide
3In the Customize button dialog box, click Edit, and make changes in any of the
following areas:
• Colors — allows you to change the color of a button
• Drawing mode — allows you to choose between changing the image a single
pixel at a time or filling the whole area
• Zoomed image — allows you to re-create an image
Associating toolbars with template features
You can display a specific toolbar when you are working with specific features and
macros. Toolbars, menus, and keyboards can be associated with a predefined list of
features, which can be activated when the particular feature is used in a document.
You can also associate macros with various triggers that execute when a particular event
occurs inside WordPerfect. There are 13 predefined triggers that you can associate with
macros (for example, PRE NEW, POST NEW, PRE PRINT, and POST PRINT). For a
list of macro triggers, see “Triggering macros from templates” on page 203.
To use the Associate button with a template macro
1Click File ` New from project.
2Choose a category from the Category list box.
3Choose a template from the Project list.
4Click Options ` Edit WP template.
5Click Associate on the Te m p l a t e toolbar.
6Enable the Tr i g g e r s option.
7Choose a trigger from the Items to associate list.
8Choose a macro from the Macros list box.
Writing and editing macros by using PerfectScript
PerfectScript macros are the common macro language for all applications in
WordPerfect Office. PerfectScript is a command-based language. When you record a
macro, you record the results of keystrokes or mouse selections instead of recording the
keystrokes themselves. For example, instead of recording each keystroke required to
change the top margin of a page to 2” (5.1 cm), the macro records the following
command:

Recordings, macros, and automation features 213
MarginTop(MarginWidth:2.0")
Recording and playing macros can speed up routine tasks, but the real power of macros
is tapped when product commands are used together with PerfectScript programming
commands. By using product commands and programming commands, the
functionality of WordPerfect Office features is combined with the customizing, decision
making, and iterative capabilities of a programming language. Using programming
commands also makes it possible to include the functionality of other applications.
A written macro can include non-recordable statements, which cannot be included in
recorded macros, that specify how a macro performs a task. You specify conditions for
playing assignments, loops, and programming commands. Writing a macro provides
greater flexibility to determine function than recording a macro. You can create a macro
in WordPerfect and play it in the application for which it was written.
With PerfectScript, you can combine statements to automate routine tasks and simplify
large ones. You write the macro using statements, compile the macro, and play the
macro.
The PerfectScript programming language consists of WordPerfect application
commands and functions, and programming statements and functions. PerfectScript
can do more than perform your recorded WordPerfect commands — it can extend the
functionality of WordPerfect in a number of ways, such as prompting you for input,
displaying messages, controlling other Corel and Windows-based applications, and
performing and repeating commands. You can also build complete applications or
wizards so that, if you have limited experience using WordPerfect, you can still use some
of the more complex actions.
PerfectScript lets you record, play, compile, and convert macros for all WordPerfect
Office applications. PerfectScript starts automatically when you record or play a macro.
If you play a macro for an application that is not running, PerfectScript automatically
starts the application.
Installing the Software Developer’s Kit
The Software Developer’s Kit (SDK) is a set of tools that lets you customize
WordPerfect Office applications for commercial or business use. For information about
acquiring a WordPerfect Office Software Developer’s Kit, visit Corel Technology
Partner.
The Corel Technology Partner program supports developers of complimentary products
and add-ons for selected Corel products, including WordPerfect Office X3. The

214 WordPerfect X3 User Guide
program is designed to help accelerate the development of third-party products and
promote these products.
The SDK includes the following components:
• online Help for the SDK
• OLE automation samples
• PerfectScript tools
• tools and utilities, including code generation wizards for third-party add-ons to
WordPerfect, Quattro Pro, and Presentations; utilities to monitor events in
WordPerfect and Presentations; and a file format parsing tool
Understanding macro commands and syntax
To edit and write macros, you must understand the PerfectScript programming
language and the principles of computer programming. For most users, recording
macro commands is more efficient than typing commands into the macro. WordPerfect
opens a new blank window with another macro bar. After you have recorded keystrokes
or commands, WordPerfect returns to the macro you are editing and inserts the newly
recorded commands.
When you create macros using the macro command browser, the macro commands
appear in a separate document, numbered. The first line of the macro identifies the
program and default language that it uses. The remainder of the macro performs the
reported instructions.
For more information about macro commands, see “Using macro conventions and
formatting macros” on page 216.
Understanding components of macro commands
Macro commands consist of four parts: a command name, parameters, enumerations,
and separators. The table and example below display and describe these elements of
syntax.
Macro command component Description
Command name Indicates which feature the command
activates. Some commands consist only of a
command name, such as FileOpenDlg().

Recordings, macros, and automation features 215
For example:
MakeItFit (TargetPage:1;{Adjust: FitLeftMargin!};{Adjust:
FitLineSpacing!})
The command in the above example has two parameters: TargetPage and Adjust. They
are separated by a semicolon. Adjust is a repeating parameter with two enumerations
specified: FitLeftMargin and FitLineSpacing. All the Adjust parameters are enclosed in
braces to group them.
When you create macros using the macro command browser, the commands are
inserted in the correct format. If you type a macro without the macro command
browser, you must arrange macro commands and their elements in a precise order or
syntax. Each macro command must be spelled correctly and must include all the
required parameters and separators.
Using types of macro commands
There are three types of macro commands: product commands, OLE object commands,
and programming commands. Product commands are specific to a product, such as
WordPerfect or Quattro Pro. OLE object commands perform tasks on an OLE object.
Programming commands work across applications; they are PerfectScript commands.
Command names often describe an action, such as Font, MarginLeft, Advance, and
FootnoteOption, in WordPerfect; AlignObjectsLeft, BitmapBlur, SelectAllObjects, and
ToolbarCopy in Presentations; or Range in Microsoft Excel. Command names are not
Parameters Provides more information about the
command, such as which options of a feature
are active. Parameters are always enclosed in
parentheses; for example, Backup
(State:On!).
Enumerations Sets the value of a parameter (for example,
State: On! or State: Off!). Enumerations
always end with an exclamation point.
Separators Marks the parameters in a command.
Semicolons separate individual parameters;
parentheses enclose a series of parameters;
and braces enclose a series of repeating
parameters.
Macro command component Description

216 WordPerfect X3 User Guide
case sensitive and usually do not contain spaces. Exceptions include programming
commands that call a subroutine, such as Case Call or OnCancel Call.
A macro can use more than one application product and OLE object. Commands to the
non-default application or OLE object require a prefix, which is specified in an
application or object statement. For example,
A1.AboutDlg ()
A1 (followed by a period) is the prefix. It tells the compiler to use the application or
Object assigned A1 in a PerfectScript application or Object statement.
Understanding syntax
Syntax refers to the grammatical rules that govern the form of macro statements and
expressions. For example, the syntax of the following statement, which types “John
Doe,” is correct:
Type(Text: "John Doe")
The syntax of the next example is incorrect and produces an error message because the
statement lacks a closing parenthesis:
Type(Text: "John Doe"
If you find it difficult to distinguish different parts of a macro, remember that you can
add extra line spaces, tabs, and even font changes to make the macro more readable. As
long as the commands are written correctly, the macro compiler ignores extra spaces and
lines.
Using macro conventions and formatting macros
When you create macros in WordPerfect, you must follow macro conventions for the
macro to compile properly. However, you do not need to observe macro formatting
conventions for a macro to compile correctly. These conventions are designed to
improve the readability of your macro.
Macro conventions
Macro command syntax must be correct for a macro to compile. Understanding the
following conventions used in WordPerfect macros will help you avoid common syntax
errors:
You can enter programming commands in uppercase, lowercase, or mixed case. The
compiler is not case sensitive. Product commands, such as AboutDlg or AddSlide, are

Recordings, macros, and automation features 217
shown in mixed case. WordPerfect system variables begin with ?, such as ?TextColorRed
or ?FontUnderline. They are shown in mixed case, and they return information about
the application environment.
Line wrapping does not affect macro execution. You should not insert spaces in a
command name unless the space is part of the syntax. Do not use hard returns, tabs, or
indents in a character expression (a character string enclosed in double quotation
marks). You can use spaces, tabs, indents, and hard returns before and after commands,
or between parameters, to make a macro easier to read. SmartQuotes in a macro create
a compile-time syntax error. For more information about SmartQuotes, see “Changing
the appearance of quotation marks” in the online Help.
Formatting macros
You can type commands into a macro that is saved in a file or in a template. If you want
to improve the readability of a macro, you can format it so that it includes tabs, spaces,
and even font or text appearance changes. Formatting the macro does not affect how it
works. For example, WordPerfect records the following macro in this format:
PosDocBottom()
Type(Text:"Sincerely")
HardReturn()
HardReturn()
HardReturn()
HardReturn()
Type(text:"Mrs. Jane Doe")
HardReturn()
Type(Text:"Vice President, Marketing")
However, if you type the commands yourself or edit an existing macro, you can format
the macro the way you want. For example, you can format it as follows:
PosDocBottom()
Type(Text:"Sincerely")
HardReturn()
HardReturn()
HardReturn()
HardReturn()
Type(text:"Mrs. Jane Doe")

218 WordPerfect X3 User Guide
HardReturn()
Type(Text:"Vice President, Marketing")
Recording macro commands in macros
WordPerfect lets you record macro commands in a macro.
To record macro commands in a macro
1Click where you want to insert the macro command.
2Click To o l s ` Macro ` Record.
3Type a name for the macro in the Filename box.
4Click Record.
A blank document displays.
5Perform the actions you want to record.
6Click the Stop button on the Macro toolbar.
WordPerfect returns you to the macro document with the new macro command
you recorded inserted.
Inserting codes in macros
When you insert a code in a macro, you must use straight double quotation marks
around the code so that WordPerfect recognizes the code in the macro.
To insert a code in a macro
1Click To o l s ` Macro ` Macro toolbar.
2Click Codes on the Macro toolbar.
3Click one of the following tabs:
• Search — allows you to select search find codes
• Merge — allows you to select merge find codes
• Date — allows you to select date find codes
• Other — allows you to select chapter, page, section page, total page, and
volume number find codes
4Choose a code from the Find codes list.

Recordings, macros, and automation features 219
5Click Insert.
6Click Close.
Using macros from earlier versions of WordPerfect
You can update macros from earlier versions of WordPerfect. The structure of the macro
language has not changed for WordPerfect versions 6 through X3. While later versions
of the macro language include access to new WordPerfect features and some new
commands for accessing existing features, most of the older product commands have
been retained to maintain macro compatibility. Because some older product commands
have changed, macros from versions 6 through 10 might need minor corrections when
you compile them for the first time.
To update macros from earlier versions of WordPerfect
1Click To o l s ` Macro ` Edit.
2Choose a macro.
3Click Edit.
4Make any changes.
5Click Save & compile on the Macro toolbar.
6Note any errors listed by the macro compiler and make changes as needed.
Using programming commands in macros
Programming commands work across WordPerfect Office applications. They control
macro functions by
• specifying conditions under which other macro commands or statements operate
(for example, Case, IfElse, Endif, Switch, and EndSwitch)
For example,
If (x = "A")
LineHeightDlg
Else
LineSpacingDlg
Endif

220 WordPerfect X3 User Guide
displays the Line height dialog box in WordPerfect if x equals the value “A”. If x has
another value, the subroutine displays the Line spacing dialog box. The If, Else, and
Endif commands are programming commands. LineHeightDlg and LineSpacingDlg
are product commands.
• repeating macro commands or statements a specified number of times or until
certain conditions are met (for example, For, Endfor, Repeat, Until, While, or
EndWhile)
• invoking or jumping to a specified subroutine with Call or Go
Programming commands and product commands are not case sensitive.
You can add blank lines to separate programming commands and subroutines, and you
can indent lines to show levels of nested commands. Some macro commands cannot be
recorded. You must type or insert them using the macro command browser. For
information about the macro command browser, see “Using the macro command
browser” on page 223.
Using parameters in macros
Commands often require parameters, which are constant values (data). Parameters are
passed to the compiler (which translates the macro so that it can be played in the
application) or passed between subroutines. In this WordPerfect command,
Advance (Where: AdvanceDown!; Amount: 1.0")
Advance is the command name, Where and Amount are parameters, and
AdvanceDown! and 1.0” are parameter data. This command advances the cursor down
one inch. Parameter names, such as Where and Amount, are optional.
Data types
A data type represents information that is needed by a parameter or returned by a
command (return value).
In the command syntax, data types are displayed in italics. For example, the
enumerations for the Rotation parameter of BoxCaption Rotation are Degrees90!,
Degrees180!, Degrees270!, and None!. Only these enumerations can replace the data
type in the command syntax. Enumerations are identified by a trailing exclamation
point. The most common data types in product commands are string, enumeration, and
numeric. Programming commands frequently use variables.

Recordings, macros, and automation features 221
Parameter names
Using parameter names is optional. For example, InhibitInput (State: Off!) works just
like InhibitInput (Off!). Some product commands have no parameters. Their syntax is
usually written with empty parameters, such as PosScreenUp (). Some programming
commands and all system variables have no parameters. Their syntax is the command
name alone, such as Pause and ?FeatureBar.
Italics
Italics in macros syntax indicate parameter names or types to be replaced with data. For
example, the syntax of GraphicsLineLength is:
GraphicsLineLength (Length: measurement)
After you replace measurement with a number, the command might be:
GraphicsLineLength (Length: 21)
or
GraphicsLineLength (21)
Punctuation
You must enclose parameters in parentheses. A missing parenthesis is a common error
that prevents macros from compiling. Parentheses are optional for commands without
parameters, but must be used with user-defined functions and procedures.
Spaces between command names and the opening parenthesis of the parameter section,
and after semicolons in parameters, are optional.
You must separate multiple parameters with semicolons (;). If you omit an optional
parameter, include the semicolon in the syntax to keep following parameters in their
correct positions. For example,
AbbreviationExpand (AbbreviationName:; Template: PersonalLibrary!)
or
AbbreviationExpand (; PersonalLibrary!)
Repeating parameters are enclosed in braces and are separated by semicolons. For
example,
CASE (<test>: any ; {<Case>: any; <Label>: label; <Case>: and;
<Label>: label...})
When data is supplied, the command could be

222 WordPerfect X3 User Guide
CASE (vChoice; {1; Exclaim; 2; Info; 3; Question; 4; Stop; 5;
QuitMacro}; QuitMacro)
Product commands perform product tasks in a specific application. For example,
ShowSlide(Slide: 4)
displays the fourth slide in the current slide show in Presentations.
Product commands are specific for each application. They perform various functions in
that application, such as
• displaying a dialog box, InitialCodesStyleDlg
• specifying settings, such as styles, BorderBottomLine; user settings, PrefZoom; or
attributes, Font
• enabling and disabling features, InhibitInput or TableCellIgnoreCalculation
• performing actions, such as inserting a file, FileInsert or code, PrinterCommand;
renaming a bookmark BookmarkRename; converting comments to text
CommentConvert; or moving the cursor PosColBottom
• playing macros that are included with the application
AddressMergeShippingMacro
Product commands that report information (return value) about the state of an
application or feature are sometimes called system variables. In WordPerfect, system
variables begin with a leading question mark, ?ColumnWidth. In Presentations, they
begin with a leading Env (EnvPaths). Some system variables in Presentations have
parameters as well as return values.
Product commands and programming commands are not case sensitive.
Using variables in PerfectScript
A variable acts as a place holder that represents a value, which can be text, numbers, or
measurements, that you can use repeatedly in a macro. You can change or manipulate
this value in the macro. WordPerfect allows you to use the commands, such as Constant,
Declare, Global, Indirect, Local, and Persist, to create variables with different functions
and actions.
Variables are typically preceded by the letter “v”.
To assign a variable in PerfectScript
• Type the Assign macro command where you want to define the variable.

Recordings, macros, and automation features 223
For example, type Assign (vName; “Lori”) to assign the text “Lori” to the variable
“vName”.
You can type a colon followed by the equals sign (:=) as a shortcut to assigning
a variable. For example, you could type vName:=“Lori” for the above example.
Using the macro command browser
The macro command browser helps you insert macro product and programming
commands in WordPerfect Office macros.
Product commands perform tasks that let you use WordPerfect Office features in
macros. Many product commands require you to specify parameters and enumerations,
which give the applications information about which options to use in dialog boxes and
whether to hide or display certain features (for example, the ruler). You can use the
macro command browser to specify the commands quickly.
To access macro commands
1Click To o l s ` Macro ` Macro toolbar.
2Click Commands on the Macro toolbar.
The PerfectScript commands dialog box displays.
To insert commands with the macro command browser
1Click To o l s ` Macro ` Macro toolbar.
2Click Commands on the Macro toolbar.
3Choose a product from the Command type list box.
4Choose items from any of the following lists:
• Commands
• Parameters
• Enumeration
5In the Command edit box, type any additional parameters you need.
6Click Insert.
7Click Close.

224 WordPerfect X3 User Guide
With the macro command browser, you can also insert system variables, which
contain system information, such as the current chart type or the default
directory. In WordPerfect, system variables begin with a question mark.
A parameter that is displayed in bold is a required parameter. The macro will
not compile or run without it.
Using macro commands to retrieve information
WordPerfect lets you create commands, such as MessageBox or GetString, that gather
information for macros. You can use these types of commands, for example, to prompt
the user to type in information. For information about the MessageBox command, see
the PerfectScript Programming Macros Help in the PerfectScript macro command
browser.
Using GetString, GetUnits, and GetNumber
You can use the GetString command to retrieve information, such as text or numbers,
as text. The GetString command uses the following format:
GetString (Var;Prompt Text; Title; MaxLength)
The prompt text, title, and maximum parameter length are optional. You can use the
GetUnits command if you want to provide WordPerfect with measurement information
that can be used to move the cursor and set margins. If you want WordPerfect to use
the information entered in a numeric expression (such as addition or subtraction), you
can use the GetNumber command. Both the GetUnits and GetNumber commands are
similar to the GetString command; however, they do not use maximum parameter
length. The user can use any of the following abbreviations to represent units of
measurement:
Unit of measurement Abbreviation
WP Units (1200 per inch) w
Points (72 per inch) p
Millimeters m
Centimeters c
Inches i or "

Recordings, macros, and automation features 225
If the user doesn’t type a unit of measurement with the number when prompted,
WordPerfect uses WP Units as a default unit of measurement.
Using OLE object commands in macros
Commands for OLE objects are called methods, and they perform tasks on an OLE
object in a specific OLE Automation server.
OLE object methods are specific for each object, such as “Excel.Application” or
“Excel.Workbooks.”
OLE object methods that return information about an object are called properties.
Many properties have parameters as well as return values. In addition, many properties
can be assigned a value, like the name of a variable, by placing them on the left-hand
side of the assignment symbol “:=”.
Compiling macros
You must compile a macro before you can play it. The programs that compile macros
are called compilers. A macro compiler is used to compile or “translate” macros so that
WordPerfect Office applications can play them. WordPerfect compiles a macro every
time you save it.
Macros are written with an editor or word processor and saved as a source file. The
macro compiler creates an object, which it saves in a hidden area of the source file (the
macro compiler does not create a separate object file). When you edit the source file, the
object is destroyed. The object is recreated each time the source file is compiled. A
compiled source file (macro) contains instructions that are executed when you play the
macro.
When you compile a macro, you might receive error messages which can indicate
misspelled commands, missing parentheses or semicolons, and other syntax errors. If
you receive an error message while the macro is compiling, you must correct all the
errors before the macro will play. You can edit the macro to fix the errors.
WordPerfect macros have three types of errors: syntax errors, run-time errors, and logic
errors.

226 WordPerfect X3 User Guide
Identifying syntax errors
Syntax errors appear when you are compiling a macro. The PerfectScript compiler flags
unrecognizable commands, such as missing parentheses or semicolons and incorrectly
spelled command names. For example, if you type Centr (WordPerfect command)
instead of Center, a compile-time syntax error is displayed in a syntax error message box
when you save and compile.
The compiler identifies syntax errors and suggests solutions. The error message displays
information about the error and its location. The compiler makes a best guess and may
not always be accurate. You must correct all errors before a macro can compile correctly.
If you continue the compilation after an error is displayed, subsequent errors may be
inaccurate.
Common syntax errors include
• missing semicolons between parameters
• missing parentheses
• missing double quotation marks
• missing command in a conditional or loop statement
• misspelled macro command names
• undefined calling statements
• using commas between parameters instead of semicolons
Identifying runtime errors
Runtime is the same as execution time. Run-time errors occur while the macro is
playing. Referencing a variable that has not been assigned a value causes a run-time
error. Run-time error messages identify errors that occur while the macro plays and
show where errors occur.
Identifying logic errors
When a macro does not produce the expected result, you may have a logic error. When
a macro has a logic error, it plays without producing any error messages because
WordPerfect accepts all of the macro commands.
Troubleshooting macro problems
The compiler can help you troubleshoot macro problems. If the compiler locates an
error, a dialog box displays information about the problem. The compiler only directs
you to the problem; it does not identify it.

Recordings, macros, and automation features 227
The PerfectScript application has debugging features. For more information about
PerfectScript, see the PerfectScript application online Help.
If you are writing or editing a macro, when you compile you change what is on screen
to a language that PerfectScript can play. If you want PerfectScript to be able to read
errors in the file, you must create a listing or log file. When you generate a listing file,
PerfectScript saves it with a .wcl filename extension. If you want to debug PerfectScript
macros using the PerfectScript debugger to tell you where the problems are located, you
must set PerfectScript to produce a listing file every time you save and compile the
macro. For more information about the PerfectScript debugger, see the PerfectScript
online Help.
To compile a macro
•Click Save & compile on the Macro toolbar.
If the Macro toolbar is not displayed, click To o l s ` Macro ` Macro toolbar.
If a macro you compile has error messages, WordPerfect still saves it even if
you do not fix the compile errors.
To set PerfectScript to generate a listing file when you compile a macro
1On the Windows taskbar, click Start ` Programs ` WordPerfect Office X3 `
Utilities ` PerfectScript.
2Click To o l s ` Settings.
3Click the Compile tab.
4Enable the Generate listing file check box.
To find macro errors using the PerfectScript debugger
1Click To o l s ` Macro ` Edit.
2Choose a macro.
3Click Edit.
4Click where you want WordPerfect to begin debugging the macro.
5Ty p e Step (On!).
If you want to display a debug window, type Display (On!).
6Click Save & compile on the Macro toolbar.

228 WordPerfect X3 User Guide
7Type a filename and path in the Listing filename box.
By default, listing files, which have a .wcl filename extension, are saved to the
same location as the macro you are compiling.
Working from the PerfectScript utility
You can use PerfectScript either inside WordPerfect or from the PerfectScript utility,
which is included with the WordPerfect Office utilities. You can also set the default
macro folder and the PerfectScript editor. You must set the PerfectScript macro editor
before you can edit a macro.
WordPerfect lets you test for errors from inside the PerfectScript utility. WordPerfect
allows you several options for debugging macros. You can debug macros step-by-step
so that the macro executes the current commands and stops at the next command. You
can also debug macros with a breakpoint so that the macro executes all the commands
in the macro until it reaches the breakpoint. Macro breakpoints are set by default to be
the beginning of the macro, the end of the macro, and at any errors. WordPerfect also
lets you debug a macro by briefly displaying or “animating” each command before it is
executed.
Animation allows you to step through macros line by line, automatically bringing up
the debugging dialog box at each step so you can check the variables and other calls.
You can specify how long the debugger will pause before moving to the next step.
PerfectScript starts automatically when you record or play a macro from a Windows
application that supports macros. If you play a macro for an application that is not
running, PerfectScript automatically starts the application.
To start PerfectScript from the Windows Start menu
• On the Windows taskbar, click Start ` Programs ` WordPerfect Office X3 `
Utilities ` PerfectScript.
In Windows XP, click Start ` All programs ` WordPerfect Office X3 ` Utilities
` PerfectScript.
To set the default macro folder in PerfectScript
1In PerfectScript, click To o l s ` Settings.

Recordings, macros, and automation features 229
2Click the General tab.
3In the Macro box, click the Browse button.
4Choose the drive and folder where you want to store the macro.
5Click Select.
To set the PerfectScript editor
1In PerfectScript, click To o l s ` Settings.
2Click the Edit tab.
3In the Editor path/filename box, click the Browse button.
4Choose the drive and folder where the editor is stored.
The PerfectScript editor is stored in the following location: X:\Program
files\WordPerfect Office X3\Programs\PS130.exe. “X” represents the folder where
you installed WordPerfect Office.
5Click Open.
You can also edit macros by selecting a macro filename in Windows Explorer
and clicking Edit from the QuickMenu.
Testing for errors from PerfectScript
WordPerfect lets you debug macros, step-by-step, with a breakpoint. You can also
debug macros by briefly displaying or “animating” each command before it is executed.
To debug a macro step-by-step from PerfectScript
1In PerfectScript, click File ` Debug ` Play.
2Choose a macro.
3Type a filename and path in the Listing filename box.
4Click OK.
5Click Debug ` Step into.
You may need to repeat this procedure more than once, until the macro is
debugged.

230 WordPerfect X3 User Guide
To set a macro breakpoint
1Choose the line of the macro at which you want to insert a breakpoint.
2Click Debug ` Breakpoint ` Add.
If you want to debug a macro with a breakpoint, click Debug ` Continue.
To animate a macro
1In the PerfectScript utility, click Edit ` To o l s .
2Click the Debug tab.
3In the Animate settings area, enable one of the following options:
• 'Runto’ does ‘step into’ — executes the next single statement
• 'Runto’ does ‘step over’ — executes the call of the label or routine without
stopping until it has completed
4Type a value in the Delay (seconds) box.
5Click OK.
6Click Debug ` Animate.
When correcting compilation errors, start at the beginning and first correct the
errors that are obvious, leaving the others until later, as some of these errors
may have been caused by an earlier error.
To view the meaning of commands from the PerfectScript Debugger
• Point to a command line.
The command or variable name and definition display.
Editing and deleting macros
WordPerfect lets you edit and delete macros.
To edit a macro
1Click To o l s ` Macro ` Edit.
2Choose the drive and folder where the macro is stored.
3Click Edit.

Recordings, macros, and automation features 231
4Make any editing changes.
5Click Save & compile on the Macro toolbar.
6Click Options ` Close macro on the Macro toolbar.
To delete a macro
1Click To o l s ` Macro ` Edit.
2Choose the drive and folder where the macro is stored.
3Click a macro.
4Press Delete.
Searching in macros
WordPerfect provides a macro with searching capabilities by recording a search in a
macro. WordPerfect lets you use all of its find and replace functionality when you are
searching in a macro. For more information about Find and Replace features, see
“Finding and replacing text” on page 45.
To record a search in a macro
1In the edit view of the macro, click where you want the search to begin.
2Click To o l s ` Macro ` Record.
3Type a name for the macro in the Filename box.
4Click Record.
5Click Edit ` Find and replace.
6In the Find box, type the text for which you want to search.
7In the Replace box, type the text with which you want to replace the found item.
8Click Replace all.
9Click To o l s ` Macro ` Record.
You can also
Search for codes In the Find box, click Match ` Codes, and
insert the codes for which you want to search
from the Codes dialog box.

232 WordPerfect X3 User Guide
Integrating with Microsoft Visual Basic for Applications
You can use Microsoft Visual Basic for Applications (VBA) with WordPerfect Office.
VBA is an object oriented programming language that lets you create VBA macros to
automate tasks. You can, for example, create a macro in WordPerfect that changes the
color of the headings. VBA is not part of the typical install of WordPerfect Office. To
use VBA, you should do a custom install and enable Microsoft Visual Basic For
Applications.
You can program and play a project or a global VBA macro in WordPerfect. You can
play a project macro only from the document that was used to create it. If the macro
does not perform the desired action, you can debug the macro.
You can edit a VBA macro. Editing a macro involves going directly to the start of the
code, whereas debugging a macro involves stepping through each line of the code.
Debugging is an extremely important part of the programming process. Debugging
lets you step through your code line by line to ensure that the macro executes properly.
This feature of programming is known as single-stepping. For example, if you are at a
point in the code where a variable is about to be assigned a value, you can step into this
line of code to determine the value of the variable at run-time.
For more information about VBA, see the Microsoft Visual Basic Help in the Visual
Basic Editor.
Event-driven programming
Visual Basic for Applications is an event-driven programming language. Most of the
code you create is written to respond to an event. An event is an action that is
recognized by VBA; for example, clicking a button or choosing an option from a list
box. Unlike traditional procedural programming, in which the program starts at line 1
and executes line by line, event-driven programming executes code in response to
events.
Replace codes In the Replace box, click Replace ` Codes,
and insert the codes that you want to use
from the Codes dialog box.
You can also

Recordings, macros, and automation features 233
The difference between PerfectScript and VBA
Previously, you could only use the PerfectScript language to automate specific tasks.
Both product commands and programming commands are used in conjunction with the
PerfectScript language. The PerfectScript language is useful for developing simple
macros. VBA offers more flexibility and power. When you use VBA to create macros,
you are assisted by the Visual Basic compiler. The compiler helps you by providing
context-sensitive Help when you are coding a VBA macro. You can combine the power
of VBA with the PerfectScript product commands to create powerful macros. You must
use the Visual Basic Editor to create VBA macros; however, PerfectScript macros are
developed from the WordPerfect Editor. You can access the Visual Basic Editor only
when you are working in an active document.
The PerfectScript class
All product commands used in WordPerfect, Quattro Pro, and Presentations can be
used in VBA macros. You must call the PerfectScript object to access a product
command. An object is an instance of a class. All objects have properties; for example,
the name of a document is a property that belongs to the document object. You can set
or change an object’s properties by calling certain methods. A method performs a
specific action, such as inserting a table into a document. You can, for example, close a
document by calling the Close method, or you can save a document by calling the Save
method. The term “class” is a VBA programming term and means a collection of related
methods, which are referred to as class members. The product commands are the class
members that belong to the PerfectScript class. WordPerfect, Quattro Pro, and
Presentations have their own PerfectScript class because the class members, which are
the product commands, are different depending on the application.
All members of the PerfectScript class will perform a specific action. For more
information about product commands, see the macros manual.
The syntax for the product commands and the PerfectScript members is usually the
same; however, there may be some differences.
Working in the VBA Editor
In most cases, the name of the class is the same as the name of the object. WordPerfect
Office has one object, which is the document object. In WordPerfect, the name of the
document object is ThisDocument, which is the same as the class. In Presentations, the
name of the document object is ThisSlideShow, which is the same as the class. In
Quattro Pro, the name of the document object is ThisDocument, which is the same as

234 WordPerfect X3 User Guide
the class. The document object is the host application that is open. In future versions,
there will be many more objects, such as a table object or a cell object.
You can create a new object, such as a dialog box, which is known as a form. You can
add controls, such as a check box or a text box. You can set the object’s properties in the
Property dialog box located in the Visual Basic Editor. You can also set the object’s
properties at run time by programming a method. For example, you can color a form
red when you click on it. For more information about setting an object’s properties, see
the Microsoft Visual Basic Help in the Visual Basic Editor.
An experienced programmer can work directly with the Windows API (Application
Programming Interface) and, for example, be able to determine how much disk space
is free or gain access to the system’s time and date values. Most VBA users will want to
automate specific and repetitive tasks.
Accessing an application from another application’s macro
You can access and change an application from another application’s macro. For
example, you could create and use a Quattro Pro object from a WordPerfect VBA
macro. This allows you to change and save a Quattro Pro document from a WordPerfect
VBA macro.
Creating VBA macros
You can create two kinds of VBA macros: a global and a project macro. You can play a
global macro from more than one document; however, a project macro can be played
only in the document which was used to create it.
You can create a project VBA macro by creating a public method for the ThisDocument
object. The term public refers to the access level. If a method is public, it can be accessed
from outside the class. This means that you can call it from the host application. If a
method is private, only methods in the same class can access it. Every public method
that belongs to the ThisDocument class is a project macro. You can create a VBA macro
called ShowMessage and code one line as follows: MsgBox “Hello”. This VBA macro
calls a Message Box that displays the string “Hello.”
Using VBA macros
You can store a VBA macro in the document by saving the document. Once you have
saved the document, you can close and reopen the document and access the macro.
After you have developed the macro, you should debug it. You can step through each
macro line by line. This is a useful exercise to ensure that the macro will have the desired

Recordings, macros, and automation features 235
outcome. A project macro is not available if the document is closed. After you have
debugged the macro, you can play the macro.
Assigning security
When you open WordPerfect Office documents created by other users, be aware that a
document could contain a macro virus. As a screening measure, VBA includes a security
mechanism to help manage document security. You determine the security level used
when opening or loading documents and add-ins containing embedded VBA macros.
You can review the assigned security level and collection of trusted certificates that come
from reputable sources. A VBA developer can attach his digital signature to a macro,
which creates a certificate when the document is opened. The fact that a document has
a digital signature does not automatically ensure the document to be free of viruses, so
that the onus is on you to find out if the developer scans for viruses before adding his
certificate to your trusted sources.
There are three security level settings available: High, Medium, and Low. With the
High setting, you can open a signed VBA project from a trusted source with the macros
enabled. Otherwise, the document is opened with the macros disabled. The default
security setting is Medium. A Medium setting indicates that a warning displays if you
try to load a VBA document that is not on your trusted source list. You can choose to
open the document with the macros enabled or disabled. The Low setting allows you to
open all VBA projects without applying any security (which disables all virus
protection).
To start VBA from WordPerfect
•Click To o l s ` Visual Basic ` Visual Basic Editor.
The members of the PerfectScript class are applicable only to WordPerfect.
To display the VBA toolbar
1Click View ` To o l b a r s .
2Enable the Visual Basic check box.
To create a VBA project macro in WordPerfect
1Click To o l s ` Visual Basic ` Visual Basic Editor.
2Double-click Project (Document1) in the Project view.
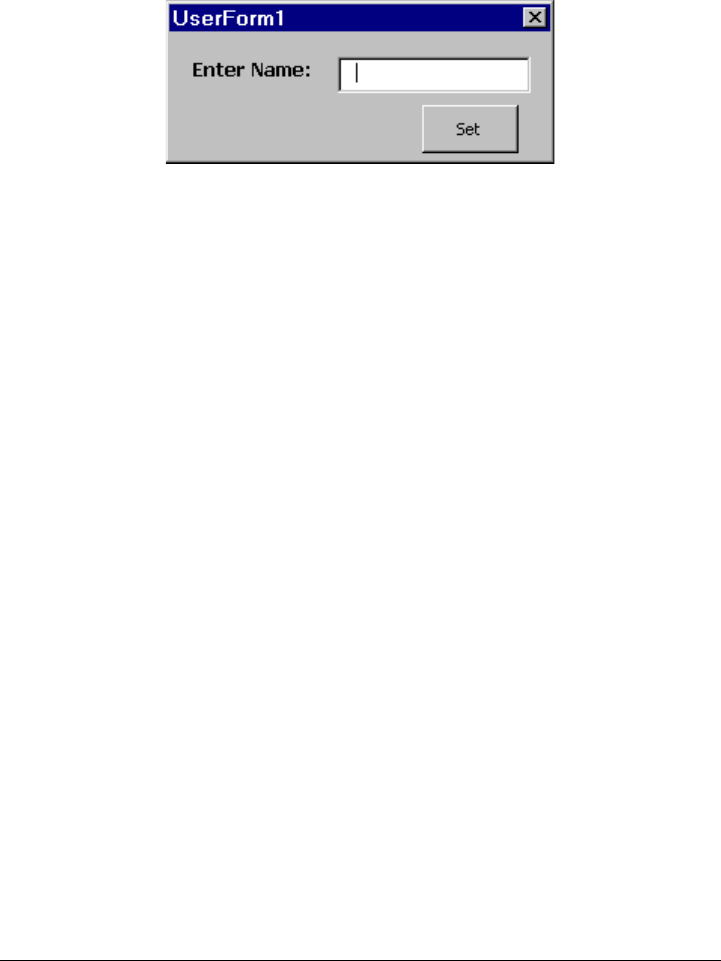
236 WordPerfect X3 User Guide
3Click Insert ` User form.
4Change the form so that it resembles the following diagram:
5Change the name of the TextBox control to NameBox, as illustrated in the
following list:
Command Button - CommandButton1
TextBox - NameBox
You can change all of the control’s attributes, including the name of the control, in
the Property dialog box located in the Visual Basic Editor.
6Double-click the CommandButton1 control to create a new method for the
UserForm1 class, and type the following lines of code in the
CommandButton1_Click method:
Private Sub CommandButton1_Click()
Dim myname, Msg As String
myname = NameBox
Msg = “Hello ” & myname
MsgBox Msg
End
End Sub
This code responds to the event that occurs when the command button is clicked.
7Double-click the WordPerfect objects folder in the Project view.
8Double-click ThisDocument, and type the following lines of code in the Editor
box:
Public Sub ShowForm()
End Sub
This code adds a new method to the ThisDocument class. If you declare
ShowForm as a Private method, you will not be able to run it from WordPerfect.
9Type the following line of code in the ShowForm method:

Recordings, macros, and automation features 237
Public Sub ShowForm()
UserForm1.Show
End Sub
To create a VBA global macro in WordPerfect
1Click To o l s ` Visual Basic ` Visual Basic Editor.
2Double-click Global macros in the Project view.
3Click Insert ` User form.
4Change the form so that it resembles the diagram below the procedure.
5Change the name of the TextBox control to NameBox as illustrated in the
following list:
Command Button - CommandButton1
TextBox - NameBox
You can change all of the control’s attributes, including the name of the control, in
the Property dialog box located in the Visual Basic Editor.
6Double-click the CommandButton1 control to create a new method for the
UserForm1 class, and type the following lines of code in the
CommandButton1_Click method:
Private Sub CommandButton1_Click()
Dim myname, Msg As String
myname = NameBox
Msg = “Hello ” & myname
MsgBox Msg
End
End Sub
This code responds to the event that occurs when the command button is clicked.
7Double-click the WordPerfect objects folder in the Project view.
8Double-click ThisDocument, and type the following lines of code in the Editor
box:
Public Sub ShowForm()
End Sub
This code will add a new method to the ThisDocument class. If you declare
ShowForm as a Private method, you will not be able to run it from WordPerfect.

238 WordPerfect X3 User Guide
9Type the following line of code in the ShowForm method:
Public Sub ShowForm()
UserForm1.Show
End Sub
The name of this macro is ShowForm. For more information about VBA, see
the Microsoft Visual Basic Help in the Visual Basic Editor.
To play a VBA macro in WordPerfect
1Click To o l s ` Visual Basic ` Play.
2Choose one of the following macros from the Macros in list box:
• ThisDocument — lets you play a project VBA macro
• Global — lets you play a global VBA macro
3Choose a macro from the Macro name list box.
4Click Run.
To start a VBA macro, you can also click the Play button on the Visual
Basic toolbar.
To edit a VBA macro
1Click To o l s ` Visual Basic ` Play.
2Choose a macro from the Macro name list box.
3Click Edit.
4Edit the code as necessary.
To debug a macro created in VBA
1Click To o l s ` Visual Basic ` Play.
2Choose a macro from the Macro name list box.
3Click Step into.
4For each line of code you want to step into, click Debug ` Step into.
5Change the code as necessary.
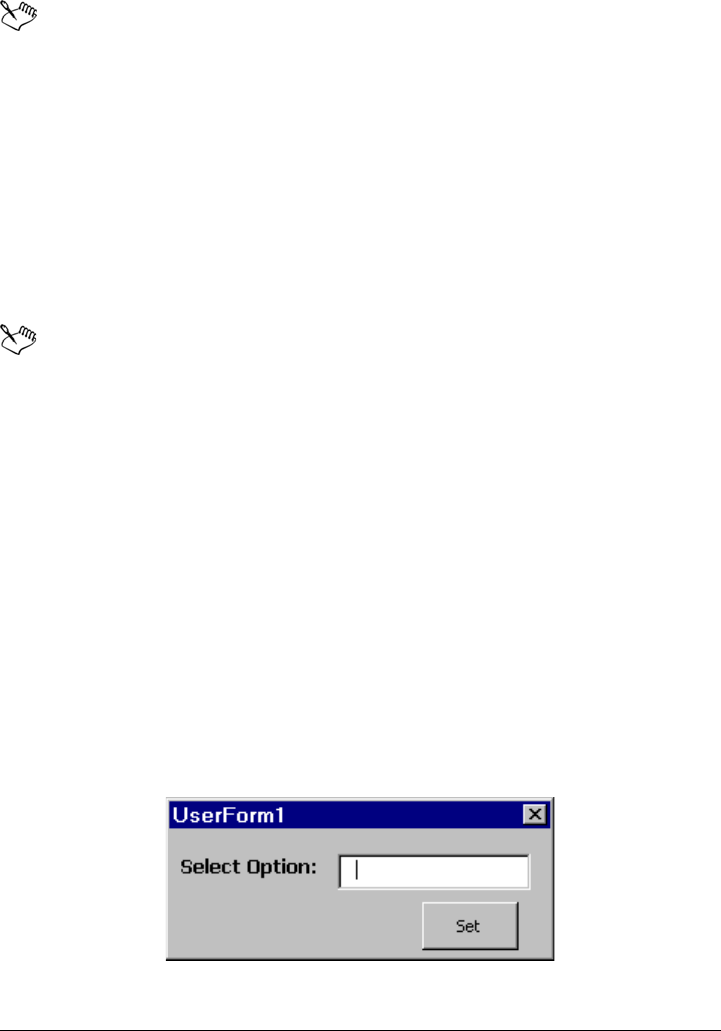
Recordings, macros, and automation features 239
After you have stepped into a line of code, you can point to a specific variable
to determine the value of the variable.
Using the PerfectScript class to change WordPerfect documents
The PerfectScript class lets you automate specific and repetitive tasks. The members
of the PerfectScript class are the product commands that are used in conjunction with
the PerfectScript language.
To create a VBA macro that uses the PerfectScript class
The images that are referenced in this procedure are examples. You can
substitute the example images with images of your choice.
1Click To o l s ` Visual Basic ` Visual Basic Editor.
2Double-click Project(Document1), and double-click the Word Perf e c t obj e c ts
folder in the Project view.
3Double-click ThisDocument, and type the following lines of code in the Editor
window:
• Public Sub AddWatermark()
•UserForm1.Show
•End Sub
• This code will add a new method, called AddWatermark, to the ThisDocument
class. Userform1 is the name of the form object. The Show method will call
Userform1.
4Click Insert ` User form, and change the form so that it resembles the following
diagram:

240 WordPerfect X3 User Guide
The default names of the controls are used. Located on this form are a CommandButton
and a ComboBox. You can change all of the control’s attributes, including the name of
the control, in the Property dialog box located in the Visual Basic Editor.
5Double-click on the form to access the Editor window, choose General from the
Object list box, and add the following code in the Editor window:
Dim myStyle As String
This code will create a string variable called myStyle.
6Choose Userform from the Object list box.
7Choose Initialize from the Procedure list box, and add the following code in the
UserForm_Initialize method:
Private Sub UserForm_Initialize()
ComboBox1.AddItem “Rose”
ComboBox1.AddItem “World”
ComboBox1.AddItem “Ribbon”
End Sub
This code responds to the event that occurs when the form is initialized. This code
adds three string items to the ComboBox1 control.
8Double-click the CommandButton1 control to create a new method for the
UserForm1 class, and type the following lines of code in the
CommandButton1_Click method:
Private Sub CommandButton1_Click()
myStyle = ComboBox1
If myStyle = “” Then
MsgBox “You have not selected a style”, vbExclamation
End If
‘The user selected the rose watermark
If myStyle = “Rose” Then
PerfectScript.ClearDoc
PerfectScript.WatermarkA Create_WatermarkA_Action,
OddPages_WatermarkA_Occurrence
PerfectScript.BoxCreate 6
PerfectScript.BoxContentType Image_BoxContentType_Content

Recordings, macros, and automation features 241
PerfectScript.BoxImageRetrieve MakeInternal_BoxImageRetrieve_Action,
“C:\rose2.wpg”
PerfectScript.ChangeWatermarkGraphicShade 25
PerfectScript.BoxUpdateDisplay
PerfectScript.BoxEnd Save_BoxEnd_State
PerfectScript.Close
End If
'The user selected the world watermark
If myStyle = “World” Then
PerfectScript.ClearDoc
PerfectScript.WatermarkA Create_WatermarkA_Action,
OddPages_WatermarkA_Occurrence
PerfectScript.BoxCreate 6
PerfectScript.BoxContentType Image_BoxContentType_Content
PerfectScript.BoxImageRetrieve MakeInternal_BoxImageRetrieve_Action,
“C:\World3.wpg”
PerfectScript.ChangeWatermarkGraphicShade 25
PerfectScript.BoxUpdateDisplay
PerfectScript.BoxEnd Save_BoxEnd_State
PerfectScript.Close
End If
'The user selected the ribbon watermark
If myStyle = “Ribbon” Then
PerfectScript.ClearDoc
PerfectScript.WatermarkA Create_WatermarkA_Action,
OddPages_WatermarkA_Occurrence
PerfectScript.BoxCreate 6
PerfectScript.BoxContentType Image_BoxContentType_Content
PerfectScript.BoxImageRetrieve MakeInternal_BoxImageRetrieve_Action,
“C:\ribb0002.wpg”
PerfectScript.ChangeWatermarkGraphicShade 25
PerfectScript.BoxUpdateDisplay
PerfectScript.BoxEnd Save_BoxEnd_State

242 WordPerfect X3 User Guide
PerfectScript.Close
End If
PerfectScript.ZoomToFullPage
Unload Me
End Sub
This code responds to the event that occurs when you click the command button.
Be sure to enter the correct path to where the graphics files are located.
In this procedure, a new method called AddWatermark is added to the
ThisDocument class. This macro calls a form that lets you select a choice of
three watermarks to insert into the odd pages of the document. PerfectScript
class members can be accessed only by calling the PerfectScript object, which
must be followed by a “.”. You can call the AboutDlg method, which is a
PerfectScript class member, by typing PerfectScript.AboutDlg.
Working with VBA methods
You can use VBA to get system information, such as the system’s date and time values.
Retrieving the system’s date and time values using VBA is very easy because all of the
Windows functions are hidden, and all you have to do is call the appropriate VBA
method.
To access the system’s date and time values
1Click To o l s ` Visual Basic ` Visual Basic Editor.
2Double-click Project(Document1) in the Project view.
3Double-click the WordPerfect objects folder in the Project view.
4Double-click ThisDocument, and type the following lines of code in the Editor
box:
Public Sub ShowTime()
End Sub
This code will add a new method to the ThisDocument class. Make sure that the
ShowTime method is declared public so that you can access this macro from
Wo r d Pe r f e c t .

Recordings, macros, and automation features 243
5Type the following new code in the ShowTime method to declare two new
variables:
Public Sub ShowTime()
Dim myTime
Dim myDate As Date
End Sub
6Type the following new code in the ShowTime method to populate the myTime
and the myDate variables:
Public Sub ShowTime()
Dim myTime
Dim myDate As Date
myTime = Time
myDate = Date
End Sub
7Type the following new code in the ShowTime method to convert the two
variables to string data types:
Public Sub ShowTime()
Dim myTime
Dim myDate As Date
myTime = Time
myDate = Date
Dim myStrTime, myStrDate, Msg As String
myStrDate = Str(myDate)
myStrTime = Str(myTime)
End Sub
8Type the following new code in the ShowTime method to populate and display the
Msg variable:
Public Sub ShowTime()
Dim myTime
Dim myDate As Date
myTime = Time
myDate = Date
Dim myStrTime, myStrDate, Msg As String

244 WordPerfect X3 User Guide
myStrDate = Str(myDate)
myStrTime = Str(myTime)
Msg = “The date is ” & myStrDateI & “ and the time is ” & myStrTime
MsgBox Msg
End Sub
For the purpose of this procedure, a message box was selected to display the
date and time (myDate, myTime, myStrDate, and myStrTime); however,
you can create a new form and display the time and date in this form. For more
information about VBA, see Microsoft Visual Basic Help in the Visual Basic
Editor.
Accessing and manipulating applications from other applications
You can create a VBA macro that will call another application. It is possible to program
a VBA macro to open and change another application at run time. For example, you
can create a Quattro Pro object from the WordPerfect VBA Editor. This lets you create
a WordPerfect VBA macro that will change a Quattro Pro document.
To create a WordPerfect VBA Macro that will manipulate a Quattro Pro
document
1Open WordPerfect, and click To o l s ` Visual Basic ` Visual Basic Editor.
2Double-click Project (Document1) in the Project view.
3Click To o l s , choose Reference, enable Corel - Quattro Pro 13.0 type library,
and click OK.
Every application has an object. Make sure you reference the right object.
4Double-click the WordPerfect objects folder in the Project view.
5Double-click ThisDocument, and type the following lines of code in the Editor
box:
Public Sub CreateQPTable()
End Sub
This code will add a new method to the ThisDocument class. Make sure that
CreateQPTable is declared public so that you can access this macro from
Wo r d Pe r f e c t .

Recordings, macros, and automation features 245
6Type the following lines of code in the CreateQPTable method:
Public Sub CreateQPTable()
Dim myQp as Object
Set myQp = CreateObject(“QuattroPro.PerfectScript”)
If myQp Is Nothing Then
MsgBox “The Quattro Pro Object is invalid”, vbCritical
End If
This code creates a Quattro Pro PerfectScript object. After the object is created, it is
tested to determine if memory has been allocated to it. A Message Box will inform
you if the object is invalid.
7Type the following lines of code in the CreateQPTable method:
Public Sub CreateQPTable()
Dim myQp as Object
Set myQp = CreateObject(“QuattroPro.PerfectScript”)
If myQp Is Nothing Then
MsgBox “The Quattro Pro Object does not exist”, vbCritical
End If
'Populate the Quattro Pro document
myQp.FileNew “FileNew”
myQp.SetCellString “B1”, “Jan”
myQp.SetCellString “C1”, “Feb”
myQp.SetCellString “D1”, “Mar”
myQp.SetCellString “A2”, “TVs”
myQp.SetCellString “A3”, “VCRs”
myQp.SetCellString “A4”, “Radios”
End Sub
This code will create a new Quattro Pro document and create an inventory table.
For the purpose of this procedure, a simple inventory table was created in a
Quattro Pro document (myQP). You can run this macro from WordPerfect.
For testing purposes, make sure that Quattro Pro is open. For more
information about VBA, see Microsoft Visual Basic Help in the Visual Basic
Editor.

246 WordPerfect X3 User Guide
Using OLE Automation
The Object Linking and Embedding (OLE) architecture is based on a model of client-
server (also known as container-component or controller-component) associations. This
model is based on the interaction between two applications in which one application
(the client or container) makes requests to the other (the server or client) to perform an
action. With OLE Automation, the application acting as the server exposes one or more
automation components which allow other applications (controller or client) to
manipulate them. For example, WordPerfect can execute a macro containing
commands that open Microsoft Word, open a document into Microsoft Word, modify
the formatting, resave the document, and close Microsoft Word. In this case,
WordPerfect is the OLE automation controller and Microsoft Word is the OLE
automation server, since it acts upon the requests made by WordPerfect. When
Microsoft Word, Visual Basic for Applications (VBA), or any other OLE automation
controller application opens WordPerfect and instructs it to perform certain specified
tasks using OLE automation methods, WordPerfect is the OLE automation server and
the controlling application becomes the OLE automation controller.
PerfectScript can send commands to WordPerfect, Presentations, and Quattro Pro
through OLE Automation. PerfectScript can also send commands to such applications
as Microsoft Excel and Microsoft Word. These applications are called OLE Automation
servers. PerfectScript is an OLE Automation controller. OLE Automation is not limited
to these programs. PerfectScript can send commands to and control any OLE
Automation server.
OLE Automation servers define objects. These objects have names that are registered
with Windows. You can refer to an application’s documentation for the names of objects
they define. OLE objects can have methods and properties. A method is a command or
function that performs an action on that object. A property is a value that the object has
(like system variables in WordPerfect.) You can retrieve and set this value. An example
of a method for the “Excel.Application” object is as follows:
Worksheets().Activate
A property of the “Excel.Application” object is as follows:
ActiveSheet.Name
Methods, like product commands, may require parameters, and may or may not return
values. Unlike system variables in WordPerfect, you can set properties by placing the
property name on the left-hand side of an assignment statement. Properties can also
take parameters when being retrieved or when being set. This makes the retrieval of a
property very similar to a method call.
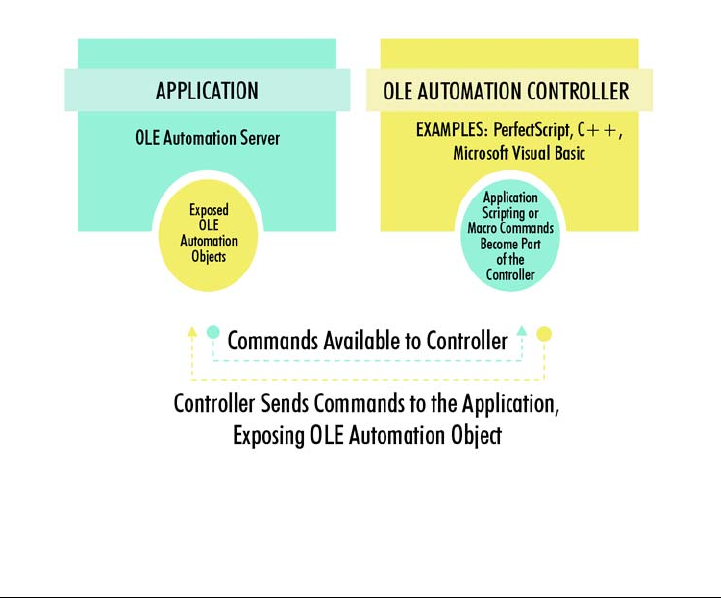
Recordings, macros, and automation features 247
Understanding OLE Automation
OLE Automation
OLE Automation for WordPerfect is a flexible and powerful feature you can use to
quickly build applications that use WordPerfect components. OLE Automation is an
integration standard that has developed to allow applications to “expose” their
programmable objects so that other applications can access them. The exposed
commands become an extension of the controlling programming language.
Applications that support OLE Automation are called OLE Automation servers.
Programming applications that can use a server’s scripting or macro commands are
called OLE Automation controllers.
As shown in the following diagram, an OLE Automation server application exposes its
programmable objects to the OLE Automation controller. The OLE Automation
controller incorporates the server application’s scripting or macro commands as part of
its own language. The controller can send these commands back to the server.
This is a diagram of an OLE Automation server application.

248 WordPerfect X3 User Guide
You can use OLE Automation for long and complicated manual processes that transfer
data between two or more applications. For example, you may have a manual process
that puts data into a spreadsheet to be used to create a presentation graphic. The
graphic is used in a word processing application. If you use OLE Automation, you may
be able to create a program that automatically does these steps for you. OLE
Automation gives you almost total control over a variety of different applications,
letting you build the applications you need through its seamless integration capabilities.
At a basic level, you can think of OLE Automation as a way for applications to speak to
and control each other through their own scripting or macro programming languages.
For example, you could have WordPerfect speak to and control Microsoft Word, another
OLE Automation server. Because WordPerfect, in this case the OLE Automation
controller, is a desktop publishing application and does not know about the inner
workings of Microsoft Word, the OLE Automation server, it needs a way to get
information from the server.
Conversely, WordPerfect can be controlled by other OLE Automation applications
through its PerfectScript application commands and a programming language. Some of
the most widely used programming languages can support OLE automation, including
Microsoft Visual Basic, Microsoft Visual Basic for Applications, and C++.
WordPerfect, PerfectScript, and OLE Automation
If you have ever used a script to send commands to WordPerfect or another Corel
application, you’ve used OLE Automation. When you run a script that sends commands
to a Corel application, you must use the WithObject statement to enable a
programmable object in the application.
Any Corel application, including WordPerfect, that supports OLE Automation provides
one programmable object that allows the PerfectScript controller to send it commands.
The Microsoft Visual Basic GetObject command, for example, cannot be used to access
a Corel document. Additionally, Corel applications do not support properties and
methods. The only way to access a Corel document through OLE Automation is by
using PerfectScript application commands.
You can also use other scripting languages to call Corel OLE Automation applications.
For example, you can call the WordPerfect object using a script created in Visual Basic.
The following Visual Basic script creates a new WordPerfect document and inserts a
footnote.
Private Sub Form_Load()
Dim objWP As Variant

Recordings, macros, and automation features 249
Set objWP = CreateObject(“WordPerfect.PerfectScript”)
objWP.FootnoteCreate
objWP.Tab
objWP.Type “This was inserted with VB.”
objWP.Quit
End Sub
As in the example above, the Microsoft Visual Basic commands, or any other OLE
automation application commands, must be preceded by an application name and a
period.
Other OLE Automation controllers
Rather than using only PerfectScript, you can use other applications as your OLE
Automation controller. For example, you can use Microsoft Visual Basic, Microsoft
Visual Basic for Applications, or Microsoft C++ as your OLE Automation controller
for Corel applications. However, if you use a programming language other than
PerfectScript to send commands to Corel applications, you cannot use PerfectScript
programming statements and functions such as FOR...NEXT or MESSAGE, or Corel
dialog box definition statements; you can only use the Corel application commands.
For information about commands and functions and PerfectScript OLE Automation
overviews, see the online Help in the respective application. However, it does not
provide procedural and reference information about programming by using OLE
automation controllers other than PerfectScript. For more information about other OLE
automation controllers, see the following reference sources:
• Microsoft Visual Basic Programmer’s Guide
• Microsoft Windows Developer’s Kit
• Microsoft Office Developer’s Kit
The PerfectScript command Quit is specifically for use with OLE Automation. If you
are scripting languages such as Visual Basic, C, C++, Delphi, FoxPro, and Corel Script,
you should use the Quit command at the end of the script. Because WordPerfect hosts
VBA, the Quit command should not be used from VBA.

250 WordPerfect X3 User Guide
Using files with DDE Execute from previous versions of WordPerfect
Older versions of WordPerfect, such as WordPerfect 5.1 and WordPerfect 6.1, use
Dynamic Data Exchange (DDE) Execute to trade information or allow one application
to instruct another to perform specific tasks.
To use DDE Execute you need to refer to:
• the wordperfect macros Help file for information about the ddeinitiate(),
ddeexecute(), and ddeterminate() programming commands
• the documentation for the other Windows applications; the information you need
includes the service (application) name, topic name, and list of commands the
application will accept through DDE Execute
Sending commands to other Windows applications
Using DDE you can create WordPerfect macros that send commands to control other
applications running under Windows. For example, you can create a macro that
launches a spreadsheet application, loads a file, and copies a range of cells to a table in
WordPerfect.
Sending commands to WordPerfect
Other applications can also use DDE Execute to control WordPerfect. The application
must first initiate a DDE conversation using the service (application) name of
“WPWin13_Macros” and topic name of “Commands.” Before terminating the
conversation, the application can send DDE Execute strings made up of one or more
WordPerfect macro commands. Note that WordPerfect accepts only product
commands, not programming commands. These product commands cannot contain
variables or expressions. See the WordPerfect Macros Help file for a list of product
commands and descriptions.
Other applications can also send commands to WordPerfect as a DDE Request item in
order to receive a string representing the command’s return value. The application must
send the DDE Execute string or DDE Request item in ANSI text format. WordPerfect
returns the DDE Request result as an ANSI text string. If either a DDE Execute string
or a DDE Request item returns an error, the application can send a DDE Request on
the item “LastCmdError” to find out what error occurred. This item will return an
ANSI text string containing a three-digit error code and a description of the error.

Recordings, macros, and automation features 251
DDE Execute application names, services, and topics
Getting online Help for macros
You can get online Help for macros through the macro command browser and the
context-sensitive Help.
You can easily display the lists of product and programming commands for all
applications in WordPerfect Office by using the WordPerfect Macros Help and the
WordPerfect Office Macro Command Reference Center.
WordPerfect gives you instant Help on any command as you edit a macro. In the macro
command browser, a brief description of the macro command appears at the bottom of
the dialog box.
Online Help for each command in the macro command browser is available.
To start WordPerfect Macros Help
•Click Help ` Macro commands.
To get more information about PerfectScript Commands
•Click Help ` Help topics.
To display Help while editing a macro
1Click in a command.
2Press F1.
Application Service, Topic
WPWin WPWin11_Macros,PS3Commands
Presentations WPPresentations,Command
Quattro Pro QPW, <full path and filename of open
notebook>

252 WordPerfect X3 User Guide
To get Help in the macro command browser
1Choose a command from the Commands list.
2Right-click the command to view the Help topic associated with that command.
To view the macro commands browser
•Click Commands on the Macro toolbar.

Index 253
WordPerfect Index
A
accessing . . . . . . . . . . . . . . . . . . . . . . . 244
applications from another application . .
244
system date and time values . . . . . . 242
address books . . . . . . . . . . . . . . . . . . . 117
creating data files . . . . . . . . . . . . . . 117
creating merge data files . . . . . . . . . 119
inserting records as labels . . . . . . . . 120
merging . . . . . . . . . . . . . . . . . 118, 119
merging envelopes . . . . . . . . . . . . . 117
merging labels . . . . . . . . . . . . . . . . 117
merging records . . . . . . . . . . . . . . . 117
merging selected records . . . . . . . . . 118
printing envelopes . . . . . . . . . . . . . 119
resetting data options . . . . . . . . . . . 119
resetting envelope options . . . . . . . 119
resetting form options . . . . . . . . . . 119
alignment . . . . . . . . . . . . . . . . . . . . . . . . 41
tab . . . . . . . . . . . . . . . . . . . . . . . . . . 41
animating . . . . . . . . . . . . . . . . . . . . . . . 230
macros . . . . . . . . . . . . . . . . . . . . . . 230
annotations . . . . . . . . . . . . . . . . . . . . . . 50
adding . . . . . . . . . . . . . . . . . . . . . . . 50
incorporating . . . . . . . . . . . . . . . . . . 50
application bar . . . . . . . . . . . . . . . . . . . . . 3
arguments . . . . . . . . . . . . . . . . . . . . . . 188
merge codes . . . . . . . . . . . . . . . . . . 188
Associate button . . . . . . . . . . . . . . . . . 212
using with template macros . . . . . . 212
Associate feature . . . . . . . . . . . . . . . . . 212
associating toolbars with template features
. . . . . . . . . . . . . . . . . . . . . . . . . . . 212
using . . . . . . . . . . . . . . . . . . . . . . . 212
B
backing up . . . . . . . . . . . . . . . . . . . . . . .14
documents . . . . . . . . . . . . . . . . . . . .14
backup . . . . . . . . . . . . . . . . . . . . . . . . . .14
documents . . . . . . . . . . . . . . . . . . . .14
bitwise AND . . . . . . . . . . . . . . . . . . . . .181
bitwise NOT . . . . . . . . . . . . . . . . . . . .182
bitwise operation . . . . . . . . . . . . . . . . . 180
bitwise OR . . . . . . . . . . . . . . . . . . . . . .182
bolding . . . . . . . . . . . . . . . . . . . . . . . . . .30
text . . . . . . . . . . . . . . . . . . . . . . . . . .30
booklets . . . . . . . . . . . . . . . . . . . . . . . . . 79
printing . . . . . . . . . . . . . . . . . . . . . .79
breakpoints . . . . . . . . . . . . . . . . . . . . . .230
setting for macros . . . . . . . . . . . . . .230
buttons . . . . . . . . . . . . . . . . . . . . . . . . . 207
editing images . . . . . . . . 207, 208, 211
editing names . . . . . . . . . . . . . 207, 211
editing QuickTips . . . . . . . . . 207, 211
C
capitalization
changing . . . . . . . . . . . . . . . . . . . . .30
case
specifying in text search . . . . . . . . . . .47
centering
text . . . . . . . . . . . . . . . . . . . . . . . . . .36
chaining . . . . . . . . . . . . . . . . . . . . . . . . .186
merge files or macros . . . . . . . . . . .186
changes
listing for document comparison . . . .55
changing . . . . . . . . . . . . . . . . . . . . . . . .239
WordPerfect documents using Perfect-

254 Index
WordPerfect
Script class . . . . . . . . . . . . . . . . . . 239
chapters
selecting . . . . . . . . . . . . . . . . . . . . . . 6
characters
counting . . . . . . . . . . . . . . . . . . . . . 10
precision level in document comparison
56
WordPerfect set values . . . . . . . . . . 180
Clipboard
pasting contents . . . . . . . . . . . . . . . 49
codes . . . . . . . . . . . . . . . . . . . . . . . . . . 218
endnotes . . . . . . . . . . . . . . . . . . . . . 62
footnotes . . . . . . . . . . . . . . . . . . . . . 61
inserting in macros . . . . . . . . . . . . 218
merge prompts . . . . . . . . . . . . . . . 185
columns . . . . . . . . . . . . . . . . . . . . . . . . . 25
adding to data table files . . . . . . . . 112
block protecting . . . . . . . . . . . . . . . . 25
creating and deleting . . . . . . . 25, 26, 27
deleting from data table files . . . . . 113
discontinuing . . . . . . . . . . . . . . .25, 27
navigating . . . . . . . . . . . . . . . . . . . . 27
newspaper . . . . . . . . . . . . . . . . . . . . 25
parallel . . . . . . . . . . . . . . . . . . . . . . 25
commands
macros . . . . . . . . . . . . . . . . . . . . . 214
printer . . . . . . . . . . . . . . . . . . . . . . 90
comments
printing . . . . . . . . . . . . . . . . . . .79, 80
comparing documents . . . . . . . . . . .54, 55
changing settings for . . . . . . . . . . . . 56
excluding text . . . . . . . . . . . . . . . . . 57
generating list of changes . . . . . . . . . 55
generating summary . . . . . . . . . . . . 55
including substructure text . . . . . . . . 56
removing markings . . . . . . . . . . . . . 55
specifying level of precision . . . . . . . 56
comparison markings
removing . . . . . . . . . . . . . . . . . . . . . 55
Compile . . . . . . . . . . . . . . . . . . . . . . . . 199
compiling . . . . . . . . . . . . . . . . . . . . . . . 225
generating listing files with PerfectScript
227
logic errors . . . . . . . . . . . . . . . . . . . 225
macros . . . . . . . . . . . . . . . . . . 225, 227
run-time errors . . . . . . . . . . . . . . . 225
syntax errors . . . . . . . . . . . . . . . . . 225
troubleshooting macro problems . . . 225
conditions . . . . . . . . . . . . . . . . . . . . . . 116
specifying for a merge . . . . . . . 116, 117
controlling
document comparisons . . . . . . . . . . 56
conversion utility . . . . . . . . . . . . . . . . . . 11
installing . . . . . . . . . . . . . . . . . . . . . 11
converting . . . . . . . . . . . . . . . . . . . . . . 110
databases to merge format . . . . . . . 110
form documents . . . . . . . . . . . . . . . 110
merge documents . . . . . . . . . . . . . . 110
multiple files . . . . . . . . . . . . . . . . . . 11
copying . . . . . . . . . . . . . . . . . . . . . . . . . 32
graphics . . . . . . . . . . . . . . . . . . . . . . 48
online text . . . . . . . . . . . . . . . . . . . . 49
text . . . . . . . . . . . . . . . . . . . . . . . . . 48
text formats . . . . . . . . . . . . . . . . . . . 32
Corel RealTime Preview
disabling . . . . . . . . . . . . . . . . . . . . . 31
previewing font changes . . . . . . . . . . 31
counting
words . . . . . . . . . . . . . . . . . . . . . . . 10
creating
VBA global macros in WordPerfect . 237
VBA macros that use PerfectScript class
239
VBA project macro in WordPerfect . 235

Index 255
WordPerfect
WordPerfect VBA macros to manipulate
Quattro Pro documents . . . . . . . . . 244
customizing . . . . . . . . . . . . . . . . . . . . . . 17
keyboards . . . . . . . . . . . . . . . . . . . 206
page sizes . . . . . . . . . . . . . . . . . 21, 22
Reveal Codes . . . . . . . . . . . . . . . . . . 17
cutting
graphics . . . . . . . . . . . . . . . . . . . . . . 48
text . . . . . . . . . . . . . . . . . . . . . . . . . 48
D
data files . . . . . . . . . . . . . . . . . . . . . . . . . 97
adding fields . . . . . . . . . . . . . . . . . 114
adding records . . . . . . . . . . . . . . . . 115
associating with form documents . . 105
changing default file extensions . . . 121
changing the data source . . . . . . . . 106
converting . . . . . . . . . . . . . . . . . . . 110
deleting fields . . . . . . . . . . . . . . . . 114
editing for merge . . . . . . . . . . . . . . 112
fields . . . . . . . . . . . . . . . . . . . . . . . . 97
finding records . . . . . . . . . . . . . . . . 112
ODBC . . . . . . . . . . . . . . . . . . . . . . 105
opening associated form documents 106
Quick data entry . . . . . . . . . . . . . . 112
records . . . . . . . . . . . . . . . . . . . . . . . 97
replacing field names . . . . . . . . . . . 114
retrieving from other file formats . . . 97
sorting . . . . . . . . . . . . . . . . . . . . . . 111
table . . . . . . . . . . . . . . . . . . . . . 97, 99
text . . . . . . . . . . . . . . . . . . . . . . 97, 99
viewing fields . . . . . . . . . . . . . . . . . 111
viewing records . . . . . . . . . . . . . . . 111
data sources . . . . . . . . . . . . . . 97, 100, 107
associating merge files . . . . . . . . . . 105
associating with form documents . . 105
changing . . . . . . . . . . . . . . . . . . . . 106
using address books . . . . . . . . . . . . . 97
data table files . . . . . . . . . . . . . . . . . . . .112
adding columns . . . . . . . . . . . . . . .112
adding rows . . . . . . . . . . . . . . . . . .113
deleting columns . . . . . . . . . . . . . .113
data text files . . . . . . . . . . . . . . . . . . . .114
adding fields . . . . . . . . . . . . . . . . . .114
adding fields to records . . . . . . . . . .113
adding records . . . . . . . . . . . . . . . .114
converting . . . . . . . . . . . . . . . . . . .110
converting from tables . . . . . . . . . . .110
deleting fields . . . . . . . . . . . . . . . . .114
deleting fields from records . . . . . . .113
deleting records . . . . . . . . . . . . . . .114
printing . . . . . . . . . . . . . . . . . . . . .114
databases . . . . . . . . . . . . . . . . . . . . . . .110
converting to data text files . . . . . . .110
converting to merge format . . . . . . .110
DDE Execute . . . . . . . . . . . . . . . . . . . .250
application names . . . . . . . . . . . . . .250
application services . . . . . . . . . . . . .250
application topics . . . . . . . . . . . . . .250
files . . . . . . . . . . . . . . . . . . . . . . . .250
sending commands . . . . . . . . . . . . .250
debug window . . . . . . . . . . . . . . . . . . .227
displaying . . . . . . . . . . . . . . . . . . . .227
debugging . . . . . . . . . . . . . . . . . . . . . . .238
PerfectScript macros . . . . . . . . . . . .229
VBA macros . . . . . . . . . . . . . . . . . .238
decimal . . . . . . . . . . . . . . . . . . . . . . . . . . 41
decimal points
tab alignment . . . . . . . . . . . . . . . . . .41
default macro folders . . . . . . . . . . . . . .228
setting in PerfectScript . . . . . . . . . .228
deleting . . . . . . . . . . . . . . . . . . . . . . . . .230
columns from data table files . . . . . .113
columns from merge data table . . . .112
fields . . . . . . . . . . . . . . . . . . . . . . .112

256 Index
WordPerfect
fields from data files . . . . . . . . . . . 114
fields from data text files . . . . . . . . 114
fields from records . . . . . . . . . . . . . 113
macros . . . . . . . . . . . . . . . . . .230, 231
merge commands . . . . . . . . . .122, 123
merge records . . . . . . . . . . . . . . . . 112
page definitions . . . . . . . . . . . . . . . . 23
page sizes . . . . . . . . . . . . . . . . . . . . 23
records from data text files . . . . . . . 114
records in data files . . . . . . . . . . . . 115
rows from data tables . . . . . . . . . . . 113
disabling . . . . . . . . . . . . . . . . . . . . . . . . 31
Corel RealTime Preview . . . . . . . . . 31
displaying
debug window . . . . . . . . . . . . . . . . 227
dividing . . . . . . . . . . . . . . . . . . . . . . . . . 24
pages . . . . . . . . . . . . . . . . . . . . . . . 24
documents . . . . . . . . . . . . . . . . . . . .15, 19
backing up . . . . . . . . . . . . . . . . . . . 14
comparing . . . . . . . . . . . . . . . . . . . . 54
See also comparing documents
comparing and reviewing . . . . . . . . . 55
controlling comparisons . . . . . . . . . 56
converting . . . . . . . . . . . . . . . . . . . . 11
creating . . . . . . . . . . . . . . . . . . . . . . . 3
creating a routing slip . . . . . . . . . . . 52
creating backups . . . . . . . . . . . . . . . 12
displaying the ruler . . . . . . . . . . . . . 15
double-sided . . . . . . . . . . . . . . . . . . 78
editing . . . . . . . . . . . . . . . . . . . . . . 45
formatting . . . . . . . . . . . . . . . . . . . . 19
generating comparison summary . . . 55
generating list of changes . . . . . . . . . 55
incorporating reviewers’ changes . . . 51
inserting files . . . . . . . . . . . . . . . . . . . 9
inserting printer commands . . . . . . . 90
merging . . . . . . . . . . . . . . . . . . . . . 97
Microsoft Word . . . . . . . . . . . . . . . . 12
navigating . . . . . . . . . . . . . . . . . . . . 15
opening . . . . . . . . . . . . . . . . . . . . . . . 4
printing . . . . . . . . . . . . . .75, 76, 78, 81
renaming . . . . . . . . . . . . . . . . . . . . . 12
restoring compared . . . . . . . . . . . . . 55
reviewing . . . . . . . . . . . . . . . . . . 50, 53
routed . . . . . . . . . . . . . . . . . . . . . . . 53
routing . . . . . . . . . . . . . . . . . . . 52, 54
saving . . . . . . . . . . . . . . . . . 12, 13, 14
saving text or graphics . . . . . . . . . . . 13
selecting . . . . . . . . . . . . . . . . . . . . . . 6
selection options . . . . . . . . . . . . . . . . 7
viewing . . . . . . . . . . . . . . . . . . . . . . 15
E
editing . . . . . . . . . . . . . . . . . . . . . . . . . 230
data files . . . . . . . . . . . . . . . . . . . . 112
data text files for merge . . . . . . . . . 112
documents . . . . . . . . . . . . . . . . . . . . 45
fields in data files . . . . . . . . . . . . . . 115
macros . . . . . . . . . . . . . . . . . . . . . . 230
merge data . . . . . . . . . . . . . . . . . . . 112
merge data files . . . . . . . . . . . . . . . 112
merge fields . . . . . . . . . . . . . . . . . . 112
merge files . . . . . . . . . . . . . . . . . . . 112
merge records . . . . . . . . . . . . . . . . 112
secondary files . . . . . . . . . . . . . . . . 112
VBA macros . . . . . . . . . . . . . . . . . . 238
editing. See also reviewing
e-mailing
merged documents . . . . . . . . . 107, 109
endnotes . . . . . . . . . . . . . . . . . . . . . . . . 59
display on page . . . . . . . . . . . . . . . . 63
finding . . . . . . . . . . . . . . . . . . . . . . 61
finding codes . . . . . . . . . . . . . . . . . . 62
inserting . . . . . . . . . . . . . . . . . . . . . 60
spacing . . . . . . . . . . . . . . . . . . . . . . 63

Index 257
WordPerfect
envelopes . . . . . . . . . . . . . . . . . . . . . . . 107
creating . . . . . . . . . . . . . . . . . . . . . 107
merging . . . . . . . . . . . . . . . . . 107, 108
merging with address books . . . . . . 117
printing . . . . . . . . . . . . . . . . . . 82, 119
errors . . . . . . . . . . . . . . . . . . . . . . . . . . 229
testing from PerfectScript . . . . . . . . 229
excluding
text from document comparison . . . . 57
exclusive OR . . . . . . . . . . . . . . . . . . . . 182
expression terms . . . . . . . . . . . . . . . . . 180
bitwise AND . . . . . . . . . . . . . . . . . 181
bitwise NOT . . . . . . . . . . . . . . . . . 182
bitwise operation . . . . . . . . . . . . . . 180
bitwise OR . . . . . . . . . . . . . . . . . . . 182
evaluating . . . . . . . . . . . . . . . . . . . 180
exclusive OR . . . . . . . . . . . . . . . . . 182
logical AND . . . . . . . . . . . . . . . . . 182
logical NOT . . . . . . . . . . . . . . . . . 183
logical OR . . . . . . . . . . . . . . . . . . . 183
negative numbers . . . . . . . . . . . . . . 180
WordPerfect character set values . . . 180
expressions . . . . . . . . . . . . . . . . . . . . . 174
expressions (merging) . . . . . . . . . . . . . 174
evaluation of . . . . . . . . . . . . . . . . . 174
numeric . . . . . . . . . . . . . . . . . . . . . 174
string . . . . . . . . . . . . . . . . . . . . . . . 174
F
faxes . . . . . . . . . . . . . . . . . . . . . . . . . . . . 92
cancelling . . . . . . . . . . . . . . . . . . . . 93
pausing . . . . . . . . . . . . . . . . . . . . . . 93
sending . . . . . . . . . . . . . . . . . . . . . . 92
viewing status . . . . . . . . . . . . . . . . . 92
field codes . . . . . . . . . . . . . . . . . . . . . . 100
field names . . . . . . . . . . . . . . . . . . . . . . 112
replacing . . . . . . . . . . . . . . . . . . . . 112
fields . . . . . . . . . . . . . . . . . . . . 97, 107, 112
adding to data files . . . . . . . . . . . . .114
adding to data text files . . . . . . . . . .114
adding to records . . . . . . . . . . . . . .113
deleting . . . . . . . . . . . . . . . . . . . . .112
deleting from data files . . . . . . . . . .114
deleting from data text files . . . . . . .114
deleting from records . . . . . . . . . . .113
editing . . . . . . . . . . . . . . . . . . . . . .112
in data table files . . . . . . . . . . . . . . . .97
in data text files . . . . . . . . . . . . . . . . .97
inserting in form documents . . . . . .101
limit . . . . . . . . . . . . . . . . . . . . . . . . .97
viewing . . . . . . . . . . . . . . . . . . . . .111
files . . . . . . . . . . . . . . . . . . . . . . . . . . . 9, 12
converting . . . . . . . . . . . . . . . . . . . .11
creating backups . . . . . . . . . . . . . 12, 14
inserting into active documents . . . . . .9
Microsoft Word . . . . . . . . . . . . . . . .12
printing to . . . . . . . . . . . . . . . . . 91, 96
renaming . . . . . . . . . . . . . . . . . . . . .12
saving . . . . . . . . . . . . . . . . . . . . . 12, 14
Find and Replace . . . . . . . . . . . . . . . . . .45
finding
macro errors with PerfectScript debugger
227
specifying case . . . . . . . . . . . . . . . . .47
text . . . . . . . . . . . . . . . . . . . . 45, 46, 47
whole words . . . . . . . . . . . . . . . . . . .47
fonts . . . . . . . . . . . . . . . . . . . . . . . . . . . . 30
changing . . . . . . . . . . . . . . . . . . . . .30
color . . . . . . . . . . . . . . . . . . . . . . . . .30
default . . . . . . . . . . . . . . . . . . . . . . .32
finding text . . . . . . . . . . . . . . . . . . . .46
modifying settings . . . . . . . . . . . . . . .29
page numbers . . . . . . . . . . . . . . . . . .67
previewing . . . . . . . . . . . . . . . . . . . .31
reusing recent . . . . . . . . . . . . . . . . . .31

258 Index
WordPerfect
size . . . . . . . . . . . . . . . . . . . . . . . . . 30
style . . . . . . . . . . . . . . . . . . . . . . . . 30
footnotes . . . . . . . . . . . . . . . . . . . . . . . . 59
continuing on next page . . . . . . . . . 63
display on page . . . . . . . . . . . . . . . . 63
finding . . . . . . . . . . . . . . . . . . . . . . 61
finding codes . . . . . . . . . . . . . . . . . . 61
inserting . . . . . . . . . . . . . . . . . . . . . 59
position . . . . . . . . . . . . . . . . . . . . . . 63
separator line . . . . . . . . . . . . . . . . . 64
spacing . . . . . . . . . . . . . . . . . . . . . . 63
form documents . . . . . . . . . . . . . . .97, 100
associating merge files . . . . . . . . . . 105
associating with data files . . . . . . . . 105
associating with data sources . . . . . 105
associating with ODBC data sources 106
changing the data file . . . . . . . . . . 106
converting merge files . . . . . . . . . . 110
converting to regular documents . . 110
creating . . . . . . . . . . . . . . . . . .101, 122
creating for a keyboard merge . . . . 103
inserting fields . . . . . . . . . . . . . . . . 101
merging . . . . . . . . . . . . . . . . . . . . . 97
merging with envelopes . . . . . . . . . 119
opening associated data files . . . . . 106
resetting options . . . . . . . . . . . . . . 119
form files . . . . . . . . . . . . . . . . . . . . . . . 110
converting . . . . . . . . . . . . . . . . . . . 110
formatting . . . . . . . . . . . . . . . . . . . . .19, 29
formatting symbols
documents . . . . . . . . . . . . . . . . . . . 19
pages . . . . . . . . . . . . . . . . . . . . . . . 19
text . . . . . . . . . . . . . . . . . . . . . . . . . 29
G
Get Units . . . . . . . . . . . . . . . . . . . . . . . 224
GetNumber . . . . . . . . . . . . . . . . . . . . . 224
GetString . . . . . . . . . . . . . . . . . . . . . . . 224
graphics
appending . . . . . . . . . . . . . . . . . . . . 48
copying . . . . . . . . . . . . . . . . . . . . . . 48
cutting . . . . . . . . . . . . . . . . . . . . . . . 48
moving . . . . . . . . . . . . . . . . . . . . . . 49
moving to another document . . . . . . 50
moving within document . . . . . . . . . 50
pasting . . . . . . . . . . . . . . . . . . . 48, 49
graphics styles
cutting . . . . . . . . . . . . . . . . . . . . . . . 48
dithering . . . . . . . . . . . . . . . . . . 83, 84
halftone options . . . . . . . . . . . . . . . . 84
pasting . . . . . . . . . . . . . . . . . . . . . . 48
printing . . . . . . . . . . . . . . . . . . . . . . 83
saving . . . . . . . . . . . . . . . . . . . . . . . 13
H
height . . . . . . . . . . . . . . . . . . . . . . . . . . . 38
lines . . . . . . . . . . . . . . . . . . . . . 38, 39
Help . . . . . . . . . . . . . . . . . . . . . . . . . . . 251
Help files
macro command browser . . . . . . . . 252
macros . . . . . . . . . . . . . . . . . . . . . . 251
hiding or displaying
Reveal Codes . . . . . . . . . . . . . . . . . . 16
text . . . . . . . . . . . . . . . . . . . . . . . . . 30
Yahoo! Search bar . . . . . . . . . . . . . . . 8
I
importing . . . . . . . . . . . . . . . . . . . . . . . 110
merge data . . . . . . . . . . . . . . . . . . . 110

Index 259
WordPerfect
incorporating reviewers’ changes . . . . . 51
indenting . . . . . . . . . . . . . . . . . . . . . . . . 35
double . . . . . . . . . . . . . . . . . . . . . . . 36
first line of paragraph . . . . . . . . . . . . 36
hanging indents . . . . . . . . . . . . . . . . 36
paragraphs . . . . . . . . . . . . . . . . . . . . 36
removing . . . . . . . . . . . . . . . . . . . . . 36
text . . . . . . . . . . . . . . . . . . . . . . 35, 36
information . . . . . . . . . . . . . . . . . . . . . 251
PerfectScript Commands . . . . . . . . 251
inserting . . . . . . . . . . . . . . . . . . . . . . . . . 59
files into documents . . . . . . . . . . . . . . 9
footnotes and endnotes . . . . . . . . 59, 60
integrating . . . . . . . . . . . . . . . . . . . . . . 232
Microsoft VBA with WordPerfect . . 232
italicizing . . . . . . . . . . . . . . . . . . . . . . . . 30
text . . . . . . . . . . . . . . . . . . . . . . . . . 30
J
justifying text . . . . . . . . . . . . . . . . . . 36, 37
K
keyboard merge . . . . . . . . . . . . . 107, 108
displaying merge commands . . . . . . 124
hiding merge commands . . . . . . . . 124
skipping records . . . . . . . . . . . . . . . 108
stopping a merge . . . . . . . . . . . . . . 107
keyboards
creating . . . . . . . . . . . . . . . . . . . . . 209
customizing . . . . . . . . . . . . . . 206, 209
keystrokes . . . . . . . . . . . . . . . . . . . . . . 206
assigning macros . . . . . . . . . . . . . . 206
assigning template macros . . . . . . . 209
removing template macros . . . . . . . 209
L
labels . . . . . . . . . . . . . . . . . . . . . . . . . .102
creating for a merge . . . . . . . . . . . .102
creating with address books . . . 117, 120
merging with address books . . . . . .117
printing . . . . . . . . . . . . 82, 83, 95, 117
landscape
page . . . . . . . . . . . . . . . . . . . . . . . . .72
leading . . . . . . . . . . . . . . . . . . . . . . . . . .38
adjusting . . . . . . . . . . . . . . . . . . . . .38
line height . . . . . . . . . . . . . . . . . . . . . . . . 38
adjusting . . . . . . . . . . . . . . . . . . 38, 39
line spacing . . . . . . . . . . . . . . . . . . . . . . .38
adjusting . . . . . . . . . . . . . . . . . . . . .38
lines . . . . . . . . . . . . . . . . . . . . . . . . . . . .38
counting . . . . . . . . . . . . . . . . . . . . . .10
height . . . . . . . . . . . . . . . . . . . . . 38, 39
spacing . . . . . . . . . . . . . . . . . . . . . . .38
listing files . . . . . . . . . . . . . . . . . . . . . . .227
generating . . . . . . . . . . . . . . . . . . .227
logical AND . . . . . . . . . . . . . . . . . . . . .182
logical NOT . . . . . . . . . . . . . . . . . . . . .183
logical OR . . . . . . . . . . . . . . . . . . . . . . .183
M
macro buttons . . . . . . . . . . . . . . . . . . .208
editing images on . . . . . . . . . . . . . .208
Macro Command Browser . . . . . . . . .223
getting Help . . . . . . . . . . . . . . . . . .252
inserting commands . . . . . . . . . . . .223
inserting system variables . . . . . . . .223
product commands . . . . . . . . . . . . .223
programming commands . . . . . . . .223
specifying commands . . . . . . . . . . .223
macro commands . . . . . . . . . . . . . 214, 224
accessing . . . . . . . . . . . . . . . . . . . .223

260 Index
WordPerfect
browser . . . . . . . . . . . . . . . . . . . . . 252
enumerations . . . . . . . . . . . . . . . . 214
Get Units . . . . . . . . . . . . . . . . . . . 224
GetNumber . . . . . . . . . . . . . . . . . 224
GetString . . . . . . . . . . . . . . . . . . . 224
MessageBox . . . . . . . . . . . . . . . . . 224
names . . . . . . . . . . . . . . . . . . . . . . 214
OLE object . . . . . . . . . . . . . . . . . . 214
parameters . . . . . . . . . . . . . . . . . . 214
product . . . . . . . . . . . . . . . . . . . . . 214
programming . . . . . . . . . . . . . . . . 214
recording into a macro . . . . . . . . . . 218
retrieving information . . . . . . . . . . 224
separators . . . . . . . . . . . . . . . . . . . 214
understanding . . . . . . . . . . . . . . . . 214
macro conventions . . . . . . . . . . . . . . . 216
macro errors . . . . . . . . . . . . . . . . . . . . 227
finding with PerfectScript debugger 227
Macro Toolbar . . . . . . . . . . . . . . . . . . 199
Codes . . . . . . . . . . . . . . . . . . . . . . 199
Commands . . . . . . . . . . . . . . . . . . 199
Dialog Editor . . . . . . . . . . . . . . . . 199
Options . . . . . . . . . . . . . . . . . . . . . 199
Pause . . . . . . . . . . . . . . . . . . . . . . 199
Play . . . . . . . . . . . . . . . . . . . . . . . 199
Record . . . . . . . . . . . . . . . . . . . . . 199
Save and compile . . . . . . . . . . . . . 199
Stop . . . . . . . . . . . . . . . . . . . . . . . 199
using . . . . . . . . . . . . . . . . . . . . . . 199
macro toolbars . . . . . . . . . . . . . . . . . . 198
viewing . . . . . . . . . . . . . . . . . . . . . 198
macro triggers . . . . . . . . . . . . . . . . . . . 203
macros . . . . . . . . . . . . . . . . . . . . . . . . 191
animating . . . . . . . . . . . . . . . . . . . 230
assigning to keystrokes . . . . . . . . . . 206
assigning to menus . . . . . . . . . . . . 207
assigning to property bar . . . . . . . . 208
assigning to toolbar buttons . . . . . . 207
changing default folder for . . . . . . . 195
compiling . . . . . . . . . . . . . . . 225, 227
creating . . . . . . . . . . . . . . . . . . . . . 191
creating menus . . . . . . . . . . . . . . . 207
customizing . . . . . . . . . . . . . . . . . . 206
debugging from PerfectScript . . . . . 229
deleting . . . . . . . . . . . . . . . . . 230, 231
editing . . . . . . . . . . . . . . . . . . . . . . 230
editing with PerfectScript . . . . . . . . 212
formatting . . . . . . . . . . . . . . . . . . . 216
getting online Help . . . . . . . . . . . . 251
Help . . . . . . . . . . . . . . . . . . . . . . . 251
hiding toolbars . . . . . . . . . . . . . . . . 199
included in WordPerfect . . . . . . . . 196
inserting codes . . . . . . . . . . . . . . . . 218
inserting triggers in templates . . . . . 205
pausing . . . . . . . . . . . . . . . . . . . . . 195
PerfectScript . . . . . . . . . . . . . . . . . 191
placing under menus . . . . . . . . . . . 207
playing . . . . . . . . . . . . . . . . . . . . . 195
predefined . . . . . . . . . . . . . . . . . . . 196
recording . . . . . . . . . . . . 191, 193, 194
recording macro commands . . . . . . 218
recording searches . . . . . . . . . . . . . 231
repeating . . . . . . . . . . . . . . . . . . . . 195
saving . . . . . . . . . . . . . . . . . . . . . . 193
searching . . . . . . . . . . . . . . . . . . . . 231
setting breakpoints . . . . . . . . . . . . . 230
starting WordPerfect Help . . . . . . . 251
storing . . . . . . . . . . . . . . . . . . . . . . 193
template . . . . . . . . . . . . . . . . 200, 201
triggering from templates . . . . . . . . 203
understanding commands . . . . . . . 214
understanding syntax . . . . . . . . . . . 214
updating from previous versions of Word-
Perfect . . . . . . . . . . . . . . . . . . . . . . 219
using . . . . . . . . . . . . . . . . . . . . . . . 196
using from previous versions of WordPer-
fect . . . . . . . . . . . . . . . . . . . . . . . . 219

Index 261
WordPerfect
using OLE object commands . . . . . 225
using parameters . . . . . . . . . . . . . . 220
using programming commands . . . 219
using QuickMacros . . . . . . . . . . . . 192
using toolbars . . . . . . . . . . . . . . . . 198
viewing toolbars . . . . . . . . . . . 198, 199
Visual Basic for Applications . . . . . 191
WordPerfect . . . . . . . . . . . . . 191, 196
WordPerfect macros . . . . . . . . . . . . 206
writing with PerfectScript . . . . . . . . 212
Make it fit . . . . . . . . . . . . . . . . . . . . . . . . 24
using . . . . . . . . . . . . . . . . . . . . . . . . 24
manipulating . . . . . . . . . . . . . . . . . . . . . 244
applications . . . . . . . . . . . . . . . . . . 244
Quattro Pro documents . . . . . . . . . 244
margins . . . . . . . . . . . . . . . . . . . . . . . . . 19
page . . . . . . . . . . . . . . . . . . . . . . . . 19
setting . . . . . . . . . . . . . . . . . . . . 19, 20
markers . . . . . . . . . . . . . . . . . . . . . . . . 123
displaying merge commands . . 123, 124
markings
removing redline . . . . . . . . . . . . . . . 55
menus
assigning macros . . . . . . . . . . . . . . 207
assigning template macros . . . 209, 210
customizing . . . . . . . . . . . . . . 207, 210
editing current template . . . . . . . . . 210
merge code parameters . . . . . . . . . . . 188
comments . . . . . . . . . . . . . . . . . . . 188
expr . . . . . . . . . . . . . . . . . . . . . . . . 188
field . . . . . . . . . . . . . . . . . . . . . . . . 188
filename . . . . . . . . . . . . . . . . . . . . 188
labels . . . . . . . . . . . . . . . . . . . . . . . 188
macroname . . . . . . . . . . . . . . . . . . 188
message . . . . . . . . . . . . . . . . . . . . . 188
prompt . . . . . . . . . . . . . . . . . . . . . 188
subexpr . . . . . . . . . . . . . . . . . . . . . 188
titles . . . . . . . . . . . . . . . . . . . . . . . .188
var . . . . . . . . . . . . . . . . . . . . . . . . .188
merge codes . . . . . . . . . . . . . . . . . . . . .123
deleting . . . . . . . . . . . . . . . . . 122, 123
displaying . . . . . . . . . . . . . . . . 122, 123
expressions . . . . . . . . . . . . . . . . . . .174
hiding . . . . . . . . . . . . . . . . . . 122, 123
inserting . . . . . . . . . . . . . . . . . . . . .123
parameters . . . . . . . . . . . . . . . . . . .188
merge commands . . . . . . . . . . . . . . . . .122
CALL . . . . . . . . . . . . . . . . . . . . . .186
CHAINDATA . . . . . . . . . . . . . . . .186
CHAINFORM . . . . . . . . . . . . . . . .186
CHAINMACRO . . . . . . . . . . . . . .186
CHAR . . . . . . . . . . . . . . . . . . . . . .185
deleting . . . . . . . . . . . . . . . . . 122, 123
displaying . . . . . . . . . . . . . . . . 122, 123
GETSTRING . . . . . . . . . . . . . . . .185
hiding . . . . . . . . . . . . . . . . . . 122, 123
inserting . . . . . . . . . . . . . 122, 123, 124
KEYBOARD . . . . . . . . . . . . . . . . .185
LABEL . . . . . . . . . . . . . . . . . 125, 186
LOOK . . . . . . . . . . . . . . . . . . 125, 185
MRGCMND . . . . . . . . . . . . . . . . .125
NESTDATA . . . . . . . . . . . . . 125, 186
NESTFORM . . . . . . . . . . . . . 125, 186
NESTMACRO . . . . . . . . . . . 125, 186
NEXT . . . . . . . . . . . . . . . . . . . . . .125
NEXTRECORD . . . . . . . . . . . . . .125
NTOC . . . . . . . . . . . . . . . . . . . . . .125
ONCANCEL . . . . . . . . . . . . . . . . .125
ONERROR . . . . . . . . . . . . . . . . . .125
PAGEOFF . . . . . . . . . . . . . . . . . . .125
PAGEON . . . . . . . . . . . . . . . . . . .125
POSTNET . . . . . . . . . . . . . . . . . .125
PRINT . . . . . . . . . . . . . . . . . . . . . .125
PROCESSOFF . . . . . . . . . . . . . . .125
PROCESSON . . . . . . . . . . . . . . . .125
PROMPT . . . . . . . . . . . . . . . 125, 185

262 Index
WordPerfect
QUIT . . . . . . . . . . . . . . . . . . . . . . 125
REPEATROW . . . . . . . . . . . . . . . 125
RETURN . . . . . . . . . . . . . . . .125, 186
RETURNCANCEL . . . . . . . . . . . 125
RETURNERROR . . . . . . . . . . . . . 125
REWRITE . . . . . . . . . . . . . . . . . . 125
STATUSPROMPT . . . . . . . . .125, 185
STEPOFF . . . . . . . . . . . . . . . . . . 125
STEPON . . . . . . . . . . . . . . . . . . . 125
STOP . . . . . . . . . . . . . . . . . . . . . . 125
STRLEN . . . . . . . . . . . . . . . . . . . 125
STRPOS . . . . . . . . . . . . . . . . . . . . 125
subroutines . . . . . . . . . . . . . . . . . . 186
SUBST . . . . . . . . . . . . . . . . . . . . . 125
SUBSTDATA . . . . . . . . . . . .125, 186
SUBSTFORM . . . . . . . . . . . .125, 186
SWITCH . . . . . . . . . . . . . . . . . . . 125
SYSTEM . . . . . . . . . . . . . . . . . . . 125
TOLOWER . . . . . . . . . . . . . . . . . 125
TOUPPER . . . . . . . . . . . . . . . . . . 125
using POSTNET bar commands . . 124
VARIABLE . . . . . . . . . . . . . . . . . . 125
WAIT . . . . . . . . . . . . . . . . . . . . . . 125
merge conditions . . . . . . . . . . . . . . . . 116
selecting data for a merge . . . . . . . . 116
merge data files . . . . . . . . . . . . . . . . . . 119
creating from address books . . . . . . 119
creating from selected records . . . . 119
merge delimiters . . . . . . . . . . . . . . . . . 174
other . . . . . . . . . . . . . . . . . . . . . . . 174
merge fields . . . . . . . . . . . . . . . . . . . . . 124
adding . . . . . . . . . . . . . . . . . . . . . 112
deleting . . . . . . . . . . . . . . . . . . . . . 112
editing . . . . . . . . . . . . . . . . . . . . . 112
inserting for POSTNET bar commands
124
Quick data entry . . . . . . . . . . . . . . 112
merge files . . . . . . . . . . . . . . . . . . . 97, 100
associating . . . . . . . . . . . . . . . . . . . 105
connecting . . . . . . . . . . . . . . . . . . . 186
converting . . . . . . . . . . . . . . . . . . . 110
data table files . . . . . . . . . . . . . . . . . 97
data text files . . . . . . . . . . . . . . . . . . 97
editing . . . . . . . . . . . . . . . . . . . . . . 112
Quick data entry . . . . . . . . . . . . . . 112
merge prompts . . . . . . . . . . . . . . . . . . 185
merge records . . . . . . . . . . . . . . . . . . . 112
editing . . . . . . . . . . . . . . . . . . . . . . 112
Quick data entry . . . . . . . . . . . . . . 112
merge variables . . . . . . . . . . . . . . . . . . 169
assigning . . . . . . . . . . . . . . . . . . . . 169
contents of . . . . . . . . . . . . . . . . . . . 169
duration of . . . . . . . . . . . . . . . . . . . 169
executing . . . . . . . . . . . . . . . . . . . . 169
global . . . . . . . . . . . . . . . . . . . . . . 169
operations on . . . . . . . . . . . . . . . . . 169
system . . . . . . . . . . . . . . . . . . . . . . 169
merged documents . . . . . . . . . . . . . . . 121
changing merge options . . . . . . . . . 121
choosing file extensions . . . . . . . . . 121
e-mailing . . . . . . . . . . . . . . . . . . . . 107
inserting blank lines . . . . . . . . . . . . 121
inserting page breaks . . . . . . . . . . . 121
specifying the number of copies . . . 121
merged records . . . . . . . . . . . . . . . . . . 121
inserting blank lines . . . . . . . . . . . . 121
inserting options to default . . . . . . . 121
inserting page breaks . . . . . . . . . . . 121
resetting options to default . . . . . . . 121
specifying the number of copies . . . 121
merging . . . . . . . . . . . . . . . . . 97, 184, 186
adding fields . . . . . . . . . . . . . . . . . 112
adding merged documents to active docu-
ment . . . . . . . . . . . . . . . . . . . . . . . 107
adding records . . . . . . . . . . . . . . . . 112

Index 263
WordPerfect
address book records . . . 116, 117, 118
address books . . . . . . . . . . . . . 118, 119
chaining files or macros . . . . . . . . . 186
changing default file extensions . . . 121
code parameters . . . . . . . . . . . . . . . 188
converting documents . . . . . . . . . . 110
converting merge files . . . . . . . . . . 110
creating data . . . . . . . . . . . . . . . . . . 97
creating form documents . . . . 101, 103
creating labels . . . . . . . . . . . . 100, 102
creating sideways text . . . . . . . . . . . 102
creating tables . . . . . . . . . . . . . . . . 104
data . . . . . . . . . . . . . . . . . . . . . . . . 116
data files . . . . . . . . . . . . . . . . . . . . . 97
deleting fields . . . . . . . . . . . . . . . . 112
deleting merge commands . . . . . . . 123
displaying merge commands . . . . . . 123
displaying merged fields sideways . . 100
documents . . . . . . . . .97, 107, 116, 121
e-mailing merged documents . 107, 109
envelopes . . . . . . . . .107, 108, 117, 119
expressions . . . . . . . . . . . . . . . . . . 174
form documents . . . . . . . . 97, 100, 119
hiding merge commands . . . . . . . . 122
importing data . . . . . . . . . . . . . . . . 110
including files . . . . . . . . . . . . . . . . 186
inserting merge commands . . . . . . . 123
keyboard . . . . . . . . . . . . . . . . 107, 108
labels with address books . . . . . . . . 117
levels . . . . . . . . . . . . . . . . . . . . . . . 169
loops . . . . . . . . . . . . . . . . . . . . . . . 169
merge commands . . . . . . . . . . . . . . 100
multiple files . . . . . . . . . . . . . . . . . 186
nesting files or macros . . . . . . . . . . 186
POSTNET bar commands . . 122, 124
printing merged documents . . . . . . 107
programming commands . . . . . . . . 184
records . . . . . . . . . . . . . . . . . . . . . . 116
saving merged documents . . . . . . . 107
saving output . . . . . . . . . . . . . . . . .107
selecting records . . . . . . . . . . . . . . .116
setting conditions . . . . . . . . . . . . . .117
skipping records . . . . . . . . . . . . . . .108
subroutines . . . . . . . . . . . . . . . . . . .186
substituting files . . . . . . . . . . . . . . .186
to tables . . . . . . . . . . . . . . . . . . . . .107
using the Merge toolbar . . . . . . . . .184
variables . . . . . . . . . . . . . . . . . . . . .169
MessageBox . . . . . . . . . . . . . . . . . . . . .224
Microsoft . . . . . . . . . . . . . . . . . . . . . . .232
Microsoft Word
Visual Basic for Applications . . . . . .232
moving
graphics . . . . . . . . . . . . . . . . . . . 49, 50
text . . . . . . . . . . . . . . . . . . . . . . . 49, 50
N
negative numbers . . . . . . . . . . . . . . . . .180
nesting . . . . . . . . . . . . . . . . . . . . . . . . .186
newspaper . . . . . . . . . . . . . . . . . . . . . . .25
columns . . . . . . . . . . . . . . . . . . . . . .25
numbering . . . . . . . . . . . . . . . . . . . . . . .65
numbering styles
changing . . . . . . . . . . . . . . . . . . . . .66
custom . . . . . . . . . . . . . . . . . . . . . . .67
deleting . . . . . . . . . . . . . . . . . . . . . .68
font . . . . . . . . . . . . . . . . . . . . . . . . .67
inserting . . . . . . . . . . . . . . . . . . . . . .66
pages . . . . . . . . . . . . . . . 65, 66, 67, 68
secondary . . . . . . . . . . . . . . . . . . . . .66
O
ODBC . . . . . . . . . . . . . . . . . . . . . . . . . .97
associating with form documents . . .106

264 Index
WordPerfect
OLE Automation . . . . . . . . . . . . . .246, 247
other controllers . . . . . . . . . . . . . . 247
PerfectScript . . . . . . . . . . . . . . . . . 247
understanding . . . . . . . . . . . . . . . . 247
using . . . . . . . . . . . . . . . . . . . . . . 246
WordPerfect . . . . . . . . . . . . . . . . . 247
OLE object commands . . . . . . . . . . . . 225
using in macros . . . . . . . . . . . . . . . 225
orientation . . . . . . . . . . . . . . . . . . . . . . 20
page . . . . . . . . . . . . . . . . . . . . . . . . 72
pages . . . . . . . . . . . . . . . . . . . . .20, 21
outlining
text . . . . . . . . . . . . . . . . . . . . . . . . . 30
P
page breaks . . . . . . . . . . . . . . . . . . . . . 121
pages . . . . . . . . . . . . . . . . . . . . . . . . . . . 15
customizing sizes . . . . . . . . . . . .21, 22
definitions . . . . . . . . . . . . . . . 20, 21, 22
dividing . . . . . . . . . . . . . . . . . . . . . 24
fitting text . . . . . . . . . . . . . . . . . . . . 24
formatting . . . . . . . . . . . . . . . . . . . . 19
margins . . . . . . . . . . . . . . . . . . .19, 20
modifying size . . . . . . . . . . . . . . . . . 23
numbering . . . . . . . . . . . 65, 66, 67, 68
orientation . . . . . . . . . . . . . . 20, 21, 72
printing sections . . . . . . . . . . . . .80, 94
restoring default . . . . . . . . . . . . . . . 24
selecting . . . . . . . . . . . . . . . . . . . . . . 6
setting margins . . . . . . . . . . . . . . . . 19
size . . . . . . . . . . . . . . . . . 20, 21, 23, 24
viewing . . . . . . . . . . . . . . . . . . . . . . 15
paper . . . . . . . . . . . . . . . . . . . . . . . . . . . 72
orientation . . . . . . . . . . . . . . . . . . . 72
paragraphs
counting . . . . . . . . . . . . . . . . . . . . . 10
formatting . . . . . . . . . . . . . . . . . . . . 35
indenting . . . . . . . . . . . . . . . . . . . . . 36
selecting . . . . . . . . . . . . . . . . . . . . . . 6
spacing . . . . . . . . . . . . . . . . . . . . . . 39
parallel . . . . . . . . . . . . . . . . . . . . . . . . . . 25
parallel columns
columns . . . . . . . . . . . . . . . . . . . . . 25
parameters . . . . . . . . . . . . . . . . . 188, 220
data types . . . . . . . . . . . . . . . . . . . 220
italics . . . . . . . . . . . . . . . . . . . . . . . 220
names . . . . . . . . . . . . . . . . . . . . . . 220
punctuation . . . . . . . . . . . . . . . . . . 220
using in macros . . . . . . . . . . . . . . . 220
pasting
Clipboard contents . . . . . . . . . . . . . . 49
graphics . . . . . . . . . . . . . . . . . . . 48, 49
online text . . . . . . . . . . . . . . . . . . . . 49
text . . . . . . . . . . . . . . . . . . . . . . 48, 49
PerfectScript . . . . . . . . . . . . 212, 228, 229
PerfectScript class . . . . . . . . . . . . . . . . 239
changing WordPerfect documents . 239
PerfectScript debugger . . . . . . . . . . . . 227
viewing command meanings . . . . . 230
PerfectScript editor . . . . . . . . . . . . . . . 229
assigning variables . . . . . . . . . . . . . 222
class . . . . . . . . . . . . . . . . . . . . . . . 232
commands . . . . . . . . . . . . . . . . . . . 251
compiling macros . . . . . . . . . . . . . . 227
debugging macros . . . . . . . . . . . . . 229
editing macros . . . . . . . . . . . . . . . . 212
generating listing files . . . . . . . . . . 227
setting . . . . . . . . . . . . . . . . . . . . . . 229
setting default macro folders . . . . . . 228
setting editor . . . . . . . . . . . . . . . . . 229
starting . . . . . . . . . . . . . . . . . . . . . 228
starting from Windows Start menu . 228
testing for errors . . . . . . . . . . . . . . . 229
using variables . . . . . . . . . . . . . . . . 222

Index 265
WordPerfect
utility . . . . . . . . . . . . . . . . . . . . . . 228
versus VBA . . . . . . . . . . . . . . . . . . 232
writing macros . . . . . . . . . . . . . . . . 212
playing
VBA macros in WordPerfect . . . . . . 238
portrait
page . . . . . . . . . . . . . . . . . . . . . . . . 72
position . . . . . . . . . . . . . . . . . . . . . . . . . 42
tab . . . . . . . . . . . . . . . . . . . . . . . . . . 42
positioning . . . . . . . . . . . . . . . . . . . . . . . 63
footnotes . . . . . . . . . . . . . . . . . . . . . 63
POSTNET bar codes . . . . . . . . . . . . . . 124
merging a single command in form docu-
ments . . . . . . . . . . . . . . . . . . . . . . 124
previewing
fonts . . . . . . . . . . . . . . . . . . . . . . . . 31
print jobs . . . . . . . . . . . . . . . . . . 73, 74
printer commands . . . . . . . . . . . . . . . . . 91
pausing . . . . . . . . . . . . . . . . . . . . . . 91
resetting . . . . . . . . . . . . . . . . . . . . . . 91
printers . . . . . . . . . . . . . . . . . . . . . . . . . 69
adding . . . . . . . . . . . . . . . . . . . . 69, 70
adding and deleting . . . . . . . . . . . . . 69
commands . . . . . . . . . . . . . . . . . 90, 96
disabling metrics . . . . . . . . . . . . . . . 72
inserting commands . . . . . . . . . . . . . 90
properties . . . . . . . . . . . . . . . . . . . . 71
reformatting documents for . . . . . . . 71
resetting . . . . . . . . . . . . . . . . . . . . . . 91
selecting . . . . . . . . . . . . . . . . . . . . . 70
settings . . . . . . . . . . . . . .69, 88, 89, 90
specifying feed . . . . . . . . . . . . . . . . . 72
printing . . . . . . . . . . . . . . . . . . . . . 69, 107
adding printers . . . . . . . . . . . . . . 69, 70
address labels . . . . . . . . . . . . . . . . . 117
adjusting margins . . . . . . . . . . . . . . 85
advanced options . . . . . . . . . . . . . . . 87
booklets . . . . . . . . . . . . . . . . . . . . . .79
cancelling . . . . . . . . . . . . . . . . . . . . .77
comments . . . . . . . . . . . . . . . . . . 79, 80
controlling print jobs . . . . . . . . . . . . .76
crop/fold marks . . . . . . . . . . . . . . . .81
data text files . . . . . . . . . . . . . . . . .114
disabling printer metrics . . . . . . . . . .72
dithering . . . . . . . . . . . . . . . . . . 83, 84
document details . . . . . . . . . . . . . . .81
documents . . . . . . . . . . . . . . . . . 75, 76
double-sided . . . . . . . . . . . . . . . . 78, 79
envelopes . . . . . . . . . . . . . . . . . . . . .82
fax . . . . . . . . . . . . . . . . . . . . . . . . . .92
graphics . . . . . . . . . . . . . . . . . . . 83, 84
inserting commands . . . . . . . . . . . . .90
labels . . . . . . . . . . . . . . . . . . 82, 83, 95
layout settings . . . . . . . . . . . . . . . . . .85
merge output . . . . . . . . . . . . . . . . .107
merged documents . . . . . . . . . . . . .107
multiple copies . . . . . . . . . . . . . . . . .75
page orientation . . . . . . . . . . . . . . . .72
pausing and resuming . . . . . . . . . 77, 93
pausing print jobs . . . . . . . . . . . . . . .91
previewing . . . . . . . . . . . . . . . . . 73, 74
printer commands . . . . . . . . . . . 90, 96
printer feed . . . . . . . . . . . . . . . . . . . .72
printer properties . . . . . . . . . . . . . . .71
printer settings . . . . . . . . . . . . . . . . .69
reformatting documents . . . . . . . . . .71
reverse order . . . . . . . . . . . . . . . . . . .72
saving settings . . . . . . . . . . . . . . . . .88
scaling print jobs . . . . . . . . . . . . . . . .85
sections . . . . . . . . . . . . . 79, 80, 93, 94
selecting printers . . . . . . . . . . . . . . . .70
setting up printers . . . . . . . . . . . . . . .91
settings . . . . . . . . . . . . . . 72, 88, 89, 90
thumbnail format . . . . . . . . . . . . . . .87
tiling print jobs . . . . . . . . . . . . . . . . .86
to files . . . . . . . . . . . . . . . . . . . . 91, 96

266 Index
WordPerfect
viewing status . . . . . . . . . . . . . . . . . 76
programming commands . . . . . . .122, 219
property bar
assigning macros . . . . . . . . . . . . . . 208
Q
QuickFonts . . . . . . . . . . . . . . . . . . . . . . 31
reusing recent fonts . . . . . . . . . . . . . 31
QuickFormat . . . . . . . . . . . . . . . . . . . . . 32
QuickMacros . . . . . . . . . . . . . . . . . . . . 192
playing . . . . . . . . . . . . . . . . . . . . . 193
recording . . . . . . . . . . . . . . . . . . . 193
QuickTips
editing . . . . . . . . . . . . . . . . . .207, 211
R
reassigning
routed documents . . . . . . . . . . . . . . 54
recording . . . . . . . . . . . . . . . . . . . . . . . 231
searches in macros . . . . . . . . . . . . . 231
records . . . . . . . . . . . . . . . . . . . . . . . . . 97
adding to data files . . . . . . . . . . . . 115
adding to data text files . . . . . . . . . 114
deleting . . . . . . . . . . . . . . . . . . . . . 112
deleting from data files . . . . . . . . . 115
editing . . . . . . . . . . . . . . . . . . . . . 112
finding . . . . . . . . . . . . . . . . . .111, 112
inserting as labels . . . . . . . . . . . . . 120
marking for a merge . . . . . . . . . . . 116
merging . . . . . . . . . . . . . . . . . .97, 119
merging from address books . . . . . 118
setting conditions . . . . . . . . . . . . . 117
sorting . . . . . . . . . . . . . . . . . . . . . 111
viewing . . . . . . . . . . . . . . . . . . . . . 111
redline text
applying . . . . . . . . . . . . . . . . . . . . . 30
removing markings . . . . . . . . . . . . . 55
removing
document comparison markings . . . . 55
renaming
files . . . . . . . . . . . . . . . . . . . . . . . . . 12
replacing
text . . . . . . . . . . . . . . . . . . . . . . . . . 45
whole words . . . . . . . . . . . . . . . . . . 47
word forms . . . . . . . . . . . . . . . . . . . 47
restoring
compared documents . . . . . . . . . . . . 55
page sizes . . . . . . . . . . . . . . . . . 21, 24
Reveal Codes . . . . . . . . . . . . . . . . . . . . . 16
customizing . . . . . . . . . . . . . . . . 16, 17
endnotes . . . . . . . . . . . . . . . . . . . . . 62
footnotes . . . . . . . . . . . . . . . . . . . . . 61
hiding or displaying . . . . . . . . . . . . . 16
reviewing
changes to documents . . . . . . . . . . . 51
creating a routing slip . . . . . . . . . . . . 52
documents . . . . . . . . . . . . . . . . . 50, 55
routed documents . . . . . . . . . . . . . . 53
routing
creating a routing slip . . . . . . . . . . . . 52
documents . . . . . . . . . . . . . . . . . . . . 52
reassigning documents . . . . . . . . . . . 54
reviewing documents . . . . . . . . . . . . 53
routing slip
creating . . . . . . . . . . . . . . . . . . . . . . 52
ruler
adding tab stops . . . . . . . . . . . . . . . . 40
copying tab stops . . . . . . . . . . . . . . . 40
indenting first line . . . . . . . . . . . . . . 36
moving tab stops . . . . . . . . . . . . . . . 42

Index 267
WordPerfect
S
saving . . . . . . . . . . . . . . . . . . . . . . . 14, 107
compound file format . . . . . . . . . . . . 14
documents . . . . . . . . . . . . . . 12, 13, 14
graphics . . . . . . . . . . . . . . . . . . . . . . 13
merge output . . . . . . . . . . . . . . . . . 107
text . . . . . . . . . . . . . . . . . . . . . . . . . 13
SDK . . . . . . . . . . . . . . . . . . . . . . . . . . . 212
searching . . . . . . . . . . . . . . . . . . . . . . . 231
in macros . . . . . . . . . . . . . . . . . . . . 231
specifying case . . . . . . . . . . . . . . . . . 47
specifying font . . . . . . . . . . . . . . . . . 46
text . . . . . . . . . . . . . . . . . . . . . . 45, 47
Web . . . . . . . . . . . . . . . . . . . . . . . 7, 8
sections . . . . . . . . . . . . . . . . . . . . . . . . . 94
printing . . . . . . . . . . . . . . . . . . . 79, 94
printing pages . . . . . . . . . . . . . . . . . 80
sentences . . . . . . . . . . . . . . . . . . . . . . . . . 6
selecting . . . . . . . . . . . . . . . . . . . . . . 6
separator line
for footnotes . . . . . . . . . . . . . . . . . . . 64
setting . . . . . . . . . . . . . . . . . . . . . . . . . 228
default macro folders in PerfectScript 228
macro breakpoints . . . . . . . . . . . . . 230
PerfectScript editor . . . . . . . . . . . . 229
shadow cursor
text . . . . . . . . . . . . . . . . . . . . . . . . . 30
size . . . . . . . . . . . . . . . . . . . . . . . . . . . . . 20
pages . . . . . . . . . . . . . . . .20, 21, 23, 24
Software Developer Kit (SDK) . . . . . . 212
sorting . . . . . . . . . . . . . . . . . . . . . . . . . 111
data files . . . . . . . . . . . . . . . . . . . . 111
records in data files . . . . . . . . . . . . 111
spacing
between lines . . . . . . . . . . . . . . . . . . 38
between paragraphs . . . . . . . . . . . . . 39
footnotes and endnotes . . . . . . . . . . .63
lines . . . . . . . . . . . . . . . . . . . . . . . . .38
spreadsheets . . . . . . . . . . . . . . . . . . . . .110
converting to data text files . . . . . . .110
strikeout . . . . . . . . . . . . . . . . . . . . . . . . .30
text . . . . . . . . . . . . . . . . . . . . . . . . . .30
substructure text
including in document comparison . .56
summary
of document comparison . . . . . . . . . .55
syntax . . . . . . . . . . . . . . . . . . . . . . . . . .214
system date . . . . . . . . . . . . . . . . . . . . .242
accessing values . . . . . . . . . . . . . . .242
system time . . . . . . . . . . . . . . . . . . . . .242
accessing values . . . . . . . . . . . . . . .242
T
tables . . . . . . . . . . . . . . . . . . . . . . . . . .104
tables of contents
converting to data text files . . . . . . .110
creating for a merge . . . . . . . . . . . .104
tabs
adding . . . . . . . . . . . . . . . . . . . . 39, 40
alignment . . . . . . . . . . . . . . . . . . . . .41
copying . . . . . . . . . . . . . . . . . . . . . .40
decimal alignment . . . . . . . . . . . . . .41
moving . . . . . . . . . . . . . . . . . . . . . . .42
removing . . . . . . . . . . . . . . . . . . 42, 43
restoring settings . . . . . . . . . . . . . 42, 43
snap to ruler . . . . . . . . . . . . . . . . . . .42
template features . . . . . . . . . . . . . . . . .212
associating with toolbars . . . . . . . . .212
Template Macro toolbar . . . . . . . . . . .199
hiding . . . . . . . . . . . . . . . . . . . . . .199
viewing . . . . . . . . . . . . . . . . . . . . .199

268 Index
WordPerfect
template macros . . . . . . . . . . . . . . . . . 200
adding . . . . . . . . . . . . . . . . . .200, 202
adding from scratch . . . . . . . . . . . . 201
assigning to keystrokes . . . . . . . . . . 209
assigning to menus . . . . . . . . .209, 210
assigning to toolbars . . . . . . . . . . . 209
assigning to toollbar buttons . . . . . 211
creating keyboards . . . . . . . . . . . . . 209
creating menus . . . . . . . . . . . . . . . 210
deleting . . . . . . . . . . . . . . . . . .202, 203
editing . . . . . . . . . . . . . . . . . . . . . 202
pause recording . . . . . . . . . . . . . . . 201
pausing . . . . . . . . . . . . . . . . . . . . . 201
playing . . . . . . . . . . . . . . . . . . . . . 201
recording . . . . . . . . . . . . . . . . . . . 201
repeating . . . . . . . . . . . . . . . . . . . . 201
resuming . . . . . . . . . . . . . . . . . . . . 201
saving and compiling . . . . . . . . . . . 202
using the Associate button . . . . . . . 212
viewing saved . . . . . . . . . . . . . . . . 201
TemplateFill macro command . . . . . . 203
adding . . . . . . . . . . . . . . . . . . . . . 205
templates
triggering macros . . . . . . . . . . . . . 203
testing . . . . . . . . . . . . . . . . . . . . . . . . . 229
errors from PerfectScript . . . . . . . . 229
text . . . . . . . . . . . . . . . . . . . . . . . . . . . 100
appending to Clipboard . . . . . . . . . . 48
copying . . . . . . . . . . . . . . . . . . . .48, 49
cutting . . . . . . . . . . . . . . . . . . . . . . 48
excluding from document comparison 57
finding and replacing . . . . . . . . . . . 45
moving . . . . . . . . . . . . . . . . . . . . . . 49
moving to another document . . . . . . 50
moving within document . . . . . . . . . 50
pasting . . . . . . . . . . . . . . . . . . . . . . 49
substructure . . . . . . . . . . . . . . . . . . 56
text boxes . . . . . . . . . . . . . . . . . . . . . . 100
creating . . . . . . . . . . . . . . . . . . . . . 100
entering text . . . . . . . . . . . . . . . . . . . . 5
rotating text . . . . . . . . . . . . . . . . . . 100
text files . . . . . . . . . . . . . . . . . . . . . . . . 110
text styles
alignment . . . . . . . . . . . . . . . . . 36, 37
centering . . . . . . . . . . . . . . . . . . . . . 36
copying and cutting . . . . . . . . . . . . . 48
copying formats . . . . . . . . . . . . . . . . 32
deleting . . . . . . . . . . . . . . . . . . . . . 6, 7
deselecting . . . . . . . . . . . . . . . . . . . . . 7
entering . . . . . . . . . . . . . . . . . . . . . 4, 5
finding . . . . . . . . . . . . . . . . . . . 46, 47
finding and replacing . . . . . . . . . . . . 45
finding in data files . . . . . . . . . . . . 112
fitting to pages . . . . . . . . . . . . . . . . . 24
formatting . . . . . . . . . . . . . . . . . . . . 29
indenting . . . . . . . . . . . . . . . . . . 35, 36
inserting . . . . . . . . . . . . . . . . . . . . 4, 5
justifying . . . . . . . . . . . . . . . . . . 36, 37
merging sideways . . . . . . . . . . . . . . 102
replacing . . . . . . . . . . . . . . . . . . . . . 45
rotating . . . . . . . . . . . . . . . . . . . . . 102
saving . . . . . . . . . . . . . . . . . . . . . . . 13
selecting . . . . . . . . . . . . . . . . . . . . . . 6
tiling
print jobs . . . . . . . . . . . . . . . . . . . . . 86
toolbar buttons . . . . . . . . . . . . . . . . . . 207
assigning macros . . . . . . . . . . . . . . 207
assigning template macros . . . . . . . 211
customizing . . . . . . . . . . . . . . . . . . 207
editing images on . . . . . . . . . . . . . . 211
toolbars . . . . . . . . . . . . . . . . . . . . . . . . . . 2
for macros . . . . . . . . . . . . . . . . . . . 198
Macro . . . . . . . . . . . . . . . . . . . . . . 199
Macro Tools . . . . . . . . . . . . . . . . . 198
Merge . . . . . . . . . . . . . . . . . . . . . . 184
Shipping Macros . . . . . . . . . . . . . . 198
Template Macro . . . . . . . . . . . . . . 199
VBA . . . . . . . . . . . . . . . . . . . . . . . 235
triggers . . . . . . . . . . . . . . . . . . . . . . . . . 203
DoFiller . . . . . . . . . . . . . . . . . . . . 203
macro . . . . . . . . . . . . . . . . . . . . . . 203
typesetting
leading . . . . . . . . . . . . . . . . . . . . . . 38
U
underlining . . . . . . . . . . . . . . . . . . . . . . . 30
V
values . . . . . . . . . . . . . . . . . . . . . . . . . . 242
accessing system date . . . . . . . . . . . 242
accessing system time . . . . . . . . . . . 242
variables . . . . . . . . . . . . . . . . . . . . . . . . 222
assigning in PerfectScript . . . . . . . . 222
using in PerfectScript . . . . . . . . . . . 222
VBA . . . . . . . . . . . . . . . . . . . . . . . 232, 242
VBA macros . . . . . . . . . . . . . . . . . . . . . 239
assigning security . . . . . . . . . . . . . . 232
creating macros . . . . . . . . . . . . . . . 232
debugging macros . . . . . . . . . . . . . 238
displaying toolbars . . . . . . . . . . . . . 235
editing macros . . . . . . . . . . . . . . . . 238
editor . . . . . . . . . . . . . . . . . . . . . . . 232
event driven programming . . . . . . . 232
global macros . . . . . . . . . . . . . . . . . 237
methods . . . . . . . . . . . . . . . . . . . . . 242
PerfectScript class . . . . . . . . . . . . . 239
playing in WordPerfect . . . . . . . . . 238
project macros . . . . . . . . . . . . . . . . 235
starting from WordPerfect . . . . . . . 235
using macros . . . . . . . . . . . . . . . . . 232
views . . . . . . . . . . . . . . . . . . . . . . . . . . . 15
switching . . . . . . . . . . . . . . . . . . . . . 15
270
volumes
selecting . . . . . . . . . . . . . . . . . . . . . . 6
W
Web
searching . . . . . . . . . . . . . . . . . . . .7, 8
Web browser
copying and pasting text from . . . . . 49
word count . . . . . . . . . . . . . . . . . . . . . . 10
WordPerfect macros . . . . . . . . . . . . . 206
previous versions . . . . . . . . . . . . . . 219
updating from previous versions . . . 219
words
counting . . . . . . . . . . . . . . . . . . . . . 10
finding and replacing . . . . . . . . . . . 47
in document comparison . . . . . . . . . 56
selecting . . . . . . . . . . . . . . . . . . . . . . 6
work area
exploring . . . . . . . . . . . . . . . . . . . . . . 2
Y
Yahoo! Search . . . . . . . . . . . . . . . . . . . .7, 8
Yahoo! Search bar
hiding or displaying . . . . . . . . . . . . . . 8
performing Web search . . . . . . . . . . . 8
WordPerfect® Office X3 User Guide
Copyright 1996–2005 Corel Corporation. All rights reserved.
Protected by U.S. Patents 5652880; 5347620; 5767860; 6195100; 6385336;
6552725; 6657739; 6731309; 6825859; 6633305; Patents Pending.
Product specifications, pricing, packaging, technical support and information
(“specifications”) refer to the retail English version only. The specifications for all other
versions (including other language versions) may vary.
INFORMATION IS PROVIDED BY COREL ON AN “AS IS” BASIS, WITHOUT
ANY OTHER WARRANTIES OR CONDITIONS, EXPRESS OR IMPLIED,
INCLUDING, BUT NOT LIMITED TO, WARRANTIES OF MERCHANTABLE
QUALITY, SATISFACTORY QUALITY, MERCHANTABILITY OR FITNESS FOR
A PARTICULAR PURPOSE, OR THOSE ARISING BY LAW, STATUTE, USAGE
OF TRADE, COURSE OF DEALING OR OTHERWISE. THE ENTIRE RISK AS
TO THE RESULTS OF THE INFORMATION PROVIDED OR ITS USE IS
ASSUMED BY YOU. COREL SHALL HAVE NO LIABILITY TO YOU OR ANY
OTHER PERSON OR ENTITY FOR ANY INDIRECT, INCIDENTAL, SPECIAL,
OR CONSEQUENTIAL DAMAGES WHATSOEVER, INCLUDING, BUT NOT
LIMITED TO, LOSS OF REVENUE OR PROFIT, LOST OR DAMAGED DATA OR
OTHER COMMERCIAL OR ECONOMIC LOSS, EVEN IF COREL HAS BEEN
ADVISED OF THE POSSIBILITY OF SUCH DAMAGES, OR THEY ARE
FORESEEABLE. COREL IS ALSO NOT LIABLE FOR ANY CLAIMS MADE BY
ANY THIRD PARTY. COREL'S MAXIMUM AGGREGATE LIABILITY TO YOU
SHALL NOT EXCEED THE COSTS PAID BY YOU TO PURCHASE THE
MATERIALS. SOME STATES/COUNTRIES DO NOT ALLOW EXCLUSIONS OR
LIMITATIONS OF LIABILITY FOR CONSEQUENTIAL OR INCIDENTAL
DAMAGES, SO THE ABOVE LIMITATIONS MAY NOT APPLY TO YOU.
Corel, the Corel logo, WordPerfect, Presentations, Quattro, Quattro Pro, Paradox,
Calc As-You-Go, Corel SCRIPT™, Corel DESIGNER, CorelDRAW, Corel Support
Services, Fit As-You-Go, Internet Publisher, MAIL, Make It Fit, ObjectPAL, Paint
Shop Pro, Painter, PerfectExpert, PerfectScript, QuickChart, QuickColumns,
QuickFill, QuickPlay, QuickSum, QuickTask, QuickTips, QuickType, QuickFonts,
QuickMenu, QuickWords, RealTime Preview, Scrapbook, Show It!, Show On The Go,
SpeedLink, and TextArt are trademarks or registered trademarks of Corel Corporation
and/or its subsidiaries in Canada, the U.S. and/or other countries.
Adobe, PostScript, and Reader are registered trademarks of Adobe Systems
Incorporated in the United States and/or other countries. dBASE is a registered
trademark of dBASE, Inc. Delphi is a registered trademark of Borland Software
Corporation in the United States and other countries. Eudora is a registered trademark
of Qualcomm Incorporated. Flash is a registered trademark of Macromedia, Inc. in the
United States and/or other countries. Grammatik is a registered trademark of Novell,
Inc. Lotus and 1-2-3 are registered trademarks of International Business Machines
Corporation in the US, other countries, or both. Mbox is a registered trademark of
Avid Technology, Inc. in the United States and/or other countries. Microsoft, Microsoft
SQL Server, MS-DOS, Outlook, PowerPoint, Visual Basic, Visual C++, Visual
FoxPro, Windows, Windows Media, and Windows NT are registered trademarks of
Microsoft Corporation in the United States and/or other countries. Netscape is a
registered trademark of Netscape Communications Corporation. Oxford is a
trademark of Oxford University Press and is used by Corel Corporation under licence.
Pentium is a registered trademark of Intel Corporation or its subsidiaries in the US and
other countries. Quicken is a trademark of Intuit Inc., registered in the United States
and other countries. QuickTime is a trademark used under license. QuickTime is a
registered trademark of Apple Computer, Inc. in the United States and other
countries. TruDoc is a registered trademark of Bitstream Inc. vCard is a trademark of
the Internet Mail Consortium. Yahoo!, Y!, the Yahoo! logo and the Y! logo are the
trademarks and/or registered trademarks of Yahoo! Inc. Other product, font, and
company names and logos may be trademarks or registered trademarks of their
respective companies.
015115
