Corel Corel® WordPerfect® Office X4 Guidebook Word Perfect Wordperfect Ug
User Manual: corel WordPerfect Office - X4 - Guidebook Free User Guide for Corel WordPerfect Software, Manual
Open the PDF directly: View PDF ![]() .
.
Page Count: 95
- Contents
- Part 1: Basics
- Part 2: Tutorials
- How to create footers
- How to create styles for text and graphics
- How to create bulleted lists
- How to create and format tables
- How to add images and captions
- How to add a table of contents
- How to add formulas to Quattro Pro spreadsheets
- How to create customized slide shows
- How to gather information with WordPerfect Lightning
- Part 3: Reference

X4
GUIDEBOOK
®

Contents
COREL WORDPERFECT OFFICE X4 GUIDEBOOK
Contents i
PART 1: BASICS
1 — Welcome to Corel WordPerfect Office X4 . . . . . . . . . . . . . . . . . . . . 3
2 — Getting started with Corel WordPerfect Office X4 . . . . . . . . . . . . . 7
3 — Learning to use Corel WordPerfect Office X4 . . . . . . . . . . . . . . . . 13
PART 2: TUTORIALS
4 — How to create footers. . . . . . . . . . . . . . . . . . . . . . . . . . . . . . . . . . . 21
5 — How to create styles for text and graphics. . . . . . . . . . . . . . . . . . . 29
6 — How to create bulleted lists . . . . . . . . . . . . . . . . . . . . . . . . . . . . . . 37
7 — How to create and format tables . . . . . . . . . . . . . . . . . . . . . . . . . . 41
8 — How to add images and captions . . . . . . . . . . . . . . . . . . . . . . . . . . 47
9 — How to add a table of contents . . . . . . . . . . . . . . . . . . . . . . . . . . . 51
10 — How to add formulas to Quattro Pro spreadsheets . . . . . . . . . . . . 55
11 — How to create customized slide shows . . . . . . . . . . . . . . . . . . . . . 61
12 — How to gather information with WordPerfect Lightning . . . . . . . . 69
PART 3: REFERENCE
13 — Sharing content with others . . . . . . . . . . . . . . . . . . . . . . . . . . . . . . 77
14 — Working with users of Microsoft Office . . . . . . . . . . . . . . . . . . . . . 87

PART 1: BASICS

PART 1: BASICS
Welcome to Corel WordPerfect Office X4 3
Welcome to Corel
WordPerfect Office X4 1
B
ASICS
Welcome to Corel® WordPerfect® Office X4, a feature-rich suite of
productivity software that includes word-processing, spreadsheet,
presentation, and address book programs.
About this guidebook
This guidebook gives you a hands-on learning experience to help you
become familiar with the tools and features of Corel WordPerfect
Office. By following the tutorials and by reading the information in the
“Basics” and “Reference” chapters, you'll learn how easy it is to create
and share professional-looking documents, spreadsheets, and slide
shows.
The chapters in this guidebook are divided into three parts: “Basics,”
“Tutorials,” and “Reference.”
Basics
Chapters 1 through 3 introduce you to the programs and utilities
included in Corel WordPerfect Office. In this part of the guidebook,
you'll find instructions on how to register the product and how to
access technical support. You'll also discover how to access additional
learning resources that can help you use the software more efficiently.
Tutorials
Chapters 4 through 12 provide simple tutorials with step-by-step
instructions for performing some common tasks. In addition to
providing helpful background information, the tutorials let you step
right into the action, so you learn as you go. As you complete each

PART 1: BASICS
4 Corel WordPerfect Office X4 Guidebook
tutorial, you’ll learn technical tips for working with the programs, as
well as valuable ideas that you can apply to your own documents,
spreadsheets, and slide shows.
For most of the tutorials, you'll start by opening a file from the Tutorial
Samples folder, which is installed with Corel WordPerfect Office X4 on
the drive where your operating system is installed. Then, you'll save the
file to a working file so that you can perform the tasks described in the
tutorial while keeping the sample file unchanged.
WordPerfect®: By completing the WordPerfect tutorials (Chapters 4
through 9) in sequence, you’ll re-create the final real-estate document
(WP_Final.wpd), which is installed in the Tutorial Samples folder. At the
same time, you’ll learn to incorporate the tools into your workflow and
use them to enhance the shape and structure of your own documents.
Quattro Pro®: By completing the Quattro Pro tutorial (Chapter 10),
you’ll learn how to create a basic formula that determines the average
cost per unit of stock. The formula totals the cost of the purchase,
including the commission, and then divides the total by the number of
stocks purchased. You’ll use basic operators and cell references to
create this formula.
Presentations™: By completing the Presentations tutorial (Chapter 11),
you’ll learn how to create a customized slide show by importing an
outline from a WordPerfect document. When you import an outline, the
headings in the WordPerfect document appear in the Presentations file
as slide titles, and the corresponding body text appears under the slide
titles.
Corel® WordPerfect® Lightning™: By completing the WordPerfect
Lightning tutorial (Chapter 12), you’ll learn how to use the Navigator,
Notes window, and Viewer to gather information from a variety of
sources and send it to WordPerfect. And, if you’ve already completed
the WordPerfect tutorials, you’ll know how to format your rough
content and create a polished document.

PART 1: BASICS
Welcome to Corel WordPerfect Office X4 5
Reference
Chapters 13 and 14 describe the tools and features that let you share
content with others. You’ll learn how to convert your files to the
industry-standard file formats PDF and HTML, and how to open PDF
files with WordPerfect and WordPerfect Lightning. If you are
transitioning from Microsoft® Office programs, or if you need to share
work with Microsoft Office users, you'll learn how easy it is to open,
import, export, and save Microsoft Office files. The compatibility
features of Corel WordPerfect Office let you easily share files with users
of Microsoft® Word, Microsoft® Excel®, or Microsoft® PowerPoint®.
About Corel Corporation
Corel is a leading developer of graphics, productivity, and digital media
software, with more than 100 million users worldwide. The company’s
product portfolio includes some of the world’s most popular and widely
recognized software brands, including CorelDRAW® Graphics Suite,
Corel® Paint Shop Pro®, Corel® Painter™, Corel DESIGNER®, Corel®
WordPerfect® Office, WinZip®, and iGrafx®. In 2006, Corel acquired
InterVideo, makers of WinDVD®, and Ulead, a leading developer of
video, imaging, and DVD authoring software. Designed to help people
become more productive and express their creative potential, Corel’s
full-featured software products set a higher standard for value in being
easier to learn and use. The industry has responded with hundreds of
awards recognizing Corel’s leadership in software innovation, design,
and value. Corel’s products are sold in more than 75 countries through
a well-established network of international resellers, retailers, original
equipment manufacturers, online providers, and Corel’s global Web
sites. With its headquarters in Ottawa, Canada, the company has major
offices in the United States, the United Kingdom, Germany, China, and
Japan. Corel’s stock is traded on the NASDAQ under the symbol CREL
and on the TSX under the symbol CRE.

PART 1: BASICS
Getting started with Corel WordPerfect Office X4 7
Getting started with
Corel WordPerfect Office X4 2
B
ASICS
Corel WordPerfect Office is a feature-rich suite of productivity software
that includes word-processing, spreadsheet, presentation, and address
book programs. The suite is designed for compatibility with Microsoft
Office and with industry-standard file formats such as PDF and HTML.
In this chapter, you’ll learn about
•main programs in Corel WordPerfect Office
•additional programs and utilities
•registering Corel WordPerfect Office
Main programs in
Corel WordPerfect Office
This section describes the main programs that are included in
Corel WordPerfect Office. Note that not all of the programs described
here are included in every edition of the software. You can find more
information about each of these programs in other sections of this
guidebook and in the Help accessible within each program.
WordPerfect
WordPerfect is a word-processing program that lets you produce
professional-looking documents, such as newsletters, articles, reports,
books, proposals, and brochures. You can easily add graphics, charts,
columns, and tables to any document. By using the Reveal Codes
feature, you can control every element of a document. In addition, the
enhanced publishing features of WordPerfect let you publish your
documents to paper, PDF, and the Web. You can also create, edit,

PART 1: BASICS
8 Corel WordPerfect Office X4 Guidebook
retrieve, validate, and save documents created with Extensible Markup
Language (XML).
Quattro Pro
Quattro Pro is a spreadsheet program that lets you manage, analyze,
report, and share data. Quattro Pro provides the tools you need to
produce tables, financial forms, lists, databases, charts, and reports.
You can use Quattro Pro to perform simple tasks, such as creating
personal budgets, or more complex tasks, such as preparing year-end
financial statements or creating reports from external databases. In
addition, Quattro Pro lets you create a single file and then publish it to
paper, electronic media, and the Web.
Presentations
With Presentations, you can create high-quality slide shows as well as
project proposals, interactive reports, demonstrations, multimedia
presentations, flyers, signs, and banners. You can also publish slide
shows and other projects to HTML, XML, or PDF.
Presentations Graphics
Presentations Graphics™ lets you create drawings, edit and create
bitmaps, and convert vector images to bitmaps.
WordPerfect Lightning
WordPerfect Lightning was invented to make the common tasks of
viewing, capturing, and reusing information and images simpler and
easier than ever before. WordPerfect Lightning 1.0 gives you the tools
you need to work with others and to capture and fine-tune your ideas.
You can use this application to take notes or to view graphics, photos,
or documents saved as PDF, Microsoft Word, or WordPerfect files. When
it’s time to polish your work, WordPerfect Lightning integrates
seamlessly with Corel WordPerfect Office and Microsoft Word —
something no online office tool does.

PART 1: BASICS
Getting started with Corel WordPerfect Office X4 9
WordPerfect Lightning has three components: the Navigator, the
Viewer, and the Notes window.
The Navigator
Using the Navigator, you can create, store, and organize your
WordPerfect Lightning notes in a familiar tree structure.
The Viewer
The Viewer is a lightweight and versatile file-viewing alternative for
PDF, Microsoft Word, WordPerfect, and image files. As a PDF reader, the
Viewer lets you search a PDF file and read the comments and
information it contains. What’s more, WordPerfect Lightning offers
clickable links and intuitive page rotation, so you can use it to replace
Adobe® Reader® and other PDF-viewing programs.
The Notes window
The Notes window lets you capture your ideas and reuse information
from other sources. It gives you access to standard word-processing
features, such as fonts and font styles, bullets and numbering, text
alignment, tables, and color. The Notes window even lets you insert
graphics or pictures into your notes.
Corel Visual Intelligence
Corel® Visual Intelligence™ is a business-intelligence program that
anyone can use for visualizing and analyzing data. When you open a
Quattro Pro spreadsheet in Corel Visual Intelligence, a graph that best
suits the data is automatically displayed. Color-coded cells let you
quickly identify value ranges, and rich visual graphs help you better
understand your data. You can customize your analysis with a series of
options that let you adjust the range of data being analyzed and
visualized. You can also use data from Microsoft Excel spreadsheets or
legacy Quattro Pro files, going back to version 9. A built-in learning
guide walks you through the basics of Corel Visual Intelligence step by
step.

PART 1: BASICS
10 Corel WordPerfect Office X4 Guidebook
Additional programs and utilities
In addition to the main programs already discussed, other programs
and utilities are included in Corel WordPerfect Office X4. This section
describes some of these programs. Not all editions of the software
include these items.
Program or utility Description
Clipbook™ Clipbook is a utility that works with any
Windows®-based program to store multiple
items, called clips, in an unlimited number
of clipboards. Clips can be text, sounds, or
graphics.
CorelMEMO™ CorelMEMO is an electronic notepad in
Presentations that lets you add comments
to slide shows and drawings.
Equation Editor Equation Editor lets you insert and format
mathematical and scientific equations in a
WordPerfect document or Presentations
slide show.
Grammatik® You can use Grammatik to check an entire
document, or part of a document, for
grammar, spelling, and style errors.
Grammatik also analyzes the grammatical
structure of a document and provides
statistics about the writing style, the types
of errors flagged in the document, and the
level of readability.
Macros Macros are time-saving programming scripts
that automate routine tasks.

PART 1: BASICS
Getting started with Corel WordPerfect Office X4 11
PerfectScript™ PerfectScript is the macro language for
WordPerfect, Quattro Pro, and
Presentations. This command-based
language lets you record the results of
keystrokes or mouse selections instead of
recording the keystrokes themselves.
PerfectExpert™ The PerfectExpert can guide you through a
detailed project, such as creating a resume,
or it can guide you through a smaller task,
such as inserting a clipart image. The
PerfectExpert even provides you with
galleries of professionally designed
documents. You can choose one of these
documents and tailor its layout and content
to match your needs.
Spell Checker Spell Checker is a writing tool that identifies
misspelled words, duplicate words, and
irregular capitalization in text selections.
TextArt™ TextArt lets you transform words into
designs. You can use multiple visual effects,
such as font, color, and rotation options, to
create professional-looking two-
dimensional or three-dimensional images.
Thesaurus The Thesaurus is a writing tool that helps
you refine your writing by letting you look
up synonyms, antonyms, and related words.
Corel WordPerfect Office
conversion utility
The Corel WordPerfect Office conversion
utility allows you to convert the file format
of a document without having to open
WordPerfect.
Program or utility Description

PART 1: BASICS
12 Corel WordPerfect Office X4 Guidebook
Registering Corel WordPerfect Office
Registering Corel WordPerfect Office gives you timely access to the
latest product updates and to high-quality technical support.
The serial number on the registration card is proof that you own a legal
copy of Corel WordPerfect Office. You need the serial number when
you call Corel Technical Support, upgrade to a new version of
Corel WordPerfect Office, or order replacement CDs.
You can use any of the following methods to register:
•Fill out the Corel WordPerfect Office registration card, and return it
to Corel. You can do this during the installation, while the setup
program is running.
•Fill out the electronic form that appears when the software
installation is completed. You’ll need access to the Internet to use
this method.
•Visit Corel on the Web, and complete the registration form at
www.corel.com.

PART 1: BASICS
Learning to use Corel WordPerfect Office X4 13
Learning to use
Corel WordPerfect Office X4 3
B
ASICS
In addition to following the tutorials in this guidebook, you can access
information from within each program of Corel WordPerfect Office to
help you learn to use the software efficiently. You can also use the
PerfectExpert, a tool that helps you work more quickly while you
become familiar with the programs.
In this chapter, you’ll learn about
•using the Help
•documentation conventions
•using the PerfectExpert
•using CorelTUTOR™
•other learning resources
•sending feedback
Using the Help
The Help is the most comprehensive source of information for each of
the main programs in Corel WordPerfect Office. The Help Topics dialog
box provides three ways to find information. You can choose a topic
from the Contents page, use the Index page to search for a specific
topic, or use the Search page to search for specific words and phrases.
If you want, you can also print topics from the Help.
WordPerfect Lightning includes a Web-based Help system, which
contains a full range of topics in a searchable format. The Help system
for WordPerfect Lightning opens in a separate browser window on your
screen.

PART 1: BASICS
14 Corel WordPerfect Office X4 Guidebook
Context-sensitive Help
WordPerfect, Quattro Pro, and Presentations include several forms of
context-sensitive Help to assist you while you work. You can access
context-sensitive Help from the menus, dialog boxes, and toolbars.
To access Help topics in WordPerfect, Quattro Pro, or
Presentations
•Click Help ` Help topics.
To access Help topics in WordPerfect Lightning
•Click the Help button , and click Help topics.
To print an entire section of the Help
1On the Contents page, choose a section.
2Click Print.
To print a selected Help topic
•Right-click the Help topic window, and click Print.
To use context-sensitive Help
•Perform an action from the following table to find information
about specific workspace components.
For help with Do the following
Menu commands Point to a command.
A brief description, called a tooltip, appears.
Toolbar buttons Point to a button.
A brief description, called a tooltip, appears.
Dialog boxes Click Help in the dialog box, or press F1.
Dialog box controls Click the What’s This? button in a dialog
box, and click the control.

PART 1: BASICS
Learning to use Corel WordPerfect Office X4 15
Documentation conventions
Before you start to follow procedures in this guidebook or the Help,
make sure that you understand the documentation conventions that are
used.
The following conventions are related to using the mouse.
The following conventions are related to keyboard actions.
When instructed to Do the following
Click Edit ` Select `
Sentence
Click the Edit menu, click Select, and click
Sentence in the menu that appears.
Enable a check box Click the check box to place a check mark or
an “X” in the box.
Disable a check box Click the check box to remove the check
mark or “X”.
Select text Drag to highlight text.
Click a paragraph Click to position the cursor in the paragraph.
Click a frame Click anywhere in a frame, or click the
border of the frame.
Right-click, and click
Paste
Click the right mouse button, and click the
Paste command in the menu that appears.
When instructed to Do the following
Press Enter Press the Enter key on your keyboard.
Press Ctrl + Shift Press the Control key, and continue to hold
it down while pressing the Shift key.

PART 1: BASICS
16 Corel WordPerfect Office X4 Guidebook
The following icons appear in this guidebook.
Using the PerfectExpert
The PerfectExpert incorporates the best features of QuickTask™ and
Coaches, which were included in earlier versions of Corel WordPerfect
Office, with galleries of professionally designed document
templates.You can choose any template and then tailor its layout and
content to match your needs.
You can use the PerfectExpert to guide you through a detailed project,
such as creating a resume, or a smaller task, such as inserting a clipart
image.
To create a document by using a template
1From within a Corel WordPerfect Office program, click File ` New
from project.
2Click the Create new tab.
3Choose one of the following programs from the list box:
• WordPerfect
• Quattro Pro
• Presentations
If the program you want is not displayed in the list box, click
Options, and click Refresh projects.
4Choose a project template from the list.
5Click the Create button.
When you see this It indicates
A note — provides related information, such
as the conditions that are necessary to
perform a procedure
A tip — provides helpful suggestions,
including shortcuts and alternate steps for
procedures

PART 1: BASICS
Learning to use Corel WordPerfect Office X4 17
Some WordPerfect project templates use prompts to guide you
through the process of adding information to a document. For
more information about prompts, see “Automating project
templates by using prompts” in the WordPerfect Help.
To use the PerfectExpert
•From WordPerfect, Quattro Pro, or Presentations, click Help `
PerfectExpert.
Using CorelTUTOR
CorelTUTOR provides a series of tutorials that introduce you to the
basic and advanced features of WordPerfect, Quattro Pro, and
Presentations. You can access the tutorials from the main program
windows.
To access CorelTUTOR
•Click Help ` CorelTUTOR.
Other learning resources
Additional resources are available to help you learn to use
Corel WordPerfect Office.
The Web
The Corel Web site contains a multitude of information and links to help
answer your questions about Corel WordPerfect Office.
Corel Store
To learn how to get more out of Corel WordPerfect Office, you can visit
the Corel® Store™ on the Web at buy.corel.com. This online shopping
forum provides listings of books, tutorials, and training videos.

PART 1: BASICS
18 Corel WordPerfect Office X4 Guidebook
Third-party books and magazines
How-to books for Corel WordPerfect Office are available at your local
computer store or bookstore. You can also find computer magazine
articles that feature descriptions of specific tasks performed with
Corel WordPerfect Office software.
Corel Support Services
Corel® Support Services™ can provide you with prompt and accurate
information about product features, specifications, pricing, availability,
services, and technical support. For the most current information about
the support services that are available for your Corel product, please
visit www.corel.com/support.
Sending feedback
If you want to share comments or suggestions about the
documentation included with Corel WordPerfect Office, please send
them by e-mail to wordperfectprodmgr@corel.com. You can check the
product Web site for the latest news, tips and tricks, and product
upgrade information. Go to www.corel.com, and follow the links to the
product site.

PART 2: TUTORIALS

PART 2: TUTORIALS
How to create footers 21
How to create footers 4
TUTORIAL
A footer is the text that appears across the bottom of a page repeatedly
throughout a document. The purpose of a footer is to provide
information that helps readers navigate through the document. Adding
footers can therefore improve the usability of a document and add
consistency to the page design. In this tutorial, you’ll add footers that
display page numbers and other useful information.
What you’ll learn to do
•create two footers
•insert a horizontal line above the footers
•insert page numbers in the footers
•add the document’s title to a footer
•add a company name and phone number to a footer
•remove footers from specific pages
First, you’ll need to access the sample document.
Step 1: Open the sample document
1Go to one of the following locations, depending on whether you
are using the Windows Vista® or Windows® XP operating system.
Note that “X” refers to the drive where the operating system is
installed.
• On Windows Vista, go to X:\Users\Public\Public
Documents\WordPerfect Office\X4\Tutorial Samples.
• On Windows XP, go to X:\Documents and Settings\All
Users\Shared Documents\WordPerfect Office\X4\Tutorial Samples.
2Open the WP_1_Footers.wpd file.
PART 2: TUTORIALS
22 Corel WordPerfect Office X4 Guidebook
After you open the sample document, you’ll save it with a new filename
to create a working document. By creating a working document, you’ll
keep the sample document unchanged so that the tutorial can be
reused.
Step 2: Create a working document
1Click File ` Save as.
2In the File name box, type the new filename (for example,
My_Footers.wpd).
3Click the Save button.
Now you’re ready to add the first footer to your document.
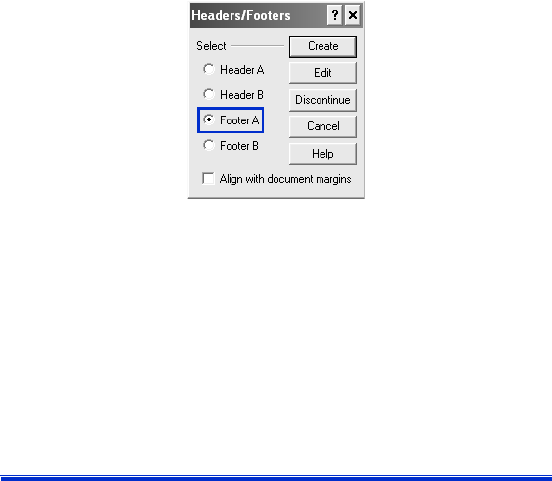
Step 3: Add the first footer
1Click Insert ` Header/Footer.
2Enable the Footer A option.
3Click the Create button.
In the next few steps, you’ll be working within Footer A. If at some point
you find yourself outside the working area for Footer A, click Insert `
Header/Footer, enable the Footer A option, and click the Edit button.
Next, you’ll add a horizontal line above the footer to create a visual
separation between the footer text and the document text.
Step 4: Add a horizontal line to the first footer
•Click Insert ` Line ` Horizontal line.
PART 2: TUTORIALS
How to create footers 23
You can also add a custom horizontal line to a header or footer.
Click Insert ` Line ` Custom line. Enable the Horizontal line
option, and modify any of the settings in the line.
Now that you have created the footer and added the horizontal line,
you’ll insert the page number and the document title.
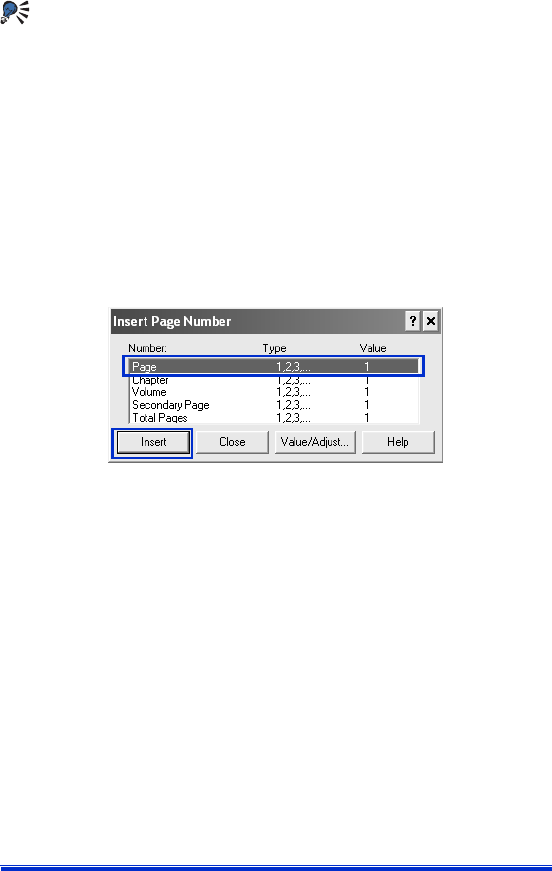
Step 5: Add page numbering to the first footer
1Press Enter to start a new line.
2Click Format ` Page ` Insert page number.
3Choose Page from the Number list.
4Click the Insert button.
5Choose Total pages from the Number list.
6Click the Insert button.
7Click Close button.
Note that the current page number and the total number of pages
appear together.
8To fix the display, position the cursor in between the numbers,
press the Spacebar, type the word of, and then press the Spacebar
again.
Step 6: Add the title of the document to the footer
1Position the cursor after the total number of pages, and click
Format ` Line ` Flush right.
2Typ e Selling and Buying a Home.
3Select all the text.

PART 2: TUTORIALS
24 Corel WordPerfect Office X4 Guidebook
4Apply bold formatting by clicking the Bold icon on the property
bar.
An alternate way to create bold text is to click Format ` Font, click
the Font tab, and enable the Bold check box.
5Clear the text selection by clicking the text.
The next step is to specify the placement of the footer in the document.
Step 7: Place the first footer on odd-numbered pages
1Click the Header/Footer placement button on the Header/Footer
toolbar.
The Header/Footer toolbar
2Enable the Odd pages option.
3Exit the footer by clicking File ` Close.
At this point in the tutorial, you formatted the first footer for all
odd-numbered pages in the document. You’ll now create a second
footer with a horizontal line.
Step 8: Add the second footer
1Position the cursor at the top of page 2.
2Click Insert ` Header/Footer.
3Enable the Footer B option.
4Click the Create button.
In the next few steps, you’ll be working within Footer B. If at some point
you find yourself outside the working area for Footer B, click Insert `
Header/Footer, enable the Footer B option, and click the Edit button.
Step 9: Add a horizontal line to the second footer
•Click Insert ` Line ` Horizontal line.
PART 2: TUTORIALS
How to create footers 25
With the second footer and horizontal line in place, you’ll add a
company name, phone number, and page numbers.
Step 10: Add a company name and phone number to
the second footer
1Press Enter to start a new line.
2Typ e Acme Real Estate 555-555-1234.
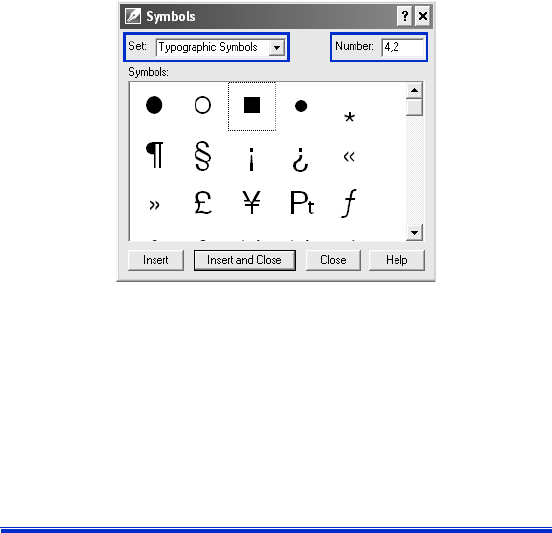
3Click after Estate.
Make sure that the cursor appears after Estate.
4Click Insert ` Symbol.
5In the Symbols dialog box, choose Ty p o g r a p h ic sy m b o l s from the
Set list box.
6In the Number box, type 4,2 to choose the square bullet.
This symbol matches the one used in the final real-estate
document, which you are re-creating in these tutorials.
7Click the Insert and Close button.
Step 11: Add page numbering to the second footer
1Position the cursor after the phone number, and click Format ` Line
` Flush right.
2Click Format ` Page ` Insert page number.
PART 2: TUTORIALS
26 Corel WordPerfect Office X4 Guidebook
3Choose Page from the Number list.
4Click the Insert button.
5Choose Total pages from the Number list.
6Click the Insert button.
7Click the Close button.
You’ll notice that the current page number is displayed together
with the total number of pages.
8To fix the display, position the cursor in between the numbers, and
press the Spacebar. Then, type the word of, and press the Spacebar
again.
9Highlight all the text.
10 Click the Bold icon on the property bar.
11 Clear the text selection by clicking the text.
The next step is to specify the placement of the footer on
even-numbered pages.
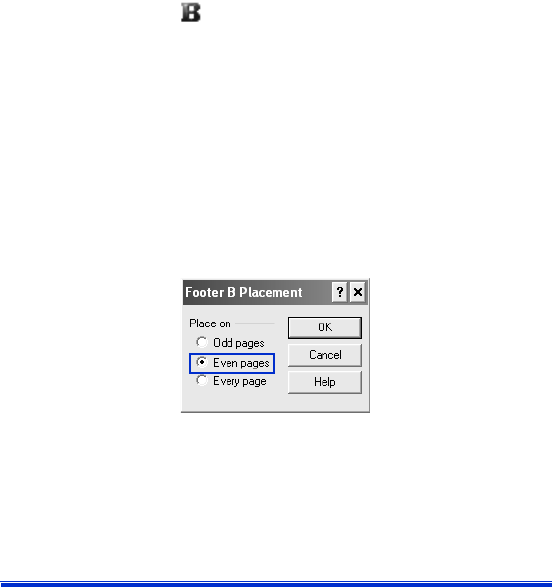
Step 12: Place the second footer on even-numbered
pages
1On the Header/Footer toolbar, click the Header/Footer placement
button.
2Enable the Even pages option.
3Click the OK button.
4Exit the footer by clicking File ` Close.
The footers now appear on all pages in the document, including the
title page and the table of contents. In the next step, you’ll remove the
footers from both the title page and the table of contents.

PART 2: TUTORIALS
How to create footers 27
Step 13: Remove the footer from specific pages
1With the cursor on page 1, click Format ` Page ` Suppress.
2Enable the Footer A and Footer B check boxes.
3Click the OK button.
4Repeat the previous three steps for pages 2 and 3.
You can also use delay codes to keep footers from displaying on a
specific page of a document, such as a title page. For more
information about delay codes, see “Inserting and editing delay
codes” in the WordPerfect Help.
You can now set the first page number for the document.
Step 14: Set the first page number
1With the cursor on page 4, click Format ` Page ` Numbering.
2Click the Set value button.
3In the Set page number box, type 1.
4Enable the Always keep number the same option.
5Click the OK button.
6To e x it t he Page Numbering Format dialog box without inserting
another page number, click the Cancel button.
Other things you can do
WordPerfect lets you edit the text in your footers.

PART 2: TUTORIALS
28 Corel WordPerfect Office X4 Guidebook
Edit the text in a footer
1Click Insert ` Header/Footer.
2Enable one of the following options:
• Footer A
• Footer B
3Click the Edit button.
4Make changes to the footer text.
You can discontinue a footer to remove it from the remainder of the
document.
Discontinue a footer
1Click Insert ` Header/Footer.
2Enable one of the following options:
• Footer A
• Footer B
3Click the Discontinue button.
Where to go from here
You have successfully inserted footers into your document. Next, you’ll
learn how to create styles for text and graphics.

PART 2: TUTORIALS
How to create styles for text and graphics 29
How to create styles for text
and graphics 5
TUTORIAL
A style is a collection of formatting attributes that are applied to text or
graphics. By using styles, you can ensure visual consistency throughout
a document and avoid having to repeat multiple formatting tasks for
every instance of a particular text or graphic element. Whenever you
change the formatting in a style, you change the appearance of all text
or graphics that use that style. The text styles that you create are saved
with the active document.
What you’ll learn to do
•create your own text style
•add additional formatting to the style
•add a table of contents marker
•create a QuickStyle
•save a text style
•create a graphics style
First, you’ll need to access the sample document.
Step 1: Open the sample document
1Go to one of the following locations, depending on whether you
are using the Windows Vista or Windows XP operating system.
Note that “X” refers to the drive where the operating system is
installed.
• On Windows Vista, go to X:\Users\Public\Public
Documents\WordPerfect Office\X4\Tutorial Samples.
• On Windows XP, go to X:\Documents and Settings\All
Users\Shared Documents\WordPerfect Office\X4\Tutorial Samples.
2Open the WP_2_Styles.wpd file.

PART 2: TUTORIALS
30 Corel WordPerfect Office X4 Guidebook
After you open the sample document, you’ll save it with a new filename
to create a working document. By creating a working document, you’ll
keep the sample document unchanged so that the tutorial can be
reused.
Step 2: Create a working document
1Click File ` Save as.
2In the File name box, type the new filename (for example,
My_Styles.wpd).
3Click the Save button.
You’re now ready to create a new text style. First, you’ll create a text
style for the headings in your document.
Step 3: Create a text style for the main heading
1Click Format ` Styles.
2Click the Create button.
3In the Styles editor dialog box, type Main Heading in the Style
name box.
4Type the following description for the style in the Description box:
Main heading style for section titles.
5In the Type list box, check to make sure that the default setting of
Paragraph appears.
Do not close the Styles editor dialog box — you’ll need to use it in the
next step.
You can now add a little extra formatting to the style you just created.
Step 4: Add formatting to the Main Heading style
1On the menu bar within the Styles editor dialog box, click Format `
Font.
2In the Font Properties dialog box, choose AvantGarde from the
Face list.
3From the Size list, choose 14.
PART 2: TUTORIALS
How to create styles for text and graphics 31
4Click Format ` Justification ` Center.
Again, you’ll be using the Styles editor dialog box in the next step, so
do not close it.
Next, you’ll mark the main heading element for use in a table of
contents. The Styles editor dialog box makes it convenient to do this at
the same time that you format a style element.
Step 5: Add a marker for the table of contents
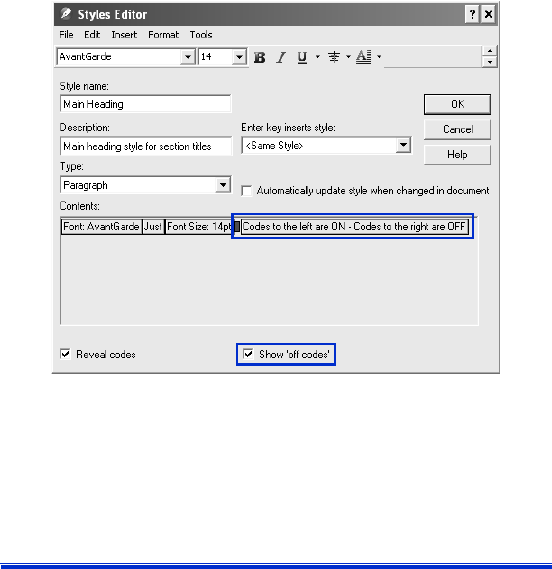
1Enable the Show ‘off codes’ check box.
2In the Contents area, select the code that is called Codes to the left
are ON - Codes to the right are OFF.
3Click To o l s ` Reference ` Table of Contents.
4Click the Mark 1 button.
Mark 1 indicates that this heading is the highest-level heading in
the document.
5Click the Close button.
6In the Styles editor dialog box, click the OK button.

PART 2: TUTORIALS
32 Corel WordPerfect Office X4 Guidebook
Do not close the Styles dialog box — you’ll need to use it in the next
step.
Now that you’ve created a custom style for the main headings in your
document, you need to make a text style for the subheading.
Step 6: Create a text style for subheadings
1Click the Create button.
2In the Styles editor dialog box, type Subheading in the Style name
box.
3Type the following description for the style in the Description box:
Secondary heading style for subheadings.
4In the Type list box, leave the default as Paragraph.
You can now add formatting to the Subheading style you just created.
Step 7: Add formatting to the Subheading style
1On the menu bar within the Styles editor dialog box, click Format `
Font.
2In the Font Properties dialog box, choose Bold.
3From the Size list, choose 12.
4Click the OK button.
5Click Format ` Justification ` Center.
Again, you’ll be using the Styles editor dialog box in the next step, so
do not close it.
Next, you’ll mark the subheading element for use in a table of contents.
The Styles editor dialog box makes it convenient to do this at the same
time that you format a style element.
Step 8: Add a second marker for the table of contents
1Enable the Show ‘off codes’ check box.
2In the Contents area, select the code that is called Codes to the left
are ON - Codes to the right are OFF.

PART 2: TUTORIALS
How to create styles for text and graphics 33
3Click To o l s ` Reference ` Table of Contents.
4Click the Mark 2 button.
Mark 2 indicates that this heading is the second-level heading in
the document.
5Click the Close button.
6In the Styles editor dialog box, click the OK button.
7In the Styles dialog box, click the Close button.
Next, you’ll apply the custom styles that you’ve just created to the
document.
Step 9: Apply the Main Heading style
1In your document, select the text Selling Your Home.
2Click Format ` Styles.
3Choose Main Heading from the Available styles list.
4Click the Insert button.
5Repeat the process for the three remaining centered headings in
your document.
Step 10: Apply the Subheading style
1Select the text Prepare your home for sale.
2Click Format ` Styles.
3Choose Subheading from the Available styles list.
4Click the Insert button.
5Repeat the process for the remaining subheadings in your
document.
Other things you can do
Another convenient way to create a text style while you edit a
document is to use the QuickStyle feature. QuickStyles are styles that
are based on the formatting in effect at the cursor location. You can also
create QuickStyles for paragraphs.

PART 2: TUTORIALS
34 Corel WordPerfect Office X4 Guidebook
Create a QuickStyle
1Select the text or paragraph.
2Click Format ` Styles.
3Click the QuickStyle button.
4In the QuickStyle dialog box, type a name for the style in the Style
name box.
5Type a description for the style in the Description box.
6Enable one of the following options:
• Character with automatic update — creates a QuickStyle for text
• Paragraph with automatic update — creates a QuickStyle for
paragraphs
7Click the OK button.
When you save a style, you can associate it with a specific template or
with the active document only. Or, if you plan to use the style with a
different template or on a different computer, you can save the style as
a separate file.
Save a text style
1Click Format ` Styles.
2Click Options ` Save as.
3In the Save styles to dialog box, type a filename in the Filename
box.
4In the Style type area, enable one of the following options:
• Both — includes both the styles you have created and the preset
styles provided with WordPerfect
• User styles — includes only the styles you have created
• System styles — includes only the preset styles provided with
WordPerfect
5Click the OK button.
6Click Options ` Settings.
7In the Style settings dialog box, enable one of the following
options in the Save new styles to area:

PART 2: TUTORIALS
How to create styles for text and graphics 35
• Current document — associates the style with the active
document
• Default template — associates the style with the default
template
• Additional objects template — associates the style with an
additional objects template
The Additional objects template option is available only if you
have specified a second default template to use for additional
objects such as keyboards, menus, template macros, toolbars, and
styles.
8Click the OK button.
Just as you can create styles for items such as headings, you can also
format how you want graphics to appear.
Create a graphics style
1Click Format ` Graphics styles.
2Enable one of the following options in the Style type area:
• Box
• Border
• Fill
• Line
3Click the Create button.
4Type a name for the style in the Style name box.
5Change any of the settings to modify the attributes of the graphics
style.
6Click the OK button.
7In the Graphics styles dialog box, click the Close button.
Where to go from here
You’ve now created styles for the section headings in the document,
and you’ve created a graphics style. Next, you’ll learn how to add
bulleted lists to your document.

PART 2: TUTORIALS
How to create bulleted lists 37
How to create bulleted lists 6
TUTORIAL
Bullets help to differentiate items in a list or add emphasis to selected
paragraphs. You might want to mark list items with bullets, rather than
with numbers or outline levels, when the order of the list items is not
important and you do not need to show hierarchical relationships in the
list.
When creating a bulleted list, you can choose a preset bulleted list
format, or you can replace the bullet in the format with a custom
symbol, such as a heart, star, or check mark. You can also create a list
that uses check boxes.
What you’ll learn to do
•create a list style
•create a bulleted list
•create a custom bullet
•apply the list format
•create a list format
First, you’ll need to access the sample document.
Step 1: Open the sample document
1Go to one of the following locations, depending on whether you
are using the Windows Vista or Windows XP operating system.
Note that “X” refers to the drive where the operating system is
installed.
• On Windows Vista, go to X:\Users\Public\Public
Documents\WordPerfect Office\X4\Tutorial Samples.
• On Windows XP, go to X:\Documents and Settings\All
Users\Shared Documents\WordPerfect Office\X4\Tutorial Samples.

PART 2: TUTORIALS
38 Corel WordPerfect Office X4 Guidebook
2Open the WP_3_Lists.wpd file.
After you open the sample document, you’ll save it with a new filename
to create a working document. By creating a working document, you’ll
keep the sample document unchanged so that the tutorial can be
reused.
Step 2: Create a working document
1Click File ` Save as.
2In the File name box, type the new filename (for example,
My_Bullets.wpd).
3Click the Save button.
You’re now ready to customize a bulleted list format and apply it to your
document.
Step 3: Customize a bulleted list format
1Locate a bulleted list in the working document, and click anywhere
in the list.
Make sure that your cursor appears within the list.
2Click Insert ` Outline/Bullets & numbering.
3In the Bullets & numbering dialog box, click the Bullets tab.
4Click the Create button.
5In the Create format dialog box, type Arrow in the List name box.
6From the Based on list box, choose the fourth item down, which
includes standard bullet symbols.
7Click in the Te x t b ef o re box, and press the Backspace key.
8On the keyboard, press Ctrl + W.
This shortcut key opens the Symbols dialog box.
9From the Set list in the Symbols dialog box, choose Iconic symbols.
10 In the Number box, type 5,152 to insert a right-pointing arrow.
The number 5 represents the Iconic Symbols set, and the number
152 represents the specific symbol. This symbol matches the arrow

PART 2: TUTORIALS
How to create bulleted lists 39
that is used in the final real-estate document, which you are
re-creating in these tutorials.
11 Click the Insert and Close button.
12 Click the OK button.
The new bulleted list format is now applied to the active list. Next,
you’ll apply this same format to the other lists in the document.
Step 4: Apply the Arrow list format to the other lists
1Locate the next bulleted list in your working document, and click
anywhere in the list.
2Click Insert ` Outline/Bullets & numbering.
3In the Bullets & numbering dialog box, choose the Arrow list
format.
The Arrow list format should appear last because it is the most
recently added format.
4Click the OK button.
5Repeat this procedure for all the remaining lists.

PART 2: TUTORIALS
40 Corel WordPerfect Office X4 Guidebook
Other things you can do
WordPerfect gives you many ways to add a professional look and feel to
your documents. By customizing your lists, you can make them more
effective and easily reflect your own personal style.
Here is an additional method for choosing a custom bullet, plus a
method for creating your own bulleted or numbered list formats.
Create a list format
1Click Insert ` Outline/Bullets & numbering.
2Click one of the following tabs:
• Numbers — lets you create formats for numbered lists
• Bullets — lets you create formats for bulleted lists
3Click the Create button.
4In the Create format dialog box, type a name for the list format in
the List name box.
5Type a description for the list format in the Description box.
6In the List type area, enable one of the following options:
• Single level list — lets you create a list with only one level
• Multilevel list (outline) — lets you create a list with multiple
levels
7Choose a style from the Based on list box.
If you want to add text before the list number, type the text in the
Tex t b e fo r e box.
8Click the OK button.
Where to go from here
You have successfully created and customized your bulleted lists.
Next, you’ll add a table to your document.

PART 2: TUTORIALS
How to create and format tables 41
How to create and format
tables 7
TUTORIAL
With WordPerfect, you can easily create tables that are visually
appealing and user-friendly. Tables let you organize cells of data in rows
and columns and are perfect for presenting lists, schedules, financial
data, comparisons, and summaries.
In this tutorial, you’ll create a simple, two-column table that lists all the
tasks someone would complete before moving to a new house. The
table will include headings that define the time frame for each task.
What you’ll learn to do
•convert a list to a table
•create subheadings in a table
•split columns
•create a table
•specify a width for table columns
First, you’ll need to access the sample document.
Step 1: Open the sample document
1Go to one of the following locations, depending on whether you
are using the Windows Vista or Windows XP operating system.
Note that “X” refers to the drive where the operating system is
installed.
• On Windows Vista, go to X:\Users\Public\Public
Documents\WordPerfect Office\X4\Tutorial Samples.
• On Windows XP, go to X:\Documents and Settings\All
Users\Shared Documents\WordPerfect Office\X4\Tutorial Samples.
2Open the WP_4_Table.wpd file.
PART 2: TUTORIALS
42 Corel WordPerfect Office X4 Guidebook
After you open the sample document, you’ll save it with a new filename
to create a working document. By creating a working document, you’ll
keep the sample document unchanged so that the tutorial can be
reused.
Step 2: Create a working document
1Click File ` Save as.
2In the File name box, type the new filename (for example,
My_Tables.wpd).
3Click the Save button.
Now you’re ready to create a table from a list in your working
document.
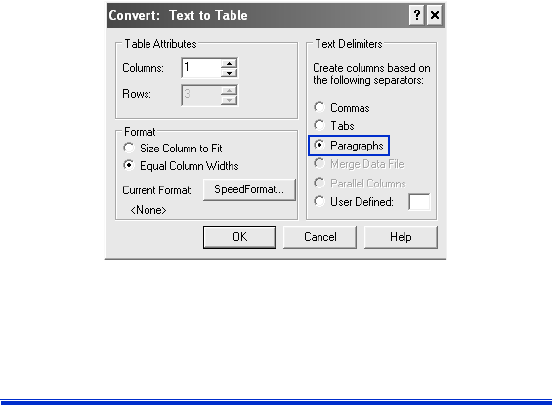
Step 3: Convert a list to a table
1Select the text that makes up the Appendix.
2Click Ta b l e ` Convert.
3In the Convert: Text to Table dialog box, enable the Paragraphs
option in the Tex t De l i m it e rs area.
4Click the OK button.
The selected text has now been converted to a table format.
PART 2: TUTORIALS
How to create and format tables 43
Instead of having column headings, the table in this tutorial has
highlighted rows that organize the table content according to time
periods. These rows act as subheadings within the table.
Step 4: Create table subheadings
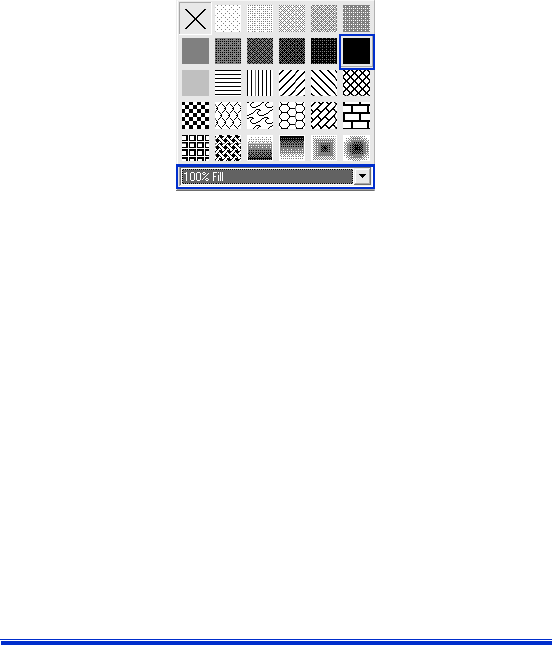
1Position the cursor in the first row of the table.
2Click Ta b l e ` Borders/Fill.
3In the Properties for Table Borders/Fill dialog box, click the Cell
tab, click the Fill button, and enable the 100% Fill option.
4Click the Foreground button, and choose Light Gray from the
Foreground palette.
5Click the OK button.
The gray fill identifies the content in the first row as a subheading
within the table.
6Select the text in the first row of the table.
7Click Format ` Font.
8Enable the Bold check box.
9Click the OK button.
In addition to changing the font and font attributes of text in a cell, row,
column, or table, you can also apply other formatting, such as
highlighting, indents, drop caps, and so forth. For more information,
see “Formatting text” in the section “Editing and formatting
documents” of the WordPerfect Help.
PART 2: TUTORIALS
44 Corel WordPerfect Office X4 Guidebook
The QuickFormat™ feature of WordPerfect allows you to copy the
formatting from a selection and apply it many times. You can copy and
apply formatting from any text, not only from tables.
Step 5: Repeat the formatting
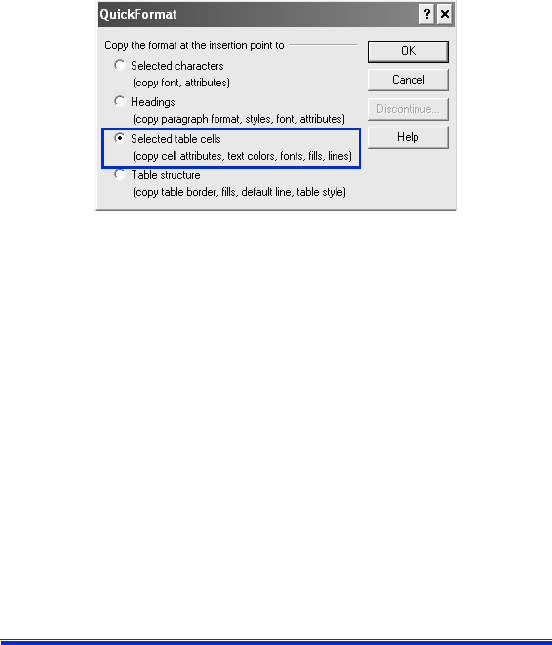
1Select the text in the first row of the table.
2Click Format ` QuickFormat.
3In the QuickFormat dialog box, enable the Selected table cells
option.
Notice that the appearance of the pointer has changed to a brush,
which indicates that you can apply the formatting to other cells.
4Click in each of the remaining subheading rows to apply the same
formatting.
5When you have finished formatting the subheadings, click Format `
QuickFormat to turn off the QuickFormat tool.
Now that the “Planning a Move” list is within a table, you can add details
as needed. For example, you can add a column to track task-related
information, such as whether the task is complete or which family
member is in charge of the task.
Step 6: Split the columns
1Click Ta b le ` Split ` QuickSplit Column.
2Move the pointer across the row. You’ll see two numbers that
indicate the size of the columns if you split the existing column at
PART 2: TUTORIALS
How to create and format tables 45
that location. Click when the numbers indicate a size of 4 inches for
the first column.
Repeat the previous step for every row that you want to split. You
can split multiple rows at one time.
Notice that in the final real-estate document, all the rows that list
tasks have been split.
3When you are finished splitting rows, click Tab le ` Split `
QuickSplit Column to turn off the QuickSplit tool.
Other things you can do
You can create a table anywhere in a document window.
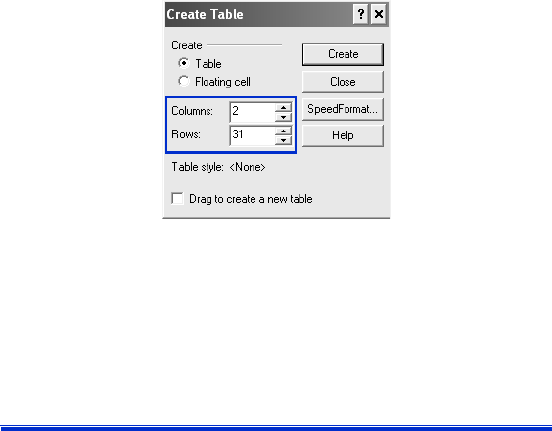
Create a new table
1Click Ta b le ` Create.
2Typ e th e fo l lo w i n g va lu e s in the following boxes:
• Columns: 2
• Rows: 31
3Click the Create button.
When you create a table, the column widths are automatically
equalized. Sometimes, however, you may want to resize one or more
columns — for instance, you may want to increase the width to
accommodate the widest line of text in the column.

PART 2: TUTORIALS
46 Corel WordPerfect Office X4 Guidebook
Accommodate the widest line of text in a table column
1Position the cursor in a table.
2Click Ta b l e ` Size column to fit.
Try the next technique if you need to fix unequal column widths in a
table.
Equalize the width of table columns
1Select two or more cells from adjacent columns.
2Click Ta b l e ` Equal column widths.
You can also specify an exact width for table columns.
Specify a width for table columns
1Select a table column.
2Click Ta b l e ` Format.
3Click the Column tab.
4In the Column width area, type 5 in the Width box.
5Click the OK button.
You can enable the Always keep width the same check box to maintain
the current column width regardless of changes to the width of other
columns, or changes to the left and right margin settings within
columns.
Where to go from here
You have successfully added and formatted tables in your document.
Next, you’ll learn how to add visual interest by inserting graphics and
images in your document.

PART 2: TUTORIALS
How to add images and captions 47
How to add images
and captions 8
TUTORIAL
Adding images to your document can be an effective way to convey
information and to make your document more visually appealing. With
WordPerfect, you can easily insert graphics or photos, as well as add
accompanying captions.
What you’ll learn to do
•insert a graphic file
•wrap text around a graphic
•add a caption
•load photos from a digital camera
First, you’ll need to access the sample document.
Step 1: Open the sample document
1Go to one of the following locations, depending on whether you
are using the Windows Vista or Windows XP operating system.
Note that “X” refers to the drive where the operating system is
installed.
• On Windows Vista, go to X:\Users\Public\Public
Documents\WordPerfect Office\X4\Tutorial Samples.
• On Windows XP, go to X:\Documents and Settings\All
Users\Shared Documents\WordPerfect Office\X4\Tutorial Samples.
2Click the WP_5_Images.wpd file.
After you open the sample document, you’ll save it with a new filename
to create a working document. By creating a working document, you’ll
keep the sample document unchanged so that the tutorial can be
reused.

PART 2: TUTORIALS
48 Corel WordPerfect Office X4 Guidebook
Step 2: Create a working document
1Click File ` Save as.
2In the File name box, type the new filename (for example,
My_Images.wpd).
3Click the Save button.
Now you’re ready to add a graphic to the title page. WordPerfect lets
you insert graphics in many industry-standard file formats, including
GIF, JPEG, TIF, and BMP.
Step 3: Insert a graphic file
1Go to the first page of your working document, and position the
cursor to the left of “Acme Real Estate.”
2Click Insert ` Graphics/Pictures ` From File.
3Browse to one of the following locations, depending on whether
you are using the Windows Vista or Windows XP operating system.
Note that “X” refers to the drive where the operating system is
installed.
• On Windows Vista, go to X:\Users\Public\Public
Documents\WordPerfect Office\X4\Tutorial Samples.
• On Windows XP, go to X:\Documents and Settings\All
Users\Shared Documents\WordPerfect Office\X4\Tutorial Samples.
4Select the logo.wpg file.
5Click the Insert button.
Now that you’ve inserted the graphic file into your document, you’ll
wrap the text around it.
Step 4: Wrap text around the graphic
1Right-click the graphic you just inserted, and click Wrap.
2In the Wrapping type area, enable the Square option.
3In the Wrap text around area, enable the Right side option.
4Click the OK button.
Next, you’ll add a caption for the graphic.
PART 2: TUTORIALS
How to add images and captions 49
Step 5: Add a caption
1Right-click the graphic, and click Caption.
2In the Box caption dialog box, choose Right from the Position list
box.
3Click the Edit button.
4Replace the default text Figure 1 with Since 1987.
Note that WordPerfect automatically adds counters for captions
and other elements in a document. Each box style has a different
caption numbering style. For example, all figure boxes are
numbered in sequence, and the number appears after the word
“Figure.” You can change the numbering style of a box caption, or
you can delete the caption number by selecting it and clicking
Delete.
5Select the text, and click Format ` Font.
6In the Font Properties dialog box, choose 8 from the Size list box.
7Click the OK button.
Now that you have added a graphic and a caption, you’ll fine-tune the
alignment of elements on the title page.

PART 2: TUTORIALS
50 Corel WordPerfect Office X4 Guidebook
Step 6: Complete the title page
1Highlight the text “Selling and Buying a Home.”
2Click Format ` Justification ` Center.
3Select the logo, and drag it to the right so that the left side of the
graphic aligns with the left side of the document title.
Notice that the company name and address also move to the right
because of the Wrap text property.
Other things you can do
If you take photos with a digital camera, you can load the photos from
your camera right into a WordPerfect document.
Load photos from a digital camera
1Connect a digital camera to your computer.
2Click Insert ` Graphics/Pictures ` Select source.
3Choose a digital camera from the Sources box.
4Click Insert ` Graphics/Pictures ` Acquire image.
5Choose the images that you want to load from the dialog box that
appears.
If your digital camera does not support WIA, you’ll be presented
with the digital camera’s interface for loading photos. Available
options vary, depending on the digital camera.
6Click the Get pictures button.
The button on your digital camera may have a different name, such
as “Send.”
If you want to load additional photos during the same session, just
click Insert ` Graphics/Pictures ` Acquire image.
Where to go from here
You’ve successfully added images and captions to your document. Next,
you’ll learn to create a table of contents to make your document easier
to navigate.

PART 2: TUTORIALS
How to add a table of contents 51
How to add
a table of contents 9
TUTORIAL
In a few simple steps, you can add a table of contents to your document.
A table of contents is a handy outline that lists main topics in the order
of their appearance in a document, along with the page number of each
topic. By quickly glancing at the topics in the table of contents, readers
can gain a sense of the document’s content and scope. They can also
easily access particular sections of the document.
What you’ll learn to do
•define a table of contents
•generate a table of contents
If you followed the tutorial in Chapter 5, “How to create styles for text
and graphics,” you marked a document with heading styles and added
markers for the table of contents. Using the styles created in that
tutorial, you can easily generate a table of contents that is based on the
heading text.
If you have not followed the tutorial in Chapter 5, you can still generate
a basic table of contents by using preset heading styles and marking the
headings manually, as described in the “Other things you can do”
section of this tutorial.
First, you’ll need to access the sample document.
Step 1: Open the sample document
1Go to one of the following locations, depending on whether you
are using the Windows Vista or Windows XP operating system.
Note that “X” refers to the drive where the operating system is
installed.

PART 2: TUTORIALS
52 Corel WordPerfect Office X4 Guidebook
• On Windows Vista, go to X:\Users\Public\Public
Documents\WordPerfect Office\X4\Tutorial Samples.
• On Windows XP, go to X:\Documents and Settings\All
Users\Shared Documents\WordPerfect Office\X4\Tutorial Samples.
2Open the WP_6_TOC.wpd file.
After you open the sample document, you’ll save it with a new filename
to create a working document. By creating a working document, you’ll
keep the sample document unchanged so that the tutorial can be
reused.
Step 2: Create a working document
1Click File ` Save as.
2In the File name box, type the new filename (for example,
My_Contents.wpd).
3Click the Save button.
Next, you need to define a table of contents for your document. By
defining a table of contents, you establish how it will display in the
document by specifying things such as the number of levels, the
position and the look of the page numbers, and the style of each level.
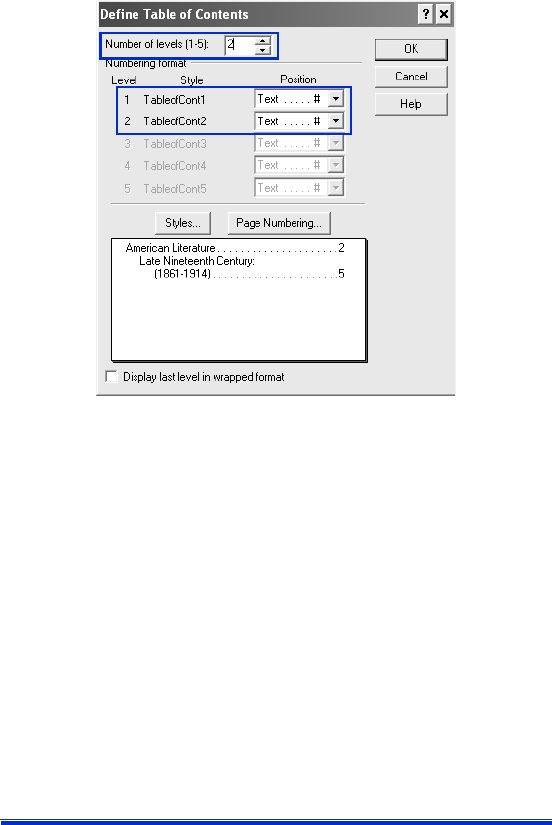
Step 3: Define a table of contents for the document
1Position the cursor under the Contents title on page 3.
2Click To o l s ` Reference ` Table of contents.
3Click the Define button.
4In the Number of levels box, type 2.
This number specifies how many levels of headings your document
has.
5For the TableofCont1 style, choose Text ..... # from the Position list
box.
6For the TableofCont2 style, choose Text ..... # from the Position list
box.
PART 2: TUTORIALS
How to add a table of contents 53
The indentation of levels in the table of contents is adjusted
according to the number of heading levels you specify.
7Click the OK button to close the Define table of contents dialog
box.
8In the Reference tools dialog box, click the Close button.
Notice that the text << Table of Contents will generate here >>
now appears on the page where you positioned your cursor.
Now that you’ve defined how and where the table of contents will
appear in your document, you are ready to generate the table of
contents. When you generate a table of contents, WordPerfect searches
the document for the table of contents entry markers. This information
is inserted on the table of contents page in the document.
You need to regenerate the table of contents whenever you update
information in the document.
Step 4: Generate the table of contents
1Click To o l s ` Reference ` Table of contents.

PART 2: TUTORIALS
54 Corel WordPerfect Office X4 Guidebook
To ensure that the table of contents is generated before you save or
print the document, enable the Auto generate check box. If you do
not generate a table of contents after editing the document, a
warning appears when you attempt to save or print.
2Click the Generate button.
3In the Generate dialog box, click the OK button.
Other things you can do
If the headings in a document were not created by using styles with
Table of Contents markers, you can still create a table of contents by
first scrolling through the document and marking each heading
manually.
Mark entries for a table of contents
1Click To o l s ` Reference ` Table of contents.
2Position the cursor at the beginning of a title that you want to
display in the table of contents.
3Choose a level from Mark 1 through Mark 5. The level you choose
depends on the levels you defined for the table of contents. Each
mark corresponds to a level of indentation.
4Repeat the previous two steps for each title that you want to
display in the table of contents.
You can press Alt + F3 to view the mark codes for the table of
contents. Then, you can go ahead and generate a table of contents
as described earlier in this tutorial.
Where to go from here
You have successfully inserted a table of contents in your document.
Next, you’ll learn how to work with formulas in Quattro Pro.

PART 2: TUTORIALS
How to add formulas to Quattro Pro spreadsheets 55
How to add formulas to
Quattro Pro spreadsheets
10
TUTORIAL
Formulas are mathematical equations that calculate a final value, such
as the sum of two cells or the total of a column. By using formulas, you
can make your Quattro Pro spreadsheets more effective. In addition,
you can use cell references in the formulas so that results are
automatically updated if the cell values change, or if you copy a formula
to a new cell.
Introducing formulas in Quattro Pro spreadsheets is a great way to help
you track your personal financial investments. For example, you can
create a spreadsheet with stock purchases, stock ticker symbols,
purchase dates, purchase volume, and purchase price. You can also
track the broker’s commission paid, as well as the average cost per unit
of stock.
In this tutorial, you’ll create a basic formula that determines the average
cost per unit of stock. The formula will total the cost of the purchase,
including the commission, and then divide the total by the number of
stocks purchased. You’ll use basic operators and cell references to
create this formula.
What you’ll learn to do
•create a basic formula
•copy a formula to a new cell
•apply a currency format
•apply a date format
First, you’ll need to access the sample notebook.

PART 2: TUTORIALS
56 Corel WordPerfect Office X4 Guidebook
Step 1: Open the sample notebook
1Go to one of the following locations, depending on whether you
are using the Windows Vista or Windows XP operating system.
Note that “X” refers to the drive where the operating system is
installed.
• On Windows Vista, go to X:\Users\Public\Public
Documents\WordPerfect Office\X4\Tutorial Samples.
• On Windows XP, go to X:\Documents and Settings\All
Users\Shared Documents\WordPerfect Office\X4\Tutorial Samples.
2Open the QP_1_Formulas.qpw file.
After you open the sample notebook, you’ll save it with a new filename
to create a working notebook. By creating a working notebook, you’ll
keep the sample notebook unchanged so that the tutorial can be
reused.
Step 2: Create a working notebook
1Click File ` Save as.
2In the File name box, type the new filename (for example,
My_Stock_Purchases.wpd).
3Click the Save button.
Now you’re ready to create a basic formula.
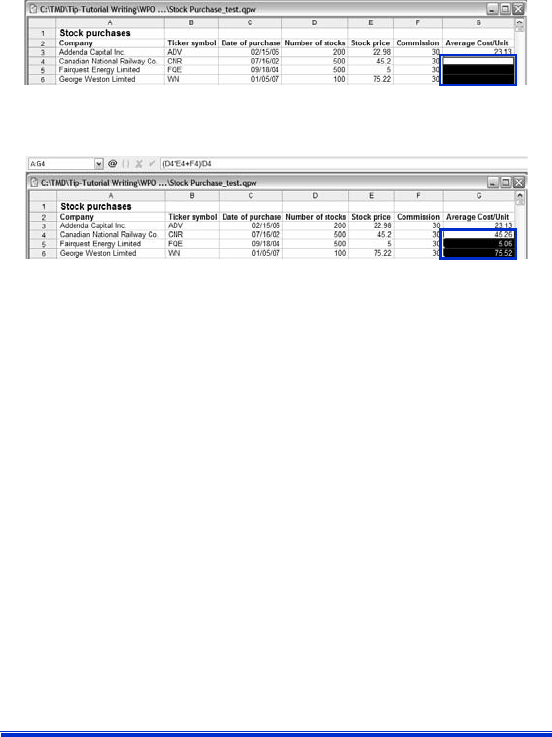
Step 3: Create a basic formula
1Click the first cell of the Average Cost/Unit column (Cell G3).
2Typ e an equal sign (=) in the cell.
The equal sign establishes the values that follow as part of a
formula.
3Typ e an opening parenthesis [ ( ] in the cell.
The opening parenthesis establishes the order of operations. The
total cost needs to be divided so that the average cost can be
determined.
4Click the first cell of the Number of stocks column (Cell D3).
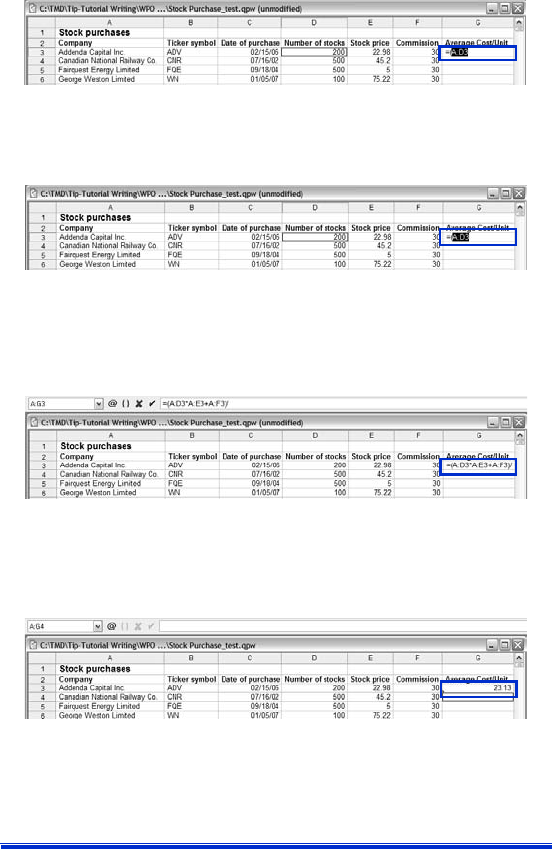
PART 2: TUTORIALS
How to add formulas to Quattro Pro spreadsheets 57
Notice that the D3 cell reference is added to the formula in cell G3.
5In cell G3, type the multiplication sign (*).
6Click the first cell of the Stock price column (Cell E3).
The E3 cell reference is also added to the formula in cell G3.
7In cell G3, type the plus sign (+).
8Click the first cell of the Commission column (Cell F3).
9In cell G3, type a closing parenthesis [ ) ], and then type a division
sign ( / ).
10 Click the first cell of the Number of stocks column (Cell D3), and
press Enter to perform the calculation.
The calculation is performed, and the average cost per unit for the
first stock is determined.
Now you’re ready to copy the formula to a new cell. When you copy a
formula to a new cell, the cell references are automatically updated to
reflect the new cell location, and the new result is displayed.
PART 2: TUTORIALS
58 Corel WordPerfect Office X4 Guidebook
Step 4: Copy a formula to a new cell
1Click the first cell of the Average Cost/Unit column (Cell G3).
2Click Edit ` Copy.
3Select cells G4 to G6.
The cells G4 to G6 are selected.
4Click Edit ` Paste.
The results are automatically displayed in the selected cells.
Next, you’ll apply a currency format to the data. Currency is a numeric
format that lets you choose the symbol for a particular currency — for
example, the euro.
Step 5: Apply a currency format to the data
1Click in the first cell in the Stock price column (E3), press Shift, and
click in the last cell in the Average Cost/Unit column (G6).
2Click Format ` Selection Properties, click the Numeric Format tab,
and choose Currency from the Numeric Formats list.
3In the Currency area, ensure that the value in the Decimal Places
box is 2.
4Click the OK button.
Now you’re ready to apply a date format.
Quattro Pro reads dates and times as values. Specific formatting and
calculation criteria are applied, depending on the date and time criteria
that you have set as defaults. When you type a date, the cell formatting
automatically switches to the date format that you previously specified.

PART 2: TUTORIALS
How to add formulas to Quattro Pro spreadsheets 59
Step 6: Apply a date format
1Click in the first cell of the Date of purchase column (C3), press
Shift, and click in the last cell (C6).
2Click Format ` Selection Properties, click the Numeric Format tab,
and choose Date from the Numeric Formats list.
3In the Date area, enable the DD-MMM-YYYY option.
4Click the OK button.
Where to go from here
You have successfully created a basic formula to calculate the average
cost per unit of stock purchased. Next, you’ll learn how to use
Presentations to create customized slide shows.

PART 2: TUTORIALS
How to create customized slide shows 61
How to create customized
slide shows
11
TUTORIAL
One way to create a customized slide show with Presentations is to
import an outline from a WordPerfect document. In Presentations, an
outline is a list that includes the text for every slide in a slide show. The
outline provides the data relationship, or map, that Presentations uses
to place the content into the slides. When you import an outline from
a WordPerfect document, the headings in the WordPerfect document
appear in the Presentations file as slide titles, and the corresponding
body text appears beneath the slide titles.
In this tutorial, you’ll create a blank slide-show file and then import an
outline based on the final real-estate document that is installed with
Corel WordPerfect Office.
What you’ll learn to do
•create a blank slide-show file
•import an outline into a slide show
•change a slide’s layout
•apply a slide show master
•customize the master layout
•play a slide show
•modify the master background layer
•save a customized master
•edit an outline
•insert an image
•resample an image
First, you’ll need to create a slide-show file. In this tutorial, the method
for creating a working file differs from the one you used for the previous

PART 2: TUTORIALS
62 Corel WordPerfect Office X4 Guidebook
tutorials. Instead of opening a preexisting file, you’ll start by creating a
blank file.
Step 1: Create a slide-show file
1Click File ` Save as.
2In the File name box, type the new filename (for example,
My_Slide_Show.shw).
3Click the Save button.
Now you’re ready to import the WordPerfect outline. The outline that
you’ll use in this tutorial is an outlined based on the final real-estate
document that is installed with Corel WordPerfect Office.
Step 2: Import the outline
1Click View ` Slide Outliner.
2Click Insert ` File.
3Browse to one of the following locations, depending on whether
you are using the Windows Vista or Windows XP operating system.
Note that “X” refers to the drive where the operating system is
installed.
• On Windows Vista, go to X:\Users\Public\Public
Documents\WordPerfect Office\X4\Tutorial Samples.
• On Windows XP, go to X:\Documents and Settings\All
Users\Shared Documents\WordPerfect Office\X4\Tutorial Samples.
4Choose PR_Outline.wpd.
5Click the Insert button.
Each first-level heading in the outline becomes a slide title, and any
second-level or third-level headings are converted to slide text.
Next, you’ll modify the text formatting on a slide by choosing a layout.
The layout layer of a slide can consist of titles, subtitles, bulleted lists,
data charts, and organization charts.
Step 3: Change the layout of a slide
1Click View ` Slide Editor.
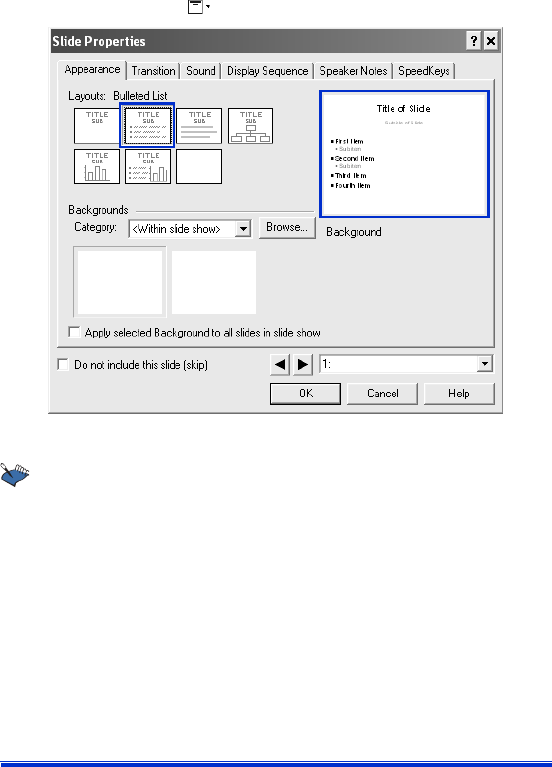
PART 2: TUTORIALS
How to create customized slide shows 63
2Click slide 4.
3Click Format ` Layout Gallery.
4On the Appearance page, click the Title layout for the Layout layer.
An alternate way to change the layout of a slide is by opening the
Select layout picker and clicking a layout.
5Click the OK button.
You can add up to 30 different layouts to a slide show.
To simplify the process of creating slide shows, Presentations includes
a collection of professionally designed masters. These masters contain
slide backgrounds and layouts that include preset objects, such as
titles, bulleted lists, and charts. The presets let you concentrate on the
content of the slide show, rather than on the format.
The masters in the Master Gallery are grouped into categories. You can
use a master provided with Presentations in the Master Gallery.
PART 2: TUTORIALS
64 Corel WordPerfect Office X4 Guidebook
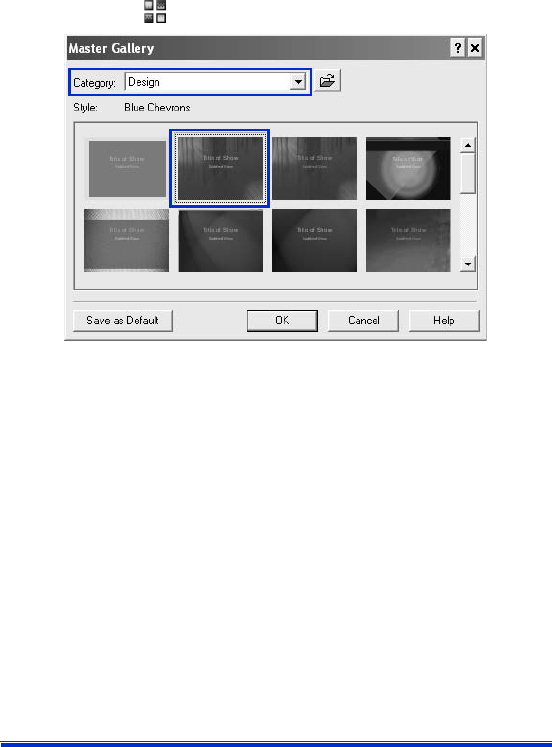
Step 4: Apply a master to the slide show
1Click Format ` Master Gallery.
2Choose Design from the Category list box.
3Choose the Blue Chevrons master from the master list.
An alternate way of choosing a master is by clicking the Master
gallery button on the toolbar.
4Click the OK button.
The layout layer of your master includes placeholders for objects such
as titles, subtitles, bulleted lists, text, data charts, and organization
charts. Objects on the layout layer appear on top of objects on the
background layer. You can customize the layout layer by adding,
modifying, and removing objects.
Step 5: Customize the master layout layer
1Click Edit ` Layout layer.
2On the Title layout slide, click the first title box to select it.
3Click Format ` Font.
4Choose the 54 from the Size list.
5Click the OK button.
6Click the second title box to select it.

PART 2: TUTORIALS
How to create customized slide shows 65
7Click Edit ` Delete.
8On the Bulleted List slide, click the bulleted list.
9Click Format ` Bulleted List Properties, and click the Bullets tab.
10 Select the first-level bullet, and change the Foreground color to
white.
Repeat this step for the second-level and third-level bullets.
11 Click Edit ` Slide Layer.
Now that you’ve created your slide show, you can check its appearance
by playing it manually. When you play a slide show manually, you can
control the display of each slide.
Step 6: Play your slide show
1Click View ` Play slide show.
2Choose a slide from the Beginning slide list box.
If you want to play the slide show continuously, enable the Repeat
slide show until you press “Esc” check box.
3Click the Play button.
4Click in the slide-show window to advance to the next slide or
animation.
If you want to return to the previous slide or animation, right-click
the slide show window, and click Previous slide.
Other things you can do
The background layer determines the overall color and size of a slide.
You can easily change the appearance of a slide show by modifying the
background layer. This example shows you how to add a date to the
background layer.
Modify the master background layer
1Click Edit ` Background layer.
2Click Insert ` Te x t B ox .
3Drag in the lower-right corner of the background to define a text
box.

PART 2: TUTORIALS
66 Corel WordPerfect Office X4 Guidebook
4Position the cursor in the text box.
5On the property bar, type 20 in the Font Sizes box.
6Click Insert ` Date/Time.
7Choose a time format from the Date/Time formats list.
8Click the Insert button.
The date appears in the lower-right corner of each slide in the slide
show.
Now that you have modified both the layout and background layers,
you can save the changes as a Presentations master and make it
accessible from the Master Gallery.
Save a customized master
1Click File ` Save As.
2Choose Presentations Master 7-X4 from the File type list box.
3Click the Save in list box.
4Browse to X:\Program Files\Corel\WordPerfect Office
X4\Languages\EN\Masters where “X” represents the drive where
the operating system is installed.
5Click File ` New ` Folder.
6Ty p e My designs in the new folder name box.
7Double-click the My designs folder.
8Typ e My_master in the File name box.
9Click the Save button.
The next time that you create a slide show, your customized master
will appear in the Master Gallery under the My designs category.
You can edit the outline in the Slide Outliner by typing content for slide
titles, subtitles, text slides, bulleted list slides, and combination slides.
Edit an outline
1Click View ` Slide Outliner.
2Type a title in the slide show, and press Enter.
3Type a subtitle in the slide show, and press Enter.
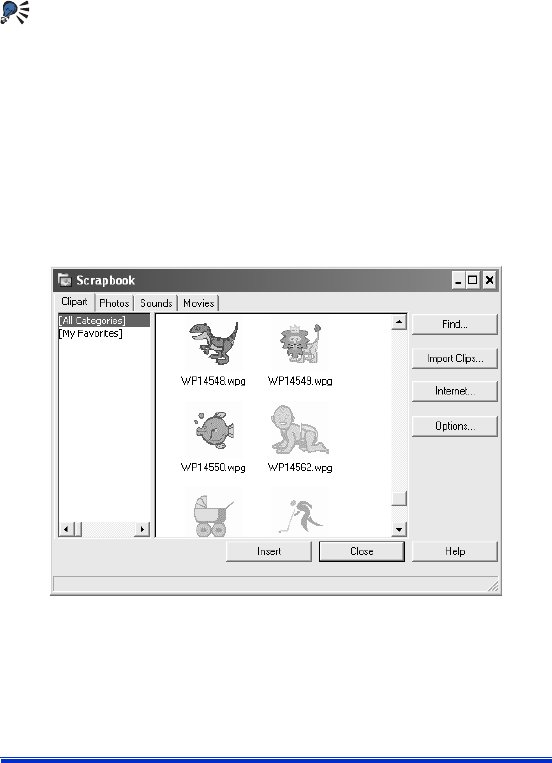
PART 2: TUTORIALS
How to create customized slide shows 67
4Type any text in the slide show.
5Click Insert ` New slide.
6In the New slide dialog box, click a slide layout on the Layout
palette.
If you delete text, you can restore it by clicking the Undelete
button on the property bar and then clicking Restore. To move an
outline up or down one level, click the Previous level button or
the Next level button on the property bar.
Next, try enhancing your slide show by inserting images, such as photos
or clipart objects from the Scrapbook™.
Insert an image from the Scrapbook
1Click Insert ` Graphics/Pictures ` Clipart.
The Scrapbook window appears.
The Scrapbook window
2Click one of the following tabs:
• Clipart — vector graphics
• Photos — bitmap images

PART 2: TUTORIALS
68 Corel WordPerfect Office X4 Guidebook
3Choose a category from the list.
4Click a graphic on the palette.
5Click the Insert button.
6Click the Close button.
You can use the Scrapbook to insert clipart from a CD. Just insert
the CD into the CD drive, and choose your clipart.
Now, try adding images to your slide show from files that you’ve saved
on your computer.
Insert a graphic from a file
1Click Insert ` Graphics/Pictures ` From file.
2Choose the drive and folder where the file is stored.
3Choose a file.
4Click the Insert button.
You can improve the print quality of an image by improving its
resolution, a process known as resampling. Resampling lets you reduce
the file size and memory requirements of your images when you edit,
print, or save documents.
Resample an image
1Click an image.
2Drag the handles to resize the image.
3Click To o l s ` Resample bitmap.
4Click the Resample button.
Where to go from here
You have successfully created a customized slide show from your
WordPerfect document. Next, you’ll learn how to collect
information and ideas with WordPerfect Lightning.

PART 2: TUTORIALS
How to gather information with WordPerfect Lightning 69
How to gather information
with WordPerfect Lightning
12
TUTORIAL
WordPerfect Lightning makes it easier than ever to capture, use, and
reuse ideas, information, and images. WordPerfect Lightning has three
basic components — the Navigator, the Viewer, and the Notes window.
In this tutorial, you’ll use these components to gather and store
content, and then send the content to WordPerfect to create a polished
document.
What you’ll learn to do
•create a folder
•create a note
•change the background color of a note
•add a background image to a note
•take a snapshot
•close and rename a note
•send a note to a word processor
•send a folder to a word processor
The Navigator in WordPerfect Lightning has a familiar tree structure,
which makes project management a snap. The Navigator lets you create
folders to store and organize content, such as documents and notes.
Step 1: Create a folder
•From the Navigator, click the New Folder button .
By default, new folders are created at the root level.
Now, you’re ready to create a note. WordPerfect Lightning lets you
create notes for a variety of purposes. Notes can serve as building
blocks for a document or as aids to project organization. For example,
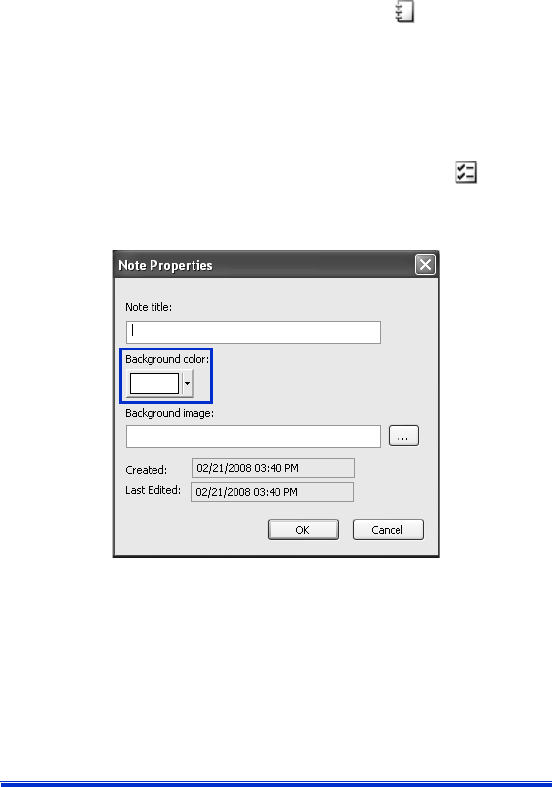
PART 2: TUTORIALS
70 Corel WordPerfect Office X4 Guidebook
you can use notes to create lists, task reminders, or comments about a
document or Web page.
Step 2: Create a note
•From the Navigator, click the New Note button .
Now, you’re ready to alter the appearance of a note. You can change the
appearance of notes by changing the background color and modifying
the font settings.
Step 3: Change the background color of a note
1In the Notes window, click the Note Properties button .
2In the Note Properties dialog box, click the Background color
picker.
3In the Colors dialog box, choose a color from the Basic colors area,
and click the OK button.
4In the Note Properties dialog box, click the OK button.
You can also change the appearance of a note by adding a background
image.
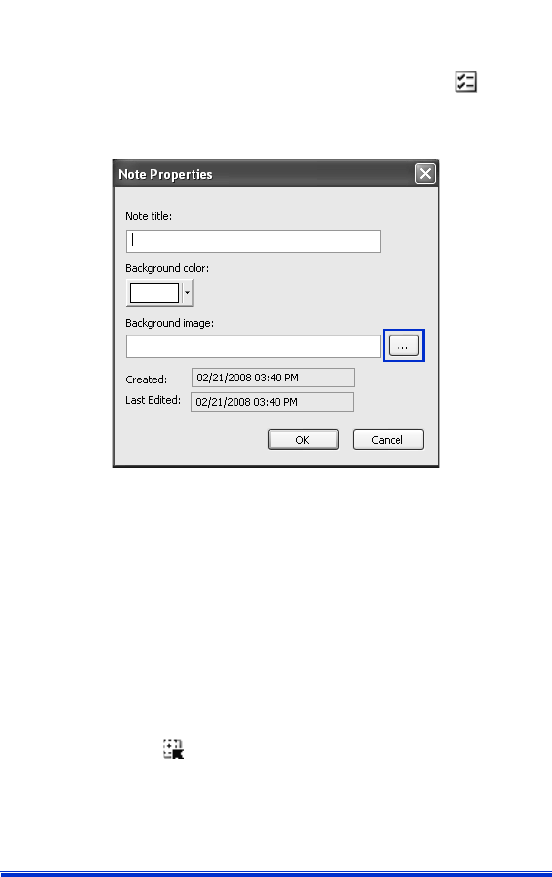
PART 2: TUTORIALS
How to gather information with WordPerfect Lightning 71
Step 4: Add a background image to a note
1In the Notes window, click the Note Properties button .
2In the Note Properties dialog box, click the button next to the
Background image box.
3In the Open dialog box, browse for an image file, select it, and click
the Open button.
4In the Note Properties dialog box, click the OK button.
Now, you’re ready to learn how to gather content with WordPerfect
Lightning. You can quickly add content to a note by pasting text or
images copied from another source, such as a document, a Web page,
or another note. In this example, you’ll paste text from a Web site.
Step 5: Take a snapshot
1In the Notes window, click the arrow next to the
Snapshot button , and choose Take Snapshot to This Note.
Notice that the pointer is replaced by crosshairs.
The Snapshot button lets you take a snapshot either to the active
note or to a new note.
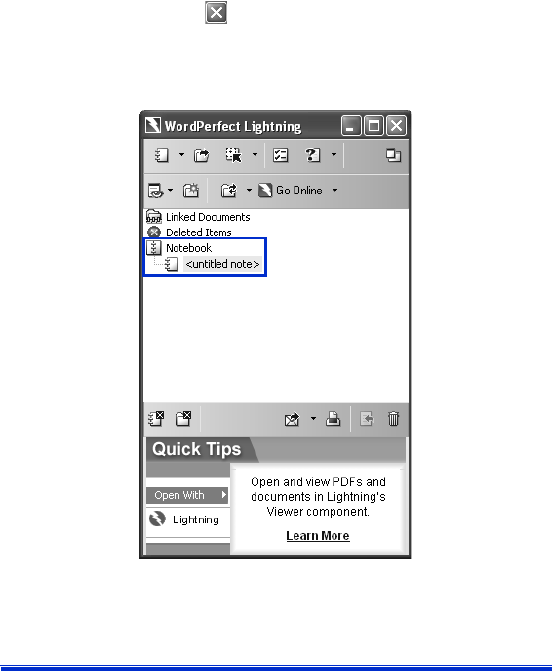
PART 2: TUTORIALS
72 Corel WordPerfect Office X4 Guidebook
2Make a selection by dragging around the area that you would like
to include in the image.
The selected area appears in the Notes window.
Now, you’re ready to close and rename your note. When closed, notes
are saved automatically in a root folder in the Navigator; however, you
can move notes to other folders in the Navigator.
Step 6: Close and rename your note
1Click the Close button in the upper-right corner of the Notes
window.
When you close the Notes window, WordPerfect Lightning
automatically saves your notes in the Navigator.
2From the Navigator, right-click the <untitled note> item, and
choose Rename.
3Type a name for your note.
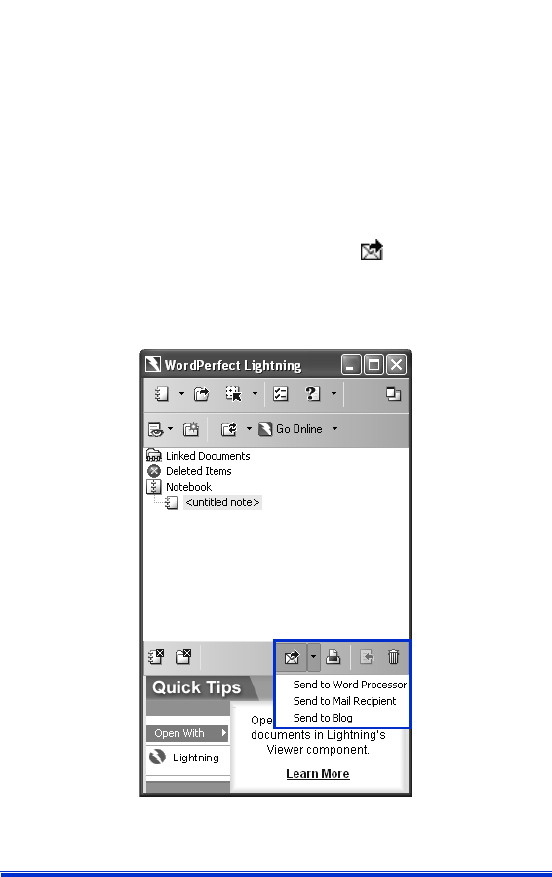
PART 2: TUTORIALS
How to gather information with WordPerfect Lightning 73
Now, you’re ready to send a note to a word processor to create a formal
document. The tools in a word processor let you apply additional
formatting, control page layout, check grammar and spelling, and use
other features to refine your document. You must have either
WordPerfect or Microsoft Word installed in order to complete this task.
Step 7: Send a note to a word processor
1From the Navigator, select a note.
2Click the arrow next to the Send to button , and choose Send to
Word Processor.
The Send to button lets you send notes to a word processor, an
e-mail application, or a blog.
3In the Choose Word Processor dialog box, enable one of the
following options:

PART 2: TUTORIALS
74 Corel WordPerfect Office X4 Guidebook
• WordPerfect
• Microsoft Word
4Click the OK button.
The note content appears in a new document window within your
word processor.
You can also send a note to a word processor from within the
Notes window by clicking the Send to button and choosing
Send to Word Processor.
Now, you can send the contents of a folder to a word processor.
Step 8: Send the contents of a folder to a word
processor
1In the Navigator, right-click a folder, and choose Send to Word
Processor.
2In the Choose Word Processor dialog box, enable one of the
following options:
• WordPerfect
• Microsoft Word
3Click the OK button.
The folder’s content appears in a new document window within
your word processor.
Where to go from here
You have successfully used WordPerfect Lightning to gather information
and send it to a word processor. Now, you can use what you learned in
the WordPerfect tutorials (Chapters 4 through 9) to format your rough
content and create a polished document.

PART 3: REFERENCE

PART 3: REFERENCE
Sharing content with others 77
Sharing content with others
13
R
EFERENCE
Corel WordPerfect Office includes tools and features that let you easily
share content with others. For example, you can e-mail documents
directly from Corel WordPerfect Office programs. You can convert your
files to the industry-standard file formats PDF and HTML. You can even
open PDF files in WordPerfect and WordPerfect Lightning.
If you need to share files with Microsoft Office users, you can convert
them to Microsoft Office formats. For more information, see “Working
with users of Microsoft Office” on page 87.
In this chapter, you’ll learn about
•working with PDF files
•creating Web-compatible content
•e-mailing files
•creating envelopes
•creating mailing labels
•using password protection
•excluding metadata when saving documents
Working with PDF files
When you need to share files with others, you can publish them to PDF
and preserve the typography, images, graphics, color, and formatting of
the original file. To view the PDF file, the recipients of the file must have
Adobe Reader or WordPerfect Lightning installed on their computers.
In addition, you can create PDF files that are compatible with different
versions of Adobe® Acrobat® and with the PDF/A standard. The
purpose of the PDF/A standard is to ensure the reliable reproduction of

PART 3: REFERENCE
78 Corel WordPerfect Office X4 Guidebook
documents for long-term preservation. In other words, the PDF/A
documents that you create today will be readable for years to come.
To publish to PDF
1Click File ` Publish to PDF.
2Choose the drive and folder where you want to save the file.
3Type a filename in the File name box.
4From the PDF style list box, choose one of the following options:
• Commercial printing (Largest file size) — creates a high-quality
PDF to send to a printer or digital copier
• PDF/A-1a (Level A compliance) — creates a standardized PDF file
that ensures the long-term archiving of the document. This
option allows document tags and font encoding to be preserved.
• PDF/A-1b (Level B compliance) — creates a standardized PDF file
that ensures the long-term archiving of the document. This
option does not include the preservation of document tags and
font encoding.
• Publishing online (Smallest file size) — creates a PDF suitable for
online viewing, such as a document to be distributed by e-mail or
displayed on the Web
• Publishing online and printing — creates a PDF suitable for
viewing or printing on a laser or desktop printer
5Click the Save button.
If you do not want the PDF file to open automatically after you save
it, disable the Open PDF after saving check box.
To import PDF documents into WordPerfect
1Click File ` Open PDF.
2Choose the drive and folder where the PDF document is stored.
3Choose the file.
4Click the Open button.
The Open PDF settings dialog box appears.

PART 3: REFERENCE
Sharing content with others 79
If the PDF document is protected by a password, type the password
in the Password box. If both permission and open passwords are
applied, type the permission password in the Password box.
5In the Page range area, enable one of the following options:
• Full document — To import an entire document, enable this
option.
• Pages — To import part of a document, enable this option, and
type a page range in the box.
6Click the Open button.
The PDF import dialog box appears.
You can import the content from the PDF file without text
formatting by enabling the Bring in content from original PDF
without any formatting check box.
To change the PDF compatibility settings
1Click File ` Publish to PDF.
2Click Settings.
The Publish to PDF settings dialog box appears.
3On the General page, choose a compatibility option from the
Compatibility list box:
• Acrobat 3.0 (PDF 1.2) — creates a PDF file that is compatible with
Adobe Acrobat 3.0
• Acrobat 4.0 (PDF 1.3) — creates a PDF file that is compatible with
Adobe Acrobat 4.0
• Acrobat 5.0 (PDF 1.4) — creates a PDF file that is compatible with
Adobe Acrobat 5.0
• PDF/A-1a — creates a standardized PDF file that ensures the
long-term archiving of the document. This option allows
document tags and font encoding to be preserved.
• PDF/A-1b — creates a standardized PDF file that ensures the
long-term archiving of the document. This option does not
include the preservation of document tags and font encoding.
4Click the OK button.

PART 3: REFERENCE
80 Corel WordPerfect Office X4 Guidebook
To view PDF documents in WordPerfect Lightning
1From either the Viewer or the Navigator, click the Open button
on the toolbar.
2Choose the folder where the document is stored.
3Right-click the filename, and click Open with ` WordPerfect
Lightning Viewer.
Creating Web-compatible content
Corel WordPerfect Office lets you create Web-compatible content by
publishing WordPerfect documents, Quattro Pro spreadsheets, and
Presentations slide shows to HTML.
To publish a WordPerfect document to HTML
1Click File ` Publish to ` HTML.
2Typ e a n am e i n th e HTML filename box.
3Click the Publish button.
To save a spreadsheet range as an HTML document
1Click File ` Publish to ` Internet.
2In the Ranges and charts to convert area, click the Range picker
, and select a range of cells.
3Click the Add button.
4In the Export range as area, enable one of the following options:
• Table exports HTML table formatting tags
• Text exports only text, excluding HTML table formatting tags
5Type a path and filename in the Save file box.
6Click the OK button.
To publish a slide show as an HTML document
1Click File ` Internet Publisher.
The Corel® Internet Publisher™ wizard starts.
2Click the Next button.

PART 3: REFERENCE
Sharing content with others 81
3Click Layout.
4Enable one of the following options:
• Create a new layout
• Use an existing layout
5Choose the formatting options for the slide show by following the
instructions in the Corel Internet Publisher wizard.
6Click the Finish button.
E-mailing files
You can e-mail files from any Corel WordPerfect Office program by using
the default e-mail program that is installed on your computer, such as
Microsoft Outlook.
To e-mail a file
•Click File ` Send to ` Mail recipient.
Your default e-mail program starts.
Creating envelopes
When you create an envelope, you can insert addresses from a
WordPerfect or Microsoft Outlook address book. If you haven’t done so
already, you need to specify which address book you want WordPerfect
to use.
After creating an envelope, you can print it. For information about
printing envelopes, see “Working with envelopes and labels” in the
WordPerfect Help.
To choose an address book for WordPerfect
1Click To o l s ` Settings.
2Click Environment.
3In the Environment settings dialog box, click the General tab.
4From the Address book list box, choose one of the following:

PART 3: REFERENCE
82 Corel WordPerfect Office X4 Guidebook
• WordPerfect address book
• Outlook address book
To create an envelope
1Click Format ` Envelope.
2Click the Address Book button in the Return address area, and
choose a contact.
3Click the Insert button.
4Click the Address Book button in the Mailing address area, and
choose a contact.
5Click the Insert button.
6Click one of the following:
• Create new — creates an envelope in a new document
• Append to doc — adds an envelope to the end of an existing
document as a page
The most recently used return address becomes the default return
address for future documents.
To change the size of an existing envelope, click the Envelope size
button on the property bar, and choose a new size.
Creating mailing labels
You can create a series of identical mailing labels that include your
name and address. You can also create a mailing label for each contact
in your address book. You can merge the contact information in your
WordPerfect or Microsoft Outlook address book with a sheet of mailing
labels. To do this, you need to specify which address book you want
WordPerfect to use. For more information, see “To choose an address
book for WordPerfect” on page 81.
When you merge the contact information in your address book with
labels, you begin by inserting merge fields into the first label that
appears in your document. The merge fields you choose direct

PART 3: REFERENCE
Sharing content with others 83
WordPerfect where to print the corresponding contact information
from your address book. When you perform the merge, WordPerfect
replaces the merge fields in the main document with the information in
your address book.
After creating a label, you can print it. For information about printing
labels, see “Working with envelopes and labels” in the WordPerfect
Help.
To create a series of identical mailing labels
1In a blank document, click Format ` Labels.
2Select a label definition from the Labels list box.
3Type your name and address on the label.
4Click To o l s ` Merge.
5Click Form Document ` Create Form Document.
6Enable the Use file in active window option, and then click the OK
button.
7Enable the No Association option, and then click the OK button.
8Click the Options button.
9Type the number of labels you want in the Number of copies for
each record box, and then click the OK button.
10 Click the Merge button.
To perform a mail merge
1In a blank document, click Format ` Labels.
2From the Labels list box, choose the label style you want to use,
and then click the Select button.
3Click To o l s ` Merge.
4Click the Form Document button, and then choose Create Form
Document.
5In the Data Source File dialog box, enable the Use file in active
Window option.
6Click the OK button.

PART 3: REFERENCE
84 Corel WordPerfect Office X4 Guidebook
7Click the Data Source button, and choose Associate an Address
Book.
8Choose an address book from the list box to the right of the Data
Source button.
9Click the Merge button.
10 Click the Insert Field button, and choose the fields you want to
insert from the Field Names list box.
11 Click Merge to generate the labels.
A new document that includes an address label for each of your
contacts is created.
Using password protection for PDF files
You can control access to a PDF file by applying an open password or a
permission password, or both. An open password secures a file and
prevents someone from opening it. A permission password allows
someone to open the file but allows or denies other specific tasks, such
as printing or editing. When only an open password is added, you are
allowing the PDF to be both opened and edited. If only the permission
password is applied, you have more control over which actions are
permitted.
To maximize the security of the PDF file, you can apply both types of
passwords to a PDF file concurrently. If both passwords are applied, the
person receiving the file can use either password to open the file for
viewing with Adobe Acrobat or Adobe Reader. If, however, you want to
allow someone to edit the document with Adobe Acrobat or print the
document with Adobe Acrobat or Adobe Reader, the person must use
the permission password. In addition, you must allow the person to
perform these actions.
To add an open password to a PDF file
1Click File ` Publish to PDF.
2Click Settings.
The Publish to PDF settings dialog box appears.

PART 3: REFERENCE
Sharing content with others 85
3Click the Security tab.
4Enable the Open password check box.
5Type a password in Open password text box.
To add a permission password to a PDF file
1Click File ` Publish to PDF.
2Click Settings.
The Publish to PDF settings dialog box appears.
3Click the Security tab.
4Enable the Permission password check box.
5Type a password in the Permission password text box.
6Perform one or more tasks from the following table.
Excluding metadata when saving
documents
Documents that you save with WordPerfect may contain information
that you do not want others to see. For example, the name of your
computer or a document summary may be included in the file. This
information, known as metadata, is used to identify, describe, and
locate electronic resources on a network. Metadata is used to enhance
the editing, viewing, filing, and retrieving of electronic documents. It is
important to keep this information stored in the original document, but
To Do the following
Add a printing permission Choose an option from the
Printing permissions list box.
Add an editing permission Choose an option from the
Editing permissions list box.
Allow the copying of content,
such as text and images
Enable the Enable the copying of
text, images, and other contents
check box.

PART 3: REFERENCE
86 Corel WordPerfect Office X4 Guidebook
you can save a version of the document that excludes the metadata,
which allows you to share the document with others.
To exclude metadata when saving a document
1In WordPerfect, click File ` Save without metadata.
2Enable the Keep original document open check box.
If the Keep original document open check box is not enabled, the
original document will close, and the version without metadata will
remain open.
3In the Save without metadata dialog box, choose the drive and
folder where you want to save the document.
By default, _mtd is added to the filename to indicate that the file
does not contain metadata.
4In the Select metadata to remove area, enable any of the following
check boxes:
• Comment information
• Hidden text
• Annotations
• Undo/redo history
• Document summary data
• Headers
• Footers
• Hyperlinks
• OLE object information
• Routing slip
5Click the Save button.

PART 3: REFERENCE
Working with users of Microsoft Office 87
Working with users of
Microsoft Office
14
R
EFERENCE
Corel WordPerfect Office includes an array of compatibility features
that make it easy to transition from using Microsoft Office programs
and that facilitate the sharing of documents with Microsoft Office users.
For instance, you can simulate the workspace of a Microsoft Office
program while you are learning to use Corel WordPerfect Office. In
addition, you can easily open, import, export, and save Microsoft Word,
Microsoft Excel, and Microsoft PowerPoint files, reducing or
eliminating many of the difficulties that can arise when working with
multiple file formats.
In this chapter, you’ll learn about
•simulating a Microsoft Office workspace
•sharing documents with users of Microsoft Office
Simulating a Microsoft Office workspace
If you have worked mostly with Microsoft Office programs, you may
find it helpful to restore a familiar workspace while you are learning to
use a program in Corel WordPerfect Office. For example, you can
simulate the Microsoft Word workspace while you become accustomed
to working with WordPerfect. When you simulate a Microsoft Office
workspace, features such as toolbars and menu items are positioned
where you would find the equivalent features in the Microsoft Office
program. In addition, the shortcut keys of Microsoft Word and
Microsoft Excel are applied to the features of WordPerfect and Quattro
Pro, respectively, so that you can quickly access the tools you need.

PART 3: REFERENCE
88 Corel WordPerfect Office X4 Guidebook
You can also display the Compatibility toolbar, which lets you easily
save documents to Microsoft Office formats and publish them to HTML.
The Compatibility toolbar
To simulate a Microsoft Office workspace
1From WordPerfect, Quattro Pro, or Presentations, click Too ls `
Workspace manager.
2Enable the appropriate Microsoft Office workspace option in the
Workspace dialog box:
• For WordPerfect, choose Microsoft Word mode.
• For Quattro Pro, choose Microsoft Excel mode.
• For Presentations, choose Microsoft PowerPoint mode.
3Click the OK button.
To display the Compatibility toolbar
1From WordPerfect or Quattro Pro, click View ` To o l b a r s .
2From the Too l ba r s list, enable the Compatibility check box.
3Click the OK button.
In Presentations, the compatibility options are accessible from the
default toolbar.
Sharing documents with users of
Microsoft Office
You can share Corel WordPerfect Office files with Microsoft Office
users, and they can share their files with you. For example, to share a
WordPerfect document with a Microsoft Word user, you can save the
WordPerfect document as a Microsoft Word file, which automatically
converts the document to the Microsoft Word format. You can also save
Quattro Pro files to the Microsoft Excel format and Presentations files
to the Microsoft PowerPoint format.

PART 3: REFERENCE
Working with users of Microsoft Office 89
Similarly, if you receive a file created with a Microsoft Office program,
you can easily open it in the corresponding Corel WordPerfect Office
program. For example, opening a Microsoft Excel file with Quattro Pro
automatically converts the file to the Quattro Pro format.
If you modify a file with Quattro Pro and the recipients of the file will
be using Microsoft Excel, then you need to save the file as a Microsoft
Excel file. If you don’t specify the Microsoft Excel format when saving,
the file is saved as a Quattro Pro file by default. Again, the same process
applies when you modify Microsoft Word files in WordPerfect and when
you modify Microsoft PowerPoint files in Presentations.
You can specify preferences for saving files. In WordPerfect, you can
choose a setting that lets you automatically save files to the same
format in which they are opened. In Quattro Pro, you can choose to save
all files to the Microsoft Excel file format.
To save a Corel WordPerfect Office file as a
Microsoft Office file
1From WordPerfect, Quattro Pro, or Presentations, click File `
Save as.
2Choose the drive and folder where you want to save the file.
3Type the filename in the Filename box.
4Choose the appropriate Microsoft Office file format from the File
type list box:
• For WordPerfect, choose Microsoft Word.
• For Quattro Pro, choose Microsoft Excel.
• For Presentations, choose Microsoft PowerPoint.
5Click the Save button.
To open a file created with a Microsoft Office program
1From WordPerfect, Quattro Pro, or Presentations, click File ` Open.
2Choose the drive and folder where the Microsoft Office file is
stored.
If you can’t see the file, choose All files from the File type box.

PART 3: REFERENCE
90 Corel WordPerfect Office X4 Guidebook
3Click the Microsoft Office file.
4Click the Open button.
To save to the Microsoft Word format automatically
1From WordPerfect, click To o ls ` Settings ` Files.
2On the Document page, enable the On save, keep the document’s
original file format check box.
3Click the OK button.
To save to the Microsoft Excel format automatically
1From Quattro Pro, click Tools ` Settings.
2In the list of categories, click Compatibility.
3Choose XLS from the Default file type list box.
4Click the OK button.
Copyright © 2008 Corel Corporation. All rights reserved.
Corel® WordPerfect® Office X4 Guidebook
Protected by U.S. Patents 5233685; 5251292; 6225996; 6317758; 6731309; Patents
Pending.
Product specifications, pricing, packaging, technical support and information
(“specifications”) refer to the retail English version only. The specifications for all
other versions (including other language versions) may vary.
INFORMATION IS PROVIDED BY COREL ON AN “AS IS” BASIS, WITHOUT ANY OTHER
WARRANTIES OR CONDITIONS, EXPRESS OR IMPLIED, INCLUDING, BUT NOT
LIMITED TO, WARRANTIES OF MERCHANTABLE QUALITY, SATISFACTORY QUALITY,
MERCHANTABILITY OR FITNESS FOR A PARTICULAR PURPOSE, OR THOSE ARISING
BY LAW, STATUTE, USAGE OF TRADE, COURSE OF DEALING OR OTHERWISE. THE
ENTIRE RISK AS TO THE RESULTS OF THE INFORMATION PROVIDED OR ITS USE IS
ASSUMED BY YOU. COREL SHALL HAVE NO LIABILITY TO YOU OR ANY OTHER
PERSON OR ENTITY FOR ANY INDIRECT, INCIDENTAL, SPECIAL, OR CONSEQUENTIAL
DAMAGES WHATSOEVER, INCLUDING, BUT NOT LIMITED TO, LOSS OF REVENUE OR
PROFIT, LOST OR DAMAGED DATA OR OTHER COMMERCIAL OR ECONOMIC LOSS,
EVEN IF COREL HAS BEEN ADVISED OF THE POSSIBILITY OF SUCH DAMAGES, OR
THEY ARE FORESEEABLE. COREL IS ALSO NOT LIABLE FOR ANY CLAIMS MADE BY
ANY THIRD PARTY. COREL'S MAXIMUM AGGREGATE LIABILITY TO YOU SHALL NOT
EXCEED THE COSTS PAID BY YOU TO PURCHASE THE MATERIALS. SOME STATES/
COUNTRIES DO NOT ALLOW EXCLUSIONS OR LIMITATIONS OF LIABILITY FOR
CONSEQUENTIAL OR INCIDENTAL DAMAGES, SO THE ABOVE LIMITATIONS MAY
NOT APPLY TO YOU.
Corel, the Corel logo, WordPerfect, Presentations, Quattro Pro, Clipbook,
Corel DESIGNER, CorelDRAW, CorelMEMO, Corel Store, Corel Support Services,
CorelTUTOR, Corel Visual Intelligence, iGrafx, Internet Publisher, Lightning,
Paint Shop Pro, Painter, PerfectExpert, PerfectScript, Presentations Graphics,
QuickTask, Scrapbook, TextArt, WinDVD, and WinZip are trademarks or registered
trademarks of Corel Corporation and/or its subsidiaries in Canada, the U.S., and/or
other countries.
Adobe, Acrobat, and Reader are registered trademarks of Adobe Systems
Incorporated in the United States and/or other countries. Excel, Microsoft,
PowerPoint, Windows, and Windows Vista, are either registered trademarks or
trademarks of Microsoft Corporation in the United States and/or other countries.
Grammatik is a registered trademark of Novell, Inc. Other product, font, and
company names and logos may be trademarks or registered trademarks of their
respective companies.
022028
