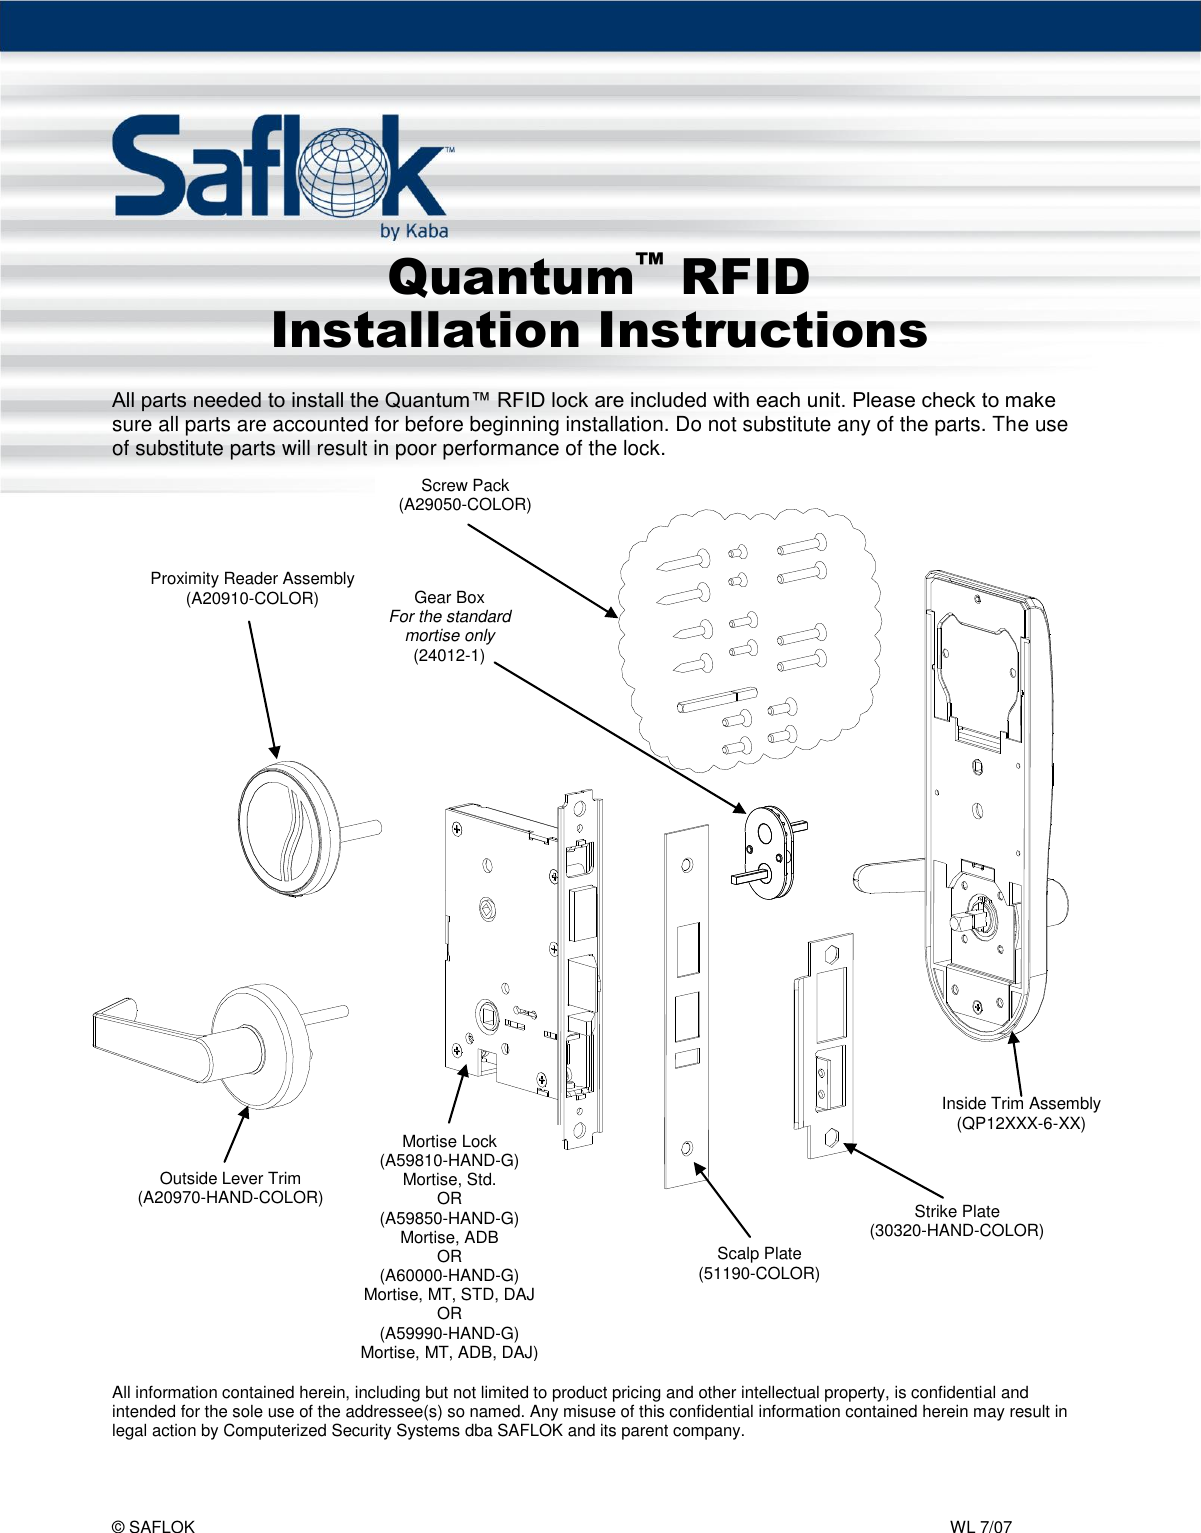
dormakaba Canada QUANTUMRF2R RFID card reader used to access security devices User Manual QUANTUM MT

Computerized Security Systems, Inc. RFID card reader used to access security devices QUANTUM MT

user manual

Quantum™ RFID  Pg. 1 of 6 © SAFLOK    WL 7/07   Outside Lever Trim (A20970-HAND-COLOR)  Mortise Lock (A59810-HAND-G) Mortise, Std. OR (A59850-HAND-G) Mortise, ADB OR (A60000-HAND-G) Mortise, MT, STD, DAJ OR (A59990-HAND-G) Mortise, MT, ADB, DAJ) Scalp Plate (51190-COLOR) Strike Plate (30320-HAND-COLOR) Inside Trim Assembly (QP12XXX-6-XX)      Quantum™ RFID Installation Instructions  All parts needed to install the Quantum™ RFID lock are included with each unit. Please check to make sure all parts are accounted for before beginning installation. Do not substitute any of the parts. The use of substitute parts will result in poor performance of the lock.      All information contained herein, including but not limited to product pricing and other intellectual property, is confidential and intended for the sole use of the addressee(s) so named. Any misuse of this confidential information contained herein may result in legal action by Computerized Security Systems dba SAFLOK and its parent company.Screw Pack (A29050-COLOR) Proximity Reader Assembly  (A20910-COLOR) Gear Box For the standard mortise only (24012-1)
Quantum™ RFID  Pg. 2 of 6 © SAFLOK    WL 7/07                     Mortise Screws  Motor Wire  Fig. 1 Preparing the door and door frame  1.  Prepare the door using the Quantum RFID installation template or drill fixture. The door edge prep is a standard, full-mortise prep for a 1-1/4” x 8” front plate (1” x 8” and 1” x 7-3/4” custom front plates are optional). The door surface holes and mortise are customized for the SAFLOK trim.  Important: Some holes are only on the inside surface of the door.    For new construction installations, the door manufacturer may prepare the door using the installation template.    For retrofit installations, remove the existing hardware and confirm that the existing door edge prep is appropriate for the SAFLOK mortise lock.   Drill fixture: If you are using a SAFLOK drill fixture, position and clamp the fixture on the door. The fixture has two positioning posts that rest inside the mortise, establishing the proper backset for the trim. When the fixture is clamped, its surfaces should be parallel with the door surfaces and door edges. Not all holes go through the door (refer to the template). Notch the material on the inside surface for easier routing of the motor wire. After machining, remove any debris from the mortise and cutouts.  2.  Prepare the door frame using the template and install the strike plate using the screws provided   (12 x 1-1/2 screws for wood frames, 12-24 x 3/8 screws for metal frames).  3.  The mortise plate has an adjustable bevel. Align the mortise front plate with the bevel of the door edge and tighten the two bevel adjustment screws at the top and bottom of the mortise case. Position the mortise case in the door edge with the motor wire routed through the notch (see Fig. 1).   Note: Use care to ensure that the wires do not get  pinched or pulled as the mortise is inserted into the pocket.   4.  Attach the mortise front plate to the door using the two mortise screws (12 x 1-1/4 screws for wood doors,  12-24 x 3/8 screws for metal doors). Be sure that the screws are fully tightened.   Important: DO NOT leave the screws loose. The screws must be fully tightened before the trim is installed. If you must leave the mortise loose to install the trim, the door preparation is incorrect.   5.  Install the scalp plate with the 8-32 x 1/4 screws provided and test for proper mechanical latch engagement into the strike plate. Mortise Front Plate Notch for routing the motor wire (inside only) Inside Door Surface
Quantum™ RFID  Pg. 3 of 6 © SAFLOK    WL 7/07 Installing the lock trim  The outside lever trim has two carriage bolts that fit into the diagonal holes in the mortise case. These carriage bolts establish an accurate trim position with respect to the mortise case assembly, allowing the levers and bolt mechanism to operate without binding. The holes machined in the door surfaces should not influence the position of the trim or the proximity reader assembly.  Do not tap or bend the carriage bolts to manipulate the fit of either trim piece during installation. The door prep holes should accommodate the outside lever trim and the proximity reader assembly. If the carriage bolts or proximity reader enclosure fit too tightly in the door prep holes, then remove the mortise and enlarge the holes to achieve a free fit.  1.  Remove the battery pack and retaining spring.  2.  Position the outside proximity reader assembly on the outside of the door (see Fig. 2). Route the ribbon cable and power cable through the 13/16” hole in the door. Do not pull on the ribbon cable.  3.  Route the ribbon cable and power cable through the rectangular hole in the inside trim. Do not pull on the ribbon cable. This hole is located above printed circuit board (PCB) assembly. Route the motor wire through the wire channel in the inside trim closest to the door edge. These holes are located below the PCB (see Fig. 3).  4.  Position the inside trim on the inside of the door.  5.  Secure inside trim to the proximity reader  assembly using two M5 x 31 mm screws.   Important: Do not fully tighten the screws at this point.   6.  Align the outside lever trim with the diagonal holes located on either side of the mortise hub and secure it by starting the two  8-32 x 1-1/4 screws (see Fig. 2).   7.  Once the outside lever trim is fully secured, check the alignment of the inside trim and be sure that the both levers rotate without binding. Once the trim is properly aligned, fully tighten the four screws that secure the trim to the door and check for proper rotation.  8.  Place the battery pack in position above the PCB and secure it in place using the retaining spring. Be sure that the battery wire is routed through the lower left corner of the battery compartment.  9.  Connect ribbon cable and motor cable to the PCB.   8-32 x 1-1/4 Screws Outside Lever Trim Fig. 2 Inside Trim Motor Wire Proximity Reader Assembly  Route the ribbon connector through the rectangular hole Fig. 3 Motor Wire Channels M5 x 0.8g x 31 mm Screws Power Cable Ribbon Cable
Quantum™ RFID  Pg. 4 of 6 © SAFLOK    WL 7/07 Installing the lock trim (continued)  10. Watching for the green LED on the proximity reader to flash four times, connect the battery wire to the PCB. The green light indicates that the PCB has reset.  Important: The battery wire should be the last connection made to the PCB.  11. With the dead bolt retracted, insert the long end of the dead bolt spindle assembly through the PCB switch cam hole and into the mortise dead bolt hub. The indicator marks on the switch cam should be at the right (3:00 position) when the mortise dead bolt is retracted (see Fig. 4). The retaining ring should rest on the switch cam when fully inserted (the proper positioning of the cam will allow the door to be opened when the dead bolt is retracted and block entry when the dead bolt is thrown for privacy, except when emergency keycards are used). Position dead bolt spindle assembly into cam assembly.  Important: As illustrated in Fig. 4, be sure that the cam is in correct orientation.   12. Install the inside escutcheon with the thumb turn pointed upward.    13. Secure the inside trim cover to the inside trim using two color-matching M4 x 16mm Torx screws (see Fig. 5).  14. Program the lock using the Quantum RFID LPI Probe. Test the functioning of the lock as discussed in the following section and the programming manual before closing the door. When the construction key is used, the red and green LEDs will blink together, indicating that the time and date are not set.   Battery Ribbon Green Ground Wire Battery Wire Dead Bolt Spindle Assembly M4 X 16mm Torx Screws Fig. 4 Fig. 5 3:00 Position  ADB Mortise Motor Wire Ribbon Connection Motor Connection Battery Connection (last)
Quantum™ RFID  Pg. 5 of 6 © SAFLOK    WL 7/07 Testing Lock Functionality  Pass a Construction key over the Quantum RFID LPI probe. Be sure that the green light flashes for five seconds while the exterior lever remains operable. If the green light does not flash, refer to the table below.    Lock Communication    Electronic Function Description    Red and green LEDs flash     Time and date not set, use the Quantum RFID LPI probe to reset  nine times simultaneously       Yellow LED flashes 12 times    Dead bolt is thrown or switch cam is not properly aligned   Yellow LED flashes two times   Keycard not allowed OR keycard cancelled by new keycard   Red and green LEDs flash    Low battery (contact the SAFLOK service department) alternately nine times   Yellow and red LEDs flash     Bad keycard read or corrupted data (may require new  two times simultaneously    keycard)   Red LED flashes two times  Keycard not read (keycard inserted upside-down, wrong end, wrong key?)     SAFLOK Door Unit Inspection Criteria  Appearance   Finish is free of blemishes or scratches that would distract from lock appearance   Lock body and under plate (if used) are mounted straight on the door   Door scalp is mounted straight and flush with the door edge   Jamb strike is mounted straight and is flush with the jamb face  Correction of minor blemishes on the door jamb are the responsibility of the property’s maintenance department  Lock Function   Knob or lever rotates and moves freely   Lever is horizontal to floor when at rest position   Dead bolt extends fully and retracts without binding (door open)   Lock latch and dead bolt engage jamb strike plate freely   Anti-pick latch when depressed (door open)   Anti-pick latch is depressed when contact is made with the strike plate (door closed)
Quantum™ RFID  Pg. 6 of 6 © SAFLOK    WL 7/07  Electronics/Keycards   Keycard can be inserted and withdrawn freely   Yellow light flashes twice when incorrect keycard is used    Red light flashes twice if keycard is used incorrectly and cannot be read  (e.g., a credit card is used)   Green light flashes when the proper keycard is used   Green light is flashing when the lever is operated   Green light continues to flash for a five-second cycle   Yellow light flashes 12 times when the dead bolt is extended and a guest/hotel  keycard is used   All keycards function to the specifications of the master plan  Door function   Door closes and latches with little or no interference   Dead bolt extends fully through the strike plate without interference (door closed)   Spacing between door edge and inside door jamb does not exceed 3/16” (door closed)  Note: If bumpers or other seals are added after strike plate installation and causes alignment and latch problems, it is the property’s responsibility to correct this condition. This note generally applies to new construction or new door installation.   FCC and IC Warnings:   This device complies with part 15 of the FCC Rules. Operation is subject to the following two conditions: (1) This device may not cause harmful interference, and (2) this device must accept any interference received, including interference that may cause undesired operation.   Changes or modifications not expressly approved by the party responsible for compliance could void the user's authority to operate the equipment.  This device complies with Industry Canada licence-exempt RSS standard(s). Operation is subject to the following two conditions: (1) this device may not cause interference, and (2) this device must accept any interference, including interference that may cause undesired operation of the device.  Cet appareil est conforme avec Industrie Canada RSS standard exempts de licence (s). Son fonctionnement est soumi aux deux conditions suivantes: (1) cet appareil ne peut pas provoquer d'interférences et (2) cet appareil doit accepter toute interférence, y compris les interférences pouvant entraîner un mauvais fonctionnement de l' appareil       Questions? Call Customer Service at 800.999.6213 and select option 3.

Navigation menu