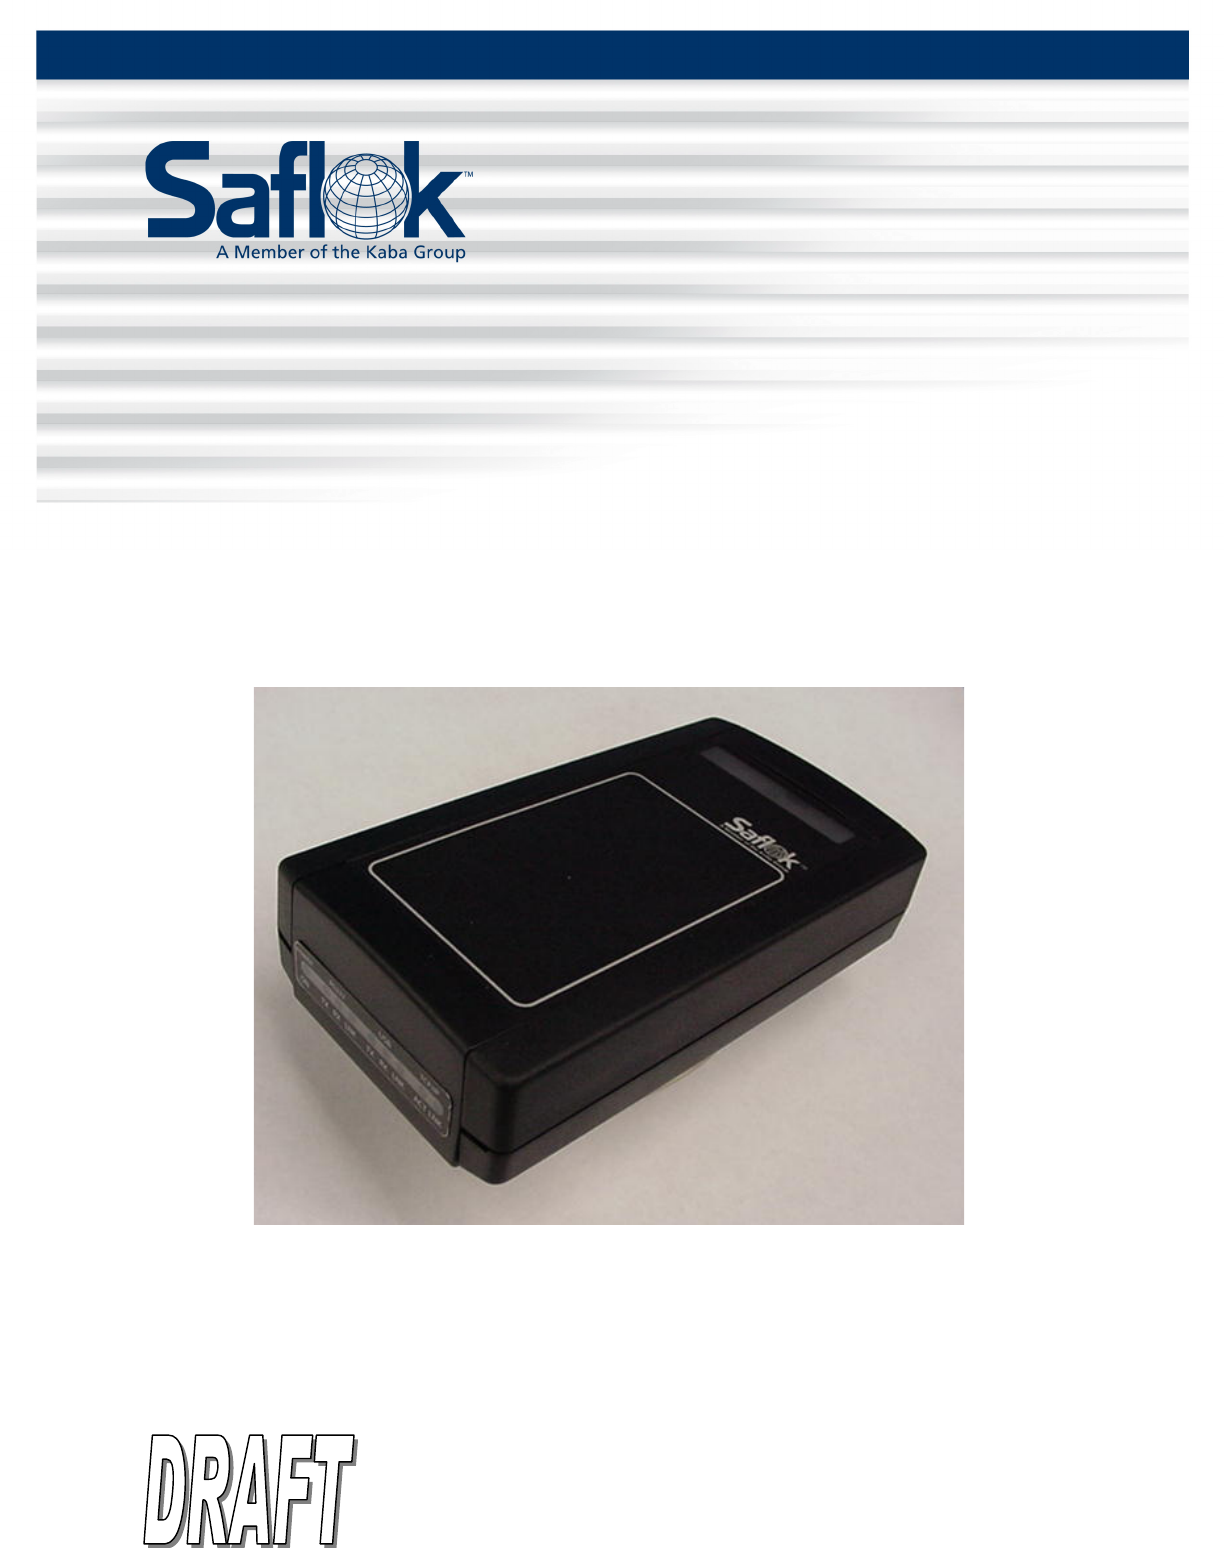
dormakaba Canada RFIDENC RFID card reader/encoder used to access security devices User Manual
Computerized Security Systems, Inc. RFID card reader/encoder used to access security devices
user manual
Network RFID Encoder Installation and Operation Instructions Pg. 1 of 13
© SAFLOK™, all rights reserved. WL 2/6/2009
Network RFID Encoder
Installation and Operation
Instructions
FCC Warning: Changes or modifications not expressly approved by Computerized Security Systems could void the user’s authority
to operate the equipment.
All information contained herein, including but not limited to product pricing and other intellectual property, is confidential and
intended for the sole use of the addressee(s) so named. Any misuse of this confidential information contained herein may result in
legal action by Computerized Security Systems dba SAFLOK and its parent company.

Network RFID Encoder Installation and Operation Instructions Pg. 2 of 13
© SAFLOK™, all rights reserved. WL 2/6/2009
Table of Contents
Setting Up the Encoder 3
Setup for TCP/IP Connection with System 6000 4
Setup for RS232 (serial) Connection with System 6000 7
Setup for USB Connection with System 6000 8
Encoding a Keycard or RFID Credential 10
Interrogating a Keycard or RFID Credential 12

Network RFID Encoder Installation and Operation Instructions Pg. 3 of 13
© SAFLOK™, all rights reserved. WL 2/6/2009
Setting Up the Encoder
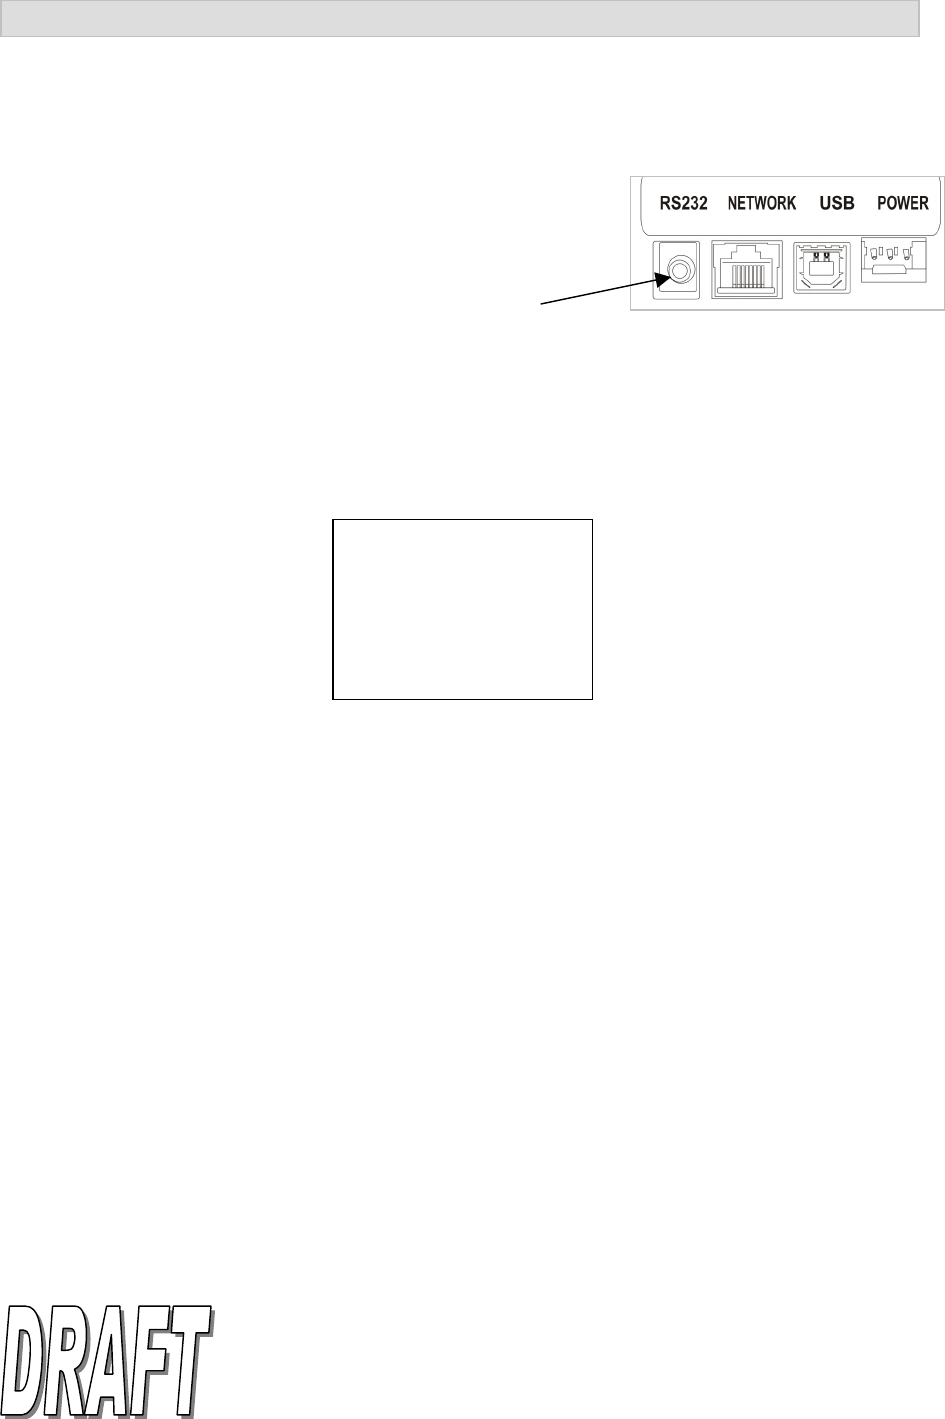
1. Connect the power cable to the encoder (located on the back of the unit, as shown in Fig. 1). Use a
SAFLOK 12V DC power supply, part number 73763.
2. Connect the communication cable to the appropriate communication port on the back of the encoder
Ethernet network (TCP/IP), DeskLinc serial port (RS232), or PC (USB).
3. Plug in SAFLOK power supply to an electrical outlet.
4. Refer to the appropriate section to complete the setup:
• TCP/IP instructions (System 6000) – page 4
• Serial instructions (DeskLinc) – page 7
• USB instructions (System 6000) – page 8
Fig. 1
Network RFID Encoder Connections
(back of the unit)
Network RFID Encoder Installation and Operation Instructions Pg. 4 of 13
© SAFLOK™, all rights reserved. WL 2/6/2009
Setup for TCP/IP Connection with System 6000
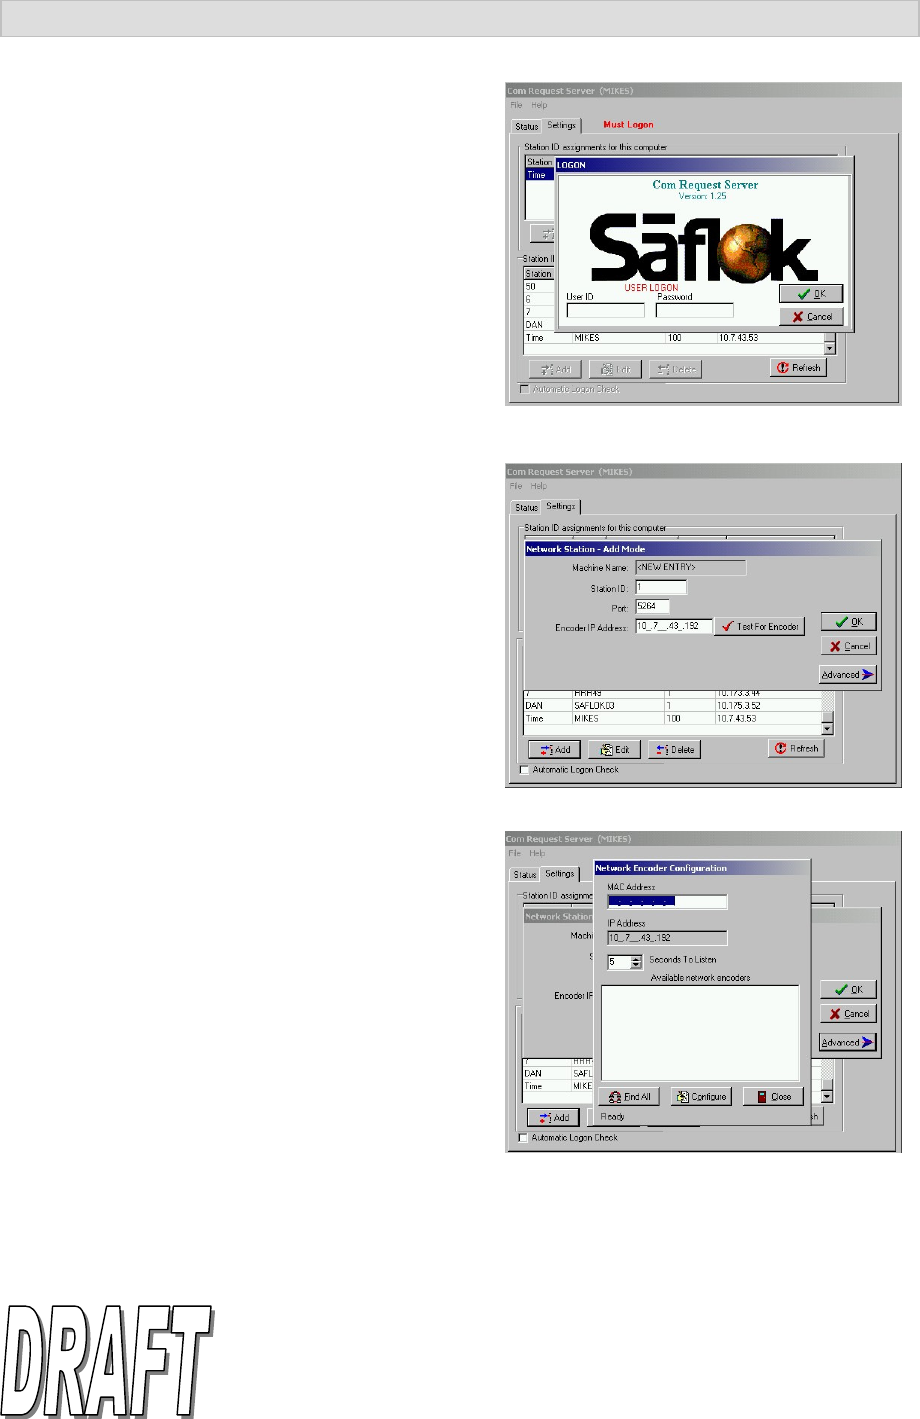
1. Logon to the CRS at any computer on the
network, a TCP/IP encoder can be added from
any CRS because it is not directly connected to
the computer.
2. Click the Settings tab then click the Add button
under station ID assignments for entire SAFLOK
system. Type in the Station ID#, the Port will
default to 5264 and should not be changed. The
encoder IP address will appear minus the last
three digits. Type in the last three digits to assign
the IP address to the encoder. Next, click the
Advanced button.
3. Type in the MAC Address. The MAC address is
found on the bottom of the encoder. If the MAC
address is not available, click Find All and the
screen will display all the TCP/IP encoders
connected to the network.
Network RFID Encoder Installation and Operation Instructions Pg. 5 of 13
© SAFLOK™, all rights reserved. WL 2/6/2009
Setup for TCP/IP Connection with System 6000 (continued)
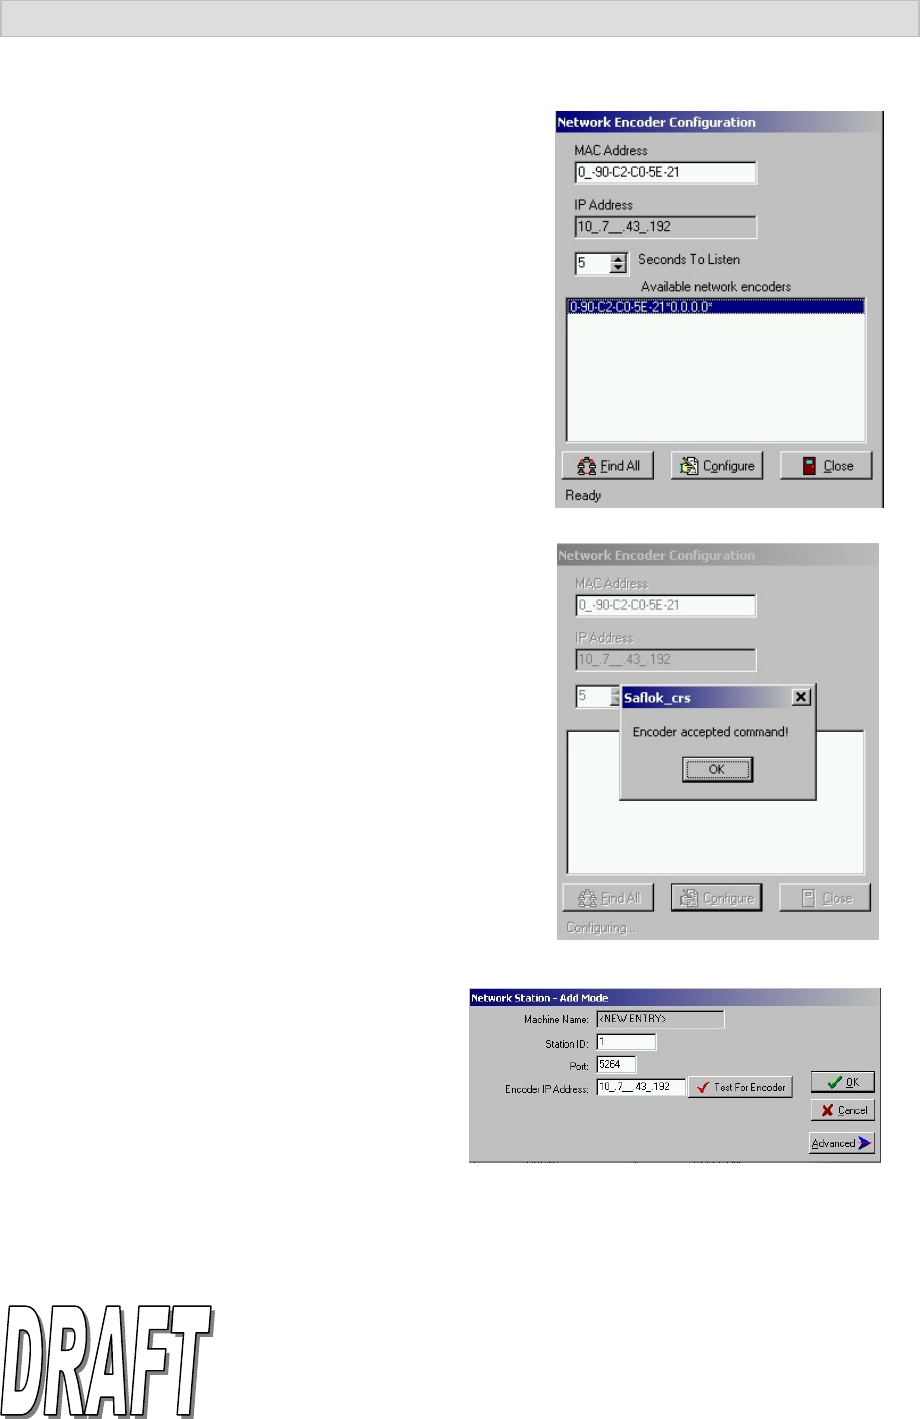
4. When the MAC address appears on the screen double
click on it and it will move it up to the MAC Address
input line. Click Configure to send the information to the
encoder.
5. When encoder receives the information the message
above will appear. Click OK. Reset the power to the
encoder for changes to take effect. Then click Close.
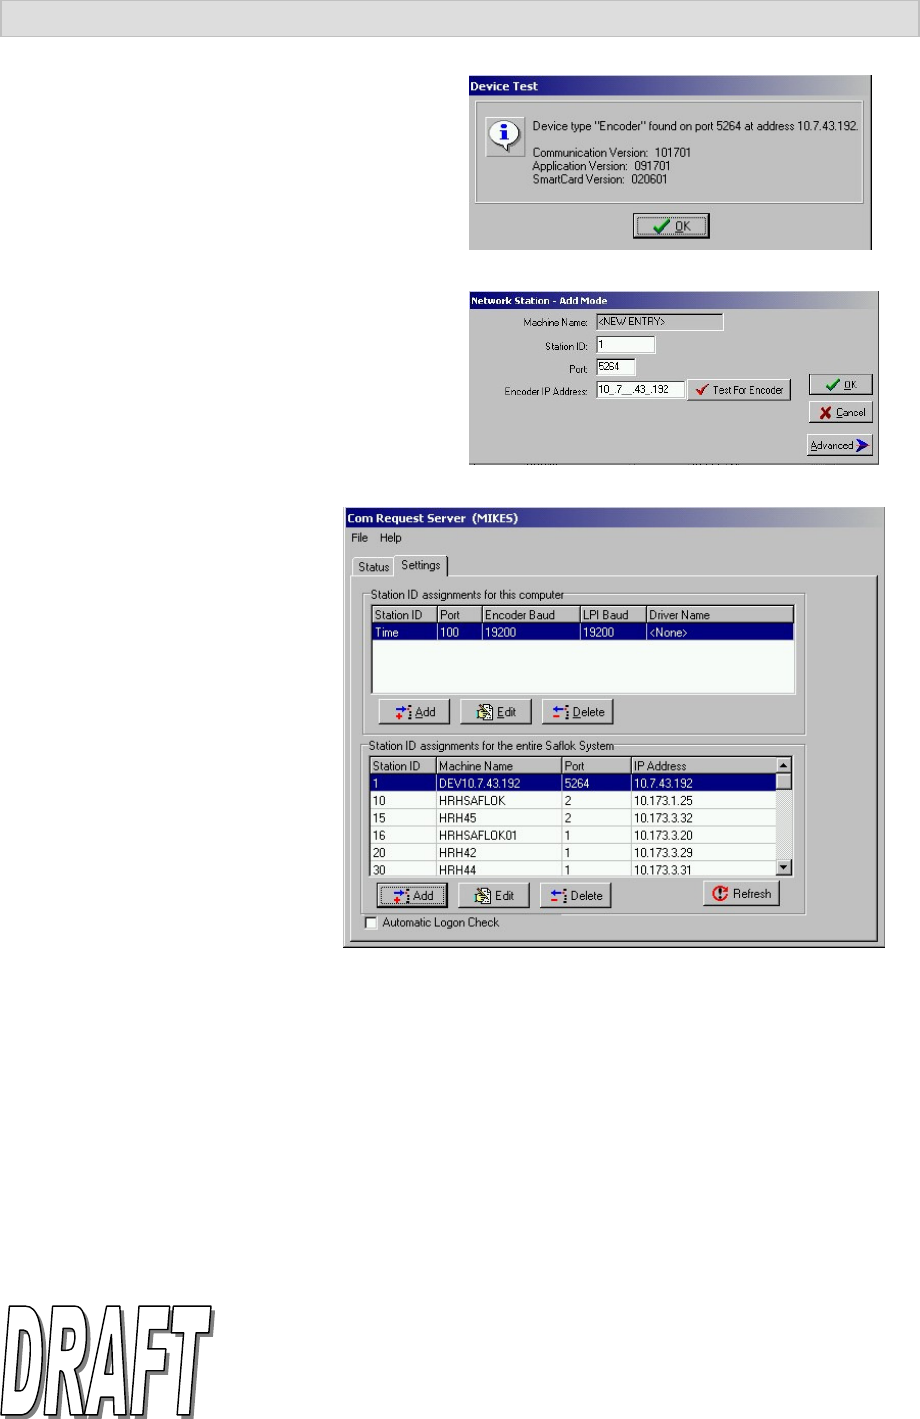
6. Click on Test For Encoder and the screen
below will appear.
Network RFID Encoder Installation and Operation Instructions Pg. 6 of 13
© SAFLOK™, all rights reserved. WL 2/6/2009
Setup for TCP/IP Connection with System 6000 (continued)
7. Click OK.
8. Click OK to add the Station ID to system.
9. Now the Station ID will appear
in the assignments for the entire
SAFLOK System and can be
added or changed in the CRS at
any computer on the network.
Network RFID Encoder Installation and Operation Instructions Pg. 7 of 13
© SAFLOK™, all rights reserved. WL 2/6/2009
CA5 POWER UP MENU
1.Start Program
2.Terminal Settings
3.Display Version
4.Load/UnLoad Files
Setup for RS232 (serial) Connection with DeskLinc™
1. Connect the RS232 cable to the encoder (see Fig. 2) and the hand-held terminal. The thin 90-degree
plug inserts into the top side of the hand-held terminal the other end plugs into the back of the
encoder unit.
2. Plug the power supplies for the hand-held terminal and encoder into a wall socket.
3. Once the terminal's batteries tab have been removed and the power supplies for the hand-held
terminal and encoder are connect to a wall socket, it will display the “Power Up” menu screen.
4. To start the program, simply press ENTER. The terminal should begin communicating with the
encoder right away. If the terminal is communicating, the encoder’s blue RS232 Link (LNK) light will
be on solid. If this does not occur, reference your DeskLinc manual for troubleshooting. The terminal
will display the Password or Sign On screen.
Fig. 2
RS232
Connection
Network RFID Encoder Installation and Operation Instructions Pg. 8 of 13
© SAFLOK™, all rights reserved. WL 2/6/2009
Setup for USB Connection with System 6000
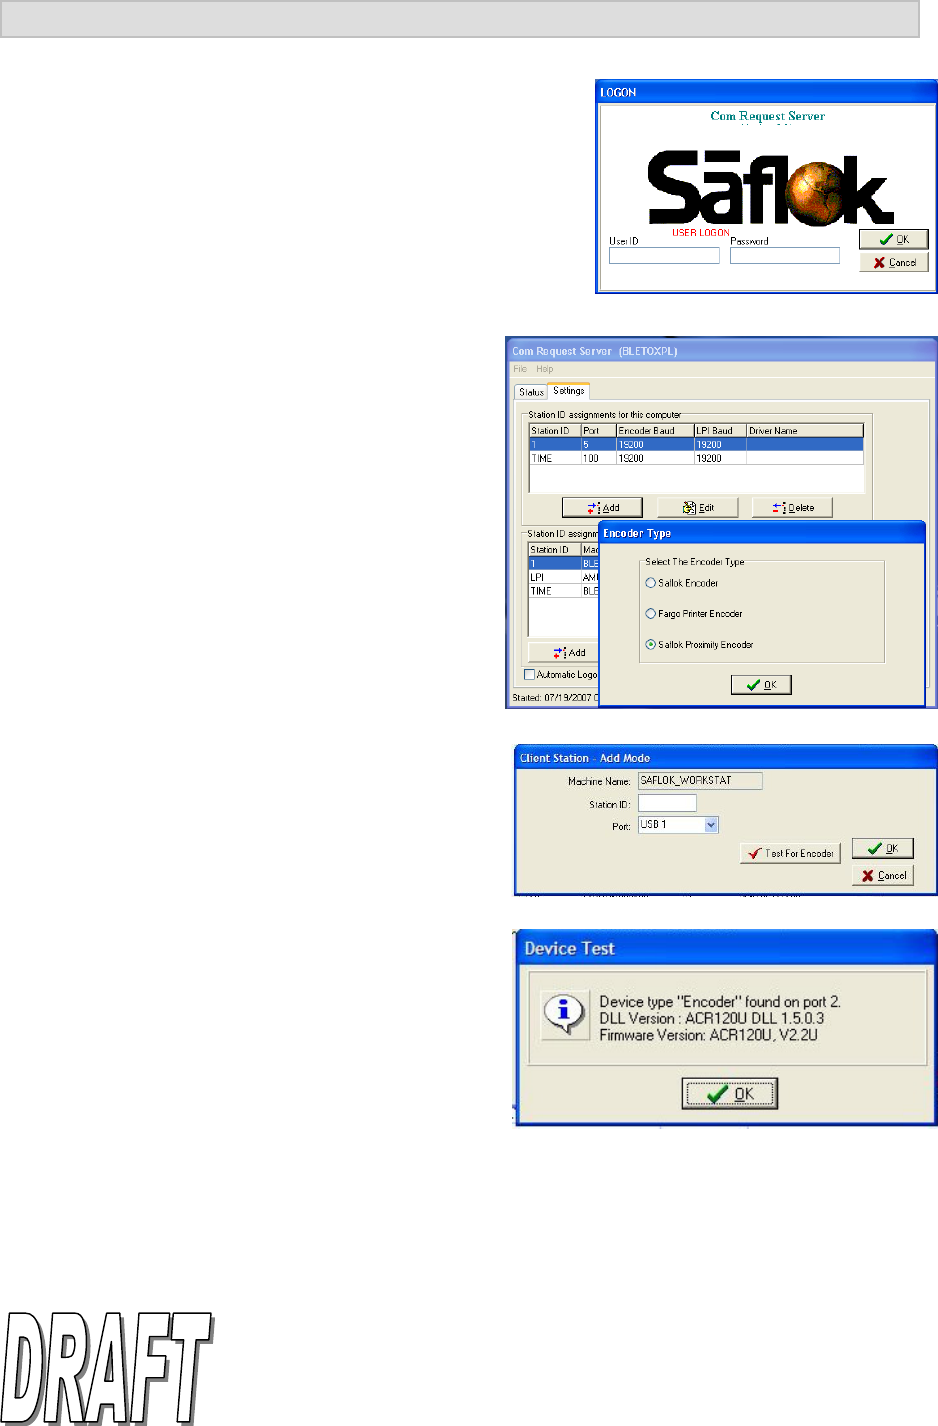
1. Log on to the Com Request Server (CRS) at the computer
the encoder will be attached to.
Note: The encoder can be added from only the CRS on the
computer that the encoder is attached to because the encoder is
directly connected to that computer.
2. Click the Settings tab, then click the Add button
under “Station ID assignments for this computer”.
3. At the Encoder Type PC dialog box, select
SAFLOK Proximity Encoder and click on OK.
4. Enter the desired Station ID name or number.
5. Select the USB Port that the encoder is attached
to.
6. At the Client Station Add-Mode PC dialog box, click
Test For Encoder.
7. At the Device Test PC dialog box, click OK to
continue.
Network RFID Encoder Installation and Operation Instructions Pg. 9 of 13
© SAFLOK™, all rights reserved. WL 2/6/2009
Setup for USB Connection with System 6000 (continued)
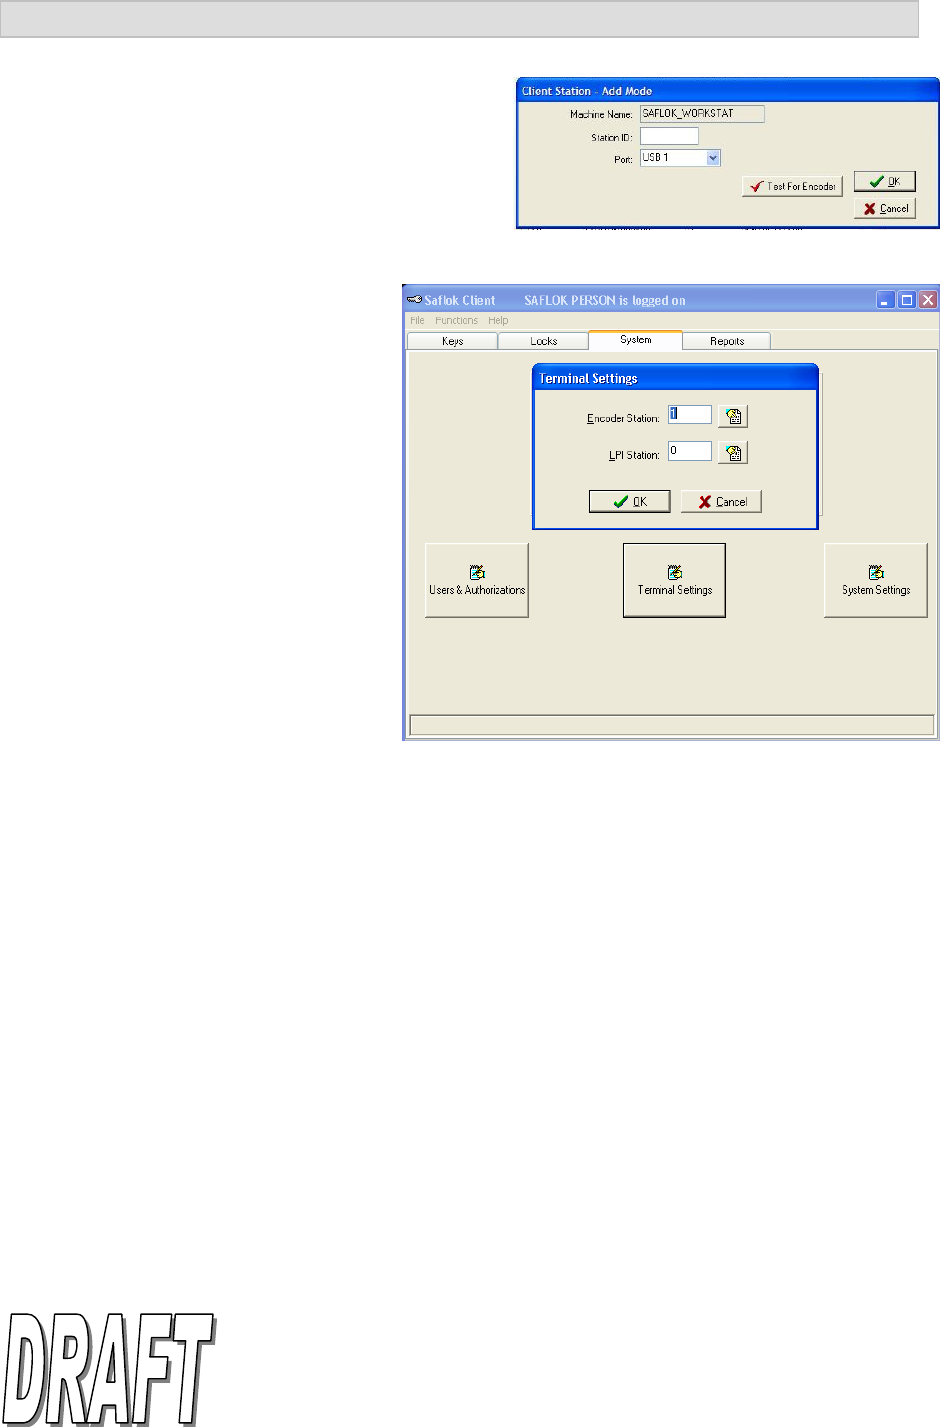
8. Click OK to add the Station ID to system.
9. At this point, the contactless smart
card encoder is installed. You may
now set it to be the default encoder in
the SAFLOK Client program (System
tab, then terminal settings). The
Station ID will appear in both “Station
Assignments for this computer” and
the “Station ID Assignments for the
Entire System” sections in the CRS.
The encoder can now be accessed by any
computer with the SAFLOK software
installed if the PC is on, the user is logged
in, and the CRS program is running.
Network RFID Encoder Installation and Operation Instructions Pg. 10 of 13
© SAFLOK™, all rights reserved. WL 2/6/2009
Encoding a Keycard or RFID Credential
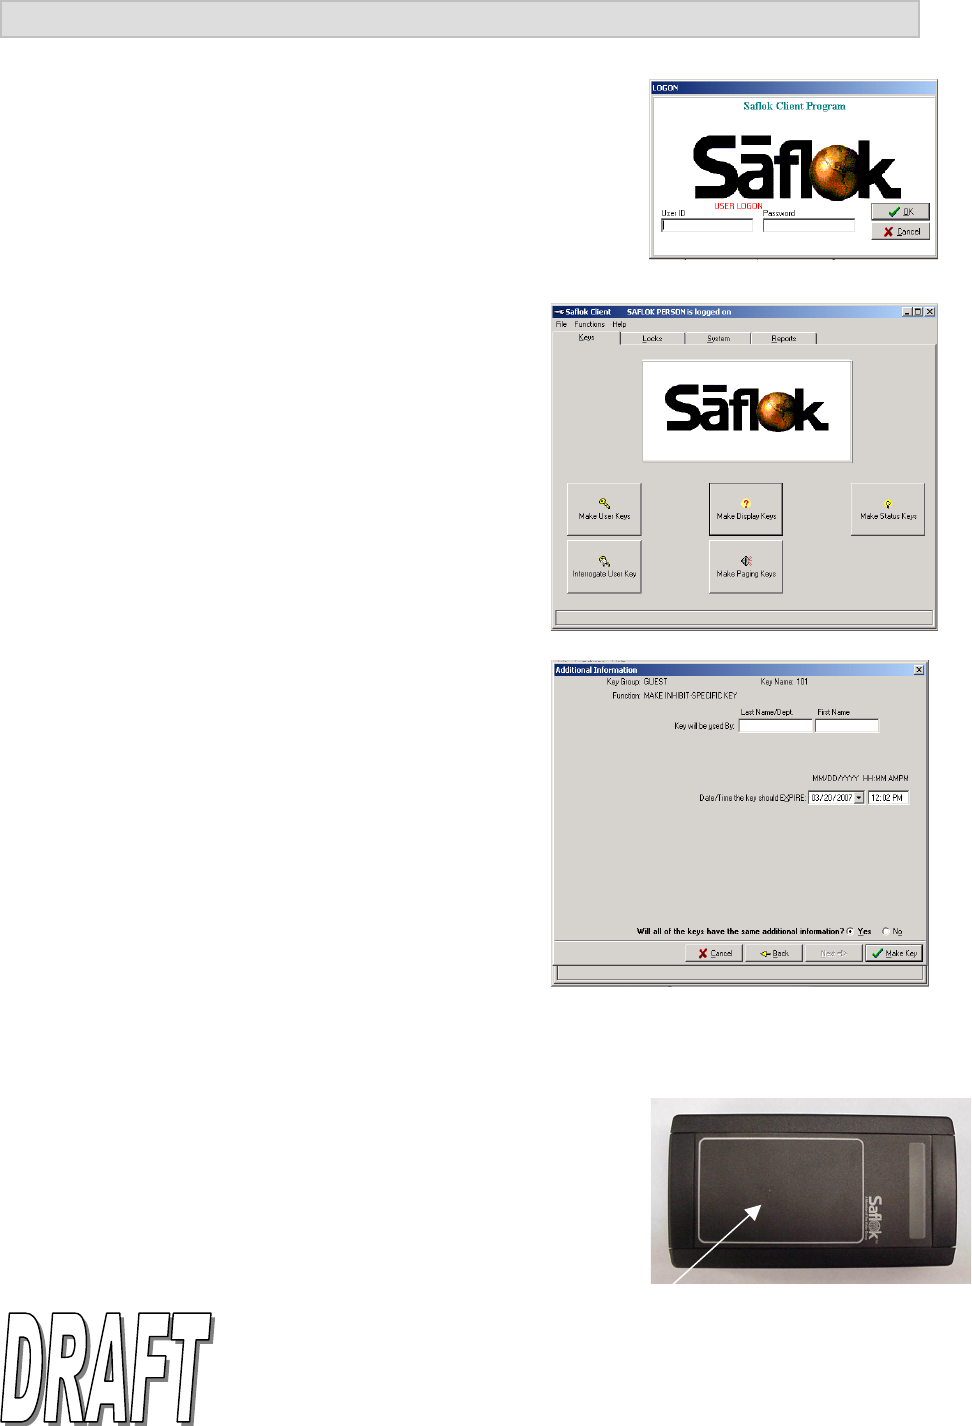
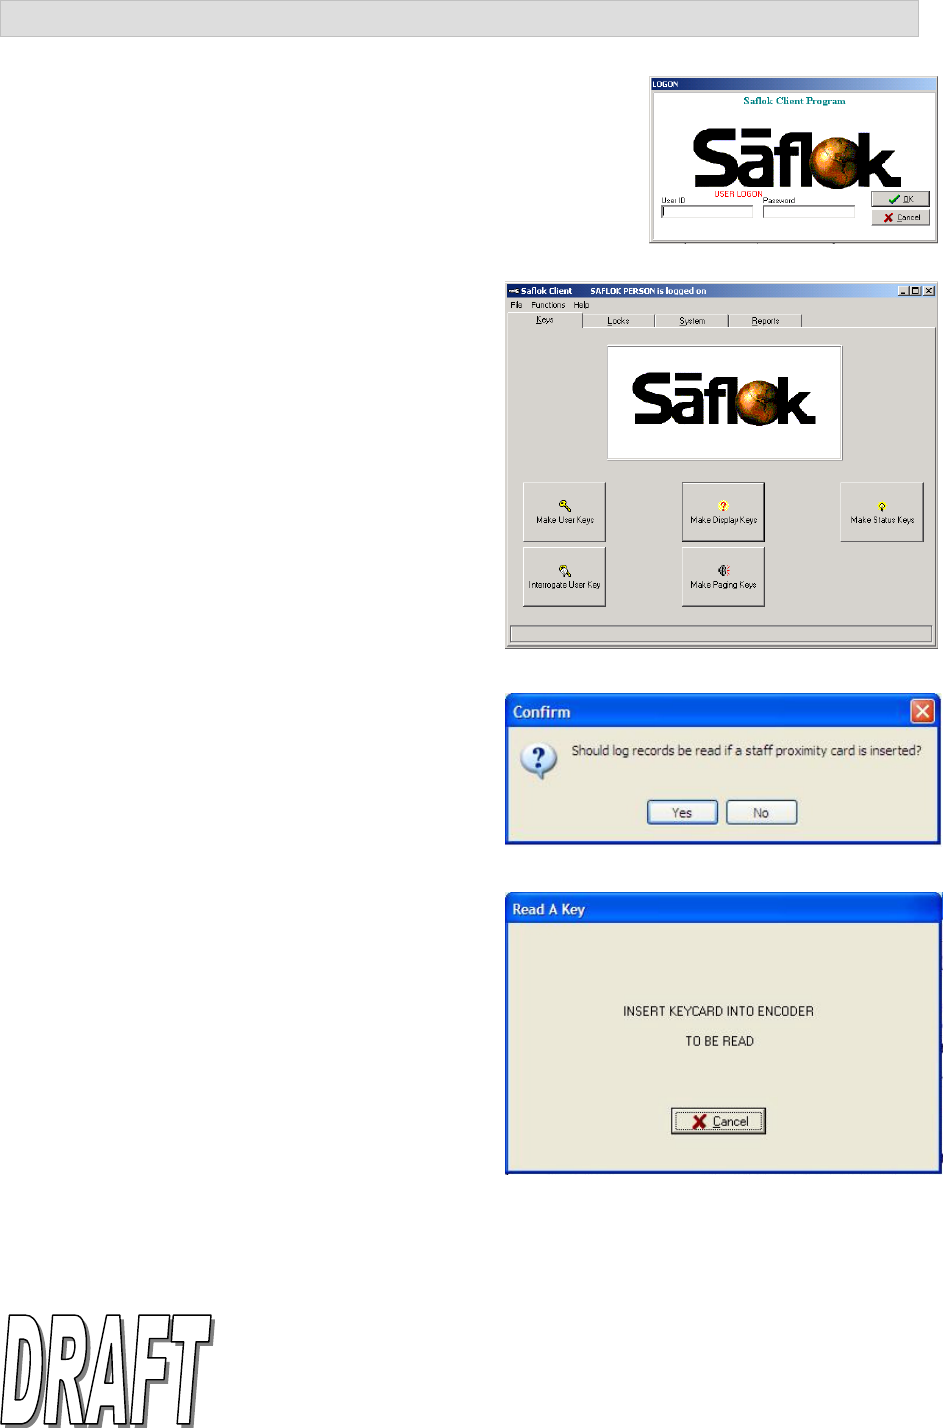
1. To encode a keycard, open the SAFLOK Client program. Enter
your User ID and Password to log on, then click OK.
2. At the main screen, click on the Keys tab.
3. Click the appropriate Make Keys button (e.g., Make
User Keys, Make Display Keys, etc.) for the keycard
you are making.
4. Following the procedure to make a key, enter the
appropriate information and make the appropriate
selections.
5. At the Additional Information PC dialog box, click Make
Key.
6. Place the RFID credential on the RFID encoder.
• If properly encoded, the green OK light will flash, indicating
readiness to encode another credential.
If not properly encoded, the red ERROR light will illuminate
and the computer screen will display an error message. Follow
the screen prompts and attempt to encode the credential
again.
RFID Encoder
Network RFID Encoder Installation and Operation Instructions Pg. 11 of 13
© SAFLOK™, all rights reserved. WL 2/6/2009
Interrogating a Keycard or Credential
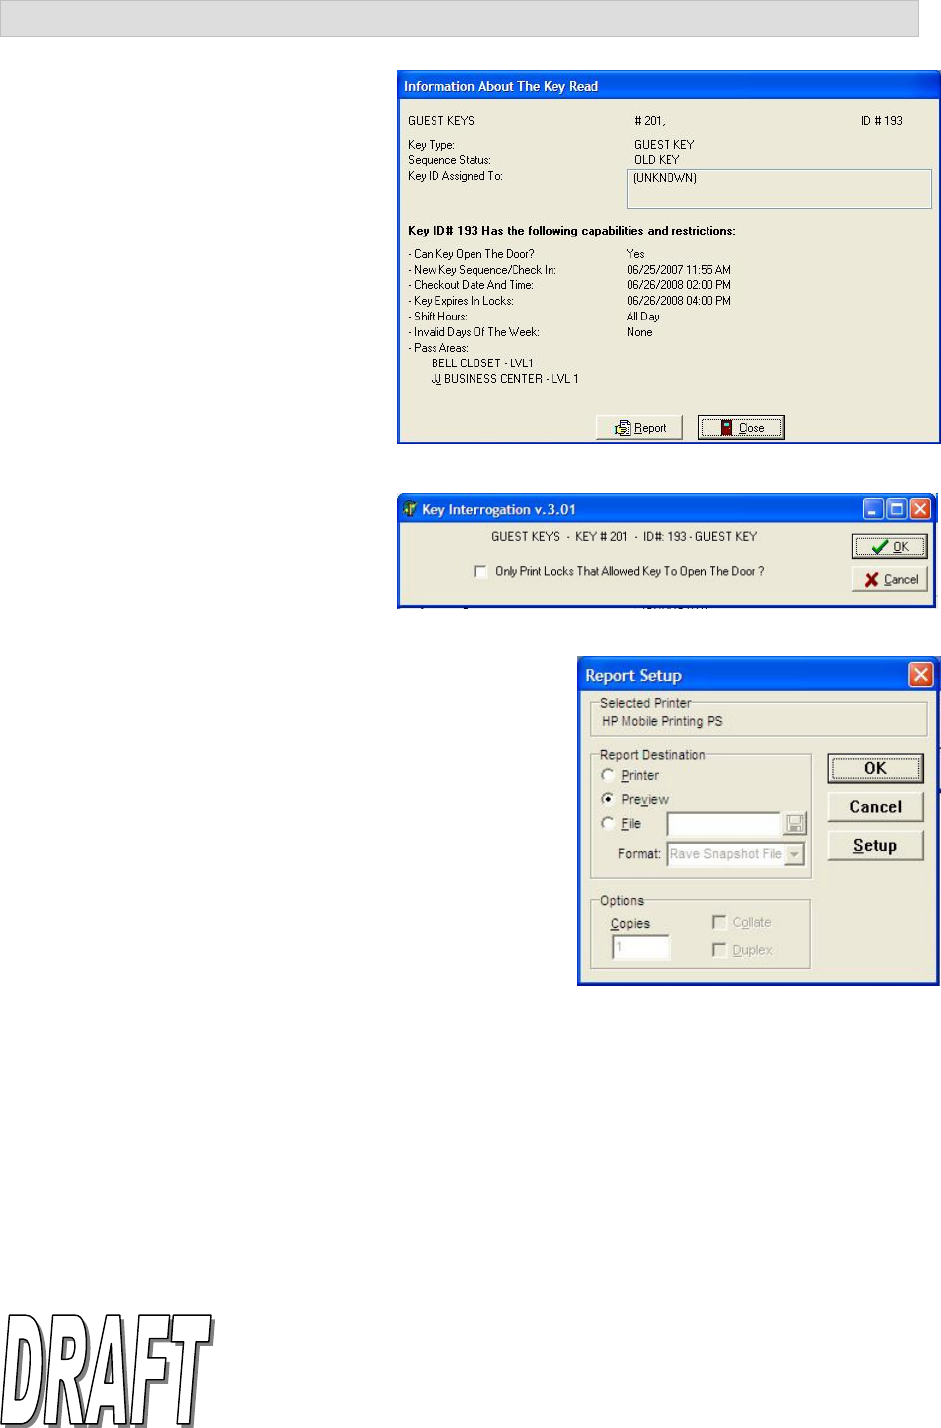
1. To interrogate a keycard, open the SAFLOK Client program. Enter
your User ID and Password to log on, then click OK.
2. At the main screen, click the Keys tab.
3. Click the Interrogate User Key button.
4. Click Yes if you would like to read log records off a
Staff keycard.
5. Place the RFID credential on the RFID encoder
when prompted by the system.
Network RFID Encoder Installation and Operation Instructions Pg. 12 of 13
© SAFLOK™, all rights reserved. WL 2/6/2009
Interrogating a RFID Keycard (continued)
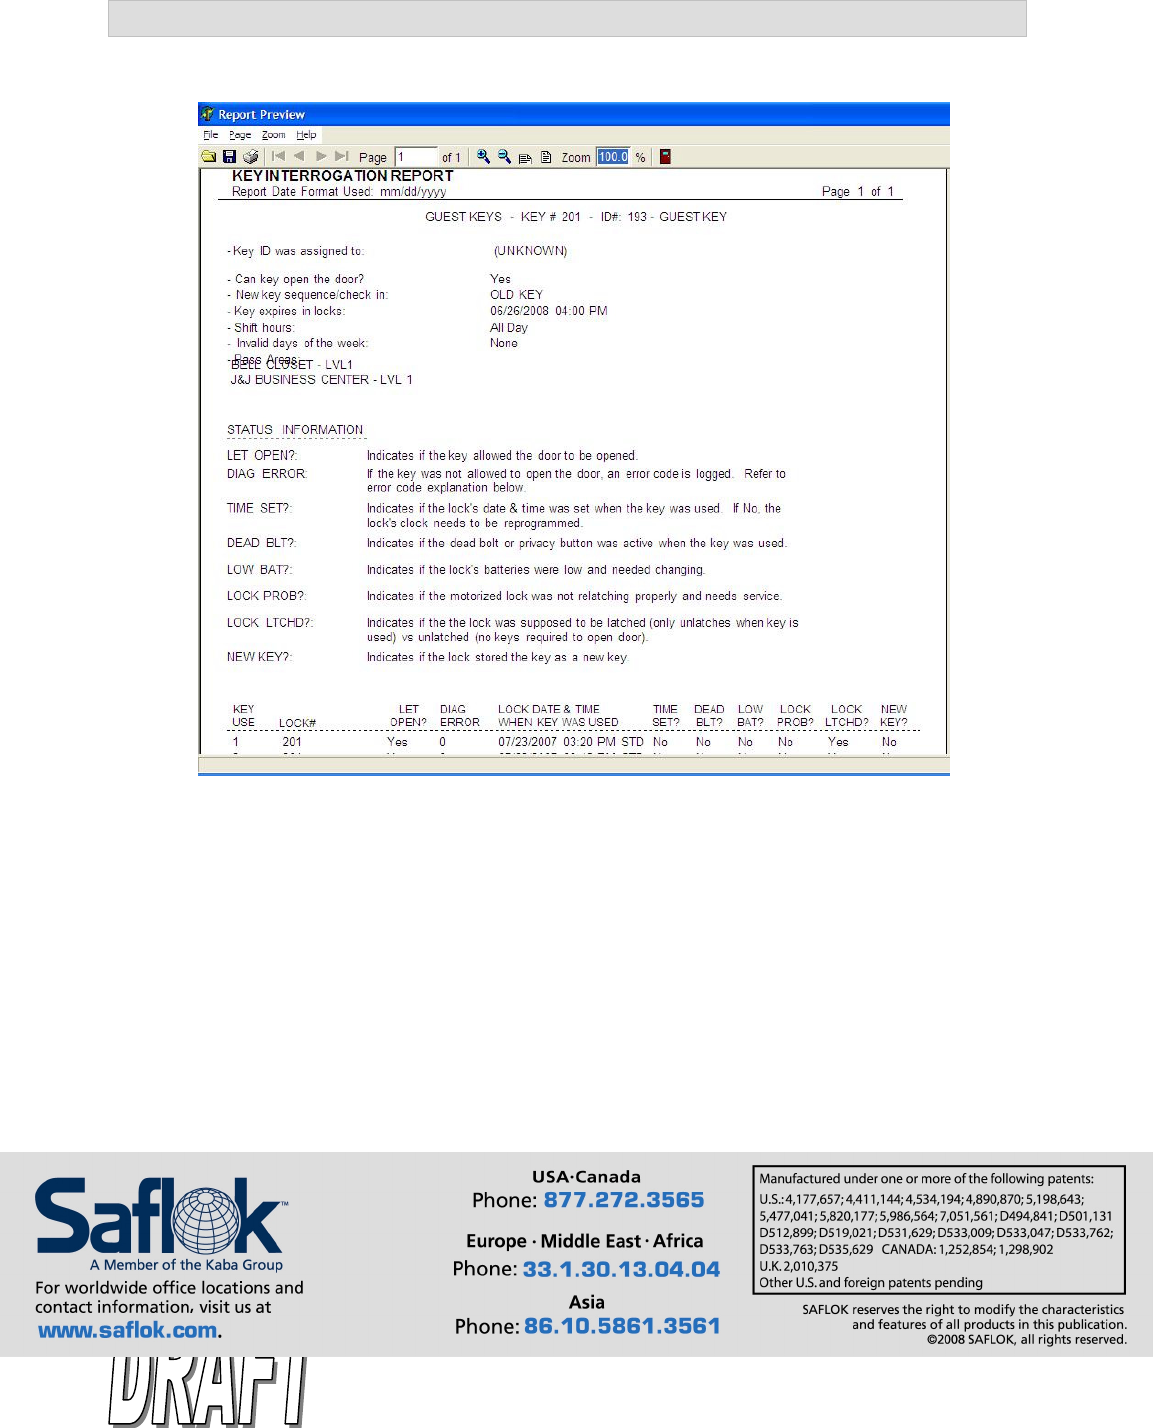
6. The Information About the Key Read
PC dialog box will appear. To view or
print the report, click Report.
7. Check the box if you would like to see
only locks that allowed the key to
open the door. Click OK to proceed.
8. Select the Report Destination and Options. Click OK to
continue.
Network RFID Encoder Installation and Operation Instructions Pg. 13 of 13
© SAFLOK™, all rights reserved. WL 2/6/2009
Interrogating a RFID Keycard (continued)
Key Interrogation Report Example
Class A Digital Device
NOTE: This equipment has been tested and found to comply with the limits for a Class A digital device,
pursuant to Part 15 of the FCC Rules. These limits are designed to provide reasonable protection against
harmful interference when the equipment is operated in a commercial environment. This equipment
generates, uses, and can radiate radio frequently energy, and, if not installed and used in accordance
with the instruction manual, may cause harmful interference to radio communications. Operation of this
equipment in a residential area is likely to cause harmful interference in which case the user will be
required to correct the interference at his own expense.