dormakaba USA WDC Single Door Controller User Manual stanley
Stanley Security Solutions, Inc. Single Door Controller stanley
Contents
- 1. User Manual
- 2. user Manual
User Manual

Wireless Access
Management System
User’s Guide
Version 2.0
6/5/2008

ii - USER’S GUIDE
STANLEY SECURITY SOLUTIONS, INC
6161 E 75th Street
Indianapolis, IN 46250
Phone: (317) 849-2250
www.stanleysecuritysolutions.com
STANLEY Portal Gateways have been approved for use under FCC ID T8H-PG16, and IC:
6498A-PG16. Operation is subject to conditional use. “This device complies with Part 15 of the
FCC Rules. Operation is subject to the followoing two conditions: (1) this device may not cause
harmful interference, and (2) this device must accept any interference received, including
interference that may cause undesired operation.”
©2008 Stanley Security Solutions, Inc. All rights reserved.
OMNILOCK is a Registered Trademark of Stanley Security Solutions, Inc.
Microsoft, Windows, Windows XP, and Secure Socket Layer (SSL) are registered trademarks of
Microsoft Corporation. All other Trademarks used or referenced in this document are the property of
their respective owners.
WIRELESS ACCESS MANAGEMENT SYSTEM

USER’S GUIDE- 3
Contents
FCC Certification ... .............................................................................................................................. .5
SOFTWARE OVERVIEW ..................................................................................................................... .5
WAMS Users ..................................................................................................................................... ..6
User Types... .................................................................................................................................. ..6
USING WAMS CONFIGURATOR ..................................................................................................... ...7
Launching WAMS Configurator ... ..................................................................................................... .7
Display Options .................................................................................................................................. .8
Tab Options ........................................................................................................................................ .8
Facility Tab... .................................................................................................................................. ..8
Readers Tab .................................................................................................................................. ..9
Timezones Tab ... ........................................................................................................................ ..10
Users Tab ..................................................................................................................................... .10
Adding Users to the Facility ............................................................................................................ ..10
Before You Begin ........................................................................................................................ ..11
Users Tab Overview ... ............................................................................................................... ...12
ID.....................................................................................................................................................13
Name ... ........................................................................................................................................ ..13
User Defined Fields ... .................................................................................................................. .13
Associations ... .............................................................................................................................. .13
Credential Settings...................................................................................................................... ...15
Settings ........................................................................................................................................ ..21
Reader Control............................................................................................................................ ...22
USING WAMS TRANSACTIONS...................................................................................................... ..23
WAMS Transactions Overview ..................................................................................................... ...23
Reader and Portal Controls ......................................................................................................... .23
Transactions Tab ... ..................................................................................................................... ..23
Alarms Tab... ..................................................................................................................................24
Transaction Types ... ........................................................................................................................ .25
Organizing and Sorting Transactions ... ......................................................................................... ..25
Display by Timespan... ..................................................................................................................25
Sort by Column Header ............................................................................................................... .26
View Transactions in Tree Levels ............................................................................................... .26
Responding to Alarms ... .................................................................................................................. .27
WAMS Statistics Monitor... ............................................................................................................... .29
USING WAMS REPORTS .................................................................................................................. .29
Reports Overview ... ........................................................................................................................ ..29
Creating Reports in WAMS ............................................................................................................ ..29
Configure Report Settings ... .........................................................................................................30
Generating a Report ... ............................................................................................................... ...31
Generating Larger Reports ......................................................................................................... ..33
Printing and Exporting Reports ... ............................................................................................... ..33
Using Dialup Networking... ............................................................................................................... .35
Using WAMS System Administrator ... ......................................................................................... ...35

4 - USER’S GUIDE
WIRELESS ACCESS MANAGEMENT SYSTEM

USER’S GUIDE- 5
FCC Certification
This equipment has been tested and found to comply with the limits for Class B Digital Device,
pursuant to Part 15 of the FCC Rules. These limits are designed to provide reasonable
protection against harmful interference in a residential installation. This equipment generates and
can radiate radio frequency energy and, if not installed and used in accordance with the
instructions, may cause harmful interference to radio communications. However, there is no
guarantee that interference will not occur in a particular installation. If this equipment does cause
harmful interference to radio or television reception, which can be determined by turning the
equipment off and on, you can try to correct the interference by taking one or more of the
following measures.
• Reorient or relocate the receiving antenna
• Increase the separation between the equipment and receiver
• Connect the equipment into an outlet on a circuit different from that to which the receiver
is connected
• Consult the dealer or an experienced radio/TV technician for help.
This device has been designed to operate with a maximum gain of 5 dBi. Approved antennas are
listed below. Antennas not included in this list or having a gain greater than 5 dBi are strictly
prohibited for use with this device. The required antenna impedance is 50 ohms.
Approved Antennas
• Portal Gateway :
Antenna Factor ANT-2.4-CW -RCT-xx •
WDC:
Integrated Antenna
• WAC /Single Door Controller:
Antenna Factor ANT-2.4-CW -RCT-xx
IMPORTANT! Any changes or modifications not expressly approved by the party responsible for
compliance could void the user’s authority to operate the equipment. The antenna(s) used for this
transmitter must be installed to provide a separation distance of at least 20 cm from all persons and
must not be co-located or operating in conjunction with any other antenna or transmitter.
End-users and installers must be provided with antenna installation and transmitter operating
conditions for satisfying RF exposure compliance.
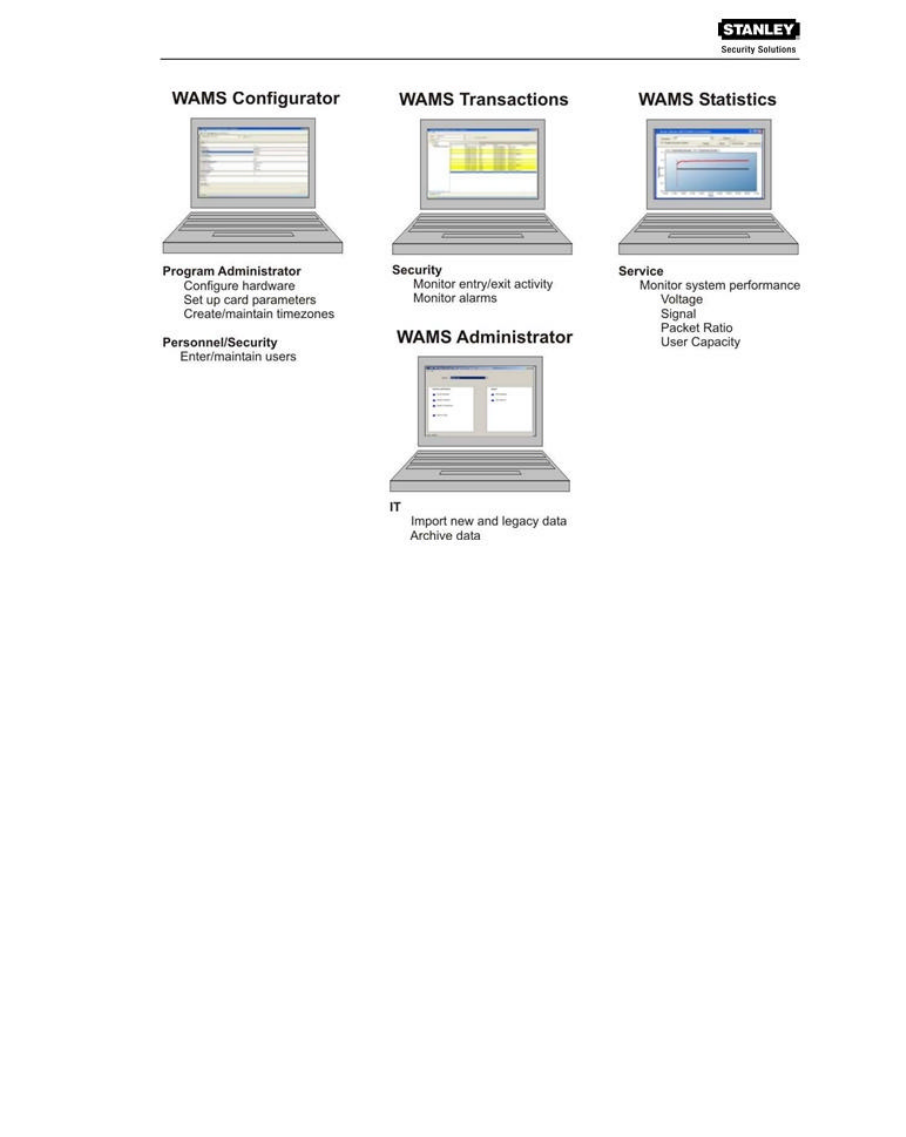
SOFTWARE OVERVIEW
The STANLEY Wireless Access Management Solution (WAMS) provides powerful tools to
manage your system: WAMS Configurator, WAMS Transactions, WAMS Statistics Monitor.
View and print reports from WAMS Configurator and WAMS Transactions using WAMS Reports.
If you are the Program Administrator responsible for setting up communications between WAMS
software and system portals and readers; you will spend most of your time using WAMS
Configurator. If you are in personnel or security, you may be the person who adds users to the
system and gives them access priviliges and IDs. You will spend most of your time on the Users
tab of the WAMS Configurator. If you are responsible to oversee security for your organization, you
will monitor all access and alarm activity using WAMS Transactions. If you are the person
responsible to ensure the system is operating at maximum performance, you will use the WAMS
Statistics Monitor. If your organization is small, you may use all three!
WIRELESS ACCESS MANAGEMENT SYSTEM
6 - USER’S GUIDE
Once the software is installed, you will find the WAMS Configurator shortcut on your desktop.
You can access all applicaltions from the WAMS Configurator main menu. You can also access
these applications from the Windows Start Menu.
WAMS Users
WAMS Users, as opposed to reader users, are those individuals who will operate one or all of
WAMS software applications. For example, a WAMS User might be a person in the Security
department who will use only WAMS Transaction software to monitor system access activity.
Another WAMS User might be a person in Human Resources or Administration who is assigned to
add users to the system, or change their settings.
Most WAMS users will be added to the system as reader users because they will have some type
of physical access to the facility, but they must also be assigned as WAMS Users and be given
Usernames and Passwords if they are to access and operate WAMS application software.
User Types
WAMS Users can be one of four User Types: Administrator, Manager, Service, and General.
You will be assigned a User Type depending on which WAMS applications you will log in to and
operate.
Administrator - An Administrator has access to all WAMS applications and all facilities. This
User Type would be assigned to a System Administrator, that is, someone who is responsible for
set up and configuration.
WIRELESS ACCESS MANAGEMENT SYSTEM
USER’S GUIDE- 7
Manager - Can access all WAMS applications. This type would, for example, be assigned to
someone responsible for adding users to the system. As an additional security measure, this
type could be restricted to access specific facilities only.
Service - Can access WAMS Transactions and WAMS Statistics Monitor. This User Type can
also be restricted to specific facilities only, if needed.
General - Can access only the WAMS Transactions and WAMS Reports applications for specific
facilities. This user type would be assigned to someone in Security for example, who will monitor
daily entry and exit activity and system alarms. They can not access the WAMS Configurator
application.
Once an Administrator has logged in to the system, they can add WAMS Users to the system. If
you are designated as a WAMS User, you will be assigned a login User Name and Password to
access the Software Application(s) you need.
USING WAMS CONFIGURATOR
If you are in Human Resources, Personnel, or Security; you may be the person who adds users to
the system and gives them access priviliges and IDs. You will spend most of your time on the
Users tab of the WAMS Configurator. The following sections describe how to launch WAMS
Configurator, provide a brief overview of the WAMS Display and Tab options.
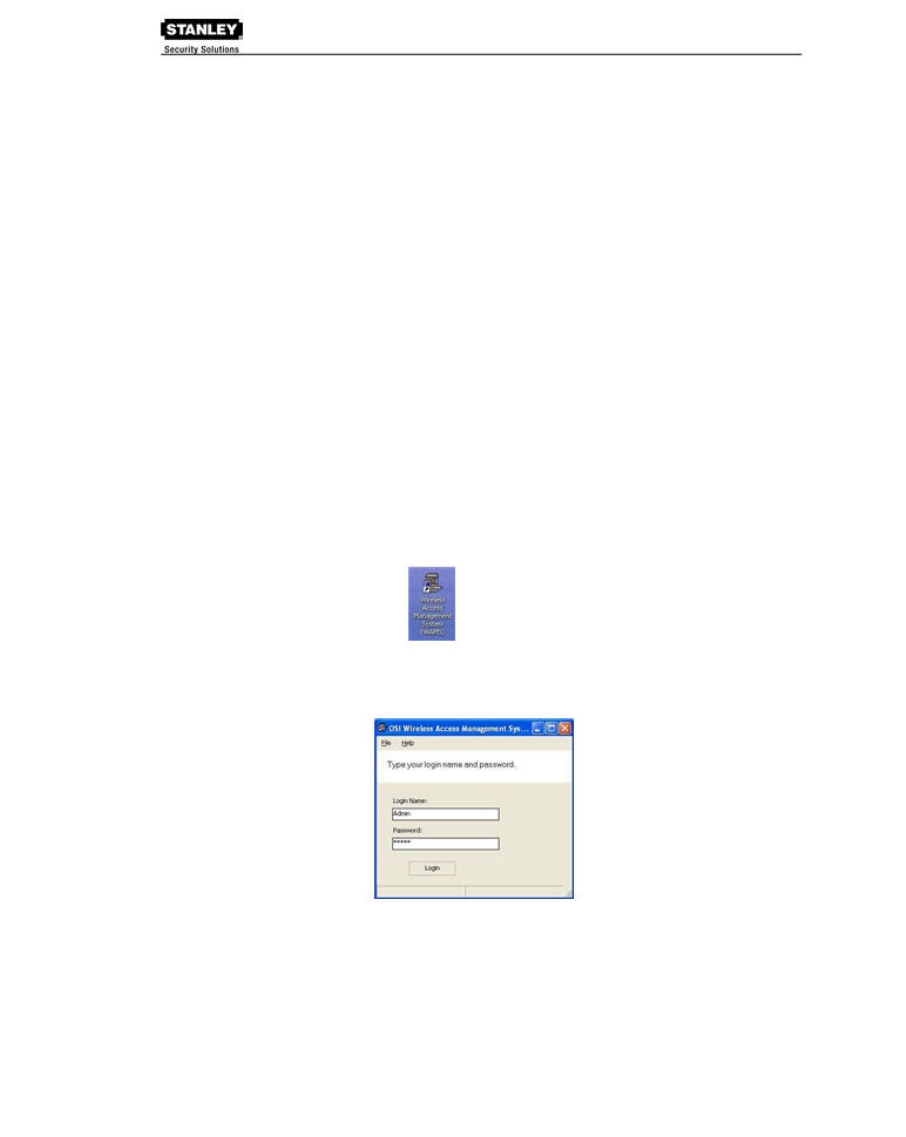
Launching WAMS Configurator
When WAMS software is loaded onto your computer, it places a shortcut to WAMS on your
desktop.
Double-click the WAMS Configurator icon to start the application.
The STANLEY WAMS splash screen appears briefly, then the Login dialog box opens.
If you are a WAMS User, your System Administrator or IT representative must provide you a
Login Name and Password. You will need this to login the WAMS Configurator. If you are a
System Administrator, see the Administrator’s Guide for more information about Launching
WAMS for the first time.
To Login to the WAMS Configurator:
WIRELESS ACCESS MANAGEMENT SYSTEM
8 - USER’S GUIDE
1. Enter your case-sensitive Login Name and Password.
2. Select Login. WAMS Configurator opens at the Reader Tab.
If the System Administrator has created only one facility, you are ready to begin. If more than
one facility has been created, select the facility from the drop-down list. Any elements you
access in WAMS Configurator will be directed to that facility.
IMPORTANT: Once the System login and password have been personalized for your facility, it is
important to record the information in hard copy form and safeguard it in a location known to
management.
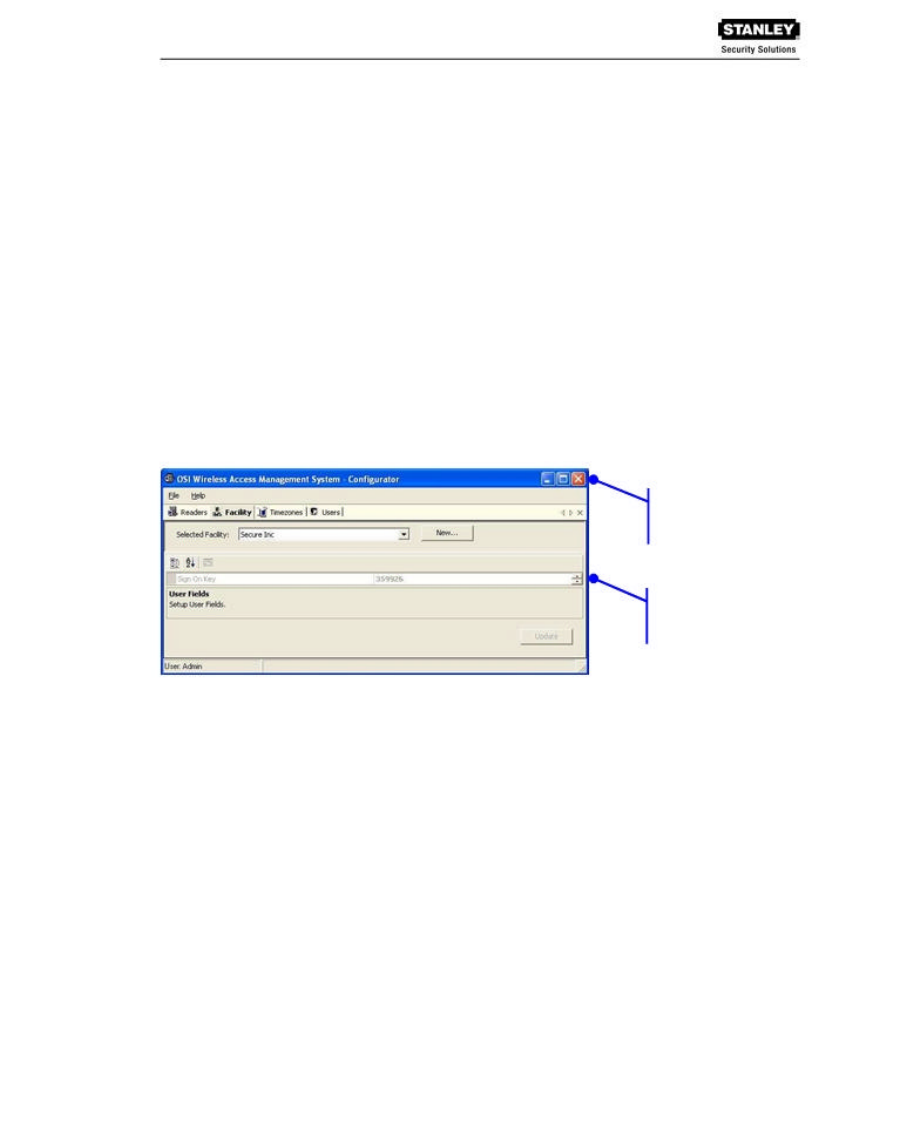
Display Options
All tasks in WAMS start from the WAMS Configurator, which has four tabs: Readers, Facility,
Timezones, and Users. Following is a brief description of WAMS display options and how the tabs
are used to perform tasks. WAMS operates in the Windows environment using its standard
conventions. You can use WAMS full screen or resize the window using the min/max buttons in the
top right corner of the Configurator.
In minimized view, use the up or down arrows to select from a list of categories or options.
Following is the Facility Tab in minimized view with the scroll bar visible.
Minimize,
maximize, and
close.
Up and down
arrows
In the Facility and Users Tabs you can display items by category or sort alphabetically. This is
useful when displaying the Configurator in full-screen view.
Tab Options
The WAMS Configurator contains four tabs: Readers, Facility, Timezones, and Users. You will
select these tabs depending on which program tasks you wish to perform.
If your Program Administrator has created more than one facility, you will need to select the
facility you wish to work with from the Facility Tab before moving on to add or maintain users
assigned to that facility. Following is a quick tour of the WAMS Configurator tabs.
Facility Tab
Most Facility set up tasks are performed in the Facility Tab. Here, the Program Administrator will
create User Groups, Timezones, and configure WAMS software to work with the type of facility
access cards or keypad credentials you will use.
If your Program Administrator has created more than one facility, you will first select the facility
you wish to work with in the Facility Tab before moving on to add or maintain users assigned to
that facility.
WIRELESS ACCESS MANAGEMENT SYSTEM
USER’S GUIDE- 9
Following is the Facility Tab displayed in full-screen, category view. Once you select a category,
you can drill down to additional settings using the ellipsis button.
Use the drop-
down list to
select a facility
to work with.
Ellipsis Button
Displays brief
description of the field
selected above.
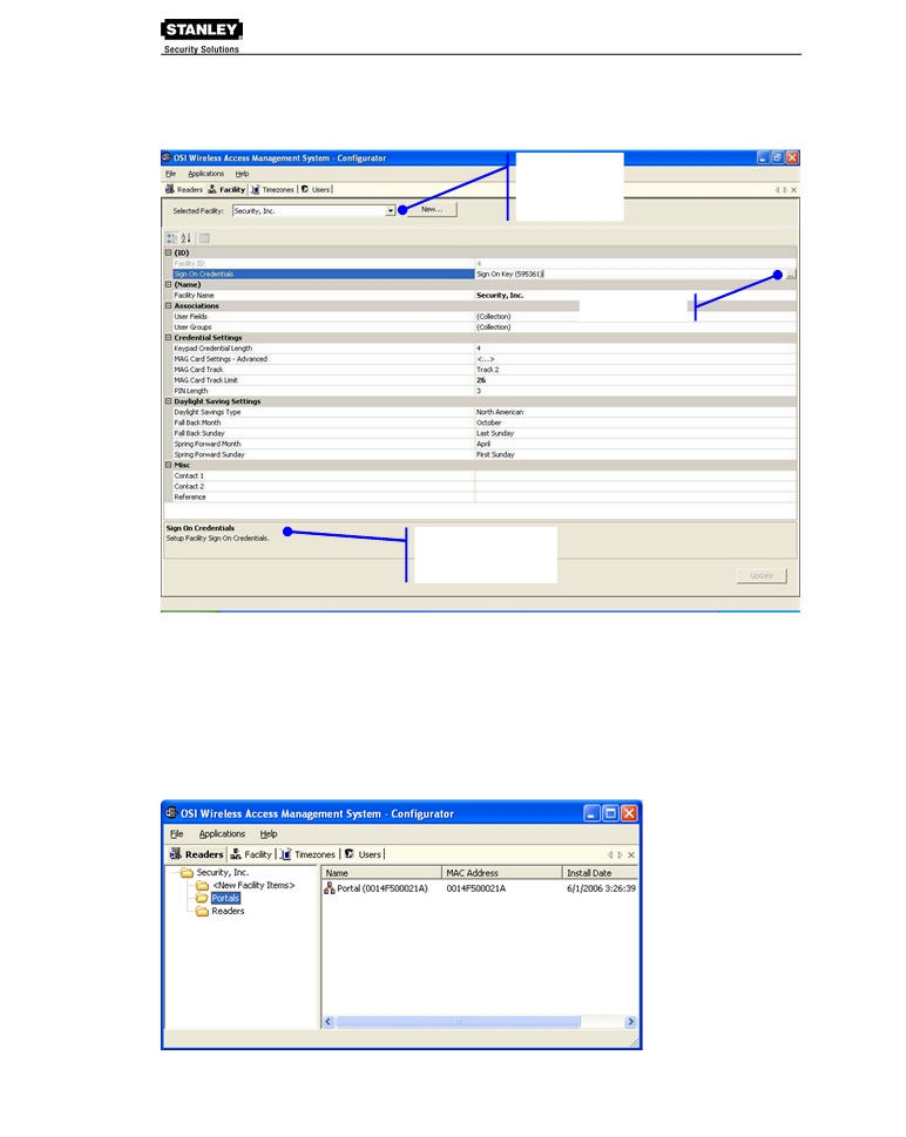
Readers Tab
The Readers tab displays the Facility Tree, which is a visual representation of all portal gateways,
readers, and I/O devices connected to the WAMS software. Once the devices are organized in
the Facility Tree, the various paths to associate readers and portals are available when you add
new users to the system. If you are using dialup gateway modems in your system, you can
perform an automatic dial out from here. Information about creating the Facility Tree and
assigning devices to the various folders in the tree is presented in the Administrator’s Guide.
Typically, only the Program Administrator will perform tasks using the Readers Tab.
WIRELESS ACCESS MANAGEMENT SYSTEM
10 - USER’S GUIDE
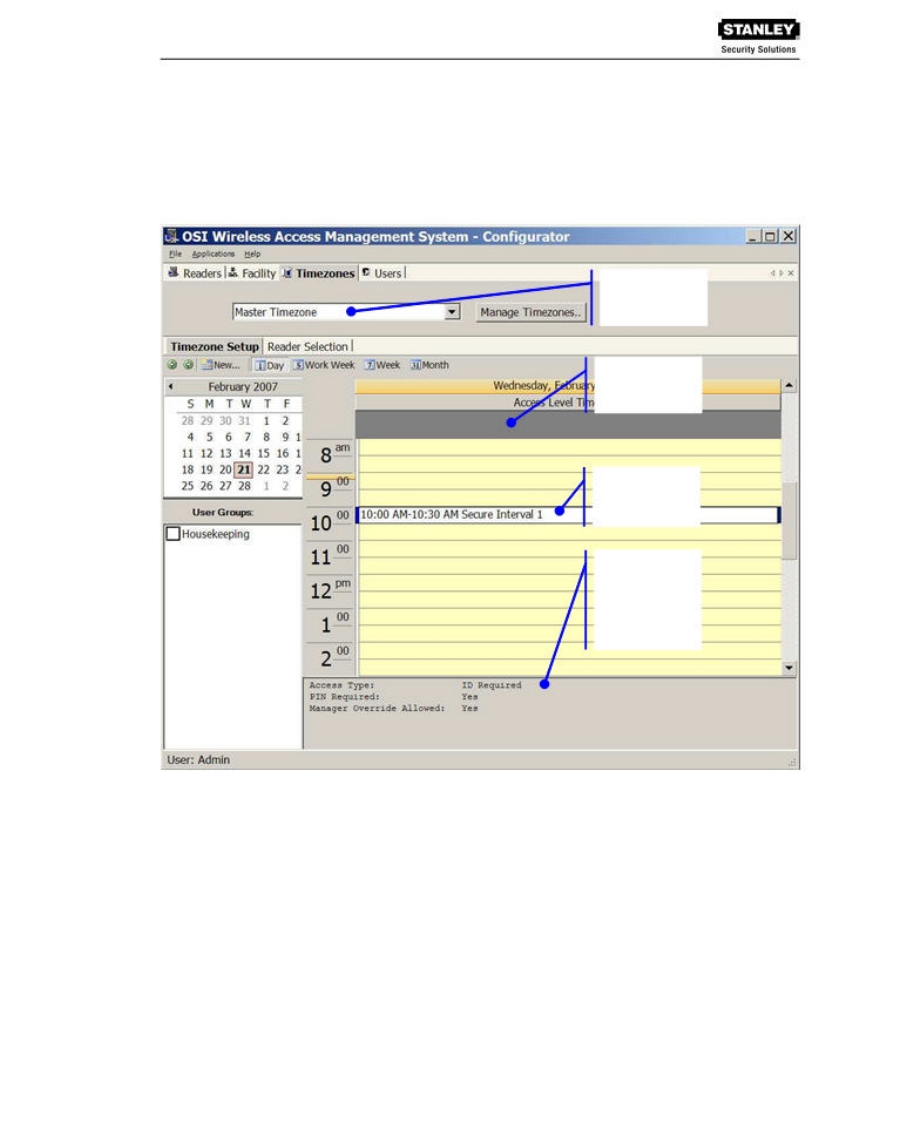
Timezones Tab
The WAMS program automatically assigns all readers to a Master Timezone. Your Program
Administrator can create any number of Timezone Intervals and Timezone Groups to modify user
access within the Master Timezone. The Timezones tab displays the default Master Timezone, a
calendar that operates similar to Microsoft Outlook, and any Timezone User Groups that have
been created. (For more information about creating Timezone Intervals and Timezone Groups, see
the Administrator’s Guide.)
Default: Master
Timezone
Calendar Detail
Defined
Timezone
Interval
Message Field
displays the
access
parameters set
for the selected
Timezone
Users Tab
If you have been assigned responsibility to add users to the system, your tasks will be performed in
the Users Tab. This tab is described in detail in the following section.
Adding Users to the Facility
Once all hardware and software have been configured, the system is ready for you to add users to
it. Follow the steps in this section the first time you enter users, and each time you add a new user
to the system.
To get started, launch WAMS Configurator. The program opens at the Facility Tab. If your
organization has been configured with more than one facility, select the facility you want to work
with, then select the Users Tab.
WIRELESS ACCESS MANAGEMENT SYSTEM

USER’S GUIDE- 11
Before You Begin
Before you begin adding users to the system for the first time, be prepared to address the
following items:
IF
_
You plan to use
only
keypad readers
_
You plan to use
card
readers
_
You plan to use a
serial
scanning device at your
computer to register user
credentials
_
You plan to use
local
readers to register
credentials
_
You plan to manually
enter
the credential numbers
THEN
WAMS assigns a unique keypad credential number to each new user and
automatically registers it with the system.
You must know the card type and settings required for that type.
The scanning device must be attached to the computer com port and you must be
able to identify that port (Com1, Com 2) when you register the credential.
Know the reader name and locations to be used.
Have a credential number list or creating conventions ready to enter.
NOTE: If you do not have this information, contact your System Administrator before you
continue.
12 - USER’S GUIDE
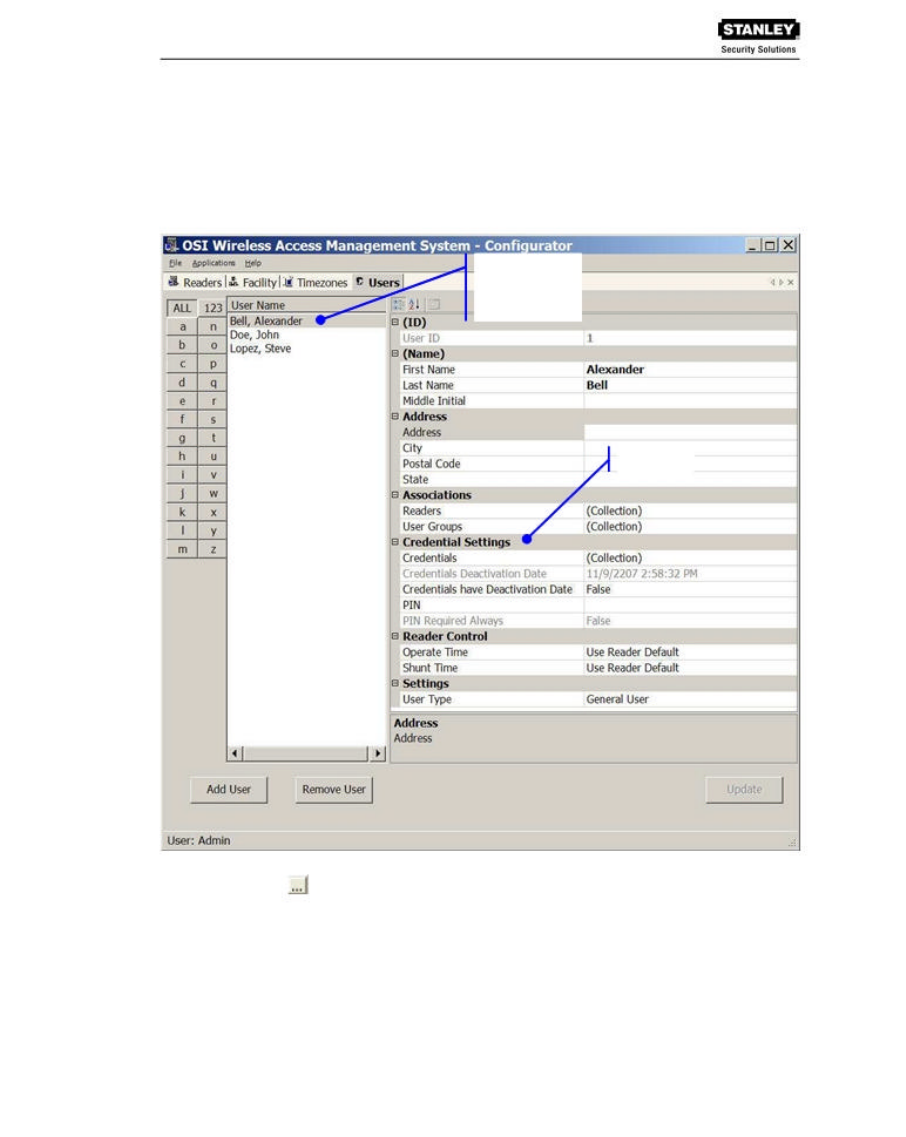
Users Tab Overview
In the Users Tab, all users currently in the system display in the list on the left. If you have a
large number of users, you can use the alphabet buttons on the far left to sort through the list
quickly. User Categories display on the right. By default, these categories display as shown;
however you can click the A-Z sort button to display categories alphabetically. Here you can add or
remover users from the system, set their credentials, and include any personal information needed
to identify that person in the system.
Click to sort
categories
alphabetically
Category
If an ellipsis button displays when you select a field, additional parameters are available for
selection. From here you will define user name and address information and access parameters
such as readers, user groups, credentials, PIN, and so on.
NOTE: If you see a need for additional fields to define for your Users, contact your System
Administrator. They can add more fields to the Users Tab, or create additional User Fields
unique to your organization.
The following sections provide a brief description of each category in the Users Tab, and present
steps for adding and configuring users in the system.
WIRELESS ACCESS MANAGEMENT SYSTEM

USER’S GUIDE- 13
ID
When you add a user, the system automatically assigns them a unique ID and displays the
number in the User ID field.
Name
Provides entry fields for user first and last name and middle initial.
To add a user name:
1. In the Users Tab of the WAMS Configurator, select the Add User button. In the ID
category, the system will display a new unique User ID.
2. In the First Name line, place the cursor in the space following <New> and enter a first
name.
3. In the Last Name line, place the cursor in the space following <User> and enter a last
name. Do the same for the Middle Initial.
NOTE: The Update button will flash to remind you to update your settings. You can update each
time you add a user, or wait until all user information is added. The software will automatically
update your settings when you leave the Users tab.
User Defined Fields
If your facility has been configured with User Defined Fields, such as Address, City, Zip Code,
enter the information as configured.
Associations
In this category, you associate users with Readers and User Groups. This task defines which
readers will recognize the user’s requests for entry and exit. If User Groups have been created
for your organization, these will also be available for selection from the Associations category.
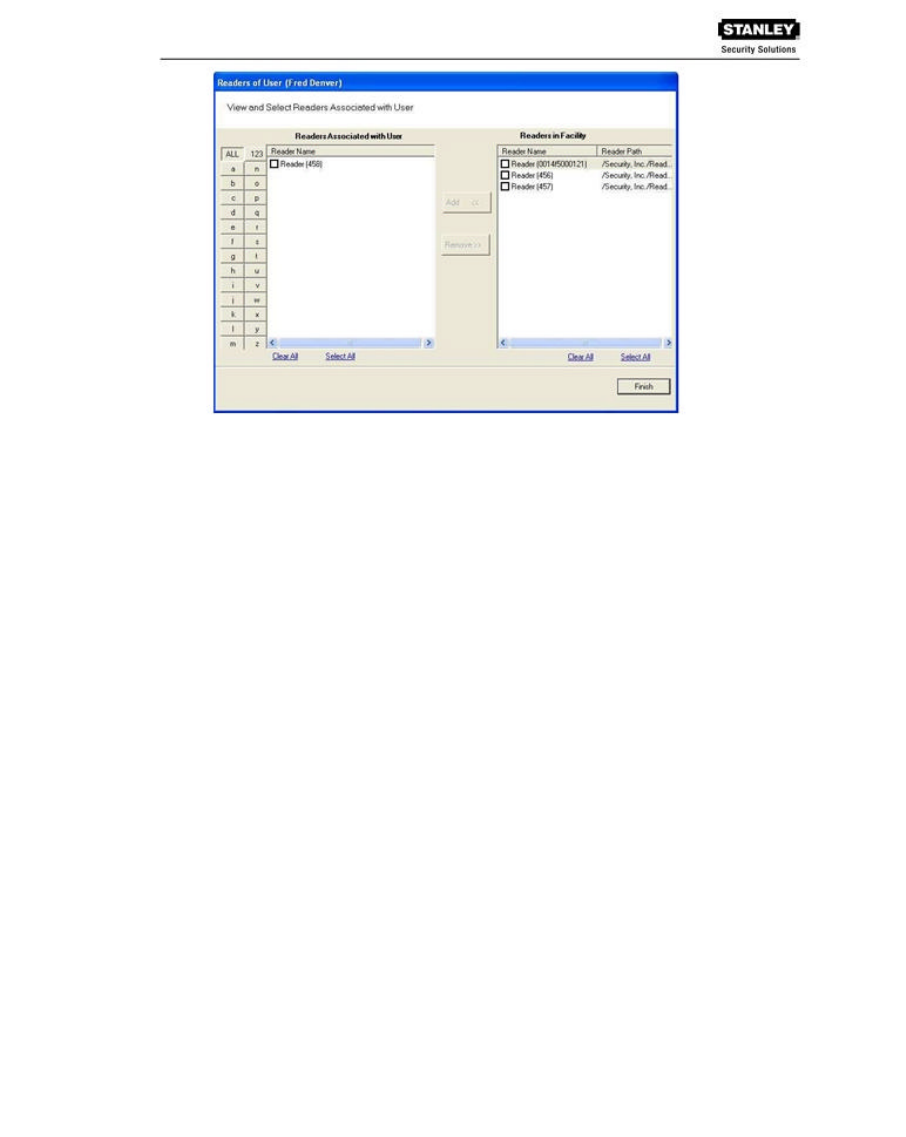
Readers
When you add a user to the system, you will associate them with the reader(s) that will recognize
their requests for entry and exit.
To associate a user with readers:
1. In the Associations category, Readers line, place the cursor next to (collection).
2. Select the ellipsis button at the right of the field. The View and Select Readers
Associated with User dialog box opens.
WIRELESS ACCESS MANAGEMENT SYSTEM
14 - USER’S GUIDE
3. Select the reader(s) from Readers in Facility.
4. Select Add <<. The selected readers are moved from the Readers in Facility list to the
Readers Associated with User list on the left. You can associate a user with any number
of readers.
5. Select Finish to save your settings and return to the Users Tab.
User Groups
If User Groups have been created for your facility, these will already be associated with readers.
For example, a User Group may have been defined for Laboratory Building 1. Laboratory
Building 1 might have six readers. By assigning the user to the Laboratory Building 1 Users Group,
they will automatically be associated with all the readers in that group.
A User Group may also be defined as a Timezone Group. Timezone User Groups further define
access levels for the Master Timezone. You can restrict access of certain groups of employees to a
specific time period. For example, you may have a housekeeping group designated as a Timezone
Group with restricted access to dormitories from 8:00 a.m. to 4:00 p.m., weekdays only. You would
then assign users from the housekeeping department to this group. For more information about
creating Timezone Groups, see the Administrator’s Guide. Steps to add users to User Groups are
presented in the following section.
To add a user to a User Group:
1. When adding or editing a User, in the Associations Category, click in the User Groups
field and click the ellipsis button. The User Groups of User dialog box opens.
WIRELESS ACCESS MANAGEMENT SYSTEM

USER’S GUIDE- 15
2. Select the group(s) to associate with this user and click the Add << button. The groups
are added to the User of Groups list.
3. Select Finish to save your selections and return to the Users Tab. You can add or
change User Groups for a user any time by returning to this list.
NOTE: You can also add users to User Groups from the Facility Tab, User Groups field. For
more information about this feature, see Facility Associations, User Groups in the Administrators
Guide.
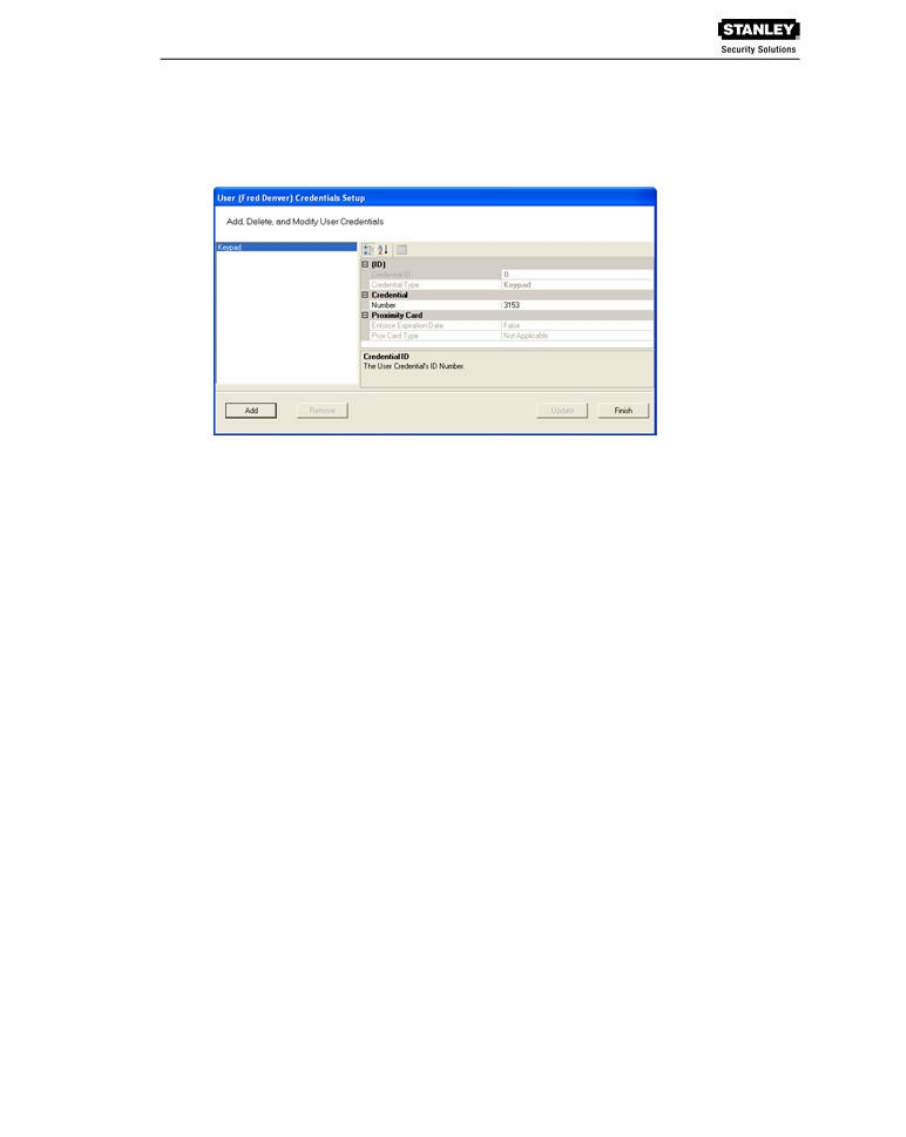
Credential Settings
WAMS tracks individual requests for access or exit from the facility by their unique credentials, and
each request is recorded as a transaction in the WAMS database for reference. Whether your
organization uses keypad readers or card readers, each user will be assigned a unique
credential number. Under Credential Settings, you will enter the credential ID and number, select a
credential type, and set additional parameters related to the credential type. You can add
another level of security by combining an individual’s credential with a personal ID number (PIN). If
your organization requires a PIN, you will enter them here.
Credential setup is a two-step process: First you will select the credential type to be used, then
you will register the credential
Keypad Type
The default credential type in WAMS is Keypad. When you add a user to the system, WAMS
assigns them a unique keypad credential number, then automatically registers it with the system. If
your facility uses only keypads, once you add the new user name, you can skip to Adding PINs and
Expirations Dates.
Card Types
If your facility uses card type credentials, you must select the card type, enter the appropriate
settings, and then register the credential number with the system.
WIRELESS ACCESS MANAGEMENT SYSTEM
16 - USER’S GUIDE
To select the card type:
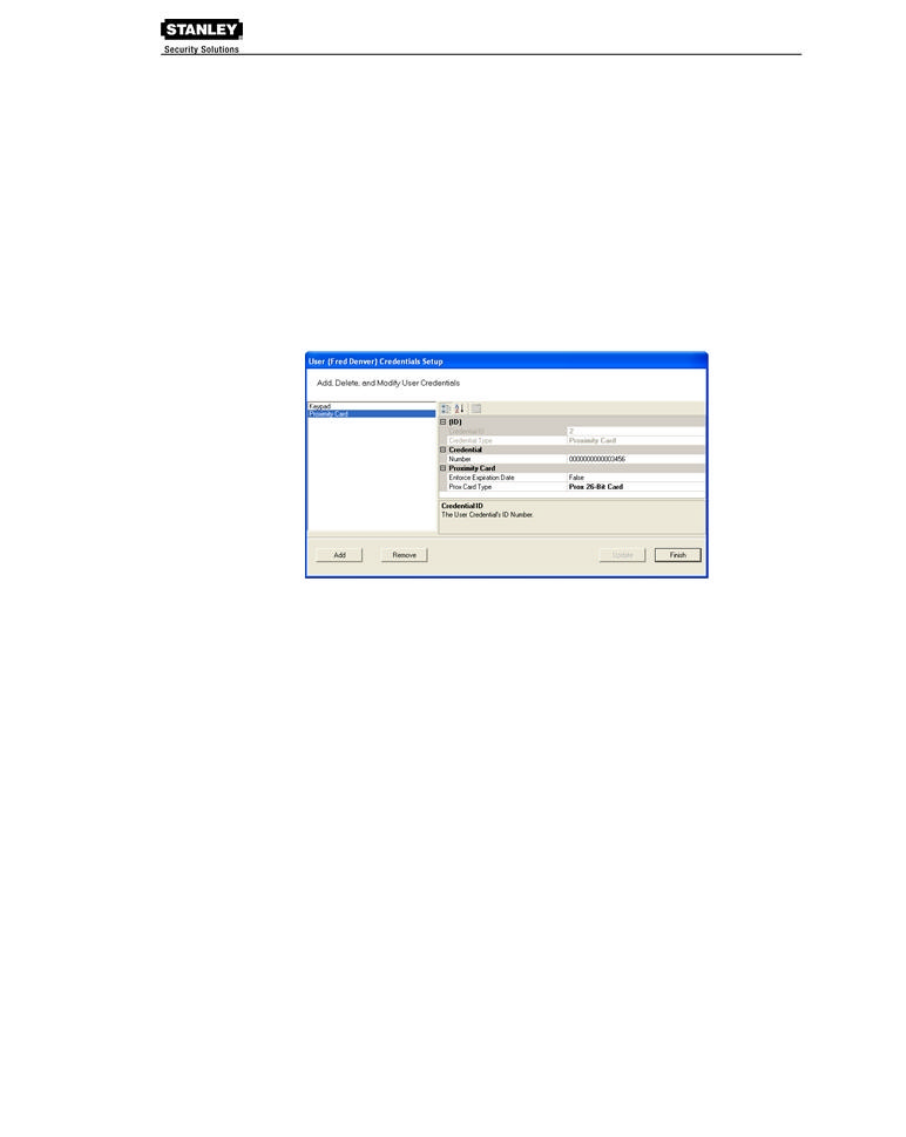
1. In the Users Tab, Credentials line, place the cursor next to (Collection) and select the
ellipsis button. The User Credentials Setup dialog box opens. The credential types are
listed on the left and the categories available for each type are listed on the right.
2. Select the type of credential the reader will use, for example, magnetic stripe card (Mag
Card). The credential options in the categories on the right will change, depending on the
type selected. Now you are ready to register the credential.
NOTE: If the credential type you need is not in the list of card types on the left, you can add one.
See Adding a Credential Type later in this section.
Credential De-Activation
You can define whether a user’s credentials can be automatically de-activated. This is useful, for
example, when entering credentials for a temporary employee or contractor. If the credential can be
de-activated, select True from the drop-down list next to the field, and then enter the de-
activation date in the De-Activation Date field. If the credential cannot be de-activated, select
False from the drop-down list. The default de-activation date is 200 years to ensure a user’s
credential is not inadvertently de-activated.
Registering the Credential
When you select a credential type, the Specify the Credential Number dialog box opens. From
here, you can enter the credential number manually, scan the user’s card with a scanning device
connected to your computer, or specify a reader where the user will scan their card. Steps to
register each type of card are presented in the next few sections.
NOTE: If you use the reader scan method, the card used must be unassigned.
You can have any one of the other types, or none.
WIRELESS ACCESS MANAGEMENT SYSTEM
USER’S GUIDE- 17
To register a Keypad credential:
1. Keypad credentials are automatically registered by the system, and no further steps are
required.
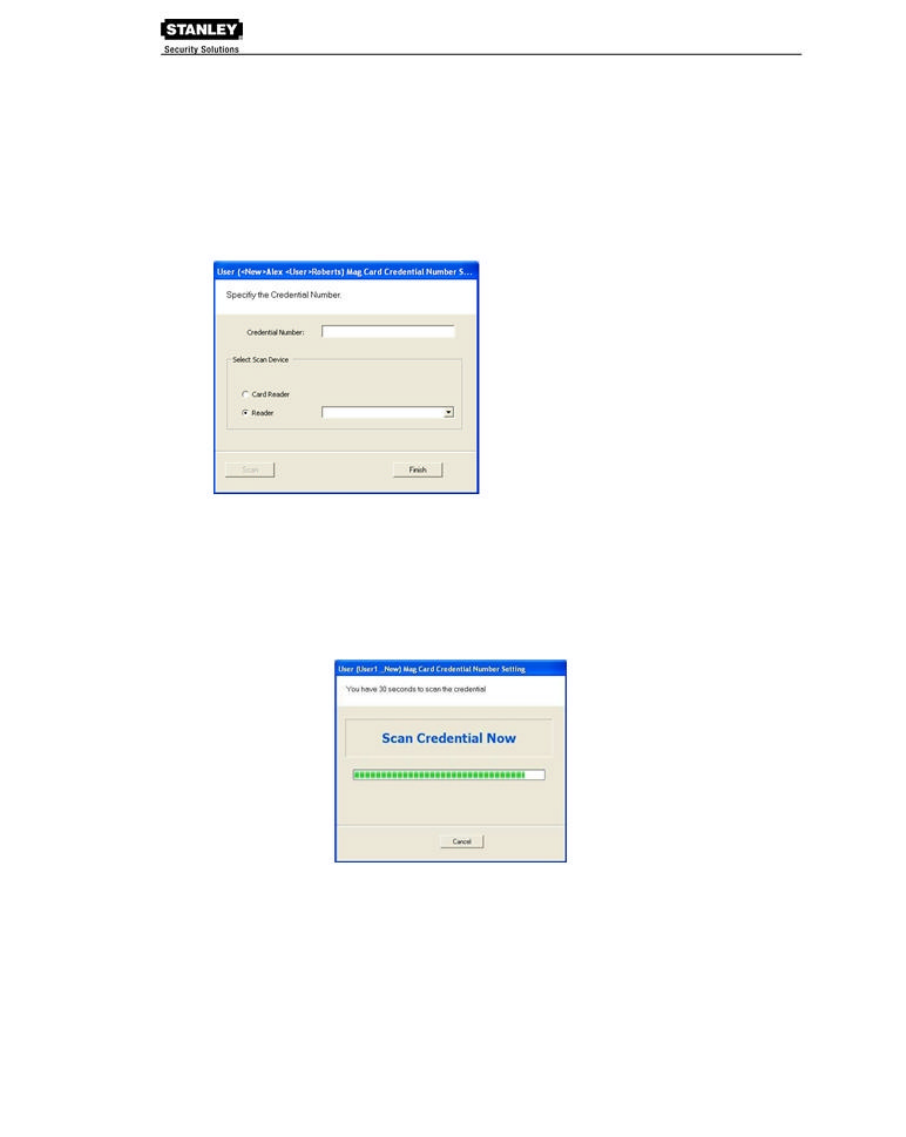
To register a Magnetic Stripe Card credential:
1. From the User Credential Setup dialog box, select Mag Card from the list. The Users
Mag Card Credential Number dialog box opens.
2. Enter a Credential Number manually (must be less than 16 characters, zeros will be
prepended) or select a scan device:
Card Reader
_ If you have a scanning device connected to your computer, select
Card Reader. When you are ready to scan the card, select the Scan
button. You will have 30 seconds to scan the card.
When recognized, the number will display in the Credential Number text box.
Select Finish and return to the Credential Setup dialog box.
WIRELESS ACCESS MANAGEMENT SYSTEM
18 - USER’S GUIDE
Reader
_ You can use a local reader to scan the card credentials. Select
Reader, and then use the drop-down list to navigate to the reader
where the card will be scanned. When you are ready to scan the
card, select the Scan button. You will have 30 seconds to scan the
card. When recognized, the number will display in the Credential
Number text box.
_ Select Finish and return to the Credential Setup dialog box.
NOTE: You may need to expand the drop-down list to view all available readers. Use
the highlighted area in the lower right corner.
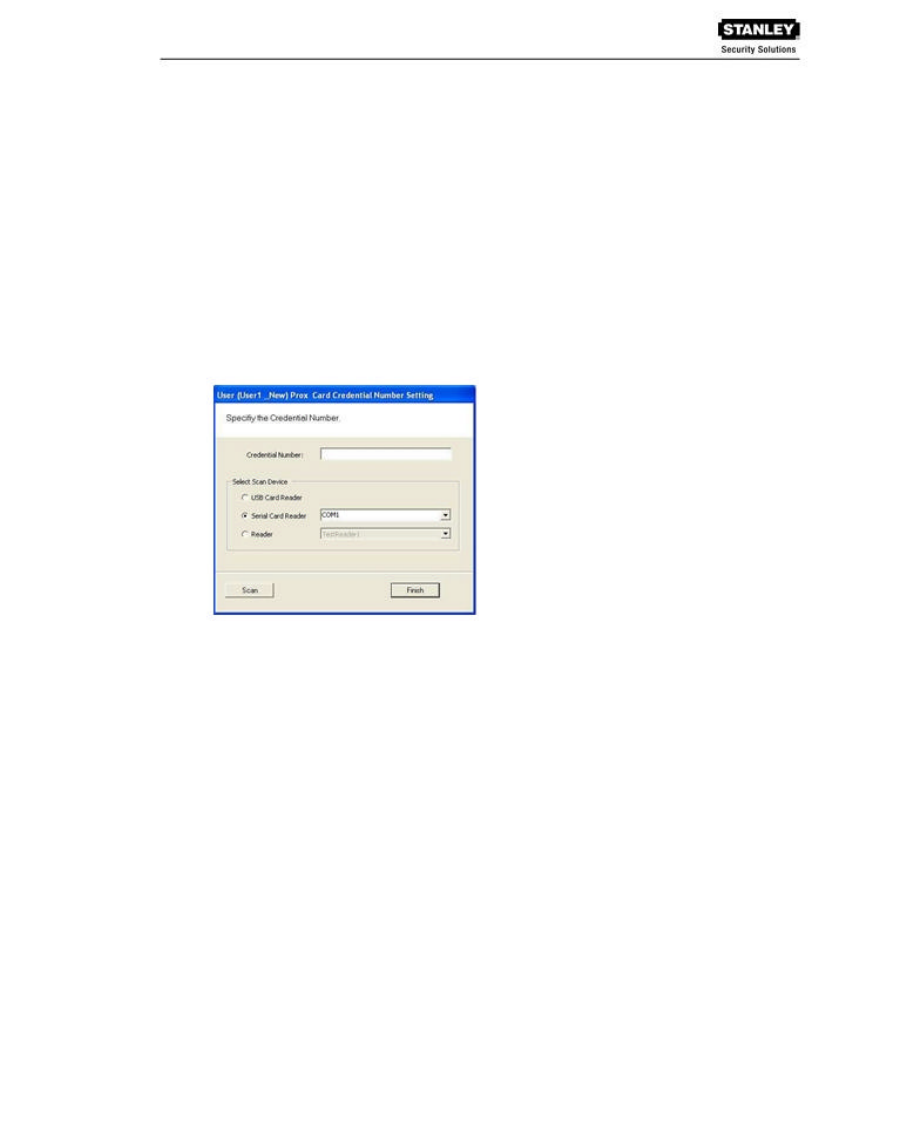
To register a Prox Card Credential:
1. Select Prox Card from the list on the left. The User Prox Card Credential Number dialog
box opens.
2. Enter a Credential Number manually (must be less than 16 characters, zeros will be
prepended) or select a scan device:
USB Card Reader
_ If you have a USB Card reader connected to your computer, select USB
Card Reader.
_ When you are ready to scan the card, select the Scan button. You will
have 30 seconds to scan the card. When recognized, the number will
display in the Credential Number text box.
_ Select Finish and return to the Credential Setup dialog box.
Serial Card Reader
_ If you have a Serial Card Reader connected to your computer, select
Serial Card Reader and then select the appropriate com port from the
drop-down list.
_ When you are ready to scan the card, select the Scan button. You will
have 30 seconds to scan the card. When recognized, the number will
display in the Credential Number text box.
_ Select Finish and return to the Credential Setup dialog box.
WIRELESS ACCESS MANAGEMENT SYSTEM
USER’S GUIDE- 19
Reader
_ You can use a local reader to scan the card credentials. Select Reader,
and then use the drop-down list to navigate to the reader where the card
will be scanned.
_ When you are ready to scan the card, select the Scan button. You will
have 30 seconds to scan the card. When recognized, the number will
display in the Credential Number text box.
_ Select Finish and return to the Credential Setup dialog box.
NOTE: You may need to expand the drop-down list to view all available readers.
Use the highlighted area in the lower right corner.
3. In the Proximity Card category, review the Prox Card Type. If the default entry is not the
one you will use, select the field and use the down-arrow to select the correct type from
the list.
4. Select Finish and return to the Credential Setup dialog box. To
register a Smart Card credential:
1. Select Smart Card from the list on the left. The Users Smart Card Credential Number
dialog box opens.
2. Enter a Credential Number manually (must be less than 16 characters, zeros will be
prepended) or select a scan device:
Card Reader
_ If you have a scanning device connected to your computer, select Card
Reader. When you are ready to scan the card, select the Scan button.
You will have 30 seconds to scan the card.
_ When recognized, the number will display in the Credential Number text
box.
_ Select Finish and return to the Credential Setup dialog box.
Reader
_ You can use a local reader to scan the card credentials. Select Reader,
and then use the drop-down list to navigate to the reader where the card
will be scanned.
_ When you are ready to scan the card, select the Scan button. You will
have 30 seconds to scan the card. When recognized, the number will
display in the Credential Number text box.
_ Select Finish and return to the Credential Setup dialog box.
WIRELESS ACCESS MANAGEMENT SYSTEM
20 - USER’S GUIDE
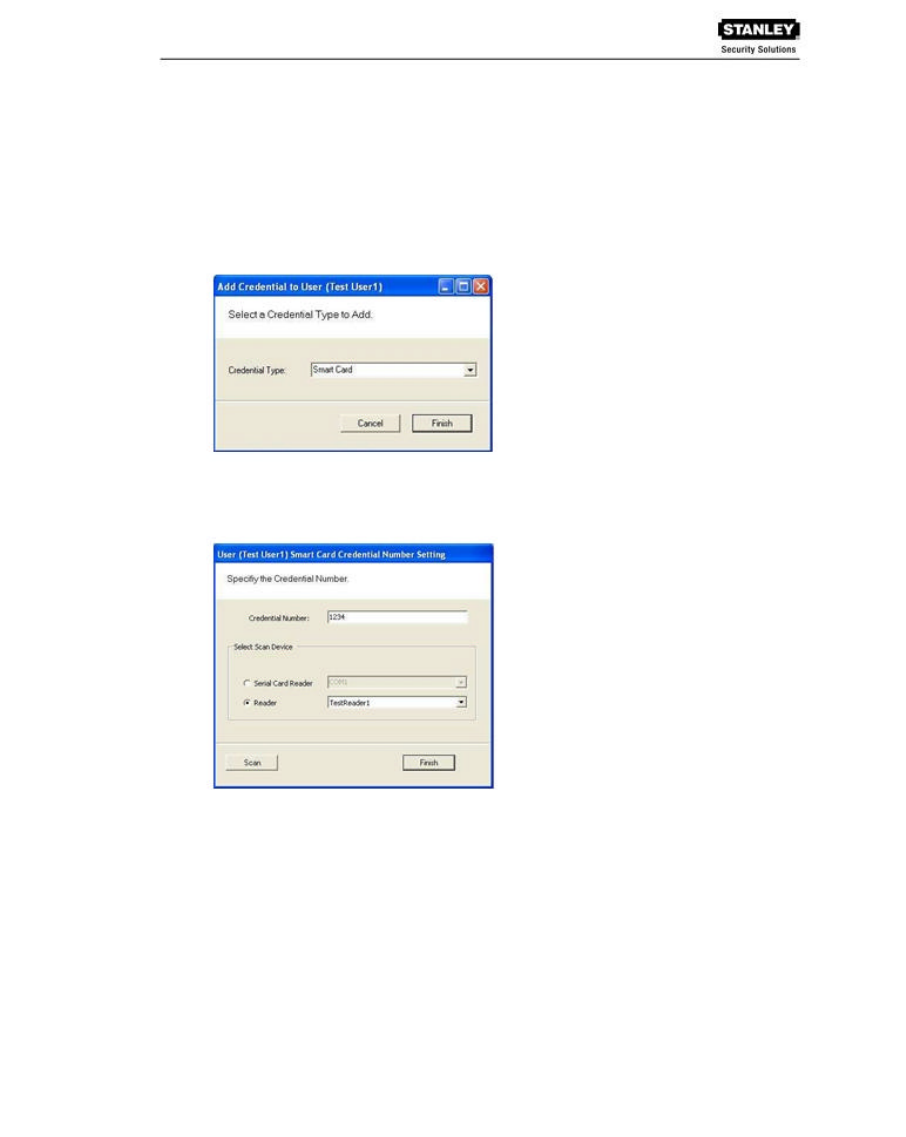
Adding a Credential Type
At least one credential type must be defined for the system. The default credential type in WAMS is
Keypad. If you use other then keypad credential types, you can add them to the User
Credentials Setup dialog box. For example, if your facility will use Smart cards, you can add
Smart Card to the list.
To add a card type to the list:
1. In the Users Credentials Setup dialog box, select the Add button. The Add Credential to
User dialog box opens.
2. Select the Credential Type from the drop-down list.
3. Select Finish. The User <Smart Card> Credential Number Setting dialog box opens.
The default Credential Number displays in the text box at the top.
4. If you selected a user before you added the new type, you can enter or scan in the
credential number. If you did not select a user, select Finish to return to the User
Credentials Setup dialog box. The new credential type will display in the list of types.
WIRELESS ACCESS MANAGEMENT SYSTEM

USER’S GUIDE- 21
PIN
You can add a level of security by requiring PIN numbers in addition to credentials for all users, or
for specific Timezone Intervals. The default displays the PIN number as asterisks in the fields;
however you can choose to show the actual PIN numbers.
To add a PIN Number for a User:
1. Under Credential Settings, click in the field next to PIN. The Set Personal Identification
Number dialog box opens.
2. Select the Show PINs check box if you wish to view the numbers instead of asterisks as
you type them in.
3. Enter a PIN number for the user.
4. Click Finish to save the PIN and exit the dialog box.
Settings
Each facility user will be assigned a user type and access type, depending on the tasks they
perform and the access mode needed to perform those tasks. The system supports four different
types of users: General Users, Managers, Programmers, and Service users. You can have up to
65,000 individual users in the system and they can be of any User Type. User types are briefly
described in the following paragraphs.
General Users
The majority of users will be assigned as General Users. They are allowed entry only when the
access level is set to ID Required. General Users never have access when the reader is in
Lockout.
To assign User Type:
1. In the Settings category, select the field next to User Type.
2. Select a User Type from the drop-down list.
Manager
Managers are one of the most useful types of IDs. This User Type provides the capability to
change the access level of a reader with a few simple key presses. These changes can and will be
overridden by the time schedule or another manager or programmer. A user with Manager
privileges is always allowed access to a reader. For example, when a facility requires an
individual to have access at all hours of the day without giving any extra privileges, that individual
will be assigned Manager Privileges.
WIRELESS ACCESS MANAGEMENT SYSTEM

22 - USER’S GUIDE
Programmer
Programmers can scan all channels at the keypad reader as well as reset the reader to respond to
keypad commands as in manager mode. The programmer must enter his or her specific
programmer code then:
Press #7 to scan all channels
Or
Press #8 to use manager codes.
NOTE: Managers and programmers are indistinguishable from a general user when no keyboard is
present.
Reader Control
The system defaults the amount of time from the moment a reader unlocks until it relocks, and
the amount of time a door can stay open before an alarm will be triggered. You can modify reader
operate and shunt times for individual users. For example, to be ADA compliant, a user who is in
a wheelchair, or uses a walker may need more time to pass through a door. You can increase the
shunt time for this user.
To modify reader operate time:
In the Reader Control category, Operate Time, select the amount of time you wish to
leave the reader in the unlocked position from the drop-down list.
To modify reader shunt time:
In the Reader Control category, Shunt Time, select the amount of time you wish to allow
for passage before an alarm will be triggered.
WIRELESS ACCESS MANAGEMENT SYSTEM

USER’S GUIDE- 23
USING WAMS TRANSACTIONS
Each time a user accesses the system, WAMS collects a transaction from the reader/portal
gateway network. Once the system is signed on and users begin accessing the system,
transactions begin including any alarm activity. You can monitor all this activity in WAMS
Transactions. Access WAMS Transactions via the Windows Start button.
To Launch WAMS Transactions:
1. Select Start>All Programs>Stanley Security Solutions>WAMS>WAMS Transactions.
2. Enter your Login and Password. WAMS Transactions opens at the Transactions Tab.
From here you can view all transaction and alarm activity for the facility you select.
NOTE: If you have been assigned the Manager or Administrator User Type, you can launch
WAMS Transactions from the Applications menu in WAMS Configurator.
WAMS Transactions Overview
As activity takes place throughout the facility, WAMS tracks each event as a transaction. The
most obvious use of WAMS Transactions is to recognize and investigate when security has been
compromised. You can immediately locate the source of the alarm and take the action necessary to
respond according to your facility policy and procedure.
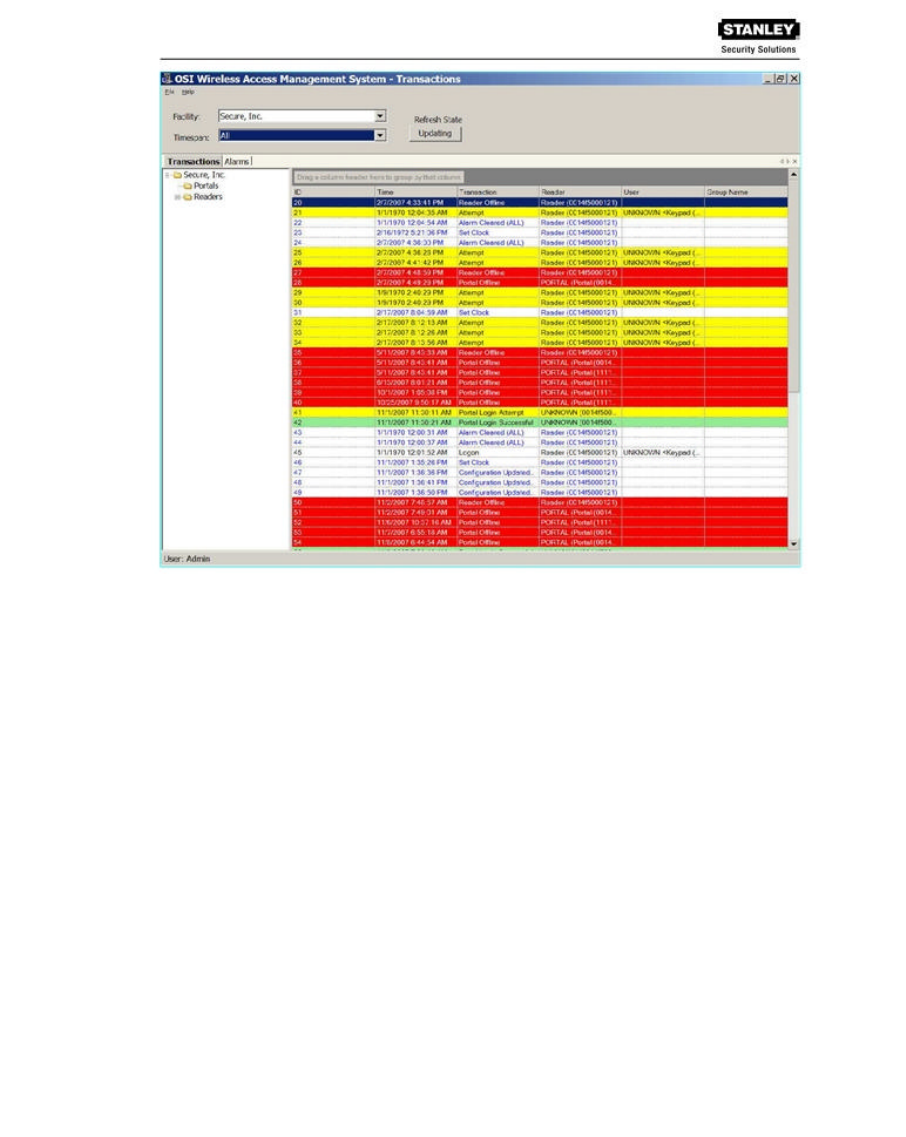
The WAMS gives each transaction in the database a unique ID, records the time and type of
transaction, the reader where the transaction occurred and the User ID and Group name
associated with the transaction. You can monitor all this activity, real time, from the WAMS
Transactions application. The transactions can be organized and sorted according to how you
want to use the data. In addition, you can temporarily pause data updating if you need to review a
transaction in more detail.
Reader and Portal Controls
WAMS Version 2.0 now provides access to reader and portal controls from within the WAMS
software. From here a user can override access levels of readers to unlock or lockout one or a
whole related group of readers. To use this feature, simply right click on the portal or reader and
select an option. For more information about this feature, see Portal and Reader Controls and
Portal and Reader Messaging in the Administrator’s Guide.
Transactions Tab
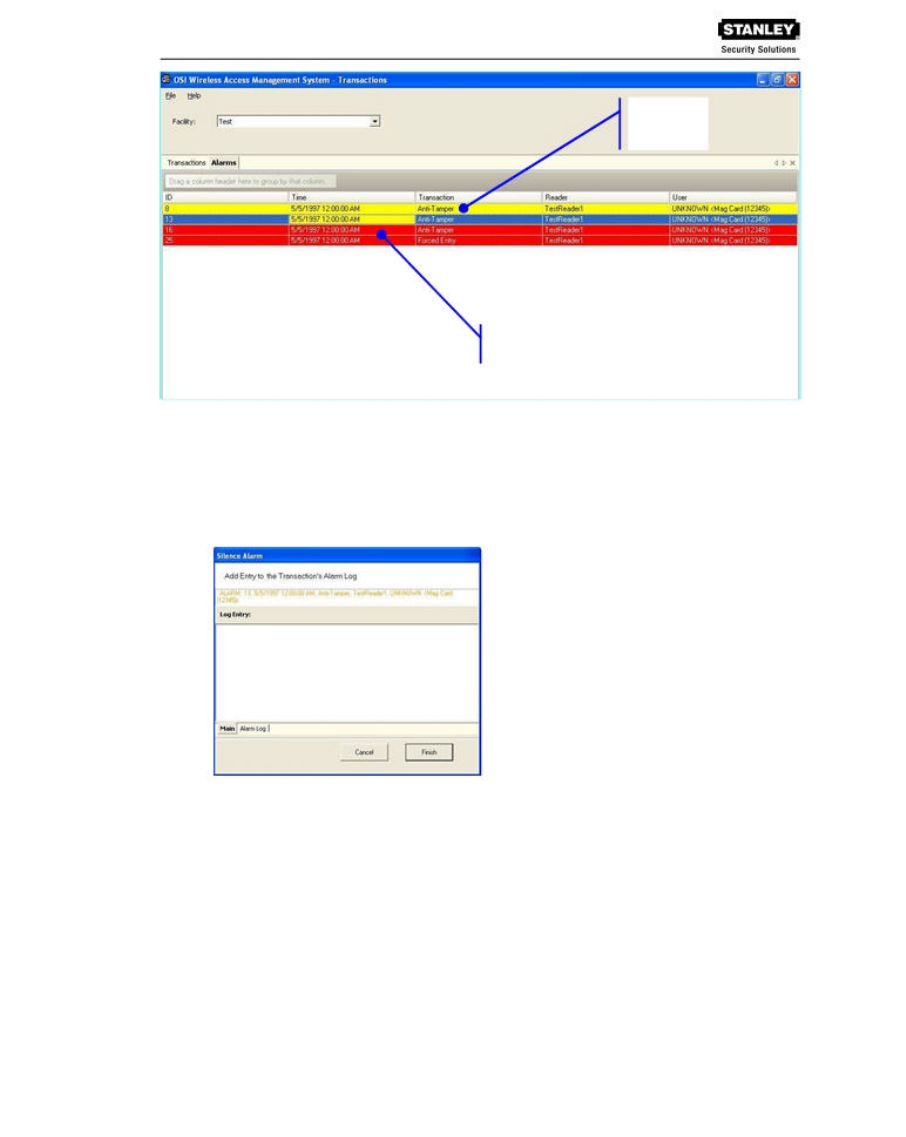
You can view all transactions as they occur in the Transactions Tab. Alarm transactions such as
Forced Entry or Anti Tamper display in red. Access requests “attempted but not allowed”
displays in yellow. Successful access requests display in black on a white background.
WIRELESS ACCESS MANAGEMENT SYSTEM
24 - USER’S GUIDE
System transactions such as changing an access level or clearing an alarm display in blue on a
white background. To review and respond to alarms, select the Alarms Tab.
Alarms Tab
When an alarm is triggered, such as a door is blocked open or forced entry, the system creates an
alarm record. When you select the Alarms Tab, unanswered alarms display in red and
activate an alarm sound .wav file on your computers sound system. When you “silence” an alarm in
WAMS Transactions, you are simply telling the system that you have recognized the alarm
condition. The alarm sound .wav file will stop on your computer system for that alarm and the
display color changes to yellow. A log will be generated as to when the alarm was silenced. The
user can add a comment to this log to further define the incident.
Remember, when you “Silence” an alarm in WAMS Transactions, you are only silencing a .wav
file; you are not resolving the problem. It is important to establish Alarm Response protocols
within your facility and follow up with action. See Responding to Alarms on page 24 for more
information.
WIRELESS ACCESS MANAGEMENT SYSTEM
USER’S GUIDE- 25
Transaction Types
The WAMS database records transactions by category. Under normal operating conditions, the
most common transaction types will be Entry and Request to Exit. The system recognizes
various alarm and status categories, such as:
Alarm Cleared (All)
Alarm Cleared (Forced Entry)
Anti-Tamper
Organizing and Sorting Transactions
WAMS makes it easy to manage high transaction traffic. You could view every transaction in the
system, real time. However, in large systems where hundreds of transactions can occur in a very
short time, you may want to limit the transactions displayed, or group them in a way that makes
sense for system activity. For example, you can limit the transactions list to only those that
occurred in the last ten minute timespan; you can sort ascending or descending by column
header; and you can arrange the columns in any order you wish. In addition, you can create a
hierarchy, rather than a columnar view.
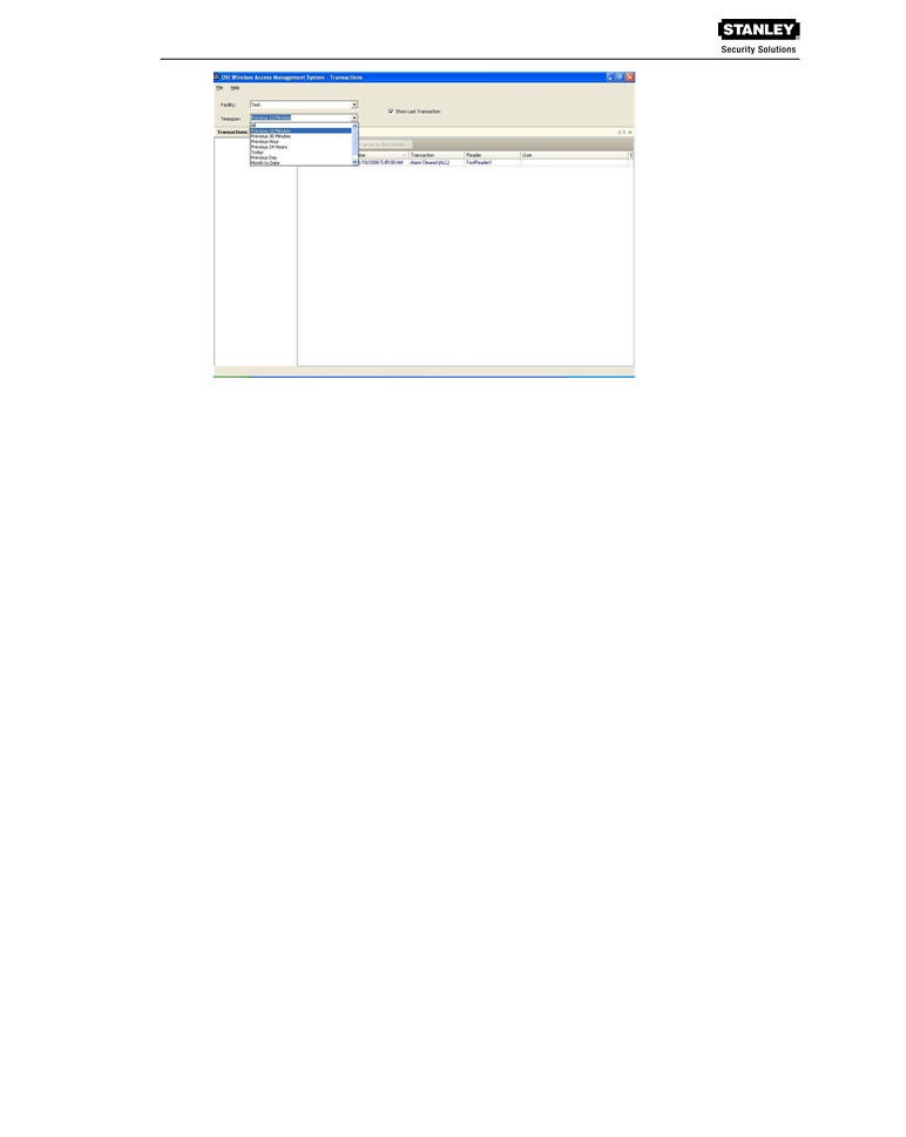
Display by Timespan
By default, WAMS Transactions displays all transactions in the order they occur. If you are
monitoring all transactions, you may want to simply watch them as they occur. However, in large
systems, your effort may best be served by limiting transactions to only those that have occurred
in the previous ten minutes, or previous hour. WAMS gives you a number of options from All to
year to date.
To set the display timespan:
1. In the Transactions Tab, select the Facility you wish to monitor.
2. Under Timespan, select the timespan you wish to display from the drop-down list. The
display list on the right changes to reflect your selection.
WIRELESS ACCESS MANAGEMENT SYSTEM
26 - USER’S GUIDE
NOTE: You can choose to always show the last transaction, no matter how you configure your
display. Select Show Transaction at the top of the display.
Sort by Column Header
You can sort WAMS Transactions by column header in ascending or descending order. This is
helpful, depending on what you are looking for. If you simply want to watch transactions in the
order they occur, the default setting—sorted by ID, descending—will display the most recent
transaction on the top line of the list. However, if you have an interest in viewing all the activity of
a particular user, you can sort alphabetically by User credential. As with common database
programs, you can move the columns in the column header to any order you wish. WAMS
Transactions will remember your changes and display in the new order when you next open the
program.
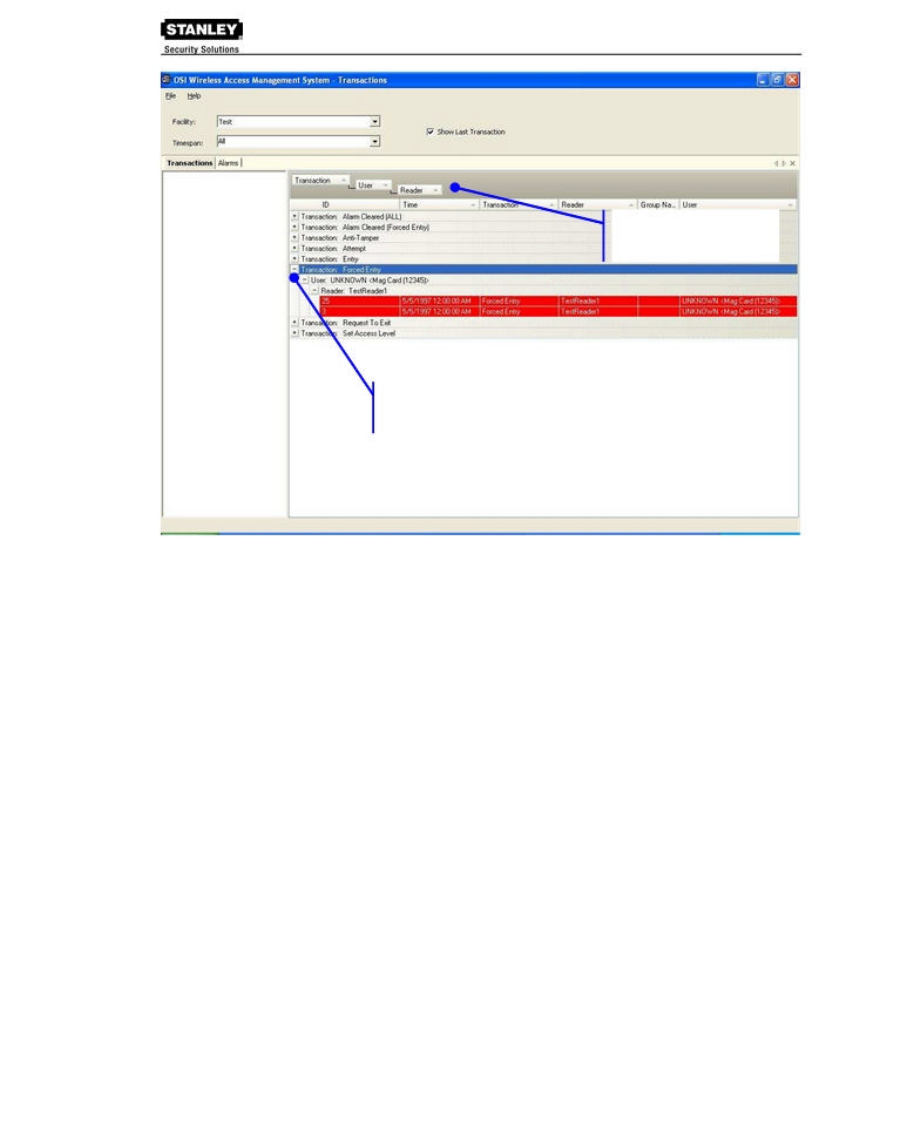
View Transactions in Tree Levels
You can display transactions similar to the way you view the Facility Tree in WAMS Configurator.
This is useful to minimize and organize the amount of data you view at one time.
WIRELESS ACCESS MANAGEMENT SYSTEM
USER’S GUIDE- 27
Drag column headers to
the gray field at the top of
the list.
Click a plus sign to expand
the selection.
In this example, we placed Transactions at the top of the tree; however, you can place them in
any hierarchy you wish. When you select the plus sign next to the top level, the second and third
level items expand to display. It’s easy to create a Transactions Tree: simply drag and drop the
column headers into position.
Responding to Alarms
When an alarm occurs, the system immediately displays it in red in the Transactions Tab. The
alarm will be categorized as either an Anti-Tamper or a Forced Entry type. At this point, you will
take action according to your facility’s security plan. In a small facility, you may simply dispatch a
person to physically investigate the source of the alarm. In larger facilities with I/O devices in the
system, the alarm may trigger a video recorder, a lighting plan, or other I/O device. In either
case, you will respond to the alarm in WAMS Transactions using the alarms tab.
As with the Transactions Tab, you can sort the alarms in ascending and descending order with a
column, and change the order in which the columns display, and create an Alarms Tree.
WIRELESS ACCESS MANAGEMENT SYSTEM
28 - USER’S GUIDE
Silenced
Alarms
Active Alarms
(unsilenced)
To respond and silence an alarm:
1. Select the Alarms Tab.
2. Double-click on an active alarm (displaying in red). The Silence Alarm text box opens at
the Alarm Log tab. Alarm details display in the message area.
3. To add an entry to the log, select the Main tab.
4. Place the cursor in the text box and enter a comment; for example, dispatched technician
to inspect reader.
5. Select Finish. In the Alarms tab, the alarm line changes from red to yellow and the alarm
sound stops.
You can continue to add comments in the alarm’s log until the condition is resolved.
To update or review the status of an alarm:
1. In the Alarms Tab, double click the alarm. The Silence Alarm text box opens.
2. Select the Alarm Log Tab. All comments regarding the alarm are recorded.
3. Select the Main Tab to enter a new comment.
4. Select Finish to close the text box and return to the Alarms Tab.
WIRELESS ACCESS MANAGEMENT SYSTEM

USER’S GUIDE- 29
WAMS Statistics Monitor
The Statistics Monitor is a powerful tool that displays a real-time, color coded overview of system
performance. When you set up your new system, and want to monitor ongoing system
performance, you will use the WAMS Statistics Monitor. Statistics Monitor is primarily a System
Administrator tool. For more information about this application, please see the WAMS
Administrator’s Guide.
USING WAMS REPORTS
You can view a wide variety of reports based on data collected in WAMS Configurator and
WAMS Transactions. Access WAMS Reports from the Applications menu at the top of the
WAMS Configurator Main Screen.
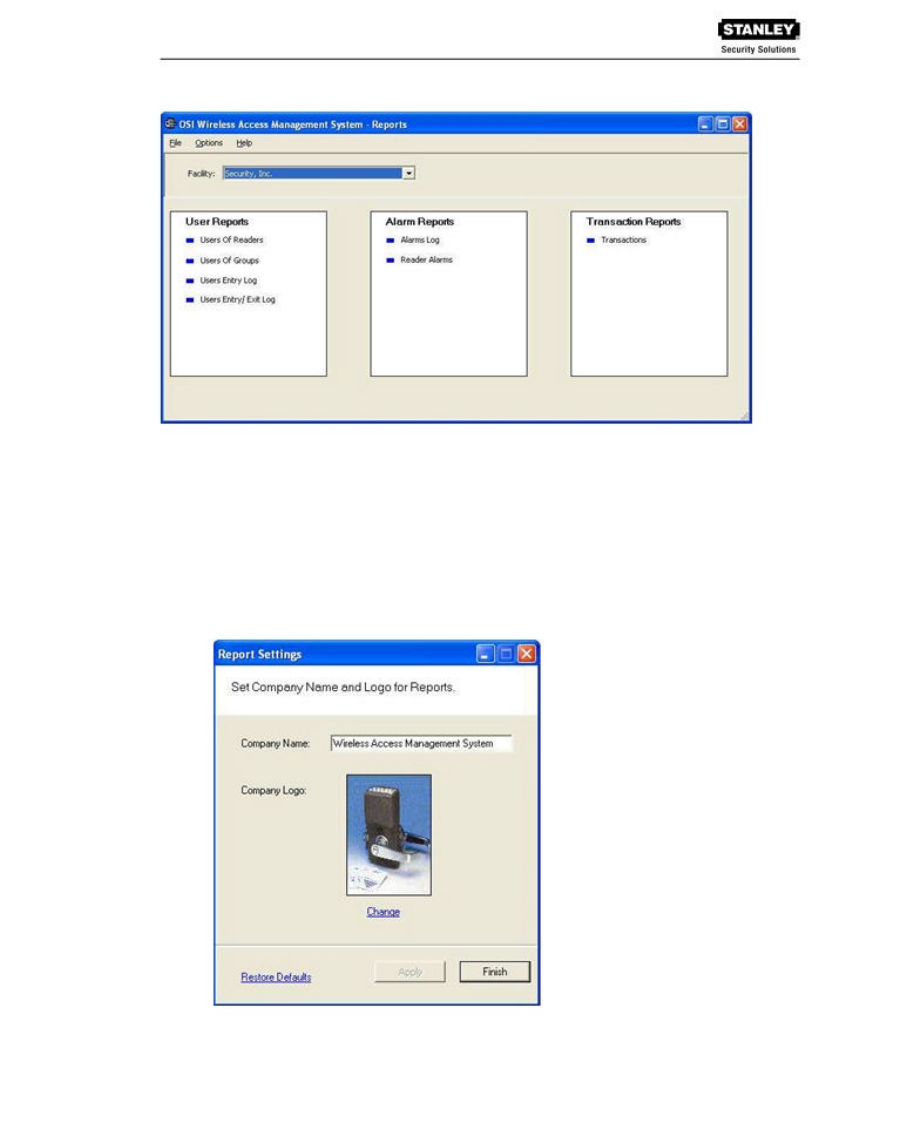
Reports Overview
WAMS provides seven reports that you can modify.
USER REPORTS
_ Users of Readers - Generate a report that lists all readers and the users currently
assigned to them, or you can specify a particular reader and view only the users for
that reader.
_ Users of Groups - Generate a report that lists all user groups and the users
currently assigned to them, or you can specify a particular user group and view only
the users for that group.
_ Users Entry Log - Generate a report that lists user entry data for all users and all a
readers, or you can specify which readers and users to list. You can also specify a
timespan or Begin and End dates on which to report.
_ Users Entry/Exit Log - Generate a report that lists user entry/exit data for all users
and all a readers, or you can specify which readers and users to list. you can also
specify a timespan or Begin and End dates on which to report.
ALARM REPORTS
_ Alarms Log - Generate a report by alarm for all readers in all timespans, or specify
which alarms, timespans, or Begin and End dates.
_ Readers Alarms Log - Generates a report by reader for all alarms in all timespans,
or specify which readers, timespans, or Begin and End dates.
TRANSACTION REPORTS
_ Transactions - Generate a report for all transactions at all readers for all users
during all timespans, or specify which transactions you wish to list.
Creating Reports in WAMS
The first step in creating reports in WAMS is to configure report settings. Here you can enter your
company name and include a picture or logo that will be included in any files exported or printed
from the application. Once you have configured your report settings you are ready to choose a
report type and generate the report. From there you can print the report, or export the report to any
number of file formats such as .doc, .rtf, .rpt, etc.
To get started, select Applications>WAMS Reports from the WAMS Configurator main menu.
WIRELESS ACCESS MANAGEMENT SYSTEM
30 - USER’S GUIDE
Once you enter your login and password, the WAMS Reports main screen opens.
Configure Report Settings
You can include your company or organization name and logo with any report. WAMS supports
both .bmp and .jpg image formats.
To configure report settings:
1. In the Facility box, select the Facility you wish to create the setting for.
2. Select Options>Report Settings. The Set Company Name and Logo for Reports dialog
box opens.
3. In the Company Name box, type in the company name you wish to appear on your
reports.
WIRELESS ACCESS MANAGEMENT SYSTEM
USER’S GUIDE- 31
4. Under Company logo, click the Change link. Use the Select Logo browser to navigate
the file you wish to include.
5. Click Open. The file is now uploaded to the WAMS Reports settings.
6. Click Finish to save your settings and begin working with Reports.
Generating a Report
This section presents steps to create some example reports. Once you are familiar with the basic
operations, you will be able to create your own reports using the selections available in WAMS
Reports. First we’ll look at a Users of Readers report with All Users selected. Then we’ll look at a
filtered report using the options under the Report Settings categories.
NOTE: The Reports application won’t show much data until you have configured your system,
added Users and User Groups, and begun collecting transactions. Once this occurs, you can
experiment with the options to get the reports that will be most significant for your operation.
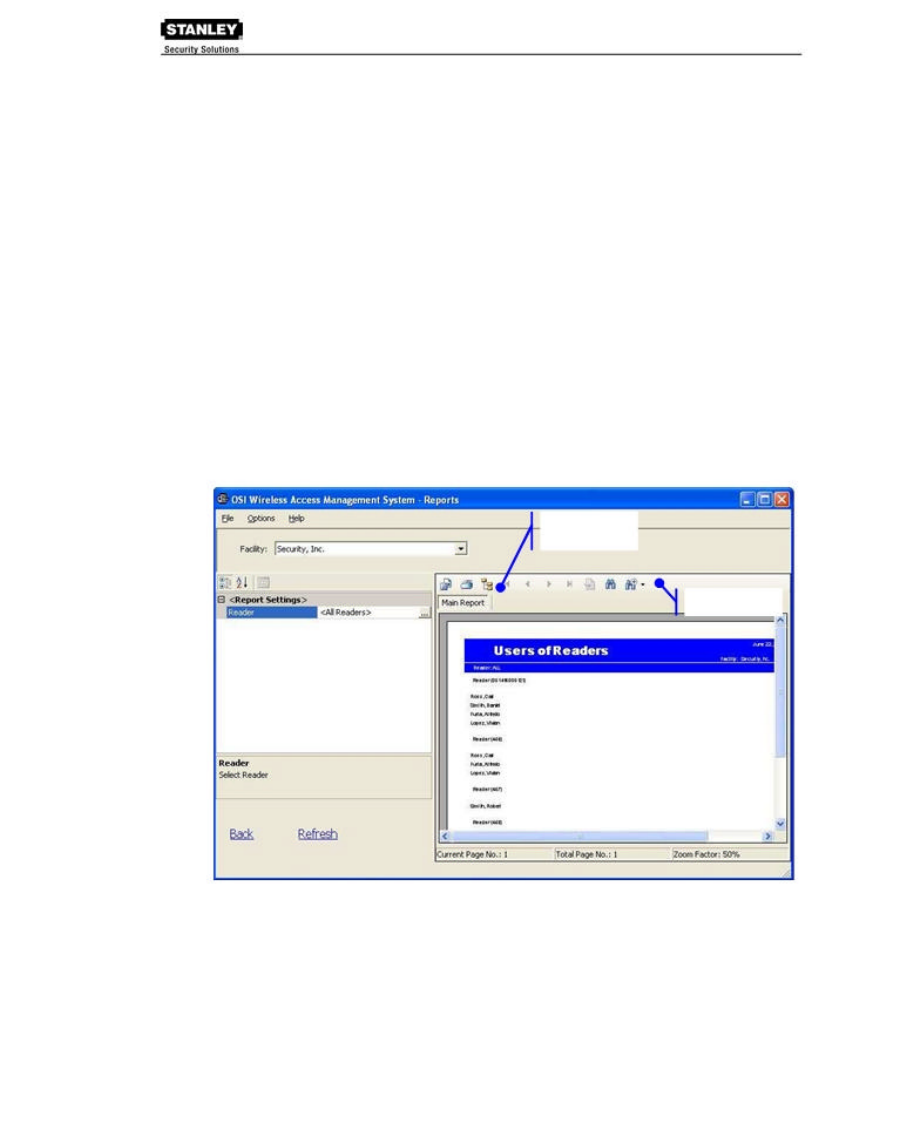
To Generate a Report:
1. In the WAMS Reports main screen, under the User Reports box, click on Users of
Readers. WAMS Reports opens at the basic users of Readers Reports generator.
2. In the Facility box, select the Facility you wish to report on.
3. Available report settings are listed on the left, and the results are shown on the right. For
this particular report, the default will be <All Readers>.
Toggle Group
Tree Icon
Menu Bar
4. Use the scroll bars to view the data, use menu icons to export, print, scroll through multi-
paged reports, or use the Zoom tools to get a closer look.
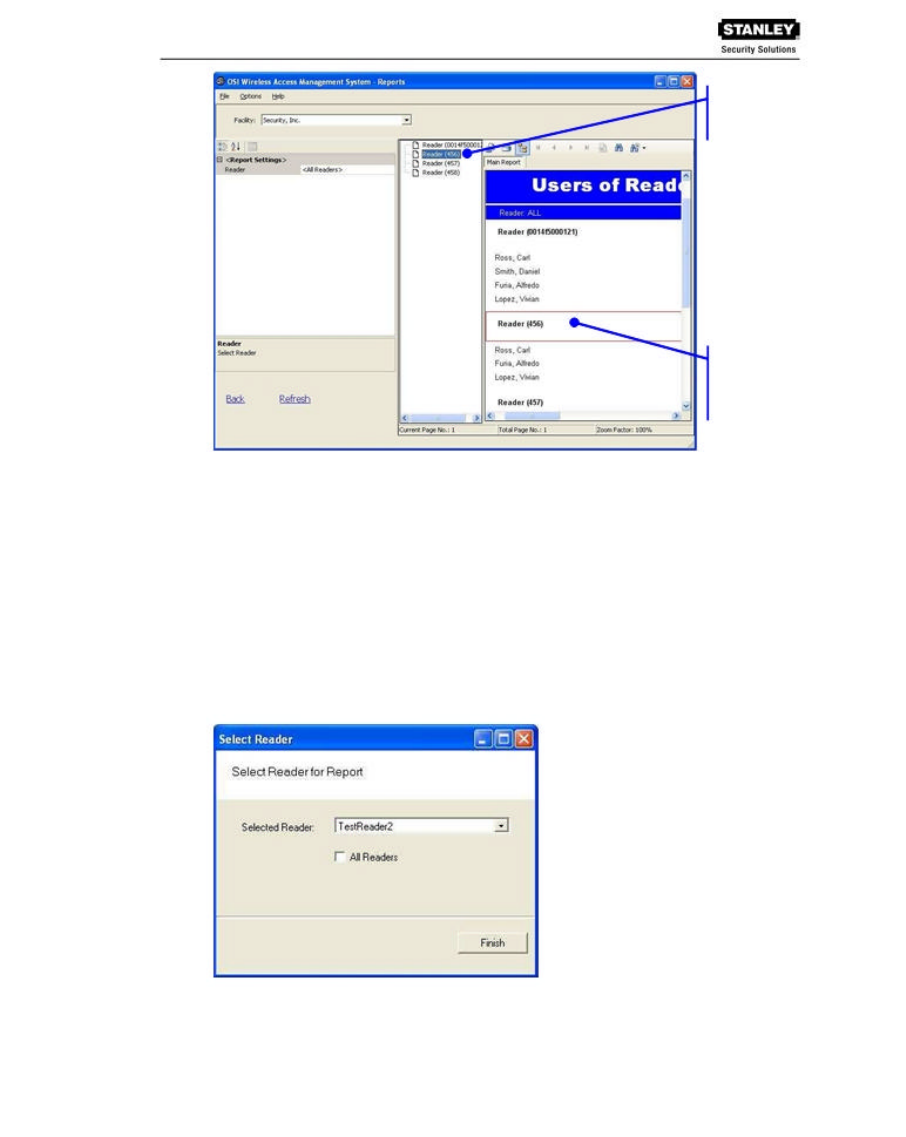
5. If you have a large number of readers, Click the Toggle Group Tree icon and highlight a
specific reader to jump to its section in the report.
WIRELESS ACCESS MANAGEMENT SYSTEM
32 - USER’S GUIDE
Expanded
Group Tree
Locates the
reader
highlighted in
the Group
Tree
6. Click Back (bottom left of screen) to return to the Report Generator screen.
To create filtered report:
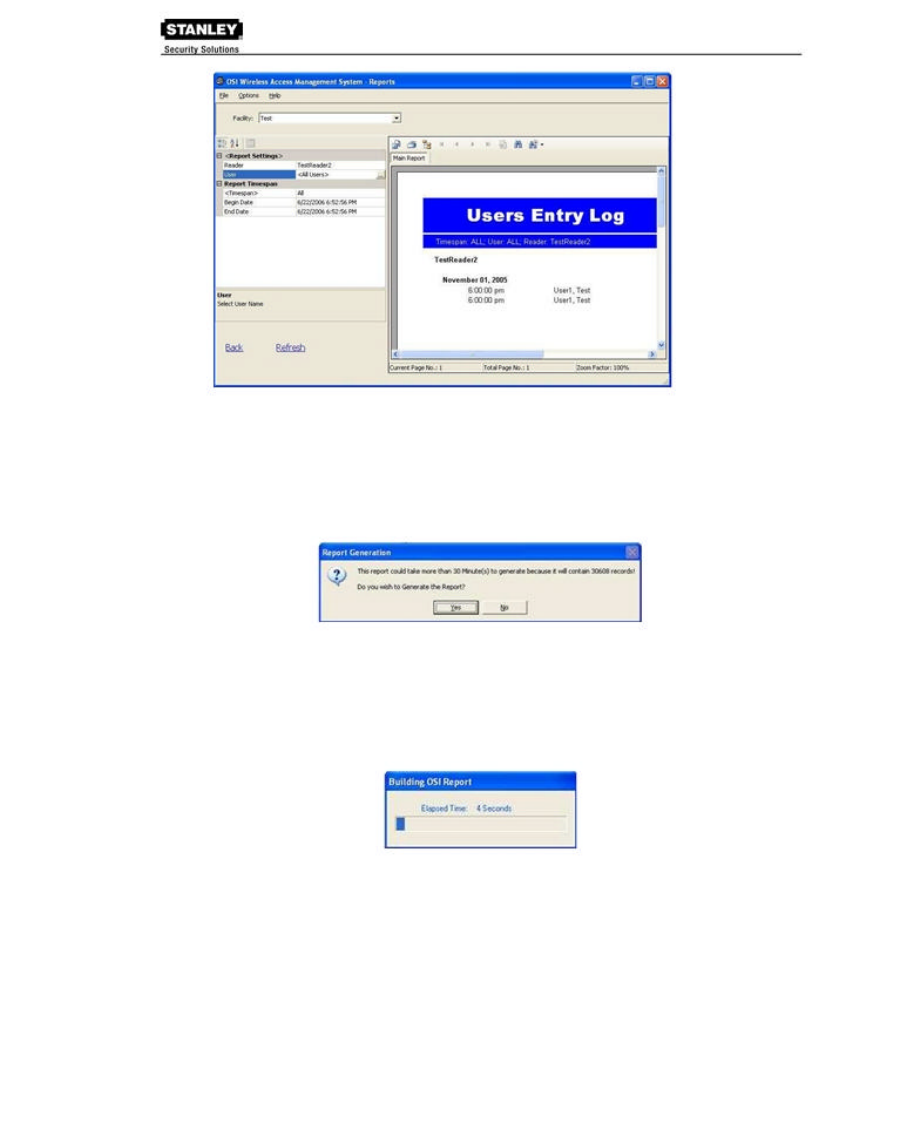
1. In the WAMS Reports main screen, select the Facility you wish to report on. In our
example, we created a facility called Test.
2. Under the User Reports box, click on Users Entry Log. In this report set up, more
selections are available for this report than for the Users of Readers report, including
Reader, User, and Report Timespans. You can use any or all of these selections to filter
your report. Each report type will have different selections available depending on the data
available for the report. The defaults are always All. In the following example, we are filtering
for Test Reader2, All Users, and All Timespans.
3. Under Report Settings, click on the Reader field then click the ellipsis button. The Select
Reader dialog box opens.
4. Clear the All Readers box just below the drop-down list box.
5. Select the reader you wish to filter for from the drop-down list.
6. Click Finish. The report results will display data for only the reader you selected.
WIRELESS ACCESS MANAGEMENT SYSTEM
USER’S GUIDE- 33
Generating Larger Reports
The more records you include in your report, the longer the report will take to generate. During
report generation, you can use other WAMS applications; however, you can generate only one
report at a time in the Reports application. If you define a report that will take more than 30
minutes to generate based on the records included, WAMS will present the following message:
In the example, WAMS detects that the defined report contains about 30,000 records and will
take more than 30 minutes to generate. If this is acceptable, simply select Yes and the report will
be generated. Select No if this is an inconvenient time to generate the report, or review your
report definitions to see if you can further filter the report and still get the information you need.
When you select Yes, the report begins to generate and WAMS displays the Elapsed Time as the
report runs.
Printing and Exporting Reports
Once you are satisfied with your report, you can print to a local or networked printer, or export the
report in several formats. Your results will be determined by the options you select and how you
wish to use the data. For example if you export to an Excel® file, you may get a different
formatting result than if you export to an Adobe Acrobat® file or print directly from WAMS.
However, you may wish to export to an Excel file and use the data in another format.
The following example was printed from an Adobe Acrobat .pdf file exported from WAMS reports. It
retains all the formatting as displayed in WAMS Reports.
WIRELESS ACCESS MANAGEMENT SYSTEM
34 - USER’S GUIDE
To print a report:
1. Create the report using the features described in the previous sections.
2. Click the Printer icon in the menu bar.
3. Navigate to the printer you wish to use.
4. Print using the appropriate actions for the chosen printer.
To export a report:
1. Create the report using the features described in the previous sections.
2. In the menu bar, click the Export Report option.
3. In the Export Report dialog box, select a format type from the drop-down list. The
available types are:
_ Crystal Reports (*.rpt)
_ Adobe Acrobat (*.pdf)
_ Microsoft Excel (*.xls)
_ Microsoft Excel Data Only (*.xls)
_ Microsoft Word (*.doc)
_ Rich Test Format (*.rtf)
4. Navigate to the location you wish to export to.
5. Enter a filename for the file.
6. Click Save.
Now you can use the report in any manner you wish, depending on the format exported.
WIRELESS ACCESS MANAGEMENT SYSTEM

USER’S GUIDE- 35
Using Dialup Networking
Set up and use of Dialup Networking is described in Appendix A of the Administrator’s Guide.
Using WAMS System Administrator
You can archive and restore data and import data from a legacy OFM Database or comma-
delimited file using the System Administrator application. You must have Administrator privileges to
use this tool. Complete instructions are presented in the Administrator’s Guide.
WIRELESS ACCESS MANAGEMENT SYSTEM

INDEX- 36
Index
A
Alarms · 24
alarm log · 28
check status · 28
responding to · 27
silencing · 28
Antennas
approved · 5
Associations · 13
C
comma-delimitted file · 35
Credential Settings · 14
Card type · 15
Keypad type · 15
Registering the Credential · 16
Credentials
adding a credential type · 20
D
Dialup Networking · 35
Display Options · 8
E
Exporting Reports · 33
F
Facility Tab · 8
filtered report · 32
G
General User · 21
M
Master Timezone · 10
O
OFM Database · 35
P
Printing Reports · 33
Privileges · 21
General Users · 21
Manager · 21
Program Administrator · 5
Prox Card Type · 19
R
Reader Controfl
Shunt Time · 22
Reader Control
Operate Time · 22
Readers Tab · 9
Registering credentials
Keypad credentials · 16
Registering Credentials
Mag Card · 17
Prox Card · 18
Smart Card · 19
USB Card Reader · 18
using a card reader · 17
using a local reader · 18
Using a Serial Card Reader · 18
Reports
Configure · 30
Create · 31
Filtered · 32
Larger · 33
S
System Administrator · 7, 35
System Performance · 29
T
Timezone Groups · See Administrator's Guide
Timezone Intervals · See Administrator's Guide
Timezone User Groups · See also Administrator's
Guide
Timezones Tab · 10
Transactions · 15, 23
Alarms tab · 24
displaying transactions · 25
Transactions Tab · 23

USER’S GUIDE- 37
U
User Types
General User · 21
User Types
Administrator · 6
General · 7
Manager · 6
Service · 6
Users
add to User Group · 14
adding users to the facility · 10
associate with readers · 13
associate with User Groups · 13
creating User Groups · See Administrator's
Guide
General · 21
Manager · 21
User ID · 13
Users Tab · 10
W
WAMS Configurator
desktop icon · 7
Login · 7
WAMS users · 6
WIRELESS ACCESS MANAGEMENT SYSTEM