eInstruction GTCO RFDBI Drawingboard Interactive 4256 User Manual InterWrite MB quick start
eInstruction GTCO Holdings LLC Drawingboard Interactive 4256 InterWrite MB quick start
Manual
1 37-902755-01
Quick start for InterWrite MeetingBoard
Quick start for InterWrite MeetingBoard
Note: For additional information, see the InterWrite MeetingBoard help file on the CD-ROM.
InterWrite MeetingBoard consists of an electronic whiteboard and elec-
tronic pens incorporating GTCO CalComps patented pen-input technol-
ogy. With MeetingBoard, meeting participants can view and share a wide
range of visual information. MeetingBoard supports group collaboration
ranging from small, informal meetings to large, multi-site conferences.
To match a wide range of collaboration needs, MeetingBoard provides
three operating modes:
n
Copyboard Mode: MeetingBoard functions as a simple electronic
whiteboard. Information written or drawn on the tablet can be saved by
printing on a color inkjet printer.
n
PC Whiteboard Mode: In this configuration, MeetingBoard is con-
nected to a PC running InterWrite Software. Information written or drawn
on the tablet is captured as an electronic image on the PC. Users can
review, save and print multipage meeting notes on the PC.
n
Interactive Mode: A standard LCD projector displays the attached
PCs screen onto the MeetingBoard tablet. With the MeetingBoard pens
and InterWrite Software, a user can launch programs, open and edit
documents, and annotate any information displayed on the PC. The
user can save screens (containing both document content and annota-
tions), review previously saved screens, and print screens. This sys-
tem can be used for local meetings, or as part of a real-time multi-site
conference (when used with conferencing software and a network con-
nection). Screens can be packaged in a self-extracting file for distribu-
tion to meeting participants, as well as those who couldnt attend.
What you need to do
First, install:
A. Assemble the electronic pens (page 1).
B. Attach the pen tray to the tablet (page 1).
C. Mount the tablet on a wall or on the optional floor stand (page 2).
Next, configure for at least one operating mode (page 3):
n
Color Copyboard mode.
n
PC Whiteboard mode.
n
Interactive mode.
You can now use the InterWrite MeetingBoard (page 4).
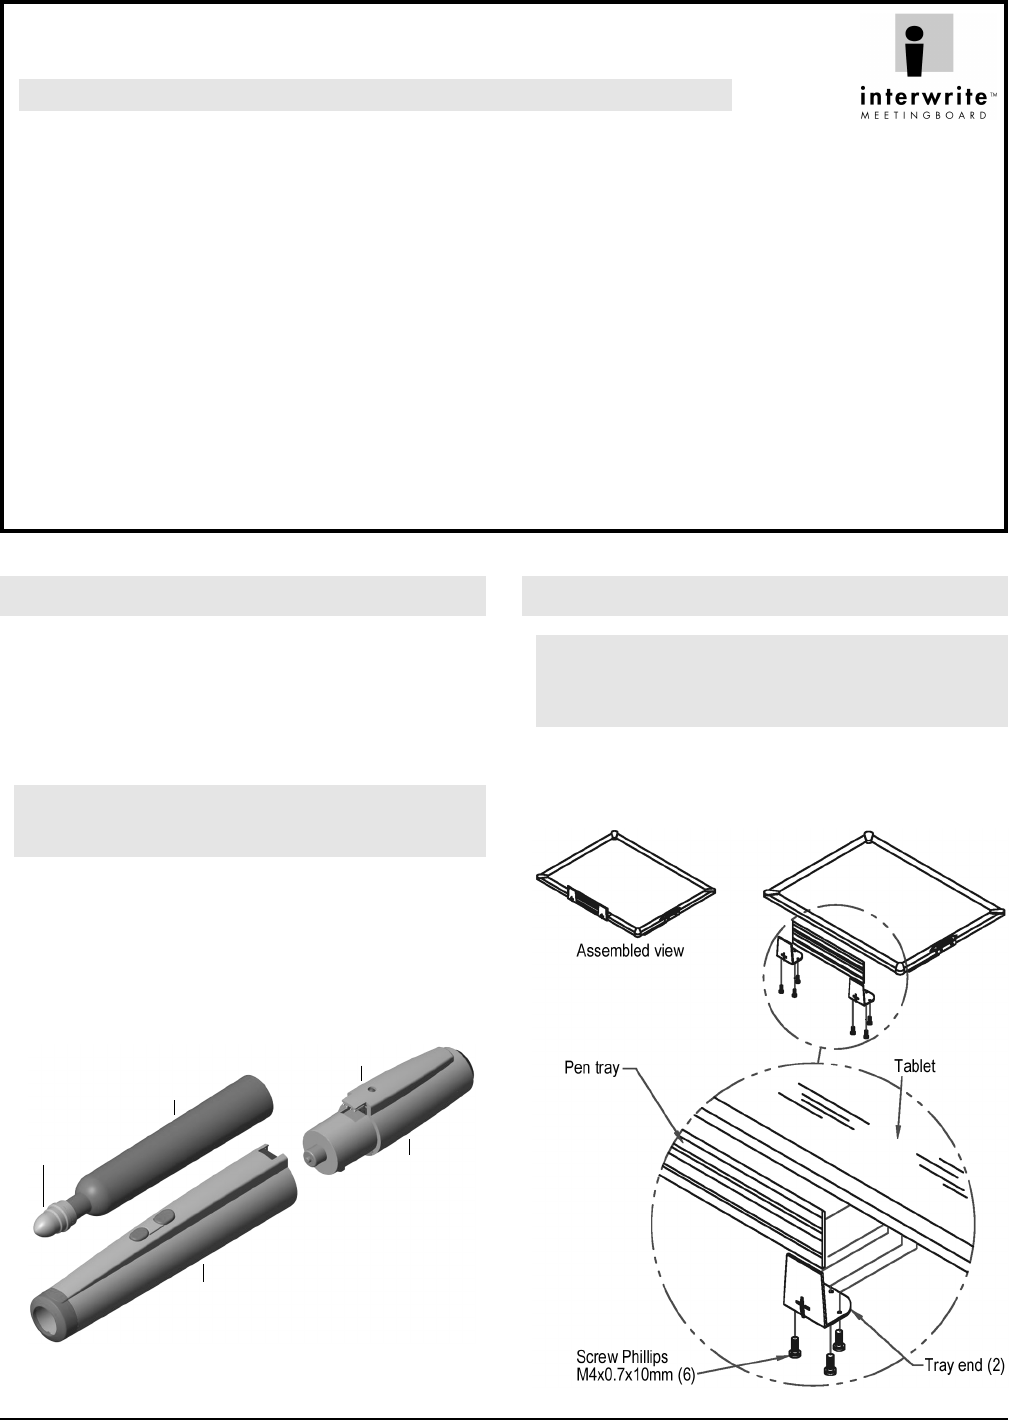
Assemble the electronic pens
1. Locate the marker holders, electronics modules, batteries, pen caps and
markers supplied. The pens are electronically coded to match the plastic
colors: black, blue, red and green.
2. Insert a marker into the pen housing with the matching color (e.g., red
marker goes in red housing).
3. Remove the markers cap and replace it with a MeetingBoard pen cap.
Note: Keep the markers capped as much as possible to prevent them
from drying out. The caps enable the electronic pens to be used in Inter-
active Mode without leaving ink on the tablet.
4. Remove the battery cover from a pen electronics module. Insert a battery
into the module (assure polarity is correct!). Replace the battery cover.
5. Snap the pen electronics module into a marker housing (any module can
be used with any marker housing).
6. The LED should flash four times, indicating the pen is working correctly.
Attach the pen tray to the tablet
CAUTION: To avoid damage to the controller, do not rest the
MeetingBoard tablet on the controller housing (located on the rear of the
tablet near one corner). Do not scratch or damage the tablets writing
surface.
1. Snap a tray bracket onto each end of the pen tray.
2. Attach the tray brackets to the bottom rear of the tablet using six Phillips
screws as shown below.
Battery cover
Electronics
module
Marker
MeetingBoard
pen cap
Marker holder
2 37-902755-01
Quick start for InterWrite MeetingBoard
Mount the tablet (choose one method: wall or floor...)
CAUTION: To avoid damage to the controller, do not rest the
MeetingBoard tablet on the controller housing (located on the rear of the
tablet near one corner). Do not scratch or damage the tablets writing
surface.
WARNING: Never nail or drill the MeetingBoard tablet. Doing so will
damage the unit and void your warranty.
IMPORTANT: To avoid damage to the tablet or injury, two people should
carry out this mounting procedure.
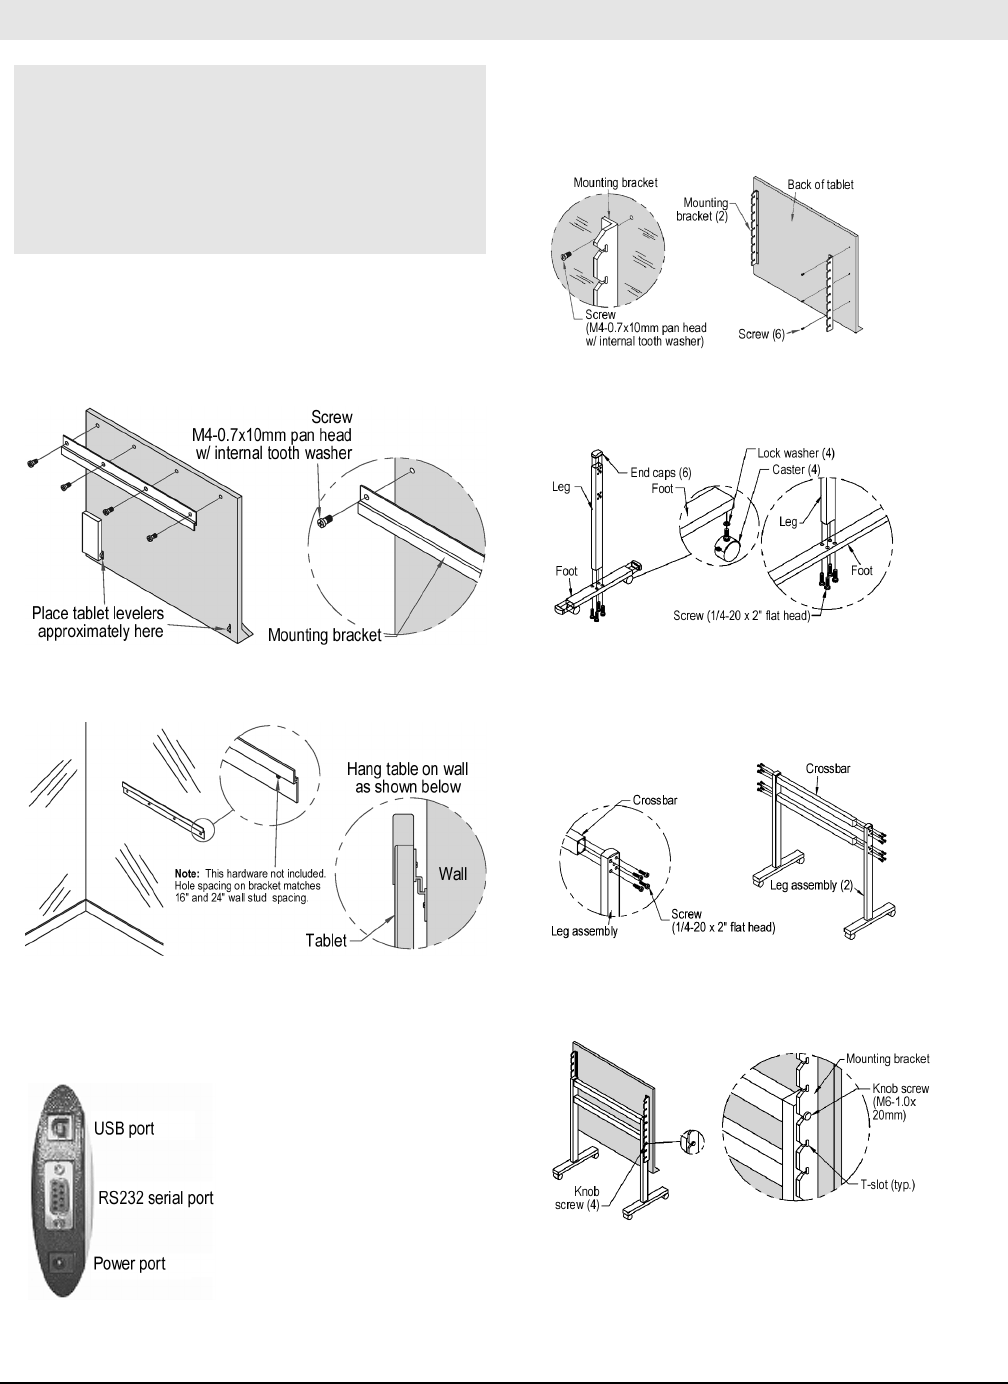
Mount the tablet on a wall
1. Attach one mounting bracket to the back of the MeetingBoard tablet using
4 Phillips screws as shown below.
2. Attach the other mounting bracket to the wall using hardware appropriate
for the wall structure (this hardware is not included) as shown below left.
3. Hang the tablet by interlocking the mounting brackets as shown above
right.
4. Connect the power supply cable to the power port on the MeetingBoard
controller (shown above).
5. Plug the power supply into an electrical outlet.
Mount the tablet on the optional floor stand
1. Attach each mounting bracket to the back of the MeetingBoard tablet us-
ing three Phillips screws as shown below.
2. Attach one foot to one leg with four screws as shown below. Attach two
casters to each foot. Insert three end caps (two on the foot and one on the
leg). Repeat for the other foot and leg.
3. IMPORTANT: In this step, the sides of the legs with 10 holes must face
away from the crossbars.
Attach both crossbars to one leg assembly using eight screws as shown
below. Attach the other leg assembly to the crossbars with eight screws.
4.Thread two thumbscrews into each leg as shown below. Hang the
MeetingBoard tablet at the desired height by sliding the mounting bracket
slots over the loose thumbscrews. Tighten the thumbscrews.
5. Connect the power supply cable to the power port on the MeetingBoard
controller (shown at left).
6. Plug the power supply into an electrical outlet.
3 37-902755-01
Quick start for InterWrite MeetingBoard
Configure for
Color Copyboard Mode
Besides the MeetingBoard, you will need:
n
Color inkjet printer (user-supplied).
n
Std. parallel input/output cable (user-supplied).
Note: MeetingBoard supports three printer
communication formats:
n
Hewlett-Packard PCL3.
n
Epson Stylus Color P2.
n
Canon BJR Color.
Only color inkjet printers using these com-
mand sets work with MeetingBoard.
1. Turn the MeetingBoard OFF using the ON/OFF
switch (located on the lower right side of the
MeetingBoard tablet).
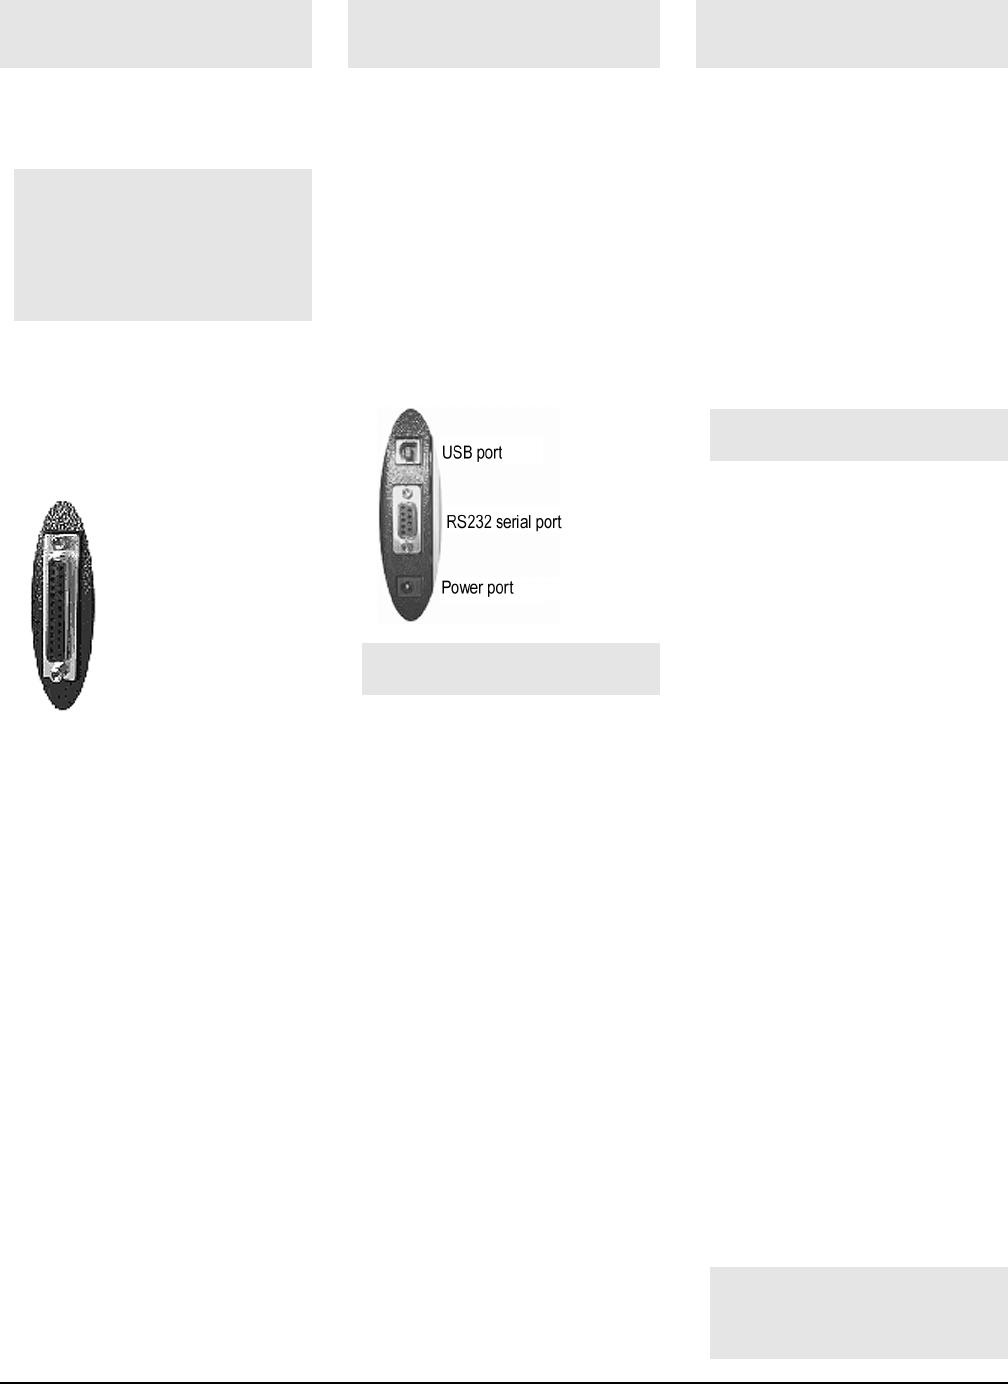
2. Using your printer cable, connect the printer to
the parallel port on the MeetingBoard control-
ler.
3. Turn the printer ON.
4. Turn the MeetingBoard ON. Count the beeps:
n
Four beeps indicates that the MeetingBoard
successfully started and found the printer.
n
More than four beeps indicates that the
MeetingBoard did not find the printer. Check
to assure the printer is ON, is properly con-
nected to the parallel port, and is a printer
supported by MeetingBoard (see list above).
Configure for
PC Whiteboard Mode
Besides the MeetingBoard, you will need:
n
PC (user-supplied) with CD-ROM drive, serial
port and Microsoft Windows 95/98/ME/2000.
n
Standard 9-pin to 9-pin serial input/output cable
or standard USB cable.
1. Turn the MeetingBoard off using the ON/OFF
switch (located on the lower right side of the
MeetingBoard tablet). Shut down the computer
and turn it OFF.
2. Using your USB cable, connect the PC to the
USB port on the MeetingBoard controller.
or
Using your serial cable, connect the PC to the
serial port on the MeetingBoard controller.
CAUTION: DO NOT connect both USB and
serial cables at the same time.
3. Turn the MeetingBoard ON. You should hear
at least four beeps from the MeetingBoard.
4. Turn the computer ON.
5. Install the MeetingBoard driver and InterWrite
software:
a. Insert the MeetingBoard CD-ROM into the
computers CD-ROM drive.
b. Wait for the installation program to launch.
Note: If the installation program does not
start on its own, use Windows Explorer to
locate and launch setup.exe on the CD-ROM.
c. Follow the instructions to install InterWrite and
MeetingBoard drivers for Windows.
d. Remove the CD-ROM.
e.Restart the PC. The MeetingBoard icon
should appear in the Taskbar.
Configure for
Interactive Mode
Besides the MeetingBoard, you will need:
n
PC (user-supplied) with CD-ROM drive, serial
port and Microsoft Windows 95/98/ME/2000.
n
Standard 9-pin to 9-pin serial input/output cable
or standard USB cable.
n
Presentation projector (user-supplied)
1. Turn the MeetingBoard off using the ON/OFF
switch (on the lower right side of the tablet).
Shut down the computer and turn it OFF.
2. Using your USB cable, connect the PC to the
USB port on the MeetingBoard (see left).
or
Using your serial cable, connect the PC to the
serial port on the MeetingBoard (see left).
CAUTION: DO NOT connect both USB and
serial cables at the same time.
3. Turn the MeetingBoard ON. You should hear
at least four beeps from the MeetingBoard.
4. Turn the projector ON.
5. Turn the computer ON.
6. Install the MeetingBoard driver and InterWrite
software:
a. Insert the MeetingBoard CD-ROM into the
computers CD-ROM drive.
b. Wait for the installation program to launch.
Note: If the installation program does not
start on its own, use Windows Explorer to
locate and launch setup.exe on the CD-ROM.
c. Follow the instructions to install InterWrite and
MeetingBoard drivers for Windows.
d. Remove the CD-ROM.
e.Restart the PC. The MeetingBoard icon
should appear in the Taskbar.
7. Aim the projector at the MeetingBoard tablets
writing area, and adjust the projected image to
fit within the writing area. Note: Make certain
the image from the PC is being projected prop-
erly before continuing.
8. On the MeetingBoard control panel, press
InterActive. Tip: You can also start InterWrite
from the PC (Start > Programs > GTCO
CalComp InterWrite > Interactive Mode).
9. When InterWrite Interactive mode starts, it asks
if Calibration is required. Click Yes using the
PCs mouse. Note: Recalibrate whenever you
move the MeetingBoard or projector.
10.As prompted by the software, click each of the
four calibration points using a MeetingBoard
electronic pen.
11. When calibration is complete, the InterWrite
menu will appear.
Tip: To learn more about InterWrite, see:
n
Quick start for InterWrite Software.
n
InterWrite Software on-line help (File > Help
on the InterWrite menu).
4 37-902755-01
Quick start for InterWrite MeetingBoard
Using the electronic pens
Using PC Whiteboard Mode
To do this... Do this...
Start 1. If necessary, turn the MeetingBoard ON, and turn the PC ON. Wait for the PC to display the Windows desktop.
2. On the MeetingBoard control panel, press the PC Whiteboard button. (This activates InterWrite on the PC.)
Note: You can also launch InterWrite through the Start > Programs menu.
Write or draw 1. Remove the cap from a pen, exposing the dry-erase marker tip.
2. Write or draw on the MeetingBoard tablet.
Note: Your marks appear on the PCs screen, within the InterWrite application window.
Erase... both marker ink and corresponding parts of the electronic image: Use the large eraser, or use the small eraser on the
back of the pen.
Erase... electronic image only: On the MeetingBoard control panel, press the Clear button twice. This will not erase the marker
ink. Erase the marker ink with a standard eraser or cloth.
Print an image On the MeetingBoard control panel, press Print, or on the PC, in InterWrite, File > Print.
Save an image On the MeetingBoard control panel, press Save, or on the PC, in InterWrite, File > Save As.
The electronic pens provide multiple functions:
n
By incorporating standard Expo or Pilot dry-erase markers, the pens
can mark directly on the MeetingBoard writing surface.
n
The pens work with InterWrite software to control programs, edit docu-
ments and annotate screens using electronic ink.
n
The pens have buttons that act as mouse buttons.
How you use a pen depends on which MeetingBoard mode you are
using:
n
In Copyboard mode Remove the cap and use the pen as a dry-
erase marker.
n
In PC Whiteboard mode Remove the cap and use the pen as a dry-
erase marker.
n
In Interactive mode Keep the cap in place. Marks you make are
projected onto the MeetingBoard surface as
electronic ink. Use the pen buttons as you
would use mouse buttons (see below).
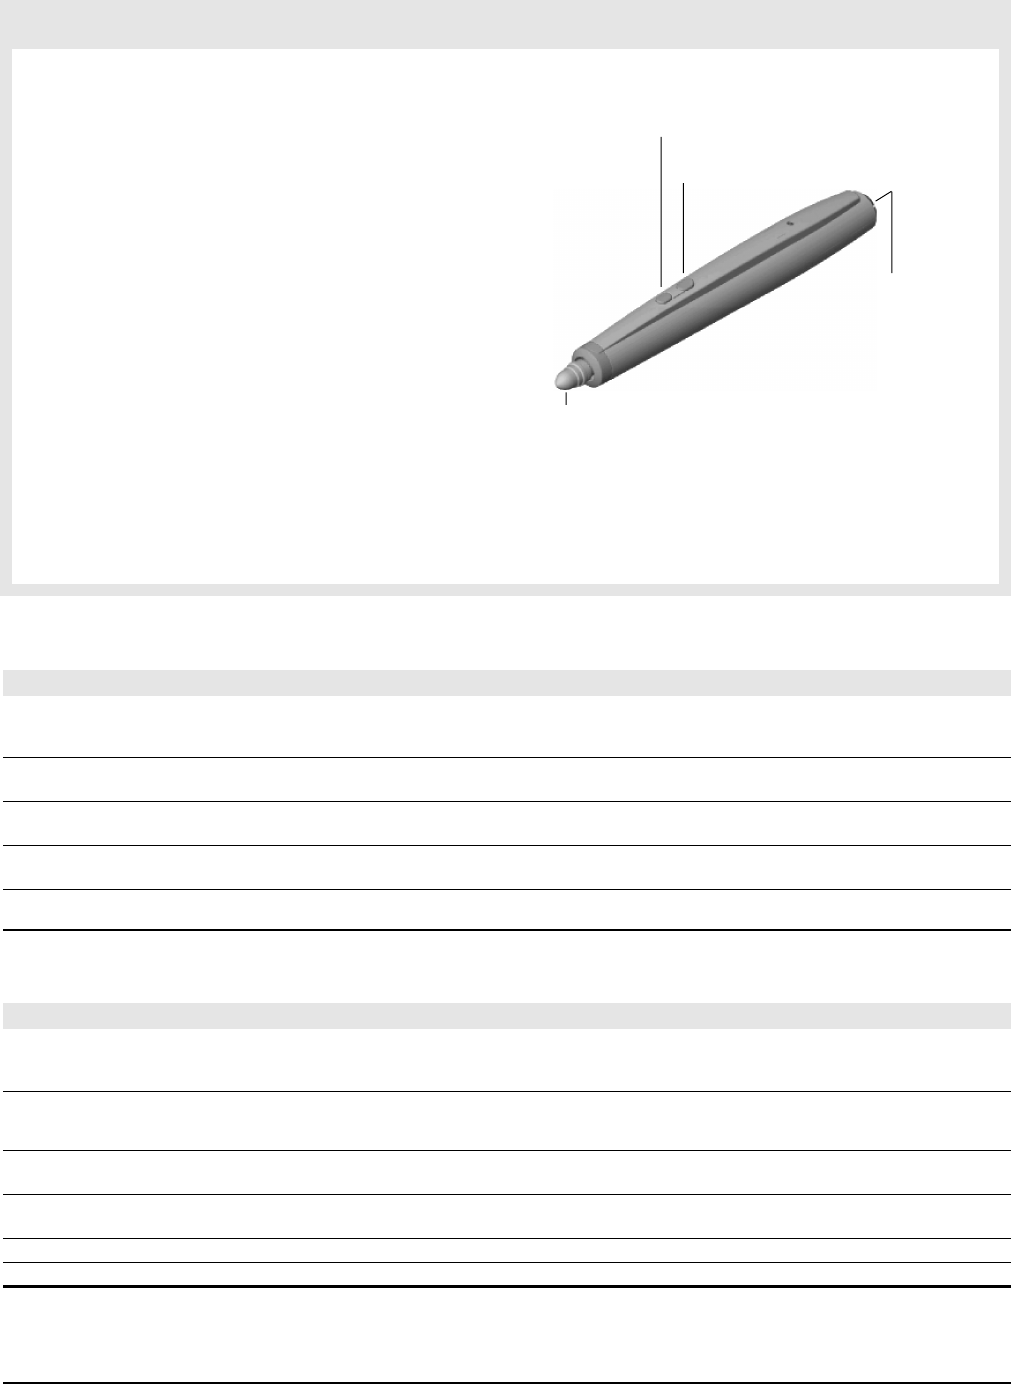
Pen buttons function as mouse buttons in Interactive mode:
n
Lower button (nearest the pen tip): same as a mouses left button.
n
Upper button (farthest from pen tip): same as a mouses right button.
The pen LED lights in the following situations:
n
When the pen is assembled, indicating proper operation. The LED
flashes four times.
n
When the battery is low. The LED flashes periodically until the pen
enters sleep mode.
Using Color Copyboard Mode
To do this... Do this...
Start Color Copyboard Mode 1. On the MeetingBoard control panel, press the Copyboard button.
2. Press the Clear button twice. (This removes previous electronic images from the buffer.)
Tip: Its always good to clear the buffer before starting to use the MeetingBoard. This assures that you are starting with a blank page.
Write or draw 1. Remove the cap from a pen, exposing the dry-erase marker tip.
2. Write or draw on the MeetingBoard tablet.
Erase... both marker ink and corresponding parts of the electronic image: Use the large eraser, or use the small eraser on the
back of the pen.
Erase... electronic image only: On the MeetingBoard control panel, press the Clear button twice. This will not erase the marker
ink. Erase the marker ink with a standard eraser or cloth.
Print an image On the MeetingBoard control panel, press the Print button.
The image will print on the attached printer. You can continue writing/drawing on the MeetingBoard while the image is being printed. The print buffer can store up to three pages.
Sleep mode assures pens operate over the longest time. After 20 sec-
onds of inactivity, a pen automatically enters sleep mode. This enables
its battery to provide several months of service.
Using Interactive Mode See Quick start for InterWrite Software (a printed guide) or the InterWrite Software help file.
Left-double-click button
(same as pressing mouses left button twice)
Right-click button
(same as pressing mouses right button)
Erase annotations
with this end
Tip
(write or draw using electronic ink,
or click: same as pressing mouses left button)