eInstruction RPN Wireless Pen User Manual SBGS4Mac
eInstruction Corporation Wireless Pen SBGS4Mac
Contents
- 1. Users Manual
- 2. Installation Manual
Users Manual

1
GETTING STARTED
for Windows and the Mac

2
We at GTCO CalComp are proud of our InterWriteTM family of prod-
ucts. We strive to continue to bring you the best the technology has
to offer. We urge you to visit our Web site, where we will post the
latest information regarding any updates and changes we have made
that would impact the instructions in this Getting Started document.
www.gtcocalcomp.com
Support/InterWrite/Documentation Library
Support/InterWrite/Software Downloads

3
Table of Contents
Introduction 5
Setup the InterWrite Model 400 Pad 6
The Electronic InterWrite Pen 7
Charging the InterWrite Pad and Pen 7
Attaching the Tether to the Pad and Pen 7
Make the Connection 8
Install the Bluetooth Device on the Computer 9
Install the Bluetooth Software on the PC 9
Install the USB Adapter 9
Install the PC Card 10
Install the InterWrite Software on Windows 11
Install the InterWrite Software on the Mac 12
Connect the Devices 13
Connect the InterWrite Pad on Windows 14
Connect the InterWrite Pad on the Mac 16
Operating the InterWrite Model 400 Pad 18
Operating the Buttons 18
The Sleep/Wake Button 18
The Connect Button 19
The Disconnect Button 19

4
Light and Tone Indicators 20
The Status Lights 20
The Power Status Light 20
The Connection Status Light 20
The Pad Battery Status Light 20
The Pen Battery Charging Status Light 20
Tone Indicators 20
Getting Started with InterWrite 21
Begin an InterWrite Session 21
Pen Selection in Windows 22
Pen Selection on the Mac 23
Pen Selection during a Presentation 23
Presentation Files 24
Distributing Presentation Files 25
Additional GTCO CalComp Resources 25
Limited Warranty for MeetingPad 400 and SchoolPad 400 26
CE Certification for MeetingPad 400 and SchoolPad 400 27
Safety Statements 30
Battery Handling and Precautions 31
APPENDIX

5
The InterWrite Model 400 MeetingPads and SchoolPads are tablet
systems that feature the patented digitizer and pen-input technology
for which GTCO CalComp is famous. InterWrite Pads are used with
the InterWrite software on a PC or a Mac to remotely control the
computer by running applications, opening and editing files, and
annotating captured screen images and pages in a presentation file.
The versatile, interactive Pad allows you to control the presentation
from anywhere in the room. When used in concert with an Inter-
Write Whiteboard, InterWrite Pads provide the ultimate collaborative
system for the Boardroom or the Classroom.
This Getting Started guide describes how to set up your InterWrite
Model 400 Pad and Pen, install the InterWrite software, and establish
a communication connection with the PC or the Mac. It ends with an
overview of the InterWrite software.
The electronic InterWrite Pen, which, when just above (in prox of), or
touching, the surface of a powered-on, connected Pad, controls the
movements of the mouse on the computer. The Pen becomes
a writing and drawing instrument when one of the many InterWrite
Annotation Tools is selected from the projected InterWrite Toolbar.
In Annotation Mode, a user can make notes on a PowerPoint Slide
Show, highlight areas of interest on a spreadsheet, or edit a docu-
ment using a wide range of pen colors and pen widths.
The InterWrite Model 400 Pad runs off batteries that must be
charged prior to setting up communication with the PC or the Mac.
The InterWrite system uses the BluetoothTM wireless technology to
establish communication between the Pad and the computer. Each
Device in the InterWrite system has to have a Bluetooth device
installed through which it communicates with the other InterWrite
Devices in the system. The InterWrite Model 400 Pads come with the
Bluetooth device built into the Pad, so the only installation required
here is the Ezurio USB Adapter or Ezurio PC Card on the computer.
The operation of your InterWrite Pad is facilitated by the InterWrite
software. The software is installed as part of the process of establish-
ing communication between the Pad and the computer and is
covered in this guide. The InterWrite software has three operational
modes: Whiteboard Mode, Interactive Mode and Office Mode
(Windows only). Whiteboard Mode, used only when an InterWrite
Whiteboard is part of the system, makes it possible to easily capture
the notes, drawings and calculations on the Whiteboard for print
and/or electronic distribution.
Interactive Mode, the operational mode used by both InterWrite
Pads and InterWrite Whiteboards, allows you to take advantage of
the full power and robust features of the InterWrite system. An
InterWrite Pad, acting as an input device to the computer, remotely
controls the computer from anywhere in the room. When the
Whiteboard and a video projector are added to the mix, the
computer’s desktop image is projected onto the Whiteboard’s
surface, and the Whiteboard, like the Pad, communicates as an input
device to the computer. In this environment, both the person at the
Whiteboard and users with Pads seated around the room can
interact with the presentation and participate actively in the collabo-
rative experience.
Office Mode makes it possible to interact directly with Microsoft’s
Office suite of products, PowerPoint, Word and Excel. Annotations,
notes and calculations can be added directly to the native application
files in this operational Mode.
The overview presented here of the features and tools of the
InterWrite software will get you started with the InterWrite system.
INTERWRITE MEETINGPAD 400 AND SCHOOLPAD 400
TM
6
Setup the InterWrite Model 400 Pad
The MeetingPad 400 and SchoolPad 400 communicate with the com-
puter using BluetoothTM wireless technology. The Bluetooth communica-
tions device is built into the Model 400 Pads. The Pad communicates with
a Bluetooth device – either an Ezurio USB Adapter, or Ezurio PC Card –
installed on the computer. The Pad runs on Nickel Metal Hydride
batteries, which provide about 40 hours of wireless operation before they
have to be recharged.
The Model 400 package includes the InterWrite Pad (MeetingPad 400, or
SchoolPad 400) and the rechargeable, electronic InterWrite Pen, a Pen
tether, pad charger, and an InterWrite CD. Optional components include
an Ezurio USB Adapter, or Ezurio PC Card, and the Bluetooth CD.
Before you use the Pad and the Pen for the first time, they should be
charged for about three hours, or until the Pad Battery Status Light goes
off. Plug the pad charger into the Power Jack. The Pad Battery Status
Light will flash slowly when the Pad battery is low and needs to be
recharged. The On/Off Power Switch turns on the charged Pad.
The three indented buttons at the top left corner above the Pad Work-
space are the Sleep/Wake Button, the Connect Button, and the Discon-
nect Button. The Sleep/Wake Button is a toggle that puts the Pad into
Sleep Mode, or wakes it from Sleep Mode. The Connect Button wakes
up the Pad, if it is in Sleep Mode, and tries to connect or reconnect a
discovered Pad. The Disconnect Button disconnects the Pad. The
buttons and status lights are described in more detail in the Operating
the InterWrite Model 400 Pad section beginning on page 18.
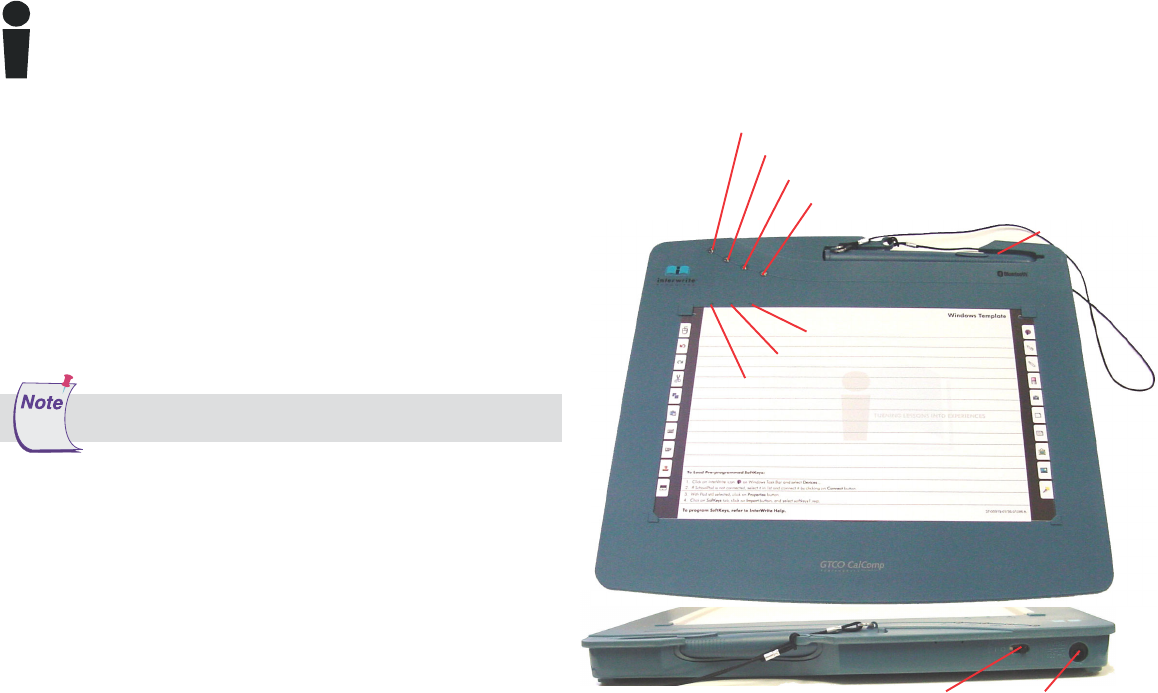
The first thing you should do when you unpack your new
Pad and Pen is charge them.
SchoolPad 400 pictured
Pen Battery Charging Status Light
Connection Status Light
Power Status Light
Pad Battery Status Light
Sleep/Wake Button
Connect Button
Disconnect Button
Pen Tray
Workspace
Charger
Jack
On/Off
Switch

7
Attaching the Tether to the Pad and the Pen
The tether has a loop at each end. One end has a metal ring attached to the
loop – that’s the Pen loop. The other end is the Pad loop.
1Thread the Pad loop up through the hole above the Pen Tray. Thread the
Pen loop through the Pad loop. Pull to tighten.
2Thread the metal ring through the eyelet on the Pen.
Charging the InterWrite Pad and Pen
1Set the InterWrite Pen into the Pen Tray with the Rocker Button facing up.
2Connect the charger’s cable to the Power Jack at the top of the Pad.
3Plug the charger into an AC power outlet.
The Pad can be used while it is charging.
4When the Pad and Pen are charged and the Pad Battery Status Light goes
out, unplug the charger from the Pad.
The Electronic InterWrite Pen
The InterWrite Pen is an input device to the computer. You will use it to control mouse movements on the computer by moving the tip
of the Pen just above (in prox of), or touching, the Pad’s Workspace surface. When the tip of the Pen is in prox of, or on, the Pad’s
Workspace, it simulates the same effects you would see with the left mouse button both in Windows and on the Mac. When the Pen is
in prox, press the Rocker Button nearest the tip to simulate a left mouse button double-click in Windows and on the Mac. Press the
outside Rocker Button (the button farthest from the Pen Tip) to simulate a right mouse button click in Windows and a Ctrl-click on the
Mac. In Windows, hold down the left Rocker Button and touch the Pen Tip to the Pad’s Workspace to erase. On the Mac, with the Pen
Tip already touching the Pad’s surface, hold down the left button to erase.
The Pen goes into Sleep Mode after about two minutes of inactivity to conserve power. Touching the Pen to a surface, or clicking one
of its Rocker Buttons, wakes up the Pen. When the Pen is in prox, the Power Status Light on the Pad will go from flashing to solid
green. When the Pen is out of prox, the Power Status Light goes back to flashing green.
The Pen can be charged only when it is placed in the Pen Tray on the Pad, and the pad charger is plugged into the Pad. A Pen charge
lasts over 40 hours. Always charge the Pen when the Pad is being charged.
Electronic InterWrite Pen
Rocker Button
Pen Tip
Press for:
Right-click – Windows
Ctrl-click – Mac
Press for:
Double-click
(both Windows and Mac)
8
Make the Connection
The InterWrite system employs BluetoothTM wireless technology to
establish wireless communication between the Whiteboards and
Pads in the InterWrite family of products and the computer. A
Bluetooth device must be installed on each component involved in
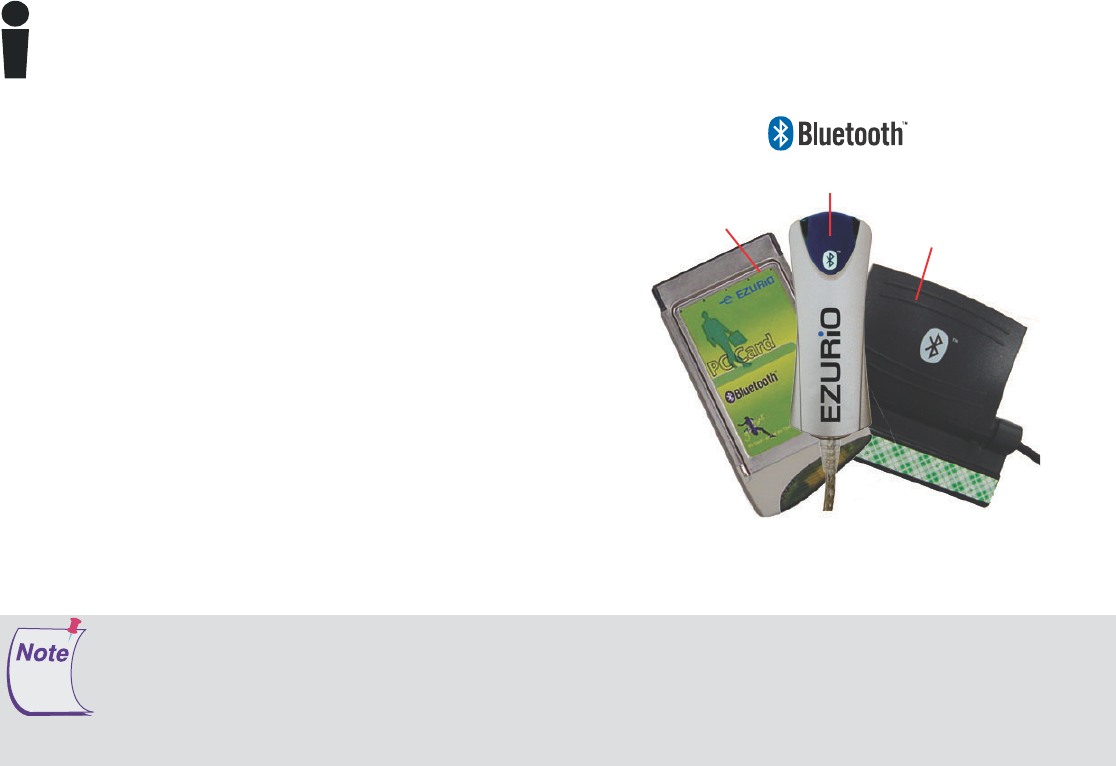
the wireless communication. The BTCOM Module is installed on the
Whiteboard. An Ezurio USB Adapter (or dongle, as it’s commonly
referred to) or Ezurio PC Card is installed on the computer. The
Model 400 Pads have the Bluetooth device built in, so no installation
is necessary. This section of the Getting Started guide describes how
to install the Bluetooth software on the PC—it’s already installed on
the Mac—how to install the Ezurio USB Adapter or PC Card on the
computer, and how to establish communication between the
Bluetooth devices using the InterWrite software.
An InterWrite wireless system that includes an InterWrite Whiteboard
and MeetingPads 400 or SchoolPads 400 uses a single Bluetooth
device through which the InterWrite Devices communicate with the
computer. Up to seven Bluetooth-enabled Devices—Pads and
Whiteboards—can communicate with one USB Adapter or PC Card
on the computer. Only one Ezurio Bluetooth device (USB Adapter or
PC Card) should be installed on the computer at any time.
InterWrite Model 100 Pads are the only Pads that have a cable that connects the Pad to the computer. InterWrite Model 300,
310 and 400 Pads are wireless. You can have a mix of wired and wireless InterWrite Pads and Whiteboards communicating
with the computer.
InterWrite 5.0 for Windows and later versions of the InterWrite software require TDK Bluetooth drivers version 1.4.2.10, or
later, in order to operate using Bluetooth wireless communication. Older versions of Bluetooth must be uninstalled before
installing the new drivers. Updated Bluetooth drivers are available on www.gtcocalcomp.com.
Bluetooth
Devices
Ezurio PC
Card
Ezurio USB Adapter
BTCOM Module

9
Install the Bluetooth Device on the Computer
Install the Bluetooth Software on the PC
For a Windows installation, login as Administrator, insert the Bluetooth
Software CD in your PC CD-ROM drive, select the Install Bluetooth Software
option from the menu, and follow the instructions on the installation screens.
Install the USB Adapter
1Insert the USB Connector into one of the USB ports on your computer. It
cannot be plugged into a keyboard USB port on the Mac. The operating system will
auto-detect and configure the new hardware device.
2Use one of the two Holders that came with your Bluetooth Comm Kit to attach the
USB Adapter to your computer. Remove the paper backing from the Holder and
attach it to the side of your monitor, or to the lid of your laptop. Slots on the back of
the Adapter casing will slide into the channels on the Holder.
Do not install the USB Adapter behind metal enclosures, as this will limit
performance. Metal serves as a shield and reduces the signal strength. Mount the
Adapter so the top of the unit is positioned above the computer or monitor case. A
5’ USB cable extender can be used when additional length is needed to mount the
USB Adapter away from metal or other enclosures.
Windows: The Bluetooth software must be installed on your Windows PC before you install the
Bluetooth Device, whether it is the Ezurio USB Adapter, or the Ezurio PC Card. Install
on Windows 98, Me, 2000, or XP, only.
Mac: The InterWrite system is compatible with the Mac OS X version 10.2.5 or above
installation of the Bluetooth software for wireless communication.
Ezurio USB Adapter
Adapter Holder

10
The Adapter-to-USB-port and software installation must be performed by a
user with Administrator privileges. If the configuration is changed, that is, if
the Adapter is moved to another USB port on the computer, or if a
different USB Adapter is installed in the USB port on that computer, the
process must be managed by the Admin.
Install the Bluetooth Device on the Computer
Ezurio PC
Card
Install the PC Card
1Insert the PC Card into the PCMCIA slot in your computer. The
operating system will auto-detect and configure the new
hardware device. (Typically, the PC Card is installed in a
notebook computer.)
If your computer has multiple USB ports, or multiple
PCMCIA card slots, the USB Adapter or PC Card
should be installed in each of the ports or slots at this
time. Then, if the USB Adapter, or PC Card, is moved,
all the ports and slots will have been properly config-
ured for that USB Adapter or PC Card.
11
Install the InterWrite Software on Windows
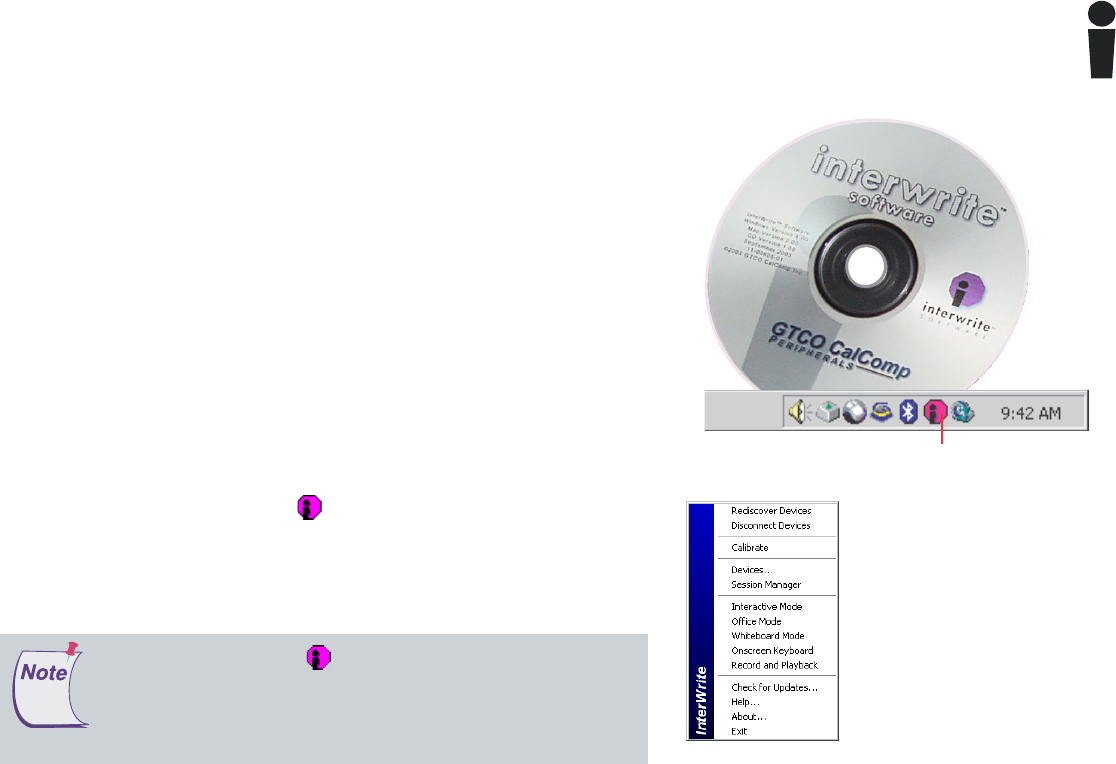
InterWrite icon
The appearance of the InterWrite icon on the Task Bar indicates that the
InterWrite Device Manager is now running on your PC. You will click on the
InterWrite icon to display the options on the Device Manager Menu shown here.
Device Manager, in addition to managing the InterWrite hardware devices, provides
direct access to the three operational modes of the InterWrite software.
Click the InterWrite icon in the System Tray of the Windows
Task Bar to display the Device Manager Menu. Select the Check
for Updates option. If a new version of the InterWrite software is
available, download it now. You should periodically check for
updates.
The InterWrite software must be installed on Windows by a user with Administrator
privileges. InterWrite is compatible with Windows 95 (serial only), 98, Me, NT (serial
only), 2000, and XP.
1Log in as Administrator. Insert the InterWrite software CD into the CD drive on
your PC. The installer will autoload. If it doesn’t, click on the Start button on the
Windows Task Bar and select Run from the menu. Type X:\setup.exe (X
represents the CD drive letter).
2Select the Install InterWrite Software menu option.
3Follow the onscreen instructions for the software installation. You will know the
InterWrite software has installed successfully by the appearance of the
InterWrite icon in the System Tray on the Windows Task Bar. If the icon does
not appear, restart your computer.
12
Install the InterWrite Software on the Mac
The InterWrite software must be installed on the Mac by a user with Admin
privileges. InterWrite is compatible with Mac OS X version 10.2.5 or higher.
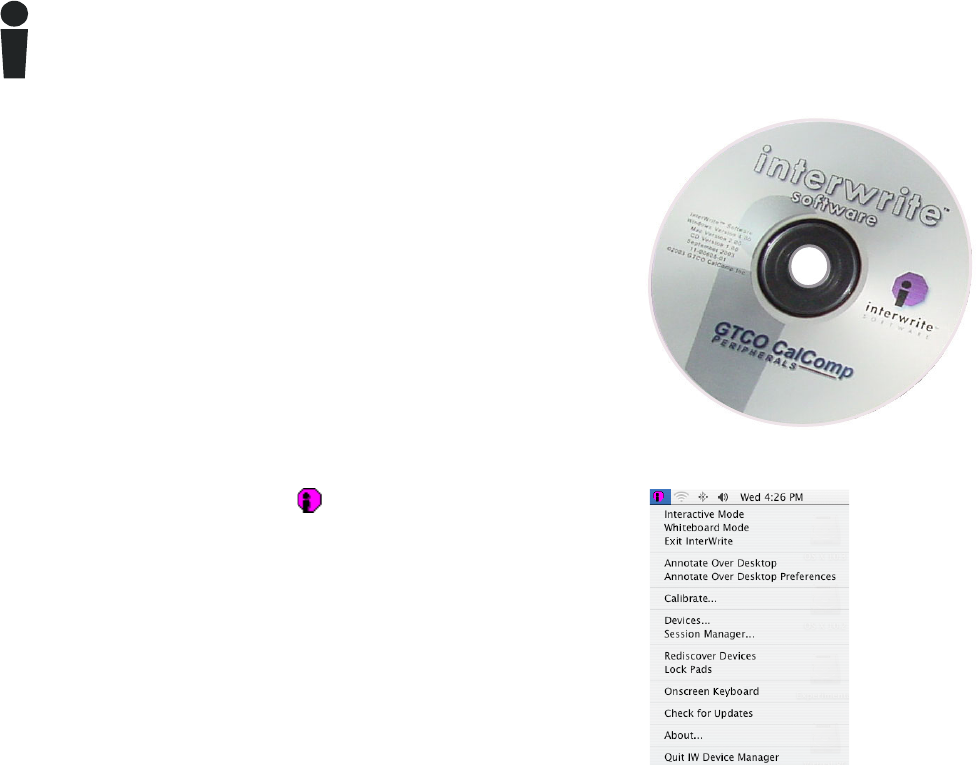
1Insert the InterWrite software CD into the CD-ROM drive on your Mac.
An InterWrite CD icon will appear on your desktop.
2Double-click on the InterWrite icon on the desktop to display the CD’s
contents. Double-click on the Install InterWrite icon.
3Follow the onscreen instructions for the software installation.
The appearance of the InterWrite icon on the Menubar indicates that the
InterWrite Device Manager is now running on your Mac. It will load and run
in the background every time you start up your Mac. You will click on the
InterWrite icon to display the options on the Device Manager Menu, shown
here. Device Manager, in addition to managing the InterWrite hardware
devices, provides direct access to the two operational modes of the
InterWrite software.

13
Connect the Devices
The InterWrite software component Device Manager is the driver for the
InterWrite Devices, Whiteboards, Pads and the iPanel. Device Manager is
loaded when the InterWrite software is successfully installed on the
computer. It automatically detects cabled InterWrite Whiteboards and
Pads and the iPanel. However, the wireless InterWrite Devices, such as
your new Model 400 Pad, need to be discovered – and, in the case of the
Mac, to select a Service – before the communication connection is
complete.
The following sections describe how to connect wireless InterWrite
devices, first on Windows, then on the Mac.
Once the InterWrite Devices are connected, a user with Administrator
privileges will need to enter the Software Authorization code described on
page 21 to complete the Windows install.
14
Connect the InterWrite Pad on Windows
The last step in setting up wireless communications between your Bluetooth devices
on the Pad and your PC is performed by Device Manager. Make sure the Pad is
powered on.
1Click on the InterWrite icon in the System Tray on the Windows Task Bar to
display the Device Manager menu.
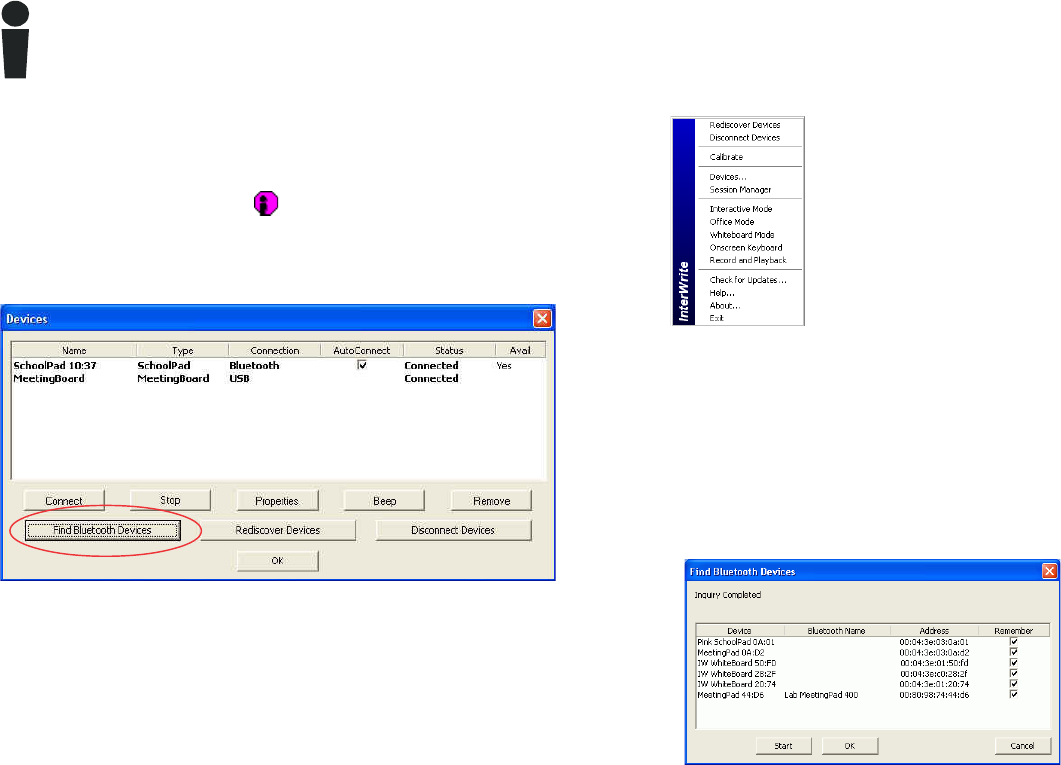
2Select the Devices... menu option.
The Devices dialog box is displayed.
3Click on the Find Bluetooth Devices button.
A search inquiry for all Bluetooth Devices will begin automatically.
When the inquiry is completed, all Devices discovered during the search will be listed
in the Find Bluetooth Devices dialog.
4Click on the Remember checkbox next to each discovered Device you want to
see added to the Devices List Window.
5Click OK to return to the Devices dialog.
15
Each discovered device is identified in the Devices dialog by its Name, Type, Connection,
Status, Availability, and whether AutoConnect is enabled. The Properties feature allows
you to give a connected InterWrite Device the Name shown in the Devices List Window
(the Model 400 Pad is given an additional Bluetooth Name) and to program its SoftKeys.
AutoConnect is a property unique to Bluetooth-enabled InterWrite Devices. When
AutoConnect is enabled, the computer will scan continuously for this and other active,
AutoConnect-enabled Bluetooth Devices and attempt to connect them. Scanning stops
once a Device is detected and connected. Therefore, if you are connecting multiple
Devices, make sure they are all powered on, so all of the Devices will be detected by the
scan. The Status property will tell you whether the connection succeeded or failed. The
Availability option indicates that a discovered Device is available for connection.
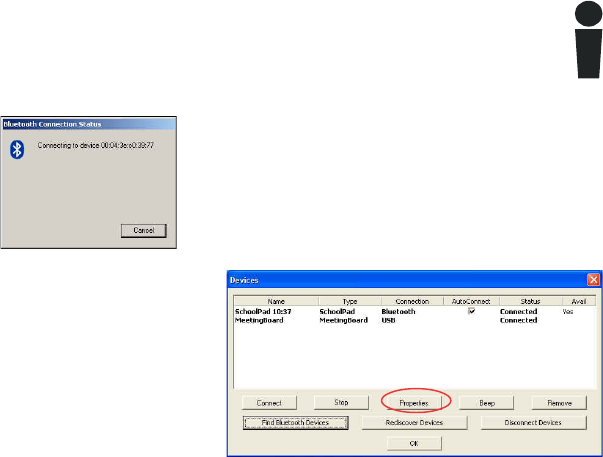
As soon as the Devices dialog is displayed, Device Manager
begins trying to connect to the Remembered Devices.
Once connected, your InterWrite Model 400 Pad is available as a system pointing device.
Your computer mouse can still be used as a pointing device.
6If you want the Pad to AutoConnect when it is powered on, click on the
AutoConnect checkbox.
7Select your new Pad in the Devices List Window and click on the Properties button.
Give the Pad a Name. This Name is stored in the InterWrite software on this
computer and will identify the Pad on this computer.
8Give the Pad a Bluetooth Name. The Bluetooth Name is stored in the Pad’s firmware
and will identify this Pad on any installation of InterWrite.
16
Connect the InterWrite Pad on the Mac
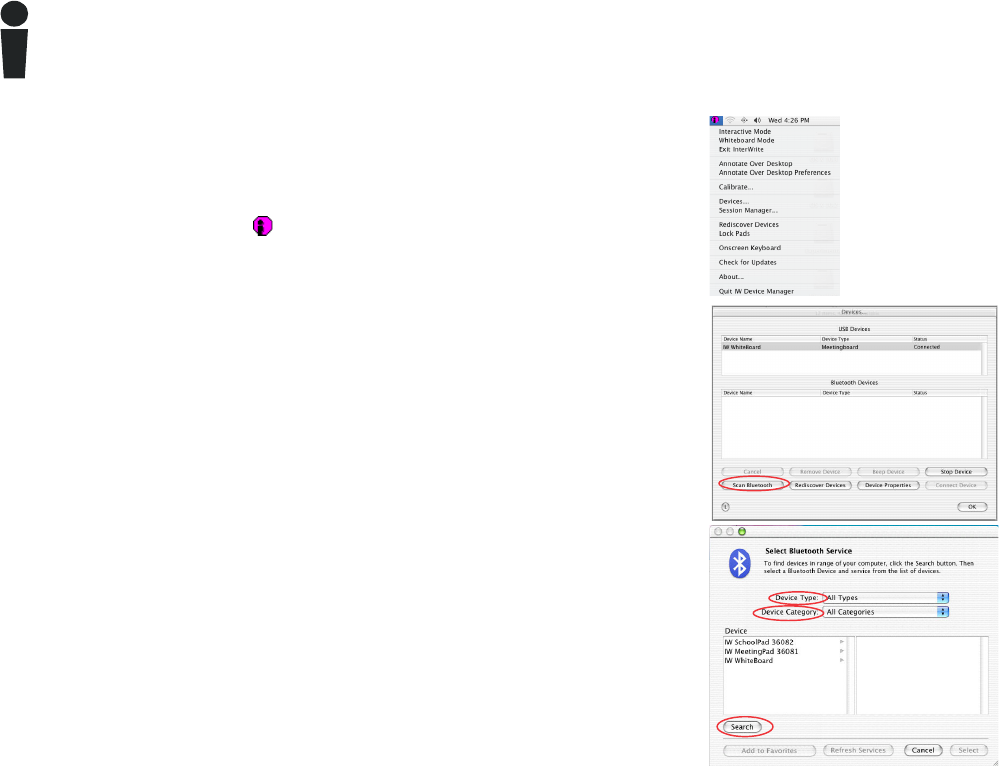
2Select the Devices... menu option.
The Devices dialog box is displayed.
The last step in setting up wireless communications between your
Bluetooth InterWrite Devices is performed by Device Manager. Make sure
the Pad is powered on.
3Click on the Scan Bluetooth button.
The Select Bluetooth Device dialog box is displayed.
4Make sure the Device Type is set to Input Devices and the Device
Category is set to Discovered Devices.
5Click on the Search button.
1Click on the InterWrite icon on the Mac Menubar to display the
Device Manager Menu.
Every active Whiteboard and Pad running Bluetooth should be discovered
and listed in the left column of the BT Services dialog box.
17
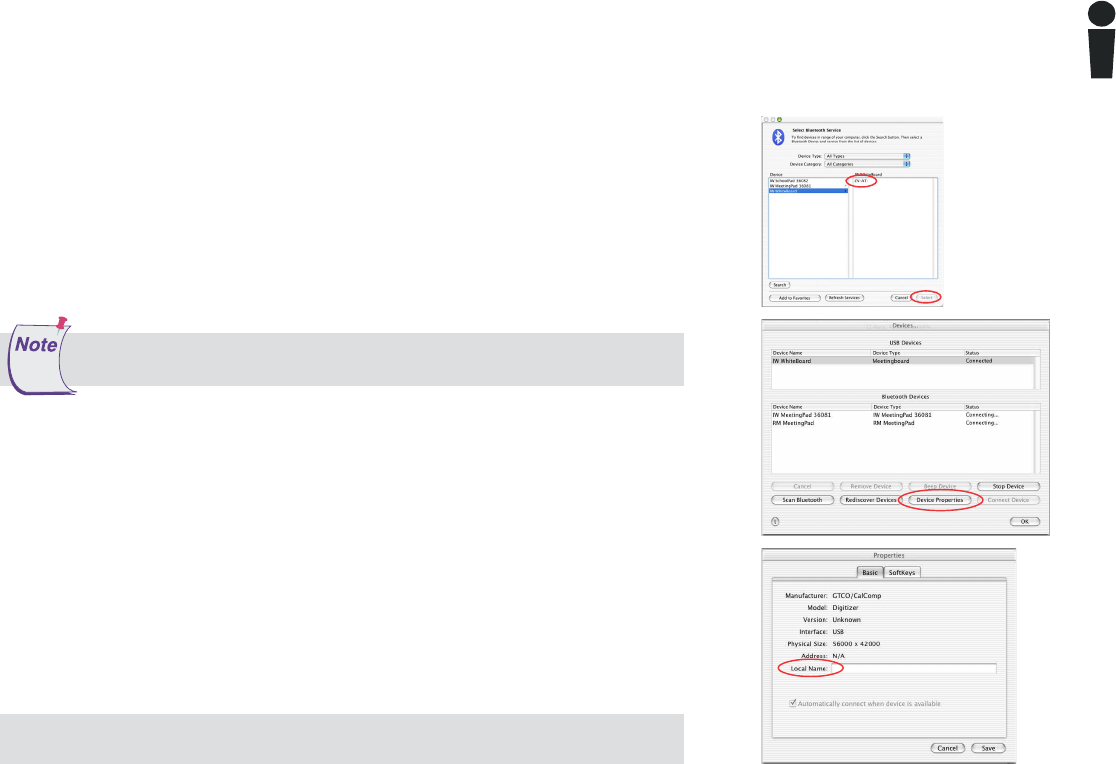
The Pad is now listed in the Bluetooth Devices section of the Devices dialog with Status
Connected. By default, the Pad will automatically reconnect in the future. If you want to
change that, select the Pad, click on the Device Properties button and clear the Auto-
matically connect when device is available checkbox.
If you turn off the Pad and power it on during the current session, Device Manager will
detect that it has gone away and will change its status to Disconnected. Click on the
Connect Device button to reconnect.
The Bluetooth dialog box goes away. The Pad beeps once when it is connected.
6Click on the device in the left column. A Service is displayed in the right column. All
Whiteboards and Pads will use the ZV-AT Service.
7Click on the Service in the right column.
8Click on the Select button.
Tip: Give each InterWrite device a Local Name, so it will be distinguishable in the
Bluetooth Devices list box.
If the device doesn’t connect, repeat the process—click on the Device, click
on the Service, click on the Select button.

18
Operating the InterWrite Model 400 Pad
The InterWrite Pad provides the freedom to interact with a projected
presentation from anywhere in the room. You can write annotations
and run applications remotely, giving you the opportunity to engage
others and encourage participation.
You use the electronic Pen on the Pad’s Workspace, the area defined
by the Pad Insert, to move the mouse cursor on the projected image,
to select and use InterWrite tools, and to click on the programmable
SoftKeys indicated on the Pad Insert. The Pen is also used to press
the indented buttons just above the Workspace.
Operating the Buttons
To operate any of the three buttons, hold the Pen vertically, touch
the Pen tip to the button and hold for several seconds.
The Sleep/Wake Button
The Sleep/Wake Button allows you to put the Pad into Sleep Mode
at any time. Sleep Mode conserves the battery charge. The Pad drops
the connection and goes into an energy-saving standby mode. The
Pad will automatically go into Sleep Mode after from a half hour to
an hour of inactivity. This button is also used to wake up the Pad
from Sleep Mode, returning it to full operating power.
SchoolPad 400 pictured
Pen Battery Charging Status Light
Connection Status Light
Power Status Light
Pad Battery Status Light
Sleep/Wake Button
Connect Button
Disconnect Button
Pen Tray
Workspace
Charger
Jack
On/Off
Switch

19
The Connect Button
The Connect Button wakes up a Pad that is in Sleep Mode and
attempts to connect, or reconnect, the powered-on, discovered Pad.
How it Works in Windows
The Pad is discovered when the signal sent from the Bluetooth
device installed on the computer is answered by the Pad. An
exchange of device addresses takes place. Device Manager displays
the Pad’s address in the Pad’s Properties profile. The Pad stores the
computer’s Bluetooth address. The computer – or more accurately,
the Bluetooth device on the computer – and the Pad are now
linked. If the Pad becomes disconnected, or is powered off, pressing
the Connect button on the Pad will turn it on and reconnect it to the
computer with the Bluetooth device that discovered it.
If you were to take the Pad to another location, say another
classroom, where a different computer and Bluetooth device are set
up, your Pad would not be able to communicate with the second
computer until the second computer discovered the Pad. The
AutoConnect setting for your Pad determines whether your Pad
stays linked to the first computer, or whether it becomes linked to
the second computer. A link between the Bluetooth devices on
computer and Pad occurs only when the AutoConnect option for
the Pad is checked. That’s when the computer’s Bluetooth device
address is stored as the Host Address on the Pad and the link is
created.
If you wanted to establish a new link between your Pad and the
second computer, check the AutoConnect setting. The second
computer’s Bluetooth device address will overwrite the value
currently stored in the Host Address field on the Pad. However, if
you want to retain the link between your Pad and the first computer,
keep the AutoConnect setting unchecked. In this way, the connec-
tion to the second computer is a temporary one, for this session
only. If the Pad becomes disconnected, it must be connected by
clicking on the Connect button to be able to continue to communi-
cate in the current session.
How it Works on the Mac
The Pad is discovered when the signal sent from the Bluetooth
device installed on the Mac is answered by the Pad’s Bluetooth
device. An exchange of device addresses takes place. Device
Manager displays the Pad’s address in the Pad’s Properties profile.
The Pad’s Bluetooth device stores the Mac’s Bluetooth address. The
Mac – or more correctly, the Bluetooth device on the Mac – and the
Pad are now linked. If the Pad becomes disconnected, is powered
off, or is asleep (in Sleep Mode), pressing the Connect button on the
Pad will turn it on and reconnect it to the Mac that discovered it.
If you were to take your Pad to another location with a different
computer and Bluetooth device, it would not be able to link to this
new computer. It has to be discovered by the new computer. Be
aware, though, that when your Pad is discovered by the second
computer, it will lose its link to the first computer.
The Disconnect Button
The Disconnect Button breaks the connection between the Pad and
the computer. It does not put the Pad into Sleep Mode, nor does it
power-off the Pad.

20
Light and Tone Indicators
The Status Lights
The four Status Lights across the top of the Pad to the left of the
Pen Tray indicate the status of various aspects of Pad operation.
The Power Status Light
The green Power Status Light, the status light on the far left, flashes
when the Pad is on and the electronic Pen is not in prox (just above
the Pad’s Workspace surface). It is solid green when the Pen (or
another GTCO CalComp pointing device) is in prox or touching the
Pad’s Workspace surface. When the Pad is powered off or in Sleep
Mode, the Power Status Light is off.
The Connection Status Light
The Connection Status Light flashes when the Pad connects,
disconnects, or beeps. Otherwise, it is not on.
The Pad Battery Status Light
The Pad Battery Status Light is on while the Pad is charging. It
turns off when the Pad is fully charged and remains off during
normal Pad operation. When the Pad battery is low and needs to
be recharged, the Pad Battery Status Light will slowly flash.
The Pen Battery Charging Status Light
The Pen should always be charged when the Pad is being charged.
The Pen Battery Charging Status Light will be on only when the
pad charger is plugged into the Pad, and the Pen is properly seated
– Rocker Button facing up – in the Pen Tray. The Pen Battery
Charging Status Light turns off when the Pen is fully charged, or the
pad charger has been disconnected from the Pad.
Tone Indicators
The Pad emits four high frequency beeps when it powers on. When
it connects with the computer, you will hear a rising tone. When it
goes into Sleep Mode or disconnects, you will hear a descending
tone.
When you press the Connect Button to reconnect your Pad, you
will hear a clicking tone until the connection link either succeeds,
which is indicated by the rising Connect tone, or fails, which is
indicated by the low frequency Error tone. If the Pad is already
linked to a computer and you press the Connect Button, you will
hear one high frequency beep. During charging, if the Pen is
positioned incorrectly in the Pen Tray, a long, continuous tone will
sound until the Pen is properly positioned.
You will hear a click when you touch a SoftKey with the Pen and
the Connection Status Light will flash. If you program a SoftKey to
beep, you will hear the beep when the function assigned to the
SoftKey is executed.

21
Getting Started with InterWrite
The InterWrite system is at the heart of a successful interactive
collaboration, whether it is in a classroom of fourth graders studying
world geography, or in a boardroom of corporate executives brain-
storming a new product launch. All the tools you will need to stimulate
inspiration, connection and participation can be found in the Inter-
Write software. Here’s a quick look at the InterWrite basics to get you
started.
The InterWrite software is run in one of three operational modes,
Interactive Mode, Office Mode (Windows only), or Whiteboard
Mode. Whiteboard Mode, available only when using a Whiteboard
with InterWrite, allows you to capture and preserve notes, drawings,
calculations—whatever you write on the Whiteboard with an electronic
InterWrite Marker Pen. Office Mode makes it possible to interact
directly with the native files of the Microsoft Office suite of products,
PowerPoint, Word and Excel. Interactive Mode, the more feature-rich
and robust of the operational modes, allows you to open and run
applications (Mouse Mode) by using your electronic InterWrite Pen to
move the cursor on the projected image. In Annotation Mode you use
the Pen to select InterWrite Tools. InterWrite Tools have been
categorized as Annotation Tools, Editing Tools, Page Creation/
Management Tools, Presentation Tools, File Management Tools, and
Miscellaneous Tools. The online InterWrite Help file describes all these
tools in detail. It can be accessed from the Device Manager Menu.
The purpose of this document is to give you a feel for the InterWrite
system by showing you how to use one tool in Interactive Mode. The
Annotation Tools of Interactive Mode consist of freehand tools, text
tools and drawing tools. Of the freehand tools, the Pen tool is the most
frequently used InterWrite Tool. The following pages describe how to
select and configure the Pen tool.
Begin an InterWrite Session
1When you are ready to begin an InterWrite session, turn on your Pad. The Pad must be active and
connected. You can verify this in Session Manager, a Device Manager Menu option.
2You can start InterWrite in Interactive Mode in two different ways:
Use your electronic Pen to click on the Launch InterWrite SoftKey icon on the Pad Insert.
– OR –
Use your electronic Pen on the Pad’s Workspace to guide the mouse cursor on the projected
image to the InterWrite icon on the Windows Task Bar or the Mac’s Menubar, and click on
it to display the Device Manager Menu. Select Interactive Mode from the menu.
Windows Admin: The first time you select Interactive Mode in Windows, you will be prompted to enter the Software
Authorization Code found on the Software License Certificate in the Accessory Kit that shipped with your Pad.

22
Pen Selection in Windows
The Windows InterWrite Toolbar is displayed, by default, along the
right side of the projected desktop image. You can drag it to the left
side of the desktop, or position it at the top or bottom.
You will note that a Down Arrow appears adjacent to many of the
InterWrite tools. Click on the Down Arrow adjacent to the tool, or
select the tool from the Toolbar and right-click in the Annotation
Window to display the tool’s Tools Settings dialog. All of the
attributes that can be assigned to that particular tool will appear in
the dialog. The Pen tool Tool Settings dialog is displayed here.
Select one of the Pen tools from the Toolbar. InterWrite will go into
Annotation Mode and the current screen will be captured as an
image page. If it is not already open, display the Tool Settings dialog
as described above. The current selections for the tool are indicated.
The Pen tool can be configured for color, line width and pen shape.
Pen shape allows you to draw or write freehand (default selection);
draw lines—straight or with angles, with or without arrows; draw
rectangles—filled or outline, with rounded or square corners; or draw
circles (ellipses)—filled or outline. The Pen with the T over it allows
you to write freehand text, which is converted automatically to typed
text. The Tool Settings dialog is persistent, a convenient feature when
you need to change the Pen tool attributes frequently. Right-click to
display the Drawing Tools palette, another persistent dialog from
which you can readily choose different Annotation Tools as you need
them. The best way to familiarize yourself with all the Annotation
Tools and their Tool Settings is to experiment with them. Have fun!
Pen Tool Settings dialog
and
Drawing Tools dialog
Windows Toolbar
23
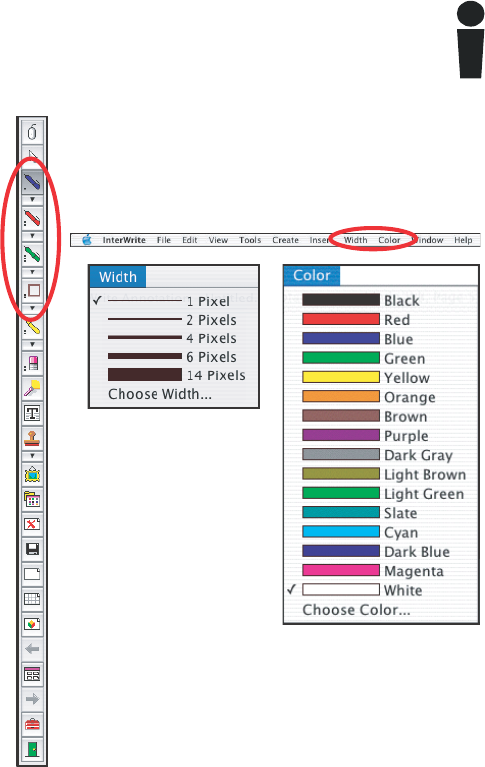
Pen Selection on the Mac
When you open InterWrite in Interactive Mode, it automatically starts up in
Annotation Mode and a blank page is displayed. The InterWrite Toolbar is
displayed, by default, along the right side of the projected desktop image.
Four different Pen tools can be configured on the Toolbar, including the
shape-drawing Pen. Each of these Annotation Tools can be configured for
color and line width either by making selections from the Width and Color
menus on the Menubar, or by clicking on the Down Arrow adjacent to the
tool to display the tool configuration menu. The current configuration
selections for each Annotation Tool are displayed on the icons.
Using your electronic InterWrite Pen, select one of the Pen tools from the
Toolbar and write or draw something in the Annotation Window. Change
the Pen color and/or line width to see how these changes affect the
appearance of your annotations on the screen. The best way to familiarize
yourself with the Pen configuration options and all the InterWrite tools is to
experiment with them.
Pen Selection during a Presentation
The Pen tool selection and configuration processes vary slightly on the
Mac and the PC, but their use during a presentation is identical. Some
users prefer to assign a different color and line width to each of the four
Pen tools. As they present their material, they can easily switch from one
Pen to the other to use the different assigned effects. Other users prefer to
keep one Pen selected and change its color and line width on the fly, as
the presentation warrants. As you become more familiar with the Inter-
Write Annotation Tools, you will find the method that best suits your
presentation style.
Mac Menubar
Mac Toolbar

24
Presentation Files
Each annotated screen capture represents a page in the presentation file. The Page
Creation tools are used to add additional pages to the presentation file. The
presentation file is automatically saved in a .GWB file.
As soon as InterWrite goes into Annotation Mode (in Windows—when an Annota-
tion Tool is selected; on the Mac—when Interactive Mode is started up), an untitled
presentation file is created. Unless you give the file a name, it is automatically saved
using today’s date. (Multiple files created today have 01, 02, 03, etc., appended to
the date name.)
An existing presentation file can be opened, its pages can be sorted, annotations
can be added to the existing pages, and new pages can be added to the file. Your
presentation will determine how each presentation file evolves. For example, you
can prepare a presentation file of blank maps ahead of time for a geography lesson.
Or, you can capture and annotate each of the monthly earnings spreadsheets as you
review the past fiscal year during a budget meeting. Or, you can run a PowerPoint
Slide Show in Office Mode (Windows only) and annotations can be added to each
slide and saved in the native file.
You can build your presentation file during your presentation, or you can pre-build
it, including the screen captures, images, graphs and text pages you want to present.
However you choose to do it, the process is the same. To capture a screen or
window, click on the Mouse Mode tool with your electronic Pen and arrange the
desktop for capture. Select an Annotation Tool, a Pen, for example, indicate your
capture preference (by clicking on either the Full Screen, Partial Screen, or Window
option in the dialog), and annotate the captured image. Use the Page Creation
Tools to add a blank, gridded, or background image page. By default, InterWrite is
in Autosave mode, so your annotated pages are automatically saved as you build
your presentation file. Click on the Save tool to save the file using the default
filename (today’s date), or a name you type on the pop-up IW Keyboard.
Mac
Toolbar Mouse
Mode
Pen
Tools
Highlighter
Eraser
Mac Save
Page
Creation
Tools
Page Sorter
Windows
Save
Windows
Toolbar
Start PRS

25
Distributing Presentation Files
The InterWrite presentation files you create can be printed for local
distribution, or emailed to anyone, anywhere.
Use the Page Sorter tool to review the presentation file. The pages
in the presentation file can be sorted, moved, copied, and deleted
in Page Sorter. When the file pages have been arranged to your
satisfaction, you can use the Page Sorter’s print option to print it,
you can export it to one of several file formats, or you can email it
directly from Page Sorter.
The native file format of saved presentation files has the .GWB
extension and can be viewed in Windows with the GWB InterWrite
Reader. This is an application that is part of the InterWrite software
suite and is installed when the InterWrite software is installed on
the Windows operating system. The InterWrite Reader is also
available for download at www.gtcocalcomp.com in the InterWrite
Interactive Products section, under the Support tab. Click on any
of the products to display the Technical Support section, where
you can access Software Downloads for your specific operating
system. InterWrite Reader can be distributed freely with your
presentation files. You can also save your presentation files in a
PDF format, which can be read by Adobe’s Acrobat Reader, and
you can export your presentation files to a variety of graphics and
HTML formats.
Now, everyone can stay in the information loop, whether they
were able to attend the presentation or not.
Additional GTCO CalComp Resources
We invite you to visit the GTCO CalComp Web site at
www.gtcocalcomp.com, where we have provided a variety of
resources to help make your InterWrite experience more reward-
ing. We especially encourage you to visit www.gtcocalcomp.com/
support_interwrite.htm and www.gtcocalcomp.com/erc/
index.htm.
What is PRS?
InterWrite PRS is an Audience Response System—a comprehensive
response system for electronically testing, polling, and surveying a
group of people. It can be used in conjunction with InterWrite to
take a survey of the audience response to the presentation, or to
test the level of comprehension after a lesson presentation, for
example. Learn more about PRS by visiting our Web site.

26
Limited Warranty for MeetingPad 400 and SchoolPad 400
2. Ship the product to GTCO CalComp with the RMA# marked clearly on the outside of the box.
GTCO CalComp reserves the right to refuse the shipment, if not properly marked.
3. Although the consumer must pay any shipping charges to ship the product to GTCO
CalComp for warranty service, GTCO CalComp will pay the return shipping charges for
ground shipment. Other shipping options are available at an additional fee.
4. Whenever warranty service is required, the original dated sales invoice (or a copy) must be
presented as proof of warranty coverage, and should be included in shipment of the product.
In addition, please include your name, address, telephone number, fax number, email address,
and a description of the problem.
5. If GTCO CalComp determines that the unit is not defective within the terms of the warranty,
the consumer shall pay the cost of all freight charges, as well as any repair charges.
Technical Support
Web-based Technical Support is available free of charge at: www.gtcocalcomp.com, where current driver
releases, as well as comprehensive technical support, troubleshooting, Technical Bulletins and FAQs can
be found.
Telephone Technical Support is available free of charge to the original consumer for a period of 90 days
from the date of purchase of the product. Please contact our Service & Support Department at (410)
312-9221 (EST), or (480) 443-2214 (MST). You can also fax your request to (410) 290-9065 (EST), or
(480) 948-5508 (MST). Our toll-free numbers in the U.S. are: 800-344-4723 for our East Coast customers
and 800-856-0732 for our West Coast customers.
Disclaimer of Unstated Warranties
The warranty printed above is the only warranty applicable to this purchase. ALL OTHER WARRANTIES,
EXPRESSED OR IMPLIED, INCLUDING, BUT NOT LIMITED TO, THE IMPLIED WARRANTIES OF
MERCHANTABILITY AND FITNESS FOR A PARTICULAR PURPOSE ARE DISCLAIMED. Assuming the
warranty above stated is otherwise applicable, it is expressly understood and agreed that GTCO
CalComp’s sole liability, whether in contract, tort, under any warranty, in negligence, or otherwise, shall
be for the repair or replacement of the defective parts, and under no circumstances shall GTCO
CalComp be liable for special, indirect, or consequential damages. The price stated and paid for the
equipment is a consideration in limiting GTCO CalComp’s liability.
Notice
Some states and provinces do not allow the exclusion or limitation of incidental or consequential
damages, so the above exclusion may not apply to you. This warranty gives you specific legal rights, and
you may have other rights, which vary from state to state, or province to province.
To obtain service on your GTCO CalComp product, call our Service & Support Department at (410) 312-
9221 (EST), or (480) 443-2214 (MST), fax us at (410) 290-9065 (EST), or (480) 948-5508 (MST). We can
also be contacted through our Web site at www.gtcocalcomp.com.
Important! All products returned to GTCO CalComp for service must have prior approval in the form of
a Return Merchandise Number (RMA#), which can be obtained by calling the Service & Support
Department.
GTCO CalComp Corporation warrants these products to be free from defects in material and
workmanship under the following terms. Complete and return the enclosed warranty registration card to
ensure that your products are covered by this warranty.
Coverage
Parts and labor are warranted for one (1) year from the date of the first consumer purchase for the
InterWrite Pad, electronic Pen, pad charger, cables and accessories. This warranty applies to the original
consumer purchaser only. This warranty does not apply to any product purchased outside the United
States or Canada. For warranty information outside the United States or Canada, contact your local
dealer or distributor.
Warranty is valid only if original consumer’s purchase or lease date is less than or equal to six months
from the original GTCO CalComp sale date. This information will be captured by the system serial
number and confirmed by the reseller’s purchase order.
Conditions
Except as specified below, this warranty covers all defects in material or workmanship in the products.
The following are not covered by the warranty:
1. Any product on which the serial number has been defaced, modified, or removed (if
applicable).
2. Damage, deterioration, or malfunction resulting from:
a. Accident, misuse, abuse, neglect, fire, water, lightening, or other acts of nature,
unauthorized product modification for any purpose, or failure to follow instructions
supplied with the product.
b. Repair, or attempted repair, by anyone not authorized by GTCO CalComp.
c. Any damage in shipment of the product (claims must be presented to the carrier).
d. Any other cause which does not relate to a manufacturing defect.
3. Any product not sold or leased to a consumer within six months of GTCO CalComp’s original
sale date.
4. Consumable parts, e.g., batteries, dry erase markers, eraser felt.
GTCO CalComp will pay all labor and material expenses for covered items, but will not pay for the
following:
1. Removal or installation charges.
2. Costs for initial technical adjustments (set up), including adjustments of user controls.
3. Certain shipping charges. (Payment of shipping charges is discussed in the next section of this
warranty.)
4. Packaging costs. (Customers should keep their boxes.)
Warranty Service Procedures
1. To obtain service on your GTCO CalComp product, call the Service & Support Department at
(410) 312-9221 (EST), or (480) 443-2214 (MST) to obtain a Return Material Authorization
Number (RMA#) and shipping instructions.

27
CE Certification for MeetingPad 400 and SchoolPad 400
Declaration of conformity according to ISO/IEC Guide 22 and
EN 45014
Manufacturer’s Name: GTCO CalComp, Inc.
Manufacturer’s Address: 14555 N. 82nd Street
Scottsdale, Arizona 85260
U.S.A.
declares, that the product
Product Name: MeetingPad 400, SchoolPad 400
Model Numbers: 400
Product Options: All
conforms to the following product specifications:
Safety: EN 60950
EMC: ETSI EN 301 489-1/2000
EN 55022/1998 CLASS B
CISPR 22(1997) CLASS B
EN 61000-4-2/1995
EN 61000-4-3/1995
EN 61000-4-4/1995
EN 61000-4-5/1995
EN 61000-4-6/1996
EN 61000-4-11/1994
EN 61000-3-2/1995
EN 61000-3-3/1995
Dispositif à faible puissance (1 mW), pas de limitation pour son
usage à l’intérieur ou à l’extérieur.
Low power device (1 mW), no limitation for indoor or outdoor
use. This product is suitable for indoor use only.
European Contact
GTCO CalComp Ges.m.b.H.
Kreiller Strasse 24
81673 Muenchen
Germany
TEL: +49 (0) 89 370012 –0
FAX: +49 (0) 89 370012 –12
European Union Emission Directive
This product is in conformity with the protection requirements of EU
Council Directive 89/366/ECC on the approximation of the laws of the
Member States relating to electromagnetic compatibility.
This product has been tested and found to comply with the limits for Class
B Information Technology Equipment according to CISPR 22/European
Standard EN55022. The limits for Class B equipment were derived for
typical industrial environments to provide reasonable protection against
interference with licensed communication devices.
European Union WEEE Directive
As the producer of the InterWrite Model 400 Pads, GTCO CalComp
supports the objectives of the European Union WEEE Directive and is
committed to ensuring on-going compliance with the Directive. In an effort
to help us meet our objectives and obligations for responsible use and
management of our products, we ask that you return this product at the
end of its useful life to the appropriate local collection facility. Further
information about the responsible end-of-life management of this and
other GTCO CalComp products is available on our Web site at
www.gtcocalcomp.com.

28

29

30
This equipment has been tested and found to comply with the
limits for a Class B digital device, pursuant to part 15 of the FCC
Rules. These limits are designed to provide reasonable protection
against harmful interference in a residential installation. This
equipment generates, uses and can radiate radio frequency energy
and, if not installed and used in accordance with the instructions,
may cause harmful interference to radio communications. How-
ever, there is no guarantee that interference will not occur in a
particular installation. If this equipment does cause harmful
interference to radio or television reception, which can be deter-
mined by turning the equipment off and on, the user is encouraged
to try to correct the interference by one or more of the following
measures:
•Reorient or relocate the receiving antenna.
•Increase the separation between the equipment and receiver.
•Connect the equipment into an outlet on a circuit different
from that to which the receiver is connected.
•Reorient or coil cables.
•If necessary, consult the dealer or an experienced radio/
television technician for additional suggestions.
Any cables the user adds to the device must be shielded to be in
compliance with the FCC standards. Any unauthorized modifica-
tion to this device could result in the revocation of the end user’s
authority to operate this device.
Safety Statements
Electronic Pen
This device complies with Part 15 of FCC rules and with RSS-210 of
Industry Canada. Operation is subject to the following two
conditions: (1) This device may not cause harmful interference, and
(2) This device must accept any interference received, including
interference that may cause undesired operation.
The radiated output power is far below the FCC Radio frequency
exposure limits. Nevertheless, this device should be used in such a
manner that the potential for human contact during normal
operation is minimized.
WARNING: Changes or modifications made to this equipment not
expressly approved by GTCO CalComp may void the FCC
authorization to operate this equipment.
Canada
Industry Canada Class B emission compliance statement. This Class
B digital apparatus complies with Canadian ICES-003.
Avis de conformite’ a’ la re’glementation d’Industrie Canada. Cet
appareil nume’rique de classe B est conforme a’ la norme NMB-
003 du Canada.

31
Japan
Battery Handling and Precautions
•Always charge batteries prior to first use.
•Never short-circuit or reverse polarity.
•Do not incinerate or dismantle batteries. Cell components are corrosive and may be harmful to skin and eyes.
•Do not pull on battery lead wires or connector. Excessive force on the leads or connectors can damage the welding
joints or other connections.
•Dispose of properly.

32
Copyright© 2005 GTCO CalComp Inc.
InterWrite is a trademark of GTCO CalComp Inc.
Bluetooth is a trademark of, and is owned by, Bluetooth SIG, Inc., U.S.A.,
and is licensed to GTCO CalComp Inc.
All other products and company names are the trademarks or registered
trademarks of their respective owners.
The information contained in this document is subject to change without notice. GTCO CalComp assumes no
responsibility for technical, or editorial errors, or omissions that may appear in this document, or for the use of this
material. Nor does GTCO CalComp make any commitment to update the information contained in this document.
This document contains proprietary information which is protected by copyright. All rights reserved. No part of this
document can be photocopied or reproduced in any form without the prior, written consent of GTCO CalComp Inc.
www.gtcocalcomp.com
37-00922-01 Rev. C
Corporate Headquarters
7125 Riverwood Drive
Columbia, Maryland 21046
Tel: 410.381.6688
Fax: 410.290.9065
Toll Free: 800.344.4723
Western Office
14555 North 82nd Street
Scottsdale, Arizona 85260
Tel: 480.948.6540
Fax: 480.948.5508
Toll Free: 800.856.0732
European Headquarters
GTCO CalComp Ges.m.b.H.
Kreiller Strasse 24
81673 Muenchen
Germany
Tel: + 49 (0) 89 370012-0
Fax: + 49 (0) 89 370012-12