User Manual

1
LCD Barometer
BA 1010US
Operating instructions
ELV Electronics Ltd. ● Hong Kong
2
1st English edition January 2004
Documentation © 2004 ELV Electronics Limited
All rights reserved. This handbook must not be reproduced in any
form, even in excerpts, or duplicated or processed using electronic,
mechanical or chemical procedures without written permission of the
publisher.
This handbook may contain mistakes and printing errors. The infor-
mation in this handbook is regularly checked and corrections made in
the next issue. We accept no liability for technical mistakes, printing
errors, or their consequences.
All trademarks and patents are acknowledged.
Printed in Hong Kong
Modifications due to technical improvements may be made without
prior notification.
56978 Y2004V1.0
3
Contents
1. General, functional features ............................................ 4
2. Safety and maintenance information .............................. 5
3. Commissioning ............................................................... 6
3.1. Inserting the batteries ..................................................... 6
3.2. Indicators ........................................................................ 7
4. Operation ........................................................................ 8
4.1. Initialisation ..................................................................... 8
4.2. Altitude adjustment ......................................................... 8
4.3. Outdoor sensor addressing ............................................ 9
4.4. Indicators and indicator adjustment ............................... 9
4.4.1. Air pressure, forecast, trend ........................................... 9
4.4.2. Temperature, humidity, climate .................................... 10
4.4.3. Sensor selection ........................................................... 10
5. Changing the batteries.................................................. 11
6. Range ............................................................................ 12
7. Technical data ............................................................... 13
8. FCC Information ............................................................ 14

4
1. General
The BA 1010US LCD Barometer displays the current
air pressure in a round, stylised instrument display as
well as a numerical digit display.
Analoguous to traditional barometers, the electronic dis-
play moves in the direction of the current trend when
the housing is tapped.
Also, the trend of the air pressure development is con-
veniently displayed by means of an arrow/symbol dis-
play and the local weather forecast is shown by means
of an easy to understand weather symbol.
Additionally, you can choose to display the tempera-
ture and relative humidity for indoors or outdoors as
well as a comfort factor based on both temperature and
humidity.
The functional features of the BA 1010US:
- Air pressure display from 300 to 1,100 hPa
- Air pressure trend display
- Weather forecast function via symbols
- Knock-on update of display in direction of trend
- Display of the indoor temperature and humidity
(sensors in the device)
or
- Display of the outdoor temperature and humidity via
radio reception of data using an outdoor radio sensor
(effective up to 100 m unobstructed)
- Climate comfort factor for room climate indicated by
three smilies: dry, agreeable, and humid.

5
Please read the complete instructions thoroughly
before initial operation; these instructions contain
information for the correct use of this device.
Intended use
The BA 1010US LCD Barometer is intended for indoor
use with maximum humidity of 95 % and a temperature
range of -19.9 °C to +70 °C. The manufacturer does not
accept any liability for the consequences of improper
use; all rights under the warranty will be forfeited.
2. Safety and maintenance information
- Do not open the device. It contains no user-service-
able parts.
- Operate the display device only indoors and avoid
moisture, dust and direct sunlight.
- Clean the display device using a dry linen cloth; it may
be slightly dampened to remove obstinate soiling. Do
not use solvents for cleaning.
- The device should be kept out of reach of children. It
is not a toy!
6
gg
3. Commissioning
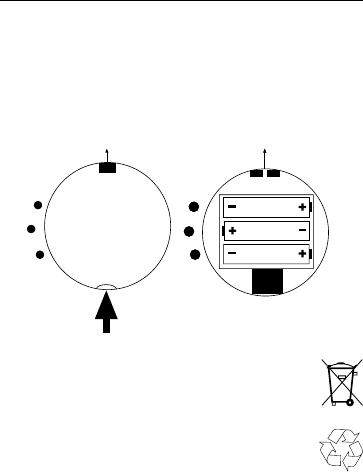
3.1. Inserting the batteries
Open the battery compartment on the back of the
display device.
Place three 1.5 V Mignon batteries (LR 6 / Mignon /
AA alkaline) into the battery compartment, ensuring that
the polarity is correct, and then close the battery
compartment.
CAUTION! Observe regulations for the
disposal of batteries!
Used batteries and rechargeable accumu-
lators must not be thrown away with house-
hold rubbish!
Please take exhausted batteries and re-
chargeables to your local dealer or to a
collection point for hazardous waste or bat-
teries.
Attachment eye Attachment eye
7
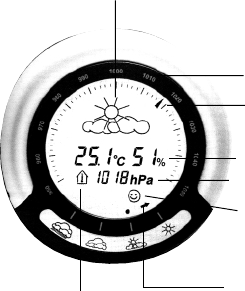
3.2. Indicators
Barometer scale
Barometer indicator
Numeric air
pressure display
Forecast display
Trend display
(see text)
Temperature and
humidity display
Indicator of the
selected sensor
(indoors/outdoors)
Climate comfort
indicator

8
4. Operation
4.1. Initialisation
The device switches on automatically when the three
Mignon batteries are inserted. In some cases it may
happen that the device does not begin operation
after the batteries are inserted, in which case nothing
is shown in the display. If this happens, remove
the batteries and reinsert to produce a display. This
problem does not influence the further operation of the
device.
After the segment test, the current data are displayed.
4.2. Altitude adjustment
The air pressure display is based on the altitude
above sea level of the location where the device is
operated. It is therefore necessary to adjust to the
actual altitude in order to have the correct air pressure
value displayed.
- Open the battery compartment and take out one of the
batteries. Wait about 1 minute.
- Press and hold down the middle button on the back
of the device while inserting the battery.
- Release the button and set the altitude with the
upper button (increments of +10 m) or lower button
(increments of -10 m). The range is to 2,000 m.
- Once the exact altitude is set, save the setting by
pressing the middle button. This value remains
stored even when the batteries are changed.
9
4.3. Setting sensor address for outdoor sensor
- Commissioning and addressing the outdoor sensor is
to be performed in accordance with their respective
instructions.
- First position the outdoor sensor near the barometer
and then carry out addressing on the barometer as
follows:
- Press the middle button on the back for approximate-
ly 2 seconds until “SEN x” appears in the display. The
“X” stands for a sensor address.
- Using the upper button, you can now select the
address (1-8) set on the sensor.
- Once the sensor is selected, no further buttons need
to be pressed. The device exits the setting mode
automatically after about 5 seconds.
- Now the automated synchronisation with the outdoor
sensor takes place. This process takes 6 minutes.
During this time it is not possible to operate the device.
4.4. Indicators and indicator adjustment
4.4.1. Air pressure, forecast, trend
- The analogue air pressure indicator is located on
the outer edge. The current air pressure (950 to
1,050 hPa) is indicated by an arrow.
- In the centre below is the numerical display of this
air pressure value in an expanded range between
300 to 1,100 hPa.
- At the top of the display the local weather forecast
is indicated by weather icons (sunny, fair, cloudy,
rain).
- At the bottom is a trend display for the air pressure
10
development in the next few hours. One point also
shows the weather forecast. An arrow shows the air
pressure development trend if there are air pressure
changes.
- Analoguous to traditional hand-display barometers,
the air pressure indicator updates in the direction of
the trend when the display is tapped a few times.
4.4.2. Temperature, humidity, climate
- In the centre of the display the temperature and
humidity values of the currently selected sensor loca-
tion are shown.
- The climate comfort factor based on the temperature
and humidity is shown in the bottom display line by
means of smilies (dry, agreeable, humid).
4.4.3. Sensor selection
- The barometer permits you to select the display of
temperature and humidity at the indoor sensor (in the
device) or at the addressed outdoor sensor.
- You can switch from one to the other using the bottom
button on the back of the device. The selected sensor
is indicated by the house icon at the bottom left of the
display:
Thermometer icon in the house: indoor values
Thermometer icon next to the house: outdoor values
- Switching over can also be done by tapping. After
tapping several times, the trend is shown in the
analogue display. Afterward the house flashes to
indicate that the display can be switched over by
tapping again.

11
5. Changing the batteries
A change of batteries is necessary if the display be-
comes unusually pale or disappears altogether.
Then it is time to change batteries in accordance with
Section 3.1.

12
6. Range and reception interference
The free field range (i.e. the range of the line of sight
contact between the transmitter and the receiver) is
100 m under optimum conditions. Walls and even
reinforced concrete can be penetrated, which does,
however, reduce the range.
Before mounting the system, try out interference-
free reception at different times of the day.
Reduced range can have the following causes:
●High frequency interference of all kinds.
●Buildings of all types or vegetation.
●The distance of the transmitter or receiver from
conductive surfaces or objects (even to the human
body or the ground) has an effect on the radiation
characteristics and therefore the range.
●Wide band interference in built up areas can reach
levels that reduce the signal-noise ratio throughout
the frequency band which reduces the range.
●Devices working on adjacent frequencies can also
affect the receiver.
●Badly shielded PCs can radiate into the receiver and
reduce the range.

13
7. Technical data
Display: .................................................... large area LCD
Air pressure measurement range:.........300 to 1,100 hPa
Resolution: ............................................................. 1 hPa
Accuracy: ...............................................................±1hPa
Analog display range: ...........................950 to 1,050 hPa
Digital display range: ............................300 to 1,100 hPa
Temperature display range: ....................-40 ˚C to +80 ˚C
Resolution: ............................................................ 0.1 °C
Accuracy: .................................................................±1 ˚C
Relative humidity display range: .............. 20 to 90 % RH
Resolution: ............................................................... 1 %
Accuracy: ................................................................ ±8 %
Weather forecast:Weather icons for sunny, fair, cloudy, rainy
Air pressure trend display: by arrow in the corresponding direction
Climate comfort indicator: ............ dry, agreeable, humid
Reception frequency for outdoor sensors: ...433.92 MHz
Battery: .................................. 3 x 1.5 V LR 6/Mignon/AA
Battery life: ...................................................... 2 - 3 years
Dimensions (ø x D): ..................................... 170 x 36 mm

14
8. FCC Information
FCC ID: RNT-BA1010US
Changes or modifications not expressly approved in writing
by ELV Electronics Limited may void the user’s authority to
operate the equipment.
NOTE: This equipment has been tested and found to comply
with the limits for a Class B digital device, pursuant to Part 15
of the FCC Rules. These limits are designed to provide
reasonable protection against harmful interference in a
residential installation. This equipment generates, uses and
can radiate radio frequency energy and, if not installed and
used in accordance with the instructions, may cause harmful
interference to radio communications. However, there is no
guarantee that interference will not occur in a particular
installation. If this equipment does cause harmful interference
to radio or television reception, which can be determined by
turning the equipment off and on, the user is encouraged to
try to correct the interference by one or more of the following
measures:
- Reorient or relocate the receiving antenna.
- Increase the separation between the equipment and
receiver.
- Connect the equipment into an outlet on a circuit different
from that to which the receiver is connected.
- Consult the dealer or an experienced radio/TV technician
for help.
15
The internal antenna used for this mobile transmitter must
provide a separation distance of at least 20 cm from all
persons and must not be co-located or operating in
conjunction with any other antenna or transmitter.
This device complies with Part 15 of the FCC Rules.
Operation is subject to the following two conditions:
(1) this device may not cause harmful
interference, and
(2) this device must accept any interference
received, including interference that may
cause undesired operation.
16
ELV Electronics Ltd. Hong Kong