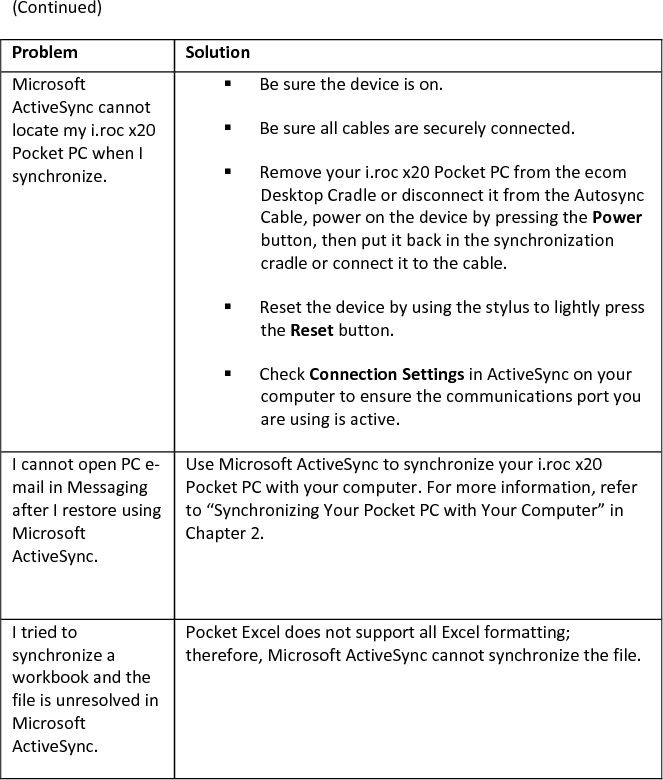
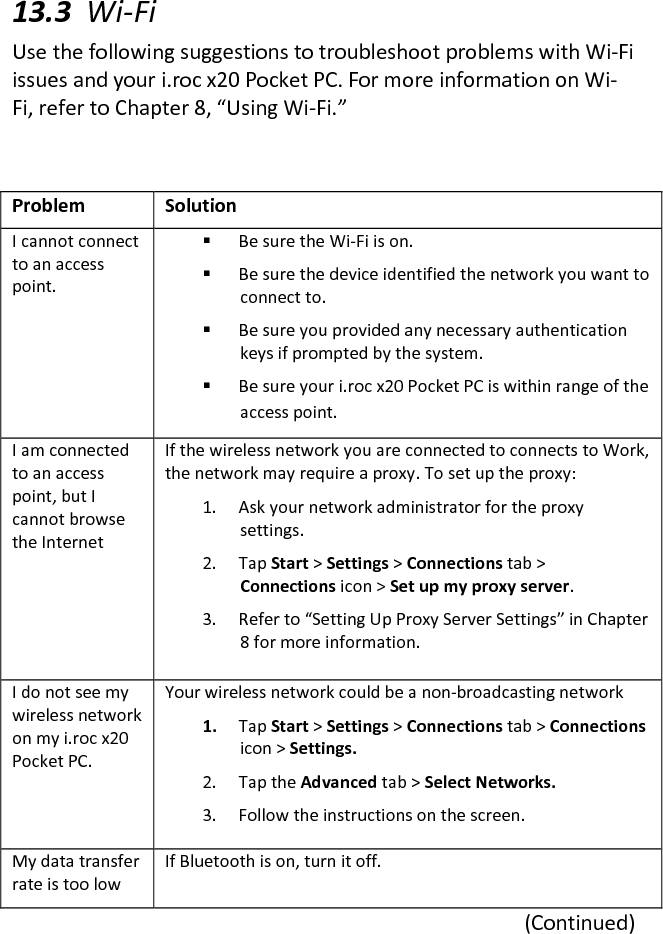
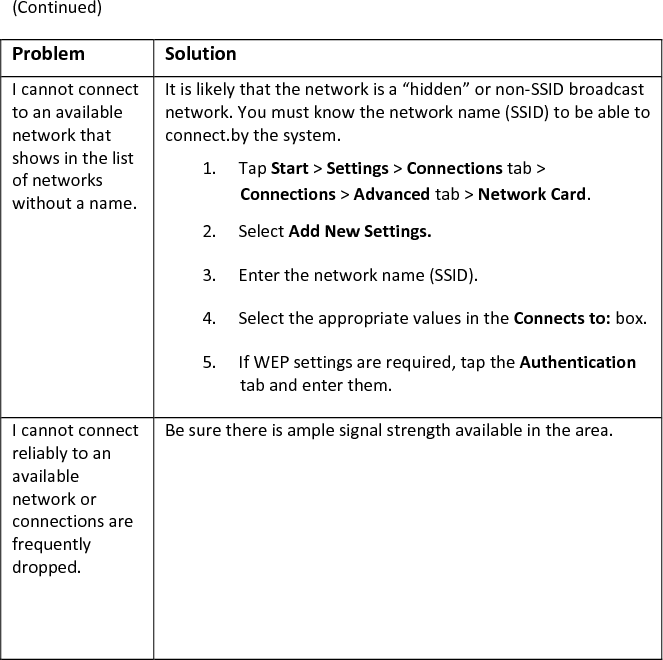
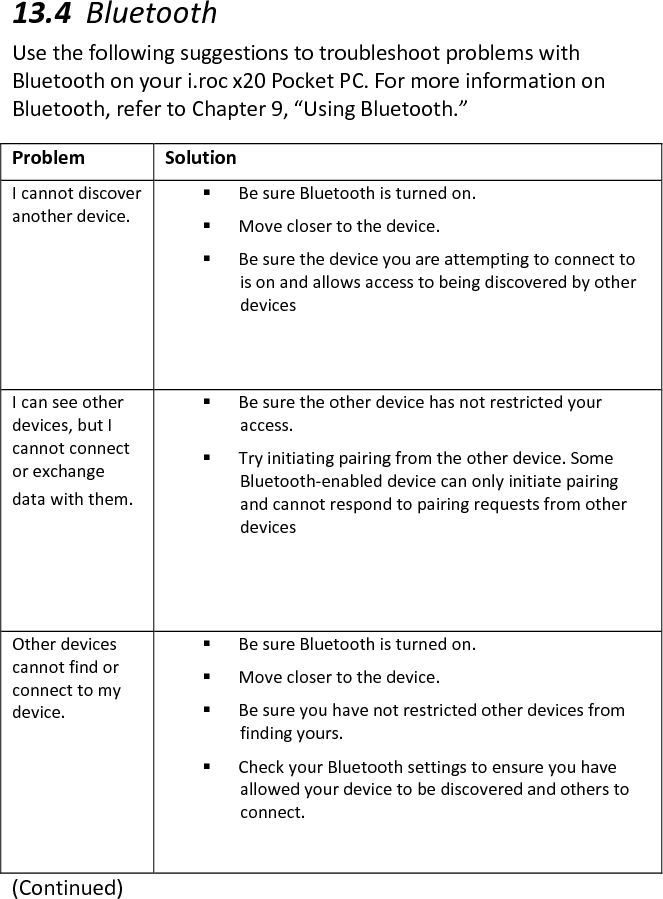
ecom instruments 0027390000 PDA with WLAN, BT and RFID User Manual 3500MW37A01 iroc manual

ecom instruments GmbH PDA with WLAN, BT and RFID 3500MW37A01 iroc manual

User Manual

     User’s Guide  Ecom i.roc® x20 Series Pocket PC  ecom i.roc® xyz ecom RFx11_125kHz ecom RFx11_134kHz ecom RFx10_13_56MHz  Juni 2009  Note: Not all models described are available in all regions. Model shown in illustrations is i.roc x20 Series Pocket PC.
Copyright© 2009 ecom instruments GmbH.  The contents of this document, either in part or in their entirety, may not be reproduced, forwarded, distributed or saved in any way without ecom instruments GmbH prior written consent.  The contents of this document are presented as they currently exist. ecom instruments GmbH does not provide any express or tacit guarantee for the correctness or completeness of the contents of this document, including, but not restricted to, the tacit guarantee of market suitability or fitness for a specific purpose unless applicable laws or court decisions make liability mandatory. ecom instruments GmbH reserves the right to make changes to this document or to withdraw it any time without prior notice  Microsoft, Windows, the Windows logo, Outlook, and ActiveSync are trademarks of Microsoft Corporation in the U.S. and other countries.  ecom i.roc x20 Products are Powered by Windows MobileTM 5 software for Pocket PC.  SD Logo is a trademark of Secure Digital.   Credant Logo is a trademark of Credant Technologies.  BluetoothTM is a trademark owned by the Bluetooth SIG, Inc.  All other product names mentioned herein may be trademarks of their respective companies.  Ecom instruments GmbH Company shall not be liable for technical or editorial errors or omissions contained herein. The information is provided “as is” without warranty of any kind and is subject to change without notice. The warranties for Ecom instruments GmbH products are set forth in the express limited warranty statements accompanying such products. Nothing herein should be construed as an additional warranty.  This document contains proprietary information that is protected by copyright. No part of this document may be photocopied, reproduced, or translated to another language without the prior written consent of Ecom instruments GmbH Company. _______________________________________________________________ WARNING: Text set off in this manner indicates that failure to follow directions could result in bodily harm or loss of life.       Body-worn operations are restricted to belt-clips, holsters or similar accessories that      have no metallic component in the assembly  CAUTION: Text set off in this manner indicates that failure to follow  directions could result in damage to equipment or loss of information.  _______________________________________________________________ User’s Guide Ecom i.roc® x20 Series Pocket PC First Edition (Juni 2009)
Contents  1 Contents  2  Getting to Know Your i.roc x20 Pocket PC .................................. 8 2.1  Using the Stylus ....................................................................... 8 2.2  Aligning the Screen .................................................................. 9 2.3  Entering Owner Information ................................................. 12 2.4  Resetting the Device .............................................................. 13 2.5  Routine Care .......................................................................... 16 3  Synchronizing with Your Computer .......................................... 18 3.1  Using Microsoft ActiveSync ................................................... 18 3.2  Synchronizing Your Pocket PC with Your Computer ............. 20 3.3  Copying Files .......................................................................... 22 3.4  Installing Programs ................................................................ 23 3.5  Backing up and Restoring Files .............................................. 23 3.6  Sending and Receiving E-mail ................................................ 24 3.7  Requesting Meetings ............................................................. 24 4  Managing the Battery ............................................................... 25 4.1  Charging with the AC Adapter ............................................... 26 4.2  Charging with the ecom Desktop Cradle and AC Adapter ..... 27
4.3  Charging with the ecom Desktop Cradle and USB Cable ....... 28 4.4  Manually Checking the Battery Charge Level ........................ 29 4.5  Power Saving Tips .................................................................. 30 5  Learning the Basics ................................................................... 33 5.1  Using the Today Screen ......................................................... 33 5.2  Status Icons ............................................................................ 35 5.3  Pop-Up Menus ....................................................................... 36 5.4  Changing the Screen Orientation .......................................... 39 5.5  Opening and Closing Applications ......................................... 40 5.6  Installing Applications ............................................................ 41 5.7  Deleting Applications ............................................................. 42 5.8  Backing Up Information ......................................................... 42 5.9  Using the i.roc x20 FIle Store Folder ...................................... 43 6  Learning Input Methods ........................................................... 45 6.1  Using Input Software ............................................................. 45 6.2  Writing with the Stylus and Microsoft Transcriber ............... 50 7  Applications .............................................................................. 53 7.1  Software Available on the ecom i.roc x20 Pocket PC ............ 53 7.2  Installing Applications ............................................................ 61
7.3  Removing Applications .......................................................... 61 7.4  Using TodayPanel Lite............................................................ 62 7.5  Using ecom Image Zone ........................................................ 64 7.6  Backing Up and Restoring ...................................................... 70 7.7  Using iTask ............................................................................. 71 8  Using Security Features ............................................................ 73 8.1  Using ecom ProtectTools ....................................................... 73 9  Using Wi-Fi (not available on all models) ................................. 79 9.1  Getting Acquainted with Wi-Fi .............................................. 79 9.2  Managing Wireless Network Settings ................................... 83 9.3  Monitoring Signal Strength and Status .................................. 84 9.4  Advanced Network Settings .................................................. 85 9.5  Wi-Fi Terms ............................................................................ 85 9.6  Wi-Fi Security Protocol Utilities ............................................. 93 10  Using Bluetooth ........................................................................ 95 10.1  Getting Acquainted with Bluetooth ...................................... 96 10.2  Powering Bluetooth On or Off ............................................... 98 10.3  Working with Bluetooth Settings .......................................... 99 10.4  Working with Bluetooth Manager ....................................... 107
10.5  Connecting to Other Devices ............................................... 109 10.6  Working with Files ............................................................... 114 10.7  Opening a Connection ......................................................... 117 11  Connecting to the Internet ..................................................... 120 11.1  Connecting to a Private Network ........................................ 121 11.2  Entering an Internet Address .............................................. 121 11.3  Using a Favorites List ........................................................... 122 12  RFx1x Software Package ......................................................... 122 12.1  Installation ........................................................................... 122 12.2  General ................................................................................ 123 12.3  Hardware ............................................................................. 124 12.4  Software .............................................................................. 131 13  Troubleshooting ...................................................................... 131 13.1  Common Problems .............................................................. 131 13.2  ActiveSync ............................................................................ 134 13.3  Wi-Fi ..................................................................................... 137 13.4  Bluetooth ............................................................................. 139 14  Regulatory Notices .................................................................. 141 14.1  Federal Communications Commission Notice ..................... 141
14.2  Canadian Notice .................................................................. 143 14.3  Japanese Notice ................................................................... 143 14.4  Korean Notice ...................................................................... 143 14.5  European Union Regulatory Notice ..................................... 143 14.6  Battery Warning .................................................................. 146 14.7  Equipment Warning ............................................................. 147 14.8  Airline Travel Notice ............................................................ 147 14.9  Wireless Notices .................................................................. 147 15  Specifications .......................................................................... 150 15.1  System Specifications .......................................................... 150 15.2  Physical Specifications ......................................................... 153 15.3  Operating Environment ....................................................... 153
2 Getting to Know Your i.roc x20 Pocket PC  Congratulations on purchasing your Ecom i.roc® x20 Series Pocket PC. Use this guide to help you set up your Pocket PC and to learn how it works.   i.roc x20 Pocket PC to switch between the current application and the last application you were running.   2.1 Using the Stylus  Your i.roc x20 Pocket PC comes with a stylus that you should use to tap or write on your screen.  You can perform three basic actions using the stylus:  Tap—Lightly touch the screen to select or open an item. Lift the stylus after you tap an item. Tapping is equivalent to clicking an item with the mouse on your computer.  Drag—Place the point of the stylus on the screen and drag an item across the screen without lifting the stylus until you have completed the selection. Dragging is equivalent to dragging with the left mouse button pressed on your computer.
Tap and hold—Hold the stylus pointer on an item for a short time until a menu displays. Tapping and holding is equivalent to right-clicking your computer mouse button. When you tap and hold, a circle of red dots appears around the stylus to indicate that the menu will soon pop up.   CAUTION: To prevent damage to your i.roc x20 Pocket PC screen, never use any device other than the stylus that comes with the Pocket PC or an approved replacement to tap or write on the screen. If you lose or break your stylus, you can order extras at www.ecom.com/go/i.roc x20accessories.   2.2 Aligning the Screen  When the i.roc x20 Pocket PC is turned on for the first time, you are guided through a screen alignment process. You must realign your screen if:   - The Pocket PC does not respond accurately to your taps.   - You perform a full reset of your Pocket PC. To realign the i.roc x20 Pocket PC screen:  1 From the Start menu, tap Settings > System tab > Screen icon. 2 Tap the Align Screen button.  Shortcut: To access the Align Screen application without  tapping on the screen, press and hold the 5-Way Navigation  button, then press the Calendar button.  3 Tap the cross-hair object at each location. Be precise when   tapping the cross-hair object.  4 Tap OK.
Adjusting Text Size  How much information you see on the screen depends on the text size. To adjust the text size:  1. Tap Start > Settings > System tab > Screen > Text Size tab.  2. Drag the slider to the desired text size; then tap OK.   Changing  the  Screen  from  Portrait  to Landscape Mode  To select Portrait or Landscape screen orientation:  1 Tap Start > Settings > System tab > Screen.  2 Tap Portrait, Landscape (right-handed), or Landscape   (left-handed).  3 Tap OK.  Shortcut: Press and hold the Calendar button for two seconds to toggle between portrait and landscape modes.  Note: The Wi-Fi antenna for the ecom i.roc x20 is located in the top of the device. If you cover up the top of the ecom i.roc x20 after you have turned on Wi-Fi, signal strength may be affected.  Setting the Date and Time  When you turn on your i.roc x20 Pocket PC for the first time, you are requested to select your time zone. After setting the time zone, you still need to set the time and date on your device. All three settings are located in the Clock Settings screen and can be set at the same time.  Note: By default, the time on the i.roc x20 Pocket PC is synchronized with your computer each time the two devices connect using ActiveSync.
Setting the Time for Home and Locations You Are Visiting  From the Start menu, tap Settings > System tab > Clock & Alarms icon.  Shortcut: From the Today screen, tap the Clock icon to set the time.  1 Tap either Home or Visiting. 2 Tap the time-zone down arrow, and select the appropriate   timezone 3 Tap the hour, minutes, or seconds, and use the up and down   arrows to adjust the time.  Shortcut: You can also adjust the time by moving the hands of   the clock with the stylus. 4 Tap AM or PM. 5 Tap OK. 6 Tap Yes to save the clock settings.   Setting the Date  1. From  the  Start  menu,  tap  Settings  >  System  tab  >  Clock  & Alarms icon.   Shortcut: From the Today screen, tap the Clock icon to set   the date.  2 Tap the down arrow by the date.  3 Tap the left or right arrow to select a month and year.  4 Tap a day.  5 Tap OK.  6 Tap Yes to save the date settings.
You need to reset your time zone, time, and date if: - The location time (Home or Visiting) needs to be changed.  - All power to the i.roc x20 Pocket PC is lost, which removes all saved settings.  - You perform a full reset of your i.roc x20 Pocket PC.   Shortcut: From the Today screen, tap the Clock icon to set the time zone, time, and date.  2.3 Entering Owner Information  You  can  personalize  your  i.roc  x20  Pocket  PC  by  entering  owner information. To enter owner information:  1. From the Today screen, tap Start > Settings > Personal tab > Owner Information.  Shortcut:  From  the  Today  screen,  tap  Tap  here  to  set  owner information.  2.  Tap  in  the  Name  field.  A  keyboard  appears  at  the  bottom  of  the screen. Tap on the characters to enter your name.   Note: If you prefer, you can use Letter Recognizer, Microsoft Transcriber, or Block Recognizer to input information. Refer to Chapter 5, “Learning Input Methods,” for more information.   3.  Tap  the  Tab  key  on  the  keyboard  to  move  the  cursor  to  the  next field.  4. Continue entering whatever information you want to include.  5. To display owner information at startup, tap the Options tab and select the Identification information checkbox.  6. Tap on the Notes tab to enter any notes.  7.Tap OK to save the information and return to the Today screen.
 2.4 Resetting the Device  Sometimes there is a need to reset your Pocket PC. Resetting the device is known as performing a “soft” or “hard” reset.  Performing a Soft Reset  (Windows Mobile 2003 SE and Windows Mobile 5)  A soft reset stops all running applications, but does not erase any programs or saved data. Be sure to save any unsaved data within a running application before performing a soft reset.  - to perform a soft-reset press both reset buttons on the Keypad  - the Pocket PC restarts and displays the today screen
Performing a Hard Reset  (Windows Mobile 2003 SE)  Perform a hard reset only when you want to clear all user-installed settings, applications, and data from RAM (Random Access Memory), where data and applications you have loaded are stored. also after the battery is completely discharged, the device will operate in the same way after Hard-Reset. All i.roc x20 are equipped with a so called Autoinstallation tool, you can reload predefined programs and settings automatically.  CAUTION:  If  you  perform  a  hard  reset,  your  Pocket  PC  loses  all  data  and programs not saved in i.roc x20 File Store.   Performing a hard reset (Windows Mobile 5) A Hard Reset stops all running applications, but does not erase any programs or saved data. Additional to a soft reset all hardsware registers will be erased.   To perform  a Hard Reset press and hold down the F1 and F4 buttons  While holding down these buttons, press the reset buttons for about two seconds  When the Pocket PC screen begins to fade, release the F1 and F4 buttons first and then release the reset buttons.  Note: If you simultaneously push and hold the Reset, F1 and F4 buttons for more than two seconds, the battery disconnects. To restart the device, either plug the device inti the AC Adapter or press the reset buttons again.  The Pocket PC resets and powers on.
 Performing a Clean-Reset (Windows Mobile 5) A Clean-Reset cleans all user installed settings, applications and data from the device.   To perform a Clean-Reset press and hold F1, F3 and the power buttons  While holding down these buttons, press the reset buttons for about two seconds  When the Pocket PC restarts release first the F1, F3 and the power buttons and then release the reset buttons  The Pocket PC resets and powers on
 2.5 Routine Care   CAUTION:  The  screen  of  your  i.roc  x20  Pocket PC  is  made  of  glass and can  be damaged or broken by drops, impacts, or pressure.   Note: ecom is not responsible for damage that occurs as a result of your failure to follow the instructions that came with the ecom branded product. Refer to the warranty document inlcuded with your i.roc x20 Pocket PC for more information.
 You should observe the following practices to protect the screen of your i.roc x20 Pocket PC from damage:   Do not sit on your i.roc x20 Pocket PC.   When transporting your i.roc x20 Pocket PC in a purse, pocket, briefcase, etc., ensure the device does not get compressed, bent, dropped, or hit.   When not in use, close the flip cover on your i.roc x20 Pocket PC and store it in a case. You can select from a wide variety of case options at www.ecom.com/go/i.roc x20accessories or www.casesonline.com.   Do not place anything on top of your Pocket PC.   Do not bang your i.roc x20 Pocket PC against hard objects.   Never use any device other than the stylus that comes with the Pocket PC or an approved replacement to tap or write on the screen. If you lose or break your stylus, you can order extras at www.ecom.com/go/i.roc x20accessories .   Clean your Pocket PC by wiping the screen and the exterior with a soft, damp cloth lightly moistened only with water.    CAUTION: To reduce the risk of damage to the internal components, do not spray liquid directly on the screen, or allow excess liquid to drip inside your Pocket PC. Using soap or other cleaning products on the screen might discolor the finish and damage it.
 3 Synchronizing with Your Computer  3.1 Using Microsoft ActiveSync  Your device can be connected to a computer so you can transfer files back and forth. In this way, you only have to input data once. Microsoft ActiveSync is a synchronization program you install on your desktop or laptop computer to:   Copy files (data, audio, or video) between your device and up to    two host computers so you always have the latest information   in all locations.   Install programs on your device   Back up and restore device information   Synchronize links   Send and receive e-mail   Request meetings   Installing ActiveSync   CAUTION: For synchronization to work properly, install Microsoft ActiveSync on your computer (Steps 1 and 2 below) before you connect your i.roc x20 Pocket PC to your computer (Step 3).   To install Microsoft ActiveSync on your host computer:  1. Insert the Companion CD into the CD tray or slot on your computer.
2. After the introductory screen displays, click Setup Wizard. The Setup Wizard detects the programs on your computer, and guides you step by step so you can install ActiveSync on your computer as well as other programs on your Pocket PC.  3  Follow the screen recommendations and when prompted, connect your Pocket PC to your personal computer:    a.  Plug the AC Adapter into an electrical outlet 1 and connect the other end of the AC Adapter to the AC connector on the ecom Desktop Cradle 2.    b.  Slide the bottom of your Pocket PC into the ecom i.roc x20 Cradle 3 and push firmly to seat it.    CAUTION: To avoid damaging your Pocket PC or the cradle, check to be sure the Pocket PC and cradle connectors are properly aligned before pushing the Pocket PC into the ecom Desktop Cradle.   c. Connect the USB Cable to the USB port on your computer 4.
 3.2 Synchronizing Your Pocket PC with Your Computer  With ActiveSync installed on your computer, you can:   Use it any time to create an additional partnership so you can synchronize information with up to two computers.   Add or delete the type of data (Contacts, Calendar, Messaging, Tasks, Favorites, Files, Notes, and AvantGo) you want synchronized with your Pocket PC.    Note: When you synchronize files, you can drag and drop the selected files from your computer to the synchronized folder on your i.roc x20 Pocket PC. If you named your device “PC1” when you created your partnership, then the synchronized folder is named “PC1.” When you synchronize, the files are automatically moved to and from your i.roc x20 Pocket PC.  Changing Synchronization Settings  You can modify your synchronization settings for Microsoft ActiveSync to:   Change when your i.roc x20 Pocket PC synchronizes with your host computer.   Change the type of connection (serial, USB, or infrared) from your i.roc x20 Pocket PC to your computer.   Select the files and information to synchronize.   Select the files and information you do not want to synchronize (for example, e-mail attachments).   Determine how conflicts between information on your i.roc x20 Pocket PC and information on your computer are to be handled.
To change synchronization settings:  1. From the Start menu on your computer, click Programs > Microsoft ActiveSync > Tools > Options.    a.  On the Sync Options tab, select the files and information to synchronize with your computer.    b.  On the Schedule tab, select when your i.roc x20 Pocket PC synchronizes with your computer.    c.  On the Rules tab, determine how conflicts between information on your i.roc x20 Pocket PC and information on your computer are to be handled.   2. Tap OK when you are finished.  3. From the File menu, click Connection Settings. Select the type of connection to be allowed between the i.roc x20 Pocket PC and the computer.   Using the Infrared Connection  As an alternative to using the desktop cradle, you can synchronize your Pocket PC and your computer using the infrared connection if you have an infrared port or an infrared USB adapter installed on your computer. The infrared connection option works only on computers that have Microsoft Windows 98SE, Me, 2000, or XP operating systems installed.  To set up an infrared connection to a computer:  1. Synchronize your Pocket PC with your computer using the desktop cradle before the first time you establish an ActiveSync connection via infrared.  2. Follow your computer manufacturer’s instructions to install and set up an infrared port.  3. Remove the Pocket PC from the cradle and line up the infrared port with the computer infrared port so they are unobstructed and within 12 inches (30.5 cm) of each other.
 4. Initiate a connection by tapping Start > Programs > ActiveSync > Tools > Connect via IR. Synchronization begins on your device.  5. To disconnect, move the devices away from each other or tap X in the upper right of the screen to turn off.   3.3 Copying Files  You can copy files to and from your host computer using Explore in ActiveSync and Windows Explorer.  To copy files:  1. Insert your i.roc x20 Pocket PC into the sync cable.  2. From the Start menu on your computer, click Programs > Microsoft ActiveSync.  3. Click Explore.  4. Double-click the My Pocket PC.  5. On your computer, right-click the Start menu, and select Explore.  6. Locate the file to be moved.    Note: You cannot copy preinstalled files or system files.  7. Drag and drop your files between your i.roc x20 Pocket PC and your computer. ActiveSync converts the files so that they can be used by the Pocket Office programs, if necessary.   Note: Move  your  files  directly  into  My  Documents  on  your  i.roc  x20 Pocket PC (or into a folder inside My Documents), so the programs on your i.roc x20 Pocket PC can locate them.
 3.4 Installing Programs  To install programs on your i.roc x20 Pocket PC from your computer using ActiveSync:  1. Connect your i.roc x20 Pocket PC to your computer using the                sync cable.  2. Follow the instructions on the screen.  3. Check the screen of your i.roc x20 Pocket PC to see if any     further steps are necessary to complete the installation.   3.5 Backing up and Restoring Files  To help reduce the chance of losing information, you should back up information to your computer regularly. For more information on backing up and restoring information using Microsoft ActiveSync, refer to “Using ActiveSync to Backup/Restore” in Chapter 6.  You can synchronize links to Web sites from the Favorites list on your computer to view them offline with Pocket Internet Explorer.  1. From the Start menu on your computer, click Programs and double-click the Internet Explorer.  2. Click Favorites to see the list of links to your favorite Web sites. 3. To save a Web site link to Mobile Favorites, open the Web site and click Create Mobile Favorite.  If you select “Favorites” as an information type to be synchronized, ActiveSync copies your mobile favorite to your Pocket PC the next time you synchronize.  4. Follow the instructions in Synchronize information to manually synchronize your favorite links.
 3.6 Sending and Receiving E-mail  You can send and receive e-mail messages by synchronizing your i.roc x20 Pocket PC with your computer using ActiveSync. If you are using ActiveSync to send and receive e-mail messages, the name of the folder you are using is displayed at the bottom of the screen. For more information on sending and receiving e-mail using ActiveSync, from the Start menu, tap Help > Messaging.  3.7 Requesting Meetings  You can schedule a meeting and send a meeting request through ActiveSync. For more information, from the Start menu, tap Help > Calendar.  3
 4 Managing the Battery  Your i.roc x20 Pocket PC is shipped with a rechargeable battery that is partially charged. It is recommended that you fully charge the Pocket PC battery before setting up the device, and recharge regularly. Your Pocket PC uses some power to maintain files in RAM and the clock. While working at your desk, keep the Pocket PC and AC Adapter connected through the ecom Desktop Cradle. When you travel, it is recommended that you carry the AC Adapter, Charger Adapter plug, or an optional spare battery with you.   CAUTION: Use only an ecom approved battery for your i.roc x20 Pocket PC. Inserting a battery that does not comply with ecom requirements might cause the Pocket PC to malfunction and will void the ecom i.roc x20 limited warranty.   The i.roc x20 Pocket PC also has a small internal backup battery that allows you to change the main battery without losing RAM data (user-installed programs and data) as long as it is replaced within 15 minutes. The internal battery can only be removed by qualified ecom Technical Support.
 4.1 Charging with the AC Adapter  The standard AC Adapter works in a standard electrical outlet. You can also charge your Pocket PC in your automobile with an optional Automobile Adapter that works in your vehicle’s electrical cigarette lighter or a 12-volt power outlet.   To purchase an optional Automobile Adapter, refer  to the ecom  Web site at: www.ecom.com/go/i.roc x20accessories .   CAUTION: Use only ecom recommended AC adapters.   To charge your Pocket PC using the AC Adapter:  1. Insert the AC Adapter plug into the AC Charger adapter 1.  2. Plug the AC Adapter into an electrical outlet 2.  3. Insert the AC Charger adapter into the bottom of the Pocket PC   CAUTION: To avoid damaging your Pocket PC or the AC Adapter, check to be sure all connectors are properly aligned before connecting them.
 4. When the Power button indicator on the front of the Pocket PC turns solid amber, the device is fully charged and you can disconnect the AC Adapter. The approximate time to fully charge a drained battery is four hours.   Note: A standard battery can be charged in about four hours; an optional extended battery takes longer.  4.2 Charging with the ecom Desktop Cradle and AC Adapter  Use the ecom Desktop Cradle to charge your Pocket PC.   Note: It is not necessary to synchronize your Pocket PC before charging it.   To charge your Pocket PC using the ecom Desktop Cradle:  1 Plug the AC Adapter into an electrical outlet 1 and connect the other end of the AC Adapter to the AC connector on the ecom Desktop Cradle   Slide the bottom of your Pocket PC into the ecom i.roc x20               cradle and push firmly to seat it.   CAUTION: To avoid damaging your Pocket PC or the cradle, check tobe sure the Pocket PC and cradle connectors are properly aligned before pushing the Pocket PC into the ecom Desktop Cradle.
   Note: The amber charge light on the front of the Pocket PC blinks while the battery is recharging and turns solid amber (nonblinking) when the battery is fully charged.   4.3 Charging with the ecom Desktop Cradle and USB Cable  An alternative method of charging the Pocket PC is to charge the device by using a USB cable. However, because this charging method drains the host battery (i.e., laptop), you must enable USB charging on the Pocket PC before you can charge the device.  To charge your Pocket PC using the ecom Desktop Cradle and USB Cable:  1. Turn on USB charging by tapping Start > Settings > System    tab > Power on the Pocket PC.  2. Select the USB Charging tab, and then check Use USB    Charging.
3.  Tap OK once USB Charging has been enabled.   4. Connect one end of the USB sync cable to the bottom of the Pocket PC.  5. Connect the USB cable to an available USB Port on your USB powered device, such as a laptop.    Note: The Pocket PC charges slower when using an USB cable than with an AC Adapter.   4.4 Manually Checking the Battery Charge Level  To manually monitor the battery power:  1. Tap Start > Settings > System tab.  2. Tap Power > Battery tab.   If the battery charge level is low, connect to AC power using the ecom Desktop Cradle and the AC Adapter, or change the battery. For
information on purchasing an optional standard or extended battery, visit the ecom Web site at  To use a shortcut to view your battery charge level, tap the Battery icon located in the TodayPanel Lite on the Today screen plug in.  Battery Saving Tip: Tap Start > Settings > System tab > Power > Advanced tab, then tap the Turn off device if not used for checkbox and set it to turn your i.roc x20 Pocket PC off after a short time of not being used.   CAUTION: It is recommended that you do not allow the battery installed in your i.roc x20 Pocket PC to discharge completely. Doing so does not harm your Pocket PC or battery; however, you will lose all data not stored in File Store (ROM). Discharging the battery completely is similar to performing a hard reset. Refer to “Performing a Hard Reset” in Chapter 1 for more information.  4.5 Power Saving Tips  Here are some power saving tips to help save energy in your Pocket PC battery.  Set the backlight to go off quickly (10 or 30 seconds) after you stop using your Pocket PC, or implement Power Save mode to turn off the backlight completely. For more information, refer to “Changing the Backlight Settings” later in this chapter.   Note: Adjusting the Backlight Brightness Level slider to the lowest level that is still useable for the given lighting conditions can be the single most important thing you can do to preserve battery life.    Leave your Pocket PC connected to AC power at all times when you’re not using it. For more information, refer to “Charging with the AC Adapter” earlier in this chapter.
 Leave your Pocket PC set to turn off after not being used for a ashort time. Tap the Battery icon > Advanced tab. On battery power, set the device to power off in the shortest acceptable time.   Turn off all wireless activities when not in use. Refer to  “Powering Wi-Fi On or Off” in Chapter 8 and “Powering Bluetooth On or Off” in Chapter 9.   Turn off the Receive all incoming beams setting and receive infrared beams manually instead. Refer to Chapter 2, “Synchronizing with Your Computer.”   You can program an Application Button to turn off the screen when an MP3 is playing, thus saving battery power used to run the screen. Tap Start > Programs > Windows Media > Tools > Settings > Buttons. From the Select Function drop-down list, tap Screen Toggle. Press a program button, then tap OK. Then, when listening to music, press that program button to turn off the screen display.  Power off your Pocket PC when it is being charged to allow it to charge at a faster rate.  To ensure you always have battery power available, invest in an extra Standard Battery or Extended Battery. These batteries can be charged in the optional battery charger. To purchase an extra battery and/or a battery charger, visit the ecom Web site at www.ecom.com/go/i.roc x20accessories .   Changing the Backlight Settings  Your new Pocket PC comes with an automatic brightness control feature that saves up to 25% battery life. The Backlight icon displays on the Today screen for easy accessibility. In addition to using the TodayPanel Lite shortcut, you can access the Backlight application by tapping Start > Settings > System tab > Backlight.
 To change the Backlight settings:  1. Tap Start > Settings > System tab > Backlight.  2. On the Battery Power tab, select the Turn off backlight if device is not used for checkbox and enter the time duration you want to pass before the backlight turns off.  3. Tap the External Power tab to change the backlight setting for when you are using an external power source (e.g., cradle, AC Adapter, etc.).  4. Tap the Brightness tab to change the brightness level on the Pocket PC when using the Pocket PC on battery or external power.  5. Tap OK when you are finished making your changes.    Note: The Backlight automatically turns on when you tap on the screen or press a button.   Disabling Buttons  The Button Lock application allows you to disable all the buttons on your Pocket PC, except the power button whenever the device is in Standby mode. By enabling this feature, you can ensure the device is not accidentally turned on, thus draining your battery.  To enable the button lock feature:  1. Tap Start > Settings > Personal tab > Buttons.   2. Tap the Lock tab and check Disable all buttons except power button. Tap OK.   4
5 Learning the Basics  5.1 Using the Today Screen  When you first turn on your i.roc x20 Pocket PC, the Today screen displays. You can also display it by tapping Start > Today. Use the Today screen to view:   Owner information   Upcoming appointments   Unread and unsent messages   Tasks that need to be completed
Navigation Bar and Command Bar  The Navigation Bar is located at the top of the screen. It displays the Start button, active notifications (such as new e-mail, Wi-Fi connection status, speaker status) and current time. Use the Start menu to select a program.   The Command bar is located at the bottom of the screen. The New menu provides shortcuts in creating new appointments, contacts, tasks, notes, etc. The Input panel button allows you to enter text.     Menu   Buttons   actions
5.2 Status Icons  You may see the following status icons displayed on the Navigation or Command bar. Tap the icon on the screen to view more information related to the item.   Icon    Status  Active connection to computer or wireless network.   Inactive connection to computer or wireless network.   Microsoft ActiveSync is synchronizing.    Speaker is on.    Speaker is off (or in mute position).    Battery power is low.    Battery power is very low.    E-mail, SMS or MMS messages received.   Instant messages received.  (Continued)
   Icon    Status   i.roc x20 Pocket PC is connected with the desktop cradle. This icon appears only when there is an active connection.   i.roc x20 Wireless icon—Tap to display Wireless screen Provides a control center to turn all wireless activities on and off, and to configure their settings.  5.3 Pop-Up Menus  Pop-up menus allow you to quickly perform an action. Use the pop-up menu to cut, copy, rename, and delete an item, also send an e-mail or send a file to another device.  To access a pop-up menu, tap and hold the stylus on the item on which you want to perform the action. When the menu appears, tap the desired action, or tap anywhere outside the menu to close it without performing an action.   Tap and hold to display the pop-up menu  Tap the action you want   Tap outside the menu to close it without performing an action
 Creating Information  From the Today screen, you can create new information, including:   Appointments   Contacts   Messages   Excel Workbook   Notes   Tasks   Word documents  1. From the Start menu, tap Today > New at the bottom of the screen.  2. Tap an option to create a new item.  3. Tap OK after you finish creating a new item.   Customizing the Today Screen  From the Settings Today screen, you can:   Add a picture as the background.   Select the information that appears on the Today screen.   Select the Today screen theme.   Set the order of the information.   Set when to see the Today screen.
1. Tap Start > Settings > Personal tab > Today.  2. Select Use this picture as the background checkbox. 3. Tap Browse to select a picture from File Explorer. 4. Tap the Items tab to select or reorder the information on the Today screen.       5. Tap an item to highlight it.
6. Tap Move Up or Move Down to change the order of items on the Today screen.   Note: You cannot change the placement of the Date on the Today screen.  7. Tap the down arrow associated with Today timeout checkbox to determine how many hours must pass before the Today screen displays.  8. Tap OK.   5.4 Changing the Screen Orientation  You can change the screen orientation of your Pocket PC from Portrait to Landscape mode.  To change the screen orientation of your Pocket PC:  1. Tap Start > Settings > System tab > Screen.  2. Tap Portrait, Landscape (right-handed), or Landscape (left-handed).
 3. Tap OK.  Shortcut: Press and hold the Calendar button for two seconds to toggle between portrait and landscape modes. 5.5 Opening and Closing Applications  Open any application on your i.roc x20 Pocket PC from the Start menu.   Note: You can also open an application by assigning it to an Application Button. To assign Application Buttons, from the Today screen, tap Start > Settings > Personal tab > Buttons.   To open an application:  1. Tap Start > Programs.  2. Tap the desired application title or logo.  To minimize an open application, tap the x at the top right of the screen. Close applications either manually or by using iTask.  Note: Applications automatically close based on available memory. Closing with iTask  1. Press the iTask button (Application Button 4 on the lower right side of your device).  2. Tap and hold the program to be closed.  3. From the pop-up menu, tap Close This Task.
Closing Manually  1. Tap Start > Settings > System tab > Memory > Running Programs tab.  2. Tap Stop All or select a particular application, then tap Stop.  Note: To bring a currently running program to the foreground, tap Activate.  5.6 Installing Applications  Install applications on your i.roc x20 Pocket PC from your:   Computer by using Microsoft ActiveSync.   i.roc x20 Pocket PC if the application file has a .cab extension.   i.roc x20 Pocket PC or your computer by copying an application file that has an .exe or .cef extension.  To install more applications on your Pocket PC:  1. Use the ecom Desktop Cradle to connect your Pocket PC to your personal computer.  2. Follow the instructions in the Installation Wizard provided with the program you want to install.  3. Check the screen on your Pocket PC to see if any further steps are necessary to complete the program installation.
 5.7 Deleting Applications  To delete applications on your Pocket PC:  1. Tap Start > Settings > System tab > Remove Programs.  2. Select the checkbox for the program(s) you want to remove, then tap Remove.   Note: By removing an application from your Pocket PC, you increase storage memory (used to store data and document files) and program memory (used to run programs) on the device.  5.8 Backing Up Information  Use i.roc x20 Backup or Microsoft ActiveSync Backup to back up and restore information on your i.roc x20 Pocket PC.   Note: Your i.roc x20 Pocket PC came preinstalled with i.roc x20 Backup. However, you must install ActiveSync on your computer before using ActiveSync Backup.   To help reduce the chance of losing information, you should back up information on a regular schedule. For more information on backing up your data, refer to “Using i.roc x20 Backup to Backup/Restore” in Chapter 6.
 5.9 Using the i.roc x20 FIle Store Folder  You can install programs and save files to the i.roc x20 File Store folder, which is accessed from File Explorer on your i.roc x20 Pocket PC.  Programs and files stored in i.roc x20 File Store are held in ROM and are saved if you perform a full reset of your i.roc x20 Pocket PC or if the battery discharges completely.   CAUTION: If you have ecom ProtectTools enabled and forget your PIN or password, resetting the device will result in loss of data stored in i.roc x20 File Store. For more information on ecom ProtectTools, refer to Chapter 7, “Using Security Features.”   Some devices also come with High Speed File Store, a faster version of i.roc x20 File Store. If your i.roc x20 Pocket PC has more than 30 MB of File Store space, it is High Speed File Store. To find out how much File Store memory is on your device, from the Today screen, tap the Memory icon > Storage Card tab. Select i.roc x20 File Store in the drop down list box. If the amount is 30 MB or more, then you have High Speed File Store.   To save to i.roc x20 File Store or High Speed File Store:  1. Copy the files to be saved to the i.roc x20 File Store folder.  2. Tap Start > Programs > File Explorer > My Device > i.roc x20 File Store.  3. Paste the selected files.
 CAUTION: If you format i.roc x20 File Store, do not perform a hard or soft reset. Doing so may prevent your Pocket PC from operating normally. For more information on formatting i.roc x20 File Store, refer to “Performing a Hard Reset” in Chapter 1.   Note: Before saving files to the i.roc x20 File Store folder, it is a good idea to determine how much memory is available in the folder. To view the amount of memory, from the Today screen, tap the Memory icon > Storage Card tab, then select i.roc x20 File Store from the drop down menu.
 6 Learning Input Methods  6.1 Using Input Software  To input information to your Pocket PC, you can tap the on-screen keyboard or write with the Letter Recognizer, Microsoft Transcriber, or Block Recognizer in any application. You can use the stylus to draw and write on the screen in the Notes application and from any Notes tab in the Calendar, Contacts, and Tasks applications.   CAUTION: To avoid damaging your i.roc x20 Pocket PC screen, always use a stylus. Never use a pen or any type of metal pointer on the screen.   Note: Microsoft Transcriber is a free program that you can download from the Microsoft Web site.   Changing Word Suggestion Options  As you type or write, the Pocket PC suggests words for you in a box above the keyboard, Letter Recognizer, or Block Recognizer, but not in the Transcriber.  You determine:   If words are suggested.   The number of letters you enter before a word is suggested.   The number of words that are suggested per entry.
 To change settings for word suggestions:  1. Tap Start > Settings > Personal tab > Input.  2. Tap the Word Completion tab.     3. Tap the down arrow associated with letters and select the number of letters you want to type before a word is suggested.  t
4. Tap  the  down  arrow  associated  with  words  and  select  the number of words you want suggested. 5. Tap OK   Note: If you do not want any words suggested, remove the checkmark by tapping the checkbox next to Suggest Words When Entering Text.
Using the On-Screen Keyboard  Use the stylus to tap letters, numbers, and symbols on the on-screen keyboard to enter typed text directly onto the screen.  1. From any application, tap the up arrow next to the Input Panel icon.  2. Tap Keyboard to display a keyboard on the screen.   Note: To see symbols, tap the 123 key.   3. Tap a letter, symbol, or number to enter information.  4. Tap OK.
Writing with the Stylus and the Letter recognizer Use the stylus and Letter Recognizer to letters, numbers, and symbols on the screen. Create words and sentences by writing in uppercase (ABC), lowercase (abc), and symbols (123) as instructed here. To write with the stylus and Letter Recognizer:  1. From any application, tap the up arrow next to the Input Panel icon.  2. Tap Letter Recognizer.  3. Write a letter or symbol between the dashed line and baseline.   To display in uppercase, write a letter between the hatch marks labeled ABC.   To display in lowercase, write a letter between the hatch marks labeled abc.   Write a number or draw a symbol between the hatch marks labeled 123.   What you write will be converted to text.   Note: For the Letter Recognizer to work effectively, write characters between the dashed line and baseline.  If you are writing a letter like “p,” write the top portion within the dashed line and baseline, and the tail portion below the baseline.  If you writing a letter like “b,” write the bottom portion within the dashed line and baseline, and the top portion above the dashed line.    Note:To view help on using Letter Recognizer, open the program and tap the question mark next to the writing area.
 6.2 Writing with the Stylus and Microsoft Transcriber  Use the stylus and Microsoft Transcriber to write words, letters, numbers, and symbols anywhere on the screen.  1. From any application, tap the up arrow next to the Input Panel icon.  2. Tap Transcriber to display the Transcriber Intro screen.  3. Tap OK.  4. Tap New at the bottom of the screen.  5. Begin writing on the screen. What you write will be converted to text.   Note: To “teach” Transcriber your style of writing, tap on the “a” icon at the bottom of the screen to display the Letter Shapes screen and follow the instructions.   Writing with the Stylus and Block Recognizer  Write letters, numbers, and symbols using the stylus and Block Recognizer. Create words and sentences by writing letters and numbers in specific areas.  1. From any application, tap the up arrow next to the Input Panel button.  2. Tap Block Recognizer.
3. Write a word, letter, or symbol between the hatch marks.   To type text, write a letter between the hatch marks labeled “abc.”   To type numbers or symbols, write a number or symbol between the hatch marks labeled “123.”  What you write will be converted to text. Drawing and Writing on the Screen  Use the stylus as a pen to draw and write on the screen in the Notes program or from the Notes tab in Calendar, Contacts, or Tasks.  1. Tap Start > Programs > Notes > New.  2. Draw and write on the screen.  3. Tap the Pen icon.  4. Tap OK.
 Converting Writing to Text  You can convert your writing to text when you write with the stylus in the Notes program or from the Notes tab in:   Calendar   Contacts   Tasks To convert writing to text: 1. From the Start menu, tap Notes or tap the Notes tab in Calendar, Contacts, or Tasks.  2. Tap a note to open it.  3. Tap Tools.  4. Tap Recognize.   Note: To convert a particular word or phrase, highlight it before you tap Recognize. If a word is not recognized, it will not be converted.  5. Tap OK.
 7 Applications  7.1 Software Available on the ecom i.roc x20 Pocket PC  The software programs described below are preinstalled on your i.roc x20 Pocket PC. You can find detailed information for using this software in the Help files located on your i.roc x20 Pocket PC. To access these Help files, tap Start > Programs > Help and select an application.  In addition, the Microsoft Pocket PC Basics Help provides instructions on operating the Pocket PC. To locate Pocket PC Basics, tap Start > Programs > Help > Pocket PC Basics.   Note: If your Pocket PC loses power, the preinstalled programs are not deleted.
To access the following programs, tap Start, then the name of the program, or tap directly on the Today screen.   Application  Function  Microsoft Calendar   Schedules appointments, meetings, and other events, and sets an alarm to remind you of the appointments. Appointments for the day are displayed on the Today screen.  Microsoft Contacts   Provides a list of colleagues and friends to e-mail and telephone.  Microsoft Messaging   Receives and sends Internet e-mail messages in Inbox on your i.roc x20 Pocket PC or your computer if ActiveSync is installed. You must have an e-mail address provided by your Internet Service Provider (ISP) or employer to send and receive e-mail.  Microsoft Pocket Internet Explorer  Browses the Internet and downloads pages through synchronization or by connecting to the Internet.  Microsoft Tasks   Tracks your to-do list.  TodayPanel Lite   Allows you to quickly access the battery, memory, storage, and backlight option on your Pocket PC.
To access the following programs, tap Start > Programs, then the name of the program.   Application  Function  Microsoft ActiveSync  Synchronizes the information between your Pocket PC and computer so you have the latest information in both locations. Be sure you install ActiveSync on your computer before connecting the cradle and i.roc x20 Pocket PC to your computer.  Microsoft Calculator   Performs calculations and converts currency.  Microsoft File Explorer  Shows where files are located on your i.roc x20 Pocket PC or storage card(s).  Microsoft Find  Allows you to search for a particular file or file folder on your i.roc x20 Pocket PC.  How Do I...?  Answers the most frequently asked questions regarding your i.roc x20 Pocket PC.  ecom Image Zone  Displays individual images and runs slide shows. Also displays images from the SD storage card of a digital camera.  ecom Mobile Printing   Enables mobile printing.  Games  Contains games designed for play on the i.roc x20 Pocket PC.  i.roc x20 Backup  Allows you to back up your data to protect it from loss due to a drained battery, accidental deletion, or hardware failure.  iTask  Allows you to quickly access the most frequently used features on your i.roc x20 Pocket PC.  (Continued)
 (Continued)  Application  Function  Microsoft MSN Messenger   Provides a chat environment which allows you to see who is online, send and receive instant messages, have an instant message conversation with a group of contacts, tell contacts that you are unavailable, and block contacts from seeing your status or sending you messages.  Microsoft Notes   Creates handwritten or typed notes, drawings, and recordings.  Microsoft Pocket Excel   Able to create and edit workbooks or view and edit Excel workbooks created on your computer.  Microsoft Pocket MSN   Allows you to subscribe to a variety of popular MSN services for your Pocket PC.  Microsoft Pocket Word   Creates new documents or views and edits Word documents created on your computer.  Print Manager   Allows you to manage your print jobs.  Microsoft Terminal Services Client  Logs onto your computer and uses all the programs available on that computer from your Pocket PC (Windows 2000 and XP or later).  Microsoft Windows Media Player 9 Series  Plays digital audio and video files in Windows Media or MP3 format on your device.
 To access the following programs, tap Start > Settings > Personal tab, then tap the name of the program.  Application  Function  Buttons   Allows you to program the application buttons to open your most used programs, customize the way your Up/Down control repeats, and disable all buttons except the power button to ensure the device is not accidentally turned on.  ecom ProtectTools   Provides software security on the Pocket PC to ensure there is little risk of losing sensitive data. Allows you to use your fingerprint (not available on some models), a PIN, and/or a password to protect your data.  Input   Define your input method, customize word completion options, and define your typing style.  Menus   Customize your Start menu or define a new menu.  Owner Information   Input information about yourself to distinguish your Pocket PC from others.  Sounds & Notifications   Enables/disables sounds for various options such as events, programs, screen taps, and hardware buttons as well as defining when notifications occur.  Today   Select a theme for the Today screen background and define which items appear on the Today screen.
To access the following programs, tap Start > Settings > Personal tab, then tap the name of the program.   Application  Function  About   Describes which version of Windows Mobile 2003 software is loaded on your i.roc x20 Pocket PC and gives information on your Device ID and applicable copyrights.  Audio   Defines audio settings.  Backlight   Enables changes to the Pocket PC backlight settings such as brightness, and conserving on battery and external power.  Certificates   Allows you to use personal certificates to positively identify yourself to others and gives information on preinstalled root certificates.  Clocks & Alarms   Allows you to select time zones, times, and dates for a home and a visiting location and set up alarms.  Enroll   The ecom Certificate Enroller allows you to download certificates from the ecom Web site if you have proper authorization.  ecom Asset Viewer   Lists detailed information about your system and its configuration.  ecom Profiles   Allows the user to change alerts (ring type and tone or vibrate mode). For example, if you are in a meeting, you can change the ring type for incoming calls to vibrate.  iTask Settings   Allows you to define the settings that will appear when you press the iTask button on the front of the device.  (Continued)
(Continued)  Application  Function  Memory   Review how much memory is available on your device or on a storage card. Also allows you to review which programs are currently running and stop or activate them.  Power   See how much main and backup battery power is remaining on your device, define when the device will turn off after not being used, and define the standby period.  Regional Settings   Define the language your device uses as well as a number of other regional specifications such as the way numbers, currency, time, and dates are displayed.  Remove Programs   Allows you to uninstall programs you have installed yourself.  Screen   Define the screen orientation, align the screen, enable Clear Type, and define the size text appears on your screen.  Self-Test   Runs a basic diagnostic test on the device.
To access the following programs, tap Start > Settings > Connections tab, then the name of the program.  Application  Function  Beam   Allows you to determine whether or not to automatically receive all incoming infrared beams.  Bluetooth   Turn Bluetooth on or off or establish a new Bluetooth connection.  Bluetooth Phone Manager   Manages Internet connections for your Pocket PC in line with your cell phone and your cell phone service provider. Also simplifies the Bluetooth pairing procedure between your Pocket PC and your cell phone.  Microsoft Connections   Connects your Pocket PC to the Internet and intranet to browse Web sites, sends and receives e-mail, and synchronizes information using ActiveSync.  i.roc x20 Wireless   Provides a centralized control to all wireless features on your Pocket PC. Allows you to turn all wireless features on and off and configure settings for the Wireless Local Area Network (WLAN), Bluetooth, etc.  LEAP   Allows you to establish LEAP connection settings if your network uses this security protocol.  Network Cards   Configure your network adapters if you use your network card in two places such as work and home.
 7.2 Installing Applications  Install applications on your i.roc x20 Pocket PC from your:   Computer by using Microsoft ActiveSync   i.roc x20 Pocket PC if the application file has a .cab extension   i.roc x20 Pocket PC or your computer by copying an application file that has an .exe or .cef extension  To install more applications on your Pocket PC:  1. Use the ecom Desktop Cradle to connect your Pocket PC to your personal computer.  2. Follow the instructions in the Installation Wizard provided with the program you want to install.  3. Check the screen on your Pocket PC to see if any further steps are necessary to complete the program installation.  7.3 Removing Applications  To remove applications on your Pocket PC:  Tap Start > Settings > System tab > Remove Programs.  Select the checkbox for the program(s) you want to remove, and then tap Remove.   Note: By removing any application from your Pocket PC, you increase storage memory (used to store data and document files) and program memory (used to run programs) on the device.
 7.4 Using TodayPanel Lite  TodayPanel Lite is a Today screen plug in that allows you to quickly view and change a variety of options. The options you can change are:   Icon   Name     Description  TodayPanel Lite  Change the TodayPanel Lite options or the Today screen settings.  Battery power  View the amount of battery power remaining, set the standby period, set the time duration for turning off the Pocket PC, set the USB charging method.  Main memory  View the amount of main memory available on the Pocket PC. Also you can view, activate, and stop all running programs from this screen.  Storage card memory  View the amount of storage card memory available or how much memory is allocated to i.roc x20 File Store. Also you can view, activate, and stop all running programs from this screen.  Backlight  View and change the backlight options on the Pocket PC.
To use TodayPanel Lite, from the Today screen, tap the icon of your choice, make the appropriate changes, and tap OK.   TodayPanel Lite also has the flexibility to change the icons to compact mode, as shown here, which allows more space on the Today screen. Also, you can change memory and storage settings to display as percentages instead of file sizes.
To change to compact mode:  1. Tap   > Options to open the TodayPanel Lite application.  2. Tap the Display Mode listbox and select Compact.  3. Tap Bar Color... to change the color of the bar and tap OK. To display the memory and storage as percentages:   1. Tap   > Options to open the TodayPanel Lite application.  2. Tap the Display Memory as listbox or the Display Storage as listbox and select the percentage listed.  3. Tap OK.   To remove the TodayPanel Lite from the Today screen:  1. Tap Start > Settings > Today icon > Items tab.  2. Uncheck the TodayPanel checkbox and tap OK.   7.5 Using ecom Image Zone  When you use ecom Image Zone you can review and share images from your i.roc x20 Pocket PC. You can also print, send, record, and e-mail images directly from your Pocket PC, or create slideshows to share your pictures with friends and family.
When you launch the ecom Image Zone, the following icons are displayed on the bottom of the screen.    Icon      Definition  Tap to view the photo in full screen.  Tap to start slideshow mode.  Tap to change folders.  Tap to delete photo.  Tap to record and attach an audio clip to the photo.  Tap to send the photo using your favorite method.  Tap to print using your favorite method.
Viewing Thumbnail Photos  To view a photo:  1. Tap Start > Programs > ecom Image Zone.  Note: By default, the viewer opens in Browse mode. Browse mode displays a thumbnail view of the photos in the current folder.   2. Tap a thumbnail (i.e., a small representation of a larger image) to select the photo. A preview of the photo and information about it is displayed.   Note: To view photos in ecom Image Zone, be sure your scroll bar has been moved all the way to the left. Otherwise, you might not be able to see other photos in the thumbnail view.   To view photos in a different folder:  1. Tap File in the Command bar, and then tap Open.  2. Select the folder you want.  3. Tap OK. ecom Image Zone displays the photos from the new file folder you selected.
Viewing a Photo Full-Screen  To view a photo full-screen and zoom in or out:  1. Tap Start > Programs > ecom Image Zone.  2. Select the photo by tapping on its thumbnail.  3. Tap on the preview window or tap Tools > View Image.  4. Zoom in or out using the tool bar buttons. If the photos are too large to fit on the screen, you can display other parts of the photo by dragging the stylus on the screen.  5. Tap OK to close the View Image screen.   Viewing a Slideshow  You can view a slideshow of the photos in a specified folder.  1. Tap Start > Programs > ecom Image Zone.  2. Tap Tools > View Slideshow.  3. Tap anywhere on the screen to display the on-screen controls. You then can use the on-screen controls to move forward or backward through the slides or to end the slideshow.   You can control slideshow display options, such as:   Sequence—the order in which photos are displayed   Delay—the amount of time each photo displays before the slideshow moves to the next photo   Rotation—the slideshow can automatically rotate the photos so they display on the full screen   Transition Effect—the method used by photos to exit and enter the slideshow   To change slideshow settings:  1. Tap Start > Programs > ecom Image Zone.  2. Tap Tools > Settings > Slideshow tab.
3. Select the settings and effects you want to use in your slideshow.  4. Tap OK to exit the menu.   Printing Photos  You can print pictures from ecom Image Zone using Print Manager. To print a picture:  1. Tap Start > Programs > ecom Image Zone.  2. Select the picture to be printed by tapping on its thumbnail.  3. Tap File > Print.  4. Select Print Manager or ecom Instant Share Printing and tap Next.  5. Follow the instructions on the screen to print your picture.    Note: For more information on using ecom Image Zone, tap Start > Programs > ecom Image Zone > Help.   E-mailing Photos  Using ecom Image Zone, you can e-mail photos to all of your family and friends. To send photos as e-mail attachments:  1. Tap Start > Programs > ecom Image Zone.  2. Select the photo you want to e-mail.  3. Tap the e-mail icon located at the bottom of the screen.  4. Tap E-mail Attachment, then Next.  5. Enter the e-mail address, then tap Send.
Attaching a Sound File to a Photo  To add sound to a photo:  1. Tap Start > Programs > ecom Image Zone.  2. Select the photo to which you want to attach a sound file by tapping on its thumbnail.  3. Tap the Cassette icon on the Command bar located at the bottom of the screen.  4. Tap the Record button on the Sound toolbar.   Icon   Name     Function  Record  Starts recording sound.  Stop  Stops the current recording.  Play  Plays the recorded sound associated with a selected photo.  Delete  Deletes the recorded sound associated with a selected photo.  5. Speak into the microphone or record the sound you want to associate with the photo.  6. Tap the Stop button on the Sound toolbar.   All photos with associated sound files have a speaker icon on the  thumbnail. To change audio options:  1. Tap Start > Programs > ecom Image Zone.  2. Tap Tools located on the Command bar at the bottom of the screen.  3. Tap Settings > Audio tab.  4. . Select your audio options.
Codec settings: PCM or GSM 6.10.   GSM 6.10 provides good voice recording and takes up far less space than Pulse Code Modulation (PCM).   PCM provides better sound quality but may take up to 86 times more storage space than GSM 6.10 recordings.  Format: Select sound quality. Higher sound quality recordings take up more storage space.   5. Tap OK to exit this menu.   7.6 Backing Up and Restoring  Use i.roc x20 Backup or Microsoft ActiveSync Backup to back up and restore information on your i.roc x20 Pocket PC.   Note: Your i.roc x20 Pocket PC came preinstalled with i.roc x20 Backup. However, you must install ActiveSync on your computer before using ActiveSync Backup.   To help reduce the chance of losing information, you should back up information on a regular schedule.   CAUTION: Restoring your information replaces the current information on your i.roc x20 Pocket PC with the information saved in your backup.   Using i.roc x20 Backup to Backup/Restore   To backup/restore using i.roc x20 Backup:  1. Tap Start > Programs > i.roc x20 Backup.  2. Tap the Backup tab or the Restore tab.
3. Select the files and folders to be backed up or restored.  4. Select file location for backed-up data.  5. Set backup or restore options and press OK.  6. Press the Backup or Restore button, and then press the Start button on the next screen.   Using ActiveSync To Backup/Restore  Use Microsoft ActiveSync Backup to back up and restore information on your ecom i.roc x20. To help reduce the chance of data loss, perform a backup on a regular schedule.   Note: Before using ActiveSync Backup, you must first install ActiveSync from the Companion CD.   Close all programs on your i.roc x20 Pocket PC before backing up or restoring your information.  To backup/restore:  1. Connect the i.roc x20 Pocket PC to your computer.  2. From your computer, open Microsoft ActiveSync by clicking  Start > Programs > Microsoft ActiveSync.  3. In ActiveSync, click Tools > Backup/Restore.  4. Select the Backup or Restore tab, then choose your options.  5. Click Backup Now or Restore Now.   7.7 Using iTask  The iTask application, sometimes called i.roc x20 Task Manager, allows you to quickly access the most frequently used features on your i.roc x20 Pocket PC.  From iTask you can manage tasks that are already running, launch new programs, and more. Each task that is currently running on the Pocket PC shows up in a list.
Tap on a task to bring the current program into the foreground or tap and hold to bring up the Task Menu.  To start iTask, tap Start > Programs > iTask.  7
8 Using Security Features  The widespread use of Pocket PCs has significantly increased employee productivity. However, non-secured or inadequately secured Pocket PCs are creating network security issues for the corporate workplace when they connect to a secure network.  Valuable information is bypassing network security and being stored on inadequately secured Pocket PCs. The ecom ProtectTools security features provide on-device security protection so there is less risk of losing sensitive information on your Pocket PC.   8.1 Using ecom ProtectTools  ecom ProtectTools helps protect your Pocket PC by providing authentication and encryption of email, calendar, contacts, notes, tasks, and/or all files stored in the My Documents folder. It can also be used to encrypt data stored on expansion cards.  When you enable ecom ProtectTools, you have the option of enrolling a fingerprint or entering a PIN and/or password to access the Pocket PC. If you are unable to successfully swipe your fingerprint or you forget your PIN or password, you can access the device with a backup question and answer.   CAUTION: ecom ProtectTools helps protect your Pocket PC and the data stored on it. If you are unable to access your device with any of the above methods, there is no way to unlock your device. You have to restore your device to factory settings, resulting in the loss of all data on your i.roc x20 Pocket PC, including data stored in i.roc x20 File Store. It is recommended that you remember your PIN/password and question/answer.
 Encrypting/Decrypting Data  If your i.roc x20 Pocket PC has been off for longer than the time you selected during setup, your data is encrypted. When you turn the device on, you are prompted to authenticate using your fingerprint, PIN, and/or password. After successful authentication, your data is decrypted. This may take a few moments depending on the amount of data you chose to have encrypted. However, encryption runs in the background, and you can perform other tasks on your i.roc x20 Pocket PC during this time.  You can monitor the decryption process in two ways:   If you selected Display encryption status on the Encryption Settings screen during setup, the ecom ProtectTools window displays the decryption status.   If you choose not to display this status, the encryption/decryption process proceeds in the background, allowing you to use your Pocket PC for other purposes.   In either case, a blue lock icon appears in the Taskbar at the bottom of the Today screen during decryption. When the icon disappears, decryption is complete. Typically the Pocket PC responds more slowly during the encryption/decryption process.
  You must authenticate yourself and wait for the decryption process to complete before synchronizing using Microsoft ActiveSync. If decryption is not complete before synchronization begins, ActiveSync may not be initiated. To correct the problem, disconnect and reconnect the device after decryption is complete.  If you enable Server Synchronization on ActiveSync, it is recommended that you do not select a Mobile Schedule to automatically initiate synchronization. Since authentication and decryption are necessary when the Pocket PC is turned on, automatic synchronization does not work properly when ecom ProtectTools is enabled. The same problem may also arise when using other server-based synchronization products.
Changing Your ecom ProtectTools Settings  If you want to change any of your security information, you can do so easily. Tap the yellow lock icon in the Taskbar at the bottom of the Today screen.   Five options are displayed:   Lock Device   Logoff   Change Passwords   Manage Encrypted Folders   Manage Security Settings   Lock Device  Selecting this option allows you to manually lock your Pocket PC, requiring authentication to access the device. Data and files are not encrypted.
Logoff  Selecting this option allows you to manually log off your Pocket PC, requiring authentication to access the device. Data and files are encrypted.  Change Passwords  To change your fingerprint, PIN or Password:  1. Tap Change Passwords.  2. Swipe your finger or enter your current PIN or password to authenticate yourself.  3. Select the information you want to change (Fingerprint, PIN/password or Question/Answer pair), then tap the Change button.  4. Follow the onscreen instructions to make the change.   Manage Encrypted Folders  By default, all data in the My Documents folder is encrypted. Selecting Manage Encrypted Folders allows you to choose other folders to store encrypted data. These can include data stored on expansion cards.  To select other folders to store encrypted data:  1. Tap Manage Encrypted Folders.  2. Tap Encrypted Folder at the bottom of the screen.  3. Tap Add.  4. Enter the name, location, and estimated size of the folder to be encrypted.    Note: The size of the folder is its maximum size and cannot be changed.
5. Tap OK. The device formats the new folder.  6. Tap OK.   Note: You cannot encrypt existing folders.  For more information on managing encrypted folders, refer to ecom ProtectTools Help. To access encryption Help, from the Today screen, tap the Yellow Lock icon > Yellow Lock icon in upper-left corner of the ecom ProtectTools screen > Help > Understanding encryption.   Manage Security Settings  You can disable security or make changes to any of the settings you selected during setup.  To make changes to security settings:  Tap Manage Security Settings.  Swipe your finger or enter your PIN or password to authenticate yourself.  To disable security, tap the Disable Security button.  To change any previously selected security settings, tap the appropriate tab at the bottom of the screen and follow the onscreen instructions. The screens match those used during the setup process. For more information, refer to“Setting Up Security” earlier in this chapter.  Use the Programs tab to select any programs you do not want to stop running when you log off. For more information, tap the Programs tab, then tap Help at the bottom of the screen.
 9 Using Wi-Fi  9.1 Getting Acquainted with Wi-Fi  With wireless access, you do not need to use cables to connect your ecom i.roc x20 to the Internet. Instead, access points transmit data to and from your wireless device. Your ecom i.roc x20 can connect to an 802.11b WLAN or connect directly to other WLAN-enabled devices. With Wi-Fi, you can:   Access the Internet   Send and receive e-mail   Access corporate network information   Use virtual private networks (VPNs) for secure remote access   Use hotspots for wireless connectivity   Note: Use of dial-up and wireless Internet, e-mail, corporate networks, and other wireless communications, such as Bluetooth-enabled devices, may require separately purchased additional hardware and other compatible equipment, in addition to a standard Wi-Fi infrastructure and a separately purchased service contract. Check with your service provider for availability and coverage in your area. Not all web content may be available. Some web content may require installation of additional software.
Powering Wi-Fi On or Off  To use Wi-Fi on your ecom i.roc x20, you need to turn on Wi-Fi and set up your device.   Note: The Wi-Fi antenna for the ecom i.roc x20 is located in the top of the device. If you cover up the top of the ecom i.roc x20 after you have turned on Wi-Fi, signal strength may be affected.   To turn the Wi-Fi on or off:  1. From the Today screen, tap the i.roc x20 Wireless icon () in the Command bar located at the bottom of the screen.  2. Tap the Wi-Fi button.  When Wi-Fi is powered on, the Wi-Fi icon on the i.roc x20 Wireless screen turns from gray to amber, and the Wi-Fi light-emitting diode (LED), located on the top left corner of the device, flashes blue indicating one or more radios are on. When a wireless connection is made, the Wi-Fi icon on the i.roc x20 Wireless screen turns from amber to green.   Note: Even though the LED flashes blue to indicate Wi-Fi is turned on, it does not necessarily mean a connection has been established with another device or access point.   If Wi-Fi is off, the Wi-Fi icon turns from green or amber to gray.   Note: Some Access Points and networks do not support one or more of the power saving modes that are available. If you cannot connect with a particular wireless network, try turning off the Wi-Fi Power Save modes.
Automatically Connecting to a Network   1. If one or more broadcast networks are present, the Network Indicator icon (   ) appears in the Navigation bar. Tap the network you want to connect to, and then tap whether the network connects to the Internet (does not use proxy settings) or Work (uses proxy settings).  2. If you are prompted for a Network Key (WEP), enter it and tap Connect. If you are not sure, contact your network administrator.   CAUTION: A new network that does not request an encryption key may not be a secure network. To check whether an existing network uses encryption, check the Encryption Status of the network. Tap Start > i.roc x20 Wireless > Wi-Fi icon > Manager button. Refer to “Monitoring Signal Strength and Status” later in this chapter for more information.   Manually Entering New Network Settings   A wireless network can be added either when the network is detected (the Network Indicator icon is showing in the Navigation bar) or manually by entering setting information. To manually add a wireless network:  1. Be sure Wi-Fi is powered on.  2. Tap the Connections icon (   or    )> Settings >  Advanced tab > Select Networks button.  3. Enter or select the network name (or tap New) you want to use to either connect to the Internet using an ISP or a Virtual Private Network (VPN) for work. Tap OK once completed.  4. Set up your Dialing Rules and Exceptions and press OK.  The next step is to setup your network interface cards.  5. From the i.roc x20 Wireless screen, tap > Settings.  6. Select Add New... in the list box on the General tab to start configuring wireless networks.
 Note: If a network was detected in step 3, the SSID is automatically entered and cannot be changed.   7. Enter a SSID into the Network Name box.  8. In the Connects to: box, select where your network connects to (The Internet or Work).  9. If you want to connect to an ad-hoc connection, tap the This is a device-to-device (ad-hoc) connection checkbox.  10. If authentication information is needed, from the Configure Wireless Network screen, tap the Network Key tab.   Note: To determine whether authentication information is needed, see your network administrator.   11. To configure the type of network authentication to use, select:  a.  To use Shared Key authentication, tap the Authentication (Shared mode) listbox. Type the network key in the Network Key: box.  b.  To use data encryption, tap the Data encryption (WEP enabled) listbox.  c.  If a network key is provided by your network automatically, tap the The Key is provided for me automatically checkbox.  12. For increased security, tap the 802.1x tab and select the Use IEEE802.1x network access control checkbox. You should only check this option if it is supported by your network environment. Ask your network administrator if you are unsure.  13. Select EAP type (PEAP or Smart Card/Certificate) from the listbox.  14. Once you have completed entering the network settings, tap OK twice to save your settings and exit this menu.
Searching for Networks to Access  Networks that you have already configured are preferred networks and can be found on the i.roc x20 Wireless screen > Settings > Wireless Networks list box. You can choose whether to connect only to preferred networks or to have your ecom i.roc x20 search for and connect to any available network (preferred or not).  1. From the i.roc x20 Wireless screen, tap Settings > Wireless tab.  2. In the Networks to access box, tap the type of network you want to connect to (All Available, Only access points, or Only computer-to-computer).  3. To connect only to networks that have already been configured, clear the Automatically connect to non-preferred networks checkbox.   Note: If you check the Automatically connect to non-preferred networks checkbox, your ecom i.roc x20 detects any new networks and provides you the opportunity to configure them.   9.2 Managing Wireless Network Settings  In managing your wireless networks, sometimes it is necessary to change network settings. In the next two sections, learn how to view, edit, and delete available wireless network settings.  Viewing or Editing a Wireless Network  To view or edit an existing or available wireless network:  1. Be sure Wi-Fi is powered on.  2. From the i.roc x20 Wireless screen, tap Settings > Wireless tab.  3. In the Wireless networks box, tap the desired network name.  4. Edit the existing settings as necessary, and then tap OK to save the changes.
Deleting a Wireless Network  You can delete networks you manually entered. However, if a network was automatically detected, you will not be able to delete it.  To delete an existing or available wireless network:  1. Be sure Wi-Fi is powered on.  2. From the i.roc x20 Wireless screen, tap Settings > Wireless tab.  3. In the Wireless networks box, tap and hold the network you want to delete.  4. Tap Remove Settings.  5.  9.3 Monitoring Signal Strength and Status  To view the signal strength between your ecom i.roc x20 and an access point Wi-Fi connection:  1. Tap the Connections icon (   or   ) in the Navigation bar.  2. When the Connectivity box displays, you will be able to view the type of network the ecom i.roc x20 is connected to (for example, Work or Internet) and an icon displaying the signal strength.   Note: The Signal Strength icon will not be displayed if a connection is not present.   3. To make changes to the connection settings, tap Settings.  4. To exit the Connectivity box, tap the Hide button.   For more detailed information:  1. Tap Start > i.roc x20 Wireless.  2. Tap the Wi-Fi icon to turn Wi-Fi on.  3. Tap the Manager button.
4. If a wireless connection has been established, you can view information on signal strength, SSID, Encryption Status, Access Point, and IP Address.  5. To add a new wireless network, tap the Configure Wireless Networks button.  6. For more detailed information on your connection status, tap the Advanced tab.   9.4 Advanced Network Settings  Use the next few sections to learn how to set up and change network configuration settings so your ecom i.roc x20 can communicate with other networks.  9.5 Wi-Fi Terms  It is recommended that you become familiar with the following terms as you begin to use Wi-Fi technology.  Term  Definition  802.11 standard   An approved standard specification of radio technology from the Institute of Electrical and Electronic Engineers (IEEE) used for wireless local area networks (WLANs).  Device-to-computer or ad-hoc  A mode that does not use access points. It provides independent peer-to-peer connectivity in a wireless LAN.  Domain Name System (DNS)  The way that Internet domain names are located and translated into IP addresses. It is an easy to remember name for an Internet address. Every website has its own specific IP address on the Internet.  (Continued)
(Continued)  Term  Definition  Encryption   An alphanumeric (letters and/or numbers) conversion process of data primarily used for protection against any unauthorized person(s).  Hotspots   Public or private areas where you can access Wi-Fi service. These wireless connections can be located, for example, at a library, cyber cafe, hotel, airport lounge, or convention center. This service can be free or sometimes requires a fee.  Infrastructure    Internet Protocol (IP) Address     Media Access Control (MAC) Address  This connection mode uses wireless access points to connect to networks.  A 128-bit number that identifies each sender or receiver of information that is sent in packets across the Internet. For example, when you request an HTML page or send e-mail, the Internet Protocol part of TCP/IP includes your IP address in the message. In this example, this information identifies your computer as the sender and/or receiver of information. A computer’s unique hardware number in a network, which also can provide security for wireless networks. When a network uses a MAC table, only the 802.11 radios (wireless devices) that have had their MAC addresses added to that network’s MAC table can access the network.  (Continued)
 Term       Definition  Security Set Identifier (SSID) A sequence of 32 characters uniquely defining (naming) a WLAN. Basically, each set of wireless devices communicating with each other is called a basic service set (BSS). Several BSSs can be joined to form one logical WLAN, called an extended service set (ESS). An SSID is the 1-32 alphanumeric, case-sensitive name given to each ESS.   Wi-Fi Protected Access (WPA) The Wi-Fi encryption method that protects unauthorized network access by utilizing a setup password (for personal use) or by verifying network users through a server (for enterprise use). Windows Internet Naming Service (WINS)  A way of managing the association of workstation names and locations with IP addresses Wired Equivalent Privacy (WEP) Basic wireless security provided by Wi-Fi. This security uses an encryption key that automatically encrypts outgoing wireless data. On the receiving side, the same encryption key enables the computer to automatically decrypt the information so it can be read. Wireless Access Point A wireless LAN transceiver or "base station" that can connect a wired LAN to one or many wireless devices. In addition, access points can also bridge to each other. Wireless Fidelity (Wi-Fi) A certification for wireless LAN products based on the IEEE 802.11 standard.
Looking Up an IP Address  To find the IP address the wireless network is using:  1. Be sure Wi-Fi is powered on.  2. Connect to a network by tapping the Connections icon ( or  )> Settings > Advanced tab > Select Networks button.  If you have already connected to a network, skip to step 5.  3. Select the network name you want to use to either connect to the Internet using an ISP or a Virtual Private Network (VPN) for work. If you need to change or create a new network management name, tap the Edit... or New... button. Tap OK once you have completed this step.  4. From the Connections screen, set up your Dialing Rules and Exceptions and press OK.  5. From the i.roc x20 Wireless screen, tap the Wi-Fi Settings button > Network Adapters tab.  6. Tap the appropriate adapter to modify the settings. The IP address appears in the IP Address box.   Changing TCP/IP Settings   Note: Most Internet Service Providers (ISPs) and private networks now use dynamically-assigned IP addresses. You will not need to change the Transmission Control Protocol/Internet Protocol (TCP/IP) settings unless your ISP or private network does not use dynamically-assigned IP addresses. If you are not sure if your ISP or private network use dynamically-assigned IP addresses, check with your network administrator.
To change TCP/IP Settings:  1. Contact your ISP or network administrator to determine your IP address, subnet mask, and/or default gateway (if needed).  2. Be sure Wi-Fi is powered on.  3. From the i.roc x20 Wireless screen, tap Settings > Network Adapters tab.  4. In the My network card connects to... dropdown box, tap either The Internet or Work.   Note: If you are connecting to your ISP at home, tap The Internet. If you are connecting to a private network, such as a corporate network at work, tap Work.  5. In the Tap an adapter to modify settings box, tap ecom i.roc x20 Wi-Fi Adapter.  6. Tap the IP Address tab.  7. Tap Use specific IP address and enter the requested information.  8. Tap OK to save your settings.   Changing DNS and WINS Settings  Note: Most Internet Service Providers (ISPs) and private networks now use dynamically-assigned IP addresses. You will not need to change Domain Name System (DNS) and Windows Internet Naming Service (WINS) settings unless your ISP or private network does not use dynamically-assigned IP addresses. If you are not sure, check with your network administrator.  Servers that require an assigned IP address may also require a way to map computer names to IP addresses. Your ecom i.roc x20 supports two name resolution options:   DNS   WINS
To change server settings:  1. Contact your ISP or network administrator to determine which name resolution to use, obtain the specific server address, and determine whether alternate addresses are available.   Note: An alternate address may enable you to connect when the primary server is unavailable.   2. Be sure the Wi-Fi is on.  3. From the i.roc x20 Wireless screen, tap Settings > Network Adapters tab.  4. In the My network card connects to... dropdown box, tap either The Internet or Work.   Note: If you are connecting to your ISP at home, tap The Internet. If you are connecting to a private network such as a corporate network at work, you should tap Work.   5. In the Tap an adapter to modify settings box, tap ecom i.roc x20 Wi-Fi Adapter.  6. Tap the Name Servers tab and enter the requested information.  7. Tap OK to save your settings.   Setting Up VPN Server Connections  A VPN connection enables you to securely connect to servers, such as a corporate network, via the Internet. To set up a VPN server connection:  1. Contact your network administrator for your user name, password, domain name, TCP/IP settings, and host name or IP address of the VPN server.  2. Tap the Connections icon (   or   )> Settings > Task tab on the Connections screen.
3. Under My Work Network, tap Add a new VPN server connection.  4. Follow the instructions on the Make New Connection screen.   Note: For online Help for any screen in the New Connection wizard or while changing settings, tap the ?.  Changing VPN Server Connections  1. Be sure Wi-Fi is powered on.  2. Tap the Connections icon (   or   )> Settings > Task tab.  3. Under My Work Network, tap Manage existing connections > VPN tab.  4. Tap the VPN connection you want to change, and then tap Edit.  5. In the Name box, enter new name for the connection (for example, your company’s name).  6. In the Host name/IP box, enter the VPN server name or IP address.  7. Next to VPN type, tap the type of authentication to use with your device (IPSec/L2TP or PPTP). If you aren’t sure which option to choose, ask your network administrator.  8. Tap Next.  9. If you selected IPSec/L2TP on the previous screen, tap the type of authentication. If you select A pre-shared key, enter the key provided by your network administrator, and then tap Next.   Note: If you selected PPTP in the previous screen, this step is skipped.
10. Enter the user name, password, and domain name provided by your network administrator.   Note: If a domain name was not provided, you may be able to connect without entering one.   11. To change advanced settings, tap the Advanced button.   Note: You will not need to change advanced settings unless:   The server to which you are connecting does not use  dynamically-assigned IP addresses and you need to enter your TCP/IP settings, or   You need to change server DNS or WINS settings.    12. Tap the Finish button to save the changes.  Starting VPN Server Connections  To start a connection through a VPN server, be sure Wi-Fi is powered on and connected, then select the VPN network.  Setting Up Proxy Server Settings  If you are connected to your ISP or private network during synchronization, your ecom i.roc x20 should download proper proxy settings from your computer. If these settings are not on your computer or need to be changed, you will need to set them up manually. To set up proxy server settings:  1. Contact your ISP or network administrator for the proxy server name, server type, port, type of Socks protocol used, and your user name and password.  2. Be sure Wi-Fi is powered on.  3. Tap the Connections icon (   or   ) > Settings > Task tab.
4. Under My Work Network, tap Edit my proxy server > Proxy Settings tab.  5. Tap the This network connects to the Internet and This network uses a proxy server to connect to the Internet checkboxes.  6. In the Proxy server box, enter the proxy server name.  7. If you need to change port number or proxy server type settings, tap the Advanced button and change the desired settings.  8. Tap OK.   9.6 Wi-Fi Security Protocol Utilities  Your ecom i.roc x20 supports the IEEE 802.1X standard for wireless encryption for customers whose network supports this feature. Contact your company’s network administrator to set up the following features.   802.1X Certificate Enroller  This utility allows you to request a user certificate from a certificate server. Once the certificate has been received and stored on your ecom i.roc x20, you can access the network using one of the 802.1X protocols. Refer to “Manually Entering New Network Settings” earlier in this chapter for information on selecting one of these protocols.  To retrieve a certificate:  1. Be sure your ecom i.roc x20 has an ActiveSync connection to a computer on the same network as the certificate server.  2. Tap Start > Settings > System tab > Enroller.  3. Complete the on-screen certificate request form by entering your name, password, and the server in which you want to retrieve the certificate.
4. Tap the Retrieve Certificate button to download the certificate from the server. The status box at the bottom of the screen will indicate whether the attempt to retrieve the certificate was successful.   Note: The enrollment tool is specifically designed to interact with Microsoft Certificate Servers. Alternate Certificate Authority servers will require a custom enrollment application which can be developed using the Embedded Visual C 4.0 tool and the Software Development Kit for Windows Mobile 2003-based Pocket PCs.   LEAP Registration Utility  Cisco Lightweight Extensible Authentication Protocol (LEAP) is an 802.1X authentication protocol that uses a username and password pair to authenticate access by a wireless client to a wireless router.  Use of the LEAP registration utility is required to log on to a LEAP-authenticated network. Most of the other types of secure networks are set up automatically by the ecom i.roc x20 Wi-Fi connection software. However, accessing a LEAP-authenticated network requires initial registration using this utility. Once you have authenticated and accessed this type of network, a connection can take place automatically whenever you access the LEAP-authenticated network.  To register the LEAP utility:  1. Tap Start > Settings > Connections tab > LEAP.  2. Tap New to create a LEAP profile. A LEAP profile must contain the following information:   SSID   Username   Password   Domain
3. Tap Edit to make changes to the selected LEAP profile from the Wireless LEAP list. Changes to the LEAP profile can also be made by tapping on an entry in the Wireless LEAP list.  4. Tap Delete to delete the selected LEAP profile from the Wireless LEAP list.   9   10 Using Bluetooth  Your i.roc x20 Pocket PC comes with built-in Bluetooth technology that allows short-range connections and provides fast, reliable, and secure wireless communication.  With Bluetooth powered on, you can send information or perform the following tasks wirelessly between two Bluetooth devices, within a range of approximately 30 feet (10 meters):   Exchange contacts, calendar items, and tasks   Send or exchange business cards   Transfer files   Synchronize with a computer through an ActiveSync connection   Partner with a Bluetooth-enabled cell phone and use the cell phone as a wireless modem   Connect to other Bluetooth devices (Virtual COM port)   Print to a Bluetooth printer Create a personal area network (PAN) to chat, play games, etc.
 Note: Use of dial-up and wireless Internet, e-mail, corporate networks, and other wireless communications, such as Bluetooth-enabled devices, might require separately purchased additional hardware and other compatible equipment, in addition to a standard Wi-Fi infrastructure and a separately purchased service contract. Check with your service provider for availability and coverage in your area. Not all Web content may be available. Some Web content might require installation of additional software.   10.1 Getting Acquainted with Bluetooth  Before you start using Bluetooth to establish wireless connections, take a few minutes and familiarize yourself with:   Terms used in this chapter   Supported Services    Note: For more detailed help, refer to the Help files installed on your i.roc x20 Pocket PC. Tap Start > Programs > Help > Bluetooth.
Understanding Terms  The following Bluetooth terms are used throughout this chapter.  The Term...  Means...  Authentication   Verification of a numeric passkey before a connection or activity can be completed  Authorization   Approval of a connection or activity before it can be completed  Bonding (Paired devices)  Create a trusted connection between your device and another. After a bond is created, the two devices become paired. A paired device does not require authentication or authorization  Device address   Unique electronic address of a Bluetooth device  Device discovery   Location and recognition of another Bluetooth device  Device name   Name that a Bluetooth device provides when discovered by another device  Data Encryption   A conversion process that is used for protecting data  Link key   Code used to securely pair devices  Passkey   Code you enter to authenticate connections or activities requested by other devices  Personal Information Manager (PIM)  Collection of programs used to manage daily business tasks (for example: Contacts, Calendar, and Tasks)  Profiles   Collection of Bluetooth settings  Service discovery   Determination of which programs you have in common with other devices
Supported Services  The functions that Bluetooth supports are called services. You can communicate only with Bluetooth devices that support at least one of the following services:   Basic Printer profile (BPP)   Dial-up Networking (DUN) profile   File Transfer Protocol (FTP)   Generic Access Profile (GAP)   LAN Access Profile (LAP)   Object Exchange (OBEX) Protocol   Object Push Protocol (OPP)   Personal Area Network (PAN) profile   Serial Port Profile (SPP)   ActiveSync—Uses SPP to connect to ActiveSync on a computer   10.2 Powering Bluetooth On or Off  To turn on Bluetooth:  1. From the Today screen, tap the i.roc x20 Wireless icon located in the Navigation bar at the bottom of the screen.  2. On the i.roc x20 Wireless screen, tap the Bluetooth icon.  When Bluetooth is turned on, the Bluetooth LED on the front of your Pocket PC flashes blue.  To turn off Bluetooth, tap the Bluetooth icon again. When Bluetooth is turned off, the Bluetooth LED turns off and no incoming or outgoing Bluetooth connections are possible.  Battery Saving Tip: Turn Bluetooth off when you are not using it.
 10.3 Working with Bluetooth Settings  From the tabs in Bluetooth Settings, you can:   Turn Bluetooth on and off   Enter or change your i.roc x20 Pocket PC Bluetooth name   Set your connection preferences   Enable Bluetooth services   Specify security settings   Define settings for sharing and connecting   Select a user profile   View software and port information   Opening Bluetooth Settings  1. From the Today screen, tap the i.roc x20 Wireless icon in the Command bar.  2. On the i.roc x20 Wireless screen, tap Bluetooth > Settings button.   Setting Accessibility Properties  Before your Pocket PC interacts with other Bluetooth devices, you need to enter or change the accessibility properties to define how you want your Pocket PC to interact.  To access the Accessibility screen:  1. From the Today screen, tap the i.roc x20 Wireless icon in the Command bar.  2. On the i.roc x20 Wireless screen, tap Bluetooth > Settings > Accessibility tab.  3. Highlight the name in the Name field and enter your new Device ID name. The device name is what other devices see on their screen when they locate your device.
4. Select Allow other devices to connect.  5. Select either All devices or Paired devices only.   CAUTION: Selecting All devices allows any device, even those unknown to you, to connect to your Pocket PC. After they are connected, security settings for specific services apply as specified in the Bluetooth Settings. Selecting Paired devices only allows only devices that you trust to connect to your Pocket PC.   Note: Paired devices share and exchange an internally generated secure Link Key before connecting.   6. Select Other devices can discover me if you want to allow other devices to search and locate your Pocket PC. Otherwise, leave this box unchecked.   Note: If another device has your device’s address and you have selected Other devices can discover me, that device may be able to locate your device even though you did not select for it to be discovered.   7. Tap OK to save your changes.  Enabling Bluetooth Services  You can use any of the following security options when transferring files, creating a serial port connection, exchanging business card information, configuring dial-up networking, and joining a personal network.   Enable service   Authorization required   Authentication (Passkey) required (with or without encryption required)
Automatically Enabling Service  To automatically enable service:  1. From the Today screen, tap the i.roc x20 Wireless icon in the Command bar.  2. Tap Bluetooth > Settings > Services tab.  3. In the Services box, select the service you want to enable: File Transfer, Information Exchange, Serial Port, Personal Network Server, Hands free, or Dial-up Networking Server.  4. The Service settings automatically enable the service and authentication settings. Tap on the appropriate checkbox to change these settings to your preference.  5. Tap OK to return to the i.roc x20 Wireless Screen if you enabled Personal Network Server or Dial-up Networking Server.   Note: If you select Authorization required in the Service Settings, you must authorize each connection. Your Pocket PC will then always ask you if the connection should be permitted.   If you enabled File Transfer, Information Exchange, Serial Port, or Hands free, tap the Advanced... button and follow the directions below for the appropriate service setting.  File Transfer Advanced Settings  When you enable File Transfer, you need to set a shared folder from which to transfer outgoing or in which to receive incoming files.  1. Tap the folder icon and locate a desired file folder.  2. Tap OK to save the settings and exit the screen.  3. Tap OK again to return to the i.roc x20 Wireless screen.
Information Exchange Advanced Settings  If you selected Information Exchange and tapped the Advanced button, the following screen displays.  1. Tap the My business card (vCard) icon.   2. Select your business card information from the Contact Information List and tap OK to save the settings.  3. Tap OK again to return to the i.roc x20 Wireless screen.   Note: To create a new business card, tap the Contacts icon next to the vCard icon and create a new business card. Tap OK when you are finished.  Serial Port Advanced Settings  If you selected Serial Port and tapped on the Advanced button:  1. Change the Inbound COM Port and Outbound COM Port numbers if they are incorrect.  2. Tap OK to save the settings and exit the screen.  3. Tap OK again to return to the i.roc x20 Wireless screen.
Hands Free Advanced Settings  If you selected Hands Free and tapped on the Advanced button: The hands-free settings are automatically set.  1. Tap the checkboxes to select or deselect any settings.  2. Tap OK to save the settings and exit the screen.  3. Tap OK to return to the i.roc x20 Wireless screen.   Requiring Authorization to Access Services  If you elect to require authorization to access services, you must authorize each connection. Your Pocket PC will then always ask you if the connection should be permitted.  To require authorization to access services:  1. From the Today screen, tap i.roc x20 Wireless > Bluetooth > Settings > Services tab.  2. Tap the tab for the service you want to enable: File Transfer, Information Exchange, Serial Port, Dial-up Networking, Personal Network Server, or Audio Gateway.  3. Select Authorization required.  4. Tap OK.   Requiring a Passkey or Bond  To establish a secure connection with another device, you can use the passkey feature or an established bond. You can also add data encryption to this type of security.  A passkey is a code you enter to authenticate connections requested by other devices. The passkey must be known and used by both parties or the connection will not be allowed.
To require a passkey or bond:  1. From the Today screen, tap i.roc x20 Wireless > Bluetooth > Settings > Services tab.  2. Tap the tab for the service you want to enable: File Transfer, Information Exchange, Serial Port, Personal Network Server, Hands free, or Dial-up Networking Server.  3. Select Authentication (Passkey) required.  4. Select Encryption Required if you want to require all data exchanged between the devices to be encrypted.  5. Tap OK.   Setting a Shared Folder  You can determine the folder that other devices access when they connect to your Pocket PC.  To select a shared folder:  1. From the Today screen, tap the i.roc x20 Wireless icon > Bluetooth > Settings > Services tab.  2. Under Services, tap File Transfer.  3. Under Service Settings, select your preferred settings.  4. Tap the Advanced tab.
5. Tap the Folder icon and locate a desired file folder.  6. Tap OK.   Understanding Profiles  Use profiles to quickly enable selected personal settings in multiple environments.  Creating a Profile  To create a profile:  1. From the Today screen, tap the i.roc x20 Wireless icon in the Command bar.  2. Tap Bluetooth > Settings > General tab > Profile icon.  3. Tap the New button.  4. Enter a descriptive name.  5. Select an existing profile to use as a template.  6. Tap OK.   Activating a Profile  When a new profile is created, you will need to activate it. To activate a profile after creating it:  1. From the Today screen, tap the i.roc x20 Wireless icon in the Command bar > Bluetooth > Settings.  2. From the General tab, select it from the Current Profile down arrow list.  3. Tap OK.
Saving Bluetooth Configuration Settings in a Profile  To save the Pocket PC Bluetooth configuration settings to any profile:  1. From the Today screen, tap the i.roc x20 Wireless icon in the Command bar > Bluetooth > Settings.  2. From the General tab, tap the Profile icon.  3. Select a profile from the Add/Delete Profiles list or create a new one.  4. Tap OK.  5. Set up your Pocket PC. You should specify the desired connection, sharing, and security settings in all Bluetooth Services selections.  6. Tap OK to close Bluetooth Services. The changes are automatically saved.   Renaming a Profile  1. From the Today screen, tap the i.roc x20 Wireless icon in the Command bar > Bluetooth > Settings.  2. From the General tab, tap the Profile icon.  3. Select a profile from the Add/Delete Profiles list.  4. Tap the Rename button.  5. Enter a new descriptive name.  6. Tap Enter.  7. Tap OK.   Deleting a Profile  1. From the Today screen, tap the i.roc x20 Wireless icon > Bluetooth > Settings.  2. From the General tab, tap the Profile icon.  3. Select a profile from the Add/Delete Profiles list.
4. Tap the Delete button.  5. Tap Yes to confirm you want to delete the profile.  6. Tap OK.   10.4 Working with Bluetooth Manager  Use Bluetooth Manager to:   Establish connections   Exchange business cards   Control the on-screen display   Display shortcuts   Opening Bluetooth Manager  From the Today screen, tap the i.roc x20 Wireless icon in the Command bar > Bluetooth > Manager.  The first screen that displays is My Shortcuts.  Locating and Selecting a Device  When you are required to locate a device and connect to it, the Bluetooth browser searches for other Bluetooth devices.  Pairing Devices  You can pair devices so they must exchange a computer generated security key prior to each connection. It is generated from a unique Bluetooth device address, a random number, and a user-defined password.  After two devices are paired, they have a trusted relationship with each other. No additional input is needed from the user. Therefore, connections and activities can be performed between the paired devices without constant authorization from the user.
To pair devices:  1. From the Today screen, tap the i.roc x20 Wireless icon in the Command bar > Bluetooth > Manager.  2. Tap Tools > Paired devices.  3. Tap Add.  4. Tap the Lookup  icon.  5. Tap a device.  6. Enter a password in the Passkey field.  7. Tap OK.  8. Enter the same password into the other device.   Note: Some devices, such as mobile phones, need to be placed in a mode to accept a bond from another device. Refer to that device’s user instructions for more information.   Unpairing Devices  You can remove a paired relationship between devices.  1. From the Today screen, tap the i.roc x20 Wireless icon in the Command bar > Bluetooth > Manager.  2. Tap Tools > Paired devices.  3. Tap a device name.  4. Tap Remove.  5. Tap Yes to remove the pairing.
 10.5 Connecting to Other Devices  Use ActiveSync, serial and dial-up connections to communicate with other Bluetooth devices, establish a partnership with a cell phone, and set up the Bluetooth services it offers.  Identifying the Communications Port  You can identify the virtual COM ports used to create a serial port connection. You may need to identify these COM ports for activities such as printing.  Use the inbound COM port when other devices initiate a serial connection. Use the outbound COM port when you initiate a serial connection to another device.  To identify the communications port:  1. From the Today screen, tap i.roc x20 Wireless > Bluetooth > Settings > Services tab.  2. Under Services, tap Serial Port and tap the Advanced... button.  3. Note the names of your inbound and outbound COM ports.  4. Tap OK.   Establishing an ActiveSync Connection  You can set up an ActiveSync partnership with a Bluetooth-enabled computer by first setting up your computer, then setting up your Pocket PC.  To establish an ActiveSync partnership with your Bluetooth-enabled computer, refer to the documentation that came with your computer.
To establish an ActiveSync connection on your Pocket PC:  1. From the Today screen, tap i.roc x20 Wireless > Bluetooth > Manager.  2. Tap New > ActiveSync via Bluetooth > Next.    3. Follow the connection wizard instructions.   Note: Be sure the ActiveSync COM port setting on your Pocket PC is the same as the COM port setting used for Bluetooth on your computer.
From the Bluetooth Browser screen, select the computer you want to synchronize with. Tap Next.  4. Under Serial Port Selection, select the name of the serial port for the computer selected above, and then tap Next > Finish.  .   Establishing a Serial Connection  Use the wireless Bluetooth serial port connection just as you would a physical serial cable connection. You must configure the application that will use the connection to the correct serial port.  To establish a serial connection:  1. From the Today screen, tap the i.roc x20 Wireless icon > Bluetooth > Manager.  2. Tap New > Explore a Bluetooth device > Next.  3. Follow the connection wizard instructions.
Dial-Up Networking  When you use dial-up networking (DUN), the remote device providing the dial-up networking service and the remote computer to which you are connecting must both have telephone access.  Devices that can provide dial-up networking include Bluetooth:   Mobile phones   Desktop computers   Modems  Using Dial-Up Networking  To connect to a device that provides modem access:  1. From the Today screen, tap i.roc x20 Wireless > Bluetooth > Manager.  2. Tap New > Connect to a Network > Next.  3. Follow the connection wizard instructions.   Note: After you create the dial-up networking shortcut with a device, tap and hold the shortcut icon in the My Shortcuts tab of the Bluetooth Manager, and tap Connect.   4. Tap New Connection.  5. Tap OK.  6. Enter a name in the Connection Name field.  7. Enter a phone number. You must sometimes enter the country code and area code, depending on where you are calling.  8. Tap OK to begin dialing.   Note: Some mobile phones require a bond between devices (see the section “Pairing Devices”).
To connect to the Internet and use Pocket Internet Explorer, you must first connect to a Bluetooth phone from Bluetooth Manager. To make this connection the default dial-up connection for Pocket Internet Explorer:  IMPORTANT: All Bluetooth default connections are made using the following procedure. Default connections cannot be made through Bluetooth Settings on the i.roc x20 Wireless screen.  1. From the Today screen, tap Start > Settings >  Connections tab. 2. Tap the Connections icon > Advanced tab.  3. Tap Select Networks.  4. Enable Bluetooth Settings from the dropdown list.   Note: The Bluetooth modem connection you created can be viewed only from the Bluetooth Settings on the Connections Task page.   Joining a Personal Area Network  Connect two or more Bluetooth devices to share files, collaborate or play multiplayer games.  To establish a Personal Area Network connection:  1. From the Today screen, tap i.roc x20 Wireless > Bluetooth > Manager.  2. Tap New > Join a personal network > Next.  3. Follow the Connection Wizard instructions.
 10.6 Working with Files  You can exchange information with a connected device and use the Bluetooth File Explorer to:   Navigate through the directories.   View files and folders.   Create new folders.   Send and receive files from a remote device.   Delete and rename files on a remote device.   Creating a File Transfer Connection  1. From the Today screen, tap i.roc x20 Wireless > Bluetooth > Manager.  The first screen that displays is My Shortcuts.  2. Tap New > Browse files on a remote device > Next.  3. Follow the connection wizard instructions.   Note: The remote device must have Bluetooth turned on and set up to allow discovery before the connection can occur.   Sending Files  1. Tap and hold the file transfer shortcut icon, and tap Connect.  2. Tap File > Send a File…  3. Locate the file(s) to send.  4. Tap the file(s) to send it.  5. Tap OK.
Creating a Folder on a Remote Device  1. Tap and hold the file transfer shortcut icon, and tap Connect.  2. Navigate to the location you want for the new folder.  3. Tap File > Create a folder.  4. Enter a folder name while New Folder is selected, and tap Enter.  5. Tap OK.   Receiving a File from a Remote Device  1. Tap and hold a file transfer shortcut icon, and tap Connect.  2. Navigate to the file location on the remote device.  3. Tap the file.  4. Tap File > Get.  5. Tap OK.   Deleting a File from a Remote Device  1. Tap and hold a file transfer shortcut icon, and tap Connect.  2. Navigate to the file location on the remote device.  3. Tap the file.  4. Tap File > Delete.  5. Tap Yes to verify you want to delete the selected file.  6. Tap OK.   Using Business Card Exchange  Using the business card exchange, you can:   Set up your own business card   Send a business card to one or more devices   Request a business card from one or more devices   Exchange business cards with one or more devices
You must establish a default contact name to send or exchange business card information.  You must first specify your default business card on the Information Exchange tab in Bluetooth Settings. This name becomes the default for business card transfers.  Setting Up Your Business Card Information  To set up your business card information:  1. Create a contact in the Contacts program that includes your name, title, and other relevant information.  2. From the Today screen, tap i.roc x20 Wireless > Bluetooth > Settings > Services tab.  3. Under Services, select Information Exchange.  4. Tap the Advanced... button.  5. Tap the My business card (vCard) icon.  6. Choose your contact from the list.  7. Tap OK.   Sending Business Cards  1. From the Today screen, tap the i.roc x20 Wireless icon in the Command bar > Bluetooth > Manager.  2. Tap Tools > Business Card Exchange.  3. Tap the Send icon.  4. Tap the device where you want to send your business card.  5. Tap OK.    Note: Be sure the receiving device has been enabled to accept the transfer.
Requesting Business Cards  1. From the Today screen, tap the i.roc x20 Wireless icon in the Command bar > Bluetooth > Manager.  2. Tap Tools > Business Card Exchange.  3. Tap the Request icon.  4. Tap the device from which you want to request a business card.  5. Tap OK.   Exchanging Business Cards  You can exchange business card information with another device. If available, the device’s information will be sent directly into your Contacts list in Pocket Outlook.  To exchange business cards:  1. From the Today screen, tap the i.roc x20 Wireless icon in the Command bar > Bluetooth > Manager.  2. Tap Tools > Business Card Exchange.  3. Tap the Exchange icon.  4. Tap the device with which you want to exchange your business card.  5. Tap OK.    10.7 Opening a Connection  1. From the Today screen, tap the i.roc x20 Wireless icon in the Command bar > Bluetooth > Manager.  2. Tap and hold the icon or list name, and then tap Connect.  3. Tap OK.
Viewing Connection Status  You can view:   Connection’s name   Device’s name   Connection status   Length of connection   Signal strength   To view the connection status:  1. From the Today screen, tap the i.roc x20 Wireless icon in the Command bar > Bluetooth > Manager.  2. Tap and hold the connection icon or list name.  3. Tap Properties from the menu.  4. Tap OK.   Closing a Connection  1. From the Today screen, tap the i.roc x20 Wireless icon in the Command bar > Bluetooth > Manager.  2. Tap and hold the connection icon or list name.  3. Tap Disconnect from the menu.  4. Tap OK.   Working with Connections  You can create shortcuts to open and view status information for all connections.  Creating a Shortcut  Creating a shortcut to one or more services does not establish a connection. It only places a shortcut to that service on the Shortcut tab of the Bluetooth Manager.
To create a shortcut:  1. From the Today screen, tap the i.roc x20 Wireless icon in the Commnd bar > Bluetooth > Manager.  2. Tap New, and then a type of service, and tap Next.  3. Follow the connection wizard instructions.    Note: Paired devices are designated by a checkmark.    Deleting a Shortcut  1. From the Today screen, tap the i.roc x20 Wireless icon > Bluetooth > Manager.  2. Tap and hold the connection icon or list name to be deleted.  3. Tap Delete from the menu.  4. Tap Yes to verify the selected shortcut should be deleted.  5. Tap OK.   Viewing Shortcuts  You can view shortcuts as icons or in a list format.  1. From the Today screen, tap the i.roc x20 Wireless icon > Bluetooth > Manager.  2. Tap View.  3. Tap List or Icon.  4. Tap OK.
 11 Connecting to the Internet Use your i.roc x20 Pocket PC to connect to the Internet or your Work network.  To send and receive e-mail with Messaging and to view Web sites with Pocket Internet Explorer, you must set up a remote connection with devices such as a Secure Digital Input/Output (SDIO) modem card, Ethernet card, or the wireless 802.11b internal radio. Another option is to use a Bluetooth-enabled device such as a phone or LAN Access point.   Note: Use of dial-up and wireless Internet, e-mail, corporate networks, and other wireless communications, such as Bluetooth-enabled devices, might require additional hardware and other compatible equipment that can be purchase separately, in addition to a standard Wi-Fi infrastructure and a separately purchased service contract. Check with your service provider for availability and coverage in your area. Not all Web content may be available. Some Web content may require installation of additional software.   Note: For more information on this subject, refer to the Help file on your i.roc x20 Pocket PC by tapping Start > Help > Connections.
 11.1 Connecting to a Private Network  1. Before you start, be sure to have your server phone number, user name, and password. This information can be obtained from your network administrator.  2. Tap Start > Settings > Connections tab > Connections icon.  3. In My Work Network, follow the instructions for each type of connection. For more information on Bluetooth connections, refer to Chapter 9, “Using Bluetooth.” For more information on Wi-Fi connections, refer to “Setting Up VPN Server Connections” or “Setting Up Proxy Server Settings” in Chapter 8, “Using Wi-Fi.”   11.2 Entering an Internet Address  With Pocket Internet Explorer and a connection to the Internet, you can view Web sites on your i.roc x20 Pocket PC by typing an address or Uniform Resource Locator (URL) in the Address bar.   Note: Web sites that use Hypertext Markup Language (HTML) 4.0, Dynamic HTML (DHTML), animated Graphic Interchange Format (GIF) images, and Java applets might not work correctly in Pocket Internet Explorer without additional software.   To enter an Internet address (URL) on your i.roc x20 Pocket PC:  1. Tap Start > Internet Explorer > Address Bar.   Note: If the Address Bar is not visible, tap the View tab > Address Bar to turn it on.
2. Enter the Internet address (URL) into the Internet Explorer Address bar.  3. Tap the Go icon. This is the common way to access a Web site on the Internet.  11.3 Using a Favorites List  With Pocket Internet Explorer and a connection to the Internet, you can view Web sites on your i.roc x20 Pocket PC by selecting one from your Favorites list.  To select a Web site from your Favorites list:  1. Tap Start > Internet Explorer.  2. Tap the Favorites icon and the Web site you want to view.   12 RFx1x Software Package 12.1 Installation  The device is delivered with installed package.  Please do the following steps to install an update or reinstall the package after uninstall. Open “File Explorer”
Please copy the “RF x10 Software Package.ARMV4.CAB” from SD Card to a temporary folder Click on “RF x10 Software Package.ARMV4.CAB” file in the temporary folder. Please perform a soft reset.  RF x10 Configuration Tool  12.2 General  The RF x10 Configuration Tool is an application based on RF x10 API which configures both scanner device and keyboard emulator software.
 The screenshots shows the main window before and after a connection. After a successful connection to a scanner, the device information will be shown in the main window. 12.3 Hardware There is a “Hardware” menu for all hardware topics:   There are two entries inside this menu: Settings
Configure Device  (deactivated if no device is online, it will be activated after a successful connect)  Settings  Before the application can connect to a scanner device, the serial communication port number be defined. The default value is 1 for com port.  The device will be connected with 9600 baud.
 After all settings are defined, the user is able to try the connection by pressing the connect button from the main window. Pressing cancel button discards modifications.  If debug info check box is checked, a log file will be created in My Documents folder from pocket pc. This file will contain information about the methods from RF x10 API used within Configuration Tool application.  Configure Device  The “Configure Device” dialog contains tab pages grouping similar options. It also contains three buttons: one for read the configuration settings of the scanner device, one for write the configuration settings of the scanner device and one to reset the configuration to the default factory settings. After a read or a reset operation, the controls from every page are updated to the corresponding values.  The first page refers to the operation mode of the device and the other options linked to this operation mode:
  In the combo box, you can specify the operation mode in which the device should work.   There are three possibilities:  Read Write  Buffered read (for future extension)  If you select read operation mode, there are also two possibilities for configuring the device depending whether you check SNR option or
not. With this option checked, the device will read only the serial number of a transponder coming inside scanner’s antenna range. If this option is not checked, the user is able to specify the start block number and the number of blocks to be read.  In write operation mode start address and number of blocks have the same meaning like in read operation mode with SNR not checked. Data that will be written to a transponder can be specified in the text box below the “data to write” label.   The block size defines the size of a block from a transponder. The second page specifies some of the options of the scanner device:
 If AFI is activated, you can specify the AFI value through the numeric up-down control. In AFI mode, only those transponders are read or written to which AFI match the defined AFI.  If singleshot check box is checked the response will be in the single shot, otherwise we will have a permanent output.  If the preload check box is checked, in case of a write command, data is written to the next transponder, otherwise, data is written to the transponder currently within antenna range.  If SNR checkbox is checked it means that serial number is transmitted in telegram, otherwise serial number is not transmitted in telegram.  If anticollision check box is checked, it means that the anti-collision is activated otherwise is deactivated.  If report mode check box is checked, the device works in report mode, otherwise it works in online mode.
The third page referrers to the transponders type that are supported by a scanner device:  The fourth page referrers to the switching and trigger mode types:     This page is for internal purpose only.  If trigger check box is checked, the scanner will read a transponder only if trigger condition is set, otherwise it reads always. If trigger is set, you can select one of the four modes of trigger from the combo box below. You can also specify the trigger period from the corresponding numeric up-down control.
If switching output check box is set, it means that switching output is switched automatically, otherwise switching output is not switched. If switching output is set, you can select one of the four modes of switching output from the combo box below. You can also specify the switching output period from the corresponding numeric up-down control.  12.4   Software There will be a “Software” menu for all keyboard emulator topics. The keyboard emulator is described in one of the following chapters. 13 Troubleshooting  Use the following suggestions to troubleshoot problems with the i.roc x20 Pocket PC.  13.1 Common Problems  Problem  Solution I cannot see anything on the screen  Be sure the i.roc x20 Pocket PC is powered on  Reset the device by using the stylus to lightly press the Reset button  Remove and replace the battery. I cannot keep my battery charged  Always keep the i.roc x20 Pocket PC connected to the AC Adapter when you are not using it  In the backlight settings, adjust the bar to a lower level to conserve more battery power.
 Turn off Bluetooth and Wi-Fi when not in use.   Refer to Chapter 3, “Managing the Battery,” for battery saving tips.   The backlight keeps turning off  In Backlight Settings, increase the amount of time  Select the option to turn on the backlight when you touch the screen or push a button.  (Continued)     Problem  Solution I want to travel with my i.roc x20 Pocket PC.  Back up your information. Refer to “Backing Up Information” in Chapter 4 for more details.   Disconnect all external devices.  Take the AC Adapter and Charger Adapter with you.   Keep your i.roc x20 Pocket PC in a protective case and keep it in your carry-on luggage.   I want to travel internationally with my i.roc x20 Pocket PC. Be sure you have the plug adapter appropriate for the country you are visiting.  I want to turn off Bluetooth and Wi-Fi for air travel  To turn off all wireless features, tap Start > i.roc x20 Wireless, and then ALL OFF button at the bottom of the screen.  I want to ship my i.roc x20 Pocket PC to a 1. Back up your information.  2. Disconnect all external devices.
repair facility. 3. Pack your i.roc x20 Pocket PC and any external devices requested by Customer Support in protective packaging. Include any additional documentation or items as instructed by Customer Support.  (Continued)  Problem  Solution I cannot connect to a network.    Be sure Wi-Fi is turned on.   Be sure you have added the necessary server information.   Be sure the network you are attempting to connect to is not busy.   If you are using an SDIO Ethernet card, be sure the proper drivers for your card are installed.   Be sure your user name and password are correct.   Tap Start > Settings > Connections tab > Connections and check your connection settings. Tap OK when you are finished to save your changes.   Be sure the WEP key is correct.   Be sure the IP Address is correct.   Be sure the hardware you are using with your i.roc x20 Pocket PC is properly configured and operational.   Reset the device by using the stylus to lightly press the Reset button.  I want to see the current date The current date is displayed at the top of the Today screen.  I cannot see all my appointments. Be sure the appointment you created is in the selected category.  I cannot find the document or workbook I saved. Pocket Word and Excel recognize and display documents in only one folder below My Documents. For example, if you created another folder in the Personal folder in My Documents, the documents in that folder will not be shown.
To find your document or workbook, tap Start > Programs > File Explorer. Open the folder you created, and then tap the file in which you are looking. 13.2 ActiveSync  Use the following suggestions to troubleshoot problems with ActiveSync on your i.roc x20 Pocket PC. For more detailed information on Microsoft ActiveSync, refer to Chapter 2, “Synchronizing with Your Computer.”  Problem  Solution  My device is always asking me for a password.  Tap Start > Settings > Personal tab > ecom ProtectTools to be sure the password settings are configured as you want.  I cannot find files sent to me by another device.  Check My Documents, which is the default save location used to receive files.
 Problem  Solution I cannot connect to my computer using the Desktop Cradle.    Be sure you have installed Microsoft ActiveSync 3.7.1 or higher on your host computer before connecting your i.roc x20 Pocket PC to it.   Be sure your i.roc x20 Pocket PC is connected to the Desktop Cradle, and that the cradle is connected to your computer.   Be sure your i.roc x20 Pocket PC is securely seated in the cradle and is making contact with the cradle connector.   Be sure you are running Microsoft Windows 98SE, Me, 2000, or XP on your computer.   Uninstall and reinstall ActiveSync.   If you are running personal firewall software, try disabling it. If you are then able to synchronize, contact the software vendor for information on configuring the required exclusions to eliminate this problem.  I connected my i.roc x20 Pocket PC before installing Microsoft ActiveSync. 1. Disconnect the i.roc x20 Pocket PC from your computer.  2. In Windows 98 or 2000, click Start > Settings > Control Panel > System. The Device Manager opens automatically. Locate and select the “unknown” USB device record and click Remove (Uninstall in Windows 2000).  3. Restart your computer and allow it to detect the USB device.  4. Install Microsoft ActiveSync 3.7.1 or higher.  5. Reconnect the i.roc x20 Pocket PC to the computer.    (Continued)
(Continued)  Problem  Solution Microsoft ActiveSync cannot locate my i.roc x20 Pocket PC when I synchronize.    Be sure the device is on.   Be sure all cables are securely connected.   Remove your i.roc x20 Pocket PC from the ecom Desktop Cradle or disconnect it from the Autosync Cable, power on the device by pressing the Power button, then put it back in the synchronization cradle or connect it to the cable.   Reset the device by using the stylus to lightly press the Reset button.   Check Connection Settings in ActiveSync on your computer to ensure the communications port you are using is active.  I cannot open PC e-mail in Messaging after I restore using Microsoft ActiveSync.    Use Microsoft ActiveSync to synchronize your i.roc x20 Pocket PC with your computer. For more information, refer to “Synchronizing Your Pocket PC with Your Computer” in Chapter 2.   I tried to synchronize a workbook and the file is unresolved in Microsoft ActiveSync.  Pocket Excel does not support all Excel formatting; therefore, Microsoft ActiveSync cannot synchronize the file.
13.3 Wi-Fi  Use the following suggestions to troubleshoot problems with Wi-Fi issues and your i.roc x20 Pocket PC. For more information on Wi-Fi, refer to Chapter 8, “Using Wi-Fi.”   Problem Solution I cannot connect to an access point.   Be sure the Wi-Fi is on.   Be sure the device identified the network you want to connect to.   Be sure you provided any necessary authentication keys if prompted by the system.   Be sure your i.roc x20 Pocket PC is within range of the access point.  I am connected to an access point, but I cannot browse the Internet If the wireless network you are connected to connects to Work, the network may require a proxy. To set up the proxy: 1. Ask your network administrator for the proxy settings. 2. Tap Start > Settings > Connections tab >  Connections icon > Set up my proxy server. 3. Refer to “Setting Up Proxy Server Settings” in Chapter 8 for more information.  I do not see my wireless network on my i.roc x20 Pocket PC.   Your wireless network could be a non-broadcasting network 1. Tap Start > Settings > Connections tab > Connections icon > Settings. 2. Tap the Advanced tab > Select Networks.  3. Follow the instructions on the screen.  My data transfer rate is too low If Bluetooth is on, turn it off. (Continued)
(Continued)  Problem Solution I cannot connect to an available network that shows in the list of networks without a name.   It is likely that the network is a “hidden” or non-SSID broadcast network. You must know the network name (SSID) to be able to connect.by the system.  1. Tap Start > Settings > Connections tab > Connections > Advanced tab > Network Card. 2. Select Add New Settings.  3. Enter the network name (SSID).  4. Select the appropriate values in the Connects to: box.  5. If WEP settings are required, tap the Authentication tab and enter them.  I cannot connect reliably to an available network or connections are frequently dropped.   Be sure there is ample signal strength available in the area.
 13.4 Bluetooth  Use the following suggestions to troubleshoot problems with Bluetooth on your i.roc x20 Pocket PC. For more information on Bluetooth, refer to Chapter 9, “Using Bluetooth.”  Problem Solution I cannot discover another device.     Be sure Bluetooth is turned on.  Move closer to the device.  Be sure the device you are attempting to connect to is on and allows access to being discovered by other devices  I can see other devices, but I cannot connect or exchange data with them.    Be sure the other device has not restricted your access.   Try initiating pairing from the other device. Some Bluetooth-enabled device can only initiate pairing and cannot respond to pairing requests from other devices Other devices cannot find or connect to my device.  Be sure Bluetooth is turned on.   Move closer to the device.   Be sure you have not restricted other devices from finding yours.   Check your Bluetooth settings to ensure you have allowed your device to be discovered and others to connect.   (Continued)
(Continued)  Problem Solution Other devices do not receive my correct business card information   Be sure you have correctly set up your business card information in Bluetooth Settings.   Check Bluetooth Settings to be sure you have  restricted this function.    The i.roc x20 Pocket PC cannot find my Bluetooth-enabled Mobile phone.    Be sure your mobile phone is in discoverable mode.   Contact your mobile phone manufacturer and ask if there is a firmware upgrade.   Check the settings on your phone to be sure it is set up to allow other Bluetooth devices to discover and connect to it.
 14 Regulatory Notices  14.1 Federal Communications Commission Notice  This equipment has been tested and found to comply with the limits for a Class B digital device, pursuant to Part 15 of the FCC Rules. These limits are designed to provide reasonable protection against harmful interference in a residential installation. This equipment generates, uses, and can radiate radio frequency energy and, if not installed and used in accordance with the instructions, may cause harmful interference to radio communications. However, there is no guarantee that interference will not occur in a particular installation. If this equipment does cause harmful interference to radio or television reception, which can be determined by turning the equipment off and on, the user is encouraged to try to correct the interference by one or more of the following measures:   Reorient or relocate the receiving antenna   Increase the separation between the equipment and receiver   Connect the equipment into an outlet on a circuit different from that to which the receiver is connected   Consult the dealer or an experienced radio or television technician for help   This PDA has been tested and demonstrated compliance when Bluetooth and WLAN are transmitting simultaneously. This PDA must not be co-located or operating in conjunction with any other antenna or transmitter.
Modifications  The FCC requires the user to be notified that any changes or modifications made to this device that are not expressly approved by Ecom instruments GmbH Company may void the authority to operate the equipment.  Cables  Connections to this device must be made with shielded cables with metallic RFI/EMI connector hoods in order to maintain compliance with FCC Rules and Regulations.  Declaration of Conformity for products marked with the FCC logo—United States only  This device complies with Part 15 of the FCC Rules. Operation is subject to the following two conditions: (1) this device may not cause harmful interference, and (2) this device must accept any interference received, including interference that may cause undesired operation.  For questions regarding your product, contact:  Ecom instruments GmbH Industriestraße 2 , 97959 Assamstadt, Germany  Or, call +49 (0) 62 94 /42 24-0  For questions regarding this FCC declaration, contact:  Ecom instruments GmbH Industriestraße 2 , 97959 Assamstadt, Germany  Or, call +49 (0) 62 94 /42 24-0  To identify this product, refer to the Part, Series, or Model number found on the product.
 14.2 Canadian Notice  This Class B digital apparatus meets all requirements of the Canadian Interference-Causing Equipment Regulations.  Avis Canadien  Cet appareil numérique de la classe B respecte toutes les exigences du Règlement sur le matériel brouilleur du Canada.  14.3 Japanese Notice   14.4 Korean Notice  14.5 European Union Regulatory Notice  This product complies with the following EU Directives:  Low Voltage Directive 73/23/EEC  EMC Directive 89/336/EEC
  Note: CE Compliance of this equipment is valid only if powered with an ecom-provided and CE marked AC adapter.   If this product has telecommunication functionality, it also complies with the essential requirements of:  ■ R&TTE Directive 1999/5/EC.  Compliance with these directives implies conformity to harmonized European standards (European Norms) which are listed on the EU Declaration of Conformity issued by Ecom instruments GmbH for this product or product family.  This compliance is indicated by the following conformity marking placed on the product:   This marking is valid for non-Telecom products and EU harmonized Telecom products (e.g., Bluetooth).     This marking is valid for EU non-harmonized Telecom products.
*Notified body number (used only if applicable—refer to the product label).  The telecommunications functionality of this product may be used in the following EU and EFTA countries:  Austria, Belgium, Cyprus, Czech Republic, Denmark, Estonia, Finland, France, Germany, Greece, Hungary, Iceland, Ireland, Italy, Latvia, Liechtenstein, Lithuania, Luxembourg, Malta, Netherlands, Norway, Poland, Portugal, Slovak Republic, Slovenia, Spain, Sweden, Switzerland, and United Kingdom.  Notice for Use in France and Italy  Italy:  E'necessaria una concessione ministeriale anche per l'uso del prodotto. Verifici per favore con il proprio distributore o direttamente presso la Direzione Generale Pianificazione e Gestione Frequenze.  License required for use. Verify with your dealer or directly with General Direction for Frequency Planning and Management (Direzione Generale Pianificazione e Gestione Frequenze).  France:  L'utilisation de cet equipement (2.4GHz Wireless LAN) est soumise a certaines restrictions: Cet equipement peut etre utilise a l'interieur d'un batiment en utilisant toutes les frequences de 2400 a 2483.5MHz (Chaine 1-13). Pour une utilisation en environement exterieur, vous devez utiliser les frequences comprises entre 2454-2483.5MHz (Chaine 10-13). Pour les dernieres restrictions, voir http://www.art-telecom.fr.  For 2.4 GHz Wireless LAN operation of this product certain restrictions apply: This product may be used indoors for the entire 2400-2483.5 MHz frequency band (channels 1-13). For outdoor use, only 2454-2483.5 MHz frequency band (channels 10-13) may be used. For the latest requirements, see
http://www.art-telecom.fr.  14.6 Battery Warning   WARNING: This computer contains a lithium ion rechargeable battery. To reduce the risk of fire or burns, do not disassemble, crush, puncture, short external contacts, or dispose of in fire or water. Replace only with the ecom spare.   CAUTION: Risk of explosion if battery is replaced by an incorrect type. Dispose of used batteries according to the instructions.    Because of the type of battery used in your i.roc x20 Pocket PC, follow local regulations regarding the safe disposal of the battery. Your vendor can advise you on local regulations, and/or the existence of any battery disposal programs in operation.
14.7 Equipment Warning  WARNING: To reduce the risk of personal injury, electrical shock, fire or damage to the equipment:  Body-worn operations are restricted to belt-clips, holsters or similar accessories that have no metallic component in the assembly Plug the AC Adapter into an electrical outlet that is easily accessible at all times.  Disconnect power from the equipment by unplugging the AC Adapter from the electrical outlet or unplugging the Synchronization cable from the host computer.  Do not place anything on the AC Adapter cord or any of the other cables. Arrange them so that no one may accidentally step on or trip over them.  Do not pull on a cord or cable. When unplugging from the electrical outlet, grasp the cord by the plug or, in the case of the AC Adapter, grasp the AC Adapter and pull out from the electrical outlet.  Do not use converter kits sold for appliances to power your i.roc x20 Pocket PC.    14.8 Airline Travel Notice  Use of electronic equipment aboard commercial aircraft is at the discretion of the airline.  14.9 Wireless Notices  In some environments, the use of wireless devices may be restricted. Such restrictions may apply aboard airplanes, in hospitals, near explosives, in hazardous locations, etc. If you are uncertain of the
policy that applies to the use of this device, please ask for authorization to use it prior to turning it on.  U.S. Regulatory Wireless Notice   WARNING: Exposure to Radio Frequency Radiation The radiated output power of this device is below the FCC radio frequency exposure limits. Nevertheless, the device should be used in such a manner that the potential for human contact during normal operation is minimized. To avoid the possibility of exceeding the FCC radio frequency exposure limits, human proximity to the antenna should be minimized.  This PDA has been tested and demonstrated compliance when Bluetooth and WLAN are transmitting simultaneously. This PDA must not be co-located or operating in conjunction with any other antenna or transmitter.   Canadian Regulatory Wireless Notice  Operation is subject to the following two conditions: (1) this device may not cause interference, and (2) this device must accept any interference, including interference that may cause undesired operation of the device.
  Japanese Regulatory Wireless Notice  Brazilian Regulatory Wireless Notice  Este equipamento opera em caráter secundário, isto é, não tem direito a proteção contra interferência prejudicial, mesmo de estações do mesmo tipo, e não pode causar interferência a sistemas operando em caráter primário.
    15 Specifications  15.1 System Specifications   Note: Not all models described are available in all regions.  For more information on specifications for your particular model, on your i.roc x20 Pocket PC, tap Start > Settings > System tab > ecom Asset Viewer.   System Feature Description  Processor   520 MHz Intel PXA 270 processor  RAM (Random     64-128 MB SDRAM (50-112 MB user available) Access Memory)  i.roc x20 File Store   64-128 MB storage (20-80 MB user available) (non-volatile  memory)  SD I/O       slot SD/SDIO/MMC card support  CF slot        Type II Compact Flash card support
Display     3.5 inch transflective type TFT color, QVGA, 64K-color support, LED backlight with power save mode.  Audio        Integrated microphone, speaker, 3.5 mm stereo       audio jack, MP3 stereo through audio jack  Infrared (IrDA IrDA, data transfer up to 4 Mb per second and SIR/FIR)
 System Feature  Description  External Power  10 watt maximum output AC Adapter  Bluetooth   Class II device; typical 10 meters (30 feet) range  Indicators   Radio LED indicator:  (Left LED)   LED off = all radios are off  Blue blinking = one or more radios on  (Right LED)   Charge/Notification LED indicator:  4-mode alarm notification:   LED off = not charging and no notifications Amber flash = charging Green flash = one or more notification events have occurred   Amber solid = charging complete  Battery 4000mAh
 15.2 Physical Specifications  Note: Weight varies on different models.    US   Metric  Length     7.4 in  180 mm       Width      3.4 in   88 mm       Depth      .1,8 in   48 mm                     15.3 Operating Environment  Environment           US     Metric  Temperature   Operating   32¡ to 104¡ F  -10¡ to 50¡ C   Nonoperating   -4¡ to 140¡ F  -20¡ to 60¡ C  Relative Humidity  Operating   up to 90%   up to 90%   Nonoperating   above 90%  above 90%  Maximum Altitude  Operating   15,000 ft   0-4572 m   Nonoperating   40,000 ft   0-12,192 m

Navigation menu