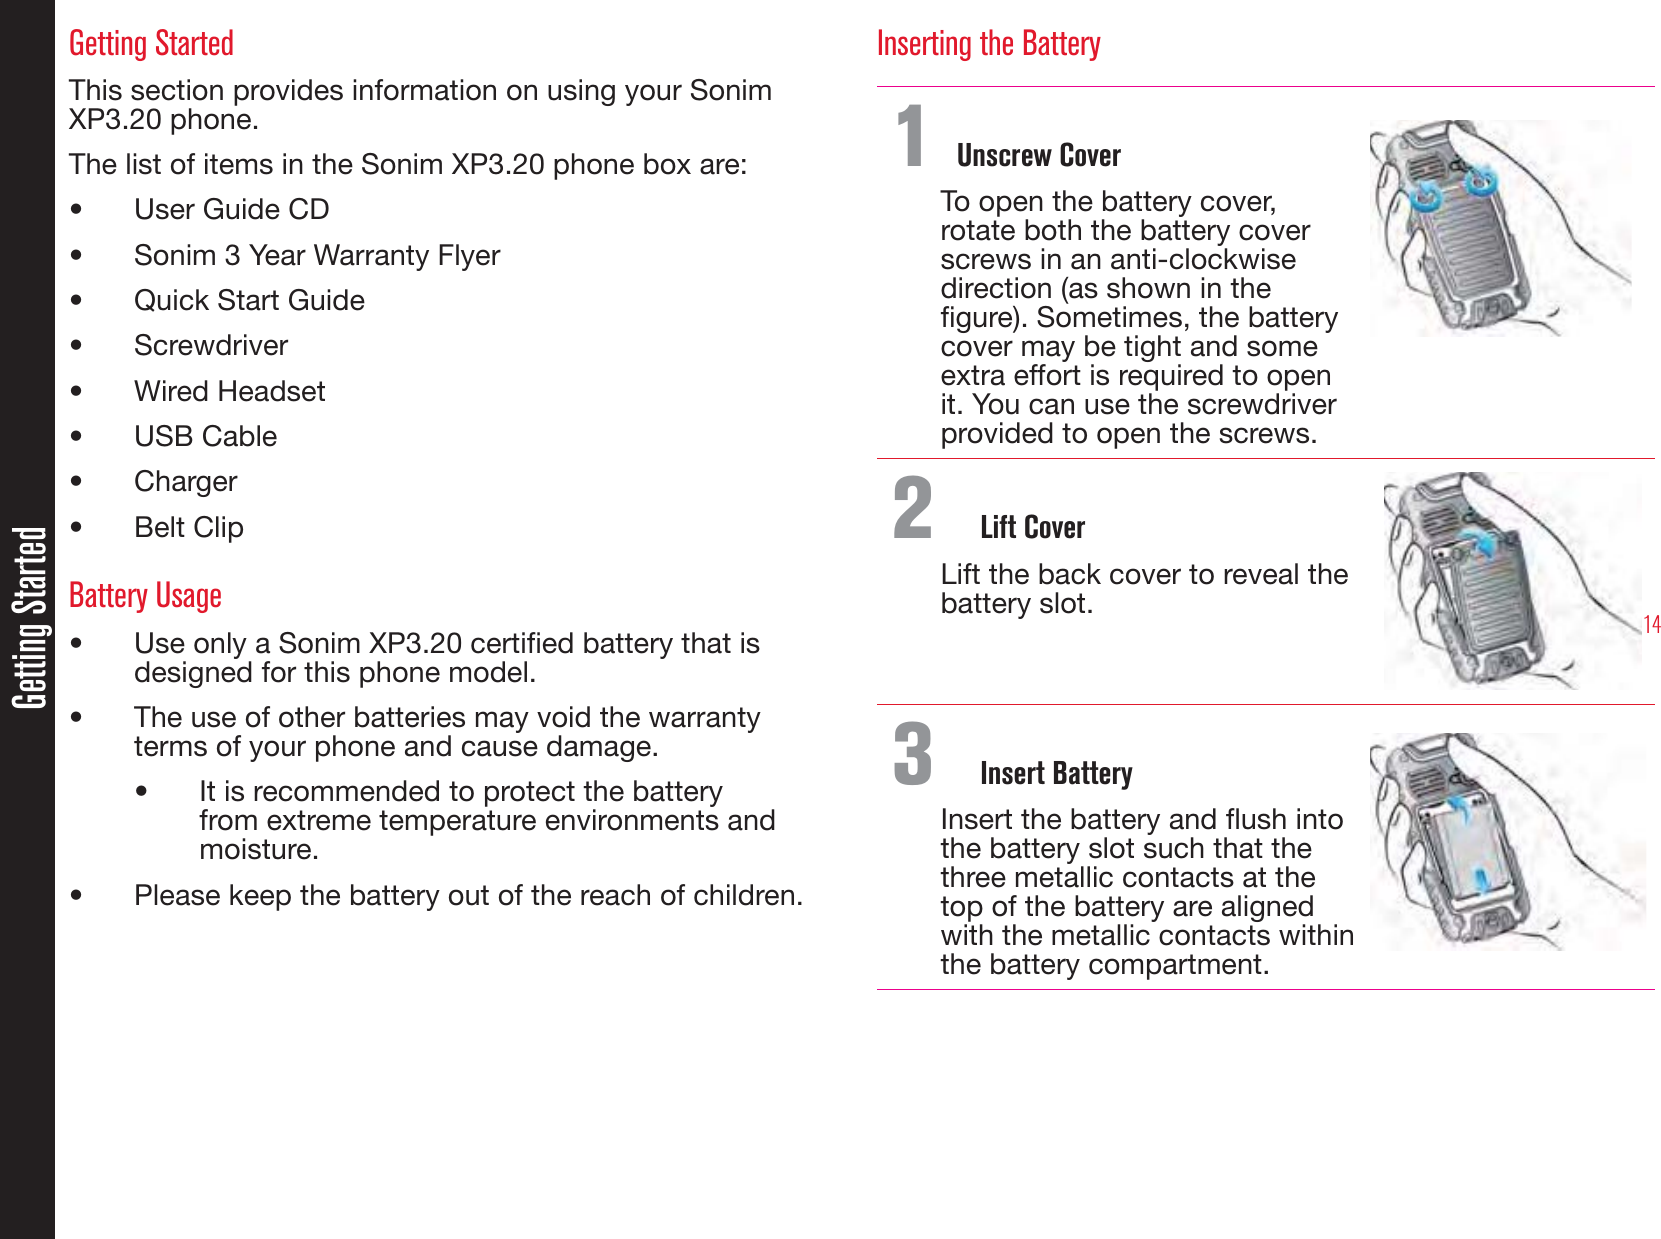
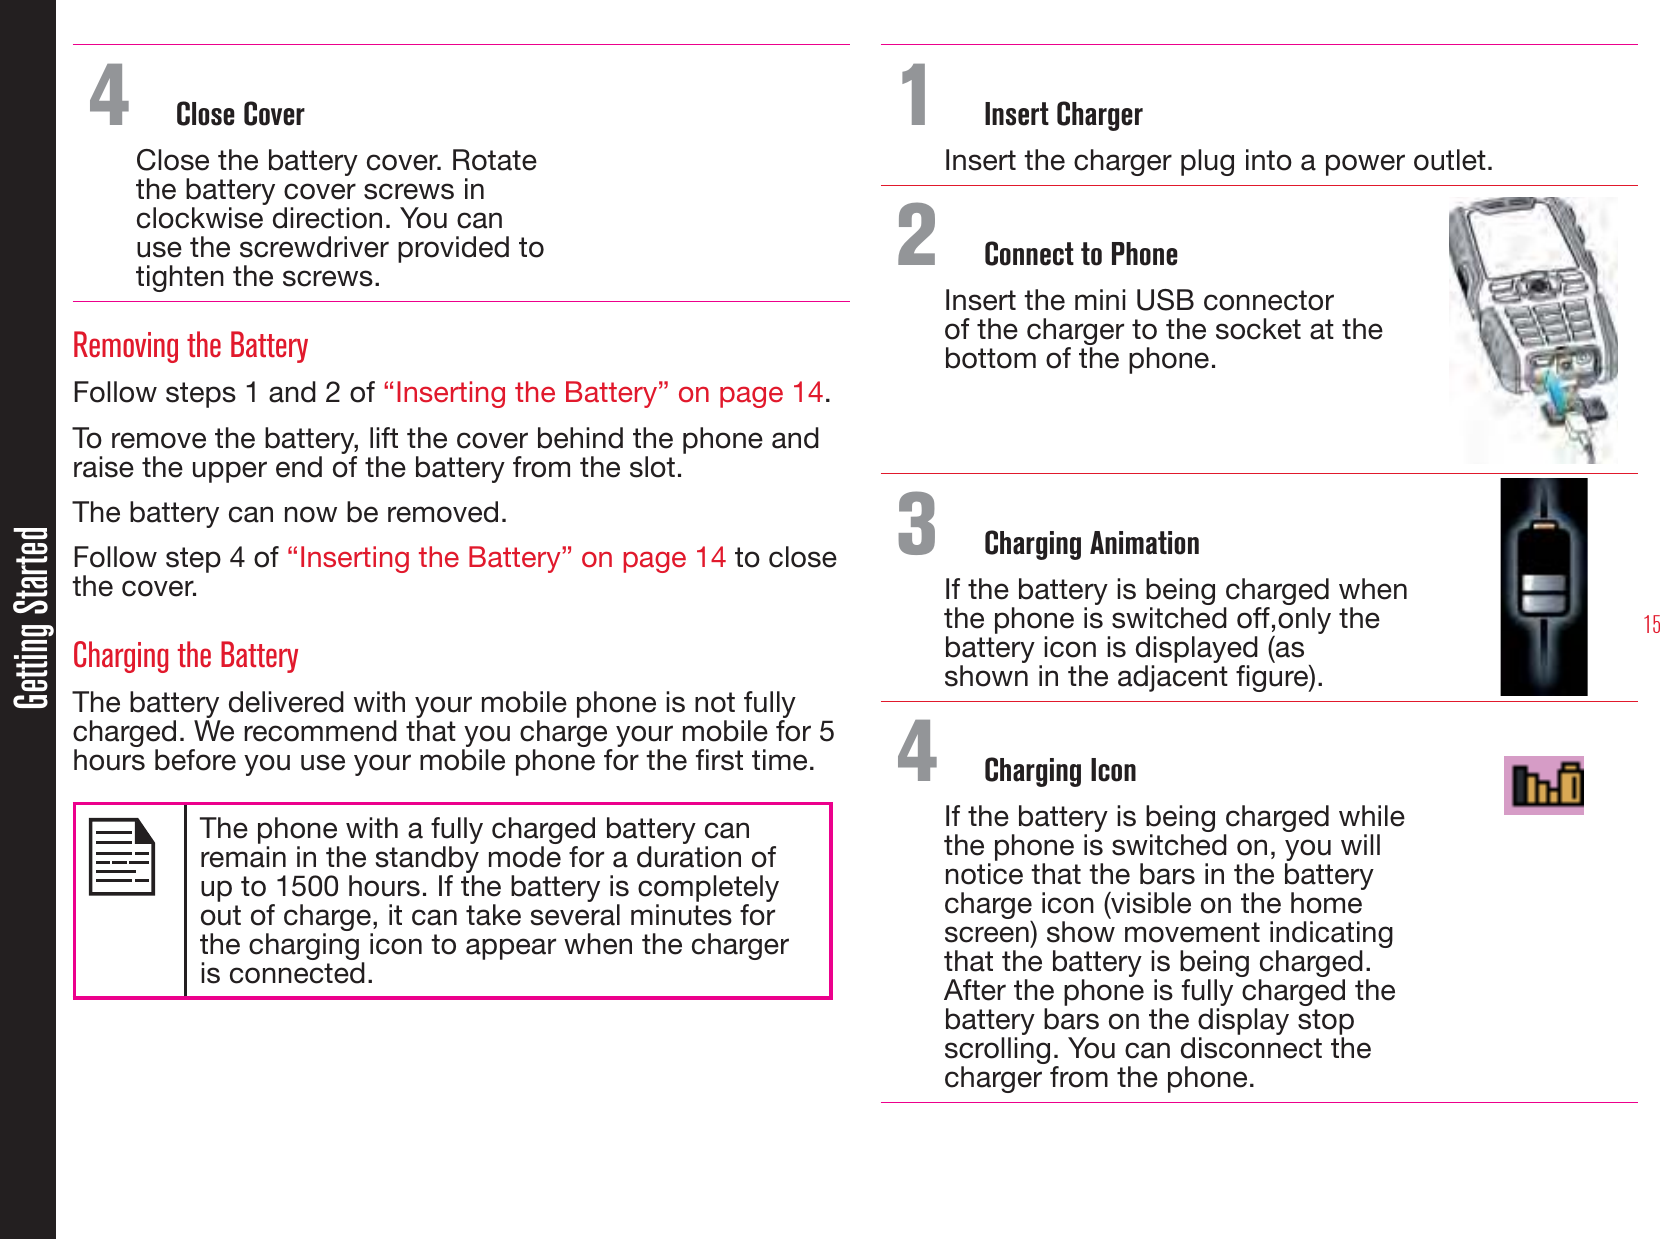
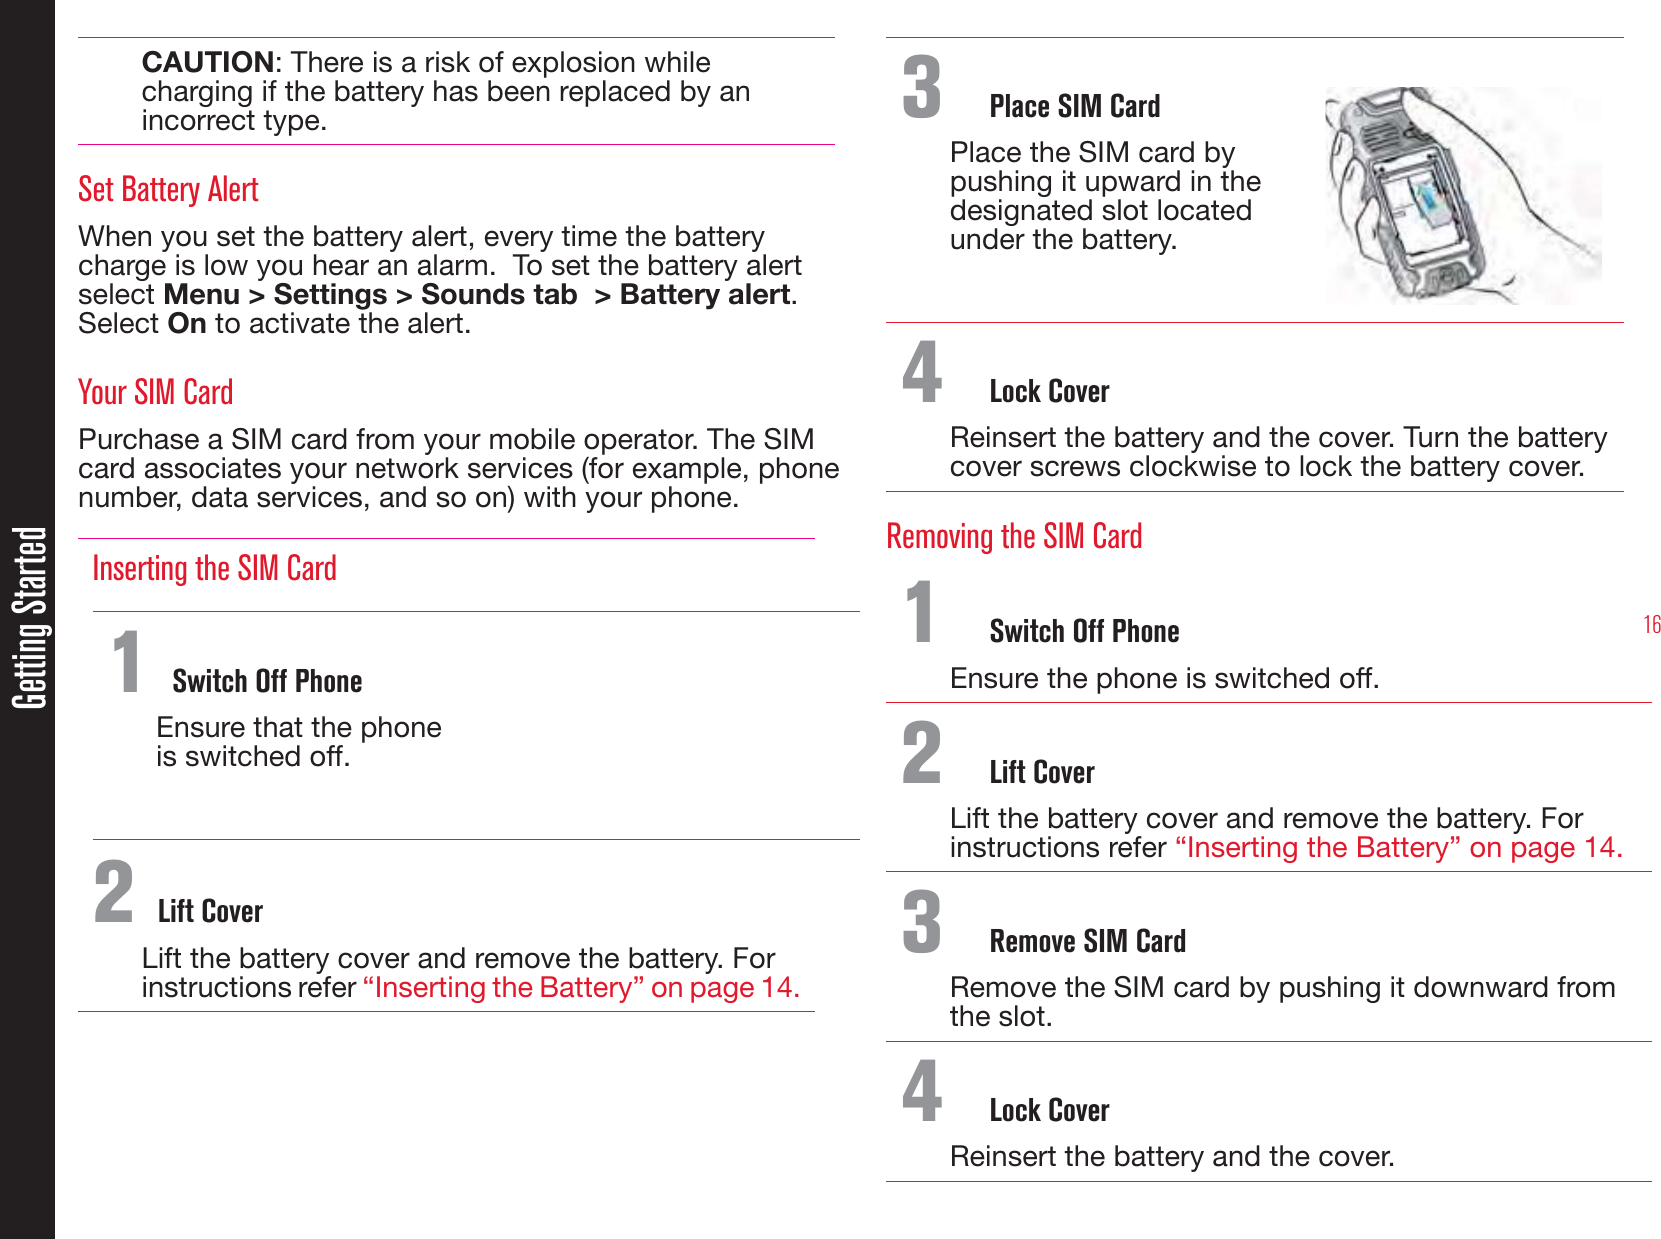
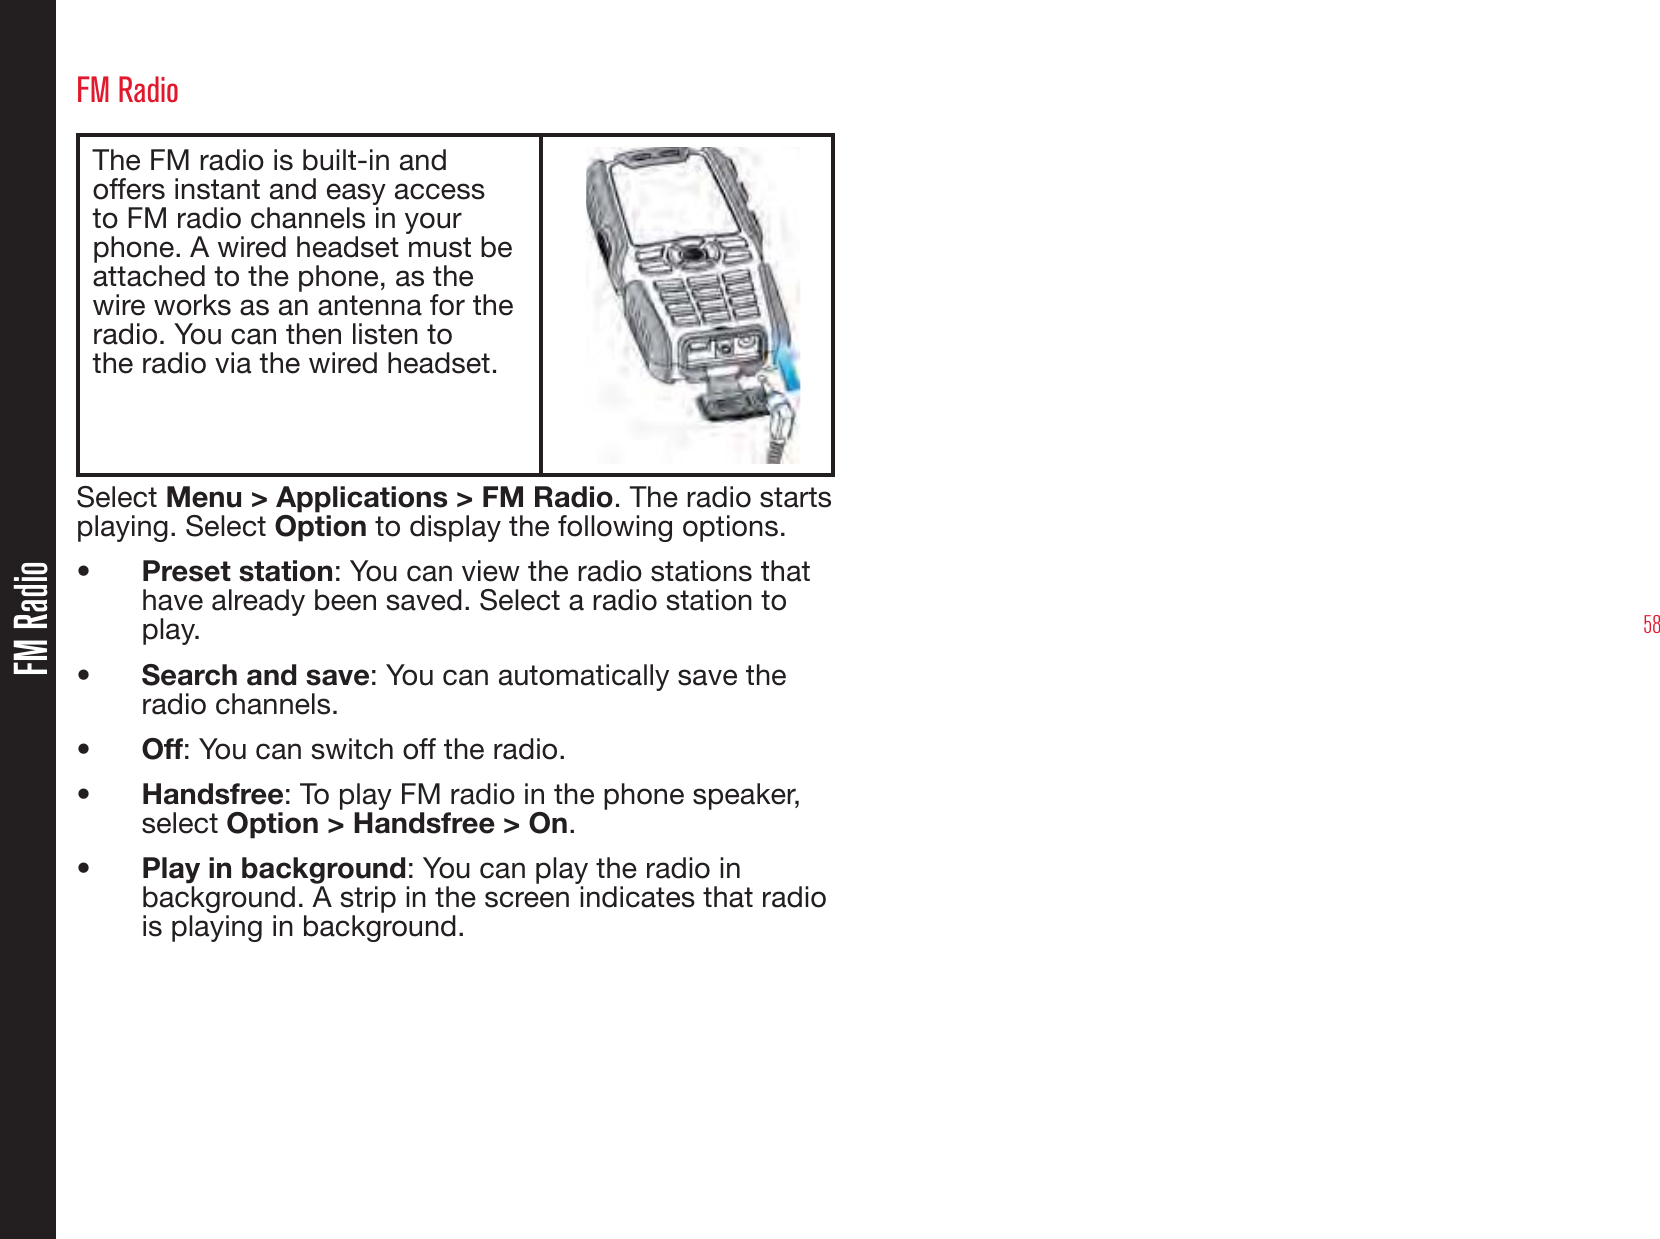
ecom instruments 500019GR01 Tri-band GSM/GPRS 850/1800/1900 Mobile Phone with Bluetooth User Manual SON 100350 XP3 20 R5 1 GE111

ecom instruments GmbH Tri-band GSM/GPRS 850/1800/1900 Mobile Phone with Bluetooth SON 100350 XP3 20 R5 1 GE111

User Manual

1 USER GUIDE      SONIM  XP3.20 QUEST        PRO       English
2Copyright © 2009 Sonim Technologies, Inc. SONIM, Sonim Xperience, Sonim Xtend and the Sonim logo are trademarks of Sonim Technologies, Inc. Other company and product names may be trademarks or registered trade- marks of the respective owners with whom they are associated. Disposal of Old Electrical and Electronic EquipmentThe symbol of the crossed-out wheeled bin indicates that within the countries in the European Union, this product, and any enhancements marked with this symbol, can not be disposed as unsorted waste but must be taken to separate collection at their end- of-life. Disposal of BatteryPlease check local regulations for disposal of batteries. The battery should never be placed in municipal waste. Use a battery disposal facility if available.
3ContentsGeneral Information————————7Phone Models CoveredNetwork Services Sonim Support Information Use the Guide EffectivelyOptions Commonly Used across Menu ItemsYour Safety Guidelines————————9Battery PerformanceBattery ReplacementAvoid Short CircuitAvoid High TemperaturesBattery DisposalPersonal Medical DevicesChild SafetyEmergency CallsSAR InformationGetting Started————————14Getting StartedBattery UsageInserting the BatteryRemoving the BatteryCharging the BatterySet Battery AlertYour SIM CardInserting the SIM Card Removing the SIM CardSwitching OnHome ScreenKey Shortcuts in Home ScreenBasic SettingsKeypad FunctionsYour Sonim XP3.20 Phone————————25Your Sonim XP3.20 PhoneMain MenuMain Menu IconsHome Screen IndicatorsKey Operations without Your SIM CardPhone Settings————————29Phone SettingsGeneral SettingsDisplay SettingsSound SettingsConnectivity SettingsCalls————————34CallsDial a NumberDial an International NumberDial a Number via ContactsDial a Number via the Calls List Managing Call ListSpeed DialReceive a CallAuto AnswerAnykey AnswerMinute ReminderCall ServicesCall ForwardingCall BarringFixed Number DialingAuto RedialFilter CallsAdd to Black listRecording a CallManaging Contacts————————40Managing ContactsAdd a New ContactDialing a Number from ContactsSending a Message from ContactsAdd a New Contact in GroupGroup SettingsSpecial NumbersDefault Contact ListDefault Contact LocationSending ContactDelete ContactsCopy or Move Numbers between Phone and SIM
4ContentsAdding a Contact to BlacklistAdding a Contact to WhitelistSearching ContactsMessages————————43MessagesAdvanced SettingsText Input ModeWrite MessagesSend a Message via ContactsCall or Save a Number Embedded in a Received MessageManage Your MessagesInboxOutboxDraft MessagesSent MessagesPredened MessagesView SMS MemoryVoice MailSIM Card MenuHardcoded Shortcuts————————48 Hardcoded ShortcutsWAP Browser————————49WAP BrowserOpera Mini————————50Opera MiniConguration of APN (Access Point Name) for Opera MiniInstallation of Opera MiniLaunching Opera MiniJava————————51JavaInstalling Pre-bundled Java ApplicationsJava HelpInstalling Java Application from SD CardInstalling Java Application from WAPTools————————52ToolsAlarmBluetoothUSB FunctionCalendarCalculatorVoice RecorderAudio PlaybackAGPSStopwatchUnit ConverterCountdown TimerFM Radio————————58FM RadioCamera————————59CameraCamera OptionsFlashlight————————60FlashlightMicro SD Card————————61Micro SD (Secure Digital) CardInserting Micro SD Card into the PhoneManaging Your Files————————62Managing Your FilesWired Headset————————63Wired HeadsetDuring CallsEnd User License Agreement————————64Unconditional 3 Year GuaranteeOur GuaranteeWhat We Will DoPhone CareConditions
5ContentsFCC————————67FCC StatementDeclaration of Conformity————————68Declaration of Conformity Index————————69
6UNCONDITIONAL3 YEAR GUARANTEE
7Congratulations on the purchase of a Sonim XP3.20™ mobile phone. This phone is a GSM/GPRS/EDGE enabled handset with tri-band capabilities and has an intuitive, feature-rich user interface, which allows you to make the best use of the offered functions.Phone Models CoveredThis user guide covers two Sonim XP3.20™ phone models: XP3.20-E and XP3.20-A. These two models contain an identical scope of features and differ only in the supported set of radio frequencies: •  Sonim XP3.20-E Quest Pro (GSM 900/1800/1900 MHz)•  Sonim XP3.20-A Quest Pro (GSM 850/1800/1900 MHz)The model name can be read on the phone label under the battery. In this User Guide, both models are referred to as Sonim XP3.20, except for the few places where information corresponding to a specific model (that is, XP3.20-A or XP3.20-E) can be found.Network Services These are additional services that you can avail through your network service provider. To make the best of these services, you must subscribe to them through your service provider and obtain instructions for their use from your service provider. Sonim Support Information For additional product and support information,  visit www.sonimtech.com.Use the Guide EffectivelyFamiliarize yourself with the terminology and symbols used in the guide to help you use your phone effectively.HOME SCREEN This is the screen displayed when the phone is in idle condition.PRESS Means to press and release a key immediately. For example, Press 2 means that you press the key on the keypad that is labelled with the numeral 2 and the alphabets “ABC”.SELECT Means to either press the Left or Right Selection Key to apply the command indicated at the bottom of the screen. The Center navigation key can also be used to select options. For example, if this guide says Select Menu > Messages > Create message, you must press the Left Selection Key to select Menu, scroll to Messages and press the Left Selection Key, scroll to Create message and press the Left Selection Key. To return to the previous screen, press the Right Selection Key.General Information
8PRESS & HOLD Means to press and hold a key for 2 seconds before releasing the key. This action is typically used when trying to switch on/off the phone or when using shortkeys to access specic functions. For example: press and hold 1 to access voicemail.MENU OPTIONS These options are displayed at the bottom of the screen. The selection keys are used to accomplish the indicated option.SELECT MENU Means to press the Left Selection Key to select the Menu option or press the Menu key (centre) for the same result.A MENU ITEM SUFFIXED WITH THREE DOTS (…)Means more options are available but only one has been mentioned in the guide.Signies a Note. Options Commonly Used across Menu ItemsThe following are common actions used across various menu items:EXIT Displays the previous screen. Use the Right Selection key to perform this function.CLEAR Deletes data character by character. Use the Right selection key to perform this function.OK Conrms an action. Use the Left Selection Key or the Menu key to perform this function.General Information
9Please read and understand the following safety guidelines before you use the phone. These guidelines provide details to enable you to operate your phone safely and conform to any legal requirements regarding the use of cellular phones.Do not to use the phone at a refuelling point. Observe restrictions when using radio equipment at fuel depots, chemical plants or where blasting operations are in progress.Electrical interference may obstruct the use of your phone. Observe restrictions in hospitals and near medical equipment.Switch off your cellular phone when in an aircraft. Wireless phones can cause interference or danger to an aircraft. In an aircraft, the phone can be used in flight mode.Do not expose the battery to high temperatures (in excess of 60°C).Adhere to road safety laws. Do not hold/use a phone while you are driving; find a safe place to stop first. Do not speak into a hands-free microphone while you are driving.Avoid using the phone in close proximity to personal medical devices,  such as pacemakers and hearing aids. Use only Sonim XP3.20 approved charging equipment to charge your phone and avoid damage to your phone.The symbol of the crossed-out wheeled bin indicates that within the countries in the European Union, this product, and any enhancements marked with this symbol, can not be disposed as unsorted waste but must be taken to separate collection at their end-of-life.Your Safety Guidelines
10Ensure that only qualied personnel install or repair your phone.The Sonim XP3.20 is water-proof and can be submerged to 1metre for 30 minutes. It can work for 30 minutes if immersed. However, it is not waterproof in deeper water, during charging or when the system connector cover on bottom of the phone is open or compromised.•  To keep your phone waterproof, make sure that the connector cover located at the bottom is rmly plugged in every time it is open for charging or use of a wired headset•  Water droplets may form on the connector cover when it is opened soon after immersion. This does not indicate water leakage. The connector cover is sealed and waterproof.•  Water droplets may condense under the display cover if the phone is immersed in water with signicant drop in temperature. This does not indicate water leakage. The droplets will disappear at room temperature.The Sonim XP3.20 is dust-resistant, rugged and shock-resistant. However, it is not dust-proof or un-breakable if subjected to overwhelming impact. For best results and long product life, one should protect the Sonim XP3.20 from salt water, dust and strong impacts.Make back-up copies of important information stored in your phone or maintain a written record.Your Safety Guidelines
11Battery PerformanceA rechargeable battery powers your device.Use the battery only for its intended purpose. Never use any charger or battery that is damaged. If the battery is completely discharged, it may take a few minutes before the charging indicator appears on the display or before any calls can be made. The full performance of a new battery is achieved only after two or three complete charge and discharge cycles. The battery can be charged and discharged hundreds of times but it will eventually wear out. Unplug the charger from the electrical plug and the device when not in use. Ensure that you do not leave the fully charged battery connected to a charger. If left unused, a fully charged battery will lose its charge over time.Battery ReplacementWhen the talk and standby times are noticeably shorter than normal, replace the battery with an original Sonim battery.If a replacement battery is being used for the rst time or if the battery has not been used for a prolonged period, it may be necessary to connect the charger and then disconnect and reconnect it to begin charging the battery.Avoid Short CircuitDo not short-circuit the battery. An accidental short-circuit can occur when a metallic object such as a coin, clip, or pen causes direct connection of the positive (+) and negative (-) terminals of the battery. (These look like metal strips on the battery.) This might happen, for example, when you carry a spare battery in your pocket or purse. A short-circuit at the terminals may damage the battery or the connecting object.Avoid High TemperaturesLeaving the battery in hot or cold places, such as in a closed car in summer or winter conditions, will reduce the capacity and lifetime of the battery. For the best results,  try to keep the battery between 15°C and 25°C (59°F and 77°F). A device with a hot or cold battery may not work temporarily, even when the battery is fully charged. Battery performance is particularly limited in temperatures well below freezing.Battery DisposalDo not dispose off batteries in a re as they may explode. Batteries may also explode if damaged. Dispose of batteries according to local regulations and recycle when possible. Do not dispose as household waste. Do not dismantle, open or shred cells or batteries. In the event of a battery leak, do not allow the liquid to come in contact with the skin or eyes. In the event of leak or a hazard seek medical  help immediately.Personal Medical DevicesMobile phones may affect the operation of cardiac pacemakers and other implanted equipment. Please avoid placing the mobile phone over the pacemaker, for example. in your breast pocket. When using the mobile phone, place it at the ear opposite the pacemaker. If a minimum distance of 15 cm (6 inches) is kept between the mobile phone and the pacemaker, the risk of interference is limited. If you suspect that interference is taking place, immediately turn off your mobile phone. Contact your cardiologist for more information. For other medical devices, consult your physician and the manufacturer of the device. Comply with instructions to switch off the device or deactivate the RF transmitter function when required, especially when posted in hospitals and aeroplanes. Equipment used in these places may beYour Safety Guidelines
12Your Safety Guidelinessensitive to radio waves emitted from the device and adversely affect their operation. Also, observe restrictions at gas stations or other areas with ammable atmosphere or when close to electro-explosive devices.Child SafetyDo not allow children to play with your mobile phone or its accessories. Keep it out of their reach. They could hurt themselves or others, or could accidentally damage the mobile phone or accessories. Your mobile phone and its accessories may contain small parts, which could be detached and create a choking hazard.Emergency CallsMobile phones operate using radio signals, which cannot guarantee connection under all conditions. Therefore you should never rely solely upon any mobile phone for essential communications (e.g. medical emergencies). Emergency calls may not be possible in all areas, on all cellular networks, or when certain network services and/or mobile phone features are in use. Check with your local service provider.SAR InformationThe Sonim XP3.20 has been certified in compliance with the Government’s requirements for exposure to Radio Waves.When communicating over the wireless network, the mobile phone emits low radio waves known as radio frequency energy or RF. The Specic Absorption Rate or SAR is the unit used to measure the amount of RF energy absorbed by the body while using the phone and is expressed in watts/kilogram (W/kg).Governments around the world have adopted comprehensive international safety guidelines, developed by scientic organizations, for example, ICNIRP (International Commission on Non-Ionizing Radiation Protection) and IEEE (The Institute of Electrical and Electronics Engineers Inc.), through periodic and thorough evaluation of scientic studies. These guidelines establish permitted levels of radio wave exposure for the general population.Tests for SAR are conducted using standardized methods with the phone transmitting at its highest certied power level in all used frequency bands.SAR Data Information for residents in countries that have adopted the SAR limit recommended by the International Commission on Non-Ionizing Radiation Protection (ICNIRP). For example, European Union, Japan, Brazil and New Zealand.The limit recommended by ICNIRP is 2 W/kg averaged over ten (10) gram of tissue.The highest SAR value for the Sonim XP3.20-E phone when tested by Sonim for use at the ear is 0.582 W/kg (10g).Note: For countries, which require SAR measurements for body-worn operation:•  The highest SAR value for the Sonim XP3.20-E phone tested by Sonim for use when worn on the body is 0.644 W/kg (10g), provided that the phone is used with a non-metallic accessory with the handset at least 1.5 cm from the body, or with the original Sonim accessory intended for this phone and worn on the body.
13Your Safety GuidelinesThe highest SAR value for the Sonim XP3.20-A phone when tested by Sonim for use at the ear is 0.253 W/kg (10g).SAR Data Information for residents in the United States and Canada.In the United States and Canada, the SAR limit for mobile phones used by the public is 1.6 watts/kilogram averaged over one gram of tissue. The standard incorporates a margin of safety to give additional protection for the public and to account for any variations in measurements.Before a phone model is available for sale to the public in the US, it must be tested and certied by the Federal Communications Commission (FCC) that it does not exceed the limit established by the government-adopted requirement for safe exposure. The tests are performed in positions and locations (that is, by the ear and worn on the body) as required by the FCC for each model. The FCC has granted an Equipment Authorization for Sonim XP3.20 with all reported SAR levels evaluated as in compliance with the FCC RF exposure guidelines. While there may be differences between the SAR levels of various phones, all mobile phones granted an FCC equipment authorization meet the government requirement for safe exposure.The highest SAR value for the Sonim XP3.20-A phone when tested by Sonim for use:•  By the ear is 0.557 W/kg (10 g).•  Worn on the body is 0.532 W/kg (10 g) for speech and 0.519 W/kg (10 g) for data calls.The highest SAR value for the Sonim XP3.20-E phone when tested by Sonim for use:•  By the ear is 0.204 W/kg (10 g).•  Worn on the body is 0.153 W/kg (10 g) for speech and 0.275 W/kg (10 g) for data calls.For body-worn operation, this phone meets FCC RF exposure guidelines provided that it is used with a non-metallic accessory with the handset at least 1.5 cm from the body, or with the original Sonim accessory intended for this phone and worn on the body. Use of other accessories may not ensure compliance with FCC RF exposure guidelines.
14Getting StartedGetting StartedThis section provides information on using your Sonim XP3.20 phone.The list of items in the Sonim XP3.20 phone box are:•  User Guide CD•  Sonim 3 Year Warranty Flyer•  Quick Start Guide• Screwdriver• Wired Headset• USB Cable• Charger• Belt ClipBattery Usage•  Use only a Sonim XP3.20 certied battery that is designed for this phone model.•  The use of other batteries may void the warranty terms of your phone and cause damage.•  It is recommended to protect the battery from extreme temperature environments and moisture.•  Please keep the battery out of the reach of children.Inserting the Battery1 Unscrew CoverTo open the battery cover, rotate both the battery cover screws in an anti-clockwise direction (as shown in the gure). Sometimes, the battery cover may be tight and some extra effort is required to open it. You can use the screwdriver provided to open the screws.2  Lift CoverLift the back cover to reveal the battery slot.3  Insert BatteryInsert the battery and ush into the battery slot such that the three metallic contacts at the top of the battery are aligned with the metallic contacts within the battery compartment.
15Getting Started4  Close CoverClose the battery cover. Rotate the battery cover screws in clockwise direction. You can use the screwdriver provided to  tighten the screws.Removing the BatteryFollow steps 1 and 2 of “Inserting the Battery” on page 14.To remove the battery, lift the cover behind the phone and raise the upper end of the battery from the slot.The battery can now be removed.Follow step 4 of “Inserting the Battery” on page 14 to close the cover.Charging the BatteryThe battery delivered with your mobile phone is not fully charged. We recommend that you charge your mobile for 5 hours before you use your mobile phone for the rst time.The phone with a fully charged battery can remain in the standby mode for a duration of up to 1500 hours. If the battery is completely out of charge, it can take several minutes for the charging icon to appear when the charger is connected.1  Insert ChargerInsert the charger plug into a power outlet.2  Connect to PhoneInsert the mini USB connectorof the charger to the socket at the bottom of the phone.3  Charging AnimationIf the battery is being charged when the phone is switched off,only the battery icon is displayed (as shown in the adjacent gure). 4  Charging IconIf the battery is being charged while the phone is switched on, you will notice that the bars in the battery charge icon (visible on the home screen) show movement indicating that the battery is being charged. After the phone is fully charged the battery bars on the display stop scrolling. You can disconnect the charger from the phone.
16Getting StartedCAUTION: There is a risk of explosion while charging if the battery has been replaced by an incorrect type.Set Battery AlertWhen you set the battery alert, every time the battery charge is low you hear an alarm.  To set the battery alert select Menu > Settings > Sounds tab  > Battery alert. Select On to activate the alert.Your SIM CardPurchase a SIM card from your mobile operator. The SIM card associates your network services (for example, phone number, data services, and so on) with your phone.Inserting the SIM Card 1 Switch Off PhoneEnsure that the phone is switched off. 2 Lift CoverLift the battery cover and remove the battery. Forinstructions refer “Inserting the Battery” on page 14.3  Place SIM CardPlace the SIM card by pushing it upward in the designated slot located under the battery.4  Lock CoverReinsert the battery and the cover. Turn the batterycover screws clockwise to lock the battery cover.Removing the SIM Card1  Switch Off PhoneEnsure the phone is switched off.2  Lift CoverLift the battery cover and remove the battery. Forinstructions refer “Inserting the Battery” on page 14.3  Remove SIM CardRemove the SIM card by pushing it downward from the slot.4  Lock CoverReinsert the battery and the cover.
17Parts of the Sonim XP3.20 PhoneThe Sonim XP3.20 keypad has 9 function keys and 12 alphanumeric keys. The left side of  the phone has one key and the right side  of the phone has three keys.Getting StartedCharger portHeadset portFunction keysEar pieceDisplay screenAlphanumeric keysMicrophone
18Getting StartedParts of the Sonim XP3.20 PhoneVolume keysPTT*/Easy call keyBattery coverBattery cover screwsLoud speakerCameraFlashCamera (press)* PTT will only work if it is enabled. Check with the service provider.
19Getting StartedNavigation arrow keys (Up/Down/Left/Right) Press and hold for voicemailPress and hold to lock/ unlock the keypad Press and hold to turn  on/off silent mode Press and hold to display+ (before dialing an international number)Right Selection Key (RSK)Menu key Power On/Off/End callCall/Accept/SendLeft Selection Key (LSK) Sonim XP3.20 KeypadThe following gure identies different keys in the phone key pad. Numeric keys and arrow keys can be congured as shortcut keys. The gure shows the permanent short cuts. For conguring other shortcut keys, please refer “Shortcuts” on page 31.Some features are enabled only if the SIM card is present.Torch (press and hold)
20Getting StartedSwitching OnWhen the phone is switched on, it tries to register with the network. After successful registration, the name of the service provider is displayed.Home ScreenCertain information is displayed when the phone is in standby mode, for example, the name of the service provider, date and time, battery charge status, GPRS connectivity. Other indicators may be displayed (if the feature is activated), like the alarm, call forward and so on. Key Shortcuts in Home ScreenThe following can be accessed from the home screen.Press To AccessMenu  Key Main MenuLeft Selection Key Main MenuRight Selection Key ContactsCall/Accept/Send Key All Calls ListUp Arrow Java Applications ListDown Arrow ContactsRight Arrow Create MessageLeft Arrow FM RadioThe four functions that are performed usingthe arrow keys are set as factory defaults,however they can be changed. Select Menu >  Settings > General tab > Shortcuts. Go to the second tab. Select the arrow key and select Option > Change. You can also change many of the shortcuts. Select Menu >  Settings > General tab > Shortcuts. Select the key and select Option > Change. GPRS connectivitySignal strength indicatorDisplay iconsLSK command RSK commandService providerBattery charge  indicator
21Getting StartedBasic SettingsSecurity SettingsTo prevent unauthorised use of your phone, you can set a PIN code. The PIN is operator dependent.1. Select Menu > Settings > General tab > Security settings > PIN code > On. Enter the PIN. Select OK. After this is set, every time you power on the phone, you will be requested to enter the PIN. If the PIN code is wrong you cannot access the phone.2.  To change the PIN code select Menu > Settings > General tab > Security settings > Change password. You can change codes for PIN, PIN2, Call barring, Safeguard and Phonelock password. Contact your service provider for details.Safeguard ModeIn the safeguard mode, the Call list, Contacts, Messages and Speed dial can be accessed only by entering a password.To enter the safeguard password, select Menu > Settings > General tab > Security settings > Safeguard. Enter the password. After entering the password, the private information screen is displayed. Press the menu key to select the required features to be safeguarded and select OK to enable.Phonelock ModeIn the phonelock mode, the phone can be unlocked only by entering a password.To enter the phonelock password, select Menu > Settings > General tab > Security settings > Phonelock > On. Enter the password. Select OK.The default password for safeguard and phonelock is 1234.To change the safeguard or phonelock password, select Menu > Settings > General tab > Security settings > Change password > Change phonelock pw / Change safeguard pw. Enter the password. Select OK. Enter the new password. Select OK. Reenter the new password. Select OK.Auto Keypad LockTo lock the keypad, select Menu > Settings > General tab > Auto keypad lock. You can choose to switch it off or enable the feature by setting time.Alternatively press and hold the ‘*’ key to lock and unlock the keypad.Date and TimeTo set the Date and Time, select Menu > Settings > General tab > Date & Time.Silent ModeIn the silent mode, the alerts for Calls, Organizer, SMS andbattery status are disabled.Select Menu > Settings > Sounds tab > Alert type > Silent OR press and hold the # key.
22Getting StartedKeypad FunctionsThe following table displays the various keys and the corresponding functions they perform:Keypad key OperationsPOWER ON/OFF/END CALL•  Press to end a call (GSM).•  Press and hold to switch on or switch off the mobile phone.•  Press when in Menu or Edit modes to return to Standby mode.•  Press to reject an incoming call.CALL/ACCEPT/SEND•  Press to answer an incoming call.•  After entering a phone number, press to make a call.•  Press while in Standby mode to access All calls list.LSK/RSKThese keys are present immediately below the display screen.•  Press the Left Selection Key (LSK) or Right Selection Key (RSK) to select the function indicated at the bottom of the screen. The indicated functions can vary according to different program denitions.•  Press LSK to access the main menu in standby mode.•  Press RSK to access the Contacts in standby mode.MENU KEY (CENTRE)Present at the centre of the navigation keys.•  Press while in standby mode to enter the main menu.•  Press when required to be used as a toggle key to select or clear a checkbox.•  Press to perform similar tasks as the Left Selection Key.•  Press to select the OK command.
23Getting StartedKeypad key OperationsNAVIGATION KEYSThe Left and Right Selection keys and Power On/Off keys surround this key group. There are arrows on the key that denote the direction to scroll for information displayed on the screen.UP/DOWNPress to move the cursor up or down in the text editor.•  Press to view the pages in the text editor.•  Press to browse menus/lists at the same level.•  Press to view the previous or next picture when previewing pictures.•  Press to browse the main menu.LEFT/RIGHTPress to navigate between tabs.•  Press to move the cursor left or right in the text editor.•  Press to browse the main menu.ALPHA-NUMERIC KEYS•  Press the required keys to enter the desired phone number and press   to make a call. Alternatively, enter the number and select Option to dial the number.•  Press and hold any numeric key to access the shortcut assigned, while in standby mode.•  Enter text while in the text editor.•  Press and hold in standby mode to access your Voice mail.•  When entering text, press to enter space.
24Getting StartedKeypad key Operations•  Press and hold to launch Opera Mini. •  Press and hold to launch Sonim Mail.•  The shortcut for this key can be configured according to different requirements. The user can change the settings.•  Press and hold to turn on the torch. to •  The shortcut for these keys can be configured according to different requirements. The user can change the settings.•  Press and hold to display ‘+’ used for dialing an international number, while in standby mode.•  When entering text, press to enter a dot (.).•  Press and hold to lock the keypad. Use it as a toggle key to lock and unlock the keypad, while in standby mode.•  When entering text, press to display special characters, for example, period, comma, and so on. Press and hold to display the text input languages.•  Press and hold in standby mode to switch between Silent on/off modes.•  When entering text, press to switch between lower case, upper case or numeric. Press and hold to enable T9 mode.
25Your Sonim XP3.20 PhoneYour Sonim XP3.20 PhoneThis model is a bar type phone with a single LCD screen. The graphic eld of the screen is 176 (w) and 220 (h) pixels. The TFT technology used displays 64K colours.Main MenuTo access the phone menu, press the menu key. The main menu which comprises the following nine items appears.Main Menu Icons1.   CALLS2.  SETTINGS3.  MY FILES4.  PHONEBOOK5.  CAMERA6.  TOOLS7.  MESSAGES8.  APPLICATIONS 9.  BROWSERHome Screen IndicatorsThe home screen indicators are visible when the phone is in standby mode. Some icons indicate the status of certain functionalities of the phone, for example, the battery charge indicator, the network status indicator, the date and time etc. Some icons are displayed only if the specic service is activated.
26Your Sonim XP3.20 PhoneThe following table describes the display indicators on the top bar of the home screen in the Sonim XP3.20 phone. These icons depend on the selected theme.Display Indicators Name DescriptionBatteryFour clear bars indicate maximum battery charge. Opaque bars indicate decline in battery chargeRoamingThis icon is only displayed when your phone is registered with a non home network.GPRSG displayed in greenindicates that the phone is GPRS attached.G displayed in red indicates that GPRS is detached.AlarmClockIndicates that the alarmclock has been set.Meeting Indicates that the phone is on meeting mode.DisplayIndicators Name DescriptionCall  ForwardIndicates that thecall forward function is enabled.Unread MessageIndicates that there are unread messages in the inbox.SMS Memory FullIndicates that the SMS memory is full.Voice MessageIndicates a new voice message.Auto Answer Indicates that auto answer has been set.Keypad Lock Indicates that the keypad is locked.FirewallIndicates that the black list/white list has been enabled.GPS Indicates that GPS is turned on.
27Your Sonim XP3.20 PhoneDisplay Indicators Name DescriptionBluetoothConnec-tivityIndicates that bluetooth is active.BluetoothCarKit/HeadsetConnec-tivityIndicates that your device is paired and connected to a carkit or headset with bluetooth connectivity.Micro SD CardIndicates that Micro SD card is inserted.WAP Push MessageIndicates a new WAPpush message.Wired HeadsetIndicates that a wired headset is connected.Both Vibration and RingingIndicates that the phone performs both vibration and ringing.DisplayIndicators Name DescriptionEDGEIndicates that the packet data session is active and EDGE feature is available in the cell.GPRSIndicates that the packet data session is active and GPRS feature is available.The following table describes the display indicators on the GSM call screen in the Sonim XP3.20 phone:Display indicators Name DescriptionActive Call Indicates an active call.Call on Hold Indicates a call on hold.Call on Mute Indicates a call on mute.Handsfree CallIndicates a handsfree call.ActiveConference CallIndicates an active conference call.
28Your Sonim XP3.20 PhoneThe following table describes the display indicators on the home screen in the Sonim XP3.20 phone:Display Indicators Name DescriptionIncoming CallIndicates an incoming call.Outgoing CallIndicates an outgoing call.Missed Call Indicates a missed call.MissedAppointmentIndicates a missed appointment.Key Operations without Your SIM CardMenus AccessibleThe following menus can be accessed on the phone without the SIM card:• Settings• General settings• Display settings• Sounds settings• My les• Camera• Tools• Applications
29Phone SettingsYou can activate and modify various settings on your Sonim XP3.20 phone. On the home screen, select Menu > Settings to display the options.General SettingsSelect Menu > Settings > General tab. The following general settings are displayed.Profiles You can customise the proles to use features such as ring volume, alert type, key sound and back-light level. There are seven environment proles present in this phone. Personal is the default prole, while the other proles are Car, Flight, Home, Meetings, Outdoor and Silent.You cannot change the parameters for the Flight and Silent modes.•  Personal: This is the default prole where all sounds are enabled. Parameters in this mode can be changed. Select Menu > Settings > General tab > Profiles > Personal > Option > Personalize to open the Personalize screen. You can use this screen to choose ring volume, alert type, key sound or backlight level. Select Menu > Settings > General tab > Profiles > Personal > Option > Activate to activate this prole.•  Car: Parameters in this mode can be changed. Select Menu > Settings > General tab > Profiles > Car > Option > Personalize to open the Personalize screen. You can use this screen to choose ring volume, alert type, key sound or backlight level. Select Menu > Settings > General tab > Profiles > Car > Option > Activate to activate this prole.•  Flight: Here all sounds are kept in mute. Select Menu > Settings > General tab > Profiles > Flight > Option > View to open the View screen. Select Menu > Settings > General tab > Profiles > Flight > Option > Activate to activate this prole. In this mode, the phone cannot make or receive calls or play FM radio.•  Home: Parameters in this mode can be changed. Select Menu > Settings > General tab > Profiles > Home > Option > Personalize to open the Personalize screen. You can use this screen to choose ring volume, alert type, key sound or backlight level. Select Menu > Settings > General tab > Profiles > Home > Option > Activate to activate this prole.•  Meetings: Here only the vibrate mode is enabled. Parameters in this mode can be changed. Select Menu > Settings > General tab > Profiles > Meetings > Option > Personalize to open the Personalize screen. You can use this screen to choose ring volume, alert type, key sound or backlight level. Select Menu > Settings > General tab > Profiles > Meetings > Option > Activate to activate this prole.•  Outdoors: Here both the vibrate and ring modes are enabled. Parameters in this mode can be changed. Select Menu > Settings > General tab > Profiles > Outdoors > Option > Personalize to open the Personalize screen. You can use this screen to choose ring volume, alert type, key sound or backlight level. Select Menu > Settings > General tab > Profiles > Outdoors > Option > Activate to activate this prole.•  Silent: Here all sounds are kept in mute. Select Menu > Settings > General tab > Profiles > Silent > Option > View to open the View screen. SelectPhone Settings
30Phone SettingsMenu > Settings > Profiles > General tab > Silent > Option > Activate to activate this prole.Alarm tone will be played even in Silent prole.LanguagesYou can change the phone’s interaction language by selecting your preferred language. For example, select Menu > Settings > General tab > Languages > English to display all menu items, user feedback messages and text entry language in English.Time and DateYou can set and display the date and time on the phone. You can also select the display format. The time zone can also be set for local settings and foreign settings.The date formats supported are YYYY/MM/DD, YYYY-MM-DD, YYYY.MM.DD, DD/MM/YYYY, DD-MM-YYYY, DD.MM.YYYY, MM/DD/YYYY, MM-DD-YYYY or MM.DD.YYYY. The time formats supported are 24 hr and 12 hr.You can view the time of major cities in different time zones using this function and set the time on your phone to a selected time zone. You also have the option to use Daylight Saving Time (DST).The local time or the international time is displayed in the lower half of the screen. Use the navigation keys to view various time zones.1.  To view the international clock, select Menu > Settings > General tab > Date and Time > International clock > Clock status > On. The international clock is displayed on the idle screen.2.  To set your local time, select Menu > Settings > General tab > Date and Time > International clock > Local settings > Option > Set time > Change time. Enter the time and select OK. To set the local date, select Option > Set time > Change date. Enter the date and select OK.3.  To set Daylight Saving Time (DST), select Menu > Settings > General tab > Date and Time > International clock > Local settings OR Foreign settings > Option > Daylight saving > On.4.  To switch between local and foreign settings, select Menu > Settings > General tab > Date and Time > International clock > Switch local/foreign > OK.5.  To view the city list, select Menu > Settings > General tab > Date and Time > International clock > Local settings OR Foreign settings > Option > City list.6.  Auto Update: This feature allows the phone to automatically adjust the time to the time and date details sent by the network. Please note that this feature has to be supported by the network. The following options are available for the user:•  Always: Whenever the time and date information is received from the network, the phone adjusts its time and to that value.•  Never: The phone ignores the time and date information sent by the network•  While not roaming: The phone adjusts the time automatically, only if it is operating in home network.
31Phone SettingsSecurity SettingsTo prevent unauthorised use of your phone, you can set PIN protection, safeguard and phonelock. To enable PIN protection or phonelock, select On. To enable safeguard, enter the password. To change any security related password, select Change Password and change the particular password. The default password for phonelock and safeguard is 1234. For the PIN, please contact your operator.ShortcutsShortcut keys have been set for specic functions. To activate a shortcut, select the shortcut and select Option > Activate. To change any shortcut, select the shortcut and select Option > Change. Select the new function. There are two tabs, one for numeric keys and the other for navigation keys.Default StorageThe individual storage location for Camera, Voice recorder, WAP download or Bluetooth can be set as Phone memory or Memory card. By default, it will be Phone memory.Memory StatusThe memory status for Contacts, Messages, My les and Memory card is displayed.Auto Power OnTo enable this feature, select On. Select the time after which the phone should be automatically switched on. Select OK. Select Off to disable this feature.Auto Power OffTo enable this feature, select On. Select the time after which the phone will be automatically switched off. Select OK. Select Off to disable this feature.FirewallYou can avoid unwanted calls or messages by entering such numbers in the Black list and enabling the Black list. You can receive calls or messages only from specic numbers by entering such numbers in the White list and enabling the White list. You can enable either the Black list  or White list at a time.1.  To enable the Black list or White list, select Menu > Settings > General tab > Firewall > Enable > Black list OR White list > SMS OR Incoming call OR SMS and Incoming call > OK.2.  To disable the Black list or White list, select Menu > Settings > General tab > Firewall > Enable > Off. 3.  To enter a number in Black list or White list, select Menu > Settings > General tab > Firewall > Black list OR White list > Add new > New number (enter the number) OR Contacts (select the number from Contacts) > OK.Auto Keypad LockSelect the time after which the keypad will be automatically locked. Select Off to disable this feature. The keypad should be locked automatically when the phone is in idle state on home screen.
32Phone SettingsDefault SettingsSelect to reset the settings to the original factory settings. Please note that this can remove changes you have made to your settings.Display SettingsSelect Menu > Settings > Display tab . The following display  settings are displayed:1.  Wallpaper: Allows you to set the background screen display using the embedded pictures available in your phone or from your own pictures that you have downloaded on to your phone or Micro SD card. The selected wallpaper is displayed on the home screen only if you select On.2.  Themes: Allows you to set the colour theme and icons for the main menu and other screens. There are two themes available. Select Menu > Settings > Display tab > Themes > Theme 1 OR Theme 2 > OK.3.  Backlight Level: Select the backlight level of the screen display as maximum, high, medium or low.4.  Backlight Duration: Keeps the screen display active for the period chosen by you. Select the screen display active time as 10 sec, 30 sec or 60 sec.5.  Greeting: Select On. Enter the greeting and Save to make it appear on the screen while powering on the phone.6.  Screensaver: Select On to make the screen saver appear on the idle screen. User can select the screensaver image.Sound SettingsSelect Menu > Settings > Sounds tab . Changing it effects the current set prole.The following sound  settings are displayed:1.  Alert Type: You can set the alert type for  incoming calls and SMS alerts. You can select from Ring only, Vibrate only, Vibrate then Ring, Ring and Vibrate or Silent.2.  Ringtone: You can set different ringtones for your calls., SMS alerts, alarms, organizer and calendar. You can select from Default sounds (pre-recorded factory tunes) OR Phone memory (downloaded via WAP, personal recordings or les transferred via Bluetooth) OR Memory card.You can download and store ring tones over Bluetooth or WAP. The ringtone formats are MIDI, MP3, WAV, AAC and AMR.3.  Ringer Volume: You can set the ringer volume for GSM calls, alarms and alerts.4.  Key Tone: You can set the keypad sound as Off, Low, Medium or High.5.  Shutter Sound: You can set the camera shutter sound.6.  Battery Alert: Select On to get any low battery alert.Connectivity SettingsSelect Menu > Settings > Connectivity tab. The following connectivity settings are displayed:
33Phone Settings1.  Network Settings: This relates to various network related settings. You can select your network, specify the network account, indicate whether GPRS is required at all times, and so on.•  Select Network: Your phone will select the network automatically or you can do it manually.•  Search Mode: You can select Auto to set the phone to automatically select a cellular network available in your area, or select Manual to set the network manually. If manual mode is set, the user has to invoke Select Network to do network selection.•  Preferred Networks: You can view the list of networks. Select Option to Insert, Add to end, Add existing, Add network code or Delete. This list is made to use while the user is roaming.•  Attach GPRS: You can access the GPRS network. Enables you to choose the registration preference.When Always attached is selected, the phone always remains registered with the GPRS network.When Attached during PDP session is selected, the phone gets registered with the GPRS network only when data transfer is required.2.  Connections: You can set the Network account and view the GPRS information.•  Network Account: You can view or edit the accounts. There are ve accounts present. You can edit the following information in the accounts: Account name, APN, Login and Password. Make the changes and select Save.•  GPRS Info: You can view the GPRS information such as data received, when used as a modem.
34CallsCallsThis section provides information on managing calls.Dial a Number1.  Use the numeric keys to enter the number and press  .2.  Alternatively you can enter the desired phone number and select Option > Dial > Dial > Select. Dial an International NumberPress and hold the numeric key 0 till the + symbol is displayed. Enter the Country code, Area code (without prededing 0) and the phone number and press   or select Option > Dial > Dial > Select.Dial a Number via ContactsYou can dial a number directly from the Contacts.To Locate a Phone Number1.  On the home screen, select Contacts. Scroll to the phone number.2. Press   to dial the number OR select Option > Dial > Dial > Select OR press the easy call key. Press   or Select End to disconnect.Dial a Number via the Calls List The Calls list comprises separate lists for All calls, Missed calls, Answered calls and Outgoing calls.1.  To access the Calls list, press   OR select Menu > Calls > Call list. All the available call lists are displayed.2.  Select a list, scroll to the number and press   to dial the number.Managing Call ListContacts within the call list have the following options:•  Save: You can save the number in Contacts (if it is not saved).•  Send messages: You can send an SMS to the number. Enter the SMS and select Option to view the SMS options and send it accordingly.•  Send phone number: You can send the name and phone number of a contact to the recipient via SMS.•  Delete: You can delete the number from the Call list.•  Dial: displays dial options from which to choose.Dial Dials the selected number.Handsfree DialYou can talk using the speaker.•  Add to blacklist: You can add the number to blacklist.•  Edit number before dialing: You can edit the number before dialing.
35CallsSpeed DialThis option enables you to dial a number quickly via a shortcut.1.  If shortcut is not set for Speed dial, select Menu > Settings > General tab > Shortcuts > scroll to a key  > Option > Change. Select Speed dial from the list. The shortcut is set.2.  Press and hold the shortcut designated for Speed dial from home screen. The Speed dial screen appears.3.  To add a new contact, scroll to an empty slot, select Add. Select the contact. Select Yes to add a picture or No to not add picture. Select the picture from Default pictures OR Phone memory OR SD card. The Speed dial is set.4.  To make a call, press   . The other options available for a contact are View, Replace, Delete and Send message.Receive a Call1.  To receive a call, press the Accept key   OR press Left Selection key. Select Accept.2.  To reject a call press the Power on/off key   OR press Left Selection key. Select Reject.3.  To receive another call while you are already speaking, enable the call waiting feature for GSM calls. Select Menu > Calls > Call settings > Call services > Call waiting > Enable.Auto AnswerWhen auto answer is enabled, your incoming calls will automatically be answered.Select Menu > Calls > Call settings > Auto answer > On.Anykey AnswerWhen enabled, you can press any key except   to answer a call.To activate this feature, select Menu > Calls > Call settings > Anykey answer > On.Long pressing (press and hold) the Power on/off key   during a GSM call will only end the call and not switch off the phone.Minute ReminderWhen enabled, you receive a prompt at the 45th second of every minute during a conversation. Select Menu > Calls > Call settings > Minute reminder > On.Call ServicesCall Time•  To view the total time spent on the last call, select Menu > Calls > Call settings > Call services > Call time > Last call.•  To view the total time spent on incoming calls, select Menu > Calls > Call settings > Call services > Call time > Incoming call.
36Calls•  To view the total time spent on outgoing calls, select Menu > Calls > Call settings > Call services > Call time > Outgoing call.•  To view the total time spent on all calls, select Menu > Calls > Call settings > Call services > Call time > All call time.Call WaitingWhen call waiting is enabled and your phone is in conversation, the message Call waiting and the number is displayed when you receive an incoming call.1.  To enable this facility, select Menu > Calls > Call settings > Call services > Call waiting > Enable.2.  To cancel this facility, select Menu > Calls > Call settings > Call services > Call waiting > Cancel. You will not be prompted when you receive an incoming call while your phone is busy. The caller will receive a busy signal.3.  To verify the call waiting status, select Menu > Calls > Call settings > Call services > Call waiting > Status.Own IDWhen enabled,  your ID is displayed to the recipient when you call or send a message. However  this service must be supported by your network.1.  To enable this option, select Menu > Calls > Call settings > Call services > Own ID > Show ID.2.  To disable this option, select Menu > Calls > Call settings > Call services > Own ID > Hide ID.3.  To request the network to set this option, select Menu > Calls > Call settings > Call services > Own ID > Set by network.Caller IDWhen enabled, you can view the ID of the caller. To enable this option, select Menu > Calls > Call settings > Call services > Caller ID.Call ForwardingYou can forward your incoming calls to a number in the Contacts or a new number, provided your network operator supports this service. To access call forward settings, select Menu > Calls > Call settings > Call forward. The Call forward options are mentioned below:Call Forward Option FunctionAll calls Forward all incoming calls to a pre-designated number.If no reply Forward calls when you do not answer incoming calls.If unreachable Forward calls when you have switched off your phone or you are out of network coverage area.If busy Forward calls when your phone is busy.Status Check the current Call forward status.Cancel all Deactivates the call forward option.
37Calls When All calls divert is enabled, the icon   is displayed at the top of the screen when the phone is in standby mode.Call BarringYou can set Call barring facility for all outgoing calls, outgoing international calls, local and home only, all incoming calls or roaming incoming calls.1.  To set call barring settings, select Menu > Calls > Call settings > Call barring.2.  Enter the restriction password. (Your network operator provides this before you use this function). This password will be sent to the network for verication.The Call barring options are mentioned below:Call Barring Option FunctionAll outgoing calls All outgoing calls are barred.Outgoing international callsAll international calls are barred.Local and home only Subscriber can make calls to mobile or landline phones in the country where the subscriber is currently located and to the home country of the subscriber. The home country is the location of the SIM card’s provider.All incoming calls All incoming calls are barred.Roaming incoming callsAll incoming calls, while roaming abroad, are barred.Barring status Checks the current call barring status.Cancel all Deactivates call barring.Fixed Number DialingA xed set of numbers are stored as xed numbers and only those numbers can be dialed from the phone. User(s) can make calls from Contacts or dial the number if the selected number is stored in xed numbers list. User(s) can however receive calls from any number. User(s) cannot make calls to the numbers which are not stored in xed numbers list.1. Select Menu > Calls > Call settings > Fixed Dial >Mode > On. Enter the PIN2 to activate xed number dialing. 2.  Enter the PIN2 to activate xed number dialing. Select Add new to add a new number to the list or select Fixed numbers list to view the list.For your PIN2, please contact your service provider.
38CallsAuto RedialWhen auto redial is enabled, your phone will automatically redial within a set interval, if a call does not connect.1.  To enable this function select Menu > Calls > Call settings > Auto redial > On.2.  If the attempt to call is not successful, you will be prompted with the message Auto redial? Select OK to redial. Select Back to return to home screen.Filter CallsThis function enables you to avoid receiving unnecessary calls OR messages. Users can select SMS/Calls/Both SMS and Calls to go to the black list/white list.At any point of time, you can enable either black list or white list. If white list is enabled, only the contacts in the white list can reach you. When black list is enabled, all other contacts except the ones in the black list can reach you.To enable this function, select Menu > Settings > General tab > Firewall > Enable > Black list or White list > SMS or Incoming call or SMS and Incoming call > OK.If the black list or white list is empty, it cannot be enabled.•  Enable Black list: Rejects all incoming calls and messages from numbers in the black list.•  Enable White list: Allows incoming calls and messages from numbers in the white list and rejects incoming calls and messages from numbers that are not in the white list.•  Off: Disallows ltering of incoming calls and messages.Add to Black listTo add a number to the black list, select Menu > Settings > General tab > Firewall > Black list > Add new. Two options are displayed:•  New number: You can enter a new number  to be stored in the black list.•  Phonebook: You can open the Contacts list to select and transfer a number to the black list.We can add a maximum of 50 numbers to the blacklist.Add to White listTo add a number to the white list, select Menu > Settings > General tab > Firewall > White list > Add new. Two options are displayed:•  New number: You can enter a new number to be stored in the white list.•  Phonebook: You can open the Contacts list to select and transfer a number to the white list.
39CallsRecording a Call1.  While making a call or receiving a call, you can press and hold the menu key to record or stop. Select Option > Record > Record own voice OR Record opposite party OR Record both.2.  A square button at the bottom indicates that recording is going on.3. Select Option > Stop recording to stop the recording.4.  The recorded le is saved in the location My files > Sounds.Depending on the settings, the storage location can be phone or Memory card.
40Managing ContactsManaging ContactsYou can use the Contacts list  to maintain phone numbers of your contacts. This feature enables you to add, delete, dial phone numbers and send SMS messages. To access the contacts, select Menu > Phonebook > Contacts. The  contacts are displayed.You can use the volume keys to scroll through the contacts.Add a New Contact•  To add a new contact, select Menu > Phonebook > Contacts > Add new. Press the menu key. Enter the name and phone number and select Save.•  Alternatively, you can directly enter a number and select Option > Save. Enter the name of the contact and select Save.The new number is updated in the Contacts list.If Phone is selected as the storage location, then the user can add many details apart from the name and phone number.Dialing a Number from ContactsOn the home screen, select Menu > Phonebook > Contacts. Select the contact. Do one of the following.• Select Option > Dial > Dial OR Handsfree dial (to talk using the speaker).• Press the easy call key.Sending a Message from Contacts1.  On the home screen, select Menu > Phonebook > Contacts. Select the contact. Select Option > Send message.2.  Enter the message and select Option > Continue. 3. Select Send message to send your message.Add a New Contact in GroupOn the home screen, select Menu > Phonebook > Groups. Select the group. Select Add member. The phone numbers in Contacts are displayed. Select the phone numbers to be added to the group.Only the contacts stored in phone memory can be added to the group.Group SettingsTo view or change the group settings, select Menu > Phonebook > Groups. Select the group. Select Option. The following options are displayed:•  View: You can view the contacts in the group.•  Rename: You can rename the group. Enter the new group name. Select OK to save.•  Send message: You can send a message to the  contacts in the group.•  Reset: You can reset the group settings.Special NumbersYou can store some special purpose phone numbers in this location. It has three categories:
41Managing Contacts•  Own Info: You can manage your own information. Select Menu > Phonebook > Special numbers > Own info. The following sub-menus are present.•  Edit own info: Enter your Name and other personal details such as Mobile number, Ofce number, Home number, Fax number, Email, Postal address and Postal code. Select Save.•  Delete own info: You can delete your information.•  Send own info: You can send your information to any number via SMS.•  Display own info: You can view your own information.•  Service Numbers: Contains the service numbers provided by the operator.•  Voice Mail Number: You can enter and save your voicemail number.Default Contact List1. Select Menu > Phonebook > Advanced > Choose contact list > Default contact list.2. Select Phone or SIM or All to select the default contact list displayed.Default Contact Location1. Select Menu > Phonebook > Advanced > Choose contact list > Default contact location.2. Select either Phone or SIM as the memory location to store the new numbers.Sending ContactYou can send contact information by SMS or by Bluetooth.Send Contact by SMS1. Select Menu > Phonebook > Contacts.2.  Select the contact and select Option > Send contact > via SMS.3.  Enter the message and select Option.4. Select Contacts to add existing phone numbers OR Select Select multiple to send the message to more than one number OR Select Phone number to enter the number.5. Select Send message to send the contact in your message.Send Contact by Bluetooth1. Select Menu > Phonebook > Contacts.2.  Select the contact and select Option > Send contact > via Bluetooth.3.  If Bluetooth is not on, the user will get a prompt to turn it on.4.  Select the paired device to which you want to send the namecard.5.  If the device is not paired, select Search more... and then select the device.6.  When the other device accepts the contact, Object sent message will be displayed.
42Managing ContactsDelete Contacts•  To delete a contact, select Menu > Phonebook > Contacts. Select the contact and select Option > Delete.•  To delete all contacts, select Menu > Phonebook > Advanced > Delete all contacts > Delete SIM records OR Delete phone records > A message appears Do you really want to delete all? Select OK to delete (if the default contact list is All)OR Select Menu > Phonebook > Advanced > Delete all contacts. A message appears Do you really want to delete all? Select OK to delete (if the default contact list is Phone OR SIM).Copy or Move Numbers between Phone and SIM•  To copy all records from Phone memory to SIM card, select Menu > Phonebook > Advanced > Copy to SIM > select > OK.•  To copy all records from SIM card to Phone memory, select Menu > Phonebook  > Advanced > Copy to phone > select > OK.•  To move all records from Phone memory to SIM card, select Menu > Phonebook > Advanced > Move to SIM > select > OK. Moved records get deleted from the source location. All the records moved from the Phone memory will not be available in the Phone memory  thereafter.•  To move all records from SIM card to Phone memory, select Menu > Phonebook > Advanced > Move to phone > select > OK. Moved records get deleted from the source location. All the records moved from the SIM card will not be available in the SIM card thereafter.Adding a Contact to Blacklist1. Select Menu > Phonebook > Contacts.2.  Select the contact and select Option > Add to blacklist.Adding a Contact to Whitelist1. Select Menu > Phonebook > Contacts.2.  Select the contact and select Option > Add to whitelist.Searching Contacts1. Select Menu > Phonebook > Contacts.2.  Enter the contact name.3.  The contact will be displayed.
43MessagesMessagesSMS is a convenient and inexpensive means of communication. You can send a text message to other people via this service. You can use the Messages menu in your phone to send an SMS message to other mobile phones or any other equipment that can receive SMS. To access the SMS function select Menu > Messages. The list of options are displayed.Advanced SettingsTo view or dene settings for your messages selectMenu > Messages > Advanced.•  Cell info: You can select to receive broadcast messages.•  Reception: Select On to get information about the reception tower.•  Topics: Select Topics > Add new to add the channel number of the topic to get information.•  Message settings: You can set the SMS account. Select SMS Account > Option > Activate to set selected account. Select SMS Account > Option > Edit to edit the following settings:Settings FunctionService Center NoThe message centre number, provided by your service provider, via which your messages are sent. The phone automatically picks up this number if it is already congured in the SIM cardValidity period Select the period for which your messages will be stored in the message centre.Status report Select On to get a conrmation report whether message has been delivered or not.Signature Select On to set a signature that will be attached along with your sent messages.Storage locationSelect SIM or Mobile phone as the storage location of messages.Send & save Select On to save the sent messages.•  Memory status: You can view the number of messages stored in the SIM and the mobile phone.•  My favourites: You can view the messages stored in this location.•  SIM archive: You can view the messages stored in the SIM.•  SMS timer: You can add a timer to an SMS and mention the time in which it is to be sent. Select SMS timer > Add > Enter the text > Save > Contacts or Phone number > Enter date > OK > Enter time > OK. The user is prompted when it is time to send the SMS.Text Input ModeWhen you enter text, the input mode is displayed at the top left of the screen. Press and release the # key to view the different text input modes, that is conventional (Abc/ABC/abc) and numeric (123). Press and hold the # key to enable the T9 mode.In conventional mode, you can enter a letter by repeatedly pressing a key until the letter you want appears. Numeric mode is used to input numbers.
44MessagesIn T9 mode, when you press a key, the alphabets or letters are displayed. Scroll to the alphabet or letter and press the menu key to select.1.  To switch between upper case (ABC), lower case (abc) or sentence case (Abc), use key #. When the sentence case is used, the letter which comes immediately after the characters full stop (.), exclamation mark (!) and question mark (?) automatically becomes capital.2.  To enter a character, press the numeric key repeatedly until the desired character appears on the screen. For example, to enter GOOD, in the text mode, press 4 once to display G, press 6 thrice to display O, and again press 6 thrice to display O and press 3 once to display D.OR If you are in T9 mode, press 4 once. Press 6 twice. Press 3 once, scroll to and select GOOD.3.  When editing text, to insert a space between characters or words, press 1.4.  To erase a character select Clear.5. Press 0 to insert a full stop(.).To insert special characters, press * to display the special characters. Press the navigation keys to scroll through the special characters. Select the character to appear in the text.Press and hold * to display the text input in different languages. Press the menu key to select the language. Select Done to change the text input language.Write Messages1.  To create a message select Menu > Messages > Create message OR press the Right navigation key as a shortcut to the Write message screen.2.  Enter the message in the text pane. The text input mode is displayed at the top left of the screen. Press and release # to select the appropriate text input mode.3.  Enter the message and select Option. The following options are present:Option FunctionContacts You can select the number from Contacts.Select multiple You can select more than one number from Contacts. Use the menu key to select.Phone number You can enter the phone number.Group You can send the message to a group.Use template You can use a message template stored in Templates folder.Save as draft You can save the message as a draft in Draft folder.Save as template You can save the message as a template in Template folder.Instead of selecting Option, press the menu key to quickly send the message to a number in Contacts.4. Select Send message to send the message OR select Add recipient to add another recipient.
45MessagesSend a Message via ContactsYou can send an SMS from the Contacts.1.  On the home screen, select Menu > Phonebook > Contacts. Select the contact. Select Option > Send message.2.  Enter the message and select Option > Continue.3. Select Send message to send the message OR select Add recipient to add another recipient.Call or Save a Number Embedded in a Received MessageIt is possible to call a number embedded in a received SMS.1. Select Menu > Messages  > Inbox > open the message containing numbers.2. Select Option > Save number. The number is displayed.3. Select Option > Dial OR Select Option > Save.Manage Your MessagesThe inbox, outbox, sent and draft folders displays the number of stored messages in parenthesis.InboxThe Inbox stores and displays all the incoming messages.1.  To access the Inbox, select Menu > Messages > Inbox > Select. The Inbox displays a list of messages.2.  Scroll to a messages and select Option to view the following list of options.•  View: You can view the message.•  Reply: You can send a message to the sender of that message.•  Forward: You can send the message to another recipient.•  Delete: You can delete the message after reading it.•  Delete all: You can delete all the messages.•  Save number: You can save the numbers present in the message. You can also dial or send  a message to the numbers (this option is displayed only if the SMS text contains any number).•  Archive to SIM: You can save the message in your SIM card memory (this option is displayed only if the SMS storage location is Mobile phone).•  Move to favourites: You can save the message in My favourites folder. These will be stored in the phone memory.•  Details: You can view the details about the message such as storage location and time of receipt.•  Dial: You can call the sender of the message.•  Smart search: You can search for a message based on the Name, Number or Time.•  Select multiple: You can select the messages one by one or select all the messages at one go.3.  To open a message, scroll to a message and press the menu key.4.  After a message is opened other functions can be performed. Select Option to list the following options: Reply, Forward, Delete, Save number, Move to favourites, Details and Dial.
46MessagesOutboxMessages that were undelivered to the recipient due to some reason are stored in Outbox.1.  To access undelivered messages, select Menu > Messages > Outbox.2. Select Option to display the outbox options.3. Press the menu key to view the message.4. Press Option > Resend to send the message. You can also forward an undelivered message.Draft MessagesMessages that have been saved to be sent later are stored in Draft.1.  To access unsent messages, select Menu > Messages > Draft.2. Select Option to display the draft options.3. Press the menu key to view the message.4. Press Option > Send to send the message.Sent MessagesMessages that have been sent and delivered are stored in Sent.1.  To access sent messages, select Menu > Messages > Sent.2. Select Option to display the sent options.3. Press the menu key to view the message.4. Press Option > Resend to resend the message.5.  You can also forward a sent message.Predefined MessagesYou can customise and store up to a maximum of 10 messages in Templates.1. Select Menu > Messages > Templates > Select > OK.2.  Enter a message and select Option > Save Templates.View SMS MemoryTo view the memory capacity for messages, select Menu > Messages > Advanced > Memory status.Voice MailYour incoming calls can be forwarded to your voice mail. Callers will be prompted to leave a message for you. This feature requires you to enter a voice mail number which is provided by your service provider.1.  To set voice mail number, select Menu > Messages > Voice mail > Voice mail number > Select. Enter the number provided by your service provider. Select Save. This number should be used when you want to listen to your stored voice mail messages.2.  When you need to listen to your incoming voice mail messages, select Menu > Messages > Voice mail > Call voice mail > Select. Enter your voice mail number and select OK. You are connected to your mailbox where you can hear the stored voice mails messages. If your voice mail number is already stored, select Menu > Messages > Voice mail > Call voice mail > Call.
47MessagesFor quick access to voice mail, press and hold 1.SIM Card MenuYou can access certain services provided by the operator using this menu.This feature can be accessed via Menu > Messages > Operator service.
48Hardcoded Shortcuts Hardcoded ShortcutsThe following are a set of special shortcuts related to voice calls. Some of these features may require network support.•  Enter 0 followed by SEND - releases all held calls or sets User Determined User Busy (UDUB) for a waiting call.•  Enter 1 followed by SEND - Releases all active calls (if any exist) and accepts the other (held or waiting) call. •  Enter 1X followed by SEND - Releases a specic active call X. •  Enter 2 followed by SEND - Places all active calls (if any exists) on hold and accepts the other (held or waiting) call.•  Enter 2X followed by SEND - Places all active calls on hold except call X with which communication shall be   supported.•  Enter 3 followed by SEND - Adds a held call to the conversation.•  Enter 4 followed by SEND - Connects two calls and disconnects the subscriber from both calls (ECT).•  Enter 4 * “Directory Number” followed by SEND - Redirects an incoming or a waiting call to the specied directory number.•  Enter 5 followed by SEND - Activates the completion of calls to busy subscriber request.•  Enter “Directory Number” followed by SEND - Places all active calls (if any exists) on hold and sets up a new call to the specied directory number. •  Enter END - Releases the subscriber from all calls (except a possible waiting call). “X” is the numbering (starting with 1) of the call given by the sequence of setting up or receiving the calls (active, held or waiting) as seen by the served subscriber. Calls hold their number until they are  released. New calls take the lowest available number.Where both a held and a waiting call exist, the above procedures shall apply to the waiting call (that is, not to the held call) in conicting situation.
49WAP BrowserWAP BrowserThis mobile phone has an internal WAP browser that allows you to browse contents of various WAP websites on the Internet. This facility is made available only if you subscribe to a data service from your network operator for Internet access. You need to consult your local operator for more details. Congure the WAP when you use it for the rst time. Some WAP parameters on your phone have already been set to a specic network operator. If you utilize the services of the same network operator you can directly operate the WAP service with the available conguration. If not, you need to recongure the settings.If you are unable to view WAP web pages because of change in WAP parameters or change in WAP web address or contents, please consult your network operator and Internet Content Provider (ICP) for updates.Select Menu > Browser > Select. The following sub menus are displayed:•  Load Homepage: This is the page that is displayed rst when you open the WAP browser.•  Bookmarks: You can use this menu to add and manage your bookmarks and go directly to the corresponding web address. You can also edit or delete bookmarks via this menu.•  History: You can view web pages which you have viewed previously.  Click on them to open the pages.•  Enter address: You can enter a web address directly and browse.•  Settings: The following congurations can be set via this menu:•  Edit homepage: You can edit the web address of your homepage. Specify a title and the web address.•  Select profile: In this menu, existing proles are listed on the display. Scroll to the required prole and select OK.•  Connection: Specify the connection details for WAP. The following details are present: 1.Network account: Select the prole which you had selected in Settings > Connectivity > Connections > Network account.2.Connection type: Select the connection type.3.Timeout: Enter the time (in seconds) after which your connection will be timed out. 4.Proxy address: Enter the proxy address.5.Proxy port: Enter the proxy port number.•  Browser options: You can enable the refresh option to refresh the web pages,  you can select to display or not display images in the web pages and you can enable, disable or clear the cookies and the cache.•  Rename profile: You can specify a name for the selected prole in this menu. The maximum length of the name is 40 characters.•  Push settings: You can decide to receive or not receive push messages from operators and web portals.•  Resume: You can view web pages from where you last left off. Access the web pages you visited last via this menu. Select the Back and Forward options to move between web pages.•  Push info: This is the inbox for WAP push messages.
50Opera MiniOpera MiniOpera Mini is one of the most popular mobile web browsers. Opera Mini presents the users with rich and very fast web experience. The Sonim XP3.20 comes with a pre-bundled copy of Opera Mini.Configuration of APN (Access Point Name) for Opera MiniSet the network account for the Opera Mini.1. Select Menu > Settings > Connectivity tab > Connections > Network account > Select > Network A/c 5. Select Edit to enter the prole details.2.  The following details are to be entered.•  Account name: Enter the name of the account.•  APN: Enter the access point name.•  Login: Enter the login name. •  Password: Enter the password.3. Select Save to save the details.Always use Network account 5 for Opera Mini and other Java applications.Installation of Opera MiniSelect Menu > Applications > Java > More Apps > Opera Mini.jad. Install the application. Once Opera Mini is installed successfully, it will be displayed in the Java box.Launching Opera MiniSelect Menu > Applications > Java > Opera Mini.
51JavaJavaSonim XP3.20 has a collection of Java applications that are saved in the phone as default. You can also download more Java applications via WAP, Bluetooth, SD Card or Java Application Manager.Installing Pre-bundled Java ApplicationsThe phone has some of the following Java applications pre-bundled depending on your distribution. They can be installed by selecting Menu > Applications > Java > More Apps. You can nd more applications in the Java Application Manager described below. •  amAze GPS: Makes the phone into a full featured GPS device with voice based turn-by-turn navigation.•  Sonim Mail: Provides email receiving and sending from the phone.•  Java Application Manager (JAM): This has an assorted list of applications that have been tested by Sonim on the phone. This picks up the latest list from a server over GPRS/EDGE.•  Trimble Outdoors: The popular complete personal assistant for trekking activities, now free with the phone.•  Trimble AllSports: Personal tness assistant with calorie monitor, racing coach, and so on, now free with the phone.In order to install the Java applications, the date and time must be set correctly on the phone.Java HelpSelect Menu > Applications > Java Help.You will obtain information on how to install Java pre-bundled applications and how to set the APN.Java applications can also be installed from the SD card.Installing Java Application from SD CardSelect Menu > My les > Memory card tab. Select the le (.jar or .jad). The installation process begins. Once the application is installed successfully, it will be displayed in the Java box.Installing Java Application from WAPCongure WAP as described in “WAP Browser” on page 49. Launch WAP. Browse to the location where the le (.jar or .jad) is present. Select the le. The installation process begins. Once the application is installed successfully, it will be displayed in the Java box.Some Java applications running in the foreground can be pushed to the background by pressing the   key.
52ToolsToolsThis section contains miscellaneous features supported by the handset.AlarmYou can set alarm for a particular time. Select Menu > Tools > Alarm.1.  To set a simple alarm, select Menu > Tools > Alarm > Simple alarm. Enter the time and select OK.2.  To set a recurrent alarm, select Menu > Tools > Alarm > Recurrent alarm. Enter the time and select OK. Using the menu key, select the day and select Save.3.  To set the alarm tone, select Menu > Tools > Alarm > Alarm tone > Default sounds or Phone memory. Select the alarm tone.4.  To enable snooze, select Menu > Tools > Alarm > Snooze. Use the menu key to toggle between on and off.The alarm will work even if the phone is in Silent mode.The alarm will work even if the phone is switched off.BluetoothBluetooth is a wireless connection that enables devices to exchange information. Devices within a range of 10 meters can be connected wirelessly using Bluetooth technology.The Sonim XP3.20 is compliant with Bluetooth specication 2.0 supporting the following proles: Headset prole, Hands free prole, Object exchange prole, Dial up networking prole, Serial port prole. This device can send images and audio les using Bluetooth connection.There may be restrictions on using Bluetooth technology in some locations. Check with your local authorities or service providers.Activate BluetoothSelect Menu > Tools > Bluetooth  > Activate. Use the menu key to toggle between on and off. When Bluetooth is activated, the Bluetooth icon is displayed on the home screen.Deactivate BluetoothSelect Menu > Tools > Bluetooth  > Activate. Use the menu key to toggle between on and off.Bluetooth SettingsType FunctionMy name Select this option to change the name of your device.Visibility Select On to show your presence to other devices. Select Off to hide your presence from other devices.My profiles Use this option to view the Bluetooth service list.
53ToolsPairing Devices1. Select Menu > Tools > Bluetooth > Search for devices.2.  Select the device of your choice.3.  Enter the passcode (for example, 0000) in the Enter passcode screen. The same passcode must be entered for the other device also.4. Select OK.5.  When the other device accepts your request the message Pairing Done is displayed on the screen.6.  When the other device rejects your request the message Pairing Failed is displayed on the screen.Do not pair with an unknown device for security reasons.Connecting a Bluetooth HeadsetYou can connect a bluetooth headset after pairing it with your phone.1. Select Menu > Tools > Bluetooth > My devices.2.  Select the paired Bluetooth headset.3. Select Option > Connect.For more details, refer the user manual of the Bluetooth headset.Rename Paired Device1. Select Menu > Tools > Bluetooth > My devices.2.  Select the paired device.3. Select Option > Rename.4.  Enter the new name.5. Select OK.Delete Paired Device1. Select Menu > Tools > Bluetooth > My devices.2.  Select the paired device.3. Select Option > Delete.If you cancel the pairing with a device that is connected, pairing is removed and the connection is switched off immediately.Sending Data via BluetoothYou can transfer les to another compatible device.1. Select Menu > My files.2.  To send an image le, select Pictures > select the le OR To send an audio le, select Sounds > select the le OR To send any other le, select Others > select the le.
54Tools3. Select Option > Send > via Bluetooth.4.  Select the paired device to which you want to send the le.My devices screen displays the paired devices. To send a data to an unpaired device, Select Search more.... Select the unpaired device of your choice. Enter the pin code when you are asked to enter.5.  When the other device accepts your le, the message Object sent is displayed on the screen.6.  When the other device rejects the le, the message Connection failed is displayed on the screen.Receiving Data via BluetoothTo receive data using Bluetooth, your device should be Bluetooth activated and must be visible to other devices.1.  When you receive a data, you are asked if you want to accept it.2. Select Accept to receive data OR select Reject to refuse the data.3.  If you accept, the data will be stored in My files > Pictures or Sounds or Others.USB FunctionYou can transfer and synchronize data between the Sonim XP3.20 phone and your computer using either USB drive or PC Tools. Select Menu > Tools > USB Function > USB Drive OR PC Sync.If you select USB drive, the SD Card should be present in the phone and the phone should be connected to the computer via USB cable. The SD card will be dispalyed as a separate drive in the computer.Select PC Sync if you want to use the PC Tools software on your computer to transfer data.The user has to restart the phone for these changes to take effect.CalendarThe calendar enables you to set appointments, create appropriate notes, schedule reminders when required, set alerts and repeat specic settings. Tasks can be viewed on daily and weekly basis.1.  To access the Organizer and its associated functions, select Menu > Tools > Calendar. The calendar for the current month is displayed. Use the navigation keys to navigate across months.2. Select Option to view the list of options available.•  View day: You can view the list of events for the day.•  View week: You can view the list of events for the week.•  New event: You can enter a new event.•  Go to date: You can go to a particular date and view the events for that date.•  Advanced: You can nd any event, delete all events or set whether the phone should notify the user if the calendar event expired during switched off state.
55ToolsEdit EventsSelect Menu > Tools > Calendar > Option > View day. Select the event. Select Option > Edit. Make the changes. Select Save.Delete EventsSelect Menu > Tools > Calendar > Option > View day. Select the event. Select Option > Delete.  Select OK.CalculatorThe calculator in this phone is designed to perform simple mathematical calculations.1. Select Menu > Tools > Calculator.2.  To enter the numbers, press the numeric keys.3.  To use mathematical operators use the navigation keys.Navigation Key OperationUp + (Addition)Down - (Subtraction)Left / (Division)Right * (Multiplication)4.  After performing the calculations, press the menu key for the nal result.5. Select Option to display the following options.Option FunctionCalculate Performing calculationsPercentage Percentage calculationsModular Modular divisionMC Clears number from memoryMR Reads the number from memoryMS Stores the entered number in memoryM+ Adds a number to the number in memory and stores the result in memoryThis phone accepts numbers up to a maximum of 9 digits per entry.Voice RecorderSelect Menu > Tools > Voice recorder.1.  To record an audio le, select Option > New episode.2.  To temporarily stop the recording, select Pause.3.  To continue with the recording, select Resume.4.  To end the recording, select Stop.5.  To select the storage location of the recorded le, select Option > Select memory > Phone memory or Memory card.
56ToolsThe recorded audio le is stored under My les. For more information refer “Managing Your Files” on page 62.Audio PlaybackThe user can do instant playback of the recorded audio within the voice recorder. To listen to an recorded audio le, select Menu > My files > Sounds. Select the le.AGPSThe Global Positioning System (GPS) is a Global Navigation Satellite System. It uses satellites that transmit precise microwave signals, which enable GPS receivers to determine their current location and time.When an user accesses an application that requires GPS, then GPS is turned on automatically. After the application is closed, GPS is turned off automatically.The GPS relies on satellite signal to calculate position. Under conditions of poor satellite reception (that is, under a tree, bad weather, and so on) standalone GPS receivers take long time (sometimes a few minutes) to provide location information to the users. The special feature Assisted GPS (AGPS) available in Sonim XP3.20 speeds up the phone’s process of calculating the position irrespective of the signal conditions. When AGPS is enabled, the phone automatically downloads the latest satellite related information (Ephemeris data) through GPRS. This information is used along with the satellite signals to calculate the position (Downloading of Ephemeris data may result in network charges).Select Menu > Tools > AGPS. This allows the user to congure the usage of AGPS feature. This helps the user to control any network charges that is incurred due to downloading of Ephemeris. The following options are displayed.•  Never: Ephemeris will not be downloaded and used.•  Always: Ephemeris data is downloaded once every day.•  While Not Roaming: Ephemeris data will not be downloaded if the phone is in roaming. StopwatchSelect Menu > Tools > Stopwatch.1.  To trigger the timer, select Start. The counter starts running.2.  To temporarily stop the counter, select Pause.3.  To resume running the counter, select Go.4.  To stop the counter, select Stop.Unit ConverterYou can convert one type of physical units to another type. Select Menu > Tools > Unit converter.1.  Select the type of physical unit. Use the Right or Left navigation keys to scroll. For example, Temperature.2.  Scroll down and select the Unit 1 for Temperature, for example, Fahrenheit.3.  Scroll down and enter the amount for Fahrenheit in Amount 1, for example, 80.4.  Scroll down and select the Unit 2 for Temperature, for example, Celsius.5.  The Temperature in Celsius is displayed in Amount 2.
57ToolsUnit converter does not supports negative values.Countdown TimerThis function is helpful when you need to be reminded of a specic event or you want to time a particular task.1. Select Menu > Tools > Countdown.2.  Specify the time for the reminder in terms of hours and minutes. The maximum time you can set is 23 hours, 59 minutes and 59 seconds (23:59:59) and the minimum is one second (00:00:01).3.  When the countdown is completed, the alarm rings.
58FM RadioFM RadioThe FM radio is built-in and offers instant and easy access to FM radio channels in your phone. A wired headset must be attached to the phone, as the wire works as an antenna for the radio. You can then listen to the radio via the wired headset.Select Menu > Applications > FM Radio. The radio starts playing. Select Option to display the following options.•  Preset station: You can view the radio stations that have already been saved. Select a radio station to play.•  Search and save: You can automatically save the radio channels.•  Off: You can switch off the radio.•  Handsfree: To play FM radio in the phone speaker, select Option > Handsfree > On.•  Play in background: You can play the radio in background. A strip in the screen indicates that radio is playing in background.
59CameraCameraThe Sonim XP3.20 has a 2MP (megapixel) camera for taking pictures. The pictures can then be saved in your phone.• Select Menu > Camera OR press the camera key. The camera is switched on.• Select the menu key OR press the camera key to shoot the picture.•  A message appears Save photo? Select Yes to save. The picture is saved in Menu > My files > Pictures.•  After clicking the picture, select Option to display the following options:•  Send: You can send the picture to a phone number via Bluetooth.•  Delete: You can delete the selected le.•  Capture: You can capture a new picture.•  Set as contact picture: You can set the captured picture as the picture against a contact. Only lower resolution pictures can be set as contact picture.Only pictures with resolution 176x220 can be set as contact picture.•  Set as wallpaper: You can set the captured picture as the phone screen wallpaper.Camera OptionsTo view the camera options, select Menu > Camera > Option. The following options are displayed:•  Picture resolution: Select the picture resolution from the following options: 1600*1200, 1280*1024, 1024*768, 640*480 or 176*220.•  Picture quality: Select the picture quality from the following options: Superne, Fine or Normal.•  View picture: This option takes the user to the Pictures folder.•  Camera Mode: You can set the color effects and self-timer.•  The color effects available are black and white, sepia and blue.•  If you switch on self-timer, the picture will be shot only after a certain amount of time after pressing the menu key.•  Flash: Select On to turn on the flash or select Off to turn off the flash.•  Advanced: The advanced options available are. •  Storage location: You can set the default location of pictures as Phone memory OR Memory card.•  Default name: You can set the default name of the picture.•  Frequency: You can set the frequency of power as 50 Hz OR 60 Hz.•  Full screen preview: You can turn on the full screen preview during shooting.
60FlashlightFlashlightYou can use the camera ash as a ashlight. To turn ON/OFF the ash, press and hold key 5. The ashlight can be turned ON/OFF from the following screens:• Idle screen.•  Keypad locked screen.•  Main menu screen.•  Menu screens: Contacts, Messages, Create message, Settings, Call list and My les.• Tools screen.•  Without SIM screen.The ashlight button does not works if you are using camera or WAP.
61Micro SD CardMicro SD (Secure Digital) CardIn Sonim XP3.20 phone, you can insert a removable Micro SD Card to increase the storage capacity. This card is inserted into the slot inside the phone. You can perform the following functions on the SD card.•  Formatting of the SD card.•  Viewing memory details such as free space, used  space and total space.•  Setting the images in the SD card as wallpaper.•  Setting the audio les in the SD card as ringtones.The maximum capacity supported is upto 2 GB.Inserting Micro SD Card into the Phone1.  Ensure the phone is switched off.2.  Lift the battery cover and remove the battery. For instructions refer “Inserting the Battery” on page 14.3.  Lift the silver clip over the designated slot located at the top left end of the battery slot.4.  Place the SD card in the designated slot and close the silver clip.5.  Replace the battery and the cover. Turn the battery cover screws clockwise to lock the battery cover.When the Sonim XP3.20 phone is connected to a computer using USB, the Micro SD card is displayed as a separate drive in the computer.
62Managing Your FilesManaging Your FilesUsing the My files menu, you can store and manage audio les, picture les, .jar les, .jad les and .txt les. You can preview the les, view their details and delete les. The internal storage capacity is approximately 25 MB.1.  To view your les select Menu > My files.2.  Scroll to a category and select either Pictures OR Sounds OR Others and select OK.3.  For pictures, select the pictures that you would have saved. For sounds, select the audio files that you would have saved.4.  Scroll to le from the displayed list and select Option to display further options.For a picture le, the following options are present.Option FunctionView You can view the picture in full screen mode.Send You can send the picture to any phone via Bluetooth.Advanced You can cut or copy the picture to another location. You can also rename the picture or view the details.Use You can use the picture as contact id or wallpaper.Delete You can delete the picture.Slide show You can view the pictures as a slide show.Change view You can view the pictures as a list or as a grid.Sort You can sort the pictures by name, date or size.Select multiple You can select all the pictures or select one by one.For an audio le, the following options are present.Option FunctionPlay You can play the audio le.Send You can send the audio le to any phone via Bluetooth.Advanced You can cut or copy the audio le to another location. You can also rename the audio le or view the details.Use You can use the audio le as contact id or ringtone.Delete You can delete the audio le.Change view You can view the audio les as a list or as a grid.Sort You can sort the audio les by name, date or size.Select multiple You can select all the audio les or select one by one.
63Wired HeadsetWired HeadsetA wired headset is supplied along with the Sonim XP3.20 phone. A wired headset is a set of headphones attached to a microphone and connected to a phone using a wire connection. The connection is usually made via a headphone jack. A wired headset allows the user to both listen and speak. The wired headset also acts as an antenna for FM radio.During Calls1.  To accept a call, press headset button to accept a call.2.  To end a call, press and hold the headset button.3.  To record the conversation, press the headset button during a call.4.  Long press the headset button to reject the call when it is ringing.
64End User License AgreementThis wireless device, (the “Device”) contains software owned by Sonim Technologies, Inc. (“Sonim”) and its third party suppliers and licensors (collectively, the “Software”). As user of this Device, Sonim grants you a non-exclusive, non-transferable, non-assignable license to use the  software solely in conjunction with the Device on which it  is installed and/or delivered with. Nothing herein shall be  construed as a sale of the Software to a user of this Device.You shall not reproduce, modify, distribute, reverse engineer, decompile, otherwise alter or use any other means to discover the source code of the Software or any component of the Software. For avoidance of doubt, you  are at all times entitled to transfer all rights and obligations to the Software to a third party, solely together with the Device with which you received the Software, provided always that such third party agrees in writing to be bound by these rules.You are granted this license for a term of the useful life of this Device. You can terminate this license by transferring all your rights to the Device on which you have received the Software to a third party in writing. If you fail to comply with any of the terms and conditions set out in this  license, it will terminate with immediate effect Sonim and its third party suppliers and licensors are the sole and exclusive owner of and retain all rights, title and interest in and to the Software. Sonim, and, to the extent that the Software contains material or code of a third party, such third party, shall be entitled third party beneciaries of these terms. The validity, construction and performance of this license shall be governed by the laws of Delaware, United States.Unconditional 3 Year GuaranteeSonim provides this Unconditional three year Guarantee for your mobile phone (hereinafter referred to as Product”).Should your Product need guaranty service, please return it to the retailer from whom it was purchased, or contact•  Online Support and country specic toll free numbers: www.sonimtech.com/support• Email: support@sonimtech.comOur GuaranteeSubject to the conditions of this Unlimited 3 year Guarantee Sonim warrants this product to be free from major defects in design, material and workmanship at the time of its original purchase by a consumer, and for a subsequent period of Three (3) years.What We Will DoIf during the guarantee period, this product fails to operate under normal use and service, due to defects in design, material or workmanship, Sonim’s authorised distributors or service partners, in the country/region where you purchased the product, will replace with the same or better model in the same or better condition. Sonim and its service partners reserve the right to charge a handling fee if a returned Product is found not to be under warranty according to the conditions below.Please note that some of your personal settings, downloads or other information may be lost when your Sonim Product is repaired or replaced. Sonim does not take any responsibility for any lost information of any kind and will not reimburse you for any such loss.
65You should always make backup copies of all the information stored on your Sonim Product such as downloads, calendar and contacts before handing in your Sonim Product for repair or replacement.Phone CareThe Sonim XP3.20 is designated class IP67 for dust and water protection, according to the IEC Ingress Protection (IP) Standard 60529. This means that the phone is dust protected and can be submerged into 1.0m deep water for up to 30 minutes. Immersion in deeper water can damage it and must be avoided. The phone is not water-proof or water resistant during charging, use of a plug-in headset, or any other use when the system connector cover on the bottom of the phone is not tightly enclosed.The Sonim XP3.20 is solid and built for heavy duty use. Its design protects against disassembly or mechanical damage when subjected to forces equal to free fall from the high of an average adult. Subjecting the phone to stronger impact and forces can damage it and must be avoided.Conditions1.  The warranty is valid only if the original proof of purchase issued to the original purchaser by a Sonim authorised dealer, specifying the date of purchase and serial number for this Product, is presented with the Product to be repaired or replaced. Sonim reserves the right to refuse warranty service if this information has been removed or changed after the original purchase of the Product from the dealer.2.  If Sonim repairs or replaces the Product, the repaired or replaced Product shall be warranted for the remaining time of the original warranty period or for ninety (90) days from the date of repair, whichever is longer. Repair or replacement may involve the use of functionally equivalent reconditioned units. Replaced parts or components will become the property of Sonim.3.  This warranty does not cover any failure of the Product due to normal wear and tear, or due to misuse, including but not limited to use in other than the normal and customary manner, in accordance with the Sonim instructions for use and maintenance of the Product. Nor does this warranty cover any failure of the Product due to accident, software or hardware modication or adjustment, acts of God or damage resulting from liquid interacting with the product beyond what is described as acceptable in the user guide for the product. A rechargeable battery can be charged and discharged hundreds of times. However, it will eventually wear out - this is not a defect. When the talk-time or standby time is noticeably shorter, it is time to replace your battery. Sonim recommends that you use only batteries and chargers approved by Sonim. Minor variations in display brightness and colour may occur between phones. There may be tiny bright or dark dots on the display. These are called defective pixels and occur when individual dots have malfunctioned and can not be adjusted. Several defective pixels are deemed acceptable.4.  This warranty does not cover Product failures caused by installations, modications, or repair or opening of the Product performed by a non-Sonim authorised person. Tampering with any of the seals on the Product will void the warranty.End User License Agreement
665.  The warranty does not cover Product failures which have been caused by use of accessories or other peripheral devices which are not Sonim branded original accessories intended for use with the Product.6.  THERE ARE NO EXPRESS WARRANTIES, WHETHER WRITTEN OR ORAL, OTHER THAN THIS PRINTED  LIMITED WARRANTY. ALL IMPLIED WARRANTIES, INCLUDING WITHOUT LIMITATION THE IMPLIED WARRANTIES OF MERCHANTABILITY OR FITNESS FOR A PARTICULAR PURPOSE, ARE LIMITED TO THE DURATION OF THIS LIMITED WARRANTY. IN NO EVENT SHALL SONIM OR ITS LICENSORS BE LIABLE FOR INCIDENTAL OR CONSEQUENTIAL DAMAGES OF ANY NATURE WHATSOEVER, INCLUDING BUT NOT LIMITED TO LOST PROFITS OR COMMERCIAL LOSS; TO THE  FULL EXTENT THOSE DAMAGES CAN BE DISCLAIMED BY LAW. DURATION OF THIS LIMITED WARRANTY. IN NO EVENT SHALL SONIM OR ITS LICENSORS BE LIABLE FOR INCIDENTAL OR CONSEQUENTIAL DAMAGES OF ANY NATURE WHATSOEVER, INCLUDING BUT NOT LIMITED TO LOST PROFITS OR COMMERCIAL LOSS; TO THE FULL EXTENT THOSE DAMAGES CAN BE DISCLAIMED BY LAW.End User License Agreement
67FCCWARNING: Changes or modications made to this equipment not expressly approved by Sonim Technologies, Inc. for compliance could void the user’s authority to operate the equipment.FCC StatementThis device complies with Part 15 of the FCC rules. Operation is subject to the following two conditions:1.  This device may not cause harmful interference.2.  This device must accept any interference received, including interference that may cause undesired operation.This equipment has been tested and found to comply with the limits for a Class B digital device, pursuant to part 15 of the FCC Rules. These limits are designed to provide reasonable protection against harmful interference in a residential installation. This equipment generates uses and can radiate radio frequency energy and, if not installed and used in accordance with the instructions, may cause harmful interference to radio communications. However, there is no guarantee that interference will not occur in a particular installation. If this equipment does cause harmful interference to radio or television reception, which can be determined by turning the equipment off and on, the user is encouraged to try to correct the interference by one or more of the following measures:•  Reorient or relocate the receiving antenna.•  Increase the separation between the equipment and receiver.•  Connect the equipment into an outlet on a circuit different from that to which the receiver is connected.•  Consult the dealer or an experienced radio/TV technician for help.
68Declaration of Conformity Sonim Technologies Inc, declares that the mobile phone Sonim XP3.20™ is in compliance with the essential requirements and other relevant provisions of Directive 1999/5/EC.Declaration of Conformity
69AAccess Point Name (APN)  50, 51Alarm clock  52AudioPlayback  56Recorder  55Auto-power ON/OFF  31BBar callsCancel  37Status  37BatteryBars  15Charge  15, 20Usage  14BluetoothActivate  52Deactivate  52Headset  53Pair devices  53Receive data  54Send data  53Settings  52Bookmarks  49CCalculator  55Calendar  54Call accept/Send key  19Call list  34Calls on hold/waiting  36Camera  58, 59Flash  59Options  59Car mode  29Connectivity settings  32Contacts  40Add  40Delete  42Group  40Move or copy  42Send  41Send message  40Count-down timer  57Create messages  44DDisplay settings  32FFilter calls  38FirewallBlack list  31White list  31Fixed number dialing  37Flashlight  60Flight mode  29FM radio  58Forward calls  36GGeneral settings  29GPRS  35, 38GSMDial  34Send phone number  34HHandsfree dial  34Hardcoded shortcuts  46Hardcoded Shortcuts  48Home mode  29Homepage  49IInternational clockDaylight saving time  30Local settings  30International number dialling  34JJavaInstalling Java Application From SD Card  51Installing Java Application From WAP  51Index
70Installing Pre-bundled Java Applications  51KKeypadAccept/Send  22End call  22Function keys  17LSK/RSK  22Navigation keys  19, 23Power On/Off  22XP3.2  19LLeft Selection Key  19MManaging your les  62Meeting mode  29Memory  43Memory status  31MenuCall list  25, 34Key  20, 22Main  25Messages  25, 43My les  25, 62Phone book  25, 40Quick settings  25Settings  25, 29SIM toolkit  25, 47Tools  25, 52WAP  25, 49MessagesDelete  45Dial sender  45Forward  45Inbox  45, 46Predened SMS  45Save sender’s number  45Sent  45SMS memory  46Unsent  45Write  44Message settings  43Memory  43Reply path  43Service number  43Signature  43Status report  43Validity period  43Micro SD card  61Insert  61My les  62OOpera Mini  50, 51Access Point Name (APN)  50, 51Network account  50OrganizerDelete entries  53Edit entries  53Outdoor mode  29PPair devices  53Personal mode  29Phone languages  30Predened message  46Predened SMS  45Proles  29Car  29Flight  29Home  29Meeting  29Outdoor  29Personal  29Silent  29RRecording a call  39SSecurity settings  31Silent mode  29SMS memory  46Sound settings  32Speed dial  35Standby mode duration  20Stopwatch  56Index
71IndexTText input modeConventional  43Predictive  43Themes  32ToolsAlarm clock  52Audio playback  55Audio recorder  55Bluetooth  52Calculator  55Calendar  54Camera  58Count-down timer  57Flashlight  60FM radio  58GPS  56opera mini  50, 51Stopwatch  56Unit converter  56USB function  54UUnit converter  56USB function  54VVoicemail  19WWAP  49Address  49Bookmarks  49Cache  49Homepage  49Push inbox  49Settings  49Wired Headset  63Write Messages  44

Navigation menu