ecom instruments 500045GR01 GSM/WCDMA Mobile Phone User Manual rev 1 2
ecom instruments GmbH GSM/WCDMA Mobile Phone Users Manual rev 1 2
Contents
- 1. Users Manual_rev 1-1
- 2. Users Manual_rev 1-2
Users Manual_rev 1-2

45
Managing Your Files
Using the My files, you can store and manage audio,
video les, image les, .jar les, .jad les and .txt les.
You can preview the les, view their details and delete
les. The internal storage capacity is approximately 99
MB.
1. To view your les select Menu > My files > select
Phone/Memory card > Options > Open.
2. Scroll to a category and select one of the categories
: Audio, Images, Java, Others or Videos and select
OK.
3. For pictures, select the images stored in the Phone
memory/memory card.
4. For sounds, select the audio files stored in the
Phone memory/memory card.
5. Scroll to le from the displayed list and select
Options to display further options.
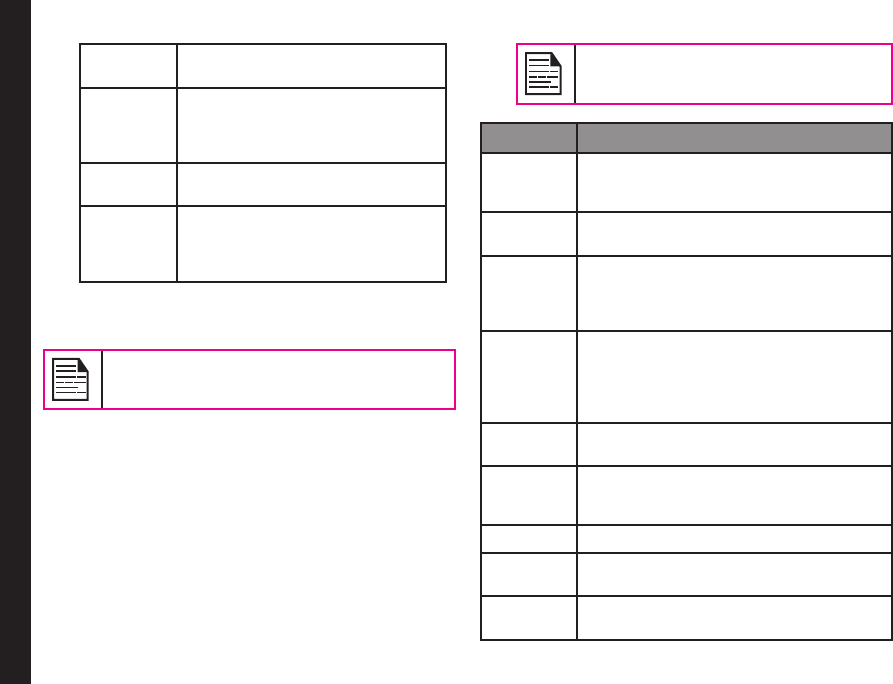
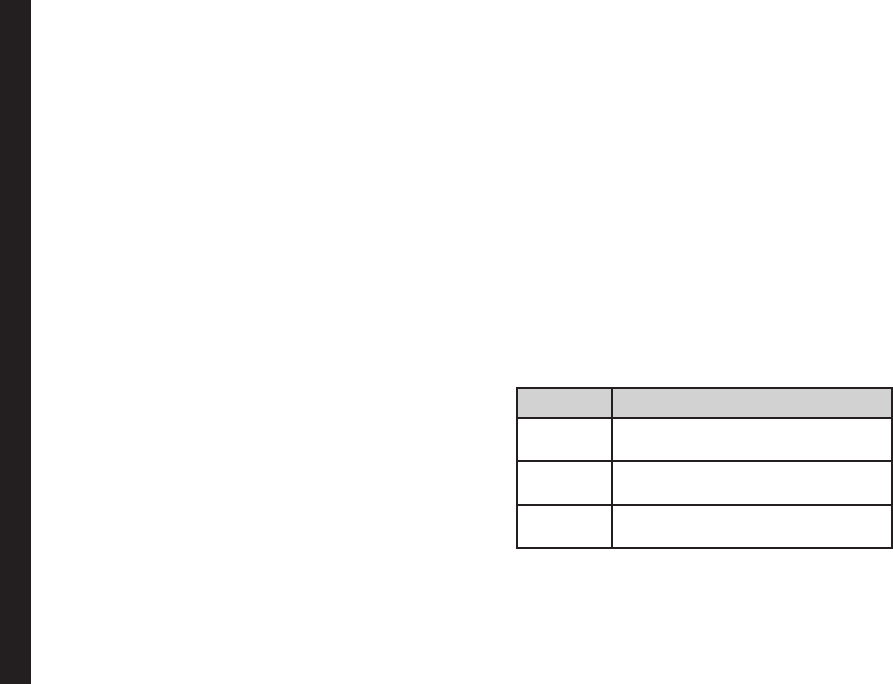
For an image le, the following options are present.
Options Function
View View the image in full screen mode.
Edit Resize the image or edit the image to
add photo effects, adjust contrast and
brightness, ip and rotate the images.
Send Send the image to any phone as a
multimedia message, E-mail or via
Bluetooth.
Use as Use the image as wallpaper, screen saver,
power On/Off display and caller picture.
New
folder
Create a new folder.
Rename Rename the image.
Delete Delete the image.
Sort by Sort the images by name, type, time, and
size.
Mark
several
Select all the images or select one by one.
Copy Copy a le to different folder.
Move Move a le to different folder.
Delete all
files
Delete all the images.
Details View the creation date, size, and copyright
details of the le.
Edit option will not be present for some
images.
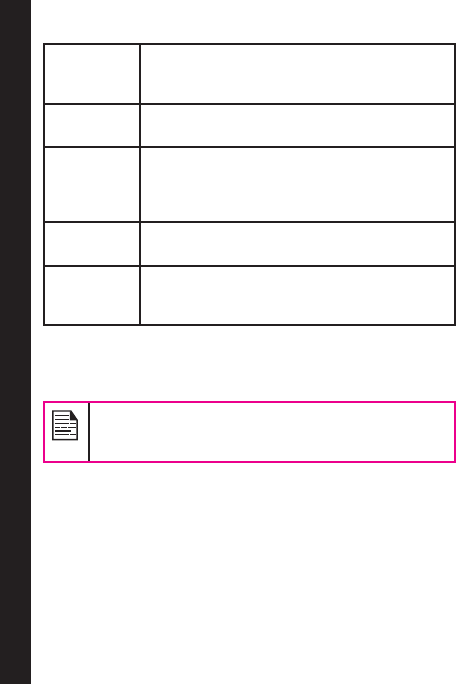
For an audio le, the following options are present.
Options Function
Play Play the audio le.
Send Send the audio le to any phone as
multimedia message, as an E-mail, or via
Bluetooth.

46
Managing Your Files
Use as Use the audio as ring tone for incoming
call.
New
folder
Create a new folder.
Rename Rename a le.
Delete Delete the audio le.
Sort by Sort the audio les by name, type, time,
or size.
Mark
several
Select all the audio les or select one by
one.
Copy You can copy a le to different folder.
Move You can move a le to different folder.
Delete all
files
You can delete all the audio les.
Details You can view the creation date, size, and
copyright details of the le.
47
Managing Contacts
You can use the phonebook to maintain phone numbers
of your contacts. This feature enables you to add, delete,
dial phone numbers, send SMS and MMS messages. To
access the contacts, select Menu > Phonebook. The
contacts are displayed.
You can also use the volume keys to scroll
through the contacts.
Add a New Contact
• To add a new contact, select Menu > Phonebook >
Options > Add new contact. Select SIM or phone
and enter the name and phone number. Press Menu
key to save and select Save.
• Alternatively, you can directly enter a number and
select Options > Save to Phonebook > Add new
contact. Select SIM or phone and enter the name
and phone number. Press Menu key to save and
select Save.
• You can also add a contact from Call history
(refer “Managing Call History” on page 30) and Write
message menu (refer “Write Message” on page 52).
The new number is updated in the Contacts list.
If Phone is selected as the storage location,
then the user can add many details apart from
the name and phone number. The user can
add a maximum of 1000 contacts.
View the Contact Details
On the home screen, select Menu > Phonebook. Select
the contact. Select Options > View or press the Menu
key.
Sending a Message from Contacts
You can send SMS and MMS messages to the contacts.
Sending SMS
1. On the home screen, select Menu > Phonebook.
Select the contact.
2. Select Options > Send message.
3. Enter the message and select Options > Send to.
Select additional recipients, if any.
4. Select Options > Send, to send the message.
Sending MMS
1. On the home screen, select Menu > Phonebook.
Select the contact.
2. Select Options > Send message > Options >
Switch to MMS.
3. Enter the message and select Options. You can
add the required picture, sound, video, subject, and
slides to the message. Select the required file.
4. Select Options > Send to. Select additional
recipients, if any.
5. Select Options > Send, to send the message.
Dialing a Number from Contacts
On the home screen, select Menu > Phonebook. Select
the contact. Select Options > Call or press the call key.

48
Managing Contacts
Edit the Contact Details
You can enter or edit the contact details. On the home
screen, select Menu > Phonebook. Select the contact.
Select Options > Edit.
Delete Contact
To delete a contact, select Menu > Phonebook. Select
the contact and select Options > Delete > A message
appears Delete? Select Yes to delete.
Copy Numbers between Phone and SIM
• To copy a selected number from SIM card to Phone
memory, select Menu > Phonebook > Options>
Copy > To phone. Select OK.
• To copy a selected number from Phone memory to
SIM card, select Menu > Phonebook > Options >
Copy > To SIM. Select OK.
• To copy a selected number from SIM card or Phone
memory to a le, select Menu > Phonebook >
Options > Copy > To file. Select OK.
Move Numbers between Phone and SIM
To move a selected number from SIM card to Phone
memory or Phone memory to SIM card, select Menu
> Phonebook > Options > Move. Select OK. Moved
records are deleted from the source location.
When the contact details are moved from
Phone to SIM, only the contact name and
mobile number is saved in the SIM card.
Sending Contact
You can send contact information by SMS, MMS, e-mail
or Bluetooth.
Send Contact by SMS
1. Select Menu > Phonebook. Select the contact.
2. Select Options > Send business card > As text
message. Select additional recipients, if any.
3. Select Options > Send to send the contact
information.
Send Contact by MMS
1. Select Menu > Phonebook. Select the contact.
2. Select Options> Send business card > As MMS.
3. Enter the message and select Options. You can
add the required picture, sound, video, subject, and
slides to the message. Select the required file.
4. Select Options > Send to. Select additional
recipients, if any.
5. Select Options > Send, to send the contact
information.
Send Contact by e-mail
1. Select Menu > Phonebook. Select the contact.
2. Select Options > Send business card > As Email.
Enter the following details:
• To: You can enter the recipient’s e-mail
address.
49
Managing Contacts
• CC: You can enter the e-mail address of the
recipient, to whom a copy of the e-mail has to
be sent.
• BCC: You can enter the e-mail address of the
recipient, to whom a blind copy of the e-mail
has to be sent.
• Subject: You can enter the subject of the
e-mail.
• Attachments: By default the selected contact
details are attached. You can also include other
attachments, if any.
• Priority: You can set the priority for the
message.
3. Select Done > A message appears displaying
the size of the message > Select Yes to send the
message.
You will not be able to send the contact by
e-mail, if e-mail account is not congured.
To congure the e-mail account, refer Refer
“Configuring Email Accounts” on page 57.
Send Contact by Bluetooth
1. Select Menu > Phonebook. Select the contact.
2. Select Options > Send business card > Via
Bluetooth.
3. If Bluetooth is not on, the user will get a prompt to
turn it on.
4. Select the paired device to which you want to send
the name card.
5. If the device is not paired, select Search new
device and then select the device.
6. When the other device accepts the contact, Done
message will be displayed.
Selecting Multiple Contacts
To select multiple contacts, select Menu > Phonebook >
Options > Mark several. To select the contacts, scroll to
the required contacts and do one of the following:
• Select Options > Mark.
• Press the Menu key.
• Select Options > Mark all to select all the contacts
in the phonebook. Once the contacts are marked,
the following options are displayed:
Options Function
Unmark Unmark the selected contact.
Send message Send an SMS/MMS message to
all the marked contacts.
Send business
card
Send a business card to the
marked contacts
Backup contacts Export the contact details of the
marked contacts as UDX le.
Delete marked Delete all the selected contacts.
Mark all Select all the contacts in the
phonebook. This option is
displayed only if all the contacts
are not selected.
50
Unmark all Unmark all the selected
contacts. This option is
displayed only if all the contacts
are marked.
Caller Groups
You can create a new group, add a new contact to the
group, and manage the groups.
• To create a new group, select Menu > Phonebook
> Options > Caller groups > Add new group. You
can assign a name, ringtone and picture for the
group.
• To add a new contact in a group, select Menu >
Phonebook. Select the contact. Select Options >
Caller groups. Select a group. Select Options >
View members > Options > Add members. The
phonebook is displayed. Select the phone numbers
to be added to the group.
Only the contacts stored in phone memory can
be added to the group.
• To manage a group, select Menu > Phonebook >
Options > Caller groups. Select a group and then
select Options. The following options are displayed.
Options Function
View members You can view the contacts
in the group.
Delete You can delete the group.
Delete all You can delete all the
groups.
Send message You can send an SMS/
MMS message to the
contacts in the group.
Group settings You can rename the group,
assign a ring tone to the
group, and add a picture to
the group.
Phonebook Settings
To view or dene settings for your phonebook, select
Menu > Phonebook > Options > Phonebook settings.
• Preferred storage: You can select either SIM or
Phone or both as the default memory location to
store the contacts.
• My number: You can manage your own information.
The following sub-menus are present.
• Edit my number: Enter your name and other
personal details such as Mobile number, Home
number, Company name, Email address, Ofce
number, and Fax number. Select OK and Save.
• Send my number: You can send your
information to any number via SMS, MMS,
e-mail and bluetooth.
• Delete: Delete the contact information.
• Extra Numbers: You can view some special
purpose phone numbers. The following sub-menus
are present.
• Owner numbers: Contains the number and
Managing Contacts

51
name of the owner. You can edit or delete the
information.
• Service numbers: Contains the service
numbers provided by the operator.
• SOS Number: Contains emergency contact
numbers stored in SIM.
• Memory status: You can view the number of
contacts stored in the SIM and mobile phone.
• Copy contacts: You can copy all the selected
records from SIM card to phone memory and from
phone memory to SIM card.
• Move contacts: You can move all the selected
records from SIM card to phone memory and from
phone memory to SIM card.
• Delete all contacts: You can delete all the contact
records stored in the SIM card and phone memory.
Searching Contacts
1. Select Menu > Phonebook.
2. Type the contact name.
3. The contact will be displayed.
Managing Contacts
52
Managing Messages
SMS and MMS are convenient and inexpensive means
of communication. You can send a text message to
other people via SMS service. MMS allows you to send
messages by including multimedia content such as
pictures, audio les, video les, and so on.
You can use the Messages in your phone to send an
SMS and MMS message to other mobile phones or any
other equipment that can receive SMS and MMS.
The MMS feature is available only if you
subscribe it from your network operator.
To access the messages function select Menu >
Messages. The list of options are displayed.
Write Message
You can create SMS and MMS messages.
SMS Messages
1. To create a SMS message select Menu > Messages
> Write message.
2. Enter the message in the text pane. The text input
mode is displayed at the top left of the screen. Press
and release # to select the appropriate text input
mode.
3. Enter the message and select Options. The
following options are present:
When you add a multimedia attachment,
the message is automatically converted
to a multimedia message. MMS charges
will apply, based on the operator.
Options Function
Send to You can select recipients for
the message. You can enter a
new number or select from the
Phonebook.
Insert
symbol
You can select the required symbol
to include in the message.
Input
Method
Options
You can set the input options to
T9, add a new T9 word or enable
auto completion and alphabetic
prediction under Advanced
Settings.
Edit
options
You can mark the required text of
a message, select Copy all to copy
the complete text or Cut all to cut
the complete message and paste
at a desired location.
Add
picture
You can add a picture to the
message.
Add
sound
You can add a sound to the
message. You can also record a
new sound using a sound recorder
and save it in the folder.
Add video You can add a video to the
message.
Add
subject
You can add a subject to the
message.
Slide
options
You can set to display a slide either
behind or before the message and
set the slide display timings.
53
Switch to
MMS
You can switch to MMS and send
the message as a MMS.
Advanced You can use a message template
stored in Templates folder.
You can attach a le, contact
details, and insert bookmarks.
Save to
drafts
You can save the message as a
draft in Draft folder.
Details You can view the details of the
message such as message type,
subject, size, number of recipients,
and attachment list.
4. Select Send to and select the recipients of the
message.
5. Select Options > Send, to send the message.
Instead of selecting Options, press the Menu
key to quickly send the message to a number
in Phonebook.
MMS Messages
1. To write a MMS message select Menu > Messages
> Write message.
2. Enter the message in the text pane. The text input
mode is displayed at the top left of the screen. Press
and release # to select the appropriate text input
mode.
3. Enter the message and select Options. The
following options are present:
For sending multimedia messages,
different charges will apply, based on the
operator.
Options Function
Send to You can select recipients for the
message. You can enter a new number or
select from the Phonebook.
Insert
symbol
You can select the required symbol to
include in the message.
Input
Method
Options
You can set the input options to T9, add
a new T9 word or enable auto completion
and alphabetic prediction under
Advanced Settings.
Edit
options
You can mark the required text of a
message, select Copy all to copy the
complete text or Cut all to cut the
complete message and paste at a
desired location.
Add
picture
You can add a picture to the message.
Add
sound
You can add a sound to the message.
You can also record a new sound using a
sound recorder and save it in the folder.
Add video You can add a video to the message.
Add
subject
You can add a subject to the message.
Preview
MMS
You can preview the message before
sending.
Managing Messages
54
Slide
options
You can set to display a slide either
behind or before the message and set the
slide display timings.
Switch to
SMS
You can switch to SMS and send the
message as a SMS.
Advanced You can use a message template stored
in Templates folder.
You can attach a le, contact details, and
insert bookmarks.
Save to
drafts
You can save the message as a draft in
Draft folder.
Details You can view the details of the message
such as message type, subject, size,
number of recipients, and attachment list.
4. Select Options > Send to and select the recipients
of the message.
5. Select Options > Send, to send the message.
Instead of selecting Options, press the Menu
key to quickly send the message to a number in
Phonebook.
Manage Your Messages
The inbox, draft, outbox and sent folders display the
number of stored messages in parenthesis.
Inbox
The Inbox stores and displays all the incoming SMS and
MMS messages.
To access the Inbox, select Menu > Messages > Inbox.
The Inbox displays a list of messages.
1. Scroll to a message and select Options to view the
following list of options.
• View: You can view the message.
• Reply: You can send a text or multimedia
message to the sender of that message.
• Call sender: You can call the sender of the
message.
• Forward: You can send the message to
another recipient.
• Delete: You can delete the message.
• Delete all: You can delete all the messages.
• Save to Phonebook: You can save the
numbers to the phonebook.
• Sort by: You can sort the messages based on
Sender, Subject, unread/read, Message size
and Message type.
• Move to Archive: You can move the selected
message to archive.
• Mark several: You can select multiple
messages, one by one.
Managing Messages

55
Managing Messages
• Mark as unread: You can mark a message as
unread.
• Advanced: You can copy and move messages
from the phone memory to SIM card or from
SIM card to phone memory.
• Details: You can view the details of the
message such as from, message type, received
date and storage for SMS messages and from,
to, cc, Number of recipients, subject, priority,
type received date, size and storage for MMS
messages.
2. To open a message, scroll to a message and press
the Menu key.
3. After a message is opened other functions can
be performed. Select Options to list the following
options: Reply, Call sender, Forward, Delete, Edit,
Save as Template, Save to Phonebook and also
other Advanced options to use the number, URL,
e-mail, USSD, copy or move the messages from
phone memory to SIM card or from SIM card to
phone memory.
Drafts
Messages that have been saved to be sent later are
stored in Draft.
1. To access unsent messages, select Menu >
Messages > Drafts.
2. Select Options to view the following list of options.
• View: You can view the message.
• Send: You can send the message.
• Edit: You can edit the message.
• Delete: You can delete the message.
• Delete all: You can delete all the messages.
• Sort by: You can sort the messages based on
Sender, Subject, unread/read, Message size
and Message type.
• Mark several: You can select multiple
messages, one by one.
• Advanced: You can copy and move messages
from phone memory to SIM card or from SIM
card to phone memory.
• Details: You can view the details of the
multimedia or e-mail message.
3. Press the Menu key to view the message.
4. Select Options > Send to send the message.
Outbox
Messages that were undelivered to the recipient due to
some reason are stored in Outbox.
1. To access undelivered messages, select Menu >
Messages > Outbox.
2. Select Options to view the following list of options.
• View: You can view the message.
• Resend: You can resend the message.
• Edit: You can edit the message.
• Delete: You can delete the message.
• Delete all: You can delete all the messages.
• Sort by: You can sort the messages based on
Receipient, Subject, unread/read, Message size
56
and Message type.
• Mark several: You can select multiple
messages, one by one.
• Advanced: You can copy and move messages
from phone memory to SIM card or from SIM
card to phone memory.
• Details: You can view the details of the
multimedia or e-mail message.
3. Press the Menu key to view the message.
4. Press Options > Resend to send the message.
Sent Messages
Messages that have been sent and delivered are stored
in Sent.
1. To access sent messages, select Menu >
Messages > Sent.
2. Select Options to view the following list of options.
• View: You can view the message.
• Forward: You can send the message to
another recipient.
• Delete: You can delete the message.
• Delete all: You can delete all the messages.
• Sort by: You can sort the messages based on
Subject, Message size and Message type.
• Move to Archive: You can move the selected
message to archive.
• Mark several: You can select multiple
messages, one by one.
• Advanced: You can copy and move messages
to the phone memory.
• Details: You can view the details of the
message such as message type, subject, size,
number of recipients, and attachment list.
3. Press the Menu key to view the message.
The SMS messages are saved in Sent
messages , only if it is activated in Messages >
Message settings >Text message > Common
settings > Save sent message.
The MMS messages are saved in Sent
messages, only if it is activated in Messages >
Message settings > Multimedia message >
Common settings > Sending > Enable Send
and save option.
Archive
You can save the received or sent messages in the
archive folder. To archive a message, select Menu
> Messages > Inbox/Sent Messages > select the
message > select Move to Archive.
Email Messages
You can send, receive, and manage e-mail messages. To
access, select Menu > Messages > Email.
The E-mail account has to be congured, created
and activated to access the e-mail messages.
Managing Messages
57
Configuring Email Accounts
You have to congure and create an e-mail account to
access the e-mail functionality.
1. To create an e-mail account Menu > Messages
> Email > A message appears Start to create
account? > Select Yes.
2. Select the specic pre-dened Email service
provider.
For Gmail, Yahoo, Hotmail pre-congured settings
are available. This can be accessed with just User
name & password.
3. Enter the e-mail address and password and select
OK.
If you get a certicate error, while retrieving or
sending email, complete the procedure provided
below, and install the new certicate.
Installing New Certicate
When certicate for an account is not installed in the
phone, you will get an error. You can install the required
certicate using the following steps.
1. In the certicate error screen, select Options or
press the center Menu key.
Certicate installation screen to install the new
certicate is displayed.
2. Select Install > OK.
3. Enter a certicate Label name in the editor.
Certicate label is a unique user-dened name for
the new certicate. You can enter any name, to
identify the certicate, easily.
Example: yahoocert1
4. Select Options > Done.
Certicate imported message is displayed, once
the certicate is installed successfully.
If you want to create other Email accounts,
1. Select Other Email accounts.
2. Enter the e-mail address and select Options > Next.
3. Select a protocol and select Options > Next.
4. Select a data account and select Options > Next.
5. Enter the incoming server address and select
Options > Next
6. Enter the outgoing server address and select
Options > Next.
7. Enter the user name and select Options > Next.
8. Enter the password and select Options > Next.
9. Enter the account name (if it is not displayed) and
select Options > Done. The e-mail account is
saved.
Instead of selecting Options > Next, press the
Menu key to quickly go to the next step.
Write Email
1. To write an e-mail, select Menu > Messages >
Email > Select the Email Account > Options >
Write Email.
2. Enter the following details:
Managing Messages

58
• To: You can enter the recipient’s e-mail
address.
• Subject: You can enter the subject of the
e-mail.
3. Select Options to enter the following details:
• Edit: You can edit the subject or content.
• Address: You can enter the e-mail address of
the recipient, to whom a copy or blind copy of
the e-mail has to be sent.
• Add Attachments: You can also include
attachments.
• Priority: You can set the priority for the
message.
• Save to Drafts : You can save the e-mail to
draft and send later.
• Size: View the size of the mail.
• Exit: Exit without sending.
4. Select Options > Send.
Email Inbox
The Inbox stores and displays all the incoming messages.
1. To access the inbox, select Menu > Messages >
Email > Select the Email Account > Options >
View > Inbox. The inbox displays a list of messages.
If you get a certicate error, while retrieving or
sending email, refer “Installing New Certificate” on
page 57, and install the new certicate.
2. Scroll to a message and select Options to view the
list of inbox options.
3. To open a message, scroll to a message and press
the Menu key.
4. To reply, select Options > Reply or press Menu key.
The reply screen with default sender, recipient and
subject details are displayed.
5. Press the Menu key to edit to the content section.
6. Navigate to the beginning of the message to enter
new content.
7. Type the content and select Options > Done or
press the Menu key.
8. Select Options > Send, to reply to the message.
Email Outbox
Messages that were undelivered to the recipient due to
some reason are stored in Outbox.
1. To access undelivered messages, select Menu >
Messages > Email > Select the Email Account >
Options > View > Outbox.
2. Select Options to display the outbox options.
3. Press the Menu key to view the message.
4. Press Options > Send to send the message.
Email Sent
Messages that have been sent and delivered are stored
in Sent.
1. To access sent messages, select Menu >
Messages > Email > Select the Email Account >
Managing Messages
59
Managing Messages
Options > View > Sent.
2. Select Options to display the sent options.
3. Press the Menu key to view the message.
Email Draft
Messages that have been saved to be sent later are
stored in Drafts.
1. To access unsent messages, select Menu >
Messages > Email > Select the Email Account >
Options > View > Draft.
2. Select Options to view the draft options.
3. Press the Menu key to view the message.
4. Press Options > Send to send the message.
Broadcast Messages
Broadcast messages are sent by the network operator,
to all the users connected to the mobile network. You
can select to receive broadcast messages. On the
home screen, select Menu > Messages > Broadcast
message.
• Receive mode: Select On to get information about
the reception tower.
• Read message: Select this to read the message.
• Languages: Select the required language.
• Channel settings: Select, add, edit, and delete
channels.
Templates
When you send messages to contacts, you can use the
predened messages stored in Templates folder. You
can use a text message template for an SMS message
and multimedia message template for an MMS message.
On the home screen, select Menu > Messages >
Templates.
Message Settings
To view or dene settings for your messages, select
Menu > Messages > Message settings.
SMS Settings
Select Message settings > Text message to edit the
following SMS settings:
• Prole settings: View and edit the prole name,
SMSC address, and type of message.
• Voicemail Server: Congure the voicemail server.
• Common settings: Set the following options:
Settings Function
Save sent
message
Save the sent messages.
Delivery
report
Receive delivery report for sent
messages.
Reply
path
view the reply path for sent
messages.
• Memory status: View the number of messages
stored in the SIM and mobile phone.
• Preferred Storage: You can select mobile phone or
memory card as the storage location of messages.
60
MMS Settings
Select Message settings > Multimedia message to edit
the following MMS settings:
• Data Account: Select the MMS data account.
• Common settings: Set the following options:
Settings Function
Compose You can set the slide time, creation
mode, picture size and select to
insert signature automatically. You
can enter the text, picture, video, or
sound for the signature.
Sending You can set the validity period,
activate to receive the delivery and
read reports, priority, delivery time
and save the sent message.
Retrieval You can select to retrieve the
message in home network or while
roaming.
You can also allow or reject
anonymous mails and
advertisements, You can send the
read report and delivery report.
Preferred
storage
You can select phone or memory
card as the storage location for
messages.
Memory
status
You can view the number of
messages stored in phone and
memory card.
Pre-dened MMS Settings: You may nd some
pre-dened operator settings on the phone.
Managing Messages
61
Managing Profiles
You can activate and modify various settings on your
Sonim XP5560 BOLT IS phone using Proles.
On the home screen, select Menu > Settings > Phone
settings > Profiles to display the options.
You can also access Proles from Menu > Proles.
You can customise the proles to use features such
as tone settings, ring volume, alert type, ring type and
extra tone. There are six environment proles present in
this phone. General is the default prole, while the other
proles are Meeting, Outdoor, Silent, Flight mode and
Headset.
You cannot change the parameters for the
Silent mode.
• General: The default prole where all sounds are
enabled. Parameters in this mode can be changed.
Select Menu > Settings > Phone settings >
Profiles > General > Options > Customize to open
the Customize screen. You can use this screen to
choose tone settings, ring volume, alert type, ring
type or extra tone. Select Menu > Settings > Phone
settings > Profiles > General > Options > Activate
to activate this prole.
• Meeting: Here only the vibrate mode is enabled.
Parameters in this mode can be changed. Select
Menu > Settings > Phone settings > Profiles
> Meeting > Customize to open the Customize
screen. You can use this screen to choose tone
settings, ring volume, alert type, ring type or extra
tone. Select Menu > Settings > Phone settings
> Profiles > Meeting > Activate to activate this
prole. You can also press and hold the # key to
activate the meeting mode from the home screen.
• Outdoor: Here both the vibrate and ring modes are
enabled. Parameters in this mode can be changed.
Select Menu > Settings > Phone settings >
Proles > Outdoors > Options > Customize to
open the Customize screen. You can use this screen
to choose tone settings, ring volume, alert type, ring
type, or extra tone.
• Silent: Here all the alerts are on mute. Select Menu
> Settings > Phone settings > Profiles > Silent >
Activate to activate this prole.
Alarm tone will be played even in Silent prole.
• Flight mode: Select Menu > Settings > Phone
settings > Profiles > Flight mode to open the Flight
mode screen. Select Flight mode to activate this
prole. In this mode, you cannot make or receive
calls but can play Media player. You can deactivate
the ight mode only by selecting Menu > Settings >
Phone settings > Proles > Flight mode > Normal
mode.
• Headset: Headset mode is activated automatically
when wired headset is inserted. User cannot change
to other proles except Flight mode when wired
headset is inserted Parameters in this mode can be
changed. Select Menu > Settings > Phone settings
> Profiles > Headset > Customize to open the
Customize screen. You can use this screen to
choose Tone settings, Volume, Alert type, Ring type
or Extra tone.
Sound Settings
Select Menu > Settings > Phone settings > Profiles >
General > Customize. Changing it effects the current set
62
Managing Profiles
prole. The following sound settings are displayed:
1. Tone settings: You can set the tone for incoming
calls, messages, and keypad.
2. Volume: You can set the volume for ringtone and
keytone.
3. Alert Type: You can set the alert type for incoming
calls and messages. You can select Ring only,
Vibrate only, Vibrate and Ring, Vibrate then ring.
4. Ring type: You can set the ringtype for your calls.
You can select Repeat, Ascending or Beep once.
You can download and store ring tones over
Bluetooth or WAP. The supported ringtone
formats are MIDI, MP3, WAV, AAC and AMR.
5. Extra tone: You can set tones for warning, error, and
connect tone for calls.
63
Tools
This section contains miscellaneous features supported
by the handset.
Calendar
The calendar enables you to set appointments, schedule
reminders when required, set alerts and repeat specic
settings. Tasks can be viewed on daily and weekly basis.
1. To access the calendar and its associated functions,
select Menu > Calendar. The calendar for the
current month is displayed. Use the navigation keys
to navigate across months.
2. Select Options to view the list of options available.
• View: You can view the list of events for the
day.
• View all: You can view all the events.
• Add event: You can enter a new event.
• Delete event: You can delete an event.
• Jump to date: You can go to a particular date
and view the events for that date.
• Go to today: You can access the current date.
• Go to weekly view: You can view the list of
events for the week.
When you are in weekly view, the option
changes to Go to monthly view to view the
calendar of the month.
Edit Events
Select Menu > Calendar > Options > View. Select the
event. Select Options > Edit. Make the changes. Select
Done and Save.
Alarm
You can set alarm for a particular time. Select Menu >
Tools > Alarm.
1. To set a simple alarm, select Menu > Tools > Alarm
> Edit > On. Enter the time and select Repeat >
Once. Select Done.
2. To set a recurrent alarm, select Menu > Tools
> Alarm > Edit > On. Enter the time and select
Repeat > Everyday or Custom. Using the Menu
key, select the day and select Done.
3. To set the alarm tone, select Menu > Tools > Alarm
> Edit > Alarm tone > Tone. Select the alarm tone.
4. To enable snooze, select Menu > Tools > Alarm >
Edit > Snooze. Use the left and right arrow keys to
set the time for snooze.
The alarm will work even if the phone is
switched off or is in Silent mode.
Calculator
The calculator in this phone is designed to perform
simple mathematical calculations.
1. Select Menu > Tools > Calculator.
2. To enter the numbers, press the numeric keys.
3. To use mathematical operators use the navigation
keys.
64
Navigation Key Operation
Up + (Addition)
Down - (Subtraction)
Left * (Multiplication)
Right / (Division)
4. After performing the calculations, press the Menu
key for the nal result.
The following calculator options are also displayed.
Options Function
MC Clears number from memory
MR Reads the number from memory
M+ Adds a number to the number in memory
and stores the result in memory
M- Subtracts a number to the number in
memory and stores the result in memory
This phone accepts numbers up to a maximum
of 12 digits per entry.
Unit Converter
You can convert one type of physical units to another
type. Select Menu > Tools > Unit converter.
1. Select the type of physical unit. Use the Right or Left
navigation keys to scroll. For example, Weight from
Kg to Pound.
2. Scroll down and enter the value in Kg slot or Pound
slot, for example, 10 Kg and select OK.
3. The Weight 10 Kg is converted to pounds and is
displayed in the Pound slot.
You can select Unit converter > Currency converter to
convert the currency based on rate. Enter the rate and
then enter the local value of the currency. The equivalent
foreign value of the currency is displayed.
World Clock
You can view the time of major cities in different time
zones using this function. You also have the option to use
Daylight Saving Time (DST).
The local time is displayed in the lower half of the screen.
1. To view the international clock, select Menu > Tools
> World clock.
2. To view the time of different cities, select the
required city using the navigation keys and the time
is displayed.
3. To set Daylight Saving Time (DST), select Menu >
Tools > World clock > Options > Daylight saving
time for foreign city > On.
4. To set the home city, select Menu > Tools > World
clock > select the home city and select Options >
Set Home city.
Tools

65
Tools
Sound Recorder
Select Menu > Tools > Sound recorder.
1. To record an audio le, select Options > New
record.
2. To temporarily stop the recording, select Pause.
3. To continue with the recording, select Continue.
4. To end the recording, select Stop. A message
appears Save audio? > Select Yes. The recorded
audio le is stored under My les. For more
information refer “Managing Your Files” on page 45.
Audio Playback
The user can do instant playback of the recorded audio
within the sound recorder. To listen to a recorded audio
le, select Menu > Tools > Sound recorder > Options
> List. You can also select Menu > My files > Open >
Audio > Open to access the audio les.
Notes
Select Menu > Tools > Notes to store the required
information.
Stopwatch
Select Menu > Tools > Stopwatch to start and stop the
timer, as required.
Text Reader
Select Menu > Tools > Text reader to view and read the
.txt les.
SIM Services
You can access certain services provided by the operator
using this menu. This feature can be accessed via Menu
> Tools > SIM services.

66
Applications
You can download more Java applications via WAP,
Bluetooth, SD Card or Java Application Manager.
Data Account and Java Settings
To use the applications requiring internet service, the
Java settings must be set.
Select Menu > Settings > Connectivity > Java Settings.
Select the required data account and save.
Installing Java Application from WAP
Congure WAP as described in “WAP Browser” on page
67. Launch WAP. Browse to the http/WAP link where the
le (.jar or .jad) is present. Select the le. The installation
process begins. Once the application is installed
successfully, it will be displayed in the Applications
(Java box).
Installing Java Application from Memory Card
Select Menu > My les > Memory card. Select the le
(.jar or .jad). The installation process begins. Once the
application is installed successfully, it will be displayed in
the Java box.
Some Java applications running in the
foreground can be pushed to the background
by pressing the key.
67
WAP Browser
This phone is equipped with a browser that provides
wireless connectivity and access to the Internet. This
feature is available only if you subscribe to a data service
from your network operator for Internet access. You need
to consult your local operator for more details.
If you are unable to view WAP web pages
because of change in WAP parameters or
change in WAP web address or contents,
please consult your network operator and
Internet Content Provider (ICP) for updates.
Select Menu > Browser. The following sub menus are
displayed:
• Homepage: This is the page that is displayed rst
when you open the WAP browser.
• Bookmarks: Use this menu to add and
manage your bookmarks and go directly to the
corresponding web address. You can also edit or
delete bookmarks via this menu.
• Input address: Enter a web address directly and
browse.
• Last Web Address: View the last visited Web page.
• Recent Pages: View web pages which you have
viewed previously. Click on them to open the pages.
• Stored pages: You can view the pages that are
saved.
• Service messages: This is the inbox for WAP push
messages.
• Settings: The following congurations can be set via
this menu:
• Homepage: Set the homepage.
• Data Accounts: In this menu, existing
accounts are listed on the display. Scroll to the
required account and select OK.
• Browser options: You can clear cache,
cookies and authentication information.
• Preferences: You can set the time out, select
to display or not display images in the web
pages and you can enable or disable the
cookies and cache.
• Security settings: You can view the trusted
certificates.
• Service message settings: You can decide
whether or not to receive the push messages
from operators and web portals. You can
enable service loading.
• Restore browser settings: You can restore to
the original browser settings.
Pre-dened Browser Settings: You may nd
some pre-dened operator settings on the
phone.
68
Managing Push to talk Services
Push to talk
Push to talk (PTT) application is available on your XP5560
phone.
You can access PTT services only if you
subscribe to PTT from your service provider.
Activating the PTT service
When you switch ON the phone , the rst time, you can
activate your PTT service by :
1. Simply pressing the PTT button (on the left side
of the phone ) OR Select Menu > Push-to-talk >
Select Yes to activate PTT service.
2. Once registered, a Login successful message is
displayed. A Green Icon is displayed at the top left
corner of the home screen. The PTT service will
retrieve PTT contacts and groups if they exist for
your company or corporation.
Press and release the PTT button located in the
left side of the phone, to use PTT service.
PTT button is enabled by default. To disable
PTT launch from left side button, select Menu
> Settings > Dedicated key > PTT Button >
select Off. PTT button can be disabled only
when PTT is logged out.
Login and Logout of the PTT Service
• To logout the PTT service, select Menu > Push to
talk > Options > Settings > Logout > Select Yes.
Once you logout the PTT service, is displayed.
• To login, select Menu > Push to talk > Select Yes.
Once you login the PTT service, is displayed
at the top left corner of the home screen indicating
your available status.
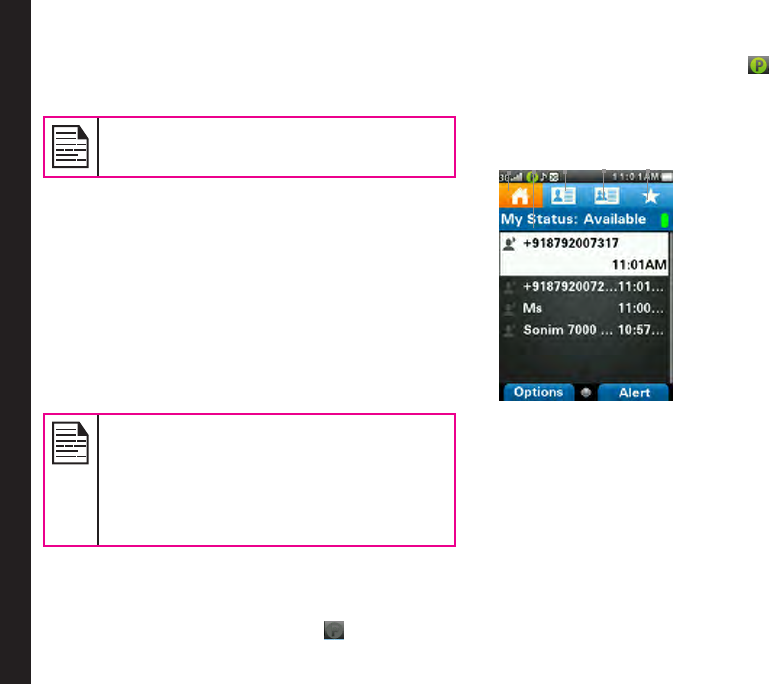
PTT Home Screen
1. PTT history tab/
Home tab
2. Presence status
3. Contacts tab
4. Groups tab
5. Favorite tab
PTT Overview
A PTT subscriber can have both public and corporate
contacts. Public contacts are created on the phone. You
can add up to 300 public contacts and 30 public groups
each containing 30 members.
Corporate administrator for the company stores the
Corporate contacts to the phone. You can add up to
1000 contacts and 100 corporate groups each containing
up to 250 members per group.
2 3 4 51
69
The maximum number of supported contacts
depends on the software conguration.
You cannot edit or delete corporate contacts and groups.
These are managed by the corporate administrator.
A PTT subscriber will be able to:
• Create groups with other public contacts.
• Create group with mix of public and corporate
contacts.
• Rename public contacts, groups or any group
members.
• Delete public contacts.
• Delete any groups created by the PTT subscriber.
• Make PTT calls to public and corporate contacts.
• Initiate a PTT quick group call to public contacts.
• Initiate a PTT quick group call to a mix of corporate
and public contacts.
• Initiate a PTT xed group call to a mix of corporate
and public contacts.
• Send alerts to public and corporate contacts.
• Add contacts and groups as favorites.
• Change availability status.
If a company has a corporate administrator, they can
further restrict the PTT capability on the handset by
making the prole as corporate only.
A corporate only subscriber will be able to:
• Make corporate PTT calls.
• Initiate a corporate xed PTT group call.
• Initiate a PTT quick group call to other corporate
contacts.
• Change availability status.
• Send alerts to other corporate contacts.
• Add contacts and groups as favorites.
• Log off.
Disallowed Corporate Only Subscriber Rights
A corporate only subscriber will not be able to:
• Create any contacts or groups.
• Add group members to a group.
• Edit contacts or groups. The user can only add
contacts and groups as favorites.
• Delete any contacts or groups and its members.
PTT Related Key Functions
PTT related keys present in your XP5560 phone are:
Key Function
PTT key • Displays the PTT home tab.
• Initiate a PTT call.
• Used for call control
Managing PTT Services
70
Volume
keys
• Adjusts the volume during an PTT
conversation.
• Navigates up and down the PTT
Contacts list.
LSK Activates the menu options displayed at
the bottom of the screen.
RSK • Sends alert to a selected contact.
• Toggles between favorite groups
and contacts in Favorites tab.
Navigation
keys
Scrolls horizontally or vertically to
access a desired menu option.
Power on/
Power off/
End call
key
• Switch on/off the phone.
• Return to the home screen when
the phone is in any other screen.
• Ends an PTT call.
PTT Display Icons
The common PTT display icons are:
Icon Description
Indicates that PTT is activated in your phone,
but you are not logged in.
Indicates you are logged-on to PTT service
and is available to answer PTT calls.
Indicates you are in Do not disturb mode.
Indicates a new notication.
Manage PTT Settings
To access the PTT Settings, press and release the PTT
button or select Menu > Push to talk. The Home tab with
call history is displayed. Select Options. The following
options are displayed.
• My Status: Set one of the following options to
indicate your online presence.
• Available - Indicates your online presence to
other contacts.
• Do not Disturb - Indicates that you are not
available for calls.
• View History : View call/alert history specic to the
selected contact.
• Search: Search for a contact in the Contacts tab.
• Call: Make a PTT call to the selected contact.
• Send Alert: Send an alert to the selected contact.
• Delete: Delete the selected contact from the call
history.
• Delete All: Delete all the calls and alerts from the
call history.
• Settings: You can set the alerts, name, sort and so
on.
• Help: View the help for specic functionality.
Managing PTT Services
71
Managing PTT Services
Options Details
Vibrate
Alert
Enable or disable vibrate mode for
incoming PTT alerts.
Audible
Alert
Enable or disable audible alerts
for incoming PTT alerts.
Alert
Repeat
Set the incoming alert notication
to
• Once - The audible alert
occurs once when the
notication is displayed.
• Repeat - The audible alert
occurs immediately, and
every 20 seconds for up to
10 minutes, until user clears
the notication.
• Continuous - The audible
alert occurs immediately, and
every 20 seconds until the
user clears the notication.
Mute
incoming
call
Mute the incoming call volume,
• When Phone silent - If
native prole is set to silent
or vibrate only, then the PTT
audio and in call tones will
be muted. (set by default on
activating silent or vibrate
only prole)
• Use App volume - On
selecting this, PTT audio
and in call tones are heard
through the loudspeaker.
Notication
Control
Notications for alerts and missed
PTT calls.
Sort
Contact
List
Sort the contacts based in
alphabetical order or online
presence
Volume Increase or decrease the alert and
call volume
Display
Name
Edit the existing login name .
Capacity View the contacts, groups and
favorites storage capacity.
Auto start • Enable - PTT will
automatically login after the
phone restarts.
• Disable – PTT login will not
happen automatically. Once
the phone restarts user has
to press the PTT button (left
side button) or select the
PTT icon on the main menu
for PTT application to login.
If phone lock is enabled, then PTT
login will not happen automatically
until the user enters the correct
phone password.
72
Use
Bluetooth
for Audio
On
Enable - On enabling this, the
PTT media, in call tones and
notication tones would be
played through the BT accessory
connected.
Disable - On disabling this, the
PTT media, in call tones and
notication tones would be played
through the phone loudspeaker
even though BT accessory is
connected.
Restore
Defaults
Restore PTT settings to factory
default settings.
Show
Tutorial
View the tutorial for specic
functionality
About View the details of the PTT
application
Logout Logout of PTT session.
Managing PTT Calls
A user can make or receive a one-to-one call or one-to-
many call (group call). Calls can be dialled directly,from
the call history/home tab, from the PTT contact or group
tab or from the favorite tab.
You cannot call any recipient who is in Do not
disturb or Ofine status.
If a call has no response from both initiator and
receiver, it is automatically disconnected after a
short time interval.
For one-to-one calls, the terminated call will be
considered by the client as a ‘Missed call’ if the
receiver never speaks during the entire call.
Direct PTT Calls
To dial a PTT call directly:
1. Enter the phone number of a contact using the dial
pad on the home screen.
2. Press and hold the PTT button.
3. Continue to hold the PTT button to speak.
4. Release the PTT button when you nish speaking.
5. To end the call, press End Call (RSK) key or End
key.
Calls from PTT History Tab
The PTT history tab is the home screen for PTT. It
maintains logs of all outgoing PTT calls, received PTT
calls and missed PTT calls and alerts.
To access the PTT history screen, press and release the
PTT button or select Menu > Push to talk.
You can make PTT calls from conversation history by
scrolling to the an entry in the list and pressing the PTT
button.
You can also get more details by highlighting an entry
and selecting Options > View history to see the call and
Managing PTT Services

73
alert records for the specic entry.
The Search screen is activated by touching a key on the
dial pad.
Calls from PTT Contacts Tab
You can make a one-to-one call and quick group call,
from the PTT Contacts tab.
One-to-One Call
This is a simple PTT session where just one caller and
one recipient are involved in the conversation.
1. Press and release the PTT button or select Menu >
Push to talk. Go to Contacts tab, to display the list
of PTT Contacts.
2. Scroll to the contact you want to call. Press and hold
the PTT button. The Screen displays PTT Private
Call in progress.
3. Continue to hold the PTT button to speak.
4. Release the PTT button when you nish speaking.
5. To end the call, press End Call (RSK) key or End
key.
Quick Group Call
You can quickly make a single call to many contacts in
the PTT Contacts list.
1. Press and release the PTT button or select Menu >
Push to talk. Go to Contacts tab, to display the list
of PTT Contacts.
2. Mark the required contacts to whom you want to
call. You can add up to 10 contacts to initiate a
quick group call.
3. Press and release the PTT button. You can also
select Options > Call to initiate a quick group call.
4. Continue to hold the PTT button while you are
speaking. Release the PTT button when you nish
speaking.
5. To end the call, press End Call (RSK) key or End
key.
Calls from PTT Group Tab
You can make a call to a group by going to the groups
tab and selecting a group.
1. Press and release the PTT button or select Menu
> Push to talk. Select Groups tab to display the
existing list of PTT groups.
2. Scroll to the PTT group you want to call. Press and
hold the PTT button to call the selected group. The
Screen displays PTT Group Call.
3. Continue to hold the PTT button while you are
speaking.
4. Release the PTT button when you nish speaking.
5. To end the call, press End Call (RSK) key or End
key.
Sending Alerts
You can send an alert to an individual to let them know
that you want to speak to them, it is a great way of
getting someone’s attention in a more discreet way.
1. Press and release the PTT button or select Menu >
Push to talk. Select Contacts tab.
Managing PTT Services

74
2. Select a contact and press RSK Alert.
3. The alert is sent to the contact.
Popup alert is displayed until you act up on it
and alert sound will be played after every 20
seconds if alert set to repeat or continuous .
Alert pop and alert sound are dependent on the
respective settings.
You can send an alert only to the individuals
who are online. If your status is set to DND, you
cannot send an alert.
Block Incoming PTT Calls
Press and release the PTT button or select Menu > Push
to talk. Select Options > My Status > Do not disturb, to
block incoming calls from the other PTT members. is
displayed at the top of the screen indicating that Do not
disturb option is enabled. presence icon is displayed
next to the contact name in the PTT Contacts list of the
other contacts.
Manage PTT Contact List
To access the PTT Contacts, press and release the PTT
button or select Menu > Push to talk. Select Contacts
tab. The contacts tab contains the list of members whom
you want to call or send alerts. Your contact list can be
created or copied from your existing list of contacts in
your phonebook.
Select a contact and select Options. By default the rst
contact is selected. The following options are displayed.
Some of the options may not be available
depending on corporate account setup.
• View Details : View contact details for the selected
contact.
• View History : View call/alert history specic to the
selected contact.
• Search: Search for a contact in the Contacts.
• Delete: Delete the selected contact from the
Contacts.
• Call: Dial a PTT call to the selected contact.
• Personal Alert: Send an alert to the selected
contact.
• New Group: You can add a new group and also
include a new member to the group.
• Settings: You can edit PTT settings such as the
alerts, volume, and display name, and also logout
of the PTT session. For more information refer,
“Manage PTT Settings” on page 70.
• Help: View the help for specic functionality.
Add Contact
To add a new contact to the PTT Contacts list, do the
following:
1. Press and release the PTT button or select Menu >
Push to talk. Select Contacts tab > New Contact.
2. Select Manual to add the contact details
manually or select Phone to select a contact from
phonebook.
3. Enter the Contact name and Contact number or
Managing PTT Services
75
select the specic contact from the phonebook.
4. Select ON to add the contact to the Favorite
Contacts list.
5. Select Save. The contact is added to the PTT
Contacts.
Contact Options
1. Select a Contact in the Contacts tab and then
select Options > View Details > Options to view
following Contact Options:
Some of the options will not be displayed
for corporate contacts.
• Add/remove as Favorite: Add/remove the
selected contact to/from Favorite Contacts.
• Call: Make a PTT call to the selected contact.
• Personal Alert: Send an alert to the selected
contact. For more information refer, “Sending
Alerts” on page 73.
• Edit: Edit the contact details.
• Delete: You can delete a selected contact from
the Contacts list.
Manage PTT Groups
To access the PTT groups, press and release the PTT
button or select Menu > Push to talk. Select Groups
tab. The Groups tab contains the list of groups with
contacts whom you want to call.
Select a group and select Options. By default the rst
group is selected. The following options are displayed.
• View Details : View details for the selected group.
• View History : View call history specic to the
selected group.
• Search: Search for a group in the groups list.
• Delete: Delete the selected group from the groups
list.
• Call: Dial a PTT call to the selected group.
• Settings: You can edit PTT settings such as the
alerts, volume, and display name, and also logout
of the PTT session. For more information refer,
“Manage PTT Settings” on page 70.
• Help: View the help for specic functionality.
Add Group
To add a new group to the PTT groups list, do the
following:
1. Press and release the PTT button or select Menu >
Push to talk. Select Groups tab > New Group.
2. Enter the Group name.
3. Select ON to add the group to the Favorite Groups
list.
4. Select Add Members. Select members from PTT
Contacts and select Add.
5. Select Save. The new group is created.
Groups Options
1. Select a Group in the Groups tab and then select
Options > View Details > Options to view the
following group Options:
Managing PTT Services
76
• Call Group: Make a PTT call to the selected
contact.
• Edit Group: Edit the group details.
• Delete Group: Delete a selected group from
the Groups list.
• Rename Contact: Edit the selected contact
name.
• Add /Remove as Favorite: Add or remove the
selected group to/from Favorite Groups.
Manage PTT Favorite Contacts
To access the PTT Favorite contacts, press and release
the PTT button or select Menu > Push to talk. Select
Favorites tab. The Favorite Contacts tab contains the list
of PTT contacts added as favorites for easy access.
If Favorite Groups is displayed, press RSK to
toggle to Favorite Contacts.
Select a Contact and select Options. By default the rst
contact is selected. The following options are displayed.
• View Details : View details for the selected contact.
• View History : View call/alert history specic to the
selected contact.
• Search: Search for a contact in the favorite contacts
list.
• New Favorite/group: Add a contact/group from
PTT contacts to the Favorite contacts list.
• Remove Favorite: Delete a contact from the
Favorite contacts list.
• Call: Dial a PTT call to the selected contact.
• Settings: You can edit PTT settings such as the
alerts, volume, and display name, and also logout of
the PTT session.
• Help: View the help for specic functionality.
Add Favorite Contact
To add a contact to the PTT favorite contacts list, do the
following:
1. Press and release the PTT button or select Menu >
Push to talk. Select Favorite Contact tab > Add
Contact.
2. Select the contact from PTT contacts list.
3. Select Save. The contact is added to the PTT
Favorite Contacts.
Favorite Contact Options
1. Select a Contact in the Favorite Contacts tab and
then select Options > View Details > Options to
view following Contact Options:
• Remove as Favorite: Remove the selected
contact from Favorites Contacts.
• Call: Make a PTT call to the selected contact.
• Send Alert: Send an alert to the selected
contact.
• Edit: Edit the contact details.
Manage PTT Favorite Groups
To access the PTT Favorite groups, press and release
the PTT button or select Menu > Push to talk. Select
Managing PTT Services
77
Favorites tab. The Favorite Groups tab contains the list
of PTT groups added as favorites for easy access.
If Favorite Contacts is displayed, press RSK to
toggle to Favorite Groups.
Select a group and select Options. By default the rst
group is selected. The following options are displayed.
• View Details : View details for the selected group.
• View History : View call history specic to the
selected group.
• Search: Search for a group in the groups list.
• New Favorite: Add a group from PTT groups to the
Favorite groups list.
• Remove Favorite: Delete a group from the Favorite
groups list.
• Call: Dial a PTT call to the selected group.
• Settings: You can edit PTT settings such as the
alerts, volume, and display name, and also logout of
the PTT session.
• Help: View the help for specic functionality.
Add Favorite Group
To add a group to the PTT Groups favorite list, do the
following:
1. Press and release the PTT button or select Menu
> Push to talk. Select Favorite Group tab > Add
Group.
2. Select the group from the group list.
3. Select Save. The group is added to the PTT Favorite
Groups.
Favorite Group Options
1. Select a Group in the Favorite Groups tab and then
select Options >View Details > Options to view
following Contact Options:
• Call Group: Make a PTT call to the selected
group.
• Edit Group: Edit the group details.
• Rename: Edit the selected contact name.
• Remove as Favorite: Remove the selected
group from Favorite Groups.
Supervisory Override
If this feature is enabled, you can congure the PTT
settings such that the user can be assigned as the
supervisor of a group. If the supervisor override is
enabled,
• supervisor user will be able to take oor even if
the oor is occupied. Supervisor icon ( )will
be displayed next to the user name when the
supervisor takes oor.
• Supervisor icon ( )is displayed next to the
specic user in the group members screen.
Supervisory override feature will be enabled in
your phone only if your client supports it.
Managing PTT Services

78
Sonim client cannot be given the supervisory
override privilege. It can be the terminator
end in any of the group calls consisting
of supervisory override privilege enabled
members.
Managing PTT Services
79
Managing Multimedia Files
Media Player
You can use the built-in media player to play the audio
and video les. To access media player, select Menu >
Multimedia > Media player. The following sub-menus
are listed:
Now Playing
You can view the audio/video files that is currently being
played. You can pause, stop, play the previous song, or
the next following song by using the navigation arrow
keys. Select Options > Settings to display and set the
following settings:
Settings Function
Player
settings
Dene the background display settings,
shufe the playlist, and song repeat
sequence of the playlist. You can play the
audio in background. A strip in the home
screen indicates that audio is playing
in background. You can also dene the
sound effects and Bass enhancement.
Audio
settings
You can dene the play speed of the
audio.
Network
settings
You can select and edit the network
prole required for streaming audio les.
My Playlists
You can view all the stored playlists. Select Options to
display the following options:
• Open: You can open a playlist and select Options.
The following options are displayed:
Options Function
Play Play a selected le.
Details View the details of the le.
Move up Select a le that is at the top of the
list by moving up. This option is
available only if there are more than
one le.
Move
down
Select a le that is at the bottom of
the list by moving down. This option
is available only if there are more
than one le.
Add Include a new le to the playlist.
Remove Remove a le from the playlist.
Send Send a le as a multimedia
message, E-mail, or via bluetooth to
another user.
Use Use the le as a ringtone.
• New: You can add a new playlist.
• Delete all: You can delete all the playlists.
• Delete: You can delete a playlist.
• Rename: You can rename a playlist.
• Storage: You can store the playlist in phone/
memory card (if present on the phone).
You can play .mp3, .wav, .amr, and .aac audio
files. You can play MPEG and 3GP video files.
80
Hardcoded Shortcuts
The following are a set of special shortcuts related to
voice calls. Some of these features may require network
support.
• Enter 0 followed by SEND - releases all held calls
or sets User Determined User Busy (UDUB) for a
waiting call.
• Enter 1 followed by SEND - Releases all active calls
(if any exist) and accepts the other (held or waiting)
call.
• Enter 1X followed by SEND - Releases a specic
active call X.
• Enter 2 followed by SEND - Places all active calls (if
any exists) on hold and accepts the other (held or
waiting) call.
• Enter 2X followed by SEND - Places all active calls
on hold except call X with which communication
shall be supported.
• Enter 3 followed by SEND - Adds a held call to the
conversation.
• Enter 4 followed by SEND - Connects two calls and
disconnects the subscriber from both calls (ECT).
• Enter 4 * “Directory Number” followed by SEND
- Redirects an incoming or a waiting call to the
specied directory number.
• Enter 5 followed by SEND - Activates the completion
of calls to busy subscriber request.
• Enter “Directory Number” followed by SEND -
Places all active calls (if any exists) on hold and sets
up a new call to the specied directory number.
• Enter END - Releases the subscriber from all calls
(except a possible waiting call).
“X” is the numbering (starting with 1) of the
call given by the sequence of setting up or
receiving the calls (active, held or waiting)
as seen by the served subscriber. Calls hold
their number until they are released. New
calls take the lowest available number.
Where both a held and a waiting call exist,
the above procedures shall apply to the
waiting call (that is, not to the held call) in
conicting situation.
81
Using Memory Card
You can increase the storage capacity by inserting an
optional memory card into the slot inside the phone. You
can perform the following functions on the memory card.
• Formatting of the memory card.
• Viewing memory details such as free space and total
space.
• Storing user data.
The maximum capacity supported is up to 16
GB.
Inserting Memory card into the Phone
1. Ensure the phone is switched off.
2. Lift the battery cover and remove the battery. For
instructions refer “Inserting the Battery” on page 14.
3. Slide and lift the silver clip over the designated slot
located below the SIM card slot.
4. Place the memory card in the designated slot and
close the silver clip
5. Replace the battery and the cover. Turn the battery
cover screws clockwise to lock the battery cover.
When the Sonim XP5560 BOLT IS phone is
connected to a computer in mass storage
mode, the memory card is displayed as a
separate drive in the computer.
When you are logged in to PTT, you cannot
access Mass storage as it will not be
recognized and the message “Currently not
available” will pop up.

82
End User License Agreement
Our Warranty
This wireless device, (the “Device”) contains software
owned by Sonim Technologies, Inc. (“Sonim”) and its
third party suppliers and licensors (collectively, the
“Software”). As user of this Device, Sonim grants you a
non- exclusive, non-transferable, non-assignable license
to use the software solely in conjunction with the Device
on which it is installed and/or delivered with. Nothing
herein shall be construed as a sale of the Software to a
user of this Device.
You shall not reproduce, modify, distribute, reverse
engineer, decompile, otherwise alter or use any other
means to discover the source code of the Software
or any component of the Software. For avoidance of
doubt, you are at all times entitled to transfer all rights
and obligations to the Software to a third party, solely
together with the Device with which you received the
Software, provided always that such third party agrees in
writing to be bound by these rules.
You are granted this license for a term of the life of this
Device. If you fail to comply with any of the terms and
conditions set out in this license, it will terminate with
immediate effect. Sonim and its third party suppliers and
licensors are the sole and exclusive owner of and retain
all rights, title and interest in and to the Software. Sonim,
and, to the extent that the Software contains material or
code of a third party, such third party shall be entitled
third party beneciaries of these terms. The validity,
construction and performance of this license shall be
governed by the laws of Delaware, United States.
Comprehensive 3 Year Warranty
Sonim provides this Comprehensive three-year warranty
for your mobile phone (hereinafter referred to as
“Product”).
You may register your phone at www.sonimtech.com/
register to receive further information about your product.
Should your Product need service, please contact Sonim
customer support.
Our Warranty
Subject to the conditions of this Comprehensive 3-year
Warranty, Sonim warrants this product to be free from
major defects in design, material and workmanship at
the time of its original purchase by a consumer, and for a
subsequent period of three (3) years.
What We Will Do
If during the warranty period, this product fails to operate
in accordance with its specications under normal
use and service, due to defects in design, material or
workmanship, Sonim’s authorized distributors or service
partners, in the country/region where you purchased
the product, will repair or replace at the sole discretion
of Sonim, with the same or better model in the same or
better condition as detailed below:
1. If a device is out-of-warranty, then additional repair
charges may apply;
2. You will be advised of the charges in advance of any
work being performed;
3. You will have the option to approve the charges and
have the repair performed, or you may choose to
have your device returned to you unrepaired;
4. Any repair charges will be billed to you through
Sonim’s Authorized Distributor.
Please note that some of your personal settings,

83
End User License Agreement
downloads or other information may be lost when your
Sonim Product is repaired or replaced. Sonim does not
take any responsibility for any lost information of any kind
and will not reimburse you for any such loss.
You should always make backup copies of all the
information stored on your Sonim Product such as
downloads, calendar and contacts before handing in your
Sonim Product for repair or replacement.
Phone Care
Each Sonim phone has a designated IP class for dust and
water protection, according to the IEC Ingress Protection
(IP) Standard 60529. This means that the phone is dust
protected and can be submerged into 2 m deep water for
up to 60 minutes. Immersion in deeper water can damage
it and must be avoided.
Sonim phones are solid and built for heavy duty use.
Its design protects against disassembly or mechanical
damage when subjected to forces equal to free fall from
the height of 2 meters. Subjecting the phone to stronger
impact and forces can damage it and must be avoided.
Conditions
1. The warranty is valid whether or not the product has
been registered.
2. The warranty is valid only if the original proof of
purchase issued to the original purchaser by an
authorized service provider, specifying the date
of purchase and serial number for this Product,
is presented with the Product to be repaired
or replaced. Sonim reserves the right to refuse
warranty service if the device is found to be out of
warranty under the conditions as set forth herein.
3. If Sonim repairs or replaces the Product, the
repaired or replaced Product shall be warranted
for the remaining time of the original warranty
period or for ninety (90) days from the date of
repair, whichever is longer. Repair or replacement
may involve the use of functionally equivalent
reconditioned units. Replaced parts or components
will become the property of Sonim.
4. This warranty does not cover any failure of the
Product due to normal wear and tear, or due to
misuse or abuse, including but not limited to use
in other than the normal and customary manner, in
accordance with the Sonim device specications
and instructions for use and maintenance of
the Product. Nor does this warranty cover any
failure of the Product due to software or hardware
modication or adjustment, acts of God or damage
resulting from liquid interacting with the product
beyond what is described as acceptable in the
user guide for the product. A rechargeable battery
can be charged and discharged hundreds of times.
However, it will eventually wear out - this is not
a defect. When the talk-time or standby time is
noticeably shorter, it is time to replace your battery.
Sonim recommends that you use only batteries and
chargers approved by Sonim. Minor variations in
display brightness and color may occur between
phones. There may be tiny bright or dark dots on
the display. These are called defective pixels and
occur when individual dots have malfunctioned and
cannot be adjusted. Up to three defective pixels are
deemed acceptable.
5. This warranty does not cover Product failures
caused by installations, modications, or repair or
opening of the Product performed by a any person
other than a Sonim-authorized person. Tampering

84
End User License Agreement
with any of the seals on the Product will void the
warranty.
6. The warranty does not cover Product failures which
have been caused by use of accessories or other
peripheral devices which are not Sonim-branded
original accessories intended for use with the
Product.
7. The 3-year warranty does not cover 3rd party
accessories or any 3rd party software applications,
which are instead covered to the extent provided by
the original vendor guarantee for these products.
8. THERE ARE NO EXPRESS WARRANTIES,
WHETHER WRITTEN OR ORAL, OTHER THAN
THIS PRINTED LIMITED WARRANTY. ALL
IMPLIED WARRANTIES, INCLUDING WITHOUT
LIMITATION THE IMPLIED WARRANTIES OF
MERCHANTABILITY OR FITNESS FOR A
PARTICULAR PURPOSE, ARE LIMITED TO THE
DURATION OF THIS LIMITED WARRANTY. IN NO
EVENT SHALL SONIM OR ITS LICENSORS BE
LIABLE FOR INCIDENTAL OR CONSEQUENTIAL
DAMAGES OF ANY NATURE WHATSOEVER,
INCLUDING BUT NOT LIMITED TO LOST PROFITS
OR COMMERCIAL LOSS; TO THE FULL EXTENT
THOSE DAMAGES CAN BE DISCLAIMED BY LAW.

85
FCC Statement
WARNING: Changes or modications made to
this equipment not expressly approved by Sonim
Technologies, Inc. for compliance could void the user’s
authority to operate the equipment.
FCC Statement
Sonim XP5560 BOLT IS Ex-Handy 08 .x -A and Ex-HSPA
08 .x -A ( NFC Model name: Sonim XPand NFC FCC
ID: WYPB01V008AA ) devices comply with part 15 of
the FCC rules. Operation is subject to the following two
conditions:
1. This device may not cause harmful interference.
2. This device must accept any interference received,
including interference that may cause undesired
operation.
This equipment has been tested and found to comply
with the limits for a Class B digital device, pursuant to
part 15 of the FCC Rules. These limits are designed
to provide reasonable protection against harmful
interference in a residential installation. This equipment
generates uses and can radiate radio frequency energy
and, if not installed and used in accordance with the
instructions, may cause harmful interference to radio
communications. However, there is no guarantee that
interference will not occur in a particular installation.
If this equipment does cause harmful interference to
radio or television reception, which can be determined
by turning the equipment off and on, the user is
encouraged to try to correct the interference by one or
more of the following measures:
• Reorient or relocate the receiving antenna.
• Increase the separation between the equipment
and receiver.
• Connect the equipment into an outlet on a
circuit different from that to which the receiver is
connected.
• Consult the dealer or an experienced radio/TV
technician for help.
IC Statement
The following is valid for the Sonim XP5560 BOLT IS Ex-
Handy 08 .x -A and Ex-HSPA 08 .x -A devices:
1. This Class B digital apparatus complies with
Canadian ICES-003.
2. This device complies with RSS-310 of Industry
Canada. Operation is subject to the condition that
this device does not cause harmful interference.
3. This device must accept any interference, including
interference that may cause undesired operation of

86
FCC Statement
the device.
IC Statement
The following is valid for the Sonim XP5560 BOLT IS Ex-
Handy 08 .x -A and Ex-HSPA 08 .x -A devices:
1. This Class B digital apparatus complies with
Canadian ICES-003.
2. This device complies with RSS-310 of Industry
Canada. Operation is subject to the condition that
this device does not cause harmful interference.
3. This device must accept any interference, including
interference that may cause undesired operation of
the device.
• This device complies with RSS-310 of Industry
Canada. Operation is subject to the condition that
this device does not cause harmful interference.
87
Declaration of Conformity
Sonim Technologies, Inc declares that the mobile phone
Sonim XP5560 BOLT IS models Ex-Handy 08 .4 ATT,
Ex-Handy 08 .5 ATT, Ex-Handy 08 .0 –E, Ex-Handy 08
.1 –E, Ex-Handy 08 .2 –E, Ex-Handy 08 .3 –E, Ex-Handy
08 .4 –E, and the Ex-Handy 08 .5 –E, Ex-HSPA 08 .0 –E,
Ex-HSPA 08 .1 –E, Ex-HSPA 08 .2 –E, Ex-HSPA 08 .3
–E, Ex-HSPA 08 .4 –E, and the Ex-HSPA 08 .5 –E are
in compliance with the essential requirements and other
relevant provisions of Directive 1999/5/EC.
Declaration of Conformity
1825 So. Grant Street, Suite 200, San Mateo, CA 94402 tel: 1.650.378.8100 fax 1.650.240.3848 www.sonimtech.com
Declaration of Conformity
We, Sonim Technologies, Inc. of 1825 S. Grant Street, Suite 200 San Mateo, CA 94402
declare under our sole responsibility that the products
Models: Ex-Handy 08 .0 –E, Ex-Handy 08 .1 –E, Ex-Handy 08 .2 –E
Ex-Handy 08 .3 –E, Ex-Handy 08 .4 –E, Ex-Handy 08 .5 –E,
Ex-HSPA 08 .0 –E, Ex-HSPA 08 .1 –E, Ex-HSPA 08 .2 –E,
Ex-HSPA 08 .3 –E, Ex-HSPA 08 .4 –E, Ex-HSPA 08 .5–E
Type: P34F008AB
to which this declaration relates, is in conformity with the following standards and/or other
normative documents:
EMC: EN 301 489-1 V1.9.2 (2011-09) EN 301 489-3 V1.4.1 (2002-08)
EN 301 489-7 V1.3.1 (2005-11) EN 301 489-17 V2.2.1 (2012-09)
EN 301 489-24 V1.5.1 (2010-10)
SAR: EN 50360:2001 AC:2006/IEC 6229-1:2005/EN62209-1:2006
EN 50360:2001A1:2012 /IEC 6229-1:2005-/EN62209-1:2006
EN 62311:2008/IEC 62209-2:2010/EN62209-2:2010
Safety (LVD): EN60950-1:2006+A11:2009+A1:2010+A12:2011
Acoustic safety: EN 50332-1(2000-11)
R&TTE:EN 301 511 V9.0.2 (2003-03), EN 300 328 V1.7.1
EN 301 908-1/-2 V5.2.1 (2011-05),
GPS RF: EN 300 440-1 V1.6.1 (2010-08) EN 300 440-2 V1.4.1 (2010-08)
A-TICK: AS/NZS 60950.1 2011/Amdt2012
We hereby declare that all essential radio test suites have been carried out and that the above
named product is in conformity to all the essential requirements of Directive 1999/5/EC.
The conformity assessment procedure according to the regulations in R&TTE Directive
1999/5/EC has been followed with the involvement of the following Notified Body:
Telefication, Edisonstraat 12A, 6902 PK Zevenaar, The Netherlands
0560 Identification mark (Notified Body number):
The technical documentation relevant to the above equipment will be held at:
Sonim Technologies, Inc.
1825 S. Grant Street, Suite 200, San Mateo, CA 94402
Iyad Hindi
Type Approval Manager
Sonim Technologies, Inc San Mateo, April 2, 2013

88
A
Activating PTT service 67
Add a Favorite PTT Group 76
Add a new PTT contact 73, 75
Add a new PTT Group 74
Add new contact 46
Alarm clock 62
Audio
Playback 64
B
Battery
Charging indicator 15
Usage Information 14
Block Incoming PTT Calls 73
Bluetooth connectivity 40
Activation 40
Connecting headset 41
Deactivation 40
Deleting paired device 41
Device pairing 40
Renaming paired device 41
Sending data to paired device 42
Settings 41
Specications 40
Supported Proles 40
Bookmarks 66
C
Calendar 62
Editing events 62
Call accept/Send key 19
Call history/list 29
Calls on hold/waiting 30
Clear key 19
Contact Options 74, 75, 76
Contacts
Add 46
Caller groups 49
Multiple contacts 48
My number 49
Phonebook settings 49
Search 50
Send message 46
View details 46
D
Direct PTT call 71
Display settings 33
E
E-mail 55
Conguring Email account 55
Draft 57
Inbox 57
Outbox 57
Sent 57
Write 56
F
Flight mode 60
H
Hardcoded Shortcuts 81
Homepage 66
I
International number dialling 29
J
Java
Installing Java Application From
Memory Card 65
Installing Java Application From
WAP 65
K
Keypad
Accept/Send 21
Back 21
Clear 21, 63
End call 21
Function keys 17
LSK/RSK 21
Navigation keys 22
Power On/Off 21
L
Language Settings 33
Left Selection Key 19
Index

89
Login and Logout of PTT Service
67
M
Memory card 82
Insert 82
Messages
Broadcast 58
Drafts 54
e-mail 53
Inbox 53
MMS 52
Outbox 54
Sent 55
Settings 58
SMS 51
Template 58
N
Network Connectivity 40
O
One-to-One PTT Call 72
P
Proles 60, 61
Flight 60
General 60
Headset 60
Meeting 60
Outdoor 60
Silent 60
PTT call me alerts 73
PTT Calls 71
PTT conversation history 71
PTT Corporate only subscriber 68
PTT Group Call 72
PTT related key functions 68
PTT Settings 69
Q
Quick Group PTT Call 72
R
Recording a call 32
S
Security Settings 38
Send a PTT call me alert 72
Silent mode 60
Sound Recorder 64
Speed dial 34
T
Themes 33
Tools
Alarm clock 62
Calculator 62
Calendar 62
Notes 64
SIM card menu 64
Sound recorder 64
Stopwatch 64
Text reader 64
Unit converter 63
World clock 63
U
Unit converter 63
USB function 43
V
Voicemail
Server settings 58
W
WAP
Address 66
Service inbox 66
Settings 66
World clock 63
Write Messages 51
Index