elero Antriebstechnik 28650 Radio Transceiver User Manual
elero GmbH Antriebstechnik Radio Transceiver Users Manual
Users Manual
138210901_US_1217
MonoTec-915
Operating instructions
(translation)
Product contents
• Wall transmitter module
• CR 2032 batter (installed)
• elero frame
• Black xing plate with xing
set (wall plugs and screws)
• Operating instructions
Technical data
Power supply 3 V
battery, CR 2032
Radio frequency [MHz]
(band)
915
Emitted Power [dBm] 2
Channels 1 (bidirectional)
Connections, terminals None
Operating temperature
[°C]
0 ... 50
Protection class (IP) 20
Dimensions (W x H x D)
[mm]
Wall transmitter
module Fixing
plate elero frame
50 x 50 x 9.6
approx. 75 x 75
approx. 80 x 80
Weight [g] approx. 50
Type of mounting Wall mounting
Item number 286500901
Safety instructions
Please read this operating manual
carefully as the procedure in this
manual is a prerequisite for correct
use of the product.
Only operate the transmitter within
sight of the devices being controlled.
The gures in this operating manual
are for illustration purposes only.
The illustrations may dier from
your product with respect to minor
details and are provided for general
information only.
elero GmbH is continually striving
to improve all products. As a result,
the specications, features and
technology of this product may be
changed at any time. The infor-
mation in this operating manual is
based on current information at the
time of publication.
No claims can be derived from the
technical data, images and informa-
tion in this operating manual.
&$87,21
Intended use Foreseeable misuse
Use only in dry rooms for controlling
elero radio receivers and elero ra-
dio drives. Do not make any chang-
es to the unit. Do not operate the
transmitter inadvertently or care-
lessly. The manufacturer will not
assume liability for damage caused
by the above.
Function
• 1-wall transmitter, bidirectional
• Radio frequency for reliable trans-
mission
• UP, STOP, DOWN/CLOSE
button, programming button P
(on rear)
• Status LED for displaying system
status
Installation and
commissioning
Make sure the radio link is unob-
structed. Avoid installing the unit in
a distributor box or metal housing,
in direct proximity to large metal
objects, or on or close to the oor.
Check the installation surface for
hidden cables, etc.
Installation:
1. Attach the xing plate to the
installation location using the
screws and wall plugs.
2. Insert the wall transmitter and the
elero frame into the xing plate at
a right angle with the wall.
3. For programming the wall trans-
mitter to the radio control or
receiver, see “Programming the
transmitter / channel”.
Programming
Programming the transmitter / channel for
multiple receivers
Requirement: The receiver is installed
1. Switch the circuit on and o: The receiver
will remain in programming mode for ap-
proximately 5 minutes.
2. Position yourself with the transmitter to be
programmed within sight and radio range of
the blind.
3. Press the programming button P for 1 s.
The blind will move up and down for approx-
imately 2 minutes (programming mode).
If several receivers are connected to the
same feed line, then all are simultaneously
ready to program. The blinds will start mov-
ing up and down randomly. The longer pro-
gramming is delayed, the greater the oset
will be. Individual transmitters can now be
assigned to the respective receiver.
You can stop receivers that you do not want
to program by pressing the STOP button on
an already programmed transmitter. You can
now make the channel assignment/change
without having to disconnect the individual
receivers.
4. Press the UP button (max. 1 second) after
the start of upward travel.
The blind will stop for a short time.
5. Press the DOWN/CLOSE button (max.
1 second) after the start of downward travel.
The blind will stop.
6. If the blind moves in the opposite direction
or the blind does not stop after program-
ming, delete the transmitter from the receiv-
er and repeat the programming process.
7. MonoTec-915 is now programmed.
Stopping programming mode in the
transmitter
Press the STOP button for at least 6 seconds
until the status LED lights up orange.
Programming additional transmitters to
one receiver
1. Press the UP, DOWN/CLOSE and P buttons
simultaneously for 3 s on a transmitter that
has already been programmed to the re-
ceiver. The indicator light will light up briey.
The receiver will remain in programming
mode for approximately 5 minutes. Press
the programming button P on the transmitter
to be programmed until the indicator light
lights up.
2. Press the UP button (max. 1 second) after
the start of upward travel.
The indicator light will light up briey.
The blind will stop, restart, stop and then
move downwards.
3. Press the DOWN/CLOSE button (max.
1 second) after the start of downward travel.
The indicator light will light up briey.
The blind will stop.
4. The transmitter or the transmitter channel
has been programmed.
Deleting individual transmitters / channels
1. Press and hold down the STOP button and
the programming button P simultaneously
for approximately 6 s.
2. The indicator light will light up orange and
then red.
Deleting all transmitters
To perform a factory reset, all selected drives
must be supplied with power.
1. Press and hold down the STOP and P and
UP and DOWN/CLOSE buttons simultane-
ously for approximately 6 s.
2. The indicator light will light up orange/green
and then red.
Replacing the battery
The coding of the transmitter is re-
tained after the battery is replaced;
the coding does not have to be re-
programmed to the remote control
or the radio receiver.
1. Pry the wall transmitter and the
elero frame out of the xing plate.
2. Carefully pull out the battery from
the side using a blunt, insulated
tool. Use only CR 2032 batteries.
Make sure the polarity is correct.
The positive terminal must be
visible.
3. Reinsert the wall transmitter into
the xing plate.
Dispose of used batteries in accor-
dance with environmental regula-
tions.
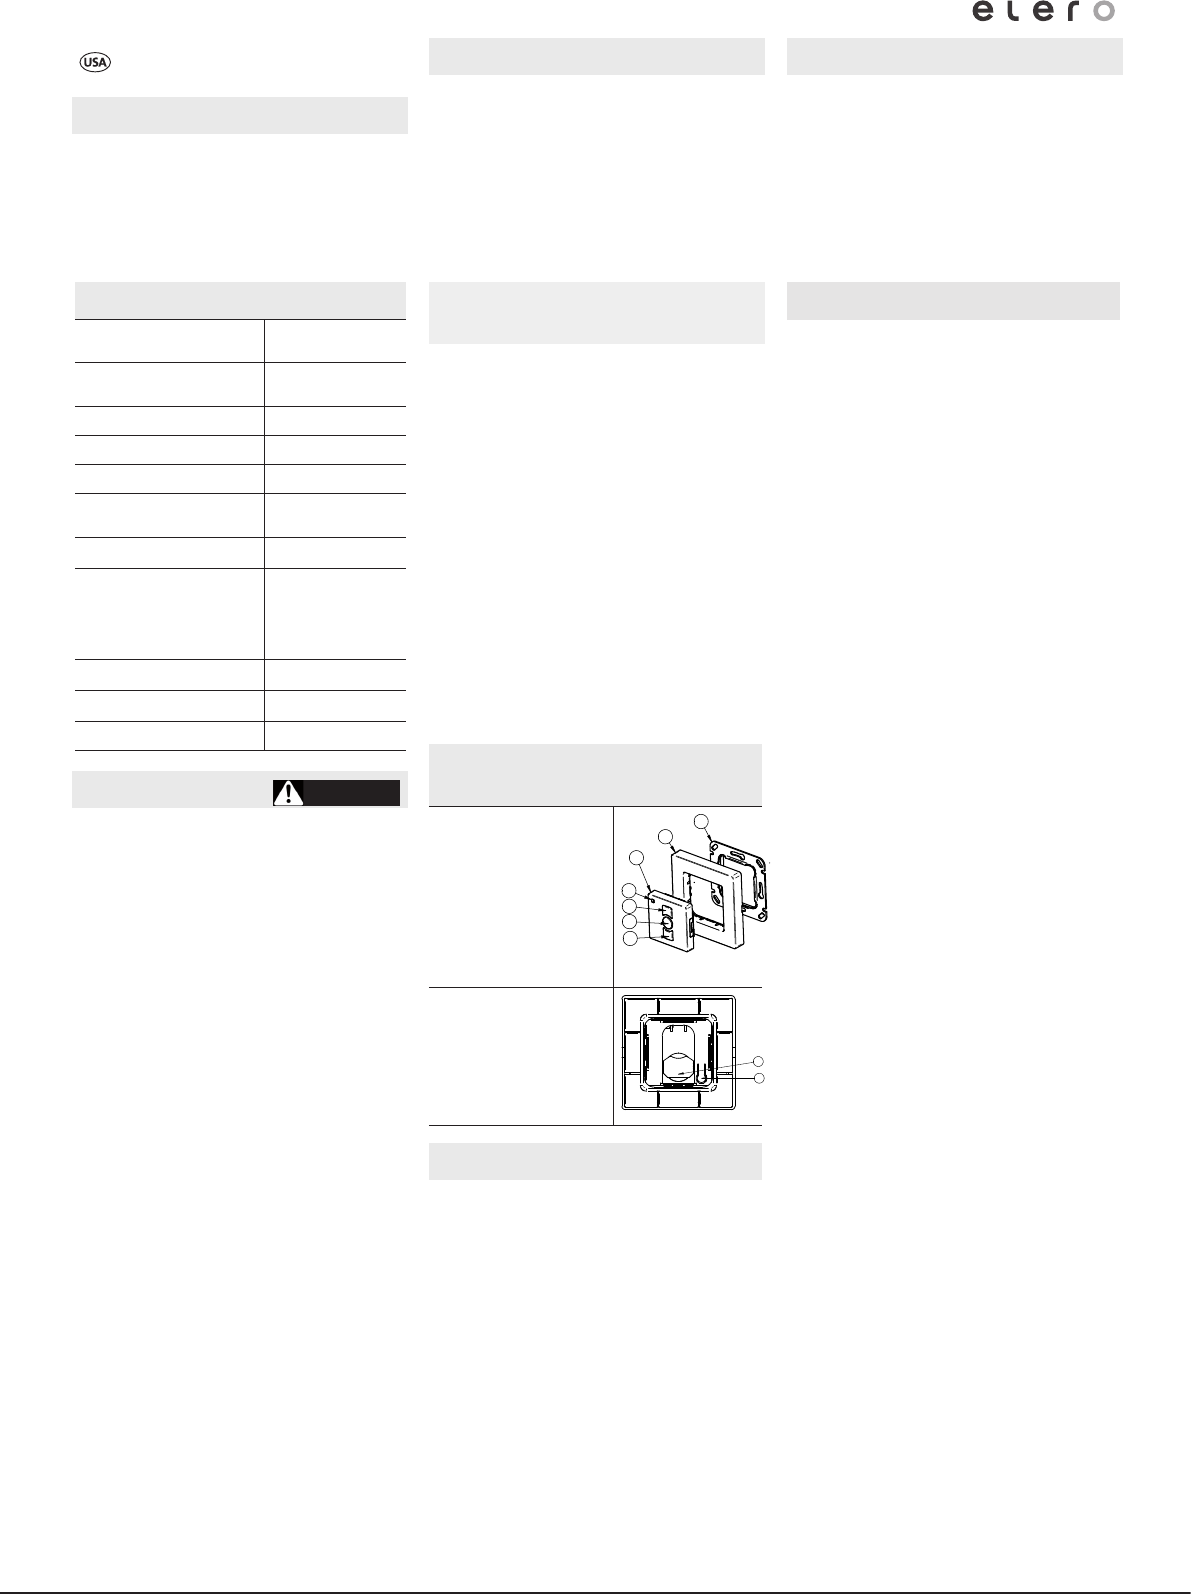
Installation /
Replacing the battery
① Fixing plate
② elero frame
③ Wall transmitter
module
④ Status LED
⑤ UP button
⑥ STOP button
⑦ DOWN/CLOSE
button
3
2
1
4
5
6
7
⑧ Programming but-
ton P (on back of
device)
⑨ Battery compartment
8
9
Disposal
Batteries and old units may not be
disposed of with household waste.
1. Dispose of packaging in the recy-
cling bin for cardboard and paper.
2. Dispose of old batteries in the
recycling bin for used batteries
or have a retailer recycle them.
3. Dispose of old units at an elec-
tronic waste recycling facility or
have a retailer recycle them.
Conformity
elero hereby declares that Mono-
Tec-915 wall transmitter is in com-
pliance with Directive 2014/53/EU.
The full text of the EU Declaration
of Conformity is available at the
following Internet address:
www.elero.de/downloads-service/
Service /
manufacturer's address
If malfunctions have occurred or the
device has been damaged despite
proper handling, contact your con-
tractor or dealer.
elero GmbH
73278 Schlierbach
GERMANY
www.elero.de
Notes on troubleshooting
Fault Cause Remedy
Drive not
running,
indicator
light not
illuminating
Battery
depleted
The bat-
tery is
incorrectly
installed
Install
a new
battery
Install the
battery
correctly
Drive not
running,
status
LED dis-
play ash-
ing red
1. The
receiver
is outsi-
de radio
range.
2. Recei-
ver not
opera-
ting or
faulty
3. Recei-
ver not
yet pro-
gram-
med
1. Reduce
distance
to the
receiver
2. Switch
on or
replace
receiver
3. Pro-
gram
receiver
Drive
runs in
the wrong
direction
Directions
are incor-
rectly pro-
grammed
Delete
transmit-
ter and
program
correctly
Repair
Please specify the item number,
item description, type of fault, situ-
ational circumstances, presumed
cause, unusual events prior to the
problem.
Cleaning
Clean the device with a damp cloth
only. Do not use cleaning agents be-
cause they can damage the plastic.
Warranty
Within the legal warranty period, we
will remedy any defects caused by
material or manufacturing defects
by repairing or replacing the unit.
Unauthorised modications will void
the warranty.
Status LEDs and their
meanings
Orange
ashing
slowly
Channel (trans-
mitter) not pro-
grammed in any
receiver
Orange
ashing
quickly
Channel (transmit-
ter) is in program-
ming mode. Opera-
tion of already pro-
grammed receivers
is not possible.
Orange ash-
ing quickly
(approx.
every
2 seconds)
More than
10 receivers
are ready for
programming.
Orange lights
up, then
green
Transmit signal is
being sent, all re-
sponse messages
received
Orange or
green ashes
several times,
then red after
6 seconds
Channel (trans-
mitter) has been
deleted
Orange lights
up, then red
Transmit signal is
being sent, not all
response messages
received
Red ashing
quickly
Battery almost
depleted
Synchronised programming
mode
For programming one transmitter to
multiple receivers at the same time.
1. Press the DOWN/CLOSE buttons
and the programming button P
simultaneously for 3 s on a trans-
mitter that has already been pro-
grammed to the receiver. The sta-
tus LED ashes orange and green
multiple times. The receivers are
now in programming mode.
2. Perform steps 2 to 7 under “Pro-
gramming the transmitter / channel”
with the transmitter to be pro-
grammed.
Conguring the drive
Programming the intermediate position
Requirement:
The blind is in the upper end position.
1. Press the DOWN/CLOSE button until the
desired intermediate position is reached.
2. Additionally press the STOP button.
The blind will stop. The intermediate
position has now been stored.
Programming the ventilation / tilting /
fabric tautening positions
Requirement:
The blind is in the lower end position.
1. Press the UP button until the louvres
open, the venetian blind slats are tilted
or the awning fabric is taut.
2. Additionally press the STOP button.
The blind will stop. The ventilation / tilting /
fabric tautening position has been stored.
Moving to the intermediate position
Requirement:
The intermediate position has been
programmed.
1. Press the DOWN/CLOSE button twice
quickly. The blind will move to the stored
intermediate position.
If no intermediate position has been pro-
grammed, the blind will move to the lower
end position.
Important: If you are using venetian blinds
and a programmed tilt position, the venetian
blind slats will also tilt.
If no tilt position has been preprogrammed,
the blind will stop at the intermediate position
with closed slats.
Moving to the ventilation / tilting / fabric
tautening positions
Requirement:
The ventilation / tilting / fabric tautening
position has been programmed.
1. Press the UP button twice quickly.
The blind will move to the stored position.
If no ventilation / tilting / fabric tautening
position has been programmed, the blind will
travel to the upper end position.
You can also use a programmed hand-held
transmitter to travel to the ventilation / tilting /
fabric tautening position.
Deleting the intermediate position
Requirement: The transmitter is pro-
grammed.
1. Press and hold down the DOWN/CLOSE
button and the STOP button simultaneous-
ly for approximately 3 s.
The intermediate position is now deleted.
The indicator light will light up briey.
Deleting the ventilation position / tilting
position / fabric tautening position
Requirement: The transmitter is programmed.
1. Press and hold down the UP button and
the STOP button simultaneously for
approximately.
The ventilation / tilting / fabric tautening
position has now been deleted.

FCC / IC
FCC ID: YBU28650
IC: 8929A- 28650
USA (FCC)
Part 15 Statement gem. FCC 15.19/RSS Gen Issue 3 Sect. 7.1.3
This device (elero MonoTec-915) complies with Part 15 of the FCC Rules and with Industry Canada license-exempt
RSS standard(s). Operation is subject to the following two conditions:
(1) this device may not cause harmful interference, and
(2) this device must accept any interference received, including interference that may cause undesired operation.
Canada, Industry Canada (IC)
Le présent appareil (elero MonoTec-915) est conforme aux CNR d‘Industrie Canada applicables aux appareils ra-
dio exempts de licence. L‘exploitation est autorisée aux deux conditions suivantes :
(1) l‘appareil ne doit pas produire de brouillage, et
(2) l‘utilisateur de l‘appareil doit accepter tout brouillage radioélectrique subi, même si le brouillage est susceptible
d‘en compromettre le fonctionnement.
Caution:
Changes or modications not expressly approved by the party responsible for compliance could void the user’s au-
thority to operate the equipment.
Information:
This equipment has been tested and found to comply with the limits for a Class B digital device, pursuant to part
15 of the FCC Rules. These limits are designed to provide reasonable protection against harmful interference in a
residential installation. This equipment generates, uses and can radiate radio frequency energy and, if not installed
and used in accordance with the instructions, may cause harmful interference to radio communications. However,
there is no guarantee that interference will not occur in a particular installation. If this equipment does cause harmful
interference to radio or television reception, which can be determined by turning the equipment o and on, the user
is encouraged to try to correct the interference by one or more of the following measures:
• Reorient or relocate the receiving antenna.
• Increase the separation between the equipment and receiver.
• Connect the equipment into an outlet on a circuit dierent from that to which the receiver is connected.
• Consult the dealer or an experienced radio/ TV technician for help
MonoTec-915
138210901_US_1217