Filemaker ODBC And JDBC Guide File Maker Pro 12 Fm12 En
User Manual: filemaker FileMaker Pro 12 - ODBC and JDBC Guide Free User Guide for FileMaker Software, Manual
Open the PDF directly: View PDF ![]() .
.
Page Count: 64
- Chapter 1 Introduction
- Chapter 2 Accessing external SQL data sources
- Chapter 3 Installing FileMaker ODBC client drivers
- Chapter 4 Using ODBC to share FileMaker data
- Chapter 5 Installing FileMaker JDBC client drivers
- Chapter 6 Using JDBC to share FileMaker data
- Chapter 7 Supported standards
- Chapter 8 Reference Information
- Index

FileMaker® 12
ODBC and JDBC Guide
© 2004–2012 FileMaker, Inc. All Rights Reserved.
FileMaker, Inc.
5201 Patrick Henry Drive
Santa Clara, California 95054
FileMaker and Bento are trademarks of FileMaker, Inc. registered in the U.S. and other countries. The file folder logo and
the Bento logo are trademarks of FileMaker, Inc. All other trademarks are the property of their respective owners.
FileMaker documentation is copyrighted. You are not authorized to make additional copies or distribute this documentation
without written permission from FileMaker. You may use this documentation solely with a valid licensed copy of FileMaker
software.
All persons, companies, email addresses, and URLs listed in the examples are purely fictitious and any resemblance to
existing persons, companies, email addresses, or URLs is purely coincidental. Credits are listed in the Acknowledgements
documents provided with this software. Mention of third-party products and URLs is for informational purposes only and
constitutes neither an endorsement nor a recommendation. FileMaker, Inc. assumes no responsibility with regard to the
performance of these products.
For more information, visit our website at http://www.filemaker.com.
Edition: 01
Contents
Chapter 1
Introduction 6
About this guide 6
About ODBC and JDBC 6
Using FileMaker software as an ODBC client application 7
Importing ODBC data 7
Adding ODBC tables to the relationships graph 7
Using a FileMaker database as a data source 8
Accessing a hosted FileMaker Pro database 8
Limitations with third-party tools 9
Networking requirements 9
Updating files from previous versions 9
Installing current drivers 9
Chapter 2
Accessing external SQL data sources 10
Importing ODBC data 10
Executing SQL to interact with data sources via ODBC 11
Working with ODBC tables in the relationships graph 11
Data sources supported in FileMaker 12 12
Adding ODBC tables to the relationships graph 12
Chapter 3
Installing FileMaker ODBC client drivers 13
Hardware and software requirements 13
ODBC client driver requirements (Windows) 13
ODBC client driver requirements (Mac OS) 13
Networking requirements 13
ODBC client driver architecture overview 13
ODBC client driver installation (Windows) 14
Configuring client drivers (Windows) 15
Opening the ODBC administrator (Windows) 15
Configuring the DSN (Windows) 15
ODBC client driver installation (Mac OS) 17
Configuring client drivers (Mac OS) 17
Where to go from here 19
4
Chapter 4
Using ODBC to share FileMaker data 20
About ODBC 20
Using the ODBC client driver 21
Overview of accessing a FileMaker database file 21
Accessing a FileMaker database file from a Windows application 22
Specifying ODBC client driver properties for a FileMaker DSN (Windows) 22
Changing an existing ODBC client driver (Windows) 22
Verifying access via ODBC (Windows) 24
Accessing a FileMaker database file from a Mac OS application 24
Specifying ODBC client driver properties for a FileMaker DSN (Mac OS) 24
Changing an existing ODBC client driver (Mac OS) 24
Verifying access via ODBC (Mac OS) 26
Chapter 5
Installing FileMaker JDBC client drivers 27
Software requirements 27
Networking requirements 27
JDBC client driver installation 27
Using the JDBC client driver 28
Chapter 6
Using JDBC to share FileMaker data 29
About JDBC 29
Using the JDBC client driver 29
About the JDBC client driver 29
Using a JDBC URL to connect to your database 30
Specifying driver properties in the URL subname 31
Solutions with multiple FileMaker database files 32
Verifying access via JDBC 32
Chapter 7
Supported standards 34
Support for Unicode characters 34
SQL statements 34
SELECT statement 34
SQL clauses 35
FROM clause 35
WHERE clause 36
GROUP BY clause 37
HAVING clause 37
UNION operator 37
ORDER BY clause 38
FOR UPDATE clause 38
DELETE statement 41
INSERT statement 41
UPDATE statement 42
CREATE TABLE statement 43
5
ALTER TABLE statement 44
CREATE INDEX statement 45
DROP INDEX statement 45
SQL aggregate functions 45
SQL expressions 46
Field names 46
Constants 47
Exponential/scientific notation 48
Numeric operators 48
Character operators 48
Date operators 48
Relational operators 49
Logical operators 50
Functions 51
Functions that return character strings 51
Functions that return numbers 52
Functions that return dates 53
Operator precedence 54
ODBC Catalog functions 54
JDBC Meta Data functions 54
Reserved SQL keywords 55
Chapter 8
Reference Information 58
Mapping FileMaker fields to ODBC data types 58
Mapping FileMaker fields to JDBC data types 58
Data types in 64-bit applications 59
ODBC and JDBC error messages 59
ODBC error messages 59
JDBC error messages 59
Index 61

Chapter 1
Introduction
This guide describes how you can use FileMaker® software as an ODBC client application and as
a data source for ODBC and JDBC applications.
The following table gives an overview of how to use ODBC and JDBC with FileMaker software.
About this guide
1For information on using ODBC and JDBC with previous versions of FileMaker Pro, see
http://www.filemaker.com/documentation.
1This guide assumes that you are familiar with the basics of using ODBC and JDBC, and
constructing SQL queries. Refer to a third-party book for more information on these topics.
1This guide uses “FileMaker Pro” to refer to both FileMaker Pro and FileMaker Pro Advanced,
unless describing specific FileMaker Pro Advanced features.
Note You can download PDFs of FileMaker documentation from
http://www.filemaker.com/documentation. Any updates to this document are also available from
the website.
About ODBC and JDBC
ODBC and JDBC are application programming interfaces (APIs). ODBC is an API for applications
written in the C language, and JDBC is a similar API for the Java language. These APIs give client
applications a common language for interacting with a variety of data sources and database
services, including FileMaker Pro and FileMaker Server Advanced.
All applications that support ODBC and JDBC recognize a basic subset of SQL (Structured Query
Language) statements. Working with SQL, you can use other applications (such as spreadsheets,
word processors, and reporting tools) to view, analyze, and modify data.
What do you want to do? How do you do it? Product See
1Use FileMaker software as an
ODBC client application.
1Access ODBC data stored in an
external SQL data source.
1. Interactively via the relationships
graph
2. One-time, static via ODBC import
or File menu > Open. Also, the
Import Records script step, the
Execute SQL script step, and the
ExecuteSQL function
1FileMaker Pro
1FileMaker Pro Advanced
1FileMaker Server
1FileMaker Server
Advanced
1This guide,
chapter 2.
1FileMaker Pro
Help
1Use a FileMaker database as a
data source.
1Share FileMaker Pro data with a
third-party ODBC client
application.
1. SQL queries
2. ODBC and JDBC
1FileMaker Pro
1FileMaker Pro Advanced
1FileMaker Server
Advanced only
This guide,
chapters 3 to 8.

Chapter 1 | Introduction 7
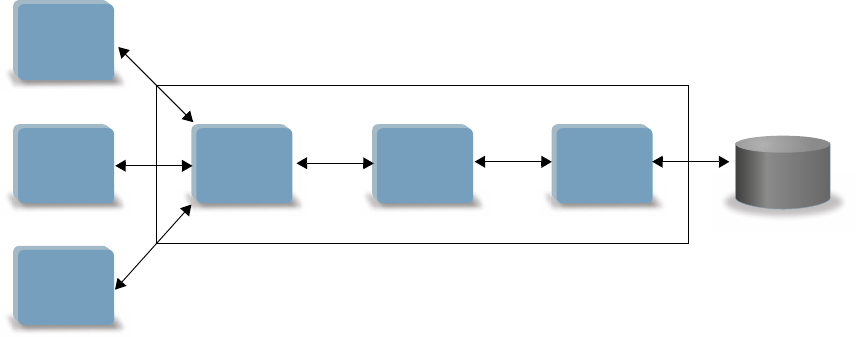
Using ODBC or JDBC APIs, a client application communicates with a driver manager that
identifies the client driver to communicate with a data source.
FileMaker software can act either as a client application or as a data source.
Using FileMaker software as an ODBC client application
As an ODBC client application, FileMaker software can access data in external SQL data sources.
FileMaker software connects to the external SQL data source using the client driver for the ODBC
data source, and either imports ODBC data or works with ODBC tables in the relationships graph.
Importing ODBC data
You can import ODBC data in either of these ways:
1from the File menu, by specifying an ODBC data source and entering SQL statements in the
FileMaker Pro SQL Query builder dialog box
1by creating a FileMaker script that uses the Import Records script step, the Execute SQL script
step, or the ExecuteSQL function
For either of these methods, you enter the SQL statements yourself, so you need to know the
supported SQL statements and their syntax for your ODBC data source. Because you write the
SQL statements yourself, you can import ODBC data from any ODBC data source.
Adding ODBC tables to the relationships graph
When you add an ODBC table to the relationships graph, you can connect to and work with data
in external SQL data sources in much the same way that you work with data in the current, active
FileMaker database file. For example, you can:
1create tables in the relationships graph for ODBC data sources
1add supplemental fields to ODBC tables to perform unstored calculations or to summarize data
in the ODBC tables
1add, change, and delete external data interactively
1create relationships between fields in FileMaker tables and fields (also called “columns”) in
ODBC tables
Because FileMaker Pro generates the SQL statements used to communicate with an ODBC table
that has been added to the relationships graph, you are limited to the specific Oracle, SQL Server,
and MySQL data sources that FileMaker Pro supports in the relationships graph.
Note You cannot modify the schema of external ODBC data sources using FileMaker Pro.
Chapter 2, “Accessing external SQL data sources,” describes how to use FileMaker software as
an ODBC client application.
Driver
Manager
Client
Application
Client
Driver Data Source

Chapter 1 | Introduction 8
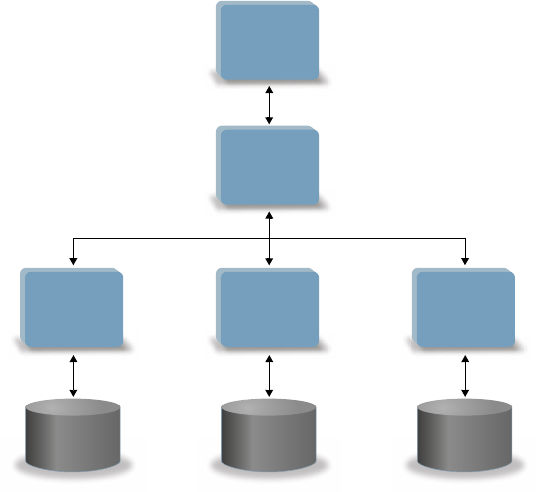
Using a FileMaker database as a data source
As a data source, FileMaker data is shared with ODBC- and JDBC-compliant applications. The
application connects to the FileMaker data source using the FileMaker client driver, constructs and
executes the SQL queries using ODBC or JDBC, and processes the data retrieved from the
FileMaker database solution.
Accessing a hosted FileMaker Pro database
With either FileMaker Server Advanced or FileMaker Pro, you can host a FileMaker database file
as a data source, sharing your data with other applications using ODBC and JDBC. The following
table describes what each FileMaker product allows.
If your FileMaker database solution uses more than one FileMaker database file, all of the
database files must be on the same computer.
The ODBC and JDBC plug-in components you need for sharing your data with other applications
are installed with FileMaker Server Advanced and FileMaker Pro.
To access a hosted FileMaker database file, you need to install the corresponding ODBC or JDBC
client driver. Install the client driver on the machine where the third-party application is installed.
This guide documents how the ODBC and JDBC client drivers, when used with FileMaker Pro and
FileMaker Server Advanced, support the industry standards for ODBC (Open Database
Connectivity), JDBC (Java Database Connectivity), and SQL (Structured Query Language).
1Chapter 3, “Installing FileMaker ODBC client drivers,” explains how to install the driver files
needed for accessing a FileMaker data source using ODBC.
1Chapter 4, “Using ODBC to share FileMaker data,” describes how to use the FileMaker ODBC
client driver to connect to a FileMaker data source from another application.
1Chapter 5, “Installing FileMaker JDBC client drivers,” explains how to install the driver files
needed for accessing a FileMaker data source using JDBC.
1Chapter 6, “Using JDBC to share FileMaker data,” describes how to use the FileMaker JDBC
client driver with a Java application or applet that connects to a FileMaker data source.
1Chapter 7, “Supported standards,” describes the SQL statements that the ODBC and JDBC
client drivers support when used with FileMaker Pro and FileMaker Server Advanced.
Important If you disable ODBC/JDBC sharing after it has already been on, a data source hosted
by FileMaker Server Advanced or FileMaker Pro immediately becomes unavailable. The
database administrator doesn’t have the capability to alert ODBC and JDBC client applications
about the data source’s availability (the administrator can communicate only with FileMaker
database file clients). No errors are reported, and the client application should notify users that the
data source is not available and transactions cannot be completed. If a client application attempts
to connect to an unavailable FileMaker database file, a message explains that the connection
failed.
This FileMaker product Allows
FileMaker Server
Advanced
Up to 50 connections and supports local access (same computer) and remote access
(both for middleware such as web servers, and for remote client access from desktop
productivity applications).
FileMaker Pro Up to nine connections and supports local access (same computer) only.
Chapter 1 | Introduction 9
Limitations with third-party tools
Microsoft Access: When using Microsoft Access to view data in a FileMaker data source, do not
use data from a summary field. The summary field’s data should not be edited in Microsoft Access,
and the data value that is displayed in Microsoft Access may not be accurate.
Networking requirements
You need a TCP/IP network when using FileMaker Server Advanced to host a FileMaker database
file as a data source over a network. FileMaker Pro supports local access (same computer) only.
Updating files from previous versions
Installing current drivers
If you installed a driver from prior versions of FileMaker Pro or FileMaker Server Advanced, you
must install the driver for version 12.
The driver for FileMaker version 12 is not compatible with earlier versions of FileMaker Pro or
FileMaker Server Advanced.
For more information on installing drivers, see chapter 3, “Installing FileMaker ODBC
client drivers” and chapter 5, “Installing FileMaker JDBC client drivers.”
Note You have to create a Data Source Name (DSN) for each FileMaker database file you want
to access as a data source. If you have previously set up access through one DSN that allows
tables to be spread among several FileMaker database files, you’ll need to consolidate those
tables into a single database file (or create several DSNs).

Chapter 2
Accessing external SQL data sources
As an ODBC client application, FileMaker software can access data in external SQL data sources.
FileMaker software connects to the external SQL data source using the client driver for the ODBC
data source, and either imports ODBC data or works with ODBC tables in the relationships graph.
Whether you are importing ODBC data or working with ODBC tables in the relationships graph,
you must configure a driver for the ODBC data source you’re using. For example, to access
records from an Oracle database, you configure an Oracle client driver.
Importing ODBC data
When you import ODBC data, you need an ODBC client driver for the external SQL data source
configured on the client machine.
After configuring an ODBC client driver, you can interact with records, import records into an
existing FileMaker Pro database file, or create a new FileMaker Pro database file from an ODBC
data source (such as Oracle or Microsoft Access databases).
First, you access the data source you want to import from. Then you construct a query for the
records you want to import from the data source. Finally, if you’re importing data into an existing
file, you map fields from your data source to fields in your FileMaker Pro database file.
You can access your ODBC data source through the File menu, with the Import Records script
step, with the Execute SQL script step, or with the ExecuteSQL function.
To import ODBC data, follow this general process:
1Install and configure specific ODBC drivers for the external data sources you want to access.
1On the computer that hosts the current FileMaker Pro file, define a system Data Source Name
(DSN) for each ODBC data source you want to access.
1Determine any additional considerations for the ODBC data sources you want to access (for
example, whether users are prompted for a user name and password).
Driver
Manager
FileMaker
Pro
Client
Driver SQL Data
Source
Chapter 2 | Accessing external SQL data sources 11
1In FileMaker Pro, do one of the following:
1To import into an existing FileMaker Pro file, choose File menu > Import Records > ODBC
Data Source.
1To create a FileMaker Pro file from the data source records, choose File menu > Open. In
the Open dialog box, choose ODBC Data Source for Files of type (Windows) or Show
(Mac OS).
Choose your data source, enter the user name and password (if any), and click OK to open the
FileMaker Pro SQL Query builder dialog box.
Using the FileMaker Pro SQL Query builder dialog box, you can construct a query. Select the
table from which you want to import, and then select specific columns you want to use in your
SQL query. Use the WHERE tab to construct search criteria and the ORDER BY tab to specify
a sort order.
You can also type an SQL statement directly into the SQL Query builder dialog box.
You can execute the query immediately, or you can use the Import Records script step, the
Execute SQL script step, or the ExecuteSQL function to execute a query as part of a FileMaker
script.
Note ODBC import, the Execute SQL script step, and external SQL data sources are not
supported in runtime solutions created with FileMaker Pro Advanced.
See FileMaker Pro Help for more information on importing data, using the SQL Query builder
dialog box, and creating FileMaker scripts.
Executing SQL to interact with data sources via ODBC
In addition to importing data into a FileMaker Pro database file via ODBC, you can also interact
with data sources using SQL statements through the Execute SQL script step and the
ExecuteSQL function. You can use any SQL statement supported by the data source, such as
INSERT, UPDATE, and DELETE.
You can also use SQL statements that go beyond simply importing data into a FileMaker Pro
database file. For example, you could execute SQL statements that add records to a database
table in SQL Server, using information from a FileMaker Pro database file.
See FileMaker Pro Help for more information on creating FileMaker scripts that use the Execute
SQL script step and the ExecuteSQL function.
Working with ODBC tables in the relationships graph
When you add an ODBC table to the relationships graph, you can connect to and work with data
in external SQL data sources in much the same way that you work with data in the current, active
FileMaker database file.
Chapter 2 | Accessing external SQL data sources 12
When you use FileMaker Pro or FileMaker Server as the host for a solution that includes ODBC
tables in the relationships graph, you configure the ODBC client driver for the external SQL data
source on the host machine.
Data sources supported in FileMaker 12
As an ODBC client application, FileMaker supports the following external SQL data sources as
ODBC tables in the relationships graph:
1Oracle 10g
1Oracle 11g
1SQL Server 2005
1SQL Server 2008
1MySQL 5.1 Community Edition (free)
For information on supported client drivers, see http://www.filemaker.com/support/technologies.
Adding ODBC tables to the relationships graph
To set up a FileMaker Pro database to access data in supported ODBC data sources:
1Install and configure specific ODBC drivers for the external data sources you want to access.
1On the computer that hosts the current FileMaker Pro file, define a system Data Source Name
(DSN) for each ODBC data source you want to access.
1Determine any additional considerations for ODBC data sources you want to access (for
example, whether users are prompted for a user name and password).
1Add one or more tables from the ODBC data source to the relationships graph in the current
FileMaker Pro file.
1Add fields to layouts in the FileMaker Pro file to display external data.
1Optionally, add supplemental fields to external tables and layouts to display calculation and
summary results based on data stored in external ODBC data sources.
See FileMaker Pro Help for detailed steps and additional information on configuring an ODBC
client driver, connecting to ODBC data sources, editing ODBC data sources, and setting up an
ODBC table in the relationships graph.
Driver
Manager
FileMaker
Pro user
Client
Driver SQL Data
Source
FileMaker
Pro user
FileMaker
Pro user
FileMaker Pro
or
FileMaker
Server host
machine
Chapter 3
Installing FileMaker ODBC client drivers
These instructions help you install the ODBC client driver needed to access FileMaker as a data
source from third-party and custom applications via ODBC (Open Database Connectivity). The
ODBC client driver is available through a separate installation on your FileMaker installation disk
or electronic download in the xDBC folder.
The latest versions of the client drivers are also available in the FileMaker Knowledge Base:
http://help.filemaker.com/
Additional information about client drivers is available from this URL:
http://www.filemaker.com/support/technologies
If you’ll be hosting a FileMaker database file using FileMaker Server Advanced, make the client
drivers available to remote users.
After installing the client driver you need, you can configure the driver to access a FileMaker data
source and construct SQL (Structured Query Language) queries to interact with the data.
Hardware and software requirements
To install and use the ODBC client drivers, you need the following minimum equipment and software:
ODBC client driver requirements (Windows)
1Pentium III 700MHz or higher
1256 MB RAM minimum, 2 GB RAM recommended, for Windows XP; 1 GB RAM minimum for
Windows Vista, Windows 7, and Windows Server 2008 R2
1Microsoft Data Access Components (MDAC) 2.8 SP1; Windows MDAC 6.0 for Vista. The
MDAC component is usually installed with Windows on the supported Windows platforms.
ODBC client driver requirements (Mac OS)
1Mac OS computer with an Intel processor
11 GB RAM minimum; 2 GB RAM recommended
1Mac OS X version 10.6 (the software may also work with later versions certified by FileMaker)
Networking requirements
If you’ll be accessing a FileMaker data source hosted on another computer, you’ll need network
access via TCP/IP.
ODBC client driver architecture overview
FileMaker provides 32- and 64-bit client drivers for both Windows and Mac OS, to support 32- and
64-bit ODBC applications.
Chapter 3 | Installing FileMaker ODBC client drivers 14
FileMaker Pro always uses a 32-bit xDBC Listener. FileMaker Server Advanced uses a 32-bit
xDBC Listener on a 32-bit operating system, and a 64-bit xDBC Listener on a 64-bit operating
system. But both the 32- and 64-bit xDBC Listeners can communicate with the 32- and 64-bit
client drivers.
You must install the client driver that matches your ODBC application. If your ODBC application is
a 32-bit application, then install the 32-bit client driver. If your ODBC application is a 64-bit
application, then install the 64-bit client driver.
ODBC client driver installation (Windows)
Windows 32-bit and 64-bit client drivers are installed as separate libraries. On a 32-bit Windows
operating system, you can install the 32-bit client driver only. On a 64-bit Windows operating
system, both the 32-bit and 64-bit client drivers can be installed.
To install the ODBC client driver:
1. Do one of the following:
1If you received your software electronically, double-click the installation icon (.exe file).
1If you have an installation disk, insert the disk into the drive.
2. In the FileMaker Pro or FileMaker Server window, double-click the xDBC folder.
3. In the xDBC folder, double-click the ODBC Client Driver Installer folder.
4. In the ODBC Client Driver Installer folder, double-click the installer file for the driver you want
to install.
1To install the 32-bit client driver (fmodbc32.dll), use the 32-bit installer file:
FMODBC_Installer_Win32.msi
1To install the 64-bit client driver (fmodbc64.dll), use the 64-bit installer file:
FMODBC_Installer_Win64.msi
The FileMaker ODBC Driver Setup Wizard opens.
5. Install the ODBC client driver by following the on-screen instructions.
6. When the installation is complete, click Close.
By default, the ODBC client driver will be installed in this folder:
1On a 32-bit Windows operating system, the 32-bit client driver (fmodbc32.dll) is installed in
this folder: c:\windows\system32
1On a 64-bit Windows operating system, the 32-bit client driver (fmodbc32.dll) is installed in
this folder: c:\windows\SysWoW64
1On a 64-bit Windows operating system, the 64-bit client driver (fmodbc64.dll) is installed in
this folder: c:\windows\system32
The ODBC client driver, FileMaker ODBC, is now available for you to configure for accessing
a FileMaker data source.
Chapter 3 | Installing FileMaker ODBC client drivers 15
Configuring client drivers (Windows)
Before using an ODBC client application to access a FileMaker data source, you must configure
a client driver for the data source. Configuration settings identify the client driver you’re using, the
location of the data source, and details on how you intend to connect.
Important When using a FileMaker client driver, you must reserve 2399 as the port.
Opening the ODBC administrator (Windows)
To configure the 32-bit client driver, you must use the 32-bit ODBC administrator. To configure the
64-bit client driver, you must use the 64-bit ODBC administrator.
To open the 32-bit ODBC administrator on a 32-bit Windows operating system:
In the Windows Control Panel, open Administrative Tools > Data Sources (ODBC).
1In Windows XP, Administrative Tools appear in the Performance and Maintenance
category.
1In Windows Vista and Windows 7, Administrative Tools appear in the System and Security
category.
The 32-bit ODBC Data Source Administrator opens.
To open the 32-bit ODBC client driver on a 64-bit Windows operating system:
1. Open the SysWoW64 folder on your system. (By default, the SysWoW64 folder is at
c:\windows\SysWoW64.)
2. Double-click the odbcad32.exe file.
The 32-bit ODBC Data Source Administrator opens.
To open the 64-bit ODBC client driver on a 64-bit Windows operating system:
In the Windows Control Panel, open Administrative Tools > Data Sources (ODBC).
1In Windows XP, Administrative Tools appear in the Performance and Maintenance
category.
1In Windows Vista and Windows 7, Administrative Tools appear in the System and Security
category.
The 64-bit ODBC Data Source Administrator opens.
Configuring the DSN (Windows)
To configure the ODBC client driver:
1. In the ODBC Data Source Administrator, select the System DSN or User DSN tab
2. Click Add.
The Create New Data Source dialog box opens.
3. Select FileMaker ODBC, and click Finish.
The FileMaker DSN Configuration dialog box opens.
Chapter 3 | Installing FileMaker ODBC client drivers 16
4. Click Next.
5. For Name, enter a name that will be meaningful to others accessing the FileMaker data source.
For Description, enter an optional description of the FileMaker data source. Click Next.
6. For Host:
1If you’re connecting to a database file hosted by FileMaker Pro on your local machine, enter
localhost or the IP address 127.0.0.1.
1If you’re connecting to a database file hosted by FileMaker Server Advanced over a network,
enter the IP address of the FileMaker Server.
If you have enabled sharing via ODBC/JDBC in the host application, you can select Connect
to host to obtain the names of available databases. Click Next.
Otherwise, click Finish to save your data source information.
7. For Database, select a database from the list of available databases, or type the filename of
the FileMaker database file you’re using as a data source.
Note For database files hosted by FileMaker Server Advanced, the list of databases may be
filtered based on the File Display Filter setting. See FileMaker Server Help for information.
If you need special handling of non-English text, click Advanced Language. The Advanced
Language Options dialog box opens.
1To auto-detect language settings, select the Auto-detect language settings for
application option.
1To specify the language setting, clear the Auto-detect language settings for application
option and select the system setting you want to use.
Select the Describe text fields as long varchar option to correct issues with long field values,
such as fields that do not have a maximum length specified getting used for Microsoft Word Mail
Merge import, or field values in PHP applications that are longer than 255 characters. If you do
not use this option for field values longer than 255 characters, then your application may
retrieve an empty string (Windows) or only 255 characters (Mac OS).
If you want to create a log file for long-running queries, select the Save long-running queries
to a log file option, and enter the name for the log file.
Click Finish to save your data source information.
8. Review the information about your FileMaker DSN.
1Click Test to verify that you have correctly configured the ODBC client driver to access the
FileMaker data source. If you receive an error message, you can correct the connection
information. You may also need to check that the FileMaker database file is hosted and
available, that the FileMaker account specified uses a privilege set with the extended
privilege Access via ODBC/JDBC, and that host application (FileMaker Pro or FileMaker
Server Advanced) has been set up for sharing via ODBC/JDBC.
1Click Done to save your data source information.
Chapter 3 | Installing FileMaker ODBC client drivers 17
ODBC client driver installation (Mac OS)
Mac OS 32-bit and 64-bit client drivers are installed as a single bundle (FileMaker ODBC.bundle)
in the /Library/ODBC folder. The ODBC client application loads the correct driver automatically.
To install the ODBC client driver:
1. Do one of the following:
1If you received your software electronically, double-click the disk image icon (.dmg file).
1If you have an installation disk, insert the disk into the drive.
2. In the FileMaker Pro or FileMaker Server window, double-click the xDBC folder.
3. In the xDBC folder, double-click the ODBC Client Driver Installer folder.
4. In the ODBC Client Driver Installer folder, double-click FileMaker ODBC.mpkg.
The FileMaker ODBC Driver Installer opens.
5. Install the ODBC client driver by following the on-screen instructions.
6. When the installation is complete, click Close.
The ODBC client driver will be installed in this folder: /Library/ODBC
Note You cannot change the installation folder for the ODBC client driver.
The ODBC client driver, FileMaker ODBC, is now available for you to configure for accessing
a FileMaker data source.
Configuring client drivers (Mac OS)
Before using an ODBC client application to access a FileMaker data source, you must configure
a client driver for the data source. Configuration settings identify the client driver you’re using, the
location of the data source, and details on how you intend to connect.
These instructions assume you have installed the ODBC Manager from Actual Technologies,
available at http://www.odbcmanager.net, which is a freeware product not supported by FileMaker.
You may also use Apple’s ODBC Administrator Tool for Mac OS X. For Mac OS X version 10.6,
ODBC Administrator is available at
http://support.apple.com/downloads/ODBC_Administrator_Tool_for_Mac_OS_X.
Because there is only one installed bundle for both 32- and 64-bit client drivers, you can use the
same ODBC administrator for both 32- and 64-bit ODBC applications. The FileMaker DSN that
you configure can be used for both 32- and 64-bit ODBC applications.
Important When using a FileMaker client driver, you must reserve 2399 as the port.
To configure the ODBC client driver:
1. Launch the ODBC Manager utility. (The ODBC Manager is installed in the Utilities folder in the
Applications folder.)
2. Select the System DSN or User DSN tab, and click Add.
The Choose a driver dialog box opens.
Chapter 3 | Installing FileMaker ODBC client drivers 18
3. Select FileMaker ODBC, and click OK.
The FileMaker DSN Configuration dialog box opens.
4. Click Continue.
5. For Name, enter a name that will be meaningful to others accessing the FileMaker data source.
For Description, enter an optional description of the FileMaker data source. Click Continue.
6. For Host:
1If you’re connecting to a database file hosted by FileMaker Pro on your local machine, enter
localhost or the IP address 127.0.0.1.
1If you’re connecting to a database file hosted by FileMaker Server Advanced over a network,
enter the IP address of the FileMaker Server.
If you have enabled sharing via ODBC/JDBC in the host application, you can select Connect
to host to obtain the names of available databases. Click Continue.
Otherwise, click Finish to save your data source information.
7. For Database, select a database from the list of available databases, or type the filename of
the FileMaker database file you’re using as a data source.
Note For database files hosted by FileMaker Server Advanced, the list of databases may be
filtered based on the File Display Filter setting. See FileMaker Server Help for information.
If you need special handling of non-English text, click Advanced Language. The Advanced
Language Options dialog box opens.
1To auto-detect language settings, select the Auto-detect language settings for
application option.
1To specify the language setting, clear the Auto-detect language settings for application
option and select the system setting you want to use.
Select the Describe text fields as long varchar option to correct issues with long field values,
such as fields that do not have a maximum length specified getting used for Microsoft Word Mail
Merge import, or field values in PHP applications that are longer than 255 characters.
If you want to create a log file for long-running queries, select the Save long-running queries
to a log file option, and enter the name for the log file.
Click Finish to save your data source information.
8. Review the information about your FileMaker DSN.
1Click Test to verify that you have correctly configured the ODBC client driver to access the
FileMaker data source. If you receive an error message, you can correct the connection
information. You may also need to check that the FileMaker database file is hosted and
available, that the FileMaker account specified uses a privilege set with the extended
privilege Access via ODBC/JDBC, and that host application (FileMaker Pro or FileMaker
Server Advanced) has been set up for sharing via ODBC/JDBC.
1Click Done to save your data source information.
Chapter 3 | Installing FileMaker ODBC client drivers 19
Where to go from here
After you install and configure a client driver, you can construct and execute SQL queries to
access a FileMaker data source.
Client applications sometimes use different terminology for accessing a data source via ODBC.
Many applications have menu items with names such as Get external data or SQL query. Review
the documentation or Help that comes with your application for details.
For more information on using FileMaker as an ODBC data source, see chapter 4, “Using ODBC
to share FileMaker data.”
Chapter 4
Using ODBC to share FileMaker data
Use the ODBC client driver to connect to a FileMaker data source from another application. The
application that uses the ODBC client driver can directly access the data in a FileMaker database file.
The FileMaker ODBC client driver is FileMaker ODBC.
Note You can also use FileMaker Pro as an ODBC client application, interacting with records
from another data source via ODBC using SQL. See chapter 2, “Accessing external SQL data
sources,” for details about accessing an external SQL data source via ODBC.
About ODBC
ODBC is an API that enables applications to access data from many database management
systems. ODBC gives client applications a common language for interacting with data sources
and database services.
All applications that support ODBC recognize a basic subset of SQL (Structured Query Language)
statements. SQL lets you use other applications (such as spreadsheets, word processors, and
reporting tools) to view, analyze, and modify FileMaker data. See chapter 7, “Supported standards,”
for the SQL statements, functions, and expressions that the ODBC client driver supports.
Your application can talk directly to a FileMaker database file by using the ODBC client driver. Your
SQL statements are delivered to the FileMaker host of the database file and the results of those
statements are sent back to you. If you use FileMaker Server Advanced to host a FileMaker
database file as a data source, the database file can be located on another machine (the server
machine) connected to the network, while your client application is located on your machine (the
client machine). This is referred to as a client/server configuration.
Driver
Manager
Client
Application
Oracle
ODBC Driver
FileMaker
ODBC Client
Driver
SQL Server
ODBC Driver
Microsoft
SQL Server FileMakerOracle
Chapter 4 | Using ODBC to share FileMaker data 21
Using the ODBC client driver
You can use the ODBC client driver with any ODBC-compliant application. Sharing your FileMaker
database file as a data source, you can:
1perform mail merges with Microsoft Word
1create charts with Microsoft Excel
1move FileMaker data to a DBMS like Microsoft SQL Server
1further analyze your FileMaker data with query or reporting tools to create charts, construct ad-
hoc queries, and perform drill-down analysis
1create a Microsoft Visual Basic application that shares information with FileMaker Pro
To share a FileMaker database file as a data source, use FileMaker Pro to define accounts that
need access to the database file. Then, control access to the database file by assigning privilege
sets to the accounts, including the extended privilege of access via ODBC/JDBC. Finally, enable
the FileMaker Server Advanced or FileMaker Pro host application to share data via ODBC/JDBC.
For details, see FileMaker Pro or FileMaker Server Help.
Important Prior versions of the FileMaker ODBC client driver are not compatible with FileMaker
version 12. To connect to a FileMaker version 12 database file, you need to install and configure
the new ODBC client driver.
Note To confirm that the FileMaker xDBC Listener is currently running, you can use the Activity
Monitor on Mac OS or the Task Manager on Windows to check the status of the FileMaker xDBC
Listener process. When the process is started, it is named fmxdbc_listener, and events are logged
by that name. The FileMaker xDBC Listener process is separate from the FileMaker Server process.
Overview of accessing a FileMaker database file
From an ODBC-compliant application, you can construct SQL queries to access a FileMaker
database file. The ODBC client driver must be installed on the computer generating the SQL query.
To access a FileMaker database file:
1. In FileMaker Pro, review the privilege sets you’ve assigned to accounts that will access the
database file.
Accounts that need access must use a privilege set with the extended privilege of Access via
ODBC/JDBC.
2. Enable the FileMaker Server Advanced (via FileMaker Server Admin Console) or
FileMaker Pro host application to share data via ODBC/JDBC.
FileMaker Server Admin Console: Click ODBC/JDBC then select Enable ODBC/JDBC.
FileMaker Pro: Choose File menu > Sharing > ODBC/JDBC and set ODBC/JDBC Sharing to
On.
3. Make sure the FileMaker database file you want to access is hosted and available.
If your FileMaker database solution uses more than one FileMaker database file, all of the
database files must be on the same computer.
4. Connect to the FileMaker data source.
Chapter 4 | Using ODBC to share FileMaker data 22
5. Construct and execute an SQL query in the client application.
Each FileMaker database file that is open and set up for access is a separate data source (you
create a DSN for each FileMaker database file you want to access as a data source).
Each database can have one or more tables. FileMaker fields are represented as columns. The
complete field name, including any non-alphanumeric characters, displays as the column name.
Accessing a FileMaker database file from a Windows application
Specifying ODBC client driver properties for a FileMaker DSN (Windows)
Create a DSN for each FileMaker database file you want to access as a data source. The DSN
identifies the FileMaker ODBC client driver, the location of the FileMaker host application, and the
FileMaker database file you’re accessing as a data source.
To configure a new ODBC client driver, see “Configuring client drivers (Windows)” on page 15.
Changing an existing ODBC client driver (Windows)
To change an existing ODBC client driver, open the correct version of the ODBC administrator.
To configure the 32-bit client driver, you must use the 32-bit ODBC administrator. To configure the
64-bit client driver, you must use the 64-bit ODBC administrator.
To open the 32-bit ODBC administrator on a 32-bit Windows operating system:
In the Windows Control Panel, open Administrative Tools > Data Sources (ODBC).
1In Windows XP, Administrative Tools appear in the Performance and Maintenance
category.
1In Windows Vista and Windows 7, Administrative Tools appear in the System and Security
category.
The 32-bit ODBC Data Source Administrator opens.
To open the 32-bit ODBC client driver on a 64-bit Windows operating system:
1. Open the SysWoW64 folder on your system. (By default, the SysWoW64 folder is at
c:\windows\SysWoW64.)
2. Double-click the odbcad32.exe file.
The 32-bit ODBC Data Source Administrator opens.
To open the 64-bit ODBC client driver on a 64-bit Windows operating system:
In the Windows Control Panel, open Administrative Tools > Data Sources (ODBC).
1In Windows XP, Administrative Tools appear in the Performance and Maintenance
category.
1In Windows Vista and Windows 7, Administrative Tools appear in the System and Security
category.
The 64-bit ODBC Data Source Administrator opens.
Chapter 4 | Using ODBC to share FileMaker data 23
To change the existing ODBC client driver:
1. In the ODBC Data Source Administrator, select the System DSN or User DSN tab (select the
tab used when you previously configured).
2. Choose the FileMaker data source that you previously configured.
The data source name you originally entered appears under Name, and FileMaker ODBC
appears as the Driver.
3. Click Configure.
The FileMaker DSN Configuration dialog box appears.
4. For Name, enter a name that will be meaningful to others accessing the FileMaker data source.
For Description, enter an optional description of the FileMaker data source. Click Next.
5. For Host, enter the location of your data source.
If you’re connecting to a FileMaker database file hosted by FileMaker Pro on your local
machine, type 127.0.0.1 (or localhost).
If you’re connecting to a FileMaker database file hosted by FileMaker Server Advanced over a
network, type the IP address of FileMaker Server.
If you’ve enabled sharing via ODBC/JDBC in the host application, select Connect to host to
obtain the names of available databases.
6. For Database, select a database from the list of available databases, or type the filename of
the FileMaker database file you’re using as a data source.
Note For database files hosted by FileMaker Server Advanced, the list of databases may be
filtered based on the File Display Filter setting. See FileMaker Server Help for information.
If you need special handling of non-English text, click Advanced Language. The Advanced
Language Options dialog box opens.
1To auto-detect language settings, select the Auto-detect language settings for
application option.
1To specify the language setting, clear the Auto-detect language settings for application
option and select the system setting you want to use.
Select the Describe text fields as long varchar option to correct issues with long field values,
such as fields that do not have a maximum length specified getting used for Microsoft Word Mail
Merge import, or field values in PHP applications that are longer than 255 characters.
If you want to create a log file for long-running queries, select the Save long-running queries
to a log file option, and enter the name for the log file.
7. Click Finish to save your data source information.
8. Click Done to close the FileMaker DSN Configuration dialog box.
Chapter 4 | Using ODBC to share FileMaker data 24
Verifying access via ODBC (Windows)
To verify that you’ve correctly configured the ODBC client driver to access the FileMaker data source:
1. In the Windows Control Panel, open Administrative Tools > Data Sources (ODBC).
1In Windows XP, Administrative Tools appear in the Performance and Maintenance
category.
1In Windows Vista and Windows 7, Administrative Tools appear in the System and Security
category.
The ODBC Data Source Administrator opens.
2. Select the System DSN or User DSN tab (select the tab used when you previously configured).
3. Choose the FileMaker data source that you previously configured.
The data source name you originally entered appears under Name, and FileMaker ODBC
appears as the Driver.
4. Click Configure.
The FileMaker DSN Configuration dialog box appears.
5. Click Next until you reach the Conclusion page.
6. Click Test.
You are prompted to enter your FileMaker account name (in Database User Name) and
password (in Database Password).
If the connection is OK, you receive the message Test completed successfully.
If the connection fails:
1Make sure the FileMaker database file is hosted and available.
1Update or correct your connection information.
1Make sure your FileMaker account uses a privilege set with the extended privilege of Access
via ODBC/JDBC.
1Verify that the FileMaker Pro or FileMaker Server host application has been set up for sharing
via ODBC/JDBC.
Accessing a FileMaker database file from a Mac OS application
Specifying ODBC client driver properties for a FileMaker DSN (Mac OS)
Create a DSN for each FileMaker database file you want to access as a data source. The DSN
identifies the FileMaker ODBC client driver, the location of the FileMaker host application, and the
FileMaker database file you’re accessing as a data source.
To configure a new ODBC client driver, see “Configuring client drivers (Mac OS)” on page 17.
Changing an existing ODBC client driver (Mac OS)
These instructions assume you have installed the ODBC Manager from Actual Technologies,
available at http://www.odbcmanager.net, which is a freeware product not supported by FileMaker.
Chapter 4 | Using ODBC to share FileMaker data 25
You may also use Apple’s ODBC Administrator Tool for Mac OS X. For Mac OS X version 10.6,
ODBC Administrator is available at
http://support.apple.com/downloads/ODBC_Administrator_Tool_for_Mac_OS_X.
Because there is only one installed bundle for both 32- and 64-bit client drivers, you can use the
same ODBC administrator for both 32- and 64-bit ODBC applications. The FileMaker DSN that
you configure can be used for both 32- and 64-bit ODBC applications.
To change an existing ODBC client driver:
1. Launch the ODBC Manager utility. (The ODBC Manager is installed in the Utilities folder in the
Applications folder.)
2. Click the System DSN or User DSN tab.
3. Choose the FileMaker data source that you previously configured.
The data source name you originally entered appears under Name, and FileMaker ODBC
appears as the Driver.
4. Click Configure.
The FileMaker DSN Configuration dialog box opens.
5. Click Continue.
6. For Name, type a name that will be meaningful to others accessing the FileMaker data source.
An additional Description is optional.
7. For Host, enter the location of your data source.
If you’re connecting to a FileMaker database file hosted by FileMaker Pro on your local
machine, type 127.0.0.1 (or localhost).
If you’re connecting to a FileMaker database file hosted by FileMaker Server Advanced over a
network, type the IP address of FileMaker Server.
If you’ve enabled sharing via ODBC/JDBC in the host application, select Connect to host to
obtain the names of available databases.
8. For Database, select a database from the list of available databases, or type the filename of
the FileMaker database file you’re using as a data source.
Note For database files hosted by FileMaker Server Advanced, the list of databases may be
filtered based on the File Display Filter setting. See FileMaker Server Help for information.
If you need special handling of non-English text, click Advanced Language. The Advanced
Language Options dialog box opens.
1To auto-detect language settings, select the Auto-detect language settings for
application option.
1To specify the language setting, clear the Auto-detect language settings for application
option and select the system setting you want to use.
Chapter 4 | Using ODBC to share FileMaker data 26
Select the Describe text fields as long varchar option to correct issues with long field values,
such as fields that do not have a maximum length specified getting used for Microsoft Word Mail
Merge import, or field values in PHP applications that are longer than 255 characters.
If you want to create a log file for long-running queries, select the Save long-running queries
to a log file option, and enter the name for the log file.
9. Click Finish to save your data source information.
10. Click Done to close the FileMaker DSN Configuration dialog box.
Verifying access via ODBC (Mac OS)
To verify that you’ve correctly configured the ODBC client driver to access the FileMaker data source:
1. Launch the ODBC Manager utility. (The ODBC Manager is located in the Utilities folder in the
Applications folder.)
2. Select the System DSN or User DSN tab (select the tab used when you previously configured).
3. Choose the FileMaker data source that you previously configured.
The data source name you originally entered appears under Name, and FileMaker ODBC
appears as the Driver.
4. Click Configure.
The FileMaker DSN Configuration dialog box opens.
5. Click Continue until you recheck the Conclusion page.
6. Click Test.
You are prompted to enter your FileMaker account name (in Database User Name) and
password (in Database Password).
If the connection is OK, you receive the message Test completed successfully.
If the connection fails:
1Make sure the FileMaker database file is hosted and available.
1Update or correct your connection information.
1Make sure your FileMaker account uses a privilege set with the extended privilege of Access
via ODBC/JDBC.
1Verify that the FileMaker Pro or FileMaker Server host application has been set up for sharing
via ODBC/JDBC.
Chapter 5
Installing FileMaker JDBC client drivers
These instructions help you install the client driver needed to access FileMaker as a data source
from third-party and custom applications via JDBC (Java Database Connectivity). The client driver
is available on your FileMaker DVD or electronic download in the xDBC folder. The latest versions
of the client drivers are also available from http://www.filemaker.com/support/technologies
If you’ll be hosting a FileMaker database file using FileMaker Server Advanced, make the client
drivers available to remote users.
After installing the client driver you need, you can configure the driver to access a FileMaker data
source and construct SQL (Structured Query Language) queries to interact with the data.
The JDBC client driver is the driver portions of the FileMaker software that allow third-party
applications or custom applications to access FileMaker files as JDBC data sources.
Software requirements
To install and use the JDBC client drivers, you need JDK 1.4 or later.
To find which version of Java you’re running, open a command window (Windows) or Terminal
window (Mac OS) and type java -version.
Networking requirements
If you’ll be accessing a FileMaker data source hosted on another computer, you’ll need network
access via TCP/IP.
JDBC client driver installation
You must have write access to the folder where you’re installing the JDBC client driver.
To install the JDBC client driver:
1. Do one of the following:
1Windows: If you received your software electronically, double-click the installation icon (.exe file).
1Mac OS: If you received your software electronically, double-click the disk image icon (.dmg file).
1If you have an installation disk, insert the disk into the drive.
2. In the FileMaker Pro or FileMaker Server window, double-click the xDBC folder.
3. In the xDBC folder, double-click the JDBC Client Driver Installer folder.
4. Copy the fmjdbc.jar file to the appropriate folder for your operating system:
1Windows: Copy the fmjdbc.jar file to the folder that includes your Java executable file
(java.exe) or to another folder location included in the ClassPath of your Java application.
1Mac OS: Copy the fmjdbc.jar file to the /Library/Java/Extensions folder or to another
folder location included in the ClassPath of your Java application.
The JDBC client driver is now available for you to use to access a FileMaker data source.
Chapter 5 | Installing FileMaker JDBC client drivers 28
Using the JDBC client driver
Your Java application or applet must register the JDBC client driver with the JDBC driver manager,
and you must specify the correct JDBC URL from within the application or applet.
Important You must reserve the port 2399 for the FileMaker JDBC client driver. The port number
is always 2399. You can’t change the JDBC sharing to a different port.
For more information on using the JDBC client driver, see chapter 6, “Using JDBC to share
FileMaker data.”

Chapter 6
Using JDBC to share FileMaker data
If you’re a Java programmer, you can use the JDBC client driver with any Rapid Application
Development (RAD) tool to visually create a Java application or applet that connects to a
FileMaker data source. The Java application or applet that uses the JDBC client driver can directly
access the data in a FileMaker database file.
About JDBC
JDBC is a Java API for executing SQL statements, the standard language for accessing relational
databases. JDBC is a name and not an acronym — although it is thought of as standing for “Java
Database Connectivity” because it is the Java equivalent for ODBC. JDBC is a low-level interface,
which means that it is used to call SQL commands directly. It is also designed to be used as a
base for higher level interfaces and tools.
Your Java applet or application can talk directly to a FileMaker database file by using the JDBC
client driver. Your SQL statements are delivered to the FileMaker host of the database file and the
results of those statements are sent back to you. If you use FileMaker Server to host, the
FileMaker database file you’re using as a data source can be located on another machine (the
server machine) connected to the network, while your Java applet or client application is located
on your machine (the client machine). This is referred to as a client/server configuration.
Using the JDBC client driver
You can use the JDBC client driver with a Java compiler or RAD tool to connect with your database
while you build the code for your Java application or applet. After the Java application or applet
has been created, the JDBC client driver must be present with the files or included within the code
in order for the application or applet to communicate with the database.
To use the JDBC client driver, your Java application or applet must register the driver with the
JDBC driver manager and you must specify the correct JDBC URL from within the application or
applet. You need the JDBC URL to make the connection to the database.
About the JDBC client driver
The JDBC client driver provides partial support for the JDBC 3.0 specification. The following
features are not supported by FileMaker:
1Savepoint support
1Retrieval of auto-generated keys
1Passing parameters to a callable statement object by name
1Holdable cursor support
FileMaker
JDBC driver
Java application
Client machine Database server
Chapter 6 | Using JDBC to share FileMaker data 30
1Retrieving and updating the object referenced by a Ref object
1Updating of columns containing CLOB, ARRAY and REF data types
1Boolean data type
1DATALINK data type
1Transform groups and type mapping
1Relationship between the JDBC SPI and the Connector architecture
For additional details, see http://www.filemaker.com/support/technologies.
The JDBC client driver has been tested against the Java Development Kit (JDK) 1.5 (Mac OS)
and 1.6 (Windows). It is a Type 4 driver — a native protocol, pure Java driver that converts JDBC
calls directly into the network protocol used by FileMaker. This type of driver offers all the
advantages of Java including automatic installation (for example, downloading the JDBC driver
with an applet that uses it).
The driver class and main entry point for the driver is named:
com.filemaker.jdbc.Driver
Important The JDBC client driver replaces the FileMaker JDBC driver released with a previous
version of FileMaker. If you have previously set up access to a FileMaker data source using the
older driver, you’ll need to re-define access by using and configuring the new driver.
Note To confirm that the FileMaker xDBC Listener is currently running, you can use the Activity
Monitor on Mac OS or the Task Manager on Windows to check the status of the FileMaker xDBC
Listener process. When the process is started, it is named fmxdbc_listener, and events are logged
by that name. The FileMaker xDBC Listener process is separate from the FileMaker Server
process.
Using a JDBC URL to connect to your database
In Java, most resources are accessed through URLs (Uniform Resource Locators). A JDBC URL
is used to identify the database so the JDBC client driver can recognize and establish a connection
with the database.
The JDBC URL consists of three main parts separated by colons:
jdbc:<subprotocol>:<subname>
The first part in the JDBC URL is always the JDBC protocol (“jdbc”). The subprotocol is the driver
name or the mechanism that supports multiple drivers. For the JDBC client driver, the subprotocol is
filemaker. The subname is the IP address of the machine that is hosting the FileMaker data source.
Registering the JDBC client driver and connecting to a FileMaker data source (an example)
Here is a snippet of a JDBC client application that:
1. Registers the JDBC client driver with the JDBC driver manager.
2. Establishes a connection with the FileMaker data source. The JDBC URL is
jdbc:filemaker://192.168.1.1/database
Chapter 6 | Using JDBC to share FileMaker data 31
3. Returns error codes.
import java.sql.*;
class FMPJDBCTest
{
public static void main(String[ ] args)
{
// register the JDBC client driver
try {
Driver d =
(Driver)Class.forName("com.filemaker.jdbc.Driver").newInstance();
} catch(Exception e) {
System.out.println(e);
}
// establish a connection to FileMaker
Connection con;
try {
con =
DriverManager.getConnection(“jdbc:filemaker://192.168.1.1/mydataba
se”,”username”, “password”);
} catch(Exception e) {
System.out.println(e);
}
// get connection warnings
SQLWarning warning = null;
try {
warning = con.getWarnings();
if (warning == null) {
System.out.println("No warnings");
return;
}
while (warning != null) {
System.out.println("Warning: "+warning);
warning = warning.getNextWarning();
}
} catch (Exception e) {
Sysem.out.println(e);
}
}
}þ
Note This example is not meant to be compiled.
Specifying driver properties in the URL subname
Specify the user and password driver properties in the subname of the JDBC URL. These are the
properties that could be passed to the connection when calling the DriverManager.getConnection
method via the Properties parameter.
Chapter 6 | Using JDBC to share FileMaker data 32
1user: an account in the FileMaker database file that uses a privilege set with the extended
privilege Access via ODBC/JDBC
1password: the password for the account in the FileMaker database file
JDBC URL connection with the database name specified in the URL
Format:
jdbc:filemaker://<filemaker host IP address>/<databasename>
Example:
jdbc:filemaker://192.168.1.1/publications
JDBC URL connection with the database name, user name, and password specified in the URL
Format:
jdbc:filemaker://<filemaker host IP
address>/<databasename>?user=<databaseusername>&password=<databasepassword>
Example:
jdbc:filemaker://192.168.1.1/customers?user=Collections&password=admin
Note Because of the use of the ampersand character (&) in this syntax, you cannot use an
ampersand character in the user name or the password.
Invalid user name example:
jdbc:filemaker://localhost/sales_db?user=ad&min&password=admin
Invalid password example:
jdbc:filemaker://localhost/sales_db?user=admin1&password=ad&min
Solutions with multiple FileMaker database files
If your FileMaker database solution uses many FileMaker database files, create an additional
database file that contains all the necessary external data source references, table occurrences,
and relationships for your solution. Then define this additional database file as your data source
in the JDBC URL. All of the FileMaker database files must be on the same computer.
Verifying access via JDBC
When verifying access to a FileMaker database file via JDBC, make sure:
1The FileMaker database file is hosted and available.
1Your FileMaker account uses a privilege set with the extended privilege of Access via
ODBC/JDBC.
Chapter 6 | Using JDBC to share FileMaker data 33
1The FileMaker Pro or FileMaker Server Advanced host application has been set up for sharing
via ODBC/JDBC.
To share a FileMaker database file as a data source, use FileMaker Pro to define accounts that
need access to the database file. Then, control access to the database file by assigning
privilege sets to the accounts, including the extended privilege of access via ODBC/JDBC.
Finally, enable the FileMaker Server Advanced or FileMaker Pro host application to share data
via ODBC/JDBC. For details, see FileMaker Pro Help.
1The JDBC client driver registration and the JDBC URL are correct (the driver can be included
inside the Java Application or located on the client machine).
For additional information on using JDBC to share FileMaker data, see
http://www.filemaker.com/support/technologies.
Chapter 7 | Supported standards 34
Chapter 7
Supported standards
This chapter describes the SQL statements and constructs supported by the FileMaker ODBC and
JDBC client drivers. Use the client drivers to access a FileMaker database solution from an
ODBC- or JDBC-compliant application. The FileMaker database solution can be hosted by either
FileMaker Pro or FileMaker Server Advanced.
The ODBC client driver supports ODBC 3.5 Level 1 with some features of Level 2. The JDBC
client driver provides partial support for the JDBC 3.0 specification. See
http://www.filemaker.com/support/technologies for more information. The ODBC and JDBC client
drivers support SQL-92 entry-level conformance, with some SQL-92 intermediate features.
Support for Unicode characters
The ODBC and JDBC client drivers support the Unicode API. However, if you’re creating a custom
application that uses the client drivers, use ASCII for field names, table names, and filenames (in
case a non-Unicode query tool or application is used).
Note To insert and retrieve Unicode data, use SQL_C_WCHAR.
SQL statements
The ODBC and JDBC client drivers provide support for the following SQL statements:
1SELECT (see below)
1DELETE (page 41)
1INSERT (page 41)
1UPDATE (page 42)
1CREATE TABLE (page 43)
1ALTER TABLE (page 44)
1CREATE INDEX (page 45)
1DROP INDEX (page 45)
The client drivers also support FileMaker data type mapping to ODBC SQL and JDBC SQL data
types. See “Mapping FileMaker fields to ODBC data types” on page 58 and “Mapping FileMaker
fields to JDBC data types” on page 58 for data type conversions. For more information on
constructing SQL queries, refer to a third-party book.
Note The ODBC and JDBC client drivers do not support FileMaker portals.
SELECT statement
Use the SELECT statement to specify which columns you're requesting. Follow the SELECT
statement with the column expressions (similar to field names) you want to retrieve (for example,
last_name). Expressions can include mathematical operations or string manipulation (for
example, SALARY * 1.05).

Chapter 7 | Supported standards 35
The SELECT statement can use a variety of clauses:
SELECT [DISTINCT] {* | column_expression [[AS] column_alias],...}
FROM table_name [table_alias], ...
[ WHERE expr1 rel_operator expr2 ]
[ GROUP BY {column_expression, ...} ]
[ HAVING expr1 rel_operator expr2 ]
[ UNION [ALL] (SELECT...) ]
[ ORDER BY {sort_expression [DESC | ASC]}, ... ]
[ FOR UPDATE [OF {column_expression, ...}] ]
Items in brackets are optional.
column_alias can be used to give the column a more descriptive name, or to abbreviate a longer
column name. For example, to assign the alias department to the column dept:
SELECT dept AS department FROM emp
Field names can be prefixed with the table name or the table alias. For example, EMP.LAST_NAME
or E.LAST_NAME, where E is the alias for the table EMP.
The DISTINCT operator can precede the first column expression. This operator eliminates
duplicate rows from the result of a query. For example:
SELECT DISTINCT dept FROM emp
SQL clauses
The ODBC and JDBC client drivers provide support for the following SQL clauses.
Note If you attempt to retrieve data from a table with no columns, the SELECT statement returns
nothing.
FROM clause
The FROM clause indicates the tables that are used in the SELECT statement. The format is:
FROM table_name [table_alias] [, table_name [table_alias]]
table_name is the name of a table in the current database.
table_alias can be used to give the table a more descriptive name, to abbreviate a longer table
name, or to include the same table in the query more than once (for example, in self-joins).
Use this SQL clause To
FROM (page 35)Indicate which tables are used in the SELECT statement.
WHERE (page 36)Specify the conditions that records must meet to be retrieved (like a FileMaker Pro find
request).
GROUP BY (page 37)Specify the names of one or more fields by which the returned values should be grouped.
This clause is used to return a set of aggregate values by returning one row for each group
(like a FileMaker Pro subsummary).
HAVING (page 37)Specify conditions for groups of records (for example, display only the departments that
have salaries totaling more than $200,000).
UNION (page 37)Combine the results of two or more SELECT statements into a single result.
ORDER BY (page 38)Indicate how the records are sorted
FOR UPDATE (page 38)To perform Positioned Updates or Positioned Deletes via SQL cursors
Chapter 7 | Supported standards 36
Field names can be prefixed with the table name or the table alias. For example, given the table
specification FROM employee E, you can refer to the LAST_NAME field as E.LAST_NAME. Table
aliases must be used if the SELECT statement joins a table to itself. For example:
SELECT * FROM employee E, employee F WHERE E.manager_id = F.employee_id
The equal sign (=) includes only matching rows in the results.
If you are joining more than one table, and you want to discard all rows that don’t have
corresponding rows in both source tables, you can use INNER JOIN. For example:
SELECT *
FROM Salespeople INNER JOIN Sales_Data
ON Salespeople.Salesperson_ID = Sales_Data.Salesperson_ID
If you are joining two tables, but you don’t want to discard rows of the first table (the “left” table),
you can use LEFT JOIN.
SELECT *
FROM Salespeople LEFT JOIN Sales Data
ON Salespeople.Salesperson ID = Sales Data.DepartmentID
Every row from the “Salespeople” table will appear in the joined table.
If you are joining two tables, but you don’t want to discard rows of the second table (the “right”
table), you can use RIGHT JOIN.
SELECT *
FROM Salespeople RIGHT JOIN Sales Data
ON Salespeople.Salesperson ID = Sales Data.DepartmentID
Every row from the “Sales Data” table will appear in the joined table.
Notes
1LEFT JOIN is supported, but the grammar LEFT OUTER JOIN is not currently supported.
1RIGHT JOIN is supported, but the grammar RIGHT OUTER JOIN is not currently supported.
1FULL OUTER JOIN is not currently supported.
WHERE clause
The WHERE clause specifies the conditions that records must meet to be retrieved. The WHERE
clause contains conditions in the form:
WHERE expr1 rel_operator expr2
expr1 and expr2 can be field names, constant values, or expressions.
rel_operator is the relational operator that links the two expressions. For example, the following
SELECT statement retrieves the names of employees who make $20,000 or more.
SELECT last_name,first_name FROM emp WHERE salary >= 20000
The WHERE clause can also use expressions such as these:
WHERE expr1 IS NULL
WHERE NOT expr2
Note If you use fully qualified names in the SELECT (projection) list, you must also use fully
qualified names in the related WHERE clause.
Chapter 7 | Supported standards 37
GROUP BY clause
The GROUP BY clause specifies the names of one or more fields by which the returned values
should be grouped. This clause is used to return a set of aggregate values. It has the following
format:
GROUP BY columns
columns must match the column expression used in the SELECT clause. A column expression can
be one or more field names of the database table separated by commas.
Example
The following example sums the salaries in each department.
SELECT dept_id, SUM (salary) FROM emp GROUP BY dept_id
This statement returns one row for each distinct department ID. Each row contains the department
ID and the sum of the salaries of the employees in the department.
HAVING clause
The HAVING clause enables you to specify conditions for groups of records (for example, display
only the departments that have salaries totaling more than $200,000). It has the following format:
HAVING expr1 rel_operator expr2
expr1 and expr2 can be field names, constant values, or expressions. These expressions do not
have to match a column expression in the SELECT clause.
rel_operator is the relational operator that links the two expressions.
Example
The following example returns only the departments whose sums of salaries are greater than
$200,000:
SELECT dept_id, SUM (salary) FROM emp
GROUP BY dept_id HAVING SUM (salary) > 200000
UNION operator
The UNION operator combines the results of two or more SELECT statements into a single result.
The single result is all of the returned records from the SELECT statements. By default, duplicate
records are not returned. To return duplicate records, use the ALL keyword (UNION ALL). The
format is:
SELECT statement UNION [ALL] SELECT statement
When using the UNION operator, the select lists for each SELECT statement must have the same
number of column expressions, with the same data types, and must be specified in the same
order. For example:
SELECT last_name, salary, hire_date FROM emp UNION SELECT name, pay,
birth_date FROM person
This example has the same number of column expressions, and each column expression, in
order, has the same data type.
Chapter 7 | Supported standards 38
The following example is not valid because the data types of the column expressions are different
(SALARY from EMP has a different data type than LAST_NAME from RAISES). This example has
the same number of column expressions in each SELECT statement, but the expressions are not
in the same order by data type.
SELECT last_name, salary FROM emp UNION SELECT salary, last_name FROM raises
ORDER BY clause
The ORDER BY clause indicates how the records are to be sorted. The format is:
ORDER BY {sort_expression [DESC | ASC]}, ...
sort_expression can be field names, expressions, or the positional number of the column
expression to use. The default is to perform an ascending (ASC) sort.
For example, to sort by last_name then by first_name, you could use either of the following
SELECT statements:
SELECT emp_id, last_name, first_name FROM emp ORDER BY last_name, first_name
or
SELECT emp_id, last_name, first_name FROM emp ORDER BY 2,3
In the second example, last_name is the second column expression following SELECT, so ORDER
BY 2 sorts by last_name.
FOR UPDATE clause
The FOR UPDATE clause locks records for Positioned Updates or Positioned Deletes via SQL
cursors. The format is:
FOR UPDATE [OF column_expressions]
column_expressions is a list of field names in the database table that you intend to update,
separated by a comma. column_expressions is optional, and is ignored.
Example
The following example returns all records in the employee database that have a SALARY field
value of more than $20,000. When each record is fetched, it is locked. If the record is updated or
deleted, the lock is held until you commit the change. Otherwise, the lock is released when you
fetch the next record.
SELECT * FROM emp WHERE salary > 20000
FOR UPDATE OF last_name, first_name, salary

Chapter 7 | Supported standards 39
Additional examples:
Notes from the examples
A column is a reference to a field in the FileMaker database file (the field can contain many distinct
values).
The asterisk (*) wildcard character is shorthand for “everything”. For the example SELECT * FROM
Salespeople, the result is all the columns in the Salespeople table. For the example SELECT
DISTINCT * FROM Salespeople, the result is all the unique rows in the Salespeople table (no
duplicates).
1FileMaker does not store data for empty strings, so the following queries always return no
records:
SELECT * FROM test WHERE c =’’
SELECT * FROM test WHERE c <>’’
1If you use SELECT with binary data, you must use the GetAs() function to specify the stream
to return. See the following section “Retrieving the contents of a container field: CAST() function
and GetAs() function,” for more information.
Retrieving the contents of a container field: CAST() function and GetAs() function
You can retrieve binary data, file reference information, or data of a specific file type from a
container field.
To retrieve binary data, use a standard SELECT statement. For example:
SELECT Company_Brochures FROM Sales_Data
Using Sample SQL
text constant SELECT 'CatDog' FROM Salespeople
numeric constant SELECT 999 FROM Salespeople
date constant SELECT DATE '2012-06-05' FROM Salespeople
time constant SELECT TIME '02:49:03' FROM Salespeople
timestamp constant SELECT TIMESTAMP '2012-06-05 02:49:03' FROM Salespeople
text column SELECT Company_Name FROM Sales_Data
SELECT DISTINCT Company_Name FROM Sales_Data
numeric column SELECT Amount FROM Sales_Data
SELECT DISTINCT Amount FROM Sales_Data
date column SELECT Date_Sold FROM Sales_Data
SELECT DISTINCT Date_Sold FROM Sales_Data
time column SELECT Time_Sold FROM Sales_Data
SELECT DISTINCT Time_Sold FROM Sales_Data
timestamp column SELECT Timestamp_Sold FROM Sales_Data
SELECT DISTINCT Timestamp_Sold FROM Sales_Data
BLOBa column
a. A BLOB is a FileMaker database file container field.
SELECT Company_Brochures FROM Sales_Data
SELECT GETAS(Company_Logo, 'JPEG') FROM Sales_Data
Wildcard * SELECT * FROM Salespeople
SELECT DISTINCT * FROM Salespeople

Chapter 7 | Supported standards 40
If file or JPEG data exists, the SELECT statement retrieves the data in binary form; otherwise, the
SELECT statement returns <null>.
To retrieve file reference information from a container field, such as the file path to a file, picture,
or Quicktime movie, use the CAST() function with a SELECT statement. For example:
SELECT CAST(Company_Brochures AS VARCHAR(NNN)) FROM Sales_Data
In this example, if you:
1Inserted a file into the container field using FileMaker Pro but stored only a reference to the file,
the SELECT statement retrieves the file reference information as type SQL_VARCHAR.
1Inserted the contents of a file into the container field using FileMaker Pro, the SELECT
statement retrieves the name of the file.
1Imported a file into the container field from another application, the SELECT statement displays
'?' (the file displays as Untitled.dat in FileMaker Pro).
To retrieve data from a container field, use the GetAs() function and specify the file’s type
depending on how the data was inserted into the container field in FileMaker Pro.
1If the data was inserted using the Insert > File command, specify 'FILE' in the GetAs()
function. For example:
SELECT GetAs(Company_Brochures, 'FILE') FROM Sales_Data
1If the data was inserted using the Insert > Sound command (Standard sound — Mac OS raw
format), specify 'snd' in the GetAs() function. For example:
SELECT GetAs(Company_Meeting, 'snd ') FROM Company_Newsletter
1If the data was inserted using the Insert > Object command (OLE container data), specify
'EMBO' in the GetAs() function. For example:
SELECT GetAs(Company_Results, 'EMBO') FROM Annual_Report
1If the data was inserted using the Insert > Picture command, drag and drop, or paste from the
clipboard, specify one of the file types listed in the following table. For example:
SELECT GetAs(Company_Logo, 'JPEG') FROM Company_Icons
File type Description File type Description
'EMF+' Windows Enhanced Metafile Plus 'PDF ' Portable Document Format
'EPS ' Embedded PostScript 'PICT' Mac OS (does not have 512-byte file-based header)
'FPix' Flash (FPX) 'PNGf' Bitmap image format
'FORK' Resource fork (Mac OS) 'PNTG' MacPaint
'GIFf' Graphics Interchange Format 'qtif' QuickTime image file
'JPEG' Photographic images '.SGI' Generic bitmap format
'JP2 ' JPEG 2000 'TIFF' Raster file format for digital images
'META' Windows Metafile (enhanced) 'TPIC' Targ a
'METO' Windows Metafile (original) 'XMLO' Layout objects
'moov' Old QuickTime format (Mac OS) '8BPS' PhotoShop (PSD)
Chapter 7 | Supported standards 41
DELETE statement
Use the DELETE statement to delete records from a database table. The format of the DELETE
statement is:
DELETE FROM table_name [ WHERE { conditions } ]
Note The WHERE clause determines which records are to be deleted. If you don’t include the
WHERE keyword, all records in the table are deleted (but the table is left intact).
Example
An example of a DELETE statement on the Employee table is:
DELETE FROM emp WHERE emp_id = 'E10001'
Each DELETE statement removes every record that meets the conditions in the WHERE clause. In
this case, every record having the employee ID E10001 is deleted. Because employee IDs are
unique in the Employee table, only one record is deleted.
INSERT statement
Use the INSERT statement to create records in a database table. You can specify either:
1A list of values to be inserted as a new record
1A SELECT statement that copies data from another table to be inserted as a set of new records
The format of the INSERT statement is:
INSERT INTO table_name [(column_name, ...)] VALUES (expr, ...)
[, VALUES (expr, ...)]
column_name is an optional list of column names that provides the name and order of the columns
whose values are specified in the VALUES clause. If you omit column_name, the value expressions
(expr) must provide values for all columns defined in the table and must be in the same order that
the columns are defined for the table. column_name may also specify a field repetition, for example
lastDates[4].
expr is the list of expressions giving the values for the columns of the new record. Usually the
expressions are constant values for the columns (but they can also be a subquery). You must
enclose character string values in pairs of single quotation marks ('). To include a single quotation
mark in a character string value enclosed by single quotation marks, use two single quotation
marks together (for example, 'Don''t').
Subqueries must be enclosed in parentheses.
The following example inserts a list of expressions:
INSERT INTO emp (last_name, first_name, emp_id, salary, hire_date)
VALUES ('Smith', 'John', 'E22345', 27500, {d ‘2008/06/05’})
Each INSERT statement adds one record to the database table. In this case a record has been
added to the employee database table, EMP. Values are specified for five columns. The remaining
columns in the table are assigned a blank value, meaning Null.
Note In container fields, you can INSERT text only, unless you prepare a parameterized
statement and stream the data from your application. To use binary data, you must specify the
type in a PutAs() function: PutAs(col, ‘type’), where the type value is a type as described
in “Retrieving the contents of a container field: CAST() function and GetAs() function” on page 39.
Chapter 7 | Supported standards 42
The SELECT statement is a query that returns values for each column_name value specified in the
column name list. Using a SELECT statement instead of a list of value expressions lets you select
a set of rows from one table and insert it into another table using a single INSERT statement.
Here's an example of an INSERT statement that uses a SELECT statement:
INSERT INTO emp1 (first_name, last_name, emp_id, dept, salary)
SELECT first_name, last_name, emp_id, dept, salary from emp
WHERE dept = ‘D050’
In this type of INSERT statement, the number of columns to be inserted must match the number
of columns in the SELECT statement. The list of columns to be inserted must correspond to the
columns in the SELECT statement just as it would to a list of value expressions in the other type
of INSERT statement. For example, the first column inserted corresponds to the first column
selected; the second inserted to the second, and so on.
The size and data type of these corresponding columns must be compatible. Each column in the
SELECT list should have a data type that the ODBC or JDBC client driver accepts on a regular
INSERT/UPDATE of the corresponding column in the INSERT list. Values are truncated when the
size of the value in the SELECT list column is greater than the size of the corresponding INSERT
list column.
The SELECT statement is evaluated before any values are inserted.
UPDATE statement
Use the UPDATE statement to change records in a database table. The format of the UPDATE
statement is:
UPDATE table_name SET column_name = expr, ... [ WHERE { conditions } ]
column_name is the name of a column whose value is to be changed. Several columns can be
changed in one statement.
expr is the new value for the column.
Usually the expressions are constant values for the columns (but they can also be a subquery).
You must enclose character string values in pairs of single quotation marks ('). To include a single
quotation mark in a character string value enclosed by single quotation marks, use two single
quotation marks together (for example, 'Don''t').
Subqueries must be enclosed in parentheses.
The WHERE clause is any valid clause. It determines which records are updated.
Examples
An example of an UPDATE statement on the Employee table is:
UPDATE emp SET salary=32000, exempt=1 WHERE emp_id = 'E10001'
The UPDATE statement changes every record that meets the conditions in the WHERE clause. In
this case the salary and exempt status are changed for all employees having the employee ID
E10001. Because employee IDs are unique in the Employee table, only one record is updated.
Here's an example using a subquery:
UPDATE emp SET salary = (SELECT avg(salary) from emp) WHERE emp_id = 'E10001'
Chapter 7 | Supported standards 43
In this case, the salary is changed to the average salary in the company for the employee having
employee ID E10001.
Note In container fields, you can UPDATE with text only, unless you prepare a parameterized
statement and stream the data from your application. To use binary data, you must specify the
type in a PutAs() function: PutAs(col, 'type'), where the type value is a type as described
in “Retrieving the contents of a container field: CAST() function and GetAs() function” on page 39.
CREATE TABLE statement
Use the CREATE TABLE statement to create a table in a database file. The format of the CREATE
TABLE statement is:
CREATE TABLE table_name ( table_element_list [, table_element_list...] )
Within the statement, you specify the name and data type of each column.
1table_name is the name of the table. table_name has a 100 character limit. A table with the
same name must not already be defined.
1The format for table_element_list is:
field_name field_type [DEFAULT expr][UNIQUE][NOT NULL] [EXTERNAL
relative_path_string [SECURE | OPEN calc_path_string]]
1field_name is the name of the field. No field in the same table may have the same name.
You specify a field repetition by using a number in square brackets. For example:
lastDates[4].
1field_type may be any of the following: NUMERIC, DECIMAL, INT, DATE, TIME,
TIMESTAMP, VARCHAR, CHARACTER VARYING, BLOB, VARBINARY, LONGVARBINARY, or
BINARY VARYING. For NUMERIC and DECIMAL, you can specify the precision and scale.
For example: DECIMAL(10,0). For TIME and TIMESTAMP, you can specify the precision.
For example: TIMESTAMP(6). For VARCHAR and CHARACTER VARYING, you can specify
the length of the string. For example: VARCHAR(255).
1The DEFAULT keyword allows you to set a default value for a column. For expr, you may
use a constant value or expression. Allowable expressions are USER, USERNAME,
CURRENT_USER, CURRENT_DATE, CURDATE, CURRENT_TIME, CURTIME,
CURRENT_TIMESTAMP, and CURTIMESTAMP.
1Defining a column to be UNIQUE automatically selects the Unique Validation Option for the
corresponding field in the FileMaker database file.
1Defining a column to be NOT NULL automatically selects the Not Empty Validation Option for
the corresponding field in the FileMaker database file. The field is flagged as a Required
Value in the Fields tab of the Manage Database dialog box in FileMaker Pro.
1To define a column as a container field, use BLOB, VARBINARY, or BINARY VARYING for
the field_type.
1To define a column as a container field that stores data externally, use the EXTERNAL
keyword. The relative_path_string defines the folder where the data is stored
externally, relative to the location of the FileMaker database. This path must be specified as
the base directory in the FileMaker Pro Manage Containers dialog box. You must specify
either SECURE for secure storage or OPEN for open storage. If you are using open storage,
the calc_path_string is the folder inside the relative_path_string folder where
container objects are to be stored. calc_path_string can be a FileMaker calculation.

Chapter 7 | Supported standards 44
Examples
ALTER TABLE statement
Use the ALTER TABLE statement to change the structure of an existing table in a database file.
You can modify only one column in each statement. The formats of the ALTER TABLE statement
are:
ALTER TABLE table_name ADD [COLUMN] column_definition
ALTER TABLE table_name DROP [COLUMN] unqualified_column_name
ALTER TABLE table_name ALTER [COLUMN] column_definition SET DEFAULT expr
ALTER TABLE table_name ALTER [COLUMN] column_definition DROP DEFAULT
You must know the table’s structure and how you want to modify it before using the ALTER TABLE
statement.
Examples
Note SET DEFAULT and DROP DEFAULT do not affect existing rows in the table, but change the
default value for rows that are subsequently added to the table.
Using Sample SQL
text column CREATE TABLE T1 (C1 VARCHAR, C2 VARCHAR (50), C3 VARCHAR (1001),
C4 VARCHAR (500276))
text column, NOT NULL CREATE TABLE T1NN (C1 VARCHAR NOT NULL, C2 VARCHAR (50) NOT NULL,
C3 VARCHAR (1001) NOT NULL, C4 VARCHAR (500276) NOT NULL)
numeric column CREATE TABLE T2 (C1 DECIMAL, C2 DECIMAL (10,0), C3 DECIMAL (7539,2),
C4 DECIMAL (497925,301))
date column CREATE TABLE T3 (C1 DATE, C2 DATE, C3 DATE, C4 DATE)
time column CREATE TABLE T4 (C1 TIME, C2 TIME, C3 TIME, C4 TIME)
timestamp column CREATE TABLE T5 (C1 TIMESTAMP, C2 TIMESTAMP, C3 TIMESTAMP,
C4 TIMESTAMP)
column for container field CREATE TABLE T6 (C1 BLOB, C2 BLOB, C3 BLOB, C4 BLOB)
column for external
storage container field
CREATE TABLE T7 (C1 BLOB EXTERNAL 'Files/MyDatabase' SECURE)
CREATE TABLE T8 (C1 BLOB EXTERNAL 'Files/MyDatabase' OPEN
'Objects')
To Sample SQL
add columns ALTER TABLE Salespeople ADD C1 VARCHAR
remove columns ALTER TABLE Salespeople DROP C1
set the default value for a
column
ALTER TABLE Salespeople ALTER Company SET DEFAULT 'FileMaker'
remove the default value
for a column
ALTER TABLE Salespeople ALTER Company DROP DEFAULT
Chapter 7 | Supported standards 45
CREATE INDEX statement
Use the CREATE INDEX statement to speed searches in your database file. The format of the
CREATE INDEX statement is:
CREATE INDEX ON table_name.column_name
CREATE INDEX ON table_name (column_name)
CREATE INDEX is supported for a single column (multi-column indexes are not supported). Indexes
are not allowed on columns that correspond to container field types, summary fields, fields that have
the global storage option, or unstored calculation fields in a FileMaker database file.
Creating an index for a text column automatically selects the Storage Option of Minimal in
Indexing for the corresponding field in the FileMaker database file. Creating an index for a non-
text column (or a column formatted as Japanese text) automatically selects the Storage Option of
All in Indexing for the corresponding field in the FileMaker database file.
Creating an index for any column automatically selects the Storage Option of Automatically
create indexes as needed in Indexing for the corresponding field in the FileMaker database file.
FileMaker automatically creates indexes as needed. Using CREATE INDEX causes the index to
be built immediately rather than on demand.
Example
CREATE INDEX ON Salespeople.Salesperson_ID
DROP INDEX statement
Use the DROP INDEX statement to remove an index from a database file. The format of the DROP
INDEX statement is:
DROP INDEX ON table_name.column_name
DROP INDEX ON table_name (column_name)
Remove an index when your database file is too large, or you don’t often use a field in queries.
If your queries are experiencing poor performance, and you’re working with an extremely large
FileMaker database file with many indexed text fields, consider dropping the indexes from some
fields. Also consider dropping the indexes from fields that you rarely use in SELECT statements.
Dropping an index for any column automatically selects the Storage Option of None and clears
Automatically create indexes as needed in Indexing for the corresponding field in the
FileMaker database file.
The PREVENT INDEX CREATION attribute is not supported.
Example
DROP INDEX ON Salespeople.Salesperson_ID
SQL aggregate functions
Aggregate functions return a single value from a set of records. You can use an aggregate function
as part of a SELECT statement, with a field name (for example, AVG(SALARY)), or in combination
with a column expression (for example, AVG(SALARY * 1.07)).
You can precede the column expression with the DISTINCT operator to eliminate duplicate
values. For example:
COUNT (DISTINCT last_name)

Chapter 7 | Supported standards 46
In this example, only unique last name values are counted.
Examples
SELECT SUM (Sales_Data.Amount) AS agg FROM Sales_Data
SELECT AVG (Sales_Data.Amount) AS agg FROM Sales_Data
SELECT COUNT (Sales_Data.Amount) AS agg FROM Sales_Data
SELECT MAX (Sales_Data.Amount) AS agg FROM Sales_Data
WHERE Sales_Data.Amount < 3000
SELECT MIN (Sales_Data.Amount) AS agg FROM Sales_Data
WHERE Sales_Data.Amount > 3000
SQL expressions
Use expressions in WHERE, HAVING, and ORDER BY clauses of SELECT statements to form
detailed and sophisticated database queries.Valid expression elements are:
1Field names
1Constants
1Exponential notation
1Numeric operators
1Character operators
1Date operators
1Relational operators
1Logical operators
1Functions
Field names
The most common expression is a simple field name, such as calc or Sales_Data.Invoice_ID.
Aggregate function Returns
SUM The total of the values in a numeric field expression. For example, SUM(SALARY) returns
the sum of all salary field values.
AVG The average of the values in a numeric field expression. For example, AVG(SALARY)
returns the average of all salary field values.
COUNT The number of values in any field expression. For example, COUNT(NAME) returns the
number of name values. When using COUNT with a field name, COUNT returns the number
of non-null field values. A special example is COUNT(*), which returns the number of
records in the set, including records with null values.
MAX The maximum value in any field expression. For example, MAX(SALARY) returns the
maximum salary field value.
MIN The minimum value in any field expression. For example, MIN(SALARY) returns the
minimum salary field value.

Chapter 7 | Supported standards 47
Constants
Constants are values that do not change. For example, in the expression PRICE * 1.05, the
value 1.05 is a constant. Or you might assign a value of 30 to the constant
Number_Of_Days_In_June.
You must enclose character constants in pairs of single quotation marks ('). To include a single
quotation mark in a character constant enclosed by single quotation marks, use two single
quotation marks together (for example, 'Don''t').
FileMaker accepts the ODBC/JDBC format date, time, and timestamp constants in braces ({}), for
example:
1{D '2012-06-05'}
1{T '14:35:10'}
1{TS '2012-06-05 14:35:10'}
FileMaker allows the type specifier (D, T, TS) to be in upper case or lower case. You may use any
number of spaces after the type specifier, or even omit the space.
FileMaker also accepts SQL-92 syntax ISO date and time formats with no braces:
1DATE 'YYYY-MM-DD'
1TIME 'HH:MM:SS'
1TIMESTAMP 'YYYY-MM-DD HH:MM:SS'
When entering date and time values, match the format of the database file locale. For example, if
the database was created on an Italian language system, use Italian date and time formats.
Constant Acceptable syntax (examples)
Text 'Paris'
Number 1.05
Date DATE '2012-06-05'
{ D '2012-06-05' }
{06/05/2012}
{06/05/12}
Note: The 2-digit year syntax is not supported for the ODBC/JDBC format or the SQL-92
format.
Time TIME '14:35:10'
{ T '14:35:10' }
{14:35:10}
Timestamp TIMESTAMP '2012-06-05 14:35:10'
{ TS '2012-06-05 14:35:10'}
{06/05/2012 14:35:10}
{06/05/12 14:35:10}
Make sure Strict data type: 4-Digit Year Date is not selected as a validation option in the
FileMaker database file for a field using this 2-digit year syntax.
Note: The 2-digit year syntax is not supported for the ODBC/JDBC format or the SQL-92
format.

Chapter 7 | Supported standards 48
Exponential/scientific notation
Numbers can be expressed using scientific notation.
Example
SELECT column1 / 3.4E+7 FROM table1 WHERE calc < 3.4E-6 * column2
Numeric operators
You can include the following operators in number expressions: +, -, *, /, and ^ or **
(exponentiation).
You can precede numeric expressions with a unary plus (+) or minus (-).
Character operators
You can concatenate characters.
Examples
In the following examples, last_name is 'JONES ' and first_name is 'ROBERT ':
Date operators
You can modify dates.
Examples
In the following examples, hire_date is {D '2008-30-01'}.
Additional examples:
SELECT Date_Sold, Date_Sold + 30 AS agg FROM Sales_Data
SELECT Date_Sold, Date_Sold - 30 AS agg FROM Sales_Data
Operator Concatenation Example Result
+Keep trailing blank characters first_name + last_name 'ROBERT JONES '
-Move trailing blank characters to the end first_name - last_name 'ROBERTJONES '
Operator Effect on date Example Result
+Add a number of days to a date hire_date + 5 {D '2008-02-04'}
-Find the number of days between two dates,
or subtract a number of days from a date
hire_date - {D '2008-01-01'}
hire_date - 10
29
{D '2008-01-20'}

Chapter 7 | Supported standards 49
Relational operators
Operator Meaning
=Equal
<> Not equal
>Greater than
>= Greater than or equal to
<Less than
<= Less than or equal to
LIKE Matching a pattern
NOT LIKE Not matching a pattern
IS NULL Equal to Null
IS NOT NULL Not equal to Null
BETWEEN Range of values between a lower and upper bound
IN A member of a set of specified values or a member of a subquery
NOT IN Not a member of a set of specified values or a member of a subquery
EXISTS ‘True’ if a subquery returned at least one record
ANY Compares a value to each value returned by a subquery (operator must be preceded by
=, <>, >, >=, <, or <=); =Any is equivalent to In
ALL Compares a value to each value returned by a subquery (operator must be preceded by
=, <>, >, >=, <, or <=)
Chapter 7 | Supported standards 50
Examples
SELECT Sales_Data.Invoice_ID FROM Sales_Data
WHERE Sales_Data.Salesperson_ID = 'SP-1'
SELECT Sales_Data.Amount FROM Sales_Data WHERE Sales_Data.Invoice_ID <> 125
SELECT Sales_Data.Amount FROM Sales_Data WHERE Sales_Data.Amount > 3000
SELECT Sales_Data.Time_Sold FROM Sales_Data
WHERE Sales_Data.Time_Sold < '12:00:00'
SELECT Sales_Data.Company_Name FROM Sales_Data
WHERE Sales_Data.Company_Name LIKE '%University'
SELECT Sales_Data.Company_Name FROM Sales_Data
WHERE Sales_Data.Company_Name NOT LIKE '%University'
SELECT Sales_Data.Amount FROM Sales_Data WHERE Sales_Data.Amount IS NULL
SELECT Sales_Data.Amount FROM Sales_Data WHERE Sales_Data.Amount IS NOT NULL
SELECT Sales_Data.Invoice_ID FROM Sales_Data
WHERE Sales_Data.Invoice_ID BETWEEN 1 AND 10
SELECT COUNT(Sales_Data.Invoice_ID) AS agg
FROM Sales_Data WHERE Sales_Data.INVOICE_ID IN (50,250,100)
SELECT COUNT(Sales_Data.Invoice_ID) AS agg
FROM Sales_Data WHERE Sales_Data.INVOICE_ID NOT IN (50,250,100)
SELECT COUNT(Sales_Data.Invoice_ID) AS agg FROM Sales_Data
WHERE Sales_Data.INVOICE_ID NOT IN (SELECT Sales_Data.Invoice_ID
FROM Sales_Data WHERE Sales_Data.Salesperson_ID = 'SP-4')
SELECT *
FROM Sales_Data WHERE EXISTS (SELECT Sales_Data.Amount
FROM Sales_Data WHERE Sales_Data.Salesperson_ID IS NOT NULL)
SELECT *
FROM Sales_Data WHERE Sales_Data.Amount = ANY (SELECT Sales_Data.Amount
FROM Sales_Data WHERE Sales_Data.Salesperson_ID = 'SP-1')
SELECT *
FROM Sales_Data WHERE Sales_Data.Amount = ALL (SELECT Sales_Data.Amount
FROM Sales_Data WHERE Sales_Data.Salesperson_ID IS NULL)
Logical operators
You can combine two or more conditions. The conditions must be related by AND or OR, such as:
salary = 40000 AND exempt = 1
The logical NOT operator is used to reverse the meaning, such as:
NOT (salary = 40000 AND exempt = 1)
Examples
SELECT * FROM Sales_Data WHERE Sales_Data.Company_Name
NOT LIKE '%University' AND Sales_Data.Amount > 3000
SELECT * FROM Sales_Data WHERE (Sales_Data.Company_Name
LIKE '%University' OR Sales_Data.Amount > 3000)
AND Sales_Data.Salesperson_ID = 'SP-1'

Chapter 7 | Supported standards 51
Functions
FileMaker SQL supports many functions you can use in expressions. Some of the functions return
characters strings, some return numbers, and some return dates.
Functions that return character strings
Note The TIME() function is deprecated. Use the SQL standard CURRENT_TIME instead.
Functions that
return character
strings Description Example
CHR Converts an ASCII code to a one-character
string
CHR(67) returns C
CURRENT_USER Returns the login ID specified at connect time
DAYNAME Returns the name of the day that corresponds to
a specified date.
RTRIM Removes trailing blanks from a string RTRIM(' ABC ') returns ' ABC'
TRIM Removes leading and trailing blanks from a
string
TRIM(' ABC ') returns 'ABC'
LTRIM Removes leading blanks from a string LTRIM(' ABC') returns 'ABC'
UPPER Changes each letter of a string to uppercase UPPER('Allen') returns 'ALLEN'
LOWER Changes each letter of a string to lowercase LOWER('Allen') returns 'allen'
LEFT Returns leftmost characters of a string LEFT('Mattson',3) returns 'Mat'
MONTHNAME Returns the names of the calendar month.
RIGHT Returns rightmost characters of a string RIGHT('Mattson',4) returns 'tson'
SUBSTR
SUBSTRING
Returns a substring of a string, with parameters
of the string, the first character to extract, and
the number of characters to extract (optional)
SUBSTR('Conrad',2,3) returns 'onr'
SUBSTR('Conrad',2) returns 'onrad'
SPACE Generates a string of blanks SPACE(5) returns ' '
STRVAL Converts a value of any type to a character
string
STRVAL('Woltman') returns 'Woltman'
STRVAL(5 * 3) returns '15'
STRVAL(4 = 5) returns 'False'
STRVAL({D '2008-12-25'})
returns '2008-12-25'
TIME
TIMEVAL
Returns the time of day as a string At 9:49 PM, TIME() returns 21:49:00
USERNAME
USER
Returns the login ID specified at connect time

Chapter 7 | Supported standards 52
Examples
SELECT CHR(67) + SPACE(1) + CHR(70) FROM Salespeople
SELECT RTRIM(' ' + Salespeople.Salesperson_ID) AS agg FROM Salespeople
SELECT TRIM(SPACE(1) + Salespeople.Salesperson_ID) AS agg FROM Salespeople
SELECT LTRIM(' ' + Salespeople.Salesperson_ID) AS agg FROM Salespeople
SELECT UPPER(Salespeople.Salesperson) AS agg FROM Salespeople
SELECT LOWER(Salespeople.Salesperson) AS agg FROM Salespeople
SELECT LEFT(Salespeople.Salesperson, 5) AS agg FROM Salespeople
SELECT RIGHT(Salespeople.Salesperson, 7) AS agg FROM Salespeople
SELECT SUBSTR(Salespeople.Salesperson_ID, 2, 2) +
SUBSTR(Salespeople.Salesperson_ID, 4, 2) AS agg FROM Salespeople
SELECT SUBSTR(Salespeople.Salesperson_ID, 2) +
SUBSTR(Salespeople.Salesperson_ID, 4) AS agg FROM Salespeople
SELECT SPACE(2) + Salespeople.Salesperson_ID AS Salesperson_ID FROM Salespeople
SELECT STRVAL('60506') AS agg FROM Sales_Data WHERE Sales_Data.Invoice = 1
Functions that return numbers
Functions that
return numbers Description Example
ABS Returns the absolute value of the numeric expression
ATAN Returns the arc tangent of the argument as an angle
expressed in radians
ATAN2 Returns the arc tangent of x and y coordinates as an
angle expressed in radians
BReturns the decimal equivalent of a binary number B'1001' returns 9
CEIL
CEILING
Returns the smallest integer value that is greater than
or equal to the argument
DEG
DEGREES
Returns the number of degrees of the argument,
which is an angle expressed in radians
DAY Returns the day part of a date DAY({d '2012/01/30'}) returns 30
DAYOFWEEK Returns the day of week (1-7) of a date expression DAYOFWEEK({d '2004/05/01'})
returns 7
MOD Divides two numbers and returns the remainder of the
division
MOD(10,3) returns 1
EXP Returns a value that is the base of the natural
logarithm (e) raised to a power specified by the
argument
FLOOR Returns the largest integer value that is less than or
equal to the argument
HOUR Returns the hour part of a value.
INT Returns the integer part of a number INT(6.4321) returns 6
LEN
LENGTH
Returns the length of a string LEN('ABC') returns 3
MONTH Returns the month part of a date MONTH({d '2012/01/30'}) returns 1

Chapter 7 | Supported standards 53
Functions that return dates
Note The DATE() function is deprecated. Use the SQL standard CURRENT_DATE instead.
LN
LOG
Returns the natural logarithm of the argument
MAX Returns the larger of two numbers MAX(66,89) returns 89
MIN Returns the smaller of two numbers MIN(66,89) returns 66
MINUTE Returns the minute part of a value
NUMVAL Converts a character string to a number; if the
character string is not a valid number, returns 0
NUMVAL('123') returns 123
PI Returns the constant value of the mathematical
constant pi
RADIANS Returns the number of radians for an argument that is
expressed in degrees
ROUND Rounds a number ROUND(123.456,0) returns 123
ROUND(123.456,2) returns 123.46
ROUND(123.456,-2) returns 100
SECOND Returns the seconds part of a value
SIGN An indicator of the sign of the argument: -1 for
negative, 0 for 0, and 1 for positive.
SIN Returns the sine of the argument
SQRT Returns the square root of the argument
TAN Returns the tangent of the argument
VAL Converts a character string to a number; if the
character string is not a valid number, returns 0
VAL('123') returns 123
XReturns the decimal equivalent of a hexadecimal
number
X'b9' returns 185
YEAR Returns the year part of a date YEAR({d '2012/01/30'}) returns
2012
Functions that return
dates Description Example
CURDATE
CURRENT_DATE
Returns today’s date
CURTIME
CURRENT_TIME
Returns the current time
CURTIMESTAMP
CURRENT_TIMESTAMP
TIMESTAMPVAL
Returns the current timestamp value
DATE
TODAY
Returns today’s date If today is 11/21/2012, DATE() returns 2012-11-21
DATEVAL Converts a character string to a date DATEVAL({01/30/2012}) returns 2012-01-30
Functions that
return numbers Description Example

Chapter 7 | Supported standards 54
Operator precedence
As expressions become more complex, the order in which the expressions are evaluated
becomes important. This table shows the order in which the operators are evaluated. The
operators in the first line are evaluated first, and so on. Operators in the same line are evaluated
left to right in the expression.
The following example shows the importance of precedence:
WHERE salary > 40000 OR hire_date > {d ‘2008/01/30’} AND dept = 'D101'
Because AND is evaluated first, this query retrieves employees in department D101 hired after
January 30, 2008, as well as every employee making more than $40,000, no matter what
department or hire date.
To force the clause to be evaluated in a different order, use parentheses to enclose the conditions
to be evaluated first. For example:
WHERE (salary > 40000 OR hire_date > {d ‘2008/01/30’}) AND dept = 'D101'
retrieves employees in department D101 that either make more than $40,000 or were hired after
January 30, 2008.
ODBC Catalog functions
The ODBC client driver supports the following Catalog functions:
1SQLTables - catalog information is stored and reported as single part names (table name only).
1SQLColumns
1SQLColumnPrivileges
1SQLDescribeCol
1SQLGetTypeInfo
JDBC Meta Data functions
The JDBC client driver supports the following Meta Data functions:
1getColumns
1getColumnPrivileges
1getMetaData
1getTypeInfo
Precedence Operator
1Unary '-', Unary '+'
2^, **
3*, /
4+, -
5=, <>, <, <=, >, >=, Like, Not Like, Is Null, Is Not Null, Between, In, Exists, Any, All
6Not
7AND
8OR
Chapter 7 | Supported standards 55
1getTables
1getTableTypes
Reserved SQL keywords
This section lists reserved keywords that should not be used as names for columns, tables,
aliases, or other user-defined objects. If you are getting syntax errors, these errors may be due to
using one of these reserved words. If you want to use one of these keywords, you need to use
quotation marks to prevent the word from being treated as a keyword.
For example, the following CREATE TABLE statement shows how to use the DEC keyword as a
data element name.
create table t ("dec" numeric)
ABSOLUTE
ACTION
ADD
ALL
ALLOCATE
ALTER
AND
ANY
ARE
AS
ASC
ASSERTION
AT
AUTHORIZATION
AVG
BEGIN
BETWEEN
BINARY
BIT
BIT_LENGTH
BLOB
BOOLEAN
BOTH
BY
CASCADE
CASCADED
CASE
CAST
CATALOG
CHAR
CHARACTER
CHARACTER_LENGTH
CHAR_LENGTH
CHECK
CHR
CLOSE
COALESCE
COLLATE
COLLATION
COLUMN COMMIT
CONNECT
CONNECTION
CONSTRAINT
CONSTRAINTS
CONTINUE
CONVERT
CORRESPONDING
COUNT
CREATE
CROSS
CURDATE
CURRENT
CURRENT_DATE
CURRENT_TIME
CURRENT_TIMESTAMP
CURRENT_USER
CURSOR
CURTIME
CURTIMESTAMP
DATE
DATEVAL
DAY
DAYNAME
DAYOFWEEK
DEALLOCATE
DEC
DECIMAL
DECLARE
DEFAULT
DEFERRABLE
DEFERRED
DELETE
DESC
DESCRIBE
DESCRIPTOR
DIAGNOSTICS
DISCONNECT
DISTINCT
DOMAIN
DOUBLE
DROP
ELSE
END
END_EXEC
Chapter 7 | Supported standards 56
ESCAPE
EVERY
EXCEPT
EXCEPTION
EXEC
EXECUTE
EXISTS
EXTERNAL
EXTRACT
FALSE
FETCH
FIRST
FLOAT
FOR
FOREIGN
FOUND
FROM
FULL
GET
GLOBAL
GO
GOTO
GRANT
GROUP
HAVING
HOUR
IDENTITY
IMMEDIATE
IN
INDEX
INDICATOR
INITIALLY
INNER
INPUT
INSENSITIVE
NSERT
INT
INTEGER
INTERSECT
INTERVAL
INTO
IS
ISOLATION
JOIN
KEY
LANGUAGE
LAST
LEADING
LEFT
LENGTH
LEVEL
LIKE
LOCAL
LONGVARBINARY
LOWER
LTRIM
MATCH
MAX
MIN
MINUTE
MODULE
MONTH
MONTHNAME
NAMES
NATIONAL
NATURAL
NCHAR
NEXT
NO
NOT
NULL
NULLIF
NUMERIC
NUMVAL
OCTET_LENGTH
OF
ON
ONLY
OPEN
OPTION
OR
ORDER
OUTER
OUTPUT
OVERLAPS
PAD
PART
PARTIAL
POSITION
PRECISION
PREPARE
PRESERVE
PRIMARY
PRIOR
PRIVILEGES
PROCEDURE
PUBLIC
READ
REAL
REFERENCES
RELATIVE
RESTRICT
REVOKE
RIGHT
ROLLBACK
ROUND
ROWID
ROWS
RTRIM
SCHEMA
SCROLL
SECOND
SECTION
SELECT
SESSION
SESSION_USER
SET
Chapter 7 | Supported standards 57
SIZE
SMALLINT
SOME
SPACE
SQL
SQLCODE
SQLERROR
SQLSTATE
STRVAL
SUBSTRING
SUM
SYSTEM_USER
TABLE
TEMPORARY
THEN
TIME
TIMESTAMP
TIMESTAMPVAL
TIMEVAL
TIMEZONE_HOUR
TIMEZONE_MINUTE
TO
TODAY
TRAILING
TRANSACTION
TRANSLATE
TRANSLATION
TRIM
TRUE
UNION
UNIQUE
UNKNOWN
UPDATE
UPPER
USAGE
USER
USERNAME
USING
USAGE
USER
USERNAME
USING
VALUE
VALUES
VARBINARY
VARCHAR
VARYING
VIEW
WHEN
WHENEVER
WHERE
WITH
WORK
WRITE
YEAR
ZONE

Chapter 8
Reference Information
Mapping FileMaker fields to ODBC data types
This table illustrates how FileMaker field types map to the standard ODBC data types.
String length is optional in table declarations. All strings are stored and retrieved in Unicode.
Note FileMaker repeating fields are supported like arrays. Examples:
INSERT INTO mytable(repField[3]) VALUES (‘this is rep 3’)
SELECT repField[1], repField[2] FROM mytable
Mapping FileMaker fields to JDBC data types
The JDBC client driver uses the following mappings when converting FileMaker data types to
JDBC SQL types. (For information about these types, see the JDK 1.5 documentation web pages
at http://www.javasoft.com.)
FileMaker field type Converts to ODBC data type About the data type
text SQL_VARCHAR The maximum column length of text is 1 million characters,
unless you specify a smaller Maximum number of
characters for the text field in FileMaker. FileMaker returns
empty strings as NULL.
number SQL_DOUBLE The FileMaker number field type can contain positive or
negatives values as small as 10-308, and as large as 10+308,
with up to 15 significant digits.
date SQL_DATE
time SQL_TIME The FileMaker time field type can contain the time of day or
a time interval. A time interval is returned as a time of day,
unless it is less than 0 or greater than 24 hours (both return
a value of 0).
timestamp SQL_TIMESTAMP
container (BLOB)SQL_LONGVARBINARY You can retrieve binary data, file reference information, or
data of a specific file type from a container field.
Within a SELECT statement, use the CAST() function to
retrieve file reference information, and use the GetAs()
function to retrieve data of a specific file type.
calculation The result is mapped to the corresponding ODBC data type.
FileMaker field type Converts to JDBC SQL type
text java.sql.Types.VARCHAR
number java.sql.Types.DOUBLE
date java.sql.Types.DATE
time java.sql.Types.TIME

Chapter 8 | Reference Information 59
The JDBC client driver converts the FileMaker calculation data type to the JDBC SQL type
matching the calculation’s result. For example, the JDBC client driver converts a FileMaker
calculation that results in a timestamp data type to java.sql.Types.TIMESTAMP.
Data types in 64-bit applications
In the 32-bit version of the ODBC API, some functions used parameters that could pass integer
values or pointer values, depending on context. But in 64-bit Windows operating systems, integers
and pointers are not the same size. The 64-bit version of the ODBC API uses abstract data types
that are not defined as a specific size.
Applications that use 32-bit values may crash when they are ported to a 64-bit operating system.
Applications that use abstract data types work correctly on both 32- and 64-bit operating systems.
ODBC and JDBC error messages
Here are the basic formats of error messages you receive when working with FileMaker and
ODBC/JDBC.
ODBC error messages
Error messages can come from:
1ODBC driver errors
1FileMaker and FileMaker xDBC Listener errors
FileMaker ODBC error messages
An error that occurs in the FileMaker listener or data source includes the data source name, in the
following format:
[FileMaker] [FileMaker ODBC] message
For example, you might get the following message from your FileMaker data source:
[FileMaker] [FileMaker ODBC] Invalid Username/Password
If you get this type of error, you did something incorrectly with the database system. Check your
FileMaker documentation for more information or consult your database administrator.
Consecutive messages for errors in different columns can sometimes display an incorrect column
name.
JDBC error messages
The FileMaker JDBC driver reports errors to the calling application by returning SQLExceptions.
Error messages can come from:
1JDBC driver errors
1FileMaker and FileMaker xDBC Listener errors
timestamp java.sql.Types.TIMESTAMP
container java.sql.Types.BLOB
calculation specified by the data type of the calculation’s result
FileMaker field type Converts to JDBC SQL type
Chapter 8 | Reference Information 60
FileMaker JDBC error messages
An error that occurs in the FileMaker listener or data source includes the data source name, in the
following format:
[FileMaker] [FileMaker JDBC] message
For example, you might get the following message from your FileMaker data source:
[FileMaker] [FileMaker JDBC] Invalid Username/Password
If you get this type of error, you did something incorrectly with the database system. Check your
FileMaker documentation for more information or consult your database administrator.
Index
A
ABS function 52
Access via ODBC/JDBC extended privilege 21
accounts and privileges 21
aggregate functions in SQL 45
ALL operator 49
ALTER TABLE (SQL statement) 44
AND operator 50
ANY operator 49
ARRAY data type 30
ATAN function 52
ATAN2 function 52
auto-generated keys 29
B
B function 52
BETWEEN operator 49
binary data
use in SELECT 39
bitmap files in container fields 40
blank characters 48
blank value in columns 41
BLOB data type
use in SELECT 39
Boolean data type 30
C
CAST function 40, 58
catalog functions for ODBC 54
CEIL function 52
CEILING function 52
character operators in SQL expressions 48
CHR function 51
client application, using FileMaker as 6
CLOB data type 30
column aliases 35
column names 22
configuring a FileMaker data source
via JDBC 31
via ODBC (Mac OS) 24
via ODBC (Windows) 22
connections, database 8
constants in SQL expressions 47
container field
JDBC data type mapping 59
ODBC data type mapping 58
with INSERT statement 41
with SELECT statement 39
with UPDATE statement 43
container field, stored externally 43
container fields
use in CREATE TABLE 43, 44
CREATE INDEX (SQL statement) 45
CREATE TABLE (SQL statement) 43
CURDATE function 53
CURRENT USER function 51
CURRENT_DATE function 53
CURRENT_TIME function 53
CURRENT_TIMESTAMP function 53
CURRENT_USER function 51
cursors
in JDBC 29
in ODBC 38
CURTIME function 53
CURTIMESTAMP function 53
D
data source
configuring for access via JDBC 31
configuring for access via ODBC (Mac OS) 24
configuring for access via ODBC (Windows) 22
disabling a shared FileMaker database file 8
one DSN for each FileMaker database file 9
verifying access via JDBC 32
verifying access via ODBC (Mac OS) 26
verifying access via ODBC (Windows) 24
data source names. See DSNs
data type mapping
JDBC client driver 58
ODBC client driver 58
database connections, number supported 8
database, DSN 23
DATALINK data type 30
date formats 47
DATE function 53
date operators in SQL expressions 48
DATEVAL function 53
DAY function 52
DAYNAME function 51
DAYOFWEEK function 52
DEFAULT (SQL clause) 43
DEG function 52
DEGREES function 52
DELETE (SQL statement) 41
disabling a shared FileMaker database file 8
DISTINCT operator 35
driver properties
JDBC client driver 31
ODBC client driver (Mac OS) 24
ODBC client driver (Windows) 22
drivers
uninstalling old 9
DROP INDEX (SQL statement) 45
DSNs
creating (Mac OS) 24
creating (Windows) 22
one per file 9
62
E
empty string
use in SELECT 39
error message formats 59
Execute SQL script step 11
ExecuteSQL function 11
EXISTS operator 49
EXP function 52
exponential notation in SQL expressions 48
expressions in SQL 46
extended privileges 21
EXTERNAL (SQL clause) 43
F
field names in SQL expressions 46
field repetitions 43
fields
mapping to JDBC 58
mapping to ODBC 58
FileMaker products 8
files
organizing on one computer 8
setting up access to 21
use in container fields 40
FLOOR function 52
FOR UPDATE (SQL clause) 38
FROM (SQL clause) 35
FULL OUTER JOIN 36
functions in SQL expressions 51
G
GetAs function 40, 58
GROUP BY (SQL clause) 37
H
HAVING (SQL clause) 37
holdable cursor 29
host, DSN 23, 25
HOUR function 52
I
image files in container fields 40
Import Records script step 11
IN operator 49
INNER JOIN 36
INSERT (SQL statement) 41
installation requirements 13, 27
INT function 52
IS NOT NULL operator 49
IS NULL operator 49
J
Java Development Kit (JDK) 30
Java version 27
JDBC
client driver, described 29
described 29
error messages 59
overview of using 6
JDBC client driver
driver class and main entry point 30
mapping data types 58
meta data functions 54
portals 34
registering with the JDBC driver manager 30
specifying the JDBC URL 30
Unicode support 34
verifying access 32
JDBC SPI 30
join 36
K
keywords, reserved SQL 55
L
LEFT function 51
LEFT JOIN 36
LEFT OUTER JOIN 36
LEN function 52
LIKE operator 49
LN function 53
LOG function 53
logical operators in SQL expressions 50
LOWER function 51
LTRIM function 51
M
Mac OS
creating a DSN 24
JDBC client driver requirements 27
ODBC client driver requirements 13
verifying ODBC access 26
mapping data types
JDBC client driver 58
ODBC client driver 58
MAX function 53
meta data functions for JDBC 54
MIN function 53
MINUTE function 53
MOD function 52
MONTH function 52
MONTHNAME function 51
63
N
network requirements 9
NOT IN operator 49
NOT LIKE operator 49
NOT NULL (SQL clause) 43
NOT operator 50
null value 41, 58
numeric operators in SQL expressions 48
NUMVAL function 53
O
ODBC
described 20
error messages 59
overview of using 6
repeating fields 58
standards compliance 34
ODBC Administrator (Mac OS) 26
ODBC client driver
catalog functions 54
mapping data types 58
portals 34
Unicode support 34
verifying access (Mac OS) 26
verifying access (Windows) 24
ODBC Data Source Administrator (Windows) 25
operator precedence in SQL expressions 54
OR operator 50
ORDER BY (SQL clause) 38
OUTER JOIN 36
overview
setting up privileges and sharing 21
using ODBC and JDBC with FileMaker 6
P
password
with JDBC 31
with ODBC 24, 26
PI function 53
port, specifying for JDBC 28
portals 34
positioned updates and deletes 38
PREVENT INDEX CREATION 45
privileges, extended 21
Q
QuickTime files in container fields 40
R
RADIANS function 53
Rapid Application Development (RAD) tools 29
REF data type 30
registering the JDBC client driver 30
relational operators in SQL expressions 49
remote access 8
repeating fields 58
requirements for installation 13, 27
reserved SQL keywords 55
RIGHT function 51
RIGHT JOIN 36
RIGHT OUTER JOIN 36
ROUND function 53
RTRIM function 51
S
savepoint support 29
scientific notation in SQL expressions 48
SECOND function 53
SELECT (SQL statement) 34
binary data 39
BLOB data type 39
empty string 39
Server Data Source 25
sharing, setting up ODBC/JDBC 21
SIGN function 53
SIN function 53
SPACE function 51
SQL aggregate functions 45
SQL expressions 46
character operators 48
constants 47
date operators 48
exponential or scientific notation 48
field names 46
functions 51
logical operators 50
numeric operators 48
operator precedence 54
relational operators 49
SQL standards compliance 34
SQL statements
ALTER TABLE 44
CREATE INDEX 45
CREATE TABLE 43
DELETE 41
DROP INDEX 45
INSERT 41
reserved keywords 55
SELECT 34
supported by client drivers 34
UPDATE 42
SQL_C_WCHAR data type 34
SQL-92 34
SQLExceptions 59
SQRT function 53
standards compliance 34
string functions 51
STRVAL function 51
subqueries 41
SUBSTR function 51
SUBSTRING function 51
syntax errors 55
system requirements 13, 27
64
T
table aliases 35
TAN function 53
testing access
JDBC client driver 32
ODBC client driver (Mac OS) 26
ODBC client driver (Windows) 24
time formats 47
TIME function 51
timestamp formats 47
TIMESTAMPVAL function 53
TIMEVAL function 51
TODAY function 53
TRIM function 51
U
Unicode support 34
UNION (SQL operator) 37
UNIQUE (SQL clause) 43
UPDATE (SQL statement) 42
UPPER function 51
URL (Uniform Resource Locator) for the JDBC client driver 30
USERNAME function 51
V
VAL function 53
VALUES (SQL clause) 41
verifying access
JDBC client driver 32
ODBC client driver (Mac OS) 26
ODBC client driver (Windows) 24
W
WHERE (SQL clause) 36
Windows
creating a DSN 22
JDBC client driver requirements 27
ODBC client driver requirements 13
verifying ODBC access 24
X
X function 53
Y
YEAR function 53
