Filemaker Help M2 Guide File Maker Pro 13 Fmp13 En
User Manual: filemaker FileMaker Pro 13 - Help Free User Guide for FileMaker Software, Manual
Open the PDF directly: View PDF ![]() .
.
Page Count: 1300 [warning: Documents this large are best viewed by clicking the View PDF Link!]
- Using FileMaker Pro
- FileMaker Pro basics
- New features in FileMaker Pro 13
- Using Help
- Using FileMaker Quick Start to learn more about FileMaker Pro
- Converting the trial version to the full version of FileMaker Pro
- About FileMaker Pro databases
- About FileMaker Pro modes
- Performing menu commands
- Converting files from FileMaker Pro 11 and earlier
- Conversion overview
- Converting a single file
- Converting multiple files at once
- Reading the Conversion.log file
- Converting FileMaker Pro databases earlier than version 7.x
- Troubleshooting conversion problems
- Preserving user dictionary information
- How layouts are converted
- Layout mode changes and improvements (FileMaker Pro 12)
- Managing files
- Starting FileMaker Pro
- Using FileMaker Quick Start to open files
- Working with favorite files and hosts
- Opening files
- Opening files with different system formats
- Opening files troubleshooting
- Using the zoom controls
- Opening multiple windows per file
- Arranging windows in FileMaker Pro
- Closing windows and files
- Closing files troubleshooting
- Saving and copying files
- Quitting FileMaker Pro
- Adding and viewing data
- Working with records in Browse mode
- Working with data in Table View
- Adding, duplicating, and deleting records
- Entering data in records
- Selecting a field in Browse mode or Find mode
- Entering and changing data in fields
- Moving text and data with drag and drop
- Exporting the contents of a field
- Working with data in date fields
- Entering Japanese Emperor Year dates
- Conversion of dates with two-digit years
- Working with data in time fields
- Committing data in records
- Using URLs in a field
- Copying and moving data in records
- Entering preset data from a value list
- Restoring data in records
- Using a field index
- Inserting the current date or other variables into a field
- Editing and formatting text
- Using data in container fields
- Inserting graphics into container fields
- Inserting QuickTime movies and multimedia into container fields
- Inserting files of any type into container fields
- Pasting graphics and movies from the Clipboard
- Playing QuickTime and QuickTimeVR movies in container fields
- Playing recorded sounds in container fields
- Working with content in interactive containers
- Working with PDF files in interactive containers
- Deleting data from container fields
- Checking spelling
- Replacing the contents of a field
- Adding and viewing data troubleshooting
- Records are missing
- Wrong or missing data in field
- Dates are not as expected
- Summary data is missing or incorrect
- Text or objects are clipped
- Data does not appear correctly
- List View or Table View refreshes when adding records
- Can't click or tab into a field
- Alerts when entering data
- Value lists troubleshooting
- Finding, sorting, and replacing data
- Finding records
- Performing a quick find in Browse mode
- Finding records based on criteria in a single field
- Making a find request
- Finding text and characters
- Finding numbers, dates, times, and timestamps
- Finding ranges of information
- Finding data in related fields
- Finding empty or non-empty fields
- Finding duplicate values
- Finding duplicate values using a self-join relationship
- Finding records that match multiple criteria
- Finding records except those matching criteria
- Viewing, repeating, or changing the last find
- Hiding records from a found set and viewing hidden records
- Constraining (narrowing) a found set
- Extending (broadening) a found set
- Finding records troubleshooting
- Saving a find request
- Managing saved find requests
- Sorting records
- Finding and replacing data
- Finding records
- Previewing and printing information
- FileMaker Pro basics
- Designing and creating databases
- Creating a database
- About planning a database
- Best practices for designing layouts
- Tips for designing layouts
- Creating a FileMaker Pro file
- Setting file options
- Defining database tables
- About defining database fields
- About choosing a field type
- Setting options for fields
- About setting up container fields
- Changing field definitions
- Creating file paths
- Using variables
- Working with formulas and functions
- About functions
- About formulas
- Using operators in formulas
- Identifying text constants and special characters in formulas
- Adding a new line to the results of a formula
- Adding comments to a formula
- Using a reserved word or symbol for a field or table name
- Getting the contents of a repetition in a repeating field
- Working with plug-ins
- Creating and managing layouts and reports
- Creating a layout
- Editing layouts
- Setting up form, list, and table views for a layout
- Changing the table that a layout shows
- Setting the automatic record-saving option for a layout
- Showing or hiding field frames
- Showing field borders and fill for the current record
- Specifying a menu set for a layout
- Changing the theme of a layout
- Changing the width of a layout
- Working with layout parts
- Adding fields to a layout
- Creating portals to display related records
- Drawing and inserting objects on a layout
- Working with panel controls on layouts
- Working with popovers on layouts
- Working with web viewers on layouts
- Controlling how layouts print
- Setting up script triggers
- Troubleshooting layouts
- Editing objects, layout parts, and the layout background
- Selecting and working with objects on a layout
- Selecting objects
- Using the Inspector to format objects
- Copying, duplicating, and deleting objects
- Moving objects on a layout
- Resizing and reshaping objects
- Setting auto-resize options for layout objects
- Specifying the display state for an object
- Formatting graphics on a layout
- Protecting objects from change
- Naming objects
- Defining conditional formatting for layout objects
- Formatting objects, layout parts, and the layout background
- Setting the fill, line style, and borders for objects, layout parts, and the layout background
- Filling objects, layout parts, or the layout background with a color gradient
- Filling objects, layout parts, or the layout background with an image
- Adding shadows and padding to layout objects
- Formatting portals
- Formatting panel controls
- Formatting popover buttons and popovers
- Hiding or showing layout objects
- Creating and working with styles for layout objects, parts, and the layout background
- About layout object, part, and background styles
- Viewing and applying layout object, part, or background styles
- Editing layout object, part, or background styles
- Creating new layout object, part, or background styles
- Renaming layout object, part, or background styles
- Reverting changes to layout object, part, or background styles
- Deleting layout object, part, or background styles
- Copying formatting attributes between layout objects, parts, or backgrounds
- Saving and managing layout themes
- Formatting and setting up field objects in Layout mode
- Specifying text formats for fields
- Specifying formats for fields containing numbers
- Specifying formats for date fields
- Specifying formats for time fields
- Specifying formats for timestamp fields
- Specifying formats for container fields
- Adding borders, fill, and baselines to fields
- Adding scroll bars to fields
- Defining value lists
- Setting up a field to display a pop-up menu, checkbox set, or other control
- Setting up a field to display a keyboard
- Setting up a field to display a drop-down calendar
- Setting up a field to auto-complete during data entry
- Setting up the display of repeating fields
- Adding tooltips on layouts
- Identifying badges on layout objects
- Making layout objects accessible to screen readers
- Controlling data input behavior of fields
- Formatting text
- Arranging objects
- Using tools to precisely position objects
- Selecting and working with objects on a layout
- Working with related tables and files
- About relationships
- About the types of relationships
- Working with the relationships graph
- Creating relationships
- Changing relationships
- Adding tables to the relationships graph
- Selecting related tables in the relationships graph
- Duplicating tables in the relationships graph
- Moving tables or notes in the relationships graph
- Resizing tables in the relationships graph
- Aligning tables in the relationships graph
- Adding text notes to the relationships graph
- Summarizing data in portals
- Filtering records in portals
- About lookups
- Creating charts from data
- Creating scripts to automate tasks
- Planning a script
- Creating and editing scripts
- Scripting with ActiveX Automation (Windows)
- Scripting with Apple events (OS X)
- Apple events troubleshooting (OS X)
- Apple events error: "Apple event timed out" (-1712)
- Apple events error: "Expected expression but found unknown token"
- Apple events error: "Invalid object containment" (-1723)
- Apple events error: "Object not found" (-1728)
- Apple events error: "Data is being accessed by another user, script, or transaction" (-10011)
- Apple events error: "Set Data failed. Invalid data was supplied" (- 17005)
- Apple events error: "Event failed. User canceled the event processing" (-17006)
- Apple events error: "Create failed. Invalid data was supplied" (- 17007)
- Working with the Scripts menu
- Using buttons with scripts
- Script examples
- Protecting databases
- About protecting databases
- Creating and managing accounts
- Creating and managing privilege sets
- Viewing privilege sets
- Creating new privilege sets
- Editing existing privilege sets
- Duplicating and deleting privilege sets
- Editing record access privileges
- Editing layouts privileges
- Editing value list privileges
- Editing scripts privileges
- Editing extended privileges for a privilege set
- Editing other privileges
- Managing extended privileges
- Opening files protected with passwords
- Authorizing access to files
- Creating a database
- Sharing data
- Sharing databases on a network
- Saving, importing, and exporting data
- Saving and sending records in other formats
- Sending email messages based on record data
- Importing data into FileMaker Pro
- Methods of importing data into an existing file
- About creating a new table for imported data
- About validating data during import
- Importing data into an existing file
- Setting up recurring imports
- Importing a folder of files all at once
- Importing Bento data (OS X)
- Importing XML data
- Setting the import action and mapping fields during import
- Converting a data file to a new FileMaker Pro file
- Exporting data from FileMaker Pro
- Exporting repeating field data
- Supported import/export file formats
- Importing and exporting dates
- Working with Microsoft Excel
- Publishing databases on the web
- Using ODBC and JDBC with FileMaker Pro
- Accessing external data sources
- Using FileMaker Pro Advanced
- FileMaker Pro Advanced basics
- Customizing files with FileMaker Pro Advanced
- Using FileMaker Pro Advanced tools
- Debugging scripts (FileMaker Pro Advanced)
- Using the Data Viewer (FileMaker Pro Advanced)
- Encrypting database files (FileMaker Pro Advanced)
- Documenting database schemas (FileMaker Pro Advanced)
- Setting up files for developer solutions (FileMaker Pro Advanced)
- About creating runtime solutions (FileMaker Pro Advanced)
- Preparing files for a runtime solution (FileMaker Pro Advanced)
- Binding files into a runtime solution (FileMaker Pro Advanced)
- Naming runtime solutions (FileMaker Pro Advanced)
- Distributing runtime solutions (FileMaker Pro Advanced)
- Importing data into upgraded runtime solutions (FileMaker Pro Advanced)
- Starting runtime solutions (FileMaker Pro Advanced)
- Recovering runtime files (FileMaker Pro Advanced)
- Displaying databases in Kiosk mode (FileMaker Pro Advanced)
- Reference
- Setting preferences
- Keyboard shortcuts (Windows)
- Keyboard shortcuts (OS X)
- Functions reference
- Script steps reference
- Script triggers reference
- OnObjectEnter
- OnObjectKeystroke
- OnObjectModify
- OnObjectValidate
- OnObjectSave
- OnObjectExit
- OnPanelSwitch
- OnRecordLoad
- OnRecordCommit
- OnRecordRevert
- OnLayoutKeystroke
- OnLayoutEnter
- OnLayoutExit
- OnLayoutSizeChange
- OnModeEnter
- OnModeExit
- OnViewChange
- OnGestureTap
- OnFirstWindowOpen
- OnLastWindowClose
- OnWindowOpen
- OnWindowClose
- FileMaker Pro features by version
- Maintaining and recovering FileMaker Pro databases
- FileMaker Pro error codes
- Glossary
- Registration
- Customer Support and Knowledge Base
- Copyright information

FileMaker® Pro 13
Help
© 2007–2013 FileMaker, Inc. All Rights Reserved.
FileMaker, Inc.
5201 Patrick Henry Drive
Santa Clara, California 95054
FileMaker and Bento are trademarks of FileMaker, Inc. registered in the U.S. and other countries. The file folder logo,
FileMaker WebDirect, and the Bento logo are trademarks of FileMaker, Inc. All other trademarks are the property of their
respective owners.
FileMaker documentation is copyrighted. You are not authorized to make additional copies or distribute this documentation
without written permission from FileMaker. You may use this documentation solely with a valid licensed copy of FileMaker
software.
All persons, companies, email addresses, and URLs listed in the examples are purely fictitious and any resemblance to
existing persons, companies, email addresses, or URLs is purely coincidental. Credits are listed in the Acknowledgements
documents provided with this software. Mention of third-party products and URLs is for informational purposes only and
constitutes neither an endorsement nor a recommendation. FileMaker, Inc. assumes no responsibility with regard to the
performance of these products.
For more information, visit our website at http://www.filemaker.com.
Edition: 01
FILEMAKER PRO HELP 3
Contents
Using FileMaker Pro . . . . . . . . . . . . . . . . . . . . . . . . . . . . . . . . . . . . . . . 24
FileMaker Pro basics . . . . . . . . . . . . . . . . . . . . . . . . . . . . . . . . . . . . . . . . . . . . . . . . . . . . . . . . . . 25
New features in FileMaker Pro 13 . . . . . . . . . . . . . . . . . . . . . . . . . . . . . . . . . . . . . . . . . . . . . 25
Using Help . . . . . . . . . . . . . . . . . . . . . . . . . . . . . . . . . . . . . . . . . . . . . . . . . . . . . . . . . . . . . . . 30
Using FileMaker Quick Start to learn more about FileMaker Pro . . . . . . . . . . . . . . . . . . . . . 30
Converting the trial version to the full version of FileMaker Pro . . . . . . . . . . . . . . . . . . . . . . 30
About FileMaker Pro databases . . . . . . . . . . . . . . . . . . . . . . . . . . . . . . . . . . . . . . . . . . . . . . 31
About FileMaker Pro modes . . . . . . . . . . . . . . . . . . . . . . . . . . . . . . . . . . . . . . . . . . . . . . . . . 33
Performing menu commands . . . . . . . . . . . . . . . . . . . . . . . . . . . . . . . . . . . . . . . . . . . . . . . . . 34
Using the status toolbar . . . . . . . . . . . . . . . . . . . . . . . . . . . . . . . . . . . . . . . . . . . . . . . . . 34
Using shortcut menus . . . . . . . . . . . . . . . . . . . . . . . . . . . . . . . . . . . . . . . . . . . . . . . . . . . 35
Converting files from FileMaker Pro 11 and earlier . . . . . . . . . . . . . . . . . . . . . . . . . . . . . . . . 36
Conversion overview . . . . . . . . . . . . . . . . . . . . . . . . . . . . . . . . . . . . . . . . . . . . . . . . . . . . 37
Converting a single file . . . . . . . . . . . . . . . . . . . . . . . . . . . . . . . . . . . . . . . . . . . . . . . . . . 37
Converting multiple files at once . . . . . . . . . . . . . . . . . . . . . . . . . . . . . . . . . . . . . . . . . . . 38
Reading the Conversion.log file . . . . . . . . . . . . . . . . . . . . . . . . . . . . . . . . . . . . . . . . . . . 40
Converting FileMaker Pro databases earlier than version 7.x . . . . . . . . . . . . . . . . . . . . . 40
Troubleshooting conversion problems . . . . . . . . . . . . . . . . . . . . . . . . . . . . . . . . . . . . . . 40
Preserving user dictionary information . . . . . . . . . . . . . . . . . . . . . . . . . . . . . . . . . . . . . . 41
How layouts are converted . . . . . . . . . . . . . . . . . . . . . . . . . . . . . . . . . . . . . . . . . . . . . . . 42
Layout mode changes and improvements (FileMaker Pro 12) . . . . . . . . . . . . . . . . . . . . 42
Managing files . . . . . . . . . . . . . . . . . . . . . . . . . . . . . . . . . . . . . . . . . . . . . . . . . . . . . . . . . . . . 44
Starting FileMaker Pro . . . . . . . . . . . . . . . . . . . . . . . . . . . . . . . . . . . . . . . . . . . . . . . . . . 44
Using FileMaker Quick Start to open files . . . . . . . . . . . . . . . . . . . . . . . . . . . . . . . . . . . . 44
Working with favorite files and hosts . . . . . . . . . . . . . . . . . . . . . . . . . . . . . . . . . . . . . . . . 46
Opening files . . . . . . . . . . . . . . . . . . . . . . . . . . . . . . . . . . . . . . . . . . . . . . . . . . . . . . . . . .47
Opening files with different system formats . . . . . . . . . . . . . . . . . . . . . . . . . . . . . . . . . . 49
Opening files troubleshooting . . . . . . . . . . . . . . . . . . . . . . . . . . . . . . . . . . . . . . . . . . . . . 49
Using the zoom controls . . . . . . . . . . . . . . . . . . . . . . . . . . . . . . . . . . . . . . . . . . . . . . . . . 50
Opening multiple windows per file . . . . . . . . . . . . . . . . . . . . . . . . . . . . . . . . . . . . . . . . . . 51
Arranging windows in FileMaker Pro . . . . . . . . . . . . . . . . . . . . . . . . . . . . . . . . . . . . . . . . 52
Closing windows and files . . . . . . . . . . . . . . . . . . . . . . . . . . . . . . . . . . . . . . . . . . . . . . . . 53
Closing files troubleshooting . . . . . . . . . . . . . . . . . . . . . . . . . . . . . . . . . . . . . . . . . . . . . . 53
Saving and copying files . . . . . . . . . . . . . . . . . . . . . . . . . . . . . . . . . . . . . . . . . . . . . . . . . 54
Quitting FileMaker Pro . . . . . . . . . . . . . . . . . . . . . . . . . . . . . . . . . . . . . . . . . . . . . . . . . . 55
Adding and viewing data . . . . . . . . . . . . . . . . . . . . . . . . . . . . . . . . . . . . . . . . . . . . . . . . . . . . . . . 57
Working with records in Browse mode . . . . . . . . . . . . . . . . . . . . . . . . . . . . . . . . . . . . . . . . . 57
Viewing records as a form, list, or table . . . . . . . . . . . . . . . . . . . . . . . . . . . . . . . . . . . . . 57
Selecting the current record . . . . . . . . . . . . . . . . . . . . . . . . . . . . . . . . . . . . . . . . . . . . . . 58
Moving through records . . . . . . . . . . . . . . . . . . . . . . . . . . . . . . . . . . . . . . . . . . . . . . . . . 59
Scroll wheel support . . . . . . . . . . . . . . . . . . . . . . . . . . . . . . . . . . . . . . . . . . . . . . . . . . . . 60
Navigating in web viewers . . . . . . . . . . . . . . . . . . . . . . . . . . . . . . . . . . . . . . . . . . . . . . . . 61
Working with data in Table View . . . . . . . . . . . . . . . . . . . . . . . . . . . . . . . . . . . . . . . . . . . . . . 61
Displaying and hiding fields in Table View . . . . . . . . . . . . . . . . . . . . . . . . . . . . . . . . . . . 65
Creating dynamic reports in Table View . . . . . . . . . . . . . . . . . . . . . . . . . . . . . . . . . . . . . 65
Adding, duplicating, and deleting records . . . . . . . . . . . . . . . . . . . . . . . . . . . . . . . . . . . . . . . 67
Adding and duplicating records . . . . . . . . . . . . . . . . . . . . . . . . . . . . . . . . . . . . . . . . . . . . 67
Adding and duplicating related records . . . . . . . . . . . . . . . . . . . . . . . . . . . . . . . . . . . . . . 68
Deleting records . . . . . . . . . . . . . . . . . . . . . . . . . . . . . . . . . . . . . . . . . . . . . . . . . . . . . . . 69
Entering data in records . . . . . . . . . . . . . . . . . . . . . . . . . . . . . . . . . . . . . . . . . . . . . . . . . . . . . 69
FILEMAKER PRO HELP 4
Selecting a field in Browse mode or Find mode . . . . . . . . . . . . . . . . . . . . . . . . . . . . . . . 70
Entering and changing data in fields . . . . . . . . . . . . . . . . . . . . . . . . . . . . . . . . . . . . . . . . 71
Moving text and data with drag and drop . . . . . . . . . . . . . . . . . . . . . . . . . . . . . . . . . . . . 72
Exporting the contents of a field . . . . . . . . . . . . . . . . . . . . . . . . . . . . . . . . . . . . . . . . . . . 73
Working with data in date fields . . . . . . . . . . . . . . . . . . . . . . . . . . . . . . . . . . . . . . . . . . . 74
Entering Japanese Emperor Year dates . . . . . . . . . . . . . . . . . . . . . . . . . . . . . . . . . . . . . 75
Conversion of dates with two-digit years . . . . . . . . . . . . . . . . . . . . . . . . . . . . . . . . . . . . . 76
Working with data in time fields . . . . . . . . . . . . . . . . . . . . . . . . . . . . . . . . . . . . . . . . . . . . 78
Committing data in records . . . . . . . . . . . . . . . . . . . . . . . . . . . . . . . . . . . . . . . . . . . . . . . 79
Using URLs in a field . . . . . . . . . . . . . . . . . . . . . . . . . . . . . . . . . . . . . . . . . . . . . . . . . . . . 79
Copying and moving data in records . . . . . . . . . . . . . . . . . . . . . . . . . . . . . . . . . . . . . . . . 80
Entering preset data from a value list . . . . . . . . . . . . . . . . . . . . . . . . . . . . . . . . . . . . . . . 81
Restoring data in records . . . . . . . . . . . . . . . . . . . . . . . . . . . . . . . . . . . . . . . . . . . . . . . . 82
Using a field index . . . . . . . . . . . . . . . . . . . . . . . . . . . . . . . . . . . . . . . . . . . . . . . . . . . . . . 83
Inserting the current date or other variables into a field . . . . . . . . . . . . . . . . . . . . . . . . . 83
Editing and formatting text . . . . . . . . . . . . . . . . . . . . . . . . . . . . . . . . . . . . . . . . . . . . . . . . . . .84
Selecting text . . . . . . . . . . . . . . . . . . . . . . . . . . . . . . . . . . . . . . . . . . . . . . . . . . . . . . . . . . 84
Editing text . . . . . . . . . . . . . . . . . . . . . . . . . . . . . . . . . . . . . . . . . . . . . . . . . . . . . . . . . . . 85
Formatting text in Browse mode . . . . . . . . . . . . . . . . . . . . . . . . . . . . . . . . . . . . . . . . . . . 86
Using data in container fields . . . . . . . . . . . . . . . . . . . . . . . . . . . . . . . . . . . . . . . . . . . . . . . . .86
Inserting graphics into container fields . . . . . . . . . . . . . . . . . . . . . . . . . . . . . . . . . . . . . . 88
Inserting QuickTime movies and multimedia into container fields . . . . . . . . . . . . . . . . . . 89
Inserting files of any type into container fields . . . . . . . . . . . . . . . . . . . . . . . . . . . . . . . . 89
Pasting graphics and movies from the Clipboard . . . . . . . . . . . . . . . . . . . . . . . . . . . . . . 90
Playing QuickTime and QuickTimeVR movies in container fields . . . . . . . . . . . . . . . . . . 91
Playing recorded sounds in container fields . . . . . . . . . . . . . . . . . . . . . . . . . . . . . . . . . . 91
Working with content in interactive containers . . . . . . . . . . . . . . . . . . . . . . . . . . . . . . . . 92
Working with PDF files in interactive containers . . . . . . . . . . . . . . . . . . . . . . . . . . . . . . . 92
Deleting data from container fields . . . . . . . . . . . . . . . . . . . . . . . . . . . . . . . . . . . . . . . . . 93
Checking spelling . . . . . . . . . . . . . . . . . . . . . . . . . . . . . . . . . . . . . . . . . . . . . . . . . . . . . . . . . . 94
Checking spelling as you type . . . . . . . . . . . . . . . . . . . . . . . . . . . . . . . . . . . . . . . . . . . . . 95
Creating and selecting spelling dictionaries . . . . . . . . . . . . . . . . . . . . . . . . . . . . . . . . . . 96
Editing user dictionaries . . . . . . . . . . . . . . . . . . . . . . . . . . . . . . . . . . . . . . . . . . . . . . . . . 97
Replacing the contents of a field . . . . . . . . . . . . . . . . . . . . . . . . . . . . . . . . . . . . . . . . . . . . . . 97
Adding and viewing data troubleshooting . . . . . . . . . . . . . . . . . . . . . . . . . . . . . . . . . . . . . . . 99
Records are missing . . . . . . . . . . . . . . . . . . . . . . . . . . . . . . . . . . . . . . . . . . . . . . . . . . . . 99
Wrong or missing data in field . . . . . . . . . . . . . . . . . . . . . . . . . . . . . . . . . . . . . . . . . . . . 100
Dates are not as expected . . . . . . . . . . . . . . . . . . . . . . . . . . . . . . . . . . . . . . . . . . . . . . 100
Summary data is missing or incorrect . . . . . . . . . . . . . . . . . . . . . . . . . . . . . . . . . . . . . . 101
Text or objects are clipped . . . . . . . . . . . . . . . . . . . . . . . . . . . . . . . . . . . . . . . . . . . . . . 101
Data does not appear correctly . . . . . . . . . . . . . . . . . . . . . . . . . . . . . . . . . . . . . . . . . . . 101
List View or Table View refreshes when adding records . . . . . . . . . . . . . . . . . . . . . . . . 102
Can't click or tab into a field . . . . . . . . . . . . . . . . . . . . . . . . . . . . . . . . . . . . . . . . . . . . . 102
Alerts when entering data . . . . . . . . . . . . . . . . . . . . . . . . . . . . . . . . . . . . . . . . . . . . . . . 103
Value lists troubleshooting . . . . . . . . . . . . . . . . . . . . . . . . . . . . . . . . . . . . . . . . . . . . . . 103
Finding, sorting, and replacing data . . . . . . . . . . . . . . . . . . . . . . . . . . . . . . . . . . . . . . . . . . . . . .105
Finding records . . . . . . . . . . . . . . . . . . . . . . . . . . . . . . . . . . . . . . . . . . . . . . . . . . . . . . . . . . 105
Performing a quick find in Browse mode . . . . . . . . . . . . . . . . . . . . . . . . . . . . . . . . . . . . 105
Finding records based on criteria in a single field . . . . . . . . . . . . . . . . . . . . . . . . . . . . . 106
Making a find request . . . . . . . . . . . . . . . . . . . . . . . . . . . . . . . . . . . . . . . . . . . . . . . . . . 107
Finding text and characters . . . . . . . . . . . . . . . . . . . . . . . . . . . . . . . . . . . . . . . . . . . . . . 109
Finding numbers, dates, times, and timestamps . . . . . . . . . . . . . . . . . . . . . . . . . . . . . . 112
Finding ranges of information . . . . . . . . . . . . . . . . . . . . . . . . . . . . . . . . . . . . . . . . . . . . 114
Finding data in related fields . . . . . . . . . . . . . . . . . . . . . . . . . . . . . . . . . . . . . . . . . . . . . 115
FILEMAKER PRO HELP 5
Finding empty or non-empty fields . . . . . . . . . . . . . . . . . . . . . . . . . . . . . . . . . . . . . . . . 116
Finding duplicate values . . . . . . . . . . . . . . . . . . . . . . . . . . . . . . . . . . . . . . . . . . . . . . . . 116
Finding duplicate values using a self-join relationship . . . . . . . . . . . . . . . . . . . . . . . . . 117
Finding records that match multiple criteria . . . . . . . . . . . . . . . . . . . . . . . . . . . . . . . . . 118
Finding records except those matching criteria . . . . . . . . . . . . . . . . . . . . . . . . . . . . . . . 120
Viewing, repeating, or changing the last find . . . . . . . . . . . . . . . . . . . . . . . . . . . . . . . . 121
Hiding records from a found set and viewing hidden records . . . . . . . . . . . . . . . . . . . . 121
Constraining (narrowing) a found set . . . . . . . . . . . . . . . . . . . . . . . . . . . . . . . . . . . . . . 122
Extending (broadening) a found set . . . . . . . . . . . . . . . . . . . . . . . . . . . . . . . . . . . . . . . 122
Finding records troubleshooting . . . . . . . . . . . . . . . . . . . . . . . . . . . . . . . . . . . . . . . . . . 123
Saving a find request . . . . . . . . . . . . . . . . . . . . . . . . . . . . . . . . . . . . . . . . . . . . . . . . . . 125
Managing saved find requests . . . . . . . . . . . . . . . . . . . . . . . . . . . . . . . . . . . . . . . . . . . 126
Sorting records . . . . . . . . . . . . . . . . . . . . . . . . . . . . . . . . . . . . . . . . . . . . . . . . . . . . . . . . . . 127
Options for sorting records . . . . . . . . . . . . . . . . . . . . . . . . . . . . . . . . . . . . . . . . . . . . . . 129
Sorting records by subsummary values . . . . . . . . . . . . . . . . . . . . . . . . . . . . . . . . . . . . 130
Sorting records troubleshooting . . . . . . . . . . . . . . . . . . . . . . . . . . . . . . . . . . . . . . . . . . 131
Finding and replacing data . . . . . . . . . . . . . . . . . . . . . . . . . . . . . . . . . . . . . . . . . . . . . . . . . 132
Find/replace troubleshooting . . . . . . . . . . . . . . . . . . . . . . . . . . . . . . . . . . . . . . . . . . . . . 134
Previewing and printing information . . . . . . . . . . . . . . . . . . . . . . . . . . . . . . . . . . . . . . . . . . . . . . 136
Specifying a default printer and paper options (Windows) . . . . . . . . . . . . . . . . . . . . . . . . . 136
Specifying printer and paper options (OS X) . . . . . . . . . . . . . . . . . . . . . . . . . . . . . . . . . . . . 137
Previewing data on a layout . . . . . . . . . . . . . . . . . . . . . . . . . . . . . . . . . . . . . . . . . . . . . . . . . 137
Printing records . . . . . . . . . . . . . . . . . . . . . . . . . . . . . . . . . . . . . . . . . . . . . . . . . . . . . . . . . . 138
Printing scripts . . . . . . . . . . . . . . . . . . . . . . . . . . . . . . . . . . . . . . . . . . . . . . . . . . . . . . . . . . . 140
Printing table and field information . . . . . . . . . . . . . . . . . . . . . . . . . . . . . . . . . . . . . . . . . . . 140
Printing the relationships graph . . . . . . . . . . . . . . . . . . . . . . . . . . . . . . . . . . . . . . . . . . . . . . 141
Printing labels . . . . . . . . . . . . . . . . . . . . . . . . . . . . . . . . . . . . . . . . . . . . . . . . . . . . . . . . . . . 142
Printing envelopes . . . . . . . . . . . . . . . . . . . . . . . . . . . . . . . . . . . . . . . . . . . . . . . . . . . . . . . . 143
Printing troubleshooting . . . . . . . . . . . . . . . . . . . . . . . . . . . . . . . . . . . . . . . . . . . . . . . . . . . .144
Document appears as expected in Preview mode . . . . . . . . . . . . . . . . . . . . . . . . . . . . 145
Document does not appear as expected in Preview mode . . . . . . . . . . . . . . . . . . . . . . 145
Records not printing . . . . . . . . . . . . . . . . . . . . . . . . . . . . . . . . . . . . . . . . . . . . . . . . . . . 147
Printing troubleshooting techniques (Windows) . . . . . . . . . . . . . . . . . . . . . . . . . . . . . . 147
Printing troubleshooting techniques (OS X) . . . . . . . . . . . . . . . . . . . . . . . . . . . . . . . . . 148
Designing and creating databases . . . . . . . . . . . . . . . . . . . . . . . . . . . 150
Creating a database . . . . . . . . . . . . . . . . . . . . . . . . . . . . . . . . . . . . . . . . . . . . . . . . . . . . . . . . . . 151
About planning a database . . . . . . . . . . . . . . . . . . . . . . . . . . . . . . . . . . . . . . . . . . . . . . . . . 151
Best practices for designing layouts . . . . . . . . . . . . . . . . . . . . . . . . . . . . . . . . . . . . . . . . . . 155
Tips for designing layouts . . . . . . . . . . . . . . . . . . . . . . . . . . . . . . . . . . . . . . . . . . . . . . . . . . 156
Creating a FileMaker Pro file . . . . . . . . . . . . . . . . . . . . . . . . . . . . . . . . . . . . . . . . . . . . . . . . 157
Setting file options . . . . . . . . . . . . . . . . . . . . . . . . . . . . . . . . . . . . . . . . . . . . . . . . . . . . . . . . 159
Defining database tables . . . . . . . . . . . . . . . . . . . . . . . . . . . . . . . . . . . . . . . . . . . . . . . . . . . 163
About defining database fields . . . . . . . . . . . . . . . . . . . . . . . . . . . . . . . . . . . . . . . . . . . . . . . 164
Defining fields in the Field Picker dialog box . . . . . . . . . . . . . . . . . . . . . . . . . . . . . . . . . 164
Defining fields in the Manage Database dialog box . . . . . . . . . . . . . . . . . . . . . . . . . . . 166
Defining fields in Table View . . . . . . . . . . . . . . . . . . . . . . . . . . . . . . . . . . . . . . . . . . . . . 167
About naming fields . . . . . . . . . . . . . . . . . . . . . . . . . . . . . . . . . . . . . . . . . . . . . . . . . . . . 167
About choosing a field type . . . . . . . . . . . . . . . . . . . . . . . . . . . . . . . . . . . . . . . . . . . . . . . . . 168
About text fields . . . . . . . . . . . . . . . . . . . . . . . . . . . . . . . . . . . . . . . . . . . . . . . . . . . . . . . 169
About number fields . . . . . . . . . . . . . . . . . . . . . . . . . . . . . . . . . . . . . . . . . . . . . . . . . . . 170
About date fields . . . . . . . . . . . . . . . . . . . . . . . . . . . . . . . . . . . . . . . . . . . . . . . . . . . . . . 170
About time fields . . . . . . . . . . . . . . . . . . . . . . . . . . . . . . . . . . . . . . . . . . . . . . . . . . . . . . 171
FILEMAKER PRO HELP 6
About timestamp fields . . . . . . . . . . . . . . . . . . . . . . . . . . . . . . . . . . . . . . . . . . . . . . . . . 171
About container fields . . . . . . . . . . . . . . . . . . . . . . . . . . . . . . . . . . . . . . . . . . . . . . . . . . 172
Defining calculation fields . . . . . . . . . . . . . . . . . . . . . . . . . . . . . . . . . . . . . . . . . . . . . . . 173
Defining summary fields . . . . . . . . . . . . . . . . . . . . . . . . . . . . . . . . . . . . . . . . . . . . . . . . 176
Setting options for fields . . . . . . . . . . . . . . . . . . . . . . . . . . . . . . . . . . . . . . . . . . . . . . . . . . .178
Defining automatic data entry . . . . . . . . . . . . . . . . . . . . . . . . . . . . . . . . . . . . . . . . . . . . 179
Defining field validation . . . . . . . . . . . . . . . . . . . . . . . . . . . . . . . . . . . . . . . . . . . . . . . . . 181
Defining global fields (fields with global storage) . . . . . . . . . . . . . . . . . . . . . . . . . . . . . 183
Defining repeating fields . . . . . . . . . . . . . . . . . . . . . . . . . . . . . . . . . . . . . . . . . . . . . . . . 184
Defining field indexing options . . . . . . . . . . . . . . . . . . . . . . . . . . . . . . . . . . . . . . . . . . . 185
Defining Furigana options . . . . . . . . . . . . . . . . . . . . . . . . . . . . . . . . . . . . . . . . . . . . . . . 187
About setting up container fields . . . . . . . . . . . . . . . . . . . . . . . . . . . . . . . . . . . . . . . . . . . . . 188
Setting up container fields to store data externally . . . . . . . . . . . . . . . . . . . . . . . . . . . . 189
Managing external storage of container data . . . . . . . . . . . . . . . . . . . . . . . . . . . . . . . . 190
Managing performance with thumbnails . . . . . . . . . . . . . . . . . . . . . . . . . . . . . . . . . . . . 191
Transferring container data . . . . . . . . . . . . . . . . . . . . . . . . . . . . . . . . . . . . . . . . . . . . . . 192
Changing field definitions . . . . . . . . . . . . . . . . . . . . . . . . . . . . . . . . . . . . . . . . . . . . . . . . . . .193
Changing field names . . . . . . . . . . . . . . . . . . . . . . . . . . . . . . . . . . . . . . . . . . . . . . . . . . 194
Duplicating field definitions . . . . . . . . . . . . . . . . . . . . . . . . . . . . . . . . . . . . . . . . . . . . . . 194
Changing field types . . . . . . . . . . . . . . . . . . . . . . . . . . . . . . . . . . . . . . . . . . . . . . . . . . . 195
Changing calculation formulas . . . . . . . . . . . . . . . . . . . . . . . . . . . . . . . . . . . . . . . . . . . 196
Changing summary fields . . . . . . . . . . . . . . . . . . . . . . . . . . . . . . . . . . . . . . . . . . . . . . . 196
Reordering field definitions . . . . . . . . . . . . . . . . . . . . . . . . . . . . . . . . . . . . . . . . . . . . . . 197
Deleting table definitions, field definitions, and data . . . . . . . . . . . . . . . . . . . . . . . . . . . 198
Creating file paths . . . . . . . . . . . . . . . . . . . . . . . . . . . . . . . . . . . . . . . . . . . . . . . . . . . . . . . . 199
Using variables . . . . . . . . . . . . . . . . . . . . . . . . . . . . . . . . . . . . . . . . . . . . . . . . . . . . . . . . . . 202
Working with formulas and functions . . . . . . . . . . . . . . . . . . . . . . . . . . . . . . . . . . . . . . . . . . 203
About functions . . . . . . . . . . . . . . . . . . . . . . . . . . . . . . . . . . . . . . . . . . . . . . . . . . . . . . . 204
About formulas . . . . . . . . . . . . . . . . . . . . . . . . . . . . . . . . . . . . . . . . . . . . . . . . . . . . . . . 205
Using operators in formulas . . . . . . . . . . . . . . . . . . . . . . . . . . . . . . . . . . . . . . . . . . . . . 206
Identifying text constants and special characters in formulas . . . . . . . . . . . . . . . . . . . . 206
Adding a new line to the results of a formula . . . . . . . . . . . . . . . . . . . . . . . . . . . . . . . . 207
Adding comments to a formula . . . . . . . . . . . . . . . . . . . . . . . . . . . . . . . . . . . . . . . . . . . 207
Using a reserved word or symbol for a field or table name . . . . . . . . . . . . . . . . . . . . . . 208
Getting the contents of a repetition in a repeating field . . . . . . . . . . . . . . . . . . . . . . . . . 209
Working with plug-ins . . . . . . . . . . . . . . . . . . . . . . . . . . . . . . . . . . . . . . . . . . . . . . . . . . . . . .210
Creating custom plug-ins . . . . . . . . . . . . . . . . . . . . . . . . . . . . . . . . . . . . . . . . . . . . . . . 210
Installing plug-ins . . . . . . . . . . . . . . . . . . . . . . . . . . . . . . . . . . . . . . . . . . . . . . . . . . . . . 211
Updating plug-ins . . . . . . . . . . . . . . . . . . . . . . . . . . . . . . . . . . . . . . . . . . . . . . . . . . . . . 212
Plug-in update example . . . . . . . . . . . . . . . . . . . . . . . . . . . . . . . . . . . . . . . . . . . . . . . . 213
Creating and managing layouts and reports . . . . . . . . . . . . . . . . . . . . . . . . . . . . . . . . . . . . . . . 216
Creating a layout . . . . . . . . . . . . . . . . . . . . . . . . . . . . . . . . . . . . . . . . . . . . . . . . . . . . . . . . . 216
Switching between layouts . . . . . . . . . . . . . . . . . . . . . . . . . . . . . . . . . . . . . . . . . . . . . . 218
Managing layouts . . . . . . . . . . . . . . . . . . . . . . . . . . . . . . . . . . . . . . . . . . . . . . . . . . . . . 219
Duplicating, deleting, or renaming layouts . . . . . . . . . . . . . . . . . . . . . . . . . . . . . . . . . . 221
Saving and reverting layout changes . . . . . . . . . . . . . . . . . . . . . . . . . . . . . . . . . . . . . . 222
Reordering and excluding layouts in the Layout pop-up menu . . . . . . . . . . . . . . . . . . . 222
Editing layouts . . . . . . . . . . . . . . . . . . . . . . . . . . . . . . . . . . . . . . . . . . . . . . . . . . . . . . . . . . . 223
Setting up form, list, and table views for a layout . . . . . . . . . . . . . . . . . . . . . . . . . . . . . 223
Changing the table that a layout shows . . . . . . . . . . . . . . . . . . . . . . . . . . . . . . . . . . . . 225
Setting the automatic record-saving option for a layout . . . . . . . . . . . . . . . . . . . . . . . . 225
Showing or hiding field frames . . . . . . . . . . . . . . . . . . . . . . . . . . . . . . . . . . . . . . . . . . . 226
Showing field borders and fill for the current record . . . . . . . . . . . . . . . . . . . . . . . . . . . 226
Specifying a menu set for a layout . . . . . . . . . . . . . . . . . . . . . . . . . . . . . . . . . . . . . . . . 227
FILEMAKER PRO HELP 7
Changing the theme of a layout . . . . . . . . . . . . . . . . . . . . . . . . . . . . . . . . . . . . . . . . . . 227
Changing the width of a layout . . . . . . . . . . . . . . . . . . . . . . . . . . . . . . . . . . . . . . . . . . . 229
Working with layout parts . . . . . . . . . . . . . . . . . . . . . . . . . . . . . . . . . . . . . . . . . . . . . . . . . . . 229
About layout part types . . . . . . . . . . . . . . . . . . . . . . . . . . . . . . . . . . . . . . . . . . . . . . . . . 230
Adding a layout part . . . . . . . . . . . . . . . . . . . . . . . . . . . . . . . . . . . . . . . . . . . . . . . . . . . 232
Changing a layout part . . . . . . . . . . . . . . . . . . . . . . . . . . . . . . . . . . . . . . . . . . . . . . . . . 233
Defining page breaks and numbering . . . . . . . . . . . . . . . . . . . . . . . . . . . . . . . . . . . . . . 234
Reordering layout parts . . . . . . . . . . . . . . . . . . . . . . . . . . . . . . . . . . . . . . . . . . . . . . . . . 235
Resizing layout parts . . . . . . . . . . . . . . . . . . . . . . . . . . . . . . . . . . . . . . . . . . . . . . . . . . . 236
Deleting layout parts . . . . . . . . . . . . . . . . . . . . . . . . . . . . . . . . . . . . . . . . . . . . . . . . . . . 237
Adding fields to a layout . . . . . . . . . . . . . . . . . . . . . . . . . . . . . . . . . . . . . . . . . . . . . . . . . . . .237
Placing and removing fields on a layout . . . . . . . . . . . . . . . . . . . . . . . . . . . . . . . . . . . . 238
Placing merge fields on a layout . . . . . . . . . . . . . . . . . . . . . . . . . . . . . . . . . . . . . . . . . . 240
Creating portals to display related records . . . . . . . . . . . . . . . . . . . . . . . . . . . . . . . . . . . . . 241
Selecting and working with portals . . . . . . . . . . . . . . . . . . . . . . . . . . . . . . . . . . . . . . . . 242
Drawing and inserting objects on a layout . . . . . . . . . . . . . . . . . . . . . . . . . . . . . . . . . . . . . . 244
Working with the layout tools . . . . . . . . . . . . . . . . . . . . . . . . . . . . . . . . . . . . . . . . . . . . 244
Adding text to a layout . . . . . . . . . . . . . . . . . . . . . . . . . . . . . . . . . . . . . . . . . . . . . . . . . . 246
Inserting the date, page number, or other variable onto a layout . . . . . . . . . . . . . . . . . 247
Inserting merge variables onto a layout . . . . . . . . . . . . . . . . . . . . . . . . . . . . . . . . . . . . 248
Drawing lines and other shapes . . . . . . . . . . . . . . . . . . . . . . . . . . . . . . . . . . . . . . . . . . 250
Inserting graphics onto a layout . . . . . . . . . . . . . . . . . . . . . . . . . . . . . . . . . . . . . . . . . . 251
Working with panel controls on layouts . . . . . . . . . . . . . . . . . . . . . . . . . . . . . . . . . . . . . . . . 252
Adding a tab control . . . . . . . . . . . . . . . . . . . . . . . . . . . . . . . . . . . . . . . . . . . . . . . . . . . 252
Changing a tab control . . . . . . . . . . . . . . . . . . . . . . . . . . . . . . . . . . . . . . . . . . . . . . . . . 253
Adding a slide control . . . . . . . . . . . . . . . . . . . . . . . . . . . . . . . . . . . . . . . . . . . . . . . . . . 254
Changing a slide control . . . . . . . . . . . . . . . . . . . . . . . . . . . . . . . . . . . . . . . . . . . . . . . . 255
Selecting and working with objects on panel controls . . . . . . . . . . . . . . . . . . . . . . . . . . 256
Moving and resizing panel controls . . . . . . . . . . . . . . . . . . . . . . . . . . . . . . . . . . . . . . . . 260
Copying, duplicating, and deleting panel controls . . . . . . . . . . . . . . . . . . . . . . . . . . . . . 260
Working with popovers on layouts . . . . . . . . . . . . . . . . . . . . . . . . . . . . . . . . . . . . . . . . . . . . 261
Adding a popover . . . . . . . . . . . . . . . . . . . . . . . . . . . . . . . . . . . . . . . . . . . . . . . . . . . . . 261
Changing popover settings . . . . . . . . . . . . . . . . . . . . . . . . . . . . . . . . . . . . . . . . . . . . . . 263
Moving and resizing popovers . . . . . . . . . . . . . . . . . . . . . . . . . . . . . . . . . . . . . . . . . . . 264
Copying, duplicating, and deleting popovers . . . . . . . . . . . . . . . . . . . . . . . . . . . . . . . . 264
Selecting and working with objects on popovers . . . . . . . . . . . . . . . . . . . . . . . . . . . . . 265
Working with web viewers on layouts . . . . . . . . . . . . . . . . . . . . . . . . . . . . . . . . . . . . . . . . . 266
Adding a web viewer . . . . . . . . . . . . . . . . . . . . . . . . . . . . . . . . . . . . . . . . . . . . . . . . . . . 267
Changing a web address . . . . . . . . . . . . . . . . . . . . . . . . . . . . . . . . . . . . . . . . . . . . . . . 268
Defining a custom web address . . . . . . . . . . . . . . . . . . . . . . . . . . . . . . . . . . . . . . . . . . 269
Controlling how layouts print . . . . . . . . . . . . . . . . . . . . . . . . . . . . . . . . . . . . . . . . . . . . . . . . 270
Specifying page margins . . . . . . . . . . . . . . . . . . . . . . . . . . . . . . . . . . . . . . . . . . . . . . . . 270
Showing page margins . . . . . . . . . . . . . . . . . . . . . . . . . . . . . . . . . . . . . . . . . . . . . . . . . 271
Setting up to print records in columns . . . . . . . . . . . . . . . . . . . . . . . . . . . . . . . . . . . . . . 271
Removing blank spaces in printouts . . . . . . . . . . . . . . . . . . . . . . . . . . . . . . . . . . . . . . . 273
Preventing objects from printing . . . . . . . . . . . . . . . . . . . . . . . . . . . . . . . . . . . . . . . . . . 275
Setting up script triggers . . . . . . . . . . . . . . . . . . . . . . . . . . . . . . . . . . . . . . . . . . . . . . . . . . .276
Setting script triggers for layouts . . . . . . . . . . . . . . . . . . . . . . . . . . . . . . . . . . . . . . . . . . 278
Setting script triggers for objects . . . . . . . . . . . . . . . . . . . . . . . . . . . . . . . . . . . . . . . . . . 279
Changing object data without activating script triggers . . . . . . . . . . . . . . . . . . . . . . . . . 280
Troubleshooting layouts . . . . . . . . . . . . . . . . . . . . . . . . . . . . . . . . . . . . . . . . . . . . . . . . . . . . 280
Troubleshooting layouts with summary or subsummary parts . . . . . . . . . . . . . . . . . . . 280
Troubleshooting label printing . . . . . . . . . . . . . . . . . . . . . . . . . . . . . . . . . . . . . . . . . . . . 281
Troubleshooting layouts that do not appear or print as expected . . . . . . . . . . . . . . . . . 282
FILEMAKER PRO HELP 8
Troubleshooting layouts designed for both Windows and OS X . . . . . . . . . . . . . . . . . . 285
Troubleshooting layouts with web viewers . . . . . . . . . . . . . . . . . . . . . . . . . . . . . . . . . . 287
Editing objects, layout parts, and the layout background . . . . . . . . . . . . . . . . . . . . . . . . . . . . . . 289
Selecting and working with objects on a layout . . . . . . . . . . . . . . . . . . . . . . . . . . . . . . . . . . 289
Selecting objects . . . . . . . . . . . . . . . . . . . . . . . . . . . . . . . . . . . . . . . . . . . . . . . . . . . . . . 289
Using the Inspector to format objects . . . . . . . . . . . . . . . . . . . . . . . . . . . . . . . . . . . . . . 290
Copying, duplicating, and deleting objects . . . . . . . . . . . . . . . . . . . . . . . . . . . . . . . . . . 291
Moving objects on a layout . . . . . . . . . . . . . . . . . . . . . . . . . . . . . . . . . . . . . . . . . . . . . . 293
Resizing and reshaping objects . . . . . . . . . . . . . . . . . . . . . . . . . . . . . . . . . . . . . . . . . . 294
Setting auto-resize options for layout objects . . . . . . . . . . . . . . . . . . . . . . . . . . . . . . . . 295
Specifying the display state for an object . . . . . . . . . . . . . . . . . . . . . . . . . . . . . . . . . . . 298
Formatting graphics on a layout . . . . . . . . . . . . . . . . . . . . . . . . . . . . . . . . . . . . . . . . . . 299
Protecting objects from change . . . . . . . . . . . . . . . . . . . . . . . . . . . . . . . . . . . . . . . . . . . 300
Naming objects . . . . . . . . . . . . . . . . . . . . . . . . . . . . . . . . . . . . . . . . . . . . . . . . . . . . . . . 300
Defining conditional formatting for layout objects . . . . . . . . . . . . . . . . . . . . . . . . . . . . . 301
Formatting objects, layout parts, and the layout background . . . . . . . . . . . . . . . . . . . . . . . 304
Setting the fill, line style, and borders for objects, layout parts, and the layout background
304
Filling objects, layout parts, or the layout background with a color gradient . . . . . . . . . 307
Filling objects, layout parts, or the layout background with an image . . . . . . . . . . . . . . 309
Adding shadows and padding to layout objects . . . . . . . . . . . . . . . . . . . . . . . . . . . . . . 310
Formatting portals . . . . . . . . . . . . . . . . . . . . . . . . . . . . . . . . . . . . . . . . . . . . . . . . . . . . . 312
Formatting panel controls . . . . . . . . . . . . . . . . . . . . . . . . . . . . . . . . . . . . . . . . . . . . . . . 313
Formatting popover buttons and popovers . . . . . . . . . . . . . . . . . . . . . . . . . . . . . . . . . . 316
Hiding or showing layout objects . . . . . . . . . . . . . . . . . . . . . . . . . . . . . . . . . . . . . . . . . . . . . 317
Creating and working with styles for layout objects, parts, and the layout background . . . . 318
About layout object, part, and background styles . . . . . . . . . . . . . . . . . . . . . . . . . . . . . 318
Viewing and applying layout object, part, or background styles . . . . . . . . . . . . . . . . . . 319
Editing layout object, part, or background styles . . . . . . . . . . . . . . . . . . . . . . . . . . . . . . 320
Creating new layout object, part, or background styles . . . . . . . . . . . . . . . . . . . . . . . . 321
Renaming layout object, part, or background styles . . . . . . . . . . . . . . . . . . . . . . . . . . . 322
Reverting changes to layout object, part, or background styles . . . . . . . . . . . . . . . . . . 322
Deleting layout object, part, or background styles . . . . . . . . . . . . . . . . . . . . . . . . . . . . 323
Copying formatting attributes between layout objects, parts, or backgrounds . . . . . . . 324
Saving and managing layout themes . . . . . . . . . . . . . . . . . . . . . . . . . . . . . . . . . . . . . . . . . . 326
Renaming a layout theme . . . . . . . . . . . . . . . . . . . . . . . . . . . . . . . . . . . . . . . . . . . . . . . 326
Saving a layout theme . . . . . . . . . . . . . . . . . . . . . . . . . . . . . . . . . . . . . . . . . . . . . . . . . . 326
Managing layout themes . . . . . . . . . . . . . . . . . . . . . . . . . . . . . . . . . . . . . . . . . . . . . . . . 327
Importing layout themes . . . . . . . . . . . . . . . . . . . . . . . . . . . . . . . . . . . . . . . . . . . . . . . . 328
Formatting and setting up field objects in Layout mode . . . . . . . . . . . . . . . . . . . . . . . . . . . 329
Specifying text formats for fields . . . . . . . . . . . . . . . . . . . . . . . . . . . . . . . . . . . . . . . . . . 330
Specifying formats for fields containing numbers . . . . . . . . . . . . . . . . . . . . . . . . . . . . . 331
Specifying formats for date fields . . . . . . . . . . . . . . . . . . . . . . . . . . . . . . . . . . . . . . . . . 333
Specifying formats for time fields . . . . . . . . . . . . . . . . . . . . . . . . . . . . . . . . . . . . . . . . . 334
Specifying formats for timestamp fields . . . . . . . . . . . . . . . . . . . . . . . . . . . . . . . . . . . . 335
Specifying formats for container fields . . . . . . . . . . . . . . . . . . . . . . . . . . . . . . . . . . . . . 336
Adding borders, fill, and baselines to fields . . . . . . . . . . . . . . . . . . . . . . . . . . . . . . . . . . 338
Adding scroll bars to fields . . . . . . . . . . . . . . . . . . . . . . . . . . . . . . . . . . . . . . . . . . . . . . 339
Defining value lists . . . . . . . . . . . . . . . . . . . . . . . . . . . . . . . . . . . . . . . . . . . . . . . . . . . . 340
Setting up a field to display a pop-up menu, checkbox set, or other control . . . . . . . . . 343
Setting up a field to display a keyboard . . . . . . . . . . . . . . . . . . . . . . . . . . . . . . . . . . . . 345
Setting up a field to display a drop-down calendar . . . . . . . . . . . . . . . . . . . . . . . . . . . . 346
Setting up a field to auto-complete during data entry . . . . . . . . . . . . . . . . . . . . . . . . . . 347
Setting up the display of repeating fields . . . . . . . . . . . . . . . . . . . . . . . . . . . . . . . . . . . 347
FILEMAKER PRO HELP 9
Adding tooltips on layouts . . . . . . . . . . . . . . . . . . . . . . . . . . . . . . . . . . . . . . . . . . . . . . . . . . 348
Identifying badges on layout objects . . . . . . . . . . . . . . . . . . . . . . . . . . . . . . . . . . . . . . . . . . 349
Making layout objects accessible to screen readers . . . . . . . . . . . . . . . . . . . . . . . . . . . . . . 350
Controlling data input behavior of fields . . . . . . . . . . . . . . . . . . . . . . . . . . . . . . . . . . . . . . . . 352
Setting the tab order for data entry . . . . . . . . . . . . . . . . . . . . . . . . . . . . . . . . . . . . . . . . 352
Allowing or preventing entry into fields . . . . . . . . . . . . . . . . . . . . . . . . . . . . . . . . . . . . . 354
Configuring quick find . . . . . . . . . . . . . . . . . . . . . . . . . . . . . . . . . . . . . . . . . . . . . . . . . . 355
Setting the keys for exiting a field . . . . . . . . . . . . . . . . . . . . . . . . . . . . . . . . . . . . . . . . . 356
Setting the text input method for fields . . . . . . . . . . . . . . . . . . . . . . . . . . . . . . . . . . . . . 357
Setting spell checking for individual fields . . . . . . . . . . . . . . . . . . . . . . . . . . . . . . . . . . . 358
Formatting text . . . . . . . . . . . . . . . . . . . . . . . . . . . . . . . . . . . . . . . . . . . . . . . . . . . . . . . . . . . 358
Making text bold, italic, highlighted, or setting other styles . . . . . . . . . . . . . . . . . . . . . . 359
Specifying paragraph attributes and tab settings . . . . . . . . . . . . . . . . . . . . . . . . . . . . . 361
Formatting fields and text for vertical writing . . . . . . . . . . . . . . . . . . . . . . . . . . . . . . . . . 362
Arranging objects . . . . . . . . . . . . . . . . . . . . . . . . . . . . . . . . . . . . . . . . . . . . . . . . . . . . . . . . . 364
Grouping and ungrouping objects . . . . . . . . . . . . . . . . . . . . . . . . . . . . . . . . . . . . . . . . . 364
Moving objects forward or backward on a layout . . . . . . . . . . . . . . . . . . . . . . . . . . . . . 365
Rotating objects . . . . . . . . . . . . . . . . . . . . . . . . . . . . . . . . . . . . . . . . . . . . . . . . . . . . . . 366
Aligning or distributing objects . . . . . . . . . . . . . . . . . . . . . . . . . . . . . . . . . . . . . . . . . . . 366
Using tools to precisely position objects . . . . . . . . . . . . . . . . . . . . . . . . . . . . . . . . . . . . . . . 368
Using the Inspector to position objects . . . . . . . . . . . . . . . . . . . . . . . . . . . . . . . . . . . . . 368
Using the rulers and grid . . . . . . . . . . . . . . . . . . . . . . . . . . . . . . . . . . . . . . . . . . . . . . . . 368
Using guides and dynamic guides . . . . . . . . . . . . . . . . . . . . . . . . . . . . . . . . . . . . . . . . 370
Sizing layouts for different devices . . . . . . . . . . . . . . . . . . . . . . . . . . . . . . . . . . . . . . . . 372
Showing text or field boundaries . . . . . . . . . . . . . . . . . . . . . . . . . . . . . . . . . . . . . . . . . . 373
Working with related tables and files . . . . . . . . . . . . . . . . . . . . . . . . . . . . . . . . . . . . . . . . . . . . .374
About relationships . . . . . . . . . . . . . . . . . . . . . . . . . . . . . . . . . . . . . . . . . . . . . . . . . . . . . . . 374
About the relationships graph . . . . . . . . . . . . . . . . . . . . . . . . . . . . . . . . . . . . . . . . . . . . 376
About match fields for relationships . . . . . . . . . . . . . . . . . . . . . . . . . . . . . . . . . . . . . . . 376
About the types of relationships . . . . . . . . . . . . . . . . . . . . . . . . . . . . . . . . . . . . . . . . . . . . . . 378
About single-criteria relationships . . . . . . . . . . . . . . . . . . . . . . . . . . . . . . . . . . . . . . . . . 378
About multi-criteria relationships . . . . . . . . . . . . . . . . . . . . . . . . . . . . . . . . . . . . . . . . . . 380
About relationships using comparative operators . . . . . . . . . . . . . . . . . . . . . . . . . . . . . 382
About relationships that return a range of records . . . . . . . . . . . . . . . . . . . . . . . . . . . . 382
About self-joining relationships . . . . . . . . . . . . . . . . . . . . . . . . . . . . . . . . . . . . . . . . . . . 384
Working with the relationships graph . . . . . . . . . . . . . . . . . . . . . . . . . . . . . . . . . . . . . . . . . . 384
Creating relationships . . . . . . . . . . . . . . . . . . . . . . . . . . . . . . . . . . . . . . . . . . . . . . . . . . 387
Changing relationships . . . . . . . . . . . . . . . . . . . . . . . . . . . . . . . . . . . . . . . . . . . . . . . . . 387
Adding tables to the relationships graph . . . . . . . . . . . . . . . . . . . . . . . . . . . . . . . . . . . . 389
Selecting related tables in the relationships graph . . . . . . . . . . . . . . . . . . . . . . . . . . . . 390
Duplicating tables in the relationships graph . . . . . . . . . . . . . . . . . . . . . . . . . . . . . . . . . 390
Moving tables or notes in the relationships graph . . . . . . . . . . . . . . . . . . . . . . . . . . . . . 391
Resizing tables in the relationships graph . . . . . . . . . . . . . . . . . . . . . . . . . . . . . . . . . . . 391
Aligning tables in the relationships graph . . . . . . . . . . . . . . . . . . . . . . . . . . . . . . . . . . . 392
Adding text notes to the relationships graph . . . . . . . . . . . . . . . . . . . . . . . . . . . . . . . . . 393
Summarizing data in portals . . . . . . . . . . . . . . . . . . . . . . . . . . . . . . . . . . . . . . . . . . . . . . . . 393
Filtering records in portals . . . . . . . . . . . . . . . . . . . . . . . . . . . . . . . . . . . . . . . . . . . . . . . . . .394
About lookups . . . . . . . . . . . . . . . . . . . . . . . . . . . . . . . . . . . . . . . . . . . . . . . . . . . . . . . . . . . 394
Defining lookups . . . . . . . . . . . . . . . . . . . . . . . . . . . . . . . . . . . . . . . . . . . . . . . . . . . . . . 395
Updating lookup values . . . . . . . . . . . . . . . . . . . . . . . . . . . . . . . . . . . . . . . . . . . . . . . . . 397
Creating charts from data . . . . . . . . . . . . . . . . . . . . . . . . . . . . . . . . . . . . . . . . . . . . . . . . . . . . . . 398
About chart types . . . . . . . . . . . . . . . . . . . . . . . . . . . . . . . . . . . . . . . . . . . . . . . . . . . . . . . . . 398
Chart planning guidelines . . . . . . . . . . . . . . . . . . . . . . . . . . . . . . . . . . . . . . . . . . . . . . . . . . 400
Creating quick charts . . . . . . . . . . . . . . . . . . . . . . . . . . . . . . . . . . . . . . . . . . . . . . . . . . . . . .400
FILEMAKER PRO HELP 10
Creating and editing charts in Layout mode . . . . . . . . . . . . . . . . . . . . . . . . . . . . . . . . . . . . 403
Column, bar, line, and area charts . . . . . . . . . . . . . . . . . . . . . . . . . . . . . . . . . . . . . . . . 405
Pie charts . . . . . . . . . . . . . . . . . . . . . . . . . . . . . . . . . . . . . . . . . . . . . . . . . . . . . . . . . . .407
Scatter and bubble charts . . . . . . . . . . . . . . . . . . . . . . . . . . . . . . . . . . . . . . . . . . . . . . . 408
Formatting and scaling chart axes . . . . . . . . . . . . . . . . . . . . . . . . . . . . . . . . . . . . . . . . 409
Specifying the data source for a chart . . . . . . . . . . . . . . . . . . . . . . . . . . . . . . . . . . . . . . 411
Changing the look of a chart . . . . . . . . . . . . . . . . . . . . . . . . . . . . . . . . . . . . . . . . . . . . . 411
Placing your chart in the appropriate layout part . . . . . . . . . . . . . . . . . . . . . . . . . . . . . . 413
Charting tips, tricks, and troubleshooting . . . . . . . . . . . . . . . . . . . . . . . . . . . . . . . . . . . . . . . 415
Example: Charting delimited data . . . . . . . . . . . . . . . . . . . . . . . . . . . . . . . . . . . . . . . . . . . . 416
Creating scripts to automate tasks . . . . . . . . . . . . . . . . . . . . . . . . . . . . . . . . . . . . . . . . . . . . . . .419
Planning a script . . . . . . . . . . . . . . . . . . . . . . . . . . . . . . . . . . . . . . . . . . . . . . . . . . . . . . . . . 419
Creating and editing scripts . . . . . . . . . . . . . . . . . . . . . . . . . . . . . . . . . . . . . . . . . . . . . . . . . 421
Managing scripts using folders . . . . . . . . . . . . . . . . . . . . . . . . . . . . . . . . . . . . . . . . . . . 424
Saving a script . . . . . . . . . . . . . . . . . . . . . . . . . . . . . . . . . . . . . . . . . . . . . . . . . . . . . . . . 426
Deleting a script . . . . . . . . . . . . . . . . . . . . . . . . . . . . . . . . . . . . . . . . . . . . . . . . . . . . . . 426
Copying and pasting scripts . . . . . . . . . . . . . . . . . . . . . . . . . . . . . . . . . . . . . . . . . . . . . 427
Running scripts on FileMaker Server . . . . . . . . . . . . . . . . . . . . . . . . . . . . . . . . . . . . . . 428
Importing scripts from other FileMaker files . . . . . . . . . . . . . . . . . . . . . . . . . . . . . . . . . 428
Scripting with ActiveX Automation (Windows) . . . . . . . . . . . . . . . . . . . . . . . . . . . . . . . . . . . 430
Using FileMaker Pro ActiveX Automation (Windows) . . . . . . . . . . . . . . . . . . . . . . . . . . 430
ActiveX Automation objects, methods, and properties (Windows) . . . . . . . . . . . . . . . . 432
ActiveX Automation example (Windows) . . . . . . . . . . . . . . . . . . . . . . . . . . . . . . . . . . . 434
Scripting with Apple events (OS X) . . . . . . . . . . . . . . . . . . . . . . . . . . . . . . . . . . . . . . . . . . . 437
Apple events troubleshooting (OS X) . . . . . . . . . . . . . . . . . . . . . . . . . . . . . . . . . . . . . . 437
Apple events error: "Apple event timed out" (-1712) . . . . . . . . . . . . . . . . . . . . . . . . . . . 438
Apple events error: "Expected expression but found unknown token" . . . . . . . . . . . . . 438
Apple events error: "Invalid object containment" (-1723) . . . . . . . . . . . . . . . . . . . . . . . 438
Apple events error: "Object not found" (-1728) . . . . . . . . . . . . . . . . . . . . . . . . . . . . . . . 438
Apple events error: "Data is being accessed by another user, script, or transaction" (-10011)
439
Apple events error: "Set Data failed. Invalid data was supplied" (-17005) . . . . . . . . . . 439
Apple events error: "Event failed. User canceled the event processing" (-17006) . . . . 440
Apple events error: "Create failed. Invalid data was supplied" (-17007) . . . . . . . . . . . . 440
Working with the Scripts menu . . . . . . . . . . . . . . . . . . . . . . . . . . . . . . . . . . . . . . . . . . . . . . 440
Using buttons with scripts . . . . . . . . . . . . . . . . . . . . . . . . . . . . . . . . . . . . . . . . . . . . . . . . . . 440
Defining a button . . . . . . . . . . . . . . . . . . . . . . . . . . . . . . . . . . . . . . . . . . . . . . . . . . . . . . 441
Copying a button . . . . . . . . . . . . . . . . . . . . . . . . . . . . . . . . . . . . . . . . . . . . . . . . . . . . . . 442
Changing a button definition . . . . . . . . . . . . . . . . . . . . . . . . . . . . . . . . . . . . . . . . . . . . . 443
Deleting a button . . . . . . . . . . . . . . . . . . . . . . . . . . . . . . . . . . . . . . . . . . . . . . . . . . . . . . 443
Script examples . . . . . . . . . . . . . . . . . . . . . . . . . . . . . . . . . . . . . . . . . . . . . . . . . . . . . . . . . . 443
If structure examples . . . . . . . . . . . . . . . . . . . . . . . . . . . . . . . . . . . . . . . . . . . . . . . . . . . 444
Loop structure examples . . . . . . . . . . . . . . . . . . . . . . . . . . . . . . . . . . . . . . . . . . . . . . . . 444
Startup script examples . . . . . . . . . . . . . . . . . . . . . . . . . . . . . . . . . . . . . . . . . . . . . . . . . 445
Perform Script and script parameter examples . . . . . . . . . . . . . . . . . . . . . . . . . . . . . . . 445
Protecting databases . . . . . . . . . . . . . . . . . . . . . . . . . . . . . . . . . . . . . . . . . . . . . . . . . . . . . . . . . 447
About protecting databases . . . . . . . . . . . . . . . . . . . . . . . . . . . . . . . . . . . . . . . . . . . . . . . . . 447
About accounts, privilege sets, and extended privileges . . . . . . . . . . . . . . . . . . . . . . . 448
About the Admin and Guest accounts . . . . . . . . . . . . . . . . . . . . . . . . . . . . . . . . . . . . . . 450
Using the predefined privilege sets . . . . . . . . . . . . . . . . . . . . . . . . . . . . . . . . . . . . . . . . 450
Planning security for a file . . . . . . . . . . . . . . . . . . . . . . . . . . . . . . . . . . . . . . . . . . . . . . . 451
Password-protecting a file . . . . . . . . . . . . . . . . . . . . . . . . . . . . . . . . . . . . . . . . . . . . . . . 453
Creating and managing accounts . . . . . . . . . . . . . . . . . . . . . . . . . . . . . . . . . . . . . . . . . . . . 453
Viewing and reordering accounts . . . . . . . . . . . . . . . . . . . . . . . . . . . . . . . . . . . . . . . . . 454
FILEMAKER PRO HELP 11
Creating accounts . . . . . . . . . . . . . . . . . . . . . . . . . . . . . . . . . . . . . . . . . . . . . . . . . . . . . 455
Editing existing accounts . . . . . . . . . . . . . . . . . . . . . . . . . . . . . . . . . . . . . . . . . . . . . . . . 456
Duplicating and deleting accounts . . . . . . . . . . . . . . . . . . . . . . . . . . . . . . . . . . . . . . . . 458
Creating accounts that authenticate via an external server . . . . . . . . . . . . . . . . . . . . . 459
Tips for creating account names and passwords . . . . . . . . . . . . . . . . . . . . . . . . . . . . . 460
Creating and managing privilege sets . . . . . . . . . . . . . . . . . . . . . . . . . . . . . . . . . . . . . . . . . 461
Viewing privilege sets . . . . . . . . . . . . . . . . . . . . . . . . . . . . . . . . . . . . . . . . . . . . . . . . . . 461
Creating new privilege sets . . . . . . . . . . . . . . . . . . . . . . . . . . . . . . . . . . . . . . . . . . . . . . 462
Editing existing privilege sets . . . . . . . . . . . . . . . . . . . . . . . . . . . . . . . . . . . . . . . . . . . . 462
Duplicating and deleting privilege sets . . . . . . . . . . . . . . . . . . . . . . . . . . . . . . . . . . . . . 463
Editing record access privileges . . . . . . . . . . . . . . . . . . . . . . . . . . . . . . . . . . . . . . . . . . 464
Editing layouts privileges . . . . . . . . . . . . . . . . . . . . . . . . . . . . . . . . . . . . . . . . . . . . . . . . 468
Editing value list privileges . . . . . . . . . . . . . . . . . . . . . . . . . . . . . . . . . . . . . . . . . . . . . . 470
Editing scripts privileges . . . . . . . . . . . . . . . . . . . . . . . . . . . . . . . . . . . . . . . . . . . . . . . . 472
Editing extended privileges for a privilege set . . . . . . . . . . . . . . . . . . . . . . . . . . . . . . . . 474
Editing other privileges . . . . . . . . . . . . . . . . . . . . . . . . . . . . . . . . . . . . . . . . . . . . . . . . . 476
Managing extended privileges . . . . . . . . . . . . . . . . . . . . . . . . . . . . . . . . . . . . . . . . . . . . . . . 479
Viewing extended privileges . . . . . . . . . . . . . . . . . . . . . . . . . . . . . . . . . . . . . . . . . . . . . 479
Editing which privilege sets may use an extended privilege . . . . . . . . . . . . . . . . . . . . . 479
Creating and deleting extended privileges . . . . . . . . . . . . . . . . . . . . . . . . . . . . . . . . . . 480
Opening files protected with passwords . . . . . . . . . . . . . . . . . . . . . . . . . . . . . . . . . . . . . . . 481
Changing your password for a file . . . . . . . . . . . . . . . . . . . . . . . . . . . . . . . . . . . . . . . . . 482
Authorizing access to files . . . . . . . . . . . . . . . . . . . . . . . . . . . . . . . . . . . . . . . . . . . . . . . . . . 483
Setting up access to a file . . . . . . . . . . . . . . . . . . . . . . . . . . . . . . . . . . . . . . . . . . . . . . . 483
Sharing data . . . . . . . . . . . . . . . . . . . . . . . . . . . . . . . . . . . . . . . . . . . . . 485
Sharing databases on a network . . . . . . . . . . . . . . . . . . . . . . . . . . . . . . . . . . . . . . . . . . . . . . . . 486
Sharing and hosting files . . . . . . . . . . . . . . . . . . . . . . . . . . . . . . . . . . . . . . . . . . . . . . . . . . . 487
Opening files as the host . . . . . . . . . . . . . . . . . . . . . . . . . . . . . . . . . . . . . . . . . . . . . . . . 487
Closing shared files . . . . . . . . . . . . . . . . . . . . . . . . . . . . . . . . . . . . . . . . . . . . . . . . . . . . 489
Working with shared files as a client . . . . . . . . . . . . . . . . . . . . . . . . . . . . . . . . . . . . . . . . . . 489
Opening shared files as a client . . . . . . . . . . . . . . . . . . . . . . . . . . . . . . . . . . . . . . . . . . 490
Opening shared databases remotely using a URL . . . . . . . . . . . . . . . . . . . . . . . . . . . . 492
Sending the URL of a shared database . . . . . . . . . . . . . . . . . . . . . . . . . . . . . . . . . . . . 494
Sharing files with FileMaker Go clients . . . . . . . . . . . . . . . . . . . . . . . . . . . . . . . . . . . . . . . . 494
Uploading files to FileMaker Server . . . . . . . . . . . . . . . . . . . . . . . . . . . . . . . . . . . . . . . . . . . 495
Saving, importing, and exporting data . . . . . . . . . . . . . . . . . . . . . . . . . . . . . . . . . . . . . . . . . . . . 498
Saving and sending records in other formats . . . . . . . . . . . . . . . . . . . . . . . . . . . . . . . . . . . 498
Saving and sending records as an Excel file . . . . . . . . . . . . . . . . . . . . . . . . . . . . . . . . 499
Saving and sending records as a PDF file . . . . . . . . . . . . . . . . . . . . . . . . . . . . . . . . . . 499
Saving and sending records as a snapshot link . . . . . . . . . . . . . . . . . . . . . . . . . . . . . . 500
Sending email messages based on record data . . . . . . . . . . . . . . . . . . . . . . . . . . . . . . . . . 502
Sending one email message . . . . . . . . . . . . . . . . . . . . . . . . . . . . . . . . . . . . . . . . . . . . . 502
Sending multiple email messages . . . . . . . . . . . . . . . . . . . . . . . . . . . . . . . . . . . . . . . . . 504
Entering or editing SMTP options . . . . . . . . . . . . . . . . . . . . . . . . . . . . . . . . . . . . . . . . . 506
Importing data into FileMaker Pro . . . . . . . . . . . . . . . . . . . . . . . . . . . . . . . . . . . . . . . . . . . . 507
Methods of importing data into an existing file . . . . . . . . . . . . . . . . . . . . . . . . . . . . . . . 508
About creating a new table for imported data . . . . . . . . . . . . . . . . . . . . . . . . . . . . . . . . 510
About validating data during import . . . . . . . . . . . . . . . . . . . . . . . . . . . . . . . . . . . . . . . . 511
Importing data into an existing file . . . . . . . . . . . . . . . . . . . . . . . . . . . . . . . . . . . . . . . . . 512
Setting up recurring imports . . . . . . . . . . . . . . . . . . . . . . . . . . . . . . . . . . . . . . . . . . . . . 513
Importing a folder of files all at once . . . . . . . . . . . . . . . . . . . . . . . . . . . . . . . . . . . . . . . 515
Importing Bento data (OS X) . . . . . . . . . . . . . . . . . . . . . . . . . . . . . . . . . . . . . . . . . . . . . 517
FILEMAKER PRO HELP 12
Importing XML data . . . . . . . . . . . . . . . . . . . . . . . . . . . . . . . . . . . . . . . . . . . . . . . . . . . . 520
Setting the import action and mapping fields during import . . . . . . . . . . . . . . . . . . . . . 522
Converting a data file to a new FileMaker Pro file . . . . . . . . . . . . . . . . . . . . . . . . . . . . . . . . 526
Exporting data from FileMaker Pro . . . . . . . . . . . . . . . . . . . . . . . . . . . . . . . . . . . . . . . . . . . 527
Exporting repeating field data . . . . . . . . . . . . . . . . . . . . . . . . . . . . . . . . . . . . . . . . . . . . . . . 529
Supported import/export file formats . . . . . . . . . . . . . . . . . . . . . . . . . . . . . . . . . . . . . . . . . . 530
Comma-Separated Text format . . . . . . . . . . . . . . . . . . . . . . . . . . . . . . . . . . . . . . . . . . . 531
dBASE III and IV DBF format . . . . . . . . . . . . . . . . . . . . . . . . . . . . . . . . . . . . . . . . . . . . 531
FileMaker Pro format . . . . . . . . . . . . . . . . . . . . . . . . . . . . . . . . . . . . . . . . . . . . . . . . . . . 532
HTML Table format . . . . . . . . . . . . . . . . . . . . . . . . . . . . . . . . . . . . . . . . . . . . . . . . . . . . 533
Merge format . . . . . . . . . . . . . . . . . . . . . . . . . . . . . . . . . . . . . . . . . . . . . . . . . . . . . . . . . 533
Microsoft Excel format . . . . . . . . . . . . . . . . . . . . . . . . . . . . . . . . . . . . . . . . . . . . . . . . . . 534
Tab-Separated Text format . . . . . . . . . . . . . . . . . . . . . . . . . . . . . . . . . . . . . . . . . . . . . . 534
XML format . . . . . . . . . . . . . . . . . . . . . . . . . . . . . . . . . . . . . . . . . . . . . . . . . . . . . . . . . . 535
XML FMPDSORESULT grammar . . . . . . . . . . . . . . . . . . . . . . . . . . . . . . . . . . . . . . . . . 535
XML FMPXMLRESULT grammar . . . . . . . . . . . . . . . . . . . . . . . . . . . . . . . . . . . . . . . . . 536
Importing and exporting dates . . . . . . . . . . . . . . . . . . . . . . . . . . . . . . . . . . . . . . . . . . . . . . . 539
Working with Microsoft Excel . . . . . . . . . . . . . . . . . . . . . . . . . . . . . . . . . . . . . . . . . . . . . . . . 540
Publishing databases on the web . . . . . . . . . . . . . . . . . . . . . . . . . . . . . . . . . . . . . . . . . . . . . . . 541
Publishing databases with FileMaker WebDirect . . . . . . . . . . . . . . . . . . . . . . . . . . . . . . . . . 541
Publishing data on static webpages . . . . . . . . . . . . . . . . . . . . . . . . . . . . . . . . . . . . . . . . . . 542
Using ODBC and JDBC with FileMaker Pro . . . . . . . . . . . . . . . . . . . . . . . . . . . . . . . . . . . . . . . 544
Sharing FileMaker Pro data via ODBC or JDBC . . . . . . . . . . . . . . . . . . . . . . . . . . . . . . . . . 545
Accessing external data sources . . . . . . . . . . . . . . . . . . . . . . . . . . . . . . . . . . . . . . . . . . . . . . . . 548
Configuring an ODBC client driver . . . . . . . . . . . . . . . . . . . . . . . . . . . . . . . . . . . . . . . . . . . . 548
Connecting to data sources . . . . . . . . . . . . . . . . . . . . . . . . . . . . . . . . . . . . . . . . . . . . . . . . . 550
Working with data sources . . . . . . . . . . . . . . . . . . . . . . . . . . . . . . . . . . . . . . . . . . . . . . . . . . 552
Editing external FileMaker data sources . . . . . . . . . . . . . . . . . . . . . . . . . . . . . . . . . . . . 552
Editing ODBC data sources . . . . . . . . . . . . . . . . . . . . . . . . . . . . . . . . . . . . . . . . . . . . . 553
Enabling ODBC data source single sign-on (Windows only) . . . . . . . . . . . . . . . . . . . . 556
Updating data between FileMaker and ODBC data sources . . . . . . . . . . . . . . . . . . . . 557
Restoring links to ODBC data sources . . . . . . . . . . . . . . . . . . . . . . . . . . . . . . . . . . . . . 557
Using supplemental fields . . . . . . . . . . . . . . . . . . . . . . . . . . . . . . . . . . . . . . . . . . . . . . . 558
ODBC data sources troubleshooting . . . . . . . . . . . . . . . . . . . . . . . . . . . . . . . . . . . . . . . 558
Querying an ODBC data source from FileMaker Pro . . . . . . . . . . . . . . . . . . . . . . . . . . . . . 559
Constructing an SQL query for importing via ODBC . . . . . . . . . . . . . . . . . . . . . . . . . . . 561
Executing SQL to interact with data sources via ODBC . . . . . . . . . . . . . . . . . . . . . . . . 561
Storing an SQL query in a field . . . . . . . . . . . . . . . . . . . . . . . . . . . . . . . . . . . . . . . . . . . 562
Automating ODBC import using the Import Records script step . . . . . . . . . . . . . . . . . . 562
Using FileMaker Pro Advanced . . . . . . . . . . . . . . . . . . . . . . . . . . . . . 564
FileMaker Pro Advanced basics . . . . . . . . . . . . . . . . . . . . . . . . . . . . . . . . . . . . . . . . . . . . . . . . . 565
About FileMaker Pro Advanced . . . . . . . . . . . . . . . . . . . . . . . . . . . . . . . . . . . . . . . . . . . . . . 565
Your responsibilities as a developer (FileMaker Pro Advanced) . . . . . . . . . . . . . . . . . . . . . 565
Customizing files with FileMaker Pro Advanced . . . . . . . . . . . . . . . . . . . . . . . . . . . . . . . . . . . . 567
Copying and pasting field schemas (FileMaker Pro Advanced) . . . . . . . . . . . . . . . . . . . . . 567
Copying or importing table schemas (FileMaker Pro Advanced) . . . . . . . . . . . . . . . . . . . . . 567
About custom functions (FileMaker Pro Advanced) . . . . . . . . . . . . . . . . . . . . . . . . . . . . . . . 569
Using custom functions (FileMaker Pro Advanced) . . . . . . . . . . . . . . . . . . . . . . . . . . . 569
Importing custom functions (FileMaker Pro Advanced) . . . . . . . . . . . . . . . . . . . . . . . . . 571
Custom Function dependency rules (FileMaker Pro Advanced) . . . . . . . . . . . . . . . . . . 572
Defining custom menus (FileMaker Pro Advanced) . . . . . . . . . . . . . . . . . . . . . . . . . . . . . . 573
Creating and editing custom menu items (FileMaker Pro Advanced) . . . . . . . . . . . . . . 577
FILEMAKER PRO HELP 13
Creating and editing custom menu sets (FileMaker Pro Advanced) . . . . . . . . . . . . . . . 580
Using FileMaker Pro Advanced tools . . . . . . . . . . . . . . . . . . . . . . . . . . . . . . . . . . . . . . . . . . . . . 583
Debugging scripts (FileMaker Pro Advanced) . . . . . . . . . . . . . . . . . . . . . . . . . . . . . . . . . . . 583
Disabling script steps (FileMaker Pro Advanced) . . . . . . . . . . . . . . . . . . . . . . . . . . . . . 586
Using the Data Viewer (FileMaker Pro Advanced) . . . . . . . . . . . . . . . . . . . . . . . . . . . . . . . 587
Encrypting database files (FileMaker Pro Advanced) . . . . . . . . . . . . . . . . . . . . . . . . . . . . . 589
Encrypting a file (FileMaker Pro Advanced) . . . . . . . . . . . . . . . . . . . . . . . . . . . . . . . . . 589
Decrypting a file (FileMaker Pro Advanced) . . . . . . . . . . . . . . . . . . . . . . . . . . . . . . . . . 591
Working with encrypted files (FileMaker Pro Advanced) . . . . . . . . . . . . . . . . . . . . . . . . 591
Documenting database schemas (FileMaker Pro Advanced) . . . . . . . . . . . . . . . . . . . . . . . 592
Setting up files for developer solutions (FileMaker Pro Advanced) . . . . . . . . . . . . . . . . . . . 594
Saving solution settings (FileMaker Pro Advanced) . . . . . . . . . . . . . . . . . . . . . . . . . . . 595
Specifying options for developer solutions (FileMaker Pro Advanced) . . . . . . . . . . . . . 596
Removing Admin access to databases (FileMaker Pro Advanced) . . . . . . . . . . . . . . . 597
Adding filename extensions to files (FileMaker Pro Advanced) . . . . . . . . . . . . . . . . . . 599
Documenting developer solutions (FileMaker Pro Advanced) . . . . . . . . . . . . . . . . . . . 599
About creating runtime solutions (FileMaker Pro Advanced) . . . . . . . . . . . . . . . . . . . . . . . . 601
Preparing files for a runtime solution (FileMaker Pro Advanced) . . . . . . . . . . . . . . . . . 602
Binding files into a runtime solution (FileMaker Pro Advanced) . . . . . . . . . . . . . . . . . . 604
Naming runtime solutions (FileMaker Pro Advanced) . . . . . . . . . . . . . . . . . . . . . . . . . . 605
Distributing runtime solutions (FileMaker Pro Advanced) . . . . . . . . . . . . . . . . . . . . . . . 607
Importing data into upgraded runtime solutions (FileMaker Pro Advanced) . . . . . . . . . 608
Starting runtime solutions (FileMaker Pro Advanced) . . . . . . . . . . . . . . . . . . . . . . . . . . 609
Recovering runtime files (FileMaker Pro Advanced) . . . . . . . . . . . . . . . . . . . . . . . . . . . 610
Displaying databases in Kiosk mode (FileMaker Pro Advanced) . . . . . . . . . . . . . . . . . . . . 611
Creating Kiosk solutions (FileMaker Pro Advanced) . . . . . . . . . . . . . . . . . . . . . . . . . . . 611
Using scripts and buttons to control Kiosk solutions (FileMaker Pro Advanced) . . . . . 613
Creating dynamic buttons (FileMaker Pro Advanced) . . . . . . . . . . . . . . . . . . . . . . . . . . 614
Reference . . . . . . . . . . . . . . . . . . . . . . . . . . . . . . . . . . . . . . . . . . . . . . . 617
Setting preferences . . . . . . . . . . . . . . . . . . . . . . . . . . . . . . . . . . . . . . . . . . . . . . . . . . . . . . . . . . 618
Setting general preferences . . . . . . . . . . . . . . . . . . . . . . . . . . . . . . . . . . . . . . . . . . . . . . . . . 618
Setting layout preferences . . . . . . . . . . . . . . . . . . . . . . . . . . . . . . . . . . . . . . . . . . . . . . . . . . 620
Setting memory preferences . . . . . . . . . . . . . . . . . . . . . . . . . . . . . . . . . . . . . . . . . . . . . . . . 620
Setting plug-in preferences . . . . . . . . . . . . . . . . . . . . . . . . . . . . . . . . . . . . . . . . . . . . . . . . . 621
Setting font preferences . . . . . . . . . . . . . . . . . . . . . . . . . . . . . . . . . . . . . . . . . . . . . . . . . . . .622
Customizing the font menu (Windows) . . . . . . . . . . . . . . . . . . . . . . . . . . . . . . . . . . . . . . . . 622
Keyboard shortcuts (Windows) . . . . . . . . . . . . . . . . . . . . . . . . . . . . . . . . . . . . . . . . . . . . . . . . . 624
General keyboard shortcuts (Windows) . . . . . . . . . . . . . . . . . . . . . . . . . . . . . . . . . . . . . . . . 624
Mode keyboard shortcuts (Windows) . . . . . . . . . . . . . . . . . . . . . . . . . . . . . . . . . . . . . . . . . 627
Text keyboard shortcuts (Windows) . . . . . . . . . . . . . . . . . . . . . . . . . . . . . . . . . . . . . . . . . . 630
Manage database keyboard shortcuts (Windows) . . . . . . . . . . . . . . . . . . . . . . . . . . . . . . . . 633
FileMaker Pro Advanced keyboard shortcuts (Windows) . . . . . . . . . . . . . . . . . . . . . . . . . . 635
Keyboard shortcuts (OS X) . . . . . . . . . . . . . . . . . . . . . . . . . . . . . . . . . . . . . . . . . . . . . . . . . . . . 636
General keyboard shortcuts (OS X) . . . . . . . . . . . . . . . . . . . . . . . . . . . . . . . . . . . . . . . . . . . 636
Mode keyboard shortcuts (OS X) . . . . . . . . . . . . . . . . . . . . . . . . . . . . . . . . . . . . . . . . . . . . 639
Text keyboard shortcuts (OS X) . . . . . . . . . . . . . . . . . . . . . . . . . . . . . . . . . . . . . . . . . . . . . 643
Manage database keyboard shortcuts (OS X) . . . . . . . . . . . . . . . . . . . . . . . . . . . . . . . . . . . 646
FileMaker Pro Advanced keyboard shortcuts (OS X) . . . . . . . . . . . . . . . . . . . . . . . . . . . . . 648
Functions reference . . . . . . . . . . . . . . . . . . . . . . . . . . . . . . . . . . . . . . . . . . . . . . . . . . . . . . . . . . 649
Functions reference (category list) . . . . . . . . . . . . . . . . . . . . . . . . . . . . . . . . . . . . . . . . . . . 649
Functions reference (alphabetical list) . . . . . . . . . . . . . . . . . . . . . . . . . . . . . . . . . . . . . . . . . 656
Aggregate functions . . . . . . . . . . . . . . . . . . . . . . . . . . . . . . . . . . . . . . . . . . . . . . . . . . . . . . .662
FILEMAKER PRO HELP 14
Average . . . . . . . . . . . . . . . . . . . . . . . . . . . . . . . . . . . . . . . . . . . . . . . . . . . . . . . . . . . . .662
Count . . . . . . . . . . . . . . . . . . . . . . . . . . . . . . . . . . . . . . . . . . . . . . . . . . . . . . . . . . . . . . . 664
List . . . . . . . . . . . . . . . . . . . . . . . . . . . . . . . . . . . . . . . . . . . . . . . . . . . . . . . . . . . . . . . . . 665
Max . . . . . . . . . . . . . . . . . . . . . . . . . . . . . . . . . . . . . . . . . . . . . . . . . . . . . . . . . . . . . . . . 667
Min . . . . . . . . . . . . . . . . . . . . . . . . . . . . . . . . . . . . . . . . . . . . . . . . . . . . . . . . . . . . . . . . 668
StDev . . . . . . . . . . . . . . . . . . . . . . . . . . . . . . . . . . . . . . . . . . . . . . . . . . . . . . . . . . . . . . 670
StDevP . . . . . . . . . . . . . . . . . . . . . . . . . . . . . . . . . . . . . . . . . . . . . . . . . . . . . . . . . . . . .671
Sum . . . . . . . . . . . . . . . . . . . . . . . . . . . . . . . . . . . . . . . . . . . . . . . . . . . . . . . . . . . . . . . . 672
Variance . . . . . . . . . . . . . . . . . . . . . . . . . . . . . . . . . . . . . . . . . . . . . . . . . . . . . . . . . . . .674
VarianceP . . . . . . . . . . . . . . . . . . . . . . . . . . . . . . . . . . . . . . . . . . . . . . . . . . . . . . . . . . .675
Container functions . . . . . . . . . . . . . . . . . . . . . . . . . . . . . . . . . . . . . . . . . . . . . . . . . . . . . . . 677
Base64Decode . . . . . . . . . . . . . . . . . . . . . . . . . . . . . . . . . . . . . . . . . . . . . . . . . . . . . . . 677
Base64Encode . . . . . . . . . . . . . . . . . . . . . . . . . . . . . . . . . . . . . . . . . . . . . . . . . . . . . . . 678
GetContainerAttribute . . . . . . . . . . . . . . . . . . . . . . . . . . . . . . . . . . . . . . . . . . . . . . . . . . 679
GetHeight . . . . . . . . . . . . . . . . . . . . . . . . . . . . . . . . . . . . . . . . . . . . . . . . . . . . . . . . . . .683
GetThumbnail . . . . . . . . . . . . . . . . . . . . . . . . . . . . . . . . . . . . . . . . . . . . . . . . . . . . . . . . 684
GetWidth . . . . . . . . . . . . . . . . . . . . . . . . . . . . . . . . . . . . . . . . . . . . . . . . . . . . . . . . . . . .685
VerifyContainer . . . . . . . . . . . . . . . . . . . . . . . . . . . . . . . . . . . . . . . . . . . . . . . . . . . . . . . 685
Date functions . . . . . . . . . . . . . . . . . . . . . . . . . . . . . . . . . . . . . . . . . . . . . . . . . . . . . . . . . . . 686
Date . . . . . . . . . . . . . . . . . . . . . . . . . . . . . . . . . . . . . . . . . . . . . . . . . . . . . . . . . . . . . . . . 687
Day . . . . . . . . . . . . . . . . . . . . . . . . . . . . . . . . . . . . . . . . . . . . . . . . . . . . . . . . . . . . . . . . 688
DayName . . . . . . . . . . . . . . . . . . . . . . . . . . . . . . . . . . . . . . . . . . . . . . . . . . . . . . . . . . . 689
DayNameJ . . . . . . . . . . . . . . . . . . . . . . . . . . . . . . . . . . . . . . . . . . . . . . . . . . . . . . . . . . 690
DayOfWeek . . . . . . . . . . . . . . . . . . . . . . . . . . . . . . . . . . . . . . . . . . . . . . . . . . . . . . . . . . 691
DayOfYear . . . . . . . . . . . . . . . . . . . . . . . . . . . . . . . . . . . . . . . . . . . . . . . . . . . . . . . . . . 692
Month . . . . . . . . . . . . . . . . . . . . . . . . . . . . . . . . . . . . . . . . . . . . . . . . . . . . . . . . . . . . . . 693
MonthName . . . . . . . . . . . . . . . . . . . . . . . . . . . . . . . . . . . . . . . . . . . . . . . . . . . . . . . . . . 694
MonthNameJ . . . . . . . . . . . . . . . . . . . . . . . . . . . . . . . . . . . . . . . . . . . . . . . . . . . . . . . . . 694
WeekOfYear . . . . . . . . . . . . . . . . . . . . . . . . . . . . . . . . . . . . . . . . . . . . . . . . . . . . . . . . . 695
WeekOfYearFiscal . . . . . . . . . . . . . . . . . . . . . . . . . . . . . . . . . . . . . . . . . . . . . . . . . . . . 696
Year . . . . . . . . . . . . . . . . . . . . . . . . . . . . . . . . . . . . . . . . . . . . . . . . . . . . . . . . . . . . . . . . 697
YearName . . . . . . . . . . . . . . . . . . . . . . . . . . . . . . . . . . . . . . . . . . . . . . . . . . . . . . . . . . . 698
Design functions . . . . . . . . . . . . . . . . . . . . . . . . . . . . . . . . . . . . . . . . . . . . . . . . . . . . . . . . . 699
DatabaseNames . . . . . . . . . . . . . . . . . . . . . . . . . . . . . . . . . . . . . . . . . . . . . . . . . . . . . . 700
FieldBounds . . . . . . . . . . . . . . . . . . . . . . . . . . . . . . . . . . . . . . . . . . . . . . . . . . . . . . . . . 701
FieldComment . . . . . . . . . . . . . . . . . . . . . . . . . . . . . . . . . . . . . . . . . . . . . . . . . . . . . . . . 703
FieldIDs . . . . . . . . . . . . . . . . . . . . . . . . . . . . . . . . . . . . . . . . . . . . . . . . . . . . . . . . . . . . . 703
FieldNames . . . . . . . . . . . . . . . . . . . . . . . . . . . . . . . . . . . . . . . . . . . . . . . . . . . . . . . . . . 704
FieldRepetitions . . . . . . . . . . . . . . . . . . . . . . . . . . . . . . . . . . . . . . . . . . . . . . . . . . . . . . 705
FieldStyle . . . . . . . . . . . . . . . . . . . . . . . . . . . . . . . . . . . . . . . . . . . . . . . . . . . . . . . . . . .706
FieldType . . . . . . . . . . . . . . . . . . . . . . . . . . . . . . . . . . . . . . . . . . . . . . . . . . . . . . . . . . .707
GetNextSerialValue . . . . . . . . . . . . . . . . . . . . . . . . . . . . . . . . . . . . . . . . . . . . . . . . . . . . 709
LayoutIDs . . . . . . . . . . . . . . . . . . . . . . . . . . . . . . . . . . . . . . . . . . . . . . . . . . . . . . . . . . .709
LayoutNames . . . . . . . . . . . . . . . . . . . . . . . . . . . . . . . . . . . . . . . . . . . . . . . . . . . . . . . . 710
LayoutObjectNames . . . . . . . . . . . . . . . . . . . . . . . . . . . . . . . . . . . . . . . . . . . . . . . . . . . 711
RelationInfo . . . . . . . . . . . . . . . . . . . . . . . . . . . . . . . . . . . . . . . . . . . . . . . . . . . . . . . . . .712
ScriptIDs . . . . . . . . . . . . . . . . . . . . . . . . . . . . . . . . . . . . . . . . . . . . . . . . . . . . . . . . . . . . 714
ScriptNames . . . . . . . . . . . . . . . . . . . . . . . . . . . . . . . . . . . . . . . . . . . . . . . . . . . . . . . . . 714
TableIDs . . . . . . . . . . . . . . . . . . . . . . . . . . . . . . . . . . . . . . . . . . . . . . . . . . . . . . . . . . . .715
TableNames . . . . . . . . . . . . . . . . . . . . . . . . . . . . . . . . . . . . . . . . . . . . . . . . . . . . . . . . . 716
ValueListIDs . . . . . . . . . . . . . . . . . . . . . . . . . . . . . . . . . . . . . . . . . . . . . . . . . . . . . . . . . 717
ValueListItems . . . . . . . . . . . . . . . . . . . . . . . . . . . . . . . . . . . . . . . . . . . . . . . . . . . . . . . . 718
ValueListNames . . . . . . . . . . . . . . . . . . . . . . . . . . . . . . . . . . . . . . . . . . . . . . . . . . . . . . 718
WindowNames . . . . . . . . . . . . . . . . . . . . . . . . . . . . . . . . . . . . . . . . . . . . . . . . . . . . . . . 719
FILEMAKER PRO HELP 15
External functions . . . . . . . . . . . . . . . . . . . . . . . . . . . . . . . . . . . . . . . . . . . . . . . . . . . . . . . . 720
External . . . . . . . . . . . . . . . . . . . . . . . . . . . . . . . . . . . . . . . . . . . . . . . . . . . . . . . . . . . . . 721
Financial functions . . . . . . . . . . . . . . . . . . . . . . . . . . . . . . . . . . . . . . . . . . . . . . . . . . . . . . . . 722
FV . . . . . . . . . . . . . . . . . . . . . . . . . . . . . . . . . . . . . . . . . . . . . . . . . . . . . . . . . . . . . . . . . 722
NPV . . . . . . . . . . . . . . . . . . . . . . . . . . . . . . . . . . . . . . . . . . . . . . . . . . . . . . . . . . . . . . . . 723
PMT . . . . . . . . . . . . . . . . . . . . . . . . . . . . . . . . . . . . . . . . . . . . . . . . . . . . . . . . . . . . . . . . 724
PV . . . . . . . . . . . . . . . . . . . . . . . . . . . . . . . . . . . . . . . . . . . . . . . . . . . . . . . . . . . . . . . . . 725
Get functions . . . . . . . . . . . . . . . . . . . . . . . . . . . . . . . . . . . . . . . . . . . . . . . . . . . . . . . . . . . . 727
Get(AccountExtendedPrivileges) . . . . . . . . . . . . . . . . . . . . . . . . . . . . . . . . . . . . . . . . . 732
Get(AccountName) . . . . . . . . . . . . . . . . . . . . . . . . . . . . . . . . . . . . . . . . . . . . . . . . . . . . 733
Get(AccountPrivilegeSetName) . . . . . . . . . . . . . . . . . . . . . . . . . . . . . . . . . . . . . . . . . . 735
Get(ActiveFieldContents) . . . . . . . . . . . . . . . . . . . . . . . . . . . . . . . . . . . . . . . . . . . . . . . 736
Get(ActiveFieldName) . . . . . . . . . . . . . . . . . . . . . . . . . . . . . . . . . . . . . . . . . . . . . . . . . . 736
Get(ActiveFieldTableName) . . . . . . . . . . . . . . . . . . . . . . . . . . . . . . . . . . . . . . . . . . . . . 737
Get(ActiveLayoutObjectName) . . . . . . . . . . . . . . . . . . . . . . . . . . . . . . . . . . . . . . . . . . . 738
Get(ActiveModifierKeys) . . . . . . . . . . . . . . . . . . . . . . . . . . . . . . . . . . . . . . . . . . . . . . . . 739
Get(ActivePortalRowNumber) . . . . . . . . . . . . . . . . . . . . . . . . . . . . . . . . . . . . . . . . . . . . 740
Get(ActiveRepetitionNumber) . . . . . . . . . . . . . . . . . . . . . . . . . . . . . . . . . . . . . . . . . . . . 741
Get(ActiveSelectionSize) . . . . . . . . . . . . . . . . . . . . . . . . . . . . . . . . . . . . . . . . . . . . . . . 742
Get(ActiveSelectionStart) . . . . . . . . . . . . . . . . . . . . . . . . . . . . . . . . . . . . . . . . . . . . . . . 742
Get(AllowAbortState) . . . . . . . . . . . . . . . . . . . . . . . . . . . . . . . . . . . . . . . . . . . . . . . . . . 743
Get(AllowFormattingBarState) . . . . . . . . . . . . . . . . . . . . . . . . . . . . . . . . . . . . . . . . . . . 744
Get(ApplicationLanguage) . . . . . . . . . . . . . . . . . . . . . . . . . . . . . . . . . . . . . . . . . . . . . . 745
Get(ApplicationVersion) . . . . . . . . . . . . . . . . . . . . . . . . . . . . . . . . . . . . . . . . . . . . . . . . 746
Get(CalculationRepetitionNumber) . . . . . . . . . . . . . . . . . . . . . . . . . . . . . . . . . . . . . . . . 747
Get(ConnectionAttributes) . . . . . . . . . . . . . . . . . . . . . . . . . . . . . . . . . . . . . . . . . . . . . . . 748
Get(ConnectionState) . . . . . . . . . . . . . . . . . . . . . . . . . . . . . . . . . . . . . . . . . . . . . . . . . . 749
Get(CurrentDate) . . . . . . . . . . . . . . . . . . . . . . . . . . . . . . . . . . . . . . . . . . . . . . . . . . . . . 750
Get(CurrentExtendedPrivileges) . . . . . . . . . . . . . . . . . . . . . . . . . . . . . . . . . . . . . . . . . . 751
Get(CurrentHostTimestamp) . . . . . . . . . . . . . . . . . . . . . . . . . . . . . . . . . . . . . . . . . . . . . 752
Get(CurrentPrivilegeSetName) . . . . . . . . . . . . . . . . . . . . . . . . . . . . . . . . . . . . . . . . . . . 753
Get(CurrentTime) . . . . . . . . . . . . . . . . . . . . . . . . . . . . . . . . . . . . . . . . . . . . . . . . . . . . . 754
Get(CurrentTimestamp) . . . . . . . . . . . . . . . . . . . . . . . . . . . . . . . . . . . . . . . . . . . . . . . . 755
Get(CurrentTimeUTCMilliseconds) . . . . . . . . . . . . . . . . . . . . . . . . . . . . . . . . . . . . . . . . 756
Get(CustomMenuSetName) . . . . . . . . . . . . . . . . . . . . . . . . . . . . . . . . . . . . . . . . . . . . . 757
Get(DesktopPath) . . . . . . . . . . . . . . . . . . . . . . . . . . . . . . . . . . . . . . . . . . . . . . . . . . . . . 758
Get(Device) . . . . . . . . . . . . . . . . . . . . . . . . . . . . . . . . . . . . . . . . . . . . . . . . . . . . . . . . . . 759
Get(DocumentsPath) . . . . . . . . . . . . . . . . . . . . . . . . . . . . . . . . . . . . . . . . . . . . . . . . . . 759
Get(DocumentsPathListing) . . . . . . . . . . . . . . . . . . . . . . . . . . . . . . . . . . . . . . . . . . . . . 761
Get(EncryptionState) . . . . . . . . . . . . . . . . . . . . . . . . . . . . . . . . . . . . . . . . . . . . . . . . . . . 762
Get(ErrorCaptureState) . . . . . . . . . . . . . . . . . . . . . . . . . . . . . . . . . . . . . . . . . . . . . . . . . 762
Get(FileMakerPath) . . . . . . . . . . . . . . . . . . . . . . . . . . . . . . . . . . . . . . . . . . . . . . . . . . . . 763
Get(FileName) . . . . . . . . . . . . . . . . . . . . . . . . . . . . . . . . . . . . . . . . . . . . . . . . . . . . . . . . 764
Get(FilePath) . . . . . . . . . . . . . . . . . . . . . . . . . . . . . . . . . . . . . . . . . . . . . . . . . . . . . . . . . 765
Get(FileSize) . . . . . . . . . . . . . . . . . . . . . . . . . . . . . . . . . . . . . . . . . . . . . . . . . . . . . . . . . 766
Get(FoundCount) . . . . . . . . . . . . . . . . . . . . . . . . . . . . . . . . . . . . . . . . . . . . . . . . . . . . . 767
Get(HighContrastColor) . . . . . . . . . . . . . . . . . . . . . . . . . . . . . . . . . . . . . . . . . . . . . . . . 767
Get(HighContrastState) . . . . . . . . . . . . . . . . . . . . . . . . . . . . . . . . . . . . . . . . . . . . . . . . . 768
Get(HostApplicationVersion) . . . . . . . . . . . . . . . . . . . . . . . . . . . . . . . . . . . . . . . . . . . . . 769
Get(HostIPAddress) . . . . . . . . . . . . . . . . . . . . . . . . . . . . . . . . . . . . . . . . . . . . . . . . . . . 770
Get(HostName) . . . . . . . . . . . . . . . . . . . . . . . . . . . . . . . . . . . . . . . . . . . . . . . . . . . . . . . 771
Get(InstalledFMPlugins) . . . . . . . . . . . . . . . . . . . . . . . . . . . . . . . . . . . . . . . . . . . . . . . . 772
Get(LastError) . . . . . . . . . . . . . . . . . . . . . . . . . . . . . . . . . . . . . . . . . . . . . . . . . . . . . . . . 774
Get(LastMessageChoice) . . . . . . . . . . . . . . . . . . . . . . . . . . . . . . . . . . . . . . . . . . . . . . . 775
FILEMAKER PRO HELP 16
Get(LastODBCError) . . . . . . . . . . . . . . . . . . . . . . . . . . . . . . . . . . . . . . . . . . . . . . . . . . . 776
Get(LayoutAccess) . . . . . . . . . . . . . . . . . . . . . . . . . . . . . . . . . . . . . . . . . . . . . . . . . . . . 777
Get(LayoutCount) . . . . . . . . . . . . . . . . . . . . . . . . . . . . . . . . . . . . . . . . . . . . . . . . . . . . . 778
Get(LayoutName) . . . . . . . . . . . . . . . . . . . . . . . . . . . . . . . . . . . . . . . . . . . . . . . . . . . . . 778
Get(LayoutNumber) . . . . . . . . . . . . . . . . . . . . . . . . . . . . . . . . . . . . . . . . . . . . . . . . . . . 779
Get(LayoutTableName) . . . . . . . . . . . . . . . . . . . . . . . . . . . . . . . . . . . . . . . . . . . . . . . . . 780
Get(LayoutViewState) . . . . . . . . . . . . . . . . . . . . . . . . . . . . . . . . . . . . . . . . . . . . . . . . . . 781
Get(ModifiedFields) . . . . . . . . . . . . . . . . . . . . . . . . . . . . . . . . . . . . . . . . . . . . . . . . . . . . 782
Get(MultiUserState) . . . . . . . . . . . . . . . . . . . . . . . . . . . . . . . . . . . . . . . . . . . . . . . . . . . 783
Get(NetworkProtocol) . . . . . . . . . . . . . . . . . . . . . . . . . . . . . . . . . . . . . . . . . . . . . . . . . . 784
Get(NetworkType) . . . . . . . . . . . . . . . . . . . . . . . . . . . . . . . . . . . . . . . . . . . . . . . . . . . . . 785
Get(PageNumber) . . . . . . . . . . . . . . . . . . . . . . . . . . . . . . . . . . . . . . . . . . . . . . . . . . . . . 785
Get(PersistentID) . . . . . . . . . . . . . . . . . . . . . . . . . . . . . . . . . . . . . . . . . . . . . . . . . . . . . 786
Get(PreferencesPath) . . . . . . . . . . . . . . . . . . . . . . . . . . . . . . . . . . . . . . . . . . . . . . . . . . 787
Get(PrinterName) . . . . . . . . . . . . . . . . . . . . . . . . . . . . . . . . . . . . . . . . . . . . . . . . . . . . . 788
Get(QuickFindText) . . . . . . . . . . . . . . . . . . . . . . . . . . . . . . . . . . . . . . . . . . . . . . . . . . . . 789
Get(RecordAccess) . . . . . . . . . . . . . . . . . . . . . . . . . . . . . . . . . . . . . . . . . . . . . . . . . . . . 790
Get(RecordID) . . . . . . . . . . . . . . . . . . . . . . . . . . . . . . . . . . . . . . . . . . . . . . . . . . . . . . . . 791
Get(RecordModificationCount) . . . . . . . . . . . . . . . . . . . . . . . . . . . . . . . . . . . . . . . . . . . 792
Get(RecordNumber) . . . . . . . . . . . . . . . . . . . . . . . . . . . . . . . . . . . . . . . . . . . . . . . . . . . 793
Get(RecordOpenCount) . . . . . . . . . . . . . . . . . . . . . . . . . . . . . . . . . . . . . . . . . . . . . . . . 794
Get(RecordOpenState) . . . . . . . . . . . . . . . . . . . . . . . . . . . . . . . . . . . . . . . . . . . . . . . . . 795
Get(RequestCount) . . . . . . . . . . . . . . . . . . . . . . . . . . . . . . . . . . . . . . . . . . . . . . . . . . . . 796
Get(RequestOmitState) . . . . . . . . . . . . . . . . . . . . . . . . . . . . . . . . . . . . . . . . . . . . . . . . . 796
Get(ScreenDepth) . . . . . . . . . . . . . . . . . . . . . . . . . . . . . . . . . . . . . . . . . . . . . . . . . . . . . 797
Get(ScreenHeight) . . . . . . . . . . . . . . . . . . . . . . . . . . . . . . . . . . . . . . . . . . . . . . . . . . . . 798
Get(ScreenWidth) . . . . . . . . . . . . . . . . . . . . . . . . . . . . . . . . . . . . . . . . . . . . . . . . . . . . . 799
Get(ScriptAnimationState) . . . . . . . . . . . . . . . . . . . . . . . . . . . . . . . . . . . . . . . . . . . . . . 800
Get(ScriptName) . . . . . . . . . . . . . . . . . . . . . . . . . . . . . . . . . . . . . . . . . . . . . . . . . . . . . . 801
Get(ScriptParameter) . . . . . . . . . . . . . . . . . . . . . . . . . . . . . . . . . . . . . . . . . . . . . . . . . . 801
Get(ScriptResult) . . . . . . . . . . . . . . . . . . . . . . . . . . . . . . . . . . . . . . . . . . . . . . . . . . . . . . 803
Get(SortState) . . . . . . . . . . . . . . . . . . . . . . . . . . . . . . . . . . . . . . . . . . . . . . . . . . . . . . . . 804
Get(StatusAreaState) . . . . . . . . . . . . . . . . . . . . . . . . . . . . . . . . . . . . . . . . . . . . . . . . . . 805
Get(SystemDrive) . . . . . . . . . . . . . . . . . . . . . . . . . . . . . . . . . . . . . . . . . . . . . . . . . . . . . 806
Get(SystemIPAddress) . . . . . . . . . . . . . . . . . . . . . . . . . . . . . . . . . . . . . . . . . . . . . . . . . 806
Get(SystemLanguage) . . . . . . . . . . . . . . . . . . . . . . . . . . . . . . . . . . . . . . . . . . . . . . . . . 808
Get(SystemNICAddress) . . . . . . . . . . . . . . . . . . . . . . . . . . . . . . . . . . . . . . . . . . . . . . . . 808
Get(SystemPlatform) . . . . . . . . . . . . . . . . . . . . . . . . . . . . . . . . . . . . . . . . . . . . . . . . . . . 809
Get(SystemVersion) . . . . . . . . . . . . . . . . . . . . . . . . . . . . . . . . . . . . . . . . . . . . . . . . . . . 810
Get(TemporaryPath) . . . . . . . . . . . . . . . . . . . . . . . . . . . . . . . . . . . . . . . . . . . . . . . . . . . 812
Get(TextRulerVisible) . . . . . . . . . . . . . . . . . . . . . . . . . . . . . . . . . . . . . . . . . . . . . . . . . . 813
Get(TotalRecordCount) . . . . . . . . . . . . . . . . . . . . . . . . . . . . . . . . . . . . . . . . . . . . . . . . . 814
Get(TriggerCurrentPanel) . . . . . . . . . . . . . . . . . . . . . . . . . . . . . . . . . . . . . . . . . . . . . . . 815
Get(TriggerGestureInfo) . . . . . . . . . . . . . . . . . . . . . . . . . . . . . . . . . . . . . . . . . . . . . . . . 816
Get(TriggerKeystroke) . . . . . . . . . . . . . . . . . . . . . . . . . . . . . . . . . . . . . . . . . . . . . . . . . . 817
Get(TriggerModifierKeys) . . . . . . . . . . . . . . . . . . . . . . . . . . . . . . . . . . . . . . . . . . . . . . . 818
Get(TriggerTargetPanel) . . . . . . . . . . . . . . . . . . . . . . . . . . . . . . . . . . . . . . . . . . . . . . . . 819
Get(UserCount) . . . . . . . . . . . . . . . . . . . . . . . . . . . . . . . . . . . . . . . . . . . . . . . . . . . . . . . 820
Get(UserName) . . . . . . . . . . . . . . . . . . . . . . . . . . . . . . . . . . . . . . . . . . . . . . . . . . . . . . . 821
Get(UseSystemFormatsState) . . . . . . . . . . . . . . . . . . . . . . . . . . . . . . . . . . . . . . . . . . . 822
Get(UUID) . . . . . . . . . . . . . . . . . . . . . . . . . . . . . . . . . . . . . . . . . . . . . . . . . . . . . . . . . . . 823
Get(WindowContentHeight) . . . . . . . . . . . . . . . . . . . . . . . . . . . . . . . . . . . . . . . . . . . . . 824
Get(WindowContentWidth) . . . . . . . . . . . . . . . . . . . . . . . . . . . . . . . . . . . . . . . . . . . . . . 825
Get(WindowDesktopHeight) . . . . . . . . . . . . . . . . . . . . . . . . . . . . . . . . . . . . . . . . . . . . . 826
FILEMAKER PRO HELP 17
Get(WindowDesktopWidth) . . . . . . . . . . . . . . . . . . . . . . . . . . . . . . . . . . . . . . . . . . . . . . 827
Get(WindowHeight) . . . . . . . . . . . . . . . . . . . . . . . . . . . . . . . . . . . . . . . . . . . . . . . . . . . . 828
Get(WindowLeft) . . . . . . . . . . . . . . . . . . . . . . . . . . . . . . . . . . . . . . . . . . . . . . . . . . . . . . 828
Get(WindowMode) . . . . . . . . . . . . . . . . . . . . . . . . . . . . . . . . . . . . . . . . . . . . . . . . . . . . 829
Get(WindowName) . . . . . . . . . . . . . . . . . . . . . . . . . . . . . . . . . . . . . . . . . . . . . . . . . . . . 830
Get(WindowOrientation) . . . . . . . . . . . . . . . . . . . . . . . . . . . . . . . . . . . . . . . . . . . . . . . . 831
Get(WindowStyle) . . . . . . . . . . . . . . . . . . . . . . . . . . . . . . . . . . . . . . . . . . . . . . . . . . . . . 832
Get(WindowTop) . . . . . . . . . . . . . . . . . . . . . . . . . . . . . . . . . . . . . . . . . . . . . . . . . . . . . . 833
Get(WindowVisible) . . . . . . . . . . . . . . . . . . . . . . . . . . . . . . . . . . . . . . . . . . . . . . . . . . . . 834
Get(WindowWidth) . . . . . . . . . . . . . . . . . . . . . . . . . . . . . . . . . . . . . . . . . . . . . . . . . . . . 835
Get(WindowZoomLevel) . . . . . . . . . . . . . . . . . . . . . . . . . . . . . . . . . . . . . . . . . . . . . . . . 836
Logical functions . . . . . . . . . . . . . . . . . . . . . . . . . . . . . . . . . . . . . . . . . . . . . . . . . . . . . . . . . 838
Case . . . . . . . . . . . . . . . . . . . . . . . . . . . . . . . . . . . . . . . . . . . . . . . . . . . . . . . . . . . . . . . 839
Choose . . . . . . . . . . . . . . . . . . . . . . . . . . . . . . . . . . . . . . . . . . . . . . . . . . . . . . . . . . . . .840
Evaluate . . . . . . . . . . . . . . . . . . . . . . . . . . . . . . . . . . . . . . . . . . . . . . . . . . . . . . . . . . . .841
EvaluationError . . . . . . . . . . . . . . . . . . . . . . . . . . . . . . . . . . . . . . . . . . . . . . . . . . . . . . . 842
ExecuteSQL . . . . . . . . . . . . . . . . . . . . . . . . . . . . . . . . . . . . . . . . . . . . . . . . . . . . . . . . . 843
GetAsBoolean . . . . . . . . . . . . . . . . . . . . . . . . . . . . . . . . . . . . . . . . . . . . . . . . . . . . . . . . 845
GetField . . . . . . . . . . . . . . . . . . . . . . . . . . . . . . . . . . . . . . . . . . . . . . . . . . . . . . . . . . . . . 846
GetFieldName . . . . . . . . . . . . . . . . . . . . . . . . . . . . . . . . . . . . . . . . . . . . . . . . . . . . . . . . 847
GetLayoutObjectAttribute . . . . . . . . . . . . . . . . . . . . . . . . . . . . . . . . . . . . . . . . . . . . . . . 848
GetNthRecord . . . . . . . . . . . . . . . . . . . . . . . . . . . . . . . . . . . . . . . . . . . . . . . . . . . . . . . . 850
If . . . . . . . . . . . . . . . . . . . . . . . . . . . . . . . . . . . . . . . . . . . . . . . . . . . . . . . . . . . . . . . . . . 851
IsEmpty . . . . . . . . . . . . . . . . . . . . . . . . . . . . . . . . . . . . . . . . . . . . . . . . . . . . . . . . . . . . .852
IsValid . . . . . . . . . . . . . . . . . . . . . . . . . . . . . . . . . . . . . . . . . . . . . . . . . . . . . . . . . . . . . . 853
IsValidExpression . . . . . . . . . . . . . . . . . . . . . . . . . . . . . . . . . . . . . . . . . . . . . . . . . . . . . 854
Let . . . . . . . . . . . . . . . . . . . . . . . . . . . . . . . . . . . . . . . . . . . . . . . . . . . . . . . . . . . . . . . . . 855
Lookup . . . . . . . . . . . . . . . . . . . . . . . . . . . . . . . . . . . . . . . . . . . . . . . . . . . . . . . . . . . . .857
LookupNext . . . . . . . . . . . . . . . . . . . . . . . . . . . . . . . . . . . . . . . . . . . . . . . . . . . . . . . . . . 858
Self . . . . . . . . . . . . . . . . . . . . . . . . . . . . . . . . . . . . . . . . . . . . . . . . . . . . . . . . . . . . . . . . 859
Mobile functions . . . . . . . . . . . . . . . . . . . . . . . . . . . . . . . . . . . . . . . . . . . . . . . . . . . . . . . . . . 860
Location . . . . . . . . . . . . . . . . . . . . . . . . . . . . . . . . . . . . . . . . . . . . . . . . . . . . . . . . . . . . . 861
LocationValues . . . . . . . . . . . . . . . . . . . . . . . . . . . . . . . . . . . . . . . . . . . . . . . . . . . . . . . 862
Number functions . . . . . . . . . . . . . . . . . . . . . . . . . . . . . . . . . . . . . . . . . . . . . . . . . . . . . . . . . 863
Abs . . . . . . . . . . . . . . . . . . . . . . . . . . . . . . . . . . . . . . . . . . . . . . . . . . . . . . . . . . . . . . . . 864
Ceiling . . . . . . . . . . . . . . . . . . . . . . . . . . . . . . . . . . . . . . . . . . . . . . . . . . . . . . . . . . . . . . 865
Combination . . . . . . . . . . . . . . . . . . . . . . . . . . . . . . . . . . . . . . . . . . . . . . . . . . . . . . . . . 865
Div . . . . . . . . . . . . . . . . . . . . . . . . . . . . . . . . . . . . . . . . . . . . . . . . . . . . . . . . . . . . . . . . . 866
Exp . . . . . . . . . . . . . . . . . . . . . . . . . . . . . . . . . . . . . . . . . . . . . . . . . . . . . . . . . . . . . . . . 867
Factorial . . . . . . . . . . . . . . . . . . . . . . . . . . . . . . . . . . . . . . . . . . . . . . . . . . . . . . . . . . . . 868
Floor . . . . . . . . . . . . . . . . . . . . . . . . . . . . . . . . . . . . . . . . . . . . . . . . . . . . . . . . . . . . . . . 869
Int . . . . . . . . . . . . . . . . . . . . . . . . . . . . . . . . . . . . . . . . . . . . . . . . . . . . . . . . . . . . . . . . . 869
Lg . . . . . . . . . . . . . . . . . . . . . . . . . . . . . . . . . . . . . . . . . . . . . . . . . . . . . . . . . . . . . . . . . 870
Ln . . . . . . . . . . . . . . . . . . . . . . . . . . . . . . . . . . . . . . . . . . . . . . . . . . . . . . . . . . . . . . . . . 871
Log . . . . . . . . . . . . . . . . . . . . . . . . . . . . . . . . . . . . . . . . . . . . . . . . . . . . . . . . . . . . . . . . 872
Mod . . . . . . . . . . . . . . . . . . . . . . . . . . . . . . . . . . . . . . . . . . . . . . . . . . . . . . . . . . . . . . . . 873
Random . . . . . . . . . . . . . . . . . . . . . . . . . . . . . . . . . . . . . . . . . . . . . . . . . . . . . . . . . . . . .874
Round . . . . . . . . . . . . . . . . . . . . . . . . . . . . . . . . . . . . . . . . . . . . . . . . . . . . . . . . . . . . . . 875
SetPrecision . . . . . . . . . . . . . . . . . . . . . . . . . . . . . . . . . . . . . . . . . . . . . . . . . . . . . . . . . 875
Sign . . . . . . . . . . . . . . . . . . . . . . . . . . . . . . . . . . . . . . . . . . . . . . . . . . . . . . . . . . . . . . . . 876
Sqrt . . . . . . . . . . . . . . . . . . . . . . . . . . . . . . . . . . . . . . . . . . . . . . . . . . . . . . . . . . . . . . . . 877
Truncate . . . . . . . . . . . . . . . . . . . . . . . . . . . . . . . . . . . . . . . . . . . . . . . . . . . . . . . . . . . .878
Repeating functions . . . . . . . . . . . . . . . . . . . . . . . . . . . . . . . . . . . . . . . . . . . . . . . . . . . . . . .879
Extend . . . . . . . . . . . . . . . . . . . . . . . . . . . . . . . . . . . . . . . . . . . . . . . . . . . . . . . . . . . . . . 879
FILEMAKER PRO HELP 18
GetRepetition . . . . . . . . . . . . . . . . . . . . . . . . . . . . . . . . . . . . . . . . . . . . . . . . . . . . . . . . 880
Last . . . . . . . . . . . . . . . . . . . . . . . . . . . . . . . . . . . . . . . . . . . . . . . . . . . . . . . . . . . . . . . . 881
Summary functions . . . . . . . . . . . . . . . . . . . . . . . . . . . . . . . . . . . . . . . . . . . . . . . . . . . . . . .882
GetSummary . . . . . . . . . . . . . . . . . . . . . . . . . . . . . . . . . . . . . . . . . . . . . . . . . . . . . . . . . 882
Text functions . . . . . . . . . . . . . . . . . . . . . . . . . . . . . . . . . . . . . . . . . . . . . . . . . . . . . . . . . . . 884
Char . . . . . . . . . . . . . . . . . . . . . . . . . . . . . . . . . . . . . . . . . . . . . . . . . . . . . . . . . . . . . . . 885
Code . . . . . . . . . . . . . . . . . . . . . . . . . . . . . . . . . . . . . . . . . . . . . . . . . . . . . . . . . . . . . . . 887
Exact . . . . . . . . . . . . . . . . . . . . . . . . . . . . . . . . . . . . . . . . . . . . . . . . . . . . . . . . . . . . . . . 888
Filter . . . . . . . . . . . . . . . . . . . . . . . . . . . . . . . . . . . . . . . . . . . . . . . . . . . . . . . . . . . . . . . 889
FilterValues . . . . . . . . . . . . . . . . . . . . . . . . . . . . . . . . . . . . . . . . . . . . . . . . . . . . . . . . . .890
GetAsCSS . . . . . . . . . . . . . . . . . . . . . . . . . . . . . . . . . . . . . . . . . . . . . . . . . . . . . . . . . . . 891
GetAsDate . . . . . . . . . . . . . . . . . . . . . . . . . . . . . . . . . . . . . . . . . . . . . . . . . . . . . . . . . . . 892
GetAsNumber . . . . . . . . . . . . . . . . . . . . . . . . . . . . . . . . . . . . . . . . . . . . . . . . . . . . . . . . 893
GetAsSVG . . . . . . . . . . . . . . . . . . . . . . . . . . . . . . . . . . . . . . . . . . . . . . . . . . . . . . . . . . . 894
GetAsText . . . . . . . . . . . . . . . . . . . . . . . . . . . . . . . . . . . . . . . . . . . . . . . . . . . . . . . . . . . 895
GetAsTime . . . . . . . . . . . . . . . . . . . . . . . . . . . . . . . . . . . . . . . . . . . . . . . . . . . . . . . . . . 896
GetAsTimestamp . . . . . . . . . . . . . . . . . . . . . . . . . . . . . . . . . . . . . . . . . . . . . . . . . . . . . 897
GetAsURLEncoded . . . . . . . . . . . . . . . . . . . . . . . . . . . . . . . . . . . . . . . . . . . . . . . . . . . . 898
GetValue . . . . . . . . . . . . . . . . . . . . . . . . . . . . . . . . . . . . . . . . . . . . . . . . . . . . . . . . . . . .899
Hiragana . . . . . . . . . . . . . . . . . . . . . . . . . . . . . . . . . . . . . . . . . . . . . . . . . . . . . . . . . . . .900
KanaHankaku . . . . . . . . . . . . . . . . . . . . . . . . . . . . . . . . . . . . . . . . . . . . . . . . . . . . . . . . 901
KanaZenkaku . . . . . . . . . . . . . . . . . . . . . . . . . . . . . . . . . . . . . . . . . . . . . . . . . . . . . . . . 901
KanjiNumeral . . . . . . . . . . . . . . . . . . . . . . . . . . . . . . . . . . . . . . . . . . . . . . . . . . . . . . . . . 902
Katakana . . . . . . . . . . . . . . . . . . . . . . . . . . . . . . . . . . . . . . . . . . . . . . . . . . . . . . . . . . . .903
Left . . . . . . . . . . . . . . . . . . . . . . . . . . . . . . . . . . . . . . . . . . . . . . . . . . . . . . . . . . . . . . . . 903
LeftValues . . . . . . . . . . . . . . . . . . . . . . . . . . . . . . . . . . . . . . . . . . . . . . . . . . . . . . . . . . .904
LeftWords . . . . . . . . . . . . . . . . . . . . . . . . . . . . . . . . . . . . . . . . . . . . . . . . . . . . . . . . . . .905
Length . . . . . . . . . . . . . . . . . . . . . . . . . . . . . . . . . . . . . . . . . . . . . . . . . . . . . . . . . . . . . . 906
Lower . . . . . . . . . . . . . . . . . . . . . . . . . . . . . . . . . . . . . . . . . . . . . . . . . . . . . . . . . . . . . . 907
Middle . . . . . . . . . . . . . . . . . . . . . . . . . . . . . . . . . . . . . . . . . . . . . . . . . . . . . . . . . . . . . . 907
MiddleValues . . . . . . . . . . . . . . . . . . . . . . . . . . . . . . . . . . . . . . . . . . . . . . . . . . . . . . . . . 908
MiddleWords . . . . . . . . . . . . . . . . . . . . . . . . . . . . . . . . . . . . . . . . . . . . . . . . . . . . . . . . . 909
NumToJText . . . . . . . . . . . . . . . . . . . . . . . . . . . . . . . . . . . . . . . . . . . . . . . . . . . . . . . . . 910
PatternCount . . . . . . . . . . . . . . . . . . . . . . . . . . . . . . . . . . . . . . . . . . . . . . . . . . . . . . . . . 911
Position . . . . . . . . . . . . . . . . . . . . . . . . . . . . . . . . . . . . . . . . . . . . . . . . . . . . . . . . . . . . . 912
Proper . . . . . . . . . . . . . . . . . . . . . . . . . . . . . . . . . . . . . . . . . . . . . . . . . . . . . . . . . . . . . . 913
Quote . . . . . . . . . . . . . . . . . . . . . . . . . . . . . . . . . . . . . . . . . . . . . . . . . . . . . . . . . . . . . . 914
Replace . . . . . . . . . . . . . . . . . . . . . . . . . . . . . . . . . . . . . . . . . . . . . . . . . . . . . . . . . . . . .915
Right . . . . . . . . . . . . . . . . . . . . . . . . . . . . . . . . . . . . . . . . . . . . . . . . . . . . . . . . . . . . . . . 916
RightValues . . . . . . . . . . . . . . . . . . . . . . . . . . . . . . . . . . . . . . . . . . . . . . . . . . . . . . . . . . 917
RightWords . . . . . . . . . . . . . . . . . . . . . . . . . . . . . . . . . . . . . . . . . . . . . . . . . . . . . . . . . . 918
RomanHankaku . . . . . . . . . . . . . . . . . . . . . . . . . . . . . . . . . . . . . . . . . . . . . . . . . . . . . . 919
RomanZenkaku . . . . . . . . . . . . . . . . . . . . . . . . . . . . . . . . . . . . . . . . . . . . . . . . . . . . . . . 919
SerialIncrement . . . . . . . . . . . . . . . . . . . . . . . . . . . . . . . . . . . . . . . . . . . . . . . . . . . . . . . 920
Substitute . . . . . . . . . . . . . . . . . . . . . . . . . . . . . . . . . . . . . . . . . . . . . . . . . . . . . . . . . . .921
Trim . . . . . . . . . . . . . . . . . . . . . . . . . . . . . . . . . . . . . . . . . . . . . . . . . . . . . . . . . . . . . . . . 922
TrimAll . . . . . . . . . . . . . . . . . . . . . . . . . . . . . . . . . . . . . . . . . . . . . . . . . . . . . . . . . . . . . . 923
Upper . . . . . . . . . . . . . . . . . . . . . . . . . . . . . . . . . . . . . . . . . . . . . . . . . . . . . . . . . . . . . . 924
ValueCount . . . . . . . . . . . . . . . . . . . . . . . . . . . . . . . . . . . . . . . . . . . . . . . . . . . . . . . . . . 925
WordCount . . . . . . . . . . . . . . . . . . . . . . . . . . . . . . . . . . . . . . . . . . . . . . . . . . . . . . . . . . 926
Text formatting functions . . . . . . . . . . . . . . . . . . . . . . . . . . . . . . . . . . . . . . . . . . . . . . . . . . . 927
RGB . . . . . . . . . . . . . . . . . . . . . . . . . . . . . . . . . . . . . . . . . . . . . . . . . . . . . . . . . . . . . . . 928
TextColor . . . . . . . . . . . . . . . . . . . . . . . . . . . . . . . . . . . . . . . . . . . . . . . . . . . . . . . . . . . .929
TextColorRemove . . . . . . . . . . . . . . . . . . . . . . . . . . . . . . . . . . . . . . . . . . . . . . . . . . . . . 930
FILEMAKER PRO HELP 19
TextFont . . . . . . . . . . . . . . . . . . . . . . . . . . . . . . . . . . . . . . . . . . . . . . . . . . . . . . . . . . . .931
TextFontRemove . . . . . . . . . . . . . . . . . . . . . . . . . . . . . . . . . . . . . . . . . . . . . . . . . . . . . . 932
TextFormatRemove . . . . . . . . . . . . . . . . . . . . . . . . . . . . . . . . . . . . . . . . . . . . . . . . . . . 934
TextSize . . . . . . . . . . . . . . . . . . . . . . . . . . . . . . . . . . . . . . . . . . . . . . . . . . . . . . . . . . . .934
TextSizeRemove . . . . . . . . . . . . . . . . . . . . . . . . . . . . . . . . . . . . . . . . . . . . . . . . . . . . . . 935
TextStyleAdd . . . . . . . . . . . . . . . . . . . . . . . . . . . . . . . . . . . . . . . . . . . . . . . . . . . . . . . . . 936
TextStyleRemove . . . . . . . . . . . . . . . . . . . . . . . . . . . . . . . . . . . . . . . . . . . . . . . . . . . . . 938
Time functions . . . . . . . . . . . . . . . . . . . . . . . . . . . . . . . . . . . . . . . . . . . . . . . . . . . . . . . . . . . 939
Hour . . . . . . . . . . . . . . . . . . . . . . . . . . . . . . . . . . . . . . . . . . . . . . . . . . . . . . . . . . . . . . . 940
Minute . . . . . . . . . . . . . . . . . . . . . . . . . . . . . . . . . . . . . . . . . . . . . . . . . . . . . . . . . . . . . . 941
Seconds . . . . . . . . . . . . . . . . . . . . . . . . . . . . . . . . . . . . . . . . . . . . . . . . . . . . . . . . . . . .941
Time . . . . . . . . . . . . . . . . . . . . . . . . . . . . . . . . . . . . . . . . . . . . . . . . . . . . . . . . . . . . . . . 942
Timestamp functions . . . . . . . . . . . . . . . . . . . . . . . . . . . . . . . . . . . . . . . . . . . . . . . . . . . . . .943
Timestamp . . . . . . . . . . . . . . . . . . . . . . . . . . . . . . . . . . . . . . . . . . . . . . . . . . . . . . . . . . 943
Trigonometric functions . . . . . . . . . . . . . . . . . . . . . . . . . . . . . . . . . . . . . . . . . . . . . . . . . . . . 944
Acos . . . . . . . . . . . . . . . . . . . . . . . . . . . . . . . . . . . . . . . . . . . . . . . . . . . . . . . . . . . . . . . 945
Asin . . . . . . . . . . . . . . . . . . . . . . . . . . . . . . . . . . . . . . . . . . . . . . . . . . . . . . . . . . . . . . . . 945
Atan . . . . . . . . . . . . . . . . . . . . . . . . . . . . . . . . . . . . . . . . . . . . . . . . . . . . . . . . . . . . . . . . 946
Cos . . . . . . . . . . . . . . . . . . . . . . . . . . . . . . . . . . . . . . . . . . . . . . . . . . . . . . . . . . . . . . . . 947
Degrees . . . . . . . . . . . . . . . . . . . . . . . . . . . . . . . . . . . . . . . . . . . . . . . . . . . . . . . . . . . . .948
Pi . . . . . . . . . . . . . . . . . . . . . . . . . . . . . . . . . . . . . . . . . . . . . . . . . . . . . . . . . . . . . . . . . . 949
Radians . . . . . . . . . . . . . . . . . . . . . . . . . . . . . . . . . . . . . . . . . . . . . . . . . . . . . . . . . . . . .949
Sin . . . . . . . . . . . . . . . . . . . . . . . . . . . . . . . . . . . . . . . . . . . . . . . . . . . . . . . . . . . . . . . . . 950
Tan . . . . . . . . . . . . . . . . . . . . . . . . . . . . . . . . . . . . . . . . . . . . . . . . . . . . . . . . . . . . . . . . 951
Script steps reference . . . . . . . . . . . . . . . . . . . . . . . . . . . . . . . . . . . . . . . . . . . . . . . . . . . . . . . . 952
Script steps reference (category list) . . . . . . . . . . . . . . . . . . . . . . . . . . . . . . . . . . . . . . . . . . 952
Script steps reference (alphabetical list) . . . . . . . . . . . . . . . . . . . . . . . . . . . . . . . . . . . . . . . 956
Control script steps . . . . . . . . . . . . . . . . . . . . . . . . . . . . . . . . . . . . . . . . . . . . . . . . . . . . . . . 960
Perform Script . . . . . . . . . . . . . . . . . . . . . . . . . . . . . . . . . . . . . . . . . . . . . . . . . . . . . . . . 960
Perform Script On Server . . . . . . . . . . . . . . . . . . . . . . . . . . . . . . . . . . . . . . . . . . . . . . . 962
Pause/Resume Script . . . . . . . . . . . . . . . . . . . . . . . . . . . . . . . . . . . . . . . . . . . . . . . . . . 964
Exit Script . . . . . . . . . . . . . . . . . . . . . . . . . . . . . . . . . . . . . . . . . . . . . . . . . . . . . . . . . . . 965
Halt Script . . . . . . . . . . . . . . . . . . . . . . . . . . . . . . . . . . . . . . . . . . . . . . . . . . . . . . . . . . . 967
If . . . . . . . . . . . . . . . . . . . . . . . . . . . . . . . . . . . . . . . . . . . . . . . . . . . . . . . . . . . . . . . . . . 968
Else If . . . . . . . . . . . . . . . . . . . . . . . . . . . . . . . . . . . . . . . . . . . . . . . . . . . . . . . . . . . . . . 970
Else . . . . . . . . . . . . . . . . . . . . . . . . . . . . . . . . . . . . . . . . . . . . . . . . . . . . . . . . . . . . . . . . 972
End If . . . . . . . . . . . . . . . . . . . . . . . . . . . . . . . . . . . . . . . . . . . . . . . . . . . . . . . . . . . . . . . 973
Loop . . . . . . . . . . . . . . . . . . . . . . . . . . . . . . . . . . . . . . . . . . . . . . . . . . . . . . . . . . . . . . . 974
Exit Loop If . . . . . . . . . . . . . . . . . . . . . . . . . . . . . . . . . . . . . . . . . . . . . . . . . . . . . . . . . .975
End Loop . . . . . . . . . . . . . . . . . . . . . . . . . . . . . . . . . . . . . . . . . . . . . . . . . . . . . . . . . . . .976
Allow User Abort . . . . . . . . . . . . . . . . . . . . . . . . . . . . . . . . . . . . . . . . . . . . . . . . . . . . . . 977
Set Error Capture . . . . . . . . . . . . . . . . . . . . . . . . . . . . . . . . . . . . . . . . . . . . . . . . . . . . . 978
Set Variable . . . . . . . . . . . . . . . . . . . . . . . . . . . . . . . . . . . . . . . . . . . . . . . . . . . . . . . . . .980
Set Script Animation . . . . . . . . . . . . . . . . . . . . . . . . . . . . . . . . . . . . . . . . . . . . . . . . . . . 982
Install OnTimer Script . . . . . . . . . . . . . . . . . . . . . . . . . . . . . . . . . . . . . . . . . . . . . . . . . . 983
Navigation script steps . . . . . . . . . . . . . . . . . . . . . . . . . . . . . . . . . . . . . . . . . . . . . . . . . . . . .984
Go to Layout . . . . . . . . . . . . . . . . . . . . . . . . . . . . . . . . . . . . . . . . . . . . . . . . . . . . . . . . . 984
Go to Record/Request/Page . . . . . . . . . . . . . . . . . . . . . . . . . . . . . . . . . . . . . . . . . . . . . 986
Go to Related Record . . . . . . . . . . . . . . . . . . . . . . . . . . . . . . . . . . . . . . . . . . . . . . . . . . 988
Go to Portal Row . . . . . . . . . . . . . . . . . . . . . . . . . . . . . . . . . . . . . . . . . . . . . . . . . . . . . . 990
Go to Object . . . . . . . . . . . . . . . . . . . . . . . . . . . . . . . . . . . . . . . . . . . . . . . . . . . . . . . . . 992
Go to Field . . . . . . . . . . . . . . . . . . . . . . . . . . . . . . . . . . . . . . . . . . . . . . . . . . . . . . . . . . .993
Go to Next Field . . . . . . . . . . . . . . . . . . . . . . . . . . . . . . . . . . . . . . . . . . . . . . . . . . . . . . 994
Go to Previous Field . . . . . . . . . . . . . . . . . . . . . . . . . . . . . . . . . . . . . . . . . . . . . . . . . . . 995
FILEMAKER PRO HELP 20
Close Popover . . . . . . . . . . . . . . . . . . . . . . . . . . . . . . . . . . . . . . . . . . . . . . . . . . . . . . . . 996
Enter Browse Mode . . . . . . . . . . . . . . . . . . . . . . . . . . . . . . . . . . . . . . . . . . . . . . . . . . . . 997
Enter Find Mode . . . . . . . . . . . . . . . . . . . . . . . . . . . . . . . . . . . . . . . . . . . . . . . . . . . . . . 998
Enter Preview Mode . . . . . . . . . . . . . . . . . . . . . . . . . . . . . . . . . . . . . . . . . . . . . . . . . . . 999
Editing script steps . . . . . . . . . . . . . . . . . . . . . . . . . . . . . . . . . . . . . . . . . . . . . . . . . . . . . . . 1000
Undo/Redo . . . . . . . . . . . . . . . . . . . . . . . . . . . . . . . . . . . . . . . . . . . . . . . . . . . . . . . . . 1000
Cut . . . . . . . . . . . . . . . . . . . . . . . . . . . . . . . . . . . . . . . . . . . . . . . . . . . . . . . . . . . . . . . . 1001
Copy . . . . . . . . . . . . . . . . . . . . . . . . . . . . . . . . . . . . . . . . . . . . . . . . . . . . . . . . . . . . . .1003
Paste . . . . . . . . . . . . . . . . . . . . . . . . . . . . . . . . . . . . . . . . . . . . . . . . . . . . . . . . . . . . . .1004
Clear . . . . . . . . . . . . . . . . . . . . . . . . . . . . . . . . . . . . . . . . . . . . . . . . . . . . . . . . . . . . . . 1005
Set Selection . . . . . . . . . . . . . . . . . . . . . . . . . . . . . . . . . . . . . . . . . . . . . . . . . . . . . . . . 1006
Select All . . . . . . . . . . . . . . . . . . . . . . . . . . . . . . . . . . . . . . . . . . . . . . . . . . . . . . . . . . .1008
Perform Find/Replace . . . . . . . . . . . . . . . . . . . . . . . . . . . . . . . . . . . . . . . . . . . . . . . . . 1009
Fields script steps . . . . . . . . . . . . . . . . . . . . . . . . . . . . . . . . . . . . . . . . . . . . . . . . . . . . . . . 1011
Set Field . . . . . . . . . . . . . . . . . . . . . . . . . . . . . . . . . . . . . . . . . . . . . . . . . . . . . . . . . . .1011
Set Field By Name . . . . . . . . . . . . . . . . . . . . . . . . . . . . . . . . . . . . . . . . . . . . . . . . . . . 1012
Set Next Serial Value . . . . . . . . . . . . . . . . . . . . . . . . . . . . . . . . . . . . . . . . . . . . . . . . . 1014
Insert Text . . . . . . . . . . . . . . . . . . . . . . . . . . . . . . . . . . . . . . . . . . . . . . . . . . . . . . . . . . 1016
Insert Calculated Result . . . . . . . . . . . . . . . . . . . . . . . . . . . . . . . . . . . . . . . . . . . . . . . 1017
Insert From Device . . . . . . . . . . . . . . . . . . . . . . . . . . . . . . . . . . . . . . . . . . . . . . . . . . . 1019
Insert From Index . . . . . . . . . . . . . . . . . . . . . . . . . . . . . . . . . . . . . . . . . . . . . . . . . . . . 1021
Insert From Last Visited . . . . . . . . . . . . . . . . . . . . . . . . . . . . . . . . . . . . . . . . . . . . . . . 1022
Insert From URL . . . . . . . . . . . . . . . . . . . . . . . . . . . . . . . . . . . . . . . . . . . . . . . . . . . . . 1023
Insert Current Date . . . . . . . . . . . . . . . . . . . . . . . . . . . . . . . . . . . . . . . . . . . . . . . . . . . 1025
Insert Current Time . . . . . . . . . . . . . . . . . . . . . . . . . . . . . . . . . . . . . . . . . . . . . . . . . . . 1026
Insert Current User Name . . . . . . . . . . . . . . . . . . . . . . . . . . . . . . . . . . . . . . . . . . . . . . 1027
Insert Picture . . . . . . . . . . . . . . . . . . . . . . . . . . . . . . . . . . . . . . . . . . . . . . . . . . . . . . . . 1028
Insert QuickTime . . . . . . . . . . . . . . . . . . . . . . . . . . . . . . . . . . . . . . . . . . . . . . . . . . . . . 1029
Insert Audio/Video . . . . . . . . . . . . . . . . . . . . . . . . . . . . . . . . . . . . . . . . . . . . . . . . . . . . 1030
Insert PDF . . . . . . . . . . . . . . . . . . . . . . . . . . . . . . . . . . . . . . . . . . . . . . . . . . . . . . . . . . 1032
Insert File . . . . . . . . . . . . . . . . . . . . . . . . . . . . . . . . . . . . . . . . . . . . . . . . . . . . . . . . . .1033
Replace Field Contents . . . . . . . . . . . . . . . . . . . . . . . . . . . . . . . . . . . . . . . . . . . . . . . . 1035
Relookup Field Contents . . . . . . . . . . . . . . . . . . . . . . . . . . . . . . . . . . . . . . . . . . . . . . . 1037
Export Field Contents . . . . . . . . . . . . . . . . . . . . . . . . . . . . . . . . . . . . . . . . . . . . . . . . . 1038
Records script steps . . . . . . . . . . . . . . . . . . . . . . . . . . . . . . . . . . . . . . . . . . . . . . . . . . . . . 1039
New Record/Request . . . . . . . . . . . . . . . . . . . . . . . . . . . . . . . . . . . . . . . . . . . . . . . . . 1039
Duplicate Record/Request . . . . . . . . . . . . . . . . . . . . . . . . . . . . . . . . . . . . . . . . . . . . . 1040
Delete Record/Request . . . . . . . . . . . . . . . . . . . . . . . . . . . . . . . . . . . . . . . . . . . . . . . . 1041
Delete Portal Row . . . . . . . . . . . . . . . . . . . . . . . . . . . . . . . . . . . . . . . . . . . . . . . . . . . . 1043
Delete All Records . . . . . . . . . . . . . . . . . . . . . . . . . . . . . . . . . . . . . . . . . . . . . . . . . . . 1044
Open Record/Request . . . . . . . . . . . . . . . . . . . . . . . . . . . . . . . . . . . . . . . . . . . . . . . . 1045
Revert Record/Request . . . . . . . . . . . . . . . . . . . . . . . . . . . . . . . . . . . . . . . . . . . . . . . . 1047
Commit Records/Requests . . . . . . . . . . . . . . . . . . . . . . . . . . . . . . . . . . . . . . . . . . . . . 1048
Copy Record/Request . . . . . . . . . . . . . . . . . . . . . . . . . . . . . . . . . . . . . . . . . . . . . . . . . 1049
Copy All Records/Requests . . . . . . . . . . . . . . . . . . . . . . . . . . . . . . . . . . . . . . . . . . . . 1050
Import Records . . . . . . . . . . . . . . . . . . . . . . . . . . . . . . . . . . . . . . . . . . . . . . . . . . . . . . 1051
Export Records . . . . . . . . . . . . . . . . . . . . . . . . . . . . . . . . . . . . . . . . . . . . . . . . . . . . . . 1054
Save Records As Excel . . . . . . . . . . . . . . . . . . . . . . . . . . . . . . . . . . . . . . . . . . . . . . . . 1057
Save Records As PDF . . . . . . . . . . . . . . . . . . . . . . . . . . . . . . . . . . . . . . . . . . . . . . . . 1058
Save Records As Snapshot Link . . . . . . . . . . . . . . . . . . . . . . . . . . . . . . . . . . . . . . . . . 1060
Found Sets script steps . . . . . . . . . . . . . . . . . . . . . . . . . . . . . . . . . . . . . . . . . . . . . . . . . . . 1062
Perform Find . . . . . . . . . . . . . . . . . . . . . . . . . . . . . . . . . . . . . . . . . . . . . . . . . . . . . . . . 1062
Perform Quick Find . . . . . . . . . . . . . . . . . . . . . . . . . . . . . . . . . . . . . . . . . . . . . . . . . . . 1064
Find Matching Records . . . . . . . . . . . . . . . . . . . . . . . . . . . . . . . . . . . . . . . . . . . . . . . . 1065
FILEMAKER PRO HELP 21
Constrain Found Set . . . . . . . . . . . . . . . . . . . . . . . . . . . . . . . . . . . . . . . . . . . . . . . . . . 1067
Extend Found Set . . . . . . . . . . . . . . . . . . . . . . . . . . . . . . . . . . . . . . . . . . . . . . . . . . . . 1068
Modify Last Find . . . . . . . . . . . . . . . . . . . . . . . . . . . . . . . . . . . . . . . . . . . . . . . . . . . . . 1069
Show All Records . . . . . . . . . . . . . . . . . . . . . . . . . . . . . . . . . . . . . . . . . . . . . . . . . . . . 1070
Show Omitted Only . . . . . . . . . . . . . . . . . . . . . . . . . . . . . . . . . . . . . . . . . . . . . . . . . . . 1071
Omit Record . . . . . . . . . . . . . . . . . . . . . . . . . . . . . . . . . . . . . . . . . . . . . . . . . . . . . . . . 1072
Omit Multiple Records . . . . . . . . . . . . . . . . . . . . . . . . . . . . . . . . . . . . . . . . . . . . . . . . . 1073
Sort Records . . . . . . . . . . . . . . . . . . . . . . . . . . . . . . . . . . . . . . . . . . . . . . . . . . . . . . . . 1074
Unsort Records . . . . . . . . . . . . . . . . . . . . . . . . . . . . . . . . . . . . . . . . . . . . . . . . . . . . . . 1076
Sort Records by Field . . . . . . . . . . . . . . . . . . . . . . . . . . . . . . . . . . . . . . . . . . . . . . . . . 1077
Windows script steps . . . . . . . . . . . . . . . . . . . . . . . . . . . . . . . . . . . . . . . . . . . . . . . . . . . . . 1079
New Window . . . . . . . . . . . . . . . . . . . . . . . . . . . . . . . . . . . . . . . . . . . . . . . . . . . . . . . . 1079
Select Window . . . . . . . . . . . . . . . . . . . . . . . . . . . . . . . . . . . . . . . . . . . . . . . . . . . . . . 1081
Close Window . . . . . . . . . . . . . . . . . . . . . . . . . . . . . . . . . . . . . . . . . . . . . . . . . . . . . . . 1083
Adjust Window . . . . . . . . . . . . . . . . . . . . . . . . . . . . . . . . . . . . . . . . . . . . . . . . . . . . . . 1084
Move/Resize Window . . . . . . . . . . . . . . . . . . . . . . . . . . . . . . . . . . . . . . . . . . . . . . . . . 1085
Arrange All Windows . . . . . . . . . . . . . . . . . . . . . . . . . . . . . . . . . . . . . . . . . . . . . . . . . . 1087
Freeze Window . . . . . . . . . . . . . . . . . . . . . . . . . . . . . . . . . . . . . . . . . . . . . . . . . . . . . . 1088
Refresh Window . . . . . . . . . . . . . . . . . . . . . . . . . . . . . . . . . . . . . . . . . . . . . . . . . . . . . 1090
Scroll Window . . . . . . . . . . . . . . . . . . . . . . . . . . . . . . . . . . . . . . . . . . . . . . . . . . . . . . . 1091
Show/Hide Menubar . . . . . . . . . . . . . . . . . . . . . . . . . . . . . . . . . . . . . . . . . . . . . . . . . . 1092
Show/Hide Toolbars . . . . . . . . . . . . . . . . . . . . . . . . . . . . . . . . . . . . . . . . . . . . . . . . . . 1093
Show/Hide Text Ruler . . . . . . . . . . . . . . . . . . . . . . . . . . . . . . . . . . . . . . . . . . . . . . . . . 1094
Set Window Title . . . . . . . . . . . . . . . . . . . . . . . . . . . . . . . . . . . . . . . . . . . . . . . . . . . . . 1095
Set Zoom Level . . . . . . . . . . . . . . . . . . . . . . . . . . . . . . . . . . . . . . . . . . . . . . . . . . . . . . 1096
View As . . . . . . . . . . . . . . . . . . . . . . . . . . . . . . . . . . . . . . . . . . . . . . . . . . . . . . . . . . . . 1097
Files script steps . . . . . . . . . . . . . . . . . . . . . . . . . . . . . . . . . . . . . . . . . . . . . . . . . . . . . . . . 1098
New File . . . . . . . . . . . . . . . . . . . . . . . . . . . . . . . . . . . . . . . . . . . . . . . . . . . . . . . . . . . 1098
Open File . . . . . . . . . . . . . . . . . . . . . . . . . . . . . . . . . . . . . . . . . . . . . . . . . . . . . . . . . . . 1099
Close File . . . . . . . . . . . . . . . . . . . . . . . . . . . . . . . . . . . . . . . . . . . . . . . . . . . . . . . . . . 1101
Convert File . . . . . . . . . . . . . . . . . . . . . . . . . . . . . . . . . . . . . . . . . . . . . . . . . . . . . . . . . 1102
Set Multi-User . . . . . . . . . . . . . . . . . . . . . . . . . . . . . . . . . . . . . . . . . . . . . . . . . . . . . . . 1103
Set Use System Formats . . . . . . . . . . . . . . . . . . . . . . . . . . . . . . . . . . . . . . . . . . . . . . 1105
Save a Copy as . . . . . . . . . . . . . . . . . . . . . . . . . . . . . . . . . . . . . . . . . . . . . . . . . . . . . . 1106
Recover File . . . . . . . . . . . . . . . . . . . . . . . . . . . . . . . . . . . . . . . . . . . . . . . . . . . . . . . . 1107
Print Setup . . . . . . . . . . . . . . . . . . . . . . . . . . . . . . . . . . . . . . . . . . . . . . . . . . . . . . . . . 1108
Print . . . . . . . . . . . . . . . . . . . . . . . . . . . . . . . . . . . . . . . . . . . . . . . . . . . . . . . . . . . . . . . 1109
Accounts script steps . . . . . . . . . . . . . . . . . . . . . . . . . . . . . . . . . . . . . . . . . . . . . . . . . . . . . 1111
Add Account . . . . . . . . . . . . . . . . . . . . . . . . . . . . . . . . . . . . . . . . . . . . . . . . . . . . . . . . 1111
Delete Account . . . . . . . . . . . . . . . . . . . . . . . . . . . . . . . . . . . . . . . . . . . . . . . . . . . . . . 1113
Reset Account Password . . . . . . . . . . . . . . . . . . . . . . . . . . . . . . . . . . . . . . . . . . . . . . 1114
Change Password . . . . . . . . . . . . . . . . . . . . . . . . . . . . . . . . . . . . . . . . . . . . . . . . . . . . 1115
Enable Account . . . . . . . . . . . . . . . . . . . . . . . . . . . . . . . . . . . . . . . . . . . . . . . . . . . . . . 1117
Re-Login . . . . . . . . . . . . . . . . . . . . . . . . . . . . . . . . . . . . . . . . . . . . . . . . . . . . . . . . . . . 1118
Spelling script steps . . . . . . . . . . . . . . . . . . . . . . . . . . . . . . . . . . . . . . . . . . . . . . . . . . . . . .1119
Check Selection . . . . . . . . . . . . . . . . . . . . . . . . . . . . . . . . . . . . . . . . . . . . . . . . . . . . . 1120
Check Record . . . . . . . . . . . . . . . . . . . . . . . . . . . . . . . . . . . . . . . . . . . . . . . . . . . . . . . 1121
Check Found Set . . . . . . . . . . . . . . . . . . . . . . . . . . . . . . . . . . . . . . . . . . . . . . . . . . . . 1121
Correct Word . . . . . . . . . . . . . . . . . . . . . . . . . . . . . . . . . . . . . . . . . . . . . . . . . . . . . . . . 1122
Spelling Options . . . . . . . . . . . . . . . . . . . . . . . . . . . . . . . . . . . . . . . . . . . . . . . . . . . . . 1123
Select Dictionaries . . . . . . . . . . . . . . . . . . . . . . . . . . . . . . . . . . . . . . . . . . . . . . . . . . . 1124
Edit User Dictionary . . . . . . . . . . . . . . . . . . . . . . . . . . . . . . . . . . . . . . . . . . . . . . . . . . 1125
Open Menu Item script steps . . . . . . . . . . . . . . . . . . . . . . . . . . . . . . . . . . . . . . . . . . . . . . . 1126
Open Edit Saved Finds . . . . . . . . . . . . . . . . . . . . . . . . . . . . . . . . . . . . . . . . . . . . . . . . 1127
FILEMAKER PRO HELP 22
Open Preferences . . . . . . . . . . . . . . . . . . . . . . . . . . . . . . . . . . . . . . . . . . . . . . . . . . . . 1128
Open File Options . . . . . . . . . . . . . . . . . . . . . . . . . . . . . . . . . . . . . . . . . . . . . . . . . . . . 1129
Open Manage Containers . . . . . . . . . . . . . . . . . . . . . . . . . . . . . . . . . . . . . . . . . . . . . . 1130
Open Manage Database . . . . . . . . . . . . . . . . . . . . . . . . . . . . . . . . . . . . . . . . . . . . . . . 1131
Open Manage Data Sources . . . . . . . . . . . . . . . . . . . . . . . . . . . . . . . . . . . . . . . . . . . . 1132
Open Manage Layouts . . . . . . . . . . . . . . . . . . . . . . . . . . . . . . . . . . . . . . . . . . . . . . . . 1133
Open Manage Scripts . . . . . . . . . . . . . . . . . . . . . . . . . . . . . . . . . . . . . . . . . . . . . . . . . 1134
Open Manage Themes . . . . . . . . . . . . . . . . . . . . . . . . . . . . . . . . . . . . . . . . . . . . . . . . 1135
Open Manage Value Lists . . . . . . . . . . . . . . . . . . . . . . . . . . . . . . . . . . . . . . . . . . . . . . 1136
Open Find/Replace . . . . . . . . . . . . . . . . . . . . . . . . . . . . . . . . . . . . . . . . . . . . . . . . . . . 1137
Open Help . . . . . . . . . . . . . . . . . . . . . . . . . . . . . . . . . . . . . . . . . . . . . . . . . . . . . . . . . . 1138
Open Remote . . . . . . . . . . . . . . . . . . . . . . . . . . . . . . . . . . . . . . . . . . . . . . . . . . . . . . . 1139
Open Sharing . . . . . . . . . . . . . . . . . . . . . . . . . . . . . . . . . . . . . . . . . . . . . . . . . . . . . . . 1140
Upload To FileMaker Server . . . . . . . . . . . . . . . . . . . . . . . . . . . . . . . . . . . . . . . . . . . . 1141
Miscellaneous script steps . . . . . . . . . . . . . . . . . . . . . . . . . . . . . . . . . . . . . . . . . . . . . . . . . 1142
Show Custom Dialog . . . . . . . . . . . . . . . . . . . . . . . . . . . . . . . . . . . . . . . . . . . . . . . . . . 1143
Allow Formatting Bar . . . . . . . . . . . . . . . . . . . . . . . . . . . . . . . . . . . . . . . . . . . . . . . . . . 1146
Refresh Object . . . . . . . . . . . . . . . . . . . . . . . . . . . . . . . . . . . . . . . . . . . . . . . . . . . . . . 1147
Beep . . . . . . . . . . . . . . . . . . . . . . . . . . . . . . . . . . . . . . . . . . . . . . . . . . . . . . . . . . . . . .1148
Speak (OS X) . . . . . . . . . . . . . . . . . . . . . . . . . . . . . . . . . . . . . . . . . . . . . . . . . . . . . . . 1149
Dial Phone . . . . . . . . . . . . . . . . . . . . . . . . . . . . . . . . . . . . . . . . . . . . . . . . . . . . . . . . . . 1150
Install Plug-In File . . . . . . . . . . . . . . . . . . . . . . . . . . . . . . . . . . . . . . . . . . . . . . . . . . . . 1152
Install Menu Set . . . . . . . . . . . . . . . . . . . . . . . . . . . . . . . . . . . . . . . . . . . . . . . . . . . . . 1153
Set Web Viewer . . . . . . . . . . . . . . . . . . . . . . . . . . . . . . . . . . . . . . . . . . . . . . . . . . . . . 1154
Open URL . . . . . . . . . . . . . . . . . . . . . . . . . . . . . . . . . . . . . . . . . . . . . . . . . . . . . . . . . . 1156
Send Mail . . . . . . . . . . . . . . . . . . . . . . . . . . . . . . . . . . . . . . . . . . . . . . . . . . . . . . . . . . 1158
Send DDE Execute (Windows) . . . . . . . . . . . . . . . . . . . . . . . . . . . . . . . . . . . . . . . . . . 1160
Perform AppleScript (OS X) . . . . . . . . . . . . . . . . . . . . . . . . . . . . . . . . . . . . . . . . . . . . 1162
Execute SQL . . . . . . . . . . . . . . . . . . . . . . . . . . . . . . . . . . . . . . . . . . . . . . . . . . . . . . . . 1163
Send Event (OS X) . . . . . . . . . . . . . . . . . . . . . . . . . . . . . . . . . . . . . . . . . . . . . . . . . . . 1165
Send Event (Windows) . . . . . . . . . . . . . . . . . . . . . . . . . . . . . . . . . . . . . . . . . . . . . . . . 1167
Comment . . . . . . . . . . . . . . . . . . . . . . . . . . . . . . . . . . . . . . . . . . . . . . . . . . . . . . . . . . . 1168
Flush Cache to Disk . . . . . . . . . . . . . . . . . . . . . . . . . . . . . . . . . . . . . . . . . . . . . . . . . . 1169
Exit Application . . . . . . . . . . . . . . . . . . . . . . . . . . . . . . . . . . . . . . . . . . . . . . . . . . . . . . 1170
Script triggers reference . . . . . . . . . . . . . . . . . . . . . . . . . . . . . . . . . . . . . . . . . . . . . . . . . . . . . . 1172
OnObjectEnter . . . . . . . . . . . . . . . . . . . . . . . . . . . . . . . . . . . . . . . . . . . . . . . . . . . . . . . . . .1172
OnObjectKeystroke . . . . . . . . . . . . . . . . . . . . . . . . . . . . . . . . . . . . . . . . . . . . . . . . . . . . . . 1173
OnObjectModify . . . . . . . . . . . . . . . . . . . . . . . . . . . . . . . . . . . . . . . . . . . . . . . . . . . . . . . . .1174
OnObjectValidate . . . . . . . . . . . . . . . . . . . . . . . . . . . . . . . . . . . . . . . . . . . . . . . . . . . . . . . .1175
OnObjectSave . . . . . . . . . . . . . . . . . . . . . . . . . . . . . . . . . . . . . . . . . . . . . . . . . . . . . . . . . .1175
OnObjectExit . . . . . . . . . . . . . . . . . . . . . . . . . . . . . . . . . . . . . . . . . . . . . . . . . . . . . . . . . . . 1176
OnPanelSwitch . . . . . . . . . . . . . . . . . . . . . . . . . . . . . . . . . . . . . . . . . . . . . . . . . . . . . . . . .1177
OnRecordLoad . . . . . . . . . . . . . . . . . . . . . . . . . . . . . . . . . . . . . . . . . . . . . . . . . . . . . . . . . 1178
OnRecordCommit . . . . . . . . . . . . . . . . . . . . . . . . . . . . . . . . . . . . . . . . . . . . . . . . . . . . . . . 1178
OnRecordRevert . . . . . . . . . . . . . . . . . . . . . . . . . . . . . . . . . . . . . . . . . . . . . . . . . . . . . . . . 1179
OnLayoutKeystroke . . . . . . . . . . . . . . . . . . . . . . . . . . . . . . . . . . . . . . . . . . . . . . . . . . . . . . 1180
OnLayoutEnter . . . . . . . . . . . . . . . . . . . . . . . . . . . . . . . . . . . . . . . . . . . . . . . . . . . . . . . . . .1181
OnLayoutExit . . . . . . . . . . . . . . . . . . . . . . . . . . . . . . . . . . . . . . . . . . . . . . . . . . . . . . . . . . . 1182
OnLayoutSizeChange . . . . . . . . . . . . . . . . . . . . . . . . . . . . . . . . . . . . . . . . . . . . . . . . . . . . 1182
OnModeEnter . . . . . . . . . . . . . . . . . . . . . . . . . . . . . . . . . . . . . . . . . . . . . . . . . . . . . . . . . .1183
OnModeExit . . . . . . . . . . . . . . . . . . . . . . . . . . . . . . . . . . . . . . . . . . . . . . . . . . . . . . . . . . . . 1183
OnViewChange . . . . . . . . . . . . . . . . . . . . . . . . . . . . . . . . . . . . . . . . . . . . . . . . . . . . . . . . . 1184
OnGestureTap . . . . . . . . . . . . . . . . . . . . . . . . . . . . . . . . . . . . . . . . . . . . . . . . . . . . . . . . . .1185
OnFirstWindowOpen . . . . . . . . . . . . . . . . . . . . . . . . . . . . . . . . . . . . . . . . . . . . . . . . . . . . . 1185
FILEMAKER PRO HELP 23
OnLastWindowClose . . . . . . . . . . . . . . . . . . . . . . . . . . . . . . . . . . . . . . . . . . . . . . . . . . . . . 1186
OnWindowOpen . . . . . . . . . . . . . . . . . . . . . . . . . . . . . . . . . . . . . . . . . . . . . . . . . . . . . . . . 1187
OnWindowClose . . . . . . . . . . . . . . . . . . . . . . . . . . . . . . . . . . . . . . . . . . . . . . . . . . . . . . . . 1187
FileMaker Pro features by version . . . . . . . . . . . . . . . . . . . . . . . . . . . . . . . . . . . . . . . . . . . . . . 1189
Maintaining and recovering FileMaker Pro databases . . . . . . . . . . . . . . . . . . . . . . . . . . . . . . . 1198
Backing up . . . . . . . . . . . . . . . . . . . . . . . . . . . . . . . . . . . . . . . . . . . . . . . . . . . . . . . . . . . . . 1198
Example backup script . . . . . . . . . . . . . . . . . . . . . . . . . . . . . . . . . . . . . . . . . . . . . . . . 1199
Saving a compacted copy . . . . . . . . . . . . . . . . . . . . . . . . . . . . . . . . . . . . . . . . . . . . . . . . . 1200
About recovering FileMaker Pro files . . . . . . . . . . . . . . . . . . . . . . . . . . . . . . . . . . . . . . . . . 1200
Preventing database damage . . . . . . . . . . . . . . . . . . . . . . . . . . . . . . . . . . . . . . . . . . . 1201
Damaged files . . . . . . . . . . . . . . . . . . . . . . . . . . . . . . . . . . . . . . . . . . . . . . . . . . . . . . . 1201
Damaged layouts . . . . . . . . . . . . . . . . . . . . . . . . . . . . . . . . . . . . . . . . . . . . . . . . . . . . 1202
Checking file consistency . . . . . . . . . . . . . . . . . . . . . . . . . . . . . . . . . . . . . . . . . . . . . . 1203
Recovering files . . . . . . . . . . . . . . . . . . . . . . . . . . . . . . . . . . . . . . . . . . . . . . . . . . . . . . 1203
Setting advanced file recovery options . . . . . . . . . . . . . . . . . . . . . . . . . . . . . . . . . . . . 1205
Troubleshooting file recovery . . . . . . . . . . . . . . . . . . . . . . . . . . . . . . . . . . . . . . . . . . . . . . . 1207
FileMaker Pro error codes . . . . . . . . . . . . . . . . . . . . . . . . . . . . . . . . . . . . . . . . . . . . . . . . . . . . 1211
Glossary . . . . . . . . . . . . . . . . . . . . . . . . . . . . . . . . . . . . . . . . . . . . . . . . . . . . . . . . . . . . . . . . . . 1219
Registration . . . . . . . . . . . . . . . . . . . . . . . . . . . . . . . . . . . . . . . . . . . . . . . . . . . . . . . . . . . . . . . 1245
Customer Support and Knowledge Base . . . . . . . . . . . . . . . . . . . . . . . . . . . . . . . . . . . . . . . . . 1246
Copyright information . . . . . . . . . . . . . . . . . . . . . . . . . . . . . . . . . . . . . . . . . . . . . . . . . . . . . . . . 1247
Using FileMaker Pro
FILEMAKER PRO HELP 24
Using FileMaker Pro

FileMaker Pro basics
FILEMAKER PRO HELP 25
FileMaker Pro basics
This section contains:
•a description of the new features of FileMaker Pro 13 and FileMaker Pro 13 Advanced
•an introduction to FileMaker Pro databases and modes
•information on the basics of working with FileMaker Pro commands and files
New features in FileMaker Pro 13
FileMaker Pro 13 includes the following new features and improvements.
New layout styles and theme saving
•Enhanced options for managing styles and themes – Apply formatting styles to layout
objects, parts, and backgrounds to promote a consistent look throughout your solutions.
Define custom styles and save them to themes to apply formatting changes automatically,
or import themes from other files. See Creating and working with styles for layout objects,
parts, and the layout background and Saving and managing layout themes.
•Enhanced and new themes – The existing 40 themes have been updated to add alternate
style options. New themes in the Aspire family provide a variety of style options for extra
versatility. See Changing the theme of a layout.
Improved layout creation
•Redesigned New Layout/Report assistant – Create layouts and reports that are optimized
for the devices they'll be used on, with predefined screen dimensions, views, and themes
for viewing on computer, iPhone, and iPad screens, or for printing in a variety of formats.
See Creating a layout.
Improved layout design tools and controls
•Control object visibility – Hide or show layout objects by indicating whether an object is
hidden or displayed depending on a specific condition or calculation. See Hiding or showing
layout objects.
•Define fields in Layout mode – Define fields in Layout mode using the Field Picker dialog
box, then drag the fields to the layout. See About defining database fields.
•Slide controls – Create multi-panel slide controls to allow you to group objects in separate
slide panels. See Adding a slide control.
•Popovers – Create popovers to allow you to work with fields and other objects without
having to move to another layout or window. See Working with popovers on layouts.
•Object type selection – Use the drop-down list in the Appearance tab of the Inspector to
select and style objects with multiple parts (such as portals or slide controls). See Specifying
the display state for an object.
•Layout design enhancements:
•Undo and redo changes to layouts even after you've saved the layout or previewed the
layout in Browse mode. See Saving and reverting layout changes.
•Screen stencils now include dimensions for the 4-inch screen on iPhone 5. See Sizing
layouts for different devices.

FileMaker Pro basics
FILEMAKER PRO HELP 26
•Show or hide page breaks in Layout mode by choosing View menu > Page Breaks.
See Defining page breaks and numbering.
•Enhanced effects for layout objects:
•Shadows and padding – Apply shadows and padding to objects in the new Advanced
Graphic area of the Inspector. See Adding shadows and padding to layout objects.
•New object display states – The fill for the current record in List View or an active portal
row is specified by the Active display state. The primary and alternate fills in List View or
a portal are specified by the Primary and Alternate display states. See Specifying the
display state for an object.
•Text baseline – New options for modifying text baselines are available in the Text area
(previously in the Graphic area) in the Inspector. See Adding borders, fill, and baselines
to fields.
•Layout background – Customize the layout background with full-screen images, colors,
or gradients. See Filling objects, layout parts, or the layout background with a color
gradient and Filling objects, layout parts, or the layout background with an image.
•Improved object moving and resizing:
•Duplicating objects with “snap-to” – When you Ctrl-drag (Windows) or Option-drag
(OS X) to duplicate an object, the duplicated object “snaps to” the grid, guides, or
dynamic guides as needed. See Copying, duplicating, and deleting objects.
•Resizing multiple objects – Resizing multiple objects maintains the difference in objects’
lengths or widths, and opposite edges of the objects remain fixed in position. See
Resizing and reshaping objects.
•Dynamic guides – Dynamic guides appear when you use the keyboard arrow keys to
move objects on a layout. See Using guides and dynamic guides.
Sharing and collaboration
•Upload files to FileMaker Server – Upload FileMaker Pro databases and externally stored
container data to FileMaker Server. See Uploading files to FileMaker Server.
•FileMaker WebDirect ™ – Use FileMaker WebDirect technology to access layouts from
FileMaker Pro databases in a web browser. FileMaker WebDirect solutions are hosted by
FileMaker Server. See FILEMAKER WEBDIRECT GUIDE.
Integration with other applications and data sources
•Enhanced support for FileMaker Go – FileMaker Pro includes new script steps, functions,
and script triggers, as well as new layout themes optimized for the iPad and iPhone, that
support the use of FileMaker Go.
•Container fields in ODBC and JDBC – When files are inserted in container fields via ODBC
or JDBC, FileMaker Pro can detect each file’s format based on its file extension. See
FILEMAKER SQL REFERENCE.
•SQL statements – FileMaker Pro supports range query syntax with the FETCH FIRST and
OFFSET keywords. See FILEMAKER SQL REFERENCE.
Improved performance and usability
•Getting Started tour – You can explore FileMaker Pro through this interactive tour. Practice
creating, modifying, and deleting records; and learn about searching for data values and
sorting records, displaying data in charts and reports, and importing and exporting data

FileMaker Pro basics
FILEMAKER PRO HELP 27
between files. You'll also get to know the rich features FileMaker Pro provides for creating
your own custom solutions. See Using FileMaker Quick Start to learn more about FileMaker
Pro.
•Improved iOS device usability – Swipe with two fingers to move to the next or previous
record in FileMaker Go. Define text, number, date, time, and timestamp fields to use a
specific type of keyboard to let you quickly enter values. See Setting up a field to display a
keyboard.
•Importing data from a URL – You can use an HTTP POST request when you specify a URL
for importing from an XML data source, import XML data using the Import Records script
step or Convert File script step, or insert data in a field using the Insert From URL script
step. See Importing XML data.
•New badges in Layout mode:
•A badge on a layout object indicates that the object on which the badge appears is a
popover button.
•A badge on a layout object indicates that a calculation has been specified to hide
the object when View menu > Show > Hide Condition is selected.
See Identifying badges on layout objects.
•Current record in List View – In List View, the current record is indicated by default with a
different fill from other records. See Selecting the current record and Setting up form, list,
and table views for a layout.
•Automatic theme updating – FileMaker Pro loads the latest version of a theme whenever
you switch to Layout mode, switch to a different layout in Layout mode, or change the
layout's theme. During file recovery, FileMaker Pro loads the same version or any newer
version of a theme. See Changing the theme of a layout and Setting advanced file recovery
options.
•Enhancements to container fields – Improvements in data storage, file metadata retrieval,
and performance have been made to container fields. See About container fields.
•File version management – Prevent a file from being opened with a version of
FileMaker Pro, FileMaker Go, or FileMaker Server that's earlier than the specified version.
See Setting file options.
•Summarize data as a list – You can use a summary field that produces a list of values in a
field from multiple records. See Defining summary fields.
Script steps, script triggers, and functions
Script steps
Enhancements to script steps
•Improvements to Edit Script dialog box – The Desktop option in the Show
Compatibility drop-down list has been replaced with Macintosh and Windows, with
the current operating system selected. See Creating and editing scripts.
•Default folder location – When you run a script that creates a file on a hosted solution,
the path and location default to your Documents folder. This affects the following script
steps: Save Records As PDF, Save Records As Excel, Save Records As Snapshot
Link, and Export Records. See Save Records As Excel script step, Save Records As
PDF script step, Save Records As Snapshot Link script step and Save Records As PDF
script step.

FileMaker Pro basics
FILEMAKER PRO HELP 28
•Improvement to Show Custom Dialog script step – You can create a button label based
on a calculation. See Show Custom Dialog script step.
•Execute SQL script step compatibility – The Execute SQL script step is compatible with
FileMaker Server, FileMaker WebDirect, and Custom Web Publishing when performed
without a dialog box. See Execute SQL script step.
New script steps
•Insert From Device – In FileMaker Go, enters content into a container field from the
following sources: music library, photo library, camera, video camera, microphone, and
signature. Also enters content into a container field or a text field from a bar code
source. See Insert From Device script step.
•Open Manage Themes – Opens the Manage Themes dialog box, where you can
manage new or edit existing layout themes. See Open Manage Themes script step.
•Perform Script On Server – Performs a script on the server that’s hosting the current
file. See Perform Script On Server script step.
•Refresh Object – Updates the content, conditional formatting, and visibility state for the
specified object. See Refresh Object script step.
•Set Script Animation – Enables or disables animations while a script is running. See Set
Script Animation script step.
•Upload To FileMaker Server – Opens the Upload to FileMaker Server dialog box. See
Upload To FileMaker Server script step.
Script triggers
New script triggers
•OnGestureTap – Triggers a script to run when a tap gesture is received on a layout in
FileMaker Go. See OnGestureTap script step.
•OnLayoutSizeChange – Triggers a script to run after a layout or window has changed
size as a result of the following:
- In FileMaker Go: Rotating the iOS device, hiding or showing the status toolbar, or when a
window is first opened.
- In FileMaker Pro and FileMaker WebDirect: Changing the size of a layout or window by
user interaction, by script step, by hiding or showing the status toolbar or formatting bar via
menu command, shortcut, or script step, or when a window is first opened.
See OnLayoutSizeChange.
Changed script triggers
•OnTabSwitch is now OnPanelSwitch. See OnPanelSwitch.
Functions
New functions
•Base64Decode – Returns container content from text encoded in Base64 format. See
Base64Decode function.
•Base64Encode – Returns the contents of the specified container field as text. See
Base64Encode function.
•Get(ConnectionAttributes) – Returns the name of the current file’s host and the name of
the certificate authority that issued the SSL certificate used to secure the connection.
See Get(ConnectionAttributes) function.

FileMaker Pro basics
FILEMAKER PRO HELP 29
•GetContainerAttribute – Returns the file metadata of the specified container field. See
GetContainerAttribute function.
•Get(CurrentTimeUTCMilliseconds) – Returns the current time in Coordinated Universal
Time (UTC) to the nearest millisecond. See Get(CurrentTimeUTCMilliseconds)
function.
•Get(Device) – Returns a number indicating the type of computer that is currently
running FileMaker Pro or FileMaker WebDirect, or the type of iOS device that is
currently running FileMaker Go. See Get(Device) function.
•Get(EncryptionState) – Returns a value representing the file's current encryption state.
See Get(EncryptionState) function.
•Get(NetworkType) – In FileMaker Go, returns a number indicating the type of network
being used to access the current file. See Get(NetworkType) function.
•Get(ScriptAnimationState) – Returns a value indicating whether or not animations are
enabled for the current script. See Get(ScriptAnimationState) function.
•Get(TriggerGestureInfo) – In FileMaker Go, returns details about the gesture that
activated an OnGestureTap trigger. See Get(TriggerGestureInfo) function.
•Get(WindowOrientation) – Returns a value indicating the orientation of the window on
which the script is acting (not necessarily the foreground window). See
Get(WindowOrientation) function.
Changed functions
•GetLayoutObjectAttribute(): isFrontTabPanel is now isFrontPanel; isObjectHidden
returns 1 (True) if objectName is hidden on a record. See GetLayoutObjectAttribute
function.
•Get(TriggerCurrentTabPanel) is now Get(TriggerCurrentPanel). See
Get(TriggerCurrentPanel) function.
•Get(TriggerTargetTabPanel) is now Get(TriggerTargetPanel). See
Get(TriggerTargetPanel) function.
Changed and removed features
•Increase in cache size – The default cache size has been increased to 128 MB.
•Instant Web Publishing – FileMaker Pro no longer hosts database files via Instant Web
Publishing. Use FileMaker WebDirect or Custom Web Publishing, which require
FileMaker Server. See Publishing databases on the web.
•Support for inserting sound into container fields – Menu commands that support recording
sound into container fields have been removed from FileMaker Pro. (Inserting audio/video
and QuickTime files is still supported.)
•Exporting and saving records in Excel .xls format – FileMaker Pro no longer supports
exporting or saving records in Excel 95-2004 Workbook (.xls) format.
FileMaker Pro 13 Advanced
•Database Encryption feature – Encrypt database files to protect them from unauthorized
access while the files are being stored on disk, by requiring all database clients to open
encrypted database files with an encryption password. See Encrypting database files
(FileMaker Pro Advanced).

FileMaker Pro basics
FILEMAKER PRO HELP 30
Related topics
FileMaker Pro features by version
Using Help
FileMaker Pro Help provides comprehensive step-by-step instructions on FileMaker Pro features.
You can open Help from the Help menu in FileMaker Pro.
There are three ways to access Help:
•Browse the Help table of contents to locate topics by subject.
•Search for particular topics by entering keywords.
•You can get information about the currently displayed dialog box by pressing F1 (Windows)
or Command-? (OS X). Some dialog boxes display a (Windows) or (OS X) button
or a Learn More link, which you can also use for getting information about the dialog box.
Using FileMaker Quick Start to learn more about FileMaker Pro
The FileMaker Quick Start Screen gives you quick access to additional information about
FileMaker Pro, including the FileMaker Resource Center online library, instructional videos, the
Getting Started tour, and FileMaker Forum, a user group communication center.
To access additional information about FileMaker Pro:
1. Do one of the following:
•Start FileMaker Pro.
•If FileMaker Pro is running or if you start FileMaker Pro and you don’t see the Quick
Start Screen, choose Help menu > Quick Start Screen.
2. On the right side of the Quick Start Screen, select a link to learn more about FileMaker Pro.
•Click Visit the Resource Center to watch instructional videos about FileMaker Pro and
explore an online library that offers links to tutorials, electronic documentation, and
more.
•Click Start now to explore FileMaker Pro and learn about creating custom solutions.
You can also start the tour by choosing Help menu > Product Documentation >
Getting Started Tour. Don’t worry about spoiling the tour — if you make changes as
you work, you can start again by deleting the file, FMP13 Getting Started.fmp12, from
your Documents folder and then restarting the tour.
•Click Go to the FileMaker Forum to collaborate with other FileMaker users through an
online bulletin board.
Related topics
Starting FileMaker Pro
Using FileMaker Quick Start to open files
Creating a FileMaker Pro file
Converting the trial version to the full version of FileMaker Pro
You can convert your copy of the trial version of FileMaker Pro 13 to the full version without
uninstalling the trial version. All of your settings, recent files list, and Favorites are preserved, so you
can continue working with your FileMaker Pro data uninterrupted.

FileMaker Pro basics
FILEMAKER PRO HELP 31
You can also use the steps below to upgrade your retail copy of FileMaker Pro version 9, 10, 11, or
12 to the full version of FileMaker Pro 13. During the installation process, you’ll be asked to provide
the license key for your current product.
Notes
•You must have an internet connection to install FileMaker Pro 13 as described below.
•You can use the following steps to upgrade your retail copy of FileMaker Pro Advanced
version 9, 10, 11, or 12 to FileMaker Pro 13, but you can’t upgrade to FileMaker Pro 13
Advanced.
To install FileMaker Pro 13 from the trial version:
1. Start your trial copy of FileMaker Pro 13. In the FileMaker Pro Trial dialog box that appears,
click Buy Now.
If the trial version is already running, choose Help menu > Buy FileMaker Pro.
The FileMaker Store web page appears.
2. Select the version of FileMaker Pro 13 that you want to purchase.
If you’re upgrading from FileMaker Pro or FileMaker Pro Advanced version 9, 10, 11, or 12, you
can only select a FileMaker Pro 12 or FileMaker Pro 13 product on the Retail page. If you’re not
upgrading, you can select from the Retail or Licensing page.
3. Follow the onscreen instructions for purchasing your product.
Your license key for that product will be sent to you by email. Print that email and keep it in a
safe place.
4. After you’ve received your license key, return to the FileMaker Pro Trial dialog box, and click
Enter License Key.
5. In the next FileMaker Pro Trial dialog box, enter your user name, organization (optional),
and the license key for your new product. Click OK.
•If you’re installing FileMaker Pro 13 for Windows, you may be asked to provide
administrator login credentials for your computer.
•If you’re upgrading from an earlier version of FileMaker Pro and you entered an
upgrade license key in the FileMaker Pro Trial dialog box, the FileMaker Pro Upgrade
dialog box appears. Enter your user name, (optional) organization, and the license key
for the earlier product. Click OK. See Converting files from FileMaker Pro 11 and earlier
for information about changes that might affect your databases created in earlier
versions of FileMaker Pro.
6. Begin working with the full version of FileMaker Pro 13.
About FileMaker Pro databases
A database is a collection of information, or data, that you can organize, update, sort, search
through, and print as needed. A FileMaker Pro database is a file or files made up of one or more
tables. A table consists of records and fields, which store and display your data.
Each FileMaker Pro database file contains information about the file’s structure, like fields and their
definitions, passwords and access privileges, calculations, layouts, and scripts. A FileMaker Pro
database file also contains the data you enter and work with.
FileMaker Pro includes an interactive tour that helps familiarize you with the product. To start the
tour:

FileMaker Pro basics
FILEMAKER PRO HELP 32
•Choose Help menu > Product Documentation > Getting Started Tour
•Choose Help menu > Quick Start Screen, and under Getting Started Tour, click
Start now.
What are tables?
Tables contain all the records, fields, and data in a file, for example a Contacts file, which holds
information pertaining to your friends or customers. A file can also contain multiple tables that,
together, contain all the information about a particular topic, or related topics (a relational database).
For more information on tables, see Defining database tables.
What are records?
To enter data in a database file, you make a new record and enter data into the fields that belong to
that record. After you create records in a file, you can work with them in various ways: you can edit
them, sort them, find a group of records that contain a particular value or share the data across a
network. For more information on records, see Adding and duplicating records.
What are fields?
Fields store, calculate, and display the data you have entered into a record. The information you put
into a field — by typing, pasting, or importing from another application — is its value. Field values in
a FileMaker Pro file can be: text, numbers, dates, times, timestamps, pictures, sounds, movies,
enclosed files, calculated values, and summary values. Each piece of information in a record — like
a name, address, or telephone number — is stored in a field. For more information on fields, see
About defining database fields.
What are layouts?
FileMaker Pro layouts present data (the text entered into fields) contained in a database. Layouts
determine how data is organized for viewing, printing, reporting, finding, and entering data. Layouts
do not store your data; they just display it. When you change the design for a layout, it doesn’t affect
the data or other layouts in the file. However, when you change data in a field on a layout, the
changes are reflected in the same field on all the layouts in the database. You can set a layout to
display and print one record, or as many as can fit on a page.
Within one database file, you can design separate layouts for entering data, summary reporting,
printing mailing labels, or publishing a database on the web. You can have as many layouts for each
file as disk space or maximum file size allows. For more information on layouts, see Creating and
managing layouts and reports.
In a layout, you:
•choose which fields to display
•arrange and format fields
•add or modify field labels
•create reports to group or summarize data
•specify how records are printed
•add graphics and text to add emphasis and interest
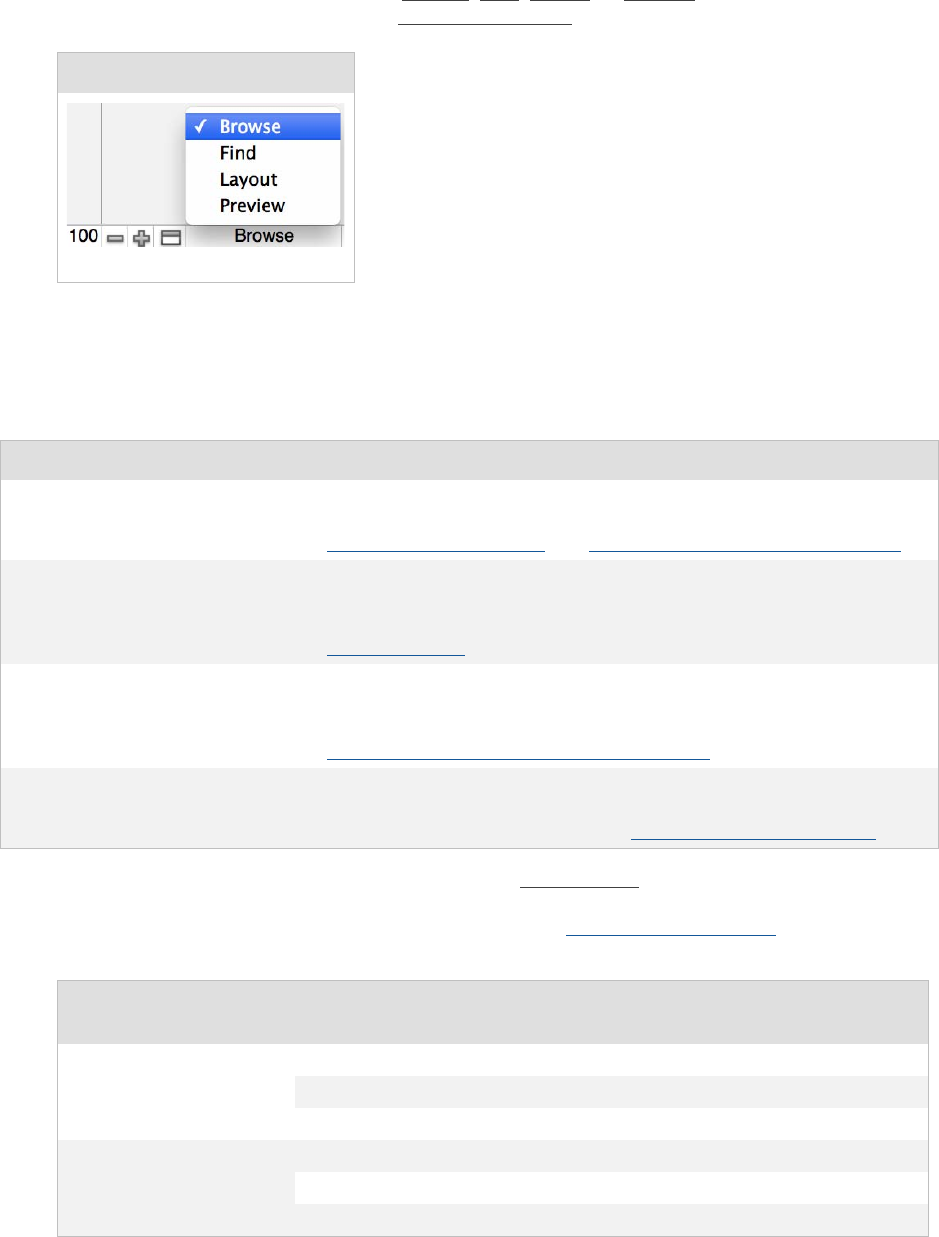
FileMaker Pro basics
FILEMAKER PRO HELP 33
About FileMaker Pro modes
You work with data in FileMaker Pro in Browse, Find, Layout, or Preview mode. You can choose a
mode from the View menu or from the Mode pop-up menu at the bottom of the document window.
Each mode provides different menu and toolbar options, so choose a mode after deciding what work
you need to do. If you’re working with a database and you can’t find the command you need, you
may be using the wrong mode. (It’s also possible that your access privileges may prohibit you from
using the command.)
You can also switch modes by clicking buttons in the status toolbar. The buttons in the status toolbar
vary depending on which mode you’re in. You can customize the buttons available in each mode by
customizing the status toolbar. For more information, see Using the status toolbar.
Mode pop-up menu
Use this mode To
Browse Work with the data in a file. You can add, view, change, sort, omit (hide), and delete
records. Browse mode is where you’ll do most of your work, like data entry. For more
information, see Adding and viewing data and Finding, sorting, and replacing data.
Find Search for particular records that match a set of criteria. You can then work with this
subset of your records, called the found set. After you find a group of records,
FileMaker Pro returns to Browse mode so you can begin working with them. For more
information, see Finding records.
Layout Determine how information is presented on your screen or in printed reports, labels,
and forms. Design layouts for specific tasks, like data entry or printing invoices. Select
and arrange fields to modify an existing layout, or create new layouts. For more
information, see Creating and managing layouts and reports.
Preview See how data in forms or reports will look before you print. Preview mode is
especially useful for viewing layouts with multiple columns (like mailing labels) and
reports with summaries. For more information, see Previewing data on a layout.
To switch from this
mode To this mode Click this button or series of buttons
Browse Find Find
Layout Edit Layout
Preview Preview
Find Browse Cancel Find
Layout Cancel Find, then Edit Layout
Preview Cancel Find, then Preview

FileMaker Pro basics
FILEMAKER PRO HELP 34
Notes
•Edit Layout is not available in Table View. If you are in Table View, you must switch to Form
View or List View to access the Edit Layout button.
•To switch from Layout mode to another mode, click Exit Layout.
Exit Layout returns you to the mode in which you were previously working. For example, if you
were working in Browse mode and you switched to Layout mode, clicking Exit Layout would
return you to Browse mode. To switch to another mode, see the table above.
•To switch from Preview mode to another mode, click Exit Preview.
Exit Preview returns you to the mode in which you were previously working. For example, if you
were working in Layout mode and you switched to Preview mode, clicking Exit Preview would
return you to Layout mode. To switch to another mode, see the table above.
Performing menu commands
There are a variety of ways to access menu commands in FileMaker Pro.
You can access menu commands by:
•choosing them from the menu bar
•pressing a keyboard shortcut
•clicking buttons in the status toolbar or formatting bar
•selecting them from shortcut menus
•activating them from Apple events (OS X only)
Important Your menu choices may be dimmed if your access privileges for the file are limited. For
more information, see Protecting databases.
Using the status toolbar
The status toolbar provides quick access to many FileMaker Pro menu commands. In all modes, it
includes navigation controls, customizable buttons, and a layout bar for working with layouts. In
Layout mode, it includes layout tools. Move the pointer over a button to see its description.
To show or hide the status toolbar:
•Choose View menu > Status Toolbar.
•Click the status toolbar control at the bottom of the document window.
To customize the status toolbar:
1. Choose View menu > Customize Status Toolbar.
The Customize dialog box (Windows) or sheet (OS X) appears.
2. Make your changes to the status toolbar:

FileMaker Pro basics
FILEMAKER PRO HELP 35
3. When you are finished, click Close (Windows) or Done (OS X).
Notes
•Windows only: You can also customize the status toolbar by using the Toolbar Options
menu. Click the down arrow on the right side of the status toolbar, choose Add or Remove
Buttons > Customize, then continue with step 2.
•You can customize the status toolbar for each mode. For example, if you customize the
status toolbar in Browse mode, it does not affect the status toolbar in other modes.
•Changes to the status toolbar are application-wide. For example, if you customize the status
toolbar in one window in Browse mode, it affects all windows in Browse mode.
•Buttons in the layout bar cannot be customized.
Using shortcut menus
You can quickly edit an object or data by choosing commands directly from a shortcut menu, also
called a “context menu” or “contextual menu.”
To display a shortcut menu:
Right-click or Control-click an object or an area to see a list of commands.
To Do this
Add a button •Windows: In the Commands tab, select Customizable or
Standard from the Categories list, then drag the desired
button from the Commands list to the status toolbar.
•OS X: Drag it from the dialog box to the status toolbar.
Remove a button Drag it from the status toolbar to the dialog box.
Rearrange buttons Drag them to the desired locations in the status toolbar.
Restore the default set of
buttons
•Windows: In the Toolbars tab, select Status Toolbar, then
click Reset.
•OS X: Drag the default set from the dialog box to the status
toolbar.
Display only icons or text
(OS X)
Choose an option from the Show pop-up menu.
Make the toolbar icons
smaller (OS X)
Select Use small size.
Insert a vertical separator
between buttons (OS X)
Drag the Separator icon to the desired location in the status toolbar.
Insert a fixed amount of
space between buttons
(OS X)
Drag the Space icon to the desired location in the status toolbar.
Insert a flexible amount
of space between
buttons, which adjusts
depending on the
window size (OS X)
Drag the Flexible Space icon to the desired location in the status
toolbar.

FileMaker Pro basics
FILEMAKER PRO HELP 36
Notes
•Shortcut menu commands vary based on what mode you’re in, the item the cursor is over,
and whether an item is selected. For example, when a field is selected in Layout mode, you
have access to commands that pertain to Layout mode.
•You can use the Control Panel (Windows) or System Preferences (OS X) to configure your
mouse, trackpad, or input device. For example, you can set up a secondary button on a
mouse.
Related topics
Working with data in Table View
Checking spelling as you type
Finding records based on criteria in a single field
Sorting records
Converting files from FileMaker Pro 11 and earlier
You must convert files created in FileMaker Pro 11 and earlier to the FileMaker Pro 12 format in
order to use them with FileMaker Pro 13.
When you convert a file, FileMaker Pro creates a Conversion.log file, so you can view the
conversion status and any problems that may have occurred during the conversion process.
When you convert files:
•You can only convert files created in FileMaker Pro version 7.x, 8.x, 9.x, 10.x, or 11.x to the
FileMaker Pro 12 format. See Conversion overview and Converting FileMaker Pro
databases earlier than version 7.x. After conversion, files will only be compatible with
FileMaker Pro 13 or later supported versions.
•Manual corrections may be necessary. You might need to correct items in the converted file
that did not convert properly. In some cases, you may need to correct items in the original
file and then convert the file again. After you convert any file, you should review the
Conversion.log file for items that may need to be corrected.
•You should test the converted file. The Conversion.log file may not indicate every item in the
file that needs to be corrected. Before you begin using a converted database solution, you
should test it thoroughly to make sure every aspect has converted successfully. For
example, make sure every script works as you expect, and that accounts and privilege sets
provide the required file security.
•Converted files may be larger than the original files. Part of the conversion process
increases the file size of databases. Though the size increase is typically not significant, the
increase varies by file. Make sure you have adequate storage space before converting files.
This section describes the basics of file conversion. It contains:
•an overview of the conversion process
•instructions on how to convert single files or multiple files at once
•information on how to view the Conversion.log file after converting one or more files
•a summary of the top conversion issues you may encounter
For additional information about converting databases, refer to the FileMaker Knowledge Base
available at http://help.filemaker.com.
If you have FileMaker Pro Advanced, after you have converted files you can consolidate tables from
a multi-file solution into one file. See Copying or importing table schemas (FileMaker Pro
Advanced).

FileMaker Pro basics
FILEMAKER PRO HELP 37
Note Snapshot links cannot be converted. You must convert the database from which the records
were found and then re-create the snapshot link.
Conversion overview
Before you convert any FileMaker Pro database, you should plan the conversion carefully. The
general steps for file conversion are:
1. Convert the database file.
2. Review the Conversion.log file.
3. Test your converted database.
4. Use the converted file.
FileMaker Pro 13 can only convert files created with versions 7.x, 8.x, 9.x, 10.x, and 11.x. (To
convert files earlier than FileMaker Pro 7, see Converting FileMaker Pro databases earlier than
version 7.x.)
When you convert files, FileMaker Pro 13 preserves the contents of your original files and creates
new, converted files in FileMaker Pro 12 format. The content of the original files are not modified,
and you can open them in the previous version of FileMaker Pro that created them. The converted
files can be opened only in FileMaker Pro 12 and FileMaker Pro 13.
You can convert a single file or convert multiple files at once:
•Use the single-file conversion method for stand-alone database files that don’t display
related data from other files. See Converting a single file.
•Use the multiple-file conversion method to convert all the files in a relational database. See
Converting multiple files at once.
Note Any FileMaker Pro application preferences remaining from prior installs of earlier versions of
FileMaker Pro are ignored. The installer does no conversion work.
Converting a single file
To convert and open a single file:
1. If the file you want to convert is currently open in the previous version of FileMaker Pro,
close the file.
If you attempt to convert a file that is currently open, an alert message will appear indicating that
the file is already in use, and the file won’t convert.
2. Start FileMaker Pro 13.
3. Do one of the following:
•If you see the Open File dialog box, continue with step 4.
•If you see the FileMaker Quick Start Screen, click Browse.
•If you don’t see any dialog box, choose File menu > Open.
4. In the Open dialog box, select the file to convert, then click Open.
Note You can also begin conversion by dragging the file onto the FileMaker Pro 13 application
icon.
The Conversion dialog box appears, where you can choose to rename the existing file prior to
conversion. By default, FileMaker Pro does not rename the file.
5. Do one of the following:

FileMaker Pro basics
FILEMAKER PRO HELP 38
•To skip renaming the old file, make sure the Rename old file checkbox is cleared, then
click OK. It’s not necessary to rename the old file if it includes the .fp7 filename
extension, because your converted file will have the .fmp12 extension.
•To rename the old file, select Rename old file. Either accept the default name (which is
the original filename appended with “Old”), or enter a new name. Then click OK.
Note If a filename includes a period (.), other than the one that precedes the filename
extension, remove it. If a period exists in a filename, FileMaker Pro won’t add the .fmp12
extension to the converted file.
6. In the Name Converted File dialog box, enter the filename that you want for the new file.
If you did not rename the file in step 5, the default filename for the new file is the old filename
(with the .fmp12 extension, if the original filename had an extension). If you renamed the file, the
default filename for the new file is the new name (with the .fmp12 extension, if the original
filename had an extension).
7. Click Save to start the conversion.
During a prolonged conversion, the File Format Conversion dialog box appears and shows the
conversion progress. If a file being converted contains indexed fields, you can save time by
clicking Skip when the index is being re-created, which postpones indexing until later.
8. Using a text editor such as Notepad (Windows) or TextEdit (OS X), open the Conversion.log
file located in the folder that contains your converted database.
The Conversion.log file is located in the same folder as the converted file. The Conversion.log
file contains a journal of the conversion process that you just completed. Much of it contains
status messages that indicate the different file components that were converted. It also may
contain error messages that indicate areas where you may need to make manual corrections to
the converted file before testing it further.
Related topics
Troubleshooting conversion problems
Reading the Conversion.log file
Converting multiple files at once
FileMaker Pro 13 can convert multiple files at the same time. You should use the multi-file
conversion method when you need to convert a database composed of multiple related files, or you
simply have many FileMaker Pro files that you want to quickly convert without being prompted to
individually rename each file.
When you convert multiple files at the same time, FileMaker Pro prompts you to specify a folder
where you want the converted files to be saved, leaving your original files unchanged.
FileMaker Pro automatically names each converted file without prompting you. FileMaker Pro won’t
overwrite any existing files in the folder. Instead, it adds a number to the end of the filename, and
increments that number if necessary until a unique name is found.
There are several ways to select the files that you want to convert; you can drag and drop the files
(or a folder containing the files) onto the FileMaker Pro 13 application icon, or you can select
multiple files in the FileMaker Pro Open dialog box.
Note If a filename includes a period (.), other than the one that precedes the filename extension,
remove it. If a period exists in a filename, FileMaker Pro won’t add the .fmp12 extension to the
converted file.
To convert multiple files at once:

FileMaker Pro basics
FILEMAKER PRO HELP 39
1. If the files you want to convert are currently open in the previous version of FileMaker Pro,
close the files.
If you attempt to convert files that are currently open, an alert message will appear indicating
that the files are already in use, and they won’t convert.
2. In Windows Explorer or in a Finder window (OS X) create a new, empty folder for the
converted files.
3. Do one of the following to select and open the files you want to convert:
•Files method: In Windows Explorer or in a Finder window (OS X) select the files you
want to convert, then drag them onto the FileMaker Pro 13 application icon.
•Folder method: If a folder contains all of the files you want to convert, drag the folder
onto the FileMaker Pro 13 application icon.
Note When multiple files from separate folders are converted, all converted files are created in
the same folder. The original files’ locations are not preserved. To make converting files easier,
convert all the files from a multi-file relational database at the same time. After the conversion,
you can move either set of files into a duplicate of your original file structure.
•Open dialog box method: In FileMaker Pro 13, choose File menu > Open, and select
the files you want to convert in the Open dialog box by holding down Ctrl (Windows) or
Command (OS X) and clicking each file. (You can also select a range of adjacent files
by clicking the first file and then Shift-clicking the last file in the range.) Then click Open.
The Open Multiple Files dialog box appears.
4. Choose Open all files and convert when necessary.
5. Click Specify, choose the folder you created in step 2 where you want to save the
converted files, and click OK (Windows) or Choose (OS X).
Important Do not choose a folder that contains any of your original files. If you do, then
converted files may be renamed (by appending a number to the filename) to prevent the
converted files from replacing the original files. This renaming of files could cause data
sources (formerly known as file references) to convert improperly, which affects
relationships and other features that rely on data sources.
6. Click Open in the Open Multiple files dialog box to start the conversion.
During a prolonged conversion, the File Format Conversion dialog box will appear and show the
conversion progress. If a file being converted contains indexed fields, you can save time by
clicking Skip when the index is being re-created, which postpones indexing until later.
FileMaker Pro 13 creates converted files in the folder you specified and opens them, leaving
your original files unchanged. The filename extension .fmp12 is added to all converted files.
7. Using a text editor such as Notepad (Windows) or TextEdit (OS X), open the Conversion.log
file located in the folder that contains your converted database files.
The Conversion.log file contains a journal of the conversion process that you just completed. Much
of it contains status messages that indicate the different file components that were converted. But it
also may contain error messages that indicate areas where you may need to make manual
corrections to the converted files before testing them further.
Note If you later need to convert the same files again, make sure you convert the files into an
empty folder; move or delete any files from the previous conversion attempt, or create a new folder
for the next conversion. This prevents converted files from being renamed during the next
conversion, which could cause data sources (formerly known as file references) to convert
improperly.

FileMaker Pro basics
FILEMAKER PRO HELP 40
Related topics
Troubleshooting conversion problems
Reading the Conversion.log file
Reading the Conversion.log file
You should open and read the Conversion.log file after converting one or multiple files. It lists the
conversion status and possible problems found during conversion, such as fields with invalid
names.
The log file is created in the same folder as your converted files. If you used the multi-file conversion
method to convert more than one file at a time, the Conversion.log file contains information for all
the converted files.
In most cases, you can correct problems in converted files. If the log file indicates a problem that
would be complicated and time-consuming to fix after conversion, you may want to try correcting the
problem in the original file using a previous version of FileMaker Pro, and then convert the file again.
Important The Conversion.log file may not indicate every item in the file that needs to be corrected.
Before you begin using a converted database solution, you should test it thoroughly to make sure
every aspect has converted successfully. For example, make sure every script works as you expect,
and that accounts and privilege sets provide the required file security.
Converting FileMaker Pro databases earlier than version 7.x
FileMaker Pro 13 cannot convert databases created with FileMaker Pro 1.x or 2.x. To use these files
with FileMaker Pro 13, first convert them using FileMaker Pro 6.x. Then use the most recent trial
version of FileMaker Pro 11 to convert the files to version 11. You can download this file at http://
www.filemaker.com/downloads.
Note Pre-7.x versions of FileMaker Pro for Windows can convert only 2.x files.
Troubleshooting conversion problems
Here are some suggestions for correcting problems that could occur during conversion.
FileMaker Pro 13 can’t open my file
If the file you want to convert is open in an earlier version of FileMaker Pro (for example, an
Inventory.fp7 file is open in FileMaker Pro 11), close the file in the earlier version.
My file didn’t convert properly
•If you are converting a copy of a file, make sure that the original file was closed before you
copied it. Otherwise, the copy will not convert correctly.
•Check the Conversion.log file located in the folder with the database you are attempting to
convert.
•Try recovering the file first using a previous version of FileMaker Pro and then convert the
file again.

FileMaker Pro basics
FILEMAKER PRO HELP 41
I received a consistency check or auto-repair message when I opened my
original file with that version of FileMaker Pro
Try recovering the original file using your version of FileMaker Pro. Then open the recovered file
with that same version, close the file, and then try converting it with FileMaker Pro 13.
The converted file won’t accept my password
Passwords are case-sensitive in FileMaker Pro. Make sure you enter your password exactly as it
was created in a previous version of FileMaker Pro. If you are not the owner of the file or the
database administrator, consult your database administrator for password information.
I can’t open a snapshot link
You cannot open a snapshot link that was created using FileMaker Pro 11. You must convert the
database from which the records were found and then re-create the snapshot link. See Saving and
sending records as a snapshot link.
I can't edit a layout object that I copied from a FileMaker Pro 11 file
You cannot edit layout objects that were copied from files created with versions of FileMaker Pro
earlier than FileMaker Pro 13. Either convert the file to FileMaker Pro 13 and edit the object, or re-
create the object in a new FileMaker Pro 13 file. See Editing objects, layout parts, and the layout
background.
Related topics
Reading the Conversion.log file
Recovering files
Preserving user dictionary information
During conversion, the reference to a user dictionary is handled differently depending on whether
you are using the default user dictionary or a custom user dictionary.
•Default user dictionary: When you convert a database file that uses the default user
dictionary (user.upr), the converted file points to the FileMaker Pro 13 user.upr file.
Therefore, you should export information from your user.upr file to the latest FileMaker Pro
user.upr file before using the converted database. See Editing user dictionaries.
•Custom user dictionary: When you convert a database file that references a custom
dictionary file, the converted file continues to look for the dictionary in its previous location. If
you move or delete the dictionary from that location, the converted file will no longer have
access to information in the custom dictionary. This could happen accidentally if the original
custom dictionary file is located in the previous FileMaker Pro folder and you later uninstall
the previous version of FileMaker Pro.
Tip To preserve a custom user dictionary, move the dictionary file to your Documents folder
(Windows), or your home folder (OS X). Then, after converting a database file, specify that it
use the dictionary file in the new location.
Related topics
Creating and selecting spelling dictionaries

FileMaker Pro basics
FILEMAKER PRO HELP 42
How layouts are converted
When you open a file converted to the FileMaker Pro 12 format, the Classic theme is applied to the
layout. The file will look as it did in the previous version. Any new layouts you create or new objects
you add to the file will have the attributes of the Classic theme. You can choose a different theme for
each layout.
If you want to change the appearance of a layout, you can change themes or use Layout tools and
features to modify the converted layout.
You’ll notice the following differences in converted layouts:
•Patterns in pre-conversion layouts are converted to images tiled to resemble the pre-
conversion pattern.
•Line patterns are converted to an appropriate line style.
•If the View menu > Show > Buttons option is selected in a file before conversion, a button
badge appears in the lower right corner of any buttons that reference a script or script
step.
•If View menu > Show > Script Triggers is selected in a file before conversion, a Layout
Script Trigger badge displays in the lower-right corner of the layout for which script
triggers have been set. In the Manage Layouts dialog box, a badge appears on the folder
icon next to a layout name for which script triggers have been set.
•Any merge symbols used on layouts are converted to a new format. For example, the
merge symbol for page number (##) changes to {{PageNumber}}.
Note If you used any of the former variable symbols as static text on a layout, they will be
converted to the new symbol format. You can retype symbols after conversion to correct static
text.
Layout mode changes and improvements (FileMaker Pro 12)
If you converted a FileMaker Pro database to FileMaker Pro 12 format for the first time, you may
want to know about the following changes that were introduced in FileMaker Pro version 12 that
affect layouts.
Note For information about new and changed features in FileMaker Pro 13, see New features in
FileMaker Pro 13.
Behavior changes
•The formats for objects and text you add to a layout are based on the current theme’s
default formats. You can customize formats after adding objects to a layout, if you want. You
can no longer set custom default formats (such as text and border style) in Layout mode.
You must select a layout object before you can set options in the Inspector.
•Objects placed in tab controls (or portals) stay with the tab control when the tab control is
copied, moved, or deleted even when the objects on the tab control are locked. In addition,
objects must be explicitly added to or removed from tab controls. Sending an object on a tab
control to the back places it in back of all objects on the tab control, not behind the tab
control.
•FileMaker Pro manages layouts using points instead of pixels. On most computer screens,
1 point equals 1 pixel. On some high-resolution displays (such as the Retina display on
iPhone), FileMaker Pro manages the display conversion to ensure proper screen rendering.

FileMaker Pro basics
FILEMAKER PRO HELP 43
By default, layout objects can be moved in 1 point increments. You can use the Inspector to
place objects at intermediate values for precise sizing and placement of printed output.
•You can specify the width of a layout.
•When working in Layout mode, you can click an object’s border or anywhere inside the
object to select it.
•Objects may be positioned anywhere on a layout, even outside the layout’s visible boundary
when viewed in Browse mode. See Changing the width of a layout.
•You can set attributes based on the current state of the object (Normal, In Focus, Hover, or
Pressed).
•If you change the width of an existing text object, the object will retain that width until you
change the width again.
•If you change the alignment of text within a text object, the object does not resize to fit the
text.
•New text objects shrink dynamically as you delete text, rather than after you exit the object.
•Borders around drop-down and calendar controls that users open in Browse mode display
the border color setting for the current state of the object.
•Activating a field in a portal will not bring it to the top of any objects that are on top of the
portal.
•To copy objects by dragging them between FileMaker Pro windows or other applications
and FileMaker Pro, you must press Ctrl (Windows) or Option (OS X) while you drag.
Feature enhancements
•You can change the theme of an existing layout. All attributes of the layout change to the
theme defaults, and new objects added to the layout match the new theme.
•You can fill fields, layout parts, objects, tab controls, and portals with color, color gradients,
or images.
•You can set individual borders on fields, layout parts, text objects, rectangles, rounded
rectangles, buttons, portals, charts, and web viewers.
•You can set a different radius for each corner of a field.
•You can set different line attributes for the border around each tab panel in a tab control.
•New rulers, guides, and grids help you create, position, resize, and align objects.
Feature changes
•The default theme for new layouts is Millennium Cool Gray.
•The following controls were removed from FileMaker Pro, renamed, or relocated within the
Inspector:
Previous versions FileMaker Pro 12
Fill pattern Removed
You can set line styles or create patterns by tiling images for fill. See
Setting the fill, line style, and borders for objects, layout parts, and the
layout background.

FileMaker Pro basics
FILEMAKER PRO HELP 44
•Buttons are inserted as single objects, not groups of objects. (You can still group objects
and create a single button area.)
•When you choose View menu > Show > Buttons in Layout mode, badges appear on
each button instead of a gray outline.
•Options for changing a color palette were removed from in the Layout preferences.
•OS X: The keyboard shortcut for Paste Text Only was changed to Command-Option-Shift-V.
•In the Inspector, values in the Position and Size controls are right-aligned. If more than one
object is selected, FileMaker Pro displays a hyphen (-).
Managing files
This section describes the many standard ways of interacting with your FileMaker Pro files.
Starting FileMaker Pro
There are several ways to start the FileMaker Pro application:
•double-click the FileMaker Pro application
•double-click a FileMaker Pro file
•drag a FileMaker Pro file on top of the FileMaker Pro icon
•Windows 7: click Start, then choose Programs > FileMaker Pro
•Windows 8: from the Start screen, click the FileMaker Pro application
Using FileMaker Quick Start to open files
The FileMaker Quick Start Screen provides a central place where you can open and create files in a
variety of ways. You can:
•Open existing FileMaker Pro files located on your computer or on remote computers as
described in this topic.
•Create and design a new empty FileMaker Pro file. See Creating a FileMaker Pro file.
•Convert a file of a different format (such as Microsoft Excel) that already contains data. See
Converting a data file to a new FileMaker Pro file.
•Create files using empty predesigned Starter Solutions provided by FileMaker, Inc. See
Creating a FileMaker Pro file.
Field border effects Removed
In files created in earlier versions of FileMaker Pro, field border effects will
appear in converted files. Obsolete effect styles display in the Line drop-
down menu, but you can’t apply them to new fields. However, you can copy
and paste fields with effects to display effects on new fields.
Pen color Renamed Line color
Pen pattern Renamed Line style (Solid, Dashed, or Dotted)
Pen width Renamed Line width
Too ltip Moved to Position tab and area
Previous versions FileMaker Pro 12

FileMaker Pro basics
FILEMAKER PRO HELP 45
To open FileMaker Pro files using FileMaker Quick Start:
1. Do one of the following:
•Start FileMaker Pro.
•If FileMaker Pro is running or if you start FileMaker Pro and you don’t see the FileMaker
Quick Start Screen, choose Help menu > Quick Start Screen.
2. Do one of the following:
Tip You can place the pointer over a recent or favorite file in the list to display the full path to its
location (local or remote).
3. Double-click a file to open it.
To narrow the list of files that appear in the recent and favorite files list:
Type a few characters in the Open a database text box. Filenames and host names containing the
characters you type appear in the list.
To hide the FileMaker Quick Start Screen when you use FileMaker Pro:
Clear Show this screen when FileMaker Pro opens, then click Close.
To display the FileMaker Quick Start Screen if it has been hidden:
Choose Help menu > Quick Start Screen.
Related topics
Opening shared files as a client
Opening files
Using FileMaker Quick Start to learn more about FileMaker Pro
To Do this
Display a list of
FileMaker Pro files
that you have recently
opened
Click Recent Files in the box at the center of the Quick Start Screen.
If no recent files are listed, choose Edit menu > Preferences (Windows)
or FileMaker Pro menu > Preferences (OS X), select Show recently
opened files, enter a value from 1 to 30 indicating the number of recent
files you want to display in the list, then click OK. (To remove the list of
recently opened files, choose File menu > Open Recent > Clear Recent
Files.)
Display a list of
FileMaker Pro files
that you have marked
as favorite
Click Favorite Files in the box at the center of the Quick Start Screen.
To add or change the order of favorite files, see Working with favorite files
and hosts.
Locate the local or
remote files that you
want to open
Click Browse.
For more information about accessing remote files, see Working with
shared files as a client.
FileMaker Pro basics
FILEMAKER PRO HELP 46
Working with favorite files and hosts
You can add a FileMaker Pro file located on your computer or on a remote computer to your list of
favorites in the File menu and in the Quick Start Screen. You can also add a remote host to the list of
favorites.
To add the current file to your list of favorites, choose File menu > Open Favorite > Add Current
File to Favorites.
To manage favorite files and hosts:
1. Choose File menu > Open Favorite > Manage Favorites. Or, in the FileMaker Pro Quick
Start Screen, click Manage Favorites.
The Manage Favorites dialog box appears.
2. Close the Manage Favorites dialog box.
To Do this
Add a favorite local file Click to open the Add a Favorite dialog box (Windows) or Open
dialog box (OS X), select one or more files in the list, click Select, then
close the Manage Favorites dialog box.
Add a favorite remote file Click to open the Add a Favorite dialog box (Windows) or Open
dialog box (OS X). Click Remote. Select the host on which the file
resides, select a remote file, then click Add to Favorites. Click Close
to return to the Add a Favorite dialog box (Windows) or Manage
Favorites dialog box (OS X). Click Cancel to return to the Manage
Favorites dialog box (Windows).
Tip When you double-click a collapsed host name or IP address, the
list of remote files is refreshed.
Change the order of
favorite files
Select a file and drag it to a new location in the list.
Open a file Double-click the file in the list.
Add a favorite remote
host Click to open the Add a Favorite dialog box (Windows) or Open
dialog box (OS X). Click Remote. Select the host, then click Add to
Favorite Hosts. Click Save in the Edit Favorite Host dialog box. Click
Close to return to the Add a Favorite dialog box (Windows) or Manage
Favorites dialog box (OS X). Click Cancel to return to the Manage
Favorites dialog box (Windows).
Remove a file or host
from the favorites list Select a file or host name and click .
Change the remote host
settings Select a host, click . Choose Edit Host. For information about
changing the settings for the remote host, see Opening shared files as
a client.
Update the list of
expanded hosts Click . Choose Refresh Expanded Hosts.

FileMaker Pro basics
FILEMAKER PRO HELP 47
Related topics
Using FileMaker Quick Start to open files
Opening files
You can open FileMaker Pro files located on your computer. You can open single files or multiple
files at the same time.
There are other methods of opening files and other types of files that you can open. You can:
•Use the FileMaker Quick Start Screen to open files. For more information, see Using
FileMaker Quick Start to open files.
•Open FileMaker Pro files that may be available as shared databases on your network. For
more information, see Working with shared files as a client. If you have marked any files as
favorites in the Remote Hosts dialog box, the FileMaker Quick Start Screen gives you quick
access to them.
•Convert files created with an earlier version of FileMaker Pro into the current FileMaker Pro
format. For more information, see Converting files from FileMaker Pro 11 and earlier.
•Convert compatible files created in other applications — such as Microsoft Excel files,
Bento 4 (or a later supported version) files, or tab-delimited text files — to FileMaker Pro
format.
To open a file if FileMaker Pro is already running:
1. Choose File menu > Open.
Tip You can also choose File menu > Open Recent or File menu > Open Favorite.
2. In the Open File dialog box, select the filename and click Open.
Note If the file was created using a version of FileMaker Pro earlier than 12, see Converting a
single file.
3. If you’re asked to enter an account name and password when the file opens, type them in
the Password dialog box, then click OK.
For more information, see Opening files protected with passwords.
To open a file if FileMaker Pro isn’t running:
•Drag the file onto the FileMaker Pro application icon.
•Double-click the FileMaker Pro file.
To open multiple files at the same time:
1. Do one of the following:

FileMaker Pro basics
FILEMAKER PRO HELP 48
2. If you see the Open Multiple Files dialog box, choose whether to convert files, and then click
Open.
The Open Multiple Files dialog box only appears if one or more of the files you open are in a
format that FileMaker Pro can convert, such as Microsoft Excel, tab-delimited text, or
FileMaker Pro 6. You can choose to do one of the following in the Open Multiple Files dialog
box:
•Open current FileMaker Pro files only. Do not convert any files.
•Open current FileMaker Pro files and convert any compatible files into FileMaker Pro
files. FileMaker Pro saves the converted files into a folder you specify, automatically
naming each file based on the name of the source file.
Notes
•To display recently opened filenames in the File menu and Quick Start Screen, choose Edit
menu (Windows) or FileMaker Pro menu (OS X) > Preferences and select Show recently
opened files. To remove the list of recently opened files, choose File menu > Open
Recent > Clear Recent Files.
•When you open a file saved with date, time, and number formats that are different from the
system formats set on your computer, you might see an alert message. See Opening files
with different system formats.
•If a file opens with a default password, you can specify a different password by pressing the
Shift key (Windows) or the Option key (OS X) when opening the file.
•You can open a FileMaker Pro for Windows file on the OS X, and vice versa. If you intend to
move files across platforms, it’s best to include the .fmp12 extension in the filename. If you
add or remove filename extensions, you must re-specify the data source (formerly known as
file references) for related files and files with external scripts.
•For information on displaying a specific layout when a file opens, see Setting file options.
•If you have FileMaker Pro Advanced, you can:
•rename a set of database files and automatically update references to related files or
scripts. See Setting up files for developer solutions (FileMaker Pro Advanced)
To open multiple files Do this
From within FileMaker Pro Choose File menu > Open, and select all the files that you want
to open in the Open File dialog box:
•To select multiple files, Ctrl-click (Windows) or Command-
click (OS X) each file.
•To select a range of adjacent files, click the first file, then
Shift-click the last file in the range.
Then click Open.
In a Windows Explorer window or
an OS X Finder window
Select the files you want to open, then drag them onto the
FileMaker Pro application icon.
That are in a folder Drag the folder onto the FileMaker Pro application icon.
Note FileMaker Pro only opens files located directly in the
folder. Any files that exist in any enclosed folders are not opened.

FileMaker Pro basics
FILEMAKER PRO HELP 49
•add the .fmp12 filename extension to a set of files. See Adding filename extensions to
files (FileMaker Pro Advanced)
Related topics
Opening shared files as a client
Opening files troubleshooting
Closing windows and files
Closing files troubleshooting
Opening files with different system formats
When you create database files, FileMaker Pro uses your computer’s system formats to determine
how dates, times, and numbers display and sort. If you open or share a database file created with
different system formats, you can use your computer’s system formats or match the formats used
when the file was created.
To use your computer’s system formats: Choose Format menu > Use System Formats. The
Use System Formats command appears in the Format menu when you open a file on a computer
with different system formats or when you change system formats from what they were since the file
was last opened.
The Use System Formats command doesn’t interfere with any date, time, and number formatting
you may have specified in Layout mode.
Note You can also set a data entry file option that determines what should occur when the system
formats in a file differ from the operating system. For more information, see Setting file options.
To change your system formats:
•Windows: Use the Regional and Language Options control panel or the Date and Time
control panel.
•OS X: Use the Language & Text System Preference.
Click System’s settings to use the new settings when you reopen the file.
Note A cloned database file inherits the system formats of the first operating system it is opened
on. For more information, see Saving and copying files.
Related topics
Opening files
Closing windows and files
Closing files troubleshooting
Opening files troubleshooting
<Filename> is damaged and cannot be opened.
See Maintaining and recovering FileMaker Pro databases.
<Filename> is currently in use and could not be opened. The file is single-
user, or the host could not be found on the network.
•All clients should access shared databases by choosing File menu > Open and clicking
Remote or by choosing File menu > Open Remote. Do not try to open a shared file directly
on its server through the networking features of your operating system. For more
information, see Working with shared files as a client.

FileMaker Pro basics
FILEMAKER PRO HELP 50
•Contact the host of the shared file and have the host open the file and make sure it is being
shared properly. For more information, see Sharing databases on a network.
•Make sure you are using an account with privileges to see the file on the network.
I forgot my account name or password.
FileMaker Customer Support cannot retrieve lost or forgotten account names and passwords. If the
file is shared, contact the owner of the file, who may be able to provide the information. For more
information, see Creating and managing accounts.
I want to log in with a different account name or password but I can’t log out.
To switch from one account to another, close the file, then hold down Shift (Windows) or Option
(OS X) while opening the file.
I’m having problems converting a file to the current FileMaker Pro format.
Try recovering the file first using the version of FileMaker Pro used to save the file. A file that
displays consistency check or auto-repair messages on opening should be recovered before
converting it. If you are converting a copy of a file, make sure that the file is closed before it is
copied. Otherwise, it will not convert correctly. Also try checking the Conversion.log. For more
information about converting files, see Converting files from FileMaker Pro 11 and earlier.
It took a long time for a file to open.
FileMaker Pro may have detected a consistency problem with the file and performed a consistency
check. This process can cause a file to take longer than usual to open. Once the file opens, try
saving and then reopening it. You can perform a consistency check on a file that you suspect is
damaged, and you can choose which components you want FileMaker Pro to recover in a damaged
file. For more information about checking file consistency and recovering files, see About recovering
FileMaker Pro files.
I received a consistency check or auto-repair message when I opened a file.
Common causes of file damage are the file was closed improperly and hard disk failure (in which the
operating system cannot read parts of the file). Try recovering the file.
Using the zoom controls
Use the zoom controls, and , (located at the bottom of the document window) to enlarge or
reduce the image on your screen.
•You can reduce the image by 75%, 50%, and 25%.
•You can enlarge the image by 150%, 200%, 300%, and 400%.
Note In Windows, you can only zoom in to 300% when Enlarge window contents to improve
readability is selected in the General tab of the Preferences dialog box, or if your system is
using a HiDPI display.
•Click the zoom percentage box to quickly return to 100% from a magnified or reduced view.
Tip If you can’t use the zoom controls, it is likely that a script has been performed that locked
the zoom level. To restore the zoom feature, run a script that has the Zoom Level script step with
the Lock option turned off.
Note You can also access the zoom controls by choosing View menu > Zoom In or Zoom Out.

FileMaker Pro basics
FILEMAKER PRO HELP 51
Opening multiple windows per file
You can open more than one window per file. This allows you to view the same layout in separate
windows, or to simultaneously view different layouts in the same file. You can perform sort
operations and find operations independently in the different windows.
To open an additional window:
Choose Window menu > New Window.
The window displays the same layout, sort order, and found set as the previously active window. To
view a different layout in the new window, choose a layout from the Layout pop-up menu. For
information on sorting and finding records, see Finding, sorting, and replacing data.
The following table describes the behavior of some FileMaker Pro actions when there are multiple
windows open.
Action Behavior when there are multiple windows open
Editing data Changes made to fields in Browse mode are reflected in other windows
when you commit the record. For more information, see Committing data
in records.
Creating a new record In other windows that display records from the same table, the new
record may or may not initially appear:
•In each window that is displaying a found set of records, the new
record is added as an omitted record and is not immediately visible,
even if the new record matches the layout’s find criteria.
•In each window that is displaying all records, the new record is added
as a visible record. However, the active record in each window does
not change to display the new record.
Deleting a record The record is removed in other windows that display records from the
same table, regardless of whether the windows are displaying a found set
or not.
Finding and sorting records You can find and sort the same records differently in each window.
Note When you switch within a window between layouts that display
records from the same table, FileMaker Pro maintains the same found
set. (For a particular window, every layout that displays records from the
same table shares the same found set.)
Closing and reopening files When you close a file, FileMaker retains the state of the last-used
window. When you reopen the file, it opens a single window in that
retained state. The information retained for a window includes:
•the current layout, window size, and position
•the current record
•the current found set and sort order
•the found sets for any other tables viewed with the window
Note FileMaker Pro only retains the window state for locally opened
files. It does not retain the window state when a shared file opened by a
client is closed.

FileMaker Pro basics
FILEMAKER PRO HELP 52
Related topics
Arranging windows in FileMaker Pro
Saving and reverting layout changes
Arranging windows in FileMaker Pro
You can use the following commands on the Window menu to work with open windows in
FileMaker Pro.
You can also open multiple databases at the same time, as well as open multiple windows for a
single file. For more information, see Opening files and Opening multiple windows per file.
Switching modes You can display the same layout in different modes in different windows.
For example, if one window is in Browse mode, another window can be in
Layout mode.
Switching between Form
View, List View, and Table
View
When multiple windows are displaying the same layout, only the window
in which you switch views changes.
Changing a layout design in
Layout mode
Layout changes appear in other windows that display the same layout
when you save the layout, switch to another layout, or switch to another
mode.
Scripts Scripts act on the active window unless you design them to work in a
particular window. There are script steps that you can use to open and
manipulate windows. For more information, see Windows script steps.
Working with web viewers If a layout contains a web viewer, and the same layout is open in multiple
windows, you can navigate each web viewer to a new location after its
initial web address is loaded. However, if the web address is a field-
based calculation, when the field value changes, the web address is re-
evaluated and the new web address is loaded.
Action Behavior when there are multiple windows open
To Choose Window menu >
Hide a document window Hide Window
Show a document window that has been hidden Show Window > window name
•Windows: Place an icon of a document window at
the bottom of the FileMaker Pro window
•OS X: Move a document window to the Dock
Minimize Window
Arrange document windows horizontally Tile Horizontally
Arrange document windows vertically Tile Vertically
Arrange document windows so they overlap Cascade Windows
Align minimized windows along the bottom of the
FileMaker Pro window (Windows)
Arrange Icons
Move all document windows in front of other application
windows (OS X)
Bring All To Front
Switch to another window window name

FileMaker Pro basics
FILEMAKER PRO HELP 53
Note If a window’s ability to resize is restricted by a script, the window can’t be arranged using
commands in the Window menu.
Closing windows and files
You can close FileMaker Pro windows and files as you would in most Windows and OS X
applications. FileMaker Pro saves changes as you work and whenever you close a file.
For information on how to quit FileMaker Pro, see Quitting FileMaker Pro.
To close a window:
•Windows: Click the close box in the upper right corner of the document window.
•Windows: Double-click the document icon in the upper left corner of the document window.
•OS X: Click the red close button in the upper-left corner of the document window.
•Choose File menu > Close.
To close a file:
Use the procedures above to close all the open windows for a file.
Notes
•Even if you close a file, it may remain open as a hidden file if the window of any other file is
displaying data from that file. (For example, another window may be displaying related data
from the file you attempted to close.) FileMaker Pro will close the file when you close all the
dependent windows.
•If you are hosting a shared file that is being accessed by one or more clients, those clients
must close the file before you can close the file.
Related topics
Opening files
Closing files troubleshooting
Closing shared files
Closing files troubleshooting
Can’t close all files (they keep reopening themselves)
•Keep trying (a few times).
•Quit FileMaker Pro.
•In each file, use the Layout pop-up menu to switch to a layout without related fields, then
close each file.
•In each file, create a script that closes each file in the file system. Then, in the Script
Triggers tab of the File Options dialog box, set that script to run when the file is closed
(using the OnLastWindowClose script trigger). For more information, see Setting file
options. An example script in a Products.fmp12 file might be:
Close [Invoices.fmp12]
Close [Customers.fmp12]
Close [LineItems.fmp12]

FileMaker Pro basics
FILEMAKER PRO HELP 54
Saving and copying files
By default, FileMaker Pro automatically saves changes to your data as you work, so there is no
Save command. You can, however:
•save a copy of your file as a backup
•save a clone of your file with no data
Some actions do not cause a file to be saved. For details, see “What FileMaker Pro doesn’t save,”
below.
To make a copy or clone of your database file:
1. Choose File menu > Save a Copy As.
2. Navigate to where you want to save the copy on your disk.
3. For File name (Windows) or Save As (OS X), type a filename.
4. For Save as type, choose FileMaker Files (Windows only).
5. For Save a (Windows) or Type (OS X), choose one of the following options:
Note To have a copy of a file that includes container data that's stored externally, choose self-
contained copy. The copy of current file and compacted copy options do not copy externally
stored data. If you want to use either of those options, you'll need to embed data in the container
fields first. For more information, see Setting up container fields to store data externally.
6. For After saving, choose one or both of the following options if you wish:
7. Click Save.
What FileMaker Pro doesn’t save
FileMaker Pro doesn't save changes to the state of a file, if they are the only changes you make
while the file is open. For example, here are some changes that are not saved:
•Displaying a different record or layout
•Sorting records or modifying a sort order
Choose To
copy of current file Duplicate the current file.
compacted copy (smaller) Optimize the file (remove blank space). See Saving a
compacted copy.
clone (no records) Save a file’s tables, layouts, scripts, page setup options, and
field definitions without the data.
self-contained copy (single file) Create a copy of the current file with all container data that is
stored as a file reference or stored externally (by both open and
secure storage) embedded in the file’s container fields.
Choose To
Automatically open file Open the file after it is saved
Create email with file as
attachment
Create an email with the saved file attached

FileMaker Pro basics
FILEMAKER PRO HELP 55
•Performing find operations such as Find, Show All Records, Omit Record, or modifying a
find request
•Changing the position and size of windows or opening a new window
•Showing or hiding the status toolbar
•Changing ruler display settings
•Changing the unit of measure
For example, if you open a file, sort records, and then close the file, FileMaker Pro does not save
the sort order. However, if you open a file, add a new record, sort the records, and then close the
file, FileMaker Pro saves the sort order as well as the new record.
Notes
•FileMaker Pro constantly saves changes to your computer’s RAM, or cache. You can set
the interval at which FileMaker Pro saves your work to disk, which can help preserve battery
power on portable computers. For more information, see Setting memory preferences.
•You can also specify when FileMaker Pro saves changes by creating (and then executing) a
script that contains the Flush Cache to Disk script step. This script command moves
anything stored in RAM to the hard disk.
•By default, FileMaker Pro does not save layout design changes automatically. Therefore
you should save your work periodically while you are designing a layout in Layout mode.
You can also set a preference so that layout changes are saved automatically. For more
information, see Saving and reverting layout changes.
•If you want more control over when record data is saved, you can clear the Save Record
Changes Automatically option on a layout-by-layout basis. For more information, see
Setting the automatic record-saving option for a layout.
•You can save FileMaker Pro data to Excel and PDF file formats. For more information, see
Saving, importing, and exporting data.
•The Save a Copy As menu command is not supported in FileMaker Pro database files
hosted by FileMaker Server.
•FileMaker Go: before you transfer a file with container fields that store data externally, you
must first embed the container field data. In FileMaker Pro, choose self-contained copy
(single file). Container data will be embedded in the copy. Then transfer the copy to the
device.
Related topics
Opening files
Closing windows and files
Quitting FileMaker Pro
FileMaker Pro saves changes to open files whenever you quit the application.
To quit FileMaker Pro:
•Windows: Choose File menu > Exit.
•OS X: Choose FileMaker Pro menu > Quit FileMaker Pro.
Important Make sure you shut down your computer properly using the method specified by your
computer and operating system. (See your computer and operating system documentation for

FileMaker Pro basics
FILEMAKER PRO HELP 56
details.) If you turn off your computer improperly (such as by unplugging it) while FileMaker Pro is
running and a file is open, you may damage the file.
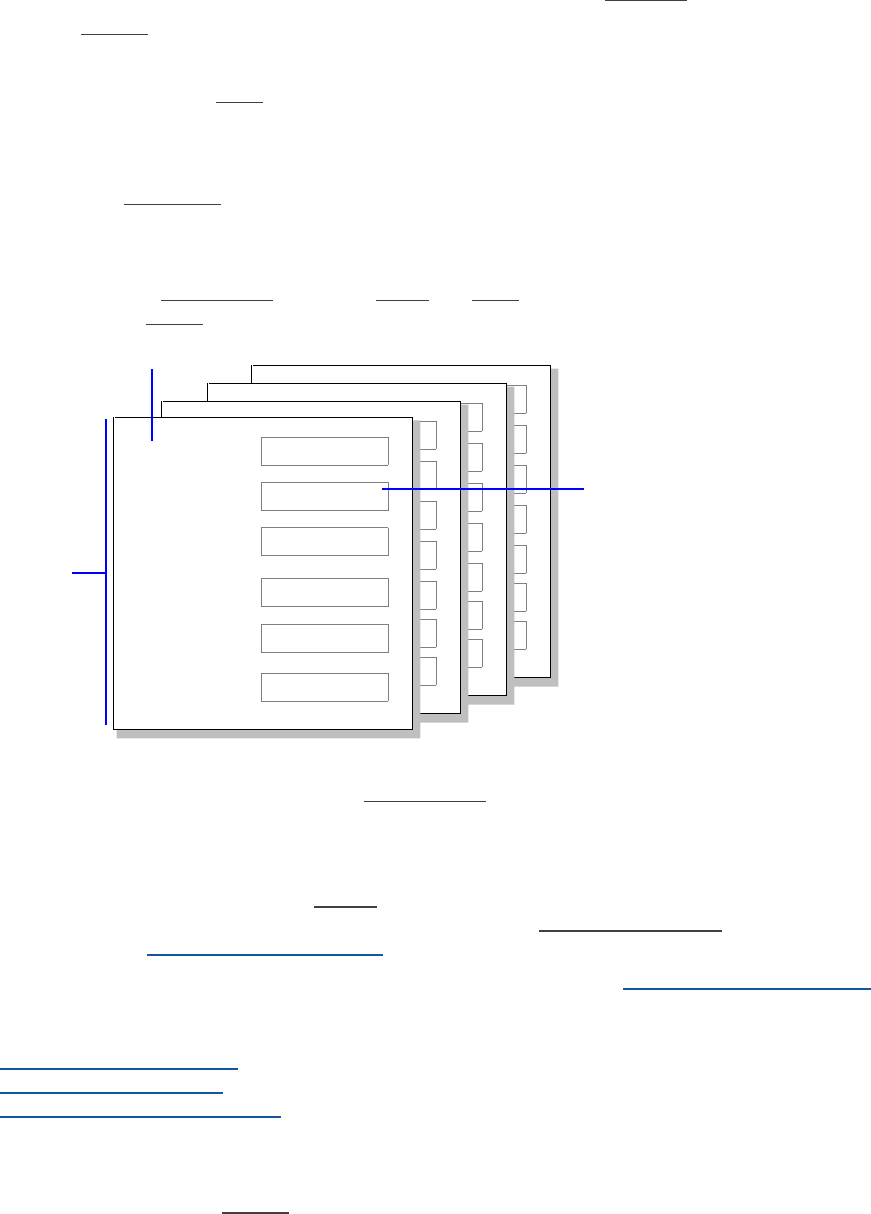
Adding and viewing data
FILEMAKER PRO HELP 57
Adding and viewing data
There are many ways to view and work with data in a FileMaker Pro database. You can:
•view records in a database
•add, duplicate, and delete records
•add and edit data in fields
•work with text in fields
•check the spelling of your data
•work with multimedia files in fields
Working with records in Browse mode
After you create a database file and define tables and fields, you can start entering data. Each set of
fields is called a record.
You work with the data in your records in Browse mode. You can view, add, change, omit, or delete
records in your database. FileMaker Pro saves the changes you make to your file as you work. If
you’ve entered data in a record but haven’t yet saved it, you can also revert the record back to its
previously saved state.
Your database can contain multiple layouts that display your data in different ways. If your database
has several layouts, you can choose a different one from the Layout pop-up menu. For more
information, see Switching between layouts.
For information on switching to Browse mode from another mode, see About FileMaker Pro modes.
Related topics
Committing data in records
Restoring data in records
Working with data in Table View
Viewing records as a form, list, or table
You can change the way records display or print.
12345Tour ID
Go AlaskaTou r Name
NewarkOrigin
FairbanksDestination
$2,299.00Unit Cost
$183.92Tax
$2482.92Tota l
12345Tour ID
Go AlaskaTour Name
NewarkOrigin
FairbanksDestination
$2,299.00Unit Cost
$183.92Tax
$2482.92Tota l
12345Tour ID
Go AlaskaTour Name
NewarkOrigin
FairbanksDestination
$2,299.00Unit Cost
$183.92Tax
$2482.92Total
FB9Product ID
Rye BreadProduct Name
BreadsCategory
$7.95Unit Price
12Stock
$1.59Discount
Record
Field data
Field label

Adding and viewing data
FILEMAKER PRO HELP 58
Notes
•Some views may not be available for each layout. If you have layout design privileges, you
can select the views that are available.
•For layouts that contain panel controls, in Form or List View, click the panel control to bring
the associated panel to the front for viewing. Table View displays all fields from each panel.
•Subsummary parts appear in Table View and List View when sorted by break fields, and
update dynamically when you change data in the file.
•To display field borders and field fill on only the current record in List View, see Showing
field borders and fill for the current record.
•Popover buttons appear in Form View and List View. Clicking a popover button in List View
displays the popover for that record only. Popovers do not appear in Table View unless they
are in the header or footer part.
Related topics
Working with data in Table View
Creating a layout
Protecting databases
About FileMaker Pro modes
Selecting the current record
In Browse mode, a database has one active record at a time for each open window. For more
information on multiple windows, see Opening multiple windows per file.
To select a record in Form View:
•In Form View, the record you’re displaying is the current record. To select another record to
make it the current record, see Moving through records.
To select a record in List View:
•In List View, the current record has a different fill from the other records. To select another
record and make it the current record, click that record or use controls in the status toolbar
(see Moving through records).
For information on changing the current record’s appearance, see Specifying the display state
for an object. The current record can also be indicated by a solid vertical bar along the left side
(see Setting up form, list, and table views for a layout).
To view records Do this in Browse mode, Find mode, or Preview mode
Individually Click Form View in the layout bar.
In a list Click List View .
In a spreadsheet-
like table Click Table View .
Each row displays a record, and each column displays a field.
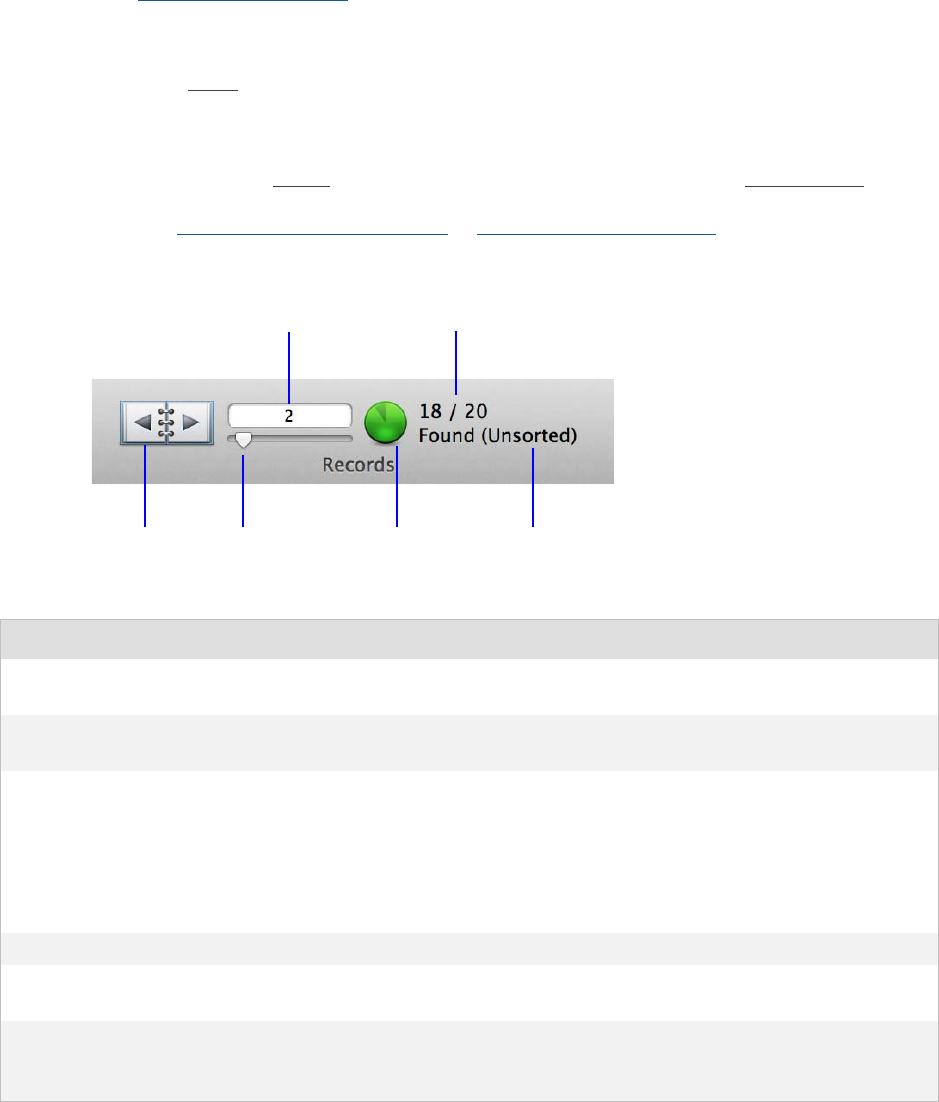
Adding and viewing data
FILEMAKER PRO HELP 59
To select a record in Table View:
•In Table View, the margin to the left of the current record is highlighted. To select another
record and make it the current record, click that record or use controls in the status toolbar
(see Moving through records).
To select a related record in a portal:
•Select the portal row (click inside the row but outside any fields in the row).
Moving through records
You can move from one record to another using the navigation controls in the status toolbar or by
using commands in the Records menu. You can also use keyboard commands to move through
records. See Keyboard shortcuts (Windows) or Keyboard shortcuts (OS X).
Current record number
Pie chart
Number of records in
the found set / Total
number of records
Book Slider Sort status
To Do this
Go to the next record in a file Click the right arrow in the book or choose Records menu > Go to
Record > Next.
Go to the previous record in a
file
Click the left arrow in the book or choose Records menu > Go to
Record > Previous.
Go to a specific record •Click the current record number above the slider or press Esc. Then
type the record number of the record you want, and press Enter
(Windows) or Return (OS X).
•Choose Records menu > Go to Record > Go To, then type the
record number of the record you want in the Specify Number dialog
box, and click OK.
Move quickly through records Drag the slider left or right.
Move through records in a list
or table
Use the scroll bar on the right side of the window.
Show only those records that
are not in the current found
set
Click the pie chart.

Adding and viewing data
FILEMAKER PRO HELP 60
Scroll wheel support
You can use a pointing device (mouse) equipped with a scroll wheel with FileMaker Pro to browse
through records, scroll up and down, and scroll in a field or portal formatted with a vertical scroll bar.
In Windows, you can also change the magnification of the image on your screen (zoom in or out).
Notes
•Windows: FileMaker Pro does not support autoscroll, panning, or DataZoom.
To use the scroll wheel Do this
To move through records in
Browse mode
•Windows: Make sure no fields or objects are selected, then
rotate the scroll wheel.
Note In Form View, rotating the scroll wheel scrolls through records
as if you were clicking the left and right pages of the book. In List
View or Table View, rotating the scroll wheel scrolls through the list of
records as if you were clicking on the up and down arrows in the
vertical scroll bar.
•OS X: In Form View, hold the mouse cursor over the book or
slider in the status toolbar, then rotate the scroll wheel.
FileMaker Pro scrolls through records as if you were clicking the
left and right pages of the book.
•OS X: In Form, List, or Table View, hold the mouse cursor over
the document window, then rotate the scroll wheel.
FileMaker Pro scrolls through the list of records as if you were
clicking on the up and down arrows in the vertical scroll bar.
In Layout, Preview, or Find
modes
•Windows: Rotate the scroll wheel to scroll up and down in the
layout, preview, or find request, as if you were clicking on the up
and down arrows in the vertical scroll bar of the document
window.
•OS X: Hold the mouse cursor over the document window, then
rotate the scroll wheel to scroll up and down in the layout,
preview, or find request as if you were clicking on the up and
down arrows in the vertical scroll bar of the document window.
To move up or down in a field
formatted with a vertical scroll
bar in Browse or Find mode
•Windows: Click in the field, then rotate the scroll wheel.
•OS X: Click in the field, hold the mouse cursor over the selected
field, then rotate the scroll wheel.
See Adding scroll bars to fields.
To move up or down in a
portal formatted with a
vertical scroll bar in Browse
mode
•Windows: Click in the portal (but not in a field), then rotate the
scroll wheel.
•OS X: Click in the portal (but not in a field), hold the mouse
cursor over the portal, then rotate the scroll wheel.
See Creating portals to display related records.
To enlarge or reduce the
image on your screen (zoom
in or out) with the scroll wheel
(Windows)
While holding down the Ctrl key, rotate the scroll wheel.

Adding and viewing data
FILEMAKER PRO HELP 61
•For more information about using the scroll wheel, refer to Windows Help and Support and
the documentation that came with your pointing device.
Related topics
Viewing records as a form, list, or table
Finding records
Sorting records
Navigating in web viewers
Web viewers are similar to web browsers, except that they display web pages directly within
FileMaker Pro. The unique feature of web viewers is that they can display web content that is
related to the current record. For example, as you browse each record in a table of names and
addresses, a web viewer can display a map of the location specified in that record.
In web viewers, you can view web pages, click links, fill in forms, and perform other tasks that you
can in web browsers. Use the shortcut menu in a web viewer to do the following:
Notes
•If you can’t click links, enter text, scroll, tab into, or use the shortcut menu in a web viewer,
then interaction is disabled. See Adding a web viewer.
•Web viewers display web pages in Browse and Preview modes.
•If you click a link that requests a new window, the new web page opens a separate web
browser window, not a new FileMaker Pro window.
•If you perform a find in Find mode or use the Find/Replace command, FileMaker Pro does
not search content in web viewers.
•If you log into a secure website in a web viewer, be sure to log out before you close the
FileMaker Pro document window. Otherwise, the web server might keep the secure session
active.
Related topics
Working with web viewers on layouts
Working with data in Table View
When you view records in a table, FileMaker Pro displays data in rows and columns. Each row
displays a record, and each column displays a field. In Table View’s spreadsheet-like format, you
can add, modify, and delete data, create quick reports, and create charts. For information on quick
reports, see Creating dynamic reports in Table View. For information on quick charts, see Creating
quick charts.
To From the shortcut menu, choose
Go back or forward one page Back or Forward.
Copy text or images Copy or Copy Image (OS X). You can then paste into a text, container,
or other type of field.
Perform other web browser
tasks
Available commands on the shortcut menu. These commands differ in
Windows and OS X.

Adding and viewing data
FILEMAKER PRO HELP 62
Working with fields
While viewing data in Table View in Browse mode, you can create, modify, or delete fields.
Note You must log in using the Full Access privilege set to modify fields in Table View.
To Do this
Create a field For the first field, click Create Field in the column heading for the first column of the
table. To create additional fields, click + in the column heading. A new column is
added on the right in the table.
To cancel creating the new field press Esc before submitting the change.
You can prevent new fields that you create from being automatically placed on the
current layout by deselecting Add newly defined fields to current layout in the
Preferences dialog box. See Setting layout preferences.
Change a field
name
Double-click the column heading for the field you want to rename, then type the
new name.
To discard changes to the field name, press Esc before you exit the column
heading.
Tip You can press Tab or Shift-Tab to edit the field names. If you press Tab in the
far right column heading, FileMaker Pro creates a new column.
For information about field names, see About naming fields.
Choose a field type Right-click the column heading, choose Field > Field Type to display a shortcut
menu, and choose a field type. For more information about field types, see About
choosing a field type.
The default field type is Text.
Set field options Right-click the column heading, then choose Field > Field Options. See Setting
options for fields.
Sort records by
one or more fields
Select a column heading and optionally Ctrl-click (Windows) or Command-click
(OS X) additional headings. Right-click one of the selected column headings and
choose Sort Ascending or Sort Descending. A sort icon appears on the column
headings indicating the sort setting.
If you select multiple columns, the order in which columns are selected determines
the sort order.
Remove a field
from a multi-field
sort order
Select an unsorted heading to deselect the columns you are sorting by, then right-
click the heading you want to remove from the sort order and choose Remove
<field name> from Sort. You can Ctrl-click (Windows) or Command-click (OS X)
multiple headings to remove more than one field from the sort order.
Sort records by a
predefined value
list
Select any column heading, right-click, then choose Sort By Value List, and
choose a value list.
Remove one or
more fields from
the sort order and
re-sort
Sort the file by two or more fields, select then right-click the column heading you
want to remove from the sort order, choose Remove <field name> from Sort.
When you release the mouse, data re-sorts based on the fields that remain in the
sort order.
Tip Click Sort in the status toolbar to view the current sort order.
Unsort the file Right-click any column heading in a sorted file and choose Unsort.
Adding and viewing data
FILEMAKER PRO HELP 63
Working with records
While viewing data in Table View in Browse mode, you can add, duplicate, sort, or delete records.
Display more fields
or hide fields
•Click Modify in the layout bar and use the options in the Modify Table View
dialog box. See Displaying and hiding fields in Table View.
•Or, right-click a column heading, then choose Field > Hide Field to hide the
selected field. To display a hidden field in Table View, right-click the + column
heading, then choose a field from the list of existing fields.
Delete a field Right-click the column heading, then choose Field > Delete Field. See Deleting
table definitions, field definitions, and data.
Important Before you delete a field, confirm that you don’t need any of the data it
contains.
To Do this
To Do this
Add a new record In the blank record at the bottom of the table, enter the data. Click in the left
margin at the bottom of the table. A new row is added to the end of the table:
•if the records have not been sorted
or
•if Keep records in sorted order is cleared in the Sort Records dialog box
For sorted data, a new row is added to the last row of the sorted category for the
currently selected row.
When you add a new record, the new record becomes the current row.
Duplicate a record Right-click the left or right margin of the record that you want to duplicate, then
choose Duplicate Record.
Copy the data in a
record
Right-click the left or right margin of the record that you want to copy, then choose
Copy Record. You can paste the copied, tab-separated data into a field or into
Microsoft Excel.
Sort records Right-click the left or right margin, then choose Sort Records. Use the Sort
Records dialog box to specify how to sort records. See Options for sorting records.
Save data as a
Microsoft Excel file
or Adobe PDF file,
or save the current
found set of
records as a
snapshot link
Right-click the left or right margin, then choose one of the options from the Save/
Send Records As shortcut menu.
See Saving and sending records in other formats.
Send email
messages based
on record data
Right-click the left or right margin of the record, then choose Send Mail. See
Sending email messages based on record data.

Adding and viewing data
FILEMAKER PRO HELP 64
Setting display options for Table View
While viewing data in Table View in Browse mode, you can resize or reorder the columns, change
the background or alternate color, or restore the default display settings.
Notes
•To use the column heading to create fields in Table View, you have to select the Include
column headers option in the Table View properties. To display Table View properties,
right-click a column heading or the left or right margin and choose Table View > Edit
Properties. See Setting up form, list, and table views for a layout.
•You can’t use Table View to change the schema for related tables or external data sources.
To change the schema for related tables, use the Manage Database dialog box.
•To reorder, resize, or sort data in Table View, you can select multiple columns but you can't
select multiple cells.
•Table View displays fields from the body part of the current layout. If a layout contains a
portal, Table View displays the data from the first related record (the first row of the portal).
•Global fields display one value for all records. You can edit a global field in any row of the
table. See Defining global fields (fields with global storage).
•Popovers do not appear in Table View unless they are in the header or footer part.
To Do this
Reorder columns Drag a column heading to a new location.
Resize a column Move the pointer to the edge of the column heading. When the pointer changes to a
double arrow, drag it to the desired size.
Set a precise
column width
Select one or more column headings. Right-click, then choose Table View > Set
Column Width from the shortcut menu. In the dialog box, type a width, choose
units from the list, then click OK.
Edit Table View
properties
Right-click a column heading or the right or left margin and choose Table View >
Edit Properties.
Change the color
of the background
Right-click the left or right margin of a record, choose Part Color from the shortcut
menu, then choose a color. The color of the row for adding new records and the
column for adding new fields will be slightly darker than the main background color.
Display a different
background color
for alternating
records
Right-click the left or right margin of a record, then choose a color from the
Alternate Color shortcut menu. If you customized the color or filled the part with an
image, the part is locked.
Create a dynamic
report
You can group data by a field, display subtotals for a field, or create subtotals for
each group of data. If you customized the color or filled the part with an image, the
part is locked.
Restore the default
display settings
Right-click a column heading or the left or right margin and choose Table View >
Reset from the shortcut menu.
Note Resetting Table View only changes the settings for the appearance of the
table. For example, it removes any leading and trailing subtotals and fill colors that
you added to the table. Resetting a table doesn’t have any impact on the data. For
example, if you created fields and added records to the table, resetting the table
doesn’t delete the fields and records.
Adding and viewing data
FILEMAKER PRO HELP 65
Displaying and hiding fields in Table View
After you define a field, you can use Layout mode to place the field on any layout (assuming you
have access privileges to do so). See Placing and removing fields on a layout. When you are
working in Table View, you can display additional fields that are not on the current layout and hide
fields that show in Table View.
Note When you display existing fields that are not on the current layout in Table View, they are not
added to the layout so they do not appear in any view other than Table View. Likewise, if you hide
fields in Table View, fields are not removed from the layout and are visible when users view the
layout in other views.
To display fields in Table View:
1. In Browse mode, right-click the table column heading, and choose Table View > Modify or
click Modify in the status toolbar.
The Modify Table View dialog box appears, listing the fields currently displayed in Table View.
2. You can use the Modify Table View dialog box to do the following:
3. Click OK to save changes or click Cancel to discard changes.
Notes
•Fields on the current layout are marked with a lock icon in the Modify Table View dialog box,
indicating they can’t be removed from the list. You can prevent these fields from displaying in
Table View by clearing their checkbox.
•When you add fields (columns) in Table View, the style and point size of the font are determined
by the layout theme’s default font settings. If you want to change the font characteristics for a
field, you must use Layout mode to format the field.
Related topics
Viewing records as a form, list, or table
Creating dynamic reports in Table View
You can use Table View in Browse mode to group your data by a field, display subtotals for a field,
create subtotals for each group of data, or display a grand total for a group of data.
Note You can view the quick report only in Table View. The changes you make have no impact on
the current layout.
To Do this
Hide fields Clear checkboxes for the fields you want to hide in Table View.
Reorder columns Drag the next to a field to reorder fields in the list and in Table View.
Display additional fields Click to open the Add Fields dialog box, then choose a field to add
and click OK. To choose a field in another table, choose the table from
the list above the list of fields, then choose a field. To define a new
field, choose Manage Database from the list.
Remove fields you added Select one or more fields and click .

Adding and viewing data
FILEMAKER PRO HELP 66
To group data by a field:
1. In Browse mode, right-click the column heading for the field that you want to use for
grouping the data, then choose Add Leading Group by <field name> or Add Trailing
Group by <field name>.
For example, if you want to display the sales data by City and add a summary row at the end of
the records for each city, choose Add Trailing Group by City. If you want to add the summary
row before the records for each city, choose Add Leading Group by City.
Adding a leading/trailing group automatically sorts the records by the field that you used for
grouping the data. For example, the cities will be listed in alphabetical order.
2. If you want to change the color of the summary row for each group, right-click the left or right
margin of the summary row and choose a color from the Part Color shortcut menu.
3. If you want to display the name of each group in the summary row, right-click the left margin
of the summary row, then choose Add Group Field (<field name>).
Tip You can add leading/trailing groups for multiple fields to display different categories for each
group of records.
To remove a group:
•In Browse mode, right-click the column heading for the field that you used for grouping the
data, then choose Remove Leading Group by <field name> or Remove Trailing Group
by <field name>.
To display subtotals:
1. In Browse mode, right-click the column heading of the field that you want to display
subtotals for.
2. Choose Leading Subtotals or Trailing Subtotals, then choose options from the shortcut
menu.
Select To
Total Calculate the total of values in the field.
Running Total Show the cumulative total for the current and all previous sorted groups.
Average Calculate the average of values in the field.
Count Count the number of records that contain a value for the field. For
example, if a field contains 100 values (one value for each record), the
result of the count is 100.
Running Count Show the cumulative count of the current and all previous sorted groups.
Minimum Show the lowest number, or earliest date, time, or timestamp for a field.
Maximum Show the highest number, or latest date, time, or timestamp for a field.
Standard Deviation Find how widely the values in a field differ from each other. This option
calculates the standard deviation from the mean of the values in a field.
Standard Deviation By
Population
Calculate population standard deviation.
Fraction of Total Calculate the ratio of the value in the field to the total of all the values in
that field. For example, find what fraction of total sales can be attributed to
each salesperson.

Adding and viewing data
FILEMAKER PRO HELP 67
A new row in the beginning of the table (for leading) or at the end of the table (for trailing)
displays the subtotal for the field.
If you have also added leading or trailing groups to the table, the group summary rows also
display the subtotal for each group for the specified field. You have to choose a leading subtotal
to display subtotals for leading groups and a trailing subtotal to display subtotals for trailing
groups.
3. (Optional) To change the color of the row that displays the subtotal for the field, right-click
the left or right margin of the row, then choose a color from the Part Color shortcut menu.
Notes
•Creating subtotals in Table View creates a summary field for each subtotal.
•You need to have Full Access privilege set to create summary fields in Table View. If you
don’t have Full Access privilege set, only existing summary fields are available in the
shortcut menu.
To remove subtotals from Table View:
1. In Browse mode, right-click the column heading of the field that displays subtotals and
choose Leading Subtotals or Trailing Subtotals.
2. Deselect any options that you want to remove from the Leading Subtotals or Trailing
Subtotals shortcut menu.
Note Removing subtotals from Table View does not remove the subtotal summary fields from
the database. To remove the summary fields from the database, choose File menu > Manage >
Database, click Fields, then choose the summary fields to remove and click Delete.
To display grand totals:
1. First group and subtotal data as described earlier in this topic.
2. In Browse mode, right-click the column heading of the field containing subtotals.
3. Choose Add Leading Grand Summary or Add Trailing Grand Summary.
A new row in the beginning of the table (for leading) or at the end of the table (for trailing)
displays the grand total for the field.
4. (Optional) To change the color of the row that displays the grand total for the field, right-click
the left or right margin of the row, then choose a color from the Part Color shortcut menu.
To remove grand totals from Table View:
In Browse mode, right-click the column heading of the field that displays grand totals and choose
Remove Leading Grand Summary by <field name> or Remove Trailing Grand Summary by
<field name>.
Adding, duplicating, and deleting records
You can add, duplicate, and, delete records in Browse mode.
Adding and duplicating records
You can add and duplicate records in Browse mode.

Adding and viewing data
FILEMAKER PRO HELP 68
To add a new record:
•In Browse mode, click New Record in the status toolbar.
To quickly add a record with the same or similar data as an existing record:
1. Select the record you want to duplicate.
Use Find mode to locate the record, if necessary.
2. Choose Records menu > Duplicate Record.
Notes
•If the file is locked or write-protected, or you don't have access privileges to create records,
FileMaker Pro doesn't add new records. For more information, see Protecting databases.
•FileMaker Pro stores new records at the end of the table. If records are unsorted, the new
record appears after the last record in the found set.
Related topics
Adding and duplicating related records
Deleting records
Finding records
Adding and duplicating related records
You can add records to a related table when you enter data in a record in the current table.
Note You can only add related records from the current table if the relationship has been defined to
allow the creation of related records. If a related table is in a write-protected file, or the user doesn't
have access privileges to create records, FileMaker Pro doesn't add new records.
Related topics
Adding and duplicating records
Deleting records
Protecting databases
To Do this in Browse mode
Create a record in the current
table
Click New Record in the status toolbar.
Add a record in a related table •If the related field is in a portal, type data into the field in the
last row of the portal, then commit the record (for example,
by clicking anywhere outside the record or selecting another
record).
•If the related field isn't in a portal, type data into the field,
then commit the record (for example, by clicking anywhere
outside the record or selecting another record).
Duplicate a record that is
displaying related data
Make sure that no records are selected in a portal, then choose
Records menu > Duplicate Record.
Duplicate a related record in a
portal
Select the related record in the portal (making sure the whole row is
highlighted), then choose Records menu > Duplicate Record.

Adding and viewing data
FILEMAKER PRO HELP 69
Deleting records
You can delete single records, a group of records, all the records in a table, or all the records in a
database. When you delete a record, you permanently discard the data you entered in all the fields
in that record.
Important You can't undo the action of deleting records. Before you delete anything, consider
making a backup copy of your database.
If you’re working in a relational database and the option to delete related records is selected in the
Edit Relationship dialog box, FileMaker Pro also deletes related records when you delete a record.
Notes
•You can temporarily omit records from the found set without deleting them from the
database. For more information, see Hiding records from a found set and viewing hidden
records.
•You can permanently delete a field definition and all the data in the field in all records. For
more information, see Deleting table definitions, field definitions, and data.
•To use one of the procedures in this topic to delete related records in a portal, Allow
deletion of portal records must be selected in the Portal Setup dialog box. For more
information, see Creating portals to display related records. The Allow deletion of portal
records option does not need to be selected when you use the Delete Portal Row script
step to delete related records. See Delete Record/Request.
Related topics
Adding and duplicating records
Adding and duplicating related records
Entering data in records
In Browse mode, you add information in a database file by entering data in records. You can:
•type information into fields using your computer keyboard.
•enter preset data from a value list.
•copy and paste data, or insert special information into a field.
To delete Do this
One record In Browse mode, select the record you want to delete. (If your layout displays related
records in a portal, select anything other than a portal row.) In the status toolbar, click
Delete Record, then click Delete.
A related record In Browse mode, select a portal row in the current table by clicking inside the row but
outside any fields in the row. Click Delete Record, then click Delete.
A group of
records
Make sure the found set contains only the records you want to delete. (For more
information, see Finding records.) Choose Records menu > Delete Found Records,
then click Delete.
All records in a
table
In Browse mode, Click Show All, then choose Records menu > Delete All Records.
All records in a
database
Create a clone of the database with no records. For more information, see Saving
and copying files.

Adding and viewing data
FILEMAKER PRO HELP 70
•copy and paste images, QuickTime movies, and insert files (such as word processing files
or PDF files) into container fields.
•use drag and drop to move data between fields, from one file to another, or from another
application. See Moving text and data with drag and drop.
•import data. See Saving and sending records in other formats.
•use lookups or relationships to copy or display data from other database files.
Note If you're working with a database that doesn't have any records, you must create a record
before entering data.
Selecting a field in Browse mode or Find mode
In Browse mode, you select a field to work with data. In Find mode, you select a field to enter a find
request.
Notes
•The boundaries of a selected field are solid lines; boundaries of other fields are dotted lines.
•When you select a rotated field in Browse mode or Find mode, the field is temporarily
displayed unrotated while the field is selected. See Rotating objects.
•To change the order in which pressing a key moves you through fields, set the tab order for
the layout. See Setting the tab order for data entry.
•You can't press a key to move to some fields:
•You can't move into fields omitted from the tab order.
•In Browse mode, you can't press a key to select summary or calculation fields.
•In Find mode, you can't press a key to move into summary fields.
•If you cannot select a field, the field could be formatted to prevent entry. See Allowing or
preventing entry into fields.
•You cannot tab into or out of a popover; however, you can tab to a popover button and
display its associated popover by pressing the Space bar. Then you can tab between the
objects on the popover.
Related topics
Finding records
Selecting the current record
To Do this
Select a field Click in the field.
Select the contents of a field Select the field, then choose Edit menu > Select All.
Move to the next field in a record (in the
established tab order)
Try pressing Tab, Enter, or Return.
Notes
•You can set which keys move to the next field. See Setting
the keys for exiting a field.
•Fields on tab panels or slide panels that are not on the
front-most panel are skipped.
Move to the previous field Press Shift-Tab, Shift-Return, or Shift-Enter.

Adding and viewing data
FILEMAKER PRO HELP 71
Entering and changing data in fields
You can enter data into text, number, date, time, timestamp, and container fields. You can also
change or delete data in fields.
If a field contains a valid URL, you can open it in another application that you specify. See Using
URLs in a field.
You can enter data in a field up to the character limit for the field type.
To enter data into a container field, see Using data in container fields.
Important To avoid confusion when using dates in FileMaker Pro, always enter four-digit years.
See Working with data in date fields.
To delete data from a field without putting it on the Clipboard:
•Select the data, then press Backspace or Delete.
To type a tab character into a field:
•Click where you want to insert the tab, then press Ctrl+Tab (Windows) or Option-Tab
(OS X).
Notes
•When you start typing data into a text field set up to auto-complete, FileMaker Pro attempts
to match what you have entered against either the field’s index or a value list. The best
match automatically appears in the field. Other matches may also appear in a drop-down
list. For more information on auto-complete fields, see Setting up a field to auto-complete
during data entry.
•In Browse mode, you can use the keyboard to enter values for radio buttons and
checkboxes. Tab into the field and type the first letter of the value that you want to enter, or
use the arrow keys to select it. Then, press the Space bar to enter the value.
•To enter or change the value in a global field, in Browse mode, select the field and enter the
new value.
•The way data appears depends on how a field is formatted in Layout mode, on the system
formats used when the file was created, and on your computer's system formats. See
Formatting and setting up field objects in Layout mode.
To enter data into a Click in the field in Browse mode, then
Tex t f ield Type the text.
Number field Type the value (from 10400 to 10-400).
Date field Type the date in the format used when the file was created. See Working with
data in date fields. If enabled, use the drop-down calendar to select a date.
Time field Type the time of day (or time duration) as hours; hours and minutes; hours,
minutes, and seconds; or hours, minutes, seconds, and fractional seconds. See
Working with data in time fields.
Timestamp Type the date in the format used when the file was created, followed by hours and
minutes; or hours, minutes, and seconds. For example: 2/2/2014 12:00 AM
or 12/31/2014 11:59:59 PM.

Adding and viewing data
FILEMAKER PRO HELP 72
•If you use the drop-down calendar to enter a date into an empty timestamp field,
FileMaker Pro enters the date you select and inserts midnight as the time portion. If you use
the drop-down calendar to change an existing timestamp, FileMaker Pro changes the date
portion only, preserving the existing time portion.
•When working with files created on a computer using different system formats, you can
choose whether to view data in its original system formats or in your own system formats. To
use your own formats, verify that Use System Formats is checked on the Format menu.
See Opening files with different system formats.
•A field can be defined to make sure data is entered in a specific format, or within a certain
range. For example, you may be required to enter a four-digit year in a date. See Defining
field validation.
•You may not be able to enter or change data in some fields (for example, calculation or
summary fields, or fields that are formatted to prevent entry). You can copy the contents of
calculation and summary fields to other fields.
•If you mix numbers and text in a number field that's used in a calculation or summary field,
FileMaker Pro ignores the text when performing the calculation or summary.
•Numbers can be entered using scientific notation, for example: 1.23e+15 or 1.23e-15.
•You can view and print only the data that fits within the field boundaries. You can change the
boundaries by resizing the field in Layout mode. See Resizing and reshaping objects.
•There are other ways to enter data, like importing or copying it from another source, pasting
a value from the field index, using a related table, and setting options to automatically enter
the data when you create a record.
•You cannot type text directly into a container field. To enter text in a container field, copy the
text, then paste it into the field.
•As you type text into a field, you can undo and redo your entries by choosing Edit menu >
Undo Typing or Edit menu > Redo Typing.
•For information on entering special characters such as accent marks, see the Help for your
operating system.
Related topics
Copying and moving data in records
Entering preset data from a value list
Restoring data in records
Using a field index
Inserting the current date or other variables into a field
Using data in container fields
Moving text and data with drag and drop
You can use drag and drop to transfer information within a FileMaker Pro database, between
databases, or between FileMaker Pro and other applications that support drag and drop.
For example, you can drag a number or text from one field and drop it into another field in the same
database. Or, you can drag text from a Microsoft Word document into a FileMaker Pro text field. You
can also drag and drop data between layouts, between container fields, and between layouts and
container fields, either in the same database or between different databases.
In FileMaker Pro, you can use drag and drop in Browse mode, Find mode, or Layout mode.
Note Drag and drop must be enabled in Preferences. See Setting general preferences.

Adding and viewing data
FILEMAKER PRO HELP 73
Notes
•If the source application displays dates, times, and numbers as text (the way FileMaker Pro
does), you can also drag and drop them into a number, date, or time field.
•When you select a rotated field in Browse mode, the field is temporarily displayed unrotated
while the field is selected. See Rotating objects.
•In Browse mode or Find mode, dragging text to a field other than a text field overwrites the
existing data.
•You can't drop text into a record or field that is being edited by someone else or that you
don’t have access privileges to edit.
•You don't have to select a field before you drop data into it.
•If validation options are set for the field, data is validated as follows:
•If the field isn't selected before you drop the data, the data is validated immediately after
you drop it.
•If the field is selected before you drop the data, data is validated when you deselect the
field.
For more information on field validation, see Defining field validation.
•Windows: You can move text from FileMaker Pro to some applications by selecting and
dragging the text, then dropping it into the other application.
•You can drag a file from Windows Explorer (Windows) or the Finder (OS X) into an
interactive container. See Working with content in interactive containers.
Related topics
Setting general preferences
Using data in container fields
Exporting the contents of a field
You can export the contents of a field to a file. The content of most field types is saved to a text file.
Content in container fields is saved with a file type that matches the content type.
To Do this
Copy text from one field to another field Select the text, drag it, then drop it into the new
location.
Copy data from one container field or layout to
another container field or layout
Select the contents of the container field or the
layout object, drag it, then drop it into the new
location.
Move text to another location in the same field (in
Browse mode or Find mode)
Select the text, drag it, then drop it into the new
location.
Copy text to another location in the same field Press Ctrl (Windows) or Option (OS X), select and
drag the text, then drop it into the new location.
Copy text between FileMaker Pro and another
application
Select the text, drag it, then drop it into the new
location.

Adding and viewing data
FILEMAKER PRO HELP 74
To export the contents of a field:
1. Click the field.
2. Choose Edit menu > Export Field Contents.
Tip You can also right-click the field and choose Export Field Contents from the shortcut
menu.
3. In the Export Field to File dialog box, choose a location and type a filename.
FileMaker Pro saves the field’s content to a new file in the specified location.
4. For After saving, choose one or both of the following options if you wish:
5. Click Save.
Related topics
Selecting a field in Browse mode or Find mode
Working with data in date fields
When entering data in date fields, type dates as follows:
•Enter the date in the system format used when the file was created.
•Type one date on one line in each field.
•Type the day, month, and year as numbers separated by a backslash or other separator
character. (Use the same character for each separator; for example, 2/3/2014. You can use
any character as a separator except a letter, a colon (:), or a “+” sign.)
•If enabled, use the drop-down calendar to select a date. Use the month and year controls to
locate the desired date and then select it to close the calendar. The date is inserted using
the current date format. For more information, see Setting up a field to display a drop-down
calendar.
•FileMaker Pro supports dates ranging from 1/1/0001 to 12/31/4000.
Note If you don't type a year in a date field and you haven't typed a separator character for a year,
FileMaker Pro enters the current year. If you enter dates with two-digit years, such as 5/12/14,
FileMaker Pro converts them to four-digit years, as described in Conversion of dates with two-digit
years.
Related topics
Entering Japanese Emperor Year dates
About date fields
Specifying formats for date fields
Setting options for fields
Inserting the current date or other variables into a field
Choose To
Automatically open file Open the file after it is saved
Create email with file as
attachment
Create an email with the saved file attached
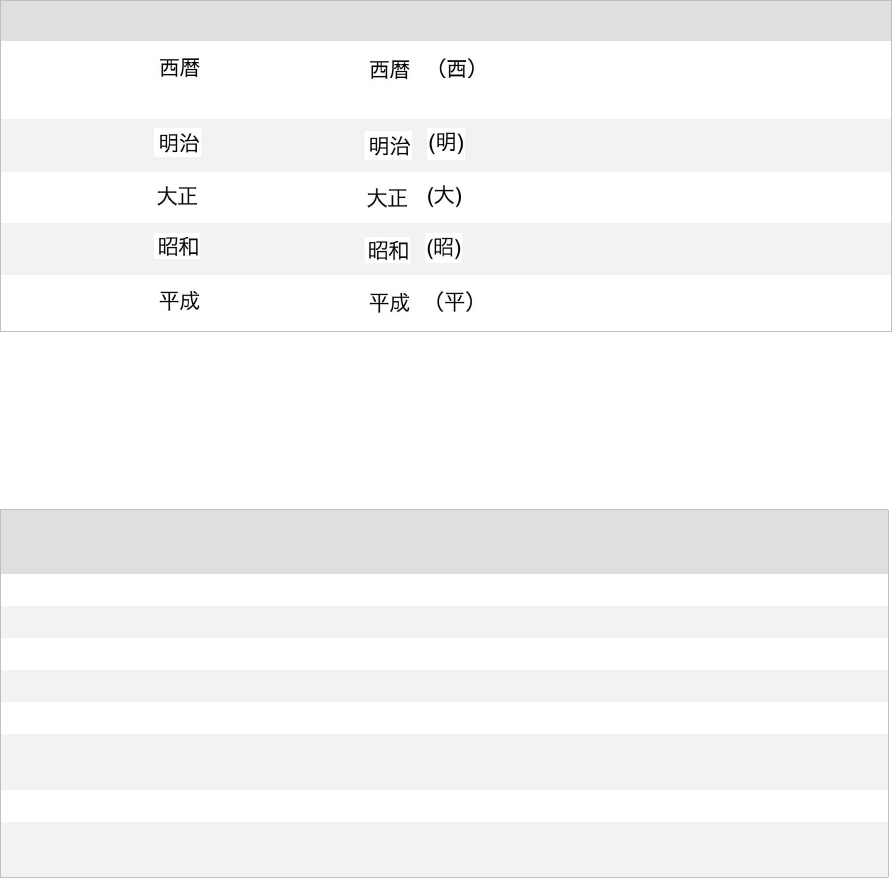
Adding and viewing data
FILEMAKER PRO HELP 75
Entering Japanese Emperor Year dates
You can enter Japanese Emperor Year (Wareki) dates in date fields. FileMaker Pro converts the
Emperor Year to a Western Gregorian (Seireki) year and saves it internally in the format specified by
the file. The display format of the date—Western or Japanese—depends on the date field format.
There are two ways to enter Japanese Emperor Year dates:
•Era abbreviation: Enter the date in the format era letterY/M/D, where era letter designates
the era (see the table below for a list of valid era letters), followed by the year, month, and
day. For example,“M1/12/30” is converted to “1868/12/30” (M1 = the 1st year of Meiji, or
1868). Similarly, “T1/12/30” becomes “1912/12/30”, “S1/12/30” becomes “1926/12/30”, and
“H1/12/30” becomes “1989/12/30”
•Using a “+” as the date separator: Enter the date in the format Y+M+D. When you use the
“+” separator, FileMaker interprets the year according to the Year Input table below. Only 1-
and 2-digit years are interpreted as Emperor years; 3- and 4-digit years are treated as
Western years. For example, “2+1+2” is converted to and saved internally as “1990/01/02”
(2nd year of Heisei, January 2nd).
Era letter Era name Era formats Reign
A.D. (anno
domini)
, , A.D.
prior to 1868/09/08
m, M Meiji , , M
1868/09/08 - 1912/07/29 (M1 - M45)
t, T Taisho . , T 1912/07/30 - 1926/12/24 (T1 - T15)
s, S Showa , , S
1926/12/25 - 1989/01/07 (S1 - S64)
h, H
Heisei , , H
1989/01/08 - (H1 - )
Year input
Seireki (Western)
year Wareki era name and era year
01988 S63
11989 S64 through Jan. 7, H1 from Jan. 8
2 - 25 1990 - 2013 H2 - H25
26 - 63 1951 - 1988 S26 - S63
64 1989 S64 through Jan. 7, H1 from Jan. 8
65 - 99 1965 - 1999
(70/30 rule)
S40 - S64 (1965 - 1989), H1 - H11 (1989 - 1999)
100 - 999 (3-digit year) 0100 - 0999 A.D. 100 - 999
0001 - 4000 (4-digit
year)
0001 - 4000 A.D. 1 - A.D. 1868 (0001 - 1868)

Adding and viewing data
FILEMAKER PRO HELP 76
Notes
•You can enter era abbreviations in lower- or upper-case, and as full width or half width
characters. Full width numbers (but not the date separators) are converted to half width
when you exit the field in Browse or Find modes.
•An era abbreviation letter followed by a “0” is interpreted as the year prior to the first year of
that era. For example, “M0” = 1867, “T0” = 1911, and so on. A “0” year entered without an
era abbreviation but with the “+” date separator is converted to 1988, the year prior to the
first year of the current era, Heisei.
Conversion of dates with two-digit years
FileMaker Pro permits you to enter dates with two-digit years, such as “12/1/99” and “3/2/09.”
However, these dates are ambiguous because they do not specify the century; entering “5/6/53”
could be in the year 1953, 2053, or the 53rd year in any other century.
Important When you enter dates with two-digit years into a date field, FileMaker Pro converts them
to four-digit years using the two-digit year conversion method described below. This conversion
method may not convert the two-digit year dates that you enter into the century that you expect,
which may result in inaccurate date entries.
You should familiarize yourself with this conversion method and, for date fields where inaccurate
date conversions are a possibility, take the following precautions to improve the accuracy of entered
dates:
•Always enter dates with four-digit years.
•Use the FileMaker Pro field validation option that requires entering four-digit year dates. An
error message will appear when an attempted date entry contains a two-digit year. For more
information, see Defining field validation.
•On your layouts, always format date fields to display four-digit years. For more information,
see Specifying formats for date fields.
Note This conversion method is used for all forms of two-digit year date entry into FileMaker Pro,
not just data entry into fields. For example, date conversion occurs during import of two-digit year
dates into FileMaker Pro. For a list of situations where the conversion method is used, see the
conversion information below.
Two-digit year date conversion method
FileMaker Pro converts two-digit year dates into four-digit year dates based on the year in which the
date is entered, always assuming that the four-digit year date should be in either the next 30 years,
or the preceding 70 years. The following table shows how two-digit year dates entered in three
different years will convert to four-digit years.
Two-digit year
In 2013,
converts to
In 2015,
converts to
In 2030,
converts to
02 2002 2002 2002
15 2015 2015 2015
42 2042 2042 2042
43 2043 2043 2043
44 1944 2044 2044
Adding and viewing data
FILEMAKER PRO HELP 77
The following illustration depicts how the conversion method is skewed. It assumes that any two-
digit year that you enter is more likely to be in the past than in the future.
This conversion method is used for all forms of two-digit year date input, including:
•entering and modifying dates in date fields.
•dates entered in a web-published database that is being accessed via a web browser.
•dates input or modified via importing. This includes data imported into an existing
FileMaker Pro file as well as data converted into a new FileMaker Pro file, but does not
include conversion of FileMaker Pro files created in previous versions of FileMaker Pro. See
the important note below.
•dates input or modified via Apple events, ODBC, and JDBC.
•dates input via drag-and-drop or script commands to a non-active field.
•dates input as part of a calculation expression in the Specify Calculation dialog box.
•dates entered for the Auto-Enter Data option in the Options for Field dialog box.
•dates entered for the Validation In range option in the Options for Field dialog box.
•dates entered as literal values by scripts.
Important This two-digit year date conversion method is not used when you convert a
FileMaker Pro file from a previous version to the current version of FileMaker Pro. FileMaker
assumes that dates in older files constitute legacy data. Therefore, during file conversion, any two-
digit year dates that still exist in the old file convert to “19xx” (not the current century, but actually
“19xx”) in the converted file. If you have any concerns about two-digit year dates in older files,
ideally you should review and correct the data in a previous version of FileMaker Pro prior to
converting the file to the current version. For more information about converting files, see
Converting files from FileMaker Pro 11 and earlier.
45 1945 2045 2045
46 1946 1946 2046
47 1947 1947 2047
50 1950 1950 2050
76 1976 1976 1976
87 1987 1983 1987
95 1995 1995 1995
Two-digit year
In 2013,
converts to
In 2015,
converts to
In 2030,
converts to
+ 30 years- 70 years
Current year
FuturePast

Adding and viewing data
FILEMAKER PRO HELP 78
Notes
•FileMaker recommends that you only enter dates into fields defined with the Date type.
Don’t use text or numeric fields to store dates. FileMaker software is not intended to support
dates in such fields.
•FileMaker Pro supports the entry of dates ranging from 1/1/0001 to 12/31/4000.
•If you need to enter the creation date or modification date for a record, use auto-enter
options, which are more accurate and easier than entering the data by hand. For more
information, see Defining automatic data entry.
•In FileMaker Pro 3.0 through 5.5 and FileMaker Pro 6.0v3 and 6.0v4, the processing of
dates with two-digit years is different depending on how they are entered. Also,
FileMaker Pro 6.0v1 and 6.0v2 have some date handling issues that are corrected in
FileMaker Pro 6.0v4.
Working with data in time fields
When entering data in time fields, type the date in the system format used when the file was
created. Type the time of day (or time duration) as one of the following:
•hours: 12
•hours and minutes: 12:20
•hours, minutes, and seconds: 12:20:45
•hours, minutes, seconds, and fractional seconds: 12:20:45.89
Notes
•If you type a single digit, FileMaker Pro assumes it's the hour (typing 5 in a time field
indexes it as 5:00:00).
•Type the time of day in 24- or 12-hour format, with or without AM or PM. (AM is assumed for
a time less than 12:00).
•You can type a negative time duration in a time field, like –08:40:00. You can't type a
negative time if Strict data type validation is defined for the field options. See Defining field
validation.
•For more information on system formats, see Opening files with different system formats.
•Each time field parameter (hours, minutes, and seconds) can store values up to
231 - 1 (2,147,483,647).
•For ODBC data sources, the time field parameters are restricted. Minutes and seconds
must be in the range of 0 to 59, and hours must be in the range of 0 to 23. Negative time
values are not supported.
Related topics
Finding numbers, dates, times, and timestamps
About time fields
Specifying formats for time fields
Setting options for fields
Inserting the current date or other variables into a field

Adding and viewing data
FILEMAKER PRO HELP 79
Committing data in records
Unlike most word processing applications, FileMaker Pro saves your data as you work. This is
called committing data. Data is committed when you:
•select another record
•click anywhere outside of the current field
•Windows: Press Enter on the numeric keypad, or Ctrl+Enter on computers without a
numeric keypad
•OS X: Press Enter (not Return), or Fn-Return on computers without a numeric keypad
•switch to another mode
Notes
•If you enter data incorrectly in a record, you can restore the original data to the record as
long as the information is not committed. For more information, see Restoring data in
records.
•When you change related data (such as related records displayed in a portal), these
changes are not committed until you commit the record that is displaying the related data.
•In FileMaker Pro 10, there was a change to how FileMaker Pro performs the Replace Field
Contents and Relookup Field Contents commands and script steps. Replace/relookup
operations are now performed without committing the active record. This change only
affects multiple uncommitted records in a window transaction, as when you do a replace/
relookup on related records in a portal. If there are uncommitted records in the window that
are affected by the operation, these changes will be made using the window's transaction
and remain uncommitted until you choose to commit the changes following the completion
of the operation. All other records will be modified and committed during the operation as
before.
Related topics
Saving and copying files
Opening multiple windows per file
Saving and reverting layout changes
Using URLs in a field
You can open a valid URL that appears in a field. FileMaker Pro opens the URL with the default
application configured on your computer for the URL type. For example, http URLs will open in your
default web browser.
To open a URL from a field:
1. Click the field to select it, and select the entire URL.
2. Right-click any part of the URL.
3. Choose Open <URL> from the shortcut menu.
You can also hold down the Alt key (Windows) or the Command key (OS X) while clicking any
part of the URL text to open the URL.
FileMaker Pro supports the fmp: protocol and the following URL schemes:
•https://
•mailto:

Adding and viewing data
FILEMAKER PRO HELP 80
•ldap://
•ldaps://
•ftp://
•http://
•gopher://
•shttp://
•file://
•mailto://
•news://
•nntp://
•telnet://
Related topics
Entering and changing data in fields
Copying and moving data in records
You can copy or move data to a field in the same record or a different record.
Notes
•You can copy values from any field type (number, text, and so on).
•You can copy values from fields formatted as radio buttons, checkboxes, drop-down lists, or
pop-up menus.
•When you paste data into a field formatted as radio buttons, checkboxes, a drop-down list,
or a pop-up menu, the matching value is selected, replacing the entire contents of the
selected field. When you paste a value that's not in the field's value list, the Other value is
selected, if applicable.
To Do this in Browse mode
Copy or move a value from one field to
another
Select the contents of the field, then choose Edit menu > Copy
or Cut. Display another record, if needed. Click the field to hold
the data, then choose Edit menu > Paste.
Copy a value from a field in the last
record that you accessed
Click the field that you want to hold the data, then choose Insert
menu > From Last Visited Record.
Copy values in a record to another
application, like a word processor
With no field selected, choose Edit menu > Copy. In the other
application, paste the record that's on the Clipboard.
Copy all data in a record (including any
related records in a portal and fields on
tab panels or slide panels that are on
the front-most panel)
With no fields selected, choose Edit menu > Copy.
Note Fields on tab panels or slide panels that are not on the
front-most panel and fields on closed popovers are not copied.
Copy all records in the found set to the
Clipboard (but not data from tab panels
or slide panels that are not in front)
With no fields selected, press Shift (Windows) or Option (OS X)
while choosing Edit menu > Copy.
Paste text from the Clipboard without
formatting (like bold or italic)
Click the field you want to hold the text, then press Ctrl+Shift+v
(Windows) or Command-Option-v (OS X).

Adding and viewing data
FILEMAKER PRO HELP 81
•When you copy a record, everything is copied except data in container fields. Data is copied
in tab-delimited format, in the order the fields appear on the layout.
•Text styles, like font, color and size, are copied and can be pasted into other applications.
•Multilingual text can be copied and pasted into other applications.
•When you copy all the records in the found set, records are separated by carriage returns.
•When you copy a record containing repeating fields to the Clipboard, FileMaker Pro inserts
the group separator character between each repetition. You can use most word processors
to replace these characters with another delimiter such as a tab or space.
•You can copy and paste the contents of individual cells in Table View. You can't copy and
paste the contents of multiple cells, but you can copy the current record or found set to the
Clipboard.
•You can duplicate records to quickly add a record with the same or similar data. See Adding
and duplicating records.
•You can drag and drop information between fields, records, and applications. See Moving
text and data with drag and drop.
Related topics
Saving and copying files
Moving through records
Finding records
Entering preset data from a value list
A field can display predetermined values as a radio button set, a checkbox set, a drop-down list, or
a pop-up menu. You can use these value lists to quickly enter preset data.
Notes
•The options available in a value list depend on the field setup. For example, the setup
determines whether the Other or Edit items appear in radio button sets, checkbox sets,
To Do this in Browse mode
Choose a predefined value from a
drop-down list or pop-up menu
Click the field, then choose the value from the drop-down list or
pop-up menu.
Type a value that isn't included in a
drop-down list
Click the field again, then type the value.
Open or close a drop-down list of
suggestions
Press Esc. If the field has an arrow control next to it, you can also
click the arrow.
Select a different suggestion in the
drop-down list
Use the arrow keys, Page Up and Page Down keys, or Home and
End keys.
Select a radio (option) button Click the button to select the value. To clear a button, Shift-click it.
Select one or more checkboxes Click a checkbox to select or clear values.
Enter a value that isn't included in a
value list
Choose or click Other. Type a value in the dialog box, then click
OK.
Clear an Other value Choose or click Other. Delete the associated value in the dialog
box, then click OK. (This action clears the field.)
Edit a value list Choose Edit, then change the values in the dialog box. Click OK.

Adding and viewing data
FILEMAKER PRO HELP 82
drop-down lists, or pop-up menus. For more information, see Setting up a field to display a
pop-up menu, checkbox set, or other control.
•If the field is defined with the Member of value list validation setting, you can't type a value
that doesn't appear in the value list. See Defining field validation.
•When you select a rotated field in Browse mode that is formatted as a value list, the field is
temporarily displayed unrotated while you enter data.
•To use the keyboard to enter values for radio buttons and checkboxes, tab into the field and
type the first letter of the value that you want to enter, or use the arrow keys to select it.
Then, press the Space bar to enter the value.
•You can Shift-click a radio button to clear it, but in some cases this may not clear the field.
For example, a field called Color is formatted on Layout #1 to display two radio buttons,
Black and White. The same field, Color, is formatted on Layout #2 as a text entry field that
accepts any value. If a user has entered Red in the field on Layout #2, the information is
now stored in the field, but doesn’t display on Layout #1. To clear the field from Layout #1,
select the field, then choose Edit menu > Clear.
Related topics
Defining value lists
Defining automatic data entry
Value lists troubleshooting
Restoring data in records
By default, FileMaker Pro saves changes to records automatically when you commit each record. If
you enter data incorrectly in a record, you can restore the original data to the record as long as the
information is not committed. Data is committed when you:
•select another record
•click anywhere outside of the current record
•Windows: press Enter on the numeric keypad, or Ctrl+Enter on computers without a
numeric keypad
•OS X: press Enter (not Return)
To restore original data to a record in Browse mode:
•Choose Records menu > Revert Record.
Data has already been committed if Revert Record is dimmed.
Notes
•You can select Edit menu > Undo to revert changes at any field level before you commit a
record. Changes to the record are removed incrementally each time you select Edit menu >
Undo.
Edit menu > Redo restores changes incrementally, enabling you to restore a record to a
specific state when you have made multiple changes before committing. The number of actions
that can be undone or redone is limited only by the amount of available memory on your
computer.
•You can prompt the user to save changes before committing a record. For more information,
see Setting the automatic record-saving option for a layout.

Adding and viewing data
FILEMAKER PRO HELP 83
•When you revert a record, any changes made to related data (such as related records
displayed in a portal) are also reverted. For more information, see Committing data in
records.
Related topics
Working with data in date fields
Selecting the current record
Using a field index
FileMaker Pro can create an index of values for each text, number, date, time, timestamp, and
calculation field. You can view the values in the index, and insert them into a field to prevent typing
values incorrectly.
Note To use index values, indexing options must be enabled for the field. See Defining field
indexing options.
To insert values from the index:
1. In Browse mode or Find mode, click the field you want to insert an index value into.
2. Choose Insert menu > From Index.
3. In the View Index dialog box, choose a value, then click Paste.
Notes
•While the View Index dialog box is open, you can view the list of values as individual words
by selecting Show individual words.
•You can enter two or more words in a field and have them treated as one word by the index.
For example, you may want a name like Jean Louis to appear as one word in the View
Index dialog box, even when Show individual words is selected. To have two or more
words treated as one, enter the space between words by pressing Ctrl+Space bar
(Windows) or Option-Space bar (OS X) instead of the Space bar alone.
•For a text field, FileMaker Pro sorts the value index according to the index order of the
field’s default language. If you want to display the values in a specific language’s dictionary
sort order, select Re-sort values based on and choose a language. Note that the re-sorted
index lasts only while the View Index dialog box is displayed. The next time you access this
dialog box, values will be displayed in the original order. For more information, see
Choosing a language for indexing or sorting.
Inserting the current date or other variables into a field
You can insert the current date, time or user name into a field.
After you insert one of these values into a field, that value doesn't change unless you change it. To
display a value that updates, place a date, time, or user name symbol on the layout. For more
information, see Inserting the date, page number, or other variable onto a layout.
To insert the current date, time, or user name into a field:
1. In Browse mode, click the field.
2. From the Insert menu, choose one of the following menu items:
•Current Date to insert the current date in a date, number, text, or timestamp field.

Adding and viewing data
FILEMAKER PRO HELP 84
•Current Time to insert the current time in a time, number, or text field. (You can also
choose Current Time to insert the current date and time in a timestamp field.)
•Current User Name to insert the current user name as specified in preferences. (To
change the user name value, see Setting general preferences.)
Notes
•If a field formatted to display a drop-down calendar is empty or contains an invalid date, the
calendar will default to the current date when opened. Press Enter (Windows), Return
(OS X), or click to insert the current date. If the field already contains a valid date, find and
click the current date in the drop-down calendar to replace the existing data with the current
date.
•FileMaker Pro determines the current date and time to insert from your operating system
settings.
•FileMaker can automatically enter values such as dates and times into fields when a record
is created or updated. For more information, see Defining automatic data entry. If you need
to track who creates or updates records in a file protected with accounts, a more secure and
accurate method is to automatically enter the account name, because any user can easily
change the user name in preferences.
•To create custom formats for date fields, see Specifying formats for date fields.
Editing and formatting text
You can enter, edit, format and check the spelling of text in Browse mode and Layout mode. In Find
mode, you can enter and edit text in find requests.
Related topics
Checking spelling
Selecting text
You must select text before you can edit it.
To select text:
•In Browse mode or Find mode, position the pointer over any selectable text.
•In Layout mode, use the Selection tool in the status toolbar to manipulate a block of
text as if it were an object. For example, copy or move it, change fonts, or resize it (which
changes the margins of the text). When a text block is selected with the Selection tool,
typing replaces the text in the text block.
•In Layout mode, use the Text tool to edit text. You can also double-click a text block with
the Selection tool to edit the text.

Adding and viewing data
FILEMAKER PRO HELP 85
Related topics
Entering and changing data in fields
Editing text
Formatting text in Browse mode
Selecting and working with objects on a layout
Working with the layout tools
Editing text
In Browse mode, you can edit or format any selectable text in a field. Use Browse mode to edit or
change the data stored in your database. You can also edit text objects in Layout mode.
To edit text:
1. Select the text you want to edit.
2. Type new text or make changes.
Whatever you type either replaces the text that was selected or is inserted after the insertion
point.
In Layout mode,
manipulate a text block
with the Selection tool.
In Layout mode, double-
click with the Selection
tool or use the Text tool
to edit text.
In Browse or Layout
mode, select the text
with the I-beam pointer.
To select Do this with the I-beam pointer
Individual characters Drag through the characters
A word Double-click the word
A line of text Triple-click anywhere in the line
A paragraph Click four times anywhere in the paragraph
An entire block of text Click five times anywhere in the block or choose Edit
menu > Select All
Nothing, just place the insertion point Click once

Adding and viewing data
FILEMAKER PRO HELP 86
Note When you select a rotated field in Browse mode, the field is temporarily displayed unrotated
while you edit the text in the field. See Rotating objects.
Related topics
Entering and changing data in fields
Selecting text
Formatting text in Browse mode
Checking spelling
Changing field names
Formatting text in Browse mode
You can change the text attributes (like font, size, color, and style) for data in text, number, date,
time, and global fields. You can also change the paragraph alignment, margins, and line spacing.
Important You can change text attributes for field data in both Browse mode and Layout mode.
Layout mode formatting is specific to a particular layout. Browse mode formatting is stored with the
data and applies in any layout that displays the field. For more information on whether to format data
in Browse mode or Layout mode, see Formatting text.
To change text attributes in Browse mode:
1. Select the text in a field.
For more information, see Selecting text.
2. Choose a command from the Format menu or the formatting bar.
If you don’t see the formatting bar, click Formatting in the layout bar.
Related topics
Editing text
Specifying text formats for fields
Using data in container fields
A container field can store pictures, multimedia files, or any other type of file that you want to keep in
a database. The way you insert the data determines how you see and interact with the data in the
container field.
To Do this
Put selected text on the
Clipboard
Choose Edit menu > Cut (to remove the text) or Copy (to
duplicate it). The text stays on the Clipboard until the next time
you use Cut or Copy.
Insert the contents of the
Clipboard at the insertion point
Choose Edit menu > Paste.
Insert a tab character into a field Press Ctrl+Tab (Windows) or Option-Tab (OS X).
Delete selected text Choose Edit menu > Clear, or press Backspace or Delete.
FileMaker Pro doesn't place the text on the Clipboard, and you
can't paste it anywhere.
Adding and viewing data
FILEMAKER PRO HELP 87
For a list of files that FileMaker Pro supports, see the table below.
Note To insert packaged files such as Keynote files into a container field, archive or zip the
packaged files.
FileMaker Pro supports the following picture, audio/video, and QuickTime formats.
To insert Do this
A picture Choose Insert menu > Picture, then choose the picture to insert.
FileMaker Pro displays the picture in the field.
A QuickTime file Choose Insert menu > QuickTime, then choose the file to insert.
FileMaker Pro displays the contents of the QuickTime file in the
container field. You can play a QuickTime movie or sound using
the standard QuickTime controls.
An audio or video file For an interactive container, choose Insert menu > Audio/Video,
then choose the file to insert. You can then play the audio or video
file in the field. See Working with content in interactive containers.
A PDF file For an interactive container, choose Insert menu > PDF, then
choose the PDF file to insert. See Working with PDF files in
interactive containers.
Any file Choose Insert menu > File, then choose the file to insert (such as
a spreadsheet file, word processing file, or any other file type that
you want to track). FileMaker Pro displays the file’s icon and name
in the container field, but not the actual content.
Container field with an inserted picture Container field with an inserted file
Picture formats Audio/video formats QuickTime formats
Encapsulated Postscript (.eps) AIFF Audio file (.aif, .aiff) AVI (.avi)
FlashPix (.fpx) AVI movie (.avi) MPEG (.mp4, .m4v, .mpg,
.m4a)
GIF (.gif) MP3 Audio File (.mp3) QuickTime Movie (.mov, .qt)
JPEG/JFIF (.jpg) MPEG-4 Audio File (.m4a) QuickTime VR (.mov)
JPEG 2000 (.jp2) (OS X) MPEG-4 movie (.mp4) AIFF (.aiff)
MacPaint (.mac) (OS X) MPEG movie (.mpg, .mpeg) AU (.au, .snd)
PDF (.pdf) (OS X) MPEG-4 video file (.m4v) MP3 (.mp3)

Adding and viewing data
FILEMAKER PRO HELP 88
Notes
•For QuickTime Movie (.mov, .qt) formats inserted as audio or video, some formats, such as
QuickTime VR, aren’t supported.
•Windows: QuickTime is required for QuickTime movies inserted using Insert menu >
QuickTime.
•OS X: For the Windows Media Videos (.wmv) format, requires Flip4Mac to be installed.
•Insert menu > QuickTime supports all media file types supported by QuickTime.
•You can export the content of a container field to a file. You can also choose to automatically
open or email the exported file. See Exporting the contents of a field.
•When you insert a very large file into a container field, a dialog box appears showing you
the progress.
Inserting graphics into container fields
You can add a graphic (or image) to a container field by inserting it, using drag and drop, or pasting
the graphic from the Clipboard.
For a list of supported image formats, see Using data in container fields. Some supported image
formats require QuickTime technology, which is installed by default as a component of OS X. To
install QuickTime in Windows, refer to the instructions and system requirements on the QuickTime
website, http://www.apple.com/quicktime.
To insert a graphic:
1. In Browse mode, click the container field.
When you select a rotated field in Browse mode, the field is temporarily displayed unrotated
while the field is selected.
2. Choose Insert menu > Picture.
3. In the dialog box, choose the graphic file.
Choose a graphic file type for Files of type (Windows) or Show (OS X).
4. Choose a storage option, then click Open.
Photoshop (.psd) QuickTime Movie (.mov, .qt)
(see notes below)
WAV (.wav)
PNG (.png) Sun Audio file (.au)
QuickTime Image File (.qif) WAVE Audio File (.wav)
SGI (.sgi) Windows Media Audio
(.wma)
Targa (.tga) Windows Media Videos
(.wmv) (see notes below)
TIFF (.tif)
Windows bitmap (.bmp)
Windows Metafile/Enhanced
Metafile (.wmf/.emf) (Windows)
Picture formats Audio/video formats QuickTime formats

Adding and viewing data
FILEMAKER PRO HELP 89
If you select Store only a reference to the file, FileMaker Pro doesn't import the graphic file; it
only keeps track of where it is on your hard disk. This option may reduce the size of your
FileMaker Pro file, but if you move or delete the file, FileMaker Pro won't be able to display it.
Tips
•To display the same graphic in all records (for example, a company logo), insert the graphic
onto a layout. See Inserting graphics onto a layout.
•If you select Store only a reference to the file, one way to see the location of the file on
your hard disk is to create a calculation using the GetAsText function.
•FileMaker Pro uses the orientation attribute set by many cameras to display photographs
right side up in container fields.
Related topics
Adding and viewing data troubleshooting
Deleting data from container fields
Specifying formats for container fields
About container fields
Inserting QuickTime movies and multimedia into container fields
Inserting QuickTime movies and multimedia into container fields
You can add a QuickTime or QuickTime VR movie to a record by inserting it into a container field.
You can also insert other multimedia file formats supported by QuickTime. For a list of supported
formats, see Using data in container fields.
To insert a movie or other file format supported by QuickTime:
1. In Browse mode, click a container field.
2. Choose Insert menu > QuickTime.
If this menu item is dimmed, either you do not have Apple QuickTime software installed on your
computer (Windows), or the field is an interactive container. See Working with content in
interactive containers.
3. In the dialog box, select the file (change folders, if needed).
4. Click Open.
Note FileMaker Pro doesn't import the file; it only stores a reference to the file and keeps track of
where it is on your hard disk.
Related topics
Adding and viewing data troubleshooting
Playing QuickTime and QuickTimeVR movies in container fields
Deleting data from container fields
About container fields
Inserting files of any type into container fields
You can use a container field to store files of any type, such as spreadsheet files, word processing
files, or any other file type that you want to track. When you insert a file, FileMaker Pro displays the
file’s icon and name in the container field, but not the actual content.

Adding and viewing data
FILEMAKER PRO HELP 90
Note To insert packaged files such as Keynote files into a container field, archive or zip the
packaged files.
To insert a file of any type into a container field:
1. In Browse mode, click a container field.
2. Choose Insert menu > File.
3. In the dialog box, choose the file.
If you select Store only a reference to the file, FileMaker Pro doesn't import the file; it only
keeps track of where it is on your hard disk. This option may reduce the size of your
FileMaker Pro file, but if you move or delete the file, FileMaker Pro won't be able to display it.
Choose this option if you want to be able to open the file from the container field.
4. Click Open.
You see the file’s icon and name in the container field.
Notes
•To open a file that has been inserted into a container field (using Store only a reference to
the file), select the container field and then press the Space bar, or double-click the
container field.
•You can drag a file from Windows Explorer (Windows) or the Finder (OS X) into the field.
•OS X: Plug-ins stored in container fields are compressed by default.
•If you select Store only a reference to the file, one way to see the location of the file on
your hard disk is to create a script using the GetAsText function.
Related topics
Adding and viewing data troubleshooting
Deleting data from container fields
About container fields
Pasting graphics and movies from the Clipboard
You can paste graphics and movies from the Clipboard into a container field.
To paste graphics or movies from the Clipboard:
1. Copy a graphic or movie to the Clipboard.
In most applications, use the Copy command.
2. In the FileMaker Pro file, switch to Browse mode and view the record to paste into.
3. Click the container field, then choose Edit menu > Paste.
Related topics
Adding and viewing data troubleshooting
Deleting data from container fields
About container fields
Adding and viewing data
FILEMAKER PRO HELP 91
Playing QuickTime and QuickTimeVR movies in container fields
You can play QuickTime movies and view QuickTime VR movies that are stored in container fields.
For more information about QuickTime files in container fields, see Using data in container fields.
Note Windows: If you’re resizing a window in which a QuickTime movie is playing, the movie briefly
stops displaying until you’ve finished resizing the window.
To play a QuickTime movie:
In Browse mode, click the container field that contains the movie. The following table describes
QuickTime controls.
To view a QuickTime VR movie:
In Browse mode, click the container field that contains the movie. The following table describes
QuickTime VR controls.
Related topics
Adding and viewing data troubleshooting
Deleting data from container fields
About container fields
Playing recorded sounds in container fields
You can play sounds that were recorded in container fields (using versions of FileMaker Pro earlier
than version 13). The sound icon is displayed in a container field that contains sound.
To play a sound, do one of these in Browse mode:
To Do this
Set the volume level (if the movie contains sound) Click and then drag the volume control.
Play or pause the movie Click or .
Move the movie backward or forward one frame at a
time Click .
Move to a specific frame in the movie Drag .
To Do this
Change your view Press the mouse button and drag across the
movie.
Zoom in or out to magnify or reduce your view Click or .
Move a magnified or reduced object Zoom in or out, then click and drag an
object.
Locate hot spots that trigger actions Click , or move your pointer over the
movie until the pointer changes to a hand.
Return to your previous view after clicking a hot spot Click .

Adding and viewing data
FILEMAKER PRO HELP 92
•Double-click the container field where the sound is stored (only if the field is not an
interactive container. See Specifying formats for container fields and Working with content in
interactive containers).
•Click the field, then press the Space bar.
Related topics
Adding and viewing data troubleshooting
Deleting data from container fields
About container fields
Working with content in interactive containers
You can work interactively with PDF, audio, and video files in an interactive container. For example,
you can scroll through the pages of a PDF file, zoom in and out, and copy text.
You can drag a file from Windows Explorer (Windows) or the Finder (OS X) into an interactive
container. If you drag multiple files, only the first file is inserted in the field.
For more information about working with PDF files in interactive containers, see Working with PDF
files in interactive containers.
Working with audio files in interactive containers
When you work with audio files in interactive containers, keep the following points in mind:
•To insert an audio file into an interactive container, in Browse mode choose Insert menu >
Audio/Video. This menu item replaces Insert menu > QuickTime.
•When the Start playback automatically option is selected in the Inspector, the audio file
starts playing when you display the record. If the option is not selected, you start playing the
audio file by clicking the play control.
•To delete an audio file from an interactive container, choose Edit menu > Clear or Cut.
Working with video files in interactive containers
When you work with video files in interactive containers, keep the following points in mind:
•To insert a video file into an interactive container, in Browse mode choose Insert menu >
Audio/Video. This menu item replaces Insert menu > QuickTime.
•When the Start playback automatically option is selected in the Inspector, the video starts
playing when you display the record. If the option is not selected, you start playing the video
by clicking the play control.
•To delete a video file from an interactive container, choose Edit menu > Clear or Cut.
Notes
•You cannot work interactively with container fields that are in portals.
•In FileMaker Go, content in container fields is displayed by the iOS like other iOS audio,
video, and PDF files.
Working with PDF files in interactive containers
When you work with PDF files in interactive containers:
•To insert a PDF file into an interactive container, in Browse mode, choose Insert menu >
PDF. (This menu item is unavailable if the container field is not an interactive container.)

Adding and viewing data
FILEMAKER PRO HELP 93
•Windows: Be sure that a web browser plug-in (such as Adobe Reader) is installed on your
local computer. If it is not installed, Insert menu > PDF will be unavailable.
•You can scroll through the pages of the PDF and zoom in and out of the PDF.
•You can copy, paste, and delete a PDF file in an interactive container; and copy text from
the document. For more information, see below.
To copy text from a PDF file in an interactive container:
•Windows: Click the PDF file to select it. Then select the text to copy and press Ctrl+C.
•OS X: Click the PDF file to select it. Then select the text to copy and press Command-C. Or,
choose Edit menu > Copy Text.
To paste copied text, select an area outside of the field and choose Edit menu > Paste. Or, press
Ctrl+V (Windows) or Command-V (OS X).
To copy a PDF file in an interactive container:
•Windows: Click the PDF file to select it, then choose Edit menu > Copy.
•OS X: Click the PDF file to select it. Then hold down the Option key and choose Edit
menu > Copy.
Note You cannot copy a PDF file using Edit menu > Copy, which copies text from the PDF. You
must also press the Option key.
To delete a PDF file from an interactive container:
•Click the PDF file to select it, then choose Edit menu > Clear.
Note Pressing the Delete key does not delete a PDF file from an interactive container.
To insert a different PDF file in an interactive container:
•Select the PDF file, then choose Insert menu > PDF.
The new file replaces the previous one.
Notes
•When you don’t have a shortcut menu or a keyboard, you must use the Edit menu on the
menu bar. You can also script a button to insert a PDF in the field. For example, create a
button that uses the Insert PDF script step. To insert a PDF, select the field, click the button,
and choose the PDF to insert.
•When a PDF file is selected in an interactive container, some keyboard shortcuts may work
differently. For example, you cannot press Ctrl+L (Windows) to switch to Layout mode. You
cannot press Ctrl+Shift+D (Windows) to display the Manage Database dialog box.
•Hosted PDF files are rendered quickly, because the host sends a thumbnail of the first page
of the PDF until you begin working with the PDF file.
Deleting data from container fields
You can delete the content of a container field.
To delete data from a container field:
1. In Browse mode, click the container field.

Adding and viewing data
FILEMAKER PRO HELP 94
2. Do one of these:
•Press Backspace or Delete.
•To delete data from an interactive container, choose Edit menu > Clear or Cut.
Related topics
Working with PDF files in interactive containers
Adding and viewing data troubleshooting
Inserting graphics into container fields
Inserting QuickTime movies and multimedia into container fields
Inserting files of any type into container fields
About container fields
Checking spelling
FileMaker Pro can check the spelling of text in the following locations:
•a selected word or passage in a field
•the visible fields in the current record only (including any related fields)
•the visible fields in all records in the current found set (including any related fields)
•while in Layout mode, all the text objects in the current layout (including any text objects on
tab panels or slide panels that are not in front)
You can set FileMaker Pro to check spelling as you type or to indicate possible misspellings with a
red dotted underline in text that’s being edited. You set these options on the Spelling tab of the File
Options dialog box. See Setting file options.
You can also set FileMaker Pro to check spelling on a field-by-field basis. You set this option in the
Inspector. See Setting spell checking for individual fields.
When you check spelling, FileMaker Pro compares your text against two dictionaries, the main
dictionary and the user dictionary. The main dictionary is preset to match your local language (for
example, in the United States, usenglsh.mpr). You can’t edit the main dictionary, but you can change
it to another language. The main dictionary is always available.
FileMaker Pro includes spelling dictionaries in the following languages: Dutch, French, Italian,
German, Portuguese (Brazil), Portuguese (Portugal), Spanish, Swedish, Swiss German, UK
English, US English, and US English (Medical).
The user dictionary, user.upr, is your second, editable dictionary. You can create multiple user
dictionaries, but only one can be used at a time. You can change user dictionaries at any time, or
turn off the user dictionary entirely and use just the main dictionary.
To check spelling in the current field, record, found set, or layout:
1. Display the record or layout, find the set of records, or select the text to check.
2. Choose Edit menu > Spelling, then choose a spelling command.
To check spelling of Choose
A selected word or passage Check Selection
Text in the current record Check Record
Text in the current layout Check Layout
Text in the found set of records Check All

Adding and viewing data
FILEMAKER PRO HELP 95
3. In the Spelling dialog box, choose one of the following options if a questionable word
appears in the Word box.
Note You can't change a word in a restricted or password-protected file or field. In that case,
click Next.
4. When the spelling check is complete, click Done.
Note You cannot check spelling in a web viewer, summary fields, or container fields.
Checking spelling as you type
FileMaker Pro can alert you to spelling errors in text you’re editing.
To check spelling as you type:
•Set options in the Spelling tab of the File Options dialog box. For more information, see
Setting file options.
FileMaker Pro can alert you to spelling errors in two different ways:
•Set an option to have FileMaker Pro mark questionable words with a red dotted underline.
To display suggested spellings, right-click the underlined word, then choose Suggested
Spellings from the shortcut menu. You can then choose a replacement, select Ignore All or
Learn, or open the Spelling dialog box.
•Set an option to have FileMaker Pro play the system alert sound when you type a
questionable word. You can then manually correct the word or choose Edit menu >
Spelling > Correct Word, then use the Spelling dialog box to correct the word.
The Correct Word command is unavailable if you’ve committed your latest changes by tabbing
or clicking out of a field, or pressing Enter (OS X).
Note Checking spelling as you type is slower than using the other spelling options.
For more information on these options, see Setting file options.
Related topics
Creating and selecting spelling dictionaries
Editing user dictionaries
To Do this
Replace a misspelled word with
one in the dictionary
Select a suggestion in the list and click Replace.
Revise a misspelled word that
isn't in the spelling dictionaries
For Word, type your replacement. Click Check if you want the
new word's spelling verified, or click Replace.
Leave the word as it is Click Ignore All. FileMaker Pro skips every occurrence of the
word.
Leave the word as it is and add it
to the user dictionary
Click Learn.
Note You must have a user dictionary selected before you can
edit it (see Creating and selecting spelling dictionaries).

Adding and viewing data
FILEMAKER PRO HELP 96
Creating and selecting spelling dictionaries
Before you check spelling, you can select the spelling dictionaries to use. You can use the main
dictionary by itself, or in combination with a customized user dictionary. (For more information on the
main and user dictionaries, see Checking spelling.)
FileMaker Pro is preset to use the user dictionary user.upr, but you can create other user
dictionaries (for example, a dictionary containing special financial or medical terminology).
You need to select dictionaries when:
•you want to use a main or user dictionary other than the preset one.
•you want to check the spelling a second time using a different main dictionary (for example,
a foreign language dictionary).
•you want to ignore your user dictionary.
•your dictionary files are not present in the default folder location: the
Extensions/Dictionaries folder in the folder where FileMaker Pro is installed.
To switch your main dictionary:
1. Choose Edit menu > Spelling >Select Dictionaries.
2. Use Spelling Language to select a main dictionary. The default choice matches your
operating system language.
3. Click OK.
To switch your user dictionary:
1. Choose Edit menu > Spelling > Select Dictionaries.
2. Select Use Main Dictionary and User Spelling Dictionary. The name and path of the
currently selected user dictionary is displayed.
3. Click Select to switch to another user dictionary.
4. Click OK.
To ignore the user dictionary:
1. Choose Edit menu > Spelling > Select Dictionaries.
2. Select Use Main Spelling Dictionary only.
3. Click OK.
You must reselect a user dictionary to use it again.
To create a new user dictionary:
1. Choose Edit menu > Spelling > Select Dictionaries.
2. Select Use Main Dictionary and User Spelling Dictionary.
3. Click New. Type a name for the dictionary, then click Create.
4. Click OK.
Related topics
Editing user dictionaries
Setting file options

Adding and viewing data
FILEMAKER PRO HELP 97
Editing user dictionaries
You can review the FileMaker Pro user dictionaries to edit, add, and remove entries. You can also
export the user dictionary to a text file or import a text file into a user dictionary.
Note You must have a user dictionary selected before you can edit it. For more information, see
Creating and selecting spelling dictionaries.
To place a word in the user dictionary during spell checking:
•In the Spelling dialog box, click Learn.
To edit, export, or import a user dictionary:
1. Choose Edit menu > Spelling > Edit User Dictionary.
2. In the User Dictionary dialog box, choose an option:
3. Click OK.
Notes
•If you have added words to your user dictionary in FileMaker Pro 3.x or earlier or in a Claris
product, you can add those words to your FileMaker Pro user dictionary. First export the
words from the previous user dictionary to a text file, then import the text file into the
FileMaker Pro user dictionary.
•You can import dictionary text files in ASCII or UTF-8 character formats. (UTF-16 text import
is not supported.)
Related topics
Checking spelling as you type
Setting file options
Replacing the contents of a field
You can replace the contents of a field in all records or in a found set with a new value, a calculation,
or a serial number.
Important This process overwrites a field in every record (or every record in the found set) with a
new value. You can't undo replacing field values. Before you begin, consider making a backup copy
of the file.
To Do this
Add a word Type it in the Entry box, then click Add.
Remove a word Select the word in the list, then click Remove.
Change a word Remove the word, type its replacement in the Entry box, then click Add.
Export the dictionary
as a text file
Click Export. Enter a name and location for the text file, then click Export.
Import a text file into
a dictionary
Click Import. Select the text file, then click Import.

Adding and viewing data
FILEMAKER PRO HELP 98
To replace field values in every record in the found set:
1. If necessary, find, omit, or sort the records in the database table.
For more information, see Finding, sorting, and replacing data.
2. In Browse mode, in the current record, select the contents of the field you want to replace.
3. If you're replacing data with a constant value (instead of serialized numbers or a calculated
result), type the value.
4. Choose Records menu > Replace Field Contents.
5. In the Replace Field Contents dialog box, select an option:
6. Click Replace.
Notes
•You can't replace calculation or summary fields or fields defined with the global storage
option.
•You can't reserialize calculation, summary, container, or global fields.
•If the field that contains the replaced data is validated, FileMaker Pro doesn't validate the
new data. See Defining field validation.
•If you select Update serial number in Entry Options, the next automatically entered value
for this field (after the replace is performed) follows in sequence. If you clear this option, the
next value isn't changed in the Options for Field dialog box. The next automatically entered
value is based on the current settings (not in sequence with the records reserialized by this
replace task).
•You can modify a field's existing values by using a calculation that includes the field. For
example, you can change the value Gross Pay to the results of the calculation Gross Pay +
1000. See Defining calculation fields.
•You can use a calculation to add a suffix or prefix to an existing field value. For example, to
append “-01” to all the values in the “Partnumber” field in the found set, enter Partnumber &
“-01” in the Specify Calculation dialog box. The result must match the field type of the
replaced field.
To replace each value with Select
The value in the currently
selected field
Replace with “<value>”. FileMaker Pro replaces the contents of
the field for the entire found set.
A serialized number Replace with serial numbers, then type the starting value for the
serial numbers in Initial value, and the incremental value in
Increment by.
If the field is defined to automatically enter a serial number, you
can select Update serial number in Entry Options to reset the
next value in the Options for Field dialog box.
A calculated value Replace with calculated result, then click Specify. In the Specify
Calculation dialog box, enter the calculation you want evaluated.
(The result must match the field type of the replaced field.) Click
OK.
Note For more information about the Specify Calculation dialog
box, see Specify Calculation dialog box.

Adding and viewing data
FILEMAKER PRO HELP 99
•In FileMaker Pro 10, there was a change to how FileMaker Pro performs the Replace Field
Contents and Relookup Field Contents commands and script steps. Replace/relookup
operations are now performed without committing the active record. This change only
affects multiple uncommitted records in a window transaction, as when you do a replace/
relookup on related records in a portal. If there are uncommitted records in the window that
are affected by the operation, these changes will be made using the window's transaction
and remain uncommitted until you choose to commit the changes following the completion
of the operation. All other records will be modified and committed during the operation as
before. For more information about committing data, see Committing data in records.
Important To avoid confusion when replacing dates in FileMaker Pro, always enter dates with four-
digit years. For more information, see Conversion of dates with two-digit years.
Related topics
Entering and changing data in fields
Finding records
Adding and viewing data troubleshooting
Saving and copying files
Adding and viewing data troubleshooting
If you're having trouble adding or viewing data, review the tips in one or more of the following
sections.
Records are missing
Records are “lost”
•Make sure that any FileMaker Pro file shared over a network has a unique filename,
whether open or not. Use an archiving or compression utility to make all copies of your files
unavailable to FileMaker Pro, or store them on removable media and remove the medium.
•You might have entered the records in Find mode. In Browse mode, in the status toolbar,
click the down arrow next to Find (Windows), or click and hold Find (OS X). Choose Modify
Last Find and see if the “lost” records appear. If so, you can:
•Flip back and forth between Modify Last Find and Browse mode and copy and paste
the contents of each field, or
•For one “record”: exit all fields, choose Edit menu > Copy, then paste into an
application like Notepad or TextEdit. (To copy multiple “records”, press Shift (Windows)
or Option (OS X) while choosing Edit menu > Copy.) Then import this text document
into your database. (Note that this will not work for data entered into related fields.)
•Manually re-enter the records in Browse mode.
Only one record appears in a list
•Check the found set. (Look in the status toolbar.)
•Check the layout in Layout mode. If the top boundary of a field object is touching the line
that separates layout parts, FileMaker Pro displays and prints that field in the layout part
above the line. Thus, for example, fields which appear to be in the body part and which you
would expect to print a number of times down the page will appear only once at the top of
the page if they are touching the header line.

Adding and viewing data
FILEMAKER PRO HELP 100
Related topics
Placing and removing fields on a layout
Printing troubleshooting
Wrong or missing data in field
•In networked databases, global field changes made by a guest are available only to that
guest, and only until the guest closes the file. Each guest can have a different global field
value. If all guests must have the same value, define a calculation field with a constant value
(in quotes).
•A ? in a field means that:
•A field object is too small to display the number, date, or time data in the field. For
information on resizing the field object, see Resizing and reshaping objects.
•A date or time is invalid. For more information, see Working with data in date fields and
Working with data in time fields.
•If the field uses a value list (list, menu, radio buttons, or checkboxes), the value in the field
might not be visible if it does not match a value in the value list. To see all values a field
holds, place a copy of the field on a layout, but don't format it to use a value list. In Browse
mode, click in the field to see all of its contents, or perform a find for a specific value.
•If the field is a repeating field, make sure it is formatted on the layout to display all repeats.
•In Table View, only the first matching record in a portal is displayed.
•A number field or calculation field could be formatted on the layout to display a limited
number of decimal places. Calculations based on the field use the number the field actually
holds, not the number displayed. See Formatting and setting up field objects in Layout
mode for more information.
•Use field validation to prevent the wrong data from being entered. For more information, see
Defining field validation.
•Data could have been entered before field validation options were created.
•If the field is supposed to be displaying related data, check to make sure there is a match for
the relationship that would cause related data to appear. For more information, see About
match fields for relationships.
•Check the alignment of the field in Layout mode. For example, data might be aligned right,
and that end of the field might not be visible on the layout.
Related topics
Finding records troubleshooting
Dates are not as expected
Records are missing
Dates are not as expected
To avoid confusion when entering dates, always use four-digit years.
•Check the date formatting applied to the field. See Specifying formats for date fields.
•Make sure dates are entered into fields of type date. Choose File menu > Manage >
Database, click the Fields tab, and check the field type of the field.
•Use field validation to prevent the wrong dates from being entered. For more information,
see Defining field validation.

Adding and viewing data
FILEMAKER PRO HELP 101
•Dates could have been entered before field validation options were added to the file.
Related topics
Working with data in date fields
Opening files with different system formats
Summary data is missing or incorrect
To make sure that subsummary data displays correctly, consider these points:
•If you’re in Browse mode, make sure you are viewing the file in List View or Table View.
•Before printing, sort by all of the break fields on which your subsummaries are based.
•Records with no value in the break fields will sort to the top, giving the appearance of no
data. You can omit records with blank values in the break field before running a
subsummary report.
•Make sure you're working with the intended found set. (Look in the status toolbar.)
•Make sure data has been entered consistently in the break field. For example, be sure that
FileMaker, Inc. is not sometimes entered as FM. Use a value list to ensure consistency
during data entry.
•In Layout mode, make sure fields aren't touching or crossing the part boundaries.
Related topics
Creating and managing layouts and reports
Troubleshooting layouts with summary or subsummary parts
Text or objects are clipped
If an object on a layout is clipped, in Layout mode:
•Resize the field or text object to make it taller or wider. For more information, see Resizing
and reshaping objects.
•Make sure no other object is stacked in front of the clipped object. Use the commands in the
Arrange menu to move objects backward or forward in the stacking order, or move the
offending object, or make its background transparent. For more information, see Moving
objects forward or backward on a layout and Setting auto-resize options for layout objects.
•Make sure fields do not cross page boundaries (marked by a heavy dotted line in Layout
mode.) For more information, see Moving objects on a layout.
Related topics
Document does not appear as expected in Preview mode
Data does not appear correctly
Problems with fonts, alignment, or text clipping
•If the file was created on another platform and then moved or shared cross-platform, these
issues can occur because of operating system differences. See Troubleshooting layouts
designed for both Windows and OS X for ways to minimize these issues.
•See also Text or objects are clipped.

Adding and viewing data
FILEMAKER PRO HELP 102
Text formatting (for example, bold or underline) is not as expected
•Check formatting in Browse mode. See Formatting text in Browse mode. Formatting applied
to data in Browse mode affects that data in any layout it appears.
•Check formatting in Layout mode. See Formatting and setting up field objects in Layout
mode.
Related topics
Document does not appear as expected in Preview mode
List View or Table View refreshes when adding records
When you commit a new record to a sorted found set displayed in List View or Table View, the
record moves to its proper location in the sort order. Therefore, the new record may move elsewhere
in the list or table and might not appear in the current window. To have FileMaker Pro display a
confirmation dialog box before each record is committed, thereby preventing an accidental commit
operation, see Setting the automatic record-saving option for a layout.
Note To keep new or changed records in the same position in the sort order, see Options for sorting
records.
Can't click or tab into a field
If you cannot enter data in a field, consider the following possibilities:
•You could be in Layout or Preview mode. To enter data, switch to Browse mode.
•The field could be a merge field. To enter data, choose a different layout from the Layout
pop-up menu.
•The field could be formatted to prohibit entry. If your access privileges allow, in Layout
mode, select the field. In the Behavior area of the Inspector, for Field entry, make sure the
Browse Mode and Find Mode options are selected.
•Access privileges may prevent you from changing the field.
•The field could be a related field and:
•Allow creation of related records is deselected in the relationship definition.
•The portal and the related field in it don't use the same relationship.
•The file containing the related data has been moved or renamed, or you don't have
access to it. In Layout mode, the field displays <File Missing>.
•The match field in the related file is a global field.
•You can't tab into fields that are not in the tab order; click instead, or add the field to the tab
order.
•The field could be a global field or summary field (no data can be entered in Find mode).
•You can’t tab into or out of a popover; however, you can tab to a popover button and display
its associated popover by pressing the Space bar. Then you can tab between the objects on
the popover.
Related topics
Alerts when entering data
Setting the tab order for data entry

Adding and viewing data
FILEMAKER PRO HELP 103
Alerts when entering data
If you receive one of these error messages, check the possibilities listed.
This field is not modifiable
•Prohibit modification of value could be selected for auto-entered data in Options for
Define Fields.
•The field could be a calculation field or summary field.
•You might not have the correct access privileges. See your database administrator.
•The file containing the field could be read-only, or you might not have write access to the
volume the file resides on (for example, if it's on a CD). See your database administrator.
•If you have copied the field from a layout in a different file, you might need to specify which
field it is in this database.
Your password does not enable you to do this, or the file is not modifiable
•If you're sure your password allows this action, the field might be a related field from a file in
which your access privileges don't allow you to edit records.
This field cannot be modified until <fieldname> is given a valid value
•You're trying to enter data into a related field, but the match field does not yet have a value.
Enter a value in the match field, then enter data in the related field.
•The value in the match field is the wrong type for the field's data type (for example, text in a
number field).
•The value in the match field is non-alphanumeric (for example: @). If you need to use these
characters in match fields, set both match fields' language for indexing to Unicode. See
Defining field indexing options for more information.
The relationship is not valid and must be corrected before this field can be
modified
•The field is a related field that has been deleted from the related file.
•The match field in the related file:
•has been deleted
•is a calculation or summary field
Related topics
Can't click or tab into a field
Value lists troubleshooting
During data entry, a value list may not work or display data as you expect it to. If you’re having
trouble with a value list, review the following troubleshooting tips.
Value list is blank; checkboxes or radio buttons do not display
•Be sure the field is formatted to display a value list. In Layout mode, select the field. In the
Inspector, click Data, then set Control style options in the Field area.

Adding and viewing data
FILEMAKER PRO HELP 104
•If the values are from a field in another table, check the relationship (make sure it is valid
and contains values). For more information, see About relationships.
•If the value list uses values from another file, the file may have been moved or renamed, or
your access privileges may not allow you to access it.
Items or characters are missing from the value list
•If the value list is obtaining its values from a field, make sure the field type matches the
values you’ve entered. For example, if a number field contains values without numeric data,
these values won’t be indexed, and any value list based on that field won’t display the non-
numeric values.
•If the value list is defined to display information from two fields, items will not be duplicated
for the field on which the value list is sorted. For example, if the value list displays
information from the Company field and the Name field, and if the values are sorted by the
Company field, only one person from each company will appear in the value list.
•If certain characters within value list items are missing or display as squares, make sure the
font you select for the field object is capable of displaying all the characters in your value
list, particularly if your values contain multiple languages or character sets. For more
information, see Specifying text formats for fields.
Error: Invalid Value List Usage
•If a field is formatted to use an external value list that is defined to use related values, the
field and value list must be defined in the same file. The field must be a related field from the
same file.
Value list displays <no values defined>
•If the value list uses values from a field in another file, the file has been moved or renamed
or your access privileges don’t allow you to access it.
Related topics
Defining value lists
Setting up a field to display a pop-up menu, checkbox set, or other control

Finding, sorting, and replacing data
FILEMAKER PRO HELP 105
Finding, sorting, and replacing data
This section describes three ways that you can manipulate data in FileMaker Pro:
•Find records: you can find records that meet criteria you specify, such as records entered on
a certain date or addresses in a particular city.
•Sort records: you can rearrange records in a particular order by sorting fields. For example,
you can sort alphabetically, numerically, by date, or by a custom sort order.
•Find and replace data: you can search for and replace text across multiple fields, similar to
the way you find and replace text in most word processing programs.
Finding records
When you perform a quick find in Browse mode, FileMaker Pro searches across all the fields that
are enabled for quick find within the selected layout. Quick find is helpful if the data you are looking
for might be in multiple fields or if you don’t know which field contains the data. See Performing a
quick find in Browse mode.
When you perform a find in Find mode, FileMaker Pro searches through all the records in a table,
comparing the search criteria you specify with the data in the table. See Making a find request.
Records with data matching the criteria become the found set, which is the subset of records being
browsed. Records that don’t match are omitted. You can then constrain (narrow) or extend
(broaden) the found set in Find mode.
You can work with just the records in the found set. For example, you can view, edit, calculate
summaries for, sort, print, delete, export, or replace data in these records. You can also open
another window in order to perform different find requests on the same data. See Opening multiple
windows per file.
You can also perform a find in Browse mode based on an entire field or a selection of text within a
field. See Finding records based on criteria in a single field.
Related topics
Configuring quick find
Finding and replacing data
Performing a quick find in Browse mode
You can perform a quick find to search across all the fields that are enabled for quick find within the
current layout.
To perform a quick find:
1. In Browse mode, type one or more words in the search text box in
the upper-right corner of the status toolbar.
2. Press Enter (Windows) or Return (OS X).
The search includes all the fields on the current layout that are enabled for quick find. Your find
request returns a found set of records.The light green area of the pie chart in the status
toolbar indicates the portion of the total records displayed.

Finding, sorting, and replacing data
FILEMAKER PRO HELP 106
To view a list of recent quick finds:
1. In Browse mode, click the down arrow in the search box.
2. Do one of the following:
•Choose a search term from the search history list to perform a quick find for the term.
•Choose Clear Recent Searches to remove the search history.
Notes
•The only operator supported by quick find is the match phrase operator, double quotation
marks (" ").
•If you type more than one word in the search box, FileMaker Pro searches for records that
have all of the words you typed.
•Quick find does not search summary, container, or global fields.
•You can also include merge fields in quick find. By default, merge fields are set to be
included in the search. For more information about quick find for merge fields, see Placing
merge fields on a layout.
•The search history is only available for the current session and will not be saved for the next
time you open the file.
•If you don’t see the search box in the status toolbar, maximize the window until the search
box is visible. If you still can’t see it, your status toolbar may have been customized to hide
the search box.
•If you want to find records that match at least one set of criteria you specify, perform a find in
Find mode. See Finding records that match multiple criteria.
Related topics
Configuring quick find
Finding records based on criteria in a single field
You can perform a find based on an entire field or a selection of text within a field. The commands to
perform finds based on field data are available on the shortcut menu. See Using shortcut menus.
To find records based on data in a field:
1. In Browse mode, do one of the following:
•Click in a field that contains the entire text you want to use for the find.
•Select specific text within a field to use for the find.
2. Right-click the field or selection. From the shortcut menu, choose Find Matching Records.
The found set changes to include only the records that match the text you indicated. If the text
you indicated contains multiple words, FileMaker Pro performs a phrase search, returning only
those records that include the words in order.
You can also quickly narrow or broaden a found set by clicking in a field (or selecting specific text)
and choosing Constrain Found Set or Extend Found Set from the shortcut menu. For more
information and examples, see Constraining (narrowing) a found set and Extending (broadening) a
found set.

Finding, sorting, and replacing data
FILEMAKER PRO HELP 107
Notes
•Performing one of the find commands creates a new find request and deletes any existing
set of requests associated with the current window.
•The find shortcut menu items are only available if you are allowed to enter the field being
used for the find. See Allowing or preventing entry into fields.
•In Browse mode you can save the find for future use. See Saving a find request.
•If you don’t have the correct privileges to perform the find, the find commands on the
shortcut menu are disabled. See About accounts, privilege sets, and extended privileges.
•The find commands on the shortcut menu are disabled if a script is running, but has been
paused.
•If the field type selected does not support finds (for example, summary fields, container
fields, and global fields), the commands on the shortcut menu won’t appear.
•If no records match your selected data, an alert box appears. Click Modify Find to go to
Find mode and correct your search criteria. Click Cancel to return to Browse mode; the
found set won’t be changed.
Related topics
Finding records that match multiple criteria
Constraining (narrowing) a found set
Extending (broadening) a found set
Making a find request
To find records, work in Find mode. You type search criteria (the value or values to find) into fields in
a find request, which looks like a blank record. When you perform the find, FileMaker Pro searches
for records that match the criteria you entered. Matching records replace any previous found set.
To make a find request:
1. Switch to Find mode by clicking Find in the status toolbar.
2. From the Layout pop-up menu, select a layout that contains the fields you want to search
for.
If necessary, you can change layouts and enter criteria on more than one layout.
3. In the find request, select a text, number, date, time, timestamp, or calculation field to use
for finding, and then type a value in the field.
You can use the Insert Operators list in the layout bar to help you enter criteria. For example,
the search criteria Jo@n can be used to find the first names John and Joan. See Finding text
and characters for more information on using operators.
You can click Omit to exclude records matching a specific set of criteria.
4. Click Perform Find.
Your find request returns a found set of records.The light green area of the pie chart in the
status toolbar indicates the portion of the total records displayed.
Tips
•You can click the pie chart to toggle between your found set and the omitted records in the
database. When all records are displayed, the pie chart is a solid color.
Finding, sorting, and replacing data
FILEMAKER PRO HELP 108
•You can see the last several find requests you have performed in a Recent Finds list.
To access a list of recent finds:
1. Do one of the following:
•In Find mode, click Saved Finds.
•In Browse mode, click the down arrow next to Find (Windows), or click and hold Find
(OS X).
2. Choose a find request from the Recent Finds list.
Notes
•You can do one or more of the following during or after performing a find request:
•Finds on unindexed fields (for example, calculation fields referencing related fields) can take
longer than finds on indexed fields. See Defining field indexing options.
•If a field’s values are indexed, you can use the index to enter values in find requests. See
Using a field index.
•You can’t enter search criteria in container fields, summary fields, global fields, or web
viewers.
•To find data in container fields, create a text or number field that describes or identifies the
contents of the container field. Then perform a find on that field. See Using data in container
fields.
To Do this
Cancel a find operation before it is finished and
leave the previous found set unchanged
Press Esc (Windows) or Command-period
(OS X).
Change or refine a find after performing it See Viewing, repeating, or changing the last find.
Narrow an existing found set See Constraining (narrowing) a found set.
Broaden an existing found set See Extending (broadening) a found set.
Show all records •In Browse mode, click Show All, or choose
Records menu > Show All Records.
•In Find mode, choose Requests menu >
Show All Records.
Note You do not need to choose Show All
Records before performing finds. FileMaker Pro
always searches all records in the tables you
specify unless you have narrowed the existing
found set.
Open another window to perform a different find
request on the same data
See Opening multiple windows per file.
Save a find request See Saving a find request.
Access a saved find request See Managing saved find requests.
Save and send a snapshot link of the found set of
records
See Saving and sending records as a snapshot
link.

Finding, sorting, and replacing data
FILEMAKER PRO HELP 109
•To delete recent finds, click the down arrow next to Find or click Saved Finds (Windows),
or click and hold Find or click Saved Finds (OS X). Then choose Clear All Recent Finds
from the list.
•In Find mode, a badge indicates a searchable field.
Related topics
Finding text and characters
Finding numbers, dates, times, and timestamps
Finding ranges of information
Finding data in related fields
Finding empty or non-empty fields
Finding duplicate values
Finding records that match multiple criteria
Finding records except those matching criteria
Viewing, repeating, or changing the last find
Hiding records from a found set and viewing hidden records
Constraining (narrowing) a found set
Extending (broadening) a found set
Finding records troubleshooting
Finding records based on criteria in a single field
Saving a find request
Managing saved find requests
Specify Find Requests and Edit Find Request dialog boxes
Finding text and characters
You can search for text in fields of type text, or in calculation fields that return a text result.
Unless you search for phrases or an exact match, the field can contain other values in addition to
the one(s) you specify, and the values can be in any order. For example, typing hotel in a field
named Accommodation finds records for Hotel, Discount Hotel, and Hotels, Luxury.
To find text and characters:
1. Start a find request.
See Making a find request.
2. Refer to the following table for examples of different ways to search for text.
To find Type this in the field Examples
Words that start with
specific Roman characters
(works with fields that use
any language except
Japanese)
The characters Chris Smith finds Chris Smith, Smith
Chris, Chris Smithson, and Smith
Christenson
Words that start with
Japanese Hiragana,
Katakana, or Kanji
characters
The characters between =
and * finds , , and

Finding, sorting, and replacing data
FILEMAKER PRO HELP 110
A phrase or sequence of
characters that match when
they are the first characters
in a word (match phrase
from word start)
The literal text
(characters), including
spaces and punctuation,
between double quotation
marks (")
"Marten and Jones Interiors"
finds Marten and Jones Interiors but not
Jones and Marten Interiors
", Ltd." finds all companies with ", Ltd."
in the name, but not those without the
comma
“Spring” finds Springville but not
ColdSpring Harbor or HotSpring
Words with one or more
unknown or variable
characters (any one
character)
One wildcard character (@)
for each unknown
character
Gr@y finds Gray and Grey
@on finds Don and Ron but not Bron
Invalid characters in a text
field
?Invalid characters display as blank
characters
Note To find the ? character, search for
"?"
Digits in a text field (any
one digit)
A # character for each digit # finds 3 but not 30
## finds 30 but not 3 or 300
#3 finds 53 and 43 but not 3
Words with zero or more
unknown or variable text
characters in a row (zero or
more characters)
* for all unknown
characters
Jo*n finds Jon and John
J*r finds Jr. and Junior
*phan* finds Phan and Stephanie
S* finds Sophie, Steve, and Sven
Operators or other non-
alphanumeric characters,
such as punctuation or
spaces
The literal text
(characters), including
spaces and punctuation,
between double quotation
marks (")
"@" finds @ (or an email address, for
example)
"," finds records containing a comma
" " finds three spaces in a row
A character with special
meaning, such as the find
operators recognized by
FileMaker Pro:
@, *, #, ?, !, =, <, >, "
(escape next character)
\ followed by the special
character
\"Joey\" finds "Joey"
joey\@abc.net finds the email address
joey@abc.net
Words with accented
characters
The literal text
(characters), including
spaces and punctuation,
between double quotation
marks (")
"òpera" finds òpera but not opera
(òpera without quotation marks finds
both òpera and opera)
To find Type this in the field Examples

Finding, sorting, and replacing data
FILEMAKER PRO HELP 111
3. When you’ve entered the find criteria that you want, click Perform Find in the status toolbar,
or choose Requests menu > Perform Find.
Notes
•Normally, finds are not case sensitive or width sensitive. For example:
•A find for fred finds Fred and FRED.
•A find request that includes Japanese half-width characters will match results that
contain the equivalent full-width characters.
You can perform case-sensitive and width-sensitive finds on a field by changing the default
indexing and sorting language for the field to Unicode. However, this procedure will change the
order in which the field sorts. If you do not want the original field to sort in Unicode order, create
a calculation field whose formula is simply the field in which you want to perform case-sensitive
or width-sensitive finds, and change the default indexing and sorting language of this field to
Unicode. Then you can sort one of the fields, and perform find requests on the other. See
Defining field indexing options and Defining calculation fields.
Partial phrases, a sequence
of words or characters
(match phrase from
anywhere)
Characters, punctuation,
and spaces between
double quotation marks
("); use * to find this text in
the middle of a longer text
string
*"son & Phillips" finds
Johnson & Phillips and Paulson &
Phillips
Exact matches of the text
you specify (match entire
field)
== (two equal signs) for a
field content match
==John finds John but not John Smith
==John Smith finds John Smith but
not Smith, John or John Smithers
Exact matches of whole
words you specify (match
whole word)
==Market finds Market, Market
Services, and Ongoing Market
Research but not Marketing or
Supermarket
=Chris =Smith finds Chris Smith or
Smith Chris but not Chris or
Christopher Smithson
Words that contain
Japanese Hiragana,
Katakana, and Kanji
characters (Japanese-
indexed fields only)
The characters
finds , , and
Kana characters in a
Japanese-indexed field
without differentiating
between Hiragana/
Katakana, Voiced/Semi-
Voiced/Unvoiced Kana,
Small/Regular Kana, and
Kana Voiced/Unvoiced
Iteration Marks
~ (tilde) and the character,
to do a relaxed search finds , , , , , and
To find Type this in the field Examples

Finding, sorting, and replacing data
FILEMAKER PRO HELP 112
Related topics
Finding duplicate values
Finding ranges of information
Choosing a language for indexing or sorting
Finding numbers, dates, times, and timestamps
When you enter criteria in a find request, numbers, dates, times, and timestamps should be entered
in the corresponding field types (or calculation fields returning the corresponding field type) to
ensure correct behavior when finding them.
Important Entering two-digit year dates along with Find operators in a find request will be
interpreted as four-digit dates based on a conversion algorithm. For example, entering a find
request as 1/1/14 .. 12/31/15 will find the years 2014 through 2015 if the current year is 2014.
It is strongly recommended that complete four-digit years be used to avoid possible confusion. For
more information about the conversion algorithm, see Conversion of dates with two-digit years.
To find numbers, dates, times, and timestamps:
1. Start a find request.
See Making a find request.
2. Refer to the following table for examples of different ways to search for numbers, dates,
times, and timestamps.
To find Type this in the field Examples
A number in a number
field or in a calculation
field that produces a
numeric result
The number .50 finds .5, .50, and $.50
One or more digits in a
number field or in a
calculation field that
produces a numeric result
A # character for each digit # finds 3 but not 30
## finds 30 but not 3 or 300
#3 finds 53 and 43 but not 3
A Boolean number in a
number field or in a
calculation field that
produces a Boolean result
1 to find True values
0 to find False values
1 finds 1
0 finds 0
Invalid data (fields with no
numeric digits) in a
number field or calculation
field that produces a
numeric result
?? finds twelve but not 12 or
twelve30
A date in a date field or in
a calculation field that
produces a date result
The date as digits, separated by a
valid date separator character (such
as a slash or hyphen)
Note For help entering dates with
the drop-down calendar, see
Working with data in date fields
3/3/2014 finds 3/3/2014,
March 3, 2014, and 3-3-2014

Finding, sorting, and replacing data
FILEMAKER PRO HELP 113
3. When you’ve entered the find criteria that you want, click Perform Find in the status toolbar,
or choose Requests menu > Perform Find.
Notes
•When you enter numbers, dates, days of the week, times, and timestamps into find
requests, always enter them using the appropriate system or file settings that are in use.
•When you perform day of the week searches on systems set to a language other than
English, you may use English day names and abbreviations if you wish. The English names
are supported in all system formats. See Opening files with different system formats.
•When you perform day of the week searches, the first day of the week depends on your
system settings. Sunday is the first day of the week in English, Japanese, and Korean, but
Monday is the first day of the week in German, French, Italian, Swedish, Dutch, Spanish,
and other system formats that FileMaker Pro supports.
Related topics
About number fields
About date fields
About time fields
Today's date in a date field
or in a calculation field that
produces a date result
// // finds April 4, 2014 (when the
current date is 4/4/2014)
A time in a time field or in
a calculation field that
produces a time result
The time as digits, separated by
colons
12:53:09 finds 12:53:09
A timestamp in a
timestamp field or in a
calculation field that
produces a timestamp
The date as digits, separated by a
valid date separator character, then
the time as digits, separated by
colons
3/3/2014 12:59:09 PM
finds 3/3/2014 12:59:09 PM
Invalid dates, times,
timestamps, or calculated
date or time results
?? finds Next Tuesday or 2/33/
2014 in a date field, or midnight
in a time field
Dates on a day of the
week in a date or
timestamp field
The day of the week
Note Full or short day names (for
example, Friday or Fri) are
acceptable in day of week searches
Tuesday finds all dates that
occur on a Tuesday
=Thu finds all dates that occur
on a Thursday
Any valid value for a date
or time component in a
date, time, or timestamp
field
* or leave component unspecified,
while specifying the other
components you want to find
5/12/* finds the 12th day of
May in any year
5/12 finds the 12th day of May
in the current year
*:15 finds times 15 minutes
after any hour
1/1/* 7 PM finds timestamps
in the 7 o’clock PM hour on
January 1st in any year
Ranges of information See Finding ranges of information
To find Type this in the field Examples

Finding, sorting, and replacing data
FILEMAKER PRO HELP 114
About timestamp fields
Finding ranges of information
You can find ranges of information, such as all records that contain a field value that is greater or
less than a number, or between two particular dates. A range is different based on the data type:
•Numbers: least to greatest
•Dates, times, and timestamps: earliest to latest
•Text: first to last word, based on the index order of words (not the sort order). A word can be
a single character; for example, a find on a field for <M would return every record that
contains a word less than M in the field’s index order.
To find ranges of information:
1. Start a find request.
See Making a find request.
2. Refer to the following table for examples of different ways to search for a range of
information.
3. When you’ve entered the find criteria that you want, click Perform Find in the status toolbar,
or choose Requests menu > Perform Find.
To find values that are Use this operator Examples
Less than a specified value <<40
<9/7/2014
<M
Less than or equal to a specified value <= or ≤<=95129
≤05:00:00
<=M
Greater than a specified value >>95129
>9/7/2014
>M
Greater than or equal to a specified value >= or ≥>=100
>=9/7/2014
≥8:00
≥M
Within the range you specify .. or ...
(two or three
periods)
12:30...17:30
1/1/2014..6/6/2015
A...M
Mon..Fri
Within the sub-range you specify {..} or {...}
(two or three
periods)
7/{1...15}/2014
{1..3}/{10..16}/2015
12:{30..45}
{7...9}:15 PM
Based only on certain date or time components
such as month, year, or minutes (see more
examples below)
* or type nothing for
each component
you don’t want to
specify
3/*/2014
2/*
2014 *:30 PM

Finding, sorting, and replacing data
FILEMAKER PRO HELP 115
Notes
•When searching for ranges of information in date, time, and timestamp fields, you don’t
have to specify all date or time components. For example, you can type 5/2014 instead of
5/1/2014...5/31/2014 to find all dates in May 2014.
•You can combine operators to simplify range searches. For example, type */{10..15}/
2014 to search for all dates in 2014, but only for days from the 10th through the 15th.
•For information on writing scripts to find a range of dates, see http://help.filemaker.com.
•Refer to the following tables for examples of different ways to search for dates, times, and
timestamps.
Related topics
Finding text and characters
Finding numbers, dates, times, and timestamps
Finding data in related fields
You can enter find criteria in related fields that are displayed in a portal or directly on a layout.
To find dates Type this in the field
In June 2014 6/2014
From July 2014 through October 2015 7/2014...10/2015
That occur on a Friday =Friday
From the 10th through the 16th of October or
November 2014
{10..11}/{10..16}/2014
That occur on March 1st between 1868 and 1912
in the Japanese Emperor Year era of Meiji
m*/3/1
That occur on December 31st between 1930 and
1940 in the Japanese Emperor Year era of
Showa
S{5..15}+12+31
To find times Type this in the field
In the 3 o’clock hour, not including 4:00 PM 3 PM
Between 8:00 AM and 8:59:59 PM 8 AM...8 PM
In the morning AM
Any of the times 4:30, 5:30, and 6:30 PM {4..6}:30 PM
To find timestamps Type this in the field
In the 3 o’clock hour today // 3 PM
In the 7 o’clock hour in May 2014 5/2014 7 PM
That occur on a Monday in 2015 =Mon 2015
From the 10th through the 16th of November
2015 and from 3:00 PM to less than 6:00 PM
11/{10..16}/2015 {3..5} PM

Finding, sorting, and replacing data
FILEMAKER PRO HELP 116
To find data in related fields:
1. Start a find request.
See Making a find request.
2. Enter the find criteria you want.
When you perform a find in a related field, FileMaker Pro displays all the records that have a
related record matching the criteria you enter. For example, in an Invoice file that is displaying
line items as related records in a portal, you could find all invoices listing a computer by typing
Computer in the Item field in the portal.
You can also omit related records. See Finding records except those matching criteria.
3. Click Perform Find in the status toolbar, or choose Requests menu > Perform Find.
Related topics
Adding and duplicating related records
Creating portals to display related records
Finding empty or non-empty fields
You can find fields that contain no data or some data.
To find empty or non-empty fields:
1. Start a find request.
See Making a find request.
2. Refer to the following table for examples of different ways to search for empty or non-empty
fields.
3. When you’ve entered the find criteria that you want, click Perform Find in the status toolbar,
or choose Requests menu > Perform Find.
Note If any value is empty in a repeating field, then a search using “=” returns that field.
To enter data in empty fields:
1. Create a find request that returns the empty field you want to replace.
2. Enter a value in the empty field in one record in the found set.
3. Choose Records menu > Replace Field Contents.
4. Click Replace.
The value you entered is placed in every record in the found set.
Finding duplicate values
You can find all records in which one or more fields contain duplicate values (for example, the same
company name in the Company field in multiple records).
To find fields that are Enter this in the field
Not empty (i.e., fields that have data) *
Empty =

Finding, sorting, and replacing data
FILEMAKER PRO HELP 117
To find all duplicate records:
1. Start a find request.
See Making a find request.
2. Refer to the following table for examples of different ways to search for a range of
information.
Notes
•One field by itself is often not sufficient to determine the uniqueness of a record. If several
fields taken together determine uniqueness, you can create a calculation field (returning a
text result) that concatenates the values of several fields, and then perform a find for
duplicate records on that field. For example, you could use the formula First Name &
Last Name & Phone Number to concatenate three fields. See Defining calculation fields.
•Values are duplicates only if word order is the same.
•When determining uniqueness in text fields, FileMaker Pro looks at the first 100 characters
in each field.
•! does not find records in which duplicate values are entered in the same field (for example,
ABC Company ABC Company in one field).
•To delete duplicate records, see Deleting records.
•You can also identify duplicate records using a self-join relationship. See Finding duplicate
values using a self-join relationship.
Related topics
Replacing the contents of a field
Defining automatic data entry
Defining calculation fields
Working with related tables and files
Summarizing data in portals
Finding duplicate values using a self-join relationship
This procedure uses a self-join relationship and a calculation field referencing the relationship to
determine when duplicate records exist.
To find Use this operator Examples
All duplicate values !! in the Company field finds
all records that contain the
same company name in the
Company field. (ABC
Company and DEF Ltd.
when duplicate values exist
for these companies in
multiple records)
Duplicate values of a specific type !characters !ABC in the Company field
finds all records containing
ABC Company when
duplicate values exist for
this company in multiple
records

Finding, sorting, and replacing data
FILEMAKER PRO HELP 118
To find duplicate records except the first instance:
1. If you plan to delete the duplicate records that you find, make a backup copy of the file.
See Saving and copying files.
2. Identify a field that determines a unique entity in your file.
For example, in a Contacts database, the Last Name field is probably not a good choice,
because you might have several people with the same last name. Employee ID is a better
choice. You can also create a calculation field (returning a text result) that combines data in
several fields to make a unique identifier. An example formula is First Name & Last Name
& Phone Number.
Note The field you choose should not be a repeating field.
3. Define a self-join relationship.
Use your chosen identifying field as the match field in both tables in the relationship. See
Creating relationships.
4. Create a new calculation field named Check Duplicate with the formula:
If(Count(<name of the table’s second occurrence>::<match field>) > 1;
“Duplicates”; “Unique”)
5. Click Show All in the status toolbar.
6. Perform a find for Duplicates in the Check Duplicates field.
All records with duplicates are marked Duplicates.
Once set up as above, this system will identify duplicate records automatically as they are created.
Finding records that match multiple criteria
You can narrow or broaden your search by using multiple criteria.
To find records that match multiple criteria:
1. Start a find request.
See Making a find request.
2. Decide whether you want records matching all or at least one set of criteria you specify.
•To find records matching all criteria specified (logical AND search):
Narrow your search by entering criteria in as many fields as needed to make your find
request specific.
Example
To find all people named Smith who work in Sales, type Smith in the Last Name field and
Sales in the Department field.
You can narrow a found set after you have created it. See Constraining (narrowing) a found
set.
•To find records matching at least one of the sets of criteria, but not necessarily all
(logical OR search):
Broaden your search by entering criteria in the first find request. Click New Request. Enter
the second (set of) criteria. Continue adding requests for each (set of) criteria.
Examples
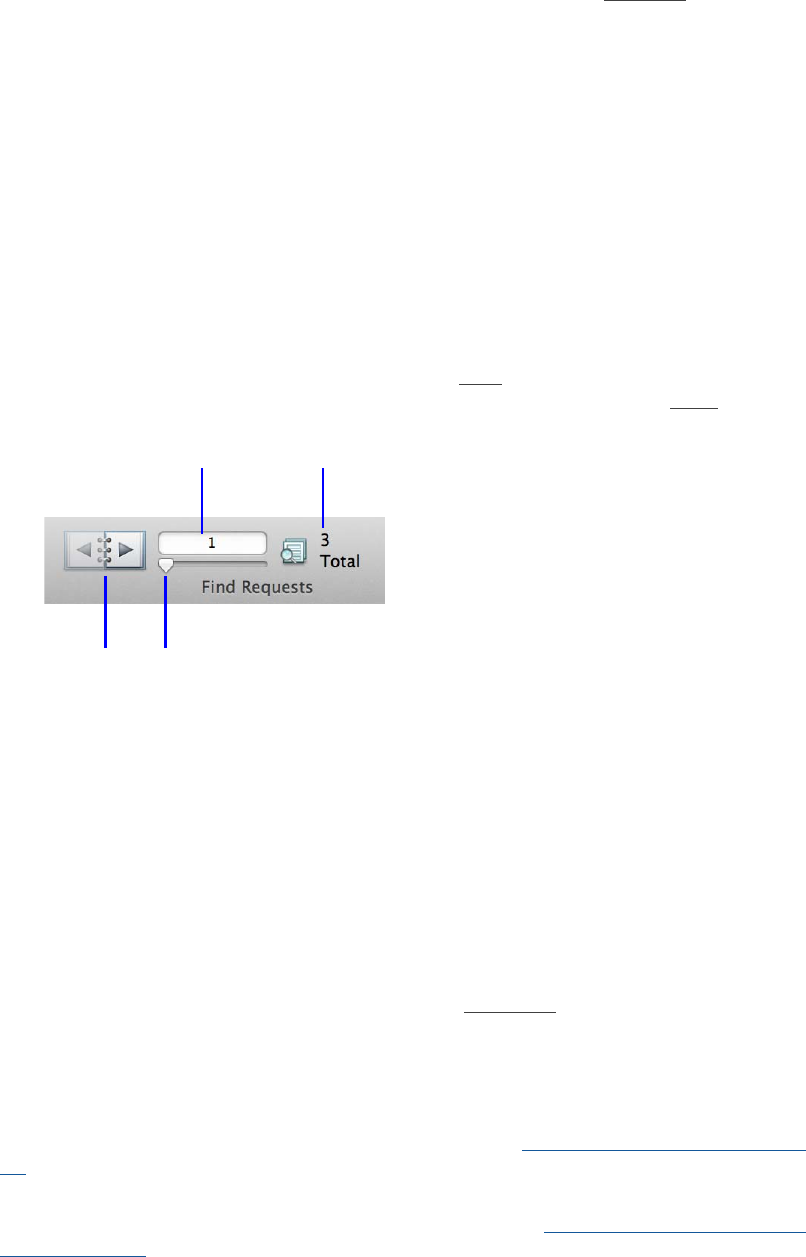
Finding, sorting, and replacing data
FILEMAKER PRO HELP 119
To include customers in New York and customers in Paris in the found set, type New York
in the City field in the first request then type Paris in the City field in the second request.
To include companies with more than 100 employees and companies with more than $100
million in assets, type >100 in the Number of Employees field in the first request, then type
>100,000,000 in the Capitalization field in the second request.
To include 6th grade students who are in Honors Algebra and 7th grade students who are in
Honors Geometry, type 6 in the Level field and Honors Algebra in the Course field in the
first request, then type 7 in the Level field and Honors Geometry in the Course field in the
second request.
3. When you’ve entered the find criteria that you want, click Perform Find in the status toolbar,
or choose Requests menu > Perform Find.
Working with multiple find requests
Requests are stored in the order they are created. To move between find requests, use the
navigation controls. Click the left and right arrows in the book, type a request number in the current
request number field and press Enter (Windows) or Return (OS X), or move the slider left and right.
You can also choose Requests menu > Go to Request, and choose one of the following options
from the submenu:
•Next
•Previous
•Go To
Note These menu items are not available if the status toolbar is hidden and locked by a script
step.
•To duplicate a request, including the criteria entered in it, choose Requests menu >
Duplicate Request.
•To delete a request, go to the request you want to delete, then click Delete Request.
•To restore a request to the way it was when you last committed it, choose Requests
menu > Revert Request. Requests are committed, for example, when you click out of all
fields, go to a different layout or request, or perform a find.
Notes
•You can broaden a found set after you have created it. See Extending (broadening) a found
set.
•To narrow your search by excluding records that meet specified criteria (for example, to find
vendors in New York state that are not in New York City), see Finding records except those
matching criteria.
Current request number Total number of requests
Book Slider

Finding, sorting, and replacing data
FILEMAKER PRO HELP 120
•You can open another window in order to perform different find requests on the same data.
See Opening multiple windows per file.
•You can save a find request for later use. See Saving a find request.
Finding records except those matching criteria
You can omit records while performing a find. In other words, you can find information in your
database that “does not equal” your specified criteria. For example, you can find all invoices except
those created in the past 30 days.
To find records that don’t match criteria:
1. In Find mode, type criteria for the records to omit.
For example, to find all sales records except those for the city of London, type London in the
City field.
2. Click Omit in the layout bar.
3. Click Perform Find in the status toolbar.
To find some records while omitting others:
1. In Find mode, type the criteria for the records to find.
For example, to find vendors in the state of New York, except those in the city of Albany, start by
typing New York in the State field.
2. Click New Request in the status toolbar.
3. Type criteria for the records to exclude, and click Omit.
To exclude Albany, you would type Albany in the City field and click Omit.
4. Click Perform Find.
Notes
•You can have omit criteria in more than one request.
•FileMaker Pro works through the requests in the order you create them. For example, in a
Clients database with clients in the US and France:
•If the first request finds all clients in Paris and the second request omits all clients in the
US, the found set contains all clients in Paris, France but none in Paris, Texas or
anywhere else in the US.
•If the order of the requests is reversed (the first request omits all clients in the US and
the second request finds all clients in Paris), the found set includes all customers in
France and in Paris, Texas, but no records for clients elsewhere in the US.
•To omit a related record from a portal row (or set of related records), you must change the
relationship or the value in at least one of the match fields so that the record is no longer
related. For more information about related fields, see Working with related tables and files.
•You can also omit records from a found set after performing a find. See Hiding records from
a found set and viewing hidden records.
•You can open another window to perform different find requests on the same data. See
Opening multiple windows per file.
•You can save a request for later use. See Saving a find request.

Finding, sorting, and replacing data
FILEMAKER PRO HELP 121
Related topics
Finding duplicate values
Viewing, repeating, or changing the last find
You can view, repeat, or change a recent find request.
To view or repeat the most recent find criteria:
•In Find mode, click Saved Finds in the status toolbar, and choose a find request from the
Recent Finds list.
•In Browse mode, click the down arrow next to Find (Windows), or click and hold Find
(OS X). Then choose a find request from the Recent Finds list.
To change the most recent find criteria:
1. In Find mode, click Saved Finds in the status toolbar, and choose a find request from the
Recent Finds list.
2. Modify the criteria.
3. Click Perform Find to perform the find using the criteria.
Note In Browse mode, you can also change the most recent find criteria by choosing Records
menu > Modify Last Find.
For information on viewing and changing a saved find, see Saving a find request.
Hiding records from a found set and viewing hidden records
All records that are not in the found set are omitted, or hidden. You can omit additional records from
the found set without doing a new find.
Important Omitted records are temporarily excluded from the found set. They still exist in the
database.
Related topics
Finding records except those matching criteria
To Do this
Omit a specific record Display or select the record to omit, then click Omit in the layout bar. You can
also choose Records menu > Omit Record.
Omit a series of
records
Display or select the first record in a number of consecutive records to omit, then
choose Records menu > Omit Multiple. In the Omit Multiple dialog box, type the
number of records to omit, then click Omit.
View the omitted set Do one of the following:
•Click the pie chart in the status toolbar.
•Choose Records menu > Show Omitted Only.
Bring back all the
records in the file
In Browse mode, click Show All in the status toolbar.
In Find mode, choose Requests menu > Show All Records.

Finding, sorting, and replacing data
FILEMAKER PRO HELP 122
Constraining (narrowing) a found set
Constraining a found set lets you narrow find results incrementally, looking for more specific detail
as you search your database. To find records based on multiple criteria in separate fields (a logical
AND search), perform a find, specify the next criteria, then choose Requests menu > Constrain
Found Set.
For example, after searching for all of the employees who work in Sales, you can narrow the search
to find all of the employees within Sales named Alvarez.
To constrain or narrow a found set:
1. Perform a find so that your database contains a found set.
See Making a find request.
2. Switch back to Find mode and type the criteria to narrow the search.
3. Choose Requests menu > Constrain Found Set.
FileMaker displays the constrained found set in Browse mode.
Example
To first search for all the employees in Sales, and then constrain the found set to Sales employees
named Alvarez:
1. Perform a find for Sales in the Department field.
2. Go to Find mode and enter a second find request: type Alvarez in the Last Name field.
3. Instead of clicking Find, choose Requests menu > Constrain Found Set.
The found set would then consist of employees in Sales named Alvarez.
Related topics
Extending (broadening) a found set
Finding duplicate values
Finding records based on criteria in a single field
Extending (broadening) a found set
Extending a found set lets you expand your search to include additional applicable records without
starting over, if you’ve constrained a previous find request too much. To find records that match
multiple criteria in the same or different fields (a logical OR search), perform a find, specify the next
criteria, then choose Requests menu > Extend Found Set.
For example, after searching for customers in New York, you can broaden the search to also find
customers in Hong Kong.
To extend or broaden a found set:
1. Perform a find so that your database contains a found set.
See Making a find request.
2. Switch back to Find mode and type the criteria to broaden the search.
3. Choose Requests menu > Extend Found Set.
FileMaker displays the extended found set in Browse mode.

Finding, sorting, and replacing data
FILEMAKER PRO HELP 123
Example
To first search for customers in New York, and then broaden the search to also include customers in
Hong Kong:
1. Perform a find for New York in the City field.
2. Go to Find mode and enter a second find request: type Hong Kong in the City field.
3. Instead of clicking Find, choose Requests menu > Extend Found Set.
The found set would then consist of customers in both New York and Hong Kong.
Related topics
Constraining (narrowing) a found set
Finding duplicate values
Finding records based on criteria in a single field
Finding records troubleshooting
Can’t click into a field to enter find criteria
•Finds cannot be made on summary fields, container fields, or fields defined with the global
storage option.
•See also Can't click or tab into a field.
Can’t find records
•Check your spelling carefully.
•Use the index to enter criteria accurately.
•Data is entered into the wrong field type.
•A range was entered backward; it must be smallest to largest.
•If a field is formatted to display as checkboxes or radio buttons, some values in the field
might not be visible. For example, if the value list item was changed from Jr to Junior, any
records entered under Jr will not be found by clicking the Junior checkbox/radio button. To
find all possible values in a field, use a copy of the field that is not formatted to use a value
list or radio buttons, and enter find criteria into this field.
Finding records that shouldn't be included
•More than one value is in the field and you can’t see it. Click in the field to see all the data
the field holds.
•Words in your find criteria are too long to be indexed (for example, a long chemical formula).
FileMaker Pro indexes the first 100 characters of each word in a text field, including spaces.
Finding the wrong records
•See also the previous two items.
•If finding in portals, see Finding data in related fields.
•In most finds using Omit, define Omit requests last. (First include all the records you want to
select from, then exclude undesired records from the group.)
•See Finding duplicate values.

Finding, sorting, and replacing data
FILEMAKER PRO HELP 124
Finding the wrong date
•The date field may not contain dates entered in a valid date format. This can happen, for
example, if the dates were imported.
•The date entered in the find request may be in an invalid format. For information on finding
dates, see Finding numbers, dates, times, and timestamps and Finding ranges of
information.
•Dates might not have been entered with four-digit years and thus could be inadvertently
placed in a different century than you intended, either in the find request or during data
entry. To avoid confusion when entering dates, always use four-digit years. See Conversion
of dates with two-digit years.
•The dates might not be in field that uses the date type (or a calculation field that returns a
date result).
•Check the system formats currently and previously used.
•If the file was converted from a previous FileMaker Pro version, it’s possible that your date
data is using a date separator that is no longer supported. (FileMaker Pro no longer allows
the month, day, and year to be separated by an alphabetic character or the time separator.)
If your dates use an invalid date separator, use one of the following methods to manually edit
date data that uses alphabetic characters or the time separator:
•Choose Edit menu > Find/Replace.
•Use the Substitute function. For example:
Before conversion, use: Substitute(DateField,”:”,”/”)
After conversion, use: Substitute(DateField;”:”;”/”) .
Finding is slow
Finds might take longer than usual in:
•fields that are not stored or indexed. To see if a field is stored and indexed: choose File
menu > Manage > Database and click the Fields tab. Select the field, click Options, then
click Storage.
•searches on related fields.
•searches in networked files.
If a file is shared and it contains global fields, you may be able to improve the performance of certain
client find requests by moving some global fields into a separate table. See the Notes section in
Defining global fields (fields with global storage).
Results vary when using wild cards in an external ODBC data source
When you do searches in an external ODBC data source using wild cards, your results might vary
from wildcard searches in FileMaker Pro.
Related topics
Finding records
Saving a find request

Finding, sorting, and replacing data
FILEMAKER PRO HELP 125
Saving a find request
You can see your last several finds in a Recent Finds list. When you have a complex find request
that you want to use on a regular basis, you can name it and save it for later use. After you create a
saved find, you can access it in future sessions.
Note The saved find is also available to any network clients that share the account.
To save a find request:
1. Create a find request or choose a recent find.
For information on creating a find request or accessing a list of recent finds, see Making a find
request.
2. After you have selected the find request you want to save, choose Records menu > Save
Current Find, or do one of the following:
•Windows: Click the down arrow next to Find and choose Save Current Find.
•OS X: Click and hold Find and choose Save Current Find.
3. In the Specify Options for the Saved Find dialog box, enter a name for the saved find.
4. Do one of the following:
•If you do not want to change any of the search criteria, click Save. The saved find
request is now available from the Saved Finds button in the status toolbar.
•If you want to change the search criteria, continue with the next section.
To change search criteria in a find request:
1. Follow steps 1 - 3 in the section above.
2. In the Specify Options for the Saved Find dialog box, click Advanced.
3. In the Specify Find Requests dialog box, do one of the following:
•Click New to change search criteria and save a new find request.
•Select a find request and click Edit to change search criteria.
•Select a find request and click Duplicate to make a copy of the find request and its
search criteria, then double-click the request or click Edit.
You can also select a find request and click Delete to delete the request.
4. In the Edit Find Request dialog box, choose either Find Records or Omit Records.
Finding records adds them to your found set. Omitting records excludes them. An individual
request can find or omit records; use multiple requests if you need to find and omit records.
5. Specify search criteria:
To specify a Do this
Field Under Find records when or Omit records when, double-click a
field name.
To select a field from a related table, click the name of the current
table at the top of the list and select the related table you want.
Select a related field from this new list.

Finding, sorting, and replacing data
FILEMAKER PRO HELP 126
6. Click Add.
7. Repeat the steps above for other search criteria you want to use.
•To change existing criteria, select the line containing the field and criteria from the top of
the dialog box, and make your changes to the field or criteria. Click Change to store
your changes.
•To delete existing criteria, select the line containing the field and criteria from the top of
the dialog box and click Remove.
8. Click OK or Cancel to return to the Specify Options for the Saved Find dialog box.
9. Click Save.
The saved find request is now available from the Saved Finds button.
Related topics
Using variables
Creating scripts to automate tasks
Specify Find Requests and Edit Find Request dialog boxes
Managing saved find requests
Whether a saved find or recent find is available to a user depends on the account that is used and
the table that the layout is based on, including any related tables that are referenced in the find
criteria.
•Users logged in as one FileMaker account will see the same saved finds and recent finds as
other FileMaker users sharing that account. You can edit, duplicate, or delete a saved find.
•Users logged into the same external authentication account will see different lists of saved
and recent finds, depending on the account ID and the username passed to the external
authentication server. You can clear saved finds for external user accounts that are no
longer active.
Note For users logged into the same FileMaker account, only one user at a time can modify a
saved find.
To edit, duplicate, or delete a saved find:
1. In the status toolbar, click the down arrow next to Find (Windows), or click and hold Find
(OS X). Then choose Edit Saved Finds from the list.
2. In the Edit Saved Finds dialog box, specify options for the saved find:
Find operator For Criteria, type your search criteria for the selected field or click
Insert Operator to further refine your search criteria. See Finding
records.
You can also include variables in the search criteria.
Particular cell of a repeating
field
For Repetition, type the number of repetitions to search for. For
more information about repeating fields, see Defining repeating
fields.
To specify a Do this

Finding, sorting, and replacing data
FILEMAKER PRO HELP 127
3. Click OK.
To delete all saved finds for a user from an externally authenticated account:
1. Follow the steps in Creating accounts that authenticate via an external server to access the
Edit Account dialog box.
2. In the Edit Account dialog box, click User Data.
3. In the Manage User Data for External Account dialog box, select the user name and data
you want to delete.
4. Click Clear.
Sorting records
FileMaker Pro stores records in the order they were added to the file. Sorting rearranges records, so
you can view, update, or print them in a different sequence.
You choose the fields whose contents you want to sort by. The first sort field arranges the records
based on the field’s contents. The second sort field arranges records when two or more records
have the same value in the first sort field, and so on. You can sort records in ascending order,
descending order, or in a custom order.
By default, the records remain sorted until you perform a find or sort records by different criteria.
When you add a new record in a sorted found set, or change the data in a sort field of a sorted
record, the record appears in the correct position in the sort order when you commit the record. To
change the way new and changed records are sorted, see Options for sorting records.
To sort the records in the current found set:
1. In Browse mode, click Sort in the status toolbar.
2. In the Sort Records dialog box, choose fields for sorting, in the order you want them sorted.
For details about the sort options in the Sort Records dialog box, see Options for sorting
records.
3. Click Sort.
To quickly sort records by a single field:
1. In Browse mode, click Table View .
2. Right-click the column heading of the field that you want to sort by.
3. From the shortcut menu, choose Sort Ascending or Sort Descending.
See Working with data in Table View.
Click To
New or Edit Create another saved find request, or rename or change this
saved find. See Saving a find request.
Duplicate Make a copy of the saved find and its search criteria.
Delete Delete one or more selected saved find requests from the list.
View by Reorder the list of saved finds.

Finding, sorting, and replacing data
FILEMAKER PRO HELP 128
To cancel a sort operation before it is finished:
Press Esc (Windows) or Command-period (OS X).
Notes
•Data sorts differently in different field types:
•Automatic record sorting:
•occurs when changes to records are committed
•does not occur while scripts are running or paused
•Records in a sorted portal are re-sorted whenever the relationship is re-established. (For
example, when you browse out of and then back into the record, or change the value in the
match field.) See Creating portals to display related records.
•Repeating fields sort by the value in the first repetition. See Defining repeating fields.
•If you import records from another file into a sorted file, the records are not automatically
sorted. Instead, the status toolbar shows Semi-sorted. Sort again to incorporate new
records in the sort order.
•System formats affect the way numbers, dates, and times sort. See Opening files with
different system formats.
•When you define a text field, the default language for indexing and sorting text is
determined by the operating system on which FileMaker Pro is running. If you want to
override the default language for a sort, select Override field's language for sort in the
Sort Records dialog box. (If you want to permanently change the field's default language,
select the field in the Manage Database dialog box, click Options, then click the Storage
tab and select the default language from the pop-up menu.) See Defining field indexing
options.
•You can open another window in order to perform different sort requests on the same data.
See Opening multiple windows per file.
•If you open a file, sort records, and then close the file, the sort order is not saved. For more
information about when a database file is saved, see Saving and copying files.
•You can sort using a “default” language setting or Unicode to have FileMaker Pro ignore
language-based sorting rules. See Choosing a language for indexing or sorting.
•The longest text string that FileMaker Pro will sort is 100 characters.
This field type Sorts data in this order
Tex t Alphabetically. Numbers sort by character position. (Example of an ascending sort:
1, 11, 2.) Numbers sort before letters. Non-alphanumeric values before the first
word are ignored (unless you change the sort language to Unicode).
Number Numerically. Non-numeric characters are ignored.
Date Chronologically.
Time Numerically. Times using AM/PM are sorted according to their 24-hour-clock
equivalent (for example, 8:00 PM is 20:00).
Timestamp Chronologically. Times using AM/PM are sorted according to their 24-hour-clock
equivalent (for example, 8:00 PM is 20:00).

Finding, sorting, and replacing data
FILEMAKER PRO HELP 129
Options for sorting records
Use the following options in the Sort Records dialog box to sort records in a particular order. See
Sorting records.
To Do this
Choose a sort field that is visible on the
current layout and sort it according to
the selected order
Choose Current Layout (LayoutName) from the tables list,
then double-click a field in the list.
Choose a sort field that is in the current
layout’s table
Choose Current Table (TableName) from the tables list, then
double-click a field in the list.
Assign different sort orders to fields as
you add them to the Sort Order list
For each sort field, in the fields list, select a field, select a sort
order, then click Move.
Ascending order is first to last character in the alphabet for
text, lowest to highest for numbers, and earliest to latest for
dates and times. Descending order is last to first character in
the alphabet for text, highest to lowest for numbers, and latest
to earliest for dates and times.
Change the sort order of a field in the
Sort Order list (for example, ascending
or descending order)
In the Sort Order list, select a field, then select a sort order for
that field.
Sort in a custom order, according to the
order of values in a value list (for
example, in the order months are
arranged)
In the fields list, select a field, select Custom order based on
value list, then choose or define a value list. (See information
about defining a list of values for data entry.)
Records with values not in the specified value list will be sorted
alphabetically at the end.
Change the order of the sort criteria (for
example, to sort first by Region, then by
City)
In the Sort Order list, click the double-arrow (to the left of the
field name) and drag the field to a new position.
Include related fields anywhere in the
sort order
Choose a table from the table list, then double-click a related
field in the list.
You can place a related field anywhere in the Sort Order list —
before, after, or between non-related fields.
If there is more than one matching record in the related table,
FileMaker Pro will sort by the value in the first matching record
in the related table, according to the sort order defined in the
relationship. See Working with related tables and files.
Sort related records (rows) in a portal If your access privileges allow, specify a sort order in the Edit
Relationship dialog box. See Working with related tables and
files.
Remove a field from the Sort Order list In the Sort Order list, double-click the field.
Remove all fields from the Sort Order
list
Click Clear All.
Sort by summary fields
For example, to sort sales regions in
order from highest to lowest total sales.
See Sorting records by subsummary values.

Finding, sorting, and replacing data
FILEMAKER PRO HELP 130
Related topics
Sorting records troubleshooting
Sorting records by subsummary values
To properly display a report with grouped data and subtotals (also known as a subsummary report),
data must be sorted to display the appropriate break fields. If you have a subsummary report, data
in the report is grouped and displayed by the category that produced the totals. However, you can
specify a subsummary value to sort on to reorder data more logically in a report.
Note If you create leading or trailing groups in Table View, the data is automatically sorted by the
field that you used to group the data.
Suppose you create a report that subtotals sales by region. You can sort data in the report by region
(Example 1) or you can specify that records in the report are sorted by subsummary values, which
lists data by total sales (Example 2).
In both examples, Total Sales is a summary field that shows regional totals when sorted by Region.
Example 1: Report with grouped data and subtotals, not sorted by subsummary values
Example 2: Report with grouped data and subtotals, sorted by subsummary values
Unsort the records (return them to
creation order)
Click Unsort or, in Browse mode, choose Records menu >
Unsort.
Sort records according to a different
language than the one used for
indexing
Select Override field's language for sort, then choose a
language. To change the field's default language for sorting,
see Defining field indexing options.
Place a new or changed record that’s in
sorted order into the adjusted order
after you commit the record
Select Keep records in sorted order. When this checkbox is
deselected, new or changed records stay in the same position
in the sort order until you perform a find or sort the records by
different criteria.
Close the Sort Records dialog box
without sorting or saving changes to the
sort order
Click Cancel.
To Do this
Regions are sorted in ascending order
Region
A
B
C
D
Total Sales
800
150
300
1200

Finding, sorting, and replacing data
FILEMAKER PRO HELP 131
To sort records by subsummary values:
1. Create a report with grouped data and subtotals. Include the field you use to categorize the
records (in this example, Region) and the summary field (here, Total Sales) in the report.
For more information on creating a report with grouped data and subtotals, see Creating a
layout.
Note You can also create a report with grouped data and subtotals in Table View in Browse
mode. See Creating dynamic reports in Table View.
2. In Browse mode, click Sort in the status toolbar, or choose Records menu > Sort Records.
3. Move the grouping field (Region) to the Sort Order list, or select it if it is already there.
4. Select Reorder based on summary field or click Specify.
5. In the Specify Field dialog box, select a summary field (Total Sales) and click OK.
6. Select a sort order (in this example, Descending order).
7. Click Sort.
8. Click Table View or List View in the layout bar, go to Preview mode, or print to
see the sorted results.
Tip If data is already sorted by the grouping field, you don’t have to re-sort when you add or remove
a summary field in the sort order. Specify the summary field in the Specify Field dialog box as
described above, then click OK.
Related topics
Defining summary fields
Changing summary fields
Sorting records troubleshooting
Records don't sort in the correct order
•If numbers don’t sort correctly (11 is before 2, for example), they are entered in a field
formatted to contain text data. Change the field type to Number. See About choosing a field
type.
•You might have text in a field formatted to contain numbers. Number fields ignore text when
sorting.
•You might have hidden values in a field that is formatted as radio buttons or checkboxes.
Values that are not on the value list do not show. To display them, add an unformatted copy
of the field to a layout, then click in the field to see what it actually holds.
Regions are sorted in descending order
by total sales
Region
D
A
C
B
Total Sales
1200
800
300
150

Finding, sorting, and replacing data
FILEMAKER PRO HELP 132
•FileMaker Pro automatically updates sort order in a file when:
•you make changes to related fields specified in the sort order. However, only the current
parent record is affected.
•any schema change, a local import-record operation, a local operation that replaces the
contents of a field, a local field relookup, a local ODBC operation, or a redefined
external data source modifies records in a table.
•FileMaker Pro does not automatically maintain sort order for modifications to:
•records that are not related to the current record.
•related fields. For example, when you sort in Table view on a related field and then
create a blank record, the record remains at the bottom of the sorted records instead of
sorting to the top with other blank records.
•a value list that is included in a sort order.
•external ODBC data sources.
Records disappear after sorting
•Records with nothing in the sort field sort to the top of the list in an ascending sort. Scroll
down (or click the book icon to page down) to see your records or omit blank records before
sorting.
Sorting repeating fields
•You can't sort the values within a repeating field.
•Repeating fields sort according to the value in the first repetition.
Related topics
Sorting records
Finding and replacing data
As in a word processing application, you can find and replace data across multiple fields (including
related fields) in a record or in a find request, across a found set of records or find requests, or
across text objects in a layout.
To find and replace data:
1. In Browse, Find, or Layout mode, choose Edit menu > Find/Replace > Find/Replace.
2. In the Find what box, type the data you want to search for. In the Replace with box, type
the replacement data.
Tip To find or replace invisible characters, such as tabs or carriage returns, manually copy and
paste these characters from a field into the Find what or Replace with box.
3. Set the search options you want to use.
Select To
An option from the Direction
list
Choose the search direction: Forward, Backward, or All.

Finding, sorting, and replacing data
FILEMAKER PRO HELP 133
4. Click one of the buttons to perform the type of find/replace operation you want.
Note Some data cannot be found or replaced:
•You cannot find data in container fields. You can find but not replace data in calculation
fields.
Match case Search for only those occurrences in which the capitalization
matches the data you specified in the Find what box.
Note In files that contain Japanese data, a find with the Match
case option cleared does not simultaneously find both the half-
width and full-width version of the same character. To
comprehensively find and replace both characters, make sure you
perform separate finds for both the half-width and full-width
character.
Match whole words only Search for only those occurrences that are whole words or are
bounded by spaces and/or punctuation characters.
Examples
good finds good and good within good-bye
travel finds travel and travel within travel.com but .com does
not find travel.com
stone house[space] finds stone house in the sentence “The
old stone house[space][space]has a large garden,” but does not
find stone house in the sentence “The old stone house[space]has
a large garden.”
An option in Search across In Browse mode, search across all records in the current layout or
just in the current record.
In Find mode, search across all find requests in the current layout
or just in the current find request.
Note In Layout mode, FileMaker Pro searches only in the current
layout.
An option in Search within In Browse and Find modes, search within all fields in the current
layout or just in the current field.
Select To
Click To
Find Next Search for and select the next occurrence of the Find what data.
Replace & Find If there is selected data that matches the Find what data, replace the Find
what data with the Replace with data, search for and select the next
occurrence.
If there is no selected data that matches the Find what data, search for and
select the first occurrence of the Find what data.
Replace Replace the selected Find what data with the Replace with data.
Replace All Replace all occurrences of the Find what data with the Replace with data.
At the end of the Replace All operation, you see a summary of the number of
occurrences found, replaced, and skipped.

Finding, sorting, and replacing data
FILEMAKER PRO HELP 134
•You cannot search for information in web viewers.
•You cannot find data in fields that you are not permitted to view, or replace data in fields that
you are not permitted to modify.
•You cannot find and replace data in fields that are formatted as pop-up menus, radio
buttons, or checkboxes. (To work around this limitation, find and replace data on a layout
that includes these fields formatted as edit boxes or drop-down lists.)
•If the current layout contains panel controls:
•In Browse and Find modes, the find and replace affects only data in fields on the front-
most panel.
•In Layout mode, the find and replace affects text on all panels.
•Performing a find and replace that includes fields on a popover opens the popover.
See Find/replace troubleshooting.
Find/replace troubleshooting
Can’t access Find/Replace menu commands
•Your access privileges don’t give you access to the menus.
•Find Selected is dimmed because you didn’t first select any data in the database.
•Find Again or Replace & Find Again is dimmed because you didn’t first specify any data in
the Find what box.
•You are in Preview mode. Switch to Browse, Find or Layout mode.
Can’t find the specified data
•Check your spelling of the data in the Find what box.
•Match case was selected. FileMaker Pro finds only the data that matches the capitalization
specified in the Find what box.
•Match whole words only was selected. FileMaker Pro finds only the data that are whole
words, including spaces and punctuation.
•Forward or Backward search direction was selected. FileMaker Pro searches only from
the current cursor position in the specified direction.
Can’t replace the specified data
•In Browse mode, you can’t replace data in calculation or summary fields, or in fields
protected by access privileges or field formatting.
•In Find mode, you can’t replace data in fields protected by field formatting.
Tip You can find/replace data in fields protected by the Field Behavior option Allow field to be
entered by using the following script steps or buttons to enter a field prior to performing a find/
replace operation:
•Perform Find/Replace script step or button
•Open Find/Replace script step or button
•In Find mode, summary and global fields are ignored.
•You can't replace data in locked layout objects.


Previewing and printing information
FILEMAKER PRO HELP 136
Previewing and printing information
With FileMaker Pro, you can print:
•all the records in the database, a subset of the records, or only the current record
•a blank record to create a paper form
•definitions of scripts, tables, fields, and relationships to see the structure of your database
FileMaker Pro prints records using the current layout. You can create layouts to print the same data
in different ways. For example, you can print records one by one, in a columnar list, or in a complex
sorted report with totals, headers, and footers. You can also create layouts for mailing labels or
envelopes.
The New Layout/Report assistant (in Layout mode) makes it easy to create such layouts and
reports. See Creating a layout.
You can control page margins, remove blank space, and keep specified objects from printing. See
Controlling how layouts print.
Important Printer and print setup options depend on the printer and system software you’re using.
Refer to your printer and system documentation for more information.
Specifying a default printer and paper options (Windows)
FileMaker Pro initially uses the Windows default printer and paper options as its default, but you can
specify a different default printer and paper options to be used when you print in FileMaker Pro. The
Windows default printer and the FileMaker Pro default printer are independent. If you change one
default, it doesn’t affect the other.
The default printer that you choose for FileMaker Pro is an application setting; all files that you print
with FileMaker Pro will print to this printer unless you choose a different one.
The paper and orientation options that you choose are file-specific settings. You can choose
different paper and orientation options for each FileMaker Pro file.
To specify a default printer and paper options:
1. With a database file open, choose File menu > Print Setup.
In Preview mode, you can also click Print Setup in the status toolbar.
The Print Setup dialog box appears.
2. In the Printer area, choose a printer and (if necessary), set its properties.
The printer you choose and its properties becomes the default printer for FileMaker Pro.
3. Set other options that you want for Paper and Orientation.
These paper and orientation options will be saved with the current file and will be used when
you print any layout in this file.
4. Click OK.
Notes
•When you print from FileMaker Pro, the Print dialog box also contains a Printer area where
you can choose a different printer. If you choose a different printer in the Print dialog box,
the FileMaker Pro default printer is reset to that printer.

Previewing and printing information
FILEMAKER PRO HELP 137
•If you regularly print a particular layout to a different printer or with different paper options —
for example, to print labels or print on a preprinted form — you may want to create a script
that prints the layout for you. This script could contain Print Setup and Print script steps that
would store and recall the particular printer and paper options that you want. See Creating
scripts to automate tasks, Print Setup script step, and Print script step.
•For information on setting up new printers in Windows, see Windows Help and Support.
Specifying printer and paper options (OS X)
FileMaker Pro prints to the OS X default printer unless you choose a different printer when you print.
You can specify different paper options for each FileMaker Pro file.
To specify printer and paper options:
1. With a database file open, choose File menu > Page Setup.
In Preview mode, you can also click Page Setup in the status toolbar.
The Page Setup dialog box appears.
2. For Format for, select Any Printer or choose a specific printer.
In most cases, leave Any Printer selected. Choose a specific printer only if you use it
exclusively to print your documents.
3. Set other options that you want for Paper Size, Orientation, and Scale.
These paper size, orientation, and scale options will be saved with the current file and will be
used when you print any layout in this file.
4. Click OK.
Notes
•Choosing a different printer sets the default used by FileMaker Pro (OS X) for subsequent
printing operations (unless a script step is defined to use a particular printer).
•If you regularly print a particular layout to a different printer or with different paper options —
for example, to print labels or print on a preprinted form — you may want to create a script
that prints the layout for you. This script could contain Print Setup and Print script steps that
would store and recall the particular printer and paper options that you want. See Creating
scripts to automate tasks, Print Setup script step, and Print script step.
•Use the Print Center application to set up new printers in OS X. For more information, see
OS X Help Center.
Previewing data on a layout
When you switch to Preview mode, you see the layout as it appears on the printed page. You can’t
enter or edit information in fields in Preview mode.
In Preview mode, you see:
•how many records fit on a printed page
•how the pagination settings you choose affect page breaks (see Defining page breaks and
numbering)
•subsummary parts with calculated summary fields (see New Layout/Report (New Layout/
Report assistant))
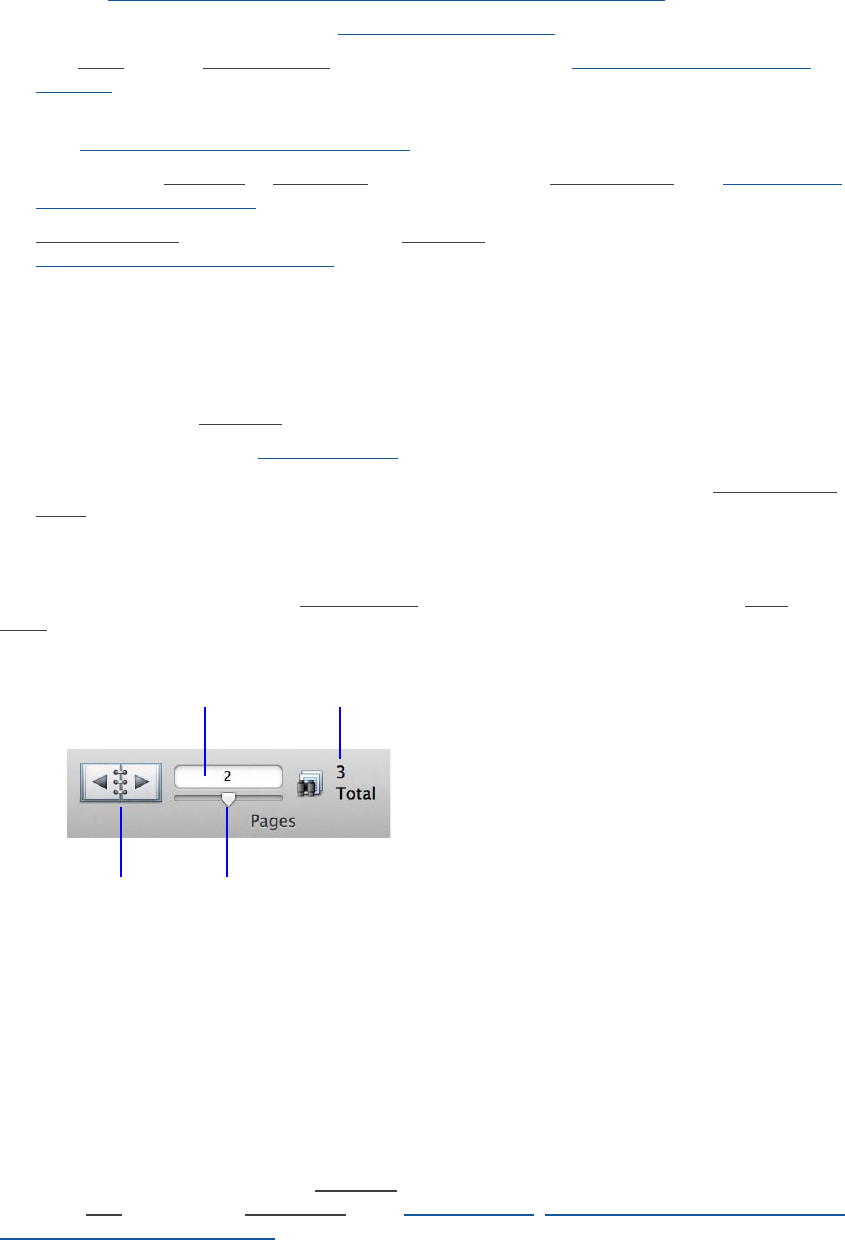
Previewing and printing information
FILEMAKER PRO HELP 138
•variable information supplied by FileMaker Pro, like page numbers, the current date, and so
on (see Inserting the date, page number, or other variable onto a layout)
•the page margins you define (see Specifying page margins)
•how fields set with sliding options close up blank space (see Removing blank spaces in
printouts)
•records arranged in columns if the Layout Setup dialog box is configured to print in columns
(see Setting up to print records in columns)
•the front-most tab panel or slide panel if the page contains panel controls (see Working with
panel controls on layouts)
•popover buttons, but not their associated popovers or the contents of popovers (see
Working with popovers on layouts)
To preview data on a layout:
1. Follow the same preliminary steps that you perform when you print:
•Specify a printer and printing options.
•Verify that the found set contains the records you want to preview.
See steps 1 through 4 in Printing records.
2. Click Preview in the layout bar (Browse mode), or choose Preview from the Mode pop-up
menu at the bottom of the document window.
To move through pages in Preview mode:
Use the navigation controls in the status toolbar. Click the left and right arrows in the book, drag the
slider left and right, or type a page number in the current page number field and press Enter
(Windows) or Return (OS X).
•Choose Records menu > Go to Record > Next, Previous, or Go To to move to the next,
previous, or a specific page. (These menu items are not available if the status toolbar is
hidden and locked by a script step.)
•Use the vertical scroll bar to move up and down on the page you are viewing. You might
need to go to the end of the report before the total number of pages is accurately displayed.
Note You can’t use Preview mode to see how your database looks when published on the web. You
must use a web browser.
Printing records
You can print information from your database, or you can print information about your database (for
example, field definitions or script steps). See Printing scripts, Printing table and field information, or
Printing the relationships graph.
Current page number Total number of pages
Book Slider

Previewing and printing information
FILEMAKER PRO HELP 139
Note If you’re printing labels or envelopes, see Printing labels or Printing envelopes.
To print records:
1. If you have more than one printer, specify which one you want to use as well as the paper
size, orientation, and other options.
See Specifying a default printer and paper options (Windows) or Specifying printer and paper
options (OS X), as well as your printer and operating system documentation.
2. If you’re printing records, use the Layout pop-up menu to switch to the layout you want to
use.
3. Make sure the found set is the way you want it by:
•using Find mode and commands on the Records menu to change the found set (see
Finding records)
•sorting the records (see Sorting records)
4. To see exactly how your paper copy will look prior to printing, click Preview in the layout bar
(Browse mode), or choose Preview from the Mode pop-up menu at the bottom of the
document window.
Some items — like sliding objects, records arranged in columns, and variable information like
page numbers — appear correctly only in Preview mode. If you’re having trouble displaying and
printing sliding objects and columnar data, see the troubleshooting topic Document does not
appear as expected in Preview mode.
5. Choose File menu > Print.
6. In the Print dialog box, for Print, choose an option (Windows) or choose FileMaker Pro
from the pop-up menu (OS X).
Tip In OS X, you can preview what you’re printing. Click Preview in the Print dialog box.
7. Select the printer, print range, number of copies and other printing settings, and then click
OK (Windows) or Print (OS X).
Other print options depend on the printer and system software you’re using. Refer to your
printer and system documentation.
Notes
•If you’re printing a layout with data that extends beyond the right margin, choose File
menu > Print Setup (Windows) or Page Setup (OS X), select the horizontal (landscape)
orientation, then click OK (if this doesn’t provide enough width, try reducing the size of the
printed area by typing a value of less than 100% for scaling in the Print Setup dialog box
(Windows) or Page Setup dialog box (OS X).
•You can “close up” blank space when printing records with varying amounts of data by
specifying sliding options. You can also use merge fields to eliminate extra blank space in
field data. See Removing blank spaces in printouts and Placing merge fields on a layout.
To print Choose
All records in the found set Records being browsed
Only the record currently selected in
Browse mode
Current record
A blank record using the current layout
(use this option to print a blank “form”)
Blank record, showing fields, then choose a
formatting option

Previewing and printing information
FILEMAKER PRO HELP 140
•When you print a field or a portal with a scroll bar, FileMaker Pro prints only the data visible
without scrolling. To print all the data, duplicate the layout and enlarge the field or portal to
display the largest possible amount of data. Then specify sliding options to remove the extra
blank space when you print. See Adding fields to a layout and Removing blank spaces in
printouts.
•You can keep any object on a layout from printing. See Preventing objects from printing.
•When you print layouts containing panel controls, only the front-most tab panel or slide
panel prints.
•You can print popover buttons, but not popovers or the contents of popovers.
Printing scripts
You can print a list of all script steps for one or more scripts in a file.
To print scripts:
1. Choose Scripts menu > Manage Scripts.
2. In the Manage Scripts dialog box, select the script or scripts you want to print:
•To select one script, click the script name.
•To select multiple scripts, Ctrl-click (Windows) or Command-click (OS X) each script
name.
•To select a range of adjacent scripts, click the first script name, and then Shift-click the
last script name in the range.
3. Do one of these:
•Click in the Manage Scripts dialog box.
•Windows: Choose File menu > Print Script in the Manage Scripts dialog box.
•OS X: Choose File menu > Print in the FileMaker Pro menu bar.
4. Select your printer.
5. Click OK (Windows) or Print (OS X).
The selected script steps and options are printed.
Tip To print a script from the Edit Script window, choose File menu > Print Script (Windows) or
File menu > Print (OS X) in the FileMaker Pro menu bar.
Related topics
Printing records
Printing table and field information
Printing the relationships graph
Creating and editing scripts
Printing table and field information
You can print field definition information for one or more tables or for one or more fields within a
table.
To print field information for one or more tables:
1. Choose File menu > Manage > Database and click the Tables tab.

Previewing and printing information
FILEMAKER PRO HELP 141
2. Select the table or tables you want to print:
•To select one table, click the table name.
•To select multiple tables, Ctrl-click (Windows) or Command-click (OS X) each table
name.
•To select a range of adjacent tables, click the first table name, and then Shift-click the
last table name in the range.
3. Click Print.
4. Click OK (Windows) or Print (OS X).
FileMaker Pro prints the field names, field types, and formula/entry options for each table that
you selected.
To print field information for certain fields in a table:
1. Choose File menu > Manage > Database and click the Fields tab.
2. Choose a table from the Table pop-up menu.
3. Select the field or fields you want to print.
•To select one field, click the field name.
•To select multiple fields, Ctrl-click (Windows) or Command-click (OS X) each field
name.
•To select a range of adjacent fields, click the first field name, and then Shift-click the last
field name in the range.
4. Click Print.
5. Click OK (Windows) or Print (OS X).
FileMaker Pro prints the field names, field types, and formula/entry options for each field that
you selected.
Related topics
Printing records
Printing scripts
Printing the relationships graph
Printing the relationships graph
You can print a graphical representation of your database by printing the relationships graph.
To print the relationships graph:
1. Choose File menu > Manage > Database, then click the Relationships tab.
Click to display page breaks in the relationships graph. Click to display the Print Setup
(Windows) or Page Setup (OS X) dialog box.
2. Click Print.
3. In the Printing Options dialog box, choose an option:
Choose Print graph on multiple pages to print the graph on more than one page. Choose
Print graph on one page to resize the graph to fit on one page.
4. Click Continue.

Previewing and printing information
FILEMAKER PRO HELP 142
5. Specify additional printer settings, if you want.
6. Click OK (Windows) or Print (OS X).
Note Table and note selection highlights do not appear when printed.
Related topics
Printing records
Printing scripts
Printing table and field information
Printing labels
To create mailing labels, create a Labels layout or a Vertical Labels layout. You can choose from
several predesigned label types or specify custom dimensions for your labels.
Labels layouts use merge fields, which expand or contract to fit the data in the field, and use no
space if the field is empty.
To create a Labels layout or Vertical Labels layout:
1. In Layout mode, click New Layout/Report.
The New Layout/Report assistant appears. For onscreen help as you work in the assistant,
press F1 (Windows) or Command-? (OS X).
2. For Show records from, choose the table that contains the records you want to use for
your labels. For Layout Name, type a name for the layout.
3. Choose Printer, then choose either Labels or Vertical Labels. Click Continue.
4. In the Specify Label Layout panel, choose either Use label measurements for and choose
from the list of standard label types, or choose Use custom measurements and enter
values for your labels’ dimensions. Click Next.
5. In the Specify Label Contents panel, double-click the fields whose data you want on the
labels, in the order you want the fields to appear.
•If the first line of the labels includes the first name and last name fields, type a space
between the two merge fields in the Label contents box.
•To place a field on a new line, press Enter (Windows) or Return (OS X).
•Add any punctuation (such as a comma) or spaces where you want them to appear on
the printed labels.
6. Click Finish.
7. Insert the labels sheets into your printer, and print the labels. For printing tips, see the next
section.
Considerations when you print labels
When you print labels, you usually use either individual sheets of labels, or a continuous-feed roll of
labels (for dot matrix printers).
Because FileMaker Pro considers the selected printer and print or page setup information when it
calculates margins and other measurements on the layout, you must verify these settings before
you create a Labels layout.

Previewing and printing information
FILEMAKER PRO HELP 143
To verify printer settings for a Labels layout or Vertical Labels layout:
1. Choose File menu > Print Setup (Windows) or Page Setup (OS X).
In Preview mode, you can also click Print Setup (Windows) or Page Setup (OS X) in the status
toolbar.
2. In the setup dialog box:
•Choose the printer you plan to use.
•If you’re using individual sheets of labels with a laser or inkjet printer, select the size of the
label sheets (usually US Letter in the United States and A4 elsewhere), then click OK.
•If you’re using continuous-feed labels with a dot matrix printer, create a custom paper size
equal to the dimensions of one label. (A custom paper size will minimize the back-and-forth
movement of the printer platen and save label paper.) Specific instructions vary depending
on your printer type, but generally you should set the paper width to the width of your label
stock, and the height to the height of one label. You may have to redefine a rarely used
paper size instead of creating a new custom paper size. Refer to your printer manual for
details.
If you define a custom paper size for printing labels on a dot matrix printer, this changes your
default print or page setup information. Make sure you reset these options before you print other
layouts.
Note FileMaker Pro uses merge fields when you create a Labels layout or Vertical Labels layout.
You can't enter or edit data using merge fields; switch to Browse mode or use another layout for that
purpose.
Related topics
Creating a layout
Placing merge fields on a layout
Formatting fields and text for vertical writing
Troubleshooting label printing
Printing envelopes
To print data on an envelope, create an Envelope layout. An envelope layout contains the fields you
select, arranged to print on an envelope.
An envelope layout uses merge fields, which expand or contract to fit the data in the field, and use
no space if the field is empty.
To create an Envelope layout:
1. In Layout mode, click New Layout/Report.
The New Layout/Report assistant appears. For onscreen help as you work in the assistant,
press F1 (Windows) or Command-? (OS X).
2. For Show records from, choose the table that contains the records you want to use for
your envelope. For Layout Name, type a name for the layout.
3. Choose Printer, then choose Envelopes. Click Continue.
4. In the Specify Envelope Contents panel, double-click the fields whose data you want on the
envelope, in the order you want the fields to appear.
•If the first line of the envelope includes the first name and last name fields, type a space
between the two merge fields in the Envelope contents box.

Previewing and printing information
FILEMAKER PRO HELP 144
•To placed a field on a new line, press Enter (Windows) or Return (OS X).
•Add any punctuation (such as a comma) or spaces where you want them to appear on
the printed envelope.
5. Click Finish.
6. Insert an envelope into your printer, and print the envelope. For printing tips, see the next
section.
Considerations when you print envelopes
Because FileMaker Pro considers the selected printer and print or page setup information when it
calculates margins and other measurements on the layout, you must verify these settings before
you create an Envelope layout.
1. Choose File menu > Print Setup (Windows) or Page Setup (OS X).
In Preview mode, you can also click Print Setup (Windows) or Page Setup (OS X) in the status
toolbar.
2. In the setup dialog box, choose the printer you plan to use, and choose a letter size paper
size.
If you feed the envelopes into the printer short-side first, choose a landscape (horizontal) paper
orientation.
3. Click OK.
After you create the layout, you might need to adjust the layout depending on the way you insert
envelopes into your printer.
Note FileMaker Pro uses merge fields when you create an Envelope layout. You can't enter or edit
data using merge fields; switch to Browse mode or use another layout for that purpose.
Related topics
Creating a layout
Printing troubleshooting
If you’re having trouble printing, look at the document in Preview mode. Click Preview in the layout
bar (Browse mode), or choose Preview from the Mode pop-up menu at the bottom of the document
window. To see all pages of the document, be sure to click the left and right arrows in the book.
Related topics
Controlling how layouts print
If you Do this
Manually feed envelopes
into a center-feed printer
Keep the header and adjust it, as necessary, to match the printing to
the envelope size.
Manually feed envelopes
into a left edge-feed printer
Keep the header and adjust it, as necessary, to match the printing to
the envelope size. (To determine the header size, you can subtract
the envelope height from 8.5 inches.)
Manually feed envelopes
into a right edge-feed printer
Delete the header, and insert a footer. Adjust the footer, as necessary,
to match the printing to the envelope size.

Previewing and printing information
FILEMAKER PRO HELP 145
Document appears as expected in Preview mode
Nothing is printing, or only some pages print
•Check the page range specified in the Print dialog box. The starting page of the range might
be higher than the number of pages in your document.
Only some records are printing
•See Records not printing.
Only one record prints, only a blank record prints, or too many records print
Check the Print dialog box:
•Windows: Look at the selection in the drop-down list at the top of the Print dialog box and
select the option you want.
•OS X: In the Print dialog box, choose FileMaker Pro from the pop-up menu. Select the
options you want.
Other problems:
Try these tips for specific printers:
•Windows: In the Print Setup dialog box, click Properties and check the options.
•OS X: Check the options in the Page Setup dialog box.
Check the documentation that came with your printer and/ or printer driver software.
If these suggestions do not solve the problem, see:
•Printing troubleshooting techniques (Windows)
•Printing troubleshooting techniques (OS X)
Document does not appear as expected in Preview mode
The problems in this section are all apparent in Preview mode, generally indicating that something is
not set correctly in FileMaker Pro.
Report with grouped data and subtotals (subsummary report) doesn’t print
correctly
•See Summary data is missing or incorrect and Troubleshooting layouts with summary or
subsummary parts.
Fields or objects aren’t printing
•The objects in question might have been formatted as nonprinting. In Layout mode, select
the object. In the Sliding & Visibility area of the Inspector, make sure Hide when printing is
deselected.
Records are missing
•See Records not printing.

Previewing and printing information
FILEMAKER PRO HELP 146
An extra blank page prints after each page
•The layout extends just below the page boundary. In Layout mode, look for a heavy dotted
line running across the bottom of the layout, which indicates where the page breaks. Resize
a layout part until the dotted line disappears. See Resizing layout parts.
Some records in the portal don’t print
•Only the number of rows displayed in the portal will print. Reformat the portal to show more
fields. See Creating portals to display related records.
•To display all matching related records, make a portal with enough rows to display all
matching records, or find the records in the related file and print from a list layout in that file.
Some fields in the columnar list layout don’t print
Only objects within the margins print. The page boundary is visible in Layout mode (you might need
to scroll to the right) as a heavy dotted line.
•In Layout mode, adjust the width and position of the fields to make them all fit to the left of
the heavy dotted line, or
•Create a second columnar list layout with the fields that don’t fit on the first layout.
There is empty space between records
•Make the body part smaller.
•Set objects to slide, and try setting the sliding options to also reduce the size of the
enclosing layout part. See Removing blank spaces in printouts.
Data is clipped
•Make the field bigger to hold the largest amount of data it contains.
•Use merge fields on your layout, and make the text block big enough to fit the longest text
you anticipate. See Placing merge fields on a layout.
•See Text or objects are clipped.
There’s empty space between fields
•Use merge fields instead of standard fields.
•Set fields and objects to slide up or left to close up space.
Sliding objects don’t slide
•Enter Preview mode; sliding doesn’t show in Browse mode.
•Be sure both the object you want to slide, and the object to be slid into, are set to slide.
•There might be at least one object (for example, a line) that is not set to slide and is
preventing other objects from sliding.
•Portal rows don’t collapse even if they hold less data. Empty portal rows at the end of the list
of related records do collapse.
•See Removing blank spaces in printouts.

Previewing and printing information
FILEMAKER PRO HELP 147
Pages break in unexpected places
•Check the paper size and page orientation selected in Print Setup (Windows) or Page Setup
(OS X). In Preview mode, you can also click Print Setup (Windows) or Page Setup (OS X)
in the status toolbar.
•Automatic page breaks are affected by the kind and size of layout parts on the layout.
Delete the header and/or footer if they are not needed.
•Each layout part on a layout can have separate page break options assigned to it. Check
the page-break options for each part. See Defining page breaks and numbering.
Related topics
Records are missing
Troubleshooting layouts
Records not printing
Records not printing
•If only one record is printing:
•See if the Current record option is set in the Print dialog box. Change the option to
Records being browsed. To see this option in OS X, choose FileMaker Pro from the
pop-up menu.
•Check your found set.
•The layout has mistakenly been set to display in two or more columns while the width of
the column (the white area of the layout) has been made too wide to fit the number of
columns selected within the printable area of the page. This results in groups of records
(specifically, those which would fall in the columns which are off the right side of the
page) not printing. To remedy the situation, click Layout Setup in the layout bar,
and set the number of columns to the desired amount. Then, if necessary, adjust the
right margin of the column by clicking and dragging the vertical dashed line on the
layout.
•Choose Layouts menu > Part Setup. If Allow part to break across page boundary is
selected, deselect it, and vice versa.
Related topics
Records are missing
Printing troubleshooting techniques (Windows)
Printing troubleshooting techniques (OS X)
Printing troubleshooting techniques (Windows)
First, check Preview mode (if you haven’t already done so)
•Document does not appear as expected in Preview mode
•Document appears as expected in Preview mode
Then try these solutions
•Shut down the computer, then start it again (don’t just restart).

Previewing and printing information
FILEMAKER PRO HELP 148
•Turn the printer off, wait 10 seconds, and then turn it on again.
•Try printing to a different printer if one is available.
•Create a new, simple FileMaker Pro file and try to print from the new file. If you can print
from one FileMaker Pro file but not another, try creating a new layout in the original file, or
experiment with different fonts.
•Cancel any stalled jobs, then try printing again.
•Windows 7: Choose Start menu > Control Panel > Hardware and Sound > Devices
and Printers. Double-click the printer being used to see all print jobs.
•Windows 8: In a File Explorer window, choose Computer from the left panel, then
choose Computer menu > Open Control Panel > Hardware and Sound > Devices
and Printers. Double-click the printer being used to see all print jobs.
•Try printing from another application, such as WordPad. If you cannot, see the
documentation that came with your computer and printer, or contact Microsoft or the
manufacturer of your printer.
Next, try these solutions
•If you can print from another application, but not from FileMaker Pro, make sure you’re
using the correct printer driver and that it’s properly configured.
•Make sure you have enough hard disk space free. Windows saves temporary print files to
your hard disk when you print. You won’t necessarily get an error message if you don’t have
adequate free hard disk space to cache your temporary files. Delete files to create disk
space, if necessary. (There may be expendable files in your C:\TEMP directory.) For more
information, see the documentation that came with your operating system.
•Run ScanDisk to check your hard disk. See the documentation that came with your
computer.
•If only a partial image prints, there could be insufficient memory on the printer. Try reducing
the resolution in the printer properties window, increasing the memory allocated to the
printer, or experiment with a less complex print job.
Try these solutions last
•Your printer software could be out-of-date or corrupt.
•Remove and reinstall the printer driver (first make certain you have the necessary
installer to reinstall).
•Try switching to a compatible driver installed from your operating system CD.
•To get printer driver updates, contact Microsoft or your printer manufacturer.
For more information on these and other possible remedies, search the FileMaker Knowledge Base
available at http://help.filemaker.com. Also try keywords that appear in any error message you see.
Printing troubleshooting techniques (OS X)
If you’re having trouble printing from FileMaker Pro in OS X, try the following suggestions:
•Turn the printer off, wait 10 seconds, then turn it on again.
•Try printing from another application. If you can’t print from other applications, you may
have a problem with how the printer is set up in OS X.

Previewing and printing information
FILEMAKER PRO HELP 149
•Create a new FileMaker Pro file and try to print from the new file. If you can print from one
FileMaker Pro file but not another, create a new layout in the original file or experiment with
different fonts.
•Your printer driver software might be corrupt or out-of-date. See the documentation that
came with your computer or printer for how to reinstall the printer driver. To get printer driver
updates, contact Apple Inc. or your printer manufacturer.
•For further suggestions on solving printing problems, also see the documentation for your
printer, computer and operating system.
•If your document doesn’t look right in Preview mode, see Document does not appear as
expected in Preview mode.
For more information on these and other possible remedies, search the FileMaker Knowledge Base
available at http://help.filemaker.com. Also try keywords that appear in any error message you see.
Designing and creating databases
FILEMAKER PRO HELP 150
Designing and creating databases

Creating a database
FILEMAKER PRO HELP 151
Creating a database
The first step in creating a database is to plan the content, structure, and design. Then, you create a
FileMaker Pro database file and define tables and fields.
Related topics
Deleting table definitions, field definitions, and data
About planning a database
A well-designed database promotes consistent data entry and retrieval, and reduces the existence
of duplicate data among the database tables. Relational database tables work together to ensure
that the correct data is available when you need it. It’s a good idea to plan a database on paper first.
Follow these general steps to plan a database:
1. Determine the purpose for your database, or the problem you want to solve. For example,
“to keep a list of my customers,” “to manage my inventory,” or “to grade my students.”
If other people will use the database, be sure to talk with them about the data they will need.
2. Consider the information you will store in your database. Typically, information falls into
broad categories. Accurately identifying these categories is critical to designing an efficient
database, because you will store different types and amounts of data in each category. For
example, a database intended to track sales has categories such as “customers,”
“products,” and “invoices.” A database that records student grades has categories such as
“students,” “classes,” and “assignments.”
3. After you’ve determined the broad categories, consider how these categories are related.
This can be done by writing simple sentences that describe how the categories interact,
such as, “customers order products” and “invoices record customers’ orders.” Each of these
pairs suggests a relationship between the data in one category and the data in the other
category.
4. After you’ve identified your categories of information, you are ready to organize your
database.
In database terminology, these categories of information are referred to as tables. Tables are
used to group data containing a common element or purpose. For example, you might use one
table to store names and addresses, while you use another table to store transaction details,
such as date of sale, item number, unit price, and so on.
Typically, databases are organized in one of three ways:
•A single table in a single file. Use a single table if you need to track data in one category
only, such as names and addresses.
•Multiple tables in a single file. Use multiple tables if your data is more complex, such as
customers, products, and invoices.
•Multiple tables in multiple files. Use multiple files if you need to share the same data
among several different database solutions. For example, you can store your tax rates
or shipping information in a separate file if you plan to use that information in more than
one solution.
Use relationships to share data between tables in the same file or with tables in external files.
Other database elements, such as scripts and access privileges, are stored at the file level;
therefore, some complex solutions will benefit from using multiple files.
Note FileMaker Pro is very flexible, so the decision to store data in a single file or in multiple
files is often one of packaging and convenience. Data stored in tables is very easily shared

Creating a database
FILEMAKER PRO HELP 152
between tables in the same file and tables in external files using relationships, as explained in
Working with related tables and files. Other elements, such as scripts and access privileges, are
stored at the file level, and because of this some complex solutions will benefit from using
multiple files.
5. Determine the database tables and the data they will include, and, in turn, which fields you
will need.
Tip To make it easy to search and sort records, create separate fields for first and last name,
titles (like Mr. or Dr.) and items in addresses (city, state or province, country, and postal code).
Separating your data into multiple fields at the time of data entry can make it easier to generate
future reports. For example, using separate fields to capture transaction details such as the
date, item number, quantity, and unit price of each transaction makes it easier to compile
summary and subsummary reports at the end of a week, month, or year.
6. Decide which fields will contain common data among the tables.
For example, a database for a bakery business might include these tables: a Customers table,
which stores customer information; a Products table, which stores product information; a Line
Items table, which stores information about products sold, and an Invoices table, which stores
order information.
Each table has only one subject, and all fields in a table describe only that subject. For example,
the fields in one record of the Customers table together store all the information about one
customer. For the same reason, you might assign each customer a unique, identifying number.
You wouldn’t enter a customer identification number into the table unless you had a new
customer to add, so the existence of a customer number determines the existence of a record.
A Customers table might also have fields for the customer’s name, address and phone number.
A Products table might have fields for a product identification number, the unit price for each
product, and the quantity in stock. A Line Items table might have fields for product and invoice
identification numbers, the name, unit price, quantity, and total price of each product sold. An
Invoices table might have fields for an invoice identification number, order date, and
salesperson.
7. Determine the match fields for each table, and circle each one in your plan.
See About match fields for relationships.
Customer ID
Address
Phone
Customer Name
Country
Salesperson
Customers table
Products table
Line Items table
Order Date
Customer ID
Order Date
Invoice ID
Invoice ID
Unit Price
Product ID
Qty
Subtotal
Discount Extended Price
Product Name
Tota l
Total in Stock
Order Date
Product ID
Unit Price
Product Name
Stock
Category
Invoices table
Region
Region
Salesperson Discount
Total in Stock
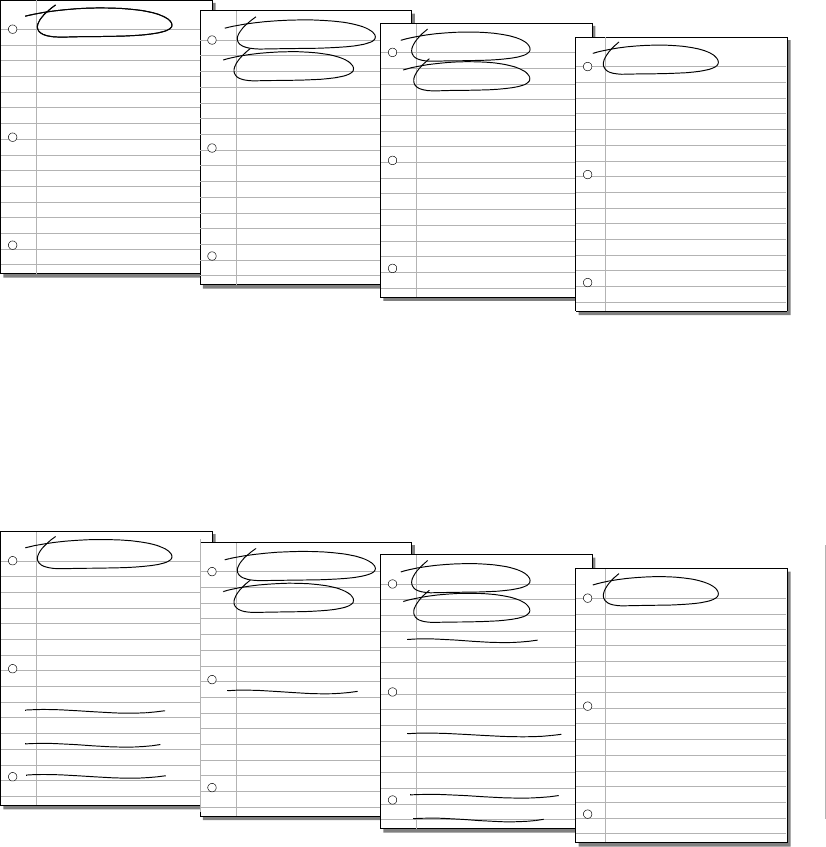
Creating a database
FILEMAKER PRO HELP 153
8. For each table, decide which fields will store data, and which ones will be used from other
(related) tables.
Based on a table’s subject, you can see where it makes sense to store the data and where to
use data from a related table. Other than match fields, all fields should appear only once in your
database. Cross out occurrences of fields that don’t pertain to the table’s subject.
9. Determine the relationships between the tables. In your plan, draw a line from each match
field in a table to the corresponding match field in the related table.
What establishes a relationship between tables is that their match fields contain matching data.
Customer ID
Address
Phone
Customer Name
Country
Salesperson
Customers table
Products table
Line Items table
Order Date
Customer ID
Order Date
Invoice ID
Invoice ID
Unit Price
Product ID
Qty
Subtotal
Discount Extended Price
Product Name
Tota l
Tota l i n Sto ck
Order Date
Product ID
Unit Price
Product Name
Stock
Category
Invoices table
Region
Region
Salesperson Discount
Total in Stock
Customer ID
Address
Phone
Customer Name
Country
Salesperson
Customers table
Products table
Line Items table
Order Date
Customer ID
Order Date
Invoice ID
Invoice ID
Unit Price
Product ID
Qty
Subtotal
Discount Extended Price
Product Name
Tota l
Tota l i n Sto ck
Order Date
Product ID
Unit Price
Product Name
Stock
Category
Invoices table
Region
Region
Salesperson Discount
Total in Stock
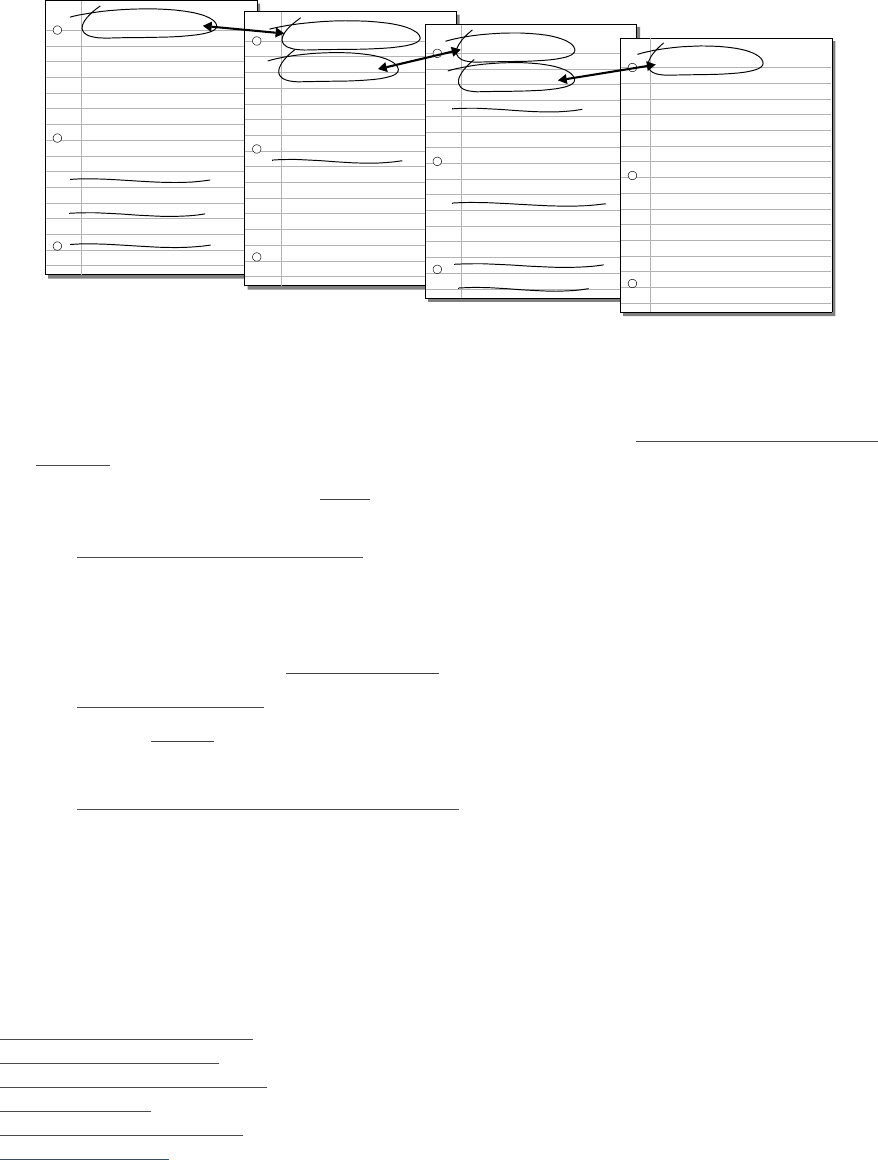
Creating a database
FILEMAKER PRO HELP 154
Relationships also make it possible to group your data to resolve complex queries. For example,
relationships can be used to determine current inventory levels, sales projections, and other
tasks where it is necessary to query data across multiple tables. See Working with related tables
and files.
10. Determine whether you need to share your database with other users, and how they will
access the file.
See Sharing databases on a network.
11. If you’re designing the database for other people to use, show them your paper plan and
ask them to review it and suggest any changes.
12. Consider who will use the database and whether you want to restrict access to it. When you
create the database, assign access privileges as needed.
See Protecting databases.
13. Decide what layouts you need, and plan a separate layout for each task.
For example, create separate layouts for printing labels or envelopes.
See Creating and managing layouts and reports.
14. Create a form that lists all the files and tables you need and the fields for each table. Also list
the forms and reports you will generate from each table.
15. Create your database.
16. If you’ve designed the database for others to use, ask a few people to test it. Then, fix any
problems they found before you make the database available for everyone to use.
Related topics
Creating a FileMaker Pro file
Defining database tables
About defining database fields
Creating a layout
About protecting databases
About relationships
Customer ID
Address
Phone
Customer Name
Country
Salesperson
Customers table
Products table
Line Items table
Order Date
Customer ID
Order Date
Invoice ID
Invoice ID
Unit Price
Product ID
Qty
Subtotal
Discount Extended Price
Product Name
Total
Tota l i n St ock
Order Date
Product ID
Unit Price
Product Name
Stock
Category
Invoices table
Region
Region
Salesperson Discount
Total in Stock

Creating a database
FILEMAKER PRO HELP 155
Best practices for designing layouts
Sketch your layouts
In addition to planning the structure of your database as described in About planning a database,
FileMaker recommends you sketch your layouts on paper or onscreen before creating them in
FileMaker Pro. A few sketches can help resolve design problems, communicate ideas, and save
time. The sketching process can also help you create layouts that are visually balanced and provide
a clear path for users to follow.
Use a theme that suits the purpose of your layout
A theme affects characteristics of a layout, such as the background color, field borders and fill, and
text attributes in text objects and in fields. The Starter Solutions that come with FileMaker Pro
illustrate how themes might be used to produce layouts containing operating system-appropriate
effects.
Select a theme in the Change Theme dialog box that best suits the purpose of your layout. (Click
in the status toolbar to display the dialog box.) If your layout will be used with FileMaker Go,
choose one of the Touch themes.
If you change the theme of a layout and then undo the change, the new theme remains, but any
formatting attributes you applied previous to applying the new theme are displayed. If you undo
again, FileMaker Pro returns the layout to the state it was before you applied the new theme.
See Changing the theme of a layout.
Use the screen stencils and positioning tools
Click the arrow on in the layout bar to display screen stencils that help you design layouts
optimally for iPad, iPhone, and several common desktop resolutions. You can have multiple screen
stencils visible at the same time. See Sizing layouts for different devices.
FileMaker Pro provides several tools to help you quickly and precisely size, position, and align
layout objects. Guides help you align layout objects vertically or horizontally within the same layout
or across multiple layouts. Dynamic guides give you visual cues as you work with layout objects.
See Using guides and dynamic guides.
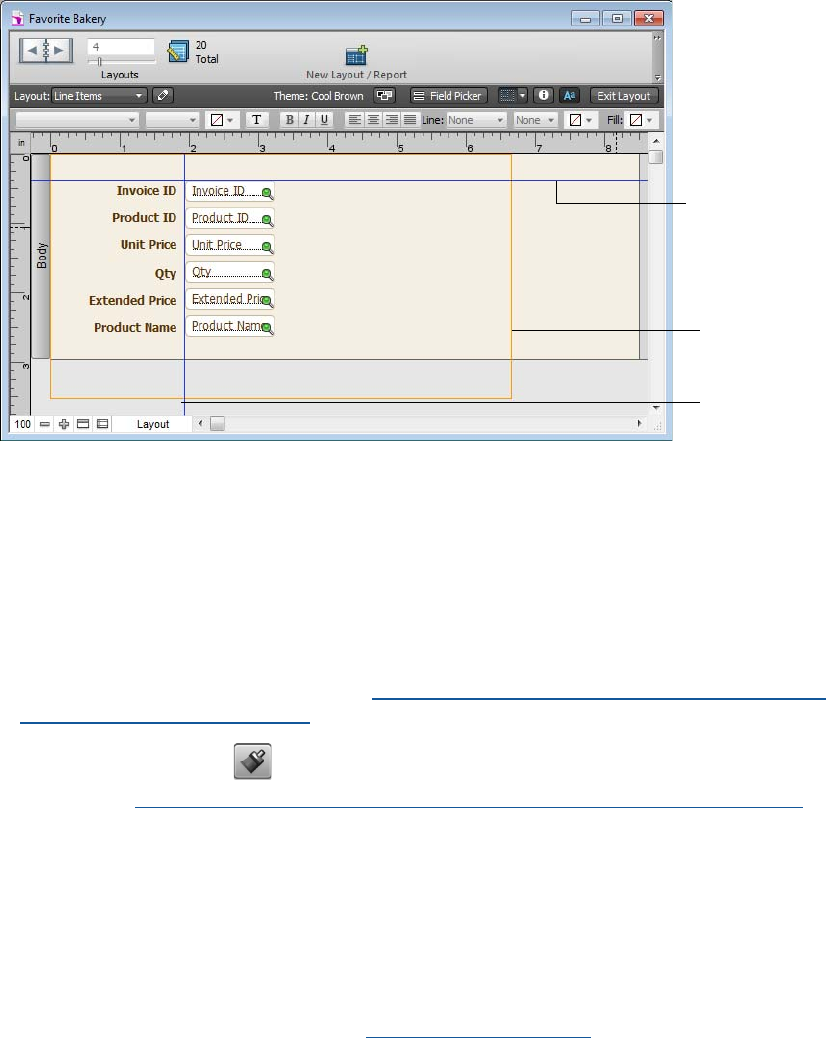
Creating a database
FILEMAKER PRO HELP 156
Consistently duplicate layout objects
A characteristic of a well-designed layout is a consistent appearance among the layout objects.
You can use:
•Predefined object styles that come with FileMaker Pro or custom styles you create to format
objects consistently on one or more layouts in a file or in multiple files in a solution. When
designing layout styles to be used throughout at file, it’s best to work on one layout
developing all the styles you need and then save them in a theme so you can apply styles
consistently throughout all layouts. See Creating and working with styles for layout objects,
parts, and the layout background
•The Format Painter tool in the status toolbar to quickly duplicate the attributes of layout
objects. See Copying formatting attributes between layout objects, parts, or backgrounds.
•Undo and redo commands in the Edit menu to incrementally remove or replace changes to
layout objects.
Test your layouts with a diverse audience
Some common symbols can be misinterpreted in some contexts. For example, a flag icon used as a
warning icon may indicate success in some cultures. Test your symbols and images with a diverse
audience before putting your layouts into use.
For tips on designing effective layouts, see Tips for designing layouts.
Tips for designing layouts
•If your department or organization has a style guide, refer to it before you begin the design
process.
•Use terminology consistently throughout your layouts and keep field labels concise.
•To help avoid a cluttered layout, keep in mind the layout’s purpose and add only the fields
that are necessary.
Screen stencil
Vertical guide
Horizontal guide

Creating a database
FILEMAKER PRO HELP 157
•It is not necessary to put all of the fields on a layout in order for users to perform sorts on
them.
•Decide if you intend the layout to be mainly used in Form View or Table View, especially if it
will be used on an iOS device. For layouts to be used on an iOS device, choose one of the
Touch themes in the Change Theme dialog box. Then design the layout accordingly. For
more information on designing layouts to be used on iOS devices, see the FILEMAKER GO
DEVELOPMENT GUIDE.
•If you plan to host your database for FileMaker WebDirect users, see the
FILEMAKER WEBDIRECT GUIDE for tips on designing layouts that work well in web browsers.
•Use tab controls or slide controls to group fields that have relevance to each other and to
indicate their connectedness. See Working with panel controls on layouts.
•Use layout parts appropriately to organize and summarize information. See About layout
part types.
•In general, use a limited number of colors and fonts per layout. Use fonts consistently:
assign one for headings, one for field labels, and one for field contents.
•Use sans serif fonts such as Verdana, Arial, and Trebuchet MS for high readability when
viewing forms onscreen.
•Use serif fonts such as Times for forms that will be printed and for fields that will contain
large amounts of text.
•Choose colors for text and backgrounds that provide enough contrast for easy readability.
For example, light gray text on dark gray backgrounds is difficult to read, especially in poor
lighting or with small font sizes. Light colors are suitable for headings but not for data entry
fields.
•To make reading and navigating a layout easier and to enhance its overall appearance, be
generous with the whitespace (empty space) between groups of fields.
•The Slice feature lets you take advantage of your existing image resources to quickly create
a visual effect for a header, body, or footer part. For example, you want to add a custom
color to the header part. You already have an image with an area that contains the color you
want. Use the Slice feature to add the desired color to the header. See Filling objects, layout
parts, or the layout background with an image.
Related topics
Best practices for designing layouts
Creating a FileMaker Pro file
You can create as many database files as you need to organize information. You can:
•Create an empty file, then design layouts yourself.
•Create an empty file using layouts defined in a FileMaker Pro Starter Solution (template).
•Use FileMaker Pro to open a file containing data in another file format, then modify the
design by adding layouts, if needed. For information, see Converting a data file to a new
FileMaker Pro file.
To create a new file:
1. Choose File menu > New Database.
Tip You can use the FileMaker Quick Start Screen to create new files. Choose Help menu >
Quick Start Screen, click Create a New Database, and continue with step 2.

Creating a database
FILEMAKER PRO HELP 158
2. Type a name for the file (choose a different folder, if needed), then click Save.
Windows: For Save as type, select FileMaker Files. If you don't type a file extension,
FileMaker Pro adds .fmp12 to the filename. (To view file extensions in Windows, see the
Windows operating system Help.)
FileMaker Pro creates the file, displays a blank, empty file in Layout mode, and displays the
Field Picker dialog box, where you can define fields for the database and add them to the
layout.
3. Define the fields, drag the fields to the layout, then close the Field Picker dialog box.
See Defining fields in the Field Picker dialog box.
4. Add objects and other embellishments to the layout.
See Creating and managing layouts and reports.
5. Save and exit the layout.
Notes
•By default, choosing File menu > New Database displays an empty database in Layout
mode. You can change the default setting to display the Manage Database dialog box
whenever you choose File menu > New Database to create a new database. See Setting
general preferences.
•To define tables, fields, and relationships, or to set field options in the Manage Database
dialog box, choose File menu > Manage > Database. See Defining fields in the Manage
Database dialog box and Defining database tables.
•To add fields and records, define field types, and set options for fields in a spreadsheet-like
table, use the options in Table View. See Working with data in Table View.
To create a file using a Starter Solution:
1. In FileMaker Pro, choose File menu > New From Starter Solution.
Tip You can use the FileMaker Quick Start Screen to create new files. Choose Help menu >
Quick Start Screen, click Use a Starter Solution, and continue with step 2.
2. Select All Solutions to view a list of all available solution files or choose a solution category
to narrow the list of choices.
Note If no solutions are listed, see Notes below.
3. Select a solution from the list (Windows) or the group of thumbnails (OS X), then click
Choose.
4. Type a name for the file (choose a different folder, if needed), then click Save.
Windows: For Save as type, select FileMaker Files. If you don't type a file extension,
FileMaker Pro adds .fmp12 to the filename. (To view file extensions in Windows, see the
Windows operating system Help.)
FileMaker Pro creates the file on your disk and the file opens. This predesigned database
contains fields and buttons set up for tasks commonly performed in databases. This file contains
no data.
5. Click New Record in the status toolbar to add data to the file.

Creating a database
FILEMAKER PRO HELP 159
Notes
•If you don’t see the FileMaker Starter Solutions, they are not installed. If you have your
installation CD, you can install the Starter Solutions by specifying the English language pack
when you perform a custom installation of FileMaker Pro over your existing installation. For
more information about installing FileMaker Pro, see the INSTALLATION AND NEW FEATURES
GUIDE FOR FILEMAKER PRO AND FILEMAKER PRO ADVANCED. If you do not have your
installation CD, visit http://www.filemaker.com and download Starter Solutions individually. If
you want Starter Solutions to be accessible from the FileMaker Quick Start Screen, place
them in one of the following locations:
•FileMaker Pro/English Extras/Templates/
•FileMaker Pro Advanced/English Extras/Templates/
•You can create a file by opening a non-FileMaker Pro data file (for example, a Microsoft
Excel file) in FileMaker Pro, or by making a copy of an existing FileMaker Pro file. When you
open a non-FileMaker Pro data file, a new FileMaker Pro file is created with the file’s data in
it. See Converting a data file to a new FileMaker Pro file.
Troubleshooting problems when creating a file
If you see the error message, This command cannot be used by this installation of FileMaker,
the ability to create new databases was disabled during the installation of FileMaker Pro.
Contact your systems administrator for more information.
Related topics
About planning a database
Defining database tables
Setting file options
You can set preferences for the current file’s default layout, login information, spelling, and opening
and/or closing scripts. To set preferences for all files, see Setting preferences.
To set options for opening and closing the current file:
1. Choose File menu > File Options, and click the Open tab if it is not already selected.
Select To
Minimum
version allowed
to open this file,
then choose a
version of
FileMaker Pro,
FileMaker Go, or
FileMaker Server
from the list
Prevent a file from being opened with a version of FileMaker Pro, FileMaker Go,
or FileMaker Server that’s earlier than the specified version.
The file must be local and not shared when the option is set. However, once the
option is set, the file can be hosted remotely. All files will appear in the Open
Remote dialog box, but only qualifying files can be opened. You need exclusive
access to the file in order to set this option, so make sure no one else is using the
file.

Creating a database
FILEMAKER PRO HELP 160
2. Click OK to save your changes, or click another tab to set additional file options.
To set spelling options for the current file:
1. Choose File menu > File Options, and click the Spelling tab.
2. Click OK to save your changes, or click another tab to set additional file options.
Checking spelling as you type can be slower than using the other spelling options if a large
amount of text is visible in the active field. See Checking spelling as you type.
To set text handling and data entry options for the current file:
Note You must log in using the Full Access privilege set to edit items in the Text tab.
1. Choose File menu > File Options, and click the Text tab.
2. In the Text Handling area, select one or more of the following options:
Log in using,
then Account
Name and
Password, and
type an account
and password
This is the default selection. The default is Log in using selected with the
Account Name and Password option set to Admin and a blank password.
Automatically log in using a specific account and password when you open the
database. To temporarily bypass the default password and enter a different one,
press Shift (Windows) or Option (OS X) while opening the file.
Note If the default account is valid but the password is invalid, you will be
prompted to enter another password.
Log in using,
then Guest
Account
Automatically log in using a guest account
Switch to
layout, then
choose a layout
from the list in
the Specify
Layout dialog
box
Display the specified layout whenever you open the file. If you don't select this
option, FileMaker Pro opens the layout you displayed when you worked in the
file, or opens a layout you specify in a startup script. (See the “Perform script”
option below.)
If a layout has been selected, its name appears to the right of the Specify button
of this option. To change the layout to use, click Specify, then choose a layout
from the list. See Specify Layout dialog box.
Note FileMaker Pro saves your current layout only if the file has been modified in
a significant way, such as editing a record or modifying database schema. See
What FileMaker Pro doesn’t save.
Select To
Select To
Indicate
questionable
words with
special
underline
Mark possible misspelled words with a red dotted underline (in Browse, Find, and
Layout modes).
Off Type without receiving any cues that you might have made a spelling error.
Beep on
questionable
spellings
Receive an audio cue that you might have made a spelling error.

Creating a database
FILEMAKER PRO HELP 161
3. In the Data Entry area, select one or more of the following options:
4. Click OK to save your changes, or click another tab to set additional file options.
To perform scripts that open and close windows:
Note You must log in using a Full Access privilege set to edit items in the Script Triggers tab.
1. Choose File menu > File Options, and click the Script Triggers tab.
2. Select one or more script triggers in the list.
Select To
Use smart
quotes
Use curly quotation marks and curly apostrophes. If this option is deselected or
you use a font that doesn't have curly quotes, FileMaker Pro uses plain (straight)
quotes and apostrophes. Changes affect new typing only; they do not affect
existing data.
Use Asian
language line-
breaking
Control Asian language line-breaking. This option is enabled by default. If this
option is disabled, standard Asian language rules concerning which characters
can start or end a line of text are ignored.
Use Roman
language line-
breaking
Control standard Roman language line-breaking, including word wrapping. This
option is enabled by default. If this option is disabled, letters and spaces are
treated equally as symbols, and Roman language words are not treated as units.
Instead, a word will wrap to the next line when it exceeds the width of the field or
text block, which could occur in mid-word.
Overwrite input
when an Asian
IME is on
(Windows)
Overwrite existing characters at the cursor location with new characters entered
by the user when an Asian input method editor (IME) is running. This option is off
by default.
Select To
Always use
current system
settings
Use the current system settings for data entry of numbers, dates, and times. This
option is on by default.
Always use
file’s saved
settings
Use the system settings saved with the file for display and data entry of numbers,
dates, and times.
Ask whenever
settings are
different
Prompt the user to choose which system settings to use when entering data in a
number, date, time, or timestamp field that was created using system settings that
are different from the current system settings.

Creating a database
FILEMAKER PRO HELP 162
Note If a snapshot link is created from a database to which any of the above script triggers are
assigned, the snapshot link will open and close as described in the table above.
3. Click OK to save your changes, or click another tab to set additional file options.
Related topics
Creating a FileMaker Pro file
Select To
OnFirstWindowOpen Run a script each time you open a window of a database file when no other
windows for the file are currently open. The script is triggered after the first
window of a file is open.
Click Specify to choose or create the script you want to use.
Note Although this is typically the first time you open a file, you can also
trigger a script this way when you open a window for a hidden file
previously opened via a script or relationship.
For more information, see OnFirstWindowOpen. For information about
operations that do not activate script triggers, see Changing object data
without activating script triggers.
OnLastWindowClose Run a script each time you close the last open window of a database file.
The script is triggered before the last window of a file is closed.
Click Specify to choose or create the script you want to use.
Note The script will run even if the file itself remains open, for example if it
is referenced by another file with open windows. The closing script will be
performed each time the last open window of the specified file is closed.
For more information, see OnLastWindowClose. If the script executed by
the OnLastWindowClose script trigger returns a False value, the file will not
close.
OnWindowOpen Run a script each time you open a window of a database file. The script is
triggered after a window is opened or after OnFirstWindowOpen (if it is
selected in the Script Triggers tab) is activated.
Click Specify to choose or create the script you want to use.
Note You can also trigger a script this way when you open a window for a
hidden file previously opened via a script or relationship.
For more information, see OnWindowOpen. For information about
operations that do not activate script triggers, see Changing object data
without activating script triggers.
OnWindowClose Run a script each time you close a window of a database file. The script is
triggered before a window is closed or before OnLastWindowClose (if it is
selected in the Script Triggers tab) is activated.
Click Specify to choose or create the script you want to use.
Note The script will run even if the file itself remains open, for example if it
is referenced by another file with open windows. The closing script will be
performed each time a window of the specified file is closed.
For more information, see OnWindowClose. If the script executed by the
OnWindowClose script trigger returns a False value, the file will not close.

Creating a database
FILEMAKER PRO HELP 163
Defining automatic data entry
Defining field validation
Opening files protected with passwords
Checking spelling
Creating scripts to automate tasks
Setting up script triggers
Defining database tables
Use database tables to organize and group your data by common characteristics or principles. Your
database can contain as many tables as you need to organize your data (limited only by the amount
of storage space on your hard disk).
By default, a new file contains a table with the same name as the file. This table can later be
renamed or deleted.
Tables you add to a file are automatically displayed in the relationships graph.
To define a table:
1. With the database open, choose File menu > Manage > Database.
2. In the Manage Database dialog box, click the Tables tab.
3. Type a name for the table, then click Create.
4. Continue to define tables, or click the Fields tab to define fields.
To change a table name:
1. With the database open, choose File menu > Manage > Database.
2. In the Manage Database dialog box, click the Tables tab.
3. Select the table you want to rename from the list.
4. In the Table Name field, type a new name for the table, then click Change.
5. Click OK.
Notes
•When you change a table name, FileMaker Pro updates all references to the table
throughout your calculations, relationships, scripts, table occurrences, and so on.
•If you are using FileMaker Pro Advanced, you can consolidate the tables from a multi-file
solution into a single file using the Copy/Paste or Import commands. Only the table schema
is copied or imported, not the data. See Copying or importing table schemas (FileMaker Pro
Advanced). To import the data with the schema, choose File menu > Import Records >
File. See Importing data into FileMaker Pro.
Important In addition to storing data, FileMaker Pro uses tables to describe relationships in the
relationships graph, and establish the context for layouts and some calculations. For information
about relationships, see Working with related tables and files. For information on the relationships
graph, see Working with the relationships graph. For information on creating layouts, see Creating
and managing layouts and reports.
•If your database references external ODBC data sources (ESS), links to ODBC tables can
break in FileMaker Pro if table names change in the ODBC data sources. You can click Re-

Creating a database
FILEMAKER PRO HELP 164
link in the Manage Database dialog box to restore links. See Restoring links to ODBC data
sources.
Related topics
About defining database fields
About relationships
Deleting table definitions, field definitions, and data
About defining database fields
A field is the basic unit of data entry in a record. To define a new field, you give it a name. Then you
select options that determine how the field interprets, enters, calculates, stores, and displays data.
After you define a field, you can set validation, auto entry, and storage options. See Setting options
for fields.
There are three ways to define fields in a database:
•In Layout mode using the Field Picker dialog box (see Defining fields in the Field Picker
dialog box)
•In the Manage Database dialog box (see Defining fields in the Manage Database dialog
box)
•In Table View (see Defining fields in Table View)
Note To add an existing field to a layout, go to Layout mode and drag a field from the Field tool
. See Placing and removing fields on a layout.
Defining fields in the Field Picker dialog box
When you create a new database, by default FileMaker Pro opens the file in Layout mode, and
displays a blank layout and the Field Picker dialog box. Use the Field Picker dialog box to define
fields for the database, and to add or change fields for an existing layout. Fields defined using the
Field Picker dialog box are added to the Manage Database dialog box.
After you’ve defined the fields, drag them from the Field Picker dialog box to the layout. (To have
fields that you define in the Field Picker dialog box automatically placed on a layout, select the Add
newly defined fields to current layout preference before you define the fields. See Setting layout
preferences.)
Note Using the Field Picker dialog box, you can define fields for the current layout of the current
FileMaker Pro table only.
To define fields:
1. In the Field Picker dialog box, click New Field.
A placeholder Field is created in the fields list, with a field type assigned. If this is a new
database file, the field is a text field.
Tip You can also press Ctrl+Enter (Windows), or Command-Return or Command-Enter (OS X),
to add a new field.
2. With the field selected, type a new name for the field.
See About naming fields.
3. To change the field type, click the field type and choose a new field type from the list.
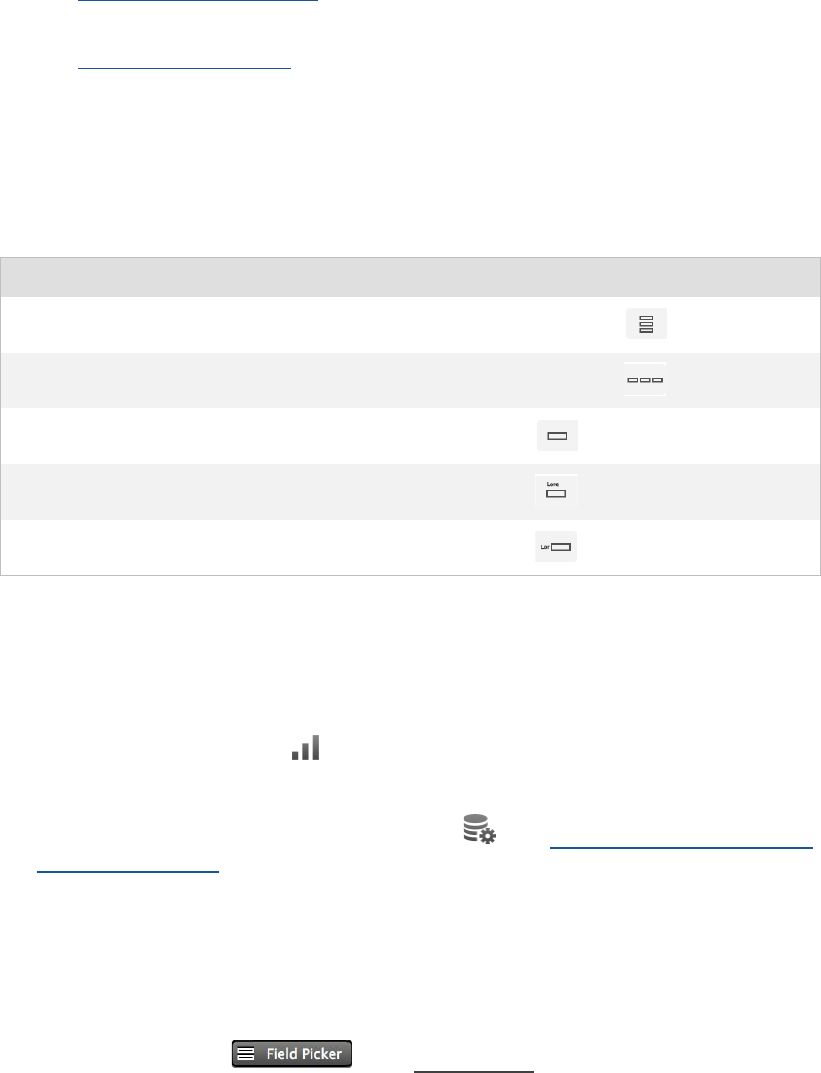
Creating a database
FILEMAKER PRO HELP 165
See About choosing a field type.
4. To set options for the field, right-click the field and choose Field Options.
See Setting options for fields.
5. Repeat steps 1–4 to continue creating fields.
Each new field has the same field type as the field added most recently.
6. When you drag fields to the layout, the fields are by default placed vertically and labels are
placed to the left of fields. To change these settings, click the arrow next to Drag Options
before you drag the fields to the layout.
Subsequent fields that are added to the Field Picker dialog box use the current drag settings.
7. Select the fields you want to place on the layout, then drag them to the layout.
To locate a field in a long list, type the field name in the search text box near the top of the Field
Picker dialog box.
To sort fields in the list, click , then choose how you want to sort fields: Creation Order,
Field Name, Field Type, or Custom Order.
To open the Manage Database dialog box, click . See Defining fields in the Manage
Database dialog box.
8. Close the Field Picker dialog box by clicking the close button or pressing Esc.
To add, delete, or change fields:
Note Changes made in the Field Picker dialog box are applied to the fields in the database and all
layouts on which the field appears.
1. In Layout mode, click in the status toolbar to open the Field Picker dialog
box.
You can also choose View menu > Field Picker.
2. If your database contains more than one table, select the appropriate table from the list at
the top of the Field Picker dialog box.
3. Add, remove, or change fields.
To display Do this
Fields stacked vertically on the layout
For Field Placement, click .
Fields horizontally on the layout
For Field Placement, click .
Fields without labels
For Labels, click .
Each field’s label above the field
For Labels, click .
Each field’s label to the left of the field
For Labels, click .
Creating a database
FILEMAKER PRO HELP 166
4. Close the Field Picker dialog box by clicking the close button or pressing Esc.
Note Another way to add an existing field to a layout is to switch to Layout mode and drag a field
from the Field tool . See Placing and removing fields on a layout.
Related topics
Defining fields in Table View
Changing field definitions
Defining fields in the Manage Database dialog box
Use the following steps to create or change fields in a new or existing database.
Note To have fields that you define in the Manage Database dialog box automatically display on a
layout, you must select the Add newly defined fields to current layout preference before you
define the fields. See Setting layout preferences.
1. With the database open in Browse mode or Layout mode, choose File menu > Manage >
Database.
2. In the Manage Database dialog box, click the Fields tab.
3. If your database contains more than one table, select the appropriate table from the Table
list.
4. For Field Name, type a name for the field.
See About naming fields.
5. For Type, select a field type.
See About choosing a field type.
6. Click Create.
7. To set options for the field, click Options.
To Do this
Add a field Click New Field, type a name for the field, and
choose a field type. Change drag options, if
needed, then drag the new field to the layout.
Delete a field Right-click the field and choose Delete Field.
To delete multiple fields at a time, select the
fields, then right-click and choose Delete Field.
Change a field’s name Windows: Double-click the field, then type a new
field name.
OS X: Select the field, then click the field name
and type a new field name.
See Changing field names.
Change the field type Select the field type, then choose a new field
type from the list. See Changing field types.
Change options for the field Right-click the field, then choose Field Options.
See Setting options for fields.

Creating a database
FILEMAKER PRO HELP 167
See Setting options for fields.
8. Continue to define fields, or click OK.
Note To add an existing field to a layout, switch to Layout mode and drag a field from the Field tool
. See Placing and removing fields on a layout.
Related topics
Defining fields in the Field Picker dialog box
Defining fields in Table View
Defining fields in Table View
Use the following steps to create or change fields in a new or existing database.
Note To have fields that you define in Table View display on a layout, you must select the Add
newly defined fields to current layout preference before you define the fields. See Setting layout
preferences.
1. With the database open in Browse mode, click Table View in the layout bar.
2. In Table View, click the Create Field column heading and type a name for the first field.
3. The default field type is text. To change the field type, right-click the column heading for the
field, then choose Field > Field Type.
See About choosing a field type.
4. To add a second field, click + in the column heading.
A new field is added to the database and is displayed as the last column in Table View.
5. Type a name for the field.
See About naming fields.
6. To select options for the field, right-click the column heading for the field, then choose
Field > Field Options.
See Setting options for fields.
7. Create more fields or add records (rows) to the database.
Note To add an existing field to a layout, switch to Layout mode and drag a field from the Field tool
. See Placing and removing fields on a layout.
Related topics
Defining fields in the Field Picker dialog box
Defining fields in the Manage Database dialog box
About naming fields
Field names must be unique, and can contain up to 100 characters. Follow these guidelines when
naming fields:
•Do not use any of the following symbols and words in the field name:

Creating a database
FILEMAKER PRO HELP 168
•,(comma), +, -, *, /, ^, &, =, ≠, >, <, ( ), [ ], { }, ", ; (semicolon), : (colon), :: (relational
indicator), $ (variable indicator)
•AND, OR, NOT, XOR, TRUE, FALSE, or the name of any FileMaker Pro function
•Don't begin a field name to be used in a calculation formula with a space, period (.), or
number.
•Use _ (underscore) in place of a space to avoid restrictions in ODBC, exporting, web
publishing, and other operations.
•If you're exchanging data with another application, check the field naming restrictions in the
file formats supported by that application.
•If you're using ODBC or JDBC to share FileMaker Pro data, avoid using SQL keywords in
field names.
Related topics
Using a reserved word or symbol for a field or table name
Changing field names
About choosing a field type
When you define a field, you select a field type based on the kind of information the field will contain.
The field type determines what kind of data can be entered and what kinds of operations
FileMaker Pro can perform with the data.
FileMaker Pro uses the field type to interpret the data for tasks like sorting records and performing
calculations. For example, if you create a text field and enter numbers, you can sort the data only in
alphabetical order. (The first character sorts, then the second, so that 11 sorts before 2.) You must
use a number field, or a calculation or summary field with a numeric result, to sort data in numerical
order.
Important Be sure to use a date field (instead of a text or number field) to store dates. To avoid
confusion when using dates in FileMaker Pro, always use four-digit years. See Defining field
validation and Conversion of dates with two-digit years.
You select the field type in the Fields tab of the Manage Database dialog box. To select the field
type in Table View, right-click the column heading, choose Field > Field Type > and select one of
the options for Field Type.
Select this type If the field data will be
Tex t Up to approximately 2 GB of letters, symbols, and/or numbers used as text per field
repetition, limited by available RAM and disk space. Indexes nominally based on the
first 100 characters of each word or value. Text fields may contain carriage returns.
See About text fields.
Number Values up to 800 digits or other characters, and the negative values of the same
range. Index is based on the first 400 significant digits. Number fields can also
contain Boolean values, to indicate, for example, true, false, yes, and no. Number
fields can't contain carriage returns. See About number fields.
Date Dates only. Gregorian calendar with a range of 1/1/0001...12/31/4000. Month, day,
and year order is based on system settings when the file is created. See About date
fields.

Creating a database
FILEMAKER PRO HELP 169
Notes
•Any field type except for summary can store a global value.
•In addition to defining a field and selecting its field type, you can create repeating fields,
global fields, and supplemental fields.
•If a field uses system formats to display data, FileMaker WebDirect uses the default system
formats for the location in which the database file was created. See Formatting and setting
up field objects in Layout mode.
Related topics
About defining database fields
Changing field types
Formatting and setting up field objects in Layout mode
About text fields
Use text fields to store letters, symbols, and numbers used as text. Indexes are based on the words
or values in the fields.
Notes
•Text fields can hold values that are combinations of letters, numbers, and special
characters, like phone numbers, postal codes, or serial numbers.
•Text fields sort in alphabetical order (left to right, character by character).
•To specify how data in a text field displays (for example, to specify a font), see Formatting
and setting up field objects in Layout mode.
•If you are using FileMaker Pro Advanced, you can copy field schemas from one file and
paste them into the same file or some other file. See Copying and pasting field schemas
(FileMaker Pro Advanced).
Time Times only. A time field can contain the hours, minutes, and seconds portion of a
time. See About time fields.
Timestamp Dates and times together to reference a fixed point in calendar time. For example, 10/
25/2014 2:39:46 AM. See About timestamp fields.
Container A file of any type, such as a picture, a PDF, or a multimedia file. You can set up
storage and display options for the field. You can reference container fields in
calculations and summary fields. You can't find or sort records based on container
fields, but you can define text fields to describe or identify them. Then, you can find or
sort records based on the description or identifying number in the text field. Files in
container fields can be embedded, stored as a reference, or stored externally. See
About container fields.
Calculation The result of a calculation formula that uses field values from the current record or
related records. The result can be one of these types of data: text, number, date,
time, timestamp, or container. See Defining calculation fields.
Summary A value that’s produced by summarizing field values from more than one record in the
same table. See Defining summary fields.
Select this type If the field data will be

Creating a database
FILEMAKER PRO HELP 170
Related topics
About defining database fields
Specifying text formats for fields
About number fields
Use number fields to store values from 10-400 up to 10400, and negative values in the same range.
Notes
•Use number fields to store:
•numbers that need to be sorted in numeric order. FileMaker Pro indexes the first 400
significant digits (numbers, decimal points, or signs) of the field, ignoring letters and
other symbols.
•numbers used in calculation formulas or summary fields. By default, FileMaker Pro
performs fixed-point math with a minimum of 16 digits of precision to the right of the
decimal point. Use the SetPrecision function to further expand the precision of this
number.
•values that are a combination of numbers, letters, and special characters that still need
to use the numbers in calculations and sorting (for example, $400 or best offer).
•Use text fields instead of number fields to store postal codes, phone numbers, and other
values with leading zeroes or characters like hyphens or parentheses.
•The characters displayed for the decimal separator and thousands separator depend on the
system formats set for the database file, and the display format for the field. For information
on changing the display format for a field (for example, 2.45 or $2.45), see Specifying
formats for fields containing numbers.
•If you are using FileMaker Pro Advanced, you can copy field schemas from one file and
paste them into the same file or some other file. See Copying and pasting field schemas
(FileMaker Pro Advanced).
Related topics
About defining database fields
Specifying formats for fields containing numbers
About date fields
Use date fields to store:
•dates you need to sort or search through
•dates used in calculation formulas or summary fields
Date fields can store values from January 1, 0001 to December 31, 4000.
Important To avoid confusion when using dates in FileMaker Pro, always use four-digit years. For
information on how FileMaker Pro handles dates with two-digit years, see Conversion of dates with
two-digit years.
Notes
•The separators in date fields and the order in which the date parts appear depend on the
system formats set for the file and the display format for the field. For information on

Creating a database
FILEMAKER PRO HELP 171
changing the display format for a field (for example, July 7, 2014 or 7/7/2014), see
Specifying formats for date fields.
•New files and clones of existing files use the current operating system format for date
formatting.
•To make sure dates are always entered with four-digit years, see Defining field validation.
•If you are using FileMaker Pro Advanced, you can copy field schemas from one file and
paste them into the same file or some other file. See Copying and pasting field schemas
(FileMaker Pro Advanced).
Related topics
About defining database fields
Specifying formats for date fields
Working with data in date fields
Dates are not as expected
About time fields
Use time fields to store:
•times you need to sort or search through
•times used in calculation formulas or summary fields
Notes
•The separators in time fields and the order in which the time parts appear depend on the
system formats set for the file and the display format for the field. For information on
changing the display format for a field (for example, 11:09 PM or 23:09), see Specifying
formats for time fields.
•If you are using FileMaker Pro Advanced, you can copy field schemas from one file and
paste them into the same file or some other file. See Copying and pasting field schemas
(FileMaker Pro Advanced).
Related topics
About defining database fields
Working with data in time fields
Specifying formats for time fields
About timestamp fields
Use timestamp fields to store a date and time together to reference a fixed point in calendar time.
A timestamp field can store date values from January 1, 0001 to December 31, 4000. Timestamps
are measured in seconds.
Important To avoid confusion when using dates in FileMaker Pro, always use four-digit years. For
information on how FileMaker Pro handles dates with two-digit years, see Conversion of dates with
two-digit years.

Creating a database
FILEMAKER PRO HELP 172
Notes
•A timestamp field always includes a date and a time of day. You must specify formats for
both date and time components to change the format of a timestamp. See Specifying
formats for timestamp fields.
•Mathematical operations performed on timestamps are similar to those performed on time
fields, and have a resolution of seconds (date fields have a resolution of days). Because
one unit of timestamp is one second, to add one day's worth of time to a timestamp you
would add 86400 (60 seconds to a minute * 60 minutes to a hour * 24 hours to a day) to the
value in the field.
•There are no negative timestamps.
•The minimum and maximum values of a timestamp are 1/1/0001 12:00 AM and 12/31/4000
11:59:59.999999 PM.
•The separators in time fields and the order in which the time parts appear depend on the
system formats set for the file and the display format for the field. To change the display
format for a field (for example, 11:09 PM or 23:09), set options in the Inspector in Layout
mode. See Specifying formats for timestamp fields.
•When you select Insert menu > Current Time in an active timestamp field, FileMaker Pro
inserts the full current date and time.
•When you select Insert menu > Current Date in an active timestamp field, FileMaker Pro
inserts the current date only.
•To specify how data in a timestamp field displays (for example, to specify whether the value
shows the day of the week or “AM” and “PM”), see Formatting and setting up field objects in
Layout mode.
•If you are using FileMaker Pro Advanced, you can copy field schemas from one file and
paste them into the same file or some other file. See Copying and pasting field schemas
(FileMaker Pro Advanced).
Related topics
About defining database fields
Working with data in date fields
Working with data in time fields
Dates are not as expected
About container fields
Use container fields to store any file:
•photos, movies, sounds
•documents, including Microsoft Word and Excel files, PDF files, and so on
You can reference container fields in calculation formulas or summary fields.
Data in container fields is by default embedded. You can, instead:
•store a reference in the field when you select a file to insert into it
•define the field to store data externally
FileMaker Pro saves externally stored container data in the same folder in which the database file is
located. See Managing external storage of container data.

Creating a database
FILEMAKER PRO HELP 173
When you save a FileMaker Pro file as a self-contained copy, container data that is stored as a file
reference, as well as externally stored data, is embedded in container fields in the copy. See Saving
and copying files.
You can use the GetContainerAttribute function to track how the contents of a container field are
stored and how much storage space it uses. This function also returns metadata about a container
field’s contents, such as the height and width of images, photo orientation, cover art of audio
contents, bar code type, and signature timestamps.
You can make a container field interactive to optimize the field for content such as audio, video, or
PDF files. See Specifying formats for container fields.
Notes
•After you define a container field, you can make the field larger in Layout mode.
•You can't find or sort records based on a container field, but you can define a text field to
describe or identify the contents of the container. Then, you can find or sort records based
on the information in the text field.
•To specify how data in a container field displays (for example, whether the image is cropped
or scaled), see Formatting and setting up field objects in Layout mode.
•FileMaker Pro uses the orientation attribute set by many cameras to display photographs
right side up in container fields. See Inserting graphics into container fields.
•To put a static graphic (like a logo) on a layout, create, paste, or import the graphic directly
onto the layout, or use a global container field. Either option will use less storage space than
storing the same graphic with every record.
•You can create a script that includes the Insert File script step to specify the contents of a
container field.
•When externally stored container data is hosted on FileMaker Server, the data can be
located on a different volume from the databases, including on network attached storage.
For more information, see FileMaker Server Help.
Related topics
About defining database fields
About setting up container fields
Using data in container fields
Deleting data from container fields
Creating file paths
Defining calculation fields
Use calculation fields to perform calculations on the following types of data: text, number, date, time,
or container.
The data in a calculation field is the result of a formula that you specify. The result can be one of
these types of data: text, number, date, time, or container.
To define calculation fields:
1. With the database open, choose File menu > Manage > Database.
2. In the Manage Database dialog box, click the Fields tab.
3. If your database contains more than one table, select the appropriate table from the Table
list.

Creating a database
FILEMAKER PRO HELP 174
4. For Field Name, type a name for the field.
See About naming fields.
5. For Type, select Calculation.
6. Click Create.
You see the Specify Calculation dialog box.
7. If necessary, for Evaluate this calculation from the context of, choose a table from the
list.
Setting the context for a calculation is only necessary when you're creating a calculation field in
a source table that has two or more occurrences in the relationships graph. The choice you
make may affect the calculation results, particularly if your calculation will include fields in
related tables. See Choosing the evaluation context for a calculation field.
8. Build a formula for your calculation.
Click where you want the item to appear in the formula box, then do the following. (You can also
type the formula into the box.)
To quickly build a formula:
•Tab to or click in the field, operators, or functions list.
•Type the first few letters of a field name, operator, or function to move to that item in the
list.
•Press Insert (Windows) or the Space bar (OS X) to place it in the formula box.
9. Select calculation options for the field.
To add a Do this
Reference to a field In the field list, double-click a field name.
To display field names from another table, choose a table from the
table list.
Mathematical or text operator For Operators, click a button or type an operator. See
Mathematical operators and Text operators.
Comparison or logical operator,
or an exponent
For Operators, double-click an operator in the list or type an
operator. See Comparison operators and Logical operators.
Constant value Type the value.
Function In the functions list, double-click a function. In the formula box,
replace the placeholder parameter with a value or expression.
To Do this
Set the field type of the result Choose a data type for Calculation result is <value>.
Choose the correct type for the result you want. See About
choosing a field type.
Make a calculated field
repeating
Select Number of repetitions, then type the number of repetitions.
See Defining repeating fields.
Prevent calculation if all
referenced fields are empty
Select Do not evaluate if all referenced fields are empty.
When enabled, FileMaker Pro does not evaluate a calculation if all
fields used by the calculation are empty.

Creating a database
FILEMAKER PRO HELP 175
10. To select indexing and storage options for the field, click Storage Options, select options in
the Storage Options dialog box, then click OK.
See Defining field indexing options and Defining global fields (fields with global storage).
11. Click OK to close the Specify Calculation dialog box.
12. Continue to define fields or click OK.
Important To avoid confusion when using dates in FileMaker Pro, always define calculation
formulas to enter four-digit years. For information on how FileMaker Pro handles dates with two-digit
years, see Conversion of dates with two-digit years.
To define calculation fields in Table View:
1. With the database open in Browse mode, click Table View in the layout bar.
2. Click + in the column heading to add a new field.
3. Right-click the column heading for the new field, then choose Field > Field Type >
Calculation from the shortcut menu.
4. Build a formula for calculation and specify options for the field in the Specify Calculation
dialog box.
Notes
•You can type field names, operators, and functions in the Specify Calculation dialog box
instead of using the fields or operators lists.
•A calculation field calculates a result from values in other fields in the current record, from
related records using a relationship, or from fields defined with global storage options. (In
contrast, a summary field produces a result using values in more than one record in the
database. See Defining summary fields.)
•Calculation fields are updated when a value in the calculation changes. Unstored
calculation fields are also updated when the record is refreshed, the field is clicked or
tabbed into or out of, or the field is refreshed (for example, by a script).
•Values, expressions, functions, and parameters can be uppercase or lowercase.
•To include literal quotation marks in a calculation text string, precede the quotation mark
character with a backslash character (/). For, example, “Hello” included in a calculation
evaluates to Hello, but “/”Hello/”” evaluates to “Hello”.
•FileMaker Pro calculates the formula when you close the Manage Database dialog box.
There may be a delay if your database contains many records (for example, 10,000).
•To change the way functions are displayed in the dialog box, choose a category from the
View list.
•Calculations that include a related field, summary field, global value, or a reference to
another unstored calculation are unstored.
•Calculations defined with global storage options display values calculated using the last
modified record.
•If any field on a layout containing unstored calculations is set to auto-resize, calculation
results will be updated when the window is resized.
•You can reference container fields in calculations and display container data in calculation
fields. See About container fields.

Creating a database
FILEMAKER PRO HELP 176
•References to related fields can become invalid if the related file is missing, or if you delete
a field in the related file. FileMaker Pro alerts you that a field reference is invalid when you
display or change the calculation formula. Changing the field type in a related file may
cause unexpected behavior.
•If your FileMaker Pro file accesses data from an ODBC data source, you can use
supplemental fields to define unstored calculations or summary instructions that act on data
coming from the external sources. See Using supplemental fields.
•If you are using FileMaker Pro Advanced, you can copy field schemas from one file and
paste them into the same file or some other file. See Copying and pasting field schemas
(FileMaker Pro Advanced).
Calculation examples
Related topics
About formulas
Working with formulas and functions
About functions
Changing calculation formulas
Formatting and setting up field objects in Layout mode
Defining summary fields
Use summary fields to calculate values such as subtotals, averages, and grand totals across
multiple records. For example, a summary field can display the grand total of all sales in the month
of May in a report.
To define summary fields:
1. With the database open, choose File menu > Manage > Database.
2. In the Manage Database dialog box, click the Fields tab.
3. If your database contains more than one table, select the appropriate table from the Table
list.
4. For Field Name, type a name for the field.
See About naming fields.
5. For Type, select Summary.
6. Click Create.
7. In the Options for Summary Field dialog box, select a summary type, then select the field
you want to group data by.
Field name Field type Calculation
Today’s Date Date Get( CurrentDate )
Full Name Tex t FirstName & “ ” & LastName
Sales Tax Number SubTotal * .08
Select this type of
summary calculation To summarize values in a field in the found set of records by
Total of Calculating the total of values in the field.

Creating a database
FILEMAKER PRO HELP 177
8. Select a summary option, if applicable, for the summary type.
9. If the field you are summarizing is a repeating field, you have the option to summarize the
repetitions together or individually.
Select All together to calculate a single summary value for all repetitions in the field.
Select Individually to calculate a summary value for each repetition.
Average of Calculating the average of values in the field.
Count of Counting the number of records that contain a value for the field. For
example, if a field contains 100 values (one value for each record), the
result of the count is 100.
Minimum Finding the lowest number, or earliest date, time, or timestamp for a field.
Maximum Finding the highest number, or latest date, time, or timestamp for a field.
Standard Deviation of Finding how widely the values in a field differ from each other. This option
calculates the standard deviation from the mean of the values in a field.
Fraction of Total of Calculating the ratio of the value in the field to the total of all the values in
that field. (For example, find what fraction of total sales can be attributed to
each salesperson.)
List of Creating a return-delimited list of non-blank values in a field.
Select this type of
summary calculation To summarize values in a field in the found set of records by
For Select To
Total of Running total Show the cumulative total for the
current and all previous records. To
restart the running total for each
sorted group, also select Restart
summary for each sorted group
and select the field upon which the
sort will be restarted from the field
list.
Average of Weighted average. In the field list
that appears, select the field that
contains the weight factor.
Determine the average in one field
based on a value in another field
that is used as a weight factor.
Count of Running count Show the cumulative count of the
current and all previous records. To
restart the running count for each
sorted group, also select Restart
summary for each sorted group
and select the field upon which the
sort will be restarted from the field
list.
Standard Deviation of By population Calculate population standard
deviation.
Fraction of Total of Subtotaled. In the field list that
appears, select the field to group by.
Calculate a fraction of the total
based only on a group of records.

Creating a database
FILEMAKER PRO HELP 178
Note You must format your summary field as a repeating field to display individual summary
values. See Setting up the display of repeating fields.
10. Click OK, then continue defining fields or click OK.
To define summary fields in Table View:
1. With the database open in Browse mode, click Table View in the layout bar.
2. Click + in the column heading to add a new field.
3. Right-click the column heading for the new field, then choose Field > Field Type >
Summary from the shortcut menu.
4. Select a summary type and set the options for the summary field in the Summary Field
dialog box.
Notes
•Use the New Layout/Report assistant to quickly create a layout that summarizes data. See
Creating a layout.
•Summary fields are associated with groups of records. The value in a summary field can
change depending on where you place the field on a layout, how many records are in the
found set, and whether the records are sorted.
•Data in a summary field reflects records currently being browsed; either all the records or a
group of found records. If you change a value in one of the fields on which the summary is
based, or if you change the found set, FileMaker Pro recalculates the result in a summary
field.
•If you choose Fraction of Total of, you can specify a group field for Subtotaled. When you
return to Browse mode, you must sort by the group field to calculate the value correctly.
•The standard deviation formula is n-1 weighted, following the normal standard deviation.
•You can't change data in a summary field manually, but you can copy it. You can also
perform calculations with summary fields using the GetSummary function.
•If your FileMaker Pro file accesses data from an ODBC data source, you can use
supplemental fields to define unstored calculations or summary instructions that act on data
coming from the external sources. See Using supplemental fields.
•If you are using FileMaker Pro Advanced, you can copy field schemas from one file and
paste them into the same file or some other file. See Copying and pasting field schemas
(FileMaker Pro Advanced).
Related topics
Changing summary fields
Summary data is missing or incorrect
Specifying formats for fields containing numbers
Setting options for fields
You can set field options when you define a field, or at a later time. You can set options for:
•entering default data into fields to make entering data fast, accurate, and consistent (for
example, FileMaker Pro can perform a calculation to automatically format a phone number)
•checking data against validation requirements

Creating a database
FILEMAKER PRO HELP 179
•making a repeating field
•indexing and storing data
•storing container data externally (see About setting up container fields)
•storing a global value
•setting Furigana input options (Japanese language fields only)
You can add, change, or remove data entry, validation, repeating, storage, and indexing options for
all field types except summary.
FileMaker Pro doesn't update existing records if you change field options. You can find existing
records and change the data, if needed.
Important To avoid confusion when using dates in FileMaker Pro, set field validation options to
make sure dates are always entered with four-digit years. For information on how FileMaker Pro
handles dates with two-digit years, see Defining field validation and Conversion of dates with two-
digit years.
Defining automatic data entry
To save time and ensure accuracy, you can set FileMaker Pro to automatically enter data in text,
number, date, time, and container fields. For example, FileMaker Pro can enter the current user's
name into a field.
To set options for automatic data entry:
1. With the database open, choose File menu > Manage > Database.
Note To set options for fields in Table View, right-click the column heading for the field, choose
Field > Field Options from the shortcut menu, then skip to step 6.
2. In the Manage Database dialog box, click the Fields tab.
3. If your database contains more than one table, select the appropriate table from the Table
list.
4. Select a text, number, date, time, or container field from the list of existing fields, or define a
new one.
5. Click Options (or double-click the field name).
6. In the Options for Field dialog box, click the Auto-Enter tab, then select options for the field.
To Do this
Enter the record creation date or time Select Creation, then choose Date or Time from the
list.
Enter the record creation date and time
(timestamp)
Select Creation, then choose Timestamp from the
list.
Enter the name of the person who creates
the record
Select Creation, then choose Name from the list.
Enter the account name that creates the
record
Select Creation, then choose Account Name from
the list.
Enter the record modification date or time Select Modification, then choose Date or Time from
the list.

Creating a database
FILEMAKER PRO HELP 180
7. Click OK to close the Options for Field dialog box, or click another tab to set additional field
options.
Notes
•You can also define value lists to save time and ensure accuracy during data entry.
•Alternatively, you can specify the auto-complete option for text fields to help ensure
accuracy for data entry. See Setting up a field to auto-complete during data entry.
•Your choices in the Options for Field dialog box are limited by the type of field you are
defining. For example, you can't choose Creation Date for a time field.
•If Creation Name or Modification Name is selected, FileMaker Pro enters the user name
shown in the General tab of the Preferences dialog box.
•If you select Calculated value, you can edit the field value in Browse mode (if Prohibit
modification of value isn't selected). The value is calculated when you create a record, or
Enter the record modification date and time
(timestamp)
Select Modification, then choose Timestamp from
the list.
Enter the name of the person who modifies
the record
Select Modification, then choose Name from the list.
Enter the account name that modifies the
record
Select Modification, then choose Account Name
from the list.
Assign a serialized number to the field in
each record
Select Serial number, then:
•For Generate, choose On creation to generate
serial numbers when records are created.
•For Generate, choose On commit to generate
serial numbers when records are committed.
For next value, type a starting value (like 100), then
type the increment in increment by.
Enter the value from the same field of the last
record you accessed
Select Value from last visited record.
Note This value will be from the last record accessed
in the table in which this options has been set.
Enter data that you specify Select Data, then type up to 255 characters. Use the
keyboard arrow keys to scroll through the text box, if
needed.
Enter the result of a calculation Select Calculated value (or click Specify), then
enter a calculation.
See Defining calculation fields for information about
the dialog box.
Select Do not replace existing value for field (if
any) to prevent overwriting data already present.
Enter a value that's copied from a field in a
related record
Select Looked-up value (or click Specify), then
define the lookup. See About lookups.
Prohibit a user from modifying a value that
you have defined to be auto-entered
Select Prohibit modification of value.
Turn off automatic data entry Clear all selected checkboxes.
To Do this

Creating a database
FILEMAKER PRO HELP 181
when one of the referenced fields changes and the destination field is empty. (However, if
you select Do not evaluate if all referenced fields are empty in the Specify Calculation
dialog box, the value isn't calculated when you create a record and all fields referenced by
the calculation are empty. Instead, the value is calculated when one of the referenced fields
contains a value.)
•Auto-enter calculations can be self-referencing.
•To make an auto-enter calculation self-modifying, leave the Do not replace existing value
for field (if any) option unchecked.
•To auto-enter a calculated value that’s automatically updated and can’t be changed by
entering data in the field, define a calculation field.
•For information about auto-entered data and FileMaker WebDirect, see the
FILEMAKER WEBDIRECT GUIDE and the FileMaker Knowledge Base.
•You can set auto-enter and validation options for external fields for ODBC tables. These
field options only affect how you work with these external fields in FileMaker Pro. The
options are independent of any options that might be set in the ODBC data source.
Related topics
Working with formulas and functions
About choosing a field type
Inserting the current date or other variables into a field
Defining value lists
Entering preset data from a value list
Defining field validation
You can select validation options to ensure that data is entered into a field correctly. When validation
options are selected, FileMaker Pro displays a message if you enter data incorrectly. For example,
you can set an option to require that users enter a value in a field.
Important To avoid confusion when using dates in FileMaker Pro, set field validation options to
make sure dates are always entered with four-digit years. For more information on how
FileMaker Pro handles dates with two-digit years, see Conversion of dates with two-digit years.
To choose field validation options:
1. With the database open, choose File menu > Manage > Database.
Note To set options for fields in Table View, right-click the column heading for the field, choose
Field > Field Options from the shortcut menu, then skip to step 8.
2. In the Manage Database dialog box, click the Fields tab.
3. If your database contains more than one table, select the appropriate table from the Table
list.
4. Select an existing field or define a new one.
5. Click Options (or double-click the field name).
6. In the Options for Field dialog box, click the Validation tab.
7. Select validation options for the field.

Creating a database
FILEMAKER PRO HELP 182
8. For Validate data in this field, select Always for ongoing field validation, or Only during
data entry to limit validation to instances when data is being entered. Check Allow user to
override if you want the user to override validation warnings.
9. To display a custom message if validation fails, select Display custom message if
validation fails. Type a message (up to 255 characters).
10. Click OK to close the Options for Field dialog box, or click another tab to set additional field
options.
Notes
•Field and validation values must be identical to successfully validate the contents of a field.
If the Validation by calculation option is used, the calculation results must exactly match
the contents of the field being evaluated. By default, the FileMaker Pro calculation engine
calculates to 16 digits of precision to the right of the decimal. If you are validating fields by
calculation that return fractional results, you can use the Round function to limit calculation
results to an expected number of digits.
To require that the entered value Select
Contains only numbers Strict data type, then choose Numeric Only from
the list
Is a date containing numeric values for the
month and day, and four digits for the year (for
example, 5/12/2014)
Strict data type, then choose 4-Digit Year Date
from the list
Is a time containing numeric values for hours
and minutes between 00:00 and 23:59 (seconds
are not evaluated for this data type validation)
Strict data type, then choose Time of Day from
the list
Is not blank Not empty
Does not duplicate a value found in this field in
other records
Unique value
Matches another value in the same field in any
other record
Existing value
Matches a value in a specified value list Member of value list, then choose a value list.
(Choose Manage Value Lists to create a list.)
Is within a specific range of letters
(alphabetically), numbers, dates, or times
In range, then type the beginning and ending
values
Matches the result of a calculation Validated by calculation (or click Specify), then
enter a calculation. See Defining calculation fields
for information about the dialog box.
Select or clear Validate only if field has been
modified, then click OK.
Does not exceed specified number of characters Maximum number of characters, then type the
maximum number of characters allowed
Does not exceed a specified file size (for
container field)
Maximum number of kilobytes, then enter the
number of kilobytes. This setting limits the size of
a file that’s embedded in a container field or stored
externally. This setting has no effect on files that
are stored by reference in a container field.

Creating a database
FILEMAKER PRO HELP 183
•You can also specify the auto-complete option for text fields to help ensure accuracy for
data entry. See Setting up a field to auto-complete during data entry.
•Unique or existing validation on a field triggers when you exit the field, not when you commit
the entire record.
•You can set auto-enter and validation options for external fields for ODBC tables. These
field options only affect how you work with these external fields in FileMaker Pro. The
options are independent of any options that might be set in the ODBC data source.
Related topics
Working with formulas and functions
Entering and changing data in fields
Committing data in records
Defining value lists
Defining global fields (fields with global storage)
A field that uses global storage contains one value that's used for all records in the file. Fields
defined with global storage are also referred to as global fields.
To define global storage options for a field:
1. With the database open, choose File menu > Manage > Database.
Note To set options for fields in Table View, right-click the column heading for the field, choose
Field > Field Options from the shortcut menu, then skip to step 6.
2. In the Manage Database dialog box, click the Fields tab.
3. If your database contains more than one table, select the appropriate table from the Table
list.
4. For Field Name, type a name for the field.
See About naming fields.
5. Click Options (or double-click the field name).
6. In the Options for Field dialog box, click the Storage tab, then select Use global storage
(one value for all records).
7. To create a repeating field, enter a value greater than 1 for Maximum number of
repetitions.
8. Click OK.
9. Continue to define fields or click Done.
Notes
•You can use a global field:
•as a fixed value in calculation formulas across all records in a file, or in conditional script
steps, such as If, Else, End If, Loop, End Loop, and Exit Loop.
•for fields that rarely need to be updated. For example, use global storage to put your
company address on several layouts. You can quickly update the value in a field with
global storage without having to update each layout.
•as a match field for a relationship.

Creating a database
FILEMAKER PRO HELP 184
•You can use variables instead of global fields for temporary data storage. See Using
variables.
•To enter or change the value in a global field, in Browse mode, select the field and enter the
new value.
•You can't use a global field to find records.
•If your file is shared, only the host's changes to global field data are saved. Changes are
saved only when the file is closed.
•If a file is shared, some calculations that include global fields are evaluated on the host
instead of on the client. The host performs the evaluation in the following situations:
•when a find request is searching an unstored calculation field whose calculation
includes a global field.
•during a find request on a table with access privileges that restrict access to certain
records, and the calculation that determines record access includes a global field.
•the evaluation of any other record access calculation that includes a global field in order
to determine whether to display related data. For example, a record access calculation
to determine the rows to display in a portal or the values to display in a related value list
will occur on the host if the record access calculation includes a global field.
To accurately evaluate these calculations on the host, FileMaker Pro transfers all the global field
values in the current table from the client to the host. If you know that certain global fields will
never be used in unstored calculations or record access calculations, you can improve
database performance by creating these global fields in a separate table. This will prevent
unneeded global field data from being repeatedly transferred to the host.
Related topics
About match fields for relationships
Defining repeating fields
You can store more than one value in a text, number, date, time, container, calculation, or global
field by making the field a repeating field.
For example, you can create a text field named Color that stores the colors available for each
product you sell. If you make Color a repeating field, you can enter all the colors for each product
into the Color field.
Note Instead of using a repeating field, it is often easier to use a related table and a portal to sort or
insert data, or create a summary report.
To define a repeating field:
1. With the database open, choose File menu > Manage > Database.
Note To set options for fields in Table View, right-click the column heading for the field, choose
Field > Field Options from the shortcut menu, then skip to step 6.
2. In the Manage Database dialog box, click the Fields tab.
3. If your database contains more than one table, select the appropriate table from the Table
list.
4. Select the field you want to repeat, or define a new field.
5. Click Options (or double-click the field name).
6. In the Options for Field dialog box, click the Storage tab.

Creating a database
FILEMAKER PRO HELP 185
7. In the Repeating area, enter a number for Maximum number of repetitions.
If the field is a calculation field, you see the Specify Calculation dialog box instead of the Options
for Field dialog box. For Number of repetitions, enter the number of repetitions (up to 32,000).
8. Click OK.
9. Click OK to close the Options for Field dialog box, or click another tab to set additional field
options.
Notes
•Use the Data tab of the Inspector to change the number of repetitions displayed on a layout.
•In a repeating field, there's a separate display area for each repetition. If you define a field to
repeat, all repetitions have the same size and other field characteristics.
•Some FileMaker Pro features (like calculation and summary fields, and find requests)
include all the values in a repeating field. For example, when you create a find request,
FileMaker Pro searches for values in all repetitions, even those that aren't visible in the
current layout. Other FileMaker Pro features, like sorting, only use the first value in a
repeating field. For information about how a feature works with repeating fields, see the
Help topic for that feature.
•Values in a repeating field cannot be easily summarized to create a report. You can,
however, define a calculation that uses an aggregate function, which is similar to
summarizing data on a record-by-record basis.
Related topics
Getting the contents of a repetition in a repeating field
Setting up the display of repeating fields
Defining field indexing options
In FileMaker Pro, you can create indexes, which are lists of the words or values in a field.
FileMaker Pro uses indexes for searching and for joining related tables. Indexes increase the speed
of searches but also increase file size.
FileMaker Pro uses different indexes for different tasks:
•Value indexes can be created for text, number, date, time, and timestamp fields, as well as
calculation fields that return results of these same types. Value indexes are used for joining
related records and for searches in number, date, time, and timestamp fields, and
calculation fields that return results of these same types. A value index is created by taking
each line of text (delimited by the carriage return character) and taking up to the first 100
primary character weights that all the characters in that line generate, according to the
Unicode Collation Algorithm. See Choosing a language for indexing or sorting.
Note Some behavior is dependent upon the data source or drivers when using Japanese
collation that does not distinguish Katakana or Hiragana, either in full- or half-width. This is also
the case with Roman characters with accents.
•Word indexes can only be created for text fields and calculation fields that return a text
result, where they are used for searches. A word index is created by storing each unique
word in a field. Fields containing large amounts of text can generate large indexes, as each
unique word in the text field appears in the word index. This can significantly increase file
size.

Creating a database
FILEMAKER PRO HELP 186
To set indexing options for a field:
1. With the database open, choose File menu > Manage > Database.
Note To set options for fields in Table View, right-click the column heading for the field, choose
Field > Field Options from the shortcut menu, then skip to step 6.
2. In the Manage Database dialog box, click the Fields tab.
3. If your database contains more than one table, select the appropriate table from the Table
list.
4. Click the field name.
5. Click Options (or double-click the field name).
6. In the Options for Field dialog box, click the Storage tab.
If you selected a calculation field, you see the Specify Calculation dialog box. Click Storage
Options.
7. Select indexing options for the field.
8. For calculation fields, select Do not store calculation results if you want FileMaker Pro to
calculate the result only when needed, then click OK.
9. Click OK to close the Options for Field dialog box, or click another tab to set additional field
options.
Notes
•You can define storage and indexing options for text, number, date, time, and timestamp
fields. You can also index calculation fields if the results are text, number, date, time, or
timestamp.
•FileMaker Pro stores most calculation field values immediately after the field is defined,
when the Manage Database dialog box is closed. By default, calculations that include a
related field, summary field, global field, or a reference to another unstored calculation are
unstored; all other calculations are stored.
•Stored results require more disk space. Unstored results require more time to calculate.
•For normal use, use None or Minimal and enable the option to Automatically create
indexes as needed.
Select To
None Prevent FileMaker Pro from indexing the field.
Minimal Create a value index of a text field’s contents or a calculation
field returning text results.
All Create both word and value indexes for text fields or calculation
fields returning text results. For number, date, time, and
timestamp fields, as well as calculation fields returning results of
these types, All creates an index of a field's values.
Automatically create indexes as
needed
Create the necessary index only if a user performs a search
using the field or if the field is used as a match field in a
relationship.
A language from the Default
language list
Specify the language used for indexing and sorting values in a
text field. Each language is tailored to support language-specific
indexing and sorting requirements.

Creating a database
FILEMAKER PRO HELP 187
•Selecting All for text fields can significantly increase file size, as every word in the text field
is indexed. Certain operations, such as importing records, may also take more time, as each
word in the field is added to the field’s index as the import occurs.
•Automatically create indexes as needed indexes the field the first time a user performs a
find request (searches) on the field. The first search is slow because the index is being
created. However, subsequent searches on that field are faster because they use the index.
(This option also creates an index when the field is used in a relationship.)
•To create relationships using text fields as match fields without creating word indexes for
these fields, use Minimal and disable Automatically create indexes as needed.
•To reduce file size and prevent users from creating indexes, use None (or Minimal) and
disable Automatically create indexes as needed.
•The combination of selecting None and disabling Automatically create indexes as
needed prevents the field from being used to create relationships.
•For databases that will be placed on CD-ROM or other read-only media, any field that could
be used in a find request should be set to Indexing All (if disk space on the CD-ROM
allows).
•To choose storage options for container fields, see Setting up container fields to store data
externally.
Related topics
Using a field index
Defining Furigana options
The Furigana option is a Japanese-specific feature. The option allows a user to specify that the
Kana reading for Japanese text in one field be entered automatically to another.
Japanese text is composed of Kana (Hiragana and Katakana) and Kanji (characters). Kanji
characters have multiple readings, and the Unicode ordering of these characters is arbitrary. Thus,
to sort Kanji characters in a truly meaningful way, it is necessary to sort by the Kana (phonetic
syllabary) reading intended for each character. The Furigana field is intended as a shadow field into
which the Kana readings for Kanji can be entered.
To create a Furigana field, the user creates two text fields in Manage Database, then selects the
field into which Kanji will be entered (the “parent” field), and establishes a link, via the Use Furigana
Field option, to the field into which the corresponding Kana readings will appear (the “child” field).
A Furigana “child” field defined with this option maintains a connection to its “parent” field data.
When the user inputs Japanese text into the parent field, FileMaker Pro guesses the intended Kana
reading of the entered characters, based on how the characters have been input, and enters this
text in the Furigana field.
To set Furigana options for a field:
1. With the database open, choose File menu > Manage > Database.
Note To set options for fields in Table View, right-click the column heading for the field, then
choose Field > Field Options from the shortcut menu, then skip to step 6.
2. In the Manage Database dialog box, click the Fields tab.
3. If your database contains more than one table, select the appropriate table from the Table
list.

Creating a database
FILEMAKER PRO HELP 188
4. In the Fields tab of the Manage Database dialog box, select an existing field, or define a
new one.
5. Click Options (or double-click the field name).
6. In the Options for Field dialog box, click the Furigana tab.
7. Select the field to enter Furigana.
8. Select the Kana reading input format for the Furigana field:
9. Click OK to close the Options for Field dialog box, or click another tab to set additional field
options.
Notes
•The Kana that is entered in the Furigana field is compliant with the input method, but
FileMaker Pro is not able to correctly guess at the "intended" reading should the user
retrieve the Kanji characters by an alternative reading, or use character code input.
•Some of the behavior for the Furigana option is platform-specific. When a database with a
Furigana field is shared, the client's operating system determines the behavior of the
Furigana field.
•Windows: Edited text is appended to the text in the Furigana field. Existing text in the
Furigana field is not replaced.
•OS X: Editing text in the parent field will cause the entire contents of the Furigana field
to be replaced.
About setting up container fields
In addition to setting up a container field to store embedded data or a file reference, you can set up
a container field to store data externally.
For example, suppose you have a shared Products database that includes a container field for
product photos. When a user in one location inserts a file into the container field, the file is
transferred to and stored in a directory on the host computer. When users in other locations view
database records, the product photo is displayed in their copy of the container field.
By storing container data externally, you can:
•Share data easily: Storing data externally also makes sharing a multi-user database easy,
because each user works with data that’s stored in one central location. You do not need to
configure a shared volume on each local computer to use container fields in a multi-user
environment. You can insert files into container fields from your hard drive without having to
copy them to a shared volume first.
•Perform incremental backups: Only a reference to an external file is stored inside the
database, which keeps databases small and facilitates incremental backups. Storing
Select To
As is Leave text as entered in Hiragana, Katakana, or Roman format
Hiragana Convert to Hiragana
Full-Width Katakana Convert to full-width Katakana
Full-Width Roman Convert to full-width Roman (Romaji)
Half-Width Katakana Convert to half-width Katakana
Half-Width Roman Convert to half-width Roman (Romaji)

Creating a database
FILEMAKER PRO HELP 189
container data externally promotes faster backups, because after an initial backup has been
performed, subsequent backups copy only the external files that were added or changed.
•Choose how data is stored: Your data remains protected by FileMaker Pro. Container data
that's stored externally in secure storage is by default encrypted and can be read by
FileMaker Pro using secure storage. Alternatively, you can choose to keep the data in its
native format (through open storage), giving you more control over how folders and files are
organized in the external file system.
Follow these general steps to set up container fields to store data externally:
1. Create a container field. See About container fields.
2. Choose storage options for the container field, using the Options for Field dialog box. See
Setting up container fields to store data externally.
3. To move existing data to the external location, perform a data transfer after changing
storage options. See Transferring container data.
Important Routine backups are strongly recommended for any document stored on a computer.
See Maintaining and recovering FileMaker Pro databases.
Note If you’re developing databases for FileMaker Go, see the FileMaker Go documentation for
differences in the behavior of some features.
Related topics
Using data in container fields
Setting up container fields to store data externally
When you create a container field, data is by default embedded in the field.
You can set up a container field to store data externally. Data that’s stored externally is by default
encrypted, using secure storage, and can only be read by the FileMaker Pro application.
FileMaker Pro manages the encrypted files automatically. However, you can use the open storage
option, which removes encryption and keeps the files in their native formats.
You can set up different storage options (embedded or stored externally) for individual container
fields in a database. Also, you can store container data externally in different folders on the file
system.
To set up external storage:
1. With the database open, choose File menu > Manage > Database.
Note To set options for fields in Table View, right-click the column heading for the field, choose
Field > Field Options from the shortcut menu, then skip to step 6.
2. In the Manage Database dialog box, click the Fields tab.
3. If your database contains more than one table, select the appropriate table from the Table
list.
4. Select an existing field or define a new one.
5. Click Options (or double-click the field name).
6. In the Options for Field dialog box, click the Storage tab.
7. In the Container area, select Store container data externally.
8. For relative to, choose a base directory from the list.

Creating a database
FILEMAKER PRO HELP 190
You can store container data in a different directory. See Managing external storage of container
data.
9. Choose how you want the container data stored.
10. Click OK to close the Options for Field dialog box.
Notes
•If the database contains one table, then the database in the base directory path and the
table in the default open storage path will have the same name. For example, “Properties” in
the base directory [database location]/Properties is the database filename, and
“Properties” in the open storage path Properties/Photo is the table name.
•To move existing data that’s embedded in container fields, you must manually transfer the
data. See Transferring container data.
•If you specify a calculation for a container field that uses open storage:
•If a filename that results from a calculation is not unique, FileMaker Pro appends the
duplicate filename with a sequential number (for example, Invoice_1.txt).
•Design the calculation to reduce the number of stored duplicate filenames. For
example, if you design a Candidates recruitment database and you expect that most
records will contain a file named Resume.doc, you can specify the following calculation
for open storage: “Candidates/” & CandidateID.
•If you have FileMaker Pro Advanced, you can encrypt database files to protect them while
they are being stored on disk. See Encrypting database files (FileMaker Pro Advanced).
Related topics
Working with formulas and functions
Managing external storage of container data
For each database, you can define one or more base directories in which to store container data
externally. The default location for each base directory is the database’s location. You can add, edit,
or delete base directories. You must have full access privileges to create or change base directories.
To create or change a base directory:
1. With the database open, choose File menu > Manage > Containers.
The Storage tab displays at least one base directory (the default). You can edit this base
directory, but you can’t delete it unless there are others in the list.
Choose To
Secure Storage (the
default)
Encrypt the data, making it readable by FileMaker Pro using
secure storage. FileMaker Pro creates a subdirectory named
“Secure” in the base directory and randomly distributes the files
across subdirectories, and creates new subdirectories as needed.
Open Storage Allow container files to stay in their original format and control
where the files are stored. The default path is relative to the base
directory and is in the format table/field.
You can type a different path or click Specify to specify a
calculation.

Creating a database
FILEMAKER PRO HELP 191
2. In the Storage tab, create, edit, or delete a base directory for the container fields in this
database.
You can set up subdirectories for individual container fields in Field Options.
3. Click OK.
Notes
•If you rename the database, you may need to change the database name in the base
directory. FileMaker Pro does not automatically update the database name in the base
directory.
•If a base directory ends with a colon (:), the last part of the path is treated as a prefix for
filenames. For example, if the directory is /invoices/inv_:, then all invoices will be
stored in the Invoices directory, and their filenames will have the inv_ prefix.
•You cannot create, edit, or delete a base directory if the database is hosted on a different
computer.
Related topics
Creating file paths
Managing performance with thumbnails
To speed up the rendering of images in container fields, FileMaker Pro by default generates image
thumbnails and caches them in memory.
The container data can be embedded in the field or stored externally. FileMaker Pro encrypts
thumbnails that are in secure storage and that are embedded.
You must have full access privileges to set options for thumbnails.
To set thumbnail options:
1. With the database open, choose File menu > Manage > Containers.
2. Click the Thumbnails tab.
3. Select or deselect Generate and store thumbnails for images.
This option is selected by default. If you deselect the option, skip to step 5.
To Do this
Create a new base
directory
Click New. In the New Base Directory dialog box, type a path for
the base directory. A base directory can be an absolute path, a
path relative to the database location, or a network path. (You can
see examples of base directories at the bottom of the dialog box.)
A base directory cannot contain references to a parent folder (“/../
”).
Edit a base directory Select a base directory in the list, then click Edit. In the Edit Base
Directory dialog box, change the path shown for Base Directory.
Delete a base
directory
Select a base directory in the list, then click Delete.
Note You cannot delete a base directory if it contains data, is used
by a container field that stores data externally, or is the only base
directory in the list, or if any data transfers are pending.

Creating a database
FILEMAKER PRO HELP 192
4. Choose storage options for thumbnail images.
5. Click OK.
Notes
•If generating thumbnails for temporary storage slows performance, change the setting to
permanent storage.
•Thumbnails that are generated from an image that’s either embedded or stored using
secure storage are also encrypted in permanent thumbnail storage.
Transferring container data
When you set up a container field to store data externally, any embedded data in the field is not
automatically moved to the external directory. If you want embedded data to be stored externally,
you must use the following steps to transfer the data. FileMaker Pro uses settings you choose in the
Options for Field dialog box to move the data to the specified base directory.
You can also transfer data that’s stored externally into the container field, convert data with secure
storage to open storage and vice versa, move data between base directories, and move files when
the open storage calculation is changed. Files that are stored by reference and some embedded
container data (such as text objects and layout objects) cannot be transferred.
You must have full access privileges to transfer data.
To transfer container data:
1. If you changed storage options for a container field in the Options for Field dialog box (or by
right-clicking and choosing Field > Field Options while working in Table View), the
Container Data Transfer dialog box appears after you exit the dialog box.
Note Or, in the Manage Containers dialog box, click Transfer Data. The Container Data
Transfer dialog box appears, showing all the container fields that are available for transfer.
2. To see information about a destination (including whether data is embedded or stored
externally, and its base directory, storage type, and file path), click the field (not the
checkbox) in the list.
The information appears below the list.
3. Fields are by default selected for data transfer. To exclude a field from data transfer,
deselect the checkbox next to the field.
4. Click Transfer.
If there is not enough disk space in the base directory, a message appears telling you how much
free space is available and how much space is needed. Click OK and create enough space.
To use Do this
Temporary storage Select Temporary storage (the default).
Temporary storage caches in-memory only. Each time the
database file is closed, the cache is discarded.
Permanent storage Select Permanent storage.
Permanent storage caches on-disk in addition to in-memory. The
on-disk portion of the cache remains when the database file is
closed.

Creating a database
FILEMAKER PRO HELP 193
FileMaker Pro transfers the data from all selected fields to their destinations.
To stop the transfer process, click Stop in the Container Data Transfer dialog box. Stopping the
transfer doesn’t roll back the data already transferred. You can restart the process at any time
by following the steps above.
5. When the transfer is completed, the Transfer Summary dialog box appears, showing you
the status, number of files transferred, and number of files skipped. Click OK.
6. To see a log of the transfer, click Open Log File.
For information about reading this file, see the next section.
Reading the Transfer.log file
The Transfer.log file displays information about container data that failed to transfer.
The most recent data is added to any existing Transfer.log file information, so you may need to scroll
to the end of the file to see the results of the latest data transfer session.
From left to right the columns show the date, time, and time zone in which the transfer took place,
the filename or error number, and a description of the transfer event.
The following are examples of warnings and errors:
Example 1: Warning
2011-07-20 16:27:58.676 +0800 Warning [Record ID 3, field
Animals::Picture] Skipped non-transferrable data: File reference or text.
Problem: File references and text cannot be transferred.
Solution: For file references, create a script that embeds the referenced files, then transfer data.
Example 2: Error
2011-07-31 11:39:45.265 +0800 Error 301 [Record ID 1] Opening record
resulted in error (301): Record cannot be changed, because another user is
modifying it.
Problem: A record was being edited when the transfer occurred.
Solution: Turn off file sharing before transferring data.
Example 3: Error
2011-07-31 11:43:06.916 +0800 Error 852 [Record ID 6, field
Animals::Picture] Saving container data resulted in error (852): Cannot
write file to the external storage.
Problem: The destination path could not be written to.
Solution: Change the operating system permissions for the destination folder.
Changing field definitions
After you define a field, you can change it. To change the definitions of related fields, make the
changes in the related table or file.
Important Changing a field definition can change or delete data already stored in the field. For
example, changing a field to a calculation field replaces existing data with a calculated value.
Deleting a field definition erases any data stored in the field.

Creating a database
FILEMAKER PRO HELP 194
Changing field names
When you change a field name, FileMaker Pro changes the name on each layout and any field
references used in calculation or summary fields. The field label changes on layouts if it matches the
original field name.
To change a field name:
1. With the database open, choose File menu > Manage > Database.
2. In the Manage Database dialog box, click the Fields tab.
3. If your database contains more than one table, select the appropriate table from the Table
list.
4. In the Fields tab of the Manage Database dialog box, select the field you want to rename.
5. For Field Name, type or paste the new name.
6. Click Change.
7. Continue making changes or click OK.
To change a field name in Table View:
1. With the database open in Browse mode, click Table View in the layout bar.
2. Double-click the column heading for the field you want to rename, then type the new name.
Related topics
About naming fields
Using a reserved word or symbol for a field or table name
Duplicating field definitions
You can duplicate a field definition and then modify it. For example, if you have defined a field with a
complex calculation formula or value list, you can define a new field that uses a similar formula or
value list.
To duplicate a field definition:
1. With the database open, choose File menu > Manage > Database.
2. In the Manage Database dialog box, click the Fields tab.
3. If your database contains more than one table, select the appropriate table from the Table
list.
4. In the Fields tab of the Manage Database dialog box, select one or more fields that you
want to duplicate, then click Duplicate.
FileMaker Pro places the duplicated field at the end of the list of field definitions and adds Copy
to the field name.
5. To change the field name for the duplicated fields, type new field names or edit the existing
names in Field Name, then click Change.
See About naming fields.
6. Change the duplicated field options as needed.
7. Continue making changes or click OK.

Creating a database
FILEMAKER PRO HELP 195
Related topics
Copying and pasting field schemas (FileMaker Pro Advanced)
Changing field types
Changing a field type changes the kind of data the field can contain. It also affects how you find and
sort information that uses that field. For example, if you change a date field to a text field, you can
type other information in the field besides a date, but you will no longer be able to sort
chronologically.
Important Changing the field type can permanently and irretrievably erase data.
To change a field type:
1. With the database open, choose File menu > Manage > Database.
2. In the Manage Database dialog box, click the Fields tab.
3. If your database contains more than one table, select the appropriate table from the Table
list.
4. For Type, select a new field type.
See About choosing a field type.
5. Click Change.
6. Change the field options as needed.
See Setting options for fields.
7. Continue making changes or click OK.
To change a field type in Table View:
1. With the database open in Browse mode, click Table View in the layout bar.
2. Right-click the column heading for the field and choose a new field type from the Field >
Field Type shortcut menu.
The following table describes the effects of changing field types:
When you change This happens
A text field to a number, date,
time, or timestamp field
The first 255 characters that can be converted are moved to the first
line, deleting any remaining characters. Values that can't be used as
dates or times are displayed and indexed as question mark (?). Date
and time fields can't contain text.
A number, date, time, or
timestamp field to a text field
Existing data isn't changed.
A container to another field
type, or remove the option for
global storage
Existing data in the field is deleted.
Any field to a container field or
to a field with global storage
Existing data is deleted.
Any field type to a calculation or
summary field
Existing data is replaced with the results of the formula or summary
you specify.

Creating a database
FILEMAKER PRO HELP 196
Changing calculation formulas
When you change a calculation formula, FileMaker Pro recalculates the value for that field in all your
records. If you use the calculation field in any other calculation or summary field, FileMaker Pro also
recalculates those fields.
To change a calculation formula:
1. With the database open, choose File menu > Manage > Database.
2. In the Manage Database dialog box, click the Fields tab.
3. If your database contains more than one table, select the appropriate table from the Table
list.
4. In the Fields tab of the Manage Database dialog box, select the calculation field, then click
Options.
5. In the Specify Calculation dialog box, make the changes you want.
See Defining calculation fields for information about the dialog box.
6. Click OK.
FileMaker Pro recalculates the formula when you close the Manage Database dialog box, and
displays a progress indicator if many records need to be reevaluated.
To change a calculation formula in Table View:
1. With the database open in Browse mode, click Table View in the layout bar.
2. Right-click the column heading for the calculation field and choose Field > Field Options
from the shortcut menu.
3. In the Specify Calculation dialog box, make the changes you want, then click OK.
Related topics
Working with formulas and functions
Changing summary fields
You can change summary fields; for example, to change the type of summary and the field you want
to group data by.
If you change the type of summary calculation, FileMaker Pro recalculates the value for every
record in the database when you exit the Manage Database dialog box.
A field used in a summary to a
field type that can't be used in a
summary
You see an alert. You must change the summary so it doesn't include
the field or delete the summary field before changing the field type.
A field used in a relationship You might not be able to change the field type if the field is used as a
match field in a relationship and the new field type cannot be used as a
match field in a relationship.
Container fields cannot be used as match fields. Fields with global
storage and summary fields cannot be used as key fields. Fields in
which indexing is disabled cannot be used as key fields.
When you change This happens
Creating a database
FILEMAKER PRO HELP 197
To change a summary field:
1. With the database open, choose File menu > Manage > Database.
2. In the Manage Database dialog box, click the Fields tab.
3. If your database contains more than one table, select the appropriate table from the Table
list.
4. In the Fields tab of the Manage Database dialog box, select the summary field, then click
Options (or double-click the field name).
5. In the Options for Summary Field dialog box, make your changes.
6. Click OK.
7. Continue making changes or click Done.
To change a summary field in Table View:
1. With the database open in Browse mode, click Table View in the layout bar.
2. Right-click the column heading for the summary field and choose Field > Field Options
from the shortcut menu.
3. In the Options for Summary Field dialog box, make the changes you want, then click OK.
Related topics
Defining summary fields
Summary data is missing or incorrect
Specifying formats for fields containing numbers
Reordering field definitions
FileMaker Pro uses the order in which fields appear in the Fields tab of the Manage Database dialog
box for all dialog boxes that list fields. You can list fields in the order they were created, by field
name, by field type, or in a custom order that you define.
To reorder field definitions:
1. With the database open, choose File menu > Manage > Database.
2. In the Manage Database dialog box, click the Fields tab.
3. If your database contains more than one table, select the appropriate table from the Table
list.
4. In the Fields tab of the Manage Database dialog box, choose the order you want from the
View by list.
To define a custom order, drag the double arrow next to the field definition to move the field
up or down in the list.
To change the Do this
Type of summary calculation Select another summary type, like Total of
Options for the summary type Select or clear options, like Running total
Field you want to group data by Select a different field name

Creating a database
FILEMAKER PRO HELP 198
5. Click OK.
To reorder field definitions by clicking column headings:
Click the Field Name or Type column heading in the Fields tab of the Manage Database dialog box.
To reverse the sort, for example, from ascending to descending order, click the heading again.
Deleting table definitions, field definitions, and data
Deleting a table or field in the Manage Database dialog box permanently and irretrievably deletes
the table or field definition and all the data in that table or field.
Important Before you delete a field or a table, confirm that you don’t need any of the data it
contains.
To delete a table definition:
1. Before you delete a table from a file, be sure you don't need any data the table contains.
2. With the database open, choose File menu > Manage > Database.
3. In the Manage Database dialog box, click the Tables tab.
4. In the Tables tab, select one or more tables that you want to delete, then click Delete.
•Click Also remove occurrences of these tables in the graph to remove any tables
based on this data table from the relationships graph.
•Click Delete to continue the deletion.
•Click Cancel to leave the table unchanged.
5. Click Done.
To delete a field definition:
1. Before you delete a field from a file, be sure you don't need any data the field contains.
2. With the database open, choose File menu > Manage > Database.
3. In the Manage Database dialog box, click the Fields tab.
4. If your database contains more than one table, select the appropriate table from the Table
list.
5. In the Fields tab, select one or more fields that you want to delete, then click Delete.
•Click Delete to continue the deletion.
•Click Cancel to leave the field unchanged.
6. Click Done.
To delete a field definition in Table View:
1. With the database open in Browse mode, click Table View in the layout bar.
2. Right-click the column heading for the field.
3. Choose Field > Delete Field from the shortcut menu.

Creating a database
FILEMAKER PRO HELP 199
Notes
•When you delete a table, you delete all of the records and field definitions associated with
that table.
•You can remove a field from a layout without deleting the field definition.
•You can’t delete a field if it is referenced in a calculation field, summary field, calculation in a
script, or relationship defined in the same file. (If the calculation, summary, script, or
relationship definition is defined in a related file, you can delete the field.)
•You can’t create, modify, or delete field definitions in an external ODBC data source.
•If FileMaker Pro displays a message that you can’t delete a field, do one of the following:
•Change the calculation field, summary field, script, or relationship so that it doesn’t
include the field you want to delete.
•Delete the calculation field, summary field, script, or relationship.
•If you place a field from a related table on a layout, and you later delete the field definition
from the related table, a placeholder for the deleted field remains on the layout. The
placeholder contains the text ::<Field Missing>. (You also see the placeholder if the related
table is deleted.)
Related topics
About relationships
Working with the relationships graph
Changing relationships
Creating file paths
In FileMaker Pro, you can specify file paths to an external file or a FileMaker data source.
Note A FileMaker “data source” was called a “file reference” in pre-9.0 versions of FileMaker.
Each named file or FileMaker data source can consist of one or more file paths. Use multiple file
paths when you want FileMaker Pro to search a list of potential files.
For information on adding a FileMaker data source and specifying file paths, see Connecting to data
sources.
FileMaker Pro supports the following file path formats:
Type of path Description Format
Relative The path to a target file specified from the
current database’s location. If the current
database is opened remotely, the path
starts from the local FileMaker Pro
directory
file:directoryName/fileName
filemac:directoryName/
filewin:../fileName
Full local or remote
(OS X)
The absolute path to a target file or folder,
either local or on a remote volume,
beginning at the top level of the file
system
filemac:/volumeName/
directoryName/fileName
filemac:/volumeName/
directoryName/
Full local (Windows) The absolute path to a target file or folder
in Windows, beginning at the top level of
the file system
filewin:/driveletter:/
directoryName/fileName
filewin:/driveletter:/
directoryName/

Creating a database
FILEMAKER PRO HELP 200
Note FileMaker Pro does not support URL protocols as file paths.
Examples of single file paths
Examples of multiple file paths
Use multiple file paths when you want FileMaker Pro to search a list of potential files. File paths are
searched in the order in which they appear. FileMaker Pro opens the first file it is able to
successfully locate, which completes the search. Each file path must be on a separate line.
•Example 1: In this example, a FileMaker Pro database must work on two different operating
systems: a Windows system that accesses local Windows files, and an OS X system that
accesses local OS X files. On both platforms, the database must access a local file named
test.xlsx.
filewin:/C:/ExcelFiles/Hosted/test.xlsx
filemac:/MacintoshHD/ExcelFiles/Hosted/test.xlsx
•Example 2: In this example for a scripted record import, a FileMaker Pro database should
access a file that is hosted. However, because the host may not be available, you also
reference two alternate files, one hosted by a different server, the other stored locally on
your hard drive. If the first network file is unavailable, FileMaker Pro will search for the
second network file. If the second network file is also unavailable, FileMaker Pro will search
for the local file.
fmnet:/192.168.10.10/Databases/test.fmp12
fmnet:/192.168.100.120/Databases/test.fmp12
file:../Databases/test.fmp12
Variables
You can use variables in file paths. Variables let you specify file or folder paths dynamically for many
scripts, for example, the Export Records script step. See Using variables.
Use the Set Variable script step to create local and global variables.
Full remote
(Windows)
The absolute path to a target file or folder
on a Windows volume shared using
Windows file sharing
filewin://computerName/
shareName/directoryName/
fileName
filewin://computerName/
shareName/directoryName/
FileMaker Network The network path to a shared
FileMaker Pro file
fmnet:/hostIPaddress/
fileName
Type of path Description Format
Type of path Example
Relative file:MyDocuments/test.xlsx
Full local (OS X) filemac:/MacintoshHD/Users/JohnSmith/Documents/test.xlsx
Full remote
(Windows)
filewin://SalesComputer/SharedVolume/ExcelFiles/test.xlsx
FileMaker
Network
fmnet:/192.168.10.10/database.fmp12

Creating a database
FILEMAKER PRO HELP 201
You can also use the Let function to specify variables in calculations.
The scope of local variables is limited to the current script. The scope of global variables is limited to
the file in which the global variables are defined, for as long as the file remains open.
Examples of using variables in file paths
Assume the following variables:
$fileName = "test.xlsx"
$username = "JohnSmith"
$targetDir = "Documents/Clients"
$chosenType = "filewin"
$$source = "file:Documents/2014/demo files"
$driveLetter = "G:"
$searchList = "file:old results.txt
file:../archived/old results.txt"
Notes
•File paths can be edited as text.
•To create a generic, cross-platform file path, begin the file path with the word file.
•To create platform-specific file paths, begin the file path with either filemac or filewin.
FileMaker Pro only searches the platform-specific file path that corresponds to the operating
system on which the FileMaker Pro application is running.
•To create a file path for use with the Insert PDF script step or the Insert Picture script step,
begin the file path with image, imagemac, or imagewin.
•To create a file path for use with the Insert Audio/Video script step or the Insert QuickTime
script step, begin the file path with movie, moviemac, or moviewin.
To Path list entry Resolved path list
Specify a filename
only
file:testing/$fileName file:testing/test.xlsx
Specify one or more
directories in a path
file:$username/$fileName file:JohnSmith/test.xlsx
Specify absolute
paths or relative
paths, with various
path type prefixes
filewin:/$driveLetter/
$targetDir/contacts.txt
filemac:../$targetDir/contacts
filewin:/G:/Documents/
Clients/contacts.txt
filemac:../Documents/
Clients/contacts
Specify a path type
prefix dynamically or
as part of a longer
path
$chosenType:/$driveLetter/
$targetDir
$$source/$fileName
filewin:/G:/Documents/
Clients
file:Documents/2014/demo
files/test.xlsx
Specify one or more
complete paths
$searchList file:old results.txt
file:../archived/old
results.txt
Specify a directory
(not a file)
file:$targetDir/
$$source/
file:$targetDir/$username/
file:Documents/Clients/
file:Documents/2014/demo
files/
file:Documents/Clients/
JohnSmith/

Creating a database
FILEMAKER PRO HELP 202
•To access a file located on a shared Windows volume, use the network path format. This
format is only compatible with shared Windows volumes. It is not compatible with shared
OS X volumes or FileMaker Network sharing.
•FileMaker does not recommend using an asterisk (*) as a wildcard character in network file
paths as it slows FileMaker network traffic. When possible, replace an asterisk with the
appropriate IP address or use variables in file paths. If you have converted a database from
a previous version of FileMaker Pro, review the converted data sources and replace any
asterisks with known IP addresses or network file paths.
•Variables are only supported in script steps that use stored file paths.
•Variables are not supported in file paths that are stored in container fields.
•Variables are not supported in FileMaker data sources. For more information on data
sources, see Editing external FileMaker data sources.
•Use the following characters as separators in a file path list: "/", ":", or carriage return.
Using variables
In FileMaker Pro, you can use variables:
•in file paths (see Creating file paths)
•in scripting (see Set Variable script step)
•in calculations (see Let function)
•in find requests that you create and edit in the Edit Find Request dialog box (see Specify
Find Requests and Edit Find Request dialog boxes)
•on layouts as merge variables (see Inserting merge variables onto a layout)
Variables add flexibility and portability to your database, and can be used instead of global fields in
your database schema.
Using the Set Variable script step or the Let function, you can create local and global variables. The
scope of local and global variables is limited to the current file.
•A local variable can only be used in script steps in the currently executing script. The value
in a local variable is cleared when the script exits. Local variables are prefixed with $.
•A global variable can be used in a calculation or script anywhere in a file, for example, other
scripts or file paths. The value of a global variable is not cleared until the file is closed. Prefix
global variables with $$.
•Local and global variables (or even two local variables in different scripts) can have the
same name but they are treated as different variables and can store different values.
Anywhere that you specify a path to a file or folder, you can use variables separated by "/", ":", or
carriage return.
Variables let you specify file or folder paths dynamically in the following script steps:
•Convert File
•Export Field Contents
•Export Records
•Import Records
•Insert Audio/Video
•Insert File
•Insert PDF

Creating a database
FILEMAKER PRO HELP 203
•Insert Picture
•Insert QuickTime
•Recover File
•Save a Copy as
•Save Records as Excel
•Save Records as PDF
•Send DDE Execute
•Send Event
•Send Mail (Attach File option)
Examples of using variables in file paths
Assume the following variables:
$fileName = "test.xlsx"
$username = "JohnSmith"
$searchList = "file:old results.txt
file:../archived/old results.txt"
Notes
•Variables are only supported in script steps that use stored file paths.
•Variables are not supported in file paths that are stored in container fields.
•Variables are not supported in FileMaker data source references.
•The data type of a variable is determined dynamically based on the assigned data. The
default data type is text.
Working with formulas and functions
A formula calculates a single value based on constants (such as 1.07 or “hello”), operators (such as
“+” or “>”), and field references (such as Subtotal or InvoiceTotal) you enter. For example, if sales
tax in your area is 7% and you have a field named Subtotal, you could create a field named
InvoiceTotal that gets the value of the formula Subtotal * 1.07.
If a formula is especially common or popular, FileMaker Pro gives it a name and defines exactly how
you should use it. A named and predefined formula is called a function. For example, if you want to
find the average of some test scores, you could write your own formula to add them all and divide by
the total number of scores. A simpler approach would be to use the function named Average and
follow the rules defined for its use.
Related topics
Functions reference (category list)
To Path list entry Resolved path list
Specify one or more
directories in a path
file:$username/$fileName file:JohnSmith/test.xlsx
Specify one or more
complete paths
$searchList file:old results.txt
file:../archived/old
results.txt

Creating a database
FILEMAKER PRO HELP 204
Functions reference (alphabetical list)
About functions
A function is a predefined, named formula that performs a specific calculation and returns a single,
specific value.
Most functions include three basic parts:
•the function
•a set of parentheses, if the function takes parameters
•the parameters required by the function
Each function returns a result of field type text, number, date, time, timestamp, or container.
For information about where functions can be used, see About formulas.
Parameters
Function parameters can be constants (such as 1.07 or “hello”), field references (such as
InvoiceTotal), expressions (such as 1 + 12), or other functions (such as the NPV function). You can
use spaces before or after the parentheses used to enclose the parameters, but spaces are not
necessary. When a function requires more than one parameter, separate individual parameters with
a list separator, such as a semicolon.
Important See Design functions for information about literal text parameters.
Curly braces ({ }) surround optional parameters (for example, the Case function and Choose
function). An ellipsis (...) signifies that you can add more parameters, each separated by a
semicolon (for example, in aggregate functions). Double quotation marks (“ ”) indicate a text string.
This table shows examples of some FileMaker Pro functions.
Related topics
Functions reference (alphabetical list)
Aggregate functions
Date functions
Design functions
External functions
Financial functions
Get functions
Logical functions
Number functions
This function Returns
Length(“John”) 4, the number of characters in the text “John”
Round(SalesTax,2) The amount of sales tax rounded to two decimal places
Position(Name, “Mc”,1,1) A number representing the starting position of one text string within
another, in this case indicating the position of the first occurrence of
“Mc” in the Name field
Get( LastError ) A number representing the error (if any) in the most recently executed
script step in the currently running script
Sum(ExtendedPrice) The total of all the values in the repeating field ExtendedPrice

Creating a database
FILEMAKER PRO HELP 205
Repeating functions
Summary functions
Text functions
Text formatting functions
Time functions
Timestamp functions
Trigonometric functions
About formulas
Formulas perform specific operations on one or more values in a database file, and return a single
result.
Formulas can be used to define:
•a calculation field. See Defining calculation fields.
•a calculated value for an automatic entry into a field. See Defining automatic data entry.
•a calculation that evaluates to true or false for data validation. See Defining field validation.
•a calculated value that can be used to replace the values in a field (by using the Replace
Field Contents command in the Records menu or a script step). See Replacing the contents
of a field.
•calculations in some FileMaker script steps, such as the script steps If, Exit Loop If,
Set Field, Insert Calculated Result, and Replace Field Contents. See
Creating scripts to automate tasks.
•titles of custom menus and menu items in FileMaker Pro Advanced. See Defining custom
menus (FileMaker Pro Advanced).
Formulas can contain:
•constants - numbers, text, date, or time values that don’t change.
•operators - symbols that indicate how to combine or compare two or more values.
•functions - predefined, named formulas that perform specific calculations and return single,
specific values for each repetition.
•field references - fields in the same table or in a related table. A related field referenced in a
calculation has the syntax tablename::related field. See Working with related tables
and files.
Formula examples
•FirstName & “ ” & LastName returns the first and last name separated by a space.
For example, Michelle Cannon.
•SubTotal * .08 returns the value in the SubTotal field multiplied by .08.
Related topics
About functions
Functions reference (category list)
Functions reference (alphabetical list)
Using operators in formulas
Identifying text constants and special characters in formulas
Adding a new line to the results of a formula
Adding comments to a formula
Using a reserved word or symbol for a field or table name

Creating a database
FILEMAKER PRO HELP 206
Using operators in formulas
An operator is a symbol or instruction that manipulates expressions in a formula. For example, the
plus (+) operator tells FileMaker Pro to add one expression to another. FileMaker Pro has four types
of operators:
•Mathematical operators
•Comparison operators
•Logical operators
•Text operators
Note For information on using variables in formulas, see Using variables.
Order of evaluation
Operators are evaluated in the order they are listed below.
1. /* */, //
2. " ", \, ¶, ${ }
3. (, )
4. NOT
5. ^
6. *, /
7. +, -
8. &
9. =, ≠, >, <, ≥, ≤
10. AND
11. OR, XOR
Related topics
About formulas
Identifying text constants and special characters in formulas
Use opening and closing quotation marks to indicate the beginning and end of text constants.
Quotation marks without text between them indicate an empty value (no text).
Use backslashes to preserve special operator characters, such as double quotation marks or a
carriage return character, simply as characters within a string (instead of as operators).
Example
"\"Fred " & "and Jane\"" returns “Fred and Jane”.
Related topics
About formulas
Defining calculation fields
Text operators
Using operators in formulas
Functions reference (category list)

Creating a database
FILEMAKER PRO HELP 207
Functions reference (alphabetical list)
Adding a new line to the results of a formula
You can format the results of a formula by inserting carriage returns in your calculation.
To add a new line to the results of a formula:
1. With the database open, choose File menu > Manage > Database.
2. In the Manage Database dialog box, click the Fields tab.
3. If your database contains more than one table, select the appropriate table from the Table
list.
4. In the Fields tab of the Manage Database dialog box, select the calculation field, then click
Options.
5. In the Specify Calculation dialog box, click to insert the cursor in the place you want the line
to break.
6. Click the ¶ button (carriage return operator) to insert a line break.
See Defining calculation fields for information about the dialog box.
7. Click OK.
Note Type \¶ (backslash followed by a carriage return operator) to enter a carriage return
(paragraph) symbol instead of an actual line break.
Examples
Field1 & ¶ & Field2 returns:
Fred
Jane
when Field1 contains Fred and Field2 contains Jane.
"Fred ¶ Jane" returns:
Fred
Jane
Related topics
About formulas
About functions
Functions reference (category list)
Functions reference (alphabetical list)
Text operators
Using operators in formulas
Adding comments to a formula
For complex or infrequently used formulas, you can add comments to explain the details. Use C
style or C++ style comments, which you can enter anywhere in a formula.
C style comments start with the characters /* and finish with the first occurrence of the characters
*/. Your explanatory text appears between the two asterisk characters. Comments can begin on
one line and end several lines later. You can nest C style comments.

Creating a database
FILEMAKER PRO HELP 208
C++ style comments begin with the characters // and finish at the end of the line.
To add comments to a formula:
1. With the database open, choose File menu > Manage > Database.
2. In the Manage Database dialog box, click the Fields tab.
3. If your database contains more than one table, select the appropriate table from the Table
list.
4. In the Fields tab of the Manage Database dialog box, select the calculation field, then click
Options.
5. In the Specify Calculation dialog box, enter your comments.
See Defining calculation fields for information about the dialog box.
6. Click OK.
C style Example
Everything shown below can be entered inside a formula:
/* This is a calculation with C style nested and multi-line comments
/*----- It returns the title if it exists in a name -----*/
*/
Case(
PatternCount("MrMsMrs", LeftWords(Name, 1)), /* returns true if the first
word in fieldName matches anyone of the titles Mr, Ms or Mrs*/
LeftWords(Name, 1) /*extracts the title */
)
C++ style Example
Greeting & "!!" // returns Hello!! if field Greeting contains the string
"Hello"
Related topics
About formulas
About functions
Functions reference (category list)
Functions reference (alphabetical list)
Text operators
Using operators in formulas
Using a reserved word or symbol for a field or table name
FileMaker Pro reserves the use of some words and symbols, including:
•The names of functions that have no arguments such as Pi or Random.
•Predefined parameters of some functions such as the Roman and Greek font scripts for the
TextFont function.
•Some keywords and symbols. See About naming fields for some guidelines.

Creating a database
FILEMAKER PRO HELP 209
Avoid using these words and symbols in field names and table names, because the names become
difficult to refer to in calculations.
If one of your field names or table names is a reserved word or contains reserved symbol, you must
put the characters ${ } around the name when it appears in a function.
Tip When you double-click to choose a field for a calculation, FileMaker Pro automatically wraps
the characters ${ } around field names that are reserved words or that contain reserved symbols.
Examples
${A + B} returns the contents of a field named A + B.
${.123} returns the contents of a field named .123.
${Pi} returns the contents of a field named Pi.
Note During file conversion, FileMaker Pro uses the characters ${ } to enclose field names that
conflict with reserved words and symbols.
Related topics
About formulas
Defining calculation fields
Text operators
Using operators in formulas
Functions reference (category list)
Functions reference (alphabetical list)
Getting the contents of a repetition in a repeating field
To find the contents of a particular repetition in a repeating field, use the GetRepetition function
(see GetRepetition function) or use square brackets [ ] as array operators (see below).
Format
repeatingField[number]
Parameters
repeatingField - any repeating field
number - the field repetition number
Data type returned
text, number, date, time, timestamp, container
Description
Returns the contents of the repeating field specified by number.
Examples
ParcelBids is a field defined to repeat with ten values and contains the values 2500, 1200, and
1500.
ParcelBids[2] returns 1200.
ParcelBids[5] returns nothing.

Creating a database
FILEMAKER PRO HELP 210
Related topics
Functions reference (category list)
Functions reference (alphabetical list)
About formulas
About functions
Defining calculation fields
Using operators in formulas
Working with plug-ins
C or C++ programmers familiar with calculations in FileMaker Pro and FileMaker Pro Advanced can
create plug-ins that extend the feature set of FileMaker Pro.
This section describes how to:
•Create plug-ins and make them available to users.
•Install plug-ins in solution files.
•Set up solution files to check plug-in version information and update plug-ins automatically,
if needed.
Creating custom plug-ins
If you are a C or C++ programmer and familiar with calculations in FileMaker Pro and
FileMaker Pro Advanced, you can create plug-ins that extend the feature set of the FileMaker
application. The plug-ins can take advantage of recursion and looping or hook into other
programming interfaces.
To use plug-ins, FileMaker Pro users need to allow solution files to install plug-ins and enable plug-
ins. For FileMaker Server-hosted files, the server administrator needs to allow the Install Plug-In File
script step to update FileMaker Server plug-ins in the Server Admin Console.
Note Plug-ins are not supported in FileMaker Go.
To see an example plug-in, go to http://www.filemaker.com/downloads.
Follow these general steps to prepare your custom plug-ins:
1. Using C or C++, create a plug-in file.
In Windows, the plug-in extension must be .fmx. In OS X, the plug-in extension must be
.fmplugin.
2. Compile and test the plug-in.
3. Install the compiled plug-in file in a container field in your FileMaker solution. See Installing
plug-ins.
4. Optionally, set up the solution file to check the version of installed plug-ins and update them,
if needed. See Updating plug-ins.
To make plug-ins available in a file, instruct users to:
1. Enable your plug-ins in the Preferences dialog box in FileMaker Pro. See Setting plug-in
preferences.
2. Click Configure and define or edit a calculation field to access external functions provided
by the plug-in, if required.
3. In the Specify Calculation dialog box, choose one of the functions provided by the plug-in as
the calculation formula.

Creating a database
FILEMAKER PRO HELP 211
Note To display all available external functions, select External functions from the View list.
4. If you want plug-in updates to be installed automatically, ensure Allow Solutions to Install
Files is selected.
See Installing plug-ins.
Note For security reasons, system administrators might require users to disable Allow
Solutions to Install Files. Contact the system administrator at your customer site for more
information.
Related topics
External functions
Installing plug-ins
Database developers can insert plug-in files in container fields, then use scripts and calculations to
install and update plug-ins.
Note If you are concerned that unwanted plug-ins might be installed when you use solution files on
a trial basis, you can disable the Allow Solutions to Install Files option in the plug-in preferences.
However, be aware that the solution file may not behave as intended if you don’t allow required plug-
ins to install. See Setting plug-in preferences.
To install a plug-in file:
1. Create a container field. See About container fields.
2. Do one of the following:
•In Browse mode, select the container field, choose Insert menu > Insert File, select a
plug-in file, then click Open.
•Write a script and use the Insert File script step to place the plug-in the container field.
See Creating and editing scripts and Insert File.
3. Create a script and use the Install Plug-In File script step to specify the container field as the
target field. See Install Plug-In File.
4. Run the script to install the plug-in.
FileMaker Pro installs plug-ins in the following locations:
Tip You can use the Get(InstalledFMPlugins) function to identify the version of the installed plugin
and compare it with the version of the plug-in stored in the container field, then update the plug-in by
reinstalling, if necessary. See Updating plug-ins and Get(InstalledFMPlugins).
Operating
system Product Plug-ins are installed in this folder
Windows 7 or
Windows 8
FileMaker Pro C:\users\user_name\AppData\Local\FileMaker\FileMaker
Pro\13.0\Extensions\
FileMaker Pro
Advanced
C:\users\user_name\AppData\Local\FileMaker\FileMaker
Pro Advanced\13.0\Extensions\
OS X FileMaker Pro Macintosh HD/Users/user_name/Library/Application
Support/FileMaker/FileMaker Pro/13.0/Extensions
FileMaker Pro
Advanced
Macintosh HD/Users/user_name/Library/Application
Support/FileMaker/FileMaker Pro Advanced/13.0/
Extensions

Creating a database
FILEMAKER PRO HELP 212
Notes
•If a plug-in has been disabled in the client’s plug-in preferences, it will install but will not be
accessible to FileMaker Pro until it is manually enabled by the user.
•You cannot install multiple versions of a plug-in to support multiple versions of
FileMaker Pro.
•If your solution requires a specific plug-in version that cannot be shared with other versions
of FileMaker Pro, instruct users to manually place plug-ins in the Extensions folder inside
the FileMaker Pro, FileMaker Pro Advanced, or FileMaker runtime folder.
•If a plug-in is intended for all installed versions of FileMaker Pro, you must manually install
the plug-in in each user’s Application Support/FileMaker/Extensions folder.
•The search order for loading plug-ins starts with the Extensions folder inside the
FileMaker Pro application folder, followed by the folder that the Install Plug-In File script step
uses. The last location checked is the Application Support/FileMaker/Extensions folder.
•FileMaker Pro will not load a plug-in if it has already loaded a plug-in with the same plug-in
ID.
•OS X: Plug-ins stored in container fields are compressed by default.
Related topics
Creating custom plug-ins
Updating plug-ins
You can use calculations and scripts to check the version of installed plug-ins, then update plug-ins
with plug-ins stored in container fields in a FileMaker Pro file. To see examples of script and
calculation syntax, see Plug-in update example.
To update plug-ins:
1. In the solution file, create a table to store plug-in information.
2. In the table, define:
•a text field for the plug-in name
•a text field to store the description of the plug-in
•a number field for the plug-in version currently required by the database
•unstored calculation fields for the version and enabled state of the plug-in that is installed in
the FileMaker Pro file.
•a container field to store the plug-in file
3. Create a layout in which to display the stored plug-in and, optionally, descriptive information
about the plug-in, then add to the layout the appropriate fields you created in step 2.
Note While you need only the container field on the layout, you might consider adding the plug-
in name, description, and version number fields so you have access to this information.
4. Create a script that compares the version of the installed plug-in with the version of the
required plug-in, then uses the Install Plug-In script step to update the plug-in, if needed.
5. Create a script that alerts users to possible plug-in installation error conditions, if the plug-in
cannot install.
6. Create a script that checks to ensure the installed plug-in is enabled.

Creating a database
FILEMAKER PRO HELP 213
7. Create a start-up script that references the above scripts, in their script order, when a user
opens the database.
Notes
•Clients must be running FileMaker Pro 12 or later to update plug-ins using this method.
•For plug-ins to install, the Allow Solutions to Install Files option must be selected in the
client’s Plug-in preferences. See Setting plug-in preferences.
•If a plug-in has been disabled in the client’s Plug-in preferences, it will install but will not be
accessible until it is manually enabled by the user.
•Only one plug-in can be stored in each container field, but you can view all plug-in
information by creating multiple plug-in container fields on a single layout.
Related topics
Creating custom plug-ins
Installing plug-ins
Get(InstalledFMPlugins)
Install Plug-In File
Plug-in update example
The following example compares the version of an installed plug-in to the version located in a
container field in the FileMaker Pro file and updates the plug-in, if necessary.
1. In the solution file, create a table named Plugin Update to store plug-in information.
2. Define the following fields:
3. Create a layout named Plugin Update Information and add to it the fields you defined in
step 2.
4. Create the following script and name it Install Plug-in:
Set Error Capture [On]
Install Plug-In File [Plugin Update::Plug-in File]
#
#Deal with errors
If [Get(LastError) ≠ 0]
If [Get(LastError) = 3]
Show Custom Dialog [Plugin Update::Plugin File & " could not be
installed.
Field name Field type
Plugin Name text
Required Plugin Version number
Installed Plugin Version calculation (unstored). For example code, see Client plug-in
version calculation.
Installed Plugin State calculation (unstored). For example code, see Client plug-in
enabled state calculation.
Plugin File container
Creating a database
FILEMAKER PRO HELP 214
Ensure Allow Solutions to Install Files is selected in the
FileMaker Pro Plug-in preferences."
Else If [Get(LastError) = 1550]
Show Custom Dialog [Plugin Update::Plugin File & " was installed
but could not be initialized."]
Else If [Get(LastError) = 1551]
Show Custom Dialog [Plugin Update::Plugin File & " could not be
installed."]
Else
Show Custom Dialog ["A general error " & Get(LastError) & " occured
when installing " & Plugin Update::Plugin File]
End If
End If
5. Create the following script and name it Check Plug-in Versions.
Go to Layout [“Plugin Update Information”]
Go to Record/Request/page [First]
Loop
If [Plugin Update::Installed Plugin Version <
Plugin Update::Required Plugin Version]
#Plug-in needs to be either installed or updated.
Perform script [“Install plug-in”]
End If
Go to Record/Request/page [Next; Exit after last]
End Loop
6. Create the following script and name it Check If Enabled:
Set Error Capture [On]
Perform Find [Restore]
#Find for "Enabled" in the Installed Plugin State field
If[Get(FoundCount) ≠ 0]
Show Custom Dialog ["Some required plug-ins are not enabled. Ensure
Allow Solutions to Install Files is selected in the FileMaker Pro Plug-
in preferences."
End If
7. Create a start-up script named Plugin Update Script that references the above scripts in
order when the database opens:
Perform Script ["Check Plug-in Versions"]
Perform Script ["Check If Enabled”]
Go to Layout [original layout]


Creating and managing layouts and reports
FILEMAKER PRO HELP 216
Creating and managing layouts and reports
FileMaker Pro layouts determine how information is organized for viewing, printing, reporting,
finding, and entering data. Layouts don’t store your data—they just display it.
Database files can have many different layouts, which display data in a variety of ways. Within one
database file, you can design separate layouts for entering data, reporting summaries, printing
mailing labels, displaying data graphically in charts, working with a database in a web browser or on
a touch device, and so on. You can change a layout’s design without affecting the data or other
layouts for the file. When you change the data in a field, the changes are reflected in the same field
on all the layouts in the database.
In a layout, you:
•choose which fields to display
•arrange and format fields
•add or modify field labels
•create reports, for example, to group or summarize data
•specify how records are printed
•add graphics and text to add emphasis and interest
•specify dimensions for a layout, according to how it will be viewed or printed
When you create a database file (without using one of the Starter Solution files shipped with
FileMaker Pro), FileMaker Pro automatically creates a layout for the initial table in the file, and for
each newly added table that contains fields.
You create layouts and reports by using the New Layout/Report assistant, which guides you through
creating the layout or report according to options you choose, such as the type of device the layout
will display on, the default view for the layout, the layout fields, and the way data is grouped and
sorted. See Creating a layout.
After creating a layout, you can do things like duplicate, delete, or rename it, or organize layouts into
folders. You can also set options to print or preview records in columns, and to control which views
are available to view or print the layout.
Related topics
Best practices for designing layouts
Tips for designing layouts
Creating dynamic reports in Table View
Sorting records by subsummary values
Editing objects, layout parts, and the layout background
About FileMaker Pro modes
Creating a layout
The New Layout/Report assistant helps you design several types of layouts and reports to display
on different types of devices (such as laptop computer screens or touch device screens), for
different purposes (such as browsing records, entering data, or printing reports, mailing labels, or
envelopes), and in different views (Form View, Table View, and List View). For details on each layout
type, see About layout types.
To create a layout:
1. In Layout mode, click New Layout/Report in the status toolbar.

Creating and managing layouts and reports
FILEMAKER PRO HELP 217
Or, in Browse mode, choose File menu > Manage > Layouts, and click New.
You see the New Layout/Report assistant, which helps you create the type of layout you want.
As you make your choices, additional options are presented to you. For some types of layouts,
such as labels, envelopes, and reports, you see additional panels.
2. When you have finished making your choices, click Finish to create the layout.
3. For layouts designed for computers or touch devices, add fields to the layout.
See About defining database fields.
4. If you intend to print a report in landscape orientation or on a special paper size, choose File
menu > Print Setup (Windows) or File menu > Page Setup (OS X), confirm the orientation
and paper settings, then click OK.
In Preview mode, you can also click Print Setup (Windows) or Page Setup (OS X) in the status
toolbar.
Modified Print Setup and Page Setup settings affect all other layouts in the current file, so you
may need to change these settings later to print other layouts properly.
Notes
•Some FileMaker Pro layouts are divided into layout parts, which are areas on the layout that
control how and where to display and print data, text, and graphics. FileMaker Pro includes
the body, header, and footer parts as needed on a layout depending on the choices you
make in the New Layout/Report assistant. Reports with grouped and totaled data also have
subsummary parts, grand summary parts, or both. You have complete control over adding,
removing, or modifying layout parts after you complete the assistant. See Working with
layout parts.
•Each layout that you create is assigned a layout theme. If the new layout is the same type
(Computer, Touch Device, or Printer) as the current layout, the same theme is assigned to
the new layout; if the new layout is a different type, the appropriate default theme is
assigned. The default theme for Computer layouts is Enlightened, the default theme for
To Do this
See an onscreen Help topic that explains
the choices in the current panel
Windows: Press F1 (Windows) or Command-?
(OS X).
Note If the layout you’re creating has additional
panels (such as for labels, envelopes, or
reports), you can also click (Windows) or
(OS X) to get information about those
panels.
Accept the settings in the panel and
continue to the next panel (available for
labels, envelopes, and report layouts)
Click Continue or Next.
Accept the settings in the panel but go
back to the previous panel (available for
labels, envelopes, and report layouts)
Click Back.
Close the assistant without saving any of
your choices
Click Cancel.
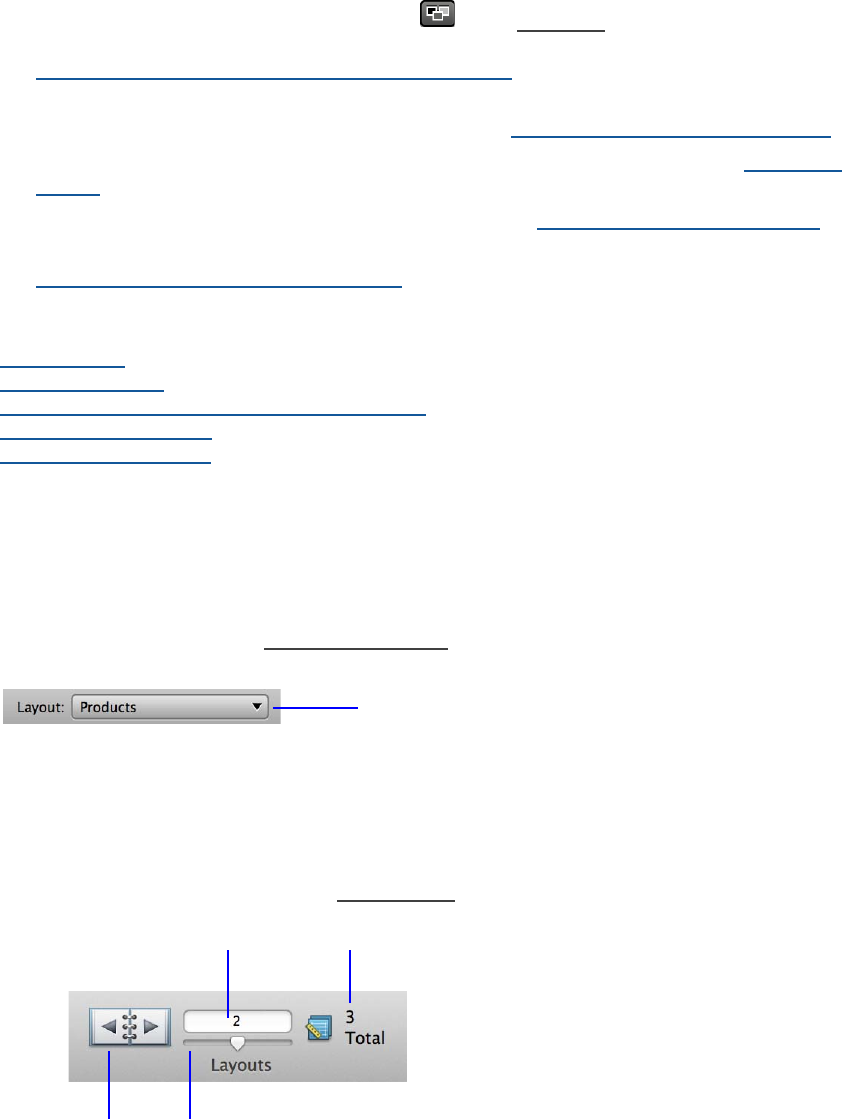
Creating and managing layouts and reports
FILEMAKER PRO HELP 218
Touch Device layouts is Enlightened Touch, and the default theme for Printer layouts is
Enlightened Print.
•You can change a layout theme by clicking in the layout bar in Layout mode. You can
also create object, layout part, and layout background styles and save them to a theme (see
Creating new layout object, part, or background styles).
•If you include a field on the layout from another table or database (a related field), you
should understand relational database concepts. See Working with related tables and files.
•You can display a specified layout every time you open a FileMaker Pro file. See Setting file
options.
•To add fields to an existing label or envelope layout, see Placing merge fields on a layout.
•You can duplicate an existing layout and customize the new one to fit your needs. See
Duplicating, deleting, or renaming layouts.
Related topics
Printing labels
Printing envelopes
Considerations when you create a Report layout
Adding fields to a layout
Troubleshooting layouts
Switching between layouts
Once you have created more than one layout, you can easily switch between them.
To switch between layouts in any mode:
•Choose a layout from the Layout pop-up menu.
•Choose View menu > Go to Layout, and choose the layout name you want.
To switch between layouts in Layout mode:
•Use the Layout pop-up menu.
•Use the navigation controls in the status toolbar.
Layout pop-up menu
Current layout number Total number of layouts
Book Slider
Creating and managing layouts and reports
FILEMAKER PRO HELP 219
•Choose Layouts menu > Go to Layout.
Note To choose a layout to appear whenever you open the current file, choose File menu > File
Options. In the Open tab, select Switch to layout. In the Specify Layout dialog box, choose the
layout you want. See Setting file options.
Managing layouts
You can manage all your layouts in the Manage Layouts dialog box. For example, you can create
folders to group layouts; rename, duplicate, and delete layouts; and choose whether to display
layouts and folders in the Layout pop-up menu.
To manage layouts:
1. Choose File menu > Manage > Layouts.
2. In the Manage Layouts dialog box, perform the tasks you want.
Note A badge on the icon next to a layout name indicates that a layout script trigger has
been set for the layout.
To In the status toolbar, do this
Go to the next layout Click the right arrow in the book.
Go to the previous layout Click the left arrow in the book.
Move quickly through layouts Drag the slider left or right.
Go to a specific layout Click the current layout number, type the layout number you
want, then press Enter (Windows) or Return (OS X).
Or press Esc, type the layout number, then press Enter
(Windows) or Return (OS X).
To On the Layouts menu, do this
Go to the next layout Choose Go to Layout > Next.
Go to the previous layout Choose Go to Layout > Previous.
Go to a specific layout Choose Go to Layout > Go To, type the layout number you
want in the Go to layout field and click OK.
Or choose a layout name from the list.
To Do this
Create a new layout Click New to display the New Layout/Report assistant. See
Creating a layout.
Create a layout
folder
Click the arrow next to New and choose Folder. In the Edit
Folder dialog box, type a folder name, and click OK. The new
folder appears in the Manage Layouts dialog box at the current
position. A folder appears as a submenu name in the Layout
pop-up menu.

Creating and managing layouts and reports
FILEMAKER PRO HELP 220
3. To include or exclude a layout, folder, or separator line in the Layout pop-up menu, select
the checkbox next to the item in the list, then select Include in layout menus.(See also
Reordering and excluding layouts in the Layout pop-up menu.)
When you create a layout, it is automatically added to the Layout pop-up menu.
Expand or collapse
a folder
Click the expand/collapse icon to the left of the folder name, or
press the + or - key (Windows) or the Right Arrow or Left Arrow
key (OS X).
Duplicate, delete, or
rename a layout
See Duplicating, deleting, or renaming layouts.
Rename a folder Double-click the folder to rename. Type a new name in the Edit
Folder dialog box, and click OK.
Duplicate a folder Select the folder, and click Duplicate. The folder name is
duplicated, with Copy appended to it, and all its layouts and
subfolders are duplicated.
Move a layout into a
folder
Expand the folder you want (see above). Use the double arrow
to the left of the layout to drag it under the expanded folder. If
the layout is at the end of the folder, use the four-pointed arrow
to indent the layout under the folder name. The layout appears
in the selected folder’s submenu in the Layout pop-up menu.
To move a layout out of a folder, with the folder expanded, use
the four-pointed arrow to drag the layout to the left, indicating
that it’s out of the folder.
Delete a folder Select the folder to delete, and click Delete, then click Delete in
the alert message. You can’t undo deleting a folder. The folder
and all its layouts and subfolders are deleted.
Reorder a layout or
folder in the list and
have those changes
appear in the Layout
pop-up menu
See Reordering and excluding layouts in the Layout pop-up
menu.
View folders and
their contents by
folder name
In the list in the upper left of the dialog box, choose a folder
name. You see the folder’s layouts and subfolders.
To show all layouts, choose Show All.
Filter the list of
folders and layouts
by name
In the box in the upper right of the dialog box, type all or part of
a folder or layout name. The list filters as you type: typing a
layout name displays the layout in the list, and typing a folder
name displays the folder and its layouts and subfolders.
To show all folders and layouts, clear the box.
Open a layout in a
document window
Select the layout in the list, and click Open.
Create a separator
line for grouping
items in the Layout
pop-up menu
See Reordering and excluding layouts in the Layout pop-up
menu.
To Do this

Creating and managing layouts and reports
FILEMAKER PRO HELP 221
Note Be sure to select each item (including a folder’s layouts and subfolders) that you want to
appear in the Layout pop-up menu. Only the items you select are displayed.
4. When you are finished, close the Manage Layouts dialog box.
Notes
•Use Ctrl-click (Windows) or Command-click (OS X) to select multiple layouts and folders.
You can duplicate and delete multiple layouts and folders, and you can open multiple
layouts.
•The Menu Set column of the Manage Layouts dialog box displays the menu set associated
with each layout. You create menu sets using the Custom Menus feature, available only
with FileMaker Pro Advanced. See Defining custom menus (FileMaker Pro Advanced) or
the FILEMAKER PRO ADVANCED FEATURES GUIDE.
Duplicating, deleting, or renaming layouts
You can duplicate, delete, and rename layouts using the Manage Layouts dialog box.
To duplicate, delete, or rename layouts:
1. In Layout mode, save the layout that you want to duplicate, delete, or rename.
2. Choose File menu > Manage > Layouts.
3. In the Manage Layouts dialog box, make the changes you want.
Notes
•A file must have at least one layout, so you can’t delete the last one.
•Layout names do not have to be unique.
•You can't copy a complete layout to another FileMaker Pro file, but you can copy and paste
all of a layout’s objects into a layout in another file. Select the layout objects you want to
copy, and choose Edit menu > Copy. Then switch to the layout in the other file, and choose
Edit menu > Paste. If field names are not identical in both files, you will need to respecify
To Do this
Duplicate a layout Select the layout, and click Duplicate. The layout name is
duplicated, with Copy appended to it.
Note If you have unsaved changes in the layout you’re
duplicating, you’re asked if you want to save the changes.
Click Save to save the changes in the original layout and
include them in the duplicated layout. Click Don’t Save to
discard the changes to the original layout (and no changes
will be included in the duplicated layout). If you're
duplicating multiple open layouts with unsaved changes,
you see an alert for each layout. Clicking Cancel cancels
duplicating the current and any other open layouts.
Delete a layout Select the layout, and click Delete, then click Delete in the
alert message. You can’t undo deleting a layout.
Rename a layout Double-click the layout name in the list (or select the layout
name and click Edit) to display the Layout Setup dialog box.
For Layout Name, type a descriptive name, then click OK.

Creating and managing layouts and reports
FILEMAKER PRO HELP 222
the field you want each field object to display. For more information, see and Copying,
duplicating, and deleting objects and Placing and removing fields on a layout.
•You can also duplicate, delete, or rename a layout by choosing from the Layouts menu in
Layout mode.
Saving and reverting layout changes
As you design a layout in Layout mode, save your work early and often. Don’t wait until you finish
working. If you want to throw away the changes you’ve made and start again, you can easily revert
to the last-saved version of a layout.
Notes
•You can undo and redo changes to layouts (such as changing a layout part or moving or
resizing layout objects), even after you’ve saved the layout or previewed the layout in
Browse mode. You can continue undoing and redoing changes until you switch to another
layout or close the window, or until another user or window changes the layout or theme in a
shared file.
•You can set an application preference to save your layout changes automatically when you
leave Layout mode. See Setting layout preferences.
•It’s a good idea to duplicate a layout before you make extensive changes.
Related topics
Saving and copying files
Reordering and excluding layouts in the Layout pop-up menu
In Layout mode, you can change the order in which layouts and folders are listed in the Layout pop-
up menu. You can also add separator lines that group layouts, and you can prevent a layout from
appearing in the Layout pop-up menu.
To In Layout mode, do this
Save changes made to
the current layout
Click Save Layout in the layout bar, or choose Layouts menu > Save
Layout.
Revert to the last-saved
version of a layout
Click Revert in the layout bar, or choose Layouts menu > Revert Layout.
Revert the last change
to a layout
Choose Edit menu > Undo.
Restore the last change
to a layout
Choose Edit menu > Redo.
To Do this
Change the layout order
or reorder folders in the
Layout pop-up menu
Choose Manage Layouts from the Layout pop-up menu. In the list, drag the
double arrow to the left of the layout or folder up or down. If you’re moving a
folder, all its layouts and subfolders move with the folder. A folder appears as a
submenu name in the Layout pop-up menu.

Creating and managing layouts and reports
FILEMAKER PRO HELP 223
Note You can also use the Layout Setup dialog box to include or exclude an item. From the Layout
pop-up menu, choose the layout, folder, or separator line to include or exclude. Click Layout Setup
in the layout bar, select or clear Include in layout menus, then click OK.
Editing layouts
After you’ve created a layout, you can choose how it will be displayed and used. You can:
•choose which views the layout can be shown in, and choose the default view to appear
whenever you first open the layout
•choose the default table from which records are displayed
•choose how to save records that are added or changed
•show or hide field frames in Browse and Find modes
•show field borders and fill on only the current record in List View
•associate a menu set with the layout, which appears when the layout is active
•change the theme of the layout
•change the width of the layout
You make most of these changes in the Layout Setup dialog box, which is available from the layout
bar in Layout mode.
Tip You can also enable quick find for a layout, which performs searches on fields you specify. See
Configuring quick find.
Setting up form, list, and table views for a layout
FileMaker Pro provides three different views of each layout: form, list, and table. When you change
views, you change the way records display or print.
To specify which views are available in other modes:
1. In Layout mode, choose the layout you want to work with from the Layout pop-up menu.
Create a separator line
for grouping layouts and
folders in the Layout
pop-up menu
Choose Manage Layouts from the Layout pop-up menu. In the list, select the
layout above which you want the separator to appear. Then click the arrow
next to New, and choose Separator.
Include or exclude
layouts, folders, or
separator lines in the
Layout pop-up menu in
Browse, Find, and
Preview modes
Note In Layout mode,
all items are displayed in
the Layout pop-up
menu, even the
excluded ones.
Choose Manage Layouts from the Layout pop-up menu. In the list, select the
checkbox next to a layout or folder name, or a separator line. To include the
item, select Include in layout menus. To exclude the item, clear this option.
A check mark appears next to the name of each item that's included in the
Layout pop-up menu.
Note Be sure to select each item (including a folder’s layouts and subfolders)
that you want to appear in the Layout pop-up menu. Only the items you select
are displayed.
To Do this

Creating and managing layouts and reports
FILEMAKER PRO HELP 224
2. Click Layout Setup in the layout bar.
You can also click the name of the layout’s current table.
3. In the Layout Setup dialog box, click the Views tab, then select one or more views.
Unless you change the default settings, FileMaker Pro enables all views.
4. Click Properties to specify the Table View options you want.
The following table describes the options you can specify in the Table View Properties dialog
box. When you’re finished specifying Table View options, click OK.
5. For Default view, choose the view to display whenever you first open the layout.
6. Click OK.
Notes
•You can view data that is in subsummary parts in Table View, List View, Preview mode, or in
a printed report when records are sorted by break fields.
•If Include column headers is selected, users can right-click the column heading in Browse
mode and choose the appropriate command to define fields, hide or delete fields, create a
dynamic report, or reset the Table View. See Working with data in Table View.
•To change the background color of the table, make sure the fields are transparent, then
change the color of the body part. The column headers pick up their font attributes (except
When you select This View menu item is enabled in Browse and Find modes
Form View View as Form
List View View as List
Table View View as Table
To Do this
Specify table grid settings Select Horizontal, Vertical (or both), choose a color for the
grid, and a style for the grid lines.
Specify whether FileMaker Pro
displays the header or footer part
Select Include header part, Include footer part, or both.
These settings only matter if you have defined header and
footer parts for the layout, and are only in effect in Table View.
Specify whether FileMaker Pro
displays column headers and how
they behave
Select Include column headers (which display the field
names).
To allow users to resize column widths by dragging column
boundaries in Browse mode or Find mode, also select
Resizable columns.
To allow users to reorder one or more columns by dragging in
Browse mode or Find mode, also select Reorderable columns.
Specify a custom row height (all
rows are the same height)
Select Use custom height, then choose a unit of measure and
type a value.
When this option is cleared, FileMaker Pro adjusts the row
height to accommodate the largest font size defined for any of
the fields on the layout.

Creating and managing layouts and reports
FILEMAKER PRO HELP 225
the font color, which is always black) from the first field in the tab order. You can't modify the
background of the column headers.
•If Include column headers is selected, users can resize columns by right-clicking the
column header and choosing Table View > Set Column Width. This shortcut menu
command is available even if Resizable columns is cleared in the Table View Properties
dialog box.
•FileMaker Pro uses the tab order to determine the default order of the columns in Table
View. You can reorder the columns if Reorderable columns is selected in the Table View
Properties dialog box. For information on reordering columns, see Viewing records as a
form, list, or table.
•For new layouts that do not use the Classic theme, by default, the current (or active) record
in List View is displayed with a different fill from the other records. To indicate the current
record with a solid vertical bar along the left side of the record, select Show current record
indicator in List View in the General tab of the Layout Setup dialog box. To have the
current record appear without a different fill, see Changing a layout part.
For layouts that were converted from FileMaker Pro 12 or earlier, by default the current record is
indicated with a solid vertical bar.
Changing the table that a layout shows
When you create a layout in a database file that contains multiple tables, you choose the table from
which you want records displayed in that layout. You can later change the underlying table if
necessary.
To change the table that a layout shows:
1. In Layout mode, choose the layout you want to work with from the Layout pop-up menu.
2. Click Layout Setup in the layout bar.
You can also click the name of the layout’s current table.
3. In the Layout Setup dialog box, choose a table from the Show records from list.
The Show records from list includes all the table occurrences that appear in the relationships
graph, including any tables added to the relationships graph from external data sources.
4. Click OK.
Setting the automatic record-saving option for a layout
When you make data entry changes to a record, FileMaker Pro normally saves these changes
automatically when you exit the record and display another record. If you prefer, you can set
FileMaker Pro to display a “Save changes to this record?” confirmation dialog box when exiting a
record in which data has been changed. This confirmation dialog box presents three options:
•Save: saves the record changes and exits the record
•Cancel: does not save the record changes or exit the record
•Don’t Save: discards the record changes and exits the record
You can set the usage of this confirmation dialog box on a layout-by-layout basis, enabling the
dialog box on certain layouts and disabling it on others.

Creating and managing layouts and reports
FILEMAKER PRO HELP 226
To set the automatic record-saving option for a layout:
1. In Layout mode, choose the layout you want to work with from the Layout pop-up menu.
2. Click Layout Setup in the layout bar.
You can also click the name of the layout’s current table.
3. In the Layout Setup dialog box, do one of the following:
•To save record changes automatically, select Save record changes automatically.
•To display a confirmation dialog box when exiting a record in which data has been
changed, clear Save record changes automatically.
4. Click OK.
Related topics
Adding and viewing data
Exporting the contents of a field
Showing or hiding field frames
You can set whether field frames appear when a record is active in Browse mode or Find mode.
Field frames outline each field on a layout with a dotted line so that fields are easy for users to see.
However, you may have added borders to field objects, which may make field frames unnecessary.
To show or hide field frames for a layout:
1. In Layout mode, choose the layout you want to work with from the Layout pop-up menu.
2. Click Layout Setup in the layout bar.
You can also click the name of the layout’s current table.
3. In the Layout Setup dialog box, do one of the following:
•Select Show field frames when record is active to show field frames.
•Clear Show field frames when record is active to hide field frames.
4. Click OK.
Notes
•Field frames only appear when a record is active, such as when you click in a field to edit it.
•When a field is active in Find mode, its field frame and badge disappear until you tab to or
click in another field.
Related topics
Adding borders, fill, and baselines to fields
Showing field borders and fill for the current record
If you have added borders or fill to a field, you can display the borders and fill on only the current
record or on all records in the field in List View and in reports. For information on adding borders or
background color or images, see Adding borders, fill, and baselines to fields.

Creating and managing layouts and reports
FILEMAKER PRO HELP 227
To show field borders and background fill on only the current record:
1. In Layout mode, choose the layout you want to work with from the Layout pop-up menu.
2. Click Layout Setup in the layout bar.
You see the Layout Setup dialog box.
3. To show field borders and background fill for only the current record in List View or a report,
select Delineate fields on current record only.
4. Click OK.
Notes
•If you select Delineate fields on current record only, borders and fill will show on the
current record in List View, but not when you print, print to PDF, or preview the records
being browsed. Borders and fill do print for all records in a field if the option is deselected.
•Fields in summary parts, header parts, and footer parts are styled like other text in these
layout parts, and do not display borders and fill.
•Summary fields do not display borders and fill, but will show the field frame when the field is
in the Focused display state.
•Delineate fields on current record only (displaying borders and fill on only the current
record) is not supported in FileMaker WebDirect. Borders and fill show on all records in
FileMaker WebDirect.
Specifying a menu set for a layout
For each layout, you can specify which menu set displays when a layout is active. A menu set is the
collection of menus that installs on the menu bar.
To specify a menu set for a layout:
1. In Layout mode, choose the layout you want to work with from the Layout pop-up menu.
2. Click Layout Setup in the layout bar.
You can also click the name of the layout’s current table.
3. In the Layout Setup dialog box, select a menu set from the Menu Set list.
4. Click OK.
Notes
•Choosing [File Default] maintains the default menu set specified for the file. To override the
default menu set for this layout, choose a different menu set from the list.
•If you have FileMaker Pro Advanced, you can choose Manage Custom Menus from the
Menu Set list to open the Manage Custom Menus dialog box. See Defining custom menus
(FileMaker Pro Advanced) or the FILEMAKER PRO ADVANCED FEATURES GUIDE.
Changing the theme of a layout
You can change the theme of an existing layout. When you change a layout’s theme, FileMaker Pro
applies the attributes of the new theme to all objects on the layout, with the following exceptions:

Creating and managing layouts and reports
FILEMAKER PRO HELP 228
•For objects containing text, the font color and font family change to the default style defined
in the theme. However, all other text properties, such as text size, are retained.
•Buttons created using versions of FileMaker Pro earlier than version 12 retain their original
formatting.
•If objects on the layout and the layout background are filled with an image, the image is
retained. However, layout parts filled with an image display the fill defined in the new theme.
To change the theme of a layout:
1. In Layout mode, display the layout you want to change.
You see the name of the current theme in the layout bar.
2. In the status toolbar, click to display the Change Theme dialog box.
Tip You can also choose Layouts menu > Change Theme.
3. Click OK to apply the selected theme to the current layout.
Notes
•The styles of layout objects are controlled by the layout’s theme. If the predesigned themes
do not display the object styles you want, you can create a custom theme. For information
about creating a theme, see Saving and managing layout themes.
•Any objects you add to a layout are formatted according to the new theme’s attributes. You
can use the Inspector to apply styles to objects or reformat the font and buttons after you
change the theme, or you can copy and paste font styles from the original text objects to
new text objects. See Copying formatting attributes between layout objects, parts, or
backgrounds.
•When you change the theme of a layout:
•custom styles applied to any objects on the layout are removed, unless you save
custom styles to the theme before changing the theme
•any unsaved changes to styles stored at the layout level are deleted (see Creating and
working with styles for layout objects, parts, and the layout background)
•If you change the theme of a layout and then undo the change, you have two levels of undo.
The first undo keeps the new theme but reveals any attributes previously applied to your
objects that were not saved as styles. The second undo reverts to how the layout looked
before you changed the theme.
•You might need to resize layout parts and layout objects after the theme is applied for the
layout to display properly. See Using tools to precisely position objects.
•If the current layout theme has a border, the border corresponds to the width of the layout. If
you resize the layout in Layout mode, the border resizes proportionally. To allow the layout
To Do this
Apply a theme from
this file
Select a theme in the Layout themes list to display a preview of
each theme.
Apply a theme from
another
FileMaker Pro file
Click Import Themes, choose the file containing the theme(s)
you want to import, and click Open. Select one or more themes
in the Import Themes dialog box, and click OK. Then select a
theme in the Layout themes list.

Creating and managing layouts and reports
FILEMAKER PRO HELP 229
border to resize in Browse mode when you resize the FileMaker Pro window, specify that
objects automatically resize horizontally on the layout. See Setting auto-resize options for
layout objects.
•Some themes have additional predefined styles for some objects. If you switch to a theme
that doesn’t support additional predefined styles, any objects formatted with additional
styles are reset to default styles. If you later switch to a theme that again supports additional
predefined styles, objects retain the default style setting. You can use the Styles tab in the
Inspector to reapply the additional predefined style. See About layout object, part, and
background styles.
•To make data easier to read in portal fields, consider using predefined styles named
Minimal. See Viewing and applying layout object, part, or background styles.
•Every layout is assigned a theme. If you want a layout to look similar to layouts created with
versions of FileMaker Pro earlier than version 12, under Basic, choose the Classic theme.
•Occasionally FileMaker Pro software updates include formatting changes for the predefined
themes. If a file uses an older version of a predefined theme and you have write permission
for the file, FileMaker Pro applies formatting changes automatically when you switch to
Layout mode, switch to a different layout, or change the layout's theme.
•If you’re creating a layout to be used with FileMaker Go, choose one of the Touch themes.
•If you’re creating a layout to be printed, choose one of the Print themes.
Changing the width of a layout
You can expand or reduce the width of a layout to accommodate more objects or eliminate blank
space on the layout. Making a layout wider helps you see the edge of the layout without resizing the
window.
To change the width of a layout: Drag the gray line on the right side of the layout.
Notes
•If the current layout theme has a border, the border corresponds to the width of the layout. If
you resize the layout in Layout mode, the border resizes proportionally. To allow the layout
border to resize in Browse mode when a user resizes the FileMaker Pro window, set objects
on the layout to automatically resize horizontally. See Setting auto-resize options for layout
objects.
•You can place objects on the gray area to the right of the layout. This lets you store objects
with a layout, yet prevent them from appearing in Browse, Find, and Preview modes.
Objects located in the gray area:
•are available for use in script steps.
•are right-anchored. (Auto-resize settings are ignored. If you move the object back onto
the layout, auto-resizing settings reactivate.)
•are skipped in the tab order.
•appear in dialog box lists and in Table View (field objects).
Working with layout parts
FileMaker Pro layouts are divided into layout parts, sections of the layout that determine how data in
a field is treated and displayed. By using parts, you can control how FileMaker Pro prints data, for
example:
Creating and managing layouts and reports
FILEMAKER PRO HELP 230
•once for each record
•only at the top of each page
•only before or after groups of sorted records (for example, to include a subtotal for each
group of records)
Each layout must have at least one part. Layout parts can contain fields, portals, buttons, text, charts
and other objects. In Layout mode, gray horizontal lines mark the division between layout parts (part
boundaries).
Part labels display horizontally or vertically on the left side of a layout.
To switch part labels between the vertical and horizontal position:
•click located at the bottom of the FileMaker Pro window
•Ctrl-click (Windows) or Command-click (OS X) a part label
Tip To display a vertical part label horizontally for a moment, hold down the mouse button on a
vertical part label. When you release the mouse, the label returns to the vertical position.
Parts are assigned styles that are defined by the theme of the layout. You can use the Inspector to
customize part styles. See Setting the fill, line style, and borders for objects, layout parts, and the
layout background.
Note The New Layout/Report assistant automatically creates the appropriate layout parts
depending on the choices you make. You can add, change, or delete layout parts after you finish the
assistant as needed. For information on creating layouts, see Creating a layout.
About layout part types
The following sections describe each layout part type.
Non-summary layout parts
Title header: Appears only once at the top of the first screen or page and replaces the normal
header (if one is specified). In reports, can be used to print a separate title page. You can have only
one title header in a layout.
Any fields in the title header preview and print data from the first record in the found set.
Header: Appears at the top of every screen or page (unless you add a title header, which
supersedes the header on the first page). Use for titles or column headings (in columnar reports).
You can have only one header in a layout.
Any fields in the header preview and print data from the first record on that page.
Body: Each object you put in the body, including fields, text objects, and graphics, appears once for
each record in the found set. You can have only one body in a layout.
Horizontal part label
Part boundaries

Creating and managing layouts and reports
FILEMAKER PRO HELP 231
Footer: Appears at the bottom of every screen or page (unless you add a title footer). You can have
only one footer in a layout.
Any fields in the footer preview and print data from the last record on that page.
Title footer: Appears only once at the bottom of the first screen or page and replaces the normal
footer (if one is specified). You can have only one title footer in a layout.
Any fields in the title footer preview and print data from the last record on the first page.
Note In Browse mode, the title header, header, footer and title footer display the data from the
active record.
Summary layout parts
To include summary data on a layout (for example, subtotals, grand totals, averages, counts, and so
on), you place summary fields in summary layout parts. Summary parts include grand summary and
subsummary parts.
A grand summary part usually contains one or more summary fields that display summary
information (like totals) about all records being browsed.
A subsummary part usually contains one or more summary fields that display “subsummary”
information (like subtotals) for a subset of records. The records are grouped (sorted) by values in
another field, the break field. Whenever the value of the break field changes, the report “breaks” and
FileMaker Pro inserts the subsummary part.
Note You may want to create the summary fields that you want prior to creating a summary part.
For more information, see Defining summary fields.
Grand summary (leading or trailing): When you place a summary field in this part, the summary field
displays summary information for all records in the found set. The grand summary part can be at the
beginning (leading) or end (trailing) of the report, depending on its placement on the layout. You can
have only one leading grand summary and one trailing grand summary in a layout.
If you put another type of field in this part, FileMaker Pro displays data from the first record (leading)
or last record (trailing) being browsed.
Subsummary (leading or trailing): When you place a summary field in this part, the summary field
displays “subsummary” information for each subset of records sorted by the specified break field.
The subsummary part can be before or after the body part, depending on the placement on the
layout. You can have multiple subsummary parts in a layout.
If you put another type of field here, FileMaker Pro displays data from the first record (leading) or
last record (trailing) in the group. Put the break field here to identify what subset of records the
summary is for.
For example, to summarize each salesperson's sales figures in a database recording sales
transactions, define a summary field totaling the Sales field, and then create a subsummary part and
place that summary field in it (the break field is the salesperson's name). If you also want a count of
that salesperson's transactions, create a second summary field counting the transactions, and also
place it on the same subsummary part. To get a grand total of all transactions, place the sales
summary field in a grand summary part.
Tip You can change the focus of a report by specifying a different break field for a subsummary
part. For example, in a sales report with a subsummary part containing a summary field for sales,
you can select Month for the break field to get monthly totals or Salesperson to get individual
performance totals.
Viewing summary data in Table View
When you view summary data in Table View:

Creating and managing layouts and reports
FILEMAKER PRO HELP 232
•The summary part is resized to display one row beyond the number of rows in the table.
•Fields placed on a layout in leading parts (leading grand summary or subsummary parts)
are aligned touching the bottom of the part.
•Fields placed on a layout in trailing parts (trailing grand summary or subsummary parts) are
aligned touching the top of the part.
•If a break field is placed in a subsummary part, it will always appear in the left-most column
in Table View. Break fields appear at the bottom of leading parts or the top of trailing parts.
•If more than one summary field is set for the same field, summary values appear together
with one value above the other.
•FileMaker Pro automatically adds field labels (such as Total) to subsummary parts to
identify the data displayed.
•If subsummary parts are assigned a fill color, the fill is applied only to the inside edge of the
right-hand column when the layout is viewed in Table View. The area to the right and below
the table appears in the color assigned to the body part in the layout.
Adding a layout part
To add a layout part to a layout, first decide what kind of part you need and where it should go.
If you're defining a subsummary part that summarizes a set of records, you also choose what field to
group or sort the layout by (the break field). Finally, you define how the part affects page breaks and
page numbering, as well as any background fill for the part.
To add a layout part:
1. In Layout mode, drag the Part tool in the status toolbar to the layout.
2. In the Part Definition dialog box, select the type of layout part you want.
See About layout part types for a description of each part type.
Part types that are already on the layout are dimmed. (Only subsummary parts can exist more
than once on a layout.)
3. If you're adding a subsummary part, after you click Sub-summary when sorted by, select
the name of the field that you want to group the records by (the break field).
You can choose a field in another table by first choosing a table name from the tables list above
the list of fields.
When the records are sorted by the break field, all records with the same value in that field are
grouped so that FileMaker Pro can calculate subsummary data. (For example, if you wanted to
subtotal sales figures for each region, the break field would be Region.) See Troubleshooting
layouts with summary or subsummary parts.
4. Click OK.
Notes
•You can also add a part by choosing Insert menu > Part in Layout mode.
•When you add a layout part, its format is based on the theme applied to the layout. You can
apply a custom style to change the display attributes of the part (such as display a color
gradient as the part background). See Creating new layout object, part, or background
styles.

Creating and managing layouts and reports
FILEMAKER PRO HELP 233
•You can add fields, portals, graphic objects, and text to any layout part. FileMaker Pro
considers an object to be in a part when the top of the object is in or just touching the part.
For example, if the top of a field touches the bottom division line of the header part, the field
displays and prints only in the header and not in the body.
•You can view data that is in subsummary parts in Table View, List View, Preview mode, or in
a printed report when records are sorted by breakfields.
•If you choose Layouts menu > Part Setup to create a subsummary part, you are prompted
to specify whether you want summary information to print above or below the records being
summarized.
•The amount of blank space above and below objects in the body part determines the
spacing between records when you print a layout, preview a layout, or view a layout as a list
(click List View in the layout bar).
•When viewing or moving objects on a layout, you might want to move the part labels if
they're in your way. To flip part labels up or down, in Layout mode, click the part label control
at the bottom of the window. You can also press Ctrl (Windows) or Command (OS X)
while clicking a part label to change the orientation, or temporarily flip down a label by
placing the arrow pointer over the flipped-up label and holding the mouse button down.
•To print a cover page for a report, add a title header part and resize it to the size of a page.
You can then add a regular header, a regular footer, and any other layout parts you want to
appear on subsequent pages.
•You can eliminate blank spaces in fields or parts when printing. See Removing blank spaces
in printouts.
Related topics
Changing a layout part
Deleting layout parts
Reordering layout parts
Resizing layout parts
Changing a layout part
You can change an existing part’s type, break field (if it's a subsummary part), and pagination
options.
To change an existing part:
1. In Layout mode, choose Layouts menu > Part Setup.
2. In the Part Setup dialog box, select the part, then click Change.
3. In the Part Definition dialog box, make your changes.
To change Do this
From one type of part to another Select a different part type. Changes you can make depend on
the part's location and function.
The break field for a subsummary
part
First choose the table that contains the field from the tables list
above the list of fields. Then select the field name in the list of
fields.
Page breaks and page numbering See Defining page breaks and numbering.

Creating and managing layouts and reports
FILEMAKER PRO HELP 234
Dimmed types are not available because either:
•that part type already exists (only subsummary parts can exist more than once on a
layout)
•the part you're changing is not in the right place on the layout (for example, a title
header must be at the top of the layout)
4. Click OK, then click Done.
Related topics
Adding a layout part
Deleting layout parts
Reordering layout parts
Resizing layout parts
Setting up form, list, and table views for a layout
Defining page breaks and numbering
You can set options for page breaks and page numbering when you add a layout part or change a
part definition.
Note Usually, pagination settings are associated with subsummary parts, but you can set page
break options for any part on the layout (except headers and footers).
For information about creating a new part, see Adding a layout part.
To define page breaks and page numbering for a part:
1. In Layout mode, choose Layouts menu > Part Setup.
2. In the Part Setup dialog box, select the part, then click Change.
You can also double-click the part label on the layout.
3. In the Part Definition dialog box, specify pagination options.
The following table describes the pagination options that are available. Dimmed options are not
available for the selected part type.
Layout part color See Setting the fill, line style, and borders for objects, layout
parts, and the layout background.
To quickly change a layout part color, right-click the part label.
Whether records in List View are
displayed with an alternating fill, as
specified by the Alternate display
state
Select or deselect Use alternate row state.
For more information about the Alternate display state, see
Specifying the display state for an object.
Whether the current (or active)
record is displayed with a different
fill from the other records in List
View, as specified by the Active
display state
Select or deselect Use active row state.
For more information about the Active display state, see
Specifying the display state for an object.
To change Do this

Creating and managing layouts and reports
FILEMAKER PRO HELP 235
4. Click OK, then click Done.
Notes
•To show or hide page breaks in Layout mode, choose View menu > Page Breaks.
•The pagination changes that you make appear only in Preview mode and when you print.
•If your layout is set up to print records in columns and you’ve specified to print records down
the page, if you choose Page break after every <value> occurrences, FileMaker Pro
starts a new column (not a new page) after the part when you preview or print. If the column
setup is to print records across the page, the specified page break starts a new page. For
more information about printing records in columns, see Setting up to print records in
columns.
•If the body or other layout part is too large to fit on the printed page, FileMaker Pro displays
a page break as a heavy, dashed line on the layout to show where it will divide the part
when you print. To fit more on the page, you can set sliding options to shrink fields and the
enclosing part if the fields contain variable amounts of information. See Removing blank
spaces in printouts.
Related topics
Inserting the date, page number, or other variable onto a layout
Inserting merge variables onto a layout
Reordering layout parts
You can change the order of only the body and subsummary parts; other parts, like the header and
footer, must appear in a specific order, so they can't be moved. For example, move a subsummary
part above the body to see subtotals first.
To Select
Start a new page before printing the contents of the
selected part (for example, to print a trailing grand
summary on a new page)
Page break before each occurrence.
Start a new page after printing the contents of the
selected part a specified number of times (for
example, to print five records in the body, and then
start a new page)
Page break after every <value>
occurrences, and enter the number of part
occurrences that you want per page. (The
default value of 1 prints one part occurrence
per page.)
Reset the page number to 1 after the selected part
prints (for example, to start page numbering after a
title header if you want it to serve as a cover page)
Restart page numbers after each
occurrence.
Allow the contents of the selected part to be split on
different pages, printing a portion at the bottom of
one page, and the rest on the next page.
(FileMaker Pro won't split the contents of a part
across two pages unless you specify this option, or
the height of the part won’t fit on a single page.)
Allow part to break across page
boundaries.
To keep the portion of the part that will not fit on
the bottom of the page from printing at the top
of the next page, also select Discard
remainder of part before new page (for
example, to print the information in a Notes
field to the bottom of the page and truncate the
rest).

Creating and managing layouts and reports
FILEMAKER PRO HELP 236
To reorder layout parts:
1. In Layout mode, choose Layouts menu > Part Setup.
2. In the Part Setup dialog box, drag the name of the part to the new location.
A part that can't be moved has a lock icon to the left of its name.
3. Click Done.
FileMaker Pro moves all the fields and objects in the part and maintains its proportions.
Notes
•While working in Layout mode, you can quickly reorder a part directly on the layout by
clicking the Selection tool in the status toolbar and Shift-dragging the part label (or
the line that marks the bottom of the part).
•You can't move a subsummary part to the same location as another subsummary part that
uses the same break field.
Resizing layout parts
There are several ways to resize a layout part.
To resize a layout part:
1. In Layout mode, click the Selection tool in the status toolbar.
2. Do one of the following:
•Drag the part label or part boundary (the line that marks the bottom of the part) until the
part is the height you want.
When you resize a layout part, FileMaker Pro maintains the size of the other parts. For
example, you can increase the height of the header part, but this won't affect the size of the
part directly following the header part.
•To maintain the height of the entire layout while changing the size of one layout part, Alt-
drag (Windows) or Option-drag (OS X) the part label or part boundary. (This causes the
size of the layout part immediately below the part you're changing to also change.)
•To precisely resize a part, select the part by clicking its part label. Click Inspector
in the layout bar, then click Position. Enter a value for the part's Height or Bottom
boundary in the Position area. For more information, see Using the Inspector to position
objects.
You can also use the rulers, grid, and guides (choose View menu > Rulers, View menu >
Grid > Show Grid, and View menu > Show Guides) to help with precisely sizing parts. For
more information, see Using the rulers and grid and Using guides and dynamic guides.
Notes
•You can't make a part smaller than the objects that it holds (in other words, you can't shrink
a part by dragging its boundary across an object) unless you press Alt (Windows) or Option
(OS X) as you drag the part boundary.
•If you reduce a layout part to nothing by dragging it under the part above it, FileMaker Pro
deletes the part from the layout.

Creating and managing layouts and reports
FILEMAKER PRO HELP 237
Deleting layout parts
You can delete all but the last layout part from a layout. You can choose to delete a part and the
objects on the part, or delete a part without deleting the objects on the part.
To delete a part and the objects on the part:
1. Select and drag any objects you want to keep to another part on the same layout.
2. In Layout mode, choose Layouts menu > Part Setup.
3. In the Part Setup dialog box, select the part to delete, then click Delete.
If the part contains objects, FileMaker Pro displays a dialog box asking you to confirm the
deletion.
4. Click Done.
Note To quickly delete a part directly on the layout, click the part label with the arrow pointer, then
press Backspace or Delete. You can undo this action.
To delete a part without deleting the objects on the part:
Note This method only works when there is a part below the one you want to delete.
1. Select the part label with the arrow pointer.
2. Press Ctrl+Backspace (Windows) or Option-Delete (OS X).
FileMaker Pro deletes the part and enlarges the part below the deleted part to make space on
the layout for the retained objects.
Adding fields to a layout
After you create a layout, you can place additional fields on it or remove fields you don't want
displayed. You can place a field anywhere on any layout, as many times as you want. However, you
can only place fields that you've already defined. For more information, see About defining database
fields.
You get different results by placing the same field in different locations on the layout. For example:
•Add the same summary field to a subsummary part to calculate totals for each group of
sorted records, and to a grand summary part to get totals for all the records in the database.
•Add a field to the header part or footer part to repeat data from the first record or the last
record on the page as a header or footer. (For example, add a Last Name field to the header
in a directory.)
•Add the same related field directly on a layout to see the field's value in the first related
record, or inside a portal to see values from more than one related record.
If you are working with a relational database, you can display fields from related tables on a layout.
You can place related fields directly on a layout or in a portal. For information on whether you should
place related fields directly on a layout or in a portal, see Deciding where to place related fields.
Fields on a layout are objects, which you can select, move, resize, and reshape. In Layout mode,
each field displays its field name, formatted with its attributes for font, size, style, alignment, line
spacing, and color.
To make data entry easier and more consistent, you can set up value lists. Fields display data as
drop-down lists, pop-up menus, checkbox sets, and radio button sets.

Creating and managing layouts and reports
FILEMAKER PRO HELP 238
For more information, see Setting up a field to display a pop-up menu, checkbox set, or other
control. For more information about editing and formatting field objects, see Selecting and working
with objects on a layout and Formatting and setting up field objects in Layout mode.
Placing and removing fields on a layout
After you define a field, you can add it anywhere on a layout. Fields can be either from the same
table, a related table in the same file, or a related table in another FileMaker Pro file.
You can place related fields directly on a layout or in a portal, but the results are different. See
Deciding where to place related fields.
Note For information about defining fields, see About defining database fields.
To place a field on a layout:
1. In Layout mode, choose the layout you want to work on from the Layout pop-up menu.
2. Do one of the following:
•To add a field, drag a field from the Field tool in the status toolbar to the position
you want on the layout. As you drag the field onto the layout, you see a border and text
baselines to help you align the field with other objects on the layout. Release the mouse
button when the field is where you want it.
If you're placing a related field in a portal, position it in the first row of the portal. Make sure
each field in the portal is from a table related to the table that the portal is set up to display
records from. See Creating portals to display related records.
•To add and resize a field, click the arrow next to the Field/Control tool
(Windows) or click and hold the Field/Control tool (OS X) in the status toolbar.
Drag the crosshair to draw the field.
•To add a specific control or field, click the arrow next to the Field/Control tool
(Windows) or click and hold the Field/Control tool (OS X) and select the type of
field or control to add to the layout. Drag the crosshair to draw the field.
Note The Field/Control tool displays the image of the tool that is currently selected.
3. In the Specify Field dialog box, select the field to place.
To choose a field in another table, choose the table from the tables list above the list of fields. Or
choose Manage Database to create a relationship or a table, then select a related field from the
list of fields. You can also click the Manage button to choose a field from the current or a
related table.
4. Select Create label to include the field name as text on the layout.
5. Click OK.
You see the field name in the field on the layout unless you have chosen to display sample data
(View menu > Show > Sample Data). Fields from related tables appear as ::Field Name
(preceded by two colons).
All fields except container fields display text baselines to indicate where the data appears in
Browse mode and to help you align fields with each other.

Creating and managing layouts and reports
FILEMAKER PRO HELP 239
To replace a field with another one:
1. In Layout mode, double-click the field.
2. Select another field name in the Specify Field dialog box.
3. Click OK.
To remove a field from a layout:
Removing a field from a layout only removes it from the layout; it does not delete the field or its data
from your database.
1. In Layout mode, click the field to select it.
2. Press Backspace or Delete, or choose Edit menu > Clear.
Notes
•If you include a field label when you place a field and you then rename the field in the Field
Picker or Manage Database dialog box, in most cases, the field label changes to match the
new field name on each layout where the field label appears.
•When you add a field to a layout, its format is based on the theme applied to the layout. You
can apply a custom style to change the display attributes of the field. See Creating new
layout object, part, or background styles.
•Fields are defined as edit boxes by default. You can make data entry for a field easier and
more consistent by defining a value list, associating it with the field, then formatting the field
as a drop-down list, pop-up menu, checkbox set, or radio button set. You can also format a
field as a drop-down calendar. See Defining value lists, Setting up a field to display a pop-up
menu, checkbox set, or other control, and Setting up a field to display a drop-down
calendar.
•You can format a field as an edit box, and enable the auto-complete option without defining
a value list in order to use previously entered values. See Setting up a field to auto-
complete during data entry.
•If you create a field label for a field with a long name, you might need to resize the label to
see the entire field name on the layout.
•To help determine an appropriate size for a field, you can display sample data in the field
from the current record instead of the field name. Choose View menu > Show > Sample
Data.
•To have FileMaker Pro insert field data into a line or block of text, use merge fields. See
Placing merge fields on a layout.
•To put a static image (like a logo or graphic embellishment) on a layout so that it appears in
every record, create, paste, or import the graphic directly onto the layout instead of using a
container field, and then place the graphic in the body part. See Drawing and inserting
objects on a layout.
•You can have new fields that you define automatically placed on the current layout by
specifying a preference on the Layout tab of the Preferences dialog box. See Setting layout
preferences.
•Instead of placing fields, you can copy fields from other layouts and other databases. See
Copying, duplicating, and deleting objects.
•If you can't read a field name within the field's borders in Layout mode, double-click the field
— its name is selected in the Specify Field dialog box.

Creating and managing layouts and reports
FILEMAKER PRO HELP 240
•When you are working in Table View in Browse mode or Find mode, you can hide fields that
show in Table View. See Displaying and hiding fields in Table View.
•If you have used the Field tool to add a field to a summary part and the text is difficult to see,
use the Inspector or the Format Painter to copy the style you want from another field.
•You can place fields in the gray area to the right of the layout. This lets you store fields on
the layout or use them in script steps but prevents them from appearing in Browse, Find,
and Preview modes. Users cannot select or work with such fields, and the fields do not
print.
Placing merge fields on a layout
Use merge fields to combine field data and text in documents like form letters, labels, envelopes, or
contracts. You create merge fields in text blocks, which allows you to use static text and field data
together.
Merge fields shrink or expand to fit the amount of text in the field for each record. For example:
•When the field <<First Name>> is between the text Dear and a colon (as in Dear <<First
Name>>:), FileMaker Pro displays Dear Charles: in Browse mode or Preview mode if the
First Name field contains Charles.
•When a merge field is on a line by itself and the field contains no data (such as an empty
Address Line 2 field in a mailing label), FileMaker Pro removes the blank line from the text
block, which improves the appearance of the text.
Note In Browse mode, you cannot enter or edit data in merge fields. For entering data, use a
different layout that contains regular fields that permit data entry.
To place a merge field on a layout:
1. In Layout mode, do one of the following:
•To create a new text block containing a merge field, click with the arrow pointer where
you want the text block to appear.
•To insert a merge field into an existing text block, click the Text tool in the status
toolbar, then click in the text block to place the insertion point where you want to insert
the merge field.
2. Choose Insert menu > Merge Field.
3. In the Specify Field dialog box, select the field to insert.
To choose a field in a related table, choose the table from the tables list above the list of fields.
Or choose Manage Database to create a new field, table, or relationship.
4. Click OK.
You see the field name enclosed by double opening (<<) and closing (>>) angle brackets in the
text block.
5. Choose if you want the merge field to be enabled or disabled for quick find. For more
information, see Configuring quick find. By default merge fields are included in the search.
If a merge field in enabled for quick find, only the fields referenced in the merge field will be
included in the search. For example, if the merge field Departing from <<DepartureCity>> is
enabled for quick find, and one of the records contains New York for the DepartureCity field,
searching for New York finds the record but searching for Departing from New York does not
find any records.

Creating and managing layouts and reports
FILEMAKER PRO HELP 241
To remove a merge field: Select the field name along with the << and >> symbols, then press
Backspace or Delete.
Notes
•You can insert punctuation, spaces, line breaks, and text between merge fields as needed.
Be careful not to type extra characters inside the << and >> symbols.
•You can insert a merge field directly into a text block by typing the field name surrounded by
two opening and two closing angle brackets, like this: <<field>>. Make sure you use
angle brackets and not the single-character quotation marks (« and »), which won’t work.
•To specify text attributes to be used when you browse, preview, or print the field data in a
merge field, in Layout mode, select the merge field name and the << >> symbols inside the
merge field, then select formatting options in the Appearance tab of the Inspector. If you
don’t see the Inspector, click Inspector in the layout bar. See Formatting text.
•To specify data formatting options (number, date, or time as appropriate for the field type),
click the Selection tool in the status toolbar, then select the merge field and apply
data formatting options in the Data tab in the Inspector. See Formatting and setting up field
objects in Layout mode.
•If you use a text field as a merge field and specify text attributes (like style, color, or size) for
that field’s value in Browse mode (on another layout), the merge field picks up those
attributes.
•In Browse mode and Preview mode, a text block displays and prints only as much text as
will fit within its dimensions. Because merge fields often display a variable amount of data,
the contents of a text block may be clipped and may not appear in its entirety. If necessary,
resize the text block to display all of the text. For information on resizing text blocks, see
Resizing and reshaping objects.
•If you want to close up space between fields and non-text objects, to align value lists or
repeating fields, or to reduce the size of an enclosing layout part, set sliding options. For
more information, see Removing blank spaces in printouts.
•You can also use a merge variable to display data. See Inserting merge variables onto a
layout.
Creating portals to display related records
A portal is a layout object that displays records from related tables. Use a portal only when you want
to display data from more than one related record. Portals display data from related fields in rows,
one record in each row. For more details on when to use portals, see Deciding where to place
related fields.
To create a portal:
1. In Layout mode, click the Portal tool in the status toolbar.
2. Position the crosshair pointer on the layout where you want the portal to begin, then drag
the pointer diagonally until the portal is the size you want.
3. In the Portal Setup dialog box, for Show related records from, choose the related table
from which you want to display related records.
You can also choose Manage Database to create a new table or relationship.

Creating and managing layouts and reports
FILEMAKER PRO HELP 242
4. Select record options for the portal.
5. Select format options for the portal.
6. Click OK.
7. In the Add Fields to Portal dialog box, choose the fields that you want to appear in the
portal, and click OK.
Tip You can drag objects, such as a related field, onto the first row of an existing portal to add it
to the portal.
Selecting and working with portals
You can resize, edit, and delete portals in Layout mode.
To select a portal:
•With the arrow pointer, click the border of the portal, or any other area within the portal that
doesn't contain a field or object.
See Selecting objects.
To Select
Sort the records in the portal Sort portal records, and click Specify. In the Sort
dialog box, choose the fields by which to sort the
portal records, and click OK.
Filter the records in the portal Filter portal records, and click Specify. In the
Specify Calculation dialog box, define a formula for
a calculation to filter the portal records, and click
OK.
Allow related records to be deleted from the
related table (in Browse mode)
Allow deletion of portal records
Display a scroll bar at the right side of the
portal, with which users can see (and enter)
more records than are visible in the portal at
one time
Show vertical scroll bar
Reset the scroll bar to display the portal’s first
record when you exit the current record
Reset scroll bar when exiting record (or, clear
this option so the scroll bar does not reset)
To Do this
Specify the initial related record to display in
the first row of the portal
In the Initial row box, type the row number.
Specify the number of rows (records) to display
in the portal
For Number of rows, type a number.
Change the fill (color) of a portal, display a
different background in alternating portal rows
(for contrast and easy identification), or display
a different background color for the selected
portal row
See Formatting portals.

Creating and managing layouts and reports
FILEMAKER PRO HELP 243
To resize a portal row:
1. Select the portal by clicking the border of the portal, or any other area within the portal that
doesn't contain a field or object.
You see selection handles at each corner of the first portal row.
2. Drag a selection handle.
The first row resizes and each additional row resizes to match the first row.
3. If necessary, resize the field objects and any other objects that appear within the portal.
To change the record options or display options for a portal:
•Double-click the portal. In the Portal Setup dialog box, change options as described above,
then click OK.
To delete a portal and its contents:
•With the arrow pointer, select the portal, then press Backspace or Delete, or choose Edit
menu > Clear.
Notes
•In Layout mode, a portal object displays its characteristics in the lower left corner of the
object: its table name, the range of rows that the portal will display, a plus sign (+) if vertical
scrolling is enabled, Filter if filtering is enabled, and Sort if sorting is enabled.
•Filtering records is performed before sorting records.
•Filtering records is intended for display purposes only, not for security purposes. Filtering
records has no effect on the results of calculations, summaries, and find requests.
•In most cases, you should enable Show vertical scroll bar in the Portal Setup dialog box.
If you don't and there are more related records than will fit in the number of portal rows
you've defined, you won't be able to see all the related records or enter new related records.
•You can place more fields into a portal after you have created it. See Setting up a field to
display a pop-up menu, checkbox set, or other control.
•You can display objects other than fields in the first row of a portal. An object placed in the
first row of a portal is displayed once for each related record.
•When you add a portal to a layout, its format is based on the theme applied to the layout.
You can apply a custom style to change the display attributes of the portal. See Creating
new layout object, part, or background styles.
•You can’t place a tab control or a web viewer in a portal. If you place these objects in a
portal, they appear as objects on the layout that overlap the portal.
•You can place a popover button in a portal as long as the associated popover does not
contain a tab control, a slide control, a chart, a web viewer, or a portal.
•You can place portals in any layout part, but a portal cannot contain another portal. If you
place a portal in a portal, the portals overlap.
•To number the rows in a portal, in Layout mode, click in the first portal row where you want
numbers to display, then choose Insert menu > Record Number Symbol. Numbers appear
in portal rows in Browse and Preview modes, and when you print the layout. See Inserting
the date, page number, or other variable onto a layout.
Creating and managing layouts and reports
FILEMAKER PRO HELP 244
•You can summarize data that appears in a portal. For example, if you have a portal that
displays products and prices, you may want a field that displays a subtotal of all the prices
listed in the portal. See Summarizing data in portals.
•If one or more records cannot be changed because they are being accessed elsewhere —
either in another window by the same user or (if the file is shared) by other clients, then the
record(s) is locked.
Related topics
Working with related tables and files
Filtering records in portals
Drawing and inserting objects on a layout
You can enhance the design of a layout in a number of ways, including:
•adding text outside of fields (such as field labels and column headings)
•using the drawing tools to add lines, rectangles, or other shapes
•adding a graphic or QuickTime movie
•adding panel controls to group layout objects on tabbed or sliding panels
•adding popovers to group layout objects and simplify data viewing and entering
Related topics
Editing objects, layout parts, and the layout background
Working with panel controls on layouts
Working with popovers on layouts
Working with the layout tools
For each type of object you work with in Layout mode, you use the layout tools in the status toolbar.
Tool Tool name Related topic
Selection tool Selecting objects
Text tool Adding text to a layout
Line tool Drawing lines and other shapes
Rectangle tool Drawing lines and other shapes
Rounded Rectangle tool Drawing lines and other shapes
Oval tool Drawing lines and other shapes

Creating and managing layouts and reports
FILEMAKER PRO HELP 245
As you are designing a layout, you can work with a tool once, use it repeatedly, or switch between
the tool last used and the Selection tool.
To work with layout tools in the status toolbar:
•Do one of the following:
Field/Control tool Placing and removing fields on a layout
Button tool Defining a button
Popover Button tool Adding a popover
Tab Control tool Adding a tab control
Slide Control tool Adding a slide control
Portal tool Creating portals to display related records
Chart tool Creating charts from data
Web Viewer tool Adding a web viewer
Field tool Placing and removing fields on a layout
Part tool Adding a layout part
Format Painter tool Copying formatting attributes between layout
objects, parts, or backgrounds
Tool Tool name Related topic
To Do this
Use a tool once Click a tool to select it. (The tool becomes gray.)
Keep a tool selected, or locked Double-click a tool. (The tool changes color to indicate
it remains selected until you select a different tool.)
Note You can specify a preference to keep layout tools
locked. See Setting layout preferences.
Switch between the tool last used and the
Selection tool
Press Ctrl+Enter or Enter on the numeric keypad
(Windows) or press Enter (OS X).
Select a tool that includes an arrow Windows: Click the arrow to display additional tools,
then choose the tool you want.
OS X: Click and hold the tool to display additional tools,
then choose the tool you want.

Creating and managing layouts and reports
FILEMAKER PRO HELP 246
Related topics
Inserting the date, page number, or other variable onto a layout
Inserting graphics onto a layout
Using buttons with scripts
Adding fields to a layout
Editing objects, layout parts, and the layout background
Adding text to a layout
Adding text to a layout makes the layout easier to use and understand. Use text for:
•field labels for fields. (You also have the option of creating a field label using the field’s name
when you place a field on a layout.)
•column headings in columnar reports.
•instructions on a form.
•a form letter, with merge fields displaying data.
•the current date, page number, or record number.
Note To add or change text in your database fields, switch to Browse mode. For more information,
see Adding and viewing data.
To type text on a layout:
1. In Layout mode, click the Text tool in the status toolbar.
You can also choose Insert menu > Graphic Object > Text.
2. With the I-beam pointer, do one of the following:
•Click where you want to add text, which creates a small text block that enlarges when
you type text into it.
•Click and drag to define the maximum line length for the text.
You see a blinking insertion point.
3. Type the text.
To set text formatting options such as font, style, line spacing, text color, and alignment, see
Formatting text.
Notes
•Text blocks that are typed or pasted onto a layout are objects, which you can manipulate in
the same way as any other object. For example, you can assign a background color or
border, or rotate a text object. For more information, see Editing objects, layout parts, and
the layout background.
•Although you can add text anywhere on a layout, the layout part where you place the text
determines how the text appears in Browse mode or Preview mode (for example, once for
each record, only at the top of the report, and so on). For more information on layout parts,
see About layout part types.
•To type text that fills another object, select the object and begin to type (without clicking the
Text tool). The text is positioned in front of the object and conforms to its shape.
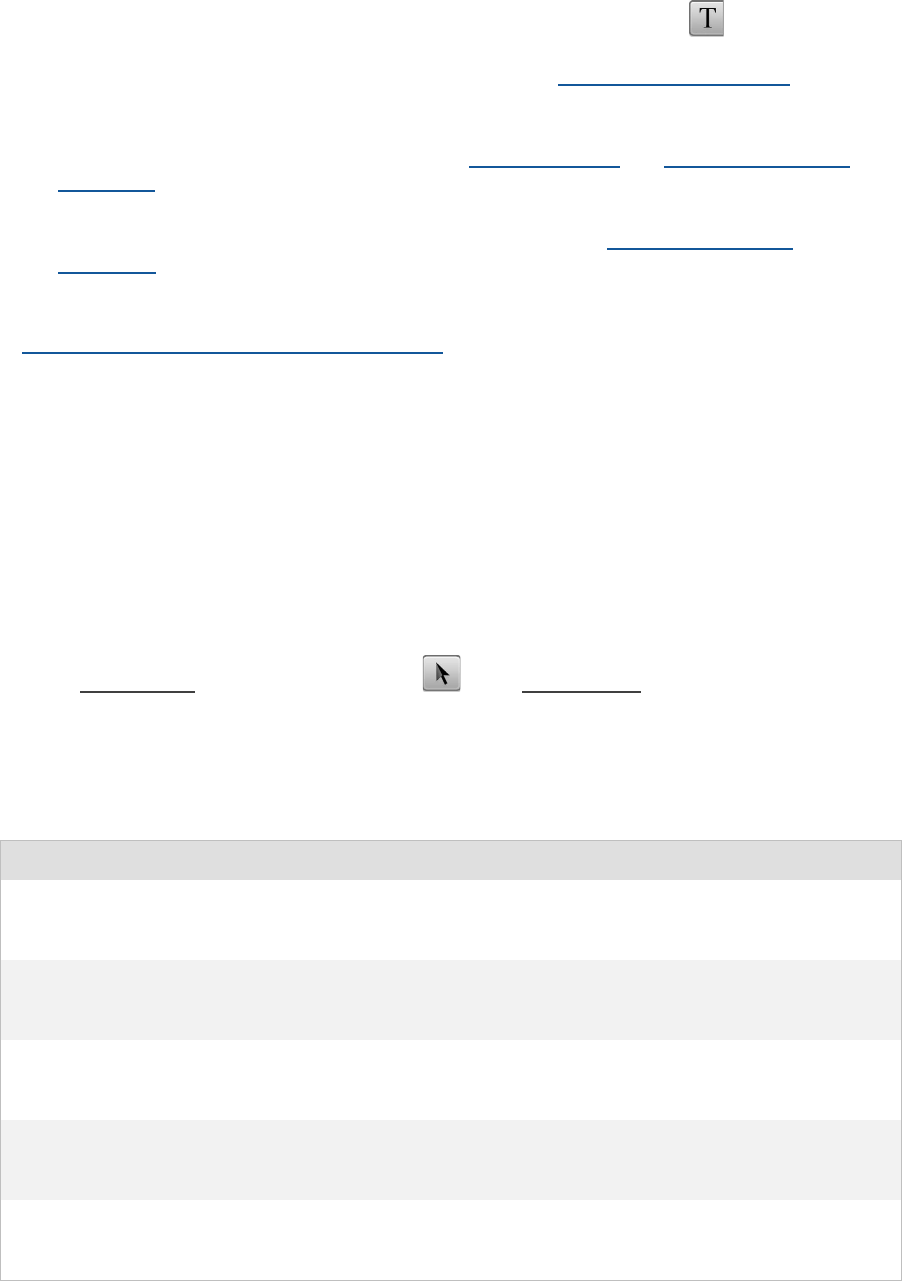
Creating and managing layouts and reports
FILEMAKER PRO HELP 247
•To enter many individual text blocks at once, double-click the Text tool to lock it. The
Text tool remains active until you click another tool. (You can also set a preference to always
lock a tool when you select it. For more information, see Setting layout preferences.)
•To create a form letter, create a Blank layout, and then use the Text tool to create a large
text block for the letter. Type the text of your letter, and insert merge fields for fields like
name and address. For more information, see Creating a layout and Placing merge fields
on a layout.
•To see nonprinting boundaries to help you align text with other objects, Choose View
menu > Show > Text Boundaries. For more information, see Showing text or field
boundaries.
Related topics
Specifying paragraph attributes and tab settings
Inserting the date, page number, or other variable onto a layout
You can display or print fixed information (such as the date as it was when entered) or variable
information (such as today’s date) when you print or preview records. For example, display the
current time in a report footer each time you print the report.
You can also display the date, time, or user name as it is when you place it on the layout. This
information stays the same whenever you display, print, or preview records. (You can also insert the
current date, time, or user name into a field in Browse mode.)
To insert the date, page number, or other variable onto a layout:
1. In Layout mode, click the Selection tool in the status toolbar, and click where you
want the information to appear.
If you want the information inserted into an existing text object, double-click where you want to
place the insertion point.
2. Choose Insert menu, then choose one of the following commands:
Choose To insert In Layout mode, you see
Current Date A fixed date (taken from your
computer's calendar). This date is static
and doesn't change.
The current date
Current Time A fixed time (taken from your
computer's clock). This time is static
and doesn't change.
The current time
Current User Name A fixed user name (taken from the User
Name specified in Preferences). This
name is static and doesn't change.
The user's name
Date Symbol A variable date. This date changes to
show the current date taken from your
computer's calendar.
{{CurrentDate}}
Time Symbol A variable time. This time changes to
show the current time taken from your
computer's clock.
{{CurrentTime}}

Creating and managing layouts and reports
FILEMAKER PRO HELP 248
If you insert a symbol, only the variable's symbol appears in Layout mode (such as
{{CurrentDate}}). You see the value of the variable in Browse, Find, and Preview modes, and
when you print the layout.
Note You can type the characters listed for the symbol instead of using the commands on the
Insert menu. For example, you can type {{CurrentTime}} to insert a time symbol. Variables are
not case-sensitive, but they can contain no spaces or extra characters between the curly
braces.
3. To set formatting options such as font, style, line spacing, text color, and alignment for the
variable, see Formatting and setting up field objects in Layout mode.
4. If necessary, resize the text block that contains the variable’s symbol.
In Browse mode and Preview mode, a text block displays and prints only as much text as will fit
within its dimensions. Because a symbol often expands when replaced with its variable text, the
contents of a text block may be clipped and may not appear in its entirety. If necessary, resize
the text block to display all of the text. For information on resizing text blocks, see Resizing and
reshaping objects.
Notes
•You can also insert the date or other variables into fields while entering data in your
database. For more information, see Inserting the current date or other variables into a field.
•To display the current page number with the total number of pages in a report (for example,
Page 1 of 10), see Inserting merge variables onto a layout.
Related topics
Adding text to a layout
Inserting merge variables onto a layout
You can create a merge variable that displays a value from a variable. You can use merge variables
for some tasks in place of global fields or unstored calculation fields. For example, a merge variable
User Name Symbol A variable user name. This name
changes to show the User Name
specified in Preferences.
{{UserName}}
Page Number Symbol A page number. (Page numbers only
appear in Preview mode or on a printed
report.)
{{PageNumber}}
Record Number Symbol A record number (or a row number
when inserted into a portal row)
{{RecordNumber}}
Other Symbol The result of a specified Get function
flag. For information about the flags
available, see Get functions.
The Get function flag that
you chose in the Select a
symbol to insert dialog box
surrounded by double curly
braces. For example,
{{AccountName}}
Merge Variable A variable that you’ve created. See
Inserting merge variables onto a layout.
Two dollar signs
surrounded by double
angle brackets (<<$$>>)
Choose To insert In Layout mode, you see

Creating and managing layouts and reports
FILEMAKER PRO HELP 249
could display the total cost at the bottom of an invoice, or display the name of the account used to
print a report.
You see the merge variable value in Browse, Find, and Preview modes, and when you print records.
To insert a merge variable onto a layout:
1. Create a variable using the Set Variable script step.
FileMaker recommends that you create global variables for use as merge variables.
2. In Layout mode, click in the layout where you want to insert the variable, then choose Insert
menu > Merge Variable.
For example, insert a merge variable into a text block or by itself on the layout.
Do not insert merge variables over a field or any other object that you want to view.
A placeholder merge variable (<<$$>>) appears on the layout.
3. Click between the $$ and >> symbols in the placeholder variable, then type the merge
variable name (the name of the variable you created in step 1).
Important To ensure that merge values are displayed accurately, each record must be refreshed as
it is being browsed, previewed, or printed. You can refresh records manually by, for example,
creating a “Refresh” button that calls the Refresh Window script step, or automatically by creating a
script that includes the Refresh Window script step.
Examples
•To create a merge variable named <<$$acctname>>, which displays the name of the
user’s account, create the script step: Set Variable[$$acctname; Value:
Get(AccountName)]. Then, insert the merge variable <<$$acctname>> on the layout.
•To create a merge variable named <<$$POnum>>, which appends the text “-MPO” to the
current record number to form a purchase order number, create the script step: Set
Variable[$$POnum; Value: Get(RecordNumber) & “-MPO”]. Then, insert the
variable <<$$POnum>> on the layout.
•To display the current page number with the total number of pages in a report (for example,
Page 1 of 10), start by creating a merge variable named <<$pp>>, and create the following
script for it:
Enter Preview Mode
Go to Record/Request/Page [Last]
Set Variable [$pp; Value:Get(PageNumber)]
Go to Record/Request/Page [First]
Pause/Resume Script [Indefinitely]
Then, combine text, the page number symbol ({{PageNumber}}), and the merge variable on
the layout header or footer:
Page {{PageNumber}} of <<$pp>>
Notes
•A variable used as a merge variable cannot include the repetition (index) number of a
repeating field (as in the syntax $variable[repetition]) or a file path.
•To remove a merge variable, select the merge variable on the layout, along with the <<, $$,
and >> symbols, then press Backspace or Delete.
Creating and managing layouts and reports
FILEMAKER PRO HELP 250
•The value of a merge variable uses the attributes of the text block it is inserted into (or the
layout’s default text attributes, if the merge variable was inserted onto the layout by itself).
To change the text attributes of merge values, select the entire merge variable in Layout
mode (including the <<, $$, and >> symbols), then select text formatting options. For more
information, see Formatting text.
•In Browse mode and Preview modes, a text block displays and prints only as much text as
will fit within its dimensions. Because merge variables can display a variable amount of
data, the contents of a text block may be clipped and may not appear in its entirety. If
necessary, resize the text block to display all of the text. For information on resizing text
blocks, see Resizing and reshaping objects.
•You can also use a merge field to display data. See Placing merge fields on a layout.
Related topics
Creating scripts to automate tasks
Using buttons with scripts
Drawing lines and other shapes
Use the layout tools in the status toolbar to draw lines, rectangles, rounded rectangles, and ovals.
You can create squares, circles, or horizontal/vertical lines by holding down the a modifier key on
the keyboard as you create objects.
To create a line, rectangle, rounded rectangle, or oval:
1. In Layout mode, click the Line tool , Rectangle tool , Rounded Rectangle tool
, or Oval tool .
See Working with the layout tools.
2. Position the crosshair pointer on the layout where you want the line or object to begin.
3. Click and drag the crosshair pointer until the object is the size that you want.
To create an object that is constrained to a certain angle or shape, do one of the following:
FileMaker Pro draws the object with the theme’s default line style and fill. You can change these
attributes after you draw the object. See Selecting and working with objects on a layout.
To create a dotted or dashed line or border, see Setting the fill, line style, and borders for
objects, layout parts, and the layout background.
To create a Use this tool And press
Horizontal or
vertical line
Line tool Shift as you draw the line
Diagonal line (at
45 degrees)
Line tool Ctrl (Windows) or Option (OS X) as you draw the line
Square Rectangle tool Ctrl (Windows) or Option (OS X) as you draw the square
Rounded square Rounded
Rectangle tool
Ctrl (Windows) or Option (OS X) as you draw the rounded
square
Circle Oval tool Ctrl (Windows) or Option (OS X) as you draw the circle
Creating and managing layouts and reports
FILEMAKER PRO HELP 251
Notes
•To create a line, rectangle, rounded rectangle, or oval, you can also choose Insert menu >
Graphic Object, and then choose the appropriate option from the submenu that appears.
•When you add a line or shape to a layout, its format is based on the theme applied to the
layout. You can apply a custom style to change the display attributes of the field. See
Creating new layout object, part, or background styles.
•Use the following techniques to work with the tools:
Inserting graphics onto a layout
You can add graphics anywhere on a layout to enhance its appearance. For example, you can add
a company logo at the top of an invoice layout.
For a list of supported image formats, see Using data in container fields.
Note You can also fill a layout object, part, or background with an image, and then set additional
formatting attributes for the image. See Filling objects, layout parts, or the layout background with an
image.
To insert a graphic onto a layout:
1. In Layout mode, choose Insert menu > Picture.
2. In the dialog box, for Files of type (Windows) or Show (OS X), choose a graphic file type.
3. Navigate to the graphic file.
4. To reference the file from disk, select Store only a reference to the file.
When you select Store only a reference to the file, FileMaker Pro doesn't import the graphic
file; instead it only keeps track of where it is on your hard disk. This option may reduce the size
of your FileMaker Pro file, but if you move or delete the graphic file, FileMaker Pro won't be able
to display it.
5. Select the file and click Open, or double-click the filename.
The graphic appears in the document.
6. Position and size the graphic on the layout as needed.
See Selecting and working with objects on a layout.
To Do this
Use a tool once Click a tool to select it (the tool becomes gray).
Keep a tool selected, or locked Double-click a tool (the tool changes color to indicate it remains
selected until you select a different tool).
Note You also set a preference to always lock a tool when you
select it. See Setting layout preferences.)
Switch between the tool last
used and the Selection tool
.
Press Ctrl+Enter or Enter on the numeric keypad (Windows) or
press Enter (OS X).

Creating and managing layouts and reports
FILEMAKER PRO HELP 252
Notes
•You can also insert graphics as data into container fields. Do this when you have a different
graphic for each record, such as employee photos in an employee directory database table.
See Inserting graphics into container fields.
•You can insert a graphic via copy and paste: copy a graphic in another application, switch to
FileMaker Pro, and then paste the graphic onto a layout.
•If your system and other applications support it, you can quickly bring a graphic or movie
from another application into FileMaker Pro by dragging the object from the other
application's window onto the FileMaker Pro layout. You can also drag objects from a layout
to another application or to the Windows or OS X desktop.
Working with panel controls on layouts
Use panel controls to simplify entering and viewing data. Panel controls are layout objects that allow
you to group objects on tab panels or slide panels on a layout.
You can use a panel control instead of several layouts, or to help organize one layout with many
fields. For example, customer information from several tables can be grouped into a tab control, with
tab panels for categories such as personal contact information, business contact information, and
purchasing information for different products.
To move between tab panels in FileMaker Pro, click the tabs at the top of a tab control. In
FileMaker Go, tap the tabs to move between tab panels.
To move through slide panels in FileMaker Pro, click the dots at the bottom of a slide control. In
FileMaker Go, swipe panels using one finger or tap to the left or right of the dots. (Moving through
slide panels by swiping is supported in FileMaker Go only.)
Related topics
Formatting panel controls
Adding a tab control
You can add a tab control to a layout to organize objects and make data entry easier.
1. In Layout mode, choose the layout you want from the Layout pop-up menu.
2. In the status toolbar, do the following:
•Windows: Click the arrow next to the Tab Control tool or the Slide Control tool
and choose Tab Control, then drag the crosshair to draw the tab control.
•OS X: Click and hold the Tab Control tool or the Slide Control tool and
choose Tab Control, then drag the crosshair to draw the tab control.
Tip You can also add a tab control by choosing Insert menu > Tab Control.
3. To name the tab, in the Tab Control Setup dialog box, do one of the following:
•For Tab Name, type a name for this tab panel.
•Click Specify to create a tab label based on a calculation. See Specify Calculation
dialog box.
4. Click Create.

Creating and managing layouts and reports
FILEMAKER PRO HELP 253
5. Repeat steps 3 and 4 to create additional tab panels.
6. For Default Front Tab, choose the panel you want in front when you switch from Layout
mode to another mode.
When you switch to Layout mode from another mode, the front-most tab panel is the one that
was last displayed in the previous mode.
7. Choose Tab Justification options: Left, Center, Right, or Full.
8. Choose Tab Width options: Label Width, Label Width + Margin, Width of Widest Label,
Minimum of, or Fixed Width of.
9. For Label Width + Margin, Minimum of, or Fixed Width of, choose a units option: Inches,
Centimeter or Points, then enter a value in the box.
10. Click OK.
11. To add objects to the tab panel, use the layout tools in the status toolbar, choose from the
Insert menu, or drag objects onto the tab panel.
For more information on adding fields and other objects, see Placing and removing fields on a
layout and Drawing and inserting objects on a layout.
Notes
•Use the Inspector to change the appearance of a tab control (for example, to make the
corners rounded). See Formatting panel controls.
•You can format the appearance of one or more tab panels to be conditional (for example,
format a tab panel to appear red when a certain condition is met). See Defining conditional
formatting for layout objects.
•You cannot place a tab control in a portal.
Related topics
Editing objects, layout parts, and the layout background
Changing a tab control
Selecting and working with objects on panel controls
Moving and resizing panel controls
Copying, duplicating, and deleting panel controls
Changing a tab control
You can add, rename, remove, and reorder tab panels in a tab control. You can also set the default
front tab panel.
To change a tab control:
1. In Layout mode, double-click the tab control.
Or, select a tab control and choose Format menu > Tab Control Setup.
The Tab Control Setup dialog box appears.
2. Make changes to the tab control.
Creating and managing layouts and reports
FILEMAKER PRO HELP 254
3. Click OK.
Related topics
Formatting panel controls
Adding a slide control
You can add a slide control to a layout to organize objects and make data entry easier.
1. In Layout mode, choose the layout you want from the Layout pop-up menu.
2. In the status toolbar, do the following:
•Windows: Click the arrow next to the Tab Control tool or the Slide Control tool
and choose Slide Control, then drag the crosshair to draw the slide control.
•OS X: Click and hold the Tab Control tool or the Slide Control tool and
choose Slide Control, then drag the crosshair to draw the slide control.
Tip You can also add a slide control by choosing Insert menu > Slide Control.
3. Customize the slide control. See Changing a slide control.
4. To add objects to a slide panel, use the layout tools in the status toolbar, choose from the
Insert menu, or drag objects onto the slide panel.
For more information on adding fields and other objects, see Placing and removing fields on a
layout and Drawing and inserting objects on a layout.
5. Click outside the slide control, or press Esc, to close the Slide Control Setup dialog box.
Related topics
Editing objects, layout parts, and the layout background
Selecting and working with objects on panel controls
Moving and resizing panel controls
To Do this
Add a new tab panel For Tab Name, type a new name and click Create, or click
Specify to create a tab label based on a calculation. See
Specify Calculation dialog box.
Rename a tab panel In the Tabs list, select a name, type the new name, and click
Change, or click Specify to create a tab label based on a
calculation.
Remove a tab panel In the Tabs list, select a name and click Delete. All objects in
the tab panel are deleted from the layout.
Reorder the tab panels In the Tabs list, drag the double arrow next to the tab name.
Set the tab panel you want in front
by default
For Default Front Tab, choose the panel you want in front when
you switch from Layout mode to another mode.
When you switch to Layout mode from another mode, the front
tab panel is the one that was last displayed in the previous
mode.
Creating and managing layouts and reports
FILEMAKER PRO HELP 255
Formatting panel controls
Copying, duplicating, and deleting panel controls
Defining conditional formatting for layout objects
Changing a slide control
You can add, remove, and reorder slide panels in a slide control. You can also include dots on a
slide panel to help you move through the panels.
To change a slide control:
1. In Layout mode, double-click the slide control.
Or, select the slide control and choose Format menu > Slide Control Setup.
The Slide Control Setup dialog box appears.
2. Do one or more of the following.
To Do this
Add a slide panel Click .
The new panel is added to the right of the active (current) panel
and becomes the active panel.
Remove a slide panel Click .
Any object on the slide panel are also removed.
If more than one panel is selected when you click , the
active panel is deleted regardless of which other panels are
selected.
Select a slide panel Click the corresponding dot at the bottom or below the slide
control.
Select multiple slide panels Click a dot to bring its panel to the front, then click the dot again.
A box appears around the dot, indicating the slide panel is
selected. Shift-click another dot, then Shift-click the dot again to
add the second slide panel to your selection. Continue Shift-
clicking dots until all the panels you want are selected.
Allow moving through slide
panels by swiping with one
finger (for FileMaker Go use
only)
Select Enable swipe gestures.
Display dots on slide panels Select Show navigation dots.
Note When developing solutions for FileMaker Pro and
FileMaker WebDirect, always include dots on slide controls
containing multiple panels so you can move between panels.
Change the size of the dots Select Show navigation dots, then type or choose a value.
Move between slide panels Do one of the following:
•Click or .
•Click the dots on or below slide panels.

Creating and managing layouts and reports
FILEMAKER PRO HELP 256
3. To add objects to a slide panel, use the layout tools in the status toolbar, choose from the
Insert menu, or drag objects onto the tab panel.
For more information about adding fields and other objects, see Placing and removing fields on
a layout and Drawing and inserting objects on a layout.
4. Click outside the slide control, or press Esc, to close the Slide Control Setup dialog box.
Notes
•Use the Inspector to change the appearance of a slide control (for example, to make the
corners rounded). See Formatting panel controls.
•You can format the appearance of one or more slide panels to be conditional (for example,
format a slide panel to appear red when a certain condition is met). See Defining conditional
formatting for layout objects.
•You cannot place a slide control in a portal.
•Animation that slides the panels when you switch between panels is not supported in
FileMaker Pro for Windows or FileMaker WebDirect.
•When you use scripts to control slide panel navigation, animation effects are off by default.
To turn on animation, see Set Script Animation.
Related topics
Editing objects, layout parts, and the layout background
Selecting and working with objects on panel controls
Moving and resizing panel controls
Copying, duplicating, and deleting panel controls
Selecting and working with objects on panel controls
You can place objects on tab panels or slide panels, then move, resize, delete, copy, and format
objects.
To select and work with objects on panel controls:
1. In Layout mode, select one or more panels or objects.
Reorder the panels within a
slide control
Drag a dot on the slide control to the new position.
Note You can’t drag dots to move slide panels between slide
controls.
Set the slide panel you want in
front by default
Select Show navigation dots, then drag the slide panel to the
left-most position.
To Do this
To Do this
Select the front tab panel or
slide panel
Click anywhere in the tab panel or slide panel.
Switch a tab panel or slide
panel to be in front
Tab panels: Click the tab of the panel that you want to be in
front.
Slide panels: Click the dot of the panel that you want to be in
front.

Creating and managing layouts and reports
FILEMAKER PRO HELP 257
2. To modify your selection, do the following.
Select more than one panel of a
panel control
Tab panels: Click a tab to bring it to the front, then click the tab
again. A box appears around the tab name, indicating the tab
panel is selected. Shift-click another tab, then Shift-click it
again to add the second tab panel to your selection. Continue
Shift-clicking tabs until all the panels you want are selected.
Note If you accidentally double-click a tab and the Tab Control
Setup dialog box opens, click OK to close it.
Slide panels: Click a dot to bring its panel to the front, then
click the dot again. A box appears around the dot, indicating
the slide panel is selected. Shift-click another dot, then Shift-
click the dot again to add the second slide panel to your
selection. Continue Shift-clicking dots until all the panels you
want are selected.
Select all tab panels or slide
panels and all objects on them
Drag the arrow pointer to make a selection box that surrounds
the panel control.
Select multiple objects on a
panel
Shift-click each object you want to select.
Select objects on multiple
panels
Tab panels: Select some objects on a tab panel, Shift-click a
tab to switch tab panels, then Shift-click objects to add them to
the selection.
Slide panels: Select some objects on a slide panel, Shift-click
a dot to switch panels, then Shift-click objects to add them to
the selection.
To Do this
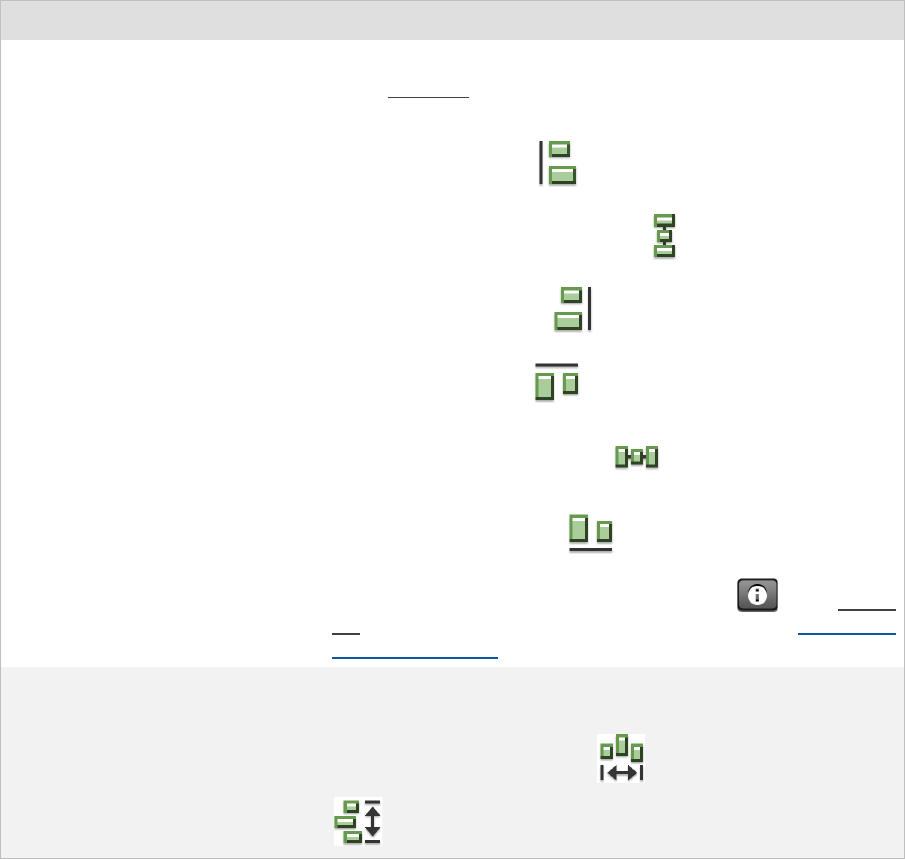
Creating and managing layouts and reports
FILEMAKER PRO HELP 258
To Do this
Line up the edges of objects on
one panel or in the same place in
different panels
Select objects on one or more panels.
In the Inspector, click Position. In the Arrange & Align area,
click one of the following:
•Align Left Edges
•Align on Horizontal Centers
•Align Right Edges
•Align Top Edges
•Align on Vertical Centers
•Align Bottom Edges
If you don’t see the Inspector, click Inspector in the layout
bar. For more information about aligning objects, see Aligning or
distributing objects.
Distribute objects horizontally or
vertically the same way on one
panel or on different panels
Select objects on one or more panels.
In the Inspector, click Position. In the Arrange & Align area,
click Distribute Horizontally or Distribute Vertically
.
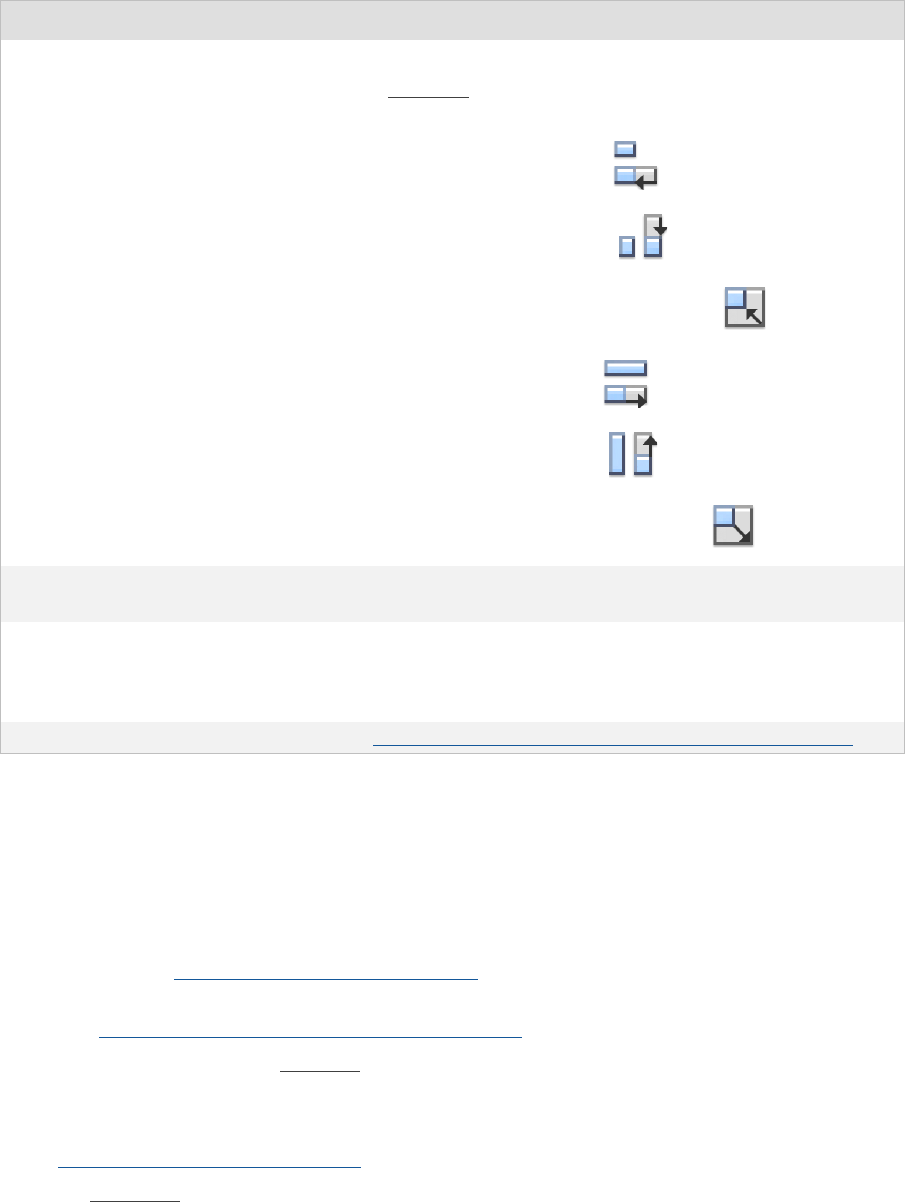
Creating and managing layouts and reports
FILEMAKER PRO HELP 259
Notes
•When you print layouts containing panel controls, only the front-most tab panel or slide
panel prints.
•When you check spelling, only the text on the front-most panel is checked.
•If you save records as an Excel file, only fields that are on the front-most panel are saved. If
you want more control over which fields appear in the Excel file, then export records
instead. See Exporting data from FileMaker Pro.
•The objects on a tab panel or slide panel have their own stacking order within that panel.
See Moving objects forward or backward on a layout.
•You can define a custom tab order for objects on a tab panel or slide panel. However, when
you press the Tab key, you navigate only to objects on the front-most panel. If you want to
automate navigation to another panel, use the Go To Field script step and specify a target
field that is on the panel you want to bring to the front. For information on tab order, see
Setting the tab order for data entry.
•If a script step specifies a field that is not on the front-most panel, FileMaker Pro selects that
field and moves its panel to the front. If, however, the field also appears on the layout and
the script locates that field first, the panel does not move forward. To have the panel move
Make objects on one panel or in
different panels the same size
Select objects on one or more panels.
In the Inspector, click Position. In the Arrange & Align area,
click one of the following:
•Resize to Smallest Width
•Resize to Smallest Height
•Resize to Smallest Width and Height
•Resize to Largest Width
•Resize to Largest Height
•Resize to Largest Width and Height
Copy an object Select an object, choose Edit menu > Copy, then choose Edit
menu > Paste.
Delete an object Select an object:
•Choose Edit menu > Clear.
•Or, press Backspace or Delete.
Format an object See Formatting and setting up field objects in Layout mode
To Do this

Creating and managing layouts and reports
FILEMAKER PRO HELP 260
to the front in this situation, assign an object name to the field that’s on the panel and use
the Go to Object script step to locate that instance of the field.
•To ensure that objects on a panel are resized along with the panel, specify resize settings
for both the panel and the objects. See Setting auto-resize options for layout objects.
•You can format the appearance of one or more tab panels or slide panels to be conditional
(for example, format a tab panel to appear red when a certain condition is met). See
Defining conditional formatting for layout objects.
Related topics
Drawing and inserting objects on a layout
Placing and removing fields on a layout
Selecting and working with objects on a layout
Formatting panel controls
Moving and resizing panel controls
You can move, resize, and reshape tab controls and slide controls.
To move a panel control and all objects on it:
•In Layout mode, drag the tab control or slide control to the new location.
See Moving objects on a layout.
To resize or reshape a panel control:
1. In Layout mode, select the tab control or slide control.
2. Drag a selection handle to change the size or shape of the tab control or slide control.
Note The size or shape of the objects on the tab control or slide control don’t change unless the
objects have been selected with the tab control or slide control.
See Resizing and reshaping objects.
Notes
•When you move a tab control or a slide control, all the objects on the panel control move
with it.
•If you make a tab control or slide control smaller, objects may become hidden from view.
Either resize the panel control or change the size of the text on the panels to fit the panel
control’s new size.
•If an object no longer fits within a resized panel, the object becomes partially or completely
hidden. However, it is still a part of the panel.
•If a panel control is not wide enough to display all of its panels, the panels will be truncated.
•You can’t move, resize, or reshape a locked panel control. See Protecting objects from
change.
Copying, duplicating, and deleting panel controls
You can copy, duplicate, or delete tab controls and slide controls and all the objects on them.
Note If you select and copy locked objects (panel controls or the objects placed on them), the
copied objects are unlocked when pasted. For more on selecting objects on a layout, see Selecting
objects.

Creating and managing layouts and reports
FILEMAKER PRO HELP 261
To copy, paste, duplicate, or delete a panel control:
1. In Layout mode, select the tab control or slide control.
2. Do the following.
Note Any tab control you cut or copy stays on the Clipboard until the next time you choose Cut or
Copy (in FileMaker Pro or another application), or restart or turn off your computer.
Working with popovers on layouts
Use popovers to simplify entering and viewing data. A popover is a layout object that allows you to
work with fields, text, and other objects on a layout. Popovers allow you to access additional details
or controls for your data without having to move to another layout or window, helping you to maintain
the context of your work.
To add a popover to a layout, in Layout mode create a popover button. An associated popover is
created along with the popover button. You can then add fields and other objects to the popover.
To work with a popover in Browse mode, you click the popover button to open the popover. You can
enter and view data in fields on a popover, view charts, use web viewers, work with panel controls,
and so on, just as you do in a layout.
Adding a popover
You can add a popover to a layout to organize objects and make data entry easier. To add a popover
to a layout, create a popover button. FileMaker Pro creates a popover at the same time. Add fields
and other layout objects on the popover.
To add a popover to a layout:
1. In Layout mode, choose the layout you want from the Layout pop-up menu.
2. In the status toolbar, do the following:
•Windows: Click the arrow next to the Button tool or the Popover Button tool
, and choose Popover Button from the menu. Then drag the crosshair to draw the
popover button.
To Do this
Copy (or cut) a tab control or slide
control, then paste it onto the
same or another layout, or onto a
layout in another database file
•Choose Edit menu > Copy (or Cut). Click with the arrow
pointer where you want the tab control or slide control
centered, then choose Edit menu > Paste Layout
Object(s) (Windows) or Edit menu > Paste (OS X).
•Or, hold down the Alt key (Windows) or Option key (OS X),
drag the pointer to a new location, and release the mouse.
Duplicate a tab control or slide
control
•Choose Edit menu > Duplicate.
•Or, press Ctrl (Windows) or Option (OS X) as you drag.
Delete a tab control or slide control •Choose Edit menu > Clear.
•Or, press Backspace or Delete.

Creating and managing layouts and reports
FILEMAKER PRO HELP 262
•OS X: Click and hold the Button tool or the Popover Button tool , and
choose Popover Button from the menu. Then drag the crosshair to draw the popover
button.
Tip You can also add a popover button by choosing Insert menu > Popover Button.
A popover button and popover are created on the layout, and the Popover Setup dialog box
appears.
3. To add a label to the popover button, type the label at the insertion point on the popover
button.
4. To change popover settings (for example, to hide the popover’s title or change the direction
in which the popover opens), use the Popover Setup dialog box.
See Changing popover settings.
5. To add objects to the popover, use the layout tools in the status toolbar, choose from the
Insert menu, or drag objects onto the tab panel.
6. Close the popover by clicking its close button.
Notes
•After you've added objects to a popover, you can move, resize, reshape, copy, delete, and
arrange the objects on the popover. See Selecting and working with objects on popovers.
•If necessary, you can place a popover button close to the edge of the layout’s viewing area.
If the popover’s display direction will extend the popover beyond the viewing area, the
popover will open in the direction in which it is most visible. Scroll bars appear on the
popover, if needed, to allow you to display all the objects on the popover.
•If you are using a popover on a narrow or short layout and you want the popover to extend
past the edge of the layout to enlarge the popover’s data entry area, set fields and the
popover to resize automatically, and anchor the popover on the right side or bottom. See
Setting auto-resize options for layout objects.
•To have a popover display in Table View, place the popover in the header part or footer part
on the layout.
•You can export data from fields on popovers with the following exceptions:
•When you save or send data as Excel (using File menu > Save/Send Records as >
Excel), fields on popovers are not included in the destination file. Use File menu >
Export Records instead. After naming the destination file and setting Excel options,
choose Current Table in the Specify Field Order for Export dialog box, then select the
fields you want to export. See Exporting data from FileMaker Pro.
•When you use the context menu in Table View to copy records or to save or send
records as a PDF, fields on popovers are not included in the destination file.
•When you use the Copy Record/Request script step or Copy All Records/Requests
script step, fields on popovers are not included in the destination file.
•Popover buttons are identified by a badge in Layout mode. If you don’t see a badge,
choose View menu > Show > Popover Buttons.
•To close a popover in Browse mode, select another area of the layout, or press Esc.
Related topics
Moving and resizing popovers
Creating and managing layouts and reports
FILEMAKER PRO HELP 263
Formatting popover buttons and popovers
Copying, duplicating, and deleting popovers
Changing popover settings
Use the Popover Setup dialog box to change popover settings.
To change settings for a popover:
1. If the Popover Setup dialog box is not open in Layout mode, do one of the following:
•If the popover is closed: Double-click the popover button or select the popover button
and choose Format menu > Display Popover, then double-click the popover.
•If the popover is open: Double-click the popover or select the popover and choose
Format menu > Popover Setup.
2. Do one or more of the following.
3. To close the Popover Setup dialog box, click outside the dialog box or click its close button.
Notes
•By default, popovers open to the right of a popover button, unless there isn’t enough room
on the layout for the popover to display.
•You can change the appearance of popover buttons and popovers independently of one
another. See Formatting popover buttons and popovers.
•To change the appearance of fields and other layout objects on a popover, select the
objects on the popover, then use the Inspector to make your changes. See Selecting and
working with objects on popovers.
To Do this
Change the title of the popover Type a title, with or without double quotation marks.
To specify a title based on a calculation, click (Windows) or
Specify (OS X) and define the calculation. See Specify
Calculation dialog box.
Show or Hide the title bar (and the
title)
Select or clear Show title bar.
Showing or hiding the title bar does not change the position of
the objects on the popover.
Change the direction in which the
popover opens on the layout •Click Left , Right , Above , or Below
.
•Or, place the arrow pointer on the popover’s title bar
area (even if the title bar is hidden) and drag the
popover to a new direction.
Assign one or more script triggers
to the popover (if you want a script
to run when you open or exit the
popover)
Click Set Script Triggers and choose one or more script
triggers. See Setting up script triggers and Creating scripts to
automate tasks.

Creating and managing layouts and reports
FILEMAKER PRO HELP 264
Related topics
Adding a popover
Copying, duplicating, and deleting popovers
Moving and resizing popovers
Moving and resizing popovers
You can move popover buttons and resize popover buttons and popovers.
To move a popover button (and its popover):
•In Layout mode, drag the popover button to the new location.
When you move a popover button, its associated popover and all objects on the popover move
with it.
See Moving objects on a layout.
To resize or reshape a popover button or popover:
1. In Layout mode, select the popover button or the popover.
If the popover is hidden, double-click the popover button.
2. Drag a selection handle to change the size or shape of the popover button or popover.
See Resizing and reshaping objects.
Notes
•If you make a popover smaller, the objects on it may become truncated or hidden.
Truncated or hidden objects are still part of the popover. When you open the popover in
Browse mode or Find mode, scroll bars appear, allowing access to all objects on the
popover.
•If necessary, you can place a popover button close to the edge of the layout’s viewing area.
If the popover’s display direction will extend the popover beyond the viewing area, the
popover will open in the direction in which it is most visible. Scroll bars appear on the
popover, if needed, to allow you to display all the objects on the popover.
•You can’t move, resize, or reshape a locked popover button. See Protecting objects from
change.
Related topics
Formatting popover buttons and popovers
Copying, duplicating, and deleting popovers
You copy, duplicate, or delete popovers by copying, duplicating, or deleting their associated popover
buttons. You can’t copy, duplicate, or delete popovers independently of their popover buttons.
To copy, paste, duplicate, or delete a popover:
1. In Layout mode, select the popover button.

Creating and managing layouts and reports
FILEMAKER PRO HELP 265
2. Do one or more of the following.
Notes
•Any popover you cut or copy stays on the Clipboard until the next time you choose Cut or
Copy (in FileMaker Pro or another application), or restart or turn off your computer.
•You can use the Duplicate command to create a series of identical popovers. After choosing
Edit menu > Duplicate, drag the new popover button to a different location on the layout,
then choose Edit menu > Duplicate again.
•If you select and copy locked objects, the copies are unlocked.
Selecting and working with objects on popovers
You can move, resize, delete, copy, and format objects on popovers.
1. In Layout mode, double-click the popover button to open the popover.
2. Select one or more objects on the popover.
3. Do one or more of the following.
To Do this
Copy (or cut) a popover, then
paste it onto the same or another
layout
•Choose Edit menu > Copy (or Cut). Click with the arrow
pointer where you want the popover button centered, then
choose Edit menu > Paste Layout Object(s) (Windows) or
Edit menu > Paste (OS X).
•Or, hold down the Alt key (Windows) or Option key (OS X),
drag the pointer to a new location, and release the mouse.
Duplicate a popover •Choose Edit menu > Duplicate.
•Or, press Ctrl (Windows) or Option (OS X) as you drag.
Delete a popover •Choose Edit menu > Clear.
•Or, press Backspace or Delete.
To select Do this
An object on the popover With the arrow pointer, click the object.
Multiple objects on the
popover
•Drag the arrow pointer to make a selection box on the
popover that includes the objects. The selection box does
not have to completely surround the objects. To avoid
including partially selected objects, press Ctrl (Windows) or
Command (OS X) as you drag.
Note Make sure the arrow pointer is on the popover, and
not the layout, when you begin dragging. Otherwise, objects
on the layout are selected instead.
•Or, Shift-click each object individually.

Creating and managing layouts and reports
FILEMAKER PRO HELP 266
Note In Layout mode, popovers are included in the default tab order. When you press Tab to move
to a popover button, press Tab again to open the popover, then continue pressing Tab to advance
through the objects on the popover. In Browse mode, popover buttons are not in the tab order by
default, but you can add popover buttons to the tab order. See Setting the tab order for data entry.
Related topics
Drawing and inserting objects on a layout
Placing and removing fields on a layout
Selecting and working with objects on a layout
Formatting popover buttons and popovers
Working with web viewers on layouts
Use web viewers to display web pages directly in a FileMaker Pro layout. Web viewers are layout
objects that allow you to display information from websites based on data in your database. For
example, a web viewer can calculate a URL for a map website based on information in your
database table’s address and city fields. As you browse each record in your table, the web viewer
displays a map of the location specified in the current record.
To make it easier for you to create web viewers, FileMaker Pro includes templates for several data-
driven websites. When you use one of these templates, you only need to specify the parameters
used by the website. You can also create a custom web address for any website.
Web viewers use the operating system’s web browser technology, so you can perform many of the
same tasks with web viewers that you can with web browsers. You can click links and navigate to
pages other than the page the web viewer originally loaded. Web viewers can also display content
on websites—such as PDF documents and QuickTime movies—for which you may need to install
additional software. You can also control URL encoding.
Web viewers are not meant to replace web browsers. For some websites, you may need to open a
separate web browser window.
Related topics
Navigating in web viewers
Troubleshooting layouts with web viewers
To Do this
Copy (or cut) the object and
then paste the object
Choose Edit menu > Copy (or Cut). Click with the arrow pointer
where you want the object pasted, then choose Edit menu >
Paste.
See Copying, duplicating, and deleting objects.
Delete the object •Choose Edit menu > Clear.
•Or, press Backspace or Delete.
See Copying, duplicating, and deleting objects.
Move the object Drag the object to a new location.
See Moving objects on a layout.
Resize or reshape the object Drag one of the selection handles to change the object’s shape
or size.
See Resizing and reshaping objects.
Creating and managing layouts and reports
FILEMAKER PRO HELP 267
Adding a web viewer
You can add a web viewer to display a web page on a layout. The address of the web page can be
either a constant or a calculation based on data in the current record.
1. In Layout mode, choose the layout you want from the Layout pop-up menu.
2. Click the Web Viewer tool in the status toolbar.
3. Drag the crosshair to draw the web viewer.
Tip You can also add a web viewer by choosing Insert menu > Web Viewer.
4. In the Web Viewer Setup dialog box, choose one of the websites in the Choose a Website
list.
Or, choose Custom Web Address from the list. See Defining a custom web address.
5. For each of the website parameters you want to use, do one of the following:
Note Some website parameters may be marked Required or Optional. If you do not specify a
Required parameter, the website might not provide the information you expect.
6. Select Allow interaction with web viewer content if you want to allow users to interact
with the web page displayed in the web viewer.
Users can click links, enter text, scroll, tab into, and use the shortcut menu in the web viewer. If
you clear this checkbox, all interaction is disabled; even scroll bars are not displayed.
7. Select Display content in Find mode if you want the web viewer to display a web page in
Find mode.
After users enter a value into a field and move out of that field, the web viewer recalculates the
URL and reloads the web page, if the web address is based on this field. If you clear this
checkbox, the web viewer is blank in Find mode.
8. Select Display progress bar if you want the web viewer to display a progress bar under the
content area that shows how much of a web page is loaded.
9. Select Display status messages if you want the web viewer to display status messages
under the content area. The following kinds of status messages can be displayed:
•Loading messages, such as “Loading: http://www.filemaker.com”
•Error messages, which are the same as those that would display on your operating
system’s web browser
•Security status. When secure web pages (pages that use the https protocol) are loaded,
a small lock icon appears
To Do this
Specify a field that
contains the
parameter
Click and choose Specify Field. Then select a database field and click OK.
Specify a
calculation that
generates the
parameter
Click and choose Specify Calculation. Then create a calculation and click
OK.
Specify a constant
value
Type a constant value enclosed in quotation marks. If you want to specify a
parameter that consists of both a constant and a field, specify it as a calculation.

Creating and managing layouts and reports
FILEMAKER PRO HELP 268
10. Select Automatically encode URL to allow FileMaker Pro to apply encoding rules to the
URL, if necessary, so that it complies with a browser’s required format. To keep the URL in
the format in which it is entered, deselect this checkbox.
For more information about URL encoding, see About URL encoding in web viewers.
11. Click OK.
Notes
•Web viewers display web pages in Form View and List View. In Table View, web viewers
display only when they are in the header or footer parts of a layout.
•You can’t place a web viewer in a portal. If you place a web viewer on a portal, the web
viewer appears as an object on the layout that overlaps the portal.
•Web viewers are included in the default tab order.
•You can define a web viewer as a button. Mouse clicks activate the button but don’t interact
with links or other web viewer content. However, you can tab into the web viewer and
interact with it using the keyboard, if Allow interaction with web viewer content is
selected and the web viewer is in the tab order. For more information about buttons, see
Defining a button.
•Avoid placing objects in front of or behind web viewers. Web viewers may not display in
Browse, Find, and Preview modes in the stacking order that you set in Layout mode.
•You cannot rotate a web viewer.
•You can send html data to a web viewer by embedding the data in a URL. For more
information, see the Set Web Viewer script step.
Changing a web address
You can change the web address used by a web viewer.
To change the web address of a web viewer:
1. In Layout mode, double-click the web viewer.
Or, select a web viewer and choose Format menu > Web Viewer Setup.
The Web Viewer Setup dialog box appears.
2. Do one of the following:
To Do this
Change the website to use In the Choose a Website list, select a new website. Specify the
website parameters you want to use as described in Adding a
web viewer.
Change or add a field used for a
website parameter Click next to the website parameter you want to change or
add and choose Specify Field. Then select a database field
and click OK. Or, you can type directly in the website parameter
box.
Remove the field or calculation
used for a website parameter
In a website parameter box, select the field name, calculation,
or text and press Backspace or Delete.
Change a custom web address Click Specify next to the Web Address box and change the
calculation as described in Defining a custom web address.

Creating and managing layouts and reports
FILEMAKER PRO HELP 269
Note Some website parameters may be marked Required or Optional. If you do not specify a
Required parameter, the website might not provide the information you expect.
3. Click OK.
Defining a custom web address
FileMaker Pro includes web viewer templates that define web addresses for several websites.
However, you can create a custom web address for any website you want to display in a web
viewer.
The web address for a web viewer is a calculated expression, similar to a formula specified by a
calculation field. To create a custom web address, you create a formula that can consist of
constants, field names, functions, and operators. FileMaker Pro evaluates the expression to
construct a URL, which the web viewer uses to display a web page.
To define a custom web address for a web viewer:
1. In Layout mode, add a web viewer, or select a web viewer that is already on the layout and
choose Format menu > Web Viewer Setup.
For more information, see Adding a web viewer.
The Web Viewer Setup dialog box appears.
2. In the Choose a Website list, choose Custom Web Address.
If a website template was previously selected, its web address remains in the Web Address
box, but the website parameter boxes disappear.
3. Click Specify next to the Web Address box.
The Specify Calculation dialog box appears.
4. Enter a formula for your web address.
For more information on formulas, see Working with formulas and functions.
5. Click OK to close the Specify Calculation dialog box.
6. Continue to edit the web address or choose other web viewer options, then click OK.
Notes
•To see example web addresses, click any of the websites in the Choose a Website list. If
one of the addresses is similar to the custom web address you want to create, you can edit
the example.
•To see a calculated URL based on your custom web address, in Layout mode choose View
menu > Show > Sample Data.
•The result of a calculation for a custom web address must be text.
•You must ensure that your custom web address:
Change whether FileMaker Pro
automatically encodes a URL
Select Automatically encode URL to allow FileMaker Pro to
apply encoding rules to the URL, if necessary, so that it
complies with a browser’s required format. To keep the URL in
the format in which it is entered, deselect this checkbox. (For
more information about URL encoding, see About URL
encoding in web viewers.)
To Do this

Creating and managing layouts and reports
FILEMAKER PRO HELP 270
•follows the format: <scheme>://
<username>:<password>@<hostname>:<port>/<path>/
<filename><parameter>
•begins with the correct scheme — for example, http://, https://, ftp://, gopher://, or file://.
If you omit the scheme, the operating system’s web browser might use one that you
didn’t intend.
•is correctly encoded as a URL, by selecting Automatically encode URL. See About
URL encoding in web viewers.
Related topics
Troubleshooting layouts with web viewers
Controlling how layouts print
What printer you use, what printer options you choose, the margins you specify, and different layout
options you choose all affect how FileMaker Pro prints your data.
FileMaker Pro also allows you to set up a layout to print records in columns (for example, to print a
multi-column phone directory), set sliding options to reduce blank spaces in printouts, and prevent
certain layout objects from printing.
Related topics
Previewing and printing information
Troubleshooting layouts
Specifying page margins
You can specify different margins for each layout. If you don't specify margins, FileMaker Pro uses
the printer's default margins, which might vary with different printers or different printer drivers. You
should specify page margins if you're printing a layout where exact spacing is important, like labels
or a preprinted form.
To specify page margins:
1. Choose File menu > Print Setup (Windows), or File menu > Page Setup (OS X), confirm
the printer and paper settings, then click OK.
In Preview mode, you can also click Print Setup (Windows) or Page Setup (OS X) in the status
toolbar.
For more information, see the documentation that came with your computer and printer.
2. In Layout mode, click Layout Setup in the layout bar.
You can also click the name of the layout’s current table.
3. In the Layout Setup dialog box, click the Printing tab.
4. Select Fixed page margins, and type values for the margins.
If you specify a margin that is narrower than your current printer supports, FileMaker Pro
displays a warning dialog box.
If you want the left and right margins to alternate (the inside margin appears on the left side for
the first page, on the right side for the second page, and so on), select Facing pages.
5. Click OK.

Creating and managing layouts and reports
FILEMAKER PRO HELP 271
6. To check the margins, switch to Preview mode.
For more information, see Previewing data on a layout.
Notes
•To change the unit of measure used for margins, in Layout mode, right-click the ruler and
choose a unit of measure from the shortcut menu. See Using the rulers and grid.
•You can display the margins in Layout mode exactly as they will print. For more information,
see Showing page margins.
•If you’re using the Print in <n> columns option and you later specify page margins, the
columns resize to fit within the new margins. For more information, see Setting up to print
records in columns.
Showing page margins
You can display the margins in Layout mode exactly as they will print. (Page margins always show
in Preview mode.)
To display the page margins: In Layout mode, choose View menu > Page Margins. The margins
show up as a thin, dotted line around the edges of the layout “page.” Page breaks appear as heavy,
dashed horizontal and vertical lines.
To hide the margins: Choose View menu > Page Margins again.
Most printers can't print to the edge of the paper. If you place objects in the margins or outside the
area the selected printer can print to, you see them in Browse and Find modes, but don't see the
objects when you preview or print.
Related topics
Specifying page margins
Previewing data on a layout
Setting up to print records in columns
You can set up a layout to print (or preview) records in columns, for example, for a directory of
names and addresses. This is in contrast to a List view or Report layout, which arranges fields in
columns.
When you set up records to print in columns, all the information for one record is printed together in
a block (much like on a label), then all the values for the next record are printed together, and so on.
You can specify the order of records — either across rows or down columns.
Across rows first Down columns first
Creating and managing layouts and reports
FILEMAKER PRO HELP 272
You only see multiple columns in Layout and Preview modes and when you print (not in Browse
mode or Find mode).
To set up columns in a layout:
1. Choose File menu > Print Setup (Windows), or File menu > Page Setup (OS X), confirm
that your printer and paper settings are correct, and then click OK.
In Preview mode, you can also click Print Setup (Windows) or Page Setup (OS X) in the status
toolbar.
FileMaker Pro considers the selected printer, and print or page setup information when it
calculates margins and other measurements on the layout.
2. In Layout mode, create a layout or choose a layout from the Layout pop-up menu.
It's easiest to start with a Blank layout or a layout with no objects in the body part. For more
information on creating layouts, see Creating a layout.
3. Click Layout Setup in the layout bar.
You can also click the name of the layout’s current table.
4. In the Layout Setup dialog box, click the Printing tab.
5. Select Print in <value> columns, and then set the options described in the following table.
6. Click OK.
On the layout, you see vertical lines indicating columns.
7. Place or arrange fields and other layout objects so they are contained within the sample
column on the left.
Use merge fields or fields or objects with sliding enabled to fit more data into the width of a
column. With either of these two features, fields can extend into the gray area of the second
column, and blank space in fields is eliminated when you view or print data. For more
information, see Placing merge fields on a layout and Removing blank spaces in printouts.
To Do this
Specify the number of columns For Print in <value> columns, type a number between 1 and
99.
Arrange records to flow across the
page first (left to right a row at a
time)
Select Across first.
Use this option for reports like labels, to use the fewest number
of rows and preserve label stock.
Arrange records to flow down the
page first (top to bottom a column
at a time)
Select Down first.
Use this option for reports like directories, where you usually
read from top to bottom, column by column.
Creating and managing layouts and reports
FILEMAKER PRO HELP 273
To change the width of columns:
The initial width of each column is calculated based on the paper size, orientation, and any margins
you have set. To change the width of columns, do one of the following:
Notes
•If you change the number of columns, FileMaker Pro adjusts the width of the columns to fit
within the width of the paper size you have defined, not including fixed margins. You may
need to readjust fields to fit within the sample column.
•When you select Down first, FileMaker Pro prints subsummary parts the width of the
column. If you've specified that a page break comes after the subsummary part,
FileMaker Pro starts a new column (not a new page). With Across first, FileMaker Pro
prints subsummary parts the width of the page, and the specified page break starts a new
page. For more information, see Defining page breaks and numbering.
Removing blank spaces in printouts
Often, the amount of information in the fields in your database varies. When you print, FileMaker Pro
can shrink field boundaries and shift objects to the left or up on your layout to close up the blank
space caused when the information in a field doesn't fill the field boundary.
For example, in a catalog, a description for one item may be longer than for another. If you use the
sliding feature of FileMaker Pro, you can close up the space between items and print more items per
page.
You can slide any object, including fields, portals, other objects, and even layout parts. Here is how
certain objects slide:
•Fields shrink to eliminate empty space within field boundaries. A field can also slide if there
is a sliding or shrinking field above or to the left of the field.
•Non-field objects, like a horizontal line or a text object, can slide if there is a sliding field
above or to the left of the objects. When a non-field object slides, it moves to another place
on the layout but it doesn't shrink.
•Portals slide like any other non-field object, but objects within a portal can't slide. If you
specify that a portal slides up and the enclosing part shrink, FileMaker Pro omits empty
portal rows.
To Do this
Interactively adjust the width of the
columns
Drag the right column boundary (the vertical dashed line at the
right edge of the sample column).
Note Because the page width is fixed, dragging the column
boundary to the right does not increase the width of the
printable area within each column (unless you previously
narrowed the column width). Instead dragging the column
boundary to the right creates a “gutter” margin between each
column. This gutter margin is useful for creating space between
columns, but it reduces the printable area within each column.
Precisely measure and adjust the
width of the columns Click Inspector in the layout bar. Click Position. Position
the pointer over the right column boundary, hold down the
mouse button (be careful not to drag the column width), and
read the column Width value in the Size area.

Creating and managing layouts and reports
FILEMAKER PRO HELP 274
•You can set layout parts to shrink when the fields in them slide up. Headers, footers, title
headers, and title footers never shrink or slide up. Don't set a part to shrink on a layout that
requires fixed vertical spacing, like labels.
All objects slide left (or up) corresponding to the amount of space that the fields to the left of (or
above) the objects shrink. However, sliding does not remove empty space you leave between fields,
or other empty spaces on parts. For example, if you create a body part with one inch of space below
the lowest object, and set all the objects to slide and the part to shrink, FileMaker Pro leaves one
inch below the lowest object when you print.
To set sliding options:
Note The effects of the sliding options you set only appear in Preview mode and printouts, not in
Browse mode.
1. In Layout mode, select both the objects you want to slide and the left-most (or top-most)
field that you want the other objects to slide into so it can shrink.
2. Click Inspector in the layout bar, then click Position.
3. In the Sliding & Visibility area, select the sliding options you want.
4. To see the effects of the sliding options you set, choose Preview from the Mode pop-up
menu at the bottom of the document window.
For more information, see Previewing data on a layout.
To modify or remove the sliding options for objects:
1. In Layout mode, select the objects you want to change.
To Select this option
Reduce the width of the selected fields to the minimum
needed for their data, and then slide all selected objects
left based on the amount of space the fields shrink.
Sliding left
Reduce the height of the selected fields to the minimum
needed for their data, and then slide all selected objects
up based on the field above that shrinks the least.
Note This option maintains consistent vertical spacing
among columns and repeating fields.
Sliding up based on, and click All
objects above
Reduce the height of the selected fields to the minimum
needed for their data, and then slide all selected objects
up based on the amount of space the fields directly
above shrink.
Note This option allows the spacing in a column to
adjust independently of other columns and repeating
fields.
Sliding up based on, and click Only
objects directly above
Close up the space in the layout part that contains the
selected fields. To slide the part up relative to all objects,
set this option for all the objects that are sliding up. To
slide the part up relative to a single object, set this option
for that object only.
Also resize enclosing part

Creating and managing layouts and reports
FILEMAKER PRO HELP 275
If you want to remove sliding from a group of objects, remember to select the left-most (or top-
most) field along with the other objects that are sliding.
2. Click Inspector in the layout bar, then click Position.
3. In the Sliding & Visibility area, deselect options you don't want.
Notes
•In many cases, you can achieve the same sliding effects by using merge fields. The
following table summarizes when to use sliding objects and when to use merge fields.
•In Layout mode, choose View menu > Show > Sliding Objects to see which objects slide
and in which directions.
•When you slide objects or parts, FileMaker Pro prints the objects relative to each other, not
precisely as you placed them on your layout.
•Be careful when setting sliding options for repeating fields. If some repeating fields are
empty and the space is removed by sliding, then adjoining data in different repeating fields
may no longer be in proper alignment.
•If your database includes one or more fields that display Japanese text, you can trim extra
spaces between characters with the TrimAll function. For each field that contains
Japanese data that you want to trim, create a calculation field that uses the TrimAll
function to trim that field, and then place that field on your layout. For more information, see
TrimAll function.
Related topics
Troubleshooting layouts
Preventing objects from printing
You can keep objects on a layout from printing. For example:
•Create a button on a report layout that doesn't print when you print the report.
•Place instructions on a layout to be read during data entry, but not printed when that layout
is printed.
To keep objects from printing:
1. In Layout mode, select the object or objects that you don't want to print.
For more information, see Selecting objects.
2. Click Inspector in the layout bar, then click Position.
Use sliding objects when you want to: Use merge fields when you want to:
•slide non-text objects, like graphics
•shrink a layout part to fit more on a page
•align formatted fields, like value lists and
repeating fields
•use a layout for data entry (you can't enter
data into a field formatted as a merge field)
•slide fields together in one continuous block
of text, such as for mailing labels
•slide fields and text together in one
continuous block of text, such as for form
letters.
For more information, see Placing merge fields
on a layout.

Creating and managing layouts and reports
FILEMAKER PRO HELP 276
3. In the Sliding & Visibility area, for Object visibility, select Hide when printing.
Notes
•You see nonprinting objects in Browse and Layout modes, but not in Preview mode or when
you print. In Layout mode, choose View menu > Show > Non-Printing Objects to display
nonprinting objects with a gray border.
•To close up the blank space taken by a nonprinting object, set sliding options for that object
and objects below it on the layout. For more information, see Removing blank spaces in
printouts.
Related topics
Using buttons with scripts
Previewing data on a layout
Setting up script triggers
You can set up a script trigger to specify that a script runs when an event occurs. For example, you
can use a script trigger to run a script that automatically enters data in fields based on what is
entered in another field.
Some script triggers run the script before an event is processed by the database engine. Other
script triggers run the script after an event is processed by the database engine. For example, you
could use the OnObjectEnter script trigger to run a script after a field is entered. (The field is the
object; entering the field is the event.)
Script triggers can be activated by user actions or by scripts. For example, you could use the
OnObjectEnter script trigger to activate a script to run when a field is entered either by a user
clicking it or by a Go to Object script step.
You can set up a script trigger to activate:
•when a user enters a specific layout. See Setting script triggers for layouts.
•when a user enters, modifies, or exits an object or objects on a layout. See Setting script
triggers for objects.
•when a file is opened or closed. For information on how to do this, see Setting file options.
To see which layout objects and layouts have script triggers assigned to them, in Layout mode,
choose View menu > Show > Script Triggers.
The following script triggers are available:
Trigger area Script trigger
Before
processing
After
processing
Object OnObjectEnter X
OnObjectKeystroke X
OnObjectModify X
OnObjectValidate X
OnObjectSave X
OnObjectExit X
OnPanelSwitch X
Creating and managing layouts and reports
FILEMAKER PRO HELP 277
Timing of script triggers
When multiple script triggers are activated by the same event, the script triggers execute in the
following relative order:
1. OnFirstWindowOpen
2. OnWindowOpen
3. OnLayoutEnter
4. OnModeEnter
5. OnRecordLoad
6. OnLayoutSizeChange
7. OnObjectEnter
8. OnObjectKeystroke
9. OnLayoutKeystroke
10. OnGestureTap
11. OnPanelSwitch
12. OnObjectModify
13. OnObjectValidate
14. OnObjectSave
15. OnObjectExit
16. OnRecordCommit or OnRecordRevert
17. OnViewChange
18. OnModeExit
Layout OnRecordLoad X
OnRecordCommit X
OnRecordRevert X
OnLayoutKeystroke X
OnLayoutEnter X
OnLayoutExit X
OnLayoutSizeChange X
OnModeEnter X
OnModeExit X
OnViewChange X
OnGestureTap X
File options OnFirstWindowOpen X
OnLastWindowClose X
OnWindowOpen X
OnWindowClose X
Trigger area Script trigger
Before
processing
After
processing

Creating and managing layouts and reports
FILEMAKER PRO HELP 278
19. OnLayoutExit
20. OnWindowClose
21. OnLastWindowClose
Notes
•Scripts that are run by script triggers use existing privileges. Unless a script is defined to run
with full privileges, the script runs using the user’s privileges.
•In Custom Web Publishing, script triggers can only be activated by a script and not by direct
user interaction. For example, if a user tabs into a field that has an OnObjectEnter script
trigger, the trigger will not activate. If a script step causes focus to move into that field, the
script trigger will activate.
•Some script triggers allow for the triggering event to be canceled if the script executed by
the script trigger returns a False value. When a command or event is canceled this way, the
error code is set to 20. See Get(LastError) function for more information. If the script
executed by the OnLastWindowClose script trigger returns a False value, then the file will
not close.
•The OnFirstWindowOpen and OnWindowOpen script triggers display in the Script
Debugger when a script is set to run on file open; the OnLastWindowClose and
OnWindowClose script triggers display in the Script Debugger when a script is set to run on
file close.
•Windows: Alt and Ctrl key combinations do not activate script triggers.
•OS X: Command key combinations do not activate script triggers.
Related topics
Debugging scripts (FileMaker Pro Advanced)
Using the Data Viewer (FileMaker Pro Advanced)
Setting script triggers for layouts
You can set up script triggers to activate when actions are performed on a specific layout.
To add, change, or delete a script trigger for a layout:
1. Create the script that you want to trigger.
2. In Layout mode, select a layout.
3. Click Layout Setup in the layout bar.
4. In the Layout Setup dialog box, click the Script Triggers tab and double-click the event that
you want to trigger the script.
5. In the Specify Script dialog box, choose the script.
6. (Optional) To specify a script parameter, type the text you want. Or, click Edit and use the
Specify Calculation dialog box to build a more complex parameter, then click OK.
7. Click OK to close the Specify Script dialog box.
8. In the Layout Setup dialog box, select modes for the script trigger.
9. Click OK.

Creating and managing layouts and reports
FILEMAKER PRO HELP 279
A badge appears in the lower-right corner of a layout on which you set a layout script
trigger. If you don’t see the badge, choose View menu > Show > Script Triggers. In the
Manage Layouts dialog box, you see next to the name of a layout for which a layout script
trigger is set.
Script triggers set for one layout do not apply to other layouts. To include a script trigger on multiple
layouts, repeat these steps on each layout.
Setting script triggers for objects
You can set up script triggers to activate when actions are performed on a specific object within a
specific layout.
To add, change, or delete a script trigger for an object:
1. Create the script that you want to trigger.
2. In Layout mode, select a layout.
3. Select one or more objects.
4. Choose Format menu > Set Script Triggers.
5. In the Set Script Triggers dialog box, double-click the event that you want to trigger the
script.
6. In the Specify Script dialog box, choose the script.
7. (Optional) To specify a script parameter, type the text you want. Or, click Edit and use the
Specify Calculation dialog box to build a more complex parameter, then click OK.
8. Click OK to close the Specify Script dialog box.
9. In the Set Script Triggers dialog box, select modes for the script trigger.
10. Click OK.
A badge or appears on the object or objects on which you set the script trigger. (The
badge that appears depends on the size of the object.) If you don’t see a badge, choose View
menu > Show > Script Triggers.
Notes
•Changes made to an object in one layout will not activate script triggers on the same object
in a different layout.
•To disable a script trigger without removing it, clear the mode checkboxes.
•If you select multiple objects that have different settings for a script trigger, the Set Script
Triggers dialog box displays a minus sign (“-”) to indicate that the trigger has not been set on
some of the objects.
•You can leave the settings intact by clicking OK, or change the settings by clicking the
checkbox.
•A check mark indicates that the trigger is set for all selected objects.
•An empty checkbox indicates that the trigger is cleared for all selected objects.

Creating and managing layouts and reports
FILEMAKER PRO HELP 280
Changing object data without activating script triggers
Bulk operations that may change many records at once will not trigger a script.
Spell checking (Edit menu > Spelling > Check All or the Check Found Set script step) or a Find/
Replace (Edit menu > Find/Replace or the Open Find/Replace script step) on more than one
record at a time will not activate script triggers.
When you check spelling for all fields in a record or all records in a found set (as in the Check Found
Set script step), script triggers will not activate except:
•If a field is active when an operation starts, the OnObjectExit trigger will activate.
•If a field is active at the end of an operation, the OnObjectEnter trigger will activate for that
field.
Only direct operations can trigger scripts:
•Changes made directly to a layout object or using a layout will trigger scripts, while changes
made to the underlying data will not trigger a script.
•Changes made to a field in one layout object instance will not trigger scripts on other layout
objects on the same layout or a different layout.
•Script steps and menu commands that apply directly to the table data rather than the layout,
such as Import Records, Replace Field Contents, and Relookup Field Contents will not
trigger scripts.
•Changes made to a field from the Show Custom Dialog script step will not activate the
OnObjectModify script trigger.
•Script steps that can change a field directly, such as Set Field, Set Field By Name, and Set
Web Viewer will not activate the OnObjectModify script trigger. Script steps that work on a
layout object even though their target is specified as a field, such as Insert Text, will activate
the OnObjectModify script trigger.
•Apple events that apply directly to or work through layout objects will trigger scripts. Apple
events that bypass the layout will not trigger the scripts.
•Schema changes that change the data in fields will not trigger scripts.
Summary fields and calculation fields:
•The OnObjectEnter, OnObjectExit, and OnObjectKeystroke script triggers will activate for
summary and calculation fields. The OnObjectModify script trigger can be set for summary
and calculation fields, but it will not activate.
Troubleshooting layouts
Sometimes a layout does not appear or print as you expect it to. If you’re having trouble with a
layout, review the tips in one or more of the following sections.
Related topics
Printing troubleshooting
Troubleshooting layouts with summary or subsummary parts
If summary data is missing or incorrect in summary reports created in Layout mode, try the following
troubleshooting tips.

Creating and managing layouts and reports
FILEMAKER PRO HELP 281
Note You can create dynamic reports in Browse mode in Table View. For more information, see
Creating dynamic reports in Table View.
•When you create a summary report in Layout mode without using the new Layout/Report
assistant, you must define a summary field for each field you want summarized. You then
place these summary fields in the subsummary or grand summary layout part.
•Before printing or previewing a report created in Layout mode, sort by all of the break fields
on which your subsummaries are based, and switch to Preview mode to see how your
report will look when printed.
•Records with no value in the break fields will sort to the top and can thus give the
appearance of no data. You can omit records with blank values in the break field before
running a subsummary report. For details, see Finding records.
•Make sure you're working with the intended found set. (Look in the status toolbar.)
•Make sure data has been entered consistently in the break field. For example, be sure that
FileMaker, Inc. is not sometimes entered as FM. Use a value list to ensure consistency
during data entry.
•In Layout mode, make sure fields aren't touching or crossing the part boundaries.
•You can have only one leading and one trailing subsummary part based on the same field.
•You can change the focus of a report by specifying a different break field for a subsummary
part. For example, in a sales report with a subsummary part containing a summary field for
sales, you can select Month for the break field to get monthly totals or Salesperson to get
individual performance totals.
•To focus attention on summary information, create a report with no body, just subsummary
or grand summary parts. You don't need to include fields in a body part to summarize them
in a summary part.
•When you create a report in the New Layout/Report assistant, fields that are in summary
parts display the part-specific style, not the default theme style.
•If you have used the Field tool to add a field to a summary part and the text is difficult to see,
use the Inspector or the Format Painter to copy the style you want from another field.
Tip For a report created in Layout mode, you can view subsummary data in Browse mode when
you view the file in Table View or List View and records are sorted by break fields.
Troubleshooting label printing
The following topics describe common problems and solutions when printing labels.
Labels have all fields on the same line
In the text block that contains merge fields, insert carriage returns at the locations you want:
1. You see a label with a line of fields, each field enclosed in double opening and closing angle
brackets like this: <<fieldname>>.
2. In Layout mode, click the Text tool in the status toolbar, and click to place the insertion
point at the position before the field that you want to begin the second line of text.
For example, in a mailing address, you might place the insertion point before the Address field.
3. Press the Enter key in the main keypad (Windows) or Return (OS X).

Creating and managing layouts and reports
FILEMAKER PRO HELP 282
Only one label prints
•Open the Print dialog box to see if you are printing only the current record.
Data doesn't print within each label
Tip When fixing label printing problems, print the first sheet of your labels on plain paper and hold
the printout and the label template sheet together up to a light to see if they are aligned.
•Make sure your paper size is set appropriately for the type of printer and labels that you’re
using. Follow the instructions in Printing labels to set the paper size for your layout.
•If you’re printing on continuous-feed label paper using a dot-matrix printer and your layout
contains a header part, delete the header part. For more information, see Deleting layout
parts.
•If you’re printing to sheets of labels, some laser and ink jet printers cannot print within 0.25
inches of the top of the paper. (Check your printer documentation for this information.) Use
a ruler to measure the distance from the top of the label paper to the top of the first row of
labels. If the distance is less than the minimum margin your printer requires, increase the
height of the header part to include the first row of labels, so that printing starts at the top of
the second row. FileMaker Pro won't print on the first row of labels, but it prints in the correct
position on subsequent labels.
•If all labels are too high or too low by the same amount, resize the header part.
•If the labels move increasingly higher on the page, make the body part one point larger and
try again. Repeat until the labels fit the page properly.
•If the labels move increasingly lower on the page, make the body part one point smaller and
try again. Repeat until fixed.
For more information on resizing layout parts, see Resizing layout parts.
There are blank lines in labels
•Check for extra carriage returns in the field: go to the problem record and click in the field. If
it expands, there may be an extra carriage return in it. Delete it.
The last row of labels on each sheet isn't printing
•Choose Layouts menu > Part Setup. Select the Body part, and click Change. In the Part
Definition dialog box, look to see whether Allow part to break across page boundaries is
selected, and then do the following:
If Allow part to break across page boundaries is not selected, then select this option, and
also select Discard remainder of part before new page. Then click OK, and try printing again.
(You may also want to try printing with Allow part to break across page boundaries selected
and Discard remainder of part before new page cleared.)
For more information, see Adding a layout part and Defining page breaks and numbering.
Troubleshooting layouts that do not appear or print as expected
The following topics describe common problems and solutions when printing layouts.
Fonts on screen look fuzzy or jagged
•You may want to change the font smoothing settings:
•Windows: See Setting general preferences.

Creating and managing layouts and reports
FILEMAKER PRO HELP 283
•OS X: You can set font smoothing options in the OS X General System Preference. For
more information, see OS X Help Center.
Report with grouped data and subtotals (subsummary report) doesn't print
correctly
•See Troubleshooting layouts with summary or subsummary parts.
Fields or objects aren’t printing
•The objects might have been formatted as nonprinting. In Layout mode, select the object. In
the Sliding & Visibility area of the Inspector, make sure Hide when printing is deselected.
Only one record is printing
•Make sure the Print dialog box is set to print Records being browsed instead of Current
record.
•Check your found set to make sure it contains all the data that you want to print. See
Finding records.
•The layout has mistakenly been set to display in two or more columns while the width of the
column (the white area of the layout) has been made too wide to fit the number of columns
selected within the printable area of the page. This results in groups of records (specifically,
those which would fall in the columns which are off the right side of the page) not printing. To
remedy the situation, in Layout mode, click Layout Setup in the layout bar, click the
Printing tab, and set the number of columns to the desired amount. Then, if necessary,
adjust the right margin of the column by clicking and dragging the vertical dashed line on the
layout.
•Choose Layouts menu > Part Setup. Select the Body part, and click Change. In the Part
Definition dialog box, look to see whether Allow part to break across page boundaries is
selected, and then do one of the following:
•If Allow part to break across page boundaries is selected, clear the checkbox, click
OK, and try printing again.
•If Allow part to break across page boundaries is not selected, then select this option,
and also select Discard remainder of part before new page. Then click OK, and try
printing again.
See Adding a layout part.
An extra blank page prints after each page
•The layout extends just below the page boundary. In Layout mode, look across the bottom
of the layout for a heavy dotted horizontal line, which indicates where the page breaks.
Move a layout part up until the dotted line disappears. See About layout part types.
Some records in the portal don't print
•In Layout mode, resize the portal to increase the number of rows that the portal will print.
•If the portal is defined to display matching records from a related table, you can instead go
to a layout that displays records from that table, find the records you want, and print a list
from the layout.
For more information about portals, see Creating portals to display related records.

Creating and managing layouts and reports
FILEMAKER PRO HELP 284
A columnar list does not print all the fields
Only objects within the margins print. The page boundary is visible in Layout mode (you might need
to scroll to the right) as a heavy dotted line.
•Choose File menu > Print Setup (Windows) or Page Setup (OS X), and change the paper
orientation to landscape so that more columns of fields will print.
In Preview mode, you can also click Print Setup (Windows) or Page Setup (OS X) in the status
toolbar.
•In Layout mode, adjust the width and position of the fields to make them all fit to the left of
the heavy dotted line, or
•Create a second columnar list layout with the fields that don't fit on the first layout. See
About layout types.
There is empty space between records
•Make the body part smaller. See Resizing layout parts.
•Set objects to slide, and try setting the sliding options to also reduce the size of the
enclosing layout part. See Removing blank spaces in printouts.
Data is clipped
•Resize the field object to make it bigger to hold the largest amount of data it contains. See
Resizing and reshaping objects.
•Use merge fields, and make the text block big enough to fit the longest text you anticipate.
See Placing merge fields on a layout.
There is empty space between fields
•Use merge fields instead of standard fields. See Placing merge fields on a layout.
•Set fields and objects to slide up or left to close up space. See Removing blank spaces in
printouts.
Sliding objects don't slide
•Switch to Preview mode; sliding doesn't show in Browse mode.
•Be sure both the object you want to slide, and the object to be slid into, are set to slide.
•There might be at least one object (for example, a line) that is not set to slide and is
preventing other objects from sliding.
•Portal rows don't collapse even if they hold less data. Empty portal rows at the end of the list
of related records do collapse.
•Panel controls slide but do not shrink. Objects inside a panel control do not slide or shrink.
When you print a form, only the front-most panel prints.
See Removing blank spaces in printouts.
Pages break in unexpected places
•Check the paper size and page orientation selected in Print Setup (Windows) or Page Setup
(OS X).
•Choose Layouts menu > Part Setup, and check each part for page break settings that
should be disabled. See Defining page breaks and numbering.
Creating and managing layouts and reports
FILEMAKER PRO HELP 285
•Delete the header part (or footer) part if they are not needed. See Deleting layout parts.
Troubleshooting layouts designed for both Windows and OS X
The following topics describe common problems and solutions when designing layouts for use in
both Windows and OS X.
Fonts don’t look the same on Windows and OS X systems
•Use fonts with identical names and font metrics on both operating systems whenever you
can. Most font vendors can supply Windows and OS X versions of the same font. Contact
your font vendor for more information.
•Use only TrueType fonts. The Windows version of FileMaker Pro does not support any other
font formats, such as OpenType, PostScript Type 1, bitmap, raster, or vector fonts.
•OS X does not support bitmap fonts. (TrueType, PostScript, and OpenType font formats are
supported.) If a file created in a previous version of FileMaker Pro uses bitmap fonts, you
must change them to fonts in a supported format. You can either make the font change in
the original file prior to conversion, or in the converted file.
The following table describes how FileMaker handles fonts when you open a file created on another
platform.
Layout text is truncated or cut off when viewed in Windows or OS X
Even when FileMaker Pro is able to match fonts, there can be subtle differences in font character
width and line spacing when viewed on another operating system. This can cause lines of text to
wrap differently or appear cut off, like the following examples.
•Leave space between objects on your layouts, in case a font is taller or wider on the other
platform.
•Resize text objects so that they are a bit wider and taller than the text within them. This
provides space for small changes in font characteristics to occur without causing word wrap
problems or truncated text.
If a font FileMaker does this
With the same
name is available
Uses the same font. Even so, there may be slight differences in font character widths
that cause problems with word wrapping and exact text placement.
With the same
name is not
available
Attempts to substitute a similar font. This can also cause word wrapping and text
placement problems.
Note If FileMaker Pro cannot find a similar font to substitute, it uses the default font
specified in the Fonts tab of the Preferences dialog box. For more information, see
Setting font preferences.
Ship to:
Poster Warehouse
123 Main Street
San Francisco, CA 94115
Color
Monit
or
Color
Monito

Creating and managing layouts and reports
FILEMAKER PRO HELP 286
Field names and columns don’t align in a columnar layout
Check the alignment of the field labels and their associated fields — they should both be aligned in
the same direction. If you put a left-aligned label over a column of right-aligned numbers, for
example, the report might look fine on your computer. But font substitution could cause field labels
to shift when the file is opened on another computer. For more information, see Specifying
paragraph attributes and tab settings.
There are gaps between text and data
To combine text and field data (such as to place a field in the middle of a sentence), don’t use
separate text objects and field objects. Instead, combine the text and fields into a single merge field.
For more information, see Placing merge fields on a layout.
Colors don’t look the same on Windows and OS X systems
Use only the colors available in the System Subset palette or the Web palette. These colors are
virtually identical across platforms. Any other colors that you use may not look the same on both
Windows and OS X. For information on specifying the palette that appears, see Setting layout
preferences.
QuickTime files don’t play in Windows
•FileMaker Pro may not be able to find a QuickTime file that was previously inserted. If the
Insert QuickTime dialog box appears, select the QuickTime file and click Open. Then try
playing the QuickTime file again.
•Make sure the QuickTime software is installed in Windows.
•Make sure the QuickTime file is saved in a cross-platform format. If necessary, use a
QuickTime editing application to re-save the file in a cross-platform format. (If you have
upgraded to QuickTime Pro, you can use the QuickTime Player application to re-save the
QuickTime file by choosing File menu > Save As, and choosing Make movie self-
contained while saving the file.)
For more information about QuickTime, see http://www.apple.com/quicktime.
A script that prints a layout does not print the same in Windows and OS X
Scripts that include Print Setup and Print script steps commands may not be compatible across
platforms. If you’re storing special print options with these script steps such as paper size,
orientation, and number of copies, FileMaker Pro may not be able to recall these settings properly
on the other operating system. (This can occur because each operating system uses different
printer driver software for printing, even when printing to the same printer.) To correct the problem,
do one of the following:
•Create separate scripts for printing in Windows and OS X. First, open the file on your
Windows computer and create the script for printing from Windows. Then, move the
database file to OS X computer and create the script for printing from OS X. You can even
create a third script using the Get(SystemPlatform) function that will print using the
correct script on each operating system:
If [Get(SystemPlatform) = 1]
Perform Script [“Print in OS X”]
Else
Perform Script [“Print in Windows”]
End If

Creating and managing layouts and reports
FILEMAKER PRO HELP 287
•Clear the Perform Without Dialog options for the Print and Print Setup script steps. This
allows users to change the print options when they run the script to print.
For more information, see Print script step and Print Setup script step.
A layout does not print the same in Windows and OS X
Printing can vary because the each operating system uses different printer driver software to control
printing. When you’re designing layouts to print data at precise locations, such as mailing label
sheets or preprinted forms, you may notice discrepancies when printing the same layout from
computers running Windows or OS X.
•Try specifying exact margins for the layout. For more information, see Specifying page
margins.
•If specifying exact margins does not help, you may need to create a unique layout for each
operating system, which would allow you to make adjustments to each layout to optimize
printing for Windows and OS X.
Troubleshooting layouts with web viewers
The following topics describe common problems and solutions when working with web viewers on a
layout.
A web viewer displays “Loading:” and a URL, but doesn’t load a web page
•The URL might be invalid. In Layout mode, you can see a calculated URL by choosing View
menu > Show > Sample Data. (Also, a web viewer displays the URL that it is trying to load
in Browse mode.) Look at this URL closely. Then in Layout mode, choose Format menu >
Web Viewer Setup. In the Web Viewer Setup dialog box, try the following changes to the
web address:
•Specify the correct URL scheme — for example, http:// — and the complete server
name, including “www.” or “.com” as required. Windows and OS X respond to
incomplete or improperly specified URLs differently. Don’t assume that the correct
scheme or “www.” will be added automatically.
•Ensure that the syntax of the website parameters in your web address is what the
website expects. Some websites explain the query syntax they require, so search the
support area of the website that you want to use for more information.
•Fix problems in the formula that defines your custom web address — for example, add
or change quotation marks around strings, use the concatenate operator (&) between
strings. See Working with formulas and functions.
•Ensure that characters in the URL are correctly encoded. Review text constants in your
web address and the data in your database. See About URL encoding in web viewers.
•You can see the progress of page loads with the progress bar and errors with the status
bar, which are displayed at the bottom of the web viewer. If you do not see the progress
bar or the status bar, select Display progress bar and Display status messages. See
Adding a web viewer.
•The URL is correct, but the website is not responding. Open your web browser and go to the
same website. If the website doesn’t respond, then the website might be down, so try again
later.
•Your computer might not be connected to a network. Open your web browser and go to one
or more known websites. If these websites don’t respond, then ensure that your computer is
connected to a network.

Creating and managing layouts and reports
FILEMAKER PRO HELP 288
Links, fields, tabbing, and scrolling in a web viewer don’t work
•The web viewer is set to prevent interaction. To enable interaction, in Layout mode choose
Format menu > Web Viewer Setup. In the Web Viewer Setup dialog box, select the Allow
interaction with web viewer content checkbox.
•The web viewer is defined as a button. Even if interaction is allowed, a web viewer that is
defined as a button prevents mouse clicks from interacting with web viewer content but
does allow keyboard interaction. For more information, see Defining a button.
A web viewer is blank in Find mode
The web viewer is set not to display content in Find mode. To display content, in Layout mode
choose Format menu > Web Viewer Setup. In the Web Viewer Setup dialog box, select the
Display content in Find mode checkbox.
Web pages that use Java, JavaScript, or other installed plug-ins don't work
Some of the operating system’s web browser preferences can affect web viewers. In particular, if
Java, JavaScript, or other plug-ins are disabled in the web browser, then these technologies are
disabled in web viewers also. In the preferences or options dialog box of the operating system’s web
browser, enable the technologies that are needed.
Some web pages don’t work correctly in a web viewer
Some technologies used by some web pages might not work correctly in a web viewer. In these
cases, use a web browser instead.
•If the web page in a web viewer contains links, you can open a link in a separate web
browser window. From the shortcut menu on a link in a web viewer, choose Open in New
Window (Windows) or Open Link in New Window (OS X).
•You can provide a way for the user to open the web viewer’s current URL in a separate web
browser window. For example, insert a button on your layout near your web viewer. Set up
the button to perform the following example script:
Open URL [No dialog; GetLayoutObjectAttribute ("Web Viewer 1";
"source")]
This script gets the current URL of the web viewer named “Web Viewer 1” and opens it in a
separate web browser window. For more information, see Naming objects.
Some web browser features don’t work as expected in a web viewer
Web viewers provide many of the same features as your operating system’s web browser, but not
all. Also, some web browser features work in web viewers on one operating system but not the
other.

Editing objects, layout parts, and the layout background
FILEMAKER PRO HELP 289
Editing objects, layout parts, and the layout
background
You edit a layout by working with the objects on the layout — positioning and arranging them,
resizing them, and making other changes to their appearance. You can change the formatting
attributes of layout parts and the layout background by, for example, changing their fill settings. You
can also work with fields — controlling how a field looks and behaves as well as how data appears
in the field.
For information about creating layouts, working with layout parts, and adding fields, objects,
popovers, and panel controls to layouts, see Creating and managing layouts and reports.
Selecting and working with objects on a layout
An object is a discrete element: a field, a text block, a graphic object (such as an oval or imported
picture), a button, a portal (for displaying rows of related records), a panel control (for grouping
objects together in tab panels or slide panels), a popover button and a popover (for grouping fields
and other objects), a chart, or a web viewer. You can select, move, resize, delete, copy, format,
name, and change an object once you have created it.
For information on creating objects, see Adding fields to a layout, Drawing and inserting objects on a
layout, Using buttons with scripts, Adding a tab control, Creating charts from data, and Adding a web
viewer.
Selecting objects
To work with an object on a layout, select it in Layout mode. You see small squares, or handles,
surrounding the selected objects.
For information about selecting text, see Selecting a field in Browse mode or Find mode and Making
text bold, italic, highlighted, or setting other styles. For information about selecting objects on panel
controls, see Selecting and working with objects on panel controls. For information about selecting
objects on popovers, see Selecting and working with objects on popovers.
To select one or more objects on a layout:
1. In Layout mode, click the Selection tool in the status toolbar.
The pointer becomes an arrow pointer.
2. Do one of the following.
To In Layout mode, do this
Select one object With the arrow pointer, click the object.
Select several objects at
once
•Drag the arrow pointer to make a selection box that includes the
objects. The selection box does not have to completely surround the
objects. To avoid including partially selected objects, press Ctrl
(Windows) or Command (OS X) as you drag.
•Or, press Shift as you click each object individually.
Select all objects on the
layout
Choose Edit menu > Select All.
Editing objects, layout parts, and the layout background
FILEMAKER PRO HELP 290
Notes
•If an object’s selection handles display as , the object is locked. See Protecting objects
from change.
•If multiple objects are grouped, you can't move an individual object within the group. See
Grouping and ungrouping objects.
•You can layer objects on a layout. If you can't see or select an object on a layout, you might
need to send other objects backward in the stacking order. See Moving objects forward or
backward on a layout.
•To switch between the Selection tool and the last-used tool, press Ctrl+Enter or Enter on the
numeric keypad (Windows) or press Enter (OS X).
Using the Inspector to format objects
In Layout mode, you can use the Inspector to view and modify the settings for objects. Each tab
focuses on a different aspect of formatting. Hold your pointer over options in each tab to see a
description of what they do.
By default, the Inspector floats above document windows. If you move the Inspector close to the
edge of the computer screen or the outside of the document window, the Inspector snaps to the
edge of the screen or the outside of the document window. To detach the Inspector from the screen
or the document window, drag the Inspector away from the edge of the computer screen or the
outside of the document window.
Select a panel control •With the arrow pointer, click inside the background of the panel
control.
•Or, drag the arrow pointer around any portion of the panel control
boundary.
Select a popover With the arrow pointer, double-click the popover button to open the
popover. Then click the popover to select it.
Select all objects of the
same type, including
objects on tab panels or
slide panels that are not
in front (for example, all
text objects or all
rectangles)
•Click the tool for the type of object to select, then choose Edit
menu > Select All.
•Or, with the arrow pointer, click an object, press Shift (Windows) or
Option (OS X), and choose Edit menu > Select All (Windows) or
Select Same (OS X).
Note Objects on popovers are not selected.
Select all fields With the arrow pointer, click a field, press Shift (Windows) or Option
(OS X), and choose Edit menu > Select All (Windows) or Select Same
(OS X).
Select a portal With the arrow pointer, click the border of the portal, or any other area
within the portal that doesn't contain a field or object.
Deselect selected objects •Click a blank area of the layout or any layout tool in the status
toolbar.
•Or, press Shift and click selected objects.
To In Layout mode, do this
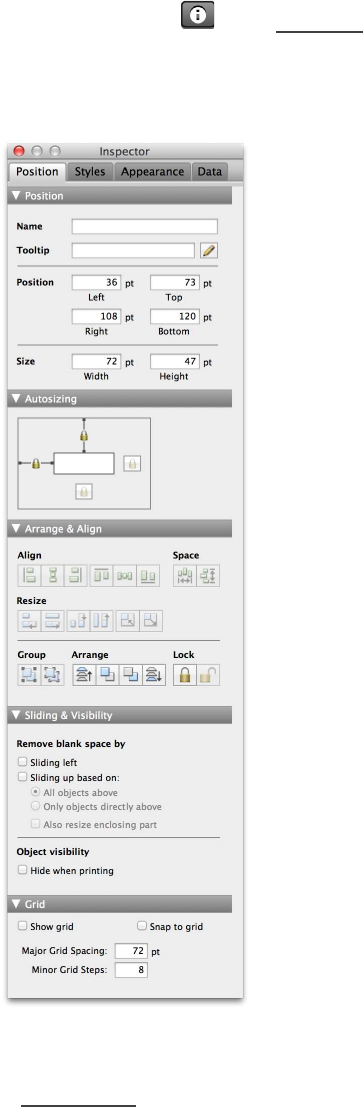
Editing objects, layout parts, and the layout background
FILEMAKER PRO HELP 291
Opening multiple Inspector windows can make it easier to work on a layout. For example, you can
display the Data tab of an Inspector window and the Appearance tab of another Inspector window
to have access to the options on each tab.
To open the Inspector:
•Click Inspector in the layout bar.
•Choose View menu > Inspector.
•To open another Inspector window, choose View menu > New Inspector.
Copying, duplicating, and deleting objects
In Layout mode, you can cut or copy and then paste graphic objects and text, fields (including
related fields), and portals. You can also cut, copy, and paste field data in Browse and Find modes.

Editing objects, layout parts, and the layout background
FILEMAKER PRO HELP 292
Note For information about copying, duplicating, and deleting data in your database, see Adding
and viewing data.
To copy, duplicate, or delete an object:
1. In Layout mode, select the object.
For more information, see Selecting objects.
2. Do one of the following:
Notes
•An object you cut or copy stays on the Clipboard until the next time you choose Cut or Copy
(in FileMaker Pro or another application), restart, or turn off your computer.
•If you copy an object from one layout and paste it to a layout that uses a different theme, the
object retains the attributes from the original layout. You can choose Edit menu > Revert
Changes to Style to remove those attributes and apply the default attributes of the new
theme. You can also use the Inspector to copy and paste object attributes. See Copying
formatting attributes between layout objects, parts, or backgrounds.
•You can copy and duplicate locked objects, but you can't cut or delete them.
•If the other application supports it, you can quickly bring objects from that application into
FileMaker Pro by dragging the object from the other application's window onto the
FileMaker Pro layout. You can also drag objects from a layout to another application or to
the Windows desktop or OS X Finder desktop.
•When copying a field to a layout in a different database file, FileMaker Pro looks for a
matching field name in the file that you're copying to. If a matching name is found, the
pasted field adopts the matching field’s definition. If a match is not found, only the field
characteristics are pasted.
•When copying a portal to another layout in the same database file, FileMaker Pro copies the
portal characteristics (like size, borders, and fill styles) and the relationship. When copying a
portal to a layout in a different database file, FileMaker Pro looks for a matching relationship
To Do this
Copy (or cut) an object, then paste it
onto the same or another layout, or into
another database file
•Choose Edit menu > Copy (or Cut). Click with the
arrow pointer where you want the object centered,
then choose Edit menu > Paste Layout Object(s)
(Windows) or Edit menu > Paste (OS X).
•Or, hold down the Alt key (Windows) or Option key
(OS X), drag the pointer to a new location, and
release the mouse.
Duplicate an object •Choose Edit menu > Duplicate.
•Or, press Ctrl (Windows) or Option (OS X) as you
drag.
Note Objects that are duplicated in this way can “snap
to” the grid, guides, and dynamic guides (see Using
the rulers and grid and Using guides and dynamic
guides).
Delete an object without replacing
what's on the Clipboard
•Choose Edit menu > Clear.
•Or, press Backspace or Delete.

Editing objects, layout parts, and the layout background
FILEMAKER PRO HELP 293
in the file that you're copying to. If a matching relationship is found, the pasted portal adopts
the relationship's definition. If a match is not found, only the portal characteristics are pasted
and the relationship is undefined.
•Use the Duplicate command to create a series of equally spaced identical objects. After
choosing Edit menu > Duplicate, immediately drag the new object to the position you want
(without deselecting it). Choose Duplicate again: the new copy appears in the same
position relative to the first copy as the first copy is to the original object.
•If you copy or duplicate a named object on a single layout, FileMaker Pro adds “Copy” or a
numeral to the new object’s name to ensure that the name is unique. If you have scripts that
need to refer to the new object, ensure that your scripts use the correct object name. See
Naming objects.
•When you copy (or cut) a popover button, the associated popover and its contents are also
copied (or cut). You can’t copy or paste a popover button or a popover independently of
each other.
Related topics
Copying, duplicating, and deleting panel controls
Copying, duplicating, and deleting popovers
Moving objects on a layout
You can move single objects or multiple objects all at once.
To move objects:
1. In Layout mode, select one or more objects that you want to move.
For more information, see Selecting objects.
2. Drag the objects to the new position.
Dynamic guides help you position the object you’re dragging with other objects. (To turn on
dynamic guides, choose View menu > Dynamic Guides.)
To move the objects in a specific or precise way, do one of the following:
To Do this
Move the selection 1 point Press Right Arrow, Left Arrow, Up Arrow, or
Down Arrow.
Limit movement to either a horizontal or vertical
direction
Press Shift as you drag the selection.
Precisely move the selection Use the rulers, guides and dynamic guides, grid,
and the Inspector. For more information, see
Using tools to precisely position objects.
Override the “snap-to” effect when you move a
selection
Press Alt (Windows) or Command (OS X) as you
drag the selection. For more information, see
Using the rulers and grid.
Position the selection beyond the boundaries of
the document window
Drag the object to the edge of the document
window. FileMaker Pro scrolls in that direction.

Editing objects, layout parts, and the layout background
FILEMAKER PRO HELP 294
Notes
•To more easily move multiple objects, group them first. For details, see Grouping and
ungrouping objects.
•When you're moving objects, remember that you can also layer, align, and rotate objects to
help you achieve the results you want. For more information, see Arranging objects.
•You can track the movement of objects on the rulers. To show the rulers, choose View
menu > Rulers. For more information, see Using the rulers and grid.
Related topics
Moving and resizing panel controls
Moving and resizing popovers
Resizing and reshaping objects
Once you've drawn a line or a shape on a layout, you can reshape or resize it. You can also reshape
or resize field objects, portals, graphics, text blocks, panel controls, popover buttons, popovers, and
charts. In addition, you can allow objects to resize automatically when the FileMaker Pro window is
resized. Resizing settings also apply to Preview mode and printing, when the page size is different
from the size of the layout being viewed or printed.
For information about auto-resizing, see Setting auto-resize options for layout objects.
For more information on resizing panel controls, see Moving and resizing panel controls.
For information about resizing graphics, see Formatting graphics on a layout.
To resize one or more objects:
1. In Layout mode, select one or more objects.
For more information, see Selecting objects.
2. Drag one of the selection handles to change the object’s shape and size.
To resize the objects in a specific or precise way, do one of the following:
To Do this
Change only the height or width of a two-dimensional object (for
example, fields, rectangles, ovals, fields, or imported graphics)
Drag a handle that appears
in the center of the object’s
border.
•Force the height and width of a two-dimensional object to be
equal (for example, a rectangle becomes a square, or an oval
becomes a circle)
•Constrain a line to horizontal or vertical
•Constrain the direction you drag to 45-degree increments when
you resize a line
Press Ctrl (Windows) or
Option (OS X) as you drag a
handle.
Resize the selected objects, keeping their proportions Press Shift as you drag a
handle.

Editing objects, layout parts, and the layout background
FILEMAKER PRO HELP 295
Notes
•Resizing the first repetition of a repeating field resizes all repetitions.
•Resizing a grouped object resizes all the objects in the group. For more information about
grouping objects, see Grouping and ungrouping objects.
•To easily align and distribute objects, you can use the buttons in the Arrange & Align area of
the Inspector or the menu commands and shortcut menus in the Arrange menu. See
Aligning or distributing objects.
Related topics
Moving and resizing panel controls
Moving and resizing popovers
Setting auto-resize options for layout objects
You can set objects to automatically resize or move horizontally or vertically when the FileMaker Pro
window is resized. Horizontal settings also apply to Preview mode and printing when the page size
is wider than the size of the layout being viewed or printed.
When layout objects are set to resize, they maintain a constant distance from the object to which
they are anchored. This allows objects to move, expand, or contract when the FileMaker Pro
window is resized.
Resize the selected objects to match all widths (or all heights) to the
smallest (or largest) object, in one step.
Click one of the Resize
buttons in the Arrange &
Align area of the Position
tab of the Inspector.
If you don’t see the
Inspector, click Inspector
in the layout bar.
Resize the selected objects, keeping the difference in their lengths or
widths the same.
Press Ctrl+Shift (Windows)
or Option-Shift (OS X) as
you drag a handle.
The opposite edges of the
objects remain fixed in the
same position as you resize
the objects.
Precisely resize the selection Use the rulers, guides and
dynamic guides, grid, and
Position area of the
Inspector. For more
information, see Using tools
to precisely position objects.
Override the grid when dragging a handle Press Alt (Windows) or
Command (OS X) as you
drag a handle. For more
information, see Using the
rulers and grid.
To Do this
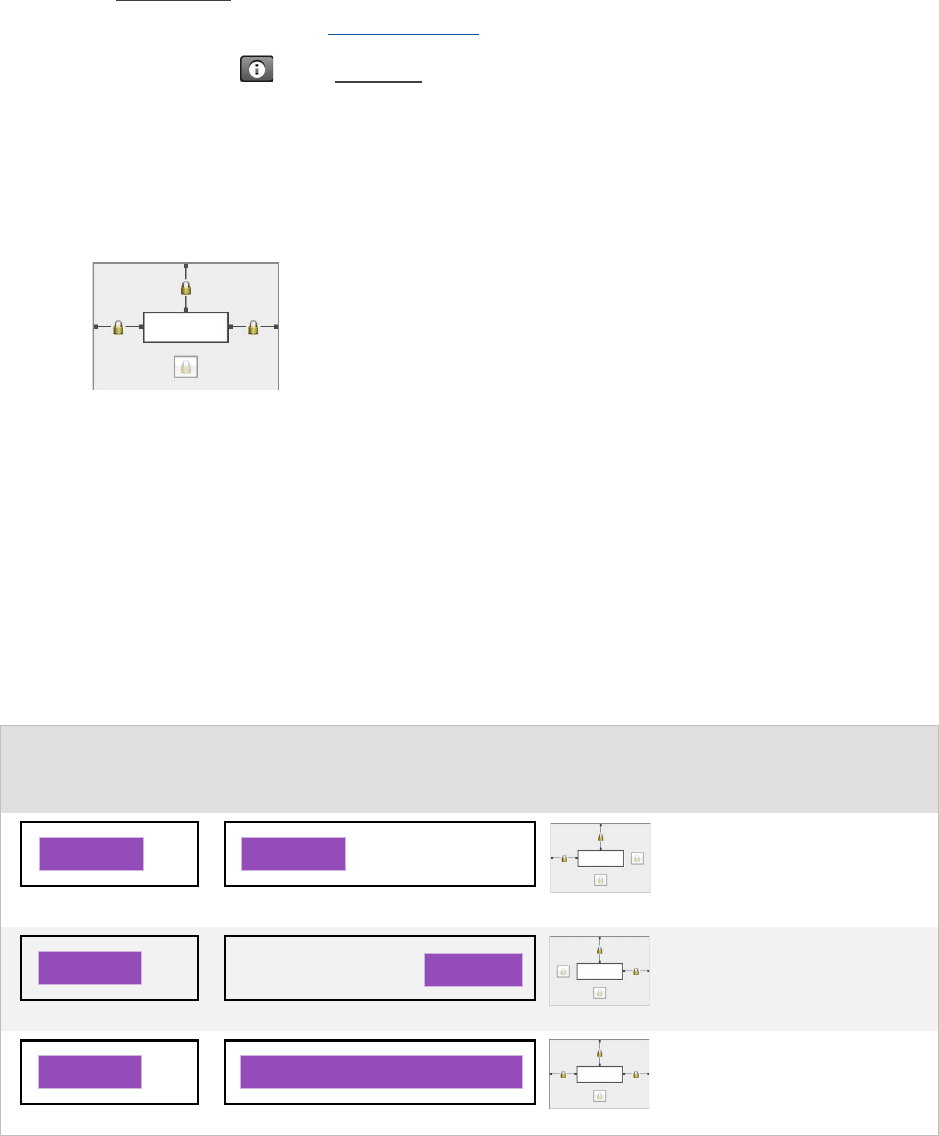
Editing objects, layout parts, and the layout background
FILEMAKER PRO HELP 296
Anchor points are either the layout, tab or slide control, or portal margin in which an object resides.
By default, objects are anchored on both the top and left sides of the layout or page.
To allow objects to resize or move when the FileMaker Pro window is resized:
1. In Layout mode, select one or more objects on the layout.
For more information, see Selecting objects.
2. Click Inspector in the layout bar, then click Position.
3. In the Autosizing area, select the line that indicates the side of the object that you want
anchored to the layout, the tab control, slide control, or portal margin.
For example, to allow an object to maintain its horizontal position on the layout and expand to
the right when the window is made wider, leave the default left and top anchors selected and
select the right anchor.
Tip To allow an object to move to the right (rather than expand) when the window is made
wider, clear the left anchor leaving the top and right anchors selected.
Notes
•The following table compares the effects of different and combined horizontal resize
settings. Vertical resize settings behave the same. In these illustrations, the outer rectangle
represents the layout, tab control, slide control, or portal margin. The inner rectangle shows
the alignment of the anchored object under different layout settings. Top anchor settings are
included so objects retain their vertical orientation on the layout.
Object’s position and
width when window
is original size
Object’s position in
resized window
Auto-resize
settings
Object alignment and
size when window is
resized
Object is left-aligned and
does not expand or move.
(This is the default setting for
new objects).
Object is right-aligned,
moving to the right margin of
the layout, tab control, slide
control, or portal.
Object expands to meet both
left and right layout, tab
control, slide control, or
portal margins.

Editing objects, layout parts, and the layout background
FILEMAKER PRO HELP 297
Important Multiple objects positioned side-by-side or stacked vertically and anchored to either both
left and right or both top and bottom margins move or resize relative to the layout, tab control, slide
control, or portal margin, not each other. Therefore, adjacent objects will not maintain a relative
distance from one another and may overlap when the window is resized.
•Objects resize independently of one another, unless they are located inside objects that
restrict their ability to resize.
•Objects are not reduced beyond their original size, even when the FileMaker Pro window is
made smaller than the size of the original layout.
•Applying resizing options to grouped objects or nested groups of objects applies settings to
the individual objects in the group, not the group itself.
•Locking objects does not prevent them from resizing, but auto-resize settings cannot be
changed on locked objects. For information about unlocking objects, see Protecting objects
from change.
•If a layout is smaller than the size of the FileMaker Pro window and you anchor an object by
its right side or bottom (except for a popover), the layout will expand to fill the window in
Browse and Find modes and the page in Preview mode.
•Objects located on tab controls, slide controls, popovers, or in portals adhere to the
following rules:
•Objects are anchored to the tab control, slide control, popover, or portal boundary rather
than to the window or layout part boundary. For example, if a tab control is anchored on
the right and objects inside the tab control are anchored on the left, these objects align
to the tab control’s left side rather than the window’s left side.
•If you want fields on a tab panel or slide panel to resize with the panel, you must specify
resize settings for both the tab panel or slide panel and the fields located on the panel. If
a panel is not set to resize, objects on the panel will not resize regardless of their
individual resize settings. The same applies to popovers: If you want fields on a popover
to resize with the popover, you must set specify resize settings for the objects on the
popover and the popover itself.
•Objects located inside portals are anchored to the top and/or bottom of each row, rather
than the top and/or bottom of the entire portal.
•If a portal object is set to resize vertically by anchoring both its top and bottom to the
layout part boundary, it can be set to expand by increasing the height of existing rows or
row height can be kept constant and more rows can be displayed when the window is
Object maintains a constant
distance from the center of
the layout.
Note The object will not
display in the exact center of
the layout after resizing,
unless it was positioned in
the center of the layout
before resizing.
Object’s position and
width when window
is original size
Object’s position in
resized window
Auto-resize
settings
Object alignment and
size when window is
resized

Editing objects, layout parts, and the layout background
FILEMAKER PRO HELP 298
made larger.
- To increase the height of existing rows, set at least one object inside the portal to auto-
resize vertically.
- To keep row height static and increase the number of rows displayed when the object
that contains a portal is enlarged, do not set any objects inside the portal to auto-resize.
•Objects set to resize behave as follows when displayed in different views:
•Form View: Objects are anchored to the sides of the window horizontally and to the
sides of their enclosing layout part vertically.
•List View: Objects are anchored horizontally.
•Table View: Auto-resize settings have no effect.
•If you place objects to the right of the layout edge, they do not auto-resize and do not
display on the layout in Browse mode.
Related topics
Using the Inspector to position objects
Specifying the display state for an object
You can specify attributes indicating the state of an object, which gives database users visual
feedback for actions they take. For example, you can format a button so it displays in a slightly
darker color when a user clicks the button, or you can indicate that the current record displays in a
contrasting color in List View.
To specify the display state for an object:
1. In Layout mode, select one or more objects.
See Selecting objects.
Note To have the active (current) record or alternating records display with a different fill in List
View, select the Body part label. The body part is considered to be an object in the following
steps.
2. Click Inspector in the layout bar, then click Appearance.
The object type drop-down list (at the top of the Appearance tab) displays the type of the
selected object. If you select objects of different types, FileMaker Pro displays Selected
Objects.
3. For objects with several components (for example, portals or slide controls), choose from
the object type drop-down list.
4. Choose a state from the object state drop-down list (below the object type drop-down list).
Choose To display the object or layout part as specified when
Normal or Inactive The object is available to the user, but is not currently selected.
In Focus The object has been activated by a mouse-click, the Tab key, or a script.
Hover The user pauses the pointer over the object.
Pressed The mouse button is held down on a clickable object.
Primary The body layout part is viewed in Form View or List View or related records
are displayed in the rows of a portal. Setting the Primary state fills the
background of the body part or all rows in a portal.

Editing objects, layout parts, and the layout background
FILEMAKER PRO HELP 299
5. Set style attributes for the display state for the object or part. See Setting the fill, line style,
and borders for objects, layout parts, and the layout background and Adding shadows and
padding to layout objects.
6. Repeat steps 3-5 to specify additional display states for the object or part.
Notes
•Conditional formatting is ignored when an object is In Focus.
•You can copy and paste formatting attributes for all the display states of an object or only
the selected state of an object. See Copying formatting attributes between layout objects,
parts, or backgrounds.
•To change whether alternating records are displayed with a different fill, or whether the
current record is displayed with a different fill in List View, change settings in the Part
Definition dialog box for the body part. See Changing a layout part.
•Portal rows do not display records with an alternating fill by default. On layouts that use the
Classic theme, portal rows also do not display the current record with a different fill by
default. For information on using the Alternate and Active object states in portal rows, see
Creating portals to display related records.
•You can create custom styles for objects, which can include the display state. See Creating
and working with styles for layout objects, parts, and the layout background.
Formatting graphics on a layout
In Layout mode, you can format graphics you've pasted or inserted onto a layout.
When you format a graphic that references an image file on disk, the changes affect only the graphic
that you see in FileMaker Pro. The formatting options do not change the original image file. For
more information on inserting graphics, see Inserting graphics onto a layout.
Note You can also format container fields that contain graphics. For more information, see
Specifying formats for container fields.
To format graphics on a layout:
1. In Layout mode, select one or more inserted graphics.
For more information, see Selecting objects.
2. Click Inspector in the layout bar, then click Data.
3. In the Data Formatting area, click Graphic , then select the formats you want to use.
Alternate The object identifies an even-numbered record in List View or a portal.
Active The object identifies the current record in List View, the selected row in a
portal, or the current panel in a panel control.
Choose To display the object or layout part as specified when
To Do this
Display the image at its unaltered
size
From the Format list, choose Crop to frame. FileMaker Pro
crops the image if it's too large to fit within the graphic
boundaries.

Editing objects, layout parts, and the layout background
FILEMAKER PRO HELP 300
Protecting objects from change
You can prevent objects from being changed, edited, moved, or deleted from a layout by locking
them.
To lock objects on a layout:
1. In Layout mode, select the objects you want to lock.
For more information, see Selecting objects.
2. Click Inspector in the layout bar, then click Position.
3. In the Arrange & Align area, click Lock .
The handles of each selected object turn gray to indicate that the object is locked.
To unlock objects:
•Select the locked objects, then click Unlock .
Notes
•Locking a field in Layout mode does not prevent changes to the information in Browse
mode. For details on securing data, see Protecting databases.
•When you copy or duplicate a locked object, the copy isn't locked.
•When you group objects that include a locked object, the grouped object is locked. For more
information on grouping objects, see Grouping and ungrouping objects.
•Locking doesn't prevent changes to the stacking order. See Moving objects forward or
backward on a layout.
•You can lock panel controls:
•Objects on panel controls won’t be locked unless you lock the panel control.
•When you lock a slide control, its position and appearance can’t be changed. However,
you can continue to make changes in the Slide Control Setup window.
•Locked objects can’t be set to automatically resize when the window is resized. See Setting
auto-resize options for layout objects.
Naming objects
You can assign names to objects and grouped objects. Some script steps and functions use these
names to specify which object to act upon.
Scale the image either always up,
always down, or either up or down
to fit within its boundaries
From the Format list, choose Reduce image to fit, Enlarge
image to fit, or Reduce or enlarge image to fit.
Unless you also select Maintain original proportions, the
image is distorted to fit the proportions of its boundaries.
Set the image’s horizontal and
vertical alignment
For Alignment, choose horizontal and vertical alignments.
To Do this

Editing objects, layout parts, and the layout background
FILEMAKER PRO HELP 301
To name an object:
1. In Layout mode, select the object or grouped object that you want to name.
For more information, see Selecting objects.
2. Click Inspector in the layout bar, then click Position.
3. In the Position area, type a value for Name.
4. Press Enter or Tab, or click outside the Inspector to apply the changes.
Notes
•No two objects can have the same name on the same layout. For information on copying a
named object, see Copying, duplicating, and deleting objects.
•Objects on different layouts can have the same name.
•Object names are not case-sensitive — for example, “Button1” and “button1” are treated as
the same object name.
•Object names can contain up to 100 characters.
•You can assign a name to an individual object or to a grouped object, but not to multiple
objects. Individual objects retain their names even if you group them. However, to see or
edit the names of individual objects in a group, you must ungroup them first.
•The name you give a field in the Manage Database dialog box is independent of the object
name that you can give a field in the Inspector.
•If you need to automate navigation to an object of any type, assign the object a name and
create a script that uses the Go to Object script step. If you have more than one copy of the
same field on a layout (for example, the same field on different tab panels), assign an object
name to the copy of the field you want to navigate to. Use the Go to Object script step,
rather than the Go to Field script step, and refer to the desired copy of the field by its object
name rather than by its field name.
Defining conditional formatting for layout objects
You can format layout objects to change automatically when they meet specified conditions. For
example, you can use conditional formatting to automatically display balances that are over 30 days
past due in bold, red text. Conditional formatting settings affect only the way data is displayed or
printed, not how data is stored in the database.
To specify conditional formatting for objects:
1. In Layout mode, select one or more objects.
For more information, see Selecting objects.
2. Choose Format menu > Conditional.
3. In the Conditional Formatting dialog box, click Add to define a new condition.
4. Specify the condition for formatting data in the selected objects.
•To specify a format based on common conditions, for Condition choose Value is. Then
choose one of the following conditions and set the parameters.
Choose To format
between Data that falls between and includes the values specified

Editing objects, layout parts, and the layout background
FILEMAKER PRO HELP 302
•To specify a format based on a calculation, for Condition choose Formula is. Then
click Specify to define the calculation. For more information, see Specify Calculation
dialog box.
Tip Use the Self function to reference data for the selected object. For more information,
see Self.
5. Specify the text and field fill format for data that meets the conditions you specified.
For example, select bold red text appears in a yellow field, when data meets your criteria.
Tip Click More Formatting to see additional formatting options.
6. Click OK.
Note To see which fields have conditional formatting, choose View menu > Show > Conditional
Formatting. You see in fields with conditional formatting.
Changing conditional format settings
Moving, disabling, enabling, and deleting conditional format settings changes the order in which
conditional settings are applied to an object.
not between Data that does not fall between and does not include the values
specified
equal to Data that is equal to the values specified
not equal to Data that is not equal to the values specified
greater than Data that is greater than the values specified
less than Data that is less than the values specified
greater than or equal
to
Data that is greater than or equal to the values specified
less than or equal to Data that is less than or equal to the values specified
containing Data that contains the value specified
not containing Data that does not contain the value specified
beginning with Data that begins with the value specified
ending with Data that ends with the value specified
empty An empty field
before today Date data before the current day
today Date data on the current day
after today Date data after the current day
more than x days
passed
Date data more than the specified number of days in the past
more than x days
ahead
Date data more than the specified number of days in the future
less than x days
passed
Date data less than the specified number of days in the past,
including the current day and any future days. See notes below.
less than x days ahead Date data less than the specified number of days in the future,
including the current day and any past days. See notes below.
Choose To format
Editing objects, layout parts, and the layout background
FILEMAKER PRO HELP 303
Notes
•You can set conditional formatting on the following layout objects: text, fields (including
fields from external ODBC data sources), merge fields, layout symbols (date, time, page
number, record number, and so on), text-based buttons, web viewers, tab panels and slide
panels. Conditional formatting is not available for non-textual objects (such as a rectangular
layout object).
•Conditional formatting can be set on single, multiple, and grouped layout objects.
•To see the effects of conditional format settings while you work in Layout mode, choose
View menu > Show > Sample Data. Note that your file must contain record data that meets
the formatting criteria you have specified for conditional formatting to appear.
•When you set multiple formatting conditions on an object, all conditions are evaluated
starting from the top of the list. Each condition that evaluates “true” is appended to the
objects previous format settings.
•When you use the Value is option with the predefined conditions less than x days passed
or less than x days ahead, the current date is included in the number of days you specify.
•Conditional formatting is ignored when the display state of an object is In Focus. See
Specifying the display state for an object.
Examples
If the current day is 11/20/2014 when you specify less than 4 days passed:
•If the data value is 11/16/2014, the condition evaluates false
•If the data value is 11/17/2014, the condition evaluates true
•If the data value is 11/20/2014, the condition evaluates true
•If the data value is 11/21/2014 (or any date in the future), the condition evaluates true
If the current day is 11/20/2014 when you specify less than 4 days ahead:
•If the data value is 11/24/2014, the condition evaluates false
•If the data value is 11/23/2014, the condition evaluates true
•If the data value is 11/20/2014, the condition evaluates true
•If the data value is 11/19/2014 (or any date in the past), the condition evaluates true
•Number and date format settings (specified in the Data Formatting area of the Inspector)
are applied after conditional formatting settings and are therefore preserved, even if data
meets your conditional formatting criteria. However, sometimes number, date, and
To Do this
Edit a condition setting Double-click the condition, change settings, then click
OK.
Change the order of conditions in the list Windows: Use the double arrow ( ) to drag the
condition to a new location.
OS X: Drag the condition to a new location.
Disable a condition Clear the condition checkbox for the setting.
Enable a condition Select the checkbox for the condition.
Delete a condition Select the condition, then click Delete.
Editing objects, layout parts, and the layout background
FILEMAKER PRO HELP 304
conditional format settings are combined. For example, if you set negative numbers to
display in red and also set conditional formatting on the same field to display negative
numbers in blue with the fill color yellow, the result will be a red number in a yellow field.
System formats have no affect on conditional formatting settings.
•Conditional formatting settings are not transferred when records are copied within
FileMaker Pro files or exported to other FileMaker Pro files.
•If you use Apple events to Get Text As Style, conditional formatting settings are not
transferred (OS X).
Related topics
Creating a layout
Selecting and working with objects on a layout
Formatting text
Specifying formats for fields containing numbers
Specifying formats for date fields
Hiding or showing layout objects
Formatting objects, layout parts, and the layout background
You can change the formatting attributes of objects, parts, and the layout background to customize
layouts. You can fill objects, parts, and the background with a solid color, a color gradient, or an
image. If you set the fill to transparent for objects in the foreground, then objects, parts, or the layout
background will show through. In addition, you can specify that objects and parts display a border
and then customize the color and line style of the border.
Setting the fill, line style, and borders for objects, layout parts, and
the layout background
Use the Graphic area of the Inspector to change the appearance of objects, layout parts, and the
layout background. You can change:
•the color (fill) or transparency of objects, layout parts, and the layout background
•line style and color of objects and parts
•borders around objects and parts
•the shape of object and part corners
Tip Use the formatting bar to quickly change the fill and border of an object or layout part or the fill
of the layout background. (You must have already specified borders in the Graphic area of the
Inspector, but you can change borders in the formatting bar.) To display the formatting bar below the
status area, click Formatting in the layout bar.
To change the appearance of objects or layout parts:
1. In Layout mode, select one or more objects or a layout part label.
See Selecting objects.
2. Click Inspector in the layout bar, then click Appearance.
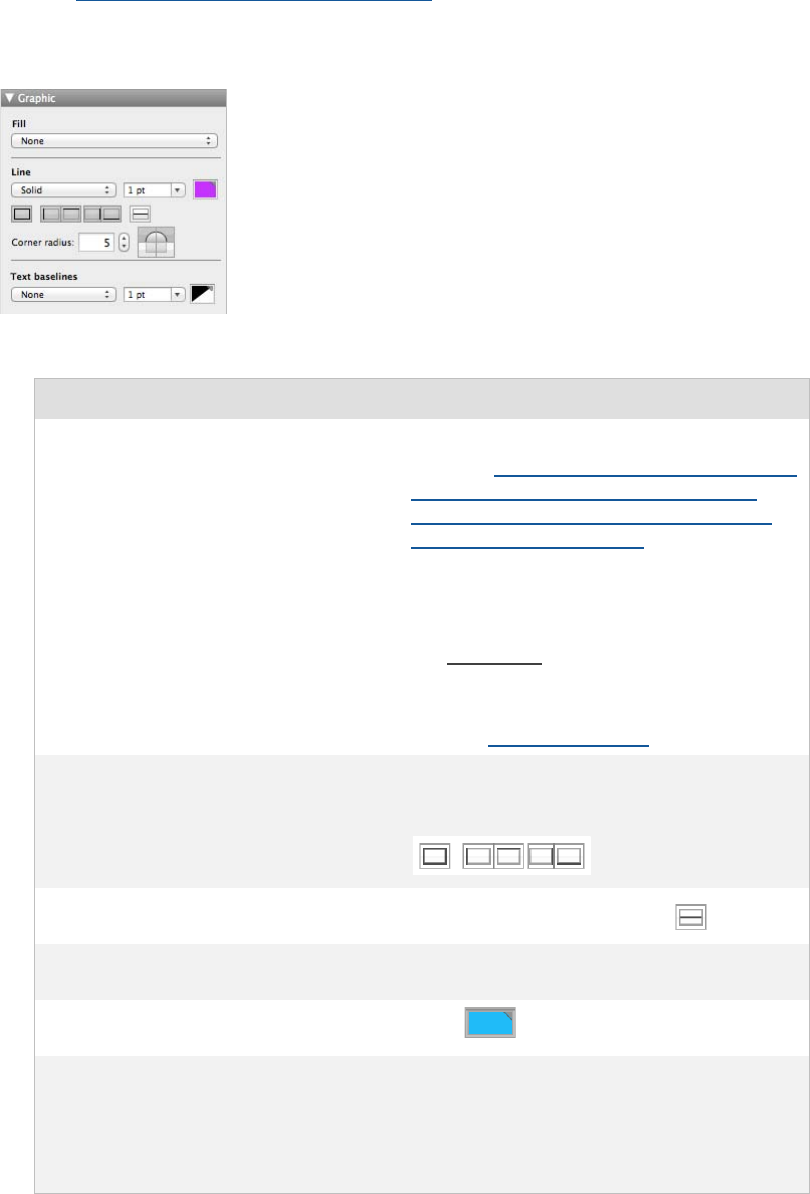
Editing objects, layout parts, and the layout background
FILEMAKER PRO HELP 305
3. To change the appearance of the object or the body part when it’s in a particular state (for
example, when a button is pressed), choose from the object state drop-down list (near the
top of the Appearance tab).
See Specifying the display state for an object.
4. In the Graphic area, select the options you want to use.
The options you choose affect the appearance of the selected objects and parts in all modes.
To add or change Use this control
The fill of an object (including the
backgrounds of text objects, fields, and
portals) or the layout part
Fill
See also Filling objects, layout parts, or the
layout background with a color gradient and
Filling objects, layout parts, or the layout
background with an image.
Notes
•The fill you specify for the body part also
affects the background of the table in
Table View.
•If your fill setting does not appear in a
portal, set portal rows to transparent.
See Formatting portals.
The border around an object or layout
part
All borders, choose any combination of Left
border, Top border, Right border, or Bottom
border
The borders between repeating fields or
portal rows Borders between repetitions .
The style and width of the border
around an object or layout part
Line
The color of the border around an
object or layout part Color
The shape of the corners of an object or
layout part
Corner radius
Choose each corner that you want to have a
rounded appearance, and specify a value in
points. The larger the value, the more a
corner is rounded.

Editing objects, layout parts, and the layout background
FILEMAKER PRO HELP 306
To fill the layout background with a solid color:
1. In Layout mode, click anywhere in the layout background to select it.
Note To select the layout background, ensure no objects or parts are selected.
2. Click Inspector in the layout bar, then click Appearance. Choose options in the
Graphic area.
3. For Fill, choose Solid Color.
Note Alternatively, you can fill the layout background with a color gradient or image. See Filling
objects, layout parts, or the layout background with a color gradient and Filling objects, layout
parts, or the layout background with an image.
4. Click the color control, then choose a color from the color palette.
5. Move the Opacity slider to change the transparency of the fill color.
To make an object, layout part, or the layout background transparent:
Note Making an object or layout part transparent allows objects or the layout background to show
through.
•In the Inspector:
•For Fill and Line, choose None.
•For Line, choose None and for Fill, move the Opacity slider in the color palette.
•In the formatting bar: For Line, choose None and for Fill, choose transparent .
Notes
•You can further customize the appearance of objects using the Advanced Graphic area of
the Inspector. See Adding shadows and padding to layout objects.
•You can copy formatting attributes between objects or parts. See Copying formatting
attributes between layout objects, parts, or backgrounds.
•Each theme comes with a set of default styles for objects such as shapes, buttons, lists, and
menus. When you create an object or a new part on a layout, the object or part is formatted
in the theme’s default style.
•Changes made in the formatting bar replace settings in the Inspector, and vice versa.
•To create a custom color, choose Other Color in a color palette, then click the color to use.
•You can set right, top, left and bottom borders on fields, layout parts, text objects,
rectangles, rounded rectangles, fields, buttons, portals, charts, popovers, and web viewers.
You can’t set individual borders on lines, ovals, circles, tab controls, or slide controls.
•You can display attributes that are specific to the state of the object when it is viewed in
Browse mode. For example, you can set a lighter fill and border when a user pauses the
mouse pointer over a field to draw attention to the field. See Specifying the display state for
an object.
The transparency of the fill color Opacity slider
The Opacity slider is located in the color
palette.
To add or change Use this control

Editing objects, layout parts, and the layout background
FILEMAKER PRO HELP 307
•You can set up a layout background to display the current record or alternating records in a
different fill color in List View. See Specifying the display state for an object.
•When you fill a layout part with an image, the image is stored in the FileMaker Pro file. The
image then appears in every record that uses the layout and “fills” the entire width of the
FileMaker Pro window when it is resized. You can also insert an image as a static object on
a layout, which lets you reference the image from another file. See Inserting graphics onto a
layout.
•You can insert graphics as data into container fields. Do this when you have a different
graphic for each record, such as employee photos in an employee directory database. See
Inserting graphics into container fields.
•If a file was created in a version earlier than FileMaker Pro 12 and contained object border
effects, effect settings appear in the Line menu. You can’t use the Line menu to apply
effects to other objects, but you can copy and paste effect styles between fields. See
Copying formatting attributes between layout objects, parts, or backgrounds. To remove
field effects, apply a different line style from the Line menu.
•To determine the RGB value of a color, in Layout mode, click the Fill color palette in the
formatting bar and choose Other Color. In OS X, select the Color Sliders tab. Values are
shown for each of the basic colors.
Related topics
Drawing and inserting objects on a layout
Selecting and working with objects on a layout
Adding borders, fill, and baselines to fields
Filling objects, layout parts, or the layout background with a color
gradient
A color gradient blends two or more colors in an object, layout part, or across the layout background.
To fill an object, a layout part, or the layout background with a color gradient:
1. In Layout mode, select one or more objects, a part label, or click anywhere in the layout
background to select it.
See Selecting objects.
Note To select the layout background, ensure no objects or parts are selected.
2. Click Inspector in the layout bar, then click Appearance.
3. To change the appearance of the object or the body part when it’s in a particular state (for
example, when a button is pressed), choose from the object state drop-down list (near the
top of the Appearance tab).
See Specifying the display state for an object.
4. In the Graphic area, for Fill, choose Gradient.
Note To display the layout background, one or more layout parts must be transparent. See
Setting the fill, line style, and borders for objects, layout parts, and the layout background.
You see the gradient control.
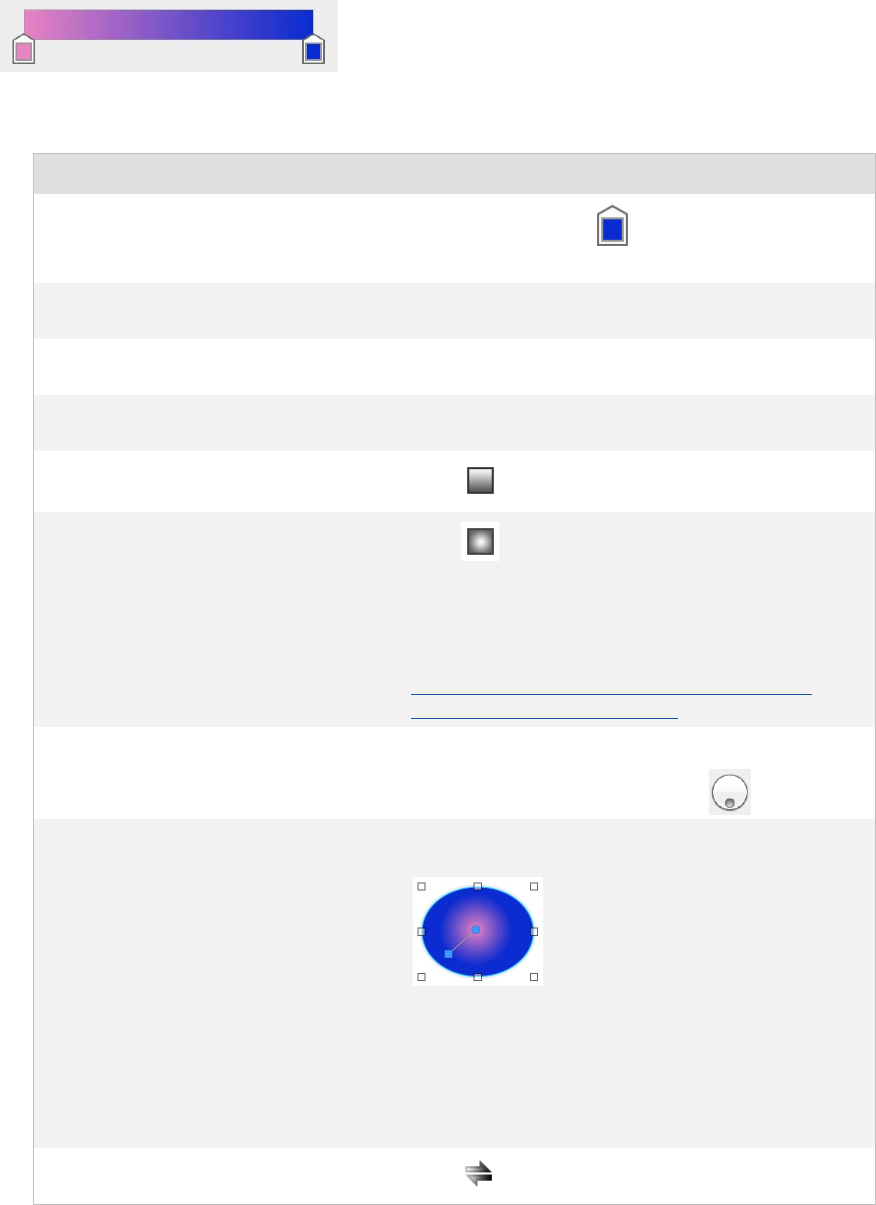
Editing objects, layout parts, and the layout background
FILEMAKER PRO HELP 308
5. Set color gradient options:
To Do this
Specify colors to be blended
Click the color stops on the gradient control
and select a color from the color palette.
Add more colors to the color gradient Click anywhere on the gradient control to add more
color stops.
Change how sharply or subtly colors
blend along the gradient
Drag the color stops along the gradient control.
Reduce the number of colors in the
gradient
Drag color stops off the gradient control.
Blend the fill horizontally or vertically
Click to specify a linear gradient.
Blend the fill from the center outward
Click to specify a radial gradient.
Note The center point of a radial gradient on a
layout part is controlled by the current theme. You
can apply a radial setting by copying and pasting
the setting from another object or layout part. See
Copying formatting attributes between layout
objects, parts, or backgrounds.
Change where a linear gradient blends •For Angle, enter a value.
•OS X: Drag the angle control .
Change the start and end points of a
linear color gradient or the center point
and radius of a radial color gradient
On the layout, drag a blue handle of the gradient
control on the image.
Note If you drag the gradient control off the layout,
it disappears. To restore the gradient control:
•Choose Edit menu > Undo.
•Or, clear the gradient setting on the object in
the Inspector, then redefine the gradient.
Reverse gradient colors left to right or
center to outside Click .

Editing objects, layout parts, and the layout background
FILEMAKER PRO HELP 309
Notes
•You can apply a radial setting by copying and pasting the setting from another object or
layout part. See Copying formatting attributes between layout objects, parts, or
backgrounds
•Each theme comes with a set of default styles for objects such as shapes, buttons, lists, and
menus. When you create an object or a new part on a layout, the object or part is formatted
in the theme’s default style.
Filling objects, layout parts, or the layout background with an
image
You can fill an object, a layout part, or a layout background with an image. Supported image formats
include .png, .bmp, .tif, .gif, or .jpg.
When you fill an object with an image, the image is stored in the FileMaker Pro file and appears in
every record that uses the layout. You can also insert an image onto a layout, which lets you
reference the image from another file. See Inserting graphics onto a layout.
To fill an object, a layout part, or the layout background with an image:
1. In Layout mode, select one or more objects, a part label, or click anywhere in the layout
background to select it.
See Selecting objects.
Note To select the layout background, ensure no objects or parts are selected.
2. Click Inspector in the layout bar, then click Appearance.
3. To change the appearance of the object or the body part when it’s in a particular state (for
example, when a button is pressed), choose from the object state drop-down list (near the
top of the Appearance tab).
See Specifying the display state for an object.
4. In the Graphic area, for Fill, click Image.
Note To display the layout background, one or more layout parts must be transparent. See
Setting the fill, line style, and borders for objects, layout parts, and the layout background.
5. Click Choose, select an image file, and click Insert.
6. Choose a fill option:
Choose To
Original Size Place the image in the object, layout part, or the layout background in its
current state.
If the image is larger than the object, layout part, or the layout background,
you see only a portion of the image.
Scale to Fit Scale the image proportionately to its largest size where its width and
height fit inside the object, layout part, or the layout background.
Scale to Fill Scale the image proportionately to its smallest size so that both its width
and height completely cover the object, layout part, or the layout
background.

Editing objects, layout parts, and the layout background
FILEMAKER PRO HELP 310
Notes
•If an image is larger than 20MB, FileMaker Pro reduces the size to 20MB.
•When you fill multiple objects, layout parts, or layout backgrounds with an image,
FileMaker Pro stores only one copy of the image in the file.
•You can also insert graphics as data into container fields. Do this when you have a different
graphic for each record, such as employee photos in an employee directory database. See
Inserting graphics into container fields.
•Each theme comes with a set of default styles for objects such as shapes, buttons, lists, and
menus. When you create an object or a new part on a layout, the object or part is formatted
in the theme’s default style.
Adding shadows and padding to layout objects
Use the Advanced Graphic area of the Inspector to further enhance the appearance of objects —
including fields, buttons, popover buttons, popovers, tab controls, slide controls, and portals — on a
layout. You can add or change:
•shadows outside or inside an object’s border
•the color, opacity, blur, spread, and offset of shadows
•the amount of padding (the space between an object’s edge and its contents) for objects
such as fields, buttons, popovers, and panel controls
Not all options in the Advanced Graphic area are available for all object types. For example, you can
apply outer shadows but not inner shadows to tab controls, and you can’t specify padding for objects
such as rectangles and ovals.
Note You can further change the appearance of objects using the Graphic area of the Inspector.
See Setting the fill, line style, and borders for objects, layout parts, and the layout background.
To add or change object appearance:
1. In Layout mode, select one or more objects.
See Selecting objects.
2. Click Inspector in the layout bar, then click Appearance.
Slice Divide an image into segments that can be used to fill the object, layout
part, or the layout background.
Using a portion of an image as fill (such as a portion of a company logo):
•ensures colors on the layout match the brand
•allows you to use color on multiple layouts without substantially
increasing the size of the file
Note Sliced fills do not display lines or rounded corners, and circles
display as square images.
Tile Duplicate and display the image in a repeating pattern in the object, layout
part, or the layout background.
Choose To

Editing objects, layout parts, and the layout background
FILEMAKER PRO HELP 311
The options you choose affect the appearance of the selected objects in all modes.
3. To add shadows to the object, in the Advanced Graphic area, select Outer Shadow or
Inner Shadow, or both.
4. To change the appearance of shadows (for example, the color or amount of blur), click
to the right of Outer Shadow or Inner Shadow, then change the effects you want.
5. To change the amount of padding between the object’s edge and its contents, for Padding,
specify values (in points) for Left, Right, Top, and Bottom.
For example, to add more padding between the bottom border of a button the button’s label,
increase the value for Bottom.
Changing the padding of popovers or slide controls differs from other objects:
•Changing the top padding of a popover increases or decreases the height of the
popover title area.
•Changing the bottom padding of a slide control increases or decreases the height of the
area containing the dots below the slide panels.
To change Use this control
The color of a shadow Color
The horizontal or vertical position of a
shadow in relation to the layout object
Horizontal Offset or Vertical Offset, or
both
Specify the values between -100 and
100 points.
The transparency of a shadow Opacity
The value is specified as a percentage.
The amount of diffusion of a shadow Blur
The value is specified in points.
The size of a shadow Spread
The value is specified in points.

Editing objects, layout parts, and the layout background
FILEMAKER PRO HELP 312
Notes
•Each theme comes with a set of default styles for objects such as shapes, buttons, lists, and
menus. When you create an object or a new part on a layout, the object or part is formatted
in the theme’s default style.
•To create a custom color, choose Other Color in a color palette, then click the color to use.
•To change the value of the fill color, move the Opacity slider in the color palette.
•You can display attributes that are specific to the state of the object when it is viewed in
Browse mode. For example, you can set a darker shadow when a user pauses the mouse
pointer over a field to draw attention to the field. See Specifying the display state for an
object.
•To determine the RGB value of a color, in Layout mode, click the Fill color palette in the
formatting bar and choose Other Color. In OS X, select the Color Sliders tab. Values are
shown for each of the basic colors.
Related topics
Drawing and inserting objects on a layout
Selecting and working with objects on a layout
Formatting portals
You format portal backgrounds and portal rows separately. You can display a different background in
alternating portal rows, for contrast and easy identification, or to display a different background color
for the selected portal row when the portal is viewed in Browse mode.
To change the background fill of a portal:
1. Select the portal.
2. Click Inspector , then click Appearance.
3. From the object type drop-down list (the first drop-down list in the Appearance tab), choose
Portal.
4. In the Graphic area, for Fill, choose Solid Color, Color Gradient, or Image.
If your fill setting does not appear in the portal, set portal rows to transparent.
5. From the object type drop-down list, choose Portal: Row.
6. From the object state drop-down list (the second drop-down list), choose Primary.
7. In the Graphic area, for Fill, choose None.
Tip To make the portal rows partially transparent, for Fill, choose Solid Color or Color
Gradient, and in the color palette, drag the Opacity slider. You can’t change the opacity for
image fills.
To change the background fill of all portal rows:
1. Select the portal.
2. Click Inspector , then click Appearance.
3. From the object type drop-down list (the first drop-down list in the Appearance tab), choose
Portal: Row.
4. From the object state drop-down list (the second drop-down list), choose Primary.

Editing objects, layout parts, and the layout background
FILEMAKER PRO HELP 313
5. Choose a fill for the portal row background.
To display a different background in alternating portal rows:
1. Double-click the portal to display the Portal Setup dialog box.
2. Select Use alternate row state, then click OK.
3. Click Inspector , then click Appearance.
4. From the object type drop-down list (the first drop-down list in the Appearance tab), choose
Portal: Row.
5. From the object state drop-down list (the second drop-down list), choose Alternate.
6. Choose a fill for the portal row background.
To display a different background for the selected portal row:
1. Double-click the portal to display the Portal Setup dialog box.
2. Select Use active row state, then click OK.
3. Click Inspector , then click Appearance.
4. From the object type drop-down list (the first drop-down list in the Appearance tab), choose
Portal: Row.
5. From the object state drop-down list (the second drop-down list), choose Active.
6. Choose a fill for the portal row background.
Related topics
Creating portals to display related records
Specifying the display state for an object
Setting the fill, line style, and borders for objects, layout parts, and the layout background
Filling objects, layout parts, or the layout background with a color gradient
Filling objects, layout parts, or the layout background with an image
Formatting panel controls
You can change the appearance of tab controls and slide controls and objects on panels. In
addition, you can format:
•display states for individual tab panels (see Specifying the display state for an object)
•components of slide controls (the slide control area, slide panels, and the dots)
Note Your formatting changes are saved to this layout only. To save changes as a style that can be
applied to other panel controls, see Creating and working with styles for layout objects, parts, and
the layout background. To save changes to a theme, see Saving a layout theme.
To format a panel control:
1. In Layout mode:
•To format a display state for a tab panel: In the Inspector, choose from the object state
drop-down list (near the top of the Appearance tab).
•To format a component of a slide control: In the Inspector, choose Slide Control, Slide
Control: Panels, or Slide Control: Dots from the object type drop-down list (near the
top of the Appearance tab).
Editing objects, layout parts, and the layout background
FILEMAKER PRO HELP 314
2. Do one or more of the following.
To Do this
Change the fill of the front-most
tab, the area of a slide control
below the slide panels, or objects
on a tab panel or slide panel
In Layout mode, select the tab control, slide control, or objects
you want to change. (See Selecting and working with objects on
panel controls.) Click Inspector in the layout bar, then click
Appearance, and choose a fill in the Graphic area. See Setting
the fill, line style, and borders for objects, layout parts, and the
layout background, Filling objects, layout parts, or the layout
background with a color gradient, or Filling objects, layout parts,
or the layout background with an image.
Tip To apply the same fill to all tabs on a tab control, drag the
arrow pointer to make a selection box that surrounds the tab
control, then apply a fill.
Change the style and color of the
border around a panel control
Select the tab control or slide control, then:
•Click Inspector in the layout bar, click Appearance,
then choose Line options in the Graphic area.
•Or, choose Line options in the formatting bar. If you don’t
see the formatting bar, click Formatting in the layout
bar.
For more information, see Setting the fill, line style, and borders
for objects, layout parts, and the layout background.
Change the shape of the corners
of a tab control or slide control Select the tab control or slide control, click Inspector in the
layout bar, then click Appearance. In the Graphic area, for
Corner radius, choose each corner that you want to have a
rounded appearance and specify a value in points. The larger
the value, the more a corner is rounded.
Place all tabs on tab panels to the
far left, center, or far right, or
spread them across the tab panels
Double-click the tab control. In the Tab Control Setup dialog
box, choose from the Tab Justification drop-down list.
Change the format of a tab panel’s
name
Select a tab control, then:
•Click Inspector in the layout bar, click Appearance,
and choose options in the Text area.
•Or, use the text options in the formatting bar. If you don’t see
the formatting bar, click Formatting in the layout bar.
See Formatting text.
Change the width of all tabs in a
tab control
Double-click the tab control. In the Tab Control Setup dialog
box, choose from the Tab Width drop-down list.
For Label Width + Margin of, Minimum of, or Fixed Width of,
choose Inches, Centimeters, or Points, then enter a value.
Editing objects, layout parts, and the layout background
FILEMAKER PRO HELP 315
Notes
•You can’t format a locked object. See Protecting objects from change.
•You can’t change the fill or border of individual slide panels.
•You can’t apply outer shadows to slide panels or inner shadows to tab controls or slide
control dots.
•Format changes applied to panel controls do not affect the objects on tab panels or slide
panels unless you select objects before applying formatting. See Selecting objects.
•You can format the appearance of one or more tab panels or slide panels to be conditional
(for example, format a tab panel to appear red when a certain condition is met). See
Defining conditional formatting for layout objects.
Related topics
Making text bold, italic, highlighted, or setting other styles
Aligning or distributing objects
Change the fill or the color and
style of the border around slide
control dots
Select the slide control and click Inspector in the layout
bar. Click Appearance, then choose Slide Control: Dots in the
object type drop-down list (near the top of the Appearance tab).
In the Graphic area, choose a fill and choose Line options. Or,
choose Line options in the formatting bar. If you don’t see the
formatting bar, click Formatting in the layout bar.
Add outer shadows to a tab control
or slide control Select the tab control or slide control, click Inspector in the
layout bar, then click Appearance. In the Advanced Graphic
area, select Outer Shadow. Click to change shadow
effects.
Add inner shadows to slide panels Click Inspector in the layout bar, click Appearance, then
choose Slide Control: Panel in the object type drop-down list
(near the top of the Appearance tab). In the Advanced Graphic
area, select Inner Shadow. Click to change shadow
effects.
Adjust the padding of a tab control
or slide control to change its
dimensions
Select the tab control or slide control, click Inspector in the
layout bar, then click Appearance. In the Advanced Graphic
area, for Padding, specify values (in points) for Left, Right,
Top, and Bottom.
•Adjusting the padding for a tab control changes the size of
the tab label area.
•Adjusting the padding for a slide control changes the size
and orientation of slide panels. Changing the bottom
padding of a slide control increases or decreases the height
of the area containing the dots. Objects placed in the slide
control area outside the panels remain displayed when you
switch between panels.
To Do this
Editing objects, layout parts, and the layout background
FILEMAKER PRO HELP 316
Showing text or field boundaries
Adding shadows and padding to layout objects
Formatting popover buttons and popovers
You can format the appearance of popover buttons — including the border, fill, and label — and
popovers — including the border, title, and content area (the area in which objects are placed).
Note Your formatting changes are saved on this layout only. To save changes as a style that can be
applied to other popover buttons or popovers, see Creating and working with styles for layout
objects, parts, and the layout background. Or, to save changes to a theme, see Saving a layout
theme.
To format a popover button:
1. In Layout mode, select the popover button.
2. Click Inspector in the layout bar, then click Appearance.
3. Do one or more the following.
To format a popover:
You format the popover and the popover content area separately.
1. In Layout mode, select the popover.
2. Click Inspector in the layout bar, then click Appearance.
To Do this
Change the line style, color, and fill
attributes of the popover button
Choose the line style, color, and fill options in the Graphic area.
See Setting the fill, line style, and borders for objects, layout
parts, and the layout background.
Change the format of the popover
button’s label
Select the popover button’s label, then:
•Choose options in the Text area.
•Or, use the text options in the formatting bar. If you don’t see
the formatting bar, click Formatting in the layout bar.
See Formatting text.
Add shadows to the popover
button
In the Advanced Graphic area, select Outer Shadow,
Inner Shadow, or both. Then click to change effects for the
shadow.
See Adding shadows and padding to layout objects.
Change the padding of the
popover button
In the Advanced Graphic area, for Padding, specify values (in
points) for Left, Right, Top, and Bottom.
See Adding shadows and padding to layout objects.

Editing objects, layout parts, and the layout background
FILEMAKER PRO HELP 317
3. Choose Popover or Popover: Content from the object type drop-down list (at the top of the
Appearance tab), then do one or more of the following.
Notes
•You can’t format a locked object. See Protecting objects from change.
•You can format the appearance of a popover button to be conditional (for example, format a
popover button to remain hidden when a certain condition is met). See Defining conditional
formatting for layout objects and Hiding or showing layout objects.
Hiding or showing layout objects
You can control the visibility of layout objects by indicating whether an object is hidden or displayed
depending on a specific condition or calculation. For example, you can choose to show or hide
certain fields in a questionnaire as a result of a user’s response to a specific question.
To designate a layout object as hidden:
1. In Layout mode, select the object.
See Selecting objects.
To Do this
Change the line style or color of
the popover’s border or the border
of the popover’s content area
Choose line style or color options in the Graphic area.
See Setting the fill, line style, and borders for objects, layout
parts, and the layout background.
Change the appearance of the
popover’s background or the
background of the popover’s
content area
Choose a fill in the Graphic area.
See Setting the fill, line style, and borders for objects, layout
parts, and the layout background.
Tip You can create a custom border for a popover by specifying
different fills for the popover and its content area.
Add an outer shadow to the
popover
In the Advanced Graphic area, select Outer Shadow. Then
click to change effects for the shadow.
See Adding shadows and padding to layout objects.
Add an inner shadow to the
popover’s content area
In the Advanced Graphic area, select Inner Shadow. Then click
to change effects for the shadow.
Change the padding between the
boundary of the popover and the
boundary of the popover’s content
area
In the Advanced Graphic area, for Padding, specify values.
Note Changing the top padding of a popover increases or
decreases the height of the popover title area.
See Adding shadows and padding to layout objects.
Change the appearance of the
popover’s title
If the Popover Setup dialog box is not open, double-click the
popover or select the popover and choose Format menu >
Popover Setup, then:
•Choose options in the Text or Paragraph area.
•Or, use the text options in the formatting bar. If you don’t see
the formatting bar, click Formatting in the layout bar.
See Formatting text.

Editing objects, layout parts, and the layout background
FILEMAKER PRO HELP 318
2. Click Inspector in the layout bar, then click Data.
3. For Hide object when, click and specify a calculation to determine when the object
should be hidden, then click OK.
4. To apply the condition for the object in Find mode, select Apply in Find mode.
Note In Layout mode, choose View menu > Show > Hide Condition to identify objects for which a
condition has been defined to hide them. Such objects display a badge in Layout mode.
Related topics
Identifying badges on layout objects
Defining conditional formatting for layout objects
Refresh Window script step
Refresh Object script step
GetLayoutObjectAttribute function
Creating and working with styles for layout objects, parts, and the
layout background
A style is a collection of attributes, such as font, color, line style, text alignment, and so on, that
determine the appearance of a layout. Each FileMaker Pro theme includes a default style for
every object, layout part, and layout background. Additionally, some objects have default styles
that add variety to layouts or create visual effects.
When you add objects or layout parts to a layout, FileMaker Pro uses the default style defined in
the current theme for that object type or part type. When you create a new layout, FileMaker Pro
uses the theme's default style for the layout background.
You can change the formatting attributes for objects, parts, and the layout background, and you
can save your changes in styles to consistently apply them to other objects or parts on the
current layout. You can also create new styles and apply them to objects, parts, or the layout
background on the current layout. To use your saved styles on other layouts, save styles to a
theme.
About layout object, part, and background styles
Each layout theme includes default styles for the objects and layout parts that you create while using
that theme. Some themes have additional default styles for some objects. For example, some
themes include styles for how the dots on a slide control are displayed or for formatting rows in
portals. A theme also includes a default style for the layout background. Styles give objects and
parts on a layout a consistent appearance. They also save you the time of reassigning formatting
attributes each time you create a new object or part.
You can modify default styles or design new styles and save them for use on the current layout.
When you edit and save formatting attributes for styles that are applied to multiple objects or layout
parts, your changes are applied to all objects and parts that use those styles on the current layout.
You can also create new styles with custom names, which you can then apply to objects, layout
parts, or the layout background on the current layout. Any styles you modify and save or any custom
styles that you create apply only to the current layout.
To use your custom styles on other layouts, save your styles to a theme. You can save custom
styles to FileMaker Pro themes or you can create new custom themes.
As you create and work with styles and themes:

Editing objects, layout parts, and the layout background
FILEMAKER PRO HELP 319
•Use the Styles tab in the Inspector to view and apply defined styles.
•Use the Appearance tab in the Inspector to create and modify styles and themes.
•Use the Change Theme dialog box to apply default and custom themes to layouts in a file.
•Use the Manage Themes dialog box to see which themes are in use in a file, and to import
themes from other files.
Related topics
Viewing and applying layout object, part, or background styles
Editing layout object, part, or background styles
Creating new layout object, part, or background styles
Renaming layout object, part, or background styles
Reverting changes to layout object, part, or background styles
Deleting layout object, part, or background styles
Copying formatting attributes between layout objects, parts, or backgrounds
How FileMaker Pro displays formatting attributes
Viewing and applying layout object, part, or background styles
You can use the Styles tab in the Inspector to:
•view the style assigned to a layout object, part, or the layout background
•display a list of all the styles defined in a theme
•apply styles to layout objects, parts, and the layout background
Note Styles are associated with themes. Each theme has predefined default styles for each object
and part type, as well as the layout background. Objects in some themes have additional predefined
styles. See About layout object, part, and background styles.
To view and apply object, layout part, or background styles:
1. In Layout mode, select one or more objects, a part label, or click anywhere in the layout
background to select it.
See Selecting objects.
Note To select the layout background, ensure no objects or parts are selected.
2. Click Inspector in the layout bar, then click Styles.
When nothing is selected on the layout, the style applied to the layout background is displayed
in the Styles list.
Notes
•If changes you make to the layout background style do not appear on the layout, ensure
that the body part is set to transparent. See Setting the fill, line style, and borders for
objects, layout parts, and the layout background.
•You can apply styles for a type of object to other objects of the same type. For example, an
oval style can be applied to a rectangle object, but not to a portal object.
To Do this
Display all styles defined in the current theme Select Show All.
Apply a different style to an object or part Select a different style in the Styles list.

Editing objects, layout parts, and the layout background
FILEMAKER PRO HELP 320
•Object display attributes are controlled by how style attributes are saved. See How
FileMaker Pro displays formatting attributes.
Related topics
Editing layout object, part, or background styles
Creating new layout object, part, or background styles
Renaming layout object, part, or background styles
Deleting layout object, part, or background styles
Copying formatting attributes between layout objects, parts, or backgrounds
Editing layout object, part, or background styles
You can change the display attributes of objects, layout parts, or layout background styles. Then you
can save your changes to modify the style defined for the layout or in the current theme. When you
save changes to a style, you can apply the style to other objects of the same type rather than
reformat individual objects.
To redefine the style of an object, layout part, or the layout background:
1. In Layout mode, select an object, a part label, or click anywhere in the layout background to
select it.
See Selecting objects.
Note To select the layout background, ensure no objects or parts are selected.
2. Click Inspector in the layout bar, then click Appearance.
3. Change the display attributes of the selected object, layout part, or the layout background.
See Selecting and working with objects on a layout.
An asterisk (*) appears after the style name and the arrow turns red, indicating the display
attributes are different from the attributes saved in the current style.
4. For Style, click and choose Save Changes to Current Style.
The asterisk disappears and the arrow changes to gray , indicating your changes have been
saved in the current style at the layout level. All objects on the current layout that are assigned
this style are reformatted to display the new attributes.
An asterisk appears after the theme name in the Inspector and the arrow turns red, indicating
the selected style definition is different from the style of the same name stored in the current
theme.
5. To update the style stored in the current theme and apply your changes to every object,
part, or the background in all layouts that use this style, click and choose Save
Changes to Theme.
The arrow changes to gray .
Notes
•If changes you make to the layout background style do not appear on the layout, ensure
that the body part is set to transparent. See Setting the fill, line style, and borders for
objects, layout parts, and the layout background.
Editing objects, layout parts, and the layout background
FILEMAKER PRO HELP 321
•The display of format settings is determined by whether you save styles at the layout level
or theme level. See How FileMaker Pro displays formatting attributes.
Related topics
Creating new layout object, part, or background styles
Renaming layout object, part, or background styles
Reverting changes to layout object, part, or background styles
Deleting layout object, part, or background styles
Copying formatting attributes between layout objects, parts, or backgrounds
Saving a layout theme
Creating new layout object, part, or background styles
You can create new, custom styles for objects, layout parts, or the layout background. You can apply
custom styles to other layouts and import them into other files, which makes it easy to give your
databases a consistent look.
To create a new object, layout part, or layout background style:
1. In Layout mode, select an object, a part label, or click anywhere in the layout background to
select it.
See Selecting objects.
Note To select the layout background, ensure no objects or parts are selected.
2. Click Inspector in the layout bar, then click Appearance.
3. Change the display attributes of the selected object, layout part, or the layout background.
See Selecting and working with objects on a layout.
An asterisk (*) appears after the style name and the arrow turns red, indicating the display
attributes are different from the attributes saved in the style.
4. For Style, click and choose Save as New Style.
5. Type a new style name, then click OK.
The asterisk disappears and the arrow changes to gray , indicating your changes have been
saved in the current style at the layout level.
An asterisk appears after the theme name in the Inspector and the arrow turns red, indicating
the selected style has not been saved to the current theme.
6. Do one of the following:
•To save the new style in the current theme, click , choose Save Changes to Theme,
then click Save.
•To save the new style in a new theme, click , choose Save as New Theme, type a
name for the theme, then click OK.
The arrow changes to gray .
Notes
•You can’t use styles on other layouts until you save styles to a theme.

Editing objects, layout parts, and the layout background
FILEMAKER PRO HELP 322
•Custom styles are based on the default style of the same type. Any changes that you make
to a custom style are added to the default style on which it is based.
•If changes you make to the layout background style do not appear on the layout, ensure
that the body part is set to transparent. See Setting the fill, line style, and borders for
objects, layout parts, and the layout background.
•You can create separate styles for popover buttons and popovers.
•Some objects, such as popovers and slide controls, have components that can be formatted
independently. For example, you can create separate styles for the slide panels, the dots, or
the area of the slide control that contains the dots. See Formatting popover buttons and
popovers and Formatting panel controls.
•How format settings are displayed is determined by whether you save styles at the layout
level or the theme level. See How FileMaker Pro displays formatting attributes.
Related topics
Editing layout object, part, or background styles
Renaming layout object, part, or background styles
Reverting changes to layout object, part, or background styles
Deleting layout object, part, or background styles
Copying formatting attributes between layout objects, parts, or backgrounds
Renaming layout object, part, or background styles
You can rename a custom style for an object, a layout part, or the layout background. You can’t
rename default styles.
To rename an object, layout part, or background style:
1. In Layout mode, click Inspector in the layout bar, then click Appearance.
2. For Style, click and choose Rename Style.
3. Type a new name, then click OK.
Tip You can also rename styles in the Styles tab in the Inspector.
Related topics
Editing layout object, part, or background styles
Creating new layout object, part, or background styles
Reverting changes to layout object, part, or background styles
Deleting layout object, part, or background styles
Copying formatting attributes between layout objects, parts, or backgrounds
Saving a layout theme
Reverting changes to layout object, part, or background styles
You can remove all layout-level changes you have made to an object, layout part, or the layout
background to return to the saved style.
Tip You can choose Edit menu > Undo, and Edit menu > Redo to incrementally revert and reapply
style changes.
Editing objects, layout parts, and the layout background
FILEMAKER PRO HELP 323
To revert changes to object, layout part, or background styles:
1. In Layout mode, select an object, a part label, or click anywhere in the layout background to
select it.
See Selecting objects.
Note To select the layout background, ensure no objects or parts are selected.
2. Click Inspector in the layout bar, then click Appearance.
3. For Style, click the red arrow and choose Revert Changes to Style.
The format of the object, layout part, or layout background returns to the appearance it had
when you began making changes. The arrow changes to gray .
Note If you have not made any layout-level changes, Revert Changes to Style is dimmed in
the style drop-down menu.
Related topics
Editing layout object, part, or background styles
Creating new layout object, part, or background styles
Renaming layout object, part, or background styles
Deleting layout object, part, or background styles
Copying formatting attributes between layout objects, parts, or backgrounds
How FileMaker Pro displays formatting attributes
Deleting layout object, part, or background styles
You can delete custom styles from database files. If you delete a custom style that is applied to
objects on a layout, the objects revert to the default style for that object. You can’t delete the default
styles that come with FileMaker Pro.
To delete an object, layout part, or background style:
•In Layout mode, click Inspector in the layout bar, then do one of the following:
•Click the Styles tab, and select Show All. Pause the arrow pointer over the style you
want to delete, click , and choose Delete Style.
•Select an object that has the style you want to delete, and click the Appearance tab in
the Inspector. For Style, click and choose Delete Style.
Related topics
Editing layout object, part, or background styles
Creating new layout object, part, or background styles
Renaming layout object, part, or background styles
Copying formatting attributes between layout objects, parts, or backgrounds
Editing objects, layout parts, and the layout background
FILEMAKER PRO HELP 324
Copying formatting attributes between layout objects, parts, or
backgrounds
You can copy formatting attributes from objects, layout parts, or a layout background and apply
formatting to other objects, parts, or backgrounds. Copy local formatting applied at the layout level
or custom or default formatting saved in styles or themes. You can also copy and paste formatting
for all of an object’s display states or only the currently selected display state. Copied formatting can
be pasted on the same layout, between layouts, or on layouts in other FileMaker Pro files.
You can use the Inspector or the Format Painter tool to copy and paste formatting attributes.
To use the Inspector to apply formatting attributes to other layout objects,
parts, or backgrounds:
In Layout mode, click Inspector in the layout bar, then click Appearance.
To Do this
Copy the formatting of all states of
an object or the format applied to a
layout part
Select the object or part label, then click to the right
of the object type drop-down list (at the top of the
Appearance tab).
Copy the formatting attributes of
the selected display state of an
object
Select the object and choose the display state you want
to copy in the object state drop-down list, then click
to the right of the list (at the top of the Appearance tab).
For more information about display states, see
Specifying the display state for an object.
Copy the formatting attributes of
the layout background
Click anywhere in the layout background to select it, then
click to the right of the object type drop-down list (at
the top of the Appearance tab).
Paste the formatting attributes for
all display states of the object that
you copied
Select one or more objects, then click to the right of
the object type drop-down list.
Paste the formatting attributes for
one display state of the object that
you copied
Select one or more objects and choose the display state
to which you want to apply the copied formatting
attributes. (You can choose a different display state from
the one you copied.) Click to the right of the object
state drop-down list.
Note Depending on formatting that has been previously
applied to the object, formatting for one or more display
states may be applied when you paste the copied state.
Paste the formatting attributes of
the part or the layout background
that you copied
Select a part label or click anywhere in the layout
background to select it, then click to the right of the
object type drop-down list.
Editing objects, layout parts, and the layout background
FILEMAKER PRO HELP 325
Notes
•If changes you make to the layout background style do not display on the layout, ensure
that the body part is set to transparent. See Setting the fill, line style, and borders for
objects, layout parts, and the layout background.
•For objects that have multiple components, each component has a separate style. For
example, portals have a Portal style, which formats the entire object, and a Portal:
Rows style, which formats only the rows of the portal. For objects with multiple components,
you can copy and paste only the format for the entire object (in this case, Portal, not Portal:
Rows). The style for the entire object is always the first style listed in the object type drop-
down list at the top of the Appearance tab in the Inspector.
To use the Format Painter tool to apply formatting attributes between layout
objects, parts, or backgrounds:
1. In Layout mode, select the object, part label, or click anywhere in the layout background that
has the formatting attributes you want to apply to other objects, parts, or backgrounds.
See Selecting objects.
Note To select the layout background, ensure no objects or parts are selected.
2. Click the Format Painter tool in the status toolbar, or choose Format menu > Format
Painter.
Tip To copy the display state of an object, hold down the Alt key (Windows) or the Option key
(OS X), then click the Format Painter tool .
3. Do one of the following:
Note When you create a report in the New Layout/Report assistant, fields that are in summary parts
display the style for the summary part, not the theme’s default style. If you used the Field tool to add
a field to a summary part and the text is difficult to see, use the Inspector or the Format Painter tool
to copy the style you want from another field.
To apply formatting attributes to Do this
A single object or a layout part Select the object or part label that you want to change.
Multiple objects Drag the arrow pointer to make a selection box that
includes the objects. The selection box does not have to
completely surround the objects. To avoid including
partially selected objects, press Ctrl (Windows) or
Command (OS X) as you drag.
Or, to apply copied formats to multiple objects
individually, double-click the Format Painter tool to lock it,
then Shift-click each object. To unlock and turn off the
Format Painter tool, press Esc.
A layout background Choose a different layout from the Layout pop-up menu,
then click its layout background.
For the new layout background to display, one or more
layout parts must be transparent. See Setting the fill, line
style, and borders for objects, layout parts, and the layout
background.

Editing objects, layout parts, and the layout background
FILEMAKER PRO HELP 326
Saving and managing layout themes
You can create themes in FileMaker Pro by making changes to layout styles and saving the
changes to the theme. You can create a new theme or rename the current theme. You can’t use
styles on other layouts until you save styles to a theme.
Use the Manage Themes dialog box to:
•see how many themes there are in a file
•see how many layouts each theme is applied to
•rename, duplicate, or delete themes from a file
•import themes from other FileMaker Pro files
Renaming a layout theme
You can rename custom themes that you create.
To rename a theme:
1. In Layout mode, click Inspector in the layout bar, then click Appearance.
2. Switch to a layout that uses the theme you want to rename.
3. For Theme, click or and choose Rename Theme.
4. Type a new name, then click OK.
Note You can’t undo your last action after you rename a theme.
Related topics
Saving a layout theme
Managing layout themes
Importing layout themes
Saving a layout theme
If you have changed style attributes on a layout, you can save your changes to a theme. Saving at
the theme level allows you to apply the theme and all its styles to another layout, or import the
theme and all its styles into another file. When you save a theme, you can either save changes to
the theme you modified (which can be a predefined FileMaker Pro theme) or create a new theme.
To save a theme:
1. In Layout mode, create new styles or edit existing styles and save your changes. See
Creating new layout object, part, or background styles, Editing layout object, part, or
background styles, or Copying formatting attributes between layout objects, parts, or
backgrounds.
2. Click Inspector in the layout bar, then click Appearance.
A asterisk (*) appears after the theme name and the arrow turns red, indicating the theme
definition has changed.
3. For Theme, click and do one of the following:

Editing objects, layout parts, and the layout background
FILEMAKER PRO HELP 327
Notes
•How format settings are displayed is determined by whether you save styles at the layout
level or the theme level.
•The maximum length for theme names is 100 characters.
•You can’t save changes to the Classic theme. You must choose Save as New Theme.
•You can undo and redo changes to themes until you save the theme or create a new theme,
or until another user or window changes the theme in a shared file.
Related topics
Renaming a layout theme
Saving a layout theme
Importing layout themes
Managing layout themes
You can use the Manage Themes dialog box to view a list of all the themes in a file as well as the
number of layouts that use each theme. You can rename custom themes, duplicate themes in the
list, and delete themes from the file.
To manage themes:
1. Choose File menu > Manage > Themes.
You see a list of all the themes available in the file. Predefined themes (themes that come with
FileMaker Pro) are enclosed in brackets (for example, [Cool]). The # of Layouts column shows
the number of layouts that use each theme.
To Choose
Save the style changes you
made at the theme level
Save Changes to Theme. Changes are applied to all layouts in
the file that use this theme. (See How FileMaker Pro displays
formatting attributes.)
Note The default themes that come with FileMaker Pro appear
in square brackets ([ ]) in the Manage Themes dialog box. When
you save changes to a default theme, the name of the theme
remains the same, but the square brackets are removed in the
Manage Themes dialog box indicating theme attributes are
different from the original default settings. You can reapply a
FileMaker Pro theme at any time. See Changing the theme of a
layout.
Save the changes you
made in a new theme and
leave the theme you started
with unchanged
Save as New Theme, then type a new name, and click OK.
Give the theme a different
name
Rename Theme, then type a new name, and click OK.
Remove any changes since
the last time you saved
styles at the theme level
Revert Changes to Theme.

Editing objects, layout parts, and the layout background
FILEMAKER PRO HELP 328
2. In the Manage Themes dialog box:
3. Click OK to close the Manage Themes dialog box.
Notes
•To import themes from another FileMaker Pro file, see Importing layout themes.
•You can’t delete a theme that is in use in a file. You must assign a different theme to the
layouts that use the theme you want to delete, then delete the previous theme.
Related topics
Renaming a layout theme
Saving a layout theme
Importing layout themes
Importing layout themes
You can import themes from other FileMaker Pro files.
Note To import themes, you must have full layout access privileges to both the source and
destination files. For more information, see Editing existing privilege sets and Editing layouts
privileges.
To import a theme:
1. Open the file into which the theme will be imported.
2. Choose File menu > Manage > Themes.
Tip In Layout mode, you can also choose Layouts menu > Change Theme > Import Themes.
3. In the Manage Themes dialog box, click Import.
4. Select the file that contains the themes you want to import, then click Open.
5. In the Import Themes dialog box, select the themes you want to import.
6. Click OK.
The imported themes appear in the Manage Themes dialog box in the order they were
imported.
7. Click OK to close the Manage Themes dialog box.
When you import a theme, FileMaker Pro logs an entry in an import.log file located in the same
folder as the database. Double-click the log file to view log entries.
To Do this
Rename a theme Select a custom theme, click Rename, then type a new name.
Tip To rename a predefined theme, duplicate the theme, then
rename the copy.
Duplicate a theme Select a theme, and click Duplicate.
Copy and paste a theme Select a theme and press Ctrl+C (Windows) or Command-C
(OS X), then press Ctrl+V (Windows) or Command-V (OS X).
Delete a theme Select a theme, then click Delete.

Editing objects, layout parts, and the layout background
FILEMAKER PRO HELP 329
Related topics
Renaming a layout theme
Saving a layout theme
Managing layout themes
Formatting and setting up field objects in Layout mode
Use FileMaker Pro field formats to control how data appears on a layout. The formats you specify
don't change the data as it's stored in the database, and you can specify a different format for each
time you place a field on a layout (whether it's on the same layout or a different layout). For example,
if you enter -5123 into a number field, you can format it in one place to display as -$5,123.00 and in
another place as <5123>.
You can also have field formats change automatically when data meets criteria you specify. See
Defining conditional formatting for layout objects.
FileMaker Pro applies field formatting in the following precedence:
•If you don’t specify formats, FileMaker Pro displays numbers, dates, and times based on the
system formats set in the Clock, Language, and Region control panel (Windows) or the
Language & Text pane in System Preferences (OS X) when the file was created.
•Once you place fields, you can select one or more fields and specify formats.
Notes
•You can specify number, date, time, and timestamp fields to display data based on the
current system formats when the file is opened. For more information, see the Help topics
for specifying formats for each field type.
If a field uses system formats to display data, FileMaker WebDirect uses the default system
formats for the location in which the database file was created.
•You can set up a field as a pop-up menu, a drop-down list, or a series of checkboxes or
radio buttons. See Defining value lists.
•You can set up a field to auto-complete during data entry. See Setting up a field to auto-
complete during data entry.
•You can set up a field to display as a drop-down calendar. See Setting up a field to display a
drop-down calendar.
•You can set up a field to display a context-specific keyboard in FileMaker Go. See Setting
up a field to display a keyboard.
•You can set specific formats for number, date, time and timestamp fields, but users can still
enter data with extraneous characters (like “per pound”). To control the type of data users
enter in a field, specify validation options. See Defining field validation.
•In Layout mode, to set default field attributes from the attributes of an existing field (for
example, to specify that all new text fields you place have text attributes that match an
existing field or all new number fields you place have number formats that match an existing
field), Ctrl-click (Windows) or Command-click (OS X) the existing field. Then create the new
fields that you want.
•To display sample data in fields formatted with the specified field formats, in Layout mode,
choose View menu > Show > Sample Data. FileMaker Pro replaces the field names with
sample data from the record currently being browsed.
•Files created with different system formats for numbers, dates, and times can affect the
appearance of data. For example, if you're in the United States and you open a database

Editing objects, layout parts, and the layout background
FILEMAKER PRO HELP 330
created in Australia, the database may have different system formats than those currently
on your computer. See Opening files with different system formats.
•Number and date format settings are applied after conditional formatting settings and are
therefore preserved, even if data meets your conditional formatting criteria. However,
sometimes number, date, and conditional format settings are combined. For example, if you
set negative numbers to display in red in the Data Formatting area of the Inspector and also
set conditional formatting on the same field to display negative numbers in blue with the fill
color yellow, the result will be a red number in a yellow field. System formats have no affect
on conditional formatting settings.
Related topics
Adding tooltips on layouts
Specifying text formats for fields
In Layout mode, you can specify a set of text attributes for each field object. All the characters in a
given field object (including all of its repetitions if it refers to a repeating field) share the same font,
size, style, color, line spacing, tab, and paragraph settings. But no attributes are shared between
different field objects. For example, you can insert more than one field object that displays data from
the same field, and each field object can have different text attributes.
Note You can also format characters in text fields in Browse mode (for example, italicize or
underline a word for emphasis). Unlike text formatting specified in Layout mode, this formatting is
stored with the data, and you see it in any layout that displays that field. For more information, see
Formatting text.
To specify text formats for fields:
1. In Layout mode, select one or more fields. Or, to set text formats for fields you place later,
start with no fields selected.
For more information, see Selecting objects.
2. Click Inspector in the layout bar, then click Appearance.
3. Select text options that you want.
Use the Text area to format the style, size, font, or color of the text or make text highlighted,
bold, italic, or underlined. Use the Paragraph area to set paragraph alignment, indenting, and
line spacing for fields. For more information, see Specifying paragraph attributes and tab
settings.
4. Press Enter or Tab, or click outside the Inspector to apply the changes.
Notes
•You can also format text (not in a field) on a layout. For more information, see Making text
bold, italic, highlighted, or setting other styles.
•Use the formatting bar (click Formatting in the layout bar, or choose View menu >
Formatting Bar) or the shortcut menu for quick access to many text attributes. For more
information, see Using the status toolbar and Using shortcut menus.

Editing objects, layout parts, and the layout background
FILEMAKER PRO HELP 331
Specifying formats for fields containing numbers
You can control how FileMaker Pro displays the values in number fields, calculation fields with
numeric results, and summary fields.
To specify formats for fields containing numbers:
1. In Layout mode, select one or more fields that display numeric values.
See Selecting objects.
2. Click Inspector in the layout bar, then click Data.
3. In the Data Formatting area, click Number , then select the formats you want to use
from the Format list.
To display numbers Do this
Rounded as needed or expressed
in scientific notation, so the
number fits within the default field
boundaries
For Format, select General.
Exactly as entered (if the value has
more digits than will display in the
field, a ? appears in the field)
For Format, select As entered.
As a Boolean value (a value that is
generally expressed as one of two
values — zero or non-zero)
For Format, select Boolean.
To change the default values, type a new value (up to seven
characters) for Show non-zeros as and Show zeros as (such
as “Yes” and “No”).
As a decimal number For Format, select Decimal.
•To specify that each value be displayed with the same
number of places, select Fixed number of decimals and
type a value. (A positive value specifies places to the right
of the decimal place, a negative value specifies places to
the left.)
•To specify a unit for a number, type a Symbol to display for
the unit and choose one of the options in the Notation list to
specify where to insert the symbol. Some examples of
symbols are cm (centimeter), km (kilometer), kg (kilogram),
or ft (foot).
•To specify special formatting for negative numbers, in the
Negative area, choose a notation. To display negative
numbers in color (for example, red), choose a color.
•To change the character that separates the whole value of
the number from the fractional part, for Separators, type a
character.
•To include a character to separate every 3 digits, click Use
thousands separator and type a character.
•To include a Kanji separator, click Kanji separator and
choose either the every 4th place or full notation options.

Editing objects, layout parts, and the layout background
FILEMAKER PRO HELP 332
4. Press Enter or Tab, or click outside the Inspector to apply the changes.
Notes
•If you specify General format and the field value is a number with 10 or more digits,
FileMaker Pro displays the number using scientific notation, or rounds the number, or both,
if necessary, to fit within the 10-character maximum for the default field boundaries. When a
number is expressed in scientific notation, you see a decimal number expressed as a power
of 10, for example, 123,456,789,000 could be displayed as 1.2346E+11. If the field value is
a number of fewer than 10 digits, specifying General format produces the same result as
specifying As entered.
•If FileMaker Pro displays a number in a field as a ?, try enlarging the field boundaries in
Layout mode to see the entire value. (When you print a layout with a field that is displaying
a ?, FileMaker Pro prints as many digits as will fit within the field boundaries and truncates
the other digits.)
•Numbers formatted as decimals are rounded when the number of decimal digits exceeds
the specified fixed number of decimal digits. (For example, if you enter 789.78 and you
specify 3 fixed digits, you see 789.780 in the field; if you specify 0 fixed digits, you see 790;
if you specify -2 fixed digits, you see 800.) However, FileMaker Pro stores and uses the
unrounded number for calculations and summaries.
As a percentage (FileMaker Pro
multiplies the value by 100 and
displays %)
For Format, select Percent.
Except for Notation, all the other options listed for displaying
numbers as a decimal number are also available when you
select Percent.
As currency For Format, select Currency. You can choose whether the
currency symbol:
•leads before or trails after the value
•appears inside or outside of the negative sign
To change the currency symbol, for Symbol, type a character.
Except for Notation, all the other options listed for displaying
numbers as a decimal number are also available when you
select Currency.
As nothing if the number is zero For Format, select Decimal. Then select Do not display
number if zero.
Using the current system formats
for decimals and thousands
separators
In the Separators area, select System Settings.
FileMaker Pro displays the decimal separator and thousands
separator based on the current system formats when the file is
opened.
When you select this option, the Decimal and Use thousands
separator options are not available.
Using a different Japanese
numeral type (if you’re using a font
that contains Japanese characters)
For Format, select Decimal, Currency, or Percent. Then, for
Numeral type, choose Half-Width, Full-Width, Kanji Numeral
(Modern), or Kanji Numeral.
With different text formatting Select text options using the Appearance tab of the Inspector.
See Specifying text formats for fields.
To display numbers Do this

Editing objects, layout parts, and the layout background
FILEMAKER PRO HELP 333
•Only numbers are displayed and printed in a number field formatted as decimal (except for
separators and notations specified in the Inspector). To display text and symbols (for
example, @1.98 per pound) in a number field, select As entered. If you use the field in a
calculation or summary, only the numeric value is used.
•If you specify the format as Boolean, any values in the number field that contain non-
numeric data display as blank because they do not contain any numeric content. For
example, the value “ABC” would display as blank. However, non-numeric field content
returns false in calculations.
•For more information about defining number fields, see About number fields.
Related topics
Defining conditional formatting for layout objects
Specifying formats for date fields
You can control how FileMaker Pro displays the values in date fields and calculation fields with date
results.
To specify formats for date fields:
1. In Layout mode, select one or more date fields or calculation fields with a date result.
For more information, see Selecting objects.
2. Click Inspector in the layout bar, then click Data.
3. In the Data Formatting area, click Date , then select the formats you want to use from
the Format list.
To display dates Do this
Exactly as entered For Format, select As entered.
In a predefined format For Format, select a format.
To change the separator between parts of a numeric date, for
Numeric separator, type another character.
In a custom format For Format, select Custom and choose options and separator
characters for day of week, month, day of month, and year.
With leading zeros (as in
01/02/99) or leading spaces in
numeric parts of dates
In the Leading character area, choose <None>, Zero, Space
for For day numbers, For month numbers, or both. (This option
is not available if you've chosen As entered.)
With different text formatting Select text options using the Appearance tab of the Inspector.
See Specifying text formats for fields.
Using a different Japanese date
display (if you’re using a font that
contains Japanese characters)
In the Japanese area, for Numeral type, choose a display type.
Using the current system formats
for dates
For Format, select Short System Date (for example, 11/11/
2014) or Long System Date (for example, Tuesday, November
11, 2014).
FileMaker Pro formats dates based on the current system
formats when the file is opened.

Editing objects, layout parts, and the layout background
FILEMAKER PRO HELP 334
4. Press Enter or Tab, or click outside the Inspector to apply the changes.
Important No matter how you format a date field in Layout mode, whenever you click or tab
into the field in Browse mode, FileMaker Pro displays the date with a four-digit year.
FileMaker recommends that you always enter dates with four-digit years. If you enter dates
with two-digit years, they are converted to four-digit year dates as described in Conversion
of dates with two-digit years.
Notes
•When As entered is selected, FileMaker Pro will display dates with four-digit years, even if
you originally entered the dates with two-digit years. Use the Custom option or one of the
two-digit year options on the Format list described above to display dates with two-digit
years.
•Be sure to size the date field on the layout according to the format you choose. For
example, the date Monday, May 5, 2014 needs more room than 5/5/14. See Resizing and
reshaping objects.
•To format a date symbol (which displays the current date), select the symbol {{CurrentDate}}
in Layout mode, and then use the Data Formatting area of the Inspector to format it as you
would a date field as described above. For more information about the date symbol, see
Inserting the date, page number, or other variable onto a layout.
•To make it easier to enter dates in a field in Browse mode, you can set up the field to display
a drop-down calendar.
•For more information about defining date fields, see About date fields.
Related topics
Defining conditional formatting for layout objects
Specifying formats for time fields
You can control how FileMaker Pro displays time values in fields.
To specify formats for time fields:
1. In Layout mode, select one or more time fields or calculation fields with a time result.
For more information, see Selecting objects.
2. Click Inspector in the layout bar, then click Data.
3. In the Data Formatting area, click Time , then select the formats you want to use from
the Format list.
To display times Do this
Exactly as entered For Format, select As entered.

Editing objects, layout parts, and the layout background
FILEMAKER PRO HELP 335
You’re finished unless the time format you chose displays seconds. If you want to format the
seconds component to display fractional seconds, continue with the next step.
4. Click Data, then click Number in the Data Formatting area.
5. Select the formatting options you want.
Only two options affect the display of the seconds component: Fixed number of decimals and
Decimal separator. The remaining options have no effect. See Specifying formats for fields
containing numbers.
6. Press Enter or Tab, or click outside the Inspector to apply the changes.
Notes
•To format a time symbol (which displays the current time), select the symbol {{CurrentTime}}
in Layout mode, and then use the Data Formatting area of the Inspector to format it as you
would a time field as described above. For more information about the time symbol, see
Inserting the date, page number, or other variable onto a layout.
•For more information about defining time fields, see About time fields.
Specifying formats for timestamp fields
Timestamp fields store both a date and a time, such as when a record was created or last modified.
You format a timestamp field by separately formatting its three components:
In a predefined format For Format, select a format from the list. Then specify one or
more of the following format options:
•a different value for Separator (such as a period or a
space) or Kanji format if you’re using a font that contains
Japanese characters.
•12-hour or 24-hour notation.
•Custom prefix or suffix text such as the designations for
before noon and after noon.
With leading zeros (as in
05:09:02) or leading spaces (as in
5: 9: 2)
For Leading character, choose options for For hours, For
minutes/seconds, or both. (This option is not available if
you've selected As entered.)
Using a different Japanese time
display (if you’re using a font that
contains Japanese characters)
In the Japanese area, choose a Numeral type.
With different text formatting Use the Appearance tab of the Inspector to choose text
attributes. See Specifying text formats for fields.
Using the current system formats
for times
For Format, select Short System Time (for example, 8:23 AM)
or Long System Time (for example, 8:23:54 AM).
FileMaker Pro formats times based on the current system
formats when the file is opened.
To display times Do this
Timestamp field component Format using
Date Date area of the Inspector

Editing objects, layout parts, and the layout background
FILEMAKER PRO HELP 336
To specify formats for timestamp fields:
1. In Layout mode, select one or more timestamp fields.
For more information, see Selecting objects.
2. Click Inspector in the layout bar, then click Data.
3. To format the date component, in the Data Formatting area, click Date , and then select
the formatting options you want.
See Specifying formats for date fields.
4. To format the time component (except the seconds portion), in the Data Formatting area,
click Time and select the formatting options you want.
See Specifying formats for time fields.
5. To format the seconds and fractional seconds component, in the Data Formatting area, click
Number , then select the formatting options you want.
In the Number area, only two options affect the display of the seconds component: Fixed
number of decimals and Separators. The remaining options have no effect. See Specifying
formats for fields containing numbers.
Notes
•You must specify formats for both date and time components before any formatting will be
applied. If you select As entered for either Date or Time, the data in the timestamp field
appears the way it is entered.
•To format timestamps based on the current system formats when the file is opened, select
Short System Date (for example, 11/11/2014) or Long System Date (for example,
Tuesday, November 11, 2014) and Short System Time (for example, 8:23 AM) or Long
System Time (for example, 8:23:54 AM).
•For more information about defining timestamp fields, see About timestamp fields.
Specifying formats for container fields
You can control how FileMaker Pro displays content in container fields.
Container fields store and display pictures, QuickTime files, sounds, movies, and files of any type.
(For more information, see Using data in container fields.) By default, container fields display:
•Pictures as images
•Sounds as a sound icon ( )
•Files of any type as the file icon and filename
When you format a container field, you can set scaling and alignment options for images. The
formatting options you choose affect the display in FileMaker Pro only, and do not affect the original
data.
Time (excluding the seconds portion) Time area of the Inspector
Seconds (including any fractional seconds) Number area of the Inspector
Timestamp field component Format using

Editing objects, layout parts, and the layout background
FILEMAKER PRO HELP 337
To specify formats for container fields:
1. In Layout mode, select one or more container fields.
For more information, see Selecting objects.
2. Click Inspector in the layout bar, then click Data.
3. In the Data Formatting area, click Graphic , then select the formats you want to use.
Notes
•If you select Interactive content for a field:
•You can use this option for container fields that store embedded data, data stored
externally, or local references to files.
•Windows: If you plan to insert PDF files into a field, be sure that a web browser plug-in
(such as Adobe Reader) is installed on the local machine. If it is not installed, the Insert
menu > PDF command will be unavailable, even if Interactive content is selected.
•This option is not supported for container fields that are in portals.
•You can customize the type of content that can be inserted into a container field, and
choose options for how the files are stored, displayed, and compressed. See Insert File
script step.
•If you add a background fill for an interactive container, you can only use a solid color fill.
See Adding borders, fill, and baselines to fields.
To Do this
Display each image at its original
size
From the Format list, choose Crop to frame. FileMaker Pro
crops the image if it's too large to fit within the field boundaries.
Scale each image either always
up, always down, or either up or
down (depending on the data in
the field) to fit within the field
boundaries
From the Format list, choose Reduce image to fit, Enlarge
image to fit, or Reduce or Enlarge image to fit.
Unless you also select Maintain original proportions, the
image is distorted to fit the proportions of the field boundaries.
Set the horizontal and vertical
alignment
For Alignment, choose horizontal and vertical alignments.
Optimize for static content Choose Images (JPEG, PNG, etc.).
Optimize for interactive content Choose Interactive content (PDF, MP3, etc.). When this option
is selected, the field becomes an interactive container. You can
work interactively with files in interactive containers. For
example, when a PDF is inserted into the field, you can scroll
through pages, zoom in and out, and copy text. When an audio
file or video file is in the field, you can play the media and use all
available controls for that media type, such as pause, play, and
fast-forward.
To have audio and video play when you display the container
field, also select Start playback automatically. If this option is
not selected, you start audio or video files by clicking the play
control.
Editing objects, layout parts, and the layout background
FILEMAKER PRO HELP 338
Related topics
About container fields
Inserting graphics into container fields
Inserting QuickTime movies and multimedia into container fields
Inserting files of any type into container fields
Working with web viewers on layouts
Working with content in interactive containers
Adding borders, fill, and baselines to fields
To enhance the appearance and usability of your layout, you can add or customize:
•the background color or fill of fields
•borders around fields
•the shape of each corner of a field
•the text baselines of fields
To add borders, fill, and baselines to fields:
1. In Layout mode, select one or more fields.
See Selecting objects.
2. Click Inspector in the layout bar, then click Appearance.
3. In the Graphic or Text area, select the options you want to use.
The options you choose affect the appearance of the selected fields in all modes.
To Do this
Add a fill color to
fields
In the Graphic area, for Fill, choose a color or specify a color gradient or image.
See Filling objects, layout parts, or the layout background with a color gradient or
Filling objects, layout parts, or the layout background with an image.
Add borders to
fields and set
their attributes
In the Graphic area, for Line, choose a style (Solid, Dashed, or Dotted) from the
pop-up menu. Then specify a line width and choose a line color. Choose All
borders, or choose any combination of Left border, Top border, Right border,
or Bottom border.
Add borders
between
repeating fields
or portal rows
Click .
Change the
shape of field
corners
In the Graphic area, for Corner radius, choose each corner that you want to
have a rounded appearance, and specify a value in points. The larger the value,
the more a corner is rounded.
Tip If you are designing databases for FileMaker Go, use Corner radius to
optimize the spacing between adjoining fields.
Add text
baselines and set
their attributes
In the Text area, select Text baselines, and then choose a baseline style from
the pop-up menu, specify a width, or choose a color.

Editing objects, layout parts, and the layout background
FILEMAKER PRO HELP 339
If the current layout is set to show field boundaries in Layout mode, you may not be able to see
some of the border effects that you have applied. To see the effects, do one of the following:
•Hide the field boundaries while in Layout mode: View menu > Show > Field
Boundaries to hide them.
•Switch to Browse mode: Choose Browse from the Mode pop-up menu at the bottom of
the document window.
Notes
•To quickly change a field’s border or fill, use the formatting bar. See Setting the fill, line style,
and borders for objects, layout parts, and the layout background.
•You can set an option to show borders and fill on all records in a field in List View instead of
on the current record only. See Showing field borders and fill for the current record.
•You can set up an alternating background fill color for body parts to create a visual contrast
when viewing lists of records. See Setting the fill, line style, and borders for objects, layout
parts, and the layout background.
•If you add a background fill for an interactive container, you can only use a solid color fill.
See Specifying formats for container fields.
Adding scroll bars to fields
Add a vertical scroll bar to a field to see more data than fits in the field's boundaries in Browse mode.
(You can't add scroll bars to container fields, repeating fields, or fields formatted to use a value list.)
To add a scroll bar to a portal, see Creating portals to display related records.
To add scroll bars to fields:
1. In Layout mode, select one or more fields.
For more information, see Selecting objects. You can also specify attributes for fields you add
later by starting with no fields selected.
2. Click Inspector in the layout bar, then click Data.
3. In the Field area, for Control Style, select Edit Box, then select Include vertical scroll
bar.
Note When you print a field or a portal with a scroll bar, FileMaker Pro prints only the data that is
visible without scrolling. To print all the data, resize the field or portal to make it larger, and then
specify sliding options to remove the extra blank space when you print. (You can do this on the
same layout, or on a duplicate of the layout.) For more information, see Duplicating, deleting, or
renaming layouts, Resizing and reshaping objects and Removing blank spaces in printouts.
Change the
offset position of
the text baseline
In the Text area, select Baseline offset, and then specify a value in points to
move the text baseline up or down.
To Do this

Editing objects, layout parts, and the layout background
FILEMAKER PRO HELP 340
Defining value lists
If a field uses the same set of text, number, date, or time values for many or all records, you can
create a value list that includes those values. Then, format a field to display the values as a pop-up
menu, a drop-down list, or as a series of checkboxes or radio buttons.
For example, define a value list that contains two values, New and Continuing. Then, define a
Customer Type field to display the values in that list as radio buttons.
Value lists help make data entry faster and more accurate. You can display the values in a particular
order; for example, by month or region.
Displaying data in a value list is a two-step process:
1. Create a value list. You can:
•Create a custom value list.
•Use values from a field in the current file or another file.
•Use values from an existing value list in another file.
2. In Layout mode, use the Inspector to format a field to display the values in a pop-up menu,
drop-down list, checkboxes, or radio buttons.
Defining a custom value list
This method is the easiest way to create a value list, because you type the values to be displayed.
1. Choose File menu > Manage > Value Lists.
In Layout mode, you can also click Manage in the status toolbar, then choose Value Lists.
2. In the Manage Value Lists dialog box, click New.
3. In the Edit Value List dialog box, for Value List Name, type a name.
4. Select Use custom values, then type each value on a separate line, in the order you want
them to appear.
Press Enter (Windows) or Return (OS X) to separate each value on its own line.
Tip To create a separator line between items in a pop-up menu or drop-down list, or produce
spaces between radio buttons or checkboxes, type a hyphen on a separate line where you want
each separator line or space to appear.
5. Click OK twice to close the Edit Value List dialog box and then the Manage Value Lists
dialog box.
6. Format a field to display values from the value list. See Setting up a field to display a pop-up
menu, checkbox set, or other control.
Defining a value list using a field in the current or another file
A value list created using this method is dynamically updated whenever the values change in the
field that the list is based on. Also, if the field is in a related table, you can show all the values in the
field, or only the related values.
Values from a value list

Editing objects, layout parts, and the layout background
FILEMAKER PRO HELP 341
1. Choose File menu > Manage > Value Lists.
In Layout mode, you can also click Manage in the status toolbar, then choose Value Lists.
2. In the Manage Value Lists dialog box, click New.
3. In the Edit Value List dialog box, for Value List Name, type a name.
4. Select Use values from field.
5. In the Specify Fields for Value List dialog box, for Use values from first field, select the
table that contains the field you want, and then select the field in the list.
If the table you want is in another file and does not appear in the list, choose Manage Database
from the list, and add the table to the relationships graph. See Creating relationships.
6. Choose whether to display all the values in the field or only related values:
•To include all the field values in the value list, choose Include all values.
•To include only related values in the value list, choose Include only related values
starting from, and choose a related table from the list. The value list will only display
field values from records that satisfy the relationship criteria specified between the
related table and the table containing the field selected in the Use values from first
field list.
For an example of a value list that displays only related values, see Example of a value list that
includes only related field values.
7. To also display associated values from a second field, select Also display values from
second field, select the table that contains the field you want, and then select the field in
the list.
Select this option to display the values from a corresponding field after the values in your value
list. For example, to help with data entry, you could display part names next to part numbers. If
Also display values from second field is dimmed, first select a field in the left field list, as
described in step 5.
Note During data entry, a value list that displays values from two fields still only enters data
from the first field specified in step 5. The second field in the value list is for display only, and its
value is not entered into any field. However, you could use a lookup to automatically enter the
data from the second field. See About lookups.
8. If you selected a second field to display values:
•Choose which field to use for determining the value list sort order.
•Choose Show values only from second field to display values from the second field,
but store the data from the first field.
If you choose not to select Show values only from second field, the value list will display both
fields, for example, a pop-up menu displays both fields.
Summary of Show values only from second field behavior:
Field/control Behavior
Radio Button set, Checkbox set, Pop-
up menu
Only the value from the second field is displayed. When
you make your selection, the corresponding value from the
first field is stored in the database.
Drop-down list The field displays the value from the first field. When you
click in the field, the drop-down list displays values from
the second field. After a selection, the list again displays
the value from the first field when the field is exited.

Editing objects, layout parts, and the layout background
FILEMAKER PRO HELP 342
Note When you make your selection, the corresponding value from the first field is stored in the
database.
9. If you want to display the values that are in a text field in a specific language’s dictionary sort
order, select Re-sort values based on and choose a language. Otherwise, the values are
sorted in the index order of the field’s default language. This setting is ignored for other
types of fields.
See Choosing a language for indexing or sorting.
10. Click OK to close the Specify Fields for Value List dialog box.
11. Click OK twice to close the Edit Value List dialog box and then the Manage Value Lists
dialog box.
12. Format a field to display values from the value list. See Setting up a field to display a pop-up
menu, checkbox set, or other control.
Defining a value list using a value list in another file
If the value list you want is already defined in another file, you can use that list instead of re-creating
it.
1. Choose File menu > Manage > Value Lists.
In Layout mode, you can also click Manage in the status toolbar, then choose Value Lists.
2. In the Manage Value Lists dialog box, click New.
3. In the Edit Value List dialog box, for Value List Name, type a name.
4. Select Use value list from another file and, from the list, choose or create a file path that
points to the file containing the value list you want to use.
For details on file paths, see Creating file paths.
5. From the Value list list, select the value list from the other file.
Some value lists may be dimmed and cannot be selected. These value lists are defined to show
only related values from a field and cannot be referenced directly from another file. Instead, use
the Use values from field option. (You will also need to add the table from the other file to the
relationships graph in the current file.) To create this type of value list, follow the instructions
above for defining a value list based on values in a field.
6. Click OK twice to close the Edit Value List dialog box and then the Manage Value Lists
dialog box.
7. Format a field to display values from the value list. See Setting up a field to display a pop-up
menu, checkbox set, or other control.
To change, duplicate, or delete a value list:
1. Choose File menu > Manage > Value Lists.
In Layout mode, you can also click Manage in the status toolbar, then choose Value Lists.
2. In the Manage Value Lists dialog box, do one of the following:

Editing objects, layout parts, and the layout background
FILEMAKER PRO HELP 343
3. In the Manage Value Lists dialog box, click OK.
Notes
•If you want a field to always use the values in the value list, no matter what layout the fields
object is on, specify a validation option in the field’s definition. See Defining field validation.
•If the value list you’re defining contains dates, make sure the values contain four-digit years
such as 6/29/2014 instead of 6/29/14. During data entry, a date field formatted to
display a value list containing two-digit year dates will convert them into four-digit years as
described in Conversion of dates with two-digit years.
•Fields from ODBC data sources can be used in value lists, but character large objects
(CLOBs) such as long text strings are not supported.
•For value lists with ODBC data, the No access privilege and Limited custom privilege are
not supported. To prohibit a user from seeing ODBC data in a value list, you must enforce
row-level security in the external SQL database. See Editing value list privileges.
Setting up a field to display a pop-up menu, checkbox set, or other
control
You can make data entry for a field easier and more consistent by displaying fields as drop-down
lists, pop-up menus, checkbox sets, radio button sets, or other controls.
You can set these controls at the same time you place fields on a layout, or you can modify existing
field controls. For more information on placing fields on a layout, see Placing and removing fields on
a layout.
Note Values displayed in these controls come from value lists. You can define a value list before or
after you set up the field controls.
To set up a field to display a pop-up menu, checkbox set or other control:
1. In Layout mode, select the field.
2. Click Inspector in the layout bar, then click Data.
3. In the Field area, choose the Control Style you want.
To Do this
Change the values in a value list
or how the values in a dynamic
value list are generated
In the list of value list names, select the value list, then click Edit.
In the Edit Value List dialog box, make changes. Then, click OK.
Note Redefining a value list item after data has been entered
might cause unexpected results. For example, if you change a
value list item from Accessory to Accessories, the field will
appear to be empty on layouts where the field is formatted as a
checkbox or radio button. Also, you will not find the existing
records if you search for Accessories.
Duplicate a value list In the list of names, select the value list, then click Duplicate.
Delete a value list In the list of names, select the value list, then click Delete. In the
confirmation dialog box, click Delete again.

Editing objects, layout parts, and the layout background
FILEMAKER PRO HELP 344
•Drop-down list displays value list items in a list. Users can use the arrow keys or “type
ahead” to select a value. Select Include arrow to show and hide list if you want to
format the field as a combo box.
•Pop-up menu displays value list items as a pop-up menu. Users must select an item
with the mouse.
•Checkbox set displays value list items as checkboxes. Users can select multiple
values for a field.
•Radio button set displays value list items as radio buttons.
•Drop-down calendar displays the current date. Users can choose another date from
the drop-down calendar, or type one in. See Setting up a field to display a drop-down
calendar.
4. Choose the value list you want from the Values from list.
To create a value list, click next to the Values from list. See Defining value lists. (You can
use value lists you define in the Inspector with other fields as well.)
5. Choose options for the value list, if desired.
To allow a user to add values to the value list for the current record, select Allow entry of other
values. An “Other” option appears in the value list. This option is not available if you selected
Drop-down list.
To allow a user to add or change values in the value list across records, select Allow editing of
value list. An “Edit” option appears in the value list. This option is not available if:
•you selected Checkbox set or Radio button set for the Control Style.
•the value list you selected in step 4 uses values from a field.
6. To display data from a different field, click next to the Display data from list.
In the Specify Field dialog box, select the field to display data from. Fields can be from the same
table, a related or unrelated table in the same file, or a related table in another FileMaker Pro
file. To choose a field in another table, choose the table from the tables list above the field list,
then select a field from the list of fields in the table.
Select Create label if you want to include the field name as text on the layout. Click OK.
7. Save the layout.
To view drop-down lists or pop-up menus, select the field in Browse mode or Find mode.
Notes
•If you added a checkbox or radio button set but can’t see it, make sure the color and line
width of the border for the field are not set to none. For information about setting color and
line width, see Setting the fill, line style, and borders for objects, layout parts, and the layout
background.
•During data entry, if the value list is blank, is missing values that should be present, or
displays an error message, see Value lists troubleshooting.
•When you format a field to use a value list created from values in a field, FileMaker Pro
displays the value list items in alphabetical order.
•Formatting a field with a checkbox allows users to enter more than one value for a field. If
more than one value is entered for a field, on other layouts where the field is not formatted
as a checkbox (such as a columnar report), FileMaker Pro displays only the first value. To
see all values, make the field larger or click in the field.

Editing objects, layout parts, and the layout background
FILEMAKER PRO HELP 345
•To allow users to begin typing a value and have the system suggest a completion for it,
select Auto-complete using value list. See Setting up a field to auto-complete during data
entry.
•To change the arrangement of value list items in checkboxes and radio buttons, resize the
field. A field that is taller than it is wide displays items stacked vertically. A field that is wider
than it is tall displays items side-by-side horizontally. See Resizing and reshaping objects.
•If the field you’re formatting to display a value list is in a portal and the value list is defined to
include only related values, you may need to create a self-join relationship in order for the
value list to display the related values properly. See Example of a value list that includes
only related field values.
•To set a default value for a value list field, set up the value list and control style, then choose
File menu > Manage Database, and click Fields. Select the value list field, click Options,
click the Auto-Enter tab, and select Data. Type the default value, click OK, and close the
Manage Database dialog box. When users add a new record to the database, this value will
appear in the value list field. Users can choose a different value from the value list. See
Defining automatic data entry.
•To format a field to no longer use a value list, select the field and in the Field area of the
Inspector, for Control Style, choose Edit box or Drop-down calendar.
•You cannot apply control styles to container fields. For more information on container fields,
see Using data in container fields.
Related topics
Setting up a field to display a drop-down calendar
Setting up the display of repeating fields
Setting up a field to display a keyboard
You can set up text, number, date, time, and timestamp fields to use a specific type of keyboard to
help you quickly enter values in FileMaker Go.
To set up a field to display a context-specific keyboard in FileMaker Go:
1. In Layout mode, select a text, number, date, time, or timestamp field.
2. Click Inspector in the layout bar, then click Data.
3. In the Behavior area, select Touch keyboard type, and choose one of the following
keyboard types from the list.
Choose For FileMaker Go to use
System Default Number and Punctuation keyboard for number and date fields,
and the default keyboard for the iOS device for text, time, and
timestamp fields
Default for Data Type Numeric 10-Key keyboard for number fields, the System Default
keyboard for text fields, and the Number and Punctuation
keyboard for date, time, and timestamp fields
ASCII Standard iOS ASCII keyboard
URL Standard iOS URL keyboard
Email Standard iOS Email keyboard

Editing objects, layout parts, and the layout background
FILEMAKER PRO HELP 346
Notes
•The default keyboard for existing layout objects is System Default.
•The default keyboard for new layout objects is Default for Data Type.
Setting up a field to display a drop-down calendar
A drop-down calendar provides a quick way to accurately enter a date.
To set up a field to display a drop-down calendar:
1. In Layout mode, select the field.
2. Click Inspector in the layout bar, then click Data.
3. In the Field area, choose Drop-down calendar from the Control Style drop-down list.
The following options are available:
•Include icon to show and hide calendar
•Auto-complete using existing values (This option is only available for fields defined
as text.)
4. To display a calendar icon in the field, select Include icon to show and hide calendar.
If this option is not set, the calendar is automatically displayed when the user enters the
field. To allow the user to control whether the calendar displays or not, set this option.
To view the drop-down calendar, select the field (or click the calendar icon) in Browse mode or Find
mode.
Notes
•When the drop-down calendar (date picker) is displayed, it defaults to the current date if the
field is empty or contains an invalid date.
•When you choose a date from a drop-down calendar, the date is inserted in the field using
the current date format.
•To dismiss the calendar, click outside the field or press Esc. To display it again, press Esc a
second time.
•To have the system suggest a value based on what the user has typed, select Auto-
complete using previously entered values. For more information, see Setting up a field
to auto-complete during data entry.
•The drop-down calendar inserts the current date and time in an empty timestamp field.
Numeric 10-Key Custom 10-key keyboard (calculator-style)
Number Keypad iPhone/iPod touch: Standard iOS Number keyboard
iPad: Custom Number keyboard that matches the iPhone
Number keyboard
Number and Punctuation Standard iOS Number and Punctuation keyboard
Phone Custom keyboard with symbols commonly used in phone
numbers
Choose For FileMaker Go to use
Editing objects, layout parts, and the layout background
FILEMAKER PRO HELP 347
Setting up a field to auto-complete during data entry
You can set up a field to use auto-complete (type ahead) to help users quickly enter values in
Browse mode or Find mode. FileMaker makes suggestions based on what the user has previously
entered into the field, or based on values in a value list.
You can use auto-complete on text fields displayed as:
•Edit boxes
•Drop-down lists
•Drop-down calendars
Note To set up fields to automatically enter information when a record is created or modified, see
Defining automatic data entry.
To set up a field to auto-complete during data entry:
1. In Layout mode, select the field.
2. Click Inspector in the layout bar, then click Data.
3. In the Field area, choose Edit box, Drop-down list, or Drop-down calendar from the
Control Style drop-down list. For more information, see Setting up a field to display a pop-
up menu, checkbox set, or other control or Setting up a field to display a drop-down
calendar.
Tip To prevent suggestions from displaying in a list, choose Drop-down list, then select
Include arrow to show and hide list. Only the best match appears in the field.
4. Select an auto-complete option:
Notes
•Only fields defined as Text fields can be set to use auto-complete. (Numerical, date, or any
other type of textual data can be stored in a text field.)
•Auto-complete is not supported in drop-down lists when the value list used is configured to
use Also display values from second field, Show values only from second field, or
Sort by second field. For more information, see Defining value lists.
Setting up the display of repeating fields
If you define a field as a repeating field, you can format the field to display only a certain range of the
repetitions, even though the information for all the repetitions is stored in the database. For
example, if a repeating field is defined to display up to eight repetitions, you could format one field
object to display the first four repetitions, and another field object to display the last four repetitions.
For information about defining a repeating field, see Defining repeating fields.
For Select
Edit box or Drop-down Calendar Auto-complete using existing values
The system makes suggestions based on the field’s index.
Drop-down list Auto-complete using value list
The system makes suggestions based on the value list
specified.

Editing objects, layout parts, and the layout background
FILEMAKER PRO HELP 348
To format a repeating field:
1. In Layout mode, select one or more repeating fields.
2. Click Inspector in the layout bar, then click Data.
3. In the Field area, for Show repetitions, enter the range of the repeating values that you
want to display.
4. Choose an orientation for displaying the field repetitions from the orientation list.
You can choose Vertical to stack the repetitions in a column, or Horizontal to position the
repetitions side by side in a row.
5. Press Enter or Tab, or click outside the Inspector to apply the changes.
Notes
•FileMaker Pro stores the data in all repetitions of a repeating field even if you change the
formatting of the field so that not all of the repetitions are visible.
•To reshape or resize all visible occurrences of a repeating field, use the handles that appear
around the first occurrence. For more information, see Resizing and reshaping objects.
•To help distinguish between individual repetitions, you can add borders between individual
cells of a repeating field. For more information, see Adding borders, fill, and baselines to
fields.
Adding tooltips on layouts
You can add tooltips to layout objects. Tooltips appear as small yellow boxes when a user moves the
pointer over an object in Browse or Find modes. Tooltips can be static text or the results of a
calculation.
To add, change, or delete tooltips:
1. In Layout mode, select the object to which you want to add a tooltip.
2. Click Inspector in the layout bar, then click Position.
3. In the Position area, do the following.
4. Press Enter or Tab, or click outside the Inspector to apply the changes.
Tip In Layout mode, choose View menu > Show > Tooltips to identify objects with tooltips. Objects
with tooltips display a badge in Layout mode.
To Do this
Create a tooltip that displays
static text
Type the text you want to appear as the tooltip in the Tooltip field.
Create a tooltip that displays
the results of a calculation Click .
In the Specify Calculation dialog box, build a formula for your
calculation. Click OK.
Change the tooltip Modify the tooltip text as required.
Delete the tooltip Delete the tooltip text.

Editing objects, layout parts, and the layout background
FILEMAKER PRO HELP 349
Notes
•Tooltips display in FileMaker Pro, FileMaker Pro Advanced, FileMaker WebDirect, and
runtime database solutions.
•Tooltips display in Browse and Find modes and in Form View, List View, and Table View.
•You can add a tooltip to grouped objects. All objects in the group will display the same
tooltip.
•All calculation results display as text, including dates, times, and numbers.
•If the object’s tooltip calculation returns an empty string, no tooltip displays. For example, if
your tooltip displays related data and the relationship is missing, the tooltip will be empty. If
an error occurs in the calculation, the tooltip displays invalid or partially valid results with
question marks.
•When you copy or duplicate an object with a tooltip, FileMaker Pro applies the tooltip to the
new object.
•Tooltip text may wrap, depending on your operating system and the length of the text
relative to the screen's width.
Related topics
Creating a layout
Viewing records as a form, list, or table
Identifying badges on layout objects
FileMaker Pro displays badges (icons) to indicate conditional formatting, script triggers, or tooltips
have been applied to a field, object, or layout; that find is available for a field; or that an object is a
button or a popover button.
To see these badges, in Layout mode, choose View menu > Show and then the type of badge you
want to display.
You also see an badge on an object for which you can apply a color gradient.
The following table shows you the available badges and what they mean.
Badge Description
Conditional Formatting. This badge displays on objects for which
conditional formatting has been defined.
Choose View menu > Show > Conditional Formatting.
See Defining conditional formatting for layout objects.
Object Script Trigger. One of these badges displays in objects for which
script triggers have been set. (The badge that appears depends on the
size of the object.)
Choose View menu > Show > Script Triggers.
See Setting script triggers for objects.
Editing objects, layout parts, and the layout background
FILEMAKER PRO HELP 350
Making layout objects accessible to screen readers
You can add accessibility labels to layout objects, which make your database accessible to assistive
applications such as screen readers. FileMaker documentation can be used with screen readers
such as JAWS for Windows and VoiceOver for OS X.
Any object can be connected to another object as an accessibility label. For example, a field label
can be connected to its field and a screen reader will speak the text in the field label. Spoken text
can come from an object on the layout, custom text you specify, or the result of a calculation.
To add accessibility labels to layout objects:
1. In Layout mode, choose View menu > Accessibility Inspector.
2. Select an object on the layout.
Layout Script Trigger. This badge displays in the lower-right corner of a
layout for which script triggers have been set.
In the Manage Layouts dialog box, a badge appears on the folder icon
next to a layout name for which script triggers have been set.
Choose View menu > Show > Script Triggers.
See Setting script triggers for layouts.
Quick Find. These badges display in fields in which you can use quick
find. A green badge indicates that the field is searchable. A yellow badge
indicates that the field is searchable, but the search might take longer than
fields with the green badge. A gray badge indicates that the layout is
disabled for quick find.
Choose View menu > Show > Quick Find.
See Configuring quick find.
Tooltip. This badge displays on objects on which tooltips have been
added.
Choose View menu > Show > Tooltips.
See Adding tooltips on layouts.
Button. This badge displays on button objects in Layout mode.
Choose View menu > Show > Buttons.
See Defining a button.
Popover Button. This badge displays on popover buttons in Layout mode.
See Working with popovers on layouts.
Color Gradient. This badge displays on objects for which you can apply a
color gradient. See Filling objects, layout parts, or the layout background
with a color gradient.
Hide Condition. This badge displays on objects for which a condition has
been defined to hide them.
Choose View menu > Show > Hide Condition.
See Hiding or showing layout objects.
Badge Description

Editing objects, layout parts, and the layout background
FILEMAKER PRO HELP 351
3. Do one of the following:
•To specify another object as the accessibility label, in the Accessibility inspector, for
Label, click Click to select, then select another object on the layout. Text from the
object that you select second appears as the label in the Accessibility inspector. This
text will be spoken when the first object selected is active.
•To specify custom text as the accessibility label for an object, for Title, type the text you
want spoken for the object or click to specify a calculation to provide the spoken
text. See Specify Calculation dialog box.
Tip If you specify an object as an accessibility label and also specify text in the Title text box, a
screen reader will speak the text in the Title text box after it speaks text from the object on the
layout.
4. For Help, type an instruction for using the object or click to specify a calculation for the
instruction.
For example, if the object is a text field that stores customer number data in a specific format,
you might enter:
•Title: Customer number.
•Help: Unique five-digit ID for tracking customers.
To delete an accessibility label:
1. In Layout mode, choose View menu > Accessibility Inspector.
2. Select the object with the label you want to delete.
3. Do the following:
•If another object on the layout is the accessibility label, for Label click X.
•If text exists in the Title or Help text boxes, delete it.
Notes
•When developing text for accessibility labels:
•Ensure the content you write is alternate yet equivalent to text on the layout. Imagine
you are describing the layout object over the telephone. For example, consider what
information the user would need to successfully complete a form.
•Avoid redundancy. Don’t simply repeat the text that appears on the layout.
•Be succinct, but provide additional information to users by describing the purpose of the
object or its high-level functionality.
•Write descriptions according to context.
•Include punctuation in label text, so the screen reader pauses at appropriate times.
•If an image on the layout contains text, include that text in the accessibility label.
(Screen readers can’t read text in images.)
•Don’t label decorative objects (visual enhancements, decorations, or embellishments)
that provide no function or information beyond aesthetics.
•You can specify objects outside a tab control, slide control, popover, or portal as
accessibility labels for objects inside a tab control, popover, or portal.
•You can specify objects inside a tab control, slide control, popover, or portal as accessibility
labels for objects outside a tab control, slide control, popover, or portal.

Editing objects, layout parts, and the layout background
FILEMAKER PRO HELP 352
•Screen readers cannot access hidden objects. For more information on hidden objects, see
Hiding or showing layout objects.
•OS X: You can specify keyboard access in the Keyboard System Preference.
Controlling data input behavior of fields
There are several ways to configure the behavior of fields in order to make data entry easier or more
efficient. You can:
•Create a custom tab order for moving between fields
•Allow or disallow data entry into fields in both Browse mode and Find mode
•Set which fields to include in a quick find search
•Set which keys may be pressed to move to the next field
•Set the Japanese text input method for fields that contain Japanese text
•Disable spell checking on a field-by-field basis
Setting the tab order for data entry
When you press Tab in Browse mode or Find mode, the default FileMaker Pro behavior is to move
left to right and top to bottom. You can change this default tab order, and even omit fields if you
want.
•Button objects, tab controls, slide controls, web viewers, and charts can be included in the
tab order.
•Summary fields can’t be included in the tab order.
•Calculation fields can be included in the tab order, but you can’t tab into them in Browse
mode (only in Find mode).
•Fields that are formatted to prevent entry can’t be tabbed into in Browse mode or Find
mode.
To set the tab order for a layout:
1. In Layout mode, choose Layouts menu > Set Tab Order.
FileMaker Pro displays numbered arrows pointing to each of the fields, tab controls, popover
buttons and regular buttons on your layout, along with the Set Tab Order dialog box. For fields
and tab controls, the numbered arrows appear on the left side of the objects; for buttons, the
numbered arrows appear on the right side of the objects. A field that is also a button has two
arrows. The left arrow is for the field, the right arrow is for the button. A blank arrow indicates an
object that is omitted from the tab order.
2. With the Set Tab Order dialog box open, specify the options you want to use:
To Do this
Reorder the tab order for individual
objects
Click the arrow beside the object. When you click another arrow,
or after you click OK in the Set Tab Order dialog box, the
number you replaced is incremented, and any objects after it in
the tab order are automatically resequenced.

Editing objects, layout parts, and the layout background
FILEMAKER PRO HELP 353
3. Click OK.
To set the tab order for repeating fields:
When you arrange multiple repeating fields next to each other to form a table-like grid on a layout,
the default tab order (shown below) moves left-to-right across each row instead of down each
column, regardless of whether each repeating field is displayed horizontally or vertically.
For multiple repeating fields arranged like this, you can quickly specify whether to tab through the
first repetition of each different field first, or within the same field first.
1. Start setting the tab order as described above, and click Create new tab order to define a
new tab order for all fields.
2. Set the tab order for any fields that appear before the grid of repeating fields.
3. Do one of the following to set the tab order for the grid of repeating fields:
Place a new object in the tab order Click the arrow beside the object. The next number in the tab
order appears in the arrow. Leave this, or backspace to delete
the number and type the number you want. When you click
another arrow, or after you click OK in the Set Tab Order dialog
box, the number you replaced is incremented, and any objects
after it in the tab order are automatically resequenced.
Add the rest of the objects to the
tab order
From the Add remaining drop-down list, select Objects and
click Add.
Create a new tab order for all
objects
•Click Clear All, and from the Add remaining drop-down
list, select Objects and click Add.
•Or, click Clear All and click arrows in the order you want.
FileMaker Pro inserts numbers in that order in the arrows.
Create a new tab order for fields
only or for buttons only
•Click Clear All, and from the Add remaining drop-down
list, select Fields only or Buttons only and click Add.
•Or, click Clear All and click arrows in the order you want.
FileMaker Pro inserts numbers in that order in the arrows.
Remove objects from the tab order Choose one of the following:
•As you set a new tab order, don't click the objects you want
to omit.
•For objects that already display a number, select the
number and press Backspace or Delete.
•From the Remove drop-down list, select All fields or All
buttons and click Remove.
To Do this

Editing objects, layout parts, and the layout background
FILEMAKER PRO HELP 354
4. Set the tab order for any fields that appear after the grid of repeating fields.
5. Click OK in the Set Tab Order dialog box.
Notes
•Buttons are not included in the default tab order. To include buttons in the tab order, use the
options in the Set Tab Order dialog box. Buttons on tab controls can be included in the tab
order this way as well.
•If you have added a panel control to the layout, when you press the Tab key, you can
navigate only to objects on the front-most panel. If you want to automate navigation to
another panel, use the Go To Field script step and specify a target field that is on the panel
you want to bring to the front. See Selecting and working with objects on panel controls.
•If you have added a popover to the layout, you can tab between fields in the popover, but
you must open the popover first (by clicking the popover button or by tabbing to the popover
button, then pressing the Space bar). You cannot tab into or tab out of a popover. See
Selecting and working with objects on popovers.
•To specify whether it’s possible to move to the next field using the Enter key or Return key
as well the Tab key, see Setting the keys for exiting a field.
•If a web viewer is included in the tab order, then you can tab into it and continue tabbing
through links and fields within the web viewer, the same way as in a web browser. You
cannot control the tab order within a web viewer, but after you tab from the last link or field in
a web viewer, the tab order continues as defined in the FileMaker Pro layout. If Allow
interaction with web viewer content is cleared in the Web Viewer Set Up dialog box, then
you cannot tab into the web viewer.
Allowing or preventing entry into fields
You can allow or prevent entry into a field. For example, you can restrict entry into a field containing
a serial number, so the field can't be modified. You can set separate Browse and Find mode data
entry options, which would allow you to permit finding serialized numbers even though they cannot
be entered.
If you allow entry into a field, you can also control whether the entire contents of the field is selected
when you click or tab into the field in Browse mode or Find mode. Otherwise, FileMaker Pro places
the insertion point after the last character in the field.
To set the repeating field tab order to Do this
Tab through the first repetition of each
different repeating field, followed by the
second repetition of each different
repeating field, and so on.
Click in the upper-left field, which causes the arrow to
blink. Then, in order, click each additional field in the first
repetition. When you’ve completed the pattern for the first
repetition, click the upper-left blinking field again, and
FileMaker Pro completes the tab order for the remaining
repetitions of the repeating fields.
Tab through every repetition in the first
field, followed by the second field, and
so on.
Double-click the first occurrence of the repeating field.
FileMaker Pro fills in the numbers for all the repetitions.
Then, double-click the first occurrence of the next
repeating field to get the next series of tab-order numbers,
and so on.
Editing objects, layout parts, and the layout background
FILEMAKER PRO HELP 355
To customize entry into a field:
1. In Layout mode, select one or more fields.
For more information, see Selecting objects. Or you can specify attributes for fields you add
later by starting with no fields selected.
2. Click Inspector in the layout bar, then click Data.
3. In the Behavior area, for Field entry, select the following options:
Notes
•Preventing entry into a field only affects the field object on that layout. To always restrict
access to a field on any layout of the database, define a privilege set to permit “view only”
field access for that field. For more information, see Protecting databases.
•When you prevent entry into a field in Browse mode, it’s no longer possible to copy data in
that field to the Clipboard. If you want to prevent a field from being changed and still permit
Clipboard copying, define the field to enter an auto-entered value and select Prohibit
modification of value. For more information, see Defining automatic data entry.
Configuring quick find
If a layout is enabled for quick find, you can use the search box in Browse mode to search for data
across multiple fields on the layout.
You can choose the fields to be included in the search. You can also include merge fields in quick
find. By default, merge fields are set to be included in the search. For more information about quick
find for merge fields, see Placing merge fields on a layout.
Note Quick find does not search summary, container, or global fields.
To set fields to be included in the search:
1. In Layout mode, to show the quick find badges for supported fields on the selected layout,
choose View menu > Show > Quick Find.
A small badge next to each field shows if the field has been enabled for quick find. If there are
no quick find badges next to a field, the field is not searchable either because it is not supported
for quick find or because it is not set to be included in the search. A gray badge indicates
that the layout is disabled for quick find. A green badge indicates that the field is searchable.
A yellow badge indicates that the field is searchable, but the search might take longer than
fields with the green badge. Some examples of fields with yellow badges are related fields,
fields that can’t be indexed, or calculations fields that don’t store the calculation results.
2. Select one or more fields.
To Do this
Prevent entry into a field in
Browse mode
Clear Browse Mode.
Prevent entry into a field in Find
mode
Clear Find Mode.
Select the entire field's contents
when the field is entered
Choose Select entire contents on entry.

Editing objects, layout parts, and the layout background
FILEMAKER PRO HELP 356
3. Click Inspector in the layout bar, then click Data.
4. In the Behavior area, select Include field for Quick Find.
Tips
•To improve search performance, limit the search to only the fields that contain the data you
are searching for. For example, a table for songs might include the track number and artist
name for each song. You could include the artist name in the search but exclude the track
number, because it is not likely that you would search for all the songs with the same track
number.
•If you want users to see which fields are searchable, you can change the appearance of the
searchable fields. For example, you can change the border or background of fields that are
searchable.
•If you choose not to include a field in the search, make sure to change the quick find setting
for all instances of the field on the layout; otherwise, the field will still be included in the
search.
To enable quick find:
1. In Layout mode, choose the layout you want to work with from the Layout pop-up menu.
2. Click Layout Setup in the layout bar.
3. In the Layout Setup dialog box, select Enable Quick Find.
4. Click OK.
To reset quick find settings to default:
1. In Layout mode, choose the layout you want to work with from the Layout pop-up menu.
2. Click Layout Setup in the layout bar.
3. In the Layout Setup dialog box, click Reset Quick Find.
4. Click OK.
Related topics
Performing a quick find in Browse mode
Setting the keys for exiting a field
You can specify for a field whether it’s possible to go to the next field with the Tab key, Return key,
Enter key, or any combination of these three keys. Setting more keys may make data entry easier,
particularly for fields where you don’t need to enter tab characters or return characters.
Note Most Windows keyboards contain two Enter keys, one in the main part of the keyboard and
one in the numeric keypad. In FileMaker Pro, the Enter key in the main part of the keyboard
behaves as the Return key.
To set the keys that may be used to exit a field:
1. In Layout mode, select one or more fields. Or, to specify attributes for fields you add later,
start with no fields selected.
For more information, see Selecting objects.
Editing objects, layout parts, and the layout background
FILEMAKER PRO HELP 357
2. Click Inspector in the layout bar, then click Data.
3. In the Behavior area, for Go to next object using, select the keys you want to use for
exiting fields.
Note When the Tab key is set to go to the next field, you can still enter a tab character into a field by
pressing Ctrl+Tab (Windows) or Option-Tab (OS X).
Related topics
Setting the tab order for data entry
Setting the text input method for fields
If your operating system is configured to support input methods for entering text, you can specify a
text input method for fields. For example, you can set input methods for fields that contain Japanese
text.
Input methods are software utilities that convert keystrokes to characters in another language such
as Japanese. FileMaker Pro supports the following Japanese input methods:
To set the text input method for a field:
1. In Layout mode, select one or more fields. Or, to specify attributes for fields you add later,
start with no fields selected.
For more information, see Selecting objects.
2. Click Inspector in the layout bar, then click Data.
3. In the Behavior area, select Set input method, and select one of the following input
methods from the list. (The input method choices are different in Windows and OS X.)
Windows OS X
•Microsoft Input Method Editor
•ATOK
•Kotoeri
•ATOK
Choose Available on To
Automatic Windows and
OS X
Not specify any input methods.
Synchronize with field’s font Windows and
OS X
Automatically set the input method to one that is
appropriate for the script type of the font used in
the field. (If an appropriate input method is not
available, the input method does not change.)

Editing objects, layout parts, and the layout background
FILEMAKER PRO HELP 358
Tip There is a FileMaker Pro application preference to set Synchronize with field’s font for all
fields in all files that you open. For more information, see Setting font preferences.
Setting spell checking for individual fields
You can set FileMaker Pro to check spelling in two ways:
•For an entire file. For more information, see Setting file options.
•On a field-by-field basis.
To disable spell checking on a field-by-field basis:
1. In Layout mode, select a field. Or, to specify attributes for fields you add later, start with no
fields selected.
2. Click Inspector in the layout bar, then click Data.
3. In the Behavior area, select Do not apply visual spell-checking.
Formatting text
You can specify how text (both in and outside of fields) appears on your layout. You control:
•the character attributes of the text, including font, font size, style, and color
•the paragraph alignment, margins, and line spacing
•tab settings
•vertical writing (if your operating system supports Japanese text entry)
You can also set conditional formatting options on layout objects, which allows the format of data
and fields to change automatically based on conditions you set. (For example, you can
automatically display balances that are over 30 days past due in bold, red text.) For information, see
Defining conditional formatting for layout objects.
You can format field data in both Layout mode and Browse mode. For example, you can select an
Address field in Layout mode and format it to display in a particular font, and you can select and
format text within the field in Browse mode (for example, to italicize, underline, or highlight a word for
emphasis). It’s possible to create conflicting formats by creating one format for a field object in
Japanese
(Active Input Mode)
Japanese
(Direct Input)
Hiragana
Full-width Katakana
Full-width Alphanumeric
Half-width Katakana
Half-width Alphanumeric
Windows Set an input method for a field containing
Japanese text.
Roman OS X Set the input method to the last-used Roman input
method.
Choose Available on To

Editing objects, layout parts, and the layout background
FILEMAKER PRO HELP 359
Layout mode, and a contrasting format for field data in Browse mode. Here is how FileMaker Pro
resolves text formatting conflicts:
•When you format a field in Layout mode, the formatting affects only the appearance of that
particular occurrence of the field object.
•When you format field data in Browse mode, this formatting is stored with the data, and you
see it in any layout that displays that field. Field data that is formatted in Browse mode takes
precedence over data formatting in Layout mode. For example, if you format field text as
Bold in Browse mode, then switch to Layout mode and format the same field as Plain Text,
the text will continue to display as bold.
Tip To maintain flexibility in formatting the same data on different layouts, use Layout mode to apply
the primary font and paragraph settings to field objects on layouts. Use Browse mode to apply bold
or italic emphasis to particular words in fields. Do not format the entire contents of a field in Browse
mode; instead, reformat its field object in Layout mode.
Notes
•You can use the formatting bar (click Formatting in the layout bar), the rulers (choose
View menu > Rulers), or the shortcut menu for quick access to many text attributes. For
more information, see Specifying paragraph attributes and tab settings and Using shortcut
menus.
•To eliminate formatting applied in Browse mode, reformat the text in Browse mode or export
and re-import the data.
•When you paste text into fields:
•unformatted text automatically acquires the default formatting of the existing field text.
•text that has the same format as existing field text keeps its formatting.
•text that has a different format to existing text keeps its formatting. To change pasted
text format to the existing text format, choose Edit menu > Undo Formatting
immediately after pasting the text.
•In Browse mode, you can format particular characters in number, date, time, and timestamp
fields. For example, you could format only the year of a date to be bold, such as 5/5/1965.
However, you can only see and print the special formatting when the field object is
formatted with the As entered option in Layout mode. If you specify any other field
formatting options, the special formatting is only visible in Browse mode when the field is
active. (Text fields do not have this limitation.) For more information on formatting fields, see
Formatting and setting up field objects in Layout mode.
Making text bold, italic, highlighted, or setting other styles
You can format text in three areas:
•format text in a field in Browse mode
•format field objects in Layout mode
•format static text on a layout (such as a field label) in Layout mode
To specify several text attributes at once:
1. Select the text or field that you want to change.
Editing objects, layout parts, and the layout background
FILEMAKER PRO HELP 360
2. Do one of the following:
•Choose a command from the Format menu or the formatting bar.
If you don’t see the formatting bar, click Formatting in the layout bar.
•In Layout mode, click Inspector in the layout bar, then click Appearance. Choose an
option in the text area.
3. Select the text attributes you want to use.
Notes
•Windows: To see all the available fonts, choose Format menu > Font > Configure/More
Fonts. In the Configure Font Menu dialog box, select a font on the left and click Move to
add it to the Font menu, or double-click the font on the left to move it to the Menu list. Make
sure Show Fonts in Typeface is enabled to activate this option.
•To set text attributes individually, choose Format menu > Font, Size, Style, Align Text,
Line Spacing, or Text Color, then choose a format from the submenu. (You can choose
more than one style from the Style submenu.)
•To change the unit of measure used for the rulers and grid, click the upper-left corner of the
document where the horizontal and vertical rulers meet until you see the unit of measure
you want. See Using the rulers and grid.
Related topics
Defining conditional formatting for layout objects
To select Do this
Text in a field in Browse mode In Browse mode, select the text in the field.
Note The formatting you specify will be stored with the data, and
you will see it in any layout that displays the field. For more
information, see Formatting text.
Field objects in Layout mode In Layout mode, select one or more fields. For more information,
see Selecting objects.
Text on a layout In Layout mode, select a text object, or select a portion of text
within a text object. For more information, see Selecting text.
To Do this
Specify the font Choose a font.
Specify the font size Choose a size (choose Custom to specify a custom font
size between 1 and 500 points).
Specify the font style Choose one or more style options (highlight, bold, italic, or
underline).
Specify the text color Click the color palette and choose a color (choose Other
Color to select a custom color).

Editing objects, layout parts, and the layout background
FILEMAKER PRO HELP 361
Specifying paragraph attributes and tab settings
In Browse mode, you can format individual paragraphs (including setting tabs) for text in a field. In
Layout mode, you can specify paragraph attributes for fields that hold text and for text that's not in a
field.
Note In both Browse mode and Layout mode, you can use the Format menu to set paragraph and
tab settings. In Layout mode, you can also use the Inspector and specify the settings in the
Paragraph and Tabs areas of the Appearance tab.
To specify paragraph attributes and tab settings:
1. In Layout mode, select the text or field you want to format. Or, in Browse mode, select the
text you want to format.
For more information, see Selecting text.
Note The formatting you specify in Browse mode will be stored with the data, and you will see it
in any layout that displays the field. For more information, see Formatting text.
2. Choose Format menu > Line Spacing > Other.
3. In the Paragraph dialog box, specify spacing and alignment.
4. To specify tab settings for the paragraph, click Tabs.
5. In the Tabs dialog box, specify tab settings.
6. Click OK.
To change paragraph indents and tabs using the rulers:
1. In Browse mode or Layout mode, display the rulers.
To Do this
Specify paragraph alignment For Alignment, select an option.
Specify paragraph margins and
indentation for the first line
For Indent, type a value for Left, Right, and First.
Specify line spacing For Line Spacing, type a value for Height, Above, and Below
and choose a unit of measure. The lines unit of measure varies
with the font you use and is slightly more than the font height.
To Do this
Set a new left, center, or right tab Select Left, Center, or Right, type a value for Position to set
where the text will align, and then click New.
Set a new decimal tab Select Align on and type a character for the text to align to (for
example, a “.”), type a value for Position to set where the text
will align to that character, then click New.
Use a character to fill across to the
tab
For Fill Character, type a character (for example, for a phone
listing, you can fill the area between the name and the
telephone number with periods).
Change a tab's settings Select the tab's settings in the scrolling list, change any of the
options in the dialog box, then click Set.
Remove a tab Select the tab's settings in the scrolling list, then click Clear.
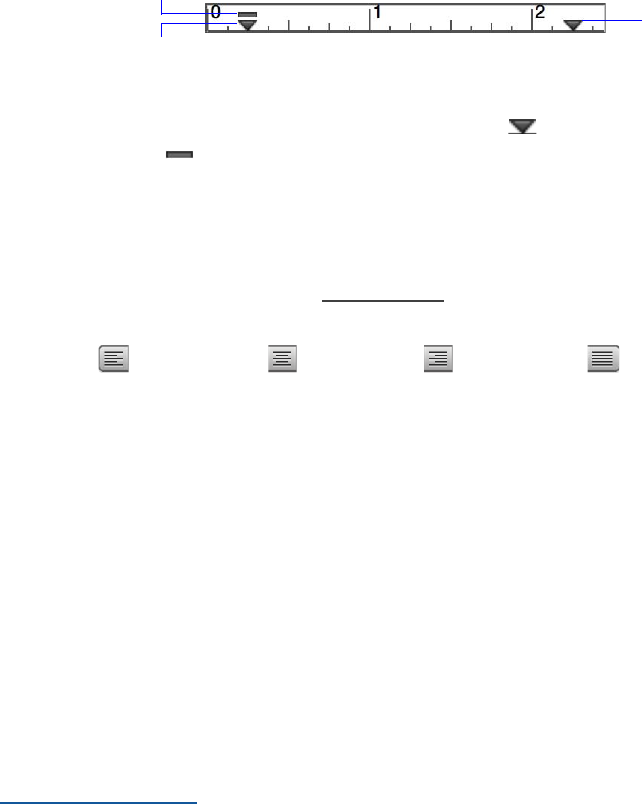
Editing objects, layout parts, and the layout background
FILEMAKER PRO HELP 362
In Browse mode, choose View menu > Ruler. In Layout mode, choose View menu > Rulers.
2. In Browse mode, select a field. In Layout mode, create text or select existing text.
In the horizontal ruler, you see the paragraph settings for the current selection. In Browse mode,
you see the current field’s settings. In Layout mode, you see the settings of the selected text.
3. To change paragraph settings, drag a margin marker to set margins and the first-line
indent marker to set the first-line indent. When you move the left margin marker, the
first-line indent marker also moves unless you press Alt (Windows) or Option (OS X) as you
drag either marker.
To change text alignment in paragraphs:
With the field or text selected, in the formatting bar, click one of the following buttons to change
alignment:
Align Left , Align Center , Align Right , or Align Full .
Notes
•You can specify vertical text alignment for text and fields. In Layout mode, choose Format
menu > Align Text, then choose Top, Center, or Bottom.
•You can use the ruler to set margins or tabs for text data in Browse mode or for text in
Layout mode. You can't use the ruler to format fields in Layout mode, you must use the
Paragraph and Tabs dialog boxes.
•To quickly set a left tab, click the ruler where you want the tab stop placed. To delete a tab
from the ruler, drag it downward off the ruler.
•You can double-click in the ruled part of the ruler to open the Tabs dialog box.
•OS X: If you have set up tab stops for a field, you need to press Option-Tab to move the
insertion point to the next tab stop.
Related topics
Adding text to a layout
Formatting fields and text for vertical writing
If your operating system is configured to support Japanese text entry, you can format field objects
and text objects that display Japanese text in vertical writing format. In vertical writing, characters
are displayed and read from top-to-bottom, with successive columns displayed vertically from right-
to-left.
There are two ways to format vertical text on a layout. The format you choose usually depends on
the page orientation of the layout. For each text object or field, you can:
•Rotate the characters only, but not the field or text object. In this case, each character is
rotated 90 degrees counter-clockwise, but the characters still display left-to-right and
columns remain horizontal.
Sets the left
margin
Sets the first-
line indent
Sets the
right margin
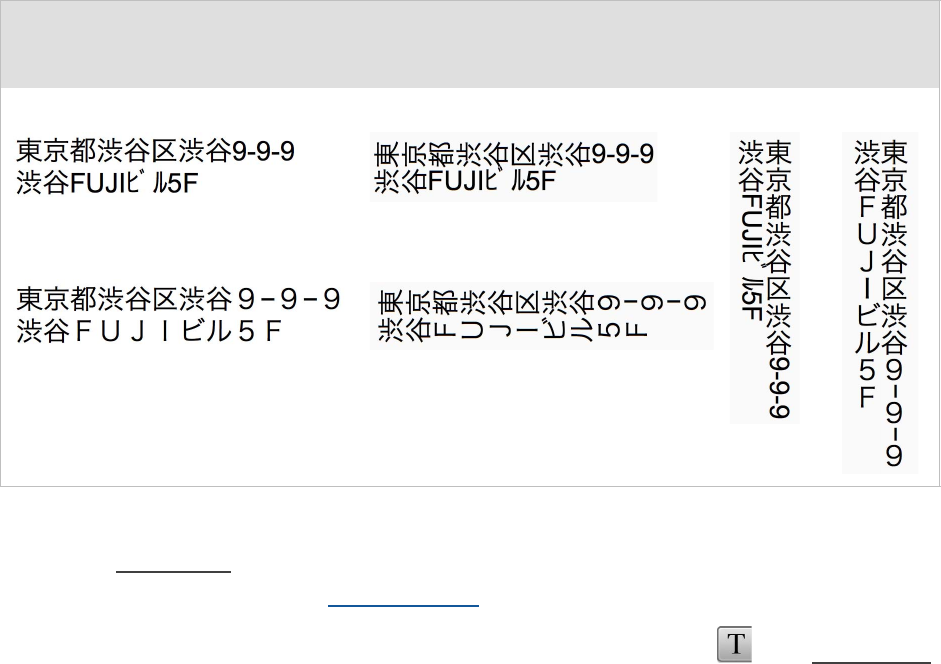
Editing objects, layout parts, and the layout background
FILEMAKER PRO HELP 363
•Rotate both the characters and the field or text object. In this case, each character is rotated
90 degrees counter-clockwise and the text object or field object is also rotated 90 degrees
clockwise so that characters display on screen in vertical format, with characters displaying
top-to-bottom in vertical columns.
Note Alphabetic and numeric half-width (hankaku) characters do not rotate when you specify
Sideways, but alphabetic and numeric full-width (zenkaku) characters do rotate. For example, when
an address field containing half-width numbers for a street number is specified as Sideways, the
half-width numbers remain in their original orientation. You can use functions to convert alphabetic
or numeric half-width characters to full-width characters or Chinese numbers. For more information,
see the Notes section below.
The following table shows the available formatting choices:
To format fields and text objects for vertical writing:
1. In Layout mode, select the fields and text objects that you would like to set to vertical.
For more information, see Selecting objects.
Tip You can select all text objects on a layout by clicking the Text tool in the status toolbar
and choosing Edit menu > Select All.
2. To rotate the characters 90 degrees counter-clockwise, choose Format menu >
Orientation > Sideways.
All text (except alphabetic and numeric full-width characters) displays as rotated.
3. To rotate the selected field objects and text objects so that text columns display vertically,
choose Arrange menu > Rotate.
Notes
•Depending on how you want the layout to print, you may want to change the page
orientation of the layout. To do so, choose File menu > Print Setup (Windows) or Page
Setup (OS X), and change the page orientation to Portrait or Landscape.
Original Japanese text Rotating characters only
Rotating both
characters and
the object
Half-width:
Full-width:
Half-width:
Full-width:
Half-width: Full-width:

Editing objects, layout parts, and the layout background
FILEMAKER PRO HELP 364
In Preview mode, you can also click Print Setup (Windows) or Page Setup (OS X) in the status
toolbar.
•When you select text in a rotated field in Browse mode or in a rotated text object in Layout
mode, the text temporarily displays unrotated while you’re editing the text.
•If necessary, you can also rotate graphics to match vertical text. For more information, see
Rotating objects.
•Instead of re-entering data, you can use functions to convert alphabetic and numeric half-
width characters to full-width characters or Chinese numbers. To convert the characters
using a function, define a new calculation field that contains the appropriate function and
place it on the layout. The following functions are available. For more information, see Text
functions.
You can also display full-width characters for number, date and time fields by changing their field
format. For more information, see:
•Specifying formats for fields containing numbers
•Specifying formats for date fields
•Specifying formats for time fields
Arranging objects
In Layout mode, you can:
•group any combination of objects so you can edit or move them together
•change the stacking order of objects to get different effects when the objects overlap
•rotate an object or group of objects in 90-degree increments
•align or distribute objects precisely
•resize objects so they are all the same width (or height) in one step
Related topics
Using tools to precisely position objects
Grouping and ungrouping objects
Group multiple objects so you can work on the grouped object as if it were a single object. You can:
•copy and paste grouped objects, maintaining the arrangement of the objects within the
group
•more easily work with stacking order, because grouped objects all exist on the same layer
•align an individual object to a grouped object
Field
Type Function Conversion type
Tex t RomanZenkaku half-width numbers or alphabetic characters to full-width
Tex t KanaZenkaku half-width Katakana to full-width
Tex t KanjiNumeral half-width numbers to Chinese numbers
Numeric NumToJText half-width numbers to full-width
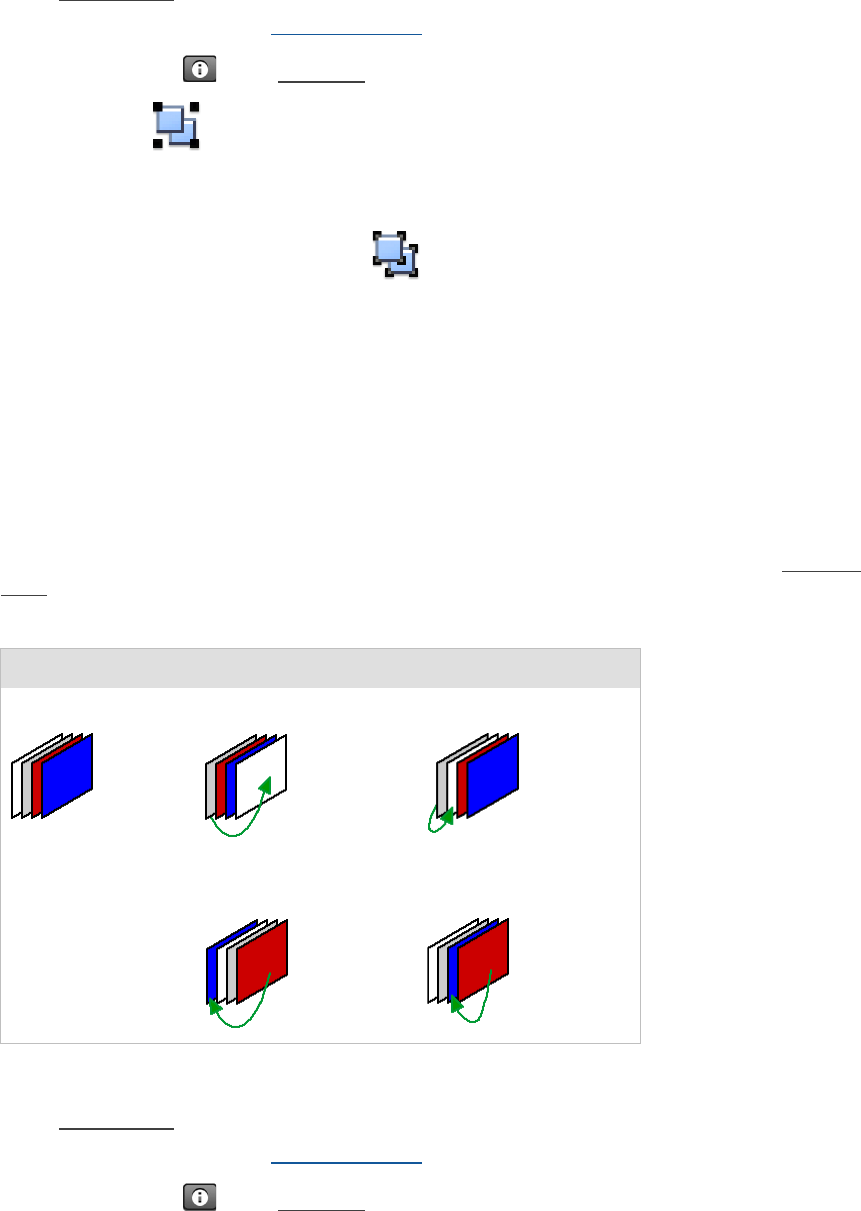
Editing objects, layout parts, and the layout background
FILEMAKER PRO HELP 365
To group objects:
1. In Layout mode, select the objects you want to group.
For more information, see Selecting objects.
2. Click Inspector in the layout bar, then click Position.
3. Click Group in the Arrange & Align area.
To ungroup a grouped object:
•Select the group, then click Ungroup in the Arrange & Align area.
Notes
•When you ungroup a group that contains other groups, the subgroups stay grouped.
•If you include a locked object in the group, the resulting grouped object is also locked.
•You can edit text that's part of a group by double-clicking the text.
•You can’t select individual objects within a group.
Moving objects forward or backward on a layout
When objects overlap on a layout, one object is on top of the other. You can change this stacking
order to create different effects. As you create objects, they stack one on top of the last, even if they
aren't overlapping, so that the last object created is always on top.
To change the order in which objects are stacked:
1. In Layout mode, select the object or objects to move in the stack.
For more information, see Selecting objects.
2. Click Inspector in the layout bar, then click Position.
Before After
Bring to Front:
Send to Back:
Bring Forward:
Send Backward:
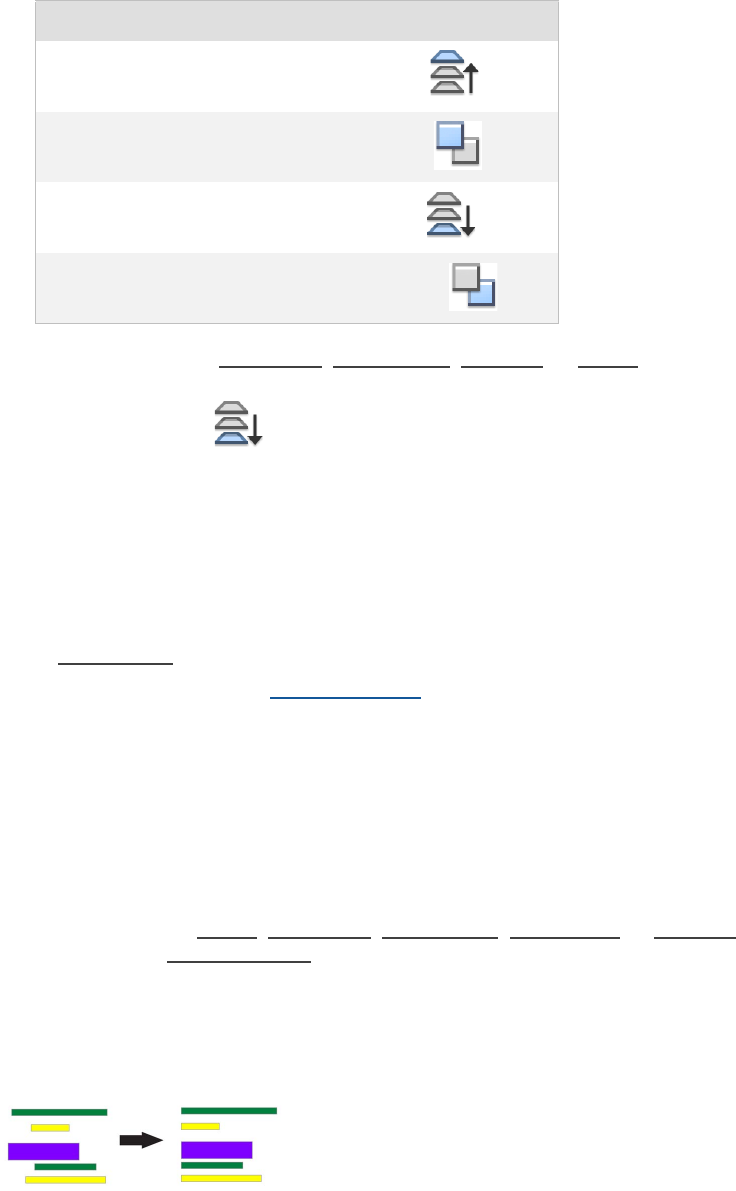
Editing objects, layout parts, and the layout background
FILEMAKER PRO HELP 366
3. Click one of the following buttons in the Arrange & Align area.
Note Objects located in tab controls, slide controls, popovers, or portals maintain a stacking order
within the tab control, slide control, or portal. For example, if you select an object on a tab control
and click Send to back , the object moves behind all the other objects on the tab control, not
behind all objects on the layout.
Rotating objects
You can rotate fields, text blocks, and graphic objects in 90-degree increments.
To rotate one or more objects:
1. In Layout mode, select the objects that you want to rotate.
For more information, see Selecting objects.
2. Choose Arrange menu > Rotate.
The object or objects rotate 90 degrees clockwise. To rotate the object or objects further, choose
Arrange menu > Rotate again.
Notes
•When you click or tab into a rotated field in Browse mode, the field is temporarily displayed
unrotated while you edit the text in the field.
•You cannot rotate portals, tab controls, slide controls, web viewers, or popovers; however
you can rotate popover buttons.
Aligning or distributing objects
You can align objects or distribute space between them on the layout.
To move the object Click
In front of all objects
Bring to front
One layer forward
Bring forward
Behind all other objects
Send to back
One layer back
Send backward
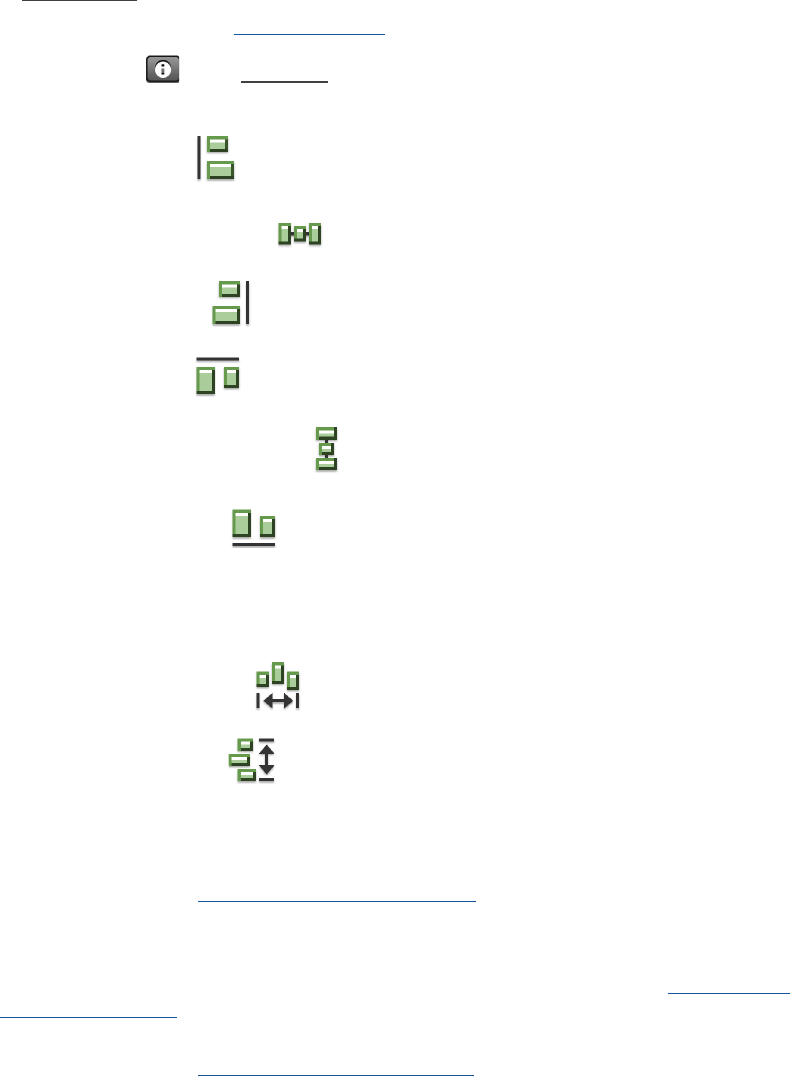
Editing objects, layout parts, and the layout background
FILEMAKER PRO HELP 367
When you align objects along their tops, bottoms, or sides, the objects align with the object farthest
out of alignment. When you align center points, the objects align along an invisible vertical or
horizontal line in the center of the objects.
When you distribute the space between objects, FileMaker Pro takes the space separating the two
objects farthest apart and divides it evenly among all the selected objects.
To align objects:
1. In Layout mode, select the objects to align.
For more information, see Selecting objects.
2. Click Inspector in the layout bar, then click Position.
3. In the Arrange & Align area, click one of the following buttons:
•Align left edges
•Align on vertical centers
•Align right edges
•Align top edges
•Align on horizontal centers
•Align bottom edges
To distribute objects:
•In the Space area, click one of the following buttons:
•Distribute horizontally
•Distribute vertically
Notes
•You can resize objects to the smallest (or largest) width, height, or both in one step. For
more information, see Resizing and reshaping objects.
•To align or distribute objects, you may also use commands in the Arrange menu or the
shortcut menu.
•You can precisely align objects using the guides. For more information, see Using guides
and dynamic guides.
•To force the alignment to a specific object, lock that object before you set the alignment. For
more information, see Protecting objects from change.
Editing objects, layout parts, and the layout background
FILEMAKER PRO HELP 368
Using tools to precisely position objects
Several tools are available to help you precisely size, reshape, and position objects in Layout mode:
the Inspector, rulers, grid, guides and dynamic guides, and screen stencils.
Related topics
Selecting and working with objects on a layout
Arranging objects
Using the Inspector to position objects
Use the Inspector to precisely position and size objects on a layout. You can also use the Inspector
to allow objects to resize automatically when the FileMaker Pro window is resized. For information,
see Setting auto-resize options for layout objects.
To precisely position and size objects with the Inspector:
1. In Layout mode, select one or more objects.
For more information, see Selecting objects.
2. Click Inspector in the layout bar, then click Position.
3. In the Position area, type a new value into one of the following fields.
If you can’t type a value, that field doesn’t make sense for the selection, or the selection is
locked.
4. Press Enter or Tab, or click outside the Inspector to apply the changes.
Notes
•To change the unit of measurement, see Using the rulers and grid.
•To precisely position an object while dragging it, note the values in the Inspector. The values
dynamically update to reflect the position as you move an object.
•Use the Inspector to measure and resize buttons, imported graphics, layout parts, and
column widths on a layout.
Using the rulers and grid
You can use rulers and the grid to help you align, size, and position objects precisely on a layout.
Field Indicates
Name The name of the selected object (optional). See Naming objects.
Too ltip The text that appears when a user moves the pointer over the object in Browse or
Find modes. See Adding tooltips on layouts.
Left The distance from the left edge of the selection to the left edge of the layout
Top The distance from the top of the selection to the top of the layout
Right The distance from the right edge of the selection to the left edge of the layout
Bottom The distance from the bottom of the selection to the top of the layout
Width The object's width
Height The object's height
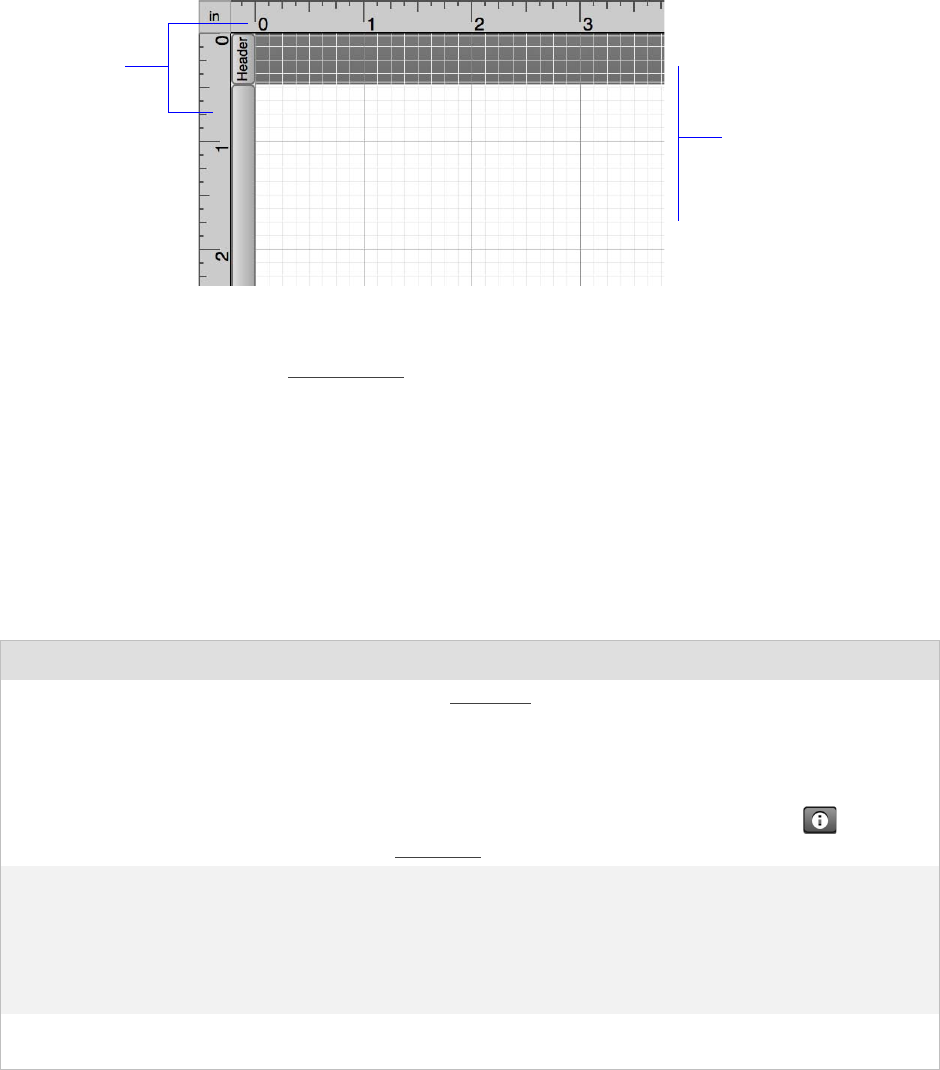
Editing objects, layout parts, and the layout background
FILEMAKER PRO HELP 369
•Rulers: Showing the rulers displays a horizontal and vertical ruler along the edge of a
layout. Guide lines on each ruler track the position of the pointer as you move the pointer on
the layout.
•Grid: Showing the grid displays a series of nonprinting intersecting horizontal and vertical
lines on a layout, which you can use for creating, resizing, positioning, and aligning objects.
Gridlines adjust when you change the unit of measure.
Showing and hiding the rulers
•To show the rulers, in Layout mode, choose View menu > Rulers.
•To hide the rulers, choose View menu > Rulers again.
Working with the grid
Use the grid to precisely control the placement of objects on a layout. When the grid is showing,
major gridlines appear slightly darker than minor gridlines. You can change the spacing between
gridlines.
You can have objects “snap-to” gridlines. When you move or resize an object, it snaps to the nearest
minor gridline. New objects are created aligning to the nearest major gridline.
Grid
Rulers
To Do this in Layout mode
Show or hide the grid In the Inspector, click the Position tab. In the Grid area,
select or deselect Show grid.
Or, choose View menu > Grid > Show Grid. To hide the
grid, choose Show Grid again.
If you don’t see the Inspector, click Inspector in the
layout bar.
Turn the “snap-to” effect on or off In the Inspector, click the Position tab. In the Grid area,
select or deselect Snap to grid.
Or, choose View menu > Grid > Snap to Grid. To turn it off,
choose Snap to Grid again.
Note Objects snap to the grid even when the grid is hidden.
Override the grid's snap-to effect Press Alt (Windows) or Command (OS X) as you drag an
object.
Editing objects, layout parts, and the layout background
FILEMAKER PRO HELP 370
The following table shows the default major units and minor steps for the selected unit of measure
(inches, centimeters, or points).
Changing the unit of measure
To change the unit of measure used by the rulers, grid, and the Inspector, do one of the following:
•Right-click a ruler and choose a unit of measure from the shortcut menu.
•Click the upper-left corner of the document where the horizontal and vertical rulers meet
until you see the unit of measure you want.
•In the Inspector, click the unit of measure, which appears next to many options, until you
see the one you want.
Each ruler increment measures the following amount of space:
Notes
•For additional control over positioning objects, use the guides and dynamic guides, and the
Arrange & Align area of the Inspector. For more information, see Using guides and dynamic
guides and Aligning or distributing objects.
•FileMaker Pro performs the snap-to effect among the layout tools in this order: grid,
dynamic guides, guides.
Using guides and dynamic guides
FileMaker Pro provides two types of guides to help you create and edit objects on a layout:
•Guides help you position objects within the same layout and across multiple layouts.
•Dynamic guides help you precisely size and position objects on a layout.
Using guides
You can create as many guides as you need on a layout. You can lock a guide to prevent it from
being moved accidentally. You can make the guides appear on other layouts you create or edit, to
help you place objects consistently on all layouts.
Change the distance between gridlines In the Inspector, click the Position tab. In the Grid area,
enter values for Major Grid Spacing and Minor Grid Steps.
See the default settings in the table below.
To Do this in Layout mode
Unit of measure Major units Minor steps
Inch (in) 1 inch 8
Centimeter (cm) 1 centimeter 2
Point (pt) 72 points 12
Unit of measure Each ruler increment measures
Inch (in) 1/8 inch
Centimeter (cm) .25 centimeters
Points (pt) 10 points

Editing objects, layout parts, and the layout background
FILEMAKER PRO HELP 371
Note Objects snap to layout part boundaries when View menu > Guides > Snap to Guides is
selected.
Using dynamic guides
When you drag objects to move, resize, or position them on a layout, dynamic guides appear near
or on other objects to help you create and edit them more precisely. Dynamic guides also “snap-to”
the upper and lower boundaries and the centers of objects as you move, resize, or position them.
For example, when you drag an object to a new position on a layout, dynamic guides appear when
an edge moves close to the edge of another object. When you drag an object to resize it, dynamic
guides appear when the new width or height matches the size of another object on the layout.
To use dynamic guides:
•To turn on dynamic guides, in Layout mode, choose View menu > Dynamic Guides.
•To turn off dynamic guides, choose View menu > Dynamic Guides again.
To In Layout mode, do this
Create a vertical guide Drag out from the vertical ruler. (If the ruler isn’t displayed,
select View menu > Rulers.)
Create a horizontal guide Drag down from the horizontal ruler. (If the ruler isn’t
displayed, select View menu > Rulers.)
Move a guide Drag the guide to the new position.
If a guide is locked, you must unlock it before you can move
it.
Use guides in other layouts you create or
edit
Right-click the guide, then choose Share Guide with All
Layouts. A guide shared with other layouts is a different
color from the one used only for the current layout.
To use a shared guide only with the current layout, right-click
the guide, then choose Share Guide with All Layouts
again.
Lock a guide Right-click the guide, then choose Lock Guide. A locked
guide is a different color from an unlocked guide.
To unlock a guide, choose Lock Guide again.
Remove a guide •Drag a horizontal guide back to the horizontal ruler,
or a vertical guide back to the vertical ruler.
•Or, right-click the guide, then choose Remove
Guide.
Show or hide the guides To show guides, choose View menu > Guides > Show
Guides. To hide guides, choose Show Guides again.
Turn the “snap-to” effect on or off Choose View menu > Guides > Snap to Guides. To turn it
off, choose Snap to Guides again.
Note Objects snap to guides even when the guides are
hidden.
Editing objects, layout parts, and the layout background
FILEMAKER PRO HELP 372
Notes
•Dynamic guides also appear when you use the keyboard arrow keys to move objects. When
you move objects in this manner, however, dynamic guides do not “snap-to” other objects.
•When you drag or resize an object that’s on a popover, dynamic guides appear only for the
popover and other objects on the popover. When you drag or resize an object outside a
popover, dynamic guides appear only for the popover and objects outside the popover. See
Working with popovers on layouts.
Sizing layouts for different devices
You can use screen stencils, nonprinting guides that help you design layouts for iPad, iPhone, iPod
touch, or computers with different screen resolutions. In Layout mode, screen stencils provide an
estimated viewing area of a device’s display. You can show up to nine screen stencils at a time.
To show screen stencils:
1. In Layout mode, click the arrow on Screen Stencil in the layout bar.
2. Do one of the following:
Notes
•If a screen stencil is visible in a database, it will be visible in all databases until the stencil is
hidden.
•You can only have one custom screen stencil at a time.
•You can show or hide all visible screen stencils by clicking Screen Stencil in the layout
bar.
•If you’re working in a shared file, your screen stencils aren’t displayed to other users.
To Do this
Show a screen stencil Choose a size from the drop-down list:
•Desktop: 640 x 480
•Desktop: 1024 x 768
•Desktop: 1280 x 960
•Desktop: 1600 x 1200
•iPhone 3.5-inch: 320 x 385 (portrait)
•iPhone 3.5-inch: 480 x 255 (landscape)
•iPhone 4-inch: 320 x 473 (portrait)
•iPhone 4-inch: 568 x 255 (landscape)
•iPad: 768 x 929 (portrait)
•iPad: 1024 x 673 (landscape)
•Custom Size
Set a custom screen stencil Choose Custom Size. Enter values for Height and Width. Click
OK.
Hide a screen stencil Deselect a size.
Editing objects, layout parts, and the layout background
FILEMAKER PRO HELP 373
Showing text or field boundaries
You can show boundaries for text objects and field objects in Layout mode. Boundaries help you
easily identify, position, and align these objects while you’re designing a layout.
To show text or field boundaries:
•In Layout mode, choose one of the following menu commands:
To hide text or field boundaries:
•Choose the corresponding command from the Show submenu again.
Notes
•These boundaries appear only in Layout mode. However, you can format objects to have
borders that do appear in Browse mode and when you print the layout. For more
information, see Setting auto-resize options for layout objects and Setting the fill, line style,
and borders for objects, layout parts, and the layout background.
Choose Boundaries appear as
View menu > Show > Text Boundaries A thin line around each text object
View menu > Show > Field Boundaries A thin line around each field object

Working with related tables and files
FILEMAKER PRO HELP 374
Working with related tables and files
FileMaker Pro uses related tables as the basis for relational databases and lookups. Relational
databases allow you to work with data from other tables dynamically, so that you can change data in
one place and your changes are reflected in all places where the related data appears.
Use relational databases to:
•See and work with data from another (or the current) table in its most up-to-date state. For
example, you can display data in related fields when you need current data from a related
table, such as the current price of an item.
•Set up and manage data efficiently and with flexibility. Instead of creating many database
tables or files with duplicate values, you store single occurrences of values and use
relationships to make those values available. You can then make changes to data in only
one place, which eliminates data duplication and promotes data accuracy.
•Save disk space, because data is stored in only one place.
For information about creating relationships, see Creating relationships.
Lookups let you copy data from one table to another; once looked-up data has been inserted, it does
not change unless you edit it or tell FileMaker Pro to look it up again.
Use lookups to:
•Copy data from a related table and keep it as copied, even when the related data changes.
For example, use a lookup to copy the price of an item at the time of purchase into an
Invoice table. Even if the price in the related table changes, the price in the Invoice table
stays the same.
Notes
•The related table could be within the same file, a FileMaker data source, or an external
ODBC data source. For information about choosing the data source, see Adding tables to
the relationships graph. For more information about working interactively with data in SQL
tables, see Accessing external data sources.
•All FileMaker Pro tables used in your database must be in FileMaker Pro 12 format. Files
created with earlier versions of FileMaker Pro must be converted to the current version first.
See Converting files from FileMaker Pro 11 and earlier.
Related topics
About planning a database
Adding tables to the relationships graph
Creating relationships
About relationships
A relationship is a powerful method for organizing your data. Using a relationship, you can join data
in one or more tables based on common field values, different field values, or a comparison of
values in two or more fields.
After you create a relationship, you can do either of the following to display the data from the related
table:
•Design a relational database, which is one or more tables in one or more files that, when
used together, contain all the data you need for your work. Each occurrence of data is
stored in only one table at a time but can be accessed and displayed from any related table.
You can change any occurrence of your related data, and the changes appear in all places
where that related data is used.

Working with related tables and files
FILEMAKER PRO HELP 375
•Define a lookup to copy data from a related table into a field in the target table. The copied
data is now stored in two places, just as if it were copied and pasted into a target field.
Looked-up data is current at the time it is copied, but once copied it remains static unless it
is relookedup or the lookup is triggered again.
Important Whenever you want to use data from another table — either in a relational database or
for a lookup — you must first define a relationship between the two tables.
For example, a typical Sales database may have these tables: an Invoices table, which keeps a
record of each invoice; a Products table, which stores the products and their current prices; and a
LineItems table, which stores sales data for each line of the invoice, including the item being sold,
the quantity, and the price at which it is sold. Because invoices are a mix of dynamic and static data,
you use both related fields and lookups to display your data. Records from the LineItems table are
displayed dynamically, in a portal on the Invoices layout, but the actual sales price of each line item
is entered using a lookup, so the invoice totals remain the same, even if prices change at some
future date.
You create a relational database by defining a relationship between two fields, called match fields.
These fields can be in different tables or they can be in the same table (a self-join). You are able to
access related data when the value in the match field(s) on one side of the relationship compares
successfully with a value in the match field(s) on the other side of the relationship, according to the
criteria you establish in the relationship.
After you have created a relationship you can use fields from the related table just as you would use
any fields in the current table: to display data on a layout, as part of a calculation formula, in a script,
as a match field for another relationship, and so on.
When you display related data in a portal, values from all related records are displayed, subject to a
user’s access privileges. When the related field isn't in a portal, the value from the first related
record is displayed. See Creating portals to display related records.
Note Use access privileges in the source table to limit or prevent access to related data. For
example, users must have access privileges to view a related match field to see the related fields
from that relationship. See Creating and managing privilege sets.
You can sort related records before displaying them. When you place a related field directly on a
layout, you see the value from the first related record in the sort order (such as the lowest or highest
value). When you display related fields in a portal, the related records are displayed in the sort order
assigned to the portal, which takes precedence over any sort order in the relationship definition.
Notes
•You can base relationships on one or more match fields in each table. Match fields should
be the same type, for example, number fields or a calculation field that returns a numeric
result.
•Relationships are always created between two tables, or, in the case of self-joining
relationships, two occurrences of the same table in the relationships graph. You can
connect relationships together in a series and access related data from any point within that
series, but each relationship is created between only two tables.
•Two or more related tables cannot form a cycle. Each series of relationships must have a
beginning table and an ending table.
•The number of relationships is limited only by disk space.
•Relationships are bi-directional, although you can set independent record sorting, creation,
and deletion options for each table in the relationship.

Working with related tables and files
FILEMAKER PRO HELP 376
•You can add pairs of match fields to a relationship as necessary until you are able to
establish the relational criteria you want.
•Because a sort order can be assigned to a portal, you can display data from a single
relationship in multiple portals on the same page, and use a different sort order for each
portal.
•Before you begin building a relational database, it’s a good idea to plan it on paper first. See
About planning a database.
Related topics
About the types of relationships
Creating relationships
About the relationships graph
When you work with tables in the relationships graph, you are using them to organize your view into
your data. Each table occurrence in the relationships graph represents a separate view into your
data. When you join two tables, you are leveraging the two existing views to create a third way of
viewing your data. For example, if you have an Invoices table with invoice ID and customer
information, and a LineItems table storing product orders for each line of each invoice, you must
create a relationship between the two tables before you can display data from the LineItems table on
the Invoices layout.
You can create a relationship between any two tables in the relationships graph, but the relationship
must not create a cycle, or closed loop between tables. That is, each series of relationships must
have a starting table and an ending table, and those tables must be different tables.
Because each relationship represents an additional set of criteria, you must be aware of your
context within the relationships graph. Context is the point in the graph from which a relationship is
evaluated. Because the graph is never a cycle, each point along the graph offers a different
perspective into your data.
Notes
•Because FileMaker Pro does not permit you to create cycles within the relationships graph,
any attempt to create a cycle causes FileMaker Pro to generate a new, uniquely named
table occurrence. This new occurrence functions like any other occurrence in the graph, and
allows you to continue with your new relationship. See Adding tables to the relationships
graph.
•You can add tables from other FileMaker Pro files and from ODBC data sources to the
relationships graph. See Accessing external data sources.
Related topics
About relationships
About planning a database
About match fields for relationships
Creating relationships
About match fields for relationships
When you create a relationship between tables, you choose one or more fields in each table as
match fields. Match fields usually have common values. In a typical relationship, a record in one
table will be related to records in another table that share a common match field value.
For example, a Customers table and an Invoice table can each use the field Customer ID to
uniquely identify each customer and purchase. If the two tables are related using Customer ID as

Working with related tables and files
FILEMAKER PRO HELP 377
the match field, a record in the Customers table can display a portal showing each invoice with a
matching Customer ID, and in the Invoices table each invoice with the same Customer ID can
display consistent customer data.
Match fields must be one of the following field types:
•text
•number
•date
•time
•timestamp
•calculation (with a text, number, date, time, or timestamp result)
Notes
•Container fields, summary fields, and calculations returning a container field as a result
cannot be used as match fields.
•The match fields used in a relationship can have different names.
•A match field can be a global field.
•Values are matched based on their indexing.
•To force match fields to consider non-alphanumeric characters, change the default
language of the match fields to Unicode. See Defining field indexing options and Choosing
a language for indexing or sorting.
•A match field used for a relational database can be a lookup target field, as long as the
lookup isn't based on a relationship that involves the match field.
•You can increase the number of possible matching values by entering multiple values in the
match field, separated by carriage returns. You can access related data by matching any
single line of your match field, according to your relationship criteria. This is sometimes
called a multi-key field or complex key field.
For example, you have a simple relationship joining records in TableA to TableB based on the
contents of a single field in each table, and the match field in TableA contains the following
values, separated by carriage returns:
red
green
blue
FileMaker Pro will match any record in TableB where the corresponding match field contains the
single value red, green, or blue. However, FileMaker Pro will not return records where the
match field contains the value red green blue. The carriage returns tell FileMaker Pro to
treat each line as a separate value.
•You can also see and work with data from external ODBC data sources. See Accessing
external data sources for more information about working interactively with data in SQL
tables.
Related topics
About relationships
About planning a database
About the types of relationships
Creating relationships
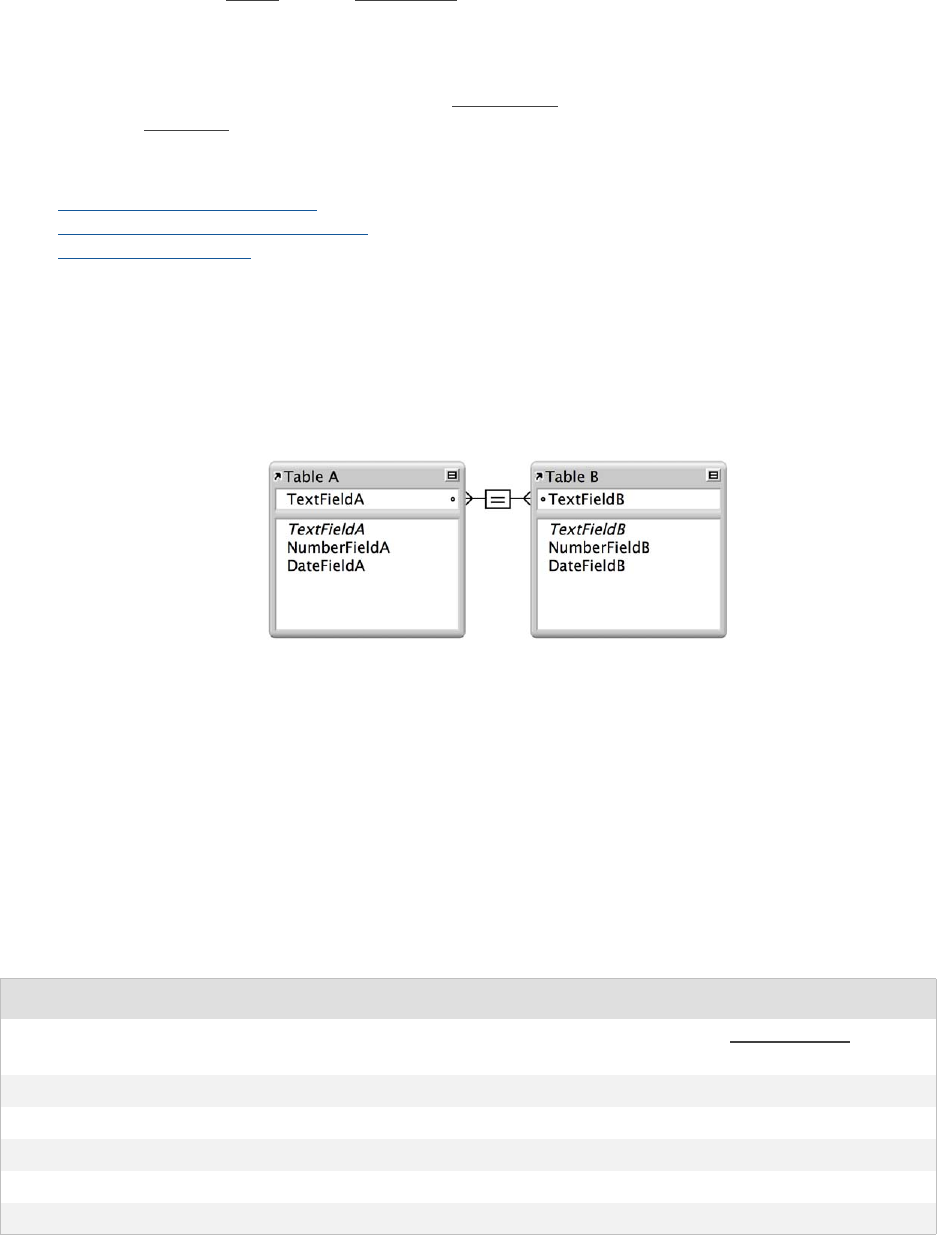
Working with related tables and files
FILEMAKER PRO HELP 378
About the types of relationships
When you join two tables using a relationship, you establish criteria that FileMaker Pro uses to
display or access related records.
Your criteria can be simple, such as matching a field in TableA with a field in TableB. A more
complex relationship definition will usually return a narrower set of related records. Examples of
complex relationships include using multiple match fields, comparing match fields using non-equal
relational operators, or using calculated match fields.
Related topics
About the relationships graph
About match fields for relationships
Creating relationships
About single-criteria relationships
In a single-criteria relationship, data in one field is matched to data in another field.
For example, a record in either table is related to any record in the other table when the values
TextFieldA and TextFieldB are the same.
Using a single-criteria relationship
Use a single-criteria relationship when you want to relate two tables based on a single common
value, such as a serial number or an ID number. For example, a database has two tables:
•Customers, which stores names and addresses
•Contacts, which stores phone numbers, types of phones numbers (such as work, home,
fax, and so on), and email addresses
The data is split between two tables because a single customer can have multiple phone numbers
and email addresses.
The tables have these fields:
Table Field name Comment
Customers Customer ID Number field, auto-enter serial number; this will
be the match field in the Customers table
First Name Text field
Last Name Text field
Address1 Text field
City Text field
State Text field
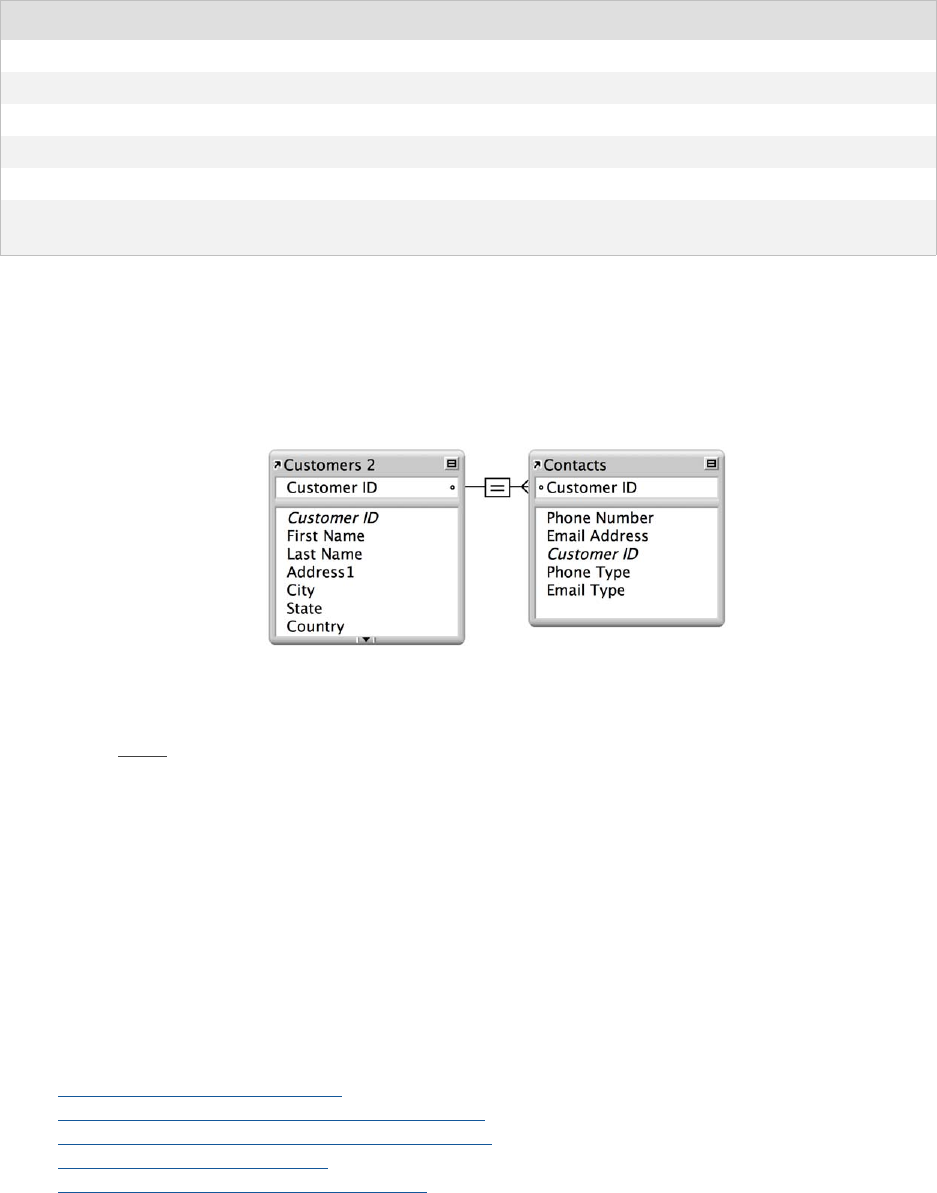
Working with related tables and files
FILEMAKER PRO HELP 379
The Customer ID field is the match field in the relationship between the two tables. In the Customers
table, the Customer ID field is set to auto-enter a serial number, giving each record in the Customers
table a unique ID number. In the Contacts table, the Customer ID is a simple number field, and no
auto-entry options are set.
In the relationships graph, a relationship is between the Contact ID fields in each table.
In the Edit Relationship dialog box, the Allow creation of records in this table via this
relationship option is enabled. This means that you will be able to enter a phone number in an
empty portal row, and FileMaker Pro will automatically create a related record for that phone
number. Also, the Delete related records in this table when a record is deleted in the other
table option is enabled, because there is no reason to retain old phone numbers if the matching
contact record has been deleted.
Because the relationship is defined to allow the creation of related records in the Contacts table, the
Customer ID number from a Customers record will be automatically inserted in the Customer ID field
in the Contacts table in each new related record. This allows many records in the Contacts table to
be related to a single record in the Customers table.
Finally, a portal is added to the Contacts table on the Customer layout. When you enter a phone
number or an email address in an empty portal row in the Customers table, FileMaker Pro creates a
related record for that phone number or email address in the Contacts table.
Related topics
About multi-criteria relationships
About relationships using comparative operators
About relationships that return a range of records
About self-joining relationships
Creating portals to display related records
Country Text field
Contacts Phone Number Text field
Phone Type Text field
Email Address Text field
Email Type Text field
Customer ID Number field; this will be the match field in the
Contacts table
Table Field name Comment
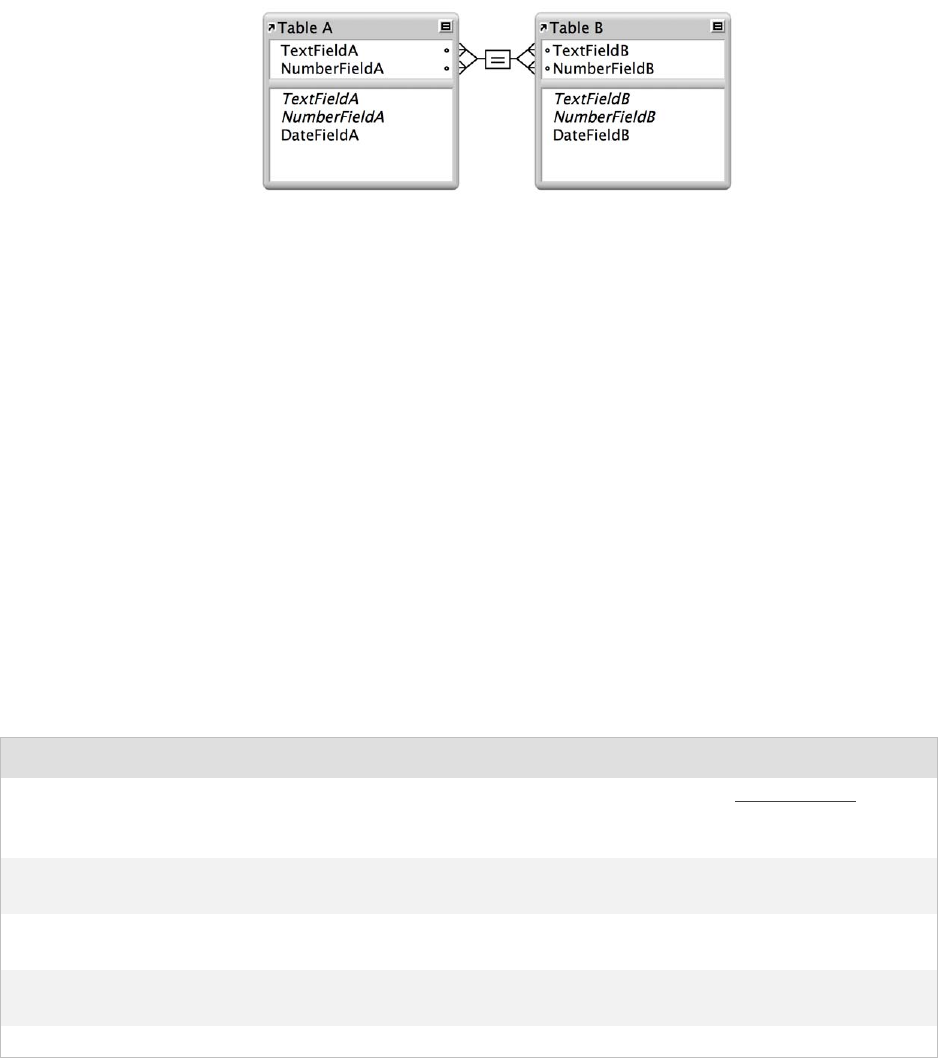
Working with related tables and files
FILEMAKER PRO HELP 380
About multi-criteria relationships
In a multi-criteria relationship, you increase the number of match fields, which increases the criteria
that FileMaker Pro evaluates before successfully joining related records. In a multi-criteria
relationship, FileMaker Pro compares the values from each match field on each side of the
relationship in the order in which the fields appear. This is called an AND comparison; to match
successfully, every match field must find a corresponding value in the other table.
In this relationship, both TextFieldA and NumberFieldA are match fields to TableB. A record in
TableA with a TextFieldA value of Blue and a NumberFieldA value of 123 will only match those
records in TableB where both TextFieldB and NumberFieldB have values of Blue and 123,
respectively. If TextFieldA and TextFieldB have matching values, but NumberFieldA and
NumberFieldB do not, no related records are returned by the relationship.
Using a multi-criteria relationship
Use a multi-criteria relationship when you want to relate two tables based on more than one
common value, such as a customer ID and a date. For example, a database has three tables:
•Equipment, a static database that stores equipment rental inventory
•Customers, which stores customer names and addresses
•Catering Line Items, which stores a record of each equipment rental, including the
equipment ID, the customer ID, and the event date
The purpose of this database is to track equipment rentals and display all rentals by a selected
customer on a selected date.
Although the database uses three tables, the multi-criteria relationship is between the Customers
and Catering Line Items tables. These two tables have these fields:
Table Field name Comment
Customers Customer ID Number field, auto-enter serial number; one of
the match fields to the Catering Line Items
table
Event Date Date field; the other match field to the Catering
Line Items table
Catering Line Items Customer ID Number field; one of the match fields to the
Customers table
Event Date Date field; the other match field to the
Customers table
Equipment ID Number field
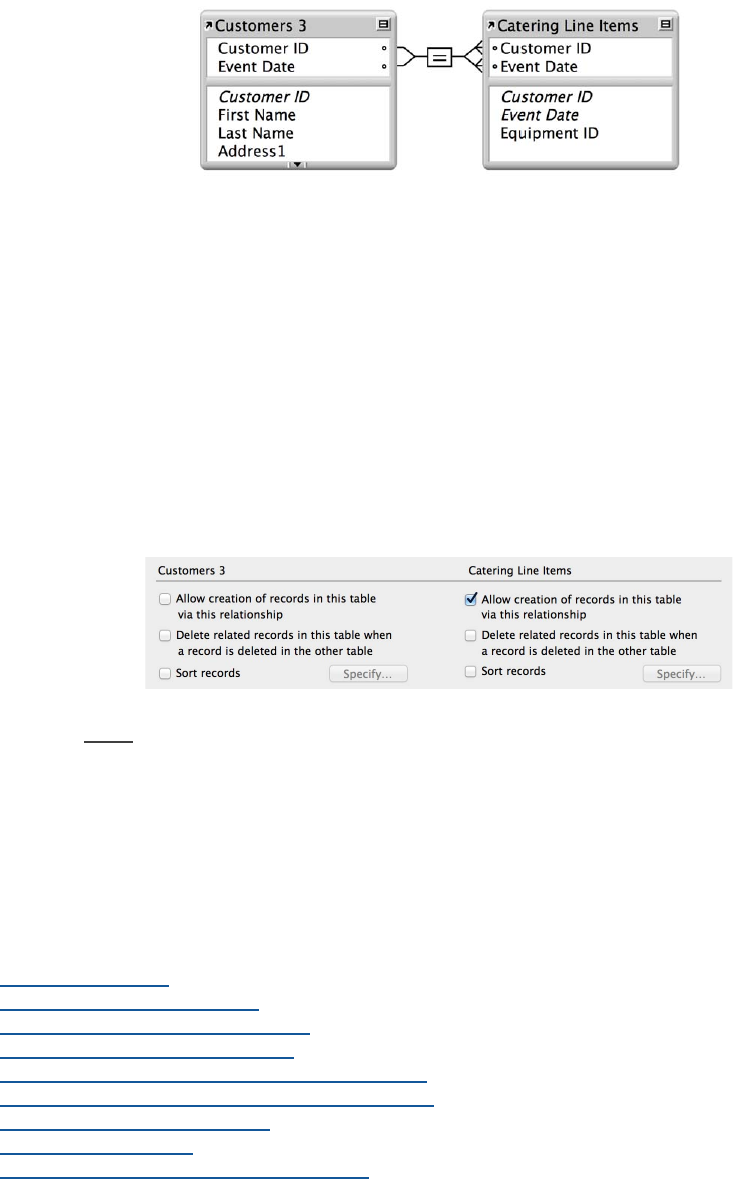
Working with related tables and files
FILEMAKER PRO HELP 381
The tables are related as follows:
Customer ID and Event Date are the match fields in the relationship between the Customers and
Catering Line Items tables. In the Customers table, the Customer ID field is set to auto-enter a serial
number, giving each record in the Customers table a unique ID number. The Event Date field is a
date field with no additional options. You enter the current date when equipment is rented, or enter
any previous date to display equipment the customer rented on that date.
In the Catering Line Items table, Customer ID and Event Date are number and date fields,
respectively, and are match fields in the relationship to the Customers table. Equipment ID is a
number field, and stores the ID of the equipment being rented. Records from this table are displayed
in a portal in the Customers table.
In the Edit Relationship dialog box, the Allow creation of records in this table via this
relationship option is enabled for the Catering Line Items table. This means that you can enter
rental information in an empty portal row, and FileMaker Pro creates a related record for that rental.
Finally, a portal is added to the Catering Line Items table on the Customers layout.
To create a new related record, enter the current date in the Customers::Event Date field and an
equipment ID number in the portal on the Customers layout. Because Event Date is a match field
and the relationship allows the creation of related records in the Catering Line Items table, the value
in Customers::Event Date is automatically entered in the Catering Line Items::Event Date field.
To view rentals from a previous date, change the value in the Customers::Event Date field.
FileMaker Pro displays all related records with the same customer ID and event date.
Related topics
About relationships
About the relationships graph
About match fields for relationships
About single-criteria relationships
About relationships using comparative operators
About relationships that return a range of records
About self-joining relationships
Creating relationships
Creating portals to display related records
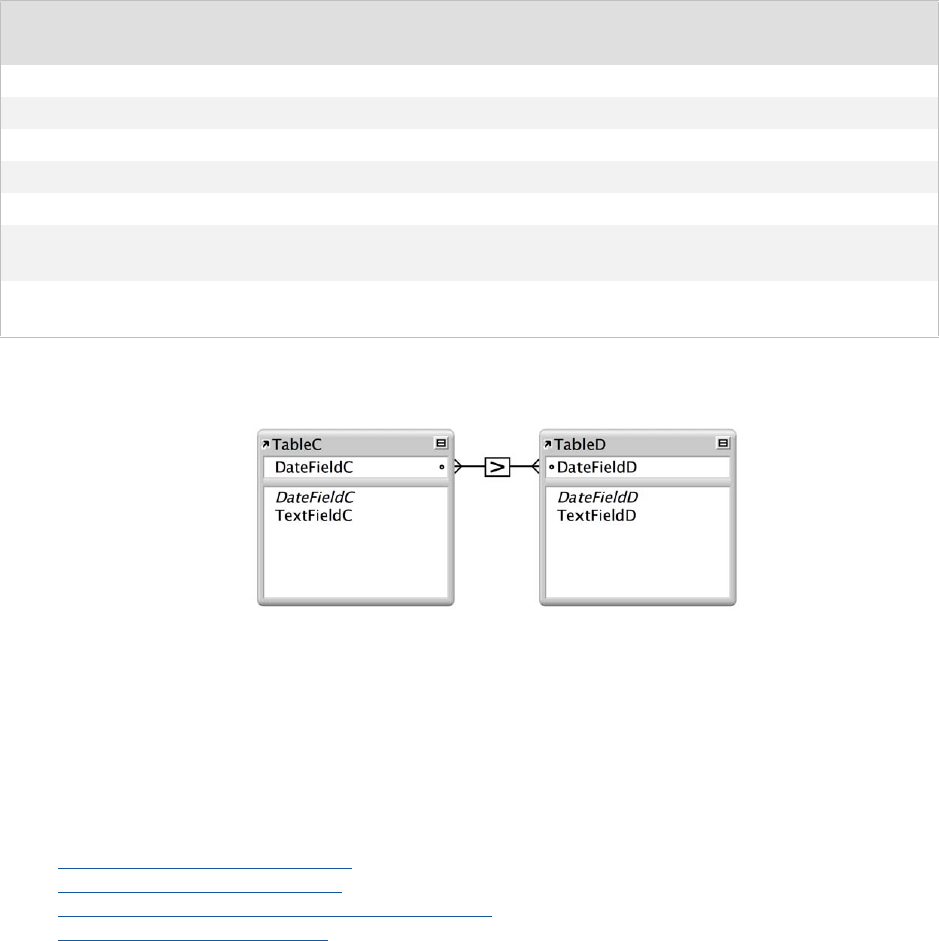
Working with related tables and files
FILEMAKER PRO HELP 382
About relationships using comparative operators
In a comparative relationship, you use one or more of the following operators to compare match field
values in the two related tables. The relationship returns related records when the comparison
evaluates successfully, according to the criteria you establish.
For example:
In this relationship, DateFieldC and DateFieldD are match fields. Records in TableD are related to
records in TableC that have a later DateFieldC value. Records in TableC are related to records in
TableD that have an earlier DateFieldD value. For example, if a record in TableC has a DateFieldC
value of 12/11/2014, all the records in TableD with a DateFieldD value of 12/10/2014 or earlier are
related to it. In TableD, if a record has a DateFieldD value of 12/11/2014, all records in TableC with
DateFieldC values of 12/12/2014 or later are related to it.
Related topics
About single-criteria relationships
About multi-criteria relationships
About relationships that return a range of records
About self-joining relationships
About relationships that return a range of records
A relationship that returns a range of records is similar to a multi-criteria relationship, except that you
use comparative operators to find records that are greater than one of your criteria and less than
your other criteria. This type of relationship is commonly used to return records that fall between a
range of dates or serial numbers.
Relational
operator Matches these records
=Values in match fields are equal
≠Values in match fields are unequal
<Values in the left match field are less than values in the right match field
≤Values in the left match field are less than or equal to values in the right match field
>Values in the left match field are greater than values in the right match field
≥Values in the left match field are greater than or equal to values in the right match
field
xAll records in the left table are matched to all records in the right table, regardless of
the values in the match fields
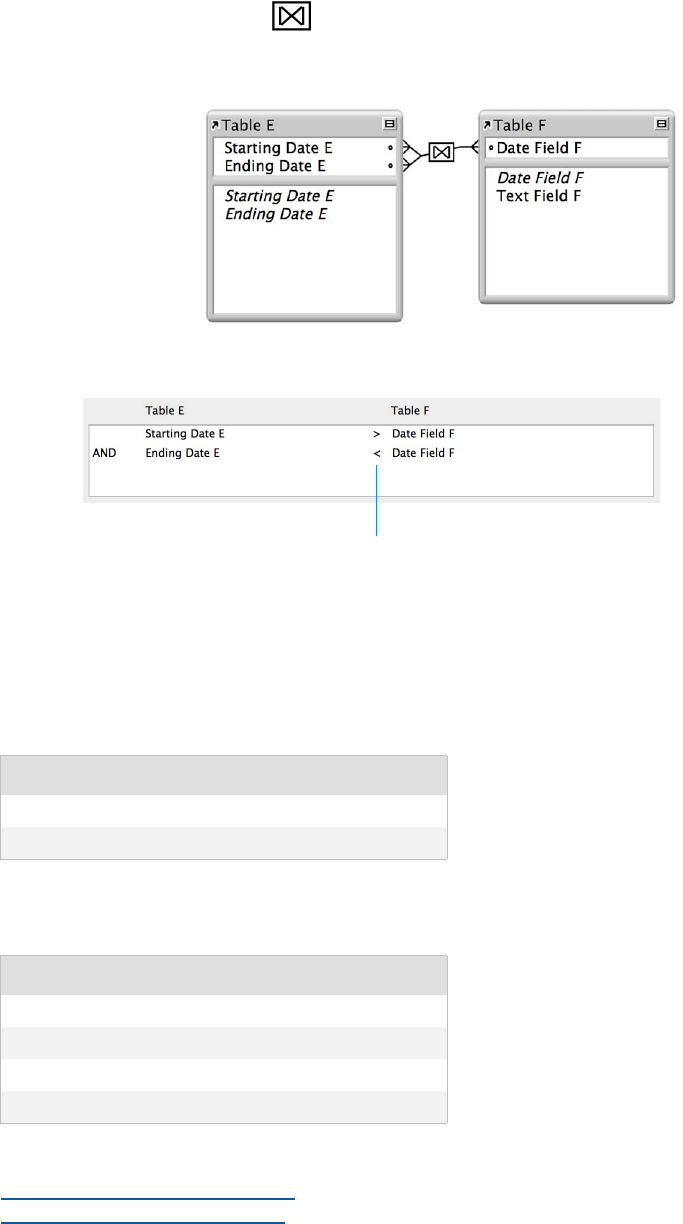
Working with related tables and files
FILEMAKER PRO HELP 383
For example, from within TableE you would like to view all the records in TableF that have
DateFieldF values that are greater than StartingDateE and less than EndingDateE.
In the relationships graph, the symbol indicates that different relational operators are being
used in this relationship.
This relationship returns records from TableF that have a DateFieldF value that is later than
StartingDateE and earlier than EndingDateE.
For example, when the StartingDateE value is 11/01/2014 and the EndingDateE value is 12/01/
2014, the relationship returns the following related records from TableF.
When the StartingDateE value is 12/01/2014 and the EndingDateE value is 01/01/2015, the
relationship returns the following related records.
Related topics
About single-criteria relationships
About multi-criteria relationships
Records from TableF: Returns
11/14/2014 blue
11/27/2014 green
Records from TableF: Returns
12/02/2014 red
12/15/2014 yellow
12/17/2014 orange
12/26/2014 brown
This relationship (in the Edit Relationship
dialog box) uses the greater than and less
than relational operators
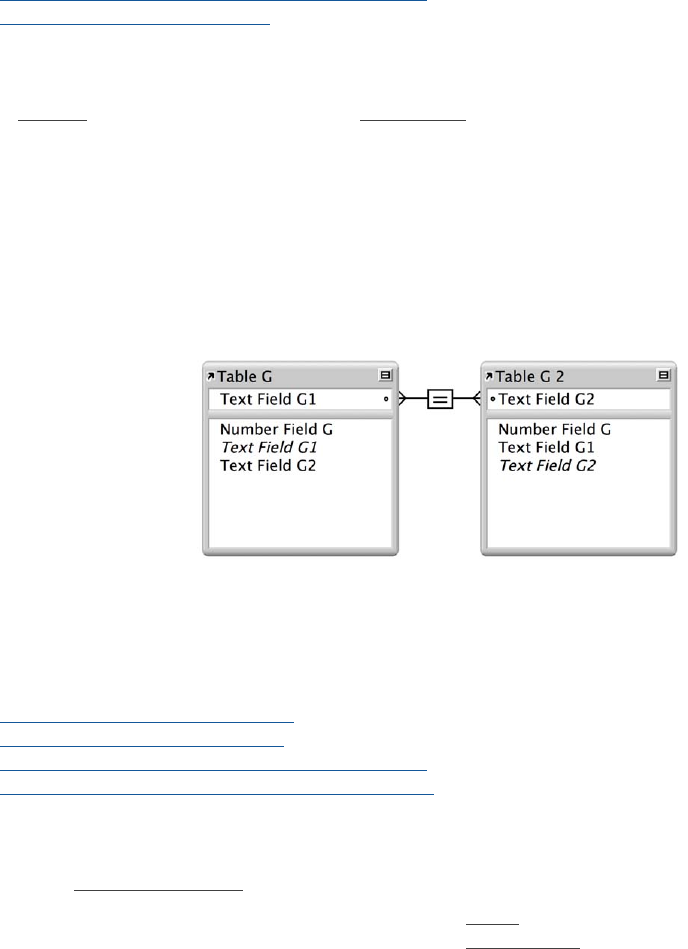
Working with related tables and files
FILEMAKER PRO HELP 384
About relationships using comparative operators
About self-joining relationships
About self-joining relationships
A self-join is a relationship in which both match fields are defined in the same table. Define a self-
join to create relationships between records in the same table. Use a self-join in a portal on a layout
of the current table to display a subset of data that's in the current table, such as all the employees
of each manager.
When you define a self-joining relationship in the relationships graph, FileMaker Pro generates a
second occurrence of the table upon which you are basing the self-join. FileMaker Pro does this to
prevent the relationships from forming a cycle, which would make it impossible to evaluate.
A self-joining relationship looks like this:
This relationship returns related records in TableG when the value in TextFieldG1 is the same as the
value in TextFieldG2.
Related topics
About single-criteria relationships
About multi-criteria relationships
About relationships using comparative operators
About relationships that return a range of records
Working with the relationships graph
Use the relationships graph to create, change, and view the relationships in your database file.
By default, the relationships graph displays all of the tables in your current database file. You can
add tables from other files (including external ODBC data sources), add more than one occurrence
of the same table to the graph, or remove tables from the graph using the buttons described below.
You can use the undo and redo keyboard shortcuts to incrementally remove or replace changes in
the relationships graph. To undo changes, press Ctrl+Z (Windows) or Command-Z (OS X). To redo
changes, press Ctrl+Shift+Z (Windows) or Command-Shift-Z (OS X).
To access the relationships graph:
1. With the database open, choose File menu > Manage > Database.
2. In the Manage Database dialog box, click the Relationships tab.
The relationships graph appears.
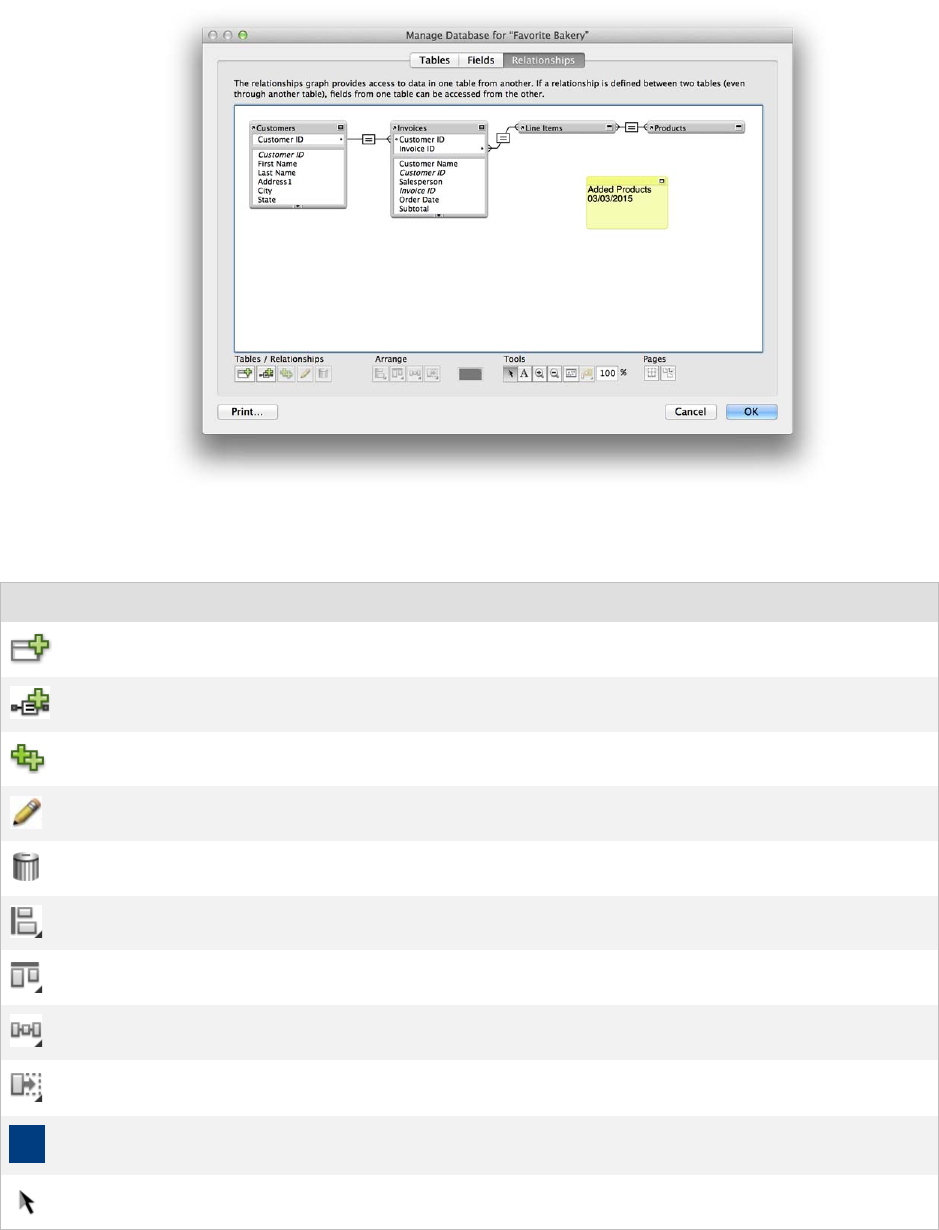
Working with related tables and files
FILEMAKER PRO HELP 385
Relationships graph buttons
Click To
Add a table to the relationships graph
Create a relationship
Duplicate selected tables (and relationships) and selected notes
Edit an existing relationship, table occurrence, or text note in the relationships graph
Delete a relationship, or table occurrence, or text note in the relationships graph
Align the left edges, centers, or right edges of the selected objects
Align the top edges, centers, or bottom edges of the selected objects
Distribute the selected objects horizontally or vertically
Resize the selected objects to the smallest width, smallest height, smallest width and
height, largest width, largest height, largest width and height
Change the color of selected tables or notes in the relationships graph
Choose the object selection cursor (default cursor)
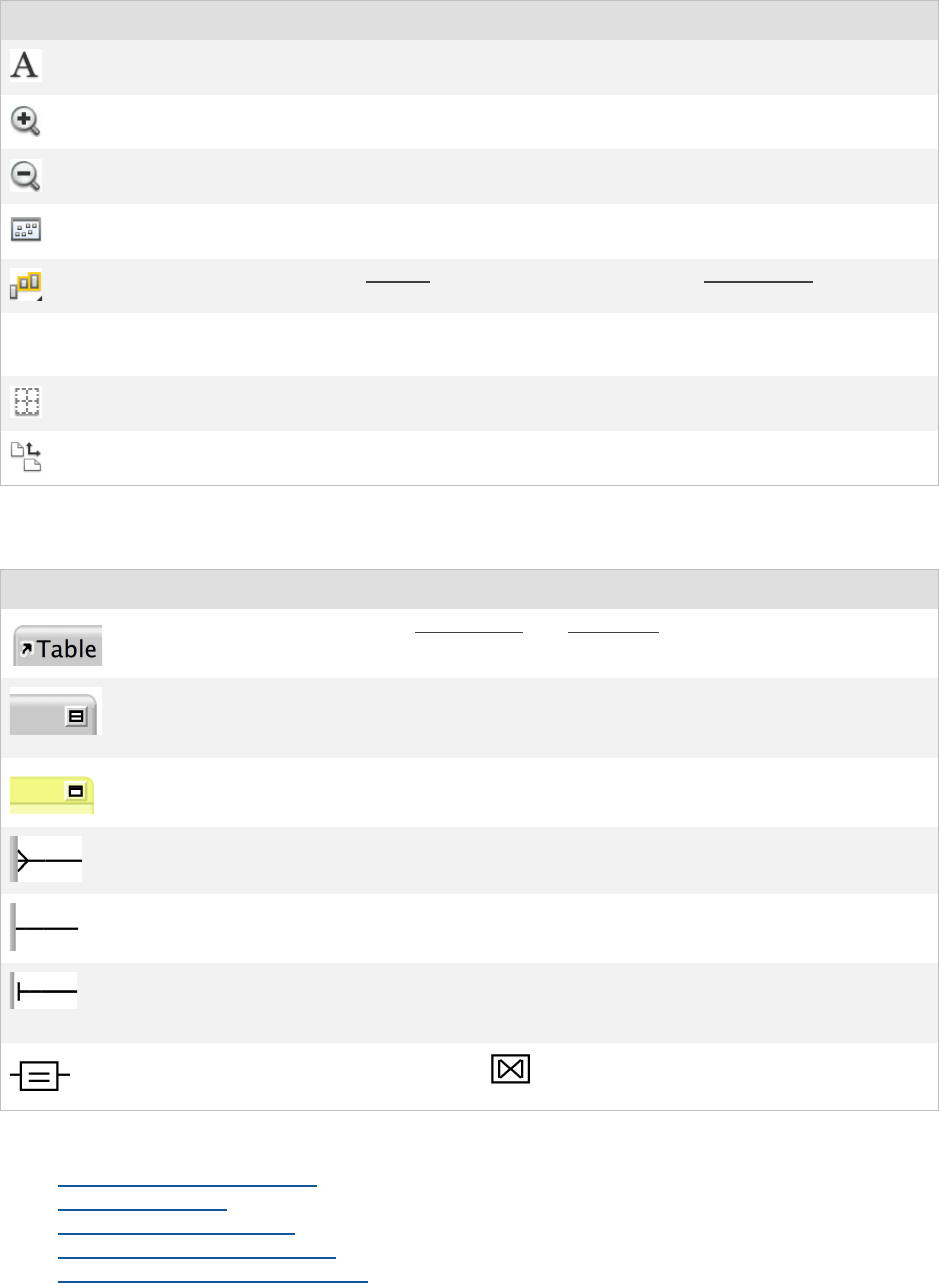
Working with related tables and files
FILEMAKER PRO HELP 386
Other relationships graph elements
Related topics
About the relationships graph
About relationships
About planning a database
About the types of relationships
About match fields for relationships
Add a text note to the relationships graph
Choose the magnification cursor
Choose the view reduction cursor
Adjust the magnification of the relationships graph to view all tables
Select related tables 1-away or select tables with the same source table
Manually reduce or increase the view of the relationships graph, up to 400%
Show page breaks
Show the Print Setup (Windows) or Page Setup (OS X) dialog box
Click To
100%
Element Action
Displays the names of the source table and source file as you move the pointer over
the table header
Toggles the display of the table. Click once to collapse all but the match fields. Click
again to collapse all but the table name. Click again to return the table to its original
size.
Toggles the display of the text note. Click once to collapse to the first line of text. Click
again to return the text note to its original size.
Indicates that the match field is available to match many records
Indicates that the match field is intended to match a single record, such as an auto-
entered value
Indicates that the join cannot be made. For example, a match field is missing or is an
unindexed field (such as an unstored calculated field or a global field), or the table
closest to the indicator is missing or unavailable.
Displays the relational operator, or for a multi-criteria relationship

Working with related tables and files
FILEMAKER PRO HELP 387
Editing ODBC data sources
Creating relationships
You create relationships between fields in tables to see and work with another table’s data.
After you have created a relationship, you can add or change match fields, change relational
operators, and set options for creating, deleting, and sorting related records. See Changing
relationships.
To create a relationship:
1. Open the relationships graph for the database.
See Working with the relationships graph.
2. In the relationships graph, locate the two tables you will be using for this relationship.
They can appear anywhere on the graph, but they must be present on the graph in order to
create the relationship. For self-joining relationships, locate the single table; FileMaker Pro will
create the second table occurrence for you.
3. Click a match field in one of the tables and drag to the corresponding match field in the other
table.
You can also click and specify the relationship.
Note For self-joining relationships, click a match field in the current table and drag outside of it,
then back onto the second match field within the current table. Rename the new table
occurrence, or click OK to accept the default name.
4. Repeat step 3 for each match field you intend to use in this relationship.
5. Click OK.
Related topics
About the relationships graph
About the types of relationships
About match fields for relationships
Adding tables to the relationships graph
Defining database tables
Deleting table definitions, field definitions, and data
Changing relationships
After you have created a relationship, you can add or change match fields, change relational
operators, and set options for creating, deleting, and sorting related records.
Note You can’t change tables within a relationship. You must create a new relationship.
To change a relationship:
1. Open the relationships graph for the database.
See Working with the relationships graph.
2. In the relationships graph, locate the relationship to edit, and double-click the indicator line
between the related tables to open the Edit Relationship dialog box.
You can also select the relationship in the relationships graph and click .
Working with related tables and files
FILEMAKER PRO HELP 388
3. Edit match fields for the relationship.
4. Select options for the relationship.
5. Click OK.
Notes
•Select Sort records to display the first found record in a particular sort order (such as the
lowest or highest value) when you have one related field directly on a layout of the current
table. (For example, display the most recent check-out date for a particular piece of
equipment.) Also sort related records to access multiple records that are in a particular sort
order and display them in a portal.
•When Sort records is selected and data in a related field in a portal changes, the portal
records are re-sorted whenever the relationship is re-established. (For example, records re-
sort when you browse out of and then back into the record, or change the value in the match
field.)
To Do this
Change a match field Select a new match field and click Change.
Add a match field Select a new match field and click Add.
Change the relational operator Select a new relational operator from the list and click Change.
Duplicate a pair of join criteria Select the paired criteria from the list in the middle part of the
dialog box and click Duplicate.
Delete a pair of join criteria Select the paired criteria from the list in the middle part of the
dialog box and click Delete.
To Select
Add a related record (to the
related table) whenever you
enter data into a related field in a
record of the current table
Allow creation of records in this table via this relationship.
When this option is selected, entering data in a related field that
has no corresponding related record creates a related record
based on the match field in the current table.
Delete related records (in the
related table) whenever you
delete a matching record in the
current table
Delete related records in this table when a record is deleted
in the other table. This option deletes related records even when
you're browsing a layout that doesn't display the related records.
Note When this option is selected in multiple relationships in the
same database, deleting a record from one table can also delete
related records in other related tables for which the option has
been enabled. This is called a cascading delete. You should
consider this option carefully before enabling it.
Sort related records Sort records. Then, in the left list in the Sort Records dialog box,
double-click the fields to sort. To change the order in which fields
are sorted, drag fields in the right list into the order you want.
Select other options, then click OK.
To change the sort order, click Specify in the Edit Relationship
dialog box.
Selecting this option does not affect the sort order in the related
file.

Working with related tables and files
FILEMAKER PRO HELP 389
•Because relationships are bi-directional, the tables that appear in the left and right side of
the Edit Relationship dialog box have equal capabilities.
•When displaying related records in a portal, the Sort Portal Records sort order takes
precedence over the sort order specified in the Edit Relationship dialog box.
Related topics
About relationships
About planning a database
About the types of relationships
About match fields for relationships
Creating relationships
Adding tables to the relationships graph
Adding tables to the relationships graph
All tables used in relationships must appear in the relationships graph. This includes tables from
external files. By default, a new file contains a table with the same name as the file.
To add a table to the relationships graph:
1. With the database open, choose File menu > Manage > Database.
2. In the Manage Database dialog box, click the Relationships tab.
3. Click to open the Specify Table dialog box.
4. To add another table occurrence from the current file, select the table name from the list of
tables.
5. To add a table occurrence from an external file, click the Data Source list and do one of the
following:
•Choose a FileMaker filename or ODBC data source name in the list.
•Choose Add FileMaker Data Source to select another FileMaker Pro file using the
Open File dialog box. This is the quickest method of adding an external FileMaker data
source.
•Choose Add ODBC Data Source to select an existing ODBC data source. See Editing
ODBC data sources for more information about ODBC data sources.
•Choose Manage Data Sources to open the Manage External Data Sources dialog box.
Use this method to add multi-path FileMaker data sources and ODBC data sources or
to edit, duplicate, or delete existing data sources. See Connecting to data sources for
more information on defining and managing external data sources.
6. After you have chosen the external file, select the table by name from the list of tables.
7. If necessary, change the name of the table occurrence.
Each table occurrence in the relationships graph must have a unique name.
8. Click OK.
Related topics
About relationships
About the relationships graph
About planning a database
About the types of relationships

Working with related tables and files
FILEMAKER PRO HELP 390
About match fields for relationships
Creating relationships
Changing relationships
Defining database tables
Selecting related tables in the relationships graph
You can identify tables that have relationships to one or more tables. You can select a table and
highlight its source table, or tables that have a 1-away relationship to it.
To identify related tables:
1. Open the relationships graph for the database.
See Working with the relationships graph
2. In the relationships graph, select one or more tables.
3. Click .
4. Choose the tables you want to highlight.
Related topics
About the relationships graph
Duplicating tables in the relationships graph
You can duplicate tables, groups of tables, and any direct relationships among them. Any options
you have set for the relationship (for example, a cascading delete) are also duplicated.
To duplicate tables and direct relationships:
1. Open the relationships graph for the database.
See Working with the relationships graph.
2. In the relationships graph, select the table or tables you want to duplicate.
3. Click .
4. To rename a duplicated table, click and type the new name of the duplicated table in
the Specify Table dialog box.
Notes
•Duplication preserves the relative positions between the original tables. By default the
duplicated tables are placed below and to the right of the original tables.
To Choose
Highlight tables that are directly
related
Select related tables 1-away
Tip Choose the command again to select the next related table
or set of related tables.
Highlight tables that are based
on the same source table
Select tables with the same source table
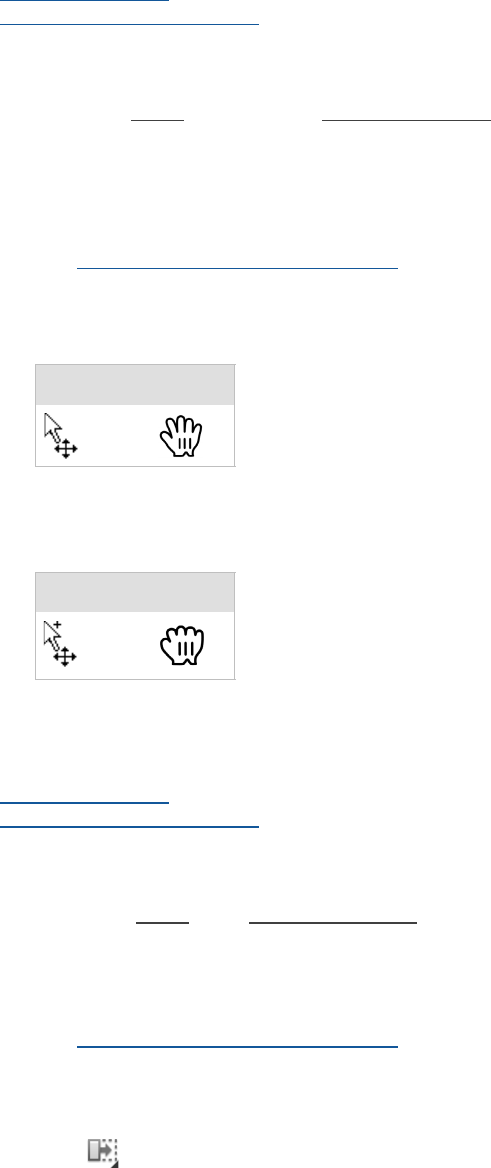
Working with related tables and files
FILEMAKER PRO HELP 391
•You can also duplicate text notes.
Related topics
About relationships
About the relationships graph
Moving tables or notes in the relationships graph
You can move tables or notes in the relationships graph to organize your view of related tables and
notes.
To move tables or notes:
1. Open the relationships graph for the database.
See Working with the relationships graph.
2. In the relationships graph, pause the pointer over a table heading or anywhere on a note.
The pointer changes to indicate you can move the object.
3. Drag the table or note to a new location.
The pointer changes again when you select and drag the object.
Note You can Shift-click multiple tables and notes, then drag to move multiple objects at once.
Related topics
About relationships
About the relationships graph
Resizing tables in the relationships graph
You can resize tables in the relationships graph in order to organize your view of related tables.
To resize tables:
1. Open the relationships graph for the database.
See Working with the relationships graph.
2. In the relationships graph, select the tables you want to resize.
If you have any collapsed tables, expand them before resizing the height.
3. Click .
Windows OS X
Windows OS X
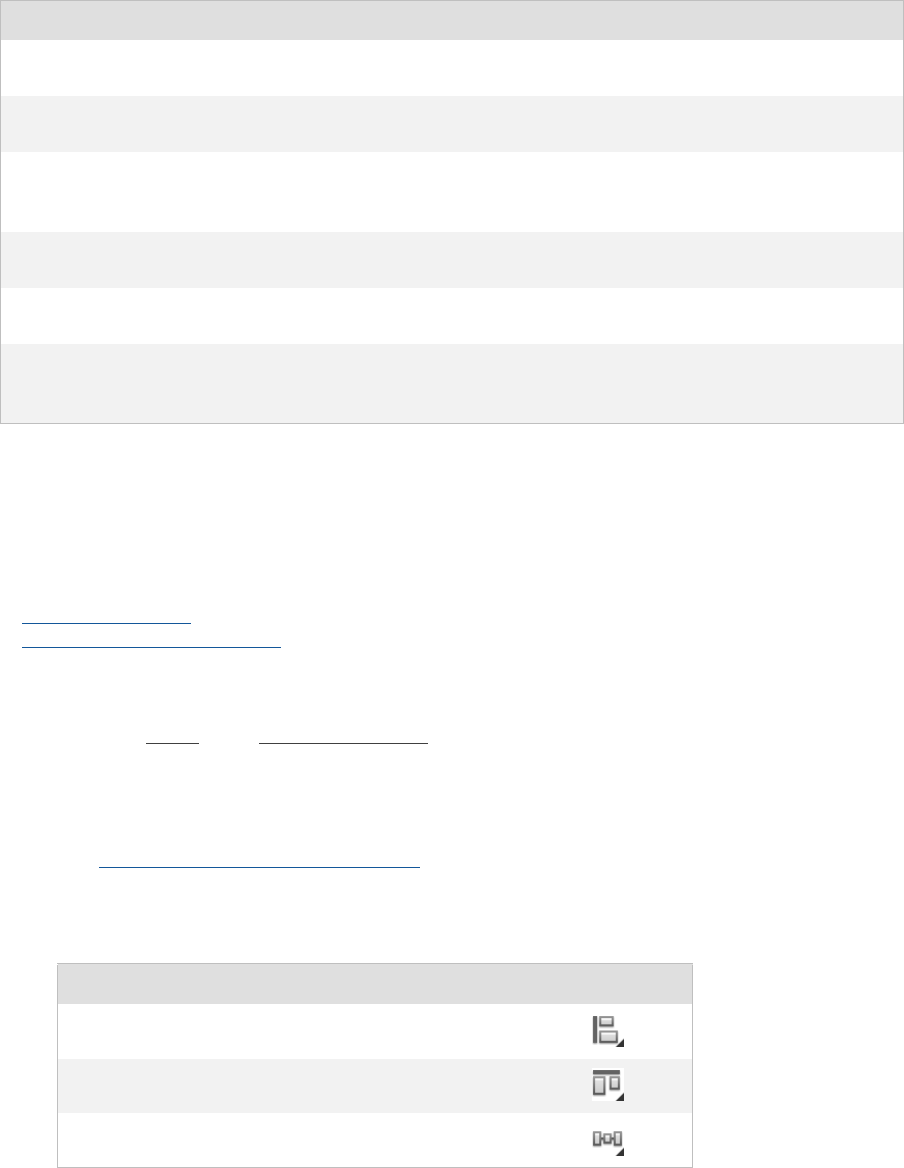
Working with related tables and files
FILEMAKER PRO HELP 392
4. Choose an option.
Notes
•To resize one table, select the table and drag its border.
•You can also resize text notes.
Related topics
About relationships
About the relationships graph
Aligning tables in the relationships graph
You can align tables in the relationships graph in order to organize your view of related tables.
To align tables in the relationships graph:
1. Open the relationships graph for the database.
See Working with the relationships graph.
2. In the relationships graph, select the tables you want to align.
3. Choose an option.
.
Note You can also align text notes.
To Choose
Change the width of all tables to
match the smallest table
Resize to Smallest Width
Change the height of all tables to
match the smallest table
Resize to Smallest Height
Change the width and height of
all tables to match the smallest
tables
Resize to Smallest Width and Height
Change the width of all tables to
match the largest table
Resize to Largest Width
Change the height of all tables to
match the largest table
Resize to Largest Height
Change the width and height of
all tables to match the largest
tables
Resize to Largest Width and Height
To Choose
Align Left Edges, Align Centers, or Align Right Edges
Align Top Edges, Align Centers, or Align Bottom Edges
Distribute Horizontally or Distribute Vertically

Working with related tables and files
FILEMAKER PRO HELP 393
Related topics
About relationships
About the relationships graph
Adding text notes to the relationships graph
You can add a text note to the relationships graph. You can edit, format, resize, align, duplicate, and
delete text notes.
To add a text note to the relationships graph:
1. With the database open, choose File menu > Manage > Database.
2. In the Manage Database dialog box, click the Relationships tab.
3. Click .
4. Position the crosshair pointer where you want to draw the text note.
5. Click and drag the crosshair pointer to create the text note.
The Edit Note dialog box appears.
6. Enter text.
Change the font, font size, font color, and background color of the note if desired.
7. Click OK.
To edit a text note:
1. Double-click a text note, or select a text note and click .
The Edit Note dialog box appears.
2. Make your changes.
3. Click OK.
To delete a text note:
1. Select the text note.
2. Click , or press Delete.
Note Text notes appear behind tables and relationships, so they can be hidden.
Related topics
About relationships
About the relationships graph
Summarizing data in portals
You can summarize data that's in a related field displayed in a portal. For example, you can get the
total of all related records, the smallest or largest related record, or find the standard deviation of all
related records in your portal. The portal can contain records from a related table or from the same
table, using a relationship defined from and to the current table (a self-join).

Working with related tables and files
FILEMAKER PRO HELP 394
To summarize data in portals:
1. Create a summary field in the table that related records are being displayed from. (This is
the table displayed in the Portal Setup dialog box.) See Defining summary fields.
Tip For a more complex summary of your data, use a calculation field to define a formula. See
Defining calculation fields.
2. Place the summary field on the layout containing your portal.
You can place the summary field anywhere on your layout, including inside the portal.
See Placing and removing fields on a layout.
Related topics
Creating portals to display related records
Filtering records in portals
By filtering portal records, you can display different sets of records in a portal.
To filter records in a portal:
1. Double-click the portal.
2. In the Portal Setup dialog box, select Filter portal records.
The Specify Calculation dialog box appears.
3. Define a calculation that determines which portal records will be displayed.
For example, if you are in an Invoices layout, in a portal that shows product records from a
LineItems table and want to display just the products with quantities greater than or equal to
one, use the formula If (LineItems::Quantity < 1; 0; 1).
4. Click OK.
Important The results of summary fields, calculations, and find requests are based on the full set of
related records, not just the records in a portal that are filtered. For example, if a portal is displaying
a filtered subset of records, and there is a Total of summary field outside the portal summarizing
these records, the summary field will total all related records, not just the displayed records.
Notes
•If filtering is enabled, in Layout mode you see Filter in the lower left corner of the portal.
•Filtering records is intended for display purposes only, not for security purposes.
•Filtering records is performed before sorting records.
•The portal filter calculation will evaluate the same as a field calculated in a portal row.
Related topics
Creating portals to display related records
About lookups
A lookup copies data from another table into a field in the current table. After data is copied, it
becomes part of the current table (and remains in the table from which it was copied). Data copied to
the current table doesn't change automatically when the data in the other table changes.

Working with related tables and files
FILEMAKER PRO HELP 395
To establish a connection between tables for a lookup, you create a relationship. Then you define a
lookup to copy data from a field in the related table into a field in the current table.
When you type or change a value in the match field of the current table, FileMaker Pro uses the
relationship to access the first record in the related table whose match field contains a matching
value. Next, it copies the value from the lookup source field into the lookup destination field, where
the value is stored.
After a value is copied into the lookup destination field, you can edit, replace, or delete it like any
other value (because the lookup value belongs to the current table). You can also update data in the
current table to match data that changes in the related table.
Use lookups to:
•Copy data from a related table (which can be the same table) and keep it as copied, even
when the data in the related table changes. For example, use a lookup to copy the price of
an item at the time of purchase into an Invoice table. Even if the price in the related table
changes, the price in the Invoice table stays the same.
•Maintain tables that already contain lookups, when you don't want to change the tables to a
relational database.
Notes
•Values in the match fields used for lookups do not have to be equal to match.
•When the same value exists in the match field in more than one record of the related table:
•the value from the first created related record is copied if the relationship does not have
a sort order.
•the value from the first record in the sort order is copied if the relationship does have a
sort order.
•If you change data in the match field of the related table or in the lookup source field for a
lookup, FileMaker Pro doesn't automatically update the data in the lookup destination field.
To update the data, you must look it up again. This occurs when the value in the match field
changes in the lookup destination table, causing FileMaker Pro to perform a relookup.
•To copy data into a second field that uses the same match fields (for example, to copy a
name and telephone number based on a matching customer identification number), define
a lookup for the second field, and use the same relationship as the first field.
•All FileMaker Pro tables used in your database must be in FileMaker Pro 12 format. Files
created with earlier versions of FileMaker Pro must be converted to the current version first.
See Converting files from FileMaker Pro 11 and earlier.
Related topics
About relationships
Defining lookups
Important Before you begin, be sure you understand how lookups differ from relational databases.
See About lookups.
To define a lookup:
1. Define the relationship for the lookup between the match field of the current table and the
match field of the related table.

Working with related tables and files
FILEMAKER PRO HELP 396
See Creating relationships.
2. With the database open, choose File menu > Manage > Database.
3. In the Manage Database dialog box, click the Fields tab.
4. If your database contains more than one table, select the appropriate table from the Table
list.
5. Select an existing text, number, date, time, timestamp, or container field from the list of
existing fields, or define a new field.
6. Click Options (or double-click the field name).
7. In the Options for Field dialog box, click the Auto-Enter tab, then select Looked-up value.
8. In the Lookup for Field dialog box, choose the table the lookup will start with, and the table
from which the value will be copied.
•For Starting with table, choose the table that the lookup will use as its starting point in
the relationships graph.
•For Lookup from related table choose the related table from which the related data
will be looked up.
9. Select the field from which the lookup value will be copied.
10. Select options for the lookup.
11. Click OK.
12. Repeat steps 5-11 for each additional field for which you want to define a lookup.
Notes about defining lookups
•You can define a relationship for a lookup when you define the database tables or the
lookup.
•The relationship can sort the related records so that the first related record (the record the
lookup will copy) is a particular record. For example, to look up the most recent check-out
date for a particular piece of equipment, sort records in descending order by check-out date.
•Be sure the lookup source field and lookup target field are the same field type, otherwise
you might get unexpected results.
•To change a lookup, be sure Looked-up value is selected in the Auto-Enter options, click
Specify, then make your changes.
•To stop or suspend using a lookup, clear Looked-up value in the Auto-Enter options.
•When data in the related table changes and you want the current table to contain the new
values, you can look up the data again. See Updating lookup values.
To Do this
Specify an action when values in the
match fields do not match exactly
For If no exact match, then, select an option to copy no
value, copy the next lower or next higher value that's in the
lookup source field, or enter a fixed value to be used instead.
Prevent null (empty) data in the
lookup source field from being
copied to the lookup destination
field
Select Don't copy contents if empty. (Clear this option to
allow empty data to be copied.)

Working with related tables and files
FILEMAKER PRO HELP 397
Important When a lookup is based on a multi-criteria relationship, a lookup will be triggered each
time a value is entered into any of the fields that are involved in the multi-criteria relationship. The
lookup is being performed each time a value is entered into one of the required fields. When all of
the requisite fields have values, the final lookup value will be copied into the lookup target field.
Related topics
About lookups
About relationships
Updating lookup values
Defining automatic data entry
Updating lookup values
If you change data in the match field of the related table or in the lookup source field for a lookup,
FileMaker Pro doesn't automatically update the data in the lookup destination field. To update the
data, you need to look it up again.
Important Relookup Field Contents updates all fields looked up by the match field across all
records in your current found set. You can't undo your actions when you update lookup values.
To update lookup values:
1. In the current table, use Find mode, or Omit Records in Browse mode, to create a found set
that contains only the records you intend to update.
2. In Browse mode in the current table, select the match field, then choose Records menu >
Relookup Field Contents.
3. When you see an alert message, click OK.
Note The Relookup Field Contents and Replace Field Contents commands no longer commit data
when they are performed. If your solution depends on the data being committed, you must explicitly
commit the data before performing those commands. For example, if you modify a field value and
then try to perform a relookup on that field without committing the data, the relookup search will be
based on the old data rather than the modified data. (For more information about committing data,
see Committing data in records.)
Tip You can update lookup values automatically by defining a button to perform the Relookup Field
Contents command, or by defining a script that uses the Relookup Field Contents script step.
Related topics
About lookups
Defining lookups
About relationships
Defining a button

Creating charts from data
FILEMAKER PRO HELP 398
Creating charts from data
There are two ways to create charts in FileMaker Pro:
•You can create a quick chart in Browse mode. When you start this way, FileMaker Pro sets
up the chart for you based on the current state of the database. You can use the Chart
Setup dialog box to modify a quick chart. You can print the chart or save it on a new layout,
if you have the correct privileges. See Creating quick charts.
•You can use the Chart tool in Layout mode to create a chart. With this method, you specify
each setting. You can create the chart on a new layout or you can add the chart to an
existing layout. See Creating and editing charts in Layout mode.
Important In FileMaker Pro, charts update dynamically as data changes. Charts that display
summary data remain accurate as long as you maintain the required sort order. If you change the
sort order, the chart may no longer show your data comparison.
Notes
•You can move charts within a layout part or move charts to other layout parts. See Moving
objects on a layout.
•You can place tooltips on charts. See Adding tooltips on layouts.
•You can set charts to resize automatically when you resize the FileMaker Pro window or you
can precisely resize charts. Resizing settings also apply to Preview mode and printing,
when the page size is different from the size of the layout being viewed or printed. See
Resizing and reshaping objects and Setting auto-resize options for layout objects.
•If you copy a chart in Browse or Find mode, then paste it onto a layout, the copy of the chart
is a bitmap image that will not update when data changes. You can’t edit a bitmap image of
a chart.
•FileMaker Pro displays a placeholder image of your chart in Layout mode.
About chart types
You can use charts to compare data graphically. For example, bar charts give a good overall picture
of your data set, but they are difficult to read when there are numerous bars. Bar charts also imply
that data values are frozen. If your data continuously changes over time, a line chart might be a
better choice. If you want to compare the percentage of one data series (a single bar) to the sum of
all data series (all the bars), a pie chart works well.
Use a To
Column chart or
bar chart
Compare two or more numerical values taken on different dates or under different
conditions. Good for comparing increases to decreases, highest with lowest, how
many, or how often.
A single-series column or bar chart is good for comparing values within a data
category, such as monthly sales of a single product. A multi-series column or bar
chart is good for comparing categories of data, such as monthly sales for several
products.
Use a line chart to compare more than 15 data points.

Creating charts from data
FILEMAKER PRO HELP 399
Related topics
Creating quick charts
Creating and editing charts in Layout mode
Stacked column or
stacked bar chart
Compare parts to the whole. Each column or bar in the chart compares multiple data
points within a category. Use a stacked bar chart to compare the annual sales
figures for products over several years. Each segment of each bar compares
specific product sales, each bar shows total product sales per year, and the entire
chart compares total sales for all years.
To chart a single data series, such as sales in one region, use a pie chart.
Positive/negative
column chart
Compare positive and negative values. Positive values appear above a mid-point
(zero, by default) and negative values appear below the mid-point. You can set a
custom mid-point. Use a positive/negative chart to compare earnings to losses or to
track productivity over time.
Pie chart
Show the relationship of each data series value to the total of all data in the series
charted. Best for showing proportions within a single data series. You can display
percentage values for each data point (slice of the pie).
Pie charts are most effective when at least some of the slices represent 25% to 50%
of the whole. Because it’s difficult to compare individual sections within a pie chart or
to compare data between pie charts, pie charts are commonly used when a general
comparison is all that’s required.
Line chart
Show data that changes continuously (trends) over time, such as historical financial
information. Line charts connect a contiguous series of data points with a line. Each
data point represents an individual measurement. Line charts are good for showing
the rise and fall of data over time.
Use a line chart to compare the monthly sales totals of four regions over the span of
a year. Charting the same data series as a bar chart makes it easy to compare totals
by region. To display upward and downward trends or cycles across all regions, use
a line chart.
Area chart
Show data that trends over time while emphasizing highs, lows, and movement
between data points. In charts containing multiple data series, the quantitative
difference between each data series is emphasized by the different colors in the
chart.
Scatter chart
Plot x and y coordinates as individual values to reveal correlation patterns. If the
trend of data values rises from left to right, the trend is considered positive. If the
trend falls from left to right, the trend is considered negative. If data points reveal no
clear slope, the data is considered not correlated. A scatter chart can compare large
numbers of data points without regard to time. Use a scatter chart to compare the
number of beverages sold at a restaurant as the temperature changed throughout
the day.
Bubble chart
Plot x and y coordinates as individual values with a third data characteristic (the
radius of each bubble). Bubble charts compare individual data points in terms of size
(magnitude). Use a bubble chart to compare market share by comparing the number
of products sold, sales figures per product, and the percentage of total sales in each
data point.
Use a To

Creating charts from data
FILEMAKER PRO HELP 400
Chart planning guidelines
•Creating a quick chart doesn’t require much planning. FileMaker Pro sets up the chart for
you based on the current state of the file. You can adjust settings, if needed, to make your
comparison clear. You can print a quick chart, save it on a new layout (if you have the
correct privileges), or you can copy and paste a quick chart into another application. See
Creating quick charts.
•Identify the audience for the chart and decide what you want the chart to emphasize. For
example, a chart for a marketing presentation might show how a product line has grown in
the months after an advertising campaign was launched. Think about the data in your
database and how it might be compared or contrasted graphically to make your point.
•Choose the best type of chart to convey your comparison. Some chart formats compare
similar data from different sources, some show trends over time, and some show
percentages of a total. See About chart types.
•Consider sketching the chart on paper to help you determine the data series you need to
assign to the x-axis and y-axis (category labels and slice data in pie charts). Charts typically
show category labels on the x-axis (values you are comparing, such as companies by
name) and values on the y-axis (values you are measuring, such as quarterly sales figures
for each company).
•Decide whether you need to modify data to show your comparison.
•Do you need to perform any calculations on the data before you create the chart? For
example, do you need to add summary fields to the database to calculate quarterly
sales figures or does your database already contain quarterly information?
•Do you need to sort data to show your comparison?
Creating quick charts
You can create and print a quick chart in Browse mode. When you start in Browse mode,
FileMaker Pro sets up the chart based on the:
•field type and contents of the active field
To Consider this
Chart summary data If you’re creating a chart in Layout mode, make sure data is
grouped and sorted correctly and that you place your chart in the
appropriate layout part. See Placing your chart in the appropriate
layout part.
Chart data in related records You can sort data based on related fields, but you must set the sort
order in the Chart Setup dialog box, not the Sort dialog box. See
Specifying the data source for a chart.
Chart multiple data values
located in single fields (for
example, data in repeating
fields or delimited data in a
single field)
To chart delimited data, your database must contain multiple data
values in single fields. You can use a calculation or a function
(such as the List function) to do this. You then specify one
delimited data field for the x-axis (category labels in pie charts) and
one data field for the y-axis (slice data in pie charts). When you
chart delimited data, values from the x-axis field correspond to
values in the y-axis field in the order they were entered. See
Example: Charting delimited data.
Note FileMaker Pro recognizes only the carriage-return character
as the data delimiter.
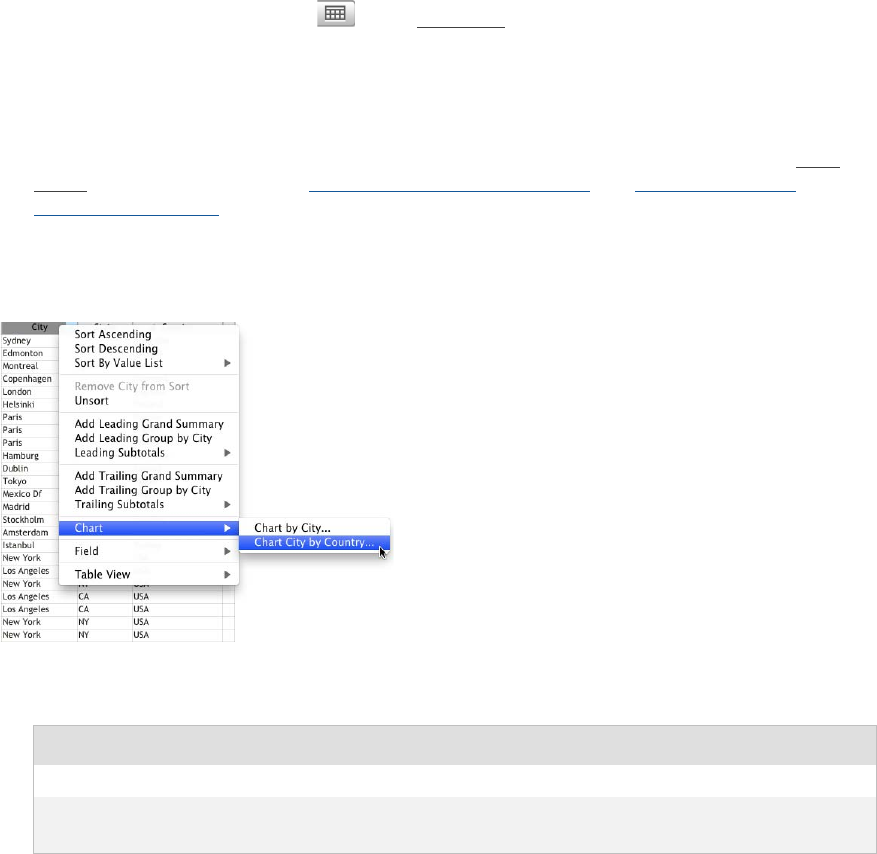
Creating charts from data
FILEMAKER PRO HELP 401
•field type and contents of the selected fields
•sort order you have specified
Note The active field is the field you right-click when you create a quick chart.
If you have the correct privileges, you can save the chart on a layout in your database.
Quick charts work best for column, bar, pie, line, and area charts, which have a single data series on
one axis and one or more data series on the other axis.
To create a quick chart:
1. Open the database containing the data that you want to chart.
2. In Browse mode, click View As in the layout bar to switch to Table View.
Tip You can create quick charts in Form View and List View, but it’s easier to work in Table
View.
3. Use Table View to sort data. (Right-click or Control-click a column and choose a sorting
option from the shortcut menu.) Quick charting uses the first sort field to group and
summarize the data in the chart. Consider adding groups or summaries if those are the data
points you intend to chart. See Working with data in Table View and Creating dynamic
reports in Table View.
FileMaker Pro chooses an appropriate summary type based on the active field.
4. Right-click the column of the values you are most interested in charting.
5. Choose one of the following:
The Chart Setup dialog box appears. When you chart data in Table View, FileMaker Pro uses
the current state of the file and the context of your selection to estimate chart settings.
Depending on the complexity of your data set and the chart type you choose, you might need to
use the Chart Setup dialog box to make adjustments to a quick chart.
Choose To
Chart by <field name>Plot individual data points in the current column
Chart <field name> by <sort field>Plot data from the current column in groups based
on the sort order
Creating charts from data
FILEMAKER PRO HELP 402
You can change settings in the Chart inspector on the right to modify the chart. The preview
helps you work efficiently in the Chart Setup dialog box. See Using the chart preview.
Note FileMaker Pro charts records in the Found Set by default. To change the source of the
data that you are charting, click Data Source in the Chart inspector and for Chart Data choose
Current Record (delimited data) or Related Records. See Specifying the data source for a
chart
6. If your chart contains summary data, you can click the Summary menu in the Chart
inspector and select a different summary type. See Summary types for charts.
7. When you are satisfied with the chart’s appearance, do the following:
To Do this
Add a title to the chart
For Title, type or change the chart title, or click to
specify a title.
Choose a chart type and
specify the data series
See Column, bar, line, and area charts (including stacked
column and bar and positive/negative charts), Pie charts, or
Scatter and bubble charts.
Note You can begin a scatter or bubble chart as a quick
chart, but you will need to modify chart settings in the Chart
Setup dialog box.
Change data labels, show or
hide tick marks and set tick
mark scale (if applicable), and
format data
See Formatting and scaling chart axes.
Change the color scheme,
legend, or fonts in the chart
Click Styles in the Chart inspector, then see Changing the
look of a chart.
Specify the type of data the
chart uses (records in the
found set, delimited records,
or related records)
Click Data Source in the Chart inspector, then see
Specifying the data source for a chart.
To Click or select
Print the chart Print Chart
Copy the chart to the
Clipboard so you can
paste it to another
layout or in another
file
Right-click the chart, choose Copy, then switch to a
different layout in the same file or another file. In Layout
mode, right-click the layout and choose Paste.
Save the chart on a
new layout
Save as Layout
You must have the correct privileges to save a quick chart
on a layout. See About accounts, privilege sets, and
extended privileges.
Creating charts from data
FILEMAKER PRO HELP 403
Note If FileMaker Pro needs to create a summary field for the chart, the summary field is added
to the current table when you save the chart on a layout. If you print the chart and do not save it
on a layout, FileMaker Pro does not create the summary field in the database.
8. If you choose not to save the chart after printing, click Cancel to close the Chart Setup
dialog box.
Related topics
Viewing records as a form, list, or table
Using shortcut menus
Creating and managing privilege sets
Creating and editing charts in Layout mode
You can use the Chart tool in Layout mode to create charts on new or existing layouts, or to edit
charts.
Note You can create a quick chart in Browse mode. See Creating quick charts.
To create a chart on a layout:
1. Do one of the following:
•Open a layout. See Creating and managing layouts and reports. If necessary, resize the
layout part so there is room for the chart. See Resizing layout parts.
•Use the New Layout/Report assistant to create a new layout for the chart. A blank
layout works well for displaying a chart. You don’t need to add fields to the layout to plot
data in a chart. See Creating a layout.
2. In Layout mode, click the Chart tool in the status toolbar, then drag a rectangle where
you want the chart to appear, or choose Insert menu > Chart.
Note Charts created in Layout mode appear differently depending on the layout part in which
they are placed. See Placing your chart in the appropriate layout part.
The Chart Setup dialog box appears. You can change settings in the Chart inspector on the right
to modify the chart. The preview helps you work efficiently in the Chart Setup dialog box. See
Using the chart preview.
Access the chart
later via the Layout
pop-up menu
Include in layout menus
If you leave Include in layout menus selected, you can
use Layouts menu > Go To Layout or the Manage
Layouts dialog box to display the chart in layout mode. See
Managing layouts.
To Click or select
To Do this
Add a title to the chart
For Title, type or change the chart title, or click to
specify a title.
Choose a chart type and
specify the data series
See Column, bar, line, and area charts (including stacked
column and bar and positive/negative charts), Pie charts, or
Scatter and bubble charts.

Creating charts from data
FILEMAKER PRO HELP 404
3. Click Done.
You see a placeholder image of the chart in Layout mode. FileMaker Pro uses sample data
when displaying a chart object in Layout mode.
4. Click Save Layout, then Exit Layout.
You see the chart based on data in the database.
To edit a chart:
1. In Layout mode, double-click the chart that you want to edit.
2. In the Chart Setup dialog box, change settings in the Chart inspector.
3. Click Done to close the Chart Setup dialog box.
4. Click Save Layout, then Exit Layout.
To chart summary data in Layout mode
1. In Browse mode, sort data by the appropriate break field to form groupings (categories) of
data. See Working with data in Table View or Sorting records by subsummary values.
For example, to chart worldwide sales by country, sort data by the Country field.
2. Create a summary field in your database to calculate an aggregate value for the category.
See Creating dynamic reports in Table View or Defining summary fields.
For example, to chart total sales, create a summary field Total Sales that sums the Sales field.
3. Create a chart in the body, header, footer, subsummary, or grand summary part of the
layout. See Placing your chart in the appropriate layout part.
In the Chart inspector, click Chart.
•For X-Axis (Horizontal) or Category Labels (pie charts), specify the sort field.
For example, the Country field.
•For Y-Axis (Vertical), or Slice Data (pie charts), specify the summary field.
For example, the Total Sales field.
In the Chart inspector, click Data Source.
•For Chart Data, select Current Found Set.
•For Chart display when layout is sorted, select Summarized groups of records.
The chart compares total sales by country.
Change data labels, show or
hide tick marks and set tick
mark scale (if applicable), and
format data
See Formatting and scaling chart axes.
Change the color scheme,
legend, or fonts in the chart
Click Styles in the Chart inspector, then see Changing the
look of a chart.
Specify the type of data the
chart uses (records in the
found set, delimited records,
or related records)
Click Data Source in the Chart inspector, then see
Specifying the data source for a chart.
To Do this

Creating charts from data
FILEMAKER PRO HELP 405
You can also chart summary data by subcategory (for example, total sales by company within one
country). To do so, you could change the chart settings specified in this example as follows:
•sort records by the main category, then the subcategory (for example, sort by Country, then
by Company)
•set the x-axis or category labels to the subcategory (Company)
•place the chart in a subsummary layout part sorted by the main category (Country)
This chart compares total sales by company within one country.
Related topics
About chart types
Chart planning guidelines
About layout part types
Column, bar, line, and area charts
To get started creating a chart, see Creating quick charts or Creating and editing charts in Layout
mode.
1. Find the records you want to chart. See Making a find request.
If you are charting delimited data stored in a single record or data from related records, you
must specify data source settings. See Specifying the data source for a chart.
2. In the Chart Setup dialog box, choose a chart type. See About chart types.
3. Enter the following settings:
For X-Axis
(Horizontal) Do this
Title
Type a title or click , choose Specify Field Name or Specify Calculation,
complete the dialog box, and click OK.
100000
0
Japan
200000
0
USAUK
100000
200000
Total Sales by Country
0
ABC Company
50000
0
XYZ, Inc.DEF Ltd.
50000
Total Sales in the USA
Creating charts from data
FILEMAKER PRO HELP 406
4. If you’re creating a quick chart and it contains summary data, you can click the Summary
menu in the Chart inspector and select a different summary type. See Summary types for
charts.
5. Enter the following settings:
6. If you are charting multi-series data, select Show Legend to display a legend in the chart.
To change labels in the legend, edit the Series Name and click outside the text box.
7. To set axis options, see Formatting and scaling chart axes.
8. To change the color scheme, legend appearance, or font style, click Style in the Chart
inspector. See Changing the look of a chart.
9. Click Print or Save as Layout (quick charts) or Done (Layout mode charts) to finish the
chart. See Creating quick charts or Creating and editing charts in Layout mode.
Data
Click to specify a data series for the x-axis. This is the data you are
comparing (for example, company name).
For Y-Axis
(Vertical) Do this
Title
Type a title or click , choose Specify Field Name or Specify Calculation,
complete the dialog box, and click OK.
Data
Click to specify a data series for the y-axis.
•To specify an additional data series for the y-axis, click Add a Y Series,
then repeat this step to complete the Series Name (title) and Data settings.
•To specify another y-axis series, click +.
•To remove a data series from the y-axis, select the series, then click –.
•To change the order of the y-axis data series, drag items in the list.
•You can enter up to 12 data series on the y-axis.
Notes
•Bar and stacked bar charts: The y-axis is the data you are comparing.
•Stacked column chart: For an effective comparison, specify more than one
y-series.
•Area chart: In a multi-series area chart, the layered order of the data series
reflects the order in which y-series are defined in the Chart Setup dialog
box. The first series in the list appears on top followed by the next series in
the list.
Symbol
(Line charts)
Choose a symbol to mark each data point in the chart, or choose None to hide
symbols. Symbol color in the final chart is determined by the color scheme
setting in the Styles area of the Chart inspector. See Changing the look of a
chart.
For X-Axis
(Horizontal) Do this

Creating charts from data
FILEMAKER PRO HELP 407
Pie charts
To get started creating a chart, see Creating quick charts for Creating and editing charts in Layout
mode.
To set up a pie chart:
1. Find the records you want to chart. See Making a find request.
If you are charting delimited data stored in a single record or data from related records, you
must specify data source settings. See Specifying the data source for a chart.
2. In the Chart Setup dialog box, for Type choose Pie.
3. For Category Labels, click , choose Specify Field Name or Specify Calculation,
complete the dialog box, and click OK. This is the data you are comparing (for example,
company names) and determines the labels for each slice of the pie.
4. For Slice Data, click to specify a data series. This is the data you are measuring (for
example, annual sales), which determines the width of each slice in the pie.
5. If you’re creating a quick chart and it contains summary data, you can click the Summary
menu in the Chart inspector and select a different summary type. See Summary types for
charts.
6. Select Show Legend to display a legend in the chart.
7. Select options for the chart.
Tip It’s not necessary to label all data points on a chart.
To Do this
Display category label values Select Show values on chart.
Display the percentage of the
total each slice represents
Select Percentages.
Specify the number of decimal
places in percentages
Enter a number for Fixed number of decimals.
Display data values for slice
data
Select Actual values.
Specify the field type for slice
data
For Data Type, choose a field type, then choose data format
characteristics. For example, you can display number data
as a decimal, percentage, or as currency.
Notes
•Custom decimals or thousand separators must be
ASCII printable characters. The tilde character (~) is not
allowed.
•Decimal digits must be from 0 (zero) to 99.
•You must enter a positive number for Fixed number of
decimals.
Display slice data values as
stored in the database, as a
decimal or percentage, or as
currency
For Format, choose a value.
Creating charts from data
FILEMAKER PRO HELP 408
8. To change the color scheme, legend appearance, or font style, click Style in the Chart
inspector. See Changing the look of a chart.
9. Click Print or Save as Layout (quick charts) or Done (Layout mode charts) to finish the
chart. See Creating quick charts or Creating and editing charts in Layout mode.
Related topics
About chart types
Scatter and bubble charts
To get started creating a chart, see Creating quick charts or Creating and editing charts in Layout
mode.
To choose a chart type, define the axes, and include a legend:
1. Find the records you want to chart. See Making a find request.
If you are charting delimited data stored in a single record or data from related records, you
must specify data source settings. See Specifying the data source for a chart.
2. In the Chart Setup dialog box, choose a chart type. See About chart types.
3. Enter the following axis settings:
Specify a custom decimal or
thousands separator character
For Decimal, enter a character or select Use thousands
separator and enter a character.
Include a decimal or currency
notation character
For Notation, choose a position for the notation and enter a
custom character.
For Do this
X-Axis Title
and
Y-Axis Title
Type a title or click , choose Specify Field Name or Specify
Calculation, complete the dialog box, and click OK.
X-Axis Data
and
Y-Axis Data
Click to specify a data series for each axis. For example, you
might plot product development costs on the x-axis and product
revenue on the y-axis.
Note The x-axis must be number field type. For example, the profit
gained.
Radius Data
(Bubble charts only) Click to specify a data series for the third data series you want to
include in this comparison. For example, radius data might show the
profit margin between cost and revenue for each product. This chart
would reveal which product is most profitable rather than which
product generates the most revenue.
Label Data
Click to specify a label for each data point.
To Do this

Creating charts from data
FILEMAKER PRO HELP 409
4. If you’re creating a quick chart and it contains summary data, you can click the Summary
menu in the Chart inspector and select a different summary type. See Summary types for
charts.
5. To specify additional data series for the y-axis, click Add Y Series, then repeat step 3 to
complete the Series Name and Data settings.
•To specify another y-axis series, click +.
•To remove a data series from the y-axis, select the series, then click –.
•To change the order of the y-axis data series, drag items in the list.
6. Select Show Legend to display a legend in the chart. To change labels in the legend, edit
the Series Name and click outside the text box.
7. To set axis options, see Formatting and scaling chart axes.
8. To change the color scheme, legend appearance, or font style, click Style in the Chart
inspector. See Changing the look of a chart.
9. Click Print or Save as Layout (quick charts) or Done (Layout mode charts) to finish the
chart. See Creating quick charts or Creating and editing charts in Layout mode.
Notes
•In Browse mode, you can display an x-axis, y-axis, or radius value by pausing the pointer
over a data point in a chart.
•In scatter and bubble charts, x-axis and y-axis values must be numerical.
•X-axis values are typically an explanatory variable (the cause).
•Y-axis values are typically a response variable (the effect).
•Bubble charts are an extension of scatter charts and give you the ability to plot a second
response variable.
•The radius display in a bubble chart shows the relative magnitude of radius data points
rather than their precise values. Therefore, if radius data values are very small (for example,
0.2, 0.5.and 0.7), bubbles display large enough that you can distinguish the difference and
relationship between them.
Formatting and scaling chart axes
You can use the Chart inspector to set display options for the x-axis and y-axis.
To set axis options:
1. Create a chart or double-click an existing chart in Layout mode.
2. In the Chart inspector, click Chart and navigate to the Axis Options.
3. If Axis Options are not displayed, click .
4. To display a data value for each data point, select Show data points on chart.
Symbol
(Scatter charts only)
Choose a symbol to mark each data point in the chart, or choose None
to hide symbols. Symbol color is determined by the color scheme
setting in the Styles area of the Chart inspector. See Changing the
look of a chart.
For Do this
Creating charts from data
FILEMAKER PRO HELP 410
5. To set display options for axes labels, click X-Axis, Y-Axis, or Radius (bubble chart only)
and do the following:
6. Set any other options, then click Print or Save as Layout (quick charts) or Done (Layout
mode charts) to finish the chart. See Creating quick charts or Creating and editing charts in
Layout mode.
Notes
•Decimal and thousands characters can be any ASCII character except a hyphen (-).
•If a format applied to a data series is incompatible with the data returned (for example, date
settings are applied to a text field containing the string “date”), the data point is ignored and
does not appear in the chart.
Related topics
Creating quick charts
To Do this
Change the angle of data point
labels
For Label Angle, enter a value between 0 (zero) and 90 or
click or drag the angle control .
Set the scale for tick marks For Scale, choose one of the following:
•Select Linear to measure data that changes
arithmetically (for example, sales growth or decline).
•Select Logarithmic to measure data that changes
exponentially (for example, sound waves measured in
decibels or earthquake magnitudes).
Specify tick mark
characteristics
Select Show major ticks or Show minor ticks, then enter a
value to specify the frequency that labels appear on tick
marks. If you don’t specify tick mark settings, FileMaker Pro
estimates an appropriate tick mark setting (auto) based on
the data values in your chart.
Select Set minimum or Set maximum, then enter a value to
specify the range of tick marks displayed.
Positive/Negative charts: Select Set mid-point to specify a
custom mid-point. The default mid-point is zero.
Format labels based on the
field type
For Data Type, choose the appropriate field type, then
choose data format characteristics. For example, you can
display number data as a decimal, percentage, or as
currency.
Notes
•Custom decimals or thousand separators must be ASCII
printable characters.The tilde character (~) is not
allowed.
•Decimal digits must be from 0 (zero) to 99.
•You must enter a positive number for Fixed number of
decimals.

Creating charts from data
FILEMAKER PRO HELP 411
Creating and editing charts in Layout mode
Column, bar, line, and area charts
Scatter and bubble charts
Specifying the data source for a chart
You can chart data from the current found set, the current record, or from related records.
To chart the records currently being browsed:
1. In the Data Source area of the Chart inspector, choose Current Found Set.
The sort order is displayed in the Data Source area of the Chart inspector.
2. Choose a display option:
•Summarized groups of records displays data points for groups of records.
Tip This setting is useful when you want to place a chart containing summary data in a
header, footer, or body layout part. Create the chart in Layout mode, sort by the x-axis field,
choose a summary field as the y-axis, and place the chart in the layout part. See Placing
your chart in the appropriate layout part. To learn how to chart summary data in a quick
chart, see Creating quick charts.
•Individual record data displays individual data points.
Note You can’t sort the current found set within the Chart Setup dialog box. To sort data, close
the dialog box, return to Browse mode, then sort. See Working with data in Table View or
Sorting records.
To chart data in the current record:
In the Data Source area of the Chart inspector, choose Current Record (delimited data).
The record must contain multiple data values separated by the carriage-return character. See
Example: Charting delimited data.
To chart data in related records:
1. In the Data Source area of the Chart inspector, choose Related Records.
2. Choose a related table from the list.
3. Specify a sort order (if applicable).
4. Choose a display option (see “To chart the records currently being browsed” above).
When you chart related records, your chart updates when the current record changes.
To finish the chart:
Set any other options, then click Print or Save as Layout (quick charts) or Done (Layout mode
charts). See Creating quick charts or Creating and editing charts in Layout mode.
Changing the look of a chart
You can use the Styles area in the Chart inspector to change the way a chart displays.
1. In the Chart Setup dialog box, click Styles in the Chart inspector.
Tip You can double-click an existing chart in Layout mode to open the Chart Setup dialog box.
2. Do one or more of the following:

Creating charts from data
FILEMAKER PRO HELP 412
3. If you chose Show legend in the Chart area of the Chart inspector, you can change the
following:
4. To change the format of text in your chart, do the following:
Note Axis label settings don’t apply to pie charts.
5. To restore defaults for the displayed text settings, click Reset.
6. Click Print or Save as Layout (quick charts) or Done (Layout mode charts) to finish the
chart. See Creating quick charts or Creating and editing charts in Layout mode.
Notes
•When you create a chart, FileMaker Pro uses the current layout theme to determine the
chart’s color scheme, chart background, font, and legend format settings. If you save the
chart on a layout and then later change the layout theme, the chart will retain the colors and
format settings from the original theme. You can use the Chart Setup dialog box to change
these settings manually.
For Do this
Chart Style Choose a style for data points.
Color Scheme Choose a coordinated color theme for data points. If you choose
Single color, choose a color for all data series in the chart.
Positive/Negative charts: You can choose a color for the positive data
points and another color for the negative data points.
You can’t choose a specific color for each data point in a chart.
Chart Background Choose a fill style and color for the background or choose Transparent
for no fill. If you choose a gradient style, choose the colors you want to
blend in the background.
Bubble Opacity
(Bubble charts only)
Drag the control to change the opacity of bubbles in the chart or enter a
percentage for opacity.
Gridlines Select Show major gridlines or Show minor gridlines and choose a
color for the lines.
For Choose
Legend Position Top, Bottom, Left, or Right to position the legend.
Background A fill style for the background. If you choose a gradient style, choose the
colors you want to blend in the background.
Border Style A style, width, and color for the border around the legend. The width can
be between 1 and 9 points. Or, choose No Border.
For Choose
Automatic A font, style, and use the slider to set a relative text size for all chart text.
Custom Fonts, sizes, and styles for the chart title, legend text, data points, and
axis titles and labels.
Border Style A style, width, and color for the border around the legend. The width can
be between 1 and 9 points. Or, choose No Border.

Creating charts from data
FILEMAKER PRO HELP 413
Placing your chart in the appropriate layout part
Data in charts created in Layout mode is evaluated based on the layout part in which the chart is
located.
When you use a calculation to specify a chart title, the title is calculated based on the chart’s layout
part.
Note You cannot place a chart in a portal.
When data is based on the current found set
Notes
•Charts placed in a subsummary layout part use data in the sorted group to create the chart.
When there is no sort order, FileMaker Pro charts individual data values in the entire found
set. Subsummaries are considered inner summaries, because they display aggregate data
from a group within the data set based on the sort order you specify.
•Charts placed in a grand summary layout part use data in the outer-most level of each
sorted subsummary group to create the chart. Grand summaries are considered outer
summaries, because they display an overall summary of aggregated data based on the
entire found set. You can also use grand summary layout parts to summarize each
subsummary group.
•The outer-most sorted groups are the group of records sorted by the first field listed in the
Sort Order dialog box.
•For grand summaries calculated on the current found set, FileMaker Pro assumes you want
to chart data in each subsummary group. Therefore, FileMaker Pro expects your x-axis
definition (category labels in pie charts) to be the sort field and your y-axis definition (slice
data in pie charts) to be a summary field. For example, to create a bar chart that compares
the total number of companies per country, you must sort data by country (x-axis or
category labels) and summarize data in the Company field (y-axis or slice data) to calculate
the number of companies in each country. FileMaker Pro then charts the summarized
values by country.
When you place a chart
in a FileMaker Pro charts data in
When Summarized groups of
records is selected, FileMaker Pro
charts data in
Header or body layout
part
The current found set Every first record in the outer-most
sorted groups
Footer layout part The current found set Every last record in the outer-most
sorted groups
Leading subsummary
layout part
All records in the sorted group Every first record in the sub-group of
the sorted group
Trailing subsummary
layout part
All records in the sorted group Every last record in the sub-group of
the sorted group
Leading grand summary
layout part
The current found set Every first record in the outer-most
sorted groups
Trailing grand summary
layout part
The current found set Every last record in the outer-most
sorted groups

Creating charts from data
FILEMAKER PRO HELP 414
When data is based on the current record (delimited values)
When data is based on related records
Note If you place a chart in a grand summary part without sorting records, FileMaker Pro will
chart data from the entire found set as though the chart had been placed in a header, footer, or
body layout part.
How layout parts affect calculated titles in charts
Related topics
About layout part types
Working with layout parts
Adding a layout part
When you place a chart in a FileMaker Pro charts data in
Header, footer, or body layout part Current record
Leading subsummary layout part First record in the sorted group
Trailing subsummary layout part Last record in the sorted group
Leading grand summary layout part First record in the found set
Trailing grand summary layout part Last record in the found set
When you place a chart in a FileMaker Pro charts data in
Header, footer, or body layout part The set of related records that is obtained from the
relationship between the current record and the
related table
Leading subsummary layout part The set of related records that is obtained from the
relationship between the first record in a sorted group
and the related table
Trailing subsummary layout part The set of related records that is obtained from the
relationship between the last record in a sorted group
and the related table
Leading grand summary layout part The set of related records that is obtained from the
relationship between the first record in the found set
and the related table
Trailing grand summary layout part The set of related records that is obtained from the
relationship between the last record in the found set
and the related table
When you place a chart in a
FileMaker Pro displays a title for a data point
from the
Header, footer, or body layout part Current record
Leading subsummary layout part First record in the sorted group
Trailing subsummary layout part Last record in the sorted group
Leading grand summary layout part First record in the found set
Trailing grand summary layout part Last record in the found set

Creating charts from data
FILEMAKER PRO HELP 415
Changing a layout part
Charting tips, tricks, and troubleshooting
Chart doesn’t look as expected
•Verify that data is sorted in the current layout and unwanted records are omitted from the
found set before creating a chart.
•Are you comparing individual data points (the price of each product in a category) or
summarized data points (the sum of all products in a category)?
•Individual data points must be numeric so they can be plotted directly on the chart.
•Summarized data points can be text or number field type. You can count data in a text
field and you can perform a variety of mathematical operations on number data (sum,
average, and so on).
•If your chart displays too few data points when data is sorted, in the Chart inspector, click
Data Source and select Individual record data.
•When you create a quick chart, FileMaker Pro includes axis labels based on the field you
selected and the current state of the file. When FileMaker Pro can’t determine appropriate
labels, it leaves labels blank. For example, if you chart individual data points such as soccer
scores, FileMaker Pro labels the appropriate axis Scores. However, the labels on the
opposite axis are blank if FileMaker Pro can’t determine you want to plot by player first
names, last names, the team name, or the game date. If axis labels are missing, you can
add them in the Chart inspector.
•If summary data looks unexpected, check the summary type FileMaker Pro applied. You
can use the Summary setting in the Chart inspector to verify and the change the summary
type.
•A chart can display up to 2048 data points. If your data set contains more than 2048
records, FileMaker Pro charts a subset of the available data representing a uniform spread
of the larger data set.
•Charts created in Layout mode appear differently in the Chart Setup dialog box preview
than in Browse mode depending on the layout part in which they are placed. See Placing
your chart in the appropriate layout part.
Troubleshooting calculated titles and data series
•When you use a calculation to specify a title in a chart created in Layout mode, the result is
based on the layout part in which the chart is located. See Placing your chart in the
appropriate layout part.
•A calculated x-axis data series must return a result:
•as text in a column, stacked column, positive/negative, pie (category label), line, or area
chart
•as number in a bar, stacked bar, scatter, or bubble chart
•When you chart data in a found set or in related records, a calculated y-axis data series
must return a result:
•as number in a column, stacked column, positive/negative, pie (slice data), line, area,
scatter, or bubble chart
•as text in a bar or stacked bar

Creating charts from data
FILEMAKER PRO HELP 416
•When you chart delimited data in the current record, a calculated y-axis data series (slice
data in pie charts) must return the result in a text field.
I received a parsing error when charting delimited data
When you chart delimited data, you must enter numerical data, dates, and times in the format of the
current locale. Otherwise, FileMaker Pro displays an error.
Blank records appear in chart
If data points for unexpected blank records appear in your chart, it’s possible:
•there are restricted records in the database that you do not have access to chart
•the file contains invalid calculations that are returning the question mark character (?)
To remove zero data points from your chart, perform a find and omit the invalid records by entering
only the = operator in the appropriate fields. If the problem persists, check and correct calculations.
See Finding records except those matching criteria.
Charting missing data values
If your x-axis data series contains missing values (no data), a data label is displayed on the x-axis
for most chart types, but no corresponding data point is displayed. Line and area charts display a
missing data point as a zero.
Tick marks display differently in the chart preview and Layout mode
FileMaker Pro automatically adjusts chart scale and tick marks depending on the size of the chart.
Therefore, tick marks and scales might look different when viewed in the chart preview and Layout
mode.
Charting repeating fields
FileMaker Pro does not recognize individual values in repeating fields as a data series. To chart data
in repeating fields, use the List function to combine repeating data in a delimited format, then
choose Current Record (delimited data) for Chart Data.
Example: Charting delimited data
FileMaker Pro can chart multiple data entries from a single field when each data value in the field is
separated by a carriage-return character (carriage return-delimited data).
About the chart
In this example, you create a new database containing two return-delimited fields: Country and
Customer Count. The fields are located on one layout and all data is stored in one record. Then you
create a column chart that compares the number of customers located in each country.
Create a database
1. Do one of the following:
•If the FileMaker Quick Start Screen is open, click Create a New Database, then close
the Quick Start Screen.
•If the FileMaker Quick Start Screen is not open, choose File menu > New Database.
2. Name the file Worldwide Customers, then click Save to save the file on your hard disk.

Creating charts from data
FILEMAKER PRO HELP 417
The file opens in Browse mode in Table View. FileMaker Pro creates the first table and layout for
you. Both have the same name as the file.
Define and format the fields
1. In the first table row, click Create Field and type Country.
2. Click + in the column and type Customer Count.
3. Click View As in the layout bar to go to Form View, then click Edit Layout to switch to
Layout mode.
4. Select the Customer Count field and field label and drag them down about an inch.
5. Select the Country field and drag its handles down until you see 5 rows in the field.
6. Select the Customer Count field and drag its handles down until you see 5 rows in the
field.
7. Click Save Layout, then Exit Layout in the layout bar to return to Browse mode.
Add data to the database
1. Click New Record in the status toolbar.
2. In the Country field, type the following, pressing Enter (Windows) or Return (OS X) after
each country name.
Spain
Italy
Japan
Germany
USA
3. In the Customer Count field, type the following, pressing Enter (Windows) or Return
(OS X) after each value.
15
6
23
10
29
You have created two fields that contain return-delimited data.
Create a column to compare the number of customers in each country
1. Click Edit Layout in the layout bar to switch to Layout mode.
2. Drag the gray Body part boundary down to make room for the chart.
3. Click the Chart tool in the status toolbar, then click in the body layout part and drag a
large rectangle where you want the chart to appear.
The Chart Setup dialog box appears.
4. In the Chart inspector, click Data Source and choose Current Record (delimited data).
5. In the Chart area of the Chart inspector, enter the following:
Creating charts from data
FILEMAKER PRO HELP 418
6. Click Done.
7. Click Save Layout, then Exit Layout in the layout bar.
Each return-delimited value in the Country field corresponds to a return-delimited value in the
Member Count field in the order the data was entered.
For Do this
Title Type Customers by Country.
Type Choose Column.
X-Axis (Horizontal) For Title, type Countries.
For Data, click , choose Specify Field Name, choose Country
in the list, then click OK.
Data values from the Country field appear below the chart. They
will be labels for the columns in your chart (x-series). This is the
data you are comparing.
Y-Axis (Vertical) For Title, type Number of Customers.
For Data, click , choose Specify Field Name, choose
Customer Count in the list, then click OK.
The columns in your chart show the data values from the Customer
Count field (y-series). This is the data you are measuring.

Creating scripts to automate tasks
FILEMAKER PRO HELP 419
Creating scripts to automate tasks
Scripts can do simple tasks like setting print orientation or complex tasks like preparing a
customized mailing to each client.
For example, you could define a complex set of tasks that creates a thank you letter to clients in
your Clients database who have made purchases in the last week. The script composes a letter
tailored to each client. The script switches to Preview mode and pauses so you can see what the
letter looks like before it prints. The whole task is initiated by clicking a button on the Sales Entry
layout.
You build scripts by selecting from a list of FileMaker Pro commands, called script steps, specifying
options (if necessary), and arranging the steps in the correct order to perform the task.
Note Many FileMaker Pro scripts can be made available to web users when you publish your
database using FileMaker WebDirect. See the FILEMAKER WEBDIRECT GUIDE.
Related topics
Script steps reference (alphabetical list)
Script steps reference (category list)
Planning a script
The more time you spend planning your script, the more likely that it will accomplish what you want.
As you plan, ask yourself these questions:
•Can you separate the task into smaller tasks? You can define sub-scripts for each small
task, and then define a script that performs the sub-scripts. It's easier to design and test
several small scripts than one complex one. You can also reuse sub-scripts in other areas.
(Use Perform Script script step to perform a sub-script inside another script.)
•What script steps should be executed under what conditions? Should every script step
always be executed? Should some be executed a number of times until a certain condition
is met? Should the script call other scripts and sub-scripts? You can control the progression
of the script in a number of different ways. See Control script steps for more information on
creating scripts with conditional steps.
•Do you want the script to run in a particular layout? Because scripts are defined at the file
level and can be called from any layout, you should make sure the script will operate in the
layout or layouts you expect. Use the Go to Layout script step to change layouts.
•Should the script work on all records in the database, the current found set, or a specific set
of records? (Use the Found Sets script steps to include only the records that you want to
work with in the found set.)
•Is all the data you need in one database file, or will the script operate on more than one file?
If you're using multiple files, which ones should the script open? In which file should the
script(s) be defined? In most cases a script should be defined in the same file as the data it
is processing. Database solutions with more than one file may need separate scripts in each
file, depending on the complexity of the task you are trying to script.
•With which record should the script start? For example, when using the Loop script step,
you must decide whether the loop starts at the first or last record, a specific record, or the
current record in the found set. (Use the Go to Record/Request/Page script step, Go to
Related Record script step, or Go to Portal Row script step to specify a starting record. If
you don't include a navigation script step to determine the current record, the loop begins
with the record that's current when the script is performed.)

Creating scripts to automate tasks
FILEMAKER PRO HELP 420
•Which window do you want to use? A script is initially attached to a specific window, which
may be in the background. The script remains on that window until a scripted action
switches to another window. For example, use the Select Window script step to specify a
different window. If the specified window is not available, the script switches to the
foreground window of the file. When you pause a script, the associated window becomes
the foreground window if it is available.
•Should the script switch among modes? A script can be run from Browse, Find, Layout, or
Preview modes. Make sure your script is in the proper mode before it acts upon something.
For example, use the Enter Browse Mode script step to modify data in fields and records,
and use the Enter Find Mode script step to set up or perform a find request.
Note Scripts performed in Layout mode automatically switch to Browse mode before executing.
•Which fields and layouts will the script need? Some steps (such as the Go to Field script
step and the Insert Text script step) require a field to be on the current layout, while others
(such as the Set Field script step) don’t. Either use the Go to Layout script step to switch to
a layout that has the fields your script requires, or place the fields on the gray area to the
right of the layout to make the fields available for script steps but not to users.
•Should the records be processed in a certain order? Decide among the current sort order, a
specified sort order, or unsorted (the order in which the records were created). Use the Sort
Records script step or the Unsort Records script step before entering a loop to order your
records properly before processing them.
•How should the script advance through multiple fields or records? (Use the Go to Record/
Request/Page script step, the Loop script step, the Exit Loop If script step and the End Loop
script step to control multiple field or record processing).
•When should the script finish? After all script steps have run? After a specified condition has
been met? (Use the If script step, the Else If script step, and the Else script step to perform
a task such as the Exit Script script step when the script reaches a specified condition.)
•How will you test your script? Use the Pause/Resume Script script step to pause at
predefined points in your script. Save a copy of your database, and then define and test
your script in it to preserve the original data.
Note If you are using FileMaker Pro Advanced, you can use the Script Debugger to test and
troubleshoot your scripts.
•How will you handle error conditions (such as an empty found set)? You can capture the last
error condition reported by FileMaker Pro by using the Get(LastError) function. Use this
function and the If script step, the Else If script step, and the Else script step to create
scripts that react gracefully to user errors or unexpected results. For even greater control,
use the Set Error Capture script step to suppress the error alerts that FileMaker Pro
normally displays in these situations, and replace them with your own using the Show
Custom Dialog script step.
•Should all users be allowed to perform all scripts? Use privilege sets to control users’
access to scripting. Through the use of privilege sets, users can be allowed to execute or
modify individual scripts, no scripts, or all scripts. You can also set the default permission for
each privileges set for any future new scripts that are defined in the file. Setting a script to
run with full access privileges will allow the script to do things on behalf of the user that may
not be normally allowed by their assigned privileges. See Creating and managing privilege
sets.
•How will users perform the script? You either need to create a button to perform the script or
specify that the script be added to the Scripts menu. Scripts can also be run from the
Manage Scripts dialog box or when a script trigger is activated. For example, you can use
the OnFirstWindowOpen script trigger to run a script when the database opens.

Creating scripts to automate tasks
FILEMAKER PRO HELP 421
Once you've considered these questions, you're ready to manage scripts in your database. See
Creating and editing scripts.
Creating and editing scripts
After you have planned your scripts, you are ready to create, edit, and manage them.
To create a script:
1. Choose Scripts menu > Manage Scripts. Or, choose File menu > Manage > Scripts.
2. In the Manage Scripts dialog box, click New.
You can also choose Empty Script or Default Script from the New list. If you choose Default
Script, FileMaker Pro includes default script steps that you can edit or delete in the Edit Script
window.
The Edit Script window opens. This is where you create scripts or edit existing scripts.
3. In the Edit Script window, create your script.
To Do this
Name a new script Type a name for the new script in the Script Name text box.
Add a script step Select it from the list of available steps and click Move. Typing the first few
letters of the script step scrolls the list to that script step.
Specify script step
options
A step with square brackets after it has options you can set. Double-click
the step, or select it and click Specify. In the next dialog box, specify
options, and click OK.
When specifying options for some script steps, you might see the
parameter “Restore”. Restore indicates that the criteria you specified when
the script step was last edited is used when the script step is executed.
Duplicate a script step Select it in the list on the right and click Duplicate.
Copy and paste a script
step
Select it in the list on the right, then choose Edit menu > Copy. Click in the
list where you want the script step to appear, and choose Edit menu >
Paste. You can also copy and paste script steps into other scripts, copy
and paste scripts, or copy and paste into other files. See Copying and
pasting scripts.
Delete a script step Select it in the list on the right and click Clear. See Deleting a script.
View available script
steps by category or
name
Choose All by category, All by name, or a specific category from the
View list.

Creating scripts to automate tasks
FILEMAKER PRO HELP 422
For information on each script step and its options, see Script steps reference (alphabetical list)
and Script steps reference (category list).
4. When you are finished, close the Edit Script window, then click Save to save it. Or choose
File menu > Save Script (Windows) in the Edit Script window, or choose Scripts menu >
Save Script (OS X) in the FileMaker Pro menu bar.
5. To create another script, repeat steps 2-4. Otherwise, return to the Manage Scripts dialog
box.
6. To include the script in the Scripts menu, select the checkbox next to the script, or select the
script and select Include in menu.
7. Close the Manage Scripts dialog box.
Tips
•Use Ctrl-click (Windows) or Command-click (OS X) to select multiple script steps. You can
add, duplicate, or delete multiple steps.
•You can use operators to concatenate text, perform mathematical functions, and do logical
comparisons. See Using operators in formulas.
See which script steps
are not supported in
FileMaker Server
schedules,
FileMaker Go,
FileMaker WebDirect,
or Custom Web
Publishing
Choose an option from the Show Compatibility list:
•All displays all script steps.
•Macintosh displays all script steps supported in FileMaker Pro for
OS X.
•Windows displays all script steps supported in FileMaker Pro for
Windows.
•Server dims script steps that are not supported in a FileMaker Server
schedule.
This option refers to scripts running in a FileMaker Server schedule.
When a FileMaker Pro or FileMaker Go client runs a script in a
database that is hosted by FileMaker Server, the script steps are run
on the client. The steps that are compatible with Macintosh,
Windows, or iOS are executed.
•iOS dims script steps that are not supported in FileMaker Go.
•Custom Web Publishing dims script steps that are not supported in
Custom Web Publishing.
•FileMaker WebDirect dims script steps that are not supported in
FileMaker WebDirect.
Perform the script with
full access privileges
Select Run script with full access privileges. See the Note below for
additional information.
Reorder the script
steps
Use the double arrow to the left of the step to drag it to a new location in the
list.
Print a script •Windows: Choose File menu > Print Script in the Edit Script window.
•OS X: Choose File menu > Print in the FileMaker Pro menu bar.
In the Print dialog box, select your options, then click OK (Windows) or
Print (OS X).
To Do this

Creating scripts to automate tasks
FILEMAKER PRO HELP 423
•Add comments to your scripts with the Comment script step. Using comments in your script
helps others who might want to look at or modify it.
•To build scripts quickly, duplicate (or copy and paste) an existing script that does something
similar to what you want to do and modify the copy. To create a duplicate script with the
same name as the original, select it in the list and press Shift+Duplicate in the Edit Script
window. (Or, in the Manage Scripts dialog box, press Shift as you click .)
•You can also print a script by selecting the script in the Manage Scripts dialog box and
clicking .
To edit a script:
1. Choose Scripts menu > Manage Scripts. Or, choose File menu > Manage > Scripts.
2. In the Manage Scripts dialog box, select the script you want to change, then click Edit or
double-click the script name.
The Edit Script window opens.
Tip You can open multiple Edit Script windows at the same time. In the Manage Scripts dialog
box, use Ctrl-click (Windows) or Command-click (OS X) to select non-contiguous scripts, or
Shift-click to select contiguous scripts, then click Edit. A separate Edit Script window opens for
each script. Double-clicking with multiple scripts selected only opens the script that you clicked.
To close all windows, press Alt (Windows) or Option (OS X) and click the close button in any
window.
3. Do steps 3-6 above.
4. To perform your script, select it in the Manage Scripts dialog box and click Perform. Make
any changes to your script as needed.
5. Close the Manage Scripts dialog box.
Notes
•You can also create, edit, duplicate, and delete scripts from the Specify Script dialog box
when you create a button or script trigger.
•Use Run script with full access privileges to enable a script to run with the full access
privilege set, even if the current user has logged in with a privilege set that does not have
full access. Using this feature enables users with limited access and privileges to perform
scripted tasks that they would otherwise be unable to execute, such as exporting or deleting
records. Access privileges do not change, but the script can do more privileged work for
them. Furthermore, full access does not carry over to any subsequent sub-script, unless this
feature has been enabled in that script as well.
•The Run script with full access privileges feature can only be enabled or modified by
users with full access privileges. Therefore, only users with full access privileges can edit or
delete scripts for which this feature has been enabled.
•The Run script with full access privileges feature only functions in the file in which the
script is defined. This command will not override access restrictions on external files. For
example, a script to delete records in File A that has the Run script with full access
privileges option enabled will not delete records in an access-restricted external file File B.
•Users without full access privileges can be given permission to edit scripts that are marked
as modifiable in their assigned privilege set. Full access privileges are required to create,
duplicate, import, and/or delete scripts.

Creating scripts to automate tasks
FILEMAKER PRO HELP 424
•If you are using FileMaker Pro Advanced, you can disable script steps for testing. To disable
a script step, select it, then click Disable. To enable a script step, select it, then click
Enable. Disabled script steps are preceded by “//”. See Disabling script steps (FileMaker
Pro Advanced).
•If a script step specifies a field in a tab panel or slide panel that is not the front-most panel,
the specified field is selected and the panel it is in moves to the front of the panel control. If,
however, the same field appears elsewhere on the layout and the script finds that field first,
the panel with that same field will not come forward. Instead, assign an object name to the
field and use the Go to Object script step to move to that instance of the field.
•If a script step specifies a field in a popover, the popover opens and the field is selected. If
the same field appears elsewhere on the layout and the script finds that field first, the
popover with that same field will not come forward. Instead, assign an object name to the
field and use the Go to Object script step to move to that instance of the field.
Related topics
Script steps reference (category list)
Script steps reference (alphabetical list)
Using buttons with scripts
Working with the Scripts menu
Editing scripts privileges
Publishing databases on the web
Debugging scripts (FileMaker Pro Advanced)
Managing scripts using folders
You can manage your scripts by grouping and filtering them.
To manage scripts using folders:
1. Choose Scripts menu > Manage Scripts. Or, choose File menu > Manage > Scripts.
2. In the Manage Scripts dialog box, perform the tasks you want.
To Do this
Create a new script
folder
Choose Folder from the New list. In the Edit Folder dialog box, type a
folder name, and click OK. The new folder appears in the Manage Scripts
dialog box at the current position. A folder appears as a submenu in the
Scripts menu.
Rename a folder Double-click the folder to rename. In the Edit Folder dialog box, type a
new name, and click OK.
Duplicate a folder
•Select the folder, and click .
•Windows: Choose Edit menu > Copy, click where you want the
folder to appear in the list, and choose Edit menu > Paste.
The folder and all scripts in the folder are duplicated.
Copy and paste a
folder to another file
See Copying and pasting scripts.
Expand or collapse a
folder
Click the expand/collapse icon to the left of the folder name, or press the
+ or - key (Windows) or the right or left arrow key (OS X). (This does not
affect the appearance of the Scripts menu.)

Creating scripts to automate tasks
FILEMAKER PRO HELP 425
3. To include the folder in the Scripts menu, select the checkbox next to the folder, or select the
folder and select Include in menu.
Note Selecting Include in menu only includes the folder itself, not its descendant scripts. Click
Include in menu next to each descendant script you want listed in the submenu. Any scripts
selected for menu inclusion without their parent folder being checked will not be included in the
Scripts menu.
4. When you are finished, close the Manage Scripts dialog box.
Tips
•Use Ctrl-click (Windows) or Command-click (OS X) to select multiple scripts and folders.
You can add, duplicate, copy, paste, delete, or print multiple scripts and folders.
•You can edit multiple scripts at the same time. In the Manage Scripts dialog box, select the
scripts you want to edit, then click Edit. A separate Edit Script window opens for each
selected script. Note that double-clicking with multiple scripts selected only opens the script
that you clicked.
Related topics
Creating and editing scripts
Saving a script
Deleting a script
Move a script into a
folder
Expand the folder you want (see above). Use the double arrow to the left
of the script to drag it under the expanded folder. If the script is at the end
of the folder list, use the four-pointed arrow to indent the script under the
folder name. The script appears in the selected folder’s submenu in the
Scripts menu.
Delete a folder Select the folder to delete, and click Delete. The folder and all scripts in
the folder are deleted.
View scripts by folder
name
In the drop-down list on the left, choose a folder name. The dialog box
lists only scripts descended from the selected folder. To show all scripts,
choose Show All.
Filter list of scripts by
name
In the box on the right, type a script name, or part of the name. The list of
scripts filters as you type.
Add a separator
between script or folder
names
Select the script or folder above where you want the new separator.
Choose Separator from the New list. The Manage Scripts dialog box and
the Scripts menu reflect your changes.
Print a script or folder
Select the script or folder to print, and click . In the Print dialog box,
select your options, then click OK (Windows) or Print (OS X).
To Do this

Creating scripts to automate tasks
FILEMAKER PRO HELP 426
Saving a script
Related topics
Creating and editing scripts
Managing scripts using folders
Deleting a script
Copying and pasting scripts
Deleting a script
When you delete a script, FileMaker Pro deletes the script definition and removes the script's name
from the Scripts menu.
To delete a script:
1. Choose Scripts menu > Manage Scripts. Or, choose File menu > Manage > Scripts.
2. In the Manage Scripts dialog box, select the script, then click Delete.
3. Click Delete to confirm the deletion.
Note FileMaker Pro doesn't update any scripts, script triggers, or buttons that refer to the deleted
script. Be sure to make any necessary changes to buttons or other scripts after you delete a script.
FileMaker Pro Advanced: You can create a Database Design Report to determine which scripts,
script triggers, or buttons in your database file refer to the deleted script. See Documenting
database schemas (FileMaker Pro Advanced).
Related topics
Creating and editing scripts
Managing scripts using folders
Saving a script
To Do this
Save a new or
edited script
With the Edit Script window open to the script you want to save, do one of
the following:
•Close the Edit Script window, then click Save.
•Windows: Choose File menu > Save Script in the Edit Script window.
•OS X: Choose Scripts menu > Save Script in the FileMaker Pro
menu bar.
Save all open
scripts
•Windows: Choose File menu > Save All Scripts in the Edit Script
window.
•OS X: Choose Scripts menu > Save All Scripts in the FileMaker Pro
menu bar.
Discard changes
before saving
With the Edit Script window open, do one of the following:
•Close the Edit Script window, then click Don’t Save.
•Windows: Choose File menu > Revert Script > Discard in the Edit
Script window.
•OS X: Choose Scripts menu > Revert Script in the FileMaker Pro
menu bar.

Creating scripts to automate tasks
FILEMAKER PRO HELP 427
Copying and pasting scripts
Copying and pasting scripts
You can copy entire scripts, script folders, or script steps from one file and paste them into the same
file or some other file.
1. Do one of the following:
2. Select the script, script folder, or script step you want to copy.
3. Copy the selection:
•Windows: Choose Edit menu > Copy in the Edit Script window.
•OS X: Choose Edit menu > Copy in the FileMaker Pro menu bar.
4. Open the dialog box in the file into which you want to paste the script, folder, or script step.
5. To paste the selection, select the script, folder, or script step after which you want the
selection to appear, then:
•Windows: Choose Edit menu > Paste in the Edit Script window.
•OS X: Choose Edit menu > Paste in the FileMaker Pro menu bar.
Notes
•Pasted objects do not retain privileges. You must redefine privilege sets in the destination
file.
•FileMaker Pro retains references to scripts, folders, and script steps if they are valid when
you paste. If you copy multiple scripts, folders, or script steps that reference each other,
copy them in one step to retain the references. If you copy them one at a time, the
references may be lost. Check all references after pasting to ensure they are valid.
•To copy and paste scripts and folders, you must have write access to the source script or
folder and privileges to create scripts and folders in the destination file.
•To copy and paste script steps, you must have write access to the source and destination
scripts.
•When you copy scripts with disabled script steps, the steps remain disabled when pasted in
the new location. See Disabling script steps (FileMaker Pro Advanced).
•When you copy scripts, folders, or script steps, breakpoints are not copied. However, when
you duplicate scripts, folders, or script steps, breakpoints are retained.
Related topics
Creating and editing scripts
Managing scripts using folders
Saving a script
Deleting a script
To copy a Do this
Script or
folder
Choose Scripts menu > Manage Scripts.
Or, choose File menu > Manage > Scripts.
Script step Choose Scripts menu > Manage Scripts.
Then, select the script from the list and click
Edit to open the Edit Script window.

Creating scripts to automate tasks
FILEMAKER PRO HELP 428
Running scripts on FileMaker Server
FileMaker Server administrators can create scheduled tasks to run two types of scripts:
•system-level scripts (for example, Windows batch files)
•FileMaker Pro scripts in databases hosted by FileMaker Server
These scripts can run in sequences.
To see whether a script step is compatible with FileMaker Server:
1. In FileMaker Pro, choose Scripts menu > Manage Scripts.
2. In the Manage Scripts dialog box, double-click a script name or create a script.
3. In the Edit Script window, select Server from the Show Compatibility list.
Script steps that are not supported from a FileMaker Server schedule appear dimmed.
Notes
•A FileMaker Server-scheduled script will halt if an unsupported script step is encountered.
To allow a scheduled script to skip an unsupported step, use the Allow User Abort script
step and select Off.
•A scheduled script is run by FileMaker Server whether or not any FileMaker Pro clients
have the files open. Clients will see the effect of the script (for example, if a script running in
FileMaker Server changes a record, it will update in FileMaker Pro), but FileMaker Pro has
no part in the script execution.
Related topics
Get(DocumentsPathListing) function
Import Records script step
Export Records script step
Importing scripts from other FileMaker files
FileMaker Pro allows you to import scripts from other FileMaker files. You can also copy and paste
scripts between files. See Copying and pasting scripts.
Many scripts refer to files, fields, layouts, records, and other scripts. In addition, some script steps,
such as Set Field, Insert Calculated Result, Replace Field Contents, and so on, may have field
references embedded in calculations. While these references may be valid in the original file, it is
possible that they will be invalid in the file into which they are being imported.
When you import a script, FileMaker Pro attempts to map fields, layouts, tables (including those
used in relationships), and so on based on their names. Fields and layouts are mapped using their
fully qualified names, and these must match exactly or the reference will not be imported. If the
referenced object cannot be found, FileMaker Pro flags it as missing. After importing a script you
should edit the script to make sure that all references are valid and appear as intended.
Important Always review your imported script before performing it for the first time.
To import a script:
1. Open the file into which the script will be imported.
2. Choose Scripts menu > Manage Scripts. Or, choose File menu > Manage > Scripts.

Creating scripts to automate tasks
FILEMAKER PRO HELP 429
3. In the Manage Scripts dialog box, click .
4. Open the file that contains the script(s) you want to import.
5. In the Import Scripts dialog box, select the script(s) you want to import.
If one or more of the scripts you’re importing refer to other scripts, make sure you select and
import all the referenced scripts at the same time. For more information, see the Notes below.
6. Click OK.
The Import Summary dialog box appears.
7. Click Open Log File to view the import log file, or click OK to close the Import Summary
dialog box.
If FileMaker Pro reports errors, follow the steps in Creating and editing scripts to correct the
<unknown> references in each script. During the script import, FileMaker Pro checks all
references to fields, layouts, other scripts, files, and so on, in each imported script. References
must match exactly to be included in the import. If a referenced object is not found,
FileMaker Pro flags it as <unknown>.
8. Close the Manage Scripts dialog box.
Tip You can import scripts into a folder by selecting the folder, then clicking .
Notes
•The match for field names is not case-sensitive.
•When importing a script that references a related field, the fully qualified field names must
match identically, including the names of the tables as they appear in the relationships
graph.
•When importing script steps that contain calculations (for example, If, Set Field, and, Insert
Calculated Result), if FileMaker Pro cannot match all items referenced in the calculation
(i.e. tables, fields, or custom functions), the calculation is commented out (using ‘C’ style
comments).
•When importing scripts from single table files, you can avoid most of these naming errors by
making a copy of the file containing the script you want to import. In the copied file, rename
the table to match one of the tables in your destination file, and import the script from the
copy. Script steps that refer to identically named fields and layouts in both files will import
properly because the underlying table in the source file has the same name as a table in the
target file.
•When importing script steps that contain more complex information (for example, find
requests, sort order, import field order, and export field order, etc.), FileMaker Pro discards
any missing field references.
•To import a script, you must have access privileges in the source file that allow you to
modify the script.
•The option Run script with full access privileges is only imported when the user
performing the import has logged into the target database with full access privileges.
Related topics
Managing scripts using folders
Deleting a script
Planning a script

Creating scripts to automate tasks
FILEMAKER PRO HELP 430
Scripting with ActiveX Automation (Windows)
Many Windows applications use the ActiveX Automation protocol to expose their object models for
external control.
ActiveX Automation support in FileMaker Pro allows you to open and close FileMaker Pro database
files, toggle the application’s visibility, and run FileMaker Pro scripts.
FileMaker Pro is an automation server. The objects FileMaker Pro exposes for automation can be
accessed by any ActiveX client or Automation controller, including as Visual Basic and other similar
programming tools.
The primary benefit of ActiveX Automation in FileMaker Pro is the ability to initiate FileMaker Pro
scripts from outside of the FileMaker Pro application.
For example, with FileMaker Pro ActiveX Automation and Visual Basic you can create your own
application (with its own interface) and drive multiple applications to accomplish a task. For example
you could define a window in Visual Basic that has one button that says, "Get today’s sales data."
The procedure for "Get today’s sales data" would open a FileMaker Pro file and, by calling a
FileMaker Pro script, find and export all of that day's sales data. The Automation procedure would
then start up Excel and graph the exported data.
Note To implement ActiveX Automation with FileMaker Pro, you need to be proficient in a
programming language such as Visual Basic or C++.
Using FileMaker Pro ActiveX Automation (Windows)
The FileMaker Pro Type Library
The type library describes the objects, properties, and methods exposed by FileMaker Pro, so that
other ActiveX clients can access FileMaker Pro.
The FileMaker Pro Type Library is included in the FileMaker Pro executable. It is not a separate file.
The FileMaker Pro Type Library was registered on your computer when you installed FileMaker Pro.
In Visual Basic, add "FileMaker Pro Type Library" to the list of Available References in your project.
Important You must add the FileMaker Pro Type Library to the list of available type libraries in the
application you will be using to implement your ActiveX Automation document. If you don't add the
type library, you won't be able to address FileMaker Pro via ActiveX Automation.
The method for adding this library varies in the different ActiveX Automation authoring tools. Consult
the manual that came with your ActiveX Automation authoring tool if you are unsure of how to do
this. The following procedure explains how to do this in Microsoft Visual Basic.
To add the FileMaker Pro Type Library to Microsoft Visual Basic:
1. In Microsoft Visual Basic, choose Project menu > References > Add Type Library.
2. Enable the checkbox to the left of the FileMaker Pro Type Library.
3. Click OK.
FMPro70Lib appears in the Visual Basic Object Browser once the project references include the
FileMaker Pro Type Library. All of the objects, methods and properties that FileMaker Pro exposes
for Automation control are now available.
Creating scripts to automate tasks
FILEMAKER PRO HELP 431
Declaring FileMaker Pro as the Application object
Declare the FileMaker Pro as the Application object each time you create an ActiveX Automation
script or application to control FileMaker Pro. This can be done with a single line of code at the top of
your Automation document, where it appears with your other definitions.
For example:
Dim FMProApp As FMPro70Lib.Application
Getting an Application object
To make any Automation calls to FileMaker, you must first get access to the FileMaker Application
Object. There are two ways to do so: by calling CreateObject, or by calling GetObject.
To use either call, first declare the Application object:
Dim FMProApp as FMPro70Lib.Application
For CreateObject only:
Set FMProApp = CreateObject("FMPRO.Application")
CreateObject will launch FileMaker if it is not already running.
The GetObject function retrieves an Application object only if FileMaker is already running.
For GetObject only:
Set FMProApp = GetObject(, "FMPRO.Application")
Notice the comma, which indicates that the first argument to GetObject — a path to a disk file — has
been omitted. The comma is required because under some circumstances GetObject takes a
filename as its first argument. To retrieve an instance of FileMaker, however, you must omit the
filename argument, or an error will occur.
Calling a FileMaker Pro script
To run a FileMaker Pro script via ActiveX Automation, call the DoFMScript function with the name of
the script as the variable.
For example:
Dim FMProApp as FMPro70Lib.Application
CreateObject("FMPRO.application")
Dim FMProDocs, FMProDocs.Open("c:\MyFile.fmp12","","")
Dim FMProDoc
FMProDoc.DoFMScript ("MyScript")
Set FMProDoc = nothing
Toggling the visibility of the FileMaker Pro application
When FileMaker Pro is launched by Automation, it will run hidden by default. You can use the visible
property to hide or show FileMaker Pro.
For example, to hide the application:
FMProApp.Visible = False
To show the application:
FMProApp.Visible = True

Creating scripts to automate tasks
FILEMAKER PRO HELP 432
Reference counts and releasing an object
When an automation object is referenced, a reference count increments to let FileMaker know that a
process is using that object. In Visual Basic, an object is reference counted every time you set the
declared variable to a FileMaker object, for example:
' just a declaration - no references yet
Dim FMDocs as FMPro70Lib.Documents
' this line causes a reference of FileMaker's "Documents" object
Set FMDocs = FMApp.Documents
' this causes a second reference of the same FileMaker "Documents" object
Set FMDocs2 = FMApp.Documents
FileMaker may not exit until all reference counts are released. In Visual Basic, you can release the
reference count by setting the object variable to "Nothing", for example:
' releases the reference to the FileMaker "Documents" object
Set FMDocs = Nothing
' releases the 2nd reference to the FileMaker "Documents" object
Set FMDocs2 = Nothing
' releases the reference to the FileMaker Application object
Set FMApp = Nothing
It is good practice to always set object variables to "Nothing" when you have finished using the
variables.
Access Privileges
FileMaker Pro uses the Documents.Open(filename As String, accountName As
String, password As String) method. If the accountName and password arguments are
empty strings, the file will be opened as a client user.
Scripts
FileMaker Pro scripts called directly by Automation may interrupt each other.
FileMaker Pro scripts called from within other FileMaker Pro scripts will run in order, as expected.
Remotely hosted files
It is not possible to open a hosted file using ActiveX Automation alone. To open a hosted file using
Automation, you can either open the hosted file directly using the FileMaker Open dialog box, and
then access the file using Automation, or you can write a FileMaker Pro script that opens the hosted
file, and then call that script via Automation.
Related topics
Using FileMaker Pro ActiveX Automation (Windows)
ActiveX Automation example (Windows)
ActiveX Automation objects, methods, and properties (Windows)
FileMaker Pro supports three Automation Objects: Application, Documents, and Document. The
following are methods and properties available for the objects.
Creating scripts to automate tasks
FILEMAKER PRO HELP 433
Application
Access to the FileMaker Pro application.
Properties
Note All properties are read-only except "Visible."
Application: Returns a pointer to this object, which is the root object of the object hierarchy.
Parent: Returns a pointer to this object.
FullName: Returns the name of the application, including the path.
Name( ): Returns the name of the application - "FileMaker Pro."
Caption: Returns the window title for the frame window. The FileMaker Pro caption is always set to
describe the currently active document and cannot be set differently by clients.
DefaultFilePath: Returns the default path specification used for opening files.
Documents: Returns a pointer to the Documents collection object so that individual Document
objects may be opened, accessed, and run through scripting.
Version: Returns the version of FileMaker Pro.
Visible: Returns TRUE if the application is visible. Set to TRUE to show the application, FALSE to
hide the application.
ScriptStatus( ): Returns 0 if no script is running, 1 if a script is paused, 2 if a script is running, or 3 if
a script is queued (selected to run but not yet started).
Methods
Quit( ): Closes the application. Note that if clients are still attached, the application is hidden until all
clients release the FileMaker Pro automation server. To prevent unexpected behavior, always follow
a Quit statement with an object release statement. For example:
FMproApp.Quit
Set FMProApp = Nothing
Documents
This is the collection of open documents, or FileMaker Pro files.
Properties
Note All properties are read-only.
Application: Returns a pointer to the Application object.
Parent: Returns a pointer to the Application object.
Count: Returns the number of Documents (long integer) in the Document collection.
_NewEnum: Returns an enumerator object to traverse all the Document objects in the Document
collection. This is not an explicit property of the object, but accessible implicitly when you use the
document in a For loop.
Active: Returns the active document.
Item(variant): Returns a specific Document object from the collection. This method is the default
member of the Documents Collection. It takes a variant parameter that can be specified by:
•A string that represents the document’s filename (full path name).

Creating scripts to automate tasks
FILEMAKER PRO HELP 434
•An index (long integer) into the Documents collection.
•NULL (which returns the entire collection).
Methods
Open(filename As String, accountName As String, password As String): Opens a specific
FileMaker Pro file, creates a Document object, and returns a pointer to the Document object.
Close( ): Closes all documents in the collection and removes them from this collection. The
Document Close statement produces a hard close of the document. If other users are connected to
the FileMaker Pro database when the application receives a Document Close statement, they will
be disconnected immediately, and without warning. Be sure to allow any connected users the
opportunity to exit FileMaker Pro before sending this command.
Document
A Document is a FileMaker Pro database file.
Properties
Note All properties are read-only.
Application: Returns a pointer to the Application object.
Parent: Returns a pointer to the Document Collection object, the parent of the Document object.
FullName: Returns the file specification of the document, including the path. If the Document
FullName command is sent to a remote file running on a host, only the file’s name, and not its path,
will be returned.
Path: Returns the path specification of the document. This does not include the filename or the
extension.
Saved: Returns the state of the document (whether the document has been saved). FileMaker Pro
always returns TRUE.
Active: If the Document object’s window is active, then TRUE is returned, otherwise, FALSE.
Methods
Activate( ): Makes the window associated with this Document object the active window.
Save( ): Flushes the database cache.
Close( ): Closes the document and removes it from the Documents collection.
DoFMScript(WhichScript As String): Executes a FileMaker Pro script on this Document object. The
script is specified by name, and must already exist in the Document (for example, in the
FileMaker Pro file).
Related topics
Using FileMaker Pro ActiveX Automation (Windows)
ActiveX Automation example (Windows)
ActiveX Automation example (Windows)
Private Sub Form_Load()
'----------------------------------------------
Creating scripts to automate tasks
FILEMAKER PRO HELP 435
' Sample code for accessing FileMaker Pro
' in Visual Basic.
'
' "FileMaker Pro 7.0 Type Library" must be checked
' and available in Visual Basic's Project/References.
'----------------------------------------------
'----------------------------------------------
' Declaring Objects and Launching FileMaker
'----------------------------------------------
' Declare object variables
Dim FMApp As FMPro70Lib.Application
Dim FMDocs As FMPro70Lib.Documents
Dim FMActiveDoc As FMPro70Lib.Document
' Launch FileMaker
Set FMApp = CreateObject("FMPRO.Application")
' Set the documents object
Set FMDocs = FMApp.Documents
' Make FileMaker visible (when launching from automation,
' FileMaker remains hidden by default.)
FMApp.Visible = True
'----------------------------------------------
' Querying open documents
'----------------------------------------------
'Check the open document count
If FMDocs.Count = 0 Then
Debug.Print "No open documents"
Else
Debug.Print "Open document count is:"; FMDocs.Count
End If
'--------------------------------------------------
' Opening a FileMaker database and running a script
'--------------------------------------------------
Creating scripts to automate tasks
FILEMAKER PRO HELP 436
' Note: A FileMaker file "c:\testing.fmp12" must be available
' with a script called "First Script" in order for the following
' to work.
Dim myOpenFile As Object ' note: can also be declared As
FMPro70Lib.Document
Set myOpenFile = FMDocs.Open("c:\testing.fmp12", "","")
myOpenFile.DoFMScript ("First Script")
'--------------------------------------------------
' Querying the active document
'--------------------------------------------------
Set FMActiveDoc = FMDocs.Active
' Display the active document's name
Debug.Print "The active file is "; FMActiveDoc.FullName
'--------------------------------------------------
' Enumerating and closing documents
'--------------------------------------------------
Dim TempToc As Object
If FMDocs.Count > 0 Then
For Each TempDoc In FMDocs
Debug.Print "About to close document: "; TempDoc.FullName
TempDoc.Close
Set TempDoc = Nothing
Next
End If
'----------------------------------------------
' Clean up and Quit
'----------------------------------------------
Set FMDocs = Nothing
Set FMActiveDoc = Nothing
Set myOpenFile = Nothing
' Quit FileMaker and release the variables

Creating scripts to automate tasks
FILEMAKER PRO HELP 437
' (Note: always set the application variable to Nothing after quitting.)
FMApp.Quit
Set FMApp = Nothing
End Sub
Related topics
Using FileMaker Pro ActiveX Automation (Windows)
ActiveX Automation objects, methods, and properties (Windows)
Scripting with Apple events (OS X)
Apple events let you automate, customize, and control many OS X applications. FileMaker Pro can
send Apple events to applications that support them. FileMaker Pro can also receive Apple events
from applications that have been designed to send Apple events.
Apple events are grouped into suites. FileMaker Pro supports the following:
•Required suite
•A special subset of the Core, Table, and Database suites
•FileMaker Pro suite
•Object Model
•A subset of the URL suite
To send Apple events from FileMaker Pro to other applications, define a script and use either the
Send Event (OS X) script step or the Perform AppleScript (OS X).
To see a list of FileMaker Pro compatible Apple events, open the FileMaker Pro Apple events
dictionary in a script editor like AppleScript Editor.
Apple events troubleshooting (OS X)
The following are known Apple events issues:
•When you attempt to find a record outside the current found set, no error is returned.
•You cannot use a list of IDs to retrieve records from a database.
•Performing a filtered reference on a range of records returns all matching records instead of
matching records within the specified range.
•You cannot use “whose” statements on summary fields to find records.
•If multiple occurrences of a field appear on a layout, all occurrences are returned when
getting or setting data.
Choose from the following list of Apple events errors:
Apple events error: "Apple event timed out" (-1712)
Apple events error: "Expected expression but found unknown token"
Apple events error: "Invalid object containment" (-1723)
Apple events error: "Object not found" (-1728)
Apple events error: "Data is being accessed by another user, script, or transaction" (-10011)
Apple events error: "Set Data failed. Invalid data was supplied" (-17005)
Apple events error: "Event failed. User canceled the event processing" (-17006)

Creating scripts to automate tasks
FILEMAKER PRO HELP 438
Apple events error: "Create failed. Invalid data was supplied" (-17007)
Apple events error: "Apple event timed out" (-1712)
This error can happen when an event takes an unusually long time to complete. If an event takes
longer than two minutes, the Apple Event Manager reports a time-out error. This error can
sometimes be generated when:
•You are using the FileMaker Pro Show event to find records in a large database
•FileMaker Pro presents a dialog box waiting for the scripter's (user's) response
•An event takes a long time to occur, such as opening a networked file when there is heavy
network traffic.
To prolong the amount of time AppleScript waits for a response: Use the "with timeout" statement.
An example of such a statement that increases the wait time to five minutes is:
tell application "FileMaker Pro"
with timeout of 300 seconds
Show (every Record whose Cell "Product" contains "FileMaker Pro")
end timeout
end tell
Apple events error: "Expected expression but found unknown
token"
This AppleScript error message can occur when smart quotes are used instead of straight quotes in
a script statement. The Perform AppleScript script step will compile statements with straight quotes
only.
This may be an issue when you copy a script from a word processor that uses smart quotes and
paste it into the script text area of the Specify AppleScript window. This may also be an issue when
using the field value option in the Specify AppleScript dialog box (your AppleScript is in a
FileMaker Pro field). If this is the case, turn smart quotes off (in File Options) to avoid the error.
Apple events error: "Invalid object containment" (-1723)
This error alerts you that an object may not have been specified correctly according to the
FileMaker Pro object containment hierarchy. The object hierarchy tells you how FileMaker Pro
objects are related. For instance, fields are a subset of records but not menus; menus can belong
only to an application, not to a window or database.
To correct this error: Examine the relationship of the objects you have specified and compare them
with the containment hierarchy.
The containment hierarchy can be found in the FileMaker Pro event and object dictionary accessible
with the AppleScript Script Editor.
Apple events error: "Object not found" (-1728)
This is one of the most frequent and generic error messages. It alerts you that an object may not
have been referenced correctly.
To correct this error:
1. Make sure that references to fields, records, databases, and layouts are spelled correctly.

Creating scripts to automate tasks
FILEMAKER PRO HELP 439
2. Verify that the object exists.
In some cases you have specified the object correctly and the "Object not found" error means that
the object does not exist. For instance, if you are specifying a field on a layout check to see that the
field exists and that it is on that layout. Also, when you use a Show command to find records and no
records are found, the result will be "Object not found."
Apple events error: "Data is being accessed by another user,
script, or transaction" (-10011)
This error can be generated if:
•the Apple event is processing one or more records, and processing is prevented because
another user has one or more records locked up
•access privileges prevent some records from being modified
•an Apple event arrives while a script is being processed
•other, similar events occur while a transaction is taking place
For Apple events that fail for one of these reasons, the locked/protected records will be skipped and
an error will be returned at the end of the transaction.
Apple events error: "Set Data failed. Invalid data was supplied" (-
17005)
This error occurs when you enter data into a field in the wrong format or when you enter a value in a
field that does not meet validation criteria set in Manage Fields.
This error can occur when you issue a set data, create record with data, or paste
command to enter:
•blank value in a field defined as "Not Empty"
•duplicate value in a field defined as "Unique"
•non-existing value in a field defined as "Existing"
•value not in the range defined for a field
•value that does not match the type validation
To correct the error:
1. Check the validation options that may be defined for the fields you are manipulating.
2. Examine the format of the data you are pasting and the format of the field. Do they match?
Note Container fields will accept QuickTime movies, TIFF, PICT, EPS graphics, PDF files, sounds,
and text.
Field type Accepted format Example
Date month/day/year
Note This is different from AppleScript's
default date format, for example, "Monday,
November 10, 2014 4:23:26 PM".
11/10/2014
Time hours:minutes:seconds 07:15:45 PM
Timestamp month/day/year hours/minutes/seconds format 11/10/2014 08:24:53 AM

Creating scripts to automate tasks
FILEMAKER PRO HELP 440
Apple events error: "Event failed. User canceled the event
processing" (-17006)
This error occurs when a Print from Finder event is canceled by the user.
Apple events error: "Create failed. Invalid data was supplied" (-
17007)
This error occurs if the user tries to create records with initial data that fails validation or access
privileges checks. As a result of this failure, the new record will be deleted.
Note about serial numbers If the record is set to auto-enter serial numbers On creation, the serial
number increments as each record is created, but is not decremented at the time the records are
deleted. This problem is avoided if serial numbers are set to be generated On commit, as serial
numbers will begin from the last committed record. See Defining automatic data entry.
Working with the Scripts menu
A script folder appears as a submenu in the Scripts menu. In Windows, FileMaker Pro lists as many
scripts and folders in the Scripts menu as will fit on a screen, depending on screen resolution and
the length of script or folder names. To scroll through additional scripts and folder submenus, click
on the triangle at the bottom of the list. In OS X, the Scripts menu is scrollable, and the maximum
number of scripts listed is not limited by screen size or resolution. In both Windows and OS X,
FileMaker Pro assigns keyboard shortcuts to the first ten scripts.
Tip To visually separate items in the Scripts menu with a single horizontal divider, create a
separator. In the Manage Scripts dialog box, select the script or folder above where you want the
separator, then choose Separator from the New list.
Related topics
Creating and editing scripts
Managing scripts using folders
Saving a script
Deleting a script
Copying and pasting scripts
Using buttons with scripts
You can use a button to perform a FileMaker Pro command or a script. For example, you could
define a button that simply switches to another layout, by using the Go to Layout script step. Or you
To Choose Scripts menu > Manage Scripts and then
Add a script or
folder to the
Scripts menu
In the Manage Scripts dialog box, select the script or folder, then select Include in
menu, or click to the left of the script in the list. A check mark appears next to the
script or folder name.
Reorder scripts
or folders in the
Scripts menu
In the Manage Scripts dialog box, drag the script or folder by the double arrow that is
to the left of its name. (Make sure Include in menu is selected.)
Remove a script
or folder from the
Scripts menu
In the Manage Scripts dialog box, select the script or folder, then deselect Include in
menu.
Creating scripts to automate tasks
FILEMAKER PRO HELP 441
could define a button that performs a more complex script that finds, sorts, and prints records, or
one that transfers information from one FileMaker Pro file to another.
In Browse mode or in Find mode, you can click a button to perform its command or script. You can
also include buttons in a layout’s tab order, which allows you to tab to a button and “click” it by
pressing the Space bar. See Setting the tab order for data entry.
You can turn many FileMaker objects into buttons. You can copy an existing button, or use text and
graphics to design your own button.
Note Another type of button that you can create is a popover button, which displays a popover. See
Working with popovers on layouts.
Related topics
Creating and editing scripts
Perform Script and script parameter examples
Defining a button
To define a button:
1. If you're defining a button that performs a script (as opposed to a single FileMaker Pro
command), create the script.
See Creating and editing scripts.
2. In Layout mode, choose the layout where you want to locate the button from the Layout
pop-up menu.
3. Create or select the object that will serve as the button on the layout in one of two ways, as
follows.
4. In the Button Setup dialog box, select a command from the list and, if necessary, set options
for the command.
5. If you want the button to perform an entire script, select Perform Script and choose a
script. (You can only select one script per button.)
To Do this
Create a new button In the status toolbar, do the following.
•Windows: Click the arrow next to the Button tool or the
Popover Button tool , and choose Button from the
menu, then drag the crosshair to draw the button.
•OS X: Click and hold the Button tool or the Popover
Button tool , and choose Button from the menu, then
drag the crosshair to draw the button.
Tip You can also choose Insert menu > Button.
Attach a button definition to
existing object(s), like text
or a field
Select the object(s) and choose Format menu > Button Setup.
If you select multiple objects, FileMaker Pro groups them when you
define them as a button. See Grouping and ungrouping objects.

Creating scripts to automate tasks
FILEMAKER PRO HELP 442
6. If you created a new button, type a label for the button at the insertion point.
7. To change appearance of the button, see Setting the fill, line style, and borders for objects,
layout parts, and the layout background.
8. Click OK.
9. Switch to Browse mode or Find mode to use the button.
Notes
•To see buttons on a layout, choose View menu > Show > Buttons.
•If a button references a script or script step, a button badge appears in the lower right
corner of the button. If the button has other FileMaker Pro badges associated with it, the
button badge could be obscured by the other badges and therefore not be visible. For more
information about badges, see Identifying badges on layout objects.
•To change button text, click the Text tool in the status toolbar.
•In the Button Setup dialog box, you can:
•choose whether the pointer will change to a hand cursor when it is over the button.
•choose items in the Show Compatibility list to see which script steps are available in
FileMaker Pro (Macintosh or Windows), FileMaker Go (iOS), Custom Web
Publishing, or FileMaker WebDirect.
•Perform Script is useful if you want to run subscripts. You can choose options to Pause,
Resume, Exit, or Halt any script that is currently running. Here is a general description of
what happens to the currently running script when a user clicks the button:
•Pause (the default): a paused script remains paused.
•Resume: a paused script will be resumed after the button’s script executes.
•Exit: a current paused script is exited. If the current script was called by another script,
control returns to the original script.
•Halt: execution of all scripts (except the button’s script) is halted.
•Another type of button that you can create is a popover button, which displays a popover.
See Working with popovers on layouts.
Related topics
Script steps reference (category list)
Script steps reference (alphabetical list)
Copying a button
When you copy a button, you copy the object and the button definition. If you copy a button from
another database file, make sure that any fields, layouts, or script references are accurate for the
current database.
To copy a button:
1. If the button is in another database file, open the file.
2. In Layout mode, select the button and choose Edit menu > Copy.
3. Switch to the layout where you want the button to go.

Creating scripts to automate tasks
FILEMAKER PRO HELP 443
4. Choose Edit menu > Paste.
Notes
•To change button text, use the Text tool in the status toolbar.
•To see a button definition, switch to Layout mode and double-click the button. The current
definition is selected in the Button Setup dialog box.
Changing a button definition
To change a button definition:
1. In Layout mode, select the button you want to change.
2. Choose Format menu > Button Setup, or double-click the button.
3. Change the script step or options, then click OK, or choose Do Nothing to disable the
button.
Related topics
Script steps reference (category list)
Script steps reference (alphabetical list)
Deleting a button
To delete a button:
1. In Layout mode, select the button you want to delete.
2. Choose Edit menu > Cut or Clear, or press Backspace or Delete.
When you delete a button, FileMaker Pro removes the button from the layout and deletes its
definition.
To delete a button definition without deleting the button object:
1. In Layout mode, select the button.
2. Choose Format menu > Button Setup, or double-click the button.
3. In the Button Setup dialog box, select Do Nothing, then click OK.
Script examples
You can use script examples provided in Help as starting points for your own scripts. Several scripts
are included in the FileMaker Pro Starter Solutions as well.
Note Don't change a Starter Solution script. Instead, save a copy of the Starter Solution, and then
modify the copy.
To view a script in FileMaker Pro:
1. Choose Script menu > Manage Scripts. Or, choose File menu > Manage > Scripts.
2. In the Manage Scripts dialog box, select the script you want to view.
3. Click Edit to see the script steps in the Edit Script window.

Creating scripts to automate tasks
FILEMAKER PRO HELP 444
4. Close the Edit Script window, then close the Manage Scripts dialog box.
If structure examples
If, Else If, Else, and End If script steps define a structure that controls whether or not script steps are
performed. This control depends upon the result of a testable condition or Boolean calculation.
•When the calculation result is any number except zero, the condition evaluates to True, and
subsequent script steps are performed.
•When the calculation result is zero, blank, or content that does not resolve into a number,
then the condition evaluates to False and the subsequent script steps are not performed.
Else If steps provide additional Boolean tests. Else steps provide alternative steps to perform if all
conditions evaluate to False.
Example 1
Performs a find. If no records are found, displays a custom dialog. If records are found, sorts the
found set.
Perform Find [Restore]
If [Get ( FoundCount ) = 0]
Show Custom Dialog ["Find Records"; "No records were found."]
Else
Sort Records [Restore; No dialog]
End If
Example 2
Performs a find. If no records are found, displays a custom dialog. If one record is found, goes to the
Invoice Details layout. If more than one record is found, goes to the Invoices layout.
Perform Find [Restore]
If [Get (FoundCount) = 0]
Show Custom Dialog ["Find Records"; "No record was found."]
Else If [Get (FoundCount) = 1]
Go to Layout ["Invoice Details"]
Else
Go to Layout ["Invoices"]
End If
Loop structure examples
Loop, Exit Loop If, and End Loop script steps define a structure that enables script steps to be
repeated. Script steps between a Loop and an End Loop are executed continuously, until an Exit
Loop If condition or an Exit After Last condition is reached for a Go to Record/Request/Page or Go
to Portal step.
Use the Exit Loop If script step to specify a calculation to be evaluated. When the calculation result
is not zero, it evaluates to True and the loop ends. When the calculation result is zero, it evaluates to
False and the loop continues.
Example 1
Copies the contents of the Customers::Work Phone to Customer::Day Contact in all records.
Go to Record/Request/Page [First]
Loop

Creating scripts to automate tasks
FILEMAKER PRO HELP 445
Set Field [Customers::Day Contact; Customers::Work Phone]
Go to Record/Request/Page [Next; Exit after last]
End Loop
Example 2
Loops through records to export files that are in container fields. Exits the loop if a record has an
empty Container field.
Set Variable [$PATH; Value: Get ( DocumentsPath ) & Products::Container]
Go to Record/Request/Page [First]
Loop
Exit Loop If [IsEmpty ( Products::Container )]
Export Field Contents [Products::Container; "$PATH"]
Go to Record/Request/Page [Next; Exit after last]
End Loop
Startup script examples
A startup script can customize a user's view of a database or perform other actions when a
database opens. Startup scripts are triggered by the OnFirstWindowOpen script trigger. For
information on setting up a startup script, see Setting file options.
Example 1
Goes to the Administration layout if the account is assigned the Full Access privilege set. Otherwise,
goes to the Data Entry layout.
If [Get ( AccountPrivilegeSetName ) = "[Full Access]"]
Go to Layout ["Administration"]
Else
Go to Layout ["Data Entry"]
End If
Example 2
Checks which version of FileMaker Pro or FileMaker Go opened the database and goes to the
appropriate Customers layout.
If [Get ( Device ) = 3]
Go to Layout ["Customers iPad"]
Else If [Get ( Device ) = 4]
Go to Layout ["Customers iPhone"]
Else
Go to Layout ["Customers"]
End If
Perform Script and script parameter examples
Perform Script performs a script that is defined in the current file or in another FileMaker Pro file.
Optional script parameters can pass text into a script. For example, you can use a script parameter
to store the active record number when a script is initiated, making it easy to return to that record at
the end of the script. Or you can call the same script from different buttons on the same layout, and
easily determine which button called the script by using a different script parameter for each button.

Creating scripts to automate tasks
FILEMAKER PRO HELP 446
When you specify a parameter, you can access it within a script or pass it to other scripts using the
Get(ScriptParameter) function.
Complex parameters, such as a list of names or other values, can also be used. Complex
parameters that are separated by carriage returns can be parsed using the LeftValues function,
MiddleValues function, and RightValues function. These functions return the beginning, middle, and
ending values from lists that are separated by carriage returns. Complex parameters separated by
other characters can be parsed as text using functions such as Left function, Middle function, and
Right function.
Notes
•A script parameter exists only for the duration of the script. Script parameters are reset each
time a script is performed. If you want a script parameter to persist while a file is open, you
can use a global variable as the script parameter.
•A script parameter exists within the parent script only, unless it is explicitly passed to
another script using the Get(ScriptParameter) function.
•A script parameter can be used (but not modified) within a script and can be passed along
to sub-scripts by using the Get(ScriptParameter) function as the parameter for the sub-
script. You can also specify different parameters each time the sub-script is called using
Perform Script. Changing the parameters passed to a sub-script does not modify the value
of the parameters returned from Get(ScriptParameter) in the parent script.
Example 1
Runs the "Print Invoice Report" script with no parameters.
Go to Layout ["Invoice Report"]
Perform Script ["Print Invoice Report"]
Example 2
Uses a field, Customer Name, as the parameter. Invoices for the current customer are returned in a
new window with the Invoice Report layout.
Main script: Current Customer Invoices
Find Matching Records [Replace; Invoices::Customer ID]
#Calls the "View Customer Invoices" sub-script defined below
Perform Script ["View Customer Invoices"; Parameter:
Invoices::Customer Name]
Sub-script: View Customer Invoices
New Window [Name: "Customer: " & Get ( ScriptParameter ); Style:
Document]
Go to Layout ["Invoice Report"]
Sort Records [Restore; No dialog]

Protecting databases
FILEMAKER PRO HELP 447
Protecting databases
You can restrict what users can see and do in a database file by defining accounts and privilege
sets. For example, you can:
•Password-protect a file
•Allow data entry only
•Allow browsing but prohibit database changes
•Restrict access to specific tables, records, fields, and layouts
•Give certain users full access to a file, which allows them to define tables, fields,
relationships, data sources, and access privileges for other users
You can also control access to a file’s schema (including its tables, layouts, scripts, and value lists).
Although your operating system includes file security features, you should use FileMaker Pro
access privileges as the fundamental way to control access to and protect the security of your
database files.
It’s especially important to protect FileMaker Pro files that are shared with other FileMaker Pro users
via the FileMaker Network, with web users via FileMaker WebDirect, and with ODBC/JDBC clients.
These shared files are more vulnerable because they may be more widely available over your
network.
Note If you have FileMaker Pro Advanced, you can encrypt database files to protect them while
they are being stored on disk. See Encrypting database files (FileMaker Pro Advanced).
About protecting databases
You can limit what users can see and do in a FileMaker Pro file. You can restrict:
•Data access. Make particular tables, fields, or records view-only, or hide them completely.
•Layout access. Prevent users from modifying layouts in Layout mode.
•Access to value lists and scripts. Prevent users from accessing and modifying value lists
and scripts, and from running scripts.
•Access to file sharing. Individually enable file sharing via the FileMaker Network, Web
Publishing, and ODBC/JDBC for only particular users.
•Outputting data. Prevent users from printing or exporting data.
•Menu access. Make only a limited set of menu commands available.
•External file access. Protect access to a file in your database by authorizing other files to
reference its tables, layouts, scripts, and value lists.
•Plug-in files. You can disable installation of plug-in files. See Setting plug-in preferences.
You restrict what users do in a file by requiring them to enter an account name and password when
they attempt to open a file. The account name and password they enter determines which privilege
set will be used to limit what they can do in a file. See About accounts, privilege sets, and extended
privileges.
You can define privileges in a shared file while clients are using it. Any privilege changes that affect
a current client do not take effect until the client closes and reopens the file.
Privileges protecting an external data source
The external data source provides the access privileges for the data. You can add access privilege
requirements in FileMaker Pro. See Editing ODBC data sources.

Protecting databases
FILEMAKER PRO HELP 448
Privileges protect a single file
The privileges that you set up apply to a single file only and all tables within that file. If your database
solution consists of multiple files that you want to protect, you may want to combine all of these files
into one multi-table file. Then you can define privileges in only a single file to manage access to the
entire database solution. If you don’t want to combine the files into one file, then you should define
privileges in each file that contains items you want to protect.
Important If you create a relationship in one file that references a table in another file, you cannot
manage access privileges for the related table in the first file. The privileges defined in the other file
control access to that table.
Note If you have a multi-file database solution that includes multiple protected files, you may want
to consider using identical account names and passwords in each protected file. When one
protected file attempts to access another protected file (such as to access related data or execute a
script in the second file), FileMaker Pro initially attempts to open the second file with the same
account name and password that was used to open the first file. If there is a matching account name
and password, FileMaker Pro skips displaying the account/password dialog box. If there is no
matching account, then FileMaker Pro displays the account/password dialog box so the user can
enter account information.
About accounts, privilege sets, and extended privileges
You use accounts, privilege sets and extended privileges to protect FileMaker Pro database files.
Accounts
Accounts authenticate users who are attempting to open a protected file. Each account specifies an
account name and (usually) a password. Any user that cannot specify valid account information
won’t be able to open a protected file. Each file initially contains two accounts: Admin and Guest.
You may want to create an account for every individual who accesses a file, or you may want to
create a small number of accounts that are shared among many individuals, such as a “Marketing”
account and a “Sales” account:
•Create accounts for individuals when it is necessary to guarantee the identities of particular
users and you want to manage access at an individual level.
•Create shared accounts when you want fewer accounts to maintain and you are less
concerned about managing individual access to the database file.
If you host files on FileMaker Server, you can create External Server accounts that obtain
authentication information from an authentication server such as an Apple OpenDirectory or
Windows Domain. This allows you to use a centrally managed user directory that may already be in
use to manage access to other network resources such as file servers. See Creating accounts that
authenticate via an external server.
See Creating and managing accounts and About the Admin and Guest accounts.
Privilege sets
A privilege set specifies a level of access to a database file. When you create a privilege set, there
are many options available that you can use to limit database access, such as which layouts are
viewable, which menus are available, and whether printing is permitted. Privilege sets can also
restrict access to particular tables, records, or fields within a file. Each account is assigned a
privilege set, which determines the level of access when someone opens a file using that account.

Protecting databases
FILEMAKER PRO HELP 449
You can create as many privilege sets as you need to define the types of access you want to permit
to a file. Each database file contains three predefined privilege sets for common types of access
levels.
See Using the predefined privilege sets and Creating and managing privilege sets.
Extended privileges
Extended privileges determine the data sharing options that are permitted by a privilege set, such as
whether a privilege set permits users to open a shared file or view a database in a web browser.
The following table lists the default extended privileges that are available. (FileMaker as well as
third-party developers may define additional extended privileges to manage access to other
software products designed to work with FileMaker Pro or FileMaker Server.)
When a user attempts to open or access a protected file using one of the above methods, the user
will be prompted to provide account information. If the privilege set for the account does not permit
the type of extended privilege access the user is requesting, the user will get an error indicating that
they cannot access the file in that way.
All extended privileges except fmreauthenticate10 are disabled by default, even in the Full Access
privilege set.
Enabling extended privileges only makes it allowable for certain privilege sets to access shared
data. To actually access the shared data, you must also set up sharing for the type of access that
you want. See Sharing databases on a network, Using ODBC and JDBC with FileMaker Pro, or
Publishing databases on the web.
For more information on extended privileges, see Managing extended privileges.
Keyword Extended privilege Determines if a privilege permits
fmwebdirect Access via FileMaker WebDirect Accessing a database file from a web browser
via FileMaker WebDirect.
fmxdbc Access via ODBC/JDBC Accessing a database file as an ODBC or
JDBC data source.
fmapp Access via FileMaker Network,
server-side scripting, or
FileMaker Go
Opening a shared file (either a file shared by
FileMaker Pro or hosted and shared by
FileMaker Server).
fmreauthenticate10 Require re-authentication after the
specified minutes in sleep/
background - Go only
Accessing a file in FileMaker Go without
having to re-login after file hibernation or after
using a different app. The default time is 10
minutes; maximum time is 10080 minutes (one
week) - FileMaker Go only.
fmxml Access via XML Web Publishing -
FMS only
Accessing a database file from a web browser
or other application via XML web publishing -
FileMaker Server only.
fmphp Access via PHP Web Publishing -
FMS only
Accessing a database file from a web browser
or other application via PHP web publishing -
FileMaker Server only.

Protecting databases
FILEMAKER PRO HELP 450
Notes
•FileMaker Pro no longer supports the fmiwp extended privilege. However, opening
database files created in FileMaker Pro 12 or earlier that use the fmiwp extended privilege
does not remove the extended privilege from the privilege sets it is assigned to.
•Shared accounts are a security risk. For better security, use individual accounts instead of
shared accounts. If you intend to use shared accounts anyway, make sure you limit the
access capabilities of the privilege sets that shared accounts use. Change the password
occasionally, particularly when certain users no longer require access.
About the Admin and Guest accounts
Each database file initially contains two accounts: Admin and Guest.
Admin account
The Admin account is assigned the Full Access privilege set, which permits access to everything in
a file. The Admin account is not assigned a password. In files for which privileges are not set up, the
file options are set up to automatically log in to the file using the Admin account.
The Admin account is fully editable. You can rename it, assign it a password, make the account
inactive, or even delete the Admin account. See Editing existing accounts.
Warning Don’t forget the account name and password that is assigned to the Full Access privilege
set. If necessary, write it down and store it in a secure place. If you lose or forget this account name
and password, you may not be able to access or change the file.
Guest account
You can permit users to open a file as a guest, which means they do not have to specify any account
information. The Guest account determines the privileges for users who open a file as a guest. By
default, the Guest account is assigned the Read-Only Access privilege set, but you can assign any
privilege set you want to the Guest account.
Initially, the Guest account is inactive, which disables the guest option in the password dialog box
and prohibits users from opening files as a guest. You can enable the Guest account to permit guest
access. For more information about opening files as a guest, see Opening files protected with
passwords.
The Guest account is not fully editable. You cannot delete the Guest account, change the Guest
account name, or assign it a password. See Editing existing accounts.
Using the predefined privilege sets
Every new FileMaker Pro database contains three predefined privilege sets. They are:
•Full Access: permits accessing and changing everything in the file
•Data Entry Only: permits viewing and entering of data only
•Read-Only Access: permits viewing but not changing data
Note The Read-Only Access privilege set permits write access to all global fields. To create a
privilege set in which global fields and all record data are view-only, you can duplicate the Read-
Only Access privilege set and change Records from Custom privileges to View only in all
tables.

Protecting databases
FILEMAKER PRO HELP 451
You cannot change or delete these predefined privilege sets, except to enable or disable extended
privileges for them. You can either use them as is, or duplicate them and then modify the duplicate
copies.
The following table summarizes the properties of these privilege sets. For more information about
these properties, see Editing record access privileges, Editing layouts privileges, Editing value list
privileges, Editing scripts privileges, Editing extended privileges for a privilege set, and Editing other
privileges.
Note The Full Access privilege set is the only one that permits access to the Manage Database
dialog box in order to modify fields, tables, relationships, and data sources. It is also the only
privilege set that permits changing accounts and privileges. Because you cannot enable these
privileges in any other privilege set, any user that wants to make database definition changes or
privileges changes must open the file with an account that is assigned the Full Access privilege set.
At least one active, FileMaker-authenticated account in each file must be assigned the Full Access
privilege set. An error message will appear if you edit accounts so that no active account is assigned
the Full Access privilege set.
Planning security for a file
A new FileMaker Pro file is initially unprotected. Whenever the file opens, it automatically logs in the
user with the Admin account, which is assigned the Full Access privilege set. This permits accessing
and changing everything in the file.
You can use accounts and privilege sets to secure the database file. How you secure a file depends
largely on whether you share the file with others or not:
•If you simply want to keep someone else from opening a database file on your computer,
you can password-protect the file. See Password-protecting a file.
Privilege
Full Access
privilege set
Data Entry Only
privilege set
Read-Only Access
privilege set
Records (in all tables) create, edit, delete create, edit, delete view only
Layouts all modifiable view only view only
Value lists all modifiable view only view only
Scripts all modifiable
and executable
all executable only all executable only
Extended privileges all off, except
fmreauthenticate10
all off, except
fmreauthenticate10
all off, except
fmreauthenticate10
Allow printing on on on
Allow exporting on on on
Manage extended privileges on off off
Override data validation warnings on off off
Disconnect user from server when
idle
off on on
Allow password modification on on on
Password change number of days off off off
Minimum password length off off off
Available menu commands All All All

Protecting databases
FILEMAKER PRO HELP 452
•If you need to share a database file with others and provide varying levels of file access to
different users, you need to plan the security for the file. Follow the steps below to plan the
security you need for the shared file.
You can additionally protect a file by requiring authorization of any file that attempts to access its
tables, layouts, value lists, and scripts. See Authorizing access to files.
To plan the security for a shared file:
1. Determine the privilege sets that you need for the file.
Make a list of the areas of the file that you want to protect, such as particular tables, fields,
records, layouts, value lists, and scripts. Plan the number of privilege sets you need to enforce
the varying levels of file access that you require.
Note Each database file contains three predefined privilege sets, which may meet some or all
of your needs. See Using the predefined privilege sets.
2. Determine whether you need individual accounts for each user, or group accounts that
multiple users can share.
3. Decide if you want to enable the Guest account, which permits users to open the file without
specifying account information.
See About the Admin and Guest accounts.
4. Create the privilege sets that you need in the file.
See Creating and managing privilege sets.
5. Determine if you need to enable any extended privileges for certain privilege sets.
If you want certain privilege sets to be able to open a shared file over a network as a client,
access the file from a web browser via FileMaker WebDirect, or access a file as an ODBC or
JDBC data source, you need to enable extended privileges for certain privilege sets. Don’t
enable extended privileges unless they’re needed.
6. Create the accounts you need in the file, and assign the appropriate privilege set to each
account.
If you’re using the Guest account, assign a privilege set to it as well. Otherwise, disable the
Guest account. See Creating and managing accounts.
7. Test each privilege set to make sure it restricts file access the way you want.
Open the file using different accounts and test each privilege set that you created. Make sure
the restrictions work the way you want, and make any needed corrections to your privilege sets.
8. Optionally limit other files from accessing the schema of your files by use of the File Access
tab.
See Authorizing access to files.
Additional security tips
Though accounts and privilege sets provide good database protection, they are not a 100% secure
solution. You should take other reasonable measures to protect access to your files and information,
and not rely solely on FileMaker Pro access privileges. For example:
•If you host FileMaker Pro databases on a computer that is shared over a network, use
operating system level security settings and passwords to restrict folder and file access to
authorized personnel only.
•Set the screen saver feature of your operating system to require a password in order to
wake up the computer from the screen saver.

Protecting databases
FILEMAKER PRO HELP 453
•Protect the physical security of the computers, hard drives, and backup storage media
where the database files reside.
Notes
•Shared accounts are a security risk. For better security, use individual accounts instead of
shared accounts. If you intend to use shared accounts anyway, make sure you limit the
access capabilities of the privilege sets that shared accounts use. Change the password
occasionally, particularly when certain users no longer require access.
•If you have FileMaker Pro Advanced, you can encrypt database files to protect them while
they are being stored on disk. See Encrypting database files (FileMaker Pro Advanced).
Password-protecting a file
If you have a non-shared database file on your computer and you want to prevent others from
opening it, you can password-protect the file.
After password-protecting a file, you will be prompted to enter an account name and password every
time you open the file. Anyone who does not know this account information will not be able to open
the file.
To password-protect a database file:
1. Make the following changes to the accounts in the file:
•Edit the Admin account so that it has a different account name, a password, and uses
the Full Access privilege set. (If the file does not contain an Admin account, create a
new account with a password and assign the Full Access privilege set to it.)
•Make sure the Guest account is inactive.
•Delete any other accounts in the file or make them inactive.
See Editing existing accounts and Duplicating and deleting accounts.
2. If necessary, edit the Full Access privilege set to allow yourself any extended privileges that
you may want for yourself.
For instructions on how to edit the Full Access privilege set, see Editing extended privileges for
a privilege set. If you don’t need any extended privileges, leave them disabled.
Warning Don’t forget the account name and password that is assigned to the Full Access privilege
set. If necessary, write it down and store it in a secure place. If you lose or forget this account name
and password, you may not be able to access or change the file.
Note To remove password protection from a file, remove passwords from all accounts. Then, in the
File Options dialog box, make sure Log in using is selected, with Account Name and Password
set to Admin and a blank password. See Setting file options.
Creating and managing accounts
Accounts specify account names and (usually) passwords for a file. When a user opens a file that
contains accounts, a dialog box usually prompts the user to enter account information. When a user
opens a file with a correct account name and password, the privilege set assigned to that account
determines what the user can do in that file. See About accounts, privilege sets, and extended
privileges.

Protecting databases
FILEMAKER PRO HELP 454
To create and manage accounts for a file, you need to open the file with an account that is assigned
the Full Access privilege set, which is the only privilege set that permits making account changes to
a file. If you open the file with any other privilege set, the File menu > Manage > Security command
is disabled.
You can create and modify accounts in a shared file while clients are using it. The account changes
you make take effect immediately. However, the changes do not disrupt any current clients. For
example, if you change the password for an account that is in use by one or more clients, their
FileMaker Pro usage is not interrupted. However, they will need to enter the new password the next
time they open the file.
You can create as many accounts as you need. You can create individual accounts for each user, or
a smaller number of accounts that users can share. Each database file also contains two predefined
accounts: Admin and Guest. See About the Admin and Guest accounts.
Warning Don’t forget the account name and password that is assigned to the Full Access privilege
set. If necessary, write it down and store it in a secure place. If you lose or forget this account name
and password, you may not be able to access or change the file.
Note Shared accounts are a security risk. For better security, use individual accounts instead of
shared accounts. If you intend to use shared accounts anyway, make sure you limit the access
capabilities of the privilege sets that shared accounts use. Change the password occasionally,
particularly when certain users no longer require access.
Viewing and reordering accounts
The Manage Security dialog box displays a list of all the accounts for a file. You can view and
reorder this list of accounts. If necessary, you can also change the authentication order of accounts,
which determines the order that FileMaker Server searches through the accounts list for a valid
account.
Note Changing the authentication order of accounts is only necessary under certain situations
when your file is hosted by FileMaker Server. See the Notes section in Creating accounts that
authenticate via an external server and the FileMaker Server documentation.
To view the accounts for a file:
1. Open the database file.
2. Choose File menu > Manage > Security.
The Manage Security dialog box appears. It initially shows the Accounts tab, which lists the
accounts defined for this file.
To reorder the accounts list:
1. Follow the steps above to display the accounts for a file.
2. Do one of the following to order the accounts:
To order the accounts list Choose
Alphabetically View by > account name or click the Account column
heading. You can also switch the alphabetical list
between ascending and descending order by clicking
the Account column heading.
In the order the accounts were created View by > creation order.

Protecting databases
FILEMAKER PRO HELP 455
To change the authentication order of accounts:
1. Follow the steps above to display the accounts for a file.
2. Choose View by > authentication order.
3. Drag each account by its arrow icon into the order you want.
4. Click OK.
Note To quickly activate or deactivate an account, click its checkbox in the first column of the
Accounts tab. See Creating accounts and Editing existing accounts.
Related topics
Duplicating and deleting accounts
About the Admin and Guest accounts
Creating accounts
You can create accounts for every individual who accesses a file, or create fewer accounts that are
shared among many individuals, such as a “Marketing” account and a “Sales” account. You must
assign a privilege set to each new account. See About accounts, privilege sets, and extended
privileges.
To create an account:
1. Choose File menu > Manage > Security.
The Manage Security dialog box appears. The Accounts tab lists the accounts defined for this
file.
2. Click New.
3. In the Edit Account dialog box, for Account is authenticated via, choose FileMaker.
For information about accounts managed by an external server, see Creating accounts that
authenticate via an external server.
4. Enter an account name and password for the account.
Tip If you plan to create accounts for individual users, you may want to base each account
name on the User Name defined in the Preferences dialog box. This User Name is the default
account name that appears in the dialog box that prompts a user for an account name and
password. The user won’t have to re-type the account name if it matches the User Name.
For tips on specifying a password, see Tips for creating account names and passwords.
5. To force the account user to choose a new password the first time he or she logs in, choose
User must change password on next login.
Note In most cases, an account that is shared by multiple users should not force a password
change upon first login. Instead, you should specify a password and provide it to the users that
need it. Also, the privilege set for a shared account should not permit password changes
In the order that FileMaker Server searches
through the accounts list for a valid account.
View by > authentication order.
To order the accounts list Choose

Protecting databases
FILEMAKER PRO HELP 456
because one user could change the password and lock out all other users who share the
account. See Editing other privileges.
6. For Account Status, choose whether you want the account to be active or inactive.
For example, you may want to keep the account inactive until you finish setting up its privilege
set or temporarily make an account inactive. Users cannot open a database using an inactive
account name and password.
7. For Privilege Set, choose the privilege set you want to use with this account.
You can choose an existing privilege set, or choose New Privilege Set and create a new one.
See Creating new privilege sets.
8. For Description, enter a description of the account (optional).
9. Click OK.
10. In the Manage Security dialog box, do one of the following:
•If you’ve finished working with accounts and privileges, click OK. In the dialog box that
appears, enter an account name and password that is assigned the Full Access
privilege set, and click OK.
•To continue working with accounts and privileges, see Creating and managing
accounts, Creating and managing privilege sets, or Managing extended privileges.
Notes
•Passwords are case-sensitive. For example, if you specify a password as zFootBallz2,
FileMaker Pro will not accept zfootballz2. When you’re entering a password for an
account, make sure the Caps Lock key on your keyboard is not inadvertently enabled.
•Account names are not case-sensitive. For example, if you specify an account name as
Chris, the account user can successfully open the file by entering chris or CHRIS as
the account name.
•If multiple users are sharing the same account (such as a shared “Marketing” account or
“Sales” account), change the password occasionally, particularly when certain users no
longer require access. Re-distribute the new password to the people who need it, and
remind them not to share the password with unauthorized users. See Editing existing
accounts.
Editing existing accounts
You can edit existing accounts, such as the account name, password, and other settings. For
example, if someone forgets their password, you can reset it for their account and inform them of the
new password.
For information about duplicating or deleting accounts, see Duplicating and deleting accounts.
Warning Don’t forget the account name and password that is assigned to the Full Access privilege
set. If necessary, write it down and store it in a secure place. If you lose or forget this account name
and password, you may not be able to access or change the file.
To edit an existing account:
1. Choose File menu > Manage > Security.
The Manage Security dialog box appears. The Accounts tab lists the accounts defined for this
file.

Protecting databases
FILEMAKER PRO HELP 457
2. Select the account you want to edit and click Edit.
3. In the Edit Account dialog box, change one or more of the options described in the following
table.
4. Click OK.
5. In the Manage Security dialog box, do one of the following:
•If you’ve finished working with accounts and privileges, click OK. In the dialog box that
appears, enter an account name and password that is assigned the Full Access
privilege set, and click OK.
•To continue working with accounts and privileges, see Creating and managing
accounts, Creating and managing privilege sets, or Managing extended privileges.
Notes
•At least one active, FileMaker-authenticated account in each file must be assigned the Full
Access privilege set. An error message will appear if you edit accounts so that no active
account is assigned the Full Access privilege set.
•You cannot rename the Guest account or assign it a password. If you do not want to permit
Guest access to a file, make the Guest account inactive. See About the Admin and Guest
accounts.
•Passwords are case-sensitive. For example, if you specify a password as zFootBallz2,
FileMaker Pro will not accept zfootballz2. When you’re entering a password for an
To Do this
Change how the account is
managed
Choose an option from the Account is authenticated via list.
For information about accounts managed by an external server,
see Creating accounts that authenticate via an external server.
Change the account name Enter a new account name in the Account Name box.
Change the password Enter a new password in the Password box.
For tips on choosing a password, see Tips for creating account
names and passwords.
Force the user to choose a new
password the next time he or
she logs in
Choose User must change password on next login.
Note In most cases, an account that is shared by multiple users
should not force a password change upon first login. Instead, you
should specify a password and provide it to the users that need it.
Also, the privilege set for a shared account should not permit
password changes. See Editing other privileges.
Make an account active or
inactive
For Account Status, choose whether you want the account to be
active or inactive. Users cannot open a database using an
inactive account name and password.
Change the privilege set for the
account
For Privilege Set, choose the privilege set you want to use with
this account.
You can choose an existing privilege set, or choose New
Privilege Set and create a new one. See Creating new privilege
sets.
Edit the account description For Description, enter the account description you want.

Protecting databases
FILEMAKER PRO HELP 458
account, you may want to make sure the Caps Lock key on your keyboard is not
inadvertently enabled.
•Account names are not case-sensitive. For example, if you specify an account name as
Chris, the account user can successfully open the file by entering chris or CHRIS as
the account name.
•Shared accounts are a security risk. For better security, use individual accounts instead of
shared accounts. If you intend to use shared accounts anyway, make sure you limit the
access capabilities of the privilege sets that shared accounts use. Change the password
occasionally, particularly when certain users no longer require access.
•To automatically log in each time a file is opened, choose File menu > File Options and
specify the account name and password. See Setting file options.
•To remove password protection from a file, remove passwords from all accounts. Then, in
the File Options dialog box, make sure Log in using is selected, with Account Name and
Password set to Admin and a blank password. See Setting file options.
Duplicating and deleting accounts
You can duplicate accounts and delete accounts that you no longer need.
To duplicate or delete existing accounts:
1. Choose File menu > Manage > Security.
The Manage Security dialog box appears. The Accounts tab lists the accounts defined for this
file.
2. Select one or more accounts that you want to duplicate or delete:
•To select one account, click the account name.
•To select multiple accounts, Ctrl-click (Windows) or Command-click (OS X) each
account name.
•To select a range of adjacent accounts, click the first account, and then Shift-click the
last account in the range.
3. Do one of the following:
•To duplicate the accounts, click Duplicate.
•To delete the accounts, click Delete.
4. Do one of the following:
•If you’ve finished working with accounts and privileges, click OK. In the dialog box that
appears, enter an account name and password that is assigned the Full Access
privilege set, and click OK.
•To continue working with accounts and privileges, see Creating and managing
accounts, Creating and managing privilege sets, or Managing extended privileges.
Notes
•If you want to temporarily prevent access to a shared file, you can make accounts inactive
instead of deleting them. When you want to restore access to the file, make the accounts
active again. See Editing existing accounts.
•At least one active, FileMaker-authenticated account must be assigned the Full Access
privilege set. An error message will appear if you delete accounts such that no active
account is assigned the Full Access privilege set.

Protecting databases
FILEMAKER PRO HELP 459
•You cannot delete the Guest account. If you do not want to permit Guest access to a file,
make the Guest account inactive. See Editing existing accounts.
Creating accounts that authenticate via an external server
If you’re hosting FileMaker Pro database files with FileMaker Server and your organization uses
centrally-managed authentication for users and groups such as Apple OpenDirectory or a Windows
Domain, you can set up accounts that authenticate users based on your authentication server. This
allows you to use your existing authentication server to control access to databases without having
to manage an independent list of accounts in each FileMaker Pro database file.
Note Although you can set up accounts for external authentication servers in FileMaker Pro, only
database files hosted by FileMaker Server can authenticate users against an authentication server.
Database files shared by FileMaker Pro won’t authenticate against an authentication server.
Important When a database file contains one or more External Server accounts, make sure you
use operating system security settings to limit direct access to the file. Otherwise, it might be
possible for an unauthorized user to move the file to another system that replicates your
authentication server environment and gain access to the file. For more information, see the
FileMaker Server documentation.
To create an account that authenticates via an external server:
1. Choose File menu > Manage > Security.
The Manage Security dialog box appears. The Accounts tab lists the accounts defined for this
file.
2. Click New.
3. In the Edit Account dialog box, for Account is authenticated via, choose External Server.
4. For Group Name, enter the name of a group that is defined on an external authentication
server.
5. For Account Status, choose whether you want the account to be active or inactive.
For example, you may want to keep the account inactive until you finish setting up its privilege
set. Users cannot open a database using an inactive account.
6. For Privilege Set, choose the privilege set you want to use with this account.
The privilege set assigned to the account determines what the externally authenticated group
members can do in the database file. You can choose an existing privilege set, or choose New
Privilege Set and create a new one. See Creating new privilege sets.
7. For Description, enter a description of the account (optional).
8. Click OK.
You see the Manage Security dialog box again.
9. Do one of the following:
•If you’re finished working with accounts and privileges, click OK. In the dialog box that
appears, enter an account name and password that is assigned the Full Access
privilege set, and click OK.
•To continue working with accounts and privileges, see Creating and managing
accounts, Creating and managing privilege sets, or Managing extended privileges.

Protecting databases
FILEMAKER PRO HELP 460
Notes
•You’ll need to set additional options in FileMaker Server to authenticate users against an
external server. For more information, see the FileMaker Server documentation.
•It’s possible for a file with External Server accounts to contain multiple accounts that could
authenticate a user. For example, a file could contain:
•Both a FileMaker-authenticated account and an account on the authentication server
with the same name.
•Two or more External Server accounts that contain the same member.
When a user opens a file, FileMaker Pro opens the file using the first matching account in the
authentication order. Any matching accounts that follow the first one are ignored. Therefore, it’s
important to set the authentication order for accounts when one or both of the above situations
exist. Otherwise, the wrong account may be used to access the file. For more information on
changing the authentication order, see Viewing and reordering accounts.
Tip The authentication order is only an issue under specific circumstances: you must be
hosting files with FileMaker Server, using an external authentication server, and have accounts
set up in such a way that there are multiple accounts that could authenticate particular users. If
you are only using FileMaker-authenticated accounts, authentication order is not a concern
because each account must have a unique name.
•If you work with shared database files that access ODBC data from Microsoft SQL Server,
you can configure Windows single sign-on authentication. See Enabling ODBC data source
single sign-on (Windows only).
Tips for creating account names and passwords
The following are suggestions for creating account names and passwords that are valid and secure:
•Use only ASCII characters in passwords, such as a-z, A-Z, 0-9, and punctuation characters
like “!” and “%.” Passwords containing certain accented characters or non-Roman
characters such as Cyrillic or Japanese may not work, particularly in cross-platform
database solutions and files accessed via FileMaker WebDirect.
•If the file is shared via Web Publishing, also limit account names to ASCII characters. Do
not use colons in account names and passwords of web-published files.
•Secure passwords are typically eight or more characters in length, and include at least one
numeric character.
•Passwords are less secure when they include strings that are easily guessed, such as
names (especially the names of family and pets), birth dates, anniversary dates, and, in
particular, the words password, default, master, admin, and similar standard terms.
•If possible, create a unique account for each user, and set up privilege sets to require
periodic password changes.
If it is not feasible to create a unique account for each user, then consider using group accounts
for users with more restrictive access, and individual accounts for users with less restrictive
access.
•If the file is shared via FileMaker WebDirect, consider creating more limited privilege sets for
users who are accessing the database via a web browser.
•Practice good management of known account names and passwords:
•Do not record account information in a master file or list, especially if it is not, in turn,
secured by a password and encryption or stored in a secure location.

Protecting databases
FILEMAKER PRO HELP 461
•Do not share account information with other users; always contact the owner or
administrator of a database to obtain the correct password to be used.
Creating and managing privilege sets
Privilege sets specify levels of access to a database, such as which layouts are viewable, which
menus are available, and whether printing is permitted. See About accounts, privilege sets, and
extended privileges.
To create and manage privilege sets for a file, you need to open the file with an account that is
assigned the Full Access privilege set, which is the only privilege set that permits making privileges
changes to a file. If you open the file with any other privilege set, the File menu > Manage >
Security command is disabled.
You can create and modify privilege sets in a shared file while clients are using it. The privilege set
changes you make take effect immediately. However, the changes do not disrupt any current clients.
For example, if you change privileges for a privilege set that is in use by one or more clients, their
privileges remain unchanged until the next time they open the file.
You can create as many privilege sets as you need to define the types of access you want to permit
to a file. Each database file also contains three predefined privilege sets for common types of
access levels. See Using the predefined privilege sets.
After you create the privilege sets that you want, you need to create or edit accounts so that they
use the appropriate privilege sets. See Creating and managing accounts.
Viewing privilege sets
The Manage Security dialog box displays a list of all the privilege sets for a file. You can view and
reorder this list of privilege sets.
To view the privilege sets for a file:
1. Open the database file.
2. Choose File menu > Manage > Security.
3. In the Manage Security dialog box, click the Privilege Sets tab.
To reorder the list of privilege sets:
1. Follow the steps above to display the privilege sets for a file.
2. Do one of the following:
•Choose View by > Name or View by > Creation Order.
•To order the list alphabetically by privilege set, click the Privilege Set column heading.
Click the heading again to switch between ascending and descending order.
•To create a custom order, choose View by > Custom Order, and drag each privilege
set by its arrow icon into the order you want.
Related topics
Creating new privilege sets
Editing existing privilege sets
Duplicating and deleting privilege sets

Protecting databases
FILEMAKER PRO HELP 462
Creating new privilege sets
You can create as many privilege sets as you need to define the types of access you want to permit
to a file. Then you can assign each privilege set to one or more accounts.
To create a new privilege set:
1. Choose File menu > Manage > Security.
The Manage Security dialog box appears. It initially shows the Accounts tab, which lists the
accounts defined for this file.
2. Click the Privilege Sets tab.
3. Click New.
The Edit Privilege Set dialog box appears. By default, each privilege set option is set to its most
restrictive setting.
4. Enter a name and description (optional) for the privilege set.
5. Manage the privileges for the privilege set. See:
•Editing record access privileges
•Editing layouts privileges
•Editing value list privileges
•Editing scripts privileges
•Editing extended privileges for a privilege set
•Editing other privileges
Editing existing privilege sets
You can edit existing privilege sets to allow or restrict permissions for a file.
Note You cannot change or delete the predefined privilege sets — Full Access, Data Entry Only,
and Read-Only Access — except to enable or disable extended privileges for them. You can
duplicate the Data Entry Only and Read-Only Access privilege sets and then modify the duplicate
copies. See Using the predefined privilege sets, Duplicating and deleting privilege sets, and Editing
extended privileges for a privilege set.
To edit an existing privilege set:
1. Choose File menu > Manage > Security.
2. In the Manage Security dialog box, click the Privilege Sets tab.
3. Select the privilege set you want to edit, and click Edit.
The Edit Privilege Set dialog box appears.
4. To rename the privilege set or edit the description, enter a new name for Privilege Set
Name or a new description for Description.
If you rename a privilege set, the privilege set name is also updated in all the accounts to which
that privilege set is assigned. You don’t have to manually update each account with the new
privilege set name.
5. Redefine the privileges for the privilege set.
For details on the different privileges you can define, see:
•Editing record access privileges

Protecting databases
FILEMAKER PRO HELP 463
•Editing layouts privileges
•Editing value list privileges
•Editing scripts privileges
•Editing extended privileges for a privilege set
•Editing other privileges
Note If nearly all the options in the Edit Privilege Set dialog box are dimmed, remember that
you cannot change or delete the predefined privilege sets — Full Access, Data Entry Only, and
Read-Only Access — except to enable or disable extended privileges for them. You can
duplicate the Data Entry Only and Read-Only Access privilege sets and then modify the
duplicate copies. See Duplicating and deleting privilege sets.
6. When you’re through editing this privilege set, click OK.
7. Do one of the following:
•If you’ve finished working with accounts and privileges, click OK. In the dialog box that
appears, enter an account name and password that is assigned the Full Access
privilege set, and click OK.
•To assign the privilege set to one or more accounts, see Creating accounts or Editing
existing accounts.
Duplicating and deleting privilege sets
You can duplicate privilege sets and delete privilege sets that you no longer need.
You cannot delete:
•the Full Access, Data Entry Only, and Read-Only Access privilege sets.
•any privilege set that is in use by an account. Edit the accounts so that the privilege set is no
longer in use, and then delete the privilege set. See Editing existing accounts.
Also, you cannot duplicate the Full Access privilege set.
To duplicate or delete a privilege set:
1. Choose File menu > Manage > Security.
2. In the Manage Security dialog box, click the Privilege Sets tab.
3. Select one or more privilege sets that you want to duplicate or delete:
•To select one privilege set, click its name.
•To select multiple privilege sets, Ctrl-click (Windows) or Command-click (OS X) each
name.
•To select a range of adjacent privilege sets, click the first privilege set name, and then
Shift-click the last name in the range.
4. Do one of the following:
•To duplicate the privilege sets, click Duplicate.
•To delete the privilege sets, click Delete.
5. Do one of the following:
•If you’ve finished working with accounts and privileges, click OK. In the dialog box that
appears, enter an account name and password that is assigned the Full Access
privilege set, and click OK.

Protecting databases
FILEMAKER PRO HELP 464
•To continue working with accounts and privileges, see Creating and managing
accounts, Creating and managing privilege sets, or Managing extended privileges.
Editing record access privileges
Privilege sets can limit access to records in a file. For a file, you can set:
•Privileges for all tables: you can limit whether a privilege set allows creating, editing, and
deleting records in all the tables in a file.
•Custom privileges for individual tables: you can set individual record access limits for each
table. For example, the privilege set can limit the ability to:
•View, edit, create, or delete all records in each table.
•View, edit, and delete certain records within each table. The privileges are limited by
means of calculation that returns a Boolean result for each record. When the calculation
evaluates to True, access is allowed for that specific activity (such as viewing the
record). When the calculation evaluates to False, access to that activity is prohibited.
•Access or modify certain fields within each table. When access to one or more fields is
restricted in a table that is otherwise visible, the user will see <No Access> instead of
the field data.
You can only set record access privileges for tables defined in the current file. If the file contains
relationships to tables in other files that you want to protect, you need to create accounts and
privilege sets in the other files to protect those tables. See About protecting databases.
To edit record access privileges:
1. Start editing a new or existing privilege set.
See Creating new privilege sets or Editing existing privilege sets.
2. In the Edit Privilege Set dialog box, choose one of the following options from the Records
list:
3. In the Custom Record Privileges dialog box, select one or more tables for which you want to
edit custom privileges. (Or select Any New Table to set privileges for any table created
later.)
The Custom Record Privileges dialog box displays the tables in the file and the custom
privileges for each table. To change the privileges, you start by selecting the tables that you
want to change, and then you choose privileges in the Set Privileges area at the bottom of the
dialog box.
To edit the privilege set to Choose
Permit creating, editing and deleting records in all
tables
Create, edit, and delete in all tables, and skip
ahead to step 10.
Permit creating and editing records only (prohibit
deleting records) in all tables
Create and edit in all tables, and skip ahead to
step 10.
Permit viewing records only (prohibit creating,
editing, and deleting records) in all tables
View only in all tables, and skip ahead to step
10.
Prohibit accessing records in all tables All no access, and skip ahead to step 10.
Create custom record access privileges for
individual tables
Custom Privileges, and continue with the next
step.

Protecting databases
FILEMAKER PRO HELP 465
•To select one table, click its name.
•To select multiple tables, Ctrl-click (Windows) or Command-click (OS X) each name.
•To select a range of adjacent tables, click the first name, and then Shift-click the last
name in the range.
•To select all tables, click Select All.
4. To set custom privileges for viewing, editing, creating, and deleting records, choose one of
the following options from the View, Edit, Create, and Delete lists in the Set Privileges
area:
Note Avoid creating inconsistent combinations of view, edit, create, and delete privileges. For
example, you most likely do not want to permit users to delete records that they cannot view.
5. To limit access or modification of certain fields within a table, continue with the next step.
Otherwise, skip ahead to step 9.
6. Select the table that contains the fields for which you want to limit access. Then, for Field
Access, choose Limited.
7. In the Custom Field Privileges dialog box, select each field for which you want to limit
access (or select Any New Field to set custom privileges for any field created later). Then
choose one of the following options:
8. Click OK.
9. Click OK.
You see the Edit Privilege Set dialog box.
10. Manage any other privileges for the privilege set.
For details on the different privileges you can define, see:
•Editing layouts privileges
•Editing value list privileges
•Editing scripts privileges
Choose To
Yes Allow the privilege (viewing, editing, creating, or deleting records).
Limited (available when
only a single table is
selected)
Allow or prohibit the privilege (viewing, editing, and deleting records)
for certain records within the table.
In the Specify Calculation dialog box, enter a calculation, and click
OK. See Entering a formula for limiting access on a record-by-record
basis, below.
No Prohibit the privilege (viewing, editing, creating, or deleting records).
Choose To
Modifiable Allow viewing and editing of the field data.
View only Allow viewing of the field data. (Editing of field data is not allowed.)
No access Prohibit access to the field.
Note When access to one or more fields is prohibited in a table that is otherwise
visible, the user will see <No Access> instead of the field data.

Protecting databases
FILEMAKER PRO HELP 466
•Editing extended privileges for a privilege set
•Editing other privileges
11. When you’ve finished editing this privilege set, click OK.
12. In the Manage Security dialog box, do one of the following:
•If you’ve finished working with accounts and privileges, click OK. In the dialog box that
appears, enter an account name and password that is assigned the Full Access
privilege set, and click OK.
•To assign the privilege set to one or more accounts, see Creating accounts or Editing
existing accounts.
Notes
•In the Custom Record Privileges and Custom Field Privileges dialog boxes, you can change
the order of tables or fields in the list by clicking one of the column headings. To switch
between ascending and descending order, click the column heading again.
•If you prohibit creating records in a file or table, then duplicating records is prohibited as
well.
•Users that cannot view certain records can still browse these records, but the user will see
<No Access> instead of the field data within each record.
•Many features in FileMaker Pro are affected when you limit access to records, fields, and
tables within a file. The following table summarizes the effects for some features.
Feature Effect of limiting data access
Lookups and
Relookups
Lookups and relookups are defined by three components, all of which can be
affected by data access privileges:
•At a minimum, the match fields used in the relationship must have view
privileges. Also, no lookup will occur for any records that are not
viewable in both the source and destination tables because a match
cannot occur under these circumstances. This includes the first related
matching record, as well as any records used to copy the next higher or
lower value.
•At a minimum, the source field for the lookup must have view privileges.
•The destination field for the lookup must have edit privileges.
FileMaker Pro does not display an error message if a lookup operation skips
certain records due to access privilege restrictions.
Accessing related
data
At a minimum, both matching fields in a relationship must have view
privileges in order for the relationship to work. Any related fields you want to
display based on the matching fields must also have view privileges at a
minimum.
Finds The found set is always filtered to display only those records that have view
privileges at a minimum. The results of the Get(FoundCount) function are
also affected if access is limited.
Value lists When a value list is based on the content of a field, and view privileges are
prohibited on the field, then the value list does not display any values. This is
so that users do not inadvertently gain access to confidential information.
The results of the ValueListItems function are also hidden when access
is limited.
Protecting databases
FILEMAKER PRO HELP 467
Entering a formula for limiting access on a record-by-record basis
To allow or prohibit record viewing, editing, and deleting privileges to certain records within a table,
you need to specify a Boolean calculation that determines whether the privilege is permitted. For
each record in the database, access is allowed when the calculation evaluates to True or to a non-
zero result, and access is prohibited when the calculation evaluates to False or zero. Here are two
examples:
•To limit access to only those records created by the current account: Define a text field
named Record_Created_By, and set the auto-enter option for the field to automatically
enter the account name when the record is created. (See Defining automatic data entry.)
Then use the following calculation when defining custom record access privileges:
Record_Created_By = Get(AccountName)
The user will only have Browse access to records for which the above calculation evaluates as
True.
•To limit access to only those records created on the current date: Define a date field named
Record_creation_date, and set the auto-enter option for the field to automatically enter
the creation date when the record is created. (See Defining automatic data entry.) Then use
the following calculation when defining custom record access privileges:
Record_creation_date = Get(CurrentDate)
The user will only have Browse access to records for which the above calculation evaluates as
True.
Tip If you specify a calculation to prohibit viewing of certain records within a table, in most cases
you should use the same calculation to prohibit editing and deleting of the same types of records.
Otherwise, you may inadvertently allow users to edit or delete records that they cannot view.
Notes
•The Boolean calculation that determines record access privileges can have unexpected
results, particularly if it is based on a user-editable field. For example, it’s possible for a user
with access privileges for only certain records to inadvertently deny themselves access to a
record after editing it. The user could make a change to a record’s content that changes the
result of the Boolean record access calculation so that it evaluates to False; then that user
Summary fields and
calculated fields
The results displayed in summary fields as well as calculated fields which
summarize over multiple records will exclude data from records for which
view privileges have been prohibited.
Find/Replace,
Replace Contents,
and spelling checking
A user can only change data using these features in:
•records that have edit privileges.
•fields that are modifiable.
Scripts You can set an option for a script to run with full access privileges, which
permits a script to perform operations that a user with limited privileges would
not usually be able to do. If you don’t enable this option, any script steps that
attempt to access or change restricted data will fail. See Creating and editing
scripts.
Apple events Data access privileges can affect the ability of a user to get, set, and delete
data using Apple events. Some Apple event commands may fail if the user
does not have appropriate access privileges.
Feature Effect of limiting data access

Protecting databases
FILEMAKER PRO HELP 468
would no longer be able to view, edit, or delete the record once he or she exits that record.
Because changes are committed as soon as a user exits a record, a user making changes
of this type will not be able to return to the record. (In most cases, you should base record
access calculations on fields that are not directly editable by users, such as auto-entered
fields that contain account names, creation dates, and modification dates.)
Also, if the file is shared and the Boolean calculation that determines record access privileges
contains one or more global fields, you may be able to improve network performance by moving
some global fields into a separate table. See the Notes section in Defining global fields (fields
with global storage).
•To fully support multiple windows that have their own found sets, summary values are a part
of the found set. (There is no single summary value for a single file as in FileMaker Pro 6
and earlier versions.) A record may appear in multiple windows, and each window has its
own found set and sort order. For these reasons, do not base privilege calculations on
summary or Get functions that rely on values using a particular found set.
Editing layouts privileges
Privilege sets can limit access to layouts in a file. For a file, you can set:
•Privileges for all layouts: you can allow or prohibit the ability to switch to Layout mode and
make design changes to all layouts. You can also prohibit access to all layouts in a file.
•Custom privileges for individual layouts: you can set two types of access limits for each
layout:
•Design and view limits for each layout: whether the privilege set permits making design
changes to a layout in Layout mode, view-only layout access, or no layout access at all.
•Data access limits for each layout: whether the privilege set permits accessing, viewing,
or modifying data displayed by each layout. When access to data is prohibited, the user
can view the layout but will see <No Access> instead of any field data.
Note There are important distinctions and interactions between layouts privileges and record
access privileges:
•Although you can use layout privileges to limit access to data, these settings protect only a
single view of data on a layout by layout basis, which may not protect all instances of the
data. To limit access to all occurrences of specific tables, records, or fields no matter where
they are displayed or accessed, use record access privileges. See Editing record access
privileges.
•Even if you use layout privileges to allow viewing and editing of data, record access
privileges still apply and may limit access to certain tables, fields, and records.
For a comparison of how layouts privileges and record access privileges work together, see How
layouts privileges and record privileges interact.
To edit layouts privileges:
1. Start editing a new or existing privilege set.
Display the Edit Privilege Set dialog box. See Creating new privilege sets or Editing existing
privilege sets.
2. To set privileges for all layouts in the file, for Layouts, choose All modifiable, All view
only, or All no access. These options allow or prohibit the following:

Protecting databases
FILEMAKER PRO HELP 469
3. To set individual privileges for each layout in the file, for Layouts, choose Custom
privileges. In the Custom Layout Privileges dialog box, select each layout (or select Any
New Layout to set privileges for any layout created later) and set the privileges you want for
it. When you’re through setting privileges for individual layouts, click OK.
Tip You can also set individual privileges for multiple layouts at once by first selecting multiple
layouts in the Custom Layout Privileges dialog box. See the Notes section below.
Important In the Custom Layout Privileges dialog box, the View only and No access
options for Records via this layout protect only a single view of data on a layout by layout
basis, which may not protect all instances of the data, such as scripts that access data and
relationships that display the data in other files. To limit access to all occurrences of specific
tables, records, or fields no matter where they are displayed or accessed, use record
access privileges. See How layouts privileges and record privileges interact and Editing
record access privileges.
4. In the Edit Privilege Set dialog box, define any other privileges for the privilege set.
For details on the different privileges you can define, see:
•Editing record access privileges
•Editing value list privileges
Privilege
All
modifiable All view only All no access
Viewing all layouts Allowed Allowed Prohibited
Duplicating and deleting all layouts Allowed Prohibited Prohibited
Creating new layouts Allowed Prohibited Prohibited
Entering Layout mode in order to make design
changes
Allowed Prohibited Prohibited
To
In the Custom Layout
Privileges dialog box
Allow viewing the layout, changing the design of
the layout in Layout mode, and deleting the
layout
For Layout, choose Modifiable.
Allow viewing of the layout only (prohibit design
changes)
For Layout, choose View only.
Prohibit viewing the layout For Layout, choose No access.
Allow viewing data, editing data, and creating
and deleting records in the layout
For Records via this layout, choose
Modifiable.
Allow viewing data (prohibit editing data and
creating and deleting records) in the layout
For Records via this layout, choose View only.
Prohibit seeing the data on the layout. (The user
will see <No Access> for each field instead of
the field data.)
For Records via this layout, choose No
access.
Allow creating new layouts and duplicating any
viewable layout
Select Allow creation of new layouts.

Protecting databases
FILEMAKER PRO HELP 470
•Editing scripts privileges
•Editing extended privileges for a privilege set
•Editing other privileges
5. When you’ve finished editing this privilege set, click OK.
You see the Manage Security dialog box.
6. Do one of the following:
•If you’ve finished working with accounts and privileges, click OK.
•To assign the privilege set to one or more accounts, see Creating accounts or Editing
existing accounts.
Notes
•Any record access privileges still apply and may limit access to certain tables, fields, and
records. See Editing record access privileges and How layouts privileges and record
privileges interact.
•To change the order of the layouts displayed in the Custom Layout Privileges dialog box,
click one of the column headings to order the list by that column. To switch between
ascending and descending order, click the column heading again.
•You can select multiple layouts in the Custom Layout Privileges dialog box in order to set
privileges for multiple layouts at once:
•To select multiple layouts, Ctrl-click (Windows) or Command-click (OS X) each layout
name.
•To select a range of adjacent layouts, click the first layout, and then Shift-click the last
layout in the range.
•To select all layouts, click Select All.
Editing value list privileges
Privilege sets can limit access to value lists in a file. For a file, you can set:
•Privileges for all value lists: you can permit viewing, editing, and deleting of value lists, or
viewing only.
•Custom privileges for individual value lists: for each value list, you can set whether it is
modifiable, view only, or accessible.
To edit value list privileges:
1. Start editing a new or existing privilege set.
Display the Edit Privilege Set dialog box. See Creating new privilege sets or Editing existing
privilege sets.
2. To set privileges for all value lists in the file, for Value Lists, choose All modifiable, All
view only, or All no access. These options allow or prohibit the following:
•All modifiable allows viewing and modifying value lists, duplicating and deleting value
lists, and creating new value lists.
•All view only allows viewing of existing value lists only. Prohibits opening the Manage
Value Lists dialog box in order to create or edit value lists.

Protecting databases
FILEMAKER PRO HELP 471
•All no access prohibits seeing the items in all value lists. Prohibits accessing value list
names in the Sort dialog box and other dialog boxes that display value list names.
Prohibits opening the Manage Value Lists dialog box in order to create or edit value
lists.
3. To set individual privileges for each value list in the file, for Value Lists, choose Custom
privileges. In the Custom Value List Privileges dialog box, select each value list (or select
Any New Value List to set privileges for any new value list created later) and set the
privileges you want for it. When you’re through setting privileges for individual value lists,
click OK.
Tip You can also set individual privileges for multiple value lists at once by first selecting
multiple value lists in the Custom Value List Privileges dialog box. See the Notes section below.
4. In the Edit Privilege Set dialog box, define any other privileges for the privilege set.
For details on the different privileges you can define, see:
•Editing record access privileges
•Editing layouts privileges
•Editing scripts privileges
•Editing extended privileges for a privilege set
•Editing other privileges
5. When you’ve finished editing this privilege set, click OK.
You see the Manage Security dialog box.
6. Do one of the following:
•If you’ve finished working with accounts and privileges, click OK. In the dialog box that
appears, enter an account name and password that is assigned the Full Access
privilege set, and click OK.
•To assign the privilege set to one or more accounts, see Creating accounts or Editing
existing accounts.
Notes
•To make a value list modifiable for users with the appropriate privileges, you must format the
field object with the options that permit adding new value list items or editing existing value
To
In the Custom Value List
Privileges dialog box
Allow viewing the value list, editing the value list,
and deleting the value list
For Privilege, choose Modifiable.
Allow viewing of the value list only. Prohibits
editing the value list in the Manage Value Lists
dialog box.
For Privilege, choose View only.
Prohibit seeing the items in a value list. (The user
will see <No Access> for the list instead of the
value list items.) Prohibits editing the value list in
the Manage Value Lists dialog box.
For Privilege, choose No access.
Allow creating new value lists and duplicating any
viewable value list
Select Allow creation of new value lists.

Protecting databases
FILEMAKER PRO HELP 472
list items (or both). See Setting up a field to display a pop-up menu, checkbox set, or other
control.
•You can select multiple value lists in the Custom Value List Privileges dialog box in order to
set privileges for multiple value lists at once:
•To select multiple value lists, Ctrl-click (Windows) or Command-click (OS X) each value
list name.
•To select a range of adjacent value lists, click the first value list, and then Shift-click the
last value list in the range.
•To select all value lists, click Select All.
•To change the order of the value lists displayed in the Custom Value List Privileges dialog
box, click one of the column headings to order the list by that column. To switch between
ascending and descending order, click the column heading again.
•For value lists with ODBC data, the No access privilege and Limited custom privilege are
not supported. To prohibit a user from seeing ODBC data in a value list, you must enforce
row-level security in the external SQL database.
Editing scripts privileges
Privilege sets can limit access to scripts in a file. For a file, you can set:
•Privileges for all scripts: you can allow or prohibit the ability to view, create, and modify
scripts. You can also hide all the scripts in a file to prevent them from being run by the
privilege set.
•Custom privileges for individual scripts: you can set whether each script is modifiable or not.
You can also hide a script to prevent it from being run by the privilege set.
Note Although some script privileges described below allow the ability to run scripts, the actions
permitted by a privilege set determine whether the steps in a script will execute successfully or not.
For example, if a privilege set does not permit accessing a Salary field, then a script containing the
Go to Field [“Employees::Salary“] script step will fail. The script author can override
script privilege issues by selecting Run script with full access privileges in the Edit Script window.
To edit script privileges:
1. Start editing a new or existing privilege set.
Open the Edit Privilege Set dialog box. See Creating new privilege sets or Editing existing
privilege sets.
2. To set privileges for all scripts in the file, for Scripts, choose All modifiable, All executable
only, or All no access. These options allow or prohibit the following:
Privilege
All
modifiable
All
executable only
All no
access
Running scripts Allowed Allowed Prohibited
Viewing script names in the Scripts menu
(except those that are hidden by clearing Include in
menu in the Manage Scripts dialog box)
Allowed Allowed Prohibited
Opening the Manage Scripts dialog box to view, create,
group, filter, edit, duplicate, delete, and print scripts
Allowed Prohibited Prohibited
Allow scripts to be imported into other database files Allowed Prohibited Prohibited

Protecting databases
FILEMAKER PRO HELP 473
3. To set individual privileges for each script in the file, for Scripts, choose Custom
privileges. In the Custom Script Privileges dialog box, select each script (or select Any
New Script to set privileges for any script created later) and set the privileges you want for
it. When you’re through setting privileges for individual scripts, click OK.
Tip You can also set individual privileges for multiple scripts at once by first selecting multiple
scripts in the Custom Script Privileges dialog box. See the Notes section below.
4. In the Edit Privilege Set dialog box, define any other privileges for the privilege set.
For details on the different privileges you can define, see:
•Editing record access privileges
•Editing layouts privileges
•Editing value list privileges
•Editing extended privileges for a privilege set
•Editing other privileges
5. When you’ve finished editing this privilege set, click OK.
6. In the Manage Security dialog box, do one of the following:
•If you’ve finished working with accounts and privileges, click OK. In the dialog box that
appears, enter an account name and password that is assigned the Full Access
privilege set, and click OK.
•To assign the privilege set to one or more accounts, see Creating accounts or Editing
existing accounts.
Notes
•In the Custom Script Privileges dialog box, the Notes column indicates which scripts run
with Full Access privileges. Depending on what these scripts do, you may want to set
Viewing script steps in the FileMaker Pro Advanced
Script Debugger and Database Design Report
Allowed Prohibited Prohibited
Privilege
All
modifiable
All
executable only
All no
access
To
In the Custom Script
Privileges dialog box
Allow running, viewing, editing, printing, and
deleting the script. (Also allow the script to be
imported into other database files.)
For Privilege, choose Modifiable.
Note Even if the script is modifiable, you cannot
modify a script that runs with Full Access
privileges unless your account is assigned the
Full Access privilege set. See Creating and
editing scripts.
Allow running the script only. (Prohibit viewing
the script in the Manage Scripts dialog box.)
For Privilege, choose Executable only.
Prohibit running or viewing the script. (The script
name will not appear in the Scripts menu.)
For Privilege, choose No access.
Allow creating new scripts and duplicating any
modifiable script
Select Allow creation of new scripts.

Protecting databases
FILEMAKER PRO HELP 474
Executable only or No access script privileges for them in certain privilege sets. For more
information on running scripts with Full Access privileges, see Creating and editing scripts.
•You can select multiple scripts in the Custom Script Privileges dialog box in order to set
privileges for multiple scripts at once:
•To select multiple scripts, Ctrl-click (Windows) or Command-click (OS X) each script
name.
•To select a range of adjacent scripts, click the first script, and then Shift-click the last
script in the range.
•To select all scripts, click Select All.
•To change the order of the scripts displayed in the Custom Script Privileges dialog box, click
one of the column headings to order the list by that column. To switch between ascending
and descending order, click the column heading again.
•You can open multiple Edit Script windows at one time. See Creating and editing scripts.
Editing extended privileges for a privilege set
Privilege sets can limit extended privileges, which determine whether and how a shared file is
accessible. For a file, you can set whether a privilege set is permitted to:
•open a shared file with the File menu > Open Remote command
•access a database file from a web browser via FileMaker WebDirect
•access a database file as an ODBC or JDBC data source
•access a database hosted on FileMaker Server
•access a database file in FileMaker Go without having to re-login
•access any other features controlled through additional extended privileges that may be
defined
Note Enabling extended privileges only makes it allowable for certain privilege sets to access
shared data. To actually access the shared data, you must also set up sharing for the type of access
that you want. See Sharing databases on a network, Sharing FileMaker Pro data via ODBC or
JDBC, or Publishing databases on the web.
For more information about extended privileges, see About accounts, privilege sets, and extended
privileges.
To edit extended privileges for a privilege set:
1. Start editing a new or existing privilege set.
Display the Edit Privilege Set dialog box. See Creating new privilege sets or Editing existing
privilege sets.
Note If the File menu > Manage > Security menu is dimmed, your privileges do not permit you
to access it. See the note below for another possible way to edit extended privileges.
2. In the Extended Privileges list, select the extended privileges you want to enable, and
clear the ones you want to disable.
The following table lists the default extended privileges that are available.

Protecting databases
FILEMAKER PRO HELP 475
Note FileMaker Pro no longer supports the fmiwp extended privilege. Opening database files
created in FileMaker Pro 12 or earlier that use the fmiwp extended privilege does not remove
the extended privilege from the privilege sets it is assigned to.
FileMaker as well as third-party developers may provide additional extended privileges as part
of additional software products designed to work with FileMaker Pro.
3. In the Edit Privilege Set dialog box, define any other privileges for the privilege set.
For details on the different privileges you can define, see:
•Editing record access privileges
•Editing layouts privileges
•Editing value list privileges
•Editing scripts privileges
•Editing other privileges
4. When you’ve finished editing this privilege set, click OK.
You see the Manage Security dialog box.
5. Do one of the following:
•If you’ve finished working with accounts and privileges, click OK. In the dialog box that
appears, enter an account name and password that is assigned the Full Access
privilege set, and click OK.
•To assign the privilege set to one or more accounts, see Creating accounts or Editing
existing accounts.
Keyword Extended privilege Determines if a privilege permits
fmwebdirect Access via
FileMaker WebDirect
Accessing a database file from a web
browser via FileMaker WebDirect.
fmxdbc Access via ODBC/JDBC Accessing a database file as an
ODBC or JDBC data source.
fmapp Access via FileMaker Network,
server-side scripting, or
FileMaker Go
Opening a shared file (either a file
shared by FileMaker Pro or hosted
and shared by FileMaker Server).
fmreauthenticate10 Require re-authentication after
the specified minutes in sleep/
background - Go only
Accessing a file in FileMaker Go
without having to re-login after file
hibernation or after using a different
app. The default time is 10 minutes;
maximum time is 10080 minutes (one
week) - FileMaker Go only.
fmxml Access via XML Web
Publishing - FMS only
Accessing a database file from a web
browser or other application via XML
web publishing -FileMaker Server
only.
fmphp Access via PHP Web
Publishing - FMS only
Accessing a database file from a web
browser or other application via PHP
web publishing - FileMaker Server
only.

Protecting databases
FILEMAKER PRO HELP 476
Notes
•There are two other methods for enabling and disabling extended privileges:
•While configuring sharing settings for FileMaker Network sharing, ODBC/JDBC, or
FileMaker WebDirect, you can enable sharing for all users or certain privilege sets if
your privilege set permits it. This method is accessible by any account assigned a
privilege set with the Manage Extended Privileges via Sharing dialogs privilege
enabled, so it can be accessed by accounts that are not assigned the Full Access
privilege set. See Editing other privileges, Sharing databases on a network, Using
ODBC and JDBC with FileMaker Pro, or Publishing databases with FileMaker
WebDirect.
•While editing an extended privilege, you can enable or disable the privilege sets that
can access it. See Editing which privilege sets may use an extended privilege. (This
method requires Full Access privileges.)
•If you are hosting a FileMaker Pro database, the database must include the fmapp
extended privilege. If you use the Upload Database assistant to upload a database to
FileMaker Server and if no sharing is enabled, the Database Server enables fmapp for the
Full Access privilege set.
•Keywords for extended privileges that begin with “fm” are reserved by FileMaker.
Related topics
Managing extended privileges
Viewing extended privileges
Editing other privileges
For a file, privilege sets can allow or prohibit:
•Printing
•Exporting records, copying records to the Clipboard, and using Apple events to query data
•Setting extended privileges
•Entering data that does not match a field’s validation options
•Disconnecting the client of a shared file from FileMaker Server software when the client is
idle
•Password changes, as well as require password changes at regular intervals, and a
minimum character length for new passwords
You can also disable most menu commands in order to permit only basic editing, or disable nearly
all of the FileMaker Pro menu commands.
To edit other privileges:
1. Start editing a new or existing privilege set.
See Creating new privilege sets or Editing existing privilege sets.
2. In the Edit Privilege Set dialog box, to set other privileges for the file, set one or more of the
following options in the Other Privileges area.

Protecting databases
FILEMAKER PRO HELP 477
To Do this
•Allow printing.
•Allow saving records as a PDF file.
•Allow printing using the Print from Finder
Apple event.
Choose Allow printing.
•Allow exporting records.
•Allow saving records as an Excel file.
•Allow copying all records in the found set to
the Clipboard.
•Allow importing records from a FileMaker file.
•Allow saving a copy of records.
•OS X: Allow querying of data using the
following Apple events: GetCellValue, Field
Contents, Record Value, Table Contents, and
Layout Contents.
Choose Allow exporting.
Note: In Windows, clearing this option has no
effect on ActiveX Automation. In OS X, clearing
this option only prohibits Apple events that
access data; other Apple events will still work.
•Allow users of this privilege set to enable and
disable extended privileges when setting up
FileMaker Network Sharing, Web Publishing,
and ODBC/JDBC sharing.
•Allow users of this privilege set to edit
extended privileges only in the Manage
Security dialog box.
Choose Manage extended privileges.
Allow entering data that doesn’t match the
validation options set for a field.
Choose Allow user to override data validation
warnings.
Note This setting is ignored when a field is
defined to prohibit field validation overrides (by
clearing the Allow user to override validation
option). See Defining field validation.
Disconnect the user of a shared file from
FileMaker Server software when the user is idle.
(This typically improves FileMaker Server
performance.)
Choose Disconnect user from server when
idle.
Note If you’re hosting shared files with
FileMaker Server, see About disconnecting users
from FileMaker Server when idle.
Allow users of this privilege set to change their
password.
Choose Allow user to modify their own
password.
Require users of this privilege set to change their
password after a certain number of days.
(When the number of days has elapsed, the next
time each user opens the file, a Change
Password dialog box will appear. The user must
change the password in order to open the file.)
Choose Must be changed every <n> days, and
enter the number of days.
Note If you choose this option without also
choosing Allow user to modify their own
password, then an account with Full Access
privileges must change the password instead of
the account assigned this privilege set. (In most
cases, you should either choose or clear both
options together.)

Protecting databases
FILEMAKER PRO HELP 478
3. In the Edit Privilege Set dialog box, define any other privileges for the privilege set.
For details on the different privileges you can define, see:
•Editing record access privileges
•Editing layouts privileges
•Editing value list privileges
•Editing scripts privileges
•Editing extended privileges for a privilege set
4. When you’ve finished editing this privilege set, click OK.
You see the Manage Security dialog box again.
5. Do one of the following:
•If you’ve finished working with accounts and privileges, click OK. In the dialog box that
appears, enter an account name and password that is assigned the Full Access
privilege set, and click OK.
•To assign the privilege set to one or more accounts, see Creating accounts or Editing
existing accounts.
Notes
•In most cases, a privilege set should not allow password changes if it is assigned to one or
more accounts that are shared by multiple users. Instead, an administrator with Full Access
privileges should change the password periodically and then provide it to all the users that
need it.
•The password change and password character length privileges described above apply
only to FileMaker-authenticated accounts, not External Server-authenticated accounts. See
About accounts, privilege sets, and extended privileges.
•Even if you set Available menu commands to Editing only, record access privileges and
layouts privileges can still prohibit the editing of certain fields, records, and data on certain
layouts. See Editing record access privileges and Editing layouts privileges.
Specify a minimum character length for new
passwords.
Choose Minimum password length, and enter
the number of characters.
Specify that only a limited set of menu
commands are available when the file is active.
For Available menu commands, choose one of
the following:
•All to enable all menu commands except
those specifically disabled by other privilege
set options.
•Editing only to enable only basic editing
commands in Browse mode.
•Minimum to disable all menu commands
except those that open, close, and create
database files, switch between database
windows, perform scripts, open
FileMaker Pro Help, or change preference
options.
To Do this

Protecting databases
FILEMAKER PRO HELP 479
•Setting Available menu commands to Editing only or Minimum disables the Window
menu > New Window command, which prohibits users from opening new windows.
Limiting the available menu commands may be useful if you want to control the ability of
users to open additional windows. (You can create scripts that allow users to open certain
windows. See Creating and editing scripts.)
•Shared accounts are a security risk. For better security, use individual accounts instead of
shared accounts. If you intend to use shared accounts anyway, make sure you limit the
access capabilities of the privilege sets that shared accounts use. Change the password
occasionally, particularly when certain users no longer require access.
Managing extended privileges
Extended privileges determine the data sharing options that are permitted by a privilege set for a
file. For example, if the file is shared, the Access via FileMaker Network extended privilege
determines if the privilege set allows opening the shared file as a client. The Access via
FileMaker WebDirect extended privilege determines whether the privilege set allows accessing the
database from a web browser. See About accounts, privilege sets, and extended privileges.
You can view extended privileges in the Manage Security dialog box, as well as enable each
extended privilege for the privilege sets that you want to permit access. All extended privileges
except fmreauthenticate10 are disabled by default, even in the Full Access privilege set.
Note Enabling extended privileges only makes it allowable for certain privilege sets to access
shared data. To actually access the shared data, you must also set up sharing for the type of access
that you want. See Sharing databases on a network, Using ODBC and JDBC with FileMaker Pro, or
Publishing databases on the web.
FileMaker as well as third-party developers may provide additional software products designed to
work with FileMaker Pro. These products may require you to add new extended privileges that
manage data access between FileMaker Pro and these products.
It may also be necessary to delete an extended privilege that is no longer required.
Related topics
Editing extended privileges for a privilege set
Viewing extended privileges
The Manage Security dialog box displays a list of all the available extended privileges. You can view
this list of extended privileges.
To view the extended privileges:
1. Open the database file.
2. Choose File menu > Manage > Security.
3. In the Manage Security dialog box, click the Extended Privileges tab.
See Editing which privilege sets may use an extended privilege and Creating and deleting
extended privileges.
Editing which privilege sets may use an extended privilege
You can edit which privilege sets may use an extended privilege. For example, you can specify
which privilege sets are allowed to open the file if it is shared over a network or accessed via a web
browser.

Protecting databases
FILEMAKER PRO HELP 480
To edit which privilege sets may use an extended privilege:
1. Choose File menu > Manage > Security.
Note If the Security menu command is dimmed, your privileges do not permit you to access it.
See the note below for another possible way to edit extended privileges.
2. In the Manage Security dialog box, click the Extended Privileges tab.
3. Select the extended privilege you want to edit, and click Edit.
The Edit Extended Privilege dialog box appears.
4. In the Access area, select or clear the checkbox for each privilege set that you want to
enable or disable.
See About accounts, privilege sets, and extended privileges.
5. Click OK.
Notes
•There are two other methods for enabling and disabling extended privileges:
•While configuring sharing settings for FileMaker Network sharing, ODBC/JDBC, or
FileMaker WebDirect, you can enable sharing for all users or certain privilege sets if
your privilege set permits it. This method is accessible by any account assigned a
privilege set with the Manage Extended Privileges via Sharing dialogs privilege
enabled, so it can be accessed by accounts that are not assigned the Full Access
privilege set. See Editing other privileges, Sharing databases on a network, Sharing
FileMaker Pro data via ODBC or JDBC, or Publishing databases with FileMaker
WebDirect.
•While editing a privilege set, you can enable or disable extended privileges for it. (This
method requires Full Access privileges.) See Editing extended privileges for a privilege
set.
FileMaker Go: In the Keyword field in the Edit Extended Privilege dialog box, you can specify the
amount of time required before a user needs to re-login to FileMaker Go. You can:
•accept the default time for new files and new privilege sets, which is fmreauthenticate10
(10 minutes).
•change the default time (up to a maximum of 10080 minutes).
•change the default time to fmreauthenticate0 or fmreauthenticate (the user can leave
FileMaker Go for up to 10 seconds). fmreauthenticate0 is the value applied to privilege
sets in files converted from an earlier version of FileMaker Pro.
•create a new fmreauthenticate10 extended privilege and specify a different time.
Creating and deleting extended privileges
FileMaker as well as third-party developers may provide additional software products designed to
work with FileMaker Pro and FileMaker Server. A product like this may require you to add a new
extended privilege if you want to control who can access a database file with the additional product.
You can also delete an extended privilege that you no longer need.
To create a new extended privilege:
1. Choose File menu > Manage > Security.
2. In the Manage Security dialog box, click the Extended Privileges tab.

Protecting databases
FILEMAKER PRO HELP 481
3. Click New.
4. In the Edit Extended Privilege dialog box, enter the appropriate keyword and description for
the extended privilege.
Note The developer of the additional software product should provide a keyword that you must
enter exactly in order for the extended privilege to work properly with the product. Refer to the
documentation that came with the additional software product.
5. In the Access area, select or clear the checkbox for each privilege set that you want to
enable or disable for the new privilege set.
6. Click OK.
To delete an extended privilege:
1. Choose File menu > Manage > Security.
2. In the Manage Security dialog box, click the Extended Privileges tab.
3. Select the extended privilege you want to delete.
4. Click Delete.
Opening files protected with passwords
When you attempt to open a protected file, you will need to enter one or more passwords and supply
other information, such as an account name, in order to open the file. You may also be able to open
the file by using Guest Access if privileges for the file are configured to permit it.
To open a file protected with passwords:
1. Open the protected file as you would any other FileMaker file.
See Opening files.
2. If you see the Open Encrypted Database dialog box, enter the encryption password, then
click OK.
If you don’t know the encryption password, see your database administrator.
3. In the Open Filename dialog box, enter your account name and password, then click OK.
If you don’t know your account name and password, see your database administrator. If you
don’t have an account, click Guest Account if available.
Notes
•Passwords are case-sensitive. For example, if your password is zFootBallz2,
FileMaker Pro will not accept zfootballz2. If you’re having trouble entering a valid
password, make sure the Caps Lock key on your keyboard is disabled.
•Account names are not case-sensitive. For example, if your account name is Chris, you
can successfully open the file by entering chris or CHRIS as the account name.
•FileMaker Pro may display a Change Password dialog box when you try to open a
protected file. You can also change your password whenever you want if your privileges
permit it. See Changing your password for a file.
•OS X: You can prevent the Open Filename dialog box from appearing each time you open a
protected file by adding your account name and password to your keychain. To add your
account information to your keychain, open the file, click Add to Keychain in the Open

Protecting databases
FILEMAKER PRO HELP 482
Filename dialog box, enter the account name and password you want to store, and click
OK. For more information about the keychain, see OS X Help Center.
•If you are assigned an account that uses the Full Access privilege set, you can prevent the
Open Filename dialog box from appearing each time the file is opened by designating a
default account name and password to automatically use when opening the file. See Setting
file options.
•If an account name and password is entered automatically when you open a file but you
want to enter different account information, hold down the Shift key (Windows) or the Option
key (OS X) when opening the file. The Open Filename dialog box will appear and you can
specify another account name and password. (Note: This method does not work in OS X
with account information stored in your keychain. Instead, use the Keychain Access
application to delete the appropriate FileMaker Pro password item from your keychain.
Then open the file.)
•If you try to access a protected file through a file that’s not authorized to access that file, you
are asked if you want to authorize the file now. Click Yes to authorize the file. If you click
Yes but are not logged in to the files with Full Access privileges, you must then enter an
account with Full Access privileges.
Changing your password for a file
FileMaker Pro may display a Change Password dialog box when you try to open a file. This can
occur in two situations:
•The first time you open a file. The administrator of the file may have specified a temporary
password that you must change the first time you open the file.
•When your password expires. Your password may expire at a regular interval and require
you to specify a new password in order to open the file.
You can also change your password whenever you want if your privileges permit it.
To change your password when FileMaker Pro prompts you to change it:
1. In the Change Password dialog box, enter your current or temporary password once and
your new password twice in the appropriate fields.
2. Click OK.
To change your password for a file:
1. Do one of the following:
•If the file is not already open, open it and click Change Password in the Open Filename
dialog box.
•If a file is already open, choose File menu > Change Password.
2. In the Change Password dialog box, enter your old password once and your new password
twice in the appropriate fields.
3. Click OK.
Notes
•If you change the password of an account that is shared by others, any other account users
that currently have the file open can continue to use the file. Once they close the file, they
will need the new password in order to open the file again.

Protecting databases
FILEMAKER PRO HELP 483
•Shared accounts are a security risk. For better security, use individual accounts instead of
shared accounts. If you intend to use shared accounts anyway, make sure you limit the
access capabilities of the privilege sets that shared accounts use. Change the password
occasionally, particularly when certain users no longer require access.
Authorizing access to files
As part of your overall security plan, you can control whether other FileMaker Pro files are permitted
to access the schema in a file (including its tables, layouts, scripts, and value lists) in your secured
solution. When protection is enabled, any use of the protected file through a FileMaker data source
will require authorization. Therefore, in a multi-file solution, you will need to authorize the other files.
For example, enabling protection prevents someone with an account in your file from creating
another file that uses tables in your file but does not implement the same business logic (such as the
same script triggers). The use of this alternative file can bypass your intended business logic
(although record-level access would still be enforced). Turning on this option also prevents files that
are not authorized from opening a protected file using the Open File script step.
Each authorized file is assigned a unique numeric identifier, which the protected file keeps track of,
ensuring that the protected file remains protected even if it is renamed or duplicated. Any efforts to
bypass authorization, such as by replacing an authorized file with a different one, will be
unsuccessful.
Protecting a file and authorizing other files to access it is different from protecting a file’s record data
and other security measures that you can take. See Planning security for a file.
Setting up access to a file
You can protect access to a file in your database by authorizing other files to access the schema
(tables, layouts, scripts, and value lists) in the file you want to protect. You must have the Full
Access privilege set for any file that you want to protect and any file that you want to authorize.
A file that you want to protect must be local; however, once you turn on protection, the file can be
hosted remotely. In addition, you need exclusive access to it, so make sure no one else is using the
file before you begin. Files that you want to authorize can be local or remote.
To authorize access to a file:
1. Open the file that you want to protect.
2. Choose File menu > Manage > Security, then click the File Access tab.
3. To protect this file against unwanted access from other files, select Require full access
privileges to create references to this file.
4. If any files that reference the protected file are currently open, you see an alert for each file,
asking if you want to authorize the file. Click Yes.
5. If you want to authorize additional files that are not currently open, click Authorize. In the
Open File dialog box, choose a file to authorize, and click Open.
You may be asked to enter the name and password of an account with Full Access privileges.
You can also authorize remote files. See Opening shared files as a client.
Important If you don’t authorize a file that references a protected file, the references will no
longer work.

Protecting databases
FILEMAKER PRO HELP 484
The authorized file appears in the File Access list, with the date and time it was authorized, and
the account used to create the authorization.
Repeat this step for each file you want to authorize.
6. When you are finished, click OK.
To remove authorization for a file:
1. Open the protected file.
2. In the File Access tab of the Manage Security dialog box, select the file for which you want
to remove authorization, then click Deauthorize.
If the deauthorized file was open on any clients, then deauthorization will not take effect until the
next time they reopen the file.
3. Click OK.
To remove all restrictions to file access:
1. Open the protected file.
2. In the File Access tab of the Manage Security dialog box, deselect Require full access
privileges to create references to this file.
In addition, you can optionally deauthorize files (see “To remove authorization for a file,” above).
3. Click OK.
Notes
•If you rename an authorized file and the file is currently open, the new name appears next to
the original name in the File Access list. For example, if you renamed the file SalesReport
to ExecReport, then ExecReport;SalesReport appears in the list.
•If users try to access a protected file through a file that’s not authorized, they are asked if
they want to authorize the file now. If they click Yes but are not logged in to both files using
Full Access privileges, they must enter the Full Access account name and password for the
files. However, if they are logged in to both files using Full Access privileges, the file is
authorized using their current accounts.
•A protected file retains its list of authorized files if the file is cloned or included in a runtime
solution, so you don’t have to repeat this process.
On one hand, this is helpful because you don’t have to repeat the authorization process.
However, if you duplicate or clone a protected file, each file will also have the same ID. If you
use both files in the same multi-file solution, you must reset the ID in one of the files so that each
file has a unique ID. To reset the protected file’s unique ID, click Reset All, then click Yes. After
resetting, you will need to reauthorize all files that are authorized to access the protected file
and any protected files that file was authorized to access.
Important Resetting the ID cannot be undone by clicking Cancel in the Manage Security
dialog box.
•To limit access to your solutions to particular FileMaker Pro versions, you can create a script
that includes the Get(ApplicationVersion) function, to perform a version check whenever
files are opened.
Sharing data
FILEMAKER PRO HELP 485
Sharing data

Sharing databases on a network
FILEMAKER PRO HELP 486
Sharing databases on a network
If your computer is connected to a network, you and other Windows and OS X FileMaker Pro and
FileMaker Go users can use the same database file simultaneously.
FileMaker Pro Network Sharing supports the sharing of files with up to 5 concurrent users (not
including the host). FileMaker Go clients are included in the limit of 5 users. To support more users
and web publishing technologies such as XML and FileMaker WebDirect, use FileMaker Server.
•The information in this topic pertains to sharing files on a local area network. To host
databases over a network, see Opening files as the host. For information about publishing
files on the web or an intranet, see Publishing databases on the web. For information about
sharing files via ODBC or JDBC, see Using ODBC and JDBC with FileMaker Pro.
•OS X: If you are unable to share files on a local network, verify on the host computer that
either the OS X Sharing firewall has been turned off, or that you have added an open
network port configuration for port 5003 to the system sharing preferences. For more
information about the OS X Sharing firewall and adding a network port configuration, see
OS X Help Center.
Important Sharing (or hosting) a FileMaker Pro database is independent of any operating system
file sharing. Access control you set up in Windows or OS X is not associated with access privileges
you set up in FileMaker Pro, and vice versa.
If you are the first person to open a shared file, you are the host. Users who open a shared file after
you are clients.
Notes
Once a shared file is open, the host and clients have access to the same information, and all
changes to the file appear in each user's window.
•Modifications to the data made by any user are saved in the shared file. Any changes to
layouts and scripts are also saved in the shared file.
•Specified sort orders, find requests, import and export field orders, and print setups are
specific to each user.
Although it's possible for multiple users to make changes in the same shared file at the same time,
there are limits to the types of simultaneous changes that are permitted. The following table
describes the types of changes you can and cannot make to shared files.
Database change Limitation
Changing data in fields and records Two people can’t edit the same record at the same
time.
Changing layouts and layout elements Two people can’t modify the same layout at the same
time.
Changing value lists Two people can’t modify or define value lists at the
same time.
Note One person can edit a value list while another
person is using it in Browse or Find mode.

Sharing databases on a network
FILEMAKER PRO HELP 487
Note Access privileges may also restrict the ability of users to change certain elements in a file. For
more information, see Protecting databases
Sharing and hosting files
To share a file, you must open it with an account that has Manage extended privileges access
privileges. Once sharing is enabled for a file, the first user to open the file becomes that file’s host.
Users do not need to have Manage extended privileges access privilege to become the host of a
database, but must have these access privileges to change the sharing status of a file. See About
accounts, privilege sets, and extended privileges for more information.
To host a FileMaker Pro file, you open it and make it available to other FileMaker Pro users on your
local area network. Other users who open the file become clients of that file.
For the greatest security and performance, only share those files that you need to share.
Tips
•You can also publish your database on the web. Users can then access your data anywhere
they have an internet or intranet connection using just a web browser. See Publishing
databases on the web for more information.
•Don't perform processor-intensive tasks in another application, such as editing a movie or
working with large graphic files, while clients are sharing a file you're hosting. When you
host a file, most of the client's work is performed on your computer.
Related topics
File hosting troubleshooting
Opening files as the host
To host a file so other users can access it as clients:
•the file must be enabled for network sharing, as described in the next section
•you must be the first to open it
Changing scripts Two people can’t modify a specific script at the same
time.
Note One person can edit a script while another person
is using it.
Changing tables, fields, relationships
(database schema)
Two people can’t modify any of these elements at one
time.
Changing data source references Two people can’t modify or define data sources at the
same time.
Note One person can edit a data source while another
person is using it.
Changing accounts and privileges Two people can’t modify or define accounts and
privileges at the same time.
Note One person can create or modify an account or
privilege while another person is using it.
Database change Limitation

Sharing databases on a network
FILEMAKER PRO HELP 488
If the file has associated lookups, related files, or uses external scripts, you must open and share
those files as well.
Note Avoid hosting files that are located on a remote or networked volume. For optimal
performance, the file you're hosting should be on the hard disk of your computer.
When you share a file, by default it is visible to all other networked users via the Open Remote File
dialog box. To prevent a shared file from appearing in this list, select Don’t display in Open
Remote File dialog. This option is a good choice for sharing files that must be open but should not
be accessed directly by users. These may include related databases, files with external scripts, and/
or files that are used to generate a value list.
To enable a file for FileMaker Network sharing:
1. Open the FileMaker Pro file.
Note To enable or change a file’s sharing status, you must open it with an account that has
Manage Extended Privileges access privileges. Users do not need to have Manage Extended
Privileges access privilege to become the host of a database, but must have these access
privileges to change the sharing status of a file. See About accounts, privilege sets, and
extended privileges for more information.
2. Choose File menu > Sharing > Share with FileMaker Clients.
3. In the FileMaker Network Settings dialog box, set Network Sharing to On.
Once sharing is enabled for a file, the first user to open the file becomes that file’s host.
4. Select the file(s) to be hosted from the list of Currently open files.
5. For Network access to the file, choose an option.
•All users provides access to all FileMaker Pro and FileMaker Go users on your
network.
•Specify users by privilege set limits network access to users based on their privilege
set.
•No users prevents any access via FileMaker networking.
6. Click OK.
To change a file’s sharing status:
1. Open the FileMaker Pro file.
2. Choose File menu > Sharing > Share with FileMaker Clients.
3. In the FileMaker Network Settings dialog box, select the file from the list of Currently open
files.
4. For Network access to the file, choose an option.
•All users provides access to all FileMaker Pro users on your network and to
FileMaker Go users.
•Specify users by privilege set limits network access to users based on their privilege
set.
•No users prevents any access via FileMaker networking.
To disable FileMaker network sharing:
1. Choose File menu > Sharing > Share with FileMaker Clients.
2. In the FileMaker Network Settings dialog box, set Network Sharing to Off.

Sharing databases on a network
FILEMAKER PRO HELP 489
Tip As the host, you can send a message to all clients accessing the database. Choose File
menu > Sharing > Share with FileMaker Clients, select the file to notify, and click Send Message.
Type a message in the Send Message dialog box and click OK. Clients see the message in a dialog
box. They can dismiss the dialog box by clicking Cancel, or the dialog box will close automatically
30 seconds after appearing.
Related topics
Closing shared files
Closing shared files
Before a shared file can be closed by a host, all clients must close the file. FileMaker Pro allows you
to prompt networked clients to close the shared file when you do one of the following: close the file,
change the sharing conditions for the file, exit FileMaker Pro, or perform a task that requires all
clients to close the file. If a client does not respond to your request to close a shared file within 30
seconds, FileMaker Pro attempts to close the shared file on the clients’ machine.
To close a shared file:
1. On the computer hosting the file, choose File menu > Close.
2. If any clients have the shared file open, you see a dialog box listing those clients. Click Ask
to send a message to these clients requesting that they close the file.
Clients see a dialog box requesting that they close the file.
Once all clients have closed the file, FileMaker Pro closes the file on your computer.
Tip As the host, you can send a message to all clients accessing the database. Choose File
menu > Sharing > Share with FileMaker Clients to open the FileMaker Network Settings dialog
box. Select the shared database from the Currently open files list. Click the Send Message
button, type a message in the Send Message dialog box, and click OK.
To quit FileMaker Pro when you're hosting a shared file: Choose File menu > Exit (Windows),
or FileMaker Pro menu > Quit FileMaker Pro (OS X). If you see a dialog box listing connected
users, click Ask. Once all clients have closed the file, FileMaker Pro closes the file on your
computer and then quits.
Related topics
Opening files as the host
Working with shared files as a client
As a client, you work with FileMaker Pro files in much the same way that you would as a single user,
with these exceptions:
•When you open a file, you see the layout, found set, and sort order from the last time the
host closed the file. (You can define a script to switch to your preferred layout and settings.
If Then FileMaker Pro
Clients click Cancel Waits for those clients to close the file
Clients click Close Now Closes the shared file on the client's computer. (If other FileMaker Pro
files are open, they are left open.)
Clients do nothing Attempts to close the file after 30 seconds, if it can be closed safely

Sharing databases on a network
FILEMAKER PRO HELP 490
Since all users' scripts are saved to the shared file, personalize the script name so you
know it's yours.)
•If your account’s privilege set prevents access to certain layouts or fields, you either can’t
view those layouts or you will see <No Access> for each field instead of the field data.
•Because you are working on a network with other users, access to records and layouts may
be delayed occasionally as other users work with the file.
•Changes you make to records and layouts are saved in the shared file.
•When you close a shared file as a client, you only close your connection to that file — it
remains open on the host's computer.
To enhance your computer's performance, always close shared files you're not actively using. If you
see a dialog box requesting that you close the FileMaker Pro file you're accessing as a client,
comply immediately. The host may be trying to perform important maintenance.
Related topics
Networked database performs slowly
Opening shared files as a client
After a file is opened by a host and shared via FileMaker Networking, you can access it as a client.
FileMaker Pro databases shared via TCP/IP can be opened remotely using the list of local hosts,
the IP address of the host machine, or the DNS name of the host machine if one has been defined.
For example, a database hosted from a computer with an IP address of 192.168.10.0 and a DNS
name of host.domain.com can be opened by entering either the IP address or the DNS name in the
File menu > Open Remote > Network File Path field, using the format
fmnet:/192.168.10.0/<filename>. (Note that fmnet:/ uses a single slash.)
Note FileMaker Pro also supports IPv6 addresses in the form of eight four-digit number groups,
separated by colons and surrounded by square brackets. For example,
fmnet:/[2001:0DB8:85A3:08D3:1319:8A2E:0370:7334]/<filename>
To open a shared file as a client:
1. Choose File menu > Open Remote.
The Open Remote File dialog box appears, displaying a list of hosts.
2. For View, choose the type of host you want displayed in Hosts.
Choose To display
Favorite Hosts Hosts you previously added as favorites. (For information about adding,
editing, or removing a favorite host, see the section after these steps.)
Local Hosts FileMaker Server hosts located on your TCP/IP subnet.
To specify a host located on another TCP/IP subnet, for Network File
Path, type a domain name (as host.domain.com) or IP address using
one of the following formats:
IPv4: 192.168.10.0
IPv6: [2001:0DB8:85A3:08D3:1319:8A2E:0370:7334]

Sharing databases on a network
FILEMAKER PRO HELP 491
Note To add a local host or a host located on an LDAP to the list of favorites, select the host to
add and click Add to Favorite Hosts. Then, see the section after these steps.
3. To see the available files from a host, select the host.
4. For Available Files, select the file you want to open, then click Open (or double-click the
filename). Or, for Network File Path, type the fully qualified filename (for example,
fmnet:/<host IP address>/<filename>), then click Open.
Tip To narrow the list of available files, type a few characters in the Filter text box. Only
filenames containing the characters you type are displayed in the list.
You might be required to enter an account name, password, and domain name (Windows only),
depending on how file sharing is configured on the host.
To add, edit, and remove favorite hosts:
1. In the Open Remote File dialog box, do one of the following:
•To organize the list of favorite hosts, for View, select Favorite Hosts. Select the host to
organize, then click Add, Edit, or Remove. (Add and Edit display the Edit Favorite Host
dialog box; Remove deletes the host from the list.)
•To mark a remote file so it appears in the Favorite Files list in the FileMaker Quick Start
Screen, for View select Favorite Hosts, select a host, select an available file, click Add
to Favorites. For more information about accessing favorite remote files, see Using
FileMaker Quick Start to open files.
•To add a local host or a host located on an LDAP to the list of favorites, for Hosts, select
the host you want to add, then click Add to Favorites. (The Edit Favorite Host dialog
box appears.)
2. In the Edit Favorite Host dialog box, for Host’s Internet Address, enter the host’s IP
address or domain name.
•Enter IP addresses using one of the following formats:
IPv4: 192.168.10.0
IPv6: [2001:0DB8:85A3:08D3:1319:8A2E:0370:7334]
•Enter domain names using the format host.domain.com.
3. For Favorite Host’s Name (optional), type a name for the host.
If you don’t enter a name, only the host’s internet address is displayed in the Manage Favorites
dialog box and the FileMaker Quick Start Screen.
4. In the File Settings area, choose to show all available files (the default) or only the files you
specify.
If you choose Show only these files, enter each filename on a separate line, ending each line
with a carriage return.
5. Click Save.
Hosts Listed by LDAP FileMaker Server hosts available through LDAP.
To specify an LDAP from which you want to see hosts displayed, see the
last section in this topic.
Choose To display

Sharing databases on a network
FILEMAKER PRO HELP 492
To specify an LDAP server:
1. In the Open Remote File dialog box, with Hosts Listed by LDAP selected for View, click
Specify.
The Specify LDAP Directory Service dialog box appears.
2. In the Server Information area, enter information about the server. (You may need to
contact your network administrator for this information.)
3. In the Login Settings area, select or clear Use Windows Authentication (Windows only).
Then:
•If you select this option, choose Log in as current user, or choose Log in using
account and type your account name, password, and domain name (Windows only).
•If you clear this option, choose Log in anonymously, or choose Log in using account
and type your account name and password.
4. Click OK.
Note
Related topics
Cannot see hosted databases
Opening shared databases remotely using a URL
The FileMaker Pro installer registers fmp: as an internet protocol. This enables you to open a shared
database using a URL. You can also run a script in the shared file using a URL.
FileMaker Pro databases shared via TCP/IP can be opened remotely using the list of local hosts,
the IP address of the host machine, or the DNS name of the host machine if one has been defined.
For example, a database hosted from a computer can be opened by entering any of the following in
the File menu > Open Remote > Network File Path field:
•an IPv4 address, for example, 192.168.10.0
•an IPv6 address, for example, [2001:0DB8:85A3:08D3:1319:8A2E:0370:7334]
•a DNS name, for example, host.domain.com
To open a shared database using a URL:
1. Launch a web browser on the intended client machine.
2. Enter the URL of the host machine into the browser’s address area using the format:
For Do this
Server Address Enter the domain name of the server, in this format:
host.domain.com
or the IP address of the server in one of the following formats:
IPv4: 192.168.10.0
IPv6: [2001:0DB8:85A3:08D3:1319:8A2E:0370:7334]
LDAP Port Keep or change the port number. (To return to the initial value, click Use
Default.)
Search base Enter an LDAP host search base string.

Sharing databases on a network
FILEMAKER PRO HELP 493
fmp://[[account:password@]netaddress]/databasename
Optional parameters are indicated by square brackets (“[ ]”).
To run a script in a shared database using a URL:
1. Follow the steps above.
2. Append ?script=scriptname to the URL. For example:
fmp://192.168.10.0/filename.fmp12?script=scriptname
Specify script parameters and local variables using the format:
fmp://[[account:password@]netaddress]/
databasename[?script=scriptname[¶m=scriptparameter][&$variablename
=value]]
Notes
•Filenames are case-sensitive. Script names are not case-sensitive.
•The filename extension .fmp12 is not required.
•You can define multiple variables in the same fmp: protocol.
•If spaces or any other special characters are needed in a link, be sure to replace them with
the appropriate percent-encoded values required for valid URLs. For example, replace a
space with %20.
Examples
fmp://My%20Addresses
fmp://192.168.10.0/My%20Addresses.fmp12
fmp://[2001:0DB8:85A3:08D3:1319:8A2E:0370:7334]/My%20Addresses.fmp12
fmp://MyAccount:MyPassword@192.168.10.0/My%20Addresses.fmp12
fmp://MyAccount:MyPassword@[2001:0DB8:85A3:08D3:1319:8A2E:0370:7334]/
My%20Addresses.fmp12
Open a file named Clients.fmp12 on the host machine with an IP address of 192.168.10.0 with a
script named ListClients:
fmp://192.168.10.0/Clients.fmp12?script=ListClients
Open a file named Clients.fmp12 on the host machine with an IP address of 192.168.10.0 with a
script named ListClients, and specify a parameter of TopClients and a local variable $NumberToList
with a value of 10:
fmp://192.168.10.0/
Clients.fmp12?script=ListClients¶m=TopClients&$NumberToList=10
Related topics
Closing shared files
Sending the URL of a shared database

Sharing databases on a network
FILEMAKER PRO HELP 494
Sending the URL of a shared database
If the database you are using is shared, you can give other FileMaker Pro users access to it by
sending a URL link to the file via email. Email recipients who have FileMaker Pro installed can open
the database from the email message you send.
The URL uses the following format:
fmp://[[account:password@]netaddress]/databasename
To send a URL link to the shared database by email:
1. Open the shared database file that you want a recipient to have access to.
Important Make sure sharing settings provide user access to the file. Choose File menu >
Sharing, choose the type of network access you are using, select All users or Specify
users by privilege set, then click OK.
2. Choose File menu > Send > Link to Database.
3. If prompted, choose an email client profile, then click OK.
An email message opens. The message contains the link to the shared database and includes
some requirements for opening the link.
4. Address the message to the recipient, type any additional information for the recipient in the
body of the message, then send the message.
Notes
•If you don’t have an email client on your computer, the URL link appears in a dialog box. To
save the link, copy it to the Clipboard and paste it in an application that accepts text.
•For the recipient to connect to the database using the link:
•The client must have FileMaker installed on their machine.
•The database file must be open on the host machine.
•Any firewalls between the client and server must allow FileMaker sharing.
•The client must have a valid account and password.
•The client and the host must be on the same local area network.
•If using an IPv6 address, the client and host must both support IPv6.
•You can also email a snapshot link of the current found set of records to other users. See
Saving and sending records as a snapshot link.
Related topics
Opening shared databases remotely using a URL
Sharing files with FileMaker Go clients
FileMaker Go lets you work with FileMaker Pro databases on an iPad, iPhone, or iPod touch. You
work with data interactively; when you change data on an iOS device, the data is updated on the
host computer, and vice versa.
Build databases using FileMaker Pro. Share them using FileMaker Pro or FileMaker Server. Then
use FileMaker Go to work with the data on a device. For example, on a device you can add, modify,
delete, find, and sort records, display data in Form View, Table View, and List View, view information

Sharing databases on a network
FILEMAKER PRO HELP 495
in portals, tab panels, slide panels, and web viewers, scan bar codes (via scripting), and perform
scripts and other tasks.
To tailor databases for use with FileMaker Go, see the FILEMAKER GO DEVELOPMENT GUIDE,
available at http://www.filemaker.com/documentation.
Uploading files to FileMaker Server
Use FileMaker Pro to transfer database files to FileMaker Server. If a database uses container fields
that store data externally, FileMaker Pro also uploads the externally stored data.
Note Before you can upload files, you must have the account name and password for the server
administrator or for a group administrator that has the privilege to perform actions on databases.
See FileMaker Server Help for more information.
To upload files to FileMaker Server:
1. Choose File menu > Sharing > Upload to FileMaker Server.
The Upload to FileMaker Server dialog box appears.
2. For Hosts, choose the type of host you want displayed in the list.
For information about adding favorite hosts or specifying an LDAP server, see Opening shared
files as a client.
3. In the list, choose the host you want to upload files to.
Or, for Host Address, type the host’s domain name (as host.domain.com) or IP address.
4. Enter your FileMaker Server Admin Console name and password, then click Next.
You can use the name and password for either the server administrator or a group administrator.
5. The server address and destination folder appear at the top of the dialog box. You can
change the folder or create a new folder.
FileMaker Server hosts database files in a default folder (MainDB) and two optional additional
folders (Additional_1 and Additional_2). If you are a server administrator, you can see all
folders. If you are a group administrator, you can see only the folders that your account allows
you to see.
Choose To display
Favorite Hosts Hosts you previously added as favorites.
Local Hosts FileMaker Server hosts located on your TCP/IP subnet.
Hosts Listed by LDAP FileMaker Server hosts available through LDAP.
To Do this
Change the destination
folder
Click Change. In the Change Folder dialog box, select a
different folder, then click OK.
Create a new destination
folder
Click Change. In the Change Folder dialog box, select a folder
in which you want to create a new folder. Click New Folder,
enter the name, then click OK.
Note You can create a new folder in only the default or
additional database folders.

Sharing databases on a network
FILEMAKER PRO HELP 496
For more information on folder locations and administrator accounts, see FileMaker Server
Help.
6. Select the files you want to upload.
7. For each file, look in the Status column. If FileMaker Pro detects a problem with a file, it
updates the status for that file and clears the checkbox. Confirm that all the files you want to
upload are selected.
8. If you want the files to be available on the server for clients to use immediately, select
Automatically open databases (on server) after upload.
9. Click Upload.
When the upload completes, FileMaker Pro updates the status for each file to indicate whether
the upload was successful.
10. To open an uploaded file in FileMaker Pro, select Open file from FileMaker Server for the
file. Then click Done.
FileMaker Pro opens each selected file. The filename and the server name appear in the
window’s title bar.
Notes
•When you add a file to the upload list, FileMaker Pro checks that the file:
•is a valid FileMaker Pro file or runtime solution
•is not currently open in FileMaker Pro
•passes a consistency check, if the file is unencrypted
If the consistency check takes more than a few seconds for a file, a progress indicator
appears. You can cancel the consistency check if it takes too long and upload the file
anyway.
•does not already exist in any FileMaker Server folder (filenames must be unique for the
entire server regardless of the folder or subfolder)
•does not exceed the available storage space on the server
If FileMaker Pro finds a problem with one or more files, a message appears in the Status
column.
•You can upload encrypted database files, but FileMaker Pro does not check them for
consistency, and FileMaker Server cannot open them automatically after they are uploaded.
An encrypted file must be opened by a server administrator or a group administrator with
the privilege to perform actions on databases.
To Do this
Add files to the upload
list
Click Browse and select all the files that you want to add to the
upload list.
•To select multiple files, Ctrl-click (Windows) or Command-click
(OS X) each file.
•To select a range of adjacent files, click the first file, then Shift-
click the last file in the range.
Then click Open.
Exclude files from the
upload list
Clear the checkbox next to any file that you don’t want to upload.

Sharing databases on a network
FILEMAKER PRO HELP 497
•If you select Automatically open databases (on server) after upload, FileMaker Server
checks whether the file has some form of sharing enabled. If no sharing is enabled,
FileMaker Server automatically enables sharing via FileMaker Network (extended privilege
fmapp) for the Full Access privilege set.
•If you cancel a multiple-file upload in progress, files that are completely uploaded remain on
the server, partially uploaded files are removed from the server, and FileMaker Pro does not
upload any remaining files. The Status column in the Upload to FileMaker Server dialog box
indicates which files were uploaded successfully.
•After the upload completes, FileMaker Pro sets a flag in the local version of the file that
indicates the file has been uploaded. When you try to open the local version of the file,
FileMaker Pro prompts you to choose whether to open the local version or the hosted
version of the file on FileMaker Server.
•FileMaker Server may not be able to open uploaded files automatically in these cases:
•The limit on the number of hosted files has been reached.
•The filename extension is not .fmp12 or is not registered on the server.
See FileMaker Server Help for more information.
•For information on how to remove or download a file or remove a folder from the server, see
FileMaker Server Help.
Related topics
Opening shared files as a client
Upload To FileMaker Server script step

Saving, importing, and exporting data
FILEMAKER PRO HELP 498
Saving, importing, and exporting data
You can exchange information between FileMaker Pro and other applications by saving, importing,
and exporting data to other file formats. For example, you can import data that is currently in another
database or spreadsheet program, or export address data in order to create personalized form
letters with a word processing program.
You can:
•save FileMaker Pro data to Excel and PDF files
•save a found set of records and email it as a snapshot link
•append FileMaker Pro records to existing FileMaker Pro PDF files
•import data into an existing FileMaker Pro file
•set up recurring imports to help you routinely refresh read-only data imported from another
file
•convert data from other applications to new FileMaker Pro files
•export data in many formats for use in other applications
Notes
•For general information on how FileMaker Pro saves files, see Saving and copying files.
•To exchange small amounts of data between files, use copy and paste or drag and drop.
See Copying and moving data in records and Moving text and data with drag and drop.
•If you’re using FileMaker Pro on both Windows and OS X, you don’t need to use import and
export features to open FileMaker Pro files created on different operating systems. To open
a FileMaker Pro for OS X file in FileMaker Pro for Windows, or vice versa, choose File
menu > Open, and open the file. See Opening files.
•You can also import scripts from other FileMaker Pro files. See Importing scripts from other
FileMaker files.
•You can import tables from other FileMaker Pro files. See About creating a new table for
imported data and Copying or importing table schemas (FileMaker Pro Advanced).
Saving and sending records in other formats
You can save FileMaker Pro data as Microsoft Excel files, as Adobe PDF files, or as a snapshot link
in all modes except Find mode. You can save the current record or all the records in the current
found set.
Creating an Excel file lets you export FileMaker Pro data from the current layout and found set and
work with it in an Excel worksheet. Creating a PDF file lets you store the current state of your file in
a static document that you can protect with a password if you want. You can also append
FileMaker Pro records to an existing FileMaker Pro PDF file. Creating a snapshot link lets you send
a found set of records.
In order to save files as Excel or PDF, you need the following access privileges:
•Allow exporting to save Excel files
•Allow printing to save PDF files
When you save an Excel or PDF file or a snapshot link, FileMaker Pro lets you create a new email
with the file attached, so you can send it to others. For Excel and PDF files, you can also choose to
open the file after saving.

Saving, importing, and exporting data
FILEMAKER PRO HELP 499
For more information, see Editing other privileges.
Tip You can also import read-only data from Excel files into FileMaker Pro files. See Setting up
recurring imports and Importing data into an existing file.
Saving and sending records as an Excel file
You can save FileMaker Pro data as an Excel file in all modes except Find mode. The Excel file will
only include fields that are visible on the layout when you perform the save (including any related
fields). Fields in panel controls that are not on the front-most panel are not included. All the records
in a repeating field will be exported into a single cell. If you want more control over which fields
appear in the Excel file, then use the Export Records command instead. See Exporting data from
FileMaker Pro.
Your access privileges must allow exporting in order to save Excel files. See Editing other privileges.
To save records as an Excel file:
1. Display the layout that shows the fields you want to include in the Excel file.
See Switching between layouts.
Note When saving as an Excel file, FileMaker Pro does not save fields that are not visible in
Browse or Preview mode.
2. In Browse or Layout mode, choose File menu > Save/Send Records As > Excel.
In Preview mode, click Save As Excel in the status toolbar.
3. In the Save Records As Excel dialog box, enter a name for the file.
4. For Save as type, choose Excel Workbooks (.xlsx).
5. Specify where to store the file, what to save, whether to automatically open the file, and
whether to create an email with the Excel file as an attachment.
•You can save the current record or all the records in the current found set.
•If you select Create email with file as attachment, an email is created with the Excel
file attached.
6. Click Options to set the Excel options:
•If you don’t want to include the field names, clear the Use field names as column
names in first row checkbox.
•For Worksheet, Title, Subject, and Author, enter descriptive information about the file.
7. Click OK.
8. Click Save.
Note When you save or send data as Excel, fields on popovers are not included in the destination
file. Use File menu > Export Records instead. After naming the destination file and setting Excel
options, choose Current Table in the Specify Field Order for Export dialog box, then select the fields
you want to export. See Exporting data from FileMaker Pro.
Related topics
Microsoft Excel format
Saving and sending records as a PDF file
You can save FileMaker Pro data as a PDF file in all modes except Find mode. The PDF file’s
appearance is based on the current layout when you create the PDF file.

Saving, importing, and exporting data
FILEMAKER PRO HELP 500
You can assign a password to the PDF file if it contains sensitive information. If you assign a
password, the file is encrypted and cannot be opened without the password. FileMaker Pro can also
create a blank email message with the PDF file as an attachment to make it easy to distribute to
others.
To save PDF files, your access privileges must allow printing. See Editing other privileges.
To append records to an existing FileMaker Pro PDF file, you must create a script that uses the
Save Records as PDF script step and select the Append to existing PDF option. See Save
Records As PDF.
Note Saving records as a PDF file is not supported in runtime solutions.
To save records as a PDF file:
1. Display the layout that you want to use as a basis for the PDF file.
See Switching between layouts.
2. In Browse or Layout mode, choose File menu > Save/Send Records As > PDF.
In Preview mode, click Save as PDF in the status toolbar.
3. In the Save Records As PDF dialog box, enter a name for the file, specify where to store the
file, what to save, whether to automatically open the file, and whether to create an email
with the PDF file as an attachment.
•You can save the current record, all the records in the current found set, or a blank
record that can be used as a paper form.
•If you select Blank record, the Appearance option is enabled to define how the fields
are formatted in the PDF file.
•If you select Create email with file as attachment, an email is created with the PDF
file attached, and you then specify the recipient.
•If you select Automatically open file, the file opens after it is created.
4. Click Options to set the PDF options:
•In the Document tab, enter descriptive information about the file, the version of Acrobat
for viewing the file, and page numbering.
•In the Security tab, assign passwords to the PDF file, as well as print and edit
privileges. If print and edit privileges are allowed, specify if copying and screen reading
software are permitted. See PDF Options dialog box.
•In the Initial View tab, define how an opened PDF file will look.
5. Click OK.
6. Click Save.
Saving and sending records as a snapshot link
You can save a found set of records, called a snapshot link, to capture a found set as it was when
you performed the find request. The found set is saved in FileMaker Pro Snapshot Link format
(FMPSL) with the filename extension .fmpsl. You can also email an FMPSL file to another person.
The snapshot link includes the current found set of record IDs—including the layout, view, sort order,
mode, and toolbar visibility. Snapshot link files can include local or remote records.
Note A snapshot link does not preserve record data, and opening a snapshot link will not return
record data to the state it was in when the snapshot link was created. To preserve record data, you

Saving, importing, and exporting data
FILEMAKER PRO HELP 501
can export records (see Exporting data from FileMaker Pro) or save a copy of the file (see Saving
and copying files).
To save records as a snapshot link file:
1. Find the records that you want to save as a snapshot link. See Making a find request.
If you don’t perform a find, all the records in the current table will be included in the FMPSL file.
2. In Browse mode, Layout mode, or Preview mode, choose File menu > Save/Send Records
As > Snapshot Link.
3. In the Save Records As Snapshot Link dialog box, accept the default filename (the name of
the active window with the .fmpsl filename extension), or enter a different name.
4. For Save, choose Records being browsed to save the entire found set of records. Or
choose Current record to save only the current record (in this case, the found set is not
stored, but the current record and all other states, such as the layout, view, and sort order,
are stored).
5. If you want to email the snapshot link, for After saving, select Create email with file as
attachment.
6. Click Save.
7. If you chose to email the snapshot link, a blank email message opens in your default email
application, with the FMPSL file attached. Complete the header information and send the
message.
To open a snapshot link file:
You can use any method of opening FileMaker Pro files to open a snapshot link file. See Opening
files.
The snapshot link file opens in a new window.
Notes
•A snapshot link does not include the find request that was used for finding the records. To
see records that are based on current information from the database, you must re-create
the find request.
•If any records (including the current record) in the snapshot link were deleted after the file
was created, only the available records are displayed.
•If a layout for a snapshot link no longer exists in the database, or the layout is associated
with another table, then no records are displayed.
•You can create a script that creates a snapshot link. See Save Records As Snapshot Link.
•Make sure that everyone who will use the snapshot link has the proper access privileges for
the layout and records.
•If any actions are set to be performed on the database when it is opened, such as switching
to a layout, running a script, or responding to a script trigger, those actions are done before
the snapshot link is opened.
•If database windows are locked and hidden when you try to open a snapshot link, the found
set will not be displayed. Unlock and unhide at least one window in the database, and then
try again.
•Snapshot links are not supported in runtime solutions created with FileMaker Pro
Advanced.

Saving, importing, and exporting data
FILEMAKER PRO HELP 502
•If Current record was selected when the snapshot link was created, then only the current
record is shown, and the state of the database (for example, the layout, view, and sort order
used at the time) is restored. If Records being browsed was selected and the window
didn’t have a found set, then only the records that existed at the time are shown. Records
created after the snapshot link was created are not shown.
•Snapshot link files created in FileMaker Pro 11 are incompatible with later versions, and
vice versa. You must convert the database from which the records were found and then re-
create the snapshot link. See Converting files from FileMaker Pro 11 and earlier.
Related topics
Sharing databases on a network
Sending email messages based on record data
FileMaker Pro lets you create email messages based on record data.
You can:
•send one email to a single address or multiple addresses. See Sending one email
message.
•send separate, customized email messages based on each record in the found set. See
Sending multiple email messages.
•create a script that sends email. See Creating scripts to automate tasks and Send Mail
script step.
•send a snapshot link of a found set of records. See Saving and sending records as a
snapshot link.
Generated email is sent using your default email application or directly through SMTP (Simple Mail
Transfer Protocol, a set of criteria for sending and receiving email). Send email through SMTP, for
example, if no email application is installed on your computer.
To send email, you must have an internet connection. In addition, to send mail on Windows through
an email application, you must also have Microsoft Outlook or Windows Mail installed and
configured properly on your computer. To send email on Macintosh through an email application,
you must have Microsoft Outlook or OS X Mail installed and configured properly on your computer.
Sending one email message
You can use FileMaker Pro to send email to one or more recipients. To specify email addresses,
subjects, and messages, you can type text, use data from fields in the current record, or use
calculations. In addition, you can gather multiple addresses from a field or calculation across all the
records in the current found set.
To send one email message:
1. Find the record with the data you want to use in your email.
See Finding records.
2. Choose File menu > Send > Mail.
The Send Mail dialog box appears.
3. For Send via, choose how you want to send the email.
•To send using an email application such as Microsoft Outlook (Windows) or OS X Mail
(OS X), accept the default, E-mail Client.
Saving, importing, and exporting data
FILEMAKER PRO HELP 503
•To send using SMTP (without an email application), choose SMTP Server. In the SMTP
Options dialog box, enter user and server information (see Entering or editing SMTP
options) and click OK. Then continue with step 4.
4. For Create, select One email using data from the current record.
5. Do one of the following to enter email addresses in the To, CC, and BCC boxes:
6. If you specified a field or calculation in step 5, select Collect addresses across found set
if you want to gather addresses from all the records in the current found set. (Otherwise,
only the address from the current record is used.)
Note If you typed email addresses into the To, CC, and BCC boxes and your found set
contains multiple records, selecting the Collect addresses across found set option will send
recipients one email for each record in the found set.
7. Do one of the following to fill in the Subject and Message boxes:
8. Select Attach file if you want to select a file to send as an attachment to the email.
9. Click OK.
To Do this
Enter one or more
email addresses
Type the addresses. Separate each address with a semicolon or the return
character.
Specify a field that
contains one or
more email
addresses
Click and choose Specify Field Name. Then select a field and click OK.
Specify a
calculation that
generates one or
more email
addresses
Click and choose Specify Calculation. Then create a calculation and click
OK.
Windows: Enter
one or more email
addresses from
the Windows
address book
Click and choose Specify Email Addresses. Then choose the email
addresses you want.
To Do this
Enter text Type the text.
Specify a field that
contains text for
the email
Click and choose Specify Field Name. Then select a field and click OK.
Specify a
calculation that
generates text for
the email
Click and choose Specify Calculation. Then create a calculation and click
OK.
Insert the contents
of a text file into
the Message box
Click next to the Message box and choose Insert Text from File. Then
choose the text file you want.
Saving, importing, and exporting data
FILEMAKER PRO HELP 504
Generated email messages are sent using your default email method.
Note Email is sent through SMTP or directly to your default email application’s outbox as plain text.
To apply formatting or change an email message’s contents, see the Send Mail script step.
Sending multiple email messages
You can use FileMaker Pro to send multiple email messages to one or more recipients. To specify
email addresses, subjects, and messages, you can type text, use data from each record in the
current found set, or use calculations. A separate email is sent for each record in the found set.
To send multiple email messages:
1. Find the records you want to use for your email messages.
See Finding records.
2. Choose File menu > Send > Mail.
The Send Mail dialog box appears.
3. For Send via, choose how you want to send the email.
•To send using an email application such as Microsoft Outlook (Windows) or OS X Mail
(OS X), accept the default, E-mail Client.
•To send using SMTP (without an email application), choose SMTP Server. In the SMTP
Options dialog box, enter user and server information (see Entering or editing SMTP
options) and click OK. Then continue with step 4.
4. For Create, select Multiple emails (one for each record in found set).
5. Do one of the following to enter email addresses in the To, CC, and BCC boxes:
6. If you specified a field or calculation in step 5, select Collect addresses across found set
if you want to gather addresses from all the records in the current found set for each
message.
To Do this
Enter one or more
email addresses
Type the addresses. Separate each address with a semicolon or the return
character.
Specify a field that
contains one or
more email
addresses
Click and choose Specify Field Name. Then select a field and click OK.
Specify a
calculation that
generates one or
more email
addresses
Click and choose Specify Calculation. Then create a calculation and click
OK.
Windows: Enter
one or more email
addresses from
the Windows
address book
Click and choose Specify Email Addresses. Then choose the email
addresses you want.
Saving, importing, and exporting data
FILEMAKER PRO HELP 505
Important Use Collect addresses across found set with caution because it can generate
a lot of email messages. For example, if your found set contains 10 records and you
specified a field that contains a single email address in each record, 100 email messages
would be generated. Each email address will receive 10 emails. See the example below.
7. Do one of the following to fill in the Subject and Message boxes:
8. Select Attach file if you want to select a file to send as an attachment to the email.
9. Click OK.
Generated email messages are sent using your default email method.
Notes
•Email is sent through SMTP or directly to your default email application’s outbox as plain
text. To apply formatting or change an email message’s contents, see the Send Mail script
step.
•If you specify the contents of a field as the email address and the field contains more than
one address (separated by commas or semicolons as required by your email client), one
message is sent to each address in each record.
Example
When you specify a field or a calculation as the email address, the number of messages sent
depends on the contents of the fields or the result of the calculation and whether you select the
Collect addresses across found set option. Suppose you have the following found set:
When you specify the Address field for the email address and select Multiple emails (one for each
record in found set), each message is addressed to only one recipient and the results are:
To Do this
Enter text Type the text.
Specify a field that
contains text for
the email
Click and choose Specify Field Name. Then select a field and click OK.
Specify a
calculation that
generates text for
the email
Click and choose Specify Calculation. Then create a calculation and click
OK.
Insert the contents
of a text file into
the Message box
Click next to the Message box and choose Insert Text from File. Then
choose the text file you want.
Address Subject Message
Recipent1@isp.com Subject1 Message1
Recipent2@isp.com Subject2 Message2
Recipent3@isp.com Subject3 Message3
Recipent2@isp.com Subject4 Message4

Saving, importing, and exporting data
FILEMAKER PRO HELP 506
•Recipient1 receives one message: Subject1, Message1
•Recipient2 receives two messages: Subject2, Message2 and Subject4, Message4
•Recipient 3 receives one message: Subject3, Message3
If you select the Collect addresses across found set option, all three recipients receive all four
messages (Subject1, Message1; Subject2, Message2; Subject3, Message3; and Subject4,
Message4) and each message is addressed to all three recipients.
Entering or editing SMTP options
To send email through SMTP, you must supply information about the sender and the SMTP server in
the SMTP Options dialog box. You see this dialog box whenever you choose SMTP Server or click
Specify (when SMTP Server is selected) in the Send Mail dialog box. FileMaker Pro uses this
information whenever you send email through SMTP. You do not have to enter it each time you send
mail.
To enter or edit SMTP options:
1. Display the Send Mail dialog box by doing either of the following.
•Choose File menu > Send > Mail.
•To create a script to send email, choose Scripts menu > Manage Scripts. In the
Manage Scripts dialog box, click New. In the Edit Script dialog box, for View, choose
Miscellaneous, double-click Send Mail in the list, then click Specify.
2. In the Send Mail dialog box:
•to enter SMTP options for the first time, for Send via, choose SMTP Server
•to edit SMTP options (and SMTP Server is selected), click Specify
3. In the SMTP Options dialog box, enter user and SMTP server information.
Note To specify a calculation that generates content for a field, click Specify next to the field,
create the calculation, then click OK.
For Do this
Name Enter the name of the email sender (for example, your name). This name
appears in the From field of your outgoing messages.
E-mail Address Enter the email address from which outgoing mail will be sent (for example,
Me@MyCompany.com).
Reply-To Address Enter the email address to which incoming replies will be sent. This can be
different from the outgoing address (for example, You@MyCompany.com). If
you do not enter a reply-to address, replies will be sent to the outgoing
address.
Outgoing SMTP
Server
Enter the name of the SMTP server from which email will be sent.
Server Port Keep the default 25, or enter a different number (such as X.400), to specify
the port number to connect to on the SMTP server.
Connection
encryption
Choose None if you do not need a secure connection, choose SSL (Secure
Sockets Layer) if your email requires a secure connection, or choose TLS
(Transport Layer Security) to allow both secure and nonsecure connections
over the same port (the actual connection encryption depends on the SMTP
server’s configuration).

Saving, importing, and exporting data
FILEMAKER PRO HELP 507
4. Click OK.
You are returned to the Send Mail dialog box, where you continue setting email options (step 4
of Sending one email message or Sending multiple email messages).
Related topics
Send Mail
Importing data into FileMaker Pro
When you import data, you’re bringing data from another source (usually a file) into an existing
FileMaker Pro file. If you want to create a new FileMaker Pro file from another file format, see
Converting a data file to a new FileMaker Pro file.
FileMaker Pro can import many different file formats. For a list of file formats that FileMaker Pro
supports, see Supported import/export file formats.
If FileMaker Pro does not support the format of a particular application, you may still be able to
convert the data by exporting data from that application in a format that FileMaker Pro does support.
For example, FileMaker Pro does not import Microsoft Access files, but you can export the data from
Microsoft Access to a format that FileMaker Pro does support, and then import that file.
The source file does not need to have the same number of fields in the same order as the target file.
During the import process, you can arrange the target fields so that the source data imports into the
correct fields, as well as skip fields that you don’t want to import.
When you import data into an existing FileMaker Pro file, you can:
•add new records from the source file
•update records with information from the source file
•update matching records with information from the source file
Important Some of the above options can overwrite existing data in your file. See Methods of
importing data into an existing file.
Notes
•You can import data from any field type into any compatible field except calculation and
summary fields. You can only import into container fields if you're importing from another
Authentication Keep the default None (to require no login authentication on the SMTP
server), or choose Plain Password (for no password encryption) or
Cram-MD5 (for password encryption).
User Name (Available if you choose Plain Password or Cram-MD5 authentication.)
Enter a user ID to authenticate the user on the SMTP server. Users must
enter the correct name and password to send mail on this server. (For
information about criteria for user names, see Tips for creating account
names and passwords.)
Password (Available if you choose Plain Password or Cram-MD5 authentication.)
Enter a password to authenticate the user on the SMTP server. Users must
enter the correct name and password to send mail on this server. (For
information about criteria for passwords, see Tips for creating account
names and passwords.)
For Do this

Saving, importing, and exporting data
FILEMAKER PRO HELP 508
FileMaker Pro file or importing a folder of image files. When you import data into a global
field, the last item imported into the field from the source file determines the global field
value.
•You can only import data into a single table at a time. To import data into related fields,
import data directly into the table that contains the related field.
•If the source file is a FileMaker Pro file with multiple tables, you can only import data from a
single table at a time. To import fields from related tables, import directly from the table that
contains the field.
•To ensure that imported data is correctly formatted, you can define fields so that data is
validated as it is imported. During import, data is skipped when it does not conform to the
validation options you set. Once the import is complete, a Summary dialog reports the
number of skipped records and fields. See Defining field validation.
•If you routinely import data from the same source, you can automate the process by setting
up recurring imports or by creating a script that uses the Import Records script step. Data
imported via recurring import is read-only in FileMaker Pro. For more information about
recurring imports, see Setting up recurring imports. For more information about using a
script to import records, see Creating scripts to automate tasks and Import Records script
step.
•A layout doesn’t have to display all the fields that are in the table. You can specify the fields
that you want to import to in the Import Field Mapping dialog box. See Importing data into an
existing file.
Related topics
Querying an ODBC data source from FileMaker Pro
Methods of importing data into an existing file
There are three ways that you can import data into an existing file. You can:
•Add new records to the file
•Update existing records in the file
•Update matching records in the file
These options are available in the Import Action area of the Import Field Mapping dialog box when
you’re importing data into an existing file. Each of these options is described in detail below.
Important The import options that update existing records and update matching records both
overwrite existing data during the import process and cannot be undone. To safeguard your data,
choose File menu > Save a Copy As to make a backup of the FileMaker Pro file before you perform
an import that updates records.
Adding records
When you add records, the import process creates a new record in the target file for each importable
record in the source file.
When you add records from most source file formats, the import process adds all the records from
the source file. If the source file is a FileMaker Pro file, you can add only the records in the found set
and skip adding the omitted records. See FileMaker Pro format.
Saving, importing, and exporting data
FILEMAKER PRO HELP 509
Updating existing records
With this option, you replace data in your file with data from the source file. For each field you import
into, data from the first importable record (or row of data) in the source file overwrites fields in the
first record in the target file. Data from the second importable record (or row of data) in the source
file overwrites fields in the second record in the target file, and so on. When you replace data,
FileMaker Pro doesn’t examine or compare the data in the files.
You can choose whether to replace or not replace data on a field-by-field basis.
Records in the target file are replaced with the same number of records from the source file. If there
are more importable records in the source file, data from the extra records in the source file will not
be imported unless you also choose Add remaining data as new records. If there are more
records in the target file, data in the extra records in the target file will not be replaced.
Updating matching records
You can update matching records and fields in your target file with data from another file. For
example, you might have a copy of a database on your desktop computer and another copy on your
laptop computer. You can update the file in your office with the changes you make on the road.
You determine which records in the source file update which records in the target file by choosing
one or more match fields in each file. If data in the match field(s) of a record in the target file
matches data in the match field(s) of a record in the source file, the record in the target file will be
updated with data from the source file.
Match fields must uniquely identify each entity in your database. For example, in a database of
people, you could use one match field such as an Employee Number, or multiple match fields such
as Last Name, First Name, and Phone Number. (Using Last Name alone might identify more than
one person, so it isn’t a good match field to use by itself.)
You also specify the fields you want to import. The contents of all fields you select to import, in all
matching records, will overwrite data in the target file, even if the field in the source file is blank.
When the target file contains a found set, only the found records are updated. (If the source file is
another FileMaker Pro file, you can also import only from a found set. See FileMaker Pro format.)
The following table shows an example of how a record in a target file appears before and after being
updated by a matching record in a source file. In the Mapping column, (Windows) or (OS X)
indicates a match field, indicates to import the field, and (Windows) or (OS X) indicates
not to import the field.
Source file Mapping Target file Result
123-456-7890 or 123-456-7890 123-456-7890
John or John John
Q Q
Smith Smith Smith
456 New Rd. 123 Main St. 456 New Rd.
Newtown Anytown Newtown
USA USA USA
3/3/1960 3/3/1960
(408) 555-6789

Saving, importing, and exporting data
FILEMAKER PRO HELP 510
Notes
•If the source file is a FileMaker Pro file, you can import only the records in the found set and
skip importing the omitted records. See FileMaker Pro format.
•Match fields in the target file cannot be container, summary, or unstored calculation fields.
The field type of match fields should correspond to the type of data in the matching field. For
example, number fields should not be matched to fields containing text.
•If all specified match fields in a record are empty, that record will not be updated.
•If a record in the source file matches more than one record in the target file, all matching
records in the found set of the target file will be updated.
•If more than one record in the source file matches a record in the found set of the target file,
the target file will be updated with the last matching record in the source file. (During the
import process, the matching record in the target file is actually updated multiple times —
once by each matching record in the source file — so the last matching source record to
update the matching target record determines its final content.)
•The found set after an update contains the records that were updated (those that matched)
and any new records added, regardless of the found set before update.
Related topics
Importing data into an existing file
Setting the import action and mapping fields during import
About creating a new table for imported data
Setting up recurring imports
About creating a new table for imported data
When importing data into an existing FileMaker Pro file, you can import it into a new table based on
the schema of the imported data. This lets you consolidate tables from multiple files into a single
database file without having to manually re-create the table schemas.
To import data into a new table:
•Set up recurring imports so data accessed from an external file refreshes automatically
when you view imported data for the first time during a FileMaker Pro session or manually
when you run a data update script. Data imported via recurring import is read-only in
FileMaker Pro. See Setting up recurring imports.
•Follow the procedures in Importing data into an existing file and choose New Table from the
Target drop-down list in the Import Field Mapping dialog box. The name of the imported
table is the same as the source table name. If the file already has a table with the same
name as the imported table, a number is added to the table’s name.
References to fields in the source table
Imported tables may contain broken references to fields in the file they were imported from. You may
have to resolve these references manually.
Imported references will be maintained if the referenced fields are present in the file you imported
the data into. For example, if Table A has references to Table B, import Table B before Table A to
preserve the references. If you import Table A first, the references will be broken even after you
import Table B.
Notes
•Data cannot be imported into fields of type calculation or summary.
Saving, importing, and exporting data
FILEMAKER PRO HELP 511
•When you select New Table from the Target drop-down list, you cannot modify the target
fields in the new target table through the Import Field Mapping dialog box (using the
Manage Database button or Manage Database in the Target drop-down list). After you
have completed the import, you can then modify the fields by choosing File menu >
Manage > Database.
About validating data during import
When you import data into an existing FileMaker Pro file, you can validate the data during import.
FileMaker Pro will skip importing records and fields that don’t match your validation requirements,
and report the number of skipped records and fields when the import operation is complete.
To validate data during import:
1. In the target file, define validation options for the fields for which you want imported data
validated during the import process.
For information on defining validation options for fields, see Defining field validation. Use the
Always validation option to ensure that validation occurs during import.
2. Import the data into the target file.
Follow the instructions in one of the following sections to import the data:
•Importing data into an existing file
•Importing a folder of files all at once
•Importing Bento data (OS X)
•Importing XML data
•Querying an ODBC data source from FileMaker Pro
3. When the import process is complete, check the Import Records Summary dialog box for
the number of records and fields that were skipped during import.
The following table describes when data validation failures cause a record or a field to be
skipped.
Note Data validation errors are only one of three reasons that records and fields may be skipped
during import. The other two are:
•Privilege errors: If access privileges prohibit modifying certain fields and records, then these
fields and records are skipped during import.
Item skipped When
A record A field is defined with either the Not empty or Validated by calculation field
validation option, and the validation fails for a record during import.
Note Unlike all other validation options, the Not empty or Validated by
calculation options are evaluated when FileMaker Pro attempts to commit
each record. Therefore, these types of validation failures cause the entire
record to be skipped. (All the other field validation options are evaluated when
FileMaker Pro attempts to commit each field.)
A field A field you’re importing into is defined with any other field validation option, and
the validation fails during import.
Note A skipped field does not prevent other fields in the same record from
being imported.

Saving, importing, and exporting data
FILEMAKER PRO HELP 512
•Locked records: If one or more records cannot be changed because they are being
accessed elsewhere — either in another window by the same user or (if the file is shared)
by other clients — then these records are skipped during import.
Importing data into an existing file
You can import data into an existing FileMaker Pro file from another FileMaker Pro file or from a file
created by another application. The records you import become the found set. When you import,
you can add new records, or update existing or matching records.
Tip If you routinely import data from the same source, you can automate the process by setting up
recurring imports. Data imported via recurring import is read-only in FileMaker Pro. See Setting up
recurring imports.
This topic explains how to import from a file that is in a format that FileMaker Pro supports. To import
from other sources, see the following topics:
To import data into an existing file:
1. In the source application (the application from which you're importing data into
FileMaker Pro), save the data you want to import in a file type that FileMaker Pro supports.
For a list of supported file types, see Supported import/export file formats.
2. If you’re updating existing or matching records, make a backup copy of the target
FileMaker Pro file that you’re importing into.
Important Updating existing or matching records overwrites data in the target file and
cannot be undone. Choose File menu > Save a Copy As to make a backup copy of the
target file. Make sure you understand how updating records works. See Methods of
importing data into an existing file.
3. If you're importing records from a FileMaker Pro file and you want to import certain records
and omit others, open the file and perform a find so that the found set in the current window
contains only the records you want to import.
See Finding records. FileMaker Pro determines the found set to import from the foreground
window in the source file. If you import records from a closed file or an open file that is not
displaying any windows, FileMaker imports all the records, regardless of any found set.
4. Open the FileMaker Pro file you want to import records into (the target file).
5. If the target file contains multiple tables, use the Layout pop-up menu to display a layout
from the table that you want to import data into.
The layout doesn’t have to display all the fields in the table. You will be able to specify the fields
that you want to import to in the Import Field Mapping dialog box.
6. If you’re updating existing or matching records, do the following before you import. (If you’re
adding new records, skip to the next step.)
To import See
A folder of image files or text files all at once Importing a folder of files all at once
Bento data (OS X) Importing Bento data (OS X)
XML data Importing XML data
ODBC data Querying an ODBC data source from FileMaker Pro

Saving, importing, and exporting data
FILEMAKER PRO HELP 513
•If you’re updating existing records in the file, make sure the found set contains only the
records you want to change. If necessary, sort the records so that data from the correct
record in the source file replaces data in each record in the target file.
•If you’re updating matching records, make sure the found set contains only the records
you want to update. Records outside the found set will not be updated, even if match
field data matches.
7. Choose File menu > Import Records > File.
8. In the Open File dialog box, choose the name of the file that contains the data you want to
import (the source file).
To narrow the choices in the list of files, for Files of type (Windows) or Show (OS X), choose a
file type. Or, choose All Files to see all the files in the current folder that you can import.
9. Click Open.
If you’re importing from a Microsoft Excel file that contains more than one worksheet or includes
a named range, you see the Specify Excel Data dialog box. Choose the worksheet or named
range to import, then click Continue.
10. Choose a target table:
For more information about importing data into a new table, see About creating a new table for
imported data.
11. In the Import Field Mapping dialog box, choose the type of import to perform, map fields in
your database to the data you want to import, then click Import.
For details on using the Import Field Mapping dialog box and finishing the import process, see
Setting the import action and mapping fields during import.
Related topics
Supported import/export file formats
Sorting records
Records script steps
Setting up recurring imports
You can set up a FileMaker Pro file to automatically update data imported from another file,
such as a Microsoft Excel spreadsheet. Recurring import occurs automatically every time you
open the file and the first time you view the layout containing the data from the external file. Later,
you can run a script to update data.
When you set up recurring imports, FileMaker Pro creates a new table for the imported data and a
new layout to display the data. You can customize the layout in Layout mode later, if you wish.
Each time you update data, FileMaker Pro deletes data in the recurring import layout and replaces it
with current data from the external file. Data imported via recurring import cannot be modified or
added to in FileMaker Pro.
Note To set up recurring imports, you must open a file with an account that is assigned the Full
Access privilege set. For information about privilege sets, see About accounts, privilege sets, and
To import the data into In the Target drop-down list, choose
An existing table A table name
A new table New Table

Saving, importing, and exporting data
FILEMAKER PRO HELP 514
extended privileges. Users do not need to use an account with Full Access privileges to use
recurring import after it has been set up in a file.
To set up recurring imports:
1. Create a new file or open the file in which you want to set up recurring imports. See Creating
a FileMaker Pro file or Opening files.
2. In Browse mode, choose File menu > Import Records > File.
3. For Files of type (Windows) or Show (OS X), select the type of file you want to import. For
example, choose Excel Workbooks (*xlsx).
For a list of supported file types, see Supported import/export file formats.
4. Locate and select the file containing data you want to import.
5. Select Set up as automatic recurring import, then click Open.
The path of the file you selected appears in the Recurring Import Setup dialog box.
6. To skip importing column headings, select Don’t import first record (Contains field
names).
7. Accept the default layout name or type a new name for the layout FileMaker Pro will create
to display the imported data.
8. Accept the default script name or type a new name for the script you can use to update data
manually.
9. Click OK.
10. If you are importing data from an Excel file, you can import by worksheet or by named
range.
Note You can import data from only one worksheet or named range per layout.
The new layout appears in Browse mode in Table View. For more information about Table View,
see Viewing records as a form, list, or table.
Notes
•Recurring import creates a new table and layout for imported data. If you want to add
imported data to an existing table or layout in your database, see Importing data into
FileMaker Pro.
•Data changes in external files must be saved in the original application before
FileMaker Pro can import them.
•Recurring import is an import-only process. To make changes to the data, first modify data
in the source file. Next import data in the FileMaker Pro file by clicking the script button on
the recurring import layout. If changes are made to the data while the FileMaker Pro file is
To Do this
Import data by worksheet Select Display worksheets, select the
worksheet you want to import, then click
Continue.
Import data by named range Select Display named ranges, select the
named range you want to import, then click
Continue.

Saving, importing, and exporting data
FILEMAKER PRO HELP 515
closed, data on the recurring import layout will update the first time you view the layout
during your next FileMaker Pro session.
•When data is imported for the first time, FileMaker Pro creates an Import log file in the folder
that contains the FileMaker Pro file. This log file is updated each time data is imported into
any FileMaker Pro file located in this folder.
•When you use the script button to update data, FileMaker Pro deletes all previously
imported records, reimports the data, and creates new records for any new data found in the
external file.
•As your needs grow, you might find that you want to modify the import script. For more
information about planning and creating scripts, see Creating scripts to automate tasks.
•The automatically generated script FileMaker Pro creates for recurring import is not
supported in a FileMaker Server scheduled script.
Related topics
Importing data into an existing file
Importing a folder of files all at once
FileMaker Pro can import a folder of files in a single operation. Instead of inserting several pictures
or QuickTime files one by one, you can import them all at once. You can also import a folder of text
files, which is faster than copying and pasting the contents of each file.
FileMaker Pro can import any image file that you can insert with the Insert Picture and Insert
QuickTime commands, including GIF, JPEG, EPS, TIFF, QuickTime Movie, and many other formats.
Text files must be plain, text-only files with a .txt filename extension or a TEXT file type.
You can import a folder of image files into a container field, or import a folder of text files into a text,
number, date, time, timestamp, or container field. In addition to the file content, you can also import
information about each file: the filename, the file path, and (for picture and movie files only) a
smaller thumbnail image.
To import a folder of files:
1. Open the FileMaker Pro file into which you want to import a folder of files.
You need an existing FileMaker Pro file into which to import a folder of files. FileMaker Pro won’t
convert the imported data into a new file.
2. If you’re updating existing or matching records, make a backup copy of the target file that
you’re importing into.
Important Updating existing or matching records overwrites data in the target file and
cannot be undone. Choose File menu > Save a Copy As to make a backup copy of the
target file. Make sure you understand how updating records works. See Methods of
importing data into an existing file.
3. If the target file contains multiple tables, use the Layout pop-up menu to display a layout that
shows records from the table you want to import data into.
4. If you’re updating existing or matching records, do the following before you import. (If you’re
adding new records, skip to the next step.)
•If you’re updating existing records in the file, make sure the found set contains only the
records you want to replace. Sort the records (for example, by the filename) to ensure
that data you’re importing replaces the correct records in the target file.
Saving, importing, and exporting data
FILEMAKER PRO HELP 516
•If you’re updating matching records, make sure the found set contains only the records
you want to update. Records outside the found set will not be updated, even if match
field data matches.
5. In Browse mode, choose File menu > Import Records > Folder.
The Folder of Files Import Options dialog box appears.
6. In the Folder Location area, click Specify, and choose the folder that contains the files you
want to import.
Select Include all enclosed folders to indicate whether to import files that exist in any
enclosed folders. (FileMaker Pro will import up to 100 folder levels deep.)
7. In the File Type area, choose Picture and movie files or Text files, then click Continue.
If you’re importing a folder of picture files, you can select Import only a reference to each
picture file to import only a reference to each file. When this option is deselected, a copy of
each file is imported directly into the database.
Important Because movie files are usually large, they are always imported by reference. If
you’re importing large picture files, consider importing only a reference to each file.
However, if you import files by reference and later move, rename, or delete a source file,
FileMaker Pro won’t be able to display it.
8. In the Import Field Mapping dialog box, choose the type of import to perform, and map fields
in your database to the data you want to import. Then click Import.
For details on using the Import Field Mapping dialog box and finishing the import process, see
Setting the import action and mapping fields during import.
For Picture and movie files import, the following data mapping is available:
For Text files import, the following data mapping is available:
Notes
•OS X: FileMaker Pro can import a folder of Portable Document Format (PDF) files into a
container field. Each PDF file appears in QuickTime format. To display different pages in a
multi-page PDF file, click the PDF file container field and use QuickTime controls.
•When the folder you specify for import contains shortcuts (Windows) or aliases (OS X) to
either files or folders, FileMaker Pro does the following:
Data Map to field type
Image Container field
File Name Text field
File Path Text field
Image Thumbnail Container field
Data Map to field type
Text Content Text, number, date, time, timestamp, or
container field
File Name Text field
File Path Text field

Saving, importing, and exporting data
FILEMAKER PRO HELP 517
•Shortcuts/aliases to files: FileMaker Pro locates each original file and imports it.
•Shortcuts/aliases to folders: FileMaker Pro does not locate the original folders and
import from them.
•Some items are not imported:
•Windows: FileMaker Pro does not import files or from folders that are hidden, offline,
system, or temporary.
•OS X: FileMaker Pro does not import invisible files or from folders that are invisible.
•The maximum size of most text files that you import is 1 GB. The size limit on UTF-16
encoded text files is 2 GB.
•If you import the File Path data into a field, you can open the original file directly from
FileMaker Pro: select the entire file path text, right-click the text, and then choose Open File
from the shortcut menu.
Importing Bento data (OS X)
FileMaker Pro can import Bento data into an existing FileMaker Pro file or convert Bento data into a
new FileMaker Pro file. The Bento file must be created with Bento 4 (or a later supported version).
Bento 4 (or a later supported version) must be installed on the computer running FileMaker Pro.
Note You can import from Bento 1 by saving Bento data as a .csv file and then importing the .csv
file into FileMaker Pro.
Before you begin importing Bento data, be sure that the bento.bentodb file is in its default location in
your home folder: Library/Application Support/Bento.
To import Bento data into an existing FileMaker Pro file:
1. Open the FileMaker Pro file that you want to import records into (the target file).
2. If you’re updating existing or matching records, choose File menu > Save a Copy As to
make a backup copy of the target file.
Important Updating existing or matching records overwrites data in the target file and
cannot be undone, so make sure you understand how updating records works before you
begin. See Methods of importing data into an existing file.
3. If the target file contains multiple tables, use the Layout pop-up menu to display a layout that
shows fields from the table you want to import data into.
4. If you’re adding new records, skip to the next step.
If you’re updating existing or matching records, do the following before you import:
•If you’re updating existing records in the file, make sure the found set contains only the
records you want to replace.
•If you’re updating matching records, make sure the found set contains only the records
you want to update. Records outside the found set will not be updated, even if match
field data matches.
5. Choose File menu > Import Records > Bento Data Source.
6. Enter the Database Password in the Bento Password dialog box, if one was set in Bento.
Click OK.
7. In the Select Bento Source dialog box, select the library and collection that you want to
import, then click Continue.

Saving, importing, and exporting data
FILEMAKER PRO HELP 518
The Import Field Mapping dialog box appears.
8. Choose the Target table and Import Action, then choose the fields in your database that
map to the data being imported.
See Setting the import action and mapping fields during import.
Note A Bento location field displays as two separate fields in the Source Fields list:
[Fieldname](Longitude) and [Fieldname](Latitude).
9. Click Import.
The Import Summary dialog box shows the progress of your import.
10. Click OK.
To import Bento data into a new FileMaker Pro file:
1. In the FileMaker Quick Start Screen, select Convert an Existing File, then choose Bento
Data Source.
If you don’t see the FileMaker Quick Start Screen, choose Help menu > Quick Start Screen,
and repeat step 1.
2. Enter the Database Password in the Bento Password dialog box, if one was set in Bento.
Click OK.
3. In the Select Bento Source dialog box, select the library and collection that you want to
import, then click Continue.
The Create a New File Named dialog box appears.
4. Type a name for the new file, choose a location, then click Save.
The Import Summary dialog box shows the progress of your import.
Bento and FileMaker Pro field type mapping
The following table lists how Bento field types map to FileMaker Pro field types.
Note Data might appear differently after you import because of the differences in field mapping
between Bento and FileMaker Pro and issues related to numerical precision.
Bento Field Type FileMaker Pro Field Type Notes
Date Timestamp Dates also display a time.
Data is reformatted into
FileMaker Pro format.
Time Time Data is reformatted into
FileMaker Pro format
Checkbox Number See “Displaying Bento
checkbox fields in
FileMaker Pro,” below
Currency Number
Automatic Counter Number
Number Number
Duration Number
Rating Number
Tex t Text

Saving, importing, and exporting data
FILEMAKER PRO HELP 519
The following user-created field types in Bento are not supported in FileMaker Pro:
•Media
•File List
•Related Data
•Message List
Displaying Bento checkbox fields in FileMaker Pro
After importing, Bento checkbox fields do not display in FileMaker Pro in the same manner as they
did in Bento. To achieve a similar result in Form View and List View, do the following:
1. For a number field that you mapped to a checkbox field, define a value list with the single
value of 1.
See Defining value lists.
2. In Layout mode, select the number field.
3. Click Inspector in the layout bar, then click Data.
4. In the Field area, under Control Style, choose Checkbox set.
5. Choose the value list you defined in step 1 from the Values from list.
6. Resize the number field so that only the checkbox is visible.
Choice Tex t
Date Created Timestamp
Date Modified Timestamp
Calculation Text, Number, Time, or Timestamp
Address Text Multiple fields are created
Email Address Tex t Multiple fields are created
Phone Number Tex t Multiple fields are created
URL Text Multiple fields are created
IM Account Text Multiple fields are created
Encrypted (Bento 3 or a
later supported version)
Tex t If the Bento database requires
a password, FileMaker Pro
also requires it
Location (Bento 4 or a
later supported version)
Number Location fields are imported as
two separate Number fields:
[Fieldname](Longitude) and
[Fieldname](Latitude)
Simple List (Bento 3 or a
later supported version)
Tex t Tab characters are inserted
between each column.
Carriage return characters are
inserted between each row.
Although simple list fields in
Bento 4 support types other
than text, FileMaker Pro
imports the data as text.
Bento Field Type FileMaker Pro Field Type Notes

Saving, importing, and exporting data
FILEMAKER PRO HELP 520
7. Save the layout.
Importing XML data
FileMaker Pro can import XML data into an existing FileMaker Pro file, or convert XML into a new
FileMaker Pro file.
The XML can be a physical file, or the result of an HTTP request sent to a web server. For example,
you could set up an Orders database to send tracking numbers to a package delivery company in
the form of an HTTP request, and their web server could return the latest package tracking
information in XML format, ready to be imported into the Orders database.
The XML that you import must conform to the FileMaker FMPXMLRESULT document type definition
(DTD). If your XML is in a different format, you can apply an Extensible Stylesheet Language (XSLT)
style sheet during import to transform your XML into the FMPXMLRESULT grammar. See XML
FMPXMLRESULT grammar.
To import XML:
1. What you do first depends on whether you are importing XML into an existing FileMaker Pro
file, or converting XML into a new FileMaker Pro file. Do one of the following:
2. If you’re updating existing or matching records, make a backup copy of the target file that
you’re importing into.
Important Updating existing or matching records overwrites data in the target file and
cannot be undone. Choose File menu > Save a Copy As to make a backup copy of the
target file. Make sure you understand how updating records works. See Methods of
importing data into an existing file.
3. Open the FileMaker Pro file that you want to import records into (the target file).
4. If the target file contains multiple tables, use the Layout pop-up menu to display a layout that
shows records from the table you want to import data into.
5. If you’re updating existing or matching records, do the following before you import. (If you’re
adding new records, skip to the next step.)
•If you’re updating existing records in the file, make sure the found set contains only the
records you want to replace. Sort the records (for example, by the field name) to ensure
that data you’re importing replaces the correct records in the target file.
•If you’re updating matching records, make sure the found set contains only the records
you want to update. Records outside the found set will not be updated, even if match
field data matches.
6. Choose File menu > Import Records > XML Data Source.
The Specify XML and XSL Options dialog box appears.
7. Skip ahead to step 10.
You should only follow steps 8 and 9 if you are converting XML into a new FileMaker Pro file.
To import XML Do this
Into an existing FileMaker Pro file Continue with step 2.
By converting the XML into a new
FileMaker Pro file
Skip ahead to step 8.

Saving, importing, and exporting data
FILEMAKER PRO HELP 521
8. Choose File menu > Open.
9. In the Open dialog box, for Files of type (Windows) or Show (OS X), choose XML Data
Source.
The Specify XML and XSL Options dialog box appears.
10. For Specify XML Data Source, choose the source of the XML data to import.
The XML source can be a file or the result of an HTTP request. See About importing data using
an HTTP request.
11. To apply an XSLT style sheet to the XML before importing, select Use XSL style sheet and
specify the source of the XSLT style sheet.
When the XML you’re importing does not conform to the FMPXMLRESULT DTD, you must
apply an XSLT style sheet that transforms the XML into the proper grammar. The XSLT source
may be a file or the result of an HTTP request. See About importing data using an HTTP
request.
12. Click Continue.
Using a Xerces-based XML parser and a Xalan-based XSLT processor, FileMaker Pro applies
an XSLT style sheet (if you specified one) to transform the XML data. If an error message
appears, correct the error and try importing again.
13. Do one of the following:
Notes
•For details about the requirements for well-formed XML, see the XML specification, which is
available at http://www.w3.org/XML/.
•FileMaker Pro uses the Xerces-C++ XML parser, which supports XML data in the following
character encodings:
•ASCII
•UTF-8
•UTF-16 (Big/Small Endian)
•UCS4 (Big/Small Endian)
•EBCDIC in both IBM037 and IBM1140 encodings
•ISO-8859-1 (Latin1)
•Windows-1252
Although Windows-1252 is the default character encoding on Windows, this character encoding
is not widely recognized by other XML processing tools. If you’re using a Windows-based
editing tool to generate XML, check the encoding="..." declaration to see which character set it
If you are importing XML Do this
Into an existing FileMaker Pro file The Import Field Mapping dialog box appears, where you
choose the type of import to perform and map fields in your
database to the data to import. (See Setting the import action
and mapping fields during import.) Choose options in the dialog
box, then click Import.
By converting the XML into a new
FileMaker Pro file
The Name Converted File dialog box appears. Type a name for
the new file, choose a location, then click Save.

Saving, importing, and exporting data
FILEMAKER PRO HELP 522
generates. See the Xerces C++ FAQ on the Apache website at http://xerces.apache.org/xerces-
c/.
•If you are using a calculation that generates the file path for the XML file, you must use the
format used by the operating system for the full path. For example, the following are valid
paths:
Windows: driveletter:/directoryName/fileName
OS X: /Volumes/VolumeName/directoryName/fileName
If you are providing a cross-platform solution, you can use the Get(SystemPlatform) function to
identify the current platform and use the correct format for each platform.
Setting the import action and mapping fields during import
When you import data into an existing FileMaker Pro file, the Import Field Mapping dialog box
appears after you select the file or source of the data to import. Use this dialog box to specify the
following import options:
•Import action: Specify how to import the data into the existing file. You can add new records
to the file, update existing records in the file, or update matching records in the file. See
Methods of importing data into an existing file.
•Field mapping: Specify where to import the data by mapping the fields in your database to
the fields in the source data that you’re importing.
To set the import action and map fields during import:
1. If you have not done so, choose the file or source of the data to import into an existing
FileMaker Pro file.
Follow the instructions in Importing data into an existing file, Importing a folder of files all at
once, Importing Bento data (OS X), or Importing XML data. You will see the Import Field
Mapping dialog box.
2. If you’re importing data from another FileMaker Pro file and that file contains multiple tables,
choose the table you want to import from the Source list.
3. In the Import Action area, choose the type of import to perform.
Important Updating existing or matching records overwrites data in the target file and
cannot be undone. Choose File menu > Save a Copy As to make a backup copy of the
target file. Make sure you understand how updating records works. See Methods of
importing data into an existing file.
To Select
Add new records to the end of the
target file
Add new records
Note If the table you’re importing into contains no data, you can
only select Add new records; the other options described
below are not available because there is no data to update.
Update the found set of records in
the target file with the records
you're importing from the source,
in order, starting with the first
record in each file
Update existing records in found set
To also add any additional records in the source as new records
in the target file, select Add remaining data as new records.
Saving, importing, and exporting data
FILEMAKER PRO HELP 523
4. If the first record of the data you’re importing contains field names (column headings)
instead of data, select Don’t import first record (contains field names).
Selecting Don’t import first record (contains field names) skips the first record during import.
5. For Target Fields, drag fields to align with fields or data in Source Fields, to indicate where
source data will be imported or updated.
To align a field, move the pointer over the icon next to a target field name in the list. When the
pointer changes to a double arrow , drag the field to a new location.
You can do any of the following to align target fields and source fields:
•To preview the data that you’re importing, click the arrows below the fields lists.
•To create or change fields in the table you're importing into, click Manage Database. In
the Manage Database dialog box, make your changes, then click OK. (If the Manage
Database button is dimmed, either you don't have sufficient access privileges, or the
database is shared over a network and does not currently permit database changes.
For more information about changing shared databases, see Sharing and hosting files.)
•To reorder the target fields all at once, choose one of the following options from the
Arrange by menu:
Note Data from a source field will not import when:
•The source field is not aligned with a target field. Drag a target field to align with each
source field you want to import. Create a new target field if necessary.
•The symbol appears between the source and target fields, which indicates that the
target field type does not support the source field data. You cannot import data into
calculation or summary fields, or import some mismatched data types such as container
data into a text field. (The symbol may also indicate that access privileges do not
permit importing data into a particular target field.)
Update data in the target file with
the data from matching records in
the source
Update matching records in found set
To also add records from the source that do not have matching
records in the target file, select Add remaining data as new
records.
To Select
Choose this option To list the fields by
Matching names Field names that match in both the target table and the source.
FileMaker Pro matches field names dynamically each time you choose
this option. (This option is not available when the source data does not
contain field names.)
Last order The order used the last time FileMaker Pro imported data into this table
or the default order (creation order).
Creation order The order in which the fields were created.
Field names Alphabetical order.
Field types Field type.
Custom import order A custom order (which you create by dragging field names).

Saving, importing, and exporting data
FILEMAKER PRO HELP 524
6. In the space between each pair of fields in the list, click the field mapping symbol one or
more times to indicate the field mapping you want performed.
Continue clicking until the symbol between the fields indicates the field mapping you want. For a
description of each symbol, refer to the Field Mapping area. You can choose whether or not to
import each field into the target field, or use a field pairing as a match field for updating matching
records.
Tip You can also set the field mapping for multiple fields at the same time. First select the target
fields you want to change by holding down Ctrl (Windows) or Command (OS X), and clicking
each target field. (You can also select a range of adjacent fields by clicking the first field and
then Shift-clicking the last field in the range.) Then click a field mapping symbol for one of the
selected fields until they all indicate the mapping that you want. (You can also press the Space
bar one or more times to change the field mapping symbol.)
7. If necessary, for Character Set, choose the character encoding used in the source file.
The Character Set list may be dimmed or available:
•If the list is dimmed, then FileMaker Pro was able to determine the encoding of the file
and picked it automatically.
•If the list is available, then FileMaker Pro was not able to determine the file encoding,
and has tried to pick an appropriate character encoding based on your operating
system and the file format you’re importing. You may need to change the encoding that
FileMaker Pro picked. If you pick a different encoding, FileMaker Pro scans the import
data, and will display an alert message if the data contains characters that are illegal in
the character set you selected.
Note If you’re importing a 16-bit Unicode (UTF-16) text file, the file must contain a Unicode
standard Byte Order Mark (BOM). If the BOM is missing, FileMaker Pro will not properly
recognize the file encoding.
8. Click Import.
You may see the Import Options dialog box, which appears when:
•the target file has fields for which automatic data entry (auto-enter) options have been
enabled
•you’re importing and adding new records from a FileMaker Pro file with repeating fields
9. If the Import Options dialog box appears, select one or more of the following options, and
then click Import.
To Do this
Auto-enter new data in fields
defined with auto-enter
options. (For example, to
enter the date in a
Modification Date field.)
Select Perform auto-enter options while importing. Otherwise,
auto-entered values will not be entered.
Note When you’re importing into fields that are set to auto-enter a
value (like modifier name, modification date or time, or lookup data),
clear this option unless you want the auto-entered data to overwrite
the data you’re importing.

Saving, importing, and exporting data
FILEMAKER PRO HELP 525
10. In the Import Records Summary dialog box, note the number of imported records and any
data that was skipped. Then click OK.
The Import Records Summary dialog box displays three statistics detailing the imported records
and any skipped data:
Notes
•If you’re importing a large amount of data, you may see an Importing dialog box that shows
the progress of the import process. To stop importing, click Stop. Records that were already
Specify how to import data
from repeating fields in the
source file
Select:
•Keeping them in the original record to maintain the field(s) as
repeating fields.
•Splitting them into separate records to import each repeating
value into a separate record. (Use this option to work with
individual values in repeating fields, such as to sort or
summarize them.)
Note When you split repeating field data into separate records
any non-repeating fields that you import are duplicated in each
separate record. For example, if a record in the source file has
values in three repetitions, splitting them into separate records
imports three records, each identical except for the values in the
repeating fields.
To Do this
Statistic Description
Total records
added/updated
The total number of records added and updated in the target file during the
import process.
Note This number will include multiple updates of the same record if you’re
updating matching records and more than one record in the source file matches
a record in the found set of the target file. See the Notes section in Methods of
importing data into an existing file.
Total records
skipped due to
errors
The number of records in the target file that were skipped due to:
•Privilege errors: Access privileges prohibit modifying one or more records.
•Locked records: One or more records cannot be modified because they are
being accessed elsewhere, either in another window by the same user or (if
the file is shared) by other clients.
•Validation errors: One or more records cannot be modified because record-
level field validation requirements are not met, and the record could not be
committed. See About validating data during import.
Total fields skipped
due to errors
The number of fields in the target file that were skipped due to:
•Validation errors: One or more fields cannot be imported because the data
does not match the validation requirements defined for the field. See About
validating data during import.
•Privilege errors: Access privileges prohibit modifying one or more fields.
Skipped fields do not prevent the updating of other fields in the same record.

Saving, importing, and exporting data
FILEMAKER PRO HELP 526
imported remain in the target file (the import is not reversed). To permanently delete the
records already imported, choose Records menu > Delete All Records.
•The records you import become the found set. After importing, check the data in the found
set. Choose Records menu > Show All Records.
•If you’re updating records, be sure your records are correct before discarding the backup
copy of the file.
Converting a data file to a new FileMaker Pro file
You can convert a data file from another application into a new FileMaker Pro file. FileMaker Pro
imports the data and creates a new FileMaker Pro file. This converted FileMaker Pro file will contain:
•The data from the file or source you convert.
•Two layouts for displaying the data: a Standard form layout and a List view layout.
•Converted field names if they are available in the file or source you convert. Otherwise, field
names are generic: f1, f2, f3, and so on. (Field names convert from Bento, Microsoft Excel,
FileMaker Pro, DBF, Merge, ODBC, and XML formats.)
•Converted field types (text, number, date, and so on) if they are available in the file or
source you convert. Otherwise, all fields are text fields. (Field types convert from Bento,
FileMaker Pro, Microsoft Excel, ODBC, DBF, and XML formats.)
For information on importing data into an existing file, see Importing data into an existing file.
Note For information on converting Bento data into a new file, see Importing Bento data (OS X).
To import data into a new file:
1. In the source application (the application from which you're importing data into
FileMaker Pro), save the data you want to import in a file type that FileMaker Pro supports.
For a list of supported file types, see Supported import/export file formats.
2. Use one of the following methods to open the data file:
•In FileMaker Pro, choose File menu > Open.
•In the FileMaker Quick Start Screen, click Convert an Existing File.
•Drag the data file onto the FileMaker Pro application.
3. In the Create a New File Named dialog box or Open dialog box (Windows) or Open File
(OS X) dialog box, for Files of type (Windows) or Show (OS X), specify the type of file (if
needed), choose the file to convert, then click Open.
4. If you see the First Row Option dialog box, choose whether the first row of data contains
field names or the first record of data, then click OK.
5. If you’re converting a Microsoft Excel spreadsheet and the Specify Excel Data dialog box
appears, choose a worksheet or named range from the workbook file, then click OK.
6. In the Create a New File Named dialog box, type a name for the new file, choose a location,
then click Save.
FileMaker Pro converts the data to a FileMaker Pro file and displays the file.
Notes
•If the file you’re converting is large, you may see an Importing dialog box that shows the
progress of the import process. To stop importing, click Stop. However, FileMaker Pro still
creates a file containing a partial set of the converted data.

Saving, importing, and exporting data
FILEMAKER PRO HELP 527
•If you routinely import data from the same source, you can automate the process by setting
up recurring imports. Data imported via recurring import is read-only in FileMaker Pro. See
Setting up recurring imports.
Exporting data from FileMaker Pro
You can export FileMaker Pro data to a new file and then open it in another application. For
example, you can export FileMaker Pro data in the merge (.mer) format and use it for a Microsoft
Word Mail Merge.
You can also save records as a spreadsheet for use in Microsoft Excel. See Saving and sending
records as an Excel file. Use export when you want to export records in the current found set or
export in a format other than an Excel spreadsheet. Use Save as Excel when you want to create an
Excel spreadsheet that contains all the fields you have access to on the current layout.
If your FileMaker Pro source file contains summary fields, you can group by a sorted field in order to
export subsummary values, such as subtotals generated by a report with grouped data. This
process exports one record for each group. For example, if you have a report that totals sales by
region, you can export one summary value for each region.
You can also export the contents of a field to a file. See Exporting the contents of a field.
To export FileMaker Pro data to be used in another application:
1. Open the FileMaker Pro file, and display a layout that shows the records you want to export.
2. Find and sort the records to export.
To export grouped subsummary values, include the break field in the sort order, or run the report
that generates the subtotals you want. For information about finding and sorting records, see
Finding records and Sorting records.
3. Choose File menu > Export Records.
4. In the Export Records to File dialog box, type a name and choose a location for the file.
If you're exporting to XML and applying an XSLT style sheet during export, give the filename an
extension that corresponds to the transformed file's format, such as .txt, .htm, or .xml, so that
different operating systems can recognize the file correctly.
If another file with the same name already exists in the same location, the exported file replaces
the existing file.
5. Choose a file type from Save as type (Windows) or Type (OS X), then click Save.
Use a file format supported by the application in which you plan to use the exported data.
Popular formats include comma-separated text (.csv), tab-separated text (.tab), merge format
(.mer), and HTML (.html). For information about file formats, see Supported import/export file
formats.
6. For After saving, choose one or both of the following options:
7. Do one of the following:
Choose To
Automatically open file Open the file after it is saved
Create email with file as
attachment
Create an email with the saved file attached

Saving, importing, and exporting data
FILEMAKER PRO HELP 528
•If you’re exporting to XML, you see the Specify XML and XSL Options dialog box.
Continue with step 8.
•If you’re exporting to any other file type, skip to step 9.
8. In the Specify XML and XSL Options dialog box, do the following:
•Specify the XML grammar to use by choosing either the FMPDSORESULT format or
the FMPXMLRESULT format.
•To apply an XSLT style sheet to the XML during export, select Use XSL style sheet
and specify the source of the XSLT style sheet. The XSLT source may be a file or the
result of an HTTP request.
9. In the Specify Field Order for Export dialog box, indicate how you want FileMaker Pro to
export the data.
•When the Specify Field Order for Export dialog box opens, the tables list defaults to
Current Layout (LayoutName) and displays only the visible fields on the current
layout. To display all field names from the current table, choose Current Table
(TableName) from the list.
•If the current layout contains panel controls, only the fields that exist on the current
panel are displayed in the Specify Field Order for Export dialog box.
10. If necessary, for Output file character set, choose the character encoding you want the
exported file to use.
To Do this
Include a field in the export Double-click the field name to move it to the Field export order
area.
To include all fields in the export, click Move All.
Include a related field in the
export
Choose the name of the related table from the list in the upper-left
corner of the dialog box, and then move the fields you want into the
Field export order area. (You can include related fields before,
after, or between other fields being exported.)
Export grouped summary
values instead of individual
records
In the fields list on the left, click a summary field whose values you
want to summarize. In the Group by area, select each break field
by which you want the values summarized. Then click Move.
When you click Move, FileMaker Pro adds the summary field and
one or more grouped summary fields to the Field export order
area. (FileMaker Pro adds one grouped summary field for each
break field you selected in the Group by area.) The grouped
summary fields use the syntax SummaryField by
GroupByField, such as “Total Sales by Region.”
Note You can’t export grouped summary values unless you sorted
the data before you started the export process. (The Group by
area shows “Unsorted” instead of any fields if data is not sorted.)
Remove a field from Field
export order and prevent its
data from being exported
For Field export order, choose a field, then click Clear.
To move all fields from the list, click Clear All.
Change the export order of the
fields
For Field export order, point to the double arrow to the left of the
field name and drag it up or down.

Saving, importing, and exporting data
FILEMAKER PRO HELP 529
You may not need to change the character set selection. FileMaker Pro automatically selects a
suitable character set based on the file format you’re exporting to and the operating system
you’re using.
11. If necessary, select Apply current layout’s data formatting to exported data to format
field data as it appears on the current layout.
FileMaker Pro allows you to format fields on a layout, which makes the data look different on the
layout than how it is actually stored in the database file. (See Formatting and setting up field
objects in Layout mode.) Select Apply current layout’s data formatting to exported data
when you want to export number, date, and time data using the field formats specified on the
current layout.
If the current layout formatting can’t be applied when you’re exporting to an Excel file, the Excel
file uses the system format.
If you’re exporting to DBF format, this option is not available.
12. Click Export.
Notes
•To use an exported file, open an application that can read the file format, and then open the
exported file.
•To use FileMaker Pro as a data source to serve FileMaker Pro data via ODBC or JDBC, see
Sharing FileMaker Pro data via ODBC or JDBC.
•If you want to save the records as an Excel file instead of exporting them, choose Save/
Send Records As > Excel. When you save records as an Excel file, all the fields that you
have access to and can see on the current layout are saved. When you export to Excel, you
must specify which fields to export.
•To append data to exported records, you need to use the Save Records As PDF script step.
•OS X: To export FileMaker Pro data to the Address Book application, export your contacts
as tab-separated text. Import the contacts in Address Book in the text file format.
Related topics
Saving and sending records as a PDF file
Sending one email message
Sending multiple email messages
Exporting repeating field data
Some file formats (such as DBF) can interpret only one value per field and do not support repeating
fields. When you export to these formats, only the first value in a repeating field is exported. An alert
message warns you if you’re exporting repeating fields to a file format that supports only the first
value.
Although you can export repeating fields to XML, if you export related fields that repeat, only the first
value in each related repeating field is exported.
You can work around these limitations by following these steps.
To export repeating field values into formats that don’t support repeating
fields:
1. In the FileMaker Pro file, find the records you want to export.
For information about finding records, see Finding records.

Saving, importing, and exporting data
FILEMAKER PRO HELP 530
2. Make a clone of the file to export.
For information about cloning files, see Saving and copying files.
3. Open the clone, then import the data from the original file.
For information about importing records, see Importing data into FileMaker Pro.
4. When the Import Options dialog box opens, select Splitting them into separate records,
then click Import.
5. Export from this clone file to DBF format.
For more information see Exporting data from FileMaker Pro.
Supported import/export file formats
FileMaker Pro and many application programs that you want to exchange data with use a
proprietary file format. In order to exchange data, you must export the data from one application in a
format that the other application can import. If you’re exchanging data with another application
program, check the documentation that came with that program to determine a common
intermediary file format that both FileMaker Pro and the other program supports.
For information on how to import or export data, see Importing data into FileMaker Pro or Exporting
data from FileMaker Pro.
FileMaker Pro supports the import/export file formats listed in the following table. FileMaker both
imports and exports most formats, but a few formats are either import/convert only or export only.
Most file formats support data conversion only and do not import or export formatting such as font,
size, style, and color. Some of the formats export or convert field names and field types. For details
on a particular format, click its link in the following table.
Supported
format
Filename
extension
Import/convert
or export Notes
Comma-
Separated Text
format
.csv or .txt Both •Works with BASIC programs and applications
like Bento.
•Format is also called Comma-Separated Values
(CSV).
dBASE III and IV
DBF format
.dbf Both •Does not support dBASE II DBF format.
•Format retains field names.
FileMaker Pro
format
.fmp12 Both •Import from the current file format.
•Export to the current FileMaker Pro file format.
•Format retains field names.
HTML Table
format
.htm Export only •Exports data as an HTML table for use as a
static web page.
Merge format .mer Both •Good export format for creating form letters in a
word processor.
•This export format works well for Microsoft Word
Mail Merge.
•Format retains field names.
Microsoft Excel
format
.xlsx Both
Saving, importing, and exporting data
FILEMAKER PRO HELP 531
You can also do the following:
•Import image files or text files from a folder all at once. See Importing a folder of files all at
once.
•OS X: Import from Bento data sources. See Importing Bento data (OS X).
•Import from ODBC data sources and use FileMaker Pro as ODBC data source to serve
FileMaker Pro data. See Querying an ODBC data source from FileMaker Pro and Sharing
FileMaker Pro data via ODBC or JDBC.
•Set up recurring imports so FileMaker Pro updates data automatically the first time you view
imported data in a file or lets you use a script to update data on demand. Data imported via
recurring import is read-only in FileMaker Pro. See Setting up recurring imports.
•Publish FileMaker Pro database files to a web page. See Publishing databases on the web.
•Save a layout as a PDF file that can be used later as a blank form. See Saving and sending
records as a PDF file.
Comma-Separated Text format
You can import, convert, and export files in comma-separated text format.
Converting Comma-Separated Text to FileMaker Pro
•Field names are generic (f1, f2, f3, and so on).
•All fields are text fields.
Exporting Comma-Separated Text files
Commas separate field values. Carriage return characters separate records. Quotation marks
enclose all field values, except unformatted numbers.
•Carriage return characters in a field export as vertical tab characters.
•Values in repeating fields are separated by the group separator character.
•Only numeric data is exported from number fields. Any non-numeric data such as text or
symbols is not included in the exported data.
•Quotation marks (") in a field (not curly quotes) export as double quotation marks ("").
dBASE III and IV DBF format
You can import, convert, and export dBASE III and dBASE IV compatible DBF files. FileMaker Pro
does not support dBASE II DBF files.
Converting DBF files to FileMaker Pro
•FileMaker Pro uses field names from the DBF file.
Tab-Separated
Tex t f or mat
.tab or .txt Both •Works with most applications. If you aren't sure
which format to use, try this one first.
XML format .xml Both •In addition to XML files, you can import the XML
data result of an HTTP request.
Supported
format
Filename
extension
Import/convert
or export Notes

Saving, importing, and exporting data
FILEMAKER PRO HELP 532
•Text, number, date, and time field types convert from the DBF file.
•FileMaker Pro imports dBASE memo field data if the memo file (<filename>.dbt) is in the
same folder as the DBF file (<filename>.dbf).
Exporting DBF files
•To export a DBF file from FileMaker Pro and import it into another application, your
database must meet DBF criteria:
•only ten characters per field name (spaces are converted to underscores, letters are
converted to all uppercase)
•no duplicate field names
•a maximum of 128 fields
•a maximum of 254 characters per field
•a maximum of 4000 bytes per record
•Only the first value in a repeating field is exported. See Exporting repeating field data to
export all values.
•You cannot select Apply current layout’s data formatting to exported data when you
export using this format.
FileMaker Pro format
You can import from and export to files in FileMaker Pro format.
Importing from a FileMaker Pro file
•When you import data from another FileMaker Pro file, you can import data from one table
in the source file into one table in the target file.
•If the source FileMaker Pro file contains multiple tables, you can only import data from a
single table at a time. During the import process, choose which table in the file that you want
to import. Repeat the import process for each table that you want to import.
•To import related data, import data directly from the related table.
•To import only a portion of the records in a FileMaker Pro file, open the file and perform a
find so that the found set in the current window contains only the records you want to import.
(See Finding records.) FileMaker Pro determines the found set to import from the
foreground window in the file. If you import records from a closed file or an open file that is
not displaying any windows, FileMaker Pro imports all the records, regardless of any found
set.
•To import a FileMaker Pro file created with a previous version, convert the file to the current
format first. See Converting files from FileMaker Pro 11 and earlier.
Exporting to a FileMaker Pro file
•When you export data to a FileMaker Pro file, a new FileMaker Pro file is created containing
the data you export.
•You can export records from a single table at a time.
•If there are tables related to the source table that you’re exporting, you can also export fields
from those related tables. However, the data you export creates only a single table in the
exported file.

Saving, importing, and exporting data
FILEMAKER PRO HELP 533
•To export only a portion of the records from the source FileMaker Pro file, perform a find
first. Only the records in the found set will be exported. See Finding records.
•FileMaker Pro exports field names and field types to the exported file.
•Both Merge and FileMaker Pro formats include field names. However, the application into
which the data will be imported must support the format you choose. Some applications will
strip out the field names when importing the exported data.
•The exported file contains a single Standard form layout.
•Any global fields that you export are no longer global fields in the exported file. Instead,
each exported global field becomes a non-global field that repeats the global field value in
each exported record. If you wish, you can change the field to a global field in the exported
file.
Note To create a new file that contains the data, layouts, scripts, and other elements of the source
file, you may want to copy the file instead of exporting data. Then you can open the copied file and
make any changes you want to make, such as removing certain data. See Saving and copying files.
HTML Table format
You can export data as an HTML table. This format is useful for displaying data as a static web page
in a web browser. For information on dynamically publishing a FileMaker Pro database to the web,
see Publishing databases with FileMaker WebDirect.
Exporting HTML files
•Each record exports as a row in the HTML table
•Each field exports as a column in the HTML table.
•Values in each repeating field are exported as a nested table containing one value per
column.
Merge format
You can import, convert, and export Merge files.
Converting Merge files to FileMaker Pro
•Field names are imported.
•All fields are text fields.
Exporting Merge files
FileMaker Pro exports a text file with the following characteristics:
•The character that separates fields is different depending on the language of your operating
system. On U.S. English systems, the field separator is a comma. On European systems,
the field separator character is a semicolon. The character may be different in other locales.
•Both Merge and FileMaker formats include field names. However, the application into which
the data will be imported must support the format you choose. Some applications will strip
out the field names when importing the exported data.
•Carriage return characters separate records.
•Field data is enclosed in quotation marks.
•The first record is a header that lists the field names.

Saving, importing, and exporting data
FILEMAKER PRO HELP 534
•Carriage return characters in a field export as vertical tab characters.
•Values in repeating fields are separated by the group separator character.
•Quotation marks (") in and around a field export as double quotation marks.
Note You can create form letters entirely in FileMaker Pro by typing your letter on a layout and
using merge fields. See Placing merge fields on a layout.
Microsoft Excel format
FileMaker Pro can import, convert, and export Microsoft Excel worksheets.
Converting Excel files to FileMaker Pro
•If a file contains more than one worksheet or a named range, you can choose the worksheet
or named range you want to import.
•You can choose whether the first row of data in the spreadsheet contains field names or
data.
•FileMaker Pro assigns an appropriate field type (text, number, date, or time) if all rows in the
column hold the same type of data. Otherwise, a column becomes a text field.
•FileMaker Pro imports calculation results, not formulas.
•Boolean values are considered numbers.
•Charts, graphics, and notes (comments) are not imported.
•Non-data structures (such as macros) are not converted.
•You can convert “hidden” files (see Excel documentation) but not password-protected files.
•Field data that is too large or too small for the equivalent data type in Microsoft Excel is
saved in text format.
Exporting FileMaker Pro files as Excel
•All fields are truncated at 32,767 characters.
•Number fields are rounded to the closest possible value accepted by Excel. For limitations,
see the Microsoft Excel online Help. Only numbers are exported from number fields.
•Repeating fields are not exported.
•If you select Apply current layout's data formatting to exported data, data in the Excel
file is formatted to resemble data in the FileMaker Pro file. If the current layout formatting
can’t be applied, the Excel file uses the system format.
Tab-Separated Text format
You can import, convert, or export Tab-Separated Text files.
Converting Tab-Separated Text to FileMaker Pro
•Field names are generic (f1, f2, f3, and so on).
•All fields are text fields.

Saving, importing, and exporting data
FILEMAKER PRO HELP 535
Exporting Tab-Separated Text files
FileMaker Pro exports plain text. (The exported file does not include font and style information.) The
tab character separates fields, the carriage return character separates records. Most applications
can use this file format.
•Tabs in fields are converted to spaces.
•Carriage return characters in a field export as vertical tab characters.
•Values in repeating fields are separated by the group separator character.
XML format
Extensible Markup Language (XML) is a language for structured data interchange. Instead of being
a rigid file format, XML is a language for defining agreed-upon formats that groups can use for
exchanging data. Many individuals, organizations, and businesses use XML to transfer product
information, transactions, inventory data, and other business data.
Example files for XML import and export are available in the folder where FileMaker Pro is installed.
For general information on XML, additional examples that use XML, and links to XML resources,
see the FileMaker website at http://www.filemaker.com.
Importing XML
FileMaker Pro supports the FMPXMLRESULT grammar for XML import. If your XML is in a different
format, you can apply an Extensible Stylesheet Language for Transformations (XSLT) style sheet
during import to transform your XML into the FMPXMLRESULT grammar.
Exporting XML
FileMaker Pro can export XML in two grammars: FMPXMLRESULT and FMPDSORESULT. You can
apply an XSLT style sheet during export to transform either of the grammars into a different XML
format, or into a different format such as HTML or plain text. For example, with XML export, you can
create a data-driven web page, or a text file of data that uses a custom field delimiter.
Note The XML import and export features in FileMaker Pro use an XML parser called Xerces and
an XSLT style sheet processor called Xalan. As you develop XML and XSL, you may want to test
your XML and XSLT with Xerces- and Xalan-based parsers and processors, available at http://
xml.apache.org and other third-party locations.
Related topics
XML FMPDSORESULT grammar
XML FMPXMLRESULT grammar
Importing XML data
Exporting data from FileMaker Pro
XML FMPDSORESULT grammar
The FMPDSORESULT grammar is useful for exporting databases that you want to format with
cascading style sheets or XSL. This grammar is compatible with the Microsoft XML Data Source
Object used by Internet Explorer.
Note Do not name your data fields with leading numbers or single-byte kana characters (for
example “7”). The FMPDSORESULT grammar does not allow numeric or single-byte kana
characters as field name tags and will not display the resulting XML file in a browser.

Saving, importing, and exporting data
FILEMAKER PRO HELP 536
Each ROW element in the exported FMPDSORESULT grammar contains a number of FIELD
elements that correspond to the field names that you export.
Spaces or single colons in field names are converted to underscores in the element names (for
example, <FIRST_NAME>). Double colons in portal fields are converted to periods (for example,
<PHONE.PHONE_NUMBER>). This is done because colons are reserved in XML for specifying
namespaces, and spaces are not allowed in XML element names.
For repeating and related fields, each FIELD element will contain a DATA element that corresponds
to each repetition or portal record.
XML export does not support exporting container field data.
Due to XML limitations, only one record from each related field is exported.
For more information, search the FileMaker Knowledge Base available at http://help.filemaker.com.
Sample XML data in the FMPDSORESULT grammar
The following is an example of XML in the FMPDSORESULT grammar. For complete details on the
document type definition (DTD) for the grammar, see the fmpdsoresult_dtd.htm file, which
you can download at http://www.filemaker.com/downloads.
<?xml version="1.0" encoding="UTF-8"?>
<FMPDSORESULT xmlns="http://www.filemaker.com/fmpdsoresult">
<ERRORCODE>0</ERRORCODE>
<DATABASE>PhoneList.fp5</DATABASE>
<LAYOUT>Web Layout</LAYOUT>
<ROW MODID="23" RECORDID="3">
<FIRST_NAME>John</FIRST_NAME>
<LAST_NAME>Smith</LAST_NAME>
<PHONE.PHONE_NUMBER>
<DATA>555-444-3333</DATA>
<DATA>555-222-9999</DATA>
</PHONE.PHONE_NUMBER>
</ROW>
<ROW MODID="32" RECORDID="6">
<FIRST_NAME>Barbara</FIRST_NAME>
<LAST_NAME>Jones</LAST_NAME>
<PHONE.PHONE_NUMBER>
<DATA>555-666-7777</DATA>
<DATA>555-333-0000</DATA>
<DATA>555-111-7654</DATA>
</PHONE.PHONE_NUMBER>
</ROW>
</FMPDSORESULT>
XML FMPXMLRESULT grammar
The FMPXMLRESULT grammar contains additional information about the database that is not in the
FMPDSORESULT grammar, such as the number of records, field types, and field formats. These
elements and attributes are necessary for the XML to validate properly.
Use the FMPXMLRESULT grammar if you require the METADATA information provided by this
grammar. Because FileMaker Pro supports both importing and exporting in the FMPXMLRESULT
grammar, this can be a useful format for transferring data between FileMaker Pro files.
Note The FMPXMLRESULT grammar is not well suited for use with cascading style sheets (CSS).
Use the FMPDSORESULT grammar if you want to use CSS with your XML data.

Saving, importing, and exporting data
FILEMAKER PRO HELP 537
In the FMPXMLRESULT grammar, the DATABASE element contains the NAME, RECORDS,
DATEFORMAT, LAYOUT, and TIMEFORMAT attributes.
The DATEFORMAT attribute specifies the format of dates in the XML document.
The TIMEFORMAT attribute specifies the format of times in the XML document.
The METADATA element contains one or more FIELD elements, each containing information for
one field/column — including the name of the field as defined in the database, the field type, the Yes
or No allowance for empty fields (EMPTYOK attribute), and the maximum number of repeating
values (MAXREPEAT attribute). Valid values for field types are TEXT, NUMBER, DATE, TIME,
TIMESTAMP, and CONTAINER.
The RESULTSET element contains all of the ROW elements that specify the record data in the
XML. Each ROW element contains the field/column data for one row in the result set — including
the record ID for the row, the modification ID for the row, and the COL element containing the data
for one field/column in the row (where multiple DATA elements represent one of the values in a
repeating or portal field).
XML export does not support exporting container field data.
Due to XML limitations, only one record from each related field is exported.
The order of the COL elements corresponds with the order of the FIELD elements in the METADATA
element, for example, where the "First Name," "Last Name," and "Department" elements are listed
in the METADATA, "Joe," "Smith," and "Engineering" are listed in the same order in the
RESULTSET ROW.
For more information, search the FileMaker Knowledge Base available at http://help.filemaker.com.
Notes
•Before importing the XML, FileMaker Pro uses a Xerces-based XML parser and a Xalan-
based XSLT processor to apply an XSLT style sheet (if you specified one) to transform the
XML data. If an error message appears, correct the error and try importing again.
•Though the XML that you import must conform to the FMPXMLRESULT grammar, certain
elements and attributes are not used during import. The following table defines which
elements and attributes are used during XML import, and lists the allowed default values for
attributes. In most cases, attribute values may be null (such as TIMEFORMAT=""). Also, the
FMPXMLRESULT element should always declare the FileMaker namespace for the
grammar.
Field Full form Short form
Year yyyy (4 digits) yy (2 digits)
Month mm (2 digits) M (1 or 2 digits)
Day dd (2 digits) d (1 or 2 digits)
Field Full form Short form
Hour (1-12) hh (2 digits) h (1 or 2 digits)
Hour (1-24) kk (2 digits) k (1 or 2 digits)
Minute mm
Second ss
AM/PM a

Saving, importing, and exporting data
FILEMAKER PRO HELP 538
Sample XML data in the FMPXMLRESULT grammar
The following is an example of XML data in the FMPXMLRESULT grammar. For complete details on
the document type definition (DTD) for the grammar, see the fmpxmlresult_dtd.htm file, which
you can download at http://www.filemaker.com/downloads.
<?xml version="1.0" encoding="UTF-8"?>
<FMPXMLRESULT xmlns="http://www.filemaker.com/fmpxmlresult">
<ERRORCODE>0</ERRORCODE>
<PRODUCT BUILD="5/23/2002" NAME="FileMaker Pro"
VERSION="7.0"/>
<DATABASE DATEFORMAT="MM/dd/yy" LAYOUT="summary"
Element Attributes Used during XML import Default value
FMPXMLRESULT Yes xmlns="http://
www.filemaker.com/
fmpxmlresult"
ERRORCODE No
PRODUCT No " "
NAME No " "
VERSION No " "
BUILD No " "
DATABASE No
NAME No " "
RECORDS No " "
DATEFORMAT No " "
TIMEFORMAT No " "
LAYOUT No " "
METADATA Yes
FIELD Yes
NAME Yes " "
TYPE Yes "TEXT", "DATE",
"NUMBER", "TIME",
"TIMESTAMP", or
"CONTAINER"
EMPTYOK No "YES" or "NO"
MAXREPEAT No " "
RESULTSET Yes
FOUND No " "
ROW Yes
RECORDID No " "
MODID No " "
COL Yes
DATA Yes

Saving, importing, and exporting data
FILEMAKER PRO HELP 539
NAME="Employees.fmp12" RECORDS="23" TIMEFORMAT="hh:mm:ss"/>
<METADATA>
<FIELD EMPTYOK="NO" MAXREPEAT="1" NAME="First Name" TYPE="TEXT"/>
<FIELD EMPTYOK="NO" MAXREPEAT="1" NAME="Last Name" TYPE="TEXT"/>
<FIELD EMPTYOK="YES" MAXREPEAT="1" NAME="Department" TYPE="TEXT"/>
</METADATA>
<RESULTSET FOUND="2">
<ROW MODID="47" RECORDID="34">
<COL>
<DATA>Joe</DATA>
</COL>
<COL>
<DATA>Smith</DATA>
</COL>
<COL>
<DATA>Engineering</DATA>
</COL>
</ROW>
<ROW MODID="89" RECORDID="78">
<COL>
<DATA>Susan</DATA>
</COL>
<COL>
<DATA>Jones</DATA>
</COL>
<COL>
<DATA>Marketing</DATA>
</COL>
</ROW>
</RESULTSET>
</FMPXMLRESULT>
Importing and exporting dates
Dates are often formatted with two-digit years, such as “12/10/14” instead of “12/10/2014.” To
ensure the accuracy of data, FileMaker strongly recommends that you always import and export
data using four-digit year dates whenever possible.
Importing dates with two-digit years
When you import date information into FileMaker Pro date fields, any dates that contain two-digit
years will be converted into four-digit years based on the interpretation algorithm described in
Conversion of dates with two-digit years. Because this interpretation process may not convert the
dates to the century you want, you should carefully review any two-digit year date data that you
import. When possible, import only four-digit year dates into FileMaker Pro.
Exporting dates
When you export FileMaker Pro data, some file formats support the Apply current layout’s data
formatting to exported data option, which allows you to export date, time, and numeric data using
the formats displayed on the current layout. If you use this option and if date fields are formatted to
display only two-digit years, then your exported file will also contain two-digit year dates. Two-digit
year dates can cause accuracy problems when you use the data with other applications. Clear the
Saving, importing, and exporting data
FILEMAKER PRO HELP 540
Apply current layout’s data formatting to exported data option in order to export dates in a four-
digit year format.
Related topics
Formatting and setting up field objects in Layout mode
Specifying formats for date fields
Saving and sending records in other formats
Exporting data from FileMaker Pro
Working with Microsoft Excel
You can use Microsoft Excel and FileMaker Pro together in a variety of ways.
Related topics
Saving, importing, and exporting data
To Do this
Use FileMaker Pro to import
data stored in an Excel file on
a regular basis
Set up recurring imports in FileMaker Pro to make it easy to
import data stored in Excel files. See Setting up recurring
imports.
Note Data imported via recurring import cannot be modified or
added to in FileMaker Pro. Any changes to the data must be
made in the Excel file and reimported into FileMaker Pro.
Bring data stored in an Excel
file into an existing
FileMaker Pro file
Import data from the Excel file. See Importing data into an
existing file.
Create a new FileMaker Pro
file using data from an Excel
file
Convert data from Excel format to FileMaker Pro format. See
Converting a data file to a new FileMaker Pro file.
Create a new Excel file using
data from a FileMaker Pro file
•Export the data in Excel format. See Exporting data from
FileMaker Pro.
•Save records in Excel format. See Saving and sending
records in other formats.
Use scripts to import data to
and from FileMaker Pro and
Excel
See Import Records, Save Records As Excel, or Export Records.
Learn more about how
FileMaker Pro interprets Excel
data
See Microsoft Excel format.

Publishing databases on the web
FILEMAKER PRO HELP 541
Publishing databases on the web
You can display your databases on the web in a variety of ways. This makes your data:
•available to many people who are using a compatible web browser anywhere in the world.
(You can, however, restrict access to files.)
•accessible from many locations—for example, while traveling or working remotely.
There are three ways to publish your data.
•FileMaker WebDirect: If you have FileMaker Server, you can use FileMaker WebDirect to
quickly and easily publish layouts from your database on the web. You don’t need to install
additional software—anyone with compatible web browser software and access to the
Internet or an intranet can connect to your FileMaker WebDirect solution to view, edit, sort,
or search records, if you give them access privileges. With FileMaker WebDirect, data in the
web browser updates automatically as FileMaker Server pushes data to the web browser.
You can use additional software to perform additional tasks (for example, to configure a
firewall to secure your network). See Publishing databases with FileMaker WebDirect.
•Static publishing: If your data rarely changes, or if you don’t want users to have a live
connection to your database, you can use static publishing. With static publishing, you
export FileMaker Pro data to create a web page that you can further customize with HTML.
The web page doesn’t change when information in your database changes, and users don’t
connect to your database. See Publishing data on static webpages.
•Custom Web Publishing: If you have FileMaker Server, you can use the Custom Web
Publishing technologies for more control over the appearance and functionality of your
published database.
With XML and PHP, you can:
•integrate your database with another website
•determine how users interact with data
•control how data displays in web browsers
See FILEMAKER SERVER CUSTOM WEB PUBLISHING WITH XML and FILEMAKER SERVER CUSTOM
WEB PUBLISHING WITH PHP.
Publishing databases with FileMaker WebDirect
With FileMaker Pro, you can design layouts to share with users in FileMaker WebDirect, allowing
them to find, browse, and modify data in a web browser.
•Use FileMaker WebDirect to quickly and easily publish the layouts you design in
FileMaker Pro as web pages. Create layouts for FileMaker Pro users and web users with
the same design tools.
•Automate simple tasks such as finding records, or automate more complex tasks using
script steps that are compatible with FileMaker WebDirect. See Creating scripts to automate
tasks.
•Use accounts and privilege sets to control the security of your solution. See Protecting
databases.
FileMaker WebDirect is available to databases hosted by FileMaker Server, which includes all the
software you need to publish layouts from your database as web pages within a local network or
intranet. With an Internet connection (typically provided through an Internet Service Provider) and
an IP address, you can publish to Internet users on the World Wide Web.
Publishing databases on the web
FILEMAKER PRO HELP 542
To publish databases on the web:
1. Open the database files in FileMaker Pro.
2. Choose File menu > Sharing > Configure for FileMaker WebDirect to open the
FileMaker WebDirect Settings dialog box.
3. Select the filename to publish on the web from the list of open files.
4. Choose which users can access the file:
5. Repeat steps 3 and 4 for each database you want to publish.
6. Click OK or choose additional settings.
Tip Select Don’t display in FileMaker WebDirect homepage in the FileMaker WebDirect
Settings dialog box to suppress a filename from appearing in the built-in FileMaker WebDirect
Database Homepage. This is useful if your solution includes multiple files and you don’t want all
the filenames displayed.
7. Upload the database files to FileMaker Server. See Uploading files to FileMaker Server.
Notes
•Web users can open solutions without specifying a password if you set up the Guest
account for web access. In FileMaker Pro, enable the Guest account and assign it a
privilege set that has the Access via FileMaker WebDirect extended privilege. See About
the Admin and Guest accounts for information on enabling the Guest account for
FileMaker WebDirect.
•For detailed information about FileMaker WebDirect (including information on accessing
published solutions in a web browser and working with container fields), see FILEMAKER
WEBDIRECT GUIDE.
Publishing data on static webpages
With static publishing, you export data to a webpage, then add the webpage to your existing
website. Web users connect to your website, not to your database.
Static publishing might be a good option for you if:
•your data doesn’t change often
•you don’t have full-time Internet access
•you don’t want users to connect directly to your database
To publish static data, you need:
•a website hosted on a web server
Choose To
All users Provide access to anyone who has the IP address or domain name of the server
hosting the database.
Specify users
by privilege set
Allow select users access to the FileMaker WebDirect solution.
Users may be asked to enter their account name and password, defined in the
Manage Security dialog box, depending on the settings in the File Options dialog
box. See Setting file options.
No users Prevent any user from accessing the FileMaker WebDirect solution.

Publishing databases on the web
FILEMAKER PRO HELP 543
•a computer connected to the Internet or an intranet (you only need to connect when you
upload your webpage to a web server)
•an application for copying (uploading) files to your web server application
Note Static webpages cannot use FileMaker Pro access privileges for protection. For security
options, see your web server documentation or check with your ISP or network administrator.
To publish static data from FileMaker Pro:
1. Follow steps 1-12 of Exporting data from FileMaker Pro to export an HTML table or XML file.
•Export an HTML table to generate a table of data that can be viewed by supported web
browsers. You can customize the appearance in a text editing or web authoring
application.
•Export an XML file if you’d like to programmatically change the appearance of the data.
2. Copy the new webpage to your web server.
3. Add links from existing web pages to your new webpage.

Using ODBC and JDBC with FileMaker Pro
FILEMAKER PRO HELP 544
Using ODBC and JDBC with FileMaker Pro
You can use FileMaker Pro as:
•a data source, sharing your database files with other applications on the same computer
using ODBC (Open Database Connectivity) and JDBC (Java Database Connectivity). For
example, you can create charts, analyze numbers, and generate reports using
FileMaker Pro data in other applications. See “FileMaker Pro as a data source,” below.
•an ODBC client application, interacting with data sources on the same computer or over a
network. For example, you can import data from an Oracle data source into FileMaker Pro,
or you can work with an Oracle data source interactively in the relationships graph and in
layouts. See “FileMaker Pro as an ODBC client application,” below.
FileMaker Pro as a data source
FileMaker Pro includes all the software you need to share your database as a data source via
ODBC and JDBC, including the client drivers you use to access your database from other
applications. To share your FileMaker database file as a data source over a network, use
FileMaker Server.
See Sharing FileMaker Pro data via ODBC or JDBC for information about enabling a database file
for sharing.
For details about supported SQL statements, expressions, Catalog functions, and client drivers, see
FILEMAKER ODBC AND JDBC GUIDE and FILEMAKER SQL REFERENCE.
FileMaker Pro as an ODBC client application
When you use FileMaker Pro as a client application, you must install and configure drivers for the
ODBC data source you’re accessing. For example, to access data from an Oracle database using
ODBC, you must install and configure an Oracle ODBC client driver. Third-party drivers are
available from a number of vendors. For more information, see Configuring an ODBC client driver.
Note ODBC data sources are also referred to as external SQL sources (ESS).
See Accessing external data sources for information about:
•working with ODBC data sources interactively, in real time, in the relationships graph and in
layouts. See Connecting to data sources.
•importing ODBC data in batch operations by writing SQL queries. See Querying an ODBC
data source from FileMaker Pro.
See the next section for an overview of using FileMaker Pro as a data source or as a client.
Deciding how to work with ODBC in FileMaker
What do you want to
do? How do you do it? See Products
Use FileMaker Pro as
a data source/share
FileMaker Pro data
1. SQL queries
2. JDBC
FILEMAKER ODBC AND
JDBC GUIDE and
FILEMAKER SQL
REFERENCE
FileMaker Pro/
Pro Advanced and
FileMaker Server only

Using ODBC and JDBC with FileMaker Pro
FILEMAKER PRO HELP 545
Terminology
Before you begin
Before you work begin working with ODBC data sources, do the following:
•Install the appropriate ODBC driver.
•Know the IP address or domain name of the ODBC data source or FileMaker Pro database.
•Know the user name and password for the ODBC data source as supplied by the database
administrator.
The access that the database administrator provides determines whether you will be allowed
read-write or read-only access.
Sharing FileMaker Pro data via ODBC or JDBC
FileMaker Pro can serve as a data source for sharing your database files with ODBC- and JDBC-
compliant applications.
Use FileMaker Pro as
an ODBC client/
access ODBC data
1. Interactively via the
relationships graph
2. One-time, static via
ODBC import (or File
menu > Open), also
Import Records script
step, Execute SQL
script step
FileMaker Pro Help FileMaker Pro/
Pro Advanced, and
FileMaker Server
What do you want to
do? How do you do it? See Products
Term Description
Database Management
System (DBMS)
An application that allows users to store, process, and retrieve information in a
database
SQL A standard programming language that controls and interacts with a DBMS
Data source The data you want to access (like a DBMS) and information to locate the data
(like the path or IP address)
Client application The application that is requesting data (using SQL) from a data source using
ODBC or JDBC
Query The retrieval, manipulation, or modification of data from a data source by
sending SQL statements
Tab le A collection of data, similar to a table in a FileMaker Pro database file
Column An attribute in a table, similar to a field in a FileMaker Pro database file
Row A set of cells in a table, similar to a record in a FileMaker Pro database file
ODBC driver A DLL (Windows) or shared library (OS X) that sends an SQL query to access
data stored in a database and delivers the requested data to the client
application
JDBC driver A JAR (Java Archive) file that sends an SQL query to access data stored in a
database and delivers the requested data to the client application

Using ODBC and JDBC with FileMaker Pro
FILEMAKER PRO HELP 546
Important Prevent data from being inadvertently modified or deleted: other applications can update
and delete unprotected, shared data. Review the privilege sets you’ve assigned to accounts that will
access shared database files. As a minimum level of protection, specify database file accounts and
passwords.
To share databases using ODBC or JDBC:
1. Open the database files.
To enable or change a file’s sharing status, you must open it with an account that has Manage
extended privileges access privileges. See About accounts, privilege sets, and extended
privileges for more information.
2. Choose File menu > Sharing > Enable ODBC/JDBC.
The ODBC/JDBC Sharing Settings dialog box appears.
3. For ODBC/JDBC Sharing, click On.
4. Select the filename(s) to share from the list of open files.
Each FileMaker Pro database file can have one or more tables. FileMaker Pro fields are
represented as columns. The complete field name, including any non-alphanumeric characters,
displays as the column name.
Avoid using spaces in the field names of database files you intend to share via ODBC and
JDBC, because some SQL query tools don’t allow spaces in column names.
5. Choose which users can access the file:
6. Repeat steps 3 - 5 for each database you want to publish.
7. Click OK or choose additional settings.
Each FileMaker Pro database file that is open and set up for access is a separate data source
(create a DSN for each individual FileMaker database file you want to access).
For details about supported SQL statements, expressions, Catalog functions, and client drivers, see
FILEMAKER ODBC AND JDBC GUIDE and FILEMAKER SQL REFERENCE.
Note In Windows, Microsoft Access can import only 32 or fewer fields at one time via ODBC from a
FileMaker Pro database file.
Choose To
All users Provide access to users from any account.
Specify users
by privilege set
Provide access to users with accounts assigned one of the selected privilege
sets. Click Specify to select the privileges that accounts must have to access the
shared database file.
Accounts that need access to the database file require the fmxdbc extended
privilege Access via ODBC/JDBC. Users may need to enter their account name
and password, defined in the Manage Security dialog box, depending on the
setting in the File Options dialog box (see Setting file options).
No users
(the default
setting)
Prevent any user from accessing the database using ODBC/JDBC.

Using ODBC and JDBC with FileMaker Pro
FILEMAKER PRO HELP 547
Important If you disable ODBC/JDBC sharing after it's already been on, FileMaker Pro stops
serving data immediately. No errors are reported, and the client application must notify users that
data is no longer available and transactions cannot be completed.
Related topics
Using ODBC and JDBC with FileMaker Pro
Protecting databases

Accessing external data sources
FILEMAKER PRO HELP 548
Accessing external data sources
You can connect to and work with data in external data sources in much the same way that you work
with data in the current, active FileMaker file. For example, you can:
•create tables in the relationships graph for external FileMaker files and ODBC data sources
•work with data from external files in FileMaker fields and layouts
•add supplemental fields to ODBC tables to perform unstored calculations or to summarize
data in the ODBC tables
•add, change, and delete external data interactively
•create relationships between fields in FileMaker tables and fields (also called “columns”) in
ODBC tables
•construct SQL queries for importing via ODBC. See Querying an ODBC data source from
FileMaker Pro.
Notes
•There are other ways to link with ODBC data sources besides using FileMaker Pro as an
ODBC client application. You can write SQL queries to use FileMaker Pro as a data source.
See Sharing FileMaker Pro data via ODBC or JDBC, FILEMAKER ODBC AND JDBC GUIDE,
and FILEMAKER SQL REFERENCE for more information.
•For an overview of the various ways of working with ODBC data sources, see Using ODBC
and JDBC with FileMaker Pro.
•You cannot modify the schema of external ODBC data sources using FileMaker Pro.
•If table names change in an ODBC data source, you can use the Manage Database dialog
box to re-link to the ODBC table. See Restoring links to ODBC data sources.
•ODBC data sources are also referred to as external SQL sources (ESS).
Related topics
Adding tables to the relationships graph
Configuring an ODBC client driver
Whether you are importing ODBC data or working with ODBC tables in the relationships graph, as a
client application, you must configure a driver for the ODBC data source you’re using. For example,
if you will be accessing records from an Oracle database, you will configure an Oracle client driver.
The way you interact with the data source, provide a password, and perform and display query
results varies with each application’s client driver. Additionally, data source configuration can vary
from one ODBC driver manufacturer to another.
Data sources supported in FileMaker 13.0
You can use the following data sources in the FileMaker Pro relationships graph. If you are importing
ODBC data, or using the Import Records or the Execute SQL script step, you can use additional
data sources, such as IBM DB2 or Informix ODBC.
•Oracle 11g
•SQL Server 2008 R2
•SQL Server 2012

Accessing external data sources
FILEMAKER PRO HELP 549
•MySQL 5.5 Community Edition (free)
For an overview of the various ways of working with ODBC data sources, see Using ODBC and
JDBC with FileMaker Pro.
Use the following procedure as a general guideline for configuring data sources (refer to the
documentation that accompanies each data source application for details).
Windows
1. Start the 32-bit ODBC Data Source Administrator by doing one of the following:
•32-bit Windows: In the Windows Control Panel, choose Administrative Tools > Data
Sources (ODBC). Administrative Tools appear in the System and Security category.
•64-bit Windows: Double-click the odbcad32.exe file in the C:\Windows\SysWOW64
folder.
2. Click the System DSN tab or the User DSN tab.
If your data source appears in the list, the driver is already configured. You can skip the
remaining steps and begin accessing ODBC data, or choose your data source and click
Configure to modify how you’ll interact with the data source.
A System DSN (data source name) is available to all users who log in to your computer. A User
DSN is available only when you log in.
Important Only System DSNs are supported when you are working with ODBC tables in the
relationships graph.
3. Click Add to configure a driver for your data source.
A list displays all ODBC client drivers installed on your computer.
If no driver appears for the data source you want to use, you can use a driver from a third-party
vendor.
To install a new driver, use the driver’s installation program.
4. Choose the driver for the data source you’ll be accessing with FileMaker Pro, then click
Finish.
A setup dialog box appears.
5. For Name, enter descriptive text to identify the data source.
Many drivers also offer options to customize how you access a data source, such as identifying
a particular data source file. Enter descriptive text, if desired.
6. Click Finish.
7. Click OK to save your data source information.
OS X
1. Install the ODBC Manager from Actual Technologies, available at http://
www.odbcmanager.net.
2. Launch the ODBC Manager utility.
3. Click the System DSN tab (or, for ODBC imports, click either the System DSN tab or the
User DSN tab).
Important Only System DSNs are supported when you are working with ODBC tables in the
relationships graph.

Accessing external data sources
FILEMAKER PRO HELP 550
If your data source appears in the list, the driver is already configured. You can skip the
remaining steps and begin accessing ODBC data, or choose your data source and click
Configure to modify how you’ll interact with the data source.
A System DSN (data source name) is available to all users who log in to your computer. A User
DSN is available only when you log in.
4. Click Add to configure a driver for your data source.
A list displays all ODBC client drivers installed on your computer.
If no driver appears for the data source you want to use, you can use a driver from a third-party
vendor.
To install a new driver, use the driver’s installation program.
5. Choose the driver for the data source you’ll be accessing with FileMaker Pro, then click OK.
6. In the configuration dialog box, click Continue.
7. For Name, enter descriptive text to identify the data source.
Many drivers also offer options to customize how you access a data source, such as identifying
a particular data source file. Enter descriptive text, if desired.
8. Click Finish.
9. Click Done to save your data source information.
After you have configured the driver, you can access records in your data source. See Connecting to
data sources and Querying an ODBC data source from FileMaker Pro.
Notes
•ODBC Manager is a freeware product not supported by FileMaker.
•You may also use Apple’s ODBC Administrator Tool for OS X, available at http://
www.apple.com/support.
Connecting to data sources
Data sources provide access to data from other FileMaker files and ODBC databases. You can
connect to:
•external FileMaker data sources
•ODBC data sources (links to external ODBC files)
Once you have defined data sources, data from the ODBC or FileMaker tables can be used in many
of the same places as data in a local file (for example, on layouts and in scripts).
Follow the steps below for the type of data source you want to add.
To add a FileMaker data source:
1. With the database open, choose File menu > Manage > External Data Sources.
The Manage External Data Sources dialog box appears.
2. Click New.
The Edit Data Source dialog box appears. For Type, FileMaker is selected by default.
3. Enter a name for the data source.
This is the name that appears in the login and other dialog boxes.
4. Click Add File.

Accessing external data sources
FILEMAKER PRO HELP 551
The Open File dialog box appears.
5. Select a FileMaker file to add to the path list.
6. Click Open to add the path for this file to the file path list.
Each named FileMaker data source can consist of one or more file paths. Use multiple file paths
when you want FileMaker Pro to search a list of potential files. See Creating file paths.
You can also enter file paths by typing them directly into the file path list. Each file path must
appear on a separate line.
7. Click OK to save the data source.
Named data sources appear in creation order in the Manage External Data Sources dialog box.
You can choose to view the names by alphabetical or custom order.
Type indicates whether the data source is a FileMaker or ODBC data source. File paths are
listed under Details.
Note Alternatively, you can choose the Relationships tab in the Manage Database dialog box and
click . In the Specify Table dialog box, for Data Source, choose Add FileMaker Data Source.
See Adding tables to the relationships graph.
For details on working with FileMaker data sources, see Editing external FileMaker data sources.
To add an ODBC data source:
Important Before creating a SQL data source, you must connect to the external data source via an
ODBC driver and set up DSNs. See Configuring an ODBC client driver.
1. With the FileMaker database open, choose File menu > Manage > External Data Sources.
The Manage External Data Sources dialog box appears.
2. Click New.
The Edit Data Source dialog box appears.
3. For Type, select ODBC.
4. Enter a name for the data source.
Names cannot be over 100 characters long.
5. For DSN, click Specify.
6. In the Select ODBC Data Source dialog box, select the System DSN that you want to work
with from this FileMaker file.
7. Set other options. For details on working with ODBC data sources, see Editing ODBC data
sources.
8. Click OK.
The data source is now listed in the Manage External Data Sources dialog box.
Note Alternatively, you can choose the Relationships tab in the Manage Database dialog box and
click . In the Specify Table dialog box, for Data Source, choose Add ODBC Data Source. See
Adding tables to the relationships graph.
To delete an external data source:
1. In the Manage External Data Sources dialog box, select the data source in the list.
2. Click Delete.

Accessing external data sources
FILEMAKER PRO HELP 552
This only deletes the data source link to the current FileMaker file. The data source is still
available to link to other FileMaker databases.
3. Click OK.
Related topics
Using ODBC and JDBC with FileMaker Pro
Working with data sources
After you’ve added a data source, you can specify options for external FileMaker data sources and
ODBC data sources.
•To access external FileMaker data sources, you define a reference to that file. See Editing
external FileMaker data sources.
•To access ODBC data sources, you must set up a driver for the data source, connect to the
data source name (DSN), identify the tables you want to work with in the external file, and
then add the external table in the relationships graph. See Editing ODBC data sources.
Related topics
Connecting to data sources
Editing external FileMaker data sources
A FileMaker data source stores the file paths that FileMaker Pro searches to access an external
FileMaker file, table, script, or value list.
To add a FileMaker data source, see Connecting to data sources.
To edit a FileMaker data source:
1. Choose File menu > Manage > External Data Sources.
The Manage External Data Sources dialog box appears.
2. Select the FileMaker data source in the list and click Edit.
The Edit Data Source dialog box appears.
3. You can change the name of the data source, edit the file path, or add another file to the file
path list.
File paths can be edited as text. Each FileMaker data source can consist of one or more file
paths, separated by carriage returns. See Creating file paths.
4. Click OK.
Notes
•In many dialog boxes, you have the option of choosing existing data sources or creating
new data sources as needed. For example, in the Edit Value List dialog box, you can specify
a data source reference to an external FileMaker file that contains a value list that you want
to access.
•You must re-specify the data source references for related files and files with external
scripts if you add or remove filename extensions.
•Use the following characters as separators in a file path list: "/", ":", or carriage return.

Accessing external data sources
FILEMAKER PRO HELP 553
•FileMaker does not recommend using an asterisk (*) as a wild card character in network file
paths as it slows FileMaker network traffic. When possible, replace an asterisk with the
appropriate IP address.
•Variables are not supported in FileMaker data source references.
•Data source references are only to other FileMaker files or to ODBC DSNs. References to
other files such as graphics are file paths.
Related topics
Sharing and hosting files
Working with shared files as a client
Creating accounts that authenticate via an external server
Editing ODBC data sources
An ODBC data source lets a FileMaker file access data from external ODBC tables. You can view
and update ODBC tables interactively in the relationships graph in much the same way you view
and update FileMaker tables.
FileMaker can connect to many relational database management systems (RDBMSs) that provide
ODBC APIs for external use. See Configuring an ODBC client driver for a list of the data sources
that are supported.
Important To work with ODBC data sources, you must:
•connect to the external data source via an ODBC driver and set up DSNs. See Configuring
an ODBC client driver.
•add an external ODBC data source. See Connecting to data sources.
After you have linked the ODBC data source to a FileMaker Pro file, you can set and edit options.
To edit an ODBC data source:
1. Choose File menu > Manage > External Data Sources.
The Manage External Data Sources dialog box appears.
2. Select the ODBC data source in the list and click Edit.
The Edit Data Source dialog box appears.
3. You can change the name of the data source, specify a different DSN, set authentication
options to log in to a named ODBC data source, or set view options.
4. For Authentication, the default option is Prompt user for user name and password.
Users must enter a user name and password the first time they access the table.
If you don’t want any user of this FileMaker file to be prompted, select Specify user name and
password (applies to all users) and enter a user name and password. You can also create a
calculation to determine user access to the external table. You cannot use variables or fields in
these calculations. See Specify Calculation dialog box for more information on setting up
calculations.
If you work with shared database files that access ODBC data from Microsoft SQL Server and
you want to enable ODBC data source single sign-on, select Use Windows Authentication
(Single Sign-on) and enter the SPN (Service Principal Name). See Enabling ODBC data
source single sign-on (Windows only).
Note FileMaker encrypts passwords. However, encryption on external data sources depends on
whether encryption is supported by the ODBC driver.

Accessing external data sources
FILEMAKER PRO HELP 554
5. To enhance performance, you can filter the list of external tables or views that are available
for you to add to the relationships graph. The default is to list all the tables from the data
source.
•For Catalog name, enter a name. Otherwise, tables from all catalogs are listed.
•For Schema name, enter a name. Otherwise, tables from all schemas are listed.
•For Table name, enter a name to list only that table.
6. You can filter the list of tables by type: Tables, Views, or System table.
Note If you want to include other types, deselect all the Filter by Type options.
7. Click OK.
Setting up an ODBC table in the relationships graph
After you have added an ODBC data source, you can work with ODBC tables in the relationships
graph and on layouts as you would other FileMaker tables. You can retrieve, add, update, and
delete data in the ODBC table interactively, in real time.
1. Choose File menu > Manage > Database.
2. In the Relationships tab in the Manage Database dialog box, click .
3. In the Specify Table dialog box, for Data Source, choose ODBC data source.
4. If you are prompted, enter the user name and password for the ODBC data source.
5. You see a list of the external tables for that data source.
6. Select the table you want and click OK.
The external table appears in the relationships graph. The table name appears in italics. For
information on linking to and working with tables in the relationships graph, see Working with the
relationships graph.
Tip To identify whether a table in the relationships graph is a FileMaker table or from an ODBC
data source, move the pointer over the arrow in the table header. You might want to add a color
to ODBC tables in order to identify them more easily.
After you add a table to the relationships graph, FileMaker adds a layout with that table name to
the Layout pop-up menu and the table is listed in the Tables tab. The table name appears in
italics.
Columns from the ODBC table appear in the Fields tab. The field names appear in italics. You
can remove fields if you do not want FileMaker Pro to display them within your solution. These
columns are not removed from the external SQL data source table schema, only from the
FileMaker Pro representation of that table’s schema. See Updating data between FileMaker and
ODBC data sources for more information.
Considerations before you begin working with ODBC data sources
•Decide whether you want to work with ODBC tables interactively in the relationships graph
or through “static” ODBC imports. For an overview of the various ways of working with
ODBC data sources, see Using ODBC and JDBC with FileMaker Pro.
•Determine which tables you want to access, and which data sources they are in.
•If FileMaker cannot automatically determine a table’s primary key, you will be asked to
select the columns that comprise a unique key. FileMaker requires every table to have one
or more columns that have a unique value for each row.

Accessing external data sources
FILEMAKER PRO HELP 555
Limitations on working with ODBC data sources
•You cannot change the schema of external ODBC data sources. However, you can add
supplemental fields to do calculations and summaries on data from ODBC tables. See
Using supplemental fields.
•Fields from ODBC data sources can be used in value lists, but character large objects
(CLOBs) such as long text strings are not supported.
•For value lists with ODBC data, the No access privilege and Limited custom privilege are
not supported. To prohibit a user from seeing ODBC data in a value list, you must enforce
row-level security in the external SQL database. See Editing value list privileges.
•The SQL Server Timestamp data type is not supported.
•Binary large objects (BLOBs) such as pictures and sounds are not supported.
•When you’re working with external tables in the Fields tab of the Manage Database dialog
box, the following field options are not supported. See Setting options for fields for
information on field options.
•On the Auto-Enter tab, you can auto-enter serial numbers when you create records,
but not when you commit records. (The external database controls how records are
committed.) When a lookup is to related data in an ODBC data source, copy next
lower value and copy next higher value are disabled.
•On the Validation tab, Unique value and Existing value are disabled. The Maximum
number of characters allowed in a field is determined by the external data source.
•The Storage tab is disabled.
•FileMaker cannot control validation and other options that ODBC administrators set. See
Updating data between FileMaker and ODBC data sources for information on how field
options are affected in Sync operations.
•FileMaker files linked to ODBC data sources don’t inherent relationships that are created in
the ODBC data sources.
Notes
•You can apply conditional formatting to data from external fields. See Defining conditional
formatting for layout objects.
•When FileMaker Server hosts databases linked to ODBC data sources, FileMaker clients do
not need to set up a DSN to access the external data source. However, the DSN must be
set up on the machine running FileMaker Server.
•FileMaker does not use SQL set semantics on queries. FileMaker may execute one query
for each related table on a layout. If you want to retain certain SQL join behavior or obtain
the results of SQL predicates such as GROUP BY, create views. Then access the data from
FileMaker through those views. (Views are sometimes called “virtual tables.”)
•Long queries, attempts to scroll the entire ODBC table, or opening a large table can result in
slower performance.
•Microsoft SQL Server: By default, DATETIME, DATETIME2, and SMALLDATETIME data
from ODBC tables is imported as the timestamp field type. You can change the field type of
a timestamp shadow field to either date or time, but the data must be structured in a specific
manner. If the imported ODBC table contains timestamp data and you treat the timestamp
field as a date field, the time portion must equal 12:00 AM (or midnight) for all records in the
table. Likewise, if you import an ODBC table that contains timestamp data and you treat the
timestamp field as a time field, the date portion must equal 1900-01-01 (or January 1, 1900)
for all records in the table.

Accessing external data sources
FILEMAKER PRO HELP 556
As with any ODBC table, if the field is a primary key and the values are not unique, the results
may be inconsistent.
Enabling ODBC data source single sign-on (Windows only)
If you work with database files hosted by FileMaker Pro or FileMaker Server that access ODBC data
from Microsoft SQL Server, you can configure the host computer to enable single sign-on (SSO).
ODBC data source single sign-on permits a client to use one Windows-authenticated login to access
ODBC data in shared files.
Important Before you can enable ODBC data source single sign-on, your Windows domain
administrator must:
•configure the Account is trusted for delegation security setting for your Windows user
account on the client.
•configure the Trust this user for delegation and Use Kerberos only security settings for
your Windows user account on the host computer.
•enable the Impersonate a client after authentication privilege for your Windows user
account on the host computer.
•configure the ODBC DSN to use Windows authentication on the host computer.
•configure Microsoft SQL Server to use Windows authentication.
To enable ODBC data source single sign-on:
1. With the database open, chose File menu > Manage > External Data Sources.
The Manage External Data Sources dialog box appears.
2. Select an ODBC data source from the list and click Edit.
The Edit Data Source dialog box appears.
3. For Authentication, select Use Windows Authentication (Single Sign-on), enter the
SPN (Service Principal Name), and click OK.
Note Your Windows domain administrator must provide the SPN, which is generally in this
format: MSSQLSvc/<fully qualified domain name>:<port>
For example: MSSQLSvc/sql2005.filemaker.com:1433
Notes
•In order to open a hosted database, the administrator must configure the FileMaker Server
service to log in as the privileged user account. For more information, see
FILEMAKER SERVER GETTING STARTED GUIDE.
•ODBC data source single sign-on is not supported:
•on Macintosh.
•for ODBC data accessed from MySQL or Oracle.
•in web publishing.
Related topics
Editing ODBC data sources
Creating accounts that authenticate via an external server

Accessing external data sources
FILEMAKER PRO HELP 557
Updating data between FileMaker and ODBC data sources
In general, committing data in ODBC data sources works the same as committing FileMaker data.
For example, FileMaker saves changes to external data when you exit a field or move to another
record. For more information, see Committing data in records. However, because external data is
controlled by different software and can be used interactively by users working outside of FileMaker
software, there are certain actions you can take to assure you have the latest record data and table
schema.
To display the latest data from an ODBC data source:
1. Open the file with the link to the external data source.
2. In Browse mode, choose Records menu > Refresh Window.
Current data, including data entered by users outside of FileMaker, appears. You can also flush
the internal cache with the Refresh Window script step.
For ODBC tables, FileMaker uses “optimistic locking” to control data entry. FileMaker does not
automatically refresh data when you begin entering data in an external record or when you do a
Find on ODBC data.
To synchronize field schema between FileMaker and the ODBC data source:
1. Choose File menu > Manage > Database.
2. In the Manage Database dialog box, click the Fields tab.
3. Choose the table you want to work with from the Table list.
FileMaker displays fields from the ODBC table. The field names appear in italics.
4. Select an external field in the list, then click Sync.
FileMaker updates the schema between the ODBC source and the “shadow” table. You have
not changed the field schema in the data source, only updated FileMaker’s table schema for any
new or missing fields. For example, if you delete a field from an ODBC table in the relationships
graph, when you click Sync again, the field from the external data source will reappear.
Note After you synchronize, any field options you set in FileMaker Pro might be reset if the ODBC
data source doesn’t force that option. For example, if you selected the Not empty validation option,
after synchronizing, you might have to reset that option.
Related topics
Restoring links to ODBC data sources
Restoring links to ODBC data sources
If one or more table names have changed in an ODBC data source, you can use the Manage
Database dialog box to update links between a FileMaker file and the external data source (ESS).
To update links to ODBC data sources:
1. Choose File menu > Manage > Database.
2. In the Manage Database dialog box, click the Tables tab.
FileMaker displays tables from the ODBC table in italics. If a table name has been changed in
the ODBC data source, <Table Missing> appears in the Details column and a Re-link button
appears in the Manage Database dialog box.

Accessing external data sources
FILEMAKER PRO HELP 558
3. Select the missing table.
4. Click Re-link.
5. In the Specify Table dialog box, select the renamed table and click OK.
If field names in the ODBC table have changed or are missing, you must synchronize the field
schema. For more information, see Updating data between FileMaker and ODBC data sources.
Notes
•Re-linking does not validate or re-specify primary keys.
•If no fields in the re-linked table match, FileMaker Pro displays an error message allowing
you to continue or terminate the re-linking process.
•You can narrow the list of tables displayed by setting a filter in the ODBC tab in the Edit Data
Source dialog box. For more information, see Editing ODBC data sources.
Using supplemental fields
If your FileMaker Pro file accesses data from an ODBC data source, you can use supplemental
fields to define unstored calculations or summary instructions that act on data coming from the
external sources. These fields display calculation and summary results in the FileMaker Pro file
without changing the external database. For example, you can use supplemental fields to display
aggregated data from an external file similarly to how you use summary fields to display aggregated
data stored in FileMaker Pro files.
To do calculations on ODBC data:
1. Open the file with the link to the external data source.
2. Choose File menu > Manage > Database.
3. In the Manage Database dialog box, click the Fields tab.
4. Choose the ODBC table you want to work with from the Table list.
5. Add a calculation field or a summary field.
See Defining calculation fields and Defining summary fields for more information.
6. Specify the fields in the ODBC table for which you want to calculate or summarize values.
The supplemental fields appear in the Fields tab for the specified ODBC table.
Related topics
Placing and removing fields on a layout
ODBC data sources troubleshooting
Missing data
•If a table is renamed or removed from an external database, <Table Missing> is displayed.
•If a column is renamed or removed from the external database table, <Field Missing> is
displayed.
•If a data source name or database is renamed or removed, <Data Source Missing> is
displayed.

Accessing external data sources
FILEMAKER PRO HELP 559
•If the connection fails, the appropriate error message for connection failure is displayed, and
<Data Source Missing> is displayed.
•If FileMaker cannot identify a unique key for an ODBC table or view, <Primary key
missing> is displayed in the relationships graph and in field objects.
Note FileMaker automatically tries to identify a unique key for an ODBC table or view. If
FileMaker cannot identify a unique key, when you Sync or add a new ODBC table, a FileMaker
dialog box appears where you can specify one or more columns to use as a unique key. If
FileMaker still cannot determine unique values for every record in the external table or view at
that time, you see <Primary key missing>. If someone working outside FileMaker software
associates a new primary key with the external table, the new primary key will be used instead
of the key specified in FileMaker.
ODBC errors
•If the name of a column in an external table is a FileMaker reserved word or a SQL keyword,
an ODBC error might result. (For example, an error might result if a column is named
“Number” or “Timestamp.”) See About naming fields and Using a reserved word or symbol
for a field or table name for more information about FileMaker reserved words. To avoid
schema naming problems with ODBC data sources, see the documentation that came with
your data source software.
•For ODBC imports and Execute SQL script steps, if an error occurs while performing a SQL
query, the Get(LastError) function returns FileMaker error 1408. The Get(LastODBCError)
function returns detailed information about the error. If there is no information about the
error, the Get(LastError) function returns FileMaker error 1409.
•When you are working with ODBC data sources in the relationships graph, the
Get(LastError) function returns FileMaker error 1408. The Get(LastODBCError) function
returns the readable error string that is generated by the ODBC driver.
•If you are connected to an ODBC table that contains a duplicate record and you modify that
record in FileMaker, your modification only affects the first instance of the record. If you then
delete the record in FileMaker, both external records are deleted.
Find results
Find results for ODBC tables might differ from FileMaker find results on the same data. For example,
Asian text in an external table might be collated differently and give different find results than the
same text in a FileMaker table.
Querying an ODBC data source from FileMaker Pro
After configuring an ODBC client driver, you can interact with records, import records into an existing
FileMaker Pro database file, or create a new FileMaker Pro database file from an ODBC data
source (such as Oracle or Microsoft Access databases).
First, you access the data source you want to import from. Then you construct a query for the
records you want to import from the data source. Finally, if you’re importing data into an existing file,
you map fields from your data source to fields in your FileMaker Pro database file.
Important See Connecting to data sources for information on how you can access and work with
ODBC data sources without writing SQL queries.
You can access your ODBC data source through the File menu, with the Import Records script step,
or with the Execute SQL script step.

Accessing external data sources
FILEMAKER PRO HELP 560
All applications that support ODBC recognize a basic subset of SQL (Structured Query Language)
statements. SQL is passed through the ODBC interface to the data source, performing queries such
as SELECT first_name, last_name FROM customers WHERE city=N'Paris' and
making updates such as the creation of a new record with INSERT INTO customers
(first_name, last_name) VALUES (N'Jane',N'Smith').
Note Because Microsoft SQL Server supports both Unicode and non-Unicode field types, you must
prefix all Unicode strings with an uppercase “N” (which stands for “National” in the SQL-92
standard). Otherwise, when a Unicode string containing non-English characters is passed to
Microsoft SQL Server, you may lose any data that doesn’t exist in the Microsoft SQL Server code
page.
To query an ODBC data source from FileMaker Pro:
1. In FileMaker Pro, do one of the following:
•To import into an existing FileMaker Pro file, choose File menu > Import Records >
ODBC Data Source.
•To create a FileMaker Pro file from the data source records, choose File menu > Open.
In the Open dialog box, choose ODBC Data Source for Files of type (Windows) or
Show (OS X).
2. Choose your data source and click Continue.
Most server-based ODBC drivers require the data source to be open, but the requirement varies
depending on the driver.
3. Enter the user name and password (if any) for the data source you chose.
To skip this dialog box in the future, select Save user name and password (this option is only
available if you’re importing into an existing FileMaker Pro file).
4. Click OK.
The FileMaker Pro SQL Query builder dialog box appears.
5. Construct your query. See Constructing an SQL query for importing via ODBC for details.
You can execute the query immediately, or copy and paste it into a field for later use. Use the
Import Records or Execute SQL script step to execute a query stored in a field. See Storing an
SQL query in a field for details.
6. Click Execute.
•If you are importing data into an existing file, FileMaker Pro displays the Import Field
Mapping dialog box. You map fields from the data source to fields in your FileMaker Pro
database file. See Setting the import action and mapping fields during import and
Importing data into an existing file.
•If you are importing data into a new file, FileMaker Pro puts the imported records into
your database file.
Note ODBC import, the Execute SQL script step, and external SQL data sources are not supported
in runtime solutions created with FileMaker Pro Advanced.
Related topics
Using ODBC and JDBC with FileMaker Pro
Configuring an ODBC client driver

Accessing external data sources
FILEMAKER PRO HELP 561
Constructing an SQL query for importing via ODBC
After you access your ODBC data source, use the SQL Query builder to construct and execute a
query. Using the SQL Query builder, you construct queries that can search an ODBC data source or
DBMS, fetch specific records, and import the resulting records into a FileMaker Pro database file.
You can execute the query immediately, or store it in a field for repeated use. See Storing an SQL
query in a field for details.
Note Performing complex queries or retrieving a large number of records may take time. Consider
batching requests for optimal performance.
To construct a query in the SQL Query builder:
1. Choose your data source.
•If you’re importing into an existing FileMaker Pro file, choose File menu > Import
Records > ODBC Data Source, and then choose your data source. The SQL Query
builder dialog box appears (you might see a password and user name dialog box first).
•If you’re creating a FileMaker Pro file from the data source records, choose File menu >
Open. In the Open dialog box, choose ODBC Data Source for Files of type (Windows)
or Show (OS X), and then choose your data source. The SQL Query builder dialog box
appears (you might see a password and user name dialog box first).
2. In the SELECT tab > Tables list box, click the table you want to import. The columns
associated with this table appear in the Columns list box.
3. Choose a column to insert into your SQL query and click Insert into SQL Query.
This constructs the SQL statement in the SQL Query box.
4. Insert additional columns into the SQL query by double-clicking the column name.
5. Click the WHERE tab to construct search criteria. This reduces the number of records that
are imported. You can also join data from two tables.
6. To sort records before importing, click the ORDER BY tab, then specify the name of the
column to sort by and whether the sort should be ascending or descending.
7. Execute the query.
You can map fields, choose whether to append records or create a table, or browse records in
the data source to decide which records you want to import. FileMaker Pro imports the resulting
records into your database file.
Note You can type an SQL statement directly into the SQL Query box. However, to assure a valid
SQL query, use the SQL Query builder.
Related topics
Querying an ODBC data source from FileMaker Pro
Automating ODBC import using the Import Records script step
Executing SQL to interact with data sources via ODBC
Executing SQL to interact with data sources via ODBC
In addition to importing data into a FileMaker Pro database file via ODBC, you can also interact with
data sources (such as Microsoft SQL Server and Oracle) using SQL statements through the
Execute SQL script step. You can use any SQL statement supported by the data source, such as
INSERT, UPDATE, and DELETE.

Accessing external data sources
FILEMAKER PRO HELP 562
You can also use SQL statements that go beyond simply importing data into a FileMaker Pro
database file. For example, you could execute SQL statements that add records to a database table
in SQL Server, using information from a FileMaker Pro database file.
To execute SQL statements against a data source via ODBC:
1. Choose Scripts menu > Manage Scripts.
2. Click New.
3. Add the Execute SQL script step to the script.
It appears in the Miscellaneous category.
4. Select the Execute SQL script step and click Specify.
5. In the Specify SQL dialog box, click Specify.
6. Select your data source and click Continue.
You might be asked for a user name and password.
7. In the Specify SQL dialog box, enter your SQL statements.
See your data source documentation for a listing of supported SQL statements and their syntax.
8. Click OK.
Related topics
Constructing an SQL query for importing via ODBC
Storing an SQL query in a field
You can store an SQL query in a text field for use with the Import Records script step or Execute
SQL script step.
To store a query in a field, do one of the following:
•Type a query directly into a field.
•Create a query dynamically in a calculation field.
•Use the SQL Query builder to construct a query, then copy and paste it into a field.
Notes on stored queries:
•When you execute a stored query, error checking is performed at runtime only. Use
Get(LastError) function, and then use Get(LastODBCError) function to return the last
readable error string that is generated by the ODBC driver.
•The SQL Query builder validates queries for use only with FileMaker Pro.
•You can store and execute a different query in each record of your database file.
•You can store a query in a global field to guarantee the same query is executed
regardless of which record you are on.
Automating ODBC import using the Import Records script step
Because accessing ODBC data sources is a task you might repeat frequently, you can create a
script with the Import Records script step that automates ODBC import. Some script step options
behave differently than when used with other file formats.

Accessing external data sources
FILEMAKER PRO HELP 563
The Specify data source option stores:
•the data source name and location
•the user ID and password (optional)
•the SQL query to be executed against the data source
For more information, see Import Records script step.
When you choose an ODBC data source in the Import Records script step, the Specify ODBC SQL
Query dialog box opens. You can do any of the following:
•Choose a field that contains a query (see Storing an SQL query in a field)
•Type a new query to be stored with the Import Record script step
•Use the SQL Query builder to construct a query to be stored with the Import Record script
step
Notes
•To save the user name and password, select Save user name and password in the ODBC
Enter Password dialog box.
•The Perform without dialog option hides all dialog boxes during an ODBC import.
•The Specify import order option stores the field order in the Import Field Mapping dialog
box, similar to other scripted imports.
•The Set Error Capture script step suppresses ODBC alerts.
•The ODBC import feature saves the data source name, user ID and password, and the SQL
query from the previous ODBC import. Keep this in mind when selecting the Specify import
order or Specify data source options.
•In Windows, to automate the interaction across multiple applications, explore the ActiveX
functionality. For more information, see Scripting with ActiveX Automation (Windows).
•If you choose to execute a query from a non-global field, the query in the current record is
executed. See Defining global fields (fields with global storage).
•SQL statements are limited to a maximum length of 256 K characters (512 KB).
•If you use the Import Records script step to import ODBC data that contains Unicode
strings, your ODBC driver must support Unicode. Otherwise, the results may be
inconsistent.
•ODBC import, the Execute SQL script step, and external SQL data sources are not
supported in runtime solutions created with FileMaker Pro Advanced.
Using FileMaker Pro Advanced
FILEMAKER PRO HELP 564
Using FileMaker Pro Advanced

FileMaker Pro Advanced basics
FILEMAKER PRO HELP 565
FileMaker Pro Advanced basics
This section contains:
•an introduction to FileMaker Pro Advanced features
•a description of your responsibilities as a FileMaker Pro Advanced developer
About FileMaker Pro Advanced
FileMaker Pro Advanced contains a range of advanced development and deployment tools to speed
up the development process and help developers produce FileMaker database solutions for work
groups, websites, and stand-alone runtime applications.
In addition to all of the features that are available with FileMaker Pro, FileMaker Pro Advanced
includes:
•Developer Utilities, for creating, customizing, and deploying runtime database solutions,
and encrypting database files.
•Database Design Report feature, for publishing comprehensive documentation on
structures or schemas of databases.
•Script Debugger, for systematic testing and debugging of FileMaker scripts.
•Data Viewer, for monitoring fields, variables, and calculations.
•Copy feature, for copying field schemas or table schemas. You can also import table.
schemas to consolidate tables from a multi-file solution into one file.
•Custom Menus feature, for creating customized menus for a solution.
•Custom Functions utility, for creating custom functions for use anywhere within the solution.
Some FileMaker Pro Advanced features are further documented in the FILEMAKER PRO ADVANCED
FEATURES GUIDE included with the software and available at http://www.filemaker.com/
documentation.
Related topics
Customizing files with FileMaker Pro Advanced
Using FileMaker Pro Advanced tools
Maintaining and recovering FileMaker Pro databases
Your responsibilities as a developer (FileMaker Pro Advanced)
Abiding by the license agreement
The FileMaker Pro Advanced license agreement allows you royalty-free distribution of an unlimited
number of FileMaker Pro runtime database solutions. However, there are several terms and
conditions in the license agreement you must abide by, including the following:
•You must provide all of the end-user technical support.
•You must provide an “About” layout that includes your name, address, and the telephone
number for your technical support.
Note You must read and agree to the terms and conditions of the FileMaker Pro Advanced license
agreement, available through the FileMaker Pro Advanced installer, before using the
FileMaker Pro Advanced software.

FileMaker Pro Advanced basics
FILEMAKER PRO HELP 566
Choosing to let FileMaker repair customer files
FileMaker, Inc. has established procedures for repairing files. If a customer complies with these
procedures, then FileMaker may supply a repaired file to the customer.
Note FileMaker does not recover account names and passwords.
If you distribute database files with passwords or you have removed full access privileges and do
not want FileMaker to repair a file for a customer who requests this service, you must:
1. Notify your customers in writing and keep a record of such notice that your database
solution contains passwords or data that can only be provided by you.
2. Every file in your runtime database solution must contain an About layout accessible from
any layout in the database.
See Documenting developer solutions (FileMaker Pro Advanced).
3. The layout name must begin with the word “About.”
4. The About layout must contain these items:
•solution name
•your company name and contact information
•your support policy (for example, how and when you are available for technical support)
5. The About layout must contain this exact warning:
“USER WARNING: This database solution contains password(s) that can only be
provided by the Developer identified above.”
6. If full access privileges have been permanently removed from your database solution by
selecting the Remove admin access from files permanently option in the Developer
Utilities, then the About layout must contain this exact warning:
“USER WARNING: This file is not customizable. Contact the above named Developer for
information on customizing this database solution.”
The accounts and privileges protection in a FileMaker file should not be viewed as an absolute
barrier that will prevent a customer from accessing files. FileMaker cannot guarantee that a
customer will not be able to identify or bypass the password through third-party solutions or tools.
Therefore, FileMaker recommends that you take appropriate steps to protect your consulting and
development efforts without relying solely upon the password.
If you have a dispute with your customer, you must resolve this dispute directly with the customer.
FileMaker is unable to, and will not, attempt to resolve such disputes.
Note Creator codes should be registered with Apple Inc. to verify that the creator code you choose
is unique. You may use the .fmpur five-character extension because FileMaker has registered the
fFmp creator code with Apple Inc. Contact Apple Developer Support or visit their website at http://
developer.apple.com to register any other creator codes.
Related topics
Protecting databases
Naming runtime solutions (FileMaker Pro Advanced)

Customizing files with FileMaker Pro Advanced
FILEMAKER PRO HELP 567
Customizing files with FileMaker Pro Advanced
This section describes the following ways you can customize files with FileMaker Pro Advanced:
•copy and paste fields for use within the same file or other database files
•copy or import existing tables into your database file
•create custom functions for use anywhere within a file
•create custom menus
Copying and pasting field schemas (FileMaker Pro Advanced)
You can copy fields from one file and paste them into the same file or some other file. Field data is
not copied.
1. Select File menu > Manage > Database > Fields tab.
2. Select the field that you want to copy.
3. Click Copy, then click OK.
4. Open the Manage Database dialog box in the file into which you want to paste the field you
copied.
5. In the Fields tab, choose the table where you want to paste the field.
6. Click Paste, then click OK.
Notes
•FileMaker Pro Advanced retains data source references to fields if they are valid when you
paste. If you copy multiple fields that reference each other, copy them in one step to retain
the references. If you copy them one at a time, the references may be lost. Check all data
source references after pasting to ensure they are valid.
•To copy and paste fields, you must have full access privileges to the source and destination
files.
•There is a difference between duplicating and copying a field: Duplicate duplicates a field
within the current table. Copy makes the field available for pasting to another file. See
Duplicating field definitions
Related topics
Copying or importing table schemas (FileMaker Pro Advanced)
Copying or importing table schemas (FileMaker Pro Advanced)
With FileMaker Pro Advanced, you can consolidate tables from a multi-file solution into one file.
There are two methods for consolidating solutions:
•Copy table schemas — Open source files to select and copy the tables you want. Then,
paste the table schemas into the destination file.
•Import table schemas — Import table schemas directly into the destination file. You can
import just the schemas or import data with a single schema. (To import the data with a
single schema, choose File menu > Import Records > File. See Importing data into an
existing file.)

Customizing files with FileMaker Pro Advanced
FILEMAKER PRO HELP 568
To copy table schema:
1. Open the database file that contains the table you want to copy.
2. Choose File menu > Manage > Database > Tables tab.
3. Select the table you want to copy.
4. Click Copy.
5. Open the database file where you want to paste the table.
6. Choose File menu > Manage > Database > Tables tab.
7. Click Paste.
To import table schema without data:
1. Open the database file into which you want to import a table.
2. Choose File menu > Manage > Database > Tables tab.
3. Click Import.
4. In the Open File dialog box, select the source file.
5. In the Import Tables dialog box, select the tables you want to import from the list and click
OK.
6. In the Import Summary dialog box, click Open Log File to see a detailed log of the
procedure, or click OK to close the dialog box.
Notes
•You must have full access privileges to the source and destination files.
•Privileges from the source file are not retained. You must redefine privilege sets in the
destination file.
•Relationships between table occurrences are not retained.
•If you created fields or tables and want to import them into the same file, close the Manage
Database dialog box once before importing.
•FileMaker Pro Advanced retains data source references to tables, fields, and scripts if they
are valid when you copy or import. Check all data source references after pasting or
importing to ensure they are valid.
•Open the Import.log file, normally located in the folder with your destination database, for
details on unresolved references and items that were renamed due to a naming conflict. If
you’ve opened the destination database remotely or do not have write access to that folder,
check the Documents folder.
•You must convert database files created in earlier versions of FileMaker Pro before
importing tables. See Converting files from FileMaker Pro 11 and earlier
Related topics
Copying and pasting field schemas (FileMaker Pro Advanced)
Documenting database schemas (FileMaker Pro Advanced)
Importing data into FileMaker Pro

Customizing files with FileMaker Pro Advanced
FILEMAKER PRO HELP 569
About custom functions (FileMaker Pro Advanced)
The Custom Functions utility lets you create custom functions that can be reused anywhere in the
database file in which they are created. You can copy and paste custom functions between
FileMaker Pro files or you can import custom functions from other FileMaker Pro files. Once
formulas are written for the function, they do not have to be rewritten to be applied to other fields or
used in other scripts.
You can maintain and edit custom functions and the formulas they contain in one central location.
Any change made to a custom function will be copied to all instances where that custom function
has been used.
Custom functions can be used:
•anywhere in a file
•by any user or only by users with full access privileges
•across multiple platforms
•to replace third-party plug-ins for some purposes
Custom functions will run in both FileMaker Pro and FileMaker Pro Advanced. Newly defined
functions appear under their own category in the functions list of the Specify Calculation and Edit
Custom Function dialog boxes. If you do not wish to reveal your custom functions, you can disable
their display in these dialog boxes.
Using custom functions (FileMaker Pro Advanced)
To create a custom function:
1. In FileMaker Pro Advanced, choose File menu > Manage > Custom Functions.
2. In the Manage Custom Functions dialog box, click New.
3. In the Edit Custom Function dialog box, for Function Name, type a name for the new
function.
Custom function names must be unique and cannot exceed 100 characters.
4. Build a formula. (For more information, see Working with formulas and functions.)
5. If the formula requires parameters, for Function Parameters, type the parameter name and
click Plus . You can edit or delete a parameter name by selecting it in the list and clicking
Edit or Delete .
6. Click where you want an item to appear in the formula box, then perform one of the
following actions.
To add a Do this
Reference to a parameter In the parameters list, double-click a parameter name.
Mathematical or text operator In the keypad, click an operator.
Comparison or logical operator For Operators, choose an operator from the list.
Constant value Type the value.
Function In the functions list, double-click a function. In the formula box,
replace the placeholder parameter with a value or expression.

Customizing files with FileMaker Pro Advanced
FILEMAKER PRO HELP 570
You can also type parameter names, operators, and functions in the Edit Custom Function
dialog box instead of using the lists or keypad.
7. All accounts is the default option for Availability and allows all users of the current
database to see and use the custom function. If you want the custom function to be
available only to those with Full Access privileges, select Only accounts assigned full
access privileges.
8. Click OK to close the Edit Custom Function dialog box.
9. Continue creating custom functions, or click OK to close the Manage Custom Functions
dialog box.
To change, duplicate, or delete a custom function:
1. Choose File menu > Manage > Custom Functions.
2. In the Manage Custom Functions dialog box:
3. In the Manage Custom Functions dialog box, click OK.
To copy a custom function to another FileMaker Pro file:
1. Choose File menu > Manage > Custom Functions.
2. In the Manage Custom Functions dialog box, select one or more functions you want to copy.
Tip You can press Ctrl-click (Windows) or Command-click (OS X) to select non-contiguous
functions, or press Shift-click to select contiguous functions.
3. Press Ctrl+C (Windows) or Command-C (OS X) to copy the functions, then click OK.
Tip OS X: You can choose File menu > Copy to copy a selected function.
4. Open a different FileMaker Pro file.
5. Choose File menu > Manage > Custom Functions.
6. Press Ctrl+V (Windows) or Command-V (OS X) to paste the functions.
Tip OS X: You can choose File menu > Paste to paste a selected function.
The custom function you copied appears at the bottom of the list. If FileMaker Pro determines
this function is invalid in the context of the target file (for example, a dependent function, field, or
calculation is missing from the target file or the function contains an invalid field type reference),
the pasted function is enclosed in comment characters (/*<function_definition>*/). For more
information, see Custom Function dependency rules (FileMaker Pro Advanced).
7. Click OK.
Notes
•You must have Full Access privileges to the currently active database to create custom
functions.
•Values, expressions, functions, and parameters can be uppercase or lowercase.
To Do this
Edit a custom function For Function Name, select the custom function and click Edit. In the
Edit Custom Function dialog box, make your changes, then click OK.
Duplicate a custom function For Function Name, select the custom function and click Duplicate.
Delete a custom function For Function Name, select the custom function and click Delete.

Customizing files with FileMaker Pro Advanced
FILEMAKER PRO HELP 571
•To change the way functions are sorted in the Edit Custom Function dialog box, choose a
category from the View list.
•The content of a custom function is protected even if it is set to be available to all users with
Full Access privileges. To edit or view the custom function content, you must have Full
Access privileges and be editing the database in FileMaker Pro Advanced.
•When a custom function is deleted, it is no longer available for use. Calculations that were
using it will return an error when they attempt to call it. If you have Full Access privileges to
a database and are editing a calculation that uses a deleted custom function, the name of
the function is replaced with the string <Function Missing>.
•If you do not have Full Access privileges and attempt to edit a calculation that uses a
custom function restricted to Full Access accounts, you see the string <Private Function>
instead of the custom function. You cannot change the calculation as long as the <Private
Function> declaration appears in the formula.
•If you have previously created custom functions and the names are identical to new
FileMaker software functions, the FileMaker functions will override your custom functions.
Verify your custom function names against the FileMaker functions, and change your
custom function names if needed.
•The characters $ and } can no longer be used in a custom function name or a parameter
name. If you used these characters in custom function or parameter names in FileMaker
Developer, you must rename them in FileMaker Pro Advanced.
•You can’t use a script to copy and paste or import custom functions.
Related topics
About custom functions (FileMaker Pro Advanced)
Importing custom functions (FileMaker Pro Advanced)
Functions reference (category list)
Functions reference (alphabetical list)
Importing custom functions (FileMaker Pro Advanced)
You can import custom functions from other FileMaker files. You can also copy and paste custom
functions within a file or between files. See Using custom functions (FileMaker Pro Advanced).
When you import a custom function, FileMaker Pro automatically resolves dependencies when
custom functions call other custom functions.
To import custom functions:
1. Open the file in which you want to import the custom functions.
2. Choose File menu > Manage > Custom Functions.
3. In the Manage Custom Functions dialog box, click Import.
4. Open the file that contains the custom functions you want to import.
5. If you’re asked to enter an account name and password when the file opens, type them in
the Password dialog box, then click OK.
For more information, see Opening files protected with passwords.
6. In the Import Custom Functions dialog box, select the custom functions you want to import.
Tip You can press Ctrl-click (Windows) or Command-click (OS X) to select non-contiguous
functions, or press Shift-click to select contiguous functions.

Customizing files with FileMaker Pro Advanced
FILEMAKER PRO HELP 572
7. Click OK.
The Import Summary dialog box appears.
8. Click Open Log File to view the import log file, or click OK to close the Import Summary
dialog box.
Note The custom function you imported appears at the bottom of the list. If FileMaker Pro
determines this function is invalid in the context of the target file (for example, a dependent
function, field, or calculation is missing from the target file or the function contains an invalid field
type reference), the imported function is enclosed in comment characters (/
*<function_definition>*/). For more information, see Custom Function dependency rules
(FileMaker Pro Advanced).
9. Close the Manage Custom Functions dialog box.
Notes
•If you import custom functions from another file, then click Cancel to close the Manage
Custom Menus dialog box, all changes you made while the dialog box was open are
discarded and the imported functions are removed from the file.
•If you cancel an import in progress before it completes, any functions imported before you
cancel must be manually removed from the target file.
•You can’t use a script to import custom functions.
Related topics
About custom functions (FileMaker Pro Advanced)
Using custom functions (FileMaker Pro Advanced)
Functions reference (category list)
Functions reference (alphabetical list)
Custom Function dependency rules (FileMaker Pro Advanced)
When you copy or import a custom function into a file, FileMaker Pro attempts to resolve any
dependencies the function may contain. The following dependency rules apply under different
conditions:
•If function_a has a dependency on function_b, yet only function_a is copied or imported into
a target file that contains a function_b, function_a calls function_b located in the target file,
which may cause unexpected results.
•If function_a has a dependency on function_b, yet only function_a is copied or imported into
a target file, function_a appears enclosed in comment characters (/*<function_definition>*/)
in the Manage Custom Functions dialog box, indicating the new function is invalid in the
target file.
•If function_a has a dependency on function_b, and both function_a and function_b are
copied or imported into a target file, function_a will operate as expected.
•If function_a has a dependency on function_b, and both functions are copied or imported
into a target file that contains an existing function_b, the copied function_b is renamed
function_b N. FileMaker Pro updates function_a to call function_b N and function_a
operates as expected.
•If function_a has a dependency on function_b, and both functions are copied or imported
into a target file that contains an existing function_a and function_b, the copied functions are
renamed function_a N and function_b M. FileMaker Pro updates function_a N to call
function_b M and function_a N operates as function_a in the original file.

Customizing files with FileMaker Pro Advanced
FILEMAKER PRO HELP 573
•If function_a calls itself recursively and it is copied or imported into a target file that contains
an existing function_a, FileMaker Pro renames the copied function to maintain the integrity
of the dependency.
Related topics
Using custom functions (FileMaker Pro Advanced)
Importing custom functions (FileMaker Pro Advanced)
Defining custom menus (FileMaker Pro Advanced)
With FileMaker Pro Advanced, you can create custom menus for your database solutions. You can
add, edit, duplicate, or delete menus and menu items in many ways, such as:
•changing a menu or menu item name.
•performing a script or script step from a menu item. You can also run scripts from an
associated toolbar icon and shortcut menu.
•assigning custom keyboard shortcuts and access keys.
•specifying a platform for your menus and menu items.
•specifying a mode for your menus.
•specifying menu sets for files and layouts.
You can create a menu by starting with a blank menu or by editing a copy of a standard FileMaker
menu. You can duplicate a menu so you can make changes without modifying the original, or you
can delete menus that your users will not need.
To create, edit, duplicate, or delete a menu:
1. Choose File menu > Manage > Custom Menus > Custom Menus tab.
2. If FileMaker Pro Advanced includes menus that do not exist in this file, click Update to add
missing menus to the file.
3. Do one of the following in the Manage Custom Menus dialog box, then click OK:
To Do this
Create a menu Click Create.
In the Create Custom Menu dialog box, do one of the following,
then click OK:
•Click Start with an empty menu.
•Click Start with a standard FileMaker menu, then select a
menu from the list.
Tip You can press Shift and click Create to create an empty menu,
then click Edit to modify it.
Edit an existing menu Select the menu from the list, then click Edit.
Note Default FileMaker Pro menus cannot be edited, so they do
not appear in the list.
Duplicate a menu Select the menu from the list, then click Duplicate.

Customizing files with FileMaker Pro Advanced
FILEMAKER PRO HELP 574
4. If you selected Create or Edit, you see the Edit Custom Menu dialog box. Specify options
for the custom menu.
Note The options you specify apply to the entire menu.
Delete a menu Select the menu from the list, then click Delete.
Important When you delete a menu, you also delete its menu
items.
Sort the menu list For View by, choose menu name, display title, custom order
(which you create by dragging items in the list), or creation order.
Tip You can also click the Menu Name or Display Title column
headings to sort the list.
Display the menu set in which
the menu is used or display
comments describing the
menu
Click the Used in Menu Sets/Comments column heading.
To Do this
To Do this
Specify the menu name For Custom Menu Name, enter a descriptive name for the menu (up
to 100 characters).
Include a comment
describing the menu
Enter a comment about the menu (up to 30,000 characters). The
comment appears in the Manage Custom Menus dialog box, not in
your solution file.
Specify the title that you
want to display in the menu
bar of your solution file
For Menu Title, select Override Title, then enter the name (up to
30,000 characters).
Windows: To specify an access key, type an ampersand (&) before
the character you want to use as the access key. For example, type
&File to display the File menu with the letter “F” as the access key.
To base the menu title on the result of a calculation, click Specify,
then build a formula in the Specify Calculation dialog box.
Note You cannot change the title of the Help or FileMaker Pro
menus.
Install menus based on
conditions you specify
For Install when, specify a calculation that results in a Boolean
value.
•If the calculation evaluates true or non-zero, the menu is
installed.
For example, for the menu to appear when the file is opened in
Windows, enter:
If( Abs(Get( SystemPlatform )) = 2; 1; 0 )
•If the calculation evaluates false or zero, the menu is not
installed.
For example, for the menu to appear when the file is opened in
OS X, enter:
If( Abs(Get( SystemPlatform )) = 1; 1; 0 )
To ensure a menu is always installed, for Install when, enter 1.

Customizing files with FileMaker Pro Advanced
FILEMAKER PRO HELP 575
5. After you create or edit the custom menu, you can create custom menu items. See Creating
and editing custom menu items (FileMaker Pro Advanced).
6. Click OK to close the Edit Custom Menu dialog box.
7. In the Manage Custom menus dialog box, for Default menu set for this file, choose a
menu set. If you do not choose a default menu set, the standard FileMaker menus are used.
8. Click OK to close the Manage Custom Menus dialog box.
Notes
•You must have full access privileges to customize menus.
•When you create a file, no internal structures for custom menus or custom menu sets exist
in the file. The first time you open the Manage Custom Menus dialog box, FileMaker Pro
creates these structures. If you click Cancel, you are prompted to discard changes made in
the file. If you don’t want to store custom menu structures in the file, click Discard.
•To create custom menus or custom menu sets in a FileMaker Pro file created via
FileMaker Server, you must open the file using FileMaker Pro Advanced.
•You can check your runtime solutions to see if custom menus are installed:
•Windows: Choose Help menu > About FileMaker Pro, then click Info.
•OS X: Choose FileMaker Pro menu > About FileMaker Pro, then click Info.
When custom menus are installed, the dialog box displays “Custom Menus Active”.
•You may need to modify menu sets and specify when FileMaker installs them.
•Custom menus display in FileMaker Pro and runtime solutions but can only be edited using
FileMaker Pro Advanced.
•Web published databases do not recognize customized menu commands. For example, if
you customize the New Record command to quit the application, this will have no effect in
FileMaker WebDirect; web users will see the default New Record command.
•FileMaker features only work if they are included in a menu. For example, if you remove the
View menu from the menu set and do not have any scripted buttons on the layout to switch
views, the mode buttons in the status toolbar are disabled, making it impossible for your
users to switch modes.
•To add custom menu items for new features to menu sets created in previous versions of
FileMaker, create a new custom menu and add the new menu item from the list of standard
FileMaker menus in the Create Custom Menu dialog box.
•If the Edit menu is not part of an installed menu set, the Cut, Copy, and Paste shortcuts do
not work.
•Shortcut menus display when a user right-clicks (Windows) or Control-clicks (OS X) an
object or an area. If you customize a menu item that has a shortcut menu item, you also
customize the behavior performed by the shortcut menu item.
•It is important to provide user documentation with your solution because the custom menus
won’t match the product documentation.
Specify in which modes to
display the menu
For Include in mode, select in which modes you want the menu to
appear (Browse, Find, Preview). When users switch modes, the
menu set changes to display only the menus specified for that mode.
To Do this

Customizing files with FileMaker Pro Advanced
FILEMAKER PRO HELP 576
•Standard FileMaker menus and menu items are localized based on the operating system’s
language. However, if you customize the title of a menu or menu item, it will not be localized
when the system’s language is changed.
•Standard FileMaker menu items are dimmed if users don’t have privileges to perform the
menu command. Menus are not dimmed if you attach a script to the menu item.
•The Open Help script step displays FileMaker Pro Help, not customized help.
•A previous version of FileMaker Pro Advanced (FileMaker Developer) allowed you to
customize the Help, About, and Scripts menus for runtime solutions. If you use
FileMaker Pro Advanced to open a runtime file created in FileMaker Developer, any
customized About, Help, and Script menus will appear as part of the Standard FileMaker
Menus menu set. You cannot change them. Custom Menu Set 1 provides a copy of the
FileMaker Pro Advanced standard menus.
•In OS X, menu cropping may occur depending on the number of custom menus installed
and the resolution of the display screen. To display all menus, reduce the number of custom
menus or increase the screen resolution.
•Custom shortcuts can only use characters found on English/U.S. keyboards. You can also
use the yen character on Japanese keyboards. If you use the yen character as a shortcut,
the character appears as a backslash (\) in the Specify Shortcut and Edit Custom Menus
dialog boxes in OS X. When you install the menu on a Japanese system, the character
appears properly as the yen character.
•In OS X, you cannot use AppleScript to access the FileMaker Pro menu (or its menu items)
if the menu is not included in the installed menu set.
•In Browse mode, the Constrain Found Set and Extend Found Set menu items appear in
shortcut menus. You cannot customize their actions.
•In Find mode, titles of custom menus and menu items that are based on field values that are
not global will be blank.
•If you customize an action for any of the following commands, the corresponding icon
performs the customized action. If you remove any of these commands from the menu bar,
the corresponding icon performs the default action:
•Zoom In and Zoom Out commands are executed via the zoom control buttons.
•Status toolbar command is executed via the status toolbar control button.
•Perform Find command is executed via the Perform Find button (or by pressing the
Enter key in Find mode).
•In Windows, the menu item name for Close and the shortcut, Ctrl+F4, cannot be modified in
the Windows System Menu of the document window. The Close behavior will change if the
action for the Close Menu item is altered in the Edit Custom Menu dialog box.
•You cannot modify the names for Browse, Find, Layout, and Preview in the Mode pop-up
menu. The actions for Browse, Find, Layout, and Preview can be modified and will be
activated when the Mode pop-up menu is changed.
Related topics
Documenting developer solutions (FileMaker Pro Advanced)

Customizing files with FileMaker Pro Advanced
FILEMAKER PRO HELP 577
Creating and editing custom menu items (FileMaker Pro
Advanced)
After you create a menu, you can create menu items. You can also create or edit menu items that
are copies of the Standard FileMaker menus. Menu items can be commands, submenus or
separators. You can create a menu item that is based on a standard FileMaker command or you can
create a menu item that initially does not have an assigned command.
When you base a menu item on a FileMaker command, that menu item inherits all the properties of
that command. You can override properties (title, shortcut, or action) to customize the menu item.
When you create a menu item that does not have an assigned command, an <unknown> menu item
appears in the Menu Items list in the Edit Custom Menu dialog box. You can then customize the
menu item properties.
To add or edit menu items in a custom menu:
1. Choose or create a custom menu and set options such as menu name, menu title, and
mode. See Defining custom menus (FileMaker Pro Advanced).
2. Choose File menu > Manage > Custom Menus > Custom Menus tab.
3. In the Manage Custom Menus dialog box, select the menu from the list and click Edit.
4. In the Edit Custom Menus dialog box, specify which menu items are included in the menu:
Drag an arrow up or down to change the order of the menu items in the list.
5. Select each menu item from the Menu Items list and specify its properties, then click OK to
close the Edit Custom Menu dialog box.
To Do this
Add a command Click Create to add a new (<unknown>) menu item to the list. For
Menu Item Type, choose Command, then select Based on
existing command. In the Specify FileMaker Command dialog box,
choose a command, then click Select or OK.
A command determines the action or behavior of a menu item.
Tip You can Shift-click Create to create an <unknown> command
menu item.
Add a submenu Click Create to add an <unknown> menu item to the list. For Menu
Item Type, choose Submenu, then click Specify. In the Select
Menu dialog box, choose a menu, then click Select.
Note You can add up to 100 menus to the menu bar. If you add a
menu that includes itself as a submenu, you may quickly reach the
limit.
Add a separator line Click Create to add an <unknown> menu item to the list. For Menu
Item Type, choose Separator.
Duplicate a menu item Select a menu item from the list, then click Duplicate.
Delete a menu item Select a menu item from the list, then click Delete.

Customizing files with FileMaker Pro Advanced
FILEMAKER PRO HELP 578
Notes
•To override a command’s behavior (item name, keyboard shortcut, or action), you must
select the Based on existing command checkbox and choose a different command. If the
checkbox is not selected, the original command behavior is retained.
To Do this
Change a command for a
menu item
For Based on existing command, click Specify, choose a different
command, then click Select or OK.
Change a menu item from
one type to another
For Menu Item Type, choose a different type. (For example, you can
change a separator to a command.)
Change the name of a
menu item
Select Item Name and enter a new name.
Windows: To specify an access key, type an ampersand (&) before the
character you want to use as the access key. For example, type
&Open to display the Open menu item with the letter “O” as the access
key.
To base the menu title on the result of a calculation, click Specify, then
build a formula in the Specify Calculation dialog box.
Define a keyboard shortcut
for a menu item
Select Keyboard Shortcut. In the Specify Shortcut dialog box, type a
key combination, then click OK. Keyboard shortcuts appear next to
menu items in the Menu Items list.
Change a keyboard shortcut
for a menu item
For Keyboard Shortcut, click Specify, type a key combination, then
click OK.
Perform a script or script
step when a user selects a
menu item
Select Action. In the Specify Script Step dialog box, select a step and
specify options as necessary, then click OK. For more information
about scripts and script steps, see Creating scripts to automate tasks.
Tip To affect the behavior of a currently running script (for example, to
halt, exit, resume, or pause the script) use the Perform Script script
step.
Change a script or script
step
For Action, click Specify, modify the script definition, then click OK.
Install menu items based on
conditions you specify
For Install when, specify a calculation that results in a Boolean value.
•If the calculation evaluates true or non-zero, the menu item is
installed.
For example, for the menu item to appear when the file is opened
in Windows, enter:
If( Abs(Get( SystemPlatform )) = 2; 1; 0 )
•If the calculation evaluates false or zero, the menu item is not
installed.
For example, for the menu item to appear when the file is opened
in OS X, enter:
If( Abs(Get( SystemPlatform )) = 1; 1; 0 )
To ensure a menu item is always installed, for Install when, enter 1.
For example, for the menu item to appear when the file is opened in
Windows or OS X, enter 1.

Customizing files with FileMaker Pro Advanced
FILEMAKER PRO HELP 579
•Buttons on toolbars are linked to menu items. If you customize a menu item that has a
toolbar button, you also customize the button, its behavior, and its tooltip. For example, the
New Record button is linked to the New Record menu item. If you customize the New
Record menu item by renaming it to New Contact and specifying a script be performed, the
toolbar button will perform the custom New Contact script and the tooltip for the button will
display New Contact.
•Shortcut menus display when a user right-clicks (Windows) or Control-clicks (OS X) an
object or an area. If you customize a menu item that has a shortcut menu item, you also
customize the behavior performed by the shortcut menu item.
•FileMaker Pro Advanced updates menus and menu items when a menu set change is
requested either through switching modes, windows, or layouts, or by performing a script
that accomplishes a similar result. Menu and menu item titles based on field contents or
functions only update when menu sets change.
•If you enter the same keyboard shortcut or access key (Windows) for two different menu
items, FileMaker Pro locates and issues the first instance of the command as follows:
•Keyboard shortcuts: right to left and top to bottom
•Access keys (Windows): left to right and top to bottom
•If you want an ampersand (&) to appear as part of a menu or menu item name, you must
type the ampersand twice. For example, if you want a menu name to appear as Records &
Reports, enter the title as Records && Reports.
•Privilege set considerations
•You can modify privilege sets in the Edit Privilege Set dialog box to control which menu
items are enabled. See Creating and managing privilege sets.
•If you set Available menu commands to Editing only or Minimum, menu items based
on FileMaker commands are enabled or disabled according to the setting. All other
menu items, including items with customized actions, are disabled. For example, if you
choose Editing only, all basic FileMaker editing commands are enabled but all other
items (including items with customized actions) are disabled.
•If you set Available menu commands to All, all menu items are enabled normally.
•Keyboard shortcut considerations
•FileMaker uses keyboard shortcuts that don’t appear in the menu bar. For example,
Command-Option-Z zooms an OS X window. In addition, the operating system defines
shortcuts. Both types of shortcuts override the ones you define in the Specify Shortcuts
dialog box.
•Windows and OS X keyboard shortcuts are different. For example, if you use
FileMaker Pro Advanced for Windows to define the Ctrl+H shortcut, then open the file in
OS X, the shortcut maps to Command-H. This conflicts with the OS X shortcut to hide
an open application. The shortcut works as expected on Windows, but on OS X, the
operating system shortcut overrides the custom-defined shortcut.
•Be sure to test custom keyboard shortcuts on both platforms. For information about
shortcuts, see the documentation provided with your operating system.
•OS X: Users can assign keyboard shortcuts for installed applications using the
Keyboard system preference. These shortcuts override any standard FileMaker Pro
menu shortcuts or custom menu shortcuts when users open a solution file on that
computer. System preference shortcuts also become the default shortcut for any
custom menus or custom menu items created while the solution is running on that
Customizing files with FileMaker Pro Advanced
FILEMAKER PRO HELP 580
computer. Do not use OS X-specific keyboard equivalents when defining shortcuts for
use in FileMaker Pro as results might be unpredictable.
Related topics
Creating and editing custom menu sets (FileMaker Pro Advanced)
Creating and editing custom menu sets (FileMaker Pro Advanced)
You can create custom menu sets to include the menus you require. You can then specify a menu
set for the file and for individual layouts.
You can create a new menu set or edit or duplicate an existing one. You can also delete menu sets
that your users will not need.
Important Duplicating a custom menu set creates a copy of the menu set and references the same
custom menus as the original menu set. It does not duplicate the custom menus. If you change a
menu item, you change the menu for all menu sets in which the menu is included.
To create, edit, duplicate, or delete menu sets:
1. Choose File menu > Manage > Custom Menus > Custom Menu Sets tab.
2. Do one of the following in the Manage Custom Menus dialog box, then click OK:
If you selected Create or Edit, you see the Edit Menu Set dialog box.
3. Specify which menus you want to include in the menu set.
To Do this
Create a menu set Click Create.
Edit an existing menu set Select the menu set from the list, then click Edit.
Duplicate a menu set Select the menu set from the list, then click Duplicate.
Delete a menu set Select the menu set from the list, then click Delete.
Sort the menu set list For View by, choose menu set name, custom order (which
you create by dragging items in the list), or creation order.
Tip You can also click the Menu Set Name column heading to
sort the list alphabetically by name.
List the menus in each menu
set or display comments
describing the menu sets
Click the Menus/Comments column heading.
To Do this
Specify or change the
menu set name
For Menu Set Name, enter a descriptive name for the menu set
(up to 100 characters).
Include or change a comment For Comment, enter a comment about the menu set (up to
30,000 characters). The comment appears in the Custom Menu
Sets tab in the Manage Custom Menus dialog box.
Customizing files with FileMaker Pro Advanced
FILEMAKER PRO HELP 581
Drag an arrow up or down to change the order of the menus in the list.
Each time you switch layouts, FileMaker Pro installs the menu set specified in the Menu Set option
in the Layout Setup dialog box.
In FileMaker Pro Advanced, you can temporarily switch menu sets or restore standard FileMaker
menus using the Tools menu, which is always added to the menu bar. This is helpful for testing
menu sets.
To temporarily switch menu sets:
1. In FileMaker Pro Advanced, choose Tools menu > Custom Menus.
2. Select the menu set you want.
Notes
•OS X:
•If you do not include a Help menu in your menu set, the operating system will install an
empty Help menu. You cannot remove this menu, change its position on the menu bar,
or change its title.
•The FileMaker Pro menu is added after the Apple menu. You cannot customize the Quit
or Preferences menu items. You can only customize the About FileMaker Pro menu
item.
•Windows: The Exit menu item is added at the end of the first unlocked (modifiable) menu.
You cannot customize the Exit menu item.
•After you create menu sets, you must specify options for installing them. You can:
•specify a default menu set for a file
To Do this
Add a menu to the menu set Click Add, do one of the following in the Select Menu dialog box,
then click Select:
•Choose a menu from the list.
•Click + to create a new menu. For more information, see
Defining custom menus (FileMaker Pro Advanced).
•Click – to remove a custom menu in the Select Menu dialog
box. Default FileMaker Pro menus shown in brackets [ ] in the
Select Menu dialog box cannot be removed from the list.
Note You can Shift-click, or Ctrl-click (Windows) or Command-click
(OS X) additional menus to add multiple menus to the menu set.
Remove a menu from the
menu set
Select the menu you want to remove from the menu set, then click
Remove.
Edit a menu Select the menu, then click Edit. See Creating and editing custom
menu items (FileMaker Pro Advanced).
Tip You can double-click a menu to display the Edit Custom Menu
dialog box, then edit the menu.
Note Standard FileMaker Menus (shown in brackets [ ]) cannot be
edited.

Customizing files with FileMaker Pro Advanced
FILEMAKER PRO HELP 582
•specify menu sets for individual layouts (see Specifying a menu set for a layout)
•create scripts that change menu sets
•specify menus within the menu set to display according to mode
•Before distributing a database with custom menus:
•Test all menus and menu items on both platforms for each user account. Be sure that all
necessary menus and menu items are available so that users can perform their tasks.
•Either be sure users can always access the View menu, or provide a method (like
buttons) to switch between Browse, Find, and Preview modes.
•You can also review the Database Design Report to check for any shortcut or access
key conflicts.
•You can create scripts that change menu sets based on conditions that you specify. For
more information, see Creating scripts to automate tasks.
•You can use Get(CustomMenuSetName) to check for the name of the active custom menu
set. You can also use the Get(LastError) function to check for missing menu sets. Check the
status of the Get(LastError) function after performing the Install Menu Set script step. If a
menu set is missing, the function will return error 115. For more information, see
Get(CustomMenuSetName) and Get(LastError).

Using FileMaker Pro Advanced tools
FILEMAKER PRO HELP 583
Using FileMaker Pro Advanced tools
This section contains information on using:
•Script Debugger to troubleshoot your FileMaker scripts
•Data Viewer to monitor fields, variables, and calculations
•the Database Design Report feature to document and publish your database schema to an
HTML or XML file
•Developer Utilities to:
•set up files to create developer solutions, such as runtime applications, which do not
require FileMaker Pro or FileMaker Pro Advanced to run
•encrypt your database files to protect them from unauthorized access while they are
being stored on disk
•create solutions in Kiosk mode with your own custom controls, without FileMaker Pro or
FileMaker Pro Advanced toolbars or menus
•set other custom options, such as removing Admin access to databases
Debugging scripts (FileMaker Pro Advanced)
The Script Debugger is an interactive tool for troubleshooting your FileMaker scripts.
With the Script Debugger, you can:
•debug scripts that are run from the Scripts menu or keyboard shortcuts
•debug startup scripts (the Script Debugger menu is enabled even if there are no open files)
•debug a script activated by a script trigger, button, or custom menu
•step into a sub-script to execute it one step at a time, or step out of a sub-script
•set or clear breakpoints in your script
•begin debugging from any script steps within the script
•view sub-scripts as you step through scripts
•debug restricted-access scripts
•pause a script when script errors are encountered
•click a script error number to open a Help topic
•monitor fields, variables, and calculations
•temporarily disable or enable script triggers while you work in the Script Debugger
To debug scripts:
1. To enable the Script Debugger, choose Tools menu > Script Debugger.
2. Run your script.
3. Choose from the following options:
Using FileMaker Pro Advanced tools
FILEMAKER PRO HELP 584
Choose To
Step Over
Execute the script one step at a time without entering sub-scripts.
If the script step is Perform Script, the Script Debugger will execute the sub-
script, and proceed to the next line of the calling script. The Script
Debugger will execute all sub-script steps until it encounters a breakpoint.
Step Into
Execute the script one step at a time, as well as enter and show steps in
sub-scripts.
If the script step is Perform Script, the Script Debugger will step to the first
line of the sub-script and await user input before proceeding to the next
sub-script step.
Step Out
Execute all script steps in the current script and, if the script is a sub-script,
return to the line after the Perform Script step in the calling script.
If the script is not a sub-script, the Step Out command will cause the Script
Debugger to execute all remaining script and sub-script steps, until it
encounters a breakpoint.
Set Next Step Set the step execution pointer to the highlighted script step.
This command passes control to the highlighted step but does not perform
the step. The highlighted step is performed when script execution or debug
stepping is resumed. Any script steps between the last executed step and
the assigned next step are not executed. Click a step to highlight it, then
click Set Next Step.
Run
Pause
Toggle between executing all script steps until the end of a script or a
breakpoint is encountered and pausing. When a script is paused, you can
double-click the script in the Call Stack list to edit it. Each active script
opens in a separate Edit Script dialog box, so you can edit multiple scripts.
Script execution is not halted until you save the changes.
You can step through a script using the Step script button when a script is
paused.
Halt Script
Halt execution of a script.
Enable/Disable Script
Triggers
Temporarily disable or enable all script triggers in a file.
You must have Full Access privileges to disable a script trigger. Script
triggers are enabled by default. When you close the Script Debugger, all
disabled script triggers are enabled.
You can also choose Tools menu > Debugging Controls > Disable Script
Triggers or Enable Script Triggers.

Using FileMaker Pro Advanced tools
FILEMAKER PRO HELP 585
4. Select Pause on error if you want scripts to pause when errors are encountered.
For Last error, click the error number to open a Help topic with details about the error. See
FileMaker Pro error codes.
Note When you use the Script Debugger to step through enabled scripts activated by a script
trigger, you can’t interact with the document windows, move between fields or records, change the
data, close the window, or quit. This blocking of interaction only occurs when a script is triggered via
some action. When you are debugging a script that is not activated by a script trigger, you can
interact normally with the document windows, fields, and records.
Viewing sub-scripts
You can view sub-scripts when you step through scripts in the Script Debugger. For example, if
Script A calls Script B, which then calls Script C, you can view the steps in all three scripts.
1. Choose Tools menu > Script Debugger.
To open the Script Debugger from the Manage Scripts dialog box, select a script, press Shift
and click Perform. To close the Script Debugger, press Ctrl (Windows) or Command (OS X) and
click Perform. For more information on keyboard shortcuts, see FileMaker Pro Advanced
keyboard shortcuts (Windows) and FileMaker Pro Advanced keyboard shortcuts (OS X).
2. Select a script step that calls a sub-script.
3. Click Step Into.
Set/Clear Breakpoint
Set or clear a breakpoint from the selected line.
Breakpoints allow the Script Debugger to execute large sections of a script,
pausing only to inspect the section marked with a breakpoint. Breakpoints
are ignored by FileMaker Pro when the Script Debugger is not in use. You
can set or clear breakpoints in the Script Debugger or when you create
scripts. To set a breakpoint when you create scripts, click to the left of the
step. Breakpoints are saved with the script in which they are set. You can
set breakpoints on multiple steps.
Note You cannot set breakpoints on steps called by a button or custom
menu.
Edit Script Open the Edit Script dialog box to edit the current script. You can make
changes to a script while it is executing, but once you save changes to the
script, execution halts.
Note To edit the script step associated with buttons or custom menu items,
use the Button Setup or Manage Custom Menu dialogs.
Open/Close Data
Viewer
Open (or close) the Data Viewer window so you can monitor specified
fields, variables, and calculation formulas. See Using the Data Viewer
(FileMaker Pro Advanced).
Authenticate/
Deauthenticate script
Unlock Script Debugger or Data Viewer for scripts that do not allow modify
privileges.
You must have Full Access privileges to authenticate a script. The higher
level of privileges applies to all scripts, but not to other file elements (for
example, records and layouts). Your editing privileges last until you close
both the Script Debugger and the Data Viewer.
Choose To

Using FileMaker Pro Advanced tools
FILEMAKER PRO HELP 586
The Call Stack list displays the sub-script.
4. Select a script in the Call Stack list to view that script’s steps in the display area.
Notes
•Set Next Step is only available for the currently executing script.
•In order to facilitate proper script debugging, the Script Debugger overrides some script
steps. The Allow User Abort script step with the option set to off will not prevent you from
stopping the execution of a script. The Adjust Window script step with the options of hide or
minimize will not hide or minimize the window when encountered through the Step Over or
Step Into buttons.
•If a script with access privileges set to Modifiable performs a script with Executable Only
access, the Executable Only script will perform in its entirety without showing its steps in the
Script Debugger. If an Executable Only script performs a script with privileges set to
Modifiable, only the steps in the Modifiable script will appear in the Script Debugger. To edit
a script, choose Authenticate/Deauthenticate Script. For more information about script
privileges and running scripts with full access, see Editing scripts privileges.
If you open the Data Viewer after choosing Authenticate/Deauthenticate Script, your access
privileges are maintained in both the Data Viewer and Script Debugger until you close the Script
Debugger.
•You can open one Edit Script dialog box per script.
•You can debug a startup script by opening the Script Debugger before opening your
database file.
•When you close the Script Debugger while a script is paused, the script resumes and
completes.
•When a File Open script is loaded, the Script Debugger displays OnFirstWindowOpen.
•When a File Close script is loaded, the Script Debugger displays OnLastWindowClose.
•When you debug a script that is called from a button, the button is identified in the Call
Stack list by the filename and layout in which the button is located. The button name is the
button object name that was assigned using the Inspector. If no name was assigned in the
Inspector, <unnamed button> followed by the filename and layout appears in the list.
When the Script Debugger stops on a script step called by a button in the script step list, the text
above the list changes to Button: <name of button>, or it changes to Button: <unnamed
button> if no name was assigned in the Inspector.
•When you debug a script that is called from a custom menu, the menu item is identified in
the Call Stack list by menu item name and filename. When the Script Debugger stops on a
script step called by a custom menu in the script step list, the text above the list changes to
Menu item: <custom menu item text>.
Related topics
Creating and editing scripts
Using the Data Viewer (FileMaker Pro Advanced)
Disabling script steps (FileMaker Pro Advanced)
You can disable and enable script steps to test portions of a script. When you run a script, disabled
script steps are skipped.

Using FileMaker Pro Advanced tools
FILEMAKER PRO HELP 587
To disable script steps:
1. Choose Scripts menu > Manage Scripts.
2. In the Manage Scripts dialog box, select the script, then click Edit (or double-click the script
name).
3. In the Edit Script dialog box, select one or more script steps, then click Disable.
Notes
•To disable script steps, you must have Modifiable privileges for the script.
•You cannot modify options for disabled script steps.
•If the file is opened in FileMaker Pro, users can see disabled script steps, but cannot enable
them.
•If you disable an If script step, you must also disable the corresponding End If step. This
also applies to Loop, Else, Exit Loop If, and Else If script steps.
•You cannot use Set Next Step to move to a disabled script step.
•The Script Debugger does not stop executing at breakpoints on disabled script steps.
•If a script is running in Script Debugger, you can click Edit Script to open the Edit Script
dialog box.
•If you copy, paste, or import scripts with disabled script steps, the steps remain disabled in
the new location.
•Disabled script steps are preceded by //. Disabled script steps will display as <unknown>
if opened in or imported into a FileMaker 7 file.
•Disabled script steps print in italics.
Related topics
Debugging scripts (FileMaker Pro Advanced)
Creating and editing scripts
Using the Data Viewer (FileMaker Pro Advanced)
Using the Data Viewer (FileMaker Pro Advanced)
You can use the Data Viewer to monitor expressions like field values, local and global variables, and
calculation formulas. You can monitor expressions while running scripts or while testing them in the
Script Debugger. You can also monitor field values and variables in the database file.
The Current tab shows:
•Fields used by the currently running script whether they are referenced directly in the script
or indirectly in calculations.
•Local variables used by the currently running script.
•Global variables independent of any script. Global variables are displayed even if no scripts
are currently running.
The Watch tab monitors expressions. You can enter expressions, one per row, in the Data Viewer.
When you use the Data Viewer with the Script Debugger, the Watch tab displays expressions from
paused scripts letting you see how data changes as you step though a script. Expressions remain in
the Watch tab until you delete them manually.
Using FileMaker Pro Advanced tools
FILEMAKER PRO HELP 588
To monitor fields and variables in the currently running script:
1. Choose Tools menu > Data Viewer, or click in the Script Debugger window.
2. Click the Current tab and do the following:
To monitor expressions:
Click the Watch tab and do the following:
To Do this
Edit or copy local or global variables Double-click a variable in the list.
Sort fields and variables in the list Click a column heading.
Items in the list are grouped by type, then sorted in
this order: fields, global variables, local variables.
Add an expression to the Watch list Click Add to Watch.
FileMaker Pro switches to the Watch tab where
the expression appears.
View restricted-access expressions
Click , then log into an account that has full
access privileges.
Note If you log in to edit restricted-access scripts
in the Script Debugger, your access privileges also
apply to the Data Viewer. If you log in from the
Data Viewer, your access privileges also apply to
the Script Debugger. In either case, your editing
privileges last until you close the Script Debugger
or the Data Viewer. For more information, see
Debugging scripts (FileMaker Pro Advanced).
To Do this
Add an expression Click .
Edit an expression 1. Select an expression, click or double-click the expression,
then define or edit the expression. See Edit Expression dialog box.
2. Click Evaluate Now to display the results of the expression or
click Monitor to add the expression to the Watch list.
Update the values for
calculations displayed in
the list
Click Refresh Values.
Values update as you scroll through the list.
Duplicate an expression Select one or more expressions, then click .
Delete an expression Select one or more expressions, then click .
Change the order of
expressions in the
Watch list
Drag the arrow next to the expression up or down.

Using FileMaker Pro Advanced tools
FILEMAKER PRO HELP 589
Notes
•Expression values in the Data Viewer automatically refresh when you use the Script
Debugger.
•Expressions remain in the Watch tab until you remove them.
•You can add local and global variables to the Data Viewer. Local variables begin with $ and
global variables begin with $$. For more information, see Using variables.
•In the Current tab:
•You can see global and local variables that are declared outside of scripts only if you
have full access privileges to the file.
•If you double-click an expression, the Current Value dialog box opens to show the
expression’s entire value, which you can copy. You can modify the values of variables,
but not field values. Close the dialog box to commit the modified values.
•Repeating fields are listed only if they contain values, like this: <fieldname>[<value>].
The first repetition is shown without brackets. If the repetitions are calculated, the
values are not shown until the script step is reached in which the calculation is solved.
Related topics
Working with formulas and functions
Defining calculation fields
Encrypting database files (FileMaker Pro Advanced)
You can encrypt database files by using the Database Encryption feature of
FileMaker Pro Advanced. Encryption protects FileMaker database files from unauthorized access
while the files are being stored on disk. Temporary files that are created by encrypted files are also
encrypted.
You create an encryption password for the file, which protects the data if the file is copied or stolen.
Users who do not enter the encryption password are not allowed access to the file.
Encrypted files can be decrypted as needed.
Note Encrypting database files that are part of a runtime solution is not supported.
Encrypting a file (FileMaker Pro Advanced)
Use the Developer Utilities to encrypt your database files.
When you encrypt a file, you create an encryption password that users must enter to access the file.
To change a file’s encryption password, you must re-encrypt the file.
Warning Do not forget the encryption password that you assign to an encrypted database file. If
necessary, write it down and store it in a secure place. If you lose or forget the encryption password,
you will not be able to access or change the file.
If you have a multi-file solution, encrypt all database files with the same encryption password and
shared ID. When one encrypted file attempts to access another encrypted file, FileMaker Pro
displays the Database Encryption Password dialog box if the files’ encryption passwords or shared
IDs do not match.
Tip Encrypt multiple files at the same time so they have the same encryption password and shared
ID.

Using FileMaker Pro Advanced tools
FILEMAKER PRO HELP 590
To encrypt a file:
1. Close all the database files that you are going to encrypt.
2. Choose Tools menu > Developer Utilities.
3. If you have used Developer Utilities on the same database solution before and saved your
settings, click Load Settings, locate and select the appropriate .sav file, the click Load.
4. Click Add, select the file or files that you want to encrypt, then click Add again.
Encrypt files that are in a multi-file solution all at the same time.
5. For Project Folder, click Specify to choose a location for the encrypted solution.
6. To rename the encrypted copy of the file, for Rename file, type a filename and click
Change.
7. To be able to quickly repeat the process, click Save Settings, and choose a folder and
location for your settings file. See Saving solution settings (FileMaker Pro Advanced).
8. For Solution Options, click Specify.
9. In the Specify Solution Options dialog box, select Enable Database Encryption (or Re-
encrypt files).
10. For Shared ID, type any combination of uppercase or lowercase characters, numbers, and
symbols between 1 and 32 characters.
Important The shared ID is case sensitive.
Encrypted files in multi-file solutions are linked by the shared ID.
11. For FileMaker Account, click Specify.
12. Enter the account name and password for an account with Full Access privileges, then click
OK.
13. For Encryption Password, click Specify.
14. Type an encryption password and a password hint for the files, then click OK.
Important The encryption password is case sensitive.
You can use any combination of uppercase or lowercase characters, numbers, and symbols in
the encryption password.
15. By default, FileMaker Pro Advanced uses secure storage to encrypt container data that is
stored externally. If you do not want to encrypt container data when you encrypt your
database files, select Keep Open Storage.
Note You can change the secure or open storage of container data that is stored externally
after you encrypt database files. For more information about storage options for container data,
see Setting up container fields to store data externally.
16. Click OK, then click Create.
To change the password for an encrypted file:
1. Close all the encrypted files whose password you are going to change.
2. Follow steps 2-15 in “To encrypt a file” above.

Using FileMaker Pro Advanced tools
FILEMAKER PRO HELP 591
3. For the Encryption Password text box at the bottom of the Specify Solution Options dialog
box, enter the current encryption password for the database file or files.
Note The Encryption Password text box is visible only if one or more of the selected files is
encrypted.
4. Click OK, then click Create.
Notes
•If FileMaker Pro Advanced fails to create an encrypted file, review the log file in your project
folder for error messages.
•To add a new database file to an encrypted multi-file solution, encrypt the new file with the
same encryption password and shared ID as the database files in the solution.
Related topics
Tips for creating account names and passwords
Decrypting a file (FileMaker Pro Advanced)
Use the Developer Utilities to decrypt an encrypted file.
Note When a file is decrypted, the secure or open storage of container data stored externally
remains as it was before the file was decrypted. To change how the data is stored in the decrypted
file, see Setting up container fields to store data externally.
To decrypt a file:
1. Close all the database files that you are going to decrypt.
2. Choose Tools menu > Developer Utilities.
3. If you have used Developer Utilities on the same database solution before and saved your
settings, click Load Settings, locate and select the appropriate .sav file, the click Load.
4. Click Add, locate the file or files that you want to decrypt, then click Add again.
5. For Project Folder, click Specify to choose a location for the encrypted solution.
6. To rename the encrypted copy of the file, for Rename file, type a filename and click
Change.
7. To be able to quickly repeat the process, click Save Settings, and choose a folder and
location for your settings file. See Saving solution settings (FileMaker Pro Advanced).
8. For Solution Options, click Specify.
9. In the Specify Solution Options dialog box, select Remove Database Encryption.
10. For Encryption Password, enter the current encryption password for the database files.
11. For FileMaker Account, click Specify.
12. Enter the account name and password for an account with Full Access privileges, then click
OK.
13. Click OK, then click Create.
Working with encrypted files (FileMaker Pro Advanced)
You work with encrypted files the same way you do with unencrypted files, with the following
exceptions.

Using FileMaker Pro Advanced tools
FILEMAKER PRO HELP 592
•When you open an encrypted database file, you must enter the encryption password before
you can enter an account password or access the database. See Opening files protected
with passwords.
•When you export records from an encrypted database file, the records are always exported
to a file that is not encrypted, regardless of the export file format.
•Contents that are entered in an encrypted interactive container via the progressive
download of data are sent through an unencrypted connection.
•You can change the secure or open storage of container data that is stored externally after
you encrypt database files. See Setting up container fields to store data externally.
•To add a new database file to an encrypted multi-file solution, encrypt the new file with the
same encryption password and shared ID as the database files in the solution.
•After you upload an encrypted database file to FileMaker Server, you must enter the
encryption password when you open the file in FileMaker Server. See Uploading files to
FileMaker Server and FileMaker Server Help.
Documenting database schemas (FileMaker Pro Advanced)
Use the Database Design Report feature to document the schema of your database and publish it in
to an HTML or XML file.
With the Database Design Report, you can:
•produce reports for any databases that are currently open, either locally or on a network
•gather statistics on the structure of your database
•use the information in the report to re-create the structure of your database if you lose the
original database files
•examine a textual representation of your database schema
•choose which elements (fields, relationships, scripts, and so on) and tables of the database
to document
•troubleshoot missing references, broken relationships, calculations, and more
A Database Design Report in HTML format includes a Report Overview that provides a snapshot of
the elements in each database file. The Report Overview contains hyperlinks to details about all
elements in each database file. The HTML version of the report is hyperlinked and you can view or
print it in a Javascript-enabled web browser.
A Database Design Report in XML format contains the same information, ready to be transformed
into the format you require. You can create tools that can use the Database Design Report XML to
analyze or process the structure of databases. For more information, download the
FileMaker Pro Advanced DATABASE DESIGN REPORT XML OUTPUT GRAMMAR PDF, available at http:/
/www.filemaker.com/documentation.
To create a Database Design Report:
1. Open all database files for which you want to produce a Database Design Report.
You must have full access privileges for any file for which you want to produce a Database
Design Report and the file must be open in FileMaker Pro Advanced. You can run a Database
Design Report on local or remote files.
2. Choose Tools menu > Database Design Report.
3. In the Available Files list, clear any files that you want to exclude from the report by
clearing the checkbox associated with the file.

Using FileMaker Pro Advanced tools
FILEMAKER PRO HELP 593
4. If there are any files that contain tables that you want to exclude from the report, select the
filename in addition to the checkbox in the Available Files list.
The tables in the file appear in the Include fields from tables in selected file list. You can then
deselect any table in the list.
By default, all tables in all selected files are reported.
5. From Include in report, clear elements that you want to exclude from the report.
By default, all elements in all selected files are reported. Each selected element, if present, will
be reported on for each selected file.
6. If you prefer to publish the report in XML format instead of the default HTML, select XML in
the Report Format section.
7. If you do not want the report to automatically open when done, clear Automatically open
report when done in the File Handling section.
8. Click Create, then Save to save the database design report.
Notes
•You can search the HTML report for the following text to locate problems:
•Missing Field
•Missing Table Occurrence
•Missing Base Table
•Missing Data Source
•Missing Layout
•Missing Value List
•Missing Custom Function
•Missing Script
•Missing Account
•Missing Privilege Set
•Missing Extended Privilege
•Missing Custom Menu
•Missing Custom Menu Set
•If you have any inactive accounts that have a blank password, the HTML report displays a
password mask ******. In the XML report, the emptyPassword="" node will report
FALSE. To get accurate password information from these inactive accounts, make the
accounts active and choose View Source.
•OS X: To view an HTML report, use web browsers such as Safari, Mozilla, and Firefox.
•The Database Design Report feature creates XML files in UTF-16 format. To view a report
in this format, use a text editor or web browser that supports UTF-16 text.
•The Database Design Report catalogs and reports information about any ODBC tables that
are used in the relationships graph.
Related topics
Copying or importing table schemas (FileMaker Pro Advanced)
Protecting databases

Using FileMaker Pro Advanced tools
FILEMAKER PRO HELP 594
Setting up files for developer solutions (FileMaker Pro Advanced)
FileMaker Pro Advanced provides Developer Utilities that let you:
•bind your database files into a stand-alone runtime database solution that does not require
FileMaker Pro or FileMaker Pro Advanced in order to be used on a computer
•encrypt your database files to protect them from unauthorized access while they are being
stored on disk
•rename a set of database files and automatically update the internal links to related files and
scripts
•display your database files in Kiosk mode
•remove administrative access from all accounts and prevent users from modifying most
design or structural elements of your databases
•add the FileMaker Pro filename extension to a set of non-runtime files
•create an error log for processing errors
Note FileMaker Pro and FileMaker Pro Advanced allow you to include as many database tables as
you need in a database file. This capability eliminates one of the main reasons for using multiple
files. However, other elements, like scripts and access privileges, are stored at the file level and so
some complex solutions will still benefit from using multiple files.
To set up your files for developer solutions:
1. Close all of your database files that you are going to customize.
2. Choose Tools menu > Developer Utilities.
3. If you have used the Developer Utilities on the same database solution before and saved
your settings, click Load Settings.
The Select a file dialog box opens so that you can browse to find your settings file.
4. Click Add to locate the files that you want to customize.
5. When you have added all the files that you want to customize, do one or more of the
following:
6. For Project Folder, click Specify to choose a location for the solution.
7. In the Choose a Folder dialog box, select or create a folder and click OK (Windows) or
Choose (OS X).
To Do this
Select the primary file for a
runtime solution
Double-click the file in the list.
Rename a file Select the file in the list, type the new name in the Rename file box,
and click Change. This also updates any internal links to related
files and scripts.
Note Do not type a filename extension. For information on adding
the FileMaker filename extension to non-runtime files, see Adding
filename extensions to files (FileMaker Pro Advanced). For
information on adding filename extensions to runtime files, see
Naming runtime solutions (FileMaker Pro Advanced).
Remove a file Select the file in the list and click Remove.

Using FileMaker Pro Advanced tools
FILEMAKER PRO HELP 595
8. If you do not want the new files to overwrite earlier versions of the files, clear the Overwrite
matching files within the Project Folder checkbox.
Important If Overwrite matching files within the Project Folder is selected, the
Developer Utilities will overwrite files with the same names as those in the list of files.
9. For Solution Options, click Specify, and select options. For example, you can customize
your database files or bind the files into a runtime solution. See Specifying options for
developer solutions (FileMaker Pro Advanced).
10. To be able to quickly repeat the process, click Save Settings, and choose a folder and
location for your settings file. See Saving solution settings (FileMaker Pro Advanced).
11. Click Create.
The Developer Utilities copy all the selected database files, with the modifications made by the
Utilities, to the Project Folder. If the default option to overwrite the destination files has been left
on, the specified Project Folder will be used to store the files copied by the Developer Utilities. If
the default option to overwrite the files has been cleared, the specified Project Folder will be
used if it is empty or a new one based on the name of the Project Folder will be created.
Related topics
About creating runtime solutions (FileMaker Pro Advanced)
Displaying databases in Kiosk mode (FileMaker Pro Advanced)
Saving solution settings (FileMaker Pro Advanced)
When you create a customized set of files in FileMaker Pro Advanced, you can save the settings
you specify in the Developer Utilities dialog box and reuse them again. The settings include the list
of files to be modified.
To save a settings file:
1. Close all of your database files that you are going to customize.
2. Choose Tools menu > Developer Utilities.
3. Click Add to locate the files that you want to customize.
4. If you add multiple files, double-click a file in the list to specify the primary file.
5. Select Developer Utilities settings as required. See Setting up files for developer solutions
(FileMaker Pro Advanced).
6. For Solution Options, click Specify, and select options as required. See Specifying
options for developer solutions (FileMaker Pro Advanced).
7. Click Save Settings.
8. Choose a location and filename for the settings file.
9. Click Save.
The extension .sav is automatically added and should not be changed. You can save as many
settings files as you want, using different locations and names.
To modify a settings file:
1. In the Developer Utilities dialog box, click Load Settings.
2. Locate and select the settings file that you want to modify and click Load.

Using FileMaker Pro Advanced tools
FILEMAKER PRO HELP 596
3. Specify options.
4. Click Save Settings.
Browse to select the file you want to replace.
5. Click Save.
6. Click Replace (OS X) or Yes (Windows) to replace the file.
Related topics
Binding files into a runtime solution (FileMaker Pro Advanced)
Removing Admin access to databases (FileMaker Pro Advanced)
About creating runtime solutions (FileMaker Pro Advanced)
Displaying databases in Kiosk mode (FileMaker Pro Advanced)
Specifying options for developer solutions (FileMaker Pro
Advanced)
Use the Developer Utilities to customize a set of database files or to bind the files into a runtime
solution.
To customize your database files or bind the files to a runtime solution:
1. Close all of your database files that you are going to customize.
2. Choose Tools menu > Developer Utilities.
3. If you have used the Developer Utilities on the same database before and saved your
settings, click Load Settings.
4. Click Add to locate the files that you want to customize.
5. If you add multiple files, double-click a file in the list to specify the primary file.
6. Select Developer Utilities settings as required. See Setting up files for developer solutions
(FileMaker Pro Advanced).
7. For Solution Options, click Specify.
8. In the Specify Solution Options dialog box, select one or more options.
To Do this
Bind databases to runtime
applications
Select Create Runtime solution application(s).
Note This option can be combined with all others, except
Databases must have a FileMaker file extension, Enable
Database Encryption (or Re-encrypt files), and Remove
Database Encryption.
See About creating runtime solutions (FileMaker Pro Advanced) for
more information.
Permanently prohibit any
administrative access to your
solution
Select Remove admin access from files permanently.
Important Once removed, administrative access cannot be
restored to the custom solution.
See Removing Admin access to databases (FileMaker Pro
Advanced) for more information.

Using FileMaker Pro Advanced tools
FILEMAKER PRO HELP 597
9. Click OK.
10. To be able to quickly repeat the process, click Save Settings, and choose a folder and
location for your settings file. See Saving solution settings (FileMaker Pro Advanced).
11. Click Create.
Related topics
Binding files into a runtime solution (FileMaker Pro Advanced)
Removing Admin access to databases (FileMaker Pro Advanced)
FileMaker Pro and FileMaker Pro Advanced use accounts, privilege sets, and extended privileges to
protect FileMaker databases. You can use the Developer Utilities to remove all administrative
accounts from a file. For more information about accounts and privileges, see Protecting databases.
Important Selecting this option permanently deletes from the database all accounts that were
using the Full Access privilege set. This will permanently eliminate access to Layout mode and the
Manage Scripts feature, except for the Extended Privileges tab of the Manage Security dialog box,
for all database files in the solution, whether they’re opened in a runtime application, in
FileMaker Pro, or in FileMaker Pro Advanced. Structural and design elements of the files cannot be
Force accounts without full
access privileges to open your
solution in Kiosk mode
Select Enable Kiosk mode for non-admin accounts.
See Displaying databases in Kiosk mode (FileMaker Pro Advanced)
for more information.
Add the FileMaker extension
to the filenames of database
files
Select Databases must have a FileMaker file extension.
Note This option is not available if you select Create Runtime
solution application(s). You can use this feature to add extensions
to files that do not have extensions.
See Adding filename extensions to files (FileMaker Pro Advanced)
for more information.
Create a log file to record any
errors encountered during
processing
Select Create Error log for any processing errors.
Specify a location and a filename for the error log.
Notes
•If you don’t specify a filename and location for the error log, it
will be saved to the project folder with the filename
Logfile.txt.
•If an error occurs during the processing of the options, the error
is logged in the error log. An error message may also indicate
that an error has been encountered.
Encrypt or re-encrypt
database files
Select Enable Database Encryption (or Re-encrypt files).
Note This option is not available if you select Create Runtime
solution application(s). You can use this feature to encrypt
database files that are not bound to runtime applications.
See Encrypting a file (FileMaker Pro Advanced).
Decrypt database files Select Remove Database Encryption.
See Decrypting a file (FileMaker Pro Advanced).
To Do this

Using FileMaker Pro Advanced tools
FILEMAKER PRO HELP 598
modified by anyone, including FileMaker employees. The only way to modify the tables, field
definitions, relationships, scripts, or access privileges is by returning to the original file before it was
customized by the Developer Utilities.
To remove Admin access to a database:
1. Close all of your database files that you are going to customize.
2. Choose Tools menu > Developer Utilities.
3. If you have used the Developer Utilities on the same database before and saved your
settings, click Load Settings.
4. Click Add to locate the files that you want to customize.
5. If you add multiple files, double-click a file in the list to specify the primary file.
6. Select Developer Utilities settings as required. See Setting up files for developer solutions
(FileMaker Pro Advanced).
7. For Solution Options, click Specify. See Specifying options for developer solutions
(FileMaker Pro Advanced).
8. Select Remove admin access from files permanently and click OK.
This prevents users from altering the design and structure of your database files and from
changing any accounts or privileges that you’ve set up.
Notes
•When the Remove admin access from files permanently option is enabled:
•Users can’t access these dialog boxes: Manage Database, Manage External Data
Sources, Manage Custom Functions, and most of Manage Security.
•The text version of custom functions is removed.
•Users can access the Extended Privileges tab in Manage Security if their account has
the Manage extended privileges option enabled.
•Users can access the dialog boxes listed above if they run a script with the Run script
with full access privileges option enabled.
•Users can access Layout mode and the Manage Scripts feature if the privilege set
assigned to their account permits it.
•All database files must have at least one active account or they can’t be opened. You can’t
use the Remove admin access from files permanently option if the accounts with Full
Access privilege sets are the only active accounts in the file. If you attempt to do so, you will
receive an error message.
•Consider the long-term needs of your users when defining access privileges. Communicate
their access privileges to them clearly in the About layout and follow the rules specified by
FileMaker. For more information, see Documenting developer solutions (FileMaker Pro
Advanced).
Related topics
Binding files into a runtime solution (FileMaker Pro Advanced)
About creating runtime solutions (FileMaker Pro Advanced)
Displaying databases in Kiosk mode (FileMaker Pro Advanced)
Saving solution settings (FileMaker Pro Advanced)

Using FileMaker Pro Advanced tools
FILEMAKER PRO HELP 599
Adding filename extensions to files (FileMaker Pro Advanced)
You can use the Developer Utilities to give non-runtime FileMaker database files the FileMaker file
extension. This is useful for cross-platform development, if you want the filename extension to be
consistent on both Windows and Macintosh platforms.
To add the FileMaker filename extension to non-runtime databases:
1. Close all of your database files that you are going to customize.
2. Choose Tools menu > Developer Utilities.
3. If you have used the Developer Utilities on the same database before and saved your
settings, click Load Settings.
4. Click Add to locate the files that you want to customize.
5. If you add multiple files, double-click a file in the list to specify the primary file.
6. Select Developer Utilities settings as required. See Setting up files for developer solutions
(FileMaker Pro Advanced).
7. For Solution Options, click Specify. See Specifying options for developer solutions
(FileMaker Pro Advanced).
8. Select Databases must have a FileMaker file extension, and click OK.
Related topics
Binding files into a runtime solution (FileMaker Pro Advanced)
About creating runtime solutions (FileMaker Pro Advanced)
Displaying databases in Kiosk mode (FileMaker Pro Advanced)
Removing Admin access to databases (FileMaker Pro Advanced)
Saving solution settings (FileMaker Pro Advanced)
Documenting developer solutions (FileMaker Pro Advanced)
You should provide documentation for your database solution, whether it is a database that must be
opened in FileMaker Pro, FileMaker Pro Advanced, or a standalone runtime database solution.
There are several ways that you can provide documentation for your solution, including a printed
manual, an online Help system, and an About layout that is available from any layout in the solution.
Create custom About and Help layouts that document what your database solution is, how to use it,
and where users can go for more information. Then use the custom menus feature to attach scripts
to menu commands that open the About and Help layouts.
Note The FileMaker Pro and FileMaker Pro Advanced Help system is not available in runtime
applications. However, status bar Help (Windows) and Help tags (OS X) are available.
Creating an About layout
For runtime database solutions, the FileMaker Pro Advanced license specifies that you must create
an About layout that provides information for your users on how to contact you for technical support.
FileMaker uses the About layout to distinguish databases created by developers using
FileMaker Pro Advanced rather than users of FileMaker Pro.
To create an About layout:
1. In Layout mode, click New Layout/Report in the status toolbar.
2. For Layout Name, type About <your solution>.

Using FileMaker Pro Advanced tools
FILEMAKER PRO HELP 600
Important For runtime database solutions, you must include the word “About” in the layout
name. You must also include certain specific information in the layout. See Your
responsibilities as a developer (FileMaker Pro Advanced).
3. Select Blank Layout.
4. Click Finish.
5. Include in the layout your logo, other graphics, and your company information.
6. Include text that notifies users if the solution files are protected with passwords or if full
access privileges have been removed.
7. See Your responsibilities as a developer (FileMaker Pro Advanced) for the exact legal
wording.
8. Create a button that lets your users return to the main layout of the primary file.
9. Choose Scripts menu > Manage Scripts and create a script that goes to the About layout.
10. Include the word About in the script’s name.
11. Create a menu command that displays the About layout. See Defining custom menus
(FileMaker Pro Advanced).
To display the About layout when the runtime application is started:
1. Open the primary file for the database solution.
2. Choose File menu > File Options.
3. In the Open tab of the File Options dialog box, select Switch to layout and choose the
About layout from the list.
Creating a custom Help layout
Create a Help layout that provides instructions for how to use your solution and add data to it. Then
create a script in the primary file of your solution to display the Help system. Use the custom menus
feature to make the script available as a command in the Help menu.
If you want to create a web page to document your solution, you can put a web viewer in your Help
layout that opens the web page.
See Creating and editing custom menu items (FileMaker Pro Advanced).
Including printed documentation
You’ll need to provide instructions to your users on how to install your database solution. Here’s a
list of things you should document:
•minimum equipment and software requirements
•how to install your bundled solution
•how to install custom files
•how to use software you might have included for:
•installing your bundled solution
•decompressing your solution files
•how to upgrade to new solution files (see Importing data into upgraded runtime solutions
(FileMaker Pro Advanced))

Using FileMaker Pro Advanced tools
FILEMAKER PRO HELP 601
•how to use your Help system
•how to start the database solution (see Starting runtime solutions (FileMaker Pro
Advanced))
•what to do in case of a damaged file (see Recovering runtime files (FileMaker Pro
Advanced))
•how to reach you for technical support
Important In the event that your runtime database solution files become damaged, make
sure users have access to your technical support email address or telephone number in
your printed documentation or in a text file. If a database file is damaged, they may not be
able to access the About layout in your solution to find out how to contact you.
You might also want to include the following recommendations:
•Tell your users not to rename any solution files (except the runtime application), or they may
be unable to run your solution.
•Recommend that users back up their data regularly. You might want to automate some of
the process by including scripts that save copies of the solution files. For more information,
see Maintaining and recovering FileMaker Pro databases.
Related topics
About creating runtime solutions (FileMaker Pro Advanced)
Preparing files for a runtime solution (FileMaker Pro Advanced)
Binding files into a runtime solution (FileMaker Pro Advanced)
Naming runtime solutions (FileMaker Pro Advanced)
About creating runtime solutions (FileMaker Pro Advanced)
With FileMaker Pro Advanced, you can bind FileMaker database files into runtime solutions, which
are solutions that do not require FileMaker Pro or FileMaker Pro Advanced in order to be used on a
computer. You can also create runtime solutions in Kiosk mode.
Before you begin to build your database solution, you need to decide how users will interact with it.
Your database solution might have any of the following components:
•a primary database file that connects all of the auxiliary files
•scripts and buttons to open auxiliary files, return to the primary file, display a splash screen
layout at startup, or quit a runtime application
•common elements and a consistent appearance for cross-platform solutions
•tooltips and custom menus
•an About layout to introduce your solution
•a custom Help system that provides usage tips for your solution
•multiple privilege sets that can specify levels of access to layouts, menus, specific tables,
record, fields, and so on
•password-protected accounts assigned to privilege sets that determine the level of access
of account users
Note FileMaker Pro and FileMaker Pro Advanced now allow you to include as many database
tables as you need in a database file. This capability eliminates one of the main reasons for using
multiple files. However, other elements, like scripts and access privileges, are stored at the file level
and so some complex solutions will still benefit from using multiple files.

Using FileMaker Pro Advanced tools
FILEMAKER PRO HELP 602
FileMaker Pro Advanced features are stripped from runtime applications. None of the commands on
the File menu > Manage submenu are available in the runtime application. Runtime applications
cannot be shared over a network and do not include the ability to Save/Send Records as Adobe
PDF files. ODBC import, the Execute SQL script step, and using ODBC data sources in the
relationships graph are not supported in runtime application. For a feature comparison of the
runtime application with FileMaker Pro, see the FILEMAKER PRO ADVANCED FEATURES GUIDE at http:/
/www.filemaker.com/documentation.
A runtime database can, however, be opened in either FileMaker Pro or FileMaker Pro Advanced.
The full functionality of these applications will be enabled, except if full access privileges have been
removed. See Removing Admin access to databases (FileMaker Pro Advanced).
You may need to bind your database files several times before you prepare them for delivery to your
users. When you have completed development and the final version is bound and ready to
distribute, you should thoroughly test your runtime solution to ensure that it behaves as expected.
See Preparing files for a runtime solution (FileMaker Pro Advanced).
Notes
•If you’re creating a solution that will have versions for Windows and OS X, test the different
versions of the solution on their respective platforms. For more information, see
Troubleshooting layouts designed for both Windows and OS X.
•If you have used multiple files instead of multiple tables in a single file, all files for your
solution should be in the same folder before being bound into a runtime solution. If it is not
practical to keep all files in one folder, be sure to include a data source reference to each file
that is just the filename.
•Make sure to specify every file that’s related to the database solution, so that if you modify
filenames all data sources will be updated.
•If you have used multiple database files, decide which file will be the primary file that users
open first. The primary file stores the custom settings. Use this file for navigation buttons or
scripts to other auxiliary files, an About layout, a custom Help layout or file, and to quit the
application. See Starting runtime solutions (FileMaker Pro Advanced).
•Create scripts and buttons for users to navigate from the primary file to auxiliary files and
layouts in the solution. See Using scripts and buttons to control Kiosk solutions (FileMaker
Pro Advanced).
•If you distribute databases as runtime solutions that require specific plug-in versions, place
plug-ins in the runtime folder created when you bind the solutions.
•Charts are not supported in runtime solutions.
•Create documentation about your database solution. See Documenting developer solutions
(FileMaker Pro Advanced).
•Although the Developer Utilities use a copy of a file instead of the original, it’s always a good
idea to make a backup copy of your original files before beginning.
Related topics
Displaying databases in Kiosk mode (FileMaker Pro Advanced)
Preparing files for a runtime solution (FileMaker Pro Advanced)
Before you bind files into a runtime application, decide if you want to:
•Let users open auxiliary files: In the runtime application, there are no menu options to open
files. If you want users to open auxiliary files, you must provide a button or script in your

Using FileMaker Pro Advanced tools
FILEMAKER PRO HELP 603
solution to perform this operation. In each auxiliary file you can also place a button or
startup script that returns users to the primary file.
•Let users modify the database: Unless your runtime database solution files are password-
protected, users can open and modify the files in FileMaker Pro or
FileMaker Pro Advanced. You can also make your files permanently unmodifiable. See
Removing Admin access to databases (FileMaker Pro Advanced).
•Create a cross-platform runtime database solution:
If your solution will be used in Windows, bind it using the Developer Utilities for Windows.
If your solution will be used on OS X, bind it using the Developer Utilities for OS X.
See Binding files into a runtime solution (FileMaker Pro Advanced).
If you’re creating a solution to be used on both Windows and OS X, create two separate runtime
solutions by binding the original solution files twice: once using FileMaker Developer Utilities for
Windows, and again using FileMaker Developer Utilities for Mac. Use the same binding key on
both platforms.
•Provide updates for your users: You can make it easier for users to update your runtime
database solution files by providing scripts in your primary file to export their data and import
it into the updated solution.
See Importing data into upgraded runtime solutions (FileMaker Pro Advanced).
•Let users print reports or other information from your runtime database solution:
It’s a good idea to set document margins if your runtime database solution will be printed from a
variety of printers.
For more information, see Specifying page margins.
•Let users perform spell checking on records: You can change the main spelling dictionary
language for your database solution by choosing one from the dictionaries supplied with
FileMaker Pro Advanced. Your users can add or modify a user-defined dictionary to the
runtime application.
For more information, see Creating and selecting spelling dictionaries.
Verifying FileMaker data sources
In addition, if you have been preparing multiple files in separate folders, you need to verify FileMaker
data source references. A data source stores the file path or paths that the runtime application
searches to access an external table, script, or value list.
During the development of a database with multiple files, you may want to have some of the files in
separate folders. During the creation of a runtime database solution, however, all files are moved
into the same folder as the runtime application.
For this reason, include a path that is just the filename of the file being referenced. Although the
runtime application will check other data sources, it will then be able to find the file in the same folder
in which it resides. You can still keep any absolute or relative paths in the same data source in case
the files are also used in FileMaker Pro or FileMaker Pro Advanced.
The Manage External Data Sources dialog box lists the data sources in the current database. Be
sure that for each FileMaker data source, there is a reference in the File Path that is to the filename
only, without any folders. The data source will look like this: file:MyFile.fmp12. See
Connecting to data sources for more information.
Tip You may want to put multiple tables in one file to avoid problems with FileMaker data source
references.

Using FileMaker Pro Advanced tools
FILEMAKER PRO HELP 604
Related topics
About creating runtime solutions (FileMaker Pro Advanced)
Naming runtime solutions (FileMaker Pro Advanced)
Distributing runtime solutions (FileMaker Pro Advanced)
Starting runtime solutions (FileMaker Pro Advanced)
Recovering runtime files (FileMaker Pro Advanced)
Binding files into a runtime solution (FileMaker Pro Advanced)
Use the Developer Utilities to produce a stand-alone runtime database solution that users can
access without running FileMaker Pro or FileMaker Pro Advanced. The Developer Utilities create a
copy of your files, and bind the database file or files to a runtime application with a name that you
specify.
To bind database files into a runtime database solution:
1. Close all database files that you are going to customize.
2. Choose Tools menu > Developer Utilities.
3. If you have used the Developer Utilities on the same database before and saved your
settings, click Load Settings.
4. Click Add to locate the files that you want to customize.
5. If you add multiple files, double-click a file in the list to specify the primary file.
6. Select Developer Utilities settings as required. See Setting up files for developer solutions
(FileMaker Pro Advanced).
7. For Solution Options, click Specify.
8. In the Specify Solution Options dialog box, select Create Runtime solution application(s).
9. For Runtime Name, type a name for your runtime application.
The runtime name is used for the runtime application filename and for the name of the folder
that contains the runtime database solution files.
10. For Extension, type a one- to five-character filename extension or use the default
extension .fmpur.
The extension is used to associate the solution files with the runtime applications. See Naming
runtime solutions (FileMaker Pro Advanced).
11. For Bindkey, type a key between 1 and 24 characters long.
Important The binding keys are case-sensitive.
The binding key links the runtime application to the database files and ensures that the bound
files will only open in the appropriate runtime application.
Important Binding installs system files pertaining to each platform. See Preparing files for a
runtime solution (FileMaker Pro Advanced) for more information.
12. To add a company logo or other custom image to the closing splash screen, click Specify,
select the closing image, and click Select.
The image should be at least 382 x 175 pixels (72 dpi) or higher, otherwise it will be distorted
when displayed. The supported image formats are JPEG and GIF.

Using FileMaker Pro Advanced tools
FILEMAKER PRO HELP 605
13. For Delay, set the number of seconds that you want the splash screen to display.
You can preview the effect that your custom splash screen will have by clicking Preview.
14. Select other options as required. See Specifying options for developer solutions (FileMaker
Pro Advanced).
15. Click OK.
16. To be able to quickly repeat the process, click Save Settings, and choose a folder and
location for your settings file. See Saving solution settings (FileMaker Pro Advanced).
17. Click Create.
Notes
•Setting the binding key:
•If you need to add auxiliary files later to the existing runtime database solution, rebind
the files using the same key.
•Use a binding key you’ll remember and record it in a safe place. (You can do this by
saving the Developer Utilities settings file. See Saving solution settings (FileMaker Pro
Advanced)) If you forget your binding key and want to change a runtime database
solution, you’ll need to rebind all of the database files using a new binding key and then
redistribute the entire solution, including a new runtime application.
•You can open a bound runtime file in FileMaker Pro and FileMaker Pro Advanced to make
modifications to it. However, if you selected the Remove admin access from files
permanently option when you bound the files, then you can’t regain access to some
features. See Removing Admin access to databases (FileMaker Pro Advanced). In this
case, you’ll have to open the original database files in order to make design changes in
FileMaker Pro Advanced and then rebind them using the binding key that you assigned to
that runtime database solution.
Related topics
About creating runtime solutions (FileMaker Pro Advanced)
Naming runtime solutions (FileMaker Pro Advanced)
Distributing runtime solutions (FileMaker Pro Advanced)
Importing data into upgraded runtime solutions (FileMaker Pro Advanced)
Starting runtime solutions (FileMaker Pro Advanced)
Recovering runtime files (FileMaker Pro Advanced)
Naming runtime solutions (FileMaker Pro Advanced)
The filename extension associates all of the runtime solution files with the runtime application. If a
user has more than one runtime database solution on a machine, the filename extension together
with the binding key will ensure that the correct runtime application is started when a solution file is
double-clicked. Use an extension that is unique to your users’ computer systems.
Consider the following points when naming runtime solutions:
•The runtime name that you specify in the Developer Utilities is used for the name of the
runtime application and can also be used for the name of the new solution folder that
contains the bound runtime database solution files.
•Filenames can include up to 31 characters. When choosing filenames for runtime database
solutions, consider the platforms on which your runtime solution will be used so your scripts
and lookups will work properly.
•Use the default extension .fmpur or type a one- to five-character extension.

Using FileMaker Pro Advanced tools
FILEMAKER PRO HELP 606
•Windows filenames must not start with a space. For cross-platform compatibility, do not use
the following characters in filenames: quotation mark ("), slash (/), backslash (\), angle
brackets (<>), asterisk (*), questions mark (?), colon (:), vertical bar (|).
The Developer Utilities automatically update all files to use the extension that you specify and
append the extension to the filenames. FileMaker data source references used in relationships,
scripts, and external value lists are updated to interact with the new filenames.
Assigning the extension for Windows solutions
The extension registers your runtime application with the Windows operating system. The extension
is used by Windows to determine which application starts when you double-click a solution file. The
Developer Utilities append the extension to all database filenames in the runtime database solution
during the binding process.
Assigning the extension for OS X solutions
In OS X, the first three characters of the extension are used in the creator code for the runtime
application. The creator code is still used by some older technologies in OS X and should be unique
to ensure that OS X can determine the difference between different runtime applications. The
creator code is only stored in the runtime application.
Because creator codes are four characters, the Developer Utilities constructs the code by using the
first three characters of the extension and inserting an uppercase "F" after the first character. For
example, the default five-character extension "fmpur" becomes the "fFmp" creator code. Creator
codes are case-sensitive.
Note Creator codes should be registered with Apple Inc. to verify that the creator code you choose
is unique. You may use the .fmpur five-character extension because FileMaker has registered the
fFmp creator code with Apple Inc. Contact Apple Developer Support or visit their website at http://
developer.apple.com to register any other creator codes.
Conflicts with non-unique filename extensions in Windows
If the extension is not unique, it might cause registry conflicts in Windows. For example, if you use
the .fmp12 extension for your runtime database solution and your users have FileMaker Pro
installed on their hard disks, all of their FileMaker Pro document icons will change to the runtime
icons. Additionally, FileMaker Pro documents will no longer automatically open the FileMaker Pro
application.
To restore the document icons to the original FileMaker Pro document icon:
1. Discard the runtime application.
2. Open a document in the FileMaker Pro application, then close it and exit the application.
3. Restart your computer.
Related topics
About creating runtime solutions (FileMaker Pro Advanced)
Preparing files for a runtime solution (FileMaker Pro Advanced)
Binding files into a runtime solution (FileMaker Pro Advanced)
Distributing runtime solutions (FileMaker Pro Advanced)
Importing data into upgraded runtime solutions (FileMaker Pro Advanced)
Starting runtime solutions (FileMaker Pro Advanced)
Recovering runtime files (FileMaker Pro Advanced)

Using FileMaker Pro Advanced tools
FILEMAKER PRO HELP 607
Distributing runtime solutions (FileMaker Pro Advanced)
The final steps in developing your runtime database solution are to bundle all of the necessary files
together, choose how you will distribute your solution—for example, on a CD-ROM or over a
network—and provide your users with documentation for installing your solution. In addition, your
documentation should include instructions for starting the runtime application and what to do if a file
is damaged.
Consider the following before you distribute your solution:
•Organize your solution components.
Important Do not rename the files and folders that Developer Utilities generates.
•Choose a distribution method.
•Choose to use either a custom installation program or a compression utility program.
•For software distributions such as internet or network downloads, ensure you have a
master password to enable or change network access to the files.
•For software distributions, consider reducing the size of your solution files. Deleting
dictionaries and language resource files for languages not supported by your database
will reduce the size of the application. See below.
Note Windows: The proper method for distributing Runtime solutions (including the executable)
is to use Installer software. This software must install components in the proper location in the
Windows filesystem and provide an uninstall capability. See the Microsoft web site for
information about the location of installed files as well as location restrictions.
•Include the same minimum equipment and software required by the
FileMaker Pro Advanced application. See the INSTALLATION GUIDE FOR FILEMAKER PRO AND
FILEMAKER PRO ADVANCED, available at http://www.filemaker.com/documentation.
To reduce the size of your solution in Windows:
1. Open the Extensions folder that is copied to the runtime solution folder.
2. Delete language resource folders for languages not supported by your solution.
Important Do not delete the language resource folder for English.
3. Open the Dictionaries folder.
4. Delete dictionaries for languages not supported by your solution.
To reduce the size of your solution in OS X:
1. Open the Extensions folder that is copied to the runtime solution folder.
2. Open the Dictionaries folder.
3. Delete dictionaries for languages not supported by your solution.
4. Control-click the runtime application package and choose Show Package Contents.
5. Locate the Resources folder in the Contents folder.
6. Delete language resource folders (*.lproj) for languages not supported by your solution.

Using FileMaker Pro Advanced tools
FILEMAKER PRO HELP 608
Related topics
About creating runtime solutions (FileMaker Pro Advanced)
Preparing files for a runtime solution (FileMaker Pro Advanced)
Binding files into a runtime solution (FileMaker Pro Advanced)
Naming runtime solutions (FileMaker Pro Advanced)
Importing data into upgraded runtime solutions (FileMaker Pro Advanced)
Starting runtime solutions (FileMaker Pro Advanced)
Recovering runtime files (FileMaker Pro Advanced)
Importing data into upgraded runtime solutions (FileMaker Pro
Advanced)
If you have upgraded a customer’s runtime solution, you can include scripts in the new runtime
solution files that allow users to import records from the old runtime files. The old files must first be
converted to the new file format.
Note When creating your upgraded runtime solution, use a different extension than the one you
used for your old runtime solution.
To prepare your upgraded solution for importing data:
1. Create a folder named “Old Solution Files” inside the folder that contains the new runtime
solution database files.
2. Place copies of the old runtime solution database files in the Old Solution Files folder.
3. In each upgraded file, create a script to convert the old solution file and import records from
it to the new file.
The functionality of the script should include:
•Convert File [<filename of the old version of the solution file>]
•Import Records [<old filename with the new solution’s extension>]
•Close File [<old filename with the new solution’s extension>]
4. Add a button to activate the script.
5. Repeat steps 3 and 4 for each upgraded file.
6. Use the Developer Utilities to bind your upgraded solution files into the new runtime
database solution.
7. Test your buttons in the runtime application.
Use sample data to make sure the records import properly and data is imported to the correct
fields.
8. Distribute the new solution files that contain the buttons.
9. Provide instructions telling users how to import data into the new solution files.
Users can copy their old files into the Old Solution Files folder and use the buttons in the new
files to convert the old files and import records from them into the new solution files.
Related topics
About creating runtime solutions (FileMaker Pro Advanced)
Preparing files for a runtime solution (FileMaker Pro Advanced)
Binding files into a runtime solution (FileMaker Pro Advanced)
Naming runtime solutions (FileMaker Pro Advanced)
Distributing runtime solutions (FileMaker Pro Advanced)
Using FileMaker Pro Advanced tools
FILEMAKER PRO HELP 609
Starting runtime solutions (FileMaker Pro Advanced)
Recovering runtime files (FileMaker Pro Advanced)
Starting runtime solutions (FileMaker Pro Advanced)
After a user has run the installation program for your runtime application, the files are installed on
the user’s hard drive. The solution’s three-character filename extension is registered with the
operating system (Windows) or in the system preferences (OS X). This registration allows the
operating system to locate and launch the runtime solution if the user double-clicks the primary or
auxiliary solution files. If a primary or auxiliary solution file is double-clicked before the runtime
application has registered the extension, the runtime application won’t be found.
Important Your users should start your solution by double-clicking the runtime application icon, not
the solution file icon. Double-clicking the icons for the solution or auxiliary files might result in errors,
depending on whether there are other copies of the runtime application on their hard disk. If your
users have more than one solution on their computers associated with the same three-character
extension and they double-click the icon for the solution file, the first solution installed will attempt to
open the file, and this might not be the correct application for the specific solutions file.
Each time the runtime application is opened, it looks for the primary file that has been bound to it. If
the primary file can’t be found, the user is asked to locate the primary file.
Caution your users that they should not rename the primary or auxiliary solution files. If they do,
relationships and external scripts may not work properly.
Note When you make a change to your solution, make sure that your users can import their data
into your updated solution. Include a script attached to a button to make it easy for your users to
import their data into the new solution files.
Related topics
About creating runtime solutions (FileMaker Pro Advanced)
Preparing files for a runtime solution (FileMaker Pro Advanced)
Binding files into a runtime solution (FileMaker Pro Advanced)
Naming runtime solutions (FileMaker Pro Advanced)
Distributing runtime solutions (FileMaker Pro Advanced)
Importing data into upgraded runtime solutions (FileMaker Pro Advanced)
Recovering runtime files (FileMaker Pro Advanced)
Icon Description
Runtime application. Tell users to double-click this icon to start the
runtime application.
Solution file

Using FileMaker Pro Advanced tools
FILEMAKER PRO HELP 610
Recovering runtime files (FileMaker Pro Advanced)
Power failures, hardware problems, or other factors can damage a FileMaker database file. If your
database solution becomes damaged, your users will need to recover the damaged file. When the
runtime application discovers a damaged file, a dialog box appears, telling the user to contact the
developer. Even if the dialog box does not appear, files can become corrupted and exhibit erratic
behavior.
Once you know which file is damaged, you can recover it using the Recover command, if you have
FileMaker Pro or FileMaker Pro Advanced installed. If your user only has the runtime application,
however, the Recover command does not appear in the File menu of the runtime application.
To recover a damaged file:
•On Windows machines, press Ctrl+Shift while double-clicking the runtime application icon.
Hold the keys down until you see the Open Damaged File dialog box.
•On Mac OS X machines, press Command-Option while double-clicking the runtime
application icon. Hold the keys down until you see the Open Damaged File dialog box.
What to expect during the recovery process
During the recovery process, the runtime application:
•creates a new file
•renames any damaged file by adding Old to the end of the filenames (for example, Contact
Manager is renamed to Contact Manager Old)
•gives the repaired file the original name
If users experience unusual behavior in the recovered files, they should revert to a backup copy that
was made before the file became corrupt, or contact you for technical assistance.
Documenting recovery for your customers
In your documentation, you should tell your users what to do after a file has been recovered. Tell
your users to:
1. Recover the damaged solution file using the method described above for the type of
computer they are using.
2. Open the recovered solution file in the runtime application.
3. Choose File menu > Save a Copy As.
4. In the dialog box, choose compacted copy (smaller) from the Save a (Windows) or Type
(OS X) list, name the file, and click Save.
Give the compacted file the same filename as the original file.
5. Make a copy of the original database and import the data from the recovered file into it.
Related topics
Checking file consistency
About creating runtime solutions (FileMaker Pro Advanced)
Preparing files for a runtime solution (FileMaker Pro Advanced)
Binding files into a runtime solution (FileMaker Pro Advanced)
Naming runtime solutions (FileMaker Pro Advanced)
Distributing runtime solutions (FileMaker Pro Advanced)
Importing data into upgraded runtime solutions (FileMaker Pro Advanced)

Using FileMaker Pro Advanced tools
FILEMAKER PRO HELP 611
Starting runtime solutions (FileMaker Pro Advanced)
Displaying databases in Kiosk mode (FileMaker Pro Advanced)
Kiosk mode is a way of displaying your database solution or your runtime database solution on a full
screen, without any toolbars or menus. As the name suggests, Kiosk mode can be used to present
your database to users as an information kiosk. You can design your database to run through a
touch screen.
Database files that open in FileMaker Pro, FileMaker Pro Advanced, or the runtime application can
be transformed into files that must open in Kiosk mode for all accounts with a specific privilege set.
When you create a solution to run in Kiosk mode, you need to provide navigation for your solution
and the ability for users to quit your solution.
The primary file is the main database that users see first in your Kiosk solution. Because Kiosk
mode does not contain any menus or window controls, the primary file must contain buttons that
users can click to navigate through the solution, close the files, and quit FileMaker Pro,
FileMaker Pro Advanced, or the runtime application.
To decide how users will navigate your Kiosk solution, start by planning your navigation design on
paper. Decide what will happen when each button is clicked, and give users a way to get back to the
beginning of your solution from each layout. To further control what users see, create startup scripts
that display a specific layout when a file is opened.
•If your Kiosk solution will be run with a touch screen, use large buttons and allow space
between buttons.
•Try to limit the number of options available on one screen.
•Because Preview mode disables buttons, make sure that any Enter Preview Mode script
step is followed by a Pause/Resume Script script step and specify an amount of time the
script should remain in Preview mode. Place an Enter Browse Mode script step after the
Pause/Resume Script script step.
Notes
•When a Kiosk solution is open, access to the operating system is limited. On Windows
machines, you can press Alt+Tab to go to another application from your Kiosk database
solution.
•If you have a previous Kiosk solution that displayed the status area, you will need to update
your solution. You cannot display the status toolbar or layout bar in a Kiosk solution. You will
need to add record navigation, script paused status, and script Cancel and Continue
buttons to your layouts.
Related topics
About creating runtime solutions (FileMaker Pro Advanced)
Setting up files for developer solutions (FileMaker Pro Advanced)
Creating Kiosk solutions (FileMaker Pro Advanced)
For your solution to display in Kiosk mode, you must:
•create an account with a limited privilege set or create a specific Kiosk account.
•clear the default option of logging into the file with the Admin account.
•enable Kiosk mode. At the same time that you enable Kiosk mode, you can bind the
database as a runtime solution.

Using FileMaker Pro Advanced tools
FILEMAKER PRO HELP 612
Note Kiosk mode is ignored if the solution is opened by accounts with the Full Access privilege set,
a privilege set that allows management of extended privileges, or a privilege set that allows
modification of layouts, value lists, and scripts.
To create a limited access Kiosk account:
1. With the database solution open, choose File menu > Manage > Security.
2. In the Manage Security dialog box, click New.
3. In the Edit Account dialog box, type an account name, click Active for the Account Status,
and select New Privilege Set from the Privilege Set list.
4. In the Edit Privilege Set dialog box, give the privilege set a name and description.
5. For Layouts, Value Lists, and Scripts, select either All view only or All no access.
6. Clear the Manage extended privileges checkbox.
7. Select other options as required.
8. Click OK.
To enable Kiosk mode:
1. Close all database files that you are going to customize.
2. Choose Tools menu > Developer Utilities.
3. If you have used the Developer Utilities on the same database solution before and saved
your settings, click Load Settings.
4. Click Add to locate the files that you want to customize.
5. If you add multiple files, double-click a file in the list to specify the primary file.
6. Select Developer Utilities settings as required. See Setting up files for developer solutions
(FileMaker Pro Advanced).
7. For Solution Options, click Specify.
8. In the Specify Solution Options dialog box, select Enable Kiosk mode for non-
admin accounts.
9. Select other options as required. See Specifying options for developer solutions (FileMaker
Pro Advanced).
10. Click OK.
11. You can quickly repeat this process by clicking Save Settings and choosing a folder and
location for your settings file. See Saving solution settings (FileMaker Pro Advanced).
12. Click Create.
If you did not bind the files to a runtime application, the Developer Utilities copy the selected
database files to the Project Folder. If you did bind the files to a runtime application, the
Developer Utilities copy all of the runtime files to a new folder created inside the Project Folder
and named after the runtime solution.
To change the default option of logging into the file with the Admin account:
1. With the database solution open, choose File menu > File Options.
2. In the Open tab, clear Log in using.
3. Click OK.

Using FileMaker Pro Advanced tools
FILEMAKER PRO HELP 613
Notes
•If there is no Quit or Exit button available in your Kiosk solution, users must force-quit the
application by pressing Alt+F4 (Windows). With OS X, users can exit a solution running in
Kiosk mode by pressing F9 or F11 to access another open application window. Force
quitting is not recommended because it can cause data corruption or damage open files.
•To ensure that users can access the primary file and quit the application cleanly:
•In each auxiliary file, provide a startup script that opens the primary file.
•In each auxiliary file, place a Main Menu button that runs the startup script to open the
primary file.
•In the primary file, include an Exit button.
•For information about creating buttons and scripts that emulate missing menu options and
window controls, see Using scripts and buttons to control Kiosk solutions (FileMaker Pro
Advanced).
Related topics
Displaying databases in Kiosk mode (FileMaker Pro Advanced)
About creating runtime solutions (FileMaker Pro Advanced)
Using scripts and buttons to control Kiosk solutions (FileMaker Pro Advanced)
Creating dynamic buttons (FileMaker Pro Advanced)
Using scripts and buttons to control Kiosk solutions (FileMaker
Pro Advanced)
You can use scripts and buttons to automate much of your database solution, control startup
behavior, emulate menu commands and window controls, navigate, and much more. See Creating
scripts to automate tasks.
Tip Use the Script Debugger to test scripts. See Debugging scripts (FileMaker Pro Advanced).
Centering database windows in Kiosk screens
If you maximize a layout that was designed for 640x480 on a screen that has a resolution larger
than 640x480, the layout will not be centered. It will display in the top left corner with empty space
surrounding it. For best results, don’t maximize kiosk windows. Use the Adjust Window[Resize to
Fit] and Move/Resize Window script steps instead to center windows based on the user’s screen
resolution. Use the Get functions to determine the resolution.
Important Before using the Adjust Window script step, perform any script steps that affect the
window display area (such as Go to Layout or Show/Hide Toolbars). Once the window area is
determined, add the Adjust Window script step.
The Adjust Window script step may cover up a window that has an Exit Application button. Be sure
that users can close the Kiosk database solution easily.
Emulating menu commands and window controls
Use the following script steps to emulate menu commands and window controls.

Using FileMaker Pro Advanced tools
FILEMAKER PRO HELP 614
Related topics
Displaying databases in Kiosk mode (FileMaker Pro Advanced)
Creating Kiosk solutions (FileMaker Pro Advanced)
Creating dynamic buttons (FileMaker Pro Advanced)
Creating dynamic buttons (FileMaker Pro Advanced)
By using scripts and calculations to evaluate the state of button fields, you can make dynamic
buttons that change each time they are clicked.
To create dynamic buttons:
•Define the dynamic button field.
•Create the dynamic button script.
•Connect the field and the script.
The following example shows how to create a button that changes every time it is clicked.
To define the dynamic button field:
1. Choose File menu > Manage > Database > Fields tab.
2. Create a field named Icons and choose Container type.
3. Click Options > Storage tab.
4. Select the Use global storage checkbox and type the number of button states for the
Maximum number of repetitions.
5. Click OK.
6. In Browse mode, select the Icons field and choose Insert menu > Picture to add graphics
to the Icons field.
Tip Ensure that all graphics are the same size.
7. Choose File menu > Manage > Database > Fields tab.
8. Create a field named Buttons and choose Container type.
9. Click Options > Auto-Enter tab.
10. For Calculated value, click Specify and enter the function
GetRepetition (Icons; 1).
To emulate these interface
elements Create buttons with these script steps attached
Menu commands Script steps for any menu command (for example, Sort
Records, Print, and Open Preferences)
Zoom controls Adjust Window or Set Zoom Level
Status toolbar control Show/Hide Toolbars
Mode pop-up menu Enter Browse Mode, Enter Find Mode, or Enter Preview Mode
Vertical scroll bar Scroll Window (if the layout is longer than one screen)
Horizontal scroll bar Scroll Window (if the layout objects are wider than one screen)
Window size and location Move/Resize Window

Using FileMaker Pro Advanced tools
FILEMAKER PRO HELP 615
Tip To create a button that displays identically across all records, click the Storage tab and
select Use global storage. Otherwise, each record will display its own button state.
11. Click OK, then OK again.
To create the dynamic button script:
1. Choose Scripts menu > Manage Scripts and click New.
2. Name the script Toggle Buttons.
3. Add a Set Field script step.
4. Select Specify target field or click Specify.
5. Double-click Buttons.
6. For Calculated result, click Specify.
7. Write a Case function that evaluates each GetRepetition test expression for the icon
number and increments the number by 1, replacing the table name “icons” with the table in
which you created the Icons field.
Case (
icons::Buttons = GetRepetition (icons::Icons; 1); GetRepetition
(icons::Icons; 2);
icons::Buttons = GetRepetition (icons::Icons; 2); GetRepetition
(icons::Icons; 3);
icons::Buttons = GetRepetition (icons::Icons; 3); GetRepetition
(icons::Icons; 4);
icons::Buttons = GetRepetition (icons::Icons; 4); GetRepetition
(icons::Icons; 5);
GetRepetition (icons::Icons; 1)
)
8. Click OK and close the Edit Script and Manage Scripts dialog boxes.
To connect the field and the script:
1. In Layout mode, select the Buttons field.
2. Click Inspector in the layout bar, then click Data.
3. In the Behavior area, clear Browse Mode and Find Mode.
4. Choose Format menu > Button Setup.
5. Select Perform Script and specify Toggle Buttons.
6. Click OK.
7. Switch to Browse mode and test your dynamic button.
For more information about using buttons with scripts, see Using buttons with scripts.
Related topics
Displaying databases in Kiosk mode (FileMaker Pro Advanced)
Creating Kiosk solutions (FileMaker Pro Advanced)
Using scripts and buttons to control Kiosk solutions (FileMaker Pro Advanced)
Creating scripts to automate tasks

Reference
FILEMAKER PRO HELP 617
Reference

Setting preferences
FILEMAKER PRO HELP 618
Setting preferences
You can customize FileMaker Pro for the way you work by changing standard settings called
preferences. Preferences affect the behavior of the application and are not specific to any
document. Types of preferences you can set include:
•General
•Layout
•Memory
•Plug-In
•Font
To set preferences for individual documents, see Setting file options.
Setting general preferences
General application preferences affect the way you work with all FileMaker Pro documents.
To set general preferences:
1. Choose one of the following menu commands:
•Windows: Choose Edit menu > Preferences.
•OS X: Choose FileMaker Pro menu > Preferences.
2. In the Preferences dialog box, click the General tab, and then set the options you want to
use.
To Do this
Enable drag and drop capabilities to move text in
fields, between fields, and between layouts, as
well as between applications that support drag
and drop.
Select Allow drag and drop text selection.
Display the names of up to 30 recently opened
files when you choose File menu > Open Recent
or when you use the FileMaker Quick Start
Screen to open files.
Select Show recently opened files, and then
enter a number from 1 to 30.
Windows: Make text easier to read by increasing
the size of all layout objects in the work area.
Select Enlarge window contents to improve
readability.
Notes:
•In the lower-left corner of the window, an
asterisk appears next to the zoom
percentage when this option is selected.
•In Windows, font smoothing is turned off at
the 75% zoom level and higher when this
option is selected.
Display and use the Manage Database dialog
box to create a new database when you choose
File menu > New Database.
Select Use Manage Database dialog to create
files.

Setting preferences
FILEMAKER PRO HELP 619
Reset the size and position of all dialog boxes to
their defaults.
For Reset dialog sizes and positions, click
Reset.
Set the name that identifies the user.
(This value is used, for example, when you
choose Insert menu > Current User Name.)
Windows: Type a name for User name.
OS X: Select System in the User Name area or,
for User Name, select Other, and then type a
name in the text box.
Note In OS X, the System name is the name
entered in the Accounts System Preference.
Set the language that FileMaker Pro uses for
menus, dialog boxes, and messages.
•Windows: For User Interface Language,
choose a language.
•OS X: Use the Language & Text System
Preference. See OS X Help Center. (You
must log out of OS X and log back in to see
the new language.)
Notes:
•The new language does not take effect until
you restart FileMaker Pro. If some language
components are not installed, FileMaker Pro
may alert you to install a language pack. See
INSTALLATION AND NEW FEATURES GUIDE FOR
FILEMAKER PRO AND FILEMAKER PRO
ADVANCED.
•This setting does not change the system
formats used for displaying and sorting
dates, times, and numbers in a particular file.
For more information on system formats, see
Opening files with different system formats.
Windows: Set the style of font smoothing. For Font smoothing style, choose a style.
Notes:
•If the fonts on your screen look fuzzy, you
may want to experiment with the different font
smoothing styles until you find one that looks
best with your monitor.
•In Windows, font smoothing is turned off at
the 100% zoom level and higher.
•In OS X, you can set font smoothing options
in the Appearance System Preference. See
OS X Help Center.
Have FileMaker Pro automatically check for
software updates once a week.
Select Notify me when an update is available.
This preference setting does not automatically
install software updates for you. If you have an
internet connection, you can go to the update
web page and download the updater software. If
you choose not to update your software when
notified, you can do so later by choosing Help
menu > Check for Updates.
To Do this
Setting preferences
FILEMAKER PRO HELP 620
3. Click OK.
Related topics
Moving text and data with drag and drop
Creating a database
Keyboard shortcuts (Windows)
Keyboard shortcuts (OS X)
Formatting fields and text for vertical writing
Setting layout preferences
Layout preferences affect the way you work in Layout mode.
To set layout preferences:
1. Windows: Choose Edit menu > Preferences.
OS X: Choose FileMaker Pro menu > Preferences.
2. In the Preferences dialog box, click the Layout tab, and then set the options you want to
use.
3. Click OK.
Related topics
Selecting and working with objects on a layout
Adding fields to a layout
Setting memory preferences
FileMaker Pro automatically records your changes as you work. These changes are stored
temporarily in an area of your computer's (RAM) memory called the cache. You can specify the size
of the cache and how often FileMaker Pro saves changes from the cache to the hard disk.
1. Windows: Choose Edit menu > Preferences.
OS X: Choose FileMaker Pro menu > Preferences.
Have FileMaker automatically check for a new
version every 30 days.
Select Notify me when a new version is
available.
If you select Don’t tell me about new versions
again in the New Version Notification dialog box,
FileMaker does not check for new versions.
To Do this
To Do this
In Layout mode, keep the tool that you're using
active until you click another tool or press Enter
Select Always lock layout tools.
Add new fields you define to the bottom of the
current layout
Select Add newly defined fields to current
layout.
Save layout changes without being prompted when
exiting Layout mode
Select Save layout changes automatically
(do not ask).
Setting preferences
FILEMAKER PRO HELP 621
2. In the Preferences dialog box, click the Memory tab, and then set the options you want to
use.
3. Click OK.
Tip You can force FileMaker Pro to save changes to disk by running a script that contains the Flush
Cache to Disk script step.
Related topics
Saving and copying files
Quitting FileMaker Pro
Setting plug-in preferences
You can use plug-in preferences to enable and configure plug-ins. Plug-ins provide optional extra
features to FileMaker Pro. Plug-ins may be available from FileMaker, third-party software
companies, or from a development or information systems group within your organization.
Note If you are a database developer, you can write custom plug-ins. Knowledge of C or C++
programming is required. See Working with plug-ins.
To set plug-in preferences:
1. Do one of the following:
•Windows: Choose Edit menu > Preferences.
•OS X: Choose FileMaker Pro menu > Preferences.
2. In the Preferences dialog box, click the Plug-Ins tab.
Installed plug-ins appear in the Enabled Plug-Ins list. Enabled plug-ins have a check mark
beside them.
3. Click a plug-in name to see a description of it.
4. If the plug-in is not enabled, select the checkbox next to the plug-in's name.
5. If the plug-in can be configured, click Configure.
For more information on configuring the plug-in, see the documentation that came with the plug-
in.
To Do this
Improve application performance For Attempt to set cache size to <n> MB,
enter a higher value.
Changes take effect after you quit
FileMaker Pro and start it again.
Save changes to disk when no one is working with the
database file or the cache is full
For Save cache contents, click during
idle time.
Save changes to your database file to disk at a
specified interval (every 10 minutes, 15 minutes, 30
minutes, or hour) or when the cache is full
For Save cache contents, click every
<n minutes> (or as necessary) and
choose a time interval from the list.
Tip Saving less often on battery-powered
portable computers conserves power.
Saving more often reduces the chance of
data loss in a system crash.

Setting preferences
FILEMAKER PRO HELP 622
6. To allow FileMaker Pro to install plug-in files and updates automatically, select Allow
Solutions to Install Files.
7. Click OK.
Setting font preferences
Use font preferences to set the default font for a particular input type as well as other font options.
Input types are scripts that categorize languages according to their writing systems. For example,
the Western/Roman input type is used for English, French, Italian, and other languages. Chinese
has two main input types: Simplified Chinese and Traditional Chinese.
To set font preferences:
1. Open the Preferences dialog box by doing one of the following:
•Windows: Choose Edit menu > Preferences.
•OS X: Choose FileMaker Pro menu > Preferences.
2. Click the Fonts tab, and then set the options you want to use.
3. Click OK.
Customizing the font menu (Windows)
You can configure the Font menu to include only the fonts you want and to display all fonts in their
typeface.
To configure the Font menu in Windows:
1. If you are in Browse mode, click in any field that displays text (any field except a container
field).
2. Choose Format menu > Font > Configure/More Fonts.
3. Set the options you want to use:
To Do this
Define a default font for an input
type.
Select an input type from the list, then choose a font from the
Specify font pop-up menu.
Switch to an input method that
matches the font’s input type when
entering each field.
Select Synchronize input method with font on field entry.
Note You can also set the input method for individual fields in
layouts. For more information, see Setting the text input method
for fields.
Apply font changes only to
characters that exist in the new
font. (When a character does not
exist in the new font, its font is not
changed, and it continues to
display properly.)
Select Use Font Locking.
Note Selecting Use Font Locking is only necessary if you use
fields that contain multiple input types, such as Roman and
Japanese text within the same field. If you’re not mixing input
types in fields, then leave this option cleared. Data entry and
editing is a little faster when font locking is turned off.

Setting preferences
FILEMAKER PRO HELP 623
4. Click OK.
Related topics
About text fields
Defining global fields (fields with global storage)
To Do this
Remove a font from the Font
menu
Double-click the font under Appear in Menu list. Or, click once to
select the font, then click Clear.
Remove more than one font
at a time
Under Appear in Menu, Shift-click (for fonts next to each other in the
list) or Ctrl-click (for fonts that aren't next to each other) the fonts you
want to remove. Click Clear.
Remove all fonts from the
Font menu
Click Clear All.
Add a font to the Font menu For Available Fonts, double-click the font you want to add. Or, click
once to select the font, then click Move.
Add more than one font at a
time
In the Available Fonts list, Shift-click (for fonts next to each other in
the list) or Ctrl-click (for fonts that aren't next to each other) the fonts
you want to add. Click Move.
Add all available fonts to the
Font menu
Click Move All.
Display fonts in their
typefaces
Select Show Fonts in Typeface.
Apply a font to selected text In the Available Fonts or Appear in Menu list, select a font, then
click Apply. (This action closes the dialog box.)

Keyboard shortcuts (Windows)
FILEMAKER PRO HELP 624
Keyboard shortcuts (Windows)
You can use keyboard shortcuts to perform many operations in FileMaker Pro, including finding
records, sorting records, printing records, and performing scripts. You can work with FileMaker Pro
in four different modes: Browse, Find, Layout, and Preview. You can use keyboard shortcuts to
invoke actions within modes and format and edit text.
Note You can create your own keyboard equivalents if you use custom menus.
General keyboard shortcuts (Windows)
You can use these keyboard shortcuts to navigate, cancel an operation, and display information in
your database file.
To Press
Cancel an operation or dialog box Esc
Click a selected button or popover button
on a layout with the keyboard
Space bar
Close a dialog box Esc
Close certain dialog boxes without
confirmation and discard changes
Shift-Esc
Close a file or window Ctrl+W or Ctrl+F4
Close all files or windows Ctrl+Alt+W
Exit or quit FileMaker Pro Alt+F4 or Ctrl+Q
Open FileMaker Pro Help F1
Open a file Ctrl+O
Use a specified account name and
password to open a file
Shift key while opening the file
Open a remote file Ctrl+Shift+O
Open the Manage Database dialog box Ctrl+Shift+D
Open the Find/Replace dialog box Ctrl+Shift+F
Open the Manage Layouts dialog box Ctrl+Shift+L
Open the Field Picker dialog box Ctrl+K
Add a new field in the Field Picker dialog
box
Ctrl+Enter
Open the Layout pop-up menu F2
Print Ctrl+P
Print without the Print dialog box Ctrl+Alt+P
Reorder items in a list box, such as Script
steps, Fields, Parts
Ctrl+Up Arrow or Ctrl+Down Arrow
Save (By default, FileMaker Pro saves
your record data automatically.)
Sort Ctrl+S
Undo the last command Ctrl+Z
Open the Manage Scripts dialog box Ctrl+Shift+S

Keyboard shortcuts (Windows)
FILEMAKER PRO HELP 625
Navigation keyboard shortcuts
You can use these keyboard shortcuts to move through fields, records, find requests, and layouts.
Note Your database designer might have changed the keyboard shortcuts for moving though fields.
For more information, consult your database designer or see Setting the keys for exiting a field.
Window display keyboard shortcuts
You can use these shortcuts in all database modes to scroll through your document and arrange
windows on your screen.
Save a script Ctrl+S
Perform one of the first ten scripts listed in
the Scripts menu
Ctrl+1 through Ctrl+0
Create a new record, request, or layout Ctrl+N
Delete a record, request, or layout Ctrl+E
Delete a record without confirmation Ctrl+Shift+E
Duplicate a record, request, or layout
object
Ctrl+D
Save a layout Ctrl+S
To move to Press
Next object (field, button, or tab) Tab
Previous object (field, button, or tab) Shift+Tab
Next record, request, layout, or page Ctrl+Down Arrow or Shift+PgDn
Previous record, request, layout, or
page
Ctrl+Up Arrow or Shift+PgUp
Next tab (When a tab is selected) Right Arrow
Previous tab (When a tab is selected) Left Arrow
To Press
Cascade document windows Shift+F5
Close a window Ctrl+Shift+F4
Cycle through document windows
Note Does not apply to “scripting” windows
Ctrl+Tab
Cycle to the previous document window Ctrl+F6
Cycle to the next document window Ctrl+Shift+F6
Resize window; full screen or previous size Ctrl+Alt+Z
Scroll the document down PgDn
Scroll the document up PgUp
Scroll the document to the left Ctrl+PgUp
Scroll the document to the right Ctrl+PgDn
To Press
Keyboard shortcuts (Windows)
FILEMAKER PRO HELP 626
Paste, select, and replace values keyboard shortcuts
You can use keyboard shortcuts to enter values into a field, replace values, select objects, and
move items in a list.
Show/hide the status toolbar Ctrl+Alt+S
Tile (arrange) document windows horizontally Shift+F4
Zoom document larger F3
Zoom document smaller Shift+F3
To insert Press
The current date Ctrl+ - (hyphen)
The current time Ctrl+;
The current time and date in a timestamp field Ctrl+;
The current user name Ctrl+Shift+N
Information from the index Ctrl+I
Information from the last visited record Ctrl+' (apostrophe)
Information from the last record and move to
the next field
Ctrl+Shift+' (apostrophe)
Merge fields Ctrl+M
To paste Press
Text from the Clipboard Ctrl+V
Text without styles Ctrl+Shift+V
To Press
Replace a field's value Ctrl+ =
Select all fields Ctrl+A
Select multiple objects Shift-click each object, or
drag the arrow pointer to
make a box that includes
the objects
Note To select only the
objects enclosed within the
selection box, press Ctrl
while dragging.
Select objects of the same type when an
object is selected
Ctrl+Shift+A
Select items in a list Up Arrow, Down Arrow
Move a selected item in a list Ctrl+Up Arrow, Ctrl+Down
Arrow
To Press

Keyboard shortcuts (Windows)
FILEMAKER PRO HELP 627
Mode keyboard shortcuts (Windows)
You can use keyboard shortcuts to change modes, navigate among records and fields, enter values
in records and fields, and format and edit text.
Browse mode keyboard shortcuts
You can use keyboard shortcuts in Browse mode to create, delete, duplicate, omit, sort, and print
records.
Find mode keyboard shortcuts
You can use keyboard shortcuts in Find mode to create and duplicate find requests.
To switch to Press
Browse mode Ctrl+B
Find mode Ctrl+F
Layout mode Ctrl+L
Preview mode Ctrl+U
To Press
Create a record Ctrl+N
Duplicate a record Ctrl+D
Delete a record Ctrl+E
Delete a record without confirmation Ctrl+Shift+E
Modify last find Ctrl+R
Show all records Ctrl+J
Sort records Ctrl+S
Go to the next record Ctrl+Down Arrow or Shift+PgDn
Go to the previous record Ctrl+Up Arrow or Shift+PgUp
Move to a specific record Esc (to activate the book icon), type the record
number, then press Enter
Omit a record Ctrl+T
Omit multiple records Ctrl+Shift+T
Open the Layout pop-up menu and switch layouts F2
Open or close a drop-down list or calendar for an active
field
Esc
Print records Ctrl+P
Print without Print dialog box Ctrl+Alt+P
Refresh a window Ctrl+Shift+R
Activate the quick find box Ctrl+Alt+F
To Press
Create a find request Ctrl+N

Keyboard shortcuts (Windows)
FILEMAKER PRO HELP 628
Layout mode keyboard shortcuts
In Layout mode, you can use keyboard shortcuts to arrange and align objects, format fields, control
layout tools, and create layouts.
Layout creation and navigation
Object selection and modification keyboard shortcuts
Delete a find request Ctrl+E
Duplicate a find request Ctrl+D
Show all records Ctrl+J
Perform a find Enter (disabled when a script is paused)
Insert from index Ctrl+I
Move to next find request Ctrl+Down Arrow or Shift+PgDn
Move to previous find request Ctrl+Up Arrow or Shift+PgUp
Move to a specific find request Esc (to activate the book icon), type the
request number, then press Enter
To Press
To Press
Create a new layout Ctrl+N
Go to the next layout Ctrl+Down Arrow or Shift+PgDn
Go to the previous layout Ctrl+Up Arrow or Shift+PgUp
Move to a specific layout Esc (to activate the book icon), type the
layout number, then press Enter
To Press
Select an object Tab or Shift+Tab repeatedly until the desired object is selected.
Select multiple objects Shift as you click each object individually.
Note You can also drag the arrow pointer to make a selection box
that includes the objects. The selection box does not have to
completely surround the objects. (To select only the objects enclosed
within the selection box, press Ctrl while dragging.)
Resize a selected object when
the Inspector is open (click
Inspector in the formatting
bar)
Ctrl+1 to move to the Position tab of the Inspector. Then Tab to the
desired sizing action and enter the size value you want. Press Enter
on the numeric keypad to return to the Layout window.
Resize selected objects, keeping
their proportions
Shift as you drag a handle.
Resize selected objects, keeping
the difference in their lengths or
widths the same.
Ctrl+Shift as you drag a handle.
The opposite edges of the objects remain fixed in the same position
as you resize the objects.

Keyboard shortcuts (Windows)
FILEMAKER PRO HELP 629
Object alignment keyboard shortcuts
Object arrangement keyboard shortcuts
Copy the style of a selected
object
Ctrl+Alt+C
Paste the style of another object Ctrl+Alt+V
To Press
To Press
Align left edges Ctrl+Alt+Left Arrow
Align right edges Ctrl+Alt+Right Arrow
Align top edges Ctrl+Alt+Up Arrow
Align bottom edges Ctrl+Alt+Down Arrow
Show or hide rulers Ctrl+Alt+Shift+R
Show or hide the object grid Ctrl+Alt+Y
Turn off the snap-to effect for grid, guides, or dynamic
guides while resizing an object
Alt and drag the object's handle
Turn off the snap-to effect for grid, guides, or dynamic
guides while dragging an object
Alt and drag the object
Toggle snapping objects to the grid Ctrl+Alt+Shift+Y
Show or hide guides when creating or editing objects Ctrl+Alt+;
Toggle snapping objects to guides Ctrl+Alt+Shift+;
Toggle dynamic guides when creating or editing objects Ctrl+Alt+’
To Press
Bring the selected object forward Ctrl+Shift+[
Bring the selected object to the front Ctrl+Alt+[
Change part labels from horizontal to vertical or vertical to
horizontal
Ctrl and click the label
Drag the selected layout part past an object Alt and drag the part
Duplicate the selected object Ctrl+D
Duplicate an object by dragging it Ctrl and drag the object
Group objects Ctrl+R
Lock an object Ctrl+Alt+L
Move the selected object one point at a time Arrow keys
Reorder the selected part Shift and drag the part
Rotate an object Ctrl+Alt+R
Send the selected object backward Ctrl+Shift+]
Send the selected object to the back Ctrl+Alt+]
Ungroup objects Ctrl+Shift+R

Keyboard shortcuts (Windows)
FILEMAKER PRO HELP 630
Inspector keyboard shortcuts
Layout tools keyboard shortcuts
Text keyboard shortcuts (Windows)
Use text keyboard shortcuts to edit and format text in fields and text on a layout.
Text deletion keyboard shortcuts
You can use these shortcuts in Browse, Layout, and Find modes.
Text editing keyboard shortcuts
You can use these keyboard shortcuts to edit field and layout text and to work with find requests.
Unlock an object Ctrl+Alt+Shift+L
To Press
To Press
Show or hide the Inspector Ctrl+I
Display the Position tab of the Inspector Ctrl+1
Display the Appearance tab of the Inspector Ctrl+2
Display the Data tab of the Inspector Ctrl+3
To Press
Toggle the current tool with the Selection tool Enter (numeric keypad, or Ctrl+Enter for
computers with no numeric keypad)
Draw a horizontal or vertical line with the Line tool Shift while drawing the line
Draw a line to a 45-degree increment with the Line tool Ctrl while drawing the line
Move an object only horizontally or only vertically Shift while moving the object
Draw a circle with the Oval tool Ctrl while drawing the circle
Draw a square with the Rectangle tool Ctrl while drawing the square
Constrain resizing an object to a square or circle Ctrl and then resize the object
To delete Press
Next character Delete
Next word Ctrl+Delete or Ctrl+Backspace
Previous character Backspace
To Press
Clear selected text Delete
Copy selected text Ctrl+Ins or Ctrl+C
Copy all text in a record Ctrl+C with no objects selected

Keyboard shortcuts (Windows)
FILEMAKER PRO HELP 631
Note If the current Find/Replace direction is Forward or All, the reverse keyboard shortcut
switches the direction to Backward. If the current Find/Replace direction is Backward, the reverse
keyboard shortcut switches the direction to Forward.
Text formatting keyboard shortcuts
Use these shortcuts to format text in fields, field labels, and text objects in Browse and Layout
modes.
Text alignment keyboard shortcuts
Copy all records in the found set to the
Clipboard in text form
Ctrl+Shift+C
with no objects selected
Cut selected text Shift+Delete or Ctrl+X
Paste Ctrl+V
Paste text only Ctrl+Shift+V
Undo Alt+Backspace or Ctrl+Z
Redo Ctrl+Y or Ctrl+Shift+Z
Exit text edit mode Enter (numeric keypad)
Find/replace data Ctrl+Shift+F
Find the next occurrence of the specified
data
Ctrl+G
Reverse the current direction of a Find
Again operation
Ctrl+Shift+G
Replace the Find what data with the
Replace with data, then search for and
select the next occurrence
Alt+Ctrl+G
Reverse the current direction of a
Replace & Find Again operation
Shift+Alt+Ctrl+G
Find the next occurrence of the selected
data in the database
Alt+Ctrl+H
Reverse the current direction of a Find
Selected operation
Shift+Alt+Ctrl+H
Insert a non-breaking space Ctrl+Space bar
Insert a tab in a field Ctrl+Tab
Open the Spelling dialog box when
alerted of a misspelled word
Ctrl+Shift+Y
To align selected text Press
Center Ctrl+ \
Left Ctrl+ [
Right Ctrl+]
Justified Ctrl+Shift+ \
To Press

Keyboard shortcuts (Windows)
FILEMAKER PRO HELP 632
Text style keyboard shortcuts
Text size keyboard shortcuts
Text navigation keyboard shortcuts
You can use these keyboard shortcuts in Browse, Layout, and Find modes to move the insertion
point to different areas of a text field or label.
Text selection keyboard shortcuts
You can use these shortcuts in Browse, Layout, and Find modes to extend the selection in a field.
To style selected text Press
Bold Ctrl+Shift+B
Italic Ctrl+Shift+I
Plain Ctrl+Shift+P
Underline Ctrl+Shift+U
To change the point size of selected text Press
The next point size up on the Format menu Ctrl+Shift+>
The next point size down on the menu Ctrl+Shift+<
Up one point Ctrl+Alt+Shift+>
Down one point Ctrl+Alt+Shift+<
To move the insertion
point to the Press
Beginning of the text Ctrl+Home
End of the text Ctrl+End
Beginning of the line Home
End of the line End
Beginning of the previous word Ctrl+Left Arrow
End of the next word Ctrl+Right Arrow
Previous character Left Arrow
Next character Right Arrow
Previous line Up Arrow
Next line Down Arrow
To extend selection to the Press
Beginning of line Shift+Home
Beginning of previous word Ctrl+Shift+Left Arrow
Beginning of text Ctrl+Shift+Home
End of line Shift+End

Keyboard shortcuts (Windows)
FILEMAKER PRO HELP 633
Manage database keyboard shortcuts (Windows)
Field type keyboard shortcuts
Use the following shortcuts to assign field types when working in the Fields tab of the Manage
Database dialog box.
Table and relationship selection and arrangement shortcuts
End of next word Ctrl+Shift+Right Arrow
End of text Ctrl+Shift+End
Next character Shift+Right Arrow
Next line Shift+Down Arrow
Previous character Shift+Left Arrow
Previous line Shift+Up Arrow
Entire contents of the active
field
Ctrl+A
To extend selection to the Press
To assign this field type Press
Tex t Ctrl+T
Number Ctrl+N
Date Ctrl+D
Time Ctrl+I
Timestamp Ctrl+M
Container Ctrl+R
Calculation Ctrl+L
Summary Ctrl+S
To Press
Move the selection around the relationships
graph, individually selecting tables, notes, or
relationships
Up Arrow, Down Arrow, Left Arrow, Right Arrow
Move the selection incrementally between
objects
Shift+Up Arrow, Shift+Down Arrow, Shift+Left Arrow,
Shift+Right Arrow
Move the selection to an object that includes text
beginning with specific characters
Type the characters
Note If multiple objects share initial characters, you
can move the selection to the next occurrence by
pressing Ctrl+G or typing the characters again.
Move the selected object Ctrl+Up Arrow, Ctrl+Down Arrow, Ctrl+Left Arrow,
Ctrl+Right Arrow after selecting a table, or drag the
selected table

Keyboard shortcuts (Windows)
FILEMAKER PRO HELP 634
Relationships graph shortcuts
Resize the selected object Ctrl+Shift+Up Arrow, Ctrl+Shift+Down Arrow,
Ctrl+Shift+Left Arrow, Ctrl+Shift+Right Arrow after
selecting a fully expanded table
Select multiple tables Shift-click multiple tables or drag the selection pointer
through multiple tables
Note To select by dragging completely around
tables, press Ctrl while dragging.
Select all tables and notes Ctrl+A
Note In Note mode, this command selects all notes.
Select all tables Ctrl+Shift+A
Select all tables directly related to the currently
selected table
Ctrl+Y
Select tables with the same source table Ctrl+U
Toggle the display state of selected tables or
notes
Ctrl+T
To Press
To Press
Add a table Ctrl+Shift+T
Edit a table Ctrl+O when one table is selected
Delete a table Delete when one or more tables are selected
Add a relationship Ctrl+Shift+R
Edit a relationship Ctrl+O when one relationship is selected
Delete a relationship Delete when one or more relationships are selected
Add a text note Ctrl+Shift+N
Duplicate a selection Ctrl+D, or Ctrl while dragging
Change to Pointer mode Ctrl+R
Change to Zoom In mode Ctrl+ = (equals)
Note Shift-click temporarily changes to Zoom Out
mode.
Change to Zoom Out mode Ctrl+ - (hyphen)
Note Shift-click temporarily changes to Zoom In
mode.
Change to Note mode Ctrl+N
Change the display percentage of the
relationships graph
Type a percentage value, then Enter
Move the selection from the relationships graph
to the command buttons and proceed from left to
right
Tab

Keyboard shortcuts (Windows)
FILEMAKER PRO HELP 635
FileMaker Pro Advanced keyboard shortcuts (Windows)
Script Debugger keyboard shortcuts
In FileMaker Pro Advanced, you can use the following keyboard shortcuts to perform Script
Debugger actions.
Move the selection through the command
buttons from right to left and to the relationships
graph from the Add Table command
Shift+Tab
Snap to fit Ctrl+I
Turn page guides on and off Ctrl+E
Display print setup options Ctrl+Shift+P
Select a different button Tab, Left Arrow, Right Arrow
Issue a selected command button Space bar
Issue a command in a selected button’s menu Enter or Space bar to display the menu, Up Arrow or
Down Arrow to make a selection in the menu, then
Enter to issue the command
Undo the last command Ctrl+Z
Redo the last command Ctrl+Shift+Z
To Press
To execute the Press
Step Over command F5
Step Into command F6
Step Out command F7
Run to Breakpoint command Alt+F8
Halt Script command Ctrl+F8
Set Next Step command Ctrl+Shift+F5
Set/Clear Breakpoint command
(toggle the breakpoint)
Ctrl+F9
Remove Breakpoints command Ctrl+Shift+F9
Edit Script command Ctrl+F10
Keyboard shortcuts (OS X)
FILEMAKER PRO HELP 636
Keyboard shortcuts (OS X)
You can work with FileMaker Pro in four different modes: Browse, Find, Layout, and Preview. You
can use keyboard shortcuts to invoke actions within modes and format and edit text.
Note You can create your own keyboard equivalents if you use custom menus.
General keyboard shortcuts (OS X)
You can use these keyboard shortcuts to navigate, edit, cancel an operation, and display
information in your database file.
To Press
Cancel an operation or dialog box Esc
Cancel a running script -. (period)
Click a selected button or popover
button on a layout with the keyboard
Space bar
Close dialog box Esc
Close a file -W
Close all files Option- -W
Quit -Q
Open FileMaker Pro Help -/
Open a file -O
Use a specified account name and
password to open a file
Option key while opening the file
Open a remote file -Shift-O
Open the Manage Database dialog box -Shift-D
Open the Find/Replace dialog box -Shift-F
Open the Manage Layouts dialog box -Shift-L
Open the Field Picker dialog box -K
Add a new field in the Field Picker dialog
box -Return or -Enter
Open the Preferences dialog box -,
Print -P
Print without the Print dialog box -Option-P
Reorder items in a list box, such as
Script steps, Fields, Parts
Control-Up Arrow or Control-Down
Arrow
Save (By default, FileMaker Pro saves
your record data automatically.)
Sort -S
Undo the last command -Z
Keyboard shortcuts (OS X)
FILEMAKER PRO HELP 637
Navigation keyboard shortcuts
You can use these keyboard shortcuts to move through fields, records, find requests, and layouts.
Note Your database designer might have changed the keyboard shortcuts for moving though fields.
For more information, consult your database designer or see Setting the keys for exiting a field.
Tip The OS X Mission Control feature uses the Control-Down Arrow and Control-Up Arrow keys. To
use these keys to move through records in FileMaker Pro, you need to change the keyboard
shortcuts in Mission Control preferences.
Window display keyboard shortcuts
You can use these keyboard shortcuts in all database modes to scroll through your document and
arrange windows on the screen.
Open the Manage Scripts dialog box -Shift-S
Save a script -S
Perform one of the first ten scripts listed
in the Scripts menu -1 through -0
Create a record, request, or layout -N
Delete a record, request, or layout -E
Delete a record without confirmation -Option-E
Duplicate a record, request, or layout
object -D
Save a layout -S
To move to Press
Next object (field, button, or tab) Tab
Previous object (field, button, or tab) Shift-Tab
Next record, request, layout, or page Control-Down Arrow
Previous record, request, layout, or
page
Control-Up Arrow
Next tab (When a tab is selected) Right Arrow
Previous tab (When a tab is selected) Left Arrow
To Press
Close a window -W
Resize the window; full screen or previous size -Option-Z
Scroll the document down Page Down
Scroll the document up Page Up
Scroll to the beginning of the document Home
Scroll to the end of the document End
To Press

Keyboard shortcuts (OS X)
FILEMAKER PRO HELP 638
Paste, select, and replace values keyboard shortcuts
You can use keyboard shortcuts to enter values into a field, replace values, and select objects, and
move items in a list.
Show or hide the status toolbar -Option-S
Minimize the current window -M
Hide the FileMaker Pro application -H
To insert Press
The current date - - (hyphen)
The current time -;
The current time and date in a
timestamp field -;
The current user name -Shift-N
Information from the index -I
Information from the last visited
record -' (apostrophe)
Information from the last record and
move to the next field -Shift-' (apostrophe)
Merge fields -Option-M
To paste Press
Text from the Clipboard -V
Text without styles -Option-Shift-V
To Press
Replace a field's value - =
Select all fields -A
Select multiple objects Shift-click each object, or drag the
arrow pointer to make a box that
includes the objects
Note To select only the objects
enclosed within the selection box,
press while dragging.
Select objects of the same type when
an object is selected -Option-A
Select items in a list Up Arrow, Down Arrow
To Press
Keyboard shortcuts (OS X)
FILEMAKER PRO HELP 639
Mode keyboard shortcuts (OS X)
Use the following shortcuts to switch to another mode.
Browse mode keyboard shortcuts
You can use keyboard shortcuts in Browse mode to create, delete, duplicate, omit, sort, and print
records.
Move a selected item in a list Control-Up Arrow, Control-Down
Arrow
To Press
To switch to Press
Browse mode -B
Find mode -F
Layout mode -L
Preview mode -U
To Press
Create a record -N
Duplicate a record -D
Delete a record -E
Delete a record without confirmation -Option-E
Modify last find -R
Show all records -J
Sort records -S
Go to the next record Control-Down Arrow
Go to the previous record Control-Up Arrow
Move to a specific record Esc (to activate the book icon), type the record number,
then press Enter
Omit a record -T
Omit multiple records -Shift-T
Open or close a drop-down list or calendar
for an active field
Esc
Print records -P
Print records without dialog box -Option-P
Refresh a window -Shift-R
Activate the quick find box -Option-F
Keyboard shortcuts (OS X)
FILEMAKER PRO HELP 640
Find mode keyboard shortcuts
You can use keyboard shortcuts in Find mode to create and duplicate find requests.
Layout mode keyboard shortcuts
In Layout mode, you can use keyboard shortcuts to arrange and align objects, format fields, control
layout tools, and create layouts.
Layout creation and navigation
Object selection and modification keyboard shortcuts
To Press
Select/deselect Omit button -T
Create a find request -N
Delete a find request -E
Duplicate a find request -D
Show all records -J
Perform a find request Enter (disabled when a script is paused)
Paste from the index -I
Move to next find request Control-Down Arrow
Move to previous find request Control-Up Arrow
Move to a specific find request Esc (to activate the book icon), type the request
number, then press Enter
To Press
Create a new layout -N
Go to the next layout Control-Down Arrow
Go to the previous layout Control-Up Arrow
Move to a specific layout Esc (to activate the book icon), type the
layout number, then press Enter
To Press
Select an object on the
layout
Tab or Shift-Tab repeatedly until the desired object is selected.
Select multiple objects Shift as you click each object individually.
Note You can also drag the arrow pointer to make a selection box that
includes the objects. The selection box does not have to completely
surround the objects. (To select only the objects enclosed within the
selection box, press while dragging.)
Keyboard shortcuts (OS X)
FILEMAKER PRO HELP 641
Object alignment keyboard shortcuts
Object arrangement keyboard shortcuts
Resize a selected object
when the Inspector is
open (click Inspector
in the formatting bar)
-1 to move to the Position tab of the Inspector. Then Tab to the desired
sizing action and enter the size value you want. Press Enter on the numeric
keypad to return to the Layout window.
Resize selected objects,
keeping their proportions
Shift as you drag a handle.
Resize multiple objects,
keeping the difference in
their lengths or widths the
same.
Option-Shift as you drag a handle.
The opposite edges of the objects remain fixed in the same position as you
resize the objects.
Copy the style of a
selected object -Option-C
Paste the style of another
object -Option-V
To Press
To Press
Align left edges -Option-Left Arrow
Align right edges -Option-Right Arrow
Align top edges -Option-Up Arrow
Align bottom edges -Option-Down Arrow
Show or hide rulers -Option-Shift-R
Show or hide the object grid -Option-Y
Turn off the snap-to effect for grid, guides, or
dynamic guides while resizing an object and drag the object's handle
Turn off the snap-to effect for grid, guides, or
dynamic guides while dragging an object and drag the object
Toggle snapping objects to the grid -Option-Shift-Y
Show or hide guides when creating or editing objects -Option-;
Toggle snapping objects to guides -Option-Shift-;
Toggle dynamic guides when creating or editing
objects -Option-’
To Press
Bring the selected object forward -Shift-[
Bring the selected object to the front -Option-[
Keyboard shortcuts (OS X)
FILEMAKER PRO HELP 642
Inspector keyboard shortcuts
Layout tools keyboard shortcuts
Change part labels from horizontal to vertical or
vertical to horizontal and click the label
Drag the selected layout part past an object Option and drag the part
Duplicate the selected object -D
Duplicate an object by dragging it Option and drag the object
Group objects -R
Lock an object -Option-L
Move the selected object one point at a time Arrow keys
Reorder the selected part Shift and drag the part
Rotate an object -Option-R
Send the selected object backward -Shift-]
Send the object to the back -Option-]
Ungroup objects -Shift-R
Unlock an object -Shift-Option-L
To Press
To Press
Show or hide the Inspector -I
Display the Position tab of the Inspector -1
Display the Appearance tab of the Inspector -2
Display the Data tab of the Inspector -3
To Press
Toggle the current tool with the Selection tool Enter or Shift-Enter (numeric keypad)
Fn-Enter or Fn-Shift-Enter (for computers with no
numeric keypad)
Draw a horizontal or vertical line with the Line tool Shift while drawing the line
Draw a line to a 45-degree increment with the Line
tool
Option while drawing the line
Move an object only horizontally or only vertically Shift while moving the object
Draw a circle with the Oval tool Option while drawing the circle
Draw a square with the Rectangle tool Option while drawing the square
Constrain resizing an object to a square or circle Option and then resize the object
Keyboard shortcuts (OS X)
FILEMAKER PRO HELP 643
Text keyboard shortcuts (OS X)
Use text keyboard shortcuts to edit and format text in fields and text on a layout.
Text deletion keyboard shortcuts
You can use these shortcuts in Browse, Layout, and Find modes.
Note The Forward Delete key is located under the Help key on most OS X extended keyboards.
Text editing keyboard shortcuts
You can use these keyboard shortcuts to edit field and layout text and to work with find requests.
To delete the Press
Next character Forward Delete
Next word Option-Forward Delete
Previous character Delete
Previous word Option-Delete
Text from the insertion point to
the beginning of the line -Delete
To Press
Clear selected text Delete
Copy selected text -C
Copy all text in a record -C with no objects selected
Copy all records in the found set to the
Clipboard in text form -Option-C with no objects
selected
Cut selected text -X
Paste -V
Paste text only -Shift-Option-V
Undo -Z
Redo -Y or -Shift-Z
Exit text edit mode Enter (numeric keypad)
Find/replace data -Shift-F
Find the next occurrence of the specified data -G
Reverse the current direction of a Find Again
operation -Shift-G
Replace the Find what data with the Replace
with data, then search for and select the next
occurrence
-Option-G
Reverse the current direction of a Replace &
Find Again operation -Shift-Option-G
Keyboard shortcuts (OS X)
FILEMAKER PRO HELP 644
Note If the current Find/Replace direction is Forward or All, the reverse keyboard shortcut
switches the direction to Backward. If the current Find/Replace direction is Backward, the reverse
keyboard shortcut switches the direction to Forward.
Text formatting keyboard shortcuts
Use these shortcuts to format text in fields, field labels, and text objects in Browse and Layout
modes.
Text alignment keyboard shortcuts
Text style keyboard shortcuts
Find the next occurrence of the selected data
in the database -Option-I
Reverse the current direction of a Find
Selected operation -Shift-
Option-I
Insert a non-breaking space Option-Space bar
Insert a tab in a field or move the insertion
point to the next tab stop
Option-Tab
Open the Spelling dialog box when alerted of a
misspelled word -Shift-Y
To align text Press
Center - \
Left - [
Right - ]
Justified -Shift- \
To style text Press
Bold -Shift-B
Italic -Shift-I
Plain -Shift-P
Subscript -Shift- - (hyphen)
Superscript -Shift- =
Underline -Shift-U
To Press
Keyboard shortcuts (OS X)
FILEMAKER PRO HELP 645
Text size keyboard shortcuts
Text navigation keyboard shortcuts
You can use these keyboard shortcuts in Browse, Layout, and Find modes to move the insertion
point to different areas of a text field or label.
Text selection keyboard shortcuts
You can use these shortcuts in Browse, Layout, and Find modes to extend the selection in a field.
To change point size Press
Up one point -Option-Shift->
Down one point -Option-Shift-<
The next point size up on the menu -Shift->
The next point size down on the menu -Shift-<
To move the insertion
point to the Press
Beginning of the text -Up Arrow
End of the text -Down Arrow
Beginning of the line -Left Arrow
End of the line -Right Arrow
Beginning of the previous word Option-Left Arrow
End of the next word Option-Right Arrow
Previous character Left Arrow
Next character Right Arrow
Previous line Up Arrow
Next line Down Arrow
To extend selection to the Press
Beginning of the line -Shift-Left Arrow
Beginning of the previous word Option-Shift-Left Arrow
Beginning of text -Option-Shift-Up Arrow
End of the line -Shift-Right Arrow
End of the next word Option-Shift-Right Arrow
End of text -Option-Shift-Down Arrow
Next character Shift-Right Arrow
Next line -Shift-Down Arrow
Previous character Shift-Left Arrow
Keyboard shortcuts (OS X)
FILEMAKER PRO HELP 646
Manage database keyboard shortcuts (OS X)
Field type keyboard shortcuts
Use the following shortcuts to assign field types when working in the Fields tab of the Manage
Database dialog box.
Table and relationship selection and arrangement shortcuts
Previous line -Shift-Up Arrow
Entire contents of the active field -A
To extend selection to the Press
To assign this field type Press
Tex t -T
Number -N
Date -D
Time -I
Timestamp -M
Container -R
Calculation -L
Summary -S
To Press
Move the selection around the relationships
graph, individually selecting tables, notes, or
relationships
Up Arrow, Down Arrow, Left Arrow, Right Arrow
Move the selection incrementally between
objects
Shift+Up Arrow, Shift+Down Arrow, Shift+Left Arrow,
Shift+Right Arrow
Move the selection to an object that includes text
beginning with specific characters
Type the characters
Note If multiple objects share initial characters, you
can move the selection to the next occurrence by
pressing -G or typing the characters again.
Switch between the relationships graph and the
zoom controls
Tab
Move the selected object Option-Up Arrow, Option-Down Arrow, Option-Left
Arrow, Option-Right Arrow after selecting a table, or
drag the selected table
Resize the selected object Control-Shift-Up Arrow, Control-Shift-Down Arrow,
Control-Shift-Left Arrow, Control-Shift-Right Arrow
after selecting a fully expanded table
Keyboard shortcuts (OS X)
FILEMAKER PRO HELP 647
Relationships graph shortcuts
Select multiple tables Shift-click multiple tables or drag the selection pointer
through multiple tables
Note To select by dragging completely around
tables, press while dragging.
Select all tables and notes -A
Select all tables -Shift-A
Select all tables directly related to the currently
selected table -Y
Select tables with the same source table -U
Toggle the display state of selected tables -T
To Press
To Press
Add a table -Shift-T
Edit a table -O when one table is selected
Delete a table Delete when one or more tables are selected
Add a relationship -Shift+R
Edit a relationship -O when one relationship is selected
Delete a relationship Delete when one or more relationships are selected
Add a text note -Shift-N while dragging
Duplicate a selection -D, or Option while dragging
Change to Pointer mode -R
Change to Zoom In mode - = (equals)
Note Shift-click temporarily changes to Zoom Out
mode.
Change to Zoom Out mode - - (hyphen)
Note Shift-click temporarily changes to Zoom In
mode.
Change to Note mode -N
Change the display percentage of the
relationships graph
Type a percentage value, then Enter
Snap to fit -I
Turn page guides on and off -E
Display page setup options -Shift-P
Undo the last command -Z
Keyboard shortcuts (OS X)
FILEMAKER PRO HELP 648
FileMaker Pro Advanced keyboard shortcuts (OS X)
Script Debugger keyboard shortcuts
In FileMaker Pro Advanced, you can use the following keyboard shortcuts to perform Script
Debugger actions.
Redo the last command -Shift-Z
To Press
To execute the Press
Step Over command F5
Step Into command F6
Step Out command F7
Run to Breakpoint command Option-F8
Halt Script command -F8 or
-. (period)
Set Next Step command Shift- -F5
Set/Clear Breakpoint command
(toggle the breakpoint) -F9
Remove Breakpoints command Shift- -F9
Edit Script command -F10

Functions reference
FILEMAKER PRO HELP 649
Functions reference
Click the following links to find functions by category, or alphabetically.
In the category list, FileMaker Pro functions are grouped by the type of data they operate on, not by
the type of data they return. For example, the Position function returns a number, but it is grouped
with Text functions because it operates on text data.
For information on where you can use functions, see About formulas.
Functions reference (category list)
Aggregate functions . . . . . . . . . . . . . . . . . . . . . . . . . . . . . . . . . . . . . . 662
Average . . . . . . . . . . . . . . . . . . . . . . . . . . . . . . . . . . . . . . . . . . . . . . . . . . . . . . . . . . . . . . . . . . . 662
Count . . . . . . . . . . . . . . . . . . . . . . . . . . . . . . . . . . . . . . . . . . . . . . . . . . . . . . . . . . . . . . . . . . . . . 664
List . . . . . . . . . . . . . . . . . . . . . . . . . . . . . . . . . . . . . . . . . . . . . . . . . . . . . . . . . . . . . . . . . . . . . . . 665
Max . . . . . . . . . . . . . . . . . . . . . . . . . . . . . . . . . . . . . . . . . . . . . . . . . . . . . . . . . . . . . . . . . . . . . . 667
Min . . . . . . . . . . . . . . . . . . . . . . . . . . . . . . . . . . . . . . . . . . . . . . . . . . . . . . . . . . . . . . . . . . . . . . . 668
StDev . . . . . . . . . . . . . . . . . . . . . . . . . . . . . . . . . . . . . . . . . . . . . . . . . . . . . . . . . . . . . . . . . . . . . 670
StDevP . . . . . . . . . . . . . . . . . . . . . . . . . . . . . . . . . . . . . . . . . . . . . . . . . . . . . . . . . . . . . . . . . . . . 671
Sum . . . . . . . . . . . . . . . . . . . . . . . . . . . . . . . . . . . . . . . . . . . . . . . . . . . . . . . . . . . . . . . . . . . . . . 672
Variance . . . . . . . . . . . . . . . . . . . . . . . . . . . . . . . . . . . . . . . . . . . . . . . . . . . . . . . . . . . . . . . . . . . 674
VarianceP . . . . . . . . . . . . . . . . . . . . . . . . . . . . . . . . . . . . . . . . . . . . . . . . . . . . . . . . . . . . . . . . . . 675
Container functions . . . . . . . . . . . . . . . . . . . . . . . . . . . . . . . . . . . . . . . 677
Base64Decode . . . . . . . . . . . . . . . . . . . . . . . . . . . . . . . . . . . . . . . . . . . . . . . . . . . . . . . . . . . . . . 677
Base64Encode . . . . . . . . . . . . . . . . . . . . . . . . . . . . . . . . . . . . . . . . . . . . . . . . . . . . . . . . . . . . . . 678
GetContainerAttribute . . . . . . . . . . . . . . . . . . . . . . . . . . . . . . . . . . . . . . . . . . . . . . . . . . . . . . . . 679
GetHeight . . . . . . . . . . . . . . . . . . . . . . . . . . . . . . . . . . . . . . . . . . . . . . . . . . . . . . . . . . . . . . . . . . 683
GetThumbnail . . . . . . . . . . . . . . . . . . . . . . . . . . . . . . . . . . . . . . . . . . . . . . . . . . . . . . . . . . . . . . . 684
GetWidth . . . . . . . . . . . . . . . . . . . . . . . . . . . . . . . . . . . . . . . . . . . . . . . . . . . . . . . . . . . . . . . . . . 685
VerifyContainer . . . . . . . . . . . . . . . . . . . . . . . . . . . . . . . . . . . . . . . . . . . . . . . . . . . . . . . . . . . . . 685
Date functions . . . . . . . . . . . . . . . . . . . . . . . . . . . . . . . . . . . . . . . . . . . 686
Date . . . . . . . . . . . . . . . . . . . . . . . . . . . . . . . . . . . . . . . . . . . . . . . . . . . . . . . . . . . . . . . . . . . . . . 687
Day . . . . . . . . . . . . . . . . . . . . . . . . . . . . . . . . . . . . . . . . . . . . . . . . . . . . . . . . . . . . . . . . . . . . . . . 688
DayName . . . . . . . . . . . . . . . . . . . . . . . . . . . . . . . . . . . . . . . . . . . . . . . . . . . . . . . . . . . . . . . . . . 689
DayNameJ . . . . . . . . . . . . . . . . . . . . . . . . . . . . . . . . . . . . . . . . . . . . . . . . . . . . . . . . . . . . . . . . . 690
DayOfWeek . . . . . . . . . . . . . . . . . . . . . . . . . . . . . . . . . . . . . . . . . . . . . . . . . . . . . . . . . . . . . . . . 691
DayOfYear . . . . . . . . . . . . . . . . . . . . . . . . . . . . . . . . . . . . . . . . . . . . . . . . . . . . . . . . . . . . . . . . . 692
Month . . . . . . . . . . . . . . . . . . . . . . . . . . . . . . . . . . . . . . . . . . . . . . . . . . . . . . . . . . . . . . . . . . . . . 693
MonthName . . . . . . . . . . . . . . . . . . . . . . . . . . . . . . . . . . . . . . . . . . . . . . . . . . . . . . . . . . . . . . . . 694
MonthNameJ . . . . . . . . . . . . . . . . . . . . . . . . . . . . . . . . . . . . . . . . . . . . . . . . . . . . . . . . . . . . . . . 694
WeekOfYear . . . . . . . . . . . . . . . . . . . . . . . . . . . . . . . . . . . . . . . . . . . . . . . . . . . . . . . . . . . . . . . . 695
WeekOfYearFiscal . . . . . . . . . . . . . . . . . . . . . . . . . . . . . . . . . . . . . . . . . . . . . . . . . . . . . . . . . . . 696
Year . . . . . . . . . . . . . . . . . . . . . . . . . . . . . . . . . . . . . . . . . . . . . . . . . . . . . . . . . . . . . . . . . . . . . . 697
YearName . . . . . . . . . . . . . . . . . . . . . . . . . . . . . . . . . . . . . . . . . . . . . . . . . . . . . . . . . . . . . . . . . 698
Design functions . . . . . . . . . . . . . . . . . . . . . . . . . . . . . . . . . . . . . . . . . 699
DatabaseNames . . . . . . . . . . . . . . . . . . . . . . . . . . . . . . . . . . . . . . . . . . . . . . . . . . . . . . . . . . . . 700
FieldBounds . . . . . . . . . . . . . . . . . . . . . . . . . . . . . . . . . . . . . . . . . . . . . . . . . . . . . . . . . . . . . . . . 701
Functions reference
FILEMAKER PRO HELP 650
FieldComment . . . . . . . . . . . . . . . . . . . . . . . . . . . . . . . . . . . . . . . . . . . . . . . . . . . . . . . . . . . . . . 703
FieldIDs . . . . . . . . . . . . . . . . . . . . . . . . . . . . . . . . . . . . . . . . . . . . . . . . . . . . . . . . . . . . . . . . . . . 703
FieldNames . . . . . . . . . . . . . . . . . . . . . . . . . . . . . . . . . . . . . . . . . . . . . . . . . . . . . . . . . . . . . . . . 704
FieldRepetitions . . . . . . . . . . . . . . . . . . . . . . . . . . . . . . . . . . . . . . . . . . . . . . . . . . . . . . . . . . . . . 705
FieldStyle . . . . . . . . . . . . . . . . . . . . . . . . . . . . . . . . . . . . . . . . . . . . . . . . . . . . . . . . . . . . . . . . . . 706
FieldType . . . . . . . . . . . . . . . . . . . . . . . . . . . . . . . . . . . . . . . . . . . . . . . . . . . . . . . . . . . . . . . . . . 707
GetNextSerialValue . . . . . . . . . . . . . . . . . . . . . . . . . . . . . . . . . . . . . . . . . . . . . . . . . . . . . . . . . . 709
LayoutIDs . . . . . . . . . . . . . . . . . . . . . . . . . . . . . . . . . . . . . . . . . . . . . . . . . . . . . . . . . . . . . . . . . . 709
LayoutNames . . . . . . . . . . . . . . . . . . . . . . . . . . . . . . . . . . . . . . . . . . . . . . . . . . . . . . . . . . . . . . . 710
LayoutObjectNames . . . . . . . . . . . . . . . . . . . . . . . . . . . . . . . . . . . . . . . . . . . . . . . . . . . . . . . . . . 711
RelationInfo . . . . . . . . . . . . . . . . . . . . . . . . . . . . . . . . . . . . . . . . . . . . . . . . . . . . . . . . . . . . . . . . 712
ScriptIDs . . . . . . . . . . . . . . . . . . . . . . . . . . . . . . . . . . . . . . . . . . . . . . . . . . . . . . . . . . . . . . . . . . . 714
ScriptNames . . . . . . . . . . . . . . . . . . . . . . . . . . . . . . . . . . . . . . . . . . . . . . . . . . . . . . . . . . . . . . . . 714
TableIDs . . . . . . . . . . . . . . . . . . . . . . . . . . . . . . . . . . . . . . . . . . . . . . . . . . . . . . . . . . . . . . . . . . . 715
TableNames . . . . . . . . . . . . . . . . . . . . . . . . . . . . . . . . . . . . . . . . . . . . . . . . . . . . . . . . . . . . . . . . 716
ValueListIDs . . . . . . . . . . . . . . . . . . . . . . . . . . . . . . . . . . . . . . . . . . . . . . . . . . . . . . . . . . . . . . . . 717
ValueListItems . . . . . . . . . . . . . . . . . . . . . . . . . . . . . . . . . . . . . . . . . . . . . . . . . . . . . . . . . . . . . . 718
ValueListNames . . . . . . . . . . . . . . . . . . . . . . . . . . . . . . . . . . . . . . . . . . . . . . . . . . . . . . . . . . . . . 718
WindowNames . . . . . . . . . . . . . . . . . . . . . . . . . . . . . . . . . . . . . . . . . . . . . . . . . . . . . . . . . . . . . . 719
External functions . . . . . . . . . . . . . . . . . . . . . . . . . . . . . . . . . . . . . . . . 720
External . . . . . . . . . . . . . . . . . . . . . . . . . . . . . . . . . . . . . . . . . . . . . . . . . . . . . . . . . . . . . . . . . . . 721
Financial functions . . . . . . . . . . . . . . . . . . . . . . . . . . . . . . . . . . . . . . . 722
FV . . . . . . . . . . . . . . . . . . . . . . . . . . . . . . . . . . . . . . . . . . . . . . . . . . . . . . . . . . . . . . . . . . . . . . . . 722
NPV . . . . . . . . . . . . . . . . . . . . . . . . . . . . . . . . . . . . . . . . . . . . . . . . . . . . . . . . . . . . . . . . . . . . . . 723
PMT . . . . . . . . . . . . . . . . . . . . . . . . . . . . . . . . . . . . . . . . . . . . . . . . . . . . . . . . . . . . . . . . . . . . . . 724
PV . . . . . . . . . . . . . . . . . . . . . . . . . . . . . . . . . . . . . . . . . . . . . . . . . . . . . . . . . . . . . . . . . . . . . . . 725
Get functions . . . . . . . . . . . . . . . . . . . . . . . . . . . . . . . . . . . . . . . . . . . . 727
Get(AccountExtendedPrivileges) . . . . . . . . . . . . . . . . . . . . . . . . . . . . . . . . . . . . . . . . . . . . . . . . 732
Get(AccountName) . . . . . . . . . . . . . . . . . . . . . . . . . . . . . . . . . . . . . . . . . . . . . . . . . . . . . . . . . . 733
Get(AccountPrivilegeSetName) . . . . . . . . . . . . . . . . . . . . . . . . . . . . . . . . . . . . . . . . . . . . . . . . . 735
Get(ActiveFieldContents) . . . . . . . . . . . . . . . . . . . . . . . . . . . . . . . . . . . . . . . . . . . . . . . . . . . . . . 736
Get(ActiveFieldName) . . . . . . . . . . . . . . . . . . . . . . . . . . . . . . . . . . . . . . . . . . . . . . . . . . . . . . . . 736
Get(ActiveFieldTableName) . . . . . . . . . . . . . . . . . . . . . . . . . . . . . . . . . . . . . . . . . . . . . . . . . . . .737
Get(ActiveLayoutObjectName) . . . . . . . . . . . . . . . . . . . . . . . . . . . . . . . . . . . . . . . . . . . . . . . . . 738
Get(ActiveModifierKeys) . . . . . . . . . . . . . . . . . . . . . . . . . . . . . . . . . . . . . . . . . . . . . . . . . . . . . . 739
Get(ActivePortalRowNumber) . . . . . . . . . . . . . . . . . . . . . . . . . . . . . . . . . . . . . . . . . . . . . . . . . . 740
Get(ActiveRepetitionNumber) . . . . . . . . . . . . . . . . . . . . . . . . . . . . . . . . . . . . . . . . . . . . . . . . . .741
Get(ActiveSelectionSize) . . . . . . . . . . . . . . . . . . . . . . . . . . . . . . . . . . . . . . . . . . . . . . . . . . . . . . 742
Get(ActiveSelectionStart) . . . . . . . . . . . . . . . . . . . . . . . . . . . . . . . . . . . . . . . . . . . . . . . . . . . . . . 742
Get(AllowAbortState) . . . . . . . . . . . . . . . . . . . . . . . . . . . . . . . . . . . . . . . . . . . . . . . . . . . . . . . . . 743
Get(AllowFormattingBarState) . . . . . . . . . . . . . . . . . . . . . . . . . . . . . . . . . . . . . . . . . . . . . . . . . .744
Get(ApplicationLanguage) . . . . . . . . . . . . . . . . . . . . . . . . . . . . . . . . . . . . . . . . . . . . . . . . . . . . . 745
Get(ApplicationVersion) . . . . . . . . . . . . . . . . . . . . . . . . . . . . . . . . . . . . . . . . . . . . . . . . . . . . . . . 746
Get(CalculationRepetitionNumber) . . . . . . . . . . . . . . . . . . . . . . . . . . . . . . . . . . . . . . . . . . . . . . 747
Get(ConnectionAttributes) . . . . . . . . . . . . . . . . . . . . . . . . . . . . . . . . . . . . . . . . . . . . . . . . . . . . . 748
Get(ConnectionState) . . . . . . . . . . . . . . . . . . . . . . . . . . . . . . . . . . . . . . . . . . . . . . . . . . . . . . . . 749
Get(CurrentDate) . . . . . . . . . . . . . . . . . . . . . . . . . . . . . . . . . . . . . . . . . . . . . . . . . . . . . . . . . . . . 750
Get(CurrentExtendedPrivileges) . . . . . . . . . . . . . . . . . . . . . . . . . . . . . . . . . . . . . . . . . . . . . . . . 751
Functions reference
FILEMAKER PRO HELP 651
Get(CurrentHostTimestamp) . . . . . . . . . . . . . . . . . . . . . . . . . . . . . . . . . . . . . . . . . . . . . . . . . . .752
Get(CurrentPrivilegeSetName) . . . . . . . . . . . . . . . . . . . . . . . . . . . . . . . . . . . . . . . . . . . . . . . . . 753
Get(CurrentTime) . . . . . . . . . . . . . . . . . . . . . . . . . . . . . . . . . . . . . . . . . . . . . . . . . . . . . . . . . . . . 754
Get(CurrentTimestamp) . . . . . . . . . . . . . . . . . . . . . . . . . . . . . . . . . . . . . . . . . . . . . . . . . . . . . . . 755
Get(CurrentTimeUTCMilliseconds) . . . . . . . . . . . . . . . . . . . . . . . . . . . . . . . . . . . . . . . . . . . . . . 756
Get(CustomMenuSetName) . . . . . . . . . . . . . . . . . . . . . . . . . . . . . . . . . . . . . . . . . . . . . . . . . . . . 757
Get(DesktopPath) . . . . . . . . . . . . . . . . . . . . . . . . . . . . . . . . . . . . . . . . . . . . . . . . . . . . . . . . . . . 758
Get(Device) . . . . . . . . . . . . . . . . . . . . . . . . . . . . . . . . . . . . . . . . . . . . . . . . . . . . . . . . . . . . . . . . 759
Get(DocumentsPath) . . . . . . . . . . . . . . . . . . . . . . . . . . . . . . . . . . . . . . . . . . . . . . . . . . . . . . . . . 759
Get(DocumentsPathListing) . . . . . . . . . . . . . . . . . . . . . . . . . . . . . . . . . . . . . . . . . . . . . . . . . . . .761
Get(EncryptionState) . . . . . . . . . . . . . . . . . . . . . . . . . . . . . . . . . . . . . . . . . . . . . . . . . . . . . . . . . 762
Get(ErrorCaptureState) . . . . . . . . . . . . . . . . . . . . . . . . . . . . . . . . . . . . . . . . . . . . . . . . . . . . . . . 762
Get(FileMakerPath) . . . . . . . . . . . . . . . . . . . . . . . . . . . . . . . . . . . . . . . . . . . . . . . . . . . . . . . . . . 763
Get(FileName) . . . . . . . . . . . . . . . . . . . . . . . . . . . . . . . . . . . . . . . . . . . . . . . . . . . . . . . . . . . . . . 764
Get(FilePath) . . . . . . . . . . . . . . . . . . . . . . . . . . . . . . . . . . . . . . . . . . . . . . . . . . . . . . . . . . . . . . . 765
Get(FileSize) . . . . . . . . . . . . . . . . . . . . . . . . . . . . . . . . . . . . . . . . . . . . . . . . . . . . . . . . . . . . . . . 766
Get(FoundCount) . . . . . . . . . . . . . . . . . . . . . . . . . . . . . . . . . . . . . . . . . . . . . . . . . . . . . . . . . . . . 767
Get(HighContrastColor) . . . . . . . . . . . . . . . . . . . . . . . . . . . . . . . . . . . . . . . . . . . . . . . . . . . . . . . 767
Get(HighContrastState) . . . . . . . . . . . . . . . . . . . . . . . . . . . . . . . . . . . . . . . . . . . . . . . . . . . . . . . 768
Get(HostApplicationVersion) . . . . . . . . . . . . . . . . . . . . . . . . . . . . . . . . . . . . . . . . . . . . . . . . . . . 769
Get(HostIPAddress) . . . . . . . . . . . . . . . . . . . . . . . . . . . . . . . . . . . . . . . . . . . . . . . . . . . . . . . . . . 770
Get(HostName) . . . . . . . . . . . . . . . . . . . . . . . . . . . . . . . . . . . . . . . . . . . . . . . . . . . . . . . . . . . . . 771
Get(InstalledFMPlugins) . . . . . . . . . . . . . . . . . . . . . . . . . . . . . . . . . . . . . . . . . . . . . . . . . . . . . . . 772
Get(LastError) . . . . . . . . . . . . . . . . . . . . . . . . . . . . . . . . . . . . . . . . . . . . . . . . . . . . . . . . . . . . . . 774
Get(LastMessageChoice) . . . . . . . . . . . . . . . . . . . . . . . . . . . . . . . . . . . . . . . . . . . . . . . . . . . . .775
Get(LastODBCError) . . . . . . . . . . . . . . . . . . . . . . . . . . . . . . . . . . . . . . . . . . . . . . . . . . . . . . . . . 776
Get(LayoutAccess) . . . . . . . . . . . . . . . . . . . . . . . . . . . . . . . . . . . . . . . . . . . . . . . . . . . . . . . . . . . 777
Get(LayoutCount) . . . . . . . . . . . . . . . . . . . . . . . . . . . . . . . . . . . . . . . . . . . . . . . . . . . . . . . . . . . . 778
Get(LayoutName) . . . . . . . . . . . . . . . . . . . . . . . . . . . . . . . . . . . . . . . . . . . . . . . . . . . . . . . . . . . . 778
Get(LayoutNumber) . . . . . . . . . . . . . . . . . . . . . . . . . . . . . . . . . . . . . . . . . . . . . . . . . . . . . . . . . . 779
Get(LayoutTableName) . . . . . . . . . . . . . . . . . . . . . . . . . . . . . . . . . . . . . . . . . . . . . . . . . . . . . . . 780
Get(LayoutViewState) . . . . . . . . . . . . . . . . . . . . . . . . . . . . . . . . . . . . . . . . . . . . . . . . . . . . . . . . 781
Get(ModifiedFields) . . . . . . . . . . . . . . . . . . . . . . . . . . . . . . . . . . . . . . . . . . . . . . . . . . . . . . . . . . 782
Get(MultiUserState) . . . . . . . . . . . . . . . . . . . . . . . . . . . . . . . . . . . . . . . . . . . . . . . . . . . . . . . . . . 783
Get(NetworkProtocol) . . . . . . . . . . . . . . . . . . . . . . . . . . . . . . . . . . . . . . . . . . . . . . . . . . . . . . . . . 784
Get(NetworkType) . . . . . . . . . . . . . . . . . . . . . . . . . . . . . . . . . . . . . . . . . . . . . . . . . . . . . . . . . . . 785
Get(PageNumber) . . . . . . . . . . . . . . . . . . . . . . . . . . . . . . . . . . . . . . . . . . . . . . . . . . . . . . . . . . . 785
Get(PersistentID) . . . . . . . . . . . . . . . . . . . . . . . . . . . . . . . . . . . . . . . . . . . . . . . . . . . . . . . . . . . . 786
Get(PreferencesPath) . . . . . . . . . . . . . . . . . . . . . . . . . . . . . . . . . . . . . . . . . . . . . . . . . . . . . . . . 787
Get(PrinterName) . . . . . . . . . . . . . . . . . . . . . . . . . . . . . . . . . . . . . . . . . . . . . . . . . . . . . . . . . . . . 788
Get(QuickFindText) . . . . . . . . . . . . . . . . . . . . . . . . . . . . . . . . . . . . . . . . . . . . . . . . . . . . . . . . . . 789
Get(RecordAccess) . . . . . . . . . . . . . . . . . . . . . . . . . . . . . . . . . . . . . . . . . . . . . . . . . . . . . . . . . . 790
Get(RecordID) . . . . . . . . . . . . . . . . . . . . . . . . . . . . . . . . . . . . . . . . . . . . . . . . . . . . . . . . . . . . . . 791
Get(RecordModificationCount) . . . . . . . . . . . . . . . . . . . . . . . . . . . . . . . . . . . . . . . . . . . . . . . . . .792
Get(RecordNumber) . . . . . . . . . . . . . . . . . . . . . . . . . . . . . . . . . . . . . . . . . . . . . . . . . . . . . . . . . . 793
Get(RecordOpenCount) . . . . . . . . . . . . . . . . . . . . . . . . . . . . . . . . . . . . . . . . . . . . . . . . . . . . . . . 794
Get(RecordOpenState) . . . . . . . . . . . . . . . . . . . . . . . . . . . . . . . . . . . . . . . . . . . . . . . . . . . . . . . 795
Get(RequestCount) . . . . . . . . . . . . . . . . . . . . . . . . . . . . . . . . . . . . . . . . . . . . . . . . . . . . . . . . . . 796
Get(RequestOmitState) . . . . . . . . . . . . . . . . . . . . . . . . . . . . . . . . . . . . . . . . . . . . . . . . . . . . . . . 796
Get(ScreenDepth) . . . . . . . . . . . . . . . . . . . . . . . . . . . . . . . . . . . . . . . . . . . . . . . . . . . . . . . . . . . 797
Get(ScreenHeight) . . . . . . . . . . . . . . . . . . . . . . . . . . . . . . . . . . . . . . . . . . . . . . . . . . . . . . . . . . . 798
Get(ScreenWidth) . . . . . . . . . . . . . . . . . . . . . . . . . . . . . . . . . . . . . . . . . . . . . . . . . . . . . . . . . . . 799
Get(ScriptAnimationState) . . . . . . . . . . . . . . . . . . . . . . . . . . . . . . . . . . . . . . . . . . . . . . . . . . . . . 800
Get(ScriptName) . . . . . . . . . . . . . . . . . . . . . . . . . . . . . . . . . . . . . . . . . . . . . . . . . . . . . . . . . . . . 801
Functions reference
FILEMAKER PRO HELP 652
Get(ScriptParameter) . . . . . . . . . . . . . . . . . . . . . . . . . . . . . . . . . . . . . . . . . . . . . . . . . . . . . . . . . 801
Get(ScriptResult) . . . . . . . . . . . . . . . . . . . . . . . . . . . . . . . . . . . . . . . . . . . . . . . . . . . . . . . . . . . . 803
Get(SortState) . . . . . . . . . . . . . . . . . . . . . . . . . . . . . . . . . . . . . . . . . . . . . . . . . . . . . . . . . . . . . . 804
Get(StatusAreaState) . . . . . . . . . . . . . . . . . . . . . . . . . . . . . . . . . . . . . . . . . . . . . . . . . . . . . . . . . 805
Get(SystemDrive) . . . . . . . . . . . . . . . . . . . . . . . . . . . . . . . . . . . . . . . . . . . . . . . . . . . . . . . . . . . . 806
Get(SystemIPAddress) . . . . . . . . . . . . . . . . . . . . . . . . . . . . . . . . . . . . . . . . . . . . . . . . . . . . . . . 806
Get(SystemLanguage) . . . . . . . . . . . . . . . . . . . . . . . . . . . . . . . . . . . . . . . . . . . . . . . . . . . . . . . . 808
Get(SystemNICAddress) . . . . . . . . . . . . . . . . . . . . . . . . . . . . . . . . . . . . . . . . . . . . . . . . . . . . . . 808
Get(SystemPlatform) . . . . . . . . . . . . . . . . . . . . . . . . . . . . . . . . . . . . . . . . . . . . . . . . . . . . . . . . . 809
Get(SystemVersion) . . . . . . . . . . . . . . . . . . . . . . . . . . . . . . . . . . . . . . . . . . . . . . . . . . . . . . . . . . 810
Get(TemporaryPath) . . . . . . . . . . . . . . . . . . . . . . . . . . . . . . . . . . . . . . . . . . . . . . . . . . . . . . . . . 812
Get(TextRulerVisible) . . . . . . . . . . . . . . . . . . . . . . . . . . . . . . . . . . . . . . . . . . . . . . . . . . . . . . . . . 813
Get(TotalRecordCount) . . . . . . . . . . . . . . . . . . . . . . . . . . . . . . . . . . . . . . . . . . . . . . . . . . . . . . . 814
Get(TriggerCurrentPanel) . . . . . . . . . . . . . . . . . . . . . . . . . . . . . . . . . . . . . . . . . . . . . . . . . . . . . 815
Get(TriggerGestureInfo) . . . . . . . . . . . . . . . . . . . . . . . . . . . . . . . . . . . . . . . . . . . . . . . . . . . . . . . 816
Get(TriggerKeystroke) . . . . . . . . . . . . . . . . . . . . . . . . . . . . . . . . . . . . . . . . . . . . . . . . . . . . . . . . 817
Get(TriggerModifierKeys) . . . . . . . . . . . . . . . . . . . . . . . . . . . . . . . . . . . . . . . . . . . . . . . . . . . . . . 818
Get(TriggerTargetPanel) . . . . . . . . . . . . . . . . . . . . . . . . . . . . . . . . . . . . . . . . . . . . . . . . . . . . . . 819
Get(UserCount) . . . . . . . . . . . . . . . . . . . . . . . . . . . . . . . . . . . . . . . . . . . . . . . . . . . . . . . . . . . . . 820
Get(UserName) . . . . . . . . . . . . . . . . . . . . . . . . . . . . . . . . . . . . . . . . . . . . . . . . . . . . . . . . . . . . . 821
Get(UseSystemFormatsState) . . . . . . . . . . . . . . . . . . . . . . . . . . . . . . . . . . . . . . . . . . . . . . . . . . 822
Get(UUID) . . . . . . . . . . . . . . . . . . . . . . . . . . . . . . . . . . . . . . . . . . . . . . . . . . . . . . . . . . . . . . . . . 823
Get(WindowContentHeight) . . . . . . . . . . . . . . . . . . . . . . . . . . . . . . . . . . . . . . . . . . . . . . . . . . . .824
Get(WindowContentWidth) . . . . . . . . . . . . . . . . . . . . . . . . . . . . . . . . . . . . . . . . . . . . . . . . . . . .825
Get(WindowDesktopHeight) . . . . . . . . . . . . . . . . . . . . . . . . . . . . . . . . . . . . . . . . . . . . . . . . . . . .826
Get(WindowDesktopWidth) . . . . . . . . . . . . . . . . . . . . . . . . . . . . . . . . . . . . . . . . . . . . . . . . . . . .827
Get(WindowHeight) . . . . . . . . . . . . . . . . . . . . . . . . . . . . . . . . . . . . . . . . . . . . . . . . . . . . . . . . . . 828
Get(WindowLeft) . . . . . . . . . . . . . . . . . . . . . . . . . . . . . . . . . . . . . . . . . . . . . . . . . . . . . . . . . . . . 828
Get(WindowMode) . . . . . . . . . . . . . . . . . . . . . . . . . . . . . . . . . . . . . . . . . . . . . . . . . . . . . . . . . . . 829
Get(WindowName) . . . . . . . . . . . . . . . . . . . . . . . . . . . . . . . . . . . . . . . . . . . . . . . . . . . . . . . . . . . 830
Get(WindowOrientation) . . . . . . . . . . . . . . . . . . . . . . . . . . . . . . . . . . . . . . . . . . . . . . . . . . . . . . . 831
Get(WindowStyle) . . . . . . . . . . . . . . . . . . . . . . . . . . . . . . . . . . . . . . . . . . . . . . . . . . . . . . . . . . . 832
Get(WindowTop) . . . . . . . . . . . . . . . . . . . . . . . . . . . . . . . . . . . . . . . . . . . . . . . . . . . . . . . . . . . . 833
Get(WindowVisible) . . . . . . . . . . . . . . . . . . . . . . . . . . . . . . . . . . . . . . . . . . . . . . . . . . . . . . . . . . 834
Get(WindowWidth) . . . . . . . . . . . . . . . . . . . . . . . . . . . . . . . . . . . . . . . . . . . . . . . . . . . . . . . . . . . 835
Get(WindowZoomLevel) . . . . . . . . . . . . . . . . . . . . . . . . . . . . . . . . . . . . . . . . . . . . . . . . . . . . . .836
Logical functions . . . . . . . . . . . . . . . . . . . . . . . . . . . . . . . . . . . . . . . . . 838
Case . . . . . . . . . . . . . . . . . . . . . . . . . . . . . . . . . . . . . . . . . . . . . . . . . . . . . . . . . . . . . . . . . . . . . . 839
Choose . . . . . . . . . . . . . . . . . . . . . . . . . . . . . . . . . . . . . . . . . . . . . . . . . . . . . . . . . . . . . . . . . . . . 840
Evaluate . . . . . . . . . . . . . . . . . . . . . . . . . . . . . . . . . . . . . . . . . . . . . . . . . . . . . . . . . . . . . . . . . . . 841
EvaluationError . . . . . . . . . . . . . . . . . . . . . . . . . . . . . . . . . . . . . . . . . . . . . . . . . . . . . . . . . . . . . 842
ExecuteSQL . . . . . . . . . . . . . . . . . . . . . . . . . . . . . . . . . . . . . . . . . . . . . . . . . . . . . . . . . . . . . . . . 843
GetAsBoolean . . . . . . . . . . . . . . . . . . . . . . . . . . . . . . . . . . . . . . . . . . . . . . . . . . . . . . . . . . . . . . 845
GetField . . . . . . . . . . . . . . . . . . . . . . . . . . . . . . . . . . . . . . . . . . . . . . . . . . . . . . . . . . . . . . . . . . . 846
GetFieldName . . . . . . . . . . . . . . . . . . . . . . . . . . . . . . . . . . . . . . . . . . . . . . . . . . . . . . . . . . . . . . 847
GetLayoutObjectAttribute . . . . . . . . . . . . . . . . . . . . . . . . . . . . . . . . . . . . . . . . . . . . . . . . . . . . . . 848
GetNthRecord . . . . . . . . . . . . . . . . . . . . . . . . . . . . . . . . . . . . . . . . . . . . . . . . . . . . . . . . . . . . . . 850
If . . . . . . . . . . . . . . . . . . . . . . . . . . . . . . . . . . . . . . . . . . . . . . . . . . . . . . . . . . . . . . . . . . . . . . . . . 851
IsEmpty . . . . . . . . . . . . . . . . . . . . . . . . . . . . . . . . . . . . . . . . . . . . . . . . . . . . . . . . . . . . . . . . . . . 852
IsValid . . . . . . . . . . . . . . . . . . . . . . . . . . . . . . . . . . . . . . . . . . . . . . . . . . . . . . . . . . . . . . . . . . . . 853
IsValidExpression . . . . . . . . . . . . . . . . . . . . . . . . . . . . . . . . . . . . . . . . . . . . . . . . . . . . . . . . . . . . 854
Let . . . . . . . . . . . . . . . . . . . . . . . . . . . . . . . . . . . . . . . . . . . . . . . . . . . . . . . . . . . . . . . . . . . . . . . 855
Functions reference
FILEMAKER PRO HELP 653
Lookup . . . . . . . . . . . . . . . . . . . . . . . . . . . . . . . . . . . . . . . . . . . . . . . . . . . . . . . . . . . . . . . . . . . . 857
LookupNext . . . . . . . . . . . . . . . . . . . . . . . . . . . . . . . . . . . . . . . . . . . . . . . . . . . . . . . . . . . . . . . . 858
Self . . . . . . . . . . . . . . . . . . . . . . . . . . . . . . . . . . . . . . . . . . . . . . . . . . . . . . . . . . . . . . . . . . . . . . . 859
Mobile functions . . . . . . . . . . . . . . . . . . . . . . . . . . . . . . . . . . . . . . . . . 860
Location . . . . . . . . . . . . . . . . . . . . . . . . . . . . . . . . . . . . . . . . . . . . . . . . . . . . . . . . . . . . . . . . . . . 861
LocationValues . . . . . . . . . . . . . . . . . . . . . . . . . . . . . . . . . . . . . . . . . . . . . . . . . . . . . . . . . . . . . . 862
Number functions . . . . . . . . . . . . . . . . . . . . . . . . . . . . . . . . . . . . . . . . 863
Abs . . . . . . . . . . . . . . . . . . . . . . . . . . . . . . . . . . . . . . . . . . . . . . . . . . . . . . . . . . . . . . . . . . . . . . . 864
Ceiling . . . . . . . . . . . . . . . . . . . . . . . . . . . . . . . . . . . . . . . . . . . . . . . . . . . . . . . . . . . . . . . . . . . . 865
Combination . . . . . . . . . . . . . . . . . . . . . . . . . . . . . . . . . . . . . . . . . . . . . . . . . . . . . . . . . . . . . . . . 865
Div . . . . . . . . . . . . . . . . . . . . . . . . . . . . . . . . . . . . . . . . . . . . . . . . . . . . . . . . . . . . . . . . . . . . . . . 866
Exp . . . . . . . . . . . . . . . . . . . . . . . . . . . . . . . . . . . . . . . . . . . . . . . . . . . . . . . . . . . . . . . . . . . . . . . 867
Factorial . . . . . . . . . . . . . . . . . . . . . . . . . . . . . . . . . . . . . . . . . . . . . . . . . . . . . . . . . . . . . . . . . . . 868
Floor . . . . . . . . . . . . . . . . . . . . . . . . . . . . . . . . . . . . . . . . . . . . . . . . . . . . . . . . . . . . . . . . . . . . . . 869
Int . . . . . . . . . . . . . . . . . . . . . . . . . . . . . . . . . . . . . . . . . . . . . . . . . . . . . . . . . . . . . . . . . . . . . . . . 869
Lg . . . . . . . . . . . . . . . . . . . . . . . . . . . . . . . . . . . . . . . . . . . . . . . . . . . . . . . . . . . . . . . . . . . . . . . . 870
Ln . . . . . . . . . . . . . . . . . . . . . . . . . . . . . . . . . . . . . . . . . . . . . . . . . . . . . . . . . . . . . . . . . . . . . . . . 871
Log . . . . . . . . . . . . . . . . . . . . . . . . . . . . . . . . . . . . . . . . . . . . . . . . . . . . . . . . . . . . . . . . . . . . . . . 872
Mod . . . . . . . . . . . . . . . . . . . . . . . . . . . . . . . . . . . . . . . . . . . . . . . . . . . . . . . . . . . . . . . . . . . . . . 873
Random . . . . . . . . . . . . . . . . . . . . . . . . . . . . . . . . . . . . . . . . . . . . . . . . . . . . . . . . . . . . . . . . . . . 874
Round . . . . . . . . . . . . . . . . . . . . . . . . . . . . . . . . . . . . . . . . . . . . . . . . . . . . . . . . . . . . . . . . . . . . . 875
SetPrecision . . . . . . . . . . . . . . . . . . . . . . . . . . . . . . . . . . . . . . . . . . . . . . . . . . . . . . . . . . . . . . . . 875
Sign . . . . . . . . . . . . . . . . . . . . . . . . . . . . . . . . . . . . . . . . . . . . . . . . . . . . . . . . . . . . . . . . . . . . . . 876
Sqrt . . . . . . . . . . . . . . . . . . . . . . . . . . . . . . . . . . . . . . . . . . . . . . . . . . . . . . . . . . . . . . . . . . . . . . . 877
Truncate . . . . . . . . . . . . . . . . . . . . . . . . . . . . . . . . . . . . . . . . . . . . . . . . . . . . . . . . . . . . . . . . . . . 878
Repeating functions . . . . . . . . . . . . . . . . . . . . . . . . . . . . . . . . . . . . . . 879
Extend . . . . . . . . . . . . . . . . . . . . . . . . . . . . . . . . . . . . . . . . . . . . . . . . . . . . . . . . . . . . . . . . . . . . 879
GetRepetition . . . . . . . . . . . . . . . . . . . . . . . . . . . . . . . . . . . . . . . . . . . . . . . . . . . . . . . . . . . . . . . 880
Last . . . . . . . . . . . . . . . . . . . . . . . . . . . . . . . . . . . . . . . . . . . . . . . . . . . . . . . . . . . . . . . . . . . . . . 881
Summary functions . . . . . . . . . . . . . . . . . . . . . . . . . . . . . . . . . . . . . . . 882
GetSummary . . . . . . . . . . . . . . . . . . . . . . . . . . . . . . . . . . . . . . . . . . . . . . . . . . . . . . . . . . . . . . . 882
Text functions . . . . . . . . . . . . . . . . . . . . . . . . . . . . . . . . . . . . . . . . . . . 884
Char . . . . . . . . . . . . . . . . . . . . . . . . . . . . . . . . . . . . . . . . . . . . . . . . . . . . . . . . . . . . . . . . . . . . . . 885
Code . . . . . . . . . . . . . . . . . . . . . . . . . . . . . . . . . . . . . . . . . . . . . . . . . . . . . . . . . . . . . . . . . . . . . . 887
Exact . . . . . . . . . . . . . . . . . . . . . . . . . . . . . . . . . . . . . . . . . . . . . . . . . . . . . . . . . . . . . . . . . . . . . 888
Filter . . . . . . . . . . . . . . . . . . . . . . . . . . . . . . . . . . . . . . . . . . . . . . . . . . . . . . . . . . . . . . . . . . . . . . 889
FilterValues . . . . . . . . . . . . . . . . . . . . . . . . . . . . . . . . . . . . . . . . . . . . . . . . . . . . . . . . . . . . . . . . 890
GetAsCSS . . . . . . . . . . . . . . . . . . . . . . . . . . . . . . . . . . . . . . . . . . . . . . . . . . . . . . . . . . . . . . . . . 891
GetAsDate . . . . . . . . . . . . . . . . . . . . . . . . . . . . . . . . . . . . . . . . . . . . . . . . . . . . . . . . . . . . . . . . . 892
GetAsNumber . . . . . . . . . . . . . . . . . . . . . . . . . . . . . . . . . . . . . . . . . . . . . . . . . . . . . . . . . . . . . . 893
GetAsSVG . . . . . . . . . . . . . . . . . . . . . . . . . . . . . . . . . . . . . . . . . . . . . . . . . . . . . . . . . . . . . . . . . 894
GetAsText . . . . . . . . . . . . . . . . . . . . . . . . . . . . . . . . . . . . . . . . . . . . . . . . . . . . . . . . . . . . . . . . . 895
GetAsTime . . . . . . . . . . . . . . . . . . . . . . . . . . . . . . . . . . . . . . . . . . . . . . . . . . . . . . . . . . . . . . . . . 896
GetAsTimestamp . . . . . . . . . . . . . . . . . . . . . . . . . . . . . . . . . . . . . . . . . . . . . . . . . . . . . . . . . . . . 897
GetAsURLEncoded . . . . . . . . . . . . . . . . . . . . . . . . . . . . . . . . . . . . . . . . . . . . . . . . . . . . . . . . . . 898
Functions reference
FILEMAKER PRO HELP 654
GetValue . . . . . . . . . . . . . . . . . . . . . . . . . . . . . . . . . . . . . . . . . . . . . . . . . . . . . . . . . . . . . . . . . . 899
Hiragana . . . . . . . . . . . . . . . . . . . . . . . . . . . . . . . . . . . . . . . . . . . . . . . . . . . . . . . . . . . . . . . . . . . 900
KanaHankaku . . . . . . . . . . . . . . . . . . . . . . . . . . . . . . . . . . . . . . . . . . . . . . . . . . . . . . . . . . . . . . . 901
KanaZenkaku . . . . . . . . . . . . . . . . . . . . . . . . . . . . . . . . . . . . . . . . . . . . . . . . . . . . . . . . . . . . . . . 901
KanjiNumeral . . . . . . . . . . . . . . . . . . . . . . . . . . . . . . . . . . . . . . . . . . . . . . . . . . . . . . . . . . . . . . . 902
Katakana . . . . . . . . . . . . . . . . . . . . . . . . . . . . . . . . . . . . . . . . . . . . . . . . . . . . . . . . . . . . . . . . . . 903
Left . . . . . . . . . . . . . . . . . . . . . . . . . . . . . . . . . . . . . . . . . . . . . . . . . . . . . . . . . . . . . . . . . . . . . . . 903
LeftValues . . . . . . . . . . . . . . . . . . . . . . . . . . . . . . . . . . . . . . . . . . . . . . . . . . . . . . . . . . . . . . . . . 904
LeftWords . . . . . . . . . . . . . . . . . . . . . . . . . . . . . . . . . . . . . . . . . . . . . . . . . . . . . . . . . . . . . . . . . . 905
Length . . . . . . . . . . . . . . . . . . . . . . . . . . . . . . . . . . . . . . . . . . . . . . . . . . . . . . . . . . . . . . . . . . . . 906
Lower . . . . . . . . . . . . . . . . . . . . . . . . . . . . . . . . . . . . . . . . . . . . . . . . . . . . . . . . . . . . . . . . . . . . . 907
Middle . . . . . . . . . . . . . . . . . . . . . . . . . . . . . . . . . . . . . . . . . . . . . . . . . . . . . . . . . . . . . . . . . . . . . 907
MiddleValues . . . . . . . . . . . . . . . . . . . . . . . . . . . . . . . . . . . . . . . . . . . . . . . . . . . . . . . . . . . . . . . 908
MiddleWords . . . . . . . . . . . . . . . . . . . . . . . . . . . . . . . . . . . . . . . . . . . . . . . . . . . . . . . . . . . . . . . 909
NumToJText . . . . . . . . . . . . . . . . . . . . . . . . . . . . . . . . . . . . . . . . . . . . . . . . . . . . . . . . . . . . . . . . 910
PatternCount . . . . . . . . . . . . . . . . . . . . . . . . . . . . . . . . . . . . . . . . . . . . . . . . . . . . . . . . . . . . . . . 911
Position . . . . . . . . . . . . . . . . . . . . . . . . . . . . . . . . . . . . . . . . . . . . . . . . . . . . . . . . . . . . . . . . . . . 912
Proper . . . . . . . . . . . . . . . . . . . . . . . . . . . . . . . . . . . . . . . . . . . . . . . . . . . . . . . . . . . . . . . . . . . . 913
Quote . . . . . . . . . . . . . . . . . . . . . . . . . . . . . . . . . . . . . . . . . . . . . . . . . . . . . . . . . . . . . . . . . . . . . 914
Replace . . . . . . . . . . . . . . . . . . . . . . . . . . . . . . . . . . . . . . . . . . . . . . . . . . . . . . . . . . . . . . . . . . . 915
Right . . . . . . . . . . . . . . . . . . . . . . . . . . . . . . . . . . . . . . . . . . . . . . . . . . . . . . . . . . . . . . . . . . . . . . 916
RightValues . . . . . . . . . . . . . . . . . . . . . . . . . . . . . . . . . . . . . . . . . . . . . . . . . . . . . . . . . . . . . . . . 917
RightWords . . . . . . . . . . . . . . . . . . . . . . . . . . . . . . . . . . . . . . . . . . . . . . . . . . . . . . . . . . . . . . . . 918
RomanHankaku . . . . . . . . . . . . . . . . . . . . . . . . . . . . . . . . . . . . . . . . . . . . . . . . . . . . . . . . . . . . . 919
RomanZenkaku . . . . . . . . . . . . . . . . . . . . . . . . . . . . . . . . . . . . . . . . . . . . . . . . . . . . . . . . . . . . . 919
SerialIncrement . . . . . . . . . . . . . . . . . . . . . . . . . . . . . . . . . . . . . . . . . . . . . . . . . . . . . . . . . . . . . 920
Substitute . . . . . . . . . . . . . . . . . . . . . . . . . . . . . . . . . . . . . . . . . . . . . . . . . . . . . . . . . . . . . . . . . . 921
Trim . . . . . . . . . . . . . . . . . . . . . . . . . . . . . . . . . . . . . . . . . . . . . . . . . . . . . . . . . . . . . . . . . . . . . . 922
TrimAll . . . . . . . . . . . . . . . . . . . . . . . . . . . . . . . . . . . . . . . . . . . . . . . . . . . . . . . . . . . . . . . . . . . . 923
Upper . . . . . . . . . . . . . . . . . . . . . . . . . . . . . . . . . . . . . . . . . . . . . . . . . . . . . . . . . . . . . . . . . . . . . 924
ValueCount . . . . . . . . . . . . . . . . . . . . . . . . . . . . . . . . . . . . . . . . . . . . . . . . . . . . . . . . . . . . . . . . 925
WordCount . . . . . . . . . . . . . . . . . . . . . . . . . . . . . . . . . . . . . . . . . . . . . . . . . . . . . . . . . . . . . . . . . 926
Text formatting functions . . . . . . . . . . . . . . . . . . . . . . . . . . . . . . . . . . 927
RGB . . . . . . . . . . . . . . . . . . . . . . . . . . . . . . . . . . . . . . . . . . . . . . . . . . . . . . . . . . . . . . . . . . . . . . 928
TextColor . . . . . . . . . . . . . . . . . . . . . . . . . . . . . . . . . . . . . . . . . . . . . . . . . . . . . . . . . . . . . . . . . . 929
TextColorRemove . . . . . . . . . . . . . . . . . . . . . . . . . . . . . . . . . . . . . . . . . . . . . . . . . . . . . . . . . . . 930
TextFont . . . . . . . . . . . . . . . . . . . . . . . . . . . . . . . . . . . . . . . . . . . . . . . . . . . . . . . . . . . . . . . . . . . 931
TextFontRemove . . . . . . . . . . . . . . . . . . . . . . . . . . . . . . . . . . . . . . . . . . . . . . . . . . . . . . . . . . . . 932
TextFormatRemove . . . . . . . . . . . . . . . . . . . . . . . . . . . . . . . . . . . . . . . . . . . . . . . . . . . . . . . . . . 934
TextSize . . . . . . . . . . . . . . . . . . . . . . . . . . . . . . . . . . . . . . . . . . . . . . . . . . . . . . . . . . . . . . . . . . . 934
TextSizeRemove . . . . . . . . . . . . . . . . . . . . . . . . . . . . . . . . . . . . . . . . . . . . . . . . . . . . . . . . . . . . 935
TextStyleAdd . . . . . . . . . . . . . . . . . . . . . . . . . . . . . . . . . . . . . . . . . . . . . . . . . . . . . . . . . . . . . . . 936
TextStyleRemove . . . . . . . . . . . . . . . . . . . . . . . . . . . . . . . . . . . . . . . . . . . . . . . . . . . . . . . . . . . . 938
Time functions . . . . . . . . . . . . . . . . . . . . . . . . . . . . . . . . . . . . . . . . . . . 939
Hour . . . . . . . . . . . . . . . . . . . . . . . . . . . . . . . . . . . . . . . . . . . . . . . . . . . . . . . . . . . . . . . . . . . . . . 940
Minute . . . . . . . . . . . . . . . . . . . . . . . . . . . . . . . . . . . . . . . . . . . . . . . . . . . . . . . . . . . . . . . . . . . . 941
Seconds . . . . . . . . . . . . . . . . . . . . . . . . . . . . . . . . . . . . . . . . . . . . . . . . . . . . . . . . . . . . . . . . . . . 941
Time . . . . . . . . . . . . . . . . . . . . . . . . . . . . . . . . . . . . . . . . . . . . . . . . . . . . . . . . . . . . . . . . . . . . . . 942
Timestamp functions . . . . . . . . . . . . . . . . . . . . . . . . . . . . . . . . . . . . . . 943
Functions reference
FILEMAKER PRO HELP 655
Timestamp . . . . . . . . . . . . . . . . . . . . . . . . . . . . . . . . . . . . . . . . . . . . . . . . . . . . . . . . . . . . . . . . . 943
Trigonometric functions . . . . . . . . . . . . . . . . . . . . . . . . . . . . . . . . . . . 944
Acos . . . . . . . . . . . . . . . . . . . . . . . . . . . . . . . . . . . . . . . . . . . . . . . . . . . . . . . . . . . . . . . . . . . . . . 945
Asin . . . . . . . . . . . . . . . . . . . . . . . . . . . . . . . . . . . . . . . . . . . . . . . . . . . . . . . . . . . . . . . . . . . . . . 945
Atan . . . . . . . . . . . . . . . . . . . . . . . . . . . . . . . . . . . . . . . . . . . . . . . . . . . . . . . . . . . . . . . . . . . . . . 946
Cos . . . . . . . . . . . . . . . . . . . . . . . . . . . . . . . . . . . . . . . . . . . . . . . . . . . . . . . . . . . . . . . . . . . . . . . 947
Degrees . . . . . . . . . . . . . . . . . . . . . . . . . . . . . . . . . . . . . . . . . . . . . . . . . . . . . . . . . . . . . . . . . . . 948
Pi . . . . . . . . . . . . . . . . . . . . . . . . . . . . . . . . . . . . . . . . . . . . . . . . . . . . . . . . . . . . . . . . . . . . . . . . 949
Radians . . . . . . . . . . . . . . . . . . . . . . . . . . . . . . . . . . . . . . . . . . . . . . . . . . . . . . . . . . . . . . . . . . . 949
Sin . . . . . . . . . . . . . . . . . . . . . . . . . . . . . . . . . . . . . . . . . . . . . . . . . . . . . . . . . . . . . . . . . . . . . . . 950
Tan . . . . . . . . . . . . . . . . . . . . . . . . . . . . . . . . . . . . . . . . . . . . . . . . . . . . . . . . . . . . . . . . . . . . . . . 951
FILEMAKER PRO HELP 656
Functions reference (alphabetical list)
A, B, C
Abs . . . . . . . . . . . . . . . . . . . . . . . . . . . . . . . . . . . . . . . . . . . . . . . . . . . . . . . . . . . . . . . . . . . . . . . 864
Acos . . . . . . . . . . . . . . . . . . . . . . . . . . . . . . . . . . . . . . . . . . . . . . . . . . . . . . . . . . . . . . . . . . . . . . 945
Asin . . . . . . . . . . . . . . . . . . . . . . . . . . . . . . . . . . . . . . . . . . . . . . . . . . . . . . . . . . . . . . . . . . . . . . 945
Atan . . . . . . . . . . . . . . . . . . . . . . . . . . . . . . . . . . . . . . . . . . . . . . . . . . . . . . . . . . . . . . . . . . . . . . 946
Average . . . . . . . . . . . . . . . . . . . . . . . . . . . . . . . . . . . . . . . . . . . . . . . . . . . . . . . . . . . . . . . . . . . 662
Base64Decode . . . . . . . . . . . . . . . . . . . . . . . . . . . . . . . . . . . . . . . . . . . . . . . . . . . . . . . . . . . . . . 677
Base64Encode . . . . . . . . . . . . . . . . . . . . . . . . . . . . . . . . . . . . . . . . . . . . . . . . . . . . . . . . . . . . . . 678
Case . . . . . . . . . . . . . . . . . . . . . . . . . . . . . . . . . . . . . . . . . . . . . . . . . . . . . . . . . . . . . . . . . . . . . . 839
Ceiling . . . . . . . . . . . . . . . . . . . . . . . . . . . . . . . . . . . . . . . . . . . . . . . . . . . . . . . . . . . . . . . . . . . . 865
Char . . . . . . . . . . . . . . . . . . . . . . . . . . . . . . . . . . . . . . . . . . . . . . . . . . . . . . . . . . . . . . . . . . . . . . 885
Choose . . . . . . . . . . . . . . . . . . . . . . . . . . . . . . . . . . . . . . . . . . . . . . . . . . . . . . . . . . . . . . . . . . . . 840
Code . . . . . . . . . . . . . . . . . . . . . . . . . . . . . . . . . . . . . . . . . . . . . . . . . . . . . . . . . . . . . . . . . . . . . . 887
Combination . . . . . . . . . . . . . . . . . . . . . . . . . . . . . . . . . . . . . . . . . . . . . . . . . . . . . . . . . . . . . . . . 865
Cos . . . . . . . . . . . . . . . . . . . . . . . . . . . . . . . . . . . . . . . . . . . . . . . . . . . . . . . . . . . . . . . . . . . . . . . 947
Count . . . . . . . . . . . . . . . . . . . . . . . . . . . . . . . . . . . . . . . . . . . . . . . . . . . . . . . . . . . . . . . . . . . . . 664
D
DatabaseNames . . . . . . . . . . . . . . . . . . . . . . . . . . . . . . . . . . . . . . . . . . . . . . . . . . . . . . . . . . . . 700
Date . . . . . . . . . . . . . . . . . . . . . . . . . . . . . . . . . . . . . . . . . . . . . . . . . . . . . . . . . . . . . . . . . . . . . . 687
Day . . . . . . . . . . . . . . . . . . . . . . . . . . . . . . . . . . . . . . . . . . . . . . . . . . . . . . . . . . . . . . . . . . . . . . . 688
DayName . . . . . . . . . . . . . . . . . . . . . . . . . . . . . . . . . . . . . . . . . . . . . . . . . . . . . . . . . . . . . . . . . . 689
DayNameJ . . . . . . . . . . . . . . . . . . . . . . . . . . . . . . . . . . . . . . . . . . . . . . . . . . . . . . . . . . . . . . . . . 690
DayOfWeek . . . . . . . . . . . . . . . . . . . . . . . . . . . . . . . . . . . . . . . . . . . . . . . . . . . . . . . . . . . . . . . . 691
DayOfYear . . . . . . . . . . . . . . . . . . . . . . . . . . . . . . . . . . . . . . . . . . . . . . . . . . . . . . . . . . . . . . . . . 692
Degrees . . . . . . . . . . . . . . . . . . . . . . . . . . . . . . . . . . . . . . . . . . . . . . . . . . . . . . . . . . . . . . . . . . . 948
Div . . . . . . . . . . . . . . . . . . . . . . . . . . . . . . . . . . . . . . . . . . . . . . . . . . . . . . . . . . . . . . . . . . . . . . . 866
E
Evaluate . . . . . . . . . . . . . . . . . . . . . . . . . . . . . . . . . . . . . . . . . . . . . . . . . . . . . . . . . . . . . . . . . . . 841
EvaluationError . . . . . . . . . . . . . . . . . . . . . . . . . . . . . . . . . . . . . . . . . . . . . . . . . . . . . . . . . . . . . 842
Exact . . . . . . . . . . . . . . . . . . . . . . . . . . . . . . . . . . . . . . . . . . . . . . . . . . . . . . . . . . . . . . . . . . . . . 888
ExecuteSQL . . . . . . . . . . . . . . . . . . . . . . . . . . . . . . . . . . . . . . . . . . . . . . . . . . . . . . . . . . . . . . . . 843
Exp . . . . . . . . . . . . . . . . . . . . . . . . . . . . . . . . . . . . . . . . . . . . . . . . . . . . . . . . . . . . . . . . . . . . . . . 867
Extend . . . . . . . . . . . . . . . . . . . . . . . . . . . . . . . . . . . . . . . . . . . . . . . . . . . . . . . . . . . . . . . . . . . . 879
External . . . . . . . . . . . . . . . . . . . . . . . . . . . . . . . . . . . . . . . . . . . . . . . . . . . . . . . . . . . . . . . . . . . 721
F
Factorial . . . . . . . . . . . . . . . . . . . . . . . . . . . . . . . . . . . . . . . . . . . . . . . . . . . . . . . . . . . . . . . . . . . 868
FieldBounds . . . . . . . . . . . . . . . . . . . . . . . . . . . . . . . . . . . . . . . . . . . . . . . . . . . . . . . . . . . . . . . . 701
FieldComment . . . . . . . . . . . . . . . . . . . . . . . . . . . . . . . . . . . . . . . . . . . . . . . . . . . . . . . . . . . . . . 703
FieldIDs . . . . . . . . . . . . . . . . . . . . . . . . . . . . . . . . . . . . . . . . . . . . . . . . . . . . . . . . . . . . . . . . . . . 703
FieldNames . . . . . . . . . . . . . . . . . . . . . . . . . . . . . . . . . . . . . . . . . . . . . . . . . . . . . . . . . . . . . . . . 704
FieldRepetitions . . . . . . . . . . . . . . . . . . . . . . . . . . . . . . . . . . . . . . . . . . . . . . . . . . . . . . . . . . . . . 705
FieldStyle . . . . . . . . . . . . . . . . . . . . . . . . . . . . . . . . . . . . . . . . . . . . . . . . . . . . . . . . . . . . . . . . . . 706
FieldType . . . . . . . . . . . . . . . . . . . . . . . . . . . . . . . . . . . . . . . . . . . . . . . . . . . . . . . . . . . . . . . . . . 707
Filter . . . . . . . . . . . . . . . . . . . . . . . . . . . . . . . . . . . . . . . . . . . . . . . . . . . . . . . . . . . . . . . . . . . . . . 889
FilterValues . . . . . . . . . . . . . . . . . . . . . . . . . . . . . . . . . . . . . . . . . . . . . . . . . . . . . . . . . . . . . . . . 890
FILEMAKER PRO HELP 657
Floor . . . . . . . . . . . . . . . . . . . . . . . . . . . . . . . . . . . . . . . . . . . . . . . . . . . . . . . . . . . . . . . . . . . . . . 869
FV . . . . . . . . . . . . . . . . . . . . . . . . . . . . . . . . . . . . . . . . . . . . . . . . . . . . . . . . . . . . . . . . . . . . . . . . 722
G
Get(AccountExtendedPrivileges) . . . . . . . . . . . . . . . . . . . . . . . . . . . . . . . . . . . . . . . . . . . . . . . . 732
Get(AccountName) . . . . . . . . . . . . . . . . . . . . . . . . . . . . . . . . . . . . . . . . . . . . . . . . . . . . . . . . . . 733
Get(AccountPrivilegeSetName) . . . . . . . . . . . . . . . . . . . . . . . . . . . . . . . . . . . . . . . . . . . . . . . . . 735
Get(ActiveFieldContents) . . . . . . . . . . . . . . . . . . . . . . . . . . . . . . . . . . . . . . . . . . . . . . . . . . . . . . 736
Get(ActiveFieldName) . . . . . . . . . . . . . . . . . . . . . . . . . . . . . . . . . . . . . . . . . . . . . . . . . . . . . . . . 736
Get(ActiveFieldTableName) . . . . . . . . . . . . . . . . . . . . . . . . . . . . . . . . . . . . . . . . . . . . . . . . . . . .737
Get(ActiveLayoutObjectName) . . . . . . . . . . . . . . . . . . . . . . . . . . . . . . . . . . . . . . . . . . . . . . . . . 738
Get(ActiveModifierKeys) . . . . . . . . . . . . . . . . . . . . . . . . . . . . . . . . . . . . . . . . . . . . . . . . . . . . . . 739
Get(ActivePortalRowNumber) . . . . . . . . . . . . . . . . . . . . . . . . . . . . . . . . . . . . . . . . . . . . . . . . . . 740
Get(ActiveRepetitionNumber) . . . . . . . . . . . . . . . . . . . . . . . . . . . . . . . . . . . . . . . . . . . . . . . . . .741
Get(ActiveSelectionSize) . . . . . . . . . . . . . . . . . . . . . . . . . . . . . . . . . . . . . . . . . . . . . . . . . . . . . . 742
Get(ActiveSelectionStart) . . . . . . . . . . . . . . . . . . . . . . . . . . . . . . . . . . . . . . . . . . . . . . . . . . . . . . 742
Get(AllowAbortState) . . . . . . . . . . . . . . . . . . . . . . . . . . . . . . . . . . . . . . . . . . . . . . . . . . . . . . . . . 743
Get(AllowFormattingBarState) . . . . . . . . . . . . . . . . . . . . . . . . . . . . . . . . . . . . . . . . . . . . . . . . . .744
Get(ApplicationLanguage) . . . . . . . . . . . . . . . . . . . . . . . . . . . . . . . . . . . . . . . . . . . . . . . . . . . . . 745
Get(ApplicationVersion) . . . . . . . . . . . . . . . . . . . . . . . . . . . . . . . . . . . . . . . . . . . . . . . . . . . . . . . 746
Get(CalculationRepetitionNumber) . . . . . . . . . . . . . . . . . . . . . . . . . . . . . . . . . . . . . . . . . . . . . . 747
Get(ConnectionAttributes) . . . . . . . . . . . . . . . . . . . . . . . . . . . . . . . . . . . . . . . . . . . . . . . . . . . . . 748
Get(ConnectionState) . . . . . . . . . . . . . . . . . . . . . . . . . . . . . . . . . . . . . . . . . . . . . . . . . . . . . . . . 749
Get(CurrentDate) . . . . . . . . . . . . . . . . . . . . . . . . . . . . . . . . . . . . . . . . . . . . . . . . . . . . . . . . . . . . 750
Get(CurrentExtendedPrivileges) . . . . . . . . . . . . . . . . . . . . . . . . . . . . . . . . . . . . . . . . . . . . . . . . 751
Get(CurrentHostTimestamp) . . . . . . . . . . . . . . . . . . . . . . . . . . . . . . . . . . . . . . . . . . . . . . . . . . .752
Get(CurrentPrivilegeSetName) . . . . . . . . . . . . . . . . . . . . . . . . . . . . . . . . . . . . . . . . . . . . . . . . . 753
Get(CurrentTime) . . . . . . . . . . . . . . . . . . . . . . . . . . . . . . . . . . . . . . . . . . . . . . . . . . . . . . . . . . . . 754
Get(CurrentTimestamp) . . . . . . . . . . . . . . . . . . . . . . . . . . . . . . . . . . . . . . . . . . . . . . . . . . . . . . . 755
Get(CurrentTimeUTCMilliseconds) . . . . . . . . . . . . . . . . . . . . . . . . . . . . . . . . . . . . . . . . . . . . . . 756
Get(CustomMenuSetName) . . . . . . . . . . . . . . . . . . . . . . . . . . . . . . . . . . . . . . . . . . . . . . . . . . . . 757
Get(DesktopPath) . . . . . . . . . . . . . . . . . . . . . . . . . . . . . . . . . . . . . . . . . . . . . . . . . . . . . . . . . . . 758
Get(Device) . . . . . . . . . . . . . . . . . . . . . . . . . . . . . . . . . . . . . . . . . . . . . . . . . . . . . . . . . . . . . . . . 759
Get(DocumentsPath) . . . . . . . . . . . . . . . . . . . . . . . . . . . . . . . . . . . . . . . . . . . . . . . . . . . . . . . . . 759
Get(DocumentsPathListing) . . . . . . . . . . . . . . . . . . . . . . . . . . . . . . . . . . . . . . . . . . . . . . . . . . . .761
Get(EncryptionState) . . . . . . . . . . . . . . . . . . . . . . . . . . . . . . . . . . . . . . . . . . . . . . . . . . . . . . . . . 762
Get(ErrorCaptureState) . . . . . . . . . . . . . . . . . . . . . . . . . . . . . . . . . . . . . . . . . . . . . . . . . . . . . . . 762
Get(FileMakerPath) . . . . . . . . . . . . . . . . . . . . . . . . . . . . . . . . . . . . . . . . . . . . . . . . . . . . . . . . . . 763
Get(FileName) . . . . . . . . . . . . . . . . . . . . . . . . . . . . . . . . . . . . . . . . . . . . . . . . . . . . . . . . . . . . . . 764
Get(FilePath) . . . . . . . . . . . . . . . . . . . . . . . . . . . . . . . . . . . . . . . . . . . . . . . . . . . . . . . . . . . . . . . 765
Get(FileSize) . . . . . . . . . . . . . . . . . . . . . . . . . . . . . . . . . . . . . . . . . . . . . . . . . . . . . . . . . . . . . . . 766
Get(FoundCount) . . . . . . . . . . . . . . . . . . . . . . . . . . . . . . . . . . . . . . . . . . . . . . . . . . . . . . . . . . . . 767
Get(HighContrastColor) . . . . . . . . . . . . . . . . . . . . . . . . . . . . . . . . . . . . . . . . . . . . . . . . . . . . . . . 767
Get(HighContrastState) . . . . . . . . . . . . . . . . . . . . . . . . . . . . . . . . . . . . . . . . . . . . . . . . . . . . . . . 768
Get(HostApplicationVersion) . . . . . . . . . . . . . . . . . . . . . . . . . . . . . . . . . . . . . . . . . . . . . . . . . . . 769
Get(HostIPAddress) . . . . . . . . . . . . . . . . . . . . . . . . . . . . . . . . . . . . . . . . . . . . . . . . . . . . . . . . . . 770
Get(HostName) . . . . . . . . . . . . . . . . . . . . . . . . . . . . . . . . . . . . . . . . . . . . . . . . . . . . . . . . . . . . . 771
Get(InstalledFMPlugins) . . . . . . . . . . . . . . . . . . . . . . . . . . . . . . . . . . . . . . . . . . . . . . . . . . . . . . . 772
Get(LastError) . . . . . . . . . . . . . . . . . . . . . . . . . . . . . . . . . . . . . . . . . . . . . . . . . . . . . . . . . . . . . . 774
Get(LastMessageChoice) . . . . . . . . . . . . . . . . . . . . . . . . . . . . . . . . . . . . . . . . . . . . . . . . . . . . .775
Get(LastODBCError) . . . . . . . . . . . . . . . . . . . . . . . . . . . . . . . . . . . . . . . . . . . . . . . . . . . . . . . . . 776
Get(LayoutAccess) . . . . . . . . . . . . . . . . . . . . . . . . . . . . . . . . . . . . . . . . . . . . . . . . . . . . . . . . . . . 777
Get(LayoutCount) . . . . . . . . . . . . . . . . . . . . . . . . . . . . . . . . . . . . . . . . . . . . . . . . . . . . . . . . . . . . 778
FILEMAKER PRO HELP 658
Get(LayoutName) . . . . . . . . . . . . . . . . . . . . . . . . . . . . . . . . . . . . . . . . . . . . . . . . . . . . . . . . . . . . 778
Get(LayoutNumber) . . . . . . . . . . . . . . . . . . . . . . . . . . . . . . . . . . . . . . . . . . . . . . . . . . . . . . . . . . 779
Get(LayoutTableName) . . . . . . . . . . . . . . . . . . . . . . . . . . . . . . . . . . . . . . . . . . . . . . . . . . . . . . . 780
Get(LayoutViewState) . . . . . . . . . . . . . . . . . . . . . . . . . . . . . . . . . . . . . . . . . . . . . . . . . . . . . . . . 781
Get(ModifiedFields) . . . . . . . . . . . . . . . . . . . . . . . . . . . . . . . . . . . . . . . . . . . . . . . . . . . . . . . . . . 782
Get(MultiUserState) . . . . . . . . . . . . . . . . . . . . . . . . . . . . . . . . . . . . . . . . . . . . . . . . . . . . . . . . . . 783
Get(NetworkProtocol) . . . . . . . . . . . . . . . . . . . . . . . . . . . . . . . . . . . . . . . . . . . . . . . . . . . . . . . . . 784
Get(NetworkType) . . . . . . . . . . . . . . . . . . . . . . . . . . . . . . . . . . . . . . . . . . . . . . . . . . . . . . . . . . . 785
Get(PageNumber) . . . . . . . . . . . . . . . . . . . . . . . . . . . . . . . . . . . . . . . . . . . . . . . . . . . . . . . . . . . 785
Get(PersistentID) . . . . . . . . . . . . . . . . . . . . . . . . . . . . . . . . . . . . . . . . . . . . . . . . . . . . . . . . . . . . 786
Get(PreferencesPath) . . . . . . . . . . . . . . . . . . . . . . . . . . . . . . . . . . . . . . . . . . . . . . . . . . . . . . . . 787
Get(PrinterName) . . . . . . . . . . . . . . . . . . . . . . . . . . . . . . . . . . . . . . . . . . . . . . . . . . . . . . . . . . . . 788
Get(QuickFindText) . . . . . . . . . . . . . . . . . . . . . . . . . . . . . . . . . . . . . . . . . . . . . . . . . . . . . . . . . . 789
Get(RecordAccess) . . . . . . . . . . . . . . . . . . . . . . . . . . . . . . . . . . . . . . . . . . . . . . . . . . . . . . . . . . 790
Get(RecordID) . . . . . . . . . . . . . . . . . . . . . . . . . . . . . . . . . . . . . . . . . . . . . . . . . . . . . . . . . . . . . . 791
Get(RecordModificationCount) . . . . . . . . . . . . . . . . . . . . . . . . . . . . . . . . . . . . . . . . . . . . . . . . . .792
Get(RecordNumber) . . . . . . . . . . . . . . . . . . . . . . . . . . . . . . . . . . . . . . . . . . . . . . . . . . . . . . . . . . 793
Get(RecordOpenCount) . . . . . . . . . . . . . . . . . . . . . . . . . . . . . . . . . . . . . . . . . . . . . . . . . . . . . . . 794
Get(RecordOpenState) . . . . . . . . . . . . . . . . . . . . . . . . . . . . . . . . . . . . . . . . . . . . . . . . . . . . . . . 795
Get(RequestCount) . . . . . . . . . . . . . . . . . . . . . . . . . . . . . . . . . . . . . . . . . . . . . . . . . . . . . . . . . . 796
Get(RequestOmitState) . . . . . . . . . . . . . . . . . . . . . . . . . . . . . . . . . . . . . . . . . . . . . . . . . . . . . . . 796
Get(ScreenDepth) . . . . . . . . . . . . . . . . . . . . . . . . . . . . . . . . . . . . . . . . . . . . . . . . . . . . . . . . . . . 797
Get(ScreenHeight) . . . . . . . . . . . . . . . . . . . . . . . . . . . . . . . . . . . . . . . . . . . . . . . . . . . . . . . . . . . 798
Get(ScreenWidth) . . . . . . . . . . . . . . . . . . . . . . . . . . . . . . . . . . . . . . . . . . . . . . . . . . . . . . . . . . . 799
Get(ScriptAnimationState) . . . . . . . . . . . . . . . . . . . . . . . . . . . . . . . . . . . . . . . . . . . . . . . . . . . . . 800
Get(ScriptName) . . . . . . . . . . . . . . . . . . . . . . . . . . . . . . . . . . . . . . . . . . . . . . . . . . . . . . . . . . . . 801
Get(ScriptParameter) . . . . . . . . . . . . . . . . . . . . . . . . . . . . . . . . . . . . . . . . . . . . . . . . . . . . . . . . . 801
Get(ScriptResult) . . . . . . . . . . . . . . . . . . . . . . . . . . . . . . . . . . . . . . . . . . . . . . . . . . . . . . . . . . . . 803
Get(SortState) . . . . . . . . . . . . . . . . . . . . . . . . . . . . . . . . . . . . . . . . . . . . . . . . . . . . . . . . . . . . . . 804
Get(StatusAreaState) . . . . . . . . . . . . . . . . . . . . . . . . . . . . . . . . . . . . . . . . . . . . . . . . . . . . . . . . . 805
Get(SystemDrive) . . . . . . . . . . . . . . . . . . . . . . . . . . . . . . . . . . . . . . . . . . . . . . . . . . . . . . . . . . . . 806
Get(SystemIPAddress) . . . . . . . . . . . . . . . . . . . . . . . . . . . . . . . . . . . . . . . . . . . . . . . . . . . . . . . 806
Get(SystemLanguage) . . . . . . . . . . . . . . . . . . . . . . . . . . . . . . . . . . . . . . . . . . . . . . . . . . . . . . . . 808
Get(SystemNICAddress) . . . . . . . . . . . . . . . . . . . . . . . . . . . . . . . . . . . . . . . . . . . . . . . . . . . . . . 808
Get(SystemPlatform) . . . . . . . . . . . . . . . . . . . . . . . . . . . . . . . . . . . . . . . . . . . . . . . . . . . . . . . . . 809
Get(SystemVersion) . . . . . . . . . . . . . . . . . . . . . . . . . . . . . . . . . . . . . . . . . . . . . . . . . . . . . . . . . . 810
Get(TemporaryPath) . . . . . . . . . . . . . . . . . . . . . . . . . . . . . . . . . . . . . . . . . . . . . . . . . . . . . . . . . 812
Get(TextRulerVisible) . . . . . . . . . . . . . . . . . . . . . . . . . . . . . . . . . . . . . . . . . . . . . . . . . . . . . . . . . 813
Get(TotalRecordCount) . . . . . . . . . . . . . . . . . . . . . . . . . . . . . . . . . . . . . . . . . . . . . . . . . . . . . . . 814
Get(TriggerCurrentPanel) . . . . . . . . . . . . . . . . . . . . . . . . . . . . . . . . . . . . . . . . . . . . . . . . . . . . . 815
Get(TriggerGestureInfo) . . . . . . . . . . . . . . . . . . . . . . . . . . . . . . . . . . . . . . . . . . . . . . . . . . . . . . . 816
Get(TriggerKeystroke) . . . . . . . . . . . . . . . . . . . . . . . . . . . . . . . . . . . . . . . . . . . . . . . . . . . . . . . . 817
Get(TriggerModifierKeys) . . . . . . . . . . . . . . . . . . . . . . . . . . . . . . . . . . . . . . . . . . . . . . . . . . . . . . 818
Get(TriggerTargetPanel) . . . . . . . . . . . . . . . . . . . . . . . . . . . . . . . . . . . . . . . . . . . . . . . . . . . . . . 819
Get(UserCount) . . . . . . . . . . . . . . . . . . . . . . . . . . . . . . . . . . . . . . . . . . . . . . . . . . . . . . . . . . . . . 820
Get(UserName) . . . . . . . . . . . . . . . . . . . . . . . . . . . . . . . . . . . . . . . . . . . . . . . . . . . . . . . . . . . . . 821
Get(UseSystemFormatsState) . . . . . . . . . . . . . . . . . . . . . . . . . . . . . . . . . . . . . . . . . . . . . . . . . . 822
Get(UUID) . . . . . . . . . . . . . . . . . . . . . . . . . . . . . . . . . . . . . . . . . . . . . . . . . . . . . . . . . . . . . . . . . 823
Get(WindowContentHeight) . . . . . . . . . . . . . . . . . . . . . . . . . . . . . . . . . . . . . . . . . . . . . . . . . . . .824
Get(WindowContentWidth) . . . . . . . . . . . . . . . . . . . . . . . . . . . . . . . . . . . . . . . . . . . . . . . . . . . .825
Get(WindowDesktopHeight) . . . . . . . . . . . . . . . . . . . . . . . . . . . . . . . . . . . . . . . . . . . . . . . . . . . .826
Get(WindowDesktopWidth) . . . . . . . . . . . . . . . . . . . . . . . . . . . . . . . . . . . . . . . . . . . . . . . . . . . .827
Get(WindowHeight) . . . . . . . . . . . . . . . . . . . . . . . . . . . . . . . . . . . . . . . . . . . . . . . . . . . . . . . . . . 828
Get(WindowLeft) . . . . . . . . . . . . . . . . . . . . . . . . . . . . . . . . . . . . . . . . . . . . . . . . . . . . . . . . . . . . 828
FILEMAKER PRO HELP 659
Get(WindowMode) . . . . . . . . . . . . . . . . . . . . . . . . . . . . . . . . . . . . . . . . . . . . . . . . . . . . . . . . . . . 829
Get(WindowName) . . . . . . . . . . . . . . . . . . . . . . . . . . . . . . . . . . . . . . . . . . . . . . . . . . . . . . . . . . . 830
Get(WindowOrientation) . . . . . . . . . . . . . . . . . . . . . . . . . . . . . . . . . . . . . . . . . . . . . . . . . . . . . . . 831
Get(WindowStyle) . . . . . . . . . . . . . . . . . . . . . . . . . . . . . . . . . . . . . . . . . . . . . . . . . . . . . . . . . . . 832
Get(WindowTop) . . . . . . . . . . . . . . . . . . . . . . . . . . . . . . . . . . . . . . . . . . . . . . . . . . . . . . . . . . . . 833
Get(WindowVisible) . . . . . . . . . . . . . . . . . . . . . . . . . . . . . . . . . . . . . . . . . . . . . . . . . . . . . . . . . . 834
Get(WindowWidth) . . . . . . . . . . . . . . . . . . . . . . . . . . . . . . . . . . . . . . . . . . . . . . . . . . . . . . . . . . . 835
Get(WindowZoomLevel) . . . . . . . . . . . . . . . . . . . . . . . . . . . . . . . . . . . . . . . . . . . . . . . . . . . . . .836
GetAsBoolean . . . . . . . . . . . . . . . . . . . . . . . . . . . . . . . . . . . . . . . . . . . . . . . . . . . . . . . . . . . . . . 845
GetAsCSS . . . . . . . . . . . . . . . . . . . . . . . . . . . . . . . . . . . . . . . . . . . . . . . . . . . . . . . . . . . . . . . . . 891
GetAsDate . . . . . . . . . . . . . . . . . . . . . . . . . . . . . . . . . . . . . . . . . . . . . . . . . . . . . . . . . . . . . . . . . 892
GetAsNumber . . . . . . . . . . . . . . . . . . . . . . . . . . . . . . . . . . . . . . . . . . . . . . . . . . . . . . . . . . . . . . 893
GetAsSVG . . . . . . . . . . . . . . . . . . . . . . . . . . . . . . . . . . . . . . . . . . . . . . . . . . . . . . . . . . . . . . . . . 894
GetAsText . . . . . . . . . . . . . . . . . . . . . . . . . . . . . . . . . . . . . . . . . . . . . . . . . . . . . . . . . . . . . . . . . 895
GetAsTime . . . . . . . . . . . . . . . . . . . . . . . . . . . . . . . . . . . . . . . . . . . . . . . . . . . . . . . . . . . . . . . . . 896
GetAsTimestamp . . . . . . . . . . . . . . . . . . . . . . . . . . . . . . . . . . . . . . . . . . . . . . . . . . . . . . . . . . . . 897
GetAsURLEncoded . . . . . . . . . . . . . . . . . . . . . . . . . . . . . . . . . . . . . . . . . . . . . . . . . . . . . . . . . . 898
GetContainerAttribute . . . . . . . . . . . . . . . . . . . . . . . . . . . . . . . . . . . . . . . . . . . . . . . . . . . . . . . . 679
GetField . . . . . . . . . . . . . . . . . . . . . . . . . . . . . . . . . . . . . . . . . . . . . . . . . . . . . . . . . . . . . . . . . . . 846
GetFieldName . . . . . . . . . . . . . . . . . . . . . . . . . . . . . . . . . . . . . . . . . . . . . . . . . . . . . . . . . . . . . . 847
GetHeight . . . . . . . . . . . . . . . . . . . . . . . . . . . . . . . . . . . . . . . . . . . . . . . . . . . . . . . . . . . . . . . . . . 683
GetLayoutObjectAttribute . . . . . . . . . . . . . . . . . . . . . . . . . . . . . . . . . . . . . . . . . . . . . . . . . . . . . . 848
GetNextSerialValue . . . . . . . . . . . . . . . . . . . . . . . . . . . . . . . . . . . . . . . . . . . . . . . . . . . . . . . . . . 709
GetNthRecord . . . . . . . . . . . . . . . . . . . . . . . . . . . . . . . . . . . . . . . . . . . . . . . . . . . . . . . . . . . . . . 850
GetRepetition . . . . . . . . . . . . . . . . . . . . . . . . . . . . . . . . . . . . . . . . . . . . . . . . . . . . . . . . . . . . . . . 880
GetSummary . . . . . . . . . . . . . . . . . . . . . . . . . . . . . . . . . . . . . . . . . . . . . . . . . . . . . . . . . . . . . . . 882
GetThumbnail . . . . . . . . . . . . . . . . . . . . . . . . . . . . . . . . . . . . . . . . . . . . . . . . . . . . . . . . . . . . . . . 684
GetValue . . . . . . . . . . . . . . . . . . . . . . . . . . . . . . . . . . . . . . . . . . . . . . . . . . . . . . . . . . . . . . . . . . 899
GetWidth . . . . . . . . . . . . . . . . . . . . . . . . . . . . . . . . . . . . . . . . . . . . . . . . . . . . . . . . . . . . . . . . . . 685
H, I, J, K
Hiragana . . . . . . . . . . . . . . . . . . . . . . . . . . . . . . . . . . . . . . . . . . . . . . . . . . . . . . . . . . . . . . . . . . . 900
Hour . . . . . . . . . . . . . . . . . . . . . . . . . . . . . . . . . . . . . . . . . . . . . . . . . . . . . . . . . . . . . . . . . . . . . . 940
If . . . . . . . . . . . . . . . . . . . . . . . . . . . . . . . . . . . . . . . . . . . . . . . . . . . . . . . . . . . . . . . . . . . . . . . . . 851
Int . . . . . . . . . . . . . . . . . . . . . . . . . . . . . . . . . . . . . . . . . . . . . . . . . . . . . . . . . . . . . . . . . . . . . . . . 869
IsEmpty . . . . . . . . . . . . . . . . . . . . . . . . . . . . . . . . . . . . . . . . . . . . . . . . . . . . . . . . . . . . . . . . . . . 852
IsValid . . . . . . . . . . . . . . . . . . . . . . . . . . . . . . . . . . . . . . . . . . . . . . . . . . . . . . . . . . . . . . . . . . . . 853
IsValidExpression . . . . . . . . . . . . . . . . . . . . . . . . . . . . . . . . . . . . . . . . . . . . . . . . . . . . . . . . . . . . 854
KanaHankaku . . . . . . . . . . . . . . . . . . . . . . . . . . . . . . . . . . . . . . . . . . . . . . . . . . . . . . . . . . . . . . . 901
KanaZenkaku . . . . . . . . . . . . . . . . . . . . . . . . . . . . . . . . . . . . . . . . . . . . . . . . . . . . . . . . . . . . . . . 901
KanjiNumeral . . . . . . . . . . . . . . . . . . . . . . . . . . . . . . . . . . . . . . . . . . . . . . . . . . . . . . . . . . . . . . . 902
Katakana . . . . . . . . . . . . . . . . . . . . . . . . . . . . . . . . . . . . . . . . . . . . . . . . . . . . . . . . . . . . . . . . . . 903
L, M, N, O
Last . . . . . . . . . . . . . . . . . . . . . . . . . . . . . . . . . . . . . . . . . . . . . . . . . . . . . . . . . . . . . . . . . . . . . . 881
LayoutIDs . . . . . . . . . . . . . . . . . . . . . . . . . . . . . . . . . . . . . . . . . . . . . . . . . . . . . . . . . . . . . . . . . . 709
LayoutNames . . . . . . . . . . . . . . . . . . . . . . . . . . . . . . . . . . . . . . . . . . . . . . . . . . . . . . . . . . . . . . . 710
LayoutObjectNames . . . . . . . . . . . . . . . . . . . . . . . . . . . . . . . . . . . . . . . . . . . . . . . . . . . . . . . . . . 711
Left . . . . . . . . . . . . . . . . . . . . . . . . . . . . . . . . . . . . . . . . . . . . . . . . . . . . . . . . . . . . . . . . . . . . . . . 903
LeftValues . . . . . . . . . . . . . . . . . . . . . . . . . . . . . . . . . . . . . . . . . . . . . . . . . . . . . . . . . . . . . . . . . 904
LeftWords . . . . . . . . . . . . . . . . . . . . . . . . . . . . . . . . . . . . . . . . . . . . . . . . . . . . . . . . . . . . . . . . . . 905
Length . . . . . . . . . . . . . . . . . . . . . . . . . . . . . . . . . . . . . . . . . . . . . . . . . . . . . . . . . . . . . . . . . . . . 906
FILEMAKER PRO HELP 660
Let . . . . . . . . . . . . . . . . . . . . . . . . . . . . . . . . . . . . . . . . . . . . . . . . . . . . . . . . . . . . . . . . . . . . . . . 855
Lg . . . . . . . . . . . . . . . . . . . . . . . . . . . . . . . . . . . . . . . . . . . . . . . . . . . . . . . . . . . . . . . . . . . . . . . . 870
List . . . . . . . . . . . . . . . . . . . . . . . . . . . . . . . . . . . . . . . . . . . . . . . . . . . . . . . . . . . . . . . . . . . . . . . 665
Ln . . . . . . . . . . . . . . . . . . . . . . . . . . . . . . . . . . . . . . . . . . . . . . . . . . . . . . . . . . . . . . . . . . . . . . . . 871
Location . . . . . . . . . . . . . . . . . . . . . . . . . . . . . . . . . . . . . . . . . . . . . . . . . . . . . . . . . . . . . . . . . . . 861
LocationValues . . . . . . . . . . . . . . . . . . . . . . . . . . . . . . . . . . . . . . . . . . . . . . . . . . . . . . . . . . . . . . 862
Log . . . . . . . . . . . . . . . . . . . . . . . . . . . . . . . . . . . . . . . . . . . . . . . . . . . . . . . . . . . . . . . . . . . . . . . 872
Lookup . . . . . . . . . . . . . . . . . . . . . . . . . . . . . . . . . . . . . . . . . . . . . . . . . . . . . . . . . . . . . . . . . . . . 857
LookupNext . . . . . . . . . . . . . . . . . . . . . . . . . . . . . . . . . . . . . . . . . . . . . . . . . . . . . . . . . . . . . . . . 858
Lower . . . . . . . . . . . . . . . . . . . . . . . . . . . . . . . . . . . . . . . . . . . . . . . . . . . . . . . . . . . . . . . . . . . . . 907
Max . . . . . . . . . . . . . . . . . . . . . . . . . . . . . . . . . . . . . . . . . . . . . . . . . . . . . . . . . . . . . . . . . . . . . . 667
Middle . . . . . . . . . . . . . . . . . . . . . . . . . . . . . . . . . . . . . . . . . . . . . . . . . . . . . . . . . . . . . . . . . . . . . 907
MiddleValues . . . . . . . . . . . . . . . . . . . . . . . . . . . . . . . . . . . . . . . . . . . . . . . . . . . . . . . . . . . . . . . 908
MiddleWords . . . . . . . . . . . . . . . . . . . . . . . . . . . . . . . . . . . . . . . . . . . . . . . . . . . . . . . . . . . . . . . 909
Min . . . . . . . . . . . . . . . . . . . . . . . . . . . . . . . . . . . . . . . . . . . . . . . . . . . . . . . . . . . . . . . . . . . . . . . 668
Minute . . . . . . . . . . . . . . . . . . . . . . . . . . . . . . . . . . . . . . . . . . . . . . . . . . . . . . . . . . . . . . . . . . . . 941
Mod . . . . . . . . . . . . . . . . . . . . . . . . . . . . . . . . . . . . . . . . . . . . . . . . . . . . . . . . . . . . . . . . . . . . . . 873
Month . . . . . . . . . . . . . . . . . . . . . . . . . . . . . . . . . . . . . . . . . . . . . . . . . . . . . . . . . . . . . . . . . . . . . 693
MonthName . . . . . . . . . . . . . . . . . . . . . . . . . . . . . . . . . . . . . . . . . . . . . . . . . . . . . . . . . . . . . . . . 694
MonthNameJ . . . . . . . . . . . . . . . . . . . . . . . . . . . . . . . . . . . . . . . . . . . . . . . . . . . . . . . . . . . . . . . 694
NPV . . . . . . . . . . . . . . . . . . . . . . . . . . . . . . . . . . . . . . . . . . . . . . . . . . . . . . . . . . . . . . . . . . . . . . 723
NumToJText . . . . . . . . . . . . . . . . . . . . . . . . . . . . . . . . . . . . . . . . . . . . . . . . . . . . . . . . . . . . . . . . 910
P, Q
PatternCount . . . . . . . . . . . . . . . . . . . . . . . . . . . . . . . . . . . . . . . . . . . . . . . . . . . . . . . . . . . . . . . 911
Pi . . . . . . . . . . . . . . . . . . . . . . . . . . . . . . . . . . . . . . . . . . . . . . . . . . . . . . . . . . . . . . . . . . . . . . . . 949
PMT . . . . . . . . . . . . . . . . . . . . . . . . . . . . . . . . . . . . . . . . . . . . . . . . . . . . . . . . . . . . . . . . . . . . . . 724
Position . . . . . . . . . . . . . . . . . . . . . . . . . . . . . . . . . . . . . . . . . . . . . . . . . . . . . . . . . . . . . . . . . . . 912
Proper . . . . . . . . . . . . . . . . . . . . . . . . . . . . . . . . . . . . . . . . . . . . . . . . . . . . . . . . . . . . . . . . . . . . 913
PV . . . . . . . . . . . . . . . . . . . . . . . . . . . . . . . . . . . . . . . . . . . . . . . . . . . . . . . . . . . . . . . . . . . . . . . 725
Quote . . . . . . . . . . . . . . . . . . . . . . . . . . . . . . . . . . . . . . . . . . . . . . . . . . . . . . . . . . . . . . . . . . . . . 914
R
Radians . . . . . . . . . . . . . . . . . . . . . . . . . . . . . . . . . . . . . . . . . . . . . . . . . . . . . . . . . . . . . . . . . . . 949
Random . . . . . . . . . . . . . . . . . . . . . . . . . . . . . . . . . . . . . . . . . . . . . . . . . . . . . . . . . . . . . . . . . . . 874
RelationInfo . . . . . . . . . . . . . . . . . . . . . . . . . . . . . . . . . . . . . . . . . . . . . . . . . . . . . . . . . . . . . . . . 712
Replace . . . . . . . . . . . . . . . . . . . . . . . . . . . . . . . . . . . . . . . . . . . . . . . . . . . . . . . . . . . . . . . . . . . 915
RGB . . . . . . . . . . . . . . . . . . . . . . . . . . . . . . . . . . . . . . . . . . . . . . . . . . . . . . . . . . . . . . . . . . . . . . 928
Right . . . . . . . . . . . . . . . . . . . . . . . . . . . . . . . . . . . . . . . . . . . . . . . . . . . . . . . . . . . . . . . . . . . . . . 916
RightValues . . . . . . . . . . . . . . . . . . . . . . . . . . . . . . . . . . . . . . . . . . . . . . . . . . . . . . . . . . . . . . . . 917
RightWords . . . . . . . . . . . . . . . . . . . . . . . . . . . . . . . . . . . . . . . . . . . . . . . . . . . . . . . . . . . . . . . . 918
RomanHankaku . . . . . . . . . . . . . . . . . . . . . . . . . . . . . . . . . . . . . . . . . . . . . . . . . . . . . . . . . . . . . 919
RomanZenkaku . . . . . . . . . . . . . . . . . . . . . . . . . . . . . . . . . . . . . . . . . . . . . . . . . . . . . . . . . . . . . 919
Round . . . . . . . . . . . . . . . . . . . . . . . . . . . . . . . . . . . . . . . . . . . . . . . . . . . . . . . . . . . . . . . . . . . . . 875
S
ScriptIDs . . . . . . . . . . . . . . . . . . . . . . . . . . . . . . . . . . . . . . . . . . . . . . . . . . . . . . . . . . . . . . . . . . . 714
ScriptNames . . . . . . . . . . . . . . . . . . . . . . . . . . . . . . . . . . . . . . . . . . . . . . . . . . . . . . . . . . . . . . . . 714
Seconds . . . . . . . . . . . . . . . . . . . . . . . . . . . . . . . . . . . . . . . . . . . . . . . . . . . . . . . . . . . . . . . . . . . 941
Self . . . . . . . . . . . . . . . . . . . . . . . . . . . . . . . . . . . . . . . . . . . . . . . . . . . . . . . . . . . . . . . . . . . . . . . 859
SerialIncrement . . . . . . . . . . . . . . . . . . . . . . . . . . . . . . . . . . . . . . . . . . . . . . . . . . . . . . . . . . . . . 920
FILEMAKER PRO HELP 661
SetPrecision . . . . . . . . . . . . . . . . . . . . . . . . . . . . . . . . . . . . . . . . . . . . . . . . . . . . . . . . . . . . . . . . 875
Sign . . . . . . . . . . . . . . . . . . . . . . . . . . . . . . . . . . . . . . . . . . . . . . . . . . . . . . . . . . . . . . . . . . . . . . 876
Sin . . . . . . . . . . . . . . . . . . . . . . . . . . . . . . . . . . . . . . . . . . . . . . . . . . . . . . . . . . . . . . . . . . . . . . . 950
Sqrt . . . . . . . . . . . . . . . . . . . . . . . . . . . . . . . . . . . . . . . . . . . . . . . . . . . . . . . . . . . . . . . . . . . . . . . 877
StDev . . . . . . . . . . . . . . . . . . . . . . . . . . . . . . . . . . . . . . . . . . . . . . . . . . . . . . . . . . . . . . . . . . . . . 670
StDevP . . . . . . . . . . . . . . . . . . . . . . . . . . . . . . . . . . . . . . . . . . . . . . . . . . . . . . . . . . . . . . . . . . . . 671
Substitute . . . . . . . . . . . . . . . . . . . . . . . . . . . . . . . . . . . . . . . . . . . . . . . . . . . . . . . . . . . . . . . . . . 921
Sum . . . . . . . . . . . . . . . . . . . . . . . . . . . . . . . . . . . . . . . . . . . . . . . . . . . . . . . . . . . . . . . . . . . . . . 672
T, U
TableIDs . . . . . . . . . . . . . . . . . . . . . . . . . . . . . . . . . . . . . . . . . . . . . . . . . . . . . . . . . . . . . . . . . . . 715
TableNames . . . . . . . . . . . . . . . . . . . . . . . . . . . . . . . . . . . . . . . . . . . . . . . . . . . . . . . . . . . . . . . . 716
Tan . . . . . . . . . . . . . . . . . . . . . . . . . . . . . . . . . . . . . . . . . . . . . . . . . . . . . . . . . . . . . . . . . . . . . . . 951
TextColor . . . . . . . . . . . . . . . . . . . . . . . . . . . . . . . . . . . . . . . . . . . . . . . . . . . . . . . . . . . . . . . . . . 929
TextColorRemove . . . . . . . . . . . . . . . . . . . . . . . . . . . . . . . . . . . . . . . . . . . . . . . . . . . . . . . . . . . 930
TextFont . . . . . . . . . . . . . . . . . . . . . . . . . . . . . . . . . . . . . . . . . . . . . . . . . . . . . . . . . . . . . . . . . . . 931
TextFontRemove . . . . . . . . . . . . . . . . . . . . . . . . . . . . . . . . . . . . . . . . . . . . . . . . . . . . . . . . . . . . 932
TextFormatRemove . . . . . . . . . . . . . . . . . . . . . . . . . . . . . . . . . . . . . . . . . . . . . . . . . . . . . . . . . . 934
TextSize . . . . . . . . . . . . . . . . . . . . . . . . . . . . . . . . . . . . . . . . . . . . . . . . . . . . . . . . . . . . . . . . . . . 934
TextSizeRemove . . . . . . . . . . . . . . . . . . . . . . . . . . . . . . . . . . . . . . . . . . . . . . . . . . . . . . . . . . . . 935
TextStyleAdd . . . . . . . . . . . . . . . . . . . . . . . . . . . . . . . . . . . . . . . . . . . . . . . . . . . . . . . . . . . . . . . 936
TextStyleRemove . . . . . . . . . . . . . . . . . . . . . . . . . . . . . . . . . . . . . . . . . . . . . . . . . . . . . . . . . . . . 938
Time . . . . . . . . . . . . . . . . . . . . . . . . . . . . . . . . . . . . . . . . . . . . . . . . . . . . . . . . . . . . . . . . . . . . . . 942
Timestamp . . . . . . . . . . . . . . . . . . . . . . . . . . . . . . . . . . . . . . . . . . . . . . . . . . . . . . . . . . . . . . . . . 943
Trim . . . . . . . . . . . . . . . . . . . . . . . . . . . . . . . . . . . . . . . . . . . . . . . . . . . . . . . . . . . . . . . . . . . . . . 922
TrimAll . . . . . . . . . . . . . . . . . . . . . . . . . . . . . . . . . . . . . . . . . . . . . . . . . . . . . . . . . . . . . . . . . . . . 923
Truncate . . . . . . . . . . . . . . . . . . . . . . . . . . . . . . . . . . . . . . . . . . . . . . . . . . . . . . . . . . . . . . . . . . . 878
Upper . . . . . . . . . . . . . . . . . . . . . . . . . . . . . . . . . . . . . . . . . . . . . . . . . . . . . . . . . . . . . . . . . . . . . 924
V, W, X, Y, Z
ValueCount . . . . . . . . . . . . . . . . . . . . . . . . . . . . . . . . . . . . . . . . . . . . . . . . . . . . . . . . . . . . . . . . 925
ValueListIDs . . . . . . . . . . . . . . . . . . . . . . . . . . . . . . . . . . . . . . . . . . . . . . . . . . . . . . . . . . . . . . . . 717
ValueListItems . . . . . . . . . . . . . . . . . . . . . . . . . . . . . . . . . . . . . . . . . . . . . . . . . . . . . . . . . . . . . . 718
ValueListNames . . . . . . . . . . . . . . . . . . . . . . . . . . . . . . . . . . . . . . . . . . . . . . . . . . . . . . . . . . . . . 718
Variance . . . . . . . . . . . . . . . . . . . . . . . . . . . . . . . . . . . . . . . . . . . . . . . . . . . . . . . . . . . . . . . . . . . 674
VarianceP . . . . . . . . . . . . . . . . . . . . . . . . . . . . . . . . . . . . . . . . . . . . . . . . . . . . . . . . . . . . . . . . . . 675
VerifyContainer . . . . . . . . . . . . . . . . . . . . . . . . . . . . . . . . . . . . . . . . . . . . . . . . . . . . . . . . . . . . . 685
WeekOfYear . . . . . . . . . . . . . . . . . . . . . . . . . . . . . . . . . . . . . . . . . . . . . . . . . . . . . . . . . . . . . . . . 695
WeekOfYearFiscal . . . . . . . . . . . . . . . . . . . . . . . . . . . . . . . . . . . . . . . . . . . . . . . . . . . . . . . . . . . 696
WindowNames . . . . . . . . . . . . . . . . . . . . . . . . . . . . . . . . . . . . . . . . . . . . . . . . . . . . . . . . . . . . . . 719
WordCount . . . . . . . . . . . . . . . . . . . . . . . . . . . . . . . . . . . . . . . . . . . . . . . . . . . . . . . . . . . . . . . . . 926
Year . . . . . . . . . . . . . . . . . . . . . . . . . . . . . . . . . . . . . . . . . . . . . . . . . . . . . . . . . . . . . . . . . . . . . . 697
YearName . . . . . . . . . . . . . . . . . . . . . . . . . . . . . . . . . . . . . . . . . . . . . . . . . . . . . . . . . . . . . . . . . 698
FILEMAKER PRO HELP 662
Aggregate functions
Aggregate functions perform statistical analysis on numbers (and also dates or times for some
functions) in:
•several fields in a record.
•related fields whether displayed in a portal or not.
•repeating fields.
For example, you can use the Sum function to add the values listed in a portal, as an alternative to
creating a report with grouped data and subtotals.
The parameter values can include a numeric constant (for example, 10) or any valid expression. A
constant parameter in a formula for a repeating field affects the result for every repetition.
When repeating field parameters (field1; field2;...) include a non-repeating field, that value is used in
the result for only the first repetition unless you use the Extend function.
Values in repetitions that exceed the number of repetitions in the calculated field are ignored. For
example, a calculated field with three repetitions holds only three results, even when one field
referenced in the calculation has five repetitions.
Click a function name for details.
Related topics
About functions
About formulas
Average
Purpose
Returns a value that is the average of all valid, non-blank values in field.
Format
Average(field{;field...})
This function Returns
Average The average of all valid, non-blank values in the specified field.
Count The number of valid, non-blank values in the specified field.
List The concatenation of all non-blank values in list form, separated by carriage returns.
Max The highest valid value in a field or fields.
Min The smallest valid non-blank value in a field or fields.
StDev The standard deviation of a series of valid non-blank values in a field or fields.
StDevP The standard deviation of a population represented by a series of valid non-blank
values in a field or fields.
Sum The total of all valid, non-blank values in the specified fields.
Variance The variance of a series of valid non-blank values in a field or fields.
VarianceP The variance of a population in a series of valid non-blank values in a field or fields.
A, B, C
D
E
F
G
H, I, J, K
L, M, N, O
P, Q
R
S
T, U
V, W, X, Y, Z

FILEMAKER PRO HELP 663
Parameters
field - any related field, repeating field, or set of non-repeating fields; or an expression that returns
a field, repeating field, or set of non-repeating fields.
Parameters in curly braces { } are optional.
Data type returned
number
Originated in
FileMaker Pro 6.0 or earlier
Description
Field can be any of the following:
•a repeating field (repeatingField).
•a field in matching related records specified by (table::field), whether or not these
records appear in a portal.
•several non-repeating fields in a record(field1;field2;field3...).
•corresponding repetitions of repeating fields in a record
(repeatingField1;repeatingField2;repeatingField3), if the result is returned
in a repeating field with at least the same number of repeats.
•several fields in the first matching record specified by
(table::field1;table::field2;...). You can include fields from different tables
(table 1::field A;table 2::field B...).
Examples
A Student table has a portal showing scores for all exams a student has taken. The exam scores are
in a table called Exams.
Average(Exams::Score) returns the student’s average score for all exams she has taken.
In the following examples:
• Field1 contains two repetitions with values of 1 and 2.
• Field2 contains four repetitions with values of 5, 6, 7, and 8.
• Field3 contains 6.
Average(Field2) returns 6.5 when the calculation isn’t a repeating field.
Average(Field1;Field2;Field3) returns 4, 4, 7, 8 when the calculation is a repeating field.
Note When a referenced field is a repeating field, the Average function returns the average of the
values in the first repetition field, then the average of the values in the second repetition field, and so
on. Therefore, (1+5+6)/3=4;(2+6)/2=4;7/1=7;8/1=8.
Related topics
Functions reference (category list)
Functions reference (alphabetical list)
About formulas
About functions
Defining calculation fields

FILEMAKER PRO HELP 664
Using operators in formulas
Count
Purpose
Returns the number of valid, non-blank values in field.
Format
Count(field{;field...})
Parameters
field - any related field, repeating field, or set of non-repeating fields; or an expression that returns
a field, repeating field, or set of non-repeating fields.
Parameters in curly braces { } are optional.
Data type returned
number
Originated in
FileMaker Pro 6.0 or earlier
Description
Field can be any of the following:
•a repeating field (repeatingField).
•a field in matching related records specified by (table::field), whether or not these
records appear in a portal.
•several non-repeating fields in a record (field1;field2;field3...).
•corresponding repetitions of repeating fields in a record
(repeatingField1;repeatingField2;repeatingField3), if the result is returned
in a repeating field with at least the same number of repeats.
•several fields in the first matching record specified by
(table::field1;table::field2;...). You can include fields from different tables
(table 1::field A;table 2::field B...).
Examples
The Accounts layout has a portal showing installment payments made.
Count(Payments::Payment) returns the number of payments made on an account.
In the following examples:
•Field1 contains two repetitions with values of 1 and 2.
•Field2 contains four repetitions with values of 5, 6, 7, and 8.
•Field3 contains 6.

FILEMAKER PRO HELP 665
Count(Field2) returns 4 when the calculation isn’t a repeating field.
Count(Field1;Field2;Field3) returns 3, 2, 1, 1 when the calculation is a repeating field.
Note When a referenced field is a repeating field, the Count function returns the total number of
valid, non-blank values in the first repetition field, then the number of valid, non-blank values in the
second repetition field, and so on.
Related topics
Functions reference (category list)
Functions reference (alphabetical list)
About formulas
About functions
Defining calculation fields
Using operators in formulas
List
Purpose
Returns a concatenated list of non-blank values (separated by carriage returns) for a field or fields.
Format
List(field{;field...})
Parameters
field - any related field, repeating field, or set of non-repeating fields; an expression that returns a
field, repeating field, or set of non-repeating fields, or a variable.
Parameters in curly braces { } are optional.
Data type returned
text
Originated in
FileMaker Pro 8.5
Description
Use this function to return a list of values for:
•a single field (table::field), which returns a single result over all repetitions (if any) for
this field and over all matching related records, whether or not these records appear in a
portal.
•several fields and/or literal values (table::field1,constant,table::field2...),
which returns a separate result for each repetition of the calculation across each
corresponding repetition of the fields. If any fields are related, only the first related record is
used.
FILEMAKER PRO HELP 666
Examples
In the following examples:
•Field1 contains white.
•Field2 contains black.
•Field3 contains three repetitions with values of red, green, blue.
•Related::Field4 refers to three records that contain 100, 200, 300.
•$f1 contains orange.
Note When referencing multiple repeating fields, List() returns the list of values across the first
repetition in the calculation's first repetition, then the list of values across the second repetition in the
second repetition, and so on.
Example 1
List (Field1; Field2) returns:
•white
•black
Example 2
List(Field3) returns:
•red
•green
•blue
Example 3
List (Field1; Field2; Field3) returns:
in calculation repetition 1:
•white
•black
•red
in calculation repetition 2:
•green
in calculation repetition 3:
•blue
Example 4
List(Related::Field4) returns:
•100
•200
•300

FILEMAKER PRO HELP 667
Example 5
List ($f1; Field2) returns:
•orange
•black
Related topics
Functions reference (category list)
Functions reference (alphabetical list)
About formulas
About functions
Defining calculation fields
Using operators in formulas
Max
Purpose
Returns the highest valid value in field.
Format
Max(field{;field...})
Parameters
field - any related field, repeating field, or set of non-repeating fields; or an expression that returns
a field, repeating field, or set of non-repeating fields.
Parameters in curly braces { } are optional.
Data type returned
text, number, date, time, timestamp
Originated in
FileMaker Pro 6.0 or earlier
Description
Field can be any of the following:
•a repeating field (repeatingField).
•a field in matching related records specified by (table::field), whether or not these
records appear in a portal.
•several non-repeating fields in a record (field1;field2;field3...).
•corresponding repetitions of repeating fields in a record
(repeatingField1;repeatingField2;repeatingField3), if the result is returned
in a repeating field with at least the same number of repeats.

FILEMAKER PRO HELP 668
•several fields in the first matching record specified by
(table::field1;table::field2;...). You can include fields from different tables
(table 1::field A;table 2::field B...).
Examples
The Accounts layout has a portal showing installment payments made.
Max(Payments::PaymentDate) returns the most recent date a payment was made on an
account.
In the following examples:
•Field1 contains two repetitions with values of 1 and 2.
•Field2 contains four repetitions with values of 5, 6, 7, and 8.
•Field3 contains 6.
Max(Field2) returns 8 when the calculation isn’t a repeating field.
Max(Field1;Field2;Field3) returns 6, 6, 7, 8 when the calculation is a repeating field.
Notes
•When a referenced field is a repeating field, the Max function returns the maximum value in
the first repetition field, then the maximum value in the second repetition field, and so on.
•Aggregate functions such as Min or Max use the data type of the first parameter to perform
all comparisons. For example, if the first parameter’s data type is text, all other parameters
are converted to text and then compared.
Related topics
Functions reference (category list)
Functions reference (alphabetical list)
About formulas
About functions
Defining calculation fields
Using operators in formulas
Min
Purpose
Returns the smallest valid non-blank value in field.
Format
Min(field{;field...})
Parameters
field - any related field, repeating field, or set of non-repeating fields; or an expression that returns
a field, repeating field, or set of non-repeating fields.
Parameters in curly braces { } are optional.

FILEMAKER PRO HELP 669
Data type returned
text, number, date, time, timestamp
Originated in
FileMaker Pro 6.0 or earlier
Description
Field can be any of the following:
•a repeating field (repeatingField).
•a field in matching related records specified by (table::field), whether or not these
records appear in a portal.
•several non-repeating fields in a record (field1;field2;field3...).
•corresponding repetitions of repeating fields in a record
(repeatingField1;repeatingField2;repeatingField3), if the result is returned
in a repeating field with at least the same number of repeats.
•several fields in the first matching record specified by
(table::field1;table::field2;...). You can include fields from different tables
(table 1::field A;table 2::field B...).
Examples
A Contracts table has a portal showing bids submitted for each contract.
Min(Bids::Price) returns the lowest bid submitted for a contract.
In the following examples:
•Field1 contains two repetitions with values of 1 and 2.
•Field2 contains four repetitions with values of 5, 6, 7, and 8.
•Field3 contains 6.
Min(Field2) returns 5 when the calculation isn’t a repeating field.
Min(Field1;Field2;Field3) returns 1, 2, 7, 8 when the calculation is a repeating field.
Notes
•When a referenced field is a repeating field, the Min function returns the minimum value in
the first repetition field, then the minimum value in the second repetition field, and so on.
•Aggregate functions such as Min or Max use the data type of the first parameter to perform
all comparisons. For example, if the first parameter’s data type is text, all other parameters
are converted to text and then compared.
Related topics
Functions reference (category list)
Functions reference (alphabetical list)
About formulas
About functions
Defining calculation fields
Using operators in formulas

FILEMAKER PRO HELP 670
StDev
Purpose
Returns the standard deviation of the sample represented by a series of non-blank values in field.
Format
StDev(field{;field...})
Parameters
field - any related field, repeating field, or set of non-repeating fields; or an expression that returns
a field, repeating field, or set of non-repeating fields.
Parameters in curly braces { } are optional.
Data type returned
number
Originated in
FileMaker Pro 6.0 or earlier
Description
Field can be any of the following:
•a repeating field (repeatingField).
•a field in matching related records specified by (table::field), whether or not these
records appear in a portal.
•several non-repeating fields in a record (field1;field2;field3).
•corresponding repetitions of repeating fields in a record
(repeatingField1;repeatingField2;repeatingField3), if the result is returned
in a repeating field with at least the same number of repeats.
•several fields in the first matching record specified by (table 1::field A, table
2::field B,...). You can name a different table for each field (table 1::field
A;table 2::field B...).
Examples
A portal displays the related values 5, 6, 7, and 8 in a field called Scores.
StDev(table::Scores) returns 1.29099444....
In the following examples:
•Field1 contains two repetitions with values of 1 and 2.
•Field2 contains four repetitions with values of 5, 6, 7, and 8.
•Field3 contains four repetitions with values of 6, 0, 4, and 4.
•Field4 contains one repetition with a value of 3.
StDev x1
2x2
2…xn
2
+++
n1–
-------------------------------------------- x1x2…xn
+++()
2
nn 1–()
---------------------------------------------------
–=

FILEMAKER PRO HELP 671
StDev(Field4) results in an error because standard deviation of a single number is not defined.
StDev(Field1;Field2;Field3) returns 2.64575131..., 3.05505046..., 2.12132034...,
2.82842712... for a repeating field.
Note When a referenced field is a repeating field, the StDev function returns the standard deviation
in the first repetition fields, then the standard deviation in the second repetition fields, and so on.
Related topics
Functions reference (category list)
Functions reference (alphabetical list)
About formulas
About functions
Defining calculation fields
Using operators in formulas
StDevP
Purpose
Returns the standard deviation of a population represented by a series of non-blank values in
field.
Format
StDevP(field{;field... })
Parameters
field - any related field, repeating field, or set of non-repeating fields; or an expression that returns
a field, repeating field, or set of non-repeating fields.
Parameters in curly braces { } are optional.
Data type returned
number
Originated in
FileMaker Pro 6.0 or earlier
Description
Field can be any of the following:
•a repeating field (repeatingField).
•a field in matching related records specified by (table::field), whether or not these
records appear in a portal.
•several non-repeating fields in a record (field1;field2;field3...).
•corresponding repetitions of repeating fields in a record
(repeatingField1;repeatingField2;repeatingField3), if the result is returned
in a repeating field with at least the same number of repeats.

FILEMAKER PRO HELP 672
•several fields in the first matching record specified by
(table::field1;table::field2;...). You can include fields from different tables
(table 1::field A;table 2::field B...).
Examples
A portal displays the related values 5, 6, 7, and 8 in the field Scores. StDevP(table::Scores)
returns 1.11803398....
In the following examples:
•Field1 contains two repetitions with values of 1 and 2.
•Field2 contains four repetitions with values of 5, 6, 7, and 8.
•Field3 contains four repetitions with values of 6, 0, 4, and 4.
•Field4 contains one repetition with a value of 3.
StDevP(Field4) results in an error because the population standard deviation of a single number
is not defined.
StDevP(Field2) returns 1.11803398... for a non-repeating field.
StDevP(Field1;Field2;Field3) returns 2.16024689..., 2.49443825..., 1.5, 2 for repeating
fields.
Note When a referenced field is a repeating field, the StDevP function returns the standard
deviation of a population in the first repetition fields, then the standard deviation of a population in
the second repetition fields, and so on.
Related topics
Functions reference (category list)
Functions reference (alphabetical list)
About formulas
About functions
Defining calculation fields
Using operators in formulas
Sum
Purpose
Returns the total of all valid, non-blank values in field.
Format
Sum(field{;field...})
Parameters
field - any related field, repeating field, or set of non-repeating fields; or an expression that returns
a field, repeating field, or set of non-repeating fields.
Parameters in curly braces { } are optional.
StDevP x1
2x2
2…xn
2
+++
n
-------------------------------------------- x1x2…xn
+++
n
-------------------------------------------
⎝⎠
⎛⎞
2
–=

FILEMAKER PRO HELP 673
Data type returned
number
Originated in
FileMaker Pro 6.0 or earlier
Description
Field can be any of the following:
•a repeating field (repeatingField).
•a field in matching related records specified by (table::field), whether or not these
records appear in a portal.
•several non-repeating fields in a record (field1;field2;field3...).
•corresponding repetitions of repeating fields in a record
(repeatingField1;repeatingField2;repeatingField3), if the result is returned
in a repeating field with at least the same number of repeats.
•several fields in the first matching record specified by
(table::field1;table::field2;...). You can include fields from different tables
(table 1::field A;table 2::field B...).
Examples
An Invoice table has a portal showing line items.
Sum(LineItems::ExtendedPrice) totals the amounts for all items on the invoice.
A TimeBilling table has a portal showing time worked on a project. Hours is a time field.
Sum(Hours::BillableHours) returns the total number of billable hours on a project. Thus, if the
portal shows 40 hours and 15:30 hours, the total billable hours are 55:30, or 55 1/2 hours.
In the following examples:
•Field1 contains two repetitions with values of 1 and 2.
•Field2 contains four repetitions with values of 5, 6, 7, and 8.
•Field3 contains 6.
If the calculation result isn’t a repeating field:
•Sum(Field2) returns 26.
•Sum(Field1;Field2;Field3) returns 12.
If the calculation result is a repeating field:
•Sum(Field2) returns a repeating field with 26 in the first repetition.
•Sum(Field1;Field2;Field3) returns a repeating field with 12, 8, 7, 8.
Note When a referenced field is a repeating field, the Sum function returns the sum of the first
repetition field, then the sum of the second repetition field, and so on.
Related topics
Functions reference (category list)
Functions reference (alphabetical list)
About formulas
About functions

FILEMAKER PRO HELP 674
Defining calculation fields
Using operators in formulas
Variance
Purpose
Returns the variance of a sample represented by a series of non-blank values in field.
Format
Variance(field{;field...})
Parameters
field - any related field, repeating field, or set of non-repeating fields; or an expression that returns
a field, repeating field, or set of non-repeating fields.
Parameters in curly braces { } are optional.
Data type returned
number
Originated in
FileMaker Pro 7.0
Description
The variance of a distribution is a measure of how spread out the distribution is. Field can be any
of the following:
•a repeating field (repeatingField).
•a field in matching related records specified by (table::field), whether or not these
records appear in a portal.
•several non-repeating fields in a record (field1;field2;field3...).
•corresponding repetitions of repeating fields in a record
(repeatingField1;repeatingField2;repeatingField3), if the result is returned
in a repeating field with at least the same number of repeats.
•several fields in the first matching record specified by
(table::field1;table::field2;...). You can include fields from different tables
(table 1::field A;table 2::field B...).
Examples
A portal displays the related values 5, 6, 7, and 8 in Scores.
Variance(table::Scores) returns 1.66666666....
In the following examples:
Variance x1
2x2
2…xn
2
+++
n1–
-------------------------------------------- x1x2…xn
+++()
2
nn 1–()
---------------------------------------------------
–=

FILEMAKER PRO HELP 675
•Field1 contains two repetitions with values of 1 and 2.
•Field2 contains four repetitions with values of 5, 6, 7, and 8.
•Field3 contains four repetitions with values of 6, 0, 4,and 4.
•Field4 contains one repetition with a value of 3.
Variance(Field4) results in an error since the variance of a single value is not defined.
Variance(Field1;Field2;Field3) returns 7, 9.33333333..., 4.5, 8 if the calculation is a
repeating field.
Student example
Two classes of students take an exam. Class 1 has scores of 70, 71, 70, 74, 75, 73, 72 and
Class 2 has scores of 55, 80, 75, 40, 65, 50, 95. The variance for each class is:
Class 1: 3.80952380...
Class 2: 361.90476190...
The variance for Class 1 is much lower than the variance for Class 2, because the scores
for Class 2 are more spread out.
Related topics
Functions reference (category list)
Functions reference (alphabetical list)
About formulas
About functions
Defining calculation fields
Using operators in formulas
VarianceP
Purpose
Returns the variance of a population represented by a series of non-blank values in field.
Format
VarianceP(field{;field...})
Parameters
field - any related field, repeating field, or set of non-repeating fields; or an expression that returns
a field, repeating field, or set of non-repeating fields.
Parameters in curly braces { } are optional.
Data type returned
number
Originated in
FileMaker Pro 7.0

FILEMAKER PRO HELP 676
Description
The variance of a population distribution is a measure of how spread out the distribution is. Field
can be any of the following:
•a repeating field (repeatingField).
•a field in matching related records specified by (table::field), whether or not these
records appear in a portal.
•several non-repeating fields in a record (field1;field2;field3...).
•corresponding repetitions of repeating fields in a record
(repeatingField1;repeatingField2;repeatingField3), if the result is returned
in a repeating field with at least the same number of repeats.
•several fields in the first matching record specified by
(table::field1;table::field2;...). You can include fields from different tables
(table 1::field A;table 2::field B...).
Examples
A portal displays the related values 5, 6, 7, and 8 in Scores.
VarianceP(table::Scores) returns 1.25.
In the following examples:
•Field1 contains two repetitions with values of 1 and 2.
•Field2 contains four repetitions with values of 5, 6, 7, and 8.
•Field3 contains four repetitions with values of 6, 0, 4, and 4.
•Field4 contains one repetition with a value of 3.
VarianceP(Field4) results in an error since the variance of a single value is not defined.
VarianceP(Field1;Field2;Field3) returns 4.66666666..., 6.22222222..., 2.25, 4 if the
calculation is a repeating field.
Student example
Two classes of students take an exam. Class 1 has scores of 70, 71, 70, 74, 75, 73, 72 and
Class 2 has scores of 55, 80, 75, 40, 65, 50, 95. The population variance for each class is:
Class 1: 3.26530612...
Class 2: 310.20408163...
The population variance for Class 1 is much lower than the population variance for Class 2
because the scores for Class 1 are more tightly clustered.
Related topics
Functions reference (category list)
Functions reference (alphabetical list)
About formulas
About functions
Defining calculation fields
Using operators in formulas
VarianceP x1
2x2
2…xn
2
+++
n
-------------------------------------------- x1x2…xn
+++
n
-------------------------------------------
⎝⎠
⎛⎞
2
–=

FILEMAKER PRO HELP 677
Container functions
Container functions calculate, manipulate, and report on data in container fields.
Click a function name for details.
Related topics
About functions
About formulas
Base64Decode
Purpose
Returns container content from text encoded in Base64 format.
Format
Base64Decode(text{;fileNameWithExtension})
Parameters
text - Base64 text to decode.
fileNameWithExtension - the filename and extension for the file created from the decoded
Base64 text.
Data type returned
container
Originated in
FileMaker Pro 13.0
Description
Base64 encoding does not retain the filename or extension of encoded content.
This function Returns
Base64Decode Container content from text encoded in Base64 format.
Base64Encode The contents of the specified container field as text in Base64 format.
GetContainerAttribute The file metadata of a container field.
GetHeight The height of the image in a container field that holds images.
GetThumbnail An image stored in the container field, resized according to specified values for
width and height.
GetWidth The width of the image in a container field that holds images.
VerifyContainer A Boolean value representing the state of container data that’s stored externally. A
False result means that files saved externally were changed or deleted.

FILEMAKER PRO HELP 678
If a filename and extension are not specified in the fileNameWithExtension parameter,
Base64Decode returns the container content with a generic filename and extension but does not
change the content’s data format.
Examples
Base64Decode(Products::Base64;"question.png") returns when
Products::Base64 is set to a string that begins with "iVBORw0KGgoAAAANSUhEUgAAAB8". The
Base64 string in this example was shortened for readability.
Related topics
Base64Encode
Functions reference (category list)
Functions reference (alphabetical list)
About formulas
About functions
Defining calculation fields
Using operators in formulas
Base64Encode
Purpose
Returns the contents of the specified container field as text in Base64 format.
Format
Base64Encode(sourceField)
Parameters
sourceField - the name of a container field.
Data type returned
text
Originated in
FileMaker Pro 13.0
Description
Base64 encoding does not retain the filename or extension of encoded content.
Base64Encode adds a line break after every 76 characters.
Examples
Base64Encode(Products::Container) returns a string that begins with
iVBORw0KGgoAAAANSUhEUgAAAB8 when Products::Container is set to . The Base64
string in this example was shortened for readability.

FILEMAKER PRO HELP 679
Related topics
Base64Decode
Functions reference (category list)
Functions reference (alphabetical list)
About formulas
About functions
Defining calculation fields
Using operators in formulas
GetContainerAttribute
Purpose
Returns the file metadata of the specified container field.
Format
GetContainerAttribute(sourceField;attributeName)
Parameters
sourceField - the name of a container field.
attributeName - the name of a supported attribute (see below).
Data type returned
text, number, date, time, timestamp, container
Originated in
FileMaker Pro 13.0
Description
Some attributes may not return a result. For example, the values for the latitude and longitude of a
photo may not be available, or some audio metadata like album art may not be available because
the metadata is stored outside the audio file. Some individual attributes in the group attribute all
may not be applicable in some circumstances.
Attributes
Attribute Returns Data type returned
General
filename The name of the file inserted into the container field. text
MD5 The result of applying the cryptographic hash function MD5
to a file inserted into the container field or a file referenced by
a container field.
text
storageType The method used to store the data in the container field:
Embedded, External (Secure), External (Open), File
Reference, Text.
text

FILEMAKER PRO HELP 680
fileSize The size (in bytes) of the file inserted into the container field. number
internalSize The amount (in bytes) of the space inside the database file
that is occupied by the container field.
number
externalSize The amount (in bytes) of the space that is stored externally
by the container field. This is either the size of the referenced
file or the total size of all files in the container field (set up for
open or secure storage).
number
externalFiles A list of the external files associated with the container field
(either files using open or secure storage or a file reference).
text
Images
width A number representing the width of the image in pixels. number
height A number representing the height of the image in pixels. number
dpiWidth A number representing the horizontal DPI of the image. number
dpiHeight A number representing the vertical DPI of the image. number
transparency 1 if the image has an alpha channel, otherwise returns 0.number
Photos
orientation A number representing the orientation of the photo:
1 (Normal)
2 (Flipped horizontally)
3 (Rotated 180 degrees)
4 (Flipped vertically)
5 (Rotated 90 degrees counterclockwise and flipped
vertically)
6 (Rotated 90 degrees counterclockwise)
7 (Rotated 90 degrees clockwise and flipped vertically)
8 (Rotated 90 degrees clockwise)
Note: Photos that were inserted using earlier versions of
FileMaker Pro are not automatically oriented; for such
photos, not applied is appended to the result. For example,
3 (Rotated 180 degrees), not applied.
text
created The earliest available timestamp for the photo. timestamp
modified The latest available timestamp for the photo. If the photo has
never been modified, an empty string is returned.
timestamp
latitude The latitude of the location of the photo. text
longitude The longitude of the location of the photo. text
make The manufacturer of the camera used for the photo. text
model The camera model used for the photo. text
Audio
Note Only MP3 and M4A files return results.
title The title of the audio. text
Attribute Returns Data type returned

FILEMAKER PRO HELP 681
Notes
•The internalSize can be much smaller than the fileSize (for example, container
fields set up for open or secure storage, file references, or compressed files) or much larger
than the fileSize (for example, container fields created by plug-ins).
•Using the attribute MD5 allows you to prevent the insertion of duplicated files into a
container field regardless of the filename.
•Bar codes and signatures are not considered images.
artist The name of the performer of the audio. text
album The name of the album containing the audio. text
year The year the audio was released. text
track The track number and count of the audio. For example, 3/12,
or 3 if the track count is not available.
text
genre The genre of the audio. text
composer The composer of the audio. text
coverArt An image of the album cover. container
duration The duration of the audio. For example, 0:03:16. time
bitRate The number of kilobits per second (kbps) used in the audio. number
Bar Codes
barcodeText The content of the bar code. text
barcodeType The type of the bar code. text
Signatures
signed The timestamp when the signature was inserted. timestamp
Groups
general Attributes listed in the General category above pertaining to
the container field.
text
audio Attributes listed in the Audio category above pertaining to the
container field.
text
image Attributes listed in the Images category above pertaining to
the container field.
text
photo Attributes listed in the Photos category above pertaining to
the container field.
text
barcode Attributes listed in the Bar Codes category above pertaining
to the container field.
text
signature Attributes listed in the Signatures category above pertaining
to the container field.
text
all Attributes in all the categories listed above pertaining to the
container field.
text
Attribute Returns Data type returned
FILEMAKER PRO HELP 682
•For the group attributes general, audio, image, photo, and all, attributes are
displayed in the format attributeName: attributeValue with one attribute per line.
Some attributes are displayed differently in order to fit the attribute on one line:
•externalFiles. Displays only the number of external files.
•transparency. Displays 1 (True) or 0 (False).
•coverArt. Displays png or jpg depending on the type of image.
•bitRate. Displays kbps after the number. If an audio uses a variable bit rate, (VBR) is
appended to the result. For example: Bit Rate: 247 kbps (VBR).
•year. Date information may be returned in parentheses after the year. For example:
Year: 2014 (11/10/2014).
Examples
Notice that the attributes in the following examples are enclosed in quotation marks.
GetContainerAttribute(Image;"all") returns:
[General]
Filename: IMG_003.JPG
Storage Type: Embedded
MD5: C35A3F668A1FB3F370969399A1FF04FE
File Size: 1964978
Internal Size: 1965064
External Size: 0
External Files: 0
[Image]
Width: 1936
Height: 2592
DPI Width: 72
DPI Height: 72
Transparency: 0 (False)
[Photo]
Orientation: 6 (Rotated 90 degrees counterclockwise)
Created: 11/14/2014 2:40:31 PM
Modified:
Latitude: 37.406167
Longitude: -121.983333
Make: Apple
Model: iPhone 4
GetContainerAttribute(Product;"barcode") returns:

FILEMAKER PRO HELP 683
[Bar Code]
Bar Code Text: 875720001107
Bar Code Type: UPC-A
GetContainerAttribute(Package;"signature") returns:
[Signature]
Signed: 11/10/2014 11:41:22 AM
Related topics
Functions reference (category list)
Functions reference (alphabetical list)
About formulas
About functions
Defining calculation fields
Using operators in formulas
GetHeight
Purpose
Returns the height in pixels of the content in a container field that holds images.
Format
GetHeight(field)
Parameters
field - any text, number, date, time, timestamp, or container field; or any text expression or
numeric expression.
Data type returned
number
Originated in
FileMaker Pro 12.0
Description
Returns the height in pixels of images in a container field that holds images. Otherwise, GetHeight
returns 0.
Examples
GetHeight(product) returns 768.
Related topics
Functions reference (category list)

FILEMAKER PRO HELP 684
Functions reference (alphabetical list)
About formulas
About functions
Defining calculation fields
Using operators in formulas
GetThumbnail
Purpose
Returns a thumbnail image of the content in a container field, according to specified values for width
and height.
Format
GetThumbnail(field;width;height)
Parameters
field - any text, number, date, time, timestamp, or container field; or any text expression or
numeric expression.
width - the width for the thumbnail.
height - the height for the thumbnail.
Data type returned
container
Originated in
FileMaker Pro 12.0
Description
Returns an image that’s stored in a container field according to specified values for width and height.
The thumbnail image always maintains the proportions of the original image.
Note If the field parameter does not specify a field that contains image data, field must
evaluate to the file path of an image. See Creating file paths.
Examples
GetThumbnail(Dog;GetLayoutObjectAttribute("rectangle","width");
GetLayoutObjectAttribute("rectangle","height")) returns an image stored in the Dog
field that fits into the dimensions of the Rectangle layout object.
GetThumbnail(Property;GetWidth(Property)/2;GetHeight(Property)/2)returns an
image that is 50 percent of the size of the original image in the Property field.
GetThumbnail ( "image:question.png" ; 50 ; 50 ) returns a thumbnail of question.png
with a maximum height and width of 50 points.
Related topics
Functions reference (category list)

FILEMAKER PRO HELP 685
Functions reference (alphabetical list)
About formulas
About functions
Defining calculation fields
Using operators in formulas
GetWidth
Purpose
Returns the width in pixels of the content in a container field that holds images.
Format
GetWidth(field)
Parameters
field - any text, number, date, time, timestamp, or container field; or any text expression or
numeric expression.
Data type returned
number
Originated in
FileMaker Pro 12.0
Description
Returns the width in pixels of images in a container field that holds images. Otherwise, GetWidth
returns 0.
Examples
GetWidth(Product) returns 1024.
Related topics
Functions reference (category list)
Functions reference (alphabetical list)
About formulas
About functions
Defining calculation fields
Using operators in formulas
VerifyContainer
Purpose
Returns a Boolean value representing the validity of data stored externally in a container field.

FILEMAKER PRO HELP 686
Format
VerifyContainer(field)
Parameters
field - any text, number, date, time, timestamp, or container field; or any text expression or
numeric expression.
Data type returned
text
Originated in
FileMaker Pro 12.0
Description
Returns a Boolean value representing the validity of data stored externally in a container field. A
0 (False) value means the data was changed or deleted; otherwise, 1 (True) is returned.
Examples
VerifyContainer(Photo) returns:
•0 (False) if files saved externally were modified or deleted.
•1 (True) if no changes or deletions occurred.
•? if the Photo field is not a container field.
Related topics
Functions reference (category list)
Functions reference (alphabetical list)
About formulas
About functions
Defining calculation fields
Using operators in formulas
Date functions
Date functions calculate dates and manipulate date information.
Important To avoid errors when using dates, always use four-digit years. For more information
about how FileMaker Pro handles two-digit dates, see Conversion of dates with two-digit years.
Note System formats affect the way dates are displayed. See Opening files with different system
formats.
Tip You can use zero (0) and negative numbers as Date function arguments. For example, the
following formula returns 5/31/2014:
Date(6;0;2014)
Click a function name for details.

FILEMAKER PRO HELP 687
Related topics
About functions
About formulas
Date
Purpose
Returns the calendar date for month, day, and year.
Format
Date(month;day;year)
Parameters
month - the month of the year (a one-digit or two-digit number; see note).
day - the day of the month (a one-digit or two-digit number; see note).
year - the year (four digits between 0001 and 4000. For example, 2014 but not 14).
Important The order of the parameters in the Date function is always Month, Day, Year, no matter
what operating system or FileMaker Pro date formats you are using.
This function Returns
Date The calendar date for the specified month, day, and year.
Day A number in the range 1 through 31, representing the day of the month for a
specified date.
DayName A text string that is the full name of the weekday for the specified date.
DayNameJ A text string that is the full name of the weekday for the specified date in
Japanese.
DayOfWeek A number representing the day of the week the specified date falls on.
DayOfYear A number equal to the number of days from the beginning of the year of the
specified date.
Month A number in the range 1 through 12, representing the number of the month of the
year in which the specified date occurs.
MonthName The name of the month for the specified date.
MonthNameJ The name of the month in Japanese for the specified date.
WeekOfYear The number of weeks after January 1 of the year of the specified date.
WeekOfYearFiscal A number between 1 and 53 representing the week containing a specified date,
figured according to the specified starting day.
Year A number representing the year in which the specified date occurs.
YearName The Japanese year name of the specified date, provided in the specified format.

FILEMAKER PRO HELP 688
Data type returned
date
Originated in
FileMaker Pro 6.0 or earlier
Description
The format of the result depends on the date format that was in use when the database file was
created. In the United States, dates are generally in the format MM/DD/YYYY. You can change the
date format in your operating system.
You can change how the date is displayed by assigning a different date format to the field in Layout
mode. Changing the formatting in this way only affects the way the data is displayed, not how it is
stored.
Important To avoid errors when using dates, always use four-digit years. For more information
about how FileMaker Pro handles two-digit dates, see Conversion of dates with two-digit years.
Note If you type a month greater than 12 or a day greater than the number of days in a month,
FileMaker Pro adds the extra days or months to the result. The date function also allows zero and
negative numbers as parameters. Decimal numbers are truncated to integers.
Examples
Date(10;10;2014) returns 10/10/2014.
Date(13;1;2014) returns 1/1/2015 (one month after December 1, 2014).
Date(6;0;2014) returns 5/31/2014 (one day before June 1, 2014).
Date(6;-2;2014) returns 5/29/2014 (three days before June 1, 2014).
Date(7;12;2014)-Date(7;2;2014) returns 10.
“Bill Due by: ” & Date(Month(DateSold) + 1;Day(DateSold);Year(DateSold))
returns Bill Due by: followed by a value that is one month later than DateSold.
Related topics
Functions reference (category list)
Functions reference (alphabetical list)
About formulas
About functions
Defining calculation fields
Using operators in formulas
Day
Purpose
Returns a number in the range 1 through 31, representing the day of the month on which date
occurs.

FILEMAKER PRO HELP 689
Format
Day(date)
Parameters
date - any calendar date
Data type returned
number
Originated in
FileMaker Pro 6.0 or earlier
Description
Use Day, for example, to identify the day of the month on which payments are due.
Important To avoid errors when using dates, always use four-digit years. For more information
about how FileMaker Pro handles two-digit dates, see Conversion of dates with two-digit years.
Examples
Day(“5/15/2014”) returns 15. This example assumes that the system date format is MM/DD/
YYYY.
Day(DateSold) returns the day of the month stored in DateSold.
If(Day(Get(CurrentDate))= 15 and Month(Get(CurrentDate))=3;“Beware the
Ides of March”;””) displays the text Beware the Ides of March only when the day of the
month returned by Get(CurrentDate) is 15 and the month returned by Get(CurrentDate) is
3; otherwise it displays nothing.
Related topics
Functions reference (category list)
Functions reference (alphabetical list)
About formulas
About functions
Defining calculation fields
Using operators in formulas
DayName
Purpose
Returns a text string that is the full name of the weekday for date.
Format
DayName(date)

FILEMAKER PRO HELP 690
Parameters
date - any calendar date
Data type returned
text
Originated in
FileMaker Pro 6.0 or earlier
Examples
DayName(Date(10;7;2014)) returns Tuesday.
DayName(ProjectDue) returns Tuesday when ProjectDue is 10/7/2014.
DayName(“10/7/2014”) returns Tuesday.
“Return your selection by ” & DayName(DueDate) displays the text Return your
selection by followed by the name of the day stored in DueDate.
Important To avoid errors when using dates, always use four-digit years. For more information
about how FileMaker Pro handles two-digit dates, see Conversion of dates with two-digit years.
Related topics
Functions reference (category list)
Functions reference (alphabetical list)
About formulas
About functions
Defining calculation fields
Using operators in formulas
DayNameJ
Purpose
Returns a text string in Japanese that is the full name of the weekday for date.
Format
DayNameJ(date)
Parameters
date - any calendar date
Data type returned
text

FILEMAKER PRO HELP 691
Originated in
FileMaker Pro 6.0 or earlier
Examples
DayNameJ(Date(4;4;2014)) returns .
Important To avoid errors when using dates, always use four-digit years. For more information
about how FileMaker Pro handles two-digit dates, see Conversion of dates with two-digit years.
Related topics
Functions reference (category list)
Functions reference (alphabetical list)
About formulas
About functions
Defining calculation fields
Using operators in formulas
DayOfWeek
Purpose
Returns a number representing the day of the week that date falls on.
Format
DayOfWeek(date)
Parameters
date - any calendar date
Data type returned
number
Originated in
FileMaker Pro 6.0 or earlier
Description
The number 1 represents Sunday, 2 represents Monday, 3 represents Tuesday, and so on. For
example, you can find out on what day of the week a holiday occurs.
Important To avoid errors when using dates, always use four-digit years. For more information
about how FileMaker Pro handles two-digit dates, see Conversion of dates with two-digit years.

FILEMAKER PRO HELP 692
Examples
DayOfWeek(“10/8/2014”) returns 4.
DayOfWeek(Date(10;9;2014)) returns 5.
DayOfWeek(ProjectDue) returns 3 when the date in ProjectDue is 10/7/2014.
Related topics
Functions reference (category list)
Functions reference (alphabetical list)
About formulas
About functions
Defining calculation fields
Using operators in formulas
DayOfYear
Purpose
Returns a number equal to the number of days from the beginning of the year of date.
Format
DayOfYear(date)
Parameters
date - any calendar date
Data type returned
number
Originated in
FileMaker Pro 6.0 or earlier
Examples
DayOfYear(Billing Date) returns 32, when Billing Date is 2/1/2014.
The following formulas return the total number of days in the current year:
DayOfYear(Date(12;31;Year(Get(CurrentDate))))
DayOfYear(Date(1;1;Year(Get(CurrentDate)) + 1) -1)
Important To avoid errors when using dates, always use four-digit years. For more information
about how FileMaker Pro handles two-digit dates, see Conversion of dates with two-digit years.
Related topics
Functions reference (category list)
Functions reference (alphabetical list)

FILEMAKER PRO HELP 693
About formulas
About functions
Defining calculation fields
Using operators in formulas
Month
Purpose
Returns a number in the range 1 through 12, representing the number of the month of the year in
which date occurs.
Format
Month(date)
Parameters
date - any calendar date
Data type returned
number
Originated in
FileMaker Pro 6.0 or earlier
Examples
Month(“3/19/2014”) returns 3. This example assumes that the operating system date format is
set to MM/DD/YYYY.
Month(Payment) returns 3, where Payment contains March 19, 2014. (The Payment field must be
of type date.)
“Bill Due by: ” & Date(Month(DateSold) + 1;Day(DateSold);Year(DateSold))
returns Bill Due by: followed by a value that is one month later than DateSold.
Important To avoid errors when using dates, always use four-digit years. For more information
about how FileMaker Pro handles two-digit dates, see Conversion of dates with two-digit years.
Related topics
Functions reference (category list)
Functions reference (alphabetical list)
About formulas
About functions
Defining calculation fields
Using operators in formulas

FILEMAKER PRO HELP 694
MonthName
Purpose
Returns the full name of the month for date.
Format
MonthName(date)
Parameters
date - any calendar date
Data type returned
text
Originated in
FileMaker Pro 6.0 or earlier
Examples
MonthName(“6/6/2014”) returns June.
“Payment due by the end of: ” & MonthName(Date(Month(InvoiceDate) +
1;Day(InvoiceDate);Year(InvoiceDate))) returns Payment due by the end of May,
where InvoiceDate is 4/4/2014.
“Payment for: ” & MonthName(Date(Month(Payment) +
1;Day(Payment);Year(Payment))) returns Payment for: followed by the name of the month
that is one past the month of the last payment.
Important To avoid errors when using dates, always use four-digit years. For more information
about how FileMaker Pro handles two-digit dates, see Conversion of dates with two-digit years.
Related topics
Functions reference (category list)
Functions reference (alphabetical list)
About formulas
About functions
Defining calculation fields
Using operators in formulas
MonthNameJ
Purpose
Returns the name of the month of date in Japanese.

FILEMAKER PRO HELP 695
Format
MonthNameJ(date)
Parameters
date - any calendar date
Data type returned
text
Originated in
FileMaker Pro 6.0 or earlier
Examples
MonthNameJ(“6/6/2014”) returns
Important To avoid errors when using dates, always use four-digit years. For more information
about how FileMaker Pro handles two-digit dates, see Conversion of dates with two-digit years.
Related topics
Functions reference (category list)
Functions reference (alphabetical list)
About formulas
About functions
Defining calculation fields
Using operators in formulas
WeekOfYear
Purpose
Returns the number of weeks after January 1 of the year of date.
Format
WeekOfYear(date)
Parameters
date - any calendar date
Data type returned
number
Originated in
FileMaker Pro 6.0 or earlier

FILEMAKER PRO HELP 696
Description
Fractions of weeks occurring at the beginning or end of the year count as full weeks, so the
WeekOfYear function returns values 1 through 54.
Important To avoid errors when using dates, always use four-digit years. For more information
about how FileMaker Pro handles two-digit dates, see Conversion of dates with two-digit years.
Examples
WeekOfYear(“1/1/2014”) returns 1.
WeekOfYear(ProjectDue) returns 6, when ProjectDue is 2/2/2014.
WeekOfYear(“1/1/2014”) - WeekOfYear(“2/2/2014”) returns -5.
Related topics
Functions reference (category list)
Functions reference (alphabetical list)
About formulas
About functions
Defining calculation fields
Using operators in formulas
WeekOfYearFiscal
Purpose
Returns a number between 1 and 53 representing the week containing date, figured according to
startingDay.
Format
WeekOfYearFiscal(date;startingDay)
Parameters
date - any calendar date
startingDay - any number between 1 and 7, where 1 represents Sunday
Data type returned
number
Originated in
FileMaker Pro 6.0 or earlier
Description
startingDay indicates which day is considered the first day of the week.

FILEMAKER PRO HELP 697
The first week of the year is the first week that contains four or more days of that year. For example,
if you select 1 (Sunday) as the starting day, then January 1 must be on Sunday, Monday, Tuesday,
or Wednesday for that week to be the first week of the fiscal year. If you select 2 (Monday) as the
starting day, then January 1 must be on Monday, Tuesday, Wednesday, or Thursday for that week to
be the first week of the fiscal year.
It is possible, using this function, that dates in a particular year will be returned as the 53rd week of
the previous year. For example, if in 2008 you selected Sunday (1) as the starting date, then
January 1, 2, or 3 in 2009 would occur in week 53 of fiscal year 2008 (in 2009, January 1 is on a
Thursday). The first day of fiscal year 2009 would be on Sunday, January 4, because you selected
Sunday (1) as the starting day.
Important To avoid errors when using dates, always use four-digit years. For more information
about how FileMaker Pro handles two-digit dates, see Conversion of dates with two-digit years.
Examples
WeekOfYearFiscal(Date(1;7;2008);1) returns 2.
WeekOfYearFiscal(Date(1;1;2009);5) returns 1.
WeekOfYearFiscal(Date(1;2;2009);1) returns 53.
Related topics
Functions reference (category list)
Functions reference (alphabetical list)
About formulas
About functions
Defining calculation fields
Using operators in formulas
Year
Purpose
Returns a number representing the year in which date occurs.
Format
Year(date)
Parameters
date - any calendar date
Data type returned
number
Originated in
FileMaker Pro 6.0 or earlier

FILEMAKER PRO HELP 698
Description
You can, for example, extract the year from a field containing the date an item was sold.
Important To avoid errors when using dates, always use four-digit years. For more information
about how FileMaker Pro handles two-digit dates, see Conversion of dates with two-digit years.
Examples
Year(DateSold) returns the year stored in DateSold.
Year(“5/5/2014”) returns 2014.
Year(Date(Month(Get(CurrentDate)) +
48;Day(Get(CurrentDate));Year(Get(CurrentDate)))) returns the year that is 48
months from today’s date.
Related topics
Functions reference (category list)
Functions reference (alphabetical list)
About formulas
About functions
Defining calculation fields
Using operators in formulas
YearName
Purpose
Returns the Japanese year name of date, provided in the specified format.
Format
YearName(date;format)
Parameters
date - any calendar date
format - a number (0, 1, or 2) that describes the display format
Data type returned
text
Originated in
FileMaker Pro 6.0 or earlier
Description
If the value for format is blank or other than 0, 1, or 2, then 0 is used.

FILEMAKER PRO HELP 699
0 - 8 (Meiji 8), 8 (Taisho 8), 8 (Showa 8), 8 (Heisei 8), (Seireki xxxx
[before 1868.9.8])
1 - 8 (Mei 8), 8 (Tai 8), 8 (Sho 8), 8 (Hei 8), xxxx (Sei xxxx [before 1868.9.8])
2 - M8, T8, S8, H8, A.D.xxxx (before 1868.9.8)
Name of Emperor in 0 = Long, 1 = Abbreviated, 2 = 2 byte Roman. Seireki is returned when date is
before listed emperors.
Examples
YearName(DateField;0) Returns when DateField contains 7/15/2008.
Related topics
Functions reference (category list)
Functions reference (alphabetical list)
About formulas
About functions
Defining calculation fields
Using operators in formulas
Design functions
Design functions return information about the structure of open database files. For example, you
could determine the names of all the layouts or fields in an open database file.
Note FileMaker Pro limits the information returned by a design function, according to the privilege
set in effect when the function evaluates a database file. See Creating and managing privilege sets
for more information about granting access to database files.
Design function parameters can be any of the following:
•filenames such as “Customer” or literal text such as "Jack"
•layouts such as layoutName
•other functions such as Left(text;number)
Important Literal text parameters such as filenames and layout names must be enclosed in
quotation marks. Use quotation marks around field names to indicate the literal string is the
parameter (omit quotation marks to indicate the value stored in the field is the parameter). You can
use spaces before or after the parentheses that enclose parameters, but spaces are not necessary.
Use a semicolon between parameters when a function requires more than one parameter.
Click a function name for details.
This function Returns
DatabaseNames A list of the names of all database files open on the computer (including files
opened as a client), separated by carriage returns.
FieldBounds The location of each side of the specified field and its rotation in degrees.
FieldComment The specified field’s comment.
FILEMAKER PRO HELP 700
Related topics
About functions
About formulas
DatabaseNames
Purpose
Returns a list of the names of all database files open on the computer, separated by carriage
returns.
Format
DatabaseNames
FieldIDs A list of all field IDs in the specified database file and layout, separated by carriage
returns.
FieldNames A list of the names of all fields on the specified layout, separated by carriage
returns.
FieldRepetitions The number of repetitions of the specified field as it is formatted on the specified
layout (which could be different from the number of repetitions specified when the
field was defined), and the orientation of the field repetitions (horizontal or vertical)
on the layout.
FieldStyle The formatting applied to the specified field on the specified layout.
FieldType Information about the specified field.
GetNextSerialValue The next serial number for the specified field in the specified database file.
LayoutIDs A list of all layout IDs in the specified database file, separated by carriage returns.
LayoutNames A list of the names of all layouts in the specified database file, separated by
carriage returns.
LayoutObjectNames A list of the names of all named layout objects, separated by carriage returns.
RelationInfo A list of four values for each relationship directly related to the specified table.
ScriptIDs A list of all script IDs in the specified database file, separated by carriage returns.
ScriptNames A list of the names of all scripts in the specified database file, separated by
carriage returns.
TableIDs A list of all table IDs in the specified database file, separated by carriage returns.
TableNames A list of the names of all defined tables in the specified database file, separated by
carriage returns.
ValueListIDs A list of all value list IDs in the specified database file, separated by carriage
returns.
ValueListItems A list of the values in the specified value list, separated by carriage returns.
ValueListNames A list of the names of all value lists in the specified database file, separated by
carriage returns.
WindowNames A list of the names of open windows in the specified database file.
This function Returns

FILEMAKER PRO HELP 701
Parameters
None
Data type returned
text
Originated in
FileMaker Pro 6.0 or earlier
Description
The names returned do not include file extensions.
Note If your database is hosted on another computer, DatabaseNames returns a list of the names
of local client and remote database files open only on the client computer.
Examples
To determine whether Customers is one of the files currently open, use the DatabaseNames
function with the FilterValues function in the formula:
FilterValues( DatabaseNames;"Customers")
If the formula returns any text value, then Customers is open.
If you want to know how many files with the same name are open, use the DatabaseNames
function with the PatternCount function in the formula:
PatternCount(FilterValues(DatabaseNames;"Customers");"Customers")
This will tell you how many files named Customers are open.
Related topics
Functions reference (category list)
Functions reference (alphabetical list)
About formulas
About functions
Defining calculation fields
Using operators in formulas
FieldBounds
Purpose
Returns the location in points of each field boundary and the field’s rotation in degrees.
Format
FieldBounds(fileName;layoutName;fieldName)
Parameters
fileName - the name of an open database file (local or remote).
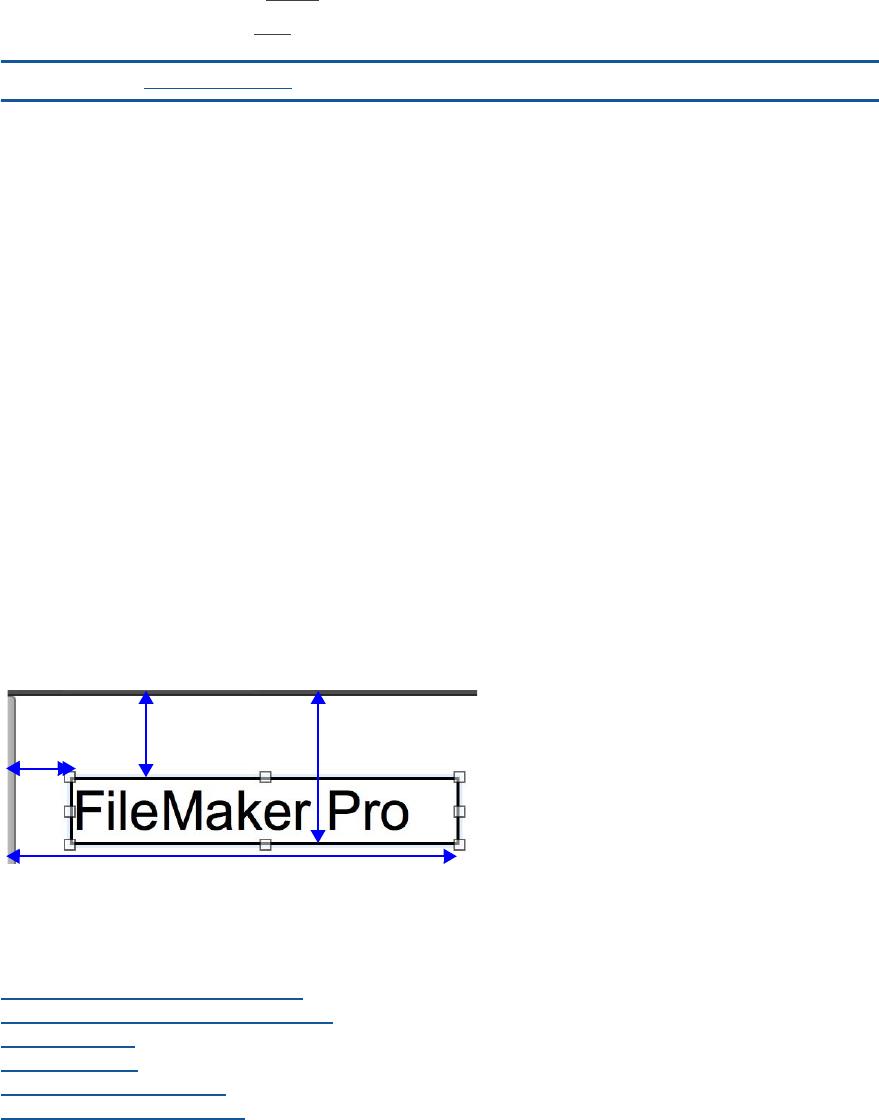
FILEMAKER PRO HELP 702
layoutName - the name of a layout in the specified database file.
fieldName - the name of a field on the specified layout.
Important See Design functions for information about literal text parameters.
Data type returned
text
Originated in
FileMaker Pro 6.0 or earlier
Description
The location returned is measured from the top left corner of the layout (regardless of printer
margins) and is specified in this order: position of left field boundary, position of top field boundary,
position of right field boundary, position of bottom field boundary, degree of rotation (measured in a
counter-clockwise direction; 0 degrees for unrotated).
Note Your layout begins where your margins end. Because field boundaries are measured from the
left side and top of the layout, boundaries returned by FieldBounds never change unless you
move or re-size a field.
Examples
FieldBounds(“Customers”;“Layout #1”;“Field”) returns 36 48 295 65 0 in the example
below. Notice that all parameters are enclosed in quotation marks.
Related topics
Functions reference (category list)
Functions reference (alphabetical list)
About formulas
About functions
Defining calculation fields
Using operators in formulas
36
295
48
65

FILEMAKER PRO HELP 703
FieldComment
Purpose
Returns the specified field’s comment.
Format
FieldComment(fileName;fieldName)
Parameters
fileName - the name of an open database file (local or remote).
fieldName - the name of a field in the specified database file.
Important See Design functions for information about literal text parameters.
Data type returned
text
Originated in
FileMaker Pro 7.0
Description
The field name must be in the form tablename::fieldname to specify a field that exists in a table
different from the current table.
Examples
FieldComment("Customers"; "Phone Number") returns “Customer's home telephone
number” if it was entered as a comment for the Phone Number field.
FieldComment("Customers"; "Accounts::Current Balance") returns “Customer's
current balance” if it was entered as a comment for the Current Balance field in the Accounts table.
Related topics
Functions reference (category list)
Functions reference (alphabetical list)
About formulas
About functions
Defining calculation fields
Using operators in formulas
FieldIDs
Purpose
Returns a list of all field IDs in fileName and layoutName, separated by carriage returns.

FILEMAKER PRO HELP 704
Format
FieldIDs(fileName;layoutName)
Parameters
fileName - the name of an open database file (local or remote).
layoutName - the name of a layout or table in the specified database file.
Important See Design functions for information about literal text parameters.
Data type returned
text
Originated in
FileMaker Pro 6.0 or earlier
Description
Related fields are returned as TableID::RelatedFieldID.
For example, 12::4, where 12 is the ID of the table and 4 is the ID of the related field.
If no parameter is specified for fileName, FileMaker returns results for the current file.
Examples
FieldIDs(“Customers”;””) returns IDs of all unique fields in the default table of Customers.
FieldIDs(“Customers”;”Layout#5”) returns IDs of all unique fields, including related fields,
on Layout#5 in Customers.
Related topics
Functions reference (category list)
Functions reference (alphabetical list)
About formulas
About functions
Defining calculation fields
Using operators in formulas
FieldNames
Purpose
Returns a list of the names of all fields on layoutName, in fileName file, separated by carriage
returns.
Format
FieldNames(fileName;layoutName)

FILEMAKER PRO HELP 705
Parameters
fileName - the name of an open database file (local or remote).
layoutName - the name of a layout or table in the specified database file.
Important See Design functions for information about literal text parameters.
Data type returned
text
Originated in
FileMaker Pro 6.0 or earlier
Description
Related fields are displayed in tablename::fieldname format.
If no parameter is specified for fileName, FileMaker returns results for the current file.
Note If FieldNames returns a question mark (?) or the name of only one field, go to the Specify
Calculation dialog box and make sure Calculation result is text. Also, you can increase the size of
the field on the layout to show more field names.
Examples
FieldNames(“Customers”;””) returns a list of all the fields in the default table of the Customers
database file.
FieldNames(“Customers”;“Data Entry”) returns a list of all the fields, including related
fields, in the Customers database file that appear on the Data Entry layout.
Related topics
Functions reference (category list)
Functions reference (alphabetical list)
About formulas
About functions
Defining calculation fields
Using operators in formulas
FieldRepetitions
Purpose
Returns the number of repetitions of the repeating field fieldName as it is currently formatted on
layoutName (which could be different from the number of repetitions when the field was defined),
and the orientation of the field repetitions (horizontal or vertical) on the layout.
Format
FieldRepetitions(fileName;layoutName;fieldName)

FILEMAKER PRO HELP 706
Parameters
fileName - the name of an open database file (local or remote).
layoutName - the name of a layout in the specified database file.
fieldName - the name of a field on the specified layout.
Important See Design functions for information about literal text parameters.
Data type returned
text
Originated in
FileMaker Pro 6.0 or earlier
Description
If fieldName isn’t a repeating field, it returns 1 vertical.
Examples
FieldRepetitions(“Customers”;“Data Entry”;“Business Phone”) returns 3 vertical
if the Business Phone field is defined as a repeating field with five repetitions but is formatted to only
show three repetitions in a vertical orientation on the Data Entry layout.
Related topics
Functions reference (category list)
Functions reference (alphabetical list)
About formulas
About functions
Defining calculation fields
Using operators in formulas
FieldStyle
Purpose
Returns the field formatting applied to fieldName on layoutName in the fileName file.
Format
FieldStyle(fileName;layoutName;fieldName)
Parameters
fileName - the name of an open database file (local or remote).
layoutName - the name of a layout in the specified database file.
fieldName - the name of a field on the specified layout.

FILEMAKER PRO HELP 707
Important See Design functions for information about literal text parameters.
Data type returned
text
Originated in
FileMaker Pro 6.0 or earlier
Description
If the field has a value list associated with it, the FieldStyle function also returns the name of the
value list.
•A standard field returns Standard.
•A standard field with a vertical scroll bar returns Scrolling.
•A drop-down list returns Popuplist.
•A pop-up menu returns Popupmenu.
•A checkbox returns Checkbox.
•A radio button returns RadioButton.
•A drop-down calendar returns Calendar.
Examples
On the Data Entry layout in the Customers database file, FieldStyle(“Customers”;“Data
Entry”;“Current Customer”) returns RadioButton Yes/No List when the Current Customer
field is formatted as a radio button and is associated with the value list named Yes/No List.
Related topics
Functions reference (category list)
Functions reference (alphabetical list)
About formulas
About functions
Defining calculation fields
Using operators in formulas
FieldType
Purpose
Returns information about fieldName.
Format
FieldType(fileName;fieldName)

FILEMAKER PRO HELP 708
Parameters
fileName - the name of an open database file (local or remote).
fieldName - the name of a field in the specified database file.
Important See Design functions for information about literal text parameters.
Data type returned
text
Originated in
FileMaker Pro 6.0 or earlier
Description
Field names must be in the format tablename::fieldname to specify a field that exists in a table
different from the current table. The result has four values separated by spaces:
•The first value is either Standard, StoredCalc, Summary, UnstoredCalc, External(Secure),
External(Open), or Global.
•The second value is the field type: text, number, date, time, timestamp, or container.
•The third value is Indexed or Unindexed.
•The fourth value is the maximum number of repetitions defined for the field (if the field isn’t
defined as a repeating field, this value is 1).
Examples
FieldType(“Customers”;“Phone Number”) returns Standard Text Unindexed 3 when, in
the Customers database file, the Phone Number field is defined as a text field that repeats a
maximum of three times and the storage options are left unchanged. (Most fields are indexed when
a find is performed in that field.)
FieldType(“Customers”;“Current Balance”) returns StoredCalc Number Indexed 1
when, in the Customers database file, the Current Balance field is defined as a stored, numeric
calculation field that is indexed.
FieldType(“Customers”;“Today’s Date”) returns Global Date Unindexed 1 when, in the
Customers database file, the Today’s Date field is defined as a global field of type date. Global fields
are never indexed.
FieldType(“Customers”;”Statement”) returns External(Secure) Container Unindexed 1
when, in the Customers database file, the Statement field is defined as a container field that stores
data externally using secure storage. Container fields cannot be indexed.
Related topics
Functions reference (category list)
Functions reference (alphabetical list)
About formulas
About functions
Defining calculation fields
Using operators in formulas

FILEMAKER PRO HELP 709
GetNextSerialValue
Purpose
Returns the next serial number of fieldName in fileName.
Format
GetNextSerialValue(fileName;fieldName)
Parameters
fileName - the name of an open database file (local or remote).
fieldName - the name of the field whose next serial number you want to determine.
Important See Design functions for information about literal text parameters.
Data type returned
text
Originated in
FileMaker Pro 6.0 or earlier
Description
Field names must be fully qualified in the format tablename::fieldname to specify a field that
exists in a table different from the current table.
Examples
GetNextSerialValue(“Customers”;”CustID”) returns the next serial number for the CustID
field.
Related topics
Functions reference (category list)
Functions reference (alphabetical list)
About formulas
About functions
Defining calculation fields
Using operators in formulas
LayoutIDs
Purpose
Returns a list of all layout IDs in fileName, separated by carriage returns.

FILEMAKER PRO HELP 710
Format
LayoutIDs(fileName)
Parameters
fileName - the name of an open database file (local or remote).
Important See Design functions for information about literal text parameters.
Data type returned
text
Originated in
FileMaker Pro 6.0 or earlier
Description
If no parameter is specified for fileName, FileMaker returns results for the current file.
Examples
LayoutIDs(“Customers”) returns a list of all the layout IDs in the Customers database file.
Related topics
Functions reference (category list)
Functions reference (alphabetical list)
About formulas
About functions
Defining calculation fields
Using operators in formulas
LayoutNames
Purpose
Returns a list of the names of all layouts in fileName, separated by carriage returns.
Format
LayoutNames(fileName)
Parameters
fileName - the name of an open database file (local or remote).
Important See Design functions for information about literal text parameters.

FILEMAKER PRO HELP 711
Data type returned
text
Originated in
FileMaker Pro 6.0 or earlier
Examples
LayoutNames(“Customers”) returns a list of all the layouts in the Customers database file.
Related topics
Functions reference (category list)
Functions reference (alphabetical list)
About formulas
About functions
Defining calculation fields
Using operators in formulas
LayoutObjectNames
Purpose
Returns a list of the names of all named objects on layoutName in fileName, separated by
carriage returns.
Format
LayoutObjectNames(fileName;layoutName)
Parameters
fileName - the name of an open database file (local or remote).
layoutName - the name of a layout in the specified database file.
Important See Design functions for information about literal text parameters.
Data type returned
text
Originated in
FileMaker Pro 8.5
Description
Layout objects without object names are not returned. If layoutName isn’t specified, then no object
names are returned.

FILEMAKER PRO HELP 712
Named tab controls, grouped objects, and portal objects that contain other named objects are
followed by a list of those named objects enclosed in angle brackets (<>). The angle brackets are
shown even if there are no named objects contained within the named tab controls, grouped objects,
or portal objects.
Examples
LayoutObjectNames ("Customers";"Data Entry") returns a list of named objects in the
Customers database file that appear on the Data Entry layout.
Related topics
Functions reference (category list)
Functions reference (alphabetical list)
About formulas
About functions
Defining calculation fields
Using operators in formulas
Naming objects
RelationInfo
Purpose
Returns a list of four values for each relationship directly related to tableName.
Format
RelationInfo(fileName;tableName)
Parameters
fileName - the name of an open database file (local or remote).
tableName - the name of a table in the specified database file.
Important See Design functions for information about literal text parameters.
Data type returned
text
Originated in
FileMaker Pro 6.0 or earlier
Description
Values in a list are separated by carriage returns, and lists are separated by two carriage returns.
For each additional relationship connected to tableName, an additional list of four values is output.
The four values are:
•Source: Data Source Name of the database table connected to tableName.

FILEMAKER PRO HELP 713
•Table: the name of the table connected to tableName.
•Options: the options that were set in the right side of the Edit Relationship dialog box
when the relationship was defined. This line is blank if the following options are not set;
otherwise these options are separated by spaces.
•Delete, if Delete related records in this table when a record is deleted in the other
table is selected in the right side of the Edit Relationship dialog box.
•Create, if Allow creation of records in this table via this relationship is selected in
the right side of the Edit Relationship dialog box.
•Sorted, if Sort records is selected in the right side of the Edit Relationship dialog box.
•Relationships: a list of the defined relationships, one per line. Field names are fully
qualified, for example, TableName::Field Name.
Examples
A database file called Human Resources has three tables: Company, Employees, and Addresses.
Company::Company ID is connected to Employees::Company ID, Employees::Employee
ID is connected to Addresses::Employee ID and Employees::DateOfHire is connected
to Addresses::DateMovedIn.
The relationships have the following criteria:
•You can create records in all tables.
•You cannot delete records in all tables.
•A sort was specified for the Addresses table for the Employees<-->Addresses relationship.
RelationInfo(“Human Resources”;“Employees”) returns:
Source: Human Resources
Table: Company
Options: Create
Company::Company ID = Employees::Company ID
Source: Human Resources
Table: Addresses
Options: Create Sorted
Addresses::Employee ID = Employees::Employee ID
Addresses::DateMovedIn >= Employees::DateOfHire
Related topics
Functions reference (category list)
Functions reference (alphabetical list)
About formulas
About functions
Defining calculation fields
Using operators in formulas

FILEMAKER PRO HELP 714
ScriptIDs
Purpose
Returns a list of all script IDs in fileName, separated by carriage returns.
Format
ScriptIDs(fileName)
Parameters
fileName - the name of an open database file (local or remote).
Important See Design functions for information about literal text parameters.
Data type returned
text
Originated in
FileMaker Pro 6.0 or earlier
Examples
ScriptIDs(“Customers”) returns a list of all the script IDs in the Customers database file.
Related topics
Functions reference (category list)
Functions reference (alphabetical list)
About formulas
About functions
Defining calculation fields
Using operators in formulas
ScriptNames
Purpose
Returns a list of the names of all scripts in fileName, separated by carriage returns.
Format
ScriptNames(fileName)
Parameters
fileName - the name of an open database file (local or remote).
Important See Design functions for information about literal text parameters.

FILEMAKER PRO HELP 715
Data type returned
text
Originated in
FileMaker Pro 6.0 or earlier
Description
If no parameter is specified for fileName, FileMaker returns results for the current file.
Examples
ScriptNames(“Customers”) returns a list of all the scripts in the Customers database file.
Related topics
Functions reference (category list)
Functions reference (alphabetical list)
About formulas
About functions
Defining calculation fields
Using operators in formulas
TableIDs
Purpose
Returns a list of all table IDs in fileName, separated by carriage returns.
Format
TableIDs(fileName)
Parameters
fileName - the name of an open database file (local or remote).
Important See Design functions for information about literal text parameters.
Data type returned
text
Originated in
FileMaker Pro 6.0 or earlier
Description
Each table ID is unique. Also, the ID is independent of when you create each table: the first table
could have the smallest, middle, or largest value.

FILEMAKER PRO HELP 716
If no parameter is specified for fileName, FileMaker returns results for the current file.
Examples
TableIDs(“University Database”) returns
1065089
1065090
for the University Database database file if two tables have been defined for the file.
Related topics
Functions reference (category list)
Functions reference (alphabetical list)
About formulas
About functions
Defining calculation fields
Using operators in formulas
TableNames
Purpose
Returns a list of all table occurrences in the relationships graph for fileName, separated by
carriage returns.
Format
TableNames(fileName)
Parameters
fileName - the name of an open database file (local or remote).
Important See Design functions for information about literal text parameters.
Data type returned
text
Originated in
FileMaker Pro 6.0 or earlier
Description
If no parameter is specified for fileName, FileMaker returns results for the current file.
Examples
TableNames(“University Database”) returns table occurrences
Teachers

FILEMAKER PRO HELP 717
Coaches
for the University Database database file if a Teachers table and a Coaches table have been defined
for the file.
Related topics
Functions reference (category list)
Functions reference (alphabetical list)
About formulas
About functions
Defining calculation fields
Using operators in formulas
ValueListIDs
Purpose
Returns a list of all value list IDs in fileName, separated by carriage returns.
Format
ValueListIDs(fileName)
Parameters
fileName - the name of an open database file (local or remote).
Important See Design functions for information about literal text parameters.
Data type returned
text
Originated in
FileMaker Pro 6.0 or earlier
Description
If no parameter is specified for fileName, FileMaker returns results for the current file.
Examples
ValueListIDs(“Customers”) returns a list of all the value list IDs in the Customers database
file.
Related topics
Functions reference (category list)
Functions reference (alphabetical list)
About formulas
About functions
Defining calculation fields

FILEMAKER PRO HELP 718
Using operators in formulas
ValueListItems
Purpose
Returns a list of the values in valuelist, separated by carriage returns.
Format
ValueListItems(fileName;valuelist)
Parameters
fileName - the name of an open database file (local or remote).
valuelist - the name of a value list in the specified database file.
Important See Design functions for information about literal text parameters.
Data type returned
text
Originated in
FileMaker Pro 6.0 or earlier
Examples
ValueListItems(“Customers”;“Code”) returns a list of all the items in the Code value list in
the Customers database file.
Related topics
Functions reference (category list)
Functions reference (alphabetical list)
About formulas
About functions
Defining calculation fields
Using operators in formulas
ValueListNames
Purpose
Returns a list of the names of all value lists in fileName, separated by carriage returns.
Format
ValueListNames(fileName)

FILEMAKER PRO HELP 719
Parameters
fileName - the name of an open database file (local or remote).
Important See Design functions for information about literal text parameters.
Data type returned
text
Originated in
FileMaker Pro 6.0 or earlier
Description
If no parameter is specified for fileName, FileMaker returns results for the current file.
Examples
ValueListNames(“Customers”) returns a list of all the value list names in the Customers
database file.
Related topics
Functions reference (category list)
Functions reference (alphabetical list)
About formulas
About functions
Defining calculation fields
Using operators in formulas
WindowNames
Purpose
Returns a list of the names of windows that are currently open.
Format
WindowNames{(fileName)}
Parameters
{fileName} - the name of an open database file (local or remote).
Parameters in curly braces { } are optional.
Data type returned
text

FILEMAKER PRO HELP 720
Originated in
FileMaker Pro 6.0 or earlier
Description
Use the optional fileName parameter to only return windows that are based on the specified file.
The window could be visible, hidden, or minimized. The order of the names in the list matches the
current stacking order of the windows. The visible windows are listed first, then the minimized
windows, and then the hidden windows. If there are no databases or windows open, an empty string
is returned.
Note Even if you close a file, it may remain open as a hidden file if the window of any other file is
displaying data from that file. (For example, another window may be displaying related data from the
file you attempted to close.) FileMaker Pro will close the file when you close all the dependent
windows.
Examples
WindowNames returns Customers and Invoices separated by a carriage return when those
windows are currently open.
WindowNames(“contacts”) returns a list of windows that are based on the contacts database
file.
Related topics
Functions reference (category list)
Functions reference (alphabetical list)
About formulas
About functions
Defining calculation fields
Using operators in formulas
External functions
Use external functions to access FileMaker Pro plug-ins. Plug-ins add features to FileMaker Pro.
For more information, see Setting plug-in preferences.
External functions are only available if FileMaker Pro plug-ins are installed and enabled on your
computer. If no FileMaker Pro plug-ins are installed, you see only the generic external function
definition in the Specify Calculation dialog box:
External (nameOfFunction; parameter)
Plug-ins written for version 7.0 and later
Each plug-in defines its own functions and parameters. See the documentation that came with the
plug-in for each function’s usage.
Plug-ins written for version 6.0 and earlier
These plug-ins are still supported and continue to use the External function to access the plug-in’s
functions. The first parameter is the name of the plug-in function to execute and the second is a
parameter that is passed to that function. See the documentation that came with the plug-in for each
function’s usage.

FILEMAKER PRO HELP 721
For more information, see Updating plug-ins.
Related topics
About functions
About formulas
External
Purpose
Accesses plug-ins created for versions of FileMaker Pro prior to 7.0 and uses the syntax
External(“function name”, parameter), where function name is in quotes and is the
name of an external function.
Format
External(nameOfFunction;parameter)
Parameters
nameOfFunction - the name of the external function
parameter - the parameter(s) required by the external function. A parameter is required, even if it’s
only 0.
Data type returned
Depends on the external function
Originated in
FileMaker Pro 6.0 or earlier
Description
Plug-ins created for FileMaker Pro version 7.0 and later do not use the External(“function
name”, parameter) syntax. For more information, see External functions.
Related topics
Functions reference (category list)
Functions reference (alphabetical list)
About formulas
About functions
Defining calculation fields
Using operators in formulas
This function Does this
External Enables access to FileMaker Pro plug-ins written for versions of FileMaker Pro prior
to 7.0.

FILEMAKER PRO HELP 722
Financial functions
Financial functions calculate financial information, such as net present value and payments. For
example, you can calculate the monthly payments required to buy a car at a certain loan rate using
the PMT function.
Click a function name for details.
Related topics
About functions
About formulas
FV
Purpose
Returns the future value (FV) of an initial investment, based on a constant interestRate and
payment amount for the number of periods in months.
Format
FV(payment;interestRate;periods)
Parameters
payment - payment to be made per period
interestRate - interest rate per period
periods - number of periods
Data type returned
number
Originated in
FileMaker Pro 6.0 or earlier
Description
Use this function to calculate FV. For example, you can calculate how much you’ll earn on an
investment in which you pay $50 a month for 60 months at a 6 percent annual interest rate.
This function Returns
FV The future value of an initial investment, based on a constant interest rate and
payment amount for the number of periods in months.
NPV The net present value of a series of unequal payments made at regular intervals,
assuming a fixed rate per interval.
PMT The payment required by the term, interest rate, and principal.
PV The present value of a series of equal payments made at regular intervals
(periods), assuming a fixed interest rate per interval.

FILEMAKER PRO HELP 723
Notes
•When interestRate is 0, this function returns the result of payment * periods.
•The FV function doesn’t account for the present value of your investment, and it assumes
that payment is made at the end of each period.
Examples
FV(50;.11/12;5 * 12) returns 3975.90398429....
FV(2000;.12;30) + 5000 * (.12 + 1) ^ 30 returns 632464.97928640....
FV(500;.11/5;60) returns 61141.65130790....
To set the decimal precision of the returned value, enclose the current formulas with the Round
function. For example, Round(Current Formula;2).
Related topics
Functions reference (category list)
Functions reference (alphabetical list)
About formulas
About functions
Defining calculation fields
Using operators in formulas
NPV
Purpose
Returns the net present value (NPV) of a series of unequal payments made at regular intervals,
assuming a fixed interestRate per interval.
Format
NPV(payment;interestRate)
Parameters
payment - a repeating field containing unequal payment amounts, or an expression that returns a
reference to one.
interestRate - interest rate.
Data type returned
number
Originated in
FileMaker Pro 6.0 or earlier
FV payment * 1 interestRate+()
periods 1–
interestRate
-----------------------------------------------------------------------------
=

FILEMAKER PRO HELP 724
Description
Use this function to calculate NPV. For example, if someone borrows money from you and pays you
back in unequal amounts over a period of several years, you can use the NPV function to calculate
the result.
Examples
NPV(Loan;.05) returns 156.91277445..., when the repeating field, Loan, contains -2000 (the
initial payment), 600, 300, 500, 700, and 400. The result (156.91277445...) is the actual profit in
today’s dollars that will be realized from this transaction.
NPV(Amounts;.10) returns 16758.35604870..., when the repeating field, Amounts, contains -
5000 (the initial investment), 10,000, 0, 10,000, and 10,000.
If you want each return value to return 2 decimal places, surround the current formulas with the
correct Round function: Round(Current Formula;2).
Related topics
Functions reference (category list)
Functions reference (alphabetical list)
About formulas
About functions
Defining calculation fields
Using operators in formulas
PMT
Purpose
Returns the payment (PMT) required by the term, interestRate, and principal.
Format
PMT(principal;interestRate;term)
Parameters
principal - principal amount.
interestRate - interest rate. If the interest rate is annual, divide the rate by 12.
term - length of time, expressed in number of months.
Data type returned
number
Originated in
FileMaker Pro 6.0 or earlier
NPV loan amount
1 interestRate+
--------------------------------------------first payment
1 interestRate+()
2
----------------------------------------------------second payment
1 interestRate+()
3
----------------------------------------------------…nth payment
1 interestRate+()
n1+
------------------------------------------------------------
++++=

FILEMAKER PRO HELP 725
Description
Use this function to calculate PMT.
Examples
In the following example, the PMT function calculates payments for purchasing a sports car costing
$21,000, at an annual rate of 6.9% over 48 monthly payments.
PMT(21000;.069/12;48) returns the payment amount $501.90.
PMT(Cost;.13;Years) returns a payment amount, based on the purchase value stored in Cost,
at a 13 percent rate, over the duration stored in Years.
“Your payment will be ” & PMT(150000;.13/12;Months) & “.” returns Your payment
will be, followed by the payment amount, based on a total cost of $150,000, at a 13 percent annual
percentage rate, over the duration stored in Months.
Related topics
Functions reference (category list)
Functions reference (alphabetical list)
About formulas
About functions
Defining calculation fields
Using operators in formulas
PV
Purpose
Returns the present value (PV) of a series of equal payments made at regular intervals (periods),
assuming a fixed interestRate per interval.
Format
PV(payment;interestRate;periods)
Parameters
payment - payment amount to be made per period. Type a negative number for money you pay and
a positive number for money you receive.
interestRate - interest rate per period.
periods - number of periods (intervals between payments).
Data type returned
number
Originated in
FileMaker Pro 6.0 or earlier
PMT payment 1 1 interestRate+()–periods–
interestRate
------------------------------------------------------------------------------
⎝⎠
⎛⎞
⁄=

FILEMAKER PRO HELP 726
Description
Use this function to calculate PV.
Note When interestRate is 0, this function returns the result of payment * periods.
Examples
Your cousin borrowed $2,000 from you, offering to pay you back $500 a year for five years, for a
total of $2,500 at the end of five years. If inflation was 5 percent annually, with the following entry
you could find out what those payments are worth with the PV function.
PV(500;.05;5) returns 2164.73833531....
If you want the return value to return two decimal places, enclose the formula with the correct Round
function: Round(Current Formula;2).
Related topics
Functions reference (category list)
Functions reference (alphabetical list)
About formulas
About functions
Defining calculation fields
Using operators in formulas
PV payment * 1 1 interestRate+()–periods–
interestRate
------------------------------------------------------------------------------
=
FILEMAKER PRO HELP 727
Get functions
Use Get functions in scripts for error checking and prevention, or to capture information about the
status of a database file or elements in it, or an action being performed.
Many Get functions return information that changes on a regular basis. For example, when the
Get(CurrentTime) function is placed in a stored calculation field, the time will only update when a
new record is created. If the calculation has other fields in it, but the calculation result still returns the
current time, then the stored calculation result will only update when those other fields have been
modified in the current record. If either of these calculations are unstored, the time will update as
needed. For performance reasons, making a calculation field unstored is not always the best idea.
Get functions are best used in a script where the status information from a Get function is up-to-date
at the moment that the calculation is run.
To access the list of Get functions, in the Specify Calculation dialog box, choose View all functions
by type or View Get functions. When you choose View all functions by name, you see only
Get(flag).
Note For information on how functions evaluate differently on the host versus the client, search the
FileMaker Knowledge Base available at http://help.filemaker.com.
Click a function name for details.
This function Returns
Get(AccountExtendedPrivileges) A list of keywords for the enabled extended privileges, separated
by carriage returns. The list that is returned is based on the
account used to open the database file.
Get(AccountName) The authenticated account name being used for the active
database file.
Get(AccountPrivilegeSetName) The name of the privilege set that is being used by the account
used to open the database file.
Get(ActiveFieldContents) The contents of the field that has the focus.
Get(ActiveFieldName) The name of the field that has the focus.
Get(ActiveFieldTableName) The name of the table that contains the active field (the field that
has the focus).
Get(ActiveLayoutObjectName) The name of the active layout object in the calculation's active
window.
Get(ActiveModifierKeys) A number representing the keyboard modifier keys (for example,
Shift) that are being pressed.
Get(ActivePortalRowNumber) The number of the portal row containing the focus.
Get(ActiveRepetitionNumber) A number representing the active repetition of a repeating field
(the repetition that has the focus).
Get(ActiveSelectionSize) A number representing how many characters are selected.
Get(ActiveSelectionStart) A number representing the starting character of the selected text.
Get(AllowAbortState) A Boolean value representing the current state of Allow user
abort script step.
Get(AllowFormattingBarState) A Boolean value representing whether the formatting bar is
allowed to be visible.
Get(ApplicationLanguage) Text representing the current application language (for example,
English).
FILEMAKER PRO HELP 728
Get(ApplicationVersion) Text representing the FileMaker application version.
Get(CalculationRepetitionNumber) A number representing the repetition of the calculation field that is
currently being calculated.
Get(ConnectionAttributes) The name of the current file’s host and the name of the certificate
authority that issued the SSL certificate used to secure the
connection.
Get(ConnectionState) A number representing the security state of the network
connection for the current file.
Get(CurrentDate) The current date according to the system calendar.
Get(CurrentExtendedPrivileges) A list of keywords for the enabled extended privileges of the
account that is being used to evaluate the calculation.
Get(CurrentHostTimestamp) The host's current date and time (to the nearest second)
according to the system clock.
Get(CurrentPrivilegeSetName) The name of the privilege set that is being used to evaluate this
calculation in the database.
Get(CurrentTime) The current time (to the nearest second) according to the system
clock.
Get(CurrentTimestamp) The current date and time (to the nearest second) according to
the system clock.
Get(CurrentTimeUTCMilliseconds) The current time in Coordinated Universal Time to the nearest
millisecond.
Get(CustomMenuSetName) The name of the active custom menu set.
Get(DesktopPath) The path to the desktop folder for the current user.
Get(Device) A number indicating the type of computer or iOS device currently
running a FileMaker product.
Get(DocumentsPath) The path to the Documents folder for the current user.
Get(DocumentsPathListing) A list of all the files and folders in the Documents folder returned
by the Get(DocumentsPath) function.
Get(EncryptionState) A value representing the current encryption state.
Get(ErrorCaptureState) A Boolean value representing the state of Error capture script
step.
Get(FileMakerPath) The path to the folder of the currently running copy of
FileMaker Pro.
Get(FileName) The name of the currently active database file.
Get(FilePath) The full path indicating the location of the file.
Get(FileSize) The size (in bytes) of the currently active database file.
Get(FoundCount) A number that represents the number of records in the current
found set.
Get(HighContrastColor) The name of the current high contrast default color scheme if Use
High Contrast is selected in the Windows operating system
Accessibility Options dialog box.
Get(HighContrastState) A Boolean value representing the state of the Use High Contrast
checkbox on the Accessibility Options dialog box.
This function Returns

FILEMAKER PRO HELP 729
Get(HostApplicationVersion) The version of FileMaker Pro or FileMaker Server running on the
computer that is hosting the current database.
Get(HostIPAddress) The IP address of the host machine for the current database.
Get(HostName) The registered name of the computer that is hosting the database
file.
Get(InstalledFMPlugins) The display name, version number (if available), and enabled
state of installed plug-ins.
Get(LastError) A number representing the error, if any, in the execution of the
most recently executed script step.
Get(LastMessageChoice) A number corresponding to the button clicked in an alert message
displayed by the Show Custom Dialog script step.
Get(LastODBCError) A string that shows the error state published by ODBC standards,
based on ISO/IEF standards.
Get(LayoutAccess) A number corresponding to the layout access privileges assigned
through the Manage Security dialog box.
Get(LayoutCount) The total number of layouts in the database file.
Get(LayoutName) The name of the layout currently displayed.
Get(LayoutNumber) The number of the layout currently displayed, according to the list
in the Manage Layouts dialog box.
Get(LayoutTableName) The name of the table that the layout is displaying records from.
Get(LayoutViewState) Information about how the database file is being viewed.
Get(ModifiedFields) A list of fields that have been modified in the current record of the
current table.
Get(MultiUserState) A number representing the current multi-user state of the
database file.
Get(NetworkProtocol) The name of the network protocol that FileMaker Pro is using on
this machine.
Get(NetworkType) A number representing the type of network being used by
FileMaker Pro to access the file that is performing the current
script.
Get(PageNumber) A number representing the current page being printed or
previewed.
Get(PersistentID) Text representing a unique identifier of the computer or device on
which FileMaker is running.
Get(PreferencesPath) The path to the preferences folder for the current user.
Get(PrinterName) A string identifying the default printer name.
Get(QuickFindText) The text that was entered in the Quick Find box.
Get(RecordAccess) A number indicating the access privileges of the current record.
Get(RecordID) The unique ID number of the current record.
Get(RecordModificationCount) The total number of times changes to the current record have
been committed.
Get(RecordNumber) The number of the current record in the current found set.
This function Returns

FILEMAKER PRO HELP 730
Get(RecordOpenCount) The total number of open records in the current found set that
haven’t yet been saved.
Get(RecordOpenState) A number representing the state of the current record.
Get(RequestCount) The total number of find requests currently defined for the current
table.
Get(RequestOmitState) A Boolean value representing the state of the Omit checkbox in
Find mode.
Get(ScreenDepth) The number of bits needed to represent the color or shade of gray
of a pixel on the main screen.
Get(ScreenHeight) The height, in points, of the screen in which the window of the
current file is open.
Get(ScreenWidth) The width, in points, of the screen in which the window of the
current file is open.
Get(ScriptAnimationState) A number indicating whether or not animations are enabled for
the currently running script.
Get(ScriptName) The name of the script currently running (or paused).
Get(ScriptParameter) The script parameter passed into the current script.
Get(ScriptResult) The script result from a performed subscript.
Get(SortState) A number value representing the current sort state.
Get(StatusAreaState) A number representing whether the status toolbar is hidden,
visible, visible and locked, or hidden and locked.
Get(SystemDrive) The drive letter (Windows) or the volume name (OS X) where the
currently running operating system is located.
Get(SystemIPAddress) The IP addresses of all the machines connected to a NIC
(Network Interface Controller) card.
Get(SystemLanguage) The language currently set on the current system.
Get(SystemNICAddress) The hardware addresses of all the Network Interface Controller
cards connected to the machine.
Get(SystemPlatform) A number indicating the current platform.
Get(SystemVersion) The version of the operating system of the machine on which the
function is executed.
Get(TemporaryPath) The path to the current user’s temporary folder used by
FileMaker Pro.
Get(TextRulerVisible) A Boolean value representing whether or not the text ruler is
visible.
Get(TotalRecordCount) The total number of records in the current table.
Get(TriggerCurrentPanel) The index number and object name of the tab panel or slide panel
to be switched from when the OnPanelSwitch script trigger is
activated.
Get(TriggerGestureInfo) Details about the gesture that activated an OnGestureTap script
trigger.
Get(TriggerKeystroke) A string containing the characters that activated an
OnObjectKeystroke or OnLayoutKeystroke script trigger.
This function Returns
FILEMAKER PRO HELP 731
Get functions example
This script uses the function Get(CurrentDate) to check each record in the found set to see if an
account is past due. If an account is past due, the script shows a message and prompts the user to
click a button labeled Ignore, Send Letter, or Send Mail (set up through the Show Custom Dialog
script step). The script captures the user's response using Get(LastMessageChoice). Then,
Get(TriggerModifierKeys) The state of the keyboard modifier keys as they were when the
script trigger was activated.
Get(TriggerTargetPanel) The index number and object name of the tab panel or slide panel
to be switched to when the OnPanelSwitch script trigger is
activated.
Get(UserCount) The number of users who are currently accessing the file.
Get(UserName) The name of the FileMaker Pro user, as specified in the General
tab of the Preferences dialog box.
Get(UseSystemFormatsState) A Boolean value representing the state of the Use System
Formats menu command.
Get(UUID) Text representing a Universally Unique Identifier (UUID).
Get(WindowContentHeight) The height, in points, of the FileMaker Pro content area.
Get(WindowContentWidth) The width, in points, of the FileMaker Pro content area.
Get(WindowDesktopHeight) The height, in points, of the desktop space.
Get(WindowDesktopWidth) The width, in points, of the desktop space.
Get(WindowHeight) The height, in points, of the window on which the script is acting
(not necessarily the foreground window).
Get(WindowLeft) The horizontal distance, in points, of the outer edge of the window
on which the script is acting (not necessarily the foreground
window) relative to the left-most edge of the screen.
Get(WindowMode) A number representing whether FileMaker Pro is in Browse
mode, Find mode, Preview mode, or printing when the function is
evaluated.
Get(WindowName) The name of the current window of the file in which the calculation
is defined.
Get(WindowOrientation) A number indicating the orientation of the window that the current
script is acting on.
Get(WindowStyle) A number indicating whether the top-most open window is a
document window, a floating document window, or a dialog
window.
Get(WindowTop) The vertical distance, in points, of the outer edge of the window
on which the script is acting (not necessarily the foreground
window) relative to the bottom edge of the menu bar.
Get(WindowVisible) A Boolean value representing whether or not the current window
is visible.
Get(WindowWidth) The width, in points, of the window on which the script is acting
(not necessarily the foreground window).
Get(WindowZoomLevel) The zoom level of the current window.
This function Returns

FILEMAKER PRO HELP 732
based on the user's response, the script performs an action: it cancels the rest of the script, prints a
"payment is late" letter, or sends email to the associated account.
Go to Layout ["LayoutName"]
Go to Record/Request/Page [First]
Loop
If [DatabaseName::Date < Get(CurrentDate) - 30]
Show Custom Dialog ["30 or more days late"]
If [Get(LastMessageChoice) = 1]
Halt Script
Else If [Get(LastMessageChoice) = 2]
Go to Layout ["Late Notice"]
Print []
Else
Send Mail [To: DatabaseName::Client; Subject: "Late Notice";
Message: "Your account is past due."]
End If
End If
Go to Record/Request/Page [Exit after last, Next]
End Loop
Go to Layout [original layout]
Related topics
About functions
About formulas
Get(AccountExtendedPrivileges)
Purpose
Returns a list of keywords, separated by carriage returns, for the enabled extended privileges. The
list that is returned is based on the account used to open the database file. See also
Get(CurrentExtendedPrivileges) function.
Format
Get(AccountExtendedPrivileges)
Parameters
None

FILEMAKER PRO HELP 733
Data type returned
text
Originated in
FileMaker Pro 11.0
Description
Extended privileges are additional access rights assigned to an account’s privilege set. See About
accounts, privilege sets, and extended privileges.
Returns an empty list if a user doesn’t have extended privileges assigned to the account used to
open the database file.
Notes
•If you specify the context for the current calculation, this function will be evaluated based on
that context; otherwise, it will be evaluated based on the context of the current window.
•For information on how functions evaluate differently on the host versus the client, search
the FileMaker Knowledge Base available at http://help.filemaker.com.
Examples
An account uses a privilege set that includes the extended privilege of Access Via
FileMaker WebDirect (keyword "fmwebdirect"):
Position(Get(AccountExtendedPrivileges); "fmwebdirect"; 1; 1) returns a value
greater than 0.
If you are logged in and running a script that is set to run with full access privileges,
Get(AccountExtendedPrivileges)returns the extended privileges for your account, but
Get(CurrentExtendedPrivileges)returns the extended privileges for the Admin account.
Related topics
Protecting databases
Creating accounts that authenticate via an external server
Functions reference (category list)
Functions reference (alphabetical list)
About formulas
About functions
Defining calculation fields
Using operators in formulas
Get(AccountName)
Purpose
Returns the name of the authenticated account being used by the current user of the database file.
Format
Get(AccountName)

FILEMAKER PRO HELP 734
Parameters
None
Data type returned
text
Originated in
FileMaker Pro 7.0
Description
Use this function for FileMaker authentication. If a user is using the default Admin account,
Get(AccountName) returns Admin. If a user is using the FileMaker Pro guest account then
[Guest] will be returned.
For external server authentication, Get(AccountName) returns the name of the authenticated
account being used by the current user of the database file, not the group the user belongs to (the
group name appears in the Account list when you define accounts and privileges in FileMaker Pro).
If an individual belongs to more than one group (account), the first group name listed when you
choose View By Authentication Order while defining accounts and privileges determines access
for the user.
Notes
•If you specify the context for the current calculation, this function will be evaluated based on
that context; otherwise, it will be evaluated based on the context of the current window.
•For information on how functions evaluate differently on the host versus the client, search
the FileMaker Knowledge Base available a http://help.filemaker.com.
Examples
Returns Marketing when Marketing is the name of the account that was used to log in to the
database file.
Related topics
Protecting databases
Creating accounts that authenticate via an external server
Get(UserName) function
Functions reference (category list)
Functions reference (alphabetical list)
About formulas
About functions
Defining calculation fields
Using operators in formulas

FILEMAKER PRO HELP 735
Get(AccountPrivilegeSetName)
Purpose
Returns the name of the privilege set that is being used by the account used to open the database.
See also Get(CurrentPrivilegeSetName) function.
Format
Get(AccountPrivilegeSetName)
Parameters
None
Data type returned
text
Originated in
FileMaker Pro 11.0
Description
If a user is using the default Admin account and you haven’t modified access privileges for the
database file, this function returns [Full Access].
Notes
•If you specify the context for the current calculation, this function will be evaluated based on
that context; otherwise, it will be evaluated based on the context of the current window.
•For information on how functions evaluate differently on the host versus the client, search
the FileMaker Knowledge Base available at http://help.filemaker.com
Examples
For an Administrator, Get(AccountPrivilegeSetName) might return [Full Access].
For a user in the sales department, Get(AccountPrivilegeSetName) might return [Data Entry
Only].
For a user with Read-Only Access to a database who is running a script that is set to run with full
access privileges, Get(AccountPrivilegeSetName)returns [Read-Only Access] but
Get(CurrentPrivilegeSetName)returns [Full Access] (for the current script).
Related topics
Protecting databases
Creating accounts that authenticate via an external server
Functions reference (category list)
Functions reference (alphabetical list)
About formulas
About functions
Defining calculation fields
Using operators in formulas

FILEMAKER PRO HELP 736
Get(ActiveFieldContents)
Purpose
Returns the contents of the field that has the focus.
Format
Get(ActiveFieldContents)
Parameters
None
Data type returned
text, number, date, time, timestamp, container
Originated in
FileMaker Pro 6.0 or earlier
Description
When the focus is in a repeating field, this function returns the contents of the active repetition. The
result type of the active field depends upon the data type of the active field and the result type
assigned to the Get(ActiveFieldContents) calculation function.
Note For information on how functions evaluate differently on the host versus the client, search the
FileMaker Knowledge Base available at http://help.filemaker.com.
Examples
Returns SomeShop when the focus is in the Name field, and that field contains the data
SomeShop.
This type of calculation is most useful if used in a script when you want to examine data in different
fields as the script proceeds.
Related topics
Functions reference (category list)
Functions reference (alphabetical list)
About formulas
About functions
Defining calculation fields
Using operators in formulas
Get(ActiveFieldName)
Purpose
Returns the name of the field that has the focus.

FILEMAKER PRO HELP 737
Format
Get(ActiveFieldName)
Parameters
None
Data type returned
text
Originated in
FileMaker Pro 6.0 or earlier
Description
For information on how functions evaluate differently on the host versus the client, search the
FileMaker Knowledge Base available at http://help.filemaker.com.
Examples
Returns Country, when the focus is in the Country field.
Related topics
Functions reference (category list)
Functions reference (alphabetical list)
About formulas
About functions
Defining calculation fields
Using operators in formulas
Get(ActiveFieldTableName)
Purpose
Returns the name of the table that contains the active field (the field that has the focus).
Format
Get(ActiveFieldTableName)
Parameters
None
Data type returned
text
Originated in
FileMaker Pro 7.0

FILEMAKER PRO HELP 738
Description
If there is no active field, this function returns an empty string.
Note For information on how functions evaluate differently on the host versus the client, search the
FileMaker Knowledge Base available at http://help.filemaker.com.
Examples
There are two fields, Teachers::Name and Coaches::Name, on the current layout. Creating a script
that returns the result of Get(ActiveFieldTableName) to a third field will return Teachers when
the script is performed after clicking in the Teachers::Name field, or will return Coaches after
clicking in the Coaches::Name field.
Related topics
Functions reference (category list)
Functions reference (alphabetical list)
About formulas
About functions
Defining calculation fields
Using operators in formulas
Get(ActiveLayoutObjectName)
Purpose
Returns the object name of the active layout object in the calculation's current window; otherwise,
returns an empty string.
Format
Get(ActiveLayoutObjectName)
Parameters
None
Data type returned
text
Originated in
FileMaker Pro 8.5
Description
For information on how functions evaluate differently on the host versus the client, search the
FileMaker Knowledge Base available at http://help.filemaker.com.
Examples
There is a named button on the current layout called cancelButton. When the focus is on the
button, Get(ActiveLayoutObjectName) returns cancelButton.

FILEMAKER PRO HELP 739
Related topics
Functions reference (category list)
Functions reference (alphabetical list)
About formulas
About functions
Defining calculation fields
Using operators in formulas
Naming objects
Get(ActiveModifierKeys)
Purpose
Returns a number representing the keyboard modifier keys (for example, Control+Shift) that are
being pressed.
Format
Get(ActiveModifierKeys)
Parameters
None
Data type returned
number
Originated in
FileMaker Pro 6.0 or earlier
Description
The number returned is calculated by summing numbers representing each modifier key being
pressed. The values assigned to the keys are:
•Shift = 1
•Caps Lock = 2
•Ctrl (Windows) and Control (OS X) = 4
•Alt (Windows) and Option (OS X) = 8
•Command (OS X) = 16
Note For information on how functions evaluate differently on the host versus the client, search the
FileMaker Knowledge Base available at http://help.filemaker.com.
Examples
Returns the number 9 when Shift+Alt is pressed on a computer running Windows.
You could use this function in a script that includes a custom dialog box script step (with an OK and
Cancel button) to perform some special action if the user presses the Alt (or Option) key while
clicking OK.

FILEMAKER PRO HELP 740
Related topics
Functions reference (category list)
Functions reference (alphabetical list)
About formulas
About functions
Defining calculation fields
Get(ActivePortalRowNumber)
Purpose
Returns the number of the portal row containing the focus.
Format
Get(ActivePortalRowNumber)
Parameters
None
Data type returned
number
Originated in
FileMaker Pro 6.0 or earlier
Description
When no portal row contains the focus, this function returns 0. If there are multiple windows open in
the current database file, each window can have its own portal row number value, but results are
returned for only the foreground window. If a user navigates to a portal without selecting a specific
portal row and without making an object active within a specific portal row,
Get(ActivePortalRowNumber) returns row 0 rather than row 1.
Notes
•If a field on a layout is defined as Get(ActivePortalRowNumber), the window must be
refreshed before the field will display the current portal row number.
•For information on how functions evaluate differently on the host versus the client, search
the FileMaker Knowledge Base available at http://help.filemaker.com.
Examples
Returns 5 when the fifth row of a portal has the focus, or when the focus is in a field in the fifth portal
row.
Returns 1 after the Go to Portal Row [First] script step runs.
Returns 0 when a portal is not selected.

FILEMAKER PRO HELP 741
Related topics
Functions reference (category list)
Functions reference (alphabetical list)
About formulas
About functions
Defining calculation fields
Using operators in formulas
Using operators in formulas
Get(TriggerModifierKeys)
Get(ActiveRepetitionNumber)
Purpose
Returns a number representing the active repetition of a repeating field (the repetition that has the
focus).
Format
Get(ActiveRepetitionNumber)
Parameters
None
Data type returned
number
Originated in
FileMaker Pro 6.0 or earlier
Description
The first repetition returns 1. If the current field isn’t a repeating field, this function returns 1.
Note For information on how functions evaluate differently on the host versus the client, search the
FileMaker Knowledge Base available at http://help.filemaker.com.
Examples
Returns 5 when the focus is in the fifth repetition of a repeating field.
Related topics
Functions reference (category list)
Functions reference (alphabetical list)
About formulas
About functions
Defining calculation fields
Using operators in formulas

FILEMAKER PRO HELP 742
Get(ActiveSelectionSize)
Purpose
Returns a number representing how many characters are selected.
Format
Get(ActiveSelectionSize)
Parameters
None
Data type returned
number
Originated in
FileMaker Pro 7.0
Description
Returns 0 if there is no selection.
Notes
•In FileMaker WebDirect, this function is not supported and returns an empty string.
•For information on how functions evaluate differently on the host versus the client, search
the FileMaker Knowledge Base available at http://help.filemaker.com.
Examples
Returns 4 when 4 characters are selected.
Related topics
Functions reference (category list)
Functions reference (alphabetical list)
About formulas
About functions
Defining calculation fields
Using operators in formulas
Get(ActiveSelectionStart)
Purpose
Returns a number representing the starting character of the selected text.
Format
Get(ActiveSelectionStart)

FILEMAKER PRO HELP 743
Parameters
None
Data type returned
number
Originated in
FileMaker Pro 7.0
Description
Returns the cursor's current position if no text is selected.
If there are multiple windows open in the current database file, a result is returned for only the
foreground window.
Notes
•In FileMaker WebDirect, Get(ActiveSelectionStart) returns a value only if the selected text is
in a field that displays as an edit box.
•For information on how functions evaluate differently on the host versus the client, search
the FileMaker Knowledge Base available at http://help.filemaker.com.
Examples
Returns 5 when the selection starts at character 5.
Related topics
Functions reference (category list)
Functions reference (alphabetical list)
About formulas
About functions
Defining calculation fields
Using operators in formulas
Get(AllowAbortState)
Purpose
Returns 1 if Allow user abort script step is on; otherwise, returns 0.
Format
Get(AllowAbortState)
Parameters
None

FILEMAKER PRO HELP 744
Data type returned
number
Originated in
FileMaker Pro 7.0
Description
For information on how functions evaluate differently on the host versus the client, search the
FileMaker Knowledge Base available at http://help.filemaker.com.
Examples
Returns 1 if Allow user abort script step is on.
Related topics
Functions reference (category list)
Functions reference (alphabetical list)
About formulas
About functions
Defining calculation fields
Using operators in formulas
Get(AllowFormattingBarState)
Purpose
Returns a Boolean value representing whether the formatting bar is allowed to be visible.
Format
Get(AllowFormattingBarState)
Parameters
None
Data type returned
number
Originated in
FileMaker Pro 8.0
Description
Returns 1 if the formatting bar is allowed; otherwise, returns 0.
The Allow Formatting Bar script step sets the formatting bar state. For more information, see Allow
Formatting Bar script step.

FILEMAKER PRO HELP 745
Notes
•In FileMaker WebDirect, this function is not supported and returns 0.
•For information on how functions evaluate differently on the host versus the client, search
the FileMaker Knowledge Base available at http://help.filemaker.com.
Examples
Returns 1 if the formatting bar is allowed to be visible.
Related topics
Functions reference (category list)
Functions reference (alphabetical list)
About formulas
About functions
Defining calculation fields
Using operators in formulas
Get(ApplicationLanguage)
Purpose
Returns text representing the current application language.
Format
Get(ApplicationLanguage)
Parameters
None
Data type returned
text
Originated in
FileMaker Pro 7.0
Description
The text that is returned by this function is in the English language.
For hosted databases, Get(ApplicationLanguage) returns the client’s current language.
Note In FileMaker WebDirect, Get(ApplicationLanguage) returns the web browser’s current
language.
FileMaker Pro supports:
•English
•French
•Italian

FILEMAKER PRO HELP 746
•German
•Swedish
•Spanish
•Dutch
•Japanese
•Simplified Chinese
•Brazilian Portuguese
•Korean
Examples
Returns English when the current application language is English.
Related topics
Functions reference (category list)
Functions reference (alphabetical list)
About formulas
About functions
Defining calculation fields
Using operators in formulas
Get(ApplicationVersion)
Purpose
Returns text representing the FileMaker application and version.
Format
Get(ApplicationVersion)
Parameters
None
Data type returned
text
Originated in
FileMaker Pro 6.0 or earlier
Description
Returns:
•Pro version for FileMaker Pro
•ProAdvanced version for FileMaker Pro Advanced
•Runtime version for FileMaker Runtime

FILEMAKER PRO HELP 747
•Web Publishing Engine version for FileMaker Server Web Client
•xDBC version for xDBC Client
•Server version for FileMaker Server
•Go version for FileMaker Go on the iPhone or iPod touch
•Go_iPad version for FileMaker Go on the iPad
Note For information on how functions evaluate differently on the host versus the client, search the
FileMaker Knowledge Base available at http://help.filemaker.com.
Examples
Returns Pro 13.0v1 in FileMaker Pro 13.0v1.
Related topics
Functions reference (category list)
Functions reference (alphabetical list)
About formulas
About functions
Defining calculation fields
Using operators in formulas
Get(CalculationRepetitionNumber)
Purpose
Returns a number representing the repetition of the calculation field that is currently being
calculated.
Format
Get(CalculationRepetitionNumber)
Parameters
None
Data type returned
number
Originated in
FileMaker Pro 7.0
Description
The first repetition returned is 1. If the current field isn’t a repeating field, the function returns 1.
Note For information on how functions evaluate differently on the host versus the client, search the
FileMaker Knowledge Base available at http://help.filemaker.com.

FILEMAKER PRO HELP 748
Examples
Returns 5 when FileMaker Pro is calculating the fifth repetition of a repeating field.
Related topics
Functions reference (category list)
Functions reference (alphabetical list)
About formulas
About functions
Defining calculation fields
Using operators in formulas
Get(ConnectionAttributes)
Purpose
Returns the name of the current file’s host and the name of the certificate authority that issued the
SSL certificate used to secure the connection.
Format
Get(ConnectionAttributes)
Parameters
None
Data type returned
text
Originated in
FileMaker Pro 13.0
Description
Get(ConnectionAttributes) returns an empty string if:
•the current file is not hosted
•the host is not FileMaker Server
•the host does not use an SSL certificate to secure the connection to the client
Examples
If the host is named “group_server” and the current SSL certificate was issued by XYZ Inc.,
Get(ConnectionAttributes) returns:
[ Peer Certificate ]
commonName: group_server
CA Issuers: XYZ Inc.

FILEMAKER PRO HELP 749
Related topics
Functions reference (category list)
Functions reference (alphabetical list)
About formulas
About functions
Defining calculation fields
Using operators in formulas
Get(ConnectionState)
Purpose
Returns a number representing the security state of the network connection for the current file.
Format
Get(ConnectionState)
Parameters
None
Data type returned
number
Originated in
FileMaker Pro 12.0
Description
Returns a value indicating whether the FileMaker Pro or FileMaker Go connection to the host uses
SSL, including whether the Server name matches the Server-side certificate (providing the highest
security). Returns:
•0 for no network connection for the current file.
•1 for a non-secured connection (FileMaker Server with SSL disabled, or to a FileMaker Pro
host).
•2 for a secured connection (SSL) when the server name doesn’t match the certificate
(default FileMaker Server installation).
•3 for a secured connection with a fully verified server name in the certificate.
Notes
•You do not have to use Get(ConnectionState) to check the security of web published files. In
FileMaker WebDirect, the web browser verifies the SSL connection.
•For information on how functions evaluate differently on the host versus the client, search
the FileMaker Knowledge Base available at http://help.filemaker.com.

FILEMAKER PRO HELP 750
Examples
Returns 3 when the Server name matches the name indicated in a Server root certificate obtained
from a trusted authority.
Related topics
Functions reference (category list)
Functions reference (alphabetical list)
About formulas
About functions
Defining calculation fields
Using operators in formulas
Get(CurrentDate)
Purpose
Returns the current date according to the system calendar.
Format
Get(CurrentDate)
Parameters
None
Data type returned
date
Originated in
FileMaker Pro 6.0 or earlier
Description
The format of the result of this function varies based on the date format that was in use when the
database file was created. In the United States, dates are generally in the format MM/DD/YYYY. You
can change the date and time formats in your operating system.
If the result is displayed in a field, it is formatted according to the date format of the field in the
current layout.
Note For information on how functions evaluate differently on the host versus the client, search the
FileMaker Knowledge Base available at http://help.filemaker.com.
Important To avoid errors when using dates, always use four-digit years. For more information
about how FileMaker Pro handles two-digit dates, see Conversion of dates with two-digit years.
Examples
Returns 2/2/2014 when the system date is set to February 2, 2014.

FILEMAKER PRO HELP 751
Get(CurrentDate)-Date(1;5;2014) returns 4 when the system date is set to January 9,
2014.
Related topics
Functions reference (category list)
Functions reference (alphabetical list)
About formulas
About functions
Defining calculation fields
Using operators in formulas
Get(CurrentExtendedPrivileges)
Purpose
Returns a list of keywords, separated by carriage returns, for the enabled extended privileges. The
list that is returned is based on the account that is being used to evaluate this calculation. See also
Get(AccountExtendedPrivileges) function.
Format
Get(CurrentExtendedPrivileges)
Parameters
None
Data type returned
text
Originated in
FileMaker Pro 6.0 or earlier
Description
Extended privileges are additional access rights assigned to an account’s privilege set. See About
accounts, privilege sets, and extended privileges.
Returns an empty list if a user doesn’t have extended privileges assigned for the current database
file.
Notes
•If you specify the context for the current calculation, this function will be evaluated based on
that context; otherwise, it will be evaluated based on the context of the current window.
•For information on how functions evaluate differently on the host versus the client, search
the FileMaker Knowledge Base available at http://help.filemaker.com.

FILEMAKER PRO HELP 752
Examples
The account that is evaluating this calculation uses a privilege set that includes the extended
privilege of Access Via FileMaker WebDirect (keyword "fmwebdirect"):
Position(Get(CurrentExtendedPrivileges); "fmwebdirect"; 1; 1) returns a value
greater than 0.
If you are logged in and running a script that is set to run with full access privileges,
Get(AccountExtendedPrivileges)returns the extended privileges for your account, but
Get(CurrentExtendedPrivileges)returns the extended privileges for the Admin account.
Related topics
Protecting databases
Creating accounts that authenticate via an external server
Functions reference (category list)
Functions reference (alphabetical list)
About formulas
About functions
Defining calculation fields
Using operators in formulas
Get(CurrentHostTimestamp)
Purpose
Returns the host’s current date and time (to the nearest second) according to the system clock.
Format
Get(CurrentHostTimestamp)
Parameters
None
Data type returned
timestamp
Originated in
FileMaker Pro 7.0
Description
The format of the value returned is determined by the database file’s settings. You can use your
client system’s settings in the operating system.
Notes
•The client machine and host machine may be in different times zones so
Get(CurrentHostTimestamp) and Get(CurrentTimestamp) may return different

FILEMAKER PRO HELP 753
date/time values. Also, the current date and time are characteristics of the host system, but
the format of the date and time is a characteristic of the database file.
•For information on how functions evaluate differently on the host versus the client, search
the FileMaker Knowledge Base available at http://help.filemaker.com.
Important For users who are connected over a network, the Get(CurrentHostTimestamp)
function can affect the performance of the database file. For example, if you use the function in an
unstored calculation field, and the field is visible in a list view, each display of the field requires an
additional network access. Stored calculation fields are a better use of the function. For example, if
you automatically enter a timestamp for each newly created record using a stored calculation field,
you minimize network access.
Examples
Returns 1/1/2014 11:30:01 AM when the system clock shows January 1, 2014 11:30:01 AM on the
host machine.
Related topics
Functions reference (category list)
Functions reference (alphabetical list)
About formulas
About functions
Defining calculation fields
Using operators in formulas
Get(CurrentPrivilegeSetName)
Purpose
Returns the name of the privilege set that is being used to evaluate this calculation in the database
file. See also Get(AccountPrivilegeSetName) function.
Format
Get(CurrentPrivilegeSetName)
Parameters
None
Data type returned
text
Originated in
FileMaker Pro 6.0 or earlier

FILEMAKER PRO HELP 754
Description
If a user is using the default Admin account and you haven’t modified access privileges for the
database file, this function returns [Full Access].
Notes
•If you specify the context for the current calculation, this function will be evaluated based on
that context; otherwise, it will be evaluated based on the context of the current window.
•If you select the Run script with full access privileges script option, this function returns
[Full Access].
•For information on how functions evaluate differently on the host versus the client, search
the FileMaker Knowledge Base available at http://help.filemaker.com.
Examples
For current user Administrator, Get(CurrentPrivilegeSetName) might return [Full Access].
For a current user in the sales department, Get(CurrentPrivilegeSetName) might return
[Data Entry Only].
For a user with Read-Only Access to a database who is running a script that is set to run with full
access privileges, Get(AccountPrivilegeSetName)returns [Read-Only Access] but
Get(CurrentPrivilegeSetName)returns [Full Access] (for the current script).
Related topics
Protecting databases
Creating accounts that authenticate via an external server
Functions reference (category list)
Functions reference (alphabetical list)
About formulas
About functions
Defining calculation fields
Using operators in formulas
Get(CurrentTime)
Purpose
Returns CurrentTime (to the nearest second) according to the system clock.
Format
Get(CurrentTime)
Parameters
None
Data type returned
time

FILEMAKER PRO HELP 755
Originated in
FileMaker Pro 6.0 or earlier
Description
The format of the value returned is determined by the operating system settings.
Notes
•If the calculation result for this script step is set to integer format, it will return the total
number of seconds elapsed since the start of the current day.
•In client/server and peer-to-peer environments, Get(CurrentTimestamp) evaluates the
status of the client machine running the script (not the host machine). For information on
how functions evaluate differently on the host versus the client, search the FileMaker
Knowledge Base available at http://help.filemaker.com.
Examples
Returns 11:30:00 AM when the function result is in text format and the system clock shows 11:30:00
AM.
Related topics
Functions reference (category list)
Functions reference (alphabetical list)
About formulas
About functions
Defining calculation fields
Using operators in formulas
Get(CurrentTimestamp)
Purpose
Returns the current date and time (to the nearest second) according to the system clock.
Format
Get(CurrentTimestamp)
Parameters
None
Data type returned
timestamp
Originated in
FileMaker Pro 7.0

FILEMAKER PRO HELP 756
Description
The format of the value returned is determined by the operating system settings.
Note In client/server and peer-to-peer environments, Get(CurrentTimestamp) evaluates the
status of the client machine running the script (not the host machine). For information on how
functions evaluate differently on the host versus the client, search the FileMaker Knowledge Base
available at http://help.filemaker.com.
Examples
Returns 1/1/2014 11:30:00 AM when the system clock shows January 1, 2014 11:30:00.
Related topics
Functions reference (category list)
Functions reference (alphabetical list)
About formulas
About functions
Defining calculation fields
Using operators in formulas
Get(CurrentTimeUTCMilliseconds)
Purpose
Returns the current time in Coordinated Universal Time (UTC) to the nearest millisecond.
Format
Get(CurrentTimeUTCMilliseconds)
Parameters
None
Data type returned
number, time
Originated in
FileMaker Pro 13.0
Description
Returns the current time without time zone adjustments in the form of the number of milliseconds
since 1/1/0001. UTC time zone adjustments must be applied to get your local time.
Examples
Get ( CurrentTimeUTCMilliseconds ) returns 63568967107528 if the time in UTC is
10:25:07.528 PM on 6/3/2015.

FILEMAKER PRO HELP 757
GetAsTimestamp ( ( Get ( CurrentTimeUTCMilliseconds ) + (
Location::TimeAdjustment * 3600000 ) ) / 1000 ) returns 11/10/2015 1:43:55.304 PM
if the time in UTC is 8:43:55:.304 PM on 11/10/2015 and the TimeAdjustment field has a value of -7.
Related topics
Functions reference (category list)
Functions reference (alphabetical list)
About formulas
About functions
Defining calculation fields
Using operators in formulas
Get(CustomMenuSetName)
Purpose
Returns the name of the active custom menu set.
Format
Get(CustomMenuSetName)
Parameters
None
Data type returned
text
Originated in
FileMaker Pro 8.0
Description
If the active menu set isn’t a custom menu set, an empty string is returned.
Notes
•In FileMaker WebDirect, this function is not supported and returns an empty string.
•For information on how functions evaluate differently on the host versus the client, search
the FileMaker Knowledge Base available at http://help.filemaker.com.
Examples
Returns Custom Menu Set #1 when this custom menu set is active.
Returns an empty string when the [Standard FileMaker Menus] menu set is active.
Related topics
Functions reference (category list)
Functions reference (alphabetical list)

FILEMAKER PRO HELP 758
About formulas
About functions
Defining calculation fields
Using operators in formulas
Get(DesktopPath)
Purpose
Returns the path to the desktop folder for the current user.
Format
Get(DesktopPath)
Parameters
None
Data type returned
text
Originated in
FileMaker Pro 8.0
Description
In Windows, the path format is /Drive:/Users/UserName/Desktop/.
In OS X, the path format is /DriveName/Users/username/Desktop/.
Notes
•In FileMaker WebDirect, this function is not supported and returns an empty string.
•For information on how functions evaluate differently on the host versus the client, search
the FileMaker Knowledge Base available at http://help.filemaker.com.
Examples
Returns /C:/Documents and Settings/John Smith/Desktop/ for a user named John Smith in
Windows.
Returns /Macintosh HD/Users/johnsmith/Desktop/ for a user named John Smith in OS X.
Related topics
Functions reference (category list)
Functions reference (alphabetical list)
About formulas
About functions
Defining calculation fields
Using operators in formulas

FILEMAKER PRO HELP 759
Get(Device)
Purpose
Returns a number indicating the type of computer that is currently running FileMaker Pro or
FileMaker WebDirect, or the type of iOS device that is currently running FileMaker Go.
Format
Get(Device)
Parameters
None
Data type returned
number
Originated in
FileMaker Pro 13.0
Description
Returns:
•0 if the device is unknown
•1 if the device is a Mac
•2 if the device is a PC running Windows
•3 if the device is an iPad
•4 if the device is an iPhone or iPod touch
Examples
Returns 2 if FileMaker Pro or FileMaker WebDirect is currently running on a PC with Windows.
Returns 3 if FileMaker Go or FileMaker WebDirect is currently running on an iPad.
Related topics
Functions reference (category list)
Functions reference (alphabetical list)
About formulas
About functions
Defining calculation fields
Using operators in formulas
Get(DocumentsPath)
Purpose
Returns the path to the Documents folder for the current user.

FILEMAKER PRO HELP 760
Format
Get(DocumentsPath)
Parameters
None
Data type returned
text
Originated in
FileMaker Pro 8.0
Description
In Windows, the path format is /Drive:/Users/UserName/Documents/.
In OS X, the path format is /DriveName/Users/username/Documents/.
When running on FileMaker Server, Get(DocumentsPath) returns the location of the Documents
folder, which is in the same folder as the server's Backups, Databases, and Scripts folders. The
Documents folder is used as a shared location that scripts from different sessions or other
processes on the machine can use to import or export files. For more information, see FileMaker
Server Help.
Notes
•In FileMaker WebDirect, this function is not supported and always an empty string.
•For information on how functions evaluate differently on the host versus the client, search
the FileMaker Knowledge Base available at http://help.filemaker.com.
Examples
For FileMaker Pro, for a user named John Smith, returns:
/C:/Users/John Smith/Documents/ in Windows.
/Macintosh HD/Users/johnsmith/Documents/ in OS X
For FileMaker Server, returns:
/C:/Program Files/FileMaker/FileMaker Server/Data/Documents in Windows Vista.
/Macintosh HD/Library/FileMaker Server/Data/Documents in OS X
Related topics
Functions reference (category list)
Functions reference (alphabetical list)
About formulas
About functions
Defining calculation fields
Using operators in formulas
Get(DocumentsPathListing) function

FILEMAKER PRO HELP 761
Get(DocumentsPathListing)
Purpose
Returns a list of all the files and folders in the Documents folder returned by the
Get(DocumentsPath) function.
Format
Get(DocumentsPathListing)
Parameters
None
Data type returned
text
Originated in
FileMaker Pro 10.0
Description
Each pathname in the Documents folder is listed separated by a line break. Files and folders are
named according to FileMaker Pro naming conventions.
Use Get(DocumentsPathListing) with the Import Records script step and Export Records script step
to determine if a file exists in the Documents folder before using the Open File script step to open
the file. Get(DocumentsPathListing) ensures that multiple scripts can safely read from and write to
the same FileMaker Pro database.
Notes
•In FileMaker WebDirect, this function is not supported and returns an empty string.
•For information on how functions evaluate differently on the host versus the client, search
the FileMaker Knowledge Base available at http://help.filemaker.com.
Examples
For FileMaker Server, returns the following pathnames:
In Windows:
/C:/Program Files/FileMaker/FileMaker Server/Data/Documents/lastmonthsales.xlsx
/C:/Program Files/FileMaker/FileMaker Server/Data/Documents/forecastsales.xlsx
/C:/Program Files/FileMaker/FileMaker Server/Data/Documents/SAP
/C:/Program Files/FileMaker/FileMaker Server/Data/Documents/SAP/sap001.txt
/C:/Program Files/FileMaker/FileMaker Server/Data/Documents/SAP/sap002.txt
In OS X:
/MacintoshHD//Library/FileMaker Server/Data/Documents/lastmonthsales.xlsx
/MacintoshHD//Library/FileMaker Server/Data/Documents/forecastsales.xlsx
/MacintoshHD//Library/FileMaker Server/Data/Documents/SAP
/MacintoshHD//Library/FileMaker Server/Data/Documents/SAP/sap001.txt
/MacintoshHD//Library/FileMaker Server/Data/Documents/SAP/sap002.txt

FILEMAKER PRO HELP 762
Related topics
Functions reference (category list)
Functions reference (alphabetical list)
Get(DocumentsPath)
Get(EncryptionState)
Purpose
Returns a value representing the file’s current encryption state.
Format
Get(EncryptionState)
Parameters
None
Data type returned
text
Originated in
FileMaker Pro 13.0
Description
Returns:
•0 if the database is not encrypted
•1 and the Shared ID as a return delimited list if the database is encrypted
Examples
In an encrypted database file with the Shared ID of 31725, Get(EncryptionState)returns:
•1
•31725
Related topics
Functions reference (category list)
Functions reference (alphabetical list)
Get(ErrorCaptureState)
Purpose
Returns 1 if the Set Error capture script step is on; otherwise, returns 0.

FILEMAKER PRO HELP 763
Format
Get(ErrorCaptureState)
Parameters
None
Data type returned
number
Originated in
FileMaker Pro 7.0
Description
For information on how functions evaluate differently on the host versus the client, search the
FileMaker Knowledge Base available at http://help.filemaker.com.
Examples
Returns 1 if the Set Error capture script step is on.
Related topics
Functions reference (category list)
Functions reference (alphabetical list)
About formulas
About functions
Defining calculation fields
Using operators in formulas
Get(FileMakerPath)
Purpose
Returns the path to the folder of the currently running copy of FileMaker Pro.
Format
Get(FileMakerPath)
Parameters
None
Data type returned
text
Originated in
FileMaker Pro 8.0

FILEMAKER PRO HELP 764
Description
In Windows, the path format is /Drive:/Program Files/FileMaker/FileMaker Pro 13/.
In OS X, the path format is /DriveName/Applications/FileMaker Pro 13/.
Notes
•In FileMaker WebDirect, this function is not supported and returns an empty string.
•For information on how functions evaluate differently on the host versus the client, search
the FileMaker Knowledge Base available at http://help.filemaker.com.
Examples
Returns /C:/Program Files/FileMaker/FileMaker Pro 13/ in Windows.
Returns /MacintoshHD/Applications/FileMaker Pro 13/ in OS X.
Related topics
Functions reference (category list)
Functions reference (alphabetical list)
About formulas
About functions
Defining calculation fields
Using operators in formulas
Get(FileName)
Purpose
Returns the name of the currently active database file, without the filename extension.
Format
Get(FileName)
Parameters
None
Data type returned
text
Originated in
FileMaker Pro 6.0 or earlier
Description
If the current calculation is stored and you specify its context, this function will be evaluated based
on that context; otherwise, it will be evaluated based on the context of the current window.
Note For information on how functions evaluate differently on the host versus the client, search the
FileMaker Knowledge Base available at http://help.filemaker.com.

FILEMAKER PRO HELP 765
Examples
Returns Contacts when Contacts is the active file.
Related topics
Functions reference (category list)
Functions reference (alphabetical list)
About formulas
About functions
Defining calculation fields
Using operators in formulas
Get(FilePath)
Purpose
Returns the full path indicating the location of the currently active database file.
Format
Get(FilePath)
Parameters
None
Data type returned
text
Originated in
FileMaker Pro 6.0 or earlier
Description
In Windows, the full path is file:/drive:/folder/filename for local files. For remote files, the full path is
file://volume/folder/filename.
In OS X, the full path is file:/volume/folder/filename for local and remote files.
If you specify the context for the current calculation, this function will be evaluated based on that
context; otherwise, it will be evaluated based on the context of the current window.
Note For information on how functions evaluate differently on the host versus the client, search the
FileMaker Knowledge Base available at http://help.filemaker.com.
Examples
Returns file:/driveletter:/databaseName for local files in Windows.
Returns file://volumename/myfoldername/databaseName for remote files in Windows.
Returns file:/path/databaseName for local and remote files in OS X.
Returns fmnet:/networkaddress/databaseName for FileMaker Pro networked files.

FILEMAKER PRO HELP 766
Related topics
Functions reference (category list)
Functions reference (alphabetical list)
About formulas
About functions
Defining calculation fields
Using operators in formulas
Get(FileSize)
Purpose
Returns the size (in bytes) of the currently active database file.
Format
Get(FileSize)
Parameters
None
Data type returned
number
Originated in
FileMaker Pro 6.0 or earlier
Description
If the current calculation is stored and you specify its context, this function will be evaluated based
on that context; otherwise, it will be evaluated based on the context of the current window.
Note For information on how functions evaluate differently on the host versus the client, search the
FileMaker Knowledge Base available at http://help.filemaker.com.
Examples
Returns 15000 when the current file size is 15000 bytes.
Related topics
Functions reference (category list)
Functions reference (alphabetical list)
About formulas
About functions
Defining calculation fields
Using operators in formulas

FILEMAKER PRO HELP 767
Get(FoundCount)
Purpose
Returns a number that represents the number of records in the current found set.
Format
Get(FoundCount)
Parameters
None
Data type returned
number
Originated in
FileMaker Pro 6.0 or earlier
Description
If there are multiple windows open in the current database file, each window can have its own found
count value, but results are returned for only the foreground window.
If you specify the context for the current calculation, this function will be evaluated based on that
context; otherwise, it will be evaluated based on the context of the current window.
Note For information on how functions evaluate differently on the host versus the client, search the
FileMaker Knowledge Base available at http://help.filemaker.com.
Examples
Returns 7 when there are 7 records in the current found set.
Related topics
Functions reference (category list)
Functions reference (alphabetical list)
About formulas
About functions
Defining calculation fields
Using operators in formulas
Get(HighContrastColor)
Purpose
Returns the name of the current high contrast default color scheme if high contrast is enabled in the
Windows Ease of Access Center and high contrast color scheme is active.

FILEMAKER PRO HELP 768
Format
Get(HighContrastColor)
Parameters
None
Data type returned
text
Originated in
FileMaker Pro 6.0 or earlier
Description
Returns an empty string if Turn high contrast is unavailable, inactive, or if this function is used in
OS X.
Notes
•In FileMaker WebDirect, this function is not supported and returns an empty string.
•For information on how functions evaluate differently on the host versus the client, search
the FileMaker Knowledge Base available at http://help.filemaker.com.
Examples
Returns High Contrast White when the Windows theme is set to High Contrast White.
Related topics
Functions reference (category list)
Functions reference (alphabetical list)
About formulas
About functions
Defining calculation fields
Using operators in formulas
Get(HighContrastState)
Purpose
Returns a Boolean value representing the state of the Turn high contrast option in the Windows
Ease of Access Center.
Format
Get(HighContrastState)
Parameters
None

FILEMAKER PRO HELP 769
Data type returned
number
Originated in
FileMaker Pro 6.0 or earlier
Description
Returns:
•0 if Use High Contrast is unavailable, inactive, or if the function is used in OS X.
•1 if Use High Contrast is available and active.
Notes
•In FileMaker WebDirect, this function is not supported and returns an empty string.
•For information on how functions evaluate differently on the host versus the client, search
the FileMaker Knowledge Base available at http://help.filemaker.com.
Related topics
Functions reference (category list)
Functions reference (alphabetical list)
About formulas
About functions
Defining calculation fields
Using operators in formulas
Get(HostApplicationVersion)
Purpose
Returns the version of FileMaker Pro or FileMaker Server running on the computer that is hosting
the current database.
Format
Get(HostApplicationVersion)
Parameters
None
Data type returned
text
Originated in
FileMaker Pro 9.0

FILEMAKER PRO HELP 770
Description
Displays a value when used with the same or higher version of FileMaker Pro or FileMaker Server
software. If the current database is not shared or hosted, this function returns an empty string. Also
returns an empty string when used from the host computer itself.
Examples
Returns Pro 13.0v1 when the host computer is running FileMaker Pro 13 version 1.
Returns ProAdvanced 13.0v1 when the host computer is running FileMaker Pro 13 Advanced
version 1.
Returns Server 13.0v1 when the host computer is running FileMaker Server 13 version 1.
Related topics
Functions reference (category list)
Functions reference (alphabetical list)
About formulas
About functions
Defining calculation fields
Using operators in formulas
Get(HostIPAddress)
Purpose
Returns the IP address of the host machine for the current database.
Format
Get(HostIPAddress)
Parameters
None
Data type returned
text
Originated in
FileMaker Pro 8.0
Description
Returns the IP address used to connect to the host machine for the current database. If the current
database isn’t being hosted, an empty string is returned.
Note In FileMaker WebDirect, returns the physical IP address of the host machine.
If IPv4 and IPv6 addresses are available for remotely hosted files, the address is returned in the
most common or default format. This might not be the same format that was used when connecting
to the host.

FILEMAKER PRO HELP 771
If the current calculation is stored and you specify its context, this function will be evaluated based
on that context; otherwise, it will be evaluated based on the context of the current window.
Note For information on how functions evaluate differently on the host versus the client, search the
FileMaker Knowledge Base available at http://help.filemaker.com.
Examples
Returns one of the following when the current database is being hosted:
•IPv4: 14.156.13.121
•IPv6: [2001:0DB8:85A3:08D3:1319:8A2E:0370:7334]
Note If the host machine has both IPv4 and IPv6 addresses, Get(HostIPAddress) returns only the
IP address that the client used to connect to the host.
Returns one of the following when accessing a locally hosted database:
•127.0.0.1 if connected to 127.0.0.1
•[::1] if connected to localhost
•14.156.13.121 if connected to the computer’s IP address or evaluated in
FileMaker WebDirect.
Related topics
Functions reference (category list)
Functions reference (alphabetical list)
About formulas
About functions
Defining calculation fields
Using operators in formulas
Get(HostName)
Purpose
Returns the registered name of the computer that is hosting the database file.
Format
Get(HostName)
Parameters
None
Data type returned
text
Originated in
FileMaker Pro 6.0 or earlier

FILEMAKER PRO HELP 772
Description
On the computer that is hosting the database file:
•Windows 7: Choose Start menu > Control Panel > System and Security > System > and
then click See the name of this computer. Computer name displays the current
registered name.
•Windows 8: In the navigation panel of a File Explorer window, choose Computer, then
choose Computer menu > Open Control Panel > System and Security > System.
Computer Name displays the current registered name.
•OS X: In the Sharing System Preference, Computer Name displays the current registered
name.
Notes
•If the current calculation is stored and you specify its context, this function will be evaluated
based on that context; otherwise, it will be evaluated based on the context of the current
window.
•For information on how functions evaluate differently on the host versus the client, search
the FileMaker Knowledge Base available at http://help.filemaker.com.
Examples
Returns Fred Jones when Fred Jones is the registered name of the host computer in use.
Related topics
Functions reference (category list)
Functions reference (alphabetical list)
About formulas
About functions
Defining calculation fields
Using operators in formulas
Get(InstalledFMPlugins)
Purpose
Returns the name, version number (if available), and enabled state of installed plug-ins.
Format
Get(InstalledFMPlugins)
Parameters
None
Data type returned
text

FILEMAKER PRO HELP 773
Originated in
FileMaker Pro 12.0
Description
The Get(InstalledFMPlugins) function is useful for determining whether an installed plug-in is newer
or older than a plug-in required by a file.
If multiple plug-ins are installed, Get(InstalledFMPlugins) returns values for each plug-in on separate
lines, separated by carriage returns.
Get(InstalledFMPlugins) returns plug-in version information only when plug-in developers have
entered version information in the resource file (Windows) or the info.plist file (OS X).
OS X: Plug-ins are stored as packages.
The enabled state is returned as follows:
•Enabled The plug-in is enabled in the FileMaker Pro preferences and can be loaded.
•Disabled The plug-in is disabled in the FileMaker Pro preferences and cannot be loaded.
•Ignored The plug-in failed to load, which could be due to software incompatibility.
Examples
When:
MyPlugin1 is installed and is enabled in the Plug-ins tab in the Preferences dialog box.
MyPlugin2 is installed and is disabled in the Plug-ins tab in the Preferences dialog box.
MyPlugin3 could not be loaded.
Get(InstalledFMPlugins) returns:
MyPlugin1;1.0;Enabled
MyPlugin2;1.1;Disabled
MyPlugin3; ;Ignored
Related topics
Installing plug-ins
Setting plug-in preferences
Updating plug-ins
Plug-in update example
Functions reference (category list)
Functions reference (alphabetical list)
About formulas
About functions
Defining calculation fields
Using operators in formulas

FILEMAKER PRO HELP 774
Get(LastError)
Purpose
Returns a number representing the error, if any, in the execution of the most recently executed script
step.
Format
Get(LastError)
Parameters
None
Data type returned
number
Originated in
FileMaker Pro 6.0 or earlier
Description
Use this function to detect and control the outcome of errors. See FileMaker Pro error codes.
Notes
•OS X: In FileMaker Pro, if an error occurs while performing an AppleScript from the Manage
Scripts feature, the AppleScript error code will be returned.
•For ODBC imports and Execute SQL script steps, if an error occurs while performing a SQL
query, returns FileMaker error 1408. For detailed information about the error, use the
Get(LastODBCError) function. If there is no information about the error, returns FileMaker
error 1409.
•For working with ODBC data sources in the relationships graph, returns FileMaker error
1408.
•Some script triggers allow for the activating command or event to be canceled if the script
executed by the script trigger returns a False value. When a command or event is canceled
this way, the error code is set to 20.
•When you perform a script that uses this function with control script steps, the control script
steps do not clear the last error condition reported by FileMaker Pro.
•For information on how functions evaluate differently on the host versus the client, search
the FileMaker Knowledge Base available at http://help.filemaker.com.
Tip To create a script that responds to errors without displaying alerts, use this function with the Set
Error Capture script step with the On option.
Examples
Returns 0 when the most recent script step executed successfully.
Returns 401 when no records are found after the Perform Find script step has been executed.

FILEMAKER PRO HELP 775
Related topics
Functions reference (category list)
Functions reference (alphabetical list)
About formulas
About functions
Defining calculation fields
Using operators in formulas
Get(LastMessageChoice)
Purpose
Returns a number corresponding to the button clicked in an alert message that is displayed by the
Show Custom Dialog script step.
Format
Get(LastMessageChoice)
Parameters
None
Data type returned
number
Originated in
FileMaker Pro 6.0 or earlier
Description
Returns:
•1 for the first button (by default, labeled OK)
•2 for the second button (by default, labeled Cancel)
•3 for the third button
Note For information on how functions evaluate differently on the host versus the client, search the
FileMaker Knowledge Base available at http://help.filemaker.com.
Related topics
Functions reference (category list)
Functions reference (alphabetical list)
About formulas
About functions
Defining calculation fields
Using operators in formulas

FILEMAKER PRO HELP 776
Get(LastODBCError)
Purpose
Returns a string that shows the error state published by ODBC standards, based on ISO/IEF
standards.
Format
Get(LastODBCError)
Parameters
None
Data type returned
text
Originated in
FileMaker Pro 6.0 or earlier
Description
•For ODBC imports and Execute SQL script steps, returns a detailed, textual ODBC error
message.
•For working with ODBC data sources in the relationships graph, returns the readable error
string that is generated by the ODBC driver.
Notes
•You can set the Set Error Capture state to “on” to suppress the error messages. You can
also use Get(LastError) to get generic errors. See FileMaker Pro error codes.
•For information on how functions evaluate differently on the host versus the client, search
the FileMaker Knowledge Base available at http://help.filemaker.com.
Examples
For ODBC imports and Execute SQL script steps, returns [DataDirect][Macintosh ODBC Driver
Manager] Data source name not found and no default driver specified (-1) when a data source
name wasn’t found and the driver wasn’t specified.
Related topics
Functions reference (category list)
Functions reference (alphabetical list)
About formulas
About functions
Defining calculation fields
Using operators in formulas
Editing ODBC data sources

FILEMAKER PRO HELP 777
Get(LayoutAccess)
Purpose
Returns a number based on record access privileges available through the current layout.
Format
Get(LayoutAccess)
Parameters
None
Data type returned
number
Originated in
FileMaker Pro 6.0 or earlier
Description
You assign the privileges in the Custom Layout Privileges dialog box.
Returns:
•0 if the custom layout privileges of an account’s privilege set allow no access to Records
via this layout
•1 if the custom layout privileges of an account’s privilege set allow view only access to
Records via this layout. If the database is opened with read-only access, FileMaker Pro
returns 1 even if the layout has read-write access privileges
•2 if the custom layout privileges of an account’s privilege set allow modifiable access to
Records via this layout
Notes
•Get(LayoutAccess) returns information about record access privileges defined for only
the current layout. It ignores current record access privileges for all other layouts. To fully
check access through a layout, consider the return values of Get(LayoutAccess) and
the Get(RecordAccess) function.
•For information on how functions evaluate differently on the host versus the client, search
the FileMaker Knowledge Base available at http://help.filemaker.com.
•See Editing layouts privileges for more details about limiting access through layouts.
Examples
Returns 1 when the layout allows view-only access to records.
Related topics
Functions reference (category list)
Functions reference (alphabetical list)
About formulas

FILEMAKER PRO HELP 778
About functions
Defining calculation fields
Using operators in formulas
Get(LayoutCount)
Purpose
Returns the total number of layouts in the database file.
Format
Get(LayoutCount)
Parameters
None
Data type returned
number
Originated in
FileMaker Pro 6.0 or earlier
Description
For information on how functions evaluate differently on the host versus the client, search the
FileMaker Knowledge Base available at http://help.filemaker.com.
Examples
Returns 3 when the file has three layouts.
Related topics
Functions reference (category list)
Functions reference (alphabetical list)
About formulas
About functions
Defining calculation fields
Using operators in formulas
Get(LayoutName)
Purpose
Returns the name of the layout currently displayed.

FILEMAKER PRO HELP 779
Format
Get(LayoutName)
Parameters
None
Data type returned
text
Originated in
FileMaker Pro 6.0 or earlier
Description
If there are multiple windows open in the current database file, each window can have its own layout
name value, but results are returned for only the foreground window.
Notes
•You can use the Get(LayoutNumber) function as an alternative to Get(LayoutName) if there
are multiple layouts with the same name.
•For information on how functions evaluate differently on the host versus the client, search
the FileMaker Knowledge Base available at http://help.filemaker.com.
Examples
Returns Product List when the Product List layout is displayed.
Returns Customer Invoice when the Customer Invoice layout is displayed.
Related topics
Functions reference (category list)
Functions reference (alphabetical list)
About formulas
About functions
Defining calculation fields
Using operators in formulas
Get(LayoutNumber)
Purpose
Returns the number of the layout currently displayed, according to the list in the Manage Layouts
dialog box.
Format
Get(LayoutNumber)

FILEMAKER PRO HELP 780
Parameters
None
Data type returned
number
Originated in
FileMaker Pro 6.0 or earlier
Description
If there are multiple windows open in the current database file, each window can have its own layout
number value, but results are returned for only the foreground window.
Notes
•You can use Get(LayoutNumber) as an alternative to the Get(LayoutName) function if there
are multiple layouts with the same name.
•For information on how functions evaluate differently on the host versus the client, search
the FileMaker Knowledge Base available at http://help.filemaker.com.
Examples
Returns 3 when the current layout is third in the list of layouts in Manage Layouts.
Related topics
Functions reference (category list)
Functions reference (alphabetical list)
About formulas
About functions
Defining calculation fields
Using operators in formulas
Get(LayoutTableName)
Purpose
Returns the name of the table from which the current layout is displaying records.
Format
Get(LayoutTableName)
Parameters
None
Data type returned
text

FILEMAKER PRO HELP 781
Originated in
FileMaker Pro 7.0
Description
If no windows are open, an empty string is returned.
Note For information on how functions evaluate differently on the host versus the client, search the
FileMaker Knowledge Base available at http://help.filemaker.com.
Examples
There are two layouts, Teachers Layout and Coaches Layout, with corresponding tables named
Teachers and Coaches in the table Instructors. An unstored calculation of
Get(LayoutTableName) returns Teachers when the current layout is Teachers Layout and
returns Coaches when the current layout is Coaches Layout.
Related topics
Functions reference (category list)
Functions reference (alphabetical list)
About formulas
About functions
Defining calculation fields
Using operators in formulas
Get(LayoutViewState)
Purpose
Returns a number indicating the currently active database file view.
Format
Get(LayoutViewState)
Parameters
None
Data type returned
number
Originated in
FileMaker Pro 6.0 or earlier
Description
Returns:
•0 (zero) if the database file is in Form View
•1 if the database file is in List View

FILEMAKER PRO HELP 782
•2 if the database file is in Table View
If there are multiple windows open in the current database file, each window can have its own layout
view state value, but results are returned for only the foreground window.
Note For information on how functions evaluate differently on the host versus the client, search the
FileMaker Knowledge Base available at http://help.filemaker.com.
Related topics
Functions reference (category list)
Functions reference (alphabetical list)
About formulas
About functions
Defining calculation fields
Using operators in formulas
Get(ModifiedFields)
Purpose
Returns a list of fields that have been modified in the current record of the current table.
Format
Get(ModifiedFields)
Parameters
None
Data type returned
text
Originated in
FileMaker Pro 13.0
Description
This function returns a list of carriage return-delimited values.
Examples
When the Invoices::Customer Name and Invoices::Company fields are modified and the record is
open, Get(ModifiedFields) returns:
•Customer Name
•Company
Related topics
Functions reference (category list)
Functions reference (alphabetical list)
About formulas

FILEMAKER PRO HELP 783
About functions
Defining calculation fields
Using operators in formulas
Get(MultiUserState)
Purpose
Returns a number representing the level of sharing for the database file using FileMaker Network.
Format
Get(MultiUserState)
Parameters
None
Data type returned
number
Originated in
FileMaker Pro 6.0 or earlier
Description
Returns:
•0 when network sharing is off
•1 when network sharing is on, you’re accessing the database file from the host computer,
and either all users or a specific group of users (based on their privilege set) have network
access to the database file
•2 when network sharing is on, you’re accessing the database file from a client computer,
and either all users or a specific group of users (based on their privilege set) have network
access to the database file
Notes
•If the current calculation is stored and you specify its context, this function will be evaluated
based on that context; otherwise, it will be evaluated based on the context of the current
window.
•For information on how functions evaluate differently on the host versus the client, search
the FileMaker Knowledge Base available at http://help.filemaker.com.
Examples
Returns 0 when access is denied to other users.
Related topics
Sharing databases on a network

FILEMAKER PRO HELP 784
Functions reference (category list)
Functions reference (alphabetical list)
About formulas
About functions
Defining calculation fields
Using operators in formulas
Get(NetworkProtocol)
Purpose
Returns the name of the network protocol (TCP/IP) that FileMaker Pro is using on this machine.
Format
Get(NetworkProtocol)
Parameters
None
Data type returned
text
Originated in
FileMaker Pro 6.0 or earlier
Description
For information on how functions evaluate differently on the host versus the client, search the
FileMaker Knowledge Base available at http://help.filemaker.com.
Examples
Returns TCP/IP.
Related topics
Functions reference (category list)
Functions reference (alphabetical list)
About formulas
About functions
Defining calculation fields
Using operators in formulas
FILEMAKER PRO HELP 785
Get(NetworkType)
Purpose
In FileMaker Go, returns a number indicating the type of network being used to access the current
file.
Format
Get(NetworkType)
Parameters
None
Data type returned
number
Originated in
FileMaker Pro 13.0
Description
In FileMaker Go, returns:
•0 if the current file is a local file on an iOS device
•1 if the network type is unknown
•2 for a cellular network
•3 for a Wi-Fi network
Note In other products in the FileMaker product line, this function is not supported and returns an
empty string.
Examples
Returns 3 when the file is being accessed from a Wi-Fi network.
Get(PageNumber)
Purpose
Returns a number representing the current page being printed or previewed.
Format
Get(PageNumber)
Parameters
None

FILEMAKER PRO HELP 786
Data type returned
number
Originated in
FileMaker Pro 6.0 or earlier
Description
If nothing is being printed or previewed, 0 is returned.
Notes
•In FileMaker WebDirect, this function is not supported and returns an empty string.
•For information on how functions evaluate differently on the host versus the client, search
the FileMaker Knowledge Base available at http://help.filemaker.com.
Examples
Returns 4 when page 4 is being printed or previewed.
Related topics
Functions reference (category list)
Functions reference (alphabetical list)
About formulas
About functions
Defining calculation fields
Using operators in formulas
Get(PersistentID)
Purpose
Returns text representing a unique identifier of the computer or device on which FileMaker is
running.
Format
Get(PersistentID)
Parameters
None
Data type returned
text
Originated in
FileMaker Pro 12.0

FILEMAKER PRO HELP 787
Description
Returns a unique, unchanging identifier for the computer on which FileMaker Pro is running, the
device on which FileMaker Go is running, or the current FileMaker WebDirect session in the form of
a 32-digit hexadecimal string. Get(PersistentID) helps you identify devices that access your solution.
Notes
•If web browser cookies are cleared during a FileMaker WebDirect session, the value
returned by Get(PersistentID) changes.
•For information on how functions evaluate differently on the host versus the client, search
the FileMaker Knowledge Base available at http://help.filemaker.com.
Examples
For a FileMaker Pro client or a FileMaker Go client, Get (PersistentID) returns a value such as
78569d0bd40b898a64e7d08ccdea8220.
Related topics
Functions reference (category list)
Functions reference (alphabetical list)
About formulas
About functions
Defining calculation fields
Using operators in formulas
Get(PreferencesPath)
Purpose
Returns the path to the preferences and default options folder for the current user.
Format
Get(PreferencesPath)
Parameters
None
Data type returned
text
Originated in
FileMaker Pro 8.0
Description
In Windows, the path format is /Drive:/Users/UserName/AppData/Local/.
In OS X, the path format is /DriveName/Users/UserName/Library/Preferences/.

FILEMAKER PRO HELP 788
Notes
•In FileMaker WebDirect, this function is not supported and returns an empty string.
•For information on how functions evaluate differently on the host versus the client, search
the FileMaker Knowledge Base available at http://help.filemaker.com.
Examples
Returns /C:/Users/John Smith/AppData/Local/ for a user named John Smith in Windows.
Returns /MacintoshHD/Users/John Smith/Library/Preferences/ for a user named John Smith in
OS X.
Related topics
Functions reference (category list)
Functions reference (alphabetical list)
About formulas
About functions
Defining calculation fields
Using operators in formulas
Get(PrinterName)
Purpose
Returns a string identifying the default printer name.
Format
Get(PrinterName)
Parameters
None
Data type returned
text
Originated in
FileMaker Pro 6.0 or earlier
Description
In Windows, returns a string with each of these entries separated by a comma:
•the printer name
•the driver name
•the name of the printer port
In OS X, returns a string with these entries separated by the word on:
•the queue name of the printer (if provided)

FILEMAKER PRO HELP 789
•the IP address of the printer
If any of this information isn’t available, <Unknown> is inserted in the result (except for queue name
in OS X).
Notes
•In FileMaker WebDirect, this function is not supported and returns an empty string.
•For information on how functions evaluate differently on the host versus the client, search
the FileMaker Knowledge Base available at http://help.filemaker.com.
Examples
Returns HP LaserJet 4, WINSPOOL, LPT1 in Windows.
Returns 24.109.265.43 in OS X.
Related topics
Functions reference (category list)
Functions reference (alphabetical list)
About formulas
About functions
Defining calculation fields
Using operators in formulas
Get(QuickFindText)
Purpose
Returns the text that was entered in the Quick Find box.
Format
Get(QuickFindText)
Parameters
None
Data type returned
text
Originated in
FileMaker Pro 11.0
Description
Returns the text that was entered the last time quick find was performed.
Examples
Returns New York if the last search that was entered in the Quick Find box was for New York.

FILEMAKER PRO HELP 790
Related topics
Performing a quick find in Browse mode
Functions reference (category list)
Functions reference (alphabetical list)
About formulas
About functions
Defining calculation fields
Using operators in formulas
Get(RecordAccess)
Purpose
Returns a number based on the current record’s access privileges, assigned through the Custom
Record Privileges dialog box.
Format
Get(RecordAccess)
Parameters
None
Data type returned
number
Originated in
FileMaker Pro 6.0 or earlier
Description
Returns:
•0 if the custom record privileges of an account’s privilege set have neither View nor Edit
privileges set to yes for the current record
•1 if the custom record privileges of an account’s privilege set have View set to yes for the
current record, or if View is set to limited and the calculation defined for limited access
returns a value of true
Note If both View and Edit are set to yes, Get(RecordAccess) returns 2
•2 if the custom record privileges of an account’s privilege set have Edit set to yes for the
current record, or if Edit is set to limited and the calculation defined for limited access
returns a value of true
Notes
•Get(RecordAccess) only returns information about the privileges defined for accessing
records. It ignores access privileges assigned through individual layouts. To fully check
access to a record, consider the return values of the Get(LayoutAccess) function and
Get(RecordAccess).

FILEMAKER PRO HELP 791
•If you specify the context for the current calculation, this function will be evaluated based on
that context; otherwise, it will be evaluated based on the context of the current window.
•For information on how functions evaluate differently on the host versus the client, search
the FileMaker Knowledge Base available at http://help.filemaker.com.
•See Editing record access privileges for more details about limiting access to records.
Examples
Returns 1 when the record access is view-only.
Related topics
Functions reference (category list)
Functions reference (alphabetical list)
About formulas
About functions
Defining calculation fields
Using operators in formulas
Get(RecordID)
Purpose
Returns the unique ID number of the current record.
Format
Get(RecordID)
Parameters
None
Data type returned
number
Originated in
FileMaker Pro 6.0 or earlier
Description
The number returned is a decimal value (an integer) generated by FileMaker Pro when the record is
created. It does not change.
Notes
•If the current calculation is stored and you specify its context, this function will be evaluated
based on that context; otherwise, it will be evaluated based on the context of the current
window.
•For information on how functions evaluate differently on the host versus the client, search
the FileMaker Knowledge Base available at http://help.filemaker.com.

FILEMAKER PRO HELP 792
•Get(RecordID)may not return a consistent value for records in ODBC data sources.
Examples
Returns a unique ID for the current record.
Related topics
Functions reference (category list)
Functions reference (alphabetical list)
About formulas
About functions
Defining calculation fields
Using operators in formulas
Get(RecordModificationCount)
Purpose
Returns the total number of times changes to the current record have been committed.
Format
Get(RecordModificationCount)
Parameters
None
Data type returned
number
Originated in
FileMaker Pro 6.0 or earlier
Description
To commit changes, you can, for example:
•click out of all fields (exit the record)
•go to a different record
•enter Find mode
If multiple windows are open, clicking in another window does not commit the record.
Notes
•If the current calculation is stored and you specify its context, this function will be evaluated
based on that context; otherwise, it will be evaluated based on the context of the current
window.
•Get(RecordModificationCount)returns NULL for ODBC data sources.

FILEMAKER PRO HELP 793
•For information on how functions evaluate differently on the host versus the client, search
the FileMaker Knowledge Base available at http://help.filemaker.com.
Examples
Returns 0 if the record has not been modified since it was created.
If changes are made to four fields and all four fields are committed together, the result increments by
one. If changes are made to four fields and each change is committed separately, the result
increments by four.
Related topics
Saving and copying files
Functions reference (category list)
Functions reference (alphabetical list)
About formulas
About functions
Defining calculation fields
Using operators in formulas
Get(RecordNumber)
Purpose
Returns the number of the current record in the current found set.
Format
Get(RecordNumber)
Parameters
None
Data type returned
number
Originated in
FileMaker Pro 6.0 or earlier
Description
The value returned is determined by the relative place of the record in the found set, and it changes
depending on the find criteria and the sort order.
Notes
•To return a value that uniquely and permanently identifies a record in this table, use
Get(RecordID).
•If you specify the context for the current calculation, this function will be evaluated based on
that context; otherwise, it will be evaluated based on the context of the current window.

FILEMAKER PRO HELP 794
•For information on how functions evaluate differently on the host versus the client, search
the FileMaker Knowledge Base available at http://help.filemaker.com.
Examples
Returns 3 when the current record is the third record in a found set.
Related topics
Functions reference (category list)
Functions reference (alphabetical list)
About formulas
About functions
Defining calculation fields
Using operators in formulas
Get(RecordOpenCount)
Purpose
Returns the total number of open records in the current found set that haven’t been saved.
Format
Get(RecordOpenCount)
Parameters
None
Data type returned
number
Originated in
FileMaker Pro 8.0
Description
If you specify the context for the current calculation, this function will be evaluated based on that
context; otherwise, it will be evaluated based on the context of the current window.
Note For information on how functions evaluate differently on the host versus the client, search the
FileMaker Knowledge Base available at http://help.filemaker.com.
Examples
Returns 4 if there are four open records in the current found set that haven’t been saved.
Related topics
Functions reference (category list)
Functions reference (alphabetical list)
About formulas

FILEMAKER PRO HELP 795
About functions
Defining calculation fields
Using operators in formulas
Get(RecordOpenState)
Purpose
Returns a number representing the state of the current record.
Format
Get(RecordOpenState)
Parameters
None
Data type returned
number
Originated in
FileMaker Pro 8.0
Description
Returns:
•0 for a closed or committed record
•1 for a new record that hasn’t been committed
•2 for a modified record that hasn’t been committed
Notes
•If you specify the context for the current calculation, this function will be evaluated based on
that context; otherwise, it will be evaluated based on the context of the current window.
•For information on how functions evaluate differently on the host versus the client, search
the FileMaker Knowledge Base available at http://help.filemaker.com.
Examples
Returns 1 if the current record is a new record that hasn’t been saved.
Related topics
Functions reference (category list)
Functions reference (alphabetical list)
About formulas
About functions
Defining calculation fields
Using operators in formulas

FILEMAKER PRO HELP 796
Get(RequestCount)
Purpose
Returns the total number of find requests defined for the current table.
Format
Get(RequestCount)
Parameters
None
Data type returned
number
Originated in
FileMaker Pro 6.0 or earlier
Description
If there are multiple windows open in the current database file, then results are returned for only the
top-most window of the file in which the calculation is defined.
Note For information on how functions evaluate differently on the host versus the client, search the
FileMaker Knowledge Base available at http://help.filemaker.com.
Examples
Returns 5 when there are five find requests defined for the current table.
Related topics
Functions reference (category list)
Functions reference (alphabetical list)
About formulas
About functions
Defining calculation fields
Using operators in formulas
Get(RequestOmitState)
Purpose
Returns a Boolean value representing the state of the Omit checkbox in Find mode.
Format
Get(RequestOmitState)

FILEMAKER PRO HELP 797
Parameters
None
Data type returned
number
Originated in
FileMaker Pro 8.0
Description
Returns 1 if the Omit checkbox is selected; otherwise, returns 0.
Note For information on how functions evaluate differently on the host versus the client, search the
FileMaker Knowledge Base available at http://help.filemaker.com.
Examples
Returns 1 when the Omit checkbox is selected in the current find request.
Related topics
Functions reference (category list)
Functions reference (alphabetical list)
About formulas
About functions
Defining calculation fields
Using operators in formulas
Get(ScreenDepth)
Purpose
Returns the number of bits needed to represent the color or shade of gray of a pixel on the main
screen.
Format
Get(ScreenDepth)
Parameters
None
Data type returned
number
Originated in
FileMaker Pro 6.0 or earlier

FILEMAKER PRO HELP 798
Description
A value of 8 represents 256 (equal to 28) colors or shades of gray.
Notes
•In FileMaker WebDirect, this function is not supported and returns 32.
•For information on how functions evaluate differently on the host versus the client, search
the FileMaker Knowledge Base available at http://help.filemaker.com.
Examples
Returns 32 on a display showing millions (232) of colors.
Returns 16 on a display showing thousands (216) of colors.
Returns 4 on a VGA display.
Returns 1 on a black-and-white display.
Related topics
Functions reference (category list)
Functions reference (alphabetical list)
About formulas
About functions
Defining calculation fields
Using operators in formulas
Get(ScreenHeight)
Purpose
Returns the height, in points, of the screen in which the window of the current file is open.
Format
Get(ScreenHeight)
Parameters
None
Data type returned
number
Originated in
FileMaker Pro 6.0 or earlier
Description
When the window spans more than one screen, this function uses the screen that contains the
largest percentage of the window. If there are multiple windows open in the current database file,

FILEMAKER PRO HELP 799
each window can have its own screen height value, but results are returned for only the foreground
window.
Note For information on how functions evaluate differently on the host versus the client, search the
FileMaker Knowledge Base available at http://help.filemaker.com.
Examples
Returns 480 when the screen resolution is set to 640 x 480.
Related topics
Functions reference (category list)
Functions reference (alphabetical list)
About formulas
About functions
Defining calculation fields
Using operators in formulas
Get(ScreenWidth)
Purpose
Returns the width, in points, of the screen in which the window of the current file is open.
Format
Get(ScreenWidth)
Parameters
None
Data type returned
number
Originated in
FileMaker Pro 6.0 or earlier
Description
When the window spans more than one screen, this function uses the screen that contains the
largest percentage of the window. If there are multiple windows open in the current database file,
each window can have its own screen width value, but results are returned for only the foreground
window.
Note For information on how functions evaluate differently on the host versus the client, search the
FileMaker Knowledge Base available at http://help.filemaker.com.
Examples
Returns 640 when the screen resolution is set to 640 x 480.

FILEMAKER PRO HELP 800
Related topics
Functions reference (category list)
Functions reference (alphabetical list)
About formulas
About functions
Defining calculation fields
Using operators in formulas
Get(ScriptAnimationState)
Purpose
Indicates whether or not animations are enabled for the current script.
Format
Get(ScriptAnimationState)
Parameters
None
Data type returned
number
Originated in
FileMaker Pro 13.0
Description
Returns 0 if animations are disabled for the current script.
Returns 1 if animations are enabled for the current script.
Animations are off by default while a script is running.
Note In FileMaker WebDirect, this function is not supported and returns an empty string.
Examples
Returns 1 when the current script has been set to enable animations using the Set Script Animation
script step.
Related topics
Functions reference (category list)
Functions reference (alphabetical list)
About formulas
About functions
Defining calculation fields
Using operators in formulas

FILEMAKER PRO HELP 801
Get(ScriptName)
Purpose
Returns the name of the script currently running (or paused).
Format
Get(ScriptName)
Parameters
None
Data type returned
text
Originated in
FileMaker Pro 6.0 or earlier
Description
For information on how functions evaluate differently on the host versus the client, search the
FileMaker Knowledge Base available at http://help.filemaker.com.
Examples
Returns Print Report when the Print Report script is running.
Returns Update Customer when the Update Customer script is running.
Related topics
Functions reference (category list)
Functions reference (alphabetical list)
About formulas
About functions
Defining calculation fields
Using operators in formulas
Get(ScriptParameter)
Purpose
Returns the script parameter passed into the current script.
Format
Get(ScriptParameter)
Parameters
None

FILEMAKER PRO HELP 802
Data type returned
text
Originated in
FileMaker Pro 7.0
Description
Use this function as part of a calculation evaluated within a script.
Note For information on how functions evaluate differently on the host versus the client, search the
FileMaker Knowledge Base available at http://help.filemaker.com.
Examples
Returns Print when “Print” was the value of the parameter passed into the current script.
The following example shows how to pass a return-delimited list as the parameter.
ScriptParameter = List ( Customers::First; Customers::Last )
LeftValues ( Get ( ScriptParameter ) ; 1 ) returns Michael if Customers::First is
"Michael".
The following example shows how to pass named parameters using the Evaluate, Let, and
Get(ScriptParameter) functions, allowing access only to variable “a” (the example returns 6):
ScriptParameter = "a = 5; b = 10"
Evaluate("Let ( [" & Get(ScriptParameter) & "]; a + 1 )" )
The following example shows how to pass named parameters, allowing access to both variable “a”
and “b”. The simplified first parameter makes the second parameter more complex (the example
returns 6, 12):
ScriptParameter = "a = 5; b = 10"
Evaluate("Let ( [" & Get(ScriptParameter) & "]; a + 1 & \", \" & b + 2 )" )
The following example shows how to pass named parameters, while keeping the ability to check the
syntax of the second parameter of the Let function (the example returns 6, 12):
ScriptParameter = "a = 5; b = 10"
Let( [a = Evaluate("Let( [" & Get(ScriptParameter) & "]; a )"),b =
Evaluate("Let( [" & Get(ScriptParameter) & "]; b )")]; a + 1 & ", " & b +
2 )
Related topics
Functions reference (category list)
Functions reference (alphabetical list)
About formulas
About functions
Defining calculation fields
Using operators in formulas
Perform Script and script parameter examples

FILEMAKER PRO HELP 803
Get(ScriptResult)
Purpose
Returns the script result from a performed subscript.
Format
Get(ScriptResult)
Parameters
None
Data type returned
text, number, date, time, timestamp, container
Originated in
FileMaker Pro 8.0
Description
Use this function as part of a calculation evaluated within a script. If a subscript doesn’t return a
result, then the content of the script result will be empty.
Examples
In the following example, the Find Customers script returns the results of a find request when it is
called from the Do Reports script. Script Find Customers uses the optional script result of the Exit
Script script step. Script Do Reports then uses Get(ScriptResult) to determine what other
script steps should be performed based on the returned result stored in Get(ScriptResult).
Find Customers
Set Error Capture [On]
Perform Find [Restore]
New Record/Request
Exit Script [Result: Get(FoundCount) < 10]
Do Reports
Perform Script [Find Customers]
If [Get(ScriptResult) = 0]
Show Custom Dialog [“You have created 10 records already.”]
End If
Related topics
Functions reference (category list)
Functions reference (alphabetical list)
About formulas
About functions
Defining calculation fields
Using operators in formulas

FILEMAKER PRO HELP 804
Get(SortState)
Purpose
Returns a value representing the current sort state.
Format
Get(SortState)
Parameters
None
Data type returned
number
Originated in
FileMaker Pro 6.0 or earlier
Description
Returns:
•0 if the records in the active table are not sorted
•1 if the records in the active table are sorted
•2 if the records in the active table are partially sorted (semi-sorted)
Each window has its own sort state.
Notes
•When records are imported from another file to a previously found and sorted set, the
records in a sorted set may exist in a semi-sorted state. To include the imported records in
the sort order, sort the found set after importing.
•If you specify the context for the current calculation, this function will be evaluated based on
that context; otherwise, it will be evaluated based on the context of the current window.
•For information on how functions evaluate differently on the host versus the client, search
the FileMaker Knowledge Base available at http://help.filemaker.com.
Examples
Returns 1 when the records in the active table are sorted.
Related topics
Functions reference (category list)
Functions reference (alphabetical list)
About formulas
About functions
Defining calculation fields
Using operators in formulas

FILEMAKER PRO HELP 805
Get(StatusAreaState)
Purpose
Returns a number indicating the current status toolbar state.
Format
Get(StatusAreaState)
Parameters
None
Data type returned
number
Originated in
FileMaker Pro 6.0 or earlier
Description
Returns:
•0 (zero) if the status toolbar is hidden
•1 if the status toolbar is visible
•2 if the status toolbar is visible and locked
•3 if the status toolbar is hidden and locked
If there are multiple windows open on the currently active database file, then results are returned for
only the active window.
Note For information on how functions evaluate differently on the host versus the client, search the
FileMaker Knowledge Base available at http://help.filemaker.com.
Examples
Returns 1, when the current status toolbar is visible.
Related topics
Functions reference (category list)
Functions reference (alphabetical list)
About formulas
About functions
Defining calculation fields
Using operators in formulas

FILEMAKER PRO HELP 806
Get(SystemDrive)
Purpose
Returns the drive letter (Windows) or volume name (OS X) where the currently running operating
system is located.
Format
Get(SystemDrive)
Parameters
None
Data type returned
text
Originated in
FileMaker Pro 8.0
Description
In FileMaker WebDirect, this function is not supported and returns an empty string.
Note For information on how functions evaluate differently on the host versus the client, search the
FileMaker Knowledge Base available at http://help.filemaker.com.
Examples
Returns /C:/ in Windows when the operating system is on the C: drive.
Returns /DriveName/ in OS X when the operating system is on a volume named DriveName.
Related topics
Functions reference (category list)
Functions reference (alphabetical list)
About formulas
About functions
Defining calculation fields
Using operators in formulas
Get(SystemIPAddress)
Purpose
Returns a list of the IP addresses of all computers connected to an active NIC (Network Interface
Controller) card.
Format
Get(SystemIPAddress)

FILEMAKER PRO HELP 807
Parameters
None
Data type returned
text
Originated in
FileMaker Pro 7.0
Description
IP addresses are separated by carriage returns.
In FileMaker WebDirect, Get(SystemIPAddress) returns the IP address of the interface used to
connect to the host.
Note For information on how functions evaluate differently on the host versus the client, search the
FileMaker Knowledge Base available at http://help.filemaker.com.
Examples
Suppose a machine has the following active physical interfaces:
•an Ethernet card not connected to a network with an IP address of 10.10.10.10
•a Wi-Fi interface with an IP address of 192.168.1.1
•a VPN connection with an IP address of 172.172.172.172
The function returns:
192.168.1.1
172.172.172.172
Suppose a machine has the following active physical interfaces:
•an Ethernet card not connected to a network with an IP address of 2001::10
•a Wi-Fi interface with an IP address of 3FFE:FFFF:101::230:6EFF:FE04:D9FF/48
•a VPN connection with an IP address of 2001:0DB8:85A3:08D3:1319:8A2E:0370:7334
The function returns:
3FFE:FFFF:101::230:6EFF:FE04:D9FF/48
2001:0DB8:85A3:08D3:1319:8A2E:0370:7334
Related topics
Functions reference (category list)
Functions reference (alphabetical list)
About formulas
About functions
Defining calculation fields
Using operators in formulas

FILEMAKER PRO HELP 808
Get(SystemLanguage)
Purpose
Returns the language currently set on the current system.
Format
Get(SystemLanguage)
Parameters
None
Data type returned
text
Originated in
FileMaker Pro 6.0 or earlier
Description
Get(SystemLanguage) is evaluated on the system preference that is set for Region on the Formats
tab. The text that is returned is in the English language.
For hosted databases, Get(SystemLanguage) returns the client’s current system language.
Note In FileMaker WebDirect, Get(SystemLanguage) returns the web browser’s current language.
Examples
Returns Japanese when Japanese is the current format for the region.
Related topics
Functions reference (category list)
Functions reference (alphabetical list)
About formulas
About functions
Defining calculation fields
Using operators in formulas
Get(SystemNICAddress)
Purpose
Returns a list of the hardware addresses of all NIC (Network Interface Controller) cards connected
to the computer.
Format
Get(SystemNICAddress)

FILEMAKER PRO HELP 809
Parameters
None
Data type returned
text
Originated in
FileMaker Pro 7.0
Description
Values in the list returned by this function are separated by carriage returns. The address consists of
6 bytes displayed in hexadecimal separated by colons. In Windows, find this address by typing the
command “ipconfig /All” in a DOS window. In OS X, find this address under Network
Overview in the System Profile tab under Applications/Utilities/Apple System Profiler.
Notes
•In FileMaker WebDirect, this function is not supported and returns an empty string.
•For information on how functions evaluate differently on the host versus the client, search
the FileMaker Knowledge Base available at http://help.filemaker.com.
Examples
Returns 00:07:34:4e:c2:0d, for example.
Related topics
Functions reference (category list)
Functions reference (alphabetical list)
About formulas
About functions
Defining calculation fields
Using operators in formulas
Get(SystemPlatform)
Purpose
Returns a number indicating the current platform.
Format
Get(SystemPlatform)
Parameters
None

FILEMAKER PRO HELP 810
Data type returned
number
Originated in
FileMaker Pro 6.0 or earlier
Description
Returns:
•1 if the current platform is Intel-based Macs
•-2 if the platform is Windows
•3 if the platform is iOS
•4 if the platform is FileMaker WebDirect
Note For information on how functions evaluate differently on the host versus the client, search the
FileMaker Knowledge Base available at http://help.filemaker.com.
Examples
Get(SystemPlatform) returns -2 when the current platform is a Windows platform.
Abs(Get(SystemPlatform)) returns 1 when the current platform is OS X.
Related topics
Functions reference (category list)
Functions reference (alphabetical list)
About formulas
About functions
Defining calculation fields
Using operators in formulas
Get(SystemVersion)
Purpose
Returns the version of the current operating system.
Format
Get(SystemVersion)
Parameters
None
Data type returned
text

FILEMAKER PRO HELP 811
Originated in
FileMaker Pro 6.0 or earlier
Description
Returns:
•6.1 for Windows 7
•6.2 for Windows 8
•10.7 for OS X version 10.7
•10.8 for OS X version 10.8
•<operating system or device> <web browser> <browser version> for
FileMaker WebDirect
For operating system or device, returns:
•Win for a Windows operating system
•Mac for an OS X operating system
•Linux for a Linux operating system
•iPad for an iPad
•iPhone for an iPhone
•iPod for an iPod
•Other for an unknown operating system or device
For web browser, returns:
•Safari for the Safari browser
•IE for the Internet Explorer browser
•Chrome for the Chrome browser
•Other for an unknown browser
For browser version, returns the version of the web browser accessing FileMaker WebDirect.
Note For information on how functions evaluate differently on the host versus the client, search the
FileMaker Knowledge Base available at http://help.filemaker.com.
Examples
Returns 10.8 when the current operating system is OS X version 10.8.
Returns iPad Safari 6.0 for an iPad using FileMaker WebDirect in Safari version 6.0.
Returns Win Chrome 25 for a Windows computer using FileMaker WebDirect in Chrome version
25.
Related topics
Functions reference (category list)
Functions reference (alphabetical list)
About formulas
About functions
Defining calculation fields
Using operators in formulas

FILEMAKER PRO HELP 812
Get(TemporaryPath)
Purpose
Returns the path to the temporary folder that FileMaker Pro uses for the current user, or the path
that FileMaker Server uses on the system.
Format
Get(TemporaryPath)
Parameters
None
Data type returned
text
Originated in
FileMaker Pro 9.0
Description
The temporary folder name begins with S, followed by a number representing the session of the
database engine during which the operation took place. Because your operating system controls the
location of temporary files, the exact path returned may be different from the examples shown. The
actual path returned also depends on which product (FileMaker Pro or FileMaker Server) is
executing the function.
In FileMaker Pro, the temporary folder and any files placed in it are deleted when FileMaker Pro is
terminated. In FileMaker Server, each schedule runs in its own session; once the schedule is
completed, the session terminates and the temporary folder is deleted.
Notes
•In FileMaker WebDirect, this function is not supported and returns an empty string.
•For information on how functions evaluate differently on the host versus the client, search
the FileMaker Knowledge Base available at http://help.filemaker.com.
Examples
In Windows, returns:
/%HomeDrive%/Documents and Settings/{user id}/Local Settings/Temp/S<n> or
/%UserProfile%/AppData/Local/Temp/S<n> or
/%HomeDrive%/WINDOWS/Temp/S<n> (Windows XP)
where %HomeDrive% is an environment variable that returns the name of your home drive on
your hard disk.
%UserProfile% is an environment variable that points to the directory where the profile of the
current user is located.
S<n> is the name of the folder in which the temporary files are placed (for example, S1); <n> is
a number representing the database engine session during which the operation took place.

FILEMAKER PRO HELP 813
In OS X, returns:
/<DriveName>/private/var/folders/<2 characters>/<20 characters>++++TI/Cleanup at
Startup/S<n>/
where DriveName is the name of your hard disk.
S<n> is the name of the folder in which the temporary files are placed (for example, S1); <n> is
a number representing the database engine session during which the operation took place.
The location may vary due to different variables on the OS, but should follow a similar pattern.
Related topics
Functions reference (category list)
Functions reference (alphabetical list)
About formulas
About functions
Defining calculation fields
Using operators in formulas
Get(TextRulerVisible)
Purpose
Returns a Boolean value representing whether or not the text ruler is visible.
Format
Get(TextRulerVisible)
Parameters
None
Data type returned
number
Originated in
FileMaker Pro 8.0
Description
Returns 1 if the text ruler is displayed; otherwise, returns 0.
Notes
•In FileMaker WebDirect, this function is not supported and returns 0.
•For information on how functions evaluate differently on the host versus the client, search
the FileMaker Knowledge Base available at http://help.filemaker.com.
Examples
Returns 1 when the text ruler is visible.

FILEMAKER PRO HELP 814
Related topics
Functions reference (category list)
Functions reference (alphabetical list)
About formulas
About functions
Defining calculation fields
Using operators in formulas
Get(TotalRecordCount)
Purpose
Returns the total number of records in the current table.
Format
Get(TotalRecordCount)
Parameters
None
Data type returned
number
Originated in
FileMaker Pro 6.0 or earlier
Description
If the current calculation is stored and you specify its context, this function will be evaluated based
on that context; otherwise, it will be evaluated based on the context of the current window.
Note For information on how functions evaluate differently on the host versus the client, search the
FileMaker Knowledge Base available at http://help.filemaker.com.
Examples
Returns 876 when there are 876 records in the current table.
Related topics
Functions reference (category list)
Functions reference (alphabetical list)
About formulas
About functions
Defining calculation fields
Using operators in formulas

FILEMAKER PRO HELP 815
Get(TriggerCurrentPanel)
Purpose
Returns the index and the object name of the current tab panel or slide panel (the panel to be
switched from) when the OnPanelSwitch script trigger is activated.
Format
Get(TriggerCurrentPanel)
Parameters
None
Data type returned
text
Originated in
FileMaker Pro 12.0
Description
Use with the Get(TriggerTargetPanel) function. Returns an index value, starting from 1, when
running a script triggered by the OnPanelSwitch script trigger, and the object name assigned to the
tab or slide panel. Returns 0 if the panel is invalid or if Get(TriggerCurrentPanel) is not used with the
OnPanelSwitch script trigger.
You can use the GetValue function to extract the value you want to use from the index value
returned by Get(TriggerCurrentPanel).
Note For information on how functions evaluate differently on the host versus the client, search the
FileMaker Knowledge Base available at http://help.filemaker.com.
Examples
When the tab or slide panel to be switched from is panel number 1, named “Category,”
Get(TriggerCurrentPanel) returns:
1
Category
Related topics
Functions reference (category list)
Functions reference (alphabetical list)
About formulas
About functions
Defining calculation fields
Using operators in formulas

FILEMAKER PRO HELP 816
Get(TriggerGestureInfo)
Purpose
In FileMaker Go, returns details about the gesture that activated an OnGestureTap trigger.
Format
Get(TriggerGestureInfo)
Parameters
None
Data type returned
text
Originated in
FileMaker Pro 13.0
Description
In FileMaker Go, returns a list containing these items:
•the string tap, indicating the script was started by an OnGestureTap trigger
•a value indicating the tap count
•a value indicating how many fingers were used to make the tap
•the x coordinate in the document where the gesture occurred
•the y coordinate in the document where the gesture occurred
For multi-finger gestures, the coordinates returned indicate the center point of the gesture. The y
coordinate has the header (if present) at 0. The records are listed under the header. Then the footer
follows the displayed records. In Form View, only one record is displayed. In List View and Table
View, all of the records in the current found set are displayed.
This function supports the following gestures:
•Single-tap with one, two, or three fingers
•Double-tap with one finger
Returns an empty string if this function is executed when no OnGestureTap trigger has been
activated.
Note In other products in the FileMaker product line, this function is not supported and returns an
empty string.
Examples
When a script is triggered by a three-finger single tap, and the gesture occurred at the coordinates
(400, 600), this function returns:
tap
1
3

FILEMAKER PRO HELP 817
400
600
Related topics
Functions reference (category list)
Functions reference (alphabetical list)
About formulas
About functions
Defining calculation fields
Using operators in formulas
Get(TriggerKeystroke)
Purpose
Returns a string containing the characters that activated an OnObjectKeystroke or
OnLayoutKeystroke script trigger. Multiple characters may be returned when the input comes from
an input method editor (IME).
Format
Get(TriggerKeystroke)
Parameters
None
Data type returned
text
Originated in
FileMaker Pro 10.0
Description
Returns a value when running a script triggered by an OnObjectKeystroke or OnLayoutKeystroke
script trigger or running a script called from the triggered script; otherwise returns an empty string.
Examples
The following code displays the text Processing input... when a carriage return is entered:
If [ Code ( Get(TriggerKeystroke) ) = 13 ]
Show Custom Dialog [“Processing input...”]
End If
Note For information on how functions evaluate differently on the host versus the client, search the
FileMaker Knowledge Base available at http://help.filemaker.com.

FILEMAKER PRO HELP 818
Related topics
Functions reference (category list)
Functions reference (alphabetical list)
About formulas
About functions
Defining calculation fields
Using operators in formulas
Get(TriggerModifierKeys)
Purpose
Returns the state of the keyboard modifier keys as they were when a script trigger was activated.
Format
Get(TriggerModifierKeys)
Parameters
None
Data type returned
number
Originated in
FileMaker Pro 10.0
Description
Returns a value only when called from a script activated by a script trigger or from a sub-script
called from the triggered script; otherwise returns an empty string.
•See Get(ActiveModifierKeys) for a description of the values assigned to the keyboard
modifier keys.
•See the Code function for a list of navigational keys and the codes returned to a script
activated by this trigger.
Time might elapse between when the keys that activated a script trigger are pressed and the script
asks for information on the modifier keys. Use Get(TriggerKeystroke) and Get(TriggerModifierKeys)
to capture the keys that were active when the script trigger was activated. Use
Get(ActiveModifierKeys) to capture any current keys being pressed.
Notes
•Windows: Alt and Ctrl key combinations do not activate script triggers.
•OS X: Command key combinations do not activate script triggers.
•For information on how functions evaluate differently on the host versus the client, search
the FileMaker Knowledge Base available at http://help.filemaker.com.

FILEMAKER PRO HELP 819
Examples
•The following example will only display a custom dialog box when lowercase “a” is
entered:
If [Get(TriggerKeystroke)=“a” and Get(TriggerModifierKeys)=0]
Show Custom Dialog [“You entered \”a\”.”]
End If
•The value 9 is returned when Shift-Option is pressed on a computer running OS X. If the
Option and Shift keys are pressed on a Mac when a script is triggered,
Get(TriggerModifierKeys) returns 9, regardless of which modifier keys have been pressed
between when the trigger was activated and when the script runs.
Related topics
Functions reference (category list)
Functions reference (alphabetical list)
About formulas
About functions
Defining calculation fields
Using operators in formulas
Get(TriggerTargetPanel)
Purpose
Returns the index and the object name of the target tab panel or slide panel (the panel to be
switched to) when the OnPanelSwitch script trigger is activated.
Format
Get(TriggerTargetPanel)
Parameters
None
Data type returned
text
Originated in
FileMaker Pro 12.0
Description
Use with the Get(TriggerCurrentPanel) function. Returns an index value, starting from 1, when
running a script triggered by the OnPanelSwitch script trigger, and the object name assigned to the
tab or slide panel. Returns 0 if the panel is invalid or if Get(TriggerTargetPanel) is not used with the
OnPanelSwitch script trigger.
You can use the GetValue function to extract the value you want to use from the index value
returned by Get(TriggerTargetPanel).

FILEMAKER PRO HELP 820
Note For information on how functions evaluate differently on the host versus the client, search the
FileMaker Knowledge Base available at http://help.filemaker.com.
Examples
When the tab or slide panel to be switched to is number 2, named “Products,”
Get(TriggerTargetPanel) returns:
2
Products
Related topics
Functions reference (category list)
Functions reference (alphabetical list)
About formulas
About functions
Defining calculation fields
Using operators in formulas
Get(UserCount)
Purpose
Returns the number of clients currently accessing the file.
Format
Get(UserCount)
Parameters
None
Data type returned
number
Originated in
FileMaker Pro 6.0 or earlier
Description
Returns:
•1 if FileMaker network sharing is turned off
•1 + the number of clients if FileMaker network sharing is turned on
This function does not count clients accessing the database file via ODBC or JDBC.
Notes
•If you specify the context for the current calculation, this function will be evaluated based on
that context; otherwise, it will be evaluated based on the context of the current window.

FILEMAKER PRO HELP 821
•For information on how functions evaluate differently on the host versus the client, search
the FileMaker Knowledge Base available at http://help.filemaker.com.
Examples
Returns 5 when there are 4 clients accessing the database file.
Related topics
Functions reference (category list)
Functions reference (alphabetical list)
About formulas
About functions
Defining calculation fields
Using operators in formulas
Get(UserName)
Purpose
Returns the name of the FileMaker Pro user, as specified in the General tab of the Preferences
dialog box.
Format
Get(UserName)
Parameters
None
Data type returned
text
Originated in
FileMaker Pro 6.0 or earlier
Description
The returned name is user-specified.
Important For greater security, use Get(AccountName) to track and manage user access: a user
cannot change the account name used to log in to a database file.
Notes
•In FileMaker WebDirect, this function returns the name of the account that logged into the
current session.
•For information on how functions evaluate differently on the host versus the client, search
the FileMaker Knowledge Base available at http://help.filemaker.com.

FILEMAKER PRO HELP 822
Examples
Returns Sharon Lloyd when Sharon Lloyd is the current user.
Related topics
Functions reference (category list)
Functions reference (alphabetical list)
About formulas
About functions
Defining calculation fields
Using operators in formulas
Get(UseSystemFormatsState)
Purpose
Returns a Boolean value representing the state of the Use System Formats command in the
Format menu.
Format
Get(UseSystemFormatsState)
Parameters
None
Data type returned
number
Originated in
FileMaker Pro 8.0
Description
Returns 1 if Use System Formats is on; otherwise, returns 0.
Notes
•In FileMaker WebDirect, this function is not supported and returns 0.
•For information on how functions evaluate differently on the host versus the client, search
the FileMaker Knowledge Base available at http://help.filemaker.com.
Examples
Returns 1 when Use System Formats is on.
Related topics
Functions reference (category list)
Functions reference (alphabetical list)
About formulas

FILEMAKER PRO HELP 823
About functions
Defining calculation fields
Using operators in formulas
Get(UUID)
Purpose
Returns text representing a Universally Unique Identifier (UUID).
Format
Get(UUID)
Parameters
None
Data type returned
text
Originated in
FileMaker Pro 12.0
Description
Returns a unique 16-byte (128-bit) string. For example, you can use this function to generate a
unique ID of a record.
For unstored calculations, returns a new string each time Get(UUID) is evaluated.
Note For information on how functions evaluate differently on the host versus the client, search the
FileMaker Knowledge Base available at http://help.filemaker.com.
Examples
Stored calculation: In a calculation field, specify the calculation Get(UUID). Every new record in the
calculation field has a unique ID such as E47E7AE0-5CF0-FF45-B3AD-C12B3E765CD5.
Unstored calculation: In a calculation field, specify the calculation Get(UUID). For Storage
Options, select Do not store calculation results. Every time a record is accessed, a new string is
generated.
Related topics
Functions reference (category list)
Functions reference (alphabetical list)
About formulas
About functions
Defining calculation fields
Using operators in formulas

FILEMAKER PRO HELP 824
Get(WindowContentHeight)
Purpose
Returns the height, in points, of the FileMaker Pro content area.
Format
Get(WindowContentHeight)
Parameters
None
Data type returned
number
Originated in
FileMaker Pro 7.0
Description
The content area depends on the current size of the active window but doesn’t include the title bar,
scroll bars, zoom controls, and page margins. The content area is the space inside these controls. It
does not include the status toolbar if it is currently showing.
Notes
•In FileMaker WebDirect, the content area includes the menu bar, status toolbar, scroll bars,
and footer area.
•For information on how functions evaluate differently on the host versus the client, search
the FileMaker Knowledge Base available at http://help.filemaker.com.
Examples
Returns 400 in OS X when the current window height is 437 and the status toolbar isn’t showing.
The example below combines Get(WindowContentHeight) with Get(WindowHeight) to
determine the height of the title bar and horizontal scroll bar:
Get(WindowHeight) - Get(WindowContentHeight) returns 37 in OS X when the window
height is 437 and the status toolbar isn’t showing.
Related topics
Functions reference (category list)
Functions reference (alphabetical list)
About formulas
About functions
Defining calculation fields
Using operators in formulas

FILEMAKER PRO HELP 825
Get(WindowContentWidth)
Purpose
Returns the width, in points, of the FileMaker Pro content area.
Format
Get(WindowContentWidth)
Parameters
None
Data type returned
number
Originated in
FileMaker Pro 7.0
Description
The content area depends on the current size of the active window but doesn’t include the title bar,
scroll bars, zoom controls, or page margins. The content area is the space inside these controls.
Notes
•In FileMaker WebDirect, the content area includes the menu bar, status toolbar, scroll bars,
and footer area.
•For information on how functions evaluate differently on the host versus the client, search
the FileMaker Knowledge Base available at http://help.filemaker.com.
Examples
Returns 400 in OS X when the current window width is 415.
The example below combines Get(WindowContentWidth) with Get(WindowWidth) to
determine the width of the vertical scroll bar:
Get(WindowWidth) - Get(WindowContentWidth) returns 15 in OS X when the window width
is 415.
Related topics
Functions reference (category list)
Functions reference (alphabetical list)
About formulas
About functions
Defining calculation fields
Using operators in formulas

FILEMAKER PRO HELP 826
Get(WindowDesktopHeight)
Purpose
Returns the height, in points, of the desktop space.
Format
Get(WindowDesktopHeight)
Parameters
None
Data type returned
number
Originated in
FileMaker Pro 7.0
Description
In Windows, the desktop space is the area inside the MDI window (sometimes referred to as the
client area). This doesn’t include any virtual space available through the scrolling of the MDI window.
In OS X, the desktop space is the area on the monitor in which the active window is located
excluding menu bars.
In FileMaker WebDirect, the desktop space is the area on the main monitor. In OS X, the main
monitor is where the menu bar is located. In Windows, the main monitor is where the taskbar is
located.
Note For information on how functions evaluate differently on the host versus the client, search the
FileMaker Knowledge Base available at http://help.filemaker.com.
Examples
Returns 956 in Windows when there is a single monitor and its MDI is set to 1280 x 1024.
Returns 1178 in OS X when there is a single monitor and its resolution is set to 1900 x 1200.
Related topics
Functions reference (category list)
Functions reference (alphabetical list)
About formulas
About functions
Defining calculation fields
Using operators in formulas

FILEMAKER PRO HELP 827
Get(WindowDesktopWidth)
Purpose
Returns the width, in points, of the desktop space.
Format
Get(WindowDesktopWidth)
Parameters
None
Data type returned
number
Originated in
FileMaker Pro 7.0
Description
In Windows, the desktop space is the space inside the MDI window (sometimes referred to as the
client area).
In OS X, the desktop space is the area on the monitor in which the active window is located
excluding menu bars.
In FileMaker WebDirect, the desktop space is the area on the main monitor. In OS X, the main
monitor is where the menu bar is located. In Windows, the main monitor is where the taskbar is
located.
Note For information on how functions evaluate differently on the host versus the client, search the
FileMaker Knowledge Base available at http://help.filemaker.com.
Examples
Returns 450 in Windows when there is a single monitor and its MDI is set to 500 x 450.
Returns 600 in OS X when there is a single monitor and its resolution is set to 800 x 600.
Related topics
Functions reference (category list)
Functions reference (alphabetical list)
About formulas
About functions
Defining calculation fields
Using operators in formulas

FILEMAKER PRO HELP 828
Get(WindowHeight)
Purpose
Returns the height, in points, of the window on which the script is acting (not necessarily the
foreground window).
Format
Get(WindowHeight)
Parameters
None
Data type returned
number
Originated in
FileMaker Pro 7.0
Description
The height of the window is calculated from the top to bottom outer edges of the window. This
position doesn’t include shadows or other effects applied to windows.
In FileMaker WebDirect, the window height does not include menus or toolbars that are part of the
web browser.
Note For information on how functions evaluate differently on the host versus the client, search the
FileMaker Knowledge Base available at http://help.filemaker.com.
Examples
Get(WindowHeight) returns 300 when the current window’s height is 300 points.
Related topics
Functions reference (category list)
Functions reference (alphabetical list)
About formulas
About functions
Defining calculation fields
Using operators in formulas
Get(WindowLeft)
Purpose
Returns the horizontal distance, in points, of the outer edge of the window on which the script is
acting (not necessarily the foreground window) relative to the left-most edge of the screen.

FILEMAKER PRO HELP 829
Format
Get(WindowLeft)
Parameters
None
Data type returned
number
Originated in
FileMaker Pro 7.0
Description
The origin of the reference coordinate system is at the left-most corner below the menu bar. A
negative value indicates the portion of the left side of the window that is hidden.
Notes
•In FileMaker WebDirect, this function is not supported and returns an empty string.
•For information on how functions evaluate differently on the host versus the client, search
the FileMaker Knowledge Base available at http://help.filemaker.com.
Examples
Returns 52 when the outer edge of the active window is 52 points from the left edge of the screen.
Returns 0 when the active window is 0 points from the left edge of the screen.
Related topics
Functions reference (category list)
Functions reference (alphabetical list)
About formulas
About functions
Defining calculation fields
Using operators in formulas
Get(WindowMode)
Purpose
Returns a number representing the mode FileMaker Pro is in at the time the function is evaluated.
Format
Get(WindowMode)
Parameters
None

FILEMAKER PRO HELP 830
Data type returned
number
Originated in
FileMaker Pro 6.0 or earlier
Description
Returns:
•0 for Browse mode
•1 for Find mode
•2 for Preview mode
•3 if printing is in progress
•4 (FileMaker Pro Advanced) if evaluating the function from the Data Viewer and the current
window is in Layout mode
If a script using this function runs while the file is in Layout mode, FileMaker Pro switches to Browse
mode and returns 0. If there are multiple windows open in the current database file, each window
can have its own window mode value, but results are returned for only the foreground window.
Note For information on how functions evaluate differently on the host versus the client, search the
FileMaker Knowledge Base available at http://help.filemaker.com.
Examples
Returns 2 if the file is in Preview mode when the function is evaluated.
Related topics
Functions reference (category list)
Functions reference (alphabetical list)
About formulas
About functions
Defining calculation fields
Using operators in formulas
Get(WindowName)
Purpose
Returns the name of the window on which the script is acting (not necessarily the foreground
window).
Format
Get(WindowName)
Parameters
None

FILEMAKER PRO HELP 831
Data type returned
text
Originated in
FileMaker Pro 7.0
Description
Returns an empty string if there is no window.
Notes
•You can set the window name with the Set Window Title script step.
•For information on how functions evaluate differently on the host versus the client, search
the FileMaker Knowledge Base available at http://help.filemaker.com.
Examples
There are two windows, Teachers and Students, displaying the same layout that includes an
unstored calculation Calc containing Get(WindowName). Teachers is returned when the Teachers
window is refreshed, and Students is returned when the Students window is refreshed.
Related topics
Functions reference (category list)
Functions reference (alphabetical list)
About formulas
About functions
Defining calculation fields
Using operators in formulas
Get(WindowOrientation)
Purpose
Returns a value indicating the orientation of the window on which the script is acting (not necessarily
the foreground window).
Format
Get(WindowOrientation)
Parameters
None
Data type returned
number

FILEMAKER PRO HELP 832
Originated in
FileMaker Pro 13.0
Description
Returns:
•-2 for landscape left
•-1 for landscape right
•0 for square (FileMaker Pro and FileMaker WebDirect only)
•1 for portrait
•2 for portrait upside down
Examples
If the window that the current script is acting on is in portrait orientation,
Get(WindowOrientation) returns 1.
You have a calculation field named Orientation that uses Get(WindowOrientation) to return a
value as listed above. You have another calculation field that references the Orientation field and
uses the If function, which returns Portrait if the Orientation field returns a value greater than 0 and
returns Landscape if the Orientation field returns a value less than 0:
If(Orientation > 0;”Portrait”;”Landscape”)
Related topics
Functions reference (category list)
Functions reference (alphabetical list)
About formulas
About functions
Defining calculation fields
Using operators in formulas
Get(WindowStyle)
Purpose
Returns the style of the window on which the script is acting.
Format
Get(WindowStyle)
Parameters
None
Data type returned
number

FILEMAKER PRO HELP 833
Originated in
FileMaker Pro 12.0
Description
Returns:
•0 (zero) if the window is a document window
•1 if the window is a floating document window
•2 if the window is a dialog window
Examples
Returns 0 if the current window is a document window when the function is evaluated.
Returns 1 if the current window is a floating document window when the function is evaluated.
Returns 2 if the current window is a dialog window when the function is evaluated.
Related topics
Functions reference (category list)
Functions reference (alphabetical list)
About formulas
About functions
New Window
Specify Advanced Style Options dialog box
Get(WindowTop)
Purpose
Returns the vertical distance, in points, of the outer edge of the window on which the script is acting
(not necessarily the foreground window) relative to the bottom edge of the menu bar.
Format
Get(WindowTop)
Parameters
None
Data type returned
number
Originated in
FileMaker Pro 7.0

FILEMAKER PRO HELP 834
Description
The origin of the reference coordinate system is at the left-most corner below the menu bar. A
negative value indicates the portion of the top part of the window that is hidden behind the menu bar.
Notes
•In FileMaker WebDirect, this function is not supported and returns an empty string.
•For information on how functions evaluate differently on the host versus the client, search
the FileMaker Knowledge Base available at http://help.filemaker.com.
Examples
Returns 52 when the outer edge of the active window is 52 points from the menu bar.
Returns 0 when the outer edge of the active window just touches the menu bar.
Related topics
Functions reference (category list)
Functions reference (alphabetical list)
About formulas
About functions
Defining calculation fields
Using operators in formulas
Get(WindowVisible)
Purpose
Returns a number representing whether or not the current window is visible.
Format
Get(WindowVisible)
Parameters
None
Data type returned
number
Originated in
FileMaker Pro 7.0
Description
The current window is the window on which the script is acting (not necessarily the foreground
window). Returns 1 if the window is visible. Returns 0 if the window is hidden using the Hide
Window command. The window can be located outside of the visible screen space and still return 1.

FILEMAKER PRO HELP 835
Note For information on how functions evaluate differently on the host versus the client, search the
FileMaker Knowledge Base available at http://help.filemaker.com.
Examples
Returns 1 when the current window is physically visible.
Returns 0 when the current window has been hidden using the Hide Window command in
FileMaker Pro.
Related topics
Functions reference (category list)
Functions reference (alphabetical list)
About formulas
About functions
Defining calculation fields
Using operators in formulas
Get(WindowWidth)
Purpose
Returns the width, in points, of the window on which the script is acting (not necessarily the
foreground window).
Format
Get(WindowWidth)
Parameters
None
Data type returned
number
Originated in
FileMaker Pro 7.0
Description
The width of the window is calculated from the left-most to right-most outer edge of the window. This
position doesn’t include shadows or other effects applied to windows.
Note For information on how functions evaluate differently on the host versus the client, search the
FileMaker Knowledge Base available at http://help.filemaker.com.
Examples
Returns 300 when the current window is 300 points wide.

FILEMAKER PRO HELP 836
Related topics
Functions reference (category list)
Functions reference (alphabetical list)
About formulas
About functions
Defining calculation fields
Using operators in formulas
Get(WindowZoomLevel)
Purpose
Returns the zoom percentage of the current window.
Format
Get(WindowZoomLevel)
Parameters
None
Data type returned
text
Originated in
FileMaker Pro 8.0
Description
In Windows, an asterisk appears next to the zoom percentage when Enlarge window contents to
improve readability is selected in the General tab of the Preferences dialog box.
Notes
•In FileMaker WebDirect, this function is not supported and returns 100.
•For information on how functions evaluate differently on the host versus the client, search
the FileMaker Knowledge Base available at http://help.filemaker.com.
Examples
Returns 200 when the current window’s zoom percentage is set to 200.
Returns 200* in Windows when the current window’s zoom percentage is set to 200 and Enlarge
window contents to improve readability is selected.
Related topics
Functions reference (category list)
Functions reference (alphabetical list)
About formulas
About functions

FILEMAKER PRO HELP 838
Logical functions
Logical functions test for a condition to evaluate it as true or false. This is known as a Boolean value.
If the condition is true, FileMaker Pro returns a 1; if the condition is false, FileMaker Pro returns a 0.
You can use the keywords True and False with logical functions and operators when a Boolean
value is needed. Keyword True returns 1 and keyword False returns 0.
Logical functions can also evaluate parameters such as text or arithmetic operations that do not
make a true or false statement, or in the case of the GetField function, return the contents of
another field.
Click a function name for details.
Related topics
About functions
About formulas
This function Returns
Case One of several possible results based on a series of tests.
Choose One result value, according to the integer value of a specified test.
Evaluate Evaluates the specified expression as a calculation.
EvaluationError An error code, if any, from the specified expression.
ExecuteSQL Executes a specified SQL SELECT statement within a FileMaker Pro
database.
GetAsBoolean 1 if data converts to a non-zero numeric value; 0 if the specified data has a
value of 0 or is empty.
GetField The contents of the referenced field.
GetFieldName The fully qualified name of a field reference.
GetLayoutObjectAttribute The requested layout object attributes from the calculation's active window.
GetNthRecord The contents of the referenced field from the requested record number.
If One of two possible results depending on the value of the specified test.
IsEmpty 1 if the specified field is empty, if the related field, related table, relationship,
or file is missing, or if some other error occurs; otherwise, returns 0.
IsValid 0 when a record contains an invalid value because of a field type mismatch
(text in a date field, for example).
IsValidExpression 1 if the syntax of the specified expression is correct.
Let Sets variable to the result of value for the duration of the specified
expression.
Lookup The value specified in the sourceField parameter using the relationships
in the relationships graph.
LookupNext The value specified in the sourceField parameter using the relationships
in the relationships graph.
Self The content of the object in which the calculation is defined; otherwise,
returns an empty string.

FILEMAKER PRO HELP 839
Case
Purpose
Returns one of several possible results based on a series of tests.
Format
Case(test1;result1{;test2;result2;...;defaultResult})
Parameters
test - any text or numeric expression.
result - result corresponding to the expression.
Parameters in curly braces { } are optional.
Data type returned
text, number, date, time, timestamp, container
Originated in
FileMaker Pro 6.0 or earlier
Description
Case evaluates each test expression in order, and when a True expression is found, returns the
value specified in result for that expression.
You can include a default result at the end of the parameter list. If none of the expressions evaluated
return True, the Case function returns the value specified for defaultResult. If no default result is
supplied, Case returns an empty result.
Examples
Case(Score >= 90;“Excellent”;Score > 50;“Satisfactory”;“Needs
Improvement”) displays Excellent when the score is 90 or above, Satisfactory when the score is
between 50 and 90, and Needs Improvement for any other score.
Case(Shipment Method=”Ground”;2;Shipment Method=”Air”;10) returns 2 when the
Shipment Method field contains Ground, and returns 10 when the Shipment Method field contains
Air.
Related topics
Functions reference (category list)
Functions reference (alphabetical list)
About formulas
About functions
Defining calculation fields
Using operators in formulas

FILEMAKER PRO HELP 840
Choose
Purpose
Returns one result value, according to the integer value of test.
Format
Choose(test;result0{;result1;result2...})
Parameters
test - Any integer calculation. The calculation result of test must be a number that indexes into the
list that follows. Because the index is a 0-based index, the test result must be 0 to access the first
result.
result - one or more results.
Parameters in curly braces { } are optional.
Data type returned
text, number, date, time, timestamp, container
Originated in
FileMaker Pro 6.0 or earlier
Description
FileMaker Pro evaluates test to obtain an index number, which is used to choose the
corresponding ordinal result.
Because Choose is a 0-based list, the first item on the list is indexed 0 and the second item on the
list is indexed 1. For example, if test evaluates to 2, then result2 is chosen.
Examples
Choose(Rating;“Not Applicable”;“Good”;“Fair”;“Poor”)
Rating is a number field that is empty or holds a value. If Rating is empty or 0, the Choose function
returns Not Applicable. If Rating is 1, the result is Good. If Rating is 2, the result is Fair, and if it is
3, the result is Poor. If Rating contains a value that does not map to one of the result parameters,
the Choose function returns nothing.
Related topics
Functions reference (category list)
Functions reference (alphabetical list)
About formulas
About functions
Defining calculation fields
Using operators in formulas

FILEMAKER PRO HELP 841
Evaluate
Purpose
Evaluates expression as a calculation.
Format
Evaluate(expression{;[field1;field2;field3;...]})
Parameters
expression - any text expression or text field.
fields - a list of fields that this function is dependent on. When these fields are modified, the
calculation will update its result.
Parameters in curly braces { } are optional. Notice that the optional field list is enclosed in square
brackets [ ].
Data type returned
text, number, date, time, timestamp, container
Originated in
FileMaker Pro 7.0
Description
The optional fields parameter is a list of fields this calculation is dependent on. If a necessary field
isn’t listed, modifying that dependent field won’t update the result of the calculation.
Examples
Evaluate(TextField) returns 4 when TextField contains 2 + 2.
Evaluate("textfield") returns 2 + 2 when textfield contains 2 + 2.
Evaluate(GetField("textfield")) returns 4 when textfield contains 2 + 2.
Evaluate(TextField;[Amount]) returns .80 when TextField contains .08 * Amount and the
Amount field contains 10.00.
Evaluate(“Let(TaxRate=.05;“& Tax Rate Calculation &“)”) returns .50 when the
field Tax Rate Calculation contains SubTotal * TaxRate where SubTotal is a numeric field that
contains 10.00.
The following example shows how to pass named parameters using the Evaluate, Let, and
Get(ScriptParameter) functions, allowing access only to variable “a” (the example returns 6):
ScriptParameter = "a = 5; b = 10"
Evaluate("Let ( [" & Get(ScriptParameter) & "]; a + 1 )")
The following example shows how to pass named parameters, allowing access to both variable “a”
and “b”. The simplified first parameter makes the second parameter more complex (the example
returns 6, 12):
ScriptParameter = "a = 5; b = 10"
Evaluate("Let ( [" & Get(ScriptParameter) & "]; a + 1 & \", \" & b + 2 )")

FILEMAKER PRO HELP 842
The following example shows how to pass named parameters, while keeping the ability to check the
syntax of the second parameter of the Let function (the example returns 6, 12):
ScriptParameter = "a = 5; b = 10"
Let( [a = Evaluate("Let( [" & Get(ScriptParameter) & "]; a )"),
b = Evaluate("Let( [" & Get(ScriptParameter) & "]; b )")]; a + 1
& ", " & b + 2 )
Note The Evaluate function evaluates an expression, including field values to be evaluated as a
calculation formula. It also allows you to specify field dependencies so that a calculation using the
evaluation function can be triggered due to changes in other fields of the same record. This function
evaluates user-defined formulas. For example, you can create a formula in the Total field that
computes state tax:
Evaluate(StateTaxFormula) + ShippingCost
where the StateTaxFormula field contains:
SubTotal * 1.0875
and the SubTotal field contains the subtotal before tax and shipping.
The Evaluate function has an optional second parameter, which is a field the calculation is
dependent on. When the dependent field contents change, FileMaker Pro re-evaluates the
calculation. In the following example, the Total calculation will be re-evaluated when SubTotal
changes:
Evaluate(StateTaxFormula; SubTotal) + ShippingCost
The dependent parameter can also be useful in other cases. For example,
Evaluate(“Get(CurrentTimeStamp)”; [FieldB; FieldC])
will store a timestamp in the calculation field whenever FieldB or FieldC changes.
Related topics
Functions reference (category list)
Functions reference (alphabetical list)
About formulas
About functions
Defining calculation fields
Using operators in formulas
EvaluationError
Purpose
Returns an error code, if any, from expression.
Format
EvaluationError(expression)
Parameters
expression - any calculation expression

FILEMAKER PRO HELP 843
Data type returned
number
Originated in
FileMaker Pro 7.0
Description
There are two types of errors: syntax and runtime. A syntax error indicates an invalid calculation. A
runtime error, such as Field missing or Record missing, occurs when the calculation currently being
run is valid but cannot properly execute. See FileMaker Pro error codes for a list of error codes and
messages.
Note The EvaluationError function must enclose the Evaluate function to return any syntax
errors.
Examples
EvaluationError(calculationField) returns 102 (Field Missing) when
calculationField contains total + 1 and the field total has been deleted or renamed.
EvaluationError(Evaluate(calculationField)) returns 1207 (Unbalanced Parenthesis)
when calculationField contains abs(-1 with no closing parenthesis.
Related topics
Functions reference (category list)
Functions reference (alphabetical list)
About formulas
About functions
Defining calculation fields
Using operators in formulas
ExecuteSQL
Purpose
Executes an SQL query statement for the specified table occurrence within a FileMaker Pro
database.
Format
ExecuteSQL(sqlQuery; fieldSeparator; rowSeparator {;arguments...})
Parameters
sqlQuery - an SQL SELECT statement. The statement can include a Union clause that combines
the results of two queries. The statement can contain programmatically generated SQL (dynamic
parameters) that indicate where optional arguments are to be used in the query. Use the
question mark character (?) to specify a dynamic parameter.
fieldSeparator - the character string used as a separator between fields in the result. If an
empty string is specified, the separator is a comma. The field separator is not displayed after the last
field in the result.

FILEMAKER PRO HELP 844
rowSeparator - the character string used as a separator between records in the result. If an
empty string is specified, the separator is a carriage return. The row separator is not displayed after
the last row in the result.
arguments- one or more expressions that are evaluated and used as values for the dynamic
parameters in the query statement.
Data type returned
text
Originated in
FileMaker Pro 12.0
Description
ExecuteSQL enables you to execute SQL SELECT statements containing dynamic parameters to
safely query FileMaker Pro databases in order to avoid security vulnerabilities through injection
attacks.
ExecuteSQL does not recognize relationships created in FileMaker Pro, which gives you flexibility to
define relationships in SQL statements and retrieve data from any table, independent of the layout
context.
ExecuteSQL cannot be used with SQL statements that modify data or the database schema (such
as the Insert Into or Delete Table commands).
If an error occurs during query parsing or execution, FileMaker Pro returns ?.
Notes
•To apply the correct formatting to dates in an SQL query, use the DATE statement. If you do
not use the DATE statement, ExecuteSQL treats dates as literal strings.
•FileMaker Pro returns date, time, and number data in Unicode/SQL format, not in the locale
of the operating system or the file.
•ExecuteSQL accepts only the SQL-92 syntax ISO date and time formats with no braces.
ExecuteSQL does not accept the ODBC/JDBC format date, time, and timestamp constants
in braces.
•For more details about SELECT statement syntax, supported SQL statements, expressions,
and Catalog functions, see the FILEMAKER ODBC AND JDBC GUIDE and the FILEMAKER SQL
REFERENCE.
Examples
Suppose a database contains two tables, Employees and Salaries, which are related through the
EmpID field.

FILEMAKER PRO HELP 845
Note The Salaries::Salary field is a number field.
You want to add a field to the Employees table that displays the percentage of an employee’s salary
relative to the total salaries in a department. Though you could use a calculation in FileMaker Pro to
generate this value, you can use the ExecuteSQL function to specify this query using dynamic
parameters.
Define a calculation field in the Employees table, then use the ExecuteSQL function to specify the
following query statement:
100 * Salaries::Salary / ExecuteSQL ( “select sum ( S.salary ) from
Employees E join Salaries S on E.EmpID = S.EmpID where E.Department = ?”;
“”; “”; Employees::Department )
Related topics
Functions reference (category list)
Functions reference (alphabetical list)
About formulas
About functions
Defining calculation fields
Using operators in formulas
GetAsBoolean
Purpose
Returns 1 if data converts to a non-zero numeric value or if a container field contains data; returns
0 if data has a numeric value of 0 or is empty.
Format
GetAsBoolean(data)
Parameters
data - any text, number, date, time, timestamp or container expression, or a field containing text, a
number, date, time, timestamp or container
Data type returned
number
EmpID Last Name Department
1
2
3
4
5
6
Smith
Ogawa
Durand
Garcia
Mehmet
Ferrini
Development
Development
Quality Assurance
Quality Assurance
Documentation
Marketing
EmpID Salary
1
2
3
4
5
6
98000
87000
86000
90000
89000
121000
Employees Salaries

FILEMAKER PRO HELP 846
Originated in
FileMaker Pro 8.0
Description
Returns a Boolean value.
Examples
GetAsBoolean(“”) returns 0.
GetAsBoolean(“Some text here.”) returns 0.
GetAsBoolean(Container Field) returns 1 when the field named Container Field contains
data, or returns 0 when Container Field is empty.
Related topics
Functions reference (category list)
Functions reference (alphabetical list)
About formulas
About functions
Defining calculation fields
Using operators in formulas
GetField
Purpose
Returns the contents of fieldName.
Format
GetField(fieldName)
Parameters
fieldName - any text expression or text field that refers to a field’s name
Important See Design functions for information about literal text parameters.
Data type returned
text, number, date, time, timestamp, container
Originated in
FileMaker Pro 6.0 or earlier
Description
Use this function to get the contents of fieldName, or in any function that uses a field, such as NPV,
GetSummary, GetRepetition, or the aggregate functions.

FILEMAKER PRO HELP 847
Examples
Suppose you have the fields Arrow and Target. Arrow contains the text string Target, and Target
contains the text string Bullseye.
•GetField(“Arrow”) returns Target. Notice the use of quotation marks around Arrow to
indicate the literal string is the fieldName parameter.
•GetField(Arrow) returns Bullseye. Notice the absence of quotation marks to indicate
the value stored in the Arrow field is the fieldName parameter.
Suppose you have the fields FirstName and LastName. FirstName contains the text string Jane,
and LastName contains the text string Public.
•GetField(“FirstName”)&“ ”&GetField(“LastName”) returns the text string Jane
Public.
GetSummary(GetField(“Field1”), GetField(“Field” & “2”)) performs a summary on
the summary field Field1, using a break field of Field2.
Related topics
Functions reference (category list)
Functions reference (alphabetical list)
About formulas
About functions
Defining calculation fields
Using operators in formulas
GetFieldName
Purpose
Returns the fully qualified name of a field reference.
Format
GetFieldName(fieldName)
Parameters
fieldName - any field object or evaluation of a text expression that refers to a field’s name
Data type returned
text
Originated in
FileMaker Pro 10.0
Description
Use this function to get the fully qualified name of fieldName (tableName::fieldName).
Note If you specify the context for the current calculation, this function will be evaluated based on
that context. Otherwise, it will be evaluated based on the context of the current window.

FILEMAKER PRO HELP 848
Examples
GetFieldName(x) returns the name of a field reference passed into a custom function as
parameter x.
GetFieldName(Evaluate(<fieldName>)) returns the name of a field based on the data stored
in <fieldName>.
GetFieldName(Evaluate(Get(ActiveFieldName))) returns the fully qualified name of the
field that has the focus when executed.
Related topics
Functions reference (category list)
Functions reference (alphabetical list)
About formulas
About functions
GetLayoutObjectAttribute
Purpose
Returns the specified attributes of the layout object given by objectName that is currently active in
the calculation.
Format
GetLayoutObjectAttribute(objectName;attributeName{;repetitionNumber;
portalRowNumber})
Parameters
objectName - the name of a named layout object on the current layout.
attributeName - the name of a supported attribute (see below).
repetitionNumber - the repetition number (for repeating fields).
portalRowNumber - the number of the row in the portal.
Note Parameters in curly braces {} are optional.
Data type returned
text
Originated in
FileMaker Pro 8.5
Attributes
objectType - returns the object's type as a text literal, in English. Valid return values are: field, text,
graphic, line, rectangle, rounded rectangle, oval, group, button group, button, portal, tab panel, slide
panel, chart, web viewer, popover, popover button, and unknown.

FILEMAKER PRO HELP 849
hasFocus - returns 1 (True) if objectName is currently active, otherwise returns 0 (False). Objects
that can have the focus are fields, portals, tab panels, slide panels, buttons, popover buttons, charts,
and groups. Also returns 1 for a portal when a portal row is selected.
containsFocus - returns 1 (True) if objectName is currently active or if it contains an active
object; otherwise returns 0 (False). Objects that can contain the focus are fields, portals, tab panels,
slide panels, buttons, popover buttons, popovers, charts, and groups.
isFrontPanel - returns 1 (True) if the target object is the tab or slide panel that is in front.
The following object coordinates are given in points relative to the bottom-left corner of the
FileMaker menu bar:
bounds - returns a list of numeric values, separated by spaces, that describes the placement of the
specified object (left-top to right-bottom).
left - returns the left edge coordinate of the specified object.
right - returns the right edge coordinate of the specified object.
top - returns the top edge coordinate of the specified object.
bottom - returns the bottom edge coordinate of the specified object.
width - returns a number representing the width (in points) of the specified object.
height - returns a number representing the height (in points) of the specified object.
rotation - returns a number representing the rotation (in degrees) of the specified object.
startPoint,endPoint - returns a pair of numeric values (horizontal vertical), separated by
spaces, that represent the start point or end point of a line object. Other objects return the top-left
point for startPoint and the bottom-right point for endPoint.
source - returns the source description of the specified object as follows. For:
web viewers - returns current URL.
fields - returns the fully qualified field name (table name::field name).
text objects - returns the text (does not return merge fields).
portals - returns the related table name.
graphics - returns image data such as the image filename.
charts - returns the XML description of a chart object.
For all other objects, returns an empty string.
content - returns the content of the specified object as follows. For:
web viewers - returns the current content (such as HTML code).
fields - returns the field data formatted using the specified object's properties.
text objects - returns the text (including text from merge fields).
graphics - returns image data such as the name of a file in a container field if the image is stored
(in the field or externally), or the reference to the file if the image is unstored.
charts - returns the bitmap representation of a chart object.
For all other objects, returns an empty string.
enclosingObject - returns objectName of the enclosing layout object. Otherwise, returns an
empty string. Only groups, tab panels, slide panels, popover buttons, popovers, and portals can
contain other objects.
containedObjects - returns a list of named objects contained within objectName. Only groups,
tab panels, slide panels, popover buttons, popovers, and portals can contain other objects.

FILEMAKER PRO HELP 850
isobjecthidden - returns 1 (True) if objectName is hidden for the current record. Otherwise,
returns 0 (False). Returns 1 for objects other than popovers that are to the right of the layout
boundary.
Notes
•If objects are set to auto-resize, attributes returned are based on the resized bounds of the
object in its current state.
•If objects are located above the status toolbar, negative coordinate values are returned.
•When repetitionNumber or portalRowNumber is 0, the function behaves as if the
parameter was not specified. For portalRowNumber, the function returns data from the
first portal row. For repetitionNumber, the function acts on the first repetition (for
returning content or source) or acts on the entire field as a whole (for returning bounds).
Both parameters are necessary because you must be able to reference a particular field
repetition within a particular portal row.
Examples
GetLayoutObjectAttribute("CancelButton";"objectType") returns button (if the
button was created in a new file or a file after it was converted), returns button group (if the button
is associated with a button action or script and was converted in a file from a previous version of
FileMaker Pro), or returns text (if the button isn’t associated with a button action or script and was
converted in a file from a previous version of FileMaker Pro).
GetLayoutObjectAttribute("CancelButton";"bounds") returns 138 24 391 38 0.
Related topics
Functions reference (category list)
Functions reference (alphabetical list)
About formulas
About functions
Defining calculation fields
Using operators in formulas
Naming objects
GetNthRecord
Purpose
Returns the contents of fieldName from the provided recordNumber.
Format
GetNthRecord(fieldName;recordNumber)
Parameters
fieldName - any related field or repeating field, or an expression that returns a field or a repeating
field
recordNumber - the record number from which you want data

FILEMAKER PRO HELP 851
Data type returned
text, number, date, time, timestamp, container
Originated in
FileMaker Pro 8.0
Description
The result of GetNthRecord() will not be updated when the record referred to by GetNthRecord()
is a record other than the one in which the calculation is currently being evaluated.
GetNthRecord of the current table returns the Nth record of the found set according to how the
current table is sorted.
GetNthRecord of a related table returns the Nth record of the related set (relative to the current
record), regardless of how the related table (or portal) is sorted.
Examples
GetNthRecord(First Name;2) returns the contents of the First Name field for record 2 in the
current table.
GetNthRecord(First Name;Get(RecordNumber)+ 1) returns the contents of the First Name
field for the next record in the current table.
GetNthRecord(Contacts::First Name;2) returns the contents of the First Name field for
record 2 in the Contacts table.
GetNthRecord(Contacts::Has Repetitions[2];2) returns the contents of the second
repetition of the Has Repetitions field for record 2 in the Contacts table.
Related topics
Functions reference (category list)
Functions reference (alphabetical list)
About formulas
About functions
Defining calculation fields
Using operators in formulas
Sorting records
If
Purpose
Returns one of two possible results (result1 or result2) depending on the value of test.
Format
If(test;result1;result2)
Parameters
test - any numeric value or logical expression

FILEMAKER PRO HELP 852
result1 - expression or field name
result2 - expression or field name
Data type returned
text, number, date, time, timestamp, container
Originated in
FileMaker Pro 6.0 or earlier
Description
If test is True (any non-zero numeric result), FileMaker Pro returns result1. If test is False (0),
result2 is returned. Test must be an expression that returns either a numeric or Boolean (True,
False) result.
Notes
•If you have more than two possible results, consider using the Case function.
•By default, if test refers to a field that doesn’t yet contain a value, If returns an empty
result. To override this functionality, deselect the Do not evaluate if all referenced
fields are empty checkbox.
Examples
If(Country = “USA”;“US Tech Support”;“International Tech Support”) returns
International Tech Support, if the Country field contains France or Japan. Returns US Tech
Support if the Country field contains USA.
If(State =”CA”;Subtotal * CA Tax Rate;0) returns the tax if the purchaser is a resident
of California; otherwise returns 0.
Related topics
Functions reference (category list)
Functions reference (alphabetical list)
About formulas
About functions
Defining calculation fields
Using operators in formulas
IsEmpty
Purpose
Returns True(1) if field is empty, if a related field, related table, relationship, or file is missing, or if
some other error occurs; otherwise, returns False(0).
Format
IsEmpty(field)

FILEMAKER PRO HELP 853
Parameters
field - any field name, text expression, or numeric expression
Data type returned
number
Originated in
FileMaker Pro 6.0 or earlier
Examples
IsEmpty(OrderNum) returns 1 if the OrderNum field is empty.
If(IsEmpty(LastName);“Invalid record”;““) displays Invalid Record if the LastName
field is blank, but displays nothing if there is an entry in LastName.
IsEmpty(Payments::DatePaid) returns 1 if, for example, the Payments table has been moved
or renamed.
IsEmpty(“text”) returns 0.
Related topics
Functions reference (category list)
Functions reference (alphabetical list)
About formulas
About functions
Defining calculation fields
Using operators in formulas
IsValid
Purpose
Returns 0 (False) if the data is invalid and 1 (True) if the data is valid.
Format
IsValid(field)
Parameters
field - any field name
Data type returned
number
Originated in
FileMaker Pro 6.0 or earlier

FILEMAKER PRO HELP 854
Description
Returns 0 (False) if:
•A record contains an invalid value because of a field type mismatch (text in a date field, for
example)
•FileMaker Pro cannot locate (temporarily or permanently) the related table in which the
referenced field is defined
•A field has been deleted from a related table, and therefore the references to that field in the
source table are invalid
Otherwise, it returns 1 (the data is valid).
Examples
IsValid(Datefield) returns 0 if there is non-date data in Datefield, for example if text was
imported into it.
IsValid(Amount) returns 0 if there is only text in the number field Amount.
IsValid(table::field) returns 0 if the related table was renamed and the relationship isn’t
updated with the new filename.
Related topics
Functions reference (category list)
Functions reference (alphabetical list)
About formulas
About functions
Defining calculation fields
Using operators in formulas
IsValidExpression
Purpose
Returns 1 (True) if expression syntax is correct. Returns 0 (False) if expression has a syntax
error.
Format
IsValidExpression(expression)
Parameters
expression - any calculation expression
Data type returned
number
Originated in
FileMaker Pro 7.0

FILEMAKER PRO HELP 855
Examples
IsValidExpression(calculationField) returns 1 (true) if calculationField contains
total + 1.
IsValidExpression(calculationField) returns 0 (false) if calculationField contains
abs(-1 with no closing parenthesis.
Related topics
Functions reference (category list)
Functions reference (alphabetical list)
About formulas
About functions
Defining calculation fields
Using operators in formulas
Let
Purpose
Sets varX to the result of expressionX for the duration of calculation, until the script exits (local
variables), or until the file is closed (global variables).
Format
Let({[}var1=expression1{;var2=expression2...]};calculation)
Parameters
var - any variable name, local variable name, or global variable name (see About naming fields for
guidelines on naming variables).
expression - any calculation expression, field, or constant.
calculation - any calculation expression, field, or constant.
Parameters in curly braces { } are optional.
Data type returned
text, number, date, time, timestamp, container
Originated in
FileMaker Pro 7.0
Description
Multiple variables are allowed when using a list syntax that is enclosed in square brackets [ ] and is
separated by semicolons. For example:
Let([variable=value;variable2=value2];calculation)
The $ symbol references a local variable and two $$ symbols reference a global variable. An
optional repetition number appears in square brackets [ ] immediately after the variable name. For
example:

FILEMAKER PRO HELP 856
Let([$variable[repetition]=value;$$variable2=value2]{;calculation} )
The Let function sets the variables from left to right. You can use previously defined variables (for
example, variables that you defined with the Set Variable script step) to define new variable values,
and you can nest one Let function within another. If you use a previously defined variable within a
nested Let function, the variable has scope only within the nested function (as if you had defined a
completely unique variable). See the City example shown below.
Once defined, local and global variables can be referenced in any calculation within their scope. The
scope of global variables is limited to the current file. The scope of local variables is the current
script. Local variables defined in a calculation are scoped to the file but are only available when
scripts are not running. A local and global variable (or even two local variables in different scripts)
can have the same name but they are treated as different variables and store different values.
Examples
Let(x=5;x*x) returns 25.
Let([x=5;squared=x*x;cubed=squared*x];cubed) returns 125.
Let(City=“Paris”;Let(City=“San Francisco”;City&“-“)&City) returns San
Francisco - Paris.
The following example sets a local variable counter at repetition 50 with a value of 120:
Let($counter[50]=120;$counter[50]*2) returns 240.
The following example shows how to pass named parameters using the Evaluate, Let, and
Get(ScriptParameter) functions, allowing access only to variable “a” (the example returns 6):
ScriptParameter = "a = 5; b = 10"
Evaluate("Let([" & Get(ScriptParameter) & "]; a+1 )" )
The following example shows how to pass named parameters, allowing access to both variable “a”
and variable “b”. The simplified first parameter makes the second parameter more complex (the
example returns 6, 12):
ScriptParameter = "a = 5; b = 10"
Evaluate("Let( [" & Get(ScriptParameter) & "]; a+1 & \", \" & b+2 )" )
The following example shows how to pass named parameters, while keeping the ability to check the
syntax of the second parameter of the Let function (the example returns 6, 12):
ScriptParameter = "a = 5; b = 10"
Let([a = Evaluate("Let( [" & Get(ScriptParameter) & "]; a )"),b =
Evaluate("Let( [" & Get(ScriptParameter) & "]; b )")]; a+1 & ", " & b+2 )
Related topics
Functions reference (category list)
Functions reference (alphabetical list)
About formulas
About functions
Defining calculation fields
Using operators in formulas
Using variables

FILEMAKER PRO HELP 857
Lookup
Purpose
Returns the value specified in sourceField using the relationships in the relationships graph. The
result of the optional failExpression will be returned if the lookup fails.
Format
Lookup(sourceField{;failExpression})
Parameters
sourceField - the field from which the lookup value is taken.
failExpression - any expression.
Parameters in curly braces { } are optional.
Data type returned
text, number, date, time, timestamp, container
Originated in
FileMaker Pro 7.0
Description
For this function to access the contents of the source field, the tables containing the source field and
calculation field need to be related. Calculations using the Lookup function won’t be forced to be
unstored calculations.
Note Lookup returns ? when the related table is an ODBC data source.
Examples
There are two tables, People and Company, in a database file containing the data shown below.
People table
Company table
CompanyID Employee
100 John Smith
200 Peter Wong
300 Sally Anderson
CompanyID CompanyName Code
100 Apple 91234
100 Apple 82345
200 FileMaker 95054

FILEMAKER PRO HELP 858
The People and Company tables are related using the number field CompanyID. The calculation
CompanyName = Lookup(Company::CompanyName;“Not found”) defined in the People
table will return Apple for the first record, FileMaker for the second record, and Not found for the
third record.
Related topics
Functions reference (category list)
Functions reference (alphabetical list)
About formulas
About functions
Defining calculation fields
Using operators in formulas
LookupNext
Purpose
Returns the next lower or higher value in sourcefield when there isn’t a matching related value.
Format
LookupNext(sourceField;lower/higherFlag)
Parameters
sourceField - the field from which the lookup value is taken
lower/higherFlag - the keywords lower or higher denote whether the value from the next
lower/higher matching record must be taken if no related record is found
Data type returned
text, number, date, time, timestamp, container
Originated in
FileMaker Pro 7.0
Description
Returns the value specified in sourceField using the relationships in the relationships graph.
LookupNext is similar to Lookup, except that when the lookup fails, the value from sourceField in
the lower or higher matching record will be returned, as specified by lower/higherFlag.
For this function to access the value in sourceField, the tables containing the source field and
calculation field need to be related. Calculations using the LookupNext function won’t be forced to
be unstored calculations.
Note LookupNext returns ? when the related table is an ODBC data source.
Examples
In this example, you are shipping several items and the cost of shipping is based on weight ranges.
Use the LookupNext function to find which shipping rate applies for an item. Use LookupNext with

FILEMAKER PRO HELP 859
the higher flag instead of Lookup because the weight of an item may not exactly match the
maximum weight, therefore we want to find the next highest value.
There are two tables, Items and Shipping Costs, in a database file containing data as shown below.
Items table
Shipping Costs table
The two tables are related by Weight and Max Weight. The calculation field Rate Lookup is
defined as Rate Lookup = LookupNext(Shipping Costs::Max Weight; Higher).
The Rate Lookup calculation field will return 25, 25, 100, and 150 for records 1 to 4. Rate
Lookup can then be used to get the correct rate code (A, A, C, and D respectively).
Related topics
Functions reference (category list)
Functions reference (alphabetical list)
About formulas
About functions
Defining calculation fields
Using operators in formulas
Self
Purpose
Returns the content of the object in which the calculation is defined.
Item Weight Rate Lookup
Lamp 8
Chair 22
Desk 60
Bed 120
Rate Code Maximum Weight
A25
B50
C100
D150
Item Weight Rate Lookup
Lamp 825
Chair 22 25
Desk 60 100
Bed 120 150

FILEMAKER PRO HELP 860
Format
Self
Parameters
None
Data type returned
text, number, date, time, timestamp
Originated in
FileMaker Pro 9.0
Description
The Self function provides a way for a calculation to reference the object with which it is associated
without having to explicitly reference the object.
Use Self to create a single calculation formula that can be applied to different objects. The Self
function is helpful for conditional formatting calculations and tooltip calculations because it returns
the content of the layout object when that object has a value. You can also use the Self function in
field definition calculations (including auto-enter and validation calculations) to return the value of
the corresponding field.
Examples
This example formula can be used in an object’s conditional formatting panel to set text formatting
when the number entered in the field is greater than 10.
self > 10 returns 1 (True) when applied to a layout field object whose value is greater than 10.
Use the following example in a layout object’s tooltip calculation to display different tooltip text
according to whether or not a value less than zero was entered.
if(self < 0; "Value is less than zero"; "Value is zero or greater")
Related topics
Functions reference (category list)
Functions reference (alphabetical list)
About formulas
About functions
Defining calculation fields
Using operators in formulas
Defining conditional formatting for layout objects
Mobile functions
Mobile functions are used with FileMaker Go.
Click a function name for details.

FILEMAKER PRO HELP 861
Related topics
About functions
About formulas
Location
Purpose
Returns the current latitude and longitude on an iOS device running FileMaker Go. Also returns the
horizontal accuracy of the values returned. The location is obtained via GPS, cellular network, or Wi-
Fi.
Format
Location (accuracy {; timeout})
Parameters
accuracy - any numeric expression or field containing a number that represents a distance in
meters.
timeout - any numeric expression or field containing a number that represents the most time it will
take to fetch the location. Measured in seconds, the default value is 60.
Parameters in curly braces { } are optional.
Data type returned
Text
Originated in
FileMaker Pro 12.0
Description
Returns and caches the location of a device in the format latitude, longitude. You can use
the values that are returned to query map services. Location fetches the location values until
timeout. If you cancel the process, FileMaker Go returns the most accurate location in the cache
(if any).
If no location is received, FileMaker Go returns an empty string. In FileMaker Pro, Location
returns an empty string.
This function Returns
Location The current latitude and longitude of an iOS device running FileMaker Go and the
horizontal accuracy of the values returned.
LocationValues The current latitude, longitude, and altitude of an iOS device running
FileMaker Go; the horizontal and vertical accuracy of the values returned; and the
number of minutes since the values were returned.

FILEMAKER PRO HELP 862
Note To avoid excessive battery consumption and repeat fetches, specify a smaller number for
timeout.
Examples
Location ( 100; 40 ) takes up to 40 seconds to return the latitude and longitude with an
accuracy of 100 meters.
+110.230000, -131.340000, +65.000000
Related topics
Functions reference (category list)
Functions reference (alphabetical list)
LocationValues
LocationValues
Purpose
Returns the current latitude, longitude, and altitude on an iOS device running FileMaker Go. Returns
the horizontal and vertical accuracy of the values returned and the number of minutes since the
values were returned. The location is obtained via GPS, cellular network, or Wi-Fi.
Format
LocationValues (accuracy {; timeout})
Parameters
accuracy - any numeric expression or field containing a number that represents a distance in
meters.
timeout - any numeric expression or field containing a number that represents the most time it will
take to fetch the location. Measured in seconds, the default value is 60.
Parameters in curly braces { } are optional.
Data type returned
Text
Originated in
FileMaker Pro 12.0
Description
Returns and caches the current location of a device in the format:
latitude¶longitude¶altitude¶horizontal accuracy (+/- accuracy in meters)
vertical accuracy (+/- accuracy in meters)¶age of value in minutes (0.2
would represent 0.2 minutes or 12 seconds ago)
You can use the GetValue function to retrieve any of the six carriage return-delimited values above.

FILEMAKER PRO HELP 863
LocationValues fetches the location values until the requested accuracy is met or until
timeout. If you cancel the process, FileMaker Go returns the most accurate location in the cache
(if any). If no location is received, FileMaker Go returns an empty string.
In FileMaker Pro, LocationValues returns an empty string.
Note To avoid excessive battery consumption and repeat fetches, specify a larger number for
accuracy and a smaller number for timeout.
Examples
LocationValues returns the following location for a device:
37.406489
-121.983428
0.000000
65
-1
0.001236
Related topics
Functions reference (category list)
Functions reference (alphabetical list)
Location
Number functions
Number functions are used to manipulate numeric data.
Click a function name for details.
This function Returns
Abs The absolute value (a positive number) of a number.
Ceiling A number rounded up to the next integer.
Combination The number of ways to uniquely choose a specified number of items from a set of
specified size.
Div An integer of the specified number divided by the divisor.
Exp The value of the constant e (the base of the natural logarithm, equal to 2.7182818)
raised to the power of a specified number.
Factorial The factorial of a specified number stopping at 1, or at a specified number
factorial.
Floor A number rounded down to the next lower integer.
Int The whole number (integer) part of the value you specify, without rounding.
Lg The base 2 logarithm of the specified number, which can be any positive value.
Ln The base-e (natural) logarithm of the specified number.
Log The common logarithm (base 10) of the specified number, which can be any
positive value.
FILEMAKER PRO HELP 864
Related topics
About functions
About formulas
Abs
Purpose
Returns the absolute value of number.
Format
Abs(number)
Parameters
number - any numeric expression or field containing a numeric expression
Data type returned
number, time
Originated in
FileMaker Pro 6.0 or earlier
Description
The absolute value of a number is positive. For example, if a negative number appears in a field, the
Abs function removes the minus sign and changes it to a positive value.
Examples
Abs(-123) returns 123.
Abs(PriceDifference) returns the positive value of the number in the PriceDifference field.
Abs(TargetDate - ActualDate) returns a positive value for the number of days difference
between the values in TargetDate and ActualDate.
Mod The remainder after a specified number is divided by divisor.
Random A random number between zero and one.
Round A number rounded off to the specified precision (number of decimal places).
SetPrecision Any math functions contained within the specified expression to the specified
digits of precision, if the math function supports extended precision.
Sign One of three possible values: -1 when the specified number is negative, 0 when
it's zero, and 1 when it's positive.
Sqrt The square root of a number.
Truncate A number truncated to the specified precision (number of decimal places), without
evaluating the value of the discarded digits.
This function Returns

FILEMAKER PRO HELP 865
Related topics
Functions reference (category list)
Functions reference (alphabetical list)
About formulas
About functions
Defining calculation fields
Using operators in formulas
Ceiling
Purpose
Returns number rounded up to the next integer.
Format
Ceiling(number)
Parameters
number - any numeric expression or field containing a numeric expression
Data type returned
number
Originated in
FileMaker Pro 7.0
Examples
Ceiling(1.25) returns 2.
Ceiling(-1.25) returns -1.
Related topics
Functions reference (category list)
Functions reference (alphabetical list)
About formulas
About functions
Defining calculation fields
Using operators in formulas
Combination
Purpose
Returns the number of ways to uniquely choose numberOfChoices items from a set of size
setSize.

FILEMAKER PRO HELP 866
Format
Combination(setSize;numberOfChoices)
Parameters
setSize - any numeric expression or field containing a non-negative numeric expression
numberOfChoices - any numeric expression or field containing a non-negative numeric
expression
Data type returned
number
Originated in
FileMaker Pro 7.0
Description
This function is useful in statistics, combinatorics, and polynomial expansions. The values returned
by this function are referred to as combination coefficients. They form Pascal’s triangle.
Examples
Combination(5;2) returns 10 for a set consisting of {a, b, c, d, e} because the unique choices
when choosing two at a time are {ab, ac, ad, ae, bc, bd, be, cd, ce, de}.
(13 * 12 * Combination(4;2) * Combination(4;3)) / Combination(52;5) returns
0.00144057..., which is the probability of being dealt a full-house in 5-card poker (less than a 1%
chance).
Related topics
Functions reference (category list)
Functions reference (alphabetical list)
About formulas
About functions
Defining calculation fields
Using operators in formulas
Div
Purpose
Returns the next lowest integer value after dividing number by divisor. Equivalent to
Floor(number/divisor).
Format
Div(number;divisor)
Combination Factorial setSize, numberOfChoices()
Factorial numberOfChoices()
----------------------------------------------------------------------------------------------------------
=

FILEMAKER PRO HELP 867
Parameters
number - any numeric expression or field containing a numeric expression
divisor - any numeric expression or field containing a numeric expression
Data type returned
number
Originated in
FileMaker Pro 7.0
Examples
Div(2.5;2) returns 1.
Div(-2.5;2) returns -2.
Related topics
Functions reference (category list)
Functions reference (alphabetical list)
About formulas
About functions
Defining calculation fields
Using operators in formulas
Exp
Purpose
Returns the value of the constant e (the base of the natural logarithm, equal to 2.7182818) raised to
the power of number.
Format
Exp(number)
Parameters
number - any numeric expression or field containing a numeric expression
Data type returned
number
Originated in
FileMaker Pro 6.0 or earlier
Description
The Exp function is the inverse of the Ln function.

FILEMAKER PRO HELP 868
Examples
Exp(1) returns 2.71828182....
Exp(Ln(2)) returns 2.
Exp(0) returns 1.
Related topics
Functions reference (category list)
Functions reference (alphabetical list)
About formulas
About functions
Defining calculation fields
Using operators in formulas
Factorial
Purpose
Returns the factorial of number stopping at 1 or stopping at the optional numberOfFactors.
Format
Factorial(number{;numberOfFactors})
Parameters
number - numeric expression or field containing a positive integer.
numberOfFactors - any numeric expression or field containing a number that represents how
many factors to include in the multiplication.
Parameters in curly braces { } are optional.
Data type returned
number
Originated in
FileMaker Pro 7.0
Description
This function is useful in statistics and combinatorics.
Where n = number and i = numberOfFactors:
Examples
Factorial(3) returns 6, which = 3 * 2 * 1.
Factorial n() nn 1–()n2–()…1()=
Factorial n;i() nn 1–()n2–()…ni–1+()=

FILEMAKER PRO HELP 869
Factorial(10;3) returns 720, which = 10 * 9 * 8.
Related topics
Functions reference (category list)
Functions reference (alphabetical list)
About formulas
About functions
Defining calculation fields
Using operators in formulas
Floor
Purpose
Returns number rounded down to the next lower integer.
Format
Floor(number)
Parameters
number - any numeric expression or field containing a numeric expression
Data type returned
number
Originated in
FileMaker Pro 7.0
Examples
Floor(1.25) returns 1.
Floor(-1.25) returns -2.
Related topics
Functions reference (category list)
Functions reference (alphabetical list)
About formulas
About functions
Defining calculation fields
Using operators in formulas
Int
Purpose
Drops digits to the right of the decimal point and returns the integer part of number without rounding.

FILEMAKER PRO HELP 870
Format
Int(number)
Parameters
number - any numeric expression or field containing a numeric expression
Data type returned
number
Originated in
FileMaker Pro 6.0 or earlier
Examples
Int(1.45) returns 1.
Int(-3.9) returns -3.
Int(123.9) returns 123.
Int(Players/3) returns 4, if Players contains 13.
Related topics
Functions reference (category list)
Functions reference (alphabetical list)
About formulas
About functions
Defining calculation fields
Using operators in formulas
Lg
Purpose
Returns the base-2 logarithm of number.
Format
Lg(number)
Parameters
number - any numeric expression or field containing a numeric expression
Data type returned
number
Originated in
FileMaker Pro 7.0

FILEMAKER PRO HELP 871
Description
Number can be any positive value. Negative values return an error. For 0, the Lg function returns
nothing because this value is out of the acceptable range.
Examples
Lg(1) = 0
Lg(2) = 1
Lg(32) = 5
Related topics
Functions reference (category list)
Functions reference (alphabetical list)
About formulas
About functions
Defining calculation fields
Using operators in formulas
Ln
Purpose
Returns the base-e (natural) logarithm of number.
Format
Ln(number)
Parameters
number - any numeric expression or field containing a numeric expression
Data type returned
number
Originated in
FileMaker Pro 6.0 or earlier
Description
Number can be any positive value. Negative values and 0 return an error. The Exp function is the
inverse of the Ln function.
Examples
Ln(2.7182818) returns .99999998....
Lg Ln number()
Ln 2()
---------------------------------
=

FILEMAKER PRO HELP 872
Ln(Exp(5)) returns 5.
Related topics
Functions reference (category list)
Functions reference (alphabetical list)
About formulas
About functions
Defining calculation fields
Using operators in formulas
Log
Purpose
Returns the base-10 (common) logarithm of number.
Format
Log(number)
Parameters
number - any positive numeric expression or field containing a numeric expression
Data type returned
number
Originated in
FileMaker Pro 6.0 or earlier
Description
Number can be any positive value. Negative values return an error. For 0, the Log function returns
nothing because this value is out of the acceptable range.
Examples
Log(1) returns 0.
Log(100) returns 2.
Related topics
Functions reference (category list)
Functions reference (alphabetical list)
About formulas
About functions
Defining calculation fields
Using operators in formulas
Log Ln number()
Ln 10()
---------------------------------
=

FILEMAKER PRO HELP 873
Mod
Purpose
Returns the remainder after number is divided by divisor.
Format
Mod(number;divisor)
Parameters
number - any numeric expression or field containing a numeric expression
divisor - numeric expression or field containing a numeric expression
Data type returned
number
Originated in
FileMaker Pro 6.0 or earlier
Description
Use the Mod function to test whether a number is even or odd by specifying a divisor of 2. If the
result is zero, then the number is even; otherwise, it’s odd. The result has the same sign as
divisor.
Examples
Mod(13;4) returns 1.
Mod(7;5) returns 2.
Mod(7;-5) returns -3.
Mod(-7;5) returns 3.
Mod(-7;-5) returns -2.
Mod(Participants;TeamSize) returns 4 if Participants contains 40 and TeamSize contains 9.
If(Mod(Get(RecordNumber);2) = 0;“even”;“odd”) labels a record even or odd using the
Get(RecordNumber) function.
Related topics
Functions reference (category list)
Functions reference (alphabetical list)
About formulas
About functions
Defining calculation fields
Using operators in formulas
Mod number Div number;divisor()divisor•()–=

FILEMAKER PRO HELP 874
Random
Purpose
Returns a number between zero and one, including zero, but not including one.
Format
Random
Parameters
None
Data type returned
number
Originated in
FileMaker Pro 6.0 or earlier
Description
Returns a pseudo-random number in the range (0,1). FileMaker Pro generates a new random
number when you:
•insert the Random function into a formula
•cause a formula containing the Random function to be reevaluated (by changing data in any
of the fields the formula uses)
•display or access a calculation field defined to have an unstored result
Examples
Int ( Dice::NumSides * Random ) + 1 returns a randomly chosen side of a single die.
The following script calculates multiple die rolls, adds the rolls to a single variable, then displays the
results in a custom dialog.
Loop
Set Variable [$ROLL; Value:$ROLL + ( Int ( Test::NumSides * Random ) +
1 )]
Set Variable [$COUNTER; Value:$COUNTER + 1]
Exit Loop If [$COUNTER = Dice::NumDice]
End Loop
Show Custom Dialog [$ROLL]
Related topics
Functions reference (category list)
Functions reference (alphabetical list)
About formulas
About functions
Defining calculation fields
Using operators in formulas

FILEMAKER PRO HELP 875
Round
Purpose
Returns number rounded off to the specified precision (number of decimal places).
Format
Round(number;precision)
Parameters
number - any numeric expression or field containing a numeric expression
precision - any numeric expression or field containing a numeric expression
Data type returned
number
Originated in
FileMaker Pro 6.0 or earlier
Description
If you round a negative number of decimal places, all digits to the right of the decimal point are
dropped, and the number is rounded to the nearest tens, hundreds, and so on. The Round function
always rounds up at 0.5.
Examples
Round(123.456;2) returns 123.46.
Round(14.5;0) returns 15.
Round(29343.98;-3) returns 29000.
Round(123.456;-1) returns 120.
Related topics
Functions reference (category list)
Functions reference (alphabetical list)
About formulas
About functions
Defining calculation fields
Using operators in formulas
SetPrecision
Purpose
Computes any math function with a precision of 16 to 400 digits to the right of the decimal point.

FILEMAKER PRO HELP 876
Format
SetPrecision(expression;precision)
Parameters
expression - any numeric expression
precision - any number or numeric expression
Data type returned
number
Originated in
FileMaker Pro 7.0
Description
All functions except trigonometric functions support extended precision. This function doesn’t
perform a truncation.
Examples
SetPrecision(5/9;30) returns 0.555555555555555555555555555556.
SetPrecision(1.321321321321321321321321321;0) returns 1.3213213213213213.
SetPrecision(If(field1>5;Exp(50);Average(5/9;1/7;5/7));25) returns either
5184705528587072464087.4533229334853848274691006 if field1 > 5, or
0.4708994708994708994708995 if field1 <= 5.
Related topics
Functions reference (category list)
Functions reference (alphabetical list)
About formulas
About functions
Defining calculation fields
Using operators in formulas
Sign
Purpose
Returns one of three possible values: -1 when number is negative, 0 when it’s zero, and 1 when it’s
positive.
Format
Sign(number)

FILEMAKER PRO HELP 877
Parameters
number - any numeric expression or field containing a numeric expression
Data type returned
number
Originated in
FileMaker Pro 6.0 or earlier
Examples
Sign(15.12) returns 1.
Sign(-175) returns -1.
Sign(BalanceDue) returns 0, if BalanceDue is a number field containing 0.
Related topics
Functions reference (category list)
Functions reference (alphabetical list)
About formulas
About functions
Defining calculation fields
Using operators in formulas
Sqrt
Purpose
Calculates the square root of number.
Format
Sqrt(number)
Parameters
number - any positive number, numeric expression, or field containing a numeric expression
Data type returned
number
Originated in
FileMaker Pro 6.0 or earlier
Description
Use this function to calculate Sqrt.
Sqrt number=

FILEMAKER PRO HELP 878
Examples
Sqrt(4) returns 2.
Sqrt(SquareFeet) returns 6 if the SquareFeet number field contains 36.
Related topics
Functions reference (category list)
Functions reference (alphabetical list)
About formulas
About functions
Defining calculation fields
Using operators in formulas
Truncate
Purpose
Returns number truncated to the specified precision (number of decimal places).
Format
Truncate(number;precision)
Parameters
number - any numeric expression or field containing a numeric expression
precision - any numeric expression or field containing a numeric expression
Data type returned
number
Originated in
FileMaker Pro 6.0 or earlier
Description
This function doesn’t evaluate digits beyond the specified precision. Use the Round function to
round up or down to the required precision.
Examples
Truncate(123.456;2) returns 123.45.
Truncate(-14.6;0) returns -14.
Truncate(29343.98;-3) returns 29000.
Truncate(123.456;4) returns 123.456.
Truncate(29343.98;5) returns 29343.98.
FILEMAKER PRO HELP 879
Related topics
Functions reference (category list)
Functions reference (alphabetical list)
About formulas
About functions
Defining calculation fields
Using operators in formulas
Repeating functions
Repeating functions perform calculations on repeating fields.
Click a function name for details.
Related topics
About functions
About formulas
Extend
Purpose
Allows a value in non-repeatingField to be used with every repetition in a repeating field.
Format
Extend(non-repeatingField)
Parameters
non-repeatingField - any non-repeating field (a field defined to contain only one value), or an
expression that returns a reference to one
Data type returned
text, number, date, time, timestamp, container
Originated in
FileMaker Pro 6.0 or earlier
This function Returns
Extend In a calculation involving both repeating and non-repeating fields, allows a value in
a non-repeating field to be used with every repetition in a repeating field.
GetRepetition The contents of the specified repetition of a repeating field.
Last The last valid, non-blank value in the specified field.

FILEMAKER PRO HELP 880
Description
Use the Extend function with calculations involving both repeating and non-repeating fields.
Without the Extend function, the value in non-repeatingField is used only with the first
repetition in the repeating field.
Examples
Extend(TaxRate) * Quantity * ItemPrice returns 1.197, .6606, and 1.497 when TaxRate
contains .06; the repeating field Quantity contains 1, 3, and 5; and the repeating field ItemPrice
contains 19.95, 3.67, and 4.99.
Item Count * Extend(if(Company Size > 100; Reduced Price; Price)) returns
$1250, $500, and $750 when Reduced Price contains $50; the repeating field Item Count
contains 25, 10, and 15; and Company Size is greater than 100. If Company Size is less than
100 and Price contains $100, this calculation returns $2500, $1000, and $1500.
Related topics
Functions reference (category list)
Functions reference (alphabetical list)
About formulas
About functions
Defining calculation fields
Using operators in formulas
GetRepetition
Purpose
Returns the contents of the repeating field specified by number.
Format
GetRepetition(repeatingField;number)
Parameters
repeatingField - any repeating field, or an expression that returns a reference to a repeating
field
number - the field repetition number
Data type returned
text, number, date, time, timestamp, container
Originated in
FileMaker Pro 6.0 or earlier
Examples
ParcelBids is a field defined to repeat with ten values and contains the values 2500, 1200, and
1500.

FILEMAKER PRO HELP 881
GetRepetition(ParcelBids;2) returns 1200.
GetRepetition(if(IsEmpty(ParcelBids) ≠ true, ParcelBids, HouseBids);2)
returns 1200.
GetRepetition(ParcelBids;5) returns nothing.
Note You can also find the contents of a particular repetition in a repeating field using square
brackets [ ] as array operators. For example, ParcelBids[2] returns 1200. See Getting the
contents of a repetition in a repeating field.
Related topics
Functions reference (category list)
Functions reference (alphabetical list)
About formulas
About functions
Defining calculation fields
Using operators in formulas
Last
Purpose
Returns the last valid, non-blank value in field.
Format
Last(field)
Parameters
field - any repeating field or related field, or an expression that returns a reference to a repeating
field or related field
Data type returned
text, number, date, time, timestamp, container
Originated in
FileMaker Pro 6.0 or earlier
Description
If field specifies a repeating field then it returns the last non-blank repetition. If field specifies a
related field, then it returns the last non-blank value in the related set.
Note The last related value will depend on the way related records are sorted. If the related records
are not sorted, then the Last function returns a value based on the creation order of the records.
Examples
Last(ParcelBids) returns 1500 if ParcelBids is a number field defined to repeat with ten values
and contains the values 2500, 1200, and 1500.

FILEMAKER PRO HELP 882
Last(Payments::PaymentDate) returns the payment date in the last matching record in the
Payments table.
Last(if(IsEmpty(Company);PersonalPhone;WorkPhone)) returns the last non-empty
phone number from the repeating field PersonalPhone when the Company field is empty. If the
Company field is not empty, the function returns the last non-empty phone number from the
repeating field WorkPhone.
Related topics
Functions reference (category list)
Functions reference (alphabetical list)
About formulas
About functions
Defining calculation fields
Using operators in formulas
Summary functions
Summary functions produce a summary of all records in the found set, or subsummary values for
records in different groups. Formulas can contain more than one summary function. Summary
functions calculate more slowly than other functions because they generate values for a range of
records.
An alternative way to generate similar calculated results is to use Aggregate functions to summarize
data in related records (whether or not they appear in a portal). See Aggregate functions and
information about summarizing data in portals.
Click the function name for details.
Related topics
About functions
About formulas
GetSummary
Purpose
Returns the value of summaryField for the current range of records when the database file is
sorted by breakField.
Format
GetSummary(summaryField;breakField)
This function Returns
GetSummary The value of the summary field for the current range of records when the database
file is sorted by the break field.

FILEMAKER PRO HELP 883
Parameters
summaryField - field of type summary, or an expression that returns a reference to one.
breakField - field, or an expression that returns a reference to one. To calculate a grand summary
value, use the same summary field for both the summary field and the break field parameters.
GetSummary must be set up in the same table as the break field.
Data type returned
number, date, time, timestamp
Originated in
FileMaker Pro 6.0 or earlier
Description
This function produces subsummary values. If the database file isn’t sorted by the break field, the
result is blank.
When a summary field is also used as the break field, returns the summary field value for the entire
found set of records (a grand summary value).
Use GetSummary to capture summary values when you want to:
•use summary values in a calculation
•display subsummary values in Browse mode or in a body part
Calculations using the GetSummary function are unstored.
Note You can get similar results using a self-join relationship and Aggregate functions. For more
information, see Summarizing data in portals.
Examples
GetSummary(Total Sales;Country) returns a summary of all records pertaining to the value
in the Country field.
GetSummary(Total Sales, if(Number of Countries > 1, Country, Sales Zone))
returns a summary of Total Sales by Country if Number of Countries is greater than 1. Otherwise, it
returns a summary of Total Sales by Sales Zone.
GetSummary(Total Sales;Total Sales) produces a summary of all records (similar to using
a summary field, which is a total of total sales).
If(ThisCharge > 3 * GetSummary(AvgCharge;Customer), “Verify this charge”,
“ “) displays Verify this charge if the current charge is greater than three times the average
charge.
Related topics
Functions reference (category list)
Functions reference (alphabetical list)
About formulas
About functions
Defining calculation fields
Using operators in formulas
FILEMAKER PRO HELP 884
Text functions
Text functions can be used to analyze, rearrange, extract, and build text strings. For example, you
could use the MiddleWords function to extract specific words from supplied text.
Text functions operate on these parameters:
•fields of type text
•text constants (in quotation marks)
•expressions having a text result
Click a function name for details.
This function Returns
Char Returns the characters for the Unicode code points in the number.
Code Returns the Unicode code points for the characters in the text. If zero characters
are in the text, returns an empty string.
Exact 1 (True) for an exact match, or 0 (False) for a mismatch between two text strings
or container fields.
Filter Only the specified characters, in the order that they were originally entered in the
text.
FilterValues Only the specified values, in the order that they were originally entered in the text.
GetAsCSS The specified text, converted to the CSS (Cascading Style Sheets) format.
GetAsDate Dates in the specified text as field type date, for use in formulas involving dates or
date functions.
GetAsNumber Numbers in the specified text as field type number, for use with formulas involving
numbers or numeric functions. If zero numeric characters are in the text, returns
an empty string.
GetAsSVG The specified text, converted to the SVG (Scalable Vector Graphics) format.
GetAsText The specified number, date, time or timestamp as field type text, for use with
formulas involving text or text functions.
GetAsTime Times or timestamps in the specified text as field type time, for use with formulas
involving the time or timestamp functions.
GetAsTimestamp The specified data as field type timestamp, for use with formulas involving
timestamps.
GetAsURLEncoded The specified text, converted with URL (Uniform Resource Locators) encoding.
GetValue A specific value from a list of values.
Hiragana Hiragana converted from Katakana (Hankaku and Zenkaku).
KanaHankaku Hankaku Katakana converted from Zenkaku Katakana.
KanaZenkaku Zenkaku Katakana converted from Hankaku Katakana.
KanjiNumeral Kanji numerals converted from Arabic numerals.
Katakana Zenkaku Katakana converted from Hiragana.
Left The specified number of characters in the text, counting from the left.
LeftValues The specified number of values in the text, counting from the left.
LeftWords The specified number of words in the text, counting from the left.
FILEMAKER PRO HELP 885
Related topics
About functions
About formulas
Char
Purpose
Returns the characters for the Unicode code points in the number.
Length The number of characters in the specified text, including all spaces, numbers, and
special characters.
Lower All letters in the specified text as lowercase.
Middle The specified number of characters in the text, starting at a specified character
position.
MiddleValues The specified number of values in the text, starting with a specified value.
MiddleWords The specified number of words in the text, starting with a specified word.
NumToJText Roman numbers converted to Japanese text.
PatternCount The number of occurrences of a search string in the specified text.
Position The specified occurrence of a search string, starting from a specified position.
Proper The first letter of each word in the specified text as uppercase, and all other letters
as lowercase.
Quote The specified text surrounded by quotation marks (“ ”).
Replace A new string of characters consisting of the specified text as modified by the
specified replacement text.
Right The specified number of characters in the text, counting from the right.
RightValues The specified number of values in the text, counting from the right.
RightWords The specified number of words in the text, counting from the right.
RomanHankaku Hankaku (alphanumeric & symbols) converted from Zenkaku (alphanumeric &
symbols).
RomanZenkaku Zenkaku (alphanumeric & symbols) converted from Hankaku (alphanumeric &
symbols).
SerialIncrement The combined text and numbers in a specified value, with the numbers
incremented by the specified amount.
Substitute A text string with every occurrence of a specified search string in the text replaced
by a specified replacement string.
Trim Text stripped of all leading and trailing spaces.
TrimAll Text with full width spaces between non-Roman and Roman characters removed.
Upper All letters in the specified text as uppercase.
ValueCount A count of the total number of values in the specified text.
WordCount A count of the total number of words in the specified text.
This function Returns

FILEMAKER PRO HELP 886
Format
Char(number)
Parameters
number - a decimal number representing one or more Unicode code points
Data type returned
text
Originated in
FileMaker Pro 10.0
Description
Each group of five digits in the number is treated as a Unicode code point, and the character for
each five-digit group is returned in the text.
If the number is 0, the function returns an empty string.
If the number is between 1 and 99,999, the function returns a single character.
If the number contains more than five digits, the function returns the string of characters represented
by those code points.
Note Some Unicode characters can be represented by a single code point or multiple code points.
For example, the character ä can be represented by the letter a plus ¨ (dieresis) or by the single
character ä. The single code point version of this kind of character is called a precomposed
character or a composite character.
Examples
Char(0) returns an empty string (“”).
Char(97) returns a.
Char(98) returns b.
Char(9800097) returns ab.
Char(228) returns ä.
Char(77600097) returns ä. In this case the number represents two Unicode characters: the letter
a and the dieresis character. When these two characters appear together in a string they are
displayed as a single character.
Related topics
Functions reference (category list)
Functions reference (alphabetical list)
About formulas
About functions
Defining calculation fields
Using operators in formulas

FILEMAKER PRO HELP 887
Code
Purpose
Returns the Unicode code points for the characters in the text.
Format
Code(text)
Parameters
text - one or more characters
Data type returned
number
Originated in
FileMaker Pro 10.0
Description
Returns the Unicode code points for the characters in text. If zero characters are in text, returns
an empty string.
If one character is in the text, the function returns the code point for that character. If the text
contains multiple characters, the Unicode code point for each character is returned as a group of
five digits where the code point for the first character is represented by the low five digits, the code
point for the second character in the next higher (to the left) five digits, and so forth.
When converting a composite character such as ä, the function returns the Unicode code point for
the composite character.
The following table shows how navigational characters are reported to a script activated by this
trigger:
Key Pressed Is reported as Notes
backspace 8 Corresponds to Unicode/ASCII code for BS (backspace)
tab 9 Corresponds to Unicode/ASCII code for HT (horizontal tab)
shift-tab 9 The shift can be detected using the value returned from the
Get(TriggerModifierKeys) function
enter 10 Corresponds to Unicode/ASCII code for LF (linefeed)
return 13 Corresponds to Unicode/ASCII code for CR (carriage return)
escape 27 Corresponds to Unicode/ASCII code for ESC (escape)
left arrow 28 Corresponds to Unicode/ASCII code for FS (file separator)
up arrow 29 Corresponds to Unicode/ASCII code for GS (group separator)
right arrow 30 Corresponds to Unicode/ASCII code for RS (record
separator)
down arrow 31 Corresponds to Unicode/ASCII code for US (unit separator)
space 32 Corresponds to Unicode/ASCII code for Space

FILEMAKER PRO HELP 888
Note If there are too many characters to be represented in the FileMaker number field type, the
function returns a NaN (Not a Number) value.
Examples
Code(“”) returns an empty string.
Code(“a”) returns 97.
Code(“b”) returns 98.
Code(“ab”) returns 9800097.
Code(“ä”) returns 228.
Code(“ä”)(an a followed by a dieresis character entered in a separate keystroke) returns
77600097.
Related topics
Functions reference (category list)
Functions reference (alphabetical list)
About formulas
About functions
Defining calculation fields
Using operators in formulas
Exact
Purpose
Compares the contents of any two fields. If the fields match, the result is 1 (True); otherwise, the
result is 0 (False).
Format
Exact(originalText;comparisonText)
Parameters
originalText - any text expression, text field, or container field
comparisonText - any text expression, text field, or container field
Data type returned
number
Originated in
FileMaker Pro 6.0 or earlier
forward delete 127 Corresponds to Unicode/ASCII code for Delete
Key Pressed Is reported as Notes

FILEMAKER PRO HELP 889
Description
For text to match exactly, the uppercase and lowercase usage must be the same. For container
fields, the data must be stored in the same manner (either embedded, or stored by reference).
Note When evaluating values, text attributes such as font, styles, and sizes are not considered.
Tip If case isn't important, use the Lower or Upper function on both parameters to process data
before checking for an exact match.
Examples
Exact(“McDonald”;“McDonald”) returns 1 (True).
Exact(“McDonald”;“MCDONALD”) returns 0 (False).
Exact(Upper(“McDonald”);Upper(“MCDONALD”)) returns 1 (True).
Exact(“John”;“John ”) returns 0 (False).
Exact(BillTo;ShipTo) returns 1 (True) when the value in BillTo is the same as the value in
ShipTo.
Exact(Recipient;Upper(Recipient)) returns 1 (True), when Recipient contains JOHNSON.
Exact(Country;“Spain”) returns 1 (True) when the Country field contains Spain.
Related topics
Functions reference (category list)
Functions reference (alphabetical list)
About formulas
About functions
Defining calculation fields
Using operators in formulas
Filter
Purpose
Returns from textToFilter only those characters specified in filterText, in the order they
were originally entered in textToFilter.
Format
Filter(textToFilter;filterText)
Parameters
textToFilter - any text expression or text field
filterText - the characters to preserve in the specified text
Data type returned
text

FILEMAKER PRO HELP 890
Originated in
FileMaker Pro 7.0
Description
If filterText doesn’t have any characters, an empty string is returned. The Filter function is
case-sensitive.
Examples
Filter(“(408)555-1212”;“0123456789”) returns 4085551212.
Filter(“AaBb”;“AB”) returns AB.
The following example removes all text from the provided data, then formats the remaining numbers
in the preferred phone number formatting:
Let(phone = filter(theField;“0123456789”);“(“ & left(phone;3) & “)” &
middle(phone;4;3) & “-” & middle(phone;7;4))
If theField contains Work: 408.555.1212 this calculation returns (408)555-1212.
Related topics
Functions reference (category list)
Functions reference (alphabetical list)
About formulas
About functions
Defining calculation fields
Using operators in formulas
FilterValues
Purpose
Returns a text result containing only the values that were provided in filterValues, in the order
they were originally entered in textToFilter.
Format
FilterValues(textToFilter; filterValues)
Parameters
textToFilter - any text expression or text field
filterValues - values that you want to preserve in the specified text
Important See Design functions for information about literal text parameters.
Data type returned
text

FILEMAKER PRO HELP 891
Originated in
FileMaker Pro 7.0
Description
If filterValues doesn’t have any values, an empty string is returned.
Values are text items separated by carriage returns. A value can be empty, a single character, a
word, a sentence, or a paragraph. When you press Enter or Return, you start creating a new value.
The last value will be recognized with or without a carriage return.
When the textToFilter or the filterValues parameter is a literal string, you must insert a
paragraph character (¶) between each item in the string. To insert a carriage return character, click
the ¶ button in the Specify Calculation dialog box.
The FilterValues function is not case-sensitive.
Examples
FilterValues(“Plaid¶Canvas¶Suitcase”;“Plaid¶Canvas”) returns
Plaid
Canvas
FilterValues(ValueListItems(“Database”;“Sizes”);“Medium¶Small”) returns
Small
Medium
when a database file named Database has a value list Sizes that contains Small¶Medium¶Large.
Related topics
Functions reference (category list)
Functions reference (alphabetical list)
About formulas
About functions
Defining calculation fields
Using operators in formulas
GetAsCSS
Purpose
Returns text converted to the CSS (Cascading Style Sheets) format.
Format
GetAsCSS(text)
Parameters
text - any text expression or text field

FILEMAKER PRO HELP 892
Data type returned
text
Originated in
FileMaker Pro 7.0
Description
CSS format is an internet text format similar to HTML. CSS supports more text formats than HTML,
so CSS will represent what you have typed more accurately.
Note The GetAsCSS function does not return formats that are set in the Conditional Formatting
dialog box.
Examples
GetAsCSS(text) returns the example result shown below when the field text contains the word
“Frank” and the word Frank has the following text attributes: Font = Helvetica, Font Size = 12 points,
Font Color = red, Font Style = bold.
Example result:
<SPAN STYLE = “font-family: 'Helvetica';font-size: 12px;color:
#FF0000;font-weight: bold;text-align: left;”>Frank</SPAN>
Related topics
Functions reference (category list)
Functions reference (alphabetical list)
About formulas
About functions
Defining calculation fields
Using operators in formulas
GetAsDate
Purpose
Returns dates in text as field type date, for use in formulas involving dates or date functions.
Format
GetAsDate(text)
Parameters
text - any text expression or text field containing text in the same format as the date on the system
where the file was created
Data type returned
date

FILEMAKER PRO HELP 893
Originated in
FileMaker Pro 6.0 or earlier
Description
Use the GetAsDate or Date function to enter a date constant into a formula. The format of text
date must be the same as the date format on the system where the file was created.
You can also use this function to convert the number of days to a date. If you specify a number as
the parameter, it has to be between 1 (for 1/1/0001) and 1460970 (for 12/31/4000).
Note If the function returns a number instead of a date, go to the Specify Calculation dialog box and
make sure the Calculation result is date.
Important To avoid errors when using dates, always use four-digit years. For more information
about how FileMaker Pro handles two-digit dates, see Conversion of dates with two-digit years.
Examples
GetAsDate(“03/03/2014”) returns 3/3/2014. You can perform date operations on this result
using the Date function.
GetAsDate(735516) returns 10/10/2014. The number 735516 specifies the number of days since
1/1/0001.
Use the following formula to determine the number of days elapsed between values in two
timestamp fields:
GetAsDate(EndDate) - GetAsDate(StartDate) returns 90 if the value in the field
EndDate is 4/1/2010 1:00 AM and the value in the field StartDate is 1/1/2010
11:15 PM.
Related topics
Functions reference (category list)
Functions reference (alphabetical list)
About formulas
About functions
Defining calculation fields
Using operators in formulas
GetAsNumber
Purpose
Returns only the numbers in text, as field type number, for use with formulas involving numbers or
numeric functions.
Format
GetAsNumber(text)

FILEMAKER PRO HELP 894
Parameters
text - any text expression or text field containing numbers
Data type returned
number
Originated in
FileMaker Pro 6.0 or earlier
Description
This function drops all non-numeric characters from text. If zero numeric characters are in text,
returns an empty string.
You can also use this function to convert a date to the number of days. The returned number is the
number of days since 1/1/0001.
Examples
GetAsNumber(“FY98”) returns 98.
GetAsNumber(“$1,254.50”) returns 1254.5.
GetAsNumber(“2 + 2”) returns 22.
GetAsNumber(SerialNumber) returns 35684, when the value of SerialNumber is
TKV35FRG6HH84.
GetAsNumber(DateOfBirth) returns 735516, when the DateOfBirth field contains 10/10/2014.
GetAsNumber(Passcode)returns an empty string, when the Passcode field contains
QTjPLeRMaCV.
Related topics
Functions reference (category list)
Functions reference (alphabetical list)
About formulas
About functions
Defining calculation fields
Using operators in formulas
GetAsSVG
Purpose
Returns text converted to the SVG (Scalable Vector Graphics) format.
Format
GetAsSVG(text)
Parameters
text - any text expression or text field

FILEMAKER PRO HELP 895
Data type returned
text
Originated in
FileMaker Pro 7.0
Description
SVG is an internet text format similar to HTML or CSS. SVG supports more text formats than HTML,
so SVG will represent what you have typed more accurately.
Note The GetAsSVG function does not return formats that are set in the Conditional Formatting
dialog box.
Examples
GetAsSVG(text) returns the example result (below) when the field text contains the word “Frank”
and the word Frank has the following text attributes: Font = Helvetica, Font Size = 12 points, Font
Color = red, Font Style = bold.
Example result:
<StyleList>
<Style#0>”font-family: 'Helvetica';font-size: 12px;color:
#FF0000;font-weight: bold;text-align: left;”,
Begin: 1, End: 5</Style>
</StyleList>
<Data>
<Span style=”0”>Frank</Span>
</Data>
Related topics
Functions reference (category list)
Functions reference (alphabetical list)
About formulas
About functions
Defining calculation fields
Using operators in formulas
GetAsText
Purpose
Returns data as field type text, for use with formulas involving text or text functions.
Format
GetAsText(data)

FILEMAKER PRO HELP 896
Parameters
data - any number, date, time or timestamp expression, or a field containing a number, date, time,
timestamp, or container
Data type returned
text
Originated in
FileMaker Pro 6.0 or earlier
Description
The data returned can be a field type number, date, time, timestamp, or container.
For a container field, GetAsText returns external path information, text (when the container
contains text that does not resolve into a valid path), or a question mark (?) if the container data is
embedded in the database. For container data stored externally, data is returned in the format
shown in the following example:
GetAsText(Container)returns
remote:cat.jpg
size:320,240
JPEG:Images/Animals/cat.jpg
Examples
GetAsText(45) returns 45.
“You are ” & GetAsText(DaysDelinquent) & “ days late.” returns You are 3 days
late. when the value of DaysDelinquent is 3.
“FY” & GetAsText(FiscalYear) returns FY98, if the FiscalYear number field contains 98.
Related topics
Functions reference (category list)
Functions reference (alphabetical list)
About formulas
About functions
Defining calculation fields
Using operators in formulas
GetAsTime
Purpose
Returns times or timestamps in text as field type time, for use with formulas involving the Time or
Timestamp functions.
Format
GetAsTime(text)

FILEMAKER PRO HELP 897
Parameters
text - any text expression or text field containing a time
Data type returned
time
Originated in
FileMaker Pro 6.0 or earlier
Description
Use the GetAsTime or the Time function to enter a time constant into a formula. The format of the
supplied time must be the same as the time format on the system where the file was created.
Examples
GetAsTime(“02:47:35”) returns 2:47:35 when you select time as the calculation result. You can
perform time calculations on this result.
GetAsTime(“02:47:35”) returns 1/1/0001 2:47:35 when you select timestamp as the calculation
result.
Abs(GetAsTime(“12:15 pm”) - CheckOut) returns 3:00:00 when the CheckOut time field
contains 3:15 PM.
Related topics
Functions reference (category list)
Functions reference (alphabetical list)
About formulas
About functions
Defining calculation fields
Using operators in formulas
GetAsTimestamp
Purpose
Returns text as field type timestamp, for use with formulas involving timestamps.
Format
GetAsTimestamp(text)
Parameters
text - any text expression, or text, number, date, or time field
Data type returned
timestamp

FILEMAKER PRO HELP 898
Originated in
FileMaker Pro 7.0
Description
Text strings must be in the form of a date followed by a time. A number is considered to be the
number of seconds since 1/1/0001. There are 86400 seconds in each day.
Examples
GetAsTimestamp(“4/5/2014 4:05:06”) returns 4/5/2014 4:05:06 AM.
GetAsTimestamp(50000) returns 1/1/0001 1:53:20 PM.
Related topics
Functions reference (category list)
Functions reference (alphabetical list)
About formulas
About functions
Defining calculation fields
Using operators in formulas
GetAsURLEncoded
Purpose
Returns text as URL (Uniform Resource Locator) encoding, for use as a URL.
Format
GetAsURLEncoded(text)
Parameters
text - any text expression or text field
Data type returned
text
Originated in
FileMaker Pro 8.5
Description
This function removes all styles from text. All characters are first converted to UTF-8 format.
Characters that are neither letters nor digits, or digits that are in the upper ASCII range, are
converted to %HH format (a percent sign followed by the character’s hexadecimal value).
See the following website for more information on URL encoding:
http://www.w3.org

FILEMAKER PRO HELP 899
Examples
GetAsURLEncoded("Hello") returns Hello.
GetAsURLEncoded("San Francisco") returns San%20Francisco.
GetAsURLEncoded("français") returns fran%c3%a7ais.
Related topics
Functions reference (category list)
Functions reference (alphabetical list)
About formulas
About functions
Defining calculation fields
Using operators in formulas
Defining a custom web address
GetValue
Purpose
Returns the requested value given by valueNumber from listOfValues.
Format
GetValue(listOfValues;valueNumber)
Parameters
listOfValues - a list of carriage return-delimited values
valueNumber - the value to return from the list
Data type returned
text
Originated in
FileMaker Pro 8.0
Description
This function is useful in looping scripts or recursive custom calculations.
Values are text items separated by carriage returns. You can place several values together to create
a carriage return-delimited list of values. A value can be empty, a single character, a word, a
sentence, or a paragraph. When you press Enter or Return, you start creating a new value. The last
value will be recognized with or without a carriage return.
When the listOfValues parameter is a literal string, you must insert a literal carriage return
character (¶) between each item in the string. To insert a literal carriage return character, click the 
button in the Specify Calculation dialog box.

FILEMAKER PRO HELP 900
Examples
GetValue(“London¶Paris¶Hong Kong”;2) returns
Paris
Related topics
Functions reference (category list)
Functions reference (alphabetical list)
About formulas
About functions
Defining calculation fields
Using operators in formulas
Hiragana
Purpose
Converts Katakana (Hankaku and Zenkaku) in text to Hiragana.
Format
Hiragana(text)
Parameters
text - any text expression or text field
Data type returned
text
Originated in
FileMaker Pro 6.0 or earlier
Examples
Hiragana(“ ”) returns
Related topics
Functions reference (category list)
Functions reference (alphabetical list)
About formulas
About functions
Defining calculation fields
Using operators in formulas

FILEMAKER PRO HELP 901
KanaHankaku
Purpose
Converts Zenkaku Katakana to Hankaku Katakana.
Format
KanaHankaku(text)
Parameters
text - any text expression or text field
Data type returned
text
Originated in
FileMaker Pro 6.0 or earlier
Examples
KanaHankaku(“ “) returns
Related topics
Functions reference (category list)
Functions reference (alphabetical list)
About formulas
About functions
Defining calculation fields
Using operators in formulas
KanaZenkaku
Purpose
Converts Hankaku Katakana to Zenkaku Katakana.
Format
KanaZenkaku(text)
Parameters
text - any text expression or text field
Data type returned
text

FILEMAKER PRO HELP 902
Originated in
FileMaker Pro 6.0 or earlier
Examples
KanaZenkaku(“ “) returns
Related topics
Functions reference (category list)
Functions reference (alphabetical list)
About formulas
About functions
Defining calculation fields
Using operators in formulas
KanjiNumeral
Purpose
Converts Arabic numerals to Kanji numeral.
Format
KanjiNumeral(text)
Parameters
text - any text expression or text field
Data type returned
text
Originated in
FileMaker Pro 6.0 or earlier
Examples
KanjiNumeral(123) returns
KanjiNumeral(“ “) returns
Related topics
Functions reference (category list)
Functions reference (alphabetical list)
About formulas
About functions
Defining calculation fields
Using operators in formulas

FILEMAKER PRO HELP 903
Katakana
Purpose
Converts from Hiragana to Zenkaku Katakana.
Format
Katakana(text)
Parameters
text - any text expression or text field
Data type returned
text
Originated in
FileMaker Pro 6.0 or earlier
Examples
Katakana(“ “) returns
Related topics
Functions reference (category list)
Functions reference (alphabetical list)
About formulas
About functions
Defining calculation fields
Using operators in formulas
Left
Purpose
Returns numberOfCharacters in text, counting from the left.
Format
Left(text;numberOfCharacters)
Parameters
text - any text expression or text field
numberOfCharacters - any numeric expression or field containing a number
Data type returned
text

FILEMAKER PRO HELP 904
Originated in
FileMaker Pro 6.0 or earlier
Examples
Left(“Manufacturing”;4) returns Manu.
Left(Name;Position(Name;“ “;1;1)) returns Sophie, when the Name field contains Sophie
Tang .
Left(PostalCode;3) & Upper(Left(LastName;4)) returns 481JOHN when the
PostalCode field contains 48187 and LastName contains Johnson.
Related topics
Functions reference (category list)
Functions reference (alphabetical list)
About formulas
About functions
Defining calculation fields
Using operators in formulas
LeftValues
Purpose
Returns a text result containing numberOfValues from the list of values in text, counting from the
left.
Format
LeftValues(text;numberOfValues)
Parameters
text - any text expression or text field
numberOfValues - any numeric expression or field containing a number
Important See Design functions for information about literal text parameters.
Data type returned
text
Originated in
FileMaker Pro 7.0
Description
Values are text items separated by carriage returns. A value can be empty, a single character, a
word, a sentence, or a paragraph. When you press Return you start creating a new value. The last
value will be recognized with or without a carriage return.

FILEMAKER PRO HELP 905
Each returned value ends with a carriage return, allowing lists to be easily concatenated.
Examples
LeftValues(“Plaid¶Canvas¶Suitcase”;2) returns
Plaid
Canvas
LeftValues(list;1) returns
Sophie
when the text being evaluated contains
•Sophie
•Bill
Related topics
Functions reference (category list)
Functions reference (alphabetical list)
About formulas
About functions
Defining calculation fields
Using operators in formulas
LeftWords
Purpose
Returns a text result containing numberOfWords in text, counting from the left.
Format
LeftWords(text;numberOfWords)
Parameters
text - any text expression or text field
numberOfWords - any numeric expression or field containing a number
Data type returned
text
Originated in
FileMaker Pro 6.0 or earlier
Examples
LeftWords(“Plaid Canvas Suitcase”;2) returns Plaid Canvas.
LeftWords(Name;1) returns Sophie, when the Name field contains Sophie Tang.

FILEMAKER PRO HELP 906
Note Characters such as the ampersand (&) and hyphen (-) can be used to identify the beginning
of a new word.
Related topics
Functions reference (category list)
Functions reference (alphabetical list)
About formulas
About functions
Defining calculation fields
Using operators in formulas
Length
Purpose
Returns the number of characters in field, including all spaces, numbers, and special characters.
Format
Length(field)
Parameters
field - any text, number, date, time, timestamp, or container field, or any text expression or
numeric expression
Data type returned
number
Originated in
FileMaker Pro 6.0 or earlier
Description
This function returns the number of characters in a specified field. For a container field, Length
returns the size of the original file in bytes.
Examples
Length(“John”) returns 4.
Length(Description) returns 12 when the value in Description is Modem for PC.
Length(“M1” & Left(Product;5)) returns 7, when the Product field contains Canvas
Backpack.
Related topics
Functions reference (category list)
Functions reference (alphabetical list)
About formulas
About functions
Defining calculation fields

FILEMAKER PRO HELP 907
Using operators in formulas
Lower
Purpose
Returns all letters in text as lowercase.
Format
Lower(text)
Parameters
text - any text expression or text field
Data type returned
text
Originated in
FileMaker Pro 6.0 or earlier
Note
To change how a field displays without modifying its contents, see Text formatting functions.
Examples
Lower(“ABCD”) returns abcd.
Lower(Course) returns history, when the Course field contains History.
Lower(“YOUR BILL IS OVERDUE”) returns your bill is overdue.
Related topics
Functions reference (category list)
Functions reference (alphabetical list)
About formulas
About functions
Defining calculation fields
Using operators in formulas
Middle
Purpose
Extracts the numberOfCharacters from text, starting at the character position specified by
start.

FILEMAKER PRO HELP 908
Format
Middle(text;start;numberOfCharacters)
Parameters
text - any text expression or text field
start - any numeric expression or field containing a number
numberOfCharacters - any numeric expression or field containing a number
Data type returned
text
Originated in
FileMaker Pro 6.0 or earlier
Examples
Middle(“(408)555-9054”;2;3) returns 408.
Middle(PhoneNumber;2;3) returns 408 when the PhoneNumber field contains (408) 555-9054.
Middle(“abcdefghij”;5;2) returns ef.
Middle(Name;Position(Name;“ ”;1;1)+1;3) returns Smi, when the text field Name
contains John Smith.
Related topics
Functions reference (category list)
Functions reference (alphabetical list)
About formulas
About functions
Defining calculation fields
Using operators in formulas
MiddleValues
Purpose
Returns a text result containing the specified numberOfValues in text, starting with
startingValue.
Format
MiddleValues(text;startingValue;numberOfValues)
Parameters
text - any text expression or text field
startingValue - any numeric expression or field containing a number
numberOfValues - any numeric expression or field containing a number

FILEMAKER PRO HELP 909
Important See Design functions for information about literal text parameters.
Data type returned
text
Originated in
FileMaker Pro 7.0
Description
Values are text items separated by carriage returns. A value can be empty, a single character, a
word, a sentence or a paragraph. When you press Return you start creating a new value. The last
value will be recognized with or without a carriage return.
Each value that is returned ends with a carriage return, allowing lists to be easily concatenated.
Examples
MiddleValues(“Plaid¶Canvas¶Suitcase”;2;1) returns
Canvas
MiddleValues(list;2;2) returns
Bill
John
when the list field contains
•Sophie
•Bill
•John
Related topics
Functions reference (category list)
Functions reference (alphabetical list)
About formulas
About functions
Defining calculation fields
Using operators in formulas
MiddleWords
Purpose
Returns a text result containing the numberOfWords from text, beginning at startingWord.
Format
MiddleWords(text;startingWord;numberOfWords)

FILEMAKER PRO HELP 910
Parameters
text - any text expression or text field
startingWord - any numeric expression or field containing a number
numberOfWords - any numeric expression or field containing a number
Data type returned
text
Originated in
FileMaker Pro 6.0 or earlier
Examples
MiddleWords(“Plaid Canvas Suitcase”;2;2) returns Canvas Suitcase.
MiddleWords(Name;1;2) returns Brigitte Erika, when the Name field contains Brigitte Erika
Durand.
Note Characters such as the ampersand (&) and hyphen (-) can be used to identify the beginning
of a new word.
Related topics
Functions reference (category list)
Functions reference (alphabetical list)
About formulas
About functions
Defining calculation fields
Using operators in formulas
NumToJText
Purpose
Converts Roman numbers in number to Japanese text.
Format
NumToJText(number;separator;characterType)
Parameters
number - any numeric expression or field containing a number
separator - a number from 0 - 3 representing a separator
characterType - a number from 0 - 3 representing a type
Data type returned
text
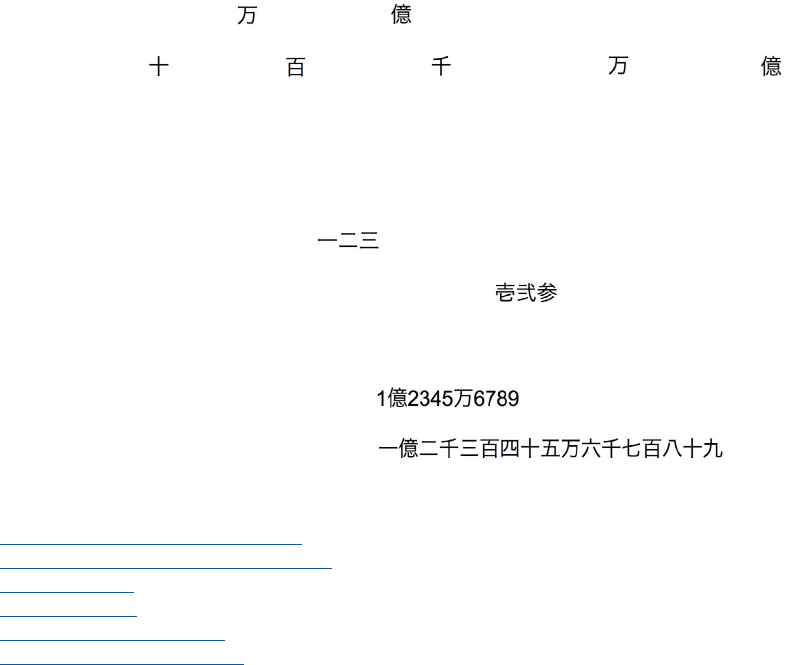
FILEMAKER PRO HELP 911
Originated in
FileMaker Pro 6.0 or earlier
Description
If the value for separator and characterType are blank or other than 0 to 3, then 0 is used.
Separator:
•0 - no separator
•1 - every 3 digits (thousands)
•2 - ten thousands( ) and millions( ) unit
•3 - tens( ), hundreds( ), thousands( ), ten thousands( ) and millions( ) unit
Type:
•0 - half width (Hankaku) number
•1 - full width (Zenkaku) number
•2 - Kanji character number
•3 - Traditional-old-style Kanji character number
Examples
NumToJText(123456789;2;0) returns
NumToJText(123456789;3;2) returns
Related topics
Functions reference (category list)
Functions reference (alphabetical list)
About formulas
About functions
Defining calculation fields
Using operators in formulas
PatternCount
Purpose
Returns the number of occurrences of searchString in text.
Format
PatternCount(text;searchString)

FILEMAKER PRO HELP 912
Parameters
text - any text expression or text field
searchString - any text expression or text field representing the set of characters you want to find
Data type returned
number
Originated in
FileMaker Pro 6.0 or earlier
Description
This function is not case-sensitive.
Examples
PatternCount(“Mississippi”;“is”) returns 2.
PatternCount(“Mississippi”;“issi”) returns 1 (the function isn’t inclusive).
PatternCount(Attending;“Guest”) returns 1 if the Guest checkbox is one of the items
selected in the Attending field.
Related topics
Functions reference (category list)
Functions reference (alphabetical list)
About formulas
About functions
Defining calculation fields
Using operators in formulas
Position
Purpose
Returns the starting position of the specified occurrence of searchString in text.
Format
Position(text;searchString;start;occurrence)
Parameters
text - any text expression or text field
searchString - any text expression or text field representing the set of characters you want to
find.
start - any numeric expression, or field containing a number, representing the number of
characters from the start of the text string at which to begin the search.

FILEMAKER PRO HELP 913
occurrence - any numeric expression or field containing a number, representing which instance of
the text string you want to find. A negative occurrence value causes the scan to go in the opposite
direction from start. A zero value for occurrence is invalid and returns a result of zero.
Data type returned
number
Originated in
FileMaker Pro 6.0 or earlier
Description
This function is not case-sensitive. If searchString isn’t contained in text or if there was no
specified occurrence, zero is returned.
Examples
Position(“Mississippi”;“iss”;1;1) returns 2.
Position(“Mississippi”;“iss”;1;2) returns 5.
Position(“Mississippi”;“iss”;3;1) returns 5.
Left(Name;Position(Name;“ “;1;1)-1) returns William, when Name is a text field that
contains William Smith.
Right(Name;Length(Name) - Position(Name;“ “;Length(Name);-1)) returns Smith.
Related topics
Functions reference (category list)
Functions reference (alphabetical list)
About formulas
About functions
Defining calculation fields
Using operators in formulas
Proper
Purpose
Returns the first letter of each word in text as uppercase and all other letters as lowercase.
Format
Proper(text)
Parameters
text - any text expression or text field
Data type returned
text

FILEMAKER PRO HELP 914
Originated in
FileMaker Pro 6.0 or earlier
Examples
Proper(“ABCD”) returns Abcd.
Proper(Name) returns Yumiko Kitagawa, when the Name field contains YUMIKO KITAGAWA.
Related topics
Functions reference (category list)
Functions reference (alphabetical list)
About formulas
About functions
Defining calculation fields
Using operators in formulas
Quote
Purpose
Returns the text form of text enclosed in quotation marks.
Format
Quote(text)
Parameters
text - any text expression or field
Data type returned
text
Originated in
FileMaker Pro 7.0
Description
This function protects text from being evaluated by the Evaluate function. Special characters
within text are escaped appropriately.
Examples
Quote(“hello”) returns “hello”.
Quote(“abc\¶”) returns “abc\¶”.
Quote(“say \”hello\” fred”) returns “say \”hello\” fred”.
Evaluate(Quote(“1 + 2”)) returns 1 + 2.
Evaluate(“1 + 2&” & Quote(“ - 1 + 2”)) returns 3 - 1 + 2.

FILEMAKER PRO HELP 915
Related topics
Functions reference (category list)
Functions reference (alphabetical list)
About formulas
About functions
Defining calculation fields
Using operators in formulas
Replace
Purpose
Replaces a string of characters in text with replacementText.
Format
Replace(text;start;numberOfCharacters;replacementText)
Parameters
text - any text expression or text field
start - any numeric expression or field containing a number representing the starting position in
text
numberOfCharacters - any numeric expression or field containing a number representing the
number of characters to remove from text
replacementText - any text expression or field containing the text to replace in the original string
Data type returned
text
Originated in
FileMaker Pro 6.0 or earlier
Description
Character replacement in text begins at the start character position and continues for
numberOfCharacters characters. Compare to the Substitute function.
Examples
Replace(“1234567”;5;1;“X”) returns 1234X67.
Replace(“1234567”;5;1;“XX”) returns 1234XX67.
Replace(“1234567”;5;2;“X”) returns 1234X7.
Replace(“William”;3;4;”NEW TEXT”) returns WiNEW TEXTm.
Replace(PhoneNumber;1;3;”415”) returns 415-555-9054, when the PhoneNumber field
contains 408-555-9054.

FILEMAKER PRO HELP 916
Related topics
Functions reference (category list)
Functions reference (alphabetical list)
About formulas
About functions
Defining calculation fields
Using operators in formulas
Right
Purpose
Returns the specified numberOfCharacters in text, counting from the right.
Format
Right(text;numberOfCharacters)
Parameters
text - any text expression or text field
numberOfCharacters - any numeric expression or field containing a number
Data type returned
text
Originated in
FileMaker Pro 6.0 or earlier
Examples
Right(“Manufacturing”;4) returns ring.
Right(Name;Length(Name) - Position(Name;“ “;1;1)) returns Cannon, when the
Name field contains Michelle Cannon.
Right(SerialNumber;3) & Upper(Left(LastName;4)) returns 187FERR when the
SerialNumber text field contains 00-48-187 and LastName contains Ferrini.
Related topics
Functions reference (category list)
Functions reference (alphabetical list)
About formulas
About functions
Defining calculation fields
Using operators in formulas

FILEMAKER PRO HELP 917
RightValues
Purpose
Returns a text result containing the specified numberOfValues in text, counting from the right.
Format
RightValues(text;numberOfValues)
Parameters
text - any text expression or text field
numberOfValues - any numeric expression or field containing a number
Important See Design functions for information about literal text parameters.
Data type returned
text
Originated in
FileMaker Pro 7.0
Description
Values are text items separated by carriage returns. You can place several items together to create
a carriage return-delimited list of values. A value can be empty, a single character, a word, a
sentence, or a paragraph. When you press Return you start creating a new value. The last value will
be recognized with or without a carriage return.
When the text parameter is a literal string as in the example below, you must insert a literal
carriage return character between each item in the list. In the Specify Calculation dialog box, click
the ¶ button to insert a literal carriage return character.
Each value that is returned ends with a carriage return, allowing lists to be easily concatenated.
Examples
RightValues(“Plaid¶Canvas¶Suitcase”;2) returns
Canvas
Suitcase
RightValues(names;1) returns
John
when the names field contains
•Sophie
•Bill
•John

FILEMAKER PRO HELP 918
Related topics
Functions reference (category list)
Functions reference (alphabetical list)
About formulas
About functions
Defining calculation fields
Using operators in formulas
RightWords
Purpose
Returns a text result containing the numberOfWords in text, counting from the right.
Format
RightWords(text;numberOfWords)
Parameters
text - any text expression or text field
numberOfWords - any numeric expression or field containing a number
Data type returned
text
Originated in
FileMaker Pro 6.0 or earlier
Examples
RightWords(“Plaid Canvas Suitcase”;2) returns Canvas Suitcase.
RightWords(Name;1) returns Virtanen, when the Name field contains Matti Virtanen.
Note Characters such as the ampersand (&) and hyphen (-) can be used to identify the beginning
of a new word.
Related topics
Functions reference (category list)
Functions reference (alphabetical list)
About formulas
About functions
Defining calculation fields
Using operators in formulas

FILEMAKER PRO HELP 919
RomanHankaku
Purpose
Converts from Zenkaku alphanumeric and symbols to Hankaku alphanumeric and symbols.
Format
RomanHankaku(text)
Parameters
text - any text expression or text field
Data type returned
text
Originated in
FileMaker Pro 6.0 or earlier
Examples
RomanHankaku(“M a c i n t o s h”) returns Macintosh.
Related topics
Functions reference (category list)
Functions reference (alphabetical list)
About formulas
About functions
Defining calculation fields
Using operators in formulas
RomanZenkaku
Purpose
Converts from Hankaku alphanumeric and symbols to Zenkaku alphanumeric and symbols.
Format
RomanZenkaku(text)
Parameters
text - any text expression or text field
Data type returned
text

FILEMAKER PRO HELP 920
Originated in
FileMaker Pro 6.0 or earlier
Examples
RomanZenkaku(“Macintosh”) returns M a c i n t o s h.
Related topics
Functions reference (category list)
Functions reference (alphabetical list)
About formulas
About functions
Defining calculation fields
Using operators in formulas
SerialIncrement
Purpose
Returns the combined text and numbers specified by text, with the numbers in text incremented
by the specified amount.
Format
SerialIncrement(text;incrementBy)
Parameters
text - any text that also contains a number
incrementBy - any numeric expression to increment the text by
Data type returned
text
Originated in
FileMaker Pro 7.0
Description
This function doesn’t remove the text in text, which normally happens when performing standard
math against a value that contains text.
If the incrementBy value is a decimal number, then only the integer portion of incrementBy
value is added to the last number in text. Any character other than a number is considered a
separator. You can use both positive and negative incrementBy values.
Examples
SerialIncrement(“abc12”;1) returns abc13.
SerialIncrement(“abc12”;7) returns abc19.

FILEMAKER PRO HELP 921
SerialIncrement(“abc12”;-1) returns abc11.
SerialIncrement(“abc12”;1.2) returns abc13.
SerialIncrement(“abc1.2”;1.2) returns abc1.3.
In the example below any character other than a number is considered as a separator and the
number on the far right is incremented.
SerialIncrement(“abc123;999”;1) returns abc123;1000.
Related topics
Functions reference (category list)
Functions reference (alphabetical list)
About formulas
About functions
Defining calculation fields
Using operators in formulas
Substitute
Purpose
Returns a text string with every occurrence of searchString in text replaced by
replaceString in text.
Format
Substitute(text;searchString;replaceString)
Parameters
text - any text expression or text field
searchString - any text expression or text field
replaceString - any text expression or text field
Data type returned
text
Originated in
FileMaker Pro 6.0 or earlier
Description
This function is case-sensitive. Compare to the Replace function.
Multiple substitutions are allowed when you enclose each pair of searchString and
replaceString parameters within square brackets [ ] and separate them with semicolons.
FileMaker supports up to 999 nested substitute conditions. Each search and replace list item is also
separated by semicolons. For example:
Substitute(text; [search1; replace1]; [search2; replace2]; ... [searchN;
replaceN])

FILEMAKER PRO HELP 922
Examples
Substitute(Description;“WYSIWYG.”;“What you see is what you get.”) replaces
every occurrence of the acronym “WYSIWYG.” in the Description field with the phrase What you
see is what you get.
Substitute(text;[“a”;“A”];[“b”;“B”]) replaces every lowercase a or b with A or B.
Related topics
Functions reference (category list)
Functions reference (alphabetical list)
About formulas
About functions
Defining calculation fields
Using operators in formulas
Trim
Purpose
Returns text stripped of all leading and trailing spaces.
Format
Trim(text)
Parameters
text - any text expression or text field
Data type returned
text
Originated in
FileMaker Pro 6.0 or earlier
Description
Use this function to remove unneeded spaces when you convert files from other programs or
systems that require a fixed number of characters per field, or to remove spaces accidentally typed
during data entry.
Examples
Trim(“ Tom ”) returns Tom.
Trim(Middle(“00230013 William 1234”;9;9)) returns William.
Related topics
Functions reference (category list)
Functions reference (alphabetical list)
About formulas

FILEMAKER PRO HELP 923
About functions
Defining calculation fields
Using operators in formulas
TrimAll
Purpose
Returns a copy of text with specified spaces removed or inserted. Use to work with spaces
between text or non-Roman spaces such as full- and half-width spaces; otherwise, use Trim.
Format
TrimAll(text;trimSpaces;trimType)
Parameters
text - any text expression or text field
trimSpaces - 0 or False, 1 or True
trimType - 0 through 3 depending on the trim style that you wish to use
Data type returned
text
Originated in
FileMaker Pro 6.0 or earlier
Description
Set trimSpaces to True (1) if you want to remove full-width spaces. Set trimSpaces to False (0) if
you want to keep full-width spaces.
Note Full-width spaces are only present in some non-Roman languages like Japanese. If you only
use Roman languages, set trimSpaces to False (0).
A character is considered Roman if its Unicode value is less than U+2F00. Any character whose
Unicode value is greater than or equal to U+2F00 is considered non-Roman.
Characters within the Roman range are those belonging to the following character blocks: Latin,
Latin-1 Supplement, Latin Extended-A & B, IPA Extensions, Spacing Modifier Letters, Combining
Diacritical Marks, Greek, Cyrillic, Armenian, Hebrew, Arabic, Devanagari, Bengali, Gurmukhi,
Gujarati, Oriya, Tamil, Telugu, Kannada, Malayalam, Thai, Lao, Tibetan, Georgian, Hangul Jamo,
and additional Latin and Greek extended blocks.
Symbols within the Roman range include punctuation characters, superscripts, subscripts, currency
symbols, combining marks for symbols, letter-like symbols, number forms, arrows, math operators,
control pictures, geometric shapes, dingbats, and so on.
Characters within the non-Roman range are those belonging to the CJK symbols/punctuations area,
Hiragana, Katakana, Bopomofo, Hangul compatibility Jamo, Kanbun, CJK unified ideographs, and
so on.
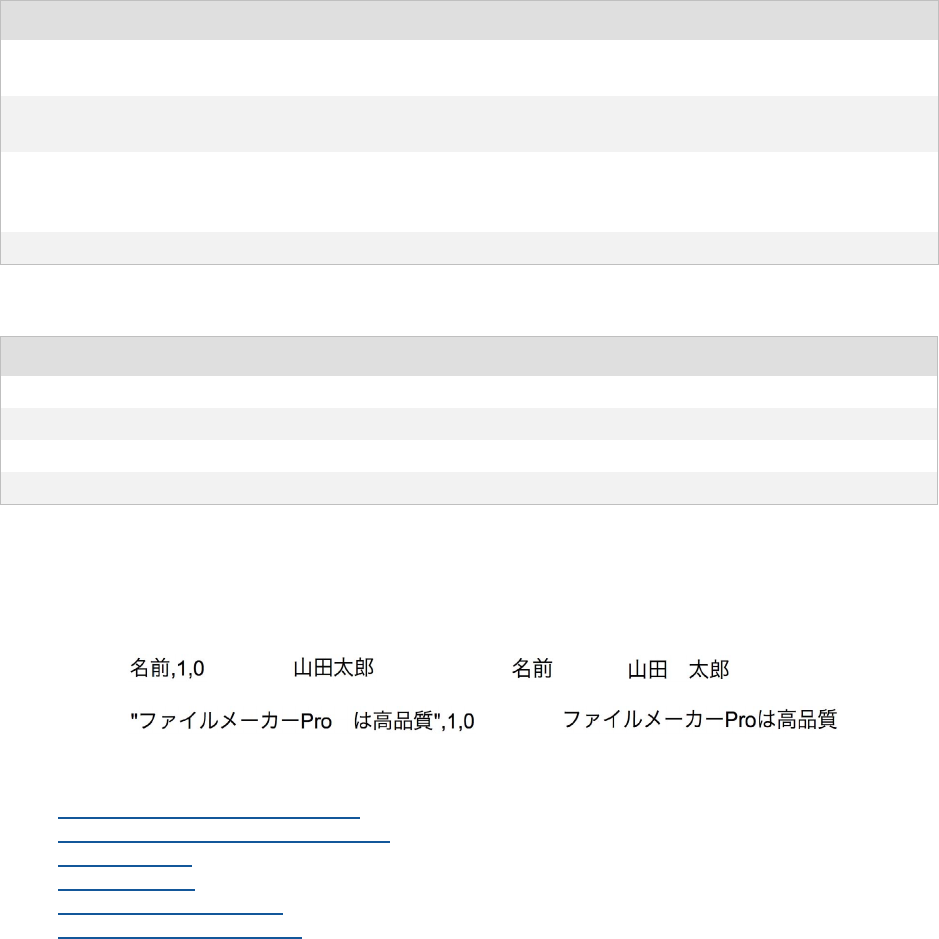
FILEMAKER PRO HELP 924
Spaces are removed or inserted depending on the value of trimType, as given in the following
tables:
In all cases, spaces between non-Roman characters are removed.
* = insert space between non-Roman and Roman text if there isn’t one.
Examples
TrimAll(" Julian Scott Dunn ";0;0) returns Julian Scott Dunn.
TrimAll( ) returns if the value of field is
TrimAll( ) returns
Related topics
Functions reference (category list)
Functions reference (alphabetical list)
About formulas
About functions
Defining calculation fields
Using operators in formulas
Upper
Purpose
Returns all letters in text as uppercase.
This trimType value Does this
0Removes all spaces between non-Roman and Roman characters (always leave
one space between Roman words).
1Always includes a half-width space between non-Roman and Roman characters
(always leave one space between Roman words).
2Removes spaces between non-Roman characters (reduce multiple space
between non-Roman and Roman words to 1 space; do not add spaces if there
are none; always leave one space between Roman words).
3Removes all spaces everywhere.
Type Non-Roman - Non-Roman Non-Roman - Roman Roman - Roman
0Remove Remove 1 space
1Remove 1 space* 1 space
2Remove 1 space 1 space
3Remove Remove Remove

FILEMAKER PRO HELP 925
Format
Upper(text)
Parameters
text - any text expression or text field
Data type returned
text
Originated in
FileMaker Pro 6.0 or earlier
Description
Use the Upper function to ensure consistent data entry of such things as state abbreviations or
postal codes.
Note To change how a field displays without modifying its contents, see Text formatting functions.
Examples
Upper(“Ca”) returns CA.
Upper(“12n34p”) returns 12N34P.
Related topics
Functions reference (category list)
Functions reference (alphabetical list)
About formulas
About functions
Defining calculation fields
Using operators in formulas
ValueCount
Purpose
Returns a count of the total number of values in text.
Format
ValueCount(text)
Parameters
text - any text expression or text field
Important See Design functions for information about literal text parameters.

FILEMAKER PRO HELP 926
Data type returned
number
Originated in
FileMaker Pro 7.0
Description
Values are text items separated by carriage returns. You can place several items together to create
a carriage-return-delimited list of values. A value can be empty, a single character, a word, a
sentence, or a paragraph. When you press Return you start creating a new value. The last value will
be recognized with or without a carriage return.
When the text parameter is a literal string as in the example below, you must insert a literal
carriage return character between each item in the list. In the Specify Calculation dialog box, click
the ¶ button to insert a literal carriage return character.
Examples
ValueCount(“Item 1¶Item 2¶Item 3”) returns 3.
ValueCount(ValueListItems(“Employees”;“Employee Names”)) returns the total
number of values in the Employee Names value list in the Employees database file.
Related topics
Functions reference (category list)
Functions reference (alphabetical list)
About formulas
About functions
Defining calculation fields
Using operators in formulas
WordCount
Purpose
Returns a count of the total number of words in text.
Format
WordCount(text)
Parameters
text - any text expression or text field
Data type returned
number
Originated in
FileMaker Pro 6.0 or earlier

FILEMAKER PRO HELP 927
Examples
WordCount(“The sun is rising.”) returns 4.
WordCount(Letter) returns the total number of words in the Letter field.
Note Characters such as the ampersand (&) and hyphen (-) can be used to identify the beginning
of a new word.
Related topics
Functions reference (category list)
Functions reference (alphabetical list)
About formulas
About functions
Defining calculation fields
Using operators in formulas
Text formatting functions
Text formatting functions can be used to change the color, font, size, and style of the specified text.
For example, you could use the TextFont function to change the font of the specified text from
Arial to Courier. You can use these functions together to change the appearance of text on your
layouts.
Text formatting functions operate on these parameters:
•fields of type text
•text constants (in quotations)
•expressions having a text result
Click a function name for details.
This function Returns
RGB A number obtained by combining the red, green, and blue values to represent a
color.
TextColor The color of text to the color specified by the RGB function.
TextColorRemove Text with the font colors reverted to the default font color for the field.
Tex tF ont Text in the specified font and character set.
Tex tF ontR emove Text with the fonts reverted to the default font for the field.
TextFormatRemove Text with the formatting reverted to the default text format for the field.
Tex tSize Text in the specified font size.
TextSizeRemove Text with the font sizes reverted to the default font size for the field.
TextStyleAdd Text with the specified styles added in a single action.
TextStyleRemove Text with the specified styles removed in a single action.

FILEMAKER PRO HELP 928
RGB
Purpose
Returns an integer number from 0 to 16777215 obtained by combining the red, green, and blue
values (each ranging from 0 to 255) to represent a color.
Format
RGB(red;green;blue)
Parameters
red - any numeric expression or numeric field containing a value ranging from 0 to 255
green - any numeric expression or numeric field containing a value ranging from 0 to 255
blue - any numeric expression or numeric field containing a value ranging from 0 to 255
Data type returned
number
Originated in
FileMaker Pro 7.0
Description
Numbers returned by this function can be passed as the color parameter in the TextColor or
TextColorRemove functions. The RGB function uses the following formula to calculate the result:
red * 2562 + green * 256 + blue
where 2562 = 65536
Tip To determine the RGB value of a color, in Layout mode, click the Fill color palette in the
formatting bar and choose Other Color. In OS X, select the Color Sliders tab. Values are shown for
each of the basic colors.
Examples
RGB(255;0;0) returns 16711680 representing red.
RGB(0;255;0) returns 65280 representing green.
RGB(0;0;255) returns 255 representing blue.
RGB(0;0;0) returns 0 representing black.
RGB(255;255;255) returns 16777215 representing white.
Using a table with text fields FirstName and LastName, specify the following auto-enter calculation
for a third field called FullName that displays FirstName in orange and LastName in purple:
TextColor(FirstName;RGB(255;165;0)) &" "&
TextColor(LastName;RGB(160;32;240))

FILEMAKER PRO HELP 929
Related topics
Functions reference (category list)
Functions reference (alphabetical list)
About formulas
About functions
Defining calculation fields
Using operators in formulas
TextColor
Purpose
Changes the color of text to the color specified by the RGB function.
Format
TextColor(text;RGB(red;green;blue))
Parameters
text - any text expression or text field
RGB(red;green;blue) - any integer from 0 to 16777215 obtained by combining the red, green,
and blue values (each ranging from 0 to 255) to represent a color
Data type returned
text
Originated in
FileMaker Pro 7.0
Description
Use this function to change the color of text.
Note Text formatting options will be lost if the field type that is returned is something other than text.
Tip To determine the RGB value of a color, in Layout mode, click the Fill color palette in the
formatting bar and choose Other Color. In OS X, select the Color Sliders tab. Values are shown for
each of the basic colors.
Examples
TextColor(“Plaid”;RGB(255;0;0)) returns the word Plaid in red.
TextColor(“Plaid”;RGB(0;255;0)) returns the word Plaid in green.
TextColor(“Plaid”;RGB(0;0;255)) returns the word Plaid in blue.
TextColor(“Plaid”;RGB(0;0;0)) returns the word Plaid in black.
TextSize( TextFont( TextColor( MyTable::MyText; RGB( 0 ; 125 ; 125 ) );
"Courier" ) ; 12) returns the text contained in MyTable::MyText formatted as 12pt. green text
with the Courier font.

FILEMAKER PRO HELP 930
Related topics
Functions reference (category list)
Functions reference (alphabetical list)
About formulas
About functions
Defining calculation fields
Using operators in formulas
TextColorRemove
Purpose
Removes all font colors in text, or removes the font color specified by the RGB function.
Format
TextColorRemove(text{;RGB(red;green;blue)})
Parameters
text - any text expression or text field.
RGB(red;green;blue) - any integer number from 0 to 16777215 obtained by combining the red,
green, and blue values (each ranging from 0 to 255) to represent a color.
Parameters in curly braces { } are optional.
Data type returned
text
Originated in
FileMaker Pro 8.0
Description
Use this function to revert text to the default font color for the field. If you don’t use the RGB
function to specify a color, all of the text displays in the default font color that was set in Layout mode
for the field. When the font color is specified by the RGB function, only the specified font color is
removed from every portion of the text displayed in that color and these same portions of the text
are then displayed in the field's default font color.
Note Text formatting options will be lost if the field type that is returned is something other than text.
Examples
TextColorRemove(“Red Text and Green Text”) returns Red Text and Green Text
displayed in the field’s default font color.
TextColorRemove(“Red Text and Green Text”;RGB(255;0;0)) returns Red Text and
Green Text with only the pure red font color removed from the words Red Text.
Related topics
Functions reference (category list)

FILEMAKER PRO HELP 931
Functions reference (alphabetical list)
About formulas
About functions
Defining calculation fields
Using operators in formulas
Formatting text
TextFont
Purpose
Changes the font of text to the specified fontName or optional {fontScript}.
Format
TextFont(text;fontName{;fontScript})
Parameters
text - any text expression or text field.
fontName - any font name expressed in text.
{fontScript} - the name of a character set that contains characters required for writing in the
specified language.
Parameters in curly braces { } are optional.
Note The fontScript parameter is not enclosed in quotation marks (“ “), and can have any of
the values listed below in Description.
Data type returned
text
Originated in
FileMaker Pro 7.0
Description
Spellings for font names must be correct. Text formatting options will be lost if the field type that is
returned is something other than text.
FileMaker Pro looks for a font that matches the specified font name and font script character set. If
no matches exist, FileMaker Pro looks for a default font with the font script specified in the Fonts tab
of the Preferences dialog box. If this fails, then the TextFont function uses the default font for the
system script specified in the Fonts tab of the Preferences dialog box. This font might not be the
same as the font script provided.
The following font scripts are available:
•Roman
•Greek
•Cyrillic
•CentralEurope

FILEMAKER PRO HELP 932
•ShiftJIS
•TraditionalChinese
•SimplifiedChinese
•OEM
•Symbol
•Other
Examples
TextFont(“Plaid”;“Courier”) returns the word Plaid in the Courier font.
TextFont(“Plaid”;“Arial”) returns the word Plaid in the Arial font.
TextFont(“Plaid”;“Arial”;Cyrillic) returns the word Plaid in the Arial font in the font
script of Cyrillic.
TextSize( TextFont( TextColor( MyTable::MyText; RGB( 0 ; 125 ; 125 ) );
"Courier" ) ; 12) returns the text contained in MyTable::MyText formatted as 12pt. green text
with the Courier font.
Related topics
Functions reference (category list)
Functions reference (alphabetical list)
About formulas
About functions
Defining calculation fields
Using operators in formulas
TextFontRemove
Purpose
Removes all fonts in text, or removes the font specified by fontToRemove or the combination of
fontToRemove and fontScript.
Format
TextFontRemove(text{;fontToRemove;fontScript})
Parameters
text - any text expression or text field.
fontToRemove - any font name expressed in text.
fontScript - the name of a character set that contains characters required for writing in the
specified language.
Parameters in curly braces { } are optional.
Note The fontScript parameter is not enclosed in quotation marks (“ “), and can have any of the
values listed below in Description.

FILEMAKER PRO HELP 933
Data type returned
text
Originated in
FileMaker Pro 8.0
Description
Use this function to revert text to the default for the field. If you don’t specify a font, all of the text
displays in the default font that was set in Layout mode for the field. When the font is specified by
fontToRemove or the combination of fontToRemove and fontScript, only the specified font is
removed from every portion of the text displayed in that font and these same portions of the text are
then displayed in the field's default font.
Spellings for font names must be correct. Text formatting options will be lost if the field type that is
returned is something other than text.
FileMaker Pro looks for a font that matches the specified font name and font script character set. If
no matches exist, FileMaker Pro looks for a default font with the font script specified in the Fonts tab
of the Preferences dialog box. If this fails, then the TextFontRemove function uses the default font
for the system script specified in the Fonts tab of the Preferences dialog box. This font might not be
the same as the font script provided.
The following font scripts are available:
•Roman
•Greek
•Cyrillic
•CentralEurope
•ShiftJIS
•TraditionalChinese
•SimplifiedChinese
•OEM
•Symbol
•Other
Examples
TextFontRemove(“Arial Text and Courier Text”) returns Arial Text and Courier Text
displayed in the field’s default font.
TextFontRemove(“Arial Text and Courier Text”;“Arial”) returns Arial Text and
Courier Text with the Arial font removed from the words Arial Text for all fontScripts that use
the Arial font.
TextFontRemove(“Arial Text and Courier Text”;“Arial”;Cyrillic) returns Arial
Text and Courier Text with the Arial font removed from Cyrillic character sets.
Related topics
Functions reference (category list)
Functions reference (alphabetical list)
About formulas

FILEMAKER PRO HELP 934
About functions
Defining calculation fields
Using operators in formulas
Formatting text
TextFormatRemove
Purpose
Removes all text formatting from text in a single action.
Format
TextFormatRemove(text)
Parameters
text - any text expression or text field
Data type returned
text
Originated in
FileMaker Pro 8.0
Description
Use this function to remove all fonts, styles, font sizes, and font colors from the specified text.
Examples
TextFormatRemove(“Plaid”) returns the word Plaid without any text formatting applied.
Related topics
Functions reference (category list)
Functions reference (alphabetical list)
About formulas
About functions
Defining calculation fields
Using operators in formulas
Formatting text
TextSize
Purpose
Changes the font size of text to fontSize.

FILEMAKER PRO HELP 935
Format
TextSize(text;fontSize)
Parameters
text - any text expression or text or number field
fontSize - any font size expressed as an integer
Data type returned
text, number
Originated in
FileMaker Pro 7.0
Description
The font size is described in points (72 points to the inch). Text formatting options will be lost if the
data type that is returned is something other than text or number.
Examples
TextSize(“Plaid”;18) returns the word Plaid in 18 point text.
TextSize(“Plaid”;24) returns the word Plaid in 24 point text.
TextSize( TextFont( TextColor( MyTable::MyText; RGB( 0 ; 125 ; 125 ) );
"Courier" ) ; 12) returns the text contained in MyTable::MyText formatted as 12pt. green text
with the Courier font.
Related topics
Functions reference (category list)
Functions reference (alphabetical list)
About formulas
About functions
Defining calculation fields
Using operators in formulas
TextSizeRemove
Purpose
Removes all font sizes in text, or removes the font size specified by sizeToRemove.
Format
TextSizeRemove(text{;sizeToRemove})
Parameters
text - any text expression or text field.
sizeToRemove - any font size expressed as an integer.

FILEMAKER PRO HELP 936
Parameters in curly braces { } are optional.
Data type returned
text
Originated in
FileMaker Pro 8.0
Description
Use this function to revert text to the default font size for the field. If you don’t specify a size, all of
the text displays in the default font size that was set in Layout mode for the field. When the font size
is specified by sizeToRemove, only the specified font size is removed from every portion of the text
displayed in that size and these same portions of the text are then displayed in the field's default font
size.
The font size is described in points (72 points to the inch). Text formatting options will be lost if the
field type that is returned is something other than text.
Examples
TextSizeRemove(“10 Point Text and 18 Point Text”) returns 10 Point Text and 18
Point Text displayed in the field’s default font size.
TextSizeRemove(“10 Point Text and 18 Point Text”;18) returns 10 Point Text and 18
Point Text with the 18 point font size removed from the words 18 Point Text.
Related topics
Functions reference (category list)
Functions reference (alphabetical list)
About formulas
About functions
Defining calculation fields
Using operators in formulas
Formatting text
TextStyleAdd
Purpose
Adds the specified styles to text in a single action.
Format
TextStyleAdd(text;styles)
Parameters
text - any text expression or text field
styles - any named style listed below in Description

FILEMAKER PRO HELP 937
Data type returned
text
Originated in
FileMaker Pro 7.0
Description
You can add multiple styles by using the + operator between style names. Negative values are not
valid. All styles will be removed, if the only style specified is Plain. Plain is ignored if mixed with other
styles. Styles are not case-sensitive and do not contain spaces.
Text formatting options will be lost if the field type that is returned is something other than text.
The styles that are available are:
•Plain
•Bold
•Italic
•Underline
•HighlightYellow
•Condense
•Extend
•Strikethrough
•SmallCaps
•Superscript
•Subscript
•Uppercase
•Lowercase
•Titlecase
•WordUnderline
•DoubleUnderline
•AllStyles (all available styles)
Note To format or change the case of text, use the Lower, Upper, or Proper function (see Text
functions).
Examples
TextStyleAdd(“Plaid”;Italic) returns the word Plaid in italics.
TextStyleAdd(FirstName;Bold+Underline) returns Sophie in bold, underlined text when
the FirstName field contains Sophie.
The following calculation removes all styles from the text, then italicizes the entire phrase.
TextStyleAdd(TextStyleAdd(FirstName;Plain);Italic)
The following calculation creates two descriptions of styles, then concatenates two phrases using
these styles. Using the Let function is an effective way to avoid creating a long and complex
TextStyleAdd statement.

FILEMAKER PRO HELP 938
Let([TitleStyle=Smallcaps+Titlecase;BodyStyle=Plain];
TextStyleAdd(titleField;titleStyle)&"¶¶" &
TextStyleAdd(bodyField;BodyStyle))
In the following example, to find every occurrence of several words and change their style, use the
Substitute function combined with the TextStyleAdd function.
Substitute(ArticleBody;[“Phrase1”;TextStyleAdd(“Phrase 1”;Italic)];[“Phrase 2”;TextStyleAdd(“Phrase
2”;Bold)];)
Related topics
Functions reference (category list)
Functions reference (alphabetical list)
About formulas
About functions
Defining calculation fields
Using operators in formulas
TextStyleRemove
Purpose
Removes the specified styles from text in a single action.
Format
TextStyleRemove(text;styles)
Parameters
text - any text expression or text field
styles - any named style from the list of available styles
Data type returned
text
Originated in
FileMaker Pro 7.0
Description
You can remove multiple styles by using the + operator between style names. Negative values are
not valid. The Plain styles cannot be used for this function. Plain is ignored if intermingled with other
styles. Styles are not case-sensitive and do not contain spaces.
An additional style called AllStyles has been provided to make it easier to remove all styles. Text
formatting options will be lost if the field type that is returned is something other than text.
The styles that are available are:
•Bold
•Italic

FILEMAKER PRO HELP 939
•Underline
•HighlightYellow
•Condense
•Extend
•Strikethrough
•SmallCaps
•Superscript
•Subscript
•Uppercase
•Lowercase
•Titlecase
•WordUnderline
•DoubleUnderline
•AllStyles (all available styles)
Examples
TextStyleRemove(“Plaid”;Italic) returns the word Plaid with the italics style removed.
TextStyleRemove(FirstName;Bold + Underline) returns Sophie with the bold and
underlined styles removed when the FirstName field contains Sophie.
TextStyleRemove(FirstName;AllStyles) returns Sophie without any styles.
TextStyleRemove(MyTable::MyText;HighlightYellow)returns the text contained in
MyTable::MyText with the HighlightYellow style removed.
Related topics
Functions reference (category list)
Functions reference (alphabetical list)
About formulas
About functions
Defining calculation fields
Using operators in formulas
Time functions
Time functions calculate times and manipulate time information.
Click a function name for details.
This function Returns
Hour A number representing the hour portion (0-23) of a specified time value.
Minute A number representing the minute portion (0-59) of a specified time value.
Seconds A number representing the seconds portion (0-59) of a specified time value.
Time A time result with the specified number of hours, minutes, and seconds.

FILEMAKER PRO HELP 940
Note You can also use the Timestamp function for time information. SeeTimestamp.
Related topics
About functions
About formulas
Hour
Purpose
Returns a number representing the hour portion (0-23) of a specified time.
Format
Hour(time)
Parameters
time - any time value or field of type time
Data type returned
number
Originated in
FileMaker Pro 6.0 or earlier
Examples
Hour(“12:15:23”) returns 12.
Hour(Duration) + (Minute(Duration)/60) returns 2.5, when the Duration time field
contains 2:30:15.
If(Hour(HoursWorked) > 8;“Overtime Pay”;“ “) returns Overtime Pay when the
number of hours in HoursWorked is greater than 8.
Hour(CheckIn) returns 3 when the value of CheckIn is 3:24.
Related topics
Functions reference (category list)
Functions reference (alphabetical list)
About formulas
About functions
Defining calculation fields
Using operators in formulas

FILEMAKER PRO HELP 941
Minute
Purpose
Returns a number representing the minute portion (0-59) of a specified time.
Format
Minute(time)
Parameters
time - any time value or field of type time
Data type returned
number
Originated in
FileMaker Pro 6.0 or earlier
Examples
Minute(“12:15:23”) returns 15.
Hour(Duration) + (Minute(Duration)/60) returns 2.5, if the Duration time field contains
2:30:15.
Note If no minute value is specified, 0 is returned.
Related topics
Functions reference (category list)
Functions reference (alphabetical list)
About formulas
About functions
Defining calculation fields
Using operators in formulas
Seconds
Purpose
Returns a number representing the seconds portion (0-59) of a specified time.
Format
Seconds(time)
Parameters
time - any time value or field of type time

FILEMAKER PRO HELP 942
Data type returned
number
Originated in
FileMaker Pro 6.0 or earlier
Examples
Seconds(“12:15:23”) returns 23.
Note If no seconds value is specified, 0 is returned.
Related topics
Functions reference (category list)
Functions reference (alphabetical list)
About formulas
About functions
Defining calculation fields
Using operators in formulas
Time
Purpose
Returns a time result with the specified number of hours, minutes, and seconds.
Format
Time(hours;minutes;seconds)
Parameters
hours - the hour value of a time
minutes - the minutes value of a time
seconds - the seconds value of a time
Data type returned
time
Originated in
FileMaker Pro 6.0 or earlier
Description
FileMaker Pro compensates when you supply fractional hours or minutes. The result is the time,
formatted according to the time format of the field in the current layout.
Use the Time function or the GetAsTime function to enter a time constant into a formula.

FILEMAKER PRO HELP 943
Examples
Time(4;14;32) returns 4:14:32.
Time(4.5;10;30) returns 4:40:30.
Time(4;15;70) returns 4:16:10.
Related topics
Functions reference (category list)
Functions reference (alphabetical list)
About formulas
About functions
Defining calculation fields
Using operators in formulas
Timestamp functions
Timestamps are used for a wide variety of synchronization purposes, such as marking the exact
date and time at which a particular event occurred.
Related topics
About functions
About formulas
Timestamp
Purpose
Returns a timestamp containing date as a calendar date and time as a time of day.
Format
Timestamp(date;time)
Parameters
date - any calendar date or date field
time - any time value or time field
Data type returned
timestamp
Originated in
FileMaker Pro 7.0
This function Returns
Timestamp A timestamp containing a calendar date and time of day.
FILEMAKER PRO HELP 944
Description
The format of the result depends on the date and time formats that were in use when the database
file was created. You can change the date and time formats in your operating system.
Examples
Timestamp(Date(10;11;2014);Time(9;10;30)) returns 10/11/2014 9:10:30 AM.
Timestamp(Date(10;11;2014);Time(13;10;30)) returns 10/11/2014 1:10:30 PM.
Timestamp(Date(10;11;2014);Time(10;65;5)) returns 10/11/2014 11:05:05 AM.
Timestamp(Date(10;35;2014);Time(4;5;6)) returns 11/4/2014 4:05:06 AM.
Related topics
Functions reference (category list)
Functions reference (alphabetical list)
About formulas
About functions
Defining calculation fields
Using operators in formulas
Trigonometric functions
Trigonometric functions are used to calculate degrees, angles, and other geometric data.
Note All trigonometric functions use radians as the unit of measure. Once you have a result, you
can convert the radians into degrees using the Degrees function.
Click a function name for details.
Related topics
About functions
About formulas
This function Returns
Acos The arccosine, or inverse cosine, of a number.
Asin The arcsine, or inverse sine, of a number.
Atan The trigonometric arc tangent, or inverse tangent, of a number.
Cos The cosine of the specified angle.
Degrees Degrees, converted from the specified radians.
Pi The value of the constant Pi, which is approximately 3.14159.
Radians Radians, converted from the specified degrees.
Sin The sine of the specified angle.
Tan The tangent of the specified angle.

FILEMAKER PRO HELP 945
Acos
Purpose
Returns the arccosine (Acos), or inverse cosine, of number.
Format
Acos (number)
Parameters
number - any numeric expression or field containing a numeric expression in the range -1 to 1
Data type returned
number
Originated in
FileMaker Pro 9.0
Description
The arccosine is the angle whose cosine is number. The returned angle is given in radians in the
range 0 (zero) to Pi. The input number parameter must be between -1 and 1.
If you want to convert the result from radians to degrees, multiply it by 180/Pi or use the Degrees
function.
Examples
Acos(-0.5) returns 2.0943951.
Acos(-0.5)*180/Pi returns 120.
Degrees(Acos(-0.5)) returns 120.
Acos(2.0)returns ? (not a number).
Related topics
Functions reference (category list)
Functions reference (alphabetical list)
About formulas
About functions
Defining calculation fields
Using operators in formulas
Asin
Purpose
Returns the arcsine (Asin), or inverse sine, of number.

FILEMAKER PRO HELP 946
Format
Asin (number)
Parameters
number - any numeric expression or field containing a numeric expression in the range -1 to 1
Data type returned
number
Originated in
FileMaker Pro 9.0
Description
The arcsine is the angle whose sine is number. The returned angle is given in radians in the range -
Pi/2 to Pi/2. The input number parameter must be between -1 and 1.
To express the arcsine in degrees, multiply the result by 180/Pi or use the Degrees function.
Examples
Asin(-0.5) returns -0.523598776.
Asin(-0.5)*180/Pi returns -30.
Degrees(Asin(-0.5)) returns -30.
Asin(2)returns ? (not a number).
Related topics
Functions reference (category list)
Functions reference (alphabetical list)
About formulas
About functions
Defining calculation fields
Using operators in formulas
Atan
Purpose
Returns the trigonometric arc tangent (Atan), or inverse tangent, of number.
Format
Atan(number)
Parameters
number - any numeric expression or field containing a numeric expression

FILEMAKER PRO HELP 947
Data type returned
number
Originated in
FileMaker Pro 6.0 or earlier
Description
The arc tangent is the angle, in radians, whose tangent is equal to the specified number.
Examples
Atan(1) returns .78539816....
Degrees(Atan(1)) returns 45.
Related topics
Functions reference (category list)
Functions reference (alphabetical list)
About formulas
About functions
Defining calculation fields
Using operators in formulas
Cos
Purpose
Returns the cosine (Cos) of angleInRadians.
Format
Cos(angleInRadians)
Parameters
angleInRadians - any numeric expression or field containing a numeric expression, in radians
Data type returned
number
Originated in
FileMaker Pro 6.0 or earlier
Examples
Cos(1.047) returns .50017107....
Cos(Radians(60)) returns .5.

FILEMAKER PRO HELP 948
Related topics
Functions reference (category list)
Functions reference (alphabetical list)
About formulas
About functions
Defining calculation fields
Using operators in formulas
Degrees
Purpose
Converts angleInRadians to degrees.
Format
Degrees(angleInRadians)
Parameters
angleInRadians - any numeric expression or field containing a numeric expression, in radians
Data type returned
number
Originated in
FileMaker Pro 6.0 or earlier
Description
Use this function to translate results of trigonometric functions from radians to degrees.
Examples
Degrees(Atan(1)) returns 45.
Degrees(1.0472) returns 60.00014030....
Related topics
Functions reference (category list)
Functions reference (alphabetical list)
About formulas
About functions
Defining calculation fields
Using operators in formulas
Degrees 180 angleInRadians•
π
------------------------------------------------------------
=

FILEMAKER PRO HELP 949
Pi
Purpose
Calculates the value of the constant Pi (π), which is approximately 3.14159.
Format
Pi
Parameters
None
Data type returned
number
Originated in
FileMaker Pro 6.0 or earlier
Examples
Pi * 15 returns 47.124.
Related topics
Functions reference (category list)
Functions reference (alphabetical list)
About formulas
About functions
Defining calculation fields
Using operators in formulas
Radians
Purpose
Converts angleInDegrees to radians.
Format
Radians(angleInDegrees)
Parameters
angleInDegrees - any numeric expression or field containing a numeric expression, in degrees
Data type returned
number

FILEMAKER PRO HELP 950
Originated in
FileMaker Pro 6.0 or earlier
Description
The parameters for FileMaker Pro trigonometric functions must be expressed in radians. If the
values you want to use as parameters in a trigonometric equation are in degrees, use this function
to convert them to radians first. A degree is equal to Pi/180 radians.
Examples
Radians(45) returns .78539816....
Sin(Radians(30)) returns .5.
Related topics
Functions reference (category list)
Functions reference (alphabetical list)
About formulas
About functions
Defining calculation fields
Using operators in formulas
Sin
Purpose
Returns the sine (Sin) of angleInRadians expressed in radians.
Format
Sin(angleInRadians)
Parameters
angleInRadians - any numeric expression or field containing a numeric expression, in radians
Data type returned
number
Originated in
FileMaker Pro 6.0 or earlier
Examples
Sin(Radians(60)) returns .86602.
Sin(.610865) returns .57357624....
Radians πangleInDegrees•
180
-----------------------------------------------------
=

FILEMAKER PRO HELP 951
Related topics
Functions reference (category list)
Functions reference (alphabetical list)
About formulas
About functions
Defining calculation fields
Using operators in formulas
Tan
Purpose
Returns the tangent (Tan) of angleInRadians.
Format
Tan(angleInRadians)
Parameters
angleInRadians - any numeric expression or field containing a numeric expression, in radians
Data type returned
number
Originated in
FileMaker Pro 6.0 or earlier
Description
Use this function to calculate the Tan of angleInRadians.
Note With the Tan function, you cannot use values exactly equal to 90 degrees (Pi/2 radians), or
multiples of 90 degrees.
Examples
Tan(.13) returns .13073731....
Tan(Radians(34)) returns .6745085.
Related topics
Functions reference (category list)
Functions reference (alphabetical list)
About formulas
About functions
Defining calculation fields
Using operators in formulas
Tan Sin angleInRadians()
Cos angleInRadians()
-----------------------------------------------------------
=

Script steps reference
FILEMAKER PRO HELP 952
Script steps reference
Click the following links to find script steps by category, or alphabetically. Each script step topic
describes what the script step does, and what its options and parameters are. It also shows the
format for the script step and provides a usage example.
For information on how to use scripts, see Creating scripts to automate tasks.
Script steps reference (category list)
Control script steps . . . . . . . . . . . . . . . . . . . . . . . . . . . . . . . . . . . . . . . 960
Perform Script . . . . . . . . . . . . . . . . . . . . . . . . . . . . . . . . . . . . . . . . . . . . . . . . . . . . . . . . . . . . . . 960
Perform Script On Server . . . . . . . . . . . . . . . . . . . . . . . . . . . . . . . . . . . . . . . . . . . . . . . . . . . . . . 962
Pause/Resume Script . . . . . . . . . . . . . . . . . . . . . . . . . . . . . . . . . . . . . . . . . . . . . . . . . . . . . . . . 964
Exit Script . . . . . . . . . . . . . . . . . . . . . . . . . . . . . . . . . . . . . . . . . . . . . . . . . . . . . . . . . . . . . . . . . . 965
Halt Script . . . . . . . . . . . . . . . . . . . . . . . . . . . . . . . . . . . . . . . . . . . . . . . . . . . . . . . . . . . . . . . . . . 967
If . . . . . . . . . . . . . . . . . . . . . . . . . . . . . . . . . . . . . . . . . . . . . . . . . . . . . . . . . . . . . . . . . . . . . . . . . 968
Else If . . . . . . . . . . . . . . . . . . . . . . . . . . . . . . . . . . . . . . . . . . . . . . . . . . . . . . . . . . . . . . . . . . . . . 970
Else . . . . . . . . . . . . . . . . . . . . . . . . . . . . . . . . . . . . . . . . . . . . . . . . . . . . . . . . . . . . . . . . . . . . . . 972
End If . . . . . . . . . . . . . . . . . . . . . . . . . . . . . . . . . . . . . . . . . . . . . . . . . . . . . . . . . . . . . . . . . . . . . 973
Loop . . . . . . . . . . . . . . . . . . . . . . . . . . . . . . . . . . . . . . . . . . . . . . . . . . . . . . . . . . . . . . . . . . . . . . 974
Exit Loop If . . . . . . . . . . . . . . . . . . . . . . . . . . . . . . . . . . . . . . . . . . . . . . . . . . . . . . . . . . . . . . . . . 975
End Loop . . . . . . . . . . . . . . . . . . . . . . . . . . . . . . . . . . . . . . . . . . . . . . . . . . . . . . . . . . . . . . . . . . 976
Allow User Abort . . . . . . . . . . . . . . . . . . . . . . . . . . . . . . . . . . . . . . . . . . . . . . . . . . . . . . . . . . . . 977
Set Error Capture . . . . . . . . . . . . . . . . . . . . . . . . . . . . . . . . . . . . . . . . . . . . . . . . . . . . . . . . . . . . 978
Set Variable . . . . . . . . . . . . . . . . . . . . . . . . . . . . . . . . . . . . . . . . . . . . . . . . . . . . . . . . . . . . . . . . 980
Set Script Animation . . . . . . . . . . . . . . . . . . . . . . . . . . . . . . . . . . . . . . . . . . . . . . . . . . . . . . . . . . 982
Install OnTimer Script . . . . . . . . . . . . . . . . . . . . . . . . . . . . . . . . . . . . . . . . . . . . . . . . . . . . . . . . . 983
Navigation script steps . . . . . . . . . . . . . . . . . . . . . . . . . . . . . . . . . . . . 984
Go to Layout . . . . . . . . . . . . . . . . . . . . . . . . . . . . . . . . . . . . . . . . . . . . . . . . . . . . . . . . . . . . . . . . 984
Go to Record/Request/Page . . . . . . . . . . . . . . . . . . . . . . . . . . . . . . . . . . . . . . . . . . . . . . . . . . .986
Go to Related Record . . . . . . . . . . . . . . . . . . . . . . . . . . . . . . . . . . . . . . . . . . . . . . . . . . . . . . . . 988
Go to Portal Row . . . . . . . . . . . . . . . . . . . . . . . . . . . . . . . . . . . . . . . . . . . . . . . . . . . . . . . . . . . . 990
Go to Object . . . . . . . . . . . . . . . . . . . . . . . . . . . . . . . . . . . . . . . . . . . . . . . . . . . . . . . . . . . . . . . . 992
Go to Field . . . . . . . . . . . . . . . . . . . . . . . . . . . . . . . . . . . . . . . . . . . . . . . . . . . . . . . . . . . . . . . . . 993
Go to Next Field . . . . . . . . . . . . . . . . . . . . . . . . . . . . . . . . . . . . . . . . . . . . . . . . . . . . . . . . . . . . . 994
Go to Previous Field . . . . . . . . . . . . . . . . . . . . . . . . . . . . . . . . . . . . . . . . . . . . . . . . . . . . . . . . . . 995
Close Popover . . . . . . . . . . . . . . . . . . . . . . . . . . . . . . . . . . . . . . . . . . . . . . . . . . . . . . . . . . . . . . 996
Enter Browse Mode . . . . . . . . . . . . . . . . . . . . . . . . . . . . . . . . . . . . . . . . . . . . . . . . . . . . . . . . . . 997
Enter Find Mode . . . . . . . . . . . . . . . . . . . . . . . . . . . . . . . . . . . . . . . . . . . . . . . . . . . . . . . . . . . . . 998
Enter Preview Mode . . . . . . . . . . . . . . . . . . . . . . . . . . . . . . . . . . . . . . . . . . . . . . . . . . . . . . . . . . 999
Editing script steps . . . . . . . . . . . . . . . . . . . . . . . . . . . . . . . . . . . . . . 1000
Undo/Redo . . . . . . . . . . . . . . . . . . . . . . . . . . . . . . . . . . . . . . . . . . . . . . . . . . . . . . . . . . . . . . . . 1000
Cut . . . . . . . . . . . . . . . . . . . . . . . . . . . . . . . . . . . . . . . . . . . . . . . . . . . . . . . . . . . . . . . . . . . . . . 1001
Copy . . . . . . . . . . . . . . . . . . . . . . . . . . . . . . . . . . . . . . . . . . . . . . . . . . . . . . . . . . . . . . . . . . . . . 1003
Paste . . . . . . . . . . . . . . . . . . . . . . . . . . . . . . . . . . . . . . . . . . . . . . . . . . . . . . . . . . . . . . . . . . . . 1004
Clear . . . . . . . . . . . . . . . . . . . . . . . . . . . . . . . . . . . . . . . . . . . . . . . . . . . . . . . . . . . . . . . . . . . . . 1005
Set Selection . . . . . . . . . . . . . . . . . . . . . . . . . . . . . . . . . . . . . . . . . . . . . . . . . . . . . . . . . . . . . . 1006
Select All . . . . . . . . . . . . . . . . . . . . . . . . . . . . . . . . . . . . . . . . . . . . . . . . . . . . . . . . . . . . . . . . . 1008
Script steps reference
FILEMAKER PRO HELP 953
Perform Find/Replace . . . . . . . . . . . . . . . . . . . . . . . . . . . . . . . . . . . . . . . . . . . . . . . . . . . . . . . 1009
Fields script steps . . . . . . . . . . . . . . . . . . . . . . . . . . . . . . . . . . . . . . . 1011
Set Field . . . . . . . . . . . . . . . . . . . . . . . . . . . . . . . . . . . . . . . . . . . . . . . . . . . . . . . . . . . . . . . . . . 1011
Set Field By Name . . . . . . . . . . . . . . . . . . . . . . . . . . . . . . . . . . . . . . . . . . . . . . . . . . . . . . . . . . 1012
Set Next Serial Value . . . . . . . . . . . . . . . . . . . . . . . . . . . . . . . . . . . . . . . . . . . . . . . . . . . . . . . . 1014
Insert Text . . . . . . . . . . . . . . . . . . . . . . . . . . . . . . . . . . . . . . . . . . . . . . . . . . . . . . . . . . . . . . . . 1016
Insert Calculated Result . . . . . . . . . . . . . . . . . . . . . . . . . . . . . . . . . . . . . . . . . . . . . . . . . . . . . . 1017
Insert From Device . . . . . . . . . . . . . . . . . . . . . . . . . . . . . . . . . . . . . . . . . . . . . . . . . . . . . . . . . . 1019
Insert From Index . . . . . . . . . . . . . . . . . . . . . . . . . . . . . . . . . . . . . . . . . . . . . . . . . . . . . . . . . . . 1021
Insert From Last Visited . . . . . . . . . . . . . . . . . . . . . . . . . . . . . . . . . . . . . . . . . . . . . . . . . . . . . . 1022
Insert From URL . . . . . . . . . . . . . . . . . . . . . . . . . . . . . . . . . . . . . . . . . . . . . . . . . . . . . . . . . . . . 1023
Insert Current Date . . . . . . . . . . . . . . . . . . . . . . . . . . . . . . . . . . . . . . . . . . . . . . . . . . . . . . . . . . 1025
Insert Current Time . . . . . . . . . . . . . . . . . . . . . . . . . . . . . . . . . . . . . . . . . . . . . . . . . . . . . . . . . 1026
Insert Current User Name . . . . . . . . . . . . . . . . . . . . . . . . . . . . . . . . . . . . . . . . . . . . . . . . . . . .1027
Insert Picture . . . . . . . . . . . . . . . . . . . . . . . . . . . . . . . . . . . . . . . . . . . . . . . . . . . . . . . . . . . . . . 1028
Insert QuickTime . . . . . . . . . . . . . . . . . . . . . . . . . . . . . . . . . . . . . . . . . . . . . . . . . . . . . . . . . . . 1029
Insert Audio/Video . . . . . . . . . . . . . . . . . . . . . . . . . . . . . . . . . . . . . . . . . . . . . . . . . . . . . . . . . . 1030
Insert PDF . . . . . . . . . . . . . . . . . . . . . . . . . . . . . . . . . . . . . . . . . . . . . . . . . . . . . . . . . . . . . . . . 1032
Insert File . . . . . . . . . . . . . . . . . . . . . . . . . . . . . . . . . . . . . . . . . . . . . . . . . . . . . . . . . . . . . . . . . 1033
Replace Field Contents . . . . . . . . . . . . . . . . . . . . . . . . . . . . . . . . . . . . . . . . . . . . . . . . . . . . . . 1035
Relookup Field Contents . . . . . . . . . . . . . . . . . . . . . . . . . . . . . . . . . . . . . . . . . . . . . . . . . . . . . 1037
Export Field Contents . . . . . . . . . . . . . . . . . . . . . . . . . . . . . . . . . . . . . . . . . . . . . . . . . . . . . . . . 1038
Records script steps . . . . . . . . . . . . . . . . . . . . . . . . . . . . . . . . . . . . . 1039
New Record/Request . . . . . . . . . . . . . . . . . . . . . . . . . . . . . . . . . . . . . . . . . . . . . . . . . . . . . . . . 1039
Duplicate Record/Request . . . . . . . . . . . . . . . . . . . . . . . . . . . . . . . . . . . . . . . . . . . . . . . . . . . .1040
Delete Record/Request . . . . . . . . . . . . . . . . . . . . . . . . . . . . . . . . . . . . . . . . . . . . . . . . . . . . . . 1041
Delete Portal Row . . . . . . . . . . . . . . . . . . . . . . . . . . . . . . . . . . . . . . . . . . . . . . . . . . . . . . . . . . 1043
Delete All Records . . . . . . . . . . . . . . . . . . . . . . . . . . . . . . . . . . . . . . . . . . . . . . . . . . . . . . . . . . 1044
Open Record/Request . . . . . . . . . . . . . . . . . . . . . . . . . . . . . . . . . . . . . . . . . . . . . . . . . . . . . . .1045
Revert Record/Request . . . . . . . . . . . . . . . . . . . . . . . . . . . . . . . . . . . . . . . . . . . . . . . . . . . . . . 1047
Commit Records/Requests . . . . . . . . . . . . . . . . . . . . . . . . . . . . . . . . . . . . . . . . . . . . . . . . . . . 1048
Copy Record/Request . . . . . . . . . . . . . . . . . . . . . . . . . . . . . . . . . . . . . . . . . . . . . . . . . . . . . . . 1049
Copy All Records/Requests . . . . . . . . . . . . . . . . . . . . . . . . . . . . . . . . . . . . . . . . . . . . . . . . . . . 1050
Import Records . . . . . . . . . . . . . . . . . . . . . . . . . . . . . . . . . . . . . . . . . . . . . . . . . . . . . . . . . . . . . 1051
Export Records . . . . . . . . . . . . . . . . . . . . . . . . . . . . . . . . . . . . . . . . . . . . . . . . . . . . . . . . . . . . 1054
Save Records As Excel . . . . . . . . . . . . . . . . . . . . . . . . . . . . . . . . . . . . . . . . . . . . . . . . . . . . . . 1057
Save Records As PDF . . . . . . . . . . . . . . . . . . . . . . . . . . . . . . . . . . . . . . . . . . . . . . . . . . . . . . .1058
Save Records As Snapshot Link . . . . . . . . . . . . . . . . . . . . . . . . . . . . . . . . . . . . . . . . . . . . . . . 1060
Found Sets script steps . . . . . . . . . . . . . . . . . . . . . . . . . . . . . . . . . . 1062
Perform Find . . . . . . . . . . . . . . . . . . . . . . . . . . . . . . . . . . . . . . . . . . . . . . . . . . . . . . . . . . . . . . 1062
Perform Quick Find . . . . . . . . . . . . . . . . . . . . . . . . . . . . . . . . . . . . . . . . . . . . . . . . . . . . . . . . . 1064
Find Matching Records . . . . . . . . . . . . . . . . . . . . . . . . . . . . . . . . . . . . . . . . . . . . . . . . . . . . . . 1065
Constrain Found Set . . . . . . . . . . . . . . . . . . . . . . . . . . . . . . . . . . . . . . . . . . . . . . . . . . . . . . . . 1067
Extend Found Set . . . . . . . . . . . . . . . . . . . . . . . . . . . . . . . . . . . . . . . . . . . . . . . . . . . . . . . . . . 1068
Modify Last Find . . . . . . . . . . . . . . . . . . . . . . . . . . . . . . . . . . . . . . . . . . . . . . . . . . . . . . . . . . . . 1069
Show All Records . . . . . . . . . . . . . . . . . . . . . . . . . . . . . . . . . . . . . . . . . . . . . . . . . . . . . . . . . . . 1070
Show Omitted Only . . . . . . . . . . . . . . . . . . . . . . . . . . . . . . . . . . . . . . . . . . . . . . . . . . . . . . . . . 1071
Omit Record . . . . . . . . . . . . . . . . . . . . . . . . . . . . . . . . . . . . . . . . . . . . . . . . . . . . . . . . . . . . . . . 1072
Script steps reference
FILEMAKER PRO HELP 954
Omit Multiple Records . . . . . . . . . . . . . . . . . . . . . . . . . . . . . . . . . . . . . . . . . . . . . . . . . . . . . . . 1073
Sort Records . . . . . . . . . . . . . . . . . . . . . . . . . . . . . . . . . . . . . . . . . . . . . . . . . . . . . . . . . . . . . . 1074
Unsort Records . . . . . . . . . . . . . . . . . . . . . . . . . . . . . . . . . . . . . . . . . . . . . . . . . . . . . . . . . . . . 1076
Sort Records by Field . . . . . . . . . . . . . . . . . . . . . . . . . . . . . . . . . . . . . . . . . . . . . . . . . . . . . . . . 1077
Windows script steps . . . . . . . . . . . . . . . . . . . . . . . . . . . . . . . . . . . . 1079
New Window . . . . . . . . . . . . . . . . . . . . . . . . . . . . . . . . . . . . . . . . . . . . . . . . . . . . . . . . . . . . . . 1079
Select Window . . . . . . . . . . . . . . . . . . . . . . . . . . . . . . . . . . . . . . . . . . . . . . . . . . . . . . . . . . . . . 1081
Close Window . . . . . . . . . . . . . . . . . . . . . . . . . . . . . . . . . . . . . . . . . . . . . . . . . . . . . . . . . . . . . 1083
Adjust Window . . . . . . . . . . . . . . . . . . . . . . . . . . . . . . . . . . . . . . . . . . . . . . . . . . . . . . . . . . . . . 1084
Move/Resize Window . . . . . . . . . . . . . . . . . . . . . . . . . . . . . . . . . . . . . . . . . . . . . . . . . . . . . . . . 1085
Arrange All Windows . . . . . . . . . . . . . . . . . . . . . . . . . . . . . . . . . . . . . . . . . . . . . . . . . . . . . . . . 1087
Freeze Window . . . . . . . . . . . . . . . . . . . . . . . . . . . . . . . . . . . . . . . . . . . . . . . . . . . . . . . . . . . . 1088
Refresh Window . . . . . . . . . . . . . . . . . . . . . . . . . . . . . . . . . . . . . . . . . . . . . . . . . . . . . . . . . . . . 1090
Scroll Window . . . . . . . . . . . . . . . . . . . . . . . . . . . . . . . . . . . . . . . . . . . . . . . . . . . . . . . . . . . . . 1091
Show/Hide Menubar . . . . . . . . . . . . . . . . . . . . . . . . . . . . . . . . . . . . . . . . . . . . . . . . . . . . . . . . . 1092
Show/Hide Toolbars . . . . . . . . . . . . . . . . . . . . . . . . . . . . . . . . . . . . . . . . . . . . . . . . . . . . . . . . . 1093
Show/Hide Text Ruler . . . . . . . . . . . . . . . . . . . . . . . . . . . . . . . . . . . . . . . . . . . . . . . . . . . . . . . 1094
Set Window Title . . . . . . . . . . . . . . . . . . . . . . . . . . . . . . . . . . . . . . . . . . . . . . . . . . . . . . . . . . . 1095
Set Zoom Level . . . . . . . . . . . . . . . . . . . . . . . . . . . . . . . . . . . . . . . . . . . . . . . . . . . . . . . . . . . . 1096
View As . . . . . . . . . . . . . . . . . . . . . . . . . . . . . . . . . . . . . . . . . . . . . . . . . . . . . . . . . . . . . . . . . . 1097
Files script steps . . . . . . . . . . . . . . . . . . . . . . . . . . . . . . . . . . . . . . . . 1098
New File . . . . . . . . . . . . . . . . . . . . . . . . . . . . . . . . . . . . . . . . . . . . . . . . . . . . . . . . . . . . . . . . . . 1098
Open File . . . . . . . . . . . . . . . . . . . . . . . . . . . . . . . . . . . . . . . . . . . . . . . . . . . . . . . . . . . . . . . . . 1099
Close File . . . . . . . . . . . . . . . . . . . . . . . . . . . . . . . . . . . . . . . . . . . . . . . . . . . . . . . . . . . . . . . . . 1101
Convert File . . . . . . . . . . . . . . . . . . . . . . . . . . . . . . . . . . . . . . . . . . . . . . . . . . . . . . . . . . . . . . . 1102
Set Multi-User . . . . . . . . . . . . . . . . . . . . . . . . . . . . . . . . . . . . . . . . . . . . . . . . . . . . . . . . . . . . . 1103
Set Use System Formats . . . . . . . . . . . . . . . . . . . . . . . . . . . . . . . . . . . . . . . . . . . . . . . . . . . . .1105
Save a Copy as . . . . . . . . . . . . . . . . . . . . . . . . . . . . . . . . . . . . . . . . . . . . . . . . . . . . . . . . . . . . 1106
Recover File . . . . . . . . . . . . . . . . . . . . . . . . . . . . . . . . . . . . . . . . . . . . . . . . . . . . . . . . . . . . . . . 1107
Print Setup . . . . . . . . . . . . . . . . . . . . . . . . . . . . . . . . . . . . . . . . . . . . . . . . . . . . . . . . . . . . . . . . 1108
Print . . . . . . . . . . . . . . . . . . . . . . . . . . . . . . . . . . . . . . . . . . . . . . . . . . . . . . . . . . . . . . . . . . . . . 1109
Accounts script steps . . . . . . . . . . . . . . . . . . . . . . . . . . . . . . . . . . . . 1111
Add Account . . . . . . . . . . . . . . . . . . . . . . . . . . . . . . . . . . . . . . . . . . . . . . . . . . . . . . . . . . . . . . . 1111
Delete Account . . . . . . . . . . . . . . . . . . . . . . . . . . . . . . . . . . . . . . . . . . . . . . . . . . . . . . . . . . . . . 1113
Reset Account Password . . . . . . . . . . . . . . . . . . . . . . . . . . . . . . . . . . . . . . . . . . . . . . . . . . . . .1114
Change Password . . . . . . . . . . . . . . . . . . . . . . . . . . . . . . . . . . . . . . . . . . . . . . . . . . . . . . . . . . 1115
Enable Account . . . . . . . . . . . . . . . . . . . . . . . . . . . . . . . . . . . . . . . . . . . . . . . . . . . . . . . . . . . . 1117
Re-Login . . . . . . . . . . . . . . . . . . . . . . . . . . . . . . . . . . . . . . . . . . . . . . . . . . . . . . . . . . . . . . . . . . 1118
Spelling script steps . . . . . . . . . . . . . . . . . . . . . . . . . . . . . . . . . . . . . 1119
Check Selection . . . . . . . . . . . . . . . . . . . . . . . . . . . . . . . . . . . . . . . . . . . . . . . . . . . . . . . . . . . . 1120
Check Record . . . . . . . . . . . . . . . . . . . . . . . . . . . . . . . . . . . . . . . . . . . . . . . . . . . . . . . . . . . . . 1121
Check Found Set . . . . . . . . . . . . . . . . . . . . . . . . . . . . . . . . . . . . . . . . . . . . . . . . . . . . . . . . . . . 1121
Correct Word . . . . . . . . . . . . . . . . . . . . . . . . . . . . . . . . . . . . . . . . . . . . . . . . . . . . . . . . . . . . . . 1122
Spelling Options . . . . . . . . . . . . . . . . . . . . . . . . . . . . . . . . . . . . . . . . . . . . . . . . . . . . . . . . . . . . 1123
Select Dictionaries . . . . . . . . . . . . . . . . . . . . . . . . . . . . . . . . . . . . . . . . . . . . . . . . . . . . . . . . . . 1124
Edit User Dictionary . . . . . . . . . . . . . . . . . . . . . . . . . . . . . . . . . . . . . . . . . . . . . . . . . . . . . . . . . 1125
Script steps reference
FILEMAKER PRO HELP 955
Open Menu Item script steps . . . . . . . . . . . . . . . . . . . . . . . . . . . . . . 1126
Open Edit Saved Finds . . . . . . . . . . . . . . . . . . . . . . . . . . . . . . . . . . . . . . . . . . . . . . . . . . . . . . 1127
Open Preferences . . . . . . . . . . . . . . . . . . . . . . . . . . . . . . . . . . . . . . . . . . . . . . . . . . . . . . . . . . 1128
Open File Options . . . . . . . . . . . . . . . . . . . . . . . . . . . . . . . . . . . . . . . . . . . . . . . . . . . . . . . . . . 1129
Open Manage Containers . . . . . . . . . . . . . . . . . . . . . . . . . . . . . . . . . . . . . . . . . . . . . . . . . . . . 1130
Open Manage Database . . . . . . . . . . . . . . . . . . . . . . . . . . . . . . . . . . . . . . . . . . . . . . . . . . . . . 1131
Open Manage Data Sources . . . . . . . . . . . . . . . . . . . . . . . . . . . . . . . . . . . . . . . . . . . . . . . . . . 1132
Open Manage Layouts . . . . . . . . . . . . . . . . . . . . . . . . . . . . . . . . . . . . . . . . . . . . . . . . . . . . . . .1133
Open Manage Scripts . . . . . . . . . . . . . . . . . . . . . . . . . . . . . . . . . . . . . . . . . . . . . . . . . . . . . . . 1134
Open Manage Themes . . . . . . . . . . . . . . . . . . . . . . . . . . . . . . . . . . . . . . . . . . . . . . . . . . . . . . 1135
Open Manage Value Lists . . . . . . . . . . . . . . . . . . . . . . . . . . . . . . . . . . . . . . . . . . . . . . . . . . . .1136
Open Find/Replace . . . . . . . . . . . . . . . . . . . . . . . . . . . . . . . . . . . . . . . . . . . . . . . . . . . . . . . . . 1137
Open Help . . . . . . . . . . . . . . . . . . . . . . . . . . . . . . . . . . . . . . . . . . . . . . . . . . . . . . . . . . . . . . . . 1138
Open Remote . . . . . . . . . . . . . . . . . . . . . . . . . . . . . . . . . . . . . . . . . . . . . . . . . . . . . . . . . . . . . . 1139
Open Sharing . . . . . . . . . . . . . . . . . . . . . . . . . . . . . . . . . . . . . . . . . . . . . . . . . . . . . . . . . . . . . . 1140
Upload To FileMaker Server . . . . . . . . . . . . . . . . . . . . . . . . . . . . . . . . . . . . . . . . . . . . . . . . . . 1141
Miscellaneous script steps . . . . . . . . . . . . . . . . . . . . . . . . . . . . . . . . 1142
Show Custom Dialog . . . . . . . . . . . . . . . . . . . . . . . . . . . . . . . . . . . . . . . . . . . . . . . . . . . . . . . . 1143
Allow Formatting Bar . . . . . . . . . . . . . . . . . . . . . . . . . . . . . . . . . . . . . . . . . . . . . . . . . . . . . . . . 1146
Refresh Object . . . . . . . . . . . . . . . . . . . . . . . . . . . . . . . . . . . . . . . . . . . . . . . . . . . . . . . . . . . . . 1147
Beep . . . . . . . . . . . . . . . . . . . . . . . . . . . . . . . . . . . . . . . . . . . . . . . . . . . . . . . . . . . . . . . . . . . . . 1148
Speak (OS X) . . . . . . . . . . . . . . . . . . . . . . . . . . . . . . . . . . . . . . . . . . . . . . . . . . . . . . . . . . . . . . 1149
Dial Phone . . . . . . . . . . . . . . . . . . . . . . . . . . . . . . . . . . . . . . . . . . . . . . . . . . . . . . . . . . . . . . . . 1150
Install Plug-In File . . . . . . . . . . . . . . . . . . . . . . . . . . . . . . . . . . . . . . . . . . . . . . . . . . . . . . . . . . . 1152
Install Menu Set . . . . . . . . . . . . . . . . . . . . . . . . . . . . . . . . . . . . . . . . . . . . . . . . . . . . . . . . . . . . 1153
Set Web Viewer . . . . . . . . . . . . . . . . . . . . . . . . . . . . . . . . . . . . . . . . . . . . . . . . . . . . . . . . . . . . 1154
Open URL . . . . . . . . . . . . . . . . . . . . . . . . . . . . . . . . . . . . . . . . . . . . . . . . . . . . . . . . . . . . . . . . 1156
Send Mail . . . . . . . . . . . . . . . . . . . . . . . . . . . . . . . . . . . . . . . . . . . . . . . . . . . . . . . . . . . . . . . . . 1158
Send DDE Execute (Windows) . . . . . . . . . . . . . . . . . . . . . . . . . . . . . . . . . . . . . . . . . . . . . . . . 1160
Perform AppleScript (OS X) . . . . . . . . . . . . . . . . . . . . . . . . . . . . . . . . . . . . . . . . . . . . . . . . . . .1162
Execute SQL . . . . . . . . . . . . . . . . . . . . . . . . . . . . . . . . . . . . . . . . . . . . . . . . . . . . . . . . . . . . . . 1163
Send Event (OS X) . . . . . . . . . . . . . . . . . . . . . . . . . . . . . . . . . . . . . . . . . . . . . . . . . . . . . . . . . . 1165
Send Event (Windows) . . . . . . . . . . . . . . . . . . . . . . . . . . . . . . . . . . . . . . . . . . . . . . . . . . . . . . . 1167
Comment . . . . . . . . . . . . . . . . . . . . . . . . . . . . . . . . . . . . . . . . . . . . . . . . . . . . . . . . . . . . . . . . . 1168
Flush Cache to Disk . . . . . . . . . . . . . . . . . . . . . . . . . . . . . . . . . . . . . . . . . . . . . . . . . . . . . . . . . 1169
Exit Application . . . . . . . . . . . . . . . . . . . . . . . . . . . . . . . . . . . . . . . . . . . . . . . . . . . . . . . . . . . . . 1170
FILEMAKER PRO HELP 956
Script steps reference (alphabetical list)
A, B, C
Add Account . . . . . . . . . . . . . . . . . . . . . . . . . . . . . . . . . . . . . . . . . . . . . . . . . . . . . . . . . . . . . . . 1111
Adjust Window . . . . . . . . . . . . . . . . . . . . . . . . . . . . . . . . . . . . . . . . . . . . . . . . . . . . . . . . . . . . . 1084
Allow Formatting Bar . . . . . . . . . . . . . . . . . . . . . . . . . . . . . . . . . . . . . . . . . . . . . . . . . . . . . . . . 1146
Allow User Abort . . . . . . . . . . . . . . . . . . . . . . . . . . . . . . . . . . . . . . . . . . . . . . . . . . . . . . . . . . . . 977
Arrange All Windows . . . . . . . . . . . . . . . . . . . . . . . . . . . . . . . . . . . . . . . . . . . . . . . . . . . . . . . . 1087
Beep . . . . . . . . . . . . . . . . . . . . . . . . . . . . . . . . . . . . . . . . . . . . . . . . . . . . . . . . . . . . . . . . . . . . . 1148
Change Password . . . . . . . . . . . . . . . . . . . . . . . . . . . . . . . . . . . . . . . . . . . . . . . . . . . . . . . . . . 1115
Check Found Set . . . . . . . . . . . . . . . . . . . . . . . . . . . . . . . . . . . . . . . . . . . . . . . . . . . . . . . . . . . 1121
Check Record . . . . . . . . . . . . . . . . . . . . . . . . . . . . . . . . . . . . . . . . . . . . . . . . . . . . . . . . . . . . . 1121
Check Selection . . . . . . . . . . . . . . . . . . . . . . . . . . . . . . . . . . . . . . . . . . . . . . . . . . . . . . . . . . . . 1120
Clear . . . . . . . . . . . . . . . . . . . . . . . . . . . . . . . . . . . . . . . . . . . . . . . . . . . . . . . . . . . . . . . . . . . . . 1005
Close File . . . . . . . . . . . . . . . . . . . . . . . . . . . . . . . . . . . . . . . . . . . . . . . . . . . . . . . . . . . . . . . . . 1101
Close Popover . . . . . . . . . . . . . . . . . . . . . . . . . . . . . . . . . . . . . . . . . . . . . . . . . . . . . . . . . . . . . . 996
Close Window . . . . . . . . . . . . . . . . . . . . . . . . . . . . . . . . . . . . . . . . . . . . . . . . . . . . . . . . . . . . . 1083
Comment . . . . . . . . . . . . . . . . . . . . . . . . . . . . . . . . . . . . . . . . . . . . . . . . . . . . . . . . . . . . . . . . . 1168
Commit Records/Requests . . . . . . . . . . . . . . . . . . . . . . . . . . . . . . . . . . . . . . . . . . . . . . . . . . . 1048
Constrain Found Set . . . . . . . . . . . . . . . . . . . . . . . . . . . . . . . . . . . . . . . . . . . . . . . . . . . . . . . . 1067
Convert File . . . . . . . . . . . . . . . . . . . . . . . . . . . . . . . . . . . . . . . . . . . . . . . . . . . . . . . . . . . . . . . 1102
Copy . . . . . . . . . . . . . . . . . . . . . . . . . . . . . . . . . . . . . . . . . . . . . . . . . . . . . . . . . . . . . . . . . . . . . 1003
Copy All Records/Requests . . . . . . . . . . . . . . . . . . . . . . . . . . . . . . . . . . . . . . . . . . . . . . . . . . . 1050
Copy Record/Request . . . . . . . . . . . . . . . . . . . . . . . . . . . . . . . . . . . . . . . . . . . . . . . . . . . . . . . 1049
Correct Word . . . . . . . . . . . . . . . . . . . . . . . . . . . . . . . . . . . . . . . . . . . . . . . . . . . . . . . . . . . . . . 1122
Cut . . . . . . . . . . . . . . . . . . . . . . . . . . . . . . . . . . . . . . . . . . . . . . . . . . . . . . . . . . . . . . . . . . . . . . 1001
D
Delete Account . . . . . . . . . . . . . . . . . . . . . . . . . . . . . . . . . . . . . . . . . . . . . . . . . . . . . . . . . . . . . 1113
Delete All Records . . . . . . . . . . . . . . . . . . . . . . . . . . . . . . . . . . . . . . . . . . . . . . . . . . . . . . . . . . 1044
Delete Portal Row . . . . . . . . . . . . . . . . . . . . . . . . . . . . . . . . . . . . . . . . . . . . . . . . . . . . . . . . . . 1043
Delete Record/Request . . . . . . . . . . . . . . . . . . . . . . . . . . . . . . . . . . . . . . . . . . . . . . . . . . . . . . 1041
Dial Phone . . . . . . . . . . . . . . . . . . . . . . . . . . . . . . . . . . . . . . . . . . . . . . . . . . . . . . . . . . . . . . . . 1150
Duplicate Record/Request . . . . . . . . . . . . . . . . . . . . . . . . . . . . . . . . . . . . . . . . . . . . . . . . . . . .1040
E
Edit User Dictionary . . . . . . . . . . . . . . . . . . . . . . . . . . . . . . . . . . . . . . . . . . . . . . . . . . . . . . . . . 1125
Else . . . . . . . . . . . . . . . . . . . . . . . . . . . . . . . . . . . . . . . . . . . . . . . . . . . . . . . . . . . . . . . . . . . . . . 972
Else If . . . . . . . . . . . . . . . . . . . . . . . . . . . . . . . . . . . . . . . . . . . . . . . . . . . . . . . . . . . . . . . . . . . . . 970
Enable Account . . . . . . . . . . . . . . . . . . . . . . . . . . . . . . . . . . . . . . . . . . . . . . . . . . . . . . . . . . . . 1117
End If . . . . . . . . . . . . . . . . . . . . . . . . . . . . . . . . . . . . . . . . . . . . . . . . . . . . . . . . . . . . . . . . . . . . . 973
End Loop . . . . . . . . . . . . . . . . . . . . . . . . . . . . . . . . . . . . . . . . . . . . . . . . . . . . . . . . . . . . . . . . . . 976
Enter Browse Mode . . . . . . . . . . . . . . . . . . . . . . . . . . . . . . . . . . . . . . . . . . . . . . . . . . . . . . . . . . 997
Enter Find Mode . . . . . . . . . . . . . . . . . . . . . . . . . . . . . . . . . . . . . . . . . . . . . . . . . . . . . . . . . . . . . 998
Enter Preview Mode . . . . . . . . . . . . . . . . . . . . . . . . . . . . . . . . . . . . . . . . . . . . . . . . . . . . . . . . . . 999
Execute SQL . . . . . . . . . . . . . . . . . . . . . . . . . . . . . . . . . . . . . . . . . . . . . . . . . . . . . . . . . . . . . . 1163
Exit Application . . . . . . . . . . . . . . . . . . . . . . . . . . . . . . . . . . . . . . . . . . . . . . . . . . . . . . . . . . . . . 1170
Exit Loop If . . . . . . . . . . . . . . . . . . . . . . . . . . . . . . . . . . . . . . . . . . . . . . . . . . . . . . . . . . . . . . . . . 975
Exit Script . . . . . . . . . . . . . . . . . . . . . . . . . . . . . . . . . . . . . . . . . . . . . . . . . . . . . . . . . . . . . . . . . . 965
Export Field Contents . . . . . . . . . . . . . . . . . . . . . . . . . . . . . . . . . . . . . . . . . . . . . . . . . . . . . . . . 1038
Export Records . . . . . . . . . . . . . . . . . . . . . . . . . . . . . . . . . . . . . . . . . . . . . . . . . . . . . . . . . . . . 1054
FILEMAKER PRO HELP 957
Extend Found Set . . . . . . . . . . . . . . . . . . . . . . . . . . . . . . . . . . . . . . . . . . . . . . . . . . . . . . . . . . 1068
F
Find Matching Records . . . . . . . . . . . . . . . . . . . . . . . . . . . . . . . . . . . . . . . . . . . . . . . . . . . . . . 1065
Flush Cache to Disk . . . . . . . . . . . . . . . . . . . . . . . . . . . . . . . . . . . . . . . . . . . . . . . . . . . . . . . . . 1169
Freeze Window . . . . . . . . . . . . . . . . . . . . . . . . . . . . . . . . . . . . . . . . . . . . . . . . . . . . . . . . . . . . 1088
G
Go to Field . . . . . . . . . . . . . . . . . . . . . . . . . . . . . . . . . . . . . . . . . . . . . . . . . . . . . . . . . . . . . . . . . 993
Go to Layout . . . . . . . . . . . . . . . . . . . . . . . . . . . . . . . . . . . . . . . . . . . . . . . . . . . . . . . . . . . . . . . . 984
Go to Next Field . . . . . . . . . . . . . . . . . . . . . . . . . . . . . . . . . . . . . . . . . . . . . . . . . . . . . . . . . . . . . 994
Go to Object . . . . . . . . . . . . . . . . . . . . . . . . . . . . . . . . . . . . . . . . . . . . . . . . . . . . . . . . . . . . . . . . 992
Go to Portal Row . . . . . . . . . . . . . . . . . . . . . . . . . . . . . . . . . . . . . . . . . . . . . . . . . . . . . . . . . . . . 990
Go to Previous Field . . . . . . . . . . . . . . . . . . . . . . . . . . . . . . . . . . . . . . . . . . . . . . . . . . . . . . . . . . 995
Go to Record/Request/Page . . . . . . . . . . . . . . . . . . . . . . . . . . . . . . . . . . . . . . . . . . . . . . . . . . .986
Go to Related Record . . . . . . . . . . . . . . . . . . . . . . . . . . . . . . . . . . . . . . . . . . . . . . . . . . . . . . . . 988
H, I, J, K
Halt Script . . . . . . . . . . . . . . . . . . . . . . . . . . . . . . . . . . . . . . . . . . . . . . . . . . . . . . . . . . . . . . . . . . 967
If . . . . . . . . . . . . . . . . . . . . . . . . . . . . . . . . . . . . . . . . . . . . . . . . . . . . . . . . . . . . . . . . . . . . . . . . . 968
Import Records . . . . . . . . . . . . . . . . . . . . . . . . . . . . . . . . . . . . . . . . . . . . . . . . . . . . . . . . . . . . . 1051
Insert Audio/Video . . . . . . . . . . . . . . . . . . . . . . . . . . . . . . . . . . . . . . . . . . . . . . . . . . . . . . . . . . 1030
Insert Calculated Result . . . . . . . . . . . . . . . . . . . . . . . . . . . . . . . . . . . . . . . . . . . . . . . . . . . . . . 1017
Insert Current Date . . . . . . . . . . . . . . . . . . . . . . . . . . . . . . . . . . . . . . . . . . . . . . . . . . . . . . . . . . 1025
Insert Current Time . . . . . . . . . . . . . . . . . . . . . . . . . . . . . . . . . . . . . . . . . . . . . . . . . . . . . . . . . 1026
Insert Current User Name . . . . . . . . . . . . . . . . . . . . . . . . . . . . . . . . . . . . . . . . . . . . . . . . . . . .1027
Insert File . . . . . . . . . . . . . . . . . . . . . . . . . . . . . . . . . . . . . . . . . . . . . . . . . . . . . . . . . . . . . . . . . 1033
Insert From Device . . . . . . . . . . . . . . . . . . . . . . . . . . . . . . . . . . . . . . . . . . . . . . . . . . . . . . . . . . 1019
Insert From Index . . . . . . . . . . . . . . . . . . . . . . . . . . . . . . . . . . . . . . . . . . . . . . . . . . . . . . . . . . . 1021
Insert From Last Visited . . . . . . . . . . . . . . . . . . . . . . . . . . . . . . . . . . . . . . . . . . . . . . . . . . . . . . 1022
Insert From URL . . . . . . . . . . . . . . . . . . . . . . . . . . . . . . . . . . . . . . . . . . . . . . . . . . . . . . . . . . . . 1023
Insert PDF . . . . . . . . . . . . . . . . . . . . . . . . . . . . . . . . . . . . . . . . . . . . . . . . . . . . . . . . . . . . . . . . 1032
Insert Picture . . . . . . . . . . . . . . . . . . . . . . . . . . . . . . . . . . . . . . . . . . . . . . . . . . . . . . . . . . . . . . 1028
Insert QuickTime . . . . . . . . . . . . . . . . . . . . . . . . . . . . . . . . . . . . . . . . . . . . . . . . . . . . . . . . . . . 1029
Insert Text . . . . . . . . . . . . . . . . . . . . . . . . . . . . . . . . . . . . . . . . . . . . . . . . . . . . . . . . . . . . . . . . 1016
Install Menu Set . . . . . . . . . . . . . . . . . . . . . . . . . . . . . . . . . . . . . . . . . . . . . . . . . . . . . . . . . . . . 1153
Install OnTimer Script . . . . . . . . . . . . . . . . . . . . . . . . . . . . . . . . . . . . . . . . . . . . . . . . . . . . . . . . . 983
Install Plug-In File . . . . . . . . . . . . . . . . . . . . . . . . . . . . . . . . . . . . . . . . . . . . . . . . . . . . . . . . . . . 1152
L, M, N
Loop . . . . . . . . . . . . . . . . . . . . . . . . . . . . . . . . . . . . . . . . . . . . . . . . . . . . . . . . . . . . . . . . . . . . . . 974
Modify Last Find . . . . . . . . . . . . . . . . . . . . . . . . . . . . . . . . . . . . . . . . . . . . . . . . . . . . . . . . . . . . 1069
Move/Resize Window . . . . . . . . . . . . . . . . . . . . . . . . . . . . . . . . . . . . . . . . . . . . . . . . . . . . . . . . 1085
New File . . . . . . . . . . . . . . . . . . . . . . . . . . . . . . . . . . . . . . . . . . . . . . . . . . . . . . . . . . . . . . . . . . 1098
New Record/Request . . . . . . . . . . . . . . . . . . . . . . . . . . . . . . . . . . . . . . . . . . . . . . . . . . . . . . . . 1039
New Window . . . . . . . . . . . . . . . . . . . . . . . . . . . . . . . . . . . . . . . . . . . . . . . . . . . . . . . . . . . . . . 1079
O
Omit Multiple Records . . . . . . . . . . . . . . . . . . . . . . . . . . . . . . . . . . . . . . . . . . . . . . . . . . . . . . . 1073
Omit Record . . . . . . . . . . . . . . . . . . . . . . . . . . . . . . . . . . . . . . . . . . . . . . . . . . . . . . . . . . . . . . . 1072
FILEMAKER PRO HELP 958
Open Edit Saved Finds . . . . . . . . . . . . . . . . . . . . . . . . . . . . . . . . . . . . . . . . . . . . . . . . . . . . . . 1127
Open File . . . . . . . . . . . . . . . . . . . . . . . . . . . . . . . . . . . . . . . . . . . . . . . . . . . . . . . . . . . . . . . . . 1099
Open File Options . . . . . . . . . . . . . . . . . . . . . . . . . . . . . . . . . . . . . . . . . . . . . . . . . . . . . . . . . . 1129
Open Find/Replace . . . . . . . . . . . . . . . . . . . . . . . . . . . . . . . . . . . . . . . . . . . . . . . . . . . . . . . . . 1137
Open Help . . . . . . . . . . . . . . . . . . . . . . . . . . . . . . . . . . . . . . . . . . . . . . . . . . . . . . . . . . . . . . . . 1138
Open Manage Containers . . . . . . . . . . . . . . . . . . . . . . . . . . . . . . . . . . . . . . . . . . . . . . . . . . . . 1130
Open Manage Data Sources . . . . . . . . . . . . . . . . . . . . . . . . . . . . . . . . . . . . . . . . . . . . . . . . . . 1132
Open Manage Database . . . . . . . . . . . . . . . . . . . . . . . . . . . . . . . . . . . . . . . . . . . . . . . . . . . . . 1131
Open Manage Layouts . . . . . . . . . . . . . . . . . . . . . . . . . . . . . . . . . . . . . . . . . . . . . . . . . . . . . . .1133
Open Manage Scripts . . . . . . . . . . . . . . . . . . . . . . . . . . . . . . . . . . . . . . . . . . . . . . . . . . . . . . . 1134
Open Manage Themes . . . . . . . . . . . . . . . . . . . . . . . . . . . . . . . . . . . . . . . . . . . . . . . . . . . . . . 1135
Open Manage Value Lists . . . . . . . . . . . . . . . . . . . . . . . . . . . . . . . . . . . . . . . . . . . . . . . . . . . .1136
Open Preferences . . . . . . . . . . . . . . . . . . . . . . . . . . . . . . . . . . . . . . . . . . . . . . . . . . . . . . . . . . 1128
Open Record/Request . . . . . . . . . . . . . . . . . . . . . . . . . . . . . . . . . . . . . . . . . . . . . . . . . . . . . . .1045
Open Remote . . . . . . . . . . . . . . . . . . . . . . . . . . . . . . . . . . . . . . . . . . . . . . . . . . . . . . . . . . . . . . 1139
Open Sharing . . . . . . . . . . . . . . . . . . . . . . . . . . . . . . . . . . . . . . . . . . . . . . . . . . . . . . . . . . . . . . 1140
Open URL . . . . . . . . . . . . . . . . . . . . . . . . . . . . . . . . . . . . . . . . . . . . . . . . . . . . . . . . . . . . . . . . 1156
P
Paste . . . . . . . . . . . . . . . . . . . . . . . . . . . . . . . . . . . . . . . . . . . . . . . . . . . . . . . . . . . . . . . . . . . . 1004
Pause/Resume Script . . . . . . . . . . . . . . . . . . . . . . . . . . . . . . . . . . . . . . . . . . . . . . . . . . . . . . . . 964
Perform AppleScript (OS X) . . . . . . . . . . . . . . . . . . . . . . . . . . . . . . . . . . . . . . . . . . . . . . . . . . .1162
Perform Find . . . . . . . . . . . . . . . . . . . . . . . . . . . . . . . . . . . . . . . . . . . . . . . . . . . . . . . . . . . . . . 1062
Perform Find/Replace . . . . . . . . . . . . . . . . . . . . . . . . . . . . . . . . . . . . . . . . . . . . . . . . . . . . . . . 1009
Perform Quick Find . . . . . . . . . . . . . . . . . . . . . . . . . . . . . . . . . . . . . . . . . . . . . . . . . . . . . . . . . 1064
Perform Script . . . . . . . . . . . . . . . . . . . . . . . . . . . . . . . . . . . . . . . . . . . . . . . . . . . . . . . . . . . . . . 960
Perform Script On Server . . . . . . . . . . . . . . . . . . . . . . . . . . . . . . . . . . . . . . . . . . . . . . . . . . . . . . 962
Print . . . . . . . . . . . . . . . . . . . . . . . . . . . . . . . . . . . . . . . . . . . . . . . . . . . . . . . . . . . . . . . . . . . . . 1109
Print Setup . . . . . . . . . . . . . . . . . . . . . . . . . . . . . . . . . . . . . . . . . . . . . . . . . . . . . . . . . . . . . . . . 1108
Q, R
Recover File . . . . . . . . . . . . . . . . . . . . . . . . . . . . . . . . . . . . . . . . . . . . . . . . . . . . . . . . . . . . . . . 1107
Refresh Object . . . . . . . . . . . . . . . . . . . . . . . . . . . . . . . . . . . . . . . . . . . . . . . . . . . . . . . . . . . . . 1147
Refresh Window . . . . . . . . . . . . . . . . . . . . . . . . . . . . . . . . . . . . . . . . . . . . . . . . . . . . . . . . . . . . 1090
Re-Login . . . . . . . . . . . . . . . . . . . . . . . . . . . . . . . . . . . . . . . . . . . . . . . . . . . . . . . . . . . . . . . . . . 1118
Relookup Field Contents . . . . . . . . . . . . . . . . . . . . . . . . . . . . . . . . . . . . . . . . . . . . . . . . . . . . . 1037
Replace Field Contents . . . . . . . . . . . . . . . . . . . . . . . . . . . . . . . . . . . . . . . . . . . . . . . . . . . . . . 1035
Reset Account Password . . . . . . . . . . . . . . . . . . . . . . . . . . . . . . . . . . . . . . . . . . . . . . . . . . . . .1114
Revert Record/Request . . . . . . . . . . . . . . . . . . . . . . . . . . . . . . . . . . . . . . . . . . . . . . . . . . . . . . 1047
S, T
Save a Copy as . . . . . . . . . . . . . . . . . . . . . . . . . . . . . . . . . . . . . . . . . . . . . . . . . . . . . . . . . . . . 1106
Save Records As Excel . . . . . . . . . . . . . . . . . . . . . . . . . . . . . . . . . . . . . . . . . . . . . . . . . . . . . . 1057
Save Records As PDF . . . . . . . . . . . . . . . . . . . . . . . . . . . . . . . . . . . . . . . . . . . . . . . . . . . . . . .1058
Save Records As Snapshot Link . . . . . . . . . . . . . . . . . . . . . . . . . . . . . . . . . . . . . . . . . . . . . . . 1060
Scroll Window . . . . . . . . . . . . . . . . . . . . . . . . . . . . . . . . . . . . . . . . . . . . . . . . . . . . . . . . . . . . . 1091
Select All . . . . . . . . . . . . . . . . . . . . . . . . . . . . . . . . . . . . . . . . . . . . . . . . . . . . . . . . . . . . . . . . . 1008
Select Dictionaries . . . . . . . . . . . . . . . . . . . . . . . . . . . . . . . . . . . . . . . . . . . . . . . . . . . . . . . . . . 1124
Select Window . . . . . . . . . . . . . . . . . . . . . . . . . . . . . . . . . . . . . . . . . . . . . . . . . . . . . . . . . . . . . 1081
Send DDE Execute (Windows) . . . . . . . . . . . . . . . . . . . . . . . . . . . . . . . . . . . . . . . . . . . . . . . . 1160
Send Event (OS X) . . . . . . . . . . . . . . . . . . . . . . . . . . . . . . . . . . . . . . . . . . . . . . . . . . . . . . . . . . 1165
FILEMAKER PRO HELP 959
Send Event (Windows) . . . . . . . . . . . . . . . . . . . . . . . . . . . . . . . . . . . . . . . . . . . . . . . . . . . . . . . 1167
Send Mail . . . . . . . . . . . . . . . . . . . . . . . . . . . . . . . . . . . . . . . . . . . . . . . . . . . . . . . . . . . . . . . . . 1158
Set Error Capture . . . . . . . . . . . . . . . . . . . . . . . . . . . . . . . . . . . . . . . . . . . . . . . . . . . . . . . . . . . . 978
Set Field . . . . . . . . . . . . . . . . . . . . . . . . . . . . . . . . . . . . . . . . . . . . . . . . . . . . . . . . . . . . . . . . . . 1011
Set Field By Name . . . . . . . . . . . . . . . . . . . . . . . . . . . . . . . . . . . . . . . . . . . . . . . . . . . . . . . . . . 1012
Set Multi-User . . . . . . . . . . . . . . . . . . . . . . . . . . . . . . . . . . . . . . . . . . . . . . . . . . . . . . . . . . . . . 1103
Set Next Serial Value . . . . . . . . . . . . . . . . . . . . . . . . . . . . . . . . . . . . . . . . . . . . . . . . . . . . . . . . 1014
Set Script Animation . . . . . . . . . . . . . . . . . . . . . . . . . . . . . . . . . . . . . . . . . . . . . . . . . . . . . . . . . . 982
Set Selection . . . . . . . . . . . . . . . . . . . . . . . . . . . . . . . . . . . . . . . . . . . . . . . . . . . . . . . . . . . . . . 1006
Set Use System Formats . . . . . . . . . . . . . . . . . . . . . . . . . . . . . . . . . . . . . . . . . . . . . . . . . . . . .1105
Set Variable . . . . . . . . . . . . . . . . . . . . . . . . . . . . . . . . . . . . . . . . . . . . . . . . . . . . . . . . . . . . . . . . 980
Set Web Viewer . . . . . . . . . . . . . . . . . . . . . . . . . . . . . . . . . . . . . . . . . . . . . . . . . . . . . . . . . . . . 1154
Set Window Title . . . . . . . . . . . . . . . . . . . . . . . . . . . . . . . . . . . . . . . . . . . . . . . . . . . . . . . . . . . 1095
Set Zoom Level . . . . . . . . . . . . . . . . . . . . . . . . . . . . . . . . . . . . . . . . . . . . . . . . . . . . . . . . . . . . 1096
Show All Records . . . . . . . . . . . . . . . . . . . . . . . . . . . . . . . . . . . . . . . . . . . . . . . . . . . . . . . . . . . 1070
Show Custom Dialog . . . . . . . . . . . . . . . . . . . . . . . . . . . . . . . . . . . . . . . . . . . . . . . . . . . . . . . . 1143
Show Omitted Only . . . . . . . . . . . . . . . . . . . . . . . . . . . . . . . . . . . . . . . . . . . . . . . . . . . . . . . . . 1071
Show/Hide Menubar . . . . . . . . . . . . . . . . . . . . . . . . . . . . . . . . . . . . . . . . . . . . . . . . . . . . . . . . . 1092
Show/Hide Text Ruler . . . . . . . . . . . . . . . . . . . . . . . . . . . . . . . . . . . . . . . . . . . . . . . . . . . . . . . 1094
Show/Hide Toolbars . . . . . . . . . . . . . . . . . . . . . . . . . . . . . . . . . . . . . . . . . . . . . . . . . . . . . . . . . 1093
Sort Records . . . . . . . . . . . . . . . . . . . . . . . . . . . . . . . . . . . . . . . . . . . . . . . . . . . . . . . . . . . . . . 1074
Sort Records by Field . . . . . . . . . . . . . . . . . . . . . . . . . . . . . . . . . . . . . . . . . . . . . . . . . . . . . . . . 1077
Speak (OS X) . . . . . . . . . . . . . . . . . . . . . . . . . . . . . . . . . . . . . . . . . . . . . . . . . . . . . . . . . . . . . . 1149
Spelling Options . . . . . . . . . . . . . . . . . . . . . . . . . . . . . . . . . . . . . . . . . . . . . . . . . . . . . . . . . . . . 1123
U, V, W, X, Y, Z
Undo/Redo . . . . . . . . . . . . . . . . . . . . . . . . . . . . . . . . . . . . . . . . . . . . . . . . . . . . . . . . . . . . . . . . 1000
Unsort Records . . . . . . . . . . . . . . . . . . . . . . . . . . . . . . . . . . . . . . . . . . . . . . . . . . . . . . . . . . . . 1076
Upload To FileMaker Server . . . . . . . . . . . . . . . . . . . . . . . . . . . . . . . . . . . . . . . . . . . . . . . . . . 1141
View As . . . . . . . . . . . . . . . . . . . . . . . . . . . . . . . . . . . . . . . . . . . . . . . . . . . . . . . . . . . . . . . . . . 1097

FILEMAKER PRO HELP 960
Control script steps
Control script steps control the progression of the script by letting you tell FileMaker Pro exactly
what to do when and if specific conditions occur.
Use these script steps to:
•call scripts and sub-scripts
•pause and resume a script, based on defined conditions
•conditionally perform script steps using if/then/else logic
•stop a script before it's finished, if a specific condition is met
•create loops that repetitively carry out a sequence of steps in a script, until a condition is
met
Note When you perform a script that uses the Get(LastError) function with control script steps, the
following control script steps do not clear the last error condition reported by FileMaker Pro: If, Else,
Else If, End If, Loop, Exit Loop If, End Loop, Exit Script, and Halt Script.
Perform Script
Purpose
Performs a script that is defined in the current file or in another FileMaker Pro file.
Format
Perform Script [“<script name>”; Parameter: <parameter>]
Options
To select a script, click Specify and choose the script from the list.
For Optional script parameter, type the text you want to use or click Edit and use the Specify
Calculation dialog box to build a more complex parameter.
Compatibility
Originated in
FileMaker Pro 6.0 or earlier
Where the script step runs Supported
FileMaker Pro Yes
FileMaker Server scheduled script Yes
FileMaker Go Yes
Custom Web Publishing Yes
FileMaker WebDirect Yes
Runtime solution Partial
A, B, C
D
E
F
G
H, I, J, K
L, M, N
O
P
Q, R
S, T
U, V, W, X, Y, Z

FILEMAKER PRO HELP 961
Description
There is no need to open an external file when using a script in it—FileMaker Pro opens it for you.
You can use separate scripts to break complex tasks into smaller segments, which are often easier
to troubleshoot. You can also save time by putting common tasks like printing or exporting records
into separate scripts, which can then be accessed by more than one script. For example, you might
want to use the same page setup and printing options in several scripts. By defining those steps
once and saving them in separate scripts, you make it easy to access those steps many times.
Use script parameters to pass text or numbers into a script. When a parameter is specified, that
parameter may be accessed within a script or passed to other script steps using the
Get(ScriptParameter) function.
Script parameters:
•exist within the parent script only unless explicitly passed to the sub-script. If your script
calls another script, parameters in the called script are independent of parameters in the
parent script.
•exist only for the duration of the script. Script parameters are reset each time a script is
performed.
•can be used (but not modified) within a script and can be passed along to sub-scripts by
using the Get(ScriptParameter) function as the parameter for the sub-script. You can also
specify different parameters each time the sub-script is called using Perform Script.
Changing the parameters passed to a sub-script does not modify the value of the
parameters returned from Get(ScriptParameter) in the parent script.
•can contain multiple values separated by carriage returns. Use the LeftValues function,
MiddleValues function, and RightValues function to isolate a specific parameter.
Tip If you've performed an external script and you want to return to the original file, add an Enter
Browse Mode step or Go to Layout step right after the Perform Script step in the original file, so that
the script returns to the original file.
Notes
•If you are using FileMaker Pro Advanced to define a custom menu item that performs a
script, select the script and optional script parameters. For more information, see Defining
custom menus (FileMaker Pro Advanced).
•A runtime solution can perform an external script only if the external file is bound to the
solution.
Example 1
Runs the "Print Invoice Report" script with no parameters.
Go to Layout ["Invoice Report"]
Perform Script ["Print Invoice Report"]
Example 2
Uses a field value, Customer Name, as the parameter. Invoices for the current customer are
returned in a new window with the Invoice Report layout.
Main script: Current Customer Invoices
Find Matching Records [Replace; Invoices::Customer ID]
#Calls the "View Customer Invoices" sub-script defined below

FILEMAKER PRO HELP 962
Perform Script ["View Customer Invoices"; Parameter:
Invoices::Customer Name]
Sub-script: View Customer Invoices
New Window [Name: "Customer: " & Get ( ScriptParameter ); Style:
Document]
Go to Layout ["Invoice Report"]
Sort Records [Restore; No dialog]
Related topics
Perform Script and script parameter examples
Script steps reference (alphabetical list)
Script steps reference (category list)
Defining custom menus (FileMaker Pro Advanced)
About formulas
Perform Script On Server
Purpose
Performs a script on the server that is hosting the current file.
Format
Perform Script On Server [Wait for completion; "<script name>"; Parameter:
<parameter>]
Options
•To select a script, click Specify and choose the script from the list.
For Optional script parameter, type the text you want to use or click Edit and use the Specify
Calculation dialog box to build a more complex parameter.
•Wait for completion pauses the script on the client until the sub-script called by Perform
Script On Server is completed on the host. Wait for completion must be selected to pass a
script result or error code from the host to the client. Use the Get(ScriptResult) function to
capture a result or the Get(LastError) function to capture an error code.
Compatibility
Where the script step runs Supported
FileMaker Pro Yes
FileMaker Server scheduled script No
FileMaker Go Yes
Custom Web Publishing Yes
FileMaker WebDirect Yes
Runtime solution No

FILEMAKER PRO HELP 963
Originated in
FileMaker Pro 13.0
Description
The current file must be hosted on FileMaker Server. Otherwise, Perform Script On Server returns
an error. Scripts performed on the host are treated as FileMaker Server scheduled scripts.
Scripts performed by Perform Script On Server:
•are not aware of the client’s current layout or record. If necessary, use the Go to Layout
script step and the Go to Record/Request/Page script step to specify which layout and
record to act on.
•can only access global variables that are defined after the script begins running on the host.
•support script parameters and script results up to 1 million characters.
Note If records are locked by a client, scripts performed on the host cannot access uncommitted
data or change the contents of those records.
Example 1
Runs a script on the server and sends the current layout name, record number, and customer email
address as the script parameter. The server navigates to the layout and record specified in the
parameter, saves a snapshot link of the current record, emails the snapshot link to the email address
specified in the parameter, and returns a result. The client fetches the script result from the server
and displays it in a custom dialog.
Main script: Email snapshot link (Client)
Perform Script On Server [Wait for completion; "Email snapshot link
(Server)"; Parameter: List ( Get ( LayoutName ) ; Get ( RecordNumber )
; Customers::Email )]
Show Custom Dialog [Get ( ScriptResult )]
Sub-script: Email snapshot link (Server)
Go to Layout [MiddleValues ( Get ( ScriptParameter ) ; 1 ; 1 )]
Go to Record/Request/Page [MiddleValues ( Get ( ScriptParameter ) ; 2 ;
1 )]
Set Variable [$PATH; Value:Get ( TemporaryPath ) & "Snapshot.fmpsl"]
Save Records as Snapshot Link ["$PATH"; Current record]
Send Mail [Send via SMTP Server; No dialog; To: MiddleValues ( Get (
ScriptParameter ) ; 3 ; 1 ); "$PATH"]
Exit Script [Result: "Snapshot link sent."]
Related topics
Perform Script script step
Perform Script and script parameter examples
Script steps reference (alphabetical list)
Script steps reference (category list)

FILEMAKER PRO HELP 964
Pause/Resume Script
Purpose
Pauses a script indefinitely or for a specified length of time so the user can perform other tasks in
the current window.
Format
Pause/Resume Script [Indefinitely/Duration (seconds) <n>]
Options
Click Specify to display the Pause/Resume Options dialog box, where you can set the following
options.
•Select Indefinitely to pause the script until the user clicks Continue (a button created by
FileMaker Pro in the status toolbar) or presses Enter.
•Select For duration and enter the number of seconds to pause the script.
•Select For duration and click Specify to create a calculation to determine the number of
seconds to pause the script.
Compatibility
Originated in
FileMaker Pro 6.0 or earlier
Description
This script step can, for example, wait for a user to enter data, and then guide the user from screen
to screen, prompting for data entry as needed. You can also use Pause/Resume Script to help
debug your scripts, for example, to see what value is in a field at a particular point in a script or to
evaluate the progress of a script.
The Pause/Resume Script script step operates on the foreground window of the file from which the
script is performed. If the script’s current window is hidden, Pause/Resume Script brings that
window to the front and shows it.
The For duration value must evaluate as a number, which is the duration of the pause in seconds.
If you use the Specify Calculation dialog box to determine the duration, the calculation result must
be a number or your script will not pause.
Where the script step runs Supported
FileMaker Pro Yes
FileMaker Server scheduled script Yes
FileMaker Go Yes
Custom Web Publishing Yes
FileMaker WebDirect Yes
Runtime solution Yes

FILEMAKER PRO HELP 965
To give you more control over a user's actions when a script pauses, FileMaker Pro makes some
menu commands unavailable to users. You can define buttons to let users perform actions not
available on the menus.
Note A Pause/Resume Script step unfreezes a Freeze Window script step.
Example 1
Goes to the Print Invoices layout and pauses. The user can click a Continue button on the status
toolbar or the layout to print the records.
Go to Layout ["Print Invoices"]
Pause/Resume Script [Indefinitely]
Print [Restore: Printer]
Go to Layout [original layout]
Related topics
Script steps reference (alphabetical list)
Script steps reference (category list)
About formulas
Exit Script
Purpose
Forces the running script, sub-script, or external script to stop immediately. If used in a sub-script,
returns to the main script with or without an optional script result.
Format
Exit Script [Result: <value or formula>]
Options
Click Specify to specify a value in the Specify Calculation dialog box. The value is typically based
on the state of the current script. The value is passed back to the calling script, where it can control
the script’s logic.
Compatibility
Where the script step runs Supported
FileMaker Pro Yes
FileMaker Server scheduled script Yes
FileMaker Go Yes
Custom Web Publishing Yes
FileMaker WebDirect Yes
Runtime solution Yes
FILEMAKER PRO HELP 966
Originated in
FileMaker Pro 6.0 or earlier
Description
If the optional script result is specified, the script result is returned and stored in the main script until
another sub-script that returns a value is called. The script result gets deleted when you exit the
main script. The script result can be stored in a local or global variable for later use.
Example 1
Performs a find and prints. If no records are found, displays all records and exits the script.
Perform Find [Restore]
If [Get ( FoundCount ) = 0]
Show All Records
Exit Script [ ]
End If
Print [No dialog]
Example 2
Prints unpaid invoices. In the Print sub-script, users can choose whether they want to print invoices.
If users choose to print, then Exit Script uses a script result to enter “Printed on <current date>” in
the Status field.
Main script: Print Unpaid Invoices
New Window [Name: "Invoice List"; Style: Document]
Go to Layout ["Print Invoices"]
Perform Find [Restore]
#Calls the "Print" sub-script defined below
Perform Script ["Print"]
#Continues after the sub-script is completed
If [Get ( ScriptResult ) = 1]
Replace Field Contents [No dialog; Invoices::Status; "Printed on " &
Get ( CurrentDate )]
Else
Show All Records
Sort Records [Restore; No dialog]
End If
Sub-script: Print
Show Custom Dialog ["Print Unpaid Invoices"; "Do you want to print
unpaid invoices?"]
If [Get ( LastMessageChoice ) = 1]
Print [No dialog]
Else
Close Window [Current Window]
End If
#Uses the Result parameter to pass the user’s choice to the main script
Exit Script [Result: Get ( LastMessageChoice )]

FILEMAKER PRO HELP 967
Related topics
Get(ScriptResult) function
Halt Script script step
Script steps reference (alphabetical list)
Script steps reference (category list)
About formulas
Halt Script
Purpose
Forces all running scripts, sub-scripts, or external scripts to stop immediately.
Format
Halt Script
Options
None.
Compatibility
Originated in
FileMaker Pro 6.0 or earlier
Description
Halt Script can leave your database in an unpredictable state. For example, the script might halt in
an unanticipated layout, view, or mode.
Example 1
Performs a find and prints. If no records are found, displays all records and halts the script.
Perform Find [Restore]
If [Get ( FoundCount ) = 0]
Show All Records
Halt Script
End If
Print [No dialog]
Where the script step runs Supported
FileMaker Pro Yes
FileMaker Server scheduled script Yes
FileMaker Go Yes
Custom Web Publishing Yes
FileMaker WebDirect Yes
Runtime solution Yes

FILEMAKER PRO HELP 968
Example 2
The Print Unpaid Invoices script calls the Print sub-script. If the user chooses not to print invoices,
the script and sub-script stop. If the user chooses to print invoices, unpaid invoices that match the
Find criteria are printed. After printing, all records are displayed and sorted.
Main script: Print Unpaid Invoices
New Window [Name: "Invoice List"; Style: Document]
Go to Layout ["Print Invoices"]
Perform Find [Restore]
#Calls the "Print" sub-script defined below
Perform Script ["Print"]
#Continues after the sub-script is completed if the user chose to print
the invoices
Show All Records
Sort Records [Restore; No dialog]
Sub-script: Print
Show Custom Dialog ["Print Unpaid Invoices"; "Do you want to print
unpaid invoices?"]
If [Get ( LastMessageChoice ) = 1]
Print [No dialog]
Else
Close Window [Current Window]
#Halts both the sub-script and the main script
Halt Script
End If
Related topics
Exit Script script step
Script steps reference (alphabetical list)
Script steps reference (category list)
If
Purpose
Evaluates a Boolean calculation and performs a conditional action based on that evaluation.
Format
If [<Boolean calculation>]
Options
Click Specify to define the Boolean calculation. In the Specify Calculation dialog box, type the
calculation you want evaluated, or use the field list (on the left) and the functions list (on the right)
with the mathematical and text operators to build the calculation.

FILEMAKER PRO HELP 969
Compatibility
Originated in
FileMaker Pro 6.0 or earlier
Description
If the calculation result is any number except zero, the calculation evaluates to True and the
subsequent script steps are executed. If the calculation result is zero, no data, or does not resolve
into a number, then the calculation evaluates to False and the subsequent script steps are not
executed.
Every If step must have a corresponding End If script step somewhere after the If step and at the
same indentation. Whenever you use an If script step, the Manage Scripts feature automatically
enters an End If step.
You can also add additional conditions by using the Else If script step and Else script step.
Note If you do not specify a calculation or if the calculation is unsuccessful, it will evaluate as False.
Use the Get(LastError) function to capture these errors.
Example 1
Performs a find. If no records are found, displays all records and sorts.
Perform Find [Restore]
If [Get (FoundCount) = 0]
Show All Records
Sort Records [Restore; No dialog]
End If
Example 2
Performs a find. If no records are found, displays a custom dialog. If records are found, sorts the
found set.
Perform Find [Restore]
If [Get ( FoundCount ) = 0]
Show Custom Dialog ["Find Records"; "No records were found."]
Else
Sort Records [Restore; No dialog]
End If
Where the script step runs Supported
FileMaker Pro Yes
FileMaker Server scheduled script Yes
FileMaker Go Yes
Custom Web Publishing Yes
FileMaker WebDirect Yes
Runtime solution Yes

FILEMAKER PRO HELP 970
Example 3
Performs a find. If no records are found, displays a custom dialog. If one record is found, goes to the
Invoice Details layout. If more than one record is found, goes to the Invoices layout.
Perform Find [Restore]
If [Get (FoundCount) = 0]
Show Custom Dialog ["Find Records"; "No record was found."]
Else If [Get (FoundCount) = 1]
Go to Layout ["Invoice Details"]
Else
Go to Layout ["Invoices"]
End If
Example 4
Performs a find. If no records are found, displays a custom dialog so the user can run the Find
Invoices script to search again. If one record is found, goes to the Invoice Details layout. If more
than one record is found, goes to the Invoices layout.
Script: Find Invoices
Perform Find [ ]
If [Get ( FoundCount ) = 0]
Show Custom Dialog ["No Record Found"; "No records were found. Do
you want to search again?"]
If [Get ( LastMessageChoice ) = 1]
#Calls this script again as a sub-script
Perform Script ["Find Invoices"]
Else
Show All Records
End If
Else If [Get ( FoundCount ) = 1]
Go to Layout ["Invoice Details"]
Else
Go to Layout ["Invoices"]
End If
Sort Records [Restore; No dialog]
Related topics
Defining calculation fields
If function
If structure examples
Script steps reference (alphabetical list)
Script steps reference (category list)
About formulas
Else If
Purpose
Evaluates a Boolean calculation and performs a conditional action based on that evaluation, like the
If script step.

FILEMAKER PRO HELP 971
Format
Else If [<Boolean calculation>]
Options
Click Specify to define the Boolean calculation. In the Specify Calculation dialog box, type the
calculation you want evaluated, or use the field list (on the left) and the functions list (on the right)
with the mathematical and text operators to build the calculation.
Compatibility
Originated in
FileMaker Pro 6.0 or earlier
Description
Must follow an If step or another Else If step. Else If cannot follow an Else script step.
When an If script step evaluates to False, script execution moves to the Else If script step. When an
Else If statement evaluates to True, the block of steps under the Else If is executed. An evaluation of
True ends the Else If process, and upon reaching the next Else If or Else statement, execution will
skip to the End If script step.
Example 1
Performs a find and sorts records. If no records match the find request, displays a custom dialog.
Perform Find [Restore]
If [ Get ( LastError ) = 0 ]
Sort Records [Restore; No dialog]
Else If [ Get ( LastError ) = 401 ]
Show Custom Dialog ["No records were found."]
End If
Related topics
Defining calculation fields
If function
If structure examples
Script steps reference (alphabetical list)
Script steps reference (category list)
About formulas
Where the script step runs Supported
FileMaker Pro Yes
FileMaker Server scheduled script Yes
FileMaker Go Yes
Custom Web Publishing Yes
FileMaker WebDirect Yes
Runtime solution Yes

FILEMAKER PRO HELP 972
Else
Purpose
Performs an alternate set of script steps when an If script step or Else If script step evaluates to
False.
Format
Else
Options
None.
Compatibility
Originated in
FileMaker Pro 6.0 or earlier
Description
Must follow an If script step or Else If script step. Else cannot follow another Else script step.
When all If script steps and Else If script steps evaluate to False, script execution moves to the Else
script step. The script steps under Else are executed, and script execution moves to the End If script
step.
Example 1
Performs a find. If no records are found, displays a custom dialog. If records are found, sorts the
found set.
Perform Find [Restore]
If [Get ( FoundCount ) = 0]
Show Custom Dialog ["Find Records"; "No records were found."]
Else
Sort Records [Restore; No dialog]
End If
Related topics
Else If
If structure examples
Script steps reference (alphabetical list)
Where the script step runs Supported
FileMaker Pro Yes
FileMaker Server scheduled script Yes
FileMaker Go Yes
Custom Web Publishing Yes
FileMaker WebDirect Yes
Runtime solution Yes

FILEMAKER PRO HELP 973
Script steps reference (category list)
End If
Purpose
Marks the end of an If script step structure.
Format
End If
Options
None.
Compatibility
Originated in
FileMaker Pro 6.0 or earlier
Description
Every If script step must have a corresponding End If script step somewhere after it at the same
indentation. Whenever you use an If script step, the Manage Scripts feature automatically enters an
End If step.
Example 1
Performs a find. If no records are found, displays all records and sorts.
Perform Find [Restore]
If [Get (FoundCount) = 0]
Show All Records
Sort Records [Restore; No dialog]
End If
Related topics
Script steps reference (alphabetical list)
Script steps reference (category list)
Where the script step runs Supported
FileMaker Pro Yes
FileMaker Server scheduled script Yes
FileMaker Go Yes
Custom Web Publishing Yes
FileMaker WebDirect Yes
Runtime solution Yes

FILEMAKER PRO HELP 974
Loop
Purpose
Repeats a set of script steps to perform batch processes such as exporting container field contents
from all records in a found set.
Format
Loop
Options
None.
Compatibility
Originated in
FileMaker Pro 6.0 or earlier
Description
This script step and the End Loop script step mark the beginning and end of a repeating structure of
script steps. The Manage Scripts feature performs the script steps that are enclosed within the loop
structure until it encounters one of the following:
•an Exit Loop If script step
•a Go to Record/Request/Page script step or Go to Portal Row script step when the Exit
after last option is selected
Every Loop step must have a corresponding End Loop step somewhere after the Loop step and at
the same indentation. Whenever you use a Loop script step, the Manage Scripts feature
automatically enters an End Loop step.
Example 1
Copies the contents of the Customers::Work Phone to Customer::Day Contact in all records.
Go to Record/Request/Page [First]
Loop
Set Field [Customers::Day Contact; Customers::Work Phone]
Go to Record/Request/Page [Next; Exit after last]
End Loop
Where the script step runs Supported
FileMaker Pro Yes
FileMaker Server scheduled script Yes
FileMaker Go Yes
Custom Web Publishing Yes
FileMaker WebDirect Yes
Runtime solution Yes

FILEMAKER PRO HELP 975
Example 2
Loops through records to export files that are in the Container field.
Set Variable [$PATH; Value: Get ( DocumentsPath ) & Products::Container]
Go to Record/Request/Page [First]
Loop
Export Field Contents [Products::Container; "$PATH"]
Go to Record/Request/Page [Next; Exit after last]
End Loop
Related topics
Loop structure examples
Script steps reference (alphabetical list)
Script steps reference (category list)
Exit Loop If
Purpose
Exits a loop if the specified calculation is True (not zero).
Format
Exit Loop If [<Boolean calculation>]
Options
Click Specify to define the Boolean calculation. In the Specify Calculation dialog box, type the
calculation you want evaluated, or use the field list (on the left) and the functions list (on the right)
with the mathematical and text operators to build the calculation.
Compatibility
Originated in
FileMaker Pro 6.0 or earlier
Description
If the calculation is True (not zero), the script continues with the script step that follows the End Loop
script step.
Where the script step runs Supported
FileMaker Pro Yes
FileMaker Server scheduled script Yes
FileMaker Go Yes
Custom Web Publishing Yes
FileMaker WebDirect Yes
Runtime solution Yes

FILEMAKER PRO HELP 976
If the calculation if False (zero), the loop is not exited and the script continues with the script step
that follows the Exit Loop If script step.
Example 1
Loops through records to export files that are in container fields. Exits the loop if a record has an
empty Container field.
Set Variable [$PATH; Value: Get ( DocumentsPath ) & Products::Container]
Go to Record/Request/Page [First]
Loop
Exit Loop If [IsEmpty ( Products::Container )]
Export Field Contents [Products::Container; "$PATH"]
Go to Record/Request/Page [Next; Exit after last]
End Loop
Related topics
Defining calculation fields
If function
If structure examples
Loop structure examples
Script steps reference (alphabetical list)
Script steps reference (category list)
About formulas
End Loop
Purpose
Marks the end of a Loop script structure.
Format
End Loop
Options
None.
Compatibility
Where the script step runs Supported
FileMaker Pro Yes
FileMaker Server scheduled script Yes
FileMaker Go Yes
Custom Web Publishing Yes
FileMaker WebDirect Yes
Runtime solution Yes

FILEMAKER PRO HELP 977
Originated in
FileMaker Pro 6.0 or earlier
Description
Whenever you use a Loop script step, the Manage Scripts feature automatically enters an End Loop
step. The steps between Loop and End Loop are automatically indented and the End Loop step is
placed at the same indentation level as its corresponding Loop step.
Example 1
Copies the data from Customers::Work Phone to Customers::Day Contact in all records.
Go to Record/Request/Page [First]
Loop
Set Field [Customers::Day Contact; Customers::Work Phone]
Go to Record/Request/Page [Next; Exit after last]
End Loop
Related topics
Loop script step
Exit Loop If script step
Loop structure examples
Script steps reference (alphabetical list)
Script steps reference (category list)
Allow User Abort
Purpose
Prevents users from stopping a script if set to Off.
Format
Allow User Abort [<on or off>]
Options
•On to allow users to stop a script by pressing Esc or Command-.(period) (OS X).
•Off to prevent users from stopping a script by pressing Esc or Command-.(period) (OS X).
Compatibility
Where the script step runs Supported
FileMaker Pro Yes
FileMaker Server scheduled script Yes
FileMaker Go Yes
Custom Web Publishing Yes
FileMaker WebDirect Yes

FILEMAKER PRO HELP 978
Originated in
FileMaker Pro 6.0 or earlier
Description
The Allow User Abort script step only affects the script that it is executed in.
By default, users can stop a script by pressing Esc or Command-.(period) (OS X). To prevent users
from stopping a script, use the Allow User Abort script step and set it to Off.
Example 1
Displays the records in the Print Invoices layout in a new window in Preview mode and pauses the
script. You can click Continue to print the invoices, or you can cancel printing in the Print dialog box
because the Print script step does not specify "Perform without dialog." Allow User Abort is Off so
that you aren't left with an extra window open if you cancel the script.
Allow User Abort [Off]
New Window [Name: "Print Invoices"; Style: Floating Document]
Go to Layout ["Print Invoices"]
Enter Preview Mode [Pause]
Print [Restore: Printer]
Close Window [Current Window]
Related topics
Script steps reference (alphabetical list)
Script steps reference (category list)
Set Error Capture
Purpose
Suppresses or enables normal FileMaker Pro alert messages.
Format
Set Error Capture [<on or off>]
Options
•On suppresses FileMaker Pro alert messages and some dialog boxes. If the error result is
100 or 803, then certain standard file dialog boxes are suppressed, such as the Open dialog
box.
•Off re-enables the alert messages.
Runtime solution Yes
Where the script step runs Supported

FILEMAKER PRO HELP 979
Compatibility
Originated in
FileMaker Pro 6.0 or earlier
Description
Use this script step to handle errors in a manner consistent with the functions the script performs. By
using the Get(LastError) function immediately after a script step, you can verify that the step was
performed properly.
By using the Get (LastError) function with the control script steps, you can make sure your script
performs correctly. When you decide to suppress alerts, it is important that you anticipate as many
problems as possible and include clear instructions for what to do when an error condition is
encountered.
Notes
•Use Get (LastError) immediately after the script step you intend to test; a successful
intervening step may clear the error code you were intending to capture.
•When Set Error Capture is used in a script that contains a sub-script, errors from the sub-
script are captured as well.
Example 1
Performs a find and suppresses the error dialog if no records were found.
Set Error Capture [On]
Perform Find [Restore]
Example 2
Performs a find. If no errors occur, sorts records. If no find criteria were specified, shows all records.
If no records match the find request, displays a custom dialog.
Set Error Capture [On]
Perform Find [Restore]
If [Get ( LastError ) = 0]
Sort Records [Restore; No dialog]
Else If [Get ( LastError ) = 400]
Show All Records
Else If [Get ( LastError ) = 401]
Show Custom Dialog ["Find"; "No records were found."]
End If
Where the script step runs Supported
FileMaker Pro Yes
FileMaker Server scheduled script Yes
FileMaker Go Yes
Custom Web Publishing Yes
FileMaker WebDirect Yes
Runtime solution Yes

FILEMAKER PRO HELP 980
Related topics
Script steps reference (alphabetical list)
Script steps reference (category list)
Set Variable
Purpose
Sets a local or global variable to a specified value.
Format
Set Variable [<variable name> {[<repetition number>]}; Value:<value or
formula>]
Options
Click Specify to set the variable options:
•Name is the name of the variable you want to create. Prefix the name with $ for a local
variable or $$ for a global variable. If no prefix is added, $ is automatically added to the
beginning of the name.
•Value is the value the variable is set to. You can enter text or specify a calculation.
•Repetition is the repetition (index) number of the variable you want to create. If no
repetition is specified, the default is 1.
Compatibility
Originated in
FileMaker Pro 8.0
Description
If a variable doesn’t exist, this script step will create one. A variable name has the same naming
restrictions as a field name. For more information, see About naming fields.
Local and global variables can be created and used in calculations.
•A local variable can only be used in script steps in the currently executing script. The value
in a local variable is cleared when the script exits.
Where the script step runs Supported
FileMaker Pro Yes
FileMaker Server scheduled script Yes
FileMaker Go Yes
Custom Web Publishing Yes
FileMaker WebDirect Yes
Runtime solution Yes

FILEMAKER PRO HELP 981
•A global variable can be used in a calculation or script anywhere in a file, for example, other
scripts or file paths. The value of a global variable is not cleared until the file is closed.
•Local and global variables (or even two local variables in different scripts) can have the
same name but they are treated as different variables and can store different values.
Example 1
Creates a related record by using a local variable to copy information into a match field.
Set Variable [$CURRENT_CUSTOMER_ID; Value: Customers::Customer ID]
Go to Layout ["Invoice Details"]
New Record/Request
Set Field [Invoices::Customer ID; $CURRENT_CUSTOMER_ID]
Example 2
Uses a local variable to save records as Excel or PDF files in the Documents folder.
Show Custom Dialog ["Save the current record as Excel or PDF?"]
If [Get ( LastMessageChoice ) = 1]
Set Variable [$PATH; Value: Get ( DocumentsPath ) & "Invoice " &
Invoice::Invoice Number & ".xlsx"]
Save Records as Excel [Restore; "$PATH"; Current record]
Else
Set Variable [$PATH; Value: Get ( DocumentsPath ) & "Invoice " &
Invoice::Invoice Number & ".pdf"]
Save Records as PDF [Restore; "$PATH"; Current record"]
End If
Example 3
Uses global variable as a toggle to stop a script from being triggered.
Script: Go to Selected Invoice for iOS
Set Variable [$$SCRIPT_TRIGGER; Value: "Off"]
Go to Layout ["Invoice Details iPad"]
Script: Trigger Entering Invoice Details
If [$$SCRIPT_TRIGGER = "Off"]
Set Variable [$$SCRIPT_TRIGGER; Value: "On"]
Exit Script [ ]
End If
Find Matching Records [Replace; Invoices::Customer Name]
Go to Record/Request/Page [First]
Related topics
Script steps reference (alphabetical list)
Script steps reference (category list)
About formulas
Using variables
Defining repeating fields

FILEMAKER PRO HELP 982
Set Script Animation
Purpose
Enables or disables animations while a script is running.
Format
Set Script Animation [<on or off>]
Options
•On enables animations while a script is running.
•Off disables animations while a script is running.
Compatibility
Originated in
FileMaker Pro 13.0
Description
Enabling animations increases the time required for a script to run. Disabling animations overrides
any animation settings for other script steps. This script step affects all script-initiated animations in
all windows.
Notes
•This script step is not supported on Windows.
•Set Script Animation does not return an error when it runs in a FileMaker product in which it
is not supported.
Example 1
While a script is running, animations are typically disabled. If a script causes a slide control to switch
between panels, there will be no animation providing feedback to users. To call attention to the
transition from panel to panel, use Set Script Animation [On] to enable animation prior to
switching between slide panels using the Go to Object script step.
Set Script Animation [On]
Go to Object [Object Name: "Panel 1"]
Pause/Resume Script [Duration (seconds): .5]
Go to Object [Object Name: "Panel 2"]
Where the script step runs Supported
FileMaker Pro Partial
FileMaker Server scheduled script No
FileMaker Go Yes
Custom Web Publishing No
FileMaker WebDirect No
Runtime solution Partial

FILEMAKER PRO HELP 983
Pause/Resume Script [Duration (seconds): .5]
Go to Object [Object Name: "Panel 3"]
Related topics
Script steps reference (alphabetical list)
Script steps reference (category list)
Install OnTimer Script
Purpose
Runs a specified script at the specified interval. Installs a timer on the active window. After the
specified interval has passed, the next time the application is idle, runs the specified script.
Format
Install OnTimer Script [“<script>”; Parameter: <script parameter>;
Interval: <number>]
Options
Click Specify to set the variable options:
•Specify script is the script that you want to run.
•Interval seconds is the value in seconds that the timer waits before running the script.
Compatibility
Originated in
FileMaker Pro 10.0
Description
This script step installs a single timer on the active window and repeats the specified script in that
window until another Install OnTimer Script step installs a timer on the window or until the window
closes. You can halt an installed timer by running another Install OnTimer Script step without
specifying a script or interval.
Note To run scripts on a schedule and independently of open windows, see FileMaker Server Help.
Where the script step runs Supported
FileMaker Pro Yes
FileMaker Server scheduled script No
FileMaker Go Yes
Custom Web Publishing No
FileMaker WebDirect Yes
Runtime solution Yes

FILEMAKER PRO HELP 984
Example 1
Uses the Install OnTimer Script step to run the Clock script once every minute.
Script: Clock OnTimer
Install OnTimer Script [“Clock”; Interval: 60]
Script: Clock
Set Field [Clock::Time; Get ( CurrentTime )]
Related topics
Script steps reference (alphabetical list)
Script steps reference (category list)
Setting up script triggers
Using variables
Navigation script steps
Navigation script steps move to different areas of a database. Use Navigation script steps to:
•go to a specific record or find request
•switch to a specific layout
•move among fields and other objects on a layout
•emulate pressing Enter or Tab
•switch to Browse mode to work with contents of a file
•switch to Find mode to fill out find requests
•switch to Preview mode to see how records, forms, or reports will look when they're printed
Go to Layout
Purpose
Switches to the specified layout.
Format
Go to Layout [“<layout name or layout number>”]
Options
Specify lets you choose the target layout. For Specify, click the arrow, then you can:
•choose the original layout. The original layout is the active layout when the script is initiated.
•choose a specific layout by name from the list of layouts you’ve defined in your file.
•choose Layout Name by calculation, and use the Specify Calculation dialog box to create
a formula whose result is a valid layout name.

FILEMAKER PRO HELP 985
•choose Layout Number by calculation, and use the Specify Calculation dialog box to
create a formula whose result is a valid layout number. (Layout numbers correspond to the
order of the layouts in the file.)
Compatibility
Originated in
FileMaker Pro 6.0 or earlier
Description
This script step is useful when you begin a script to make sure the user starts with the correct layout
displayed.
Notes
•The Go to Layout script step can only take you to layouts defined in the same file as the
script itself. To go to layouts in an external file, define a script in that file using the Go to
Layout script step, and call that script from the first file using the Perform Script script step.
•Layout Name by calculation recognizes layouts with the same names in the order in which
they were created. If you have multiple layouts with the same name, either select the
specific layout you want from the layout list or use Layout Number by calculation.
•Define an unstored calculation field with the function Get(LayoutNumber) function and place
it on your layouts to verify the layout numbers of your layouts.
•When a file has two or more tables, FileMaker Pro appends the name of the source table to
the layout name for clarity. For example, Go to Layout [“Layout #2” (TableB)].
Example 1
Opens a new window and goes to the Summary field on the Invoice Details layout.
New Window [Style: Document]
Go to Layout ["Invoice Details"]
Go to Field [Invoices::Summary]
Example 2
Checks which device is running the database and goes to the appropriate layout.
If [PatternCount ( Get ( ApplicationVersion ); "iPad" )]
Go to Layout ["Customers iPad"]
Else If [PatternCount ( Get ( ApplicationVersion ); "Pro" )]
Go to Layout ["Customers"]
Where the script step runs Supported
FileMaker Pro Yes
FileMaker Server scheduled script Yes
FileMaker Go Yes
Custom Web Publishing Yes
FileMaker WebDirect Yes
Runtime solution Yes

FILEMAKER PRO HELP 986
Else
Go to Layout ["Customers iPhone"]
End If
Sort Records [Restore; No dialog]
Related topics
New Window script step
Get(LayoutAccess) function
Get(LayoutName) function
Get(LayoutNumber) function
Get(LayoutTableName) function
Script steps reference (alphabetical list)
Script steps reference (category list)
About formulas
Go to Record/Request/Page
Purpose
In Browse mode, moves to a record in the found set. In Find mode, displays a find request. In
Preview mode, moves to a page in a report.
Format
Go to Record/Request/Page [<First/Last/Previous/Next/By calculation>]
Options
Specify lets you choose from the following options.
•First moves to the first record in the file or found set, displays the first find request, or
moves to the first page in a report.
•Last moves to the last record in the file or found set, displays the last find request, or moves
to the last page in a report.
•Previous moves to the previous record in the file or found set, displays the previous find
request, or moves to the previous page in a report. Exit after last tells FileMaker Pro to stop
the script when it reaches the last record in the found set. You can use Exit after last with
the Loop script step to exit out of a loop after the last record.
•Next moves to the next record in the file or found set, displays the next find request, or
moves to the next page in a report. Exit after last tells FileMaker Pro to exit the script or
control structure (like a loop) when it reaches the last record in the found set.
•By Calculation lets you create a calculation to determine the desired record number, find
request number, or page number.
Compatibility
Where the script step runs Supported
FileMaker Pro Yes
FileMaker Server scheduled script Partial

FILEMAKER PRO HELP 987
Originated in
FileMaker Pro 6.0 or earlier
Description
FileMaker Server scheduled script and Customer Web Publishing do not support the By
Calculation option.
Example 1
Performs a find, sorts the records, and goes to the first record.
Perform Find [Restore]
Sort Records [Restore; No dialog]
Go to Record/Request/Page [First]
Example 2
Goes to the record number the user enters in the custom dialog.
Show Custom Dialog ["Enter the record number you want to view.";
Invoices::Record Number]
Go to Record/Request/Page [Invoices::Record Number]
Show All Records
Example 3
Loops through records to export files that are in the Container field. Exits the loop if a record has an
empty container field.
Set Variable [$PATH; Value: Get ( DocumentsPath ) & Products::Container]
Go to Record/Request/Page [First]
Loop
Exit Loop If [IsEmpty ( Products::Container )]
Export Field Contents [Products::Container; "$PATH"]
Go to Record/Request/Page [Next; Exit after last]
End Loop
Related topics
Script steps reference (alphabetical list)
Script steps reference (category list)
About formulas
FileMaker Go Yes
Custom Web Publishing Partial
FileMaker WebDirect Yes
Runtime solution Yes
Where the script step runs Supported

FILEMAKER PRO HELP 988
Go to Related Record
Purpose
Goes to the current related record(s) in a related table.
Format
Go to Related Record [From table: “<table name>”; Using layout “<layout name>”]
Options
•Get related record from lets you select the source relationship from a list of tables in the
current database. If the table is not in the list or if you need to add or change a relationship,
Manage Database displays the Manage Database dialog box, where you can create or edit
relationships.
•Show record using layout lets you choose a layout in the current file that will be used to
display the related record(s).
•Use external table’s layouts opens the file containing the external table you specify and
lets you choose a layout from that file in which to display the related record(s). This option is
only available if the source relationship you selected references a table in another file.
•Show in new window allows you to show the related records in a new window and lets you
specify the settings for the new window. For more information, see New Window script step.
Tip To bring the new window with the related record(s) to the front automatically, add the Select
Window script step.
•Specify lets you edit the settings you have previously chosen for the new window.
•Show only related records creates a new found set in the related table with the options
either to match the current record or to match the entire found set. The first record in the
found set becomes the current record. (If you don’t select this option, Go to Related Record
makes the first record in the table’s unsorted order the current record.)
•Match current record only creates a new found set in the related table containing a set of
records that match the current record. For example, if there are three records in the related
invoice table that match the customer record in the customer table you are currently
viewing, and you want to see all three invoices, use Match current record only to display
the three invoices.
•Match all records in the current found set creates a new found set in the related table
that matches all records in the current found set. For example, if you have a found set of ten
customers and there are forty invoices in the invoice table that match any of these ten
customers, use Match all records in the current found set to display the forty matching
invoices. If you don’t define a sort order, the found set will be unsorted.
Compatibility
Where the script step runs Supported
FileMaker Pro Yes
FileMaker Server scheduled script Yes
FileMaker Go Yes
Custom Web Publishing Yes

FILEMAKER PRO HELP 989
Originated in
FileMaker Pro 6.0 or earlier
Description
Suppose you have an Invoices table that's related to a Customers table and you're currently looking
at a particular invoice. In the Invoices table, you have a button that's set to Go to Related Record
[Customers]. Clicking this button determines which customer record your current invoice is related
to and immediately goes to that record in the Customers table. If the record in question is not
currently in the Customers table’s found set, the script can perform a find to make the record
current.
Tip If the related records cannot be found, this script step returns an error code which can be
captured with the Get(LastError) function.
This script step also works with portal rows. If this script step is used from an active portal row, and
the portal’s table is the related table, then the related record in that table is made current. If the
portal’s table is not the related table, the first related record in the found set is made current.
When used with a table in an external file, this script step will open the file containing the external
table and, if selected, go to the external layout you specify.
There are situations in which a script containing the Go to Related Record script step could modify
an unintended set of records. For example:
•If the related records cannot be found, this script step remains on the current layout.
•If you select a table occurrence to which there’s no relationship, or a layout that doesn’t
refer to the correct table occurrence, FileMaker Pro displays an error message. After the
error message displays, script execution continues with the next script step.
•If there are no related records or no record in the active portal row, the script might produce
unexpected results. Use the IsEmpty function to determine if there are no related records
before using Go to Related Record.
•If you have Allow creation of related records enabled and Go to Related Record is
executed from an empty portal row, the script might produce unintended results.
Notes
•The sort order is not maintained if the related records are in an external file.
•If you are filtering records in a portal, this script step exposes all of the records, not just the
filtered records.
Example 1
Goes to a related record in the Invoices table and sorts the found set of related records.
Go to Related Record [Show only related records; From table: "Invoices";
Using layout: “Invoices”]
Sort Records [Restore; No dialog]
Go to Record/Request/Page [First]
FileMaker WebDirect Yes
Runtime solution Yes
Where the script step runs Supported

FILEMAKER PRO HELP 990
Example 2
Goes to a related record in the Invoices table and sorts the found set of related records in a new
window.
Go to Related Record [Show only related records; From table: "Invoices";
Using layout: “Invoices”; New Window]
Sort Records [Restore; No dialog]
Go to Record/Request/Page [First]
Related topics
Script steps reference (alphabetical list)
Script steps reference (category list)
Go to Portal Row
Purpose
Navigates among the rows in the active portal.
Format
Go to Portal Row [Select; <First/Last/Previous/Next/By calculation>]
Options
Specify lets you choose from the following options.
•First moves to the first row in the portal.
•Last moves to the last row in the portal.
•Previous moves to the previous row in the portal. Exit after last tells FileMaker Pro to exit
the script when it reaches the last portal row. You can use Exit after last within a loop to exit
the loop after the last portal row.
•Next moves to the next row in the portal. Exit after last tells FileMaker Pro to exit the script
when it reaches the last portal row. You can use Exit after last within a loop to exit the loop
after the last portal row.
•By Calculation moves to the row number that is the result of the calculation you create, or
to the row number specified in a dialog.
•Select entire contents selects the entire portal row. If select entire contents isn’t selected,
only one related field in the portal is active.
Compatibility
Where the script step runs Supported
FileMaker Pro Yes
FileMaker Server scheduled script Partial
FileMaker Go Yes
Custom Web Publishing Partial
FileMaker WebDirect Partial

FILEMAKER PRO HELP 991
Originated in
FileMaker Pro 6.0 or earlier
Description
When no portal is active, the script uses the first portal in the layout stacking order.
This script step tries to keep the same related field selected when changing rows. If no field in a
portal is selected, the script selects the first related field it can enter.
When a related field in a portal is selected, you can use this step to move to the same field in
another portal row. For example, if the third field in the second portal row is selected, Go to Portal
Row [Next] goes to the third field in the third portal row.
Notes
•In FileMaker WebDirect, the cursor moves next to the specified row, but the row is not
selected.
•FileMaker Server scheduled scripts and Custom Web Publishing do not support the By
Calculation option.
Example 1
Goes to the last row of a portal to create a record.
Go to Field [Related Invoices::Summary]
Go to Portal Row [Last]
Example 2
Allows a user to make batch updates to the Status field in a portal.
Go to Portal Row [Select; First]
Loop
Go to Field [Select/perform; Invoices::Status]
Pause/Resume Script [Indefinitely]
Go to Portal Row [Next; Exit after last]
End Loop
Related topics
Go to Object script step
Script steps reference (alphabetical list)
Script steps reference (category list)
About formulas
Runtime solution Yes
Where the script step runs Supported

FILEMAKER PRO HELP 992
Go to Object
Purpose
Moves to the specified object on the current layout.
Format
Go to Object [Object Name: "<object name>"]
Options
Click Specify to display the "Go to Object" Options dialog box, where you can set the following
options:
•Object Name is the named object to make active on the current layout. To assign an object
name, choose View menu > Inspector in Layout mode. Click Position, then enter a name
for the object.
•Repetition (optional) lets you choose a field's repetition to go to. Otherwise defaults to 1.
This option is ignored if the object is not a field.
Compatibility
Originated in
FileMaker Pro 8.5
Description
This script step uses an object name to identify an object, so you must assign a unique object name
to each object on a layout that you want to go to.
Notes
•If this script step specifies an object on a tab panel or a slide panel that is not the front-most
panel, the specified object is selected and the panel it is on moves to the front of the panel
control.
•If the script step specifies a field on a popover, the popover opens.
Example 1
Navigates to a text field named "First Name".
Go to Object [Object Name: "First Name"]
Where the script step runs Supported
FileMaker Pro Yes
FileMaker Server scheduled script Yes
FileMaker Go Yes
Custom Web Publishing Yes
FileMaker WebDirect Yes
Runtime solution Yes

FILEMAKER PRO HELP 993
Example 2
Navigates between different tabs of a tab control.
If [Invoices::Status = "Paid"]
Go to Object [Object Name: "Invoice Statement Tab"]
Else If [Invoices::Status = "Unpaid"]
Go to Object [Object Name: "Invoice Payment Tab"]
End If
Example 3
Navigates to either the "Paid" tab or the "Unpaid" tab in a tab control depending on the value of
Invoices::Status.
Go to Layout ["Invoice Details"]
Go to Object [Object Name: Invoices::Status]
Related topics
Script steps reference (alphabetical list)
Script steps reference (category list)
Naming objects
Defining repeating fields
Go to Field
Purpose
Moves to the specified field on the current layout.
Format
Go to Field [Select/perform; <table::field>]
Options
•Select/perform tells FileMaker Pro to perform an action on the contents of a field. All text in
a field is selected with this option. The contents of the field (sound or movie) determine what
action is performed. If the field contains a sound, then the sound is played. If the field
contains a movie, the movie is played. For example, if the primary command is Edit, Select/
perform opens the document in a state ready for editing.
•Select Go to target field or click Specify to specify the target field.
Compatibility
Where the script step runs Supported
FileMaker Pro Yes
FileMaker Server scheduled script Yes
FileMaker Go Yes
Custom Web Publishing Yes

FILEMAKER PRO HELP 994
Originated in
FileMaker Pro 6.0 or earlier
Description
To play a sound or movie, use the Select/perform option.
Notes
•If this script step specifies a field on a tab panel or a slide panel that is not the front-most
panel, the specified field is selected and the panel it is on moves to the front of the panel
control. If, however, the same field appears elsewhere on the layout and the script finds that
field first, the panel with that same field will not come forward. You can force FileMaker Pro
to find a specific field by assigning an object name to the field and using the Go to Object
script step to move to that instance of the field. If the object is a repeating field, you can also
specify which repetition that you want to go to.
•If the script step specifies a field on a popover, the popover opens.
•In FileMaker WebDirect, the cursor moves to the specified field.
Example 1
Goes to the Invoice Details layout, creates a record, and goes to the Summary field.
Go to Layout ["Invoice Details"]
New Record/Request
Go to Field [Invoices::Summary]
Related topics
Script steps reference (alphabetical list)
Script steps reference (category list)
Go to Next Field
Purpose
Moves to the next field in the tab order of the current layout.
Format
Go to Next Field
Options
None.
FileMaker WebDirect Yes
Runtime solution Yes
Where the script step runs Supported

FILEMAKER PRO HELP 995
Compatibility
Originated in
FileMaker Pro 6.0 or earlier
Description
If no field is selected when this script step is performed, this script step moves to the first field in the
tab order of the current layout. If a field is formatted as a button, the field object is selected, not the
button object.
Note In FileMaker WebDirect, the cursor moves to the selected field.
Example 1
Goes to the next field in the tab order unless the Status field in the current record is empty.
If [IsEmpty ( Invoices::Status )]
Show Custom Dialog ["Invoice Status cannot be empty."]
Else
Go to Next Field
End If
Related topics
Setting the tab order for data entry
Script steps reference (alphabetical list)
Script steps reference (category list)
Go to Previous Field
Purpose
Moves to the previous field in the tab order of the current layout.
Format
Go to Previous Field
Options
None.
Where the script step runs Supported
FileMaker Pro Yes
FileMaker Server scheduled script Yes
FileMaker Go Yes
Custom Web Publishing Yes
FileMaker WebDirect Yes
Runtime solution Yes

FILEMAKER PRO HELP 996
Compatibility
Originated in
FileMaker Pro 6.0 or earlier
Description
If no field is selected when this script step is performed, this script step moves to the last field of the
tab order of the current layout. If a field is formatted as a button, the field object is selected, not the
button object.
Note In FileMaker WebDirect, the cursor moves to the selected field.
Example 1
Controls field entry validation. Can be started with the OnObjectExit script trigger.
If [IsEmpty ( Customers::First Name )]
Show Custom Dialog ["You must enter a first name."]
Go to Previous Field
End If
Related topics
Setting the tab order for data entry
Script steps reference (alphabetical list)
Script steps reference (category list)
Close Popover
Purpose
Closes an open popover in the window in which the script step runs.
Format
Close Popover
Options
None.
Where the script step runs Supported
FileMaker Pro Yes
FileMaker Server scheduled script Yes
FileMaker Go Yes
Custom Web Publishing Yes
FileMaker WebDirect Yes
Runtime solution Yes

FILEMAKER PRO HELP 997
Compatibility
Originated in
FileMaker Pro 13.0
Description
Closes an open popover in the target window. If no popover is open, Close Popover does nothing
and does not return an error code.
Example 1
Closes the open popover and navigates to either the "Paid" or the "Unpaid" tab of a tab control
depending on the value of Invoices::Status.
Close Popover
Go to Object [Object name: Invoices::Status]
Related topics
Get(WindowMode) function
Script steps reference (alphabetical list)
Script steps reference (category list)
Enter Browse Mode
Purpose
Switches to Browse mode, where you can enter or edit data.
Format
Enter Browse Mode [Pause]
Options
Pause temporarily stops the script so the user can enter data.
Where the script step runs Supported
FileMaker Pro Yes
FileMaker Server scheduled script No
FileMaker Go Yes
Custom Web Publishing No
FileMaker WebDirect Yes
Runtime solution Yes

FILEMAKER PRO HELP 998
Compatibility
Originated in
FileMaker Pro 6.0 or earlier
Example 1
Goes to the Print invoices layout, enters Preview mode, prints, and enters Browse mode.
Go to Layout ["Print Invoices"]
Enter Preview Mode [Pause]
Print [No dialog]
Enter Browse Mode [ ]
Related topics
Get(WindowMode) function
Script steps reference (alphabetical list)
Script steps reference (category list)
Enter Find Mode
Purpose
Switches to Find mode, where you can search for sets of records.
Format
Enter Find Mode [Restore; Pause]
Options
•Pause temporarily stops the script to allow the user to enter a find request.
•Specify find requests allows you to create and edit requests for use with this script step.
Compatibility
Where the script step runs Supported
FileMaker Pro Yes
FileMaker Server scheduled script Partial
FileMaker Go Yes
Custom Web Publishing Partial
FileMaker WebDirect Yes
Runtime solution Yes
Where the script step runs Supported
FileMaker Pro Yes
FileMaker Server scheduled script Partial

FILEMAKER PRO HELP 999
Originated in
FileMaker Pro 6.0 or earlier
Description
When you select Specify find requests at the time the script step is defined, FileMaker Pro
displays the current find request(s), if any. Additional find requests can be defined, and existing find
requests can be duplicated, edited, or deleted.
To edit a find request, select it from the list in the Specify Find Requests dialog box and click Edit.
In the Edit Find Requests dialog box, select the action (Find Records or Omit Records) you want
the find request to perform. A single find request can either find records or omit records, but cannot
perform both actions at the same time. Use multiple find requests to find and omit records from
within a single script step.
For each field in your request, specify the criteria for which you want FileMaker Pro to search.
Example 1
Goes to the Invoice Details layout, enters Find mode, pauses for user input, and performs the find.
Go to Layout ["Invoice Details"]
Enter Find Mode [Pause]
Perform Find [ ]
Related topics
Get(WindowMode) function
Script steps reference (alphabetical list)
Script steps reference (category list)
Enter Preview Mode
Purpose
Switches to Preview mode, where you can see how records, forms, or reports will look when they're
printed.
Format
Enter Preview Mode [Pause]
Options
Pause temporarily stops the script to allow you to examine the preview result before proceeding
with the next step in the script.
FileMaker Go Yes
Custom Web Publishing Partial
FileMaker WebDirect Yes
Runtime solution Yes
Where the script step runs Supported

FILEMAKER PRO HELP 1000
Compatibility
Originated in
FileMaker Pro 6.0 or earlier
Example 1
Opens the Print Invoices layout in a new window, enters Preview mode, prints, and closes the
window.
New Window [Style: Floating Document]
Go to Layout ["Print Invoices"]
Enter Preview Mode [Pause]
Print [No dialog]
Close Window [Current Window]
Related topics
Get(WindowMode) function
Script steps reference (alphabetical list)
Script steps reference (category list)
Editing script steps
With editing script steps, you can cut, copy, paste, or clear the contents of a field; undo or redo
previous actions; or select the contents of a field.
Undo/Redo
Purpose
Reverses, restores, or switches between the most recently performed actions in the file.
Format
Undo/Redo [Undo; Redo; Toggle]
Options
Undo reverses the previously performed action in the file.
Where the script step runs Supported
FileMaker Pro Yes
FileMaker Server scheduled script No
FileMaker Go No
Custom Web Publishing No
FileMaker WebDirect No
Runtime solution Yes

FILEMAKER PRO HELP 1001
Redo restores the previously undone action in the file.
Toggle switches between the two most recently performed actions in the file.
Compatibility
Originated in
FileMaker Pro 6.0 or earlier
Description
Multiple actions can be undone by repeatedly executing this script step with the Undo option. The
number of actions that can be undone or redone is limited only by the amount of available memory.
Example 1
Undoes data entry if the Phone Number field has fewer than seven digits.
If [Length ( Customer::Phone Number ) < 7]
Show Custom Dialog ["Phone Number must contain at least 7 digits. Undo
number input?"]
If [Get ( LastMessageChoice ) = 1]
Undo/Redo [Undo]
End If
End If
Related topics
Script steps reference (alphabetical list)
Script steps reference (category list)
Cut
Purpose
Deletes the contents of the specified field in the current record and saves the contents to the
Clipboard.
Format
Cut [Select; <table::field>]
Where the script step runs Supported
FileMaker Pro Yes
FileMaker Server scheduled script Yes
FileMaker Go Yes
Custom Web Publishing Yes
FileMaker WebDirect Yes
Runtime solution Yes

FILEMAKER PRO HELP 1002
Options
•Select entire contents deletes the contents of a field and saves it to the Clipboard. If you
do not use Select entire contents, only the selected portion of the field's data is cut.
•Select Go to target field or click Specify to select the field whose contents you want to cut.
Compatibility
Originated in
FileMaker Pro 6.0 or earlier
Description
This script step removes the contents of the field. To duplicate the field information, use the Copy
script step.
Notes
•Contents that you cut or copy to the Clipboard are accessible to other applications.
•With FileMaker WebDirect, the Cut script step does not place data onto the Clipboard.
•If you manually select field data before you run this script step in FileMaker WebDirect, the
script step performs as if you did not make a selection. To select field data before you run
this script step in FileMaker WebDirect, use the Set Selection script step.
Example 1
Cuts the contents of the Email field in the current record.
Cut [Customers::Email]
Example 2
Prompts the user to either cut or copy the contents of the Email field.
Show Custom Dialog ["Do you want to cut or copy the customer's email
address?"]
If [Get ( LastMessageChoice ) = 1]
Cut [Customers::Email]
Else If [Get ( LastMessageChoice ) = 2]
Copy [Customers::Email]
End If
Where the script step runs Supported
FileMaker Pro Yes
FileMaker Server scheduled script Yes
FileMaker Go Yes
Custom Web Publishing Yes
FileMaker WebDirect Partial
Runtime solution Yes

FILEMAKER PRO HELP 1003
Related topics
Paste script step
Clear script step
Script steps reference (alphabetical list)
Script steps reference (category list)
Copy
Purpose
Copies the contents of the specified field in the current record and saves them to the Clipboard.
Format
Copy [Select; <table::field>]
Options
•Select entire contents copies the entire contents of a field to the Clipboard. If you do not
use Select entire contents, only the selected portion of the field's data is copied.
•Select Go to target field or click Specify to select the field whose contents you want to
copy. When no field is specified and nothing is selected, FileMaker Pro copies the values
from all fields of the current record.
Compatibility
Originated in
FileMaker Pro 6.0 or earlier
Description
This script step duplicates the contents of the field. To remove the field information, use the Cut
script step.
Notes
•Contents that you cut or copy to the Clipboard are accessible to other applications.
•With FileMaker WebDirect, the Copy script step does not place data onto the Clipboard.
Where the script step runs Supported
FileMaker Pro Yes
FileMaker Server scheduled script Yes
FileMaker Go Yes
Custom Web Publishing Yes
FileMaker WebDirect Partial
Runtime solution Yes

FILEMAKER PRO HELP 1004
•If you manually select field data before you run this script step in FileMaker WebDirect, the
script step performs as if you did not make a selection. To select field data before you run
this script step in FileMaker WebDirect, use the Set Selection script step.
Example 1
Prompts the user to either cut or copy the contents of the Email field.
Show Custom Dialog ["Do you want to cut or copy the customer's email
address?"]
If [Get ( LastMessageChoice ) = 1]
Cut [Customers::Email]
Else If [Get ( LastMessageChoice ) = 2]
Copy [Customers::Email]
End If
Related topics
Paste script step
Clear script step
Script steps reference (alphabetical list)
Script steps reference (category list)
Paste
Purpose
Pastes the contents of the Clipboard into the specified field in the current record.
Format
Paste [Select; No style; <table::field>]
Options
•Select entire contents replaces the contents of a field with the contents of the Clipboard. If
you do not use Select entire contents, Paste copies the contents of the Clipboard to the
currently selected portion of the field.
•Paste without style tells FileMaker Pro to ignore all text style and formatting associated
with the Clipboard contents.
•Select Go to target field or click Specify to specify the field to paste into.
Compatibility
Where the script step runs Supported
FileMaker Pro Yes
FileMaker Server scheduled script Yes
FileMaker Go Yes
Custom Web Publishing Yes
FileMaker WebDirect Partial

FILEMAKER PRO HELP 1005
Originated in
FileMaker Pro 6.0 or earlier
Description
If you try to paste data that doesn't match the field type of the target field, FileMaker Pro pastes the
data but displays a validation alert when you attempt to exit the field. If the field is not on the current
layout, FileMaker Pro returns an error code which can be captured with the Get(LastError) function.
Note If you manually select field data before you run this script step in FileMaker WebDirect, the
script step performs as if you did not make a selection. To select field data before you run this script
step in FileMaker WebDirect, use the Set Selection script step.
Example 1
Pastes the Clipboard contents into the active field.
Show Custom Dialog ["Do you want to paste the Clipboard contents?"]
If [Get ( LastMessageChoice ) = 1]
Paste [Select]
End If
Related topics
Cut script step
Copy script step
Clear script step
Script steps reference (alphabetical list)
Script steps reference (category list)
Clear
Purpose
Deletes the contents of the specified field in the current record.
Format
Clear [Select; <table::field>]
Options
•Select entire contents deletes the entire contents of a field. If you do not use Select entire
contents, only the selected portion of the field's data is deleted.
•Select Go to target field or click Specify to specify the field whose contents you want to
delete.
Runtime solution Yes
Where the script step runs Supported

FILEMAKER PRO HELP 1006
Compatibility
Originated in
FileMaker Pro 6.0 or earlier
Description
This script step removes the contents of the field without placing the contents on the Clipboard. If
you want to cut and paste the field information, use the Cut script step. Use Undo immediately to
restore the contents.
Note If you manually select field data before you run this script step in FileMaker WebDirect, the
script step performs as if you did not make a selection. To select field data before you run this script
step in FileMaker WebDirect, use the Set Selection script step.
Example 1
Clears the Email field in the current record.
Show Custom Dialog ["Do you want to clear the customer's email address?"]
If [Get ( LastMessageChoice ) = 1]
Clear [Select; Customers::Email]
End If
Related topics
Script steps reference (alphabetical list)
Script steps reference (category list)
Set Selection
Purpose
Allows the user to specify the starting and ending position of a selection in a field.
Format
Set Selection [<table::field>; Start Position: <n>; End Position: <n>]
Options
•Select Go to target field or click Specify to specify the field whose contents you want to
select.
Where the script step runs Supported
FileMaker Pro Yes
FileMaker Server scheduled script Yes
FileMaker Go Yes
Custom Web Publishing Yes
FileMaker WebDirect Partial
Runtime solution Yes

FILEMAKER PRO HELP 1007
•Specify lets you set the starting and ending positions of a selection, either by entering the
start and end numbers directly or by using a calculation to determine them.
Compatibility
Originated in
FileMaker Pro 6.0 or earlier
Description
The starting and ending values can be typed in directly or determined via a calculation. If no target
field is specified the current active field is used.
Notes
•Field position is determined by the number of characters, including spaces, beginning with
position 1, the first character in the field. The selection includes all values beginning with the
Start Position and concluding with the End Position. For example, if Field1 has the value
“abcdefgh”, and the script parameters specify a start position of “3” and an end position of
“6”, the script step will return the selection “cdef”.
•If the start position is valid and the end position out of range, everything from the start
position to the end of the field is selected. If the end position only is valid, the cursor moves
to the end position, and nothing is selected. If both start and end positions are invalid, the
cursor moves to the end of the field contents.
•No action is taken if the user attempts to perform a selection on a container field.
•Data selected out of visual range is scrolled into view.
Example 1
Selects the first 5 digits of the Postal Code field.
Set Selection [Customers::Postal Code; Start Position: 1; End Position: 5]
Example 2
Selects the number of paragraphs that the user specifies in the custom dialog.
Show Custom Dialog ["How many paragraphs do you want to select?";
Products::Number of Paragraphs]
If [Get ( LastMessageChoice ) = 1]
Set Selection [Products::Description; Start Position: 1; End Position:
Position ( Products::Description ; ¶ ; 1 ; Products::Number of Paragraphs
Where the script step runs Supported
FileMaker Pro Yes
FileMaker Server scheduled script Yes
FileMaker Go Yes
Custom Web Publishing Yes
FileMaker WebDirect Yes
Runtime solution Yes

FILEMAKER PRO HELP 1008
)]
End If
Related topics
Script steps reference (alphabetical list)
Script steps reference (category list)
Select All
Purpose
Selects the entire contents of the active field.
Format
Select All
Options
None.
Compatibility
Originated in
FileMaker Pro 6.0 or earlier
Example 1
Selects the contents of the active field.
Show Custom Dialog ["Do you want to select the contents of the active
field?"]
If [Get ( LastMessageChoice ) = 1]
Select All
End If
Related topics
Script steps reference (alphabetical list)
Script steps reference (category list)
Where the script step runs Supported
FileMaker Pro Yes
FileMaker Server scheduled script Yes
FileMaker Go Yes
Custom Web Publishing Yes
FileMaker WebDirect Yes
Runtime solution Yes

FILEMAKER PRO HELP 1009
Perform Find/Replace
Purpose
Finds/replaces data according to the options in the “Perform Find/Replace” Options dialog box.
Format
Perform Find/Replace [No dialog; “<text to be found>”; ”<replacement
text>”; Find Next/Replace & Find/Replace/Replace All]
Options
•Perform without dialog prevents display of the Find/Replace Summary dialog box at the
end of the find/replace operation. This option also prevents display of the confirmation
dialog box when a Replace All operation is executed.
If you want the user to be able to enter find or replace criteria, use the Open Find/Replace script
step.
•Specify displays the “Perform Find/Replace” Options dialog box, where you can set find
options and the type of find/replace operation to be performed.
•For Perform, choose which action you want the find/replace to perform:
Find Next finds an instance of the find term.
Replace & Find finds an instance of the find term, then replaces the term and searches for
the next instance when the script is run again.
Replace replaces highlighted text that matches the find term with the replace term. When
using the Replace action, you may need to pair the Perform Find/Replace script step with
the Select All script step.
Replace All finds and replaces all instances of the find term.
•Find what lets you specify the find term. Either type the term or click Specify to define
a calculation.
•Replace with lets you specify text to replace instances of the find term. Either type the
replacement text or click Specify to define a calculation.
•For Direction, select the direction you want the find/replace to search through records.
•Match case considers the find term’s case when performing the find.
•Match whole words only omits finds where the find term is embedded in another word.
•All records/requests finds within all records/requests in the found set.
•Current records/requests restricts the find to the current record/request.
•All fields finds within every field on the layout.
•Current field restricts the find to within the active field. You can use the Go to Field
script step to select the field before the Find/Replace is performed.
Compatibility
Where the script step runs Supported
FileMaker Pro Yes
FileMaker Server scheduled script No

FILEMAKER PRO HELP 1010
Originated in
FileMaker Pro 6.0 or earlier
Example 1
Replaces text in the Reorder Level field that matches the find criteria in all records without
prompting the user.
Go to Field [Products::Reorder Level]
Perform Find/Replace [No dialog; 1; 3; Replace All]
Example 2
Goes to the next occurrence of the product name in the Description field.
Show Custom Dialog ["Do you want to find the current product name in the
Description field?"]
If [Get ( LastMessageChoice ) = 1]
Go to Field [Products::Description]
Perform Find/Replace [Products::Name; Find Next]
End If
Example 3
Replaces specific terms in the current field with record data.
Show Custom Dialog ["Do you want to replace placeholder terms with record
data?"]
If [Get ( LastMessageChoice ) = 1]
Perform Find/Replace [No dialog; "[NAME]"; Customers::Name; Replace
All]
Perform Find/Replace [No dialog; "[COMPANY]"; Customers::Company;
Replace All]
Perform Find/Replace [No dialog; "[ADDRESS]"; Customers::Address;
Replace All]
End If
Related topics
Substitute function
Script steps reference (alphabetical list)
Script steps reference (category list)
Finding and replacing data
FileMaker Go No
Custom Web Publishing No
FileMaker WebDirect No
Runtime solution Yes
Where the script step runs Supported

FILEMAKER PRO HELP 1011
Fields script steps
Fields script steps operate on specific fields. With these script steps, you can:
•paste data into fields
•import information into fields and export data from fields
•evaluate a calculation and assign the result to a field
Set Field
Purpose
Replaces the entire contents of the specified field in the current record with the result of a
calculation.
Format
Set Field [<table::field>; <value or formula>]
Options
•Select Specify target field or click Specify to specify the field whose contents you want to
replace. If no field is specified and a field is selected in Browse mode or Find mode, that
field is used.
•For Calculated result, click Specify to define the calculation. In the Specify Calculation
dialog box, type the calculation you want evaluated, or use the field list (on the left) and the
functions list (on the right) with the mathematical and text operators to build the calculation.
Compatibility
Originated in
FileMaker Pro 6.0 or earlier
Description
•The result of the calculation must match the field type. For example, you can't assign a date
calculation to a container field.
•The specified field doesn’t have to be on the current layout.
Where the script step runs Supported
FileMaker Pro Yes
FileMaker Server scheduled script Yes
FileMaker Go Yes
Custom Web Publishing Yes
FileMaker WebDirect Yes
Runtime solution Yes

FILEMAKER PRO HELP 1012
•If the result of the calculation doesn’t match the target field type, and the validate option for
the field is set to Always, the field will not be set and an error code is returned (which can
be captured with the Get(LastError) function).
•When possible, the Set Field script step makes the record active and leaves it active until
the record is exited or committed. Scripts that use a series of Set Field script steps should
group these steps together if possible, so that subsequent Set Field script steps can act on
the record without having to lock the record, download and upload data, index the field, and
so on, after each individual Set Field script step. These functions and record level validation
are performed after the record has been exited or committed.
•If the target field is a repeating field, you can specify a repetition number or generate a
repetition number from a calculated expression.
Example 1
Inserts the sum of the invoices' grand totals into the Statistics field.
Set Field [Customers::Statistics; Sum ( Invoices::Grand Total )]
Example 2
Demonstrates when to use Set Field instead of Set Field By Name to simplify scripts.
#If the target field does not change, use the Set Field script step.
Set Field [Customers::Work Phone; Credit Collection::Phone Number]
#If you use Set Field By Name with a target field that does not change,
#you must surround the target field in quotation marks so it evaluates as
a literal string
#and returns the specified field name. If you do not use quotation marks,
#Set Field By Name evaluates the specified field and uses the result as
the target field.
#If the result does not specify a field name, nothing happens.
Set Field By Name ["Customers::Work Phone"; Credit Collection::Phone
Number]
Related topics
Set Field By Name script step
Defining calculation fields
Script steps reference (alphabetical list)
Script steps reference (category list)
Set Field By Name
Purpose
Replaces the entire contents of a calculated target field in the current record with the result of the
calculated value.
Format
Set Field By Name[<calculated target field>; <calculated value>]

FILEMAKER PRO HELP 1013
Options
•Select Specify target field or click Specify to create a calculation to specify the field whose
contents you want to replace. In the Specify Calculation dialog box, use the field list (on the
left) and the functions list (on the right) with the mathematical and text operators to build the
calculation.
•For Calculated result, click Specify to define the calculated value.
Compatibility
Originated in
FileMaker Pro 10.0
Description
The Set Field By Name script step lets you create a calculation to specify a field name, then change
the value of the field either literally or based on a second calculation.
Because the target field is calculated, a single Set Field By Name step can replace multiple Set
Field script steps between If conditions.
The calculated target field must return a text result.
If quotation marks are not included around the fully qualified field name, the target field name is
obtained from the named field.
If no field is specified and a field is selected in Browse mode or Find mode, that field is used.
Notes
•The specified field doesn’t have to be on the current layout.
•Set Field By Name ignores validation checking.
•When possible, the Set Field By Name script step makes the record active and leaves it
active until the record is exited or committed. Scripts that use a series of Set Field By Name
script steps should group these steps together if possible, so that subsequent Set Field By
Name script steps can act on the record without having to lock the record, download and
upload data, index the field, and so on, after each individual Set Field By Name script step.
These functions and record-level validation are performed after the record has been exited
or committed.
Example 1
Identifies the target field (National Statistics or World Statistics) based on geographical location,
then enters a calculated value (the sum of all Grand Totals) in the target field.
Where the script step runs Supported
FileMaker Pro Yes
FileMaker Server scheduled script Yes
FileMaker Go Yes
Custom Web Publishing Yes
FileMaker WebDirect Yes
Runtime solution Yes

FILEMAKER PRO HELP 1014
Set Field By Name [If ( Customers::Country = "Japan" ; Customers::National
Statistics ; Customers::World Statistics ); Sum ( Invoices::Grand Total )]
Example 2
Demonstrates when to use Set Field By Name instead of Set Field to simplify scripts.
#With Set Field, an If statement with multiple Else If steps is needed
#to determine which field on the Customers table to update
#with information from Credit Collection::Phone Number.
If [Credit Collection::Call Location = "Work"]
Set Field [Customers::Work Phone; Credit Collection::Phone Number]
Else If [Credit Collection::Call Location = "Home" ]
Set Field [Customers::Home Phone; Credit Collection::Phone Number]
Else If [Credit Collection::Call Location = "Mobile" ]
Set Field [Customers::Mobile Phone; Credit Collection::Phone Number]
End If
#A single Set Field By Name script step can perform the same task
#by using a calculation to determine the target field.
Set Field By Name [GetFieldName ( Evaluate ( Credit Collection::Call
Location & " Phone" ) ); Credit Collection::Phone Number]
Related topics
Script steps reference (alphabetical list)
Script steps reference (category list)
Set Next Serial Value
Purpose
Resets the next serial value in an auto-entry serial number field.
Format
Set Next Serial Value [<table::field>; <value or formula>]
Options
•Select Specify target field or click Specify to specify the serial number field on which the
script step will operate. The field you specify must be defined as an auto-entry serial
number field.
•Calculated result: Click Specify to enter the next serial value or create a calculation to
determine the next serial value.
Compatibility
Where the script step runs Supported
FileMaker Pro Yes
FileMaker Server scheduled script Yes

FILEMAKER PRO HELP 1015
Originated in
FileMaker Pro 6.0 or earlier
Description
Allows you to use the Manage Scripts feature to update the value. You can define this script step to
use any calculation expression to determine the next serial value of a field that has been defined as
an auto-entry serial number field. The calculation always evaluates to a text result.
For example, you might want to reset the next serial value after you do one of the following:
•import records into a FileMaker Pro database with an auto-entry serial number field
•delete multiple serialized numbers from a FileMaker Pro database
Notes
•This script step affects the definition of the field you specify instead of the actual contents of
the field that you specify.
•This script step can operate on multiple files. If you specify a field in another file, then
FileMaker Pro attempts to update the serial number for the specified field in the other file. To
specify a field in another file, define a relationship to that file and use Specify target field to
select a field from that file.
Example 1
Calculates the number of the next available invoice ID, using the Max function to return the highest
value in the Invoice ID field. If an invoice ID contains non-numeric data, then the calculation would
need to be more sophisticated to maintain the numeric and non-numeric data.
Set Next Serial Value [Invoices::Invoice ID; Max ( Invoices::Invoice ID )
+ 1]
Example 2
Sets the next serial number value in the Invoice ID field options after importing records. Useful if
Perform auto-enter options while importing is not selected in order to preserve dates and other
auto-entered values.
Import Records [Add; Mac Roman]
Set Next Serial Value [Invoices::Invoice ID; Get ( TotalRecordCount ) + 1]
Example 3
Prompts the user to input the next serial value.
Show Custom Dialog ["Set the next serial number value"; Invoices::Next
Serial Value]
If [Get ( LastMessageChoice ) = 1]
FileMaker Go Yes
Custom Web Publishing Yes
FileMaker WebDirect Yes
Runtime solution Yes
Where the script step runs Supported

FILEMAKER PRO HELP 1016
Set Next Serial Value [Invoices::Invoice ID; Invoices::Next Serial
Value]
End If
Related topics
Import Records script step
Defining calculation fields
Script steps reference (alphabetical list)
Script steps reference (category list)
Insert Text
Purpose
Pastes a text value into a field in the current record.
Format
Insert Text [Select; <table::field>; “<text>”]
Options
•Select entire contents replaces the contents of a field. If you do not select this option,
Insert Text inserts the specified value at the end of the field's data.
•Select Go to target field or click Specify to specify the field to receive the pasted
information. If no field is selected, the Insert Text command will place the specified text after
the insertion point. If no field is active at the time the command executes, it has no effect.
Also, if the selected field is not present on the current Layout, the Insert Text command has
no effect.
•Specify displays the Specify dialog box where you can enter the exact value you want to
paste.
Compatibility
Originated in
FileMaker Pro 6.0 or earlier
Where the script step runs Supported
FileMaker Pro Yes
FileMaker Server scheduled script Yes
FileMaker Go Yes
Custom Web Publishing Yes
FileMaker WebDirect Yes
Runtime solution Yes

FILEMAKER PRO HELP 1017
Description
This script step pastes text that is specified in the script, instead of text provided by the user.
Notes
•This script step is intended to paste text into text field types. To insert other types of data
into other types of fields, use either the Insert Calculated Result script step or the Set Field
script step.
•If the specified field does not exist on the layout where the script is being performed, Insert
Text returns an error code which can be captured with the Get(LastError) function.
Example 1
Inserts "Draft" into the Status field.
Insert Text [Select; Invoices::Status; "Draft"]
Example 2
Inserts either "Paid" or "Unpaid" depending on the value of the Payment Date field.
If [ IsEmpty ( Invoices::Payment Date )]
Insert Text [Select; Invoices::Status; "Unpaid"]
Else
Insert Text [Select; Invoices::Status; "Paid"]
End If
Example 3
Inserts "Draft" into the Status field or displays a dialog if Status is not on the current layout.
Insert Text [Select; Invoices::Status; "Draft"]
If [Get ( LastError ) = 102]
Show Custom Dialog ["Status field is missing on current layout"]
End If
Related topics
Script steps reference (alphabetical list)
Script steps reference (category list)
Insert Calculated Result
Purpose
Pastes the result of a calculation into the current field in the current record.
Format
Insert Calculated Result [Select; <table::field>; <value or formula>]

FILEMAKER PRO HELP 1018
Options
•Select entire contents replaces the contents of a field. If you don't select this option, Insert
Calculated Result replaces only the selected portion of the current field, or inserts the result
at the insertion point. The default insertion point is at the end of the field's data.
•Select Go to target field or click Specify to specify the field to paste the calculated results
into. The target field must be present on the layout to paste successfully. If no field is active
when the script is performed, the step has no effect.
•Calculated result: Click Specify to define the calculation whose results will be inserted by
this script step. In the Specify Calculation dialog box, type the calculation you want
evaluated, or use the field list (on the left) and the functions list (on the right) with the
mathematical and text operators to build the calculation.
Compatibility
Originated in
FileMaker Pro 6.0 or earlier
Description
If the specified field does not exist on the layout where the script is being performed, Insert
Calculated Result returns an error code which can be captured with the Get(LastError) function.
Example 1
Inserts the current date if the invoice prints successfully.
Set Error Capture [On]
Print [ ]
Insert Calculated Result [Select; Invoices::Print Status; If ( Get (
LastError ) = 0 ; "Printed on " & Get ( CurrentDate ) ; "Not Printed" )]
Related topics
Set Field script step
Defining calculation fields
Script steps reference (alphabetical list)
Script steps reference (category list)
Where the script step runs Supported
FileMaker Pro Yes
FileMaker Server scheduled script Yes
FileMaker Go Yes
Custom Web Publishing Yes
FileMaker WebDirect Yes
Runtime solution Yes

FILEMAKER PRO HELP 1019
Insert From Device
Purpose
In FileMaker Go, enters content into a container field from the following sources: music library, photo
library, camera, video camera, microphone, signature. Enters content into a container field or text
field from a bar code source.
Format
Insert from Device [<table::field>; Type: Music Library]
Insert from Device [<table::field>; Type: Photo Library]
Insert from Device [<table::field>; Type: Camera; Camera: Front/Back;
Resolution: Full/Small/Medium/Large]
Insert from Device [<table::field>; Type: Video Camera; Camera: Front/
Back; Resolution: Full/Small/Medium/Large; Max Duration: <value or
formula>; Start immediately]
Insert from Device [<table::field>; Type: Microphone; Max Duration: <value
or formula>; Start immediately]
Insert from Device [<table::field>; Type: Bar Code; Camera: Front/Back;
Resolution: Full/Small/Medium/Large; <table::field>]
Insert from Device [<table::field>; Type: Signature]
Options
•Select Specify target field to specify a container field. You can also specify a text field for
bar codes. If no field is specified, the currently active field is used, if it is a container field or
text field.
•Click Insert from to select the type of source.
•For Camera, choose Back or Front.
•For Resolution, choose Full, Large, Medium, or Small.
•Select Maximum duration to specify the number of seconds a video camera or
microphone records. Click Specify to define a duration from a calculation.
•Select Start immediately to have a video camera or microphone start recording
immediately.
•For Scan from Camera, choose Back or Front.
•For Scan from Field, choose a field.
•In the list of Bar code types, select the types of bar codes you want FileMaker Go to
scan. By default, all types are selected.
Compatibility
Where the script step runs Supported
FileMaker Pro No
FileMaker Server scheduled script No
FileMaker Go Yes

FILEMAKER PRO HELP 1020
Originated in
FileMaker Pro 13.0
Description
•FileMaker Go does not support all types of bar codes.
•If the target field is a repeating field, you can specify a repetition number or generate a
repetition number from a calculated expression.
•If the target field is a text field, only the text value of the bar code is inserted into the field.
•If the target field is a container field, an image of the bar code is inserted into the field. The
text value of the bar code is also stored in the field. You can retrieve the text value of the bar
code with the GetAsText function. You can retrieve the bar code type with the
GetContainerAttribute function.
Notes
•In the Edit Script dialog box, the selected bar code types are not displayed. To see all
settings, use the Manage Script dialog box to print the script or use the Database Design
Report (FileMaker Pro Advanced).
•In the Bar Code Options dialog box, select:
•EAN-13 to scan ISBN-10 or ISBN-13 bar codes. Also select ISBN-10 (from EAN-13) if
you need to convert a scanned ISBN-13 bar code to the ISBN-10 type.
•EAN-13 as well as UPC-A or UPC-E to scan UPC-A or UPC-E bar codes.
Example 1
Inserts a photo taken by the iOS device’s back camera at Full resolution into the File Container field.
Insert from Device [Products::File Container; Type: Camera; Camera: Back;
Resolution: Full]
Example 2
Inserts an image of a bar code taken by the iOS device’s back camera at Small resolution into the
container field named UPC. To retrieve the text value of the bar code, use GetAsText(UPC).
Insert from Device [Products::UPC; Type: Barcode; Camera: Back;
Resolution: Small]
Related topics
Script steps reference (alphabetical list)
Script steps reference (category list)
Custom Web Publishing No
FileMaker WebDirect No
Runtime solution No
Where the script step runs Supported

FILEMAKER PRO HELP 1021
Insert From Index
Purpose
Pastes a value from the index into a field.
Format
Insert From Index [Select; <table::field>]
Options
•Select entire contents replaces the contents of a field. If you do not select this option,
Insert From Index inserts the result at the cursor position or at the end of the field's data.
•Select Go to target field or click Specify to specify the field to paste the index value into.
The field you specify may be of any type.
Compatibility
Originated in
FileMaker Pro 6.0 or earlier
Description
This script step displays the index for the active field. You can use Insert From Index in Browse or
Find modes.
FileMaker Pro displays the View Index dialog box so the user can select an entry. This method
promotes consistent data entry and correct spelling. For this script step, you can specify a field and
select the entire contents of the field.
FileMaker Pro uses what was last selected for the Show individual words option in the View Index
dialog box (it is not remembered in the script).
Notes
•If the specified field does not exist on the layout where the script is being performed, Insert
From Index returns an error code which can be captured with the Get(LastError) function.
•If you have turned indexing off for a field and deselected the option to Automatically create
indexes as needed, the index will not display and an error code is returned. For more
information on field indexing see Defining field indexing options.
Where the script step runs Supported
FileMaker Pro Yes
FileMaker Server scheduled script No
FileMaker Go No
Custom Web Publishing No
FileMaker WebDirect No
Runtime solution Yes

FILEMAKER PRO HELP 1022
Example 1
Displays the index for a field in Find mode so the user can select a preexisting value.
Enter Find Mode [ ]
Insert From Index [Customers::Company]
Perform Find [ ]
Related topics
Set Field script step
Script steps reference (alphabetical list)
Script steps reference (category list)
Insert From Last Visited
Purpose
Pastes information from a field in the last active record into the specified field in the current record or
find request.
Format
Insert From Last Visited [Select; <table::field>]
Options
•Select entire contents replaces the contents of a field. If you do not select this option,
Insert From Last Visited inserts the result at the insertion point or at the end of the field's
existing data.
•Select Go to target field or click Specify to specify the field to paste into.
Compatibility
Originated in
FileMaker Pro 6.0 or earlier
Description
Use this script step to ensure consistency and automate data entry. The active record is the last
record where FileMaker Pro performed some activity, such as pasting text or moving into a field with
the Go to Field script step.
Where the script step runs Supported
FileMaker Pro Yes
FileMaker Server scheduled script Yes
FileMaker Go Yes
Custom Web Publishing Yes
FileMaker WebDirect Yes
Runtime solution Yes

FILEMAKER PRO HELP 1023
Note If the specified field does not exist on the layout where the script is being performed, Insert
From Last Visited returns an error code which can be captured with the Get(LastError) function.
Example 1
Creates a new record and inserts the customer name from the last record that was viewed.
New Record/Request
Insert From Last Visited [Invoices::Customer Name]
Example 2
Inserts the value from the Customer Name field of the last visited record into a find, pauses for the
user to make modifications, then performs the find.
Enter Find Mode [ ]
Insert From Last Visited [Invoices::Customer Name]
Pause/Resume Script [Indefinitely]
Perform Find [ ]
Related topics
Set Field script step
Script steps reference (alphabetical list)
Script steps reference (category list)
Insert From URL
Purpose
Enters the content from a URL into a field.
Format
Insert From URL [Select; No dialog; <table::field>; Resource URL]
Options
•Select entire contents replaces the contents of a field. If you do not select this option,
Insert From URL inserts the content from the URL at the insertion point or at the end of the
field's data.
•Perform without dialog prevents the “Insert From URL” Options dialog box from displaying
when the script step executes.
•Select Go to target field or click Specify to specify the field to insert the URL content into.
•For Specify URL, click Specify to display the “Insert From URL” Options dialog box, where
you can type the URL directly in the text entry area or click Specify to create your URL from
a calculation.
Compatibility
Where the script step runs Supported
FileMaker Pro Yes
FILEMAKER PRO HELP 1024
Originated in
FileMaker Pro 12.0
Description
Insert From URL supports http, https, httppost, httpspost, ftp, ftps, and file protocols.
FileMaker Pro downloads the resource that is specified by the URL to the target field.
Image files: In Windows, container fields can render GIF, JPG, PNG, BMP, and TIFF files. In OS X,
container fields can render GIF, JPG, JPG2, PNG, BMP, TIF, FPX, PSD, SGI, TGA, MAC, and QIF
files. Other image types display as thumbnails.
FileMaker WebDirect: if Select entire contents is deselected, and you Insert From URL to a text
field, the contents from the URL are appended to the text field. Multiple fetches can result in
unpredictable results and slower performance.
Important For better performance in FileMaker WebDirect, be sure that Select entire contents is
selected.
Notes
•httppost and httpspost are custom schemes defined by FileMaker Pro that enable you to
send HTTP POST data. See About importing data using an HTTP request.
•Be aware that there are possible security issues with using https, httpspost, and ftps.
FileMaker cannot perform a certificate check to verify that the server that you specify is the
server that replies.
Example 1
Accesses a website and inserts a PDF into the Sales Report container field.
Insert From URL [No dialog; Customers::Sales Report; “http://
www.filemaker.com/sales_report.pdf”]
Example 2
Inserts a map showing the customer's address in the Address Map container field.
Insert From URL [No dialog; Customers::Address Map; "http://
maps.google.com/maps/api/staticmap?center=" & Customers::Address &
"&zoom=14&markers=" & Customers::Address & "&size=256x256&sensor=false"]
Example 3
Inserts the HTML code for http://www.apple.com.
FileMaker Server scheduled script Yes
FileMaker Go Yes
Custom Web Publishing Yes
FileMaker WebDirect Yes
Runtime solution Yes
Where the script step runs Supported

FILEMAKER PRO HELP 1025
Insert From URL [No dialog; Customers::HTML Website Code; "http://
www.apple.com"]
Related topics
Script steps reference (alphabetical list)
Script steps reference (category list)
Insert Current Date
Purpose
Pastes the current system date into the specified field.
Format
Insert Current Date [Select; <table::field>]
Options
•Select entire contents replaces the contents of a field with the current date. If you do not
select this option, Insert Current Date adds the value of the current date to the end of the
field's existing data.
•Select Go to target field or click Specify to specify the field to paste the date into.
Compatibility
Originated in
FileMaker Pro 6.0 or earlier
Description
•To perform a calculation with the current date, make sure the receiving field is defined as a
date field.
•If the specified field does not exist on the layout where the script is being performed, Insert
Current Date returns an error code which can be captured with the Get(LastError) function.
Example 1
Goes to the Email History layout, inserts the current date in the Last Sent field, then goes to the
original layout.
Where the script step runs Supported
FileMaker Pro Yes
FileMaker Server scheduled script Yes
FileMaker Go Yes
Custom Web Publishing Yes
FileMaker WebDirect Yes
Runtime solution Yes

FILEMAKER PRO HELP 1026
Go to Layout ["Email History"]
Insert Current Date [Select; Emails::Last Sent]
Go to Layout [original layout]
Related topics
Set Field script step
Script steps reference (alphabetical list)
Script steps reference (category list)
Insert Current Time
Purpose
Pastes the current system time into the specified field.
Format
Insert Current Time [Select; <table::field>]
Options
•Select entire contents replaces the contents of a field with the current time. If you do not
select this option, Insert Current Time adds the value of the current time to the end of the
field's existing data.
•Select Go to target field or click Specify to specify the field to paste into.
Compatibility
Originated in
FileMaker Pro 6.0 or earlier
Description
•To perform a calculation with the current time, make sure the receiving field is defined as a
Time field.
•If the specified field does not exist on the layout where the script is being performed, Insert
Current Time returns an error code which can be captured with the Get(LastError) function.
Where the script step runs Supported
FileMaker Pro Yes
FileMaker Server scheduled script Yes
FileMaker Go Yes
Custom Web Publishing Yes
FileMaker WebDirect Yes
Runtime solution Yes

FILEMAKER PRO HELP 1027
Example 1
Goes to the Email History layout, inserts the current time in the Last Sent field, then goes to the
original layout.
Go to Layout ["Email History"]
Insert Current Time [Select; Emails::Last Sent]
Go to Layout [original layout]
Related topics
Set Field script step
Script steps reference (alphabetical list)
Script steps reference (category list)
Insert Current User Name
Purpose
Pastes the current user name into the specified field in the current record.
Format
Insert Current User Name [Select; <table::field>]
Options
•Select entire contents replaces the contents of a field with the current user name. If you do
not select this option, Insert Current User Name adds the value of the current user name to
the end of the field's existing data.
•Select Go to target field or click Specify to specify the field to paste into.
Compatibility
Originated in
FileMaker Pro 6.0 or earlier
Description
•If the specified field does not exist on the layout where the script is being performed, Insert
Current User Name returns an error code which can be captured with the Get(LastError)
function.
Where the script step runs Supported
FileMaker Pro Yes
FileMaker Server scheduled script Yes
FileMaker Go Yes
Custom Web Publishing Yes
FileMaker WebDirect Yes
Runtime solution Yes

FILEMAKER PRO HELP 1028
•User name is the FileMaker Pro user, an editable field displayed on the General tab of the
Preferences dialog box. To track user access to a database with more security, use the
Get(AccountName) function to return the current user’s account name.
•In FileMaker WebDirect, Insert Current User Name pastes the current user’s account name,
not the current user name.
Example 1
Goes to the Email History layout, inserts the current user name in the Sent by field, then goes to the
original layout.
Go to Layout ["Email History"]
Insert Current User Name [Select; Emails::Sent by]
Go to Layout [original layout]
Related topics
Set Field script step
Script steps reference (alphabetical list)
Script steps reference (category list)
Insert Picture
Purpose
Imports a graphic from another file into the current container field.
Format
Insert Picture [Reference;“<filename>”]
Options
•Store only a reference instructs FileMaker Pro to store only a link to the graphic file instead
of the entire file. This option may reduce the size of your FileMaker Pro file, but if you move
or delete the graphic, FileMaker Pro will be unable to display it.
•Select Specify source file or click Specify to identify the file that contains the graphic. For
more information on creating file paths in FileMaker Pro, see Creating file paths.
Compatibility
Where the script step runs Supported
FileMaker Pro Yes
FileMaker Server scheduled script No
FileMaker Go Yes
Custom Web Publishing No
FileMaker WebDirect Partial
Runtime solution Yes

FILEMAKER PRO HELP 1029
Originated in
FileMaker Pro 6.0 or earlier
Description
You must specify a field, click in a field, or use the Go to Field script step before performing this
script step.
When Insert Picture is performed, unless a file is specified with the Specify source file option,
FileMaker Pro displays a dialog box where the user can select and preview the file to be imported.
Note FileMaker WebDirect does not support the Store only a reference or Specify source file
options.
Notes
•If there is no active container field on the layout where the script is being performed, Insert
Picture returns an error code that can be captured with the Get(LastError) function.
•For information on supported picture formats, see Using data in container fields.
Example 1
Goes to the Picture field and inserts a picture.
Go to Field [Products::Picture]
Insert Picture ["Mobile Phone.png"]
Related topics
Script steps reference (alphabetical list)
Script steps reference (category list)
Using data in container fields
Insert QuickTime
Purpose
Imports a QuickTime movie or sound file into the current container field.
Format
Insert QuickTime [“<filename>”]
Options
Select Specify source file or click Specify to display the Open dialog box where you can specify
the name, file type, and location of the QuickTime file you intend to insert. For more information, see
Creating file paths.
Compatibility
Where the script step runs Supported
FileMaker Pro Yes

FILEMAKER PRO HELP 1030
Originated in
FileMaker Pro 6.0 or earlier
Description
You must specify a field, click in a field, or use the Go to Field script step before performing this
script step.
When Insert QuickTime is performed, unless a file is specified with the Specify source file option,
FileMaker Pro displays a dialog box where the user can select and preview the file to be imported.
Notes
•If there is no active container field on the layout where the script is being performed, Insert
QuickTime returns an error code that can be captured with the Get(LastError) function.
•This script step requires that QuickTime extension for Windows be installed.
•For a list of media types that QuickTime supports, see Using data in container fields.
•FileMaker Pro doesn't import the file; it only stores a reference to the file and keeps track of
where it is on your hard disk.
Example 1
Goes to the Demo field and inserts a QuickTime video file.
Go to Field [Products::Demo]
Insert QuickTime [“Mobile Phone.mp4”]
Related topics
Script steps reference (alphabetical list)
Script steps reference (category list)
Insert Audio/Video
Purpose
Imports an audio or video file, or a reference to an audio or video file, into the current interactive
container.
Format
Insert Audio/Video [Reference;“<filename>”]
FileMaker Server scheduled script No
FileMaker Go Yes
Custom Web Publishing No
FileMaker WebDirect No
Runtime solution Yes
Where the script step runs Supported

FILEMAKER PRO HELP 1031
Options
•Select Store only a reference to have FileMaker Pro store only a link to an audio or video
file in the container field instead of the actual file. This option may reduce the size of your
FileMaker Pro file, but if you move or delete the file being referenced, FileMaker Pro won't
be able to display it.
•Select Specify source file or click Specify to display the Specify Audio/Video File dialog
box, where you can specify the audio or video file you intend to insert in the interactive
container. Or click Add File and choose a file to insert. For more information, see Creating
file paths.
Compatibility
Originated in
FileMaker Pro 12.0
Description
You must specify a field, click in a field, or use the Go to Field script step before performing this
script step.
When Insert Audio/Video is performed, unless a file is specified with the Specify source file option,
FileMaker Pro displays a dialog box where the user can select and preview the file to be imported.
Note FileMaker WebDirect does not support the Store only a reference or Specify source file
options.
Notes
•If there is no active container field on the layout where the script is being performed, Insert
Audio/Video returns an error code that can be captured with the Get(LastError) function.
•This script step works only for interactive containers. For more information, see Specifying
formats for container fields.
•For a list of supported media types, see Using data in container fields.
Example 1
Goes to the Media field and inserts an audio file.
Go to Field [Customers::Media]
Insert Audio/Video [“Music.mp3”]
Where the script step runs Supported
FileMaker Pro Yes
FileMaker Server scheduled script No
FileMaker Go Yes
Custom Web Publishing No
FileMaker WebDirect Partial
Runtime solution Yes

FILEMAKER PRO HELP 1032
Example 2
Inserts the media file specified in the Media Name field into the active container field by reference.
Set Variable [$MEDIA_PATH; Value: Get ( DocumentsPath ) & Products::Media
Name]
Insert Audio/Video [Reference; “$MEDIA_PATH”]
Related topics
Script steps reference (alphabetical list)
Script steps reference (category list)
Insert PDF
Purpose
Imports a PDF file, or a reference to a PDF file, into the current interactive container.
Format
Insert PDF [Reference;“<filename>”]
Options
•Select Store only a reference to have FileMaker Pro store a link to a PDF file in the
container field instead of the actual file. This option may reduce the size of your
FileMaker Pro file, but if you move or delete the file being referenced, FileMaker Pro won't
be able to display it.
•Select Specify source file or click Specify to display the Specify PDF File dialog box,
where you can specify the PDF file you intend to insert in the interactive container. Or click
Add File to choose a file to insert. For more information, see Creating file paths.
Compatibility
Originated in
FileMaker Pro 12.0
Description
You must specify a field, click in a field, or use the Go to Field script step before performing this
script step.
Where the script step runs Supported
FileMaker Pro Yes
FileMaker Server scheduled script No
FileMaker Go Yes
Custom Web Publishing No
FileMaker WebDirect Partial
Runtime solution Yes

FILEMAKER PRO HELP 1033
When Insert PDF is performed, unless a file is specified with the Specify source file option,
FileMaker Pro displays a dialog box where the user can select and preview the file to be imported.
Note FileMaker WebDirect does not support the Store only a reference or Specify source file
options.
Notes
•If there is no active container field on the layout where the script is being performed, Insert
PDF returns an error code that can be captured with the Get(LastError) function.
•This script step works only with interactive containers. For more information, see Specifying
formats for container fields.
•FileMaker WebDirect does not support the Specify source file option.
Example 1
Goes to the File field and inserts a PDF.
Go to Field [Products::File]
Insert PDF [“Product Description.pdf”]
Related topics
Script steps reference (alphabetical list)
Script steps reference (category list)
Insert File
Purpose
Imports a file or a reference to a file into the current container field. Configures the Insert File dialog
box.
Format
Insert File [<dialog options>;<table::field>;”<filename>”]
Options
•Select Dialog options or click Specify to create a custom Insert File dialog box, filter file
types, and choose storage, display, and compression options for files that are inserted into a
container field. See Insert File Options dialog box.
•Store only a reference instructs FileMaker Pro to store only a link to a file in the container
field instead of the entire file. This option may reduce the size of your FileMaker Pro file, but
if you move or delete the file being referenced, FileMaker Pro won't be able to display it.
•Select Go to target field or click Specify to specify the container field to insert the file into.
•Select Specify source file or click Specify to specify the file to be inserted. For information
on creating file paths in FileMaker Pro, see Creating file paths.

FILEMAKER PRO HELP 1034
Compatibility
Originated in
FileMaker Pro 6.0 or earlier
Description
You must specify a target field, click in a field, or use the Go to Field script step before performing
this script step. If you do not specify a file to insert, FileMaker Pro displays a dialog box where the
user can select a file.
Notes
•If there is no active container field on the layout where the script is being performed, Insert
File returns an error code that can be captured with the Get(LastError) function.
•FileMaker WebDirect does not support the Dialog options, Store only a reference, or
Specify source file options.
Example 1
Goes to the File field and inserts a document.
Go to Field [Products::File]
Insert File ["Instruction Manual.doc"]
Example 2
Opens a dialog box with custom file format filters for the user to select a file, attempts to compress
the selected file, then inserts the file into the active container field.
Insert File [Filters; Insert; Compress when possible]
Example 3
Inserts the file specified in the File Name field into the File container field, and attempts to display
the contents of the file.
Set Variable [$FILE_PATH; Value: Get ( DocumentsPath ) & Products::File
Name]
Insert File [Insert; Display content; Never compress; Products::File ;
$FILE_PATH]
Related topics
Script steps reference (alphabetical list)
Where the script step runs Supported
FileMaker Pro Yes
FileMaker Server scheduled script No
FileMaker Go Yes
Custom Web Publishing No
FileMaker WebDirect Partial
Runtime solution Yes

FILEMAKER PRO HELP 1035
Script steps reference (category list)
Replace Field Contents
Purpose
Uses the value in a specified field in the current record or uses a calculation to replace the value in
that field in every record in the current found set.
Format
Replace Field Contents [No Dialog; <table::field>;
Current contents/Serial numbers/Calculation results]
Options
•Perform without dialog prevents display of the Replace Field Contents dialog box when
the script step executes.
•Select Go to target field or click Specify to specify the target field for the replace operation.
•Click Specify to display the Replace Field Contents dialog box, where you can determine
the settings required for the Replace Field Contents command.
•Replace with "current contents" uses the current value in the specified field as the
replacement value to place in that field in every other record in the current found set.
•Replace with serial numbers reserializes the field in every record in the current found
set.
•Entry options uses the next available value in Entry Options as the first record number,
incrementing with whatever value is in Entry Options.
•Custom Values lets you enter a value to be used as a starting point for the
serialization, as well as a value by which to increment each serialized field in the current
found set.
•Update serial number in Entry Options? resets the serial number value in Entry
Options so that the next serial number that is automatically entered will follow the
records you have reserialized with this script step. If this option is not used, the serial
value in Entry Options is not changed, and may not be in sequence with the newly
reserialized records.
•If the field to be replaced was set up for auto-entry of a serial number and Prohibit
modification of value is not selected, FileMaker Pro will still put sequential numbers in
the selected field, but will do so starting with the next number to be automatically
entered.
•Replace with calculated result displays the Specify Calculation dialog box, where you
can enter a calculation to be used as the replacement value.
Compatibility
Where the script step runs Supported
FileMaker Pro Yes
FileMaker Server scheduled script Partial

FILEMAKER PRO HELP 1036
Originated in
FileMaker Pro 6.0 or earlier
Description
Important Replace Field Contents modifies all records in the found set. You cannot undo a Replace
Field Contents script step.
•This script step can also be used to reserialize a field in every record in the current found
set.
•When you use the Replace Field Contents script step, the data must be committed first
before the operation is performed, or you may get unexpected results. For example, if a field
value is modified and a replace is attempted before the data is committed, then the replace
will be based on the old data rather than the modified data. (For more information about
committing data, see Committing data in records.)
•FileMaker WebDirect, FileMaker Server scheduled scripts, and Custom Web Publishing run
this script step as if the Perform without dialog option is selected.
Example 1
Assigns serial numbers to all invoices in the found set.
Sort Records [Restore]
Go to Record/Request/Page [First]
Replace Field Contents [No dialog; Invoices::Invoice ID; Serial numbers]
Example 2
Replaces the contents of the Customer ID field in all records in the found set with the contents of the
current record's Customer ID field.
Perform Find [Restore]
Replace Field Contents [No dialog; Invoices::Customer ID; Current
Contents]
Related topics
Defining calculation fields
Script steps reference (alphabetical list)
Script steps reference (category list)
FileMaker Go Yes
Custom Web Publishing Partial
FileMaker WebDirect Partial
Runtime solution Yes
Where the script step runs Supported

FILEMAKER PRO HELP 1037
Relookup Field Contents
Purpose
Copies new values from the lookup source field into the records that make up the current found set.
Format
Relookup Field Contents [No dialog; <table::field>]
Options
•Perform without dialog prevents a dialog box from displaying when the script step
executes that lets the user confirm field information.
•Select Go to target field or click Specify to specify the field that is the target of the
relookup operation. FileMaker Pro moves the cursor to the field you specify. This must be
the match field for the relationship upon which the lookup is based, not the Lookup source
or target field. If no field is selected, Relookup Field Contents returns an error code that can
be captured with the Get(LastError) function.
Compatibility
Originated in
FileMaker Pro 6.0 or earlier
Description
•The target field specified for the Relookup Field Contents step must be an editable field.
•Relookups are only performed on the found set of records in the active table.
•Calculation fields cannot be used for the Relookup Field Contents command. If you use the
Relookup Field Contents command, and you're using a calculation field as the matching
value, you must specify one of the input fields for the calculation as the field parameter for
the Relookup Field Contents.
•When you use the Relookup Field Contents script step, the data must be committed first
before the operation is performed, or you may get unexpected results. For example, if a field
value is modified and a relookup is attempted before the data is committed, then the
relookup search will be based on the old data rather than the modified data. (For more
information about committing data, see Committing data in records.)
Where the script step runs Supported
FileMaker Pro Yes
FileMaker Server scheduled script Partial
FileMaker Go Yes
Custom Web Publishing Partial
FileMaker WebDirect Yes
Runtime solution Yes

FILEMAKER PRO HELP 1038
Example 1
Finds records that have matching values in the Customer ID field, then updates all lookups in the
found set based on the relationship that uses Customer ID as a match field.
Go to Layout [“Invoice Details"]
Find Matching Records [Replace; Invoices::Customer ID]
Relookup Field Contents [No dialog; Invoices::Customer ID]
Related topics
Script steps reference (alphabetical list)
Script steps reference (category list)
Export Field Contents
Purpose
Exports the contents of a single field in the active record to a new file.
Format
Export Field Contents [<table::field>; “<filename>”; Automatically open;
Create email]
Options
•Select Specify target field or click Specify to specify the field to be exported. If no field is
specified, FileMaker Pro will export the contents of the current field in the active table.
•Select Specify output file or click Specify to specify the name and location of the file to
which the field contents will be exported. For more information, see Creating file paths. If no
file is specified, the user is asked to choose a filename and location when the script step is
performed. You can choose to Automatically open file or Create email with file as
attachment after saving.
Compatibility
Originated in
FileMaker Pro 6.0 or earlier
Where the script step runs Supported
FileMaker Pro Yes
FileMaker Server scheduled script No
FileMaker Go Yes
Custom Web Publishing No
FileMaker WebDirect Partial
Runtime solution Yes

FILEMAKER PRO HELP 1039
Description
If the contents of the exported field is text, then FileMaker creates a UTF-16 format text file.
Notes
•FileMaker WebDirect does not support the Specify output file option. FileMaker WebDirect
exports field contents to the web browser’s default download location.
•FileMaker WebDirect does not support this script step in mobile browsers.
Example 1
Opens a dialog box to set the export path and filename, then exports the image.
Export Field Contents [Products::Picture; ”Mobile Phone.png”]
Example 2
Exports files from the Container field in all the records in the found set to a set file path.
Set Variable [$PATH; Value: Get ( DocumentsPath ) & Products::Container]
Go to Record/Request/Page [First]
Loop
Export Field Contents [Products::Container; "$PATH"]
Go to Record/Request/Page [Next; Exit after last]
End Loop
Related topics
Script steps reference (alphabetical list)
Script steps reference (category list)
Records script steps
Records script steps affect specific records and find requests. Use these script steps to:
•add, delete, and copy records or find requests
•change field contents in all records in the found set
•commit and revert records
•import and export records
•save records to various formats
New Record/Request
Purpose
In Browse mode, creates a new, blank record. In Find mode, creates a new find request.
Format
New Record/Request

FILEMAKER PRO HELP 1040
Options
None.
Compatibility
Originated in
FileMaker Pro 6.0 or earlier
Example 1
Goes to the Invoice Details layout, creates a record, and goes to the Summary field.
Go to Layout [“Invoice Details”]
New Record/Request
Go to Field [Invoices::Summary]
Related topics
Script steps reference (alphabetical list)
Script steps reference (category list)
Duplicate Record/Request
Purpose
In Browse mode, makes a duplicate of the current record. In Find mode, duplicates the current find
request.
Format
Duplicate Record/Request
Options
None.
Compatibility
Where the script step runs Supported
FileMaker Pro Yes
FileMaker Server scheduled script Yes
FileMaker Go Yes
Custom Web Publishing Yes
FileMaker WebDirect Yes
Runtime solution Yes
Where the script step runs Supported
FileMaker Pro Yes

FILEMAKER PRO HELP 1041
Originated in
FileMaker Pro 6.0 or earlier
Description
If the record has a field set up for automatic entry of values, this script step does not duplicate the
value in the field of the current record. In that case, FileMaker Pro generates and enters a new value
for the duplicated record.
To use the Duplicate Record/Request script step with portal rows, first use the Go to Portal Row
script step, and then use the Duplicate Record/Request step. Using the Duplicate Record/Request
step when a portal row is selected will duplicate the selected row in the related table. This option is
only available when the option to allow creation of related records has been enabled for the
relationship.
Example 1
Performs a find, goes to the last record, and duplicates the record.
Perform Find [Restore]
Go to Record/Request/Page [Last]
Duplicate Record/Request
Related topics
Script steps reference (alphabetical list)
Script steps reference (category list)
Delete Record/Request
Purpose
In Browse mode, deletes the current record. In Find mode, deletes the current find request.
Format
Delete Record/Request [No dialog]
Options
Perform without dialog prevents the deletion confirmation dialog box from displaying when the
script step executes.
FileMaker Server scheduled script Yes
FileMaker Go Yes
Custom Web Publishing Yes
FileMaker WebDirect Yes
Runtime solution Yes
Where the script step runs Supported
FILEMAKER PRO HELP 1042
Compatibility
Originated in
FileMaker Pro 6.0 or earlier
Description
Important You cannot undo a Delete Record/Request script step.
Example 1
Goes to a related record and asks if the user wants to delete it.
Go to Related Record [From table: "Products"; Using layout: “Product
Details”]
Delete Record/Request [ ]
Example 2
Displays a custom dialog to ask if the user wants to delete the current product.
Show Custom Dialog ["Do you want to delete " & Products::Name & "?"]
If [Get ( LastMessageChoice ) = 1]
Delete Record/Request [No dialog]
End If
Related topics
Script steps reference (alphabetical list)
Script steps reference (category list)
Where the script step runs Supported
FileMaker Pro Yes
FileMaker Server scheduled script Partial
FileMaker Go Yes
Custom Web Publishing Partial
FileMaker WebDirect Yes
Runtime solution Yes
To delete Do this
A master record Make sure that the record you want to delete is active (use navigation script steps),
and then use Delete Record/Request. If the current layout contains a portal, click
anywhere on the record outside of the portal to make sure that no related record is
selected, then use Delete Record/Request.
A related record Use the Delete Portal Row script step. If Delete Record/Request executes when a
related field in a portal is selected, the user sees a dialog box that asks whether the
master record or related record should be deleted.
A find request Make sure that the find request you want to delete is active (use navigation script
steps), and then use Delete Record/Request.
FILEMAKER PRO HELP 1043
Delete Portal Row
Purpose
Deletes the selected portal row (which deletes data in a related record).
Format
Delete Portal Row [No dialog]
Options
Perform without dialog prevents a message box from displaying when the script step executes
that asks the user to confirm the deletion of the portal row.
Compatibility
Originated in
FileMaker Pro 6.0 or earlier
Description
Use the Go to Portal Row script step to control which row is selected. (If no portal row is selected,
nothing happens when this script step executes.)
Note After you use a Delete Portal Row script step in FileMaker WebDirect, click anywhere on the
layout or use a Commit Record/Request script step to commit the deletion.
Important You cannot undo a Delete Portal Row script step.
Example 1
Asks if the user wants to delete the portal row if a product is discontinued.
If [Products::Availability = "Discontinued"]
Delete Portal Row [ ]
End If
Example 2
Asks if the user wants to delete the product in the current portal row.
Show Custom Dialog ["Do you want to delete " & Products::Name & "?"]
If [Get ( LastMessageChoice ) = 1]
Where the script step runs Supported
FileMaker Pro Yes
FileMaker Server scheduled script Partial
FileMaker Go Yes
Custom Web Publishing Partial
FileMaker WebDirect Partial
Runtime solution Yes

FILEMAKER PRO HELP 1044
Delete Portal Row [No dialog]
End If
Related topics
Script steps reference (alphabetical list)
Script steps reference (category list)
Delete All Records
Purpose
Deletes all the records in the current found set.
Format
Delete All Records [No dialog]
Options
Perform without dialog prevents a message box from displaying when the script step executes
that asks the user to confirm the deletion of records.
Compatibility
Originated in
FileMaker Pro 6.0 or earlier
Description
To delete all records in the current table, use the Show All Records script step, then use Delete All
Records.
Important You cannot undo a Delete All Records script step.
Example 1
Asks if the user wants to delete all records in the current table.
Show All Records
Delete All Records [ ]
Where the script step runs Supported
FileMaker Pro Yes
FileMaker Server scheduled script Partial
FileMaker Go Yes
Custom Web Publishing Partial
FileMaker WebDirect Yes
Runtime solution Yes

FILEMAKER PRO HELP 1045
Example 2
Asks if the user wants to delete all records in the current found set.
Show Custom Dialog ["Do you want to delete all " & Get ( FoundCount ) & "
records found?"]
If [Get ( LastMessageChoice ) = 1]
Delete All Records [No dialog]
End If
Related topics
Script steps reference (alphabetical list)
Script steps reference (category list)
Open Record/Request
Purpose
Makes an existing record or find request available for editing if the current user has record-editing
privileges.
Format
Open Record/Request
Options
None.
Compatibility
Originated in
FileMaker Pro 6.0 or earlier
Description
When performed on a record, this script step verifies that the user has sufficient access privileges to
edit the record. If the user has the proper privilege set, FileMaker Pro attempts to prevent others
from simultaneously editing or deleting the record. Once locked, the record is considered “opened”
and may be edited.
Where the script step runs Supported
FileMaker Pro Yes
FileMaker Server scheduled script Yes
FileMaker Go Yes
Custom Web Publishing Yes
FileMaker WebDirect Yes
Runtime solution Yes

FILEMAKER PRO HELP 1046
If an error occurs (for example, if the current user has insufficient access privileges, the record is
currently locked by another user, or the record is open in another window), FileMaker Pro generates
an error message, which may be captured using the Set Error Capture script step and the
Get(LastError) function. (Opening a find request will not return an error, because requests can’t be
locked by other users.)
Important Because any attempt to modify a field or a record will also attempt to open the record for
editing, in most cases you will not need to use the Open Record/Request script step to open a
record explicitly. But when using the Go to Record/Request/Page script step to enter a field or
record, use the Open Record/Request script step first to obtain a write lock.
Example 1
Prints the current invoice if the user has the privileges to edit it.
Go to Layout ["Print Invoices"]
Open Record/Request
If [Get ( LastError ) = 0]
Print [ ]
End If
Go to Layout [original layout]
Example 2
Checks if the current user account has the privilege to edit records. If not, asks if the user wants to
log in to a different account.
Note This script does not run properly if Run script with full access privileges is selected
because this option allows any account to open the record.
Set Error Capture [On]
Go to Layout ["Invoice Details"]
Open Record/Request
If [Get ( LastError ) = 200]
Show Custom Dialog ["You cannot edit this record. Do you want to re-
login?"]
If [Get ( LastMessageChoice ) = 1]
Re-Login [ ]
Else
Go to Layout [original layout]
End If
End If
Related topics
Script steps reference (alphabetical list)
Script steps reference (category list)

FILEMAKER PRO HELP 1047
Revert Record/Request
Purpose
Returns the current record or request to the way it was before you began adding or changing data in
the record.
Format
Revert Record/Request [No dialog]
Options
Perform without dialog prevents a dialog box from displaying when the script step executes that
asks the user to confirm the revert action.
Compatibility
Originated in
FileMaker Pro 6.0 or earlier
Example 1
Displays a dialog if the current record has been modified but not committed. Gives the user the
option of reverting the record.
If [Get ( RecordOpenState ) = 2]
Show Custom Dialog ["This record has been modified since it was last
entered."]
#Button 1 is Commit. Button 2 is Revert.
If [Get ( LastMessageChoice ) = 2]
Revert Record/Request [No dialog]
End If
End If
Related topics
Script steps reference (alphabetical list)
Script steps reference (category list)
Where the script step runs Supported
FileMaker Pro Yes
FileMaker Server scheduled script Partial
FileMaker Go Yes
Custom Web Publishing Partial
FileMaker WebDirect Yes
Runtime solution Yes

FILEMAKER PRO HELP 1048
Commit Records/Requests
Purpose
Commits a record.
Format
Commit Records/Requests [Skip data entry validation; No dialog; Force
Commit]
Options
•Skip data entry validation overrides any data entry validation options set for fields and
commits the record anyway. This option only skips validation for fields set with the Only
during data entry validation option in the Options for Field dialog box; fields set to Always
validate will still validate, even if the Skip data entry validation option is selected. For more
information on field validation, see Defining field validation.
•Perform without dialog prevents a dialog box from displaying when the script step
executes that asks the user to confirm the commit action.
Note Perform without dialog only applies when Save record changes automatically is
cleared in the Layout preferences.
•Override ESS locking conflicts allows clients of ODBC data sources to force-commit
changes when optimistic locking otherwise prevents the commit action. ODBC data sources
are also referred to as external SQL sources (ESS).
Compatibility
Originated in
FileMaker Pro 6.0 or earlier
Description
This script step exits the current record or find request, updating field data and making no field
active.
Example 1
Goes to the Invoice Details layout, inserts the current date into the Date field, and commits the
record.
Where the script step runs Supported
FileMaker Pro Yes
FileMaker Server scheduled script Partial
FileMaker Go Yes
Custom Web Publishing Partial
FileMaker WebDirect Yes
Runtime solution Yes

FILEMAKER PRO HELP 1049
Go to Layout ["Invoice Details"]
Insert Calculated Result [Invoices::Date; Get ( CurrentDate )]
Commit Records/Requests [No dialog]
Related topics
Set Field script step
Script steps reference (alphabetical list)
Script steps reference (category list)
Copy Record/Request
Purpose
Copies the values of a record or find request to the Clipboard.
Format
Copy Record/Request
Options
None.
Compatibility
Originated in
FileMaker Pro 6.0 or earlier
Description
Text fields are copied in tab-delimited format, without styles, in the order they appear in the record
layout. Text in container fields is also copied. (This script step is equivalent to choosing Copy from
the Edit menu when there is no active field.)
Notes
•Contents that you cut or copy to the Clipboard are accessible to other applications.
•When using the Copy Record/Request step with repeating fields, FileMaker Pro inserts the
group separator character between each repetition. You can use a text editor to replace
these characters with another delimiter such as a tab or space.
Where the script step runs Supported
FileMaker Pro Yes
FileMaker Server scheduled script Yes
FileMaker Go Yes
Custom Web Publishing Yes
FileMaker WebDirect No
Runtime solution Yes

FILEMAKER PRO HELP 1050
•Any fields located in popovers are ignored when you copy records.
Example 1
Copies the contents of the current record and displays a custom dialog.
Copy Record/Request
Show Custom Dialog ["You can now paste the current record in your
spreadsheet software."]
Related topics
Script steps reference (alphabetical list)
Script steps reference (category list)
Copy All Records/Requests
Purpose
In Browse mode, copies the values of all records to the Clipboard. In Find mode, copies all find
requests.
Format
Copy All Records/Requests
Options
None.
Compatibility
Originated in
FileMaker Pro 6.0 or earlier
Description
Text fields are copied in tab-delimited format, without styles, in the order they appear in the record
layout. Text in container fields is also copied. (This script step is equivalent to choosing Copy from
the Edit menu while holding down the Shift key (Windows) or Option key (OS X) when there is no
active field.)
Where the script step runs Supported
FileMaker Pro Yes
FileMaker Server scheduled script Yes
FileMaker Go Yes
Custom Web Publishing Yes
FileMaker WebDirect No
Runtime solution Yes

FILEMAKER PRO HELP 1051
Notes
•Contents that you cut or copy to the Clipboard are accessible to other applications.
•When using the Copy All Records/Requests step with repeating fields, FileMaker Pro
inserts the group separator character between each repetition. You can use a text editor to
replace these characters with another delimiter such as a tab or space.
•Any fields located in popovers are ignored when you copy records.
Example 1
Finds all records with the same Customer ID as the current record, sorts, copies the contents of all
the records in the found set, and displays a dialog.
Find Matching Records [Replace; Invoices::Customer ID]
Sort Records [Restore; No dialog]
Copy All Records/Requests
Show Custom Dialog ["You can now paste data from the current " & Get (
FoundCount ) & " invoices."]
Related topics
Script steps reference (alphabetical list)
Script steps reference (category list)
Import Records
Purpose
Imports records from another file or data source you specify.
Format
Import Records [No dialog; “<source or filename>”; Add/Update existing/
Update matching; <platform and character set>]
Options
•Perform without dialog prevents display of import-related dialog boxes when the script
step executes. However, if a data source file has not been specified, the Open File dialog
box will be displayed when a script is run from FileMaker Pro.
•Specify data source lets you choose the file or source of the data to be imported.
Depending on the file or source you choose, a dialog box may appear for specifying the
following additional options:
When you
choose this file
or source Do this
File In the Specify File dialog box, choose the file you want to import, or type file paths
directly into the list. Specify one path per line. FileMaker Pro will use the first path
it locates as the file to import. See Creating file paths.

FILEMAKER PRO HELP 1052
•Specify import order tells FileMaker Pro to use a predefined import order. The last import
order used in the file appears as the default and can be edited. This option also lets you
choose whether to keep repeating field data together or to split repeating fields into
separate records, as well as whether to add new records, replace data in the current found
set, or import data as a new table.
Note When import source fields and target fields are mapped using matching names, field
name matching is performed dynamically each time the script step is performed.
Compatibility
Folder In the Folder of Files Import Options dialog box, choose the folder of image or
text files that you want to import, or type the folder paths directly into the list.
Specify one path per line. FileMaker Pro will use the first path it locates as the
folder to import. For more information, see Importing a folder of files all at once
and Creating file paths. This option is not supported from scripts running on
FileMaker Server.
Bento Data
(OS X)
If the Bento database you want to import has a password, enter it in the Bento
Password dialog box. In the Select Bento Source dialog box, select the library
and collection that you want to import, then select field mapping options. For
more information, see Importing Bento data (OS X). This option is not supported
from scripts running on FileMaker Server.
XML Data In the Specify XML and XSL Options dialog box, choose the source of the XML
data that you want to import, and choose an XSLT style sheet if you want to apply
one prior to import. The XML and XSLT source may be a file or the result of an
HTTP request, or a calculation that generates a file path or an HTTP request. For
more information, see Importing XML data.
ODBC Data Specify the data source name and location, the user ID and password (if any),
and the SQL query to be executed. You can enter a query directly or specify a
calculation to generate the query. For more information, see Automating ODBC
import using the Import Records script step.
SQL statements are limited to a maximum length of 256 K characters (512 KB).
Note If you use the Import Records script step to import ODBC data that
contains Unicode strings, your ODBC driver must support Unicode. Otherwise,
the results may be inconsistent.
When you
choose this file
or source Do this
Where the script step runs Supported
FileMaker Pro Yes
FileMaker Server scheduled script Partial
FileMaker Go Partial
Custom Web Publishing No
FileMaker WebDirect Partial
Runtime solution Yes

FILEMAKER PRO HELP 1053
Originated in
FileMaker Pro 6.0 or earlier
Description
You can set the import order and use the Specify import order option, or perform this script step
with the dialog box so the user can set new criteria, such as importing data as a new table.
If the source file is open, the found set is imported; if not, all records in the source table are
imported.
When you include this script step in a FileMaker Server scheduled script and you do not select
Perform without dialog in the Edit Script dialog box, the text (NOT compatible) appears after the
script step. The script, however, will run. The behavior will be the same as if Perform without
dialog was selected. See Get(DocumentsPathListing) function for more information.
If you schedule a FileMaker Server script to do any of the following, you will receive an error:
•importing records to new table
•importing records from a folder
•importing images to a container field
Notes
•When using the Import Records script step or Export Records script step in a
FileMaker Server scheduled script, keep the following in mind:
•Any specified file must be in the FileMaker Server Documents folder, the temporary
folder, or a child folder of either the FileMaker Server Documents folder or the
temporary folder. For example, the following are all valid paths for file.csv:
<Documents>/file.csv
<Temporary Path>/file.csv
<Documents>/Folder1/file.csv
<Temporary Path>/Folder1/Folder2/Folder3/Folder4/file.csv
•Any path specified that isn’t a complete path to the file (for example, anything other than
/Library/FileMaker Server/Data/Documents/<0 or more directories>/<filename> ) is
evaluated as being relative to the temporary path.
•Any paths that include “..” are considered invalid.
•For FileMaker Pro, if an absolute path is not specified in a script that will be executed from
FileMaker Pro, the path is assumed to be relative to the location of the database file from
which the script was run. For example, if a script containing the Export Records script step
is run with the pathname file:/export.tab, and the file running the script is /MyFiles/
Library/Books.fmp12, the exported file will be created as /MyFiles/Library/export.tab.
•Support for importing photos from a digital camera or device has been removed from
FileMaker Pro.
•If a script created in an earlier version of FileMaker Pro contains an Import Records
[Digital Camera] script step, the step is commented as obsolete. You can remove the
step, but you can’t edit it.
•If a button references an Import Records [Digital Camera] script step, the button is
disabled and the Import Records script step is commented as obsolete in the Button
Setup dialog box.

FILEMAKER PRO HELP 1054
•FileMaker Go only supports importing from one FileMaker Pro file to another FileMaker Pro
file.
•FileMaker Go does not support importing to a new table.
•When using this script step in FileMaker WebDirect, keep the following in mind:
•FileMaker WebDirect does not support this script step in mobile browsers.
•FileMaker WebDirect does not support the Perform without dialog or Specify data
source options.
•FileMaker WebDirect only supports importing from Comma-Separated Text, Tab-
Separated Text, DBF, Merge, and Excel file formats.
Example 1
Imports information from New Product Catalog.xlsx as new records without prompting the user.
Go to Layout ["Products"]
Import Records [No dialog; Source: "New Product Catalog.xlsx"; Worksheet:
"Stock"; Add; Mac Roman]
Example 2
Updates existing records with information from New Product Catalog.xlsx.
Go to Layout ["Products"]
Sort Records [Restore; No dialog]
Go to Record/Request/Page [First]
Import Records [No dialog; Source: "New Product Catalog.xlsx"; Worksheet:
"Stock"; Update matching; Mac Roman]
Example 3
Sets the next serial value after importing records. Useful when Perform auto-enter options while
importing is not selected to preserve dates and other auto-entries.
Go to Layout ["Products"]
Import Records [No dialog; Source: "New Product Catalog.xlsx"; Worksheet:
"Stock"; Add; Mac Roman]
Set Next Serial Value [Invoices::Invoice ID; Get ( TotalRecordCount ) + 1]
Sort Records [Restore; No dialog]
Go to Record/Request/Page [First]
Related topics
Set Next Serial Value script step
Export Records script step
Script steps reference (alphabetical list)
Script steps reference (category list)
Export Records
Purpose
Exports records to a specified file.

FILEMAKER PRO HELP 1055
Format
Export records [No dialog; “<output filename>”; Automatically open; Create
email; <platform and character set>]
Options
•Perform without dialog prevents dialog boxes from displaying when the script step is run
from FileMaker Pro. These dialog boxes would let the user set new export criteria.
•Select Specify output file or click Specify to display a dialog box where you can specify
the file and file type to export. Choose the folder you want to export to, or type the folder
path directly into the list. Specify one path per line. FileMaker Pro will use the first path it
locates. See Creating file paths. The file type you use depends on the import requirements
of the program using the exported data. You can also specify options to Automatically
open the file and Create email with the file as attachment after saving.
If FileMaker Pro executes a script that does not specify an absolute path, and the database file
containing the script is hosted, the path is assumed to be the current user’s Documents folder.
Note You can export records as a Microsoft Excel worksheet by choosing Excel Workbooks
(.xlsx) from the File Type list. For more information on saving FileMaker Pro files as Excel files,
see Saving and sending records as an Excel file.
If you specify XML as the export file type, the Specify XML and XSL Options dialog box appears,
where you can specify an XML grammar and choose an XSLT style sheet if you want to
transform the XML. The XSLT source may be a file, the result of an HTTP request, or a
calculation that generates a file path or an HTTP request.
Note Do not export fields whose name is entirely numeric (such as "2") or whose name is a
single-byte kana character (Japanese version) using the FMPDSORESULT grammar.
•Select Specify export order or click Specify to use the export order that was in effect when
you added the script step. The last export order used in the file appears as the default and
can be edited or deleted. If necessary, choose an output file character set from the list.
Select Apply current layout’s data formatting to exported data, or the formatting of the
last exported data will be used.
Compatibility
Originated in
FileMaker Pro 6.0 or earlier
Where the script step runs Supported
FileMaker Pro Yes
FileMaker Server scheduled script Partial
FileMaker Go Partial
Custom Web Publishing No
FileMaker WebDirect Partial
Runtime solution Yes

FILEMAKER PRO HELP 1056
Description
You can set the export order before adding this script step, or perform the step with a dialog box so
a user can set new criteria. Export Records exports all the records currently being browsed. If you
want to limit the set of records you're exporting, use a find request before using Export Records.
When you include this script step in a FileMaker Server scheduled script and you do not select
Perform without dialog in the Edit Script dialog box, the text (NOT compatible) appears after the
script step. The script, however, will run. The behavior will be the same as if Perform without
dialog was selected. See Get(DocumentsPathListing) function for more information.
Notes
•When using the Export Records script step or Import Records script step in a
FileMaker Server scheduled script, keep the following in mind:
•Any specified file must be in the FileMaker Server Documents folder, the temporary
folder, or a child folder of either the FileMaker Server Documents folder or the
temporary folder. For example, the following are all valid paths for file.csv:
<Documents>/file.csv
<Temporary Path>/file.csv
<Documents>/Folder1/file.csv
<Temporary Path>/Folder1/Folder2/Folder3/Folder4/file.csv
•Any path specified that isn’t a complete path to the file (for example, anything other than
/Library/FileMaker Server/Data/Documents/<0 or more directories>/<filename> ) is
evaluated as being relative to the temporary path.
•Any paths that include “..” are considered invalid.
•Export to .fmp12 is not supported.
•In FileMaker Go, exporting to .fmp12 and XML formats is not supported.
•When using this script step in FileMaker WebDirect, keep the following in mind:
•FileMaker WebDirect does not support this script step in mobile browsers.
•FileMaker WebDirect does not support exporting to .fmp12, XML, or Excel formats.
•If the Specify output file option is selected, FileMaker WebDirect outputs exported
records with the specified filename and file type but ignores the specified file path.
•FileMaker WebDirect outputs exported records to the web browser’s default download
location.
Example 1
Finds and sorts records, then exports the found set as an Excel file without prompting the user.
Go to Layout ["Invoices"]
Perform Find [Restore]
Sort Records [Restore; No dialog]
Export Records [No dialog; "Unpaid Invoice List.xlsx"; Unicode (UTF-16)]
Example 2
Exports the found set as an Excel file unless a file with that name already exists in the output
directory.

FILEMAKER PRO HELP 1057
If [not PatternCount ( Get ( DocumentsPathListing ); "Unpaid Invoice
List.xlsx" )]
Export Records [No dialog; "Unpaid Invoice List.xlsx"; Unicode (UTF-
16)]
End If
Related topics
Import Records script step
Save Records As PDF script step
Save Records As Excel script step
Script steps reference (alphabetical list)
Script steps reference (category list)
Save Records As Excel
Purpose
Saves records to a specified Excel worksheet.
Format
Save Records As Excel [Restore; No dialog; “<output filename>”;
Automatically open; Create email; Records being browsed/Current record]
Note In order to save records as a Microsoft Excel worksheet, your privilege set must include Allow
exporting, or you must select Run script with full access privileges in the Edit Script dialog box.
Options
•Perform without dialog prevents the Excel Options dialog box from displaying as the script
step executes if you have already specified a file. If you have not specified a file, the Save
Records as Excel dialog box displays as the script step executes, but the Excel Options
dialog box is not displayed.
•Select Specify output file or click Specify to display a dialog box where you can specify
the file path. Choose the folder you want to export to, or type the file path directly into the
list. Specify one path per line. FileMaker Pro will use the first path it locates. See Creating
file paths. You can choose to Automatically open file or choose to Create email with file
as attachment to create a blank email with the Excel file as an attachment.
If FileMaker Pro executes a script that does not specify an absolute path, and the database file
containing the script is hosted, the path is assumed to be the current user’s Documents folder.
•Select Specify options or click Specify to display the "Save Records as Excel" Options
dialog box. From the Save list, choose Records being browsed or Current record.
Specify whether the values in the first row should be used as field names or as data. For
Worksheet, Title, Subject, and Author, you can enter text directly, or click Specify to enter
a field name or values from a calculation.
Compatibility
Where the script step runs Supported
FileMaker Pro Yes

FILEMAKER PRO HELP 1058
Originated in
FileMaker Pro 8.0
Description
This script step operates in all modes except Find mode.
Example 1
Finds and sorts records, then saves the found set as an Excel file without prompting the user.
Go to Layout ["Invoices"]
Perform Find [Restore]
Sort Records [Restore; No dialog]
Save Records As Excel [No dialog; "Unpaid Invoice List.xlsx"; Records
being browsed]
Related topics
Saving and sending records as an Excel file
Export Records script step
Import Records script step
Script steps reference (alphabetical list)
Script steps reference (category list)
Save Records As PDF
Purpose
Saves records to a specified PDF file.
Format
Save Records As PDF [Append; No dialog; “<output filename>”; Automatically
open; Create email; Records being browsed/Current record/Blank record, as
formatted/with boxes/with underlines]
Note In order to save records as a PDF file, your privilege set must include Allow printing, or you
must select Run script with full access privileges in the Edit Script dialog box.
Options
•Select Append to existing PDF to append the records being browsed, the current record,
or a blank record after the last page of the specified PDF file. When you append records,
FileMaker Server scheduled script No
FileMaker Go No
Custom Web Publishing No
FileMaker WebDirect No
Runtime solution Yes
Where the script step runs Supported

FILEMAKER PRO HELP 1059
the PDF Options dialog box settings in the Document and Initial View tabs are ignored, but
the settings in the Security tab are maintained.
•Perform without dialog prevents dialog boxes from displaying when the script step
executes if a file has already been specified.
•Select Specify output file or click Specify to display a dialog box where you can specify
the file path. Choose the folder you want to save to, or type the file path directly into the list.
Specify one path per line. FileMaker Pro will use the first path it locates. See Creating file
paths. You can choose to Automatically open file or you can choose to Create email with
file as attachment after saving.
If FileMaker Pro executes a script that does not specify an absolute path, and the database file
containing the script is hosted, the path is assumed to be the current user’s Documents folder.
•Select Specify options or click Specify to display the "Save Records as PDF" dialog box.
From the Save list, choose Records being browsed, Current record, or Blank record. If
you select Blank record, the Appearance pop-up is enabled. The Appearance pop-up box
allows you to specify formatting options for fields: as formatted in FileMaker, with boxes, or
with underlines.
Select Options to display the PDF Options dialog box.
•In the Document tab, you can specify descriptive information for the PDF file. For each
of the options in the document tab, you can enter text directly, or click Specify to enter a
field name or values from a calculation.
•In the Security tab, you can assign passwords to the PDF file, as well as print and edit
privileges. If print and edit privileges are allowed, you can specify if copying and screen
reading software are permitted.
•In the Initial View tab, you can define the initial view for the layout and magnification for
the PDF file.
Compatibility
Originated in
FileMaker Pro 8.0
Description
This script step operates in all modes except Find mode.
Note OS X: Save Records As PDF is not supported in runtime solutions. However, users can print
the current record to PDF by choosing File menu > Print > PDF.
Where the script step runs Supported
FileMaker Pro Yes
FileMaker Server scheduled script No
FileMaker Go Yes
Custom Web Publishing No
FileMaker WebDirect No
Runtime solution No

FILEMAKER PRO HELP 1060
Example 1
Goes to the Products layout, shows all records, sorts the records, and saves the records as a PDF
without prompting the user.
Go to Layout ["Products"]
Show All Records
Sort Records [Restore; No dialog]
Save Records As PDF [No dialog; "Product Catalog.pdf"; Records being
browsed]
Example 2
Finds all invoices with the current record's Customer ID, sorts, saves the invoices to a PDF, and
appends the products purchased by the customer to the PDF.
Go to Layout ["Invoices"]
Find Matching Records [Replace; Invoices::Customer ID]
Sort Records [Restore; No dialog]
Save Records As PDF [No dialog; "Customer Backup.pdf"; Records being
browsed]
Go to Related Record [Show only related records; Match found set; From
table: "Products"; Using layout: “Products”]
Save Records As PDF [Append; No dialog; "Customer Backup.pdf"; Records
being browsed]
Go to Layout [original layout]
Related topics
Saving and sending records as a PDF file
Export Records script step
Import Records script step
Script steps reference (alphabetical list)
Script steps reference (category list)
Save Records As Snapshot Link
Purpose
Saves a set of found records to a FileMaker Pro Snapshot Link (FMPSL) file.
Format
Save Records As Snapshot Link [“<output filename>”; Records being browsed/
Current record]
•Select Specify output file or click Specify to display the Specify Output File dialog box,
and enter the path of the snapshot link. Click Add File and choose the folder to save the file
to, or type the path directly in the list. Specify one path per line. FileMaker Pro will use the
first path it locates. See Creating file paths. You can also select Create email with file as
attachment to create a blank email with the snapshot link as an attachment.
If FileMaker Pro executes a script that does not specify an absolute path, and the database file
containing the script is hosted, the path is assumed to be the current user’s Documents folder.

FILEMAKER PRO HELP 1061
•For Specify, choose Records being browsed (to save the entire found set of records), or
Current record (to save only the current record).
Compatibility
Originated in
FileMaker Pro 11.0
Description
This script step operates in all modes except Find mode.
To send a snapshot link file via SMTP, use the Send Mail script step with the snapshot link file as an
attachment, and place it after the Save Records As Snapshot Link script step in the script.
Use this script step with the Get(TemporaryPath) function to save the snapshot link file to a
temporary location, if you do not need to store the file locally. If you use Get(TemporaryPath) to form
a file path, first assign it to a variable, then use the variable in the Specify Output File dialog box.
See Creating file paths.
Note FileMaker WebDirect does not support the Specify output file option. FileMaker WebDirect
saves snapshot links to the web browser’s default download location.
Example 1
Saves the current record as a snapshot link and asks where the user wants to save the snapshot
link file.
Save Records As Snapshot Link [Current record]
Example 2
Saves the found set as a snapshot link in a temporary directory, then creates an email with the
snapshot link as an attachment.
Set Variable [$PATH; Value: Get ( TemporaryPath ) & "Invoices.fmpsl"]
Save Records As Snapshot Link ["$PATH"; Create email; Records being
browsed]
Related topics
Saving and sending records as a snapshot link
Get(DesktopPath) function
Get(TemporaryPath) function
Export Records script step
Import Records script step
Where the script step runs Supported
FileMaker Pro Yes
FileMaker Server scheduled script Yes
FileMaker Go Yes
Custom Web Publishing No
FileMaker WebDirect Partial
Runtime solution No

FILEMAKER PRO HELP 1062
Script steps reference (alphabetical list)
Script steps reference (category list)
Found Sets script steps
With Found Sets script steps, you can:
•specify a find request to find records
•extend or constrain the found set
•modify the most recent find request
•show all records
•omit records from the found set
•sort and unsort records
Perform Find
Purpose
Enters Find mode and finds records that match one or more find requests that you set up, that are
stored with the script step.
Format
Perform Find [Restore]
Options
Select Specify find requests or click Specify to create and manage find requests. The requests
you create are stored with the script step. For more information, see Specify Find Requests and Edit
Find Request dialog boxes.
•New opens the Edit Find Request dialog box, where you define criteria for a find request.
•Edit opens a selected find request from the list.
•Duplicate duplicates one or more selected find requests from the list.
•Delete deletes one or more selected find requests from the list.
The Edit Find Request dialog box allows you to create or edit find request criteria.
•For Action, select Find Records or Omit Records to specify whether this find request will
find or omit records. Finding records adds them to your found set. Omitting records
excludes them. An individual request can find or omit records; use multiple requests if you
need to find and omit records during the same Perform Find script step.
•Find records when (or Omit records when) shows a list of the fields in your current table.
To construct a find request, begin by selecting a field from this list.
•To select a field from a related table, click the name of the current table at the top of the
list and select the related table you want. Select a related field from this new list.
•Change the value in Repetition to specify a particular cell of a repeating field.
•Type your search criteria for the selected field in the Criteria area.

FILEMAKER PRO HELP 1063
•Click Insert Operator to further refine your search criteria. See Finding records.
•Click Add to add your criteria to the find request.
•To change existing criteria, select the line containing the field and criteria from the top of the
dialog box, and make your changes to field and/or criteria. Click Change to store your
changes.
•To delete existing criteria, select the line containing the field and criteria from the top of the
dialog box and click Remove.
Compatibility
Originated in
FileMaker Pro 6.0 or earlier
Description
If you do not create a find request, this script step will perform the last find request that was
executed.
You can use a Perform Find script following an Enter Find Mode script step, to pause the script and
allow the user to enter find criteria before performing a find.
Example 1
Goes to the Invoice Details layout, enters Find Mode, pauses for user input, performs a find, and
returns to the original layout.
Go to Layout ["Invoice Details"]
Enter Find Mode [Pause]
Perform Find [ ]
Go to Layout [original layout]
Example 2
Goes to Find mode, pauses for user input, and performs the find. Displays the Invoice Details layout,
Invoices layout, or a custom dialog depending on how many records were found.
Set Error Capture [On]
Enter Find Mode [Pause]
Perform Find [ ]
If [Get ( FoundCount ) = 1]
Go to Layout ["Invoice Details"]
Else If [Get ( FoundCount ) > 1]
Go to Layout ["Invoices"]
Where the script step runs Supported
FileMaker Pro Yes
FileMaker Server scheduled script Yes
FileMaker Go Yes
Custom Web Publishing Yes
FileMaker WebDirect Yes
Runtime solution Yes

FILEMAKER PRO HELP 1064
Else
Show Custom Dialog ["No records were found."]
End If
Related topics
Constrain Found Set script step
Extend Found Set script step
Finding ranges of information
Script steps reference (alphabetical list)
Script steps reference (category list)
Perform Quick Find
Purpose
Finds records that match one or more search words based on text that you specify or text returned
by a calculation formula.
Format
Perform Quick Find [<value or formula>]
Options
Click Specify to specify the search text in the Specify Calculation dialog box. Type the search text in
quotation marks or use a calculation function that returns the text to use for the search.
Compatibility
Originated in
FileMaker Pro 11.0
Description
You can use the Get(QuickFindText) function to pass the text that is typed in the Quick Find box to
the Perform Quick Find script step.
Where the script step runs Supported
FileMaker Pro Yes
FileMaker Server scheduled script Yes
FileMaker Go Yes
Custom Web Publishing Yes
FileMaker WebDirect Yes
Runtime solution Yes

FILEMAKER PRO HELP 1065
Example 1
Performs a quick find with the contents of the Custom Quick Find field, sorts the found set, and goes
to the first record. Started by the OnObjectSave script trigger.
Perform Quick Find [Invoices::Custom Quick Find]
Sort Records [Restore; No dialog]
Go to Record/Request/Page [First]
Example 2
Goes to the Invoice Details layout and performs a quick find using the text in the Quick Find search
box. If no records are found, displays a custom dialog. Useful with a custom menu item that
performs quick finds.
Go to Layout ["Invoice Details"]
Perform Quick Find [Get ( QuickFindText )]
If [Get ( LastError ) = 401]
Show Custom Dialog ["No records match " & Get ( QuickFindText )]
End If
Related topics
Script steps reference (alphabetical list)
Script steps reference (category list)
Performing a quick find in Browse mode
Find Matching Records
Purpose
Finds records based on the context of a specified field.
Format
Find Matching Records[Replace/Constrain/Extend; <table::field>]
Options
Select Specify target field or click Specify, select a field or specify a calculation indicating the field
you want to search by, and click OK.
Notes
You can:
•double-click the script step to specify a target field
•clear Specify target field to remove current target field settings
To specify the type of find request, for Specify, choose:
•Replace to search the entire database and replace the current found set with records that
match the contents of the active field.
•Constrain to search the found set and display matching records based on the contents of
the active field (a logical AND search).

FILEMAKER PRO HELP 1066
•Extend to broaden your search to include additional records in the found set that match
additional criteria in the specified field (a logical OR search).
Compatibility
Originated in
FileMaker Pro 12.0
Description
Finds records based on the context of a specified field, letting you create scripts that behave
similarly to using the shortcut menu in Table View.
If you do not specify a field, FileMaker Pro searches based on the contents of the field that is active
when the script runs. If data is selected in the active field, FileMaker Pro searches for the selected
data. If data is not selected, FileMaker Pro searches for the entire contents of the active field. If you
do not specify a field and there is no active field when the script runs, FileMaker Pro displays an
invalid command alert.
Find Matching Records runs in Browse or Preview modes. If the database is in another mode when
the script runs, FileMaker Pro switches to Browse mode before running the script.
Find Matching Records can be copied and pasted or imported into other FileMaker Pro files.
Example 1
Finds all records with the same category as the current record, then switches to Table View.
Find Matching Records [Replace; Products::Category]
View As [View as Table]
Example 2
Opens a new window, goes to the Invoices layout, finds all records in the found set with the same
Customer ID as the current record, sorts the new found set, and goes to the first record.
New Window [Style: Document]
Go to Layout ["Invoices"]
Find Matching Records [Constrain; Invoices::Customer ID]
Sort Records [Restore; No dialog]
Go to Record/Request/Page [First]
Example 3
Either extends the found set with records matching the current record's Customer ID or creates a
new found set with records matching the current record's Customer ID.
Where the script step runs Supported
FileMaker Pro Yes
FileMaker Server scheduled script Yes
FileMaker Go Yes
Custom Web Publishing Yes
FileMaker WebDirect Yes
Runtime solution Yes

FILEMAKER PRO HELP 1067
Show Custom Dialog ["Do you want to add the current customer to the found
set?"]
If [ Get ( LastMessageChoice ) = 1 ]
Find Matching Records [Extend; Invoices::Customer ID]
Else
Find Matching Records [Replace; Invoices::Customer ID]
End If
Related topics
Show Omitted Only script step
Script steps reference (alphabetical list)
Script steps reference (category list)
Constrain Found Set
Purpose
Narrows the existing found set using the criteria you specify in the stored find request.
Format
Constrain Found Set [Restore]
Options
Select Specify find requests or click Specify to create and store a find request with the script step.
Compatibility
Originated in
FileMaker Pro 6.0 or earlier
Description
This script step is equivalent to a logical AND search.
Note If no records match the find criteria, this script step returns a found set of zero records.
Example 1
Constrains the found set to paid invoices or shows all records.
Where the script step runs Supported
FileMaker Pro Yes
FileMaker Server scheduled script Yes
FileMaker Go Yes
Custom Web Publishing Yes
FileMaker WebDirect Yes
Runtime solution Yes

FILEMAKER PRO HELP 1068
Show Custom Dialog ["Display only paid invoices?"]
If [Get ( LastMessageChoice ) = 1]
Constrain Found Set [Restore]
Else
Show All Records
End If
Related topics
Script steps reference (alphabetical list)
Script steps reference (category list)
Extend Found Set
Purpose
Broadens the existing found set using the criteria in the stored find request.
Format
Extend Found Set [Restore]
Options
Select Specify find requests or click Specify to create and store a find request with the script step.
Compatibility
Originated in
FileMaker Pro 6.0 or earlier
Description
This script step is equivalent to a logical OR search.
Example 1
Extends the found set to include unpaid invoices.
Show Custom Dialog ["Include unpaid invoices in the found set?"]
If [Get ( LastMessageChoice ) = 1]
Where the script step runs Supported
FileMaker Pro Yes
FileMaker Server scheduled script Yes
FileMaker Go Yes
Custom Web Publishing Yes
FileMaker WebDirect Yes
Runtime solution Yes

FILEMAKER PRO HELP 1069
Extend Found Set [Restore]
End If
Related topics
Script steps reference (alphabetical list)
Script steps reference (category list)
Modify Last Find
Purpose
Changes the most recent find request.
Format
Modify Last Find
Options
None.
Compatibility
Originated in
FileMaker Pro 6.0 or earlier
Description
Modify Last Find runs in Find mode. If the database is in another mode when the script runs,
FileMaker Pro switches to Find mode before running the script.
Example 1
Performs a find. If no records were found, modifies the find request.
Perform Find [Restore]
If [Get ( FoundCount ) = 0]
Modify Last Find
End If
Where the script step runs Supported
FileMaker Pro Yes
FileMaker Server scheduled script Yes
FileMaker Go Yes
Custom Web Publishing Yes
FileMaker WebDirect Yes
Runtime solution Yes

FILEMAKER PRO HELP 1070
Example 2
Performs a find, then sorts the found set. If no records were found, allows the user to modify the find
request.
Set Error Capture [On]
Enter Find Mode [Pause]
Perform Find [ ]
If [Get (LastError) = 401]
Modify Last Find
Else
Sort Records [Restore; No dialog]
End If
Related topics
Script steps reference (alphabetical list)
Script steps reference (category list)
Show All Records
Purpose
Finds all the records in the table underlying the foreground window and leaves you in the current
record.
Format
Show All Records
Options
None.
Compatibility
Originated in
FileMaker Pro 6.0 or earlier
Description
Use this script step to redisplay all the records after working with a found set.
Where the script step runs Supported
FileMaker Pro Yes
FileMaker Server scheduled script Yes
FileMaker Go Yes
Custom Web Publishing Yes
FileMaker WebDirect Yes
Runtime solution Yes

FILEMAKER PRO HELP 1071
Use Show All Records in Browse mode or Preview mode. If you perform this script step in Find
mode or Layout mode, FileMaker Pro switches to Browse mode after the records have been found.
Example 1
Goes to the Invoices layout, shows all records, and performs a sort.
Go to Layout [“Invoices”]
Show All Records
Sort Records [Restore; No dialog]
Example 2
Performs a find, shows all records if no records were found, and sorts the found set.
Perform Find [Restore]
If [Get (FoundCount) = 0]
Show All Records
End If
Sort Records [Restore; No dialog]
Related topics
Script steps reference (alphabetical list)
Script steps reference (category list)
Show Omitted Only
Purpose
Finds the records not in the current found set.
Format
Show Omitted Only
Options
None.
Compatibility
Where the script step runs Supported
FileMaker Pro Yes
FileMaker Server scheduled script Yes
FileMaker Go Yes
Custom Web Publishing Yes
FileMaker WebDirect Yes
Runtime solution Yes

FILEMAKER PRO HELP 1072
Originated in
FileMaker Pro 6.0 or earlier
Description
Use this script step in Browse mode or Preview mode. If you perform this script step in Find mode or
Layout mode, FileMaker Pro switches to Browse mode after the records have been found.
Example 1
Shows all omitted records.
Show Custom Dialog ["Show omitted records?"]
If [Get ( LastMessageChoice ) = 1]
Show Omitted Only
End If
Example 2
Demonstrates that using the Find Matching Records script step instead of Show Omitted Only can
be a simpler way to create a found set of only the current record.
#With Show Omitted Only, multiple steps are necessary
#to create a new found set, omit the current record,
#and show only the omitted record.
Show All Records
Omit Record
Show Omitted Only
#A single Find Matching Records script step can perform the same task
#when a field with unique values, such as an Invoice ID field, is
specified.
Find Matching Records [Replace; Invoices::Invoice ID]
Related topics
Script steps reference (alphabetical list)
Script steps reference (category list)
Omit Record
Purpose
Omits the current record from the found set and places you on the next record in the table.
Format
Omit Record
Options
None.

FILEMAKER PRO HELP 1073
Compatibility
Originated in
FileMaker Pro 6.0 or earlier
Description
This script step temporarily hides the current record.
Omit Record only operates in Browse mode and Find mode. When this script step is performed in
Find mode, it causes the find request to become an Omit request, as if the Omit checkbox had been
selected.
Example 1
Omits the current record if it was created before the current date.
If [Invoices::Date Created < Get ( CurrentDate )]
Omit Record
End If
Related topics
Script steps reference (alphabetical list)
Script steps reference (category list)
Omit Multiple Records
Purpose
Omits several records from the found set, starting with the current record, and places you on the
next record in the table.
Format
Omit Multiple Records [No dialog; <number of records>]
Options
•Perform without dialog prevents a dialog box from displaying when the script step
executes; the dialog lets the user enter the number of records to be omitted.
Where the script step runs Supported
FileMaker Pro Yes
FileMaker Server scheduled script Yes
FileMaker Go Yes
Custom Web Publishing Yes
FileMaker WebDirect Yes
Runtime solution Yes

FILEMAKER PRO HELP 1074
When Perform without dialog is selected, if you do not specify the number of records, only the
current record is omitted.
•Select Specify records or click Specify to enter the exact number of records you want to
omit. You can also click Specify in the Options dialog box and enter a calculation. The
calculation result must be a number.
Compatibility
Originated in
FileMaker Pro 6.0 or earlier
Description
This script step temporarily hides the omitted records. If this script step is performed from Layout
mode, FileMaker Pro switches to Browse mode after the script step has been performed.
Example 1
Omits all records in the current found set.
Go to Record/Request/Page [First]
Omit Multiple Records [No dialog; Get ( FoundCount )]
Related topics
Script steps reference (alphabetical list)
Script steps reference (category list)
Sort Records
Purpose
Sorts the records in the current found set according to specified criteria.
Format
Sort Records [Restore; No dialog]
Options
•Perform without dialog prevents display of a dialog box when the script step executes that
lets the user enter a different set of sort instructions.
Where the script step runs Supported
FileMaker Pro Yes
FileMaker Server scheduled script Partial
FileMaker Go Yes
Custom Web Publishing Partial
FileMaker WebDirect Yes
Runtime solution Yes

FILEMAKER PRO HELP 1075
•Select Specify sort order or click Specify to create a sort order and store it with the script
step. When Specify sort order is not selected, FileMaker Pro uses the most recently
executed sort instructions.
•Select Keep records in sorted order to place a new or changed record that’s in sorted
order into the adjusted order after the record is committed. When this checkbox is
deselected, new or changed records stay in the same position in the sort order until a find
request is performed or the records are sorted by different criteria.
Compatibility
Originated in
FileMaker Pro 6.0 or earlier
Description
Find the records you want to sort (using Perform Find script step or Show All Records script step)
before using this script step. If you sort a repeating field, FileMaker Pro sorts on only the first entry in
that field. You don't need to use the Enter Browse Mode script step or Go to Record/Request/Page
script step after using Sort Records.
Each Sort Records script step can store a unique sort order; the sorting instructions are stored with
the step, not the script. You can use this step several times within the same script and store a
different sort order for each occurrence.
Note Items in the sort order that aren’t valid when the script step is performed are ignored. When
you specify a sort order in a database containing multiple tables, FileMaker Pro stores the table
name for each sort field in the sort order. For example, a sort order using the Last Name field of the
Contacts table is stored in the sort order as Contacts::Last Name. If the Sort Records script step is
performed when a table other than Contacts is the active table, Contacts::Last Name cannot be
evaluated, and is ignored in the sort order.
Example 1
Goes to the Invoices layout, performs a find, sorts the records, then goes to the first record in the
found set.
Go to Layout ["Invoices"]
Perform Find [Restore]
Sort Records [Restore; No dialog]
Go to Record/Request/Page [First]
Related topics
Script steps reference (alphabetical list)
Where the script step runs Supported
FileMaker Pro Yes
FileMaker Server scheduled script Partial
FileMaker Go Yes
Custom Web Publishing Partial
FileMaker WebDirect Yes
Runtime solution Yes

FILEMAKER PRO HELP 1076
Script steps reference (category list)
Unsort Records
Purpose
Restores the records in the current found set to their creation order (the order in which they were
entered in the file).
Format
Unsort Records
Options
None.
Compatibility
Originated in
FileMaker Pro 6.0 or earlier
Description
Use this script step when it's important to maintain the original creation order, as with invoices
entered by invoice number or membership records entered by date.
Note You don't need to perform an Unsort Records script step before executing a Sort Records
script step.
Example 1
Goes to the Print Invoices layout, sorts the records, prints, returns to the original layout, then unsorts
the records.
Go to Layout ["Print Invoices"]
Sort Records [Restore; No dialog]
Print [No dialog]
Go to Layout [original layout]
Unsort Records
Where the script step runs Supported
FileMaker Pro Yes
FileMaker Server scheduled script Yes
FileMaker Go Yes
Custom Web Publishing Yes
FileMaker WebDirect Yes
Runtime solution Yes

FILEMAKER PRO HELP 1077
Related topics
Script steps reference (alphabetical list)
Script steps reference (category list)
Sort Records by Field
Purpose
Sorts the records in the current found set according to the context of a specified field.
Format
Sort Records by Field[Ascending/Descending/Associated value list;
<table::field>]
Options
•Select Specify target field or Specify, select a field you want to sort by, and click OK.
Tip You can double-click the script step in the list to specify the target field.
•Ascending displays data in ascending order.
•Descending displays data in descending order.
•Associated value list displays data in the order determined by the value list associated
with the field.
Compatibility
Originated in
FileMaker Pro 12.0
Description
Sorts the records in the current found set according to the context of a specified field, letting you
create scripts that behave similarly to interactively using the shortcut menu in Table View. If you do
not specify a field, the script sorts by the field that is active when the script runs. If there is no active
field when the script runs, FileMaker Pro displays an invalid sort order alert.
Tip You can find the records you want to sort (using Perform Find script step or Show All Records
script step) before using this script step. You don't need to use the Enter Browse Mode script step or
Go to Record/Request/Page script step after using Sort Records by Field.
Where the script step runs Supported
FileMaker Pro Yes
FileMaker Server scheduled script Yes
FileMaker Go Yes
Custom Web Publishing Yes
FileMaker WebDirect Yes
Runtime solution Yes

FILEMAKER PRO HELP 1078
Example 1
Sorts the current found set by the active field. Can be started by the OnObjectValidate script trigger
to maintain the current found set's sort order when field values change.
Sort Records by Field [Ascending]
Example 2
Shows invoices for the current customer ID, with the most recent invoice listed first.
Find Matching Records [Replace; Invoices::Customer ID]
Sort Records by Field [Descending; Invoices::Invoice ID]
Related topics
Sort Records script step
Script steps reference (alphabetical list)
Script steps reference (category list)

FILEMAKER PRO HELP 1079
Windows script steps
Windows script steps affect screen elements and windows. You can:
•open or close a window
•select a window
•arrange windows
•move or resize a window
•update a window
•freeze a window
•scroll a window
•show or hide a window, the status toolbar, or the text ruler
•set the title of a window
•set the zoom level
•view data as a list, table, or form
•refresh a window
New Window
Purpose
Creates a new window based on the foreground window. You can create a document window, a
floating document window, or a dialog window.
Format
New Window[Name: <name of window>; Height: n; Width: n; Top: n; Left: n;
Style: Document/Floating Document/Dialog]
Options
Click Specify to set options for the new window.
•Window Name is the name you specify for your new window. You can enter literal text or
click Specify to create a window name from a calculation.
•Height is the height of the new window in points. You can enter a number or click Specify to
generate a number from a calculation.
•Width is the width of the new window in points. You can enter a number or click Specify to
generate a number from a calculation.
•Distance from top is the new window’s distance in points from the top of the screen (OS X)
or top of the FileMaker Pro window (Windows). You can enter a number or click Specify to
generate a number from a calculation.
•Distance from left is the new window’s distance in points from the left of the screen (OS X)
or left of the FileMaker Pro window (Windows). You can enter a number or click Specify to
generate a number from a calculation.

FILEMAKER PRO HELP 1080
•Window Styles settings let you specify that the new window is a document window (default
setting) or a dialog window. To specify a window style, select Specify Advanced Style or
click Specify. See Specify Advanced Style Options dialog box.
Note If you clear the Specify Advanced Style checkbox, you will lose any advanced style
settings that have been created.
Compatibility
Originated in
FileMaker Pro 6.0 or earlier
Description
A new window has the same layout, same table, same found set, and same current record as the
original window. You can specify the new window is a document window, a floating document
window, or a dialog window.
•Document windows allow users to minimize, maximize, restore, or close them or start a new
FileMaker Pro process as they work in FileMaker Pro.
•Floating document windows remain on top of other FileMaker Pro windows even when they
become inactive.
•Dialog windows are modal. They appear in the foreground and can’t be minimized. Users
cannot activate an open document window before closing an open dialog window.
Create document windows for typical user-input tasks or tasks that can take place in a random
order. Use dialog windows to collect required or prerequisite information or to alert users.
Notes
•In FileMaker WebDirect and Custom Web Publishing, this script step opens a new virtual
window in the web browser. Inactive virtual windows remain open but are not visible. To
change the current (active) virtual window, use the Select Window script step.
•Window style settings are not supported in FileMaker Go, FileMaker WebDirect, or Custom
Web Publishing.
•Window names created with the New Window script step do not have to be unique.
•Window name selection is not case-sensitive.
•It is not necessary to enter values for each option. When no value is entered, FileMaker Pro
uses the default value associated with the Window menu > New Window command.
Where the script step runs Supported
FileMaker Pro Yes
FileMaker Server scheduled script Yes
FileMaker Go Partial
Custom Web Publishing Partial
FileMaker WebDirect Partial
Runtime solution Yes

FILEMAKER PRO HELP 1081
•Minimum height and minimum width depend on the operating system of the user performing
the script. If the height or width you specify are less than the minimum, FileMaker Pro uses
the minimum values.
•If the window height or width values you specify exceed the user’s screen resolution,
FileMaker Pro uses the maximum values possible.
•You can create a new window off-screen by supplying negative top and/or left values, which
can be useful for multiple monitor environments.
•There are some restrictions when you use script steps with dialog windows. For more
information, see Specify Advanced Style Options dialog box.
•When a dialog window is open, subsequent New Window script steps create only dialog
windows.
Kiosk mode (FileMaker Pro Advanced)
•Any new document window created in Kiosk mode is a standard Kiosk-mode window and
the status toolbar is hidden.
•No Kiosk properties apply to dialog windows opened in Kiosk mode. For example, the status
toolbar shows.
•When multiple Kiosk and non-Kiosk files are open, if a non-kiosk file opens a new dialog
window, the user can’t switch to other windows (including a window created in Kiosk mode)
Example 1
Goes to the Customers layout in a new window and sorts by the Customer ID field.
New Window [Top: Get ( WindowTop ) + 25; Left: Get ( WindowLeft ) + 25;
Style: Document]
Go to Layout ["Customers"]
Sort Records by Field [Descending; Customers::Customer ID]
Example 2
Goes to the Print Invoices layout in a new floating window and enters Preview Mode.
New Window [Name: "Print Invoices"; Top: Get ( WindowTop ) + 25; Left: Get
( WindowLeft ) + 25; Style: Floating Document]
Go to Layout ["Print Invoices"]
Enter Preview Mode [ ]
Related topics
Go to Layout script step
Defining calculation fields
Script steps reference (alphabetical list)
Script steps reference (category list)
Select Window
Purpose
Specifies a window by name and makes it the foreground window.

FILEMAKER PRO HELP 1082
Format
Select Window [Current window or Name:<name of window>; Current file]
Options
•Click Current Window to bring the active window of the file that contains the script to the
foreground.
•Click Specify to select which window you want FileMaker Pro to bring to the foreground.
You can enter literal text or click Specify to generate a name from a calculation.
•Select Current file only to restrict matches to the current file (not selecting this option
matches all available FileMaker Pro files).
Compatibility
Originated in
FileMaker Pro 6.0 or earlier
Description
Because FileMaker Pro script steps are always performed in the foreground table, it is sometimes
necessary to bring a specific window to the front. Use this script step when you are working with
scripts in multi-table files to make certain that a script step is performed in the intended table.
Notes
•In FileMaker WebDirect and Custom Web Publishing, this script step displays the specified
virtual window in the web browser window. The previous virtual window remains open when
it is not displayed.
•Window name selection is not case-sensitive. This script will select the first matching
window and bring it to the front.
•The Select Window script step does not open a window of a related file when the related file
is opened in a hidden state, such as when a file is opened because it is the source file of a
related field. To use the Select Window script step with this type of related file, open the
related file using the Open File script step.
For example, a layout in the file Data Entry contains a related field from the file Companies.
When this layout is displayed, FileMaker Pro opens the Companies file in a hidden state. To
open a new window displaying the hidden related file, use a script such as:
Open File[Open Hidden; "Companies"]
Select Window[Name: "Companies"]
Where the script step runs Supported
FileMaker Pro Yes
FileMaker Server scheduled script Yes
FileMaker Go Yes
Custom Web Publishing Yes
FileMaker WebDirect Yes
Runtime solution Yes

FILEMAKER PRO HELP 1083
To return the file to its original state, perform a Close Window [] script step to close the open
window.
•Select Window can make visible a hidden related file if the script step is executed from
within the hidden file.
Example 1
Selects the Print Invoices window. If the Print Invoices window is not open, creates a new window
and goes to the Print Invoices layout.
Select Window [Name: "Print invoices"]
If [Get ( LastError ) = 112]
New Window [Name: "Print Invoices"; Style: Floating Document]
Go to Layout ["Print Invoices"]
End If
Related topics
Defining calculation fields
Script steps reference (alphabetical list)
Script steps reference (category list)
Close Window
Purpose
Closes the currently active window or any other window by name.
Format
Close Window [Current window or Name: <name of window>; Current file]
Options
•Click Specify to select which window you want FileMaker Pro to close. You can enter literal
text or click Specify to generate a name from a calculation.
•Select Current file only to restrict matches to the current file (not selecting this option
matches all available FileMaker Pro files).
Note Closing the last window of a file closes the file and halts execution of the current script. In
FileMaker WebDirect, closing the last window logs out the current web session.
Compatibility
Where the script step runs Supported
FileMaker Pro Yes
FileMaker Server scheduled script Yes
FileMaker Go Yes
Custom Web Publishing Yes
FileMaker WebDirect Yes

FILEMAKER PRO HELP 1084
Originated in
FileMaker Pro 6.0 or earlier
Example 1
Goes to a related record in the Invoices table using the Print Invoices layout, prints, and closes the
window.
Go to Related Record [Show only related records; From table: "Invoices";
Using layout: “Print Invoices”; New Window]
Print [Restore: Printer; No dialog]
Close Window [Current Window]
Example 2
Closes the current window if it is hidden.
If [Get ( WindowVisible ) = 0]
Close Window [Current Window]
End If
Example 3
Closes the Invoice Details window if it is open.
If [PatternCount ( WindowNames ( Get ( FileName ) ) ; "Invoice Details" )]
Close Window [Name: "Invoice Details"]
End If
Related topics
Defining calculation fields
Script steps reference (alphabetical list)
Script steps reference (category list)
Adjust Window
Purpose
Hides or changes the size of a window.
Format
Adjust Window [Resize to fit/Maximize/Minimize/Restore/Hide]
Options
Use Specify to choose an adjustment option.
•Resize to fit resizes the window to the minimum size possible while keeping all items in the
layout visible.
Runtime solution Yes
Where the script step runs Supported

FILEMAKER PRO HELP 1085
•Maximize resizes the window to full-screen size.
•Minimize reduces the window to an icon on the status bar (Windows) or Dock (OS X)
•Restore returns the window to its previous size.
•Hide hides the current database window from view. This option is equivalent to the Hide
Window menu command
Compatibility
Originated in
FileMaker Pro 6.0 or earlier
Example 1
Goes to the Print Invoices layout, enters Preview mode, and resizes the window to fit the viewing
area.
Go to Layout ["Print Invoices"]
Enter Preview Mode [ ]
Adjust Window [Resize to Fit]
Related topics
Script steps reference (alphabetical list)
Script steps reference (category list)
Move/Resize Window
Purpose
Adjusts the size or location of the chosen window.
Format
Move/Resize Window [Current window or Name: <name of window>; Current
file; Height: <n>; Width: <n>; Top: <n>; Left: <n>]
Options
Click Specify to set the move/resize options.
•Current Window selects the current foreground window when the script step is performed.
Where the script step runs Supported
FileMaker Pro Yes
FileMaker Server scheduled script No
FileMaker Go Yes
Custom Web Publishing No
FileMaker WebDirect No
Runtime solution Yes

FILEMAKER PRO HELP 1086
•Window Name selects an open window by name. You can enter literal text or click Specify
to create a window name from a calculation.
•Select Current file only to restrict matches to the current file (not selecting this option
matches all available FileMaker Pro files).
•Height is the height of the adjusted window in points. You can enter a number or click
Specify to generate a number from a calculation.
•Width is the width of the adjusted window in points.You can enter a number or click Specify
to generate a number from a calculation.
•Distance from top is the adjusted window’s distance in points from the top of the screen
(OS X) or top of the FileMaker Pro window (Windows). You can enter a number or click
Specify to generate a number from a calculation.
•Distance from left is the adjusted window’s distance in points from the left of the screen
(OS X) or left of the FileMaker Pro window (Windows). You can enter a number or click
Specify to generate a number from a calculation.
Compatibility
Originated in
FileMaker Pro 6.0 or earlier
Description
The adjusted window maintains the same layout, same table, same found set, and same current
record as the original window.
Notes
•Window name selection is not case-sensitive.
•It is not necessary to enter values for each option. When no value is entered, FileMaker Pro
uses the original location and size of the window as default values.
•Minimum window height and width depend on the script user’s operating system. If the
height and width values you specify are less than the minimum, FileMaker Pro uses the
minimum values.
•Maximum window height and width depend on the script user’s screen resolution. If the
height or width values you specify are greater than the maximum, FileMaker Pro uses the
maximum value possible.
•You can move a window off-screen by supplying negative top and/or left values, which can
be useful for multiple monitor environments.
Where the script step runs Supported
FileMaker Pro Yes
FileMaker Server scheduled script No
FileMaker Go No
Custom Web Publishing No
FileMaker WebDirect No
Runtime solution Yes

FILEMAKER PRO HELP 1087
•Windows: FileMaker Pro orients the moved window to the top left corner of the visible part of
the application window. Note that this may not be the (0,0) point of the window, depending
on how the current file window is positioned (for example, if half of the file window extends
past the left border of the application window, you would need to scroll to the left to see the
(0,0) point of the application window).
Example 1
Goes to the Customer Info layout, positions the window in the top-left corner of the FileMaker Pro
window (Windows) or the top-left corner of the screen (OS X), and resizes the window.
Go to Layout ["Customer Info"]
Move/Resize Window [Current Window; Height: 400; Width: 600; Top: 0; Left:
0]
Related topics
New Window script step
Go to Related Record script step
Defining calculation fields
Script steps reference (alphabetical list)
Script steps reference (category list)
Arrange All Windows
Purpose
Adjusts the size and location of all open windows.
Format
Arrange All Windows [Tile Horizontally/Tile Vertically/Cascade
Window/Bring All to Front]
Options
•Tile Horizontally positions open windows in a left/right orientation. Windows are resized to
prevent overlapping.
•Tile Vertically positions open windows in a top/bottom orientation. Windows are resized to
prevent overlapping.
•Cascade Window positions windows in an overlapping pattern, beginning in the top left
corner of the screen. Windows are resized to fill the screen, less any offset.
•Bring All to Front (OS X) moves all open FileMaker Pro windows to the front. Windows are
not resized.
Compatibility
Where the script step runs Supported
FileMaker Pro Yes
FileMaker Server scheduled script No

FILEMAKER PRO HELP 1088
Originated in
FileMaker Pro 6.0 or earlier
Description
The size and location of the open windows are the only things that change; current table, active
window, and active record are not affected by this script step.
Example 1
Opens a new window, goes to the Invoices layout, and arranges all FileMaker Pro windows in an
overlapping pattern.
New Window [Name: "Invoice List"; Style: Document]
Go to Layout ["Invoices"]
Arrange All Windows [Cascade Window]
Example 2
Opens two windows and arranges them top to bottom.
New Window [Name: "Invoice List"; Style: Document]
Go to Layout ["Invoices"]
New Window [Name: "Customer List"; Style: Document]
Go to Layout ["Customers"]
Arrange All Windows [Tile Vertically]
Related topics
Script steps reference (alphabetical list)
Script steps reference (category list)
Freeze Window
Purpose
Stops updating the active window.
Format
Freeze Window
Options
None.
FileMaker Go No
Custom Web Publishing No
FileMaker WebDirect No
Runtime solution Yes
Where the script step runs Supported

FILEMAKER PRO HELP 1089
Compatibility
Originated in
FileMaker Pro 6.0 or earlier
Description
Use Freeze Window to hide actions from the user while FileMaker Pro performs the remainder of
the script. A Pause/Resume script step unfreezes a Freeze Window script step.
Note A Refresh Window step is not needed if it would be the last step in a script. FileMaker Pro
automatically turns off Freeze Window and refreshes the display when a script ends. Use Refresh
Window to force a window update within a script.
Example 1
Freezes the window, goes to the Print Invoices layout, prints, and returns to the original layout.
Freeze Window
Go to Layout ["Print Invoices"]
Print [Restore: Printer; No dialog]
Go to Layout [original layout]
Example 2
Freezes the window, then copies data from the Work Phone field to the Day Contact field in all
records.
Freeze Window
Go to Record/Request/Page [First]
Loop
Set Field [Customers::Day Contact; Customers::Work Phone]
Go to Record/Request/Page [Next; Exit after last]
End Loop
Related topics
Script steps reference (alphabetical list)
Script steps reference (category list)
Where the script step runs Supported
FileMaker Pro Yes
FileMaker Server scheduled script No
FileMaker Go Yes
Custom Web Publishing No
FileMaker WebDirect Yes
Runtime solution Yes

FILEMAKER PRO HELP 1090
Refresh Window
Purpose
Updates the entire contents of the FileMaker Pro document window, including any related records.
Format
Refresh Window [Flush cached join results; Flush cached external data]
Options
Select Flush cached join results to delete the results of queries for related records and cause
related records to be refreshed. Do not select this option if you know your script does not affect
related data, and if you want to minimize the performance impact of re-accessing related data
(particularly when sharing a database over a network).
Select Flush cached external data to delete the results of queries for related ODBC data source
records and cause related ODBC records to be refreshed. FileMaker Pro dumps the internal cache
and refreshes record data. Do not select this option if you know your script does not access ODBC
data.
Compatibility
Originated in
FileMaker Pro 6.0 or earlier
Description
Refresh Window updates the visibility state of all objects with hidden conditions in the window.
You do not need to select Flush cached join results in order to refresh the entire window.
This script step updates records (rows) in the current ODBC table.
Note To update a single layout object without updating the entire window, use the Refresh Object
script step.
Example 1
Updates the Total field to include taxes and beeps after all records are updated.
Go to Record/Request/Page [First]
Loop
Set Field [Invoices::Total; Invoices::Total * Invoices::Tax]
Go to Record/Request/Page [Next; Exit after last]
Where the script step runs Supported
FileMaker Pro Yes
FileMaker Server scheduled script Yes
FileMaker Go Yes
Custom Web Publishing Yes
FileMaker WebDirect Yes
Runtime solution Yes

FILEMAKER PRO HELP 1091
End Loop
Refresh Window [ ]
Beep
Related topics
Script steps reference (alphabetical list)
Script steps reference (category list)
Updating data between FileMaker and ODBC data sources
Scroll Window
Purpose
Scrolls a window up or down, scrolls to the top or bottom of a layout, or brings the current field into
view.
Format
Scroll Window [Home/End/Page Up/Page Down/To Selection]
Options
Use Specify to choose a scrolling option.
•Home, End, Page Up, or Page Down scrolls the window to the beginning, to the end, up a
page, or down a page.
•To Selection brings the current field into view (similar to tabbing into a field).
Compatibility
Originated in
FileMaker Pro 6.0 or earlier
Example 1
Goes to the Invoices layout, scrolls to the bottom of the window, and creates a new record.
Go to Layout ["Invoices"]
Scroll Window [End]
New Record/Request
Where the script step runs Supported
FileMaker Pro Yes
FileMaker Server scheduled script No
FileMaker Go Yes
Custom Web Publishing No
FileMaker WebDirect No
Runtime solution Yes

FILEMAKER PRO HELP 1092
Example 2
Performs a find, sorts, and scrolls to the top of the window.
Perform Find [Restore]
Sort Records [Restore; No dialog]
Scroll Window [Home]
Related topics
Script steps reference (alphabetical list)
Script steps reference (category list)
Show/Hide Menubar
Purpose
Shows or hides the menu bar in FileMaker WebDirect.
Format
Show/Hide Menubar [Show/Hide/Toggle]
Options
•Show tells FileMaker WebDirect to show the menu bar.
•Hide tells FileMaker WebDirect to hide the menu bar.
•Toggle switches between showing and hiding the menu bar.
Compatibility
Originated in
FileMaker Pro 13.0
Example 1
If the Guest account is logged in, goes to the Invoices layout and hides the menu bar and status
toolbar.
If [Get ( AccountName ) = "[Guest]"]
Go to Layout ["Invoices"]
Show/Hide Menubar [Hide]
Where the script step runs Supported
FileMaker Pro No
FileMaker Server scheduled script No
FileMaker Go No
Custom Web Publishing No
FileMaker WebDirect Yes
Runtime solution No

FILEMAKER PRO HELP 1093
Show/Hide Toolbars [Hide]
End if
Show/Hide Toolbars
Purpose
Shows or hides the status toolbar.
Format
Show/Hide Toolbars [Lock; Show/Hide/Toggle]
Options
•Lock prohibits the user from using the status toolbar control to manually show or hide
the status toolbar.
•Show tells FileMaker Pro to show the status toolbar.
•Hide tells FileMaker Pro to hide the status toolbar.
•Toggle switches between showing and hiding the status toolbar (equivalent to clicking
Show/Hide Status Toolbar).
Compatibility
Originated in
FileMaker Pro 6.0 or earlier
Example 1
Enters Find Mode, shows the status toolbar, pauses for user input, performs the find, and hides the
status toolbar.
Enter Find Mode [ ]
Show/Hide Toolbars [Show]
Pause/Resume Script [Indefinitely]
Perform Find [ ]
Show/Hide Toolbars [Hide]
Where the script step runs Supported
FileMaker Pro Yes
FileMaker Server scheduled script Yes
FileMaker Go Yes
Custom Web Publishing No
FileMaker WebDirect Yes
Runtime solution Yes

FILEMAKER PRO HELP 1094
Related topics
Script steps reference (alphabetical list)
Script steps reference (category list)
Show/Hide Text Ruler
Purpose
Shows or hides the text ruler.
Format
Show/Hide Text Ruler [Show/Hide/Toggle]
Options
•Show tells FileMaker Pro to show the text ruler.
•Hide tells FileMaker Pro to hide the text ruler.
•Toggle switches between showing and hiding the text ruler.
Compatibility
Originated in
FileMaker Pro 6.0 or earlier
Description
The text ruler is used to format paragraphs and tabs within fields and on layouts.
Example 1
Goes to the Description field on the Product Details layout and shows the text ruler.
Go to Layout ["Product Details"]
Go to Field [Products::Description]
Show/Hide Text Ruler [Show]
Related topics
Script steps reference (alphabetical list)
Script steps reference (category list)
Where the script step runs Supported
FileMaker Pro Yes
FileMaker Server scheduled script No
FileMaker Go No
Custom Web Publishing No
FileMaker WebDirect No
Runtime solution Yes

FILEMAKER PRO HELP 1095
Set Window Title
Purpose
Changes the title of a window.
Format
Set Window Title [Current window or Name: <name of window>; Current file;
New Title: <new window name>]
Options
Click Specify to set options for the title of a window.
•Window to Rename tells FileMaker Pro which window to rename. Select Current Window
to rename the current window. To specify another window, enter the window name in literal
text or click Specify to create a name using a calculation.
•Select Current file only to restrict matches to the current file (not selecting this option
matches all available FileMaker Pro files).
•Rename window to is the new title for the window. You can enter literal text or click Specify
to create a name using a calculation.
Compatibility
Originated in
FileMaker Pro 6.0 or earlier
Description
You can change the name of any open window.
Note Window name selection is not case-sensitive.
Example 1
Performs a find and sets the window title to display the number of records that were found.
Perform Find [Restore]
Set Window Title [Current Window; New Title: Get ( FoundCount ) & "
records found"]
Where the script step runs Supported
FileMaker Pro Yes
FileMaker Server scheduled script Yes
FileMaker Go Yes
Custom Web Publishing Yes
FileMaker WebDirect Yes
Runtime solution Yes

FILEMAKER PRO HELP 1096
Related topics
Defining calculation fields
Script steps reference (alphabetical list)
Script steps reference (category list)
Set Zoom Level
Purpose
Enlarges or reduces the image on the screen.
Format
Set Zoom Level [Lock; 25%...400%/Zoom In/Zoom Out]
Options
•Lock prohibits users from making changes to the zoom level.
•Specify lets you select a zoom level.
•Reduction values: 100%, 75%, 50%, or 25%.
•Enlargement values: 150%, 200%, 300%, or 400%.
•Zoom In reduces the screen image by one zoom level.
•Zoom Out enlarges the screen image by one zoom level.
Compatibility
Originated in
FileMaker Pro 6.0 or earlier
Example 1
Goes to the Invoices iPhone layout, sets the zoom level to 100%, and locks the zoom level.
Go to Layout ["Invoices iPhone"]
Set Zoom Level [Lock; 100%]
Related topics
Script steps reference (alphabetical list)
Script steps reference (category list)
Where the script step runs Supported
FileMaker Pro Yes
FileMaker Server scheduled script No
FileMaker Go Yes
Custom Web Publishing No
FileMaker WebDirect No
Runtime solution Yes

FILEMAKER PRO HELP 1097
View As
Purpose
Displays data in the specified format.
Format
View As [View as Form/View as List/View as Table/Cycle]
Options
•View as Form tells FileMaker Pro to display records page by page in the format determined
by the database designer.
•View as List tells FileMaker Pro to display records as records in a list, so they can be
browsed without clicking the left and right arrows in the book.
•View as Table tells FileMaker Pro to display the records on screen in a grid, so that many
fields and records may be viewed at one time in a format similar to a spreadsheet.
•Cycle switches from the current view to the next view.
Compatibility
Originated in
FileMaker Pro 6.0 or earlier
Description
You can choose View as Form, View as List, View as Table, or you can choose Cycle to
switch from the current format to the next format.
Example 1
Imports records, sorts, and switches to Table View.
Import Records [ ]
Sort Records [Restore; No dialog]
View As [View as Table]
Example 2
Performs a find, then changes view depending on the number of records in the found set.
Where the script step runs Supported
FileMaker Pro Yes
FileMaker Server scheduled script Yes
FileMaker Go Yes
Custom Web Publishing Yes
FileMaker WebDirect Yes
Runtime solution Yes

FILEMAKER PRO HELP 1098
Enter Find Mode [Pause]
If [Get (FoundCount) = 1]
View As [View as Form]
Else If [Get ( FoundCount ) > 1]
View As [View as List]
End If
Related topics
Script steps reference (alphabetical list)
Script steps reference (category list)
Files script steps
Files script steps operate on entire files. With Files script steps, you can:
•create a file
•open or close a file
•save a copy of a file
•convert a file to FileMaker Pro
•set multi-user status
•allow users to choose formats for the file
•recover a file
•set print setup options
•print
New File
Purpose
Allows the user to create a new database file.
Format
New File
Options
None.
Compatibility
Where the script step runs Supported
FileMaker Pro Yes
FileMaker Server scheduled script No
FileMaker Go No

FILEMAKER PRO HELP 1099
Originated in
FileMaker Pro 6.0 or earlier
Description
This script step opens the “Create a new file named:” dialog box. After the new database opens, the
script becomes active again, and if script steps remain, the script continues. The new database
remains open and active.
Tip If you want the original database to remain active, add a Select Window script step after the
New File step.
Example 1
Exports records, then creates a new file to import the records into.
Set Error Capture [On]
Export Records [ ]
New File
Related topics
Script steps reference (alphabetical list)
Script steps reference (category list)
Open File
Purpose
Opens the specified FileMaker file or allows the user to select a file to open.
Format
Open File [Open hidden; “<filename>”]
Options
•Open hidden causes FileMaker Pro to open and hide the specified database.
•Specify lets you select a FileMaker Pro database or ODBC data source to open. Choose
Add FileMaker Data Source or Add ODBC Data Source to locate and select a file. After
you select a file, it is added to the Specify Table list. Choose Manage Data Sources to
modify or delete a data source you’ve already added to the list.
Custom Web Publishing No
FileMaker WebDirect No
Runtime solution No
Where the script step runs Supported

FILEMAKER PRO HELP 1100
Compatibility
Originated in
FileMaker Pro 6.0 or earlier
Description
For ODBC data sources, this script step re-establishes a link to the ODBC data source.
Script steps after Open execute in the FileMaker file that contains the script, not the file opened by
the script.
If you don't specify a file, FileMaker Pro displays the Open File dialog box when the Open File script
step executes so that the user can specify a file. The Open File dialog box will also be displayed if
the file used in the script has been moved, deleted, or renamed.
Notes
•If new database creation has been disabled in your installation of FileMaker Pro, it will not
be possible to convert file types such as Microsoft Excel or tab delimited files into
FileMaker Pro databases. However, you can still import the data from other file types into
FileMaker Pro (if you open the database with a password that allows you to import). If you
need more information, contact your system administrator.
•In runtime solutions, the Open File script step returns an error if an external file is not bound
to the solution.
•This script step is unable to open a file from an unauthorized file.
•If the specified file is opened then hidden by FileMaker Pro, scripts that are set to run upon
opening are still executed.
Example 1
Exports records from the current database, opens the Invoices Backup database, and runs the
Import Invoices script from the Invoices Backup database.
Export Records [ ]
Open File ["Invoices Backup"]
Perform Script ["Import Invoices" from file: "Invoices Backup"]
Related topics
Convert File
Script steps reference (alphabetical list)
Script steps reference (category list)
Working with data sources
Where the script step runs Supported
FileMaker Pro Yes
FileMaker Server scheduled script No
FileMaker Go Yes
Custom Web Publishing No
FileMaker WebDirect No
Runtime solution Partial

FILEMAKER PRO HELP 1101
Close File
Purpose
Closes the specified FileMaker file.
Format
Close File [Current File/”<filename>”]
Options
Specify lets you select a FileMaker Pro to close or an ODBC data source to disconnect from.
Choose Add FileMaker Data Source or Add ODBC Data Source to locate and select a file. After
you select a file, it is added to the Specify Table list. Choose Manage Data Sources to modify or
delete a data source you’ve already added to the list.
Compatibility
Originated in
FileMaker Pro 6.0 or earlier
Description
If you do not specify a file, FileMaker Pro stops the currently running script and closes the FileMaker
database that the script is running from.
This script step disconnects the specified ODBC data source. This enables you to “re-login” to the
specified ODBC data source with a different user name and password, without closing the FileMaker
file.
Note If a user moves the specified file, FileMaker Pro might not be able to close the file.
Example 1
Opens the Invoices database and performs a script, then closes the current database.
Open File ["Invoices"]
Perform Script ["Sort Records" from file: "Invoices"]
Close File [Current File]
Related topics
Script steps reference (alphabetical list)
Script steps reference (category list)
Where the script step runs Supported
FileMaker Pro Yes
FileMaker Server scheduled script No
FileMaker Go Yes
Custom Web Publishing No
FileMaker WebDirect No
Runtime solution Yes

FILEMAKER PRO HELP 1102
Working with data sources
Convert File
Purpose
Converts a supported file type into a FileMaker Pro file.
Format
Convert File [Open File; “<filename or source>”; No dialog; Skip Indexes]
Options
•Open file after conversion lets you specify whether you want a FileMaker Pro file to open
automatically after conversion.
•Specify data source lets you choose the file or source of the data to be converted. If you
don’t specify a file, FileMaker Pro displays the Open File dialog box when the script step
executes. For more information about converting files, see the conversion information in the
FILEMAKER PRO USER’S GUIDE.
•Depending on the file or source you choose, a dialog box may appear for specifying the
following additional options.
•Perform without dialog prevents certain dialog boxes from displaying when the script step
is run.
•When converting FileMaker files, the dialog boxes used to rename the old file and name
the converted file are not displayed.
•When converting other file types, the dialog boxes that are used to specify the way a file
and its data are converted are not displayed.
In these two cases, the default settings for those dialog boxes are used instead.
•Skip index creation for FileMaker files lets you specify whether FileMaker Pro should
create an index in a converted FileMaker file.
When you
choose this file
or source Do this
File In the Specify File dialog box, choose the file you want to import. See Creating file
paths.
XML Data In the Specify XML and XSL Options dialog box, choose the source of the XML data
that you want to import, and choose an XSLT style sheet if you want to apply one
prior to import. The XML and XSLT source may be a file or the result of an HTTP
request, or a field that contains a file path or an HTTP request. For more information,
see Importing XML data.
ODBC Data Specify the data source name and location, the user ID and password (if any), and
the SQL query to be executed. For more information, see Constructing an SQL query
for importing via ODBC.

FILEMAKER PRO HELP 1103
Compatibility
Originated in
FileMaker Pro 6.0 or earlier
Description
See Supported import/export file formats for more information.
Note You cannot use this command to convert the contents of a folder. Each file in a folder must be
converted separately.
Example 1
Converts the Invoices database to the current FileMaker format.
Show Custom Dialog ["Convert the Invoices database?"]
If [Get ( LastMessageChoice ) = 1]
Convert File [“Invoices.fp7”]
End If
Related topics
Script steps reference (alphabetical list)
Script steps reference (category list)
Set Multi-User
Purpose
Allows or disallows network access to a database.
Format
Set Multi-User [On/On (Hidden)/Off]
Options
•Select On to allow network access via FileMaker Network Sharing. This is the same as
selecting All Users in the FileMaker Network Settings dialog box.
•Select On (Hidden) to allow network access but prevent the name of the shared database
from appearing in the Open Remote File dialog box. This is the same as selecting the All
Where the script step runs Supported
FileMaker Pro Yes
FileMaker Server scheduled script No
FileMaker Go No
Custom Web Publishing No
FileMaker WebDirect No
Runtime solution Yes

FILEMAKER PRO HELP 1104
Users and Don't Display in Open Remote File dialog options in the FileMaker Network
Settings dialog box.
•Select Off to disallow network access. This is the same as selecting No Users in the
FileMaker Network Settings dialog box.
Compatibility
Originated in
FileMaker Pro 6.0 or earlier
Description
A shared, or multi-user, database is a file available to users on a network. See Sharing and hosting
files for more information.
Example 1
Guarantees that a database is hosted upon launch. Started by the OnFirstWindowOpen script
trigger.
Show Custom Dialog ["Make this file available on the network?"]
If [Get ( LastMessageChoice ) = 1]
Set Multi-User [On]
End If
Example 2
Turns network sharing on if it is off.
If [Get ( MultiUserState ) = 0]
Set Multi-User [On]
End If
Related topics
Script steps reference (alphabetical list)
Script steps reference (category list)
Where the script step runs Supported
FileMaker Pro Yes
FileMaker Server scheduled script No
FileMaker Go No
Custom Web Publishing No
FileMaker WebDirect No
Runtime solution No

FILEMAKER PRO HELP 1105
Set Use System Formats
Purpose
Allows the user to choose between the formats stored with the file or the user's current system
formats.
Format
Set Use System Formats [On/Off]
Options
•On instructs FileMaker Pro to use the current system formats.
•Off instructs FileMaker Pro to use the formats saved with the file.
Compatibility
Originated in
FileMaker Pro 6.0 or earlier
Description
Each FileMaker Pro database file stores the date, time, and number formatting of the computer on
which the database was created. These regional settings may be different from the system formats
currently set on your computer.
When you use the current system formats, you don't change the formats saved with the file – you
simply enter and view data in a format that's familiar to you. For example, if a database was created
in Australia, where dates are usually written day-month-year, and you open it in the United States,
where dates are usually written month-day-year, FileMaker Pro alerts you that the system formats
are different.
A startup script that uses the Set Use System Formats script step can be used to control how
FileMaker Pro handles date, time, and number formats for a file that has system formats that are
different from the current system formats.
Example 1
Checks the system language before using system formats. Started by the OnFirstWindowOpen
script trigger.
Where the script step runs Supported
FileMaker Pro Yes
FileMaker Server scheduled script No
FileMaker Go Yes
Custom Web Publishing No
FileMaker WebDirect No
Runtime solution Yes

FILEMAKER PRO HELP 1106
If [Get ( SystemLanguage ) = “Japanese”]
Set Use System Formats [On]
End If
Related topics
Script steps reference (alphabetical list)
Script steps reference (category list)
Save a Copy as
Purpose
Saves a copy of the current database file.
Format
Save a Copy as [“<filename>”; Automatically open; Create email; copy/
compacted/clone]
Options
Specify output file displays the Specify Output File dialog box, where you can specify the name
and location of the resulting copy. For more information, see Creating file paths. If you do not specify
a file, FileMaker Pro saves a copy of the current file and displays the Save As dialog box so the user
can specify copying options. You can choose to Automatically open file or Create email with file
as attachment after saving.
Use Specify to choose a save format: copy of current file, compacted copy (smaller), clone (no
records), or self-contained copy (single file).
Compatibility
Originated in
FileMaker Pro 6.0 or earlier
Description
Use this script step to back up your database.
Where the script step runs Supported
FileMaker Pro Yes
FileMaker Server scheduled script No
FileMaker Go Yes
Custom Web Publishing No
FileMaker WebDirect No
Runtime solution Yes

FILEMAKER PRO HELP 1107
Notes
•This script step is not supported in FileMaker Pro database files hosted by
FileMaker Server.
•For files used in FileMaker Go, choose self-contained copy(single file). Container objects
will be embedded in the copy.
Example 1
Saves a copy or clone of the current database.
Show Custom Dialog ["Save a copy or empty clone of the current file?"]
If [Get ( LastMessageChoice ) = 1]
Save a Copy as [copy]
Else
Save a Copy as [clone]
End If
Related topics
Script steps reference (alphabetical list)
Script steps reference (category list)
Recover File
Purpose
Recovers a damaged FileMaker Pro file.
Format
Recover File [No dialog; “<filename>”]
Options
•Perform without dialog prevents a dialog box from displaying after the script step performs
that shows how many bytes of data were recovered, the number of records and field values
skipped, and the number of field definitions recovered.
Perform without dialog applies only to default recovery operations. The Advanced Recovery
Options dialog box is not supported.
•Select Specify source file or click Specify to display a dialog box where you can select the
file to be recovered. For more information, see Creating file paths. If you don’t select a
source file, the Open Damaged File dialog box displays at runtime.
Compatibility
Where the script step runs Supported
FileMaker Pro Yes
FileMaker Server scheduled script No
FileMaker Go No

FILEMAKER PRO HELP 1108
Originated in
FileMaker Pro 6.0 or earlier
Description
The Recover command makes an aggressive attempt to reopen a damaged file. It is intended for
data recovery, not file repair. Do not use the Recover command as part of routine file maintenance.
FileMaker Pro attempts to recover as much of the information in a damaged file as possible, and
then creates a new, recovered file. The original file is not deleted or replaced.
Note Before you begin, be sure you have enough disk space for the recovered file. If there isn't
enough space, the recovered file won't be usable.
Example 1
Opens Invoices Backup, then attempts to recover the database if it is damaged.
Open File ["Invoices Backup"]
If [Get ( LastError ) = 807]
Recover File [No dialog; "Invoices Backup.fmp12"]
End If
Related topics
Script steps reference (alphabetical list)
Script steps reference (category list)
Print Setup
Purpose
Sets print options, such as paper size and orientation, which can be stored with this script step.
Format
Print Setup [Restore; No dialog]
Options
•Perform without dialog prevents the Print Setup dialog box from displaying when the
script step executes. If you select Perform without dialog, the output from this script step
will be sent to the last specified printer and not the one specified in the Edit Script dialog
box.
•Select Specify page setup or click Specify to open the Print Setup dialog box and choose
page setup options that are stored with the script step.
Custom Web Publishing No
FileMaker WebDirect No
Runtime solution Yes
Where the script step runs Supported

FILEMAKER PRO HELP 1109
Compatibility
Originated in
FileMaker Pro 6.0 or earlier
Description
You can also have this script step performed with a dialog box so the user can specify print options.
You can use multiple Print Setup script steps within a script.
Example 1
Goes to the Print Invoices layout, sorts the records, changes the print settings, and prints.
Go to Layout ["Print Invoices"]
Sort Records [Restore; No dialog]
Print Setup [Restore; No dialog]
Print [ ]
Related topics
Script steps reference (alphabetical list)
Script steps reference (category list)
Print
Purpose
Prints information in a file.
Format
Print [Restore: “<printer>”; No dialog]
Options
•Select Perform without dialog to prevent the Print dialog box from displaying when the
script step executes.
•Select Specify print options or click Specify to specify an output destination. When the
script executes, the output from this script step is sent to the printer or fax you specified.
Where the script step runs Supported
FileMaker Pro Yes
FileMaker Server scheduled script No
FileMaker Go Yes
Custom Web Publishing No
FileMaker WebDirect No
Runtime solution Yes

FILEMAKER PRO HELP 1110
OS X: As an alternative to specifying a printer or fax, you can click PDF in the Print dialog box,
then choose a PDF option from the list or choose Edit menu to define a custom PDF output
format or destination.
If you do not specify an output destination before saving the script or if the specified printer
cannot be found when the script executes, the output from the script step is sent to the user’s
default printer.
Compatibility
Originated in
FileMaker Pro 6.0 or earlier
Description
Multiple print steps can be added to a script. You can store print options with this script step, or allow
the user to enter printing criteria when the step executes.
If the print job needs special page setup options to print correctly, add a Print Setup script step
before the Print step.
Notes
•When you use more than one Print script step in a script, the saved printer name applies to
only the containing Print script step.
•A printer name specified in a Print Setup script step is not inherited by any Print script step
in a script.
Example 1
Goes to the Print Invoices layout, sorts the records, and prints.
Go to Layout ["Print Invoices"]
Sort Records [Restore; No dialog]
Print [Restore: Printer; No dialog]
Related topics
Script steps reference (alphabetical list)
Script steps reference (category list)
Where the script step runs Supported
FileMaker Pro Yes
FileMaker Server scheduled script No
FileMaker Go Yes
Custom Web Publishing No
FileMaker WebDirect No
Runtime solution Yes

FILEMAKER PRO HELP 1111
Accounts script steps
Accounts script steps allow you to create and manage user accounts. With Accounts script steps,
you can:
•add accounts
•delete accounts
•reset account passwords
•change passwords
•enable accounts
•log in to a file using a different account and password
Notes
•Accounts created using script steps cannot be granted full access privileges (only accounts
created manually).
•Users who are not assigned the Full Access privilege set can only execute account scripts if
Run script with full access privileges is selected in the Edit Script dialog box when the
script is created or edited. For more information on access privileges and script steps, see
Editing scripts privileges.
Add Account
Purpose
Adds a new account name, password, and privilege set.
Format
Add Account [Account Name: <account name>; Password: <password>;
Privilege Set: “<privilege set>”; Expire password]
Options
Click Specify to display the “Add Account” Options dialog box, where you can set the following
options.
•Account Name is the name for the new account. You can enter literal text or click Specify
to create a new account name from a calculation.
•Password is the password for the new account. You can enter literal text or click Specify to
create a new password from a calculation.
•Privilege Set lets you assign a predefined privilege set for this user or create a new
privilege set.
The Full Access privilege set cannot be assigned via this script step. Accounts with Full Access
privilege sets must be created manually.
•User must change password on next login When selected, this option forces users to
change their password the next time they log in to the database.

FILEMAKER PRO HELP 1112
Compatibility
Originated in
FileMaker Pro 7.0
Description
The account name and password can be literals stored with this script step, or generated at runtime
based on calculations that you set up.
Notes
•Account names must be unique.
•You must be assigned the Full Access privilege set to perform this script step. Select Run
script with full access privileges to enable users with less than full access privileges to
perform this script step.
Example 1
Adds a new user account with data entry only privileges. Requires you to change the password the
next time you log into the account.
Add Account [Account Name: "User"; Password: "1234"; Privilege Set: "[Data
Entry Only]"; Expire password]
Example 2
Adds a new account with read-only privileges using the name and password in the custom dialog.
Show Custom Dialog ["Do you want to add a new account?"; Accounts::Name;
Accounts::Password]
If [Get ( LastMessageChoice ) = 1]
Add Account [Account Name: Accounts::Name; Password:
Accounts::Password; Privilege Set: "[Read-Only Access]"]
End If
Example 3
Adds a new data entry only account unless the current user has read-only privileges. Uses the
current user's name for the new account name.
If [Get ( AccountPrivilegeSetName ) ≠ "[Read-Only Access]"]
Add Account [Account Name: Get ( UserName ); Password: "1234";
Privilege Set: "[Data Entry Only]"; Expire password]
Else
Where the script step runs Supported
FileMaker Pro Yes
FileMaker Server scheduled script Yes
FileMaker Go Yes
Custom Web Publishing Yes
FileMaker WebDirect Yes
Runtime solution Yes

FILEMAKER PRO HELP 1113
Show Custom Dialog ["You do not have enough privileges to add an
account."]
End If
Related topics
Script steps reference (alphabetical list)
Script steps reference (category list)
Delete Account
Purpose
Deletes the specified account.
Format
Delete Account [Account Name: <account name>]
Options
Click Specify to set the Account Name to be deleted. You can enter literal text or click Specify to
create an account name from a calculation.
Compatibility
Originated in
FileMaker Pro 7.0
Description
•You must specify an existing account.
•You must be assigned the Full Access privilege set to perform this script step. Select Run
script with full access privileges to enable users with less than full access privileges to
perform this script step.
•You cannot use this script step to delete an account that has full access privileges.
•This script step deletes an account without displaying a dialog box.
Where the script step runs Supported
FileMaker Pro Yes
FileMaker Server scheduled script Yes
FileMaker Go Yes
Custom Web Publishing Yes
FileMaker WebDirect Yes
Runtime solution Yes

FILEMAKER PRO HELP 1114
Example 1
Deletes the Sales account.
Delete Account [Account Name: "Sales"]
Example 2
Deletes the current account if it has full access privileges.
If [Get ( AccountPrivilegeSetName ) = "[Full Access]"]
Delete Account [Account Name: Get ( AccountName )]
Re-Login [ ]
Else
Show Custom Dialog ["You do not have enough privileges to delete an
account."]
End If
Related topics
Script steps reference (alphabetical list)
Script steps reference (category list)
Reset Account Password
Purpose
Resets the password of the existing FileMaker Pro account you specify.
Format
Reset Account Password [Account Name: <account name>;
New Password: <password>; Expire password]
Options
•Click Specify to display the “Reset Account Password” Options dialog box, where you can
set the following options.
•Account Name is the name of the existing FileMaker Pro account with the password to be
reset. You can enter literal text or click Specify to create a new account name from a
calculation.
•New Password is the new password for this account. You can enter literal text or click
Specify to create a new password from a calculation.
•User must change password on next login When selected, this option forces users to
change their password the next time they log in to the database.
Compatibility
Where the script step runs Supported
FileMaker Pro Yes
FileMaker Server scheduled script Yes

FILEMAKER PRO HELP 1115
Originated in
FileMaker Pro 7.0
Description
Use multiple occurrences of this script step to reset multiple accounts in a single script.
Notes
•You must be assigned the Full Access privilege set to perform this script step. Select Run
script with full access privileges to enable users with less than full access privileges to
perform this script step.
•This script step resets the account password without displaying a dialog box.
Example 1
Changes the password of the Sales account. Requires you to change the password the next time
you log into the account.
Reset Account Password [Account Name: "Sales"; New Password: "1234";
Expire password]
Example 2
Asks if you want to change the current account's password. Resets the password with the contents
of the Password field.
Show Custom Dialog ["Reset the current account password?";
Accounts::Password]
If [Get ( LastMessageChoice ) = 1]
Reset Account Password [Account Name: Get ( AccountName ); New
Password: Accounts::Password]
End If
Related topics
Script steps reference (alphabetical list)
Script steps reference (category list)
Change Password
Purpose
Changes the password for the current account.
FileMaker Go Yes
Custom Web Publishing Yes
FileMaker WebDirect Yes
Runtime solution Yes
Where the script step runs Supported

FILEMAKER PRO HELP 1116
Format
Change Password [Old Password: <old password>;
New Password: <new password>; No dialog]
Options
Click Specify to display the “Change Password” Options dialog box, where you can set the following
options.
•Old Password is the old password for the current account. You can enter literal text or click
Specify to generate the password from a calculation.
•New Password is the new password for the current account. You can enter literal text or
click Specify to create a new password from a calculation.
•Perform without dialog prevents the Change Password dialog box from displaying when
the script step executes. When this option is selected, FileMaker Pro uses the literal
password information stored with the script step, or generates a new password based on a
calculation.
Compatibility
Originated in
FileMaker Pro 7.0
Description
This script step displays the Change Password dialog box, unless Perform without dialog is
selected. Change Password allows you to change your password but not your access privileges.
Notes
•Users must have password change privileges to use this script step to change their
passwords. To enable users who do not have password change privileges to run this script
step, select Run script with full access privileges.
•Unless the Set Error Capture script step has enabled error capture, users get five attempts
to change their password.
•If Set Error Capture is on, users get a single attempt to enter their old and new password.
Example 1
Opens the Change Password dialog box every ten times the database is opened to encourage the
user to change his or her password frequently. Started by the OnFirstWindowOpen script trigger.
Where the script step runs Supported
FileMaker Pro Yes
FileMaker Server scheduled script Partial
FileMaker Go Yes
Custom Web Publishing Partial
FileMaker WebDirect Yes
Runtime solution Yes

FILEMAKER PRO HELP 1117
Set Field [Accounts::Open Count; Accounts::Open Count + 1]
If [Accounts::Open Count = 10]
Set Field [Accounts::Open Count; 0]
Change Password [ ]
End If
Related topics
Script steps reference (alphabetical list)
Script steps reference (category list)
Enable Account
Purpose
Enables or disables a specific account.
Format
Enable Account [Account Name: <account name>; Activate/Deactivate]
Options
Click Specify to display the “Enable Account” Options dialog box, where you can set the following
options.
•Account Name is the name of the account to be activated or deactivated. You can enter
literal text or click Specify to generate the account name from a calculation.
•Activate account enables the specified account.
•Deactivate account disables the specified account.
Compatibility
Originated in
FileMaker Pro 7.0
Description
•You must specify an existing account.
Where the script step runs Supported
FileMaker Pro Yes
FileMaker Server scheduled script Yes
FileMaker Go Yes
Custom Web Publishing Yes
FileMaker WebDirect Yes
Runtime solution Yes

FILEMAKER PRO HELP 1118
•You must be assigned the Full Access privilege set to perform this script step. Select Run
script with full access privileges to enable users with less than full access privileges to
perform this script step.
•You cannot use this script step to deactivate an account with full access privileges.
Example 1
Displays the contents of the Name field and prompts the user to activate an account with that name.
Show Custom Dialog ["Activate the " & Accounts::Name & " account?"]
If [Get ( LastMessageChoice ) = 1]
Enable Account [Account Name: Accounts::Name; Activate]
End if
Example 2
Deactivates the current account and prompts the user to log in to a different account.
Show Custom Dialog ["Deactivate the " & Get ( AccountName ) & " account?"]
If [Get ( LastMessageChoice ) = 1]
Enable Account [Account Name: Get ( AccountName ); Deactivate]
Re-Login [ ]
End if
Related topics
Script steps reference (alphabetical list)
Script steps reference (category list)
Re-Login
Purpose
Allows the user to log in to the database using a different account and password without closing and
reopening the file.
Format
Re-Login [Account Name: <account name>; Password: <password>; No dialog]
Options
Perform without dialog prevents the Open <filename> dialog box from displaying when the script
step executes. This dialog box requires the user to manually enter an account and password (or edit
information already displayed in the dialog box) to open a database file. When Perform without
dialog is selected, FileMaker Pro uses the account and password information that is stored with the
script step, or generates information from calculations when the step executes.
Click Specify to display the “Re-Login” Options dialog box, where you can set the following options.
•Account Name is the name of the account to be authenticated. You can enter literal text or
click Specify to create a new account name from a calculation.
•Password is the password for this account. You can enter literal text or click Specify to
create a new password from a calculation.

FILEMAKER PRO HELP 1119
Compatibility
Originated in
FileMaker Pro 7.0
Description
Privileges assigned to the new account take effect immediately, including access to tables, records,
layouts, scripts, and value lists.
Notes
•You do not need full access privileges to perform this script step. Users with any level of
access can use this script step to re-login to the database.
•Users get five attempts to enter their account and password, unless the Set Error Capture
script step is enabled.
•If the Set Error Capture script step is enabled, users get a single attempt to enter their
account and password.
•Perform without dialog must be selected for this script to work in a FileMaker Server
scheduled script.
Example 1
Prompts the current user to re-login after deleting the specified account.
Note Because of the Delete Account step, users must have full access privileges to run this script.
Delete Account [Account Name: "User"]
Re-Login [ ]
Related topics
Script steps reference (alphabetical list)
Script steps reference (category list)
Spelling script steps
With spelling script steps you can:
•check the spelling in a selection of text
•check the spelling of a record
Where the script step runs Supported
FileMaker Pro Yes
FileMaker Server scheduled script Partial
FileMaker Go Yes
Custom Web Publishing Partial
FileMaker WebDirect Yes
Runtime solution Yes

FILEMAKER PRO HELP 1120
•check the spelling of an entire found set
•correct a word
•set spelling options for a file
•select a dictionary
•edit the user dictionary
Check Selection
Purpose
Uses the spelling checker to check the selected text.
Format
Check Selection [Select; table::field]
Options
•Select entire contents checks all the text in the active field. If you do not use Select entire
contents, you must select some text before this script step executes.
•Select Go to target field or click Specify to specify a field to be checked.
Compatibility
Originated in
FileMaker Pro 6.0 or earlier
Description
Displays the Spelling dialog box unless the field is empty.
Example 1
Checks spelling in the Notes field in the current record.
Check Selection [Select; Products::Notes]
Related topics
Script steps reference (alphabetical list)
Where the script step runs Supported
FileMaker Pro Yes
FileMaker Server scheduled script No
FileMaker Go No
Custom Web Publishing No
FileMaker WebDirect No
Runtime solution Yes

FILEMAKER PRO HELP 1121
Script steps reference (category list)
Check Record
Purpose
Uses the spelling checker to check the contents of every field in the current record.
Format
Check Record
Options
None.
Compatibility
Originated in
FileMaker Pro 6.0 or earlier
Example 1
Checks spelling in all fields in the current record. Started by the OnRecordCommit script trigger.
Check Record
Related topics
Script steps reference (alphabetical list)
Script steps reference (category list)
Check Found Set
Purpose
Uses the spelling checker to check the contents of every field in the records being browsed.
Where the script step runs Supported
FileMaker Pro Yes
FileMaker Server scheduled script No
FileMaker Go No
Custom Web Publishing No
FileMaker WebDirect No
Runtime solution Yes

FILEMAKER PRO HELP 1122
Format
Check Found Set
Options
None.
Compatibility
Originated in
FileMaker Pro 6.0 or earlier
Example 1
Checks spelling in all fields in all records in the found set.
Perform Find [Restore]
Check Found Set
Related topics
Script steps reference (alphabetical list)
Script steps reference (category list)
Correct Word
Purpose
Opens the Spelling dialog box so you can correct a word that FileMaker Pro has identified as
misspelled.
Format
Correct Word
Options
None.
Where the script step runs Supported
FileMaker Pro Yes
FileMaker Server scheduled script No
FileMaker Go No
Custom Web Publishing No
FileMaker WebDirect No
Runtime solution Yes

FILEMAKER PRO HELP 1123
Compatibility
Originated in
FileMaker Pro 6.0 or earlier
Description
This script step is the same as choosing Edit menu > Spelling > Correct Word.
Use this script step to open the Spelling dialog box for users if you have restricted their access to
FileMaker Pro menus.
Notes
•Check spelling as you type must be selected (File menu > File Options > Spelling tab.)
•This script step can only correct a word after FileMaker Pro identifies it as being misspelled.
Example 1
Displays a custom dialog that asks if the user wants to open the Spelling dialog box.
Show Custom Dialog ["Open the Spelling dialog box to correct spelling?"]
If [Get ( LastMessageChoice ) = 1]
Correct Word
End If
Related topics
Script steps reference (alphabetical list)
Script steps reference (category list)
Spelling Options
Purpose
Opens the File Options dialog box to the Spelling tab.
Format
Spelling Options
Where the script step runs Supported
FileMaker Pro Yes
FileMaker Server scheduled script No
FileMaker Go No
Custom Web Publishing No
FileMaker WebDirect No
Runtime solution Yes

FILEMAKER PRO HELP 1124
Options
None.
Compatibility
Originated in
FileMaker Pro 6.0 or earlier
Description
This script step is the same as choosing File menu > File Options > Spelling tab.
Use this script step to open the File Options dialog box for users if you have restricted their access
to FileMaker Pro menus.
Example 1
Displays a custom dialog that asks if the user wants to turn on the Beep on questionable spellings
option.
Show Custom Dialog ["Would you like to check spelling as you type?"]
If [Get ( LastMessageChoice ) = 1]
Spelling Options
End If
Related topics
Script steps reference (alphabetical list)
Script steps reference (category list)
Select Dictionaries
Purpose
Opens the Select Dictionaries dialog box.
Format
Select Dictionaries
Where the script step runs Supported
FileMaker Pro Yes
FileMaker Server scheduled script No
FileMaker Go No
Custom Web Publishing No
FileMaker WebDirect No
Runtime solution Yes

FILEMAKER PRO HELP 1125
Options
None.
Compatibility
Originated in
FileMaker Pro 6.0 or earlier
Description
This script step is the same as choosing Edit menu > Spelling > Select Dictionaries.
Use this script step to open the Select Dictionaries dialog box for users if you have restricted their
access to FileMaker Pro menus.
Example 1
Opens the Select Dictionaries dialog box and checks spelling in all fields in the current record.
Select Dictionaries
Check Record
Related topics
Script steps reference (alphabetical list)
Script steps reference (category list)
Edit User Dictionary
Purpose
Opens the User Dictionary dialog box.
Format
Edit User Dictionary
Options
None.
Where the script step runs Supported
FileMaker Pro Yes
FileMaker Server scheduled script No
FileMaker Go No
Custom Web Publishing No
FileMaker WebDirect No
Runtime solution Yes

FILEMAKER PRO HELP 1126
Compatibility
Originated in
FileMaker Pro 6.0 or earlier
Description
This script step is the same as choosing Edit menu > Spelling > Edit User Dictionary.
Use this script step to open the Edit User Dictionary dialog box for users if you have restricted their
access to FileMaker Pro menus.
Example 1
Displays a custom dialog that asks if the user wants to open the Edit User Dictionary dialog box.
Show Custom Dialog ["Would you like to edit the dictionary used for spell
checking?"]
If [Get ( LastMessageChoice ) = 1]
Edit User Dictionary
End If
Related topics
Script steps reference (alphabetical list)
Script steps reference (category list)
Open Menu Item script steps
Open Menu Item script steps open specific FileMaker Pro dialog boxes as if you had chosen the
command from a menu. You could use one of these script steps to open a dialog box for users if you
have restricted their access to FileMaker Pro menus with access privileges. With these script steps
you can:
•open the Edit Saved Finds dialog box
•open the Preferences dialog box
•open the File Options dialog box
•open the Manage Database dialog box
•open the Manage External Data Sources dialog box
•open the Manage Layouts dialog box
•open the Manage Scripts feature
Where the script step runs Supported
FileMaker Pro Yes
FileMaker Server scheduled script No
FileMaker Go No
Custom Web Publishing No
FileMaker WebDirect No
Runtime solution Yes

FILEMAKER PRO HELP 1127
•open the Manage Themes dialog box
•open the Manage Value Lists dialog box
•open the Find/Replace dialog box
•open Help
•open the Open Remote File dialog box
•open the FileMaker Network Settings dialog box
•open the Upload to FileMaker Server dialog box
Open Edit Saved Finds
Purpose
Opens the Edit Saved Finds dialog box, where the user can add or change saved finds.
Format
Open Edit Saved Finds
Options
None.
Compatibility
Originated in
FileMaker Pro 10.0
Description
Use this script step to open the Edit Saved Finds dialog box for users if you have restricted their
access to FileMaker Pro menus.
Example 1
Displays a custom dialog that asks if the user wants to open the Edit Saved Finds dialog box.
Show Custom Dialog ["Do you want to change a saved find?"]
If [Get ( LastMessageChoice ) = 1]
Where the script step runs Supported
FileMaker Pro Yes
FileMaker Server scheduled script No
FileMaker Go No
Custom Web Publishing No
FileMaker WebDirect No
Runtime solution Yes

FILEMAKER PRO HELP 1128
Open Edit Saved Finds
End If
Related topics
Script steps reference (alphabetical list)
Script steps reference (category list)
Open Preferences
Purpose
Opens the Preferences dialog box to the General preferences area.
Format
Open Preferences
Options
None.
Compatibility
Originated in
FileMaker Pro 6.0 or earlier
Description
This script step is the same as choosing Edit menu > Preferences (Windows) or FileMaker Pro
menu > Preferences (OS X).
Use this script step to open the Preferences dialog box for users if you have restricted their access
to FileMaker Pro menus.
Example 1
Displays a custom dialog that asks if the user wants to open the Preferences dialog box.
Show Custom Dialog ["Do you want to open the Preferences dialog box?"]
If [Get ( LastMessageChoice ) = 1]
Open Preferences
End If
Where the script step runs Supported
FileMaker Pro Yes
FileMaker Server scheduled script No
FileMaker Go Yes
Custom Web Publishing No
FileMaker WebDirect No
Runtime solution Yes

FILEMAKER PRO HELP 1129
Related topics
Script steps reference (alphabetical list)
Script steps reference (category list)
Open File Options
Purpose
Opens the File Options dialog box to the Open tab.
Format
Open File Options
Options
None.
Compatibility
Originated in
FileMaker Pro 6.0 or earlier
Description
This script step is the same as choosing File menu > File Options.
Use this script step to open the File Options dialog box for users if you have restricted their access
to FileMaker Pro menus.
Note Only the Spelling tab of the File Options menu is available in runtime solutions.
Example 1
Displays a custom dialog that asks if the user wants to open the File Options dialog box.
Show Custom Dialog ["Do you want to open the File Options dialog box?"]
If [Get ( LastMessageChoice ) = 1]
Open File Options
End If
Where the script step runs Supported
FileMaker Pro Yes
FileMaker Server scheduled script No
FileMaker Go No
Custom Web Publishing No
FileMaker WebDirect No
Runtime solution Partial

FILEMAKER PRO HELP 1130
Related topics
Script steps reference (alphabetical list)
Script steps reference (category list)
Open Manage Containers
Purpose
Opens the Manage Containers dialog box, where the user can manage thumbnail settings and
external locations for container content.
Format
Open Manage Containers
Options
None.
Compatibility
Originated in
FileMaker Pro 12.0
Description
This script step is the same as choosing File menu > Manage > Containers.
Notes
•The user’s account must be assigned the Full Access privilege set, or this script step will not
be performed. (Select Run script with full access privileges to enable the script for all
users.)
•See Sharing databases on a network for information about making schema changes to
shared databases.
Example 1
Displays a custom dialog that asks if the user wants to edit settings for thumbnails, and opens the
Manage Containers dialog box.
Where the script step runs Supported
FileMaker Pro Yes
FileMaker Server scheduled script No
FileMaker Go No
Custom Web Publishing No
FileMaker WebDirect No
Runtime solution No

FILEMAKER PRO HELP 1131
Show Custom Dialog ["Do you want to change settings for thumbnail images
in container fields?"]
If [Get ( LastMessageChoice ) = 1]
Open Manage Containers
End If
Related topics
Script steps reference (alphabetical list)
Script steps reference (category list)
Open Manage Database
Purpose
Opens the Manage Database dialog box, where the user can create or edit tables, fields, and
relationships.
Format
Open Manage Database
Options
None.
Compatibility
Originated in
FileMaker Pro 6.0 or earlier
Description
This script step is the same as choosing File menu > Manage > Database.
Notes
•The user’s account must be assigned the Full Access privilege set, or this script step will not
be performed. (Select Run script with full access privileges to enable the script for all
users.)
Where the script step runs Supported
FileMaker Pro Yes
FileMaker Server scheduled script No
FileMaker Go No
Custom Web Publishing No
FileMaker WebDirect No
Runtime solution No

FILEMAKER PRO HELP 1132
•See Sharing databases on a network for information about making schema changes to
shared databases.
Example 1
Displays a custom dialog that asks if the user wants to manage the database's tables and fields, and
opens the Manage Database dialog box.
Show Custom Dialog ["Do you want to manage database tables and fields?"]
If [Get ( LastMessageChoice ) = 1]
Open Manage Database
End If
Related topics
Script steps reference (alphabetical list)
Script steps reference (category list)
Open Manage Data Sources
Purpose
Opens the Manage External Data Sources dialog box, where the user can create, edit, or delete
external FileMaker or ODBC data sources.
Format
Open Manage Data Sources
Options
None.
Compatibility
Originated in
FileMaker Pro 6.0 or earlier
Description
This script step is the same as choosing File menu > Manage > External Data Sources.
Where the script step runs Supported
FileMaker Pro Yes
FileMaker Server scheduled script No
FileMaker Go No
Custom Web Publishing No
FileMaker WebDirect No
Runtime solution No

FILEMAKER PRO HELP 1133
Notes
•The user’s account must be assigned the Full Access privilege set, or this script step will not
be performed. (Select Run script with full access privileges to enable the script for all
users.)
•See Sharing databases on a network for information about making schema changes to
shared databases.
Example 1
Displays a custom dialog that asks if the user wants to manage the database's data sources, and
opens the Manage External Data Sources dialog box.
Show Custom Dialog ["Do you want to manage the database's external data
sources?"]
If [Get ( LastMessageChoice ) = 1]
Open Manage Data Sources
End If
Related topics
Connecting to data sources
Script steps reference (alphabetical list)
Script steps reference (category list)
Open Manage Layouts
Purpose
Displays the Manage Layouts dialog box.
Format
Open Manage Layouts
Options
None.
Compatibility
Where the script step runs Supported
FileMaker Pro Yes
FileMaker Server scheduled script No
FileMaker Go No
Custom Web Publishing No
FileMaker WebDirect No
Runtime solution No

FILEMAKER PRO HELP 1134
Originated in
FileMaker Pro 11.0
Description
This script step is the same as choosing File menu > Manage > Layouts, or choosing Manage
Layouts from the Layout pop-up menu.
Example 1
Displays a custom dialog that asks if the user wants to manage the database's layouts, and opens
the Manage Layouts dialog box.
Show Custom Dialog ["Do you want to manage database layouts?"]
If [Get ( LastMessageChoice ) = 1]
Open Manage Layouts
End If
Related topics
Script steps reference (alphabetical list)
Script steps reference (category list)
Open Manage Scripts
Purpose
Displays the Manage Scripts dialog box.
Format
Open Manage Scripts
Options
None.
Compatibility
Originated in
FileMaker Pro 6.0 or earlier
Where the script step runs Supported
FileMaker Pro Yes
FileMaker Server scheduled script No
FileMaker Go No
Custom Web Publishing No
FileMaker WebDirect No
Runtime solution No

FILEMAKER PRO HELP 1135
Description
This script step is the same as choosing Scripts menu > Manage Scripts, or File menu >
Manage > Scripts.
Note Once an Open Manage Scripts step is performed, FileMaker Pro halts execution of the
current script. This prevents unexpected conditions from occurring if the currently running script is
edited.
Example 1
Displays a custom dialog that asks if the user wants to manage the database's scripts, and opens
the Manage Scripts dialog box.
Show Custom Dialog ["Do you want to manage database scripts?"]
If [Get ( LastMessageChoice ) = 1]
Open Manage Scripts
End If
Related topics
Script steps reference (alphabetical list)
Script steps reference (category list)
Open Manage Themes
Purpose
Opens the Manage Themes dialog box, where the user can manage layout themes.
Format
Open Manage Themes
Options
None.
Compatibility
Originated in
FileMaker Pro 13.0
Where the script step runs Supported
FileMaker Pro Yes
FileMaker Server scheduled script No
FileMaker Go No
Custom Web Publishing No
FileMaker WebDirect No
Runtime solution No

FILEMAKER PRO HELP 1136
Description
This script step is the same as choosing File menu > Manage > Themes.
Use this script step to open the Manage Themes dialog box for users if you have restricted their
access to FileMaker Pro menus.
Notes
•Users must have full layout access privileges to open the Manage Themes dialog box. For
more information, see Editing existing privilege sets and Editing layouts privileges.
Example 1
Displays a custom dialog that asks if the user wants to manage the database's themes, and opens
the Manage Themes dialog box.
Show Custom Dialog ["Do you want to manage database themes?"]
If [Get ( LastMessageChoice ) = 1]
Open Manage Themes
End If
Related topics
Script steps reference (alphabetical list)
Script steps reference (category list)
Open Manage Value Lists
Purpose
Opens the Manage Value Lists dialog box, where the user can manage new or edit existing value
lists.
Format
Open Manage Value Lists
Options
None.
Compatibility
Where the script step runs Supported
FileMaker Pro Yes
FileMaker Server scheduled script No
FileMaker Go No
Custom Web Publishing No
FileMaker WebDirect No
Runtime solution No

FILEMAKER PRO HELP 1137
Originated in
FileMaker Pro 6.0 or earlier
Description
This script step is the same as choosing File menu > Manage > Value Lists.
Use this script step to open the Manage Value Lists dialog box for users if you have restricted their
access to FileMaker Pro menus.
Notes
•The user’s account must be assigned the Full Access privilege set, or this script step will not
be performed. (Select Run script with full access privileges to enable the script for all
users.)
•See Sharing databases on a network for information about making schema changes to
shared databases.
Example 1
Displays a custom dialog that asks if the user wants to manage the database's value lists, and
opens the Manage Value Lists dialog box.
Show Custom Dialog ["Do you want to manage database value lists?"]
If [Get ( LastMessageChoice ) = 1]
Open Manage Value Lists
End If
Related topics
Script steps reference (alphabetical list)
Script steps reference (category list)
Open Find/Replace
Purpose
Opens the Find/Replace dialog box.
Format
Open Find/Replace
Options
None.
Compatibility
Where the script step runs Supported
FileMaker Pro Yes
FileMaker Server scheduled script No

FILEMAKER PRO HELP 1138
Originated in
FileMaker Pro 7.0
Description
This script step is the same as choosing Edit menu > Find/Replace > Find/Replace.
Use this script step to open the dialog box for users if you have restricted their access to
FileMaker Pro menus.
Note If you want to perform a find/replace without opening a dialog box, use the Perform Find/
Replace script step with Perform without dialog selected.
Example 1
Displays a custom dialog that asks if the user wants to open the Find/Replace dialog box.
Show Custom Dialog ["Open the Find/Replace dialog box?"]
If [Get ( LastMessageChoice ) = 1]
Open Find/Replace
End If
Related topics
Script steps reference (alphabetical list)
Script steps reference (category list)
Open Help
Purpose
Opens FileMaker Pro Help to the Help contents screen.
Format
Open Help
Options
None.
Compatibility
FileMaker Go No
Custom Web Publishing No
FileMaker WebDirect No
Runtime solution Yes
Where the script step runs Supported
Where the script step runs Supported
FileMaker Pro Yes

FILEMAKER PRO HELP 1139
Originated in
FileMaker Pro 6.0 or earlier
Description
This script step is the same as choosing Help menu > FileMaker Pro Help.
Example 1
Displays a custom dialog that asks if the user wants to see the onscreen Help.
Show Custom Dialog ["Do you want to open onscreen Help?"]
If [Get ( LastMessageChoice ) = 1]
Open Help
End If
Related topics
Script steps reference (alphabetical list)
Script steps reference (category list)
Open Remote
Purpose
Opens the Open Remote dialog box.
Format
Open Remote
Options
None.
Compatibility
FileMaker Server scheduled script No
FileMaker Go Yes
Custom Web Publishing No
FileMaker WebDirect No
Runtime solution No
Where the script step runs Supported
Where the script step runs Supported
FileMaker Pro Yes
FileMaker Server scheduled script No
FileMaker Go Yes

FILEMAKER PRO HELP 1140
Originated in
FileMaker Pro 6.0 or earlier
Description
This script step is the same as choosing File menu > Open Remote.
The Open Remote dialog box allows you to select and open a shared FileMaker Pro database over
a network connection.
Use this script step to open the dialog box for users if you have restricted their access to
FileMaker Pro menus.
Example 1
Displays a custom dialog that asks if the user wants to open a shared database, and opens the
Open Remote dialog box.
Show Custom Dialog ["Do you want to open a shared database?"]
If [Get ( LastMessageChoice ) = 1]
Open Remote
End If
Related topics
Script steps reference (alphabetical list)
Script steps reference (category list)
Open Sharing
Purpose
Opens the FileMaker Network Settings dialog box, where users can set up network database
sharing.
Format
Open Sharing
Options
None.
Custom Web Publishing No
FileMaker WebDirect No
Runtime solution No
Where the script step runs Supported

FILEMAKER PRO HELP 1141
Compatibility
Originated in
FileMaker Pro 6.0 or earlier
Description
This script step is the same as choosing File menu > Sharing > Share with FileMaker Clients.
Use this script step to open the FileMaker Network Settings dialog box for users if you have
restricted their access to FileMaker Pro menus.
Note The user’s account must be assigned a privilege set that permits changes to sharing settings,
or this script step will not be performed. (Select Run script with full access privileges to enable
the script for all users.)
Example 1
Displays a custom dialog that asks if the user wants to share the current database, and opens the
FileMaker Network Settings dialog box.
Show Custom Dialog ["Do you want to share this database?"]
If [Get ( LastMessageChoice ) = 1]
Open Sharing
End If
Related topics
Script steps reference (alphabetical list)
Script steps reference (category list)
Upload To FileMaker Server
Purpose
Displays the Upload to FileMaker Server dialog box.
Format
Upload To FileMaker Server
Where the script step runs Supported
FileMaker Pro Yes
FileMaker Server scheduled script No
FileMaker Go No
Custom Web Publishing No
FileMaker WebDirect No
Runtime solution No

FILEMAKER PRO HELP 1142
Options
None
Compatibility
Originated in
FileMaker Pro 13.0
Description
This script step is the same as choosing File menu > Sharing > Upload to FileMaker Server.
Use this script step to open the Upload to FileMaker Server dialog box for users if you have
restricted their access to FileMaker Pro menus.
Example 1
Displays a custom dialog that asks if the user wants to upload a database to FileMaker Server, and
opens the Upload to FileMaker Server dialog box.
Show Custom Dialog ["Do you want to upload a database to
FileMaker Server?"]
If [Get ( LastMessageChoice ) = 1]
Upload To FileMaker Server
End If
Related topics
Uploading files to FileMaker Server
Script steps reference (alphabetical list)
Script steps reference (category list)
Miscellaneous script steps
Miscellaneous script steps allow you to script miscellaneous actions, like:
•displaying a dialog box that presents the user with different options
•showing or hiding the toolbars
•playing the system alert sound
•Installing a plug-in file in a container field
•launching a web browser and displaying a specified URL
Where the script step runs Supported
FileMaker Pro Yes
FileMaker Server scheduled script No
FileMaker Go No
Custom Web Publishing No
FileMaker WebDirect No
Runtime solution No
FILEMAKER PRO HELP 1143
•sending internet email
•sending a DDE command (Windows) or an event to another application
•exiting the application
•refreshing an object or window
Tip Use the Comment script step to annotate your scripts so your colleagues can understand them.
Show Custom Dialog
Purpose
Displays a custom message dialog box, with custom text and labels.
Format
Show Custom Dialog [<title>; <message text>; Table1::input field 1;...]
Options
Click Specify to display the “Show Custom Dialog” Options dialog box, where you can set the dialog
box title, message text, and buttons, and specify up to three fields to use for input or display.
General options
•Title lets you specify the title of the custom dialog box. You can enter literal text or click
Specify to create the dialog box title from a calculation.
•Message lets you specify the message of the dialog box.You can enter literal text or
click Specify to create the message text from a calculation.
•Button Labels let you specify how many buttons (up to three) to display in the custom
dialog box and labels for these buttons. If you leave a button label blank, the button
does not appear in the custom dialog box. If you leave all button titles blank, an OK
button displays in the lower-right corner of the custom dialog box. To create a button
label based on a calculation, click Specify and then specify the calculation.
•Commit Data checkboxes pass input from the dialog box to the database according to
the action of each button. If no fields are active, then the data is committed; if a field is
active, then the data is committed when the record is committed.
Input Field options
•Select Show input field <n> to activate an input field.
•Select Specify to choose the field for input. Each input area maps to one field.
•Select Use password character (*) to mask text as it is entered, or as it is displayed
from the database. This option obscures data being input into the custom dialog box or
being displayed, but does not alter the actual data as it is stored in the database.
•Use Label to specify a field label (the text that will identify this input to the user.) You
can enter literal text or create the label from a calculation.

FILEMAKER PRO HELP 1144
Compatibility
Originated in
FileMaker Pro 6.0 or earlier
Description
The custom message dialog box can take user input for up to three fields in the database, and
display data from up to three fields in the database. The script pauses as long as the custom dialog
box stays on the screen. Fields used for input can be of type text, number, date, time, timestamp, or
container. Your custom dialog box can also have up to three buttons, with custom button titles.
Use the Get(LastMessageChoice) function to determine which button the user presses.
•1 for the first button (by default, labeled OK)
•2 for the second button (by default, labeled Cancel)
•3 for the third button
Notes
•If values entered into input fields don’t match the field type, a validation error message
displays. The user must resolve validation errors before the dialog box can be closed. See
Defining field validation for more information.
•The fields you specify don’t need to appear on the current layout. Show Custom Dialog
input fields are independent of layouts, similar to the Set Field script step.
•Data can't be inserted into calculation or summary fields.
•Show Custom Dialog ignores any field entry options. See Allowing or preventing entry into
fields for more information.
•Data entry via the Show Custom Dialog script step is limited by any access privileges
criteria that may be in place. (Select Run script with full access privileges to enable the
script for all users.)
•(Windows) You can create a keyboard shortcut for a custom dialog box button by placing an
ampersand before the shortcut key letter in the button label. For example, to create a
keyboard shortcut ‘D’ (Alt+D) for a button labeled ‘Done’, type the label ‘&Done’.
•For databases created with pre-12 versions of FileMaker Pro that are opened with
FileMaker Pro 13, the Commit Data checkbox for Default Button is selected when you
open the Show Custom Dialog dialog box.
•Before you change the data commitment status of a button for a database that’s already in
use, consider the behavior that users currently expect of the button and how changing its
behavior could affect the validity of data committed (or not committed) to the database.
Where the script step runs Supported
FileMaker Pro Yes
FileMaker Server scheduled script No
FileMaker Go Yes
Custom Web Publishing No
FileMaker WebDirect Yes
Runtime solution Yes

FILEMAKER PRO HELP 1145
•To develop more-complex custom dialog boxes, you can use the New Window script step.
Example 1
Performs a find. If no records were found, displays a custom dialog.
Perform Find [Restore]
If [Get (FoundCount) = 0]
Show Custom Dialog ["No records were found."]
End If
Example 2
Creates a new record, prompts the user to enter information, then goes to the Customer Details
layout. The first button is Cancel so that users don't inadvertently create a record by pressing Return
or Enter in the custom dialog.
Freeze Window
New Record/Request
Show Custom Dialog ["New Customer"; "Enter information into the fields
below:"; Customers::Company; Customers::Name; Customers::City]
If [Get ( LastMessageChoice ) = 1]
Delete Record/Request [No dialog]
Else
Go to Layout ["Customer Details"]
End If
Example 3
Enters Find mode, prompts the user for find criteria, and performs the find. If the find returns no
records, asks if the user wants to find again, and either performs the script again or halts all scripts.
Script: Find
Enter Find Mode [ ]
Show Custom Dialog ["Find customers by ID, name, or city.";
Customers::ID; Customers::Name; Customers::City]
If [Get ( LastMessageChoice ) = 1]
Perform Find [ ]
If [Get ( FoundCount ) = 0]
Show Custom Dialog ["No records were found. Find again?"]
If [Get ( LastMessageChoice ) = 1]
#Calls this script as a sub-script
Perform Script ["Find"]
Else
Show All Records
#Halts all scripts and sub-scripts
Halt Script
End If
End If
Else If [Get ( LastMessageChoice ) = 2]
Enter Browse Mode [ ]
End If
Related topics
Script steps reference (alphabetical list)

FILEMAKER PRO HELP 1146
Script steps reference (category list)
Allow Formatting Bar
Purpose
Enables or disables display of the formatting bar.
Format
Allow Formatting Bar[<On/Off>]
Options
•On indicates that the formatting bar, the View menu > Formatting Bar menu item, and the
Formatting Bar button in the layout bar are enabled.
•Off hides the formatting bar, disables the View menu > Formatting Bar menu item, and
disables the Formatting Bar button in the layout bar.
Compatibility
Originated in
FileMaker Pro 6.0 or earlier
Description
This script step works in all modes except Layout mode.
Use this script step to disable the formatting bar and menu items related to the formatting bar. This
script step only affects the active window of the file from which the script step is called.
In runtime solutions created with the FileMaker Pro Advanced software, the formatting bar is hidden
in Kiosk mode. Allow Formatting Bar has no effect in Kiosk mode.
Example 1
Goes to the Comment field on the Invoice Details layout and shows the formatting bar.
Go to Layout ["Invoice Details"]
Go to Field [Invoices::Comments]
Allow Formatting Bar [On]
Where the script step runs Supported
FileMaker Pro Yes
FileMaker Server scheduled script No
FileMaker Go No
Custom Web Publishing No
FileMaker WebDirect No
Runtime solution Partial

FILEMAKER PRO HELP 1147
Related topics
Script steps reference (alphabetical list)
Script steps reference (category list)
Refresh Object
Purpose
Updates the content, conditional formatting, and visibility state for the specified object.
Format
Refresh Object [Object Name: <object name>; Repetition: <value or
formula>]
Options
Select Specify to display the "Refresh Object" Options dialog box, where you can set the following
options:
•Object name is a named object on the current layout.
•Repetition (optional) lets you choose which field repetition to refresh. Defaults to 1. This
option is ignored if the object is not a field.
Compatibility
Originated in
FileMaker Pro 13.0
Description
Refresh Object does not support repetition numbers when updating the visibility state of an object
with a hidden condition.
If the specified object is in a portal, Refresh Object updates the object in every visible portal row.
If the repetition calculation returns zero, or the expression does not exist, all repetitions are
refreshed.
Note To update all objects in the current window, use the Refresh Window script step.
Where the script step runs Supported
FileMaker Pro Yes
FileMaker Server scheduled script No
FileMaker Go Yes
Custom Web Publishing No
FileMaker WebDirect Yes
Runtime solution Yes

FILEMAKER PRO HELP 1148
Example 1
Allows the user to log into a different account and updates the visibility state of the Confidential
object. The Confidential object hides when the user is not logged in to the Admin account.
Re-Login [ ]
Refresh Object ["Confidential"]
Related topics
Script steps reference (alphabetical list)
Script steps reference (category list)
Beep
Purpose
Plays a system beep sound.
Format
Beep
Options
None.
Compatibility
Originated in
FileMaker Pro 6.0 or earlier
Example 1
Performs a find. If no records were found, beeps.
Set Error Capture [On]
Perform Find [Restore]
If [Get ( FoundCount ) = 0]
Beep
Show Custom Dialog ["No records were found."]
End If
Where the script step runs Supported
FileMaker Pro Yes
FileMaker Server scheduled script No
FileMaker Go Yes
Custom Web Publishing No
FileMaker WebDirect No
Runtime solution Yes

FILEMAKER PRO HELP 1149
Related topics
Script steps reference (alphabetical list)
Script steps reference (category list)
Speak (OS X)
Purpose
Produces speech from text.
Format
Speak [<text to be spoken>]
Options
Click Specify to display the “Speak” Options dialog box, where you can set the following options.
•Type the text to be spoken directly in the text entry area, or click Specify to create your
spoken text from a calculation.
•Use Voice lets you select from the various voices available on your computer.
•Wait for speech completion before continuing tells FileMaker Pro to wait until the
speech is completed before continuing with the next script step.
Compatibility
Originated in
FileMaker Pro 6.0 or earlier
Description
You can enter a literal text string or use a calculation to create the text to be spoken. You can also
specify which voice synthesizer to use and whether or not to wait for the speech to be completed,
before continuing with the next script step.
If the database is opened on a non-speaking computer, the script can still be edited, but only the
default voice synthesizer is available. Speak script steps are not executed when the script is run on
a non-speaking computer.
Where the script step runs Supported
FileMaker Pro Yes
FileMaker Server scheduled script No
FileMaker Go No
Custom Web Publishing No
FileMaker WebDirect No
Runtime solution Yes

FILEMAKER PRO HELP 1150
Example 1
Tells the user to enter a company name if the Company field is empty. Can be started by the
OnRecordCommit, OnLayoutExit, or OnWindowClose script triggers.
If [IsEmpty ( Contacts::Company )]
Speak ["Enter a company name"]
End If
Example 2
Speaks the contents of the Summary field in the current record.
Go to Layout ["Invoice Details"]
Speak [Invoices::Summary]
Related topics
Script steps reference (alphabetical list)
Script steps reference (category list)
Dial Phone
Purpose
Dials a phone from within a script.
Format
Dial Phone [No dialog; <phone number>]
Options
•Perform without dialog prevents the Dial Phone dialog box from displaying when the script
step executes.
•Click Specify to display the “Dial Phone” Options dialog box where you can set the
following options.
•Phone Number lets you enter a phone number to dial.
•Specify lets you create a calculation to generate the phone number.
•Use Dialing Preferences (if NDISWAN TAPI is not installed) tells FileMaker Pro to use
the current phone dialing preferences, based on your location. These preferences
remove, insert, and append digits to phone numbers, as when a dialing prefix is
required in a business setting. This option can apply to phone numbers provided from a
field value or to a number that the user enters. (If TAPI is installed, modem and dialing
preferences are set in the Phone Dialer accessory application.)
Compatibility
Where the script step runs Supported
FileMaker Pro Yes
FileMaker Server scheduled script No

FILEMAKER PRO HELP 1151
Originated in
FileMaker Pro 6.0 or earlier
Description
You can enter a phone number or specify a calculation to create a phone number. You can specify
number, text, calculation, or global fields. Letters within the phone number are translated to numbers
(except for q and z). You can also choose whether to use the current phone preferences based on
your current location.
Tip To place an international call in FileMaker Go, filter the phone number for numerical digits and
the "+" symbol. Select Use Dialing Preferences to allow the iPhone to automatically detect the
correct country formatting.
Important The Dial Phone script step is not supported in OS X, but you can create scripts that
include the Dial Phone script step to use in FileMaker Go.
Example 1
Dials the phone number contained in the script.
Dial Phone ["5550987654"]
Example 2
Dials the phone number contained in the Work Phone field in the current record.
Go to Layout ["Customer Details"]
If [not IsEmpty ( Customers::Work Phone )]
Dial Phone [No dialog; Customers::Work Phone]
End If
Example 3
Filters the contents of the Work Phone field for appropriate characters and dials the filtered number.
Go to Layout ["Customer Details"]
If [not IsEmpty ( Customers::Work Phone )]
Dial Phone [No Dialog; Filter ( Customers::Work Phone ; "1234567890+"
)]
End If
Related topics
Filter function
Script steps reference (alphabetical list)
Script steps reference (category list)
FileMaker Go Yes
Custom Web Publishing No
FileMaker WebDirect No
Runtime solution Yes
Where the script step runs Supported

FILEMAKER PRO HELP 1152
Install Plug-In File
Purpose
Installs or updates a plug-in file from a container field onto your computer.
Format
Install Plug-In File[<table::field>]
Options
Select Specify target field or click Specify to specify the container field with the plug-in that you
want to install or update. If no field is specified, FileMaker Pro installs the plug-in in the current
container field in the active table.
Compatibility
Originated in
FileMaker Pro 12.0
Description
You must insert the plug-in in a container field before you can install or update the plug-in. For more
information, see Insert File or Installing plug-ins.
FileMaker Pro installs plug-ins in the following locations:
Where the script step runs Supported
FileMaker Pro Yes
FileMaker Server scheduled script Yes
FileMaker Go No
Custom Web Publishing Yes
FileMaker WebDirect Yes
Runtime solution Yes
Operating
system Product Plug-ins are installed in this folder
Windows 7 or
Windows 8
FileMaker Pro C:\users\user_name\AppData\Local\FileMaker\FileMaker Pro\
13.0\Extensions\
FileMaker Pro
Advanced
C:\users\user_name\AppData\Local\FileMaker\FileMaker Pro
Advanced\13.0\Extensions\
OS X FileMaker Pro Macintosh HD/Users/user_name/Library/Application Support/
FileMaker/FileMaker Pro/13.0/Extensions
FileMaker Pro
Advanced
Macintosh HD/Users/user_name/Library/Application Support/
FileMaker/FileMaker Pro Advanced/13.0/Extensions

FILEMAKER PRO HELP 1153
Only FileMaker plug-in files can be installed. If a non-plug-in file is located in the target or active
container field, no action takes place when the script runs. Plug-in files have the extension .fmx
(Windows) or .fmplugin (OS X).
Compressed plug-in files in .zip format or plug-in files in .tar format can’t be installed.
You can use the Get(InstalledFMPlugins) function to identify the name, version, and enabled state of
an installed plug-in. This function can help you determine whether the installed plug-in is newer or
older than the plug-in required by the solution file. See Get(InstalledFMPlugins).
Plug-ins must be enabled in the plug-in preferences for FileMaker Pro to recognize them. If the
Install Plug-In File script step installs a plug-in update but the plug-in is disabled in the plug-in
preferences, FileMaker Pro installs the update but does not enable the plug-in. See Setting plug-in
preferences.
Note The system administrator can use the personalization file during a volume license installation
to disable plug-ins and prevent plug-in updates from installing in FileMaker Pro. For more
information, see the FILEMAKER PRO NETWORK INSTALL SETUP GUIDE.
Example 1
Installs the Video plug-in.
Show Custom Dialog ["Do you want to install the latest version of the
Video Plug-In?"]
If [Get ( LastMessageChoice ) = 1]
Install Plug-In File[Plugins::Video]
End If
Related topics
Script steps reference (alphabetical list)
Script steps reference (category list)
Install Menu Set
Purpose
Changes the menu set based on conditions established in the script.
Format
Install Menu Set [Specified menu set name; Use as file default]
Options
Use As File Default overrides the file’s default menu set specified in the Manage Custom Menus
dialog box with the menu set specified in this script step. Once you close the file, the default menu
set reverts to the one specified in the Manage Custom Menus dialog box. Select the menu set that
you want the script step to install from the list.
Compatibility
Where the script step runs Supported
FileMaker Pro Yes

FILEMAKER PRO HELP 1154
Originated in
FileMaker Pro 8.0
Example 1
Goes to the Invoice Details layout and installs the Invoices Menu Set if the Print Invoices Menu Set
was installed.
Go to Layout ["Invoice Details"]
If [Get ( CustomMenuSetName ) = "Print Invoices Menu Set"]
Install Menu Set [“Invoices Menu Set”]
End If
Related topics
Get(CustomMenuSetName) function
Script steps reference (alphabetical list)
Script steps reference (category list)
Set Web Viewer
Purpose
Controls the specified web viewer.
Format
Set Web Viewer [Object Name: “<object name>”; Action: <action>]
Options
Click Specify to display the Set Web Viewer Options dialog box, where you can set the following
options:
•Object Name is the name of the web viewer to act upon. To assign an object name, select
the web viewer, choose View menu > Inspector in Layout mode. Click Position, then enter
a name for the object.
•For Action, choose one of the following:
•Reset resets the named web viewer to its originally specified web address. This action
also clears this web viewer’s Back and Forward history.
•Reload reloads the web page that the web viewer is displaying.
•Go Forward goes forward one page, the same way a web browser does.
FileMaker Server scheduled script No
FileMaker Go Yes
Custom Web Publishing No
FileMaker WebDirect No
Runtime solution Yes
Where the script step runs Supported

FILEMAKER PRO HELP 1155
•Go Back goes back one page, the same way a web browser does.
•Go to URL lets you specify a new web address to load in the web viewer. The new web
address is a calculation that you specify in the “Set Web Viewer - Go to URL” Options
dialog box. In this script step, you cannot change whether the web viewer allows
interaction, shows a progress bar or status messages, displays content in Find mode, or
automatically encodes a URL. You can set these options only when you add or change
a web viewer in Layout mode.
Compatibility
Originated in
FileMaker Pro 8.5
Description
Click Specify to open the Set Web Viewer Options dialog box and specify the web viewer’s object
name and the action to be performed.
Notes
•This script step works only for named web viewer objects.
To specify the object name, either type the name in the Object Name box or click Specify and
create a calculation.
If you choose the action Go to URL:
•You specify a web address in much the same way you do when you create a web
viewer on a layout. For more information, see Adding a web viewer and Defining a
custom web address.
•You can send html data to a web viewer by including the data in a URL, using the
following format:
data:[<mediatype>][;base64],<data>
Where the following syntax applies:
dataurl = "data:" [ mediatype ] [ ";base64" ] "," data
mediatype = [ type "/" subtype ] *( ";" parameter )
data = *urlchar
parameter = attribute "=" value
More information about the “data URL scheme” can be found on the web.
Where the script step runs Supported
FileMaker Pro Yes
FileMaker Server scheduled script No
FileMaker Go Yes
Custom Web Publishing No
FileMaker WebDirect Partial
Runtime solution Yes

FILEMAKER PRO HELP 1156
•FileMaker Pro supports only UTF-16 character encoding. Character data encoded using
other methods will not display the target of the URL.
•FileMaker WebDirect does not support the GoForward and GoBack options.
Example 1
Resets the web viewer named Product Website to its originally specified web address.
Set Web Viewer [Object Name: "Product Website"; Action: Reset]
Example 2
Displays the FileMaker, Inc. homepage in the Product Website web viewer:
Set Web Viewer [Object Name: "Product Website"; URL: "http://
www.filemaker.com"]
Example 3
Displays the URL entered in the Website field in the Product Website web viewer:
Set Web Viewer [Object Name: "Product Website"; URL: Products::Website]
Example 4
Uses the data URL scheme to display a small icon in a web viewer named WV2.
Set Web Viewer [Object Name: "WV2"; URL: "data:image/
gif;base64,R0lGODlhFwAMAKEAAL+/v///
AAAAUwAAACH5BAEAAAAALAAAAAAXAAwAAAI7hBGHapHcXJKPumizpigI+QliSH0XIjokWJ6oB
4+qt0Zmaqpjesxz7st1YD8ZEbhJajAuDgfSYTx60wIAOw=="]
Related topics
Script steps reference (alphabetical list)
Script steps reference (category list)
Working with web viewers on layouts
Naming objects
Adding a web viewer
Open URL
Purpose
Allows the user to open a URL.
Format
Open URL [No dialog; <URL>]
Options
•Perform without dialog prevents the “Open URL” Options dialog box from displaying when
the script step executes.

FILEMAKER PRO HELP 1157
•Click Specify to display the “Open URL” Options dialog box, where you can type the URL
directly in the text entry area or click Specify to create your URL from a calculation.
Compatibility
Originated in
FileMaker Pro 6.0 or earlier
Description
Windows:
Open URL supports http, https, ldap, ldaps, ftp, file, and mailto URL types. For example, if the
URL starts with http, FileMaker Pro opens the user's web browser and processes the URL.
Note FileMaker Pro uses the preferences stored in the Windows system file URL.DLL to determine
the application to handle the URL. The URL is then passed to ShellExecute for execution.
OS X:
If the user has configured the internet system preferences, this script step allows the user to open a
URL. Open URL supports http, https, ldap, ldaps, ftp, file, and mailto URL types, using the
applications specified in either the control panel or system preferences. For example, if the URL
starts with http, FileMaker Pro opens the user's web browser and processes the URL.
Example 1
Opens the user's web browser and displays the FileMaker, Inc. homepage.
Open URL [No dialog; "http://www.filemaker.com/"]
Example 2
Opens Windows Notepad and opens the file My_File.txt on the root level of the user's hard disk.
Open URL [No dialog; "file://c:/My_File.txt"]
Example 3
Launches the default email application, opens a new email message, and uses the value in the
Email field to address the message.
Open URL [No dialog; "mailto:" & Customers::Email]
Example 4
Opens a shared FileMaker Pro file running on another system.
Where the script step runs Supported
FileMaker Pro Yes
FileMaker Server scheduled script No
FileMaker Go Yes
Custom Web Publishing No
FileMaker WebDirect Yes
Runtime solution Yes

FILEMAKER PRO HELP 1158
Open URL [No dialog; "fmp://account:password@host/database"]
#where "account" is the FileMaker Pro account name, "password" is the
account password, "host" is a DNS entry, IPv4 address, or IPv6 address for
the machine where the file resides, and "database" is the FileMaker Pro
filename.
Important Account name and password information entered in an Open URL script step is visible
to users with script editing access privileges, and is therefore not secure.
Related topics
Script steps reference (alphabetical list)
Script steps reference (category list)
Send Mail
Purpose
Sends an intranet or internet email message (with or without a file attachment) to one or more
recipients. Email can be sent through an email application or via SMTP (Simple Mail Transfer
Protocol, a set of criteria for sending and receiving email).
Format
Send Mail [Send via E-mail Client/Send via SMTP Server]; No dialog; To:
“<to>”; CC: “<CC>”; BCC: “<BCC>”;
Subject: “<subject>”; Message: “<message>”; “<attachment>”]
Options
•Perform without dialog instructs FileMaker Pro to put the composed email message in the
email application's outbox, ready to be sent. If this option is not selected, the composed
message is left open in the email application so it can be reviewed. In some email
applications, the new message is left in the Drafts folder.
•Click Specify to display the Send Mail dialog box, where you can set options for your mail.
Choose the method by which to send mail, E-Mail Client or SMTP Server. (If you choose
SMTP Server, the SMTP Options dialog box appears. For information about setting SMTP
options, see Entering or editing SMTP options.) Then choose to create One email using
data from the current file, or create Multiple emails (one for each record in found set).
Note If you choose SMTP Server and Multiple emails (one for each record in the found
set) and FileMaker encounters an error while emailing one of the records, the remaining records
will not be sent.
For each of the following options, you can enter text directly, or click to enter values from an
address book (Windows), field, or calculation.
•(Windows) Select Specify Email Addresses to enter one or more email addresses.
Separate each address with a semicolon or a carriage return character.
•Select Specify Field Name to specify a field that contains one or more email addresses.

FILEMAKER PRO HELP 1159
•Select Specify Calculation to specify a calculation that generates one or more email
addresses.
•If you use the Specify Field Name option to specify a value for the To, CC, or BCC entries,
you can also select Collect addresses across found set to specify that all the values from
this field in the current found set be used (to address a message to multiple recipients).
•To stores the address(es) of the recipient(s).
•CC stores the address(es) of the carbon copy recipient(s).
•BCC stores the address(es) of the blind carbon copy recipient(s)
•Subject indicates the title for the email message.
•Message indicates the text of the email message. You can type the message as text, use a
field value, create a message from a calculation, or insert text from a file.
•Select Attach File to select a file to send as an attachment to the mail message. For more
information, see Creating file paths.
Compatibility
Originated in
FileMaker Pro 6.0 or earlier
Description
•Sending mail using an email application is not supported in Custom Web Publishing or in
FileMaker Server scheduled scripts.
•FileMaker Server scheduled scripts support sending mail via SMTP. However, if you attach
a file, that file needs to be in a folder that FileMaker Server is allowed to export to. For more
information, see Get(DocumentsPath) function.
•FileMaker WebDirect does not support the Perform without dialog or Attach File options.
•To send email, you must have an internet connection. In addition, to send mail through an
email application, you must have the following configurations.
Windows:
•A [Mail] section in the Win.ini file.
•Microsoft Exchange or Microsoft Outlook installed and configured properly.
OS X:
•OS X Mail or Microsoft Outlook installed to send email with FileMaker Pro.
•Internet system preferences configured for use with one of the supported mail
applications.
Where the script step runs Supported
FileMaker Pro Yes
FileMaker Server scheduled script Partial
FileMaker Go Yes
Custom Web Publishing Partial
FileMaker WebDirect Partial
Runtime solution Yes

FILEMAKER PRO HELP 1160
•If you select Multiple emails and Collect addresses across found set, FileMaker Pro
generates an email message for every record in the found set. Each message is addressed
to everyone specified in the TO, CC and BCC boxes for every record in the found set.
•You can create an Adobe PDF or a Microsoft Excel file from your data to send as an
attachment. For more information, see Save Records As PDF and Save Records As Excel.
•The Send Mail script step does not control the font’s appearance. Use the email client to
make any changes to the font.
•FileMaker Pro sends email messages as plain text. To edit the message's contents and
formatting, choose to send the message through an email client and do not select the
Perform without dialog option. You can then edit the message within the email client
before it is sent.
Example 1
Goes to the Customers layout, performs a find, and sends a prewritten email to the address in the
Email field in the current record without prompting the user.
Go to Layout ["Customers"]
Perform Find [Restore]
Send Mail [Send via E-mail Client; No dialog; To: Customers::Email;
Subject: Invoices::Summary; Message: "Dear Customer,¶¶Thank you for your
business."]
#The Collect addresses across found set option is not selected.
Example 2
Saves the current record as a PDF, then emails the PDF to the address in the Email field in the
current record.
Go to Layout ["Print Invoices"]
Save Records As PDF [Restore; No dialog; "Invoice.pdf"; Current record]
Send Mail [Send via E-mail Client; No dialog; To: Customers::Email;
Subject: Invoices::Summary; Message: "Dear Customer,¶¶Thank you for your
business. Your invoice is attached."; "Invoice.pdf"]
Go to Layout [original layout]
Related topics
Script steps reference (alphabetical list)
Script steps reference (category list)
Send DDE Execute (Windows)
Purpose
Sends a DDE (Dynamic Data Exchange) command to another application to execute a series of
commands available in that application.
Format
Send DDE Execute [<topic text or filename>; <service name>]

FILEMAKER PRO HELP 1161
Options
Click Specify to display the “Send DDE Execute” Options dialog box, where you can set the
following options:
•Service name is the name of the application that executes the commands. Refer to the
documentation of the application you specify for the valid service name. You can enter the
service name directly as text or click Specify to create the service name from a calculation.
•Topic is a filename or text string that describes the topic that the application executes the
commands on. Refer to the documentation of the application specified in the Service Name
for valid topics. You can enter the topic name directly as text or click Specify to create the
topic name from a calculation. For more information, see Creating file paths.
•Commands are a calculated value or text string that specifies what the application does.
Refer to the documentation of the application specified in the Service Name for valid
commands and formats. You can enter the commands directly as text or click Specify to
create the commands from a calculation.
Compatibility
Originated in
FileMaker Pro 6.0 or earlier
Description
•FileMaker Pro sends DDE execute commands, but does not receive them.
•Because DDE is a Windows feature, if you run a script containing a Send DDE execute
script step on an OS X-based computer, the script step is ignored. (An error code is
generated, which can be captured with the Get(LastError) function.)
•When a FileMaker Pro script first establishes a DDE connection, the connection stays open
to execute subsequent script steps for the same service name and topic. If the script
includes another DDE Execute script step using a different service name or topic,
FileMaker Pro closes the current connection and opens another with the new service name
and topic. All open connections close when the script is completed.
Example 1
Opens a URL in Internet Explorer. (Internet Explorer must be open when this step executes.)
Send DDE Execute [Service Name: "iexplore"; Topic: "WWW_OpenURL";
Commands: "www.filemaker.com"]
Where the script step runs Supported
FileMaker Pro Yes
FileMaker Server scheduled script No
FileMaker Go No
Custom Web Publishing No
FileMaker WebDirect No
Runtime solution Yes

FILEMAKER PRO HELP 1162
Related topics
Script steps reference (alphabetical list)
Script steps reference (category list)
Perform AppleScript (OS X)
Purpose
Sends AppleScript commands to another application.
Format
Perform AppleScript [“<applescript text>”]
Options
Click Specify to display the “Perform AppleScript” Options dialog box, where you can set the
following options.
•Calculated AppleScript lets you create a calculation to use as the AppleScript text.
•Native AppleScript lets you manually enter the text of an AppleScript (up to 30000
characters). Indenting of repeat loops and conditional statements is not supported.
Compatibility
Originated in
FileMaker Pro 6.0 or earlier
Description
You can create a calculation to generate the AppleScript commands to be sent, or you can type the
commands directly into the Native AppleScript text area.
For calculated scripts and scripts stored in FileMaker Pro fields, the AppleScript commands are
compiled each time the script is performed. If you type the script into the Native AppleScript text
area, then FileMaker Pro compiles the script and detects any scripting or system errors. (The script
is recompiled whenever it's edited.)
Note Because AppleScript is an OS X feature, if you run a script containing a Perform AppleScript
script step on a Windows computer, the script step is ignored. (An error code is generated, which
can be captured with the Get(LastError) function.)
Where the script step runs Supported
FileMaker Pro Yes
FileMaker Server scheduled script No
FileMaker Go No
Custom Web Publishing No
FileMaker WebDirect No
Runtime solution Yes

FILEMAKER PRO HELP 1163
Tips on usage
•FileMaker Pro can use the Perform AppleScript script step to send Apple events to itself
or to FileMaker Pro software running on other machines.
•Use Perform AppleScript to pass image data between FileMaker Pro and other
applications. With AppleScript, you can pass images stored in container fields to other
applications or pass images into FileMaker Pro container fields.
•Use Perform AppleScript to communicate with applets and other scriptable applications.
For example, if you have created an AppleScript applet with sub-routines, you can call
the handlers using the Perform AppleScript command, like this:
Perform AppleScript ["tell application "My Applet" to
doMyRoutine()"]
Example 1
Opens the Documents folder of the current OS X User.
Perform AppleScript ["tell application "Finder" (*enter line break*)
activate (*enter line break*) set x to path to documents folder (*enter
line break*) open x (*enter line break*) end tell"]
Example 2
Sets the bounds of the Documents window to the specified size. The Documents folder must be
open before this script runs.
Perform AppleScript ["tell application "Finder" to set bounds of window
"Documents" to {170, 70, 1000, 600}"]
Example 3
Calculates and performs the AppleScript to install a network printer. "\" tells FileMaker Pro to
recognize the symbol that follows as a character and not as a calculation operator.
Perform AppleScript ["do shell script \"lpadmin -p " & Printers::Name & "
-E -v lpd://" & Printers::IP Address & " -P /Library/Printers/PPDs/
Contents/Resources/" & Substitute ( Printers::Driver Name ; " " ; "\\\ " )
& ".gz -D \\\"" & Printers::Description & "\\\"\""]
Related topics
Script steps reference (alphabetical list)
Script steps reference (category list)
Execute SQL
Purpose
Executes any SQL statement on an ODBC data source.
Format
Execute SQL [No Dialog; ODBC: <datasource name>; <native SQL
or calculated SQL>]

FILEMAKER PRO HELP 1164
Options
•Perform without dialog prevents the Specify SQL dialog box, the Select ODBC Data
Source dialog box, and the Password dialog box from displaying when the script step
executes.
•Click Specify to display the Specify SQL dialog box, where you can set the following
options.
•Specify displays the Select ODBC Data Source dialog box. Select a data source from
the list, click OK, and enter a valid user name and password.
Note Select Save user name and password if you selected Perform without dialog, or
users may be unable to access your data source.
•Calculated SQL text lets you create a calculation to use as the SQL query.
•SQL text lets you manually enter a SQL query statement.
Compatibility
Originated in
FileMaker Pro 6.0 or earlier
Description
You can use this script step to manage data in an ODBC data source through an ODBC SQL
interface. This provides more control over the FileMaker Pro interaction with ODBC data sources.
You can add multiple Execute SQL steps to a script.
Important See Get functions for information about error handling.
•Get(LastODBCError) function returns the latest error state returned by ODBC.
•Get(LastError) function returns the last FileMaker Pro error.
Notes
•SQL statements are limited to a maximum length of 256 K characters (512 KB).
•FileMaker Server, FileMaker WebDirect, and Custom Web Publishing support this script
only if the Perform without dialog option is selected.
•If you use the Execute SQL script step to send ODBC data that contains Unicode strings,
your ODBC driver must support Unicode. Otherwise, the results may be inconsistent.
•ODBC import, the Execute SQL script step, and external SQL data sources are not
supported in runtime solutions created with FileMaker Pro Advanced.
Where the script step runs Supported
FileMaker Pro Yes
FileMaker Server scheduled script Partial
FileMaker Go No
Custom Web Publishing Partial
FileMaker WebDirect Partial
Runtime solution No

FILEMAKER PRO HELP 1165
•Because Microsoft SQL Server supports both Unicode and non-Unicode field types, you
must prefix all Unicode strings with an uppercase “N” (which stands for “National” in the
SQL-92 standard). Otherwise, when a Unicode string containing non-English characters is
passed to Microsoft SQL Server, you may lose any data that doesn’t exist in the Microsoft
SQL Server code page.
Example 1
Updates records in the Employees table of an external ODBC data source.
Execute SQL [SQL Text: INSERT INTO Employees (EmployeeID, FirstName,
LastName, Title, WorkPhone, Salary) VALUES (100, N'Joe', N'Smith',
N'Software Engineer', '987-7000', 100000) UPDATE Employees SET Title =
N'Manager' WHERE EmployeeID = 103 DELETE FROM Employees WHERE EmployeeID =
103]
Example 2
Calculates and performs an SQL statement to update records in the Customers table of an external
ODBC data source.
Execute SQL [Calculated SQL Text: "INSERT INTO Customers (Company,
LastName) VALUES (" & Customers::Company & "," & "N'" & Customers::Last &
"')"]
Related topics
Script steps reference (alphabetical list)
Script steps reference (category list)
Send Event (OS X)
Purpose
Sends an Apple event to another application, called the target application.
Format
Send Event ["<Target Application>"; "<Event Class>"; "<Event ID>",
"<Document or Calculation or Script Text>"]
Options
Click Specify to display the “Send Event” Options dialog box, where you can set the following
options.
•Send the <value> event with lets you choose between the following:
•open application tells FileMaker Pro to open an application. Click Specify
Application to select the application.
•open document tells FileMaker Pro to open a document in the target application. You
can also specify a calculated value or script.
•do script tells FileMaker Pro to perform a script in the language of the target
application. Click Specify Application to select an application, and use Document to
select the document to use with the target application. Or, select Script text and enter

FILEMAKER PRO HELP 1166
script text or type in the name of the script (make sure it is one that will be recognized
by the target program).
•other displays the Specify event dialog box, where you can manually enter the Apple
event Event class and Event ID.
•Select Document or click Specify to select the document you want used with the target
application. For more information, see Creating file paths.
•Select Calculation or click Specify to create a calculation that generates a value you want
to send with the event.
•Bring Target Application to foreground activates the target application and displays it on
the screen. Displaying the target application can slow down the performance of your script.
If Bring Target Application to foreground is not selected, the event is performed in the
background.
•Wait for event completion before continuing tells FileMaker Pro to wait until the event is
finished before continuing. If you don't want to wait until the event is completed, deselect
this option.
•Copy event result to the clipboard copies the resulting events data to the Clipboard, from
which it can later be retrieved. This option is disabled if Bring Target Application to
foreground is selected.
•Click Specify Application to display a dialog box where you can select the target
application.
Compatibility
Originated in
FileMaker Pro 6.0 or earlier
Description
Select the event you want to send in the “Send Event” Options dialog box.
•When FileMaker Pro sends an Apple event, it sends text (not compiled) data. You must
know what information the target application expects to receive with an event.
•Each Send Event script step sends one event. You can include more than one Send Event
in a script.
Example 1
Opens the TextEdit application.
Send Event ["TextEdit", "aevt", "oapp"]
Where the script step runs Supported
FileMaker Pro Yes
FileMaker Server scheduled script No
FileMaker Go No
Custom Web Publishing No
FileMaker WebDirect No
Runtime solution Yes

FILEMAKER PRO HELP 1167
Related topics
Script steps reference (alphabetical list)
Script steps reference (category list)
Send Event (Windows)
Purpose
Starts another application, opens a document in another application, or prints a document in another
application.
Format
Send Event [“<aevt>”; “<event name>”; “<filename>”]
Options
Click Specify to display the “Send Event” Options dialog box, where you can set the following
options.
•For Send the <event name> message, select:
•open document/application to tell FileMaker Pro to open a document file or
application. Documents are opened using the application that Windows has associated
with the document’s file type.
•print document to tell FileMaker Pro to print a document in another application.
•Select File or click Specify to specify a document/application to open, or a document to
print. For more information, see Creating file paths.
•Select Calculation or click Specify to create a message from a calculation.
•Select Text to manually enter text for the message to be sent.
•Select Bring target application to foreground to activate the target application and
display it on the screen. Displaying the target application can slow down the performance of
your script. If Bring target application to foreground is not selected, the event is
performed in the background.
Compatibility
Originated in
FileMaker Pro 6.0 or earlier
Where the script step runs Supported
FileMaker Pro Yes
FileMaker Server scheduled script No
FileMaker Go No
Custom Web Publishing No
FileMaker WebDirect No
Runtime solution Yes

FILEMAKER PRO HELP 1168
Description
For additional scripting capabilities, you can create a program in Basic or C and run that program
with this script step.
Note When specifying a document or application by calculation or text, the file type or application
name will appear as <unknown> in the script definition.
Example 1
Opens the Notepad application.
Send Event ["aevt"; "odoc"; "NOTEPAD.EXE"]
Example 2
Opens the image.bmp file with its default application.
Send Event ["aevt"; "odoc"; "image.bmp"]
Related topics
Defining calculation fields
Script steps reference (alphabetical list)
Script steps reference (category list)
Comment
Purpose
Adds comments to the list of steps in the script.
Format
#<comment text>
Options
Click Specify to display a dialog box to enter the comment text.
Compatibility
Originated in
FileMaker Pro 6.0 or earlier
Where the script step runs Supported
FileMaker Pro Yes
FileMaker Server scheduled script Yes
FileMaker Go Yes
Custom Web Publishing Yes
FileMaker WebDirect Yes
Runtime solution Yes

FILEMAKER PRO HELP 1169
Description
Use comments to document your script. Comments appear in bold and are prefaced with a #.
Comments are present only when you are viewing the script and do not appear when the script is
performed.
Note Comments print in italics.
Example 1
Shows how comments are used to explain script steps.
Go to Layout ["Invoices"]
#Find all invoices for the current customer
Find Matching Records [Replace; Invoices::Customer ID]
#Sort found set by Invoice ID
Sort Records [Restore; No dialog]
#Save all records in the found set as a PDF
Save Records As PDF [No dialog; "Customer Backup.pdf"; Records being
browsed]
#Go back to the original layout
Go to Layout [original layout]
Related topics
Script steps reference (alphabetical list)
Script steps reference (category list)
Flush Cache to Disk
Purpose
Performs an immediate flush of the FileMaker Pro internal file cache to the computer's hard disk.
Format
Flush Cache to Disk
Options
None.
Compatibility
Where the script step runs Supported
FileMaker Pro Yes
FileMaker Server scheduled script No
FileMaker Go Yes
Custom Web Publishing No
FileMaker WebDirect No
Runtime solution Yes

FILEMAKER PRO HELP 1170
Originated in
FileMaker Pro 6.0 or earlier
Description
FileMaker Pro automatically flushes changes from its internal file cache to the computer's hard disk
during idle time. Use this script step to force FileMaker Pro to flush its internal file cache after
extensive changes have been made through script steps such as the Import Records script step or
the Replace Field Contents script step.
Example 1
Assigns serial numbers to all records in the found set and flushes the changes to the disk.
Perform Find [Restore]
Sort Records [Restore]
Go to Record/Request/Page [First]
Replace Field Contents [Products::Serial Number; Serial numbers]
Flush Cache to Disk
Related topics
Script steps reference (alphabetical list)
Script steps reference (category list)
Exit Application
Purpose
Closes all open files and exits the FileMaker Pro application.
Format
Exit Application
Options
None.
Compatibility
Where the script step runs Supported
FileMaker Pro Yes
FileMaker Server scheduled script Yes
FileMaker Go Partial
Custom Web Publishing No
FileMaker WebDirect Partial
Runtime solution Yes

FILEMAKER PRO HELP 1171
Originated in
FileMaker Pro 6.0 or earlier
Description
•In FileMaker WebDirect, the Exit Application script step logs out the current web session
and returns you to the FileMaker WebDirect Database Homepage.
•In FileMaker Go, the Exit Application script step closes all open databases and leaves
FileMaker Go running.
Example 1
Prevents the user from opening the database on a weekend. Started by the OnFirstWindowOpen
script trigger.
Allow User Abort [Off]
If [DayName ( Get ( CurrentDate ) ) = "Saturday" or DayName ( Get (
CurrentDate ) ) = "Sunday"]
Exit Application
End If
Related topics
Script steps reference (alphabetical list)
Script steps reference (category list)

Script triggers reference
FILEMAKER PRO HELP 1172
Script triggers reference
You can set up a script trigger to specify that a script runs when an event occurs. Click the links for
the topics in this section to see a description of each script trigger.
Related topics
Setting script triggers for layouts
Setting script triggers for objects
Setting file options
OnObjectEnter
Triggers a script to run when a layout object becomes active as a result of the following:
•a user tabs to the object
•a user clicks the object
•a script step causes an object to be entered
•a user moves between repetitions in a repeating field
When the script runs
After the event has been processed.
Modes in which the trigger can be used
Browse and Find modes.
Result
None.
Originated in
FileMaker Pro 10.0
Notes
•The OnObjectEnter, OnObjectExit, and OnObjectKeystroke script triggers can be activated
when assigned to summary and calculation fields.
•If OnObjectEnter is assigned to a portal object, it will activate whenever a different portal
row becomes active. Clicking another object in the same portal row will not cause the
portal’s OnObjectEnter script trigger to activate again.
•OnObjectEnter will not activate from a portal in Find mode.
•When FileMaker Pro switches to Find mode and a field is entered, OnObjectEnter is
activated if the trigger is set to run in Find mode.
•Scrolling does not make the object active and does not activate this script trigger.
•Clicking a button, a popover button, or a panel control does not activate this trigger on the
button or tab. Pressing Tab to navigate to a button or tab and make it the active object does
activate this trigger.
•Closing a popover with the Esc key or the Close Popover script step makes the associated
popover button active and activates the OnObjectEnter script trigger.

Script triggers reference
FILEMAKER PRO HELP 1173
•See Changing object data without activating script triggers for a list of actions that do not
activate this script trigger.
Related topics
Setting up script triggers
Setting script triggers for layouts
Setting script triggers for objects
OnObjectKeystroke
Triggers a script to run when an object is active and receives one or more characters from the
keyboard, either directly or via an input method editor (IME). Use the Get(TriggerKeystroke) function
to return the characters that activated the script trigger.
When the script runs
Before the event has been processed.
Modes in which the trigger can be used
Browse and Find modes.
Result
You can use the Exit Script script step within the triggered script to return True or False.
•True: The event that triggered the script proceeds.
•False: The event that triggered the script is canceled.
Originated in
FileMaker Pro 10.0
Notes
•This script trigger is not supported in FileMaker WebDirect.
•Combining keystrokes in an IME will not activate this trigger. Instead, the trigger activates
after the text is committed in the IME. The triggered script processes the committed string.
•Use the Get(TriggerModifierKeys), Code, and Char functions to work with special
characters such as navigational keys like the Tab and the arrow keys, and with general
Unicode characters. See the Code function for a list of navigational keys and the codes
reported to a script. The Char function returns the characters for Unicode code points.
•Keystrokes are processed in the following order:
1. The operating system processes certain keys.
2. FileMaker Pro processes keyboard shortcut keys.
3. A script triggered by OnObjectKeystroke processes the characters.
4. A script triggered by OnLayoutKeystroke processes the characters.
5. Navigational keys are used for navigation, while non-navigational keys are processed
by the active object if there is one.
6. If there is no active object, an alert displays for non-navigational keys.

Script triggers reference
FILEMAKER PRO HELP 1174
The first of these steps to use the key stops the process. A script executed by the
OnObjectKeystroke or OnLayoutKeystroke script trigger can stop further processing of the
keystroke by returning False.
•Keyboard shortcuts such as cut and paste actions (Windows: Ctrl-X, Ctrl-V; OS X:
Command-X, Command-V) will not activate this script trigger.
•Using the arrow keys or mouse to navigate and select within pop-up lists, menus, and
calendars will not activate this trigger. Entering text into these fields will activate this trigger.
•The OnObjectKeystroke and OnLayoutKeystroke script triggers do not activate if the active
object is a web viewer.
•The OnObjectEnter, OnObjectExit, and OnObjectKeystroke script triggers can be activated
when assigned to summary and calculation fields.
•See Changing object data without activating script triggers for a list of actions that do not
activate this trigger.
Related topics
Setting up script triggers
Setting script triggers for layouts
Setting script triggers for objects
OnObjectModify
Triggers a script to run when the value associated with an object changes as a result of the
following:
•a user types into an object
•a user clicks an object such as a checkbox and causes the value to change
•edit operations such as cut, paste, and clear
•script steps such as the Insert Text script step that change a field
When the script runs
After the event has been processed.
Modes in which the trigger can be used
Browse and Find modes.
Result
None.
Originated in
FileMaker Pro 10.0
Notes
•This script trigger activates if used in a panel control when the panels are switched.
•This script trigger will not activate a script when the following operations are performed:
•those described in Changing object data without activating script triggers
•a window is refreshed to update data from an external data source

Script triggers reference
FILEMAKER PRO HELP 1175
•auto-enter fields are updated
•The OnObjectModify script trigger can be set for summary and calculation fields, but it will
not activate.
Related topics
Setting up script triggers
Setting script triggers for layouts
Setting script triggers for objects
OnObjectValidate
Triggers a script to run before an active object has been validated and saved.
When the script runs
Before the event has been processed.
Modes in which the trigger can be used
Browse and Find modes.
Result
You can use the Exit Script script step within the triggered script to return True or False.
•True: The event that triggered the script proceeds.
•False: The event that triggered the script is canceled.
Originated in
FileMaker Pro 11.0
Notes
•This script trigger activates only when the selected field data has been changed.
•See Changing object data without activating script triggers for a list of actions that do not
activate this script trigger.
Related topics
Setting up script triggers
Setting script triggers for layouts
Setting script triggers for objects
OnObjectSave
Triggers a script to run after object data has been validated and saved, but before the field is exited.
When the script runs
After the event has been processed.
Modes in which the trigger can be used
Browse and Find modes.

Script triggers reference
FILEMAKER PRO HELP 1176
Result
You can use the Exit Script script step within the triggered script to return True or False.
•True: The event that triggered the script proceeds.
•False: The event that triggered the script is canceled, but the object is saved and the field
that was active before the event that triggered the script remains active.
Originated in
FileMaker Pro 10.0
Notes
•This script trigger activates only when the selected field data has been changed.
•See Changing object data without activating script triggers for a list of actions that do not
trigger a script.
Related topics
Setting up script triggers
Setting script triggers for layouts
Setting script triggers for objects
OnObjectExit
Triggers a script to run before an active object is exited as a result of the following:
•a user tabs away from an object
•a user clicks a different object
•a script step attempts to make a different object be the active object
•a user requests a dialog box that would normally cause the field to be exited
•a user attempts to move between rows in a portal object
•a user attempts to move between repetitions in a repeating field
When the script runs
Before the event has been processed.
Modes in which the trigger can be used
Browse and Find modes.
Result
You can use the Exit Script script step within the triggered script to return True or False.
•True: The event that triggered the script proceeds.
•False: The event that triggered the script is canceled.
Originated in
FileMaker Pro 10.0

Script triggers reference
FILEMAKER PRO HELP 1177
Notes
•The trigger will activate regardless of how the object is formatted.
•If the object is set to not allow entry, the script can only be triggered if the object is entered
using a script step.
•The OnObjectEnter, OnObjectExit, and OnObjectKeystroke script triggers can be activated
when assigned to summary and calculation fields.
•Clicking into a different portal row will activate the OnObjectExit script trigger set on the row
being exited and then the OnObjectEnter script trigger for the new row. As with
OnObjectExit script triggers assigned to other objects, the script trigger is activated before
the exit occurs, and the script determines whether the exit is successful based on the script
result.
•Scrolling does not make the object active and does not activate this script trigger.
•See Changing object data without activating script triggers for a list of other actions that do
not activate this script trigger.
•OnObjectExit will not activate from a portal in Find mode.
Related topics
Setting up script triggers
Setting script triggers for layouts
Setting script triggers for objects
OnPanelSwitch
Triggers a script to run when a panel control changes panels. This can happen, for example, when
the focus in a panel control moves to a different panel or when a user clicks an inactive panel in a
panel control.
When the script runs
Before the event has been processed.
Modes in which the trigger can be used
Browse and Find modes.
Result
You can use the Exit Script script step within the triggered script to return True or False.
•True: The event that triggered the script proceeds.
•False: The event that triggered the script is canceled.
Originated in
FileMaker Pro 12.0
Notes
OnPanelSwitch applies to the entire panel control and not to individual panels. To control switching
to particular panels, use the Get(TriggerCurrentPanel) and Get(TriggerTargetPanel) functions.

Script triggers reference
FILEMAKER PRO HELP 1178
Related topics
Setting up script triggers
Setting script triggers for layouts
Setting script triggers for objects
OnRecordLoad
Triggers a script to run after a record is made current or entered, such as after a user or script
switches to a layout, switches records, opens a new window, creates or deletes a record, or
performs a Find operation.
When the script runs
After the event has been processed.
Modes in which the trigger can be used
Browse and Find modes.
Result
None.
Originated in
FileMaker Pro 10.0
Notes
•FileMaker Pro does not pass information regarding which record activated the script. You
may want to use additional script triggers to capture that information.
•See Changing object data without activating script triggers for a list of actions that do not
activate this script trigger.
Related topics
Setting up script triggers
Setting script triggers for layouts
Setting script triggers for objects
OnRecordCommit
Triggers a script to run before a record that has been changed is committed.
Actions that cause a record to be committed include:
•a user changes data in a record and moves to another record
•a user changes a record and immediately accesses the Manage Database dialog box
•a user presses the Enter key
•a user clicks the layout outside of the activated record after the record has been modified
•script steps that move focus to a different record if the previous record was modified
•a script performs a Commit Records/Requests script step

Script triggers reference
FILEMAKER PRO HELP 1179
When the script runs
Before the event has been processed.
Modes in which the trigger can be used
Browse and Find modes.
Result
You can use the Exit Script script step within the triggered script to return True or False.
•True: The event that triggered the script proceeds.
•False: The event that triggered the script is canceled.
Originated in
FileMaker Pro 10.0
Notes
•Moving from record to record inside a portal does not cause a commit; those changed
records are committed when the focus leaves the main record to which they are related.
•This trigger fires only when there are uncommitted record changes.
•Exiting a record that had keyboard focus activates this script trigger only when the record
being exited was changed.
•See Changing object data without activating script triggers for a list of other actions that do
not activate this script trigger.
Related topics
Setting up script triggers
Setting script triggers for layouts
Setting script triggers for objects
OnRecordRevert
Triggers a script to run before a set of records is reverted by the Records menu > Revert Record
command or by the Revert Record/Request script step. This also triggers a script to run by reverting
from a validation error dialog.
When the script runs
Before the event has been processed.
Modes in which the trigger can be used
Browse and Find modes.
Result
You can use the Exit Script script step within the triggered script to return True or False.
•True: The event that triggered the script proceeds.
•False: The event that triggered the script is canceled.

Script triggers reference
FILEMAKER PRO HELP 1180
Originated in
FileMaker Pro 10.0
Notes
•This trigger fires only when there are uncommitted record changes.
•Clicking Revert Field in a field validation error dialog box does not activate this script trigger.
•See Changing object data without activating script triggers for a list of other actions that do
not activate this script trigger.
Related topics
Setting up script triggers
Setting script triggers for layouts
Setting script triggers for objects
OnLayoutKeystroke
Triggers a script to run when one or more characters are entered from the keyboard either directly or
via an input method editor (IME). Use the Get(TriggerKeystroke) function to return the characters
that activated the script trigger.
Two types of characters may cause this trigger to activate:
•keys that would normally be applied to an active object
•keys normally used for navigation
When the script runs
Before the event has been processed.
Modes in which the trigger can be used
Browse, Find, and Preview modes.
Result
You can use the Exit Script script step within the triggered script to return True or False.
•True: The event that triggered the script proceeds.
•False: The event that triggered the script is canceled.
Originated in
FileMaker Pro 10.0
Notes
•This script trigger is not supported in FileMaker WebDirect.
•Use the Get(TriggerModifierKeys), Code, and Char functions to work with special
characters such as navigational keys like the Tab and the arrow keys, and with general
Unicode characters. See the Code function for a list of navigational keys and the codes
reported to a script. The Char function returns the characters for Unicode code points.
•Keystrokes are processed in the following order:

Script triggers reference
FILEMAKER PRO HELP 1181
1. The operating system processes certain keys.
2. FileMaker Pro processes keyboard shortcut keys.
3. An active object with an OnObjectKeystroke script trigger can process a character.
4. An OnLayoutKeystroke script trigger can process a character.
5. Navigational keys are used for navigation, while non-navigational keys are processed
by an active object with an OnObjectKeystroke script trigger.
6. If there is no active object, an alert displays for non-navigational keys.
The first of these steps to use the key stops the process. A script executed by the
OnObjectKeystroke or OnLayoutKeystroke script trigger can stop further processing of the
keystroke by returning False.
•Using the arrow keys or mouse to navigate and select within pop-up lists, menus, and
calendars will not activate this trigger. Entering text into these fields will activate this trigger.
•Windows: The Alt and Ctrl keys do not activate this script trigger.
•OS X: The Command key does not activate this script trigger.
•If an error in the triggered script causes the script not to finish, the keystroke that triggered
the script is not processed.
•See Changing object data without activating script triggers for a list of other actions that do
not activate this script trigger.
Related topics
Setting up script triggers
Setting script triggers for layouts
Setting script triggers for objects
OnLayoutEnter
Triggers a script to run after a layout is loaded.
When the script runs
After the event has been processed.
Modes in which the trigger can be used
Browse, Find, and Preview modes.
Result
None.
Originated in
FileMaker Pro 10.0
Notes
•This trigger does not activate if the layout is changed remotely.
•See Changing object data without activating script triggers for a list of other actions that do
not activate this script trigger.

Script triggers reference
FILEMAKER PRO HELP 1182
Related topics
Setting up script triggers
Setting script triggers for layouts
Setting script triggers for objects
OnLayoutExit
Triggers a script to run before a layout is exited.
When the script runs
Before the event has been processed.
Modes in which the trigger can be used
Browse, Find, and Preview modes.
Result
You can use the Exit Script script step within the triggered script to return True or False.
•True: The event that triggered the script proceeds.
•False: The event that triggered the script is canceled.
Originated in
FileMaker Pro 11.0
Notes
This script trigger can be activated when the window is closed.
Related topics
Setting up script triggers
Setting script triggers for layouts
Setting script triggers for objects
OnLayoutSizeChange
Triggers a script to run after a layout or window has changed size as a result of the following:
•in FileMaker Go: rotating the iOS device, hiding or showing the status toolbar, or when a
window is first opened
•in FileMaker Pro and FileMaker WebDirect: changing the size of a layout or window by user
interaction, by script step, by hiding or showing the status toolbar or formatting bar via menu
command, shortcut, or script step, or when a window is first opened
When the script runs
After the event has been processed.
Modes in which the trigger can be used
Browse and Find modes.

Script triggers reference
FILEMAKER PRO HELP 1183
Result
None.
Originated in
FileMaker Pro 13.0
Notes
•Use the Get(WindowOrientation) function to return the current window orientation.
•If you resize the window using a mouse, this trigger activates only when you finish resizing
the window.
Related topics
Setting up script triggers
Setting script triggers for layouts
Setting script triggers for objects
OnModeEnter
Triggers a script to run after you switch modes manually or in a script step.
When the script runs
After the event has been processed.
Modes in which the trigger can be used
Browse, Find, and Preview modes.
Result
None.
Originated in
FileMaker Pro 10.0
Notes
See Changing object data without activating script triggers for a list of actions that do not activate
this script trigger.
Related topics
Setting up script triggers
Setting script triggers for layouts
Setting script triggers for objects
OnModeExit
Triggers a script to run before a user tries to exit the current mode on a layout.

Script triggers reference
FILEMAKER PRO HELP 1184
When the script runs
Before the event has been processed.
Modes in which the trigger can be used
Browse, Find, and Preview modes.
Result
You can use the Exit Script script step within the triggered script to return True or False.
•True: The event that triggered the script proceeds.
•False: The event that triggered the script is canceled.
Originated in
FileMaker Pro 10.0
Notes
See Changing object data without activating script triggers for a list of actions that do not activate
this script trigger.
Related topics
Setting up script triggers
Setting script triggers for layouts
Setting script triggers for objects
OnViewChange
Triggers a script to run after you switch views (Form, List, Table) manually or in a script step.
When the script runs
After the event has been processed.
Modes in which the trigger can be used
Browse, Find, and Preview modes.
Result
None.
Originated in
FileMaker Pro 11.0
Notes
This script trigger will not activate when a window is opened, unless another action after the window
is opened causes the view to change.
Related topics
Setting up script triggers

Script triggers reference
FILEMAKER PRO HELP 1185
Setting script triggers for layouts
Setting script triggers for objects
OnGestureTap
Triggers a script to run when a tap gesture is received on a layout in FileMaker Go.
When the script runs
Before the event has been processed.
Modes in which the trigger can be used
OnGestureTap can be set up to activate in Browse and Find modes.
Result
You can use the Exit Script script step within the triggered script to return True or False.
•True: The event that triggered the script proceeds.
•False: The event that triggered the script is canceled.
If the triggered script returns no value, the script proceeds and processes the tap normally.
Originated in
FileMaker Pro 13.0
Notes
OnGestureTap will not activate for taps made in active web viewers or active edit boxes.
The following gestures activate this trigger in FileMaker Go:
•Single-tap with one, two, or three fingers
•Double-tap with one finger
Use Get(TriggerGestureInfo) to get information about the gesture that causes this trigger to activate.
Related topics
Setting up script triggers
Setting script triggers for layouts
Setting script triggers for objects
OnFirstWindowOpen
Triggers a script to run each time you open a window of a database file when no other windows for
the file are open.
When the script runs
After the first window of a file is opened.
Modes in which the trigger can be used
OnFirstWindowOpen activates before FileMaker Pro enters a mode.

Script triggers reference
FILEMAKER PRO HELP 1186
Result
None.
Originated in
FileMaker Pro 12.0
Notes
Although this is typically the first time you open a file, you can also trigger a script this way when you
open a window for a hidden file previously opened via a script or relationship.
Related topics
Setting up script triggers
Setting script triggers for layouts
Setting script triggers for objects
OnLastWindowClose
Triggers a script to run each time you close the last window of a database file.
When the script runs
Before the last window of a file is closed.
Modes in which the trigger can be used
OnLastWindowClose activates after FileMaker Pro exits a mode.
Result
You can use the Exit Script script step within the triggered script to return True or False.
•True: The event that triggered the script proceeds.
•False: The event that triggered the script is canceled.
Originated in
FileMaker Pro 12.0
Notes
•The script will run even if the file itself remains open, for example if it is referenced by
another file with open windows. The closing script will be performed each time the last open
window of the specified file is closed.
•If the script executed by the OnLastWindowClose script trigger returns a False value, then
the file will not close.
Related topics
Setting up script triggers
Setting script triggers for layouts
Setting script triggers for objects

Script triggers reference
FILEMAKER PRO HELP 1187
OnWindowOpen
Triggers a script to run each time you open a window of a database file.
When the script runs
After a window is opened or after OnFirstWindowOpen (if it is selected in the Script Triggers tab) is
activated.
Modes in which the trigger can be used
OnWindowOpen activates before FileMaker Pro enters a mode.
Result
None.
Originated in
FileMaker Pro 12.0
Notes
You can also trigger a script this way when you open a window for a hidden file previously opened
via a script or relationship.
Related topics
Setting up script triggers
Setting script triggers for layouts
Setting script triggers for objects
OnWindowClose
Triggers a script to run each time you close a window of a database file.
When the script runs
Before a window is closed or before OnLastWindowClose (if it is selected in the Script Triggers tab)
is activated.
Modes in which the trigger can be used
OnWindowClose activates after FileMaker Pro exits a mode.
Result
You can use the Exit Script script step within the triggered script to return True or False.
•True: The event that triggered the script proceeds.
•False: The event that triggered the script is canceled.
Originated in
FileMaker Pro 12.0

Script triggers reference
FILEMAKER PRO HELP 1188
Notes
•The script will run even if the file itself remains open, for example if it is referenced by
another file with open windows. The closing script will be performed each time a window of
the specified file is closed.
•If the script executed by the OnWindowClose script trigger returns a False value, then the
file will not close.
Related topics
Setting up script triggers
Setting script triggers for layouts
Setting script triggers for objects

FileMaker Pro features by version
FILEMAKER PRO HELP 1189
FileMaker Pro features by version
This topic lists the features introduced in previous versions of FileMaker Pro and FileMaker Pro
Advanced starting from version 8.0. For details about each feature, download the product
documentation at http://www.filemaker.com/downloads.
For information about when script steps, functions, and script triggers were introduced, see the
individual Help topics.
For information about new features in the current version, see New features in FileMaker Pro 13.
FileMaker Pro 8.0
•Import data from another file into a new table in the current file. This allows you to
consolidate data previously stored in separate databases.
•Save data in Adobe PDF and Microsoft Excel format.
•Export data in Excel format (.xls).
•Export records in Microsoft Excel format using the Export Records script step.
•New command to send email, File menu > Send > Mail.
•New Tab Control tool for creating and managing tabbed panels on layouts.
•New Field/Control Setup dialog box makes it easier to create and edit checkbox sets and
other controls that display data from a value list.
•New scroll wheel support for Windows and the Mac OS.
•Add text notes to tables in the relationships graph.
•Support for variables in file paths.
•By default, fields on the current layout are listed first when you sort records, replace field
contents, export records, or send email.
•Improved database templates, Starter Solutions.
•Improved Instant Web Publishing. For example, create and use your own home page
instead of the default Database Homepage.
•New menu commands to navigate through records and layouts.
•Perform finds in Browse mode using shortcut menus.
•New tools to align objects in Layout mode and in the relationships graph.
•New auto-complete capability for text fields.
•Visual spell checking.
•New drop-down calendar style for data entry.
•Set a variable to a specified value in a script or calculation expression.
•Enhancements to the Go to Related Record script step.
•Restrict the Windows script step selections to the windows in the current file.
FileMaker Pro 8.0 Advanced
•Copy and import tables across files or within the same file.
•Copy scripts, script steps, or fields.
•Add tooltips.
FileMaker Pro features by version
FILEMAKER PRO HELP 1190
•Create custom menus.
•Monitor fields, variables, and calculations using the Data Viewer.
•View sub-scripts as you step through scripts.
•Disable script steps.
•Enhanced Database Design Report.
FileMaker Pro 8.5
•Use web viewers to access websites such as FedEx® or GoogleTM from a layout.
•Web Viewer Example database with sample records and data to show you how you can use
web viewers. You must have an internet connection to use this database.
•Web page with resources for web viewers.
•Assign names to layout objects (such as buttons, portals, and tabs in a tab panel) using the
Info palette (formerly known as the Size palette).
•Enhancements to the RelationInfo function.
•Re-sort indexed values based on the sort order for a specified language.
FileMaker Pro 8.5 Advanced
•Enhanced Database Design Report, including properties for new features in FileMaker Pro
8.5.
•Updated example plug-in and API for XCode 2.2 that work on either PowerPC-based or
Intel-based Macintosh computers.
FileMaker Pro 9.0
•Support for external SQL (ODBC) data sources – Display, access, and use data from SQL
tables.
•Supplemental fields – Add unstored calculation fields and summary fields to SQL (ODBC)
data source tables within FileMaker Pro. Then use these fields in FileMaker Pro layouts,
scripts, finds, sorts, joins, and exports without changing data from an external table. This
feature lets you extend SQL tables.
•Email links to shared databases – Choose the new File menu > Send Link menu item to
send an email with URL links to FileMaker Pro shared databases. Use this feature with
shared peer-to-peer or FileMaker Server hosted databases.
•Increased number of peer-to-peer file sharing users – Share files with up to nine concurrent
users with FileMaker Pro Network Sharing.
•Conditional formatting – Set formatting rules based on conditions you specify with the new
Format menu > Conditional menu item, and apply conditional formats to data in fields,
layouts, or text-based buttons.
•Append to PDF – Append new data to an existing PDF file with this new script step option.
•Updated label support – Use new and updated Avery label sizes in the New Layout/Report
assistant, including new, popular shipping labels.
•FileMaker Pro Quick Start Screen – Provides a central place where for creating files,
opening existing files located on your computer or on remote networked computers, and
accessing electronic FileMaker Pro documentation.
FileMaker Pro features by version
FILEMAKER PRO HELP 1191
•Online update notification – Receive notification when software updates are available over
the Internet.
•Auto-resize layout objects – Specify how layout objects dynamically adjust to window
resizing. As you resize windows, data contracts or expands on a form, in Preview mode,
and in printing.
•Enhanced tab panel control – Use new tab control setup features to set the default tab and
tab width on a form.
•Improved web viewer – View and set options for status and messages in the new progress
bar area.
•Learn buttons – Link directly to context-sensitive Help topics from these dialog boxes to
learn more about using them: Web Viewer Setup, Button Setup, Specify Calculation, and
Create Layout/Report.
•Enhanced Help menu – Access product documentation, register or activate FileMaker Pro,
transfer activation to another computer, send FileMaker your feedback, and more from the
Help menu.
•Revised File menu – The File menu > Define command is now File menu > Manage, and
the new Manage dialog boxes replace the Define dialog boxes.
•Improved Undo/Redo – Undo or redo editing multiple times in the active field or layout text
object.
•Improved spell checking – Control visual spell checking for individual fields.
•Enhanced toolbar – Use new and improved buttons on the toolbar, including Alignment
(Layout mode), Save Records as Excel, and Save Records as PDF.
•Multiple script editing windows – Open multiple edit script windows at one time.
•Script organization features – Create groups and filters to manage numerous scripts and
search for scripts.
•Copy and paste scripts – Copy entire scripts and script steps from one file and paste them
into the same or a different file.
FileMaker Pro 9.0 Advanced
•Enhanced Script Debugger – Debug restricted-access scripts upon login and authentication
from within the Script Debugger, select multiple script steps, view last script error results,
and link directly to Help for more information with the Script Debugger.
•Enhanced Data Viewer – Use the new Current tab to view field or variable data in the
current script, and view restricted data in Data Viewer upon login and authentication.
•PHP Site Assistant link – Choose Tools menu > Launch PHP Assistant to link directly to
PHP Site Assistant.
•Enhanced Database Design Report – Document your database solution, including new
features such as script groups, external SQL data source tables, new functions, and more.
FileMaker Pro 10.0
•Status toolbar – Use the redesigned status area, which now appears as a toolbar at the top
of the FileMaker Pro window, to perform most tasks.
•Saved finds – Save complex find requests for use in future FileMaker Pro sessions and
access recent finds using buttons on the status toolbar.

FileMaker Pro features by version
FILEMAKER PRO HELP 1192
•Improved Find mode – A badge indicates the fields you can use to search your
database.
•Layout object tooltips – Use FileMaker Pro to add descriptive text that appears when users
move the pointer over layout objects in Browse or Find modes.
•FileMaker Quick Start Screen – Create a FileMaker Pro database from an Excel or Bento 2
(or a later supported version) file. Access instructional materials, such as videos and the
FileMaker Tutorial, from the Learn More panel.
•Improved Starter Solutions – Create a database from an updated Starter Solution template
to take advantage of the new FileMaker Pro features.
•Advanced recovery options – Perform a consistency check on files you suspect might be
damaged, select specific file components to be recovered, and view information about the
file’s status. View a detailed file recovery log both during and after the file recovery process.
•Dynamic subsummary reports – See recalculated summary values in real time in Browse
mode when data changes.
•More layout themes – Choose new layout themes in the New Layout/ Report assistant to
enhance your reports.
•Sort order – See new records appear in sorted order when you add records to a found set.
•Additional support for ODBC data sources (also known as external SQL sources or ESS) –
Display, access, and use data from SQL tables in Microsoft SQL Server 2008, Oracle 11g,
and MySQL 5.1 Community Edition. Define value lists using fields in ODBC data source
tables. Use Windows authentication (single sign-on) to access ODBC data from Microsoft
SQL Server. Accurately access SQL-supported timestamp data from ODBC data sources.
•Microsoft Excel 2007/2008 – Import data from and export data to Excel 2007/2008 format
files.
•Better support for importing data from Bento 2 (Mac OS) – Use standard import procedures
in FileMaker Pro to transfer information from a Bento 2 (or a later supported version) data
source to a FileMaker Pro file.
•SMTP-direct email support – Choose File menu > Send Mail or use a script to send email
directly from FileMaker Pro files without using email client software.
•Script triggers – Specify that a script runs when a specific event occurs, such as when a
user or script enters, changes, or exits a field; when a key is pressed; when a field is
modified; or when a record is committed.
•Scripting user interface improvements – Use the Manage Scripts feature (formerly
ScriptMaker) to display a default script you can use as a starting point for writing your own
scripts, see whether individual script steps are supported in web publishing or in
FileMaker Server schedules, and more. The Manage Scripts dialog box no longer opens in
a maximized state when the FileMaker Pro window is maximized.
•Error reporting improvements – Control script steps no longer clear the last error condition
reported by FileMaker Pro.
FileMaker Pro 11.0
•FileMaker charts – Compare and contrast data graphically in bar, line, area, and pie charts
using an integrated charting tool.
•Layout folders – Create folders to group layouts; rename, duplicate, and delete layouts; and
choose to display layouts and folders in the Layout pop-up menu — all in the Manage
Layouts dialog box.
FileMaker Pro features by version
FILEMAKER PRO HELP 1193
•Default layout view – Set the default view (Form, List, Table) that you want to appear when
you first open a layout.
•Enhanced New Layout/Report assistant – Offers a more streamlined approach for grouping
data and creating summary reports.
•Recurring import – Automatically import data from Microsoft Excel or other data sources,
such as Tab and CSV, into FileMaker Pro 11. Updates in the source file are reflected in the
FileMaker Pro table.
•Enhanced support for Bento data import (Mac OS) – Import Bento date and timestamp
formats into FileMaker Pro and then reformat the data as a FileMaker Pro date or
timestamp. Import encrypted and simple list fields from a Bento data source.
•Instant Web Publishing – Databases published on the web through Instant Web Publishing
include a status toolbar similar to the one you use when you work with databases in
FileMaker Pro. FileMaker charts can be published using Instant Web Publishing.
•Work with data in a spreadsheet-like format – Add fields and records in Table View using a
familiar, spreadsheet-like format. Sort, delete, and hide fields; change a field’s data type;
and set field options. Create a quick report by adding a leading or trailing group by field, all
from Table View.
•Quick find – Search across all the fields on a layout in Browse mode.
•Inspector – Most editing tasks that you do in Layout mode can be done with the Inspector,
which allows you to view and modify object settings in one convenient place.
•Portal filtering – Add a filter to a portal to specify the related records that are shown in a
portal.
•Clear recent files – Clear the names of files recently opened using File menu > Clear
Recent Files.
•Snapshot link – Capture and preserve a found set of record IDs — including the layout,
view, and sort order — exactly as it was when you performed the original find request, and
email it to another person.
•Text highlight – Apply a highlight to easily identify key text in your layouts.
•Enhanced Quick Start Screen – Quickly create, convert, open, and manage local, remote,
and favorite files. Access tutorials and other helpful resources, such as the FileMaker
Forum.
•Refined security – Control whether other FileMaker Pro files are permitted to access the
schema (including the tables, layouts, scripts, and value lists) in a file in your secured
solution, and prevent versions of FileMaker Pro earlier than version 11 from opening the file.
•Use variables in scripted find requests – Include local and global variables in scripted find
requests that you create or edit.
•Merge variables on layouts – Create a merge variable that displays values from local or
global variables. Use merge variables for some tasks in place of global fields or unstored
calculation fields.
•TLS (Transport Layer Security) support for sending mail via SMTP – When you send email
via SMTP, you can choose TLS encryption to allow both secure and nonsecure connections
over the same port.
•Script selection and editing improvements:
•The Specify Script dialog box has buttons for adding, editing, duplicating, and deleting
scripts.

FileMaker Pro features by version
FILEMAKER PRO HELP 1194
•In Windows, move the scripting windows outside the FileMaker Pro application window.
Menus inside these scripting windows allow you to manage and edit your scripts.
•Origination information in Help – Each script step, script trigger, and function description
includes the version of FileMaker Pro in which it was created.
•Function and script trigger name changes:
•Get(PrivilegeSetName) function changed to Get(CurrentPrivilegeSetName).
•Get(ExtendedPrivileges) function changed to Get(CurrentExtendedPrivileges).
•Get(PortalRowNumber) function changed to Get(ActivePortalRowNumber).
•OnLayoutLoad script trigger changed to OnLayoutEnter.
•Enhanced user interface (Mac OS) – The appearance and behavior of Mac OS dialog
boxes have changed in order to better reflect Mac OS X standards.
•“Available menu commands” setting in default privilege set – To further refine security, the
setting for “Available menu commands” in the default privilege set (used when creating a
new privilege set) is now Minimum.
FileMaker Pro 11.0 Advanced
•Custom menu user interface improvements – The user interface was enhanced in order to
make creating and managing custom menus and custom menu sets easier and more
intuitive.
•Custom function copy/paste/import – Copy, paste, and import custom functions in the
custom functions list; and copy, paste, and import custom functions between files.
•Enhanced Script Debugger – Debug scripts called by buttons and custom menu items.
FileMaker Pro 12.0
•FileMaker Pro themes – The FileMaker Pro architecture has been redesigned to support
rich, beautiful layout themes. You can easily change the theme by choosing from the
Layouts menu in Layout mode.
•Layout object formatting – FileMaker Pro provides greater control over object formatting
with features such as gradient fills, image fills (including scaling and slicing), transparency,
object states, and rounded corners. Rather than setting default object formatting with no
objects selected, use themes to set object formatting. You can remove styles from selected
objects and control changing themes with multiple undo.
•New layout assistance tools – In Layout mode, dynamic alignment guides, guidelines that
drag out from rulers, and control over the grid give you visual cues to help you design new
layouts and modify existing ones. Multiple undo and redo let you experiment and refine with
ease.
•Screen stencils – In Layout mode, you can click to display guides that help you
design layouts optimally for iPad, iPhone, and common desktop resolutions, or set custom
dimensions.
•Improved accessibility – FileMaker Pro supports assistive technology and the ability to
access the FileMaker Pro document window and objects on layouts using the keyboard and
screen readers. With the new Accessibility inspector, you can add accessibility labels to
layout objects, which are then interpreted (for example, read aloud) by users’ software
screen readers. Also, you can create accessible runtime solutions (with FileMaker Pro
Advanced).

FileMaker Pro features by version
FILEMAKER PRO HELP 1195
•Updated Starter Solutions – FileMaker Pro Starter Solutions have been updated to a
modern appearance with more options for customization. Some Starter Solutions contain
layouts designed for FileMaker Go.
•New file format – The FileMaker Pro file format has been changed to support the new
features.
•Enhanced container fields – You can now store container data outside of the database file in
managed storage. Storing container data externally facilitates sharing multi-user databases
and improves backups. Container data that's stored externally in secure storage is by
default encrypted and can be read by FileMaker Pro using secure storage. Enhancements
also let you render images faster with thumbnails; drag and drop files; and work interactively
with audio, video, and PDF files in container fields.
•Plug-in updating – Store plug-in files in solution files, then use scripts and calculations to
ensure users always have the correct version of required plug-ins installed.
•Define window styles – Control user interaction with your solution by specifying that layouts
opened by a script or button display as standard document windows, floating document
windows, or modal dialog windows, and by choosing the controls that appear in the
windows.
•Enhanced tab control – Modify tab behavior so that the active tab is retained when switching
to Layout mode. You can set up conditional formatting of individual tab panels and tab
labels.
•Record sorting – You can control whether record sorting is persistent or temporary. Records
added or edited after being sorted are by default integrated into the sort order. Deselect
Keep records in sorted order to change this behavior.
•New badges in Layout mode:
•A badge in the lower-right corner on a layout indicates that script triggers are
associated with the layout.
•A badge that appears on a layout indicates that the object on which the badge
appears is a button.
•Layout variable symbols – New layout variables display the status of a file, elements in the
file, or an action being performed. Also, variable symbols for date, time, user name, page
number, and record number have changed.
•Working with shared files – You can now run a script in a remote file using a URL.
•FileMaker charts – Create quick charts in Table View, with the option to summarize data and
print charts without changing the database schema. You can modify charts using a new
Chart inspector. New chart types include stacked column or bar, positive/negative column,
scatter, and bubble. (You can also create quick charts by right-clicking a field in Form View
or List View.)
•Table View refinements – Column headers in Table View provide more options for grouping,
sorting, and summarizing, and make it easier to customize the appearance of the table so
your data and calculations are clear.
•OS X: Enhanced support for Bento data import – Import Bento Location fields as
[Fieldname](Longitude) and [Fieldname](Latitude).
•Support for FileMaker Go – FileMaker Pro includes new script steps, functions, and
extended privileges, as well as layout themes optimized for touch screens on the iPad and
iPhone, and includes changes to custom menus that support the use of FileMaker Go.
FileMaker Pro features by version
FILEMAKER PRO HELP 1196
•Improved integration with external SQL sources (ESS) – If one or more table names have
changed in an ODBC data source, you can update links between a FileMaker Pro file and
the source. You can also force-commit changes when optimistic locking otherwise prevents
the commit action.
•Compatibility information in script steps – In Help and the Edit Script dialog box, the
compatibility section has been refined to include FileMaker Pro, FileMaker Server
scheduled script, FileMaker Go, Custom Web Publishing, and Instant Web Publishing. Help
also includes whether a script step is supported in runtime solutions.
•Insert File script step – You can now specify advanced options for the Insert File dialog,
which appears when you choose a file to insert into a container field. These options include
whether content can be inserted by reference, whether content can be compressed, and
which formats are allowed in the field.
•New Window script step – Creates a new window based on the foreground window. You can
create a document window, a floating document window, or a dialog window.
•Changed script steps, functions, and script triggers:
•Allow Toolbars script step is now Allow Formatting Bar.
•Show/Hide Status Area script step is now Show/Hide Toolbars.
•Get(AllowToolbarState) function is now Get(AllowFormattingBarState).
•OnFileClose script trigger is now OnLastWindowClose.
•OnFileOpen script trigger is now OnFirstWindowOpen.
•Enhancements to script triggers – Four windows script triggers are available in a new Script
Triggers tab in the File Options dialog box: OnWindowOpen, OnWindowClose,
OnFirstWindowOpen, and OnLastWindowClose.
•Changed features:
•Plug-in updating – Plug-in updating has been simplified. You now store plug-ins in
solution files and install updates from container fields. The Auto Update plug-in has
been removed from FileMaker Pro.
•Table View sorting – Instead of clicking a column heading to sort data, you now choose
from the shortcut menu for the column. This makes sorting more predictable and allows
for selection of one or more column headers in order to perform additional actions on
the associated fields.
•Importing data from FileMaker Pro databases – Import order has been improved. The
addition or deletion of fields after field mapping no longer affects the sort order in import
target files.
•Extended privilege sets – The fmmobile and fmxslt extended privileges have been
removed. A new extended privilege, fmreauthenticate10, has been added for
FileMaker Go. Also, brackets have been removed from all default extended privileges
for consistency and to enable editing.
•You can now specify which buttons in the Specify Custom dialog box commit data to a
database.
•Mac OS X Lion: Export to .xls requires Rosetta, which is not available on OS X Lion.
•Removed features:
•Mac OS X: Support for importing photos from a digital camera or device – Script steps
and menu commands that support importing photos from a digital camera or device
(also known as Image Capture) have been removed from FileMaker Pro.
FileMaker Pro features by version
FILEMAKER PRO HELP 1197
•Windows: Support for OLE – You can no longer insert or work with OLE objects from
earlier versions of FileMaker Pro. Because of this change, the Insert Object and Update
Link script steps, menu items related to OLE objects, and the Update all links before
printing option in the Print dialog box have been removed. However, you can activate
OLE objects in container fields and on layouts and save them to their original formats.
•Windows: The Flash menubar on misspelled words option has been removed from
the Spelling tab in the File Options dialog box.
FileMaker Pro 12 Advanced
•Improved custom menus:
•To support FileMaker Pro files created for devices such as the iPad and iPhone, default
custom menus and menu sets are no longer created when you create a file. You can
add custom menus and menu sets to files manually, if you want to use them in your
solution files.
•If you don’t specify a menu item name, FileMaker Pro installs a blank item in the menu.
Choosing it executes the settings defined for the item.
•Specify calculations that determine when custom menus or menu items are installed.
•Enhanced Script Debugger – You can now temporarily disable or enable script triggers
while you work in the Script Debugger.
•Database Design Report – The Database Design Report now identifies the tab controls or
portals in which objects are located.
•Close window button in runtime solutions – The close window button in runtime solution
windows now works as it does in FileMaker Pro windows. If you want to prevent users from
closing a runtime window, use custom menus, script triggers, or window styles.

Maintaining and recovering FileMaker Pro databases
FILEMAKER PRO HELP 1198
Maintaining and recovering FileMaker Pro databases
Power failures, hardware problems, and other factors can damage a FileMaker Pro database file.
Although the Recover feature might be able to salvage a damaged file, it is strongly recommended
that you perform regular maintenance on your FileMaker Pro databases.
Regular FileMaker Pro maintenance takes two forms:
•Backing up
•Saving a compacted copy
About file maintenance
In order to understand how file corruption occurs, it is useful to know how FileMaker Pro manages
data.
FileMaker Pro is a disk-based application, so it does not need to load the entire database into RAM
as the file is opened. Instead, the application transfers data as needed from the hard drive to RAM
and back. As the file is used, updated data is written from data buffers in RAM to the hard drive. The
most common cause of file damage is an unexpected application termination or quit. In most cases,
an unexpected quit occurs when the file is between hard-drive updates. In this situation, the next
time the database is opened, FileMaker Pro runs a consistency check on the file and the file usually
opens without problems. However, if the unexpected quit occurs during a hard drive update, the file
is likely to require recovery.
Notes
•Because unexpected application termination is the most common cause of database
corruption, try to ensure that your operating system is stable.
•Make sure that you are running the most current and stable version of .dll files (Windows)
and system components (OS X).
•Run only the software that is absolutely necessary on your most critical machines. Keeping
your configurations simple reduces the chance that some software may conflict, and makes
it easier to troubleshoot if there is a problem.
•Use an uninterruptible power supply (UPS) if your files are being used in an area subject to
power outages.
•Consider all hard disk problems to be potentially serious. In cases of multiple corrupted files
on a hard drive, the hard drive may be at fault. Check the hard drive with a disk utility
program.
•Software that optimizes, compresses, or partitions the hard drive should be the most current
version. Driver software must be compatible with your version of the operating system.
Backing up
Routine backups are strongly recommended for any document stored on a computer. Magnetic
media are susceptible to a variety of problems, and a storage device such as a hard disk should
never be the sole repository for your data. Extreme heat, cold, sunlight, and the presence of electric
and magnetic fields can all contribute to the failure of magnetic storage media, so a careful backup
strategy will include optical as well as magnetic media.
It is easier to back up a database than it is to re-create it. Whether you should back up your data
every day, several times a week, or less frequently is usually determined by the amount of data you
are adding to your databases and how difficult it would be to re-create your files in the event they
become corrupted.

Maintaining and recovering FileMaker Pro databases
FILEMAKER PRO HELP 1199
A strong backup strategy is one that employs multiple media and backs up on a consistent
schedule. This affords you some protection against the failure of a single hard disk, removable disk,
tape, or other media.
In its simplest form, backing up means copying your files to another disk for safekeeping. As your
files become larger or more numerous, you might need to use a third-party program to do a proper
backup.
A good third-party backup program should provide multiple copies of a database as sources for
restoration. A scheme involving rotating backups can accomplish this. Typically, this method
involves separate backup copies over no less than a two-week rotation. The file is backed up to a
set on day one, a new set on day two, until ten sets of backups exist (assuming a five day work
week). On the eleventh day, the first set is reused. This type of rotation ensures that a lurking
problem will not spoil your chances of a complete file restoration.
For very important files, it’s a good idea to store backups at an off-site location. Fires, earthquakes,
and other disasters can and do occur, and there is added safety in securing copies of your vital files
off-site.
Note To avoid possibly damaging the only backup of your database, make sure that you copy the
database file you want to restore and leave the original backup file unchanged in the backup folder.
Do not move the database file out of the backup folder, and do not use FileMaker Pro to open the
database file that is stored in the backup folder.
Example backup script
You can use the following script to save automated backup copies of a FileMaker Pro database.
This script saves a copy of your database on the fifth close and every fifth close thereafter. To make
the script work, you need to define a global field called Count Field in one of the tables in your
database. If you do not define a global number field, FileMaker Pro may increment a different record
each time you close the application. You should define this script in all solution files that require
backups.
To create the script:
1. Choose Scripts menu > Manage Scripts. Or, choose File menu > Manage > Scripts.
2. In the Manage Scripts dialog box, click New. For details on creating scripts, see Creating
and editing scripts.
3. In the Edit Script window, for Script Name, type Backup.
4. Enter the following script:
Set Field [<table name>::Count Field; <table name>::Count Field + 1]
If [<table name>::Count Field > 4]
Save a copy as ["Backup Copy.fmp12"; copy]
Set Field [<table name>::Count Field; 0]
End if
5. When you are finished, close the Edit Script window, then click Save.
6. Close the Manage Scripts dialog box.
7. Choose File menu > File Options, and click the Script Triggers tab.
8. Click the OnLastWindowClose script trigger, then click Select.
9. Select the Backup script.
10. Click OK.

Maintaining and recovering FileMaker Pro databases
FILEMAKER PRO HELP 1200
11. Close the solution file.
This script will create a backup of your file every fifth time you close the file.
Saving a compacted copy
When you save a compacted copy of a file, FileMaker Pro re-creates the entire database, fitting as
much data into each block as possible. This copies the logical structure, or arrangement, into the
new file and reclaims unused space. Compacting can be time consuming if the file is large, and it
might be best accomplished as an overnight task.
To save a compacted copy:
1. Make sure that you have enough room on your intended storage media.
You should have at least as much free space on your intended media as the size of your
uncompressed file. It is not a good idea to fill any storage media to its maximum capacity.
2. Choose File menu > Save a Copy As.
3. In the “Create a copy named” dialog box, for Save a (Windows) or Type (OS X), choose
compacted copy (smaller).
4. Click Save.
About recovering FileMaker Pro files
FileMaker Pro runs a consistency check automatically, if necessary, when a database is opened.
You can also choose to verify the consistency of a file if you suspect the file is damaged. If a
database requires more extensive correction to open, you can have FileMaker Pro attempt to
recover the file.
The underlying action of file recovery is to preserve as much of the data as possible. In this context,
data generically refers to the file’s schema and structure and its tables, records, layouts, scripts, and
field definitions. Non-essential data, such as the sort order, is not recovered.
These utilities do not guarantee that the file has been completely repaired. Therefore, after getting a
damaged database to open, you should immediately save a backup copy of the recovered database
and, depending on the severity of the problem, possibly import the data into a clone of the original
database.
After you have opened a repaired or recovered database, check for consistent content, especially if
an active operation was running at the time of the shutdown.
Special notes on file recovery
In general, recovering a file should be reserved for files that will not open or are displaying index
problems. Try to save a compacted copy of the file first. Databases that are returning records
incorrectly from a find should be fixed by saving a compacted copy (see Saving a compacted copy).
The Recover command aggressively attempts to correct a file so you can open it and recover your
data. To do this, the recovery process may delete corrupted fields, layouts, layout objects, scripts,
and data. For this reason, you should only use the Recover command when you cannot open a file.
Do not use this command for regular file maintenance.
Note There are many other conditions that return incorrect find results, including mismatched field
types. Also, records might be unexpectedly deleted by a misplaced script step or an option set in the
Edit Relationship dialog box. Be certain you have eliminated all other possibilities before assuming
that a file is damaged and must be recovered.

Maintaining and recovering FileMaker Pro databases
FILEMAKER PRO HELP 1201
Preventing database damage
File corruption is not inevitable, but it's a good idea to take measures to prevent damage and to
ensure that databases are properly backed up.
•Routine backups are strongly recommended with any database.
•Back up heavily used databases frequently enough so that you will not lose more than one
day of work.
•Use an uninterruptible power supply (UPS).
•Check the condition of the hard disk with a drive utility program.
•Be sure software that optimizes, compresses, or partitions the hard disk is current.
•Be sure driver software is compatible with the operating system version.
•Use virus detection software. However, do not run virus protection software on open or
hosted databases. First, close the databases, and then run the virus protection software.
Damaged files
A frequent cause of file damage is a FileMaker Pro file being closed improperly. Another cause of
file damage is media failure (for example, bad sectors on a hard disk), where parts of a file cannot
be read by the operating system.
FileMaker Pro provides two mechanisms for handling databases that might be damaged:
consistency checks and file recovery. Consistency checks occur automatically, if needed, when the
file is opened. You can also choose to verify the consistency of a file that you suspect is damaged
(for more information, see Checking file consistency). You can also have FileMaker Pro attempt to
recover a damaged file (for more information, see Recovering files).
Improperly closed files
A file is not closed properly when:
•external power is interrupted, shutting down the computer abruptly
•FileMaker Pro runs into a problem and presents a dialog box that requires the user to quit
the application (for example, disk-read error or file-damaged error)
•another application (or the system software) crashes, causing FileMaker Pro to crash
•FileMaker Pro freezes, forcing a manual reboot of the computer
•a manual reboot is made for some other reason
Note In each of these cases, it is possible that the active file and all unlocked local files that are
open at the same time may have been damaged. Damage to a file may occur in both active and
inactive tables. Files opened across the network from a remote computer are unlikely to be
damaged because the remote FileMaker Pro application is still open.
Troubleshooting damaged files
If you think a file is damaged because records are missing or data is not what you expect, first see
Adding and viewing data troubleshooting and Finding records troubleshooting. If the suggestions do
not solve the problem, make a backup copy of the file, and then recover the file.
If you cannot open a file or if you receive an error message indicating that the file is damaged, see
Recovering files.

Maintaining and recovering FileMaker Pro databases
FILEMAKER PRO HELP 1202
Related topics
Troubleshooting file recovery
Damaged layouts
If a FileMaker Pro database file hangs or crashes when you switch to a particular layout, the layout
may contain a damaged or corrupted object. If this happens, try deleting the corrupted object. This
may be difficult, however, as the corruption may not be visible. Corruption may also cause
FileMaker Pro to crash or hang when it tries to display the object, making the object hard to isolate
and delete. In many instances, the simplest and sometimes only solution is to delete the entire
layout, which also deletes the corrupted object.
Deleting a corrupted layout
1. In another layout, switch to Layout mode.
2. Scroll the window far down or to the right, past where objects would be visible on the
damaged layout.
3. Switch to the damaged layout. Because the corrupted objects are off-screen, the computer
should not hang.
4. Delete this layout.
If a file hangs or crashes as it opens and begins to display the first layout, you won't be able to open
the file into a different layout and do the above steps. You can select the Bypass on open script
checkbox in the Advanced Recovery Options dialog box to create a new blank layout for the file to
open with instead of the damaged one. (For more information, see Setting advanced file recovery
options.)
Notes
•Whenever you only want to bypass the layout to open the file, select Copy blocks as-is
and Bypass on open script in the Advanced Recovery Options dialog box, and leave other
options deselected.)
•FileMaker Pro Advanced: Runtime applications do not support advanced file recovery
features.
Opening a file with a corrupted opening layout
1. Open or create another FileMaker Pro file.
2. Create a script with the following step: Perform Script [External: "BadFile"]
where BadFile is the name of the unopenable file.
3. Define this step to perform any script in BadFile that switches to a layout other than the
opening layout.
4. Perform this script. You should then be in BadFile in a different layout.
5. Follow the steps in Deleting a corrupted layout, above.
You can also try recovering the file and rebuilding the file’s structure by selecting Scan and
rebuild scripts, layouts, etc. in the Advanced Recovery Options dialog box. For details, see
Setting advanced file recovery options.
Related topics
Troubleshooting file recovery

Maintaining and recovering FileMaker Pro databases
FILEMAKER PRO HELP 1203
Checking file consistency
FileMaker Pro verifies the consistency of a database file, if needed, when the file is opened.
You can also have FileMaker Pro verify consistency if you suspect that a file is damaged. A
consistency check reads every block in the file and verifies that:
•the internal structure of the block is valid
•the block is properly linked to other blocks in the file
The consistency check does not read all the data within each block or check the schema or higher-
level structures in the file. Those higher-level checks are performed only by the Recover command.
To check file consistency:
1. Choose File menu > Recover.
2. In the Select Damaged File dialog box, select the file you want to check, and click Check
Consistency.
3. If you see the Open Encrypted Database dialog box, type the encryption password, then
click OK.
If you don’t know the encryption password, see your database administrator.
FileMaker Pro checks the consistency of the selected file and displays a summary of the file’s
status, including the total number of blocks checked, total number of blocks processed, and
number of bad blocks found.
4. To see a log of the file consistency check, click Open Log File.
The Recover.log file displays in a separate window, in tab-delimited format. From left to right the
columns show the date, time, and time zone in which the consistency check took place, the
filename, error number, and description of the consistency check event. You can save or print
this file for further examination. Then close the window.
The most recent data is added to any existing Recover.log file information, so you may need to
scroll to the end of the file to see the results of the latest consistency check.
5. In the status dialog box, click OK.
The Select Damaged file dialog box remains open. If the consistency check indicated that the
file was damaged, try saving a compacted copy of the file before attempting to recover it (see
Recovering files). If the consistency check revealed no damage, click Cancel.
Note It might take longer to open a file on which FileMaker Pro is performing a consistency check.
Recovering files
If a file appears to be damaged, first try saving a compacted copy, which copies all the data and
rebuilds the tree structure of the database (see Saving a compacted copy). Even if the file can’t be
opened, you can use the Advanced Recovery Options dialog box (described below) to make a
compacted copy. If a file is too damaged to open or use, you can use the Recover command to have
FileMaker Pro salvage as much information as it can and create a new, recovered file.
Note FileMaker Pro Advanced: Runtime applications do not support advanced file recovery
features.
To recover a damaged file:
1. Choose File menu > Recover.
2. Select the file to recover, and click Select.

Maintaining and recovering FileMaker Pro databases
FILEMAKER PRO HELP 1204
FileMaker Pro displays the “Name new recovered file” dialog box. The original (damaged)
filename, followed by Recovered, displays for File name (Windows) or Save As (OS X).
3. Accept the default name, or enter a different name for the recovered file.
4. To have FileMaker Pro use the default file recovery settings (recommended for best results),
make sure that Use advanced options is deselected and then skip to the next step.
To change the recovery settings, select Use advanced options or click Specify, set options,
then click OK. (For more information about advanced recovery options, see Setting advanced
file recovery options.)
5. Click Save.
6. If you see the Open Encrypted Database dialog box, type the encryption password, then
click OK.
If you don’t know the encryption password, see your database administrator.
You see the progress of the file recovery. When the operation is finished, FileMaker Pro displays
the status of the recovered file. For more information, see Results of a recover, below.
7. To see a log of the recovery process, click Open Log File.
The Recover.log file displays in a separate window, in tab-delimited format. From left to right the
columns show the date, time, and time zone in which the recovery took place, the filename,
error number, and description of the recovery event. You can save or print this file for further
examination. Then close the window.
The most recent data is added to any existing Recover.log file information, so you may need to
scroll to the end of the file to see the results of the latest file recovery.
Note These steps apply only to files in FileMaker Pro 12 format. To use these steps to recover a file
created in a different FileMaker Pro format, you must convert the file to the FileMaker Pro 12 format.
If the file is too damaged to convert, recover the file in the appropriate version of the application. See
Converting files from FileMaker Pro 11 and earlier.
Results of a recover
After a file is recovered, FileMaker Pro displays status information. What you see depends on the
result of the recovery operation and the options that were used. The following table shows all
possible results that could be displayed for each database component that can be recovered. (For
information about these settings, see Setting advanced file recovery options.)
For this component One of these messages is displayed
File blocks •Scanned and rebuilt “<nnn>” blocks, dropped “<nnn>” invalid data
blocks
•Copied as is
•Copied logical structure
Schema •Scanned fields and tables, “<nnn>” missing fields added
•NOT scanned
Structure •Scanned; “<nnn>” items modified
•NOT scanned

Maintaining and recovering FileMaker Pro databases
FILEMAKER PRO HELP 1205
In many cases, a successfully recovered database is larger than the original database. This is
caused by new disk blocks being allocated as the database is recovered. For example, rebuilding
the index field by field and record by record can cause data distribution that is different (and possibly
larger) than the original file.
After you recover a file, copy the most recent data from the recovered file to a backup copy of the
original file. It is safest to use that file instead of the recovered file.
Note A newly recovered database will also take longer to open than a database that was closed
properly the last time it was used. This happens only the first time a recovered database is opened,
as a result of rebuilding various internal structures that were deleted during recovery.
Related topics
Troubleshooting file recovery
Setting advanced file recovery options
FileMaker Pro uses certain default settings when it recovers a file. You can change these settings
when you attempt to recover a damaged file.
Note FileMaker Pro Advanced: Runtime applications do not support advanced file recovery
features.
To set advanced file recovery options:
1. Choose File menu > Recover.
2. Select the file to recover, and click Select.
3. In the “Name new recovered file” dialog box, select Use advanced options.
FileMaker Pro displays the Advanced Recovery Options dialog box, with either the default
recovery options selected (if this is the first time the dialog box is displayed during the current
application launch) or with the most recent settings made during the current application launch.
4. Select one option for how you want FileMaker Pro to generate the new file.
After the new file is generated, it is scanned and then a new database is rebuilt according to the
options you select in the next step.
Field indexes •Rebuilt
•NOT modified
•Removed for later rebuilding (as needed)
•Some rebuilt, some removed for later rebuilding
For this component One of these messages is displayed
Select To Default
Copy file blocks as-is Copy all file blocks as they are to the recovered file,
which may include damaged blocks.
Off
Copy logical structure (same
as Compacted Copy)
Copy all the original data without checking the blocks
and rebuild the tree structure in the recovered file.
Off
Scan blocks and rebuild file
(drop invalid blocks)
Include only undamaged and non-duplicate blocks in
the recovered file.
On

Maintaining and recovering FileMaker Pro databases
FILEMAKER PRO HELP 1206
5. Select one or more additional options to define how to scan and rebuild the new database
after the new file has been generated.
6. Click OK.
To use these settings the next time you recover a file during the same application launch, keep Use
advanced options selected in the “Name new recovered file” dialog box. To change these settings,
keep Use advanced options selected in the “Name new recovered file” dialog box, and click
Specify.
To revert to the FileMaker Pro default recovery settings, deselect Use advanced options.
Notes
•When Bypass startup script and layout is selected, the bypass will not be allowed if any
one of these conditions exist:
•a user fails three attempts to log in
•the accounts catalog is damaged
•the Admin account is missing from a runtime version of a file created by FileMaker Pro
Advanced
Select To Default
Scan record data and rebuild
fields and tables
Rebuild the file’s schema. This option forces all
records and field data to be scanned.
Note Scanning all the records and field data may take
a long time, but it’s the only option that re-creates
missing field or table definitions. If any fields or records
are at invalid locations in the file, only this option will
find and remove them.
On
Scan and rebuild scripts,
layouts, etc.
Rebuild the file’s structure.
If the locale of themes stored in a file matches the
installed themes on disk, FileMaker Pro will update the
same version or any newer version of themes stored in
a file.
On
Rebuild field indexes, and then
select Now or Later
Rebuild field indexes during file recovery, or later as
indexes are needed.
On, Now
Delete cached settings Remove the most recently used settings including
page format, print settings, layout formatting defaults;
and for every table in a file, the import and export
order, recent sorts, recent finds, the last found set, and
send mail options. (However, any saved finds are
recovered.)
On
Bypass startup script and
layout
Bypass any scripts or layouts that are normally used
when the file is opened. (Any scripts created in File
Options with the OnFirstWindowOpen or
OnWindowOpen script triggers are disabled and
FileMaker Pro creates a blank layout into which the file
opens.) This option prompts you near the end of the
recovery process to enter an account and password
with full access to the database.
Off

Maintaining and recovering FileMaker Pro databases
FILEMAKER PRO HELP 1207
•If you change file recovery settings and then switch to using a script that bypasses dialog
boxes, FileMaker Pro uses its default file recovery options (instead of those you set). If you
return to recovering files using dialog boxes, however, the changed settings are restored.
•Whenever you only want to bypass the layout to open the file, select Copy blocks as-is
and Bypass on open script, and leave other options deselected.
Troubleshooting file recovery
Use the following table to help you determine how to recover or check the consistency of a file you
suspect is damaged.
Problem Solution
Performing a find returns more records
than you expected, or the find returns
fewer records than it should. (For
example, the found set includes records
that once contained the word or value
being searched but doesn’t any longer,
or the found set doesn’t include a record
you just added with the word or value
being searched.)
The indexes for the search field (the field containing the
value being searched) have become out of sync with the
data. If the problem occurs only when searching on one
field, use the Manage Database dialog box to turn off the
field index, then save the changes, and then turn on the
field index again. To do this:
1. With the database open, choose File menu >
Manage > Database.
2. In the Manage Database dialog box, click the
Fields tab, and double-click the indexed field.
3. In the Options for Field dialog box, click the
Storage tab.
4. Remove the index by selecting Indexing: None.
Then click OK.
5. In the Manage Database dialog box, double-click
the same field. In the Options for Field dialog box,
click the Storage tab.
6. Place the index back on for that field by selecting
Indexing: All. Click OK.
7. Click OK to close the Manage Database dialog
box.
8. Test the file.
If more than one index appears to have a problem, in the
Advanced Recovery Options dialog box, select Copy file
blocks as-is and only Rebuild indexes / Now. This
combination of options creates a new database that is a
copy of the old one with all the field indexes rebuilt.
For more information, search the FileMaker Knowledge
Base available at http://help.filemaker.com.

Maintaining and recovering FileMaker Pro databases
FILEMAKER PRO HELP 1208
FileMaker Pro crashes or hangs when
opening a file that displays a layout
containing a corrupted graphic. The
layout can't be avoided because of an
On Open script or because the Switch to
Layout option (in the File Options dialog
box) is selected.
Try opening the file from a different file (which you can do
if the file contains a script that switches to a layout other
than the opening layout) and then deleting the corrupted
layout. To do this:
1. Open another FileMaker file or create a new one.
2. Define a script with the following step:
Perform Script [ "Script" from file::
"Badfile"]
(Badfile is the name of the unopenable file and Script
is a script within the unopenable file that switches to
any layout but the opening layout.)
3. Perform the script.
4. In another layout, switch to Layout mode.
5. Scroll the window to the bottom of the screen or to
the right edge of the screen beyond the position
where objects would be visible on the damaged
layout.
6. Switch to the damaged layout.
Because the corrupted objects are off-screen, the
computer should not hang.
7. Delete this layout.
If the problem persists, recover the file using the
Advanced Recovery Options dialog box. Select Copy file
blocks as-is and only Bypass startup script and layout.
This combination of options creates a new database that
is a copy of the old one. When FileMaker Pro opens, it
switches to a new blank layout, and the On Open script
option is disabled.
For more information, search the FileMaker Knowledge
Base available at http://help.filemaker.com.
Your computer crashed when you were
making lots of changes to the layout and
script structure of a database. The
database is now reported as damaged.
If you were making significant changes to the layouts,
scripts, or other database structure but were not changing
the data, you may want to retrieve only the most recently
modified layouts or scripts from the damaged file and then
copy them to a good backup copy of the original file.
To do this, in the Advanced Recovery Options dialog box,
select either Copy logical structure or Scan blocks and
rebuild file. Then select only Scan and rebuild scripts,
layouts, etc. (structure). This combination of options
creates a new file and rebuilds the structure much faster
than if all the fields and records also were scanned and
rebuilt. Use the new file only to copy the minimum
necessary scripts and layouts, and then paste them into a
known good backup copy of the original file.
Problem Solution

Maintaining and recovering FileMaker Pro databases
FILEMAKER PRO HELP 1209
A database you tried to open is reported
as damaged, and you want to try saving
a compacted copy of the file.
In the Advanced Recovery Options dialog box, select
Copy logical structure, but select none of the
checkboxes. This option performs the exact same
operation as saving a compacted copy of the database.
Because copying the logical structure does not scan the
field data or structure, there could still be problems with
the resulting file, so test that file carefully for signs of
problems. Also consider performing a full recovery; that is,
recover the file with Use advanced options deselected in
the “Name new recovered file” dialog box, to see if
problems are reported.
You suspect there may be problems
with your file, although the file is not
reported as damaged.
Start by doing a file consistency check, to check the low-
level block format of the file. (Click the Check
consistency button in the Select Damaged File dialog
box.)
If no problems are found, then recover the file with Use
advanced options in the “Name new recovered file”
dialog box deselected. If no problems are found while
scanning the schema and structure, you can assume that
the original file has no structural problems.
However, there is still a risk that the file contains corrupted
data or graphics. If database users report that going to a
particular layout or record causes their computer to hang
or FileMaker Pro to crash, then data or graphics could be
corrupted. In that case, locate and delete the problem
layout or record. To do this:
1. In another layout, switch to Layout mode.
2. Scroll the window to the bottom of the screen or to
the right edge of the screen beyond the position
where objects would be visible on the damaged
layout.
3. Switch to the damaged layout. Because the
corrupted objects are off-screen, the computer
should not hang.
4. Delete this layout.
For more information, search the FileMaker Knowledge
Base available at http://help.filemaker.com.
Problem Solution

Maintaining and recovering FileMaker Pro databases
FILEMAKER PRO HELP 1210
You want to recover a large file in the
shortest possible amount of time while
ensuring that everything important
about recovering the file is performed.
In the Advanced Recovery Options dialog box, select
Scan blocks and rebuild file and then select Scan
record data and rebuild fields and tables (schema),
Scan and rebuild scripts, layouts, etc. (structure), and
Rebuild field indexes / Later. This combination of
options scans and rebuilds the file schema and structure
but deletes instead of rebuilds existing field indexes. File
recovery will take less time, and the field indexes will be
rebuilt later, as they are needed, during database use.
Note Deselecting Delete cached settings is unlikely to
have much impact in shortening file recovery time.
Problem Solution

FileMaker Pro error codes
FILEMAKER PRO HELP 1211
FileMaker Pro error codes
This table describes the numbered error codes returned by the Get(LastError) function, or by the
Script Debugger in FileMaker Pro Advanced.
Error
Number Description
-1 Unknown error
0No error
1User canceled action
2Memory error
3Command is unavailable (for example, wrong operating system, wrong mode, etc.)
4Command is unknown
5Command is invalid (for example, a Set Field script step does not have a calculation
specified)
6File is read-only
7Running out of memory
8Empty result
9Insufficient privileges
10 Requested data is missing
11 Name is not valid
12 Name already exists
13 File or object is in use
14 Out of range
15 Can't divide by zero
16 Operation failed, request retry (for example, a user query)
17 Attempt to convert foreign character set to UTF-16 failed
18 Client must provide account information to proceed
19 String contains characters other than A-Z, a-z, 0-9 (ASCII)
20 Command/operation canceled by triggered script
21 Request not supported (for example, when creating a hard link on a file system that does
not support hard links)
100 File is missing
101 Record is missing
102 Field is missing
103 Relationship is missing
104 Script is missing
105 Layout is missing
106 Table is missing
107 Index is missing
108 Value list is missing
109 Privilege set is missing

FileMaker Pro error codes
FILEMAKER PRO HELP 1212
110 Related tables are missing
111 Field repetition is invalid
112 Window is missing
113 Function is missing
114 File reference is missing
115 Menu set is missing
116 Layout object is missing
117 Data source is missing
118 Theme is missing
130 Files are damaged or missing and must be reinstalled
131 Language pack files are missing (such as Starter Solutions)
200 Record access is denied
201 Field cannot be modified
202 Field access is denied
203 No records in file to print, or password doesn't allow print access
204 No access to field(s) in sort order
205 User does not have access privileges to create new records; import will overwrite existing
data
206 User does not have password change privileges, or file is not modifiable
207 User does not have sufficient privileges to change database schema, or file is not
modifiable
208 Password does not contain enough characters
209 New password must be different from existing one
210 User account is inactive
211 Password has expired
212 Invalid user account and/or password; please try again
213 User account and/or password does not exist
214 Too many login attempts
215 Administrator privileges cannot be duplicated
216 Guest account cannot be duplicated
217 User does not have sufficient privileges to modify administrator account
218 Password and verify password do not match
300 File is locked or in use
301 Record is in use by another user
302 Table is in use by another user
303 Database schema is in use by another user
304 Layout is in use by another user
306 Record modification ID does not match
307 Transaction could not be locked because of a communication error with the host
Error
Number Description

FileMaker Pro error codes
FILEMAKER PRO HELP 1213
308 Theme is locked and in use by another user
400 Find criteria are empty
401 No records match the request
402 Selected field is not a match field for a lookup
403 Exceeding maximum record limit for trial version of FileMaker Pro
404 Sort order is invalid
405 Number of records specified exceeds number of records that can be omitted
406 Replace/Reserialize criteria are invalid
407 One or both match fields are missing (invalid relationship)
408 Specified field has inappropriate data type for this operation
409 Import order is invalid
410 Export order is invalid
412 Wrong version of FileMaker Pro used to recover file
413 Specified field has inappropriate field type
414 Layout cannot display the result
415 One or more required related records are not available
416 A primary key is required from the data source table
417 Database is not a supported data source
418 Internal failure in INSERT operation into a field
500 Date value does not meet validation entry options
501 Time value does not meet validation entry options
502 Number value does not meet validation entry options
503 Value in field is not within the range specified in validation entry options
504 Value in field is not unique as required in validation entry options
505 Value in field is not an existing value in the database file as required in validation entry
options
506 Value in field is not listed on the value list specified in validation entry option
507 Value in field failed calculation test of validation entry option
508 Invalid value entered in Find mode
509 Field requires a valid value
510 Related value is empty or unavailable
511 Value in field exceeds maximum field size
512 Record was already modified by another user
513 No validation was specified but data cannot fit into the field
600 Print error has occurred
601 Combined header and footer exceed one page
602 Body doesn't fit on a page for current column setup
603 Print connection lost
Error
Number Description

FileMaker Pro error codes
FILEMAKER PRO HELP 1214
700 File is of the wrong file type for import
706 EPSF file has no preview image
707 Graphic translator cannot be found
708 Can't import the file or need color monitor support to import file
709 QuickTime movie import failed
710 Unable to update QuickTime reference because the database file is read-only
711 Import translator cannot be found
714 Password privileges do not allow the operation
715 Specified Excel worksheet or named range is missing
716 A SQL query using DELETE, INSERT, or UPDATE is not allowed for ODBC import
717 There is not enough XML/XSL information to proceed with the import or export
718 Error in parsing XML file (from Xerces)
719 Error in transforming XML using XSL (from Xalan)
720 Error when exporting; intended format does not support repeating fields
721 Unknown error occurred in the parser or the transformer
722 Cannot import data into a file that has no fields
723 You do not have permission to add records to or modify records in the target table
724 You do not have permission to add records to the target table
725 You do not have permission to modify records in the target table
726 There are more records in the import file than in the target table; not all records were
imported
727 There are more records in the target table than in the import file; not all records were
updated
729 Errors occurred during import; records could not be imported
730 Unsupported Excel version (convert file to Excel 2007/2008 format or a later supported
version and try again)
731 File you are importing from contains no data
732 This file cannot be inserted because it contains other files
733 A table cannot be imported into itself
734 This file type cannot be displayed as a picture
735 This file type cannot be displayed as a picture; it will be inserted and displayed as a file
736 Too much data to export to this format; it will be truncated
737 Bento table you are importing is missing
738 The theme you are importing already exists
800 Unable to create file on disk
801 Unable to create temporary file on System disk
Error
Number Description

FileMaker Pro error codes
FILEMAKER PRO HELP 1215
802 Unable to open file.
This error can be caused by one or more of the following:
•Invalid database name
•File is closed in FileMaker Server
•Invalid permission
803 File is single user or host cannot be found
804 File cannot be opened as read-only in its current state
805 File is damaged; use Recover command
806 File cannot be opened with this version of FileMaker Pro
807 File is not a FileMaker Pro file or is severely damaged
808 Cannot open file because access privileges are damaged
809 Disk/volume is full
810 Disk/volume is locked
811 Temporary file cannot be opened as FileMaker Pro file
812 Exceeded host’s capacity
813 Record Synchronization error on network
814 File(s) cannot be opened because maximum number is open
815 Couldn't open lookup file
816 Unable to convert file
817 Unable to open file because it does not belong to this solution
819 Cannot save a local copy of a remote file
820 File is in the process of being closed
821 Host forced a disconnect
822 FMI files not found; reinstall missing files
823 Cannot set file to single-user, guests are connected
824 File is damaged or not a FileMaker file
825 File is not authorized to reference the protected file
826 File path specified is not a valid file path
850 Path is not valid for the operating system
851 Cannot delete an external file from disk
852 Cannot write a file to the external storage
853 One or more containers failed to transfer
900 General spelling engine error
901 Main spelling dictionary not installed
902 Could not launch the Help system
903 Command cannot be used in a shared file
905 No active field selected; command can only be used if there is an active field
906 Current file is not shared; command can be used only if the file is shared
Error
Number Description

FileMaker Pro error codes
FILEMAKER PRO HELP 1216
920 Can’t initialize the spelling engine
921 User dictionary cannot be loaded for editing
922 User dictionary cannot be found
923 User dictionary is read-only
951 An unexpected error occurred (*)
954 Unsupported XML grammar (*)
955 No database name (*)
956 Maximum number of database sessions exceeded (*)
957 Conflicting commands (*)
958 Parameter missing (*)
959 Custom Web Publishing technology is disabled
960 Parameter is invalid
1200 Generic calculation error
1201 Too few parameters in the function
1202 Too many parameters in the function
1203 Unexpected end of calculation
1204 Number, text constant, field name or “(“ expected
1205 Comment is not terminated with "*/"
1206 Text constant must end with a quotation mark
1207 Unbalanced parenthesis
1208 Operator missing, function not found or “(“ not expected
1209 Name (such as field name or layout name) is missing
1210 Plug-in function has already been registered
1211 List usage is not allowed in this function
1212 An operator (for example, +, -, *) is expected here
1213 This variable has already been defined in the Let function
1214 AVERAGE, COUNT, EXTEND, GETREPETITION, MAX, MIN, NPV, STDEV, SUM and
GETSUMMARY: expression found where a field alone is needed
1215 This parameter is an invalid Get function parameter
1216 Only Summary fields allowed as first argument in GETSUMMARY
1217 Break field is invalid
1218 Cannot evaluate the number
1219 A field cannot be used in its own formula
1220 Field type must be normal or calculated
1221 Data type must be number, date, time, or timestamp
1222 Calculation cannot be stored
1223 Function referred to is not yet implemented
1224 Function referred to does not exist
Error
Number Description

FileMaker Pro error codes
FILEMAKER PRO HELP 1217
Error codes marked with an asterisk (*) are returned only by web-published databases.
Related topics
Get(LastError)
1225 Function referred to is not supported in this context
1300 The specified name can’t be used
1301 One of the parameters of the function being imported or pasted has the same name as a
function already in the file
1400 ODBC client driver initialization failed; make sure the ODBC client drivers are properly
installed
1401 Failed to allocate environment (ODBC)
1402 Failed to free environment (ODBC)
1403 Failed to disconnect (ODBC)
1404 Failed to allocate connection (ODBC)
1405 Failed to free connection (ODBC)
1406 Failed check for SQL API (ODBC)
1407 Failed to allocate statement (ODBC)
1408 Extended error (ODBC)
1409 Error (ODBC)
1413 Failed communication link (ODBC)
1414 SQL statement is too long
1450 Action requires PHP privilege extension (*)
1451 Action requires that current file be remote
1501 SMTP authentication failed
1502 Connection refused by SMTP server
1503 Error with SSL
1504 SMTP server requires the connection to be encrypted
1505 Specified authentication is not supported by SMTP server
1506 Email message(s) could not be sent successfully
1507 Unable to log in to the SMTP server
1550 Cannot load the plug-in or the plug-in is not a valid plug-in
1551 Cannot install the plug-in. Cannot delete an existing plug-in or cannot write to the folder or
disk
1626 Protocol is not supported
1627 Authentication failed
1628 There was an error with SSL
1629 Connection timed out; the timeout value is 60 seconds
1630 URL format is incorrect
1631 Connection failed
Error
Number Description

Glossary
FILEMAKER PRO HELP 1219
Glossary
A
Access key (Windows)
A key that activates a menu, menu item, or control when used with the ALT key. In Windows,
this key corresponds to the underlined letter on a menu, command, or dialog box option.
Access privileges
Permission to view and work with certain records, fields, layouts, value lists, and scripts and to
perform selected activities in a file.
Account
A username and (usually) password that accesses a file with a defined level of privileges. There
are two predefined accounts: Admin and Guest. Admin is a Full Access account that can be
renamed or deleted. At least one Full Access account that is authenticated via FileMaker must
be defined for each database file. Guest account is a special account that cannot be renamed or
deleted, but can be made active or inactive.
ActiveX Automation
A Windows programming and scripting protocol that allows external control of specific
commands and actions in FileMaker Pro, including opening and closing FileMaker Pro
databases, toggling the application's visibility, and performing FileMaker Pro scripts.
Alpha channel
The alpha channel of an image stores transparency information and controls the transparency
of the red, green, and blue color channels.
Animation
A visual effect that provides feedback while you are performing actions in FileMaker Pro and
FileMaker Go such as switching between slide panels.
API (Application Programming Interface)
A set of software application building blocks, such as data structures, variables, procedures,
and functions, used by programmers.
AppleScript
A scripting language you can use to control functions of OS X and of applications that support
AppleScript (often called scriptable applications).
Apple events
An OS X technology that lets applications communicate with one another. FileMaker Pro can
send and receive Apple events to and from applications that support them.
Ascending sort order
Alphabetical sequence (A to Z) for words, lowest to highest order for numbers, and earliest to
latest for dates and times.
ASCII character set
American Standard Code for Information Interchange. A standard character set used by
computer systems worldwide (often extended for different alphabets).
Authentication
The process of checking the validity of an account and password (if one is defined) before
assigning privileges and allowing access to a system or a database file. An account
authenticated via FileMaker Pro or FileMaker Server is referred to as a FileMaker Account.

B
FILEMAKER PRO HELP 1220
(FileMaker Server can also authenticate an account via External Server — an external
authentication system such as Apple Open Directory, or a Windows Domain.)
Authorization
Allowing a file to access a protected file’s schema (including its tables, layouts, scripts, and
value lists). Such a file is an authorized file.
Auxiliary files
In a FileMaker Pro Advanced runtime solution, files that are bundled with a primary file.
B
Badge
An icon indicating that conditional formatting, script triggers, or tooltips have been applied to a
field, object, or layout; that find is available for a field; or that an object is a button or a popover
button.
Base directory
For container fields that store an external reference, the directory in which the referenced data is
stored. You can also specify a file system path or a calculation for each open storage container
field.
Binding key
In FileMaker Pro Advanced, a case-sensitive key between 1 and 24 characters long that links
the components of a runtime solution.
Blank layout
A layout that contains empty body, header, and footer parts. (In previous versions of
FileMaker Pro, a Blank layout was a predefined layout type.)
Body part
A layout part that contains individual records from a database file.
Book
In the status toolbar, the navigation control for moving from one record to another in Browse
mode, from one layout to another in Layout mode, from one request to another in Find mode,
and from one page to another in Preview mode.
If you don't see the status toolbar, click the status toolbar control button at the bottom of the
document window.
Boolean value
A Boolean value is either True or False. A field containing any number except zero evaluates as
True. A field containing zero, no data, or content that does not resolve into a number evaluates
as False. For example, a field containing “ABC,” “ABC0,” or an empty field is False. A field
containing “1” or “ABC2” is True.
Break field
In a subsummary part, records are grouped (sorted) by values in another field, called the break
field. Whenever the value of the break field changes, the report “breaks” and FileMaker Pro
inserts the subsummary part.
Browse mode
The FileMaker mode in which you enter and edit information in fields. Groups of fields make up
the records of your database. You can view one record at a time (click Form View in the layout
C
FILEMAKER PRO HELP 1221
bar), view your records in a list (click List View), or view records arranged in a spreadsheet-like
table (click Table View).
(Use Browse mode to enter and edit your information; use Layout mode to design how your
information is displayed. Use Find mode to find records that match search criteria; use Preview
mode to display how your records will print.)
Button
A layout object that performs a specified script in Browse or Find modes.
C
Cache
The amount of memory assigned to FileMaker Pro. A larger cache size increases performance.
A smaller cache size saves data to the hard disk more frequently, offering greater protection in
case of a system crash.
Calculation field
A field that returns the result of a calculation of values. You can create a formula for the
calculation using functions, constants, operators, and information from other fields in the same
record.
Cascading style sheets
A system of codes or tags that define how a web browser displays information in a web page.
Cascading style sheets provide more control over the layout and appearance of web pages than
HTML. Cascading style sheets work like templates for web pages. If a web page contains
cascading style sheets, users must view it in a browser that supports cascading style sheets.
CGI (Common Gateway Interface)
The specification for communication between an HTTP server and server gateway programs,
which is supported by most servers.
Character encoding
The character set or code page of a file. If necessary, you can specify a character set to be used
when importing, exporting, indexing, sorting, and spell-checking files. FileMaker supports ASCII,
Windows ANSI, Macintosh, Japanese (Shift-JIS), Unicode UTF-8, Unicode UTF-16, and
Unicode UTF-16 Windows.
Chart
A graphical depiction that makes it easy to compare data and see patterns and trends.
Chart legend
A key that identifies the colors assigned to a data series in a chart.
Client
A user that opens a database file that is shared on a network, published in a browser, or shared
via ODBC/JDBC. FileMaker Network settings and privileges determine how FileMaker Pro and
FileMaker Go clients interact with databases hosted through FileMaker Pro, and
FileMaker Server.
Client application
The application that requests data (using SQL) from a data source (using ODBC or JDBC).
Also, FileMaker Pro is a client application when it accesses a database hosted by
FileMaker Server.
C
FILEMAKER PRO HELP 1222
Client/server architecture
The relationship between two networked computers that share resources. The client requests
services from the server, and the server provides services to the client.
Clipboard
A temporary storage area in computer memory where FileMaker Pro places the most recent
selection you've cut or copied.
Clone
A copy of a FileMaker Pro file that contains all the field definitions, tables, layouts, scripts, and
page setup options, but none of the data.
Column
When a database file is viewed as a table, a column corresponds to a field.
Combo box
A type of drop-down list you can set up in Layout mode. In the Data tab of the Inspector, select
Include arrow to show and hide list. The list will only drop when users click the arrow, not
when they enter the field.
Commit
To save changes to a database file. Certain actions such as navigating between records,
finding, and sorting do not change the file’s modification date. Other actions, such as changing
data in a record or changing a layout do change the file’s modification date.
Consistency check
A consistency check examines a file that may have been damaged due to, for example, an
unexpected quit. FileMaker Pro reads every file block and verifies that the internal structure of
the block is valid and the block is properly linked to other blocks in the file. (A consistency check
does not read all the data within each file block or check the schema or higher-level structures in
the file; these tasks are performed by file recovery.)
Constant
In a formula, an unchanging value. For example, a constant can be a field name, a text literal
("Total:"), or a number. The value of the constant doesn't change from record to record as the
formula is evaluated. Text constants in formulas can be up to 253 characters long.
Container data type
Pictures, movies, and documents, such as Microsoft Word files and PDF files can be inserted in
a container field. Data in container fields can be embedded in the field, stored by file reference,
or stored externally.
Context
The table occurrence from which calculations and scripts are begun, and from which a
relationship is evaluated in the relationships graph.
Convert
Opening a data file from another application, which creates a new FileMaker Pro file containing
the data.
Also refers to opening a file created with a previous version of FileMaker Pro.
Custom function
A function that is not one of the default FileMaker Pro functions. In FileMaker Pro Advanced,
you can create custom functions that can be reused anywhere in the database.
D
FILEMAKER PRO HELP 1223
Custom menu
A menu that is not one of the default FileMaker Pro menus. In FileMaker Pro Advanced, you can
create custom menus, menu items, and menu sets.
D
Data Entry Only privilege set
One of the three predefined privilege sets that appear in every file. The Data Entry Only
privilege set allows read/write access to the records in a file, but not design access (for
example, the ability to create layouts and value lists).
Data point
In a chart, the value of data plotted on the x or y axis displayed as a column, bar, point, bubble,
or slice.
Data series
Data points that are plotted in a chart. When multiple data series are charted, each data series
is displayed in a unique color and is defined in the chart’s legend, if included.
Data source
A named reference that provides access to another FileMaker database file or to an ODBC
database. ODBC data sources are also referred to as external SQL sources (ESS).
In charting, the origin of the data to be charted (current found set, current record (delimited
data), or related records).
Data source name (DSN)
A data structure that contains the information about a specific database that an ODBC driver
needs in order to connect to it.
Data Viewer
A FileMaker Pro Advanced feature that lets you monitor expressions such as field values, local
and global variables, and calculations. You can monitor expressions while running scripts or
while testing them in the Script Debugger. You can also monitor field values and variables in the
database file.
Database Design Report
A FileMaker Pro Advanced tool that creates a report of your database schema.
Database Encryption
A form of encryption that protects “data at rest.” For FileMaker, data at rest is a FileMaker Pro
database file, and its temporary files, while it is being stored on disk (and not open). An
encrypted database is protected from unauthorized access with an encryption password.
FileMaker Pro Advanced is required to encrypt database files. Encrypted database files can be
decrypted and re-encrypted as needed.
Database file
A collection of information in a file containing one or more tables pertaining to a subject, such as
customers or invoices. (A large database can also comprise many database files.)
Database Management System (DBMS)
An application that allows users to store, process, and retrieve information in a database.
Descending sort order
Reverse alphabetical sequence (Z to A) for words, highest to lowest order for numbers, and
latest to earliest dates and times.
D
FILEMAKER PRO HELP 1224
Developer Utilities
A FileMaker Pro Advanced feature that lets you bind files into a runtime solution, display files in
Kiosk mode, prevent users from modifying the design or structure of databases, and
automatically rename sets of files and update links to related files.
Dialog window
A document window in a modal state. Its behavior is similar to the behavior of a window when a
running script is paused. You can create and customize a dialog window using the New Window
script step.
Document window
A standard modeless FileMaker window. You can create and customize a document window
using the New Window script step.
Domain name
The primary subdivision of internet addresses, which is indicated by the last part of an internet
address after the final period (or dot). In the United States, the standard domains are .com, .edu,
.gov, .mil, .org, and .net. In other countries, the top-level domain is usually the country domain.
Domain name server (DNS)
A server that matches up the URL of a website (for example http://www.filemaker.com) with its
proper numeric IP address (for example 12.34.56.78).
Driver
The ODBC or JDBC driver translates SQL queries into commands that a DBMS can
understand. It processes ODBC/JDBC calls, submits SQL requests to the data source, and
returns the data back to the driver manager, which then routes it to the requesting application
(for example, FileMaker Pro).
Driver manager
The control panel that manages communication between requesting applications and data
sources. When an application makes a request via ODBC/JDBC, the driver manager routes the
request through the correct driver to the correct data source and returns the data to the
requesting application. All ODBC/JDBC drivers and data sources to be used on that computer
are registered with the driver manager.
Drop-down calendar
A field set up to display an interactive monthly calendar when a user enters the field in Browse
or Find mode.
DTD (Document Type Definition)
A formal description of a particular type of XML. It defines a document structure, including the
names of data elements and where they may occur within the structure. Valid XML conforms to
the rules established in its DTD.
Dynamic guides
In Layout mode, guidelines that extend horizontally and vertically to help you move, resize, or
align objects. Dynamic guides also “snap-to” the upper and lower boundaries and the centers of
objects as you move, resize, or align the objects.
E
FILEMAKER PRO HELP 1225
E
Email
Electronic mail. A system for transmitting messages from one computer or terminal to another. A
message sent from one computer user to another is stored in the recipient’s account mailbox
until that person logs onto the system and reads the message.
Embedded
For container fields, a file that is stored in the container field. Container data can also be stored
by reference or stored externally.
Encryption password
The password required to open an encrypted file. For FileMaker Pro, the encryption password is
required for the FileMaker Pro user who opens the file, but not for the client who opens a file
hosted by FileMaker Pro. FileMaker Pro Advanced is required to enable, disable, or change an
encryption password.
Envelope layout
A predefined layout with fields arranged for printing on standard business envelopes.
Ethernet
A type of fast local area network used for connecting computers and peripherals within the
same building or campus.
Export
To save data from one file so that it can be used in another file or in another application.
Expression
A value or any computation that produces a value. Expressions can contain functions, field
values, and constants and can be combined to produce other expressions.
Extended privilege
Data sharing permissions that determine if a privilege set allows users to open a shared file
using FileMaker Pro or FileMaker Server (fmapp); view a database as an ODBC or JDBC data
source (fmxdbc); view a database using a web browser via FileMaker WebDirect (fmwebdirect),
XML web publishing (fmxml), or PHP web publishing (fmphp); or access a file in FileMaker Go
without having to re-login (fmreauthenticate10). Plug-ins from third-party developers may
provide additional extended privileges.
External function
A function written in C or C++ as part of a third-party plug-in that extends the feature set of
FileMaker Pro or FileMaker Pro Advanced.
External script
A script used by a database file, but defined in a different database file. Use the Perform Script
script step to select a defined script from a related file, or to select a file reference to a database
file on your hard drive or network.
F
Field
The basic unit of data in a record. You define a field to hold a specific, discrete category of data,
such as Last Name, Employee Photo, or to display the result of a calculation. You can define
text, number, date, time, timestamp, container, calculation, and summary fields. Field can also
F
FILEMAKER PRO HELP 1226
refer to the object on a layout that displays the data, such as an edit box, checkbox set, or pop-
up menu.
Field boundary
In Layout mode, an outline that shows the size of a field. To see field boundaries, choose View
menu > Show > Field Boundaries. These boundaries only appear in Layout mode. However,
you can use the Appearance tab of the Inspector to format objects to have borders that do
appear in Browse mode and when you print the layout.
Field label
Text on a layout that identifies a field. When you place a field on a layout, you can have
FileMaker Pro add a field label that matches the field name. You can change or delete this field
label if you want.
Field name
The name you assign to a field when you define the field. When you place a field onto a layout,
you can have FileMaker Pro also place an editable field label that matches the field name. Fully
qualified fields are displayed in tablename::fieldname format.
Field type
The part of a field definition that determines what kind of data you can enter in the field and the
kinds of operations FileMaker Pro can perform with the data. FileMaker Pro can create text,
number, date, time, timestamp, container, calculation, and summary fields. (Global fields contain
the same value for all records in the database and can be of any type except summary.)
File path
The location of a file in an operating system as identified by the drive, folders, filename, and file
extension.
FileMaker Network
A communications method built into FileMaker Pro that allows you to share files hosted by
FileMaker Pro or FileMaker Server with others over a network or in FileMaker Go. The
FileMaker Network settings and privileges you set up determine how other users (called
“clients”) can open and use the shared file.
FileMaker WebDirect
A web application for accessing layouts from database files in a web browser. Web clients use
FileMaker WebDirect to access layouts from database files hosted by FileMaker Server.
Find mode
The FileMaker mode in which you specify criteria for finding a subset of records.
(Use Browse mode to enter and edit your information; use Layout mode to design how your
information is displayed. Use Find mode to find records that match search criteria; use Preview
mode to display how your records will print.)
Find request
In Find mode, a blank form based on the current layout. Enter search criteria into one or more
fields of the find request.
Firewall
A security system used to prevent unauthorized users from gaining access to a LAN. A firewall
usually has a single computer that is connected to the internet and all internet traffic must pass
through that computer.
F
FILEMAKER PRO HELP 1227
Floating document window
A standard modeless FileMaker window that stays on top of other windows while users work in
FileMaker Pro. You can create and customize a floating window using the New Window script
step.
Footer part
Use the footer part for page numbers or dates. This part appears at the bottom of every screen
or page (unless you add a Title Footer). You can have only one footer in a layout. A field in the
footer displays data from the last record on that page.
Form View
Displays one record at a time. By default, fields appear on separate lines. To select this view,
click Form View in the layout bar.
If you don't see the status toolbar, click the status toolbar control button at the bottom of the
document window.
Formatting bar
In Layout and Browse modes, the area that displays options for formatting text and objects. To
show or hide the formatting bar, click Formatting in the layout bar.
If you don't see the status toolbar, click the status toolbar control button at the bottom of the
document window.
Formula
A set of instructions that FileMaker Pro follows to calculate a value used in a field or as the
criteria for matching database records.
Found set
The set of records in a table that are made active when you search for data. When you find all
records, the found set is the entire table.
Full Access privilege set
One of the three predefined privilege sets that appear in every file. The Full Access privilege set
allows complete read/write access to a file, including making changes to privileges for the file.
Fully qualified name
The complete name of a field or layout, expressed using the format tableName::[field or
layout name], where “tableName” is the name of the underlying table occurrence in the
relationships graph upon which the field or layout is based. A fully qualified name identifies an
exact instance of a field or layout. Because fields and layouts with common names can be
based on different tables, FileMaker Pro uses fully qualified names to avoid errors in
calculations and scripts.
Function
A predefined, named formula that performs a specific calculation and returns a single, specific
value.
Formatting bar in Layout mode
G
FILEMAKER PRO HELP 1228
Function list separator
The punctuation character ; (a semicolon) that separates parameters in a function definition. If
you type a comma (,), FileMaker Pro automatically changes it to a semicolon after you close the
Specify Calculation dialog box.
G
GIF (Graphics Interchange Format)
A platform-independent file format often used to distribute graphics on the internet.
Global field
A field defined with the global storage option can contain one value that's used for all records in
a file. Use the value of a global field as a fixed value in calculations, to declare variables in If or
Loop script steps, or for fields that rarely need to be updated (for example, a company logo in a
container field). A global field can be any field type except summary. A global field can’t be
indexed.
Global variable
A global variable can be used in a calculation or script anywhere in a file, for example, other
scripts or file paths. The value of a global variable is not cleared until the file is closed.
Grammar
A precise description of a formal language, such as XML, consisting of sets of rules for how
strings (words) in the language can be generated, and how the strings can be recognized as
part of the language.
Grand summary
Total or other aggregate value for all records in the found set.
Grand summary part
Use grand summary parts to view and display summary information (totals, averages, and so
on) in summary fields for all records in the found set. You can add one grand summary part at
the top (leading) and one grand summary part at the bottom (trailing) of a layout.
Grid
In Layout mode, a series of nonprinting intersecting horizontal and vertical lines. The grid aligns
objects you create, resize, move, or position. Objects “snap to” the grid to help you create and
edit objects more precisely. Gridlines adjust when you change the unit of measure.
Grouped object
A collection of objects that behaves as one object in Layout mode.
Guest
A user who opens a protected file without specifying an account name and password. The
Guest account is assigned a privilege set that determines what guests can do in the file. Guest
access may be disabled for a file.
Guides
Nonprinting, movable horizontal and vertical guidelines to help you position and align objects in
Layout mode. An object's left or right boundary, top or bottom boundary, or center “snaps to” a
guide.
H
FILEMAKER PRO HELP 1229
H
Handle
One of the small squares surrounding a selected object, and used to resize and reshape the
object.
Header part
Use a header part for column headings, titles, and other information that appears only at the top
of every page on a layout. FileMaker Pro displays the header in Browse mode and prints it on
every page, except the first page if you add a title header. Fields added to a header are printed
on every page, using data from the first record on that page.
Homepage
The starting page for a website. It often has some form of a table of contents that allows viewers
to link to other parts of the website.
Host
After a file has been opened and enabled for sharing, the host is either the first FileMaker Pro
user to share the file, or the host is FileMaker Server. Once the host opens the file, other users
(clients) can access and change the file. All changes are stored in the file on the computer or
device where the file resides. FileMaker Network settings and privileges determine how
FileMaker Pro and FileMaker Go clients interact with databases hosted through FileMaker Pro
or FileMaker Server.
HTML (Hypertext Markup Language)
A language that is used for displaying and accessing information on the World Wide Web.
HTTP (Hypertext Transfer Protocol)
The internet protocol that defines how a web server responds to requests for files.
I
Import
To bring (copy) data from a table, another file, or another application into the current table. You
can also import scripts from one FileMaker Pro file into another.
Indexing
An option that can be enabled when defining (or changing) the definition of a field. When
indexing is enabled, FileMaker Pro builds a list of all the values that occur in the field in the
table. This improves the performance of tasks such as finding data, but it increases the size of
the database file on disk.
Inspector
In Layout mode, a tool that allows you to view and edit the settings for objects. You can open
multiple inspectors to view and format settings in different tabs at the same time. To open the
Inspector, choose View menu > Inspector. To open another Inspector window, choose View
menu > New Inspector.
Interactive container
A container field for which the Interactive content option in the Inspector is selected.
Interactive containers are rendered using the web browser technologies that web viewer uses.
Internet
An international network of many other networks that are linked using the TCP/IP network
protocol.

J, K
FILEMAKER PRO HELP 1230
Internet Service Provider (ISP)
The company from which you purchase your connection to the internet.
Intranet
A private TCP/IP network of linked computers within a company or organization.
IP (Internet Protocol) address
For IPv4, a four-part number, usually formatted as 12.34.56.78, that uniquely identifies a
computer on the internet; for IPv6, an eight-part number, usually formatted as
[2001:0DB8:85A3:08D3:1319:8A2E:0370:7334], that uniquely identifies a computer on the
internet. When referenced in an application, IPv6 addresses must be contained in square
brackets, for example, [2001:0DB8:85A3:08D3:1319:8A2E:0370:7334].
J, K
JDBC
A Java API that uses SQL statements to access data from, and exchange data with, many
database management systems. The JDBC driver communicates between your Java applet and
the FileMaker Pro or FileMaker Server data source.
JPEG (Joint Photographic Experts Group)
A platform-independent file format often used to distribute graphics on the internet.
Key
A column (or columns) that makes a particular row unique (corresponds to a match field).
Kiosk
A FileMaker database that runs full screen, without toolbars or menus. Users click buttons to
navigate. In FileMaker Pro Advanced, use the Developer Utilities to create Kiosk solutions. You
can bind Kiosk solutions into stand-alone runtime solutions.
L
Labels layout
A predefined layout with fields arranged for printing horizontally or vertically on mailing label
stock, and media and index sheets.
LAN (local area network)
A connection between computers within a location using cable or a wireless system.
Layout
An arrangement of fields, objects, pictures, and layout parts that represents the way information
is organized and presented when you browse, preview, or print records. You can design
different layouts for entering data, printing reports and mailing labels, displaying web pages, and
so on.
Layout bar
In the status toolbar, the area that displays options for working with layouts, such as the Layout
pop-up menu.
Layout bar in Browse mode

L
FILEMAKER PRO HELP 1231
If you don't see the status toolbar, click the status toolbar control button at the bottom of the
document window.
Layout mode
The FileMaker mode in which you determine how information in fields is presented on the
screen and in printed reports.
(Use Browse mode to enter and edit your information; use Layout mode to design how your
information is displayed. Use Find mode to find records that match search criteria; use Preview
mode to display how your records will print.)
Layout part
A section of a layout that organizes or summarizes information. Layout parts include Body,
Header, Footer, Title Header, Title Footer, leading and trailing Grand Summary, and leading and
trailing Subsummary.
Layout pop-up menu
In the layout bar, a pop-up menu from which you can choose Manage Layouts (Layout mode)
or a defined layout (all modes).
If you don't see the status toolbar, click the status toolbar control button at the bottom of the
document window.
Layout theme
A collection of coordinated styles that determine the color, object, part, and background
attributes, and the fonts used on a layout. Themes also enhance the appearance of a layout or
report and give all your layouts a consistent look. A theme does not control the placement or
behavior of fields or objects on a layout. A theme is assigned when you create a new layout, but
you can change the theme in Layout mode. You can also create a theme by changing the styles
used for the layout, and then saving the theme with a new name.
Layout tools
In the status toolbar in Layout mode, a collection of tools that includes the Selection tool
(pointer), Text tool, Line tool, Rectangle tool, Rounded Rectangle tool, Oval tool, Field/Control
tool, Button tool, Popover Button tool, Tab Control tool, Slide Control tool, Portal tool, Chart tool,
Web Viewer tool, Field tool, Part tool, and Format Painter tool.
If you don't see the status toolbar, click the status toolbar control button at the bottom of the
document window.
Layout types
FileMaker Pro includes several predefined types of layouts and reports to display on different
types of devices (such as laptop computer screens or touch device screens), for different
purposes (such as browsing records, entering data, or printing reports, mailing labels, or
envelopes). After you choose a layout type, you can make additional choices.
To use a predefined layout type, in Layout mode, click New Layout/Report in the status toolbar.
The assistant guides you through creating the type of layout or report you want. After you finish
the assistant, use the tools and commands in Layout mode to tailor the layout for your needs.
LDAP (lightweight directory access protocol)
A protocol for accessing online directory services.
Layout bar in Layout mode

M
FILEMAKER PRO HELP 1232
Link
On a web page, text or a graphic which — when you click it — displays an associated web page
or a specific element within a page.
Also, the HTML code that creates a link to another web page or to a specific element within a
page.
List View
Displays records one record at a time in a list format. To select this view, click List View in the
layout bar.
If you don't see the status toolbar, click the status toolbar control button at the bottom of the
document window.
List view layout
A type of Report layout in which fields that you specify appear in columns across the screen or
page in one line. Field names are in the header part and the footer part is blank. (In previous
versions of FileMaker Pro, a List view layout was a predefined layout type.)
Locked object
An object on a layout that cannot be edited or deleted. To lock or unlock an object, select it in
Layout mode. In the Inspector, click Position, then choose Lock or Unlock in the Arrange &
Align area. If an object is locked, its selection handles dim.
If you don’t see the Inspector, choose View menu > Inspector.
Lookup
A lookup matches records and copies data from a related table into a field in the current table.
After data is copied, it becomes part of the current table (as well as existing in the table it was
copied from). Data copied to a table doesn't automatically change when the values in the related
table change.
Lookup target field
The field that you want data copied to during a lookup.
Lookup source field
The field in the related table that contains the data you want copied during a lookup.
M
Many-to-many relationship
A correspondence between data in database tables in which more than one record in the first
table is related to more than one record in another table, and more than one record in that table
is related to more than one record in the first table.
Match field
For relational databases and lookups, a field in a source table and a field in a related table that
contain values you want to use to find matching records. (A match field is sometimes called a
key field or trigger field.) In the relationships graph, match fields appear in italics.
For importing records, values in the match fields determine which records in the source table
update which records in the target table.
Menu
A list of menu items. Each menu has a title that appears on the menu bar.
N
FILEMAKER PRO HELP 1233
Menu bar
The area at the top of the window (Windows) or screen (OS X) that displays the installed menu
set.
Menu item
One item listed in a menu on the menu bar. A menu item corresponds with one command,
submenu, or separator.
Menu item properties
All the settings for a menu item, including platform, display title, shortcut, and action.
Menu set
The collection of menus that installs on the menu bar.
Merge field
A placeholder on a layout for the contents of a database field. A merge field expands or
contracts in Browse and Preview modes, or when printed, to fit the amount of data in the
database field for each record.
Merge fields are useful for mail merge form letters; FileMaker Pro uses merge fields in
predefined Labels and Envelope layouts.
Merge variable
A variable inserted onto a layout that displays values from a local or global variable onto the
layout of the current record. You see the merge variable value in Browse, Find, and Preview
modes, and when you print records.
Modal window
A window that requires user action before users can continue working in FileMaker Pro. Use a
modal window to display alert messages or to collect information from users.
Mode
In FileMaker Pro, the four different environments (Browse, Find, Layout, and Preview) that you
use to work with your database file.
Mode pop-up menu
A pop-up menu at the bottom of the document window from which you can choose a mode
(Browse, Find, Layout, or Preview). This menu is available in all modes.
Multi-key field
A match field that contains more than one value, each on a separate line. A multi-key field can
be used in one table involved in a relationship, to match several possible values in the match
field of the other table.
Multimedia
Files that combine media, like text, graphics, sound, animation, and video.
N
Network protocol
A network protocol (for example, TCP/IP) is a set of rules that govern how computers exchange
messages on a network.
New Layout/Report assistant
The New Layout/Report assistant guides you through creating a layout or report according to
options you choose. In Layout mode, click New Layout/Report in the status toolbar, or choose
Layouts menu > New Layout/Report.
O
FILEMAKER PRO HELP 1234
O
Object
On a FileMaker Pro layout, an object is a discrete entity or shape that you can select, move,
modify, delete, or name. Lines, fields, buttons, popovers, panel controls, portals, imported
graphics, blocks of text, tab controls, and web viewers are objects.
ODBC
An API that uses SQL statements to access data from, and exchange data with, many database
management systems. FileMaker Pro uses ODBC drivers to share data (as a data source) and
to interact with data from other applications (as a client application).
1-away relationship
A correspondence between database tables in which two tables are directly related to each
other, with no other tables between them.
One-to-many relationship
A correspondence between data in database tables in which one record in the first table is
related to more than one record in another table.
One-to-one relationship
A correspondence between data in database tables in which one record in the first table is
related to one record in another table.
Operands
Components of a formula. For example, in the formula Quantity*Price, Quantity and Price are
the operands.
Operators
In calculations, symbols that indicate how to combine two or more expressions. These include
the standard arithmetic operators (+, -, /, *), logical operators that set up conditions that must be
met to make a value True or False (AND, OR, XOR, and NOT), and find operators (<, =, @) that
help you limit the records defined in a find request.
In the relationships graph, symbols that define the match criteria between one or more pairs of
fields in two tables. These include: != (not equal), > (greater than), < (less than), = (equal), <=
(less than or equal to), >= (greater than or equal to) and x (all rows, or cartesian product).
P
Panel control
Panel controls include the tab control and slide control. Individual panels of these controls are
tab panels and slide panels, respectively.
Parent script
A script that defines script parameters and can call other scripts.
Part label
In Layout mode, the label that appears at the left or side of the bottom dividing line of each
layout part. By dragging it up or down, you can use the part label to resize a part. You can also
open the Part Definitions dialog box by double-clicking the label.
PHP (PHP: Hypertext Preprocessor)
An open-source programming language primarily used in server-side application software to
create dynamic web pages. FileMaker Server lets you publish data from FileMaker Pro
databases on customized web pages created with PHP.
Q
FILEMAKER PRO HELP 1235
Plug-in
Software that extends the capabilities of an application in a specific way.
Popover
A layout object that can contain other layout objects. Popovers include a content area (where
objects are placed) and can include a title. You open a popover by clicking a popover button.
Popovers reposition on the screen as needed to stay in view.
Popover button
A layout object that opens a popover.
Port
A pre-assigned number that indicates a “logical connection place” where a client (such as a web
browser) can connect to a particular server application on a networked computer. Port numbers
range from 0 to 65536. Port 80 is the default port for HTTP services such as FileMaker Pro web
publishing, but you can use another port number if 80 is already in use by another server
application.
Portal
For relational databases, a layout object in one table where you place one or more related fields
to display in rows the data from one or more related records.
Preview mode
The FileMaker mode in which you see how layouts will look when they're printed.
(Use Browse mode to enter and edit your information; use Layout mode to design how your
information is displayed. Use Find mode to find records that match search criteria; use Preview
mode to display how your records will print.)
Primary file
In a FileMaker Pro Advanced runtime solution, the file that connects all of the auxiliary files and
opens when you start the runtime application. From the Developer Utilities in
FileMaker Pro Advanced, you can select a primary file for solutions that have more than one file.
Privilege set
A defined set of permissions that determines a level of access to a database file. You can define
as many privilege sets as you like for a file. There are three predefined privilege sets: Full
Access, Data Entry Only, and Read-Only Access.
Q
Query
Retrieving, manipulating, or modifying data from a data source by sending SQL statements.
Also, requesting, and then receiving, data from a DBMS. You can also add, edit, format, sort,
and perform calculations on your data using queries.
Quick find
In Browse mode, searches records across multiple fields on a layout.
QuickTime
An application from Apple Inc. that compresses, stores, and plays files combining text, sound,
animation, and video.
QuickTime VR
A type of QuickTime movie. QuickTime VR movies let you view panoramic images or objects
from many angles.
R
FILEMAKER PRO HELP 1236
R
Read-Only Access privilege set
One of the three predefined privilege sets that appear in every file. The Read-Only Access
privilege set allows read access to the records in a file, but not write or design access.
Record
One set of fields in a database table. Each record contains data about a single activity,
individual, subject, or transaction.
Recover
If a file is damaged (for example, from an unexpected quit during a hard-drive update), you can
attempt to recover the file. FileMaker Pro preserves as much data (the file’s schema and
structure and its tables, records, layouts, scripts, and field definitions) as possible.
Recurring import
A method of setting up a file to automatically import read-only data from another file. With
recurring import, imported data refreshes when you open the file, view the layout that contains
the imported data for the first time during a FileMaker Pro session, or run a data update script.
Recursive script
A script that calls itself.
Related field
For relational databases, a field in one table that is related to a field in another table (or to a
different field within the same table). If a relationship is defined between two tables (even
through another table), data in fields in one table can be accessed from the other table.
Related record
A record in the related table whose match field (according to the relationship used) contains a
value that's equal to the value in the match field of another table.
Related table
For relational databases, the table that contains the data you want to access and work with in
the current table. For lookups, the table that contains the data to copy.
Relational database
A group of one or more database files that, when used together, contain all the data you need.
Each occurrence of data is stored in only one table at a time, but can be accessed in any table,
either in the same file or from a related file. Data from another table or file is displayed in the
current table without being copied, and the data changes whenever the values in the other table
or file change.
Relationship
Relationships provide access to data from one table to another. Relationships can join one
record in one table to one record in another table, one record to many other records, or all
records in one table to all records in another table, depending on the criteria you specify when
you create the relationship in the relationships graph.
Relationships graph
In the Relationships tab of the Manage Database dialog box, you can see the occurrences of
tables both in the current file and from any external, related database files. In this relationships
graph, you join tables and change relationships between fields in different tables.
When you create a new table, a visual representation, or occurrence, of the table appears in the
relationships graph. You can specify multiple occurrences (with unique names) of the same
table in order to work with complex relationships in the graph.
S
FILEMAKER PRO HELP 1237
Repeating field
A field containing multiple, separate values.
Report layout
A predefined layout type for setting up reports. You can create a layout with simple rows and
columns of data (as in a list), or a complex report with grouped data (subsummary reports). The
fields that you specify appear in columns across the screen or page in one line. Field names are
in the header part and the footer part is blank.
Report with grouped data
A subsummary report that you create using the Report layout type. Reports with grouped data
can include totals and subtotals.
Row
When a database file is viewed as a table, a row corresponds to a record.
Runtime solution
A database that does not require FileMaker Pro or FileMaker Pro Advanced in order to be used.
In FileMaker Pro Advanced, use the Developer Utilities to bind a primary file and any auxiliary
files to produce a stand-alone runtime solution.
S
Schema
In database terminology, a schema is the organization of the tables, the fields in each table, and
the relationships between fields and tables.
Screen stencils
In Layout mode, nonprinting guides that help you design layouts for iPad, iPhone, iPod touch, or
computers with different screen resolutions.
Script
One or more instructions (script steps) that you define to automate repetitive or difficult tasks.
You manage scripts using the Manage Scripts feature. You run a script by clicking its button,
choosing its menu command, calling it from another script or a plug-in, or running it at startup or
when a file closes.
Script Debugger
A FileMaker Pro Advanced tool for debugging FileMaker Pro scripts.
Script step
A command that you include in a script.
Script trigger
A mechanism that causes a specified script to run when a particular event occurs.
Search criteria
In Find mode, the values and operators you specify to locate records. For example, if you type
ABC Travel in the Vendor field, FileMaker Pro looks for and returns all records that have this
name in the Vendor field.
Security
The protection that’s placed on a file. Security includes various types of accounts to
authenticate users, levels of privilege sets to determine what can be done with a file, and
authorization of other files to create references to the current file (including its tables, layouts,
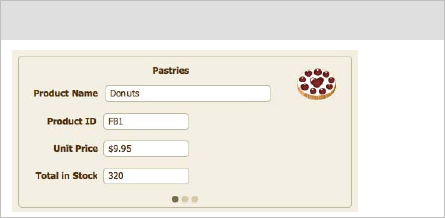
S
FILEMAKER PRO HELP 1238
scripts, and value lists). Security also includes extended privileges, which determine the data
sharing options that are permitted by a privilege set.
Self-join
A relationship between fields in the same table. This creates another occurrence of the table in
the relationships graph.
Separator
A line within a menu that separates or groups menu items.
Serial number
A unique number entered by FileMaker Pro for each record. You can tell FileMaker Pro to
automatically enter a serial number for each record by setting the Auto-Enter options in the
Options for Field dialog box. You can also serialize records in Browse mode by choosing
Records menu > Replace Field Contents.
Shared database
A database file for which sharing has been enabled, which permits users to access the
database file over a network. FileMaker Pro, FileMaker Pro Advanced, and FileMaker Server
each support one or more of the following ways to share databases: FileMaker Network sharing,
which permits multiple FileMaker Pro or FileMaker Go users to use a database file
simultaneously; publishing of databases to web browser users via FileMaker WebDirect or
Custom Web Publishing; and sharing of data with other applications via ODBC/JDBC.
Shared ID
In FileMaker Pro Advanced, a case-sensitive ID between 1 and 32 characters long that links
encrypted database files in a multi-file solution.
Shortcut
Also known as keyboard shortcut. One or more keys that users can press to perform tasks.
Shortcut menu
Use to edit objects or data quickly by choosing commands from a shortcut, or context, menu.
Commands vary depending on the mode you're using, the item the cursor is over, and whether
an item is selected.
To display a shortcut menu, Right-click (Windows) or Control-click (OS X) the item.
Slide control
A layout object made up of one or more slide panels, allowing you to organize fields and other
objects within each slide panel’s borders.
Slide panel
A component of a slide control. The slide panel is the area displayed when a dot in a slide
control is selected. You can place objects such as lines, fields, buttons, portals, imported
graphics, blocks of text, tab controls, slide controls, and web viewers in slide panels.
Slide control in Browse mode
S
FILEMAKER PRO HELP 1239
Slider
In the status toolbar, the navigation control for quickly moving to a record in your database file
based on its location in the file. For example, in Browse mode, move the slider to the left to go to
the first record and to the right to go to the last record.
In Browse mode, moving the slider changes the current record. In Find mode, moving the slider
changes the current find request. In Layout mode, moving the slider changes the current layout.
In Preview mode, moving the slider changes the current page.
Sliding objects
Objects that move together to close gaps left by entries in adjacent fields.
Set sliding in Layout mode, in the Sliding & Visibility area of the Inspector.
If you don’t see the Inspector, choose View menu > Inspector.
Snapshot link
A found set of records that is saved in the FileMaker Pro Snapshot Link (FMPSL) format, with
the filename extension .fmpsl. A snapshot link captures and preserves the found set as it was
when you performed the find request. You can also email an FMPSL file to another person.
Solution
A database file or files.
Sort order
The sequence for rearranging records. Records are sorted by the first field in the sort order list,
then the second, and so on. Values within each field are sorted by the order specified
(ascending, descending, or custom).
Source file
The file from which you bring data during importing or exporting, or the file from which you add a
table to the relationships graph.
Source table
The table upon which one or more table occurrences in the relationships graph are based. The
source table is the table defined in the Tables tab of the Manage Database dialog box.
SQL
A structured programming query language that controls and interacts with a DBMS.
Stacking order
The order in which objects overlap on a layout. In Layout mode, you can change this order by
cutting and pasting objects or by clicking Bring to front, Bring forward, Send to back, or
Send backward in the Arrange & Align area of the Inspector.
If you don’t see the Inspector, choose View menu > Inspector.
Standard form layout
The default layout, with all fields arranged on separate lines in the order they were defined. The
body part is only as tall as it needs to be to include all the fields in the database. This layout
includes header and footer parts. (In previous versions of FileMaker Pro, a Standard Form
layout was a predefined layout type.)
Starter Solution
Or template. A predesigned and formatted FileMaker Pro file, or web page, that you can copy
and change for your own use.
Startup script
A script that automatically runs when a file is opened. You can script such things as setting
system formats to the user's formats or setting a database to be shared in a startup script.
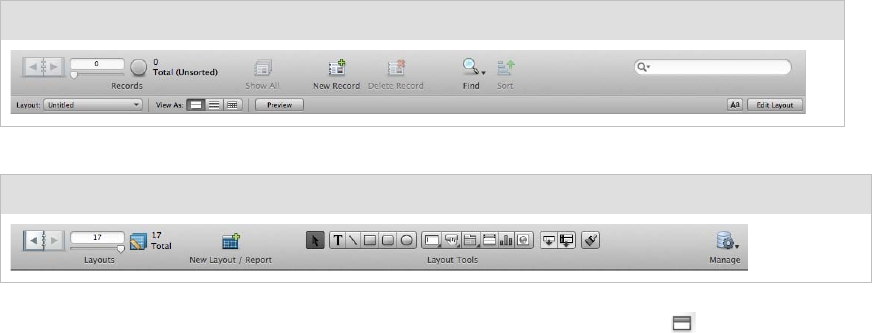
S
FILEMAKER PRO HELP 1240
You specify a startup script in the File Options dialog box.
Status toolbar
The area across the top of the document window that displays navigation controls, customizable
buttons, and a layout bar for working with layouts. In Layout mode, it includes layout tools.
If you don't see the status toolbar, click the status toolbar control button at the bottom of the
document window.
Structure
In FileMaker Pro, the organization of file elements such as scripts, layouts, value lists,
privileges, and so on. You interact with a file’s schema through its structure.
Submenu
A menu that extends from another menu item.
Sub-script
A script that is called from another script.
Subsummary parts
Use summary parts to view and display information from one or more records. You place a
summary field in a summary part to display a summary of information for each group of records
sorted on the break field. You can add one or more subsummaries above (leading) or below
(trailing) the body.
Subsummary value
Aggregate values for different categories of data within a field. For example, a subsummary
value can be the total of employees for each department.
Summary field
A field that contains the result of a summary calculation of values across a group of records.
Supplemental field
A FileMaker calculation field or summary field that you can append to ODBC tables in order to
do calculations on the external data while working in FileMaker. The calculations are not stored
and you are not changing the schema of the ODBC table.
System formats
Settings you control with control panels to determine how dates, times, currency, and numbers
display and sort on your computer. (See the documentation that came with your computer for
information on using these control panels.)
If the system formats are different on your computer from the ones on the computer where the
database file was created, the first time you open the file, FileMaker Pro will ask you if you want
Status toolbar in Browse mode (Windows)
Status toolbar in Layout mode (OS X)
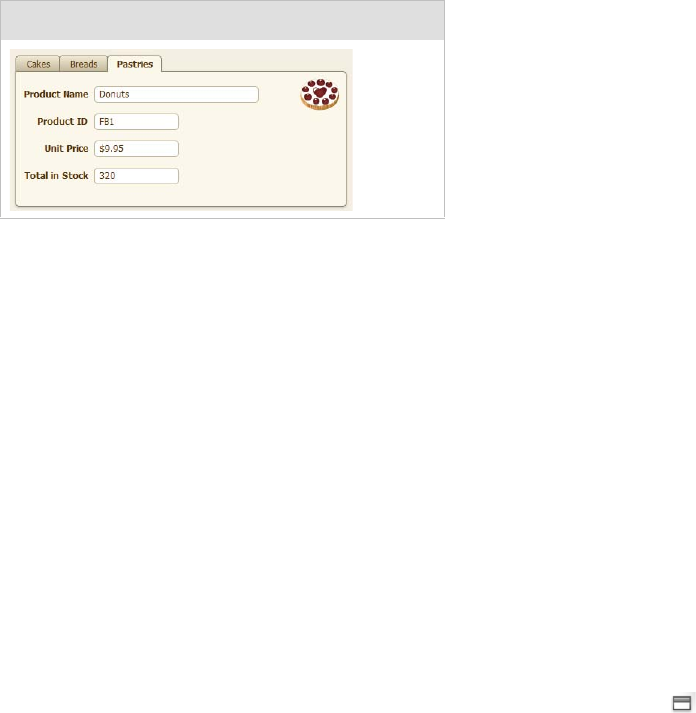
T
FILEMAKER PRO HELP 1241
to use the system’s settings or the file’s settings. Using the Inspector, you can also format
number fields to display decimals and thousands separators according to the current system
formats.
T
Tab control
A layout object made up of one or more tab panels that allows you to organize fields and other
objects within each tab panel's borders.
Tab order
The order in which you move from field to field in a record. In Layout mode, you can define a
custom tab order and include buttons, tab controls, and web viewers in the tab order.
Tab panel
A component of a tab control. The tab panel is the area displayed when a tab in a tab control is
selected. You can place objects such as lines, fields, buttons, portals, imported graphics, blocks
of text, tab controls, slide controls, and web viewers in tab panels.
Table
A collection of data pertaining to a subject, such as customers or stock prices. A database file
contains one or more tables, which consist of fields and records. When you create a new table,
a visual representation, or occurrence, of the table appears in the relationships graph. You can
specify multiple table occurrences (with unique names) of the same table in order to work with
complex relationships in the graph.
Table View
Displays multiple records in a tabular format like a spreadsheet. Each record appears in a row,
and each field appears in a column. To select this view, click Table View in the layout bar.
If you don't see the status toolbar, click the status toolbar control button at the bottom of the
document window.
In Browse mode, you can use Table View to create, modify, and delete fields; choose field types;
add, delete, and sort records; or create a chart or dynamic report.
Target file
The file into which you bring data during importing.
TCP/IP (Transmission Control Protocol/Internet Protocol)
The basic communication protocol that is the foundation of the internet.
Template
A predefined website that you can select in the Web Viewer Setup dialog box to help you create
a web viewer quickly.
Tab control and tab panels in Browse mode
U
FILEMAKER PRO HELP 1242
Text baseline
In Layout mode, the guideline that appears at the base of the text in a field or text block. Text
baselines can be solid, dotted, or dashed. If you want text baselines to also appear in Browse
and Find modes, select Text baselines in the Appearance tab of the Inspector.
If you don’t see the Inspector, choose View menu > Inspector.
Text expression
Any expression that returns a text result. For example, a text expression can be a constant
("London"), a field reference (Status), or a calculated value (Rightwords(Lastname;1)).
Timestamp
A field type combining date and time that is compatible with the ODBC requirement for the SQL
format [yyyy.mm.dd hh:mm:ss.sss].
Tooltip
A small box that displays text when a user moves the cursor over a layout object. Tooltips
display in Browse, Find, and Layout modes.
U
Unicode
A worldwide standard that, in one code page, provides a unique number for every character in
human languages, no matter what the platform, software program, or operating system.
Unit of measure
In Browse and Layout modes, you can set the unit of measure to points, inches, or centimeters.
Unstored calculation
A calculation field with a result that is only calculated when the value is needed, for example, to
browse or print. In most cases, FileMaker Pro makes a field stored when you define it, but you
can change the storage type to unstored.
URL (Uniform Resource Locator)
A web address, which consists of a protocol, a host name, and optionally a port, a directory, and
a filename. For example, http://www.filemaker.com/ , ftp://12.34.56.78:80/myfiles/, or fmp://
mywebsite.com/sample.fmp12.
V
Value list
To save time and ensure accuracy during data entry, define frequently used text, number, date,
or time values as a value list. When you enter data, you can choose from the list of defined
values.
You can format value lists to display in a drop-down list or pop-up menu, or as checkboxes or
option (radio) buttons. The values in a value list can be user-defined or based on the values in a
field in the same file or in a different file. You can also define relationships for use with value
lists, to access and display particular related values. Another option is to use a value list from
another file.
Variable
In a calculation, a symbol or name that represents a value. Use the Set Variable script step to
specify the name, value, and repetition of the variable. Names prefixed by $ are local variables
available only within the current script. Prefix the name with $$ to make the variable available
W, X, Y, Z
FILEMAKER PRO HELP 1243
throughout the current file (global). Local and global variables can have the same name but they
are treated as different variables.
View
An arrangement of your data primarily useful for onscreen manipulation. In Browse mode, Find
mode, or Preview mode, Form View displays individual records, List View displays records in a
list, and Table View displays records in a spreadsheet-like table format.
W, X, Y, Z
Web address
The calculated expression that you enter in the Web Viewer Setup dialog box. A web address is
not equivalent to a URL that a web user could enter in a web browser.
Web browser
An application that you can use to view web pages/sites on the World Wide Web or an intranet.
Browsers download the web pages onto the viewer's computer.
Web page
An HTML document displayed on the internet or on an intranet.
Web server
A computer that is connected to the internet or an intranet and has a web server application
installed on it. Web server applications deliver web pages and associated files to web browsers.
Website
One or more web pages connected by links and displayed on the internet or on an intranet.
Web user
Someone using a web browser to access a FileMaker Pro database published on the World
Wide Web or an intranet.
Web viewer
A layout object that allows you to display information from websites based on data in your
database.
World Wide Web
An interlinked collection of web pages residing on web servers, and other documents, menus,
and databases, which are available via URLs.
X-axis data
In a column, stacked column, line, and area chart, the data series you are comparing (for
example, company name).
In a bar or stacked bar chart, the data series you are measuring (for example, annual sales).
XSLT (Extensible Stylesheet Language Transformations)
XSLT (XSL Transformations) is a subset of XSL (Extensible Stylesheet Language) that is used
to transform, or change, the structure of an XML document into a different document format. For
example, you can use an XSLT style sheet to transform an XML document into an HTML or TXT
document.
XML (Extensible Markup Language)
Instead of being a rigid file format, XML is a language for defining agreed-upon formats that
groups can use for exchanging data. Many organizations and businesses are using XML to
transfer product information, transactions, inventory, and other business data.
W, X, Y, Z
FILEMAKER PRO HELP 1244
FileMaker Pro can export XML data that can then be used, for example, by spreadsheet
applications, data charting applications, and enterprise SQL databases. FileMaker Pro can also
import XML data.
Y-axis data
In a column, stacked column, line, and area chart, the data series you are measuring (for
example, annual sales).
In a bar or stacked bar chart, the data series you are comparing (for example, company name).
Registration
FILEMAKER PRO HELP 1245
Registration
Please take the time to register your product during installation, or by choosing Help menu >
Register FileMaker Pro in FileMaker Pro or Help menu > Register FileMaker Pro Advanced in
FileMaker Pro Advanced. By registering your software, you may be eligible for upgrade offers and
other customer services.
If you are using the FileMaker Pro trial version, you must register your software prior to use.
For more information on registration, see “Registering FileMaker Pro” in the INSTALLATION AND NEW
FEATURES GUIDE FOR FILEMAKER PRO AND FILEMAKER PRO ADVANCED.

Customer Support and Knowledge Base
FILEMAKER PRO HELP 1246
Customer Support and Knowledge Base
Choose Help menu > Resource Center to access:
•ready-made solutions
•instructional videos and tutorials
•customer stories
•forums and other support options
To access the FileMaker Knowledge Base, visit http://help.filemaker.com.
To see system requirements, visit http://www.filemaker.com/products.
Note Information in the FileMaker Knowledge Base and the FileMaker Forum may not be available
in all languages.
Contact Support
FileMaker support representatives can help you with installation, launch, or reinstallation (not
including data recovery) when your hardware configuration meets the minimum system
requirements for the software. Visit http://www.filemaker.com/cs.

Copyright information
FILEMAKER PRO HELP 1247
Copyright information
© 1992-2013 FileMaker, Inc. All rights reserved.
FileMaker, Inc.
5201 Patrick Henry Drive
Santa Clara, California 95054
FileMaker and Bento are trademarks of FileMaker, Inc. registered in the U.S. and other countries.
The file folder logo, WebDirect, and the Bento logo are trademarks of FileMaker, Inc. All other
trademarks are the property of their respective owners.
FileMaker documentation is copyrighted. You are not authorized to make additional copies or
distribute this documentation without written permission from FileMaker. You may use this
documentation solely with a valid licensed copy of FileMaker software.
All persons, companies, email addresses, and URLs listed in the examples are purely fictitious and
any resemblance to existing persons, companies, email addresses, or URLs is purely coincidental.
Credits are listed in the Acknowledgements documents provided with this software. Mention of third-
party products and URLs is for informational purposes only and constitutes neither an endorsement
nor a recommendation. FileMaker, Inc. assumes no responsibility with regard to the performance of
these products.
For more information, visit our website at http://www.filemaker.com.

FILEMAKER PRO HELP 1248
Help topics that do not appear in the main table
of contents
Creating a database
Choosing a language for indexing or sorting
When you create a file, FileMaker Pro uses the operating system language setting to determine the
language used for indexing text fields and sorting data. You can choose a different language in the
Storage tab of the Options for Field dialog box (for indexing and sorting) and the Sort Records dialog
box (for sorting only).
For languages such as Chinese, Spanish, and others, the index order of values in a text field can
differ from the sort order. For example, dictionary sort order in some languages distinguishes
between characters with and without diacritical marks, but index order does not. If you want to
display indexed values in dictionary sort order for such languages, select Re-sort values based on
in the View Index dialog box or Specify Fields for Value List dialog box (for field-based value lists)
and choose a language.
In all of these instances, you can change the language for indexing or sorting to:
•another language supported by FileMaker Pro
•a setting named Default, which is language-neutral
•a setting named Unicode, which is based on Unicode numeric encoding order
For more information about Unicode, visit http://www.unicode.org.
Using a language-based setting for indexing or sorting
Language settings in FileMaker Pro are based on Unicode Collation Algorithm primary and
secondary character collation weights, tailored to support language-specific indexing and sorting
requirements.
Note Some behavior is dependent upon the data source or drivers when using Japanese collation
that does not distinguish Katakana or Hiragana, either in full- or half-width. This is also the case with
roman characters with accents.
Using the Default language setting for indexing or sorting
The Default language setting uses the Unicode Collation Algorithm primary and secondary collation
weights for indexing and sorting characters without any language-specific tailoring.
The Default setting is useful when you need an index with more character distinctions than you get
when you index using a specific language. For example, if you use the French language setting to
index records containing the words “demande” and “demandé,” and then use the index to search for
the word “demande,” the result contains a set of records that contain either "demande" or
“demandé.” If you use the Default language setting to index the same records, a search for the word
“demande” results in the set of records that contain “demande,” but not “demandé.”
Using the Unicode setting for indexing or sorting
When you choose to index or sort by Unicode, characters are distinguished and ordered by their
Unicode numeric encoding. This means lowercase and uppercase letters are indexed and sorted
separately and punctuation characters are treated as alphanumeric characters.
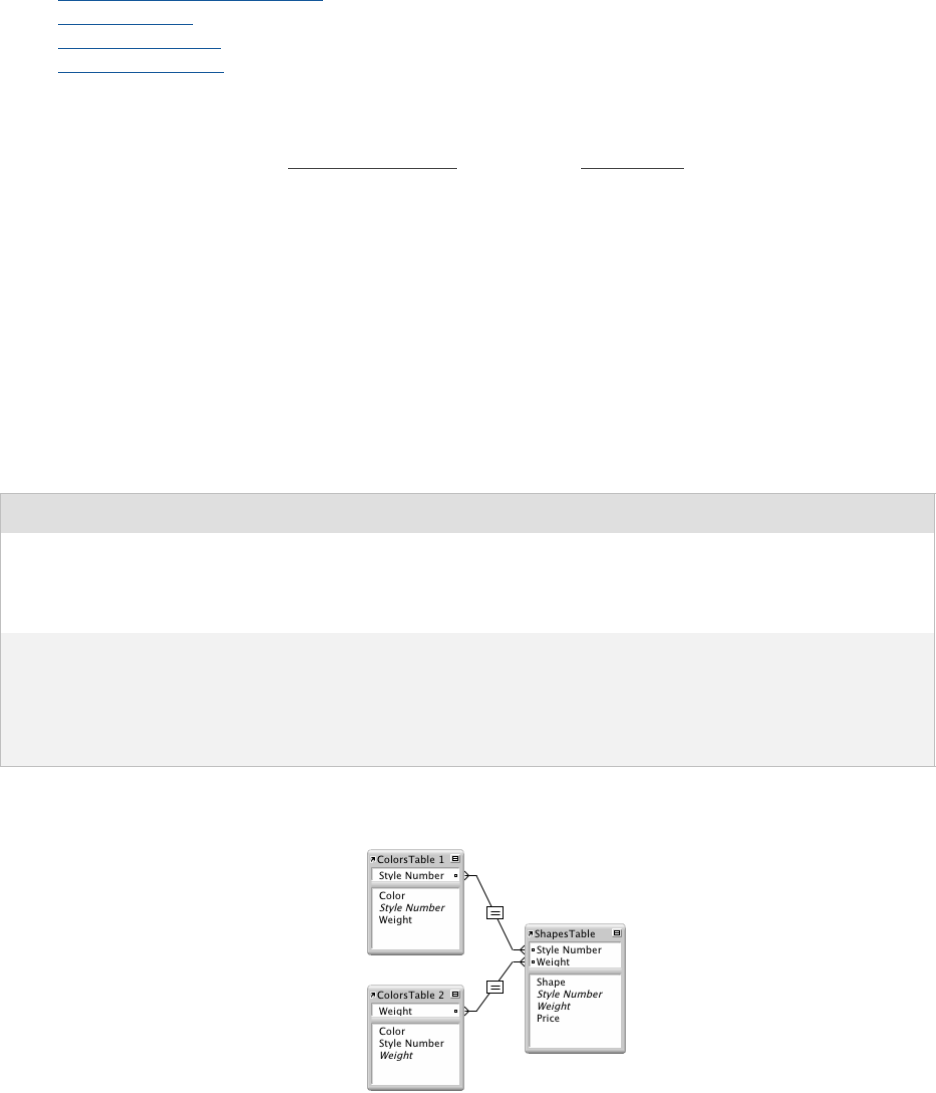
FILEMAKER PRO HELP 1249
If you have been using the ASCII setting for sorting and indexing data in previous versions of
FileMaker Pro, you can use the Unicode setting to achieve similar results.
Related topics
Defining field indexing options
Sorting records
Using a field index
Defining value lists
Choosing the evaluation context for a calculation field
Context is the table in the relationships graph from which a relationship is evaluated. When you
define a calculation in a source table, and the table has more than one occurrence in the
relationships graph, you must specify the context from which you want the calculation to evaluate.
Each context choice represents a different table in the relationships graph, and a different
perspective into your data; when you choose the context for a calculation, you tell FileMaker Pro to
evaluate the calculation starting from that table occurrence. Because each context choice
represents a different association of related tables and fields, choosing the evaluation context for
your calculation is critical to getting the results you expect.
An example of how context changes the results of a calculation
You have a database with two source tables named ColorsSourceTable and ShapesSourceTable.
The tables have these properties:
The tables are related as follows:
There are two separate relationships:
Source table name Table occurrences in relationships graph Field names
ColorsSourceTable ColorsTable 1, ColorsTable 2 Color
Style Number
Weight
ShapesSourceTable ShapesTable Shape
Style Number
Weight
Price

FILEMAKER PRO HELP 1250
•In the first, ColorsTable 1 and ShapesTable are related using the Style Number fields.
•In the second, ColorsTable 2 and ShapesTable are related using the Weight fields.
Because ColorsTable 1 and ColorsTable 2 share the same source table, a calculation defined in
ColorsSourceTable can be evaluated from the context of either the ColorsTable 1 table occurrence
or the ColorsTable 2 table occurrence.
To see how this works, consider the effects of context on two calculation fields in the table
ColorsSourceTable. Each calculation field uses the same formula to determine the sum of prices in
the table ShapesSourceTable; the only change is the evaluation context. ShapesSourceTable has
three records with these values:
A single record in the ColorsSourceTable has these values:
Because the relationships use different match fields, each relationship returns a different set of
related records.
Calculation result 1
The relationship between ColorsTable 1 and ShapesTable, which uses Style Number as the match
field, returns these two records:
A calculation field defined in the ColorsSourceTable with the formula Sum(ShapesTable::Price)
that is set to evaluate from the context of the table ColorsTable 1 returns the value $8.00.
Calculation result 2
The relationship between ColorsTable 2 and ShapesTable, which uses Weight as the match field,
returns these two records:
A second calculation field defined in the ColorsSourceTable with the same formula,
Sum(ShapesTable::Price), but set to evaluate from the context of the table ColorsTable 2
returns the value $15.00.
Shape Style Number Weight Price
circle 100 5$2.00
square 100 2$6.00
triangle 200 2$9.00
Color Style Number Weight
red 100 2
Shape Style Number Weight Price
circle 100 5$2.00
square 100 2$6.00
Shape Style Number Weight Price
square 100 2$6.00
triangle 200 2$9.00

FILEMAKER PRO HELP 1251
Notes
•When constructing a calculation formula, evaluation context determines which tables
appear as related and unrelated in the Specify Calculation dialog box.
•A calculation formula can use global fields from unrelated tables. These are the only fields
that can be used from unrelated tables.
Related topics
About relationships
Defining calculation fields
About formulas
Specify Calculation dialog box
This dialog box appears so that you can build a formula for a calculation or calculated field.
1. If necessary, for Evaluate this calculation from the context of, choose a table from the
list.
Setting the context for a calculation is only necessary when you're creating a calculation field in
a source table that has two or more occurrences in the relationships graph. The choice you
make may affect the calculation results, particularly if your calculation will include fields in
related tables.
For more information on the use of context in calculations, see Choosing the evaluation context
for a calculation field.
2. Build a formula for your calculation.
Click where you want the item to appear in the formula box, then do the following. (You can also
type the formula into the box.)
To quickly build a formula:
To add a Do this
Reference to a field In the field list, double-click a field name.
To display field names from another table, choose a table from the
tables list.
Note When the Specify Calculation dialog box opens from within
the Replace Field Contents and Send Mail dialog boxes, the tables
list may default to Current Layout (LayoutName) and display
only the visible fields on the current layout. To display all field
names from the current table, choose Current Table
(TableName) from the list.
Mathematical or text operator For Operators, click a button or type an operator. See
Mathematical operators and Text operators.
Comparison or logical operator,
or an exponent
For Operators, double-click an operator in the list or type an
operator. See Comparison operators and Logical operators.
Constant value Type the value.
Function In the functions list, double-click a function. In the formula box,
replace the placeholder parameter with a value or expression. For
information on each function, see Functions reference
(alphabetical list), or Functions reference (category list).

FILEMAKER PRO HELP 1252
•Tab to or click in the field, operators, or functions list.
•Type the first few letters of a field name, operator, or function to move to that item in the
list.
•Press Insert (Windows) or the Space bar (OS X) to place it in the formula box.
3. Select calculation options for the field.
4. To select indexing and storage options for the field, click Storage Options, select options in
the Storage Options dialog box, then click OK.
See Defining field indexing options and Defining global fields (fields with global storage).
5. Click OK.
Important To avoid confusion when using dates in FileMaker Pro, always define calculation
formulas to enter four-digit years. See Conversion of dates with two-digit years.
Notes
•You can type field names, operators, and functions in the Specify Calculation dialog box
instead of using the fields or operators lists.
•If you are using FileMaker Pro Advanced to customize menus, you can base a menu or
menu item title on the result of a calculation. You can also create tooltips based on a
calculation. See Defining custom menus (FileMaker Pro Advanced) and Adding tooltips on
layouts.
Related topics
About functions
About formulas
Adding a new line to the results of a formula
Adding comments to a formula
Changing calculation formulas
Defining calculation fields
Defining automatic data entry
Defining field validation
Defining field indexing options
To Do this
Set the field type of the result Choose a data type for Calculation result is <value>.
Choose the correct type for the result you want. See About
choosing a field type.
Make a calculated field
repeating
Select Number of repetitions, then type the number of repetitions.
See Defining repeating fields.
Prevent calculation if all
referenced fields are empty
Select Do not evaluate if all referenced fields are empty.
When enabled, FileMaker Pro does not evaluate a calculation if all
fields used by the calculation are empty. This typically improves
performance.

FILEMAKER PRO HELP 1253
Layout/Report assistant context-sensitive pages
New Layout/Report (New Layout/Report assistant)
In this panel of the New Layout/Report assistant, you specify the database table this layout will
access, a name for the layout, the type of layout that you want to create, and a default view for the
layout.
Note You may want to review the following Help topics before creating the layout: Creating and
managing layouts and reports, Considerations when you create a Report layout, Printing labels, and
Printing envelopes.
1. For Show records from, choose the table that contains the records that you want this
layout to display.
2. For Layout Name, type a descriptive name for the layout.
The layout name automatically appears in the menus used for choosing layouts, such as the
Layout pop-up menu. (To change this setting, see Managing layouts.)
3. Choose the type of layout you want to create.
Depending on the type you choose, additional options may become available.
For more information about each layout type, see About layout types.
4. If you chose Computer or Touch Device, you can then choose the view in which you want
records displayed or choose to create a report.
Your layout will be displayed only in the view you selected. To display the layout in all views, do
not choose a view in this panel. After you close the assistant, you can choose additional views
for the layout using the Layout Setup dialog box (see Setting up form, list, and table views for a
layout).
Choose To
Computer Create a layout to be used on a laptop or desktop
computer screen.
Touch Device Create a layout to be used on a touch-compatible input
device. Then choose iPad/iPad mini, iPhone 3.5-inch,
iPhone 4-inch, or Custom Device.
To change the layout’s default orientation to portrait, click
; to change the orientation to landscape, click .
Printer Arrange data for printing on labels or envelopes or in a
report. Then choose Labels, Vertical Labels, Envelopes,
or Report.
Choose To
Form Display records in Form View. Records are displayed as a standard form:
fields are by default displayed each on a separate line, in the order you
specify. In Browse mode and Find mode, you see one record, or form, at a
time. Form View is good for data entry or onscreen browsing.

FILEMAKER PRO HELP 1254
5. When you have finished making your choices:
•For layouts that will display on computers or touch devices, click Finish. Layouts in
Form View and List View are displayed in Layout mode. Layouts in Table View are
displayed in Browse mode (and the Modify Table View dialog box appears if there are
fields defined in the database).
You can then add or change fields, objects, and other embellishments to your layout. See
About defining database fields, Working with data in Table View, and Drawing and inserting
objects on a layout.
•For labels, vertical labels, envelopes, or reports, click Continue. You see the next panel
in the assistant.
Notes and tips
•When you create a report, you have the option of creating a script that will sort a report later
in the assistant. The script simplifies the process of viewing and printing the report. The
report must be sorted properly to display summary information, and it’s easy to forget which
fields need to be sorted.
•Table View provides a view of your data in a spreadsheet-like format that allows you to
quickly rearrange fields, add or delete records, or define fields in Browse mode. For
example, you can quickly reorder or resize columns (fields) with just a mouse click (if those
options are set). See Working with data in Table View.
•You can also use Table View to view summary data, by grouping your data by one or more
columns (fields) and check subtotals for each group or grand totals for the table. The
summary results recalculate and update in real time when you change data values in Table
View. See Creating dynamic reports in Table View.
Related topics
Creating a layout
Header and Footer Information (New Layout/Report assistant)
In this panel of the New Layout/Report assistant, you can specify the text that you want to appear in
the header and footer of your report. You can choose text to appear left-aligned, right-aligned, and
centered in both the header and the footer.
List Display records in List View. In Browse mode, you see records in a list.
Depending on the size of the layout, you may see several records at a time.
List View is good for viewing or printing multiple records in rows (a list of
records).
Table Display records in Table View. The fields are displayed in a grid in the order
you specify from left to right. Field names are the column headings.
Report Display or print data in a report. You can create many variations of Report
layouts; for example, create a simple report with rows and columns of data
(formerly a predefined layout type known as the List view layout), or a
complex report with data grouped by specified values with subtotals and
grand totals.
Choose To

FILEMAKER PRO HELP 1255
Notes and tips
•FileMaker Pro left-aligns text you add in the left positions, center-aligns text you add in the
center positions, and right-aligns text you add in the right positions.
•If you choose to include the layout name in the header or footer part, FileMaker Pro uses
the name you entered in the first panel of the assistant. If you change the layout name later,
that change is not reflected in the header or footer.
•You can type or paste up to 255 characters in the Custom Text dialog box.
•You can place one graphic (logo) in the header and one in the footer. The maximum height
of a logo is one-quarter of the current page height; the maximum width is the width of the
current page.
Related topics
Creating a layout
Specify Label Layout (New Layout/Report assistant)
In this panel of the New Layout/Report assistant, you can choose a predefined measurement based
on common label types, or specify a custom measurement.
To use predefined label dimensions that match the labels you have:
•From the Use label measurements for list, choose the label code that matches the labels
you have.
FileMaker Pro creates a Labels layout that uses the exact dimensions of label stock code you
choose. For example, choose Avery 5160 to have FileMaker Pro use that label’s
measurements for the layout.
To add to the layout Do this
The page number when you preview or
print. (In Layout mode, you see the page
number symbol, {{PageNumber}}.)
Choose Page Number.
The current system date when you preview
or print. (In Layout mode, you see the
current date symbol, {{CurrentDate}}.)
Choose Current Date.
The layout name you specified in the first
panel of the assistant.
Choose Layout Name.
Text in a font size slightly larger than (1.5
times) the currently defined text size or the
size defined by the layout theme.
Choose Large Custom Text.
In the Custom Text dialog box, for Custom text, type what
you want to appear in the specified location, then click OK.
Text in the same font size as the currently
defined text size or the size defined by the
layout theme.
Choose Small Custom text.
In the Custom Text dialog box, for Custom text, type what
you want to appear in the specified location, then click OK.
A graphic you insert. Choose Logo.
In the dialog box, choose a file to insert, then click Open.

FILEMAKER PRO HELP 1256
To create a custom label dimension:
1. First, try to match your labels to a predefined dimension.
2. If you can't match your labels to a predefined dimension, select Use custom
measurements, and type values for Labels across the page, Width, and Height.
3. Measure the unused margins on the label stock. Then, select Fixed page margins and
enter values for Top, Bottom, Left, and Right.
Related topics
Creating a layout
Printing labels
Organize Records by Category (New Layout/Report assistant)
In this panel of the New Layout/Report assistant, you select the break fields that you want to
categorize your report by. For example, if you have sales data that you want to group by region, you
would choose the Region field.
In Report categories, the order of the break fields determines the hierarchy, or nesting, of the
categories. So, if you want to group sales data by region and then by city, you would choose the
Region field first, and then the City field.
As you change the number of break fields in Report categories, the image on the right changes to
reflect your choices. The assistant displays the selected break fields in shades of blue to help you
judge the hierarchy that you want.
FileMaker Pro automatically sorts your report by the fields you choose for report categories. (They
are pre-selected in the Sort Records panel that you see next.)
To Do this
Include a break field In Report fields, double-click the fields you want, in the
order you want them used in the hierarchy. (Or select one or
more fields, then click Move.)
Note Only the fields you chose in the previous panel are
available. If you need to add a field, click Back. The
assistant saves your choices in this and all preceding
panels.
Display break fields in the body of the
report
In the Report categories list, select the checkboxes of the
break fields you want to display in the body of the report.
Hide break fields in the body of the report In the Report categories list, clear the checkboxes next to
the fields that you want to prevent from appearing in the
body of the report.
Note Data in the report will be grouped by all fields you
include in the Report categories list, but non-selected fields
will not appear in the report.
Remove fields you've already selected In Report categories, double-click the field you want to
remove. (Or select one or more fields, then click Clear.)
Change the order of the break fields to
change the hierarchy of the grouping
In Report categories, drag the double-arrow next to the
field name (Windows) or drag the field name (OS X) to a
new position.

FILEMAKER PRO HELP 1257
Notes and tips
•To select more than one field name in the field lists, Shift-click to select contiguous fields,
Ctrl-click (Windows) or Command-click (OS X) to select non-contiguous fields.
•If you chose to include subtotals (in the New Layout/Report panel), FileMaker Pro will
subsummarize fields based on the report categories you choose in this panel. You will
specify how the subsummaries work in the Specify Subtotals panel later in the assistant.
(FileMaker Pro uses the term subsummary to include not only subtotals, but also averages,
counts, and other summary data for a subset of records.)
•Container, calculation, and summary fields can't be break fields; they are dimmed in Report
fields.
•You can choose up to 10 break fields.
•For each break field you add, FileMaker Pro adds a subsummary part to the layout. After
you finish with the assistant, you can modify characteristics like pagination and page
numbering. See Changing a layout part.
•Each break field appears before the group of records you're categorizing (in a leading
subsummary part). You can set a break field to appear after the detail records by changing it
to a trailing subsummary part. See Changing a layout part.
•If you want only a summary report (with no detail records), you can delete the body part
after you finish the assistant.
Related topics
Creating a layout
Include Subtotals and Grand Totals (New Layout/Report assistant)
In this panel of the New Layout/Report assistant, you can design a report with grouped data, which
includes summary fields that total data by group (for example, total sales by region).
To include summary fields:
•Choose Include subtotals or Include grand totals, or both.
As you select different options in the assistant, the sample image on the right changes to reflect
your choices.
To omit summary fields from the report, click Continue without making any selections.
Note If you create a subsummary report, you can’t choose to wrap fields to multiple lines. If you
select more fields than will fit across the printed page, they extend beyond the page margin. Try
either changing the page orientation to horizontal (landscape), reducing the print scale to less than
100%, or manually adjusting the fields in Layout mode.
Specify Fields (New Layout/Report assistant)
In this panel of the New Layout/Report assistant, you select the fields that you want to include in the
report. The fields appear on the layout in the order you specify.

FILEMAKER PRO HELP 1258
Notes and tips
•To select more than one field name in the field lists, Shift-click to select contiguous fields.
Ctrl-click (Windows) or Command-click (OS X) to select non-contiguous fields.
•If you are creating a sorted report, include the fields you want to sort by. If you are creating
a report with grouped data, include the break fields. Even if you don't want sort or break
fields to appear in the body of the report, FileMaker Pro needs them to structure the report
correctly. If you see in a later panel that the field you want isn't available, click Back to
return to this panel.
•After you finish the assistant, you have complete control over placing or removing fields or
portals in Layout mode.
•In a report with grouped data, add the break field twice if you want it to appear in the body
part as well as in the subsummary part.
Related topics
Creating a layout
Specify Grand Totals (New Layout/Report assistant)
If you selected Include Grand Totals in the Include Subtotals and Grand Totals panel, you can use
this panel to define how they appear.
To specify a grand total:
1. For Summary field, click Specify.
The Specify Field dialog box appears.
2. Choose a summary field from the list, or define a new summary field. (Only fields defined as
the summary field type are available in the list.)
•To define a summary field in the current table, click Add. See Options for Summary
Field dialog box (New Layout/Report assistant).
•To define a summary field in another table, choose Manage Database from the list. See
Defining summary fields.
Note You must have full access privileges to define summary fields.
To Do this
Include a field in
the report
In Available fields, double-click the fields you want, in the order you want them to
appear.
Or, select one or more fields, then click Move.
To choose a field from another table, first choose the table from the list of tables, and
then choose the field. You can also create a new field or table by choosing Manage
Database from the list of tables.
Remove fields
you've already
selected
In Fields shown on layout/report, double-click the field you want to remove.
Or, select one or more fields, then click Clear.
Change the order
of the fields in the
report
In Fields shown on layout/report, drag the double-arrow next to the field name to a
new position.

FILEMAKER PRO HELP 1259
3. Click OK.
4. For Grand total placement, choose Beginning of report, End of report, or Beginning
and end.
FileMaker Pro places the summary field vertically in line with the field the summary field is
based on.
5. Click Add Grand Total.
The grand total appears in the Grand totals list.
6. Repeat the above steps for each grand total that you want to add.
Notes and tips
•To remove a grand summary, select the grand summary definition in Grand totals, then
click Remove Grand Total or double-click the grand summary in the list.
•To change a grand summary, remove the grand summary definition and redefine it.
•When you define a grand summary in this panel, you are defining a grand summary part,
(leading, trailing, or both), depending on the placement you choose. After you finish with the
assistant, you can modify characteristics like pagination and page numbering. See
Changing a layout part.
•If you define more than one grand summary with the same placement, the order in which
you define the grand summary in the assistant determines the order of the summary fields
in the grand summary part in the report. You can change the order of the summary fields
after you finish the assistant.
Related topics
Creating a layout
Create a Script for this Report (New Layout/Report assistant)
In this panel of the New Layout/Report assistant, you can automate your report by creating a script
for it.
To have FileMaker Pro create a script to rerun this report:
1. Select Create a script.
2. Type a script name to appear in the Scripts menu, or keep the default name.
This is the script name that you will choose from the Scripts menu when you want to rerun this
report.
3. Optionally, select Run script automatically if you want FileMaker Pro to display an up-to-
date report each time you open this layout.
Notes and tips
•If your layout contains summary data but it doesn’t appear in the report when you run the
script, you might need to switch to List View or Table View.
•When you create a script, FileMaker Pro includes default steps, which you can modify after
you finish the assistant. For example, you can add or delete steps, delete or change the
script name in the Scripts menu, or create a button on the layout to run the script.

FILEMAKER PRO HELP 1260
•If you want to include only a certain subset of the records in the database when you run this
report, you can edit the script to include a Perform Find script step after you finish the
assistant.
Related topics
Creating a layout
Viewing records as a form, list, or table
Creating and editing scripts
Sort Records (New Layout/Report assistant)
In this panel of the New Layout/Report assistant, you select the fields that you want the records
sorted by.
The sort hierarchy is determined by the order you specify. For example, if you want to sort by year
and then month, choose the Year field first, then the Month field.
If you are creating a report with grouped data and have selected one or more break fields, you see
them at the top of the Sort order list with a lock icon. You can't remove them or change their
position because the records must be sorted by those fields first for the report categories to display
properly.
Notes and tips
•By default, the field list in the Sort Records dialog box shows only the fields from the current
layout. If you want to sort using other fields, return the Specify Fields panel, choose a table
from the tables list above the list of fields, select additional fields, then return to the Sort
Records panel.
•Data sorts differently in different field types. See Sorting records.
To Do this
Include a field to sort by In Report fields, double-click the fields you want, in the order you want
them used in the sort hierarchy. (Or, select a field, then click Move.)
Remove fields you've
already selected
In Sort order, double-click the field you want to remove. (Or, select a field,
then click Clear.)
Change the order of the
fields to change the
sorting hierarchy
In Sort order, drag the double arrow next to the field name to a new
position.
Change the way
FileMaker Pro sorts the
fields
With the field selected in Sort order, click
•Ascending order to sort in alphabetical order for text, lowest to highest
for numbers, and earliest to latest for dates and times.
•Descending order to sort in reverse alphabetical order for text, highest
to lowest for numbers, and latest to earliest for dates and times.
•Custom order based on value list and choose (or define) a value list
to sort in the order that matches a field's value list. For example, sort in
order by month.
Reorder the records
based on the values in a
summary field
In Sort order, select the non-summary field that you want to reorder based
on the values in a summary field. Click Reorder based on summary field,
and click Specify. In the Specify Field dialog box, select a summary field
and click OK.

FILEMAKER PRO HELP 1261
•Repeating fields sort by the value in the first repetition.
•The Reorder based on summary field option lets you sort grouped summary data.
Suppose you want to group data by region, then display total sales in each region from
highest to lowest rather than alphabetically by region. To do this, you can define a summary
field in the file (for example, Total Sales) and group the report by Region in the Organize
Records by Category panel of the New Layout/Report assistant. Next include and select the
Region field in the Sort order list of the assistant’s Sort Records panel, select Reorder
based on summary field, and choose the summary field Total Sales in the Select Field
dialog box.
•System formats affect the way numbers, dates, and times sort.
•When you define a text field, the default language for indexing and sorting text is
determined by the operating system on which FileMaker Pro is running. You can override
the default language for a sort and specify a different language. See Options for sorting
records. To permanently change a field’s default language, see Defining field indexing
options.
Related topics
Creating a layout
Specify Envelope Contents (New Layout/Report assistant)
In this panel of the New Layout/Report assistant, you place the fields and text that you want to print
on each envelope.
Important FileMaker Pro formats fields on an Envelope layout as merge fields. Merge fields are
enclosed by double angle bracket delimiters (<< and >>). Make sure to select these brackets along
with the field name if you move or delete a field name on the layout. Don't insert punctuation or other
text inside the brackets unless it's part of the field name.
To Do this
Place fields on the envelope In Available fields, double-click each field you want, in
the order you want them to appear. (Or, select one or more
fields, then click Add Field.)
To choose a field from another table, first choose the table
from the list of tables, and then place the field. You can
also create a new field or table by choosing Manage
Database from the list of tables.
Move a field to a new line In Envelope contents, click to place the insertion point
before the field you want to move (before the angle
bracket delimiters <<). Then press Enter (Windows) or
Return (OS X).
Place text or punctuation between fields In Envelope contents, click where you want the text or
punctuation, then type what you want.
Remove a field from the envelope In Envelope contents, select the field name and the
delimiters (<< and >>), then press Backspace (Windows)
or Delete (OS X).
Remove all fields and text from the envelope Click Clear All.

FILEMAKER PRO HELP 1262
Notes and tips
•To select more than one field name in the field lists, Shift-click to select contiguous fields.
Ctrl-click (Windows) or Command-click (OS X) to select non-contiguous fields.
•You can’t enter or edit data using merge fields; use another layout for that purpose.
Related topics
Creating a layout
Printing envelopes
Specify Label Contents (New Layout/Report assistant)
In this panel of the New Layout/Report assistant, you place the fields and text you want to print on
each label.
Important FileMaker Pro formats fields on a Labels layout as merge fields. Merge fields are
enclosed by double angle brackets (<< and >>). Make sure to select these brackets along with the
field name if you move or delete a field name on the layout. Don't insert punctuation or other text
inside the brackets unless it's part of the field name.
Notes and tips
•To select more than one field name in the field lists, Shift-click to select contiguous fields.
Ctrl-click (Windows) or Command-click (OS X) to select non-contiguous fields.
•You can’t enter or edit data using merge fields; use another layout for that purpose.
•When you modify the alignment of text in vertical labels, adjustments to the left move text up
and adjustments to the right move text down.
Related topics
Creating a layout
To Do this
Place fields on
the label
In Available fields, double-click each field you want, in the order you want them to
appear. (Or, select one or more fields, then click Add Field.)
To choose a field in another table, first choose the table from the list, and then place
the field. You can also create a new field or table by choosing Manage Database
from the list of tables.
Move a field to a
new line
In Label contents, click to place the insertion point before the field you want to move
(before the angle bracket delimiters <<). Then press Enter (Windows) or Return
(OS X).
Place text or
punctuation
between fields
In Label contents, click where you want the text or punctuation, then type what you
want.
Remove a field
from the label
In Label contents, select the field name and the delimiters (<< and >>), then press
Backspace (Windows) or Delete (OS X).
Remove all fields
and text from the
label
Click Clear All.

FILEMAKER PRO HELP 1263
Printing labels
Specify Subtotals (New Layout/Report assistant)
If you selected Include Subtotals in the Include Subtotals and Grand Totals panel, you can use this
panel to define how they appear.
Note FileMaker Pro uses the term subsummary to include not only subtotals, but also averages,
counts, and other summary data for a subset of records (the categories of records you defined in the
Organize Records by Category panel).
To specify a subtotal:
1. For Summary field, click Specify.
The Specify Field dialog box appears.
2. Choose a summary field from the list, or define a new summary field. (Only fields defined as
the summary field type are available in the list.)
•To define a summary field in the current table, click Add. See Options for Summary
Field dialog box (New Layout/Report assistant).
•To define a summary field in another table, choose Manage Database from the list. See
Defining summary fields.
Note You must have full access privileges to define summary fields.
3. Click OK.
4. For Category to summarize by, choose a break field.
For example, if you are subtotaling sales data by region, choose the Region field. The fields that
appear in this list are the ones that you selected in the Organize Records by Category panel.
5. For Subtotal placement, choose Above record group, Below record group, or Above
and below.
FileMaker Pro places the summary field vertically in line with the field the summary field is
based on.
6. Click Add Subtotal.
7. Repeat the above steps for each subtotal (subsummary) that you want to add.
Notes and tips
•To remove a subsummary, select the subsummary definition in Subtotals, then click
Remove Subtotal or double-click the subsummary in the list.
•To change a subsummary, remove the subsummary definition and redefine it.
•When you define a subsummary in this panel, you are defining a leading subsummary part.
If, for Subtotal placement, you choose Above record group or Above and below, you’re
also defining a trailing subsummary part. After you finish with the assistant, you can modify
characteristics like pagination and page numbering. See Changing a layout part.
•If, for Subtotal placement, you choose Below record group, FileMaker Pro not only
creates a trailing subsummary part to hold the break field and the summary field you
specify, but also creates a leading subsummary part containing only the break field.
•If you define more than one subsummary for the same break field with the same placement,
the order in which you define the subsummary fields in the assistant the order of the

FILEMAKER PRO HELP 1264
summary fields in the subsummary part in the report. You can change the order of the
summary fields after you finish the assistant.
Related topics
Creating a layout
Options for Summary Field dialog box (New Layout/Report assistant)
If you clicked Add in the Specify Field dialog box, you can use the Options for Summary Field dialog
box to define a new summary field for this report from within the New Layout/Report assistant. If you
are defining summary fields outside the New Layout/Report assistant, see Defining summary fields.
1. For Summary Field Name, type a name for the field.
See About naming fields.
2. From the list of fields, choose a field to summarize.
Note Fields with invalid field types are dimmed in the list based on the summary calculation you
selected.
3. Select a summary option, if applicable, for the summary type you chose.
Select this type of
summary calculation To summarize values in a field in the found set of records by
Total of Calculating the total of values in the field.
Average of Calculating the average of values in the field.
Count of Counting the number of records that contain a value for the field. For
example, if a field contains 100 values (one value for each record), the
result of the count is 100.
Minimum Finding the lowest number, or earliest date, time, or timestamp for a
field.
Maximum Finding the highest number, or latest date, time, or timestamp for a
field.
Standard Deviation of Finding how widely the values in a field differ from each other. This
option calculates the standard deviation from the mean of the values
in a field.
Fraction of Total of Calculating the ratio of the value in the field to the total of all the
values in that field. (For example, find what fraction of total sales can
be attributed to each salesperson.)
For Select To
Total of Running total Show the cumulative total for the
current and all previous records. To
restart the running total for each
sorted group, also select Restart
summary for each sorted group
and select the field upon which the
sort will be restarted from the field
list.

FILEMAKER PRO HELP 1265
4. If the field you are summarizing is a repeating field, you have the option to summarize the
repetitions together or individually.
Select All together to calculate a single summary value for all repetitions in the field.
Select Individually to calculate a summary value for each repetition.
Note You must format your summary field as a repeating field to display individual summary
values. See Setting up the display of repeating fields for more information.
5. Click OK.
Notes
•Summary fields are associated with groups of records. The value in a summary field can
change depending on where you place the field on a layout, how many records are in the
found set, and whether the records are sorted.
•Data in a summary field reflects records currently being browsed; either all the records or a
group of found records. If you change a value in one of the fields on which the summary is
based, or if you change the found set, FileMaker Pro recalculates the result in a summary
field.
•When use the New Layout/Report assistant to create summary fields, you can create a
summary field for the current table only. To create a summary field for another table, see
Defining summary fields.
•If you choose Fraction of Total, you can specify a group field for Subtotaled. When you
return to Browse mode, you must sort by the group field to calculate the value correctly.
•The standard deviation formula is n-1 weighted, following the normal standard deviation.
•You can't change data in a summary field manually, but you can copy it. You can also
perform calculations with summary fields using the GetSummary function.
•If your FileMaker Pro file accesses data from an ODBC data source, you can use
supplemental fields to define unstored calculations or summary instructions that act on data
coming from the external sources. For more information, see Using supplemental fields.
Average of Weighted average. In the field list
that appears, select the field that
contains the weight factor.
Determine the average in one field
based on a value in another field
that is used as a weight factor.
Count of Running count Show the cumulative count of the
current and all previous records. To
restart the running count for each
sorted group, also select Restart
summary for each sorted group
and select the field upon which the
sort will be restarted from the field
list.
Standard Deviation of By population Calculate population standard
deviation.
Fraction of Total of Subtotaled. In the field list that
appears, select the field to group by.
Calculate a fraction of the total
based only on a group of records.
For Select To

FILEMAKER PRO HELP 1266
•If you are using FileMaker Pro Advanced, you can copy field schemas from one file and
paste them into the same file or some other file. For more information, see Copying and
pasting field schemas (FileMaker Pro Advanced).
Related topics
Changing summary fields
Summary data is missing or incorrect
Specifying formats for fields containing numbers
Creating and managing layouts and reports
About layout types
You can use the New Layout/Report assistant to create several types of layouts. After you choose a
category that corresponds to the way in which the layout will be viewed — on a computer screen or
a touch device screen — or printed, you make additional choices for the layout. After you finish the
assistant, you can further customize the layout. A default layout theme is assigned to each layout.
The various choices you can make in the New Layout/Report assistant are described below.
Computer
Computer layouts are designed to display within the dimensions of most laptop and desktop
computer screens. After you choose Computer, you then choose the view in which you want to
display the layout. After you finish the assistant, you add the fields and any layout objects and
embellishments you want to the layout.
The default theme for Computer layouts is Enlightened.
Touch Device
Touch Device layouts are designed to display on touch-compatible input devices, including the iPad,
iPad mini, iPhone 3.5-inch, iPhone 4-inch, or a device with dimensions that you customize after you
finish the assistant. After you choose Touch Device, you choose the view in which you want to
display the layout. You can also choose the orientation — portrait or landscape — for the layout.
After you finish the assistant, you add the fields and any layout objects and embellishments you
want to the layout.
The default theme for Touch Device layouts is Enlightened Touch.
Printer
Printer layouts are designed for printing data on labels (horizontal or vertical), envelopes, and in
reports. The printer choices are described below.
The default theme for Printer layouts is Enlightened Print.
Labels
A Labels layout contains the fields you select, arranged to print horizontally on virtually any kind of
label stock. (FileMaker Pro includes the dimensions of a large number of standard label types.) If the
label type you want isn't available, you can specify custom label dimensions.
You can only print (or preview) data; you cannot add information. (Use another layout type for data
entry or finding data.)

FILEMAKER PRO HELP 1267
Vertical Labels
A Vertical Labels layout is like the Labels layout above, except that Asian and full-width characters
are rotated so that labels may be used vertically. See Formatting fields and text for vertical writing.
Envelopes
An Envelope layout contains the fields you select, arranged to print on a standard “Number 10”
business envelope. You can only print (or preview) data; you can't add information. (Use another
layout type for data entry or finding data.)
Report
The New Layout/Report assistant lets you define varied report formats. You can create a Report
layout with simple rows and columns of data (formerly a predefined layout type known as the List
view layout), or a complex report with data grouped by specified values and including subtotals and
grand totals.
You can also group records by sorting data by selected fields. You can then subtotal — or
subsummarize — data in these groups (for example, group sales data by region, then subtotal sales
for each region).
When you create a Report layout in the assistant, you can then choose to:
•include subtotals and grand totals in the report.
•add header and footer parts with static text (like your company's name), dynamic text (like
the page number or current date), or a graphic (like your company logo).
•group records by sorting; you can then subtotal, or subsummarize data in the groups (for
example, group sales data by region, then subtotal sales for each region).
•save information in a script to rerun the report (for example, switch to the report layout, sort
the data, and pause to let you preview the report).
You can modify any of these options after you finish the assistant.
Notes
•If you click Finish in the first panel of the New Layout/Report assistant without choosing a
layout type, FileMaker Pro creates a blank layout in Form View. A blank layout contains no
fields; you add the fields you want in Layout mode. A blank layout is good for complex
layouts (for example, a data entry screen or form letter).
•You can change the layout theme. See Changing the theme of a layout.
Related topics
Printing labels
Printing envelopes
Considerations when you create a Report layout
Considerations when you create a Report layout
•If you are creating a Report layout with grouped data, you should think about how you want
the report to look so you can more easily proceed through the New Layout/Report assistant.
The assistant asks you to specify the field or fields that you want to categorize (group) the
data by. If you are including subtotals or grand totals, you should also think about which
fields you want to summarize and define those summary fields before you begin the
assistant. (If necessary, you can also define the summary fields within the assistant.)

FILEMAKER PRO HELP 1268
•If you're having trouble getting the results you want for a report with grouped data, refer to
the onscreen Help available for each panel of the assistant.
•When you create a Report layout, you have the choice of saving a script that switches to the
layout, and sorts the records (if specified). The script is added to the Scripts menu, where
you can choose it to run the report in the future. Verify that you're viewing the found set that
you want before running the script. You can view or edit the script (for example, you can add
a Find script step) by choosing Scripts menu > Manage Scripts.
•You can create a report that displays fields from left to right across the page, with field
names as column headings, as a simple list (formerly a predefined layout type known as the
List view layout). When you create the Report layout, do not include subtotals or grand
totals, and do not organize records by category. Save the layout, and then view the records
in List View in Browse mode.
•If you plan on printing records in a list and the columns extend beyond the width of a page,
try doing the following:
•Reduce the field size or the font size for data in fields.
•Choose File menu > Printer Setup (Windows) or Page Setup (OS X). (In Preview
mode, you can also click Print Setup (Windows) or Page Setup (OS X) in the status
toolbar.) In the setup dialog box, change the page orientation to horizontal (landscape).
Or reduce the scale at which you print to less than 100%. If necessary, re-create the
layout with the New Layout/Report assistant after you set up your printer and page
options.
•Create several layouts that show fewer columns, and then print each layout separately.
•A Report layout described above arranges fields in columns. You can also arrange records
in columns, for example, to print a multi-column directory of names and addresses. See
Setting up to print records in columns.
Related topics
Creating a layout
Deciding where to place related fields
You can place fields from related tables either directly on layouts or in portals:
•Directly on layouts: Place related fields directly on a layout to display data from the first
related record, even when there are more than one related record that match the criteria of
the relationship. (The first related record that is displayed is determined by whether the
relationship specifies a sort order.)
•In portals: Place related fields within a portal on a layout to display data from all related
records that match the criteria of the relationship.
For example, you might do the following on an Invoice layout in an Invoices database:
•Place related fields on the invoice that displays data from the Clients database, such as the
client's identification number and contact information. (The match field is Client ID.) There is
only one record in the Clients database for each Client ID, so each related field on the
invoice displays the data for that client.
•Place a related field on the invoice that displays the most recent value from the Order Date
field in the Order History database. (Again, the match field is Client ID.) If the client has
placed more than one order, there are multiple records in Order History that match this
client's Client ID. By defining a sort order on the Order Date field when you define the

FILEMAKER PRO HELP 1269
relationship, the most recent date displays in the related field when it's placed directly on the
layout (not in a portal).
•Place related fields on the invoice that display data about each ordered item, such as
Product ID, Product Name, Unit Price, and so on. (The match field is Order ID.) Since in
most cases there is more than one product on the invoice (you're displaying more than one
related record), you create a portal to hold the related fields. Each row of the portal displays
one related record with the related fields you select from the Line Item database.
How FileMaker Pro evaluates references to related fields in portals
When you place a related field in a portal, FileMaker Pro uses one of two starting points to evaluate
the related data to display: the record in the portal’s table, or the record in the layout’s table. The
starting point is significant because it affects the related data that the field displays.
FileMaker Pro determines which starting point to use based on the path of relationships between
two tables in the relationships graph:
•the layout’s table
•the field’s table (the table that contains the placed field)
If the path of relationships from the layout’s table to the field’s table includes the portal’s table, the
record in the portal’s table is the starting point. Otherwise, the record in the layout’s table is the
starting point.
For example, the following relationships graph shows a school enrollment database. It contains
tables for teachers, classes, and students, and an enrollment table to indicate which students are in
each class. There is also an advisors table (another occurrence of the teachers table) which assigns
a faculty advisor to each student.
Consider the following layout, which displays the enrolled students in a class. The layout’s table is
Classes, and the portal’s table is Students.
The table below describes how FileMaker Pro determines the starting points for four fields placed in
this portal from different tables.
Classes
Students

FILEMAKER PRO HELP 1270
In addition to fields placed in a portal, FileMaker Pro uses this method to determine the starting point
for other references to fields in portals:
•Value lists: when a value list is defined to include only related values from a field, and a field
in a portal is formatted to display this value list. (The starting point determines the values
displayed in the value list.)
•Calculations: when scripted calculations refer to fields while a portal is active.
Usually, FileMaker Pro determines the correct related data to display. However, you can change the
starting point by modifying the relationships graph to include other tables and relationships, and then
changing the related fields referenced in the portal.
Related topics:
Adding fields to a layout
Placing and removing fields on a layout
Creating portals to display related records
Working with related tables and files
Example of a value list that includes only related field values
About URL encoding in web viewers
FileMaker Pro evaluates a web viewer's web address, encodes the URL by default, then tries to
load the web page using this URL. FileMaker Pro uses the following URL encoding rules to fix only
the most common problems:
•The following characters are never automatically encoded:
ABCDEFGHIJKLMNOPQRSTUVWXYZabcdefghijklmnopqrstuvwxyz
0123456789-_.~!*'();:@=+$,/?[]
Placed field
Path from
layout’s table to
field’s table
Does path
include
portal’s table?
Starting
point Comment
Name field from
Students table
Classes-Enrollment-
Students
Yes Portal’s
record
The placed field is from the portal’s
table (a very common occurrence).
The field would display an enrolled
student in each row of the portal.
Name field from
Advisors table
Classes-Enrollment-
Students-Advisors
Yes Portal’s
record
The placed field would display each
student’s advisor in each row of the
portal.
Name from
Teachers table
Classes-Teachers No Layout’s
record
The placed field would repeat the
teacher for the class in each row of
the portal, not the first related
teacher value for each student.
Class Name
from Classes
table
Classes No Layout’s
record
The placed field is from the layout’s
table (an uncommon occurrence).
The field would repeat the class
name for each row in the portal,
which is redundant if the layout
includes the Class Name field
outside of the portal.
FILEMAKER PRO HELP 1271
•An ampersand (&) is encoded only if a space follows it. For example, “& “is encoded, but
“&x” is not.
•A pound sign (#) is encoded only if a number character (0 through 9) follows it.
•The backslash (\) and percent (%) characters are always encoded.
•All other characters are always encoded.
Notes
•All of the characters listed above are Unicode characters. When a character is encoded,
both bytes are encoded separately (unless the first byte is 00), as described by the URL
encoding standard. See http://www.w3.org/Addressing/.
Because FileMaker Pro cannot correct all possible URL encoding problems, test your web
viewer to ensure that its URLs are correctly encoded.
•You can prevent FileMaker Pro from automatically encoding a URL by deselecting the
Automatically encode URL checkbox in the Web Viewer Setup dialog box. When this
option is deselected, the URL remains as it is entered.
Related topics
Defining a custom web address
Troubleshooting layouts with web viewers
Web Viewer Setup dialog box
Use this dialog box to specify the web address and other options for a web viewer.
1. Choose one of the websites on the Choose a Website list.
Or, choose Custom Web Address from the list. For more information, see Defining a custom
web address.
2. For each of the website parameters you want to use, do one of the following:
Note Some website parameters may be marked Required or Optional. If you do not specify a
Required parameter, the website might not provide the information you expect.
3. If you are adding or changing a web viewer in Layout mode, then continue to step 4 to
choose additional options. If you are setting a URL with the Set Web Viewer script step,
then click OK.
4. Select Allow interaction with web viewer content if you want to enable the user to
interact with the web page displayed in the web viewer.
To Do this
Specify a field that
contains the
parameter
Click and choose Specify Field. Then select a database field and click
OK.
Specify a
calculation that
generates the
parameter
Click and choose Specify Calculation. Then create a calculation and click
OK.
Specify a constant
value
Type a constant value enclosed in quotation marks. If you want to specify a
parameter that consists of both a constant and a field, specify it as a calculation.

FILEMAKER PRO HELP 1272
Users can click links, enter text, scroll, tab into, and use the shortcut menu in the web viewer. If
you clear this checkbox, all interaction is disabled; even scroll bars are not displayed.
5. Select Display content in Find mode if you want the web viewer to display a web page in
Find mode.
After the user enters a value into a field and moves out of that field, the web viewer recalculates
the URL and reloads the web page, if the web address is based on this field. If you clear this
checkbox, the web viewer is blank in Find mode.
6. Select Display progress bar if you want the web viewer to display a progress bar under the
content area that shows how much of a web page is loaded.
7. Select Display status messages if you want the web viewer to display status messages
under the content area. The following kinds of status messages can be displayed:
•Loading messages, such as “Loading: http://www.filemaker.com”
•Error messages, which are the same as those that would display on your operating
system’s web browser
•Security status. When secure web pages (pages that use the https protocol) are loaded,
a small lock icon is shown
8. Select Automatically encode URL to allow FileMaker Pro to apply encoding rules to the
URL, if necessary, so that it complies with a browser’s required format. To keep the URL in
the format in which it is entered, deselect this checkbox.
For more information about URL encoding, see About URL encoding in web viewers.
9. Click OK.
Related topics
Adding a web viewer
Working with web viewers on layouts
Set Web Viewer script step
Editing objects on layouts
How FileMaker Pro displays formatting attributes
When you change display attributes for objects, layout parts, or the layout background,
FileMaker Pro displays formats according to a defined hierarchy, or precedence. One factor that
determines whether format attributes display is whether you save changes at the layout level or the
theme level. The following illustration shows the order of precedence in which formatting changes
are displayed.

FILEMAKER PRO HELP 1273
Related topics
Defining conditional formatting for layout objects
Creating and working with styles for layout objects, parts, and the layout background
Saving and managing layout themes
Default styles delivered in themes
Predefined themes that come with FileMaker Pro
Default styles on layouts
Predefined styles that come with FileMaker Pro,
which have been changed by users but not saved to
the theme.
Custom styles saved in themes
User-defined formatting saved at the theme level
Custom styles saved on layouts
User-defined formatting saved in styles at the
layout level
Priority used for displaying formatting attributes
Local formatting
User-defined formatting not saved in styles
Conditional formatting
User-defined conditional formatting saved on
layouts Settings saved for each
object
Changes do not affect other
objects
Changes saved for an
object are applied to
other objects of the
same style on the
current layout, but not
on other layouts
Settings saved
in themes are
applied to
objects using the
same style on all
layouts
Default styles
can be changed
and saved at
the layout or
theme level

FILEMAKER PRO HELP 1274
Example of a value list that includes only related field values
If you are generating the values in a value list from a field, you can have FileMaker Pro dynamically
change the value list's values based on the values in a second field. In other words, the value list will
only display values in the first field from related records where the relationship definition is met by a
value entered into the second field.
For example, imagine you have a table called Products that tracks a large number of inventory
items. You could define a value list and assign it to the Item Name field to display only a subset of
those items based on values in a second field, Category. During data entry, when you specify the
value of the Category field (for example, Accessory), only the Item Name values where the Category
equals Accessory show up in the value list. Similarly, if the value of Category changes to Clothing,
the values for Item Name change to those records where Category matches Clothing.
To set up a value list like the example above, do the following:
1. Define a self-join relationship in the Products table and use the Category fields as the match
fields.
For more information, see About self-joining relationships. Defining a self-join relationship
creates another occurrence of the Products table in the Relationships graph (referred to here as
the Products 2 table).
2. Define a value list that uses values from the Item Name field in the Products 2 table. Define
this value list to include only related values starting from the Products table.
For more information about defining a value list, see Defining value lists.
3. In Layout mode, add the Category and Item Name fields from the Products table to your
layout.
For more information, see Placing and removing fields on a layout. If you want to create multiple
line items on an invoice, you can add the Category and Item Name fields to a portal.
4. Format the Item Name field to display the value list you created in step 2.
For more information, see Setting up a field to display a pop-up menu, checkbox set, or other
control.
5. Enter data into your Category and Item Name fields.
After you enter a value for Category and tab into the Item Name field, FileMaker Pro retrieves
the related records where Category matches the value you entered, and displays the
corresponding Item Name values in the value list.
Note Both the field with the value list values and the match field for the relationship must reside in
the same file, for example, Category and Item Name from the example above.
Distributing runtime solutions
OS X runtime application package (FileMaker Pro Advanced)
The Developer Utilities generate a runtime application package for OS X. The package will have the
name that you give to your runtime solution. The runtime application package contains the core
resources and code required for running the application. The contents of the package should not be
altered, except to remove the language resource files. For more information, see Distributing
runtime solutions (FileMaker Pro Advanced).
FILEMAKER PRO HELP 1275
The package contains a Contents folder, which has information on the package and the
Frameworks, OS X, and Resources folders. The Resources folder includes the language resources
folders (*.lproj). The package can be opened by using the Show Package Contents command.
The Extensions folder accompanies OS X package and contains the Dictionaries folder. The
Dictionaries folder contains dictionary files (*.mpr) for all of the languages supported. The
Dictionaries folder also contains a file for the user spelling dictionary (User.upr).
Windows runtime solutions folder contents (FileMaker Pro Advanced)
DLL files for Windows runtime solutions
The Developer Utilities generate a set of Dynamic Link Libraries (DLLs) during the binding process.
These are in the solution folder along with the runtime application and bound database files. They
must be delivered as part of the runtime solution. If any of these files are missing or become
damaged, they must be replaced. Include the entire project directory when distributing your runtime
solution.
Extensions folder for Windows solutions
The Extensions folder of Windows runtime solutions contains a folder for each language supported
and a dictionaries folder. Each language resource folder contains a DLL file for the language
(FMRSRC.dll), a file containing the text for the interface, dialog boxes, and error messages
(FMStrs.dls), and a file containing the Windows language ID for the language (lang.dat).
The Extensions folder also contains the Dictionaries folder. The Dictionaries folder contains
dictionary files (*.mpr) for all of the languages supported. The Dictionaries folder also contains a file
for the user spelling dictionary (User.upr).
Plug-in update calculations
Client plug-in version calculation
Let (
[
PluginNamePosition = Position ( Get(InstalledFMPlugins);
Plugin Name ; 1 ; 1 );
PluginVersionStart = PluginNamePosition + Length( Plugin Name )
+ 1;
PluginVersionEnd = Position ( Get(InstalledFMPlugins); ";" ;
PluginNamePosition ; 2 );
PluginVersionLength = PluginVersionEnd - PluginVersionStart
];
Middle ( Get(InstalledFMPlugins) ; PluginVersionStart ;
PluginVersionLength )
)
FILEMAKER PRO HELP 1276
Client plug-in enabled state calculation
Let (
[
PluginNamePosition = Position ( Get(InstalledFMPlugins);
Plugin Name ; 1 ; 1 );
PluginStateStart = Position ( Get(InstalledFMPlugins); ";" ;
PluginNamePosition ; 2 ) + 1;
PluginStateEnd = If ( Position ( Get(InstalledFMPlugins); "¶" ;
PluginNamePosition ; 1 ) > 0;
Position ( Get(InstalledFMPlugins); "¶" ; PluginNamePosition ; 1 );
Length( Get(InstalledFMPlugins) ) + 1
);
PluginStateLength = PluginStateEnd - PluginStateStart
];
Middle ( Get(InstalledFMPlugins) ; PluginStateStart ;
PluginStateLength )
)
Protecting databases with accounts and privilege sets
How layouts privileges and record privileges interact
Both layouts privileges and record privileges restrict what you can see and do to data in database
files, but there are important distinctions and interactions that you should be aware of when you use
them.
Layouts privileges and record privileges provide layers of protection as depicted in the illustration
below. As users attempt to access data, any one of the layers can restrict access to data; one type
of privilege does not override or supersede another one. They all act together to restrict access to
layouts and data.
However, layout privileges offer limited data access protection because they only protect individual
layouts and the data they display. Even if you use layout privileges to restrict access to every layout
in a file, there are many other potential ways to access the data, including:
•Access JDBC and ODBC
•Scripts, calculations, and Apple events that access data
•Relationships from other files that could display the data
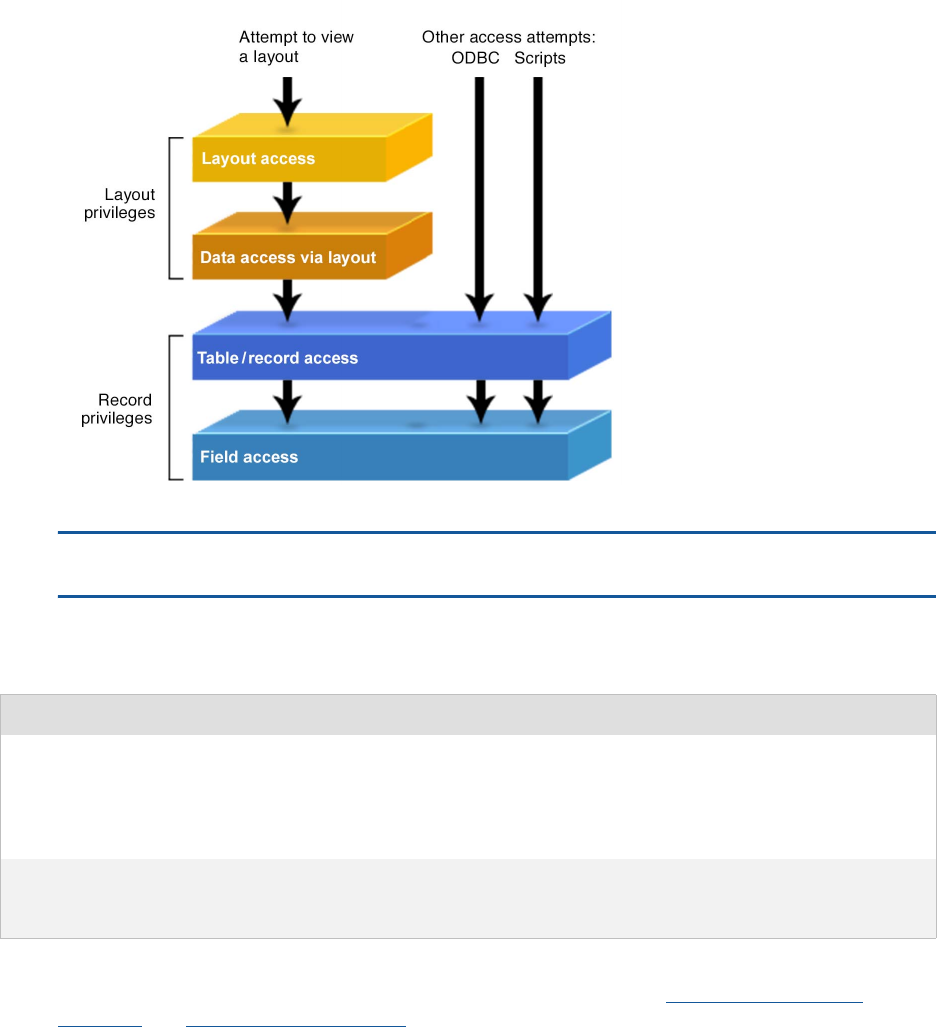
FILEMAKER PRO HELP 1277
Important To more fully protect data, use record privileges, which limit access to all occurrences of
specific tables, records, or fields no matter where they are displayed or accessed.
The following table summarizes the strengths and drawbacks of layouts privileges and record
privileges:
When you use layouts privileges to restrict data access, make sure you also use appropriate record
privileges to completely protect your data. For more information, see Editing record access
privileges and Editing layouts privileges.
About disconnecting users from FileMaker Server when idle
In the Edit Privileges dialog box, you can use the Disconnect user from server when idle option to
determine what happens to users of a file shared by FileMaker Server after a certain period of
inactivity. You can:
•automatically disconnect the user after a certain period of inactivity, or
•always keep the user connected
Privilege Good for Drawbacks
Layouts
privileges
•Prohibiting layout design changes in
Layout mode
•Making layouts view-only
•Hiding layouts
•Does not protect the underlying table
data that the layout displays, leaving it
vulnerable to be accessed in many ways
Record
privileges
•Comprehensively protecting table,
record, and field data wherever they are
accessed
•None

FILEMAKER PRO HELP 1278
Because the performance of the host can be affected by the number of active connections it must
maintain, in most cases, you should edit privilege sets to disconnect users from the host computer
when they are idle. Because you can set this option on a privilege set basis, you set certain users to
be disconnected while permitting other users to always maintain their connections.
Review the following notes for more details on disconnecting clients of shared files.
Notes
•The FileMaker Server administrator sets the length of time that FileMaker Pro users can be
idle in any database hosted by FileMaker Server. The FileMaker Pro Disconnect user
from server when idle option determines whether or not a FileMaker Pro client
disconnects a user from a particular database. Because users who are disconnected have
to reopen the file, FileMaker Server administrators should make sure the idle time is long
enough not to annoy users with frequent disconnections.
•For the privilege set assigned to the Guest account, you most likely should enable
Disconnect user from server when idle. This will prevent users who open a file with guest
access from remaining connected when idle.
•In the Full Access privilege set, the Disconnect user from server when idle option is
disabled and cannot be enabled. Therefore users with Full Access privileges remain
connected to FileMaker Server when idle.
•For information on setting the Disconnect user from server when idle option, see Editing
other privileges.
Saving, importing, and exporting data
Options for saving
For After Saving, choose one or both of the following options:
Related topics
Saving and copying files
Exporting the contents of a field
Saving and sending records as a PDF file
Export Field Contents script step
Save Records As Excel script step
Save Records As PDF script step
Save a Copy as script step
Specify Output File dialog box
Import Summary dialog box
The Import Summary dialog box displays an overview of your import or copy process. For more
details, click Open Log File to display error messages.
If the Import.log file already exists, FileMaker Pro appends new errors to the end of the existing file.
Choose To
Automatically open file Open the file after it is saved
Create email with file as
attachment
Create an email with the saved file attached

FILEMAKER PRO HELP 1279
Related topics
Importing scripts from other FileMaker files
Importing custom functions (FileMaker Pro Advanced)
Copying or importing table schemas (FileMaker Pro Advanced)
PDF Options dialog box
Use this dialog box to set PDF options when saving and sending records as a PDF file.
To set the PDF options for a file:
1. In the Document tab:
•Enter descriptive information about the file such as the title, subject, author, and
keywords.
•Select the version of Acrobat for viewing the file.
•Specify page numbering options.
2. In the Security tab:
•Specify Require password to open the file or Require password to control printing,
editing and security and assign passwords to the PDF file.
•Specify printing and editing privileges. If printing and editing privileges are allowed,
specify if copying and screen reading software are permitted.
3. In the Initial View tab:
•Select the panel and page elements of the PDF file to show.
•Select the page layout to display.
•Select the desired magnification.
4. Click OK.
Notes
•In the Security tab, if you specify Require password to open the file, the password will be
required when a user opens the PDF file using any application that enforces passwords
such as Adobe Reader, Adobe Acrobat Professional, or Apple Preview. If you specify
Require password to control printing, editing and security, the password will be
required when a user opens the PDF file using an application that allows a user to modify
privileges on the file such as Adobe Acrobat Professional. The password will be required
before a user can modify the privileges on the file.
•If either password option is specified in the PDF file, the file will be protected and its
contents will also be encrypted. An encrypted PDF file's content appears as "unreadable
text" when opened using non-PDF reading applications. The file's content cannot be
indexed by the operating system and search engines, which means users will not be able to
search for content within the document using desktop and internet search utilities.
•If no password is specified for the PDF file, the file's contents are fully readable using other
applications and can be indexed and searched on using search applications and utilities.
Also, because there is no password protection, the file can be opened by anyone.
Related topics
Saving and sending records as a PDF file
Save Records As PDF script step

FILEMAKER PRO HELP 1280
Specify Excel Data dialog box
Use the Specify Excel Data dialog box when you’re importing data from a Microsoft Excel file that
contains more than one worksheet or includes a named range.
•To import data by worksheet, select Display worksheets, select the worksheet you want to
import, then click Continue.
•To import data by named range, select Display named ranges, select the named range
you want to import, then click Continue.
Related topics
Converting a data file to a new FileMaker Pro file
Importing data into an existing file
About importing data using an HTTP request
You can import data into a FileMaker Pro file by specifying a URL as the source of the data.
FileMaker Pro supports both HTTP GET and HTTP POST requests in these dialog boxes:
•Specify XML and XSL Options (see Importing XML data)
•“Insert from URL” Options (see Insert From URL script step)
The HTTP GET and HTTP POST requests work the same way, except that an HTTP POST request
lets you send (or post) data to the web server in the message body.
To specify the type of HTTP request, use one of the following schemes in the URL:
When your URL begins with http or https, FileMaker Pro sends the URL unchanged. However,
httppost and httpspost are custom schemes defined by FileMaker Pro and are handled differently.
When your URL begins with httppost or httpspost, FileMaker Pro sends the URL beginning with
http:// or https:// followed by the text before the first “?” character. All the text after the first “?”
character is sent as POST data in the message body.
Example
This URL specifies a POST request and two key-value pairs:
httppost://www.filemaker.com/path?fname=Bob&lname=Smith
FileMaker Pro sends this URL:
http://www.filemaker.com/path
The text after the “?” is sent as POST data:
fname=Bob&lname=Smith
For this HTTP request type Use this scheme in the URL
GET http
https (secure HTTP)
POST httppost
httpspost (secure HTTP)

FILEMAKER PRO HELP 1281
Sharing databases on a network
File hosting troubleshooting
If you are having trouble hosting a file
•Make sure your computer is set up for networking. See your network administrator.
•Check to make sure that FileMaker Network Sharing is turned on. (See Sharing databases
on a network.)
Other errors and remedies
•If FileMaker Pro is not responding, stop the application and launch it again. If this does not
help, restart the computer and try again.
•You can only host FileMaker files that are open on your computer.
•You can’t host from two different instances of FileMaker Pro on the same machine. If two
instances of FileMaker Pro are running, quit one and then open the shared file in the
remaining running copy.
•Running FileMaker Pro and FileMaker Server on the same computer is not supported. If
you see the message “FileMaker cannot share files because another user is already sharing
files using FileMaker Pro on this computer,” quit both applications and run only one of the
applications.
•Another computer on your network might be using the IP address assigned to you (or vice
versa). Check with your network administrator.
•The computer might be set to DHCP with no DHCP server present. Check with your
network administrator to verify correct network setup.
•You can’t host if there is a network error. Check with your network administrator.
•If your system is set up for IPv6 but other systems trying to access it are not, revert to using
an IPv4 address if possible.
Related topics
Cannot see hosted databases
Networked database performs slowly
Cannot see hosted databases
If the Open Remote File dialog box does not show a shared database that is being hosted over a
network:
•Make sure the host and client computers are correctly connected to the network. Refer to
the documentation that came with your computer or ask your network administrator.
•Host and client computers must use FileMaker 7.0 or later for IPv4 addresses, and
FileMaker 10.0 or later for IPv6 addresses.
•The file must be open on the host computer and sharing must be enabled. See Opening
files as the host.
•FileMaker Pro shows only the databases hosted on your local TCP/IP subnet. To open a
database on a different TCP/IP subnet, in the Hosts dialog box, click Specify Host and
enter the host computer's IP address or domain name.

FILEMAKER PRO HELP 1282
•If the client is outside your LAN's firewall, blocking must be removed from port number 5003
by your network administrator. (FileMaker Pro uses TCP port number 5003 to share
databases.)
•Windows:
•Bonjour software is required in order to view hosted databases in the Open Remote File
dialog box. Be sure that Bonjour is installed on your system.
•Make sure you have only one network adapter installed for the protocol you are using.
For details, choose Help menu > Resource Center, click FileMaker Knowledge Base,
and search for keywords Host, Adapter, Network.
•If you host FileMaker Pro files from a server with two or more network cards,
FileMaker Pro broadcasts only from the card with ID 0.
•OS X:
•Make sure the FileMaker Pro application has not been moved out of the FileMaker Pro
folder.
•FileMaker Pro network hosts on a different subnet may not appear in the Local Hosts
list in the Open Remote File dialog box. Consult your network administrator about the
host and client subnet mask settings.
Networked database performs slowly
If your networked files perform tasks slowly, here are some things to
consider:
•Be sure the database resides on the hard disk of the host computer. The host is the first
machine to open a file.
•Use FileMaker Pro networking, not the operating system's networking. Don't access files via
the Network Neighborhood or a Shortcut (Windows) or Go menu > Connect to Server or
an Alias (OS X). Make sure the host computer is the first to open the file, then access it as a
client. See information about using shared files as a client.
•Dedicate the host computer to FileMaker Pro. Any application runs more slowly if it must
compete for the computer's resources. Disable unneeded extensions.
•Minimize the use of bitmapped graphics in the file.
•In large files, activities such as finds, sorts, exports, and subsummary reports on related
fields or calculations referencing related fields will be slow. When possible, perform these
actions in the file in which the fields are defined.
•If many clients need to access the file, consider using FileMaker Server software.
Using operators in formulas
Mathematical operators
Mathematical operators perform arithmetic computations.
Symbol Name Definition
+Plus Adds two values

FILEMAKER PRO HELP 1283
Related topics
About formulas
Comparison operators
Comparison operators compare two values and return either True or False. (Such expressions are
sometimes called Boolean expressions.) Mathematically, a result of True equals 1 and False equals
0.
Note You can also use <> for Not Equal To (≠), >= for Greater Than or Equal To (≥), and <= for Less
Than or Equal To (≤).
Related topics
About formulas
Logical operators
Logical operators can build compound conditions into a formula, such as two or more conditions that
must be met before you choose a particular method of calculation. With logical operators, you can
describe such combinations of conditions.
Use AND, OR, or XOR with two expressions; use NOT with one expression.
-Minus Subtracts the second value from the first
*Multiply Multiplies each value
/Divide Divides the first value by the second
^Power Of Raises the first value to the power of the second value
( ) Precedence FileMaker Pro evaluates formulas from left to right, performing
multiplication and division before addition and subtraction. Using
parentheses lets you change the order: FileMaker Pro evaluates
expressions between parentheses first. For more information on the order
in which operators are evaluated, see Using operators in formulas.
Symbol Name Definition
Symbol Name Definition
=Equals True if the items are equal
≠Not Equal To True if the items are not equal
>Greater Than True if the value on the left exceeds that
on the right
<Less Than True if the value on the left is less than
the value on the right
≥Greater Than or Equal To True if the value on the left is greater
than or equal to the value on the right
≤Less Than or Equal To True if the value on the left is less than or
equal to the value on the right

FILEMAKER PRO HELP 1284
Examples
Use ApplicationReceived="Y" AND FeePaid>0 if you want something to occur only if you
have received both the application AND the fee.
Use CurrentBalance≤0 OR CreditApproved="Y" if you want something to occur only if no
money is owed, OR credit has been approved, OR both are true.
Use FeePaid>0 XOR FreeGift="Y" if you want something to occur only if EITHER a fee has
been paid or a free gift has been sent, but not both (for example, if a fee has not been paid and a
free gift has been sent).
Use NOT IsEmpty(FieldName) to identify records that have a value in the FieldName field.
Related topics
About formulas
Text operators
Use text operators to combine two or more text items into one larger item, indicate text constants in
a formula, format the results of a formula, or represent special characters in a formula.
Related topics
About formulas
Symbol Definition
AND True only if both items are true
OR True if either item is true
XOR True if either of the expressions (but not both) is true
NOT Changes the value from False to True or from True to False
Symbol Name Definition
&Concatenate Appends the text string on the right to the end of the text
string on the left. Text strings can be fields, constants
enclosed in quotes, or certain functions.
" " Text constant Marks the beginning and the end of characters to be
considered a text constant. Quotation marks without text
between them indicate an empty value (no text). If you enter
text into a formula without using quotation marks,
FileMaker Pro tries to interpret the text as a field or function
name.
\Backslash Marks an operator character to be used as a character
instead of an operator.
¶Carriage return Inserts a paragraph carriage return in the result of a formula.
/* */ C style comment Marks the beginning and the end of characters to be
considered as text comments within a formula.
// C++ style comment Identifies a single-line comment within a formula.
${ } Reserved name Identifies reserved function names and keywords used as
field names and table names.

FILEMAKER PRO HELP 1285
Identifying text constants and special characters in formulas
Adding a new line to the results of a formula
Adding comments to a formula
Using a reserved word or symbol for a field or table name
Scripts reference
Specify Field dialog box
This dialog box appears so that you can choose a field.
1. Select the field you want in the list.
To choose a field in another table, choose the table from the tables list above the list of fields.
(You can also choose Manage Database to create a relationship or a table.) Then select a field
from the list of fields.
You can also click the Manage button to choose a field from the current or a related table,
if the button is visible.
Note When the Specify Field dialog box opens from within the Send Mail dialog box, the tables
list may default to Current Layout (LayoutName) and display only the visible fields on the
current layout. To display all field names from the current table, choose Current Table
(TableName) from the list.
2. If the field you’re specifying is a repeating field, for Repetition, enter which repetition you
want.
You can also click Specify to create a formula to calculate the repetition.
3. Click OK.
Examples of calculated repetition
In the following example, you create a script step that inserts text in a repetition based on the day.
You have a database that has a date field with seven repetitions. Each repetition represents a day of
the week starting from Sunday. If you run the script on a Wednesday, the calculation returns 4 and
the text is inserted in the fourth repetition.
Insert Text [Select; FileName::FieldName [DayOfWeek(Get (Current Date))];
Text.
In the following example, you create a script to clear the contents of a field with five repetitions.
count=1
Loop
Clear [Select;FileName::FieldName[count]
count=count+1
Exit Loop If [FileName::count=5]
End Loop
Related topics
Adding a web viewer
Check Selection script step
Clear script step
Copy script step

FILEMAKER PRO HELP 1286
Cut script step
Export Field Contents script step
Go to Field script step
Insert Calculated Result script step
Insert Current Date script step
Insert Current Time script step
Insert Current User Name script step
Insert From Index script step
Insert From URL script step
Insert Text script step
Paste script step
Relookup Field Contents script step
Replace Field Contents script step
Set Field script step
Set Next Serial Value script step
Set Selection script step
Specify File dialog box
This dialog box appears so that you can choose a file that is needed by one of the following script
steps:
•Convert File
•Import Records
•Insert File
•Insert Picture
•Insert PDF
•Insert Audio/Video
•Recover File
•Send Mail
As with data sources, you can specify multiple file paths separated by carriage returns. File paths
are searched in the order in which they appear, and FileMaker Pro uses the first file it is able to
locate. For more information about valid file path formats, see Creating file paths.
To specify a file needed by a script:
1. Click Add File in the Specify File dialog box, and select the file you want using the Open
File dialog box.
2. Click Open to add the path for this file to the file path list.
3. Repeat steps 1 and 2 for each file path you want to add.
You can also enter file paths by typing them directly into the file path list. Each file path must
appear on a separate line.
4. If you’re adding a Convert File or Import Records script step, for File Type, choose the file
type of the file you’re converting or importing.
5. Click OK.

FILEMAKER PRO HELP 1287
Related topics
Convert File script step
Import Records script step
Insert File script step
Recover File script step
Send Mail script step
Specify Output File dialog box
This dialog box appears so that you can choose an output file that is needed by one of the following
script steps:
•Export Field Contents
•Export Records
•Save Records As Excel
•Save Records As PDF
•Save Records As Snapshot Link
•Save a Copy as
As with FileMaker data sources, you can specify multiple file paths separated by carriage returns.
File paths are searched in the order in which they appear, and FileMaker Pro uses the first file it is
able to locate. For more information about valid file path formats, see Creating file paths.
To specify an output file needed by a script:
1. Click Add File in the Specify Output File dialog box, and select the file you want using the
Save File dialog box.
2. Click Save to add the path for this file to the file path list.
3. Repeat steps 1 and 2 for each file path you want to add.
You can also enter file paths by typing them directly into the file path list. Each file path must
appear on a separate line.
4. If you’re specifying an output file for an Export Records script step, for File Type, choose
the file type you’re exporting to.
5. Choose Automatically open file to open the file after it is saved. Choose Create email
with file as an attachment to create an email and attach the saved file. These actions
occur after FileMaker Pro creates the output file.
6. Click OK.
Related topics
Export Field Contents script step
Export Records script step
Save Records As Excel script step
Save Records As PDF script step
Save Records As Snapshot Link
Save a Copy as script step
Specify Find Requests and Edit Find Request dialog boxes
Use these dialog boxes to create and manage find requests that appear in the following script steps
and when you create a saved find:

FILEMAKER PRO HELP 1288
•Enter Find Mode
•Perform Find
•Extend Found Set
•Constrain Found Set
For more information on saving a find request, see Saving a find request.
In the Specify Find Requests dialog box:
•New opens the Edit Find Request dialog box, where you define criteria for a find request.
•Edit opens a selected find request from the list.
•Duplicate duplicates one or more selected find requests from the list.
•Delete deletes one or more selected find requests from the list.
In the Edit Find Request dialog box:
1. For Action, select Find Records or Omit Records to specify whether this find request will
find or omit records.
Finding records adds them to your found set. Omitting records excludes them. An individual
request can find or omit records; use multiple requests if you need to find and omit records
during the same Perform Find script step.
2. Find records when (or Omit records when) shows a list of the fields in your current table.
To construct a find request, begin by selecting a field from this list.
•To select a field from a related table, click the name of the current table at the top of the
list and select the related table you want. Select a related field from this new list.
•Change the value in Repetition to specify a particular cell of a repeating field.
3. Type your search criteria for the selected field in the Criteria area.
•Click Insert Operator to further refine your search criteria. See Finding records.
•You can include local variables (beginning with $) and global variables (beginning with
$$) in find requests that you create or edit in the Edit Find Request dialog box. See
“Notes for using variables in find requests,” below.
4. Click Add to add your criteria to the find request.
•To change existing criteria, select the line containing the field and criteria from the top of the
dialog box, and make your changes to the field or criteria. Click Change to store your
changes.
•To delete existing criteria, select the line containing the field and criteria from the top of the
dialog box and click Remove.
5. Click OK.
Notes for using variables in find requests
•A variable in a find request can represent a simple expression (for example, */*/
$birthYear) or a complex expression (for example, $birthQuery, where the value of
$birthQuery is */*/1994).
•A variable in a find request cannot include the repetition (index) number of a repeating field
(as in the syntax $variable[repetition]) or a file path.

FILEMAKER PRO HELP 1289
•Variables in a find request can’t include additional variables. FileMaker Pro might not find
matching records accurately if variables are nested.
•Because the value of a variable might be unknown during the validation of a field’s find
request, validation stops when FileMaker Pro detects a variable. For example, when you
enter find criteria for a date field in the Edit Find Request dialog box, FileMaker Pro stops
validating the request when you enter the $ symbol (indicating a variable).
•If a find request contains a variable that FileMaker Pro doesn’t recognize, the variable is not
evaluated, and no matching records are found.
•Use either a slash (/) or colon (:) as the terminator character in a variable used in a file path.
Example
The following table shows how criteria can be used to return certain records. Assume that six
records have been entered into a text field called FirstName: Anne, Andrew, Lando5, Han, Han,
Susan.
Note For a list of operators that can be used to find text, see Finding text and characters.
Related topics
Enter Find Mode script step
Perform Find script step
Extend Found Set script step
Constrain Found Set script step
Finding text and characters
Using variables
Specify Script dialog box
Use this dialog box to choose a script to perform in a file that is called by the Perform Script script
step, the Perform Script On Server script step, or a script trigger.
This dialog box also appears in FileMaker Pro Advanced when you customize a menu item to
perform a script.
To specify a script to perform in a file:
1. Select the current file or another specified file (data source) from the list.
2. Select a script from the list.
Action Criteria Record(s) Returned
Find Records Table::FirstName: [==”Andrew”] Andrew
Find Records Table::FirstName: [*an] Han, Han, Susan
Find Records Table::FirstName: [@an] Han, Han
Find Records Table::FirstName: [!] Han, Han
Find Records Table::FirstName: [@an*] Lando5, Han, Han
Find Records
Omit Records
Table::FirstName: [*e*]
Table::FirstName: [*w*] Anne
Find Records
Omit Records
Table::FirstName: [*an*]
Table::FirstName: [*#] Anne, Andrew, Han, Han, Susan

FILEMAKER PRO HELP 1290
3. For Optional script parameter, type the text you want to use or click Edit and use the
Specify Calculation dialog box to build a more complex parameter.
4. Click OK.
You can also create, duplicate, edit, or delete a script using this dialog box.
Notes
•When you create, duplicate, edit, or delete a script using the Specify Script dialog box, your
changes are not undone when you click Cancel.
•If you choose Perform Script or Perform Script On Server from the Edit Script dialog box,
the create, duplicate, edit, and delete commands are not available.
•The create, duplicate, edit, and delete commands are not available for external FileMaker
files.
Related topics
Creating and editing scripts
Perform Script script step
Defining custom menus (FileMaker Pro Advanced)
Setting script triggers for layouts
Setting script triggers for objects
Set Variable Options dialog box
This dialog box appears so that you can specify a variable in the Set Variable script step to use in a
script, calculation, or file path.
To specify a variable to use in a calculation:
1. Type a variable name. Prefix the name with $ for a local variable or $$ for a global variable.
If no prefix is added, $ is automatically added to the beginning of the name. A variable name
has the same naming restrictions as a field name. For more information, see About naming
fields.
2. Enter a value for the variable or click Specify to create a formula to calculate the value.
3. Enter a repetition number (optional) or click Specify to create a formula to calculate the
repetition. The default is 1.
To Do this
Create a script Click the + button or choose New Default Script from the Action pop-up menu.
Duplicate a script Select a script and choose Duplicate from the Action pop-up menu.
A copy of the selected script appears in the list, with the word “copy” added to
the original script name. To create a duplicate script with the same name as the
original script, select it in the list and use Shift+Duplicate.
Note Script folders cannot be duplicated or created from this dialog box. For
more information on working with folders, see Managing scripts using folders.
Edit a script Select a script and choose Edit from the Action pop-up menu.
Tip You can also press Alt-double-click (Windows) or Option-double-click
(OS X) to open the Edit Script dialog box.
Delete a script Select a script and click the – button.

FILEMAKER PRO HELP 1291
4. Click OK.
Examples
Name: $abc
Value: fieldName * 10
Repetition: 10
Set Variable [$abc[10]; Value: fieldName * 10]
Name: $$abc
Value: “xyz”
Repetition: 1
Set Variable [$$abc; Value: “xyz”]
Name: $CurrentUser
Value: Get(UserName)
Repetition: 1
Set Variable [$CurrentUser; Value: Get(UserName)]
Name: $$TaxRate
Value: 1 if the field City contains the value “San Francisco”, 2 if City is “New York”, 3 if City is
“Miami”, 0 if it’s none of those values.
Repetition: 1
Set Variable [$$TaxRate; Value: Case ( City = “San Francisco” ; 1 ; City =
“New York” ; 2 ; City = “Miami” ; 3 ; 0 )]
Related topics
Let function
Set Variable script step
Defining repeating fields
Edit Expression dialog box
This dialog box appears so you can specify which expressions you want to monitor with the Data
Viewer.
To specify an expression:
1. Select the database file containing the expression.
2. Build or edit the expression you want to monitor.
To add a Do this
Reference to a field In the field list, double-click a field name.
To display field names from another table, choose a table from the
table list.
Mathematical or text operator Type an operator.
Comparison or logical operator For Operators, click a button or double-click an operator from the
list.
Constant value Type the value.
Function In the functions list, double-click a function. In the formula box,
replace the placeholder parameter with a value or expression.
FILEMAKER PRO HELP 1292
3. Click Evaluate Now to display the results of an expression, or click Monitor to add the
expression to the Data Viewer and close the Edit Expression dialog box.
Related topics
Using the Data Viewer (FileMaker Pro Advanced)
Specify Script Step dialog box
This dialog box appears so you can customize a menu item to perform a script step.
To customize a menu item to perform a script step:
1. Select a script step from the list.
2. Specify options as necessary.
3. Click OK.
Related topics
Defining custom menus (FileMaker Pro Advanced)
Insert File Options dialog box
This dialog box appears when you select Dialog options or click Specify in the Edit Script dialog
box for the Insert File script step. Use this dialog box to create a custom Insert File dialog box. The
custom Insert File dialog box appears when users choose a file to insert into a container field.
1. For Custom Dialog Title, type a name.
Or, click Specify to create a title from a calculation (for example, to localize the title).
The title appears in the custom Insert File options dialog box.
2. Add, edit, or delete filters for the file types available in the custom Insert File dialog box.
3. For Storage options, choose how you want the file stored.
•Let user choose allows users to decide how to store the file when they are working in
the custom Insert File dialog box. (The Store only a reference to the file option is
available.)
To Do this
Create a filter Click New. In the New Filter dialog box, type a filter name and
filename extensions in the Name and Extensions fields, respectively.
Or, click next to the Name field, and choose a filter from the list.
The name and corresponding filename extensions are entered in the
Name and Extensions fields, respectively. You can change the name
and remove or add filename extensions.
To create a filter from a calculation (for example, to localize the filter),
choose Specify Calculation.
Click OK.
Edit a filter Click Edit. In the Edit Filter dialog box, make your changes, and click
OK.
Remove a filter Click Delete.

FILEMAKER PRO HELP 1293
•Reference only allows storing a file by reference.
•Insert only allows either embedding a file in the field, or storing the file externally in the
location specified in the Manage Containers dialog box. It does not allow storing a file
by reference. (See About setting up container fields.)
4. For Display, choose how you want supported image files and video and audio files
displayed in the field.
•Icon with filename displays an icon in the field; the file is stored as an attachment. (To
work with the file, you can export it.) Choose this option if you want files to be
compressed, or to be able to include file extensions that are not supported by
FileMaker Pro.
•Content of file (when possible) displays the content whenever possible, so that users
can see, play, or interact with the file in the field. Content is displayed in the field when
FileMaker Pro recognizes the file type. Otherwise, an icon appears in the field. When
you choose this option, the Let user choose compression option becomes unavailable.
5. For Compression, choose how you want the file compressed.
Note Because FileMaker Pro assesses your compression setting when a file is inserted into the
field, the result may not be what you expected. A file cannot be compressed if the Reference
storage option is selected in the Insert File Options dialog box (or if Store only a reference to
the file is selected in the custom Insert File dialog box), the file content (and not an icon) is
displayed in the field, or the file is already compressed (for example, it’s an MP3 file).
•Never compress keeps the file uncompressed, even when the file is displayed as an
icon in the field.
•Let user choose allows users to decide in the custom Insert File dialog box. (The
Compress option is available.) The file will not be compressed if any conditions above
exist.
•Compress (when possible) compresses a file when it is inserted in the field if it can be
compressed. The file will not be compressed if any conditions above exist.
6. Click OK to save your changes and return to the Edit Script dialog box.
For more information about how these options work together, see the example below.
Notes
•It is possible to select both Content of file (when possible) and Compress (when
possible). For example, if a file with an unsupported extension is inserted into the field, the
file is compressed and displayed as an icon.
•To create a custom menu for the container field, see Defining custom menus (FileMaker Pro
Advanced).
Example
The following example shows a typical configuration in the Insert File Options dialog box. Using
these settings, FileMaker Pro inserts files into the container field and displays file content. When a
file’s content cannot be displayed, the file is compressed and displayed as an icon.
1. For Custom Dialog Title, type Insert Media.
FileMaker Pro adds double-quotation marks around the filter name.
2. Select the “All Files” filter, then click Edit. Click , and choose Video. For Extensions,
remove .mpg. Click OK.

FILEMAKER PRO HELP 1294
3. In the Insert File Options dialog box, click New. For Name, type PDF Documents. For
Extensions, type .pdf. Click OK.
4. In the Insert File Options dialog box, click New. Click , and choose All Files. Click OK.
5. In the Insert File Options dialog box, for Storage options, choose Insert.
Insert is a good choice for multi-user databases, because it ensures that all files will be
available for all users.
6. For Display, choose Content of file (when possible).
The Let user choose compression option becomes unavailable. This makes the Compression
option in the custom Insert File dialog box unavailable.
7. For Compression, choose Compress (when possible).
8. Click OK.
With the above settings, when a file is inserted into the field and can’t be compressed because
of the display setting, that setting changes to Icon with filename, making file compression
possible. For example, if a JPEG file is inserted in the field, using the above settings,
FileMaker Pro does not compress the file, and displays the content in the field. However, if an
Excel file is inserted in the field, FileMaker Pro compresses the file and displays an icon in the
field.
9. Save and then run the script.
In the custom Insert File dialog box, with the above settings, you can’t select Store only a
reference to the file or Compress, but you can choose a filter (from Show).
Related topics
About setting up container fields
Specify Calculation dialog box
Authenticate Script Debugging dialog box
This dialog box appears if you do not have Full Access privileges when you click to authenticate
a script in the Data Viewer or Script Debugger.
To authenticate a script:
1. Enter a user name and password with Full Access privileges.
2. Click OK.
Related topics
Debugging scripts (FileMaker Pro Advanced)
Using the Data Viewer (FileMaker Pro Advanced)
Specify Advanced Style Options dialog box
You can specify a window style in your New Window script step definition. This dialog appears when
you select Specify Advanced Style or click Specify in the New Window Options dialog box.
To specify one of the window styles, select Document Window, Floating Document Window, or
Dialog Window, then select one or more of the following Window Controls options.

FILEMAKER PRO HELP 1295
Notes
•When you hide a button in the title bar, its corresponding menu command is disabled.
•In the Microsoft Windows OS:
•When a window is maximized, the maximize and restore buttons become a single
button.
•You can use a script or button script step to control a window, even if a button is
disabled in the window’s title bar.
•When you disable both the maximize and minimize buttons, these buttons do not
appear in the window’s title bar.
•When a dialog window is open:
•Users can’t open a new file or run scripts from the Scripts menu.
•Users can interact with non-document windows such as the FileMaker Pro Advanced
Data Viewer and Script Debugger, if these windows are open when the dialog window
opens. However, users cannot interact with open Manage Scripts, Manage Layouts,
Edit Script, or Manage Favorites dialog boxes.
•Because dialog windows are modal, users must close dialog windows before they can
open or interact with any open document windows or switch from Browse to Layout
mode. However, solution developers can use a script to open another dialog window or
a modal utility window (for example, the Manage Database dialog box) while a dialog
window is open. For more information, see the table describing script step restrictions
below.
•Although all script steps appear active in the Edit Script dialog box, the following script
steps cannot be used with dialog windows or their use is restricted.
Select or clear To
Close Enable or disable the close button in the window’s title bar
Minimize Enable or disable the minimize button in a document window’s title bar
Maximize Enable or disable the maximize button in the window’s title bar
Zoom Control Area Enable or disable the zoom control and Mode pop-up menu at the left
bottom of a document window
Resize Allow or prevent the window from being resized
Script step Supported Restriction with dialog windows
Adjust Window Yes Only operates on the current window
Arrange All Windows No
Convert File No
Go To Related Record Yes Can open a new dialog window only
Move/Resize Window Yes Only operates on the current window
New File No
New Window Yes Can open a new dialog window only
Open File No
Open Remote No

FILEMAKER PRO HELP 1296
•Any operations that attempt to open a non-dialog window will fail when a dialog window is
open (for example, using a script trigger to run a script from another file). OnTimer scripts do
not execute when a dialog window is open unless the script launches from the dialog
window itself.
•OS X: A FileMaker Pro dialog window does not have the same qualities or restrictions of a
standard dialog window. For example, Apple events can communicate with a database
while a FileMaker Pro dialog window is open.
Related topics
New Window
Charting non-toc topics
Chart Setup dialog box
Use the Chart Setup dialog box to modify a quick chart or to create or edit a chart in Layout mode.
Note To get started creating a chart, see Creating quick charts or Creating and editing charts in
Layout mode.
The Chart Setup dialog box has two sections:
•The chart preview. See Using the chart preview.
•The Chart inspector contains chart settings.
To create or edit a chart:
1. Before you make changes in the Chart Setup dialog box, consider:
•Reducing the found set, if needed, to make your data comparison clear. See Making a
find request.
•Sorting data (for example, sales from highest to lowest). If you are charting summary
data, sort data into categories (for example, sort by region). See Working with data in
Table View or Sorting records.
2. In the Chart inspector, enter settings:
Perform Script Yes Will fail, if executed from another
open file
Quit Application No
Select Window Yes Can select only the current dialog
window
Script step Supported Restriction with dialog windows
To Do this
Add a title to the chart
For Title, type or change the chart title, or click to
specify a title.
Choose a chart type and
specify the data series
See Column, bar, line, and area charts (including stacked
column and bar and positive/negative charts), Pie charts, or
Scatter and bubble charts.

FILEMAKER PRO HELP 1297
3. When you are satisfied with the chart, do one of the following:
For quick charts created in Browse mode:
•Click Print to print a copy of the chart, then click Cancel.
•Click Save as Layout to save the chart on a new layout. To access the chart later via
the Layout pop-up menu, select Include in layout menus in the dialog box that
appears.
Note You must have the correct privileges to save a chart on a layout. See About accounts,
privilege sets, and extended privileges.
Otherwise:
•Click Done.
For charts created in Layout mode:
•Click Done.
•Click Save Layout, then Exit Layout.
Note If you click Cancel in the Chart Setup dialog box, no changes to the chart are saved.
However, if you made any changes to the database schema using the Select Field or Specify Field
dialog boxes while working in the Chart Setup dialog box, those changes remain in the database.
Using the chart preview
You can use the chart preview to work efficiently in the Chart Setup dialog box.
Note In a shared file, data changes made by other users are not displayed in the chart preview.
However, the chart will display updated data when it is viewed in Browse mode.
Change data labels, show or
hide tick marks and set tick
mark scale (if applicable), and
format data
See Formatting and scaling chart axes.
Change the color scheme,
legend, or fonts in the chart
Click Styles in the Chart inspector, then see Changing the
look of a chart.
Specify the type of data the
chart uses (records in the
found set, delimited records,
or related records)
Click Data Source in the Chart inspector, then see
Specifying the data source for a chart.
To Do this
To Do this
Display tooltips for objects in
the preview
Pause the pointer over the title, chart legend, axes titles,
axes, or radius objects.
Tip You can select an object in the preview to open the
Chart inspector and activate the object’s control.
Switch the x-axis and y-axis Click Swap Axes. If the chart has multiple y data series
defined, only the first y-series appears on the x-axis.
FILEMAKER PRO HELP 1298
Save as Layout dialog box
If you have the correct privileges, you can save a quick chart in a new layout. You can re-display or
edit the chart later.
Note You can’t save a quick chart on an existing layout.
Related topics
About accounts, privilege sets, and extended privileges
Summary types for charts
Display sample data if the
preview is slow to display
Click Use actual data below the preview and choose Use
sample data. When you’ve finished editing the chart,
restore the Use actual data setting or verify the chart in
Browse mode.
Tip You can choose View menu > Show > Sample Data in
Layout mode to display sample data in the Chart Setup
dialog box by default.
Pause a preview update Click .
To refresh a paused preview Click .
To Do this
To Click or select
Print the chart Print Chart
Save the chart in a
new layout
Save as Layout
To access the chart
later via the Layout
pop-up menu
Include in layout menus
If you clear Include in layout menus, you can use
Layouts menu > Go To Layout or the Manage Layouts
dialog box to display the chart in layout mode. See
Managing layouts.
Select To
Total Calculate the total of values in the field.
Average Calculate the average of values in the field.
Count Count the number of records that contain a value for the field. For
example, if a field contains 100 values (one value for each record), the
result of the count is 100.
Minimum Show the lowest number, or earliest date, time, or timestamp for a field.
Maximum Show the highest number, or latest date, time, or timestamp for a field.
Standard Deviation Find how widely the values in a field differ from each other. This option
calculates the standard deviation from the mean of the values in a field.

FILEMAKER PRO HELP 1299
Miscellaneous Non-toc Topics
FileMaker Quick Start Screen
The FileMaker Quick Start Screen provides a central place where you can:
•Create new files, using either a Starter Solution provided by FileMaker Pro or by creating an
empty file you design yourself. For information, see Creating a FileMaker Pro file.
•Create new files using data from a file of a different format (such as Bento 4, or a later
supported version, or Microsoft Excel). For information, see Converting a data file to a new
FileMaker Pro file.
•Open existing files located on your computer or remote networked computers. For
information, see Using FileMaker Quick Start to open files.
•Visit the FileMaker Resource Center to learn more about FileMaker Pro, experience
FileMaker Pro as you work through the interactive Getting Started tour, or view the
FileMaker Forum to collaborate with other FileMaker users through an online bulletin board.
For information, see Using FileMaker Quick Start to learn more about FileMaker Pro.
Select ODBC Data Source dialog box
This dialog box appears so that you can access an existing ODBC data source. You can import from
the data source, or you can work with the data source interactively in the relationships graph.
•If you want to import ODBC data into FileMaker Pro files (by writing SQL queries), see
Querying an ODBC data source from FileMaker Pro.
•If you want to access and work with ODBC data interactively on layouts and in the
relationships graph (without writing SQL queries), see the section on adding an ODBC data
source in Connecting to data sources.
Specify Layout dialog box
Use this dialog box to set the default layout to display whenever you open the file.
To specify a layout, select the layout in the list, then click OK.
Standard Deviation By
Population
Calculate population standard deviation.
Fraction of Total Calculate the ratio of the value in the field to the total of all the values in
that field. For example, find what fraction of total sales can be attributed to
each salesperson.
Select To
To Do this
Expand or collapse
a folder
Click the expand/collapse icon to the left of the folder name, or
press the + or - key (Windows) or the Right Arrow or Left Arrow
key (OS X).
View folders and
their contents by
folder name
In the list in the upper left of the dialog box, choose a folder
name. You see the folder’s layouts and subfolders.
To show all layouts, choose Show All.

FILEMAKER PRO HELP 1300
Related topics
Creating and managing layouts and reports
Edit Folder dialog box
Use this dialog box to change the name of a layout folder or a script folder.
To change the entire folder name, select the current name and type the new name. To change part
of the folder name, select the portion to change, then type your changes. Then click OK.
The new name appears in the Manage Layouts or the Manage Scripts dialog box.
Related topics
Creating and managing layouts and reports
Managing scripts using folders
Specify users by privilege set dialog box
Use this dialog box to allow accounts assigned a privilege set to access one of the following:
•a database file that you’ve specified in the FileMaker Network Settings dialog box
•a database file specified in the ODBC/JDBC Settings dialog box that you want to share via
ODBC/JDBC
•a database file that you’ve specified in the FileMaker WebDirect Settings dialog box
Users are granted access to the database file through the selected privilege set.
To allow access by privilege set:
•Select the checkbox next to the privilege set to use for allowing access to the specified
database file. Then click OK.
Notes
•Only active accounts can access the database file; use the Manage Security dialog box to
activate additional accounts.
•Users may be asked to enter their account name and password when they open the file,
depending on the setting in the File Options dialog box. (See Setting file options.)
Related topics
Opening files as the host
Sharing FileMaker Pro data via ODBC or JDBC
Publishing databases with FileMaker WebDirect
Filter the list of
folders and layouts
by name
In the box in the upper right of the dialog box, type all or part of
a folder or layout name. The list filters as you type; typing a
layout name displays the folder in the list, and typing a folder
name displays the folder and its layouts and subfolders.
To show all folders and layouts, clear the box.
To Do this
