Foxit PDF Page Organizer User Manual PDFPage
User Manual: foxit Foxit PDF Page Organizer - User Manual Free User Guide for Foxit PDF Page Organizer Software, Manual
Open the PDF directly: View PDF ![]() .
.
Page Count: 67

Copyright © 2010 Foxit Corporation. All Rights Reserved.
No part of this document can be reproduced, transferred, distributed or stored
in any format without the prior written permission of Foxit.
Anti-Grain
Geometry
-
Version
2.3
Copyright
(C)
2002-2005
Maxim
Shemanarev
(http://www.antigrain.com)
Permission to copy, use, modify, sell and distribute this software is granted
provided this copyright notice appears in all copies. This
software is provided
―as is‖ without express or implied warranty, and with no claim as to its suitability
for any purpose.

PDF Page Organizer Contents
Introduction
● Why PDFPO?
● Introducing PDFPO
● Eval and Registered Version
● Main Features
● What's New
● Install & Uninstall
● Basic Steps in Using PDFPO
The PDFPO Window
● Overview the Work Area
● A Closer Look at the Edit Area
❍ The Pages Pane
❍ The Outlines Pane
❍ The Annotation Pane
❍ The Info Pane
❍ The Layout Pane
● A Look at the Editable Dialog Boxes
❍ The Pages Import Box
❍ The Pages Modify Box
❍ The Outlines Import Box
❍ The Annotation Insert Boxes
Using PDF Page Organizer
● Creating and Saving *PPO* Documents
● Opening *PPO* Documents
● Generating PDF Documents
● Closing Documents
● Showing or Hiding Toolbar or Status Bar
● Resizing the Edit Area or Preview Area
● Magnifying and Decreasing the View
❍ To Increase or Decrease Magnification

❍ To Resize a Page to Fit the Window
❍ To Resize a Page to Fit the Window Width
❍ To Return a Page to its Actual Size
● Previewing Documents
❍ To preview Another Page with View Tools
❍ To jump to Another Page by its Number
❍ To preview Document with Outline
❍ To preview Document with Pages
Organizing Pages
● Importing Pages from PDF Document
❍ Importing Pages
❍ Modifying Imported Pages
❍ Removing Imported Pages
❍ Reordering the Pages List
● Editing Outlines
❍ Importing PDF Outlines
❍ Inserting Entries
❍ Renaming Entries
❍ Deleting Entries
❍ Previewing Outlines
❍ Attaching Entries to Pages
❍ Releasing Destinations
● Creating Annotations
❍ Inserting Free Text Annotations
❍ Inserting Stamp Annotations
❍ Insert Text Annotations
❍ Removing Annotations
❍ Modifying Annotations
● Adding Information
● Setting Page Layout
❍ Resizing Page
❍ Scaling Content
❍ Clipping Content
❍ Moving Content
❍ Rotating Page
❍ Restoring Change


Introduction
Why PDFPO?
There are a number of affordable PDF creator on the market that can convert printed documents to PDF
files. However, you often need to use very expensive tools like Adobe® Acrobat® to do post processing
like merging different documents together, re-arranging pages, composing page outlines, etc.
PDF Page Organizer provides a very reliable alternative to those expensive and complicated tools. It is
designed entirely to post process PDF files and generate PDF files. It also displays overview page
without support of any additional software (like Adobe® Acrobat® Reader), so you can easily know
what you are working on.
Go to Contents

Introduction
Introducing PDFPO
Welcome to use Foxit PDF Page Organizer (PDFPO). PDFPO is designed entirely to post process PDF
files and generate PDF files.
PDFPO is a cost-effective and powerful tool that can be used to merge, split, and re-organize your PDF
files, perserving original pages layout. It's very useful if you use PDF creation tools to create PDF files,
or want to re-organize your existing PDF documents.
PDFPO has a build-in viewer that you can find nowhere on the market. Using this viewer, you can enjoy
organizing documents on one side, and meanwhile viewing what you get on the other side.
PDFPO is released as shareware, you can have unlimited days to evaluate it free, while the eval version
of the program has much limited way to use. If you want to use the
Eval and Registered Version .
For registered users, PDFPO allows you to do the following things:
● Merge several PDF files or extract several pages from a PDF file and add them to a document.
● Add an outline (bookmarks) to the file so it's easier for users to browse inside the document.
● Creat annotations to the file, so you can add something like comments, company log, or
copyright marks to your document.
More features will be built into future versions, and free lifetime technical support and upgrades are
provided at a low price.
Go to Contents
fully functional version, you must
register the program.
For details, please see
Introduction
Eval and Registered Version
PDF Page Organizer has two versions for users: Evaluation version and registration versions.
For more information about registration, please visit our Online order page.
Evaluation Version
PDFPO is released as shareware, you can evaluate it in an unlimited day, while you have to experience
restrictions as below:
1. All pages in generated PDF files will contain a copyright mark.
2. Create only up to 10 outline entries for your target pdf document.
3. Allow only first half pages (up to ten pages) can be generated with annotations.
4. Allow only first half pages (up to ten pages) can be generated with layout.
If you are evaluating PDFPO, the "Licensed To" and "S/N" on "About" will be printed as "Evaluator"
and "null" (see the following figure). While in the following two versions they will be displayed as
"registered user name" and "registered serial number" respectively.

Introduction
Registered Version
This is a complete version containing advanced key inside. In this version, user can freely use all
● Merge several pdf files or split a pdf file into several pages by importing source pdf pages, and
add them to a file
● Add an outline (bookmarks) to the file so it's easier for users to browse inside the document.
● Create annotations to the file, so you can add something like comments, company log, or
copyright marks to your document.
● Reset page layout of the file, so that you can specify how the page can be previewed by users or
printed.
● Generate the file into a new pdf document contained pages, outlines, annotations, and basic
information.
Go to Contents
functions supported by PDFPO program, without any restrictions. Using this Registered Version,
users can:

Introduction
Main Features:
1. Standalone software, Adobe Acrobat and Reader NOT required!
2. Can generate multiple pdf files from a single pdf file by splitting its pages.
3. Can generate a single pdf file by merging multiple pdf files or selected pages from one or more
pdf files.
4. Can save the pages in the rough as *.po file for further reorganization and use before finally
generating it into target pdf file.
5. Can preview its contents while managing pdf pages.
❍ PDFPO has a build-in viewer that you can find nowhere on the market. Using this viewer,
you can enjoy organizing pages on one side, and meanwhile viewing what you get on the
other side.
6. Pages pane allows you to import and edit pdf pages. You can use Import command to bring up
Page Details dialog box, and within this box, you can:
❍ Add (merge) multiple pdf files in one operation.
❍ Split it into single page or sets of pages when imported a single pdf file.
The imported files or selected pages are entered into Pagespane for further edit.
7. Outlines pane allows you to import and edit outlines for target pdf file. Within the Outlines pane,
you can:
❍ Directly insert and edit outline.
❍ Use the Import command to import whole or a portion of outline from inside an pre-
existing pdf file. And the imported outline can be mixed with other outlines as a
subordinate or coordinate outline.
❍ Position an entry(outline) to any location in a page simply by dragging the Position icon.
8. Annotation pane allows you to insert and modify three types of annotations (text, free text and
stamp) for target pdf files. You can use Insert command to pop up Annotation Details dialog
box, and within this dialog box, you can:
❍ Edit contents and descriptions for annotations.
❍ Set the attributes of annotations whether to be Read-only or Printable, or not.
❍ Customize the size and color of the text and marquee for annotation(s)
❍ Select to apply annotation(s) to current page, any page ranges, and or all pages.
❍ Set the annotation location by simply selecting the Relative or Absolute position.
9. Layout pane allows you to reset page's layout so that you can easily change the page outlook for
user preview or print. In this pane, you can:
❍ Reduce and enlarge pang size.
❍ Shrink or stretch page content in a vertical or horizontal way.
❍ Clip the content of pages to meet the different purpose of the file printout.
❍ Move the location of the current page's content.
❍ Rotate the orientation of the current page's content.
10. Info pane allows you to add basic information, such as Title, Subject and Keywords, about pdf
files into target files.
Go to Contents
Introduction
What's New
What's New in Version 2.93
you just need to double-click on it.
Foxit PDF Page Organizer Version 2.93 Build 080116 has introduced some new features and
enhancements listed below:
with Foxit PDF Page Organizer,
pages with Foxit PDF Page Organizer.
PDF files much easier.
File Association: Version 2.93 creates ppo file association automatically. To open a ppo file
Rotating Preview: You can now preview page rotation in the Preview window.
●
●
Multi-line Annotations: Now you can insert multi-line stamp or free text to the designated
●
Unicode Support: Better Unicode support for annotation editing.
●
Streamlined UI: The User Interface has been redesigned thoroughly, making organizing your
●
Bug Fixes.
●
Introduction
What's New in Version 2.4
● Powerful Layout pane was added.
What's New in Version 2.3
● PDF displaying API was enhanced. A new PDF API was added in this version to make the
preview displaying more clear and fast.
● File importing function was improved. User can import multiple PDF files at a time. In before
version user can only add PDF file one by one.
What's New in Version 2.2
● Annotation pane was added. In this version, users can create annotations for their target PDF
documents. Annotations can be displayed or printed in some or all pages of your document. It's
very useful if you want to add something like comments, company logo, or copyright marks to
your document.
What's New in Version 2.1
● Outline Position feature was added. This new feature can help you to quickly link an entry to any
location of a page. What you need to do is dragging the position icon to the target you want.
What's New in Version 2.0
● Information pane was added. In this pane, user can add for the destination document basic
information like Title, Subject, and Keywords.
● Outline Importing feature was added. In this version, user can use the new function of Import
PDF Outlines to selectively import pre-existing PDF outlines included in one existing PDF
document.


Introduction
Install & Uninstall
The Foxit PDF Pages Organizer (PDFPO) is a neat green software, no installation is required. All you
need to do is to visit the website, download the PDFPO zip file to your disk, and unzip it, and then run
the pdfpo.exe.
Here are the steps:
1. Go to our download web page, click download the PDFPO
2. Click on Open to save the zip file into the temporary folder, click on Save (recommended) to
store into your explorer.
3. Double click the zip file and extract the PDFPO file into PDFPO folder.
4. Open the PDFPO folder and run the PDFPO.EXE.
5. You can copy the PDFPO.EXE to anywhere you feel convenient.
To unistall the PDFPO program, just simply delete the pdfpo folder.
Go to Contents
Introduction
Basic Steps in Using PDFPO
Launch a New File Window
On the PDFPO window, click New button or choose File > New or simply press CTRL +N to open a
new file window.
Importing and organizing pages
On the Pages pane, click Import button or choose Pages > Import PDF Page(s) or simply press CTRL
+ I to import pages from the existing PDF document.
Importing and editing Outlines
On the Outlines pane, using Import, Insert and other edit functions to import and edit Outlines for the
imported pages. If you are not a user of Pro Version, you have to use this function in limited way.
Creating Annotations
On the Annotations pane, using Insert to edit annotation content, description, position, page ranges and
other parameters. If you are not a user of Pro Version, you have to use this function in limited way.
Resetting Page Layout
On the Layout Pane, use the value buttons to change the page layout such as resize page, scale content,
clip content, move content, rotate page. If you are not a user of Pro Version, you have to use this
function in limited way.
Adding Information
On the Info pane, filling the relevant information for the destinations file. This is an optional step, you
can chose not to add information.
Saving and Opening
After finish the above first step or three steps, you can choose to save it so that later you can open it for
further reorganization.

The PDFPO Window
Overview the Work Area
As the following legend shows, the main window of PDFPO falls into two head areas, the left area is the
Page Edit Area comprising of five panes for organizing pages. The right one is the Document Preview
Area for previewing pages. Menu Bar and Toolbar on the top of the window provides shortcut control to
work with the imported pages. And the Status Bar on the bottom of the window provides a visual view
reporting the current page location on the source or destination document.
Menu Bar
The Menu Bar gives you the full access to all features of the PDF Page Organizer. You can access the
menu by either using mouse or keyboard. Keyboard shortcuts, when available, are printed on the right of
the menu item.
Tool Bar
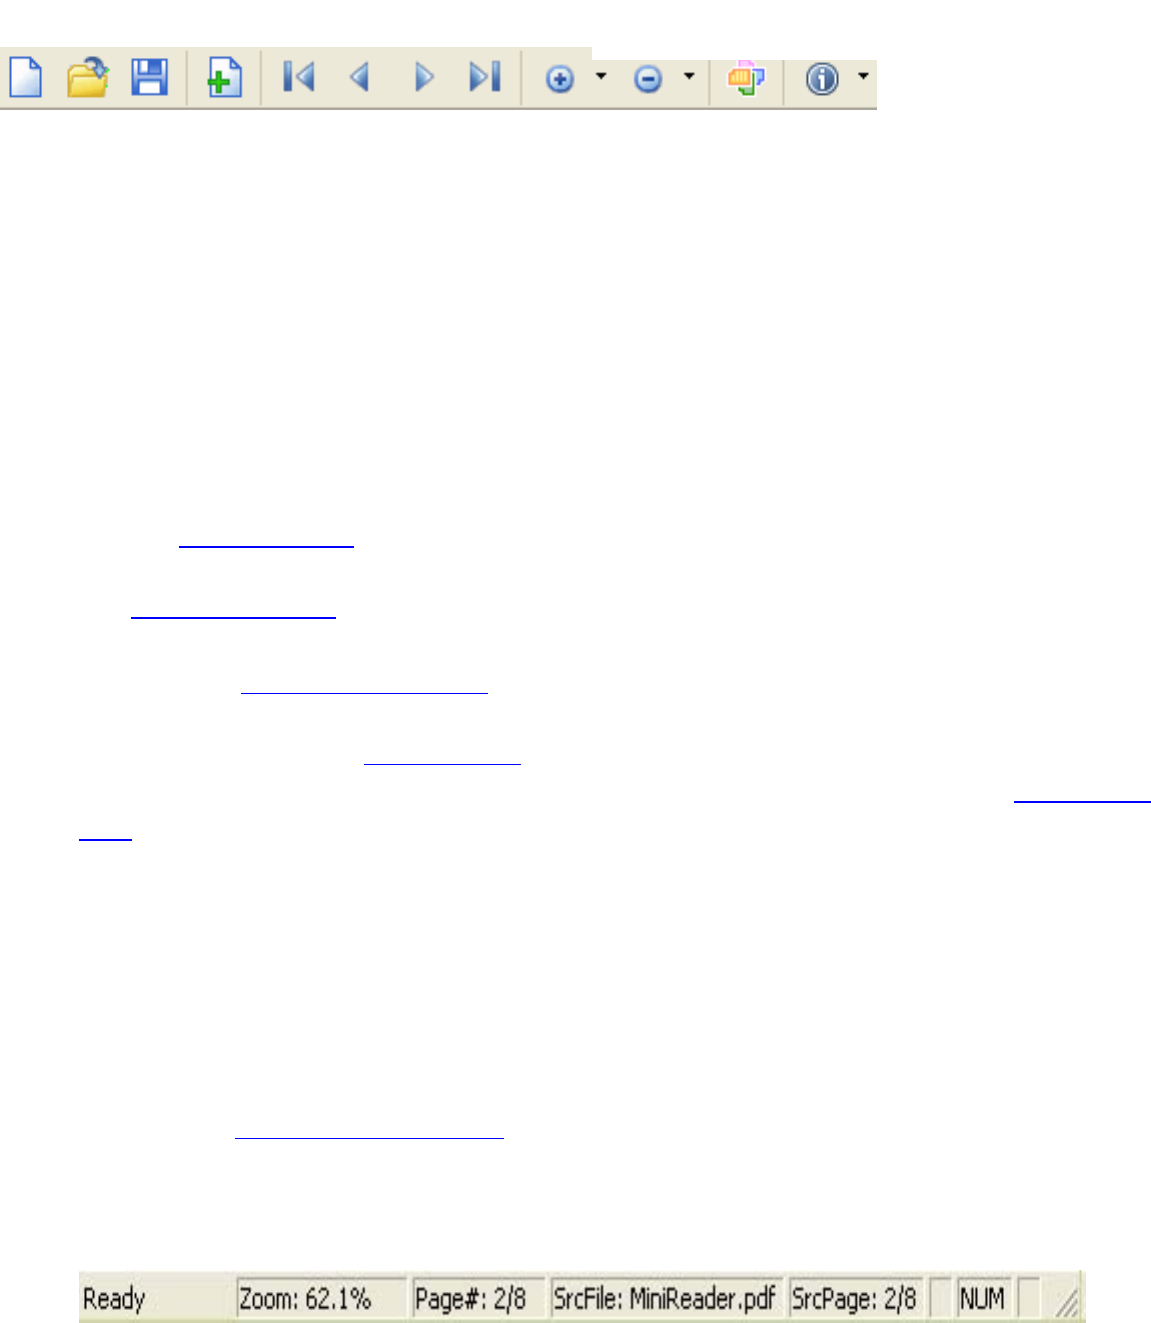
PDF Page Organizer
The Tool Bar provides access to the frequently- used commands and facilitates your work with the
document. When you point to a button, the "Ready" on the left side of Status Bar can synchronously
report events for you.
Page Edit Area
The Page Edit Area, comprising of three panes, is the central work places, nearly all organization work
are accomplished here.
● Pages: This pane serves to import the source pages and list them in a visual way for further edit.
See also The Pages pane.
● Outlines: This pane serves to import , insert attach the bookmarks for the imported pages. See
also The Outlines pane.
● Annotations: This pane serves to create and edit Free Text or Stamp annotations for target pdf
files. See also The Annotations pane.
● Info: This pane serves to add basic information for the final output file which includes all
imported pages. See also The Info pane.
● Layout: This pane serves to reset page layout for file preview or printing. See also The Layout
pane.
Document Preview Area
This area serves to dispay pdf contents for you to preview, so that you can enjoy organizing pages on
one side, and meanwhile viewing what you get on the other side.
You can preview the documents uisng the Pages, Outlines together with View Tools in the Menu Bar or
Tool Bar. Please see Previewing Documents for details.
Status Bar
The Status Bar on the bottom of the window provides a visual view reporting the current page location
on the source or destination document, the mouse pointing event, and the zoom level.

The PDFPO Window
● Ready: Reporting the status of this program in progress. When mouse is doing on the toolbar or
in the menu bar, , it will state the function of that feature.
● Zoom: Reporting the size of your viewing screen with percentage.
● Page#: Reporting location of the current displayed page in the destination file.
● SrcFile: Reporting the name of the source file from which pages are distilled.
● ScrPage: Reporting the location of the current displayed page in the source file.
Go to Contents

The PDFPO Window
A Closer Look at the Edit Area
The Page Edit Area, comprising of five panes, is the central work places. And nearly all tasks are
manipulated here.
● Pages pane: This pane serves to import the pdf pages and list them in a entry-list way for
reorganization. You can click a pages list to view their included contents in the Preview Area by
using the left or right cursor key.
● Outlines pane: This pane serves to import, insert, attach bookmarks for the imported pages. You
can also click the Outline entries to view their associated contents.
● Annotations pane This pane serves to create and edit annotations for target pdf files. You can
select to create Free Text or Stamp annotations.
● Info pane: This pane serves to add basic information for the final output file. You can annotate
Tile, Subject and Keyword for this file which contains all the imported pages.
● Layout pane: This pane serves to reset page layout for target pdf file. You can resize page, scale
content, clip content, move content, and rotate page.
Go to Contents
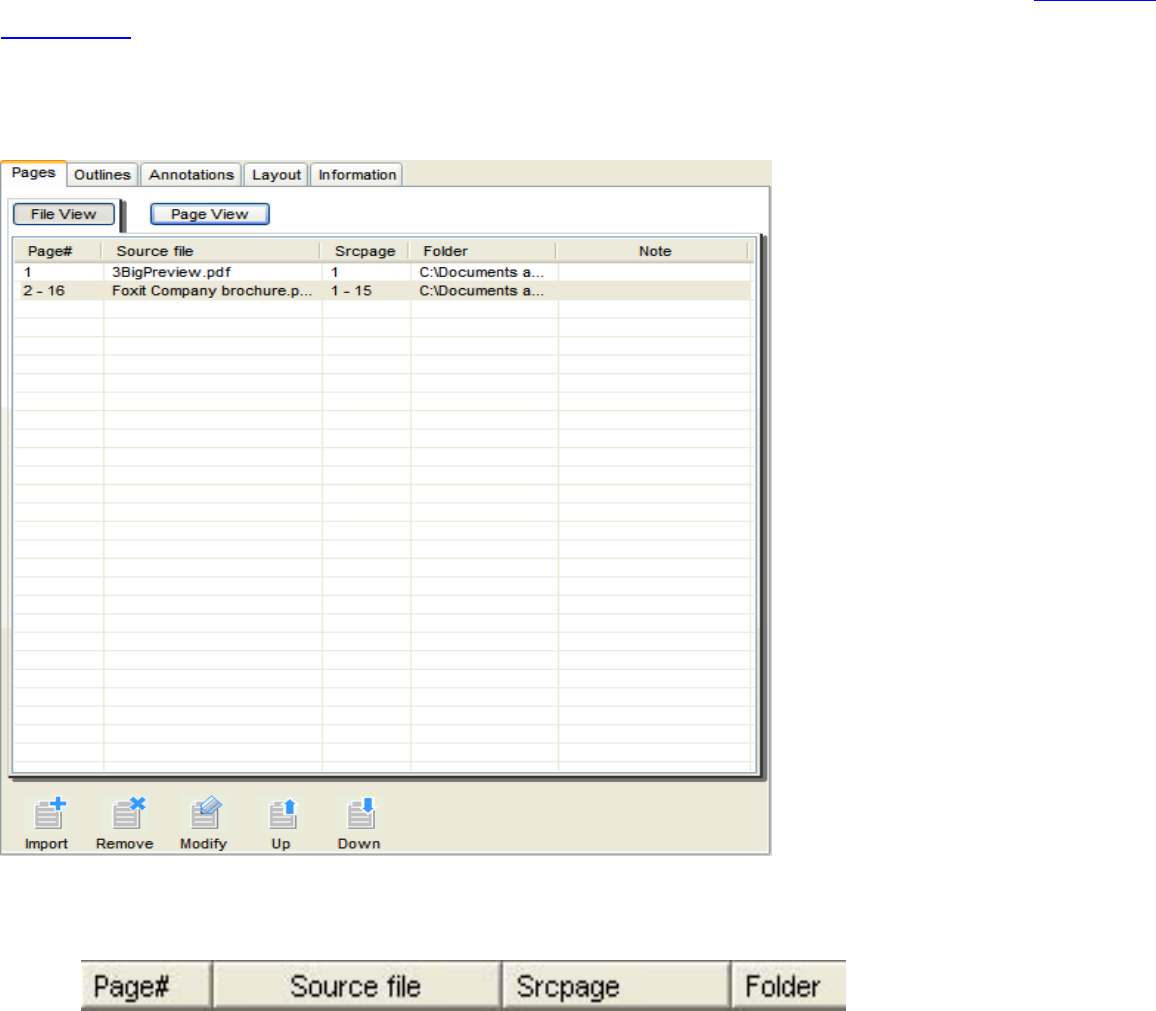
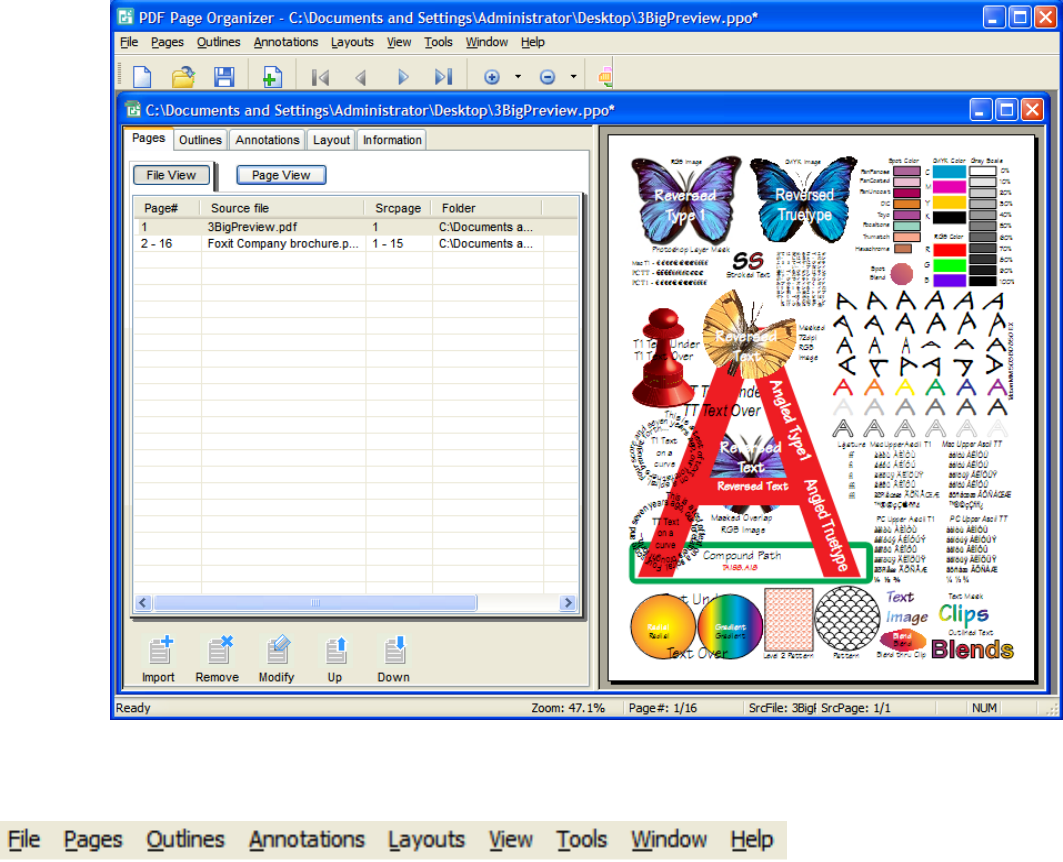
The PDFPO Window / A Closer Look at the Edit Area
The Pages pane
This Pages pane is populated to import and organize the pdf pages. It is comprised of a Entry List on the
top, and Button Tools on the bottom. You can fist use the Import command to bring about "The Pages
Import Box" to add pdf pages. Imported pages details will then be displayed into Pages pane in light of
Entry List as following legend shows. You can view their included contents in the Preview Area using
navigation bar or left/right cursor. You can also remove or modify the undesired imported pages, and
deftly rearrange the pages list sequence by using Up and Down arrow.
Entry List
● Page#: Displaying the output locations of the imported pages in the destination document.
● Source File: Displaying the original PDF document name from which pages are extracted.
● Srcpage: Displaying the input locations of the imported pages in the source file.
● Folder: Displaying the file path of the source PDF document on your disk driver.
The PDFPO Window / A Closer Look at the Edit Area
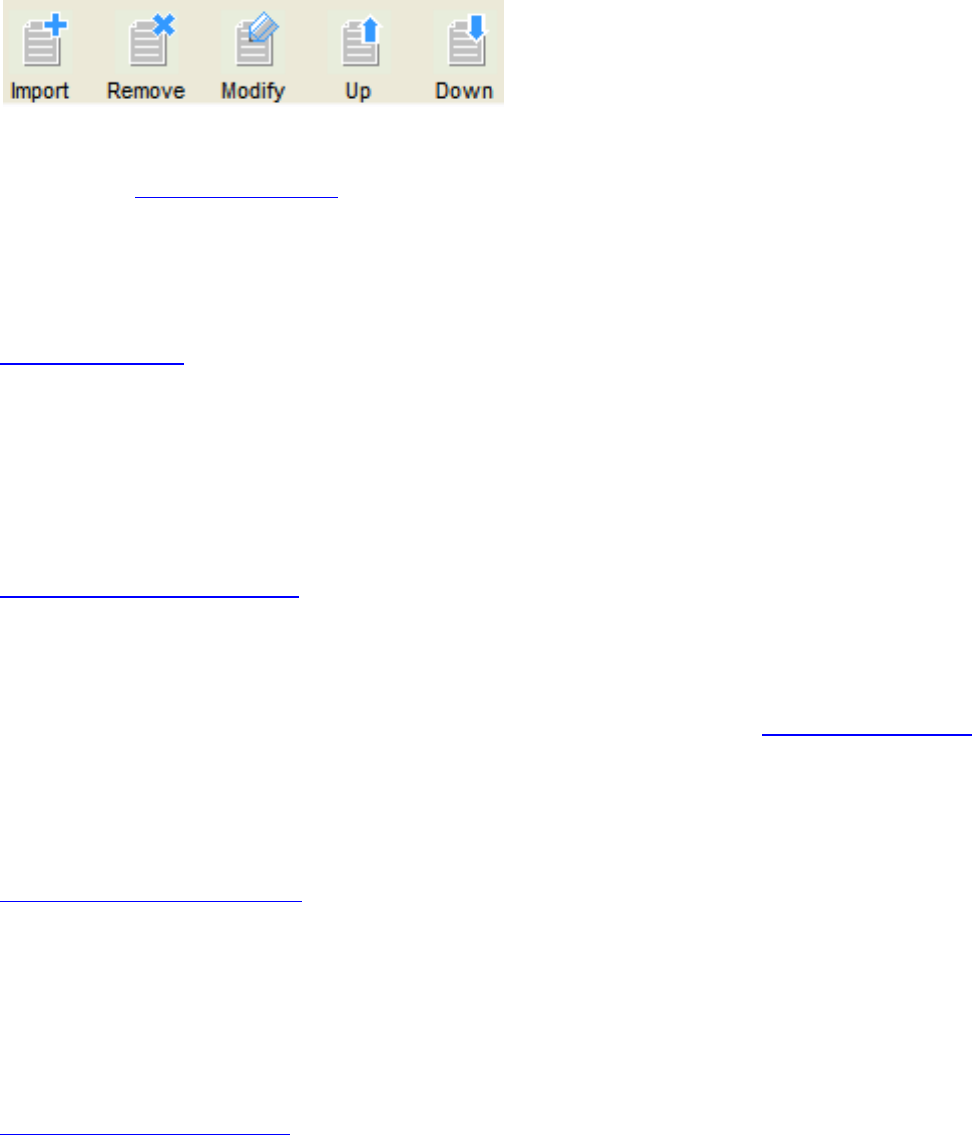
Button Tools
● Import: A button for you to merge or extract pages from the pdf files. Click on this button will
bring about Pages Import Box. on which you can add file and set page ranges to import. The
equivalent commands are -- Import button on the Toolbar, Import PDF Page(s) on the Pages of
Menu bar, or on the Right-click drop-down Menu.
See Also:
Importing Pages
● Remove: A button for you to delete an unwished-for pages list. To remove, highlight a pages
list you want to delete, and then click on Remove button. The equivalent commands are --
Remove item on the Pages of Menu bar, or on the Right-click drop-down Menu.
See also:
Removing Imported Pages
● Modify: A button for you to reorganize the imported pages, such as changing the pages ranges
or re-importing pages from another pdf file. To modify, select a page(s) list want to be changed,
and click on Modify button, or double click on it, this will bring up Pages Modify Box on which
you can do changing. The equivalent commands are -- Modifyitem on the Pages of Menu bar, or
on the Right-click drop-down Menu.
See also:
Modifying Imported Pages
● Up: A button for you to rearrange the order of the pages list by moving up a highlight pages list.
To move up a list, select this list, and click Up button. The equivalent commands are -- Move Up
item on the Right-click drop-down menu.
See also:
Reordering the Pages List
● Down: A button for you to rearrange the order of the pages list by moving down a highlight
pages list. To move down a list, select this list, and click Down button. The equivalent commands
are --Move Down item on the Right-click drop-down menu.
See also:

The PDFPO Window / A Closer Look at the Edit Area
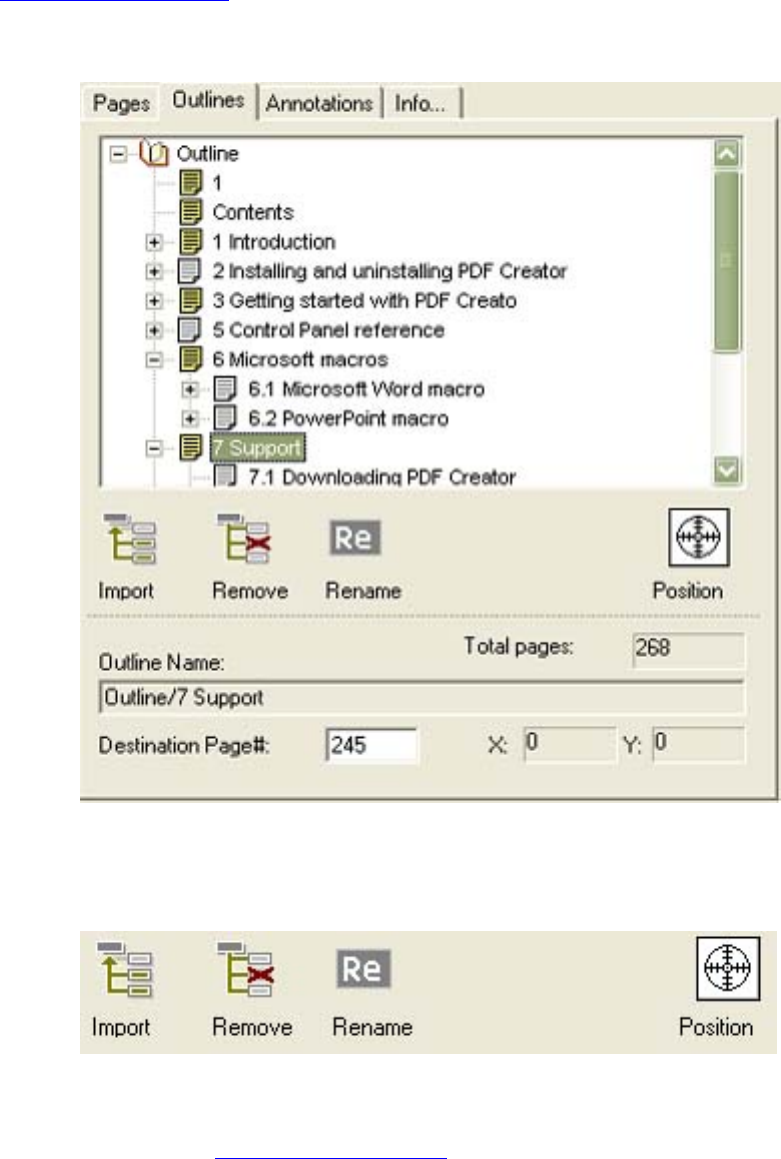
The Outlines Pane
This Outlines pane provides a place for you to edit outlines for the target document by inserting,
positioning, attaching, releasing, deleting the entries (outlines), and importing pre-existing outlines
included in the source PDF document. It comprises Button Tools and Status Bar on the bottom. You can
select to directly insert and edit new outlines in the Outlines pane, or use Import button to bring about
Outlines Import Box to import pre-existing from pdf files. In addition, in course of organizing the
outlines, double-click an engaged entry, its associated pages can be displayed in the Preview pane.
Button Tools
● Import: A button for you to import pre-existing outlines from pdf files. Click this button will
bring about Outlines Import Box on which you can select ready-made outlines from a source pdf
The PDFPO Window / A Closer Look at the Edit Area
file or another pdf on your disk. The equivalent commands are -- Import PDF Outlines on the
Outlines of Menu bar, or on the Right-click drop-down Menu.
● Remove: A button for you to delete needless entries (outlines). To remove an entry or a section
tree, select this entry or section, and click Remove button. The equivalent commands are --
Remove on the Outlines of Menu bar, or on the Right-click drop-down Menu.
● Rename: A button for you to change an entry or a sub-entry name. To rename an entry or sub-
entry, select this entry or sub-entry, and click Rename button, and then input a new name. The
equivalent commands are --Rename on the Outlines of Menu bar, or on the Right-click drop-
down Menu.
● Position: A button for you to make a linking between an entry and any location in a page. To
position an entry pointing, just drag this button to anywhere you want in page. Once you position
a entry, the X and Y coordinates on the Status bar will show exact place.
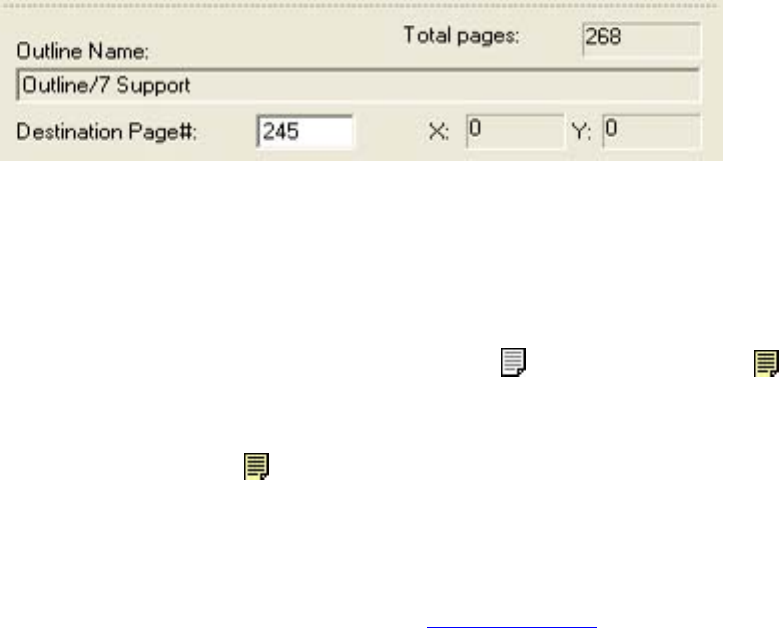
Status Bar
● Total Pages: Displaying the sum total of pages contained in the destination document.
● Outline Name: Providing a place to display the selected entry name.
● Destination Page#: This place serves the following two purposes:
❍ The first one is to facilitate your attachment of an entry to some page, to do this, just need
to select an entry, a disengaged entry or an engaged entry , and then key a page
number in this place. To view the result, first click other entry, and then click it.
❍ The other is for displaying its associated destination page number when you selecting an
engaged entry .
● X and Y Coordinates: These two coordinates are used to show you your position when you
drag the Position button to somewhere in a page.
Go to Contents
The PDFPO Window / A Closer Look at the Edit Area
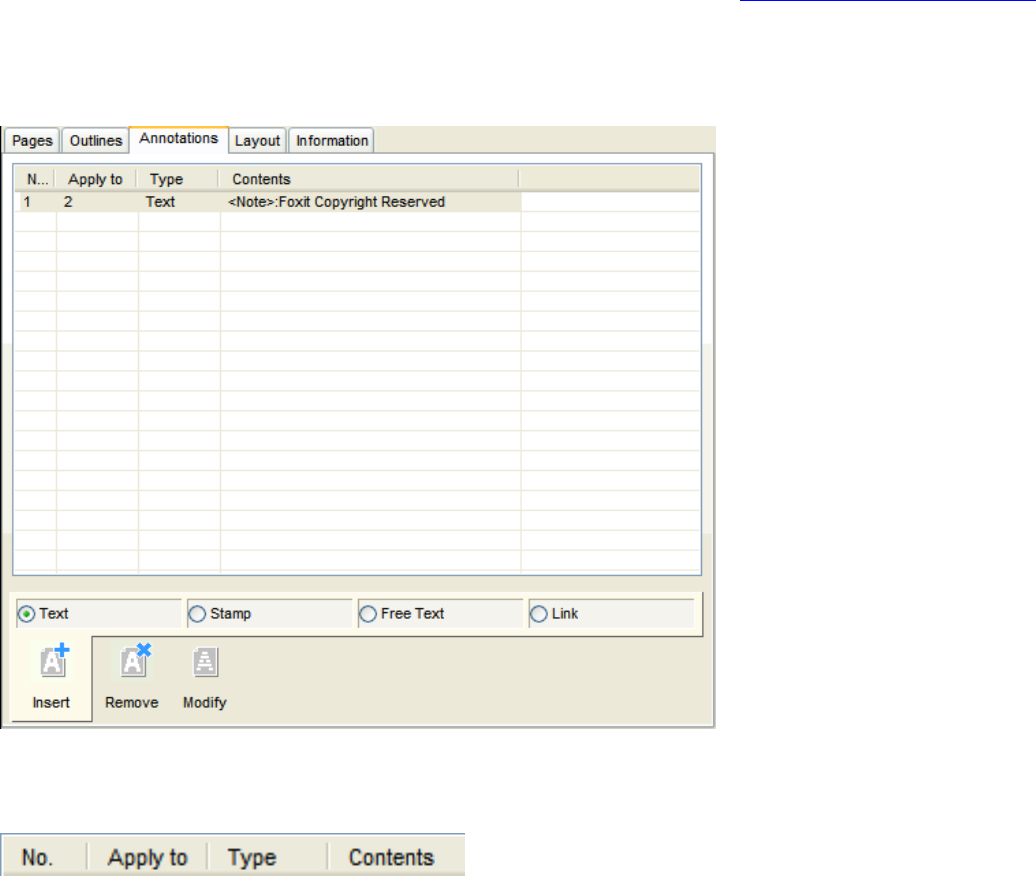
The Annotations (Annots) Pane
This Annotations (Annots) pane is populated to create and modify annotations for your target pdf
documents. It contains a Entry List on the top, Button Tools on the bottom. You can first use Insert
button to create a Free Text Annot, Stamp Annot, or Text Annot in The Annotation Insert Box . Annot
details then will be displayed into Annotations pane as showed in the following legend, you can use the
navigation bar to view it. You can also use Remove or Modify command to delete or change a
undesired annotation.
Entry List
● No.: Indicates the insertion sequence of the annotations.
● Apply To: Indicates the page or page ranges which the annotation append to
●
Contents: Indicates the contents of the annotations.
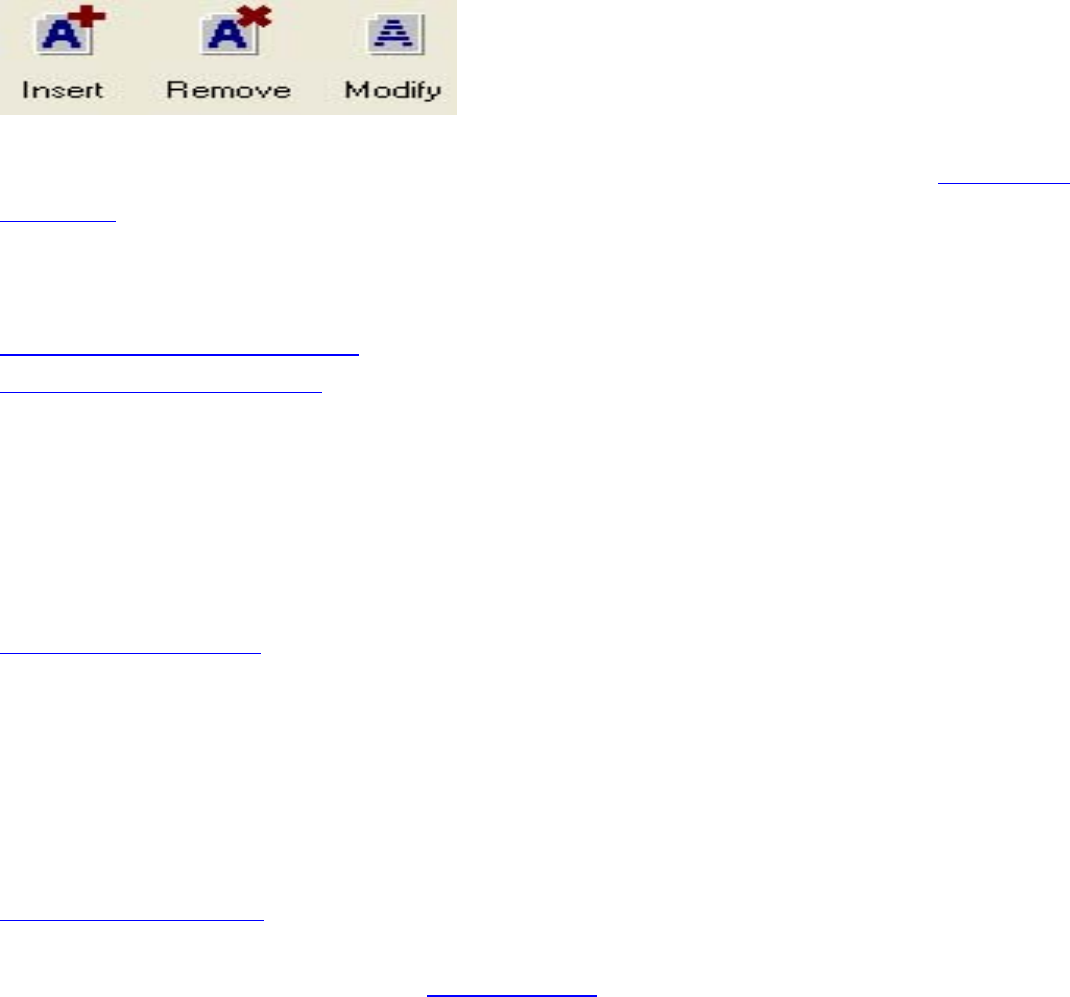
Button Tools
●Type: Indicates the type of the annotation, like Text, Stamp, Free Text and Link.
The PDFPO Window / A Closer Look at the Edit Area
● Insert: A button for you to insert annotations. Click on this button will bring about Annotation
Insert Box.on which you can edit the annotations. The equivalent commands are -- Insert a New
Annotation item on the Annotations of Menu bar, or on the Right-click drop-down menu.
See also:
Inserting Free Text Annotations
Inserting Stamp Annotations
● Remove: A button for you to remove the undesired annotation list. To remove, select the
annotation you want to delete, and then click on Remove button. The equivalent commands are --
Remove item on the Annotations of Menu bar, or on the Right-click drop-down menu.
See also:
Removing Annotations
● Modify: A button for you to modify a dissatisfactory annotation list. To modify, select the
annotation list you want to change, and then click on Modify button, or double click on that
annotation list. The equivalent commands are -- Modify item on the Annotations of Menu bar, or
on the Right-click drop-down menu.
See also:
Modifying Annotations
Go to Contents
The PDFPO Window / A Closer Look at the Edit Area
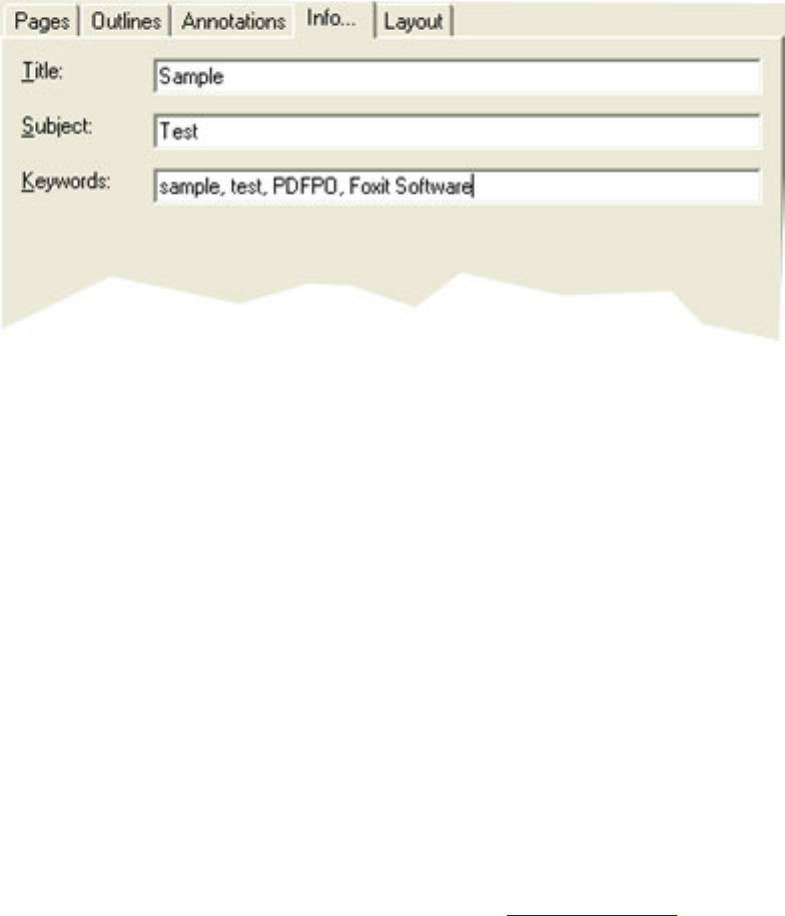
The Info Pane
This Info pane is populated to add basic information for the destination document. You have three fields
to describe: Title, Subject and Keywords.
Title
The destination document's name you wish to entitle.
Subject
The motif of the destination document.
Keywords
The keywords associated with the destination document. Keywords are useful for those who will be
indexing their documents and would like to improve searching efficiency.
Go to Contents
The PDFPO Window / A Closer Look at the Edit Area
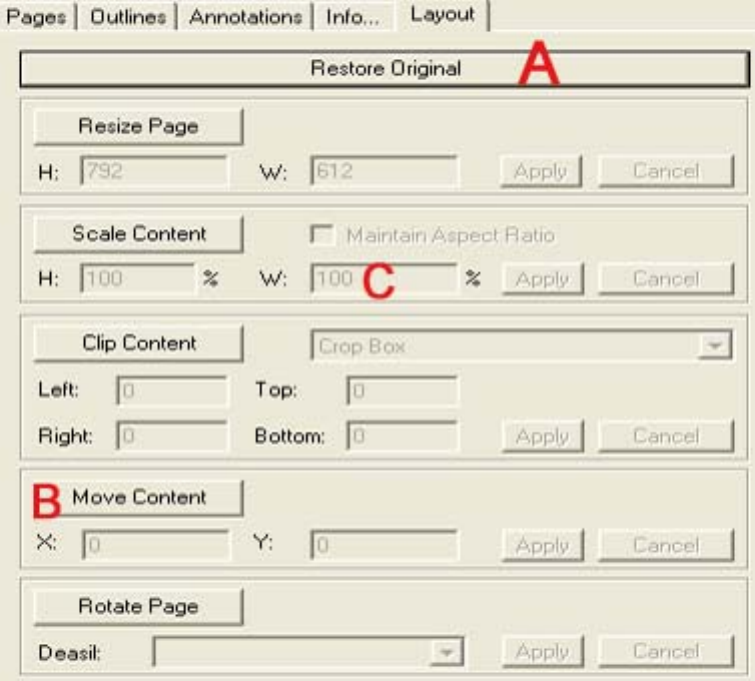
The Layout Pane
The Layout pane is populated to reset page layout. It's especially useful when you want to specify page
layout for user preview or print. It consists of an undone button - Restore Original on the top, and five
Value Buttons beneath. You can simply click on a Value Button to enable its affiliated value fields, and
type in a new value you want, and then click Apply to make it effect, or Cancel to retract your behavior.
Note: The page layout is deployed in user space coordinate system.
A --- Undo Button B--- Value Buttons C --- Value Fields
Restore Original
A button for you to undo all changes in a current page. Click on this button, all values you
changed on current page will be got back to its original state.
Resize Page
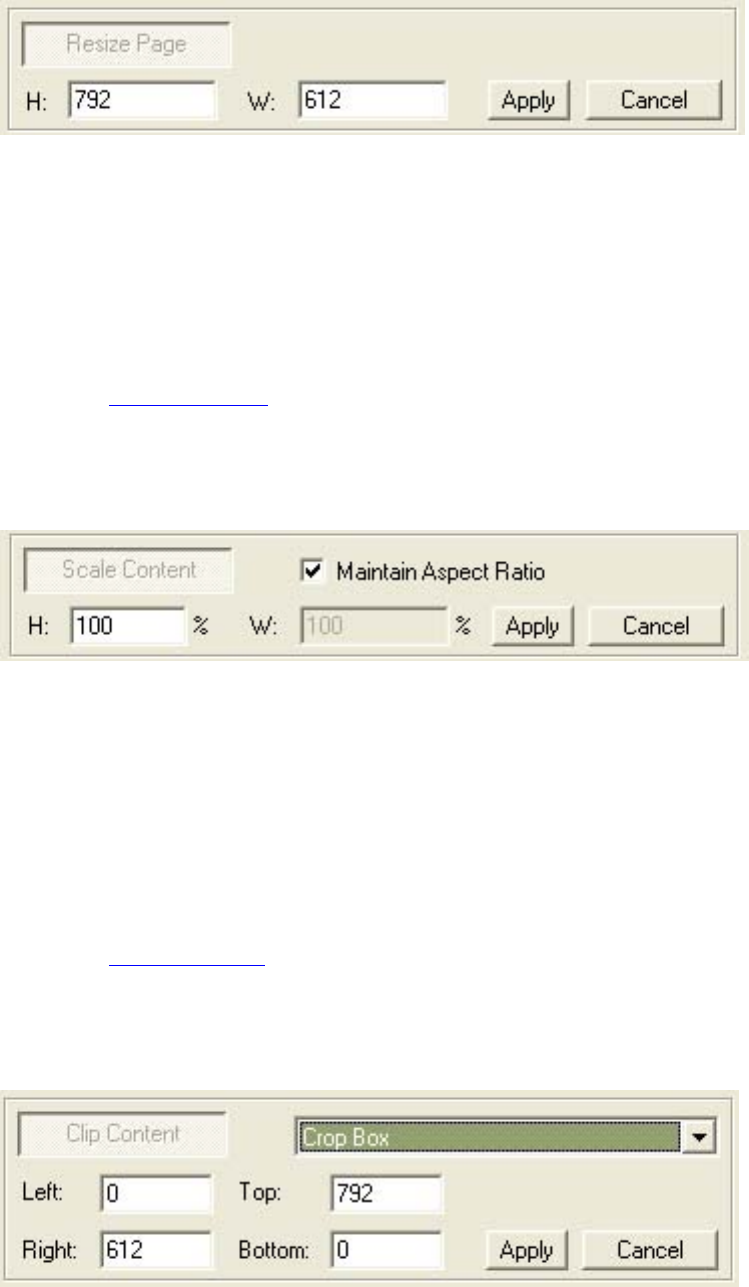
, to a position you want. And then click
The PDFPO Window / A Closer Look at the Edit Area
A button for you to enlarge or reduce the size of current page displaying in the Preview
Pane. When you click on Resize Page button, its affiliated value fields are enabled for
edit. You can either enter H (height) and/or W (Width) in their field, or drag the reference
point on the *red rectangle*, in Preview Pane
Apply to take effect, or Cancel to undo the changing.
See also: Resizing Page
Scale Content
A button for you to stretch or shrink the proportion of document content currently
displayed in the Preview Pane. When you click on Scale Content button, its affiliated
value fields are enabled for edit. Just enter a new value in the H (height) or W (width)
field, and then click on Apply button to take it affect, or Cancel to take back the
changing. If you want to constrain proportions when scaling contents, check Maintain
Aspect Ratio. You can preview the result in the Preview Pane.
See also: Scale Content
Clip Content
A button for you to clip contents for file output.
The PDFPO Window / A Closer Look at the Edit Area
When you click on Clip Content button, its affiliated value fields are enabled for edit.
Drop down the combo box and select a kind of box - CropBox, ArtBox, TrimBox,
BleedBox, and then enter a new value into Left, Right, Top, and Bottom field, or drag the
reference point on the *red frame*, in Preview Pane, to a position you want. And then
click Apply to take effect, or Cancel to undo the changing.
See also: Clipping Content
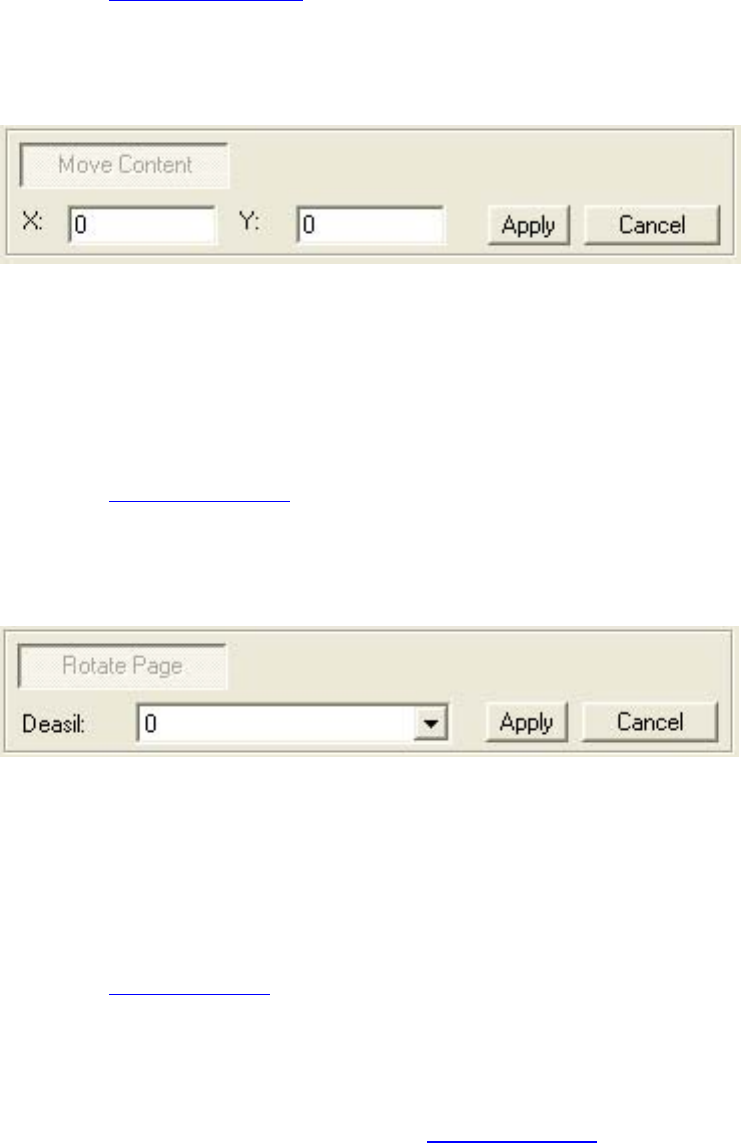
Move Content
A button for you to adjust the location of current page content. When you click on Move
Content button, its affiliated value fields are enabled for edit. You can either enter a new
X and /or Y value in their field, or drag content in Preview Pane to a position you like.
And then click Apply to take effect, or Cancel to undo the changing.
See also: Moving Content
Rotate Page
A button for you to change orientation of current displayed page. When you click on
Rotate Page button, its affiliated value fields enabled for edit. You can drop down the
Deasil combo box to select an orientation in 90-degree increments. And then click Apply
to take effect, or Cancel to undo the changing.
See also: Rotating Page
Go to Contents

The PDFPO Window / A Look at the Editable Dialog Boxes
A Look at the Editable Dialog Boxes
In this section, we will be introducing four main dialog boxes which you will most often deal with when
importing , modifying pages, importing outlines, and inserting annotations.
● The Pages Import Box: This box works to import source pages and specify the pages range that
you want to import.
● The Pages Modify Box: This box works to provide chances for you to change the imported page
(s) if the pages don't meet your satisfaction.
● The Outlines Import Box: This box works to selectively import the pr-existing outlines in the
source file.
● The Annotation Insert Box: This box works to create and edit annotations, and specify its
location on documents, and more.
Go to Contents
The PDFPO Window / A Look at the Editable Dialog Boxes
The Pages Import Box
When you import pages, you should see a pop-up dialog box of the following example. In this dialog
box, you can add multiple pdf file to import in one operation, and or extract pages from a pdf file. By
default, all pages in the source file are imported. All imported pages are displayed in "The Pages pane".
Source File
Provide a place for you to add the source PDF files which pages you want to import. To add file(s), click

The PDFPO Window / A Look at the Editable Dialog Boxes
on Add button, in the pop-up Open dialog box, select one or multiple pdf files, and click Open. The
selected pdf files will be entered into the File(s) box. And files are displayed by its location like "E:
\PDFfoxitlprinter.pdf:". If you wish to delete an unwanted file, highlight this file, and click on Remove
button.
● Pages: When a file is selected in the File(s) box, Pages will show its total page number.
● Total Pages: Shows the total pages number of all the added files in the File(s) box.
Note: Currently, you can not specify page ranges when you import multiple pdf file at one time.
Page(s)
This area is only available when one file is added. In this Page(s) area, you can specify the page ranges
to import by checking Single Page, Multi Pages or All Pages. When you do a checking, the Source Page
(s) Number and the Result Page(s) Number will change accordingly.
● Single Page: When check this option, the left space under Source Pages Number will be
meanwhile editable, which allows you to type in the single page number say *8* (the 8th page).
If the page number you type exceeds the total pages number of a file, once you click Ok, you will
be prompted invalid.
● Multi Pages: When check this option, the two spaces under Source Pages Number will be
meanwhile editable, which allows you to type the initial page and ending page number so that
you can import sets of ranges say *2 - 28*.
● All Pages: This is the default check value which allows you to import all pages of a pdf file.
● Source Pages(s) Number: This field depends on which page range you select. When All Pages
is checked, this field are disabled, only displaying initial and final number of a pdf file; when
Multi Pages, this field is enabled to edit; when Single Page, the right space of this field is
enabled to edit.
● Result Page(s) Number: This field is designed to display the location or position of the source
page(s) in the destination document.
Go to Contents

The PDFPO Window / A Look at the Editable Dialog Boxes
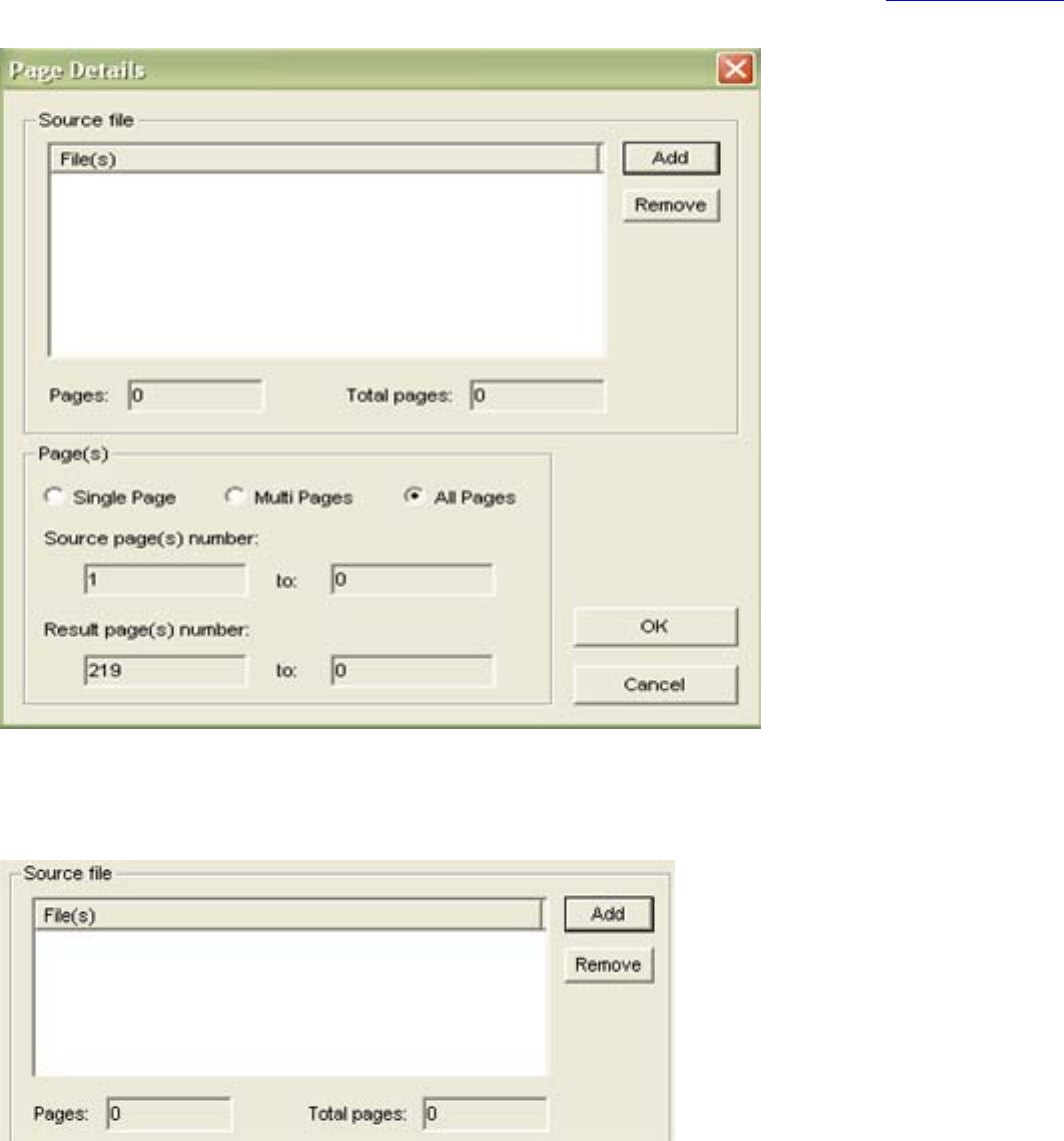
The Pages Modify Box
When you modify pages, you should see a pop-up dialog box of the following example. This Page
Details box is populated to give a chance for altering the imported pages and re-specify the page rangs.
For the parameters' usage, please refer to "The Pages Import Box".
Source File
Display the path of the souce PDF document that you want to change. You can just use Browse to select
and open another PDF document to replace this current PDF file. Then will the location of the new PDF
document be shown here instead.
Total Pages
Display the sum total of pages in the being imported source file. For example, the Total pages will
report *100* number, if you are importing a source PDF document containing total 100 pages.
Page(s)
In this Page(s) area, you can re-specify the page ranges to import by checking Single Page or Multi

The PDFPO Window / A Look at the Editable Dialog Boxes
Pages. When you do a checking, the Source Page(s) Number and the Result Page(s) Number will change
accordingly.
● Single Page: When this option is checked, the left space under Source Pages Number will be
meanwhile editable, which allows you to type in the single page number say *8* (the 8th page).
If the page number you type in exceeds the total pages number in the source file, when you click
Ok, you will be prompted invalid.
● Multi Pages: When this option is checked , the two spaces under Source Pages Number will be
meanwhile editable, which allows you to type in the initial page and ending page number so that
you can import ranges of pages say *2 - 28*.
● Source Pages(s) Number: This field is associated with the page ranges specification. When
Multi Pages is checked, this field is enabled to edit; when Single Page, the right space of this
field is enabled .
● Result Page(s) Number: This field is designed to display the location of the source page(s) in
the destination document.
Go to Contents

The PDFPO Window / A Look at the Editable Dialog Boxes
The Outlines Import Box
When you perform import of outlines, you should see a pop-up dialog box of the following example. In
this dialog box, you can select to import outlines from the listing of source files, or Browse another PDF
file on your hard drive. To follow, under Source Outline(s), you can further select different portion
inside one outline to import .The imported outlines are entered into Outlines pane, and mixed with
outlines from other pdf files, or of your insertion.
Note: The "listing of source files" lists those pdf files of which page(s) have been included in or
imported to Pages pane.
Select from Source File(s): This place is for listing source files which pages have been imported to
the Pages pane. Double click a file will display its outline onto Source Outline(s) on the left side. If you
select a file that does 't contain outline itself, Source Outlines will display "No Outlines".
Select Another PDF File: This place is for imputing outlines from other PDF documents on your
drive. Using Browse, you can bring about Open dialog box to select your intended PDF document.

The PDFPO Window / A Look at the Editable Dialog Boxes
When you open a document, its outline will at once be displayed on to the Source Outlines area. If this
document doesn't include outline itself, the Source Outlines will show "No Outlines".
Source Outline(s): Displaying bookmarks of a pdf document when you select it.
● Select All: Click this button to check all outlines for import.
● Select Inverse: Click this button to reverse your selection
● Deselect All: Click this button to cancel all your selections.
Legends: Illustrating the reference meaning of the icons on the Source Outlines.
Go to Contents
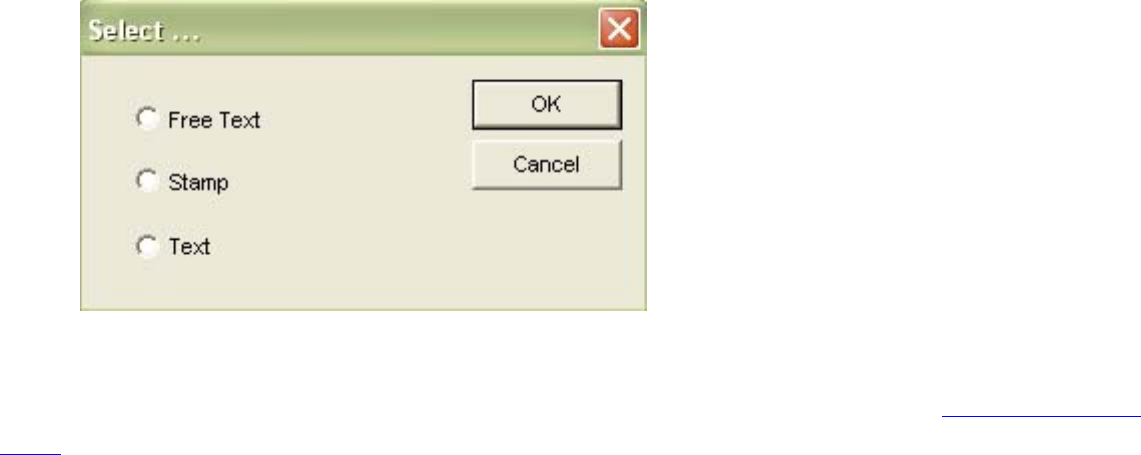
The Annotation Insert Boxes
When you perform insertion of annotation, you should see a small pop-up dialog box (see below),
prompting you to select one annot type to create: Free Text, Stamp or Text.
Whatever you select in the above Select... dialog box, its corresponding window will always pop up to
allow you to edit the annotation. And every edited annotation entry is entered onto " The Annotations
pane
Parameters (Common to all the Annots Boxes)
Attributes Setup
● Print: Check this option to indicate the annotation is allowed to be printed together with target
document. Uncheck it to indicate the annotation should only display its appearance while in the
Reader but should not print.
● Read-Only: Check this option to indicate you set annotation attribute as Read-Only into the
target document, and user is not allowed to change its value in the Reader.
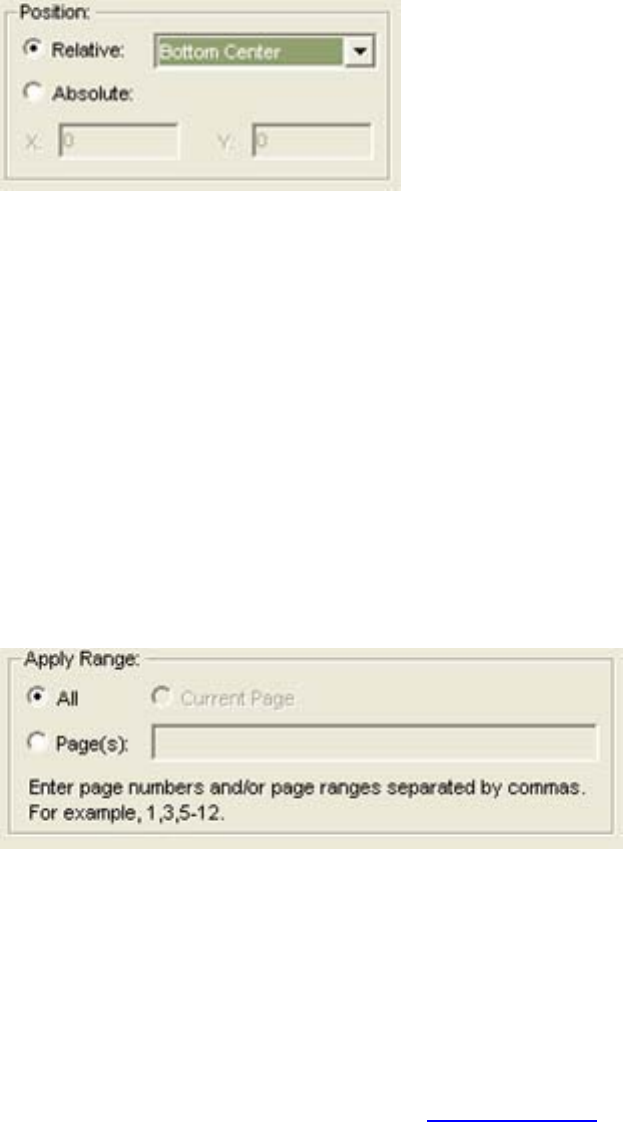
Location Setup
● Position: A place for you to set location of annotations in target documents.
" for later view or reedit.
The PDFPO Window / A Look at the Editable Dialog Boxes
The PDFPO Window / A Look at the Editable Dialog Boxes
● Relative: This is default option. There are total nine position indicators in the
combo box. You can drop them down, and choose the fittest one for yourself.
● Absolute: If you check this option, you can manually enter the X and Y
coordinates to position your annotation. But be sure the coordinates are not set too
big to exceed the visible area.
Page Range(s) Setup
● Apply Range: A place for you to specify page ranges to which you want to append annotations.
Should use commas to separate the page number if you assign annotations to multiple non-
contiguous pages.
● Check All, annotations will be appended to the whole document.
● Check Current Page, annotations will only gain access to the current displaying
page.
● Check Page(s), annotations will be appended to the page ranges or the separate
page you specify in this edit box.
Go to Contents
Using PDF Page Organizer
Creating and Saving *PPO* Documents
To create a basic *PPO* document, do the following:
1. Click the New button on the Toolbar, or alternatively choose File > New, or simply press CTRL
+ N to open a new file window. If needed, you can launch multiple file windows.
2. On the Pages pane, click Import button, or alternatively choose Pages > Import PDF Page(s),
or simply press CTRL + I to import pages from the existing PDF document.
You can add multiple pdf files to import at a time, or import a single file by extracting its sets of
pages.
3. Click the Save button on the Toolbar, or alternatively choose File > Save, or simply press CTRL
+S to save this file with the extension as *.ppo*. You can also use Save as command to save the
file with another name.
To create a *PPO*document with Outlines, do the following:
1. Click the New button on the Toolbar, or alternatively choose File > New, or simply press CTRL
+ N to open a new file window. If needed, you can launch multiple file windows.
2. On the Pages pane, click Import button, or alternatively choose Pages > Import PDF Page(s),
or simply press CTRL + I to import pages from the existing PDF document.
You can add multiple pdf files to import at a time, or import a single file by extracting its sets of
pages.
3. On the Outlines pane, use Import, Insert command and other edit functions to create Outlines
for the imported pages.
You can import a pre-existing outline from a pdf file.
4. Click the Save button on the Toolbar, or alternatively choose File > Save, or simply press CTRL
+S to save this file with the extension as *.ppo*. You can also use Save as command to save the
file with another name.
To create a *PPO* document with Annotations, do the following:
1. Click the New button on the Toolbar, or alternatively choose File > New, or simply press CTRL
+ N to open a new file window. If needed, you can launch multiple file windows.
2. On the Pages pane, click Import button, or alternatively choose Pages > Import PDF Page(s),
Using PDF Page Organizer
or simply press CTRL + I to import pages from the existing PDF document.
You can add multiple pdf files to import at a time, or import a single file by extracting its sets of
pages.
3. On the Annotations pane, use Insert command to edit the annotation content and determine its
style and format.
You can select to insert a Free Text or Rubber Stamp annotation for the imported pages.
4. Click the Save button on the Toolbar, or alternatively choose File > Save, or simply press CTRL
+S to save this file with the extension as *.ppo*. You can also use Save as command to save the
file with another name.
To create a *PPO* document with reset page Layout, do the following:
1. Click the New button on the Toolbar, or alternatively choose File > New, or simply press CTRL
+ N to open a new file window. If needed, you can launch multiple file windows.
2. On the Pages pane, click Import button, or alternatively choose Pages > Import PDF Page(s),
or simply press CTRL + I to import pages from the existing PDF document.
You can add multiple pdf files to import at a time, or import a single file by extracting its sets of
pages.
3. On the Layout pane, click a value button together with the displayed page in Preview Pane to
resize page, rotate page, scale content, clip content, or move content.
You can use Restore Original button to undo all your change on a current displayed page.
4. Click the Save button on the Toolbar, or alternatively choose File > Save, or simply press CTRL
+S to save this file with the extension as *.ppo*. You can also use Save as command to save the
file with another name.
To create a *PPO*document with pdf Info, do the following:
1. Click the New button on the Toolbar, or alternatively choose File > New, or simply press CTRL
+ N to open a new file window. If needed, you can launch multiple file windows.
2. On the Pages pane, click Import button, or alternatively choose Pages > Import PDF Page(s),
or simply press CTRL + I to import pages from the existing PDF document.
You can add multiple pdf files to import at a time, or import a single file by extracting its sets of

Using PDF Page Organizer
pages.
3. On the Info pane, enter text or information in the Title, Subject, and Keywords fields.
4. Click the Save button on the Toolbar, or alternatively choose File > Save, or simply press CTRL
+S to save this file with the extension as *.ppo*. You can also use Save as command to save the
file with another name.
To create a *PPO* document with all above features do the following:
1. Click the New button on the Toolbar, or alternatively choose File > New, or simply press CTRL
+ N to open a new file window. If needed, you can launch multiple file windows.
2. On the Pages pane, click Import button, or alternatively choose Pages > Import PDF Page(s),
or simply press CTRL + I to import pages from the existing PDF document.
You can add multiple pdf files to import at a time, or import a single file by extracting its sets of
pages.
3. On the Outlines pane, use Import, Insert command and other edit functions to create Outlines
for the imported pages.
You can import a pre-existing outline from a pdf file.
4. On the Outlines pane, use Import, Insert command and other edit functions to create Outlines
for the imported pages.
You can import a pre-existing outline from a pdf file.
5. On the Layout pane, click a value button together with the displayed page in Preview Pane to
resize page, rotate page, scale content, clip content, or move content.
You can use Restore Original button to undo all your change on a current displayed page.
6. On the Info pane, enter text or information in the Title, Subject, and Keywords fields.
7. Click the Save button on the Toolbar, or alternatively choose File > Save, or simply press CTRL
+S to save this file with the extension as *.ppo*. You can also use Save as command to save the
file with another name.
Go to Contents

Using PDF Page Organizer
Opening *PPO* Documents
To open a saved *PPO* file, do one of the following:
● On the Menu bar, select File > Open. In the Open dialog box, select a desired *.ppo file, and
click Open.
● On the Toolbar, select Open button. In the Open dialog box, select a desired *.ppo file, and click
Open.
● Use the keyboard shortcut Ctrl + O to open. In the Open dialog box, select a desired *.ppo file,
and click Open.
Note: Currently you can only open one file at a time.
Go to Contents

Using PDF Page Organizer
Generating PDF Documents
After completing your pages organization on the Pages, Outlines, Annotations, Layout, and/or Info pane,
and you exult over the work, you can then generate your PDF file.
To generate a PDF file do one of the following:
● On the Menu bar, select File > Generate PDF. In the Generate As.. dialog box, input a name and
click Save.
● On the Toolbar, select Generate button. In the Generate As ...dialog box, input a name and click
Save.
● Use the keyboard shortcut Ctrl + Shift + G to generate. In the Generate As.. dialog box, input a
name and click Save.
You can see the generating process in a pop-up progress bar, and you may need to wait for seconds
when generating pdf files. It depends on the file size you generate.
Go to Contents

Using PDF Page Organizer
Closing Documents
To close a current file window, do as the following:
● On the Menu bar, select Window > Close or File > Close to exit your current file window.
● Use the Close button on the right-up border of your current window.
To close all open files do as the following:
● On the Menu bar, select Window > Close All to close all windows at a time.
● Use the Close button on the right-up border of your file windows to close one by one.
Note: To close the application, you can use the Close button on the title border, or select File > Exit to
perform the task.
Go to Contents


Using PDF Page Organizer
Resizing the Edit Area or Preview Area
To expand or shrink the Edit Area, do the following::
● Drag the right border of the Edit Area toward to left side to shrink the Edit Area, toward the right
side to expand it.
To expand or shrink the Preview Area, do the following:
● Drag the left border of the Preview Area toward to left side to expand the Preview Area, toward
the right side to shrink it.
Go to Contents

Using PDF Page Organizer
Magnifying and Decreasing the View
To increase or decrease magnification
● To magnify or reduce your page, just select the Zoom In or Zoom Out tool from the Toolbar or
View menu.
To Resize a Page to Fit the Window
● To resize a page to fit entirely in the Preview Area, choose View > Fit Page from the Menu bar.
To Resize a Page to Fit the Window Width
● To resize a page to fit entirely the width of the Preview Area, choose View > Fit Width from the
Menu bar.
To Return a Page to its Actual Size
● To make a page come back to it actual size, choose View > Actual Size from the Menu bar.
Go to Contents

Using PDF Page Organizer
Previewing Documents
To preview Another Page with View Tools
Do one of the following:
● To go to next page, click the Next button on the Toolbar or choose View > Next Page on the
Menu bar. To go to the previous page, click the Previous button on the Toolbar or choose View
> Previous Page on the Menu bar.
● To go to the first page, click the First button on the Toolbar or choose View > First Page on the
Menu bar. To go to the last page, click the Last button on the Toolbar or choose View > Last
Page on the Menu bar.
T jump to Another Page by its Number
● Choose View > Go To Page on the Menu bar, on the pop-up box type the page number, and click
Ok.
To preview Document with Outline
● To preview the destination document with its outline, click the outline's text in the pane.
To preview Document with Pages
❍ Select a file in the Pages list, and then press the left or right curser key to page through
your document.
Go to Contents

Organizing Pages
Importing Pages From PDF Document
In this section, we introduce how to import pages from the existing PDF document to PDFPO and then
modify them.
Importing Pages
You can import a single page, page ranges or all pages (a whole PDF document).
1. Click Import button either on the bottom of the Pages pane or on the Toolbar, or choose Edit >
Import from the Menu bar, or simply right click your mouse and select Import Before or
Import After on the drop-down menu.
2. In the Page Details box, click on Browse.
3. In the Open dialog box, select a PDF file from which you want import page(s), and click Open.
4. In the Page Details box, specify page rangs in the Page(s) area, and then click Ok.
5. The page(s) is listed in the Pages pane in a way indicating its original file title, path and location
on the original and present file.
See also:
● The Pages Pane
● The Pages Import Box
Modifying Imported Pages
"Modify" feature is to provide a chance for you to rework the imported page(s) in case you feel the
distilled page(s) or PDF file are not entirely what you want.
Do one of the following:
● Double click a source file you want to change, on the pop-up Page Details dialog box, make a
modification to the existing items, or click Browse to import another PDF file, and then click Ok
button.
● Right click a source file you want to change and choose Modify, on the pop-up Page Details
dialog box, make a modification to the existing items, or click Browse to import another PDF
file, and then click Ok button.
● Highlight a source file you want to change, click Modify button on the Pages pane. On the pop-
up Page Details dialog box, make a modification to the existing items, or click Browse to import
another PDF file, and then click Ok button.

Organizing Pages
● Highlight a source file you want to change on the Pages pane, click Modify button on the
Toolbar. On the pop-up Page Details dialog box, make a modification to the existing items, or
click Browse to import another PDF file, and then click Ok button.
● Highlight a source file you want to change, click Pages > Modify from the Menu bar. On the
Page Details dialog box, make a modification to the existing items, or click Browse to import
another PDF file, and then click Ok button.
The modified source pages will again be shown on the Pages pane list.
See also:
● Pages Modify Box
Removing Imported Pages
Do one of the following:
● Select a pages list you want to delete, and click Remove button.
● Select a pages list you want to delete, and right click your mouse, and then choose Remove.
● Select a pages list you want to delete, and choose Pages > Remove from the menu bar.
● If you are a key user you can use the cursor key to select a pages list you want to delete, and
press Del key.
Note: The removed pages can not be undone or recovered, if you want to retrieve them, you have to
import again.
Reordering the Pages List
After import multiple PDF files, you can resort the pages list so that they locate in a your desired order.
Do one of the followings:
● Select a source file you want to move in the Pages pane list, and click Up or Down button.
● Select a source file you want to move, right-click your mouse, and click Up or Down on the drop-
down menu.
Note: When you reorder the pages list, the destination page# will be changed accordingly.
Go to Contents

Organizing Pages
Editing Outlines
In this section, we introduce how to create outlines for the destination file. You can first import outline
from the existing PDF file and then base on that structure to perfect it to fit your current destination file.
Or just manually insert entries one by one, according to your current file, to build the outline. And then,
you can modify the entries' name and link them with their associated destination pages or a particular
title in a page. To follow, you can preview the destination file by using the built outline and do
remodification, and remove the disengaged entry to finish your work.
Importing Outlines From PDF Document
PDFPO provides a very flexible way for you to input outlines. You can import preexisting outlines for
the imported pages from the source PDF file, or another PDF file on your driver.
1. Select a child entry, a parent entry or the head Outline under where you want to position the
imported outline.
2. Click Import button on the Outlines pane, or right click your mouse to select Import PDF
Outlines on the drop-down menu, or select Outlines > Import PDF Outlines from the menu bar.
3. On the pop-up Outlines Import dialog box, select the pdf file. If you select to import outlines
from the Source PDF Files, just double click a file of which its outline will immediately be
displayed in the left side box. If you select to import outlines from another PDF file , click
Browse to Open the intended PDF file, and at once its outline will be displayed in the left side
box.
4. On the left side box, check the check box to select your desired outline, or use the buttons "Select
All, Select Inverse, Deselect All " on the bottom to help you do a quick select.
5. Click Import button after done.
6. The imported outline is located in the place you select in Step one.
Note: If you want imported outline to locate under a parent entry, you must select this parent entry and
do the import task. If you want the imported outline to stay as a entirely new parent entry, you must
select the head Outline, and then perform the import task.
See Also
● The Outlines Import Box
Inserting Entries
Many times you may want to insert entries while you are editing outlines. You can choose to insert a sub-
Organizing Pages
entry or a coordinate entry.
To insert a sub-entry, do one of the following:
● Point to an entry where you want to insert a child entry, and then on the menu bar, click Outlines
> Insert Under.
● Point to an entry where you want to insert a child entry, and then right click on your mouse and
choose Insert Under on the drop-down menu.
To insert a coordinate entry, do one of the following:
● Point to an entry where you want to insert a coequal entry before or after, and then on the menu
bar, click Outlines > Insert Before or Outline > Insert After.
● Point to an entry where you want to insert a coequal entry before or after, and then right click
your mouse and choose Insert Before or Insert After on the drop-down menu.
Renaming Entries
Many times you may want to change the outline's name while you are editing outlines. To rename do
one of the following:
● Point to an entry which you want to rename, and then on the Menu bar, click Outlines > Rename
and input a new name.
● Point to an entry which you want to rename, and then click on the Rename button and input a
new name.
● Point to an entry which you want to rename, and then right click your mouse, choose Rename on
the drop-down menu and input a new name.
Deleting Entries
Many times there are idle entries you may want to remove while editing the outlines. You can remove a
sub-entry , node entries, or all entries (whole outline) at a time.
To delete a sub-entry do one of the following:
● Point to an child entry that you want to remove, and then on the Menu bar click Outlines >
Remove.
● Point to an child entry that you want to remove, and then right click your mouse and choose
Remove on the drop-down menu.
● Point to an child entry that you want to remove, and then click on the Remove button.
Organizing Pages
To delete node entries do one of the following:
● Point to a parent entry that you want to remove, and then on the Menu bar click Outlines >
Remove.
● Point to an parent entry that you want to remove, and then right click your mouse and choose
Remove on the drop-down menu.
● Point to an parent entry that you want to remove, and then click on the Remove button.
Note: When you are deleting a parent entry, all its child entries are deleted too.
To delete Whole Outline do one of the following:
● Point to the head Outline, and then on the Menu bar click Outlines > Remove.
● Point to the head Outline, and then right click you mouse and choose Remove All on the drop-
down menu.
● Pont to the head Outline, and then click on the Remove button.
Previewing Outlines
To preview outlines, you can just click the plus sign to expand the outline or the subtraction sign to fold
them. Or more simply, just use the menu items Expand and Expand All to accomplish task.
To preview outlines do one of the following:
● Point to the head Outline or a parent entry, and then on the menu bar, click Outlines > Expand
or Outlines > Expand All.
● Point to the head Outline or a parent entry, and then right click your mouse and choose Expand
or Expand All.
Note: "Expand" will only display the first parent entries, and "Expand All" will display the whole
outline including all children.
Attaching Entries to Pages
You can attach a disengaged or reattach an engaged entry to a currently displaying page or other
destination pages. You can also position an entry to a particular place in a page so that you can go
directly to this place by clicking this entry later when you view it in PDF reader.
To attach to a currently displaying page, do one of the following:
● Display the page to which you want to attach entry on the Preview area, and then right click on
Organizing Pages
an engaged or disengaged entry, and choose Point to This Page on the drop-down menu.
● If you are to attach a vacant entry to the currently displaying page, you can use Position to make
it. Do like this: click the vacant entry and then drag the Position to the current page.
● If you know the currently displaying page number in the destination document, you can also do
like this: select the entry which you want to attach to page, and then in the Destination Page#
box input this page number. (Actually you can get the currently displaying page number simply
by looking at the item "Page#" in the status bar)
To attach to other destination pages
This task can be accomplished by means of the Destination Page# box. Here is how:
● Select an entry in the Outlines pane, and then in the Destination Page# box, input a page number
you hope this entry to point to.
Notes:
● The page number you input must not exceed the total page number in the destination document,
or it will be treated as invalid number.
● You can observer the page number in the status bar of the bottom of the PDFPO window.
To position an entry to a particular place in a page
This task is useful when there are multiple crosstitles in a page, you can position a group of contiguous
entries to those crosstitles so that later you can view them directly and easily in a PDF viewer.
Do the following:
● Select an entry in the Outlines pane, display the page to which you want to position this entry on
the Preview area, and then drag Position to anywhere you want in this page.
Note: You will not be able to see the result in PDFPO after finish this above performance until you view
it in a PDF viewer.
Releasing Destinations
To release destinations is to delete pages that are included in the entries. Releasing a entry's destination
will not remove this entry, only make it idle. You can release a sub-entry's destinations, node entries' or
all entries' (whole outline's) destinations.
To release a sub-entry's destination, do one of the following:

Organizing Pages
● Point to an entry of which its page you want to release, and then on the Menu bar click Outlines
> Remove Destination.
● Point to an entry of which its page you want to release, and then right click your mouse and
choose Remove Destination on the drop-down menu.
To release node entries' destinations, do the following:
● Point to a parent entry of which its pages including its child entries you want to release, and then
right click your mouse and choose Remove Destinations Tree on the drop-down menu.
To release all entries' destinations, do the following:
● Point to the head Outline, and right click your mouse and then choose Remove Designations
Tree on the drop-down menu.
Go to Contents

Organizing Pages
Creating Annotations
In this section, we introduce how to create and edit annotations for the destination documents.
See also:
The Annotations Pane
The Annotation Insert Boxes
Inserting Free Text Annotations
1. Click Insert button on "The Annotations Pane" .
2. Select Free Text on the pop-up prompt dialog box, and click on Ok button.
3. On the pop-up "Annotation Details: Free Text" dialog box, do the following:
● Enter text in the Content field which will appear in the associated pages.
● Choose Marquee size by selecting either Auto Size or Custom.
Beware that the marquee size must not be smaller than that of the content text, otherwise part of
the annotations will be out of view.
● Choose Position by selecting either Relative or Absolute. This will decide where you want the
annotation to locate.
● (Optional) Choose Font style and format for Content text.
● (Optional) Check Print if you hope the annotation can be printed together with target document,
and Read Only, if you don't want annotation be changed in Reader.
4. Click Ok to insert the annotation to the Annotations Pane.
Inserting Stamp Annotations
1. Click Insert button on "The Annotations Pane" .
2. Select Stamp on the pop-up prompt dialog box, and click on Ok button.
3. On the pop-up "Annotation Details: Stamp" dialog box, do the following:
● Enter text in the Content field which will appear in the associated pages.
● Enter text in the Description field which will appear as a Pop-up Note in Reader.
● Choose Frame Color to set Pop-up Note (description) appearance.
● Choose Marquee size by selecting either Auto Size or Custom.
Beware that the marquee size must not be smaller than that of the content text, otherwise part of

Organizing Pages
the annotations will be out of view.
● Choose Position by selecting either Relative or Absolute. This will decide where you want the
annotation to locate.
● (Optional) Choose Font style and format for Content text.
● (Optional) Check Print if you hope the annotation can be printed together with target document,
and Read Only, if you don't want annotation be changed in Reader.
4. Click Ok to insert the annotation to the Annotations Pane.
Inserting Text Annotations
1. Click Insert button on "The Annotations Pane" .
2. Select Text on the pop-up prompt dialog box, and click on Ok button.
3. On the pop-up "Annotation Details: Text" dialog box, do the following:
● Enter text in the Content field which will appear in the pop-up window.
● Choose a Type name which will be used to construct icon appearance and displayed onto the
associated page(s).
● Choose Frame Color to set pop-up window appearance.
● Choose Position by selecting either Relative or Absolute. This will decide where you want the
annotation to locate.
● (Optional) Choose Font style and format for Content text.
● (Optional) Check Print if you hope the annotation can be printed together with target document,
and Read Only, if you don't want annotation be changed in Reader.
4. Click Ok to insert the annotation to the Annotations Pane.
Removing Annotations
Do one of the following:
● Select an annotation list from "The Annotations Pane" , click Remove button.
● Select an annotation list from "The Annotations Pane" , and choose Annotations > Remove in
the Menu Bar.
Modifying Annotations
Sometimes you may not satisfy with the existing annotations, you can then reedit it by using "modify".
Do one of the following:

Organizing Pages
● Select an annotation list you want to change in "The Annotations Pane" , click Modify button,
and then change the contents or settings.
● Select an annotation list you want to change in "The Annotations Pane" , choose Annotations >
Modify in the Menu Bar, and then change the contents or settings.
Go to Contents


Organizing Pages
Setting Page Layout
In this section, we introduce how to reset page layout. Resetting page layout is especially useful when you want to
adjust page makeup when it displayed, or adjust page box when it printed.
See also: The Layout Pane
Resizing Page
of a page currently displayed in the Preview Pane.
It's very useful if there are documents with different page size (for example the dimensions of A4 and A3 ) which
you want it to be unified in a same size (for example A4). When you resize page, you may like to zoom out your
page to a fittest size for easy operation.
To resize a page, do the following:
1. Click on Resize Page button on the Layout Pane, you will see the following changes:
● It's affiliated value fields are enabled for edit.
● The page rectangle in , its a natural
size of a page.
2. Enter value in the H(height) and/or W (Width) field, or drag the reference point in the Media Box to a
position you want.
● Note: PDFPO doesn't allow you to drag Media Box to a smaller size than that of the Crop Box. If you
insist on reducing the Media Box, you can manually type the value in the H &W field to perform the task.
3. Click on Apply button to take your change effect, or Cancel to take back the change.
Note: Please be aware of that the intersection between the page's media box and the crop box is the region
that is viewed or printed. And the crop box's default is the value of media box. So on one hand, when you
shrink the page's media box without reducing the crop box accordingly, the portion outside of the media
box will not be displayed in Viewer (see the following example). On the other hand, if you enlarge the
page's media box without resizing the crop box, the displaying content is kept intact, while the page size is
expanded (for example expanded from A4 to A3), this will affect your printing result.
Example: The following example shows a page' media box that is reduced in PDFPO and its result got
displayed in a viewer.
Resizing page is actually to enlarge or reduce the Media Box
Preview Pane is highlighted in red. This rectangle is called Media Box
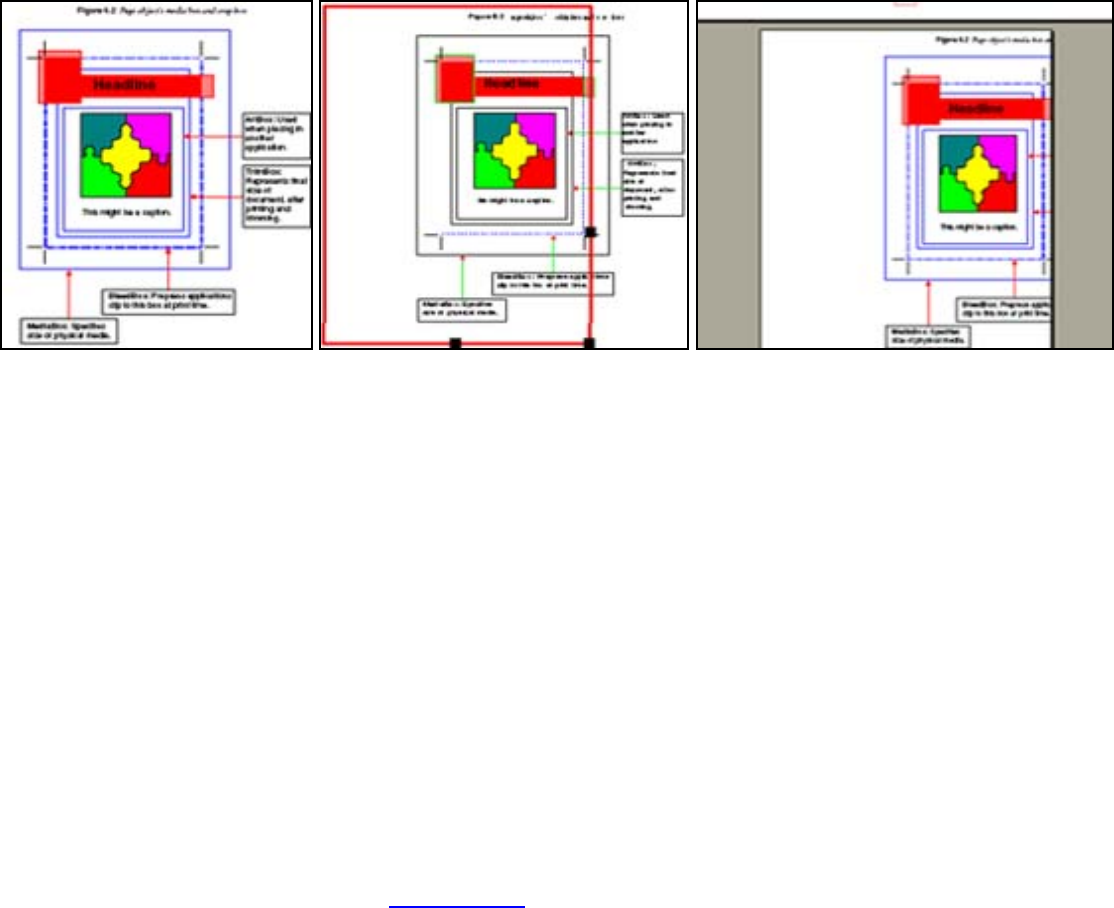
Organizing Pages
<A> <B> .<C>
● Figure <A>: Shows the original PDF page in PDF Viewer.
● Figure <B>: Shows the PDF page is resized in PDFPO. The *red rectangle* indicates the page size
(media box) you pick.
● Figure <C>: Shows the result page layout in PDF viewer
Scaling Content
Scaling content is actually to stretch or shrink the proportion of page content currently displaying in the Preview
Pane. You can do vertical or horizontal scaling by changing the value H(height) and/or W(width). The scaling is
specified as percent with 100 being the normal height and width. When you scale content, you may like to zoom
out your page to a fittest size for easy operation.
To scale content, do the following:
1. Click on Scale Content button on the Layout Pane, you will see the following changes:
● It's affiliated value fields are enabled for edit.
● The page rectangle in Preview Pane is highlighted in purple. This rectangle indicates the region for
viewing or printing.
2. Enter value in the H(height) and/or W (Width) field.
3. Check Maintain Aspect Ratio, if you want to constrain proportions when scaling contents.
● Note: When you check Maintain Aspect Ratio, the W field will be disabled, whereas its value will
change accordingly when you change the value of H.
4. Click on Apply button to take your change effect, or Cancel to take back the change.
Note: In the default coordinate system, the positive direction of the x-axis points to the right, and the
positive direction of the y-axis points upward. So for horizontal scaling, a positive value of scaling width
has the effect of expanding the content space; see Example 1. For vertical scaling, however, a negative
Organizing Pages
value of scaling height has the effect of decreasing the content space; see Example 2.
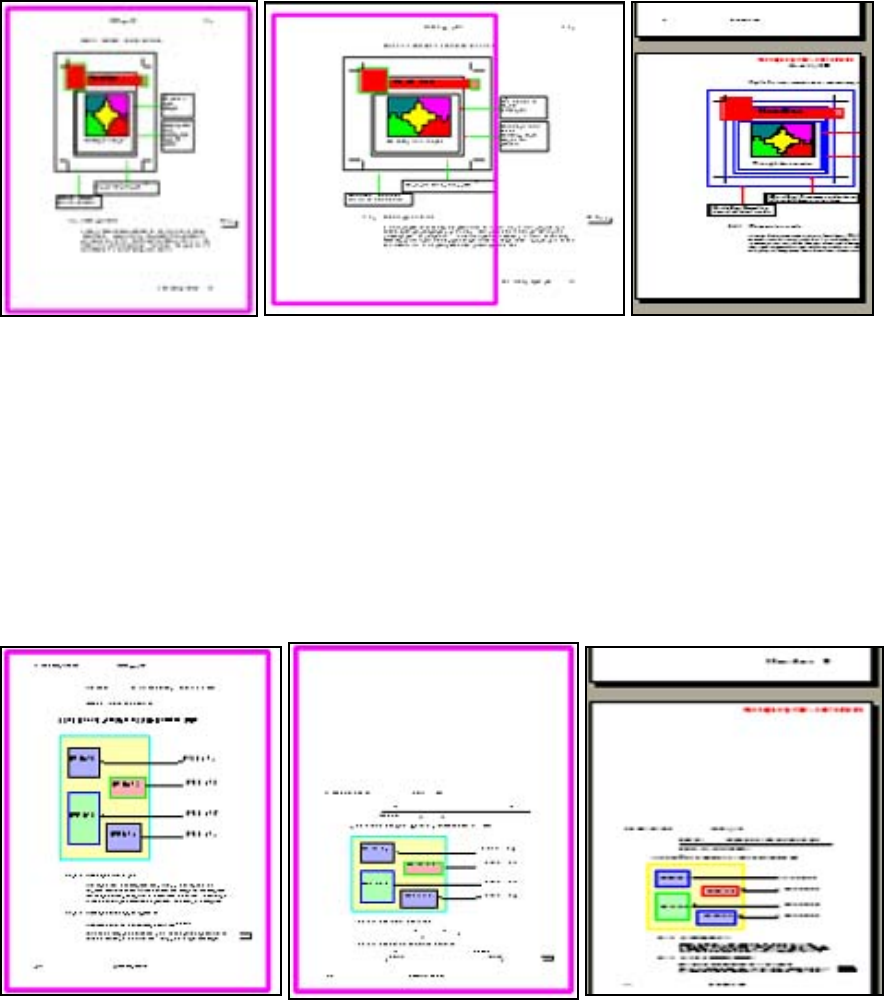
Example 1: The following figures show a page content that is scaled horizontally with W percent being
160.
<A> <B> <C>
● Figure <A>: Shows the original PDF page in PDF Viewer.
● Figure<B>: Shows the PDF page which is stretched horizontally in PDFPO. The *purple rectangle*
indicates the region for viewing or printing. That portion outside of *purple rectangle* will not be
displayed in PDF Viewer, see Figure <C>.
● Figure<C>: Shows the result page layout in PDF Viewer.
Example 2: The following figures show a page content that is scaled vertically with H percent being 60.
<A> <B> <C>
● Figure <A>: Shows the original PDF page in PDF Viewer.
● Figure<B>: Shows the PDF page which is shrinked vertically in PDFPO. The *purple rectangle* indicates
the region for viewing or printing.
● Figure<C>: Shows the result page layout in PDF Viewer.
Clipping Content

Organizing Pages
Clipping content is actually to adjust the page's crop box, art box, trim box, and bleed box, so to adjust the file
To clip content do the following:
1. Click on Clip Content button on the Layout Pane, you will see the following changes:
● It's affiliated value fields are enabled for edit.
● The page rectangle in Preview Pane is highlighted in red. By default, this *red rectangle* is Crop Box, its
default is the value of Media Box.
2. Just change the value if you want to adjust crop box. If you want to modulate other box, drop down the
combo box and select another box - ArtBox, TrimBox or BleedBox.
3. Enter a new value into Left, Right, Top, and Bottom field, or drag the reference point on the *red
rectangle*, in Preview Pane, to a position you want.
● Note: PDFPO doesn't allow you to drag CropBox, ArtBox, TrimBox or BleedBox to a larger size than that
of the Media Box. If you insist on enlarging the those boxes, you can manually type new value in the Left,
Right, Top, or Bottom field, to perform the task.
4. Click on Apply button to take your change effect, or Cancel to take back the change.
Moving Content
Moving content is actually to adjust the location of the current page's content. The location of the page content is
specified as x-axis and y-axis with 0,0 being the starting place. When you move content, you may like to zoom
out your page to a fittest size for easy operation.
To move content do the following:
1. Click on Move Content on the Layout Pane, you will see the following changes:
● It's affiliated value fields are enabled for edit.
● The page rectangle in Preview Pane is highlighted in purple. This rectangle indicates the origin size of a
page.
2. Enter a new X and /or Y value in their field, or drag content in Preview Pane to a position you like.
● Note: In the default coordinate system, the positive direction of the x-axis points to the right, and the
positive direction of the y-axis points upward. So moving content rightward or upward has a positive X
and Y value. Moving content leftward or downward, however, a negative X and Y value.
● Contents outside of the displaying region of a page, or exceed the intersection between Media Box and
display, the output file page size and the file print. When you clip content, you
may like to zoom out your page
to a fittest size for easy operation.
Organizing Pages
Crop Box, will not be displayed in PDF Viewer.
3. Click on Apply button to take your change effect, or Cancel to take back the change.
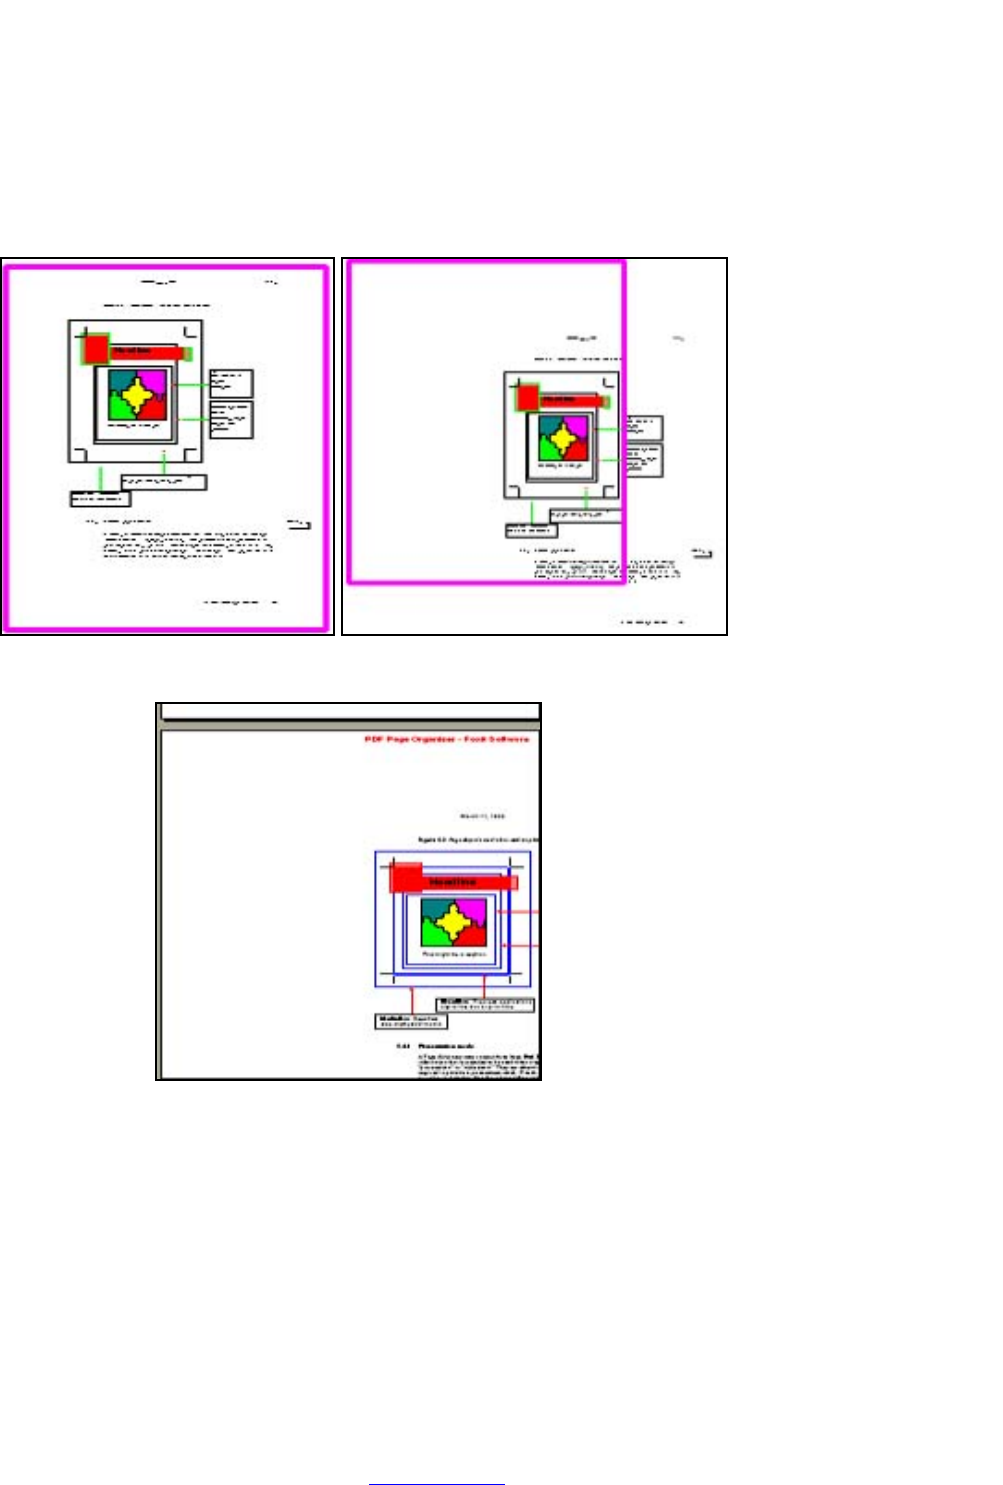
Example: The figures show that a portion of a page content is moved outside of the displaying region of a
page and got no display in Viewer.
<A> <B> <C>
● Figure <A>: S hows the original PDF page in PDF Viewer.
● Figure<B>: Shows a portion of the page is moved outside of the displaying region in PDFPO. The
*purple rectangle* indicates the region for viewing or printing.
● Figure<C>: Shows the result page layout in PDF Viewer
Rotating Content
Rotating content is actually to change the orientation of the currently displayed page's content. This will change
its actual orientation of the page, and can be saved and generated into pdf file.
To rotate content do the following:
1. Click on Rotate Page button on the Layout Pane, you will see the following change:

Organizing Pages
● It's affiliated value fields are enabled for edit.
2. Drop down the Deasil combo box to select an orientation in 90-degree increments - 90,180,270.
3. Click on Apply button to take your change effect, or Cancel to take back the change.
Note: You can not see the result in the Preview Pane, while you can view it in PDF viewer.
Restoring Original
Restoring original is actually to undo all changes in a current displaying page. Click on this button, all values you
changed on the current page will be got back to its original state.
Go to Contents

Frequently Asked Questions
How can I Merge and Split PDF Documents?
As you know, in the importing progress, you can specify single page, range of pages or all pages to be
imported to the PDFPO. In this way, you can choose to split or merge PDF documents. If to split, you
can import (split) a PDF document to multiple page files, if to merge, you can import (merge) different
PDF documents to a file.
1. Launch a New file window, or open a saved *.pdfpo document.
2. Select Import on the file window
3. On the pop-up Page Details box, click Browse to open the PDF document you want to split or
merge.
4. On the Page Details box, specify the page ranges in the Page(s) area, and then click Ok
If you are importing pages for merging PDF files, you can repeat the above 2-4 steps to merge the page
(s) into a same PDFPO file.
If you are importing pages for splitting a PDF file, you can open another PDFPO file, and then repeat the
above 1-4 steps to split the other part of a PDF file into it.
Can it work without Acrobat Reader?
Yes, you can use Foxit PDF Page Organizer or PDF Viewer without the support of Acrobat Reader.
Where is the inserted annotations?
You need to make the box size large, because your font size is already 25, so a 5x5 box doesn't make
much space for the annotation, also you need to move the position a little bit. Try use 50x50 for the size,
and 50,50 for position, you will see the annotation in the preview window.
We understand that's not convenient to specify those size and position in that way, so in the new version,
we automatically calculate the box size (according to font and text content), and you can simple choose
from positions like "left lower corner", or "lower middle", something like that.
