Hasselblad CFV 50c User Guide UM Eng
User Manual: hasselblad CFV-50c - User Guide Free User Guide for Hasselblad Camera, Manual
Open the PDF directly: View PDF ![]() .
.
Page Count: 49
CFV 50c
USER MANUAL
v4

CFV 50c
2
Welcome to Hasselblad
CFV 50c
3
C O N T E N T S
About this manual
This manual describes how to work with the
Hasselblad CFV-50c digital back only. Please
refer to previously published manuals for de-
tails concerning older or discontinued Hassel-
blad equipment and firmware.
The manual explains specific practical aspects
of operation and control, the menu system
and suchlike. It is assumed that reasonable
levels of general analogue and digital photo-
graphic knowledge as well as computer skills
are already acquired, so these are not dealt
with here.
INTRODUCTION 4
Computer system requirements 5
Warnings and restrictions 5
Firmware updates 5
Workflow 7
Before you start 6
Hasselblad Capture Files 7
Capture destination 7
Phocus 8
Getting Started 9
Buttons, Parts & Components 10
Battery 11
Powering the CFV-50c 11
On/Off button 11
CF Cards 12
Navigating the Menu 13
Overview of Menu 14
Menu 15
Initial Settings 17
ISO setting 18
White Balance Setting 18
Exposure Time 19
Quality 19
Live View 33
Change Language 34
Temperature Warning 34
Camera Connectivity 34
Flash/Strobe 39
Appendix 42
Cleaning 43
Language change 44
Battery Life & Battery Warning 44
Technical Specifications 45
Equipment Care & Service 46
File Storage 20
Storage 21
Folder 21
Delete 21
Format 22
Settings 29
Language 24
Sound 24
Date & Time 24
Display 25
Custom Options 25
P Button 25
Display Off 25
Power Off 26
Mark Overexposure 26
Image Orientation 26
Aspect ratio 26
Show preview 27
Camera 27
Service 27
About 28
Previews, Browsing & Live View 29
Preview Modes 30
Browsing 31
Zooming 32

CFV 50c
4
INTRODUCTION
The captured image is temporarily stored internally on a CF
card or externally via a FireWire connection onto a computer
hard disk. When tethered to a computer you can remotely
make captures using Phocus with some Hasselblad V System
models/accessories (see later section in this manual and the
Phocus user manual for further details).
As the CFV-50c is a purely electronic device, attention to
power supply is vital. When working untethered it is there-
fore important to plan battery loading / battery replacement
to ensure continued workflow. Likewise, image storage is
limited and appropriate steps should also be taken when
planning a shoot.
When attaching and removing the CFV-50c, pay particular at-
tention to the image sensor area. The sensor itself is covered
and protected by a glass IR filter but take great care when
handling. If you need to clean the filter, see later section for
specific details. When storing separated from the camera, al-
ways ensure you have replaced the protective cover. If you
scratch or mark the filter in any way, it will show up on every
shot. Replacements are expensive so treat the glass surface
with at least as much care as you would a lens. The sensor it-
self is not accessible for any kind of cleaning or maintenance
by a user. Do not attempt any such action as you will almost
certainly damage it irreparably. When storing separated
from the camera, always ensure you use a protective cover.
As is the case with all electronic devices pay extra care when
working in damp en vironments and avoid damp conditions
for storage.
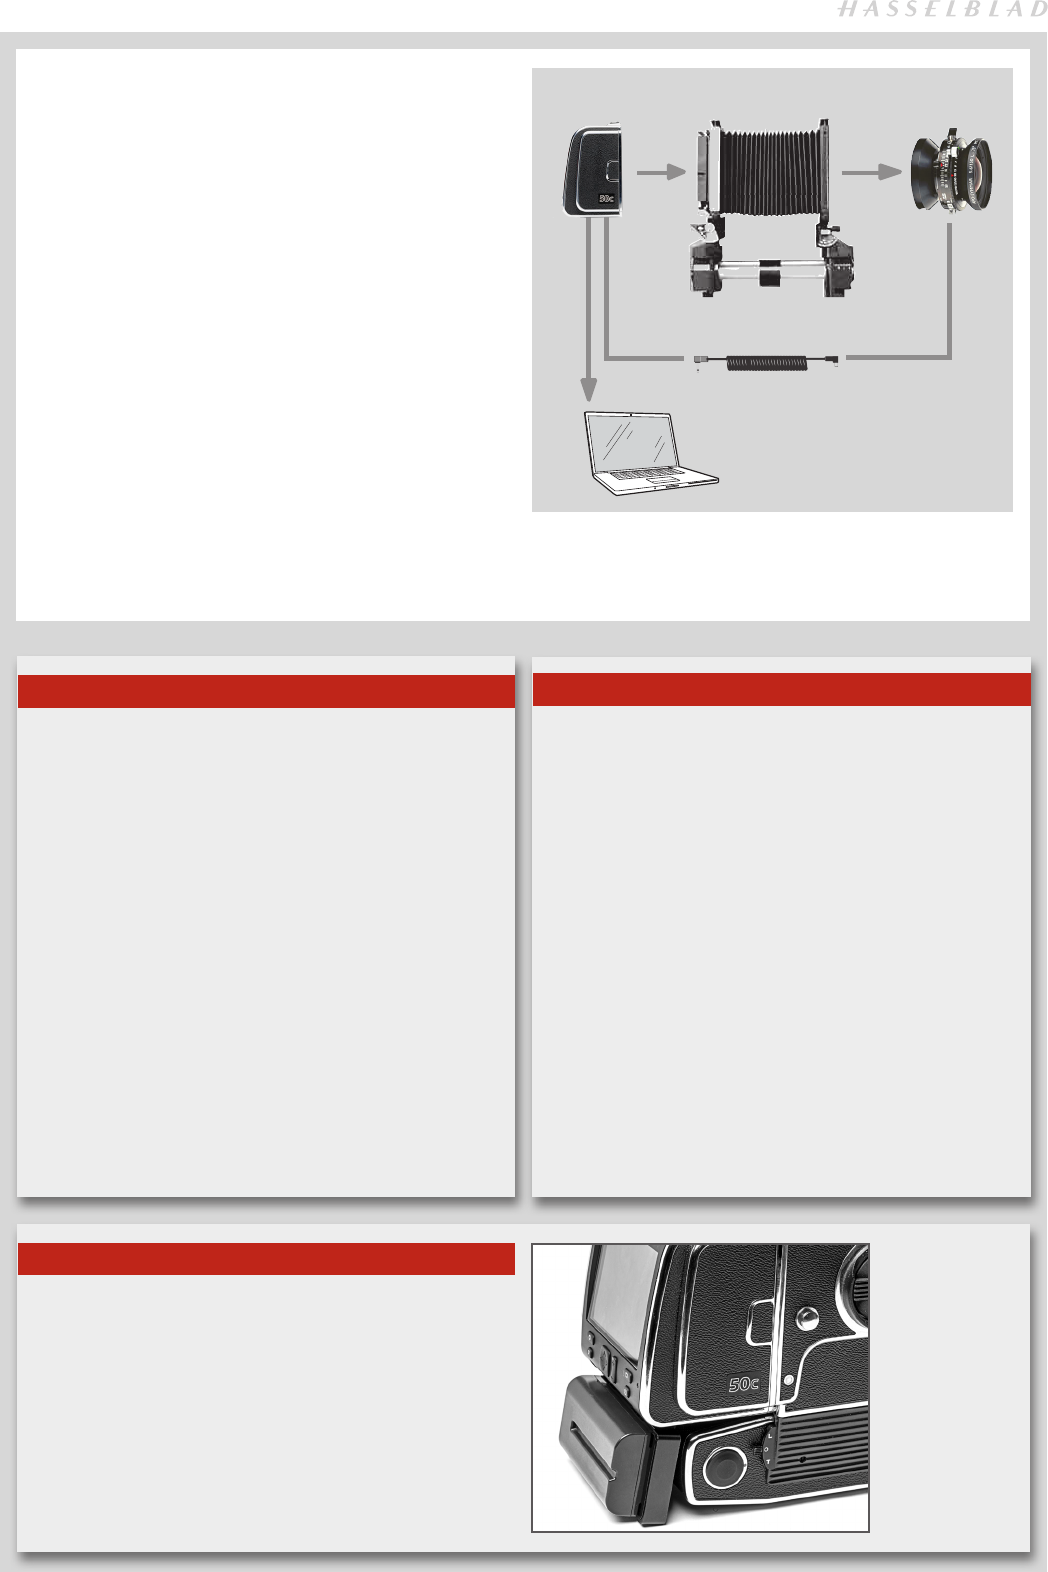
In keeping with Hasselblad’s modular design philosophy, the
CFV-50c is an independent component. It can be attached to
a large format / view camera (see later section in this manual)
for both tethered and untethered use.
With untethered use, the management of captures is han-
dled by the CFV-50c. In tethered use, captures are handled
and stored by the computer and can be visually checked in
Phocus immediately.
Settings are made entering the CFV-50c menu using the but-
tons on the unit. When tethered, some settings are available
in Phocus.
We hope you enjoy working with the CFV-50c. The results
will prove you made the right choice.
The CFV-50c is the ultimate choice for those who want
to extract the optimum from Hasselbad V series camer-
as and lenses when when working digitally. This excep-
tional product uses the latest of everything in the world
of digital backs regarding materials and firmware. Build
quality is of course Hasselblad which is legendary.
Being a Hasselblad product means it is versatile and the
CFV-50c is no exception as it easily converts a technical- or
large format camera into a very convenient and very capa-
ble tool as well.
The key to this superb back is the fantastic CMOS sensor
which opens up a new world of possibilities for V series own-
ers. Teamed with Phocus, Hasselblad’s proprietory image
file editor, the CFV-50c offers:
ISO range is an amazing 100 - 6400 with remarkably
little noise even at the most sensitive setting.
Longest shutter speed is over 34 minutes to provide a
solution or to add a creative addition to many situations.
HNCS – Hasselblad Natural Color Solution – saves time
and secures the job because skin tones or specific
product tones are going to be rendered automatically,
accurately and immediately without any fuss.
JPEG & RAW files can be produced simultaneously if
you choose. The JPEG files are not only 1/4 resolution
they are also HNC profiled so you can print straight from
a folder for amazing quality. RAWs are retained of course
for your final masterpieces.
Digital Lens Correction, applied at the file editing
stage, takes a discerning look at any colour aberration,
distortion and light fall off however minor (which is
inherent in any lens, anywhere) and resolves the
situation automatically.
Capture rate is about as fast as you can crank the
handle!
This is the product that some V series owners have been
waiting for a long time in order to leave the analogue
world behind and move on into top flight digital quality.
For others it is the chance to have a foot in both the
analogue and the digital worlds for the optimum of
choice.
Versatility, with a capital 'V', is perhaps the word that
sums up this product best - we know you are going to be
satisfied.
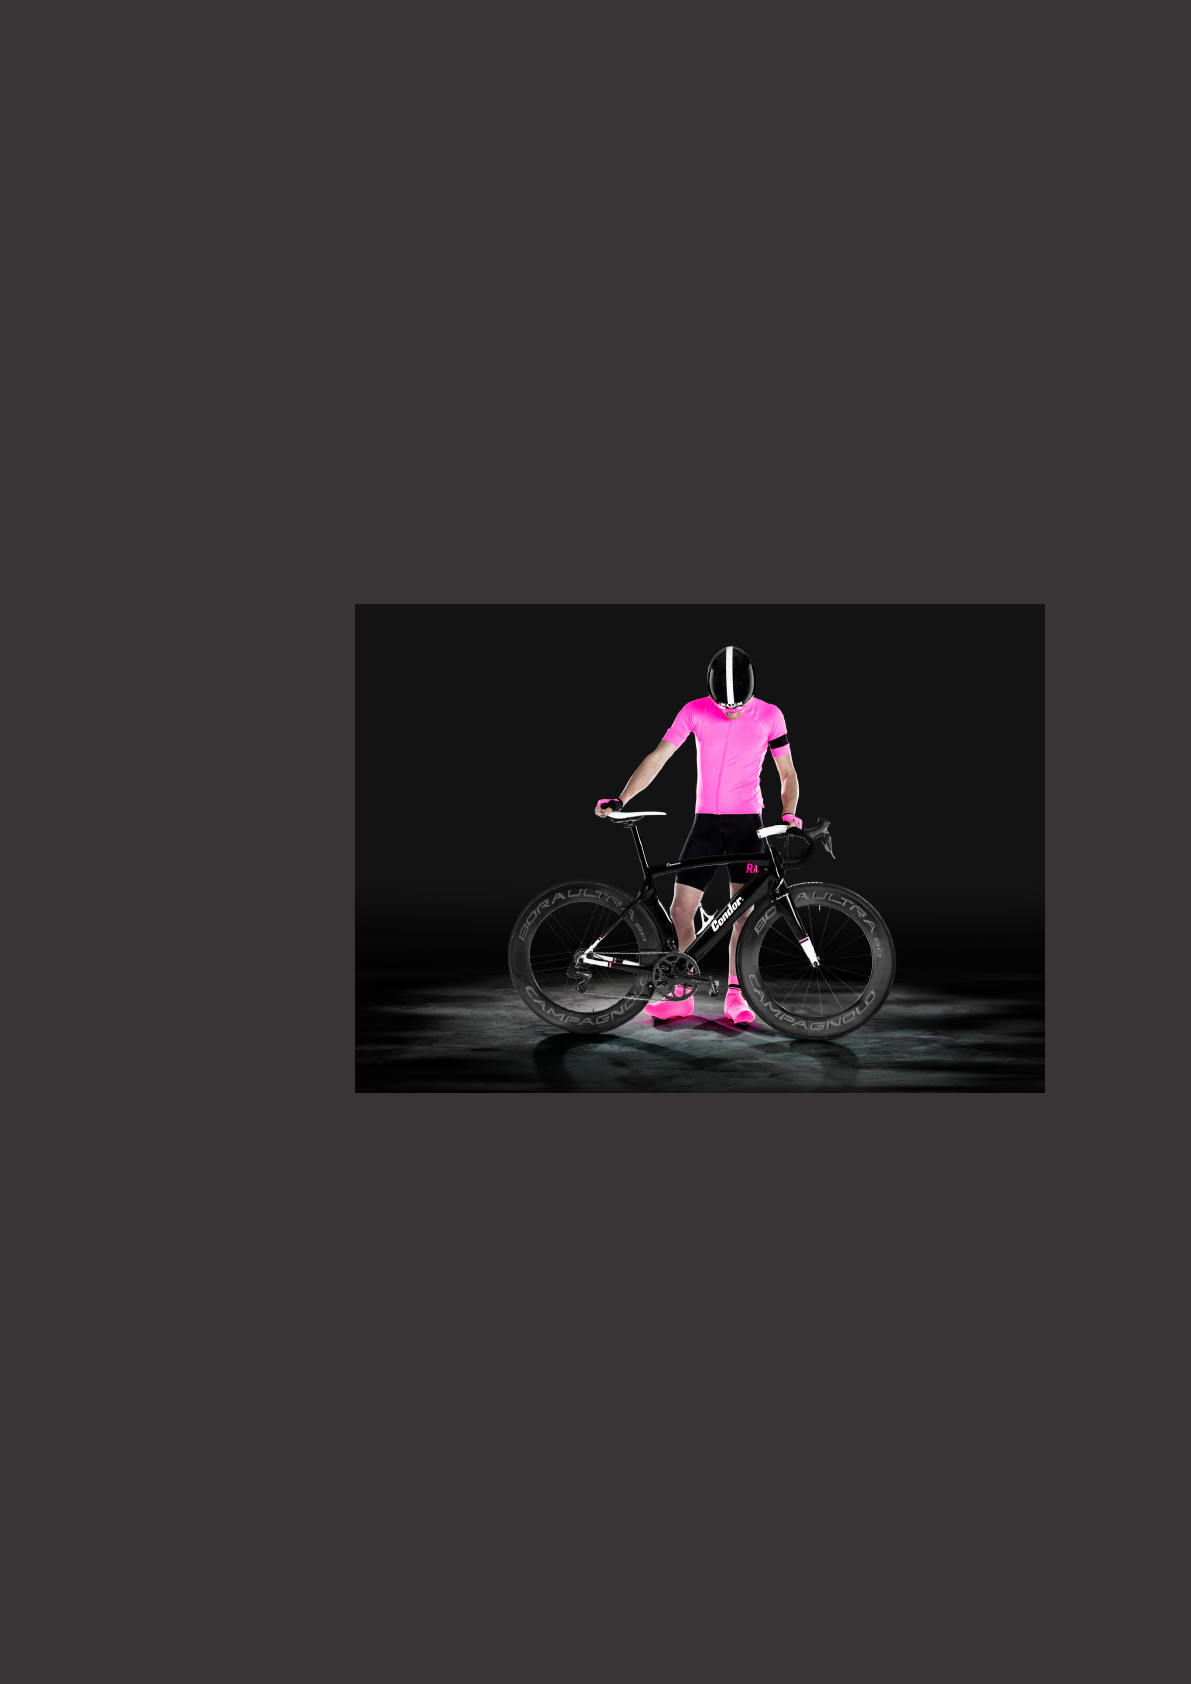
Insert photo: © Frank Meyl - Hasselblad Master 2012

CFV 50c
5
CONNECTING TO A COMPUTER
To connect to a computer, attach a FireWire cable from the FireWire port on a computer to the port on the side of the CFV-
50c. Ensure the orientation of the plug is correct.
When you are connected to a computer, the following applies:
• The CFV-50c will take power via the FireWire cable if it is available (not all computers can supply power, notably PC lap-
tops). This will help conserve the battery power.
• When using a Thunderbolt to FireWire adapter ensure you select the correct setting (see p 27 in this manual: Settings >
Service > Tethered power)
• The destination medium and location are controlled from Phocus.
COMPUTER SYSTEM REQUIREMENTS
Final image-storage and correction requires a certain minimum standard regarding computer capabilities. Large image
files require a high-performance computer with plenty of memory, advanced graphics capabilities and a recent operating
system. In most cases, you will want your computer to include a FireWire 800/400 connector, which will enable you to load
images directly from the camera. To load images stored on the removable compact-flash card, you could instead use a
compact-flash card reader, but we still recommend FireWire for maximum flexibility.
FIRMWARE UPDATES
If you have registered your CFV-50c you should automatically receive e-mail informing you of the latest developments. Oth-
erwise you are advised to make regular checks regarding firmware updates.
When updating you should also study the accompanying ‘Release Notes’ or ‘Read Me’ files where you will find details about
improvements, developments and changes.
WARNINGS AND RESTRICTIONS
• If you want to power the CFV-50c from a PC laptop (as opposed to a Macintosh laptop), you must ensure that the
FireWire port on the computer is capable of supplying power. Please note the following:
– Most recent Macintosh computers are compatible, both desktops and laptops.
– Most recent desktop PC computers are compatible.
– Most laptop PC computers are not compatible (but can be modified in many cases).
• Keep the CFV-50c and computer equipment away from moisture wherever possible. If the CFV-50c becomes wet,
disconnect from power and allow it to dry before attempting to operate again.
• Always take great care when you remove the CFV-50c for cleaning as the exposed CCD sensor protective filter is
vulnerable to damage.
• Keep all cables connected to or from the CFV-50c and computer out of the way where they cannot be tripped over.
USER MANUAL
This user manual is primarily designed for on-screen PDF reading to exploit search tools etc. However, there is a sufficiently
wide left margin to allow one-sided print outs to fit an ISO standard ring binder if required.
Please note that the format is A4 to conform with the most common standard. Therefore if printing out to US Letter format
or similar please ensure you select “Fit to Printable Area” in the page scaling dialogue.
CFV 50c
6
Register your CFV-50c for regular news about the latest developments, updates, news and tips!
– www.hasselblad.com –
BEFORE YOU START
Please see below for items included with delivery.
Please ensure that all the items noted on the accompanying packing
information have been supplied and are correct.
If anything is missing or seems faulty in any way then you should contact
your Hasselblad dealer immediately.
Please keep purchase details and the warranty in a safe place. Become familiar with the various parts and components.
Leave protective covers on as much as possible and avoid touching glass surfaces and inserting fingers into the camera
body. Hasselblad cameras have a robust construction and are capable of withstanding fairly rough treatment but neverthe-
less are precision instruments and will serve you longer if treated with respect from the beginning.
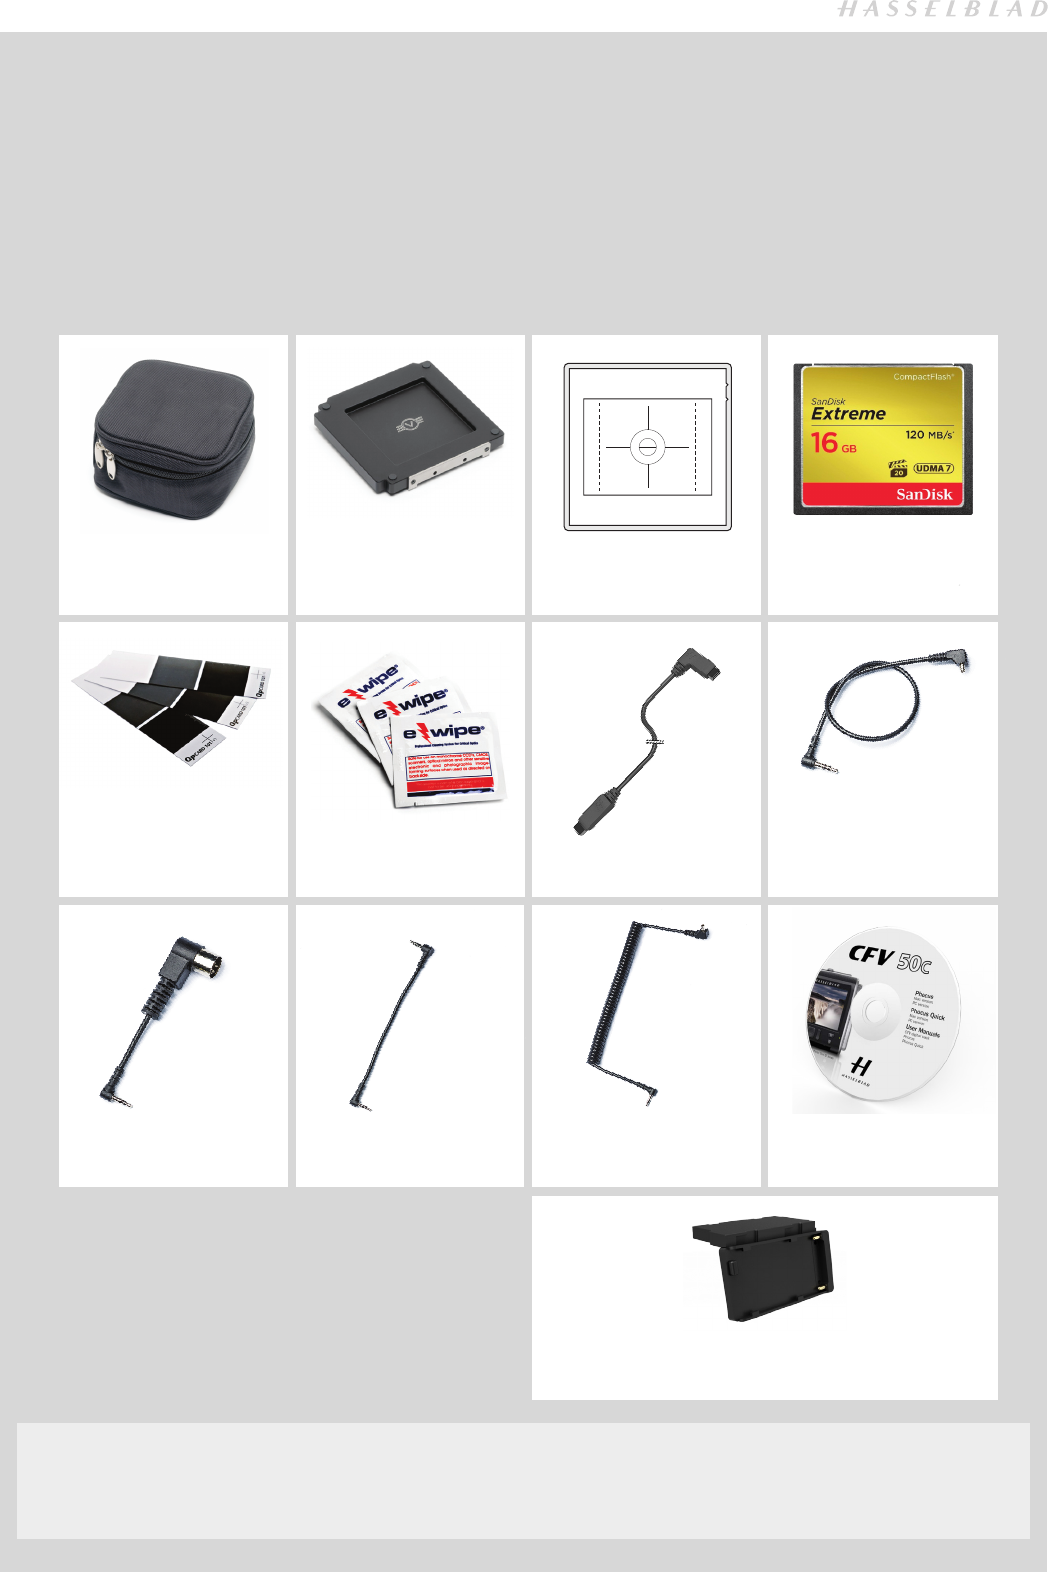
Accessory items included with delivery
Protective case
Protection cover
3054560
Focusing screen
3042264 CF-Flash card
Grey cards CFV FireWire cable
Flash output sync cable
1006720
E-wipes
Exposure cable EL
1006721
Flash input sync cable
1006722
Exposure cable 503
1006719
Software DVD
The Hasselblad 555ELD, 500EL/ELM, 500/553 ELX and SWC
models require a Battery Adapter (optional accessory 3054668)
for untethered use. The Hasselblad ArcBody might also require
the Battery Adapter at certain extreme settings. See page 37 in
this manual.
Optional battery adapter
3054668
CFV 50c
7
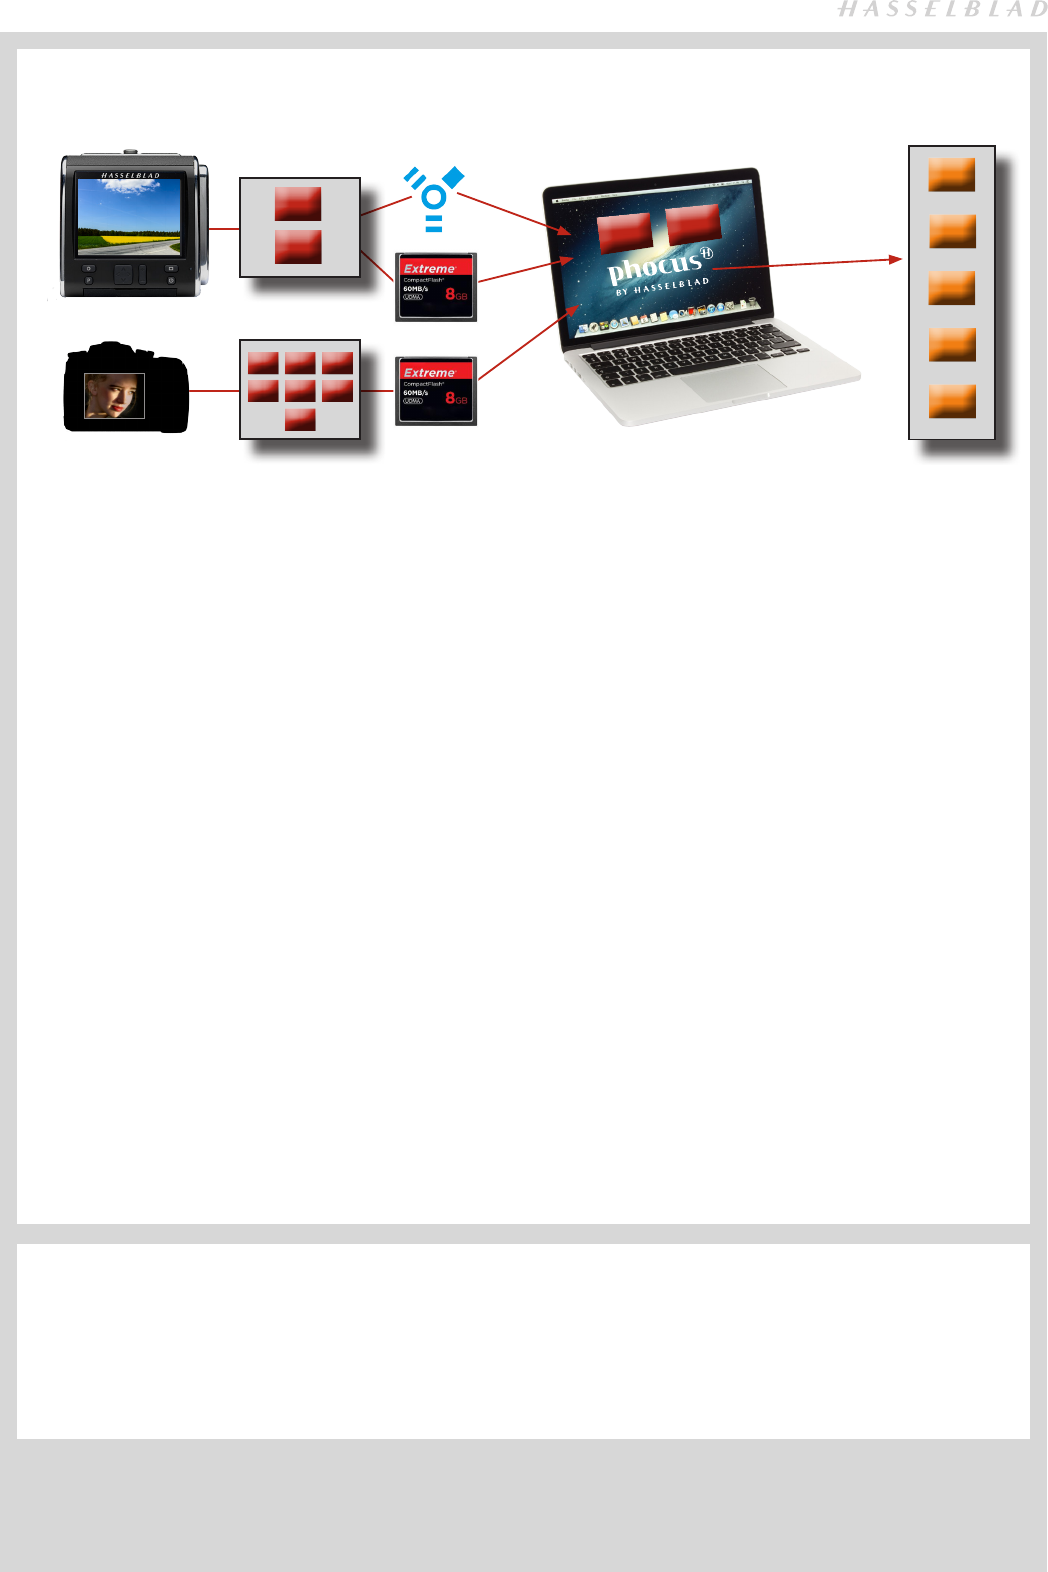
HASSELBLAD CAPTURE FILES, PHOCUS & ADOBE/APPLE SOFTWARE WORKFLOWS
The CFV-50c captures files and stores them as Hasselblad RAW format files or Hasselblad RAW + JPEG formats simultane-
ously. Lossless compression is applied so the actual size of each capture can vary.
Hasselblad RAW files are initially stored in the 3FR format which is a proprietary Hasselblad format for the temporary storage
of captures. A 3FR file contains the complete digitized raw image exactly as it was captured by the camera. 3FR information
requires further computing power (typically by way of Phocus) to obtain complete development. If processed in Phocus, 3FR
files become Hasselblad 3F files – denoted by each file now bearing the suffix “.fff”. If processed by other RAW processors, the
3FR files are not converted to 3F but can be exported directly to TIFF, PSD etc according to requirements.
However, when working tethered – which necessitates using Phocus – 3FR files are automatically processed and stored in
the background on a computer appearing as 3F files on the hard disk ready for selective adjustment and export. 3FR files
stored on a CF card can be processed to completion using:
• Hasselblad Phocus (included)
• Adobe Camera Raw / Lightroom
• Apple Aperture
To sum up, capture files can be stored as 3FR files (on a CF card) for later processing in Phocus or other software, or they can
be stored as 3F files (as a result of tethered shooting or 3FR files processed and imported to Phocus). In all cases if you keep
the original 3FR/3F files, you will also retain the possibility of reprocessing them in the future in later versions of Phocus or
other software to take advantage of eventual improvements and developments.
Note that using Phocus is the most comprehensive method. The Phocus and Adobe methods can produce almost identical
results (V lens corrections, DAC, is not available with Adobe) regarding RAW conversion so it is a matter of personal choice
regarding which method would best suit your preferred ways of working. Alternatively you can use Apple Aperture though
you should take note that the benefits of DAC and HNCS etc, will be lost in this case.
Mixed formats
Phocus can also process most other capture formats, generic and proprietary. This means you can include other formats in
your normal Phocus workflow if you choose. Or if you prefer, you can include Hasselblad files in Adobe / Apple workflows
as stated above.
.nef
.dng
.cr2
.tiff
.mos
.jpeg
etc.
3FR
JPEG
.fff
.jpeg
CAPTURE DESTINATION
The capture destination is the location to which new captures are saved and from which you can browse. Choice is normally
automatic but a manual selection is also possible in some cases:
• When untethered, a compact-flash card is automatically selected.
• When tethered, captures are automatically saved directly to the computer hard disk. See Phocus user manual about
how to select or create a new storage folder.
TIFF
JPEG
PSD
DNG
etc.

CFV 50c
8
Phocus is the capture processing and file manage-
ment application aimed primarily at Hasselblad 3F
file handling. Phocus Mobile offers remote viewing
and control when shooting tethered while Phocus
Quick offers a very rapid and simplified file process-
ing capability.
Phocus allows the extraction of the most detailed files from the
world’s most advanced cameras to your desktop in a profes-
sional and efficient manner.
Phocus works the way that photographers work and provide
serious photographers with a well thought out, and intuitive
workflow, designed to provide maximum power and options
with a minimum of effort. Phocus produces ground-breaking
new levels of image quality and technical precision and when
combined with the world’s finest optics and image sensors the
result is exactly what you would expect from Hasselblad – sim-
ply stunning image quality.
FEATURES IN PHOCUS
Ultimate Image Quality
· Hasselblad Natural Color Solution (HNCS)
· Sophisticated lens corrections for H and V System lenses
Specialized Tools
· Phocus Mobile *
· Live Video
· Scene calibration & reproduction tools
· Leading edge Moiré removal
· Highlight recovery, shadow fill, clarity and dust spot
removal tools
plus:
· Easy-to-use interface
· Extensive customization options for individual workflow
scenarios
· Import/Export of Image Adjustments, Keywords, Work-
flow settings etc.
· High quality printing
· Slide show
· RAW file support for more than 150 DSLR cameras
· License free software (unlimited installations - no regis-
tration issues)
Any File from Anywhere!
Phocus allows you to import your files, RAW or otherwise and
work in the same powerful and intuitive processing environ-
ment, no matter where your files are coming from. This means
that you can browse all kinds of RAW and non-RAW formats.
Phocus on a Mac supports RAW files from more than 150 cam-
eras, including Canon, Nikon, Leica, Sony, Fuji, Olympus, and
so on**, as well as the most common file formats such as TIFF,
JPEG, DNG, and PNG, making it easier than ever to work as you
see fit, not as your camera dictates.
Ultimate Image Quality
Phocus combines with Hasselblad Natural Color Solution
(HNCS) and digital lens corrections to provide ultimate image
quality in every image you create. With Phocus, the moiré that
can occur on even extremely high-resolution images is effec-
tively removed automatically and directly on the raw data,
leaving image quality intact and saving hours of tedious post-
production work.
Tethered shooting is also very smooth with Phocus Remote
camera controls providing a number of remote functions, such
as remote focusing, live view, aperture and exposure time con-
trols, etc.
PHOCUS
Phocus Quick
Phocus Quick allows a preview of images from camera
to screen at the touch of a button. Your original images
(in RAW format) remain on the memory card and can be
backed up automatically if you wish. Either way, you can
view and review in Phocus Quick and still go back later and
fine-tune your images. The perfect combination of ease of
use and peace of mind! Phocus Mobile is available for free
download from the Hasselblad website.
Phocus Mobile
Phocus Mobile is available for the iPhone®, iPad® and iPod
Touch®. It enables you to connect wirelessly to a computer
running Phocus and to remotely browse your high-resolu-
tion RAW, JPEG and TIFF images.
This provides a handy solution for working with clients in
the studio, enabling each person to view images on an
individual iOS device, rather than all gathering around a
single computer.
Phocus Mobile also allows users to remotely operate and
trigger a tethered camera, giving control of many param-
eters, all neatly presented in a virtual camera display. This
feature is very convenient for remote control of the camera
when it’s located in a difficult-to-access position. Phocus
Mobile is available for free download at the App Store.
* Phocus Mobile is available for download on the App Store.
** Full list available at http://www.apple.com/aperture/specs/raw.html

CFV 50c
9
Photo: Bryn Griffiths © / Hasselblad Masters
GETTING STARTED
CFV 50c
10
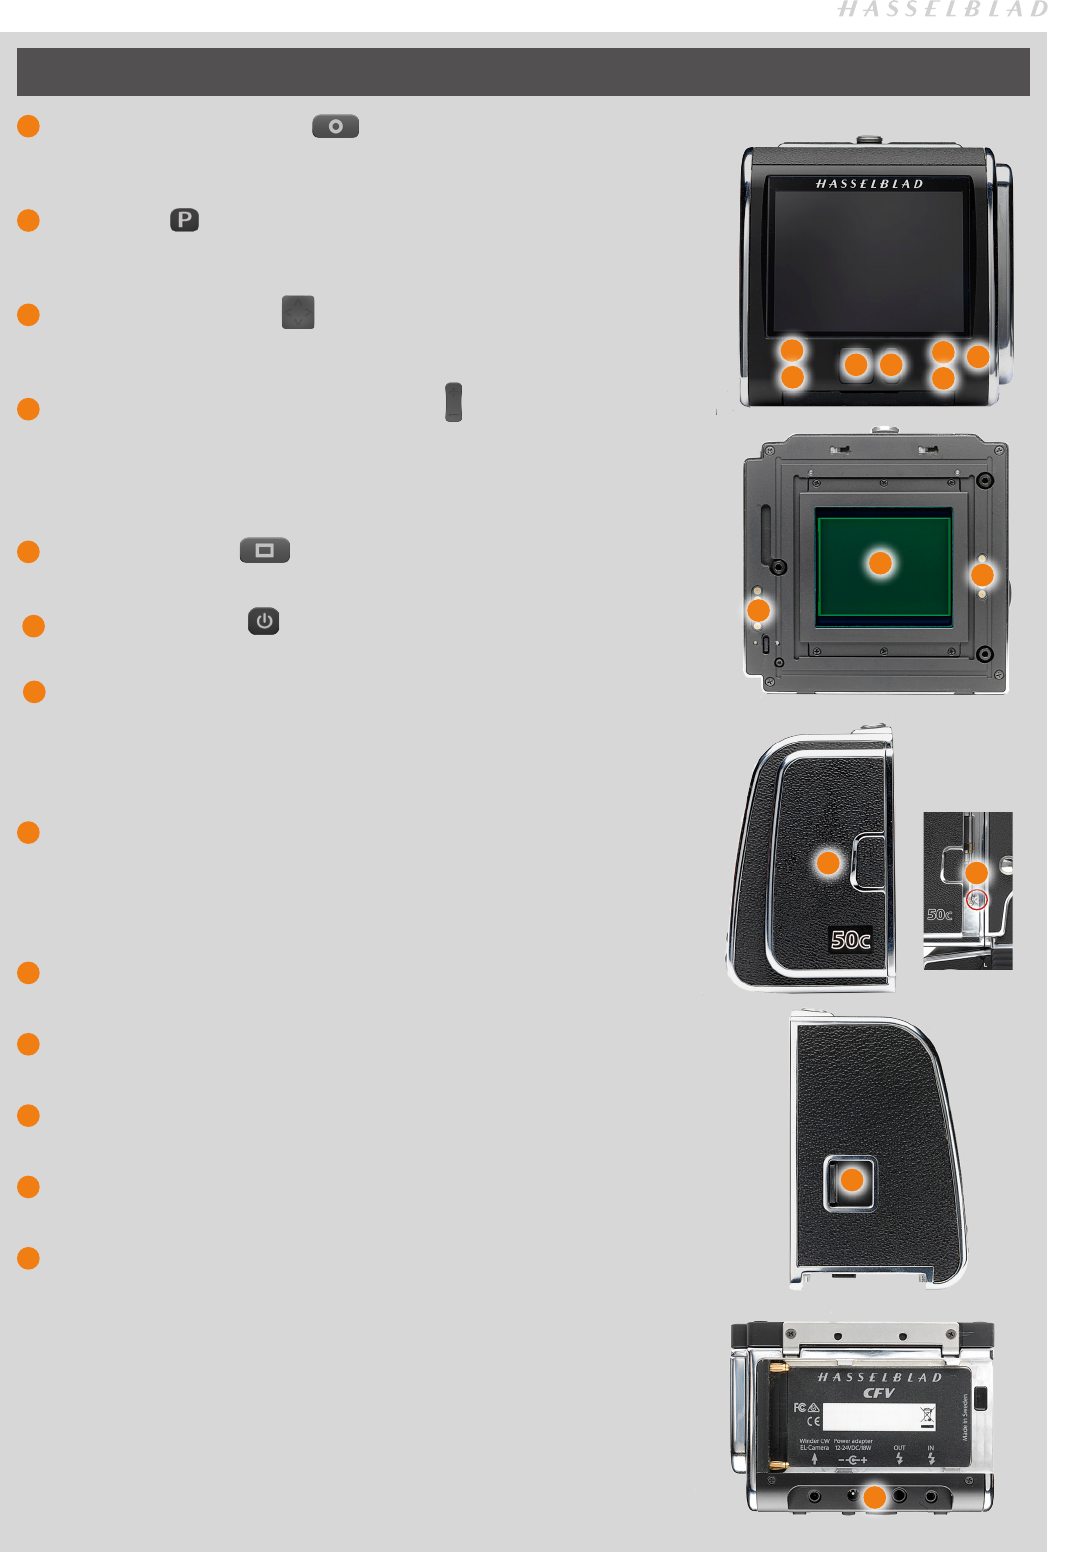
BUTTONS, PARTS & COMPONENTS
1 MENU / (EXIT) button
Opens and closes the menu system. Also used for various other tasks (EXIT
button, for example) as you issue commands navigating the menu system.
2 P button
Assignable button to access a specific function. Setting is made via Custom
Options.
3 Navigation button
A four-way rocker button enabling you to browse images as well as navi-
gate the menu system.
4 Zoom- in/-out (Selection) button
A dual function button for preview inspection and menu option selection.
Zoom in to view close-ups of previews for focus checking. Zoom out to
view several at once and finally to view and select folders and media.
Also acts as the selection button for value setting.
5 Display button
Steps through the various viewing modes of the preview.
On / Off button
Turns the CFV on and off.
Ready-light
Indicates CFV-50c’s condition. GREEN signifies a new capture is possible
(steady or blinking). ORANGE signifies the unit is busy (writing to a CF card or
sending data, for example) and so a new capture is not possible. RED signi-
fies a problem (an explanatory message will be displayed).
8 CMOS and IR filter
The sensor is positioned behind a permanently mounted IR filter. Always
be very careful not to touch or scratch the surface of the filter when it is ex-
posed. Replace the protective cover whenever the CFV-50c is not mounted
on a camera.
9 Databus connectors
For digital communication with certain camera models.
10 CF-card cover
Protective cover for CF card slot..
11 ‘Sensor plane’ index
For physical focus measurement in critical close-up work.
12 FireWire port
For computer connection.
13 Flash sync and power connector ports
Ports for Flash sync, Winder CW and EL-Cameras as well as external power
adapter. Protected behind a rubber cover.
6
7
1
23 4 5
6
7
8
9
9
11
10
12
13
CFV 50c
11
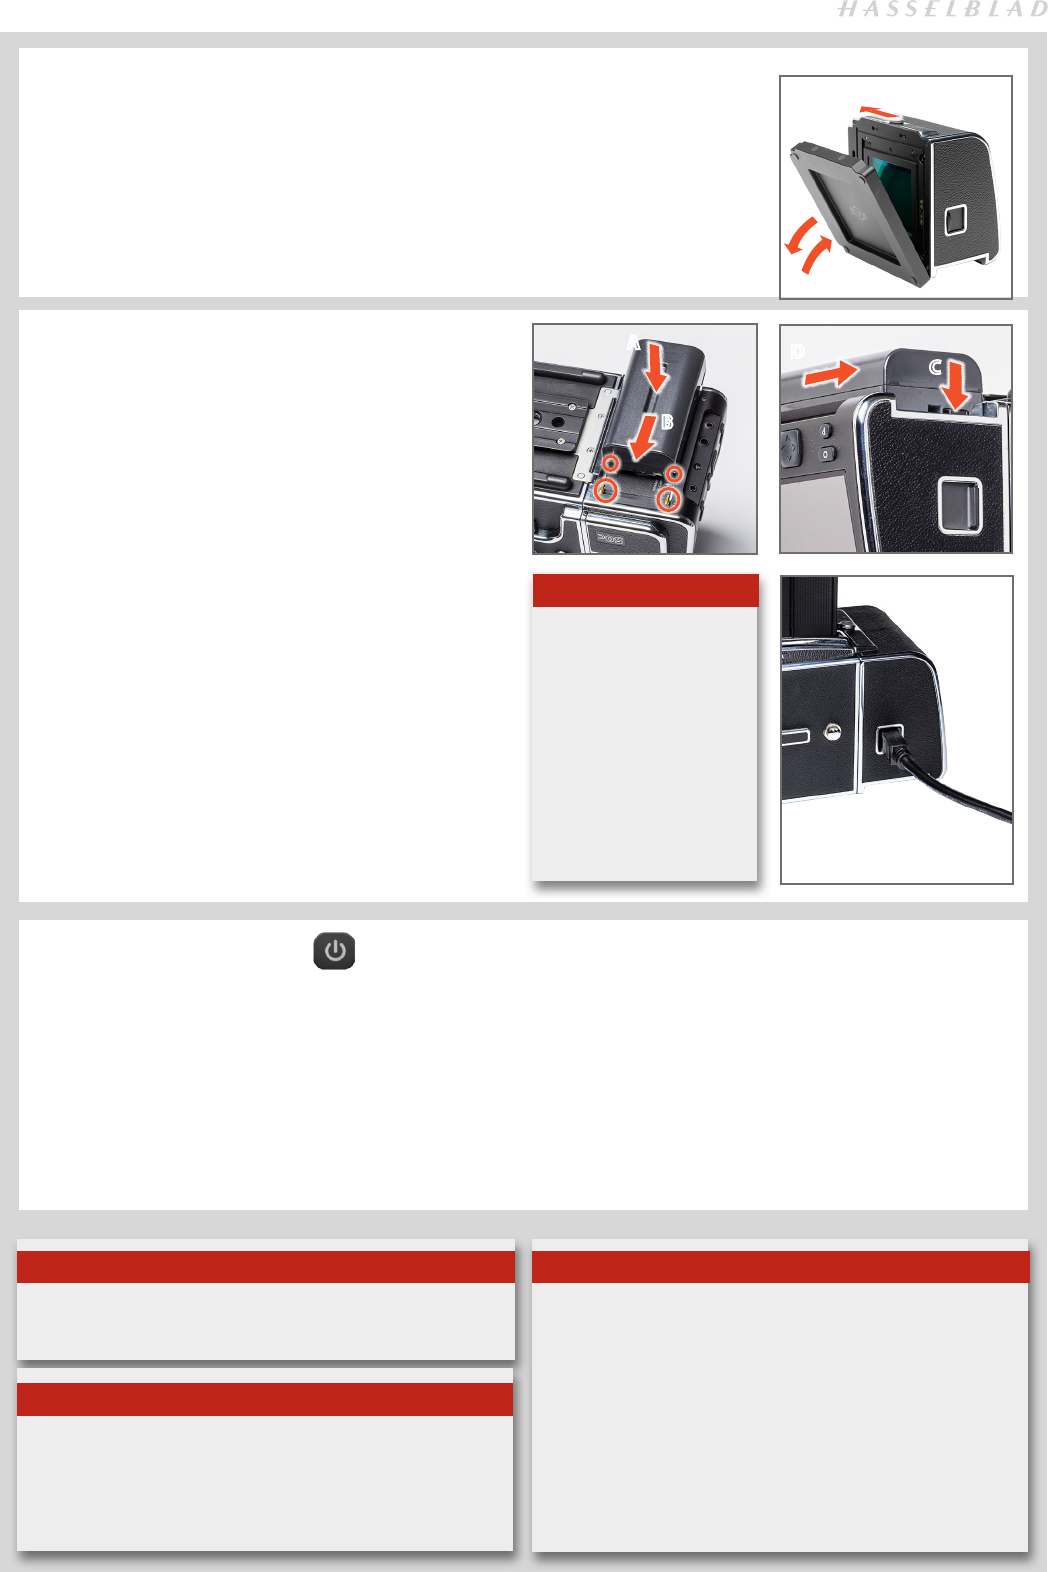
ATTACHING AND REMOVING THE CFV-50C
When both attaching and removing the protective cover as well as attaching and removing
the CFV-50c to the camera, slide the locking button A. Avoid trying to just ‘snap’ the CFV-
50c or protective cover into place without using the button.
A
POWERING THE CFV-50C
The CFV-50c requires power either from the battery (7.2V
Sony InfoLithium L type − NP-F550 for example) or from a
computer via a FireWire cable.
To attach a battery:
1. Firstly, ensure the battery is fully charged (see user appro-
priate manual for battery and charger).
2. Position the battery as in the illustration.
3. Press the battery towards the camera
A
. This automati-
cally depresses the battery retaining catch. Slide the bat-
tery into the final position
B
ensuring the contact prongs
on the camera are inserted into the battery. The battery
retaining catch will now return to the safety position.
To remove a battery:
1. Depress the battery retaining catch
C
and slide the bat-
tery over it
D
. It will then be freely removed.
FireWire connection:
1. Connect a FireWire cable between the FireWire port
on the CFV-50c and the FireWire port on the computer.
You do not need to attach a battery with a FireWire
connection.
ON / OFF BUTTON
With a fully charged battery fitted, keep the ON/OFF button
until the LED is illuminated. A Hasselblad logo splash screen
will appear on the display followed by an audible signal. This
signifies that the CFV-50c has been activated.
The CFV-50c will enter standby mode after the preset time to
save the battery. Keep the ON/OFF button depressed again
to turn the CFV-50c off. An audible signal will be heard again
to confirm this.
Tip
If the situation allows, change the Time Out and Power Down
settings to reduce battery consumption.
Note
Time & Date settings on the CFV-50c (which are included with
your capture files and batch labels) are updated automati-
cally through a FireWire/Phocus connection. These settings
are retained for some weeks by a small rechargeable cell that
is automatically recharged by the main battery or FireWire with
regular use.
If problems occur, charge the cell by leaving the CFV-50c on for
approximately 12 hours.
When using a FireWire connection you have to press the
button as usual for activation but only if the battery remains
attached. If the connection is FireWire only, active mode is
instigated automatically. The splash screen appears but no
audible signal is heard from the CFV-50c. There may be an
audible signal generated by the computer, however. Remov-
ing the FireWire connection turns the CFV-50c off immedi-
ately, also without an audible signal from the CFV-50c.
Tip
Save battery consumption by turning down the brightness
and/or contrast of the display using the Items on the MENU >
SETTINGS > USER INTERFACE > DISPLAY menu. You can also
save battery consumption by changing the Display Off /Sleep /
Power Off settings.
C
D
A
B
Note
The Hasselblad 555ELD,
500EL/ELM, 500/553 ELX
and SWC models also re-
quire a Battery Adapter
(optional accessory
3054668) for untethered
use. The Hasselblad Arc-
Body might also require
a Battery Adapter at cer-
tain extreme settings. See
‘Camera Connectivity’.
CFV 50c
12
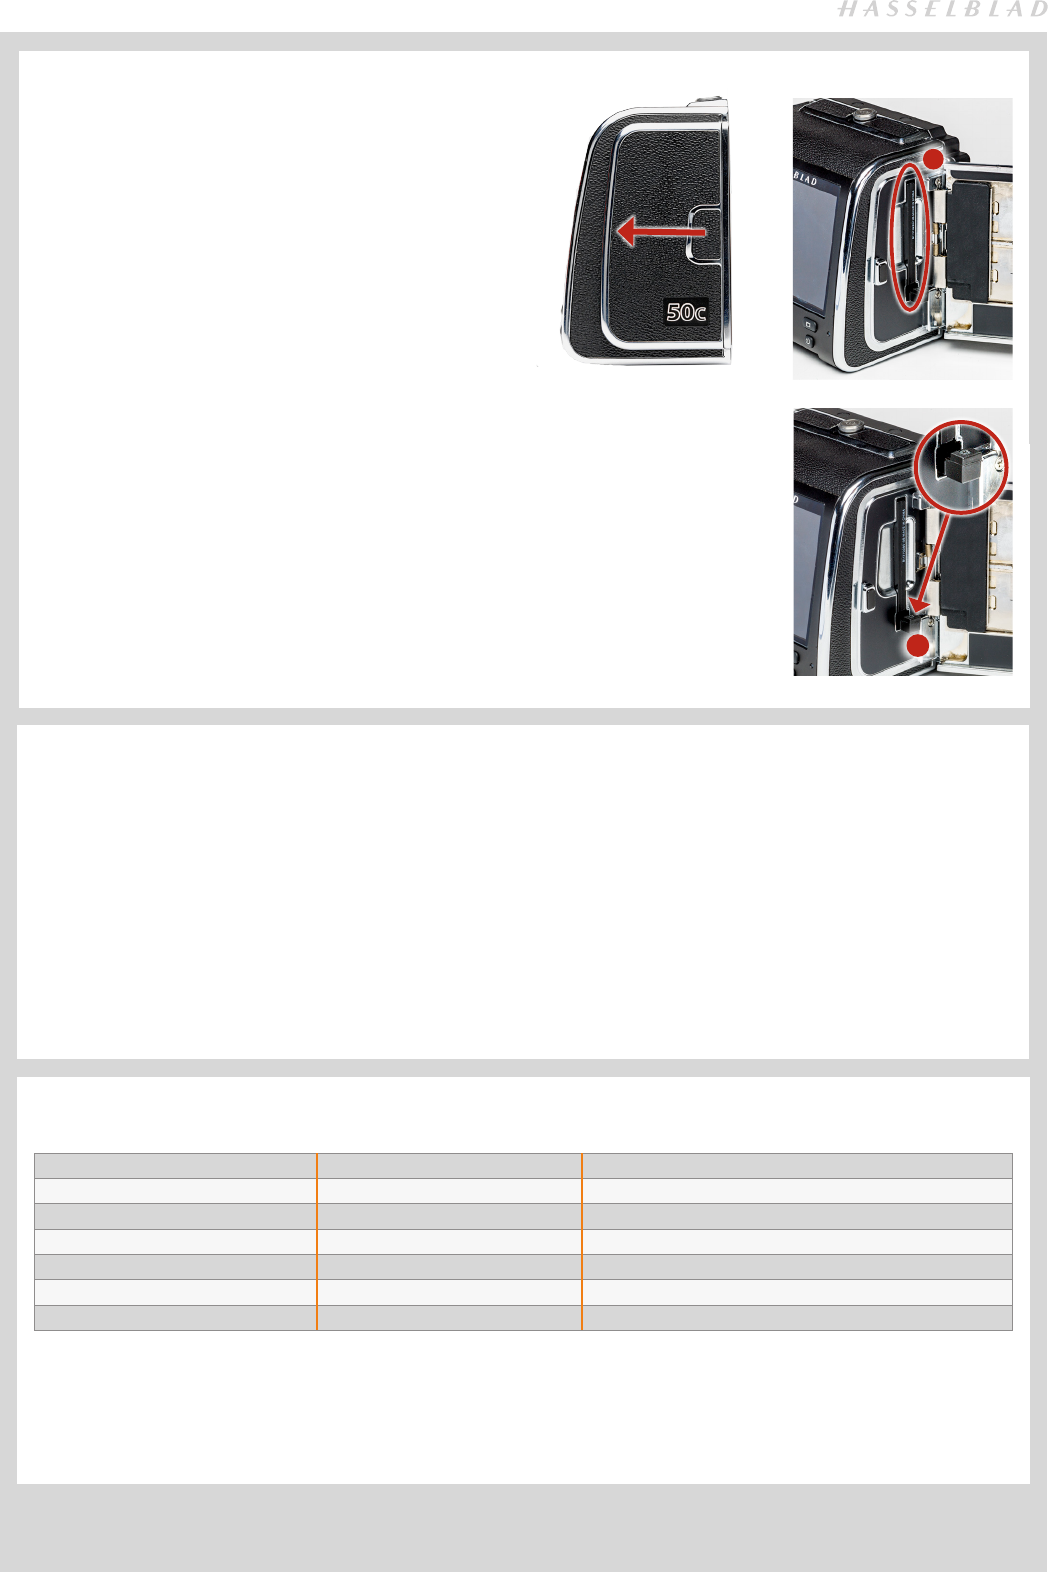
INSERTING A CF CARD
1. Open the CF card slot cover by inserting a thumb in the
recess and then sliding it to the left.
2. Behind the cover, you will see a slot for the card (A) and a
release button (B) below the slot.
3. Hold the compact-flash card so that the connector holes
face into the slot and you can read the brand label when
you are behind the camera. Gently press the card into the
slot. If you encounter resistance, it might be because you
are holding the card backwards or upside down.
4. If the card can be easily inserted nearly all the way into
the back, then you are inserting it correctly. Press the
card another couple of millimetres firmly into place.
5. Close the slot cover and slide it to the right to lock it.
REMOVING A CF CARD
1. Open the CF card slot cover
2. Press the release button (B) a little way in and then
release it so that it extends a little out from the slot.
3. Press the now extended release button all the way back
into the unit again. Some force is required. As you do
this, the card will be pushed out a few millimetres.
4. Grasp the card and pull it away from the unit.
5. Close the slot cover shut again.
CF CARD TIPS
1. All CF cards should be formatted in the CFV-50c before
first-time use even if the CFV-50c is already able to read
it. This will enable the CFV-50c to use the card more effi-
ciently.
2. You can also use the ‘Format’ command for the purpose
of deleting all images on a card. This is sometimes faster
than using the delete function but it is not as flexible
because all data from all batches will always be erased.
3. Be aware that formatting will erase all data contained
on the target medium, so ensure you have backed up all
required files beforehand.
4. Do not remove a CF card from the CFV-50c if the ‘ready’
light is blinking! All files on the card may become cor-
rupted (and consequently lost) if you do so and new for-
matting may also be necessary.
5. Only UDMA/type 4/60MBs (or 400x) cards or better are
recommended for CFV-50c use. See list in below.
Lexar Professional Compact Flash 8 800x
Lexar Professional Compact Flash 16 1000x
SanDisk Extreme Compact Flash 8 60 MB/s
SanDisk Extreme Compact Flash 16 90 MB/s
UDMA 6 SanDisk 32 90 MB/s
UDMA 6 SanDisk 64 90 MB/s
UDMA 7 SanDisk 128 100 MB/s
RECOMMENDED CF CARDS
Ensure you format all previously unused cards in the CFV-50c before use for optimum performance.
Do not remove a CF card from the CFV-50c if the ‘ready’ light is orange. All files on the card may become corrupted (and consequently lost) if you
do so and new formatting may also be necessary.
B
A

CFV 50c
13
Photo: Bryn Griffiths © / Hasselblad Masters
NAVIGATING THE MENU
CFV 50c
14
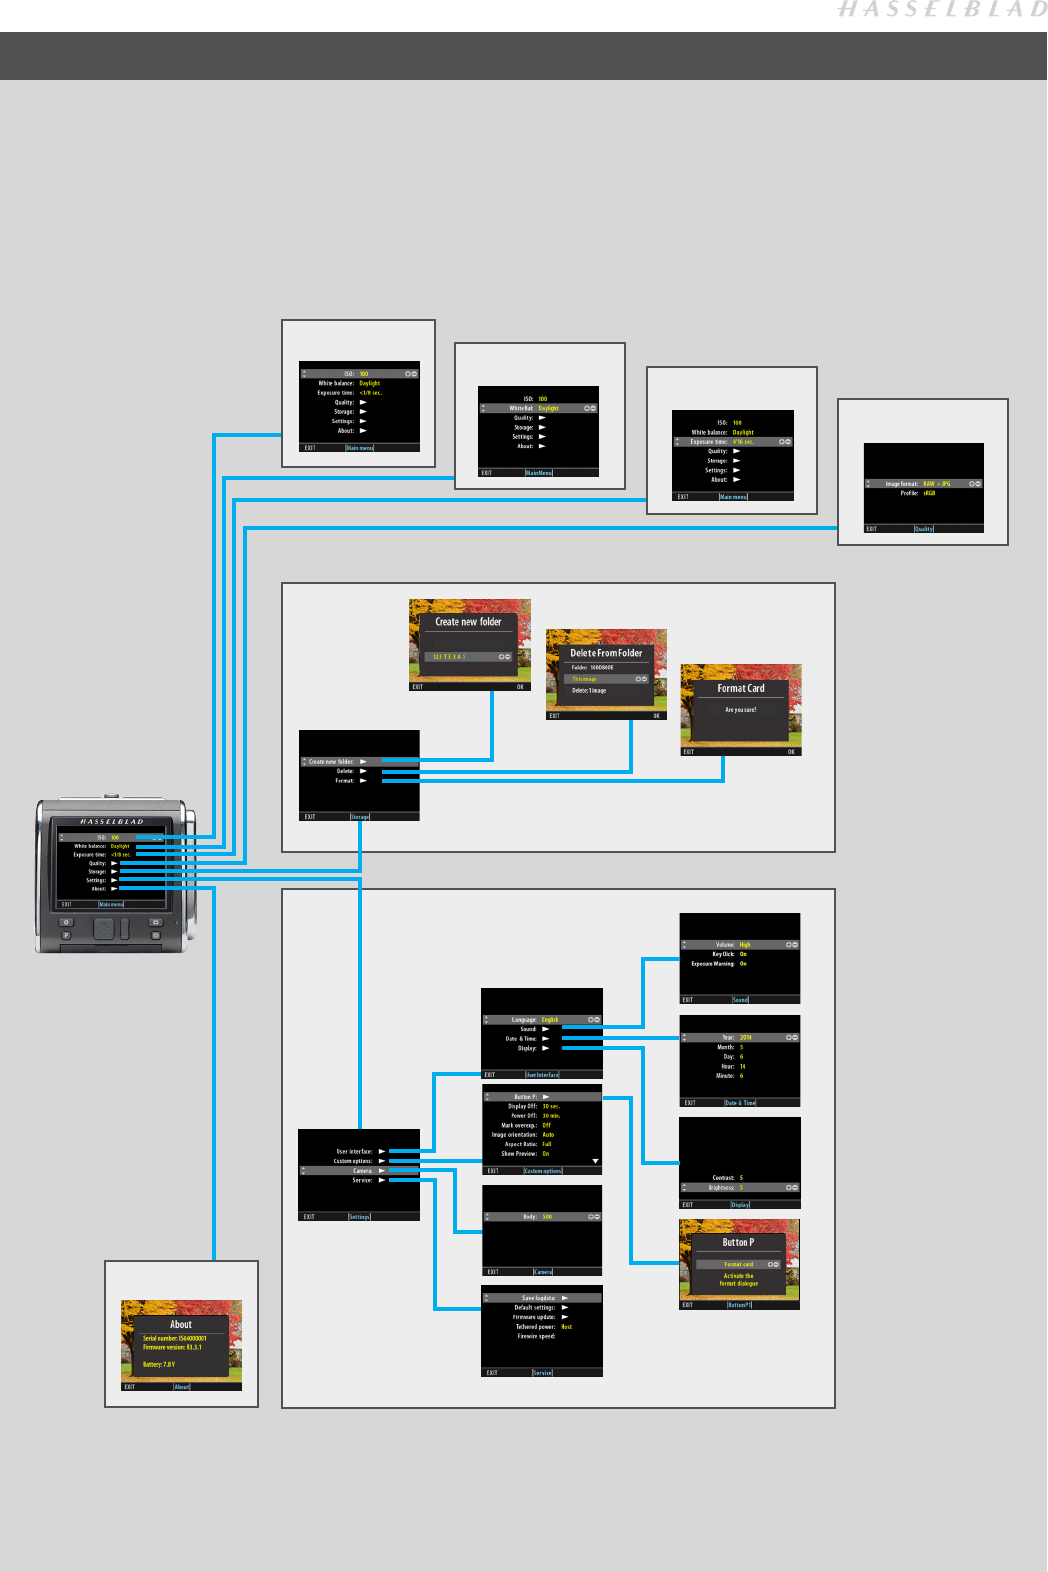
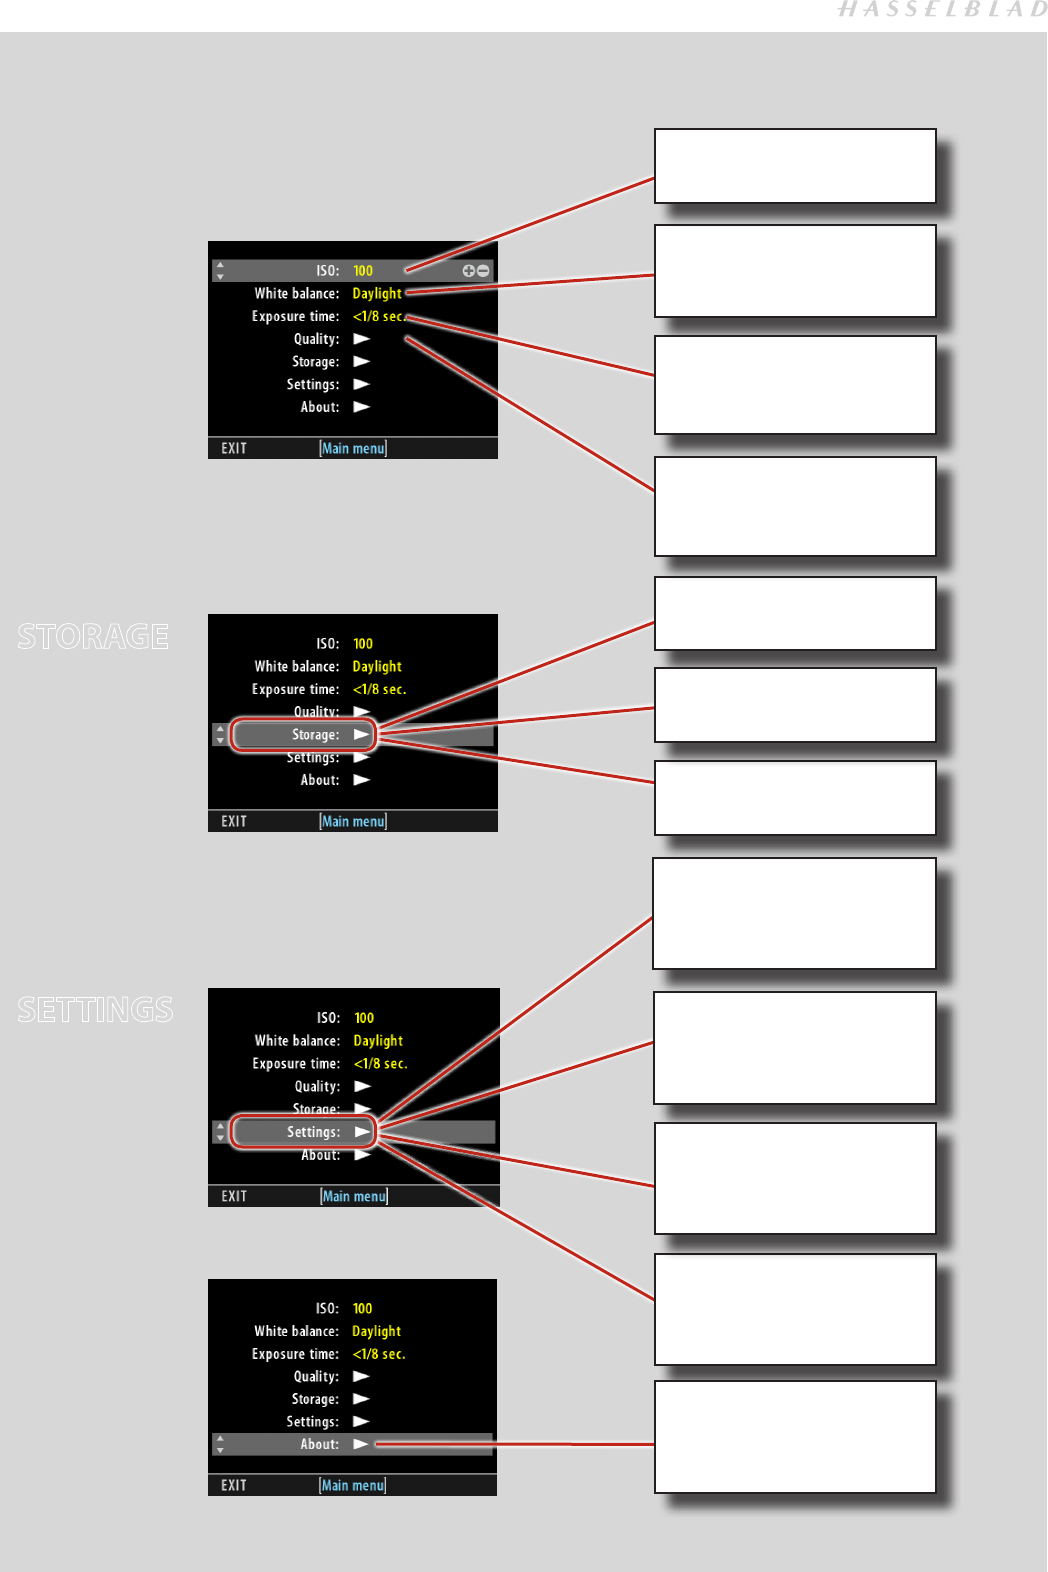
The menu is structured in a manner similar to very many digitally controlled personal devices and should be familiar to most.
Once the menu is accessed, navigation, selection and confirmation are made by the various buttons beneath the display.
The first screen presents the main divisions: ISO, White balance and Quality – for rapid access while working – followed by
Storage, Settings and About.
BASIC OVERVIEW OF MENU & SCREENS
STORAGE
SETTINGS
ISO WHITE BALANCE
QUALITY
EXPOSURE TIME
ABOUT
CFV 50c
15
STORAGE
SETTINGS
BASIC DESCRIPTION OF MENU ITEMS
By using the buttons on the control panel you can navigate
down through the various levels in the menu. Below is an
overview of the setting options available.
White Balance
Sets the colour temperature to match the light
source.
ISO
Sets the light sensitivity. of the sensor.
Exposure Time
Sets the appropriate setting to match the
selected lens shutter speed/exposure time.
User interface
Sets menu language, sound, date & time and
display.
Custom Options
Sets options regarding P Button, show
preview, mark overexposure, etc.
Service
Accesses save log data, default settings, firm-
ware update, tethered power and firewire speed.
Format
Used to format CF cards for optimum use.
Create new folder
Allows extra file folders for better workflow.
Quality
Allows option of RAW only or RAW + JPEG per
capture. Also allows profile (sRGB /Adobe 1998).
Delete
For single or multiple deletion of images.
Camera
Accesses the individual settings requirements
for the various Hasselblad V System models as
well as for view camera / large format use.
About
Provides serial number, firmware revision
and focus calibration information.
CFV 50c
16
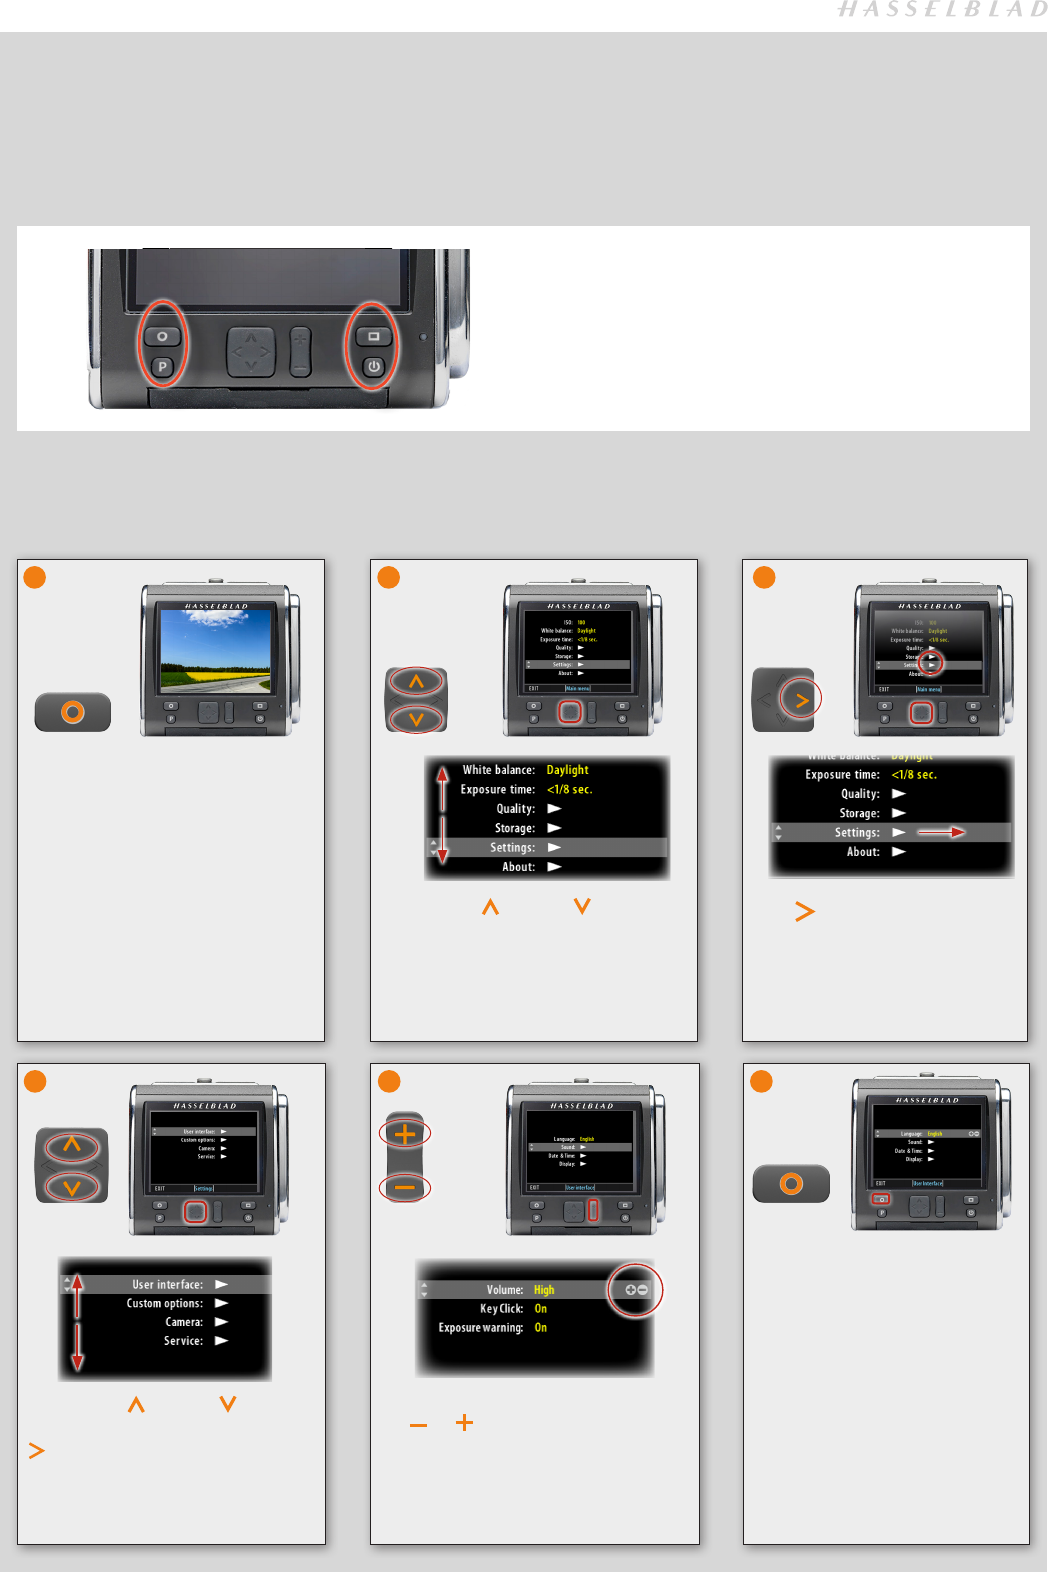
OVERVIEW OF NAVIGATING MENU AND SETTINGS.
Navigating the menu and accessing the settings on the CFV-50c are achieved by pressing the appropriate buttons surrounding
the display. Note that some of the buttons are modal and so have dual functions which is indicated by the designation that ap-
pears closest to that particular button when navigating. For example, the MENU button also acts as a SAVE or EXIT button ac-
cording to dialogue requests. To take another example, the VIEW DISPLAY button will activate the spirit-level function but is not
indicated accordingly because it requires a long press. These variations are all mentioned in the relevant sections.
In this example the Menu button acts as the Exit button and
the Display button acts as the OK button according to the
mode.
Here is an example of the necessary steps to take to make a setting change, in this case Sound. The actions are illustrated in full
here to clearly describe the procedure. The procedures later on in this manual are described and illustrated in an abbreviated
manner so it wise to study this full description first.
Press the up or down arrows
on the Navigation button to access
Settings. The highlight on the menu
item indicates selection of that par-
ticular item.
Press the Zoom button – indicated by
the or symbols on the menu list
– to step through the available choices
until the desired one is shown.
5
2
Press the MENU button to access
the menu from the regular image
display.
1
Press on the Navigation
button) to access Settings –
indicated by an arrow on the
menu list – to navigate to the
submenu screen.
Press the up or down arrows
to highlight User Interface. Press
on the Navigation button to
access Sound.
4
Press the Exit (Menu) button to
confirm and save the choice as
well as return to image view.
6
3
CFV 50c
17
Photo: Paul Gisbrecht © / Hasselblad Masters
INITIAL SETTINGS
CFV 50c
18
1. Press MENU.
2. Navigate to ISO.
3. Press the ZOOM button to step through the available settings.
4. Save the chosen selection by pressing EXIT (MENU button).
ISO can also be set on the CFV-50c when tethered, via Phocus.
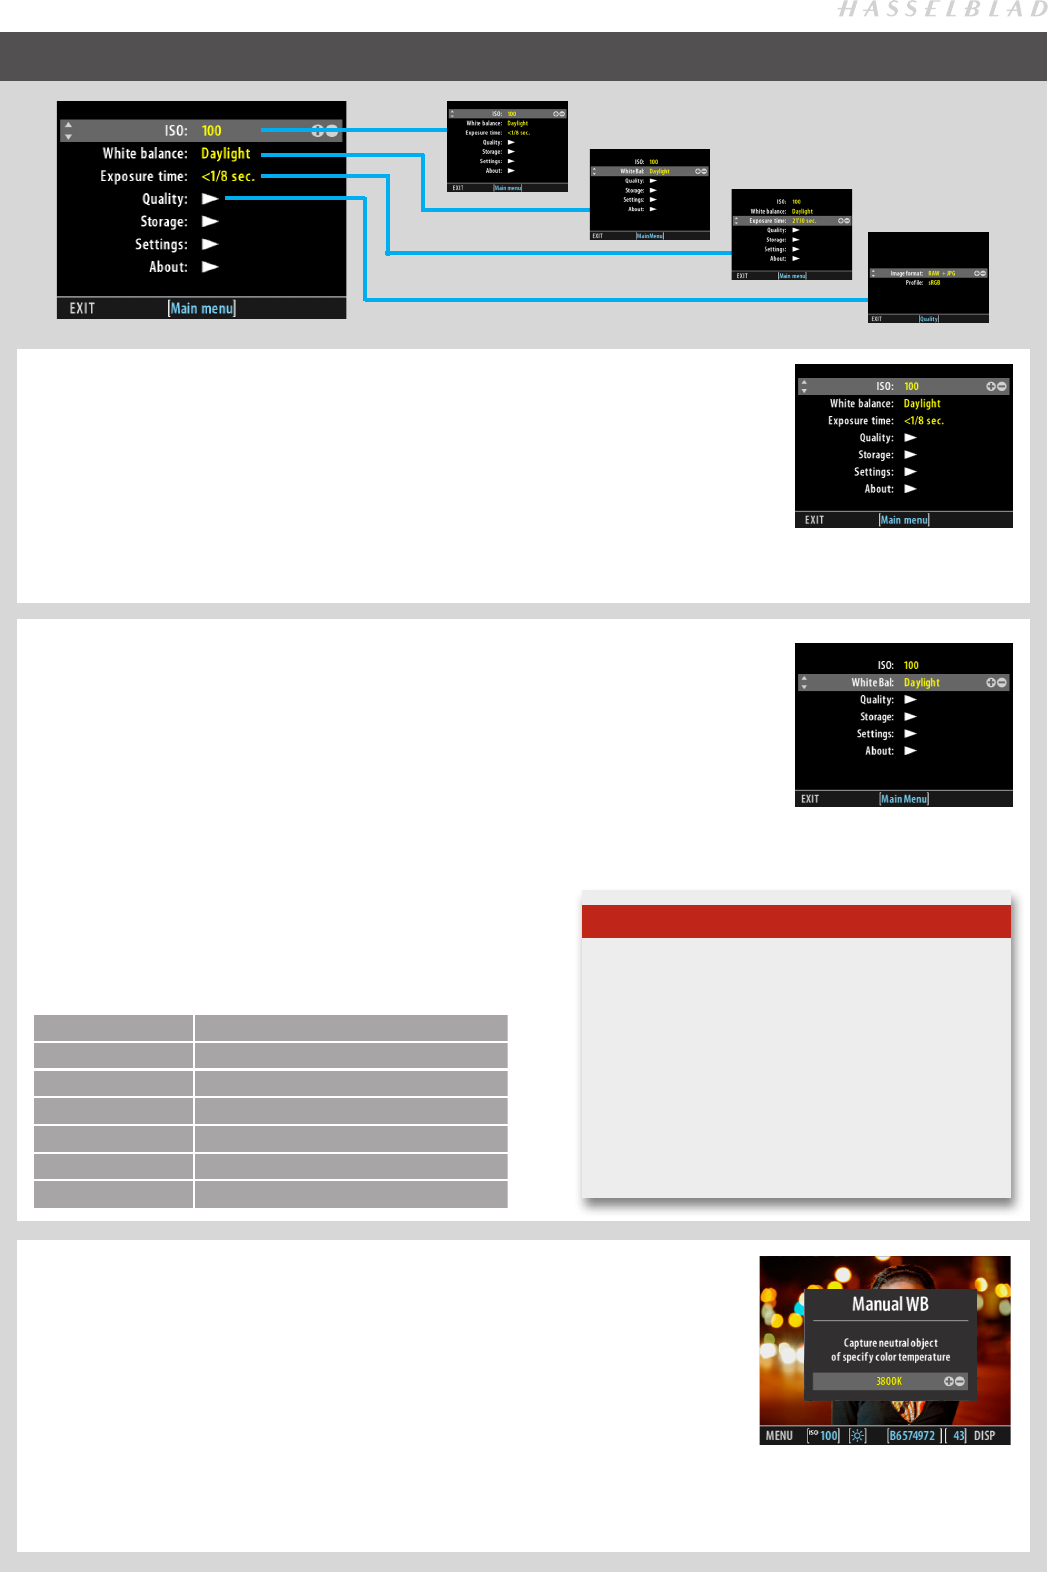
ISO SETTINGS
MENU > ISO
WHITE BALANCE SETTING
– PRESETS:
MENU > WHITE BALANCE
There are six ‘White Balance’ presets plus two manual methods of
white balance setting to choose from.
1. Press MENU.
2. Navigate to White Balance.
3. Use the ZOOM button to step through the available settings.
4. Save the chosen selection by pressing EXIT (MENU button).
White balance can also be set on the CFV-50c when tethered, via
Phocus.
White Bal. Setting Setting description
Daylight For general outdoor use in direct sunlight.
Cloudy For general outdoor use in cloudy weather.
Shade For general outdoor use in shady locations out of direct sunlight.
Flash For general indoor use when using a normal flash/strobe system.
Fluorescent For use when using fluorescent lighting (strip lights).
Tungsten For use when shooting indoors under standard tungsten/B lamps.
Manual For a manual setting
Note
White Balance settings are technically not necessary
for 3F/3FR files because raw format files contain all the
information required for correction in Phocus and/or
other software, regardless of the original color tem-
perature of the light source or color temperature set-
ting on the CFV-50c at the time of exposure.
However, if you intend to shoot RAW & JPEG or use
Phocus / Phocus Quick for JPEG production and plan
to deliver or print the JPEG files directly, then you
should make a White Balance setting.
MENU – INITIAL SETTINGS
WHITE BALANCE SETTING
NUMERICAL VALUE SETTING:
MENU > WHITE BALANCE
Manual setting allows a specific numeral setting.
1. Press MENU.
2. Navigate to White Balance.
3. Use the ZOOM button to step through until you reach Manual.
4. Use the Navigator to access the dialogue.
5. Press the ZOOM button to select the desired numerical setting.
6. Save the chosen selection by pressing EXIT (MENU button).

CFV 50c
19
There are two ways to make manual white/grey balance set-
tings using a ‘Grey card’ or ‘Qp card’ (supplied). If colour ac-
curacy is not critical, you can use any neutrally coloured area
or surface that you judge to be close to a mid-grey value
(concrete, overcast sky, or even white paper, for example). It
won’t be perfect but just try to ensure that it is as neutral as
possible in colour value.
• Make the first shot a grey card/Qp card close-up and then
make the adjustment in Phocus for the session.
• Use the integral white balance from grey card function to
make an in-camera setting for the session.
White balance settings are mirrored in Phocus when teth-
ered.
WHITE BALANCE SETTING BY USING A ‘GREY CARD’:
MENU > WHITE BALANCE > MANUAL
1. Press MENU.
2. Navigate to White Balance.
3. Navigate to Manual then press again the Navigation button again.
4. Position the central spot in the viewfinder over an area that you consider should
be rendered as neutral in color in the image and make a test capture (ensure the
exposure is approximately correct otherwise you will see a warning message). A
small rectangle appears on the display marking that parti cular area.
5. Press the MENU button to exit the menu system and keep the setting.
Calculations then take place automatically so that the following shots use the
area chosen as the new ‘white balance’ standard. Using this method you can
also read off the screen what the color temperature of the light source has been
judged to be in degrees Kelvin.
White Balance Shot screen appears
after test capture to illustrate the
area chosen for white balance cal-
culation.
MANUAL WHITE BALANCE ‘GREY CARD’ INCAMERA SETTING:
1. Press MENU.
2. Navigate to EXPOSURE TIME.
3. Press the ZOOM button to step through the settings.
4. Save the chosen selection by pressing EXIT (MENU but-
ton).
Exposure time can also be set on the CFV-50c when tethered,
via Phocus.
EXPOSURE TIME
MENU > EXPOSURE TIME
Exposure time is set in accordance with the already deter-
mined shutter setting. Increments from are 1/8 second or
faster.
QUALITY
MENU > QUALITY
Image format offers a choice between the creation of RAW only files or simultaneous RAW
+ JPEG files from each capture.
Profile offers a choice between an sRGB or an Adobe 1998 profile for JPEG captures.
IMAGE FORMAT SETTING:
1. Press MENU.
2. Navigate to Quality.
3. Navigate to Image Format.
4. Press the ZOOM button – to step through the available options.
5. Save the chosen selection by pressing EXIT (MENU button).
Tip
When changing large differences in
exposure time it is more practical to
use the Flash Sync cable method.
See Camera Connectivity in this
manual.

CFV 50c
20
Photo: Martin Schubert © / Hasselblad Masters
FILE STORAGE
CFV 50c
21
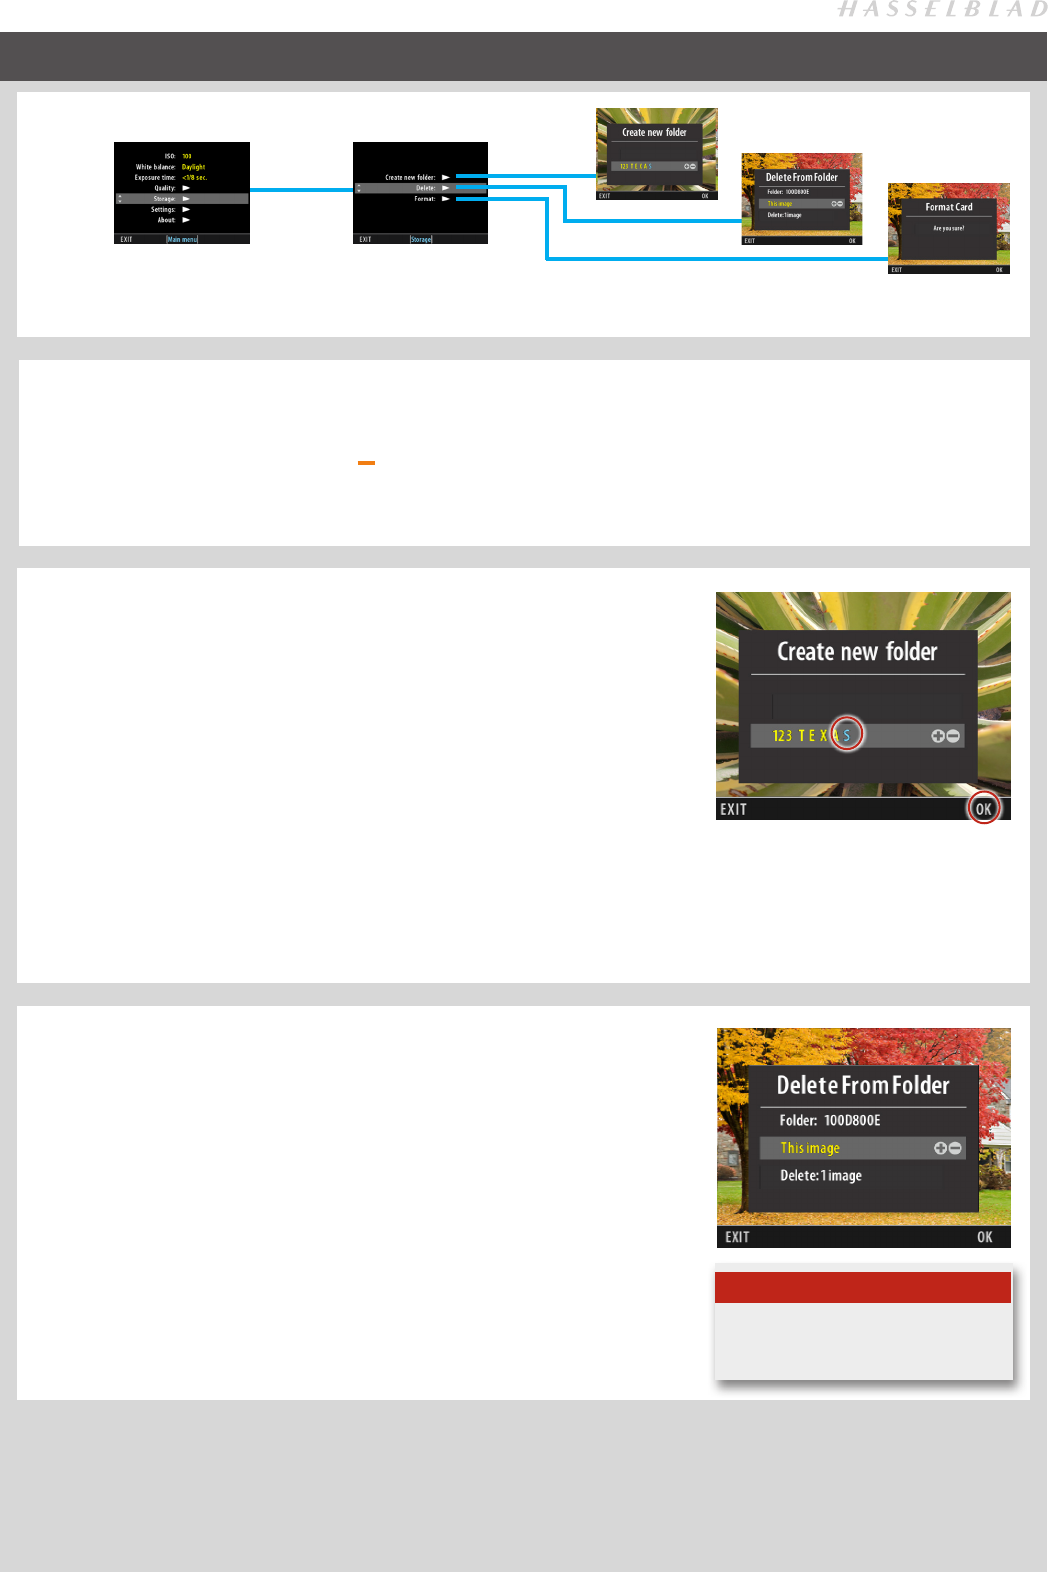
STORAGE
Note
You will always be asked to confirm
each delete operation.
DELETE
MENU > STORAGE > DELETE
Delete allows you to make single or multiple deletes of captures.
1. Browse to image you want to delete
2. Press MENU.
3. Navigate to Storage.
4. Navigate to Delete.
5. Navigate to Delete dialogue.
6. Press the ZOOM button to step through options.
7. Press OK (Display button) to confirm.
You can choose to customise the P button for immediate access to ‘Delete’.
Storage includes three entries: Create new folder, Delete and Format.
‘CURRENT’ FOLDER SELECTION
You can re-direct new captures to a selected folder for storage instead of the latest folder created.
1. Enter Browse mode
2. Zoom out (use the ZOOM out button ) to reach the Folder View.
3. Navigate to the desired folder (use the Navigator and zoom in) and return to the Standard Preview.
4. In this way, the newly selected folder becomes the ‘current’ folder, so all new captures will now be stored there instead.
CREATE NEW FOLDER
MENU > STORAGE > CREATE NEW FOLDER
All new captures are automatically stored in the current folder until directed
otherwise. A newly created folder automatically becomes the ‘current’ folder.
1. Press MENU.
2. Navigate to STORAGE.
3. Navigate to CREATE NEW FOLDER dialog.
4. The CREATE NEW FOLDER dialog allows folder naming. The first three-
digits are fixed and are automatically incremented for each new folder.
The following five characters can be assigned as follows:
Use the Navigator to select each character in turn. When selected (high-
lighted as blue) use the ZOOM button to select the desired character/digit.
5. Press OK (Display button) to save.
The last character has been selected
and is colored blue to indicate that it
can be changed. Pressing OK saves
the new name and creates the new
folder which now becomes the ‘cur-
rent’ folder.

CFV 50c
22
FOR MAT
The camera is only able to read and write to storage media
that have been formatted correctly. New cards sometimes
have no formatting, or you might want to convert a card that
is currently using a format that the camera cannot read. In
either case, you must reformat the CF card.
MENU > STORAGE > FORMAT
1. Press MENU.
2. Navigate to Storage.
3. Navigate to Format.
4. Navigate to Format dialogue.
5. Confirm by pressing OK (Display button).
You can choose to customise the P button for immedi-
ate access to ‘Format’.
CFV 50c
23
Photo: Bryn Griffiths © / Hasselblad Masters
SETTINGS
CFV 50c
24
LANGUAGE
MENU > SETTINGS > USER INTERFACE > LANGUAGE
Language choice is retained but can be changed at any time. Choose between:
English, German, French, Italian, Spanish, Japanese, Chinese, Korean.
1. Press MENU.
2. Navigate to Settings.
4. Navigate to User Interface.
5. Navigate to Language.
6. Press the ZOOM button to step through options.
7. Save the chosen selection by pressing EXIT (MENU button).
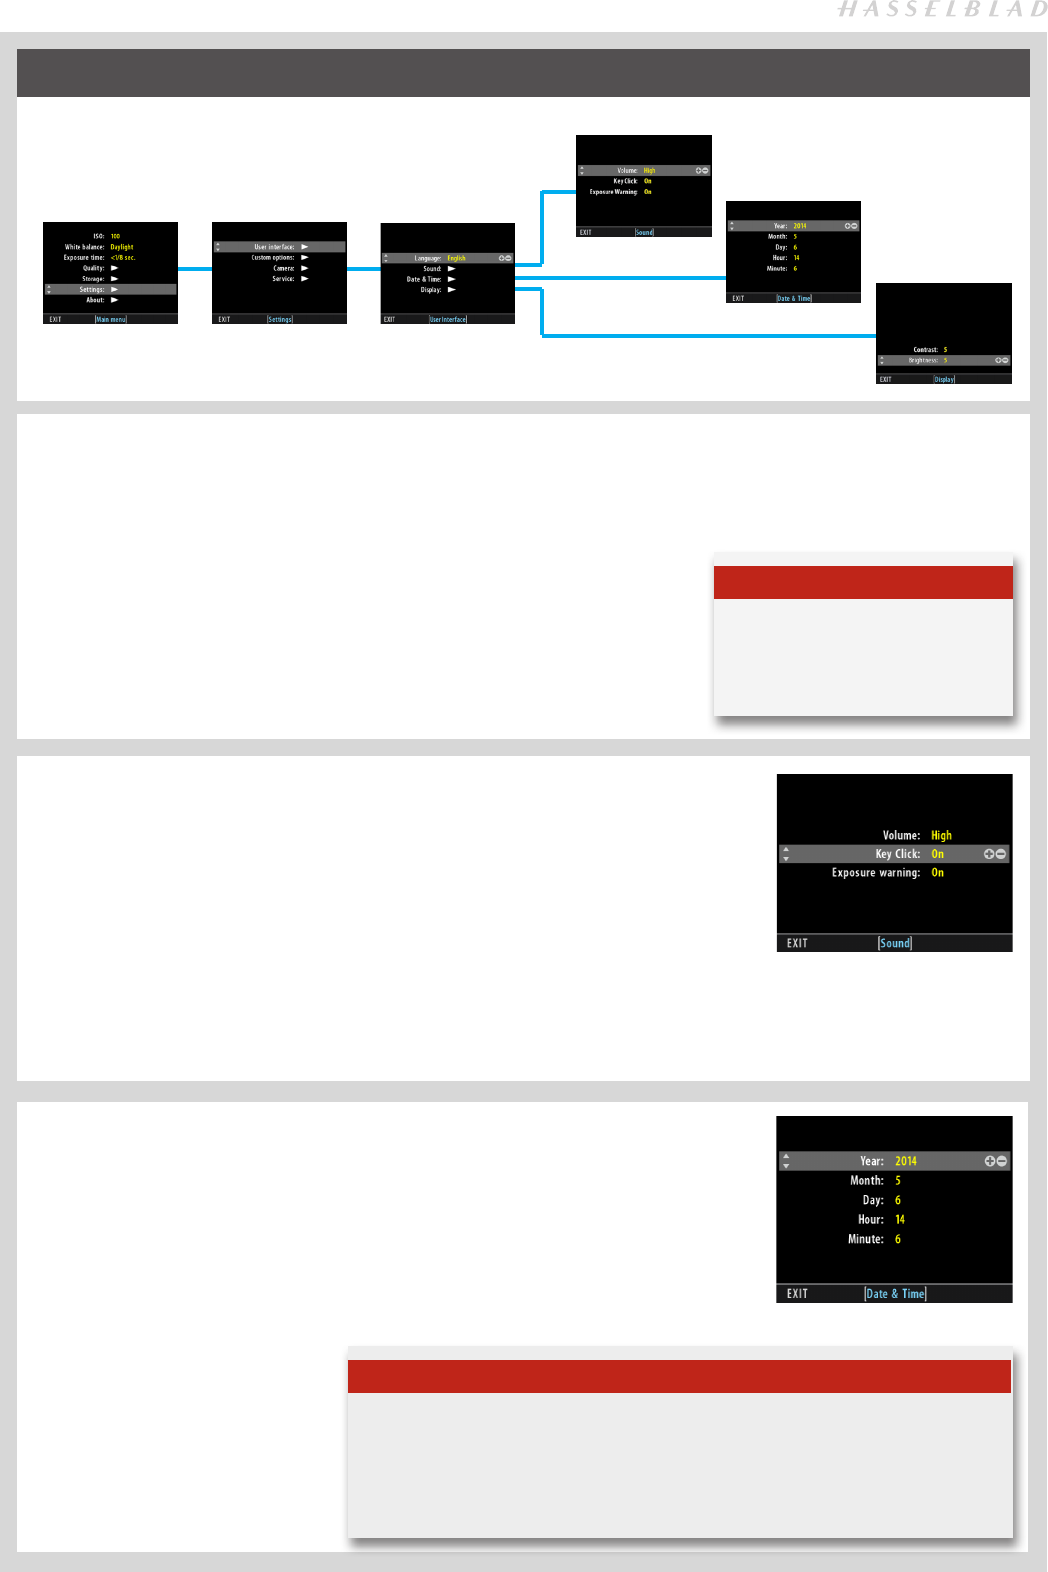
SOUND
MENU > SETTINGS > USER INTERFACE > SOUND
Volume level of all sounds and the option of ‘key click’ and ‘Exposure warning’
sounds can be selected:
1. Press MENU.
2. Navigate to Settings.
4. Navigate to User Interface.
5. Navigate to Sound the navigate to the options.
6. Press the ZOOM button to step through options.
7. Save the chosen selection by pressing EXIT (MENU button).
Tip
If the CFV-50c has been set to a lan-
guage you don't understand (a rent-
ed back, for example), see section in
Appendix for solution.
DATE & TIME
MENU > SETTINGS > USER INTERFACE > DATE & TIME
The CFV-50c has an internal clock that keeps track of the date and time. This informa-
tion is used to mark each shot with the date and time at which it was taken. It is also
used to label folders with the date on which each folder was created. (See note about
keeping the internal battery charged to maintain Date and Time settings).
1. Press MENU.
2. Navigate to Settings.
3. Navigate to User Interface.
4. Navigate to Date & Time.
5. Navigate to required item to select
it.
6. Press the ZOOM button to step
through options.
7. Save the chosen selection by press-
ing EXIT (MENU button).
Note
Time & Date settings on the CFV (which are included with your capture files and batch
labels) are updated automatically through a FireWire/Phocus connection. These set-
tings are retained for about two consecutive weeks by a small rechargeable cell that is
automatically recharged by the main battery or FireWire with regular use.
If problems occur, charge the cell by leaving the CFV ON for approximately 12 hours.
SETTINGS
SETTINGS > USER INTERFACE
CFV 50c
25
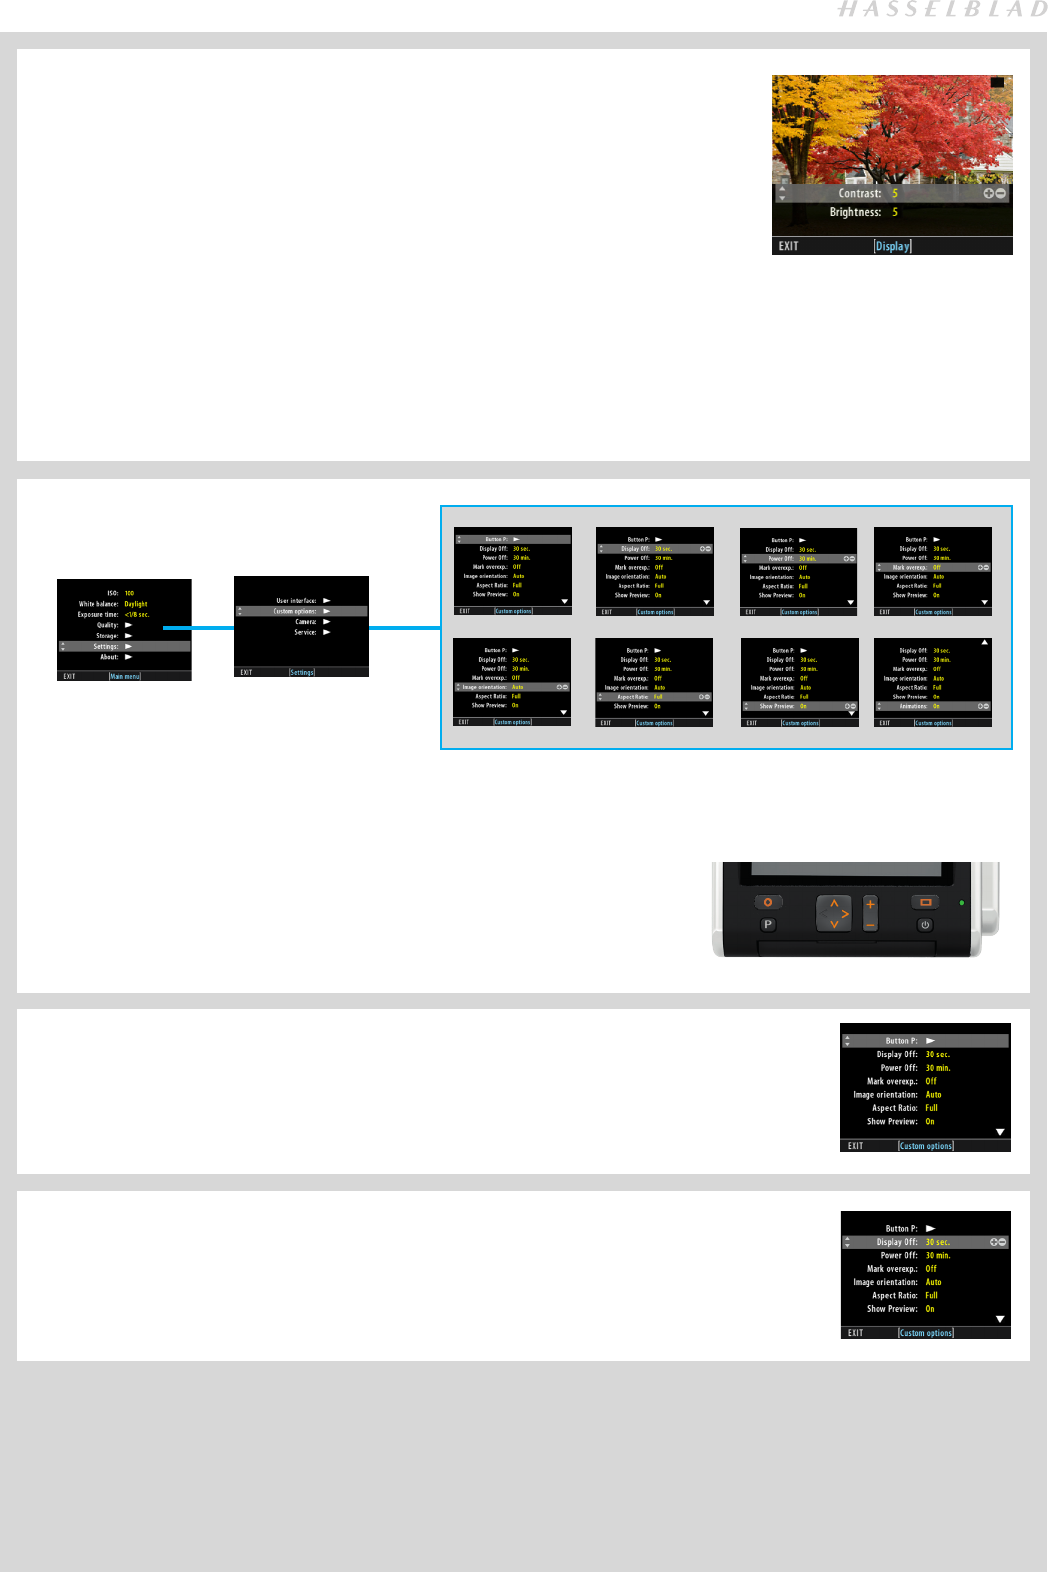
DISPLAY
MENU > SETTINGS > USER INTERFACE > DISPLAY
This setting controls the level of Contrast and Brightness (both on a scale of 1-10) on
the display. Usually, you should leave this set to the default level of 5; however in some
viewing environments and/or with some types of images you may wish to increase or
decrease this value. A value of 10 provides maximum contrast; a value of 0 provides no
contrast (a black screen) while a value of 10 provides maximum brightness; a value of 0
provides minimal brightness. Lower brightness values require less battery power.
1. Press MENU.
2. Navigate to Settings.
3. Navigate to User Interface.
5. Navigate to Display.
6. Press the ZOOM button to step through options.
7. Save the chosen selection by pressing EXIT (MENU button).
Custom Options allows the setting of various options, as listed here. The setting procedure is the same for these features:
1. Press MENU.
2. Navigate to Settings.
3. Navigate to Custom Options.
4. Navigate to required item.
5. Press the ZOOM button to step through options.
6. Save the chosen selection by pressing EXIT (MENU button).
SETTINGS > CUSTOM OPTIONS
Navigator Display
Zoom
Menu
• P Button Function
MENU > SETTINGS > CUSTOM OPTIONS > P BUTTON
The P button is a customizable button to rapidly access a variety of functions.
OPTIONS: Delete image, Format card, Focus confirm, Live View, Browse mode, Mark over-
exposure
• Display Off
MENU > SETTINGS > CUSTOM OPTIONS > DISPLAY OFF
Sets the amount of elapsed time before the display is turned off. See ‘Power Modes’ section
in this manual for further details.
OPTIONS: 10 sec, 20 sec, 30 sec, 60 sec and Never.
CFV 50c
26
• Power Off:
MENU > SETTINGS > CUSTOM OPTIONS > POWER OFF
Sets the amount of elapsed time before the back turns itself off completely requiring a re-
start.
OPTIONS: 30 min, 60 min, Never
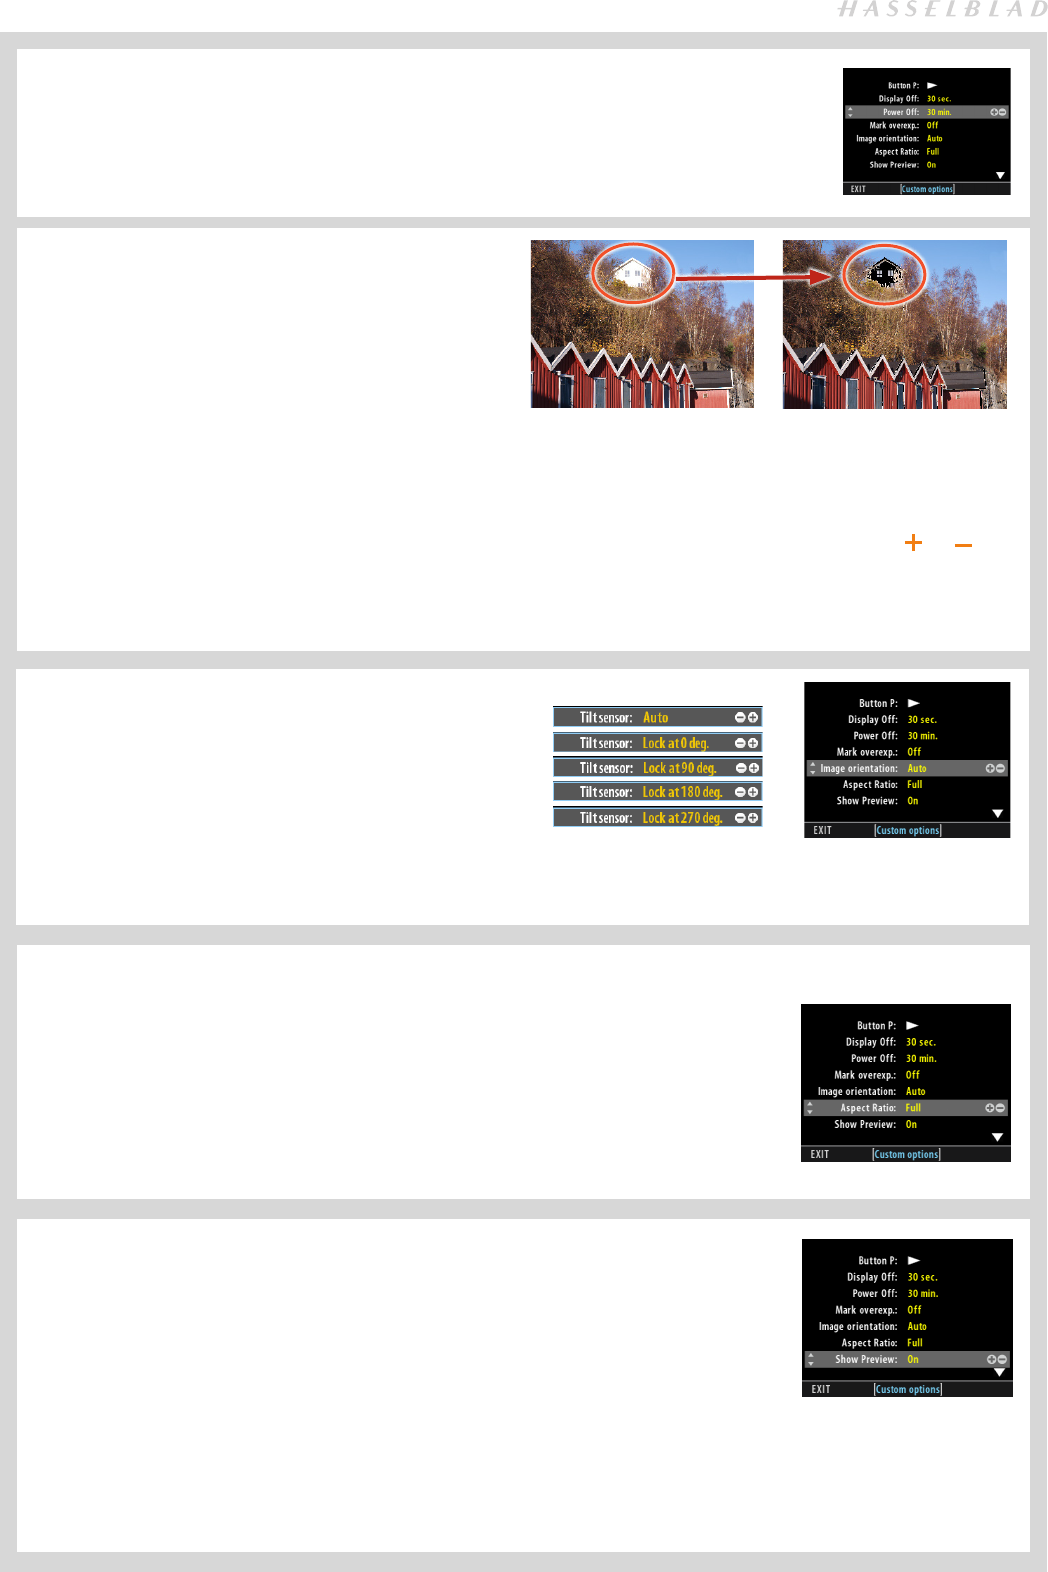
• Mark overexposure
MENU > SETTINGS > CUSTOM OPTIONS > MARK OVER
EXP.:
Though a histogram shows you when some of your pixels
are overexposed, it does not tell you which ones. In a shot
with many bright areas, it can be hard to know whether
the key parts of your image are just bright or completely
overexposed. To help you find them, the CFV-50c can pro-
vide an overexposure indicator, which shows precisely
which areas of your shot are overexposed (i.e., pixels that
are at maximum brightness, causing loss of detail). When
enabled, the overexposure indicator flashes the overex-
posed pixels from black to white.
You can choose to customise the P button for immedi-
ate access to ‘Mark overexposure’.
Affected areas flash from black to white.
1. Press MENU > SETTINGS > CUSTOM OPTIONS >
MARK OVEREX.
2. Select On or Off by pressing the ZOOM ( or )
button.
3. Save the selection option by pressing EXIT (Menu
button).
• Image Orientation
MENU > SETTINGS > CUSTOM OPTIONS > IMAGE
ORIENTATION
Sets the viewing orientation of captures when they appear
in Phocus. Also avoids unintentional orientation changes
when the camera is pointing straight up or down, for
example. Settings can be locked at:
OPTIONS: Auto, Lock at 0 degrees, Lock at 90 degrees, Lock
at 180 degrees and Lock at 270 degrees.
• Aspect Ratio
MENU > SETTINGS > CUSTOM OPTIONS > ASPECT RATIO
Aspect Ratio selects either Full or Square Crop of the files.
1. Press MENU.
2. Navigate to Settings
3. Navigate to Custom Options.
4. Navigate to Aspect Ratio.
5. Press the ZOOM button to
select Full or Square Crop.
6. Save the chosen selection
by pressing EXIT (MENU
button).
OPTIONS: Full, Square Crop.
• Show Preview
MENU > SETTINGS > CUSTOM OPTIONS > SHOW
PREVIEW
Selects whether a preview appears after every exposure
or not.
1. Press MENU.
2. Navigate to Settings
3. Navigate to Custom Options.
4. Navigate to Show Preview.
4. Press the ZOOM button to select On or Off.
5. Save the chosen selection
by pressing EXIT (MENU
button).
OPTIONS: On, Off.
You can choose to customise
the P button for immeditate ac-
cess to ‘Focus check’. This will
adjust the preview to 100%.
CFV 50c
27
SETTINGS > CAMERA
MENU > SETTINGS > CAMERA
Selects the particular camera in use to ensure the correct exposure synchronisation. See ‘Cam-
era Connectivity’ chapter for complete information.
SETTINGS > SERVICE
SERVICE
MENU > SETTINGS > SERVICE
SaveLogdata saves a log file on the CF card.
Default Settings resets all settings back to factory settings. See the Appendix in this manual
for a detailed list of the default settings.
Firmware update: Download the latest firmware update for the sensor unit from the Hassel-
blad website. Unzip the file first and then transfer the “.cim” file to a CF card. Insert the card
in the camera and navigate to “Firmware update”. The sensor unit will then automatically
update.
Tethered power offers options when using a Thunderbolt to FireWire adapter, for example,
on a MacBook Pro. This particular configuration does not supply enough power to the camera
from the computer so in this case the ‘Battery’ option should be selected. Select ‘Host’ for all
other configurations.
Firewire speed displays the setting for the current transfer rate.
1. Press MENU.
2. Navigate to Settings.
3. Navigate to Service.
4. Navigate to required item.
5. Press the ZOOM button to step through options.
6. Save the chosen selection by pressing EXIT (MENU button).
Select this option when using
a Thunderbolt to FireWire
adapter.
Select this option when using
other configurations than
a Thunderbolt to FireWire
adapter.
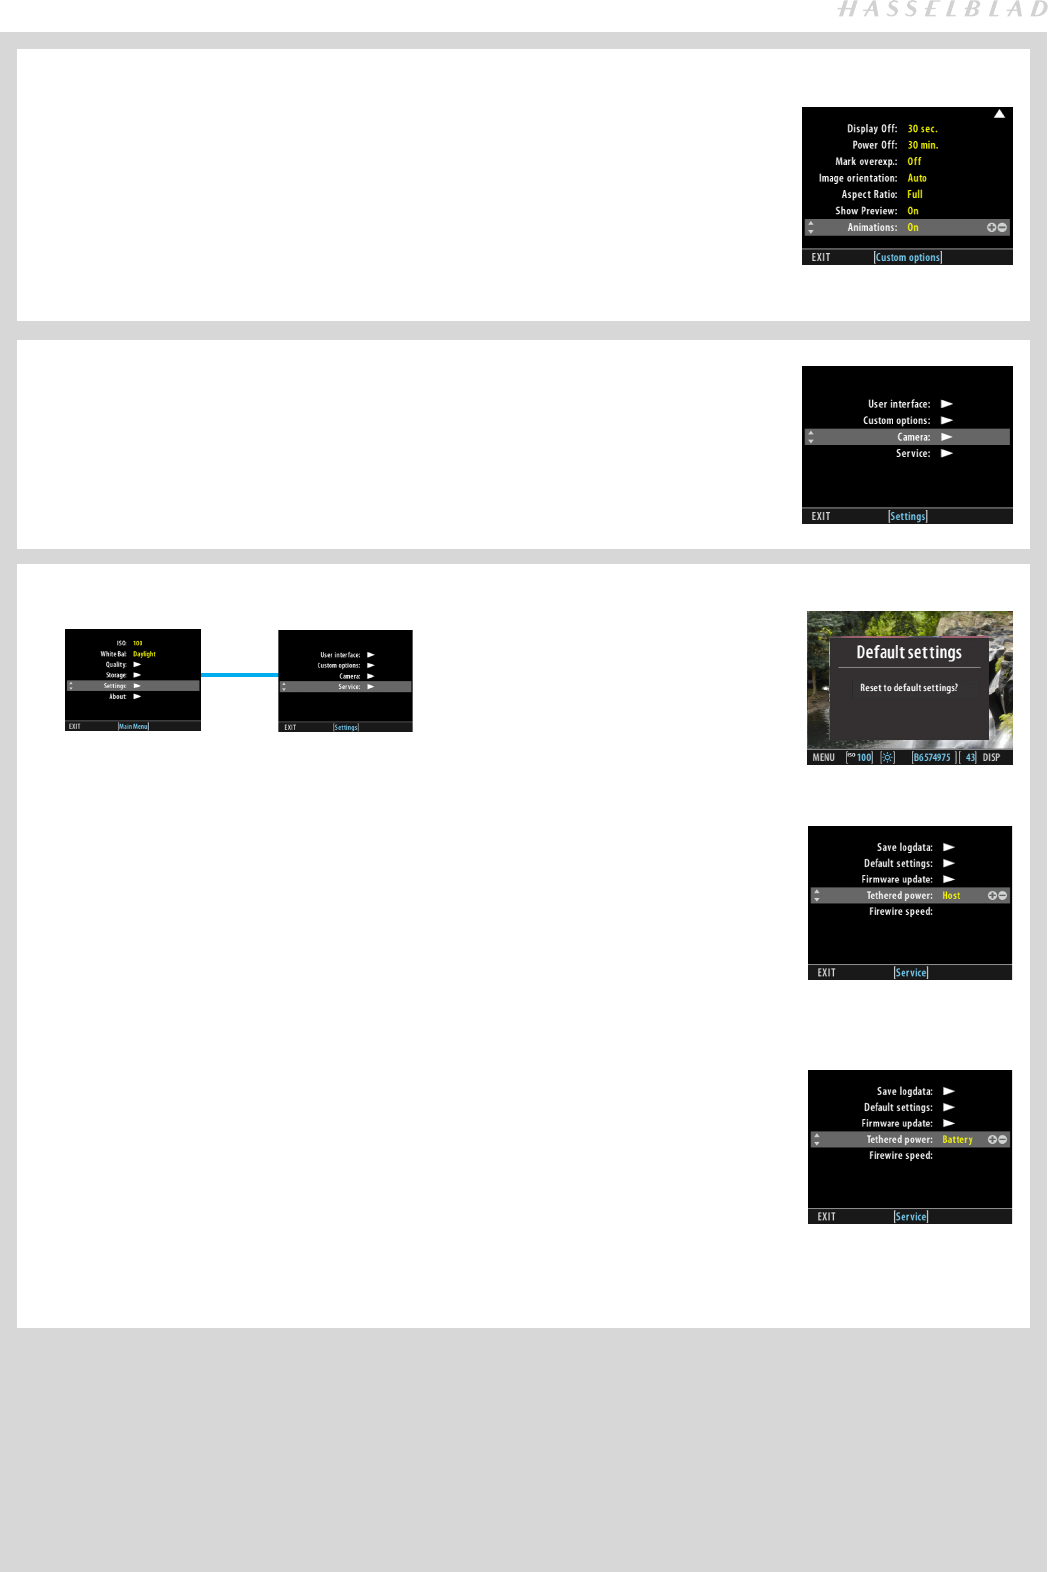
• Animation
MENU > SETTINGS > CUSTOM OPTIONS > ANIMATION
Animation selects the behaviour of previews on the display
when browsing and zooming.
1. Press MENU.
2. Navigate to Settings
3. Navigate to Custom Options.
4. Navigate to Animations.
5. Press the ZOOM button to
select.
6. Save the chosen selection
by pressing EXIT (MENU
button).

CFV 50c
28
ABOUT
MENU > ABOUT
The About box displays which firmware version is present so
you can see if you have the latest (which can be downloaded
from the Hasselblad website). The serial number is also dis-
played in case Hasselblad Support need to know it for any
eventual problem solving.
1. Press MENU.
2. Navigate to About.
CFV 50c
29
PREVIEWS, BROWSING & LIVE VIEW
Photo: Dmitry Ageev © / Hasselblad Masters
CFV 50c
30
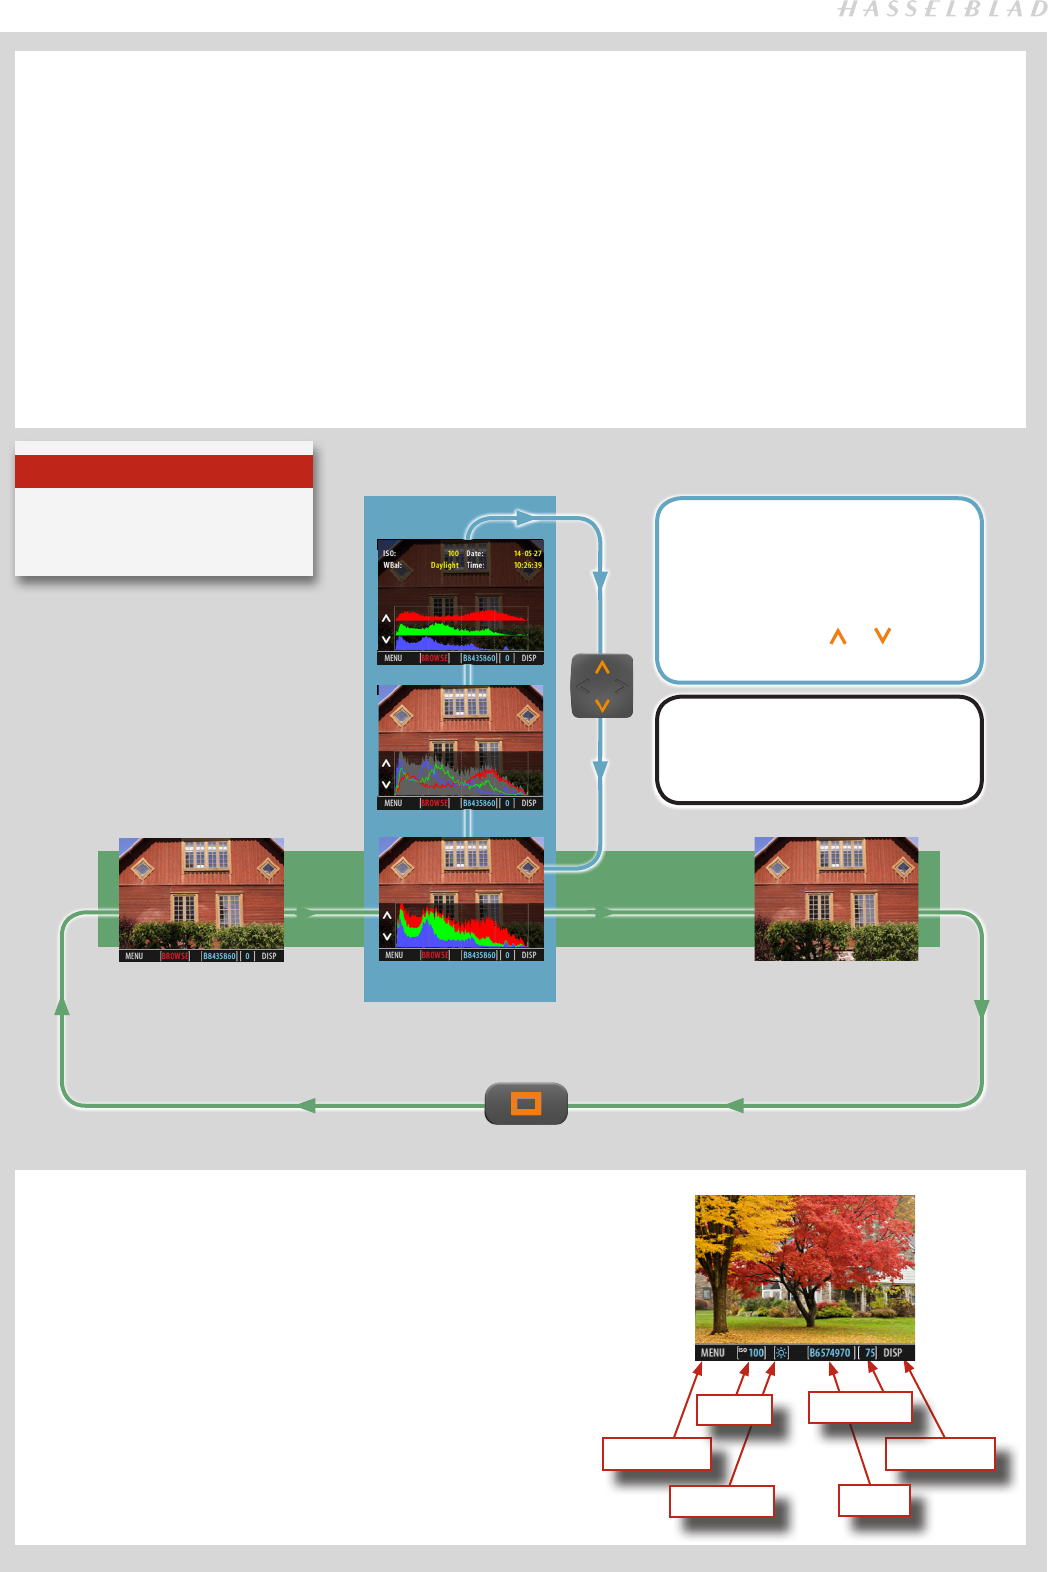
PREVIEW MODES
Use the Display button to cycle through the available pre-
view modes which are:
• Standard preview:
Shows a preview image surrounded by a display of a few
important settings. Note that the information covers some
of the image. Go to Full–screen mode to see whole image.
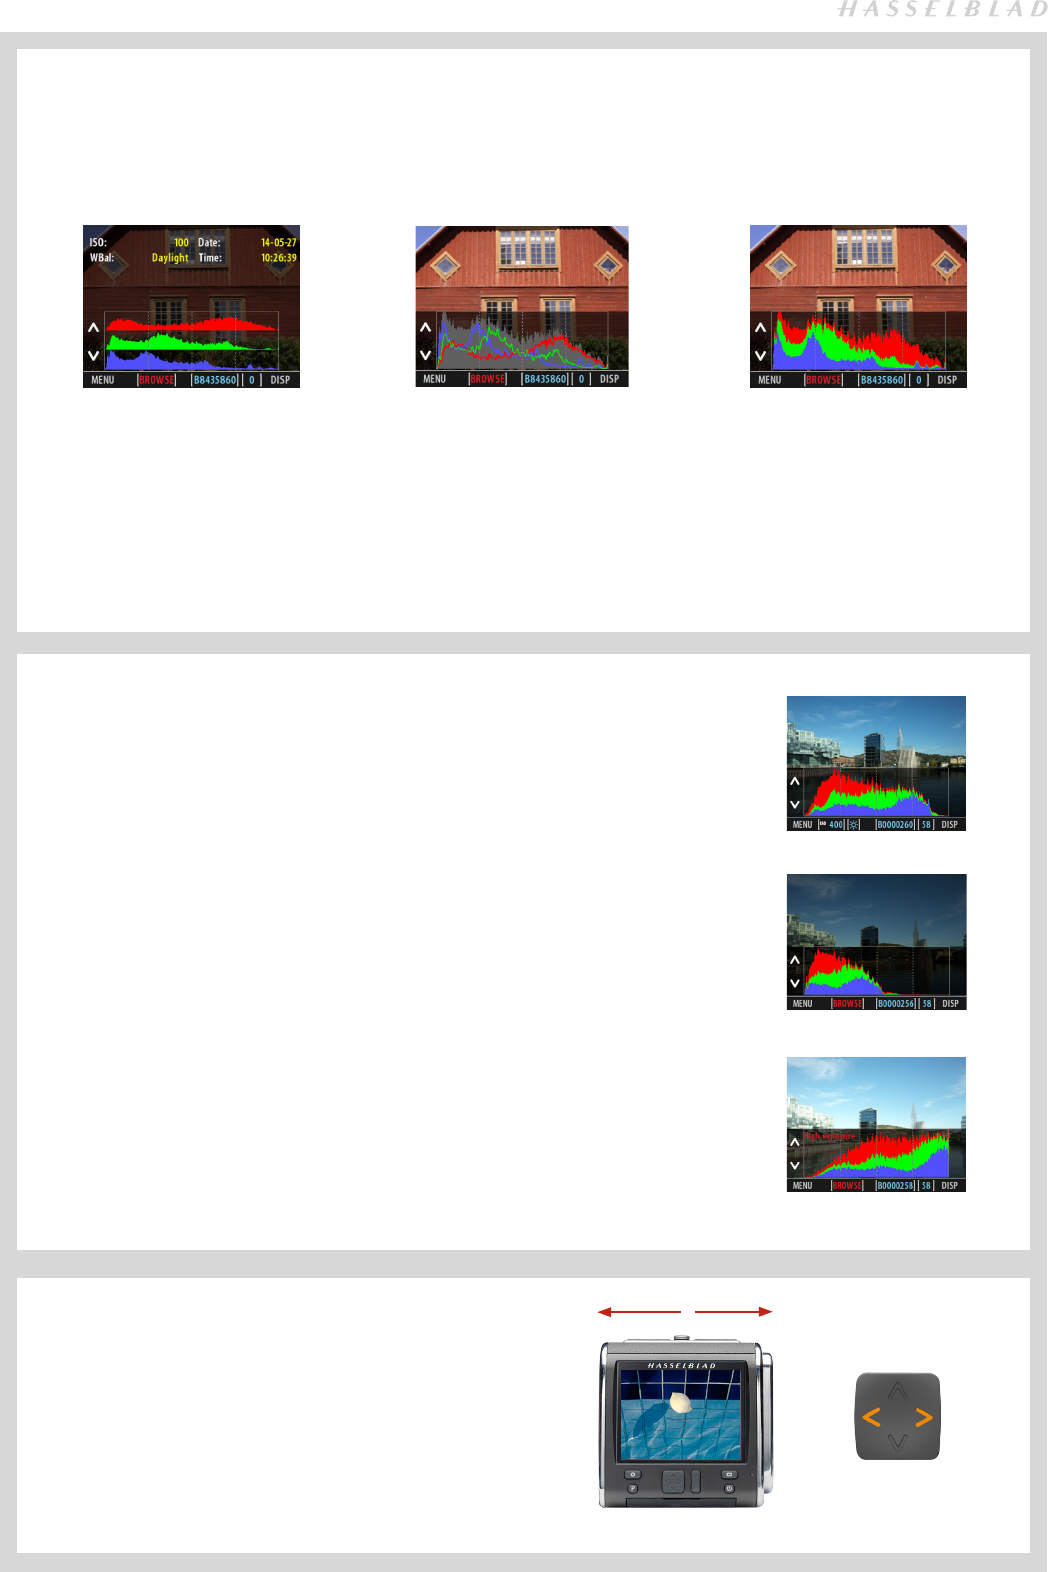
• Histogram:
Shows a preview image overlaid with a histogram.
• Full-screen preview:
Shows the preview only, with no frame or settings
information.
Two additional screens also available, accessible from the
Histogram preview by pressing the up and down arrows on
the navigation button.
• Combined Histogram:
Shows a preview image overlaid with a histogram display-
ing the three components: red blue and green.
• Histogram and full details:
Shows a preview image overlaid with both a histogram
and camera-setting details.
STANDARD PREVIEW
The Standard Preview display is the one shown when you
first turn on the camera and is probably the view you will use
most often.
It displays a preview of your most recent capture and basic
information about the settings.
This preview also enables you to navigate the menu system.
See Simple description of menu items for details.
Button function Button function
ISO setting
White balance File name
Capture counter
Full-screen preview
Standard preview
Histogram and Full details and
Combined histogram are accessed
by firstly navigating to Histogram
mode by pressing the Display
button and then pressing the up
or down arrows (
or )
on the
Navigation button.
Combined Histogram
Histogram and Full Details
Standard, Histogram and Full-screen
preview modes are accessed by
pressing the Display button.
Histogram
The standard preview displays infor-
mation described below.
Full screen preview displays the full
format view without distractions.
Tip
Note that the display mode can also
be changed when the camera is
tethered to a computer.
CFV 50c
31
HISTOGRAM MODE – EXPOSURE LEVEL
The histogram provides a graph that indicates the total number of pixels at each
brightness level, with brightnesses going from black on the left to white on the
right. It is a valuable tool for evaluating captures. A well-exposed shot usually has
a full range of levels, while under- and overexposed shots tend to show levels con-
centrated at the left or right part of the scale, respectively. The histogram is only
an indicator that should be interpreted – there are several situations in which a
‘bad’ histogram will match an exposure that could be perfect for the intended ef-
fect (and vice-versa). Look at the histogram examples and the explanations below:
EVEN EXPOSURE
A histogram display that is spread across the full range indicates a likely good ex-
posure. There may still be a few pixels at the extremes, indicating a few spectral
highlights and saturated shadows, but this is often normal in a good exposure.
UNDEREXPOSURE
A histogram display that is concentrated on the left with few pixels elsewhere indi-
cates a likely underexposure. Many details will be lost in the shadows.
OVEREXPOSURE
A histogram display that is concentrated on the right with few pixels elsewhere
indicates a likely overexposure. Many details will be lost in the highlights.
BROWSING
In Browse mode use the left or right arrows on the navigator
button) to browse captures in a folder. Zoom out to Folder View
if you want to select another folder to browse.
You can also browse when at a specific histogram setting where
the graphs and information remain reflecting the new images.
You can customise the smooth scrolling on or off in the
Custom Options menu (Animations)
Histogram and Full details Combined Histogram Histogram mode
Even exposure
Underexposure
Overexposure
HISTOGRAM TYPES
There are three types of histogram representation available: Histogram and Full details, Combined histogram and Histogram
mode.
In Histogram and Full details mode,
you can read a list of camera set-
tings, plus see the histogram and, in
the background, a darkened preview
of the image. The setting details are
stored with the capture file, so you
can also refer to them in Phocus and
other applications.
In Combined Histogram mode, the
RBG channels are represented to
show individual distribution against
a luminosity histogram.
In Histogram mode, the individual
RBG channels are represented to
show a comparative display.
CFV 50c
32
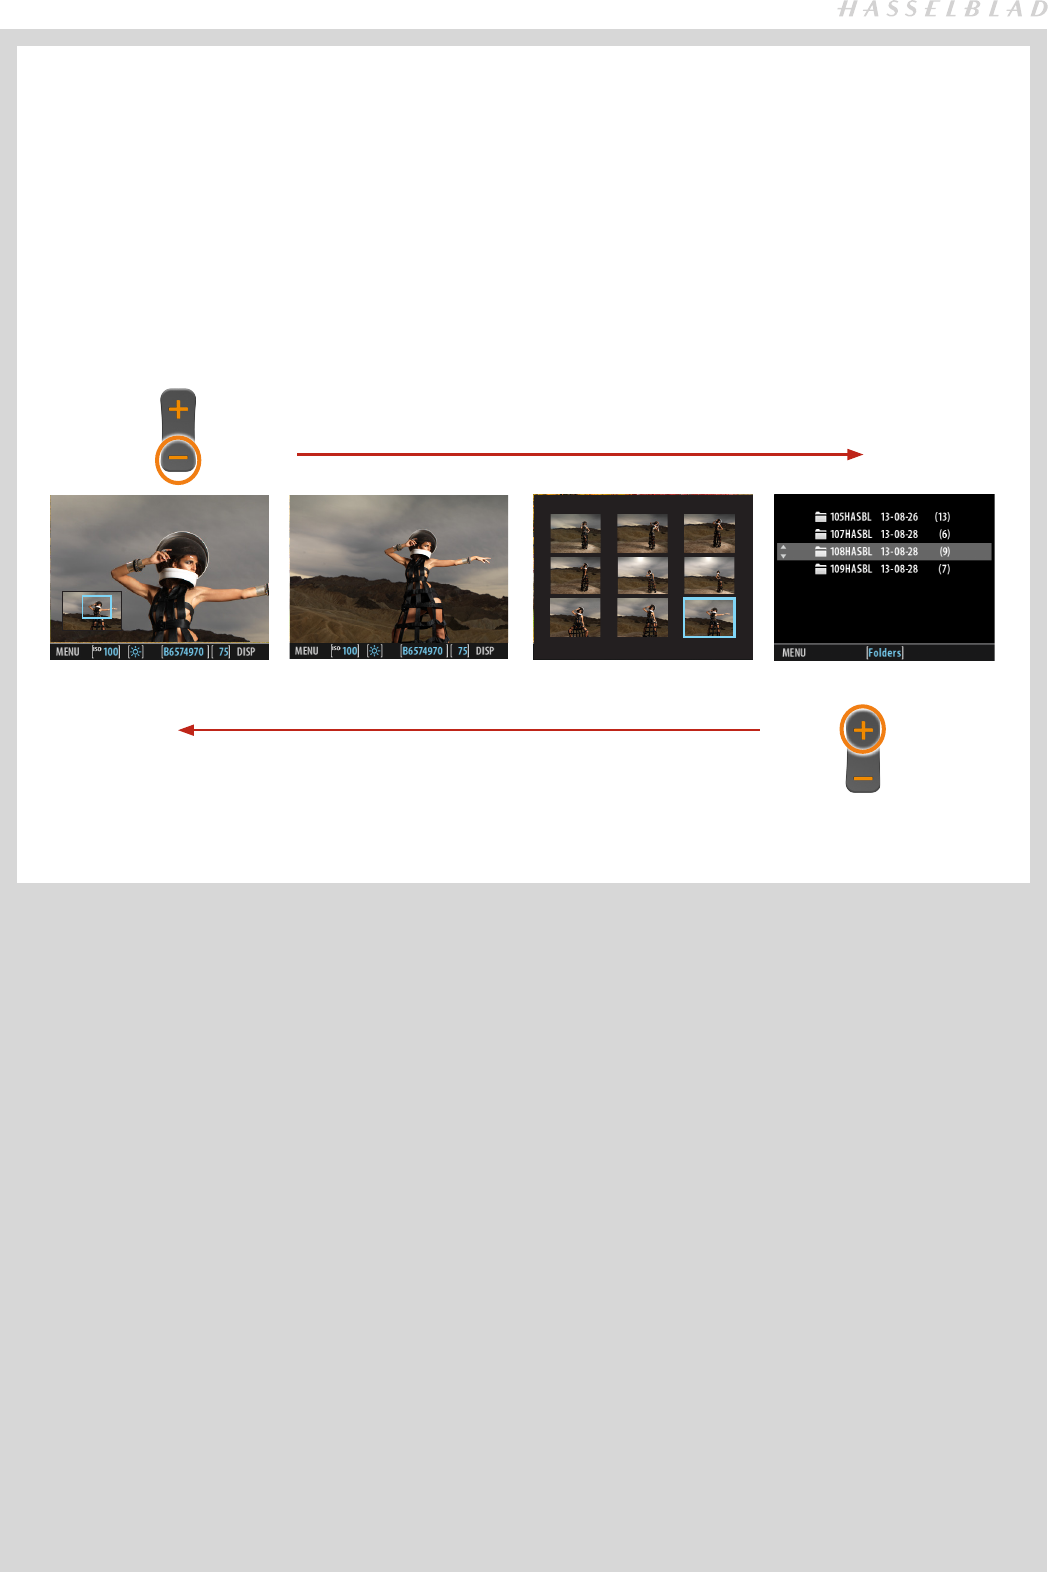
ZOOMING IN AND OUT
There are four views in Browse mode. Zoom in by using the Zoom in (
+
) / out (
-
) button.
Zoomed View is reached by zooming in from the Standard View. When zoomed in, you can select the area of interest by
using the navigation button. A smaller inserted overview of the capture at 100% displays the position of the enlarged area
with a blue frame. While zoomed in, navigate the blue frame (with the navigator button)to view other areas of interest for
checking.
Standard Preview displays the full frame partially covered by the information bar at the bottom.
9-Thumbnail View displays an overview of your work so far and helps to find specific shots. Selection of specific images,
highlighted by a blue frame, is made by the navigation button.
Folder view displays the list of folders saved. The highlighted folder is the current folder and contains the images you were
browsing. Navigate to another folder and then zoom in to reveal its contents if desired.
Standard PreviewZoomed View 9-Thumbnail View Folder View
ZOOM IN
ZOOM OUT
You can customise the smooth zooming on or off in the Custom Op-
tions menu (Animations)
CFV 50c
33
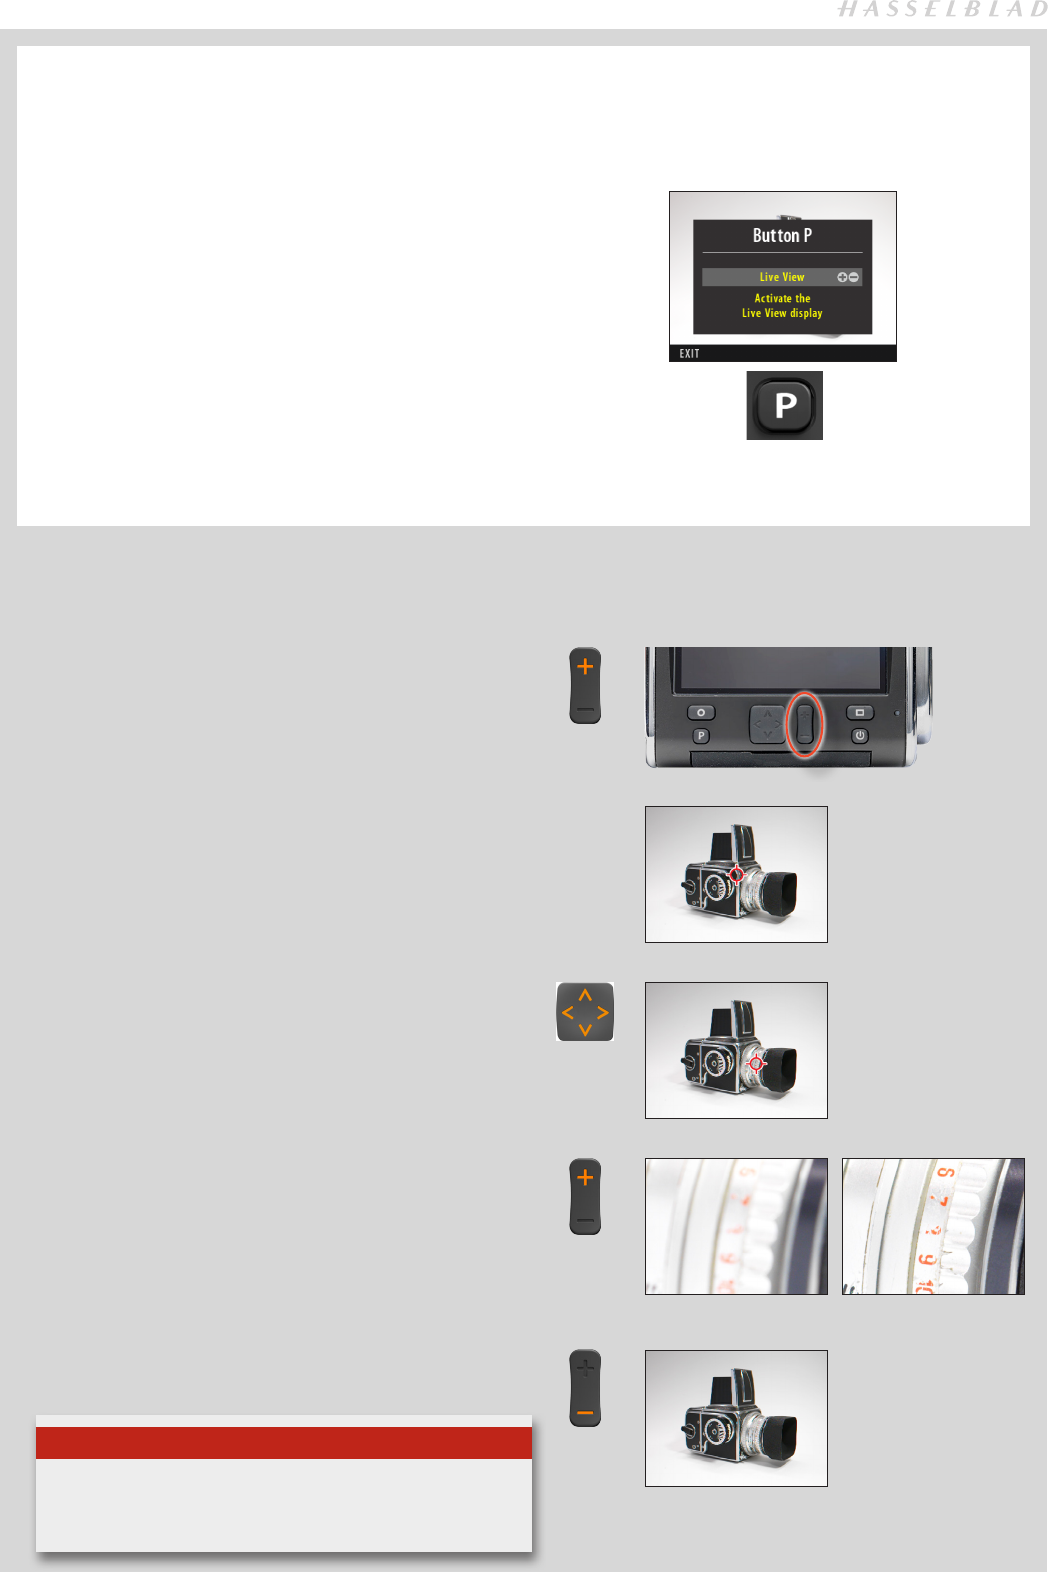
LIVE VIEW
Live View
This feature is useful for accurate focusing, composition, checking depth of field etc. It is activated by the P button.
ZOOMING IN LIVE VIEW
2. A cursor appears to select the chosen area for magnification.
3. Move the cursor by the Navigation Button to target the par-
ticular area required.
Before focusing After focusing
4. When the cursor is located correctly, press ‘+’ on the Zoom
Button again. The display now presents an image at 100%
magnification which can be scrolled using the Navigation
Button.
5. Press ‘–’ on the Zoom Button to return to full screen view.
1. Firstly, program the P button to ‘Live View’. Tip: for a short-cut to pro-
gram the P Button, press ‘MENU’ and next the P Button.
2. Set the camera to ‘B mode’ and attach a lockable cable release. Note:
500 C/M and older have a lever that can keep the shutter release de-
pressed.
3. Activate the ‘B mode’
4. Press the chosen P button. The display will now show a live image.
5. The CFV has an autoexposure function in Live View, but you can also
use the aperture to change exposure level. Note: the lens must be
stopped down.
6. Turn off Live View by pressing the same P button again and deactivate
the ‘B mode’.
1. Press ‘+’ on the Zoom Button.
Tip
Be aware when working untethered that Live View makes
greater demands on battery consumption than normal opera-
tion.

CFV 50c
34
Photo: Bara Prasilova © / Hasselblad Masters
CAMERA CONNECTIVITY
CFV 50c
35
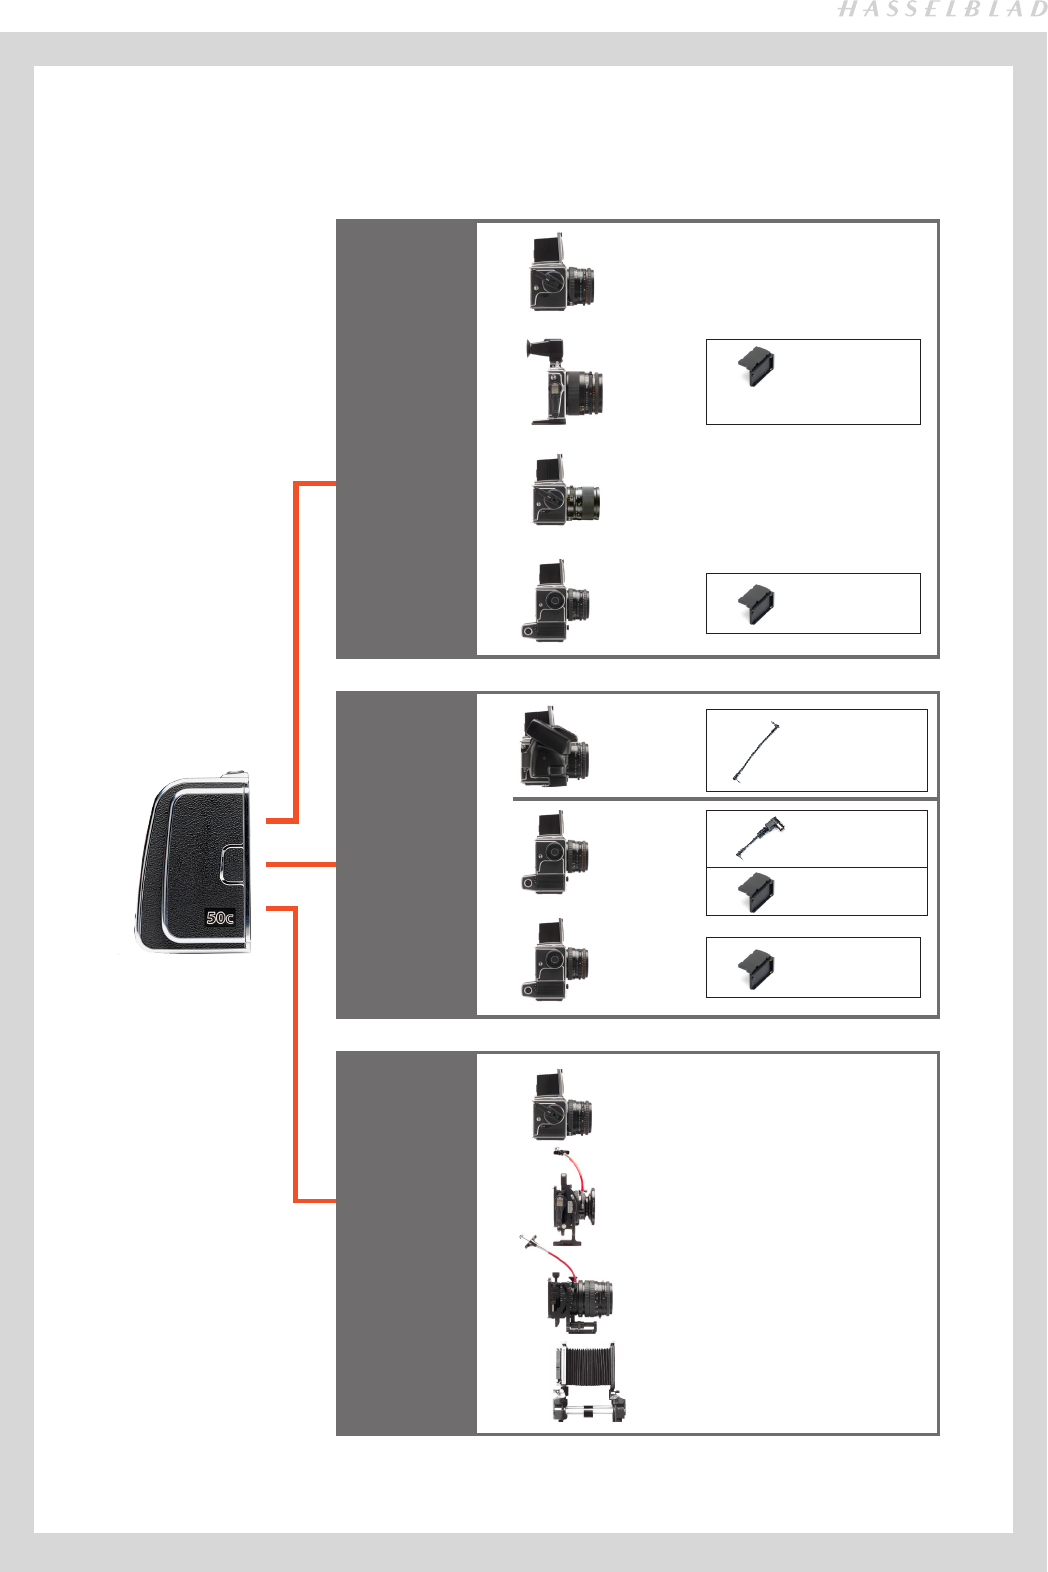
Connectivity diagram
This diagram illustrates the situation regarding V System cameras and the connection requirements according to model.
All cables illustrated here are supplied.
CFV-50c
digital back
2000 FC / FCM
2003 FCW
201 F / 203 FE
205 TCC / FCC
Any view camera with
Hasselblad V System
adapter 1)
FlexBody
ArcBody 1)
Flash input
cable always
required
With C type lenses only
(C-mode setting)
May require a Battery
Adapter (3054668) at
certain extreme settings.
Optional accessory.
Phocus
remote control
(NOTE: only these cameras/
combinations can be con-
trolled from Phocus)
503 CW +
Winder CW
500 EL/ELM
500/553 ELX
555 ELD
+
Exposure cable 503 CW
required for Phocus control
of 503CW + Winder CW.
+
Battery Adapter (3054668)
required for portable use.
Optional accessory.
Exposure Cable EL required
for Phocus control of EL/ELM
and ELX use.
+
+Battery Adapter (3054668)
required for portable use.
Optional accessory.
555 ELD
500 EL/ELM
500/553 ELX
500 C/CM
501 C/CM
503 CX/CXi/CW
SWC/M
903 SWC
905 SWC
Modified 202FA/203 FE / 205 TCC / 205 FCC
With F type lenses and CF type lenses at
F-mode setting
Cable free
operation
+
Battery Adapter (3054668)
required for portable use.
Optional accessory.
+Battery Adapter (3054668)
required for portable use.
Optional accessory.
Some limitations regarding image quality apply
in some instances. See user manual for details.
1) Note: Shift settings are not recommended on cameras with wide angle lenses
and a short lens to image plane distance. E.g. the ArcBody.

CFV 50c
36
CFV50C AND HASSELBLAD V SERIES CAMERAS
The various models in the Hasselblad V series have various capture sequence requirements depending on the situation.
These can involve just a setting or a combination of setting and cable attachment. For example a 503CW only needs a set-
ting but additionally needs a cable if a Winder CW is fitted and exposure via Phocus is desired.
Eight Hasselblad V models are listed plus the option of view/large format camera attachment. See chart in this chapter for
an overview and the separated descriptions of the various Hasselblad V models below.
MENU > SETTINGS > CAMERA
1. Press MENU.
2. Navigate to Settings
3. Navigate to Camera
4. Navigate to required item
5. Press the ZOOM button to step through the options
6. Save the chosen selection by pressing EXIT (MENU button).
SETTINGS > CAMERA
The exposure time set on the CFV-50c sets the maximum
length of exposure. The default setting is 1/8 sec and this is
the setting that can be kept for all exposures from 1/8 sec
through 1/2000 sec. However, this setting should be changed
in accordance with the time required if it exceeds 1/8 sec.
If you prefer, you can connect the ‘Flash sync input cable’
between the lens PC socket and the CFV-50c which allows
you to retain the default setting of 1/8 second while still be-
ing able to use exposure times longer than 1/8 second. This
method also allows the use of the B setting. However, see
special note CFV-50c with all camera models on following
page concerning long exposures.
Model setting variations
Look in the list below for the camera model you are using
and make the appropriate settings change. Do not forget to
change the setting if you change camera model!
Winder CW
For use with 503 CW models:
• Make a Winder CW setting.
• If you want to control the camera from Phocus, connect the ‘Exposure cable 503´ be-
tween the CFV-50c and the Winder CW as in the illustration.
• Do not use the winder at rapid sequence setting.
ELD
For use with ELD models:
• Make an ELD setting.
• A B setting exposure can be made by choosing the ‘Bulb’ in the ‘Exposure Time’ setting.
• Only the single shot function (A or AS mode camera settings) should be set on the camera. Rapid
sequence shots are not possible.
• Use a Battery Adapter (optional accessory 3054668) to provide the necessary extension beyond the
motor housing of the EL models for battery attachment. It is attached to the CFV-50c in the same man-
ner as a battery, and the battery itself is then attached to the adapter as in the illustration.
All Hasselblad EL models
Battery Adapter
Note
Capture Sequence in Phocus functions in the same manner
as an interval timer. It applies only to a motor or winder driv-
en camera model and Pinhole mode.
Initial delay: Controls the amount of time required to elapse
before the first exposure.
Delay: Controls the amount of time required between each
exposure.
Count: Controls the total number of exposures required.
See Phocus user manual for further details.
Hasselblad 503CW plus winder CW
Exposure Cable 503

CFV 50c
37
ELX
For use with 500EL/ELM and 500/553ELX models:
• Make an ELX setting.
• The Exposure Cable EL (supplied) should be connected.
• Rapid sequence shots are not possible.
• Use a Battery Adapter (optional accessory 3054668) to provide the necesssary extension be-
yond the motor housing of the EL models for battery attachment. It is attached to the CFV-50c
in the same manner as a battery, and the battery itself is then attached to the adapter as in the
illustration.
All Hasselblad EL models except ELD
Exposure Cable EL
Pinhole
For use with lenses/cameras with no shutter. Intended primarily for use in a studio environment where complete darkness can
be achieved and exposures made accordingly, for ‘light painting’ etc. In this mode the CFV-50c uses the exposure time (as well
as other required stages in a capture sequence) set in the Capture Sequence dialog. The CFV-50c can be triggered from Phocus
(see later section for full description of Capture Sequence settings procedure).
Flash sync
For use with un-modified 200 series models (together with C-lenses in C-mode),an ArcBody, a FlexBody or view
cameras fitted with a Hasselblad adapter.
• Make a Flash sync setting.
• A Flash sync input cable should be used.
• All exposures times, including the B setting, function correctly without having to alter the “Exposure Time” setting.
• Do not use a winder at rapid sequence setting.
SWC
For use with the SWC/M, 903 SWC and 905 SWC models.
• Make an SWC setting.
PLEASE NOTE: Due to the mechanical design of the SWC, pressing the exposure release button too slowly may cause a faulty capture with a
magenta cast. Either press the button much more distinctly or alternatively change the setting from SWC to Flash sync and use the Flash
input sync cable to connect the lens to the CFV-50c.
Use a Battery Adapter (optional accessory 3054668) to provide the necesssary extension beyond the tripod shoe. It is attached to the
CFV-50c in the same manner as a battery, and the battery itself is then attached to the adapter as in the illustration.
200
For use with modified 202, 203 and 205 models together with F-lenses / CF-lenses in F-mode. (Only these three mod-
els can be modified for cable-free compatibility with the CFV-50c. Please contact your Hasselblad dealer for further informa-
tion)
• Make a 200 setting.
• A Flash sync input cable should not be used.
• All exposures times, including the B setting, function correctly without having to alter the “Exposure Time” setting.
• Do not use a winder at rapid sequence setting.
500
For use with 500C/CM, 501C/CM and 503 CX/CXi/CW/CWD models.
• Make a 500 setting.
CFV 50c
38
Note
Although the SWC/M, 903SWC and 905SWC models work in
conjunction with a CFV-50c, the combination is not recom-
mended for critical work in certain instances. It is difficult to
predict all photographic situations so it is advisable to read the
following and make a judgement followed by checking the fo-
cus on the preview to see if it matches your expectations.
The Biogon 38 lens was designed for film use where the unusu-
ally close proximity of the lens to the film plane was of no con-
sequence. However, digital sensors and their protective filters
make very different demands on the angle and travelling dis-
tances of the peripheral rays exiting the rear lens element. Grad-
ual unsharpness consequently occurs towards the edges of the
frame, particularly noticeable with flat subjects (typically copy-
ing situations, 90º shots against building façades, etc) though
these effects will be naturally less obvious with more three-
dimensional subjects. Slight green and magenta casts are also
caused, though these can be removed digitally in Phocus.
Note
The Hasselblad 555ELD, 500EL/ELM and 500/553 ELX models
require a Battery Adapter (optional accessory 3054668) for
untethered use. The Hasselblad ArcBody might also require a
Battery Adapter at certain extreme settings.
The adapter unit consists of two connected battery mounting
plates. It is attached to the CFV-50c in the same manner as a
battery allowing the extra mounting plate to be accessible for
attaching the battery itself.
Note
CFV-50c with ALL CAMERA MODELS
Long exposure times (1/8 s and longer in this case) can occasion-
ally produce capture anomalies such as very strong colour casts,
posterization etc. This, however, is not caused by a fault in the
camera or back but by the sensor being exposed to light before or
after the main exposure time selected on the CFV-50c back.
To avoid this situation you can:
a) Increase the setting on the back by approximately 10-20%
while retaining the determined shutter setting. For example, a
5 sec exposure time would require a 6 sec setting on the back
or a 25 sec exposure would require a ca. 30 sec setting, etc.
or, for optimum ease of use as well as security, the recommendation is:
b) Use the supplied Flash input sync cable. By connecting this
cable from the flash terminal on the lens to the Flash sync IN
terminal on the back, you can bypass the need for any specific
long exposure time settings on the back.
View cameras / Lenses with flash sync shutters
Any view camera with
Hasselblad V adapter
Flash sync input cable
Host computer with FireWire, running Phocus
View / Large Format cameras
For optimum use, the CFV-50c can also be used with view
cameras (with the appropriate Hasselblad V adapter and ca-
bles). The exposure time set on the unit sets the maximum
length of exposure. The default setting is 1/8 sec and this is
the setting that can be kept for all exposures from 1/8 sec
through 1/2000sec. However, this setting should be changed
in accordance with the time required if it exceeds 1/8 sec.
Times up to 34 minutes can be set.
If you prefer, you can connect the ‘Flash sync input cable’ be-
tween the lens PC socket and the unit which allows you to
retain the default setting of 1/8 second while still being able
to use exposure times longer than 1/8 second. This method
also allows the use of the B setting.
MENU > SETTINGS > CAMERA
1. Press MENU.
2. Navigate to Settings
3. Navigate to Camera
4. Navigate to ‘Flash sync*
5. Save the chosen selection by pressing EXIT (MENU
button).
A Hasselblad ELD
model illustrating
the adapter and
battery in use.
Note: Shift settings are not recommended on cameras with
wide angle lenses and a short lens to image plane distance.
CFV 50c
39
FLASH / STROBE
Photo: Joseph Goh © / Hasselblad Masters
CFV 50c
40
Flash output
sync cable
Flash output
sync cable
Standard flash /
strobe sync cable
Flash input
sync cable
Standard flash /
strobe sync cable
Standard flash /
strobe sync cable
Standard flash /
strobe sync cable
Standard flash /
strobe sync cable
Standard flash /
strobe sync cable
FireWire cable FireWire cable FireWire cable
Laptop computerLaptop computer
Laptop computer
Modified 202FA/203 FE / 205 TCC / 205 FCC with F type
lenses and CF type lenses at F-mode setting.
Modified and unmodified 2000 FC / FCM, 2003 FCW,
201 F / 203 FE, 205 TCC / FCC with C type lenses (C-mode
setting). FlexBody. Any view camera with Hasselblad
V System adapter.
500 C/CM, 501 C/CM, 503 CX/CXi/CW, 555 ELD, 500 EL/
ELM, 500/553 ELX, SWC / SWC/M, 903 SWC and 905 SWC.
TETHERED / portable / laptopUNTETHERED / portable / CF card
Flash input
sync cable
FireWire cable
STUDIO FLASH/STROBE
tethered
Laptop/desktop computer
TETHERED / studio / computer
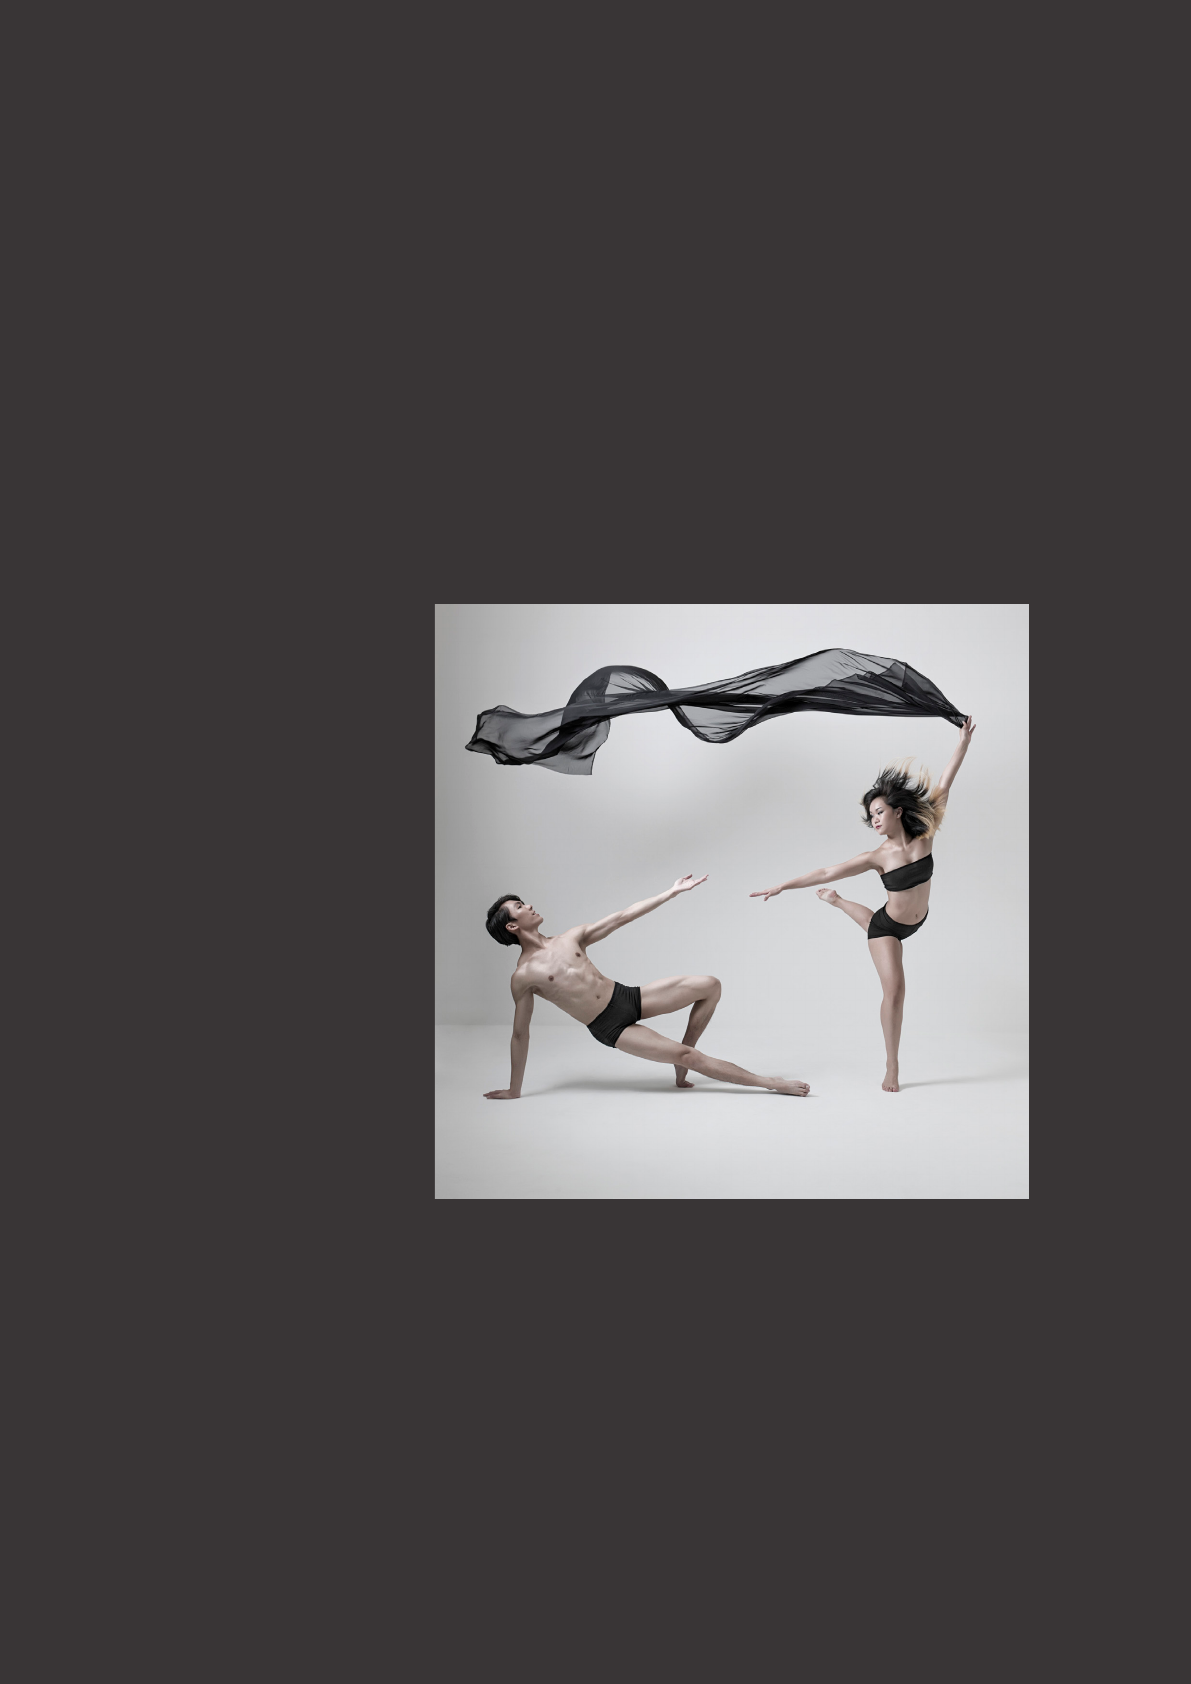
Flash / strobe connection for CFV-50c digital backs.
Please note the different ways of connecting the various camera
body / CFV-50c / flash /computer combinations.
In particular, notice the importance of the correct connections
when using a FireWire link directly to a desktop computer in com-
bination with studio flash /strobe.
The Flash input sync cable, Flash output sync cable and FireWire
cable are supplied.
Pay particular attention when using studio flash/strobe units in
conjunction with a desktop computer. Ensure you use the correct
configuration to guard against both personal injury and damage
to equipment.
Flash input
sync cable
Flash output
sync cable
Standard flash /
strobe sync cable
ALL CAMERA MODELS
500 C/CM, 501 C/CM, 503 CX/CXi/CW, 555 ELD, 500
EL/ELM, 500/553 ELX, SWC / SWC/M, 903 SWC and
905 SWC.
Modified 202FA/203 FE / 205 TCC / 205 FCC with F
type lenses and CF type lenses at F-mode setting.
Modified and unmodified 2000 FC / FCM, 2003
FCW, 201 F / 203 FE, 205 TCC / FCC with C type lenses
(C-mode setting). FlexBody. Any view camera with
Hasselblad V System adapter.

CFV 50c
41
FLASH / STROBE
Various configurations of cables are needed to match the requirements of various CFV-50c / Hasselblad body combinations.
In addition, some modification might be required for certain camera bodies. Neither of these points however are directly
related to CFV-50c use but rather to general flash use. See the chart on the following page for details.
503CWD or 503CW+CFV-50c combination
A 503CWD or 503CW+CFV-50c combination offers TTL flash control with some slight adjustments. As the reflective charac-
teristics of the digital sensor are different to film surface characteristics (for which the TTL function was originally designed),
this function has to be slightly ‘tricked’ to perform correctly. Proceed as follows:
Move the film speed selector on the camera so that is becomes approximately 1⁄ f/stop higher than the ISO setting on the
CFV-50c. Therefore, for example, when the CFV-50c is set at 100 ISO, the ‘film speed setting’ on the camera should read 160
ISO, and so on. Testing for the most suitable compensation that suits you is recommended.
STUDIO FLASH/STROBE UNITS WHEN TETHERED TO A DESKTOP COMPUTER
If the CFV-50c is tethered to a computer that is connected to a regular electricity supply system as well as a studio flash/
strobe unit that is also connected to a regular electricity supply system/generator system, then make the following connec-
tions instead. For your own safety and to protect the electronics in the CFV-50c, please ensure you do this correctly.
a) Connect the flash input sync cable from the sync contact (PC connector) on the lens to the flash sync IN terminal on the
CFV-50c.
b) Connect the flash output sync cable from the flash sync OUT terminal on the CFV-50c to a regular flash/strobe sync
cable that is connected to the unit.
CFV50C AND HASSELBLAD 200 SERIES CAMERAS
Connection to 200 series cameras depends on whether they are modified or not (contact your local Hasselblad Service Cen-
ter about modification). TTL is also possible if the flash/strobe unit allows. See the appropriate camera manual for further
details.
Please note the difference below – unmodified cameras can only use C lenses (C/CF/CFi etc) at the C-mode setting whereas
modified cameras can use C and F-type lenses.
CAMERAS WITH PORTABLE FLASH/STROBE UNITS WITH C TYPE LENSES:
a) Connect the flash input sync cable from the sync contact (PC connector) on the lens to the flash sync IN terminal on
the CFV-50c.
b) Connect the flash output sync cable from the flash sync OUT terminal on the CFV-50c to a regular flash sync cable that
is connected to the unit.
c) Use the C-mode setting.
d) Shutter speeds faster than 1/90 sec allowed.
MODIFIED CAMERAS WITH PORTABLE FLASH/STROBE UNITS WITH F AND CF TYPE LENSES:
a) Connect the standard PC /flash / strobe sync cable from the sync contact (PC connector) on the camera body to the unit.
b) Use F type or CF type lenses at the F-mode setting.
c) Use a shutter speed no faster than 1/90 sec.

CFV 50c
42
Photo: Hengki Koentjoro © / Hasselblad Masters
APPENDIX
CFV 50c
43
CLEANING THE SENSOR FILTER
If you see dark or colored spots or lines in your images, then you may need to
clean the outer surface of the CFV-50c’s infrared (IR) filter. In most cases, the
careful use of compressed air will be adequate though if you use canned com-
pressed air, read the instructions very carefully before use to avoid spraying
impurities or even ice on the filter! Sometimes, however, small particles will
get stuck to the surface of the IR filter, requiring for a more thorough cleaning,
involving either fluid or wipes.
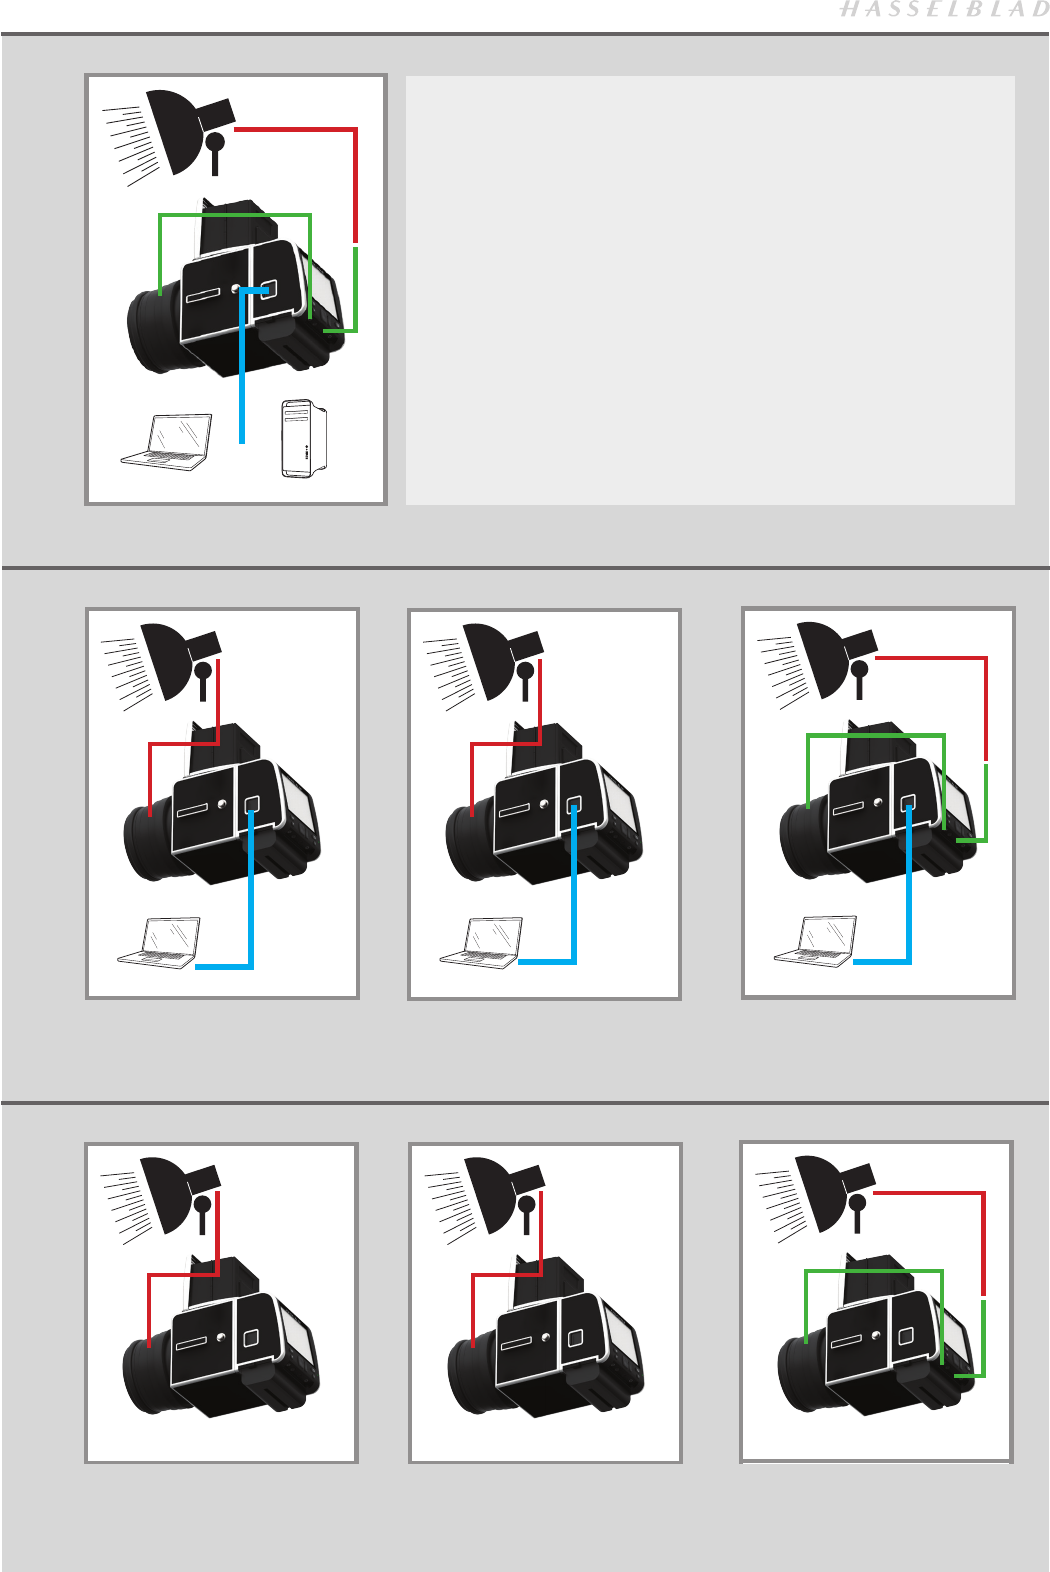
1. If compressed air did not remove all the problems on the filter, then use an
E-wipe.
2. Tear at the notch to break seal. Remove E-wipe from its packaging and
fold the tissue to match the width of the IR filter.
3. Apply firm pressure using two or three fingers at the edge of the wipe to
ensure an even, firm contact with filter surface. Wipe the surface in one
unbroken motion.
4. Finally check if the IR filter has been properly cleaned either by visual
inspection or by mounting the CFV-50c to a camera and making a test
capture. If further cleaning is needed, repeat cleaning procedure.
Note
If you still see spots on your shots after you have cleaned
the outside of the infrared filter, then you may have dust
either on the inside of the IR filter or on the sensor itself.
However,
never attempt to remove the glass filter – you will
probably ruin the sensor if you do so!
If dust manages to get between the IR filter and sensor, it can
only be removed at the Hasselblad factory. Contact your Has-
selblad dealer or Hasselblad Service Center for assistance.
Note
Do not use same side of the e-wipe twice as you might re-
apply any particles removed in the first pass.
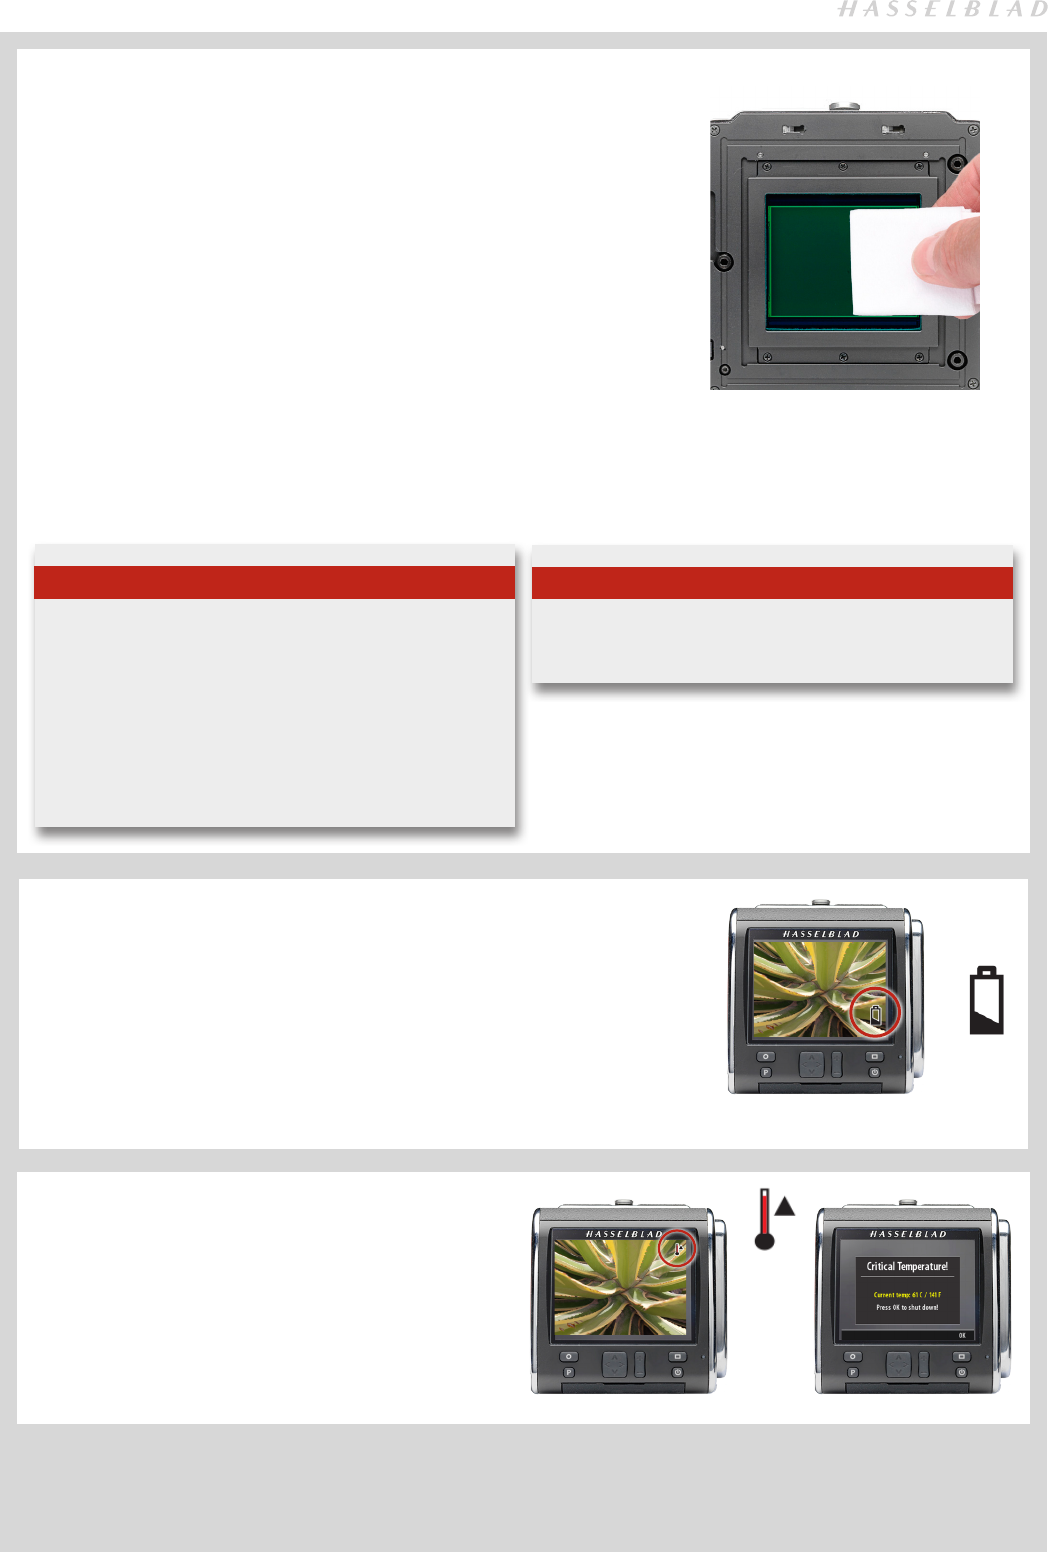
BATTERY LIFE & BATTERY WARNING
Battery life is dependent on a number of variable factors and therefore cannot be
exactly predicted. If the camera is left in the active state for long periods, for exam-
ple, then the battery will naturally become exhausted much faster. Adjusting Display
Off to activate sooner will help.
A low camera battery state is indicated by a symbol on the display and in addition,
an audible signal sounds and obvious measures should be taken.
Low battery warning
TEMPERATURE WARNING
Many rapidly taken captures make heavy demands on the
processor in the CFV-50c which in turn produces heat. This,
particularly in combination with high ambient temperature,
can result in noise in the image files. To prevent this, the CFV-
50c displays a warning icon when the temperature rises.
At ca. 60° C a warning dialogue appears signifying that the
CFV-50c is temporarily shutting down to allow it to cool.

CFV 50c
44
MENU > SETTINGS > USER INTERFACE > LANGUAGE
If the CFV-50c has been set to a language you don’t understand (on a rented back, for example), you can navigate to your
preferred language by following the actions and appearance in the illustrations here.
1. Press MENU.
2. Navigate to Settings 1 (the fifth menu entry from
the top).
3. Navigate to User Interface 2 (the first menu entry).
4. Navigate to Language 3 (the first menu entry).
5. Press the ZOOM button 4 to step through options until
you see your preferred language.
6. Save the chosen selection by pressing EXIT (MENU
button).
2
4
CHANGING UNKNOWN LANGUAGE SETTING
1
3

CFV 50c
45
Sensor type
CMOS, 50 Mpixels (8272 × 6200 pixels)
Sensor dimensions 43.8 × 32.9 mm
Pixel size
5.3 × 5.3 µm
Image size RAW 3FR capture 65 MB on average. TIFF 8 bit: 154 MB
RAW file format Lossless compressed Hasselblad 3FR
JPEG 1/4 resolution print ready files
Shooting mode Single shot
Color definition 16 bit
ISO speed range ISO 100, 200, 400, 800, 1600, 3200 and 6400
Longest exposure time 34 minutes
Color management Hasselblad Natural Color Solution
CF storage capacity 16 GB CF card holds 240 images on average
Storage options CF card type U-DMA (e.g. SanDisk Extreme Pro) or tethered to Mac or PC
Acoustic feedback Yes
Software Phocus for Mac and Windows (included). Adobe Photoshop Lightroom®
Tethered operation Supported in Phocus by Hasselblad and Hasselblad Tethered plug-in for Adobe® Photoshop® Lightroom®
Platform support Macintosh: OS x10.5 or later. Windows: XP, Vista, Windows 7 (from version 2.8, 64 bit only), Windows 8
Host connection type FireWire 800 (IEEE 1394b). Thunderbolt supported via optional adapters.
View camera compatibili’ty Mechanical shutters controlled via flash sync, electronic shutters controlled by Phocus.
Power supply Rechargeable Li-ion battery 8.4 VDC
Operating temperature 0 - 45 deg. C / 32 - 113 deg F
Dimension (WxHxD) 91 x 92 x 57 mm
Weight 530 g without battery
Camera support
All Hasselblad V System cameras manufactured since 1957. 2000 cameras and 201F with C lenses only. 202FA / 203FE and 205FCC
camera types need a minor camera modication to use F/FE lenses. The ArcBody is not compatible. SWC/M and newer can be used
but has limitations on image quality due to lens design not being suitable for digital capture. All other cameras with Hasselblad V
interface.
TECHNICAL SPECIFICATIONS — CFV-50c
Quality RAW
Language English
Sound volume High
Exposure warning On
P button Instant focus confirm
Display off 30 sec
Power off 30 minutes
Image orientation Auto
Aspect Ratio Full
Show preview On
Animation On
Tethered power From host
DEFAULT SETTINGS

CFV 50c
46
EQUIPMENT CARE
Hasselblad equipment is designed to withstand the rigors of professional
use in most environments. To avoid the possibility of damage however,
it should be protected from harsh conditions and in particular avoid oil
fumes, steam, humid conditions and dust.
Extremes of temperature: High temperatures can have an adverse ef-
fect equipment. Avoid frequent and severe temperature changes and be
particularly careful in humid environments. If entering damp or humid
conditions from dry and cold conditions, seal all equipment in a plastic
bag or similar first before entering and then wait until the equipment has
acclimatized to the new temperature before removing. Failure to do so
can cause condensation internally as well as externally which can lead to
problems particularly in regard to the CFV-50c. Try to ensure the environ-
ment or conditions are as dry as possible when storing.
Dust and grit: Take care to prevent dust and grit from getting into your
equipment. In coastal areas take measures to protect your equipment
from sand and salt water spray. Impact: Your equipment can be damaged
by severe physical shocks so practical protective precautions should be
taken. Some form of protective case or camera bag is advised for trans-
portation.
Loss: Hasselblad equipment is much sought after and you should take
obvious steps to prevent theft. Never leave it visible in an unattended car,
for example. Separate and specific camera insurance cover should be con-
sidered by professional users.
SERVICE
Return your equipment to a service centre for occasional checking and
preventive maintenance to ensure optimal reliability. You can easily keep
a check on service intervals by looking under ‘Info’ in the menu. If your
equipment is used constantly and intensively, regular periodic check-ups
are recommended at one of the Hasselblad Authorized Service Centers.
They have the expert staff and specialised equipment necessary to ensure
that your equipment remains in perfect working order.
CAUTION
• Keep all equipment and accessories out of the reach of small
children.
• Do not place heavy objects on the equipment.
• Do not use the batteries except as specified.
• Use only the batteries specified for use.
• Remove the batteries when cleaning the equipment or if you in-
tend to leave the equipment unused for a long period.
• Take particular care when working with strobe / studio flash units
to prevent damage to equipment and personal injury.
• Do not attempt to open the CFV-50c.
• Keep the CFV-50c and all other computer equipment away from
moisture. If the CFV-50c becomes wet, disconnect from power and
allow it to dry before attempting to operate again.
• Always replace the protective sensor/filter cover when the CFV-
50c is not connected to the camera.
• Never try to remove the glass IR filter from the front of the sensor
as this will probably ruin it. If dust manages to get between the
sensor and the IR filter, please contact your Hasselblad dealer for
assistance.
Disposal of Waste Equipment by Users in Private Households in the
European Union
This symbol on the product or on its packaging indicates that
this product must not be disposed of with your other house-
hold waste. Instead, it is your responsibility to dispose of your
waste equipment by handing it over to a designated collection point for
the recycling of waste electrical and electronic equipment. The separate
collection and recycling of your waste equipment at the time of dispos-
al will help to conserve natural resources and ensure that it is recycled in
a manner that protects human health and the environment. For more
information about where you can dispose of your waste equipment for
recycling, please contact your local city office, your household waste
disposal service or the retailer where you purchased the product.
EQUIPMENT CARE & SERVICE

CFV 50c
47
CFV-50c
About 28
Appendix 42
Aspect ratio 26
Battery life & battery warning 43
Bat ter y 11
Browsing 29
Buttons, parts & components 10
Camera connectivity 34
Capture destination 7
CF Cards 12
Cleaning 43
Computer system requirements 5
Custom Options 25
Date & time 24
Delete 21
Display 25
Equipment care & service 46
Exposure time 19
File storage 20
Firmware updates 5
Flash/Strobe 39
Folder 21
Format 22
Hasselblad capture files 7
Image orientation 26
Initial settings 17
ISO setting 18
Language 24, 44
Live View 33
Mark overexposure 26
Menu 15
Navigating the menu 13
On/Off button 11
P Button 25
Phocus 8
Power off 26
Powering the CFV-50c 11
Preview 29
Quality 19
Service 27
Sound 24
Technical specifications 45
Temperature warning 43
Warnings and restrictions 5
White balance setting 18
Workflow 7
Zooming 32
ALPHABETICAL INDEX

CFV 50c
48
The information in this manual is furnished for informational use
only, is subject to change without notice, and should not be con-
strued as a commitment by Victor Hasselblad AB.
The text in this manual cannot be reprinted or reused without the
express permission of Victor Hasselblad AB.
The images in this manual cannot be reprinted or reused without
the express permission of the photographers who took them.
All text in this manual : © Victor Hasselblad AB.
All images in this manual not credited to a specific photographer:
© Victor Hasselblad AB.
Victor Hasselblad AB assumes no responsibility or liability for any
errors or inaccuracies that may appear in this manual.
Victor Hasselblad AB assumes no responsibility or liability for loss
or damage incurred during or as a result of using Hasselblad soft-
ware or products.
Hasselblad, Phocus, Phocus Mobile and Phocus Quick are trade-
marks of Victor Hasselblad AB. Adobe and Adobe Photoshop are
trademarks of Adobe Systems, Inc. Macintosh, Mac OS, iPhone®,
iPad® and iPod Touch® and FireWire are registered trademarks
of Apple Computer, Inc. InfoLithium is a registered trademark
of Sony Corporation. Canon, Nikon, Leica, Sony, Fuji and Olym-
pus are trademarks of their respective corporations. Qp Card is a
trademark of Qp Card AB. E-Wipe is a trademark of Photosol Inc.
Copyright © 2014
Victor Hasselblad AB
All rights reserved.

CFV 50c
49
CFV-50c • User Manual • ENG • V4 • 2015
www.hasselblad.com
