i MOBIL de C V 06C-1 Tri-band GSM900/1800/1900 mobile phone User Manual N3020
i-MOBIL S.A. DE C.V. Tri-band GSM900/1800/1900 mobile phone N3020
Users Manual
1
C-1 User Manual
EN V1.1

Claims
All the trademarks and logos indicated as such herein, including the registered and
unregistered trademarks and logos, are the property of i-MOBIL and their respective owners.
The foregoing is the trademark of i-MOBIL and can not be used without
i-MOBIL’s authorization.
i-MOBIL reserves its right to make changes and improvements to any of the products
described in this manual without prior notice. Under no circumstances shall i-MOBIL be
responsible for any loss of data or income or any special, incidental, consequential or
indirect damages howsoever caused.
The content of this manual is provided “as is”. To the fullest extent permissible by law,
i-MOBIL makes no representations or warranties of any kind, either express or implied, for,
but not limited to, the accuracy, merchantability and fitness of this manual for a particular
purpose.
2
3
Contents
FOR YOUR SAFETY....................................................................................................................................................................6
BRIEF INTRODUCTION.............................................................................................................................................................7
YOUR PHONE’S LABEL..................................................................................................................................................................7
PASSWORD......................................................................................................................................................................................7
PHONE IMAGE AND KEY DEFINITION......................................................................................................................................... 7
BRIEF MENU TREE......................................................................................................................................................................... 8
DISPLAY ICON................................................................................................................................................................................9
GETTING STARTED..................................................................................................................................................................10
USING THE BATTERY..................................................................................................................................................................10
INSTALLING A MEMORY CARD AND THE SIM CARD..............................................................................................................10
CHARGING THE BATTERY .......................................................................................................................................................... 11
LOW BATTERY WARNING............................................................................................................................................................ 11
BATTERY TIPS.............................................................................................................................................................................. 11
TURNING YOUR PHONE ON/OFF................................................................................................................................................ 11
KEYPAD SHORTCUTS.................................................................................................................................................................. 12
USE AND MAINTENANCE............................................................................................................................................................12
BASIC FUNCTIONS...................................................................................................................................................................13
SIM LOCK ....................................................................................................................................................................................13
MAKING A CALL........................................................................................................................................................................... 13
ANSWERING OR REJECTING A CALL ........................................................................................................................................13
DURING A CALL ...........................................................................................................................................................................13
MISSED CALL............................................................................................................................................................................... 14
HOW TO USE MULTIMEDIA ENTERTAINMENT...........................................................................................................15
MUSIC PLAYER............................................................................................................................................................................15
FM RADIO ....................................................................................................................................................................................16
VOICE RECORDER........................................................................................................................................................................ 17
MASS STORAGE........................................................................................................................................................................... 18
FILE VIEWER.................................................................................................................................................................................18
SETTING UP RING STYLES AND DISPLAY...................................................................................................................19
PERSONALISING A RING TYLE ..................................................................................................................................................19
ADJUSTING VOLUME .................................................................................................................................................................. 19
SETTING UP DISPLAY .................................................................................................................................................................19
SETTING UP TIME & DATE........................................................................................................................................................20
SETTING UP GREETINGS AND LANGUAGE ..............................................................................................................................20
USING PHONEBOOK................................................................................................................................................................21
STORING A PHONEBOOK ENTRY...............................................................................................................................................21
SEARCHING FOR A PHONEBOOK ENTRY .................................................................................................................................21
EDITING A PHONEBOOK ENTRY................................................................................................................................................ 21
DELETING PHONEBOOK ENTRY................................................................................................................................................22
ASSIGNING A GROUP..................................................................................................................................................................22
VIEWING AND SETTING UP 1-TOUCH DIAL ............................................................................................................................. 22
VIEWING MEMORY STATUS........................................................................................................................................................23
4
USING CALL HISTORY............................................................................................................................................................24
VIEWING CALL HISTORY ............................................................................................................................................................24
DELETING CALL HISTORY..........................................................................................................................................................24
VIEWING CALL INFORMATION...................................................................................................................................................24
ENTRY METHOD ........................................................................................................................................................................26
WHERE TO USE ENGLISH ENTRY METHOD.............................................................................................................................26
TEXT ENTRY METHODS.............................................................................................................................................................. 26
CURSOR ........................................................................................................................................................................................26
MULTI-TAP....................................................................................................................................................................................26
T9 ENGLISH ENTRY METHOD ...................................................................................................................................................26
PUNCTUATION AND SPECIAL CHARACTERS...........................................................................................................................26
MESSAGES....................................................................................................................................................................................27
VIEWING MESSAGES...................................................................................................................................................................27
CREATING MESSAGES ................................................................................................................................................................27
USING SMS TEMPLATE .............................................................................................................................................................28
DELETING MESSAGES.................................................................................................................................................................28
SETTING UP MESSAGES.............................................................................................................................................................28
INFORMATION MESSAGES..........................................................................................................................................................29
VOICE MAIL .................................................................................................................................................................................. 29
PERSONAL ORGANIZER........................................................................................................................................................30
ALARM...........................................................................................................................................................................................30
MEMO............................................................................................................................................................................................ 30
WORLD TIME ................................................................................................................................................................................30
CALCULATOR ...............................................................................................................................................................................31
CALENDAR....................................................................................................................................................................................31
MEMORY STATUS ........................................................................................................................................................................31
STK...............................................................................................................................................................................................31
CALL AND PHONE SETTINGS.............................................................................................................................................32
MINUTE REMINDER.....................................................................................................................................................................32
FIXED DIALING.............................................................................................................................................................................32
CALL FORWARD........................................................................................................................................................................... 32
CALL BARRING............................................................................................................................................................................. 33
CALL WAITING ............................................................................................................................................................................. 33
PHONE SETTING..........................................................................................................................................................................33
OTHER SETTINGS.....................................................................................................................................................................35
NETWORK SETTING ....................................................................................................................................................................35
SECURITY SETTING ....................................................................................................................................................................35
TROUBLESHOOTING...............................................................................................................................................................36
BATTERY INFORMATION.......................................................................................................................................................37
ACCESSORIES.............................................................................................................................................................................38
SAFETY OF THE BATTERY..........................................................................................................................................................38
RAPID TRAVEL CHARGER........................................................................................................................................................... 38
DATA CABLE .................................................................................................................................................................................38

FOR YOUR SAFETY
SWITCH ON SAFELY Do not use in prohibited areas or when it may cause interference or danger.
6
SWITCH OFF IN HOSPITALS Follow any restrictions. Switch the phone off near medical equipments.
SWITCH OFF WHEN REFUELING Do not use the phone at a refueling point. Do not use near fuel or chemicals.
SWITCH OFF IN AIRCRAT Follow any restrictions. Wireless devices can cause interference in aircraft.
ROAD SAFETY Obey all local laws. Please use the hands free kit whilst driving.
ACCESSORIES AND BATTERIES Use only approved accessories and batteries. Do not try to connect
incompatible products.
BACKUP IMPORTANT INFORMATION Remember to make backup copies or keep a written record of all
important information.
CONNECTING TO OTHER DEVICES When connecting to any other devices, read its user manual for detailed
safety instructions. Do not try to connect incompatible products.
MAINTENANCE Only authorized and qualified personnel may repair this product.
WATER RESISTANCE Your phone is not water-resistant. Keep it dry.
INTERFERENCE All wireless devices may be susceptible to interference, which could affect performance.
Damage to the security seal will cause the warranty invalid.
Warning: Improper use will invalidate the warranty.
BRIEF INTRODUCTION
Your phone’s label
The bar code label includes information about your phone, such as the serial number. Please keep it properly.
Password
Security Code
This phone includes a Personal Identity Code, to ensure you data is stored securely, activating this code means you will
need to enter your PIN to access some features, e.g. the phone book.
PIN & PIN2 code
The PIN (Personal Identity Number) and PIN2 codes are 4-to 8-digit numbers that usually come from your network
service provider along with the SIM card.
The PIN2 code is required to activate some network features. It can be obtained from your network provider.
To set up PIN and PIN2 codes, please refer to Other settings>Security setting on P40 of this guide.
PUK & PUK2 code
These codes are only required should you accidentally enter your SIM PIN code incorrectly and block the SIM. The
PUK (Personal Unblocking Key) and PUK2 codes are 4-to 8-digit codes obtained from your network service provider.
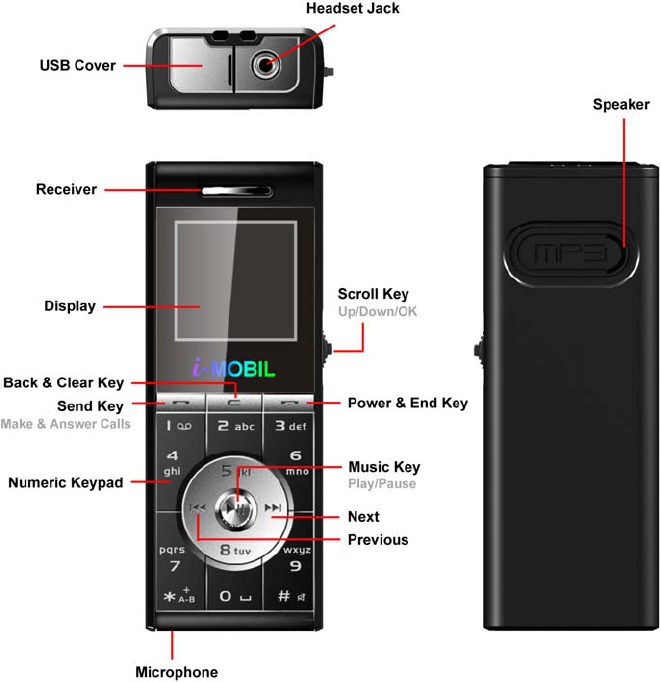
Phone image and key definition
7
Scroll key Back & Clear key Send key Power & End key
Scroll up and down to move
through menu options, or to
increase / decrease the
volume.
Delete character or number
Make and answer calls
Power on or off
Press for OK or to enter the
option menu
Back to the previous menu OK or enter the option menu End or reject calls
Exit to standby mode
(In Music player, FM radio or
Voice record interface)
Lock or unlock the keypad
(with # key)
Exit to standby mode
Brief menu tree
1、 2、 3、
Call Recorder FM radio Music Player
1、Dialled calls 1、Choose channel Music Player
2、Missed calls 2、Name channel
3、Received calls 3、Delete channel
4、Delete 4、Manual tuning
5、Call Information 5、Auto tuning
6、Set frequency
7、Search all
4、 5、 6、
Message Phonebook Service
1、SMS 1、Names 1、Call forward
2、Info. Messages 2、Add new 2、Call barring
3、Voice mail 3、Settings 3、Call waiting
7、 8、 9、
Settings Extras Profiles
1、Phone 1、Voice recorder 1、Normal
2、Time & Date 2、Data connect 2、Meeting
3、Call 3、Alarm 3、Outdoor
4、Network 4、Memo 4、Car
5、Security 5、World time 5、VIP
6、Restore factory settings 6、Calculator
7、Calendar
8
9、Games
10、Memory card
11、SIM Tool Kit
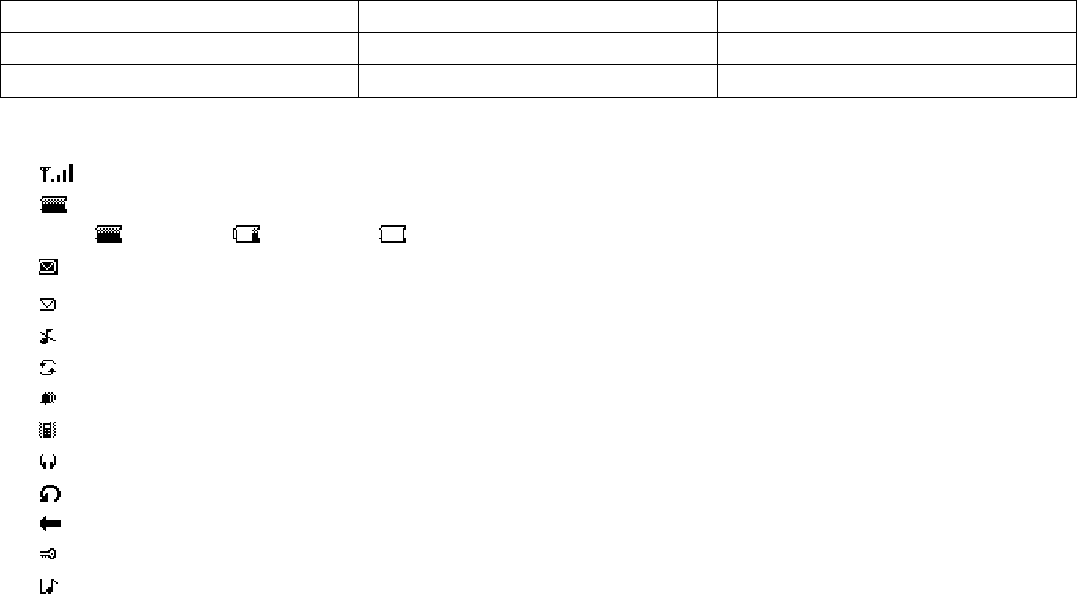
Display icon
Signal strength indicator. Vertical bars show the strength of the network connection.
Battery level indicator
Battery full, Low battery, Low battery warning
Message inbox full
New message. The icon disappears after the new messages are read.
Silence mode. In standby, press and hold # key to turn on or off the speaker.
Roam indicator.
Alarm on. The icon disappears after the alarms are turned off.
Vibration on.
Earphone is connected and detected.
Back to the previous menu.
Exit to standby
Keypad locked
Voicemail indicator.
Note: Your phone may not appear exactly as the illustrations in this manual.
9

GETTING STARTED
Using the battery
Installing the battery
1. By applying gentle pressure to the rear case of the phone, slide the cover down to expose the battery.
2. With the gold contacts facing into the phone clip the battery in place, positioning the top of the battery first.
3. Replace the rear cover, by sliding it back onto the phone until it clips in place.
Installing a memory card and the SIM card
Warning:
♦ Do not bend or scratch your memory card or SIM card.
♦ Avoid exposing your memory card and SIM card to static electricity, water or dirt.
♦ As the memory card fits beneath the SIM card, please ensure that the memory card is fitted first.
1. By applying gentle pressure to the rear case of the phone, slide the cover down to expose the battery.
Slide the memory card into the memory card holder with the gold contacts facing down into the phone body.
Note:
♦ If you need to format your memory card, please use formats FAT12 or FAT16.
♦ If file formats other than FAT12 or FAT16 are used the phone may not be able to read the content of the memory
10
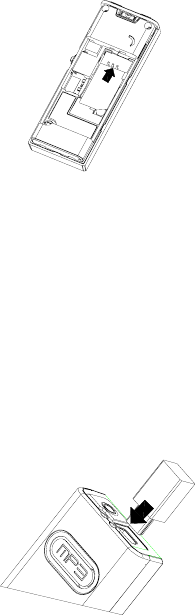
card.
2. Slide the SIM card into the SIM card holder with the gold contacts facing down.
Charging the battery
Warning: To avoid damaging the phone, please do not remove the battery when the phone is charging.
To ensure the best performance of your phone’s battery, please charge the battery fully before using it for the first time
(Approx. 12 hours), using the method described below. Please note: some batteries require several full
charge/discharge cycles to reach their best performance.
1. Make sure the battery has been installed properly before charging.
2. Open the protective USB cover and plug the travel charger into the USB connector.
3. Plug the other end of the travel charger into the electrical outlet.
Tips:
♦ It may take a few seconds for your phone to display a visible charging indication if your phone is switched off.
♦ Your phone can be used while charging.
♦ It may take a few minutes for your phone to display a visible charging indication if the battery is fully discharged.
♦ The phone will be charged from your PC when it is connected with the USB cable, however it will take a longer time
to charge than when charging with the travel charger.
Low battery warning
When the battery is low, the phone pops up messages to notify you to charge the battery. If the battery energy falls
below the minimum limit, the phone will switch off automatically.
When the battery is low, the backlight may not work when pressing the keypad and some functions may not work.
Please charge the battery immediately.
Battery tips
♦ Use only the batteries, data cable and chargers approved by the original manufacturer. Do not use a non-approved
data cable or chargers , or else it may damage the battery.
♦ Do not short-circuit the battery. Please store the battery inside the phone to prevent accidental short circuiting of
the battery contacts.
♦ Do not place or charger the battery in very hot, or very cold locations as temperature extremes can adversely affect
the battery.
♦ Please keep the charger and handset out of the reach of small children.
♦ Please ensure that the gold contacts of the battery are kept clean and free from dirt.
♦ The battery can be charged and discharged hundreds of times but it will eventually wear out. Please replace the
battery when the battery capacity falls to approximately 50% of its original storage capacity.
Turning your phone on/off
Power on
1. Press and hold the Power key for 2 seconds to turn your phone on. Your phone will display the power on
animation and enter standby mode.
2. If necessary, enter your SIM card PIN code (displayed as ****) to unlock the SIM card.
11
3. Please refer to Other settings>Security setting>PIN code at P40 to get more information on the PIN code.
Power off
Press and hold the Power key for 2 seconds to turn your phone off. Your phone will display power off animation.
Keypad shortcuts
In standby mode
Up To enter SMS.
Down To enter main menu.
Scroll key
Press To enter Name list.
To enter Music player.
Dial key To enter Call history>Dialled calls.
1 (Press and hold) To dial voice mail.
9 (Press and hold) To dial emergency call (060).
* & # key function list
*key #key
In standby mode Press and hold to enter the ‘+’ for
international dialing. Press and hold to turn the loud speaker
on or off.
Name list
Call history Press to page up. Press to page down.
Calendar Press to go to last month. Press to go to next month.
Create SMS Press to enter into the punctuation list;
Press to switch entry method;
Music Player Press to mark the start point for the ‘loop’
feature. To select between different play modes;
repeat, random.
Use and maintenance
The following suggestions will help you use and maintain your mobile.
1. Please keep dry. Rainwater, humidity and any kinds of liquid or moisture might contain minerals which could
corrode the circuit.
2. Moving parts maybe damaged if you put or use the phone in a dirty or dusty place.
3. Please do not use or store the phone in a high temperature environment as this may result in damage to the
electronic or plastic parts.
4. Please do not use or store the phone in a very low temperature environment.
5. Please do not use any chemicals, detergent or caustic detergents to clean the mobile. If you want to clean it, please
wipe it gently using a soft cloth made damp with some soapy water.
6. Please do not paint the phone. Paint might clog the moving parts and prevent proper operation.
7. Only use the headset provided, or an approved spare.
8. If the mobile has got wet, please switch it off immediately and remove the battery. Leave it to dry thoroughly before
using it again.
9. To get the maximum talk and standby times from your battery, please turn down the volume, reduce the backlight
and contrast.
10. Please keep all metal objects away from the charger port on the top of the phone to avoid damaging the electronic
circuits.
12
13
Basic functions
SIM Lock
The phone is special for the SIM cards of i-MOBIL. To use other SIM cards, please follow the steps below.
1. Insert the SIM card and switch on the phone.
2. Enter the password. If the password is correct, restart your phone.
Note:
♦ The password is provided by i-MOBIL, please contact your local service provider for detailed information.
♦ The phone is to be locked permanently after entering wrong password for 5 times. And it can not be used until
the software is updated. Please contact your local service provider for detailed information.
Making a call
Making a call from standby mode
1. Input the phone number. To change the number, move the cursor by the Scroll key, press the C key to delete
digits.
2. Press the Dial key (Dial).
3. To make an international call, press and hold the * key to enter the international prefix ‘+’ in place of the
international access code.
Then input the country code, area code and phone number, and press the Dial key (Dial).
Making a call by your phone book
1. In standby mode, press the Scroll key to enter the Phone book; or from main menu, select Phone book>Names.
2. Select an entry by the Scroll key, then press Dial key (View) to view all the phone numbers in this entry.
3. Select a number you want by the Scroll key, then press the Dial key (Call).
Making a call by call history
Your phone stores 20 phone numbers for each Dialled, Received and Missed calls.
1. In standby mode, press the Dial key to enter the Dialled call list.
You can press the * key or # key to switch to the Received or Missed call lists.
2. Select the number you want by scrolling up or down, then press the Dial key (Call).
Answering or rejecting a call
1. Press the Dial key (Ans) or press the Scroll key up to answer an incoming call; or press the Scroll key to enter
option menu and select from Busy, Reject or Answer.
2. Press the Power key (Reject) to end or reject a call.
3. When the headset is connected, press the Dial key or the headset button to answer a call.
During a call
Switching to other functions
Press the Dial key to enter the option menu as described below. Then press the associated number key to select the
option or highlight the required option by using the scroll key, and then press the Dial key to select.
1. Dial new
2. Hold
3. Mute
4. End this call
5. Send DTMF
14
6. Main menu
7. Listen
Note: Some of these ‘in call’ functions require your network provider to activate them. For more details please contact
your network provider.
Searching names
1. During a call, press the Dial key (option) to enter options menu (talk), select Main menu>Phone book>Names.
2. Select a name and press the Dial key (view) to view the number list.
Missed Call
The phone displays ‘Missed calls: X call(s)’.
1. Press the Dial key (View) or Scroll key to view the missed call list.
2. Press * key or # key to switch to missed or Received call lists.
3. In the missed call list, select the entry you want and press the Dial key (Dial). Or press the Scroll key to view the
date and time of this entry.

How to use multimedia entertainment
Music Player
The music player allows you to store and play MP3 music from the phone’s memory card.
Music can be transferred to, or removed from the phones memory card, by connecting the phone to a PC with the
supplied USB cable. The phone’s memory card will appear as a removable drive under the PCs ‘My Computer’ icon.
Windows can be used to click and drag files into or out of the phones memory card.
Note:
♦ When the phone accesses the memory card for the first time, it creates a ‘Playlist’ file, which is a list of all the
current files it finds on the memory card. If you change the files on the memory card you MUST delete the playlist
file, to ensure the handset updates its file list the next time it access the memory card.
♦ Your phone do not support link with Apple Macintosh computers. When connecting to PC, please only use in the
circumstances of Microsoft 2000 or above.
To activate or quit the music player
1. In standby, press shortcut to activate music player.
2. Or in the main menu, select Music Player, press the Dial key or Scroll key to start the player.
3. Press the C key to exit music player and return to standby.
Play list
1. In music player, press the Dial key or Scroll key to view the handsets current playlist. When you first start the
music player, all the tracks on the handsets memory card will be automatically put in the playlist. Music tracks can
be moved on or off this playlist by using the ‘Add’ or ‘Move’ features accessible under the Dial key.
2. Press the Dial key to edit the play list:
Select ‘Add’ to add music to the playlist from the memory card.
Select ‘Move’ to move tracks off the playlist. This does not delete tracks, and they can be ‘Added’ again, it merely
removes the track from the current play list.
Select music
1. In music player, press to jump to the previous track, press to jump to the next one; press to pause or
continue playing the current track.
2. Or in the play list, select the music you want, press Scroll key to play.
Adjust the volume
In the music player, push the Scroll key up or down to adjust the volume.
Switch the play mode
With the music playing, press the # key to switch the play mode between Sequence , Random , Sequence &
Repeat and Random & Repea t.
Broken-point memory repeat
It is possible to repeat part of a track. The start point for the repeat is ‘marked’ by pressing the * key as the required
point is reached when the track is playing. To mark the end point for the repeat the * key is pressed a second time as
the required point is reached in the track. The MP3 player will now loop between these two points forever. Then press
the * key again to stop the loop and continue to play.
Fast forward
While playing, press and hold to fast rewind; press and hold to fast forward.
15

How to view the music information
While playing, press 4 to view the music information of the current track if there is an icon “i” displayed.
Lock keypad
In music player, press the Power key and then the # key to lock the keypad (the display will show ).
How to copy MP3 files to the phone
To manipulate the music files stored on the phone’s memory card it must be connected to a PC via the USB cable
provided.
When the phone is connected to the PC, it should be automatically detected.
However, if the PC fails to detect the phone, the connection can be manually established by selecting Extras from the
phone’s main menu, then selecting Data connect, and pressing Connect.
The phone’s memory card will appear as a ‘Removable Disk’ under the My computer icon of the PC.
1. Copy MP3 files to the root directory (the folder that appears when you open the memory card) of the removable
disk.
2. To ensure your phone updates it playlist, please ensure you delete the ‘playlist’ file on the phone’s memory card.
3. When you have finished editing the contents of the Phone’s memory card, close the USB connection by double
clicking the ‘Safely Remove Hardware’ icon in the System Tray of PC and selecting ‘Stop’. Then press Exit on the
handset and disconnect the USB cable.
Note:
♦ If you have muted the handsets speaker by pressing the #key the MP3 player will only play through the headset.
♦ The battery consumption is higher than usual when the MP3 player is being used.
♦ You can download MP3 files up to the capacity of the memory card. The phones MP3 player will read the contents
of any folders put onto the phones memory card, but can only read down two levels of folder, so it is better to keep
all the content in the top level folder.
FM Radio
The FM tuner within this product have been tested and found to comply with the limits for a Class A digital device,
pursuant to Part 15 of the FCC Rules. These limits are designed to provide reasonable protection against harmful
interference when the equipment is operated in a commercial environment. This equipment generates, uses, and can
radiate radio frequency energy and, if not installed and used in accordance with the instruction manual, may cause
harmful interference to radio communications. Operation of this equipment in a residential area is likely to cause
harmful interference in which case the user will be required to correct the interference at his own expense.
Tip: The FM radio uses the headset wires as an aerial, so the radio will not work unless the headset is connected.
To activate or quit the FM radio
1. From the main menu, select FM radio and press the Dial key or the Scroll key.
2. The radio will now display ‘Searching’, as it locates the radio stations.
3. The display will now show the current radio station found and start playing it through the headsets.
4. The volume can be adjusted by operating the scroll up or down.
5. To change, rename or delete stations, or to manually tune or re-tune, press the Dial key to enter the options menu
and select from the options available.
6. Press the C key to exit back to main menu.
To listen to the Radio
In FM radio, press or to change channel. Press to pause or continue playing the current channel.
Search channel
Tip: The FM radio stores all the channels found when the automatic search was performed. Please use the manual
searching feature under the options menu to find a channel which was not found during the auto search.
Search All
In the FM radio, press the Dial key ( ), select Search all to search all FM channels and store them automatically in
sequence.
Manual tuning
16

1. In FM radio, press the Dial key ( ) to select Manual tuning.
2. Press or to tune the frequency in 100kHz steps.
3. Press the Dial key (Save) or Scroll key to save the new station.
4. Select a station number from 1 to 40 and press the Dial key to save the manually tuned station.
Auto tuning
1. In FM radio, press the Dial key () to select Auto tuning.
2. Press or to start auto searching. The tuning will stop at the first radio station found, and begin playing this
station.
3. Press Dial key (Save), select a station number from 1 to 40, press the Dial key (Save). Or press or
continue searching.
Note: the radio may stop on ‘silent stations’, if this happens please press or to continue searching.
Edit channel name
In FM radio, press the Dial key ( ) to display the following options:
1. Choose channel: Select a stored channel and play.
2. Name channel: Rename the current channel.
3. Delete channel: Delete the current channel.
Adjust the volume
In FM radio, push the Scroll key up or down to adjust the volume.
Lock keypad
In FM radio, press the Power key ( ) then # key to lock the keypad (shown as ).
Note:
The radio remembers the last radio station you were listening to, and the next time the radio is turned on, it will try to
return to that station and re-commence playing it.
Voice recorder
Note: Please make sure the memory card is properly placed before entering into voice recorder, or else it does not
work.
To activate or quit the Voice recorder
1. In the main menu, select Extras>Voice recorder.
2. In the voice recorder, press the Power key to go back to the previous menu.
Record voice
Select Voice Recorder>record to start recording.
Save record
1. During recording, press the C key to save record and go back to the previous menu.
2. Press the Power key to save the record and exit to standby mode.
Play record
In the voice recorder, select Saved records to enter into the saved record list. Select the record you want, press the Dial
key (Play) or Scroll key to play.
Edit record
In the voice recorder, select Saved records to enter into the saved record list, then highlight the record you want and
rename it, delete it and view details of it by using the Scroll key as follows:
Rename
Select Rename, enter the name you want and press the Dial key to save.
17
18
Delete
1. Select Delete to delete the current record.
2. Select Delete all to delete all the saved records.
Details
Select Details to view the detailed information of the current record.
Note:
1. The recording time depends on the capacity and free space of the memory card.
2. All the records are saved in the folder ‘Audio’ created in the memory card automatically.
Mass storage
1. In standby mode (lock or unlock), connect to PC with USB data cable. The pop-up message shows ‘Activate mass
storage?’. Select 'Yes' to activate mass storage; select ‘No’ to charge the battery by the USB data cable.
2. In the main menu, select Extras>Data connect.
a. Press the Dial key (Select) or Scroll key to enter Mass storage.
b. Press the Dial key (Connect) or Scroll key to enable the connection to PC.
c. After the connected animation is displayed, connect the USB data cable. Select Activate.
d. Select Mass storage on PC. Copy the MP3 files from PC to phone.
e. Double click the ‘Safely Remove Hardware’ icon in the System Tray of PC, select Stop and quit safely. And
then press Exit on the phone. Press the Dial key to turn off mass storage. And then the phone can be used
properly.
Note:
♦ Formatting the mass storage on PC is not supported, or else the phone will not work properly unless re-powered
on.
♦ The phone can be charged via the USB connector from the PC. When the USB cable is connected, select ‘Exit’ on
the phone when prompted to ‘Link USB’.
File viewer
1. Select Extras>Memory card>File Viewer>T-FLASH.
2. Select a file folder, press the Dial key to enter the folder, or press the Scroll key to have the following options:
Info: To check the detailed information of the current file folder.
Delete: To delete the current file folder.
Rename: To edit the name of the current file folder.
3. Select a file, press Dial key to view the detailed information of the file, or press Scroll key to have the following
options:
Info: To view the detailed information of the current file.
Delete: To delete the current file.
Rename: To edit the name of the current file.
19
Setting up ring styles and display
The phone comes with 5 pre-defined profiles: Normal, Meeting, Outdoor, Car and VIP. These profiles can be
personalized by editing them.
Personalising a ring tyle
Open the main menu, select Profile>Normal, Meeting, Outdoor, Car or VIP.
Select one profile, then press the Dial key (Select) or Scroll Key to open it.
Setting an incoming call ringer alert
1. Select Personalise>Incoming call alert.
2. Select Internal to open the internal ring tone list in the phone; Select External to open the external ring tone list
which will include the MP3 files.
3. Select the ring tone you want, then press the Dial key (Select) or Scroll key.
Setting a message ringer alert
1. Select Personalise>Message alert tone.
2. Select the message tone from the list and then press the Dial key (Select) or Scroll key.
Adjusting volume
1. Select Personalise>Ring volume, Earpiece volume, Keypad volume or Vibrator.
2. Use the Scroll key to adjust volume, then press the Dial key (Select) or Scroll key.
3. Press the Dial key (Select) or Scroll Key to set vibrator on/off.
Setting up display
Open the main menu, select Settings>Phone>Screen.
Setting display color
Select Screen>Screen colour, then use the Dial key (Select) or Scroll key to select the color that you want.
Setting backlight
Select Screen>Backlight timer, then use the Dial key (Select) or Scroll key to set the time you want.
Setting contrast
Select Screen>Contrast, use the Scroll key to adjust the brightness, then press the Dial key (Select) or Scroll key to
save the brightness setting.
20
Setting wallpaper
Select Screen>Wallpaper, then use the Dial key (Select) or Scroll key to save the wallpaper setting.
Setting up Time & Date
Open the main menu, select Settings>Time & Date.
Setting time
1. Select Time & Date>Time.
2. Enter the time you need, then press the Dial key (OK) or Scroll key to save the time setting.
(e.g. If the time would be 2:45 pm, please enter 1-4-4-5)
Setting date
1. Select Time & Date>Date.
2. Enter the date you need, then press the Dial key (OK) or Scroll key to save the date setting.
(e.g. If the date would be Mar 15th 2005, please enter 1-5-0-3-2-0-0-5)
Setting date format
1. Select Time & Date>Date format.
2. Select the format you want, and then press the Dial key (Option) or Scroll key to save the date format setting.
Setting up greetings and language
Setting language
1. Open the main menu, select Settings>Phone >language.
2. Select the language you want, then press the Dial key (Option) or Scroll key to save the language setting.
Setting greetings
1. Open the main menu, select Settings>Phone>Greetings
2. Enter the greetings you want, then press the Dial key (Save) or Scroll key to save the greetings setting.
Please refer to ‘Entry method’ P29 to get more information about entry method.
Tips: Greetings will be displayed before the home screen displays.
21
Using phonebook
You can store up to 200 entries in your phonebook.
The numbers you can store in the SIM card will vary. You can store the contact’s name, phone numbers and other
relative numbers in the phone book.
Storing a phonebook entry
Storing a phonebook entry from the menu
1. Open the main menu, select Phonebook>Add new.
2. Press the Scroll key to open New, then input the contact name and press the Dial key to save.
3. Use the Scroll key to select Add number, then input the phone number you want.
4. Press the Dial key (Save) or Scroll key to select Number type, then press the Dial key (Save) or Scroll key to
save the entry.
5. Three phone numbers can be added into each entry. To add more numbers, redo the 3rd step.
Storing a phonebook entry in standby mode
1. In the home screen, input a phone number, then press the Scroll key to enter Option menu>Save.
2. If adding a new phone number to an existing entry, select To existing to enter phone book list.
Select the entry you want, then press the Dial key (Select) to save the new number.
3. If creating a new entry, select New entry.
(Please refer to ‘Storing a phonebook entry from the menu’ P24)
Searching for a phonebook entry
In the home screen, press the Scroll key; or open the main menu, then select Phonebook>Names to enter contact lists.
In contact lists, press the *, # key to page up or down.
1. To search by first letter: press the number key which the first letter of a contact’s name begins with, then use the
Scroll key to select a name you want.
2. To search by name: press the Scroll key to open option menu, select Search, then input the contact’s name and
press the Dial key (OK).
3. To search by group: press the Scroll key to open option menu, select View by group,then select the group and
press the Dial key (OK) or Scroll key, and then all the group’s contact lists will appear.
Editing a phonebook entry
In the home screen, press the Scroll key; or open the main menu, then select Phonebook>Names to enter contact lists.
1. Select the contact you want, then press the Scroll key to open option menu and select Edit.
2. Select the contact name or phone number which needs to be changed, then press the Scroll key to enter editing
mode.
3. After editing, press the Dial key (Save) or Scroll key to select a number type, then press the Dial key (Save) or
Scroll key to save the entry.
22
Deleting phonebook entry
In the home screen, press the Scroll key; or open the main menu, then select Phone book>Names to enter contact
lists.
Deleting a single number
1. Select the contact you want, press the Dial key (View) to view all phone numbers under this entry,
2. Select the phone number you want to delete, then press the Scroll key to enter Option menu and select Delete to
delete the number.
Deleting an entry
1. Repeat the steps of ‘Deleting a single number’.
After deleting all the phone numbers in this contact, this contact name will disappear automatically.
2. Or select the contact name you want, then press the Scroll key to enter Option menu directly and select Delete.
Deleting all phonebook entries
In your phonebook, press the Scroll key to enter Option menu, then select Delete all>SIM card, Phone or All.
Select SIM card to delete all entries in SIM card.
Select Phone to delete all entries in your phone.
Select All to delete all entries both in SIM card and your phone.
Assigning a group
Viewing group status
1. Open the main menu, select Phonebook>Setting>View by group.
2. Press the Scroll key to set the display or hide status of group.
“;“: Show all the contacts under this group; “:“: Hide all the contacts under this group.
3. Press the Dial key (OK) to save the group status and back to previous menu.
Assigning a group
1. In the phonebook list, select a contact, then press the Scroll key to enter Option menu and select Add to group.
2. Select the group you want to assign, and then press the Dial key (OK) or Scroll key to save the setting.
Viewing and setting up 1-touch dial
Note:On this phone you can only assign key 2 to 9 to eight numbers in SIM card s 1-touch dial numbers.
1. In the main menu, select Phone book>Settings>1-touch dial list. Then press the Dial key (Select) or Scroll key to
view the one-digit speed dial number list.
2. In the main menu, select Phone book>Names to access name list. Press the Dial key (View) to view the details.
Press the Scroll key to access the option menu. Select 1-touch dial, and then select a speed dial number (from 2
to 9) for the contact, press the Dial key (Select) or Scroll key to save and back to the previous menu
23
automatically.
Viewing memory status
Choosing default save location
Open the main menu, select Phonebook>Setting>Default Save Location>SIM card, Phone or Optional.
Select SIM card to save all new entries in SIM card by default.
Select Phone to save all new entries in phone by default.
Select Optional to save new entries in SIM card or phone.
Viewing memory status
Open the main menu, select Phonebook>Setting>Status to show the memory status of SIM card or phone.

Using call history
Viewing call history
Note:If the phone number has been saved in your phonebook, the contact name will be displayed in call record.
1, In the idle screen, press the Dial key ( ) directly to view dialled calls list.
You can switch to received calls list and missed calls list by the * and # key.
2, Or open the main menu, select Call record>Dialled calls, Missed calls or Received calls.
3, Select a record, press the Scroll key to show the details.
Deleting call history
1. Open the main menu, select Call record>Delete> Dialled calls, Missed calls, Received calls or All calls.
Select Dialled calls to delete all the records in Dialled calls list.
Select Missed calls to delete all the records in Missed calls list.
Select Received calls to delete all the records in Received calls list.
Select All calls to delete all the records in Call history list.
2. Press the Dial key (Select) or Scroll key to delete and press the Power key to cancel this operation.
Viewing call information
Note:
♦ To set call costs and cost limit, input PIN2. Please refer to PIN2 P7。
♦ To view the last call cost and all call costs, set charge rate at first.
Cost information
Open the main menu, select Call record>Call info.>Cost info.>Last call, All calls, Clear logs, Charge rate or Cost limits.
Last call: Press Dial key (Select) or Scroll key to view the cost of the latest call.
All calls: Press Dial key (Select) or Scroll key to view the cost of all calls.
Clear logs: Press Dial key to clear.
Cost limits: Input the limitation of cost. If necessary, please input PIN2.
Open the main menu, and select Call record>Call info.> Cost info> Charge rate>Set rate or Check rate.
Check rate: View the current cost unit.
Set rate: Input the cost unit, then press Dial key (Save). If necessary, please input PIN2.
Note: The time duration displayed in your phone may not be exact with the time duration based on which your service
provider charge you. To get the exact cost information, please contact your local service provider.
Timer information
Open the main menu, select Call record>Call info.>Timer info.>Last call or All calls.
Last call: Press Dial key (Select) or Scroll key to view the time duration of the latest call.
24
25
All calls: Press Dial key (Select) or Scroll key to view the time duration of all calls.
Entry method
Where to use English entry method
Your phone offers a number of different text entry methods for entering text information in:
1) Creation or editing of contact details in the phonebook
2) Name searching in the phonebook
3) Creating SMS messages
4) Editing memos
Text entry methods
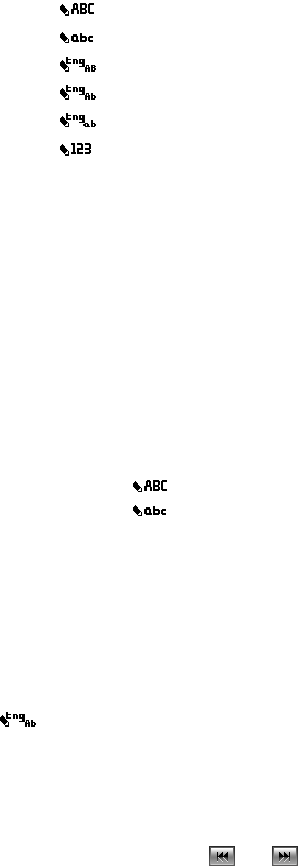
Capital letter
Lowercase
T9 (capital letter)
T9(first letter capital)
T9(lowercase)
Number
Tips:
♦ To change between text entry methods, press the #key.
♦ With the T9 method selected, you can toggle between T9 entry methods by pressing and holding the space key.
Cursor
When editing, a cursor ‘I’ will be shown in the text string to indicate the location new characters will be entered.
Multi-tap
To enter text in Multi-tap mode, the key with the appropriate group of letters must be pressed, if the first letter of the
group is required, the key is pressed once. If the second letter is required it should be pressed twice.
e.g Input the word ‘Hello’
♦ Switch to capital letter, then press 4 twice to input ‘H’
♦ Switch to lowercase, then press 3 two times to input ‘e’, press 5 three times to input ‘l’, press 5 three times to
input ‘l’, then press 6 three times to input ‘o’.
T9 English entry method
It’s easier to use T9 to input words.
e.g. Input the word ‘Hello’
Ensure you are in T9 mode (cycle through the options by pressing #), then press and hold the space key to switch to
T9(first letter capital).
Press 4,3,5,5,6. As you type the phone will be trying to work out the most likely word you are trying to spell. When you
have completed the word, confirm the word the phone has correctly predicted the word you require by pressing the
space key, this will enter the word displayed, enter a space and move on ready to enter the next word.
If the word the phone has predicted is not the one you require, alternative words found by the same keypresses can be
shown by pressing the or .
Press 0 to enter a space.
Punctuation and Special characters
In edit mode, press 1 to input punctuation and special characters.
Press 1 to select the alternative punctuation or special characters.
26

Messages
Viewing messages
Note:You must set up your message inbox before you can send and receive messages. Usually, your service provider
has already set up the message in box for you.
In standby mode, push the Scroll key up to open SMS menu; or open the main menu, select Messages>SMS>Inbox,
Outbox or Saved items.
Inbox:
1. Use the Scroll key to select the message you need, press the Dial key (Read) or Scroll key to read the message.
2. Press the Dial key (Option) or Scroll key to open the option menu:
Reply: To reply to the sender’s number
Delete: To delete the message
Forward: To continue to send the message to other recipients
Save: To save the message
Edit: To edit the message and save
Call: To call the sender’s number
Extract number: To extract the numbers embedded in the message
Send to many: To send the message to a group of persons
Outbox
1. Use the Scroll key to select the message you need, press the Dial key (Read) or Scroll key to read the message.
2. Press the Dial key (Option) or Scroll key to open the option menu:
Delete: To delete the message
Send: To send the message
Save: To save the message
Edit: To edit the message and save
Call: To call the sender’s number
Extract number: To extract the numbers embedded in the message
Send to many: To send the message to a group of persons
Saved items
1. Use the Scroll key to select the message you need, press the Dial key (Read) or Scroll key to read the message.
2. Press the Dial key (Option) or Scroll key to open the option menu:
Delete: To delete the message
Send: To send the message
Edit: To edit the message and save
Extract number: To extract the numbers embedded in the message
Send to many: To send the message to a group of persons
Creating messages
Note:If you set the language as English, up to 160 English characters can be contained in each message (including
space)
If you set the language as others, 70 characters can be contained in each message (including space).
In standby mode, push the Scroll key up to enter SMS>Create; or open the main menu, and select
Messages>SMS>Create.
27

1. To enter the content.
2. Press the Dial key (Option) to access the option menu:
Send: To send the message
Save: To save the message
Insert name: To insert the names selected from the list
Insert number: To insert the numbers selected from the list
Send to many: To send the message to a group of persons
3. Press the End key back to previous menu.
Warning:
1. In the message entry screen, press the C key to delete the characters to the left of the cursor; Press and hold the C
key to clear all the characters.
2. The SMS will be divided into at most 6 continuous pieces automatically and send them one by one if the characters
entered in one message exceeds the character limits. The upper limit is 912 English characters in purely English
language or 396 characters in other languages.
Using SMS template
Open the main menu, and select Messages>SMS>Template. There are 10 templates of short messages for quick reply.
You can choose one from the following:
1. Where are you?
2. Hello, how are you?
3. Call me, it is urgent.
4. I’m busy and I’ll call you later.
5. Call me if it is possible.
6. I’ll arrive a little bit late.
7. I received your message, I’ll call you later.
8. What are you doing?
9. At what time do we meet?
10. At what time is the meeting?
Deleting messages
Open the main menu, select Messages>SMS>Inbox, Outbox or Saved items.
Delete all:To delete all of the messages in this folder
Delete one:
1. Select a message, press the Dial key (Read) or Scroll key to view this message.
2. Press the Dial key (Option) or Scroll key to access option menu.
3. Select Delete.
Setting up messages
Open the main menu, select Messages>SMS>Settings, to open the option menu:
1. SMS center No.: Enter the SMS service center code, then press the Dial key (Save).
2. Validity: Select the length of time your message will be stored in the SMS service center and back to previous
menu.
3. Status rept.: Set the delivery status report on/off and back to previous menu.
4. Save priority: Set the priority to store in SIM card or phone and back to previous menu.
28
29
5. Status: Display the SMS storage status in SIM card and phone.
Information messages
Note: Information message functions are network support services. Please contact your service provider for more
information.
Open the main menu, select Messages> Info. messages.
Viewing information messages
1. In Info messages menu, use the Scroll key to select Read.
2. Use the Scroll key to select the information you want, then press Dial key to read.
Notes:
1. Please set up a topic first and then you can use the read menu.
2. If no information message in current topic, The display will show “no message”
Setting up information messages
1. In Info messages menu, use the Scroll key to select Settings.
2. Press the Dial key (select) or Scroll key to Add or Delete the language.
3. Select Topics>Add new to access the self-created topic list. Press the Dial key (Select) or Scroll key to Add,
View/Edit or Delete topics.
4. Select Topics>Current list to access the currently selected list. Press the Dial key (Select) or Scroll key to Add or
Delete topics.
Voice mail
Open the main menu, select Messages>Voice mail>Listen or Voice mail number.
Please set the voice mail number before listening to the voice mail messages.
Note: Voice mail is a network support service; please contact your local service provider for detailed information.
30
Personal organizer
Alarm
Tip: You can set more than one clock at a time.
Open the main menu, and select Extras>Alarm.
Turn Alarm on
Select an alarm, press the Dial key (Option) or Scroll key to access the option menu.
Active: Activate the current alarm.
Modify/Reset: Edit or set the current alarm.
Alarm status: View the status of the current alarm.
Deactivate all: Close all the activated alarms.
Turn Alarm off
Turn all off: Select an alarm, press the Dial key (Option) or Scroll key to access the option menu. Select Deactivate
all.
Turn one off: Select an activated alarm, press the Dial key (Option) or Scroll key to access the option menu. Select
Alarm off.
Memo
In the main menu, select Extras>Memo.
Add
1. Select Add, enter the content and press the Dial key (OK) to save.
2. Select turn On or Off the reminder press the Dial key (OK).
3. If Choosing On, select the remind date, and then enter the time. Press the Dial key (OK) or Scroll key to save.
View
Select View all to view the detailed content of the memo. Press the Dial key (Option) or Scroll key to enter the option
menu:
View/Edit: Enter the content you want and press the Dial key (OK) to save.
Delete: Delete the current memo.
World time
In the main menu, select Extras>World time.
1. Push the Scroll key to move the straight line on the screen to show the time zone and corresponding time.
31
2. Press the Dial key (Select) to select a time zone and the phone time will be set to the current time zone, and then
the phone will go back to the previous menu automatically.
Calculator
You can have some basic mathematics operation such as plus, minus, multiply and divide.
In the main menu, select Extras>Calculator.
1. During entering digits, press the C key to delete a character.
2. Press the # key to switch the function notation. Press the Dial key to get the result.
3. Press the Power key to back to the previous menu.
Calendar
In the main menu, select Extras>Calendar.
1. Push the Scroll key to move the cursor left or right, push and hold the Scroll key to move the cursor up or down.
Press the # key or * key to change month.
2. Press the C key to back to the previous menu, or press the Power key to return to the standby mode.
Memory status
In the main menu, select Extras>Memory card>Status.
To view the current status of the memory card.
STK
Your phone supports STK.
Please contact your SIM card service provider on the usage, charge rate and data of STK.
32
Call and phone settings
Minute reminder
In the main menu, select Settings>Call>Minute reminder.
Select On or Off, press the Dial key (Select) or Scroll key to save.
Fixed dialing
Note: The SIM card installed needs to support fixed dialing.
The number which can be stored depends on the memory of SIM card.
In the main menu, select Settings>Call>Fixed dialing.
1. Enter PIN2 code to access the option menu.
2. Select Fixed dial setting>On to enable the fixed dialing; select Fixed dial setting>Off to disable the fixed dialing
3. Select Fixed dial list to access fixed dial name list. Select the contact you want, press the Dial key (View) or Scroll
key to dial.
4. In the name list, press the Scroll key to access the option menu:
Select Edit to edit the number or name of the current contact;
Select Delete to delete the current number.
Select Add new to add a new contact.
Tip: You can only dial or send messages to the numbers in the fixed dial list, when the fixed dialing is activated.
Call forward
Tip:
♦ Call forward is invalid when the fixed dialing is activated.
♦ In this function, you can forward the incoming calls to the assigned number. (Call forward is network support
service, please contact your local wireless service provider for detailed information.)
In the main menu, select Services>Call forward>Forward all calls, Forward if busy, Forward if no reply, Forward if out of
reach or Cancel all.
Forward all calls: All the incoming calls are to be forwarded to the assigned number unconditionally.
Forward if busy: Forward the incoming calls to the assigned number when the line is busy.
Forward if no reply: Forward the incoming calls to the assigned number when the call is not answered.
Forward if out of reach: Diver the incoming calls to the assigned number when the phone is not available or switched
off.
Cancel all: Cancel all the activated forwarding.
You can use call forward feature in different conditions. There are On, Off and Status in each option. Press the Dial key
(Select) or Scroll key to select.
1. Select On>Set number or Voice mail.
Set number: Enter the number you want to assign, or press the Dial key (Search) in the phone book before
entering the number. Press the Dial key (OK) or Scroll key to save.
33
Voice mail: Your phone will display the voice mail number automatically. You can also enter the voice mail number
you want, press the Dial key (Select) or Scroll key to save.
2. Select Off to disable call forward.
3. Select Status to view the current status of call forward.
Call barring
Tip: In this function, you can restrict the incoming and outgoing calls. (Call barring is network support service, please
contact your local wireless service provider for detailed information.)
In the main menu, Select Services>Call barring>Outgoing, Intl. out, Local only, Incoming, Roaming in, Cancel all or New
password.
Outgoing: All out calls can not be made
Intl. out: International calls can not be made.
Local only: Only local calls in the same network as the SIM card can be made.
Incoming: All incoming calls can not be made.
Roaming in: Incoming calls can not be received while roaming.
Cancel all: Enter the password to cancel all the restrictions.
New password: You may change the network barring password provided by the wireless service provider when
applying the relevant service.
You can use call barring function in different conditions. There are On, Off and Status in each option. Press the Dial key
(Select) or Scroll key to save.
1. Select On and enter network password to restrict the numbers in the current condition.
2. Select Off and enter network password to cancel the restriction.
3. Select Status to view the current status of call barring.
Call waiting
In the main menu, select Services>Call waiting.
1. Select On to enable call waiting. Incoming call icon displays when there is an incoming call during a call.
2. Select Off to disable call waiting.
3. Select Status to view the current status of call waiting.
Phone setting
Airplane mode
In the main menu, select Settings>Phone>Airplane mode.
1. Select On to disable calling functions. You can only use the entertainment functions on the airplane. (Please
comply with the relative regulations.)
2. Select Off to disable the airplane mode.
My number
Tip: You can set 2 my numbers only.
34
In the main menu, select Settings>Phone>My number.
1. Press the Dial key (Add), and enter the number, and then press the Dial key (OK) to save.
2. Select a number, and then press the Dial key (Option) or Scroll key to the option menu: to Edit No. or Delete No.
Any key answer
In the main menu, select Settings>Phone>Any key ans.
Press the Dial key (Select) or Scroll key to turn On or Off.
On: Press any key to answer the incoming calls.
Off: Press the Dial key or Scroll key to answer the incoming calls. (Please refer to Answering or rejecting a call at
P15 for more information.)
Auto on and off
Your phone switches on or off automatically on the assigned time when Auto on/off is activated.
In the main menu, select Settings>Phone>Auto power on/off.
1. Press the Dial key (Select) or Scroll key to set Auto power on or Auto power off.
2. Press the number keys to enter the time of switch on or switch off and press the Dial key (OK) or Scroll key to
save.
35
Other settings
Network setting
In the main menu, select Settings>Network>Network opts. or New password.
1. Select Network opts.>Automatic, Manual, Set preferred Ntwk or Add network to search network in different ways.
2. Select New password to change the network password.
Security setting
In the main menu, select Settings>Security>PIN code, Change PIN2 or Phone lock.
PIN code
1. Select PIN code, press the Dial key (Select) or Scroll key to open the PIN code entry screen.
2. Enter the proper PIN code, and press the Dial key (Select) or Scroll key to save the setting.
Warning:
♦ The SIM card is locked if wrong PIN code is entered for 3 times. (Please contact your local wireless service
provider to unlock the SIM card.)
♦ The SIM card is to be damaged if the wrong PIN code is entered for 10 times. (Please contact your local service
provider for help.)
Change PIN2 code
1. Select Change PIN2>Change.
2. Enter the proper PIN2 code, and press Dial key (OK) or Scroll key.
3. Enter the new PIN2 code twice and press Dial key.
Warning:
♦ The SIM card is locked if wrong PIN2 code is entered for 3 times. (Please contact your local wireless service
provider for PUK2 code to unlock the SIM card.)
♦ The SIM card is to be damaged if the wrong PUK2 code is entered for 10 times. (Please contact your local service
provider for help.)
Phone lock
Enter the phone unlock code to open the phone lock screen. Press the Dial key (Option) or Scroll key to turn On, Off or
Change code.
Note:
♦ You need to enter the unlock code to switch on the phone and access some menus if the phone lock is activated.
♦ The default phone unlock code is 1234.

36
Master reset
In the main menu, select Settings>Restore factory settings. Press the Dial key (Select) or Scroll key to restore the
factory settings.
Note:
♦ Your personalized settings will be canceled after this operation.
♦ Master reset does not have effect on the phone book or other data rather than setting.
♦ Master reset does not change the time and date in your phone.
Troubleshooting
Problems: Solutions:
Display ‘Locked’ when the
phone is turned on.
Wrong PIN number has been input, please contact your service provider to unlock.
No Signal strength indicator
is displayed
Lost connection with the network. The phone may be in a place without network
service. Please move to another location or contact your service centre for help.
The keypad doesn’t work or
work very slowly.
The operation speed of the screen is slow under low temperature which is normal.
Please try again in a warmer place.
No display while charging Low battery, or out of the temperature range (0-45 ). Please wait for couple minutes or ℃
move the mobile to a warmer place to recharge again.
‘Not Provided’ or ‘Not Set' is
displayed on the screen while
using some functions.
Many functions can only be used after applying for the services. Please contact your
service provider for details.
‘SIM damaged’ is display on
the screen.
SIM might be damaged, please contact your service provider for help.
‘Insert SIM’ displayed Please make sure that you have inserted the SIM card properly. If it is no use, SIM may
be damaged and please contact your service provider.

37
Battery information
Type Capacity
Li-ion 430 mAh
--The battery life depends on many factors, including the SIM card, network conditions, settings , usage and
enviorenment.
--Making calls, turning on the backlight and music player will consume more battery power.
--The standby time is shorter when the network is not available than in the standard status.
--For power saving, the backlight turns off automatically if your phone stands idle for an assigned time.
--The performance of battery varies with the charging status, temperature, local radio wave and backlight status.
38
Accessories
Safety of the battery
1. Please use the battery provided by the original manufacturer. Use of any other battery will lead to the warranty
being invalid and the manufacturer of the phone will take no responsibility in repairing the phone damaged by the
use of unapproved fittings.
2. Please keep any metal things (e.g. Keys in your pocket) away from the contact point of your battery to avoid short
circuits.
3. Do not bend or open the battery by force
4. Please keep the battery away from water and fire.
5. The battery can not be charged under 0C (32F) or above 45C (113F).
Rapid travel charger
The rapid travel charger can help you to quickly charge the battery. Plug the charger to an AC wall socket and plug the
other end into the charger port of the phone. Please make sure the battery is correctly inserted on the phone before
charging. Please do not remove the battery while charging.
Data cable
Only use the data cable approved by the phone manufacturer. The use of any other types would invalidate any approval
or warrant applying to the phone and could be dangerous.
SAR information
The SAR limit of USA (FCC) is 1.6 W/kg averaged over one gram of tissue. Device types C-1 (FCC ID: TPP06C-1) has
also been tested against this SAR limit. The highest SAR value reported under this standard during product certification
for use at the ear is 0.281 W/kg and when properly worn on the body is 0.814 W/kg. This device was tested for typical
body-worn operations with the back of the handset kept 1.5cm from the body. To maintain compliance with FCC RF
exposure requirements, use accessories that maintain a 1.5cm separation distance between the user's body and the
back of the handset. The use of belt clips, holsters and similar accessories should not contain metallic components in its
assembly. The use of accessories that do not satisfy these requirements may not comply with FCC RF exposure
requirements, and should be avoided.
-End of Document-