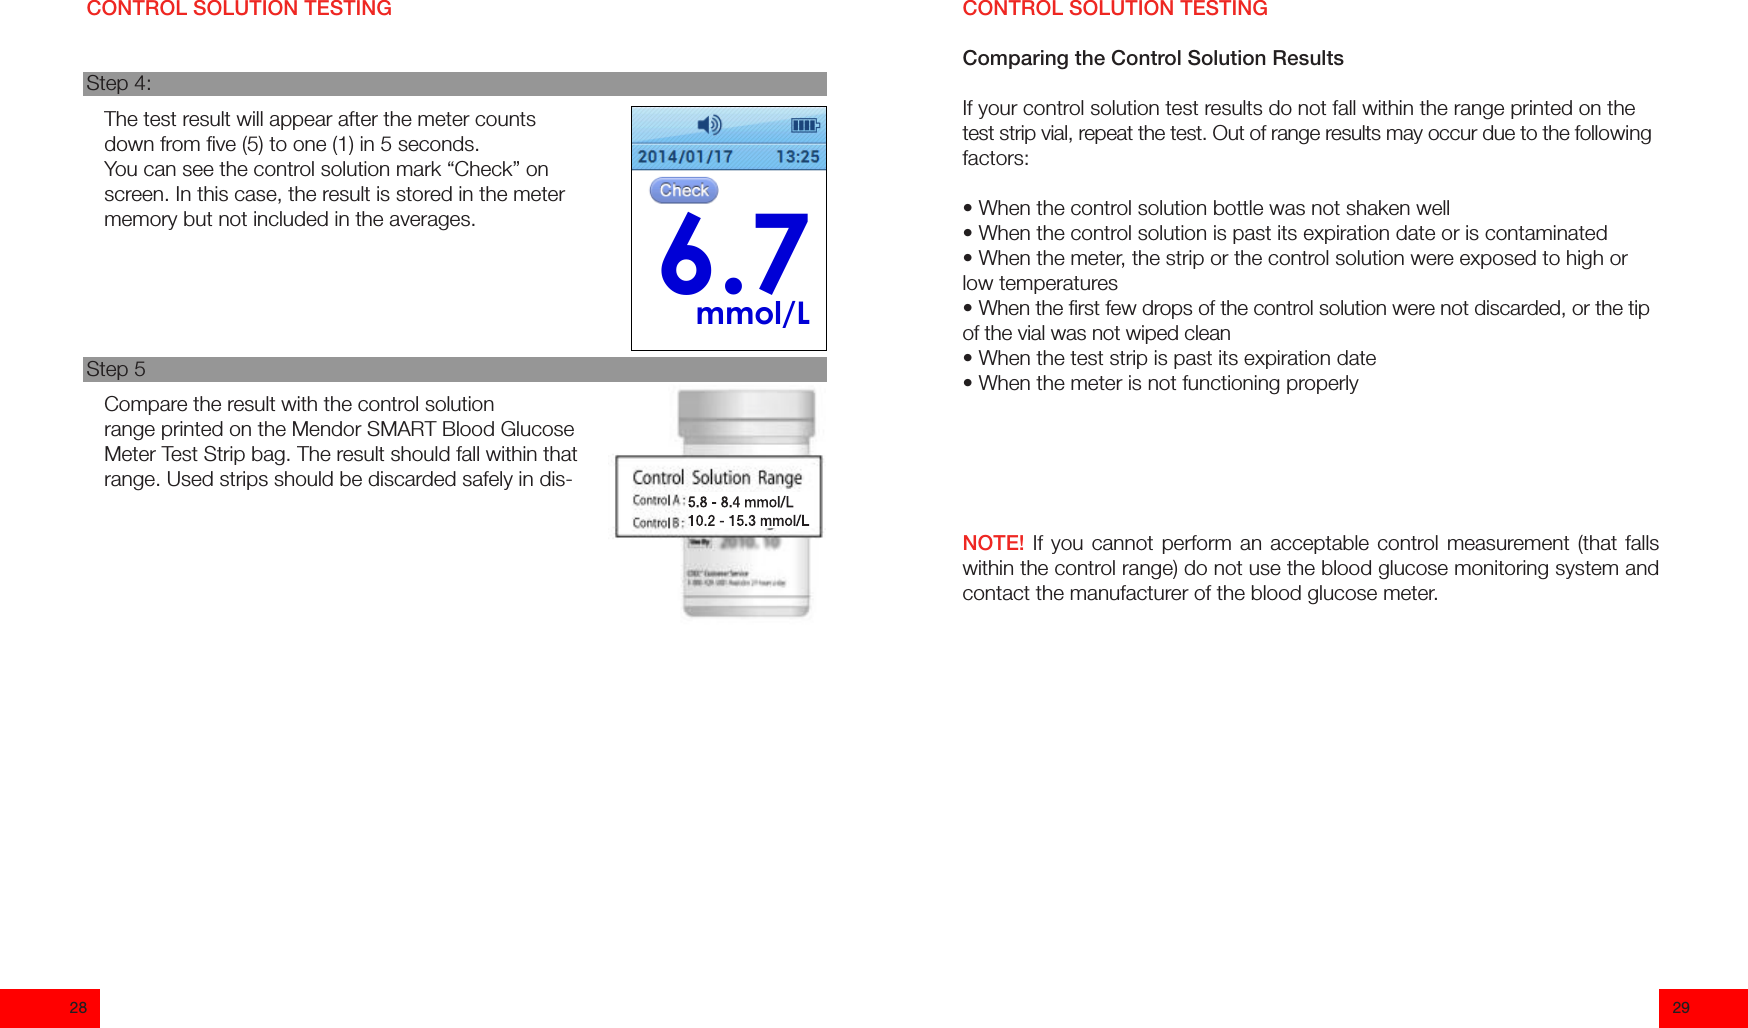
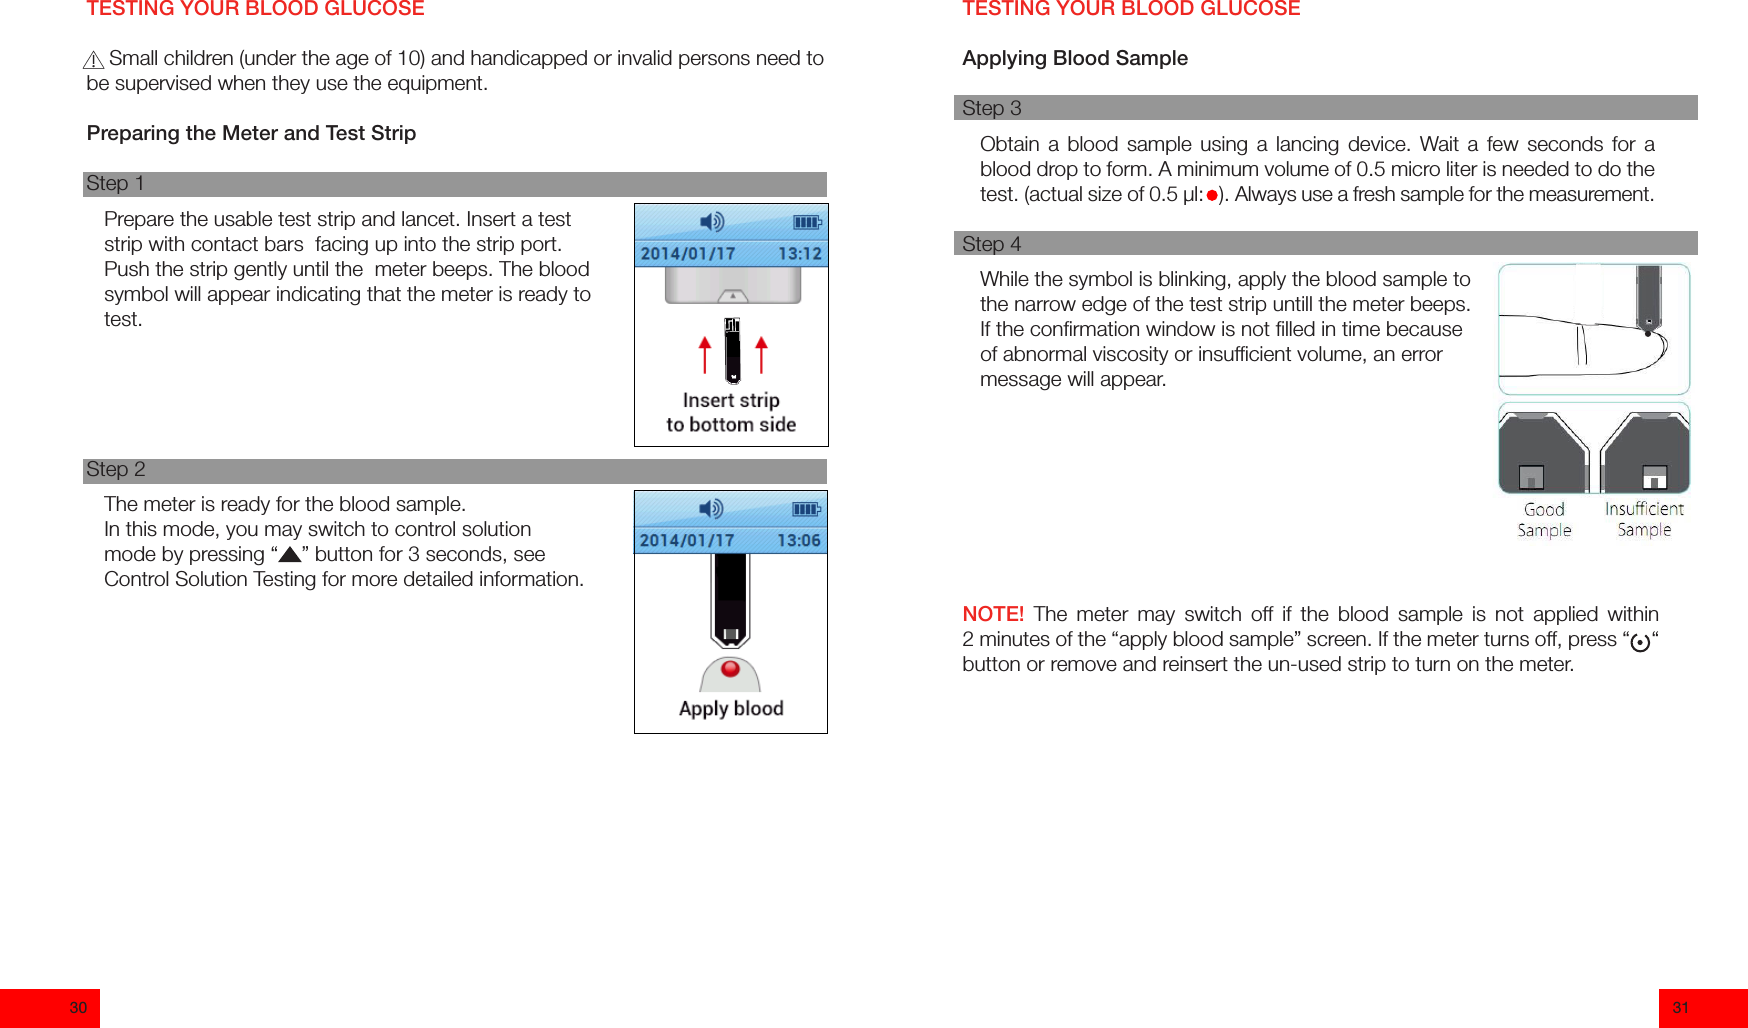
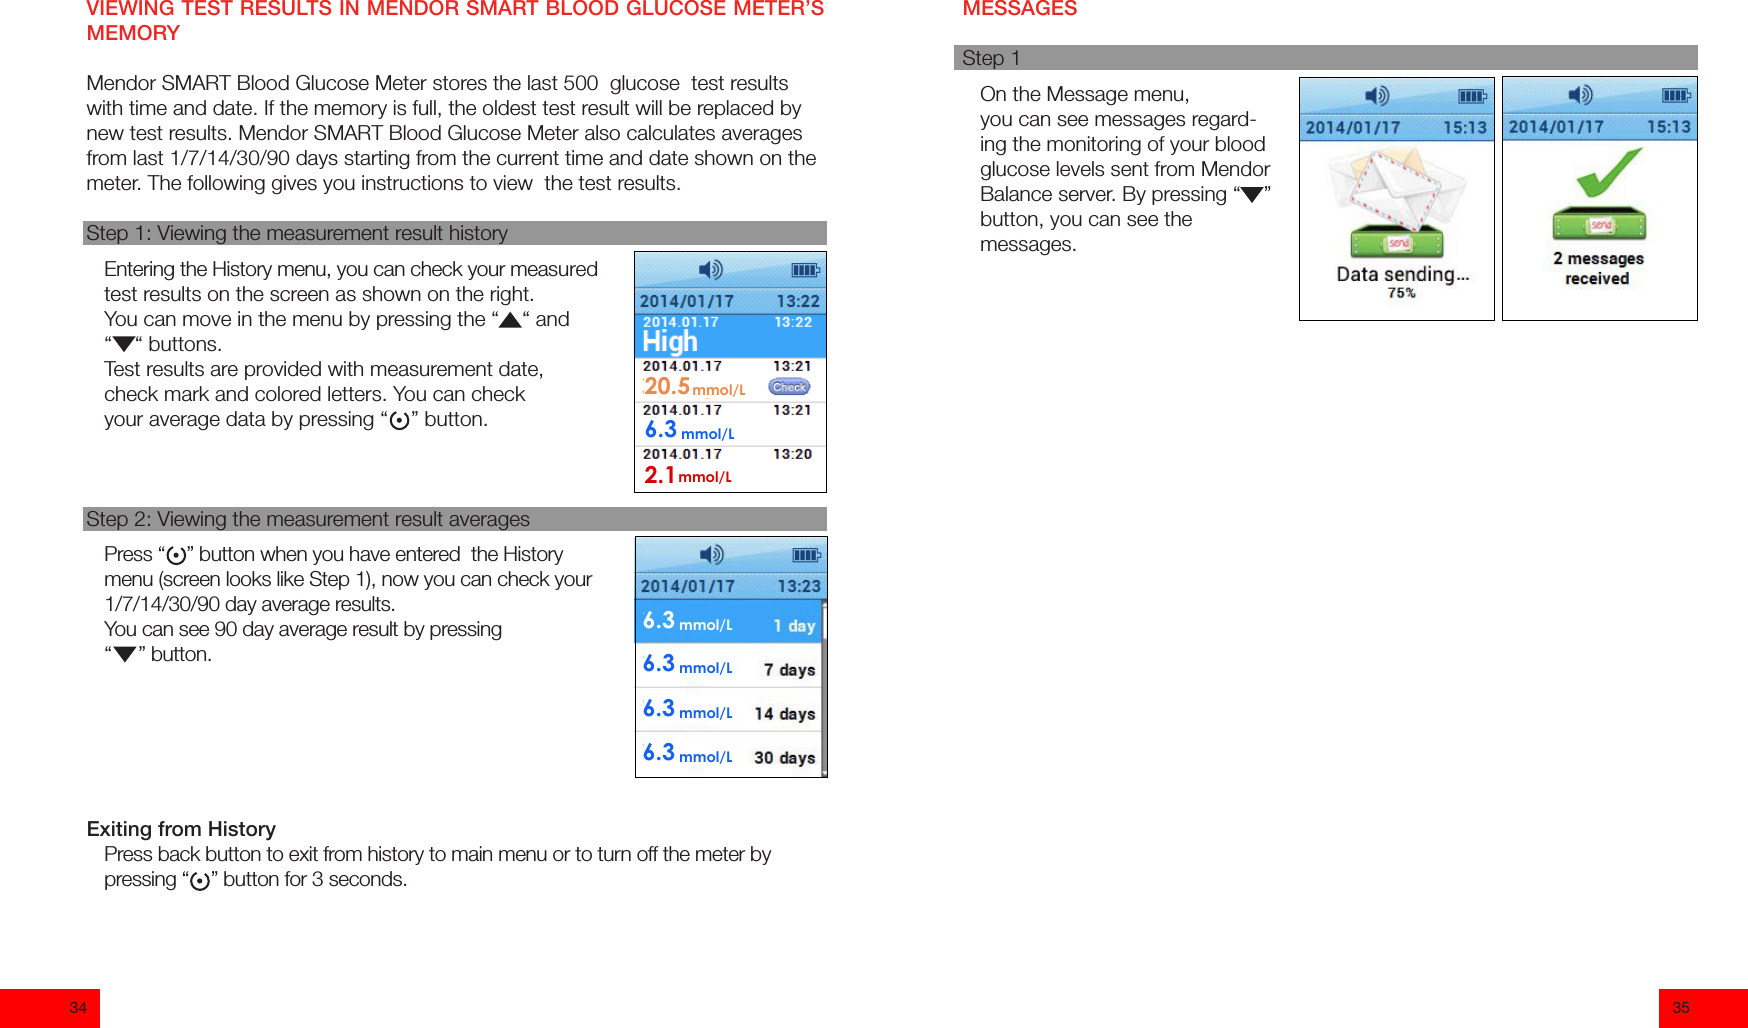
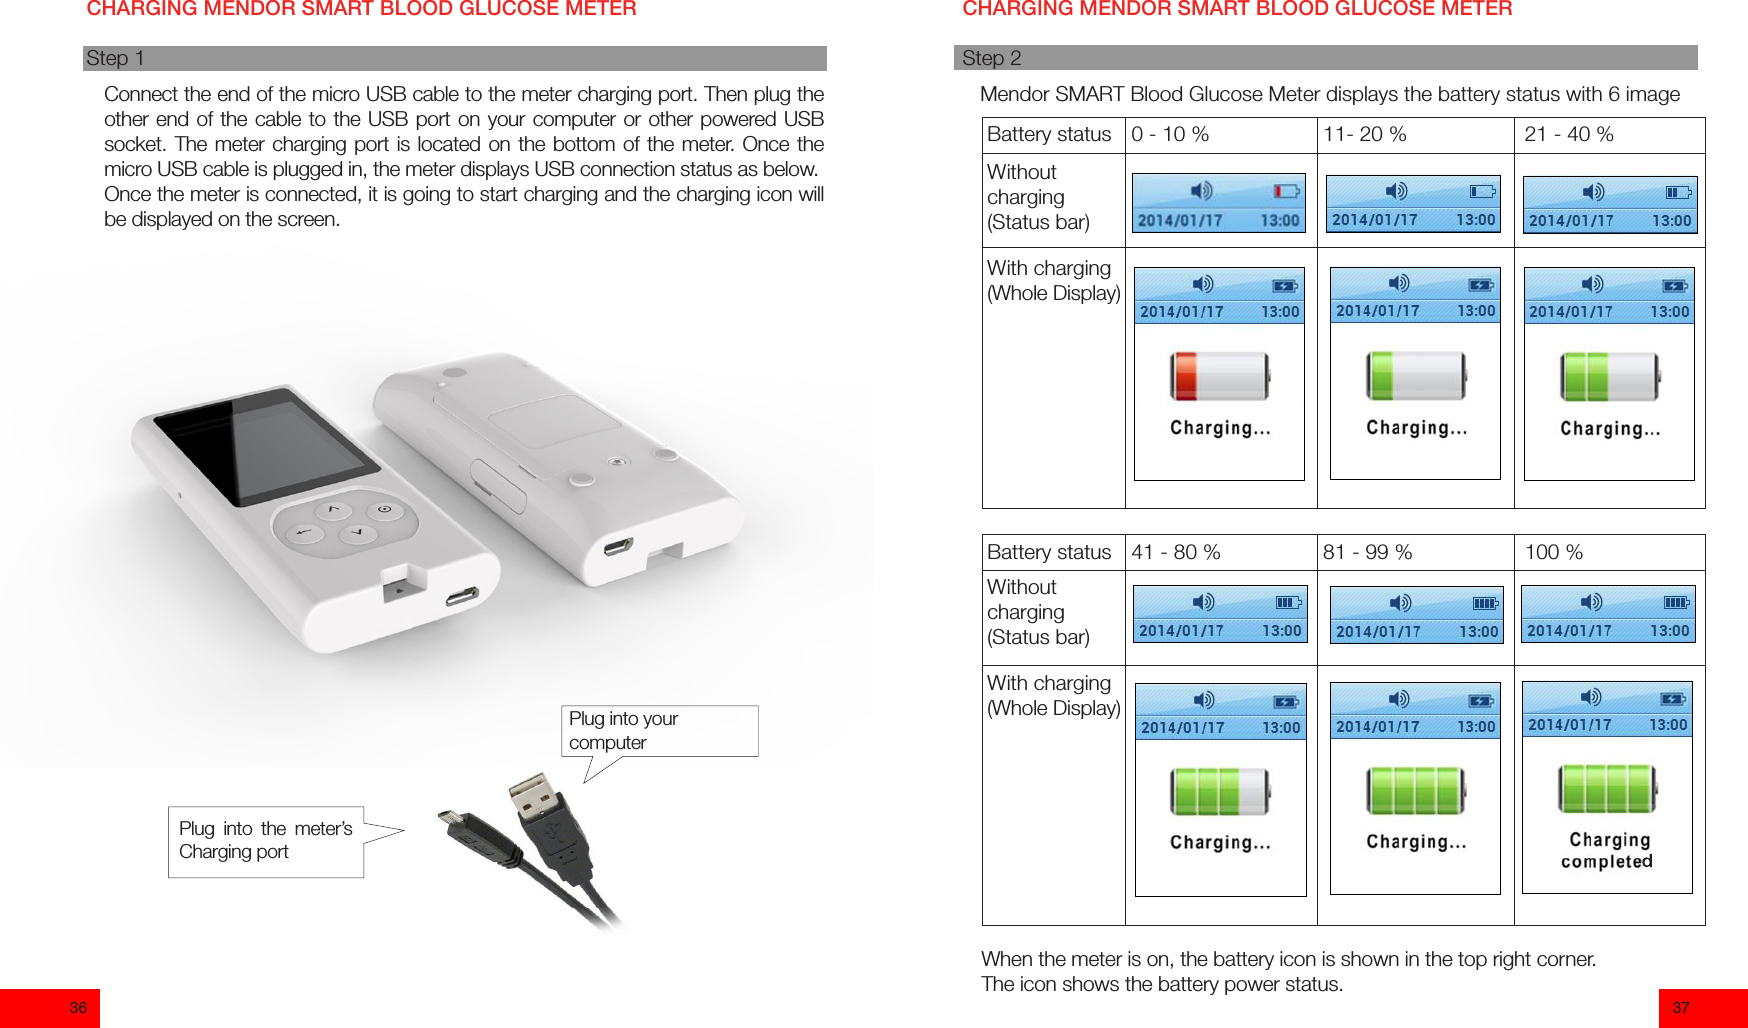
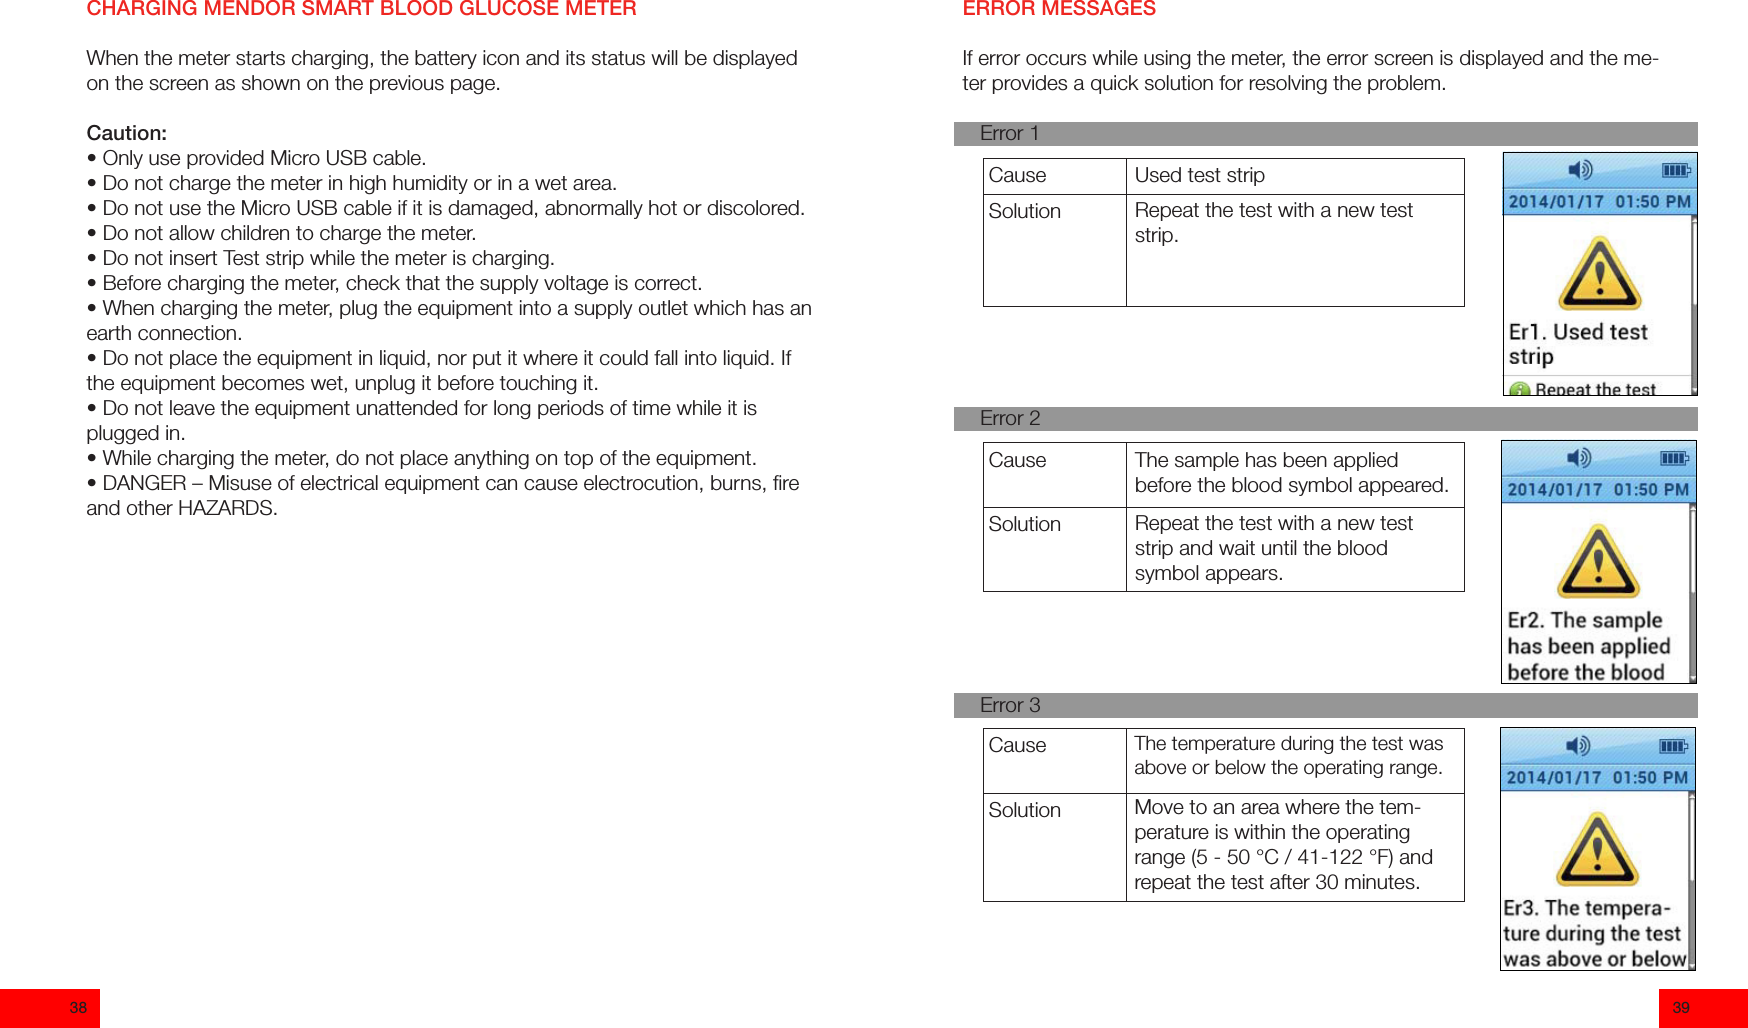
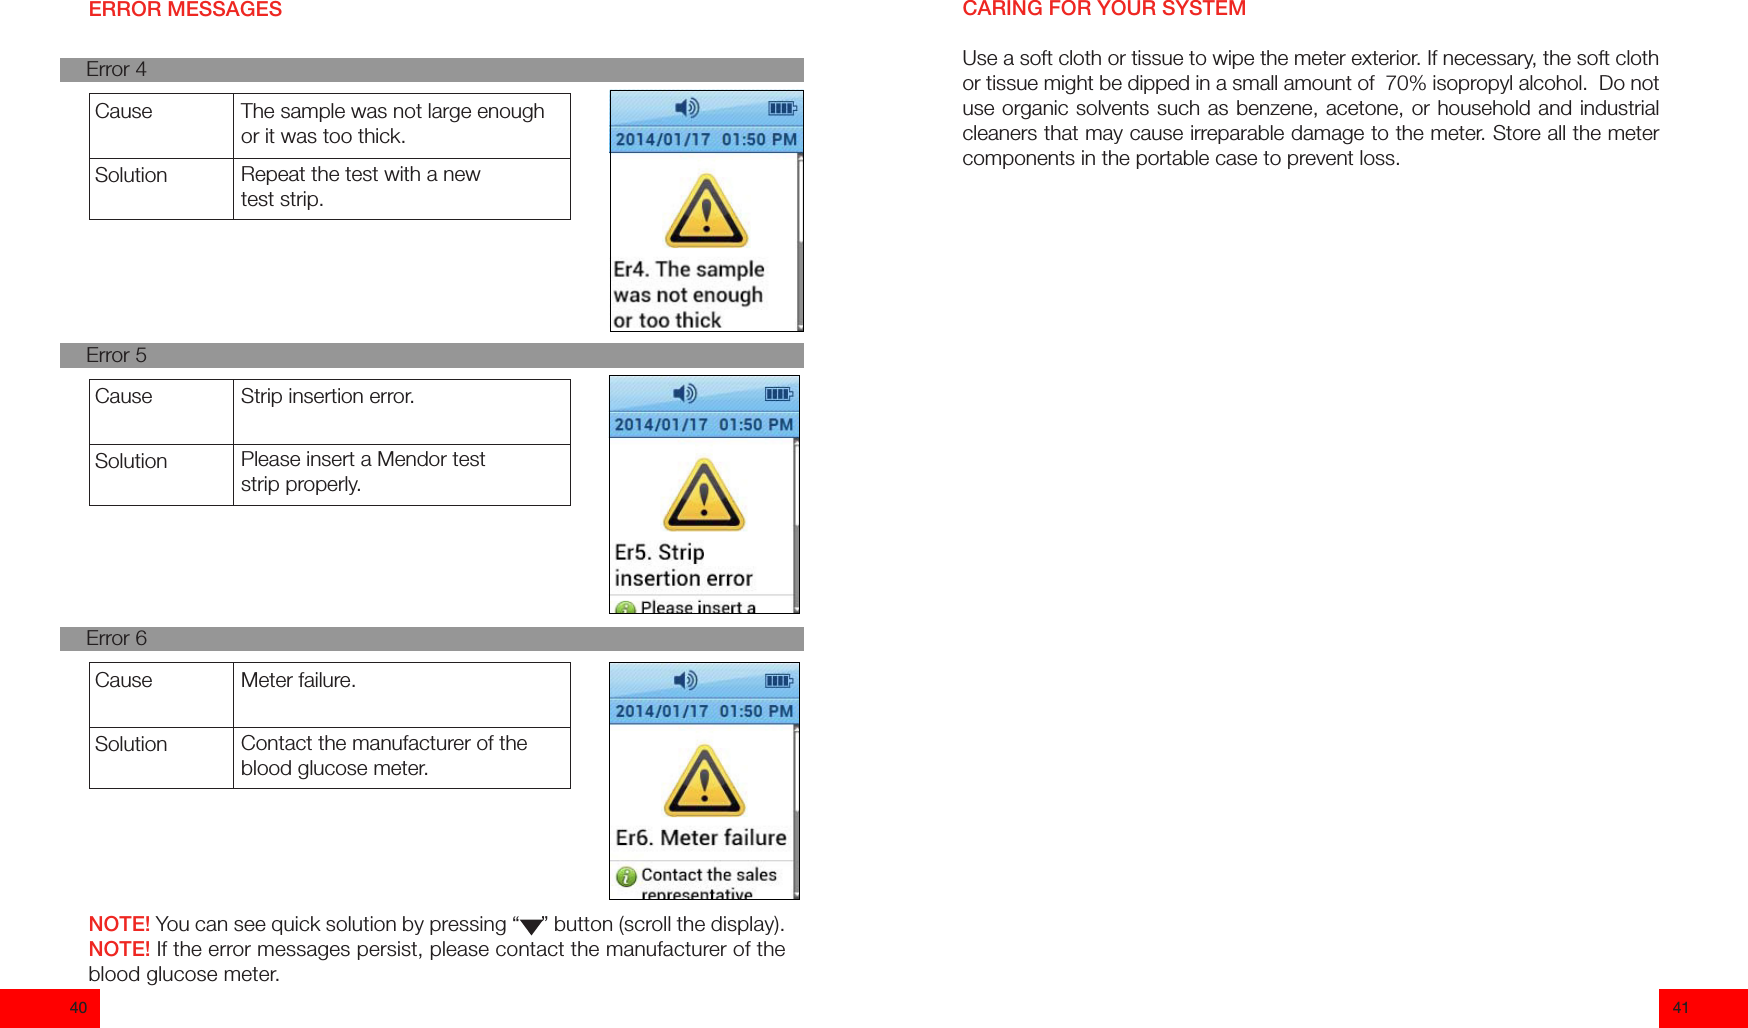
i SENS GM01CAB Blood Glucose Meter User Manual PM062011L04 B SMART USER MANUAL indd

i-SENS, Inc. Blood Glucose Meter PM062011L04 B SMART USER MANUAL indd

Users Manual

User Manual for Mendor SMART Blood Glucose MeterModel Name: GM01CABManufacturer i-SENS, Inc. www.i-sens.com 43, Banpo-daero 28-gil, Seocho-gu, Seoul 06646, Korea
FOR THE USER OF MENDOR SMART BLOOD GLUCOSE METERThank you for selecting Mendor SMART Blood Glucose Monitoring System. The system provides you with safe, convenient and painless blood glucose in vitro (i.e., outside the body) diagnostic monitoring. You can obtain accurate results in just 5 seconds with a small (0.5 μl) blood sample.Mendor SMART Blood Glucose Meter is capable of sending test results to Mendor Balance server by using 3G data transmission. Mendor SMART Blood Glucose Meter securely uploads and manages blood glucose readings, elimi-nating the need to maintain personal logbooks.TABLE OF CONTENTSInformationTable of Contents............................................................................................3Information: Read This First!...........................................................................4Important Information.....................................................................................5Specications.................................................................................................7Mendor SMART Blood Glucose Monitoring System Components...................8Warnings........................................................................................................9Mendor SMART Blood Glucose Meter Test Strip............................................10Mendor SMART Blood Glucose Meter..........................................................11Meter Display................................................................................................12Main Menu....................................................................................................13Operating Mendor SMART Blood Glucose Meter..........................................16Basic Settings..............................................................................................17• Setting up the Date and Time.....................................................17• Setting up the Audio Function.....................................................20• Setting up the Alarm...................................................................21• Network.....................................................................................23• Synchronize................................................................................24• Security Token............................................................................25PreparationChecking the System....................................................................................26Control Solution Testing................................................................................27TestingTesting Your Blood Glucose...........................................................................30High and Low Message................................................................................33Additional FunctionViewing test results in Mendor SMART Blood Glucose Meter’s  Memory........34Messages......................................................................................................35Charging Mendor SMART Blood Glucose Meter...........................................36Error messages............................................................................................39MaintenanceCaring for Your System.................................................................................41General Trouble shooting..............................................................................42Performance     Characteristics........................................................................43Warranty Information....................................................................................44Manufacturer Information..............................................................................45
4 5INFORMATION: READ THIS FIRST!To receive safe and optimum system benets, please read the entire manual contents before using the system. Please note:• Do not use the system for the diagnosis of diabetes without the guidance ofa healthcare professional or for testing newborns.• Use only fresh capillary whole blood samples for testing.• Wash your hands before each measurement. If water is not available, usedisinfectant wipes with 70 % IPA only, dry your hands carefully.• Milking of nger may affect result.The following chart explains the symbols you will nd in Mendor SMART Blood Glucose Meter’s user manual, product packaging, and product inserts.Warning: For personal use only. Do not share the device with other users.IMPORTANT INFORMATION• Mendor SMART Blood Glucose Monitoring System is intended for self-testing and for outside of the body (in vitro diagnostic) use.• The glucose in the blood sample mixes with special chemicals on the teststrip that produce a small electrical current through a reaction called glucose oxidase. The meter detects this electrical current and measures the amount of glucose in the blood sample.• Mendor SMART Blood Glucose Meter is designed to minimize code relat-ed errors in monitoring by using the no-coding function.• The Mendor SMART Blood Glucose Meter should be used only with the MendorTest Strips.• Severe dehydration and excessive water loss may cause false low results.Very high (over 60%) or very low (under 20%) hematocrit can lead to inaccurate test results. If you experience symptoms inconsistent with your test results after following the instructions in this manual, contact your healthcare professional.• Follow your local/country laws and regulations for proper disposal of the meterincluding the rechargeable battery.• Make sure to charge Mendor SMART Blood Glucose Meter for at least 3hours before rst use. • When fully charged, Mendor SMART Blood Glucose Meter will have a stand-by time of 3 days (8 measurements per day). The battery life-time is approximately 250 measurements. It is recommended that you charge Mendor SMART Blood Glucose Meter battery at least every 2 days to prevent battery outage.• If the meter fails to charge, please contact the manufacturer of the bloodglucose meter.• If this user manual is not complied with the protection provided by the devicemay be impaired.• Mendor SMART Blood Glucose Meter’s Test Strips can be used up until theexpiration date printed on the test strip vial label if the test strips are used and stored according to the storage and handling conditions presented in this man-ual. For detailed storage and usage information for test strips, refer also to the Mendor SMART Blood Glucose Meter’s Test Strip package insert.• The equipment complies with applicable EMC emission requirements and itis testes in dynamic electromagnetic elds according to ISO 15197. The equip-ment is tested for immunity to electrostatic discarge as specied in IEC 61000-4-2. Emissions of the energy used are low and not likely to cause interference Consult instructions for useCaution, consult instructions for useTemperature limitationsUse byDo not reuseManufacturerBatch codeIn vitro diagnostic medicaldeviceSerial numberRecyclable packageFragile Keep away from sunlightDo not use if package is damagedSterilised using irradiationElectric and electronicwasteAuthorized representative in the European community
6 7SPECIFICATIONSProduct specicationsOperating rangesReported result rangeTemperature1.1 - 33.3 mmol/L (20 - 600 mg/dL) 5 - 50 °C (41-122 °F) Minimum 0.5 μl10 - 90 %5 seconds20 - 60 %Fresh capillary whole bloodPlasma-equivalentElectrochemical500 test results  100.5 mm (height) x 48.0 mm (width) x 18.5 mm (thickness)59.1g (with battery)5.0 V / 0.5 A(Charging with micro USB cable)3.7 V / 580m A, Lithium-polymer battery(Rechargeable type)Sample sizeRelative humidityTest timeHematocritSample typeCalibrationAssay methodMemoryDimensionWeightRated voltage/Rated currentPowerNOTE! If you need assistance with using the Mendor SMART Blood Glucose  Meter, please, contact the manufacturer.IMPORTANT INFORMATIONCaution:• Do not expose the meter to direct sunlight or heat for an extended period oftime.• Prevent the entry of dirt, dust, blood, or water at the meter’s test strip port.• Do not drop the meter or submit it to strong shocks.• Do not try to x or alter the meter in any way.• Keep the meter in a cool and airy place.• Keep the meter away from strong electromagnetic elds such as cell phonesand microwave ovens.• Do not let the equipment come into contact with surfaces which are too hotto touch.• Do not use this meter in a dry environment, especially if synthetic materialsare present. Synthetic clothes, carpets, etc., may cause damaging static dis-charges in a dry environment. Do not use this meter near cellular or cordless telephones, walkie talkies, garage door openers, radio transmitters, or other electrical or electronical equipment that are sources of electromagnetic radiation, as these may interfere with the proper operation of the meter.
8 9MENDOR SMART BLOOD GLUCOSE MONITORING SYSTEM COMPONENTSComponents (provided by the manufacturer):• Mendor SMART Blood Glucose Meter (rechargeable battery included)• Mendor SMART Blood Glucose Meter Test Strips• User manual• Micro USB cableCertain components may not be included depending on the place of purchase.Additionally:• In order to to clean Mendor SMART Blood Glucose Meter you need 70%isopropyl alcohol available in local pharmacies.• In order to to test Mendor SMART Blood Glucose Meter fucntioning youneed  Mendor  SMART  B lood  Glucose  M eter  Control  Solution  available  from  the          manufacturer.WARNINGSRead through the warnings before using the device. Basic safety precautions should be taken before using the device including those listed in the Warnings.The Mendor SMART Blood Glucose Meter Test Strips shall be used only with fresh capillary whole blood samples. Do not use venous or arterial blood sam-ples.Mendor SMART Blood Glucose Meter may lose current displaying data (just measurement data) when battery power is extremely low.Do not test while the battery is being charged.Do not reuse test strips.Do not use test strips past the expiration date.Do not try to open the battery cover or replace the battery. The battery can not be replaced by user.Store Mendor SMART Blood Glucose Meter at a temperature of 0 - 35 ˚C (32 - 95 ˚F). Store test strips in a cool and dry place at a temperature of 1- 30 ˚C (34 - 86 ˚F).Keep test strips away from direct sunlight or heat and do not freeze.Store test strips only in their original vial.Close the vial tightly immediately after removing a test strip for testing.Do not bend, cut, or alter test strips in any way.Handle test strips only with clean and dry hands.Keep test strips and the test strip vial away from children. The test strips and vial cap may be choking hazards.Drying agents in the bottle cap may be harmful if inhaled or swallowed, or may cause skin or eye irritation.Use this equipment for that purpose only described in this user manual.Do not use accessories which are not recommended in this user manual.Do not use the equipment if it is not working properly or it is visibly broken.Do not insert anything into the device’s ports if this is not specically instructed.KEEP THESE INSTRUCTIONS! NOTE! Please check the completeness and condition of delivery and contact the manufacturer of the blood glucose meter if any component is missing or damaged.NOTE! Please contact your healthcare professional for more information about local disposal requirements for the meter.
10 11MENDOR SMART BLOOD GLUCOSE METER TEST STRIPThe Mendor SMART Blood Glucose Meter Test Strip supports the accurate measurement of blood glucose levels in a capillary whole blood sample.Contact barsGently push the test strip, with its contact bars facing up, into the test strip port of the meter.Conrmation windowCheck here to see whethersufcient blood sample hasbeen applied.Edge to apply blood sampleApply blood sample here for testing.Detachable vial capMendor SMART Test Strip VialMENDOR SMART BLOOD GLUCOSE METERMeter DisplayDisplay results and messages.Up/Down ButtonSelect or changecursor or value.Sim Card SlotInsert mobile SIM card.     ButtonTurn on/off the meter by pressing the button for 3 seconds. Also, used for menu selection conrmation.Micro USB PortCharge battery or transfer data from the meter to PC.Back ButtonBack to the previous menu.Test Strip PortInsert the test strip here.
12 13METER DISPLAYMain MenuThe main menu is composed of symbols as shown in the picture below.Using “    ”, “     ”, and “     ” button, you can enter into each menu.Sound On/OffDisplays the status of the sound function.PP2 AlarmAppears when the alarm has been set remotely using Mendor Balance.Alarm SymbolAppears when alarm has been set.Year/Month/DayDisplays set date.Test WizardProvides easy step instructions for measuring.MessagesProvides Mendor Balance server messages.MessageAppears when a new message has been sent.Airplane ModeDisplays the status ofthe Airplane mode.Battery IconIndicates battery level.Hour/MinuteDisplays set time.HistoryDisplays the testresults in the meter’s memory.SettingsTo set e.g. date, time, sound and alarm.MAIN MENUHistoryWhen you select History menu, the screen is displayed as shown in the picture below. You can then check measured test results on the screen by using the “     “ button. Scroll down to see old test results.Mendor SMART Blood Glucose Meter provides the blood glucose values in 3 different colors (orange, blue and red) to indicate different blood glucose levels, as following:• Orange for measurements above 15 mmol/L (270 mg/dL)•Blue for measurements above and equal to 4 mmol/L (72 mg/dL) and belowand equal to 15 mmol/L (270 mg/dL)• Red color for measurements below 4 mmol/L (72 mg/dL)Latest measured resultDisplays latest stored result.20.56.32.1mmol/Lmmol/Lmmol/L
14 15MAIN MENUTest WizardWhen you select Test Wizard menu, the meter gives stepwise instructions       for the blood glucose measurement with pictures.Before testing please see section “Testing your blood glucose”Insertion stageInsert the test strip withcontact bars facing upwards.MAIN MENUSettingsIn Setting mode, you can set Date/Time, Sound, Alarm, Network, Synchronize and Security Token.Date/TimeSet up current date and time.Choose from 12 or 24 Hour setting and Date notation.SoundSet up Audio Function and adjust volume.NetworkSwitch connec-tion On / Off.Security TokenRetrieve Security Token for connecting the meter to Mendor Balance.AlarmSet up alarm.SynchronizeSynchronize meter with the Mendor Balance service.
16 17OPERATING MENDOR SMART BLOOD GLUCOSE METERTurn on Mendor SMART Blood Glucose MeterYou can start Mendor SMART Blood Glucose Meter by pressing the “     “ button for 3 secondsand the display will turn on. When the progress bar animation completes loading, you are ready to use Mendor SMART Blood Glucose Meter.Turn off Mendor SMART Blood Glucose MeterSee details in section “Testing Your Blood Glucose”.BASIC SETTINGSWhen using the Mendor SMART Blood Glucose Meter for the rst time, please, check and update the meter’s settings prior to using the meter.Setting up the Date and TimeStep 1: Enter the Settings modeTo enter the setting mode on the main menu, press the “    ”, “    ” button to position the cursor at “Setting”. Then, press “    ” button and the meter will be in the setting mode.Step 2: Enter the Time SettingsEnter the Time setting mode, by moving the cursor to “Time Setting” and then press the “    ” button to open the menu where you can adjust the time.Step 3: Select Time Setting typeIn the Time setting mode, you can select Time setting type (Auto or Manual)  by pressing “    ”, ”    ”, and ”    ” buttons.
18 19BASIC SETTINGSStep 3a: Auto Set modeIn Auto set mode, by pressing “Agree” button, the meter sets automatically to the local time-zone. This includes daylight saving.Step 3b: Manual Set modeIn Manual Set mode you can adjust the current year, month, day and time by pressing “    ”, ”    ”, and ”    ” buttons.Step 4: Entering the Time FormatIn this screen the set time and the current time format is displayed. You can set the time format by pressing time format button.OKCancelBASIC SETTINGSStep 5: Setting the Time FormatThe meter provides two options for your convenience.You can choose from “12-Hour” or “24-Hour” option.12 Hour format is displayed as “HH:MM AM/PM” while 24 Hour format is displayed as “HH:MM”.Step 6: Setting the Date notationThe meter provides three options for your convenience. You can choose from “yyyy/mm/dd” or “mm/dd/yyy” or “dd/mm/yyyy” option. For example, “yyyy/mm/dd” format is displayed as “2014/01/17”.
20 21BASIC SETTINGSSetting up the Audio functionStep 1: Setting the Sound (Beep)Enter the Sound mode.The meter provides 2 different sound options: On and Off. If the Sound is turned “On” the meter makes the “beep” sound at certain steps when measuring the blood glucose level. (Turning on the meter, inserting the strip, starting Countdown, the test result appears)Step 2: Deactivating the Sound function (Mute)Selecting the “Off” button will deactivate (Mute)the sound function.BASIC SETTINGSSetting up the AlarmStep 1: Entering the Alarm settingsIn this mode, you can select from Alarm or Result Alarm.Step 2: Entering the AlarmOn the Alarm screen, press “+Add” to set up the alarm time. Step 3: Setting the AlarmYou can select the hour by pressing “    ” button thenothers selections will become blurred. Adjust hour setting by pressing “    ” and “    ” buttonsand pressing “    ” button to conrm hour setting.For other settings, do the same as above.Also you can select from “On” or “Off” or “Delete”.If you select “Off” or “    ” button, this alarm is deactivated and the time setting is saved.If you selects “Delete”, this alarm is deleted.
22 23BASIC SETTINGSStep 4: Checking the AlarmIn this mode, you can see current alarm setting. Check marks indicates that “This alarm is activated.“ Mendor SMART Blood Glucose Meter provides up to 3 regular alarms. If you set up 3 normal alarms, “+Add” is deacti-vated (greyed) as shown on the right.Step 5: Entering the Result AlarmIn this mode you can activate or deactivate a beep sound to indicate a result that is too high (over 15 mmol/L, 270 mg/dL) or too low (below 4 mmol/L, 72 mg/dL). Select “On” to activate the function or select “Off” to deactivate it.Please note, that by turning the sound function “Off”, you also turn off the Result Alarm.Exiting from SettingsAfter completing meter setting, press the “    ” button to exit from Settings.BASIC SETTINGSNetwork Step 1: Enter the Network SettingsEnter the Network settings by moving the cursor to “Network” and pressing the “    “ button.In the Network settings you can switch the meter’s network connectivity on or off (airplane mode).Step 2: Switching the Network connectivity On/OffTo switch the meter’s network connectivity off, move the cursor to “Off” and press the “    “ button. An airplane symbol appears to the upper edge of the display, indicating that the meter is now in airplane mode.To switch the meter’s network connectivity back on, move the cursor to “On” and press the “    “ button.Please note that when your meter is connected to a Balance account, all the measurements you have made in airplane mode will be uploaded to your account at the same time once you do a measurement or use the Synchronize function with the network connectivity switched on again.
24 25BASIC SETTINGSSynchronize Step 1: Synchronizing the meter with BalanceWhen using the meter with Balance, the Synchronize function can be used to upload measurements from the meter’s memory to your Balance account (if you have been using the meter in airplane mode or out of net-work range), as well as synchronizing alarms and mes-sages when you are doing a glucose proling program in Balance.To synchronize the meter with Balance, move the cur-sor to “Synchronize” and press the “    “ button. You will see the loading circle and the text “Please wait” while the meter synchronizes.Step 2: Synchronization completeOnce the synchronization is complete, you will see the text “Your meter has been successfully synchronized”. Press the “    “ button to get back to the Settings menu.BASIC SETTINGSSecurity Token Step 1: Retrieving the Security TokenSecurity Token is a code which is needed for connect-ing the meter to a Balance account. Move the cursor to “Security Token” and press the “    “ button to retrieve the code. You will see the loading circle and the text “Please wait” while the Security Token is being retrieved.Step 2: Security Token receivedAfter a little while you can see the Security Token in the display. You can use the token to connect the meter while creating a new Balance account, or you can connect the meter to an already existing account. One meter can only be connected to one account at a time.The Security Token needs to be retrieved only once when you start using the meter with Balance. Please note that the Security Token is valid for one hour after retrieval – if you don’t connect the meter to a Balance account within that time, you need to retrieve a new Security Token.
26 27CHECKING THE SYSTEMHistoryYou may check your meter and test strips using Mendor SMART Blood Glucose Meter Control Solution, which contains a known amount of glucose and is used to check that the meter and the test strips are working properly. The test strip vials have Mendor SMART Blood Glucose Meter Control Solution ranges printed on their labels. Compare the result displayed on the meter to Mendor SMART  Blood Glucose Meter Control Solution range printed on the test strip vial. Before using a new meter or a new vial of test strips, conduct a control solution test following the procedure on page 25 - 26.Notes:• Use only Mendor SMART Blood Glucose Meter Control Solution.• Check the expiration date printed on the bottle.When you rst open the control solution bottle, record the discard date(date opened plus 3 months) in the space provided on the label.• Make sure your meter, test strips, and control solution are at room temperaturebefore testing. Control solution tests must be done at room temperature (20 - 25 ˚C, 68 - 77 ˚F).• Before using the control solution, shake the bottle, discard rst few dropsand wipe the tip clean.• Close the control solution bottle tightly and store at a temperature of 8 - 30 ˚C(46 - 86 ˚F).Do a control solution test:• When using the meter for the rst time.• Whenever you open a new vial of test strips.• If the meter or test strips do not function properly.• If your symptoms are inconsistent with the blood glucose test resultsand you feel that the meter or test strips are not working properly.• If you drop the meter or suspect the meter has been damaged.CONTROL SOLUTION TESTINGChecking with control solutionStep 1Insert a test strip with contact bars facing upwards into the strip port. Push the strip gently until the meter beeps. The meter will automatically turn on and the blood symbol will appear indicating the meter is ready to test blood glucose”Step 2In measurement mode, you can switch to controlsolution mode pressing “    ” button for 3 seconds.You should use the proper control solution.When the screen display is as shown on the right, apply the control solution to the test strip.Step 3Shake the control solution bottle well. Discard the rst drop of control solution and squeeze a small drop of the control solution on a clean non absorbent surface, such as the cleaned cap of control solution bottle. Apply the control solution to the narrow edge of the test strip until the meter beeps. Make sure the conrmation window lls completely.NOTE! Mendor SMART Blood Glucose Meter Control Solution and Strips can be purchased separately. Please contact the manufacturer of the blood glucose meter.
28 29CONTROL SOLUTION TESTINGStep 4: The test result will appear after the meter counts down from ve (5) to one (1) in 5 seconds.You can see the control solution mark “Check” on screen. In this case, the result is stored in the meter memory but not included in the averages.Step 5Compare the result with the control solutionrange printed on the Mendor SMART Blood Glucose Meter Test Strip bag. The result should fall within that range. Used strips should be discarded safely in dis-mmol/L6.7CONTROL SOLUTION TESTINGComparing the Control Solution ResultsIf your control solution test results do not fall within the range printed on the test strip vial, repeat the test. Out of range results may occur due to the following factors:• When the control solution bottle was not shaken well• When the control solution is past its expiration date or is contaminated• When the meter, the strip or the control solution were exposed to high orlow temperatures• When the rst few drops of the control solution were not discarded, or the tipof the vial was not wiped clean• When the test strip is past its expiration date• When the meter is not functioning properlyNOTE! If you cannot perform an acceptable control measurement (that falls within the control range) do not use the blood glucose monitoring system and contact the manufacturer of the blood glucose meter.
30 31TESTING YOUR BLOOD GLUCOSE    Small children (under the age of 10) and handicapped or invalid persons need to be supervised when they use the equipment.Preparing the Meter and Test StripStep 1Prepare the usable test strip and lancet. Insert a test strip with contact bars  facing up into the strip port. Push the strip gently until the  meter beeps. The blood symbol will appear indicating that the meter is ready to test.Step 2The meter is ready for the blood sample.In this mode, you may switch to control solution mode by pressing “    ” button for 3 seconds, see Control Solution Testing for more detailed information.TESTING YOUR BLOOD GLUCOSEApplying Blood SampleStep 3Obtain a blood sample using a lancing device. Wait a few seconds for a blood drop to form. A minimum volume of 0.5 micro liter is needed to do the test. (actual size of 0.5 μl:   ). Always use a fresh sample for the measurement.Step 4While the symbol is blinking, apply the blood sample to the narrow edge of the test strip untill the meter beeps. If the conrmation window is not lled in time because of abnormal viscosity or insufcient volume, an error message will appear.NOTE! The meter may switch off if the blood sample is not applied within           2 minutes of the “apply blood sample” screen. If the meter turns off, press “    “ button or remove and reinsert the un-used strip to turn on the meter.
32 33TESTING YOUR BLOOD GLUCOSEStep 5The test result (in mmol/L) will appear after the meter counts down from ve to one (5-to-1). The result is equivalent to your plasma glucose concentration.Step 6After nishing the test, remove the test strip 6.2mmol/L6.2mmol/LHIGH AND LOW MESSAGEMendor SMART Blood Glucose Meter displays test results between 1.1 - 33.3 mmol/L (20 - 600 mg/dL). Please refer to the instructions below, if you receive a High or Low message. High MessageThe “High” message appears when the blood glu-cose level is above 33.3 mmol/L (600 mg/dL) and may indicate hyperglycemia (high blood glucose).If the “Hi” message is displayed again on retesting,please contact your healthcare professionalimmediately.Low MessageThe “Low” message appears when the blood glucose Level is below than 1.1 mmol/L (20 mg/dL) and indicates hypoglycemia (low blood glucose). If the “Low” message is displayed again on retesting, please contact your healthcare professionalimmediately.NOTE! If the HIGH/LOW messages persist after measuring several times and your feelings do not match with the results contact your healthcare professional.NOTE! Follow the instructions given by your physician when interpreting the re-sults. Do not alter your treatment on the basis of meter readings before consulting your healthcare professional. If an error message appears see section “Error Messages”.33.3 mmol/L1.1 mmol/L
34 35VIEWING TEST RESULTS IN MENDOR SMART BLOOD GLUCOSE METER’S MEMORYMendor SMART Blood Glucose Meter stores the last 500  glucose  test results with time and date. If the memory is full, the oldest test result will be replaced by new test results. Mendor SMART Blood Glucose Meter also calculates averages from last 1/7/14/30/90 days starting from the current time and date shown on the meter. The following gives you instructions to view  the test results. Step 1: Viewing the measurement result historyEntering the History menu, you can check your measured test results on the screen as shown on the right. You can move in the menu by pressing the “    “ and     “    “ buttons.Test results are provided with measurement date, check mark and colored letters. You can check your average data by pressing “    ” button.Step 2: Viewing the measurement result averagesPress “    ” button when you have entered  the History menu (screen looks like Step 1), now you can check your 1/7/14/30/90 day average results. You can see 90 day average result by pressing “     ” button.Exiting from HistoryPress back button to exit from history to main menu or to turn off the meter by pressing “    ” button for 3 seconds.20.56.32.1mmol/Lmmol/Lmmol/L6.36.36.36.3mmol/Lmmol/Lmmol/Lmmol/LMESSAGESStep 1On the Message menu, you can see messages regard-ing the monitoring of your blood glucose levels sent from Mendor Balance server. By pressing “    ” button, you can see the messages.
36 37CHARGING MENDOR SMART BLOOD GLUCOSE METERStep 1Connect the end of the micro USB cable to the meter charging port. Then plug the other end of the cable to the USB port on your computer or other powered USB socket. The meter charging port is located on the bottom of the meter. Once the micro USB cable is plugged in, the meter displays USB connection status as below. Once the meter is connected, it is going to start charging and the charging icon will be displayed on the screen.Plug into the meter’s Charging portPlug into your computerCHARGING MENDOR SMART BLOOD GLUCOSE METERStep 2Mendor SMART Blood Glucose Meter displays the battery status with 6 image Battery statusBattery status0 - 10 %41 - 80 %11- 20 %81 - 99 %21 - 40 %100 %Without charging(Status bar)Without charging(Status bar)With charging(Whole Display)With charging(Whole Display)When the meter is on, the battery icon is shown in the top right corner.The icon shows the battery power status.
38 39CHARGING MENDOR SMART BLOOD GLUCOSE METERWhen the meter starts charging, the battery icon and its status will be displayed on the screen as shown on the previous page.Caution:• Only use provided Micro USB cable.• Do not charge the meter in high humidity or in a wet area.• Do not use the Micro USB cable if it is damaged, abnormally hot or discolored.• Do not allow children to charge the meter.• Do not insert Test strip while the meter is charging.• Before charging the meter, check that the supply voltage is correct.• When charging the meter, plug the equipment into a supply outlet which has anearth connection.• Do not place the equipment in liquid, nor put it where it could fall into liquid. Ifthe equipment becomes wet, unplug it before touching it. • Do not leave the equipment unattended for long periods of time while it isplugged in.• While charging the meter, do not place anything on top of the equipment.• DANGER – Misuse of electrical equipment can cause electrocution, burns, reand other HAZARDS.ERROR MESSAGESIf error occurs while using the meter, the error screen is displayed and the me-ter provides a quick solution for resolving the problem.Error 1CauseCauseCauseUsed test stripThe sample has been applied     before the blood symbol appeared.Repeat the test with a new test strip.Repeat the test with a new test strip and wait until the blood symbol appears.SolutionSolutionSolutionError 2Error 3The temperature during the test was above or below the operating range.Move to an area where the tem-perature is within the operating range (5 - 50 °C / 41-122 °F) and repeat the test after 30 minutes.
40 41CauseCauseCauseThe sample was not large enough or it was too thick.Strip insertion error.Meter failure.Repeat the test with a new test strip.Please insert a Mendor test strip properly.Contact the manufacturer of the blood glucose meter.SolutionSolutionSolutionError 4Error 5Error 6ERROR MESSAGESNOTE! You can see quick solution by pressing “    ” button (scroll the display).NOTE! If the error messages persist, please contact the manufacturer of the blood glucose meter.CARING FOR YOUR SYSTEMUse a soft cloth or tissue to wipe the meter exterior. If necessary, the soft cloth or tissue might be dipped in a small amount of  70% isopropyl alcohol.  Do not use organic solvents such as benzene, acetone, or household and industrial cleaners that may cause irreparable damage to the meter. Store all the meter components in the portable case to prevent loss.
42 43Problem TroubleshootingCheck whether the test strip is inserted with the contact bars facing up. Check if the strip has been inserted completely till the end.Check if the conrmation window is lled adequately.Repeat the test after inserting a new test strip.Repeat the test after inserting a new test strip.Check the validity period of the test strip.Perform a test with control solution to verify the strips are OK.Check the meter.The display is blank even after inserting a test strip.The test does not start even after applying the blood sample on the strip.The test result does not match your expectation.GENERAL TROUBLE SHOOTINGNOTE! If the problem is not resolved, please contact the manufacturer of the blood glucose meter.PERFORMANCE CHARACTERISTICSThe performance of Mendor SMART Blood Glucose Monitoring System has been evaluated in laboratory and in clinical tests.Accuracy:The  accuracy  of    Mendor  SMART  Blood  Glucose  Meter  System (Model:GM01CAB/GM01CAD) was assessed by comparing blood glucose results obtained by patients with those obtained using a YSI Model 2300 Glucose  Analyzer,  a  laboratory  instrument.  The  following  Results  were obtained by 100 diabetic patients at clinic centers. Within ±0.28 mmol/L(Within 5 mg/dL)Within ± 5 %IntervalSystem accuracy results for glucose concentration < 4.17 mmol/L (< 75 mg/dL)System accuracy results for glucose concentration ≥ 4.17 mmol/L (≥ 75 mg/dL)Results from repeatibility evaluation74/96 (77.1%)249/504 (49.4%)12345Within ±0.56 mmol/L(Within 10 mg/dL)Within ± 10 %Glucose concentration mmol/LWithin ±0.83 mmol/L(Within 15 mg/dL)Within ± 20 %Pooled SD or CVWithin ± 20 %94/96 (97.9%)401/504 (79.6%)1.7 to 2.82.9 to 6.16.2 to 8.38.4 to 13.914.0 to 22.296/96 (100%)493/504 (97.8%)0.1 mmol/L0.1 mmol/L2.8 %2.7 %3.0 %504/504 (100%)
44 45WARRANTY INFORMATIONManufacturer’s WarrantyMendor warrants that the meter shall be free of defects in material and work-manship in normal use for a period of two (2) years. The meter must have been subjected to normal use. The warranty does not cover improper handling, tampering use or service of the meter. All claim must be made within the warranty period. Mendor will, at its discretion, repair or replace a defective meter or meter part that is covered by this warranty. As a matter of warranty policy, Mendor will not reimburse the consumer’s purchase price.Obtaining Warranty ServiceTo obtain warranty service, you must return the defective meter or meter part along with proof of purchase to the manufacturer.MANUFACTURER INFORMATIONi-SENS, Inc. 43, Banpo-daero 28-gil, Seocho-gu, Seoul 06646, Koreatel. 1-800-429-5001 www.i-sens.comArt. PM062011L04_A Rev. 10/14Manufacturer i-SENS, Inc. www.i-sens.com 43, Banpo-daero 28-gil, Seocho-gu, Seoul 06646, Korea
FCC Part 15.19This device complies with part 15 of the FCC Rules. Operation is subject to the following two conditions: (1) This device may not cause harmful interference, and (2) this device must accept any interference received, including interference that may cause undesired operation.FCC Part 15.21Any changes or modifications (including the antennas) to this device that are not expressly approved by the manufacturer may void the user's authority to operate the equipment.FCC Part 15.105 (B)Note : This equipment has been tested and found to comply with the limits for a Class B digital device, pursuant to part 15 of the FCC Rules. These limitsare designed to provide reasonable protection against harmful interference in a residential installation This equipment generates, uses and can radiate radio frequency energy and, if not installed and used in accordance with the instructions, may cause harmful interference to radio communications,However, there is no guarantee that interference will not occur in a particular installation. If this equipment does cause harmful interference to radio or television reception, which can be determined by turning the equipment off and on, the user is encouraged to try to correct the interference by one or more of the following measures:- Reorient or relocate the receiving antenna.- Increase the separation between the equipment and receiver.- Connect the equipment into an outlet on a circuit different from that to which the receiver is connected. - Consult the dealer or an experienced radio/TV technician for help.Modifications not expressly approved by the manufacturer could void the user authority to the operated equipment under FCC rules.RF Exposure Statement (2.1093)This equipment complies with FCC RF Radiation exposure limits set forth for an uncontrolled environment. This device and its antenna must not be co-located or operating in conjunction with any other antenna or transmitter.This equipment should be installed and operated with a minimum distance of 5mm between the radiator and your body.

Navigation menu