iBaby Labs IBB-M2C Baby monitor User Manual
iBaby Labs, Inc. Baby monitor
user manual
iBaby Labs, Inc.

iBaby MonitorUser Manual
2
Content
1
PRODUCT OVERVIEW
.......................................................................................................................... 3
1.1 PACKING LIST ........................................................................................................................... 3
1.2 INTERFACE INTRODUCTION ....................................................................................................... 3
1.3 PRODUCT SPECIFICATIONS ........................................................................................................ 4
2
INSTALLATION INSTRUCTIONS
........................................................................................................ 5
2.1 APP DOWNLOAD ............................................................................................................................. 5
2.2 DEVICE STARTUP ........................................................................................................................... 5
2.3 ACCOUNT REGISTRATION AND LOGIN ................................................................................................. 6
2.4 DEVICE ACTIVATION ..................................................................................................................... 6
3
APP OPERATION AND FUNCTION INTRODUCTION
............................................................................ 9
3.1 VIDEO CONTROL MAIN INTERFACE .................................................................................................... 9
3.2 APP FUNCTION MENU ................................................................................................................... 10
3.3 INTRODUCTION TO COMMON FUNCTIONS ............................................................................................ 11
4
FAQS
................................................................................................................................................ 15
4.1 DEVICE LED STATUS LIGHT MEANING ................................................................................... 15
4.2 INSTALLATION ISSUES ............................................................................................................. 15
4.3 KEEP LOADING ....................................................................................................................... 19
4.4 USAGE ISSUES ......................................................................................................................... 21
5
CONTACT INFORMATION
.................................................................................................................. 22
6
FCC CAUTION
.................................................................................................................................. 22
iBaby MonitorUser Manual
3
1
Product Overview
1.1 Packing list
iBabymonitor*1
Wall bracket *1
User manual *1
Power adapter *1
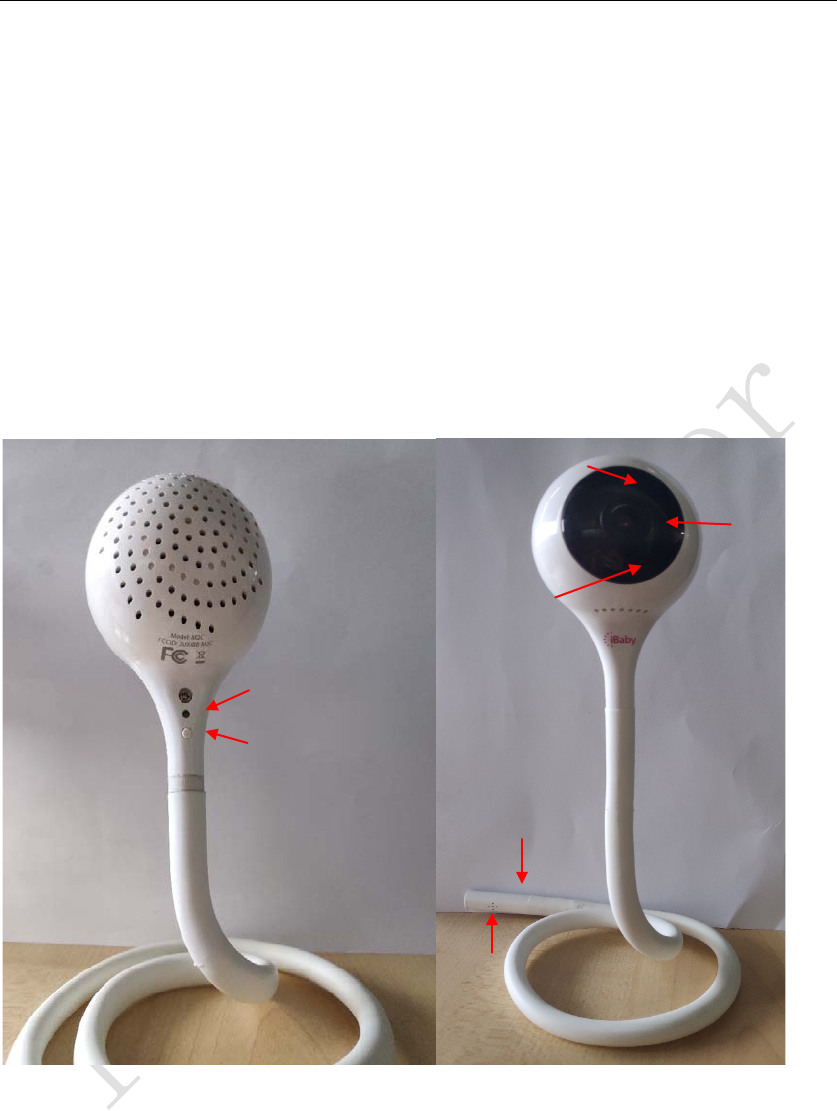
1.2 Interface Introduction
1) LED status light: Indicates the current working status of the machine, see Table 1 of
Section 4.1
2) Power interface
3) Reset button: Long press to restore the device to factory settings.
4) Temperature and humidity sensor interface: Used to connect the bottom and
transmit temperature and humidity data.
5) Photosensitive sensor: Used for automatic switching of night vision.
6) Microphone
7) Lens
LED status light
Microphone
Temperature&humidity
sensor interface
Power interface
Reset button
Photosensitive sensor
Lens

iBaby MonitorUser Manual
4
1.3 Product Specifications
Model:M2C
Video
compression
method H.264
Frame rate 1~12 frames
Resolution Ultra (1920*1080),HD(1280*720),VGA(640*480)
Lens
standard:4.0mm F=2.0
Fixed aperture (2 million lens) Angle of view 85°
Online users support 4 users to watch online
Audio
compression
method G711
Sampling
frequency 8Kpbs
Input one audio input / built-in microphone
Output one audio output / built-in speaker
Intercom mode full duplex: two-way voice simultaneous intercom
Night vision
Night vision
control
Photosensitive Resistor Automatic Control IR Light On
(Minimum Illumination 0LUX)
Night vision effect 8 12ML LED lights Night vision 8 meters
Network protocol
Network
protocol TCP/IP, HTTP, UDP, DHCP, UPNP, NTP, P2P, etc.
Support IP
address Dynamic IP address
Wireless
Wireless
Protocol Support WI-FI 802.11 a/b/g/n
WI-FI module supports 2.4GHz Wi-Fi
Encryption
mode Support WPA/WPA2 encryption
Built-in
antenna port 1
Other interfaces
USB interface 1
Temperature
and humidity
module
built-in:1
Reset button 1
Power
connector DC5V 1A
Other exterior plastic
iBaby MonitorUser Manual
5
2
Installation instructions
2.1
APPDownload
Apple users: App Store search for "iBaby Care App"
Android users: Search the "iBaby Care App" on the Google Play Store
The application icon is shown below:
2.2
Device startup
Plug the device into the power supply. After about 30 seconds, the power-on prompt sounds
and the rear LED status light turns red and flashes slowly, indicating that the device startup is
complete and enters the standby state.
Note:
If the device has been activated on the server, no power-on tone will sound when powering up.
For the meaning of LED status lights, see Table 1 in Section 4.1.
material
Otheres
Use
environment indoor use
Product power
consumption
within 2.5W when no one is watching during the day, within
3W after the infrared light is turned on at night
Working
environment temperature: -10~40 °C, humidity: 40 °C ≤75%
Storage
environment temperature: -40 ° C ~ 55 ° C, humidity: 55 ° C ≤ 90%
Size
body size: 585*55*55mm (length * width * height)
packing size: 222*222*77mm (length * width * height)
Weight gross weight: 380g
System requirements
Mobile
operating
system
iOS8.0 or above,Android4.0 or higher
Certification Certificate FCC CE ROSH RCM KC

iBaby MonitorUser Manual
6
2.3
Account registration and login
1. New users
Press the App prompt to register an account. The account number must be an actual
and valid mailbox, and the password must be a combination of letters (case sensitive)
and numbers, and the length is 6 characters or more. Login will be completed
automatically after registration is completed.
Note: The real mailbox is convenient for recovering the password and obtaining
technical support reply when you forget the password.
2. Users with existing accounts
Log in directly using your registered email account and password. If you have
forgotten your login password, please click the "Forgot Password" link on the login
page and follow the steps to reset the password.
2.4
Device Activation
After the device is booted, confirm that the phone used to activate the device is connected to
Wi-Fi and can access the iBaby Care App with the registered account when it is connected to the
Internet.
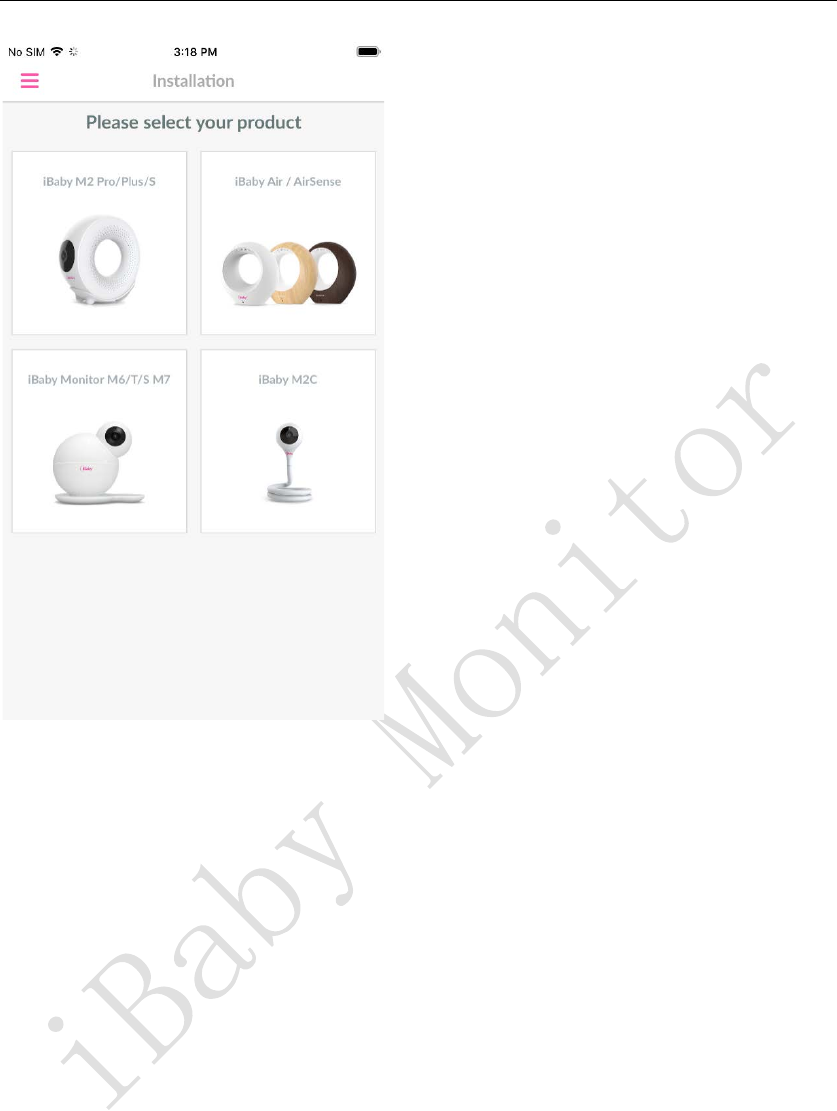
1. Click “Add Device” in the menu bar to enter the product selection page below, select the
corresponding device model to activate, and then select “Installation Preparation” page.
iBaby MonitorUser Manual
7
3. After confirming that the prepared content is complete, click the "Next" button.
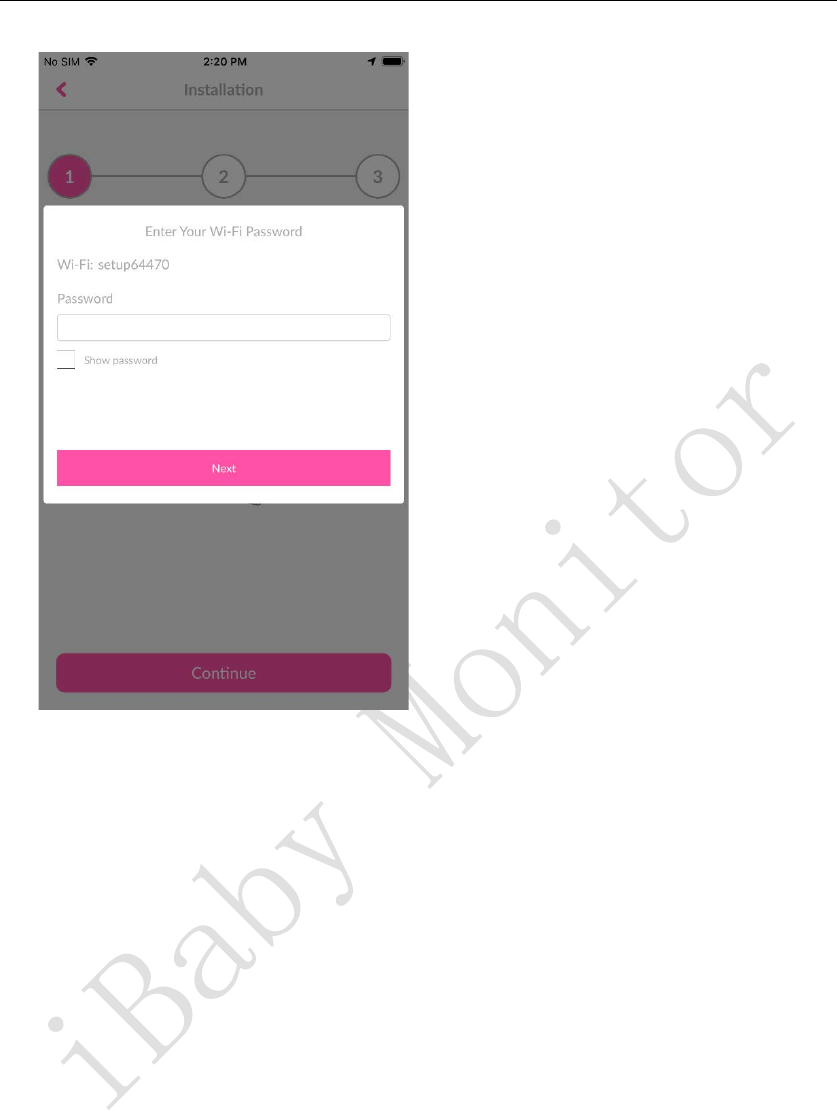
4. Go to the following page, enter the correct Wi-Fi password, and click the “Next” button to
enter the device activation process.
iBaby MonitorUser Manual
8
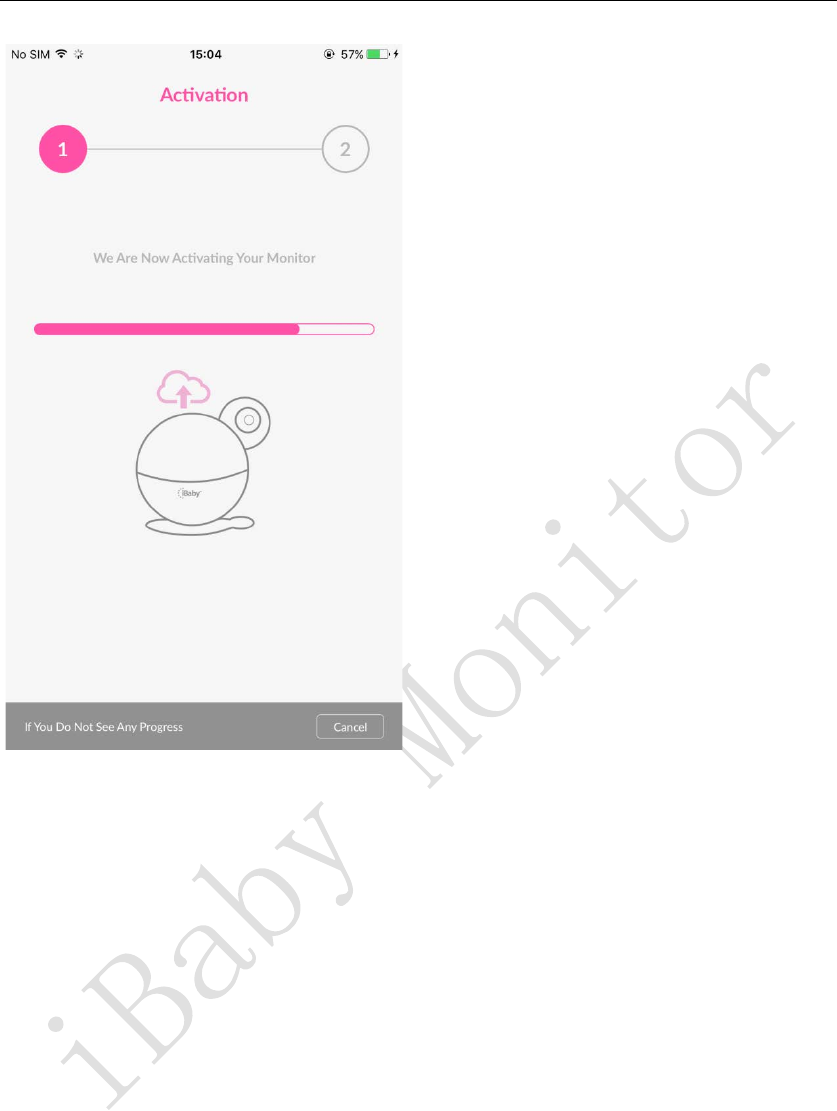
5. Activate the progress display, please wait for the activation progress to complete
automatically and jump to the video control main interface (this process lasts about 1
minute), you can start normal use.
Note:
If you have not activated successfully, please refer to the “Installation Questions” section in
section 4.2 of this document.
iBaby MonitorUser Manual
9
3
APP operation and function introduction
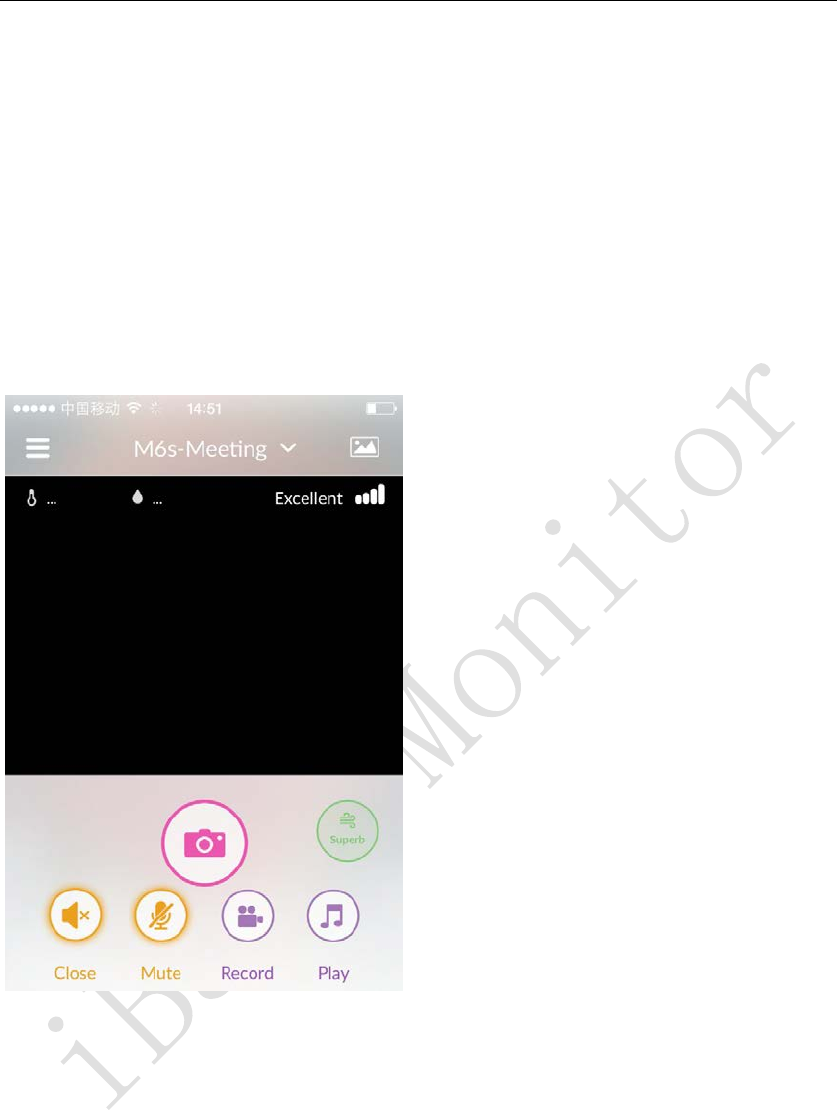
3.1
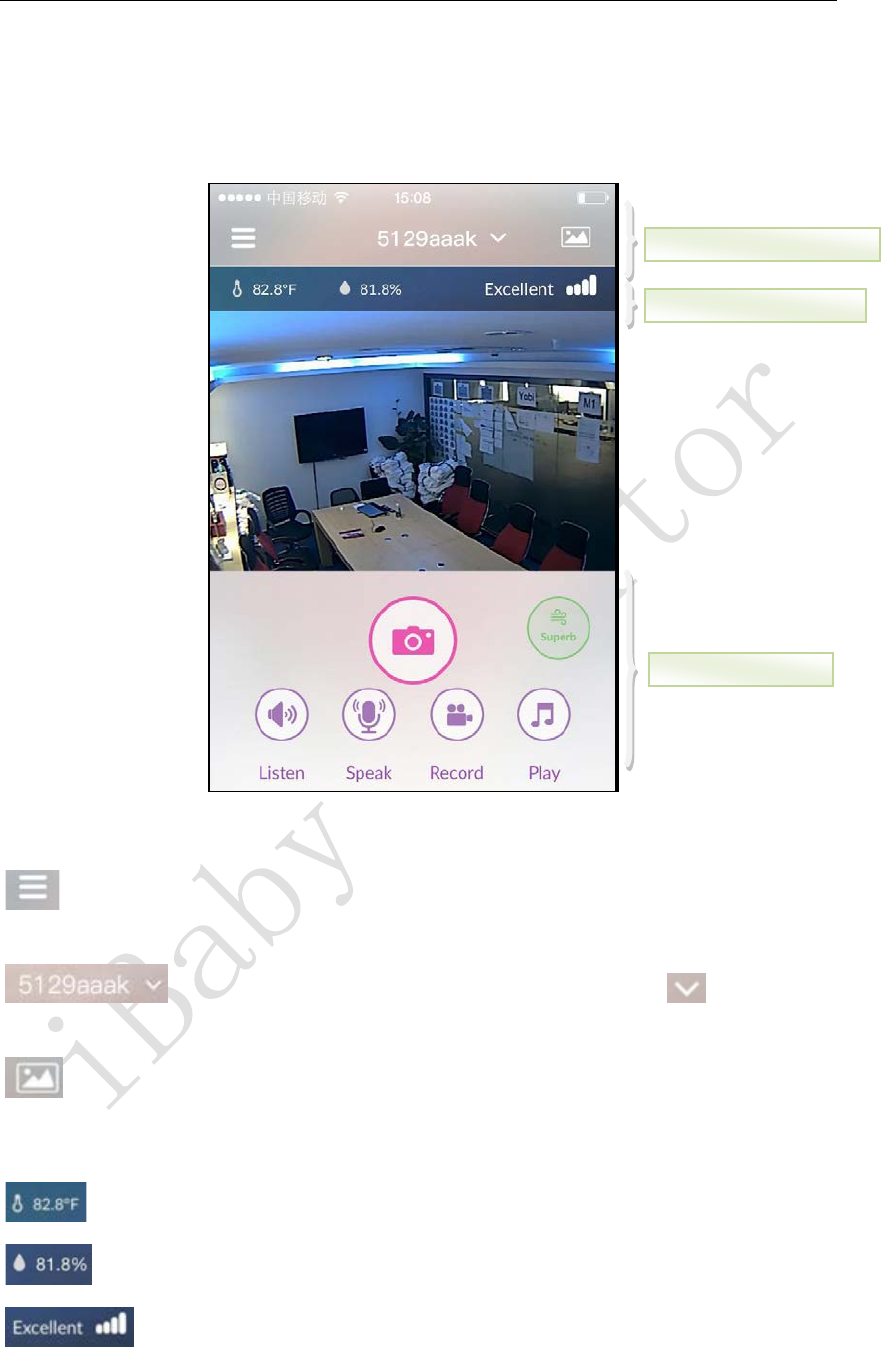
Video control main interface
收听:
1. Functional navigation area:
:Function menu navigation button. Click on the left side to slide out the function menu
page.
:Device list. When multiple devices are installed, click to switch to
watch other devices.
:Media library. Display alarms, manual recording/photographing media files.
2. Information display area:
:Current ambient temperature
:Current environmental humidity
:Device side Wi-Fi signal strength indication
3. Function button area:
Function button
area
Information display area
Functional navigation area
iBaby MonitorUser Manual
10
:Listen button. Receive sound from the device side.
:Speech button.Transfer the sound to the device side.
:Record button. Record the current video, The video file is saved in the media library.
:Music button.Enter the music play page.
:Capture button. Capture the current video, the image is saved in the media library :
Air quality icon. Display the current air quality level, click to view historical data.
3.2
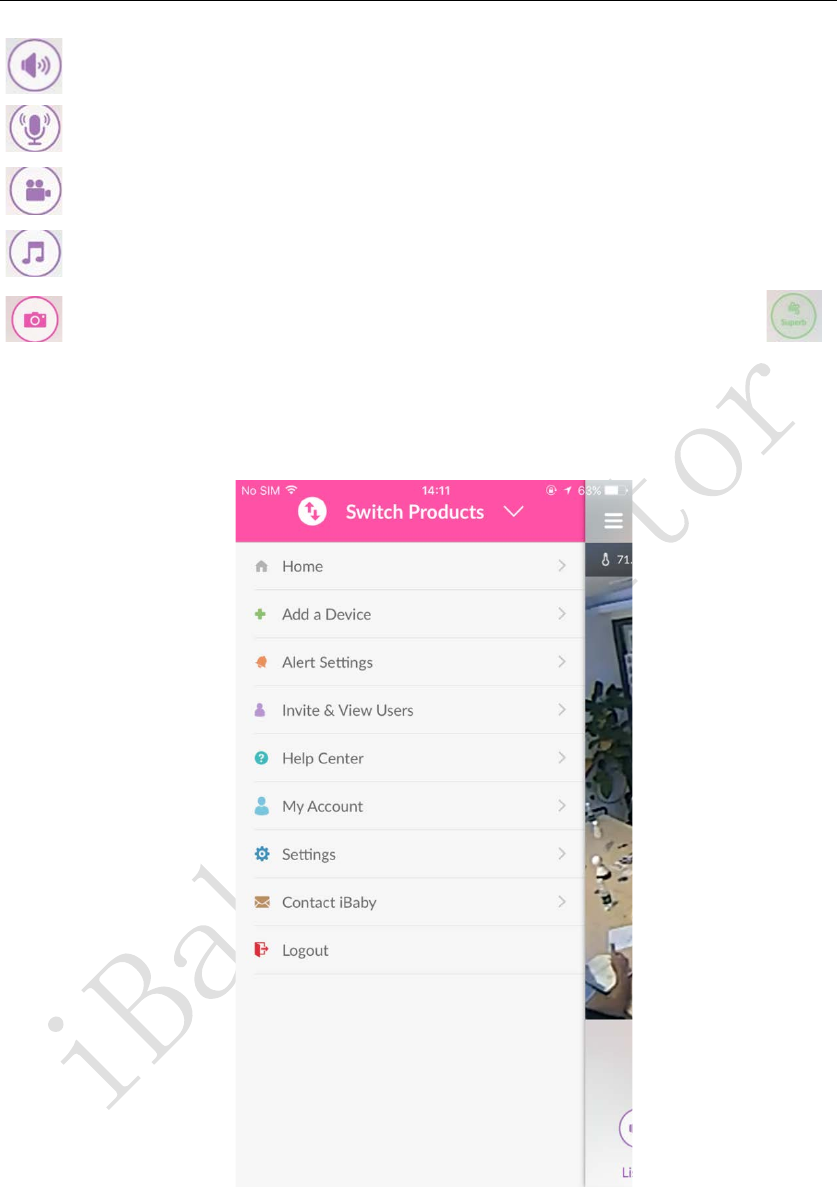
APP function menu
Switch products: Click to select other types of iBaby products
Home: Return to the viewing screen.
Add device: Add new device
Alarm setting: set alarm level or information such as movement, sound, etc.
Invite & View Users: Invite other users to view or configure viewer user permissions.
Help Center: Frequently Asked Questions
iBaby MonitorUser Manual
11
My account: personal information display and settings
Settings: device parameters, information settings
Contact us: Contact iBaby
Logout / Logout: Exit the current account
3.3
Introduction to common functions
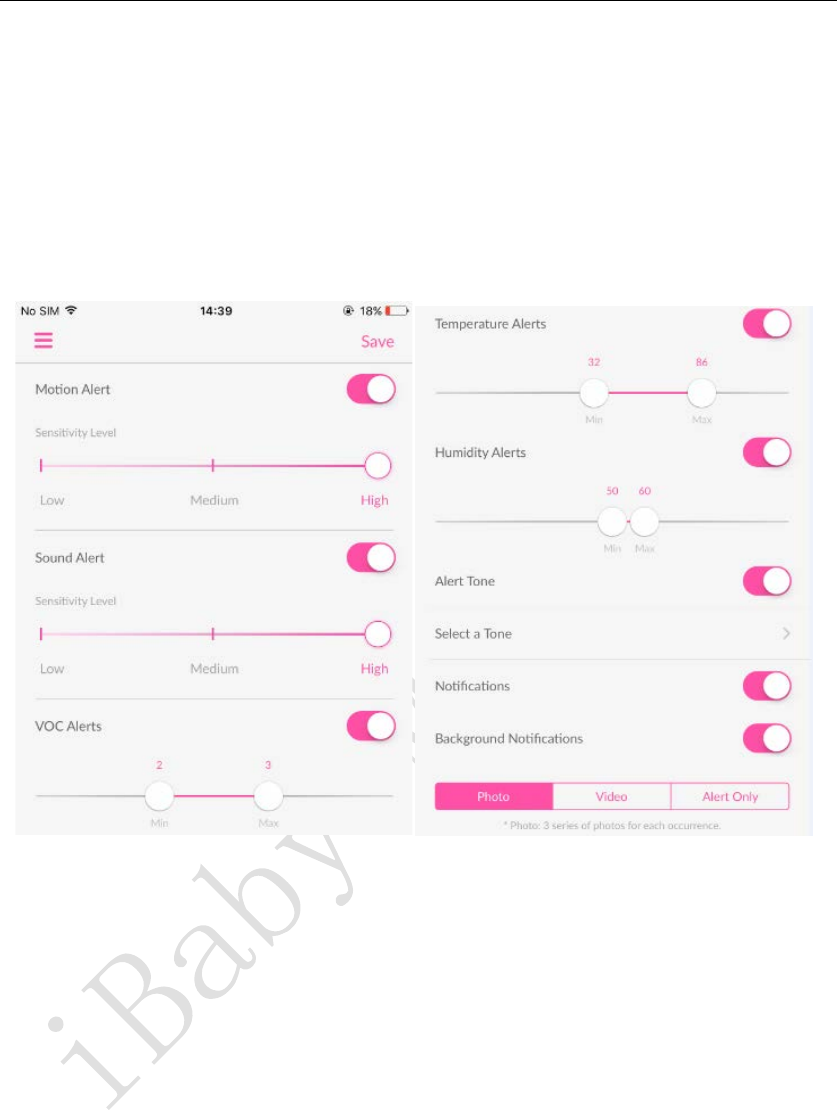
3.3.1 Alarm setting function
Motion alarm: An alarm that is triggered when an object moves in the screen. The higher the
sensitivity level, the more sensitive it is.
Audible alarm: The alarm that is triggered when the ambient sound reaches the alarm level. The
higher the sensitivity level, the more sensitive it is.
Temperature alarm: An alarm that is triggered when the ambient temperature is below a
minimum value (such as 32°F) or above a maximum value (such as 86°F).
Humidity alarm: An alarm that is triggered when the ambient humidity is below a minimum
value (such as 50%) or above a maximum value (such as 60%).
Alarm ringtone: Whether there is an audible prompt when setting the alarm, and the alarm
ringtone can be selected when it is turned on.
Push notification: This button is enabled to receive an alert push message when the app is closed
or running in the background.
iBaby MonitorUser Manual
12
Alarm action type selection:
Picture: When moving or audible alarm, capture 3 pictures and upload them to the media
library for encryption.
Video: When moving or audible alarm, record a short 15 second video and upload it to the
media library for encryption.
Alarm only: Only alarm message notifications are made and media files are not stored.
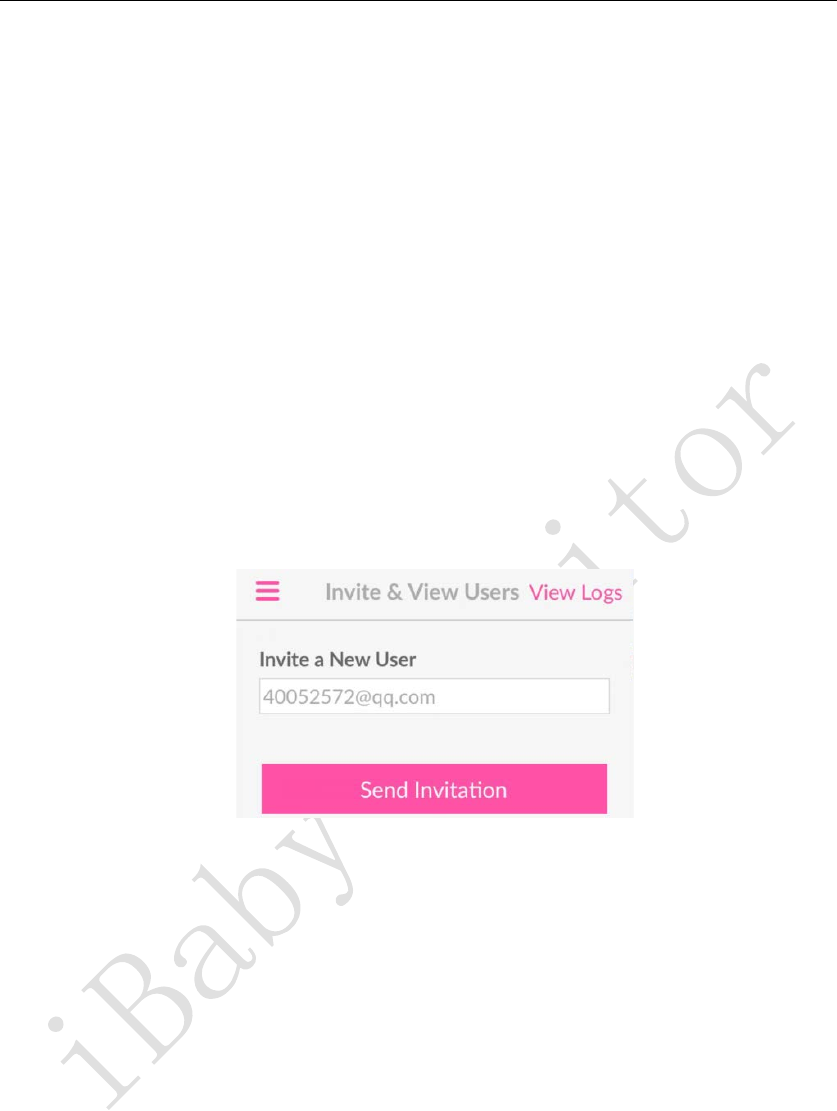
3.3.2 Invite & View Users
This feature invites family members or friends to work with the device. The invited user
will act as a viewer within the permissions granted by the inviter. For detailed steps, see question
2 in section 4.4.
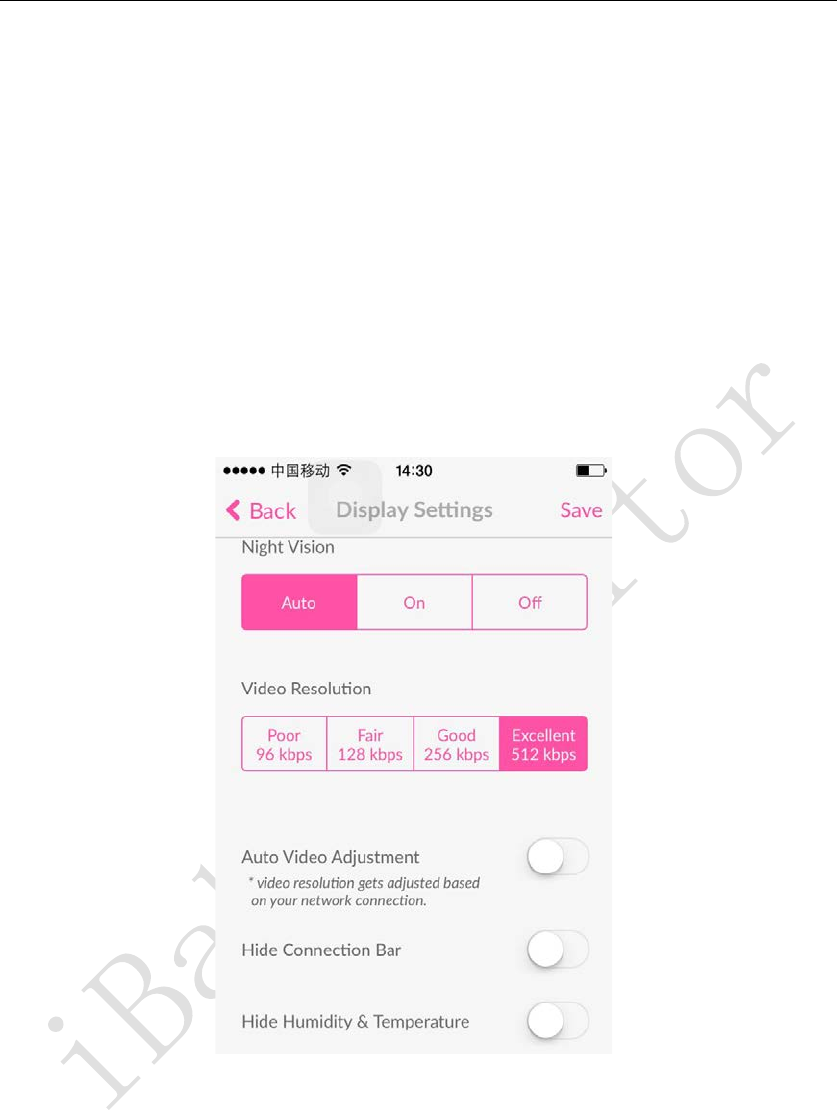
3.3.3 Settings
Display Settings
Night vision settings:
Auto: Automatically switch the screen to color/black and white as the ambient light is
bright/dark. The default is automatic.
On: The picture is black and white regardless of whether the ambient light is bright or
dark.
Off: The picture is displayed in color regardless of whether the ambient light is bright
or dark.
Video resolution setting:
Poor 96kbps: The picture quality is poor, but the occupied bandwidth is small. The

iBaby MonitorUser Manual
13
amount generated per second is not more than 96kpbs
Medium 128kbps: medium quality, taking up less bandwidth. The amount generated per
second is not less than 128kpbs
Good 256kbps: good picture quality (720P effect), occupying moderate bandwidth. The
amount generated per second is not more than 256kpbs
Excellent 512kbps: The best picture quality (1080P effect), occupying a large
bandwidth. The number generated per second is not less than 512kpbs
Automatic video adjustment: After turning on, the device will automatically adjust the display
resolution according to the network conditions. After turning on, the video resolution setting will
be invalid.
Hide the connection bar: Open the information display area in the main page of the hidden video
control.
Hide Temperature and Humidity: Turn on the temperature and humidity display in the
information display area in the main page of the hidden video control.
3.3.4 Settings
Sleep Mode
As shown below, when this setting is turned on, all invited viewers cannot view and operate
the device. It is generally used when viewers who do not wish to invite are invited to operate the
device during certain time periods or in some cases.
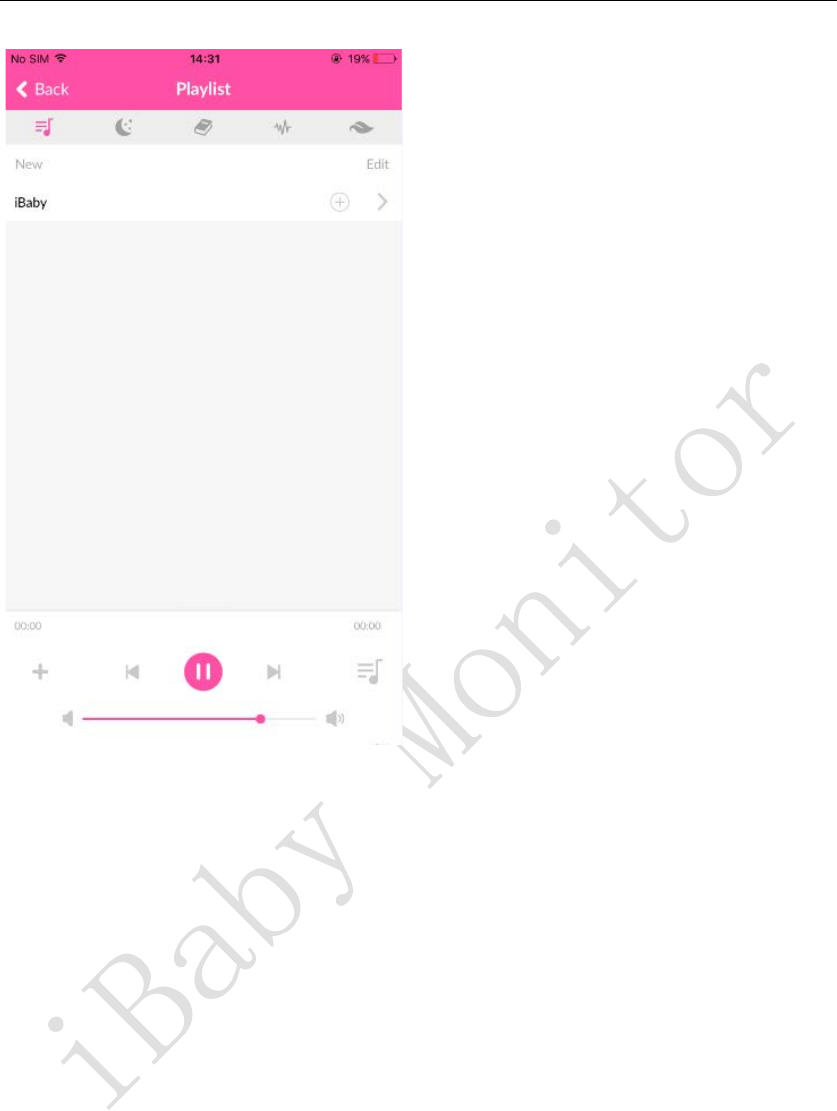
3.3.5 Music playback
As shown below, this function integrates the current popular children's songs, stories and
poems and lullaby and other Internet resources, from the application to the songs on the device
side to play.
Note: Since songs are Internet resources, there may be problems with delayed loading or
playback depending on the status of the network during playback. Check the network
configuration at the time.
iBaby MonitorUser Manual
14
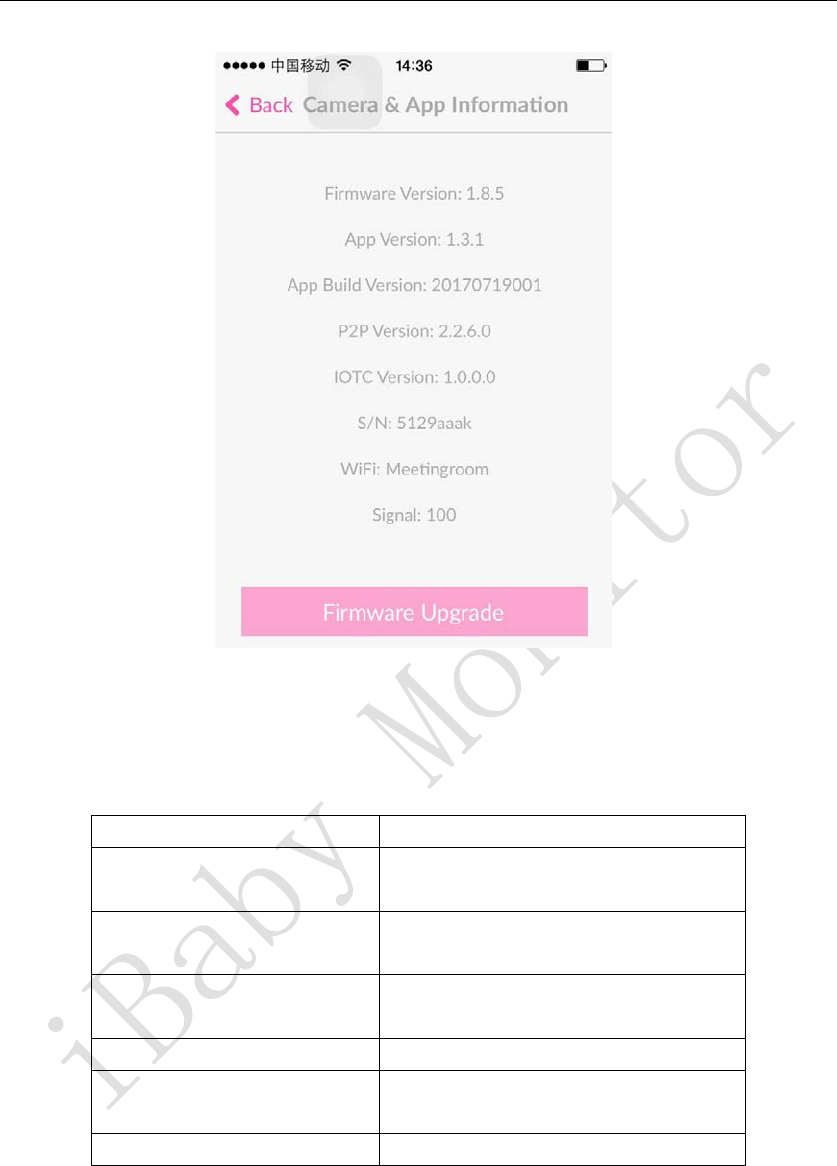
3.3.6 Version Information
As shown in the following figure, you can view the version of the APP, the
version of the device firmware, and the serial number of the device. If a new version of the
firmware is released, it can be updated to the latest firmware via the "Firmware Upgrade" button.
iBaby MonitorUser Manual
15
4
FAQs
4.1 Device LED Status Light Meaning
LED status
Meaning
Red slow flashing
The device is not connected to
WI-FI, to be activated.
Green slow flashing
The device is connected to WI-FI but
has not been activated yet.
Steady red The device is activated without being
connected to WI-FI.
Steady green
The device is working normally.
Red light and green light
alternately flashes
Device startup.
No light
The device is not powered or faulty.
Table 4.1
4.2 Installation issues
Question 1Apple users:
Prompt during installation, if you can't see any progress, please click Cancel
(LED status light behind iBaby, red flashing)
iBaby MonitorUser Manual
16
Answer: Red indicates that iBaby is not connected to your WI-FI. The solution is
as follows:
1) Please use the USB cable that comes with the original phone to ensure good
transmission.
2) Please install iBaby in a place with good WI-FI signal. The WI-FI name and
password are preferably 8-32 characters in upper and lower case letters, numbers,
- or underscores. They cannot contain special characters (such as Chinese
characters, Japanese). , Korean, etc.).
3) The SSID broadcast on the router should be turned on.
4) WPA2-PSK is selected for the WI-FI authentication type on the router, and AES
is selected for the encryption algorithm.
Question 2Android users:
Prompt installation failed, the LED status light behind iBaby flashes red, what is
the reason?
iBaby MonitorUser Manual
17
Answer: Red indicates that iBaby is not connected to your WI-FI. The solution is
as follows:
1) Please confirm the WI-FI password, and then restart the device and re-install
it.
2) Please install iBaby in a place with good WI-FI signal. The WI-FI name and
password are preferably 8-32 characters in upper and lower case letters, numbers,
- or underscores. They cannot contain special characters (such as Chinese
characters, Japanese). , Korean, etc.).
3) The SSID broadcast on the router should be turned on.
5) WPA2-PSK is selected for the WI-FI authentication type on the router, and AES
is selected for the encryption algorithm.
Note:
After entering the password, immediately enter the installation, the installation
progress bar, at around 5%, iBaby will make two beeps, after the installation is
complete, the green light is always on.
If you don't hear the "beep" sound, you need to take the device to the side of the
router to install, and power off and restart the router, it is best to change the
time period before installing.
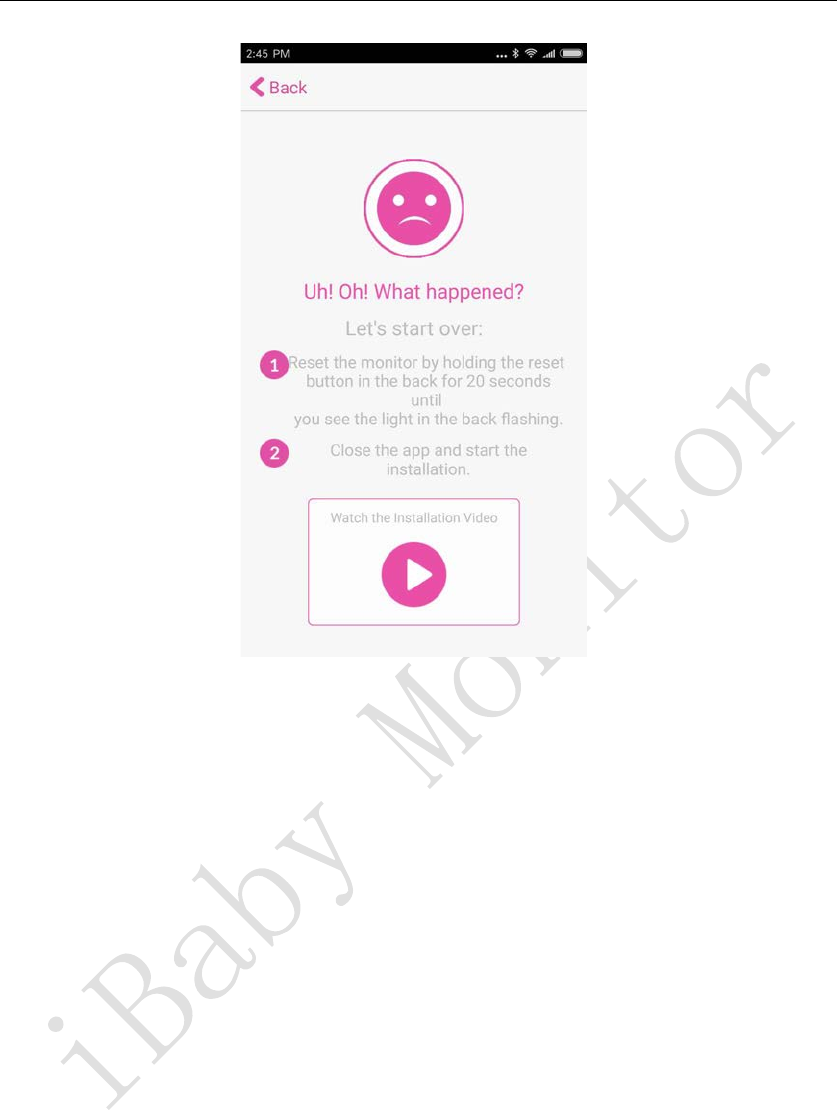
Question 3 Prompt during installation, if you can't see any progress, please click
Cancel (LED status light behind iBaby, green flashing)
iBaby MonitorUser Manual
18
Answer: The green flashes slowly, indicating that the device is connected to your
WI-FI but has not been activated on the server. Please exit the app from the
background of the mobile phone, then run the APP, and turn off the router and device.
If it still doesn't work, please re-install it in a different period of time and
the device does not need to be reset.
Question 4 When adding equipment, stuck in the next step, what is the reason?
Answer: The reasons and solutions are as follows
1) Please use the original iPhone data cable
2) Please make sure the phone is connected to Wi-Fi
3) The device is plugged in and the startup is completed (the LED status light behind iBaby, the
red flashes slowly)
4) The device is powered up and restarted.
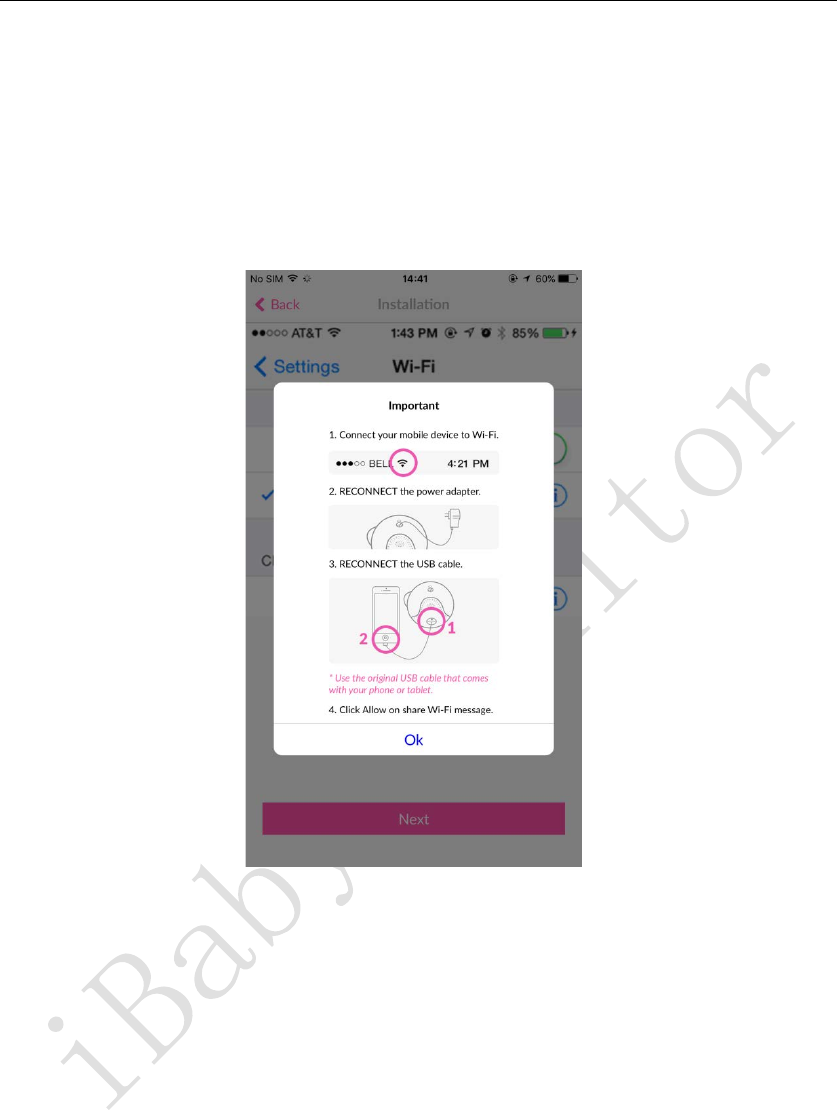
Question 5 The home has replaced the new WI-FI, how to install the device?
Answer: If you have an Apple device (iPhone or iPad), you need to use a USB cable to reconnect
your Apple device and iBaby. Click Allow WI-FI to share. If you don't have an Apple device,
you need to RESET iBaby and reinstall it. RESET method, see question 4.4 in section 4.4.
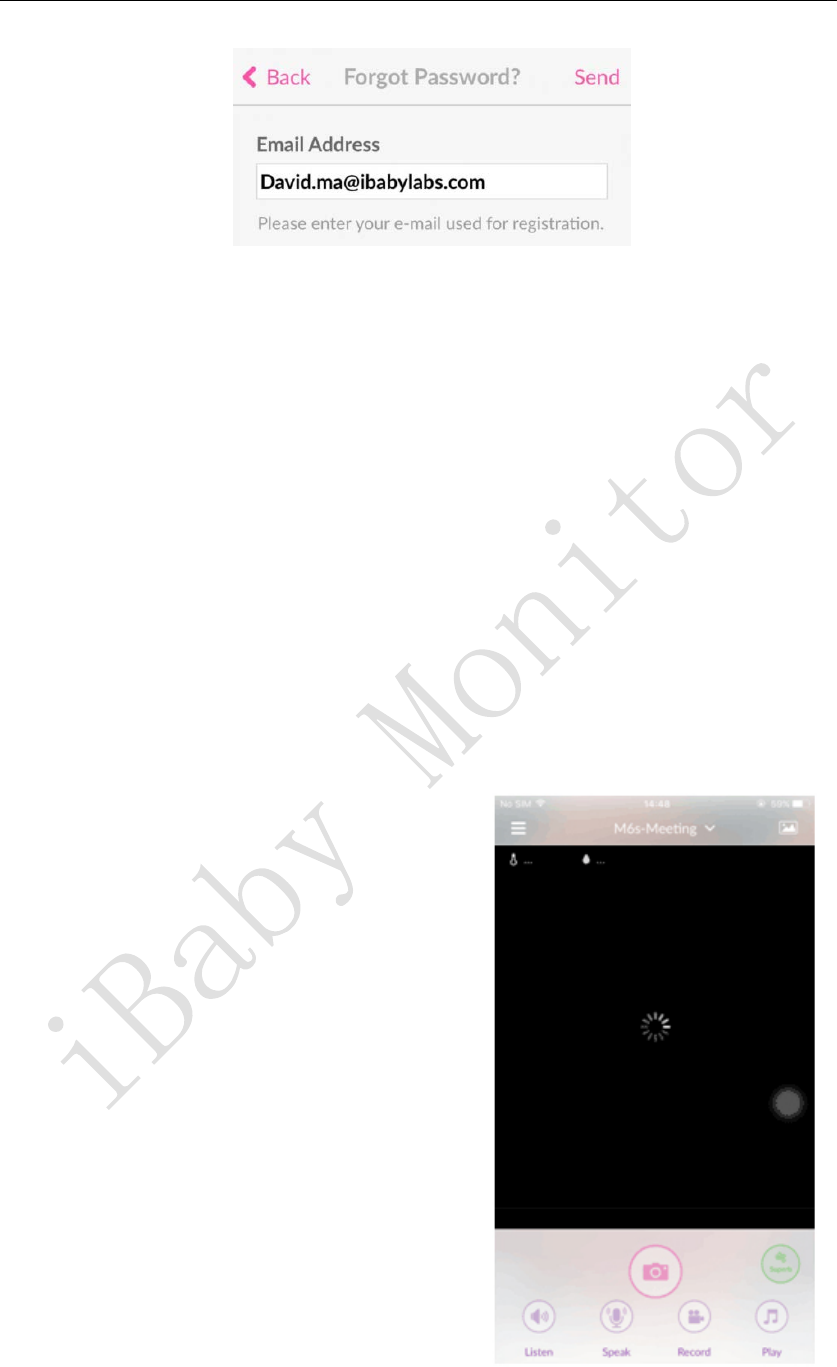
Question 6 I forgot my login password, how do I do this?
Answer: If you have forgotten your login password, enter the email address you originally
registered, and click Send. A link to reset your password will be sent to your email address.
Please log in to the mailbox within one hour and click the password link to set a new login
password.
iBaby MonitorUser Manual
19
4.3 Keep Loading
Question 1 When viewing at home, the screen compares cards, which is slower (LED
status lights behind iBaby, sometimes green, sometimes red)
Answer: Sometimes red, sometimes green, indicating that the WI-FI signal is not stable enough
at the time, or the nearby WI-FI interference is serious, and it needs to be optimized from the
following aspects:
1) If the router is a normal 2.4G, it is recommended to log in to the router to optimize the WI-FI
settings. Take the TP-Link router as an example: select the band bandwidth 20M (NETGEAR
router: enable 20/40MHz coexistence).
2) iBaby is too far away from WI-FI, or there are too many middle partition walls. It is
recommended to try it near the WI-FI signal.
3) The router is heavily loaded at the time, and the router is powered off and restarted.
4) The router should be cool and not too old.
Question 2 When watching at home, the picture is always loaded, no picture is coming
out (the LED status light behind iBaby is red)
iBaby MonitorUser Manual
20
Answer: Red indicates that iBaby is not connected to your WI-FI. Please try the following steps:
1) The device is powered up and restarted to see if the LED light turns green.
2) The router is heavily loaded at the time, and the router is powered on and restarted.
3) iBaby is too far away from WI-FI, or there are too many middle partition walls. It is
recommended to try it near the WI-FI signal.
4) The router should be cool and not too old.
5) If it is always red, the router's WI-FI password may have been changed and the device needs
to be reinstalled.
Question 3When watching at home, the screen is black, but when you hear the sound, you
can control the rotation of the device (the LED status light behind iBaby is green)
Answer: Green indicates that iBaby is connected to your WI-FI, but the network bandwidth is
not enough. The reasons and solutions are as follows:
1) The router is heavily loaded at the time, and the router is powered on and restarted.
2) The device is powered on and restarted.
3) The APP is closed from the background of the mobile phone.
4) WI-FI is too far away from iBaby, or the nearby WI-FI is seriously interfered. If the router is
2.4G, log in to the router to optimize WI-FI. Take TP-Link router as an example: Band
bandwidth is 20M (NETGEAR) Router: Enable 20/40MHz coexistence).
5) The router should be cool and not too old.
Question 4 Watching normal at home, watching 4G outside, comparing cards, slower.
Answer: Looking at the device screen, the requirements for network bandwidth are the same as
watching video movies. The network where the device is located and the network speed of the
iBaby MonitorUser Manual
21
mobile phone must be fast.
1) Try to lower the resolution of the device.
2) The mobile app is closed in the background and reopened.
3) The device is powered up and restarted.
4.4 Usage issues
Question 1 When listening to the intercom at the same time, the noise is very loud.
Answer: The phone is too close to the device, it is recommended to be 10 meters away to reduce
the crosstalk. The device is placed at home and there is no such problem when going out.
Question 2 I am the owner of the device, how can I invite other users to watch it?
Answer: You can invite other users (referred to as viewers) to watch by the owner. The steps are
as follows:
1) Viewer's mobile phone, download the app, and register for an email account.
2) Owner, in the settings menu - "Invite & View Users, add viewers' email accounts, and send
invitations.
3) Viewer's mobile phone, exit the app from the background, and re-run the app.
Note:
Such a device is bound to both the owner account and the viewer account.
Question 3 The picture of the device is fuzzy. How to adjust the resolution?
Answer: You can adjust the resolution of the device in the APP Settings - Display Settings page.
The image quality corresponding to “Excellent” is the highest, 1080P effect, but the occupied
network bandwidth is also relatively large. If it is an Apple mobile phone, when the vertical
screen is displayed, the screen is enlarged. It is recommended that the mobile phone be viewed
horizontally, the picture is clearer, and the viewing angle is wider.
Question 4 Why can't I find my previous alarm pictures and videos?
Answer: Alarm pictures and videos are saved on the iBaby server. The default is 100 records, if it
exceeds, the oldest record will be overwritten. Selecting a video will occupy a certain amount of
network bandwidth. When the network is not good, it is recommended to select a picture.
Question 5 Why is the product not displayed in temperature and humidity?
Answer: Please check from the following:

iBaby MonitorUser Manual
22
1) Is the base placed?
The temperature and humidity module is built into the magnetic base. The iBaby and the three
metal domes on the base should be aligned and placed flat. It is best to pick up the iBaby and
pick up the magnetic base.
2) Is the iBaby firmware version up to date?
APP Settings Menu - "Settings -" Device & Application Information page, confirm the firmware
version is 1.8.1 and above.
Question 6 How to reset the device (reset device to factory settings)?
Answer: Press and hold the RST button on the bottom of the device, don't let go, until the LED
status light in Figure 1 starts to flash red and flash alternately (more than one second), then you
can let go. When the music is ringing, and the LED light turns red slowly (one second), the reset
is complete.
5
Contact information
Customer service hotline:1-888-538-1004(Monday – Friday: 9 am – 5 pm PT)
Email:support@ibabylabs.com
Website:https://ibabylabs.com
6
FCC Caution
This device complies with part 15 of the FCC Rules. Operation is subject to the following two conditions: (1)
This device may not cause harmful interference, and (2) this device must accept any interference received,
including interference that may cause undesired operation.
FCC warning:
Any Changes or modifications not expressly approved by the party responsible for compliance could void the
user's authority to operate the equipment.
Note: This equipment has been tested and found to comply with the limits for a Class B digital device,
pursuant to part 15 of the FCC Rules. These limits are designed to provide reasonable protection against harmful
interference in a residential installation. This equipment generates uses and can radiate radio frequency energy
and, if not installed and used in accordance with the instructions, may cause harmful interference to radio
communications. However, there is no guarantee that interference will not occur in a particular installation. If
this equipment does cause harmful interference to radio or television reception, which can be determined by
turning the equipment off and on, the user is encouraged to try to correct the interference by one or more of the
following measures:
-Reorient or relocate the receiving antenna.
-Increase the separation between the equipment and receiver.
-Connect the equipment into an outlet on a circuit different from that to which the receiver is connected.
-Consult the dealer or an experienced radio/TV technician for help.
This equipment complies with FCC radiation exposure limits set forth for an uncontrolled environment. This
equipment should be installed and operated with minimum distance 20cm between the radiator & your body.