iControl Networks GATEWAY1 Low power security transceiver User Manual Manual
iControl Networks Inc. Low power security transceiver Manual
Manual
Version 2.2 March 2005 iControl Confidential page 1
iControl System
Starter Kit
Beta User Manual
This document provides more detailed information on how to use
your iControl System. More specifically:
• how to read your iControl Summary page
• adding, changing, and managing your iControl box and devices, and
• frequently asked questions
You should consult your Quick Start Guide or Getting Started Guide
for information on how to install your system. Your Starter kit or
device box will provide a list of what’s included with the kit or device.
© 2004-2005 iControl Networks, Inc. All rights reserved. No reproduction in whole or in part without prior
written approval. iControl Networks, iControl and I logo design are pending trademarks of iControl Networks.
All other trademarks are the property of their respective owners. Information contained herein is subject to
change without notice. The only warranties for iControl products and services are set forth in the express
warranty statements accompanying such products and services. Nothing herein should be construed as
constituting an additional warranty. iControl shall not be liable for technical or editorial errors or omissions
contained herein.
Printed in USA.
Version 2.2
March 2005
Version 2.2 March 2005 iControl Confidential page 2
Table of Contents
Chapter 1 Getting Started 3
Chapter 2 About your iControl box 9
Chapter 3 Using your System 11
Chapter 4 Using your Wired Camera 19
Chapter 5 Using your Door/Window Sensor 32
Chapter 6 Using your Keychain Remote Control 33
Chapter 7 Using your Lamp Module 36
Chapter 8 Using your Motion Sensor 37
Chapter 9 Adding Additional Devices 38
Chapter 10 Frequently Asked Questions 42
Chapter 11 Terms and Conditions, Warranty Information, and More 44
Appendix A Battery Maintenance 45
Check pages
Version 2.2 March 2005 iControl Confidential page 3
1 Getting Started
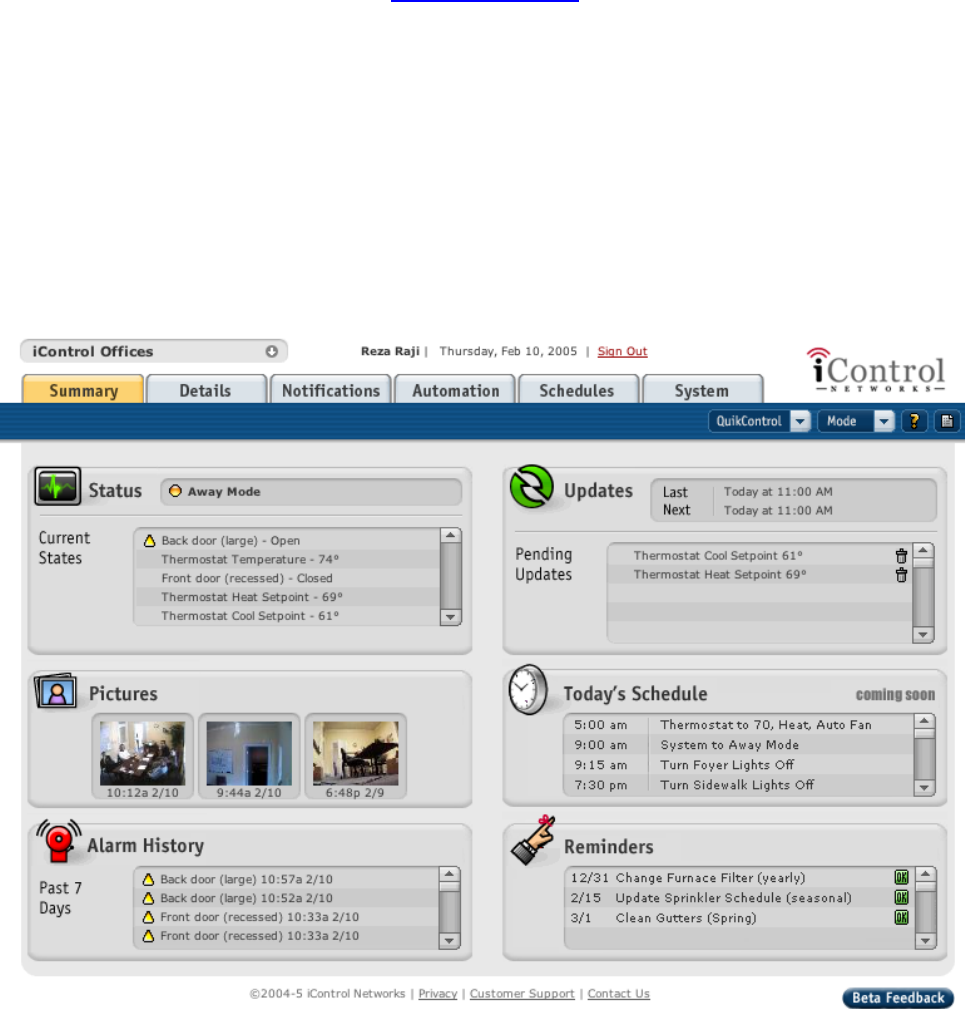
Your iControl Summary page is where you begin using your iControl System; the iControl
Summary page is your portal to your iControl System.
To begin, log on
First, go to a web browser and enter www.icontrol.com. In the customer login area, type
the user name and password provided to you via email when you purchased your iControl
product.
You will be presented with your Summary page. This web page provides a fast, simple
view into the status of your iControl box and devices. It also is the starting point from
which you can monitor your system’s status, change your devices’ setup, add devices, set
and change notifications, and set and modify automations.
Here is an example of the Summary page where you can access the many functions of
your iControl System.
Version 2.2 March 2005 iControl Confidential page 4
Read your Summary page
This section provides a definition of the many terms found on your Summary page and
serves as a good background to the iControl System.
Tabs
Your iControl Summary page has five major tabs.
Summary tab
When you log onto your iControl System from www.icontrol.com, your landing page is the
Summary page. This is where you begin using your System. The Summary page consists
of the following series of windows.
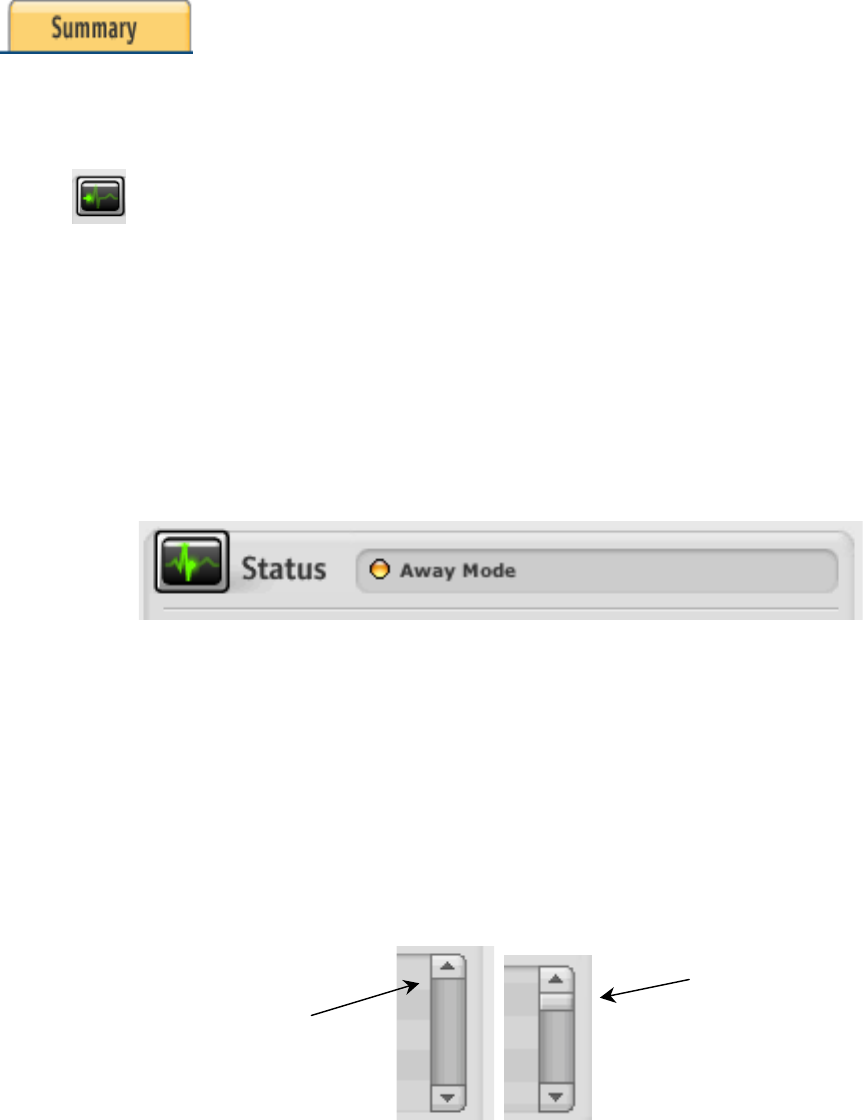
Status window
The top portion of this window indicates the overall status of the system and the
current mode the system is in. The status light can have three possible colors
as described below:
Green – No alarm conditions. System operating normally
Yellow – One or mode device alarm conditions (e.g. motion detected)
Red – System problem (e.g. iControl box communication problem).
The Status window also shows the current mode for your iControl System.
Here, the System is in ‘Away Mode’.
The rest of the Status window is a list showing the current state of all the devices
in the system. In the screen shown earlier, three devices appear: a
door/window sensor called ‘Back door’; a Thermostat showing the current
temperature at 74 degree and its Heat Setpoint to of 69 degrees and Cooling
Setpoint of 61 degrees; and a door/window sensor labeled ‘front door’.
Your house may have many more devices than three and to view these you
place your cursor over the up or down arrow to scroll to see additional devices or
on the small box inside the scroll bar.
Click here
Click here
Version 2.2 March 2005 iControl Confidential page 5
Current states
Current states refer to the status of all of your devices. If a device has a yellow
triangle next to it, the triangle indicates that the device has recognized a change
that creates an alarm. The following table shows the possible states and the
alarm conditions of Starter Kit devices.
Device
Possible state
Example
Alarm Condition
Door/Window
Sensor
Open, Closed
Open indicates the
door or window is
open
Open
Motion
Sensor
Occupied, Empty
Occupied means a
person is in the
monitored area
Occupied
Additional optional devices, such as freeze, water, smoke and heat sensors
have their own associated states as well but are not described here since they
are not part of the iControl Starter Kit.
Pictures window
Here you will see thumbnails of pictures or video from each of your iControl
cameras. In the Summary page shown earlier, three thumbnails are shown, as
three cameras are active. If your hover the cursor over a thumbnail, the name of
the associated camera is displayed. You can also click on the thumbnail and it
will expand. From there you can take a new picture, view past pictures, watch
live video and delete pictures.
Alarm History
This window shows the record of the alarms recognized by the devices installed
in your iControl System. An alarm occurs whenever a device detects a change,
such as a door/window sensor detecting a door open or a motion sensor detects
movement. (These are the only two types alarms available from the devices in
the Starter Kit. Other optional devices provide alarms for freezing, water
leakage, etc. and these devices will be offered in the future). For each change,
it shows the time of the alarm. Each item in the alarm history has a yellow
triangle next to it, indicating that it is an alarm.
You can click on any change to learn more about the device. Use the scroll bar
on the right to scroll down the events. The Alarm History only saves the last 7
days of alarms.
Version 2.2 March 2005 iControl Confidential page 6
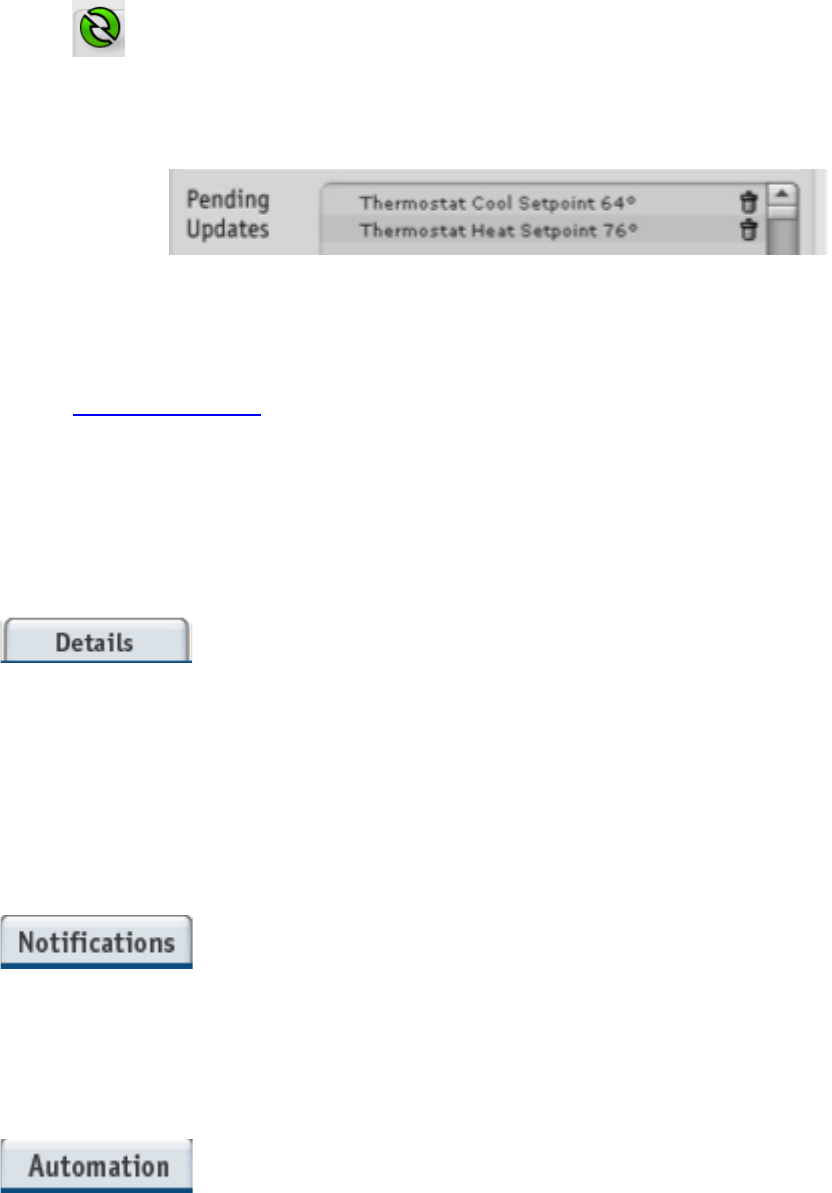
Pending Updates window
This window shows the changes that you made to your IContol box or devices.
They will be implemented the next time your iControl box communicates with the
iControl servers.
In this example, the Thermostat will change its setpoint for cooling to 64 degrees
and the heating setpoint to 76 degrees. (Note, a thermostat device is not part of
your Starter Kit but is available as an optional accessory. Please go to
www.icontrol.com for more information.)
Reminders window
Reminders are not implemented in Beta.
Schedules window
Schedules are not implemented in Beta.
Details tab
This tab presents a listing of all the devices installed in your system. It displays their
current state, images from any cameras installed in your system, and the current settings
and ambient temperature from any thermostats installed in your system. If you click on
any device name, you will be taken to its device page which provides detailed information
about the device including the device’s name that you chose, the device ID, and
manufacturer. If you click on a photo image, you will be taken to an expanded view of that
image where you can take additional images and access thumbnails of previously taken
images.
Notifications tab
By clicking on this tab, you will go to a web page where you can set notifications for each
mode (Home, Away, and Sleep). For example, you can have an email sent to you when
your iControl system is in Away mode that a device recognizes a change such as a
Door/Window Sensor detecting an open door. See Chapter 3 entitled, Using your iControl
System, for more details on setting and changing notifications.
Automation tab
By clicking on this tab, you will go to a web page where you can set automations. An
automation is an action taken by a device based on the change in the state of another
device. For example, a Door/Window Sensor detects an open door; when this change
occurs, a camera takes a picture.
Version 2.2 March 2005 iControl Confidential page 7
Schedules tab
By clicking on this tab, you will go to a web page where you can set schedules for your
devices. For example, you can set by time of day or day of week, how devices operate.
For example, every night at 10PM, every lamp module changes state causing every light in
the house controlled by a lamp module turn off. This feature is not implemented in Beta.
System tab
This tab is most useful for seeing a complete list of devices in your system and confirming
that a device was installed and is working. The System tab also provides a way to add
and delete a device. You may also access the device page via this tab to change the
device’s name or gather such information as device ID and manufacturer.
Definition of other items on the Summary page
Help button
Help which is indicated by a ‘?’ mark is not yet implemented.
Mode
Your iControl System has three modes, Home, Sleep and Away. You can set your
System in any of the modes. For example, the system can be in Home mode while you
are home and Sleep mode when you are asleep. The mode setting affects the behavior of
the system. For example, you may want receive notifications only when you are Away
from your home.
QuikControl button
QuikControl is shortcut that allows you to have one of your devices take an action.
Click on the QuikControl button and you will see the actions that you can take. Two
actions are available for the starter kit devices: Have a camera take a picture and change
the brightness of a lamp controlled by the lamp module. (You will have had to install a
Version 2.2 March 2005 iControl Confidential page 8
camera or a lamp to see these QuikControl actions). A third action, change the
temperature is available if an optional thermostat is bought and installed.
Version 2.2 March 2005 iControl Confidential page 9
2 About your iControl Box
This section describes some of physical characteristics of the iControl box.
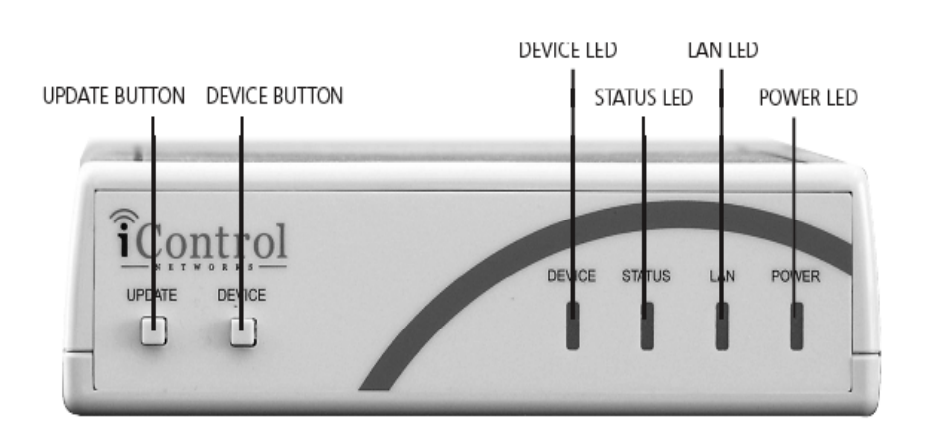
iControl Box Indicator Lights
The iControl box has the following buttons and indicator lights:
DEVICE light:
Blinks green when your box is communicating with lamp modules, door/window sensors,
motion sensors, and other devices. You may not see this LED turn on and off often
because most of your devices act infrequently (such as turning on a light in the evening)
and therefore will blink very infrequently.
STATUS light:
Used for troubleshooting.
LAN light:
Flashes green whenever there is activity on your home IP network.
POWER light:
Steady green when plugged in.
UPDATE BUTTON:
Initiates a iControl box to server uplink communication. Used when you need to manually
update the iControl network with information.
DEVICE BUTTON:
Can be used to enable the iControl box to discover a newly installed device.
Version 2.2 March 2005 iControl Confidential page 10
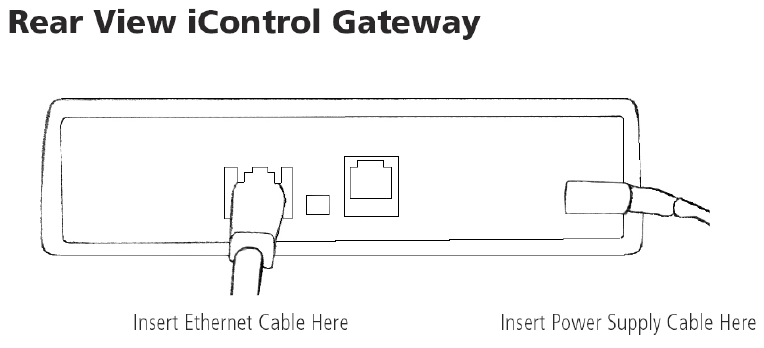
iControl Box back panel
As described in the Installation Guide, the iControl box should not be plugged into
power strips or wall outlets that are connected to or contain a surge protector or
uninterruptible power supply.
The rear view shows the Ethernet port with an Ethernet cable inserted, an insert for a reset
button, a phone jack, and power connector with the power supply cable inserted. The
reset button, marked as ‘RST’, is not functional today and will not be functional in the
shipping product. The phone jack is not supported in Beta.
Version 2.2 March 2005 iControl Confidential page 11
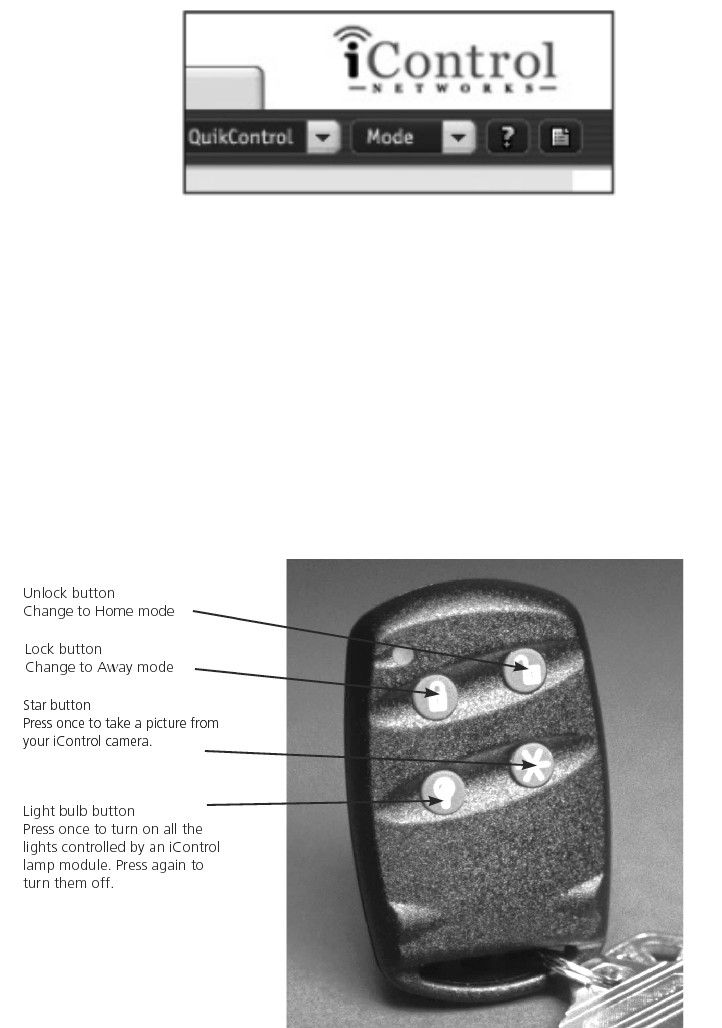
3 Using your iControl System
Your iControl System can operate in one of three modes: Home, Sleep or Away. You can
set the mode in one of two ways: the Mode button on your Summary page or via the ‘Lock’
and ‘Unlock’ buttons on your Keychain Remote Control.
To change the mode via your Summary page.
1 Navigate to the ‘Mode’ link shown in the Summary page menu bar.
2 Click on it. A new window appears and there will be a pointer next to one of the
modes.
3 Select the mode to which you want to change your System.
To change the mode from your Keychain remote.
1 Click on the lock or unlock button while you are within a 100 foot (line-of-sight) to
the area in your location where you installed your iControl box. The following
picture shows the Keychain’s lock and unlock buttons.
Version 2.2 March 2005 iControl Confidential page 12
Change or Set Notifications
A notification is an email or SMS (Short Message Service also referred to as text
messaging) message sent to your PC, PDA, or cell phone alerting you that a device
recognized a change in your location. For example, a Motion Sensor may sense that
someone has entered a room; a Door/Window Sensor may report that a door is open.
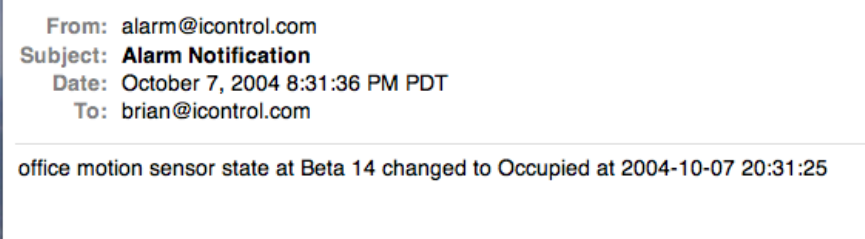
Here is an example of an email notification sent to ‘brian@icontrol.com’ regarding his
office Motion Sensor detecting that someone occupied his office at 8:31PM on 10 July
2004.
[Note to reader: the wording of an email notification will change for the shipping product from this cryptic style
to proper grammar and composition]
You can assign notifications on a mode or device basis. In Home mode, you may not want
to receive notifications while someone is home. In Sleep mode and Away mode, you may
or may not want to receive notifications. In Away mode, you may want to receive an email
notification any time a device recognizes a change at your house. For example, every
time a window or door opens, you can set notifications under the Notification tab to
generate an email.
IN BETA, YOUR NOTIFICATIONS ARE PRE-ASSIGNED SUCH THAT IN AWAY MODE,
YOU WILL RECEIVE AN EMAIL NOTIFICATION IF MOTION IS DETECTED OR IF A
DOOR/WINDOW SENSOR GOES FROM CLOSED TO OPEN. You can change this pre-
set notification as described later in this chapter.
Note: In the shipping product, users will be able to:
• assign different notifications for different sensor states in each mode
• attach a picture to their notification. They will be able to click on a picture
and attach it to their email or text message notification

Version 2.2 March 2005 iControl Confidential page 13
Your default notification
While you were purchasing your iControl System, you were asked to provide an email or
SMS address. This information was used to set your default notification. A default
notification is the email or SMS address to which you chose to have your iControl System
notifications sent. To see your default notification, click on the Notification tab. You will
see a screen like this:
A customer named George purchased an iControl System. During his purchase on the
iControl website, he provided his email address, George@yourISP.com. If you click on the
word ‘George’, you will see the email or SMS address that George provided during his
purchase.
Version 2.2 March 2005 iControl Confidential page 14
George’s email is shown here as he chose to have his notifications go to his email.
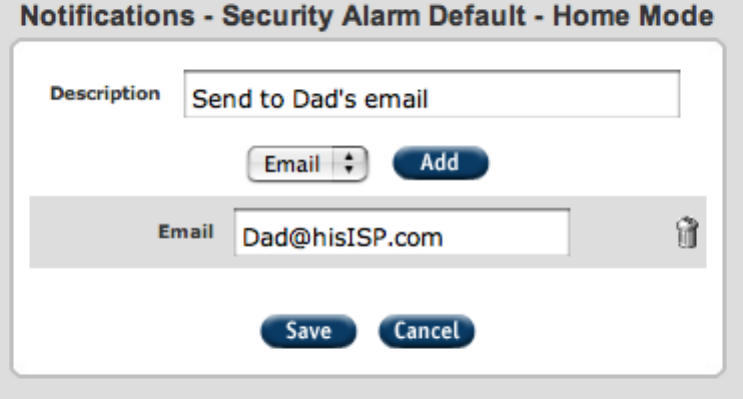
Change your default notification
You can change your default notification. To do so,
1 Select the Notifications tab.
2 Select the mode (Home, Sleep, Away) that you want to change. Click on the name
that you entered, in this case, George.
3 Here you have the option of changing the name of your notification. If you do not
want to change it, click on the Cancel button. If you wish to change it, change it now
by typing in a new name. Here the default notification in Home mode is now named
‘Send email to Dad’. Click on the Add button.
4 You may change your email address. Enter a new email address if you wish. If you
do not wish to change it, click on the Save button.
5 You can add more email addresses. For example, you have set up your system to
send an email when your children come home after school and you want both
parents to receive an email. To add addresses, click on the Add button. Enter the
additional email addresses.
6 To save, click on the Save button.
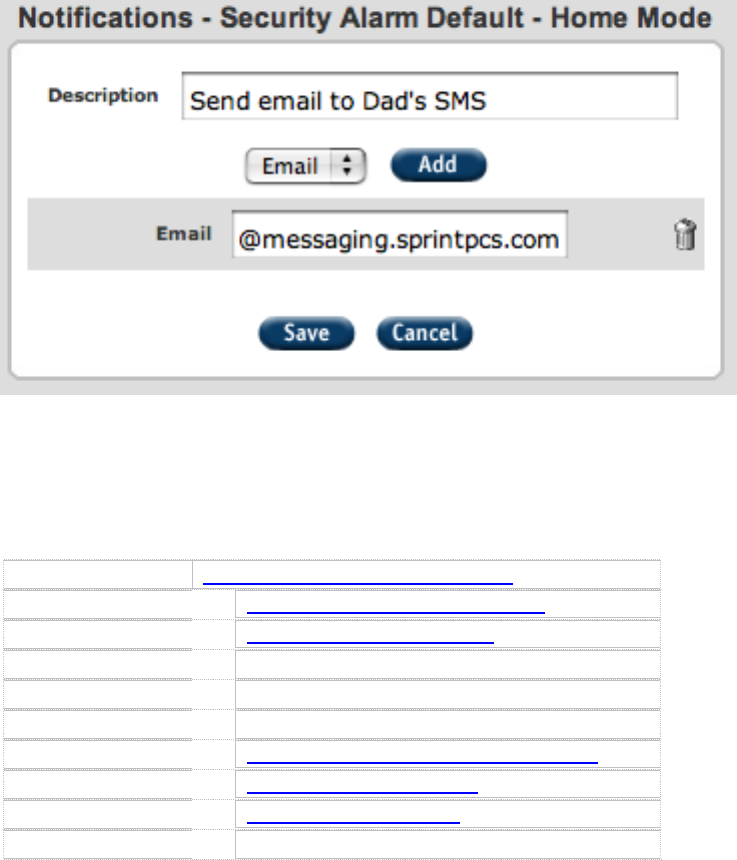
Send your notification to your SMS (Short Messaging Service also called text
messaging) address
You may wish to have your notifications sent to your SMS address on your cellphone or
PDA instead of your email address.
1 Click on the Notifications tab.
2 Choose which mode (Home, Sleep, Away) that you want to edit. Click on the
notification name.
Version 2.2 March 2005 iControl Confidential page 15
3 Rename your notification if you wish. Here we have named it ‘Send email to Dad’s
SMS’.
4 Click on the ‘Add’ button.
5 Enter your SMS address. To receive an iControl notification via SMS, you need to
enter your SMS address in a special way. Here are the formats for representative
carriers:
Telecom carrier
Yourphonenumber@yourcarrier.net or .com
Alltel
1112223333@message.alltel.com
AT&T
1112223333@mobile.att.net
Cingular
1112223333@mobile.mycingular.com
Metro PCS
1112223333#mymetropcs.com
Nextel
1112223333@messaging.nextel.com
Sprint
1112223333@messaging.sprintpcs.com
T-Mobile
1112223333@tmomail.net
Verizon
1112223333@vtext.com
Virgin
1112223333@vmobl.com
Note to reader: These addresses are being revised.
6 Enter your SMS address.
7 To save, click on the Save button.
Set different notifications for different modes
You can set different notifications for different modes. For example, in Home mode, you
may want to send the notifications to your work email address. In Away mode, you may
want emails sent to your personal email address.
To do so, go to the Notification tab and click on the Mode for which you wish to set a
notification.
Version 2.2 March 2005 iControl Confidential page 16
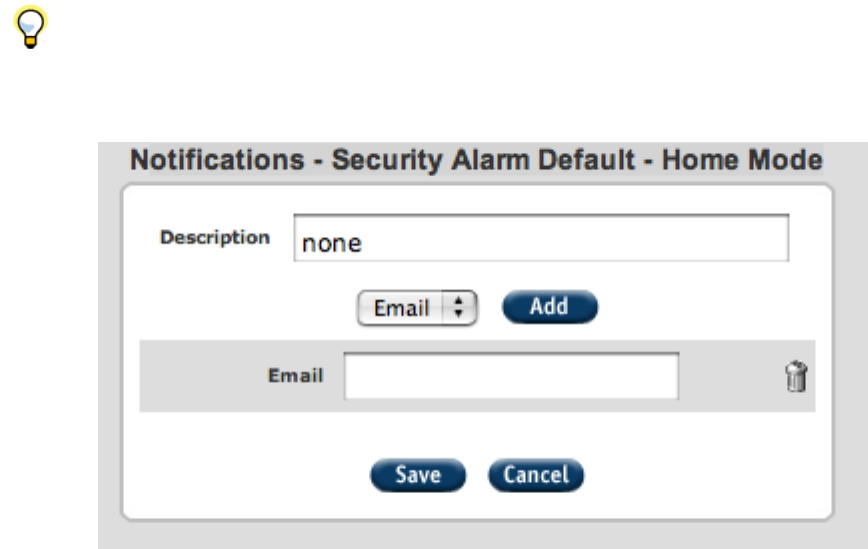
Tip: To delete an existing notification, select the Notification tab, and click on the
mode from which you want to remove notification. Click on the trash can icon and click on
the Save button.
Change or set automation
Automation enables you to program your devices to take an action when another device
recognizes a change. For example, you may want to take a picture when someone enters
your front door while you are away.
In Beta, you can configure two types of automations: the iControl Camera takes a picture
or the Lamp Module turns lights on or off.
To have the camera take a picture based on a device recognizing a change
1 Go to the Summary page, then click on the Automation button.
2 In this example, we want the camera to take a picture when the Hall Motion Sensor
detects a change when we are away. Go to the column ‘Away’ and the row entitled,
‘Hall Motion Sensor’.
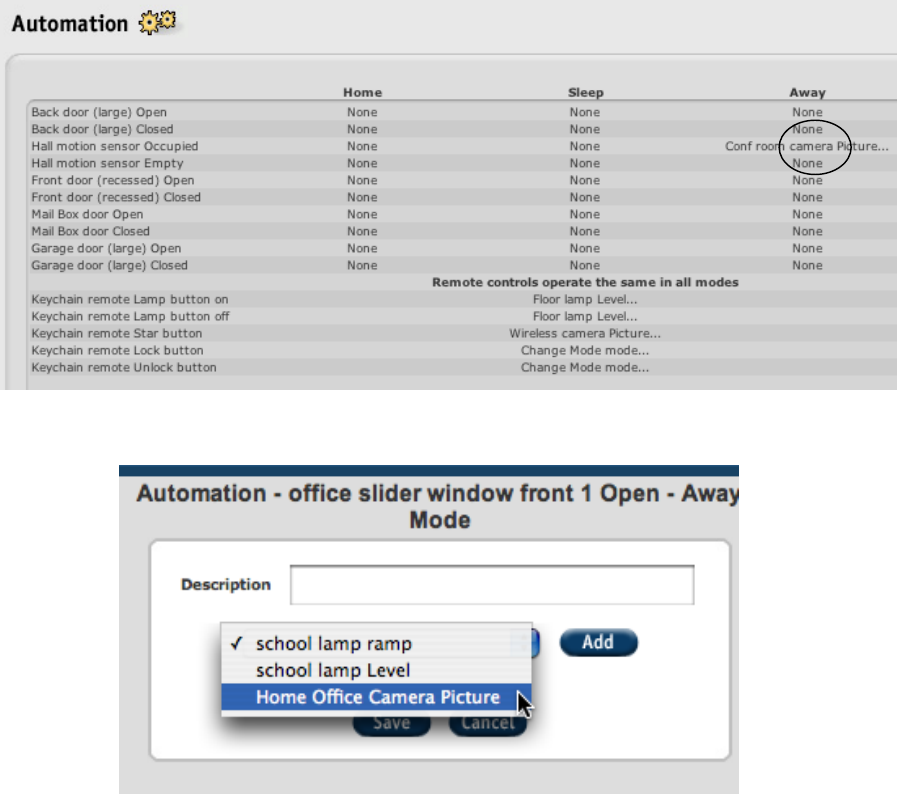
Version 2.2 March 2005 iControl Confidential page 17
3 Choose camera from the drop down menu.
4 Click the Add and Save buttons.
To have the house lights turn on based on a device recognizing a change
You can set lights to come on or off and at different levels when a device recognizes a
change.
1 Go to the Summary page, then to Automation tab.
2 Choose the mode and device. In this example, we want the house lights to come on
when the front door is open while we are away. Go to the column ‘Away’ and the row
entitled, ‘Front Door open’ and click.
3 Choose the action you want to have occur from the drop down menu. Here we chose
Lamp 1 level to turn on the lights.
4 Choose a lamp level from the drop down menu. Lamp levels can be on, off, or some
percent of the lamp’s brightness.
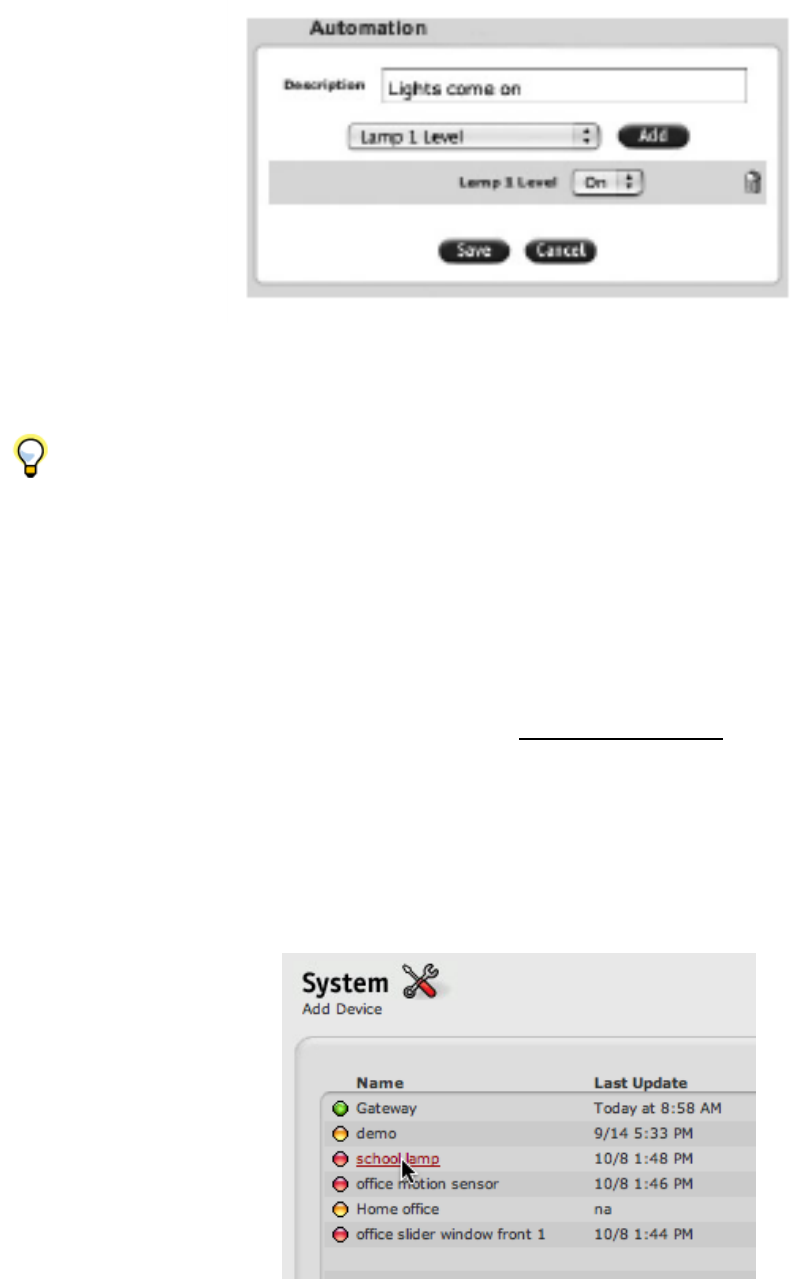
Version 2.2 March 2005 iControl Confidential page 18
5 Click on Add and Save.
Tip: You can have different actions occur in different modes. In this example, the
lights are to come on when the Front Door (large) was opened while the iControl System is
set in Away mode. We did not set the lights to come on in Home mode as the lights would
probably be on as friends and family are around.
Rename a Device
iControl Networks, Inc. adds your device to your system before your Starter Kit is shipped
to you. (If you purchase additional devices after buying your Starter Kit, you will need to
add them to your system. See Chapter 9 Adding Additional Devices for instructions.) You
may wish to rename them in your terms.
To rename your device,
1 Go to the System tab. Click on the name of device you wish to change. In the Name
field, backspace over the old name to delete it and then type in the new name.
2 Click on the Save button.
Version 2.2 March 2005 iControl Confidential page 19
4 Using your Camera
You can use your iControl Wired or Wireless Camera to see pictures (images) or live video
from your location while you are away.
Setting up your camera for pictures
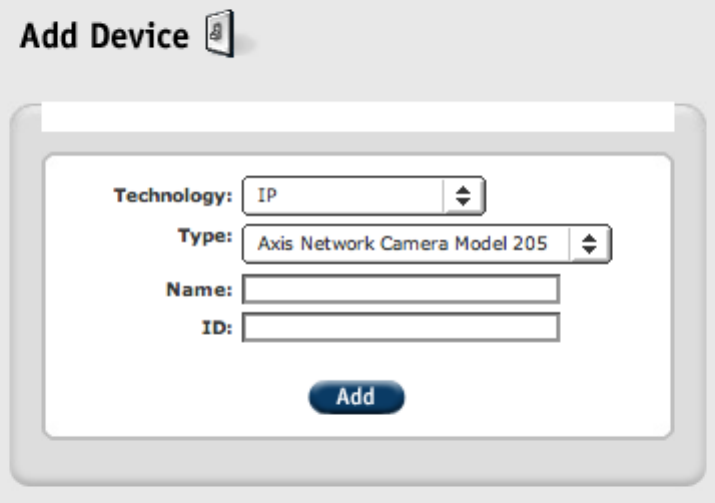
1 Go to the System tab.
2 Navigate to the ‘Add Device’ heading under the tab heading on the left hand side of the
page.
3 At the Add Device screen shown below, first choose the technology and then the type
of technology from the drop down menus. Here we are adding a wired IP camera, so
the technology is IP and the type is an Axis Network Camera Model 205.
4 Create a name for the camera.
5 Enter the serial number from the back of the camera. The number should have the
following 12 character format.
S/N 00408C648CCD
Do not enter the letters ‘S/N’.
6 Click Add. You should now see the new camera in the System device list with a
yellow dot next to it. The yellow dot indicates that it is installing. Wait a few minutes
for the iControl Box to discover and configure the camera. Once the iControl box
completed its communication, the yellow dot will turn green indicating that the
camera is installed and operating. If you do not see a green dot within five mintues,
refer to the Frequently Asked Questions (FAQ) section of this manual for more
assistance.

Version 2.2 March 2005 iControl Confidential page 20
You can now see a thumbnail picture from your camera. Go to your Summary page
and look under Pictures. Click on the thumbnail to see an expanded view. You can
also manually take pictures now by using the QuikControl button. Additionally you can
create automations using the camera. See Chapter 3 in this manual for more details.
Setting up your camera for video
This is an advanced feature of the iControl System. You should be familiar with port
forwarding functionality on home network routers before attempting to implement this
feature. You must first have your camera set up for pictures. To set up for video,
1 Go to the Summary page.
2 Under Pictures, click on the picture thumbnail from the camera for which you want
to enable video. An expanded window will open.
3 Click on menu item, Live Video, shown below. The menu item shown here is inside
of the expanded picture window.
4 You will then see the following dialog box. Record the IP address and port number
shown in the window (Here the IP address is 192.168.1.102 and the port number is
80).
At this point you need to configure your location’s router to enable port forwarding. LEAVE
the window shown above open, as you will need it to finish your work. Go to the next
section.
Version 2.2 March 2005 iControl Confidential page 21
Setting up port forwarding
To set up your camera to show video, you will need to establish port forwarding for your
camera. Port forwarding enables your home router to pass streaming video through so
that it can be accessed from your iControl Summary page.
To set up port forwarding, you will need the router’s user name and password. (Check your
router’s user manual as you may have recorded the password and user name there. Also,
you may have used the default user name and password provided in the user manual.)
Setting port forwarding for Linksys router
Here are the steps for a typical Linksys router. Different models of Linksys routers may
have different screens and you should consult your Linksys user manual for more
information.
1 Select ‘Click here to go to your router’s home page’ from the ‘Camera Not
Accessible’ window.
You will then be presented with the router administration page. Enter your user name and
password.
2 On the administration page, select the tab named Application & Gaming from the
menu bar.

Version 2.2 March 2005 iControl Confidential page 22
3 On the Applications & Gaming page, in table entitled, Port Range, enter the
application name as ‘camera’.
4 Enter the Start port (obtained from the steps in the prior section, Setting up your
camera for video.) in the Start field. In this example it is 80. Enter the end port in
the End field as 80. The Start port and end port are the same in this example.
5 Select the protocol as ‘Both’ in the Protocol field.
6 Enter the IP Address obtained from the steps in the prior section, Setting up your
camera for video, in the IP Address field.
7 Check the check box under the heading, Enable.
Version 2.2 March 2005 iControl Confidential page 23
8 Select the Save Settings button to save your entries.
9 Close your browser window and return to your iControl Summary page. Select the
thumbnail of the camera that you have enabled for video. You will be presented
with an expanded window. Select the menu item, Live Video, from the menu bar at
the top of the window.
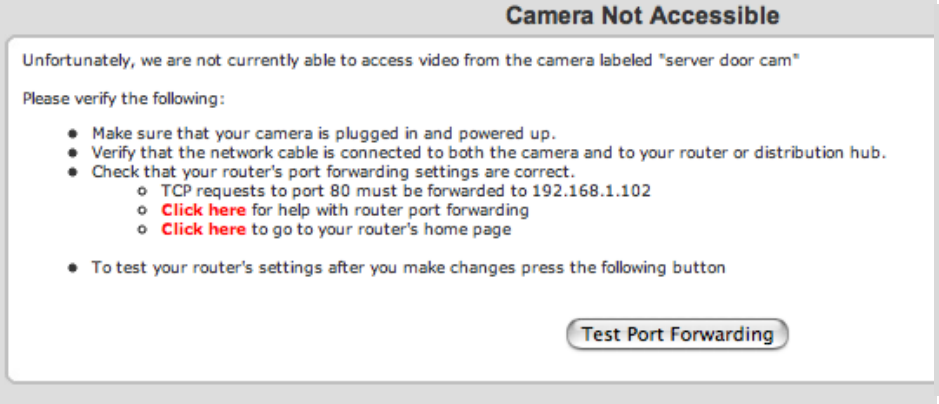
10 At this point you should see live video. If you do not, you will again be presented
with a dialog box entitled, Camera not Accessible. Click on the button, Test port
forwarding, to test your port forwarding work. If it does not test properly, email
beta@incontrol.com.
[Note to reader: In the dialog box, ‘Click here to get help with your router’ is not
available in Beta]
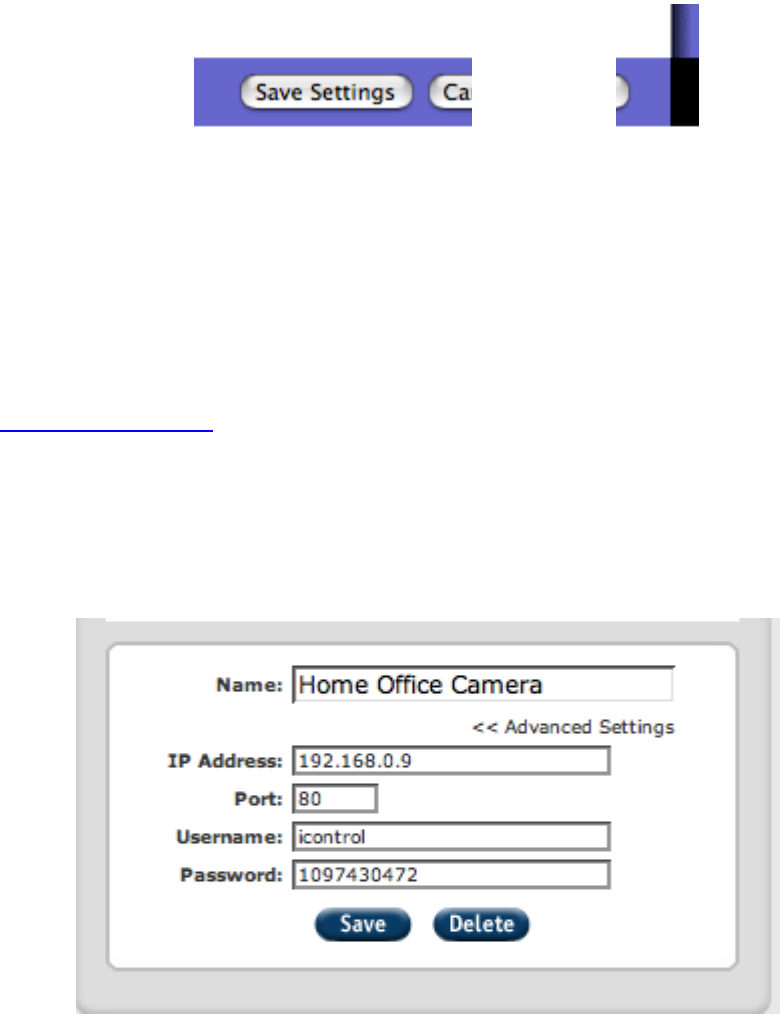
11 If you want to review your settings, navigate to your system tab, select the camera
that you would like to review and click on advanced settings. You should see a
dialog box similar to this:
Version 2.2 March 2005 iControl Confidential page 24
Setting port forwarding for a NetGear router
Here are the steps for a typical NetGear router. Your NetGear router screens may be
different from those shown here and you should consult your NetGear user manual for
more information.
1 Select ‘Click here to go to your router’s home page’ from the ‘Camera Not
Accessible’ window. You will then need your user name and password to access
the administration page.
2 On your adminstration page, there will be an item called port forwarding under
Advanced in the left hand navigation bar that you will select to enter the necessary
information.
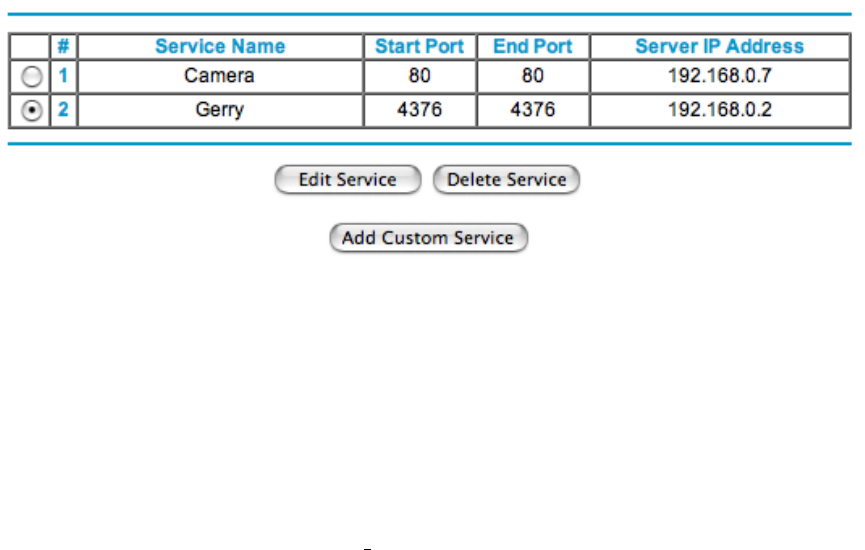
Here is an example of the portion of the setup screen for a NetGear router showing
port forwarding already configured for an iControl camera.
To implement port forwarding,
1 Select the button, Add Custom Service.
2 Create a Service name. In this example the Service name is Camera.
3 Enter the Start port. In this example, it is 80.
4 Enter an End port. In this example, it is 80.
5 Enter the IP address obtained by following the instructions in prior section entitled,
Setting up your camera for live video.
6 Save your changes and close the screen as shown on the router’s port forwarding
setup screen.
7 Close your browser and return to your iControl Summary page. Select the
thumbnail of the camera that you have enabled for video. You will be presented
with an expanded window. Select the menu item, Live Video, from the menu bar at
the top of the window.
8 At this point you should see live video. If you do not, you will be presented with a
dialog box entitled, Camera not Accessible. Click on the button, ‘Test port
forwarding’, to test your port forwarding work. If it does not test properly, repeat the
port forwarding process.

Version 2.2 March 2005 iControl Confidential page 25
Entering the camera password and ID for Internet Explorer
For some versions of Internet Explorer, you may need to enter the camera user name and
password the first time you attempt to view video from within an Internet Explorer browser
page. You will need to enter this information if Internet Explorer presents you the dialog
box shown below when you select the menu item, Live Video, from the expanded picture
thumbnail in your iControl Summary page.
To obtain the iControl Camera user name and password,
1 Go to the System tab
2 Select the Camera from which you want to see live video

Version 2.2 March 2005 iControl Confidential page 26
3 Select the heading, Advanced Settings, from the dialog box shown below
4 Write down the Username and Password shown in the dialog box shown below. In
this example, the Username is icontrol and the Password is 1097430472.
5 Return to the Internet Explorer dialog box and enter the username and password.
Again, the username and password entered here is for the camera. Again, your
iControl System password and user ID is different from this one and is not used
here.

Version 2.2 March 2005 iControl Confidential page 27
6 Check the box, ‘Remember my password’.
7 Click on the button, OK, to close the window.
8 Quit Internet Explorer.
9 Reopen Internet Explorer and log on to www.icontrol.com and navigate to the
Summary page. Click on the picture thumbnail to bring up an expanded view and
then select ‘Live video’.
Setting port forwarding for other routers
There are many routers in use today. The steps for implementing Port Forwarding on D-
Link and Belkin routers may be different but the same tasks need to be accomplished:
• Access your router’s administration page
• Create a service called ‘camera’
• Enter a start and stop or end port
• Enter the IP address obtained earlier (see Step 4 “Setting up your camera for video’
in Chapter 4 of your User Guide)
• Return to your iControl Summary page (see Step 9 under the heading “Setting Up
Port Forwarding’ in Chapter 4 your User Guide).
For support in setting up port forwarding for other routers, please email
support@icontrol.com.
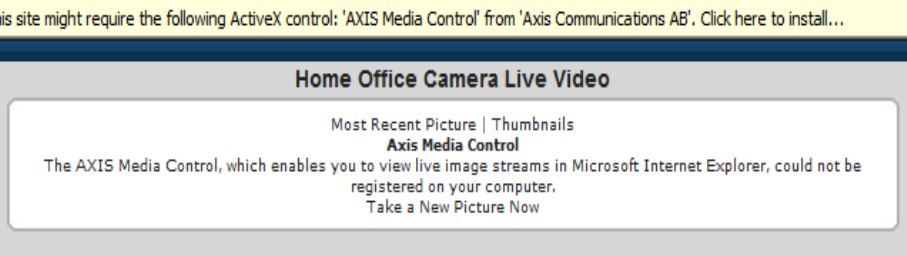
Adding AXIS Media Control ActiveX control for your Camera
If you are presented with the following dialog box, you will need to install an ActiveX
control into your browser so that you can view live video from within an Internet Explorer
page.
icontrol
1097430472
Version 2.2 March 2005 iControl Confidential page 28
To install the necessary ActiveX control entitled, AXIS Media Control, follow the
instructions at the top of the dialog box as shown in this example that begin, “This site
might require the following ActiveX control…” to click and install it.
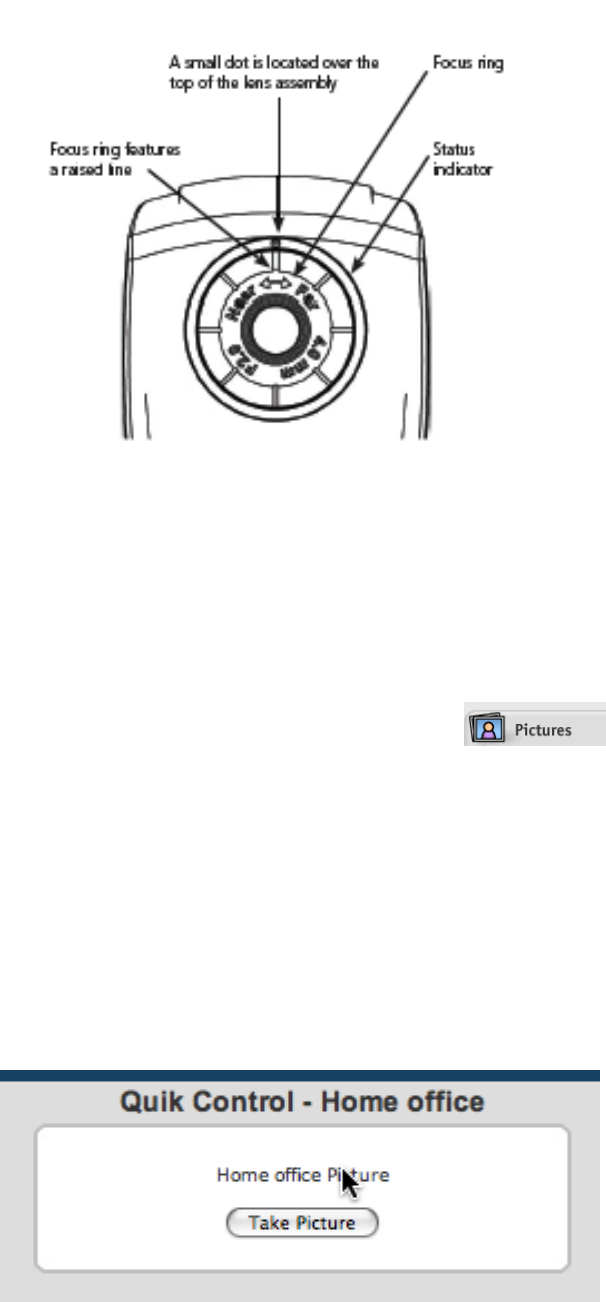
Focusing your camera
If the images on the Summary page or the expanded picture window are unclear, use the
focus ring to adjust the lens.
1 Navigate to the Summary page. Click on the thumbnail of the camera that you want
to focus. You will be presented with an expanded window.
2 Walk to the front of the camera.
3 Adjust the focus ring until the raised line is aligned with the dot above the lens. The
focus ring is a ring encircling the camera lens. The camera may be in focus now.
4 Return to the Summary page, take another picture and see if the focus is
satisfactory.
5 If necessary, adjust the ring again and go to the web site to check again.
Version 2.2 March 2005 iControl Confidential page 29
Seeing pictures from your location
You can see pictures from your camera remotely in one of four ways.
Viewing from the Pictures area on the Summary page
1 Go to the Summary page. Select the thumbnail picture of the camera you want to
view from the Pictures area indicated by the Picture icon.
2 You will be presented with an expanded image.
3 At the bottom of the window, you can select the heading, Take a new picture now.
Viewing by using the QuikControl feature on the Summary page
1 Navigate to the Summary page. Go to QuikControl button in the upper right hand
portion of the page.
2 Click on the button to show a drop down menu. Select the name of the camera, in
this case it is called ‘Home office’ to obtain a picture. A new window will appear as
shown below:
3 Click on Take Picture button.
Version 2.2 March 2005 iControl Confidential page 30
4 You will then be brought back to Summary page where an item ‘Home office
Picture’ will be listed in the Pending Updates window. At the next iControl System
update (the time of which is shown in the Pending updates window), the picture will
be taken.
Viewing from the Details tab
1 Go to the Details tab. On the Details page, you will see a thumbnail from each of
your cameras. Select the one you want to see.
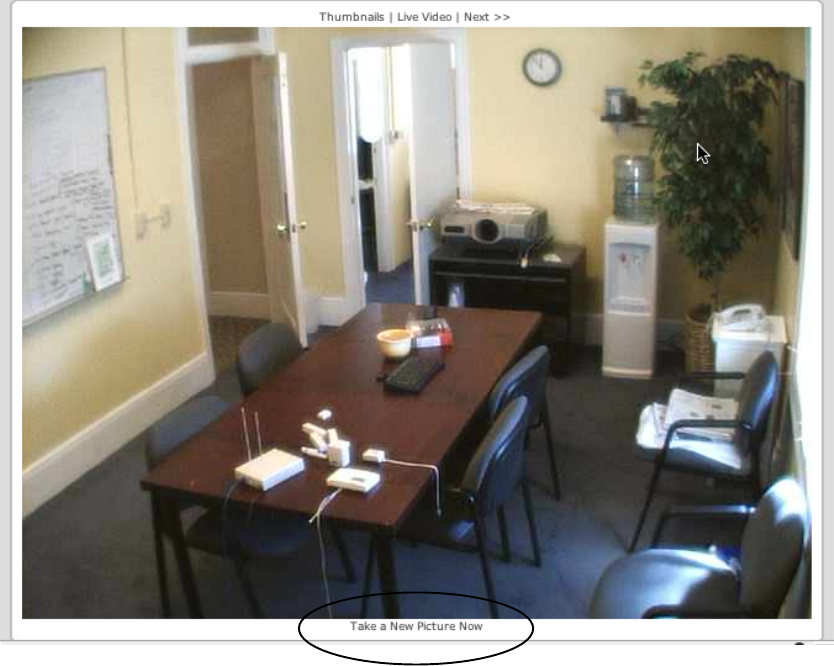
Viewing by using the “Take a picture now” link
This option is only available if you have properly set up port forwarding for a given camera
1 Click on the desired camera's thumbnail picture to expand the image.
2 At the bottom of the window, click on the heading, "Take a picture now"
3 The camera will take a picture and it will be immediately displayed in the open
window.
Version 2.2 March 2005 iControl Confidential page 31
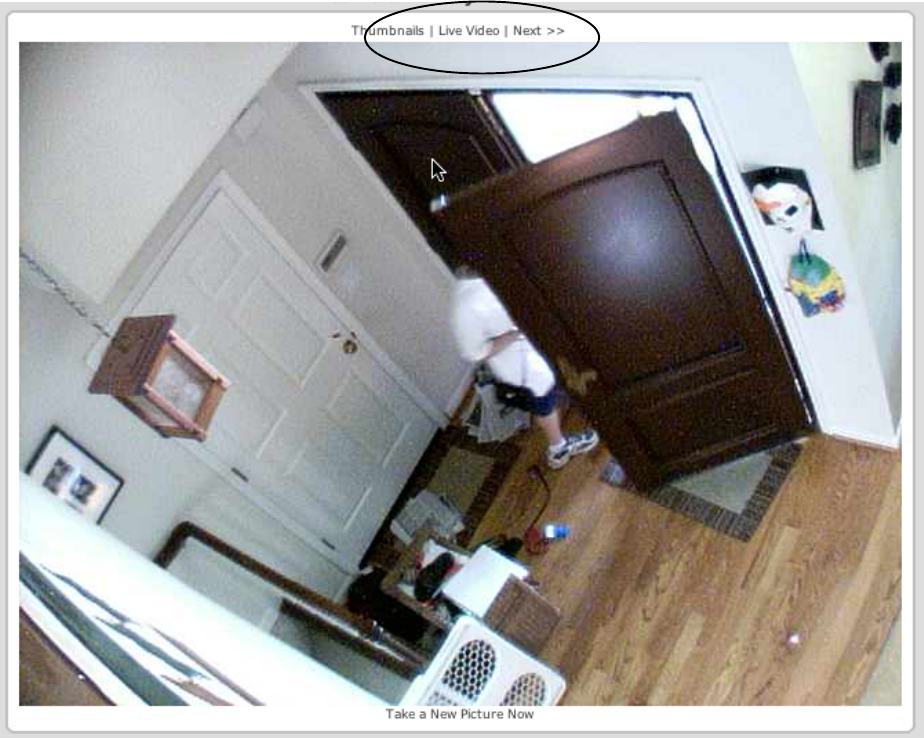
Seeing live video from your location
If you have configured your camera to provide live video from your location, you can see
live video from your location. To do so,
1 Go to the Summary tab.
2 Under the heading, Pictures, click on the picture thumbnail from the camera that
you want to see video. An expanded picture will appear.
3 Click on the heading, Live Video and you will be brought to a screen displaying live
video from your camera. Note, you may need to wait a few moments for the video
to appear.
Screen shot from clicking on a picture in Pictures in Summary Page
Version 2.2 March 2005 iControl Confidential page 32
5 Using your Door/Window Sensor
Once you have installed a Door’/Window Sensor in your house and it appears in your
iControl Summary page, you only have to activate the sensor once to make it operational.
To do so, open and close the door or window once to tell your iControl box whether it is
initially open or closed. You do not need to make any other configuration changes or take
any other set up actions.
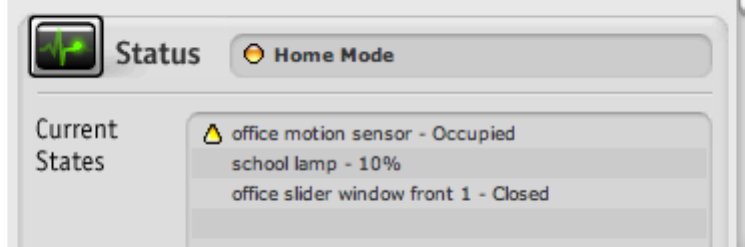
Check on your Door/Window Sensor
The following describes how to see the status of your Door/Window Sensor.
1 Navigate to the Summary page.
2 Go to the Status window. In the image shown below, the Door/Window Sensor is
named ‘office slider window front 1’ and its state is closed. This Door/Window
Sensor recognizes that the office slider window is closed.
Version 2.2 March 2005 iControl Confidential page 33
6 Using your Keychain Remote Control
Through your iControl Keychain Remote Control, you can control selected functionality in
your iControl System. For example, you can click on the Light Button and turn on the
lights as you approach your house. The Keychain Remote has a range of approximately
100 feet (assuming a clear line-of-sight to your iControl box).
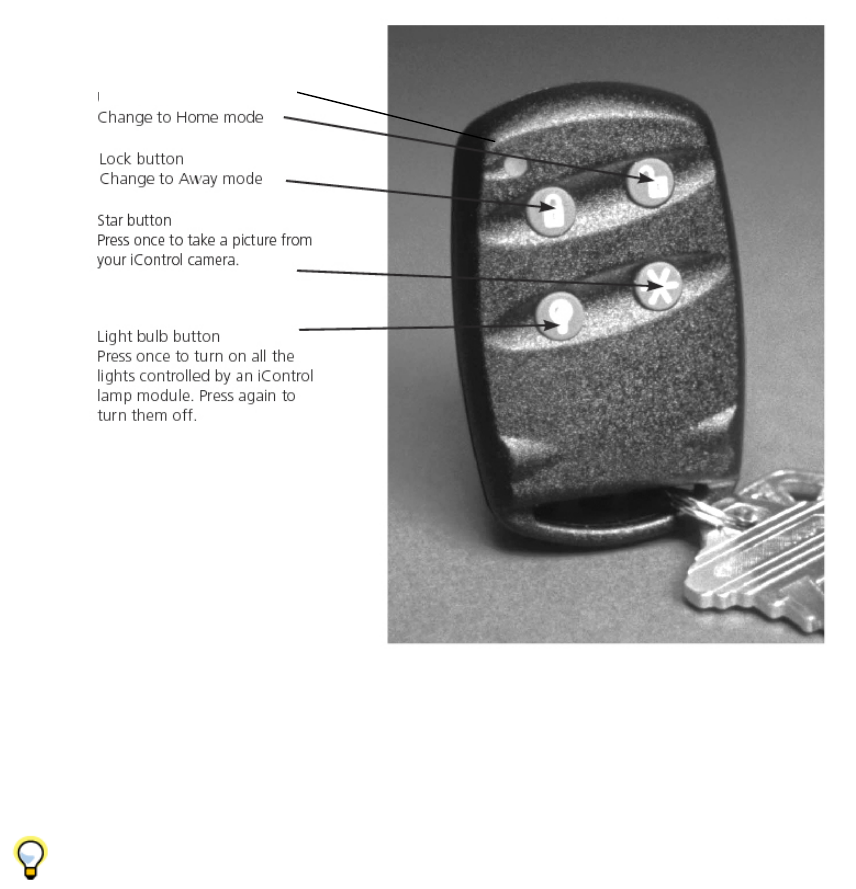
How your Keychain Remote works
The buttons on your Keychain Remote Control are pre-configured with the functionality as
described in the captions shown above.
Tip: when pressing a button on the Keychain Remote Control, it is important to hold
the button down until the Keychain Remote LED (see above diagram) flashes green. In
contrast to a car remote control that activates immediately, the iControl Keychain
Remote Control takes a few moments to communicate with your iControl box the
green light flashes.
Your iControl System page will show that you have a Keychain Remote Control as part of
your system. iControl Networks, Inc. sets up your Keychain Remote as part of your
Keychain Remote LED
Version 2.2 March 2005 iControl Confidential page 34
system before it is shipped to you.
You can purchase additional Keychain Remote Control devices as you may want a device
for each member in the family. To do so, go to the www.icontrol.com website.
Customizing your Keychain Remote Control
You can customize the button preferences on your Keychain Remote. Button preferences
enable you to choose which actions your Keychain Remote Control buttons invoke. You
may want to take a picture, turn on a light, or change the iControl box’s mode to sleep
when you leave your location.
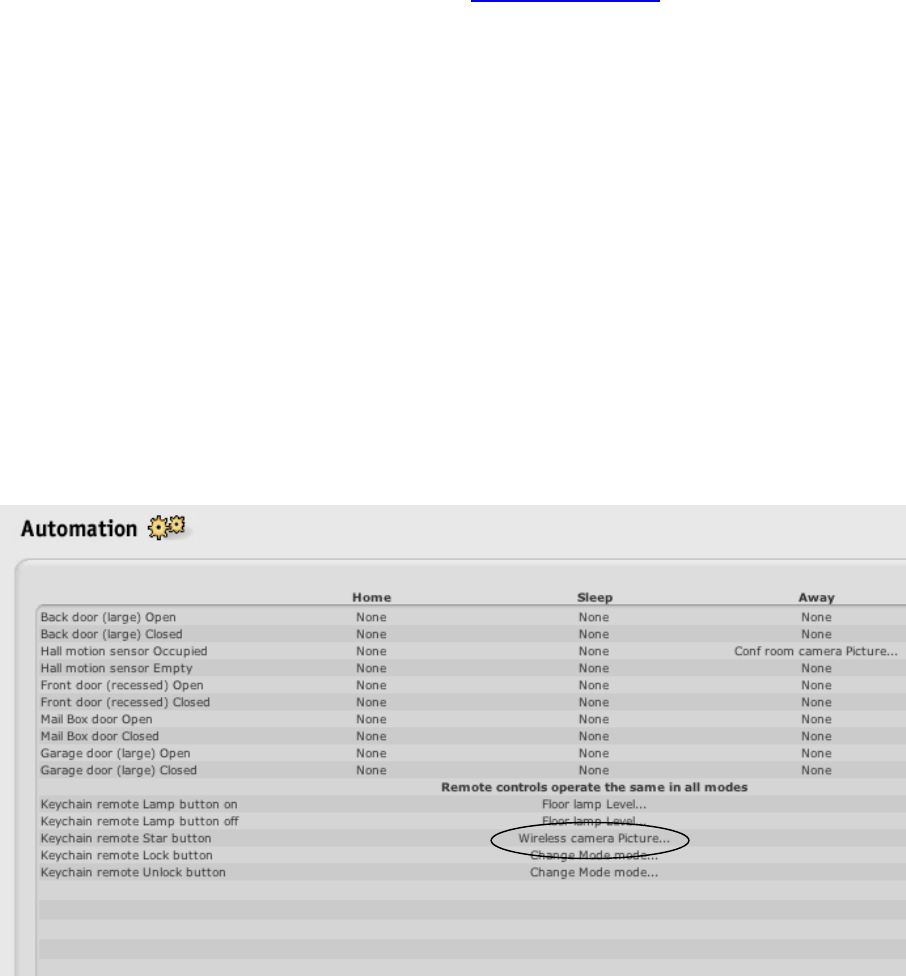
Modifying the actions for your keychain remote control buttons
Let’s say we have a Keychain named ‘Keychain Remote’ and when Mom presses the Star
button, we want the house camera to take a picture. Instead, she wants the Start button to
change the system mode to Sleep.
1 From the Summary page.
2 Click on the Automation tab. Scroll down to ‘Keychain Remote Star’. Go to the
‘Sleep’ column.
3 Click on the value in that column, in this example, ‘None’.
4 Click on the drop down menu and choose ’Change Mode’.
5 Select the Add button.
6 Select the desired mode in the newly added line.
7 Click the Save button.

Version 2.2 March 2005 iControl Confidential page 35
Tip: Your Keychain Remote works the same across all modes, Home, Sleep and
Away.
Customizing your Light Button
You can set the light brightness with your Light button (the button with the light bulb on it).
So for example, when you press the Light button, not only will the lights in your house
controlled by a Lamp Module turn on but they will turn on to pre-set brightness.
Let’s add this functionality to ‘Mom Keychain’.
1 Go to the Automation tab.
2 At the Security Automation window, go to the column labeled ‘Sleep’ and the row
entitled, Mom Keychain Remote Lamp button on. Click on the word ‘none’.
3 Choose Lamp 1 level from the drop down menu. Click Add.
4 Click next to ‘Lamp 1’ level, the ‘on or off’ button. Choose a lighting level. Enter a
phrase in the Description field that describes how you configured the button such as
“Turn on house lights”.
5 Click on the Save button to save your changes.
Tip: You can set any button on a Keychain remote control to perform any available
action (turn on lights for example). We have presented some of the alternatives for you in
this manual.

Version 2.2 March 2005 iControl Confidential page 36
7 Using your Lamp Module
Set the brightness level
You can set the brightness of the lights that are controlled by a Lamp module. To do so,
1 Go to the Summary page.
2 Click on the QuikControl button on the blue menu bar.
3 Click in the Brightness field to show a drop down menu. Choose a brightness level
such as 100%. This means the light will be as bright as it can be. Click on the
button labeled ‘Set’.
4 The change in brightness level will now be displayed in the Pending window and
your iControl System will update the lamp at the time shown in the Pending window.
Tip: The Lamp Module can only control lights using 40w to 300w incandescent light
bulbs. It cannot control other types of bulbs such as florescent lights. Also, it is not
recommended for 3 way lights or lights controlled by 3 way wall switches.
Control your Lamp Module
The Lamp Module can be turned on and off in one of three ways:
1 Press the Light button on your Keychain Remote once to turn any light s controlled
by the Lamp Module on or off. If the light is on, pressing the Light button twice
quickly will turn it off. Likewise, if it is off, pressing the button once will turn it on.
2 Using QuikControl. Go to your Summary page and click on the QuikControl button.
One of the items in the drop down menu will be your Lamp Module. Select the
Lamp module to open its control dialog box. Select the brightness level you want
and click the Set button. In a few minutes, the iControl box will talk to the Lamp
module via iControl’s servers. Then the Lamp Module will turn on to the selected
brightness level.
3 If you have added turning lights on or off to an automation such as turning on the
lights if a Motion Sensor recognizes a person entering the Sensor’s monitored area.
To set up automation, go to Chapter 3 under Change or set automation.
See the status of your Lamp Module
1 Go to the Summary page. In the Status window, look for your Lamp module. Scroll
down if necessary to see it listed.
2 The lamp’s brightness level will be displayed.
Version 2.2 March 2005 iControl Confidential page 37
8 Using your Motion Sensor
See the status of your Motion Sensor
To see the status of your Motion Sensor,
1 Go to the Summary page. In the Status window, look for the name you gave your
Motion Sensor. Scroll down if necessary to see it listed. A yellow triangle next to
the name of the Motion Sensor indicates that it has recognized a change such as a
person entering the room See Chapter 1 Getting Started for more information.
Occupied and Empty states
The term ‘Occupied’ means that the Motion Sensor has detected a person moving in the
area that it monitors over 40 pounds in weight. The term ‘Empty’ means that the Motion
Sensor has not detected a person moving into the area it monitors for several minutes.
If a person enters a monitored area, the Motion Sensor immediately recognizes the
change and reports that the area is occupied through your iControl box which in turn
displays the information on your Summary page.
If a person leaves the monitored area, the Motion Sensor ‘waits’ a few minutes before
reporting that the area is empty. This delay is to allow the Motion Sensor to confirm that
the person has left the room. The yellow triangle status icon disappears when the status
changes to ‘empty’.

Version 2.2 March 2005 iControl Confidential page 38
9 Adding Additional Devices
This chapter describes how to add additional devices to your iControl System. The basic
steps are shown below:
1 Write down the serial number, sometimes identified as a DL or S/N number or ID
number, of your device. Here are examples for the devices available in the Starter
Kit to help you confirm that you are recording the appropriate serial number:
Device
Total count of numbers and
letters in the serial number
Sample serial or ID
number
IControl box
12
006035019f62
Lamp module
12
120013752100
Camera
12
00408c6675d2
Motion Sensor
6
2a34c1
Door Window Sensor
6
0d5aa8
Keychain Remote
6
AA64DC
Thermostat
5
BD7DE
Tip: Letters can be entered in upper or lower case.
2 Navigate to the System page
3 Select the Add Device heading
Version 2.2 March 2005 iControl Confidential page 39
4 Choose the technology, then the type from the drop down menu. For this Starter
Kit, here is the list of devices and associated technologies:
Device
Technology
Type
Camera - Wired
IP
Camera – Wired – Model Axis 205
Camera – Wireless
IP
Camera – Wireless – Model Axis 206
Door/Window
Sensor
GE Security
Door/Window Sensor – Micro - Model
60-688-95
Keychain Remote
GE Security
Keychain Remote Control 4-Button -
Model 60-659-95R
Lamp Module
LonWorks
Powerline
Lamp Module – Model 6101-0000
Motion Sensor
GE Security
Motion Sensor Model 60- 807-95R
Thermostat
GE Security
Thermostat – Model 60-909-95
5 You can give the device a name such as hallway light, back door light, office
camera, Dad’s keychain remote, or hallway watcher for a motion sensor.
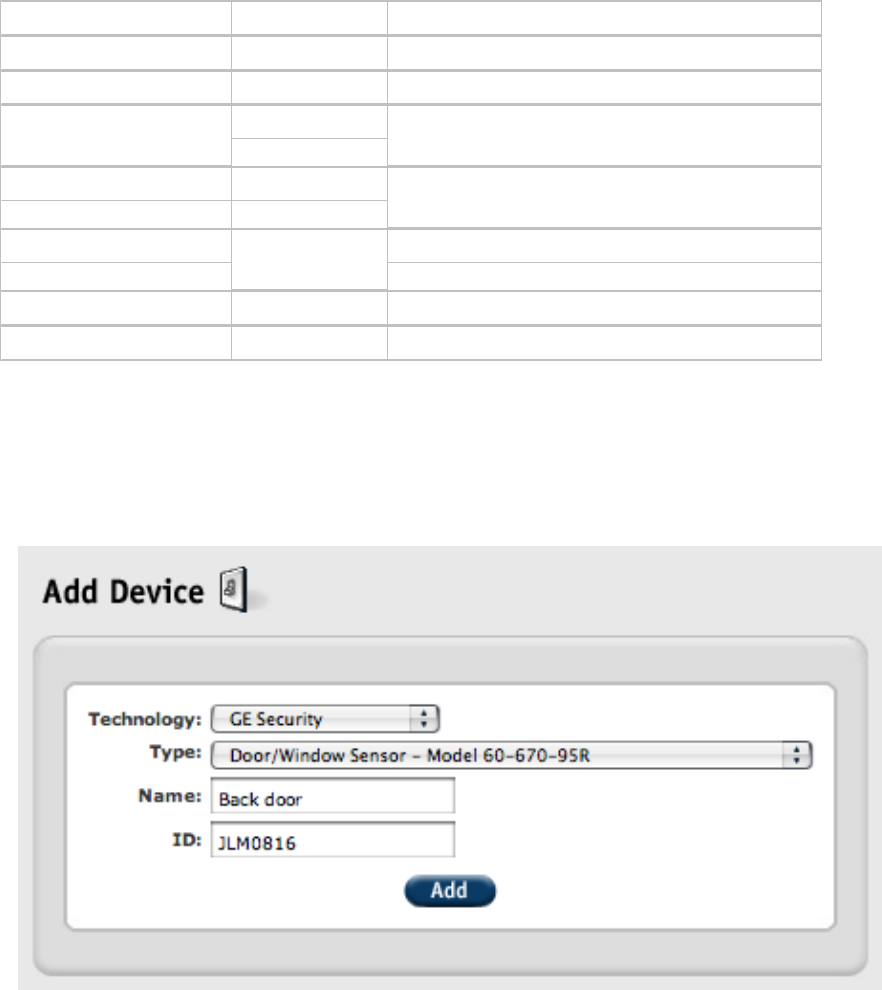
6 Enter the identifier in the ID field. Here is an example of adding a Door/Window
Sensor
7 Click on the Add button to add the device to your iControl System
8 You will receive a confirmation in the Status screen that you have successfully
added the device.
9 You will be returned to the System page where you will see the new device.
Version 2.2 March 2005 iControl Confidential page 40
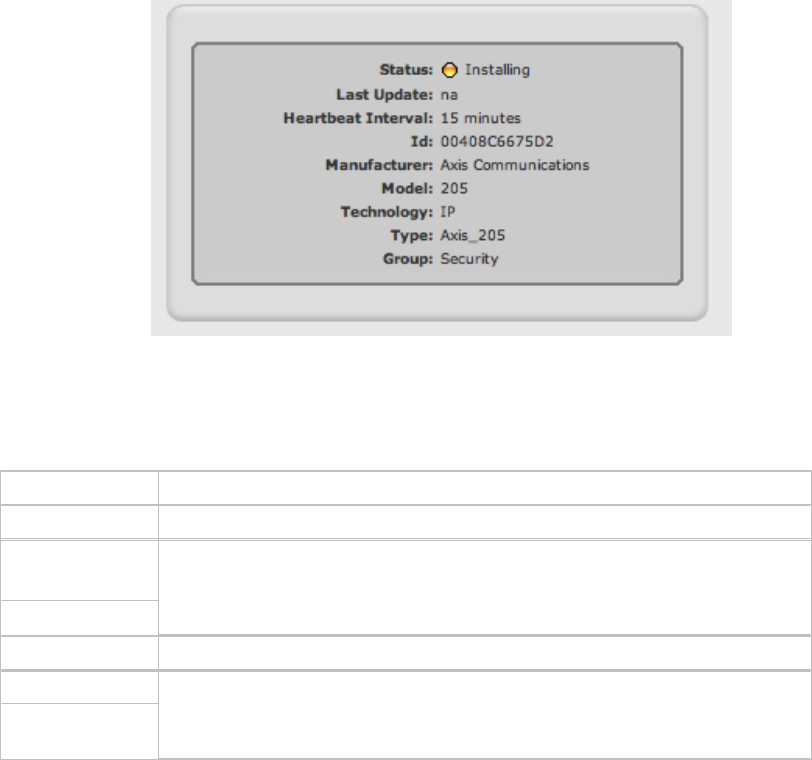
A yellow circle will be adjacent to the device name indicating that the system is still
installing that device. You can obtain additional information about any device by
clicking on its name. If you click on the screen , you will see a similar table to that
shown below. Here is an example of a camera is being installed.
Description of the colored icons
Besides the yellow circle, you will see other colored icons next to each device listed in on
the System page. Here is a definition of what each icon means.
Colored icon
Status
Green circle
Device working and no changes recognized
Yellow
triangle
Any of these states: Device working and recognized a
change; Device undergoing installation; Device status
unknown because the iControl box is disconnected.
Red circle
Device off line
Yellow circle
iControl box installing a device. Only seen on when you
click on System and then on a device listed on that page
that has a yellow circle.
Version 2.2 March 2005 iControl Confidential page 41
To Delete a device
To delete a device, follow these steps:
1 Navigate to the System tab.
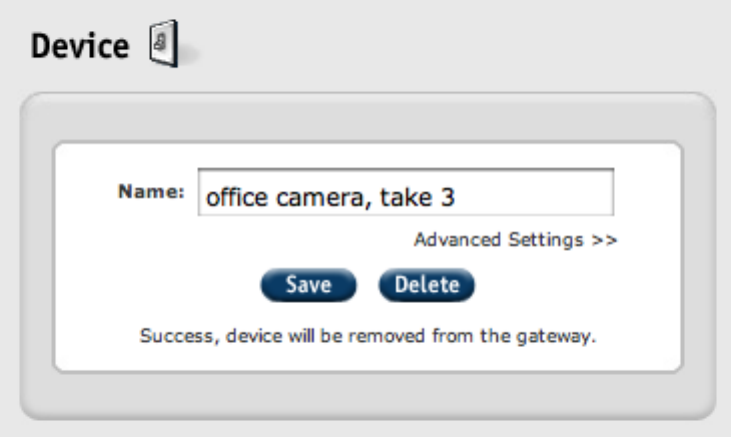
2 Choose a device by clicking on the name of the device that you wish to delete.
3 The following window will appear. Click on the delete button. If you successfully
delete the device, the message ‘Success, device will be removed from iControl box.’
will appear in the window.
Version 2.2 March 2005 iControl Confidential page 42
10 Frequently Asked Questions
Camera
How do I reset my camera?
If for some reason you need to reset your camera, follow these steps:
1 Disconnect the power cord from your camera
2 Press and HOLD the control button (a little black pin) next to the network indicator
on the back of the camera. Reconnect the power cord while holding the black pin
down
3 When the Status light turns yellow (within 5 to 10 seconds), release the button
4 When the Status light turns green, the camera is reset to the factory settings. The
status light may take up to 1 minute to turn green.
What is the camera’s resolution?
It has three different resolutions: 640x480, 320x240, 160x120. In Beta, all pictures are
taken at 640x480 and all video is presented at 320x240.
What is the camera’s frame rate?
Up to 30 frames per second
My picture is fuzzy. What do I do?
See Chapter 4 on how to install your camera for details on focusing your camera.
Will port forwarding let viruses into my network?
No.
Will other people be able to see what my camera sees?
No. They will not have the unique IP address, user ID, and password to access your
camera.
Why don’t I plug my iControl Camera into my iControl box?
Your camera is an IP device and can talk to the iControl network over the Internet on its
own.
Where are the pictures and video from the iControl Camera stored?
The pictures are stored on the iControl network servers. The video is not stored but is
delivered directly from the camera to your iControl Summary page.
Does iControl save my video?
No.
Can iControl spy via my camera?
iControl has strict security and privacy policies to prevent the potential for spying via your
camera.
Version 2.2 March 2005 iControl Confidential page 43
Will the Camera use an Ethernet port on my router?
Yes. It will require a physical port on your router. If you have a four port router, it will use
one of the four ports.
Keychain Remote Control
What are the default buttons?
Unlock Button: Change to Home mode
Lock Button: Change to Away mode
Light Button: Press once to turn on all the lights controlled by a lamp module.
Press again to turn them off.
Star Button: Take a picture
Motion Sensor
How do I test my motion sensor?
1 Remove sensor from mounting plate, then reattach. You have 60 seconds
2 Walk across room and wait for sensor light to turn on
3 Stop, stand still and wait for sensor light to turn off.
4 Repeat Steps 2 & 3 until entire area has been tested
5 Leave the room for at least 60 seconds. After 60 seconds without motion, walk test
mode time expires and the light on the sensor no longer activates when motion is
detected.
Will the Motion Sensor sense my pets?
No for pets less than 40 pounds. This also means that it will not sense children less than
40 pounds.
Version 2.2 March 2005 iControl Confidential page 44
11 Terms and Conditions, Warranty Information, and
More
This chapter is in development
iControl Privacy policy
The written policy will be available when the product is shipping and will be provided in this
section as well as on the website where the customer can see access it during the
purchase process.
FCC Compliance
NOTE: This equipment has been tested and found to comply with the limits for a Class
B digital device, pursuant to Part 15 of the FCC Rules. These limits are designed to
provide reasonable protection against harmful interference in a residential installation.
This equipment generates, uses, and can radiate radio frequency energy and, if not
installed and used in accordance with the instructions, may cause harmful interference
to radio communications. However, there is no guarantee that interference will not
occur in a particular installation. If this equipment does cause harmful interference to
radio or television reception, which can be determined by turning the equipment off and
on, the user is encouraged to try and correct the interference by one or more of the
following measures:
• Reorient or locate the receiving antenna.
• Increase the separation between the equipment and receiver.
Connect the equipment into an outlet on a circuit different from that towhich the receiver is connected.
• Consult the dealer or an experienced radio/TV technician for help.
Modifications made to the iControl Gateway, Keychain Remote, IP Camera, Motion
Sensor, Door Window Sensors and associated sensors unless expressly approved by
iControl, could void the user’s authority to operate the equipment.
The term “IC:” before the radio certification number only signifies that Industry Canada
technical specifications were met.
Version 2.2 March 2005 iControl Confidential page 45
Appendix A Battery Maintenance
iControl box
No battery maintenance is required as it does not contain a battery.
iControl Wired Camera
No battery maintenance is required as it does not contain a battery.
iControl Door/Window Sensor
The Sensor (the larger module of the two—sensor and magnet) requires a 3 VDC battery
and is designed for long battery life. To change the battery, follow these steps:
1 Remove the cover from the base plate by using a pen knife or similar tool to pry
them apart.
2 Slide out the battery and replace it with a new one.
iControl Lamp Module
No battery maintenance is required as it does not contain a battery.
iControl Motion Sensor
The motion sensor uses 2 AA batteries and is designed for long battery life. To change
the battery, follow these steps:
1 Open the Motion Sensor via the sensor body button and pull the sensor body away
from the mounting plate. Most of the motion sensor is now removed from the
mounting plate.
2 Press the tabs at the top and bottom locations and pull the sensor face plate off of
the sensor’s body.
3 Replace the batteries.
4 Replace the sensor body and face plate.
5 Go to the System tab to see if it shows the device.
iControl Keychain Remote
Your iControl Keychain Remote battery is designed to last several years. However if you
need to change the battery, follow these steps:
1 Turn over your Keychain Remote. Remove the screw on the back and then the back
cover.
2 Insert a 12 volt alkaline battery. Match the ‘+’ and ‘-‘ markings on the inside of the
battery compartment to the battery.
3 Reattach the cover.
4 Test the Keychain Remote.
Note: Please dispose of your battery in accordance to local regulations.