iControl Networks IHUB3000H Home Monitoring Gateway User Manual Manual
iControl Networks Inc. Home Monitoring Gateway Manual
Users Manual
Copyright ©2007 iControl Networks, Inc.All rights reserved.
No reproduction in whole or in part without prior written approval. iControl
Networks, iControl, and iControl logo design are pending trademarks of iControl
Networks. All other trademarks are the property of their respective owners.
Information contained herein is subject to change without notice. The only
warranties for iControl products and services are set forth in the express
warranty statements accompanying such products and services. Nothing herein
should be construed as constituting an additional warranty. iControl Networks
shall not be liable for technical or editorial errors or omissions contained herein.
All rights reserved.
Document ID:13004.02.026
Printed Documentation
Table Of Contents
Your iControl Personal Web Portal Explained ....................................................11
Tabs and Windows..........................................................................................12
Summary tab...................................................................................................12
Status window..............................................................................................12
Pictures window...........................................................................................14
Alarm History window ..................................................................................15
Today’s Schedule window ...........................................................................16
Notifications tab...............................................................................................16
Automations tab ..............................................................................................16
Schedules tab..................................................................................................17
System tab ......................................................................................................17
Changing Modes.................................................................................................19
Updates Button ...................................................................................................21
History.................................................................................................................23
Your iControl Devices .........................................................................................25
Your iControl Box ............................................................................................25
Your iControl Box.........................................................................................25
Your iControl Box.........................................................................................25
Your Camera...................................................................................................26
Your Camera ...............................................................................................26
Your Camera ...............................................................................................27
Setting Up the Camera(s) That Came with Your Starter Kit.........................27
Adding an Additional Camera to Your System.............................................28
Editing Your Camera's Settings ...................................................................29
Taking Pictures Manually.............................................................................31
Taking Pictures as Part of an Automation, Notification, or Schedule...........33
Sending Pictures..........................................................................................33
Deleting Pictures..........................................................................................35
Focusing Your Camera................................................................................35
Managing Pictures .......................................................................................39
About Your Wireless Settings ......................................................................41
Your Carbon Monoxide Detector.....................................................................43
Installing Your Carbon Monoxide Detector ..................................................43
Using Your Carbon Monoxide Detector .......................................................46
Your Door/Window Sensor..............................................................................46
Installing your Door/Window Sensor............................................................47
Checking Installation of Your Door/Window Sensor ....................................48
Using Your Door/Window Sensor ................................................................49
Your Freeze Sensor ........................................................................................50
Mounting Your Freeze Sensor .....................................................................50
Your Keychain Remote ...................................................................................51
Your Keychain Remote................................................................................51
Your Keychain Remote................................................................................52
Modifying The Actions of Your Keychain Remote Buttons...........................53
Table Of Contents
Your Lamp Module ..........................................................................................56
Your Lamp Module ......................................................................................56
Your Lamp Module ......................................................................................57
Installing Your Lamp Module .......................................................................58
Physical Installation of Your Lamp Module ..................................................61
Setting the Brightness of Lighting ................................................................62
Adding Your Keychain Remote....................................................................63
Your Motion Sensor.........................................................................................66
Your Motion Sensor .....................................................................................66
Your Motion Sensor .....................................................................................66
Mounting your Motion Sensor ......................................................................66
Using Your Motion Sensor...........................................................................69
Your Panic Pendant ........................................................................................70
Your Panic Pendant.....................................................................................70
Your Panic Pendant.....................................................................................71
Your Smoke/Heat Sensor................................................................................71
Your Smoke/Heat Sensor ............................................................................71
Your Smoke/Heat Sensor ............................................................................72
Managing Your iControl Devices.........................................................................73
Renaming Devices ..........................................................................................73
Deleting a Device ............................................................................................74
Automations........................................................................................................77
Automations ....................................................................................................77
Sample Automations Window ......................................................................77
Automations ....................................................................................................78
Sample Automations Window ......................................................................78
Adding and Editing Automations .....................................................................80
Common Tasks...................................................................................................91
Commonly Used Terms...................................................................................91
Turn Up the Heat in the AM, Down During the Day, Up in the Evening...........91
Send Me a Notification When the Panic Pendant Goes Off ............................94
Managing Your System from a Mobile Device ....................................................95
Logging In .......................................................................................................95
The Change Mode Screen ..............................................................................96
The Pictures Screen........................................................................................97
Change Premise Screen .................................................................................99
Frequently Asked Questions.............................................................................101
The iControl Gateway....................................................................................102
Can I plug the iControl box into an uninterruptible power supply or a surge
protector?...................................................................................................102
What if the iControl box Power light does not turn on? ..............................103
What if I do not have a router or similar device?........................................103
What is the phone jack for? .......................................................................103
When do the LEDs blink? ..........................................................................103
The iControl System......................................................................................103
What Kind of Broadband do I need?..........................................................103
Printed Documentation
When I tried using QuikControl why didnt anything happen? ....................103
How can I tell my iControl box is communicating with the iControl servers?
...................................................................................................................104
What do I do if I cant see the device I just installed? .................................104
What should I do if my device just seems to keep installing the dot is still
yellow?.......................................................................................................104
Notifications...................................................................................................105
Camera .........................................................................................................105
What do I need for my wireless Camera to work? .....................................105
My Camera is out of focus. What do I do?.................................................105
What if my camera hasnt been discovered and has a yellow dot next to it?
...................................................................................................................105
What do I do if I cant see any images or video from the camera I just
installed? ...................................................................................................105
How do I use WEP (Wireless Equivalent Privacy) on my Wireless camera?
...................................................................................................................106
What is the cameras resolution?................................................................106
Door/Window Sensor ....................................................................................106
What should I do if my Door/Window sensor has a red dot next to it on the
System page of my iControl Portal? ..........................................................106
Why does my Door/Window sensor always report itself as open?.............106
How far away can I install my iControl Door/Window sensor from the iControl
box?...........................................................................................................107
Keychain Remote ..........................................................................................107
What are the default actions of the buttons? .............................................107
The Keychain Remote is doing something it is not supposed to do. What
should I do? ...............................................................................................107
My Keychain Remote isnt doing anything. I press buttons repeatedly.......107
Why doesnt my Keychain Remote lamp button doesnt turn the lamp on or
off?.............................................................................................................107
I used the Keychain Remote and the light level is different now. Why?.....108
If I buy another Lamp module, can my Keychain Remote control it? .........108
Powerline Lamp Module................................................................................108
My lamp module isnt installing, what should I do? .....................................108
What kinds of lights can I use the Lamp module with? ..............................108
Can I use it on a lamp wired into a 3-way or 4-way wall switch? ...............109
Can I use a 3-way light? ............................................................................109
Can I plug a Lamp module into an uninterruptible power supply (UPS)?...109
Can I plug a Lamp module into a power strip with a surge protector or into a
surge protector?.........................................................................................109
How far away can I install a Lamp module from the iControl box? ............109
What does the black button on the bottom of the Lamp module do? .........109
Motion Sensor ...............................................................................................109
How do I test that a Motion Sensor is covering the area I hope it does
monitor?.....................................................................................................109
Table Of Contents
Why doesnt the motion sensor detect when I leave the room and come
back? .........................................................................................................110
Will the Motion Sensor sense my pets?.....................................................110
Why is there nothing in the picture that was taken as a result of the motion
detector being activated?...........................................................................110
How far away can I install my iControl Motion sensor from the iControl box?
...................................................................................................................110
Thermostat ....................................................................................................110
What type of system will the iControl thermostat work with? .....................110
Index .................................................................................................................113
Your iControl Personal Web Portal
Explained
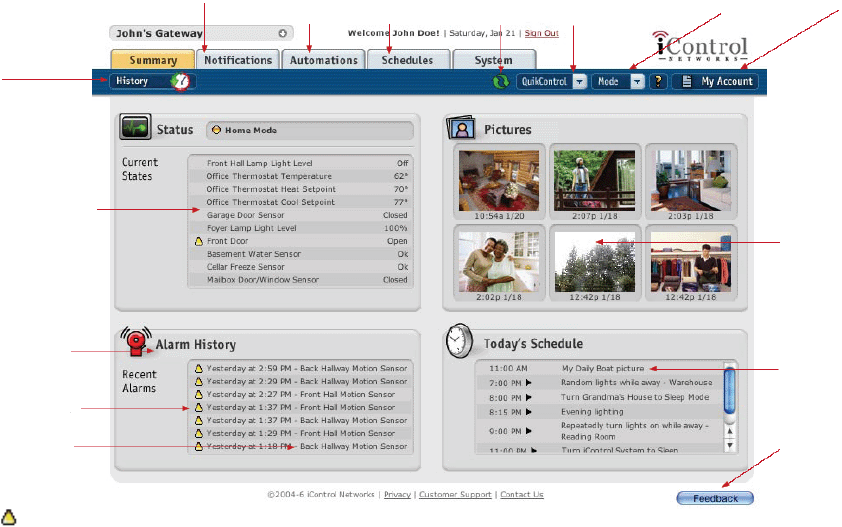
After you log in to your iControl System, the first page you will see of your personal web
portal is the iControl Summary page. This is where you begin using your iControl
System. This webpage is divided into four major windows: Status, Pictures, Alarm
History, and Today’s Schedule. The Status window shows you the current state of your
devices and System. The Pictures window displays recent pictures. The Alarm History
window shows the recent changes in devices, and the Today’s Schedule window shows
you the schedules that will run today. By selecting the tabs at the top of the page
(Summary, Notifications, Automations, Schedules, and System), you can access the rich
functionality of the System. The following is an example of the iControl Summary page.
Printed Documentation
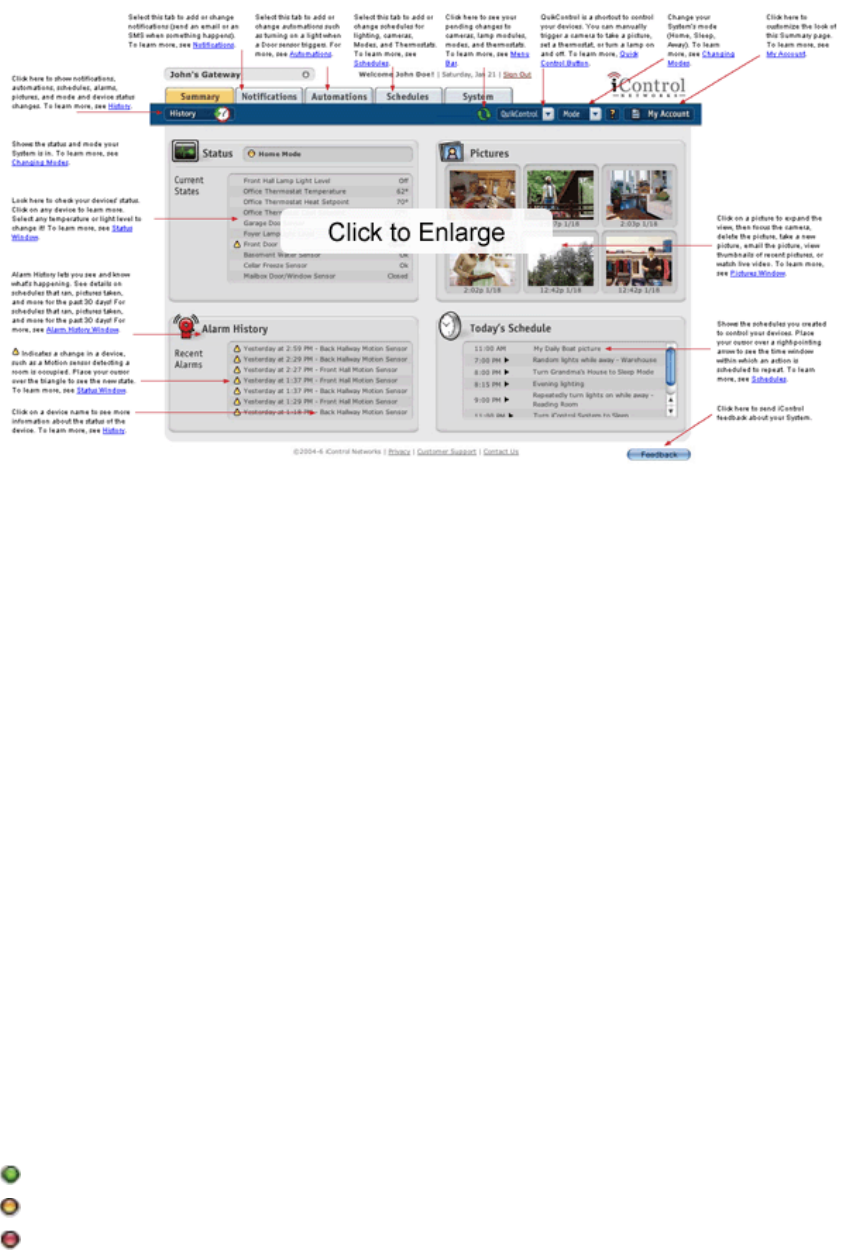
The interface of the iControl Summary page includes five tabs (Summary, Notifications,
Automations, Schedules, and System) and a menu bar with six buttons (History, Update
(green arrows), QuikControl, Mode, Help, and My Account).
Tabs and Windows
The tabs displayed on the iControl Summary page open a series of windows.
Summary tab
The Summary tab consists of the following windows:
Status window
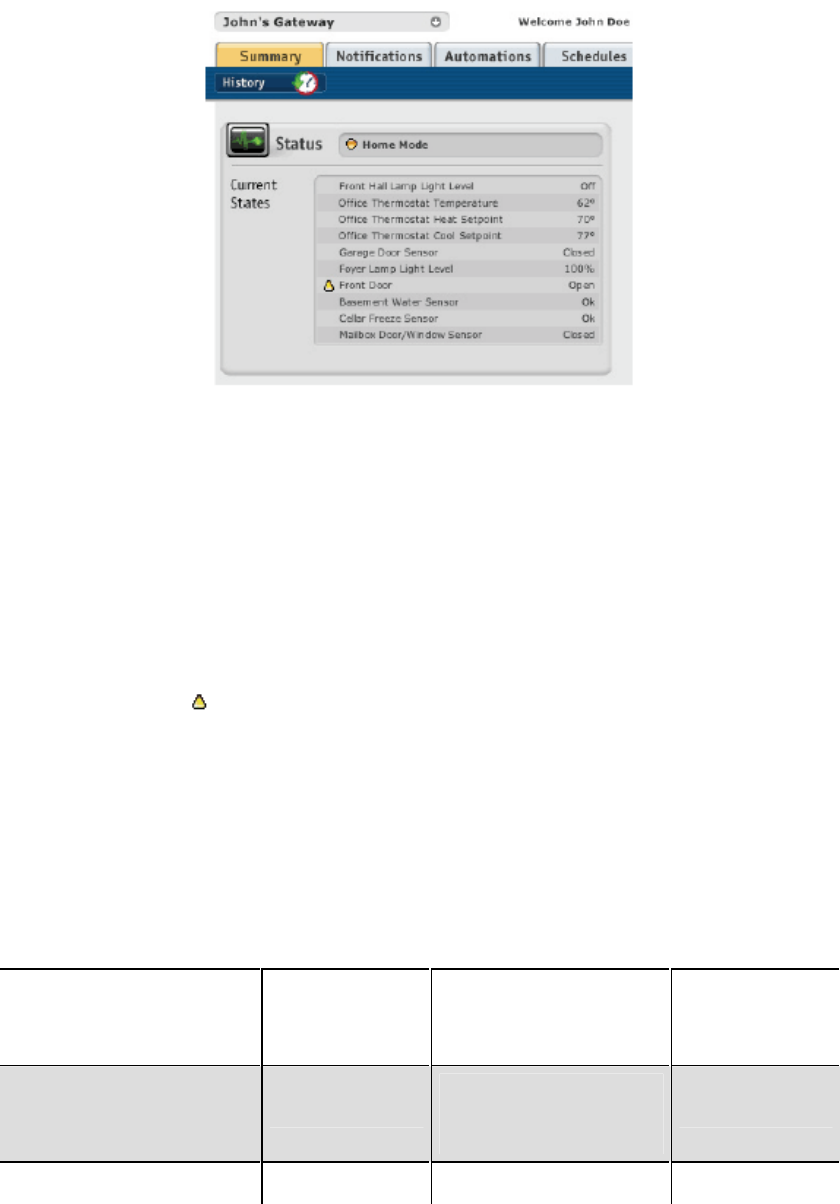
The Status window shows you the overall System status and the current mode of the
System. In this example, the System is in Home mode (your System can be in Home,
Sleep, or Away mode). The Status light is always one of three colors:
Green System operating normally (no alarm conditions).
Yellow Alarm conditions on one or more devices (e.g., Front Door open).
Red The iControl box is offline.
Your iControl Personal Web Portal Explained
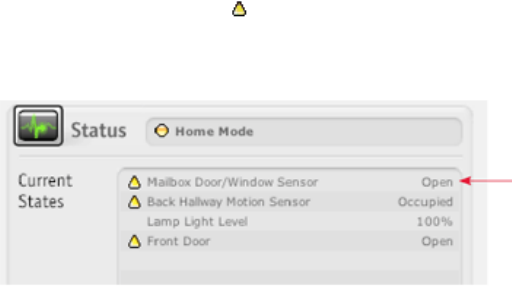
The lower part of the Status window, labeled ‘Current States’, lists the current state of all
devices installed in your iControl System (e.g., the Front Hall Lamp Light is Off ).
However, certain devices will not be listed as they do not have states. In the current
Starter Kit, only cameras are such devices. Also, your location may have more iControl
devices installed than those showing in the Current States window. You can view these
devices by clicking on the up or down arrows or the small box inside the scroll bar on the
right of the Status window.
If a yellow triangle ( ) displays next to the current state of a device, this device has
recognized a change that creates an alarm condition. In our example, the yellow triangle
next to ‘Front Door – Open’ indicates that the Door/Window sensor has recognized the
change from ‘Closed’ to ‘Open’.
The following table shows the possible states and the alarm conditions of iControl
devices.
Device Possible
State(s) Example
Generates a
yellow triangle
when:
Carbon Monoxide
detector Ok or Alarm
‘Alarm’ indicates the
presence of carbon
monoxide.
Alarm
Door/Window sensor, Open or Closed ‘Open’ indicates the Open

Printed Documentation
Micro Door/Window
sensor, Recessed
Door/Window sensor
door or window is
open.
Freeze sensor Ok or Freeze
‘Freeze’ indicates that
the air temperature is
below 41 degrees.
Temperature is
below 41
degrees.
Keychain Remote
Lights On/Off,
Take Picture,
Change mode.
Press the appropriate
button to trigger the
System to change
mode.
Not applicable.
Lamp module
On, Off,
Brightness at
10% to 100%
50%– set the Lamp
module to dim the
controlled light to 50%
brightness.
Not applicable.
Motion sensor Occupied or
Empty
‘Occupied’ means a
person is in the
monitored area.
Occupied
Panic Wristwatch and
Hanging Pendant Ok or Alarm
‘Alarm’ indicates the
user has pressed the
panic button to request
help
Alarm
Smoke and Heat sensor Ok or Alarm
‘Alarm’ indicates the
presence of smoke or
temperatures above 135
degrees.
Alarm
Thermostat
Degrees
between 32° F
and 120° F
67° F Not applicable.
Water sensor Ok or Alarm ‘Alarm’ indicates the
presence of water. Water detected.
Note: This User Manual will discuss devices which may not be in your particular Starter
Kit. More devices are available as accessories from iControl at www.icontrol.com. The
term ‘Gateway’ – which appears on the System page and elsewhere – is interchangeable
with the term ‘iControl box’.
Pictures window
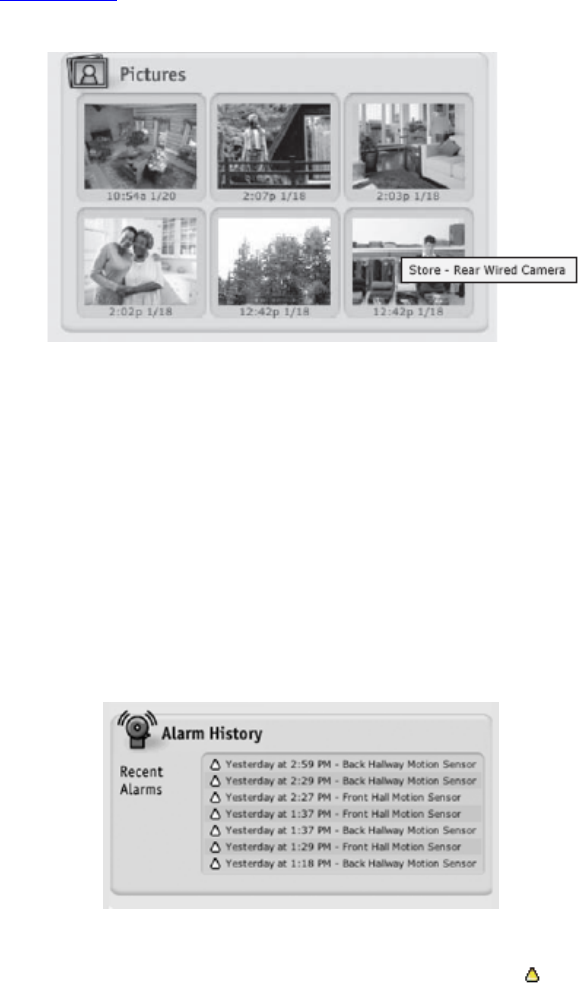
Your iControl Personal Web Portal Explained
In this window, you can see the most recent pictures from each of your iControl cameras.
If you place the cursor over a picture, the name of the camera will display, such as ‘Store
- Rear Wired Camera’. You can also expand a picture by clicking on it. In the expanded
view, you can delete the picture, take a new picture, email the picture, view thumbnails of
recent pictures, or watch live video (if port forwarding is enabled). You can also focus
the camera if you are viewing the picture on your local network.
The Pictures window can be customized to show a different set of pictures for each
camera. See My Account.
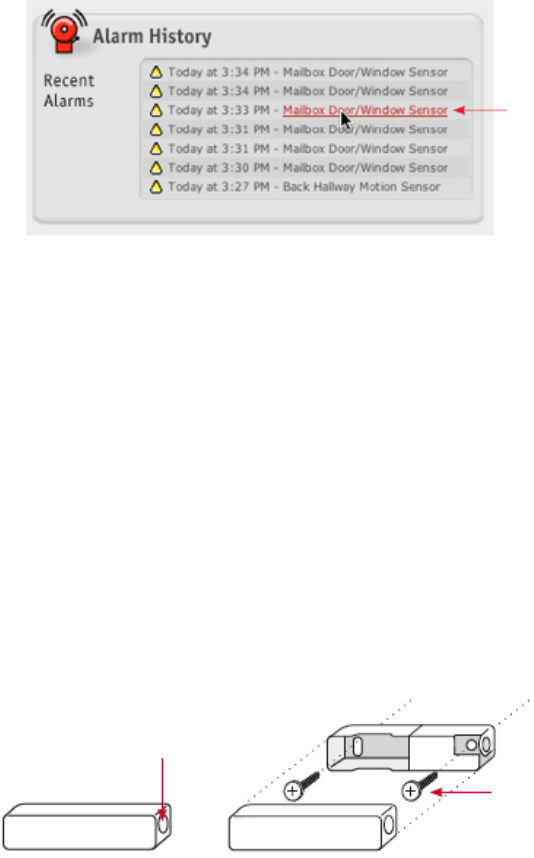
Alarm History window
This window shows recent alarms generated by your iControl devices. An alarm occurs
whenever a device detects a change. Your Door/Window sensor may, for instance, detect
an open door, or your Motion sensor may detect a person entering the monitored room.
For each change, the Alarm History window displays the time of the alarm and the
device’s name. In our example, the Back Hallway Motion Sensor generated an alarm
condition at four different times (2:59PM, 2:29PM, 1:37PM, and 1:18PM).
Next to each item in the Alarm History window is a yellow triangle ( ), indicating an
alarm condition. You can place your cursor on any triangle to see the device state that
Printed Documentation
caused the alarm condition. You can click on any device’s name to see the device’s alarm
history.
The Door/Window sensor and the Motion sensor are only two examples of iControl
alarm devices. Additional alarm devices, such as a Thermostat and Freeze, Water,
Smoke, and Carbon Monoxide sensors, are available as optional accessories.
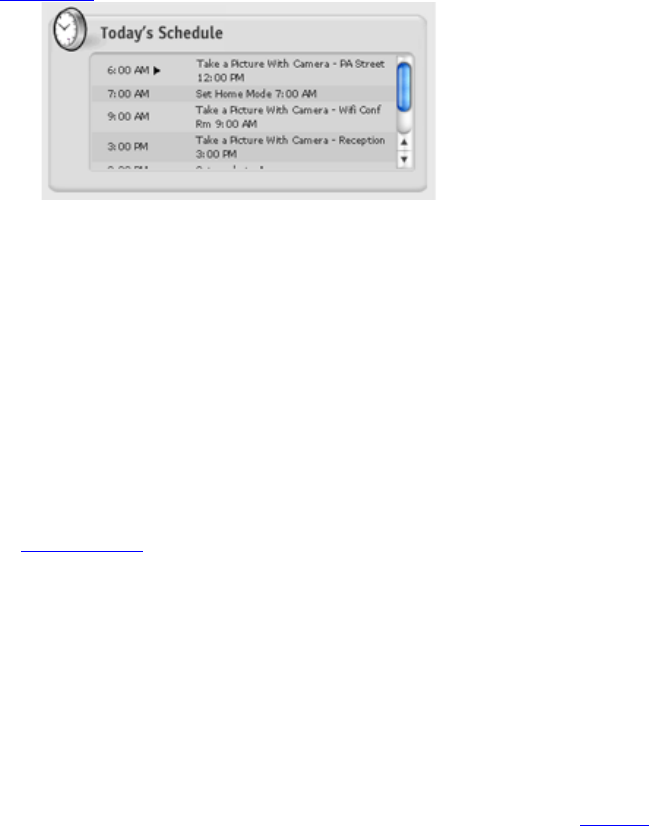
Today’s Schedule window
This window shows the events scheduled to occur today. You can place your cursor on
any rightpointing arrow beside a time to see the time window within which an action is
scheduled to repeat.
To learn more, see Schedules.
Notifications tab
The iControl System can email and/or SMS you and any number of staff or family
members when an event happens. For example, the System can automatically send you
and your staff an email when the front door of the store opens in the morning so that you
know the store opened on time. You and your parent’s caregiver can get an SMS if your
parent does not enter the kitchen in the morning for breakfast. You can get an email when
someone comes into your vacation home. For detailed information on how to create and
use notifications, see Notifications.
Automations tab
Automations allow you to set up your devices to perform an action automatically
whenever another device recognizes a change. For example, you can program your
camera to take a picture of whoever comes through the door when a warehouse door
opens. If a Motion sensor detects a person entering the kitchen at night, you can have the
lights come on. For detailed information on how to add and use automations, see Adding

Your iControl Personal Web Portal Explained
and Editing Automations in Automations.
Schedules tab
You can schedule actions for your devices to perform at particular times of the day and
days of the week. You can also schedule actions to repeat or occur randomly. You can,
for example, have lights come on and stay on from 8PM to 11PM every night.
Alternatively, you can have the lights turn on and off randomly during that time period. A
camera can be scheduled to take a picture every two hours so you can check on store
traffic. A thermostat at your parent’s house or vacation home can be set to turn up during
the breakfast and dinner hours and down during the day and in the evening. For detailed
information on how to add and use schedules, see Adding and Editing a Schedule in
Schedules.
System tab
You can access the complete list of devices installed in your iControl System via the
System tab. You can check to see if all of the installed devices are working properly. A
green dot indicates that the System is operating properly, while a yellow dot indicates
that the System is still installing the device or is not in communication with it. A red dot
indicates that the device is offline, possibly because it is unplugged. You can add and
delete devices, change their name, and confirm or change their device ID. You can also
see the history of the device (when it was installed or deleted, for example). For detailed
information on how to use the System tab, see Managing Your iControl Devices.
Changing Modes
Your System can operate in Home, Sleep, or Away mode. Modes allow you to make
system-wide changes. Some possible uses are:
xHome mode can be used when you are home and do not want to receive
notifications whenever someone goes in or out of a door or room. You
could also set up schedules or automations that cause the cameras to
take pictures only when the System is in Away mode.
xSleep mode allows you to have notifications for Motion sensors be
inactive while notifications for Door/Window sensors that may be on
external doors or windows remain active.
xAway mode can be used when you are traveling or away from your
location.
You can change your System’s mode in several ways. You can set the desired mode by
clicking on the ‘Mode’ button in the blue menu bar. You can also change the mode
through schedules. For example, you can schedule your System to go into Sleep mode at
11PM each night. Or, you can press the ‘Lock’ button on your Keychain Remote to
change the mode to Away.
To change the mode via your iControl Summary page, follow these steps:
1. Click on the ‘Mode’ button in the blue menu bar. You will see a drop-down
menu which shows the current mode marked with a green arrow.
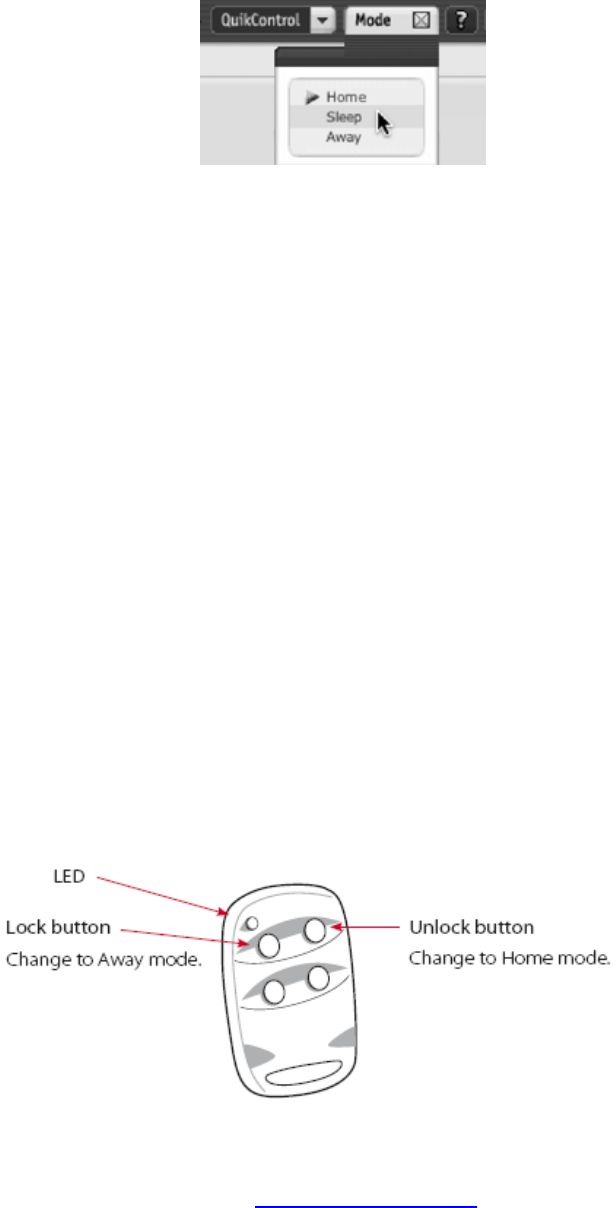
Printed Documentation
2. Select the mode in which you wish to put your iControl System by clicking
on Home, Sleep, or Away. After choosing the mode, you will see a new
window appear indicating when the change will take effect.
To change the mode from your Keychain Remote:
1. Press and hold the ‘Lock’ or ‘Unlock’ button on your Keychain Remote.
You need to hold the button for one to two seconds until the LED flashes,
indicating the command was sent. The change will take effect in a few
moments. The range of the Keychain Remote is 100 feet, so you can use
it within 100 feet of your iControl box.
2. By pressing the ‘Lock’ button, you can change to Away mode, and by
pressing the ‘Unlock’ button you can change to Home mode, as shown in
the following image:
Note: For more information on how to change these default settings and use the other
buttons on your Keychain Remote, see Your Keychain Remote.

Updates Button
The Updates button shows the latest changes you have made to your iControl
System. The updates that are shown in this window are:
xTemperature, mode, and fan setting changes on any thermostats
xQuikControl commands to take a picture
xQuikControl commands to change the brightness level or turn on or off
any lighting controlled by a Lamp module
xChanges to the System mode
The following screen shows examples of these updates.
1. Click on the QuikControl button.
2. Place your cursor over the device you wish to control to open the
QuikControl window.
3. Select the change you want to occur such as ‘Lamp Set Brightness Level’
or ‘Take a picture’.

Printed Documentation
4. Click the ‘Close’ button in the window. The iControl System automatically
estimates how long it will take the change to occur. In this example, the
change will take one minute or less.
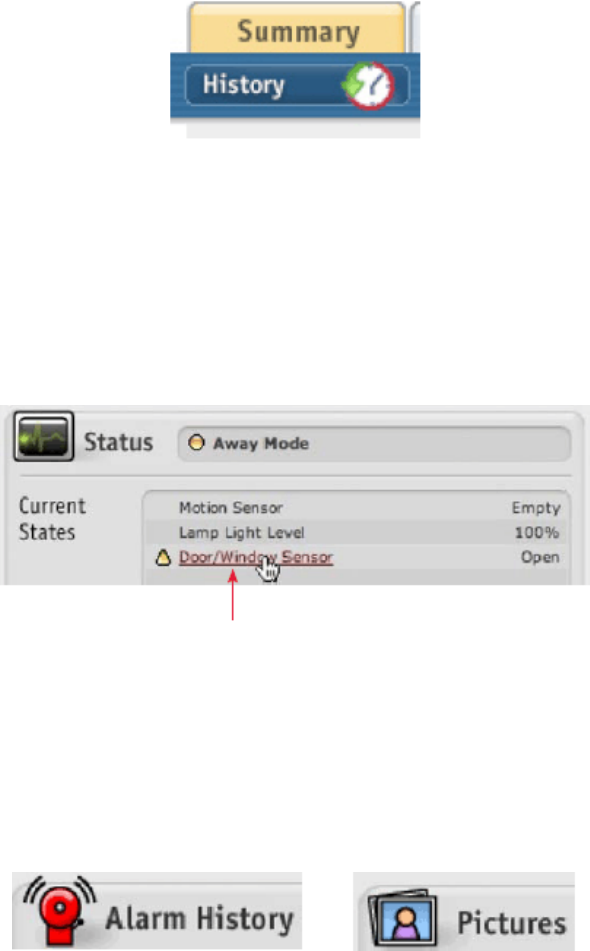
History
Your iControl History window records and reports all of the notifications generated;
automations, schedules, and alarms triggered; pictures taken; and mode and device-status
changes that occurred in the last 30 days (or the last hour, day, or week). The History
window is contextsensitive, which means you will see different categories of information
(e.g. Notifications, Pictures, etc.), depending on how you get there. Once there, you can
change categories freely. Furthermore, in the All category, you can select to view only
events pertaining to a single device.
Click here to filter by device.
Click here to filter by category.
You can access the History window in a variety of ways.
From the Summary page, you can access the History window by clicking on:
xthe ‘History’ button in the blue menu bar. When you access the History
window in this way, you are presented with all notifications, automations,
schedules, alarms, pictures, logins, and mode and device-state changes
for the last day. Click on the right to see views from the last hour, 7 days,
or 30 days.
Printed Documentation
xa device listed in the Status or Alarm History windows. When you place
your cursor over a device name (e.g. ‘Door/Window Sensor’), a clickable
link is revealed. Clicking on the link will take you to the History window
with only events pertaining to that device presented.
Click here to view only events pertaining to the Door/Window sensor.
xthe Alarm History or Pictures icons. This will take you to the History
window with either the Alarms or Pictures category selected.
Clicking on the ‘History’ button from the Notifications, Automations, or Schedules
windows will take you to the History window with the corresponding category selected.
Your iControl Devices
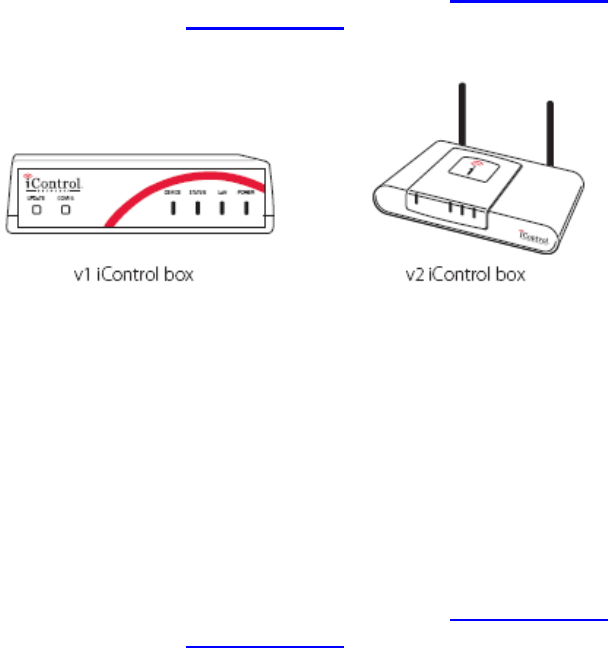
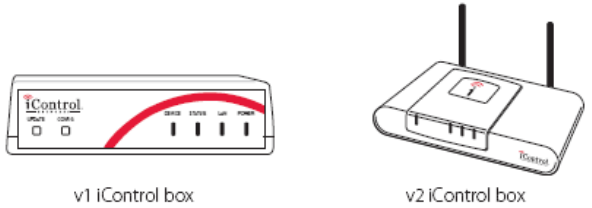
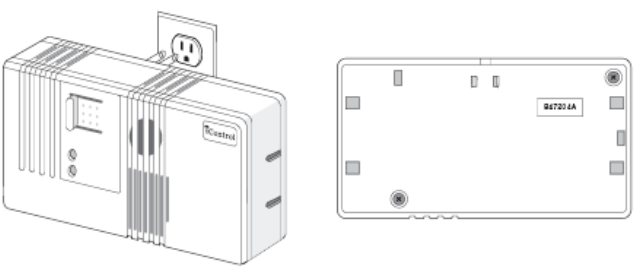
Your iControl Box
Your iControl Box
The appearance of your iControl box will vary, depending on when you purchased
your iControl System. Please refer to the images below to determine which box your
System uses. If you have a v1 iControl box, continue with v1 iControl Box. If you
have a v2 iControl box, skip to v2 iControl Box.
Printed Documentation
Your Camera
Your Camera
You can use your iControl Wired or Wireless camera to take pictures (images) or see live
video from your location. Your iControl System provides you a number of ways to
manually or automatically take pictures.
This section provides you guidance on how to:
xSetting up the camera(s) that came with your starter kit
xAdd an iControl Wireless camera to your System
xAdd an iControl Wired camera to your System
xUse your camera to take pictures manually or automatically
xManage and send pictures taken with your camera
Managing Your iControl Devices
Note: If you wish to watch live video remotely from your location, you will need to
configure your router for port forwarding.
Your Camera
You can use your iControl Wired or Wireless camera to take pictures (images) or see live
video from your location. Your iControl System provides you a number of ways to
manually or automatically take pictures.
This section provides you guidance on how to:
xSetting up the camera(s) that came with your starter kit
xAdd an iControl Wireless camera to your System
xAdd an iControl Wired camera to your System
xUse your camera to take pictures manually or automatically
xManage and send pictures taken with your camera
Note: If you wish to watch live video remotely from your location, you will need to
configure your router for port forwarding.
Setting Up the Camera(s) That Came with Your Starter Kit
Printed Documentation
When you log in to your personal web portal, the Setup Assistant will walk you through
setting up each camera that came with your Starter Kit. Simply follow the steps in the
Setup Assistant and you should be up and running in no time.
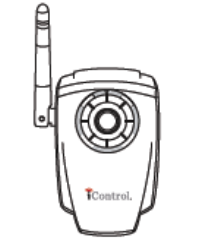
Determining Your Camera Type
There are two different types of cameras available for use with the
iControl System.
The wired camera will not have an antenna, and requires an
ethernet connection to a local router/cable modem or similar
device.
The wireless camera does have an external antenna (see
image) and can use the wireless setting from the local
router/cable modem or similar device.
Adding an Additional Camera to Your System
Information You'll Need
To begin setting up your additional camera, please have the following information from
your router or similar device:
xIP Address to access your wireless router's administration page
xThe username and password to log in to your router
xIf you have a wireless camera you will also need:
oYour wireless network's SSID. This is also sometimes called your
network name.
oYour wireless network's Security Mode. This is the type of
encryption used by your wireless network.
oYour encryption key, this is based on the security mode you're
using and may be blank if you're using an open network.
iControl Wireless Camera
Managing Your iControl Devices
iControl recommends using WPA encryption on your wireless network, which has been
shown to be far more secure than WEP. For more information on wireless security and
finding your wireless settings please see About Your Wireless Settings.
Adding the Camera
Now you are ready to add your camera to your network. Follow these steps:
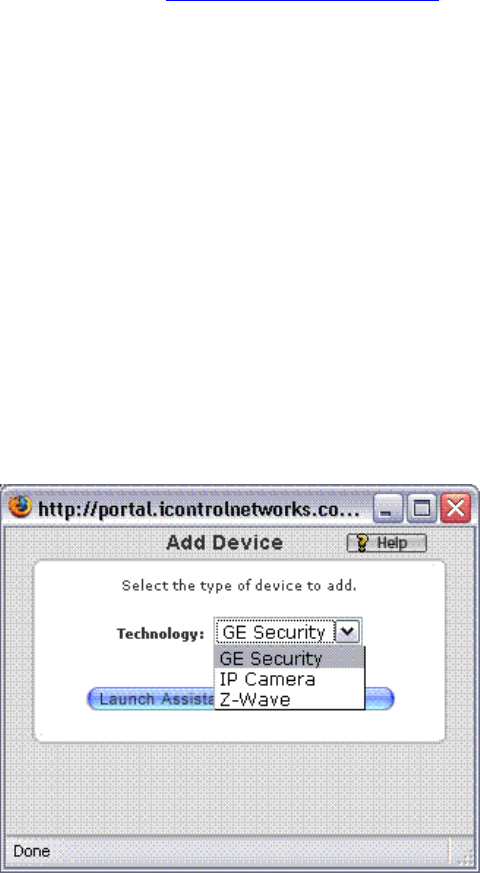
1. Go to the System Tab of your iContro Portal, and click the button labeled
Add Device.
2. Choose 'IP Camera' from the drop down menu. The Camera Assistant will
launch automatically to walk you through adding and configuring your
camera.
3. Customize your system's Automations and Schudules to use your new
camera.
Editing Your Camera's Settings
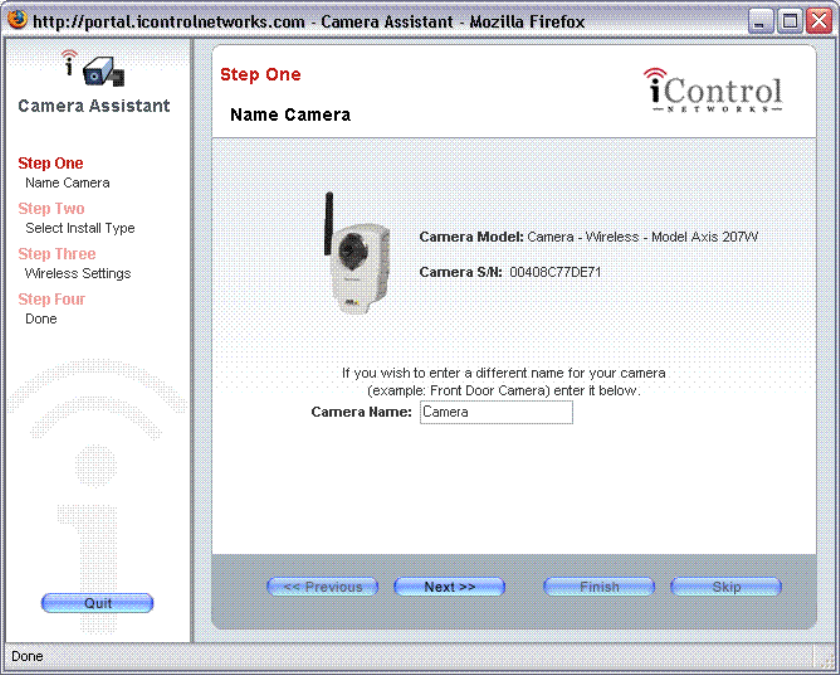
Printed Documentation
To edit your camera's settings, simply log in to your iControl Portal, click on the
System tab, and choose the camera you wish to make changes to. Clicking edit
will automatically launch a camera assistant, allowing you to:
xRename your camera
xEdit your installation type, allowing you to choose between automatically
assigned or manually assigned IP addresses and ports.
xUpdate the wireless settings if you have a wireless camera
Managing Your iControl Devices
Taking Pictures Manually
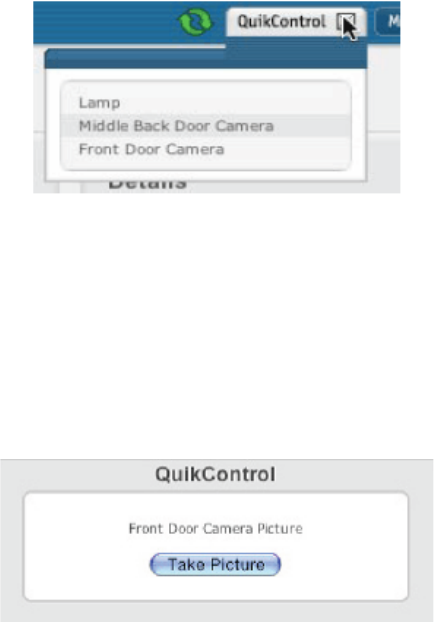
You can take pictures manually using the ‘QuikControl’ button or the Pictures window
on your Summary page. To take a picture using the QuikControl button, follow these
steps:
1. Click on the ‘QuikControl’ button in the blue menu bar. You will see a
drop-down menu displaying your camera(s), and lamp(s) (as shown).
2. Select the camera you have chosen to take a picture. (In our example, the
camera’s name is ‘Front Door Camera’.) You will then see the following
window:
3. Click on the ‘Take Picture’ button in the QuikControl window. A window
will appear telling you how long it will take for the System to take the
picture (e.g., ‘within a minute’). Click on the ‘Close’ button to close the
window.
Printed Documentation
4. Refresh your browser after the time indicated. The new picture will appear
in the Pictures window of your Summary page. If you click on it, you will
see an expanded view of your picture.
You can also take pictures from the Pictures window of the Summary page. To do so,
follow these steps:
1. Click on the Summary tab.
2. In the Pictures window, select a picture taken with the camera of your
choice. A window will come up with an expanded version of the picture.
3. Click on the ‘Take Picture’ button to take a new picture. A window will
appear telling you how long it will take for the System to take the picture
(e.g., ‘within a minute’). Click on the ‘Close’ button to close the window.
4. Refresh your browser after the time indicated. The new picture will appear
in the Pictures window of your Summary page. If you click on it, you will
see an expanded view of your picture.
Click here to take a picture.

Managing Your iControl Devices
Taking Pictures as Part of an Automation, Notification, or Schedule
A picture can be included with a notification as an email attachment. It will be the picture
most recently taken by the selected camera. For more details on notifications, see
Notifications. You can have pictures taken automatically as part of an automation. For
more details on automations, see Automations.
You can schedule pictures to be taken automatically at different times of the day, on
different days of the week, and in different modes. For more details on how to set up
schedules, see Schedules.
Sending Pictures
You can send pictures to anyone – friends, family, caregivers, business associates, etc. To
do so, follow these steps:
1. Click on the Summary tab.
2. Click on the picture you wish to send by email. This will bring up an
expanded view of the picture.
3. Click on the ‘Email Picture’ button at the bottom of the expanded window.
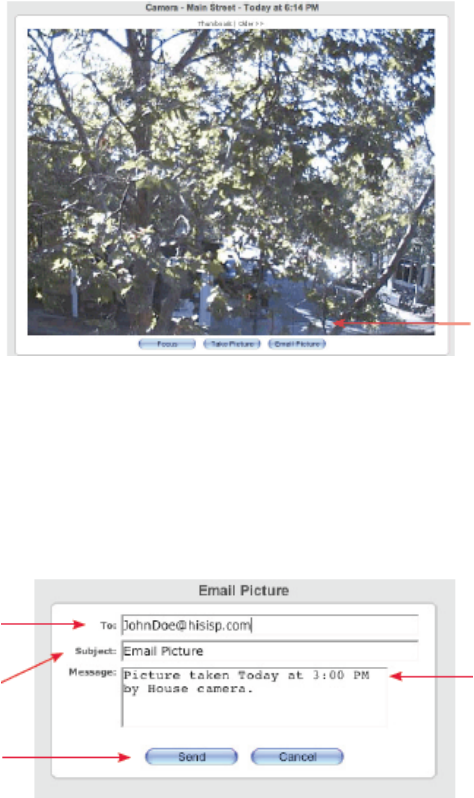
Printed Documentation
Click here to email the picture.
You will then see the Email Picture window in which you can compose
your email.
Type in one or more email addresses, separated by commas.
Enter a subject for the email in the Subject field.
Click here to email the picture.
A default message appears. You can edit it.
4. Click on the ‘Send’ button to send the email.
Managing Your iControl Devices
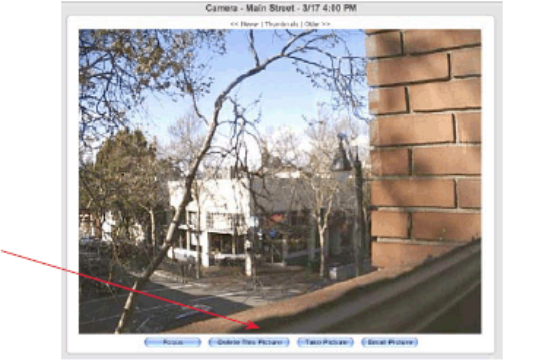
Deleting Pictures
To delete a picture, click on it in the Pictures window. You will now see an expanded
view of the picture. Click on the ‘Delete This Picture’ button in the lower portion of the
window as shown here:
Click here to delete the picture
You can only delete one picture at a time. Note that you cannot delete the most recent
picture taken by a camera.
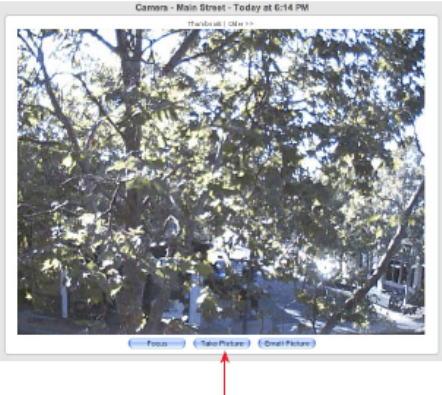
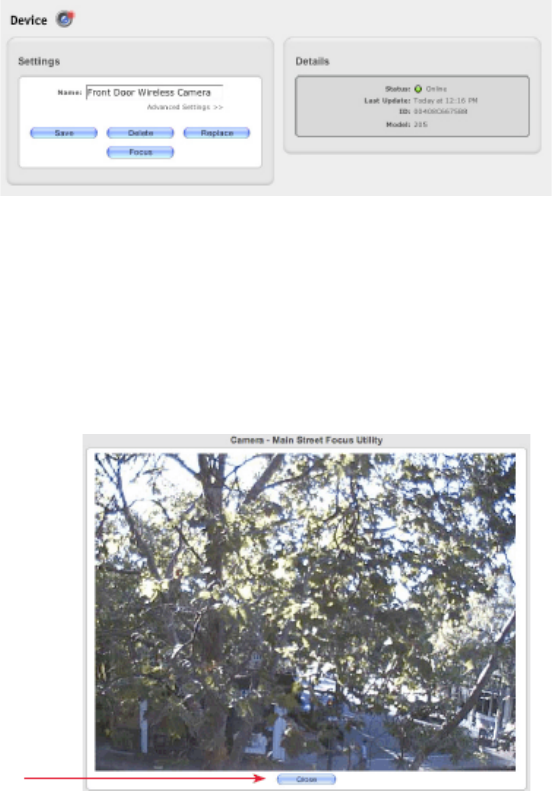
Focusing Your Camera
To focus your camera, you will use its focus ring (the black ring encircling the lens) and
the focus feature accessed via the Summary page or the System page. To use the focus
feature, you need to be at your location.
From the Summary page,
1. Placing your cursor over a picture (without clicking) will bring up a small
window showing the name of the camera that took the picture.
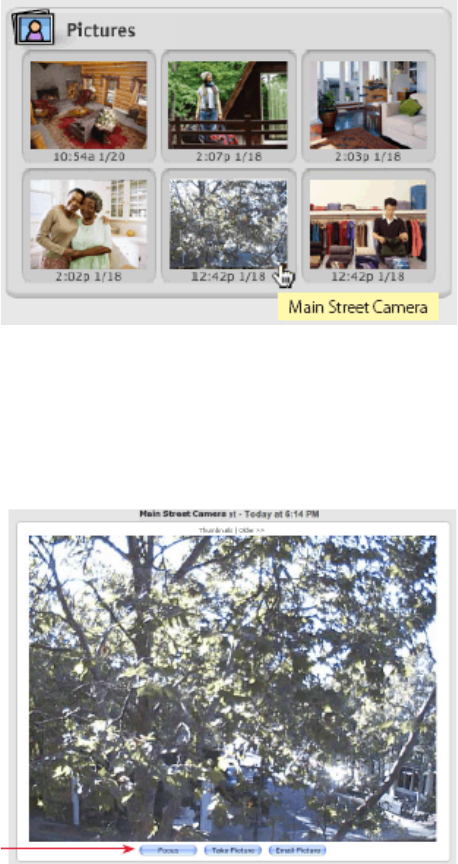
Printed Documentation
Click on any picture from the camera you want to focus. This will bring up
an expanded view of the picture.
Click here to bring up a window displaying what your camera sees.
2. Click on the ‘Focus’ button in the lower portion of the window. This will
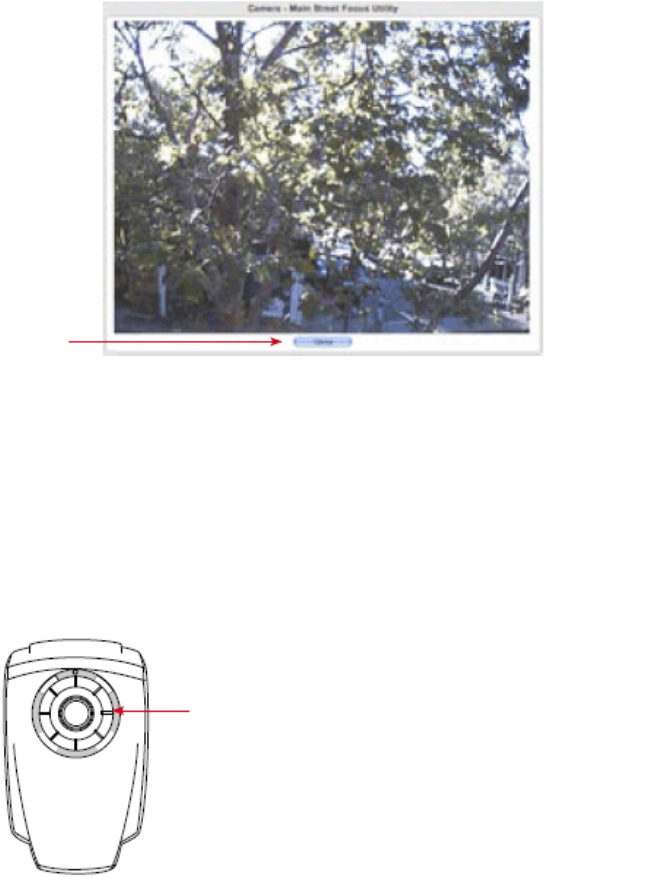
open the ‘Main Street Camera Focus Utility’ window:
Managing Your iControl Devices
Click here to see real time images from your camera.
3. Go to your camera and gently turn the focus ring (shown in the following
illustration) until the image is in focus. Do NOT over twist the focus ring.
Your System will immediately update this window so you can quickly see
how each adjustment improves the image.
Focus ring: This black ring encircles the camera lens.
Turning the ring clockwise focuses the camera on objects further away and turning the ring counterclockwise focuses
the camera on nearer objects. Do not over twist the focus ring.
4. Continue to adjust the focus ring until you find the image satisfactory.
5. When you’re done, click the ‘Close’ button.
Printed Documentation
From your System page,
1. Click on the name of the camera you wish to focus. The following window
will appear:
2. Click on the ‘Focus’ button. This will open the ‘Main Street Camera Focus
Utility’ window:
Click here to see real time images from your camera.
Managing Your iControl Devices
3. Go to your camera and use the camera’s focus ring to sharpen the image.
Your System will immediately update this window so you can quickly see
how each adjustment improves the image.
4. Continue to adjust the focus ring until you find the image satisfactory.
5. When you’re done, click the ‘Close’ button.
Note: You can only access the Camera Focus Utility when you are on the same network
as your iControl box. You cannot access it when you are away from your iControl box
location, such as on the road or at work.
Managing Pictures
You iControl service enables you to retain all the pictures taken by each of your cameras
for up to 30 days. You can use the pictures in many ways--to capture activities of family
to share with others, to show friends your home or vacation house, to document the
arrival of service workers, or to show your staff the conditions in a store or office. To see
your archived pictures, follow these steps:
1. Go to your Summary page.
2. Click on any picture in the Pictures window to bring up an expanded view
of the picture (as shown). Click on ‘Older’ to see a less recent picture,
‘Newer’ to see a more recent picture, or ‘Thumbnails’ to see archived
pictures.
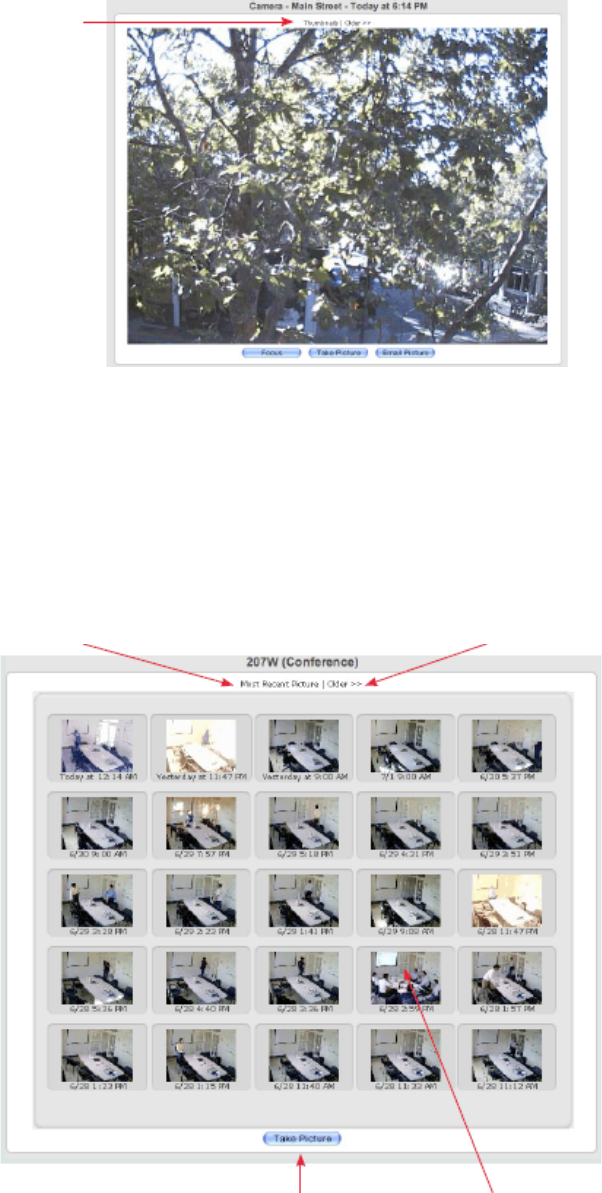
Printed Documentation
Click on ‘Thumbnails’ to see archived pictures from this camera.
3. Click on ‘Thumbnails’ to view your archived pictures from this camera.
Click on ‘Newer’ or ‘Older’ to navigate through the thumbnail screens. You
can also click on any thumbnail to see an expanded view of that picture.
Click here to see an expanded view of the most recent picture.
Click here to see more archived pictures.
Managing Your iControl Devices
Click here to take a picture .
Click on a thumbnail to see an expanded view of that picture.
The iControl Service archives pictures for up to 30 days. To preserve a picture longer
than 30 days, use your browser’s commands to save it to your hard drive. In Windows,
right-click the picture to bring up a menu which includes a ‘Save Image’ option. On a
Macintosh, control-click the image to bring up the menu.
About Your Wireless Settings
Wireless Security
iControl supports 3 types of wireless security: Open, WEP and WPA.
An OPEN wireless network means that there is no security on it at all. This
means that anyone with an 802.11 wireless enabled device may be able to
connect to your home network. By default most home routers are set to OPEN
wireless.
WEP encryption uses a HEX key (all numbers 0-9 and/or letters a-f only) in order
to encrypt the traffic on your wireless network. While it does offer more protection
than OPEN, WEP has been shown to be easily broken, and is therefor not
considered very secure.
There are several types of WPA security. WPA and WPA2 Encryption are both
supported by iControl Cameras, but only if you're using the "personal" mode.
While terminology may differ from router to router, iControl will support both
methods using the shared passphrase, or PSK. Radius servers or enterprise
mode are not supported by iControl.
Finding your Wireless Settings
To find your wireless settings, including your SSID, Security Mode, and encryption key,
follow these steps:
1. Go to a browser and enter the router's IP address (usually in the form of
192.168.1.1 or 192.168.0.1). Consult your router's manual for the router's
IP address.
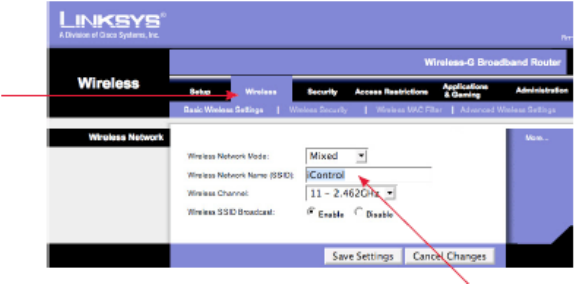
Printed Documentation
2. To log in to your router to find the SSID, Security mode, and encryption
key, you will need the router's username and password. Check your
router's manual, as you may have recorded the username and password
there. Or, you may have used the default username and password
provided in the router's manual. Some manufacturers use admin as the
default username or password and leave the other item blank.
3. Obtain the WEP key and Security mode for your network. Here is an
example of a page from a Linksys wireless router showing the information
you need to gather. Consult your router manual for more details on how to
access this information within the router's setup pages.
Click here to find your SSID.
SSID here is ‘iControl’. As a home user, you may have created a name. Consult your IT person for the SSID in a
business.
4. While still in your router’s administration pages, access your SSID.

Managing Your iControl Devices
Here is the WEP key that you will need to record and use.
Here is the Security mode you will need to record and use.
Your Carbon Monoxide Detector
Installing Your Carbon Monoxide Detector
To install your Carbon Monoxide detector, follow these steps:
From the Summary page,
1. Click on the System tab.
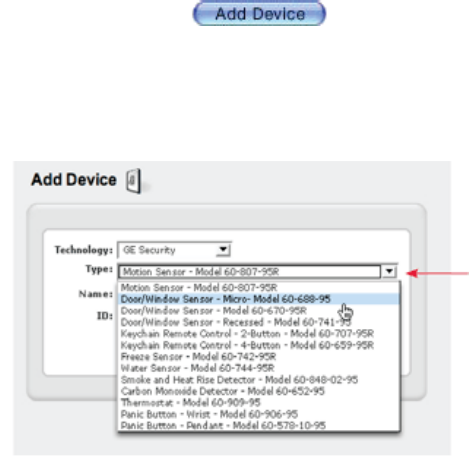
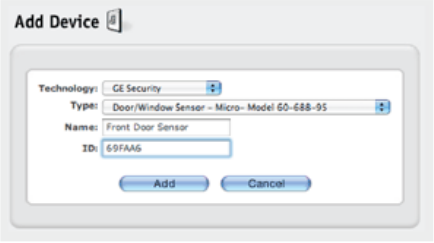
2. Click on the ‘Add Device’ button to open the Add Device
window.
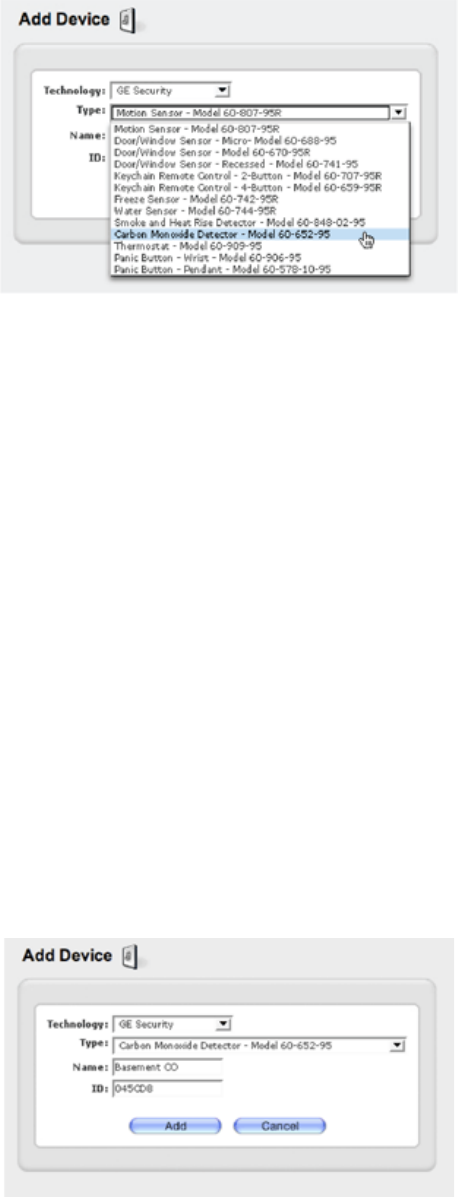
Printed Documentation
3. Choose the technology for the device (‘GE Security’).
4. Choose the device type (‘Carbon Monoxide Detector – Model 60-652-95’).
5. Create a name for the device such as ‘Basement CO’.
6. Enter the six-digit ID number of the device (e.g., ‘045CD8’). The ID is
found on the back of the Carbon Monoxide detector. It is a combination of
six letters and numbers, preceded by the letters ‘DL’. (You can enter the
letters is lower- or upper-case.) Do not enter the letters ‘DL’ or use the
letters and numbers next to the letters ‘TX’.
Managing Your iControl Devices
7. Click on the ‘Add’ button. You will be returned to the System window and
your newly-added CO detector will appear in the list of devices.
8. Next, physically install the device by simply plugging the sensor in to any
wall outlet. Once installed, the green Power LED comes on immediately. If
it does not, check that the outlet is not controlled by a wall switch—
iControl recommends using an outlet not controlled by a wall switch, as
this may result in the device being inadvertently turned off.
The iControl box discovers the CO detector within about 70 minutes of its initial
installation. As soon as your System ‘sees’ your Carbon Monoxide detector, the yellow
dot adjacent to its name on your System page will turn green. If the yellow dot next to the
name of the alarm does not turn green, repeat the installation process, making sure to
enter the correct device type and ID.
After installation, test the device by pressing the ‘Test/Reset’ button. The device should
chirp loudly and the red LED should flash red. You should also see an alarm in the Alarm
History window on your Summary page.
Note:The CO detector should not be used as a smoke or fire detector and is not suitable
for installation in hazardous locations, as defined by public building codes.
To operate properly, a CO detector needs to be placed with the following considerations
in mind:
xPlace within 100 feet of your iControl box.

Printed Documentation
xThe CO detector is for indoor use only.
xDo not install the device above or below heating vents, above cooking
surfaces, or within five feet of open flames; next to windows, exterior
doors, or in locations where furniture or draperies may block the unit; or
near automobile exhaust pipes.
xThe device only measures the carbon monoxide levels at its installed
location. Dangerous gas levels could still be present in other areas.
Using Your Carbon Monoxide Detector
Once you have installed a Carbon Monoxide detector in your location, it will appear on
the Summary page of your personal web portal. The status of your CO detector in the
Current States area of your Status window will be either ‘OK’ or ‘Alarm’.
When CO rises to dangerous levels, the CO detector will sound in your location and you
will see ‘Alarm’ and a yellow alarm-condition triangle beside the device in the Current
States area of your Status window, as well as an alarm in the Alarm History window.
Note: If the reset button is pressed within 15 seconds of the initial alarm, the CO detector
will not transmit the alarm signal to the iControl box.
You can have a notification sent to you when the alarm triggers. For details on how to
add a notification, see Notifications.
See Frequently Asked Questions for important details on your Carbon Monoxide
detector.
Your Door/Window Sensor
Managing Your iControl Devices
Installing your Door/Window Sensor
If your iControl Starter Kit includes a Door/Window sensor, it is pre-configured for
your System at the factory; you may skip to the instructions in the next section on
how to mount your sensor.
You only need to add a Door/Window sensor to your System if you buy additional
sensors or want to add back a Door/Window sensor you have deleted from the System.
You can install your Door/Window sensor in moments. The following steps explain how
to add a sensor to your System.
1. Click on the System tab.
2. Click on the ‘Add Device’ button to open the Add Device
window.
Click on the dropdown arrow in the Type window and choose the desired Door/Window Sensor.
3. Choose the technology for the device (‘GE Security’).
Printed Documentation
4. Choose the device type (‘Door/Window Sensor – Micro— Model 60-688-
95’, ‘Door/Window Sensor – Model 60-670-95R’, or ‘Door/Window Sensor
– Recessed— Model 60-741-95’).
5. Create a name for the device such as ‘Front Door Sensor’.
6. Enter the six-digit ID number of the device (e.g., ‘69FAA6’). The ID is
found on the back of the Door/Window sensor. It is a combination of six
letters and numbers, preceded by the letters ‘DL’. (You can enter the
letters in lower- or upper-case.) Do not enter the letters ‘DL’ or use the
letters and number next to the letters ‘TX’.
7. Click on the ‘Add’ button. You will be returned to the System window and
your newly-added sensor will appear in the list of devices.
Checking Installation of Your Door/Window Sensor
After mounting your Door/Window sensor, go back to your computer, click on the
System tab, and check to see if a green dot appears next to the name of the Door/Window
sensor.
Once the sensor is added to your System and mounted, the iControl box will discover it
Managing Your iControl Devices
within about 70 minutes. If you want to activate it more quickly, open and close the door
or window once. You do not have to press any buttons on the iControl box to install the
sensor; the iControl System installs it automatically.
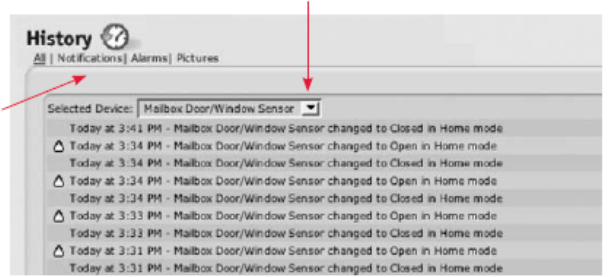
Using Your Door/Window Sensor
You can check the status of your Door/Window sensor in the Status window or the Alarm
History window on your iControl Summary page.
The Status window lists the current states of all devices installed in your iControl System.
In the following illustration, the Door/Window sensor is named ‘Mailbox Door/Window
Sensor’. Its current state is ‘Open’. This Door/Window sensor recognizes that the
Mailbox Door is open. A Door/Window sensor has two states: ‘Open’ and ‘Closed’.
When it is open, there is a yellow triangle to the left of its name, indicating an alarm
condition.
Mailbox Door/Window Sensor open
The Alarm History window displays the status of a device if the device generated a recent
alarm. The following illustration shows the Alarm History window after the Mailbox has
been opened a few times. You now have a record of when the Mailbox was opened. If
you set up an automation to take a picture when the Mailbox is opened, the iControl
System will provide you a picture of who opened the Mailbox.
Printed Documentation
Click here to see additional information about the alarm.
Your Freeze Sensor
Mounting Your Freeze Sensor
Next, physically install the device. You can install your Freeze sensor with either double-
stick tape or screws. If you are using screws, you will need to remove the cover, screw
the Freeze sensor base to a surface, and then replace the cover.
Press here to open
Mount using screws
Note: To operate properly, your Freeze sensor needs to be placed with the following
considerations in mind:
xPlace it within 100 feet of your iControl box.
Managing Your iControl Devices
xPlace it in an area likely to get cold before any other area in the building,
to ensure early warning.
xMount it on an interior wall where there is free air movement and not on an
outside wall or near a basement floor.
xDo not place the sensor in the same room as a furnace, water heater, or
any other heat source that may stay warm after the heating fails.
xKeep away from areas with extensive metal or electrical wiring that may
prevent sensor signals from reaching your iControl box and areas where it
may be exposed to moisture.
Once the sensor is added to your System and installed, the iControl box will discover it
within about 70 minutes. As soon as your System ‘sees’ your Freeze sensor, the yellow
dot adjacent to its name on your System page will turn green, indicating that your sensor
is activated. If you want to activate the sensor more quickly, apply ice to it so that its
temperature drops to 41°. Note that it will take some time for the sensor to cool to 41°
(even with direct contact with ice).
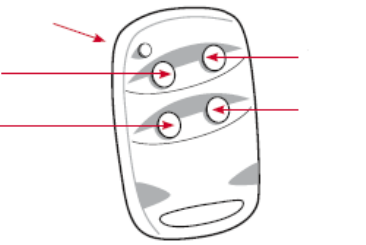
Your Keychain Remote
Your Keychain Remote
Your iControl Keychain Remote is a useful tool that allows you to control various device
actions, such as turning on lights, changing the System mode from Away to Home as you
approach the house, or changing the System mode from Home to Away as you drive off
to work.

Printed Documentation
Keychain Remote LED.
Lock button.
Change to Away mode.
Light button.
Press once to toggle a light controlled by an iControl Lamp module.
Unlock button.
Change to Home mode.
Star button.
Press once to take a picture from your iControl camera.
The Keychain Remote also comes in a two-button version, with only Lock and Unlock
buttons.
Note: The buttons on your Keychain Remote are pre-configured with the functionality
described in the figure above. Each button allows you to change a System mode or
change a device state. All buttons are configurable through your iControl personal web
portal.
Your Keychain Remote
Your iControl Keychain Remote is a useful tool that allows you to control various device
actions, such as turning on lights, changing the System mode from Away to Home as you
approach the house, or changing the System mode from Home to Away as you drive off
to work.
Managing Your iControl Devices
Keychain Remote LED.
Lock button.
Change to Away mode.
Light button.
Press once to toggle a light controlled by an iControl Lamp module.
Unlock button.
Change to Home mode.
Star button.
Press once to take a picture from your iControl camera.
The Keychain Remote also comes in a two-button version, with only Lock and Unlock
buttons.
Note: The buttons on your Keychain Remote are pre-configured with the functionality
described in the figure above. Each button allows you to change a System mode or
change a device state. All buttons are configurable through your iControl personal web
portal.
Modifying The Actions of Your Keychain Remote Buttons
Your Keychain Remote buttons have the following default settings:
Both Keychain Remotes:
xLock button: Put System in Away Mode.
xUnlock button: Put System in Home Mode.

Printed Documentation
For the 4-button Keychain Remote:
xLight button: Toggle a Lamp module.
xStar button: Take a picture.
You can modify the actions of your Keychain Remote buttons. Let’s say you have a
Keychain Remote named ‘Mom’s Keychain Remote’. Mom wants the Star button –
instead of taking a picture – to put the System into Sleep mode.
To modify the action of the Keychain Remote Star button:
1. Click on the Automations tab to open the Automations window (as shown).
Each button on Moms Keychain Remote appears here with its setting.
Note: Because the Light button toggles, it has two settings associated
with it: Keychain Remote Lamp On and Keychain Remote Lamp Off.
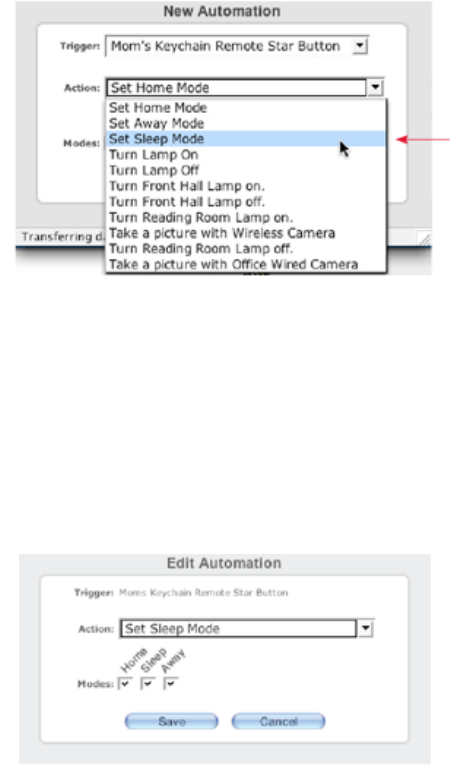
Managing Your iControl Devices
2. Click on the pencil icon to the right of ‘Mom’s Keychain Remote Star
Button’. This will bring up the Edit Automation window.
Click on the down arrow, and select an action.
3. Click on the Action drop-down menu to choose a new action – ‘Set Sleep
Mode’ in this example.
4. Select the mode(s) in which you want the Keychain Remote to switch your
System into Sleep mode – all modes, in this example. When someone
presses Mom’s Keychain Remote Star button, the System will
automatically switch into Sleep Mode, regardless of whether the System is
in Home, Sleep, or Away mode.
5. Click on the ‘Save’ button to save the change.
Printed Documentation
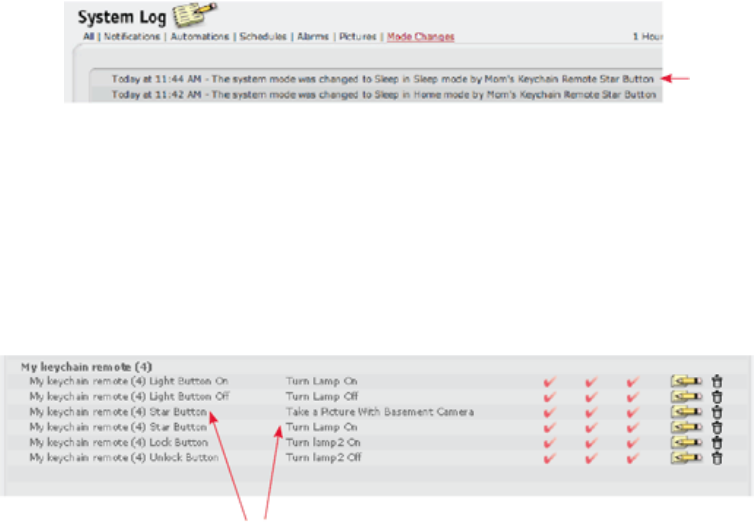
You can always refer to your History window to see which Keychain Remote buttons
were pressed, what mode the System was in, and what mode the System was changed to.
Click on the ‘History’ button in the blue menu bar to bring up the History window, then
click on the Mode Changes category.
Your History window shows that the System switched from Home into Sleep mode when
the Star button was pressed. When the System was already in Sleep mode, pressing the
Star button had no effect:
Nothing changes if you try to change to Sleep mode when the System is already in Sleep mode.
Note: You can set any button on your Keychain Remote to perform multiple actions. For
example, you can set your Star button to both take a picture and turn on a light in the
house. Here’s an example of when pressing the Star button causes two actions.
Here, pressing the Star button will take a picture and turn on a light.
Your Lamp Module
Your Lamp Module
Managing Your iControl Devices
Your iControl Lamp module provides a convenient automated lighting solution for your
home or business. A lamp can be turned on or off from your Keychain Remote, your
personal web portal, via automation, or with a schedule. For example, you can have lights
turn on or off based on room occupancy, motion, or time of use. You can schedule the
lights controlled by a Lamp module to come on and off, depending on the time of the day
and day of the week. You can even set the brightness of your lamp so the Lamp module
can also serve as a dimmer.
Your Lamp Module
Your iControl Lamp module provides a convenient automated lighting solution for your
home or business. A lamp can be turned on or off from your Keychain Remote, your
personal web portal, via automation, or with a schedule. For example, you can have lights
turn on or off based on room occupancy, motion, or time of use. You can schedule the
lights controlled by a Lamp module to come on and off, depending on the time of the day
and day of the week. You can even set the brightness of your lamp so the Lamp module
can also serve as a dimmer.
Printed Documentation
Installing Your Lamp Module
Installing Your Lamp Module
The Lamp module is easy to install. If your iControl Starter Kit includes a Lamp module,
it is preconfigured for your System at the factory; you may skip to the instructions in the
next section on how to physically install your module.
Installing Your Lamp Module
The Lamp module is easy to install. If your iControl Starter Kit includes a Lamp module,
it is preconfigured for your System at the factory; you may skip to the instructions in the
next section on how to physically install your module.
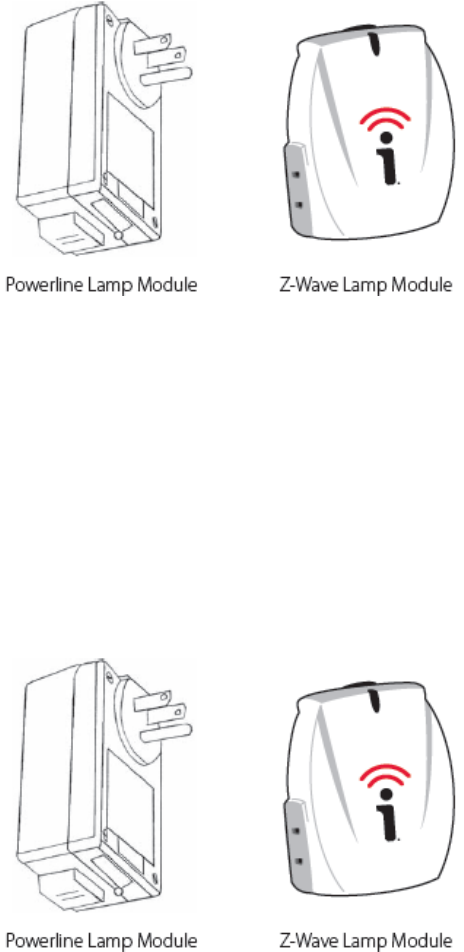
Installing Your Powerline Lamp Module
To install a Powerline Lamp module, follow these steps:
1. Click on the System tab of your personal web portal.
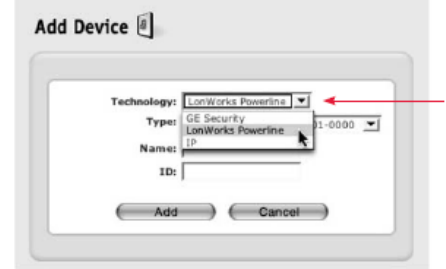
2. Click on the ‘Add Device’ button to open the Add Device window.
Managing Your iControl Devices
Click on the dropdown arrow in the Technology window and choose ‘LonWorks Powerline’.
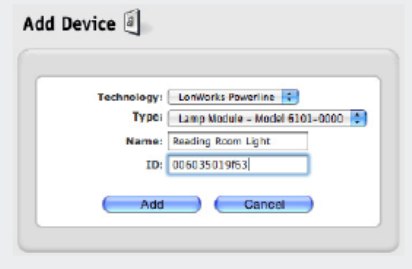
3. Choose the technology for the device (‘LonWorks Powerline’).
4. Choose the device type. Only one device is available (‘Lamp Module
Model 6101-0000’).
5. Create a name for the device such as ‘Reading Room Light’.
6. Enter the 12-digit ID number of the device (e.g., ‘006035019f63’). The ID,
found on the bottom of the Lamp module, is a combination of twelve
letters and numbers preceded by the words “Neuron ID”. (You can enter
the letters in lower- or upper-case.) Do NOT enter the colons separating
the pairs of numbers or letters.
7. Click on the ‘Add’ button. You will be returned to the System window and
your newly-added module will appear in the list of devices.
Printed Documentation
Installing Your Z-Wave Lamp Module
To install a Z-Wave Lamp module, follow these steps:
1. Click on the System tab of your personal web portal.
2. Click on the Add Device button to open the Add Device window.
3. Choose the technology for the device (Z-Wave).
4. Click the Launch Assistant button and follow the directions to complete the
installation of your Z-Wave Lamp module.
Troubleshooting Tips for Installing Your Z-Wave Lamp Module
Initial installation of the Z-Wave Lamp Module is done in a low powered mode. Because
of this, the iControl Box may have trouble locating the Z-Wave device. If you're
experiencing this difficulty please try the following steps:
1. Confirm that the Z-Wave Lamp Module you're trying to install is within two
to three feet of the iControl Box. After initial installation is complete, the
Lamp Module May be moved to its final location.
2. Try changing the orientation of the iControl Box. This can mean turning
the iControl Box on its side, or moving it lower or higher in relation to the
Z-Wave Lamp Module. Z-Wave is an RF frequency so imagine that you're
moving an antenna to improve reception.
Managing Your iControl Devices
3. Be sure that the Z-Wave Lamp Module has not been associated with
another iControl System. Once installed, Z-Wave modules can't be moved
between systems.
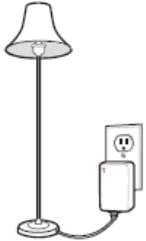
Physical Installation of Your Lamp Module
Next, physically install your Lamp module. Lamp modules are suited to controlling only
indoor lamps and light fixtures using between 40- and 300-watt incandescent light bulbs.
They do not operate properly with fluorescent light bulbs. To install your Lamp module,
follow these steps:
1. Choose the light you wish to control (one light per module).
2. Plug in the Lamp module.
3. Plug the power cord from the light into the Lamp module (as shown).
Note: To operate properly, a Lamp module needs to be placed with the following
considerations in mind:
Printed Documentation
xInstall it within 100 feet of the iControl box.
xPowerline Lamp modules DO NOT work if plugged into power strips
equipped with a surge protector or uninterruptible power supplies.
xIf a wall switch controls the power outlet, the wall switch must be turned on
and left in the On position.
xThe Lamp module is not recommended for 3-way lights or lights controlled
by 3-way wall switches.
Setting the Brightness of Lighting
You can set the brightness of your lighting, using the Lamp module as a dimmer. To do
so, follow these steps:
1. From your iControl Summary page, either click on the current level of the
Lamp module you want to set in the Current States area of the Status
window or select the Lamp module you want to adjust from the
QuikControl menu. This will bring up the QuikControl menu for that Lamp
module.
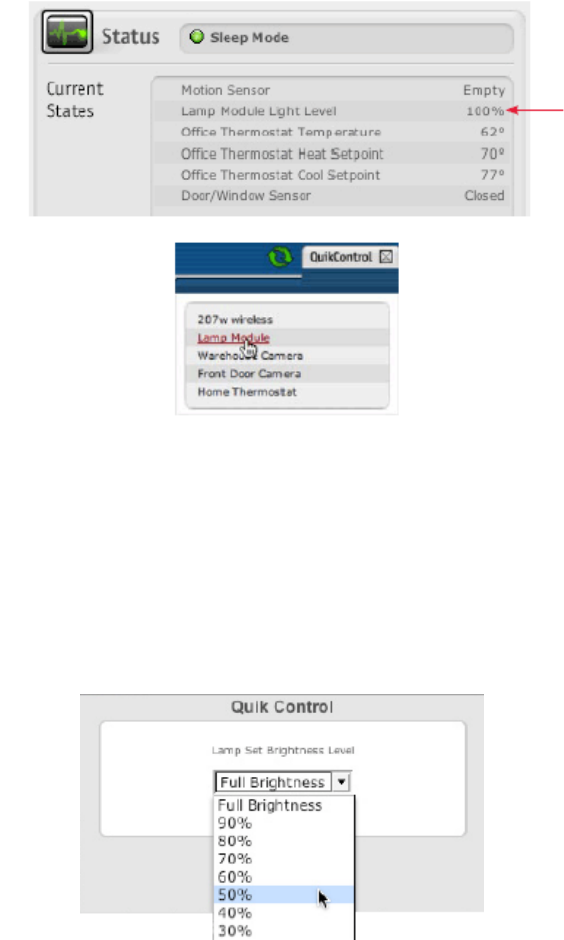
Managing Your iControl Devices
Place your cursor over the 100% and click on it.
2. Click on the down arrow, and choose the desired brightness level (e.g.,
50%) from the list.
3. Click on the ‘Set’ button to save the change.
Adding Your Keychain Remote
Printed Documentation
You can control your Lamp module in five ways:
xwith your Keychain Remote (such as pressing the Light button as you
approach your location or while in your location)
xvia your personal web portal (where you can use QuikControl to turn on or
off lights and set brightness levels)
xfrom your mobile portal (where you can turn on or off lights and set
brightness levels)
xwith an automation (such as automatically turning on the lights when the
Door/Window sensor indicates ’Open’)
xwith a schedule (turning lights on or off at particular times, randomly, or on
a repeating basis.)
To control the Lamp module from your Keychain Remote:
Press the Light button to toggle the state of a light controlled by a Lamp module. Pressing
the Light button on the Keychain Remote alternately sends ‘Light Button On’ and ‘Light
Button Off’ signals to your iControl System. So if you use the Keychain Remote Light
button to turn your lights on, then the next signal the Keychain Remote Light button will
send is ‘Light Button Off’. However, you may not experience the desired result. If, for
example – after turning the lights on with the Keychain Remote Light button – you turn
the lights off manually, using QuikControl, or with an automation or schedule, then
pressing the Keychain Remote Light button will send the ‘Light Button Off’ signal and
no change will occur. Pressing the Light button a second time will send the ‘Light Button
On’ signal, and the lights will turn on.
A ‘Light Button On’ signal will always turn (or leave) the lights on to full brightness and
a ‘Light Button Off’ signal will always turn (or leave) the lights off, irrespective of the
brightness level of the lamp when the signal is received.
Note: The Keychain Remote that comes with your Starter Kit is pre-configured to control

Managing Your iControl Devices
the Lamp module in the kit. If you purchase additional Lamp modules or Keychain
Remotes, you will need to add an automation to enable the Keychain Remote to turn on
or off existing or newly-purchased Lamp modules.
To control the Lamp module from your personal web portal:
1. Click on the ‘QuikControl’ button in the blue menu bar.
2. From the QuikControl drop-down menu, select the appropriate Lamp
module.
3. In the ‘Set Brightness Level’ drop-down menu, select the desired
brightness (e.g., 50%).
4. Click on the ‘Set’ button to save the change. The new light level will take
effect in a few seconds, after the iControl System has received the
requested change.
To learn how to control the Lamp module via a schedule, see Schedules. To learn how to
control the Lamp module via an automation, see Automations.
To check the status of your Lamp module:
xClick on the Summary tab.
xIn the Current States area of your Status window, scroll down the list to
locate your Lamp module. You will see the brightness level of the Lamp
module to the right of its name. Note that you can adjust this level by
clicking on it.
Printed Documentation
Your Motion Sensor
Your Motion Sensor
Your iControl Motion sensor detects movement within a specific area by sensing the
infrared energy emitted from a body as it moves across the sensor’s field of view. When
motion is detected, the sensor transmits an alarm signal to your iControl box, which in
turn communicates with the iControl servers, and then the alarm appears in your personal
web portal.
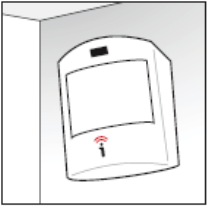
Mounting your Motion Sensor
Now you can physically install your Motion sensor. Generally, your Motion sensor must
be inclinemounted in a corner 7.5 feet high, aiming at the target area (as shown).
To operate properly, your Motion sensor needs to be placed with the following
considerations in mind:
Managing Your iControl Devices
xInstall it only in an indoor space.
xThe sensor can monitor an area approximately 35 feet long by 40 feet
wide or about 1200 square feet.
xMount the sensor so it ‘sees’ the area to be monitored. It is best to mount
it approximately 7.5 feet high on a wall.
xMount the sensor on a rigid, interior wall or rigid, insulated outside wall,
facing in.
xPlace the sensor within 100 feet of your iControl box.
xWindows in monitored area should be closed, as the device can sense
motion outside.
xChildren and pets over 40 lbs. can trigger the sensor, if they climb on
furniture or other objects in the monitored area. Children and pets under
40 lbs. may not be detected by the sensor.
xDo not aim the sensor at windows, fireplaces, air conditioners, heaters, or
forced-air heating vents.
xDo not place the sensor in direct sunlight.
xDo not mount the sensor near metal ductwork or other large metallic
surfaces that may interfere with signals from the sensor.
Printed Documentation
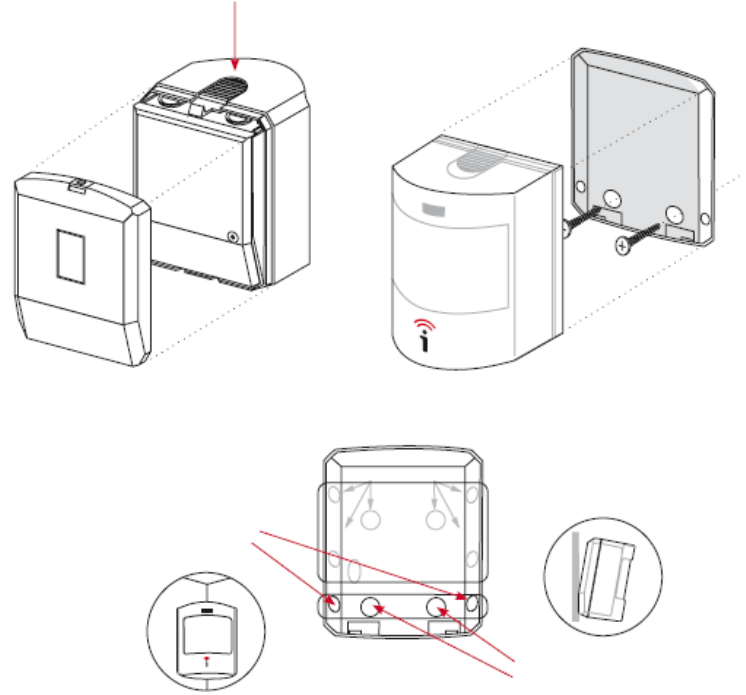
To mount your Motion sensor, you will need the screws that come with the sensor, a
pencil, a ruler, a drill, and a screwdriver. The following diagrams show the sequence of
the installation process:
Press Down Here to detach back. Optional screw. Unscrew if present.
Mount Motion sensor back to wall with 3/4” long screw and wall anchors. Snap the sensor body onto back.
For corner mount, drill here.
For wall mount, drill here.
When a Motion sensor is first installed, the sensor does an automatic test, and the LED
found on the upper front of the sensor turns red for five to ten seconds. The Motion
sensor requires an additional 60 seconds when there is no motion in the monitored area to
complete its test. This is the only time the LED turns red during normal operation. The

Managing Your iControl Devices
LED does NOT turn on whenever it detects people coming and leaving the area.
Using Your Motion Sensor
To check the status of your Motion sensor, click on your Summary tab. In the Current
States area of your Status Window, locate your Motion sensor. The status of your Motion
sensor is either ‘Occupied’ or ‘Empty’. The term ‘Occupied’ means that the Motion
sensor has detected a person moving in the area that it monitors and a yellow alarm-
condition triangle appears next to the sensor’s name. The term ‘Empty’ means that it has
NOT detected a person moving in the area that it monitors in the last five minutes.
If a person enters a monitored area, the Motion sensor recognizes the change within two
to three seconds and reports that the area is occupied through your iControl System,
which in turn displays ‘Occupied’ next to the sensor’s name on your iControl Summary
page within 30 seconds.
If a person leaves the monitored area, the Motion sensor ‘waits’ about five minutes
before reporting that the area is ‘Empty’. This delay allows the Motion sensor to confirm
that the person has left the room, and also prevents unnecessary multiple ‘Occupied’
event alarms. If a person does not move, the Motion sensor can report that the area is
‘Empty’. The yellow alarm-status triangle next to the sensor’s name in the Current States
area of the Status window disappears when the status changes to ‘Empty’.
You can use your Motion sensor as part of any automation. When the Motion sensor
detects a room is occupied, the iControl System can change modes, take a picture, or turn
lights on or off. Here are two examples:
xWhen someone arrives at a home or office (where the Motion sensor
monitors the area the
xIf a person comes to a front door or a particular room (where there is a
Motion sensor and a light), the iControl System can have a light come on
when the Motion Sensor detects that person.
For details on how to create automations, see Automations.
You can also use your Motion sensor with notifications. Here are a couple of examples:
Printed Documentation
xAdd a Custom notification such that when a Motion sensor detects
movement, an email or SMS message is sent to one or more people.
xAdd an iWatch notification such that if the Motion sensor remains in the
‘Empty’ state, a notification is sent. You may have a store that should
open at 9AM, and if no one is present inside the store to manage it, you
can receive a notification with a custom message that alerts you that the
store is not staffed.
For details on how to create notifications, see Notifications.
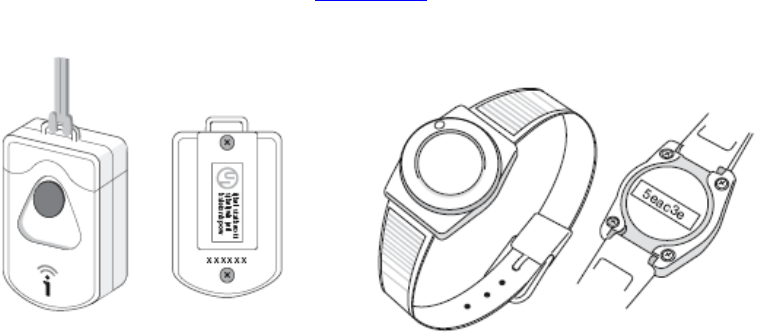
Your Panic Pendant
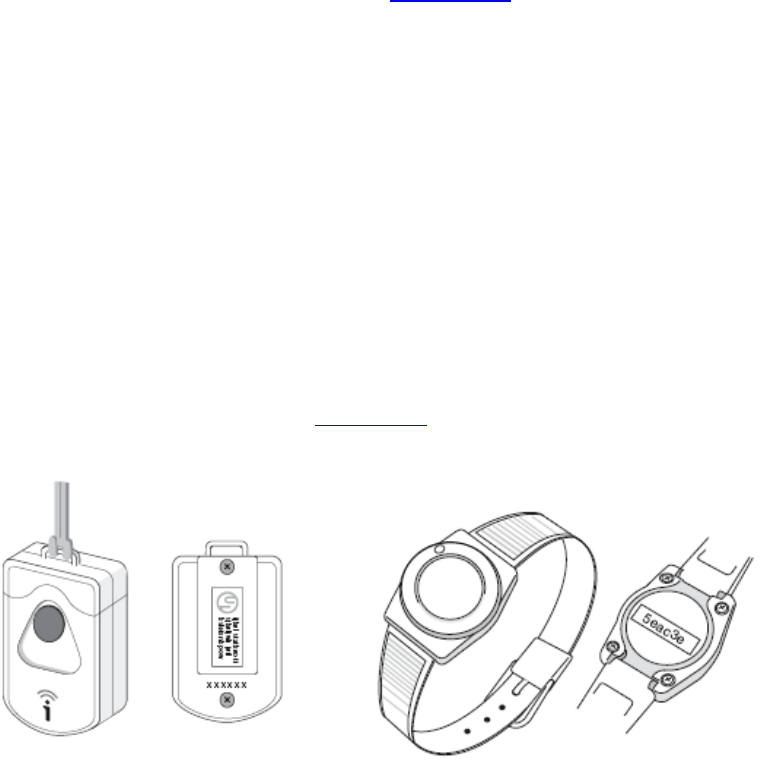
Your Panic Pendant
The Panic pendant is a water-resistant, wireless, battery-powered device used for
communicating immediately with family members, caregivers, or anyone else when the
person wearing the device presses the Panic button. The Notify Lists feature found on the
Notification tab is an excellent means to enable you to specify any number of family
members, caregivers, medical staff, or neighbors to be on the list of people contacted
when the Panic button is pressed (see Notify Lists).
Managing Your iControl Devices
The Panic pendant comes in two types: a hanging version worn around the neck and a
wristwatch version. Both can be affixed to a belt or placed in a pocket.
Your Panic Pendant
The Panic pendant is a water-resistant, wireless, battery-powered device used for
communicating immediately with family members, caregivers, or anyone else when the
person wearing the device presses the Panic button. The Notify Lists feature found on the
Notification tab is an excellent means to enable you to specify any number of family
members, caregivers, medical staff, or neighbors to be on the list of people contacted
when the Panic button is pressed (see Notify Lists).
The Panic pendant comes in two types: a hanging version worn around the neck and a
wristwatch version. Both can be affixed to a belt or placed in a pocket.
Your Smoke/Heat Sensor
Your Smoke/Heat Sensor
Your iControl Smoke/Heat sensor detects heat and smoke in your location. It can be used
in garages, offices, storage areas, bedrooms, basements, and warehouses, and is
Printed Documentation
especially useful where space heaters are used. If smoke or heat are present, the device’s
siren activates and it communicates with your iControl box. You quickly receive an alarm
on your iControl web portal. The Smoke/Heat sensor has an indicator light that turns red
in an alarm condition.
Your Smoke/Heat Sensor
Your iControl Smoke/Heat sensor detects heat and smoke in your location. It can be used
in garages, offices, storage areas, bedrooms, basements, and warehouses, and is
especially useful where space heaters are used. If smoke or heat are present, the device’s
siren activates and it communicates with your iControl box. You quickly receive an alarm
on your iControl web portal. The Smoke/Heat sensor has an indicator light that turns red
in an alarm condition.
Managing Your iControl Devices
Renaming Devices
You may change device names at any time to suit your needs. You may use numbers,
upper and lower case etters, and characters such as apostrophes.
To rename a device, follow these steps:
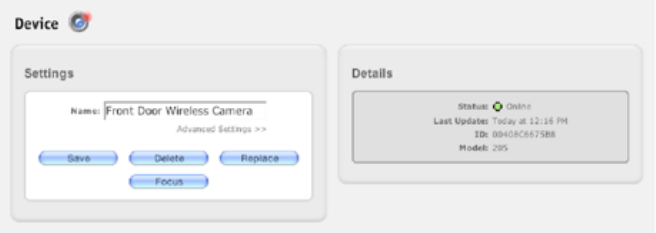
1. Click on the System tab.
2. Click on the name of the device you wish to change (e.g., ‘Wireless
Camera’). You will see the Device window.
3. In the Name field, replace the old name (e.g., ‘Wireless Camera’) with a
new name (e.g., ‘Front Door Wireless Camera’).
4. Click on the ‘Save’ button to save the new name. You will now see the
new device name listed in the System window.
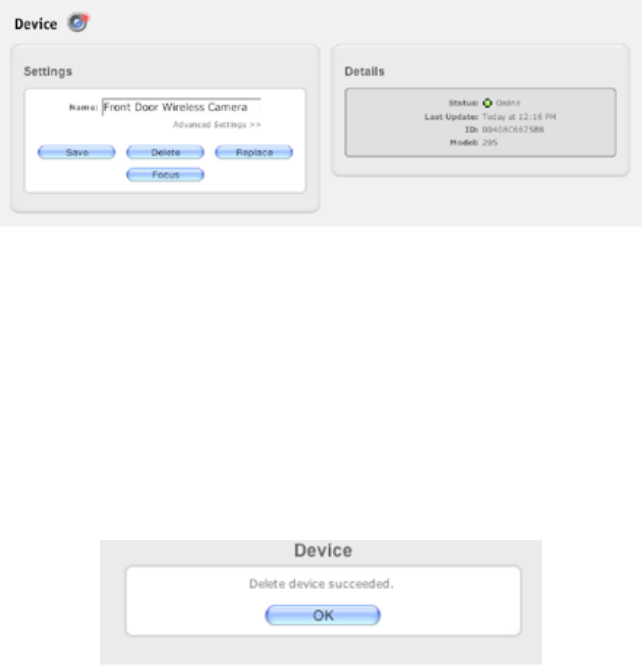
Printed Documentation
Deleting a Device
You can also delete any camera, Lamp module, or other device from your System. To
delete a device from your iControl System:
x Click on the System tab.
x Place your cursor over the name of the device you wish to delete (e.g. ‘Wireless
Camera’), and click on it. You will see the Device window (as shown) with the device to
be deleted.
x Click on the ‘Delete’ button to open the Delete Device window.
x Click on ‘Yes’ below the message: ‘Are you sure that you want to delete the device
Wireless Camera?’
x Click on the ‘OK’ button below the confirmation message: ‘Delete device succeeded’
in the Device window.
Note: If you attempt to delete a device that is incorporated into an automation,
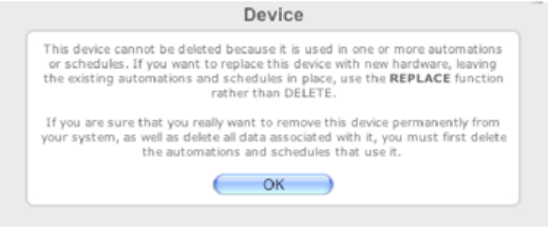
Automations
notification, or schedule, the following dialog box will appear:
You should either replace the device or delete any automations, notifications, or
schedules that use it. Click on ‘OK’ to exit this window.
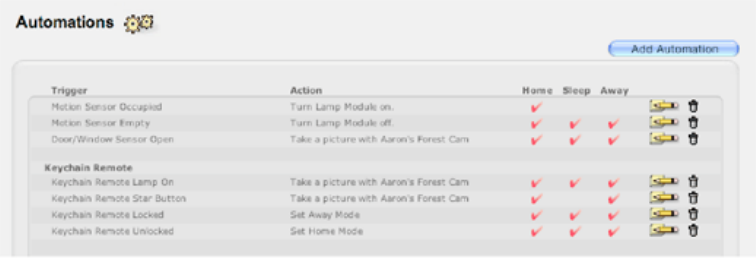
Automations
Automations
Automations link a change in one device with the action of another device. For example,
you may program an iControl camera to take a picture if a Door/Window sensor detects
an open door. You can create any number of automations and specify in which modes
they will operate.
Sample Automations Window
Here is a sample Automations window taken from an iControl System that has
automations for a Motion sensor, a Door/Window sensor, and a Keychain Remote.
An automation consists of a change in one device (called a ‘trigger’) and the resulting
action of another device. Devices such as Door/Window sensors, Keychain Remotes, and
Motion sensors trigger when a door is opened, a button on a Keychain Remote is pressed,
or a room is occupied. These devices can cause actions such as a camera taking a picture
or a Lamp module turning lights on or off.
As suggested by the sample Automation window, there is a range of features to choose
from in designing your automations. The following bullets and screen shots provide
illustrative examples of the kinds of automations you can create.
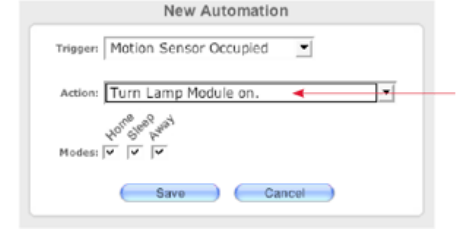
Printed Documentation
xAutomate one device to cause another to take an action. Here, when a
Motion sensor detects a family room is occupied, we want the Lamp
module to turn on a light.
When a Motion sensor senses a room is occupied, a Lamp module turns a light on.
xHave automations occur in selected modes. When someone opens the
door at the tree nursery while the business is open or closed, we want a
record of who came in. So, when the Door/Window sensor’s state
changes to ‘Open’, an automation will cause Aaron’s Forest Cam to take a
picture of who comes through the door.
If you have multiple devices, you can select which camera, thermostat, or
lamp module will respond. Not all devices of a particular type need to act
in the same manner.
Automations
Automations link a change in one device with the action of another device. For example,
you may program an iControl camera to take a picture if a Door/Window sensor detects
an open door. You can create any number of automations and specify in which modes
they will operate.
Sample Automations Window
Here is a sample Automations window taken from an iControl System that has
automations for a Motion sensor, a Door/Window sensor, and a Keychain Remote.
Common Tasks
An automation consists of a change in one device (called a ‘trigger’) and the resulting
action of another device. Devices such as Door/Window sensors, Keychain Remotes, and
Motion sensors trigger when a door is opened, a button on a Keychain Remote is pressed,
or a room is occupied. These devices can cause actions such as a camera taking a picture
or a Lamp module turning lights on or off.
As suggested by the sample Automation window, there is a range of features to choose
from in designing your automations. The following bullets and screen shots provide
illustrative examples of the kinds of automations you can create.
xAutomate one device to cause another to take an action. Here, when a
Motion sensor detects a family room is occupied, we want the Lamp
module to turn on a light.
When a Motion sensor senses a room is occupied, a Lamp module turns a light on.
xHave automations occur in selected modes. When someone opens the
door at the tree nursery while the business is open or closed, we want a
record of who came in. So, when the Door/Window sensor’s state
changes to ‘Open’, an automation will cause Aaron’s Forest Cam to take a
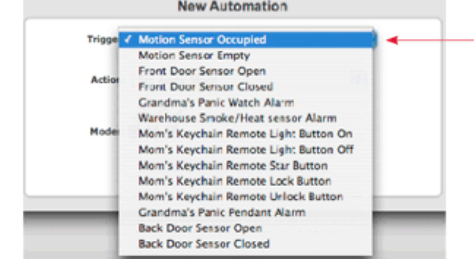
Printed Documentation
picture of who comes through the door.
If you have multiple devices, you can select which camera, thermostat, or
lamp module will respond. Not all devices of a particular type need to act
in the same manner.
Adding and Editing Automations
To add or edit a new automation (e.g., turning on the lights when the Motion sensor
detects that an area such as a hallway, lobby, or kitchen is occupied), follow these steps:
1. Click on the Automations tab.
2. Click on the ‘Add Automation’ button on the right-hand side of the window
to add an automation, or on a pencil icon to edit an existing automation.
Clicking on the ‘Add Automation’ button, will open a New Automation
window.
3. Choose the trigger for the automation by clicking on the down arrow. (In
our example, ‘Motion Sensor Occupied’ was chosen as a trigger for the
automation.)
Down arrow gives you access to all the devices in your System that can trigger an automation.

Common Tasks
The following table lists the triggers and actions associated with specific
iControl devices. ‘NA’ means that there is not a trigger or action
associated with that device. Triggers and actions for a device will appear
in the Trigger and Action drop-downs of the New Automation window if
that device was added to your system.
Device Trigger Action
Camera NA Take a picture
Carbon
Monoxide
detector
Alarm NA
Door/Window
sensors Open or Closed NA
Freeze sensor Alarm NA
Keychain
Remote
Depends upon the button. Defaults
are: Lock-change to Away Mode;
Unlock-change to Home Mode;
Star-Take a picture; Light Bulb-
Toggle lighting
NA
Lamp module NA Turn On, Turn Off
Motion sensor Occupied or Empty NA
Panic Pendant,
Panic Wristwatch Alarm NA
Smoke and Heat
sensor Alarm NA
System NA Set Away Mode, Home
Mode, Sleep Mode
Thermostat NA
Set Thermostat Fan, Set
Thermostat Heat
Setpoint, Set
Thermostat Cool
Setpoint
Water sensor Alarm NA
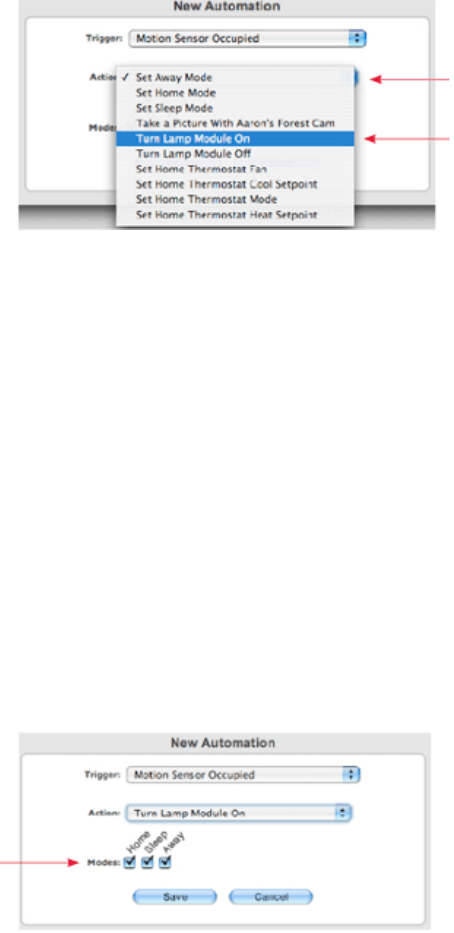
Printed Documentation
4. Choose the action to be taken by clicking on the down arrow. (In our
example, ‘Turn Lamp Module On’ was chosen so that the lights will come
on when the Motion sensor sees that the area is occupied.)
Click on this down arrow.
Choose ‘Turn Lamp Module On’.
Note: If you have multiple devices of the same type, each device will be
shown in the list to let you choose from among them.
5. Under Modes, check each mode in which you want the picture to be taken
(e.g., all modes).
Choose in which mode(s) you want the automation to occur.
Common Tasks
6. Click on the ‘Save’ button to save your automation.
Common Tasks
Commonly Used Terms
The following briefly defines the terms commonly used in the iControl System:
xAlarms: An alarm is displayed in your Alarms window of your Summary
page when the device changes state such as when a Motion sensor
detects that a room Is occupied or unoccupied.
xAutomations: Automations link a change in one device with the action of
another device such as when a Door/Window sensor detects a door open,
a camera takes a picture.
xModes: Your system can operate in one of three modes: Home, Sleep, or
Away. Modes allow you to have your devices behave differently
depending upon the mode. By putting your System in Away mode, you
can activate all your sensors; by placing your System in Home mode, you
can ‘turn off’ your sensors when you are around your house or business.
xNotifications: You can have the iControl service send you emails and/or
SMS messages when, for example, a Door/Window sensor opens or a
camera takes a picture.
xNotify Lists: A list you create of the people you want notified via email
and/or SMS when an event occurs—a Motion sensor detects movement, a
picture is taken, etc.
xQuikControl: A shortcut to change modes, control lighting, change a
thermostat, or take a picture.
Turn Up the Heat in the AM, Down During the Day, Up in the
Evening
To have your System turn up the heat in the morning, turn it down during the day, turn it
up in the evening, and turn it down again at night, create two schedules following these
steps:
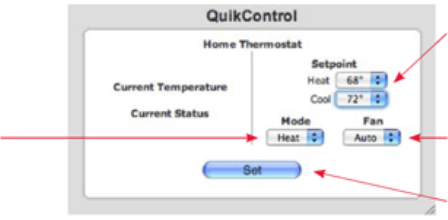
Printed Documentation
1. First, set the heat setpoint of your Thermostat. Click the ‘QuikControl’
button in the blue menu bar and select ‘Home Thermostat’ (the name you
gave your Thermostat). In the new QuikControl Home Thermostat window
that appears, use the drop-down menus to select your desired heat and
cool setpoints. Here, we chose ‘68°’ as the heat setpoint and ‘72°’ as the
cool setpoint. We want the heat to come on so ‘Heat’ is selected. We want
the fan to circulate the heat but we want the fan to shut off when the heat
turns off, so we selected ‘Auto’ under Fan.
Select heating as the mode.
Choose the temperature at which you want the heat to come on.
Set fan to ‘Auto’ to turn it on when heating and off when heating is complete.
Click on ‘Set’ to save your settings.
2. Click on the ‘Set’ button to save your choices.
3. Click on the Schedules tab to go to the Schedules window.
4. Click on the ‘Add Schedule’ button.
5. In the Name box, give the schedule a name such as ‘Weekday Home
Thermostat Schedule - AM’.
6. Click on ‘>> to’ to reveal some additional options.
7. Use the drop-down menus to select 7:00AM as your start time and
8:30AM as your end time.
8. We’ll have this schedule operate only on weekdays, so make sure the
Mon-Fri checkboxes are checked and the Sat and Sun checkboxes are
unchecked.
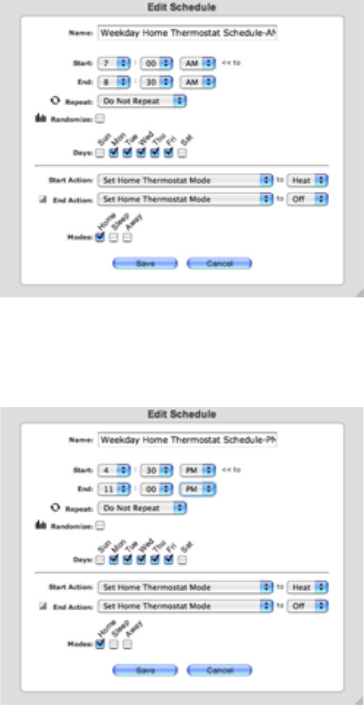
Index
9. Under Start Action, select ‘Set Home Thermostat Mode’ and ‘Heat’.
10. Under End Action, select ‘Set Home Thermostat Mode’ and ‘Off’.
11. We only want this schedule to operate in Home mode, so make sure there
is a check in the Home mode checkbox and that there aren’t checks in the
Sleep and Away mode checkboxes.
12. Click on the ‘Save’ button to save the schedule. You will be returned to the
Schedules window, where your new schedule will appear in the list of
schedules.
13. Now repeat Steps 3 through 11, using ‘Weekday Home Thermostat
Schedule - PM’ as the name of your schedule, 4:30PM as the start time,
11:00PM as the end time, ‘Set Thermostat Mode’ and ‘Heat’ as the Start
Action, and ‘Set Thermostat Mode’ and ‘Off’ as the End Action.Your
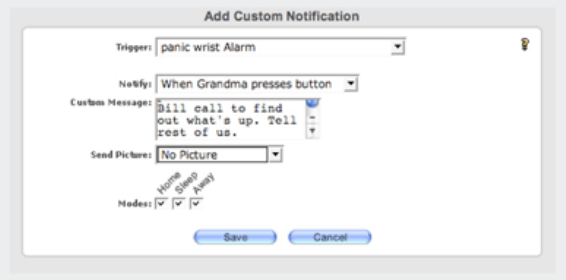
Printed Documentation
schedules will activate at the scheduled times, if the System is in Home
mode at those times.
To schedule your thermostat to cool your home, you can use the same procedure,
selecting ‘Cool’ instead of ‘Heat’ in Step 8 and adjusting the start and end times.
Send Me a Notification When the Panic Pendant Goes Off
To have a notification sent to you when the button is pushed on a Panic pendant, create a
custom notification following these steps:
1. Click on the Notifications tab to go to the Notifications window.
2. Click on the ‘Add Notification’ button.
3. The ‘Create a new Custom Notification’ option is already selected, so click
the ‘OK’ button.
4. Under Trigger, select ‘panic wrist Alarm’.
5. Under Notify, select ‘When Grandma presses button’. You will be notified
the next time Grandma presses her Panic button.
6. We want this notification to operate in all modes, so make sure there are
checks in the Home, Sleep, and Away mode checkboxes.
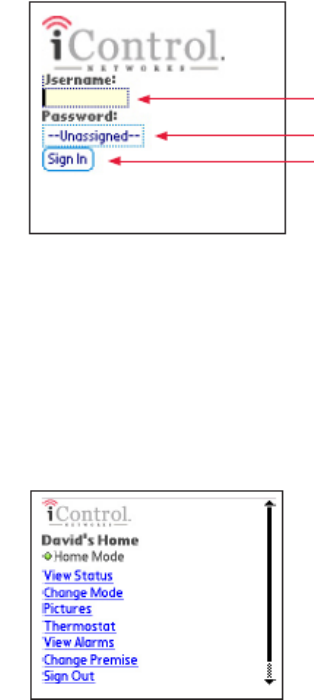
Managing Your System from a Mobile
Device
Logging In
To log in, go to http://mobile.icontrol.com, enter the same username and password you
use to access your personal web portal from your computer, and tap on ‘Sign In’. Note,
your username and password are case sensitive.
Note: The term ‘tap’ is used to indicate when to select items on a screen or in a drop-
down menu. Different mobile devices employ a scroll wheel, buttons, or a stylus and may
use the term ‘press’, ‘tap’, or ‘click’. This manual uses the term ‘tap’ to refer to all these
selection processes.
Type in your username.
Type in your password.
Tap on ‘Sign In’ to complete your login.
On your mobile device, your personal web portal looks like the image below. From here,
you can view the status of your devices, change modes, take and view pictures, manage
your thermostat(s), and view recent alarms.
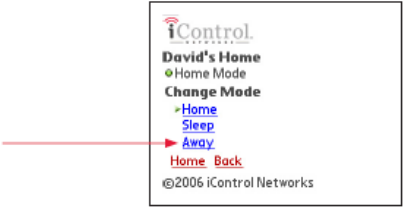
Printed Documentation
View Status See the status of all of your devices as well as the temperature of your
location (if you have a thermostat installed). From this screen, you can change lighting
levels or adjust your thermostat.
Change Mode Change your System mode (e.g., from Home to Away or Away to Sleep).
Pictures Take or view pictures from any of your cameras.
Thermostat Adjust the settings of your thermostat(s), change mode (e.g., heating to
cooling), or adjust the fan (on, off, or auto).
View Alarms View alarms from the past two days.
Change Premise Switch among multiple locations (for users with access to multiple
iControl Systems). Change Premise will appear only if you have more than one location
with an iControl System.
Sign Out Log off from your mobile personal web portal.
The Change Mode Screen
To change your System mode from your mobile portal, simply tap on the desired mode
from the Change Mode screen.
Change the mode of your System by tapping on the desired mode.
You will then see the following confirmation message in a new screen:
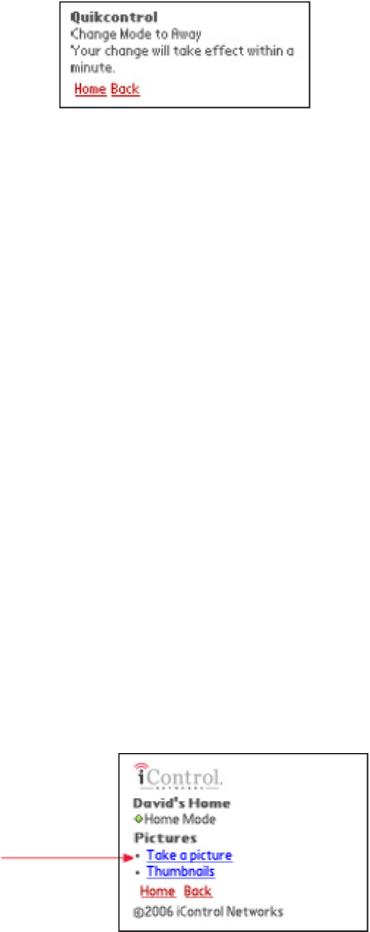
Index
You will need to wait a few moments and refresh your browser to see that your System
has changed to ‘Away’ mode. You will also see a green arrow next to ‘Away’ in the
Change Mode screen.
The Pictures Screen
From this screen you can:
xtake pictures using any of your cameras
xview thumbnails of all your pictures
Tap to take a picture.
If you have more than one camera, tap on the first camera name that appears to reveal the
name of your other cameras.
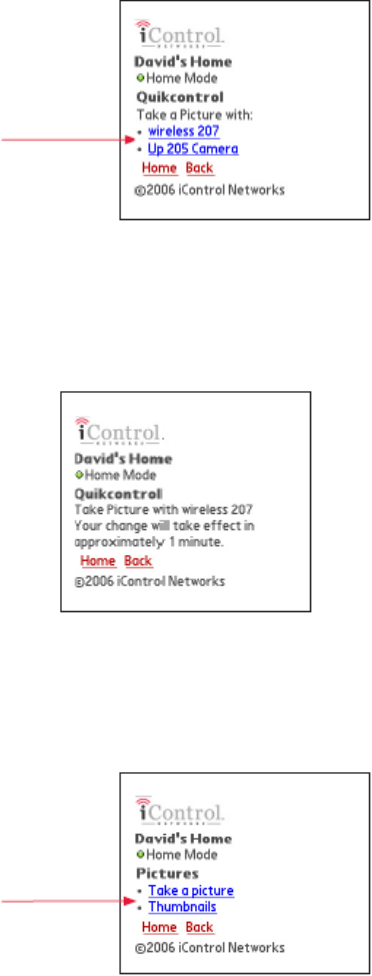
Printed Documentation
Tap to select the camera you want to use.
You will see a message indicating when the picture will be taken.
You can also view thumbnails of previously taken pictures. Tap on ‘Thumbnails’ from
the Manage Pictures screen.
Tap on ‘Thumbnails’ to see archived pictures.
This will bring up a screen similar to the following one:
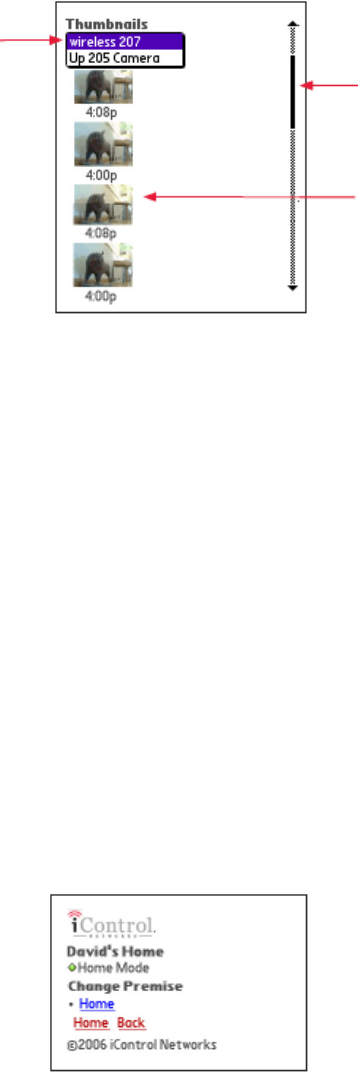
Index
Tap on the camera’s name to see the associated Thumbnails. Here we chose ‘wireless 207’.
Scroll to see more wireless 207 thumbnails.
Shows the four most recent pictures.
You will see the four most recent pictures from your camera. Scroll to the bottom of the
screen and tap on ‘Older>>’ to view older pictures from this camera.
Change Premise Screen
If you have access to more than one premise with an iControl System, you will see the
Change Premise screen. For example, if you have a System in your office and another in
your home, the Change Premise menu item lets you easily switch between them. Click on
the Premise name shown to reveal other premises and then tap on name of the premise
you want to manage.
Frequently Asked Questions
The iControl Gateway
xCan I plug the iControl box into an uninterruptible power supply or a surge
protector?
xWhat if the iControl box Power light does not turn on?
xWhat if I do not have a router or similar device?
xWhat is the phone jack for?
xWhen do the LEDs blink?
xThe iControl System
xWhat Kind of Broadband do I need?
xWhen I tried using QuikControl why didnt anything happen?
xHow can I tell my iControl box is communicating with the iControl servers?
xWhat do I do if I cant see the device I just installed?
xWhat should I do if my device just seems to keep installing the dot is still
yellow?
Notifications
xWhy did I unexpectedly receive an iWatch Exception notification as an
email or SMS?
Camera
xWhat do I need for my wireless Camera to work?
xMy Camera is out of focus. What do I do?
xWhat if my camera hasnt been discovered and has a yellow dot next to it?
xWhat do I do if I cant see any images or video from the camera I just
installed?
xHow do I use WEP (Wireless Equivalent Privacy) on my Wireless camera?
xWhat if my network uses security other than WEP?
xWhat is the cameras resolution?
Door/Window Sensor
xWhat should I do if my Door/Window sensor has a red dot next to it on the
System page of my iControl Portal?
xWhy does my Door/Window sensor always report itself as open?
xHow far away can I install my iControl Door/Window sensor from the
iControl box?
Keychain Remote
Printed Documentation
xWhat are the default actions of the buttons?
xThe Keychain Remote is doing something it is not supposed to do. What
should I do?
xMy Keychain Remote isnt doing anything. I press buttons repeatedly.
xWhy doesnt my Keychain Remote lamp button doesnt turn the lamp on or
off?
xI used the Keychain Remote and the light level is different now. Why?
xIf I buy another Lamp module, can my Keychain Remote control it?
Lamp Module
xMy lamp module isnt installing, what should I do?
xWhat kinds of lights can I use the Lamp module with?
xCan I use it on a lamp wired into a 3-way or 4-way wall switch?
xCan I use a 3-way light?
xCan I plug a Lamp module into an uninterruptible power supply (UPS)?
xCan I plug a Lamp module into a power strip with a surge protector or into
a surge protector?
xHow far away can I install a Lamp module from the iControl box?
xWhat does the black button on the bottom of the Lamp module do?
Motion Sensor
xHow do I test that a Motion Sensor is covering the area I hope it does
monitor?
xWhy doesnt the motion sensor detect when I leave the room and come
back?
xWill the Motion Sensor sense my pets?
xWhy is there nothing in the picture that was taken as a result of the motion
detector being activated?
xHow far away can I install my iControl Motion sensor from the iControl
box?
Thermostat
xWhat type of system will the iControl thermostat work with?
The iControl Gateway
Can I plug the iControl box into an uninterruptible power supply or a surge
protector?
No. We do not recommend using uninterruptible power supplies or surge protectors.
Index
What if the iControl box Power light does not turn on?
Make sure that the power cord is fully inserted into the power jack of the iControl box. If
the Power LED in the front of the box still does not turn on, there may be a problem with
your electrical connection. In rare instances, the iControl box or power supply may be
faulty.
What if I do not have a router or similar device?
A router or similar device that does DHCP is required so that the iControl Gateway and
associated devices are able to get IP addresses. You will plug the router or similar device
into your broadband modem.
What is the phone jack for?
A phone dial-up option will be available in a future version of the product.
When do the LEDs blink?
During normal operation, the Power LED should stay on steady green. The Device LED
turns on briefly when the iControl box is communicating with iControl devices. The
Status LED is on when there is communication between the iControl servers and the
iControl box. The LAN LED blinks rapidly when there is communication between the
router and the iControl box.
The iControl System
What Kind of Broadband do I need?
The iControl System will work with any broadband connection that does not have a high
amount of latency. Unfortunately this means that most Satellite brroadband connections
will not work with the iControl System.
When I tried using QuikControl why didnt anything happen?
When you select an action with QuikControl, a dialog box tells you how long it will take
for the change to occur. Usually this time is between 30 seconds to 3 minutes, depending
on a number of factors, including how recently your gateway communicated with the
iControl server.
During the indicated time window, the iControl servers receive your request,
communicate with your iControl box, and then initiate the local devices to act.
Finally, your Summary page is updated with the new settings or status. This
Printed Documentation
whole process may take a few minutes, and you may need to update your
Summary page by clicking refresh to see that the desired action has taken place.
How can I tell my iControl box is communicating with the iControl servers?
When looking at the System tab on the iControl portal, a green dot should appear next to
Gateway. If the dot is red, make sure that the iControl box is connected to your router via
an Ethernet cable and check that the iControl box has power. (The Power LED on the
front panel of the iControl box is green when it has power). Next, check to see if your
router and DSL or cable modem are working, and make sure that you have access to the
Internet. If you can browse the Internet, your modem and Internet connection are
working. Refresh your browser window and log in if necessary. If the dot is still red, reset
your iControl box by pressing the reset button on the back of the box (it is recessed, you
may need a paperclip in order to do this). If the problem persists, contact
support@icontrol.com.
What do I do if I cant see the device I just installed?
Click on the System tab and see if there is a red dot next to the devices name in the
System window. If so, confirm that the device type and ID are entered correctly. Click on
the devices name, and then look on the right hand side of the resulting page. There will
be a field labeled ID, the number in this field should match the Serial Number (S/N)
printed on the label of the device.
What should I do if my device just seems to keep installing the dot is still
yellow?
1. Confirm that the device is plugged in (if it has a power supply).
2. Confirm that the device type and ID shown on the Device page match the
type and serial number of the actual device. (Go to your System tab and
click on a device name to bring up the Device page.).
3. Activate the device. If it is a Motion sensor, wave your hand in front of it to
force it to communicate its status. If it is a Door/Window sensor, open and
close the door. If it is a Keychain Remote, press a button. For Water and
Freeze sensors, apply water or ice. For a CO detector or Smoke/Heat
sensor, press the Test button. For a Panic pendant or wristwatch, press
the Panic button. Then wait a few moments for your iControl box to
discover the device and change the dot to green.
4. If it is a camera, see Section 10.4, About your Camera, or visit the related
FAQ.
5. Confirm that your iControl box has a green dot next to it. If it does not,
unplug and plug back in the power supply to the iControl box. Wait a few
minutes for the System to restore itself. You will see the devices details,
including its type and ID. Make sure that the type and ID match those for
Index
the device itself. Chapter 8 and Appendix C provide detailed information
on how to accurately enter the correct device type and ID.
Notifications
Why did I unexpectedly receive an iWatch Exception notification as an email or SMS?
You may have set an iWatch Monitor notification at some point in the past. This creates a
notification to have a message sent to you when something does NOT happen. You can
see your notifications by clicking on the Notifications tab in the iControl Portal.
Camera
What do I need for my wireless Camera to work?
The wireless camera uses an 802.11 connection to connect with the iControl Gateway.
This means that if you purchase an iControl wireless camera, you will need an existing
wireless router in order to supply a wireless network.
My Camera is out of focus. What do I do?
Follow the instructions in Section 8.2.9 of the User Manual, Focusing Your Camera.
What if my camera hasnt been discovered and has a yellow dot next to it?
Please see the troubleshooting steps in the next question.
What do I do if I cant see any images or video from the camera I just
installed?
Follow these steps:
1. Make sure that power is connected to the camera via the Axis power
supply, and if it is a wired camera, that the camera is connected to your
router with an Ethernet cable.
2. Verify that the Serial Number of the physical camera matches the Serial
Number attempting to be discovered by the system. To do this, go to the
System tab in the iControl Portal and click on the camera that is
attempting to install. On the right is a number labeled ID. This number
should match the S/N on the back of camera.
If these do not match, and there are other cameras in your system, check
to see if the ID matches one of those. If the ID and the S/N numbers dont
Printed Documentation
match and this is your only camera, perform a replace operation on the left
panel.
3. If none of the above steps have solved the problem, perform a factory
reset of the camera. To factory reset the camera perform the following
steps:
oDisconnect power to the camera.
oDepress and hold the button on the back of the camera.
oWhile holding the button, connect power to the camera. Continue to
hold the button.
oHold the button until the LED ring on the front of the camera turns
amber.
oWait until the LED ring turns solid green. The camera is now reset
to factory settings.
oWait one to three minutes for the camera to be discovered by your
iControl System.
4. If the problem continues, contact support@icontrol.com.
How do I use WEP (Wireless Equivalent Privacy) on my Wireless camera?
See Section 8.2.1 in the iControl User Manual for more details.
What is the cameras resolution?
The iControl Camera takes pictures at 640x480 and all video are presented at 320x240 or
640x320 depending upon your preference.
Door/Window Sensor
What should I do if my Door/Window sensor has a red dot next to it on the
System page of my iControl Portal?
Try the following steps, in this order:
1. Open and close the window or door that it is mounted on. Wait a few
moments and see if the dot turns green. Repeat once, if necessary.
2. If the problem persists, confirm that the devices type and ID are correctly
entered in the System.
Why does my Door/Window sensor always report itself as open?
1. The sensor may be installed incorrectly, verify that the arrows on the
sensor and the sensor magnets are aligned.
Index
2. Re-position the sensor and the sensor magnet so that the space between
them is smaller. There needs to be a magnetic field between the two
pieces, and they may be too far apart. Wait a few moments to see if the
dot turns green. If the problem persists, re-position the sensors again.
How far away can I install my iControl Door/Window sensor from the
iControl box?
100 feet.
Keychain Remote
What are the default actions of the buttons?
See Section 8.6 in the iControl Users Manual.
The Keychain Remote is doing something it is not supposed to do. What
should I do?
Click on the Automations tab. For each Keychain Remote, you will see the settings for
each button. You may have re-configured the buttons to change their function.
My Keychain Remote isnt doing anything. I press buttons repeatedly.
The Keychain Remote needs a few moments to communicate via infrared with your
iControl box. When you press a button, hold it for a second or two, the LED on the
Keychain Remote should turn green and then after about one minute, your System
initiates the action you wish.
Why doesnt my Keychain Remote lamp button doesnt turn the lamp on or
off?
Pressing the Light button on the Keychain Remote 4-button version alternately sends
Light Button On and Light Button Off signals to your iControl System. So if you use the
Keychain Remote Light button to turn your lights on, then the next signal the Keychain
Remote Light button will send is Light Button Off. However, you may not experience the
desired result. If, for example after turning the lights on with the Keychain Remote Light
button you turn the lights off manually, using QuikControl, or with an automation or
schedule, then pressing the Keychain Remote Light button will send the Light Button Off
signal and no change will occur. Pressing the Light button a second time will send the
Light Button On signal, and the lights will turn on.
Printed Documentation
I used the Keychain Remote and the light level is different now. Why?
A Light Button On signal will always turn (or leave) the lights on to full brightness and a
Light Button Off signal will always turn (or leave) the lights off, irrespective of the
brightness level of the lamp when the signal is received.
If I buy another Lamp module, can my Keychain Remote control it?
Yes. The Keychain Remote that comes with your Starter Kit is configured from the
factory to control the Lamp module that comes with the kit. If you purchase additional
Lamp modules or Keychain Remotes, you will need to add an automation to enable the
Keychain Remote to turn on or off existing or newly purchased Lamp modules.
Powerline Lamp Module
Shipped with version 1 systems only.
My lamp module isnt installing, what should I do?
There are four things to try in this situation.
1. Check the outlet youve plugged the lamp module in to. Make sure that it is
working correctly and isnt controlled by a switch.
2. Check if your iControl gateway is currently receiving its power from a UPS
(uninterruptible power supply) or a power strip with surge protection. If it is
plug it in directly to a wall outlet or power strip without surge protection.
3. Check the ID on the lamp module and make sure it matches the one
installed on your system.
oTo do this, look at the label on the back side of the lamp module,
the physical ID is printed below the second bar code and is 12
characters long. This ID should match the one that is listed on the
iControl Portal for your device. It can be viewed by logging onto
your portal, clicking on System Tab and clicking on the lamp
module youre troubleshooting. If the ID listed is not the same as the
one on the devices label, you can click on the replace button, and
enter the ID of the lamp module you have in your kit (12 digits, no
punctuation).
4. If none of the above solves the problem, try connecting the lamp module
to another circuit in your house.
What kinds of lights can I use the Lamp module with?
Index
You can use it on any light that uses a 40-watt to 300-watt incandescent light bulb. It
does not work with fluorescent light bulbs or incandescent light bulbs less than 40 watts
or greater than 300 watts.
Can I use it on a lamp wired into a 3-way or 4-way wall switch?
No.
Can I use a 3-way light?
No.
Can I plug a Lamp module into an uninterruptible power supply (UPS)?
No, the iControl Lamp Module does not work properly when plugged into a UPS.
Can I plug a Lamp module into a power strip with a surge protector or into
a surge protector?
No, the iControl Lamp module does not work properly when plugged into such a power
supply.
How far away can I install a Lamp module from the iControl box?
100 feet.
What does the black button on the bottom of the Lamp module do?
It is used for iControl testing purposes only.
Motion Sensor
How do I test that a Motion Sensor is covering the area I hope it does
monitor?
Follow these steps to do a walk test:
1. Remove your Motion sensor from the mounting plate, then re-attach it.
2. Walk across the room, and wait for the Motion sensor light to turn red.
3. Stop, stand still, and wait for the Motion sensor light to turn off.
4. Repeat Steps 2 and 3, until the entire monitored area has been tested.
Printed Documentation
5. Leave the room for at least 60 seconds. After 60 seconds without motion,
the walk test mode time expires. After the walk test is finished, the light on
the Motion sensor no longer activates when motion is detected.
Why doesnt the motion sensor detect when I leave the room and come
back?
The Motion Sensor has a built in four-minute delay. If after four minutes, it has not
detected motion, it changes from Occupied to Empty. If motion occurs during that four-
minute period, it remains in an Occupied state, as reported on the Summary Pages
Current States window. If motion occurs after the four-minute window, it changes from
Empty to Occupied as shown in the Current States window and a new alarm is generated
in the Alarm History window.
Will the Motion Sensor sense my pets?
The Motion Sensor cannot detect pets weighing less than 40 pounds. This also means that
it will not sense children weighing less than 40 pounds. However, in some cases, pets and
children will trip the Motion sensor if they walk very close to the sensor itself.
Why is there nothing in the picture that was taken as a result of the motion
detector being activated?
The Motion sensor has a 2 - 3 second delay before communicating with the iControl box.
The camera may miss the person walking through the cameras field of view. The remedy
is to reposition the camera and Motion sensor to account for this delay. For example,
point the camera along a corridor that takes a couple of seconds to traverse, and position
the motion sensor so that motion is detected as the person enters that corridor.
How far away can I install my iControl Motion sensor from the iControl
box?
100 feet.
Thermostat
What type of system will the iControl thermostat work with?
The iControl thermostat is an HAI single stage heating and cooling thermostat. It has 5-
wires, and requires 24 volts of AC power. Generally your existing thermostat should have
3 to 5 wires connected to it in order for our thermostat to be compatible.
The iControl thermostat is known to not work with
Index
xheat-pump systems
xradiant or baseboard heat, since these are often 120v or 240v systems.
xTwo wire systems, these are generally analog and do not supply enough
power to work with the iControl Thermostat.
Index
1
120v .............................................. 95
2
2007 iControl Networks................... 3
240v systems................................ 95
3
320x240 ........................................ 95
4
4-button Keychain Remote ........... 47
6
640x320 ........................................ 95
640x480 ........................................ 95
A
AC................................................. 95
access.. 5, 17, 22, 29, 35, 74, 89, 93,
95
History window .......................... 17
IP Address................................. 22
Action.... 5, 46, 47, 71, 72, 74, 85, 95
System initiates ......................... 95
Activate ......................................... 95
device........................................ 95
Add ............................................... 37
Add Automation ............................ 74
Add Device ........... 22, 37, 41, 52, 54
Add Device window..... 37, 41, 52, 54
Add Notification’ button ................. 88
Add Schedule ............................... 85
adding ................... 22, 41, 52, 57, 63
Additional .................................. 22
Custom...................................... 63
iWatch ....................................... 63
Your Keychain RemoteYou ....... 57
Admin............................................ 35
Alarm History .... 5, 17, 37, 40, 43, 95
Alarm History window .. 5, 17, 37, 40,
43, 95
Alarm History window displays.. 5, 43
status......................................... 43
Alarm History window shows .......... 5
Alarm’............................................ 88
alarm-condition ....................... 40, 63
Alarms .. 5, 17, 37, 40, 43, 60, 63, 65,
66, 74, 85, 88, 89, 95
Motion Sensor generated ............5
sensor transmits ........................60
Alarms window ..............................85
All ..................................................17
All modes ......................................74
All rights reserved............................3
Allows............................................46
AM.................................................85
appear .. 5, 13, 25, 27, 29, 37, 40, 41,
43, 47, 52, 60, 63, 68, 74, 85, 89,
91, 95
Summary page ..........................40
Appear indicating ..........................13
Appear telling ................................25
Appendix .......................................95
Approach.......................................46
house.........................................46
Auto...............................................85
Automations5, 13, 17, 22, 27, 43, 47,
50, 51, 57, 63, 68, 71, 72, 74, 85,
95
Click...........................................95
Automations link............................85
Automations tabAutomations ..........5
Automations WindowHere.......71, 72
AutomationsAutomations link ..71, 72
change.................................71, 72
Away .... 5, 13, 29, 44, 46, 47, 85, 88,
89, 90, 95
Change ................................13, 46
Home ...................................46, 89
Sleep .........................................89
Away Mode 5, 13, 46, 47, 74, 85, 88,
90
Away mode checkboxes..........85, 88
Axis ...............................................95
B
Back ........................................37, 43
Carbon Monoxide ......................37
Back Hallway...................................5
Printed Documentation
Basement CO ............................... 37
Battery .................................... 64, 65
Blue menu bar .............................. 17
Brightness......... 5, 50, 51, 56, 57, 95
set ............................................. 56
Brightness level....................... 57, 95
lamp .................................... 57, 95
Broadband .................................... 95
Kind ........................................... 95
Browse.......................................... 95
Internet ...................................... 95
Business ................................. 50, 51
Buttons.................. 25, 27, 29, 52, 54
C
Came ............................................ 21
Camera 5, 13, 20, 21, 22, 23, 25, 27,
29, 33, 46, 67, 68, 71, 72, 74, 85,
89, 91, 95
Camera Assistant.......................... 22
Camera Focus Utility..................... 29
Camera hasnt ............................... 95
Camera matches........................... 95
Serial Number ........................... 95
Camera takes ................... 71, 72, 85
picture ........................... 71, 72, 85
Camera There............................... 21
Camera's name............................. 91
CameraYou............................. 20, 21
Carbon Monoxide.......... 5, 37, 40, 74
back........................................... 37
Carbon Monoxide detector...... 37, 40
installed ..................................... 40
Carbon Monoxide sensors .............. 5
Caregivers ........................ 27, 64, 65
Change device names .................. 67
Change Mode ......... 5, 63, 85, 89, 90
Change Mode Change.................. 89
Change Mode screen.................... 90
Change Mode ScreenTo change .. 90
Change Premise ..................... 89, 93
Change Premise screen ............... 93
Change Premise Switch................ 89
changing ............... 13, 46, 71, 72, 74
AutomationsAutomations link ... 71,
72
Away ................................... 13, 46
Home ...................................13, 46
Home Mode ...............................74
ModesYour ................................13
System.......................................46
System mode.............................46
Check ............................................43
see.............................................43
status .........................................43
Checking
Installation .................................43
Choose 'IP Camera .......................22
Choose 'Turn.................................74
Click
Automations...............................95
Clickable........................................17
Closed .. 5, 25, 29, 43, 60, 71, 72, 74,
95
CO.....................................37, 40, 95
iControl box discovers ...............37
Commonly Used TermsThe ..........85
Computer ......................................43
Condition triangle appears ............63
Configurable..................................46
Contextsensitive............................17
Control...........................................57
Control various ..............................46
Convenient automated ............50, 51
iControl Lamp module provides 50,
51
Cool...............................................85
Copyright.........................................3
Counterclockwise ..........................29
Create .....................................85, 88
Current States .. 5, 40, 43, 56, 57, 63,
95
Current States window ..............5, 95
Custom Message ..........................63
custom notification ........................88
Custom notification following these
steps ..........................................88
Custom Notification’ ................63, 88
D
Day..........................................33, 85
Down During..............................85
Default settings .............................47
following.....................................47
Index
Delete This Picture........................ 29
Deleting................................... 29, 68
DeviceYou................................. 68
Pictures ..................................... 29
PicturesTo delete ...................... 29
Desired brightness ........................ 57
select......................................... 57
Desired mode ............................... 90
simply tap .................................. 90
Determining .................................. 21
Your........................................... 21
Device detects ................................ 5
Device generated.......................... 43
Device name............................. 5, 95
device presses........................ 64, 65
Panic button ........................ 64, 65
Device recognizes........................... 5
Device window........................ 67, 68
Devices 5, 17, 21, 22, 37, 40, 41, 43,
44, 46, 52, 54, 60, 64, 65, 66, 67,
68, 71, 72, 74, 85, 89, 95
Activate ..................................... 95
ID number ..................... 37, 41, 52
Renaming.................................. 67
Devices employ............................. 89
DevicesYou................................... 67
Renaming.................................. 67
DeviceYou .................................... 68
Deleting ..................................... 68
DHCP............................................ 95
Didnt ............................................. 95
dimmer.............................. 50, 51, 56
Directions to.................................. 54
follow ......................................... 54
DL ........................................... 37, 41
Do NOT......................................... 52
Doesnt .......................................... 95
Dont .............................................. 95
Door5, 13, 17, 25, 37, 41, 43, 57, 63,
71, 72, 85, 95
iControl Starter Kit includes ....... 41
Door/Window ... 5, 13, 17, 41, 43, 71,
72, 74, 85, 95
Door/Window sensor.... 5, 41, 43, 74,
95
Door/Window Sensor’ ................... 17
Down .......................................74, 85
Down again ...................................85
Down During .................................85
Day ............................................85
Drive off.........................................46
work ...........................................46
Dropdown................................41, 52
Drops.............................................44
41...............................................44
DSL ...............................................95
Ductwork .......................................60
During............................................95
E
E.g.. 5, 25, 37, 41, 52, 56, 57, 67, 74,
89
Easy ..............................................52
install .........................................52
edit ..............................23, 27, 47, 74
new automation .........................74
Editing AutomationsTo ..................74
Editing Your Camera's Settings.....23
email........................ 5, 27, 63, 85, 95
get................................................5
send.............................................5
email and/or SMS......................5, 85
Email attachment ..........................27
Emails ...........................................85
Empty ............................5, 63, 74, 95
enable ............... 5, 33, 57, 64, 65, 95
End Action.....................................85
enter 5, 27, 35, 37, 41, 52, 63, 89, 95
router’s IP ..................................35
Etc.................................................27
Ethernet...................................21, 95
Etters.............................................67
EveningTo .....................................85
Examples of iControl alarm devices 5
Exception notification ....................95
F
Factory ..........................................41
Family............................................27
Family members......................64, 65
Fan................................................85
FAQ...............................................95
find ....................................22, 29, 35
SSID ..........................................35
Printed Documentation
First page........................................ 5
Focusing ....................................... 29
Your CameraTo focus ............... 29
Focusing Your Camera ................. 95
Follow these steps ............ 37, 52, 54
Following........................... 47, 54, 95
default settings .......................... 47
directions to............................... 54
instructions in Section 8.2.9 ...... 95
Form ............................................. 35
192.168.1.1 ............................... 35
Freeze........................... 5, 44, 74, 95
Frequently Asked Questions......... 95
Fri checkboxes.............................. 85
Friends.......................................... 27
Front ....................................... 25, 41
Front Door................................. 5, 67
G
Gateway.................................... 5, 95
GE Security............................. 37, 41
Grandma....................................... 88
Green dot appears next ................ 43
name ......................................... 43
H
HAI................................................ 95
Hanging Pendant ............................ 5
Heat 5, 37, 44, 60, 65, 66, 74, 85, 89,
95
Turn Up ..................................... 85
Heat SensorYour iControl ....... 65, 66
Help ................................................ 5
History window........................ 17, 47
History window records................. 17
History, Update ............................... 5
History’ button......................... 17, 47
HistoryYour ................................... 17
Home ... 5, 13, 33, 35, 46, 47, 50, 51,
63, 74, 85, 88, 89, 93
Change................................ 13, 46
Home Mode ...... 5, 13, 46, 47, 74, 85
change ...................................... 74
Unlock-change .......................... 74
Home mode checkbox .................. 85
Home Thermostat' ........................ 85
House ........................................... 46
approach ................................... 46
I
IContro Portal ................................22
iControl... 3, 5, 13, 17, 19, 20, 21, 23,
29, 33, 35, 37, 40, 41, 43, 44, 46,
50, 51, 52, 55, 56, 57, 60, 63, 65,
66, 68, 71, 72, 74, 85, 89, 93, 95
iControl box 5, 13, 19, 29, 37, 40, 43,
44, 55, 60, 65, 66, 95
IControl box discovers...................37
CO .............................................37
IControl box Power........................95
IControl Box The appearance .......19
IControl Gateway ..........................95
iControl Lamp Module .46, 50, 51, 95
IControl Lamp module provides ...50,
51
convenient automated .........50, 51
IControl Networks............................3
IControl Personal Web Portal
ExplainedAfter .............................5
IControl Portal .........................23, 95
IControl Service.............................33
iControl Starter Kit...................41, 52
IControl Starter Kit includes.....41, 52
Door...........................................41
iControl Summary....5, 13, 43, 56, 63
iControl Summary page 5, 13, 43, 56,
63
iControl System 5, 13, 19, 20, 21, 43,
57, 63, 68, 71, 72, 85, 89, 93, 95
IControl User Manual ....................95
Icontrol.com...................................89
ID.........................3, 5, 37, 41, 52, 95
ID number .........................37, 41, 52
device ............................37, 41, 52
Immediately.............................64, 65
Inc ...................................................3
Inclinemounted..............................60
Included.........................................27
Indicator light...........................65, 66
Information You'll Need To............22
infrared energy emitted .................60
sensing ......................................60
Installation ....... 23, 37, 43, 54, 55, 60
Installed...................................37, 40
Carbon Monoxide detector ........40
Index
Your Carbon Monoxide
DetectorTo install................... 37
Installing............................ 37, 52, 54
easy........................................... 52
Your........................................... 52
Your Powerline .......................... 52
Your Z ....................................... 54
Instructions ................................... 41
skip............................................ 41
Instructions in Section 8.2.9.......... 95
Follow........................................ 95
Interchangeable .............................. 5
Internet.......................................... 95
browse....................................... 95
InTo log......................................... 89
Logging ..................................... 89
IP 23, 35, 95
IP Address .................................... 22
access ....................................... 22
Is occupied.................................... 85
Is smaller ...................................... 95
Isnt ................................................ 95
IT 35
iWatch..................................... 63, 95
Add............................................ 63
K
Keychain Remote... 5, 13, 46, 47, 50,
51, 57, 71, 72, 74, 95
Keychain Remote 4-button ........... 95
Keychain Remote buttons............. 47
Keychain Remote ButtonsYour..... 47
Keychain Remote isnt ................... 95
Keychain Remote Lamp Off.......... 47
Keychain Remote Lamp On.......... 47
Keychain Remote Light button 57, 95
Keychain Remote needs............... 95
Keychain Remote Star button ....... 47
Keychain RemoteYour .................. 46
Kind............................................... 95
Broadband................................. 95
L
Lamp.... 5, 25, 47, 50, 51, 52, 54, 55,
56, 57, 68, 71, 72, 74, 95
brightness level ................... 57, 95
Lamp module ... 5, 47, 50, 51, 52, 54,
55, 56, 57, 68, 71, 72, 74, 95
Lamp module isnt..........................95
Lamp Module Model 6101.............52
Lamp module needs......................55
Lamp Module On...........................74
Lamp module to dim........................5
Lamp module turning...............71, 72
Lamp module youre.......................95
Lamp modules DO NOT................55
Lamp ModuleYour...................50, 51
LAN ...............................................95
Last 30 days..................................17
Launch Assistant...........................54
Lbs ................................................60
LED ....................... 13, 37, 46, 60, 95
Let's say you .................................47
Light Bulb-Toggle ..........................74
Light button ................. 46, 47, 57, 95
Light Button Off .......................57, 95
Light Button On .......................57, 95
LightingYou ...................................56
Lights.............................................46
Lights On.........................................5
Linksys ..........................................35
Location.............................40, 65, 66
Lock...................................13, 46, 47
Log ............................................5, 89
InTo log......................................89
login.........................................17, 89
logins.......................................17, 89
LonWorks Powerline .....................52
M
Macintosh......................................33
Mailbox..........................................43
Mailbox Door .................................43
Mailbox Door/Window Sensor .......43
Main Street Camera Focus Utility..29
Make .............................................95
Manage .........................................33
PicturesYou ...............................33
Manage Pictures ...........................91
ManuallyYou .................................25
Match ............................................95
Serial Number............................95
Micro ...............................................5
Micro Door/Window.........................5
Micro— Model 60 ..........................41
Printed Documentation
mobile portal ........................... 57, 90
Mode Changes ............................. 47
Model 60 ................................. 37, 41
Modes .. 5, 13, 17, 27, 47, 71, 72, 74,
85, 88, 90, 95
ModesYour ................................... 13
Changing................................... 13
Modifying ...................................... 47
The ............................................ 47
ModuleThe.................................... 52
ModuleTo...................................... 52
Mom's ........................................... 47
Mon............................................... 85
Monitor notification........................ 95
Monitored room............................... 5
More.............................................. 93
Motion .. 5, 13, 50, 51, 60, 63, 71, 72,
74, 85, 95
Motion Sensor.. 5, 13, 60, 63, 71, 72,
74, 85, 95
Motion sensor back....................... 60
Motion sensor detecting 5, 63, 71, 72
Motion sensor detects movement . 60
Motion Sensor generated................ 5
alarm ........................................... 5
Motion sensor light........................ 95
Motion sensor needs..................... 60
Motion sensor recognizes ............. 63
Motion sensor requires ................. 60
Motion SensorNow........................ 60
Motion SensorYour ....................... 60
Mounting ................................. 41, 44
Your........................................... 44
moves across................................ 60
sensor’s field ............................. 60
My Account ..................................... 5
N
NA................................................. 74
Name ................................ 43, 67, 85
green dot appears next ............. 43
Needs ........................................... 67
Neuron ID ..................................... 52
new automation............................. 74
edit ............................................ 74
New Automation window............... 74
open .......................................... 74
Newer............................................33
Next section ..................................41
Night..............................................85
NOT.............................29, 60, 63, 95
notification sent .......................40, 88
Notification When ..........................88
Notifications 5, 13, 17, 27, 40, 63, 64,
65, 68, 85, 88, 95
Notifications generated..................17
Notifications tabThe.........................5
Notifications Why ..........................95
Notifications window......................88
Notify ........................... 64, 65, 85, 88
Notify Lists.........................64, 65, 85
Now ...............................................22
O
Obtain............................................35
WEP key....................................35
Occupied ..... 5, 63, 71, 72, 74, 85, 95
Occur today.....................................5
Occurred .......................................17
Off .............................................5, 85
offline...............................................5
OK.....................................40, 68, 88
Older .......................................33, 91
On weekdays ................................85
Open .......................5, 43, 57, 71, 72
Operate .........................................13
Other device..................................68
P
Panic ................. 5, 64, 65, 74, 88, 95
Panic button ................ 64, 65, 88, 95
Panic pendant .......64, 65, 74, 88, 95
Panic Pendant Goes OffTo ...........88
Panic PendantThe...................64, 65
Panic Wristwatch.......................5, 74
Part................................................27
Person.....................................64, 65
Personal web ................................89
Personal web portal...................5, 40
pertaining
Door/Window .............................17
Physical.........................................55
Physically ......................................44
Physically install ......................55, 60
Index
Pictures 5, 13, 17, 20, 21, 25, 27, 29,
33, 43, 46, 47, 63, 71, 72, 74, 85,
89, 91, 95
camera takes............................. 85
camera taking...................... 71, 72
Deleting ..................................... 29
Pictures ScreenFrom .................... 91
Pictures Take................................ 89
Pictures taken ......................... 17, 33
retain all..................................... 33
Pictures window...... 5, 25, 27, 29, 33
PicturesTo delete .......................... 29
Deleting ..................................... 29
PicturesYou ............................ 27, 33
Managing .................................. 33
Sending ..................................... 27
Please........................................... 95
plug ................................... 37, 55, 95
PM ................................................ 85
Possible State................................. 5
Power............................................ 95
Power LED.............................. 37, 95
Powered device used.............. 64, 65
Powerline ................................ 52, 55
Powerline Lamp ModuleShipped .. 95
Pre ................................................ 41
Preconfigured ............................... 52
premise ......................................... 93
Press............................................. 95
Test button ................................ 95
Press Down Here.......................... 60
Pressing.................................. 47, 95
Star button................................. 47
Purchased..................................... 19
pushed .......................................... 88
Panic pendant ........................... 88
Q
QuikControl....... 5, 25, 56, 57, 85, 95
QuikControl menu ......................... 56
R
Reading Room Light ..................... 52
Rear ................................................ 5
Recessed.................................. 5, 41
red dot....................................... 5, 95
Renaming ..................................... 67
Devices ..................................... 67
DevicesYou ...............................67
Repeat Steps ................................95
reports all ......................................17
notifications generated...............17
Requires 24...................................95
Reset.............................................37
Resistant .................................64, 65
Retain all .......................................33
pictures taken ............................33
Rightpointing ...................................5
S
S/N’ ...............................................95
Sat.................................................85
Satellite brroadband ......................95
Save ............................ 47, 67, 74, 85
Save Image ...................................33
Schedule windowThis window shows
the................................................5
ScheduleA picture .........................27
schedules ... 5, 13, 17, 27, 50, 51, 57,
68, 85, 95
Schedules following these steps ...85
Schedules tabYou ...........................5
Schedules window ..............5, 17, 85
Schudules .....................................22
use.............................................22
Screen...........................................91
Section 10.4 ..................................95
Security ................. 22, 35, 37, 41, 95
Security Mode .........................22, 35
See......................................5, 43, 93
check .........................................43
See Frequently Asked Questions..40
See Section 8.2.1..........................95
See Section 8.6.............................95
Seein ...............................................5
Select ............................................57
desired brightness .....................57
Send Me........................................88
Send Picture......................20, 21, 27
Sending .........................................27
PicturesYou ...............................27
sensing..........................................60
infrared energy emitted..............60
sensor .. 5, 13, 17, 37, 41, 43, 44, 57,
60, 63, 65, 66, 71, 72, 74, 85, 95
Printed Documentation
Sensor detects heat ................ 65, 66
Sensor needs................................ 44
Sensor transmits........................... 60
alarm ......................................... 60
sensor’s field................................. 60
moves across ............................ 60
SensorNext ................................... 44
Sensor's field ................................ 60
view ........................................... 60
Serial Number............................... 95
camera matches........................ 95
match ........................................ 95
Service enables ............................ 33
Set ........................ 21, 47, 56, 57, 85
brightness.................................. 56
Up.............................................. 21
Set Away Mode............................. 74
Set Brightness Level ..................... 57
Set Thermostat Cool Setpoint....... 74
Set Thermostat Fan ...................... 74
Set Thermostat Heat Setpoint....... 74
Setpoint......................................... 85
Setpoints....................................... 85
Setup Assistant............................. 21
Sign In........................................... 89
Sign Out Log................................. 89
Simply tap ..................................... 90
desired mode............................. 90
Skip............................................... 41
instructions ................................ 41
Sleep........... 5, 13, 47, 74, 85, 88, 89
Sleep Mode....................... 13, 47, 74
Smoke............... 5, 37, 65, 66, 74, 95
Smoke/Heat ............................ 65, 66
SMS .............................. 5, 63, 85, 95
So make........................................ 85
So that .......................................... 95
Solution................................... 50, 51
specific area.................................. 60
SSID ....................................... 22, 35
Star button .............................. 46, 47
pressing..................................... 47
when pressing ........................... 47
Start Action ................................... 85
Star-Take ...................................... 74
Starter Kit................ 5, 20, 21, 57, 95
Status ... 5, 17, 40, 43, 56, 57, 63, 89,
95
Alarm History window displays ..43
check .........................................43
Using Your Motion SensorTo
check......................................63
Status changes .......................17, 63
Status window ... 5, 40, 43, 56, 57, 63
Status window lists........................43
Steps .............................................85
Store................................................5
Subject ..........................................27
Such ..............................................46
Suit ................................................67
time............................................67
Summary.... 5, 17, 25, 27, 29, 33, 37,
40, 57, 63, 85, 95
Summary page..................25, 40, 95
Summary tab...........5, 25, 27, 57, 63
Summary tabThe.............................5
Sun checkboxes............................85
System . 5, 13, 19, 20, 21, 22, 23, 25,
29, 37, 41, 43, 44, 46, 47, 52, 54,
67, 68, 74, 85, 89, 90, 93, 95
System initiates .............................95
action .........................................95
System mode .......... 5, 13, 46, 89, 90
changing ....................................46
System operating ............................5
System page ...........5, 29, 37, 44, 95
System tab . 5, 22, 23, 37, 41, 43, 52,
54, 67, 68, 95
System tabYou................................5
System turn ...................................85
System window ..... 37, 41, 52, 67, 95
T
Take ................................................5
Take pictures.....................20, 21, 25
Take pictures manually .................25
Technology..................37, 41, 52, 54
terms commonly used ...................85
Test ...............................................37
Test button ....................................95
press..........................................95
The
Modifying ...................................47
Index
The Front Hall Lamp Light .............. 5
The lights ...................................... 74
The Motion sensor ........................ 74
Thermostat Adjust......................... 89
Thermostats 5, 71, 72, 74, 85, 89, 95
Thumbnail screens........................ 33
Thumbnails ......................... 5, 33, 91
Time.............................................. 67
suit............................................. 67
To 50............................................... 5
Today's ........................................... 5
Today's Schedule ........................... 5
trigger.... 5, 17, 40, 60, 71, 72, 74, 88
trip................................................. 95
Try................................................. 95
Turn ........................................ 74, 85
Turn Off......................................... 74
Turn On......................................... 74
Turn Up......................................... 85
Heat........................................... 85
TX ........................................... 37, 41
Type... 21, 22, 23, 27, 37, 41, 52, 64,
65, 71, 72, 74, 89, 95
Type need............................... 71, 72
U
Uninterruptible......................... 55, 95
Unlock......................... 13, 46, 47, 74
Unlock-change.............................. 74
Up
Setting ....................................... 21
UPS .............................................. 95
use . 5, 13, 19, 20, 21, 22, 29, 33, 35,
37, 41, 50, 51, 57, 63, 67, 68, 85,
89, 91, 95
Schudules ................................. 22
Use its focus ................................. 29
Useful tool..................................... 46
User Manual ............................. 5, 95
username.......................... 22, 35, 89
Username and password you ....... 89
Using Your Carbon Monoxide
DetectorOnce ............................ 40
Using Your Door ........................... 43
Using Your Motion SensorTo check
.................................................. 63
status......................................... 63
V
v1 iControl .....................................19
v2 iControl .....................................19
Vary...............................................19
View ..............................................60
sensor's field..............................60
View Alarms View..........................89
View Status See............................89
W
wait....................................63, 90, 95
wants.. 13, 29, 41, 43, 44, 47, 56, 68,
71, 72, 74, 85, 88, 91, 93
Keychain Remote ......................47
Star button .................................47
Water................. 5, 44, 64, 65, 74, 95
Water sensor.............................5, 74
water-resistant.........................64, 65
Wave .............................................54
Wave Lamp ModuleTo ..................54
Ways .............................................57
Webpage.........................................5
Weekday .......................................85
WEP ........................................35, 95
WEP key .......................................35
When Grandma.............................88
When pressing ..............................47
Star button .................................47
Why doesnt ...................................95
Why?A...........................................95
Window sensor. 5, 13, 17, 41, 43, 57,
71, 72, 85, 95
Window Sensor If ..........................41
Window SensorAfter......................43
Window SensorYou.......................43
Windows..................................29, 33
WindowsThe ...................................5
Wired.......................5, 20, 21, 44, 95
Wireless ... 20, 21, 22, 23, 35, 64, 65,
67, 68, 91, 95
Wireless Equivalent Privacy ..........95
Wireless setting.............................21
Wireless Settings ..........................35
Wires connected ...........................95
Within a minute .............................25
Work..............................................46
drive off......................................46
Printed Documentation
WPA.............................................. 35
Y
Yes.......................................... 68, 95
Your
Determining............................... 21
Installing .................................... 52
Mounting ................................... 44
Your CameraTo focus................... 29
Focusing.................................... 29
Your Carbon Monoxide DetectorTo
install ......................................... 37
Installing .................................... 37
Your Door ..................................... 43
Your Keychain RemoteYou........... 57
Adding .......................................57
Your Lamp ModuleNext.................55
Your Powerline..............................52
Installing ....................................52
Your schedules .............................85
Your Starter KitWhen ....................21
Your System..................................22
Your Z ...........................................54
Installing ....................................54
Youve ............................................95
Z
Z 54
Z-Wave..........................................54
FCC Warning statement
FCC RF Radiation Exposure Statement:
1. This Transmitter must not be co-located or operating in conjunction with any other antenna or transmitter.
2. This equipment complies with FCC RF radiation exposure limits set forth for an uncontrolled environment. This equipment
should be installed and operated with a minimum distance of 20 centimeters between the radiator and your body.
This equipment has been tested and found to comply with the limits for a Class B digital device, pursuant to part 15 of the FCC
rules. These limits are designed to provide reasonable protection against harmful interference in a residential installation. This
equipment generates, uses and can radiate radio frequency energy and, if not installed and used in accordance with the
instructions, may cause harmful interference to radio communications. However, there is no guarantee that interference will not
occur in a particular installation. If this equipment does cause harmful interference to radio or television reception, which can be
determined by turning the equipment off and on, the user is encouraged to try to correct the interference by one or more of the
following measures:
-Reorient or relocate the receiving antenna.
-Increase the separation between the equipment and receiver.
-Connect the equipment into an outlet on a circuit different from that to which the receiver is connected.
-Consult the dealer or an experienced radio/TV technician for help.
You are cautioned that changes or modifications not expressly approved by the party responsible for compliance could void your
authority to operate the equipment.
This device complies with Part 15 of the FCC Rules. Operation is subject to the following two conditions: (1) this device may
not cause harmful interference and (2) this device must accept any interference received, including interference that may cause
undesired operation
IC Warning statement
R
SS-GEN 7.1.5: 只要filingIC
,
都要放下列這段
O
peration is subject to the
fo
llowing two conditions: (1)
th
is device may not cause
in
terference,
a
nd (2) this device must accep
t
a
ny interference, including
interference that may cause
JD!Xbsojoh!tubufnfou!
!
STT.HFO!8/2/6;!!
!
Pqfsbujpo!jt!tvckfdu!up!uif!gpmmpxjoh!uxp!dpoejujpot;!)2*!uijt!efwjdf!nbz!opu!dbvtf!joufsgfsfodf-!
boe!)3*!uijt!efwjdf!nvtu!bddfqu!boz!joufsgfsfodf-!jodmvejoh!joufsgfsfodf!uibu!nbz!dbvtf!voeftjsfe!
pqfsbujpo!pg!uif!efwjdf/!
!
!
STT.HFO!8/2/5;!
!
Vtfs!Nbovbm!gps!Usbotnjuufst!xjui!Efubdibcmf!Boufoobt!
!
Uif!vtfs!nbovbm!pg!usbotnjuufs!efwjdft!frvjqqfe!xjui!efubdibcmf!boufoobt!tibmm!dpoubjo!uif!gpmmpxjoh!
jogpsnbujpo!jo!b!dpotqjdvpvt!mpdbujpo;!
Uijt!efwjdf!ibt!cffo!eftjhofe!up!pqfsbuf!xjui!uif!boufoobt!mjtufe!cfmpx-!boe!ibwjoh!b!nbyjnvn!
hbjo!pg!\2/9^!eC/!Boufoobt!opu!jodmvefe!jo!uijt!mjtu!ps!ibwjoh!b!hbjo!hsfbufs!uibo!\2/9^!eC!bsf!!
tusjdumz!qspijcjufe!gps!vtf!xjui!uijt!efwjdf/!Uif!sfrvjsfe!boufoob!jnqfebodf!jt!\61^!pint/!
!
STT.HFO!8/2/6!
!
Up!sfevdf!qpufoujbm!sbejp!joufsgfsfodf!up!puifs!vtfst-!uif!boufoob!uzqf!boe!jut!hbjo!tipvme!cf!tp!
diptfo!uibu!uif!frvjwbmfou!jtpuspqjdbmmz!sbejbufe!qpxfs!)f/j/s/q/*!jt!opu!npsf!uibo!uibu!qfsnjuufe!
gps!tvddfttgvm!dpnnvojdbujpo/
IC Warning statement
R
SS-GEN 7.1.5: 只要filingIC
,
都要放下列這段
O
peration is subject to the
fo
llowing two conditions: (1)
th
is device may not cause
in
terference,
a
nd (2) this device must accep
t
a
ny interference, including
interference that may cause
IC Warning statement
R
SS-GEN 7.1.5: 只要filingIC
,
都要放下列這段
O
peration is subject to the
fo
llowing two conditions: (1)
th
is device may not cause
in
terference,
a
nd (2) this device must accep
t
a
ny interference, including
interference that may cause