iGenio VORTEXPIII SELFIE STICKS User Manual Vortex Pro III Instructions CF ENG ESP copy
iGenio Ltd. SELFIE STICKS Vortex Pro III Instructions CF ENG ESP copy
iGenio >
User Manual

Wireless Selfie Stick
INSTRUCTIONS
Model
Paloselfi Inalámbrico
INSTRUCCIONES
Modelo
OFFICIAL BLUETOOTH
®
PRODUCT
OFFICIAL BLUETOOTH
®
PRODUCT

THANK YOU
Thank you for purchasing our
product.
In order to get the most out of your
new wireless selfie stick, we kindly
invite you to read these instructions
prior to use.
The Vortex Pro III has been designed
with maximum utility, convenience
and portability in mind.
It is compatible with virtually all major
iOS 5.0+ and Android 4.3+
cellphones including larger, wider
models.
The Vortex Pro III is manufactured
with fully certified Bluetooth® 3.0
technology made in the USA by
Broadcom® Corporation which
guarantees you instant pairing as well
as reliable and secure connections
every time.
GRACIAS
Gracias por adquirir nuestro produc-
to.
A fin de obtener el máximo provecho
de su nuevo paloselfi inalámbrico, le
invitamos a leer las presentes
instrucciones antes de su empleo.
El Vortex Pro III ha sido diseñado para
ofrecer la máxima utilidad,
conveniencia y portabilidad.
Es compatible prácticamente con
todos los principales teléfonos
móviles iOS 5.0+ y Android 4.3+,
incluyendo los modelos más grandes
y anchos.
El Vortex Pro III está fabricado con
tecnología plenamente certificada
para Bluetooth
®
3.0 que le garantiza
un emparejamiento instantáneo, así
como conexiones fiables y seguras
en cada ocasión.

Step 1
UNPACK & UNFOLD MOUNT
The Vortex Pro III is shipped in its
folded, fully collapsed position.
By loosening the locking screw
located under the mount, rotate
approximately through 270 degrees
as shown below.
Tighten screw to secure your
preferred position.
Paso 1
DESEMBALADO Y DESPLIEGUE DEL
SOPORTE
El Vortex Pro III se envía en posición
completamente doblada y replega-
da.
Después de liberar el tornillo de
bloqueo ubicado bajo el soporte, gire
aproximadamente 270 grados según
se indica a continuación.
Apriete de nuevo el tornillo para
bloquear el dispositivo en la posición
deseada.

Step 2
MOUNT YOUR CELLPHONE
Hold your cellphone horizontally and
place its upper edge inside the top
edge of the mount.
By sufficiently pushing the phone in
an upwards direction, the
spring-loaded mount will open so
you can easily secure your phone.
Your phone will be securely held in
place by the tension in the clamp.
Paso 2
MONTE SU TELÉFONO MÓVIL
Sostenga su móvil horizontalmente y
coloque el lado superior de este
dentro del lado superior del soporte.
Al empujar con cierta fuerza el
teléfono hacia arriba, el mecanismo
de muelle del soporte permitirá su
apertura, de manera que pueda
encajar el móvil fácilmente.
Este quedará firmemente sujeto en
posición gracias a la tensión del
mecanismo.

Step 3
ACTIVATE BLUETOOTH® & PAIR
WITH YOUR CELLPHONE
Activate Bluetooth® on your
cellphone in accordance with your
manufacturer’s instructions.
Hold down The Vortex Pro III shutter
button for 3 seconds to enter
Bluetooth® pairing mode. The button
will flash blue intermittently.
When your cellphone is successfully
paired with your selfie stick the blue
light will remain lit but cease flashing.
Paso 3
ACTIVE EL BLUETOOTH
®
Y EMPARE-
JE CON SU TELÉFONO MÓVIL
Active el Bluetooth
®
en su móvil de
acuerdo con las instrucciones del
fabricante.
Mantenga pulsado el disparador del
Vortex Pro III durante tres segundos
para entrar en el modo de empareja-
miento de Bluetooth
®
. El botón
parpadeará en azul de forma
intermitente.
Cuando su teléfono se haya empare-
jado correctamente con el paloselfi,
el piloto azul permanecerá iluminado,
pero dejará de parpadear.
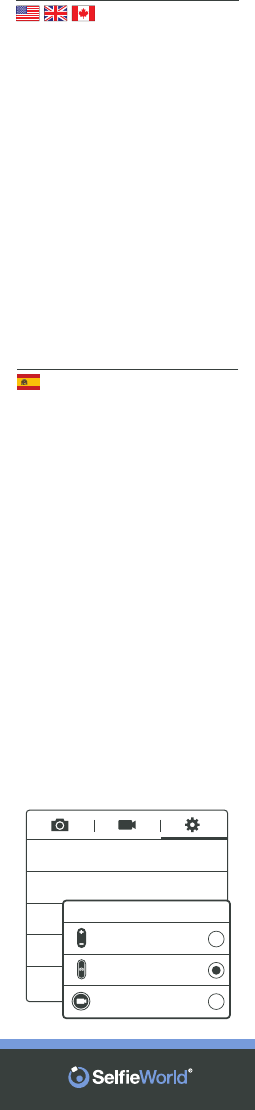
• Open Camera application
• Click 'gear' icon for Settings
• Click option 'Volume Key'
• Click 'The Camera Key'
Note that screenshots and settings
may vary according to make, model
and Android version of cellphone.
*
*Tenga en cuenta que las capturas de
pantalla podrían variar.
GPS tag
Volume key
Timer
White balance
The camera
key
O
Auto
0
O
Volume key
The zoom key
The camera key
The record key
Step 4
IMPORTANT STEP FOR ANDROID USERS
Android users need to check their
camera settings are configured correctly
otherwise the selfie stick button might
operate your camera's zoom function
and not the shutter.
Follow the steps below to ensure that
your "Volume Key" is set to operate the
"Camera Key".
• Abra la aplicación Cámara
• Toque el icono del engranaje para los
Ajustes
• Toque la opción “Tecla de volumen”
• Toque la opción “La tecla de cámara”
Paso 4
PASO IMPORTANTE PARA USUARIOS DE
ANDROID
Los usuarios de Android necesitan
comprobar que los ajustes de su
cámara se encuentren correctamente
configurados, o de lo contrario el botón
del paloselfi podría accionar la función
de zoom de la cámara en lugar del
disparador.
Siga los pasos indicados a continuación
para asegurarse de que la “Tecla de
volumen” esté configurada para actuar
como “La tecla de cámara”.

Step 5
EXTEND SELFIE STICK
Once you have successfully mounted
and paired the Vortex Pro III with your
cellphone, extend it to your preferred
length.
Paso 5
EXTIENDA EL PALOSELFI
Una vez montado y emparejado
correctamente el Vortex Pro III con su
teléfono móvil, extiéndalo hasta la
longitud deseada.

Step 6
POSE & TAKE SELFIE
Now simply pose for your Selfie and
press the shutter button on the
handle of The Vortex Pro III to remote-
ly take your photo.
Paso 6
POSE Y HÁGASE UN SELFI
Ahora no tiene más que posar para
su selfi y pulsar el disparador situado
en el mango del Vortex Pro III con el
fin de realizar su fotografía a
distancia.

Step 7
SWITCHING OFF
When you have finished, collapse the
stick, remove your cellphone from
the mount by reversing the mounting
instructions in Step 2.
Switch off your cellphone’s
Bluetooth® function.
Hold down The Vortex Pro III shutter
button for 3 seconds to switch off
your selfie stick.
Paso 7
APAGADO
Cuando haya terminado, repliegue el
palo y retire el móvil del soporte
siguiendo las instrucciones de
montaje del paso 2 en orden inverso.
Desactive la función Bluetooth
®
de
su teléfono.
Mantenga pulsado el disparador del
Vortex Pro III durante tres segundos
para apagar su paloselfi.

Step 8
RECHARGING
The Vortex Pro III may need charging
prior to use.
To recharge connect the supplied
charging cable to the selfie stick
handle and the other to your comput-
er’s USB port or mains outlet
(requires mains USB adaptor).
A red light in the end of the handle will
illuminate during the charging phase.
Charge for between 30 minutes and
1 hour.
Paso 8
RECARGA
El Vortex Pro III debería venir cargado
de fábrica.
Para recargarlo, conecte un extremo
del cable de carga suministrado al
mango del paloselfi y el otro al puerto
USB de su ordenador.
Durante la fase de carga se iluminará
un piloto rojo en el extremo del
mango.
Cárguelo durante 30 minutos.

If you still experience problems,
please contact our technical support
team at support@igenio.co.uk in the
first instance.
All products are covered by our
Lifetime Manufacturer's Warranty
and we are fully committed to your
100% satisfaction.
We kindly request you do not leave
negative reviews without contacting
our support team first. We will do our
very best to assist you.
Upgrade your cellphone or device
to the latest iOS or Android version
(particularly important for older
devices).
For models with rechargeable
batteries, charge for at least 1 hour.
For models with standard batteries,
ensure LED light appears after
switching on.
For Bluetooth® models, ensure the
product is properly paired and
connected in accordance with the
manufacturer's instructions.
For cable models, ensure that the
audio cable is fully plugged in to the
device's audio port.
For Android users, ensure that you
have properly configured the
volume key to operate the camera
shutter (see above).
If clicking the button fails to take a
photo, download the "Camera 360"
app by PinGuo Inc. from your app
store.
TROUBLESHOOTING
This product has been extensively
tested with all major cellphone
brands and models. In the event of
technical problems, we recommend
you check the following:
•
•
•
•
•
•
•

En caso de que siga teniendo
problemas, póngase en contacto en
primer lugar con nuestro servicio
técnico en support@igenio.co.uk
Todos los productos se encuentran
cubiertos de por vida por nuestra
Garantía del Fabricante y estamos
plenamente comprometidos con su
satisfacción al 100 %. Le rogamos
no escriba reseñas negativas sin
ponerse antes en contacto con
nuestro servicio técnico. Intentare-
mos ayudarle de la mejor manera
posible.
Actualice su teléfono o dispositivo
a la última versión de iOS o Android
(esto es especialmente importante
para los dispositivos más
antiguos).
En los modelos con pilas
recargables, cargue durante al
menos una hora.
En los modelos con pilas estándar,
asegúrese de que el piloto led se
ilumine tras el encendido.
En los modelos con Bluetooth®,
asegúrese de que el producto esté
correctamente emparejado y
conecta do de conformidad con las
instrucciones del fabricante.
En los modelos con cable,
asegúrese de que el cable de audio
se encuentre completamente
insertado en el puerto de audio del
dispositivo.
Los usuarios de Android deberán
asegurarse de que la tecla de
volumen esté correctamente
configurada para accionar el
disparador de la cámara (ver
arriba).
Si al pulsar el botón no se realiza la
fotografía, descargue la app
“Camera 360” de PinGuo Inc. de
su tienda de aplicaciones.
RESOLUCIÓN DE PROBLEMAS
Este producto ha sido ampliamente
probado con todas las principales
marcas y modelos de teléfonos
móviles. En caso de problemas
técnicos, le recomendamos compro-
bar los siguientes puntos:
•
•
•
•
•
•
•

FCC STATEMENT
This device complies with Part 15 of
the FCC Rules. Operation is subject
to the following two conditions:
1 This device may not cause harmful
interference, and
2 This device must accept any
interference received, including
interference that may cause
undesired operation.
Warning: Changes or modifications not
expressly approved by the party
responsible for compliance could void
the user's authority to operate the
equipment.
NOTE: This equipment has been tested
and found to comply with the limits for a
Class B digital device, pursuant to Part
15 of the FCC Rules. These limits are
designed to provide reasonable
protection against harmful interference
in a residential installation.
This equipment generates uses and can
radiate radio frequency energy and, if
not installed and used in accordance
with the instructions, may cause harmful
interference to radio communications.
However, there is no guarantee that
interference will not occur in a particular
installation. If this equipment does
cause harmful interference to radio or
television reception, which can be
determined by turning the equipment off
and on, the user is encouraged to try to
correct the interference by one or more
of the following measures:
•
•
•
•
Reorient or relocate the receiving
antenna
Increase the separation between the
equipment and receiver
Connect the equipment into an outlet
on a circuit different from that to which
the receiver is connected
Consult the dealer or an experienced
radio/TV technician for help
RF WARNING STATEMENT
This equipment complies with FCC
radiation exposure limits set forth for an
uncontrolled environment. This device
has been evaluated to meet general RF
exposure requirement. This device can
be used in portable exposure condition
without restriction.

Please contact us at
support@igenio.co.uk
prior to returning any items.
We may require you to return the
faulty product for inspection or ask
you for photographs of the product
fault. We will require your proof of
purchase.
This does not affect your statutory
rights.
• accidental damage;
• normal wear and tear;
• general product misuse;
• damage caused through usage not
in accordance with the usage
instructions;
• damage caused by modifications
made by unauthorized 3rd parties.
LIFETIME WARRANTY
The Vortex Pro III from Selfie World®
comes with a Lifetime Warranty
against manufacturing defects.
If a defect is found, we will be happy
to repair or replace your product. A
defect is defined as any fault in the
product’s materials or workmanship,
which is present at the time of
purchase.
The following conditions are not
classified as defects and are not
covered by the Manufacturer’s
Warranty:

Antes de retornar ningún artículo le
rogamos se ponga en contacto con
nosotros en support@igenio.co.uk
Es posible que le pidamos devolver el
producto defectuoso para su
inspección o realizar fotografías del
fallo. Deberá presentarnos su prueba
de compra.
Esto no afecta a sus derechos como
consumidor.
• daños accidentales;
• desgaste por uso normal;
• incorrecta utilización general del
producto;
• daños provocados por una
utilización no conforme con las
instrucciones de uso;
• daños provocados por modifica
ciones efectuadas por terceros no
autoriza dos.
GARANTÍA DE POR VIDA
El Vortex Pro III de Selfie World® se
proporciona con garantía de por vida
frente a defectos de fabricación.
En caso de encontrar un defecto,
estaremos encantados de reparar o
sustituir su producto. Como defecto
se entiende cualquier fallo presente
en el momento de la compra en los
materiales del producto o en la mano
de obra.
Die folgenden Bedingungen werden
nicht als Defekte eingestuft und fallen
nicht unter die Herstellergarantie:

PRODUCT SPECIFICATION
• Length of extension:
8”-32” (20-80cm)
• Telescopic material:
Stainless steel
• Telescopic sections: 6
• Net weight: 129g
• Battery type: Polymer Li-ion
• Model: 352530
• Typical capacity:
210mAh, 0.777Wh
• Input current: 120mA
• Nominal voltage: 3.7v
• Charging voltage: 5v
• Charging time: 30 minutes
• Weight: 4.0g
• Bluetooth® chipset:
Broadcom® BCM20730
• Bluetooth® compatibility:
Android 4.3+ / iOS 5.0+
ESPECIFICACIONES DEL PRODUCTO
• Longitud extensible:
de 20 a 80 cm
• Material telescópico:
Acero inoxidable
• Secciones telescópicas: 6
• Peso neto: 129g
• Tipo de batería:
Polímero ion de litio
• Modelo: 352530
• Capacidad típica:
210mAh, 0.777Wh
• Corriente de entrada: 120mA
• Tensión nominal: 3.7v
• Tensión de carga: 5v
• Tiempo de carga: 30 minutos
• Peso: 4.0g
• Bluetooth
®
chipset:
Broadcom
®
BCM20730
• Compatibilidad Bluetooth
®
:
Android 4.3+ / iOS 5.0+

The Selfie World Selfie World brand and logo is owned by
iGenio Ltd., a company registered in the UK.
GET MORE GREAT
SELFIE PRODUCTS
We invite you to visit
our website at
http://Selfie.World
Follow Us For Great Discounts
& The Latest Promotions
instagram.com/goselfieworld
facebook.com/goselfieworld
twitter.com/goselfieworld
OBTENGA OTROS
FENOMENALES
PRODUCTOS PARA
SELFIS
Le invitamos a visitar
nuestra web en
http://Selfie.World
instagram.com/goselfieworld
facebook.com/goselfieworld
twitter.com/goselfieworld