iKeyless 1RHK Keyless Remote User Manual XX XXXX Exhibit Cover
iKeyless, LLC Keyless Remote XX XXXX Exhibit Cover
iKeyless >
Manual

2320 Presidential Drive, Suite 101, Durham, NC 27703 USA Voice: 919-381-4235 Fax: 770-831-8598
Certification Exhibit
FCC ID: X32-1RHK
IC: 8797A-1RHK
FCC Rule Part: 15.231
IC Radio Standards Specification: RSS-210
ACS Project Number: 15-3021
Manufacturer: iKeyless, LLC
Model: 300-0403
Manual

300-0403
Draft User Manual
5/18/2015

Contents
Programming……………………………..1-6
Battery Replacement…………………….7
Compliance Statements…………………8-9
i
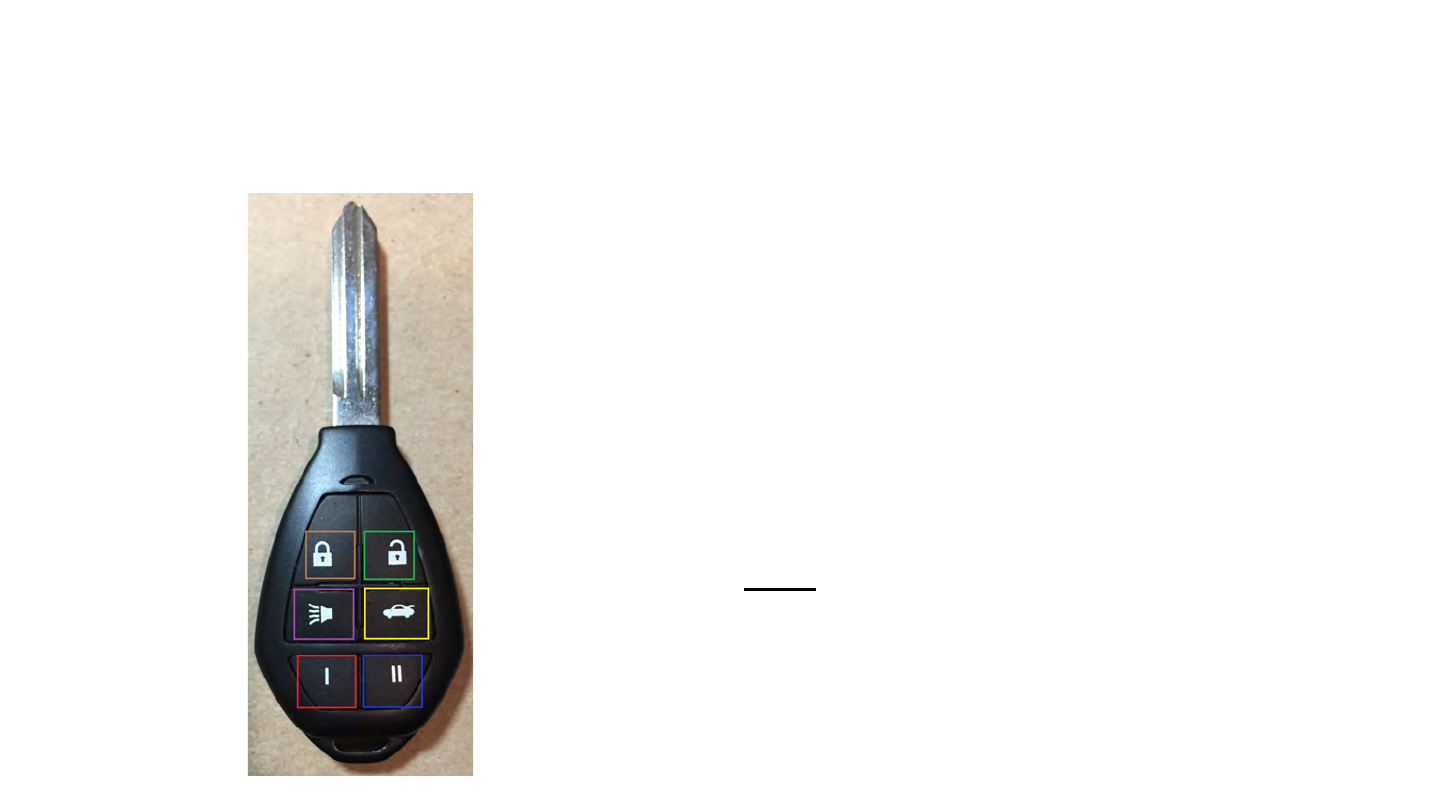
Remote Layout
Six Standard Buttons:
1. Extra function I (Red Square)
2. Extra function II (Blue Square)
3. Trunk (Yellow Square)
4. Alarm (Purple Square)
5. Lock (Brown Square)
6. Unlock (Green Square)
Note: Remote functionality is based on
remote configuration and supported vehicle
features. Please consult your vehicle’s
owner's manual for supported features.
1

Programming Summary
1. Press Function I + Alarm at the same time, LED will turn on
2. Enter the number that corresponds to the key you want to program:
a. Use Lock to increment the “100”s place
b. Use Unlock to increment the “10”s place
c. Use Trunk to increment the “1”s place
3. Exit programming mode by pressing the Function I + Alarm buttons at the same time
4. The code you programmed will be flashed on the LED, first with a sequence of pulses indicating the
value of the “100”s place followed by pause, then a sequence of pulses indicating the value of the “10”
s place followed by a pause, and finally a sequence of pulses indicating the “1”s place.
2

Step 1: Enter Programming Mode
● Press the Unlock + Alarm (red boxes) buttons
simultaneously
● LED (blue box) will turn ON and stay on when you
release the buttons indicating that the key is in program
mode
● If the LED is ON go to Step 2
● If the LED turns OFF, repeat Step 1
3

Step 2: Enter Remote Code
● Press Lock (red square) to increment the “100”s place
● Press Unlock (blue square) to increment the “10”s place
● Press Trunk (green square) to increment the “1”s place
● When you have entered the desired number, go to Step 3
●Example 1: To enter the remote code “326” press Lock 3 times to
increment the “100”s place twice (100 * 3 = 300), press Unlock
two times to increment the “10”s place (10 * 2 = 20), and press
Trunk six times to increment the “1”s place.
● NOTE: Zero is not a valid programming digit code, if you do
increment the “1”s or “10”s or “100”s place place before exiting
programming mode, it will trigger an error and the LED will flash 3
times then turn OFF, go to Step 1
● NOTE: Pressing any button more than 7 times will trigger an error
and the LED will flash 3 times then turn OFF, go to Step 1
● NOTE: If too much time passes between button presses the
remote will timeout and flash the LED 3 times then turn OFF, go
to Step 1
3

Step 3: Exit Programming Mode
● After you have entered the desired remote code, press the Unlock
+ Alarm buttons simultaneously. The LED will go out.
●For a new remote: If no further LED flashes are seen, then the
remote was incorrectly set up. Return to Step 1 and re-enter
programming mode and your code. If the LED flashes, please use
Step 4 to verify your setup
●For a remote already configured: The remote should flash back
a verification code. See step 4 for verification of correct setup.
●For both new and configured: If the LED illuminates solid for 3
seconds, there was a hardware failure. Please contact tech
support.
3

Step 4: Verify Programming Code
● The remote confirms the last valid setup code via a 3 sets of LED
flashes. Each set of flashes corresponds to the number of times
each button (in descending order) was pressed during
programming.
● Example: The setup code was ‘326’. If entered correctly, the LED
will flash three times, pause, flash one time, pause, and finally
flash twice
● If the flash sequence matches the code entered, there is nothing
more to do; the remote is setup and working. If the code did not
match, return to step one and re-enter the code.
3
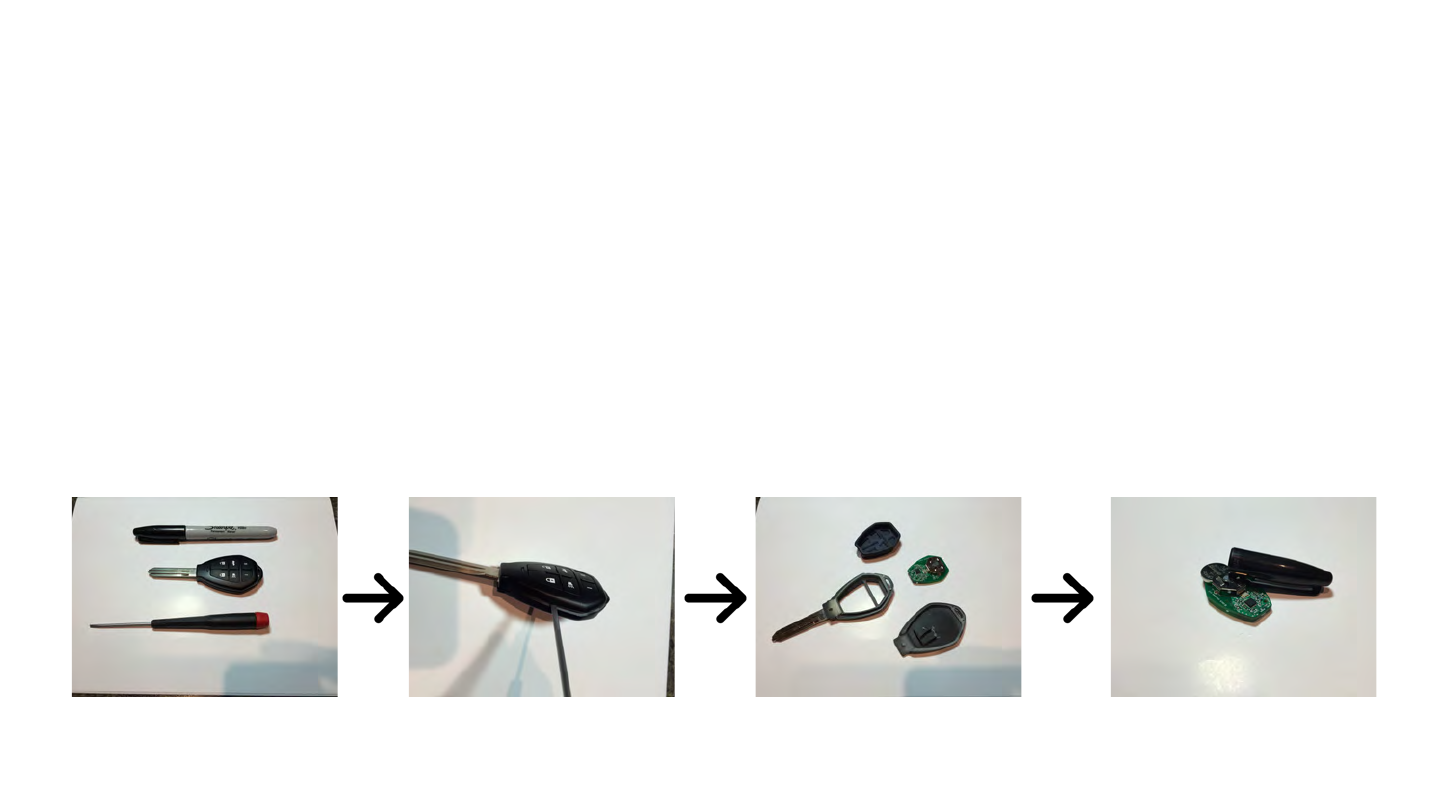
Changing the CR1632 Battery
1. You Will Need:
a. A Small Flat head Screwdriver
b. A small piece of wood or plastic such as a pen-cap.
2. Insert the screwdriver into the notch on the left side of the remote. Gently twist till the top and bottom shell of the remote
pop apart slightly. If the shell does not pop apart, you may need a larger screwdriver.
3. Separate the back and front shell. Remove the rubber insert and the remote circuit board. Do not set the circuit board down
on any metal surface!
4. Using the wood or plastic tool, carefully push the battery out the bottom of the holder. Insert a new CR1632 battery with
any text facing up. Safely dispose of the old battery.
5. Reassemble the remote and use as normal.
7

FCC Regulatory Statement
Model: 300-0403
FCC ID: X32-1RHK
This device complies with part 15 of the FCC Rules. Operation is subject to the following two conditions: (1) This device may not cause harmful
interference, and (2) this device must accept any interference received, including interference that may cause undesired operation.
NOTE: This equipment has been tested and found to comply with the limits for a Class B digital device, pursuant to Part 15 of the FCC Rules. These
limits are designed to provide reasonable protection against harmful interference in a residential installation. This equipment generates, uses,
and can radiate radio frequency energy and, if not installed and used in accordance with the instructions, may cause harmful interference to radio
communications. However, there is no guarantee that interference will not occur in a particular installation. If this equipment does cause harmful
interference to radio or television reception, which can be determined by turning the equipment off and on, the user is encouraged to try to
correct the interference by one or more of the following measures:
• Reorient or relocate the receiving antenna.
• Increase the separation between the equipment and receiver.
• Connect the equipment into an outlet on a circuit different from that to which the receiver is connected.
• Consult the dealer or an experienced radio/TV technician for help.
Warning: Changes or modifications to this device not expressly approved by (iKeyless LLC) could void the user’s authority to operate the
equipment. 8

IC Regulatory Statement
Model: 300-0403
IC: 8797A-1RHK
Under Industry Canada regulations, this radio transmitter may only operate using an antenna of a type and maximum (or lesser) gain
approved for the transmitter by Industry Canada. To reduce potential radio interference to other users, the antenna type and its gain should be
so chosen that the equivalent isotropically radiated power (e.i.r.p.) is not more than that necessary for successful communication. This device
complies with Industry Canada licence-exempt RSS standard(s). Operation is subject to the following two conditions: (1) this device may not
cause interference, and (2) this device must accept any interference, including interference that may cause undesired operation of the device.
Conformément à la réglementation d'Industrie Canada, le présent émetteur radio peut fonctionner avec une antenne d'un type et d'un gain
maximal (ou inférieur) approuvé pour l'émetteur par Industrie Canada. Dans le but de réduire les risques de brouillage radioélectrique à
l'intention des autres utilisateurs, il faut choisir le type d'antenne et son gain de sorte que la puissance isotrope rayonnée équivalente (p.i.r.e.)
ne dépasse pas l'intensité nécessaire à l'établissement d'une communication satisfaisante. Le présent appareil est conforme aux CNR
d'Industrie Canada applicables aux appareils radio exempts de licence. L'exploitation est autorisée aux deux conditions suivantes : (1)
l'appareil ne doit pas produire de brouillage, et (2) l'utilisateur de l'appareil doit accepter tout brouillage radioélectrique subi, même si le
brouillage est susceptible d'en compromettre le fonctionnement.
9