User Manual
EN If you love your iOttie product, let us know by leaving a
review online, or connect with us on our social platforms.
FR Si vous aimez votre produit iOttie, merci de nous le faire
savoir en laissant un commentaire en ligne ou nous rejoindre
sur nos réseaux sociaux.
ES Si le gusta su producto iOttie, háganos saber dejando
una reseña en línea, o conéctese con nosotros en nuestras
plataformas sociales.
www.iottie.com cs@iottie.com
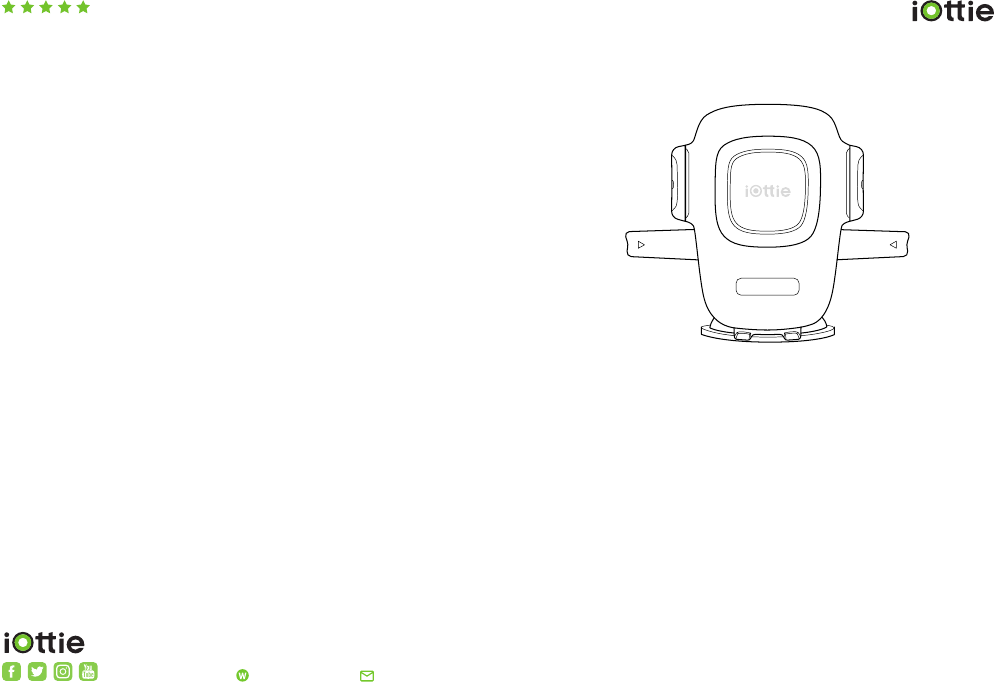
Alexa Built-in Dashboard & Windshield Mount
FRENCH Alexa Built-in Dashboard & Windshield Mount
SPANISH Alexa Built-in Dashboard & Windshield Mount
Easy One Touch Connect
1 installation/installation/installation
2 software/software/software
3 skills/skills/skills
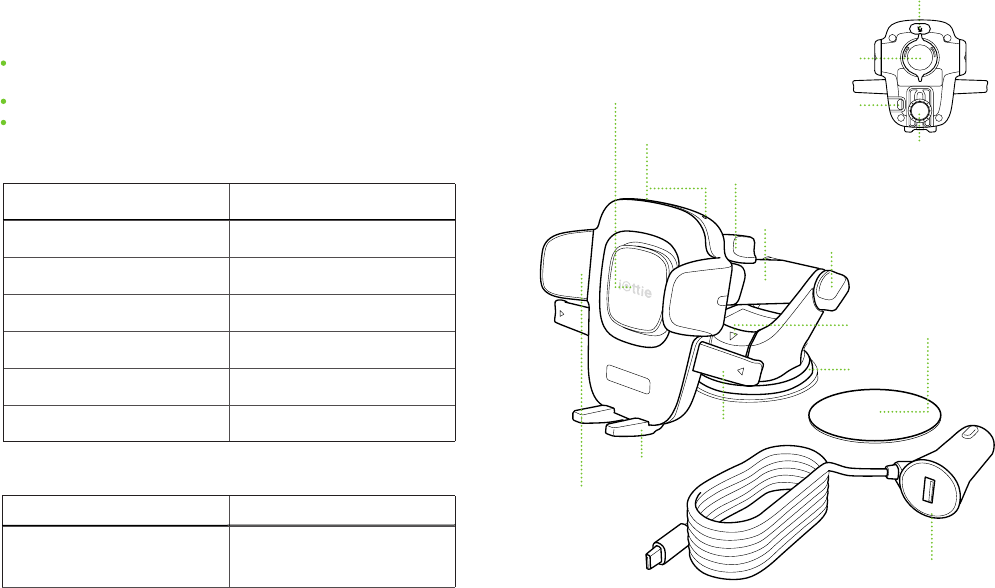
At a Glance
Foot
Foot Knob
Mute Button
Release Bars
Suction Cup
Dashboard
Pad
Locking Side
Arms
Lever
Telescopic Knob
Telescopic Arm
Pivot Knob
Dual Car Charger
with Micro USB cable
Microphones
Easy One Touch
Trigger Button Micro USB Port
Cradle Knob
What’s in the Box:
Mounting Head, Base, and Dual Car
Charger with Micro USB Cable
Getting Started
Critical Information
For optimal mounting, please follow the detailed instructions within this manual
when using the Easy One Touch Connect. For software installation, please see the
“Software Manual.” iOttie is not liable for possible damages due to product misuse.
The Easy One Touch Connect is mounted with a semi-permanent adhesive tape.
Each base is one-time use only. Once removed, it cannot be re-mounted.
When mounting, it is recommended that the surface & product be above 40° F.
Manuals should be followed in order: 1. Installation 2. Software 3. Skills.
Specifications
Car Charger Specifications
ITEM SPECIFICATIONS
INPUT --
CHARGING PORT Micro USB
DEPTH 2.25”
WIDTH 4.25”
HEIGHT 3.6”
WEIGHT 3.345 oz
INPUT OUTPUT
12V~24V
DC 5V - 3A
9V - 2A
12V - 1.5V
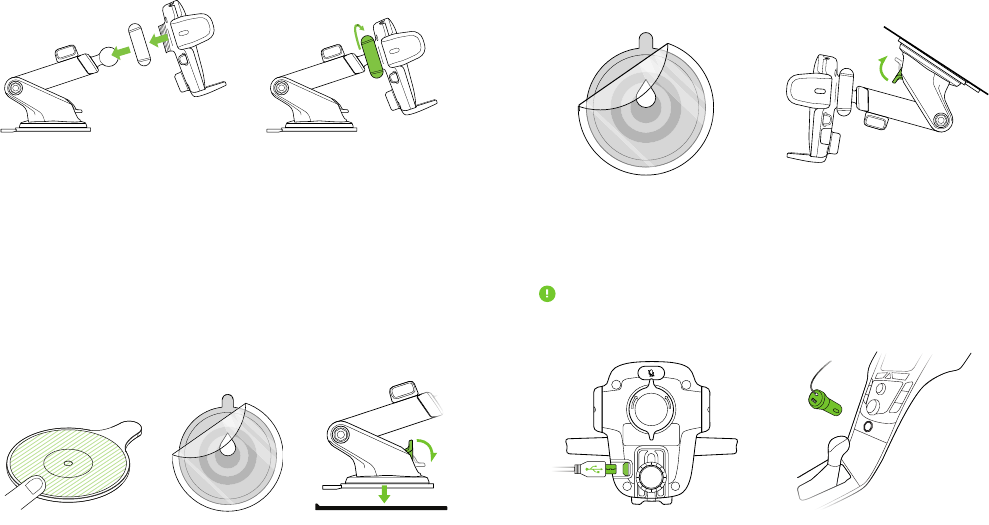
Installation
1. Peel o the protective film on the
Suction Cup and press firmly onto
the windshield.
A. Connect the Mount Cradle with
the Ball Joint.
Choose an installation method: Dashboard/Flat Surface (A) or
Windshield/Curved Glass (B)
Choose an area on a flat surface on the vehicle’s dashboard
and wipe any dust or debris from the surface.
Choose a location on the windshield and wipe any dust
or debris from the surface.
B. Then, tighten the Cradle Knob.
2. Push Locking Lever down to
engage suction.
2. Selecting a Location
1. Assembling the Mount
Option A
Dashboard or Flat Surface Installation
Option B
Windshield Installation or Curved Glass Installation
2. Peel o the protective
film on the Suction Cup
and press mount firmly
onto the dashboard pad.
3. Push Locking Lever
down to engage
suction.
Connecting Power
The Easy One Touch Connect is powered via a micro-USB cable. There is no o/
on switch on the device. Once it is plugged in, the device will remain on unless the
vehicle shuts o power when in parking mode.
1. Plug the micro-USB cable into
the USB port on the back of the
Mounting Head.
STICKY SUCTION CUP
STICKY SUCTION CUP
2. Insert Car Charger into your
vehicle’s power port.
1. Peel o the film
on the dashboard
pad & stick on the
desired installation
location.
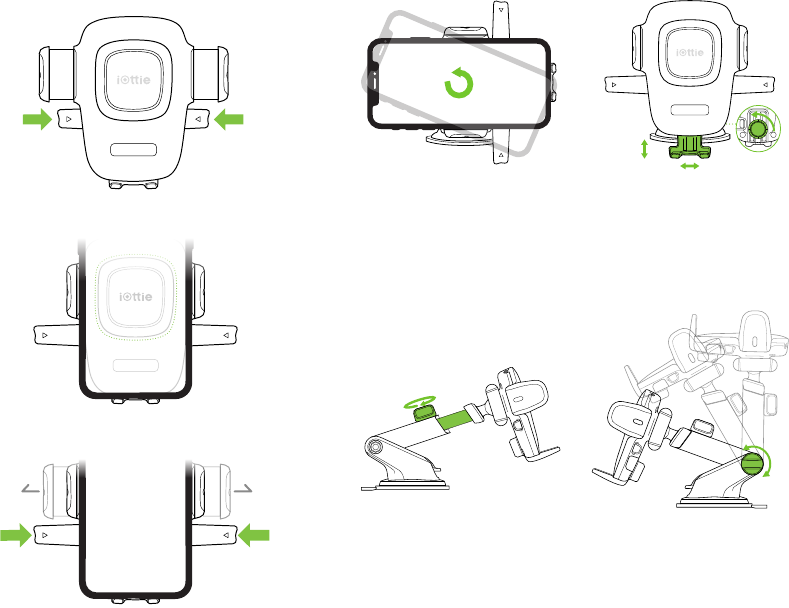
Using the Easy One Touch Mechanism
The Easy One Touch lock and release mechanism makes it simple to
mount & retrieve smartphones in seconds.
Mounting
Releasing
Step 1: Press the locking
side arms in.
Press the locking side
arms with one hand and
retrieve the device.
Adjusting the Mount
1. Cradle Knob
When mounting in landscape mode,
loosen to rotate the Cradle. Tighten
to lock in desired position.
3. Telescopic Knob
Located on top of Telescopic Arm,
loosen to extend the arm, and
tighten to secure distance.
2. Foot Knob
Located on the lower back of
Cradle. Loosen to re-position
mount’s foot. The Foot can be
adjusted up & down or side-to-
side.
4. Pivot Knob
Located on the side of the Mount
Base, turning allows you to pivot
telescopic arm. Tighten to secure
position.
Step 2: Press your device
against the Easy One Touch
trigger button. The mount’s
arms will automatically
close on contact and hold
the device during the
driving journey.
FCC Statement
15.19
1. This device complies with Part 15 of the FCC Rules. Operation is subject to the following two
conditions:
(1) This device may not cause harmful interference.
(2) This device must accept any interference received, including interference that may cause
undesired operation.
15.21
Note: The grantee is not responsible for any changes or modifications not expressly approved by
the party responsible for compliance. Such modifications could void the user’s authority to operate
the equipment.
15.105(b)
NOTE: This equipment has been tested and found to comply with the limits for a Class B digital
device, pursuant to part 15 of the FCC Rules. These limits are designed to provide reasonable
protection against harmful interference in a residential installation.
This equipment generates uses and can radiate radio frequency energy and, if not installed and
used in accordance with the instructions, may cause harmful interference to radio communications.
However, there is no guarantee that interference will not occur in a particular installation. If this
equipment does cause harmful interference to radio or television reception, which can be
determined by turning the equipment off and on, the user is encouraged to try to correct the
interference by one or more of the following measures:
- Reorient or relocate the receiving antenna.
- Increase the separation between the equipment and receiver.
-Connect the equipment into an outlet on a circuit different from that to which the receiver is
connected.
-Consult the dealer or an experienced radio/TV technician for help