IRobot Owner’s Guide En US
User Manual: iRobot Owner’s Guide iRobot: Customer Care - iRobot Owner’s Guide and Quick Start Cards
Open the PDF directly: View PDF ![]() .
.
Page Count: 28
www.irobot.com
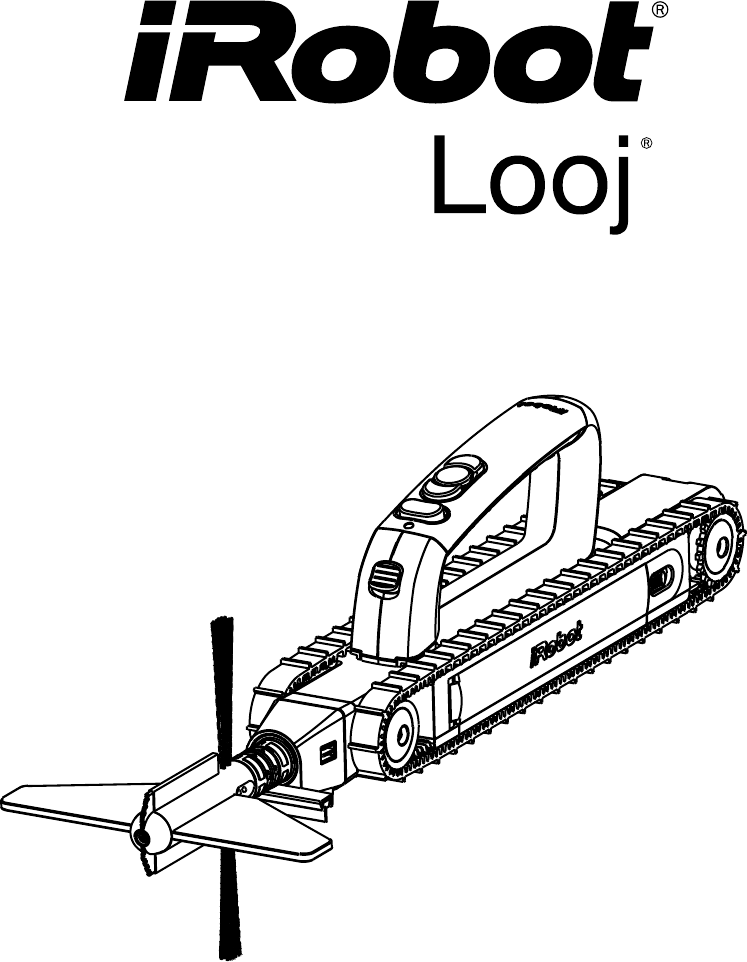
Gutter Cleaning Robot
Model 330 Owner’s Manual

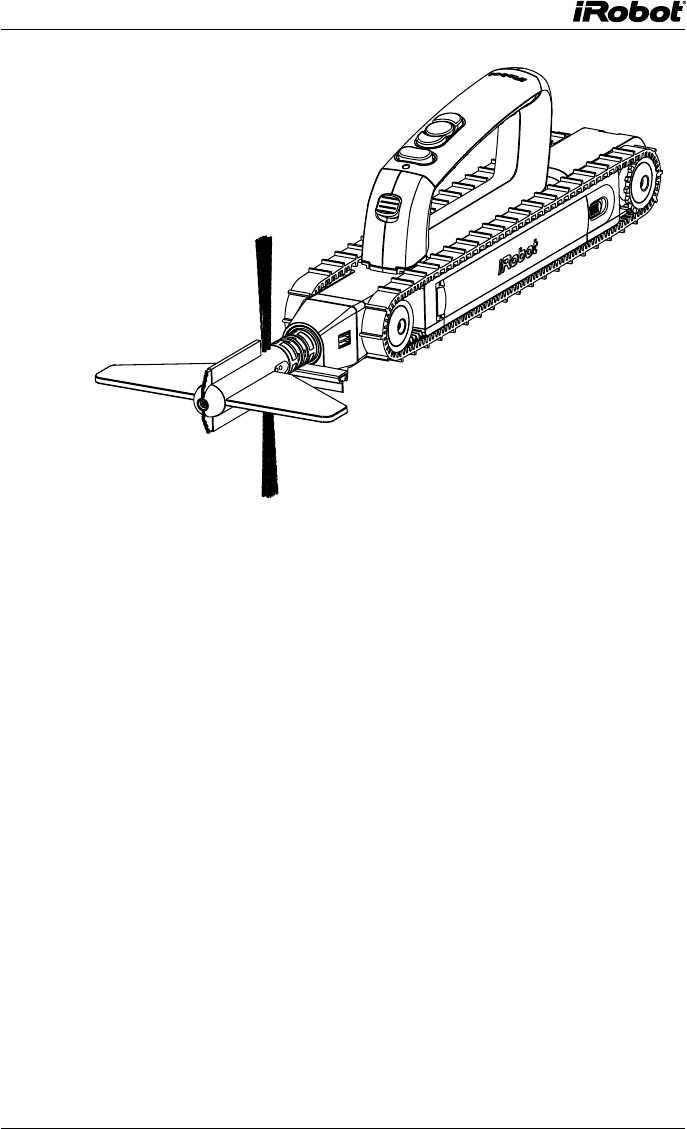
2iRobot Looj 300 Series Owner’s Manual

www.irobot.com 3
Dear iRobot® Looj® Owner,
Welcome to the world of iRobot. As an owner of the iRobot Looj Gutter
Cleaning Robot, you join a growing group of people around the globe who,
like you, are discovering an easier way to clean their gutters.
The use of practical robots that help you in and around your home is a new
reality. We encourage you to share your feedback as we continue to develop
new and groundbreaking robots. Here’s what you can do to participate in
our efforts:
• Communicate with us if you have questions, comments or require
support. Contact us at www.irobot.com.
• Register online at www.irobot.com/register or by phone
(877.855.8593). You’ll be among the first to hear about our newest
robots, product enhancements, and special offers.
Thank you for joining the robot revolution. We look forward to your valued
input as we continue to deliver groundbreaking products that will change
and improve your world.
On behalf of the entire iRobot team,
Colin Angle
Co-Founder and CEO
iRobot Corporation
Welcome

4iRobot Looj 300 Series Owner’s Manual
IMPORTANT: Make sure you read and follow all safety instructions
and labels from your ladder manufacturer before attempting to use
Looj. Failure to do so may result in serious injury or death.
Ladder Safety
• iRobot Looj enables you to clean a single run of gutter with one ladder
position. Choose the safest ladder position possible along each run. Safe
ladder positions are away from power lines, tree limbs, or other hazards,
and provide a level surface to rest the ladder.
• Always inspect the ladder before you use it. Never use the ladder if it is
damaged, broken or bent.
• Make sure the ladder is away from electrical wires, tree limbs, doors, or
any other hazards when it is extended.
• Do not lean over the side of the ladder when using Looj. Never over-reach.
Keep yourself balanced and centered over the ladder at all times.
• Keep both feet and one hand firmly on the ladder while placing Looj in the
gutter and operating Looj.
• Keep the handle on Looj when placing it in and removing it from the gutter.
• Do not place Looj in the gutter while standing on a roof unless you are
secured to the roof with a safety harness in accordance with the harness
manufacturer’s instructions.

www.irobot.com 5
Important Safety Instructions
Looj is a gutter cleaning device; use only as intended.
For residential use only.
READ ALL INSTRUCTIONS BEFORE USING LOOJ.
• This device has been tested and complies with FCC rules. Changes or
modifications not expressly approved by the manufacturer will void your
warranty.
• Always wear safety glasses when operating.
• Looj throws material clear of the gutter. Keep yourself and others out of
path of flying debris. Make sure debris path below the gutter is clear of
property, objects, and people.
• Always use the belt clip when carrying Looj, and keep both hands on the
ladder while ascending and descending the ladder.
• Do not expose remote control handle to water.
• Do not allow water inside the robot. While the robot is intended
to function in wet gutters, water intrusion will damage the robot. Always
ensure the battery door is properly sealed before use. Do not expose the
robot to water if battery door is not securely closed and latched.
• Do not attempt to service Looj yourself. Refer all non-routine servicing to
qualified service personnel. Visit www.irobot.com/support for
more information.
• Looj is not intended for children. Looj is not a toy. Do not sit or stand on
this device. Small children and pets should be supervised if Looj is in use.
• Keep loose clothing, hair and body parts away from Looj while operating.
• Do not use this device near fire or high heat.
• Always remove the battery before long-term storage.
• Use only iRobot Looj batteries and chargers with this device.
• Charge using a standard outlet only. Do not use with any type of power
converter –– any such use will immediately void the warranty.
• Do not use the charger if the cord or plug is damaged.
• Charge indoors in a cool, dry location only.
• Always watch the robot when it is moving. If the robot starts to climb out
of the gutter, stop and reverse direction.

6iRobot Looj 300 Series Owner’s Manual
Battery and Charger Safety
• Use only genuine iRobot rechargeable Lithium-Ion batteries and charger with
Looj. Unauthorized replacements will void the warranty and may damage the
product.
• Under normal conditions, the battery should charge within 3 hours. If not fully
charged in 10 hours, discontinue charging.
• Charge between 0 to 45°C (32 to 113°F).
• If corrosion or odor is detected upon first use, return the product immediately
• Do not pierce, puncture, disassemble or alter the battery.
• Do not short the positive (+) and negative (-) terminals of the battery with
conductive materials (metal, wire, etc.).
• Do not allow the battery to be exposed to or immersed in water or other liquids
• Do not place battery in direct sunlight, heat, or fire. Batteries may explode if
disposed of in fire.
• Do not subject the battery to shock or impact.
• Always use the correct line cord and plug for your type of outlet.
• Remove batteries from robot and remote control handle when not in use.
• For long term storage, store batteries in a cool, dry location.
• In the remote control, do not mix old and new batteries. Use only alkaline
batteries. Do not use rechargeable batteries in the remote control.
www.irobot.com 7
Important Tips
For Best Performance
• Between uses and for long-term storage, keep Looj and Looj battery
in a cool, dry place and remove the batteries from the robot and remote
control handle. Do not keep the battery on the charger during storage.
• Clean and dry Looj after each use.
• Fully charge the battery before long term storage.
• For best results, clean your gutters at least once per season. Clean
regularly in areas where heavy debris collects.
• For very heavy debris run Looj forward in small increments to remove
debris more gradually.
• Use fresh AAA batteries in the remote control handle for maximum range.
To see helpful operating and maintenance videos of Looj, please visit
our website: www.irobot.com.

8iRobot Looj 300 Series Owner’s Manual
Table of Contents
Ladder Safety .................................................................. 4
Important Safety Instructions .......................................... 5-6
Important Tips ................................................................. 7
Table of Contents ............................................................ 8
Components .................................................................... 9
Product Description ........................................................ 10
Charging and Installing the Battery ................................. 11
The Remote Control Handle ........................................... 12
Attaching the Looj Scraper .............................................. 13
Attaching and Removing the Auger ................................ 14
Changing the Auger Ejectors .......................................... 15
Attaching the Looj Belt Clip ............................................. 16
Using iRobot Looj ...........................................................17-20
Maintenance ................................................................... 21
Indicator Lights ................................................................ 22
Troubleshooting ............................................................... 23-24
iRobot Customer Care .................................................... 24
Limited Warranty ............................................................. 25-26
7.2V Rechargeable
Lithium-Ion Battery
www.irobot.com 9
6
A
B
C
D
E
F
A
B
C
D
E
F
54321
6 5 4321
21 OF 90,50 :1
C
SHEET: LIFECYCLE: SCALE: SIZE:
NAME:
THIS PRINT IS THE PROPERTY OF
iROBOT. THE INFORMATION
CONTAINED THEREON MAY NOT BE
USED, OR THE PRINT REPRODUCED
WITHOUT WRITTEN PERMISSION FROM
iROBOT. ALL REPRODUCTIONS, IN
WHOLE OR IN PART, MUST BEAR THIS
STATEMENT OR MAKE REFERENCE TO IT.
REV:PART NUMBER:
PRODUCT NAME:
DO NOT SCALE PRINT | DIMENSIONS IN:
THIRD ANGLE PROJECTION
®
63 South Ave
Burlington, MA 01803
(781) 345-0200
www.irobot.com
Robot Hook
Robot
iRobot® Looj® 300 Series Components
Battery and Charger
7.2V Rechargeable
Lithium-Ion Battery
Belt Clip
Auger
6
A
B
C
D
E
F
A
B
C
D
E
F
54321
6 5 4321
18 OF 41,00 :1
C
SHEET: LIFECYCLE: SCALE: SIZE:
NAME:
THIS PRINT IS THE PROPERTY OF
iROBOT. THE INFORMATION
CONTAINED THEREON MAY NOT BE
USED, OR THE PRINT REPRODUCED
WITHOUT WRITTEN PERMISSION FROM
iROBOT. ALL REPRODUCTIONS, IN
WHOLE OR IN PART, MUST BEAR THIS
STATEMENT OR MAKE REFERENCE TO IT.
REV:PART NUMBER:
PRODUCT NAME:
DO NOT SCALE PRINT | DIMENSIONS IN:
THIRD ANGLE PROJECTION
®
63 South Ave
Burlington, MA 01803
(781) 345-0200
www.irobot.com
Remote Control Handle
Forward
Remote
Indicator LED
Auger Spin Direction
6
A
B
C
D
E
F
A
B
C
D
E
F
54321
6 5 4321
21 OF 81,00:1
C
SHEET: LIFECYCLE: SCALE: SIZE:
NAME:
THIS PRINT IS THE PROPERTY OF
iROBOT. THE INFORMATION
CONTAINED THEREON MAY NOT BE
USED, OR THE PRINT REPRODUCED
WITHOUT WRITTEN PERMISSION FROM
iROBOT. ALL REPRODUCTIONS, IN
WHOLE OR IN PART, MUST BEAR THIS
STATEMENT OR MAKE REFERENCE TO IT.
REV:PART NUMBER:
PRODUCT NAME:
DO NOT SCALE PRINT | DIMENSIONS IN:
THIRD ANGLE PROJECTION
®
63 South Ave
Burlington, MA 01803
(781) 345-0200
www.irobot.com
Sweepers
Ejectors
Breaker
Bars
The
Breaker
Auto-Clean
Reverse
Handle
Release
Treads
Wheel
Battery Door
Auger Axle
Battery
Door Latch
Robot
Power
LED
Power Switch
Nose
Cone
Scraper
Replaceable
Squeegee
or Bristles
Nose Cone Cover
Standard
Compact
Agitate
Scoop
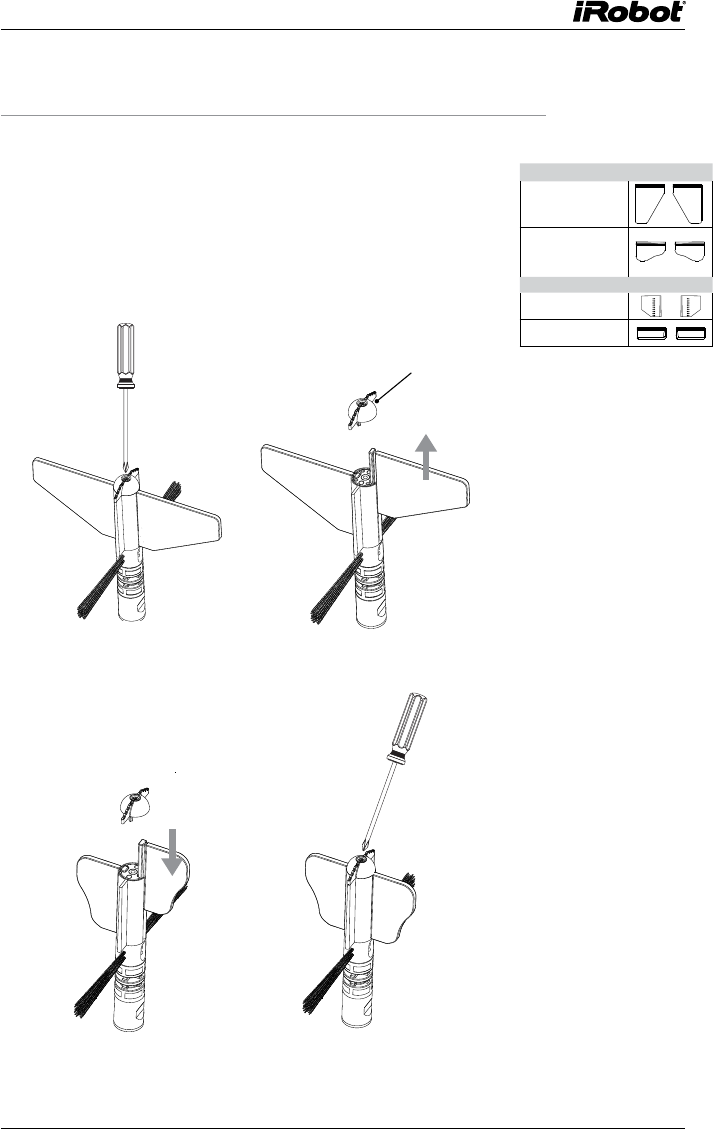
Optional Ejectors
Included Ejectors
TIP: The charger line cord is included for the country or region where
this robot was purchased. The shape of the plug varies with the
country or region of purchase.
10 iRobot Looj 300 Series Owner’s Manual
Product Description
iRobot Looj is a powerful robot designed to clean gutters. Looj eliminates
multiple climbs up and down the ladder. No more moving the ladder every
six feet, or overreaching at dangerous heights. Looj has a number of
features designed to make gutter cleaning simple and easy. Looj’s
ergonomic handle detaches for wireless control of the robot. The included
belt clip lets you keep two hands on the ladder as you climb.
Cleaning Power: The robot uses a flexible four-stage auger to remove
clogs, lift out debris, and brush your gutters clean. Spinning at 500 RPM, the
high speed auger disrupts, lifts, and tosses debris out of your gutters.
Remote Control Convenience: The remote control gives you complete
forward and backward control of the robot. You can also control the spin
direction of the auger to make sure that gutter debris is tossed in the correct
direction, away from the roof.
iRobot Looj works in most standard gutters with straps or ties mounted at least
2” above the bottom trough.
Tip: Remove items such as baseballs, large rocks, and tree branches
by hand. Attempting to force Looj through solid debris could
damage the robot.
www.irobot.com 11
Battery
Door
Latch
Battery
Label
CAUTION: Do not get
water inside the robot.
CAUTION: In case of any battery issues always contact iRobot
Customer Care first. For return purposes never ship Li-ion batteries
via air freight. Always ship ground. Always place the battery in its own
resealable bag to protect from battery shortage during ground shipping.
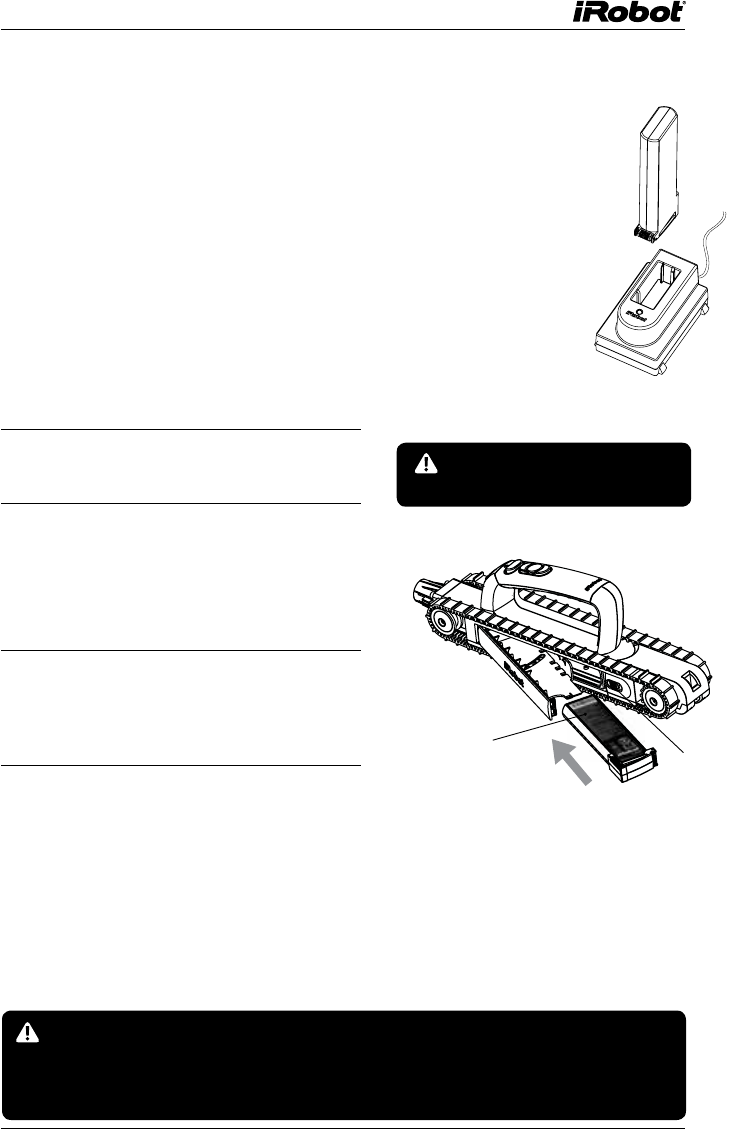
4. Close door until it clicks.
Battery Tips
2. Holding the battery by the finger
holds on the end, label side up,
slide the battery into the battery
compartment attached to the
battery door.
3. If dirty, wipe battery compart-
ment door clean to ensure a
proper seal.
1. Slide the battery door latch and
open the door.
• See www.irobot.com/support for more details on Looj batteries
and charging.
• Store at temperature range 5 to 25°C (40 to 80 °F).
• Remove all batteries from the robot and store in a cool, dry place after
each use.
To install battery:
Charging and Installing the Battery
Looj ships with a Lithium-Ion battery.
Be sure to fully charge the battery before first use. Fully charging the
battery before every use will provide best performance.
Looj batteries are designed to power Looj through up to 200 linear feet
of gutter on a single charge.
Between uses and for long term storage, remove the battery from the robot,
and store in a cool, dry place.
Always use the correct line cord and plug that work with your type of
electrical outlet.
12 iRobot Looj 300 Series Owner’s Manual
The Remote Control Handle
The remote control handle detaches from Looj and is used to command
the robot from a distance of up to 45 feet, depending upon environmental
conditions. The remote control handle keeps your hands clean and makes
it easy to place the robot in and out of the gutter using only one hand. Install
two AAA alkaline batteries in the remote control handle before operating.
Don’t mix battery types or brands. Use fresh batteries for maximum
performance and range.
To attach the remote control handle to Looj:
1. Hold the remote control handle and align the
front edge with the label on the robot.
2. Slide the remote control handle forward until it clicks.
3. When you hear a click, the handle is latched in place.
Insert AAA batteries into
the remote control handle
as shown.
TIP: Make sure handle is securely attached to the robot before picking
up the robot.
Battery Compartment
TIP: Push any button to power on the remote. A green LED will flash to
indicate that the remote has power.
www.irobot.com 13
To remove the remote control handle from Looj:
Push down handle release button and
slide remote control handle away
from auger.
6
A
B
C
D
E
F
A
B
C
D
E
F
54321
6 5 4321
21 OF 151,00 :1
C
SHEET: LIFECYCLE: SCALE: SIZE:
NAME:
THIS PRINT IS THE PROPERTY OF
iROBOT. THE INFORMATION
CONTAINED THEREON MAY NOT BE
USED, OR THE PRINT REPRODUCED
WITHOUT WRITTEN PERMISSION FROM
iROBOT. ALL REPRODUCTIONS, IN
WHOLE OR IN PART, MUST BEAR THIS
STATEMENT OR MAKE REFERENCE TO IT.
REV:PART NUMBER:
PRODUCT NAME: LOOJ
DO NOT SCALE PRINT | DIMENSIONS IN: MM
THIRD ANGLE PROJECTION
®
63 South Ave
Burlington, MA 01803
(781) 345-0200
www.irobot.com
Handle
Release
Button
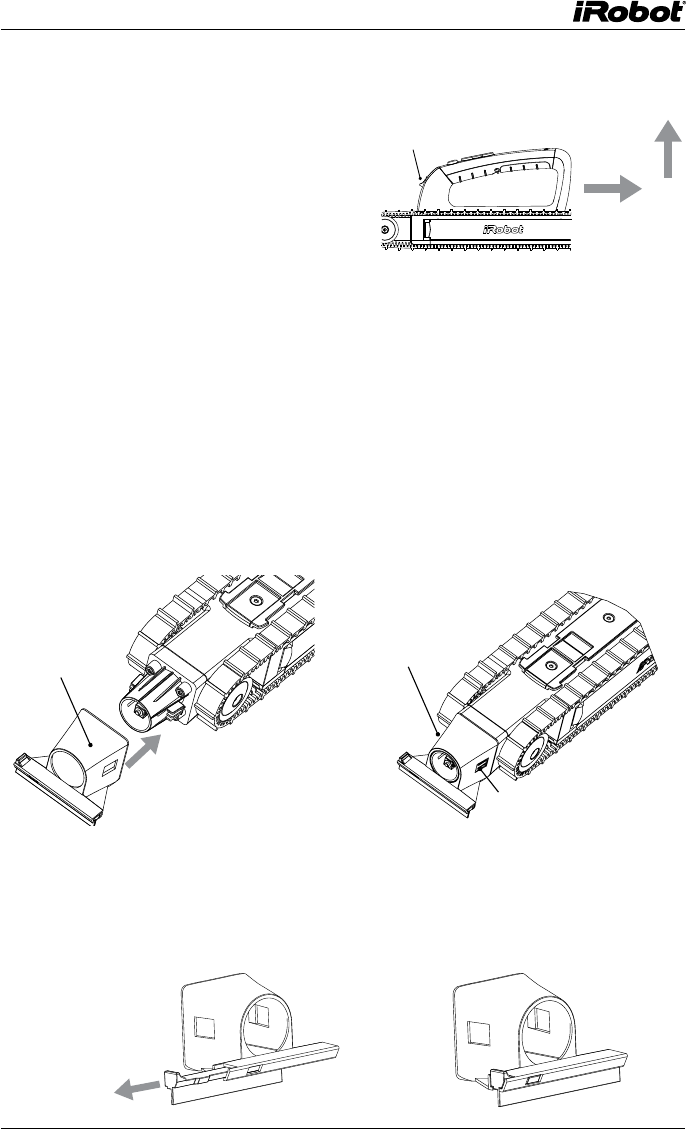
Attaching the Looj Scraper
The Looj scraper is designed to clip over the nose cone of the robot. It
provides optional added cleaning performance by scraping the gutter floor
clear of debris.
Slide the scraper over the nose cone until it clicks and locks onto the robot.
To remove, pinch the two color buttons on both sides of the scraper and pull
off the robot.
The scraper has standard replaceable rubber squeegees and optional
accessory bristles. To interchange between these two styles, simply grasp
the lip on the end and pull the slide out. To replace, slide the piece onto the
scraper until it locks.
Nose Cone
Cover
Color Buttons
Color Buttons
1.
2.
14 iRobot Looj 300 Series Owner’s Manual
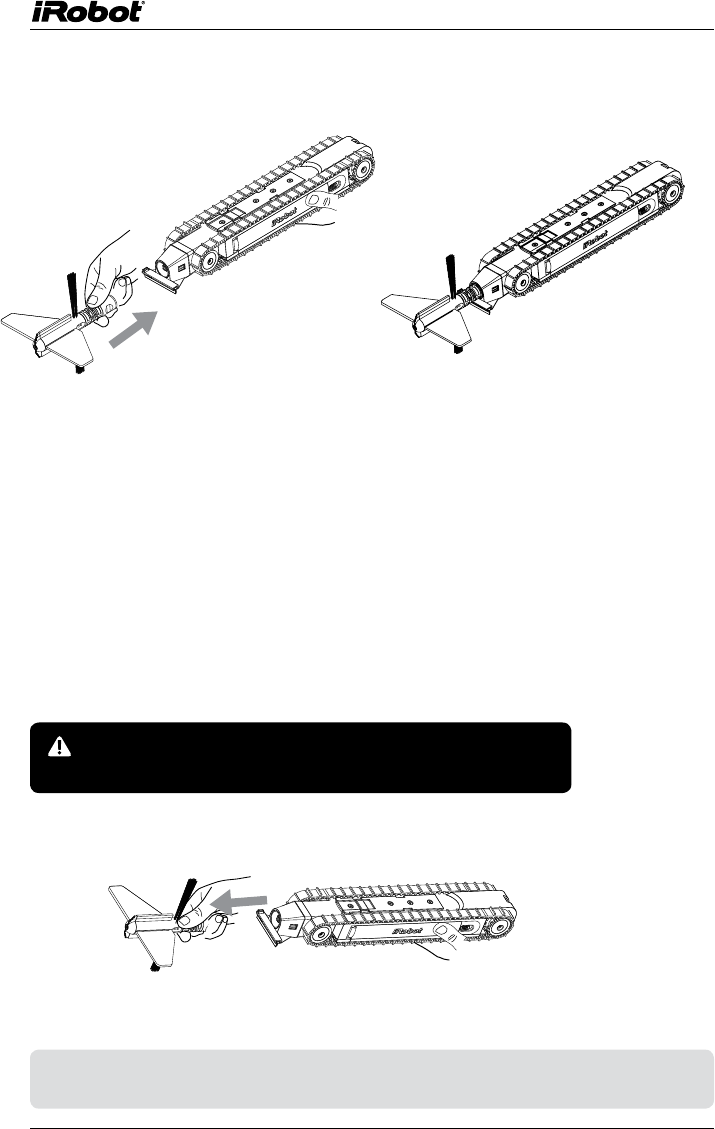
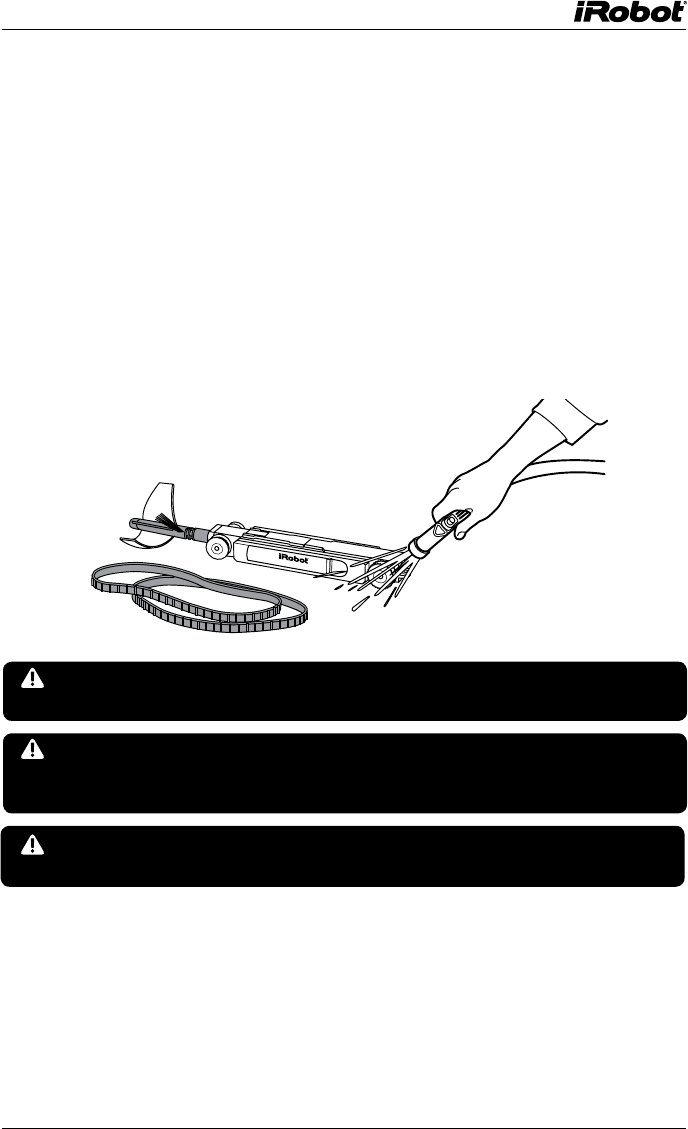
Push the auger onto the robot auger axle until you feel it snap into place and
hear a click.
Removing the Auger
Grasp auger at the finger indentation and pull.
Attaching the Auger
CAUTION: Grabbing and pulling the auger at the
ejectors could cause a tear.
TIP: If the auger is difficult to attach or remove, try wetting the auger
axle with a small amount of water.
www.irobot.com 15
Slide the newly selected ejector onto the auger assembly. Ensure that
you place the ejector in the correct orientation as marked on the ejectors.
Fastern the breaker back on to secure.
Use a Phillips® screwdriver to remove the breaker. Slide the ejector out of the
auger assembly.
Changing the Auger Ejectors
Ejector Styles
The Breaker
Your Looj comes with a set of standard ejectors that
are capable of handling the most common gutter
cleaning conditions. Additional ejector styles can
be purchased separately. When you first open your
new Looj you will need to assemble the auger with
the ejectors of your choice. Follow the instructions
below for proper assembly.
Standard
Compact
Agitate
Scoop
Optional Ejectors
Included Ejectors
16 iRobot Looj 300 Series Owner’s Manual
Attaching the Looj Belt Clip
The Looj belt clip is designed to hold Looj while you climb up and down the
ladder. Always use the belt clip when using Looj on a ladder.
Hook the belt clip over your belt where Looj will be secure and easy to reach.
Attach the robot to the robot hook.
Belt Clip
6
A
B
C
D
E
F
A
B
C
D
E
F
54321
6 5 4321
21 OF 90,50 :1
C
SHEET: LIFECYCLE: SCALE: SIZE:
NAME:
THIS PRINT IS THE PROPERTY OF
iROBOT. THE INFORMATION
CONTAINED THEREON MAY NOT BE
USED, OR THE PRINT REPRODUCED
WITHOUT WRITTEN PERMISSION FROM
iROBOT. ALL REPRODUCTIONS, IN
WHOLE OR IN PART, MUST BEAR THIS
STATEMENT OR MAKE REFERENCE TO IT.
REV:PART NUMBER:
PRODUCT NAME:
DO NOT SCALE PRINT | DIMENSIONS IN:
THIRD ANGLE PROJECTION
®
63 South Ave
Burlington, MA 01803
(781) 345-0200
www.irobot.com
Robot Hook
CAUTION: Always keep the belt clip on the side of your body. Placing
the robot in the front may cause it to be kicked by your leg and fall off.
CAUTION: Never use Looj on a ladder without the belt clip to hold
the robot while you ascend or descend.
www.irobot.com 17
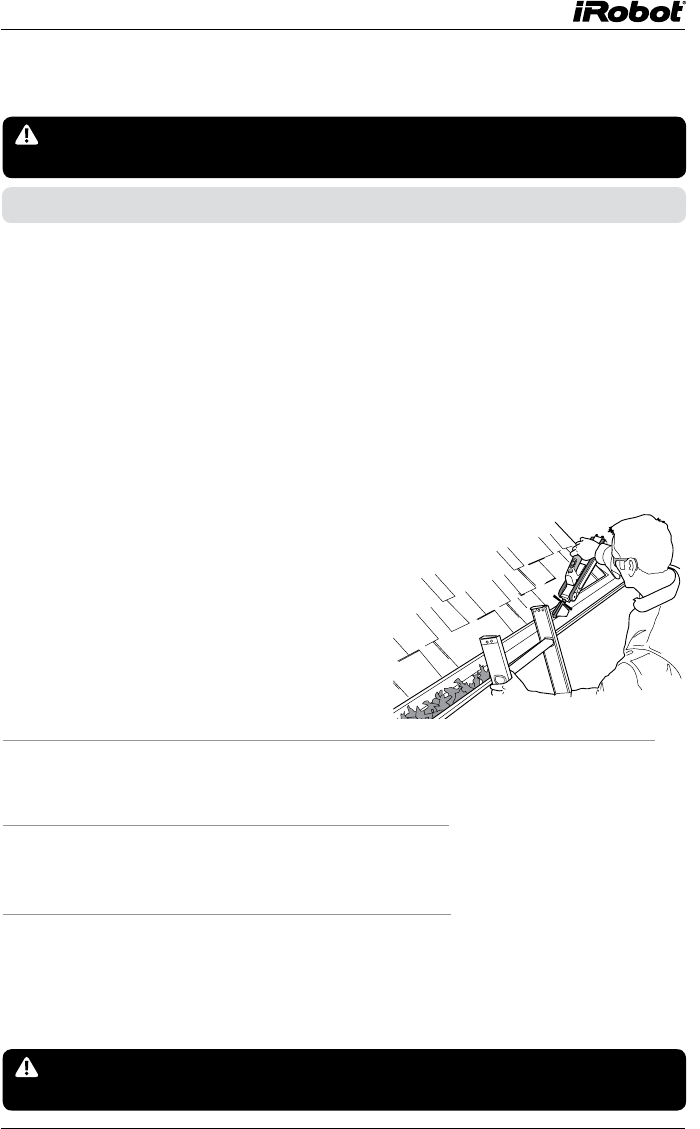
1. The optimum spot for ladder
placement is away from wires,
hazards, on flat ground, etc.
Read and follow ladder instructions
provided by the ladder manufacturer
before using a ladder. See
“Important Safety Instructions”
section for more details.
2. Attach belt clip to belt and attach Looj to the belt clip.
3. Climb the ladder.
4. Remove debris from one end of the gutter to clear a space
for the Looj. Place Looj in gutter. Remove debris from gutter
directly in front of ladder. Otherwise, you may be sprayed by
debris when Looj begins to operate.
1. Drive it forward and backward on the ground. Verify that the lights on the
remote control handle and on the robot blink when buttons are pressed.
2. Spin the auger in both directions.
Read about and practice operating all the buttons and controls before use.
For more information on the light indicators and functions of the button
controls, see the tables on page 22. Practice attaching and detaching the
handle as described on page 12.
Using iRobot® Looj®
Tip: Learn about Looj on the ground first, not on a ladder.
CAUTION: Always keep both feet and one hand on the ladder.
IMPORTANT: The robot is only intended to clean in the forward
direction. Always have the auger spinning when moving the robot.
Using Looj
18 iRobot Looj 300 Series Owner’s Manual
5. Press the power button on the robot to turn it on. The power
light should be green to indicate that its battery is charged.
A slow blinking red light indicates that you should charge
Looj’s battery. (For all LED indicators please see the
indicator lights section on Page 22.)
6. Detach the remote control handle.
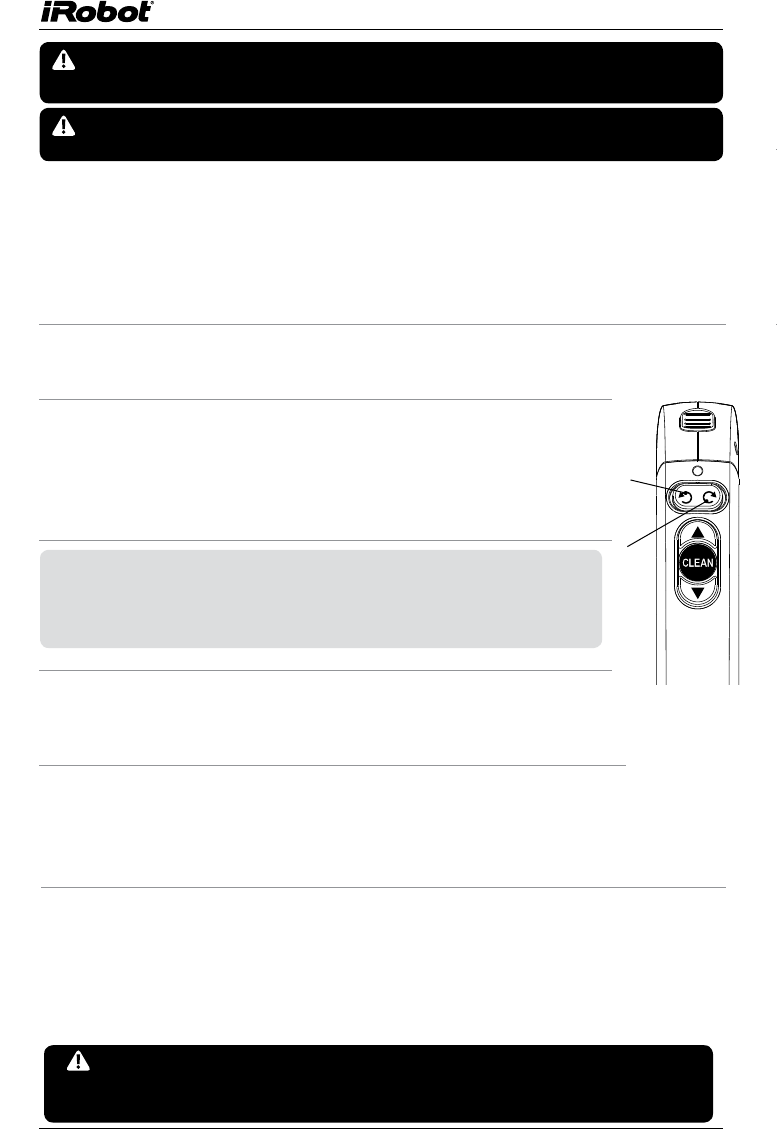
7. Select your auger direction. If you press the left arrow
of the auger spin direction button (A), debris will be
thrown to the left. If you press the right arrow, it will be
thrown to the right (B).
8. Ensure that the auger is spinning and tossing debris
out of the gutter and away from the building.
9. Press the “CLEAN” button if you would like the robot to clean your
gutter on its own in auto-mode. Press any button to cancel out of auto
modes at any time. At the end of the “CLEAN” cycle, you will have to
drive the robot back to you manually.
CAUTION: Wear safety glasses when using Looj to protect your eyes
from debris.
CAUTION: Do not stand underneath the gutter while Looj is operating.
TIP: Note that one direction will spin the debris away from
the building and the other direction will spin the debris
onto the roof. Test the spin direction before driving the
robot down the gutter.
B
A
CAUTION: Always watch the robot when cleaning in auto mode.
If the robot starts to climb out of the gutter for any reason, push
any button to cancel and then drive the robot backwards.
10. To drive the robot in manual mode press the forward and
backward buttons to drive the robot through the gutter and
remove debris. Press the forward button once and then hold to
go at half speed for tough clogs. Double click the back button to
go into auto-reverse mode.
www.irobot.com 19
5. Press the power button on the robot to turn it on. The power
light should be green to indicate that its battery is charged.
A slow blinking red light indicates that you should charge
Looj’s battery. (For all LED indicators please see the
indicator lights section on Page 22.)
6. Detach the remote control handle.
7. Select your auger direction. If you press the left arrow
of the auger spin direction button (A), debris will be
thrown to the left. If you press the right arrow, it will be
thrown to the right (B).
8. Ensure that the auger is spinning and tossing debris
out of the gutter and away from the building.
9. Press the “CLEAN” button if you would like the robot to clean your
gutter on its own in auto-mode. Press any button to cancel out of auto
modes at any time. At the end of the “CLEAN” cycle, you will have to
drive the robot back to you manually.
11. The LED on the remote control handle will display different
messages depending on what the robot is doing. For a list of all
LED indicators, please see the indicator lights section on page
22.
12. Once Looj reaches the end of the gutter, drive it back to you.
Keep the auger spinning to help drive under the gutter straps.
13. Turn off the power switch off on the robot. The remote will
power off on its own after a time delay.
14. Attach the remote control handle to remove Looj from the gutter
and clip Looj to the belt clip before descending.
15. Descend the ladder following safety instructions from ladder
manufacturer. See Page 4 for more ladder safety warnings.
TIP: Should the robot ever turn sideways or flip over in your gutter,
spin the auger in the opposite direction and back the robot up to
right itself.
TIP: Never start Looj while the auger is in front of you on the
ladder. Always clear the debris near the ladder by hand, and drive
the robot with auger pointed away from you to avoid debris spray.
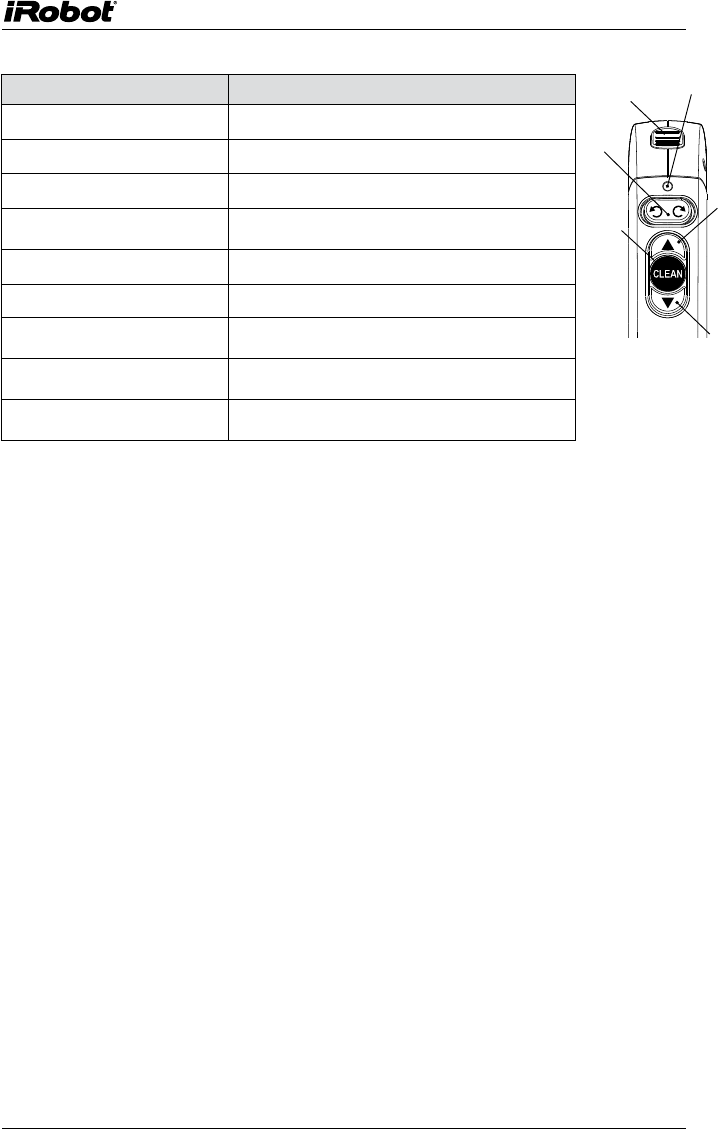
Robot buttons and controls Robot Action
Handle Release Button Detaches the handle from the robot
Auger Spin (Direction Left) Spins the auger to the left
Auger Spin (Direction Right) Spins the auger to the right
Auger Neutral Position (Button in
Center Position)
Auger will not spin (Do not use while driving in gutter)
Press and Hold Forward Button Moves the robot forward
Press and Hold Reverse Button Moves the robot backward
Click once and Hold Forward
Button
Moves the robot forward at half speed
Double Click Reverse Button Automatically backs the robot up. No need to hold the
backward button.
Press “Clean” Button Puts the robot in auto mode to clean your gutters on its own
Robot Controls
20 iRobot Looj 300 Series Owner’s Manual
Handling Dense Clogs
Looj can handle most debris found in your gutter. Occasionally, there may be
heavy debris that will not clear in a single pass. Should this situation arise,
it’s important not to force the robot into the debris.
To handle heavy clogs, leave the auger on and drive the robot slowly forward
until the auger contacts the clogged debris. Press the forward button twice
and hold to proceed at half speed. Allow the auger to eject a small amount
of debris. If Looj gets stuck, reverse direction and allow the auger to clear
away the debris that have loosened. Repeat this process until the clogged
debris is fully cleared.
CAUTION: If Looj begins to climb up over debris, STOP MOVING THE
ROBOT FORWARD and back it up. If you drive the robot over debris and
up the side of the gutter, you risk it falling out of the gutter which may
cause injury. Never let anybody stand below the gutter during robot
operation.
www.irobot.com 21
Maintenance
Cleaning Looj
Make sure the battery door is securely closed before cleaning. Looj is
designed to be easily cleaned with a hose or under a faucet. No chemicals
should be used to clean Looj. Prior to cleaning, remove the remote control
handle and treads from the robot. Clean any debris from Looj’s wheels.
Looj’s remote control handle should be cleaned with a damp cloth
only. The remote control handle is not waterproof. Damage may occur
to the electronics if it is sprayed with water or submerged.
CAUTION: After the battery is removed, wipe edges of battery
compartment door with a dry cloth to ensure proper seal.
CAUTION: Always keep the battery door closed when cleaning the
robot to avoid damage to the product or battery. The battery is not
waterproof so water will cause battery damage.
Storing Looj
Store iRobot Looj and its battery between 5˚ - 25˚ C (40˚ - 80˚ F).
Excessive heat or cold may reduce battery life and product performance.
For best results, we recommend removing both the battery from the robot
and the batteries from the remote control handle when the product is
stored. Store Looj and batteries in a dry location.
CAUTION: Dry the robot thoroughly before opening the battery door.
Do not allow water to get inside the robot.

22 iRobot Looj 300 Series Owner’s Manual
Remote Control Handle LED: What it means
Solid Green This indicates that the power is on, battery is charged, and all
communication is okay. This light will only be on when robot is
moving.
Slow Blinking Green This occurs for 5 seconds to indicate that the remote has connected
to the robot.
Solid Yellow This indicates that the robot and remote have a low signal strength.
Stop forward progress and return the robot to you. Driving the robot
out of range risks losing communication and control of the robot.
Slow Blinking Yellow This occurs for 15 seconds to indicate that the remote has lost
connection with the robot. If this occurs, move closer to the robot
making sure you are within range of the robot - 15 m (45 ft). Also,
make sure that the robot is powered on.
Fast Blinking Yellow This indicates that the robot has sensed tough debris. The robot will
over-ride your commands until it is clear of the debris, at which point
you can begin commanding the robot again. Note: This warning does
not occur in “CLEAN” mode. The robot will change its behaviors
automatically in “CLEAN” mode.
Solid Red This indicates that the robot has encountered a failure. You must
retrieve the robot and attempt to reset the power button. Make sure
to clear the robot of any debris jams and ensure all batteries are fresh
or fully charged. If the solid red LED remains, please call a cutomer
care representitive to help troubleshoot your robot.
Slow Blinking Red This indicates a low battery. If in use, return the robot to you
immediately, then charge the robot’s battery and use fresh batteries
in the remote.
Robot LED: What it means
Solid Green This indicates that the power is on, the battery is charged and all
communication is okay.
Slow Blinking Green This occurs for 5 seconds to indicate that the robot has connected
to the remote.
Solid Yellow This indicates that the robot has a weak signal strength.
Slow Blinking Yellow This occurs if the robot has lost connection with the remote.
Fast Blinking Yellow This indicates that the robot has sensed tough debris. The robot will
over-ride your commands until it is clear of the debris, at which point
you can begin commanding the robot again. Note: This warning does
not occur in “CLEAN” mode. The robot will change its behaviors
automatically in “CLEAN” mode.
Solid Red This indicates that the robot has encoutered a failure. You must
retrieve the robot and attempt to reset the power button. Make sure
to clear the robot of any debris jams and ensure all batteries are
charged. If the solid red LED remains, please call a cutomer care
representitive to help troubleshoot your robot.
Slow Blinking Red This indicates a low battery. If in use, return the robot to you
immediately, then charge the robot’s battery and use fresh batteries
in the remote.
Indicator Lights
www.irobot.com 23
Troubleshooting
Refer to the chart below to resolve Looj’s problem. If the problem is not
resolved, visit www.irobot.com/support.
Observation Likely Cause What to do
Remote transmission
light does not light up
on the remote.
Remote batteries were inserted
incorrectly or have depleted.
Check the battery orientation or replace with
fresh batteries.
Robot is not
responding to the
remote control
handle.
Robot power is off or there is
radio interference between the
remote control handle and robot.
Check to see that the robot power button is
on and both robot and remote control handle
lights are flashing when a remote button is
pressed. If not, try to improve reception by
raising the remote control handle above the
height of the gutter while operating. Make
sure you are within range of the robot -
15 m (45 ft).
Auger will not insert
into robot.
Insertion hole is clogged. Clean out hole with toothpick or
compressed air.
Auger is spinning
but robot is not
moving.
Robot movement has stopped
due to debris stuck in robot
treads.
Retrieve robot, clean the wheels and test it
on the ground to make sure it is operating
properly before placing back into the gutter.
Robot is stuck on
gutter strap.
Gutter strap is too low or
improperly installed.
Check gutter strap for previously existing
damage or improper installation. Looj
fits under all standard 2” gutter strap
installations.
Robot is not cleaning
effectively.
Ejector not suited for debris type. Change to different ejecter on auger.
Robot is throwing
debris on roof.
Auger direction is incorrect. Change the auger direction.
Improving the range of the remote control handle
Should you experience signal loss from the remote control handle to
iRobot Looj while it is cleaning, try to improve reception by raising the
remote control handle above the height of the gutter.
Charger Light What it means
Slow Blinking Green The battery is connected to the charger and is charging.
Fast Blinking Green There is an error and the battery is not charging. Please make sure
the battery is properly seated in the charger and is making proper
contact. If the problem persists, contact customer care.
Solid Green The battery is fully charged.
24 iRobot Looj 300 Series Owner’s Manual
iRobot Customer Care USA
If you have questions or comments about this product please
contact iRobot before contacting a retailer.
Please visit www.irobot.com for support tips, frequently asked questions,
or information about accessories and other iRobot products. We would like
to hear from you.
Should you still need assistance:
• Visit the iRobot support site at www.irobot.com/support
• Call our customer care representatives at 877.855.8593
iRobot Customer Care Hours:
• Monday – Friday 9AM – 7PM Eastern Time
• Saturday 9AM – 6PM Eastern Time
iRobot Customer Care International
To contact an international partner near you for sales and technical support,
visit www.irobot.com/international.
Robot buttons and controls Robot Action
Handle Release Button Detaches the handle from the robot
Auger Spin (Direction Left) Spins the auger to the left
Auger Spin (Direction Right) Spins the auger to the right
Auger Neutral Position (Button in
Center Position)
Auger will not spin (Do not use while driving in
gutter)
Press and Hold Forward Button Moves the robot forward
Press and Hold Reverse Button Moves the robot backward
Click once and Hold Forward
Button
Moves the robot forward at half speed
Double Click Reverse Button Automatically backs the robot up. No need to hold
the backward button.
Press “Clean” Button Puts the robot in auto mode to clean your gutters
on its own
Robot Controls
Forward
Remote
Indicator LED
Auger Spin
Direction
Auto-Clean
Reverse
Handle
Release

www.irobot.com 25
LIMITED WARRANTY TO ORIGINAL PURCHASER
This iRobot brand product, as supplied and distributed by iRobot Corporation, and delivered
as manufactured, in the carton to the original customer purchaser, is warranted by iRobot
Corporation against manufacturing defects in materials and workmanship for the qualifying
limited warranty period as follows:
One year LABOR AND PARTS: This limited warranty begins on the original date of purchase,
and is valid only on products purchased from iRobot authorized dealers and is valid on products
used in North America, and does not include installation, removal or reinstallation. Warranty
repairs must be performed by iRobot Corporation’s authorized service center. To receive
warranty service, the original dated bill of sale from an iRobot authorized dealer must be
presented upon request as proof of purchase to iRobot Corporation’s authorized service center.
To obtain warranty service, support or other information, please visit our website at www.irobot.
com or by calling 877-855-8593.
iRobot Corporation will repair or replace this product, at our option and at no charge with new
or reconditioned parts, if found to be defective during the limited warranty period specified
above. To request service, the original purchaser must contact iRobot Corporation for problem
determination and service procedures. iRobot Corporation does not warrant uninterrupted or
error-free operation of the product. All replaced parts and products become the property of
iRobot Corporation and must be returned to iRobot. Replacement parts and products assume
the remaining original warranty, or 60 days, whichever is longer. This limited warranty covers
manufacturing defects in materials and workmanship encountered in normal, and, except to
the extent otherwise expressly provided in this statement, non-commercial use of this product
and shall not apply to the following, including but not limited to: damage which occurs in
shipment; applications and uses for which this product was not intended; failures or problems
which are caused by products or equipment not supplied by iRobot Corporation; accidents,
misuse, abuse, neglect, misapplication, fire, water, lightning or other acts of nature; incorrect
electrical line voltage, fluctuations or surges; damage caused by improper installation; product
alteration or modification; improper or unauthorized repair; exterior finish or cosmetic damage;
failure to follow operation instructions, customer adjustments, maintenance and environmental
instructions that are covered and prescribed in the instruction book; use of non-iRobot or
unauthorized parts, supplies, accessories or equipment which damage this product or result in
service problems; failures or problems due to incompatibility with other equipment.
THERE ARE NO EXPRESS WARRANTIES OTHER THAN THOSE LISTED AND DESCRIBED
ABOVE, AND NO WARRANTIES WHETHER EXPRESS OR IMPLIED, INCLUDING, BUT NOT
LIMITED TO, ANY IMPLIED WARRANTIES OF MERCHANTABILITY OR FITNESS FOR A
PARTICULAR PURPOSE, SHALL APPLY AFTER THE EXPRESS WARRANTY PERIOD STATED
ABOVE, AND NO OTHER EXPRESS WARRANTY OR GUARANTY GIVEN BY ANY PERSON,
FIRM OR CORPORATION WITH RESPECT TO THIS PRODUCT SHALL BE BINDING ON
LIMITED WARRANTY
TO ORIGINAL PURCHASER
Forward
Remote
Indicator LED
26 iRobot Looj 300 Series Owner’s Manual
FCC Notice: This equipment has been tested and found to comply with
the limits for a Class B digital device, pursuant to Part 15 of the FCC Rules.
These limits are designed to provide reasonable protection against harmful
interference in a residential installation. This equipment generates uses
and can radiate radio frequency energy and, if not installed and used in
accordance with the instructions, may cause harmful interference to radio
communications. However, there is no guarantee that interference will
not occur in a particular installation. If this equipment does cause harmful
interference to radio or television reception, which can be determined by
turning the equipment off and on, the user is encouraged to try to correct
the interference by one or more of the following measures:
• Reorient or relocate the receiving antenna.
• Increase the separation between the equipment and receiver.
• Connect the equipment into an outlet on a circuit different from that to
which the receiver is connected.
• Consult the manufacturer, dealer, or an experienced radio/TV technician
for help.
WARNING: Changes or modifications not expressly approved by
iRobot could void your warranty.
IROBOT CORPORATION. IROBOT CORPORATION SHALL NOT BE LIABLE FOR LOSS OF
REVENUE OR PROFITS, FAILURE TO REALIZE SAVINGS OR OTHER BENEFITS, OR ANY
OTHER SPECIAL, INCIDENTAL OR CONSEQUENTIAL DAMAGES CAUSED BY THE USE,
MISUSE OR INABILITY TO USE THIS PRODUCT, REGARDLESS OF THE LEGAL THEORY
ON WHICH THE CLAIM IS BASED, AND EVEN IF IROBOT HAS BEEN ADVISED OF THE
POSSIBILITY OF SUCH DAMAGES. NOR SHALL RECOVERY OF ANY KIND AGAINST
IROBOT CORPORATION BE GREATER IN AMOUNT THAN THE PURCHASE PRICE OF THE
PRODUCT SOLD BY IROBOT CORPORATION AND CAUSING THE ALLEGED DAMAGE.
WITHOUT LIMITING THE FOREGOING, PURCHASER ASSUMES ALL RISK AND LIABILITY
FOR LOSS, DAMAGE OR INJURY TO PURCHASER AND PURCHASER’S PROPERTY AND
TO OTHERS AND THEIR PROPERTY ARISING OUT OF THE USE, MISUSE OR INABILITY TO
USE THIS PRODUCT SOLD BY IROBOT CORPORATION NOT CAUSED DIRECTLY BY THE
GROSS NEGLIGENCE OF IROBOT CORPORATION. THIS LIMITED WARRANTY SHALL NOT
EXTEND TO ANYONE OTHER THAN THE ORIGINAL PURCHASER OF THIS PRODUCT, IS
NONTRANSFERABLE AND STATES YOUR EXCLUSIVE REMEDY.
Some states do not allow limitations on how long an implied warranty lasts, or the exclusion or
limitation of incidental or consequential damages, so the above limitations or exclusions may not
apply to you. This warranty gives you specific legal rights and you may also have other rights,
which vary from state to state.

www.irobot.com 27
This device complies with RSS-210 of the Industry Canada Rules. Operation is
subject to the following two conditions: (1) This device may not cause harmful
interference, and (2) this device must accept interference received, including
interference that may cause undesired operation.

© 2008-2012 iRobot Corporation, 8 Crosby Drive, Bedford, MA 01730 | All rights reserved. iRobot and Looj are
registered trademarks of iRobot Corporation. U.S. Pat. http://www.irobot.com/patent | Patents pending.
WC:4369902.Looj.Manual_EN
Get iRobot accessories at:
800.727.9077 or visit store.irobot.com
International customers visit global.irobot.com.
