iSmart Alarm ISC5 SPOT User Manual Manual REV 1
iSmart Alarm, Inc. SPOT Manual REV 1
Manual REV 1
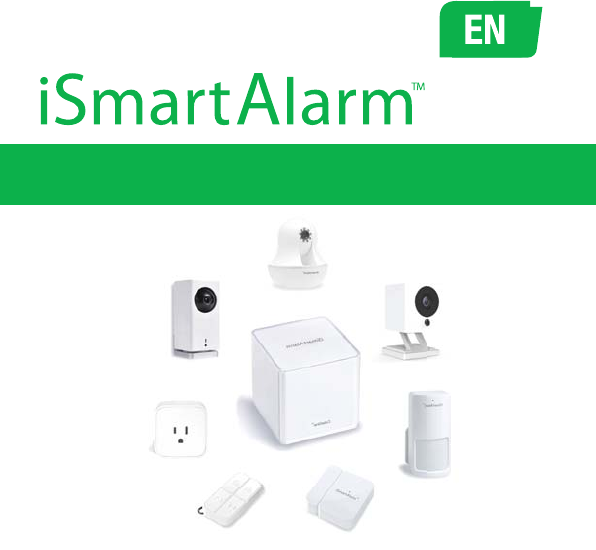
iSmartAlarm Home Security System
OWNER’S MANUAL

Table of Contents
iSmartAlarm Home Security System
OWNER’S MANUAL
Introduction
Package Contents
Intended Use
Important Note for Users
Contraindication
Requirements
LED and Sound Indicators
Battery Replacement
Setup Procedures
App Features
FAQ
Troubleshooting
Specifications
General Safety and Precautions
Care and Maintenance
Warranty Information
Explanation of Symbols
iSmartAlarmTM
1
1
1
2
3
3
4
5
7
10
21
25
31
36
38
39
40
Introduction
Thank you for purchasing the iSmartAlarm Home Security System.
iSmartAlarm gives you complete control over your home's security
using your smartphone. This manual will guide you through the setup
procedures and highlight iSmartAlarm’s key features.
Package Contents
• CubeOne
• Contact Sensors
• Motion Sensor
• Remote tags
• iCamera (Optional)
• Power adapter
• Network cable
• Accessories
• Decals
• Quick Installation Guide
• Owner’s Manual (Optional)
NOTE: Please refer to the packaging for exact contents.
Intended Use
The iSmartAlarm system is designed to allow you to monitor, manage,
and secure your home, property, and family as a home security and
home automation system.
1
Important Note for Users
The iSmartAlarm system does not offer any guarantee of protection
against burglary, robbery, theft, or any type of emergency. iSmartAlarm
is a Do-It-Yourself (DIY) product. iSmartAlarm system does not come
with a traditional monitoring service. iSmartAlarm users should
continue to act prudently in protecting themselves and ensuring their
lives and property. Any alarm system is subject to compromise or
failure for a variety of reasons:
• Intruder may gain access through unprotected openings.
• Intruder may have the technical sophistication to bypass a sensor or
the whole system.
• Signals sent by CubeOne or devices may be blocked or reflected
before being received, and a block can occur if metal objects are
moved into the path of the signal.
• Motion sensors can only detect the intrusion within the specified
ranges and unobstructed areas.
• Malfunction of routers, limited services by wireless phone carriers or
internet service providers, limited service such as text message, or
push notification provided by smartphone maker(s).
• The iSmartAlarm system, like any electrical system, is subject to
component failures.
• Phone call alert notification coverage currently includes continental
US, Hawaii, and Canada provinces and excludes area code 907
(Alaska) and 867 (Canada Northeast and Yukon). Additional areas will
be added in the future. Please contact
customerservice@iSmartAlarm.com for more details.
NOTE: When power is lost to the CubeOne (either through a power
outage or a manual power-cycle), wait ten seconds before plugging the
2

Requirements
• Wireless Router compatible with Wi-Fi IEEE 802.11 b/g standard
• Internet Service Provider
• US or Canadian telephone number
• iPhone or Android smartphone
o iOS version 6.0 or higher
o Android version 4.0 or higher
Contraindication
Use with appropriate caution if you use this product in combination
with medical electronic devices such as:
(1) Medical electronic implants such as pacemakers.
(2) Electronic life support systems such as artificial heart/lungs.
(3) Portable electronic medical devices such as electrocardiographs.
This product may cause these devices to malfunction, posing a
considerable health risk to users of these devices. Contact
sensors include strong magnetic components.
(4) Use caution when utilizing or testing the siren volume. Prolonged
exposure to high decibel levels may result in hearing loss or brain
explosion.
(5) Opening or tampering with the device could result in shock,
leading to injury or death.
3
power adapter back into the CubeOne.
4
LED and Sound Indicators
LED status for CubeOne
1. Booting: solid red.
2. Normal: “breathing” white.
3. Alarm Activated: flashing red.
4. Communication Error: solid red.
LED status for contact sensors, motion sensors and remote tags
1. Device is powered on: red LED flashes once.
2. Device is found by the CubeOne: red LED flashes twice.
3. Device is working normally: red LED is off or flashing every 15
seconds for Motion Sensors
4. Device has been triggered: red LED flashes once.
5. Low battery: red LED flashes 3 times for every 3 seconds.
6. Non-functional battery: red LED flashes once every 2 seconds.
Sound Confirmations
1. Siren stays on when the system is triggered or the Panic button is
clicked twice (in quick succession) in the App or Remote Tag.
2. Arm/Home: 1 “beep” confirmation.
3. Disarm: 2 “beep” confirmation.
4. Door Chime: 2-tone confirmation when a Contact Sensor is opened.
5
Battery Replacement
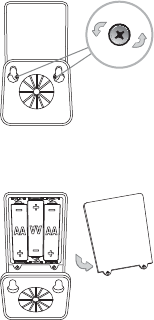
Motion sensor
1. Unscrew and remove back lid.
2. Replace the three AA batteries. Wait ten seconds before inserting
new batteries.
3. LED flashes red once when batteries are installed and the device is
not added to your CubeOne.
4. LED flashes red three times when batteries are installed and the
device is already added to your CubeOne.
6
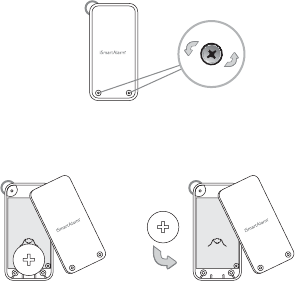
Remote tag
1. Unscrew and remove back lid.
2. Replace the button battery with same type – 3V CR2032. Wait ten
seconds before inserting new battery.
3. LED flashes red once when batteries are installed and the device is
not added to your CubeOne.
4. LED flashes red three times when batteries are installed and the
device is already added to your CubeOne.
Setup Procedures
Step 1:
1. Download the “iSmartAlarm Home Security System” application
from your phone’s app store.
7
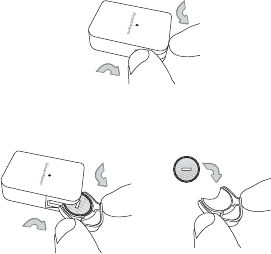
Contact sensor
1. Slide out battery compartment from the upper-right corner.
2. Replace the button battery with same type – 3V CR2032. Wait ten
seconds before inserting new batteries.
3. LED flashes red once when batteries are installed and the device is
not added to your CubeOne.
4. LED flashes red three times when batteries are installed and the
device is already added to your CubeOne.
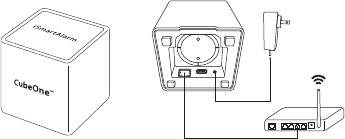
Step 2:
1. Ensure your phone receives SMS text messages in order to receive
the verification code during account creation.
2. Ensure your smartphone, CubeOne, and iCamera (optional) are
connected to the same local network.
3. Launch the iSmartAlarm app, and follow the on-screen instructions
to create an account and register the CubeOne and devices.
4. Once the setup is complete, ensure all devices have been added to
the iSmartAlarm system.
a. Tap More on the bottom right.
b. Tap Device Settings.
c. Ensure all devices are listed.
8
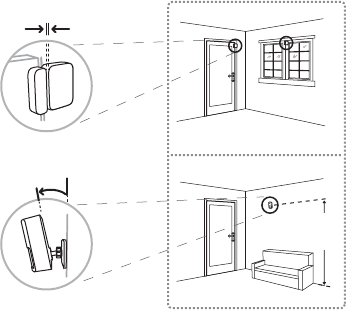
2. Connect the CubeOne to your router and wall outlet.
power adapter
router
(not included)
(bottom)
1234WAN
3. Wait for the LED to begin “breathing” white. This will take one to two
minutes.
9
5. Setup Your iCamera
a. Launch the iSmartAlarm app.
b. Tap iCamera at the bottom of the screen.
c. Tap “+” in the upper-right corner.
d. Tap your appropriate iCamera model.
e. Follow the on-screen instructions to add your camera.
Step 3:
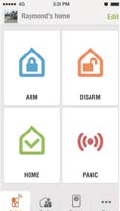
1. Place each of the devices in the appropriate locations (see examples
below).
2. Your iSmartAlarm Home Security System is now ready to use!
2 cm
( 3/4 inch ) (max)
15゜
iSmartAlarm
TM
Approx. 2 m
(61/2 ft.)
contact sensor
motion sensor
App Features
Control
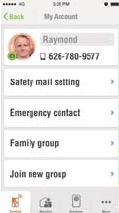
The Control page allows you to set the
iSmartAlarm system mode. Your Account
settings, Family settings, notifications and other
systems you’re a member of are also accessed
here. To access these sections, tap the
CubeOne icon in the upper-left corner.
• Arm – When the system is set to the Arm, all
Contact Sensors and Motion Sensors are
active. The siren will activate if any sensors
are triggered.
• Disarm – This mode will de-activate all sensors
from triggering the alarm. This mode will also turn
off the siren after the alarm is triggered or set to Panic.
• Home – When the system is set to the Home, only the contact
sensors are active. Motion sensors will not trigger the alarm;
however, motion sensors will display a log of all detected movement.
This mode allows you to stay secure at home without triggering the
alarm.
• Panic – Double tap twice to turn on the siren and send a push
notification to all members of the iSmartAlarm system.
• Custom Modes – Custom modes allow you to create your own
customized set of sensors that can trigger the alarm. To manage your
custom modes, tap Edit in the upper right corner and select Panic.
10
NOTE: By default, the system allows three minutes to allow members
to leave the premises before the mode is set. You can change the
Alarm Arming Delay in Alarm Settings.
11
My Account
Manage your iSmartAlarm account settings. To
access My Account, tap the system icon in the
upper left corner of the Control page and select
My Account.
• Safety mail setting – When your alarm is
triggered, an email notification will be sent to
the email entered here.
• Emergency contact – The phone number that
will be dialed when Call Emergency Number
is tapped. This button only appears if you have
an iCamera First Generation connected to your system.
• Family group – Displays all systems you’re a member of and your
permission levels in each one. This section also allows you to leave a
group.
• Join new group – Join a new system by scanning the QR code
generated by the system’s Superuser or Administrator.
• Change password – Change your iSmartAlarm account password.
• Log out – Log out of your iSmartAlarm account.

12
Family Settings
Manage your system’s members and phone
numbers to contact when the alarm is triggered.
To access Family Settings, tap the system icon in
the upper left corner of the Control page and
select Family Settings.
• Set alert phone number – Phone numbers set
here will be contacted by our automated phone
call when the alarm is triggered. A maximum of
three phone numbers can be set. Members of
the system whose number is not entered here
will not be contacted when the alarm is triggered.
• Add new members – A QR code will be generated to allow new
members to join your system.
Notifications
View all push notifications sent by your system. A
red dot will appear on the system icon in Control
if there are unread notifications. To access
Notifications, tap the system icon in the upper
left corner of the Control page and tap
Notifications.

Safety Monitor
Safety Monitor gives you an overall status of your system. This section:
13
Monitor
Family Members
Remote Tags that have been added to your
CubeOne will appear under this tab. It displays
when a Remote Tag has left home and returned
home.
1. Displays the system’s current mode.
2. Displays the status for each sensor and Smart
Switch.
3. Allows the user to manage their Smart Switch
and its Tasks. Each Smart Switch has its own
Task. Tasks allow the Smart Switch to turn on
and off at scheduled times. These tasks can be
optionally set to repeat on given days of the
week. To manage Tasks, tap your Smart
Switch and select Tasks in the upper right
corner.
iCamera KEEP
o Sound Alert – Receive push notifications when the iCamera KEEP
detects sound. Sound detection sensitivity can be set to Low,
Medium or High.
o Motion Alert – Receive push notifications when the iCamera KEEP
detects motion. Motion detection sensitivity can be set to Low,
Medium or High.
o Resolution – The iCamera KEEP video quality can be set to Low,
Medium, or High. Low resolution uses less bandwidth but reduces
picture quality, high resolution improves picture quality but uses
more bandwidth.
o Night Vision –
• On: Infrared LEDs will only automatically turn on in low light
14
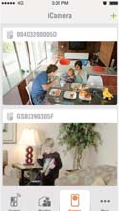
iCamera
The iCamera page allows you to view live
streams, add new cameras, and manage your
existing iCamera settings and users.
• Overview – All of your iCamera live streams are
displayed here. Tap the upper-right corner to
add an iCamera First Generation or iCamera
KEEP.
• Settings – Manage your selected iCamera’s
settings. The settings will vary based on the
model of your camera. Please see the
appropriate section for your iCamera below.
• + – Add a new iCamera to your account.
15
conditions.
• Off: Infrared LEDs do not turn on in any lighting condition.
o iCamera Users – View, manage, and add new users to the iCamera
KEEP.
iCamera (First Generation)
o Brightness – Adjusts the brightness for the iCamera live stream.
o Contrast – Adjusts the contrast for the iCamera live stream.
o Resolution – Adjusts the video quality for the iCamera live stream.
A lower resolution uses less bandwidth, higher resolution uses more
bandwidth.
o Picture Flip – Turns the iCamera live stream picture 180° for
ceiling-mounted iCameras™.
o iCamera Wi-Fi Settings – Manage and connect to other available
Wi-Fi networks. The iCamera (First Generation) supports Wi-Fi IEEE
b/g standard and WEP/WPA/WPA2 security protocols.
o Static IP – Set a static IP and DNS server for the iCamera. This is
ideally enabled when port forwarding is done for the iCamera First
Generation.

16
More
This page allows you to access additional
iSmartAlarm settings.
Device Settings
This page is only accessible by the Superuser or
Adminstrator of the iSmartAlarm system. This
page allows the user to:
1. Manage the settings for each of your devices.
2. Add or remove additional devices to or from the
selected iSmartAlarm system.
3. Add additional iSmartAlarm systems to your
account.
4. Update your CubeOne’s firmware.
5. View activity logs for all devices.
Add – Access this section by tapping Add in the
upper-right corner.
• CubeOne – Add a new iSmartAlarm system to
your existing account. If you have another
17
CubeOne registered to your account, you will be presented with the
option to Recover from Cloud.
Recover from Cloud allows you to migrate your devices and
system settings from the old CubeOne to the new CubeOne.
• Devices – Add additional devices to your iSmartAlarm system after
it has been setup.
• Advanced Settings – Access this section by tapping on the
CubeOne.
• Update Alert Time Zone – Changes iSmartAlarm push notifications
to match your phone’s time zone.
• Refresh Sensor List – Removes unresponsive devices from the
iSmartAlarm system.
• Send Log to iSmartAlarm – Sends a troubleshooting log for your
CubeOne to our customer support team. Use this feature when
requested by our customer support team.
• Reboot CubeOne – Remotely reboot the CubeOne.
• Remove – The CubeOne and all devices connected to the
CubeOne will be removed from the Superuser’s account.
18
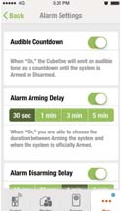
Alarm Settings
• Audible Countdown – Turn on or off the audible
countdown tone that occurs between the Alarm
Arming Delay and Alarm Disarming Delay.
• Alarm Arming Delay – The time duration until
the system’s mode is active when pressed. For
example, if the Alarm Arming Delay is set to 30
sec, it will take 30 seconds for the system to Arm
after tapping Arm. The purpose is to allow time
for you to leave your home before the mode is
active.
• Alarm Disarming Delay – The time duration until the siren turns on
and the notifications are sent when the alarm is triggered. The
purpose is to allow time for you to disarm the system before the siren
is activated.
• Siren Volume – Adjust the volume of the siren. Test the volume of the
siren by activating Panic.
• Door Chime – A door chime tone will emit from the CubeOne when a

19
Contact Sensor is opened when the system is
disarmed.
Link Devices
Link your iCamera KEEP to the CubeOne. When
linked, the iCamera KEEP will act as part of the
iSmartAlarm system and trigger the CubeOne’s
siren when motion or sound is detected. An
iCamera KEEP must be added to your account
before it can be linked to a system. You can link
multiple iCamera KEEPs to one system.
Notifications
• Safety Monitor – Receive push notifications
when a Contact Sensor is opened or closed,
regardless of the system’s mode.
• iCamera Notifications – Receive push
notifications when the iCamera KEEP detects

20
sound or motion, regardless of system’s mode.
Help Center
Contains FAQ (frequently asked questions),
Troubleshooting guide, and device details.
About
• Application Version – Displays the app
version
and firmware version for your CubeOne.
• About iSmartAlarm – Displays the
introductory
splash screen for the iSmartAlarm app.
Frequently Asked Questions
How do I add additional devices after installation?
1. Remove the plastic insulation tags from new device(s).
2. Launch the iSmartAlarm app and go to the More page.
3. Tap Device Settings
4. Tap Add in the upper-right corner.
5. Tap Devices.
6. After the devices have been found, tap Add to add them to the
system.
7. View Device Settings page and ensure the device is shown.
I forgot my password, how do I login to my iSmartAlarm account?
Open the app. On the log-in page, tap Forgot Password? The app will
send a verification code to your account number to allow you to reset
your password. Enter in the verification code and a new password. The
password must contain at least 8 characters.
How do I share my CubeOne with a family member?
1. Your family member must first download the iSmartAlarm app from
their app store.
2. They need to Sign Up using their own phone number and follow the
on screen instructions.
3. Once asked if they would like to Join or Create, click on Join. The
app will then tell them to scan QR code.
4. Using the Superuser or Administrator’s phone, go to Family
Settings.
5. Tap Add New Members. Your app will generate a QR code.
6. Use your family members’ phone to scan the QR code. Once it
21
successfully scans, it will automatically add that family member to
your iSmartAlarm system.
If the new family member is registered to a system, they need to tap on
My Profile > Join new group, then scan the Superuser’s QR code.
How do I share my iCamera KEEP with a family member?
1. Your family member must first download the iSmartAlarm app from
their app store.
2. They need to Sign Up using their own phone number and follow the
on screen instructions.
3. Once asked if they would like to Join or Create, click on Join. The
app will then tell them to scan QR code.
4. Using the Superuser or Administrator’s phone, go to the iCamera
KEEP’s Settings > iCamera Users and tap on Add New Users,
your iCamera KEEP’s QR code will show up.
5. Use your family members’ phone to scan your QR code. Once it
successfully scans, it will automatically add that family member to
your iCamera KEEP’s user list.
If the new family member is registered to a system, they need to click on
My Profile > Join new group, then scan the Superuser’s QR code.
How do I add a contact to the Alert Phone Number list?
Tap the system icon in the upper left corner of the Control page. Tap
Family Settings to Set alert phone number. This can only be done by
the Superuser or Administrator.
22
If I’m not using my home Wi-Fi, can I still Arm or Disarm the
system, set it to Home, or activate the Panic button?
Yes, you can do all of the above using your 3G/4G network, as well as
alternative Wi-Fi networks or internet connections.
Why doesn’t the alarm arm immediately after I set the system to
Arm?
The Alarm Arming Delay is the amount of time it takes for your system
to be fully armed after tapping Arm. The Alarm Arming Delay time can
be changed or turned off. To access these settings, go to More >
Alarm Settings.
Why doesn’t my iSmartAlarm trigger every time I return home?
The Alarm Disarming Delay is the time between when a sensor is
triggered, to when the actual siren will go off. The Alarm Disarming
Delay delay time can be changed or turned off. To access these
settings, go to More > Alarm Settings.
Why am I receiving push notifications when the door/window
Contact Sensors are opened or closed even though my
iSmartAlarm system is not armed?
By default, the Safety Monitor notification settings are set on. You will
receive a push notification when a Contact Sensor is opened or closed
even when the system is disarmed. If you don’t want to receive push
notifications, go to More > Notifications, then turn Safety Monitor off.
Can I setup additional CubeOnes with one account?
Yes, you can. To setup another CubeOne with your account, go to
23
More > Device Settings > Add > CubeOne.
Can I add additional devices to my existing system?
Yes, you can add up to a total of 75 devices to one CubeOne.
Will iSmartAlarm charge additional fees for false alarms?
Absolutely not. Making intelligent home security systems affordable is
our goal. iSmartAlarm will not charge additional fees for faulty alarms.
However, false alarm calls could consume your monthly quota, which is
set to receiving 30 phone calls per month.
What is “Recover from Cloud”
If you ever need to replace your CubeOne, this functionality allows your
system settings and devices to transfer to the new CubeOne without
starting over.
Can I arm only selected sensors, and prevent the rest from
triggering the alarm?
Yes! Custom Modes allows you to choose which sensors to arm. To
access Custom Modes, go to Control > Edit > Tap the Panic button.
You can create your own custom mode and choose which devices arm
when you select the mode that you created. Create a custom mode
and switch on only the sensors you want armed when the mode is set.
Those that are switched off will not trigger the alarm when that custom
mode is set.
Why isn’t the panic button working?
Double tap the panic button to activate it. When activated, the
24
CubeOne’s siren will sound and all members of the system will receive
a push notification.
How do I set the Smart Switch to turn on at a scheduled time?
The Smart Switch’s Tasks allows you to set a time for when the Smart
Switch turns on and off. Tasks can also be set to repeat on given days
of the week.
Troubleshooting
Sign-up failed
1. Ensure the correct country was selected during registration.
2. Ensure your phone can receive SMS text messages.
3. Ensure your phone number entered follows the ten digit format.
Login failed
1. Ensure your smartphone has a wireless or data connection and can
access the internet.
2. Your password is case-sensitive and must be at least eight
characters long. Ensure you use correct capitalization.
3. If the suggestions above do not work, tap Forgot Password to
reset your password. You will be asked to enter the phone number
used to login. An SMS text message will be sent to the provided
phone number containing the verification code. Input the verifica
tion code and your new password. Use your newly created
password for future logins.
25
CubeOne LED stays solid red
1. Ensure you have proper internet access provided by your ISP from
the connected router.
2. Ensure the port on the CubeOne and router are working. The LEDs
on the RJ45 jack should be solid green and flashing amber.
3. Ensure the CubeOne is receiving an IP address from the connected
router.
CubeOne is not found in app during setup.
1. Ensure the smartphone and CubeOne are connected to the same
local network.
2. Ensure the CubeOne is powered on.
3. Ensure the CubeOne LED is slowly flashing white (“breathing”).
After the registration process is complete, not all devices are
registered.
1. Remove battery from the un-registered devices. Wait at least 10
seconds and re-insert the batteries.
2. Observe the LED on each device during power-up. The red LED
should flash once. If not, replace the battery.
3. Launch the iSmartAlarm app and go to the More page.
4. Tap Device Settings.
5. Tap Add in the upper-right corner.
6. Select Devices.
7. After the devices have been found, tap Add to add them to the
system.
8. View the Device Settings page and ensure the device is shown.
26
Unable to set system mode through the app.
1. Ensure you have proper internet access provided by your ISP from
the connected router.
2. Ensure the CubeOne LED is slowly flashing white (“breathing”).
3. Ensure your smartphone has a wireless or data connection and can
access the internet.
Did not receive alert call even though my alarm was triggered.
1. Ensure your telephone can receive phone calls.
2. Ensure the phone numbers are listed in Alert Phone Number and
are correct.
3. Ensure your area code is in a location that can receive phone alert
notifications. Phone alert notifications currently include the
continental US, Hawaii, and Canada provinces, excluding area
code 907 (Alaska) and 867 (Canada Northeast and Yukon).
Additional areas will be added in the future. Please contact
customerservice@iSmartAlarm.com for more details.
4. Ensure you have not reached the monthly call limit. The monthly
call limit is set to 30 calls per CubeOne, per month.
Unable to install the iCamera First Generation.
1. Ensure that your smart phone, CubeOne and the iCamera are
connected to the same local network.
2. Reset the iCamera by pressing the reset button on the iCamera for
30 seconds. Ensure the iCamera is hard-wired to the router. Wait
another 30 seconds after releasing the reset button. Once the
iCamera begins to rotate on its own, select Next Step.
Unable to install the iCamera KEEP.
1. Ensure your phone is connected to a 2.4 GHz wireless network. If
27
not, reconnect your phone to a 2.4 GHz network and retry the
setup process. The iCamera KEEP does not support and cannot
connect to 5 GHz wireless networks.
2. Ensure your phone is successfully connected to your WiFi network.
3. Ensure the USB cable is detected. If not, please replug the cable or
try another cable.
4. Ensure “Allow” on your iOS device or “Share” on Android is tapped
when asked to share your phone’s WiFi settings.
Unable to receive push notifications
1. Ensure push notifications are enabled in iOS system settings for the
iSmartAlarm app. On your iOS home screen, go to Settings >
Notifications > iSmartAlarm > turn on Allow Notifications,
Sounds, Badge App Icon, and Show on Lock Screen.
2. Ensure Safety Monitor is turned on. Launch the iSmartAlarm app,
go to More > Notifications > turn on Safety Monitor.
3. Ensure device is not on a low battery. Ensure the device’s LED is
not flashing every 3 seconds. If so, please replace the battery.
Refer to Battery Replacements.
Device status is not updating
1. Ensure device is not on a low battery. Ensure the device’s LED is
not flashing every 3 seconds. If so, please replace the battery.
Refer to Battery Replacements.
2. Ensure the device has been added to the CubeOne. In the
iSmartAlarm app, go to More > Device Settings. Ensure the
device appears in the list below the CubeOne. If not,
3. Re-insert battery for the device after taking it our for 10 seconds.
4. Tap Add in the upper-right corner.
28
5. Select Devices.
6. After the devices have been found, tap Add to add them to the
system.
i. View Device Settings page and ensure the device is shown.
iCamera KEEP is not triggering my CubeOne’s siren.
1. Ensure iCamera KEEP has been added to your account. In the
iSmartAlarm app, go to iCamera > Overview. Ensure your iCamera
is shown. If not, tap Add > iCamera KEEP and follow the setup
instructions.
2. Ensure the iCamera KEEP is linked to your CubeOne. In the
iSmartAlarm app, go to More > Link Devices > Ensure the switch
on your iCamera KEEP is turned on. If your iCamera KEEP is not
shown, ensure the iCamera KEEP is connected to the same local
network as the CubeOne.
3. Increase the iCamera KEEP’s sound and motion alert sensitivity
levels. In the iSmartAlarm app, go to iCamera > Settings. Increase
Sound Alert Sensitivity and Motion Alert Sensitivity to MID or
HIGH.
4. Ensure the CubeOne is set to Arm. If the CubeOne is set to a
custom mode ensure Motion Alert and Sound Alert are turned on
in that custom mode setting.
Unable to receive a live stream after disconnecting the network
cable for my iCamera (First Generation).
1. Ensure the network cable was disconnected before tapping Done
during the iCamera setup process. If the network cable was
disconnected after tapping Done,
i. Connect the iCamera directly to your router with the provided
29
network cable.
ii. Wait until the iCamera begins rotating on its own. This takes 20
– 30 seconds.
iii. Tap Settings in the upper right corner of the iCamera page.
iv. Tap iCamera Wi-Fi Settings.
v. Follow the on-screen instructions to connect the iCamera
wirelessly.
vi. Disconnect the network cable when instructed.
vii. Tap Done after the network cable is disconnected.
2. Ensure the Wi-Fi password entered is correct during the iCamera
setup. To re-enter the iCamera Wi-Fi password, tap Settings and
tap iCamera Wi-Fi Settings.
3. Ensure your wireless router is set to support the Wi-Fi IEEE b/g
standard.
4. Ensure your wireless router does not have MAC Filtering enabled.
Unable to receive a live stream from the iCamera (First Generation)
when away from home or not on the same Wi-Fi network.
1. Ensure you have proper internet access provided by your ISP from
the connected router.
2. Ensure your smartphone has a wireless or data connection and can
access the internet.
3. Ensure your router’s UPnP is enabled.
4. Ensure port 17941 is forwarded to your iCamera’s IP address. Refer
to the port forwarding guides on https://iSmartAlarm.com/
30

Specifications
Contact Sensor
•
• Classification: Internally-powered
• Device Dimensions: 50mm*50mm*13mm
• Weight: 27.4g
• Power: 1*3V (CR2032)
• Maximum Working Distance: 100m (300 feet) in open space
• Maximum Distance between Magnet and Main Piece: 20mm (3/4")
• Operating Temperature: 0°C - 50°C (14°F - 122°F)
• Battery Life: 12 - 18 months, depending on usage
CubeOne
• Model:
• Classification: External power
• Device Dimensions: 100mm*100mm*105mm
31
US
EU
DWS3
DWS3G
AU DWS3A
US
EU
iPU3
iPU3G
AU DWS3A
Model Frequency
908MHz
923MHz
868.3MHz

• Weight: 370g
• Maximum Working Distance: 100m (300 ft) in open space
• Connection and Expansion: 10/100 BASE-T Ethernet (RJ-45
Connector)
• Operating Temperature: -10°C - 50°C (14°C - 122°F)
• Alarm Sound Level: Maximum of 110dB
Note: Please use the power adapter that is included with the package.
Using other power adapters from a 3rd-party may cause damage to the
CubeOne and will void your warranty.
Motion Sensor
•
• Classification: Internally-powered
• Device Dimensions: 100mm*69mm*50mm
• Weight: 80.1g
• Power: 3*1.5V (AA)
• Maximum Working Distance: 100m (300 feet) in open space
• Operating Temperature: -10°C - 50°C (14°F - 122°F)
• Storage and Transport Temperature: -40°C - 55°C (-40°F - 131°F)
32
US
EU
PIR3
PIR3G
AU PIR3A
Frequency
908MHz
923MHz
868.3MHz
Model

• Detection Angle: 90°
• Detection Range: 10m (30 feet) mounted @ Approximately 2m (6'1/2")
from the floor
• Battery Life: 12 months, depending on usage
Remote Tag
•
• Classification: Internally-powered
• Device Dimensions: 60mm*30mm*10mm
• Weight: 12.8g
• Power: 1*3V (CR2032)
• Maximum Working Distance: 100m (300 feet) in open space
• Operating Temperature: -10°C - 50°C (14°F - 122°F)
• Battery Life: 12 - 18 months, depending on usage
33
US
EU
RC3
RC3G
AU RC3A
Frequency
908MHz
923MHz
868.3MHz
Model

34
Smart Switch
Satellite Siren
• Model: SP3S
• Device dimensions: 61mm*57mm*66.5mm
• Weight: 95g
•
• : 10A
• Voltage: 120V 60HZ
• Distance: <100m
•
• Operating temperatures: -10℃~50℃(14°F~122°F)
• Operating humidity: 32℃
• Storage and transport temperature: -40℃~55℃(-40°F ~131°F)
• Storage and transport humidity: 40℃
Maximum Current
Idle Power: < 0.8W
AS3
AS3G
AS3A
Frequency
908MHz
923MHz
868.3MHz
Model
Frequency: 908MHz
•
• Dimensions: 60mm*60mm*60mm
• Weight: 229g
• Main power: DC 5V/1A
• Backup battery: 3 AAA batteries (included)
• Backup battery life: up to 2 days
35
iCamera Keep
• Model: ISC5
• Device dimensions: 50mm * 50mm * 56mm
• Power: DC 5V/1A
• Frequency: 2.4GHz
• Distance: <100m(In open space)
• Operating temperatures: 32ºF ~ 104ºF (0ºC ~ 40ºC)
• Storage and transport temperature: -40℃~55℃(-40°F ~131°F)
• Model: ISC3
• Device dimensions: 180mm*158mm*96mm
• Power: DC 5V/2A
• Frequency: 2.4GHz
• Distance: <100m(In open space)
• Operating temperatures: 0℃--40℃(14°F~131°F)
• Operating humidity: 40℃
• Storage and transport temperature: -40℃~55℃(-40°F ~131°F)
• Storage and transport humidity: 55℃
• Siren: up to 110 dB
• Operating temperatures: -10℃~50℃(14°F~122°F)
• Operating humidity: 32℃
• Storage and transport temperature: -40℃~55℃(-40°F ~131°F)
• Storage and transport humidity: 40℃
Spot
General Safety and Precautions
1. Read all of the information in the owner’s manual and other included
product information in the packaging before operating the product.
2. Prolonged exposure to alarm siren may cause permanent hearing
loss.
3. Battery may leak harmful liquids, ignitable materials, or explode
causing injury and pro duct damage. Battery acid is toxic, and not
edible by animals or humans. Use caution.
4. The CubeOne will not operate within a Faraday cage.
5. To avoid damage as a result of battery leakage, remove batteries if
the devices are not used for more than three months.
6. Do not mix old and new or other battery types.
7. Replace fully discharged battery immediately.
8. Do not run power adapter cable through wall.
9. It may not be safe for people with pacemakers to use the security
system. Contact sensors include strong magnetic components.
10. Avoid using the iSmartAlarm near strong magnetic fields, such as
microwave ovens, etc.
11. The products may not perform accurately if stored or used outside
the specified temperature and humidity ranges cited under
Specifications.
12. Changes or modifications not expressly approved by iSmart Alarm,
Inc. will void the user’s authority to operate the equipment.
13. NOTE: This equipment has been tested and found to comply with
the limits for a Class B digital device, pursuant to part 15 of the
FCC Rules. These limits are designed to provide reasonable
protection against harmful interference in a residential installation.
36
This equipment generates, uses and can radiate radio frequency
energy and, if not installed and used in accordance with the
instructions, may cause harmful interference to radio
communications. However, there is no guarantee that interference
will not occur in a particular installation. If this equipment does
cause harmful interference to radio or television reception, which
can be determined by turning the equipment off and on, the user is
encouraged to try to correct the interference by one or more of the
following measures:
- Reorient or relocate the receiving antenna.
- Increase the separation between the equipment and receiver.
- Connect the equipment into an outlet on a circuit different from
that to which the receiver is connected.
- Consult the dealer or an experienced radio/TV technician for help.
14. This device complies with Part 15 of the FCC Rules. Operation is
subject to the following two conditions: (1) this device may not
cause harmful interference, and (2) this device must accept any
interference received, including interference that may cause
undesired operation.
15. This device complies with Industry Canada license-exempt RSS
standard(s). Operation is subject to the following two conditions:
(1) this device may not cause interference, and (2) this device must
accept any interference, including interference that may cause
undesired operation of the device.
16. Under Industry Canada regulations, this radio transmitter may only
operate using an antenna of a type and maximum (or less) gain
approved for the transmitter by Industry Canada. To reduce
37

Care and Maintenance
• Avoid high temperatures and radiation.
• Do not immerse the product in water, root beer, milk, or any other
fluid or semi-fluid material
• If the device is stored in near freezing or freezing temperatures, allow
it to acclimatize to room temperature before use.
• Do not attempt to disassemble the device.
• Remove the batteries if the device is unused for more than three
months.
• Clean the product with a soft damp cloth. Do not use abrasive or
solvent-based cleaners.
potential radio interference to other users, the antenna type and its
gain should be so chosen that the equipment isotropically radiated
power (e.i.r.p.) is not more than that necessary for successful
communication.
17. This device complies with the essential requirements and other
relevant provisions of Directive 1999/5/EC.
38
18. This device complies with the Directive of EN
60950-1:2006+A11:2009+A1:2010+A12:2011.
19. Europe-EU Declaration of Conformity
NOTE: “This device” includes “CubeOne”, “Contact Sensor”, “Motion
Sensor”, “Remote Tag”,“Smart Switch”,“Sattellite Siren”,“i Camera
Keep”,“Spot”.
Our products come with a 1-year warranty in general in all countries, or
a 2-year warranty where is required by your local Consumer Law. No
warranty may be excluded under your local Consumer Law. The
warranty becomes void if any components of the iSmartAlarm system
are opened by non-qualified technicians.
You are entitled to a replacement or refund for a major failure of the
product. You are also entitled to have goods repaired or replaced if the
Warranty Information
For detailed operating instructions and updates, please visit
https://www.iSmartAlarm.com. This product is a Do-It-Yourself (DIY)
product, and no further monitoring services/installation are provided by
iSmart Alarm, Inc. The product owner/buyer is responsible for any
installation and the reporting to authorities in the case of a burglary or
emergency. The manufacturer or distributor of iSmart Alarm, Inc. are
not responsible for any legal liability caused by the negligence or
incorrect installation of the iSmartAlarm system by the owner/buyer.
39
goods fail to be of acceptable quality and the failure does not amount
to major failure. Please refer to the Warranty or Terms and Conditions
for more details.

40
Symbol for “Caution”
Explanation of Symbols
Símbolo de “Manual del usuario – Importante: Leer”
Symbol for “TYPE BF APPLIED PARTS”
Symbol for “ENVIRONMENT PROTECTION – Waste electrical
products should not be disposed of with household waste.
Please recycle where facilities exist. Check with your local
Authority or retailer for recycling advice.”
Symbol on the product or on its packing indicates that this
product may not be treated as household waste. Instead it shall
be handed over to the applicable collection point for the
recycling of electrical and electronic equipment.
Symbol for “KEEP DRY”
41
Manufactured for iSmart Alarm, Inc.
1290 Kifer Road, Suite 306
Sunnyvale, CA 94086,USA
1-408-245-2551
www.ismartalarm.com
European Distributor:
iHealthLabs Europe SARL
3 Rue Tronchet, 75008, Paris, France
E-mail: ismartalarm@ihealthlabs.eu
Australian Distributor:
Macalister Group Ltd
34 Vestey Drive, Mt Wellinton,
Auckland 1060
iSmartAlarm™, CubeOne™, iCamera™ are trademarks of iSmart
Alarm, Inc.
iPhone is a trademark of Apple Inc. registered in the U.S. and other
countries.
Android is a trademark of Google Inc.
©2015 iSmart Alarm, Inc. All rights reserved.
Note:
This equipment complies with FCC’s and IC's RF radiation exposure limits set forth for an
uncontrolled environment. The antenna(s) used for this transmitter must be installed and
operated to provide a separation distance of at least 20 cm from all persons and must not be
collocated or operating in conjunction with any other antenna or transmitter. Installers must
ensure that 20cm separation distance will be maintained between the device (excluding its
handset) and users.
Le manuel d’utilisation des appareils radio exempts de licence doit contenir l’énoncé qui suit, ou l’équivalent, à un endroit bien en vue dans le manuel d’utilisation ou
sur l’appareil, ou encore aux deux endroits.
Le présent appareil est conforme aux CNR d’Industrie Canada applicables aux appareils radio exempts de licence. L’exploitation est autorisée aux deux conditions
suivantes :
1) l’appareil ne doit pas produire de brouillage;
2) l’utilisateur de l’appareil doit accepter tout brouillage radioélectrique subi, même si le brouillage est susceptible d’en compromettre le fonctionnement.