ipio IPD-346 Steno Keyboard Folio for iPad Mini User Manual
Incipio Technologies, Inc. Steno Keyboard Folio for iPad Mini Users Manual
ipio >
Users Manual
HARD SHELL ULTRA-THIN BLUETOOTH KEYBOARD FOLIO
Setup Guide
WHAT’S IN THE BOX?
_
MAIN FEATURES
_
• iPad mini Bluetooth Keyboard Folio
• USB to Micro-USB charging cable
• User documentation
• Keyboard automatically enters Stand-By mode to conserve battery when not in use.
• Built-in rechargeable battery can be charged by utilizing the included Micro-USB
charging cable.
• Light-weight and compact design for ultimate portability.
• Can be paired with up to 3 devices. (Keyboard can only connect to one device at a time)
• Hard-shell dual-sided protection
• Adjustable viewing angles for a comfortable user experience..
• Sliding QWERTY keyboard with optimized key spacing
• Built-in magnetic closure magnets for an extra layer of protection to your devices screen.
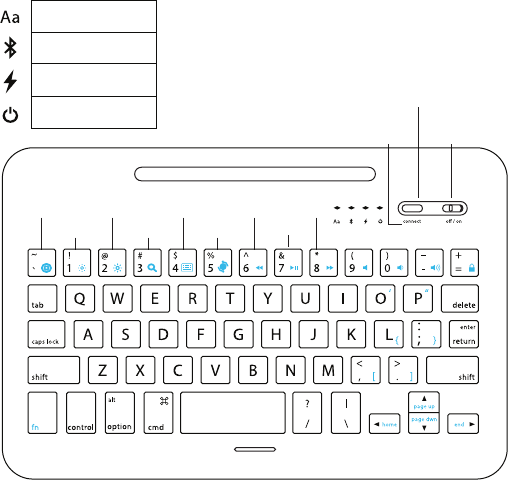
OVERVIEW:
IPAD HOME
SCREEN
BRIGHTNESS +
BRIGHTNESS - SEARCH
STATUS
INDICATORS
POWER
BUTTON
IOS LANGUAGE
SELECT
PREVIOUS NEXT TRACK
MUTE VOLUME – VOLUME + LOCK SCREEN
VIRTUAL
KEYBOARD
TOGGLE
PLAY / PAUSE
BLUETOOTH CONNECT PAIRING
BUTTON
Blue (Blinking) pairing
Blue (On) Caps
lock enabled
Red (Blinking)- Low battery
Red (On)- Charging
Blue (on)- Powered on
KEY FUNCTIONS
_
To access the functions on the keyboard, press and hold the Function (Fn) key and
combine with the desired hotkeys on keyboard.
[fn] + ~ : Return to iPad Home Screen
[fn] + 1 : Decrease iPad screen brightness
[fn] + 2 : Increase iPad Screen brightness
[fn] + 3 : Launch iPad search function / Close iPad Search Function
[fn] + 4 : Toggle Virtual keyboard On / Off
[fn] + 5 : Toggle iOS Language selection
[fn] + 6 : Previous track
[fn] + 7 : Play / Pause
[fn] + 8 : Next Track
[fn] + 9 : Mute
[fn] + 0 : Decrease Volume
[fn] + - : Increase Volume
[fn] + = : Lock iPad and Turn off Screen / Unlock iPad and Turn on Screen)

CHARGING GUIDE
_
BATTERYCHARGING
The red LED indicator located above the will blink when your Bluetooth’s keyboard
battery is low. To charge your Bluetooth keyboard, you must perform the following steps:
1. Connect the Micro-USB cable to the keyboard charging interface located on the back
edge of the Bluetooth keyboard, directly behind the on and off switch.
2. Connect the USB-A connector (the larger of the two ends) to a USB power adaptor or
to the USB interface on your computer.
3. The red LED indicator will be now be lit steady during the charging process and will
automatically turn off once charging is complete.
Your iPad mini Bluetooth keyboard can connect to 1 external device at a time and can
store the last 3 paired devices’ connection information. By default, the keyboard will
search for the last paired device. If your keyboard is unable to locate the last paired
external device, it will automatically search and pair with the second external device,
then the third one.
If there has been no keyboard usage or your external device has been away from the
keyboard’s operating distance for more than 10 minutes, the keyboard will enter into
standby mode to preserve battery power. You can touch any key to wake the keyboard.
The iPad mini Bluetooth takes approximately 2-3 seconds to wake from from standby
mode. Your external device should be in the valid connecting distance before pressing a
key to wake the keyboard..
BLUETOOTH OPERATION
_
BLUETOOTH KEYBOARD PAIRING & CONNECTING
_
To initiate the pairing and connecting process between the iPad mini Bluetooth keyboard
and your device, please follow the steps outlined below:
1. Toggle on your Bluetooth keyboard by moving the switch in the upper right hand corner
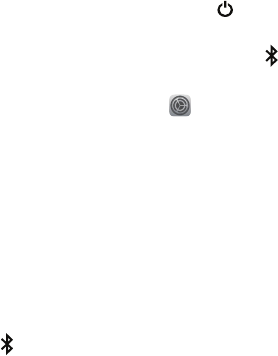
to the on position. The blue LED indicator located above the power icon will be lit for 3
seconds and then turn off.
2. Press the CONNECT button, the blue LED indicator above the Bluetooth Icon will
begin to blink, the keyboard is now ready to connect your device.
3. Turn on and unlock your iPad mini. Click on the Settings icon .
4. Select Bluetooth from the left panel and make sure the toggle for Bluetooth shows that is
turned on.
5. Your iPad mini will search for a list of available Bluetooth devices.
6. Under Devices, select Incipio iPad mini with Retina display Bluetooth keyboard begin the
pairing process.
7. Your iPad mini will now bring up the device pairing prompt with the pairing password.
Type the password using the Bluetooth Keyboard keys and when complete press ENTER on
the keyboard to complete the pairing process.
8. Once your iPad mini Bluetooth keyboard is connected successfully, the blue LED
indicator above the Bluetooth Icon on your keyboard will turn off.

TROUBLESHOOTING
_
UNABLETOCONNECT
1. Make sure the power switch on your Bluetooth Keyboard is in the ONposition.
2. Make sure the keyboard is within the operating distance.
3. Make sure the battery is charged.
4. Make sure the iPad mini Bluetooth is enabled.
5. Make sure Bluetooth keyboard has been paired with the iPad mini.
6. Unpair the Bluetooth Keyboard from your iPad mini by selecting the Info icon
next to Incipio iPad mini Bluetooth Keyboard, and select Forget this Device. Select the
device again to restart the pairing process.
UNABLETOCHARGEKEYBOARD
1. Make sure the USB power cord is connected properly to the keyboard and the power
source.
2. Make sure the power source is working properly.
FCC STATEMENT
_
WARNING: Changes or modifications to this unit not expressly approved by the party
responsible for compliance could void the user’s authority to operate the equipment.
NOTE: This equipment has been tested and found to comply with the limits for a Class
B digital device, pursuant to Part 15 of the FCC Rules.
These limits are designed to provide reasonable protection against harmful interference
in a residential installation. This equipment generates, used and can radiate radio
frequency energy and, if not installed and used on accordance with the instructions,
may cause harmful interference to radio communications. However, there is no
guarantee that interference will not occur in a particular installation. If this equipment
does cause harmful interference to a radio or television reception, which can be
determined by turning the equipment off and on, the user is encouraged to try to
correct the interference by one or more of the following measures:
• Reorient or relocate the receiving antenna.
• Increase the separation between the equipment and receiver.
• Connect the equipment into an outlet on a circuit different from that to which the
receiver is connected.
• Consult the dealer or an experience radio/TV technician for help.
This device complies with Part 15 of the FCC Rules. Operation is subject to the
following two conditions: (1) This device may be cause harmful interference, and (2) this
device must accept any interference received, including interference that may cause
undesired operation.
Shield cables must be used with this unit to ensure compliance with the
Class B FCC limits.
IIC STATEMENT
_
This device complies with Industry Canada license-exempt RSS standard(s).
Operation is subject to the following 2 conditions: (1) This device may not cause any
interference, and (2) this deice must accept any interference, including interference that
may cause undesired operation of the device.
Under Industry Canada regulations, this radio transmitter may only operate using
an antenna of a type and maximum (or lesser) gain approved for the transmitter by
Industry Canada. To reduce potential radio interference to other users, the antenna
type and its gain should be chosen that the equivalent isotropically radiated power
(e.i.r.p.) is not more than that necessary for successful communication.
• Bluetooth Specification: Version 3.0
•Frequency:2.402-2.480GHz
• Wave Receiving Sensitivity: -78dBm(standard), ultra-low radiation
•Rated Output Power: 4 dBm
• Operating Distance: 10 meters
• Modulation System: GFSK
• Operation Voltage: 3.0 ~ 4.2V
• Operating Current: <3.0mA
• Sleeping Current: < 40μA
• Standby Time: >90 days
• Charging Time: <3 hours
• Lithium Battery Capacity: high capacity polymer battery 3.7/ 160mA
• Uninterrupted Operating Time: 80 hours
• Operating Time under Normal Usage: 320 hours (2 hrs of uninterrupted use in a
8-hour work day)
• Key Strength: 80±10g
• Key Life: 5 million strokes
• Operation Temperature: -10 to 55°C
PRODUCT SPECIFICATIONS
_
QUE CONTIENT LA BOÎTE ?
_
PRINCIPALES CARACTÉRISTIQUES
_
• Etui avec clavier sans fil Bluetooth
• Câble de charge USB vers micro-USB
• Documentation utilisateur
• Passage en veille automatique pour économiser de l’énergie.
• Batterie rechargeable intégrée pouvant être chargée par une interface
micro-USB standard
• Design compact et très léger garant d’une portabilité extrême.
• Possibilité d’effectuer un jumelage avec au maximum trois appareils.
• Protection double face à coque dure.
• Angles de vue réglables.
• QWERTY Clavier coulissant avec écart optimisé entre les touches.
• Fermeture magnétique.
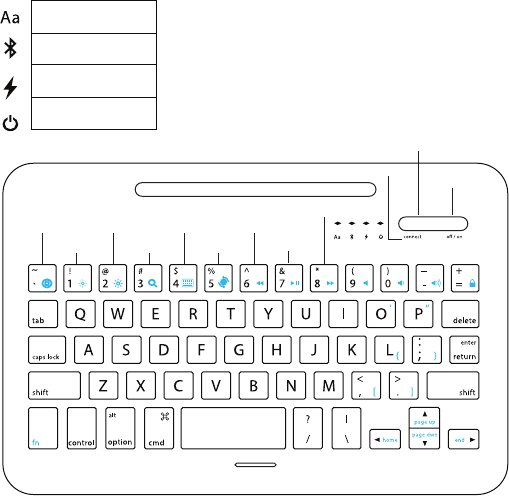
VUE D’ENSEMBLE:
IPAD ÉCRAN
D’ACCUEIL
LA LUMINOS-
ITÉ +
LA LUMINOSITÉ - RECHERCHER
INDICATEUR
BOUTON
D’ALIMENTATION
CLAVIER VIRTUEL
PISTE
PRÉCÉDENTELANGUE
PISTE SUIVANTE
SOURDINE VOLUME – VOLUME + VERROUILLER
L’ÉCRANN
IMAGE PASSANT
EN REVUE
LECTURE / PAUSE
BOUTON DE COUPLAGE
BLUETOOTH CONNEXION
Blue (Blinking) pairing
Blue (On) Caps
lock enabled
Red (Blinking)- Low battery
Red (On)- Charging
Blue (on)- Powered on
Ce clavier Bluetooth peut se connecter à un appareil externe à la fois et enregistrer
les informations des trois derniers appareils jumelés. Par défaut, le clavier cherchera le
dernier appareil jumelé. S’il ne peut pas trouver le dernier appareil externe jumelé, il
recherchera automatiquement l’avant-dernier puis le précédent pour le jumelage.
Le clavier passera automatiquement en veille s’il n’est pas utilisé pendant dix minutes
ou si l’appareil externe se trouve hors de la distance de fonctionnement du Bluetooth
pendant plus de dix minutes. Vous pouvez appuyer sur n’importe quelle touche pour
sortir le clavier de sa veille. Le clavier sera actif dans 2-3 secondes (l’appareil externe
doit se trouver à une distance de connexion valide).
DESCRIPTION DU FONCTIONNEMENT BLUETOOTH
_
DESCRIPTION DES TOUCHES SPÉCIALES
_
Pour accéder aux fonctions de la tablette IPad mini with Retina display, appuyez sur la
touche de fonction (Fn) et maintenez-la enfoncée en combinaison avec les raccourcis
clavier multimédia pertinents.
GUIDE DE CHARGE
_
• La diode rouge se mettra à clignoter si la batterie est faible.
• Branchez le câble micro-USB dans l’interface de charge du clavier.
• Branchez l’adaptateur USB-A dans l’adaptateur de l’alimentation ou
l’interface USB de l’ordinateur ou d’autres sources d’alimentation.
• La diode rouge restera allumée pendant la charge et s’éteindra une fois
l’appareil chargé.
CONNEXION / JUMELAGE DU CLAVIER
BLUETOOTH
_
1. Allumez l’interrupteur à bascule. La diode bleue restera allumée pendant trois
secondes puis s’éteindra.
2. Appuyez sur le bouton connexion. La diode bleue commencera à
clignoter pour indiquer que le clavier est prêt à être jumelé à l’appareil.
3. Allumez et déverrouillez l’iPad. Cliquez sur l’icône [paramètres] de l’iPad.
4. Sélectionnez Bluetooth
5. Appuyez sur à côté de activer le Bluetooth. Votre IPad mini with Retina display
recherchera
une liste des appareils disponibles.
6. Dans appareils disponibles, sélectionnez clavier Bluetooth Incipio IPad mini with
Retina display afin de le jumeler avec votre IPad mini with Retina display puis
saisissez le mot de passe de jumelage tel qu’indiqué à l’écran du IPad mini with Retina
display.
7. La diode bleue s’éteindra une fois le clavier Bluetooth connecté avec
succès.
DÉPANNAGE
_
IMPOSSIBLEDESECONNECTER
1. Veillez à ce que le commutateur d’allumage soit sur ON.
2. Veillez à ce que le clavier soit dans la distance de fonctionnement.
3. Veillez à ce que la batterie soit chargée.
4. Veillez à ce que le Bluetooth du IPad mini with Retina display soit activé.
5. Veillez à ce que le clavier Bluetooth soit jumelé avec le IPad mini with Retina display.
6. Videz l’historique de jumelage des appareils externes et fermez la fonction Bluetooth
puis recommencez le jumelage.
IMPOSSIBLEDECHARGERLECLAVIER
1. Veillez à ce que le cordon d’alimentation USB soit correctement raccordé au clavier et
à la source d’alimentation.
2. Veillez à ce que la source d’alimentation fonctionne correctement.
FCC DÉCLARATION
_
AVERTISSEMENT: Les changements ou modifications de cette unité non expressément
approuvés par la partie responsable de la conformité pourraient annuler l’autorité de
l’utilisateur à utiliser l’équipement.
REMARQUE: Cet équipement a été testé et trouvé conforme aux limites pour un appareil
numérique de classe B, conformément à la partie 15 des règles de la FCC. Ces limites sont
conçues pour fournir une protection raisonnable contre les interférences nuisibles dans
une installation résidentielle. Cet équipement génère, utilise et peut émettre une énergie de
radiofréquence et, s’il n’est pas installé et utilisé sur conformément aux instructions, peut causer
des interférences nuisibles aux communications radio. Cependant, il n’existe aucune garantie
que des interférences ne se produiront pas dans une installation particulière. Si cet équipement
provoque des interférences nuisibles à une réception radio ou télévision, ce qui peut être
déterminé en mettant l’équipement hors tension, l’utilisateur est encouragé à essayer de corriger
l’interférence par une ou plusieurs des mesures suivantes:
• Réorienter ou déplacer l’antenne de réception.
• Augmenter la distance entre l’équipement et le récepteur.
• Connecter l’équipement à une sortie sur un circuit différent de celui sur lequel le
récepteur est branché.
• Consulter le revendeur ou un technicien d’expérience en radio / TV pour de l’aide.
Cet appareil est conforme à la partie 15 des règles de la FCC. Son fonctionnement est soumis
aux deux conditions suivantes: (1) Ce dispositif peut être la cause d’interférences nuisibles, et
(2) cet appareil doit accepter toute interférence reçue, y compris les interférences qui peuvent
provoquer un fonctionnement indésirable.
Câbles de bouclier doivent être utilisés avec cet appareil pour assurer la conformité avec les
limites de la classe B de la FCC.
IC DÉCLARATION
_
Conformément à la réglementation d’Industrie Canada, le présent émetteur radio peut
fonctionner avec une antenne d’un type et d’un gain maximal (ou inférieur) approuvé
pour l’émetteur par Industrie Canada. Dans le but de réduire les risques de brouillage
radioélectrique à l’intention des autres utilisateurs, il faut choisir le type d’antenne et
son gain de sorte que la puissance isotrope rayonn ée équivalente (p.i.r.e.) ne dépasse
pas l’intensité nécessaire à l’établissement d’une communication satisfaisante.
Le présent appareil est conforme aux CNR d’Industrie Canada applicables aux
appareils radio exempts de licence. L’exploitation est autoris é e aux deux conditions
suivantes : (1) l’appareil ne doit pas produire de brouillage, et (2) l’utilisateur de l’appareil
doit accepter tout brouillage radioélectrique subi,
même si le brouillage est susceptible d’en compromettre le fonctionnement.
• Spécificités Bluetooth : Version 3.0
•Fréquence:2,402-2,480GHz
• Sensibilité de réception d’ondes: -78dBm (standard), rayonnements très
faibles
• Puissance de sortie nominale: 4 dBm
• Distance de fonctionnement: 10 mètres
• Système de modulation: GFSK
• Tension de fonctionnement: 3.0~4.2V
• Intensité de fonctionnement: <3mA
• Intensité de veille: 40μA
• Temps en veille: > 90 journées
• Temps de charge: < 3 heures
• Capacité de la batterie au lithium: 3.7/ 160mA
• Temps de fonctionnement sans interruption: 80 heures
• Temps de fonctionnement en utilisation normale: 320 heures (2 heures
d’utilisation ininterrompue dans une journée de travail de 8 heures)
• Force des touches : 80±10g
• Durée de vie des touches : 5 million coups
• Température de fonctionnement : -10 to 55°C
SPÉCIFICITÉS DU PRODUIT
_