lantronix XPSWF 802.11b/g/n/ac, Bluetooth and BLE device User Manual xerox wpsa ug
lantronix 802.11b/g/n/ac, Bluetooth and BLE device xerox wpsa ug
Contents
- 1. User Manual
- 2. User Manual II
User Manual

Xerox® Wireless Print Solutions Adapter
User Guide
© 2015 Xerox Corporation. All rights reserved. Unpublished rights reserved under the copyright laws of the United States. Contents of this
publication may not be reproduced in any form without permission of Xerox Corporation.
Copyright protection claimed includes all forms of matters of copyrightable materials and information now allowed by statutory or judicial
law or hereinafter granted, including without limitation, material generated from the software programs which are displayed on the
screen such as styles, templates, icons, screen displays, looks, and so on.
Xerox® and Xerox and Design®, Phaser®, PhaserSMART®, PhaserMatch®, PhaserCal®, PhaserMeter™, CentreWare®, PagePack®, eClick®,
PrintingScout®, Walk-Up®, WorkCentre®, FreeFlow®, SMARTsend®, Scan to PC Desktop®, MeterAssistant®, SuppliesAssistant®, Xerox
Secure Access Unified ID System®, Xerox Extensible Interface Platform®, ColorQube®, Global Print Driver®, and Mobile Express Driver®
are trademarks of Xerox Corporation in the United States and/or other countries.
Adobe® Reader®, Adobe® Type Manager®, ATM™, Flash®, Macromedia®, Photoshop®, and PostScript® are trademarks of
Adobe Systems Incorporated in the United States and/or other countries.
Apple, Bonjour, EtherTalk, TrueType, iPad, iPhone, iPod, iPod touch, Mac and Mac OS are trademarks of Apple Inc., registered in the U.S.
and other countries. AirPrint and the AirPrint logo are trademarks of Apple Inc.
Google Cloud Print™ web printing service, Gmail™ webmail service, and Android™ mobile technology platform are trademarks of Google,
Inc.
HP-GL®, HP-UX®, and PCL® are trademarks of Hewlett-Packard Corporation in the United States and/or other countries.
IBM® and AIX® are trademarks of International Business Machines Corporation in the United States and/or other countries.
Microsoft®, Windows Vista®, Windows®, and Windows Server® are trademarks of Microsoft Corporation in the United States and other
countries.
Novell®, NetWare®, NDPS®, NDS®, IPX™, and Novell Distributed Print Services™ are trademarks of Novell, Inc. in the United States and
other countries.
SGI® and IRIX® are trademarks of Silicon Graphics International Corp. or its subsidiaries in the United States and/or other countries.
Sun, Sun Microsystems, and Solaris are trademarks or registered trademarks of Oracle and/or its affiliates in the United States and other
countries.
McAfee®, ePolicy Orchestrator®, and McAfee ePO™ are trademarks or registered trademarks of McAfee, Inc. in the United States and
other countries.
UNIX® is a trademark in the United States and other countries, licensed exclusively through X/ Open Company Limited.
Wi-Fi® is a trademark of the Wi-Fi Alliance Corporation.
PANTONE® and other Pantone, Inc. trademarks are the property of Pantone, Inc.
U.S. Patent 8,922,813. Other patents pending.
Document version 1.0: July 2015
BR14864
Xerox® Wireless Print Solutions Adapter
User Guide
3
Table of Contents
1Safety
General Guidelines . . . . . . . . . . . . . . . . . . . . . . . . . . . . . . . . . . . . . . . . . . . . . . . . . . . . . . . . . . . . . . . . . . . . . . . . 7
2Features
Introduction . . . . . . . . . . . . . . . . . . . . . . . . . . . . . . . . . . . . . . . . . . . . . . . . . . . . . . . . . . . . . . . . . . . . . . . . . . . . . . 9
Key Features . . . . . . . . . . . . . . . . . . . . . . . . . . . . . . . . . . . . . . . . . . . . . . . . . . . . . . . . . . . . . . . . . . . . . . . . . . . . . . 9
Protocol Support . . . . . . . . . . . . . . . . . . . . . . . . . . . . . . . . . . . . . . . . . . . . . . . . . . . . . . . . . . . . . . . . . . . . . . . . . . 9
Troubleshooting Capabilities. . . . . . . . . . . . . . . . . . . . . . . . . . . . . . . . . . . . . . . . . . . . . . . . . . . . . . . . . . . . . .10
Configuration Methods . . . . . . . . . . . . . . . . . . . . . . . . . . . . . . . . . . . . . . . . . . . . . . . . . . . . . . . . . . . . . . . . . . .10
Addresses and Port Numbers. . . . . . . . . . . . . . . . . . . . . . . . . . . . . . . . . . . . . . . . . . . . . . . . . . . . . . . . . . . . . .10
Hardware Address . . . . . . . . . . . . . . . . . . . . . . . . . . . . . . . . . . . . . . . . . . . . . . . . . . . . . . . . . . . . . . . . . . . .10
IP Address . . . . . . . . . . . . . . . . . . . . . . . . . . . . . . . . . . . . . . . . . . . . . . . . . . . . . . . . . . . . . . . . . . . . . . . . . . .10
Port Numbers . . . . . . . . . . . . . . . . . . . . . . . . . . . . . . . . . . . . . . . . . . . . . . . . . . . . . . . . . . . . . . . . . . . . . . . .10
More Information . . . . . . . . . . . . . . . . . . . . . . . . . . . . . . . . . . . . . . . . . . . . . . . . . . . . . . . . . . . . . . . . . . . . . . . .11
Welcome Center . . . . . . . . . . . . . . . . . . . . . . . . . . . . . . . . . . . . . . . . . . . . . . . . . . . . . . . . . . . . . . . . . . . . .11
3 Installation
Package Contents . . . . . . . . . . . . . . . . . . . . . . . . . . . . . . . . . . . . . . . . . . . . . . . . . . . . . . . . . . . . . . . . . . . . . . . .13
User-Supplied Items. . . . . . . . . . . . . . . . . . . . . . . . . . . . . . . . . . . . . . . . . . . . . . . . . . . . . . . . . . . . . . . . . . . . . .13
Hardware Components . . . . . . . . . . . . . . . . . . . . . . . . . . . . . . . . . . . . . . . . . . . . . . . . . . . . . . . . . . . . . . . . . . .14
Parts of the Wireless Print Solutions Adapter . . . . . . . . . . . . . . . . . . . . . . . . . . . . . . . . . . . . . . . . . . .14
Wi-Fi Protected Setup (WPS) . . . . . . . . . . . . . . . . . . . . . . . . . . . . . . . . . . . . . . . . . . . . . . . . . . . . . . . . . .15
To Start WPS. . . . . . . . . . . . . . . . . . . . . . . . . . . . . . . . . . . . . . . . . . . . . . . . . . . . . . . . . . . . . . . . . . . . . . . . .16
Installing the Wireless Print Solutions Adapter . . . . . . . . . . . . . . . . . . . . . . . . . . . . . . . . . . . . . . . . . . . . .16
4 Configuration Using the Web Manager
Accessing the Web Manager . . . . . . . . . . . . . . . . . . . . . . . . . . . . . . . . . . . . . . . . . . . . . . . . . . . . . . . . . . . . . .17
Navigating the Web Manager. . . . . . . . . . . . . . . . . . . . . . . . . . . . . . . . . . . . . . . . . . . . . . . . . . . . . . . . . . . . .17
5Status Page
Accessing the Status Page . . . . . . . . . . . . . . . . . . . . . . . . . . . . . . . . . . . . . . . . . . . . . . . . . . . . . . . . . . . .19
6Network Page
Access Point Settings . . . . . . . . . . . . . . . . . . . . . . . . . . . . . . . . . . . . . . . . . . . . . . . . . . . . . . . . . . . . . . . . . . . . .21
Bridge (br0) Settings . . . . . . . . . . . . . . . . . . . . . . . . . . . . . . . . . . . . . . . . . . . . . . . . . . . . . . . . . . . . . . . . . . . . .22
Bridging Operation . . . . . . . . . . . . . . . . . . . . . . . . . . . . . . . . . . . . . . . . . . . . . . . . . . . . . . . . . . . . . . . . . . .22
To View or Configure Bridge Settings . . . . . . . . . . . . . . . . . . . . . . . . . . . . . . . . . . . . . . . . . . . . . . . . . .22
To Configure and Enable Bridging . . . . . . . . . . . . . . . . . . . . . . . . . . . . . . . . . . . . . . . . . . . . . . . . . . . . .22
Table of Contents
Xerox® Wireless Print Solutions Adapter
User Guide
4
Wired (eth0) Network Interface Settings. . . . . . . . . . . . . . . . . . . . . . . . . . . . . . . . . . . . . . . . . . . . . . . . . . .22
To Configure Wired Network Interface Settings . . . . . . . . . . . . . . . . . . . . . . . . . . . . . . . . . . . . . . . .22
Wired (eth0) Network Link Settings. . . . . . . . . . . . . . . . . . . . . . . . . . . . . . . . . . . . . . . . . . . . . . . . . . . . . . . .23
To Configure Wired Network Link Settings . . . . . . . . . . . . . . . . . . . . . . . . . . . . . . . . . . . . . . . . . . . . .23
Wireless (wlan0) Network Interface Settings . . . . . . . . . . . . . . . . . . . . . . . . . . . . . . . . . . . . . . . . . . . . . . .23
To Configure Wireless Network Interface Settings . . . . . . . . . . . . . . . . . . . . . . . . . . . . . . . . . . . . . .23
Wireless (wlan0) Network Link Settings . . . . . . . . . . . . . . . . . . . . . . . . . . . . . . . . . . . . . . . . . . . . . . . . . . . .23
To Configure Wireless Network Link Settings . . . . . . . . . . . . . . . . . . . . . . . . . . . . . . . . . . . . . . . . . . .23
WLAN Scan/Quick Connect. . . . . . . . . . . . . . . . . . . . . . . . . . . . . . . . . . . . . . . . . . . . . . . . . . . . . . . . . . . .23
WLAN Profiles . . . . . . . . . . . . . . . . . . . . . . . . . . . . . . . . . . . . . . . . . . . . . . . . . . . . . . . . . . . . . . . . . . . . . . . . . . .24
Configuring WLAN Profile Settings . . . . . . . . . . . . . . . . . . . . . . . . . . . . . . . . . . . . . . . . . . . . . . . . . . . .24
7Printer Page
Printer Configuration . . . . . . . . . . . . . . . . . . . . . . . . . . . . . . . . . . . . . . . . . . . . . . . . . . . . . . . . . . . . . . . . . . . . .29
Configuring Printer Settings . . . . . . . . . . . . . . . . . . . . . . . . . . . . . . . . . . . . . . . . . . . . . . . . . . . . . . . . . . .29
Print Jobs . . . . . . . . . . . . . . . . . . . . . . . . . . . . . . . . . . . . . . . . . . . . . . . . . . . . . . . . . . . . . . . . . . . . . . . . . . . . . . . .30
To View Print Jobs . . . . . . . . . . . . . . . . . . . . . . . . . . . . . . . . . . . . . . . . . . . . . . . . . . . . . . . . . . . . . . . . . . . .30
AirPrint . . . . . . . . . . . . . . . . . . . . . . . . . . . . . . . . . . . . . . . . . . . . . . . . . . . . . . . . . . . . . . . . . . . . . . . . . . . . . . . . . .30
To Configure the Wireless Print Solutions Adapter for Apple AirPrint . . . . . . . . . . . . . . . . . . . . .30
Google Cloud Print . . . . . . . . . . . . . . . . . . . . . . . . . . . . . . . . . . . . . . . . . . . . . . . . . . . . . . . . . . . . . . . . . . . . . . .31
To Register a Printer with Google Cloud Print . . . . . . . . . . . . . . . . . . . . . . . . . . . . . . . . . . . . . . . . . . .31
To Unregister a Printer with Google Cloud Print. . . . . . . . . . . . . . . . . . . . . . . . . . . . . . . . . . . . . . . . .31
8 Diagnostics Page
DNS . . . . . . . . . . . . . . . . . . . . . . . . . . . . . . . . . . . . . . . . . . . . . . . . . . . . . . . . . . . . . . . . . . . . . . . . . . . . . . . . . . . . .33
Accessing the DNS Settings . . . . . . . . . . . . . . . . . . . . . . . . . . . . . . . . . . . . . . . . . . . . . . . . . . . . . . . . . . .33
Ping . . . . . . . . . . . . . . . . . . . . . . . . . . . . . . . . . . . . . . . . . . . . . . . . . . . . . . . . . . . . . . . . . . . . . . . . . . . . . . . . . . . . .33
To ping a Remote Host . . . . . . . . . . . . . . . . . . . . . . . . . . . . . . . . . . . . . . . . . . . . . . . . . . . . . . . . . . . . . . .33
Routes. . . . . . . . . . . . . . . . . . . . . . . . . . . . . . . . . . . . . . . . . . . . . . . . . . . . . . . . . . . . . . . . . . . . . . . . . . . . . . . . . . .34
Traceroute. . . . . . . . . . . . . . . . . . . . . . . . . . . . . . . . . . . . . . . . . . . . . . . . . . . . . . . . . . . . . . . . . . . . . . . . . . . . . . .34
To Perform a Traceroute . . . . . . . . . . . . . . . . . . . . . . . . . . . . . . . . . . . . . . . . . . . . . . . . . . . . . . . . . . . . . .34
9 Administration Page
Clock . . . . . . . . . . . . . . . . . . . . . . . . . . . . . . . . . . . . . . . . . . . . . . . . . . . . . . . . . . . . . . . . . . . . . . . . . . . . . . . . . . . .35
To Specify a Clock-Setting Method . . . . . . . . . . . . . . . . . . . . . . . . . . . . . . . . . . . . . . . . . . . . . . . . . . . .35
Discovery . . . . . . . . . . . . . . . . . . . . . . . . . . . . . . . . . . . . . . . . . . . . . . . . . . . . . . . . . . . . . . . . . . . . . . . . . . . . . . . .35
To Configure Discovery . . . . . . . . . . . . . . . . . . . . . . . . . . . . . . . . . . . . . . . . . . . . . . . . . . . . . . . . . . . . . . .36
HTTP . . . . . . . . . . . . . . . . . . . . . . . . . . . . . . . . . . . . . . . . . . . . . . . . . . . . . . . . . . . . . . . . . . . . . . . . . . . . . . . . . . . .36
Proxy Server . . . . . . . . . . . . . . . . . . . . . . . . . . . . . . . . . . . . . . . . . . . . . . . . . . . . . . . . . . . . . . . . . . . . . . . . . . . . .37
Table of Contents
Xerox® Wireless Print Solutions Adapter
User Guide
5
SSL . . . . . . . . . . . . . . . . . . . . . . . . . . . . . . . . . . . . . . . . . . . . . . . . . . . . . . . . . . . . . . . . . . . . . . . . . . . . . . . . . . . . . .37
Credentials. . . . . . . . . . . . . . . . . . . . . . . . . . . . . . . . . . . . . . . . . . . . . . . . . . . . . . . . . . . . . . . . . . . . . . . . . . .37
To Configure an SSL Credential to Use an Uploaded Certificate . . . . . . . . . . . . . . . . . . . . . . . . .38
To Configure an SSL Credential to Use a Self-Signed Certificate . . . . . . . . . . . . . . . . . . . . . . . . .38
Trusted Authorities . . . . . . . . . . . . . . . . . . . . . . . . . . . . . . . . . . . . . . . . . . . . . . . . . . . . . . . . . . . . . . . . . . .39
To Upload a Trusted Authority Certificate. . . . . . . . . . . . . . . . . . . . . . . . . . . . . . . . . . . . . . . . . . . . . .39
Approaches for Uploading Authority Certificates . . . . . . . . . . . . . . . . . . . . . . . . . . . . . . . . . . . . . . .40
Default Credential. . . . . . . . . . . . . . . . . . . . . . . . . . . . . . . . . . . . . . . . . . . . . . . . . . . . . . . . . . . . . . . . . . . .40
Syslog . . . . . . . . . . . . . . . . . . . . . . . . . . . . . . . . . . . . . . . . . . . . . . . . . . . . . . . . . . . . . . . . . . . . . . . . . . . . . . . . . . .40
To Configure Syslog Settings . . . . . . . . . . . . . . . . . . . . . . . . . . . . . . . . . . . . . . . . . . . . . . . . . . . . . . . . . .40
System . . . . . . . . . . . . . . . . . . . . . . . . . . . . . . . . . . . . . . . . . . . . . . . . . . . . . . . . . . . . . . . . . . . . . . . . . . . . . . . . . .41
To Configure System Settings . . . . . . . . . . . . . . . . . . . . . . . . . . . . . . . . . . . . . . . . . . . . . . . . . . . . . . . . .41
User Management . . . . . . . . . . . . . . . . . . . . . . . . . . . . . . . . . . . . . . . . . . . . . . . . . . . . . . . . . . . . . . . . . . . . . . .42
To Change the User Admin Password . . . . . . . . . . . . . . . . . . . . . . . . . . . . . . . . . . . . . . . . . . . . . . . . . .42
Cloning . . . . . . . . . . . . . . . . . . . . . . . . . . . . . . . . . . . . . . . . . . . . . . . . . . . . . . . . . . . . . . . . . . . . . . . . . . . . . . . . . .42
Export Configuration . . . . . . . . . . . . . . . . . . . . . . . . . . . . . . . . . . . . . . . . . . . . . . . . . . . . . . . . . . . . . . . . .42
Export Status. . . . . . . . . . . . . . . . . . . . . . . . . . . . . . . . . . . . . . . . . . . . . . . . . . . . . . . . . . . . . . . . . . . . . . . . .43
Import Configuration . . . . . . . . . . . . . . . . . . . . . . . . . . . . . . . . . . . . . . . . . . . . . . . . . . . . . . . . . . . . . . . . .43
Quick Setup . . . . . . . . . . . . . . . . . . . . . . . . . . . . . . . . . . . . . . . . . . . . . . . . . . . . . . . . . . . . . . . . . . . . . . . . . . . . . .44
To Access the Quick Setup Page . . . . . . . . . . . . . . . . . . . . . . . . . . . . . . . . . . . . . . . . . . . . . . . . . . . . . . .44
Installing New Firmware. . . . . . . . . . . . . . . . . . . . . . . . . . . . . . . . . . . . . . . . . . . . . . . . . . . . . . . . . . . . . . . . . .44
ATroubleshooting
BRegulatory
Notice to Users in the European Union . . . . . . . . . . . . . . . . . . . . . . . . . . . . . . . . . . . . . . . . . . . . . . . . . . . .51
Notice to Users in the United States . . . . . . . . . . . . . . . . . . . . . . . . . . . . . . . . . . . . . . . . . . . . . . . . . . . . . . .51
Notice to Users in Canada . . . . . . . . . . . . . . . . . . . . . . . . . . . . . . . . . . . . . . . . . . . . . . . . . . . . . . . . . . . . . . . .52
Standards and Norms . . . . . . . . . . . . . . . . . . . . . . . . . . . . . . . . . . . . . . . . . . . . . . . . . . . . . . . . . . . . . . . . . . . .52
Emissions and Immunity . . . . . . . . . . . . . . . . . . . . . . . . . . . . . . . . . . . . . . . . . . . . . . . . . . . . . . . . . . . . . .52
Safety . . . . . . . . . . . . . . . . . . . . . . . . . . . . . . . . . . . . . . . . . . . . . . . . . . . . . . . . . . . . . . . . . . . . . . . . . . . . . . .53
Energy Efficiency (Power Adapter). . . . . . . . . . . . . . . . . . . . . . . . . . . . . . . . . . . . . . . . . . . . . . . . . . . . .53
Table of Contents
Xerox® Wireless Print Solutions Adapter
User Guide
6

Xerox® Wireless Print Solutions Adapter
User Guide
7
1
Safety
General Guidelines
Your attention to the following safety guidelines helps to ensure the continued, safe operation of your
Wireless Print Solutions Adapter.
If any of these conditions occur, do the following:
1. Remove power from the device.
2. Call an authorized service representative.
WARNINGS:
• Do not push objects into slots or openings on the adapters.
• Do not remove covers; there are no serviceable internal components
• Do not place objects on the adapters or power cord.
• Do not use outdoors.
• Do not place in an area where people can step on the power cord.
• Only use the power adapter provided; it is matched for use with the print adapter.
• Ensure that the Voltage (V) and Frequency (Hz) of your mains electrical outlet is within
the ranges stated on the power adapter.
• Plug the power adapter directly into a properly grounded electrical outlet.
• Do not wrap the power cord around the power adapter.
• When you disconnect the power adapter, pull on the plug; do not pull on the power
cord.
The following are hazards to your safety:
• The power cord is damaged or frayed.
• Liquid is spilled into a device.
• A device is exposed to water.
• The device emits smoke, or the surfaces are unusually hot.
• The device emits unusual noise or odors.
• The device causes a circuit breaker, fuse, or other safety device to activate.
Safety
Xerox® Wireless Print Solutions Adapter
User Guide
8
Xerox® Wireless Print Solutions Adapter
User Guide
9
2
Features
Introduction
The Wireless Print Solutions Adapter supports bridging of traffic between a single external Ethernet device
and the wireless network. The Wireless Print Solutions Adapter is a high performance, Ethernet-to-wireless
bridging connectivity tool. It allows you to access and manage a device remotely over a network or on the
Internet. The Wireless Print Solutions Adapter provides high-security, offering robust data encryption and
authentication options including AES and SSL/TLS. Remote configuration over a network is possible using a
web browser (HTTP and HTTPS).
Key Features
•Power Supply: Converts 100–240 VAC to +5 Vdc
•Controller: 32-bit Cortex A5 microprocessor running at 528 MHz
•Memory: 256-Mbyte DRAM, 256-Mbyte Flash
•Ethernet: Wired 10/100/1000 Mbps 802.3 Ethernet networking
•Wireless: 802.11 ac/b/g/n wireless networking
•Configuration: Using HTTP
•Tunneling: Ethernet-to-wireless
•Site survey tool: Built-in
•Temperature Range: Operates over a temperature range from 0°C through +55°C (32° F through
+131° F)
Protocol Support
For network communications and management, the Wireless Print Solutions Adapter supports the
following protocols:
•ARP
•UDP
•TCP
•ICMP
•DHCP
•Auto IP
•DNS
Features
Xerox® Wireless Print Solutions Adapter
User Guide
10
• SSL/TLS
• HTTP/HTTPS, for uploading or downloading of files, and firmware upgrades
Troubleshooting Capabilities
The Wireless Print Solutions Adapter offers a comprehensive set of diagnostic tools that allow you to
troubleshoot problems quickly and easily. The diagnostic tools, available from the Web Manager, allow you
to:
• View critical hardware, IP socket, and routing table information.
• Perform ping and traceroute operations.
• Conduct forward or reverse DNS lookup operations.
• View system log messages.
Configuration Methods
After installation, the Wireless Print Solutions Adapter requires configuration.
1. To operate correctly, ensure that the adapter has a unique network IP address.
2. To log in to the Wireless Print Solutions Adapter, assign IP addresses, and configure other settings, use
the Web Manager.
For details, see Configuration Using the Web Manager on page 17.
Addresses and Port Numbers
Hardware Address
The hardware address is also referred to as the Ethernet address, physical address, or MAC address. Every
Wireless Print Solutions Adapter has a unique MAC address. For example, 01-23-45-67-89-AB or
01:23:45:67:89:AB.
IP Address
Every device connected to an IP network requires a unique IP address. This address is used to locate the
specific device on the network.
Port Numbers
Each TCP connection and UDP (User Datagram Protocol) is defined by a destination and source IP address,
and a destination and source port number. For example, a Telnet server commonly uses TCP port number
23.

Features
Xerox® Wireless Print Solutions Adapter
User Guide
11
The Wireless Print Solutions Adapter uses the following default server port numbers:
• TCP Port 80: HTTP, Web Manager Configuration
• TCP Port 443: HTTPS
• TCP Port 631: IPP
• TCP Port 444:IPPS
More Information
You can obtain more information from these sources:
Welcome Center
If you need assistance during or after installation, visit the Xerox website for online solutions and support
at www.xerox.com/office/worldcontacts.
When you report a problem, provide the following information:
• Your name, company name, address, and phone number.
• Model number of your Xerox printer.
• The serial number for the Wireless Print Solutions Adapter.
• Firmware version and current configuration.
• Description of the problem.
• Status of the unit when the problem occurred, including information on user and network activity at
the time of the problem.
Resource Location
Installation Guide Packaged with the Wireless Print Solutions Adapter.
Other documentation for your Wireless Print
Solutions Adapter.
www.xerox.com/office/WPSAdocs
Technical support information for your Wireless Print
Solutions Adapter, including online technical
support, Online Support Assistant, and device driver
downloads.
www.xerox.com/office/WPSAsupport
Wireless Print Solutions Adapter online help. In the Wireless Print Solutions Adapter user interface,
click Help.
Register product www.xerox.com/office/register
Features
Xerox® Wireless Print Solutions Adapter
User Guide
12
Xerox® Wireless Print Solutions Adapter
User Guide
13
3
Installation
This chapter describes how to install the Wireless Print Solutions Adapter. It contains the following
sections:
• Package Contents
• User-Supplied Items
• Hardware Components
• Wi-Fi Protected Setup (WPS)
• Installing the Wireless Print Solutions Adapter
Package Contents
The Wireless Print Solutions Adapter package includes the following items:
•Xerox
® Wireless Print Solutions Adapter.
• RJ-45 Ethernet Straight CAT5 cable, 1.5 meters.
• One 5 VDC Power Supply, with a selection of international AC power adapters.
• Mounting components including hook-and-loop adhesive strips, and rubber feet.
• Wireless Print Solutions Adapter Installation Guide.
• Warranty document.
User-Supplied Items
To complete your installation, ensure that you have the following:
• An available connection to your Ethernet network and the provided Ethernet cable.
• Access to an AC power outlet for the 5-VDC power supply.
Installation
Xerox® Wireless Print Solutions Adapter
User Guide
14
Hardware Components
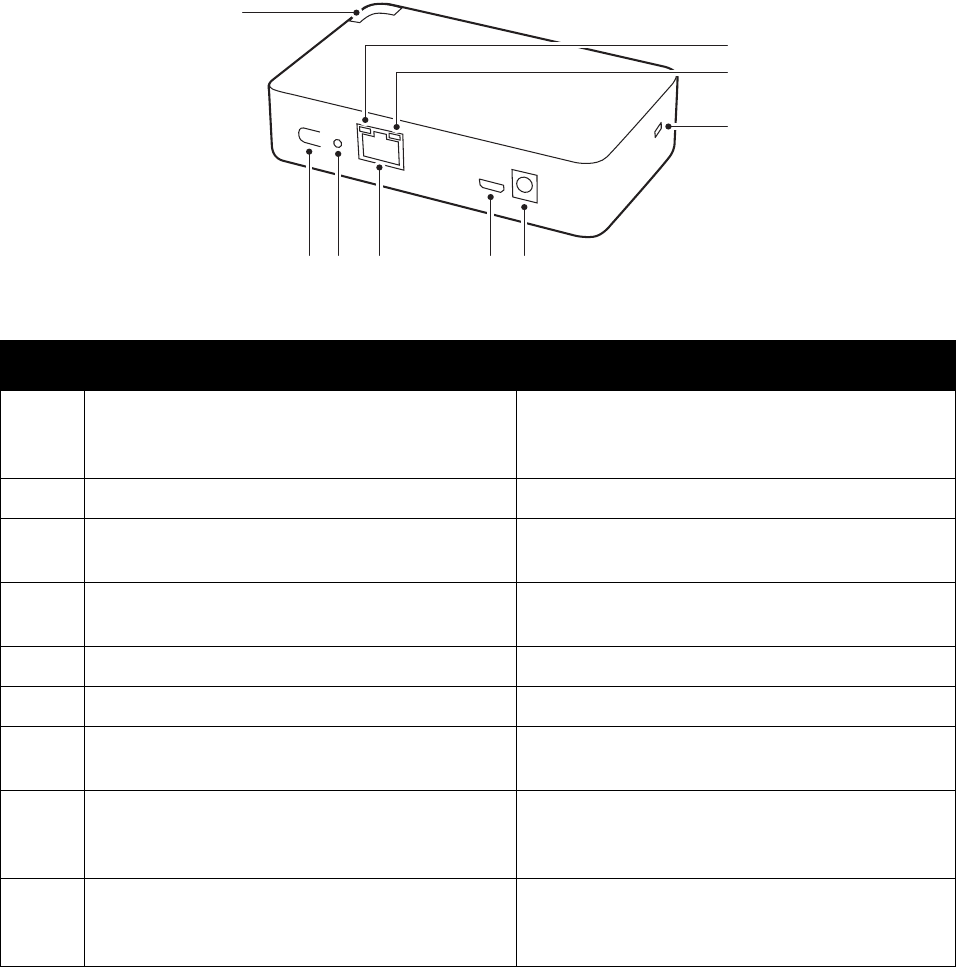
Parts of the Wireless Print Solutions Adapter
Feature Description
1 Status LED Indicates system status using color and blink
patterns.
For details, see Status LED on page 15.
2 WPS Button Wi-Fi Protected Setup Button.
3 Reset Button access Used to reset the Wireless Print Solutions Adapter
to the factory-default settings.
4 RJ45 Ethernet Port Supports the physical connection between the
Wireless Print Solutions Adapter and the Printer.
5 Service Port Service port.
6 5 VDC Power Connector The 5 VDC Power Supply connector.
7 Kensington Security Slot A slot used for attaching an anti-theft lock-and-
cable.
8 Right RJ45 Ethernet LED Blinks to indicate transmission and reception
activity between your wireless router and the
Wireless Print Solutions Adapter.
9 Left RJ45 Ethernet LED Solid green light indicates that an established link
exists between your connected printer and the
Wireless Print Solutions Adapter.
65432
1
7
9
8

Installation
Xerox® Wireless Print Solutions Adapter
User Guide
15
Status LED
The Status LED indicates various system status based on its color and blink pattern. The Status LED is
located on the top, front corner of the Wireless Print Solutions Adapter. For details, see Parts of the Wireless
Print Solutions Adapter on page 14.
Reset Button
To reset the device settings to factory default, you can use the Reset Button. Settings, including the IP
address, gateway, and network mask are set to 00.
To reset the device to factory defaults:
1. To depress the Reset Button, place the end of a paper clip or similar object into the Reset Button
opening. For details, see Parts of the Wireless Print Solutions Adapter on page 14.
2. Continue to depress the Reset Button for 15 seconds, then remove the paper clip.
The adapter reboots automatically and restores to the factory-default settings.
Wi-Fi Protected Setup (WPS)
Using WPS, you can connect to the Wireless Print Solutions Adapter using a router or an access point in one
operation. This process is simpler than creating a profile with a network name (SSID), setting up wireless
security parameters, and updating the choice list.
Condition Green LED Flash Pattern
Adapter is powered on with no error conditions Continuous solid green light
Adapter is powered off LED is not illuminated
Locate Device function is in process Slow-flashing light occurs for two minutes. For details see To
Configure System Settings on page 41.
WPS button is pressed on adapter A slow-flashing light
Condition Amber LED Flash Pattern
No Ethernet Link is available Two long flashes followed by two short flashes that repeat.
No IP Address is obtained from the Ethernet
network
Two long flashes followed by three short flashes that
repeat.
No WLAN Link is available Three long flashes followed by two short flashes that
repeat.
No IP address is obtained from the WLAN
network
Three long flashes followed by three short flashes that
repeat.
WPS Profile Error One long flash followed by one short flash that repeats.
WPS Timeout Error One long flash followed by two short flashes that repeat.
Installation
Xerox® Wireless Print Solutions Adapter
User Guide
16
To Start WPS
1. Press and hold down the WPS Button for at least 5 seconds.
2. Release the button.
The unit starts in Wi-Fi protected setup mode, indicated by a slow-flashing green light.
3. Within 2 minutes, to pair the device, press the WPS button on the router or access point.
Installing the Wireless Print Solutions Adapter
Ensure that you place or mount the device securely on a flat horizontal or vertical surface. The device
comes with hook-and-loop adhesive strips to enable you to mount it securely to a flat surface.
Notes:
•The Wireless Print Solutions Adapter comes with one 5 VDC Power Supply, and a selection of
international AC power adapters.
•If you use AC power, do not use outlets that are controlled by a wall switch.
•When connected to power, the adapter powers on and automatically runs a self-test, and
the LEDs illuminate to indicate the device status.
To install your device, perform the following steps:
1. Connect an RJ-45 Ethernet cable between Wireless Print Solutions Adapter unit and the Ethernet port
on your printer.
2. Select and install one of the AC power adapters on the 5 VDC Power Supply. For details, see the
Wireless Print Solutions Adapter Installation Guide supplied with the device.
3. To power on the device, plug in the device to the power supply provided.
4. Check for Status LED activity and monitor according to Status LED on page 15.
5. On your personal computer or mobile device, navigate to your list of available networks, then select
the SSID for your Wireless Print Solutions Adapter. The SSID appears as “wpsa-xxxx” with the last four
characters matching the last four characters of your adapter's wireless MAC address. For details, see
the Wireless Print Solutions Adapter Installation Guide, or Cannot find the SSID for the Adapter in
available wireless connections. on page 49.
6. Open a web browser, then to access your Wireless Print Solutions Adapter, type its default IP address
of 192.168.0.1. The Quick Installation page appears.
7. To continue installing the Wireless Print Solutions Adapter, log in to Web Manager.
– The default login is admin.
– The default password is PASS.
8. Complete the Quick Setup procedure. For details see Quick Setup on page 44.
Xerox® Wireless Print Solutions Adapter
User Guide
17
4
Configuration Using the
Web Manager
This chapter describes how to use the Web Manager to configure the Wireless Print Solutions Adapter, the
Xerox browser-based configuration tool. The Wireless Print Solutions Adapter configuration is stored in
non-volatile memory and is retained without power. All changes take effect immediately, unless otherwise
noted.
This chapter includes:
• Accessing the Web Manager
• Navigating the Web Manager
Accessing the Web Manager
1. At your computer, open a Web browser.
2. In the address field, type the IP address or host name that is assigned to the Wireless Print Solutions
Adapter. Determine if the IP address was assigned manually or automatically by DHCP. For details see
Installing the Wireless Print Solutions Adapter on page 16.
Note: The default IP address of the Wireless Print Solutions Adapter is 192.168.0.1.
3. Type your user name and password, or use the factory default user name of admin and password of
PASS. The Device Status web page loads.
Navigating the Web Manager
The Web Manager is an embedded Web server that allows you to manage and configure the wireless
adapter. It is comprised of five tabbed pages that contain page-specific links.

Configuration Using the Web Manager
Xerox® Wireless Print Solutions Adapter
User Guide
18
A menu bar on the left side of each page provides links you can click to navigate from one page to another.
Some pages are read-only, while others allow you to change configuration settings.
Notes:
•To take effect, some configuration changes require a system reboot. For details, see System
on page 41.
•Before you try to connect to the device, wait for the system reboot to complete. This process
can take up to 30 seconds.
•If a parameter changes on a page, a Submit button appears. To save the change, click the
Submit button.
•To log out of the interface, at the top of the page, click the Logout link, then close the
browser window. To log in to the interface, reopen the browser.
Web Manager
Page Description
Status Provides product information and network settings. For details, see Status Page on
page 19.
Network Provides the status of the Ethernet and WLAN interface/link and lets you configure
Wireless Print Solutions Adapter settings. For details, see Network Page on page 21.
Printer Supports printing and printer management functions. For details, see Printer Page on
page 29.
Diagnostics Provides a page to perform various diagnostic procedures. For details, see Diagnostics
Page on page 33.
Administration Allows you to configure date and time, discovery, HTTP, SSL, Syslog, System, user
management, and cloning functions. For details, see Administration Page on page 35.
Xerox® Wireless Print Solutions Adapter
User Guide
19
5
Status Page
When you log into the Web Manager or you select the Status tab from any page, the Status page appears.
The Status page provides device, network, and printer-specific status information. To view specific status
details, click the links for Device, Network, or Printer.
Note: The Logout button is available on any web page. If you log out of the Web Manager, to log in
again, reenter the login and password.
Accessing the Status Page
1. At your computer, open a Web browser.
2. In the address field, type the IP address of the Wireless Print Solutions Adapter, then press Enter or
Return. For details, see Accessing the Web Manager on page 17.
3. Log in to the Wireless Print Solutions Adapter.
– The default login is admin.
– The default password is PASS.
4. Click the Status tab.
Status Page
Xerox® Wireless Print Solutions Adapter
User Guide
20

Xerox® Wireless Print Solutions Adapter
User Guide
21
6
Network Page
You can view and configure the Ethernet and WLAN interface details on the Network Page. You can also
configure the Wireless Print Solutions Adapter settings. Interface settings are related to the configuration
of the IP and related protocols. Link settings are related to the physical link connection, which carries the IP
traffic.
The Wireless Print Solutions Adapter contains two network interfaces. Only one interface can be active at a
time unless bridging is enabled. Then both interfaces are activated and the bridging subsystem controls
them. The Ethernet interface is called Network (eth0), and the WLAN interface is called Network (wlan0).
Notes:
•Some settings require a reboot to take effect. For details, see System on page 41.
•After you reboot the adapter, wait at least 30 seconds before you connect to the device.
The Wireless Print Solutions Adapter supports bridging of traffic between a single external Ethernet device
and the wireless network. When bridging is enabled and active, the MAC address of the external device is
used as the MAC address for the WLAN interface. The device then bridges traffic between the two
interfaces. The external Ethernet device appears as a wireless node on the network.
Access Point Settings
Software Access Point (Soft AP) is a feature that allows you to create an access point for your Wireless Print
Solutions Adapter so that wireless devices can locate and connect to it. When you use Soft AP, the Wireless
Print Solutions Adapter broadcasts its SSID. This allows wireless devices to locate it and connect to it. The
Wireless Print Solutions Adapter SSID appears as wpsa-xxxx where the last four digits of the address are
the last four digits of the MAC address for the adapter. The Soft AP feature is useful to help you configure
the Wireless Print Solutions Adapter for the first time before you connect it to a wireless network. The
default IP address for the Wireless Print Solutions Adapter is 192.168.0.1.
To Configure Access Point Settings
1. On the Network Page, click Access Point.
2. Configure the access point details.
– To enable the Wireless Print Solutions Adapter to broadcast its SSID, for State, select Enabled.
–For IP Address, enter the IP address of the Soft AP interface.
–For Network Name (SSID), type the network name or the SSID for the access point. The SSID
details update automatically without rebooting the adapter.
CAUTION: To be able to restore the wireless adapter at a later time, ensure that you export
the WLAN Profile, HTTP Authentication URI, and the soft AP groups with export secrets
enabled.
Network Page
Xerox® Wireless Print Solutions Adapter
User Guide
22
– For Security Suite, enter the security suite to use with the access point. For details, see To
Configure WLAN Security Settings on page 25.
–Click Submit.
Bridge (br0) Settings
Bridging Operation
The Bridging MAC Address is acquired using pre-configuration or auto-detection. If either the eth0 or
wlan0 links go down, bridging reverts to the Inactive state, as noted on the Bridge Statistics page.
When in the Active state, all packets that arrive on the wlan0 interface are bridged through the eth0
interface. Similarly, all packets that arrive on the eth0 interface are bridged through the wlan0 interface.
To View or Configure Bridge Settings
• To view the Bridge status, on the Network page, click Bridge >Statistics.
• To configure Bridge settings, on the Network page, from the links, click Bridge >Configuration.
To Configure and Enable Bridging
1. Ensure that you have configured the Wireless Network (wlan0) to communicate with your wireless
network.
2. Ensure that the Wired Network (eth0) is Enabled.
3. On the Bridge Configuration page, for State, select Enabled.
4. If desired, configure the Bridging MAC Address.
5. Click Submit.
6. For changes to take effect, on the Administration page, click Reboot.
Wired (eth0) Network Interface Settings
Network interface settings apply to both the Ethernet (eth0) and WLAN (wlan0) interfaces, but are
configured independently for each interface.
To Configure Wired Network Interface Settings
• To view Ethernet (eth0) Interface statistics, on the Network page, select Wired Network >Interface.
• To configure Ethernet (eth0) Interface settings, on the Network page, select Wired
Network >Interface >Configuration.
Network Page
Xerox® Wireless Print Solutions Adapter
User Guide
23
Wired (eth0) Network Link Settings
To Configure Wired Network Link Settings
• To view Wired Network (eth0) Interface status, on the Network page, select Wired Network >Link.
• To modify Wired Network (eth0) Interface settings, on the Network page, select Wired
Network >Link >Configuration.
Physical link parameters can be configured for an Ethernet (eth0) Network Interface.
• When speed is Auto, duplex must be Auto or Half.
• When speed is not Auto, duplex must be Half or Full.
• Fixed-speed Full duplex produces errors when connected to Auto, due to duplex mismatch.
Wireless (wlan0) Network Interface Settings
This page is used to configure and view the status of the wlan0 interface on the device. To see the effect of
these items after a reboot, view the Status page.
To Configure Wireless Network Interface Settings
• To view the Wireless Network (wlan0) Interface status, on the Network page, then select
Wireless Network >Interface.
• To modify Wireless Network (wlan0) Interface settings, on the Network page, select
Wireless Network >Interface >Configuration.
Wireless (wlan0) Network Link Settings
You can select and name up to four WLAN Profiles for automatic connection to wireless networks.
To Configure Wireless Network Link Settings
• To view Wireless Network (wlan0) Interface status, on the Network page, select
Wireless Network >Link.
• To modify Wireless Network (wlan0) Interface settings, on the Network page, select
Wireless Network >Link >Configuration.
WLAN Scan/Quick Connect
To view the WLAN Link Scan and Status information, on the Network page, select WLAN Scan/Quick
Connect.

Network Page
Xerox® Wireless Print Solutions Adapter
User Guide
24
WLAN Profiles
WLAN Quick Connect allows users to add a WLAN profile from a list of available networks that refreshes
automatically every 60 seconds. Since details of the selected network are pre-populated, users do not need
to configure the connection. Users can test the network connection before they add it to the pool of WLAN
profiles.
A WLAN profile defines all of the settings needed to establish a wireless connection. This is true when in
infrastructure mode for an access point, as well as another wireless client. A maximum of eight profiles can
exist on the Wireless Print Solutions Adapter at a time. All enabled profiles are active.
The Wireless Print Solutions Adapter supports dynamic profiles and prioritization of the profiles. Dynamic
Profiles are created using WPS or Quick Connect. Profiles are assigned numbers based on priority. For
example, dynamic profiles list in reverse order of creation, followed by choice-list profiles, then any
remaining profiles.
Configuring WLAN Profile Settings
On the Network page, you can edit, create, or delete a WLAN profile.
WLAN Quick Connect
Settings Description
Network Name Type a network name or to search for a network, click Scan.
Scan Performs a scan for devices within range of the Wireless Print Solutions Adapter.
To limit the scan to devices that are configured with the specified SSID, include
the network SSID. To perform a scan for all devices, omit the network SSID.
Refresh scan results every 60
seconds
• To automatically update the list every 60 seconds, select the check box.
• To stop automatically updating the list, clear the check box.
SSID To display a network configuration profile, for SSID, click the link for the network
name.
BSSID The Basic Service Set Identifier is the MAC address that identifies the access
point that created the wireless network.
CH The channel number and frequency (MHz) of a network.
RSSI A real-time value that indicates the signal strength of the network. Green
indicates the strongest, yellow indicates average, and red indicates the weakest
signal strength.
Security Suite The security suite of a network. For example: WEP, WPA, WPA2, WPS, IBSS.
Note: Although WPS and IBSS are reported with the security flags, they are not
security settings. WPS indicates that an Access Point supports WPS.
Network Page
Xerox® Wireless Print Solutions Adapter
User Guide
25
To Create a Profile
1. To create a WLAN profile, on the Network page, select WLAN Profiles.
2. For Add a new Profile, type the name for the profile. This profile is unique to this wireless device.
3. Click Submit.
The profile appears in the WLAN Profiles list. The profile is enabled by default.
To Configure WLAN Profile Settings
1. On the Network page, select WLAN Profiles.
2. For WLAN Profiles, click the profile that you want to edit.
3. To update the network name, for Network Name (SSID), type a new network name.
Note: This name is the name of the network that you wish to attach to. If you do not know the
network name (SSID), consult your network administrator.
4. For State, select Enabled.
5. For Suite, from the menu, select a security suite.
–None
–For WEP, see To configure WEP Settings on page 25.
– For WPA or WPA2/IEEE 802.11i, see To Configure WPA or WPA2 Settings on page 26.
To Configure WLAN Security Settings
To Configure an Open Network
To select no security settings, for Suite, select None, then click Apply.
To configure WEP Settings
WEP security is available in Infrastructure mode. WEP is a simple and efficient security mode, encrypting
the data using the RC4 algorithm. However, WEP has become more vulnerable due to advances in hacking
technology. Common equipment can find WEP keys in minutes. For stronger security, use WPA, or the
stronger WPA2, with AES (CCMP).
1. For Suite, select WEP.
2. For Authentication, select an option.
–Shared: Encryption keys of both parties are compared as a form of authentication. If mismatches
occur, no connection establishes.
–Open: A connection establishes without first checking for matching encryption keys. If keys do
not match, however, data becomes garbled and prevents connectivity on the IP level.
3. For Key Type, select an option.
–If you select Passphrase, for Key Size, select 40 bits or 104 bits, then for Passphrase, type an
alphanumeric phrase up to 63 characters in length. Spaces and special characters are allowed.
–If you select Hex, for Key Size, select 40 bits or 104 bits, then for TX Key Index, select a key index
value from 1 through 4.
Note: For interoperability with some products that generate four identical keys from a passphrase, this
index must be one.
Network Page
Xerox® Wireless Print Solutions Adapter
User Guide
26
For Keys 1-4, enter one or more encryption keys in hexadecimal format. Enter 10 hexadecimal
digits (0-9, a-f) for WEP40 and 26 for WEP104. For security reasons, the configured keys are not
shown.
Note: For maximum security, Xerox recommends that you use a passphrase of 20 or more characters.
Spaces and special characters are allowed.
4. Click Apply.
5. To test the settings, click Tes t Connection.
6. When you finish your selections, click Submit.
To Configure WPA or WPA2 Settings
WPA and WPA2/IEEE802.11i security suites are available for Infrastructure mode only.
WPA is a security standard specified by Wi-Fi Alliance Corporation. WPA2 is a Wi-Fi standard to enforce
better interoperability. The Wireless Print Solutions Adapter is compliant with both WPA and WPA2.
The WPA2 mode is compliant with the Robust Secure Network specified in the IEEE standard 802.11i.
1. For Suite, select WPA or WPA2/IEEE 802.11i
2. For Authentication, select an option.
–PSK, for Passphrase, type the key. For a Pre-shared key, ensure that the same key is configured
both on the Wireless Print Solutions Adapter side and on the Access Point side.
–IEEE 802.1X: This authentication method communicates with an authentication server that is
part of the network. The authentication server matches the credentials sent by the Wireless Print
Solutions Adapter with an internal database.
Note: For maximum security, Xerox recommends that you use a passphrase of 20 or more characters.
Spaces and punctuation characters are allowed.
3. For Key type, select either Passphrase or Hex.
4. If you select IEEE 802.1X, select the protocol to use to authenticate the WLAN client.
•LEAP: Type a User Name and Password, then select an Encryption. Options are CCMP, TKIP,
or WEP. Click Apply.
•EAP-TLS: Type a Username, then select a value for Encryption. Options are CCMP, TKIP, or
WEP. This option validates the certificate received from the authentication server. To
validate against a certificate installed on the device, select Enabled. For Credentials, select
the credential to validate against. If the credential is not listed, type the name for the
credential, then click Apply.
•EAP-TTLS: For EAP-TTLS Option, select a security protocol. Options include EAP-MSCHAPV2,
MSCHAPV2, MSCHAP, CHAP, PAP, and EAP-MD5. Type a Username and Password, then
select an Encryption. Options are CCMP, TKIP, or WEP. Click Apply.
•PEAP: For PEAP Option, select a security protocol. Options include EAP-MSCHAPV2 and
EAP-MD5. Type a Username and Password, then select an Encryption. Options are CCMP,
TKIP, or WEP. Click Apply.
5. To test the settings, click Tes t Connection.
6. When you finish your selections, click Submit.
Network Page
Xerox® Wireless Print Solutions Adapter
User Guide
27
To Delete a Profile
1. On the Network page, select WLAN Profiles.
2. For the profile that you want to delete, select the check box.
3. Click Submit. A window appears that requests confirmation of the delete action.
4. Click OK.
The profile is removed from the WLAN profiles list.
Note: If you delete the active profile, you will need to reconfigure an active profile. To do so, reconnect
to the adapter via SoftAP, or reset to factory defaults, then reconfigure the wireless settings.
Network Page
Xerox® Wireless Print Solutions Adapter
User Guide
28
Xerox® Wireless Print Solutions Adapter
User Guide
29
7
Printer Page
You can use the Printer page to print test pages, add or delete a printer, and modify default print options.
The Xerox® Wireless Print Solutions Adapter supports printing and printer management through the Web
Manager user interface and Google Cloud Print. All printer options are available when a printer is added. All
printing and printer management functionality is available on the Printer page.
Notes:
•Only add a printer which supports Adobe PS3.
•You can associate one printer to a Wireless Print Solutions Adapter at any time. Once you
configure an adapter to a printer, all printer configuration options are available.
Printer Configuration
To access the Printer web page, in the Web Manager, click the Printer tab.
Configuring Printer Settings
To access printer configuration options for a printer that was added previously, select the Printer tab, then
click Printer Configuration.
To Add a Printer
1. In the Web Manager, click the Printer tab.
2. Click Printer Configuration.
Note: The Printer Configuration page allows you to add a new printer the first time that you configure
the Wireless Print Solutions Adapter.
3. For the new printer, enter the details:
a. Type the IP Address of the printer.
b. Type the Name of the printer as it will appear in the user interface.
c. Type the Location of the printer as it will appear in the user interface.
d. If needed, browse to the location for the PPD File that you want to use.
4. Click Add Printer. A confirmation page appears, then the Printer Configuration page appears for the
new printer.
Note: Once you configure the Wireless Print Solutions Adapter with a printer, the Add Printer button
changes to Delete Printer. You can configure only one printer at a time with the Wireless Print
Solutions Adapter.
Printer Page
Xerox® Wireless Print Solutions Adapter
User Guide
30
To Delete a Printer
1. In the Web Manager, click the Printer tab.
2. Click Printer Configuration.
3. Click Delete Printer.
4. To confirm the selection, click Delete Printer again.
The button changes to Add Printer.
To Print a Test Page
1. In the Web Manager, click the Printer tab.
2. Click Printer Configuration.
3. Click Print Test Page. A confirmation page appears, then Printer Configuration page loads.
Print Jobs
To View Print Jobs
1. In the Web Manager, click the Printer tab.
2. Click Printer Jobs.
– To search for Active Print jobs, type the printer Job ID or name of the printer, then click Search.
– To clear existing search results, click Clear.
– To show all completed print jobs, click Show Completed Jobs.
– To show all jobs, click Show All Jobs.
AirPrint
AirPrint is a software feature that allows you to print documents from Apple iOS-based mobile devices and
Mac OS-based devices without the requirement to install a print driver.
You can use the Wireless Print Solutions Adapter to print using the Apple AirPrint feature.
Note: You can configure AirPrint options only if the printer is configured with the Wireless Print
Solutions Adapter and if AirPrint is installed. For details on how to install AirPrint, go to
https://support.apple.com/en-us/HT201311.
To Configure the Wireless Print Solutions Adapter for Apple AirPrint
1. In the Web Manager, click the Printer tab.
2. In the navigation pane, click AirPrint.
3. For Latitude, enter the latitude coordinates for your device.
Printer Page
Xerox® Wireless Print Solutions Adapter
User Guide
31
4. For Longitude, enter the longitude coordinates for your device.
Note: If you do not know your coordinates, enable Share Location, then click Find Your Location.
5. Click Save.
Google Cloud Print
Google Cloud Print allows you to print documents that are stored in the cloud without using a print driver.
Register the Wireless Print Solutions Adapter printer at Google Cloud Print.
Note: You can register the printer with Google Cloud Print only if the printer is configured with the
Wireless Print Solutions Adapter and if Google Cloud Print is installed. For details on how to install
Google Cloud Print, go to https://google.com/cloudprint.
To Register a Printer with Google Cloud Print
Note: You need a valid Google Email account and Password to register your printer with Google Cloud
Print.
1. In the Web Manager, click the Printer tab.
2. In the navigation pane, click Google Cloud Print. The status for your printer appears as Unregistered.
3. Click Register Printer. A link appears.
4. In this window, click the link Click here to open Google Cloud Print confirmation page for your
printer.
Note: If you are logged into your Google email account, you can bypass the next two steps.
5. Type your Google Email address and Password.
6. Click Sign in. A confirmation page appears.
7. Click Finish printer registration. A link appears that allows you to manage your printers through
Google Cloud Print.
Note: If needed, to manage your printers, click Manage your printers.
8. On the Printer page, click Google Cloud Print. The status for your printer now appears as Registered,
along with the associated email account.
To Unregister a Printer with Google Cloud Print
1. In the Web Manager, click the Printer tab.
2. Click Google Cloud Print. If your printer is configured with Google Cloud Print, the status appears as
Registered.
3. Click Unregister Printer. A confirmation page appears.
4. To confirm, click Unregister Printer again. The Google Cloud Print Page appears.
Printer Page
Xerox® Wireless Print Solutions Adapter
User Guide
32
Xerox® Wireless Print Solutions Adapter
User Guide
33
8
Diagnostics Page
To access the Diagnostics page, log into the Web Manager, then click the Diagnostics tab. The Diagnostics
page provides access to view and configure DNS settings, ping devices, view and configure networking
routes, and run traceroutes.
DNS
The primary and secondary DNS addresses come from the active interface. DHCP overrides the static
addresses from the Network Interface configuration settings.
To look up either the DNS host name or the IP address for an address, type the address or host name in the
field, then click Lookup.
Accessing the DNS Settings
1. To view the current DNS name or IP address, on the Diagnostics page, click DNS.
2. To Configure the DNS Settings, on the Diagnostics page, click DNS, begin to enter the name of a DNS
host, then click Lookup.
3. To manually configure DNS servers, click the Network tab.
– To configure for Wireless, click Wireless Network >Interface >Configuration.
– To configure for a Wired connection, click Wired Network >Interface >Configuration.
Ping
You can use Ping to test connectivity to a remote host.
To ping a Remote Host
1. On the Diagnostics page, click Ping.
2. For Host, enter the IP address or host name for the Wireless Print Solutions Adapter that you want to
ping.
3. For Count, enter the number of ping packets that the Wireless Print Solutions Adapter attempts to
send to the Host. The default number of packets is 3.
4. For Timeout, enter the time in seconds that the Wireless Print Solutions Adapter waits for a response
from the Host before it times out. The default time is 5 seconds.
5. Click Submit.
Diagnostics Page
Xerox® Wireless Print Solutions Adapter
User Guide
34
Routes
Routing allows one system to find the network path to another system, from a gateway to a destination.
To view the current networking routes, on the Diagnostics page, click Routes.
Traceroute
You can use traceroute to trace a packet from the Wireless Print Solutions Adapter to an Internet host. A
traceroute shows how many hops the packet requires to reach the host, and how long each hop takes. This
information can be helpful to diagnose delays for a web page that loads slowly.
To Perform a Traceroute
1. On the Diagnostics page, click Traceroute.
2. For Host, enter the IP address or DNS host name for the destination device.
3. For Protocol, select the protocol that you want to use for the traceroute.
4. Click Submit.
Xerox® Wireless Print Solutions Adapter
User Guide
35
9
Administration Page
To open the Administration page, after you log in to the Web Manager, select the Administration tab. Use
the Administration page to configure date and time, discovery, HTTP, SSL, Syslog, System, user
management, and cloning.
Clock
You can update clock settings manually or you can synchronize the clock with an SNTP server. If you select
SNTP, you can choose automatic time zone detection.
To Specify a Clock-Setting Method
1. In the Web Manager, click the Administration tab.
2. Click Clock. The current time appears at the bottom of the page.
3. For Change Date and Time, select a Method:
–Manual: You can set the date and time manually. For Date and Time, click the arrows, select a
value, then click Submit.
–SNTP: This option enables the Wireless Print Solutions Adapter to synchronize the time with an
NTP server. For NTP Server, type the NTP server URL, then click Submit.
4. To select your time zone, for Time Zone, click the arrow, then select the zone for your geographical
location. The list refreshes to show additional time zones, by city, in that geographical location. To
further refine you location, select an option. To navigate back, at the top of the list, click the back
symbol (..).
When you are complete, the time updates to show your current time.
Discovery
UPnP allows the Wireless Print Solutions Adapter to be discoverable by devices on your network.
The current statistics and configuration options for device discovery are available for the Wireless Print
Solutions Adapter.

Administration Page
Xerox® Wireless Print Solutions Adapter
User Guide
36
To Configure Discovery
1. To view or configure Discovery settings, in the Web Manager, click the Administration tab, then select
Discovery.
2. For UPnP Server State, select Enabled.
3. For UPnP Server Port, enter the port you want the Wireless Print Solutions Adapter to use.
4. Click Submit.
HTTP
Hypertext Transfer Protocol (HTTP) is a request-response standard protocol between clients and servers.
HTTP defines how messages are formatted and transmitted. It also defines the actions Web servers and
browsers take in response to different commands. HTTP Authentication enables the requirement of user
names and passwords for access to the device.
To View HTTP Statistics
1. In the Web Manager, select the Administration tab.
2. Click HTTP.
3. Click Statistics.
4. To view accumulated logs, click View.
5. To clear accumulated logs, click Clear.
To Configure HTTP Settings
1. In the Web Manager, select the Administration tab.
2. Click HTTP.
3. Click Configuration.
4. As required, modify the settings.
5. Click Submit.
To Configure HTTP Authentication
1. In the Web Manager, select the Administration tab.
Discovery
Settings Description
UPnP Server State Use this setting to allow the Wireless Print Solutions Adapter to be discovered by devices
on the network.
UPnP Server Port To restore the default settings, leave UPnP Server Port blank.
Administration Page
Xerox® Wireless Print Solutions Adapter
User Guide
37
2. Click HTTP.
3. Click Authentication.
4. As required, modify the settings.
5. Click Submit.
6. To delete the current configuration, click Delete.
7. Confirm the deletion, then click OK.
Proxy Server
1. In the Web Manager, click the Administration tab.
2. Click Proxy Server.
3. As needed, modify the State, Host, Port, Username, and Password.
4. Click Submit.
Notes:
•In some network environments, a Proxy Server is required to access resources on the
network. Use this procedure only if your network requires a Proxy Server.
•If you do not know the Proxy Server settings for your network environment, contact your
network administrator.
SSL
Secure Sockets Layer (SSL) is a protocol that creates an encrypted connection between devices. It also
provides authentication and message integrity services. SSL is used widely for secure communication to a
Web server, and also for wireless authentication.
SSL certificates identify the Wireless Print Solutions Adapter to peers and are used with some methods of
wireless authentication. Provide a name at upload time to identify certificates on the Wireless Print
Solutions Adapter.
You can upload Certificate and Private key combinations, obtained from an external Certificate Authority
(CA), to the Wireless Print Solutions Adapter. The Wireless Print Solutions Adapter can also generate self-
signed certificates with associated private keys.
Credentials
The Wireless Print Solutions Adapter can generate self-signed certificates and their associated keys for
both RSA and DSA certificate formats. When you generate certificates, assign them a credential name to
help identify them on the Wireless Print Solutions Adapter. Once you create your credentials, then
configure them with the desired certificates.
Administration Page
Xerox® Wireless Print Solutions Adapter
User Guide
38
To Create a New Credential
To create an SSL credential:
1. In the Web Manager, click the Administration tab.
2. Click SSL.
3. Click Credentials.
4. Type the name for your credential.
5. Click Submit.
The SSL credential appears in the list.
To Delete a Credential
To delete an SSL credential:
1. In the Web Manager, click the Administration tab.
2. Click SSL.
3. Click Credentials.
4. For the credential that you want to delete, click the X.
5. To confirm the delete, click OK.
To Configure an SSL Credential to Use an Uploaded Certificate
1. In the Web Manager, click the Administration tab.
2. Click SSL.
3. Click Credentials.
4. For View or Edit, click the credential that you want to modify.
5. To upload a certificate to assign to the credential, for New Certificate, click Browse.
6. Locate, then double-click the valid certificate.
– If you select SSL authority, RSA, or DSA certificates, for New Certificate Type, select PEM, PKCS7,
or PKCS12.
– If the Web Manager determines that the certificate is an Authority Certificate type, the New
Certificate Type field updates to PKCS12 automatically. For PKCS12 certificates, type a password.
Notes:
•Ensure that the certificate is formatted properly with a valid open and close tag.
•Ensure that the Private Key is associated to the selected certificate and that it is formatted
properly with a valid open and close tag.
7. For New Private Key, to locate the associated valid private key, click Browse.
8. Locate, then double-click the New Key Type.
9. Click Submit.
To Configure an SSL Credential to Use a Self-Signed Certificate
1. In the Web Manager, click the Administration tab.
2. Click SSL.

Administration Page
Xerox® Wireless Print Solutions Adapter
User Guide
39
3. Click Credentials.
4. For View or Edit, click the credential that you want to modify.
5. For Create New Self-Signed Certificate, type the details requested.
6. For Expires, type the date that the self-signed certificate expires in mm/dd/yyyy format.
7. For Type, select RSA or DSA.
8. Specify a key length.
Note: The process to create a self-signed certificate can take up to 30 seconds, depending on the
length of the key.
9. Click Submit.
Trusted Authorities
One or more authority certificates are used to verify the identity of a peer. Authority certificates are used
with some wireless authentication methods. These certificates do not require a private key.
To Upload a Trusted Authority Certificate
You can upload SSL authority, RSA, or DSA certificates.
To upload a trusted authority certificate:
1. In the Web Manager, click the Administration tab.
2. Click SSL.
3. Click Trusted Authorities.
4. To locate the valid certificate, for Authority, click Browse.
Trusted
Authorities
Settings
Description
Authority SSL authority certificate.
RSA or DSA certificates are allowed.
The format of the authority certificate can be PEM or PKCS7. PEM files must start with
“-----BEGIN CERTIFICATE-----” and end with “-----END CERTIFICATE-
----”. Some Certificate Authorities add comments before and/or after these lines.
Those comments must be deleted before upload.
Authority Certificate
Type
This field automatically updates, depending upon extension of the certificate entered.
If the field is NONE, the certificate is unsupported and will not load. If the field is
PKCS12, enter the password in the corresponding field.
Delete To delete an existing certificate authority, beside the specific authority, click Delete.

Administration Page
Xerox® Wireless Print Solutions Adapter
User Guide
40
5. Locate, then double-click the certificate.
Notes:
•If you select SSL authority, RSA, or DSA certificates, for New Certificate Type, select PEM or
PKCS7.
•Ensure that the certificate is formatted properly with a valid open and close tag.
•Ensure that the Private Key is associated to the selected certificate and that it is formatted
properly with a valid open and close tag.
6. Click Submit.
Approaches for Uploading Authority Certificates
• You can upload multiple root authority or self-signed certificates. If you have two root authority
certificates, then they will appear in the user interface as two trusted authority certificates with
different common names.
• You can upload a root authority certificate with a chain of intermediate authority certificates signed
by a Root Certificate Authority or by an intermediate Certificate Authority in a hierarchy. For example:
Root CA > Intermediate CA1, issued by Root CA > Intermediate CA2, issued by Intermediate CA1.
Default Credential
The Wireless Print Solutions Adapter uses a device SSL credential for IPPS. This credential can be used
wherever an SSL credential is required, such as HTTPS.
The device credential is created on the first boot and recreated after a factory reset. The Device host name
is used as the CN attribute of the certificate. The credential is regenerated if the host name changes.
Syslog
The System Log (Syslog) provides information that shows the current configuration and statistics of the
Syslog. You can configure the Syslog Host and set the severity level for events to log.
Note: The system log is saved to local storage, but it is not retained through reboots unless diagnostics
logging to the file system is enabled. To allow the administrator to save the complete system log, save
the system log to a server that supports remote logging services. For details, refer to RFC 3164. The
default port is 514.
To Configure Syslog Settings
1. In the Web Manager, click the Administration tab.
2. Click Syslog.
3. To enable Syslog, for State, select Enabled.
4. For Host, type the IP address of the remote server that stores the logs.
CAUTION: If you delete the device credential, SSH/TLS become unavailable.
Administration Page
Xerox® Wireless Print Solutions Adapter
User Guide
41
5. For Remote Port, enter the port number for the remote host that supports logging services. The default
port number is 514.
6. For Severity Log Level, click the arrow to select the minimum level message type that you want the
system to log.
7. Click Submit.
System
Use the System page to reboot the Wireless Print Solutions Adapter or restore it to factory settings as
needed. You can reboot the device, restore factory defaults, upload new firmware and update its short and
long names.
To Configure System Settings
1. In the Web Manager, click the Administration tab.
2. Click System.
3. Select desired action:
– To reboot the Wireless Print Solutions Adapter, click Reboot.
Notes:
•When you reboot the Wireless Print Solutions Adapter, allow one minute for the process to
complete.
•After the reboot process completes, wait an additional 20 seconds before making any
connections to the adapter.
– To locate the device, click Locate Device. The Wireless Print Solutions Adapter will display a fast
green LED light that blinks for two minutes. For details, see Status LED on page 15.
– To restore factory settings, click Factory Defaults, then to continue, click OK. The Wireless Print
Solutions Adapter reboots automatically.
Notes:
•If you restore the device to original factory settings, all configured settings are reset to the
default.
•After the reboot process completes, wait 20 seconds before you connect to the Wireless Print
Solutions Adapter.
– To update the firmware for your Wireless Print Solutions Adapter, see Installing New Firmware on
page 44.
– To enable or disable Near Field Communication (NFC), for State, select an option, then click
Submit.
– To change the language for the Wireless Print Solutions Adapter, for Language, select an option,
then click Submit.
Administration Page
Xerox® Wireless Print Solutions Adapter
User Guide
42
User Management
To Change the User Admin Password
1. In the Web Manager, click the Administration tab.
2. Click User Management.
3. In the Admin Password field, enter the desired password.
Note: The default Admin Password is PASS.
4. Click Submit.
Cloning
The cloning feature allows you to:
• Clone settings from one Wireless Print Solutions Adapter to another.
• Export an XML configuration record (XCR) from one device and save it to use as an import file for
another device.
• Save, then if necessary, restore the device settings.
• Edit the saved XML file to create a different configuration and then import that into one or more
devices as needed.
• Dump the XML data to a screen or export it to a location on a file system.
Export Configuration
By default, all settings groups are checked.
To Export a Configuration File
1. In the Web Manager, click the Administration tab.
2. Click Cloning.
3. Click Export Configuration.
4. Select the desired options.
– To create a configuration backup, along with a link to open it, select Download (from link).
– To export secret password and key information, select Export secrets.

Administration Page
Xerox® Wireless Print Solutions Adapter
User Guide
43
Note: Ensure that the group list is formatted as comma-delimited text and encased in double-
quotation marks.
5. Click Export.
A file that contains the current configuration information is generated for download.
6. To access the exported configuration information, click Current Configuration.
Export Status
You can export the current status in XML format. By default, all groups are exported, or you can select a
subset of groups to export.
To Export Status:
1. In the Web Manager, click the Administration tab.
2. Click Cloning.
3. Click Export Status.
4. For Groups to Export, select the status groups that you want to export to the XML configuration file.
Note: Ensure that the group list is formatted as comma-delimited text and encased in double-
quotation marks.
5. Click Export.
The exported status appears in a new browser tab.
Import Configuration
To import system XML configuration file that you saved previously, use Import Configuration.
To Import a Configuration File
1. In the Web Manager, click the Administration tab.
2. Click Cloning.
3. Click Import Configuration.
4. To locate the XML configuration file that you want to import, click Browse, then select the file.
5. Click Import.
6. Click Import Configuration.
CAUTIONS:
• To prevent unauthorized access to secure network information, such as secret
passwords and network keys, use with extreme caution.
• Use only with a secure link.
• Save only in secure locations.
Administration Page
Xerox® Wireless Print Solutions Adapter
User Guide
44
Quick Setup
Quick Setup provides a window to configure all basic settings for the Wireless Print Solutions Adapter. You
can access Quick Setup on the Administration page and whenever you reset the Wireless Print Solutions
Adapter to factory defaults. For details, see To Configure System Settings on page 41.
To Access the Quick Setup Page
1. In the Web Manager, click the Administration tab.
2. Click Quick Setup.
3. On the verification window that appears, click OK.
Note: If you want to bypass Quick Setup and proceed to the Status page, at the bottom of the page,
click Advanced Setup.
To Configure Quick Setup Details
1. For Locale, select the desired Language from the menu.
2. For Bridge 1 (br0):
a. For State, select to enable or disable the state.
b. For Bridging Mac Address, type the bridging Mac address details.
3. For Network (wlan0):
a. For Network Name (SSID), view the existing network/SSID name, if one is configured.
b. For State, select to enable or disable the state.
c. For DHCP Client, select to turn DHCP Client on or off.
d. for IPv6 DHCP Client, select to turn IPv6 DHCP Client on or off.
4. For Available Networks:
a. For Refresh scan ever 60 seconds, select the check box, then click Scan to scan the available
networks every 60 seconds.
b. Scroll through the list of available networks, as needed.
5. For Printer, any printer that is configured appears.
6. For Add Printer:
a. For IP Address, type the IP address for the printer.
b. For Name, type the name of the printer as it will appear in the user interface.
c. For Location, type the location of the printer as it will appear in the user interface.
7. To clear any of the options that you have selected at any time, click Clear.
8. To submit your selections for Quick Setup, click Submit.
Installing New Firmware
You can install firmware for your Wireless Print Solutions Adapter when updates are released on Xerox.com.
Administration Page
Xerox® Wireless Print Solutions Adapter
User Guide
45
To locate and install firmware for your Wireless Print Solutions Adapter:
1. Open a web browser, they type www.xerox.com/office/WPSAsupport.
2. Locate the firmware file archive in .zip format.
3. Download the file to your computer, then unzip the file. The firmware file will have a .rom file
extension.
The zip file contains release notes, and instructions on how to install the firmware.
4. Open the instruction document and follow the process defined. Once the firmware installation
finishes, the Wireless Print Solutions Adapter restarts.
Administration Page
Xerox® Wireless Print Solutions Adapter
User Guide
46

Xerox® Wireless Print Solutions Adapter
User Guide
47
A
Troubleshooting
You can use this section to troubleshoot common issues that can occur with the Wireless Print Solutions
Adapter (WPSA).
Status LED never illuminates.
Probable Cause Solution
The WPSA does not have full power. 1. Ensure that the AC power adapter is fully seated
into the 5VDC Power Supply. For details, refer to the
Wireless Print Solutions Adapter Installation Guide
supplied with the device, or available at
www.xerox.com/office/WPSAdocs.
2. Ensure that the power adapter is plugged into a
100–240 VAC outlet.
3. Ensure that the barrel connector is seated properly
into the WPSA.
WPSA Does not acquire an IP address from the network.
Probable Cause Solution
The adapter is not connected to the access point. Ensure that the adapter connects properly to the
access point. For details, see Installing the Wireless
Print Solutions Adapter on page 16.
Connectivity to the gateway server is interrupted. Use Ping or Traceroute to check the gateway server.
For details, see Ping on page 33.
The wireless access point connects to managed
switches that use Spanning Tree protocol but
protocols that manage DHCP issues are not
enabled.
Ensure that PortFast for Cisco, FastLink for Netgear,
or Edge Mode for Adtran are enabled on the
network.
DHCP is not enabled on the network or it is
malfunctioning.
Configure a static IP address. For details, see
Wireless (wlan0) Network Interface Settings on
page 23.

Troubleshooting
Xerox® Wireless Print Solutions Adapter
User Guide
48
Cannot print from via PC.
Probable Cause Solution
The printer is not bridged onto the wireless
network.
Connect to the web manager to ensure that the
WPSA bridge is enabled. For details, see Bridge (br0)
Settings on page 22.
The printer is offline. Verify that the printer is online and accepting jobs.
The PC is on a different network than the printer. Ensure that the printer IP address is accessible from
the client PC.
Use Ping or Traceroute to test connectivity and
verify communication between the PC and the
printer. For details see Ping on page 33.
Cannot locate printer or print from an iOS device.
Probable Cause Solution
The printer has not been added to the WPSA. Ensure that the wireless adapter is set up to use the
printer. For details, see To Add a Pr inter on page 29.
The Wireless adapter and the iOS device are not
connected to the same Wi-Fi router or access
point that is on the same subnet.
If the WPSA and the iOS device are on different
routers or access points, ensure that mDNS
Forwarding is enabled in both. Contact your router
and/or access point manufacturer's technical
support for assistance.
Multicast DNS is disabled on either the Wi-Fi
router or the wireless Access point.
Enable multicast DNS on the Wi-Fi router or the
wireless access point.
Cannot locate printer or print via Google Cloud Print.
Probable Cause Solution
The wireless adapter is not communicating with
Google Cloud Print.
Ensure that the proxy server is set up, if required. For
details, see Proxy Server on page 37.
The printer is not registered with Google Cloud
Print.
Register your printer with Google Cloud Print. For
details, see Google Cloud Print on page 31.
The printer name or IP address has changed. On the WPSA Printer Configuration page, confirm
that the IP address defined for the printer matches
the IP address of your printer. For details see Printer
Configuration on page 29.

Troubleshooting
Xerox® Wireless Print Solutions Adapter
User Guide
49
Cannot locate printer or print from Android device.
Probable Cause Solution
There is no print service installed on the Android
device.
Ensure that the correct print service plugin is installed on
the phone/tablet:
• GoogleCloud Print
• Mopria Print Service
• Xerox Android Print Service
You can download these plugins from the Google Play Store.
The print service is installed, but is not enabled. Ensure that print service is enabled in the Android OS via
the Settings Menu, Print Settings. For details, refer to your
Android device documentation, or contact the Android
device manufacturer for support.
The printer is not on the phone or tablet list of
printers.
If the WPSA and the Android device are on different routers
or access points, ensure that mDNS Forwarding is enabled
in both. Contact your router and/or access point
manufacturer's technical support for assistance.
Cannot connect to Adapter's embedded web server.
Probable Cause Solution
The PC and Adapter are on different networks. Ensure that the PC is connected to the same network as the
WPSA. For details, see Accessing the Web Manager on
page 17.
The adapter is powered off or is offline. Ensure that the status LED on the WPSA is illuminated. For
details, see Status LED on page 15.
Cannot find the SSID for the Adapter in available wireless connections.
Probable Cause Solution
The adapter is powered off or is offline. Ensure that the status LED on the WPSA is illuminated. For
details, see Status LED on page 15.
The adapter is out of range of the PC or laptop. Ensure that the laptop or PC is within wireless range of
WPSA. Move the laptop or PC closer to the adapter.
SoftAP mode is disabled. Ensure that SoftAP mode is enabled in the web manager.
For details, see Access Point Settings on page 21.
Troubleshooting
Xerox® Wireless Print Solutions Adapter
User Guide
50
Xerox® Wireless Print Solutions Adapter
User Guide
51
B
Regulatory
Notice to Users in the European Union
Hereby, Xerox declares that Wireless Print Adapter is in compliance with Directives 1999/5/EC, 2006/95/EC,
2004/108/EC, 2002/95/EC, and 2009/125/EC.
The full text of the EU declaration of conformity is available at the following Internet address:
www.xerox.com/enviornment_europe.
Notice to Users in the United States
The Wireless Print Adapter has been tested and found to comply within the limits for Class B digital device
pursuant to Part 15 of the FCC Rules. These limits are designed to provide reasonable protection against
harmful interference in a residential installation. This equipment generates, uses, and can radiate radio
frequency energy and, if not installed and used in accordance with the instructions, may cause harmful
interference to radio communications. However, there is no guarantee that interference will not occur in a
particular installation. If this equipment does cause harmful interference to radio and television reception,
which can be determined by turning the equipment off and on, the user is encouraged to try to correct the
interference by one or more of the following measures:
(1) Reorient or relocate the device with its built-in receiving antenna.
(2) Increase the separation between the equipment and receiver.
(3) Connect the equipment into an outlet on a circuit different from that to which the receiver is
connected.
(4) Consult the dealer or an experienced radio/TV technician for help.
The user is cautioned that changes and modifications made to the equipment without the approval of
manufacturer could void the user's authority to operate this equipment.
Operation is subject to the following two conditions:
(1) This device may not cause harmful interference.
(2) This device must accept any interference received, including interference that may cause
undesired operation.
The radiated output power of the print server is far below the FCC radio frequency exposure limits.
Nevertheless, the print server shall be used in such a manner that the potential for human contact during
normal operation is minimized.
To satisfy RF exposure requirements, this device and its antennas must operate with the separation
distance of at least 20 centimeters from all persons and must not be co-located or operating in conjunction
Regulatory
Xerox® Wireless Print Solutions Adapter
User Guide
52
with any other antenna or transmitter. End users must be provided with specific operating instructions for
satisfying RF exposure compliance.
Notice to Users in Canada
The Wireless Print Adapter does not exceed the Class B limits for radio-emissions.
CAN ICES-3 (B)/NMB-3(B)
This transmitter must not be co-located or operating in conjunction with any other antenna or transmitter.
This equipment should be installed and operated with a minimum distance of 20 centimeters between the
radiator and your body.
This device complies with Industry Canada’s license-exempt RSSs. Operation is subject to the following two
conditions:
(1) This device may not cause interference; and
(2) This device must accept any interference, including interference that may cause undesired
operation of the device.
As a License-Exempt Local Area Network (LE-LAN) device, there are operational restrictions:
(1) the device for operation in the band 5150-5250 MHz is only for indoor use to reduce the potential
for harmful interference to co-channel mobile satellite systems;
(2) the maximum antenna gain permitted for devices in the bands 5250-5350 MHz and 5470-5725
MHz shall comply with the e.i.r.p. limit; and
(3) the maximum antenna gain permitted for devices in the band 5725-5825 MHz shall comply with
the e.i.r.p. limits specified for point-to-point and non point-to-point operation as appropriate.
Be advised that high-power radars are allocated as primary users (i.e. priority users) of the bands 5250-
5350 MHz and 5650-5850 MHz and that these radars could cause interference and/or damage to LE-LAN
devices.
Standards and Norms
Emissions and Immunity
European
• EN 300 328
• EN 301 489-01
• EN 301 489-17
• EN 301 893
• EN 61000-3-3
• EN 61000-3-2
Regulatory
Xerox® Wireless Print Solutions Adapter
User Guide
53
• EN 55024
• EN 55022
American
•FCC 15.21
• FCC 15.105
•FCC 15E
• FCC 15.247
• FCC 15.407
Canadian
•ICES-003
• RSS-210
Safety
• UL/IEC/EN 60950-1
Energy Efficiency (Power Adapter)
• (EC) No 278/2009 - Lot 7
• DoE - External Power Supplies - 10 CFR 430.32(w)
• NR Canada - External Power Supplies - CSA C381.1-08
Regulatory
Xerox® Wireless Print Solutions Adapter
User Guide
54