FAO Schwarz Runway Playset
Thank you for purchasing this runway from FAO Schwarz®. Please read all instructions and warnings on this sheet before use. Keep this instruction sheet for future reference as it contains important information.
Introduction
Thank you for purchasing this runway from FAO Schwarz®. Please read all instructions and warnings on this sheet before use. Keep this instruction sheet for future reference as it contains important information.
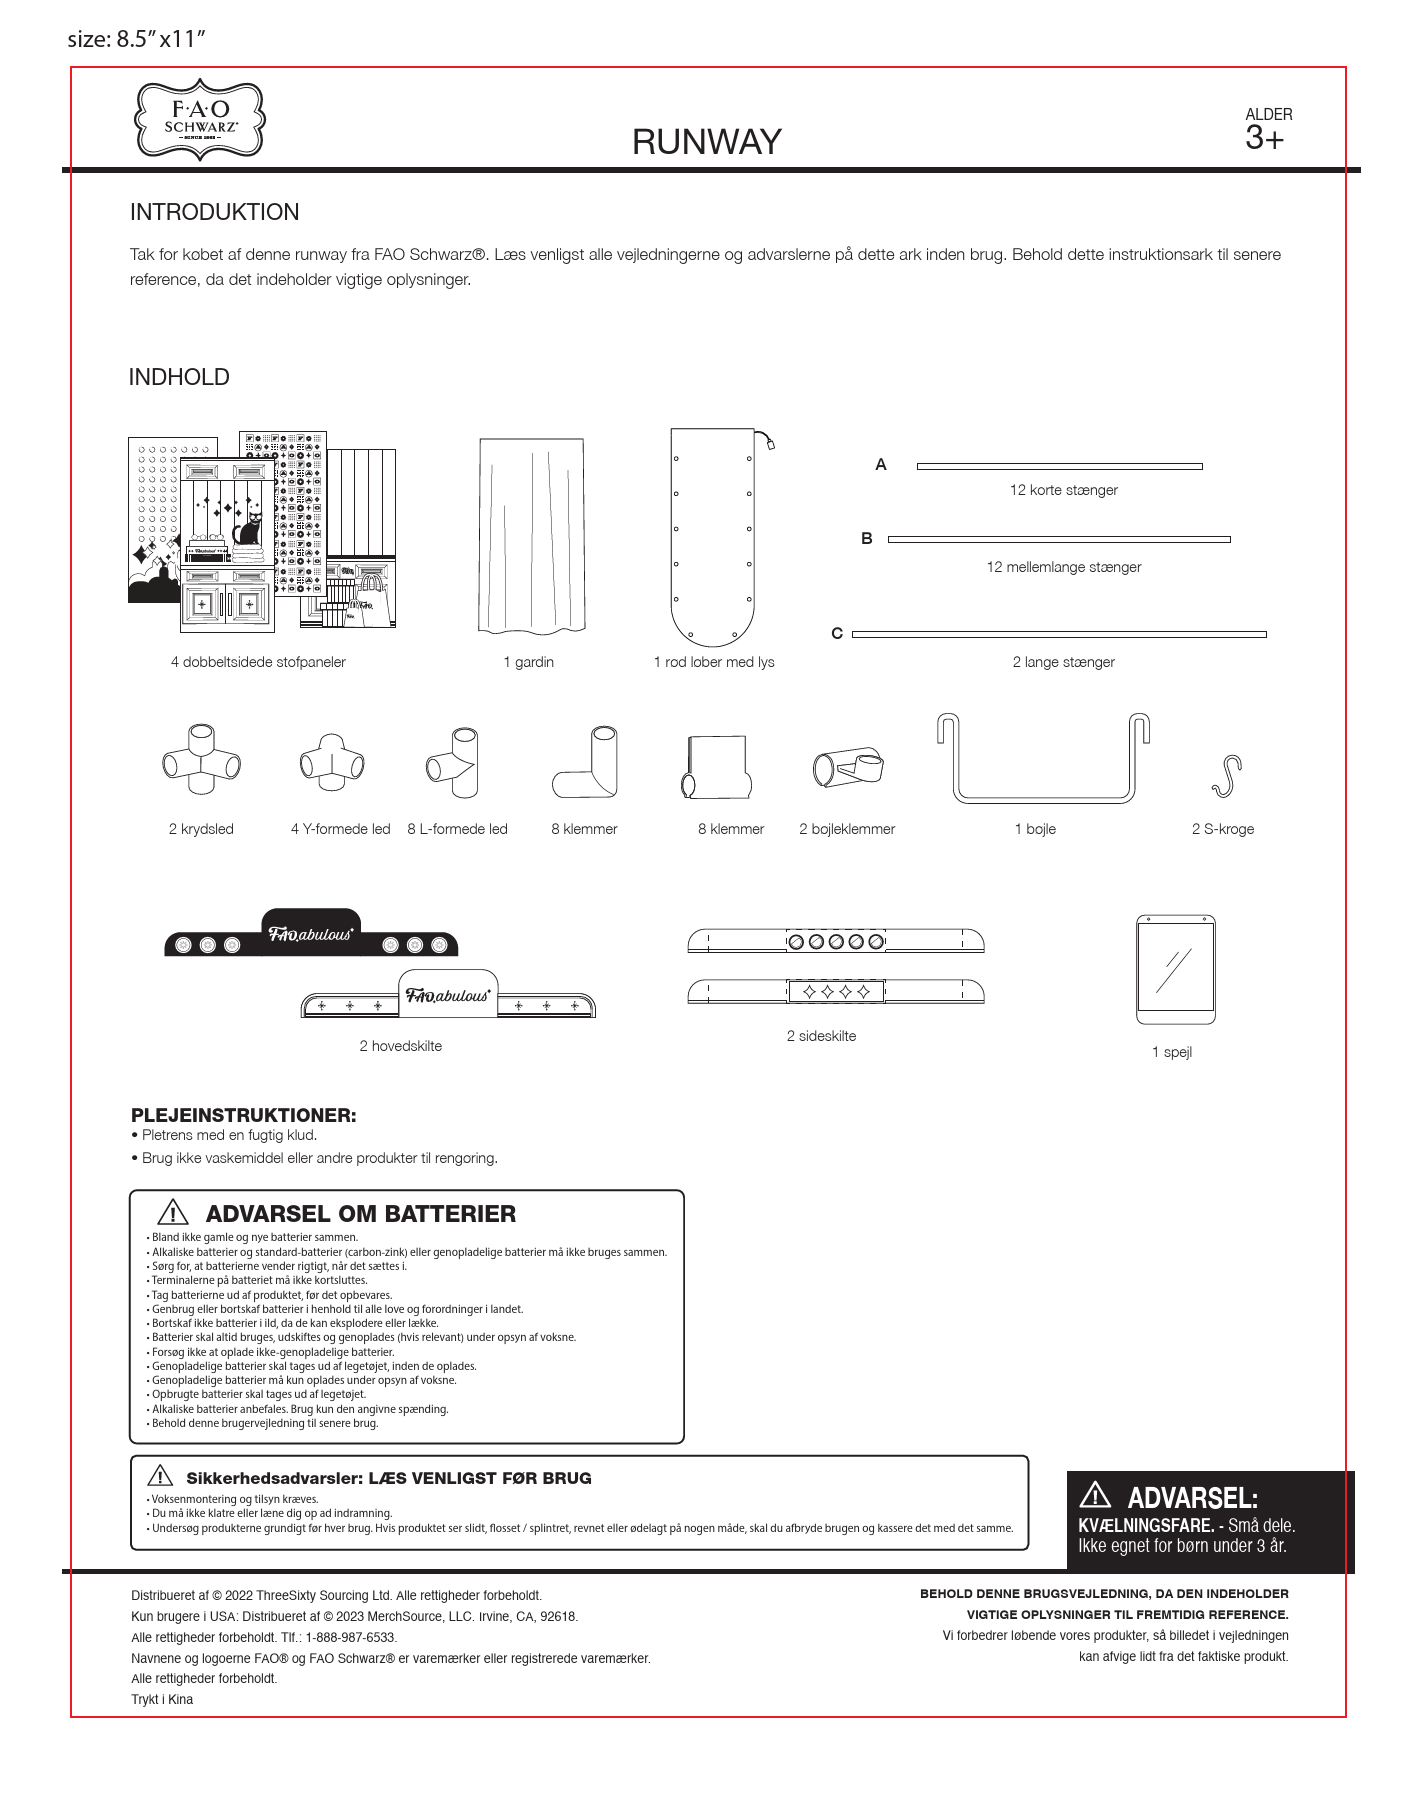
Contents
- 12 short rods
- 12 medium rods
- 4 double-sided fabric panels
- 1 curtain
- 1 red carpet with lights
- 2 long rods
- 2 cross connectors
- 4 Y-shaped connectors
- 8 L-shaped connectors
- 8 clips
- 8 clips
- 2 hanger clips
- 1 hanger
- 2 S-hooks
- 2 side panels
- 2 main panels
- 1 mirror
Care Instructions
- Spot clean with a damp cloth.
- Do not use detergent or other cleaning products.
Battery Warning
- Do not mix old and new batteries.
- Do not mix alkaline, standard (carbon-zinc), or rechargeable batteries.
- Ensure batteries are inserted correctly.
- Do not short-circuit the battery terminals.
- Remove batteries from the product before storing.
- Recycle or dispose of batteries according to all local laws and regulations.
- Do not dispose of batteries in fire, as they may explode or leak.
- Batteries should always be used, replaced, and recharged (if applicable) under adult supervision.
- Do not attempt to recharge non-rechargeable batteries.
- Rechargeable batteries must be removed from the toy before charging.
- Rechargeable batteries should only be charged under adult supervision.
- Exhausted batteries must be removed from the toy.
- Alkaline batteries are recommended. Use only the specified voltage.
- Keep this user manual for future reference.
Safety Warnings: Please Read Before Use
- Adult assembly and supervision required.
- Do not climb or lean on the frame.
- Inspect products thoroughly before each use. If the product appears worn, frayed, cracked, or damaged in any way, discontinue use and discard immediately.
Warning: Choking Hazard - Small Parts. Not suitable for children under 3 years.
Assembly
- Insert a long rod (C) through the end of the red carpet. Note: The product must be assembled by an adult.
- Place a Y-shaped connector on each end of the long rod (C). Ensure the Y-shaped connector lies flat on the ground with an opening facing upwards.
- Insert 2 medium rods (B) into the bottom of each Y-shaped connector and insert 1 short rod (A) into the top of each Y-shaped connector.
- Place a cross connector on the top of each short rod (A) with the angled openings facing away from each other.
- Insert 2 medium rods (B) into the angled openings of each cross connector, and insert a short rod (A) into the opening facing upwards.
- Place Y-shaped connectors on top of all short rods (A), turning them in the direction used in step 2. Then insert the medium rods (B) into each angled opening.
- Place the curtain onto the last long rod (C), then insert the rod into the Y-shaped connectors at the top.
- Place L-shaped connectors onto the medium rods (B) at the top and bottom of each side of your runway. The openings should face upwards on the bottom rods and downwards on the top rods.
- Place the T-shaped connectors onto the medium rods with the openings facing upwards and downwards.
- Connect all outer rods between the L-shaped and T-shaped connectors using a total of 8 short rods (A).
- Press the 4 double-sided fabric panels onto the outer frames. Ensure the panel with the battery pocket is on the same side as the battery pack emerging from the red carpet.
- Place 2 clips onto each medium rod (B) at the top. A total of 8 clips are needed here.
- Fold the side panels into triangles and then press them into the clips. [*Side panels - fold the graphic-free strips back to form a triangle*]
- Place the FAOabulous main panels over the curtain, and press them into the clips. The side flaps on the panels should sit across each side of the side panels, forming an X. If it is difficult to press the panels into the clips, remove the clips from the rods and squeeze the bottom of the clips together so the panels can be pressed in more easily.
- Place the 2 hanger clips opposite each other on one side of your runway.
- Fasten the hanger rod into the hanger clips.
- Attach the S-hooks to the back of the mirror, then hang the mirror on one of the top rods using the S-hooks.
- You can now walk down your runway! It is ready for your fashion shows.
Inserting Batteries
- Loosen the screw counter-clockwise with a Phillips head screwdriver, then remove the battery cover.
- Insert 3 x AAA 1.5V batteries into the battery compartment (not included), ensuring they are inserted correctly as shown in the diagram.
- Replace the battery cover and tighten the screw.
- Place the battery pack into the pocket on the double-sided fabric panel.
Distributed by © 2022 ThreeSixty Sourcing Ltd. All rights reserved. For USA customers only: Distributed by © 2023 MerchSource, LLC. Irvine, CA, 92618. All rights reserved. Tel: 1-888-987-6533. The names and logos FAO® and FAO Schwarz® are trademarks or registered trademarks. All rights reserved. Printed in China.
KEEP THIS USER MANUAL AS IT CONTAINS IMPORTANT INFORMATION FOR FUTURE REFERENCE. We are continuously improving our products, so the image in the manual may differ slightly from the actual product.
