K9-C26 INST-1-21
File info: application/pdf · 8 pages · 1.92MB
K9-C26 INST-1-21
K9‐C26 & K9‐C26‐B INSTALLATION INSTRUCTIONS K9 Kit for ...
K9‐C26 INST 1‐21 K9‐C26 Assembly 23312 23304 23303 23302 23308 23310 23305 23301 23313 23314 23303 23311 23309 18846 23307 Under floor stiffener
Full PDF Document

If the inline viewer fails, it will open the original document in compatibility mode automatically. You can also open the file directly.
Extracted Text
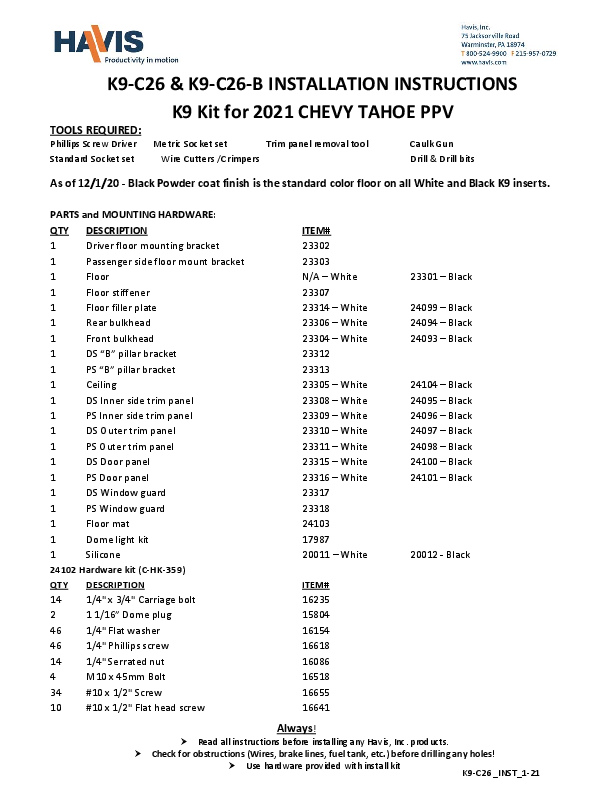
K9-C26 & K9-C26-B INSTALLATION INSTRUCTIONS

TOOLS REQUIRED:
Phillips Screw Driver
Standard Socket set

K9 Kit for 2021 CHEVY TAHOE PPV

Metric Socket set

Trim panel removal tool

Wire Cutters /Crimpers

Caulk Gun Drill & Drill bits

As of 12/1/20 - Black Powder coat finish is the standard color floor on all White and Black K9 inserts.

PARTS and MOUNTING HARDWARE:

QTY DESCRIPTION

1

Driver floor mounting bracket

1

Passenger side floor mount bracket

1

Floor

1

Floor stiffener

1

Floor filler plate

1

Rear bulkhead

1

Front bulkhead

1

DS "B" pillar bracket

1

PS "B" pillar bracket

1

Ceiling

1

DS Inner side trim panel

1

PS Inner side trim panel

1

DS Outer trim panel

1

PS Outer trim panel

1

DS Door panel

1

PS Door panel

1

DS Window guard

1

PS Window guard

1

Floor mat

1

Dome light kit

1

Silicone

24102 Hardware kit (C-HK-359)

QTY DESCRIPTION

14 1/4" x 3/4" Carriage bolt

2

1 1/16" Dome plug

46 1/4" Flat washer

46 1/4" Phillips screw

14 1/4" Serrated nut

4

M10 x 45mm Bolt

34 #10 x 1/2" Screw

10 #10 x 1/2" Flat head screw

ITEM# 23302 23303 N/A � White 23307 23314 � White 23306 � White 23304 � White 23312 23313 23305 � White 23308 � White 23309 � White 23310 � White 23311 � White 23315 � White 23316 � White 23317 23318 24103 17987 20011 � White
ITEM# 16235 15804 16154 16618 16086 16518 16655 16641

23301 � Black
24099 � Black 24094 � Black 24093 � Black
24104 � Black 24095 � Black 24096 � Black 24097 � Black 24098 � Black 24100 � Black 24101 � Black
20012 - Black

Always!

 Read all instructions before installing any Havis, Inc. products.

 Check for obstructions (Wires, brake lines, fuel tank, etc.) before drilling any holes!

 Use hardware provided with install kit

K9-C26 _INST_1-21

K9-C26 Assembly

23312

23305

23304 23303

23310

23302

23301

23308

18846 23314

23313

23303

23309

23311

23307 Under floor stiffener
(Not shown)
K9-C26 _INST_1-21

Remove rear seats

Flip seat seats forward to access hardware.

Flip seat seats down and remove plastic trim covers to access front hardware.

Save removed hardware from seats. To be reused later.

Remove plastic covers behind the paddle handle. Remove screws. (7mm socket)
Note: A small 90� scribe helps to pick plastic covers off.

Remove plastic covers behind armrest handle. Remove screws. (7mm socket)
Note: A small 90� scribe helpsK9t-oC2p6ic_kINpSlTa_s1t-i2c1covers off.

Remove screw at bottom of door panel. (7mm socket)

Remove / unsnap entire door panel from door. (Trim removal tool)
Remove armrest bracket.

Disconnect door latch cable and lock pin. Remove speaker. (7mm socket)

Gently remove trim around window frame.

NOTE: Window guards are shipped flat. On the edge of a workbench, bend a contour in
the middle of the guard so it will fit tight against the window frame.

Hook top of door panel into rubber window gasket. Center door panel and drill 1/8" mount holes. Attach with # 10 x 3/4" sheet metal screws.
K9-C26 _INST_1-21

Align the hinge mounting holes to holes in the door panel. Attach hinge with # 10 x 1/2 Phillips
pan head sheet metal screws.

Mount optional K9-A-104 Fan and Fan mount to window guard with 1/4" hardware and spacers as per
the instructions provided in the K9-A-104 kit.

Using previously removed seat mounting hardware, attach driver side floor mounting bracket. Do not tighten hardware yet.

Repeat on passenger side. Do not tighten hardware yet.

Attach stiffener (angle) bracket to bottom of K9 floor with (3) 1/4" x 3/4" Phillips head bolts and flat washers.
Place floor in vehicle and properly line up to brackets.

Loosely attach floor to brackets with 1/4" x 3/4" Phillips head bolts and flat washers.
Tighten all floor and floor bK9ra-Cc2k6e_tINhSaTr_d1w-2a1re.

Tighten rear floor mounting hardware.

Install supplied 1.0625 dome plugs into holes in floor. It is recommended to also use silicone to
prevent leaks.

Attach rear cargo filler plate to rear of K9 floor prior to installing rear bulkhead.

Attach plate to fill gap below floor using (3) 1/4" x 3/4" Phillips head bolts and flat washers.

Attach rear bulkhead to floor using 1/4" x 3/4" Phillips head bolts and flat washers.

Remove OEM upper B pillar trim panel and grab handle. Using previously removed hardware and attach driver side B pillar mounting bracket. Repeat for passenger side. Reinstall trim Kp9a-nCe26ls_oINvSeTr_b1r-a21ckets.

Attach front bulkhead to floor and B pillar mounting brackets with 1/4"x 3/4" carriage bolts and nuts.

Place ceiling panel on top of front and rear bulkheads.

Attach ceiling to bulkheads with 1/4" x 3/4" Phillips head bolts and flat washers.

Pre-assemble side trim panels outside of the vehicle. Place inside as one piece.

Square up kit and loosely attach side trim to floor with 1/4" x 3/4" Phillips head bolts and flat washers.

Attach trim to rear wall and ceiling with 1/4" x 3/4" Phillips head bolts and flat washers.
K9-C26 _INST_1-21

Install LED dome light with hardware included as per instructions in the dome light kit.

Example of optional K9-A-102 installed on passenger side of front bulkhead.

Neatly silicone / caulk the lower seams to shed water out of vehicle. Note: The floor is designed to minimize the need for sealant. Caulk (sealant) is mostly needed where the floor meets the doorsill and
lower filler panels.

Confirm smooth operation of the sliding door.

K9-C26 shown with SBX-5008 mount and SBX- 1000 series box.

After silicone is dry, place in rubber mat to complete instaKll9a-tCi2o6n_. INST_1-21