SonicWall NSa 2700 Quick Start Guide
For product information, use the QR code or go to SonicWall Tech Docs for NSa.
Regulatory Model Number: 1RK51-109
Product Name: NSa 2700
1 Package Contents
- SonicWall NSa 2700 appliance
- Ethernet cable
- Serial console cable (RJ45 to DB9)
- Power cord (1)
- SonicWall NSa 2700 Quick Start Guide
- Safety, Environmental, and Regulatory Information documents
Note: The included power cord is approved for use only in specific countries or regions. Verify that it is rated and approved for use in your location. The power cord is for AC mains installation only. Refer to the NSa 2700 Safety, Regulatory, and Legal Information document for additional safety information.
Note (Japanese): 添付の電源コードに関して電気安全を確保するために、弊社製品にご使用いただく電源コードは必ず製品同梱の電源コードをご使用ください。この電源コードは他の製品では使用できません。
Items missing? Contact SonicWall Technical Support at: https://www.sonicwall.com/support/contact-support
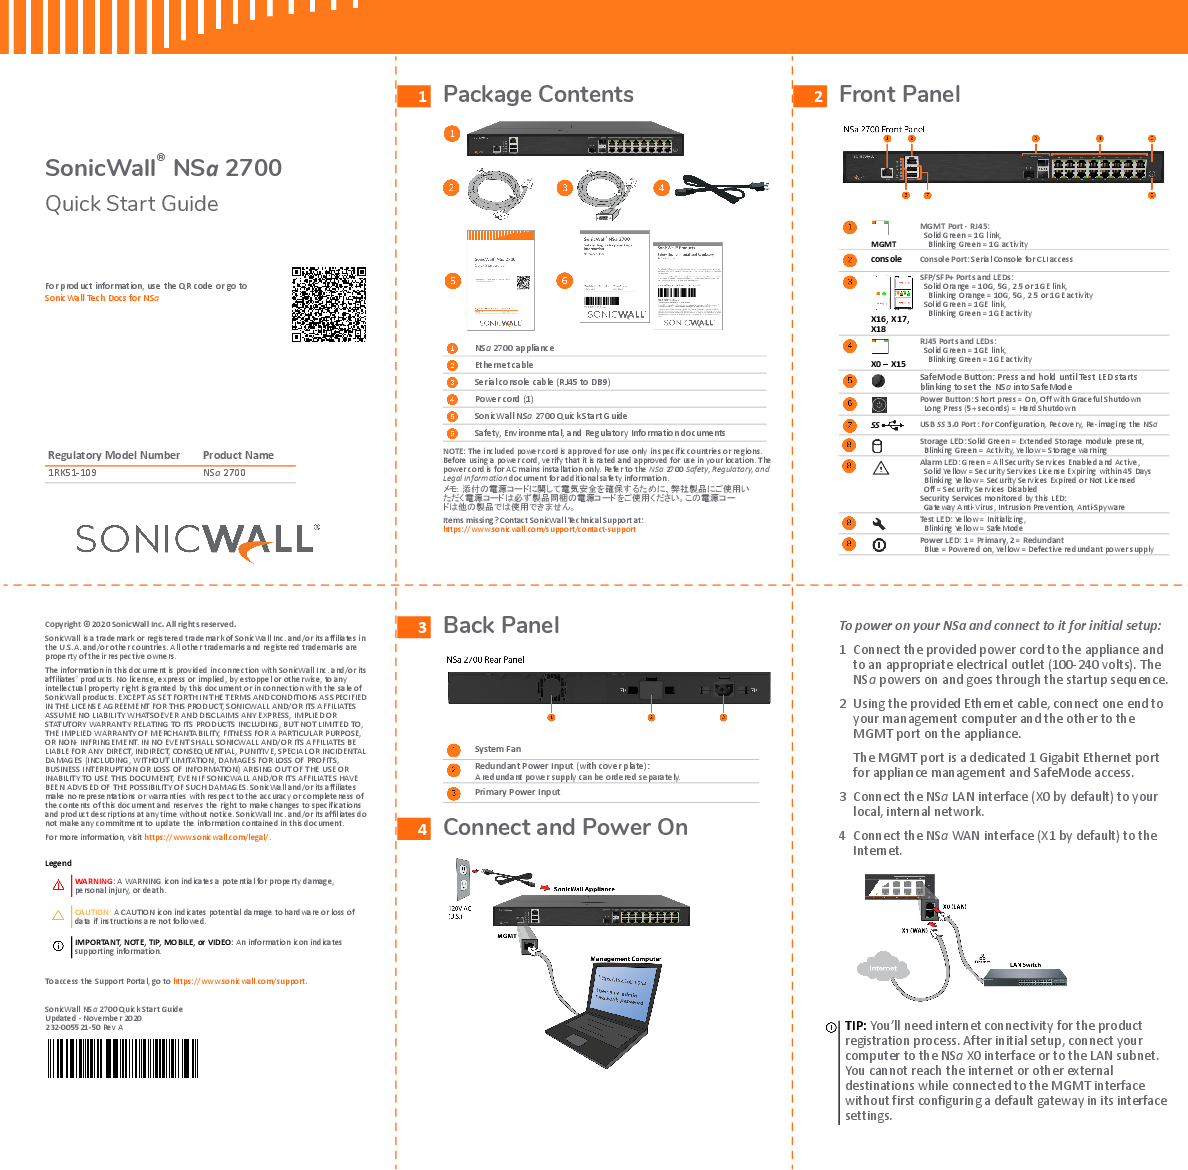
2 Front Panel
MGMT Port - RJ45: Solid Green = 1G link, Blinking Green = 1G activity
Console Port: Serial Console for CLI access
SFP/SFP+ Ports and LEDs: Solid Orange = 10G, 5G, 2.5 or 1GE link, Blinking Orange = 10G, 5G, 2.5 or 1GE activity; Solid Green = 1GE link, Blinking Green = 1GE activity
RJ45 Ports and LEDs: Solid Green = 1GE link, Blinking Green = 1GE activity
SafeMode Button: Press and hold until Test LED starts blinking to set the NSa into Safe Mode.
Power Button: Short press = On, Off with Graceful Shutdown; Long Press (5+ seconds) = Hard Shutdown.
USB SS 3.0 Port: For Configuration, Recovery, Re-imaging the NSa.
Storage LED: Solid Green = Extended Storage module present, Blinking Green = Activity, Yellow = Storage warning.
Alarm LED: Green = All Security Services Enabled and Active; Solid Yellow = Security Services License Expiring within 45 Days; Blinking Yellow = Security Services Expired or Not Licensed; Off = Security Services Disabled. Security Services monitored by this LED: Gateway Anti-Virus, Intrusion Prevention, Anti-Spyware.
Test LED: Yellow = Initializing, Blinking Yellow = SafeMode.
Power LED: 1 = Primary, 2 = Redundant. Blue = Powered on, Yellow = Defective redundant power supply.
3 Back Panel
- System Fan
- Redundant Power Input (with cover plate): A redundant power supply can be ordered separately.
- Primary Power Input
4 Connect and Power On
To power on your NSa and connect to it for initial setup:
- Connect the provided power cord to the appliance and to an appropriate electrical outlet (100-240 volts). The NSa powers on and goes through the startup sequence.
- Using the provided Ethernet cable, connect one end to your management computer and the other to the MGMT port on the appliance. The MGMT port is a dedicated 1 Gigabit Ethernet port for appliance management and SafeMode access.
- Connect the NSa LAN interface (X0 by default) to your local, internal network.
- Connect the NSa WAN interface (X1 by default) to the Internet.
TIP: You'll need internet connectivity for the product registration process. After initial setup, connect your computer to the NSa X0 interface or to the LAN subnet. You cannot reach the internet or other external destinations while connected to the MGMT interface without first configuring a default gateway in its interface settings.
5 Setup Options
Setup using Local Management
Set up and manage your NSa by connecting it to a management computer via Ethernet cable. To minimize scrolling, set your screen resolution to at least 1920 x 1080 pixels.
Setup using Cloud Management
Use SonicWall Capture Security Center (CSC) with Zero Touch to manage and configure your NSa from the cloud.
Setup using SonicExpress App
Use SonicWall SonicExpress on your smartphone to register and configure your NSa.
Note: After initial setup, be sure to download the latest firmware from MySonicWall and upgrade your NSa.
6 Initial Setup and Registration Using Local Management
- Connect the MGMT interface to your computer. The NSa provides a DHCP address for your computer.
- Navigate to https://192.168.1.254 in your web browser and log in with the default credentials: Username: admin, Password: password.
- Launch the Setup Guide wizard or manually configure the NSa to configure your WAN interface, change the admin password, and select other settings.
- After completing the setup wizard, connect your computer to the LAN or WAN network and log into SonicOS/X.
Note: Your appliance must be registered to download the latest firmware from MySonicWall.
Tip: Registering the appliance from SonicOS/X requires that DNS settings are configured for the WAN interface. For DHCP WAN type, DNS is set automatically.
7 Cloud Management
Use Capture Security Center (CSC) with Zero Touch to manage and configure your NSa.
Note: This option requires a Cloud Management license.
- Log into CSC at cloud.sonicwall.com using your MySonicWall credentials.
- Select the MySonicWall tile to register your NSa.
- Enable Zero Touch and NSM licensing on your NSa in MySonicWall.
- Select the Network Security Manager tile in CSC to manage your NSa from the cloud.
8 SonicExpress App
Use SonicExpress on your smartphone to register and configure your NSa.
- Download and launch the SonicExpress App on your iOS or Android device.
- Tap Login and log in with your MySonicWall credentials.
- Select the Tenant for the NSa. Tenants can contain multiple SonicWall appliances.
- Connect your iOS/Android device to the NSa with the smartphone USB cable. This cable is not supplied with the NSa.
- Use the Setup Guide to register the NSa, synchronize service licenses, change the password, and configure essential interface settings.
Note: Use the USB cable from your mobile device.
9 SonicWall Secure SD-Branch
SD-Branch combines SD-WAN, SD-LAN, unified security and centralized management for distributed enterprises.
Related Products
- TZ, NSa, NSsp Series: Next-generation Firewalls with Integrated SD-WAN
- SonicWave APs: Wireless Access Points
- SonicWall Switch: Network Access Switch
- Capture Client: Endpoint Security
- Cloud App Security: Secure Cloud Applications
- Capture Security Center: Single-pane-of-glass Management with Zero-Touch Deployment


