HyperX Cloud Flight Wireless Gaming Headset
Quick Start Guide
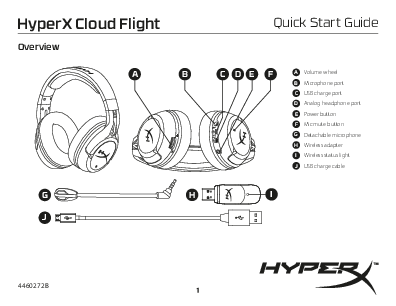
Overview
This section details the components of the HyperX Cloud Flight wireless gaming headset.
A diagram shows the HyperX Cloud Flight headset from multiple angles, including a front view, a rear-angled view highlighting ports and buttons, and close-ups of the detachable microphone (G), wireless adapter (H), and USB charge cable (J). Labels A through F point to specific controls and ports on the headset: A (Volume wheel), B (Microphone port), C (USB charge port), D (Analog headphone port), E (Power button), F (Mic mute button).
Key Components:
- A - Volume wheel: Used to adjust the audio volume.
- B - Microphone port: Where the detachable microphone (G) connects.
- C - USB charge port: For charging the headset's internal battery.
- D - Analog headphone port: Allows for an optional wired connection.
- E - Power button: Used to turn the headset on/off and cycle through LED effects.
- F - Mic mute button: Instantly mutes or unmutes the microphone.
- G - Detachable microphone: A flexible, removable microphone boom.
- H - Wireless adapter: A USB dongle that enables the wireless connection to your PC, PS4, or Mac.
- I - Wireless status light: Located on the adapter, this light indicates the connection status.
- J - USB charge cable: Connects the headset to a power source for charging.
Usage
Charging
For optimal performance, it is recommended to fully charge your headset before its first use. When the USB charge cable (J) is connected to the headset, the LED indicator on the ear cup will display the charging status.
| EAR CUP LED | CHARGE STATUS |
|---|---|
| Breathing | Charging |
| Off | Charging complete |
Diagrams illustrate the charging process, showing the USB charge cable connected to the headset and a computer's USB port. An inset highlights the ear cup LED status. Another diagram points out the power button on the headset, often depicted with a circular icon containing a line.
Power Button
- Power on: Press and hold the power button (E) for 3 seconds until you hear an audible beep.
- Power off: Press and hold the power button (E) for 3 seconds until you hear an audible beep.
- LED effect: Briefly press the power button (E) to cycle through the headset's various LED lighting effects.
Connecting to Your Devices
Use the HyperX Cloud Flight headset wirelessly with your PC, PlayStation 4™, or Mac®.
- Connect the wireless adapter (H) to an available USB port on your PC, PS4, or Mac. The status light (I) on the adapter will begin to blink.
- Power on the headset by pressing and holding the power button (E).
- Once the wireless adapter's status light (I) is solid (no longer blinking), the headset is successfully connected and ready for use.
A diagram visually represents this connection process: the wireless adapter (H) is shown plugged into USB ports on a PC, PS4, and Mac, with its status light (I) blinking. The headset is then powered on, and the solid status light on the adapter indicates a successful connection.
Note: If this is your first time using the headset with your device, you may need to configure it as the default audio input and output device within your system's sound settings.
Support and Troubleshooting
For any questions or setup issues you may encounter, please contact the HyperX support team or refer to the comprehensive user manual available online:
Regulatory Information
This section provides important compliance information for the HyperX Cloud Flight headset.
FCC Compliance
This device complies with Part 15 of the FCC Rules. Operation is subject to the following two conditions: (1) this device may not cause harmful interference, and (2) this device must accept any interference received, including interference that may cause undesired operation. This equipment has been tested and found to comply with the limits for a Class B digital device, providing reasonable protection against harmful interference in a residential installation. If interference occurs, users are advised to try measures such as reorienting the antenna, increasing separation between equipment and receiver, connecting to a different circuit, or consulting a qualified technician. A shielded-type power cord is required for compliance.
Canadian Compliance
This Class B digital apparatus complies with Canadian ICES-003 and Industry Canada license-exempt RSS standards. Operation is subject to two conditions: (1) no harmful interference, and (2) acceptance of any interference. This apparatus meets Canadian standards NMB-003 and ICES-003.
Other Regional Compliance Statements
Includes compliance statements for ANATEL (Brazil), IFETEL (Mexico), KCC (Korea), Taiwan NCC, and VCCI (Japan), confirming adherence to their respective electronic device regulations.
Product Hazardous Substance Information
The following table details the presence of hazardous substances in the product's components, as per SJ/T 11364 regulations.
| 部件名称 (Parts Name) | 铅(Pb) | 汞(Hg) | 镉(Cd) | 六价铬(Cr(VI)) | 多溴联苯 (PBB) | 多溴二苯醚 (PBDE) |
|---|---|---|---|---|---|---|
| 麦克风 (MIC) | X | O | O | O | O | O |
| 电池 (Battery) | X | O | O | O | O | O |
Key: 'O' indicates the substance is below the regulatory limit. 'X' indicates the substance exceeds the limit in at least one homogeneous material. The product also features an environmental protection use period mark.
