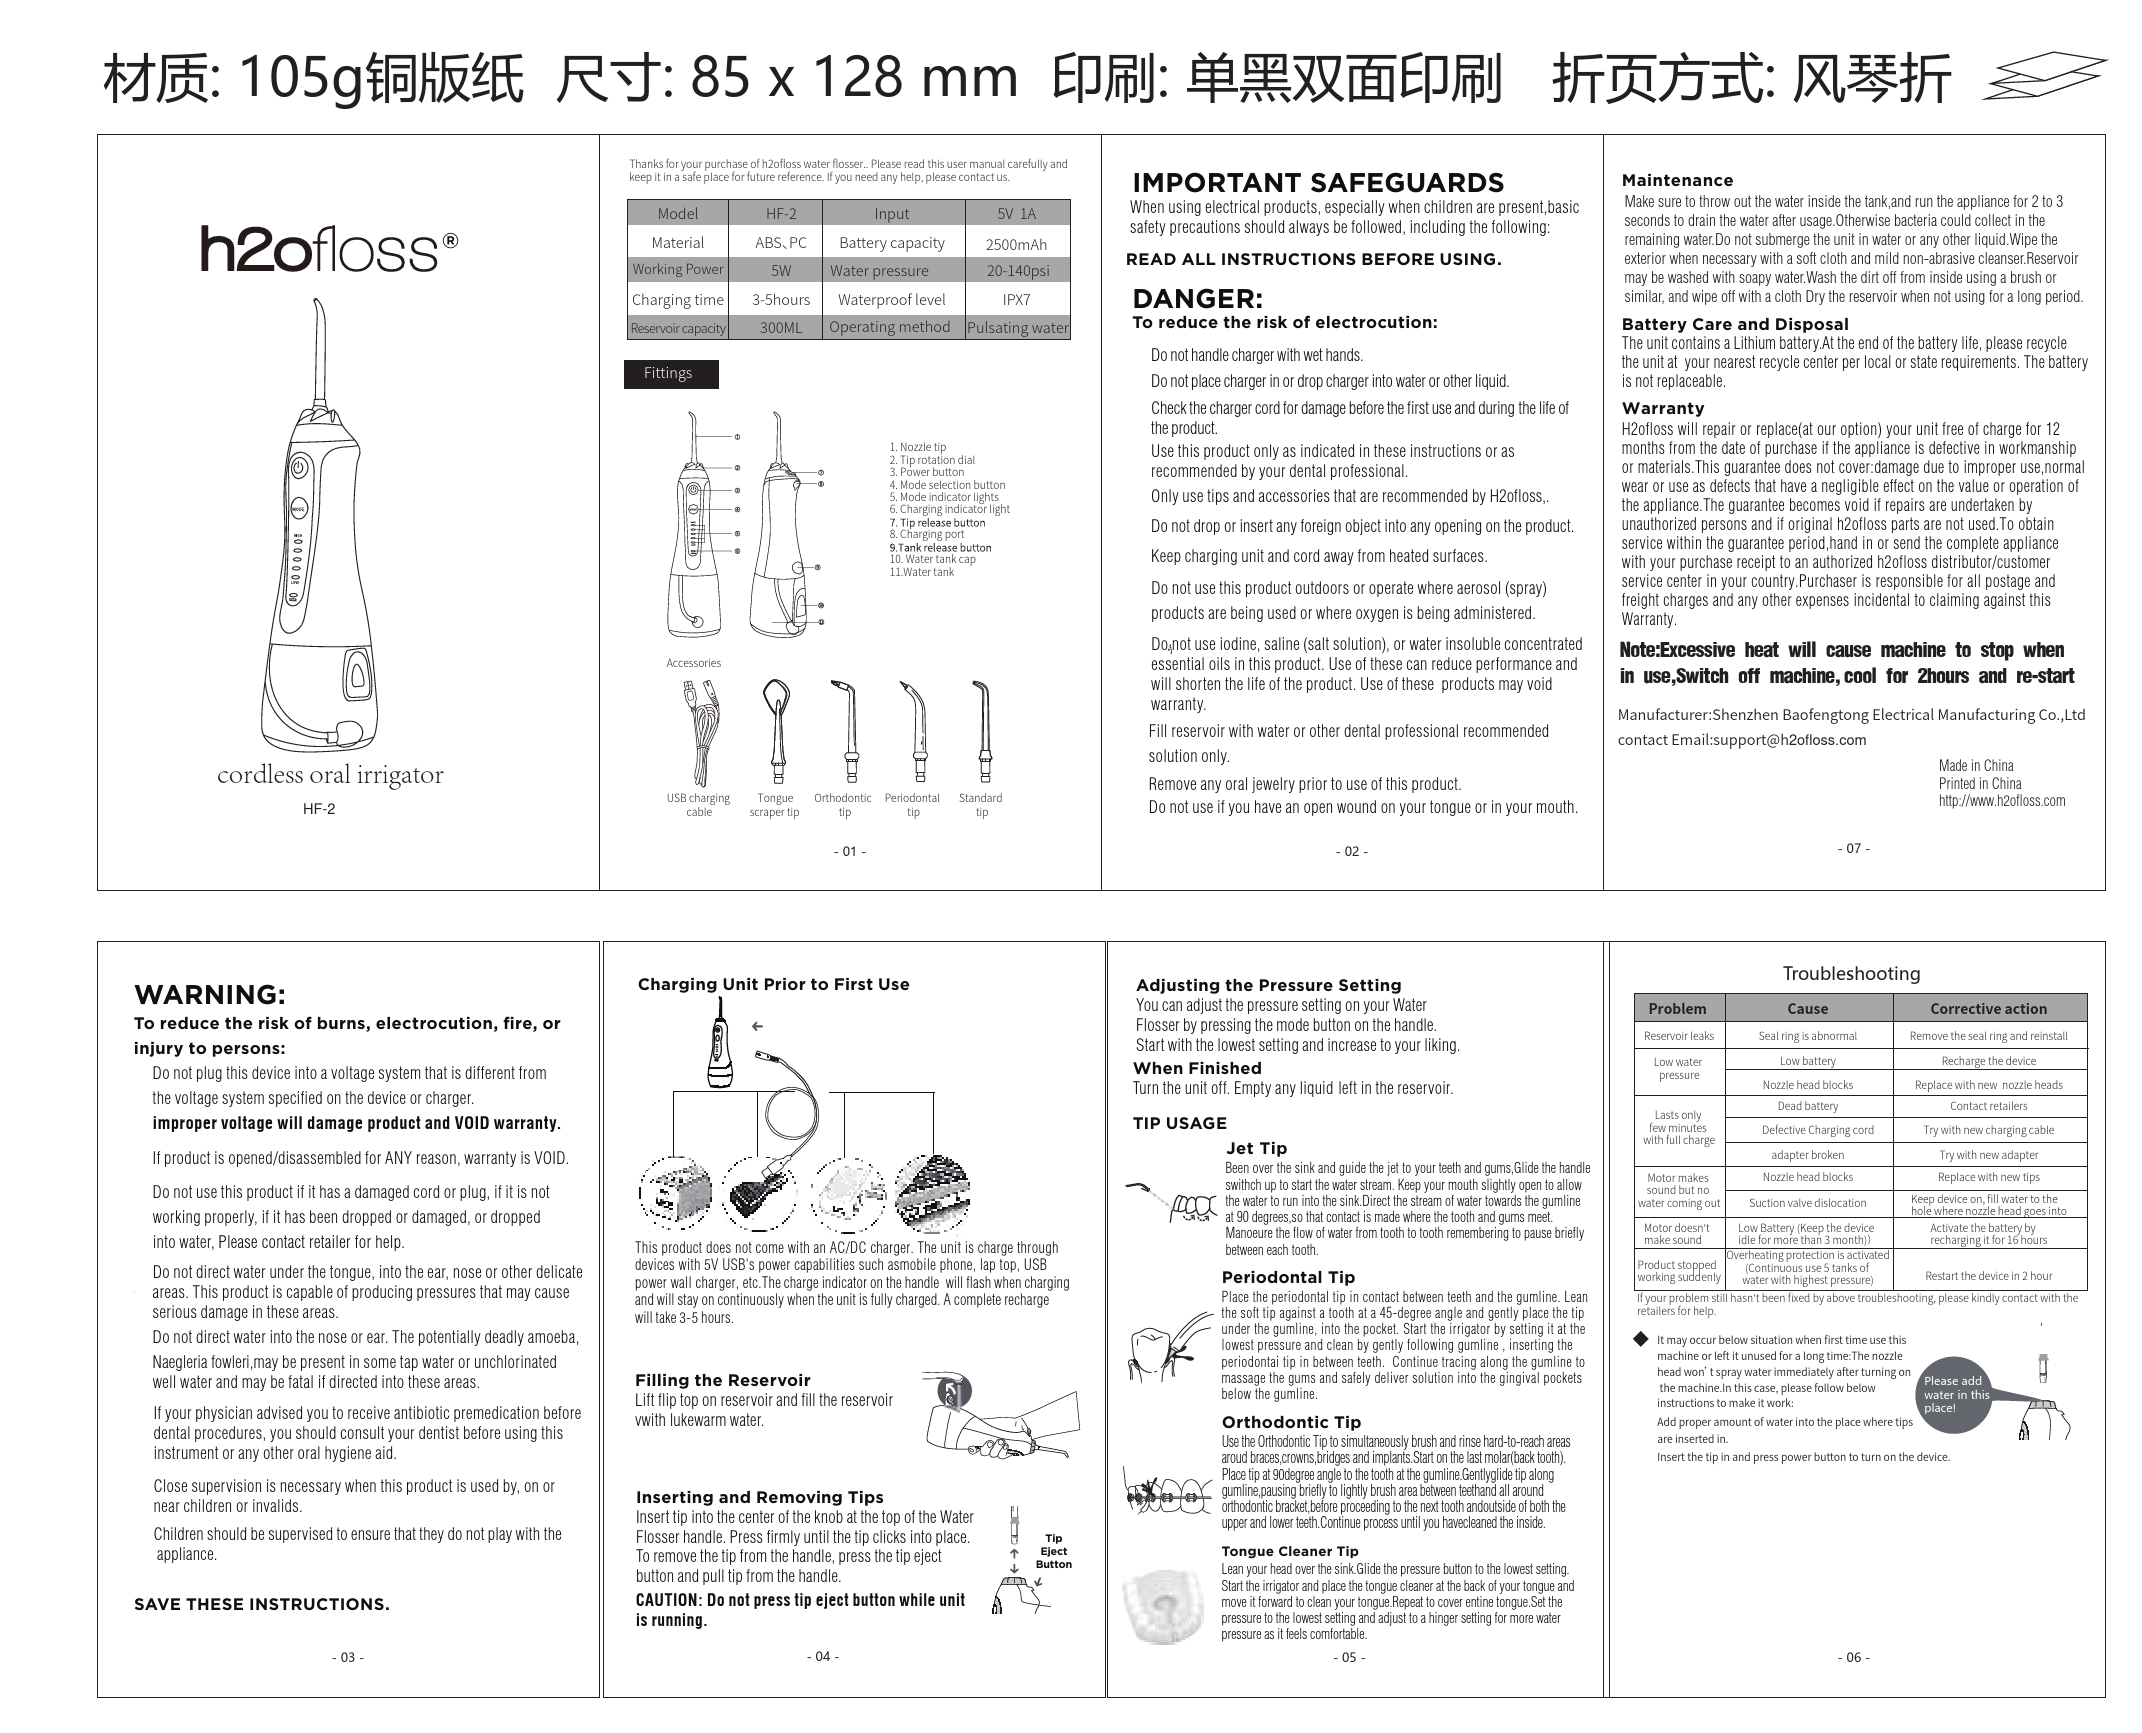
H2ofloss HF-2 Cordless Oral Irrigator
Thank you for purchasing the H2ofloss water flosser. Please read this user manual carefully and keep it in a safe place for future reference. If you need any help, please contact us.
Product Specifications
| Model | Material | Working Power | Input | Battery capacity | Water pressure | Waterproof level | Reservoir capacity | Operating method |
|---|---|---|---|---|---|---|---|---|
| HF-2 | ABS, PC | 5W | 5V 1A | 2500mAh | 20-140psi | IPX7 | 300ML | Pulsating water |
Accessories
The product includes the following accessories:
- Nozzle tip
- Tip rotation dial
- Power button
- Mode selection button
- Mode indicator lights
- Charging indicator light
- Tip release button
- Charging port
- Tank release button
- Water tank cap
- Water tank
- USB charging cable
- Tongue scraper tip
- Orthodontic tip
- Periodontal tip
- Standard tip
IMPORTANT SAFEGUARDS
When using electrical products, especially when children are present, basic safety precautions should always be followed, including the following:
READ ALL INSTRUCTIONS BEFORE USING.
DANGER: To reduce the risk of electrocution:
- Do not handle the charger with wet hands.
- Do not place or drop the charger into water or other liquid.
- Check the charger cord for damage before the first use and during the life of the product.
- Use this product only as indicated in these instructions or as recommended by your dental professional.
- Only use tips and accessories recommended by H2ofloss.
- Do not drop or insert any foreign object into any opening on the product.
- Keep the charging unit and cord away from heated surfaces.
- Do not use this product outdoors or operate where aerosol (spray) products are being used or where oxygen is being administered.
- Do not use iodine, saline (salt solution), or water insoluble concentrated essential oils in this product. Use of these can reduce performance and will shorten the life of the product. Use of these products may void the warranty.
- Fill the reservoir with water or other dental professional recommended solution only.
- Remove any oral jewelry prior to use of this product.
- Do not use if you have an open wound on your tongue or in your mouth.
WARNING:
To reduce the risk of burns, electrocution, fire, or injury to persons:
- Do not plug this device into a voltage system that is different from the voltage system specified on the device or charger. Improper voltage will damage the product and VOID the warranty.
- If the product is opened/disassembled for ANY reason, the warranty is VOID.
- Do not use this product if it has a damaged cord or plug, if it is not working properly, if it has been dropped or damaged, or dropped into water. Please contact the retailer for help.
- Do not direct water under the tongue, into the ear, nose, or other delicate areas. This product is capable of producing pressures that may cause serious damage in these areas.
- Do not direct water into the nose or ear. The potentially deadly amoeba, Naegleria fowleri, may be present in some tap water or unchlorinated well water and may be fatal if directed into these areas.
- If your physician advised you to receive antibiotic premedication before dental procedures, you should consult your dentist before using this instrument or any other oral hygiene aid.
- Close supervision is necessary when this product is used by, on, or near children or invalids.
- Children should be supervised to ensure that they do not play with the appliance.
SAVE THESE INSTRUCTIONS.
Maintenance
- Make sure to empty the water inside the tank and run the appliance for 2 to 3 seconds to drain any remaining water after usage to prevent bacteria collection.
- Do not submerge the unit in water or any other liquid.
- Wipe the exterior when necessary with a soft cloth and mild non-abrasive cleanser.
- The reservoir may be washed with soapy water. Wash the dirt off from inside using a brush or similar, and wipe off with a cloth.
- Dry the reservoir when not using for a long period.
Battery Care and Disposal
- The unit contains a Lithium battery. At the end of the battery life, please recycle the unit at your nearest recycle center per local or state requirements. The battery is not replaceable.
Warranty
H2ofloss will repair or replace (at its option) your unit free of charge for 12 months from the date of purchase if the appliance is defective in workmanship or materials. This guarantee does not cover damage due to improper use, normal wear, or defects that have a negligible effect on the value or operation of the appliance. The guarantee becomes void if repairs are undertaken by unauthorized persons and if original H2ofloss parts are not used. To obtain service within the guarantee period, hand in or send the complete appliance with your purchase receipt to an authorized H2ofloss distributor/customer service center in your country. The purchaser is responsible for all postage and freight charges and any other expenses incidental to claiming against this warranty.
Note: Excessive heat will cause the machine to stop when in use. Switch off the machine, cool for 2 hours, and restart.
Charging Unit Prior to First Use
This product does not come with an AC/DC charger. The unit is charged through devices with 5V USB power capabilities, such as a mobile phone charger, laptop, or USB power wall charger. The charge indicator on the handle will flash when charging and will stay on continuously when the unit is fully charged. A complete recharge will take 3-5 hours.
Filling the Reservoir
Lift the flip top on the reservoir and fill the reservoir with lukewarm water.
Inserting and Removing Tips
Insert the tip into the center of the knob at the top of the Water Flosser handle. Press firmly until the tip clicks into place.
To remove the tip from the handle, press the tip eject button and pull the tip from the handle.
CAUTION: Do not press the tip eject button while the unit is running.
[Tip Eject Button]
Adjusting the Pressure Setting
You can adjust the pressure setting on your Water Flosser by pressing the mode button on the handle. Start with the lowest setting and increase to your liking.
When Finished
Turn the unit off. Empty any liquid left in the reservoir.
TIP USAGE
Jet Tip
Lean over the sink and guide the jet to your teeth and gums. Glide the handle switch up to start the water stream. Keep your mouth slightly open to allow the water to run into the sink. Direct the stream of water towards the gumline at a 90-degree angle, so that contact is made where the tooth and gums meet. Maneuver the flow of water from tooth to tooth, remembering to pause briefly between each tooth.
Periodontal Tip
Place the periodontal tip in contact between teeth and the gumline. Lean the soft tip against a tooth at a 45-degree angle and gently place the tip under the gumline, into the pocket. Start the irrigator by setting it at the lowest pressure and clean by gently following the gumline, inserting the periodontal tip between teeth. Continue tracing along the gumline to massage the gums and safely deliver solution into the gingival pockets below the gumline.
Orthodontic Tip
Use the Orthodontic Tip to simultaneously brush and rinse hard-to-reach areas around braces, crowns, bridges, and implants. Start on the last molar (back tooth). Place the tip at a 90-degree angle to the tooth at the gumline. Gently glide the tip along the gumline, pausing briefly to lightly brush the area between teeth and all around the orthodontic bracket, before proceeding to the next tooth and the outside of both the upper and lower teeth. Continue the process until you have cleaned the inside.
Tongue Cleaner Tip
Lean your head over the sink. Glide the pressure button to the lowest setting. Start the irrigator and place the tongue cleaner at the back of your tongue and move it forward to clean your tongue. Repeat to cover the entire tongue. Set the pressure to the lowest setting and adjust to a higher setting for more water pressure as it feels comfortable.
Troubleshooting
| Problem | Cause | Corrective action |
|---|---|---|
| Reservoir leaks | Seal ring is abnormal | Remove the seal ring and reinstall. |
| Low water pressure | Low battery | Recharge the device. |
| Lasts only a few minutes with full charge | Nozzle head blocks | Replace with new nozzle heads. |
| Motor makes sound but no water coming out | Nozzle head blocks | Replace with new tips. |
| Motor doesn't make sound | Suction valve dislocation | Keep device on, fill water to the hole where the nozzle head goes into. |
| Product stopped working suddenly | Dead battery | Activate the battery by recharging it for 16 hours. |
| Defective Charging cord / adapter broken | Try with new charging cable. Try with new adapter. | |
| Overheating protection is activated (Continuous use 5 tanks of water with highest pressure) | Restart the device in 2 hours. |
If your problem still hasn't been fixed by the above troubleshooting, please kindly contact the retailers for help.
It may occur below situation when first time use this machine or left it unused for a long time: The nozzle head won't spray water immediately after turning on the machine. In this case, please follow below instructions to make it work:
Add proper amount of water into the place where tips are inserted in.
[Add water in this place!]
Insert the tip and press the power button to turn on the device.
Manufacturer: Shenzhen Baofengtong Electrical Manufacturing Co., Ltd
Contact Email: support@h2ofloss.com
Made in China
Printed in China
http://www.h2ofloss.com

