Home›ONN›ONN Full Motion TV Wall Mount 19-50 Inch Quick Start Guide
ℹ️ Document Conversion Notice:
This page was converted from the original file for easier reading. Diagrams/images may appear only in the original PDF below.
File info: application/pdf · 1 pages · 5.11MB
ONN Full Motion TV Wall Mount
Quick Start Guide
Model: OPT01 | Date: May 15, 2019
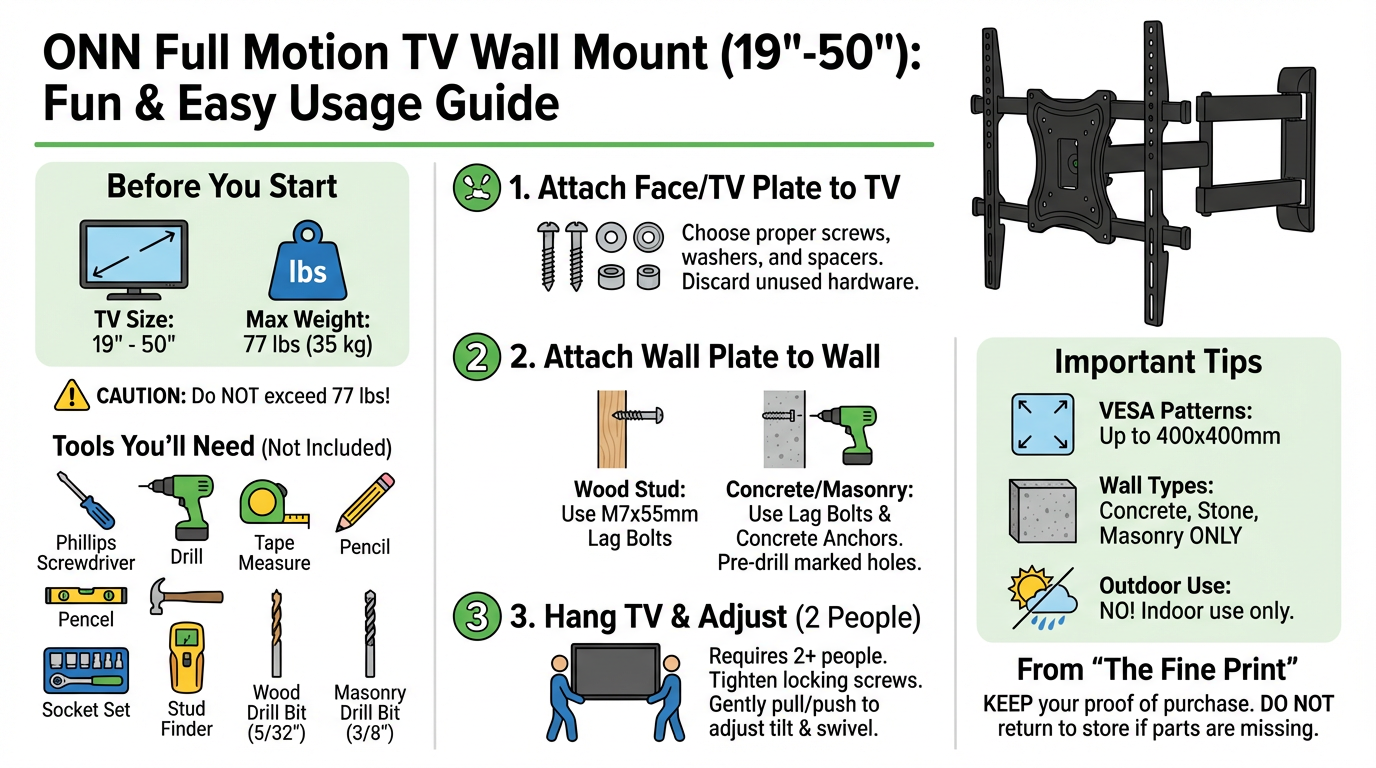
Product Overview & Compatibility
This quick start guide provides essential information for the ONN Full Motion TV Wall Mount, designed for easy installation and optimal viewing flexibility.
Key Specifications:
Supported TV Size: Compatible with TVs between 19 inches and 50 inches screen size.
Maximum TV Weight: Supports TVs up to 77 lbs (35 kg).
Wall Compatibility for Plastic Anchors: Plastic anchors are for use only on concrete, stone, or masonry walls.
Outdoor Use Warning: This product is not intended for outdoor use. Using it outdoors could lead to product failure and/or personal injury.
Warranty & Support Information
Limited Warranty:
The limited warranty covers defects in material or workmanship for purchases made in the U.S.A. and Canada. It excludes claims from conditions, malfunctions, or damage not resulting from defects in material or workmanship. The warranty duration is one year from the purchase date.
Customers should keep their original proof of purchase (store receipt). If the product is found to be defective, damaged, or has missing parts after inspection, it should not be returned to the store.
Need Help?
Support is available daily from 7 a.m. to 9 p.m. CST. Customers can call 1-888-516-2630 for assistance. For additional details, refer to the Product Guide.
Feedback is welcome; customers can scan with the Walmart app to share their thoughts.
What's in the Box?
Ensure all components are present before beginning installation:
A: Assembled Wall Plate (x1)
B: Extension arm (x4)
C: Hanging template (x1)
D: M7x55mm Lag bolt (x3)
E: Concrete anchor (x3)
F: M6x8mm screw (x4)
G: Allen wrench (x1)
H1: M4x12mm screw (x4)
H2: M6x12mm screw (x4)
H3: M8x16mm screw (x4)
H4: M8x30mm screw (x4)
I1: M4x25mm screw (x4)
I2: M6x35mm screw (x4)
J: M8x35mm screw (x4)
K: M8x10mm spacer (x4)
L: M8x5mm spacer (x4)
M: M4 washer (x4)
N: M6 washer (x4)
O: M8 washer (x4)
P: Product Guide (x1)
Q: M6x17mm spacer (x4)
Tools Needed (Not Included)
Phillips Screwdriver
Drill
Tape Measure
Level
Pencil
Socket Set
For Wood Stud Installation: 5/32" Wood Drill Bit, Stud Finder
For Concrete, Stone or Masonry Wall Installation: 3/8" Masonry Drill Bit, Hammer
Installation Steps
Step 1: Attach Face Plate or TV Plate to TV
Choose the proper screws that fit the TV's mounting holes. Use spacers and washers as needed; they are not always required. There will be leftover screws, spacers, and washers after installation. Discard all unused hardware once TV mount installation is complete.
Visual description: Diagrams show various screw, spacer, and washer combinations being attached to the back of a TV, illustrating how to select the correct hardware for different TV types. One diagram shows removing an inner circle of a M4/M6/M8 screw spacer if necessary.
Step 2: Attach Wall Plate to Wall
Hold the Hanging template at the desired position, pre-drill marked 3 holes, and attach the wall plate to the wall.
For Wood Stud Mounting: Use only M7x55mm Lag bolts (D).
For Concrete, Stone, or Masonry Wall: Use both M7x55mm Lag bolts (D) and Concrete anchors (E).
Visual description: Diagrams show the wall plate being mounted. For wood stud installation, a stud finder is used to locate studs, and lag bolts are driven into the wall. For concrete/masonry, holes are drilled, anchors are inserted, and lag bolts are used to secure the wall plate.
Step 3: Hang TV on Wall Plate
This step requires 2 or more people to complete. One person should hold the TV while others tighten the locking screws. Refer to the Product Guide for more details.
Adjust the tilt and swivel angle by placing hands on both sides of the TV and gently pulling or pushing to achieve the desired viewing position.
Visual description: A diagram shows two people lifting a TV onto the wall mount. Another diagram shows a person adjusting the TV's angle by holding its sides.