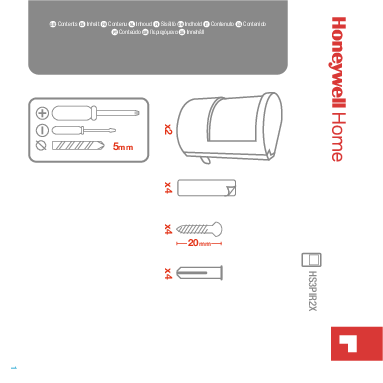
What's Included
The package contains the following items:
- Mounting Brackets (x2)
- Adhesive Strips (x4)
- Screws (x4)
- Wall Plugs (x4)
- Screwdriver Set (5mm)
Planning the Location
To ensure optimal detection, plan the sensor's placement carefully:
- Optimal Angle: 105°
- Optimal Range: 2 to 12 meters
- Recommended Height: Approximately 2.5 meters from the floor.
- Clearance: Position at least 1 meter from opposing surfaces and 5cm from ceilings or adjacent walls.
Placement to Avoid:
- Near heat sources (e.g., radiators). ❌
- Facing windows that might cause glare or drafts. ❌
- In direct sunlight. ❌
Ideal Placement:
- Mount on a wall with an unobstructed view of the area to be monitored. ✔️
System Linking (Learn Mode)
To connect the HS3PIR2X sensor to your alarm system, place the alarm in learn mode. Please consult your specific alarm system's online manual for detailed instructions.
The general process involves:
- Activating learn mode on your alarm panel.
- Preparing the sensor (e.g., opening the casing, inserting batteries).
- Following the prompts on your alarm system.
- Confirmation of successful linking, typically within 30 seconds. ⏳
Installation Procedure
Follow these steps to install the sensor:
- Attach Bracket to Sensor: Secure the mounting bracket (A) to the back of the sensor unit (B).
- Prepare Mounting Surface: Clean the wall or surface where the sensor will be installed.
- Mount the Bracket:
- Adhesive Method: Remove the backing from the adhesive strips on the bracket and press firmly onto the surface.
- Screw Method: Drill pilot holes, insert wall plugs if needed, and use the provided screws to fix the bracket securely.
- Attach Sensor to Bracket: Clip or slide the sensor unit onto the installed mounting bracket.
- Exit Learn Mode: Once installed and linked, the sensor will automatically exit learn mode after approximately 120 seconds. ⏳
Manual Linking: If your system requires it, a manual linking procedure may be available. Refer to your alarm system's documentation.
Troubleshooting
For further assistance or to resolve any issues, please visit the official support website: