Shark Robot Vacuum
[Google Assistant compatible] [Amazon Alexa compatible]
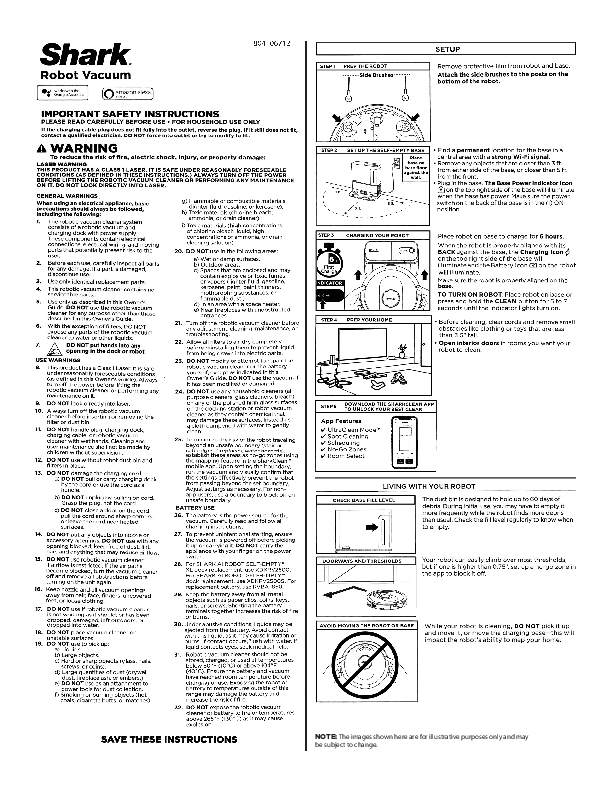
Setup
Step 1: Prep the Robot
Remove protective film from robot and base. Attach the side brushes to the posts on the bottom of the robot.
Diagram description: Shows the underside of the robot with two side brushes being attached to posts.
Step 2: Set Up the Self-Empty Base
Find a permanent location for the base in a central area with a strong Wi-Fi signal. Place base on bare floor against the wall. Remove any objects that are closer than 3 feet from either side of the base, or closer than 5 feet from the front. Plug in the base. The Base Power Indicator on the top right side of the base will illuminate when the base has power. Make sure the power switch on the back of the base is in the [ON position].
Diagram description: Shows the charging base placed against a wall, with distance markers indicating 3 feet clearance on the sides and 5 feet clearance in front. A close-up shows the base with a power indicator light.
Step 3: Charging Your Robot
Place robot on base to charge for 6 hours. When the robot is properly aligned with its back against the base, the Charging Indicator on the top right side of the base will illuminate and the Battery Indicator on the robot will illuminate. Make sure the robot is properly aligned on the base. To turn on robot: Place robot on base or press and hold the CLEAN button for 5 to 7 seconds until the indicator lights turn on.
Diagram description: Shows the robot docked on the charging base, with a 6-hour charging time indicated. Lights on the base and robot are shown as illuminated.
Step 4: Prep Your Home
Before cleaning, clear cords and remove small obstacles like clothing or toys that are less than 3.5 inches tall. Open interior doors in rooms you want your robot to clean.
Diagram description: Shows a room floor with electrical cords and small toys depicted as obstacles to be removed. Arrows indicate interior doors that should be opened.
Step 5: Download the SharkClean App
Download the SharkClean app to unlock your best clean. App Features: UltraClean Mode™, Spot Cleaning, Scheduling, No-Go Zones, Room Select.
Diagram description: Shows a smartphone screen displaying the SharkClean app interface with various cleaning modes and features listed.
Living with Your Robot
Base Fill Level
The dust bin is designed to hold up to 60 days of debris. During initial use, you may have to empty it more frequently while the robot finds more debris than usual. Check the fill level regularly to know when to empty.
Diagram description: Shows a close-up of the self-empty base's dust bin with a fill level indicator.
Doorways and Thresholds
Your robot can easily climb over most thresholds, but if one is higher than 0.75 inches, set up a no-go zone in the app to block it off.
Diagram description: Shows a robot approaching a threshold, with an arrow indicating a 'no-go zone' being set up in the app for thresholds over 0.75 inches.
Avoid Moving the Robot or Base
While your robot is cleaning, do not pick it up and move it, or move the charging base – this will impact the robot's ability to map your home.
Diagram description: Shows the robot and its charging base with a 'do not move' symbol (circle with a line through it) overlaid.
Important Safety Instructions
Please read carefully before use. For household use only. If the charging cable plug does not fit fully into the outlet, reverse the plug. If it still does not fit, contact a qualified electrician. Do not force into outlet or try to modify to fit.
Laser Warning
This product has a Class 1 Laser. It is safe under reasonably foreseeable conditions. Always turn off the power before lifting the robotic vacuum cleaner or performing any maintenance on it. Do not look directly into laser.
General Warnings
- The robotic vacuum cleaner system consists of a robotic vacuum and charging dock with power supply. These components contain electrical connections, electrical wiring, and moving parts that potentially present risk to the user.
- Before each use, carefully inspect all parts for any damage. If a part is damaged, discontinue use.
- Use only identical replacement parts.
- This robotic vacuum cleaner contains no serviceable parts.
- Use only as described in this Owner's Guide. Do not use the robotic vacuum cleaner for any purpose other than those described in this Owner's Guide.
- With the exception of filters, do not expose any parts of the robotic vacuum cleaner to water or other liquids.
- Do not put hands into any opening in the dock or robot.
Use Warnings
- This product has a Class 1 Laser. It is safe under reasonably foreseeable conditions (as defined in this Owner's Guide). Always turn off the power before lifting the robotic vacuum cleaner or performing any maintenance on it.
- Do not look directly into laser.
- Always turn off the robotic vacuum cleaner before inserting or removing the filter or dust bin.
- Do not handle plug, charging dock, charging cable, or robotic vacuum cleaner with wet hands. Cleaning and user maintenance shall not be made by children without supervision.
- Do not use without robot dust bin and filters in place.
- Do not damage the charging cord: a) Do not pull or carry charging dock by the cord or use the cord as a handle. b) Do not unplug by pulling on cord. Grasp the plug, not the cord. c) Do not close a door on the cord, pull the cord around sharp corners, or leave the cord near heated surfaces.
- Do not put any objects into nozzle or accessory openings. Do not use with any opening blocked; keep free of dust, lint, hair, and anything that may reduce airflow.
- Do not use robotic vacuum cleaner if airflow is restricted. If the air paths become blocked, turn the vacuum cleaner off and remove all obstructions before turning on the unit again.
- Keep nozzle and all vacuum openings away from hair, face, fingers, uncovered feet, or loose clothing.
- Do not use if robotic vacuum cleaner is not working as it should, or has been dropped, damaged, left outdoors, or dropped into water.
- Do not place vacuum cleaner on unstable surfaces.
- Do not use to pick up: a) Liquids. b) Large objects. c) Hard or sharp objects (glass, nails, screws, or coins). d) Large quantities of dust (drywall dust, fireplace ash, or embers.) e) Do not use as an attachment to power tools for dust collection. f) Smoking or burning objects (hot coals, cigarette butts, or matches). g) Flammable or combustible materials (lighter fluid, gasoline, or kerosene). h) Toxic materials (chlorine bleach, ammonia, or drain cleaner). i) Toxic materials (high concentrations of chlorine bleach liquid, high concentrations of ammonia, or drain cleaning solution).
- Do not use in the following areas: a) Wet or damp surfaces. b) Outdoor areas. c) Spaces that are enclosed and may contain explosive or toxic fumes or vapors (lighter fluid, gasoline, kerosene, paint, paint thinners, mothproofing substances, or flammable dust.) d) In an area with a space heater. e) Near fireplaces with unobstructed entrances.
- Turn off the robotic vacuum cleaner before any adjustment, cleaning, maintenance, or troubleshooting.
- Allow all filters to air-dry completely before reinstalling them to prevent liquid from being drawn into electric parts.
- Do not modify or attempt to repair the robotic vacuum cleaner or the battery yourself, except as indicated in this Owner's Guide. Do not use the vacuum if it has been modified or damaged.
- Do not use any household cleaners (all purpose cleaners, glass cleaners, bleach) on any of the polished high gloss surfaces on the docking station or robot vacuum cleaner as they contain chemical that may damage these surfaces. Instead use a cloth dampened with water to gently clean.
- To minimize the risk of the robot traveling beyond an unsafe boundary (stair or cliff edges, fireplaces, water hazards), establish these areas as no-go zones using the mapping feature in the SharkClean™ mobile app. Upon setting the boundary, run the vacuum and visually confirm that the settings effectively prevent the robot from passing beyond the set boundary. Adjust settings as necessary. For non-app users, use a boundary to block off an unsafe boundary.
Battery Use
- The battery is the power source for the vacuum. Carefully read and follow all charging instructions.
- To prevent unintentional starting, ensure the vacuum is powered off before picking it up or carrying it. Do not carry the appliance with your finger on the power switch.
- For SHARK AI ROBOT SELF-EMPTY™ XL dock replacement, use XDKRV2500. For SHARK AI ROBOT SELF-EMPTY™ dock replacement, use XDKRV2500S. For replacement battery, use RVBAT850.
- Keep the battery away from all metal objects such as paper clips, coins, keys, nails, or screws. Shorting the battery terminals together increases the risk of fire or burns.
- Under abusive conditions, liquids may be ejected from the battery. Avoid contact with this liquid, as it may cause irritation or burns. If contact occurs, flush with water. If liquid contacts eyes, seek medical help.
- Robotic vacuum cleaner should not be stored, charged, or used at temperatures below 50°F (10°C) or above 104°F (40°C). Ensure the battery and vacuum have reached room temperature before charging or use. Exposing the robot or battery to temperatures outside of this range may damage the battery and increase the risk of fire.
- Do not expose the robotic vacuum cleaner or battery to fire or temperatures above 265°F (130°C) as it may cause explosion.
Save These Instructions
Troubleshooting
| Error Code | Description | Solution |
|---|---|---|
| CLEAN (RED) + ! (RED) alternating or CLEAN (WHITE) + ! (RED) flashing | Blockage in brushroll. | Remove any debris from around and inside the brushroll so that it can spin freely. |
| DOCK (RED) + ! (RED) flashing | Side brush is stuck. | Remove any debris from around the side brushes so they move freely. |
| CLEAN (RED) + DOCK (RED) + ! (RED) flashing | A drive wheel is stuck. | Clean the wheels and remove any debris wrapped around the axles so they can move freely. |
| DOCK (RED) flashing | Front bumper may be jammed. | Clean the bumper and make sure it moves in and out freely. |
| CLEAN (RED) + DOCK (WHITE) flashing | Cliff sensor error. | Move your robot to a new location and clean its cliff sensors. |
| CLEAN (RED) flashing | Robot may be stuck on an obstacle. | Move robot to a new location on a level surface. |
| BATTERY ICON (RED) flashing | Battery is critically low and needs recharging. | Please pick up your robot and place it on the base. Make sure the charging indicator on the top right side of the base is illuminated to confirm your robot is placed on the base correctly. |
| DOCK (RED) FLASHING + ! (RED) solid | Blockage in dust bin. | Check base and robot dust bin for clogs. Clear any debris and reinstall the dust bin, ensuring that it clicks into place. |
Refurbished Product Limited Ninety Days Warranty
The Refurbished Product Service Center offers the following warranty to the original purchaser of a product which we have refurbished. This product that has been refurbished is warranted against any electronic or mechanical defects for a period of NINETY DAYS from the date of the original purchase by the consumer. Since this unit was sold as a refurbished item, the warranty does not apply to any cosmetic appearance items such as scratches. Should a defect occur, the Refurbished Product Service Center will repair or, at its option, replace defective unit/parts with new or rebuilt materials without charge for either parts or labor. Replacement unit/parts will be warranted for the remaining portion of the original warranty period.
This warranty does not cover installation or damage from accident, misuse, abuse, improper wiring, incorrect voltage, operating the unit against the instructions in the owner's manual or any product which has been opened, altered, or tampered with. This warranty does not cover costs for removal and or installation of the unit for repair. Under no circumstances shall the service center be liable for any special, incidental or consequential damages or for any other expenses incurred by reason of use or sale of this product. This warranty is in lieu of any other warranties expressed or implied warranty of merchantability of fitness for particular use or otherwise.
This warranty gives the consumer specific legal rights and they may also have other rights which vary from State to State. Some States do not follow the exclusion or limitation of incidental or consequential damages, hence the above exclusion and limitations may not apply.
Refurbished Product Service Center, 13225 Marquardt Avenue Santa Fe Springs, CA 90670.
Warranty Repair Information
If you need service on your unit and this product requires repair during the 90 days warranty period, please go to www.ConsumerServiceRefurbish.com or call the Refurbished Product Service Center at 562-946-3531 to obtain the required return authorization (RA) number. Pack the unit properly (the original carton is ideal for this purpose) along with a copy of your purchase receipt and a letter describing the problem. Send the unit freight prepaid and insured to:
Refurbished Product Service Center, Att: Customer Service Department, 13225 Marquardt Avenue Santa Fe Springs, CA 90670.
Your unit will be promptly repaired and returned to you. We will refuse to accept delivery of the returned unit unless the assigned RA number appears on the outside of the shipping carton.
Owner's Information (Keep for your permanent records)
NAME: _________________________
ADDRESS: _________________________
CITY: _________________________ STATE: _________ ZIP CODE: _________
PHONE: _________________________ E-MAIL: _________________________
MODEL: _________________________ SERIAL NO.: _________________________
