Zigbee 3.0 5-in-1 LED Strip Controller - Model LM052
Manual Instruction
? Please read the instructions carefully before using the controller.
1. Features
- 16 Million colors to choose
- Color temperature: 2700K-6500K
- Dim brightness/saturation
- Support music rhythm
- Tap-to-Run & automation
- Free screw when connecting to LED strip
- Link/Unlink/Reset Button on the controller
- Auto-transmitting & Synchronization
- Smartphone APP control (Tuya Smart / Smart Life)
- Support third party voice control
- Support remote control (control distance 30m)
- Device sharing
- Group control
- 2.4G wireless transmission
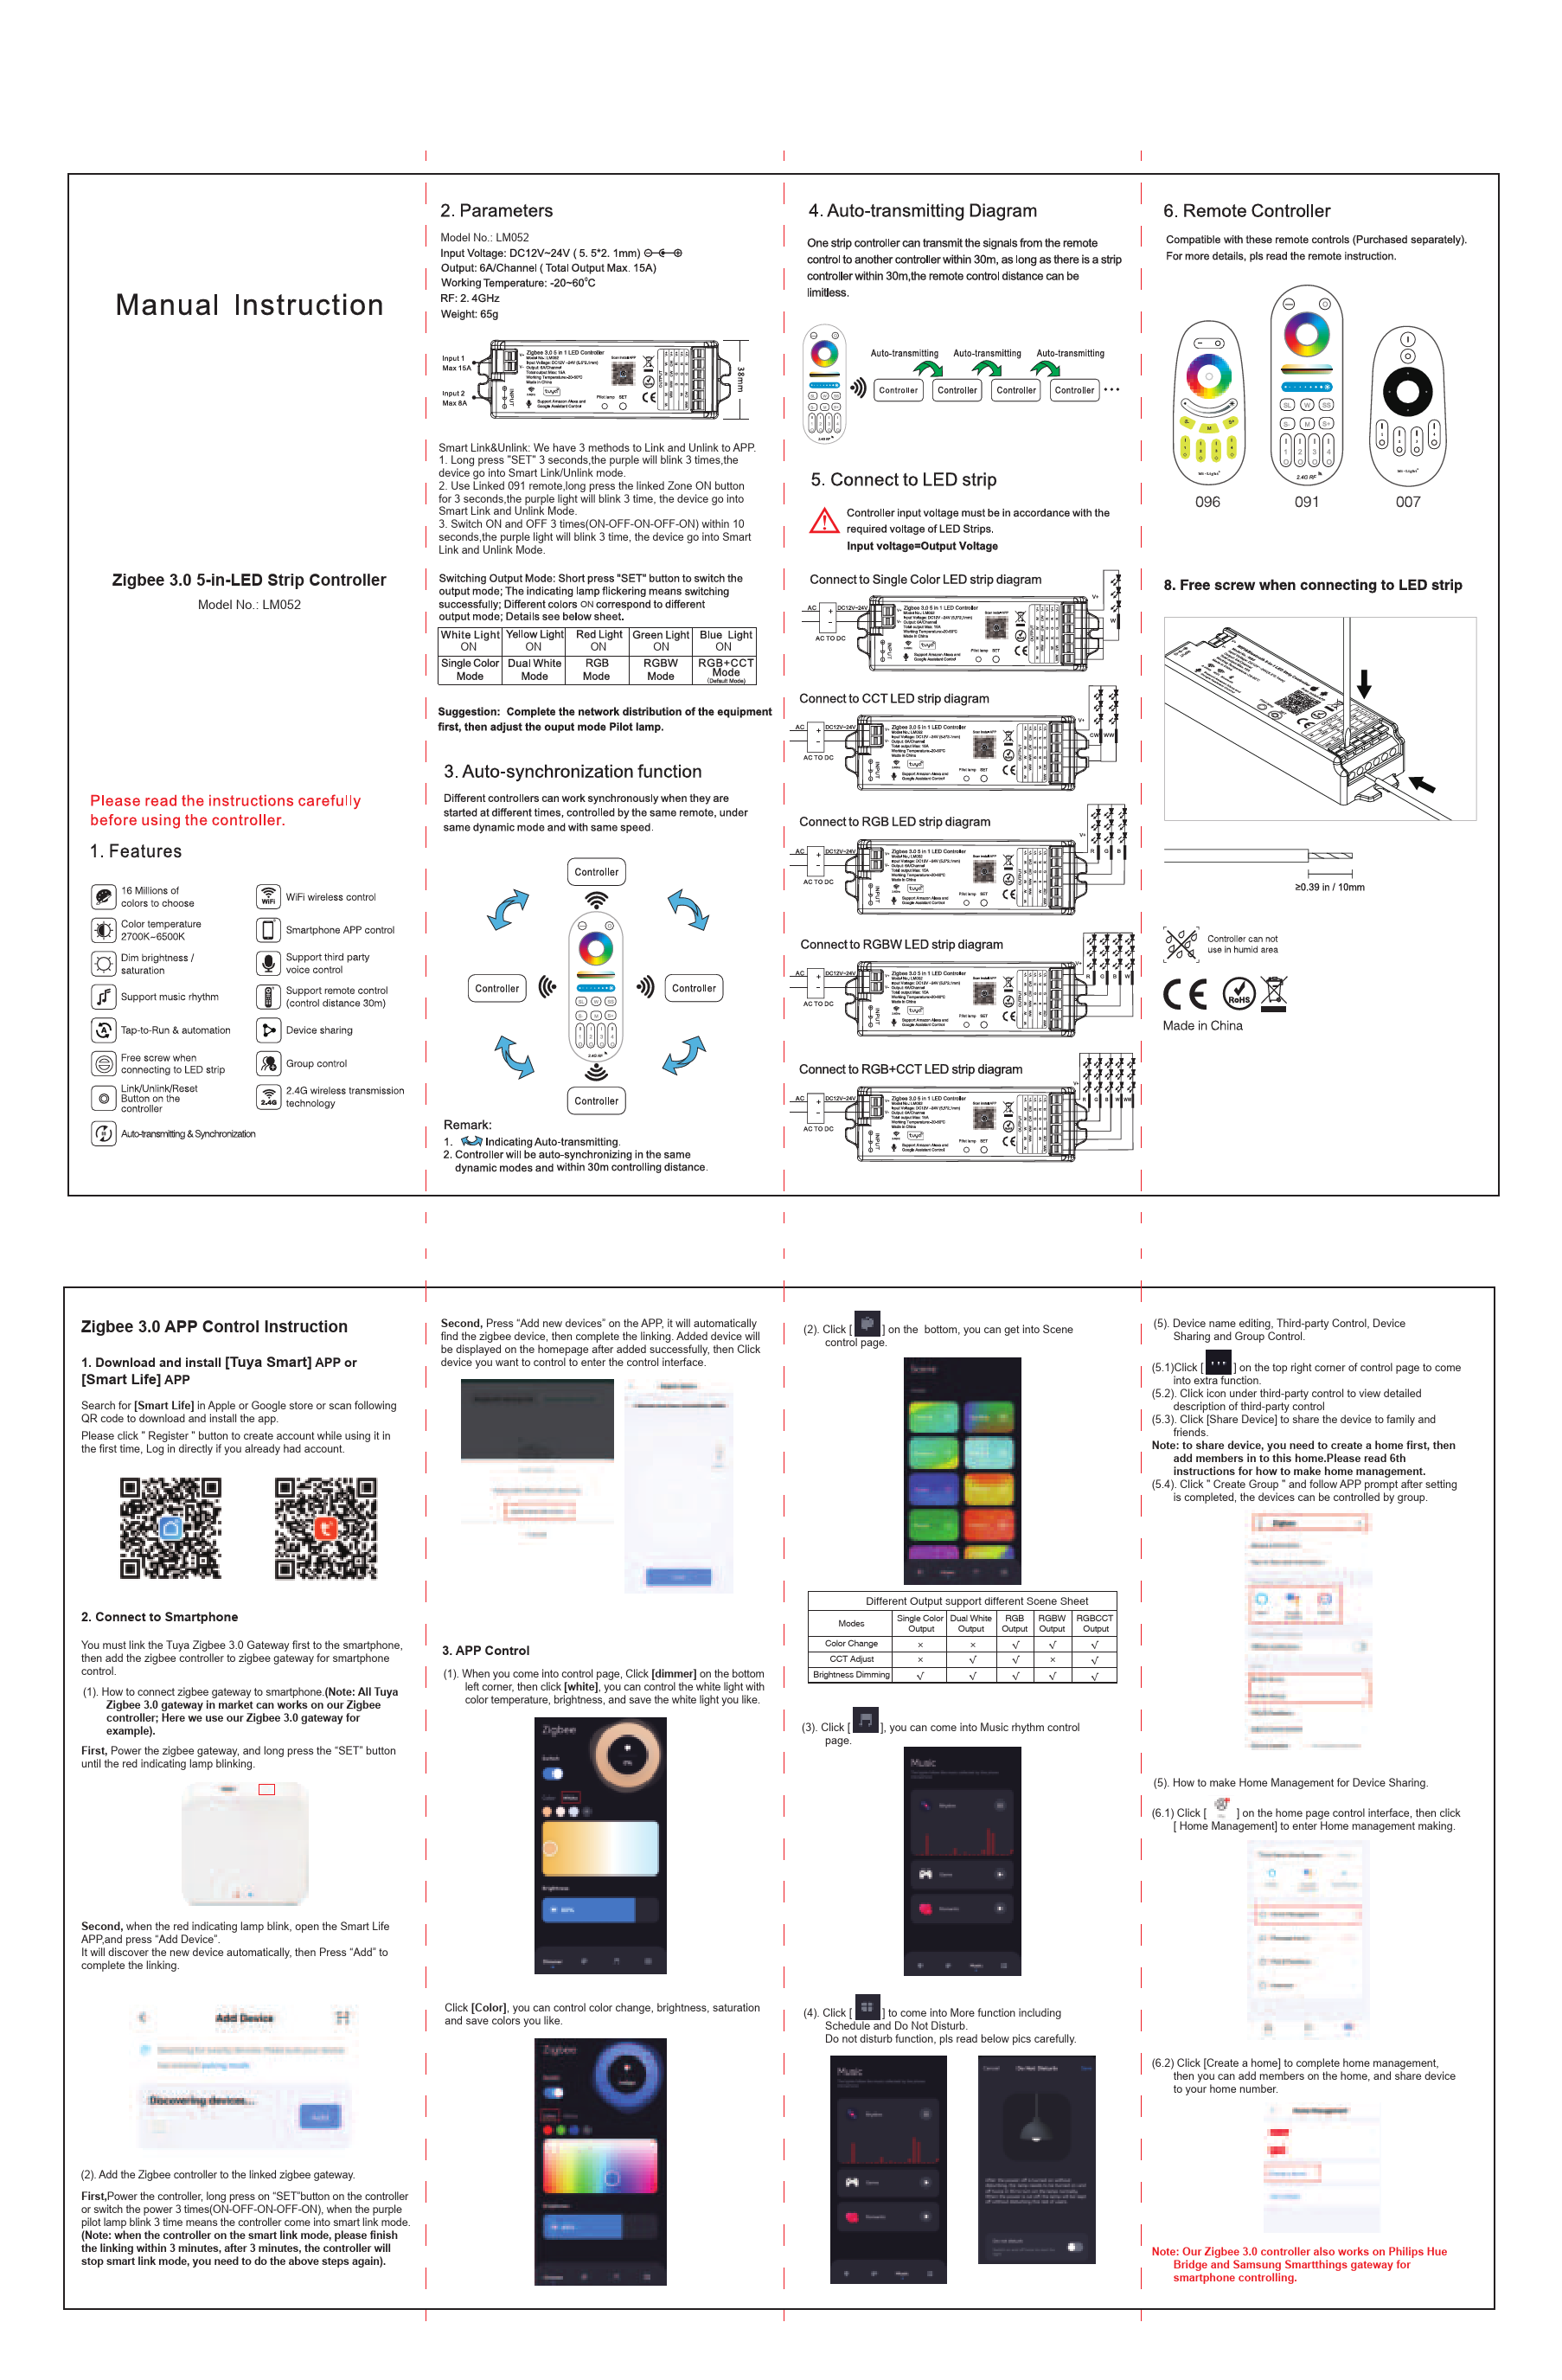
2. Parameters
- Model No.: LM052
- Input Voltage: DC12V~24V (5.5*2.1mm)
- Output: 6A/Channel (Total Output Max. 15A)
- Working Temperature: -20~60°C
- RF: 2.4GHz
- Weight: 65g
3. Auto-synchronization Function
Different controllers can work synchronously when they are started at different times, controlled by the same remote, under the same dynamic mode, and with the same speed. Controllers can transmit signals from the remote control to another controller within 30m. As long as there is a strip controller within 30m, the remote control distance can be limitless.
[Note: Auto-transmitting and synchronization occur within 30m controlling distance for controllers in the same dynamic modes.]
4. Remote Controller Compatibility
Compatible with these remote controls (Purchased separately). For more details, please read the remote instruction.
[Compatible remote models: 096, 091, 007]
5. Connect to LED Strip
Controller input voltage must be in accordance with the required voltage of LED Strips.
Input Voltage: DC12V-24V
Connection Diagrams:
- Connect to Single Color LED strip diagram: Shows input terminals (DC IN, V+, V-) and output terminals (V+, M1, M2, M3, M4, V-).
- Connect to CCT LED strip diagram: Shows input terminals (DC IN, V+, V-) and output terminals (V+, WW, CW, V-).
- Connect to RGB LED strip diagram: Shows input terminals (DC IN, V+, V-) and output terminals (V+, R, G, B, V-).
- Connect to RGBW LED strip diagram: Shows input terminals (DC IN, V+, V-) and output terminals (V+, R, G, B, W, V-).
- Connect to RGB+CCT LED strip diagram: Shows input terminals (DC IN, V+, V-) and output terminals (V+, R, G, B, WW, CW, V-).
[Note: The controller has a "Free screw" design for connecting to LED strips.]
[Compliance marks: CE, RoHS. Made in China.]
6. Zigbee 3.0 APP Control Instruction
1. Download and Install APP: Download and install the [Tuya Smart] APP or [Smart Life] APP from the Apple or Google store. Register for an account or log in if you already have one.
2. Connect to Smartphone:
You must link the Tuya Zigbee 3.0 Gateway first to your smartphone, then add the Zigbee controller to the Zigbee gateway for smartphone control.
- Connecting Zigbee Gateway to Smartphone:
- Power the Zigbee gateway.
- Long press the "SET" button on the gateway until the red indicator lamp blinks.
- Open the Smart Life APP, press "Add Device".
- The APP will discover the new device automatically. Press "Add" to complete linking.
- Adding Zigbee Controller to Linked Gateway:
- Power the controller.
- Long press the "SET" button on the controller OR switch the power ON-OFF-ON-OFF-ON within 10 seconds.
- The purple pilot lamp blinking 3 times indicates the controller has entered smart link mode.
- Complete the linking within 3 minutes, otherwise, the controller will exit smart link mode and require restarting the process.
3. APP Control Interface:
- Dimmer/White Control: Click [Dimmer] then [White] to control white light with color temperature, brightness, and save preferred settings.
- Color Control: Click [Color] to control color change, brightness, saturation, and save preferred colors.
- Scene Control: Click the [Scene] icon to access various pre-set dynamic lighting scenes.
- Music Rhythm Control: Click the [Music] icon to enable music synchronization for lighting effects.
- More Functions: Click the [More functions] icon to access Schedule and Do Not Disturb functions. The Do Not Disturb function details are provided visually (described textually).
4. Device Management:
- Device Name Editing, Third-party Control, Device Sharing, and Group Control:
- Access extra functions by clicking the [Settings icon] on the top right corner of the control page.
- View detailed descriptions for third-party control by clicking the relevant icon.
- Share the device with family and friends via [Share Device]. This requires creating a home first and adding members.
- Create groups for controlling multiple devices simultaneously by clicking "Create Group".
- Home Management for Device Sharing:
- Click the [Home icon] on the home page control interface.
- Enter Home Management and click [Create a home] to set up home management.
- Add members to the home and share devices.
[Note: This Zigbee 3.0 controller is also compatible with Philips Hue Bridge and Samsung Smartthings gateways for smartphone control.]
7. Smart Link & Unlink Methods
There are 3 methods to Link and Unlink to the APP:
- Long press "SET" for 3 seconds; the purple light blinks 3 times, and the device enters Smart Link/Unlink mode.
- Use a linked 091 remote; long press the linked Zone ON button for 3 seconds; the purple light blinks 3 times, and the device enters Smart Link and Unlink Mode.
- Switch power ON and OFF 3 times (ON-OFF-ON-OFF-ON) within 10 seconds; the purple light blinks 3 times, and the device enters Smart Link and Unlink Mode.
8. Switching Output Mode
Short press the "SET" button to switch the output mode. The indicating lamp flickering signifies a successful switch. Different colors of the indicating lamp correspond to different output modes:
- White Light ON: Single Color Mode
- Yellow Light ON: Dual White Mode
- Red Light ON: RGB Mode
- Green Light ON: RGBW Mode
- Blue Light ON: RGB+CCT Mode (Default Mode)
9. Connecting to LED Strip (Free Screw)
The controller features a "Free screw" design for easy connection to LED strips, indicated by a diagram showing the terminal blocks.
10. Output Mode Support for Scenes
| Modes | Single Color Output | Dual White Output | RGB Output | RGBW Output | RGBCCT Output |
|---|---|---|---|---|---|
| Color Change | ✔️ | ✔️ | ✔️ | ✔️ | ✔️ |
| CCT Adjust | ✔️ | ✔️ | |||
| Brightness Dimming | ✔️ | ✔️ | ✔️ | ✔️ | ✔️ |
Important Notes
The controller cannot be used in humid areas.


