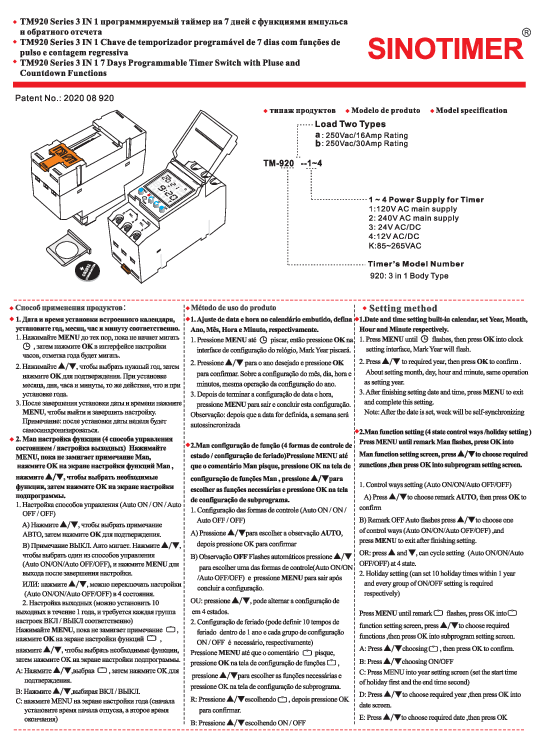
Product Overview
The SINOTIMER TM920 Series is a versatile 3-in-1 programmable timer switch designed for precise time control. It offers 7-day programming capabilities, along with pulse and countdown functions, making it suitable for a wide range of applications including lighting control, industrial automation, and home appliances.
Key Features:
- 3-in-1 Functionality: Timer, Pulse, Countdown
- 7-Day Programmable Timer
- High Load Capacity: Available in 16A and 30A ratings (250VAC)
- Multiple Power Supply Options: 120V AC, 240V AC, 24V AC/DC, 12V AC/DC, 85-265VAC
- Internal CR2032 lithium battery for memory backup
Visual Description: The device features a clear LCD display showing time, day, and program status. It includes several control buttons labeled MENU, OK, ▲ (Up), and ▼ (Down) for navigation and setting. The rear of the unit has a terminal block for electrical connections, with clearly marked terminals for Normally Closed (NC) and Normally Open (NO) contacts, as well as power input.
Load Types:
- Type A: 250VAC / 16Amp Rating
- Type B: 250VAC / 30Amp Rating
Power Supply Options:
- 1: 120V AC main supply
- 2: 240V AC main supply
- 3: 24V AC/DC
- 4: 12V AC/DC
- K: 85~265VAC
Timer's Model Number Structure: 920 indicates the 3-in-1 Body Type.
Usage Guide
1. Date and Time Setting
Set the built-in calendar's Year, Month, Day, Hour, and Minute.
- Press the [MENU] button repeatedly until the year setting indicator flashes. Then, press the [OK] button to enter the clock setting interface. The year will flash.
- Press the [▲] or [▼] buttons to select the desired year. Press [OK] to confirm.
- Repeat the process using [▲] or [▼] to set the Month, Day, Hour, and Minute, confirming each with [OK].
- After completing the date and time settings, press the [MENU] button to exit and save the configuration.
- Note: Once the date is set, the day of the week will automatically synchronize.
2. Man Function Setting (Control Modes / Holiday Setting)
Configure control states and holiday settings.
2.1 Control Ways Setting
Choose from four control modes: Auto ON, ON, Auto OFF, or OFF.
- Press the [MENU] button until the "Man" remark flashes. Press [OK] to enter the Man function setting screen.
- Press the [▲] or [▼] buttons to select the desired control mode (Auto ON, ON, Auto OFF, OFF).
- Press the [MENU] button to exit after finishing the selection.
- Alternatively, you can cycle through the four states by pressing [▲] or [▼] directly.
2.2 Holiday Setting
Set up to 10 holiday periods within a year, each with a specific ON/OFF time.
- Press the [MENU] button until the holiday remark flashes. Press [OK] to enter the function setting screen.
- Press the [▲] or [▼] buttons to select the holiday group you wish to configure (e.g., Holiday 1). Press [OK] to confirm.
- Set the start time for the holiday (e.g., start date and time). Use [▲]/[▼] to select the year, then [OK]. Then select the month, day, hour, and minute, confirming each with [OK].
- Set the end time for the holiday. Repeat the process to select the end year, month, day, hour, and minute.
- Press [OK] to confirm the holiday settings. The system will then prompt for the next holiday setting or allow you to exit by pressing [MENU].
- To set multiple holidays, repeat steps 2-5 for each holiday period.
3. Program/Pulse/Countdown Function Setting
Choose and configure one of the following functions: Program, Pulse, or Countdown. These functions cannot be used simultaneously.
3.1 Program Setting
Set up to 16 programmable ON/OFF times for each day of the week.
- Press the [MENU] button when the "Prog" indicator flashes. Press [OK] to enter the program setting screen. "01" will flash, indicating the first program group.
- Press [OK] to set the ON time. The hour and minute indicators will flash.
- Press the [MENU] button to switch between hour and minute flashing. Use [▲]/[▼] to set the desired hour and minute, confirming each with [OK].
- After setting the ON time, press [OK] to set the OFF time, following the same procedure.
- When the week setting screen appears, the indicator for Monday (1) will flash. Press [▲] or [▼] to enable or disable Monday for this program. Press [OK] to copy the setting to Tuesday (2) or press [▼] to disable and move to Tuesday.
- Configure the ON and OFF times and days of the week for each program group (up to 16).
- After setting the week for the ON time, press [OK] to proceed to the OFF time week setting, or press [MENU] to exit.
- Note: If all days of the week need to be active for a program, ensure all day indicators are enabled.
- Press [OK] to confirm and exit, or press [MENU] to save and exit.
3.2 Pulses Control Program Setting
Configure pulse signals for up to 32 channels, useful for bells or trigger equipment.
- Press the [MENU] button on the clock display screen. When the pulse indicator flashes, press [OK] to enter the group 1 setting screen.
- Press the [MENU] button again; the hour indicator will flash.
- Use [▲]/[▼] to set the hour and press [OK]. Set the minute and press [OK] to confirm.
- The program will enter the week setting screen. Configure the days of the week similar to the program setting.
- Use [▲]/[▼] to set the pulse control duration, which can range from 1 to 99 seconds. Press [OK] for the next setting or [MENU] to confirm and exit.
3.3 Single Countdown Setting
Set a countdown timer, with a maximum duration of 99 minutes and 59 seconds.
- After pressing the [RES] button, press the [▲] or [▼] button when the countdown indicator flashes. Press [OK] to enter the countdown setting mode.
- Use [▲]/[▼] to set the minutes and press [OK]. Then set the seconds and press [OK] to confirm.
- Press [▲] or [▼] to select the Auto OFF state if desired.
- Press [OK] to start the countdown or [MENU] to exit.
Notes
- Pressing and holding the [MENU] button for 3 seconds will close the current procedure, but all previous settings will be retained. Pressing the [RES] button will clear all settings and reset the timer.
- If no operation is performed on any setting screen for 30 seconds, the timer will automatically return to the clock screen and will not save the current settings.
- The timer is equipped with a built-in lithium battery, allowing you to install it in a distribution box or control circuit after completing the settings without losing data.
