File info: application/pdf · 6 pages · 2.08MB
Invisalign Professional Whitening System | Invisalign Provider
Extracted Text
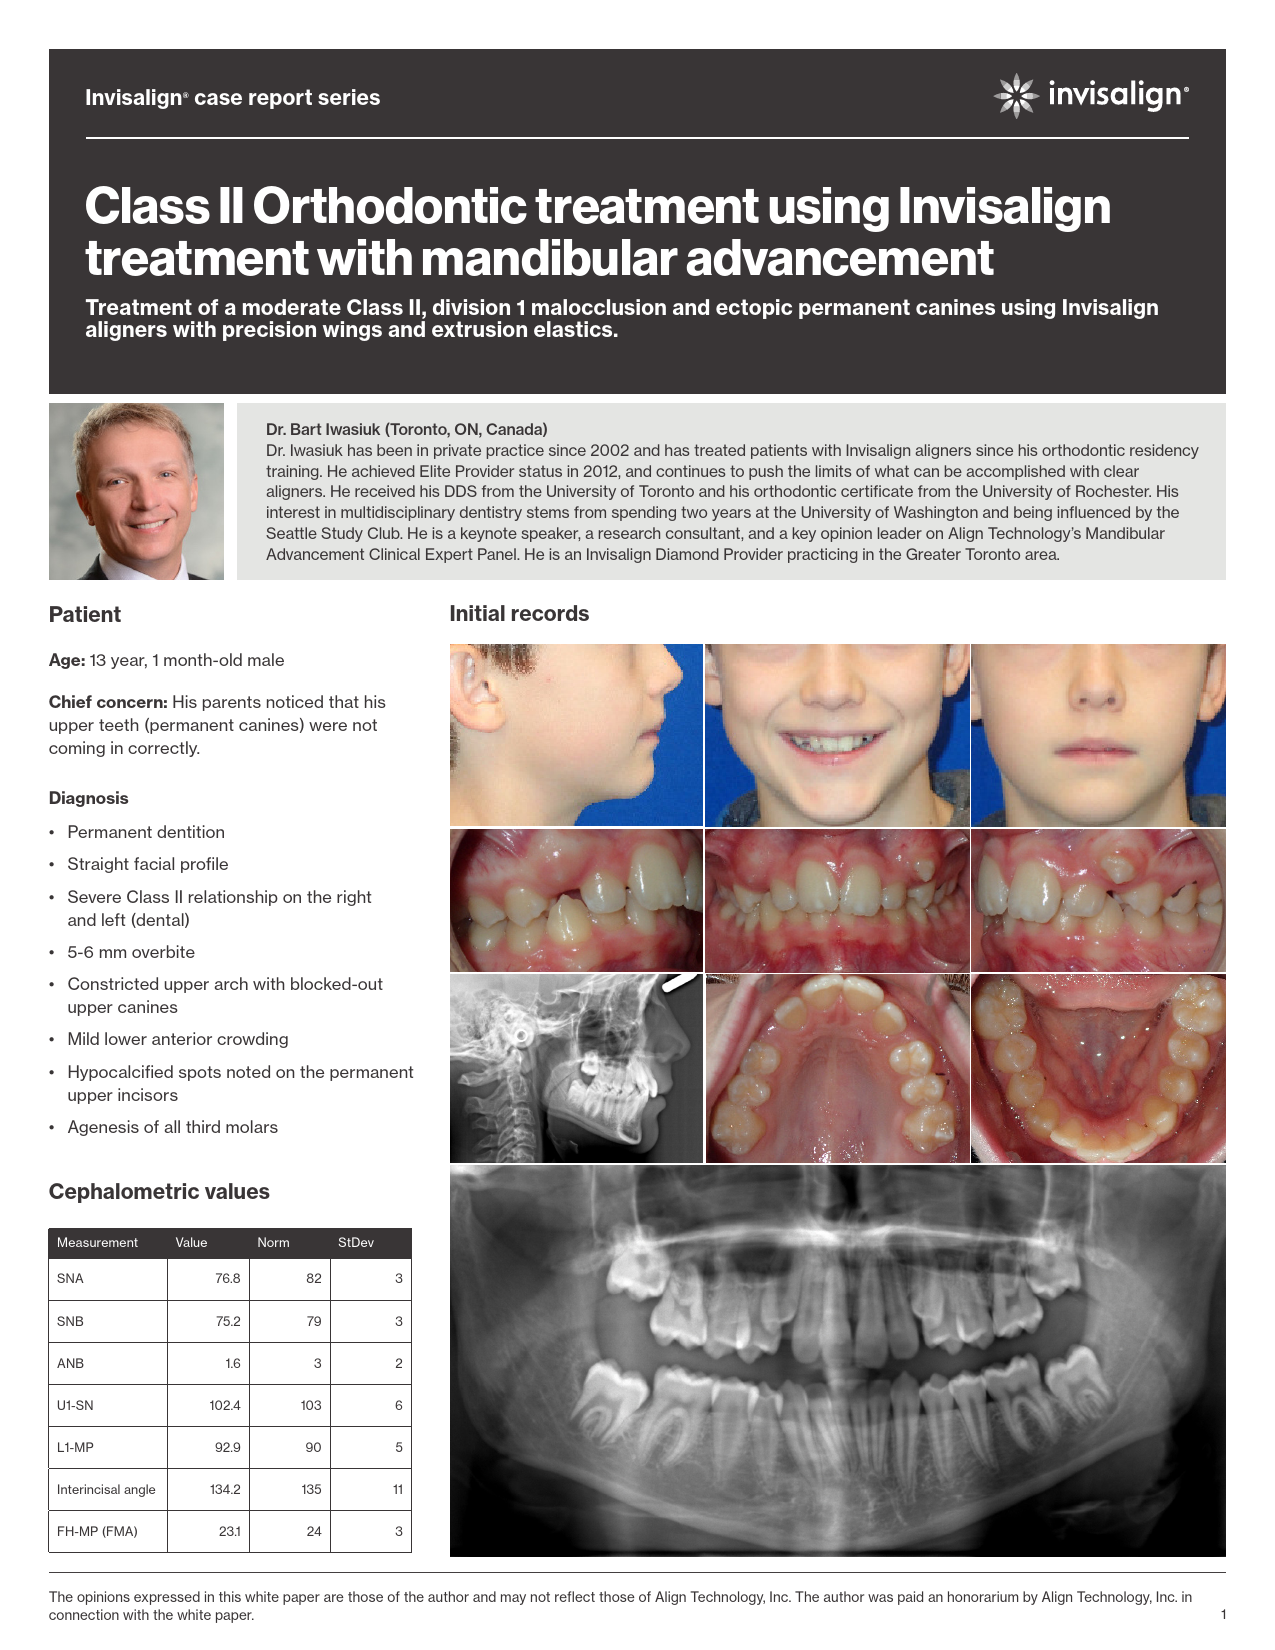
Invisalign� case report series
Class II Orthodontic treatment using Invisalign treatment with mandibular advancement
Treatment of a moderate Class II, division 1 malocclusion and ectopic permanent canines using Invisalign aligners with precision wings and extrusion elastics.

Dr. Bart Iwasiuk (Toronto, ON, Canada) Dr. Iwasiuk has been in private practice since 2002 and has treated patients with Invisalign aligners since his orthodontic residency training. He achieved Elite Provider status in 2012, and continues to push the limits of what can be accomplished with clear aligners. He received his DDS from the University of Toronto and his orthodontic certificate from the University of Rochester. His interest in multidisciplinary dentistry stems from spending two years at the University of Washington and being influenced by the Seattle Study Club. He is a keynote speaker, a research consultant, and a key opinion leader on Align Technology's Mandibular Advancement Clinical Expert Panel. He is an Invisalign Diamond Provider practicing in the Greater Toronto area.

Patient
Age: 13 year, 1 month-old male
Chief concern: His parents noticed that his upper teeth (permanent canines) were not coming in correctly.

Initial records

Diagnosis
� Permanent dentition � Straight facial profile � Severe Class II relationship on the right
and left (dental) � 5-6 mm overbite � Constricted upper arch with blocked-out
upper canines � Mild lower anterior crowding � Hypocalcified spots noted on the permanent
upper incisors � Agenesis of all third molars

Cephalometric values

Measurement SNA

Value

Norm

StDev

76.8

82

3

SNB

75.2

79

3

ANB

1.6

3

2

U1-SN

102.4

103

6

L1-MP

92.9

90

5

Interincisal angle

134.2

135

11

FH-MP (FMA)

23.1

24

3

The opinions expressed in this white paper are those of the author and may not reflect those of Align Technology, Inc. The author was paid an honorarium by Align Technology, Inc. in

connection with the white paper.

1

Invisalign� case report series

Treatment goals
1. Bring the permanent upper canines into the arch and align all the teeth.
2. Correct the bite to Class I molar and canine without extractions. 3. Reduce the deep bite. 4. Widen the arches and broaden the smile. 5. Maintain good oral hygiene during and after orthodontic treatment.
Treatment plan
1. First, create proper mesial-distal space for the upper permanent canines with Invisalign aligners and weekly aligner changes, using distalization mechanics supported with Class II elastics. Level the lower arch during this time.
2. Connect Class II elastics to buttons bonded to the upper canines to help them extrude (3/16" 4.5 oz. elastics full-time). This step can wait so long as the canines continue to erupt while the space is being generated.
3. Re-scan the patient and add precision wings to the aligners for mandibular advancement once the canines have erupted into the arch.

4. Detail and finish the occlusion with additional aligners as needed.
5. Retain the teeth with a bonded lingual wire on upper 2-2 and lower 3-3. Add a clear retainer to the upper arch up to 45 days later (for night-time wear), once the teeth have settled and the occlusion has stabilized. Form lingual bite ramps into the upper clear retainer if the deep bite starts to relapse.*
Invisalign aligner features used
� Upper canine eruption compensation feature (for structural integrity of the aligner, since the actual canines are ectopic).
� Optimized attachments for various tooth movements in the set-up. � Upper lingual precision bite ramps to help level the lower arch. � Precision button cut-outs on the lower 6s for the Class II elastics. � Conventional attachments for aligner retention. � Precision wings for mandibular advancement (after the permanent
canines erupt).

ClinCheck� software set-up and staging
Initial aligners
To prepare adequate space for the permanent upper canines with minimal upper incisor flaring, the upper posterior teeth were distalized in the set-up for the initial Invisalign aligners. The ectopic canines were not included in the setup. Instead, eruption compensation features were used, with buttons for Class II elastics bonded to the permanent canines as they erupted.

ClinCheck software set-up and staging for the initial aligners.

* Vivera� retainers can now be ordered with precision bite ramps as a feature.

Experiences, results and opinions in this article are those of the doctor in his orthodontic practice and not necessarily of Align Technology, Inc. The doctor was paid an honorarium

2

by Align Technology, Inc. for his time to develop this article.

Invisalign� case report series
ClinCheck� software set-up and staging
Mandibular advancement aligners

ClinCheck� software set-up and staging for the mandibular advancement aligners, shown with precision wings (top row) and without the wings (middle row). The overbite is set to an overcorrected position of 1 to 1.5 mm open. We position the mandible 2 mm past edge-to-edge (i.e., slightly Class III with the wings in place).
Progress records

Initial aligners with buttons bonded to the upper canines and lower first molars for 3/16" 4.5 oz. extrusion/Class II elastics once adequate space has been re-captured.

After the initial aligners were completed (27 upper + 27 lower aligners, no precision wings).

Experiences, results and opinions in this article are those of the doctor in his orthodontic practice and not necessarily of Align Technology, Inc. The doctor was paid an honorarium

3

by Align Technology, Inc. for his time to develop this article.

Invisalign� case report series
After the mandibular advancement (MA) aligner phase was completed (36 upper + 36 lower aligners with precision wings). Notice the normal overbite achieved despite the 1 to 1.5 mm open bite in the anterior segment of the ClinCheck� software set-up.
Final photos

After 12 additional U/L aligners for detailing, a solid Class I bite was achieved, along with ideal overbite and overjet. No final radiographs were taken due to a lack of medical justification for these per Canada's guidelines on dental radiographs.

Experiences, results and opinions in this article are those of the doctor in his orthodontic practice and not necessarily of Align Technology, Inc. The doctor was paid an honorarium

4

by Align Technology, Inc. for his time to develop this article.

Invisalign� case report series

Treatment summary
� Number of aligners used:
- Upper: 27 (without precision wings) +36 (MA) +12 additional aligners (for detailing)
- Lower: 29 (without precision wings) +36 (MA) +12 additional aligners (for detailing)
� Aligner change interval: weekly
� Treatment time: 18 months of active aligner treatment. This time does not include a 2-month break between each aligner series to let the teeth settle into occlusion, and 4 weeks to order and deliver the aligners (i.e., 3 months total between each aligner phase).
- Buttons for Class II/canine extrusion elastics were bonded to the permanent upper canines after the first 3 months of aligner wear. The 3/16" 4.5 oz. Class II elastics were worn full time.
- After aligner #27 of 29 of the first series, the upper aligners were discontinued (without retention) and the remaining lower aligners were worn only at night for 1 month each, to allow the permanent upper canines to further erupt. Afterwards, new intraoral scans of the arches were taken for the Invisalign treatment with mandibular advancement.
� Appointment scheduling:
- For aligners without the mandibular advancement feature, the patient was seen every 3 months. All the initial "non-MA" Invisalign aligners were delivered to the patient all at once, so that they could continue to make progress with their treatment even if they missed an appointment.
- For aligners with precision wings, the patient was seen every 8 weeks (i.e., before every bite jump increment). This was done to ensure that the patient could properly engage the precision wings at each new jump. This step is a critical checkpoint because if not enough growth has occurred since the last increment, the precision wings might not engage correctly and the patient might crush the precision wings with their bite, which can lead to unwanted torqueing of the teeth around the precision wings. Should the patient be unable to engage the precision wings of the new bite jump increment, they can step back 1 or 2 aligners and wear them for an additional week or two each. This additional 6-8 weeks in the previous aligner stages is usually enough to allow the bite to comfortably advance to the next bite-jump increment.
Clinical discussion
The primary goal of the initial aligners was to make space for the permanent upper canines and capture them into the arch. To avoid flaring the upper incisors, distalization mechanics with Class II elastics for anchorage was planned. This approach cannot be used with the mandibular advancement feature in the aligners, so this phase was completed first before the mandibular advancement phase. Invisalign aligners sequential or modified sequential distalization is effective for first molar distalization. Although several distalization1 staging patterns are available, a standard approach of distalizing 2 teeth at any given time was utilized in this specific case.
Since the canines were ectopic, we did not include them in the ClinCheck� software set-up, and requested an eruption compensation feature for the canines instead, so that the aligners would still be structurally sound.

Bonded buttons and Class II elastics were used to help guide the canines into place. The upper cuspids tipped back and rotated during this phase as a result, but the elastic side effect was resolved with the second set of aligners during the mandibular advancement phase, which allowed simultaneous Class II correction and full control over canine alignment. Once the permanent canines were located close to the desired position, a settling phase was started prior to a new intraoral scan being taken for the mandibular advancement phase.
The goal of the mandibular advancement phase was to coordinate the arches and remove any anterior dental interferences preventing the posterior teeth from occluding in a solid Class I relationship. The precision wings were used to disclude the bite and position the mandible forward without needing elastics. Good aligner adaptation is especially important during this phase, so we avoid adding any features that will reduce the plastic-to-tooth contact area (e.g., button cutouts). We try to have 2 retentive attachments per quadrant during this phase, and we will use lingual attachments* on the permanent first molars to achieve this goal if the location of the precision wings prevents us from placing retention attachments buccally (our first choice). For retention, we use occlusally-beveled horizontal attachments (3 or 4 mm depending on size of crown). Avoid placing these attachments in the interproximal zones.
By intruding the upper and lower incisors and using attachments on the canines and bicuspids to help anchor the aligners onto the teeth, the anterior interferences were removed. The arch widths were also optimized for a Class I bite during this phase, and anterior lingual precision bite ramps in the upper aligners helped generate intrusion forces in the anterior segments.
At aligner #31 of 36 (MA phase), the patient had difficulty engaging the precision wings on the right side, so we cut off all the precision wings and the patient wore their aligners on 4-4 from stages 32 to 36. This allowed for passive eruption of the permanent first molars back into occlusion, because a common side effect seen with use of the precision wings (as well as other appliances with full-crown coverage like a Herbst) is disclusion of the posterior teeth.
Rather than initiate a second mandibular advancement phase, we used Class II elastics during the post-MA finishing phase for any additional A-P correction needed (on U3 precision-cut hooks to L6 bonded buttons). Aside from the overbite correction, we do not build overcorrection for individual tooth alignment (e.g., rotations) into our mandibular advancement aligners, because we expect to detail the occlusion with additional aligners after the mandibular advancement phase is completed.
The goal of the detailing aligners after the mandibular advancement phase was to improve individual tooth positions and the curve of Wilson around the bicuspids and the first molars. Class II elastics were worn for 10 weeks at night only, and then on the right side full time during the last two aligners (in order to improve the midline). Bonded lingual retention was placed on upper 2-2 and lower 3-3. A clear upper retainer was delivered 1.5 months later, after the occlusion had settled.

1 Align Technology, Inc. claims bank. Data on file at Align Technology, as of July 16, 2019. * Since this case has been treated, lingual attachments have now become available and can be requested in special instructions in prescription form on molars or premolars for
Invisalign treatment with mandibular advancement. One attachment per quadrant is recommended to provide sufficient retention.

Experiences, results and opinions in this article are those of the doctor in his orthodontic practice and not necessarily of Align Technology, Inc. The doctor was paid an honorarium

5

by Align Technology, Inc. for his time to develop this article.

Invisalign� case report series
Bonus clinical section: Managing upper ectopic canines in your teen patients
If the Class II dental relationship is the result of premature loss of the primary upper dentition, the posterior teeth may have drifted mesially, which can lead to inadequate space for the permanent canines. In this situation, distalizing the upper premolars and molars may be preferred over advancing the incisors, in order to maintain a proper overjet relationship afterwards.
Even if the permanent canines have not yet erupted, Invisalign aligner treatment can still begin, in order to open up space in the arch that was previously lost to mesial drift. To facilitate elastic engagement, a pontic space or interproximal ridge can be used1 instead of a bonded button or hook cut into the aligner. This technique only works if an interdental space is present with sufficient width to fit an elastic. However, by wrapping the elastic around the aligner rather than utilizing button cut-outs or precision cuts, the elastic can be retained by the aligner plastic portion of either a pontic for missing teeth (e.g., the right buccal segment in the images below) or an interproximal ridge for smaller spaces (e.g., the left buccal segment in the images below).

Upper Class II elastics "lassoed" around the upper aligner instead of using a button or precision-cut hook.
This "lasso" technique allows for full plastic engagement of the buccal surfaces of the dentition adjacent to the space, without losing aligner surface contact area due to precision-cut hooks or button cut-outs. The horizontal force vector of the Class II elastic helps keep the upper incisors from flaring, in order to maximize the distalization forces generated during the space recapture process. As it the case with precision cuts, retention attachments can also be added to the adjacent teeth to minimize the risk of aligner separation from the teeth during elastics wear.
As the ectopic permanent cuspids begin to erupt, a button for vertical/distalization elastics can be bonded to the canines once enough enamel surface area appears. During the eruption/extrusion phase, the gingival edge of the pontic space can be trimmed so that the aligner does not interfere with tooth eruption/extrusion. However, aligner treatment can continue on the remaining teeth independently, until the erupting canines are ready to be included in the arch.
After verifying the position of the canine root in relation to the adjacent teeth using radiographs if needed, the canine can be included in the arch through a new impression or scan. Until then, the aligner itself does not need to include the actual canine anatomy. Any feature built into the aligner for the missing canine just needs to be adequate to maintain the structural integrity of the aligner. There is no urgency to include the actual canine geometry into the aligners until adequate mesial-distal space has been made and the ectopic tooth is near the occlusal plane, at which time, a new impression or digital scan can be taken. This is similar to bypassing ectopic teeth in fixed appliances by waiting until adequate space has been created before engaging the affected teeth.
If you have Invisalign treatment results from your practice that you would be interested in sharing with your peers, please submit your cases to the Invisalign Gallery at:
submit.InvisalignGallery.com

1 This technique is not recommended in cases where interdental space is inadequate to accommodate an elastic and its forces, as aligner breakage may occur.

The opinions expressed in this white paper are those of the author and may not reflect those of Align Technology, Inc. The author was paid an honorarium by Align Technology, Inc. in connection with the white paper.

� 2020 Align Technology, Inc. All rights reserved. Invisalign, the Invisalign logo, iTero, iTero Element, and ClinCheck, among others, are trademarks and/or service

marks of Align Technology, Inc. or one of its subsidiaries or affiliated companies and may be registered in the U.S. and/or other countries. | MKT-0004418 Rev A

6