Installation Guide for SUNCO models including: LED Ceiling Panel, 40W LED Ceiling Panel
• Refer to install manual of your suspension kit for complete details. SUSPENSION Turn Power OFF Turn Power ON Anchors Wire rope1 Wire rope2 Screw LED CEILING PANEL 40W Install Guide and Manual Required Tools: Drill, Ladder, Hammer, Pliers, Tape Measure, Pencil, Philips Screwdriver.
PN SM2x2-40W-5K-6PK Installation Manual (PDF) Sunco Lighting Sunco Lighting Sunco,Lighting,2x2,LED,Flat,Panel,Light,Fixture,5000K,Daylight,,Drop,Ceiling,Office,Lights,40W,,Dimmable,0-10V,,4400,LM,,Flat,Backlit,Fixture,,Direct,Wire,,Dustproof,Commercial,Grade,,ETL/DLC,6,Pack,B0B8THG321,B09FFWYXVR,B08YZBLKZ1,B09FFWZ9QT,B08CMH75FG
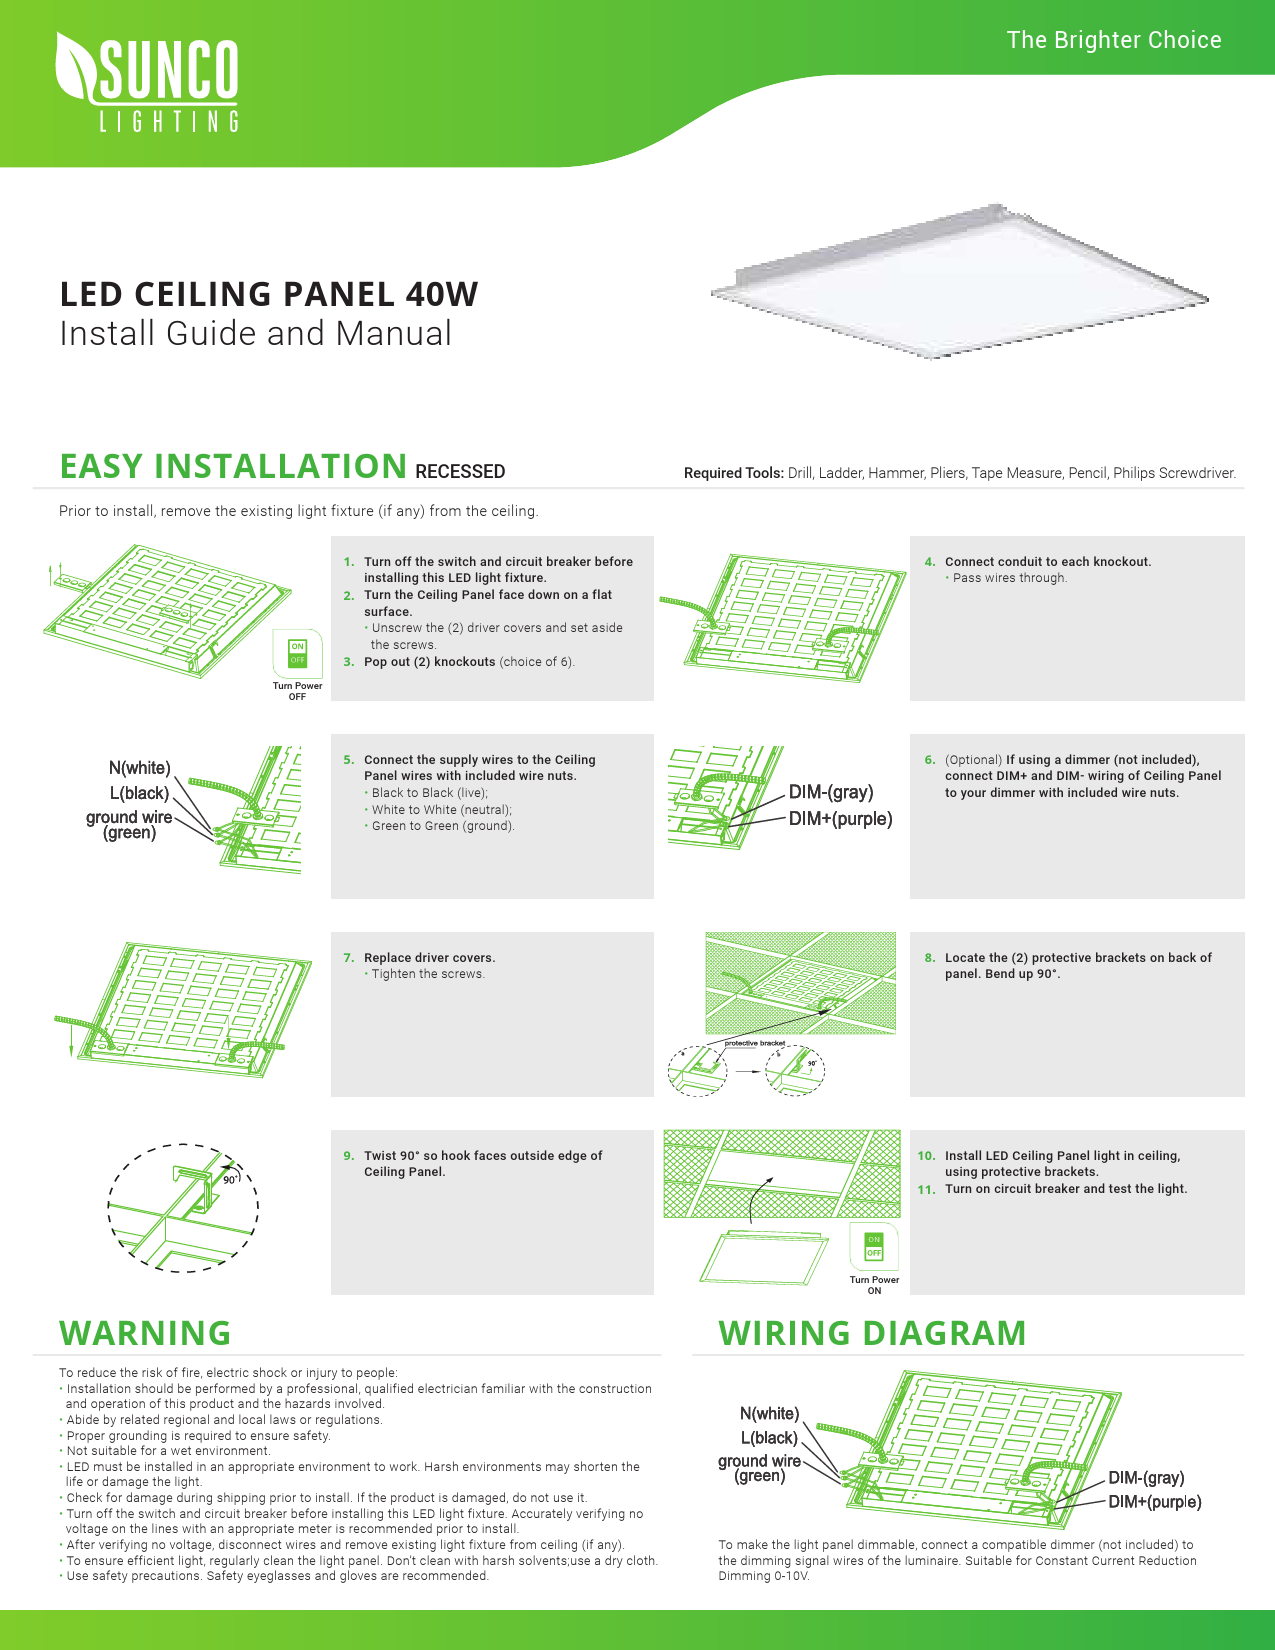
The Brighter Choice

LED CEILING PANEL 40W Install Guide and Manual

EASY INSTALLATION RECESSED
Prior to install, remove the existing light fixture (if any) from the ceiling.

Turn Power OFF

1. Turn off the switch and circuit breaker before installing this LED light fixture.
2. Turn the Ceiling Panel face down on a flat surface. · Unscrew the (2) driver covers and set aside the screws.
3. Pop out (2) knockouts (choice of 6).

Required Tools: Drill, Ladder, Hammer, Pliers, Tape Measure, Pencil, Philips Screwdriver.
4. Connect conduit to each knockout. · Pass wires through.

5. Connect the supply wires to the Ceiling Panel wires with included wire nuts. · Black to Black (live); · White to White (neutral); · Green to Green (ground).

6. (Optional) If using a dimmer (not included), connect DIM+ and DIM- wiring of Ceiling Panel to your dimmer with included wire nuts.

7. Replace driver covers. · Tighten the screws.

8. Locate the (2) protective brackets on back of panel. Bend up 90°.

9. Twist 90° so hook faces outside edge of Ceiling Panel.

10. Install LED Ceiling Panel light in ceiling, using protective brackets.
11. Turn on circuit breaker and test the light.

WARNING
To reduce the risk of fire, electric shock or injury to people: · Installation should be performed by a professional, qualified electrician familiar with the construction
and operation of this product and the hazards involved. · Abide by related regional and local laws or regulations. · Proper grounding is required to ensure safety. · Not suitable for a wet environment. · LED must be installed in an appropriate environment to work. Harsh environments may shorten the
life or damage the light. · Check for damage during shipping prior to install. If the product is damaged, do not use it. · Turn off the switch and circuit breaker before installing this LED light fixture. Accurately verifying no
voltage on the lines with an appropriate meter is recommended prior to install. · After verifying no voltage, disconnect wires and remove existing light fixture from ceiling (if any). · To ensure efficient light, regularly clean the light panel. Don't clean with harsh solvents;use a dry cloth. · Use safety precautions. Safety eyeglasses and gloves are recommended.

Turn Power ON
WIRING DIAGRAM
To make the light panel dimmable, connect a compatible dimmer (not included) to the dimming signal wires of the luminaire. Suitable for Constant Current Reduction Dimming 0-10V.

The Brighter Choice

LED CEILING PANEL 40W Install Guide and Manual

EASY INSTALLATION SUSPENSION
NOTE: 2 piece suspension kits (not included) required for suspension install.

Turn Power OFF

1. Turn off the switch and circuit breaker before installing this LED light fixture.
2. Turn the Ceiling Panel face down on a flat surface. · Unscrew the (2) driver covers and set aside the screws.
3. Pop out (2) knockouts (choice of 6).

5. Connect the supply wires to the Ceiling Panel wires with included wire nuts. · Black to Black (live); · White to White (neutral); · Green to Green (ground).

Required Tools: Drill, Ladder, Hammer, Pliers, Tape Measure, Pencil, Philips Screwdriver.
4. Connect conduit to each knockout. · Pass wires through.
6. (Optional) If using a dimmer (not included), connect DIM+ and DIM- wiring of Ceiling Panel to your dimmer with included wire nuts.

7. Replace driver covers. · Tighten the screws.

Anchors
Wire rope1 Screw Wire rope2

8. Drill (2) holes in the ceiling. Place the anchors into hole. Insert the wire rope and screw. · Refer to install manual of your suspension kit for complete details.

9. Adjust the support rope/wire so Ceiling Panel hangs horizontally. · Suspension kit is not included.

Turn Power ON

10. Install LED Ceiling Panel light in ceiling, using protective brackets.
11. Turn on circuit breaker and test the light.

WARNING
To reduce the risk of fire, electric shock or injury to people: · Installation should be performed by a professional, qualified electrician familiar with the construction
and operation of this product and the hazards involved. · Abide by related regional and local laws or regulations. · Proper grounding is required to ensure safety. · Not suitable for a wet environment. · LED must be installed in an appropriate environment to work. Harsh environments may shorten the
life or damage the light. · Check for damage during shipping prior to install. If the product is damaged, do not use it. · Turn off the switch and circuit breaker before installing this LED light fixture. Accurately verifying no
voltage on the lines with an appropriate meter is recommended prior to install. · After verifying no voltage, disconnect wires and remove existing light fixture from ceiling (if any). · To ensure efficient light, regularly clean the light panel. Don't clean with harsh solvents;use a dry cloth. · Use safety precautions. Safety eyeglasses and gloves are recommended.

SPECIFICATIONS
Voltage Wattage Suitable for Locations Ingress Housing Weight Warranty

100-277V 40W Damp SPCC+PS lens 4.85 lbs 10 years
Adobe PDF Library 15.0 Adobe InDesign 16.0 (Windows)