User Manual for BAUHN models including: APGS-1221, Portable Green Screen
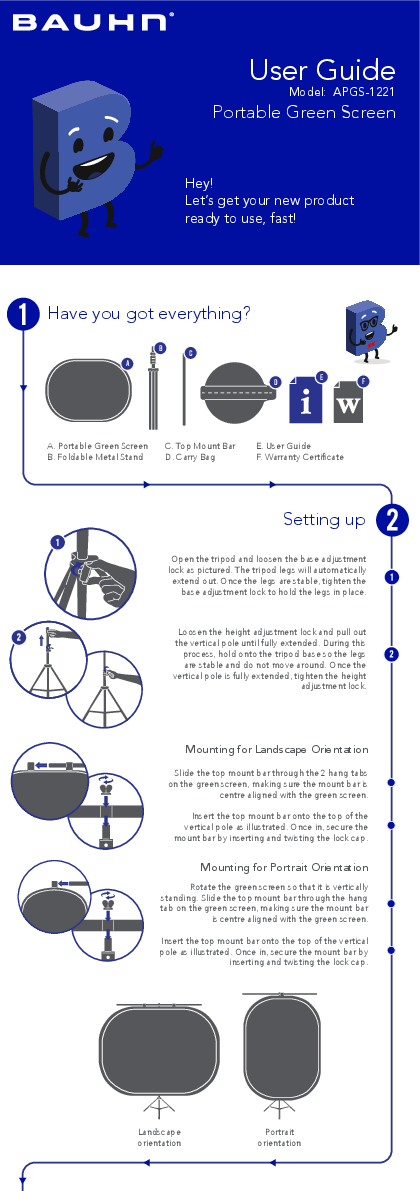
Setting up Have you got everything? Open the tripod and loosen the base adjustment lock as pictured. The tripod legs will automatically extend out.
Loosen the height adjustment lock and pull out the vertical pole until fully extended. During this process, hold onto the tripod base so the legs.
User Guide
Model: APGS-1221
Portable Green Screen
Hey! Let's get your new product ready to use, fast!

Have you got everything?
B C
A D

E

F

A. Portable Green Screen C. Top Mount Bar B. Foldable Metal Stand D. Carry Bag

E. User Guide F. Warranty Certificate

Setting up
Open the tripod and loosen the base adjustment lock as pictured. The tripod legs will automatically extend out. Once the legs are stable, tighten the
base adjustment lock to hold the legs in place.
Loosen the height adjustment lock and pull out the vertical pole until fully extended. During this
process, hold onto the tripod base so the legs are stable and do not move around. Once the vertical pole is fully extended, tighten the height
adjustment lock.

Mounting for Landscape Orientation
Slide the top mount bar through the 2 hang tabs on the green screen, making sure the mount bar is
centre aligned with the green screen.
Insert the top mount bar onto the top of the vertical pole as illustrated. Once in, secure the mount bar by inserting and twisting the lock cap.
Mounting for Portrait Orientation
Rotate the green screen so that it is vertically standing. Slide the top mount bar through the hang tab on the green screen, making sure the mount bar
is centre aligned with the green screen.
Insert the top mount bar onto the top of the vertical pole as illustrated. Once in, secure the mount bar by
inserting and twisting the lock cap.

Landscape orientation

Portrait orientation

Packing the green screen

The green screen comes with a carry bag to pack into, so you can take it anywhere you go.

Holding the top, grab the bottom and fold together.

Fold the remaining two outer sides inwards.

3

Flip over and pull the back side

towards your body.

4

Adjust the edges to form a circle

3

4

and store it inside the carry bag.

Ask for a hand! With the green screen being large, having another person to help will make the process easier.

Troubleshooting

Wrinkles on background

· Spray the green screen with water and stretch it out tight as it dries to reduce the wrinkles and lines.

Dirt marks and debris on background

· Clean your green screen using only mild soap and water; do not use cleaning solutions.

Large shadows on background

· Appropriately distance between the person/model and the green screen. Trial with the background lighting and person/model until no dark shadows on the green screen are visible.
· Remove the wrinkles as this may create shadows on the background.

Specifications

Green Screen Size Net Weight

200 x 150 cm 2.8kg

Give us a call
What? You mean this User Guide didn't have ALL the answers? Speak to us! We'd love to help you get up and running as quickly as possible.
Call our After Sales Support on 1300 002 534. Operating hours: Monday-Friday, 8:30am-6pm Saturday, 9am-6pm AEST

Enjoy using your new product!
Well done, you made it. Now sit back and relax... your new product is automatically covered by a 1-year warranty. How nice!
Adobe PDF Library 15.0 Adobe InDesign 16.3 (Windows)